Embed Size (px)
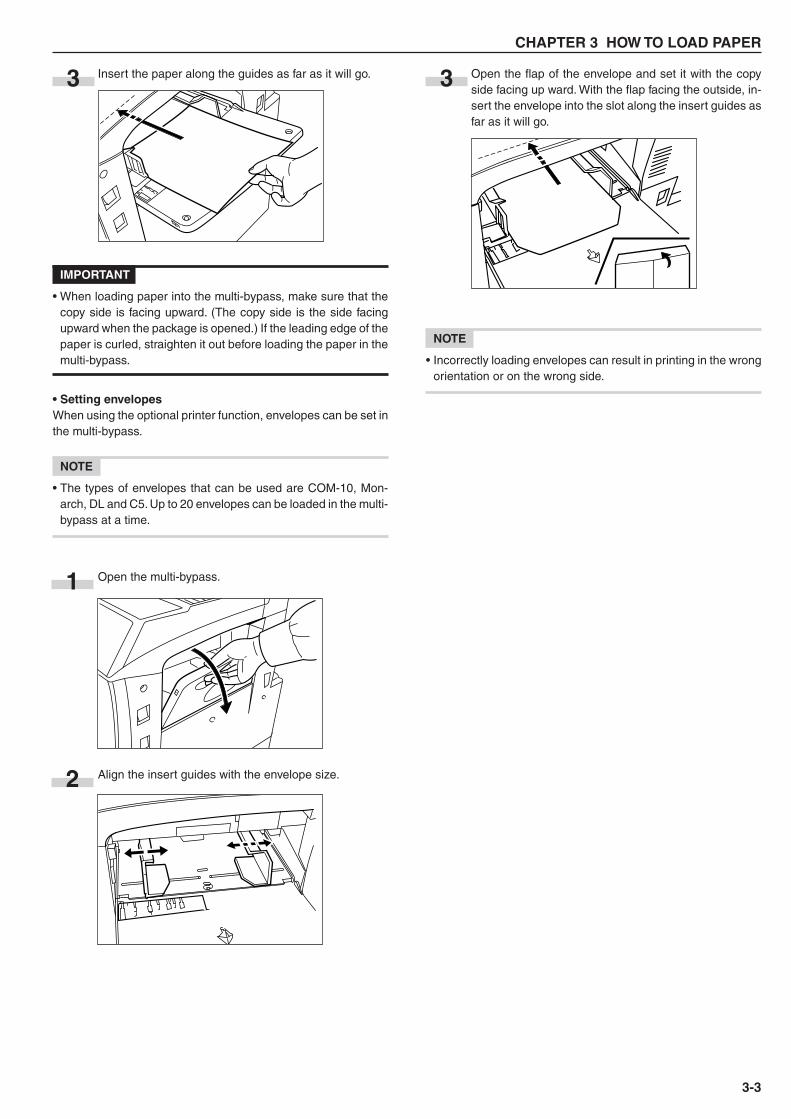
Citation preview
Operation Guide
Please read the operation guide before using the copier.
Keep it close to the copier for easy reference.
* The above illustration includes the optional original cover.
All rights reserved. No part of this material may be reproduced or transmitted in any form or by any means, electronic ormechanical, including photocopying, recording or by any information storage and retrieval system, without permission inwriting from the Publisher.
Legal Restriction On Copying• It may be prohibited to copy copyrighted material without permission of the copyright owner.• It is prohibited under any circumstances to copy domestic or foreign currencies.• Copying other items may be prohibited.
We have determined as a participating company in the InternationalEnergy Star Program that this product is compliant with the standardslaid out in the International Energy Star Program.
About the International Energy Star Program
International Energy Star Program has as its basic goals the promotionof efficient energy use and the reduction of the environmental pollutionthat accompanies energy consumption by promoting the manufactureand sale of products that fulfill program standards.
International Energy Star Program standards require that copies comeequipped with a “Low Power Mode” where energy consumption is reducedafter a certain amount of time elapses since the device was last used, aswell as an “Off Mode” where the device automatically turns itself off afterthere is no activity within a set amount of time. When the copier includesprinter and fax functions, the printer and fax must enter a “Low PowerMode” where power consumption is automatically reduced after a certainamount of time elapses since they were last used, and they must alsosupport a “Sleep Mode” where power consumption is reduced to aminimum when there is no activity within a set amount of time.This product is equipped with the following features as a result of itscompliance with International Energy Star Program standards.
� Low Power Mode
The device automatically enters “Low Power Mode” when 15 minuteshave passed since the device was last used. The amount of time of noactivity that must pass before “Low Power Mode” is activated may belengthened. See “Energy saver (preheat) function” for more information.
� Off Mode
The device automatically enters “Off Mode” when 60 minutes have passedsince the device was last used. The amount of time of no activity thatmust pass before “Off Mode” is activated may be lengthened. For moreinformation see “Auto shut-off function”.
� Sleep Mode (If the copier has printer and/or facsimile function)
The device automatically enters “Sleep Mode” when 60 minutes havepassed since the device was last used. The amount of time of no activitythat must pass before “Sleep Mode” is activated may be lengthened. Formore information see “Auto shut-off function”.
� Automatic 2-Sided Copy Function
The Energy Star Program encourages the use of 2-sided copying whichreduces the load on the environment. Your sales or service representativecan provide information about adding 2-sided copying capabilities to thisdevice.
� Paper Recycling
The Energy Star Program encourages the use of environmentally friendlyrecycled paper. Your sales or service representative can provideinformation about recommended paper types.
Please read this Operation Guide before using the copier. Keep it close to the copier for easy reference.
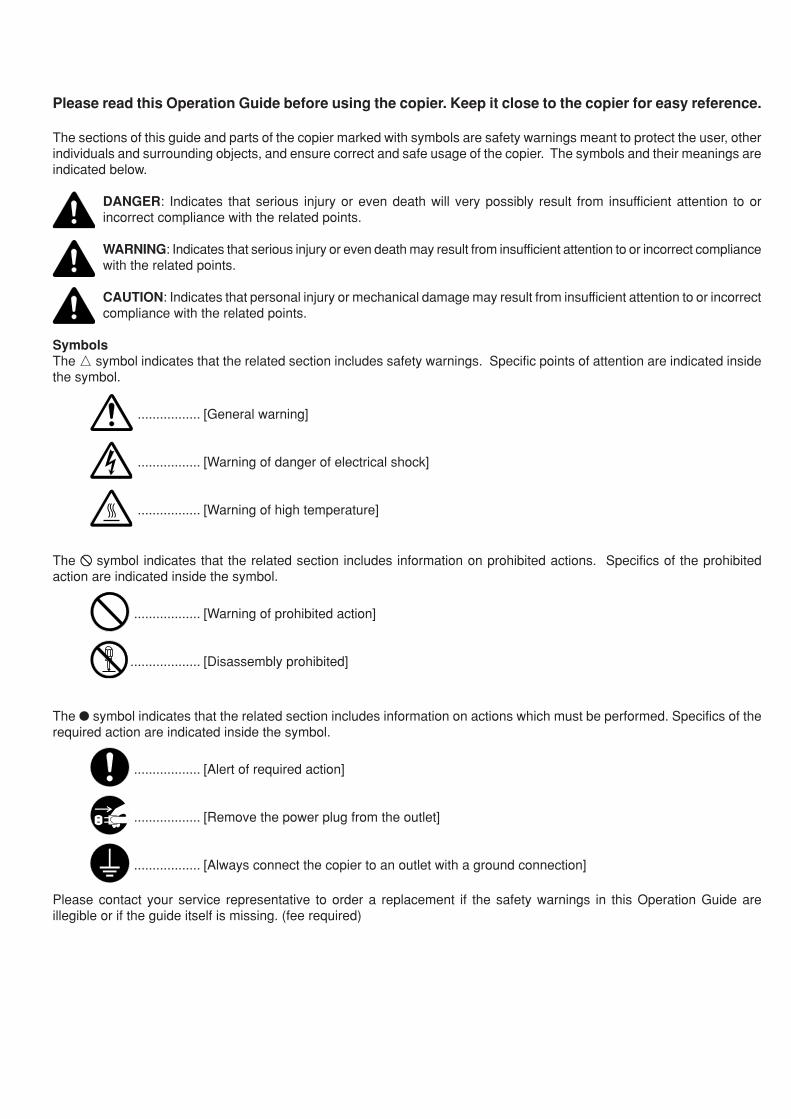
The sections of this guide and parts of the copier marked with symbols are safety warnings meant to protect the user, otherindividuals and surrounding objects, and ensure correct and safe usage of the copier. The symbols and their meanings areindicated below.
DANGER: Indicates that serious injury or even death will very possibly result from insufficient attention to orincorrect compliance with the related points.
WARNING: Indicates that serious injury or even death may result from insufficient attention to or incorrect compliancewith the related points.
CAUTION: Indicates that personal injury or mechanical damage may result from insufficient attention to or incorrectcompliance with the related points.
SymbolsThe m symbol indicates that the related section includes safety warnings. Specific points of attention are indicated insidethe symbol.
................. [General warning]
................. [Warning of danger of electrical shock]
................. [Warning of high temperature]
The symbol indicates that the related section includes information on prohibited actions. Specifics of the prohibitedaction are indicated inside the symbol.
.................. [Warning of prohibited action]
................... [Disassembly prohibited]
The � symbol indicates that the related section includes information on actions which must be performed. Specifics of therequired action are indicated inside the symbol.
.................. [Alert of required action]
.................. [Remove the power plug from the outlet]
.................. [Always connect the copier to an outlet with a ground connection]
Please contact your service representative to order a replacement if the safety warnings in this Operation Guide areillegible or if the guide itself is missing. (fee required)
i
CONTENTSCHAPTER 1
IMPORTANT! PLEASE READ FIRST ...1-1
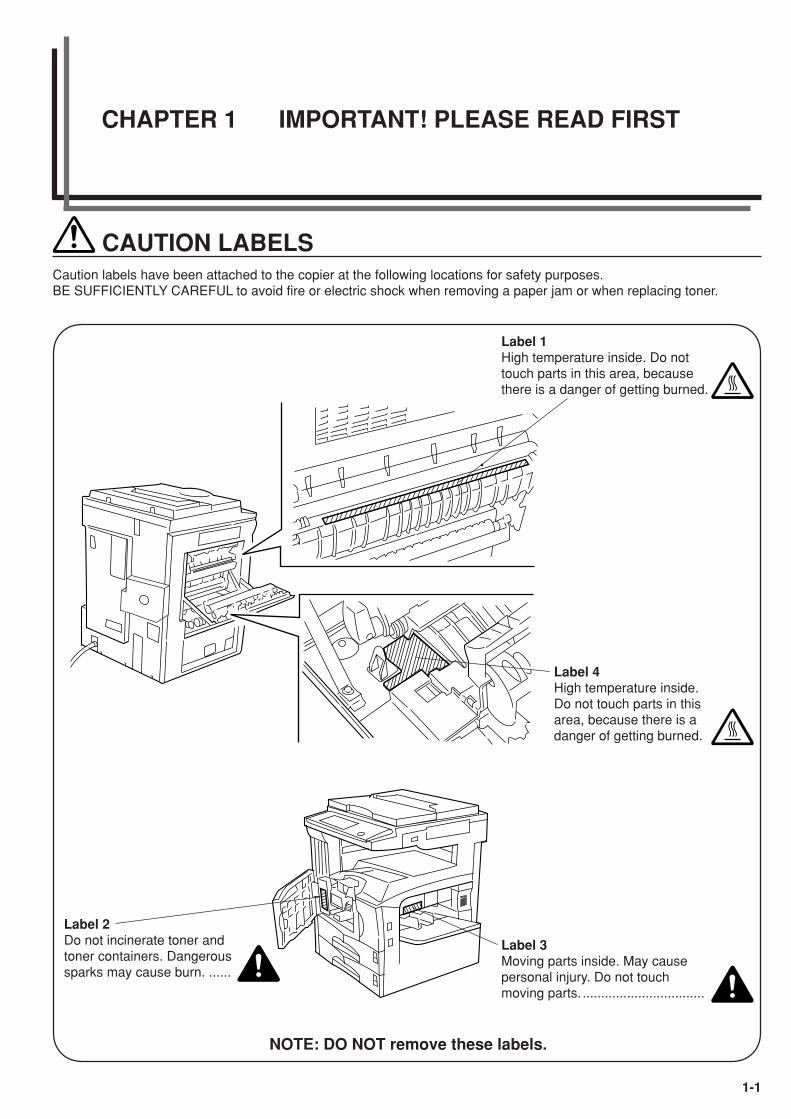
CAUTION LABELS ............................................... 1-1
INSTALLATION PRECAUTIONS .......................... 1-2
PRECAUTIONS FOR USE .................................. 1-3
CHAPTER 2NAMES OF PARTS .......................... 2-1
(1) Main body .................................................... 2-1
(2) Operation panel ........................................... 2-3
(3) Touch panel ................................................. 2-4
CHAPTER 3HOW TO LOAD PAPER ................... 3-1
1. How to load paper ............................................... 3-1
(1) Precautions for loading paper ...................... 3-1
(2) Loading paper into the drawer ..................... 3-1
(3) Loading paper into the multi-bypass ............ 3-2
2. Replacing the toner container and
waste toner box ................................................... 3-4
CHAPTER 4BASIC OPERATION ........................ 4-1
1. Basic copying procedure ..................................... 4-1
2. Enlargement/reduction ........................................ 4-4
(1) Auto magnification selection mode .............. 4-4
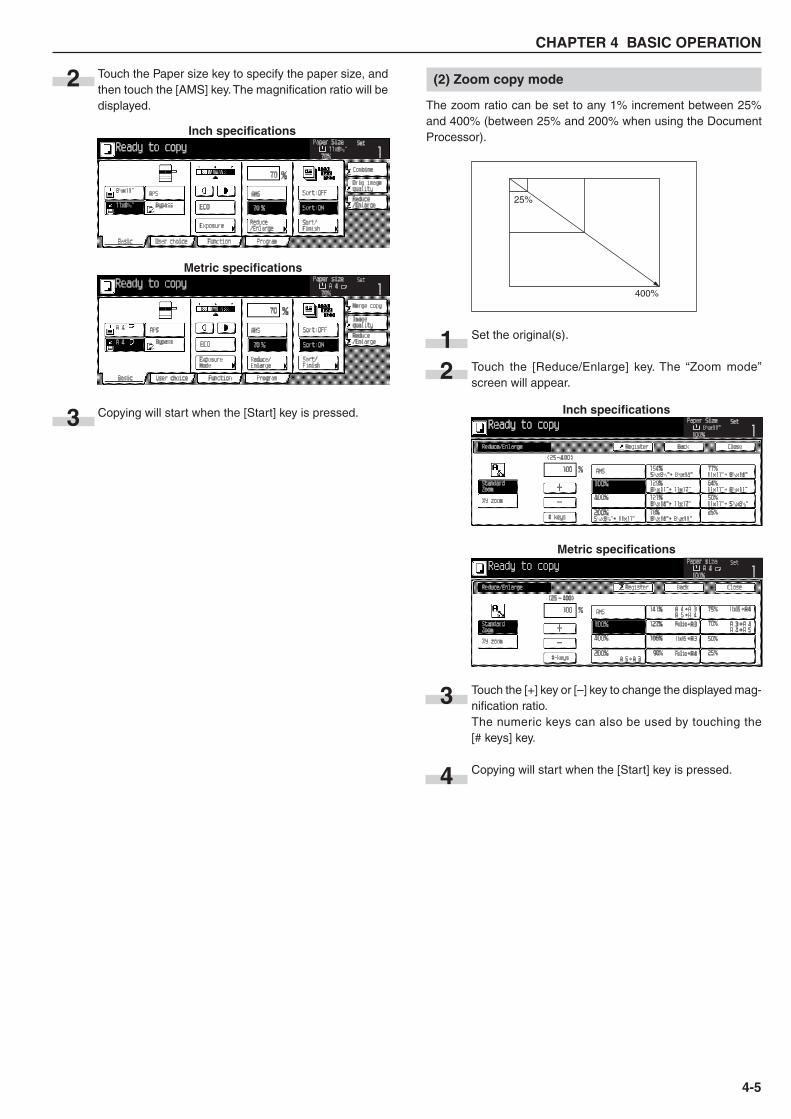
(2) Zoom copy mode ......................................... 4-5
(3) Standard zoom mode .................................. 4-6
(4) XY zoom mode ............................................ 4-6
3. Interrupt copying .................................................. 4-7
4. Energy saver (preheat) function .......................... 4-8
5. Auto shut-off function ........................................... 4-8
CHAPTER 5FUNCTIONS..................................... 5-1
1. Duplex copying from various originals
[Duplex copy] ....................................................... 5-1
(1) Duplex copying from two-sided originals ..... 5-1
(2) Duplex copying from a book original ............ 5-1
(3) Duplex copying from one-sided originals ..... 5-2
2. Copying two-page originals as separate pages
[Page separation copy mode] .............................. 5-4
(1) Page separation copies from
book originals ............................................... 5-4
(2) Page separation copies from two-sided
originals ....................................................... 5-4
3. Making a margin space for binding
[Margin mode] ..................................................... 5-6
(1) Margin .......................................................... 5-6
(2) Front & back margin ..................................... 5-6
4. Making copies with clean edges
[Border erase mode] ............................................ 5-8
(1) Erasing blemishes from edges of copies
(Sheet Erase) ............................................... 5-8
(2) Erasing blemishes from the edges and middle
of copies made from books (Book Erase) .... 5-8
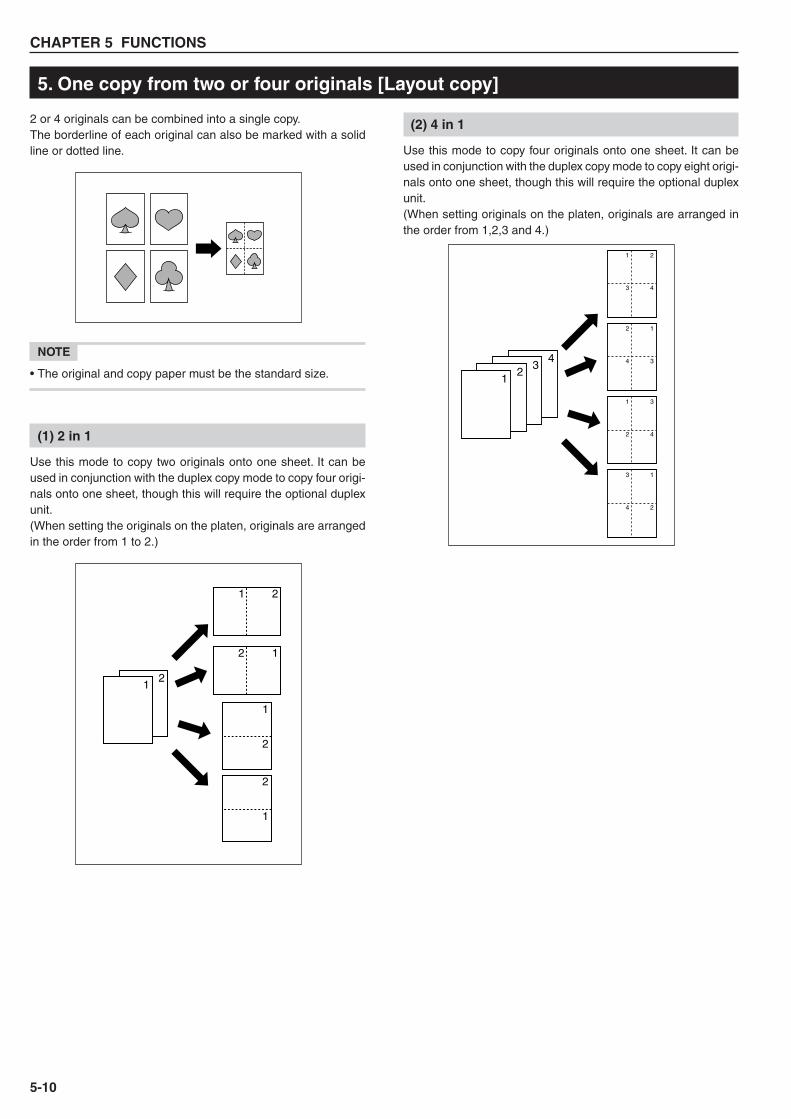
5. One copy from two or four originals
[Layout copy] ..................................................... 5-10
(1) 2 in 1 .......................................................... 5-10
(2) 4 in 1 .......................................................... 5-10
6. Printing page numbers on the copies
[Print page numbers function] ........................... 5-12
7. Overlaying images [Form overlay mode] ........... 5-15
8. Making a booklet (sheet originals)
[Booklet copy mode] .......................................... 5-16
9. Making a booklet (two-page [open-face] originals)
[Booklet + cover copy mode] ............................. 5-18
10. Sorting without document finisher [Sort copy] ... 5-20
11. Rotate sort copy mode ...................................... 5-21
12. Auto selection mode .......................................... 5-22
13. Adding covers for copies ................................... 5-23
14. Original size selection ....................................... 5-25
15. Feeding paper as a backing sheet for transparencies
[Transparency + backing sheet modes] ............. 5-26
16. Inverting black and white [Invert copy mode] ..... 5-28
17. Making mirror-image copies
[Mirror copy mode] ............................................. 5-29
18. Copying large number of originals in one batch
[Batch scanning] ................................................ 5-30
19. Reducing toner consumption
[Toner economy mode] ...................................... 5-31
20. Original set direction .......................................... 5-32
21. Memorizing frequently used settings
[Program mode] ................................................ 5-33
(1) Registering various settings as a single
program...................................................... 5-33
(2) Copying with a registered program ............ 5-34
(3) Changing the name of
the program button ..................................... 5-35
(4) Deleting the program ................................. 5-36
(5) Entering the program name ....................... 5-37
22. Using the [Register] key .................................... 5-39
23. Deleting the [Register] key ................................ 5-41
ii
CHAPTER 6COPIER MANAGEMENT ................. 6-1
1. Copy management mode .................................... 6-1
(1) Copy management mode............................. 6-1
(2) How to display the “Management code menu”
screen .......................................................... 6-3
(3) How to make various settings ...................... 6-3
(4) Making copies when the copier is in the copy
management mode ...................................... 6-9
2. Default settings .................................................. 6-11
(1) “Machine default” settings ..........................6-11
(2) Accessing the machine default setting
mode .......................................................... 6-13
(3) Changing the default settings .................... 6-13
(4) Copy default settings ................................. 6-23
(5) Accessing the copy default setting mode .. 6-24
(6) Changing the copy default settings............ 6-25
3. Print Form .......................................................... 6-35
4. Selection of language ........................................ 6-37
5. Drum refreshing ................................................. 6-38
CHAPTER 7OPTIONAL EQUIPMENT................. 7-1
(1) Duplex Document Processor ....................... 7-1
(2) Document Processor ...................................7-2
(3) Paper Feeder ............................................... 7-3
(4) Paper Feeder ............................................... 7-3
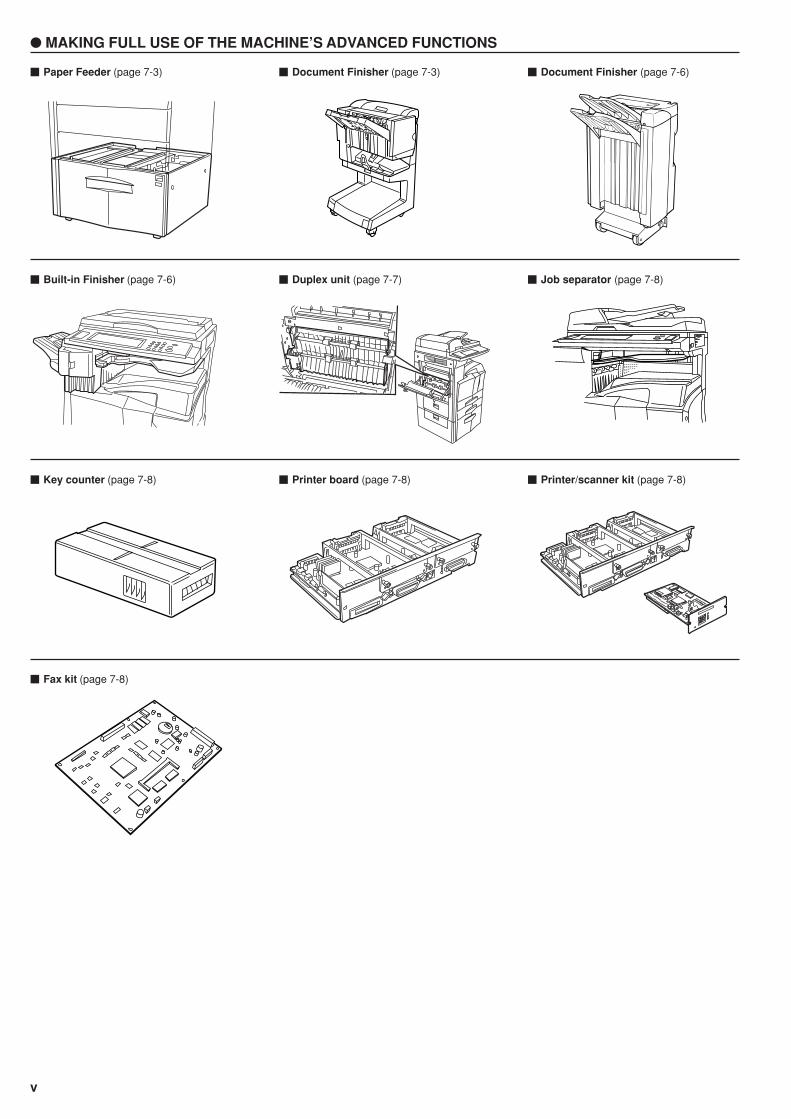
(5) Document Finisher ....................................... 7-3
(6) Document Finisher ....................................... 7-6
(7) Built-in Finisher ............................................7-6
(8) Duplex unit ...................................................7-7
(9) Job separator ............................................... 7-8
(10) Key counter .................................................. 7-8
(11) Printer board ................................................ 7-8
(12) Printer/scanner kit ........................................ 7-8
(13) Fax kit .......................................................... 7-8
CHAPTER 8WHEN A PROBLEM OCCURS ....... 8-1
1. Error messages ...................................................8-1
2. When an indicator lights or blinks orange ............8-3
3. When paper misfeeds ..........................................8-3
(1) Cautions .......................................................8-4
(2) Removal procedures .................................... 8-4
4. Troubleshooting ................................................. 8-11
CHAPTER 9CLEANING ANDSPECIFICATIONS ............................ 9-1
1. Cleaning the copier ............................................. 9-1
2. Specifications ...................................................... 9-3
3. Optional units ...................................................... 9-4
iii
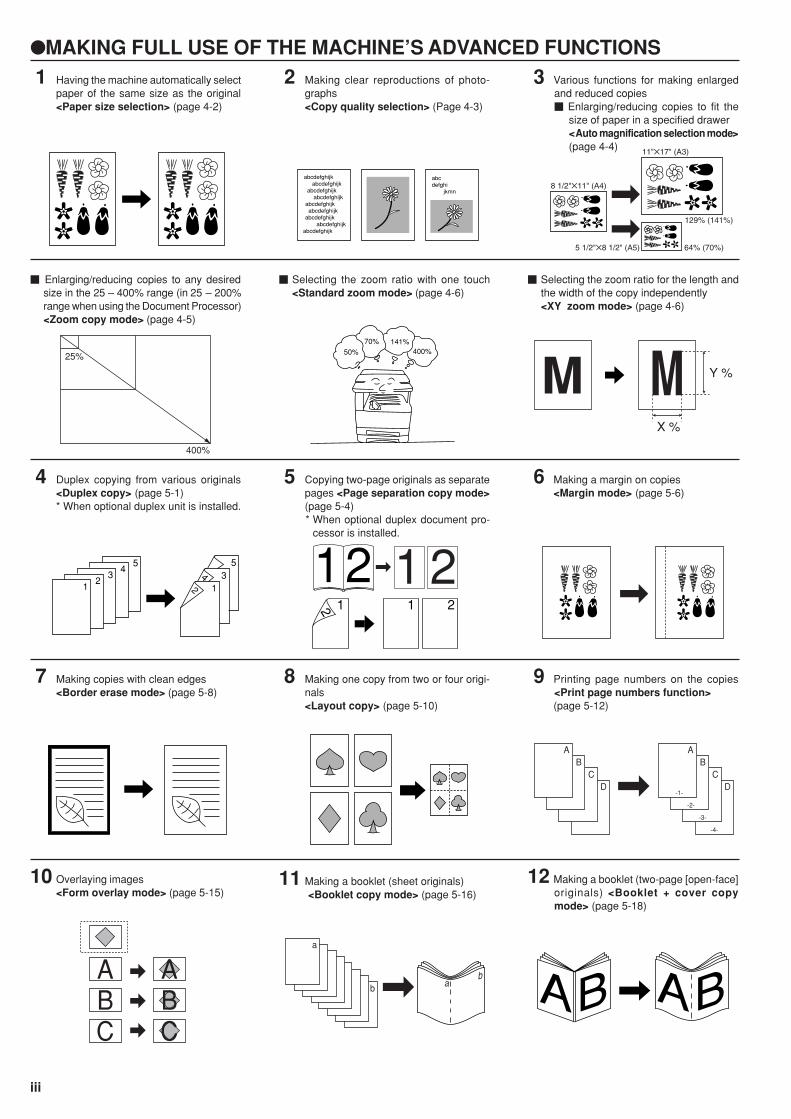
�MAKING FULL USE OF THE MACHINE’S ADVANCED FUNCTIONS1 Having the machine automatically select
paper of the same size as the original<Paper size selection> (page 4-2)
3 Various functions for making enlargedand reduced copies� Enlarging/reducing copies to fit the
size of paper in a specified drawer<Auto magnification selection mode>(page 4-4)
� Enlarging/reducing copies to any desiredsize in the 25 – 400% range (in 25 – 200%range when using the Document Processor)<Zoom copy mode> (page 4-5)
� Selecting the zoom ratio with one touch<Standard zoom mode> (page 4-6)
2 Making clear reproductions of photo-graphs<Copy quality selection> (Page 4-3)
6 Making a margin on copies<Margin mode> (page 5-6)
7 Making copies with clean edges<Border erase mode> (page 5-8)
8 Making one copy from two or four origi-nals<Layout copy> (page 5-10)
5 Copying two-page originals as separatepages <Page separation copy mode>(page 5-4)* When optional duplex document pro-
cessor is installed.
4 Duplex copying from various originals<Duplex copy> (page 5-1)* When optional duplex unit is installed.
9 Printing page numbers on the copies<Print page numbers function>(page 5-12)
25%
400%
50%
70% 141%400%
abcdefghijkabcdefghijk
abcdefghijkabcdefghijk
abcdefghijkabcdefghijk
abcdefghijkabcdefghijk
abcdefghijk
abcdefghi
jkmn
54
32
1 1234
5
DC
BA
DC
BA
-4-
-3-
-2-
-1-
10 Overlaying images<Form overlay mode> (page 5-15)
ABC
BC
A
11 Making a booklet (sheet originals) <Booklet copy mode> (page 5-16)
12 Making a booklet (two-page [open-face]originals) <Booklet + cover copymode> (page 5-18)
bb
a
a
BA BA
� Selecting the zoom ratio for the length andthe width of the copy independently<XY zoom mode> (page 4-6)
M M Y %
X %
64% (70%)5 1/2"✕8 1/2" (A5)
8 1/2"✕11" (A4)
11"✕17" (A3)
129% (141%)
1 21212 1 2
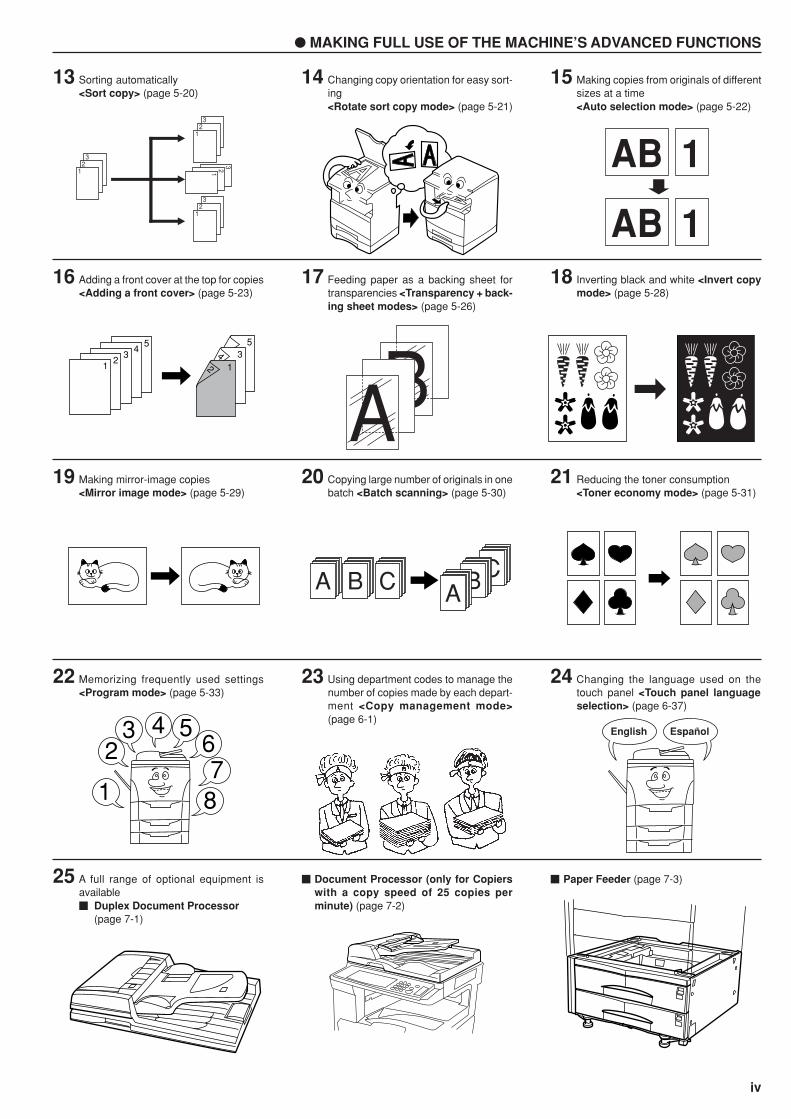
� MAKING FULL USE OF THE MACHINE’S ADVANCED FUNCTIONS
iv
16 Adding a front cover at the top for copies<Adding a front cover> (page 5-23)
17 Feeding paper as a backing sheet fortransparencies <Transparency + back-ing sheet modes> (page 5-26)
19 Making mirror-image copies<Mirror image mode> (page 5-29)
22 Memorizing frequently used settings<Program mode> (page 5-33)
20 Copying large number of originals in onebatch <Batch scanning> (page 5-30)
23 Using department codes to manage thenumber of copies made by each depart-ment <Copy management mode>(page 6-1)
24 Changing the language used on thetouch panel <Touch panel languageselection> (page 6-37)
25 A full range of optional equipment isavailable� Duplex Document Processor
(page 7-1)
534
121
54
32
1 BA
18 Inverting black and white <Invert copymode> (page 5-28)
1
23 4 5
67
8
A B C CBA
English Español
� Document Processor (only for Copierswith a copy speed of 25 copies perminute) (page 7-2)
� Paper Feeder (page 7-3)
AB 1
AB 1
14 Changing copy orientation for easy sort-ing<Rotate sort copy mode> (page 5-21)
15 Making copies from originals of differentsizes at a time<Auto selection mode> (page 5-22)
13 Sorting automatically<Sort copy> (page 5-20)
32
1
32
1
321
32
1
21 Reducing the toner consumption<Toner economy mode> (page 5-31)
� MAKING FULL USE OF THE MACHINE’S ADVANCED FUNCTIONS
v
� Job separator (page 7-8)
� Printer/scanner kit (page 7-8)� Key counter (page 7-8)
� Duplex unit (page 7-7)� Built-in Finisher (page 7-6)
� Document Finisher (page 7-3) � Document Finisher (page 7-6)� Paper Feeder (page 7-3)
� Fax kit (page 7-8)
� Printer board (page 7-8)
1-1
Caution labels have been attached to the copier at the following locations for safety purposes.BE SUFFICIENTLY CAREFUL to avoid fire or electric shock when removing a paper jam or when replacing toner.
CAUTION LABELS
NOTE: DO NOT remove these labels.
CHAPTER 1 IMPORTANT! PLEASE READ FIRST
Label 3Moving parts inside. May causepersonal injury. Do not touchmoving parts. .................................
Label 2Do not incinerate toner andtoner containers. Dangeroussparks may cause burn. ......
Label 4High temperature inside.Do not touch parts in thisarea, because there is adanger of getting burned.
Label 1High temperature inside. Do nottouch parts in this area, becausethere is a danger of getting burned.
1-2
• During copying, some ozone is released, but the amountdoes not cause any ill effect to one's health. If, however,the copier is used over a long period of time in a poorlyventilated room or when making an extremely largenumber of copies, the smell may become unpleasant. Tomaintain the appropriate environment for copy work, it issuggested that the room be properly ventilated.
� Power supply/Grounding the copier
WARNING• DO NOT use a power supply with a voltage other
than that specified. Avoid multiple connections inthe same outlet. These types of situations presenta danger of fire or electrical shock. .......................
• Plug the power cord securely into the outlet. Ifmetallic objects come in contact with the prongson the plug, it may cause a fire or electric shock. .
• Always connect the copier to an outlet with aground connection to avoid the danger of fire orelectrical shock in case of an electric short. If anearth connection is not possible, contact yourservice representative. ..........................................
Other precautions• Connect the power plug to the closest outlet possible to
the copier.
• The power supply cord is used as the main disconnectdevice. Ensure that the socket/outlet is located/installednear the equipment and is easily accessible.
� Handling of plastic bags
WARNING• Keep the plastic bags that are used with the
copier away from children. The plastic may clingto their nose and mouth causing suffocation. ........
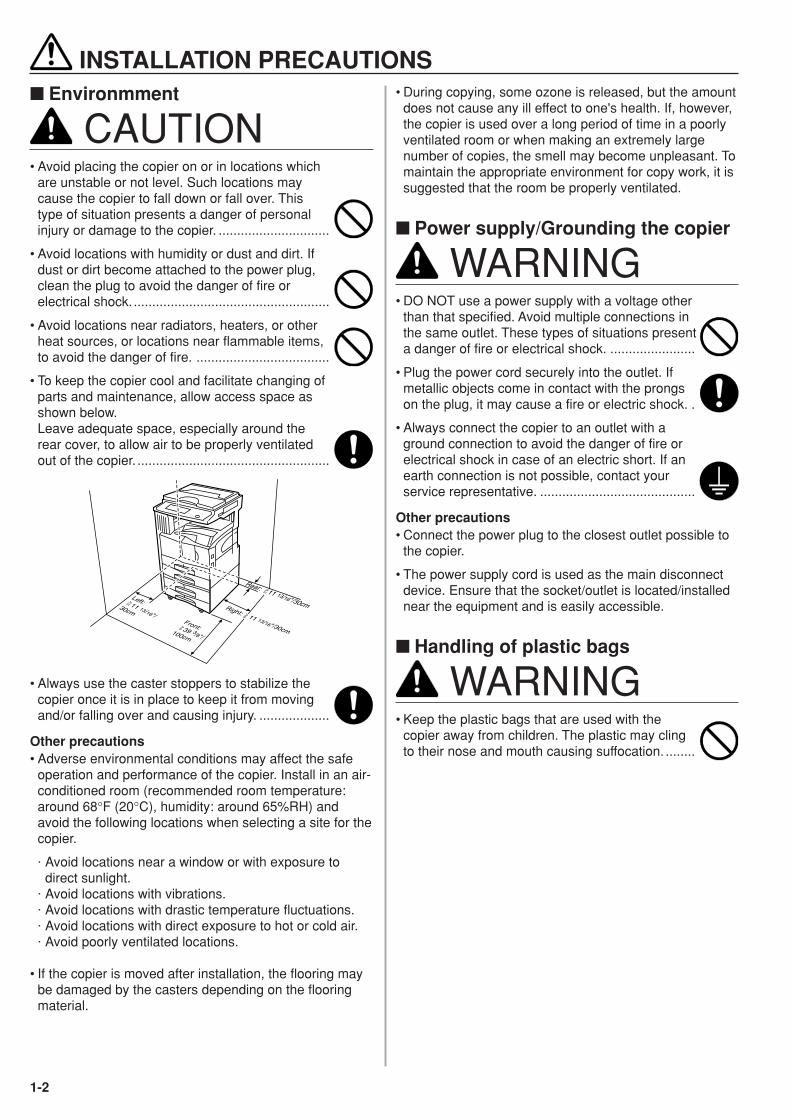
INSTALLATION PRECAUTIONS� Environmment
CAUTION• Avoid placing the copier on or in locations which
are unstable or not level. Such locations maycause the copier to fall down or fall over. Thistype of situation presents a danger of personalinjury or damage to the copier. ..............................
• Avoid locations with humidity or dust and dirt. Ifdust or dirt become attached to the power plug,clean the plug to avoid the danger of fire orelectrical shock. .....................................................
• Avoid locations near radiators, heaters, or otherheat sources, or locations near flammable items,to avoid the danger of fire. ....................................
• To keep the copier cool and facilitate changing ofparts and maintenance, allow access space asshown below.Leave adequate space, especially around therear cover, to allow air to be properly ventilatedout of the copier. ....................................................
Rear: 11 13/16"/30cm
>=
Right: 11 13/16"/30cmFront: 39 3/8"/
100cm
>=
>=
Left: 11 13/16"/30cm
>=
• Always use the caster stoppers to stabilize thecopier once it is in place to keep it from movingand/or falling over and causing injury. ...................
Other precautions• Adverse environmental conditions may affect the safe
operation and performance of the copier. Install in an air-conditioned room (recommended room temperature:around 68°F (20°C), humidity: around 65%RH) andavoid the following locations when selecting a site for thecopier.
. Avoid locations near a window or with exposure todirect sunlight.
. Avoid locations with vibrations.
. Avoid locations with drastic temperature fluctuations.
. Avoid locations with direct exposure to hot or cold air.
. Avoid poorly ventilated locations.
• If the copier is moved after installation, the flooring maybe damaged by the casters depending on the flooringmaterial.

1-3
CAUTION• DO NOT pull the power cord when removing it
from the outlet. If the power cord is pulled, thewires may become broken and there is a dangerof fire or electrical shock. (ALWAYS grasp thepower plug when removing the power cord fromthe outlet.) .............................................................
• ALWAYS remove the power plug from the outletwhen moving the copier. If the power cord isdamaged, there is a danger of fire or electricalshock. ....................................................................
• If the copier will not be used for a short period oftime (overnight, etc.), turn the main switch OFF(�).If it will not be used for an extended period of time(vacations, etc.), remove the power plug from theoutlet for safety purposes during the time thecopier is not in use. ...............................................
• ALWAYS hold the designated parts only whenlifting or moving the copier. ...................................
• For safety purposes, ALWAYS remove the powerplug from the outlet when performing cleaningoperations. ............................................................
• If dust accumulates within the copier, there is adanger of fire or other trouble. It is thereforerecommended that you consult with your servicerepresentative in regard to cleaning of internalparts. This is particularly effective if accomplishedprior to seasons of high humidity. Consult withyour service representative in regard to the costof cleaning the internal parts of the copier. ...........
� Cautions when using the copier
WARNING• DO NOT place metallic objects or containers with
water (flower vases, flower pots, cups, etc.) on ornear the copier. This of situation presents adanger of fire or electrical shock should they fallinside. ....................................................................
• DO NOT remove any of the covers from thecopier as there is a danger of electrical shockfrom high voltage parts inside the copier. .............
• DO NOT damage, break or attempt to repair thepower cord. DO NOT place heavy objects on thecord, pull it, bend it unnecessarily or cause anyother type of damage.These types of situations present a danger of fireor electrical shock. ................................................
• NEVER attempt to repair or disassemble thecopier or its parts as there is a danger of fire,electrical shock or damage to the laser. If thelaser beam escapes, there is a danger of itcausing blindness. .................................................
• If the copier becomes excessively hot, smokeappears from the copier, there is an odd smell, orany other abnormal situation occurs, there is adanger of fire or electrical shock. Turn the mainswitch OFF (�) immediately, remove the powerplug from the outlet and contact your servicerepresentative. ......................................................
• If anything harmful (paper clips, water, otherfluids, etc.) falls into the copier, turn the mainswitch OFF (�) immediately. Next, remove thepower plug from the outlet to avoid the danger offire or electrical shock. Then contact your servicerepresentative. ......................................................
• DO NOT remove or connect the power plug withwet hands, as there is a danger of electricalshock. ....................................................................
• ALWAYS contact your service representative formaintenance or repair of internal parts. ................
PRECAUTIONS FOR USE
1-4
� Cautions when handlingconsumables
CAUTION• DO NOT attempt to incinerate the toner
containers or the waste toner box. Dangeroussparks may cause burns. ......................................
• Keep the toner containers and the waste tonerbox out of the reach of children. ............................
• If toner happens to spill from the toner containersor the waste toner box, avoid inhalation andingestion, as well as contact with your eyes andskin. .......................................................................
. If you do happen to inhale toner, move to a place withfresh air and gargle thoroughly with a large amount ofwater. If coughing develops, contact a physician.
. If you do happen to ingest toner, rinse your mouth outwith water and drink 1 or 2 cups of water to dilute thecontents of your stomach. If necessary, contact aphysician.
. If you do happen to get toner in your eyes, flush themthoroughly with water. If there is any remainingtenderness, contact a physician.
. If toner does happen to get on your skin, wash withsoap and water.
• DO NOT attempt to force open or destroy thetoner containers or the waste toner box. ...............
Other precautions• After use, ALWAYS dispose of the toner containers and
the waste toner box in accordance with Federal, Stateand Local rules and regulations.
• Store all consumables in a cool, dark location.
• If you will not be using the copier for a prolonged periodof time, remove all paper from the drawer(s) and themulti-bypass tray and seal in its original packaging.
PRECAUTIONS FOR USE
Other precautions• DO NOT place heavy objects on the copier or cause
other damage to the copier.
• DO NOT open the front cover, turn off the main switch,or pull out the power plug during copying.
• When lifting or moving the copier, contact your servicerepresentative.
• Do not touch electrical parts, such as connectors orprinted circuit boards. They could be damaged by staticelectricity.
• DO NOT attempt to perform any operations notexplained in this handbook.
• CAUTION : Use of controls or adjustments orperformance of procedures other than those specifiedherein may result in hazardous radiation exposure.
• Do not look directly at the light from the scanning lampas it may cause your eyes to feel tired or painful.
2-1
(1) Main body
5
1
2
7
8
9
3
4
6
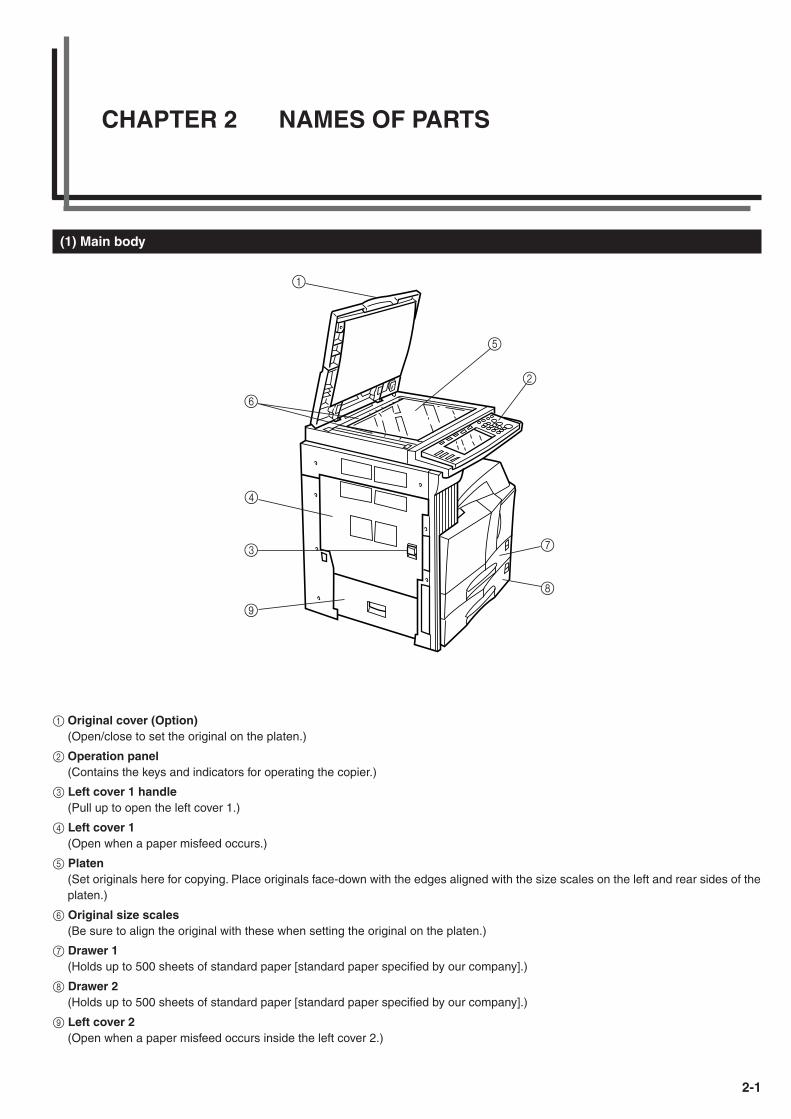
1 Original cover (Option)(Open/close to set the original on the platen.)
2 Operation panel(Contains the keys and indicators for operating the copier.)
3 Left cover 1 handle(Pull up to open the left cover 1.)
4 Left cover 1(Open when a paper misfeed occurs.)
5 Platen(Set originals here for copying. Place originals face-down with the edges aligned with the size scales on the left and rear sides of theplaten.)
6 Original size scales(Be sure to align the original with these when setting the original on the platen.)
7 Drawer 1(Holds up to 500 sheets of standard paper [standard paper specified by our company].)
8 Drawer 2(Holds up to 500 sheets of standard paper [standard paper specified by our company].)
9 Left cover 2(Open when a paper misfeed occurs inside the left cover 2.)
CHAPTER 2 NAMES OF PARTS
CHAPTER 2 NAMES OF PARTS
2-2
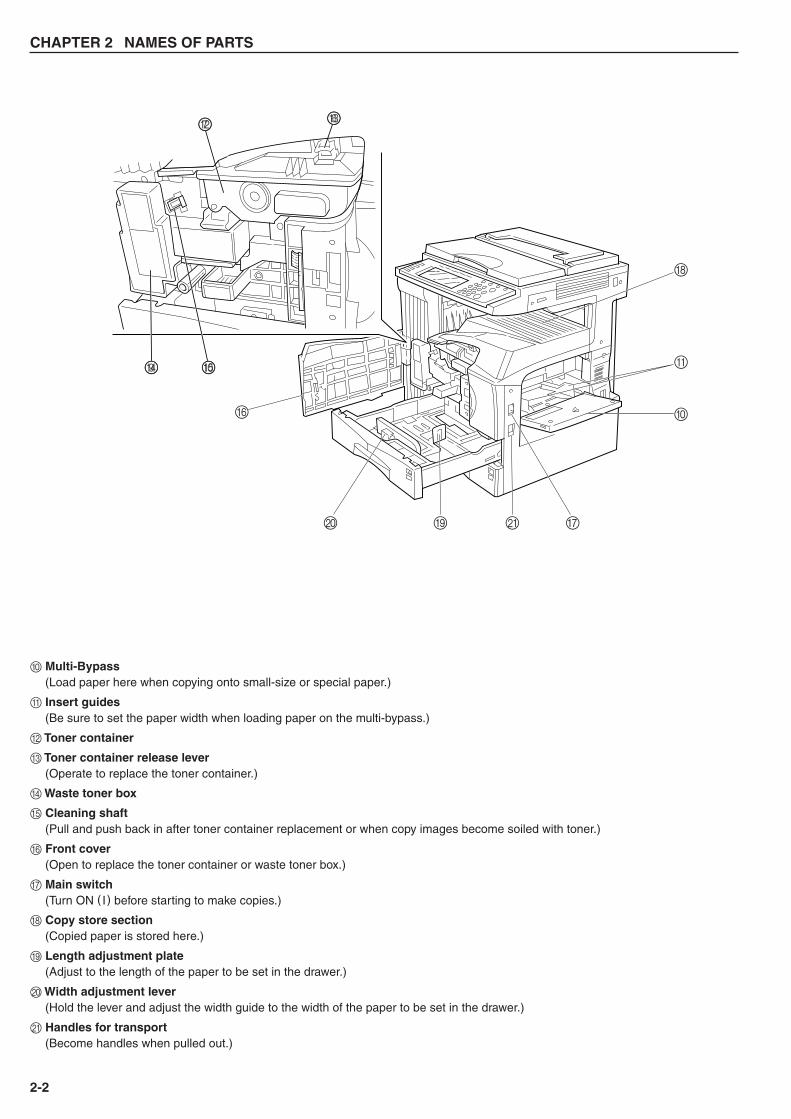
0 Multi-Bypass(Load paper here when copying onto small-size or special paper.)
A Insert guides(Be sure to set the paper width when loading paper on the multi-bypass.)
B Toner container
C Toner container release lever(Operate to replace the toner container.)
D Waste toner box
E Cleaning shaft(Pull and push back in after toner container replacement or when copy images become soiled with toner.)
F Front cover(Open to replace the toner container or waste toner box.)
G Main switch(Turn ON ( I) before starting to make copies.)
H Copy store section(Copied paper is stored here.)
I Length adjustment plate(Adjust to the length of the paper to be set in the drawer.)
J Width adjustment lever(Hold the lever and adjust the width guide to the width of the paper to be set in the drawer.)
K Handles for transport(Become handles when pulled out.)
87 CB
A
0
H
GKIJ
F
09 ED
CHAPTER 2 NAMES OF PARTS
2-3
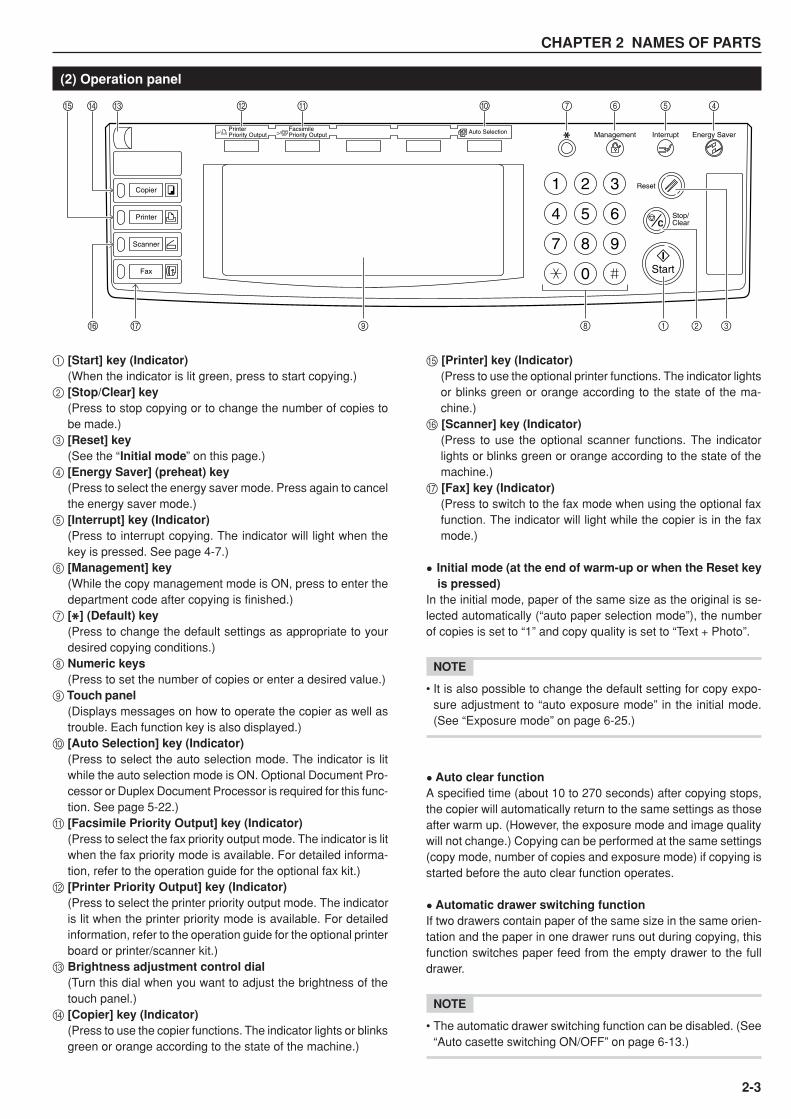
1 [Start] key (Indicator)(When the indicator is lit green, press to start copying.)
2 [Stop/Clear] key(Press to stop copying or to change the number of copies tobe made.)
3 [Reset] key(See the “Initial mode” on this page.)
4 [Energy Saver] (preheat) key(Press to select the energy saver mode. Press again to cancelthe energy saver mode.)
5 [Interrupt] key (Indicator)(Press to interrupt copying. The indicator will light when thekey is pressed. See page 4-7.)
6 [Management] key(While the copy management mode is ON, press to enter thedepartment code after copying is finished.)
7 [ ] (Default) key(Press to change the default settings as appropriate to yourdesired copying conditions.)
8 Numeric keys(Press to set the number of copies or enter a desired value.)
9 Touch panel(Displays messages on how to operate the copier as well astrouble. Each function key is also displayed.)
0 [Auto Selection] key (Indicator)(Press to select the auto selection mode. The indicator is litwhile the auto selection mode is ON. Optional Document Pro-cessor or Duplex Document Processor is required for this func-tion. See page 5-22.)
A [Facsimile Priority Output] key (Indicator)(Press to select the fax priority output mode. The indicator is litwhen the fax priority mode is available. For detailed informa-tion, refer to the operation guide for the optional fax kit.)
B [Printer Priority Output] key (Indicator)(Press to select the printer priority output mode. The indicatoris lit when the printer priority mode is available. For detailedinformation, refer to the operation guide for the optional printerboard or printer/scanner kit.)
C Brightness adjustment control dial(Turn this dial when you want to adjust the brightness of thetouch panel.)
D [Copier] key (Indicator)(Press to use the copier functions. The indicator lights or blinksgreen or orange according to the state of the machine.)
E [Printer] key (Indicator)(Press to use the optional printer functions. The indicator lightsor blinks green or orange according to the state of the ma-chine.)
F [Scanner] key (Indicator)(Press to use the optional scanner functions. The indicatorlights or blinks green or orange according to the state of themachine.)
G [Fax] key (Indicator)(Press to switch to the fax mode when using the optional faxfunction. The indicator will light while the copier is in the faxmode.)
• Initial mode (at the end of warm-up or when the Reset keyis pressed)
In the initial mode, paper of the same size as the original is se-lected automatically (“auto paper selection mode”), the numberof copies is set to “1” and copy quality is set to “Text + Photo”.
NOTE
• It is also possible to change the default setting for copy expo-sure adjustment to “auto exposure mode” in the initial mode.(See “Exposure mode” on page 6-25.)
• Auto clear functionA specified time (about 10 to 270 seconds) after copying stops,the copier will automatically return to the same settings as thoseafter warm up. (However, the exposure mode and image qualitywill not change.) Copying can be performed at the same settings(copy mode, number of copies and exposure mode) if copying isstarted before the auto clear function operates.
• Automatic drawer switching functionIf two drawers contain paper of the same size in the same orien-tation and the paper in one drawer runs out during copying, thisfunction switches paper feed from the empty drawer to the fulldrawer.
NOTE
• The automatic drawer switching function can be disabled. (See“Auto casette switching ON/OFF” on page 6-13.)
Start
Stop/ Clear
Reset
Interrupt
1 2 3
4 5 6
7 8 9
0
Management Energy Saver
Copier
Printer
Scanner
Fax
PrinterPriority Output
FacsimilePriority Output Auto Selection
19GF 8 2 3
45670ABCDE
(2) Operation panel

CHAPTER 2 NAMES OF PARTS
2-4
A [Exposure] key(Touch this key to display the exposure setting screen.)
B [Eco] key(Touch this key to highlight it to enter the toner economy modewhere the exposure level will be lowered and toner consump-tion reduced. Use this mode as well for test printing and thelike when high quality printing is not required. For informationon how to select whether you want the toner economy modeto be automatically selected or not each time the copier isturned on, see “Eco print” on page 6-27.)
C [Sort: OFF] key(Touch this key when the sort function is not used.)
D [Sort: ON] key(Touch this key when the sort function is used.)
E [Sort/Finish] key(Touch this key when displaying the Sort/Finish function se-lection screen.)
F Registration keys(Touch this key to recall the registered settings. Each functionon the Function screen can be registered to the registrationkeys.)
G [Basic] key(Touch this key to return to the Basic screen.)
1 Displays messages regarding the machine status and requiredoperations.
2 Displays the size and magnification ratio of the paper set ineach drawer.
3 Displays the number of copies to be made.4 Paper size keys (Indicator icon)
(Displays the size of paper that is set in each of the drawers.When selecting the drawer from which paper will be fed, touchthe appropriate key to highlight that key. The [*] key is displsyedwhen the special paper is set. Drawers 3 and 4 are displayedwhen the optional cassette/paper feeder is attached.)
5 [APS] key(Touch this key to automatically select the paper size.)
6 [Bypass] key(Touch this key to copy onto paper set in the multi-bypass tray.)
7 [AMS] key(Touch this key to automatically select the magnification ratio.)
8 [Reduce/Enlarge] key(Touch this key to manually select the magnification ratio.)
9 100% key(Touch this key to set the magnification ratio to 100%.)
0 Copy exposure adjustment key/Copy exposure indicator(Touch the appropriate key to manually adjust the copy expo-sure. The current setting is displayed on the copy exposureindicator.)
(3) Touch panel
Inch specifications
Metric specifications
4
G H 6 5 C D E
F
321
9I 8 7A BJ 0
4
G H 6 5 C D E
F
321
9I 8 7A BJ 0
CHAPTER 2 NAMES OF PARTS
2-5
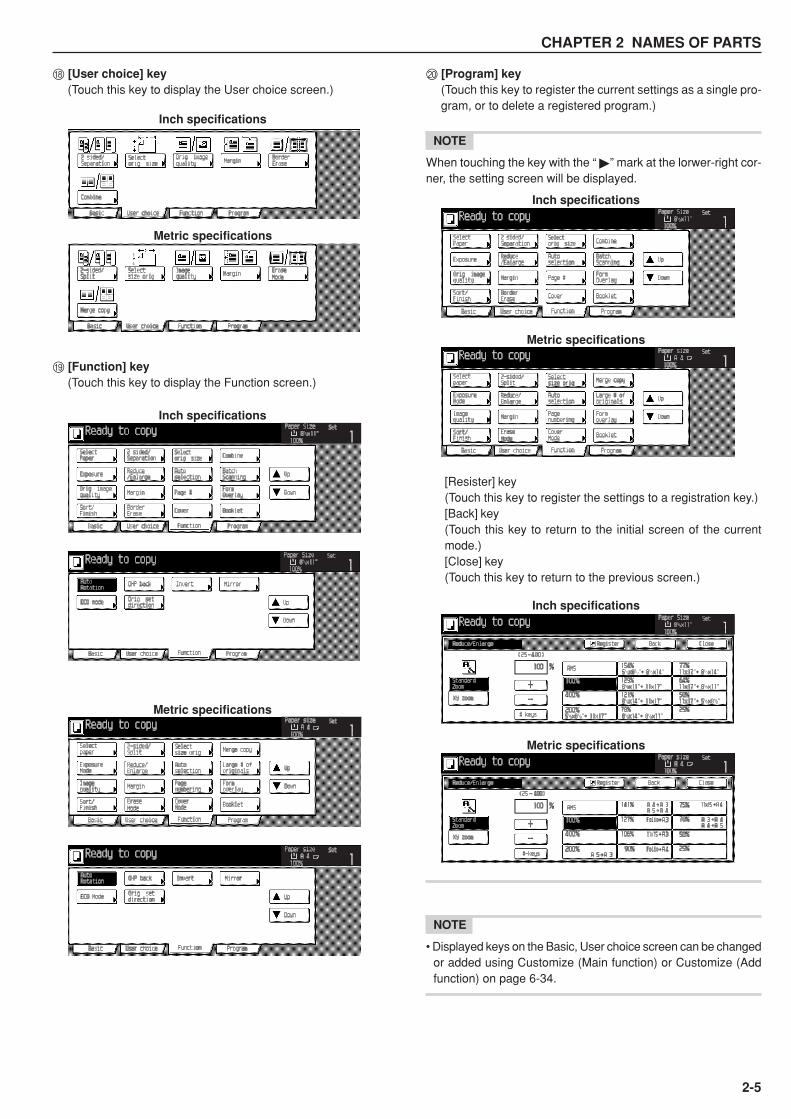
H [User choice] key(Touch this key to display the User choice screen.)
I [Function] key(Touch this key to display the Function screen.)
Inch specifications
Metric specifications
J [Program] key(Touch this key to register the current settings as a single pro-gram, or to delete a registered program.)
NOTE
When touching the key with the “ �” mark at the lorwer-right cor-ner, the setting screen will be displayed.
[Resister] key(Touch this key to register the settings to a registration key.)[Back] key(Touch this key to return to the initial screen of the currentmode.)[Close] key(Touch this key to return to the previous screen.)
NOTE
• Displayed keys on the Basic, User choice screen can be changedor added using Customize (Main function) or Customize (Addfunction) on page 6-34.
Inch specifications
Metric specifications
Inch specifications
Metric specifications
Inch specifications
Metric specifications

CHAPTER 2 NAMES OF PARTS
2-6

3-1
Paper can be loaded into the two drawers and the multi-bypass.
(1) Precautions for loading paper
After unpacking the paper, fan it several times and then load intothe tray.
IMPORTANT
• Loading paper into the standard drawer, optional paper feederor multi-bypass when some paper is still remaining in each ofthem may cause paper misfeeds.
(2) Loading paper into the drawer
Up to 500 sheets of standard paper (75 or 80 g/m2/standard pa-per as specified by our company) or colored paper can be loadedinto the each drawer.(Inch specifications)• The each drawer can be set to hold paper of any desired size
from 11" ✕ 17" to 5 1/2" ✕ 8 1/2".(Metric specifications)• The each drawer can be set to hold paper of any desired size
from A3 to A5R and Folio.
IMPORTANT
• Set the type of paper (standard paper, recycled paper, letter-heads or colored paper) to be loaded in the drawer in “Papertype (1st to 2nd cassette)” on page 6-16.
1
1. How to load paper
Pull the drawer out toward you as far as it will go.* Do not pull more than one drawer out at a time.
Hold the width adjustment lever and move it to align thewidth guide with the required paper width.Paper sizes are marked inside the drawer.
Hold the length adjustment plate and move it to alignwith the required paper length.
2
3
CHAPTER 3 HOW TO LOAD PAPER
CHAPTER 3 HOW TO LOAD PAPER
3-2
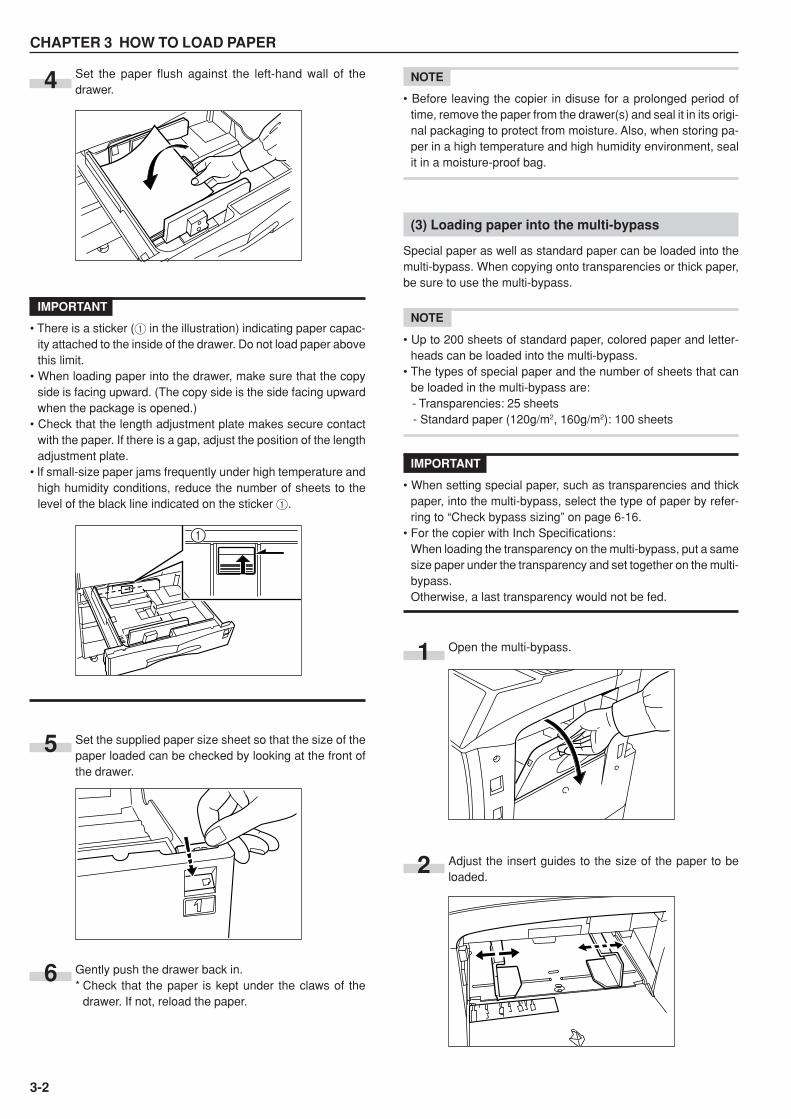
Set the paper flush against the left-hand wall of thedrawer.
IMPORTANT
• There is a sticker (1 in the illustration) indicating paper capac-ity attached to the inside of the drawer. Do not load paper abovethis limit.
• When loading paper into the drawer, make sure that the copyside is facing upward. (The copy side is the side facing upwardwhen the package is opened.)
• Check that the length adjustment plate makes secure contactwith the paper. If there is a gap, adjust the position of the lengthadjustment plate.
• If small-size paper jams frequently under high temperature andhigh humidity conditions, reduce the number of sheets to thelevel of the black line indicated on the sticker 1.
Set the supplied paper size sheet so that the size of thepaper loaded can be checked by looking at the front ofthe drawer.
Gently push the drawer back in.* Check that the paper is kept under the claws of the
drawer. If not, reload the paper.
4 NOTE
• Before leaving the copier in disuse for a prolonged period oftime, remove the paper from the drawer(s) and seal it in its origi-nal packaging to protect from moisture. Also, when storing pa-per in a high temperature and high humidity environment, sealit in a moisture-proof bag.
(3) Loading paper into the multi-bypass
Special paper as well as standard paper can be loaded into themulti-bypass. When copying onto transparencies or thick paper,be sure to use the multi-bypass.
NOTE
• Up to 200 sheets of standard paper, colored paper and letter-heads can be loaded into the multi-bypass.
• The types of special paper and the number of sheets that canbe loaded in the multi-bypass are:
- Transparencies: 25 sheets - Standard paper (120g/m2, 160g/m2): 100 sheets
IMPORTANT
• When setting special paper, such as transparencies and thickpaper, into the multi-bypass, select the type of paper by refer-ring to “Check bypass sizing” on page 6-16.
• For the copier with Inch Specifications:When loading the transparency on the multi-bypass, put a samesize paper under the transparency and set together on the multi-bypass.Otherwise, a last transparency would not be fed.
Open the multi-bypass.
Adjust the insert guides to the size of the paper to beloaded.
5
1
6
1
2
CHAPTER 3 HOW TO LOAD PAPER
3-3
Insert the paper along the guides as far as it will go.
IMPORTANT
• When loading paper into the multi-bypass, make sure that thecopy side is facing upward. (The copy side is the side facingupward when the package is opened.) If the leading edge of thepaper is curled, straighten it out before loading the paper in themulti-bypass.
• Setting envelopesWhen using the optional printer function, envelopes can be set inthe multi-bypass.
NOTE
• The types of envelopes that can be used are COM-10, Mon-arch, DL and C5. Up to 20 envelopes can be loaded in the multi-bypass at a time.
Open the multi-bypass.
Align the insert guides with the envelope size.
Open the flap of the envelope and set it with the copyside facing up ward. With the flap facing the outside, in-sert the envelope into the slot along the insert guides asfar as it will go.
NOTE
• Incorrectly loading envelopes can result in printing in the wrongorientation or on the wrong side.
3
1
2
3
CHAPTER 3 HOW TO LOAD PAPER
3-4
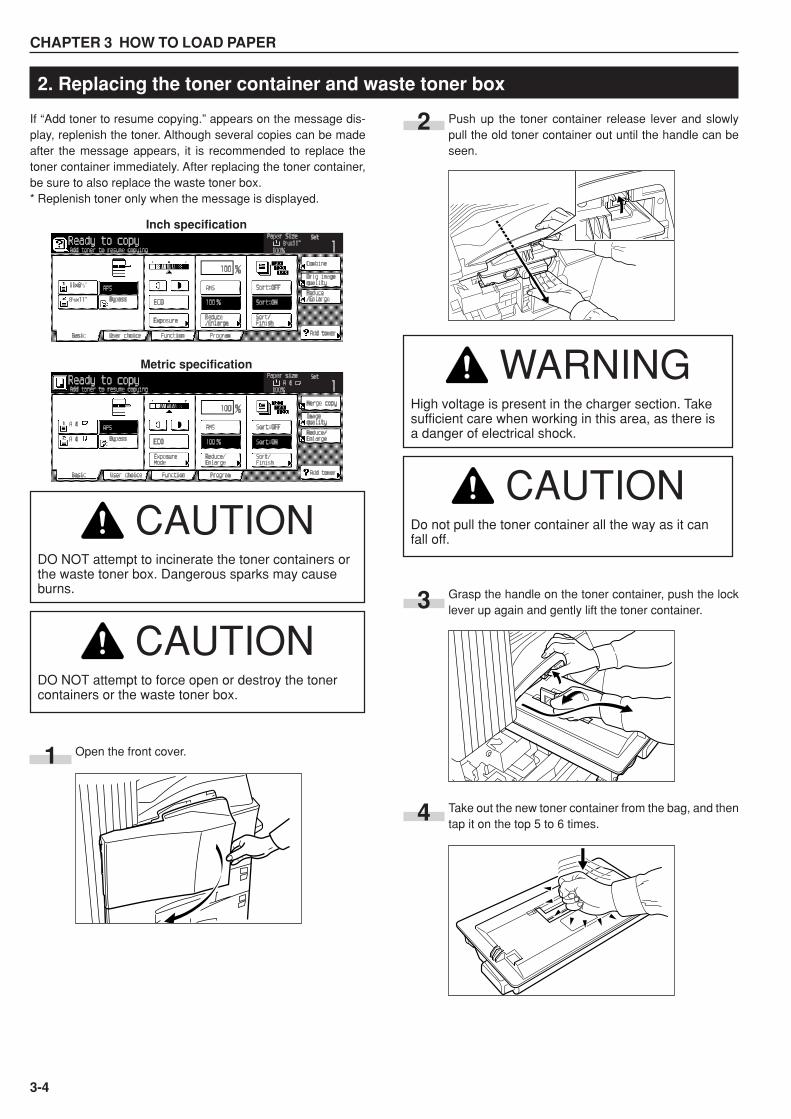
Push up the toner container release lever and slowlypull the old toner container out until the handle can beseen.
Grasp the handle on the toner container, push the locklever up again and gently lift the toner container.
Take out the new toner container from the bag, and thentap it on the top 5 to 6 times.
If “Add toner to resume copying.” appears on the message dis-play, replenish the toner. Although several copies can be madeafter the message appears, it is recommended to replace thetoner container immediately. After replacing the toner container,be sure to also replace the waste toner box.* Replenish toner only when the message is displayed.
Open the front cover.
2. Replacing the toner container and waste toner box
1
2
3
4
Inch specification
Metric specification
CAUTIONDO NOT attempt to incinerate the toner containers orthe waste toner box. Dangerous sparks may causeburns.
CAUTIONDO NOT attempt to force open or destroy the tonercontainers or the waste toner box.
WARNINGHigh voltage is present in the charger section. Takesufficient care when working in this area, as there isa danger of electrical shock.
CAUTIONDo not pull the toner container all the way as it canfall off.
CHAPTER 3 HOW TO LOAD PAPER
3-5
Close the opening of the waste toner box with its seal.
Remove the cap from the grid cleaner.
Attach the grid cleaner to the machine body aligning withthe notches.
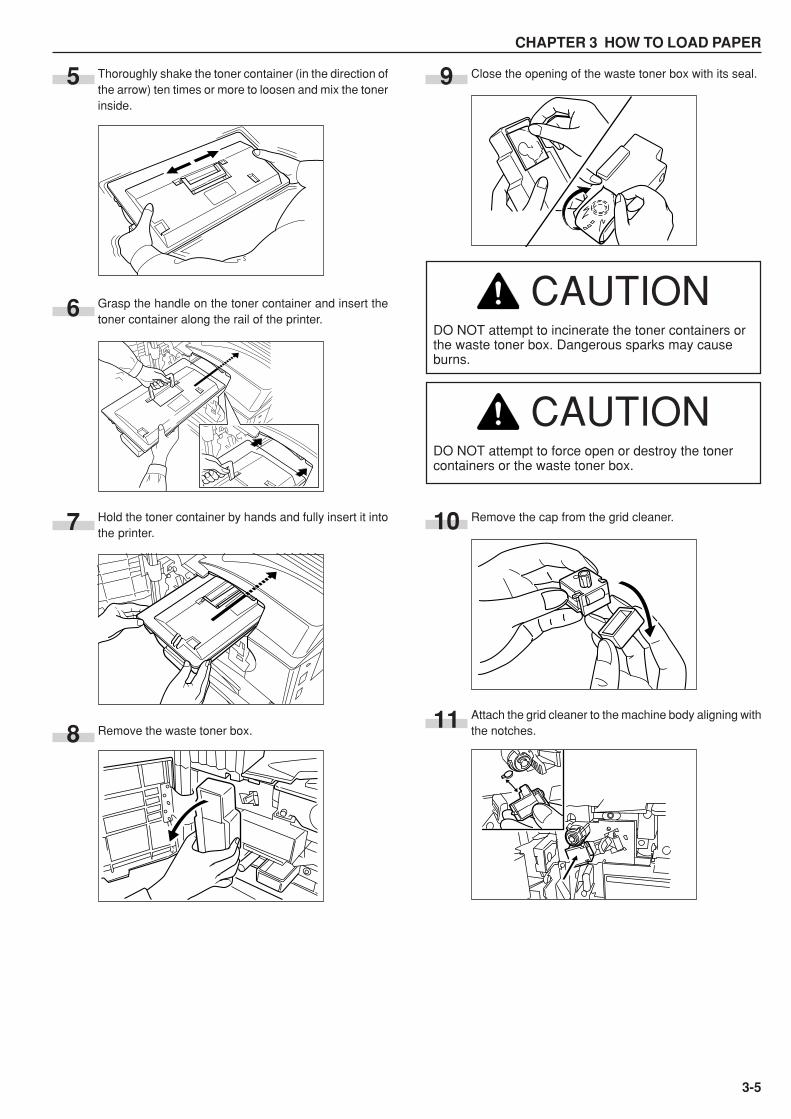
Thoroughly shake the toner container (in the direction ofthe arrow) ten times or more to loosen and mix the tonerinside.
Grasp the handle on the toner container and insert thetoner container along the rail of the printer.
Hold the toner container by hands and fully insert it intothe printer.
Remove the waste toner box.
5
6
8
9
107
11
CAUTIONDO NOT attempt to incinerate the toner containers orthe waste toner box. Dangerous sparks may causeburns.
CAUTIONDO NOT attempt to force open or destroy the tonercontainers or the waste toner box.
CHAPTER 3 HOW TO LOAD PAPER
3-6
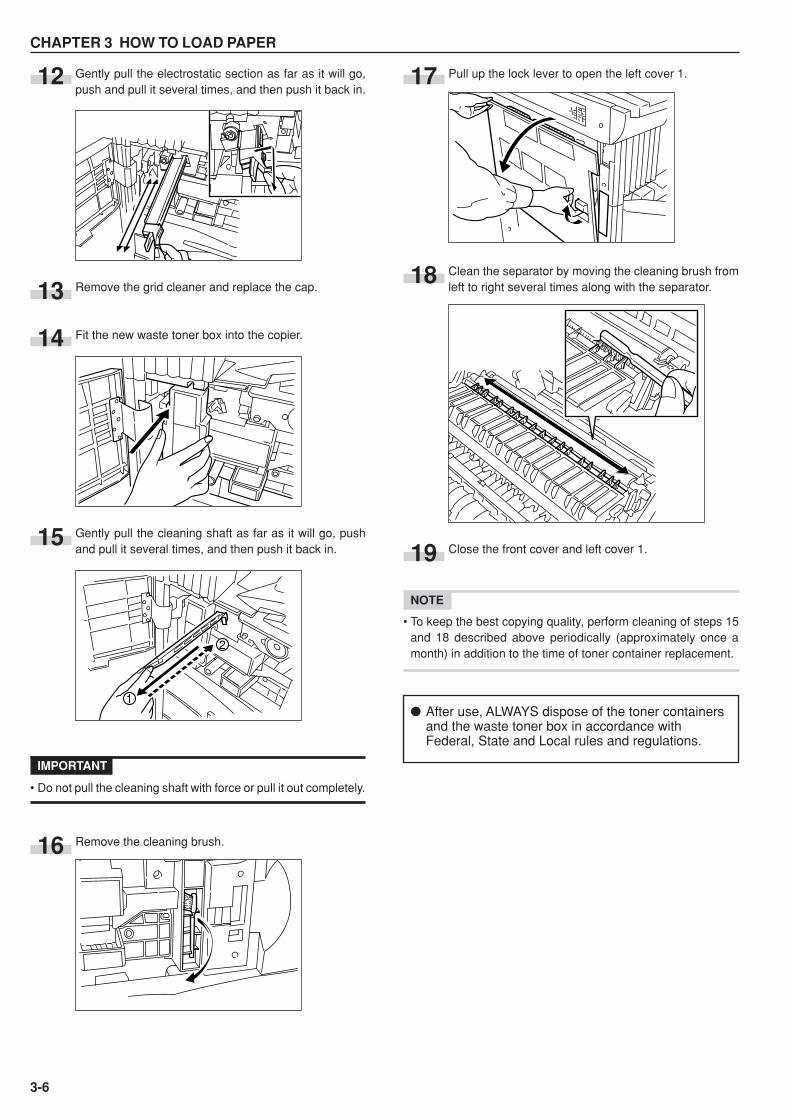
Pull up the lock lever to open the left cover 1.
Clean the separator by moving the cleaning brush fromleft to right several times along with the separator.
Close the front cover and left cover 1.
NOTE
• To keep the best copying quality, perform cleaning of steps 15and 18 described above periodically (approximately once amonth) in addition to the time of toner container replacement.
Gently pull the electrostatic section as far as it will go,push and pull it several times, and then push it back in.
Remove the grid cleaner and replace the cap.
Fit the new waste toner box into the copier.
Gently pull the cleaning shaft as far as it will go, pushand pull it several times, and then push it back in.
IMPORTANT
• Do not pull the cleaning shaft with force or pull it out completely.
Remove the cleaning brush.
15
16
12
13
14
1
2
� After use, ALWAYS dispose of the toner containersand the waste toner box in accordance withFederal, State and Local rules and regulations.
17
18
19
4-1
3. Function selectionSelect from the copier’s various functions.
• Enlargement/reduction (see page 4-4)• Interrupt copying (see page 4-7)• Duplex copying from various originals (see page 5-1)• Copying two-page originals as separate pages (see page
5-4)• Making a margin space for binding (see page 5-6)• Making copies with clean edges (see page 5-8)• One copy from two or four originals (see page 5-10)• Printing page numbers on the copies (see page 5-12)• Overlaying images (see page 5-15)• Making a booklet (sheet originals) (see page 5-16)• Making a booklet (two-page [open-face] originals) (see
page 5-18)• Sorting without document finisher (see page 5-20)• Rotate copy (see page 5-21)• Auto selection mode (see page 5-22)• Adding covers for copies (see page 5-23)• Feeding a paper as a backing sheet for transparencies
(see page 5-26)• Inverting black and white (see page 5-28)• Making mirror-image copies (see page 5-29)• Copying large number of originals in one batch (see page
5-30)
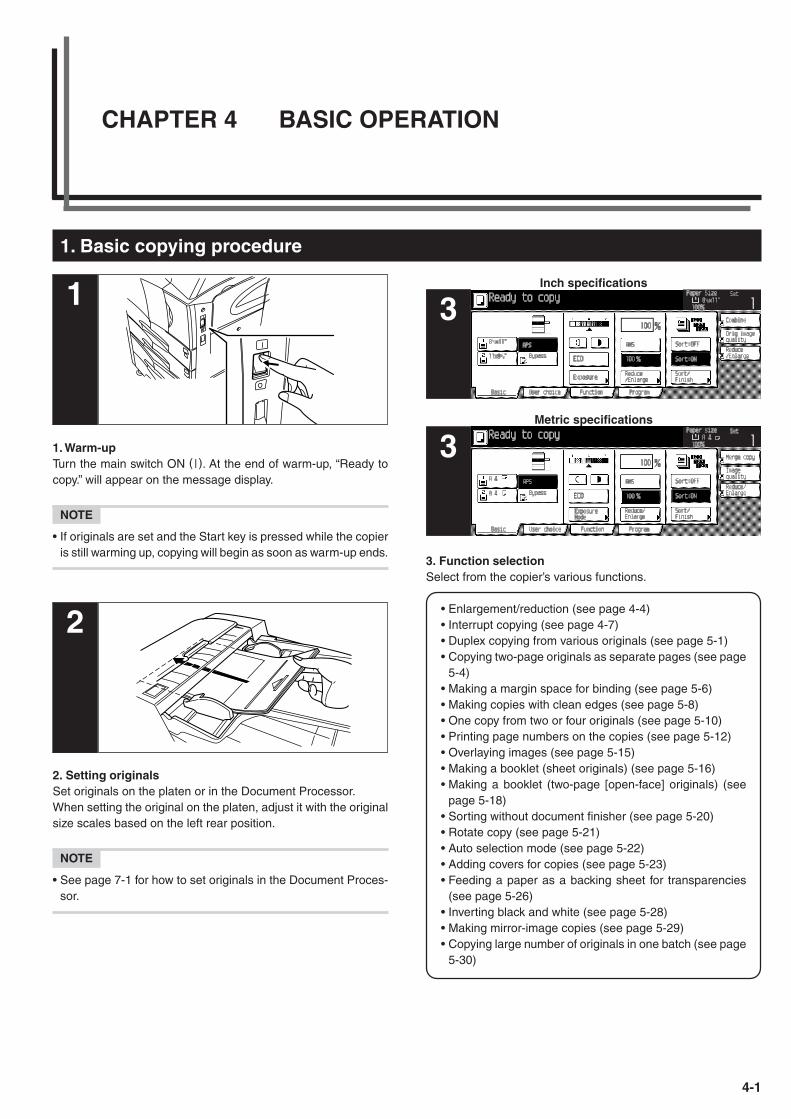
1. Basic copying procedure
1. Warm-upTurn the main switch ON ( | ). At the end of warm-up, “Ready tocopy.” will appear on the message display.
NOTE
• If originals are set and the Start key is pressed while the copieris still warming up, copying will begin as soon as warm-up ends.
2. Setting originalsSet originals on the platen or in the Document Processor.When setting the original on the platen, adjust it with the originalsize scales based on the left rear position.
NOTE
• See page 7-1 for how to set originals in the Document Proces-sor.
2
3Metric specifications
3Inch specifications1
CHAPTER 4 BASIC OPERATION
CHAPTER 4 BASIC OPERATION
4-2
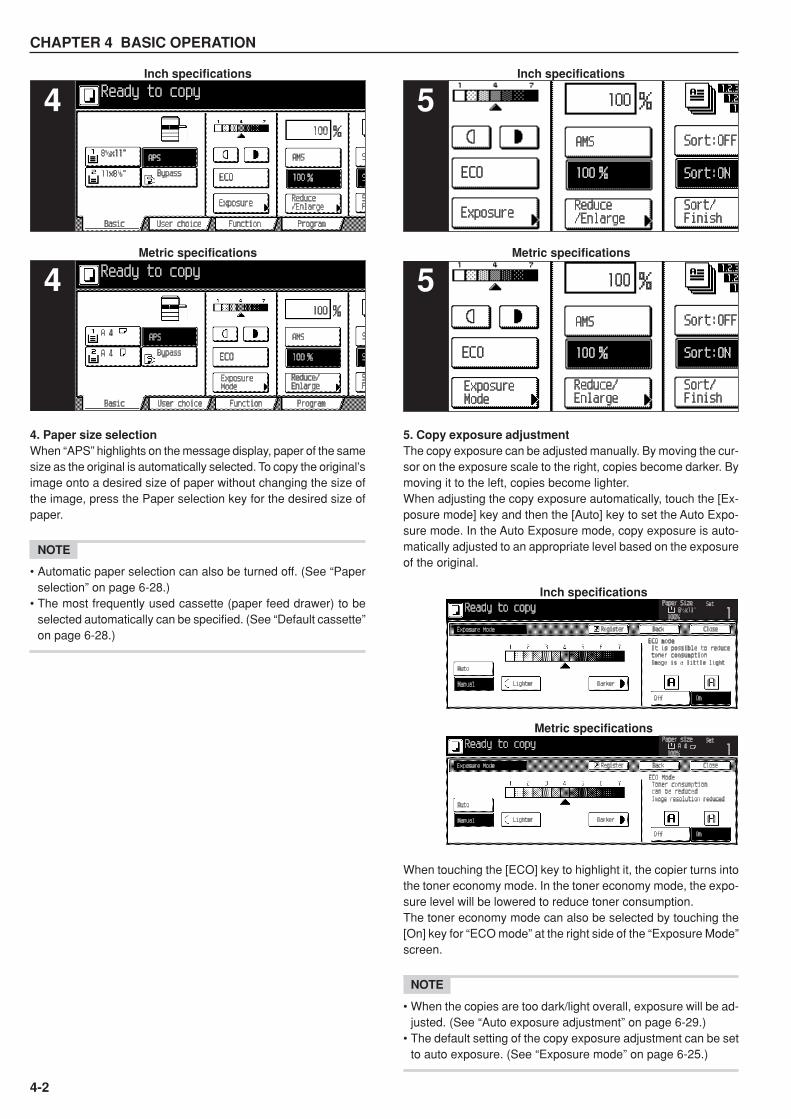
4. Paper size selectionWhen “APS” highlights on the message display, paper of the samesize as the original is automatically selected. To copy the original’simage onto a desired size of paper without changing the size ofthe image, press the Paper selection key for the desired size ofpaper.
NOTE
• Automatic paper selection can also be turned off. (See “Paperselection” on page 6-28.)
• The most frequently used cassette (paper feed drawer) to beselected automatically can be specified. (See “Default cassette”on page 6-28.)
5. Copy exposure adjustmentThe copy exposure can be adjusted manually. By moving the cur-sor on the exposure scale to the right, copies become darker. Bymoving it to the left, copies become lighter.When adjusting the copy exposure automatically, touch the [Ex-posure mode] key and then the [Auto] key to set the Auto Expo-sure mode. In the Auto Exposure mode, copy exposure is auto-matically adjusted to an appropriate level based on the exposureof the original.
When touching the [ECO] key to highlight it, the copier turns intothe toner economy mode. In the toner economy mode, the expo-sure level will be lowered to reduce toner consumption.The toner economy mode can also be selected by touching the[On] key for “ECO mode” at the right side of the “Exposure Mode”screen.
NOTE
• When the copies are too dark/light overall, exposure will be ad-justed. (See “Auto exposure adjustment” on page 6-29.)
• The default setting of the copy exposure adjustment can be setto auto exposure. (See “Exposure mode” on page 6-25.)
4Metric specifications
4Inch specifications
5Metric specifications
5Inch specifications
Metric specifications
Inch specifications

CHAPTER 4 BASIC OPERATION
4-3
7. Setting the number of copiesUse the numeric keys to enter the desired number of copies onthe message display. Up to 999 copies can be set.
NOTE
• It is possible to lower the limit on the number of copies that canbe set at a time. (See “Preset limit” on page 6-33.)
8. Starting copyingPress the [Start] key. If the Start indicator is lit green and “Readyto copy.” is displayed on the message display, copying is pos-sible.
Start
Stop/ Clear
Reset1 2 3
4 5 6
7 8 9
0
6. Copy quality selectionCopy quality is selected according to the original. Touch the [Userchoice] key and [Orig image quality] key to open the “Orig. imagequality” screen.
Text+Photo mode:Touch the [Text+Photo] key to highlight it. Set this mode to copyoriginals with mixed text and photo.Photo mode:Touch the [Photo] key to highlight it. With this mode, a dimentionaleffect of photo is added.Text mode:Touch the [Text] key to highlight it. With this mode, pencil and finelines are clearly copied.
NOTE
• The default copy quality mode used in the initial mode can beselected. (See “Exposure mode” on page 6-25.)
• The copy exposure can be adjusted in all copy quality modes.(See “Manual exposure adjustment (Mixed)” on page 6-30, and“Manual exposure adjustment (Text)” and “Manual exposure ad-justment (Photo)” on page 6-31.)
6Metric specifications
6Inch specifications
Inch specifications
Metric specifications
8
7
7
Metric specifications
Inch specifications
CHAPTER 4 BASIC OPERATION
4-4
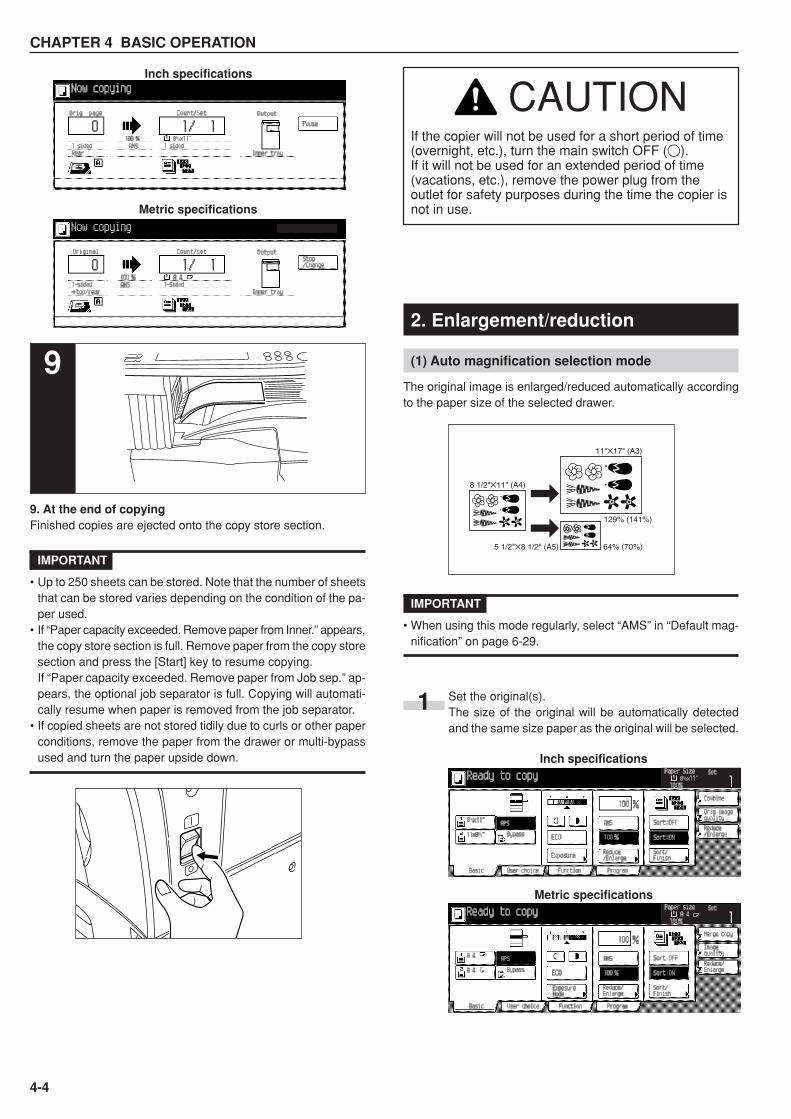
9. At the end of copyingFinished copies are ejected onto the copy store section.
IMPORTANT
• Up to 250 sheets can be stored. Note that the number of sheetsthat can be stored varies depending on the condition of the pa-per used.
• If “Paper capacity exceeded. Remove paper from Inner.” appears,the copy store section is full. Remove paper from the copy storesection and press the [Start] key to resume copying.If “Paper capacity exceeded. Remove paper from Job sep.” ap-pears, the optional job separator is full. Copying will automati-cally resume when paper is removed from the job separator.
• If copied sheets are not stored tidily due to curls or other paperconditions, remove the paper from the drawer or multi-bypassused and turn the paper upside down.
(1) Auto magnification selection mode
The original image is enlarged/reduced automatically accordingto the paper size of the selected drawer.
IMPORTANT
• When using this mode regularly, select “AMS” in “Default mag-nification” on page 6-29.
Set the original(s).The size of the original will be automatically detectedand the same size paper as the original will be selected.
92. Enlargement/reduction
1
64% (70%)5 1/2"✕8 1/2" (A5)
8 1/2"✕11" (A4)
11"✕17" (A3)
129% (141%)
Metric specifications
Inch specifications
Metric specifications
Inch specifications
CAUTIONIf the copier will not be used for a short period of time(overnight, etc.), turn the main switch OFF (�).If it will not be used for an extended period of time(vacations, etc.), remove the power plug from theoutlet for safety purposes during the time the copier isnot in use.
CHAPTER 4 BASIC OPERATION
4-5
(2) Zoom copy mode
The zoom ratio can be set to any 1% increment between 25%and 400% (between 25% and 200% when using the DocumentProcessor).
Set the original(s).
Touch the [Reduce/Enlarge] key. The “Zoom mode”screen will appear.
Touch the [+] key or [–] key to change the displayed mag-nification ratio.The numeric keys can also be used by touching the[# keys] key.
Copying will start when the [Start] key is pressed.
Touch the Paper size key to specify the paper size, andthen touch the [AMS] key. The magnification ratio will bedisplayed.
Copying will start when the [Start] key is pressed.
2
3
12
Inch specifications
Metric specifications
3
4
25%
400%
Metric specifications
Inch specifications

CHAPTER 4 BASIC OPERATION
4-6
(3) Standard zoom mode
Enlargement/reduction copying is possible using the ratios pre-set in the copier.Available ratios in Inch specification
Reduction 25%50%: 11" ✕ 17" ––> 5 1/2" ✕ 8 1/2"64%: 11" ✕ 17" ––> 8 1/2" ✕ 11"77%: 11" ✕ 17" ––> 8 1/2" ✕ 14"78%: 8 1/2" ✕ 14" ––> 8 1/2" ✕ 11"
Enlargement 121%: 8 1/2" ✕ 14" ––> 11" ✕ 17"129%: 8 1/2" ✕ 11" ––> 11" ✕ 17"154%: 5 1/2" ✕ 8 1/2" ––> 8 1/2" ✕ 14"200%: 5 1/2" ✕ 8 1/2" ––> 11" ✕ 17"400%
Available ratios in Metric specificationReduction 25%
50%70%: A3 ––> A4, A4 ––> A575%: 11" ✕ 15"––> A490%: Folio ––> A4
Enlargement 106%: 11" ✕ 15"––> A3127%: Folio ––> A3141%: A4 ––> A3, A5 ––> A4200%: A5 ––> A3400%
Set the original(s).
Touch the [Reduce/Enlarge] key.The “Reduce/Enlarge” screen will appear.
Touch the key corresponding to the desired zoom ratio.
NOTE
• The zoom ratio can be changed in increments of 1% from theselected ratio by pressing the [+] key or [–] key.
Copying will start when the [Start] key is pressed.
1
2Inch specifications
Metric specifications
3
(4) XY zoom mode
It is possible to set the zoom ratio for the length and the width ofthe copy independently. The zoom ratio can be set to any 1%increment between 25% and 400% (between 25% and 200%when using the Document Processor).
Set the originals.
Touch the [Reduce/Enlarge] key.The “Reduce/Enlarge” screen will appear.
Touch the [XY zoom] key.The XY zoom mode set-up screen will appear.
4
2Inch specifications
Metric specifications
1
3Inch specifications
Metric specifications
M M Y %
X %
CHAPTER 4 BASIC OPERATION
4-7
Touch the [+] key or [–] key to set the zoom ratio for thevertical and/or horizontal direction.The numeric keys can also be used by touching the[# keys] key.
Check the direction of the original top side.
Copying will start when the [Start] key is pressed.
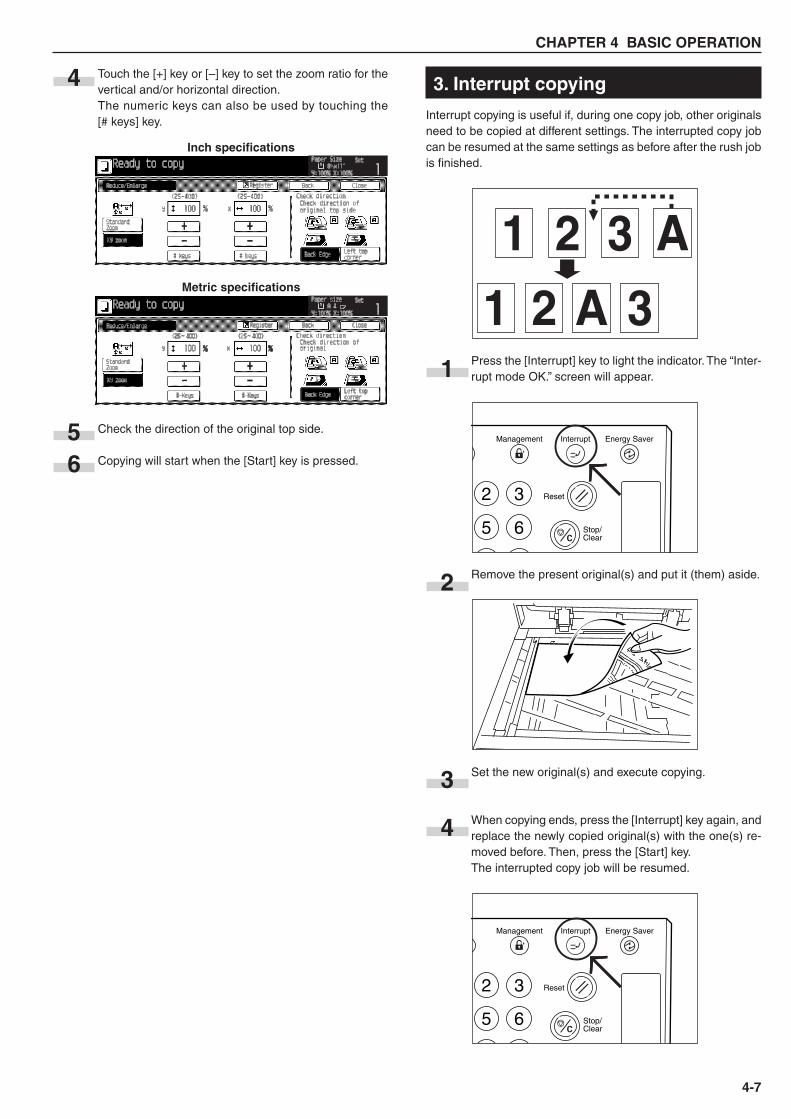
3. Interrupt copying
Interrupt copying is useful if, during one copy job, other originalsneed to be copied at different settings. The interrupted copy jobcan be resumed at the same settings as before after the rush jobis finished.
Press the [Interrupt] key to light the indicator. The “Inter-rupt mode OK.” screen will appear.
Remove the present original(s) and put it (them) aside.
Set the new original(s) and execute copying.
When copying ends, press the [Interrupt] key again, andreplace the newly copied original(s) with the one(s) re-moved before. Then, press the [Start] key.The interrupted copy job will be resumed.
4
5
1
2
3
4
A321
A 321
Stop/ Clear
Reset
InterruptManagement Energy Saver
2 3
5 6
6
Inch specifications
Metric specifications
Stop/ Clear
Reset
InterruptManagement Energy Saver
2 3
5 6
→→→→
CHAPTER 4 BASIC OPERATION
4-8
5. Auto shut-off function
This function automatically turns the main switch OFF (�) if nocopying operation is performed for a certain period (15 to 240minutes). To make copies again, set the main switch to the ON(I ) position.
• Auto shut-off functionThe auto shut-off function is a power saving feature which auto-matically turns the main switch OFF (�) when a certain timeelapses with out copying being performed.Copiers are generally in the standby mode more than operationmode, and power consumption in the standby mode accounts fora large part of overall consumption. Having the copier turn OFF(�) automatically reduces unnecessary power consumption inthe standby mode or at night if the copier is left on. The result is alower electricity bill.
NOTE
• To change the time remaining until the auto shut off functionoperates, see “Auto shut-off time” on page 6-17. To cancel theauto shut-off function, see “Auto shut-off ON/OFF” on page 6-22.
• If the optional printer board or printer/scanner kit is installed inyour copier, the copier will enter the energy-saving preheat modewhenever the auto shut-off function engages. In this state, whenthe copier detects data for a print job, it will automatically re-cover to a print-ready state and printout of the correspondinginformation will begin.
• If the optional fax kit is installed in your copier, the copier will beautomatically turned OFF (�) whenever the auto shut-off func-tion engages. In this state, when the copier receives an incom-ing fax, it will automatically recover to a print-ready state andprintout of the corresponding information will begin.
4. Energy saver (preheat) function
This function turns the machine off to save energy by pressingthe [Energy Saver] (preheat) key, while leaving the main switchturned ON.When this function is activated, the Energy Saver (preheat) indi-cator is the only indicator lit on the operation panel.
To resume copying after the energy saver (preheat) function hasbeen activated, press the [Energy Saver] key again. It will takethe copier about 30 seconds to return to a copy-ready state.
NOTE
• The energy saver (preheat) function will also engage automati-cally in this copier if no operation is performed for a predeter-mined period of time. (See “Auto preheat time” on page 6-17.)
2
45
6
98
7
*0
#
3
1
*Management
Interrupt
Start
Stop/
Clear
Energy Saver
Reset
Energy Saver
5-1
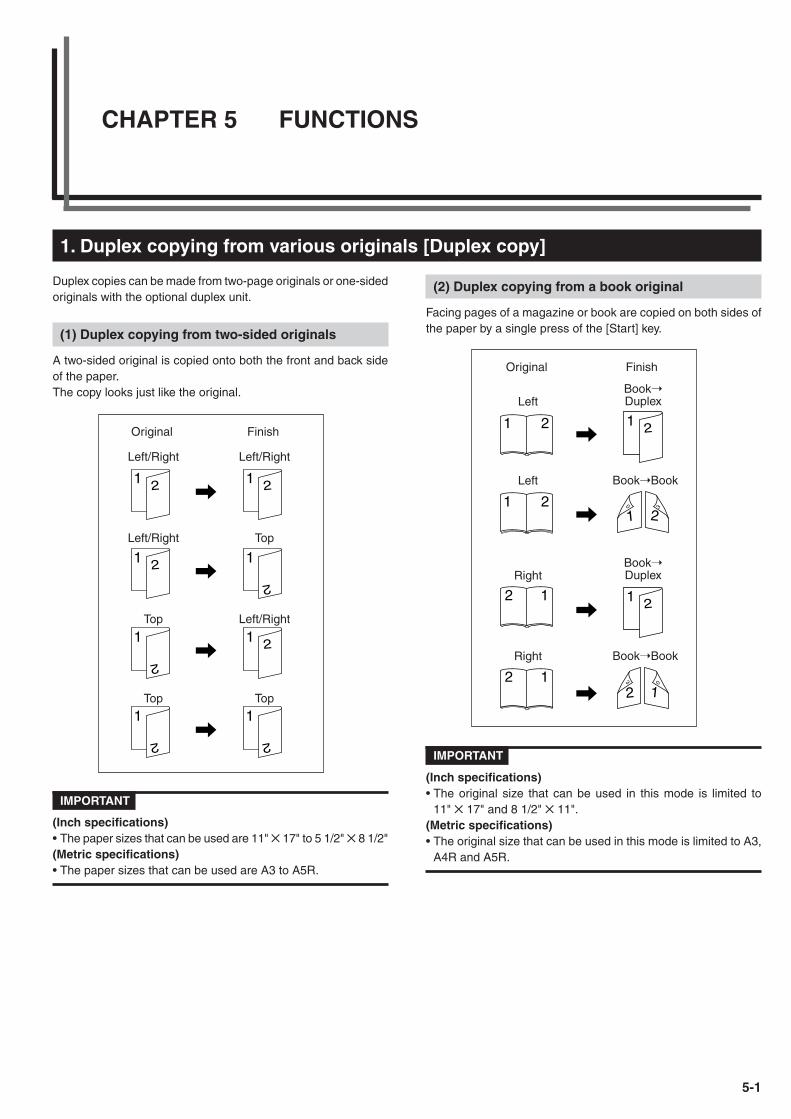
1. Duplex copying from various originals [Duplex copy]
Duplex copies can be made from two-page originals or one-sidedoriginals with the optional duplex unit.
(1) Duplex copying from two-sided originals
A two-sided original is copied onto both the front and back sideof the paper.The copy looks just like the original.
IMPORTANT
(Inch specifications)• The paper sizes that can be used are 11" ✕ 17" to 5 1/2" ✕ 8 1/2"(Metric specifications)• The paper sizes that can be used are A3 to A5R.
(2) Duplex copying from a book original
Facing pages of a magazine or book are copied on both sides ofthe paper by a single press of the [Start] key.
IMPORTANT
(Inch specifications)• The original size that can be used in this mode is limited to
11" ✕ 17" and 8 1/2" ✕ 11".(Metric specifications)• The original size that can be used in this mode is limited to A3,
A4R and A5R.
1 2 1 2
1 2 1
2
1
2
1
2
1
2
1 2
1 2
1 2
0 3
3 0
1 2
1 21 2
2 1
2 1
2 1
Original
Left/Right
Finish
Left/Right
Left/Right Top
Top Left/Right
Top Top
Original
Left
Finish
Book➝Duplex
Left Book➝Book
RightBook➝Duplex
Right Book➝Book
CHAPTER 5 FUNCTIONS
CHAPTER 5 FUNCTIONS
5-2
(3) Duplex copying from one-sided originals
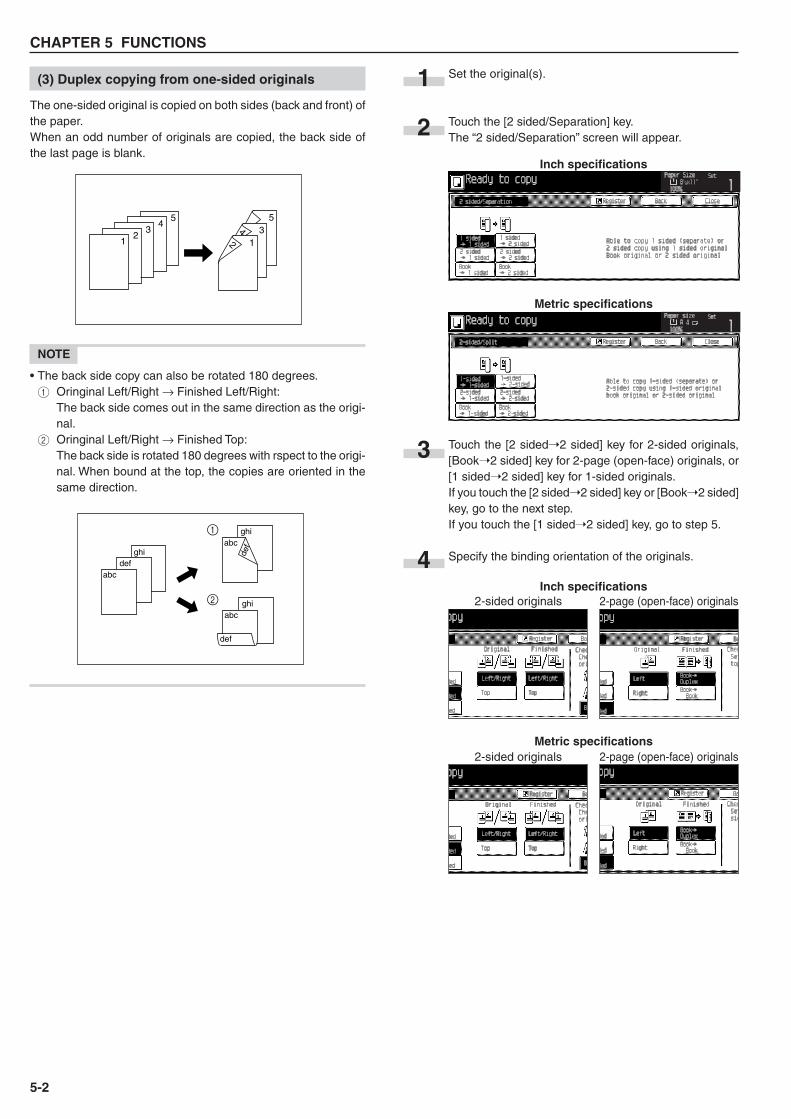
The one-sided original is copied on both sides (back and front) ofthe paper.When an odd number of originals are copied, the back side ofthe last page is blank.
NOTE
• The back side copy can also be rotated 180 degrees.1 Oringinal Left/Right → Finished Left/Right:
The back side comes out in the same direction as the origi-nal.
2 Oringinal Left/Right → Finished Top:The back side is rotated 180 degrees with rspect to the origi-nal. When bound at the top, the copies are oriented in thesame direction.
Set the original(s).
Touch the [2 sided/Separation] key.The “2 sided/Separation” screen will appear.
Touch the [2 sided➝2 sided] key for 2-sided originals,[Book➝2 sided] key for 2-page (open-face) originals, or[1 sided➝2 sided] key for 1-sided originals.If you touch the [2 sided➝2 sided] key or [Book➝2 sided]key, go to the next step.If you touch the [1 sided➝2 sided] key, go to step 5.
Specify the binding orientation of the originals.
2
1
3
Inch specifications
Metric specifications
54
32
1 1234
5
defghi
abc
ghi
ghiabc
def
def
abc
4Inch specifications
Metric specifications
2-sided originals 2-page (open-face) originals
2-sided originals 2-page (open-face) originals
CHAPTER 5 FUNCTIONS
5-3
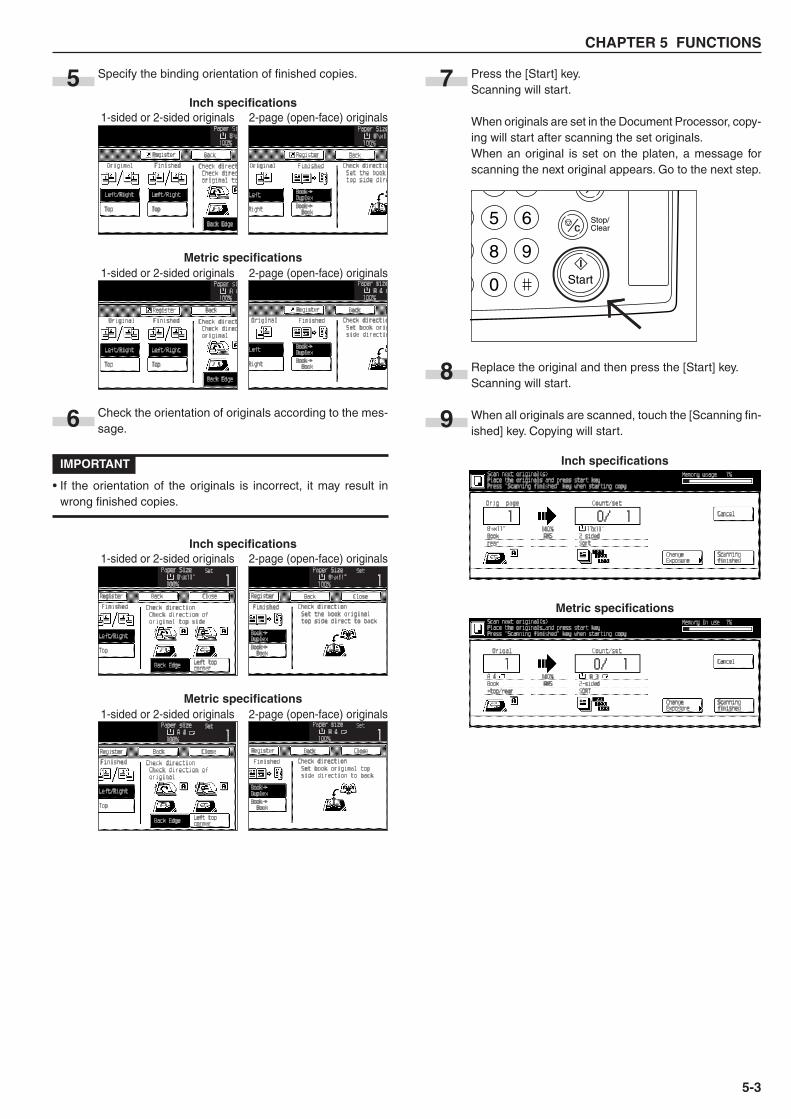
Press the [Start] key.Scanning will start.
When originals are set in the Document Processor, copy-ing will start after scanning the set originals.When an original is set on the platen, a message forscanning the next original appears. Go to the next step.
Replace the original and then press the [Start] key.Scanning will start.
When all originals are scanned, touch the [Scanning fin-ished] key. Copying will start.
Specify the binding orientation of finished copies.
Check the orientation of originals according to the mes-sage.
IMPORTANT
• If the orientation of the originals is incorrect, it may result inwrong finished copies.
5
6
7
8
Start
Stop/ Clear
5 6
8 9
0
Inch specifications
Metric specifications
1-sided or 2-sided originals 2-page (open-face) originals
1-sided or 2-sided originals 2-page (open-face) originals
Inch specifications
Metric specifications
1-sided or 2-sided originals 2-page (open-face) originals
1-sided or 2-sided originals 2-page (open-face) originals
9
Metric specifications
Inch specifications
→→
CHAPTER 5 FUNCTIONS
5-4
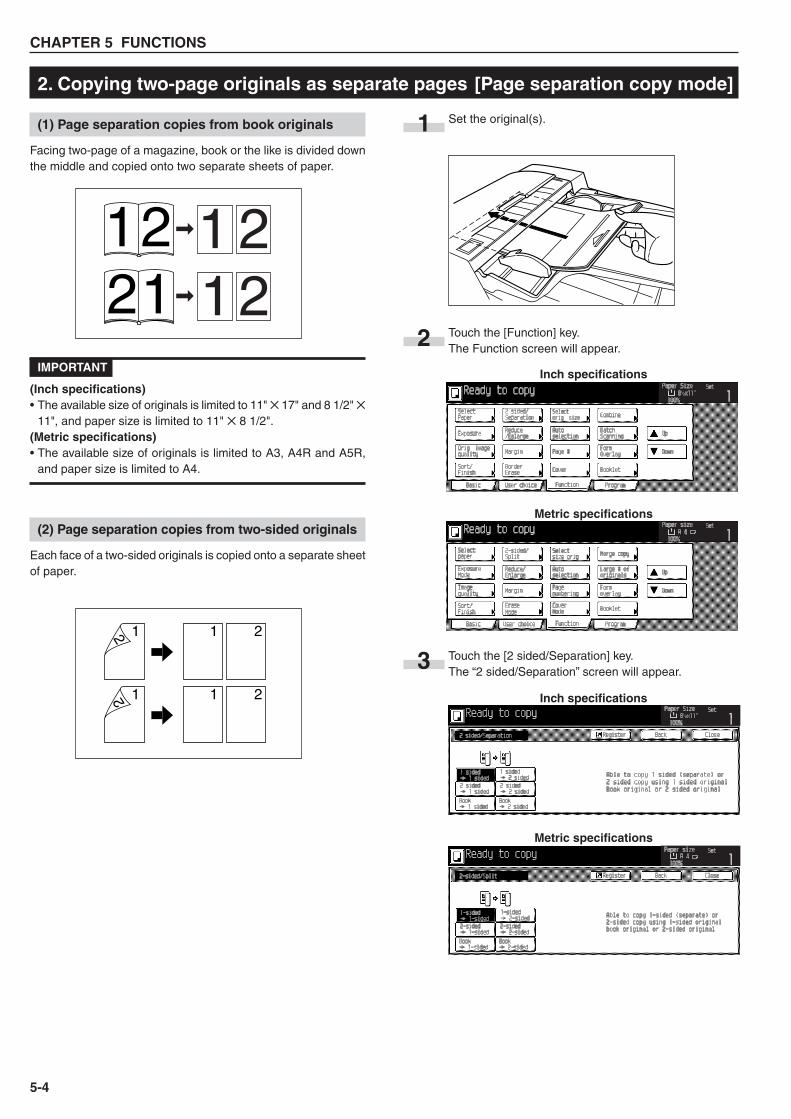
2. Copying two-page originals as separate pages [Page separation copy mode]
Set the original(s).
Touch the [Function] key.The Function screen will appear.
Touch the [2 sided/Separation] key.The “2 sided/Separation” screen will appear.
(1) Page separation copies from book originals
Facing two-page of a magazine, book or the like is divided downthe middle and copied onto two separate sheets of paper.
IMPORTANT
(Inch specifications)• The available size of originals is limited to 11" ✕ 17" and 8 1/2" ✕
11", and paper size is limited to 11" ✕ 8 1/2".(Metric specifications)• The available size of originals is limited to A3, A4R and A5R,
and paper size is limited to A4.
(2) Page separation copies from two-sided originals
Each face of a two-sided originals is copied onto a separate sheetof paper.
1
2
3
Inch specifications
Metric specifications
Inch specifications
Metric specifications
12 1 2
12 1 2
1 2121221
CHAPTER 5 FUNCTIONS
5-5
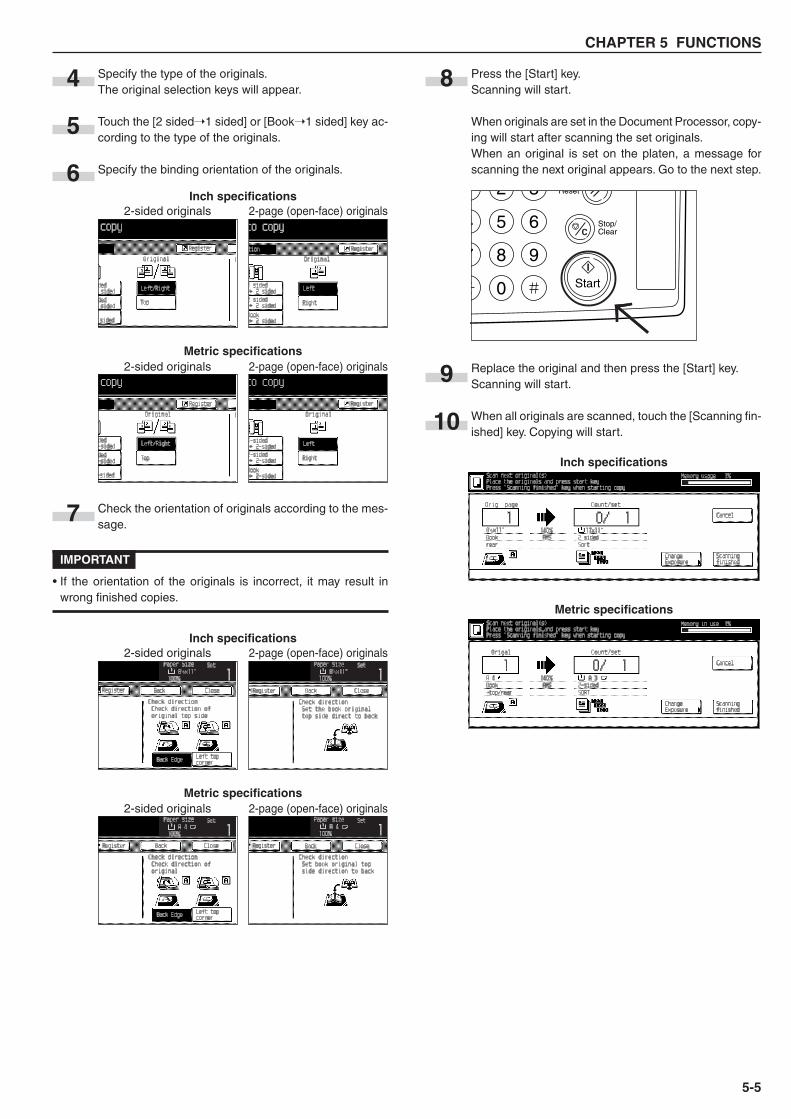
Press the [Start] key.Scanning will start.
When originals are set in the Document Processor, copy-ing will start after scanning the set originals.When an original is set on the platen, a message forscanning the next original appears. Go to the next step.
Replace the original and then press the [Start] key.Scanning will start.
When all originals are scanned, touch the [Scanning fin-ished] key. Copying will start.
Specify the type of the originals.The original selection keys will appear.
Touch the [2 sided➝1 sided] or [Book➝1 sided] key ac-cording to the type of the originals.
Specify the binding orientation of the originals.
Check the orientation of originals according to the mes-sage.
IMPORTANT
• If the orientation of the originals is incorrect, it may result inwrong finished copies.
4 8
7
5
6Inch specifications
Metric specifications
2-sided originals 2-page (open-face) originals
2-sided originals 2-page (open-face) originals 9
10
Start
Stop/ Clear
Reset2 3
4 5 6
7 8 9
0 →→
Inch specifications
Metric specifications
2-sided originals 2-page (open-face) originals
2-sided originals 2-page (open-face) originals
Metric specifications
Inch specifications
CHAPTER 5 FUNCTIONS
5-6
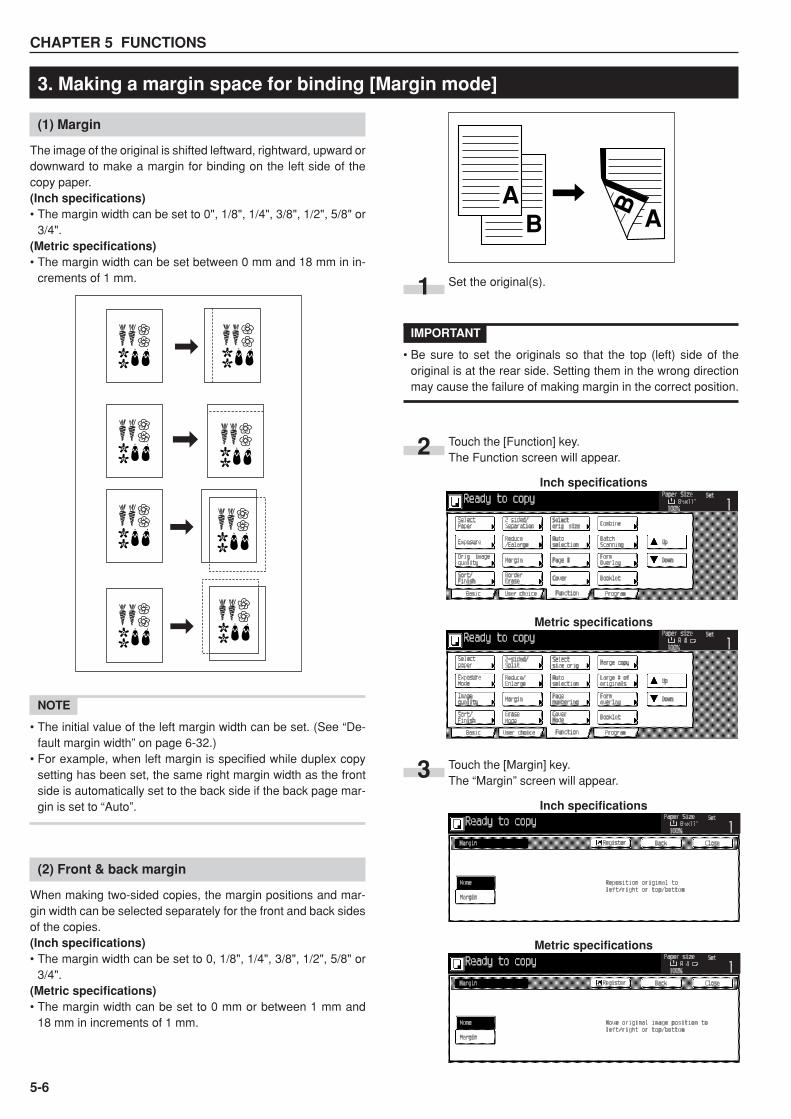
(1) Margin
The image of the original is shifted leftward, rightward, upward ordownward to make a margin for binding on the left side of thecopy paper.(Inch specifications)• The margin width can be set to 0", 1/8", 1/4", 3/8", 1/2", 5/8" or
3/4".(Metric specifications)• The margin width can be set between 0 mm and 18 mm in in-
crements of 1 mm.
NOTE
• The initial value of the left margin width can be set. (See “De-fault margin width” on page 6-32.)
• For example, when left margin is specified while duplex copysetting has been set, the same right margin width as the frontside is automatically set to the back side if the back page mar-gin is set to “Auto”.
(2) Front & back margin
When making two-sided copies, the margin positions and mar-gin width can be selected separately for the front and back sidesof the copies.(Inch specifications)• The margin width can be set to 0, 1/8", 1/4", 3/8", 1/2", 5/8" or
3/4".(Metric specifications)• The margin width can be set to 0 mm or between 1 mm and
18 mm in increments of 1 mm.
Set the original(s).
IMPORTANT
• Be sure to set the originals so that the top (left) side of theoriginal is at the rear side. Setting them in the wrong directionmay cause the failure of making margin in the correct position.
Touch the [Function] key.The Function screen will appear.
Touch the [Margin] key.The “Margin” screen will appear.
3. Making a margin space for binding [Margin mode]
1
2Inch specifications
Metric specifications
Inch specifications
Metric specifications
3
AA B
B
CHAPTER 5 FUNCTIONS
5-7
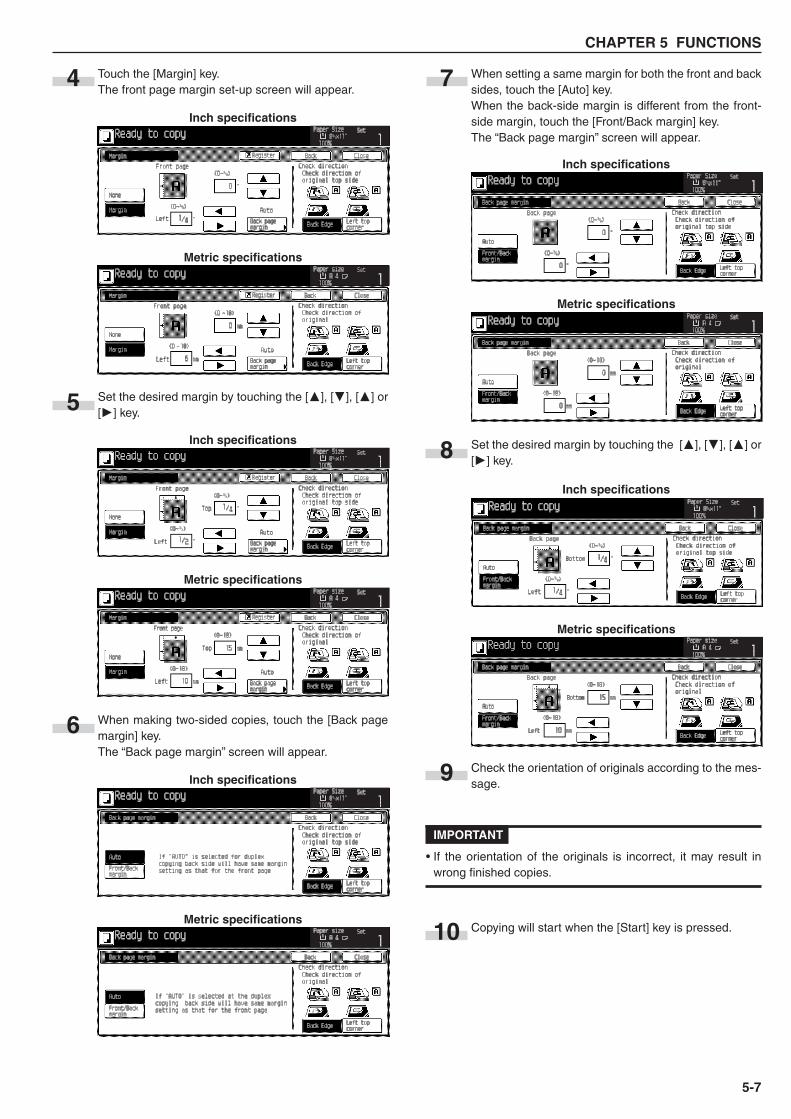
Touch the [Margin] key.The front page margin set-up screen will appear.
Set the desired margin by touching the [�], [�], [�] or[�] key.
When making two-sided copies, touch the [Back pagemargin] key.The “Back page margin” screen will appear.
When setting a same margin for both the front and backsides, touch the [Auto] key.When the back-side margin is different from the front-side margin, touch the [Front/Back margin] key.The “Back page margin” screen will appear.
Set the desired margin by touching the [�], [�], [�] or[�] key.
Check the orientation of originals according to the mes-sage.
IMPORTANT
• If the orientation of the originals is incorrect, it may result inwrong finished copies.
Copying will start when the [Start] key is pressed.
Inch specifications
Metric specifications
4
Inch specifications
Metric specifications
5
Inch specifications
Metric specifications
6
Inch specifications
Metric specifications
7
Inch specifications
Metric specifications
8
9
10
CHAPTER 5 FUNCTIONS
5-8
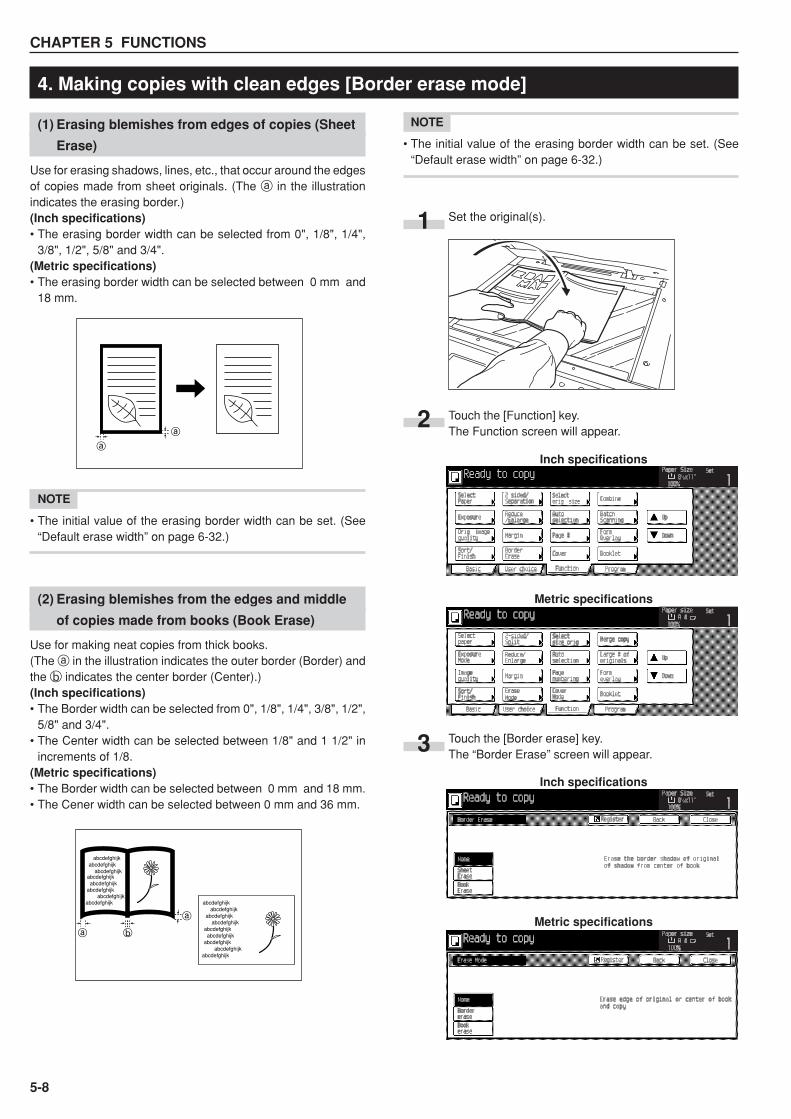
(1) Erasing blemishes from edges of copies (Sheet
Erase)
Use for erasing shadows, lines, etc., that occur around the edgesof copies made from sheet originals. (The a in the illustrationindicates the erasing border.)(Inch specifications)• The erasing border width can be selected from 0", 1/8", 1/4",
3/8", 1/2", 5/8" and 3/4".(Metric specifications)• The erasing border width can be selected between 0 mm and
18 mm.
NOTE
• The initial value of the erasing border width can be set. (See“Default erase width” on page 6-32.)
(2) Erasing blemishes from the edges and middle
of copies made from books (Book Erase)
Use for making neat copies from thick books.(The a in the illustration indicates the outer border (Border) andthe b indicates the center border (Center).)(Inch specifications)• The Border width can be selected from 0", 1/8", 1/4", 3/8", 1/2",
5/8" and 3/4".• The Center width can be selected between 1/8" and 1 1/2" in
increments of 1/8.(Metric specifications)• The Border width can be selected between 0 mm and 18 mm.• The Cener width can be selected between 0 mm and 36 mm.
NOTE
• The initial value of the erasing border width can be set. (See“Default erase width” on page 6-32.)
Set the original(s).
Touch the [Function] key.The Function screen will appear.
Touch the [Border erase] key.The “Border Erase” screen will appear.
4. Making copies with clean edges [Border erase mode]
1
2
Inch specifications
Metric specifications
3Inch specifications
Metric specifications
a
a
abcdefghijkabcdefghijk
abcdefghijkabcdefghijk
abcdefghijkabcdefghijk
abcdefghijkabcdefghijk
abcdefghijk
abcdefghijkabcdefghijk
abcdefghijkabcdefghijkabcdefghijk
abcdefghijkabcdefghijk
abcdefghijk
a
ba
CHAPTER 5 FUNCTIONS
5-9
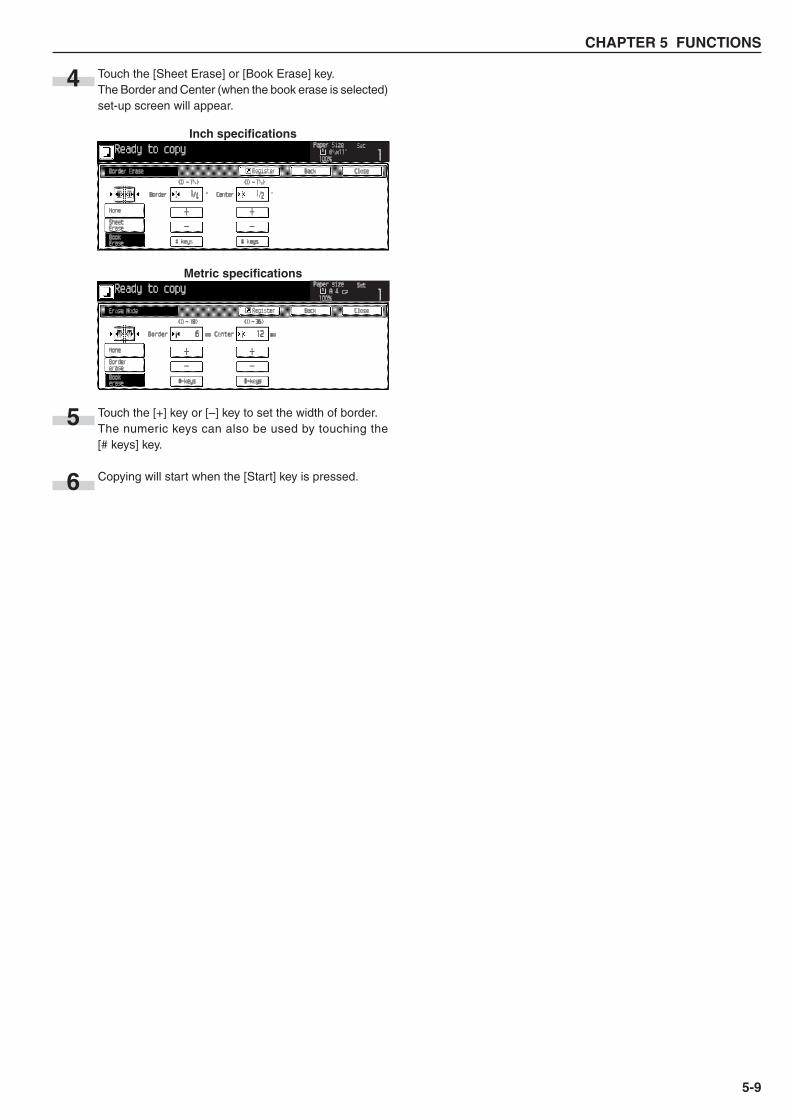
Touch the [Sheet Erase] or [Book Erase] key.The Border and Center (when the book erase is selected)set-up screen will appear.
Touch the [+] key or [–] key to set the width of border.The numeric keys can also be used by touching the[# keys] key.
Copying will start when the [Start] key is pressed.
4
Inch specifications
Metric specifications
5
6
CHAPTER 5 FUNCTIONS
5-10
2 or 4 originals can be combined into a single copy.The borderline of each original can also be marked with a solidline or dotted line.
NOTE
• The original and copy paper must be the standard size.
(1) 2 in 1
Use this mode to copy two originals onto one sheet. It can beused in conjunction with the duplex copy mode to copy four origi-nals onto one sheet, though this will require the optional duplexunit.(When setting the originals on the platen, originals are arrangedin the order from 1 to 2.)
(2) 4 in 1
Use this mode to copy four originals onto one sheet. It can beused in conjunction with the duplex copy mode to copy eight origi-nals onto one sheet, though this will require the optional duplexunit.(When setting originals on the platen, originals are arranged inthe order from 1,2,3 and 4.)
5. One copy from two or four originals [Layout copy]
21
1 2
2 1
1
2
2
1
43
21
1
3
2
4
2
4
1
3
1
2
3
4
3
4
1
2
CHAPTER 5 FUNCTIONS
5-11
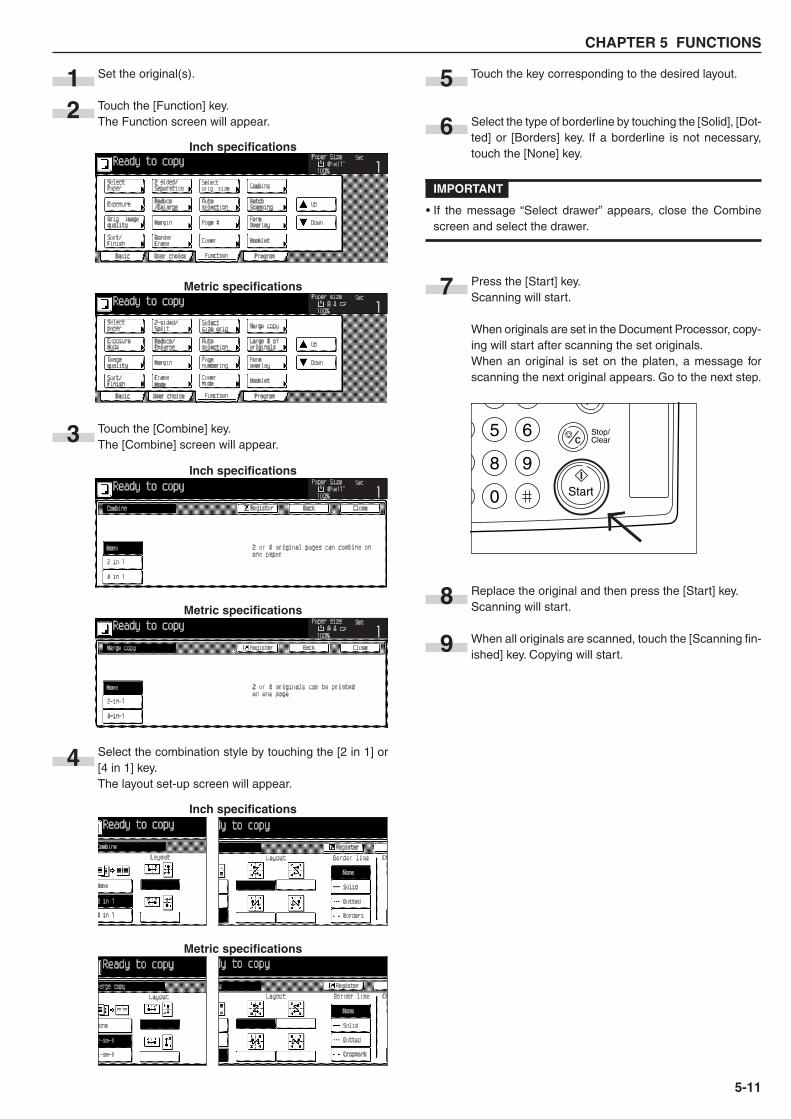
Set the original(s).
Touch the [Function] key.The Function screen will appear.
Touch the [Combine] key.The [Combine] screen will appear.
Select the combination style by touching the [2 in 1] or[4 in 1] key.The layout set-up screen will appear.
1
Inch specifications
Metric specifications
3Inch specifications
Metric specifications
4
Inch specifications
Metric specifications
5
6
7
8
9
Start
Stop/ Clear
5 6
8 9
0
2
Touch the key corresponding to the desired layout.
Select the type of borderline by touching the [Solid], [Dot-ted] or [Borders] key. If a borderline is not necessary,touch the [None] key.
IMPORTANT
• If the message “Select drawer” appears, close the Combinescreen and select the drawer.
Press the [Start] key.Scanning will start.
When originals are set in the Document Processor, copy-ing will start after scanning the set originals.When an original is set on the platen, a message forscanning the next original appears. Go to the next step.
Replace the original and then press the [Start] key.Scanning will start.
When all originals are scanned, touch the [Scanning fin-ished] key. Copying will start.
→→
CHAPTER 5 FUNCTIONS
5-12
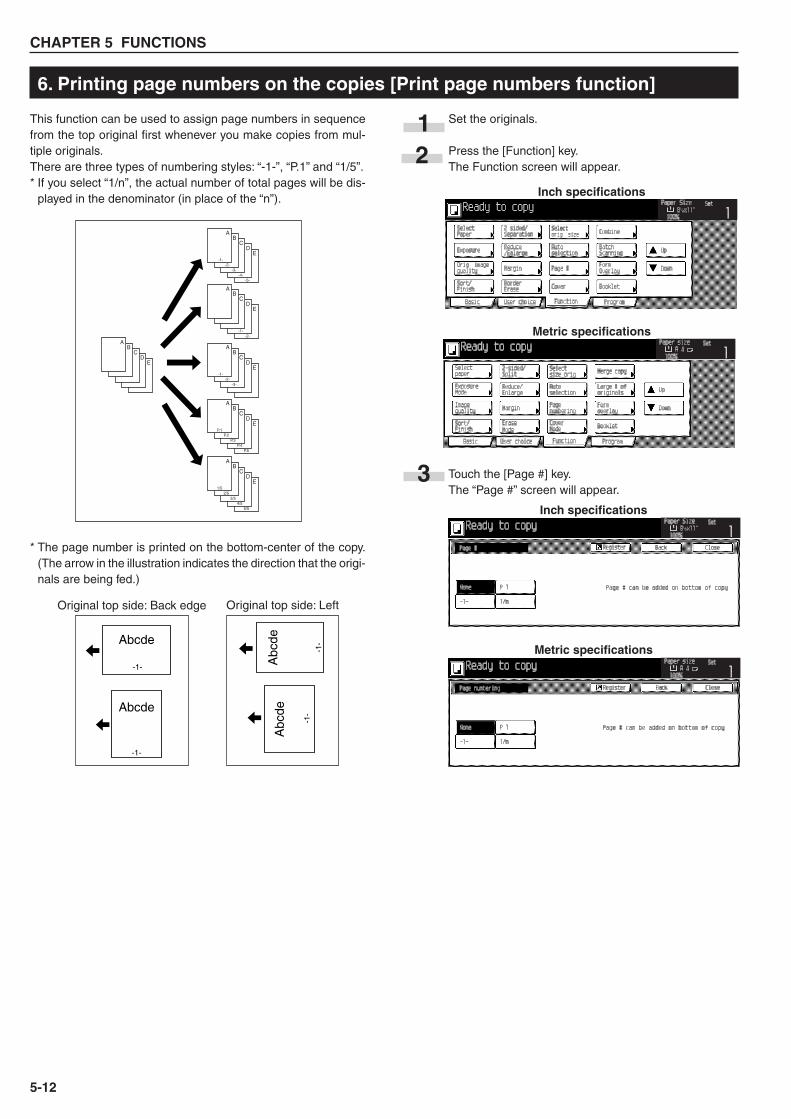
This function can be used to assign page numbers in sequencefrom the top original first whenever you make copies from mul-tiple originals.There are three types of numbering styles: “-1-”, “P.1” and “1/5”.* If you select “1/n”, the actual number of total pages will be dis-
played in the denominator (in place of the “n”).
* The page number is printed on the bottom-center of the copy.(The arrow in the illustration indicates the direction that the origi-nals are being fed.)
Set the originals.
Press the [Function] key.The Function screen will appear.
Touch the [Page #] key.The “Page #” screen will appear.
6. Printing page numbers on the copies [Print page numbers function]
12
Inch specifications
Metric specifications
3Inch specifications
Metric specifications
E
-5-
D
-4-
C
-3-
B
-2-
A
-1-
E
-2-
D
-1-
CB
A
ED
C
-3-
B
-2-
A
-1-
E
P.5
D
P.4
C
P.3
B
P.2
A
P.1
E
5/5
D
4/5
C
3/5
B
2/5
A
1/5
ED
CB
A
Abcde
-1-
Abcde
-1-
Original top side: Back edge Original top side: Left
Abc
de
-1-
Abc
de
-1-
CHAPTER 5 FUNCTIONS
5-13
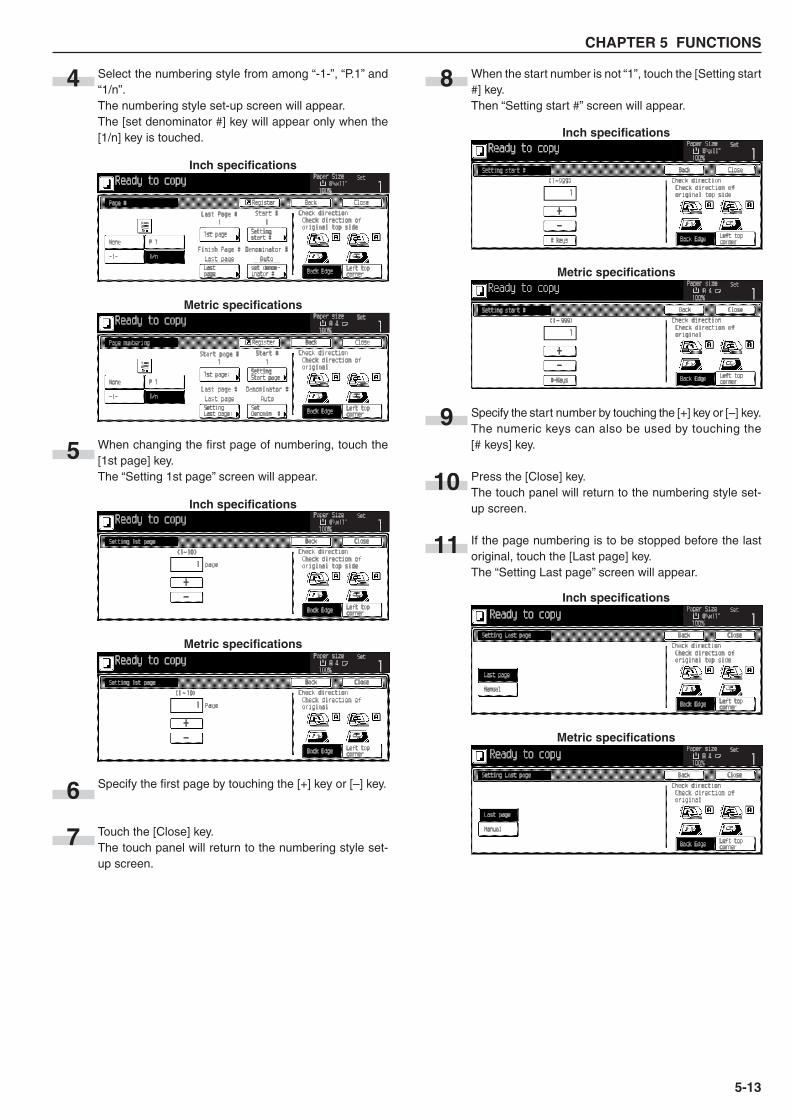
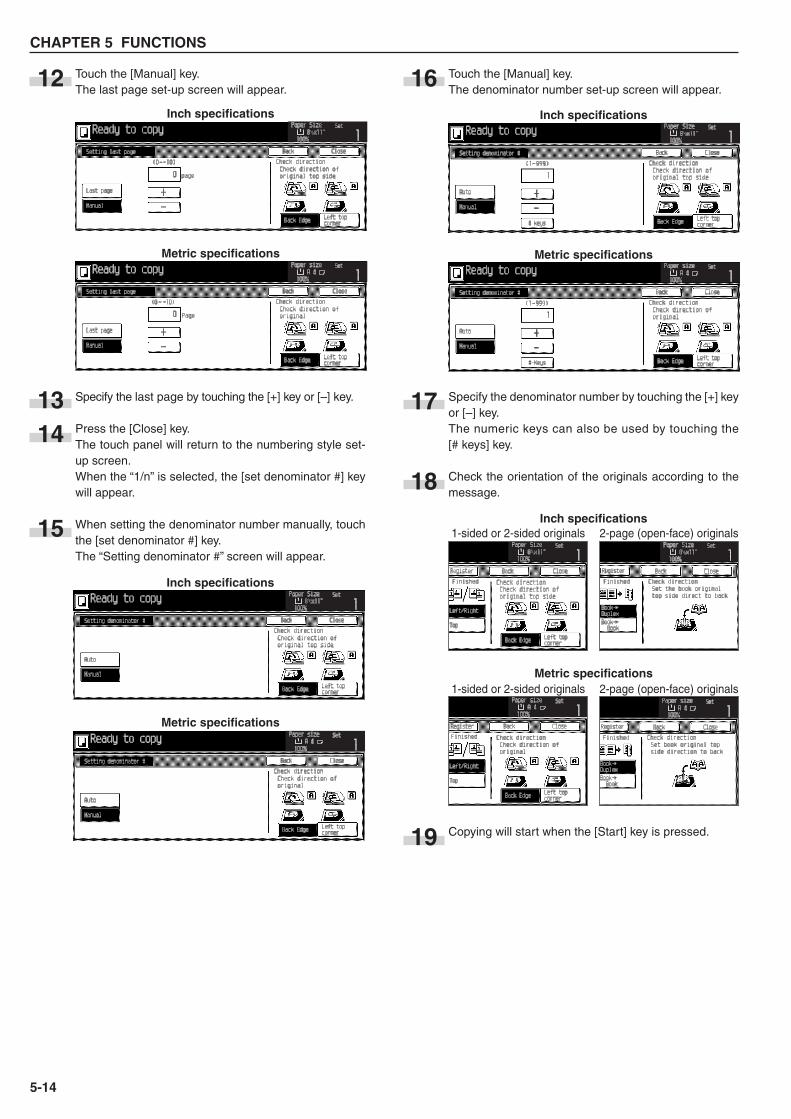
Select the numbering style from among “-1-”, “P.1” and“1/n”.The numbering style set-up screen will appear.The [set denominator #] key will appear only when the[1/n] key is touched.
When changing the first page of numbering, touch the[1st page] key.The “Setting 1st page” screen will appear.
Specify the first page by touching the [+] key or [–] key.
Touch the [Close] key.The touch panel will return to the numbering style set-up screen.
5
When the start number is not “1”, touch the [Setting start#] key.Then “Setting start #” screen will appear.
Specify the start number by touching the [+] key or [–] key.The numeric keys can also be used by touching the[# keys] key.
Press the [Close] key.The touch panel will return to the numbering style set-up screen.
If the page numbering is to be stopped before the lastoriginal, touch the [Last page] key.The “Setting Last page” screen will appear.
6
7
8
Inch specifications
Metric specifications
9
10
11
4
Inch specifications
Metric specifications
Metric specifications
Inch specifications
Inch specifications
Metric specifications
CHAPTER 5 FUNCTIONS
5-14
Touch the [Manual] key.The denominator number set-up screen will appear.
Specify the denominator number by touching the [+] keyor [–] key.The numeric keys can also be used by touching the[# keys] key.
Check the orientation of the originals according to themessage.
Copying will start when the [Start] key is pressed.
Touch the [Manual] key.The last page set-up screen will appear.
Specify the last page by touching the [+] key or [–] key.
Press the [Close] key.The touch panel will return to the numbering style set-up screen.When the “1/n” is selected, the [set denominator #] keywill appear.
When setting the denominator number manually, touchthe [set denominator #] key.The “Setting denominator #” screen will appear.
16Inch specifications
Metric specifications
17
18
1314
15
Inch specifications
Metric specifications
Inch specifications
Metric specifications
1-sided or 2-sided originals 2-page (open-face) originals
1-sided or 2-sided originals 2-page (open-face) originals
19
12Inch specifications
Metric specifications
CHAPTER 5 FUNCTIONS
5-15
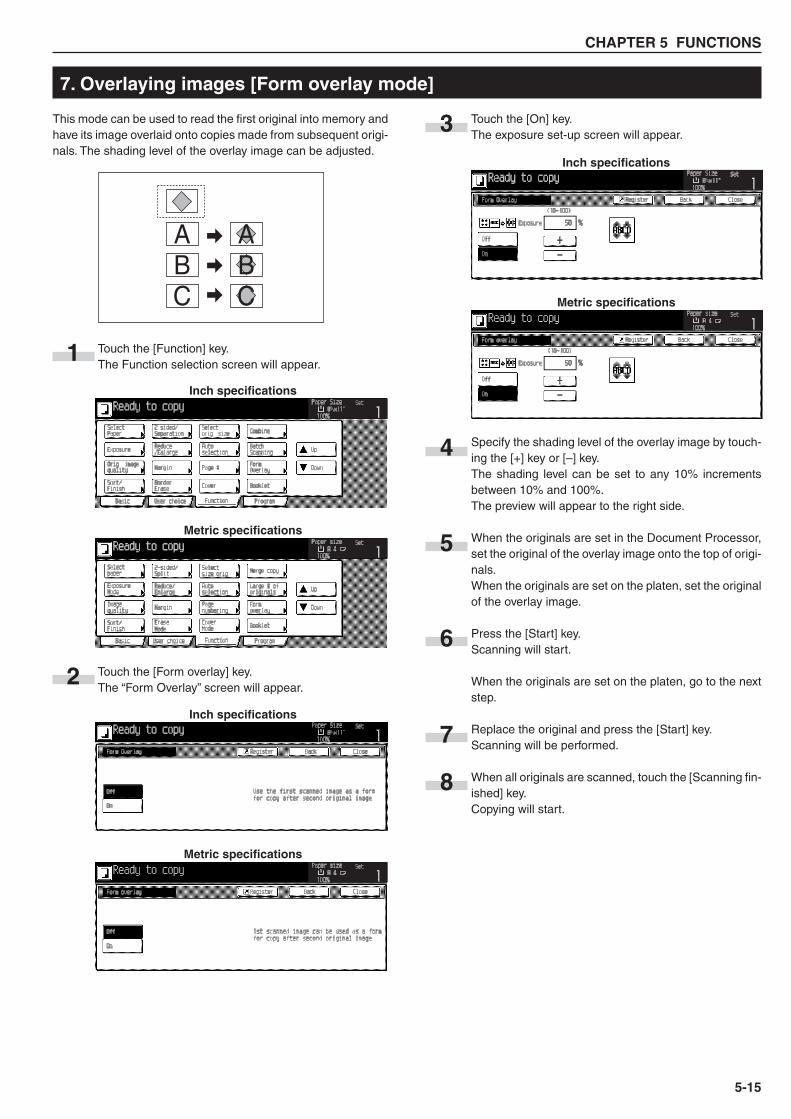
This mode can be used to read the first original into memory andhave its image overlaid onto copies made from subsequent origi-nals. The shading level of the overlay image can be adjusted.
Touch the [Function] key.The Function selection screen will appear.
Touch the [Form overlay] key.The “Form Overlay” screen will appear.
Touch the [On] key.The exposure set-up screen will appear.
Specify the shading level of the overlay image by touch-ing the [+] key or [–] key.The shading level can be set to any 10% incrementsbetween 10% and 100%.The preview will appear to the right side.
When the originals are set in the Document Processor,set the original of the overlay image onto the top of origi-nals.When the originals are set on the platen, set the originalof the overlay image.
Press the [Start] key.Scanning will start.
When the originals are set on the platen, go to the nextstep.
Replace the original and press the [Start] key.Scanning will be performed.
When all originals are scanned, touch the [Scanning fin-ished] key.Copying will start.
7. Overlaying images [Form overlay mode]
1Inch specifications
Metric specifications
2Inch specifications
Metric specifications
3Inch specifications
Metric specifications
4
6
7
8
ABC
BC
A
5
CHAPTER 5 FUNCTIONS
5-16
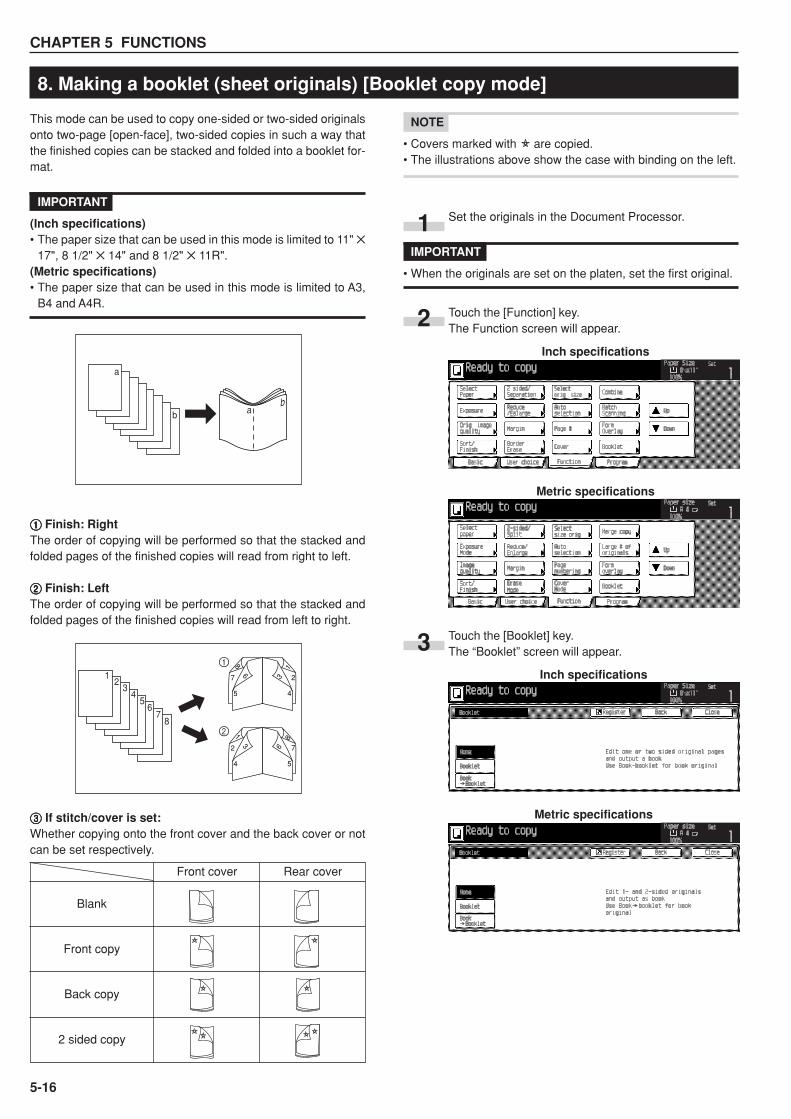
8. Making a booklet (sheet originals) [Booklet copy mode]
This mode can be used to copy one-sided or two-sided originalsonto two-page [open-face], two-sided copies in such a way thatthe finished copies can be stacked and folded into a booklet for-mat.
IMPORTANT
(Inch specifications)• The paper size that can be used in this mode is limited to 11" ✕
17", 8 1/2" ✕ 14" and 8 1/2" ✕ 11R".(Metric specifications)• The paper size that can be used in this mode is limited to A3,
B4 and A4R.
11111 Finish: RightThe order of copying will be performed so that the stacked andfolded pages of the finished copies will read from right to left.
22222 Finish: LeftThe order of copying will be performed so that the stacked andfolded pages of the finished copies will read from left to right.
33333 If stitch/cover is set:Whether copying onto the front cover and the back cover or notcan be set respectively.
NOTE
• Covers marked with are copied.• The illustrations above show the case with binding on the left.
Set the originals in the Document Processor.
IMPORTANT
• When the originals are set on the platen, set the first original.
Touch the [Function] key.The Function screen will appear.
Touch the [Booklet] key.The “Booklet” screen will appear.
1
3
2
bb
a
a
87
65
43
21 7
86
5
231
4
2
13
4
768
5
1
2
Inch specifications
Metric specifications
Inch specifications
Metric specifications
Blank
Front copy
Back copy
2 sided copy
Front cover Rear cover
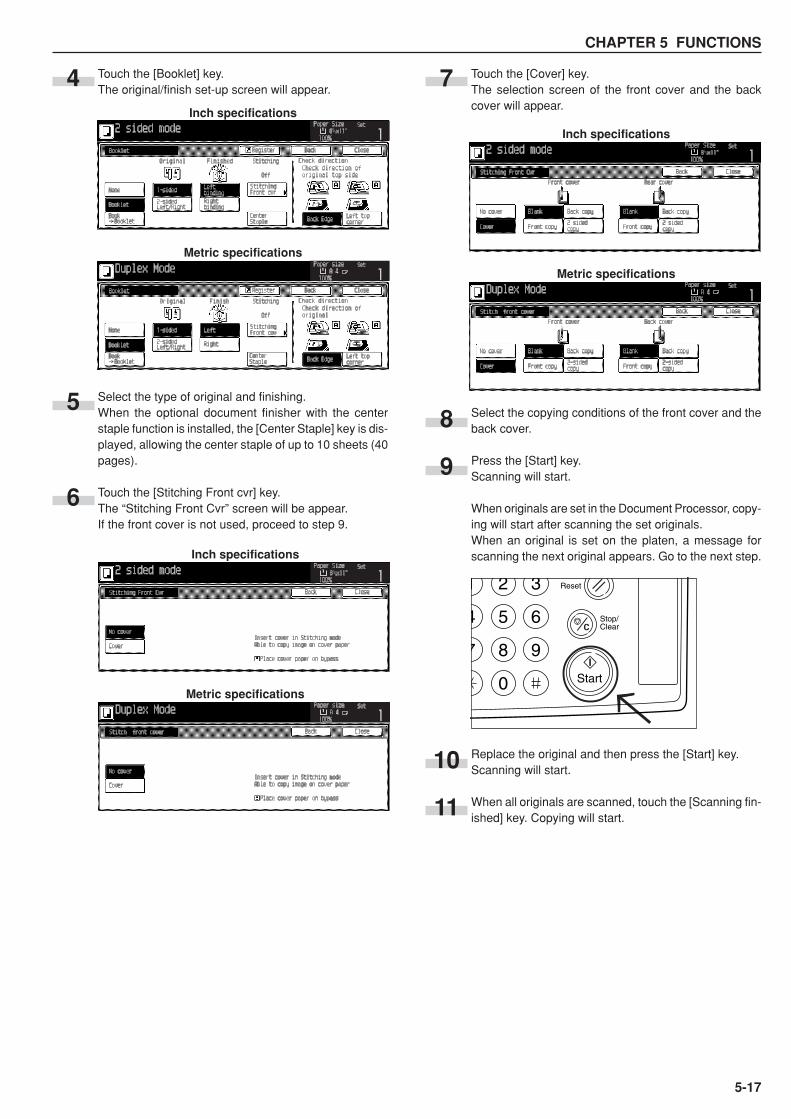
CHAPTER 5 FUNCTIONS
5-17
Touch the [Cover] key.The selection screen of the front cover and the backcover will appear.
Select the copying conditions of the front cover and theback cover.
Press the [Start] key.Scanning will start.
When originals are set in the Document Processor, copy-ing will start after scanning the set originals.When an original is set on the platen, a message forscanning the next original appears. Go to the next step.
Replace the original and then press the [Start] key.Scanning will start.
When all originals are scanned, touch the [Scanning fin-ished] key. Copying will start.
Touch the [Booklet] key.The original/finish set-up screen will appear.
Select the type of original and finishing.When the optional document finisher with the centerstaple function is installed, the [Center Staple] key is dis-played, allowing the center staple of up to 10 sheets (40pages).
Touch the [Stitching Front cvr] key.The “Stitching Front Cvr” screen will be appear.If the front cover is not used, proceed to step 9.
6
7
5
4
8
Start
Stop/ Clear
Reset1 2 3
4 5 6
7 8 9
0
Inch specifications
Metric specifications
Inch specifications
Metric specifications
9
10
11
Inch specifications
Metric specifications
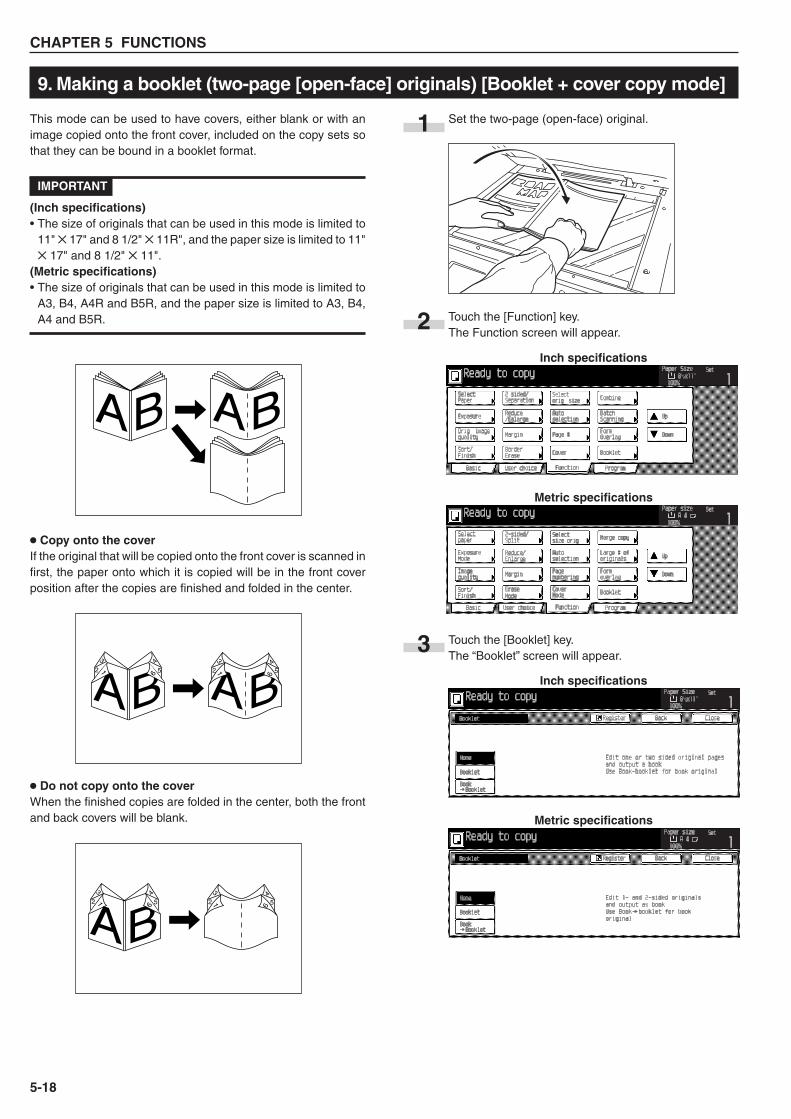
CHAPTER 5 FUNCTIONS
5-18
This mode can be used to have covers, either blank or with animage copied onto the front cover, included on the copy sets sothat they can be bound in a booklet format.
IMPORTANT
(Inch specifications)• The size of originals that can be used in this mode is limited to
11" ✕ 17" and 8 1/2" ✕ 11R", and the paper size is limited to 11"✕ 17" and 8 1/2" ✕ 11".
(Metric specifications)• The size of originals that can be used in this mode is limited to
A3, B4, A4R and B5R, and the paper size is limited to A3, B4,A4 and B5R.
• Copy onto the coverIf the original that will be copied onto the front cover is scanned infirst, the paper onto which it is copied will be in the front coverposition after the copies are finished and folded in the center.
• Do not copy onto the coverWhen the finished copies are folded in the center, both the frontand back covers will be blank.
9. Making a booklet (two-page [open-face] originals) [Booklet + cover copy mode]
Set the two-page (open-face) original.
Touch the [Function] key.The Function screen will appear.
Touch the [Booklet] key.The “Booklet” screen will appear.
1
Inch specifications
Metric specifications
3Inch specifications
Metric specifications
BA2
B A3
1 5
46 612
3
5
4
2
3
1 5
4
612
3
5
4
AB
6
BA BA
2
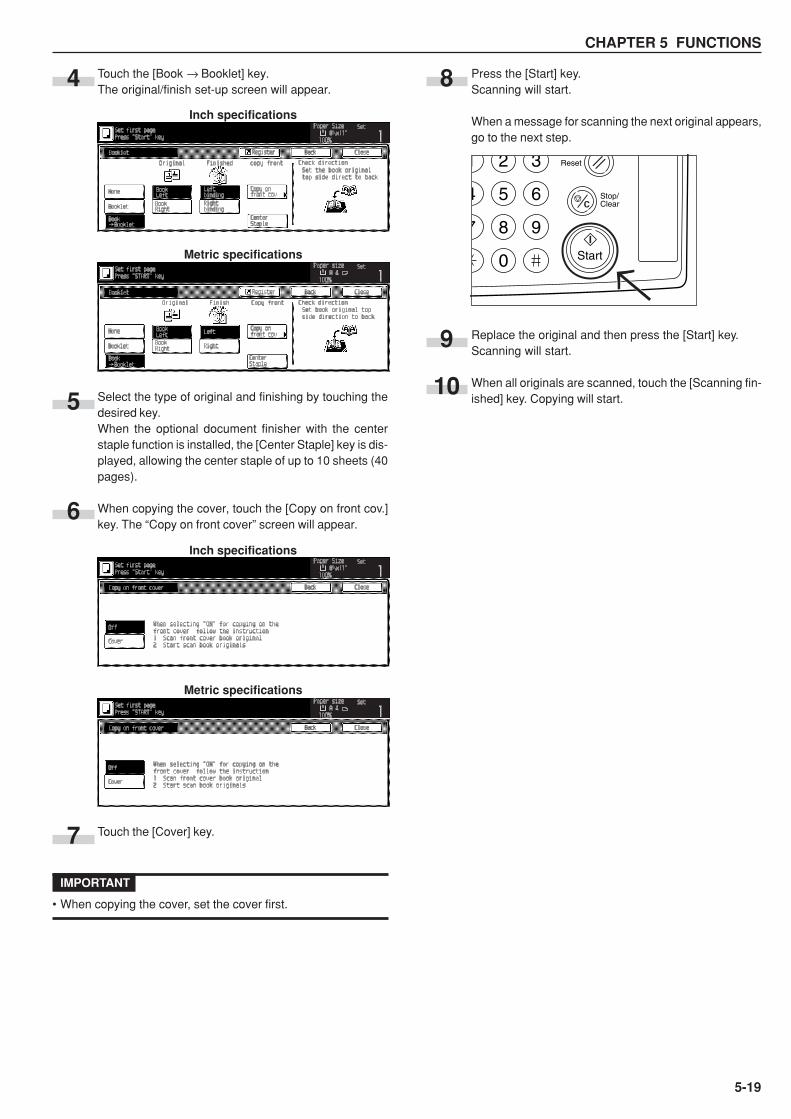
CHAPTER 5 FUNCTIONS
5-19
Press the [Start] key.Scanning will start.
When a message for scanning the next original appears,go to the next step.
Replace the original and then press the [Start] key.Scanning will start.
When all originals are scanned, touch the [Scanning fin-ished] key. Copying will start.
Touch the [Book → Booklet] key.The original/finish set-up screen will appear.
Select the type of original and finishing by touching thedesired key.When the optional document finisher with the centerstaple function is installed, the [Center Staple] key is dis-played, allowing the center staple of up to 10 sheets (40pages).
When copying the cover, touch the [Copy on front cov.]key. The “Copy on front cover” screen will appear.
Touch the [Cover] key.
IMPORTANT
• When copying the cover, set the cover first.
6Inch specifications
Metric specifications
5
7
8
9
4Inch specifications
Metric specifications
10
Start
Stop/ Clear
Reset1 2 3
4 5 6
7 8 9
0
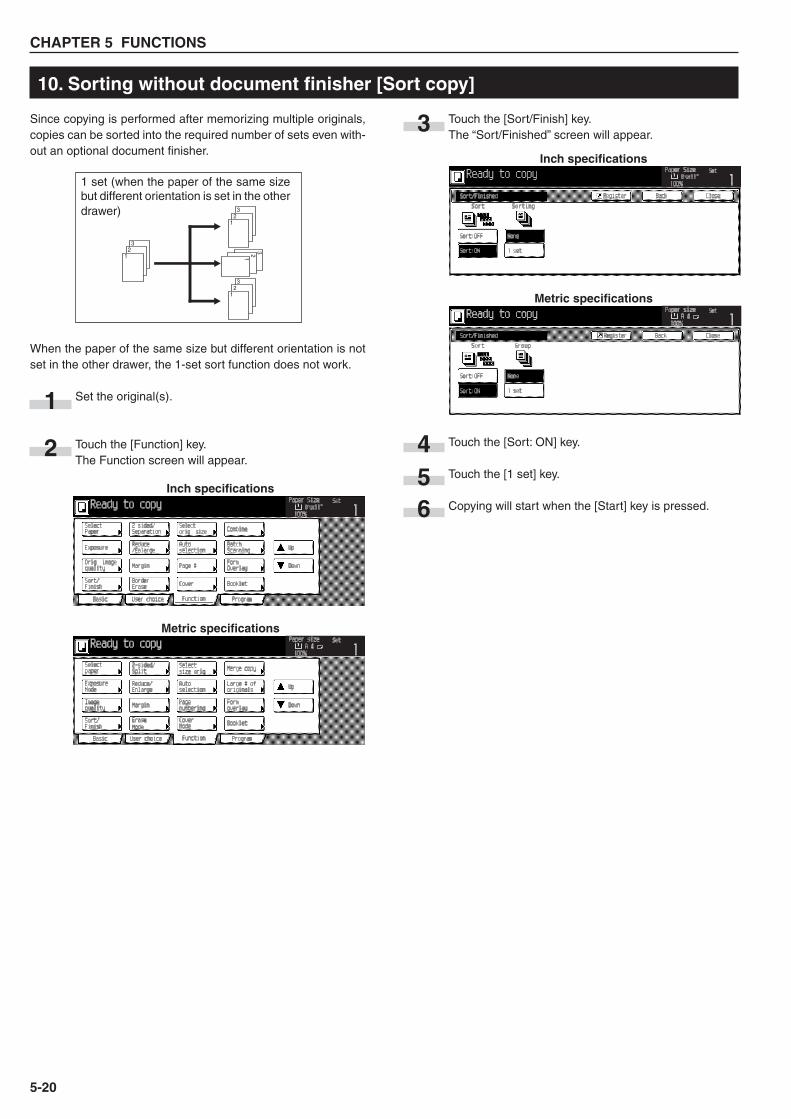
CHAPTER 5 FUNCTIONS
5-20
Since copying is performed after memorizing multiple originals,copies can be sorted into the required number of sets even with-out an optional document finisher.
When the paper of the same size but different orientation is notset in the other drawer, the 1-set sort function does not work.
Set the original(s).
Touch the [Function] key.The Function screen will appear.
10. Sorting without document finisher [Sort copy]
Touch the [Sort/Finish] key.The “Sort/Finished” screen will appear.
Touch the [Sort: ON] key.
Touch the [1 set] key.
Copying will start when the [Start] key is pressed.
2
Inch specifications
Metric specifications
1
3
4
Inch specifications
Metric specifications
56
32
1
32
1
321
32
1
1 set (when the paper of the same sizebut different orientation is set in the otherdrawer)
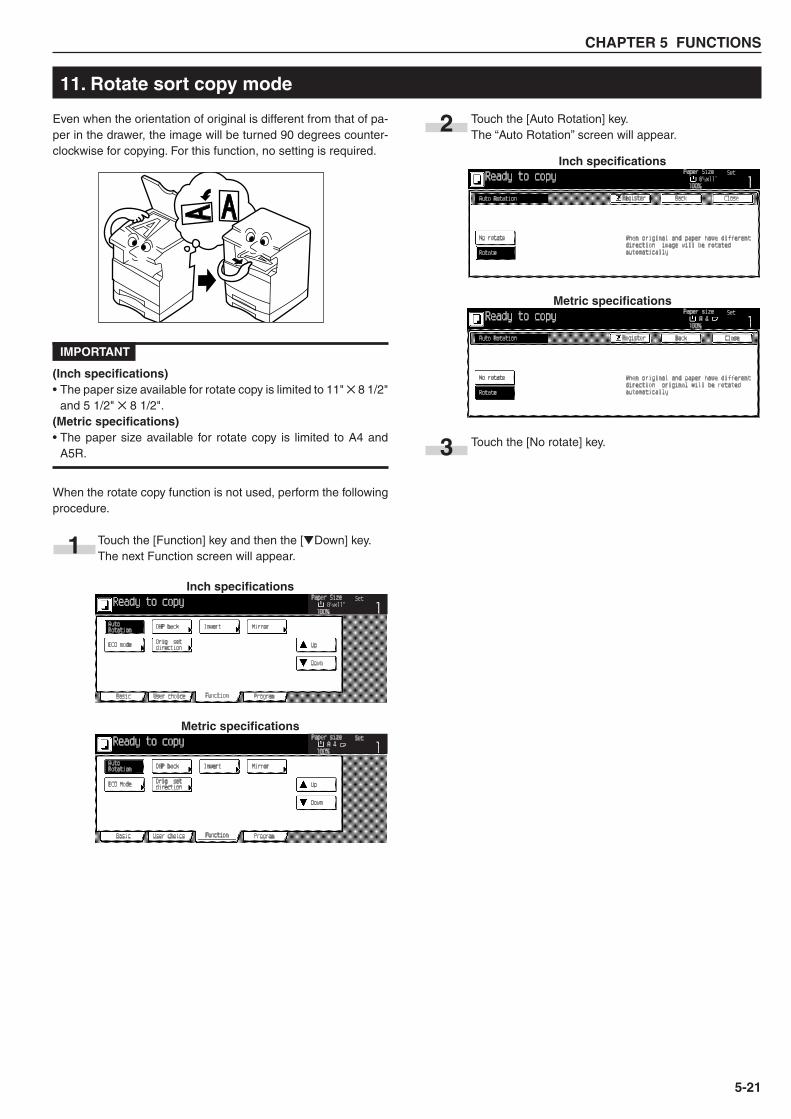
CHAPTER 5 FUNCTIONS
5-21
11. Rotate sort copy mode
Even when the orientation of original is different from that of pa-per in the drawer, the image will be turned 90 degrees counter-clockwise for copying. For this function, no setting is required.
IMPORTANT
(Inch specifications)• The paper size available for rotate copy is limited to 11" ✕ 8 1/2"
and 5 1/2" ✕ 8 1/2".(Metric specifications)• The paper size available for rotate copy is limited to A4 and
A5R.
When the rotate copy function is not used, perform the followingprocedure.
Touch the [Function] key and then the [�Down] key.The next Function screen will appear.
Touch the [Auto Rotation] key.The “Auto Rotation” screen will appear.
Touch the [No rotate] key.
Inch specifications
Metric specifications
Inch specifications
Metric specifications
2
1
3
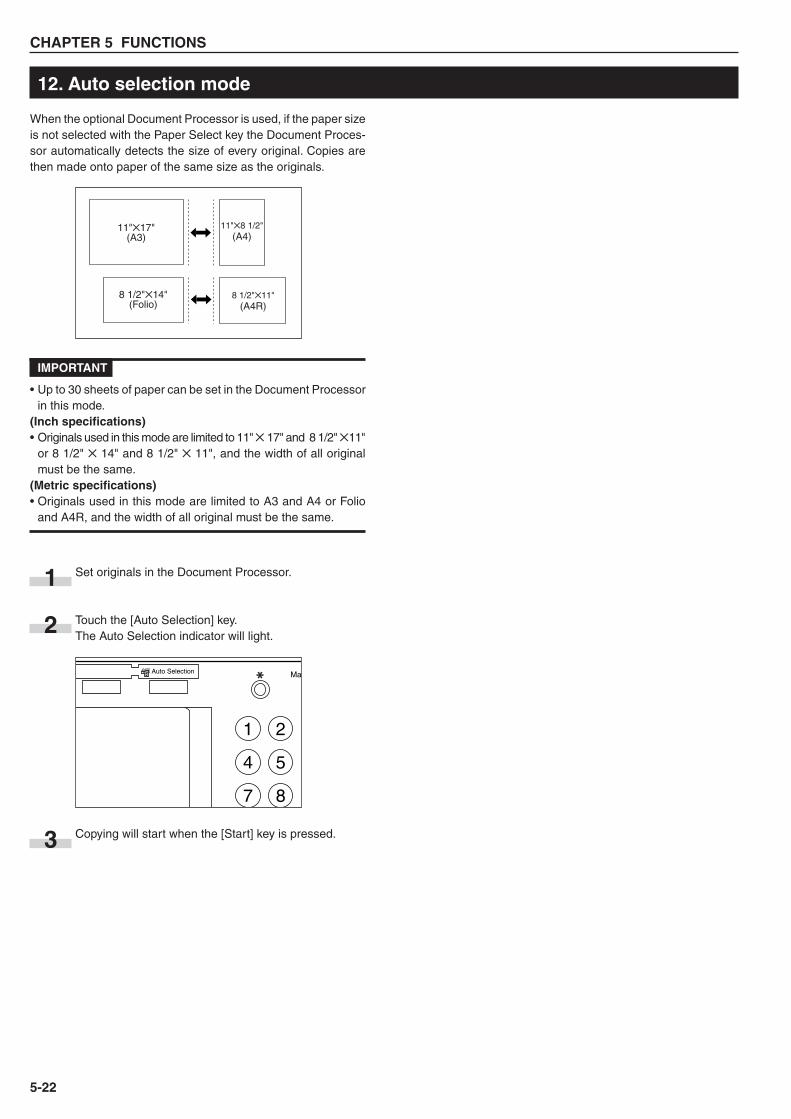
CHAPTER 5 FUNCTIONS
5-22
12. Auto selection mode
When the optional Document Processor is used, if the paper sizeis not selected with the Paper Select key the Document Proces-sor automatically detects the size of every original. Copies arethen made onto paper of the same size as the originals.
IMPORTANT
• Up to 30 sheets of paper can be set in the Document Processorin this mode.
(Inch specifications)• Originals used in this mode are limited to 11" ✕ 17" and 8 1/2" ✕11"
or 8 1/2" ✕ 14" and 8 1/2" ✕ 11", and the width of all originalmust be the same.
(Metric specifications)• Originals used in this mode are limited to A3 and A4 or Folio
and A4R, and the width of all original must be the same.
Set originals in the Document Processor.
Touch the [Auto Selection] key.The Auto Selection indicator will light.
Copying will start when the [Start] key is pressed.
2
3
1
(A3)
(Folio)
(A4)11"✕17"
8 1/2"✕14"
11"✕8 1/2"
(A4R)8 1/2"✕11"
Ma Auto Selection
1 2
4 5
7 8
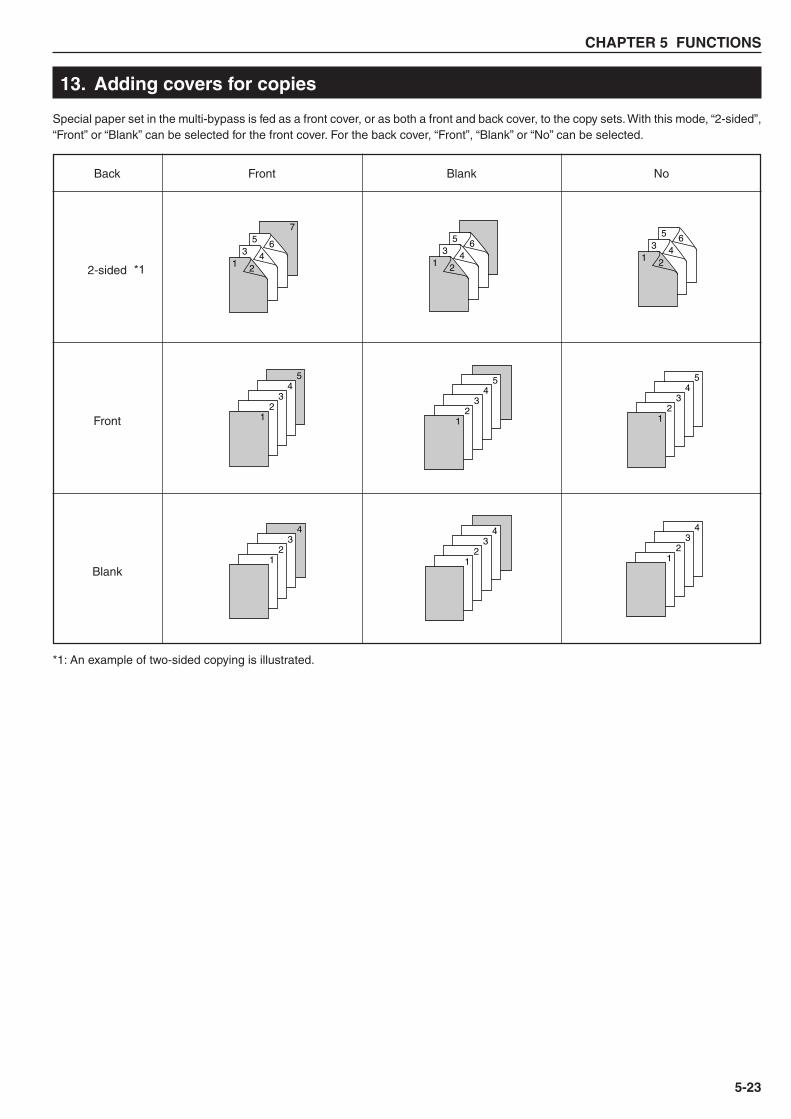
CHAPTER 5 FUNCTIONS
5-23
43
21
54
32
1
54
32
1
75 6
3 41 2
54
32
1
43
21
5 63 4
1 2
5 63 4
1 2
43
21
13. Adding covers for copies
Special paper set in the multi-bypass is fed as a front cover, or as both a front and back cover, to the copy sets. With this mode, “2-sided”,“Front” or “Blank” can be selected for the front cover. For the back cover, “Front”, “Blank” or “No” can be selected.
*1: An example of two-sided copying is illustrated.
Back Front Blank No
2-sided
Front
Blank
*1
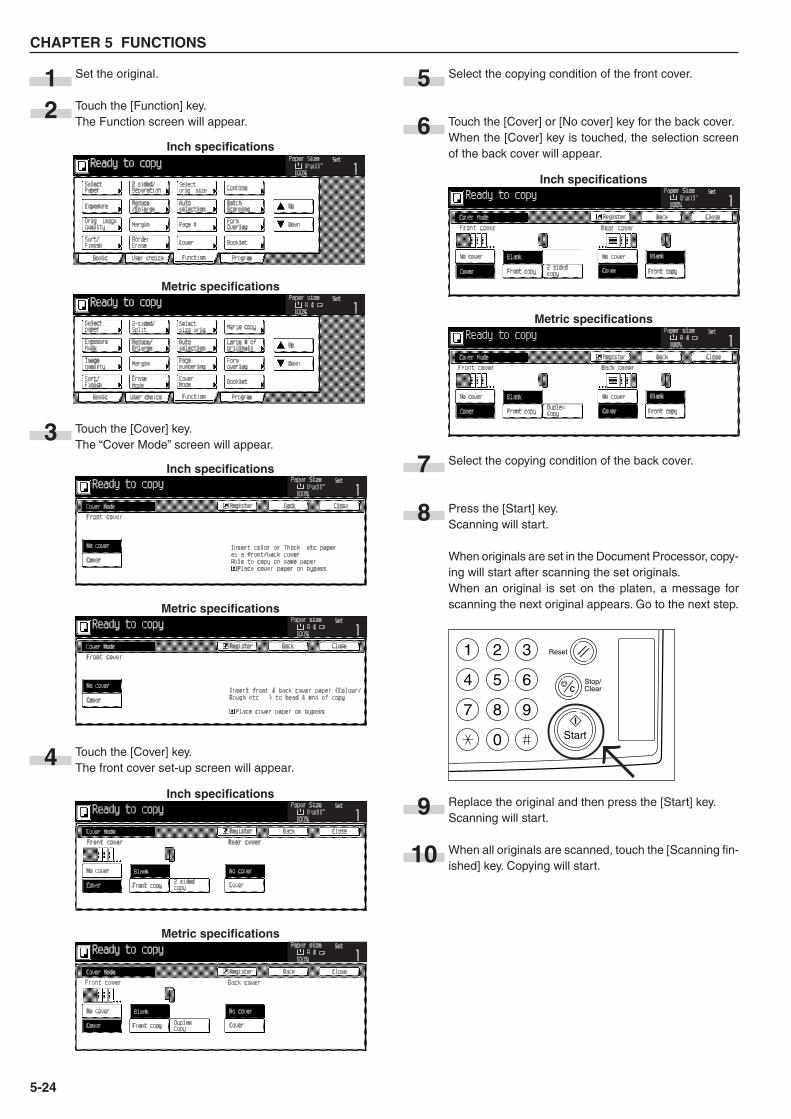
CHAPTER 5 FUNCTIONS
5-24
Set the original.
Touch the [Function] key.The Function screen will appear.
Touch the [Cover] key.The “Cover Mode” screen will appear.
Touch the [Cover] key.The front cover set-up screen will appear.
2Inch specifications
Metric specifications
3Inch specifications
Metric specifications
4Inch specifications
Metric specifications
Select the copying condition of the front cover.
Touch the [Cover] or [No cover] key for the back cover.When the [Cover] key is touched, the selection screenof the back cover will appear.
Select the copying condition of the back cover.
Press the [Start] key.Scanning will start.
When originals are set in the Document Processor, copy-ing will start after scanning the set originals.When an original is set on the platen, a message forscanning the next original appears. Go to the next step.
Replace the original and then press the [Start] key.Scanning will start.
When all originals are scanned, touch the [Scanning fin-ished] key. Copying will start.
6
Inch specifications
Metric specifications
5
7
8
9
1
10
Start
Stop/ Clear
Reset1 2 3
4 5 6
7 8 9
0 →→
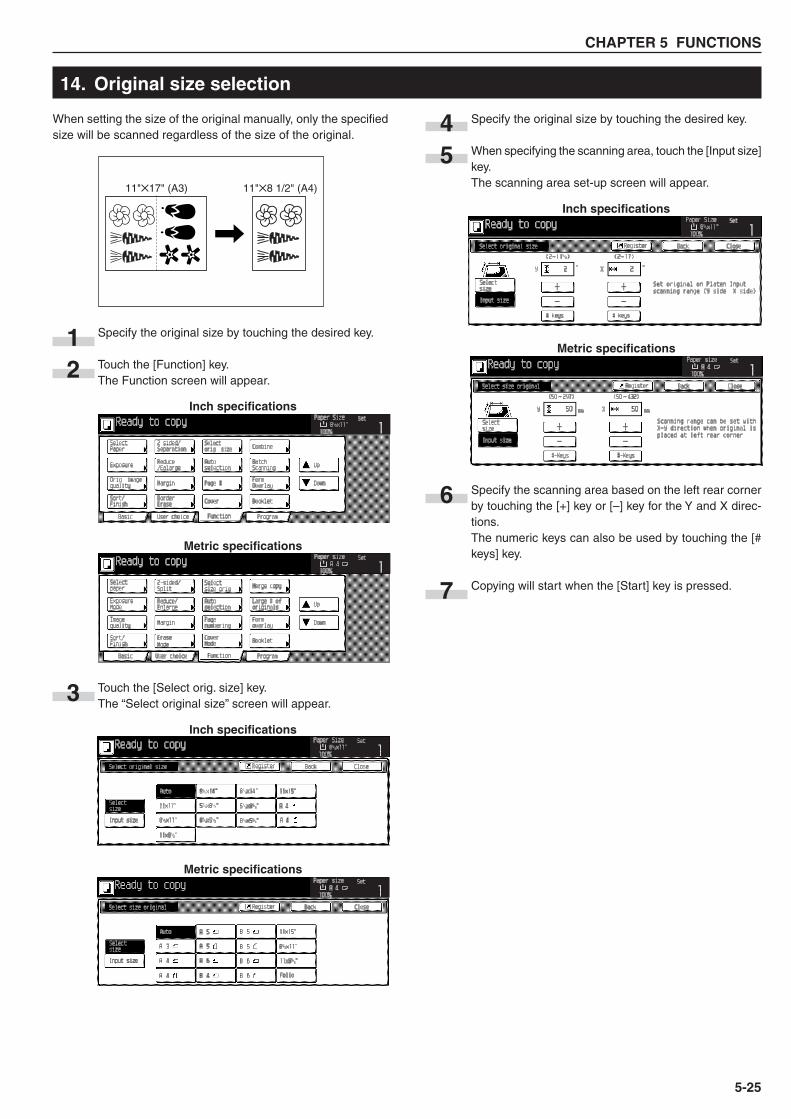
CHAPTER 5 FUNCTIONS
5-25
When setting the size of the original manually, only the specifiedsize will be scanned regardless of the size of the original.
Specify the original size by touching the desired key.
Touch the [Function] key.The Function screen will appear.
Touch the [Select orig. size] key.The “Select original size” screen will appear.
14. Original size selection
1
Inch specifications
Metric specifications
3Inch specifications
Metric specifications
Specify the original size by touching the desired key.
When specifying the scanning area, touch the [Input size]key.The scanning area set-up screen will appear.
Specify the scanning area based on the left rear cornerby touching the [+] key or [–] key for the Y and X direc-tions.The numeric keys can also be used by touching the [#keys] key.
Copying will start when the [Start] key is pressed.
Inch specifications
Metric specifications
4
6
7
11"✕8 1/2" (A4)11"✕17" (A3)
2
5
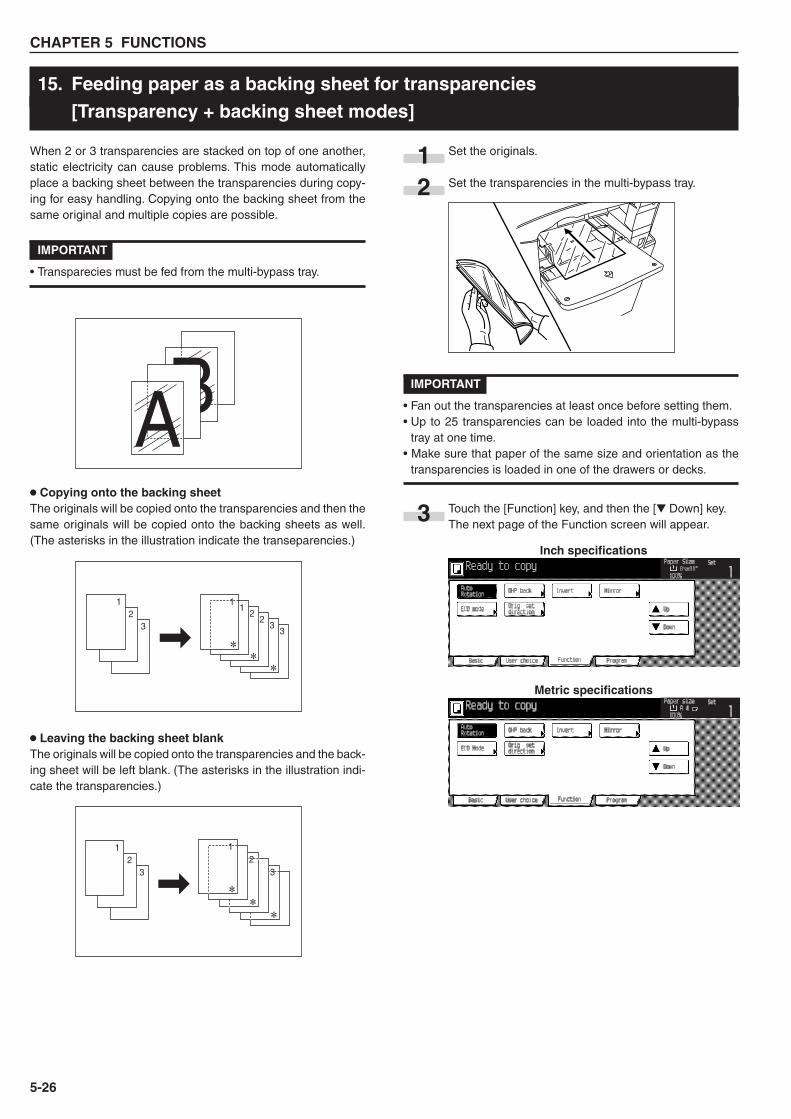
CHAPTER 5 FUNCTIONS
5-26
Set the originals.
Set the transparencies in the multi-bypass tray.
IMPORTANT
• Fan out the transparencies at least once before setting them.• Up to 25 transparencies can be loaded into the multi-bypass
tray at one time.• Make sure that paper of the same size and orientation as the
transparencies is loaded in one of the drawers or decks.
Touch the [Function] key, and then the [� Down] key.The next page of the Function screen will appear.
15. Feeding paper as a backing sheet for transparencies[Transparency + backing sheet modes]
When 2 or 3 transparencies are stacked on top of one another,static electricity can cause problems. This mode automaticallyplace a backing sheet between the transparencies during copy-ing for easy handling. Copying onto the backing sheet from thesame original and multiple copies are possible.
IMPORTANT
• Transparecies must be fed from the multi-bypass tray.
• Copying onto the backing sheetThe originals will be copied onto the transparencies and then thesame originals will be copied onto the backing sheets as well.(The asterisks in the illustration indicate the transeparencies.)
• Leaving the backing sheet blankThe originals will be copied onto the transparencies and the back-ing sheet will be left blank. (The asterisks in the illustration indi-cate the transparencies.)
1
Inch specifications
Metric specifications
3
BA
32
1
33
22
11
32
32
1 1
2

CHAPTER 5 FUNCTIONS
5-27
Touch the [OHP back] key.The “OHP back” screen will appear.
Touch the [Copy] key or [Blank] key.
Copying will start when the [Start] key is pressed.
4Inch specifications
Metric specifications
5
6
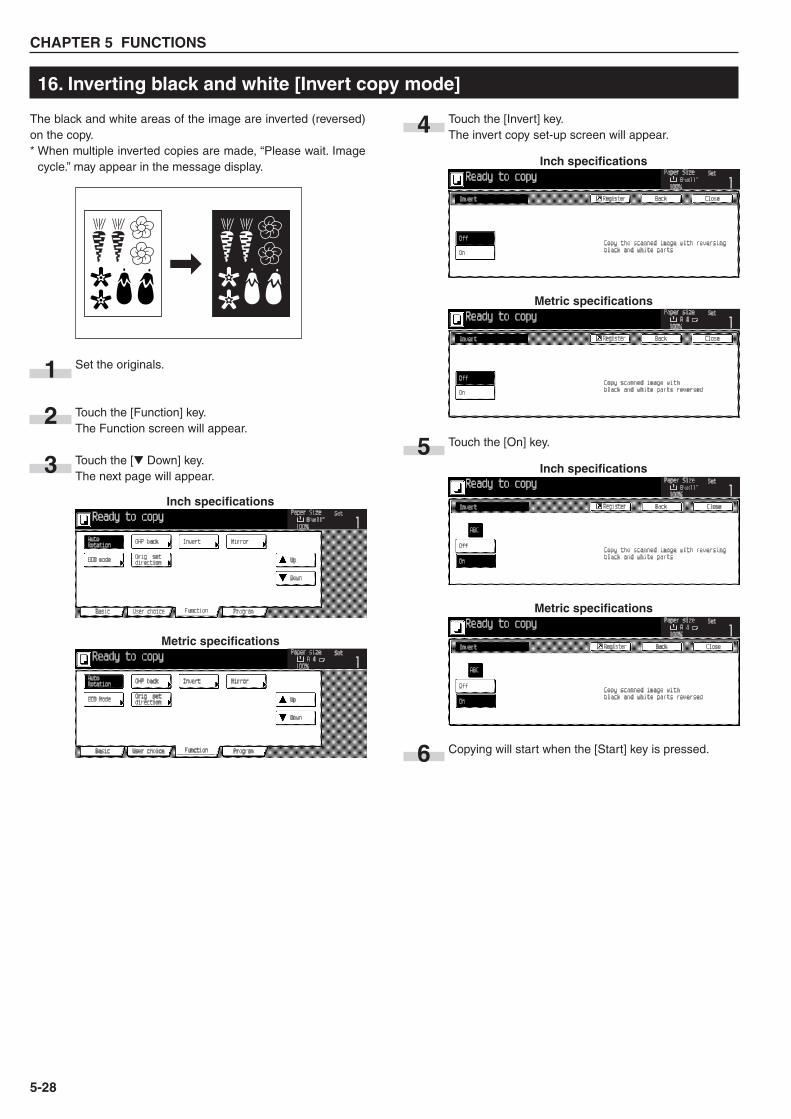
CHAPTER 5 FUNCTIONS
5-28
The black and white areas of the image are inverted (reversed)on the copy.* When multiple inverted copies are made, “Please wait. Image
cycle.” may appear in the message display.
Set the originals.
Touch the [Function] key.The Function screen will appear.
Touch the [� Down] key.The next page will appear.
1
2
3Inch specifications
Metric specifications
4
Metric specifications
Inch specifications
5Inch specifications
Metric specifications
6
16. Inverting black and white [Invert copy mode]
Touch the [Invert] key.The invert copy set-up screen will appear.
Touch the [On] key.
Copying will start when the [Start] key is pressed.
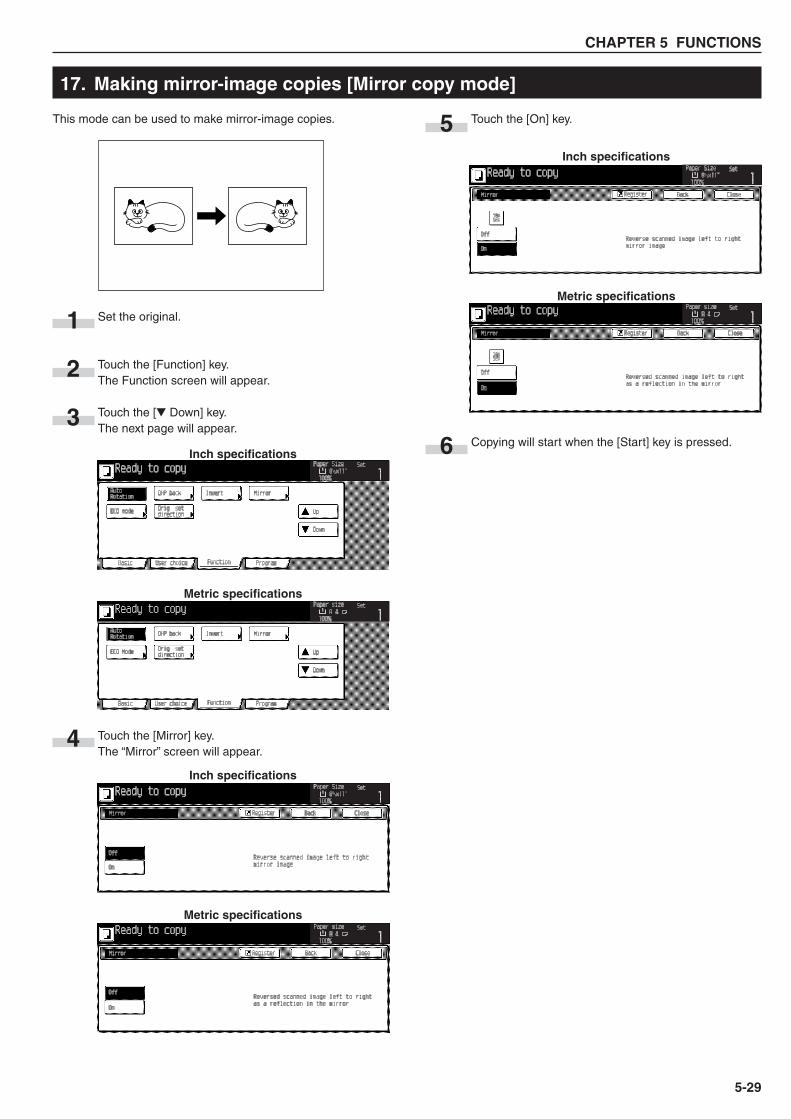
CHAPTER 5 FUNCTIONS
5-29
17. Making mirror-image copies [Mirror copy mode]
This mode can be used to make mirror-image copies.
Set the original.
Touch the [Function] key.The Function screen will appear.
Touch the [� Down] key.The next page will appear.
Touch the [Mirror] key.The “Mirror” screen will appear.
1
2
4Inch specifications
Metric specifications
Touch the [On] key.
Copying will start when the [Start] key is pressed.
5
6
Inch specifications
Metric specifications
3Inch specifications
Metric specifications
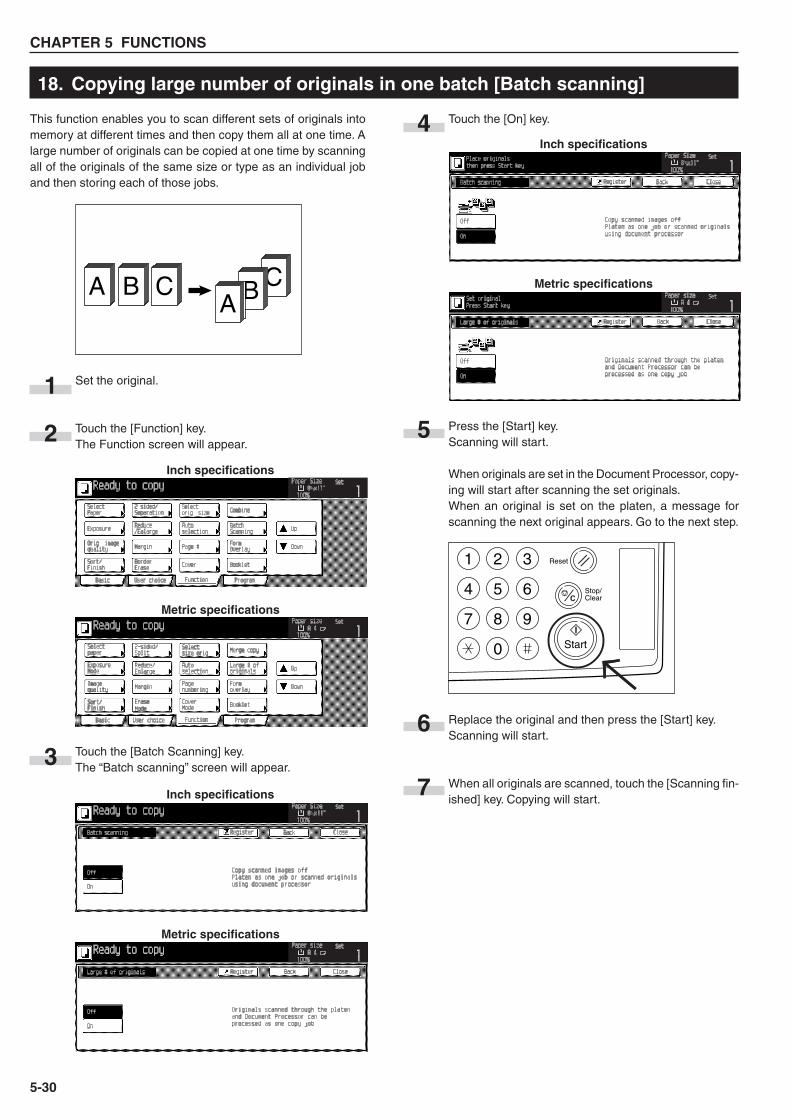
CHAPTER 5 FUNCTIONS
5-30
Touch the [On] key.
Press the [Start] key.Scanning will start.
When originals are set in the Document Processor, copy-ing will start after scanning the set originals.When an original is set on the platen, a message forscanning the next original appears. Go to the next step.
Replace the original and then press the [Start] key.Scanning will start.
When all originals are scanned, touch the [Scanning fin-ished] key. Copying will start.
This function enables you to scan different sets of originals intomemory at different times and then copy them all at one time. Alarge number of originals can be copied at one time by scanningall of the originals of the same size or type as an individual joband then storing each of those jobs.
Set the original.
Touch the [Function] key.The Function screen will appear.
Touch the [Batch Scanning] key.The “Batch scanning” screen will appear.
18. Copying large number of originals in one batch [Batch scanning]
4
Inch specifications
Metric specifications
3
Inch specifications
Metric specifications
5
6
7
A B C CBA
1
Inch specifications
Metric specifications
2
Start
Stop/ Clear
Reset1 2 3
4 5 6
7 8 9
0 →→
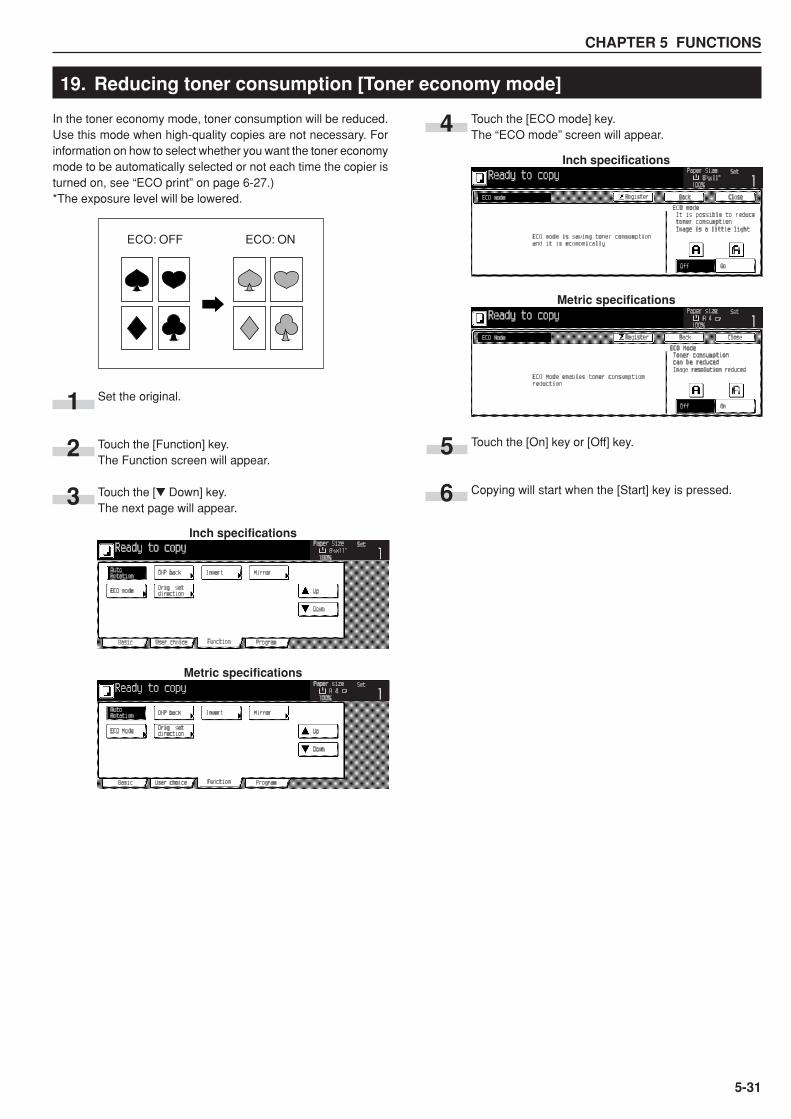
CHAPTER 5 FUNCTIONS
5-31
Touch the [ECO mode] key.The “ECO mode” screen will appear.
Touch the [On] key or [Off] key.
Copying will start when the [Start] key is pressed.
19. Reducing toner consumption [Toner economy mode]
In the toner economy mode, toner consumption will be reduced.Use this mode when high-quality copies are not necessary. Forinformation on how to select whether you want the toner economymode to be automatically selected or not each time the copier isturned on, see “ECO print” on page 6-27.)*The exposure level will be lowered.
Set the original.
Touch the [Function] key.The Function screen will appear.
Touch the [� Down] key.The next page will appear.
1
2
4Inch specifications
Metric specifications
3Inch specifications
Metric specifications
5
6
ECO: OFF ECO: ON
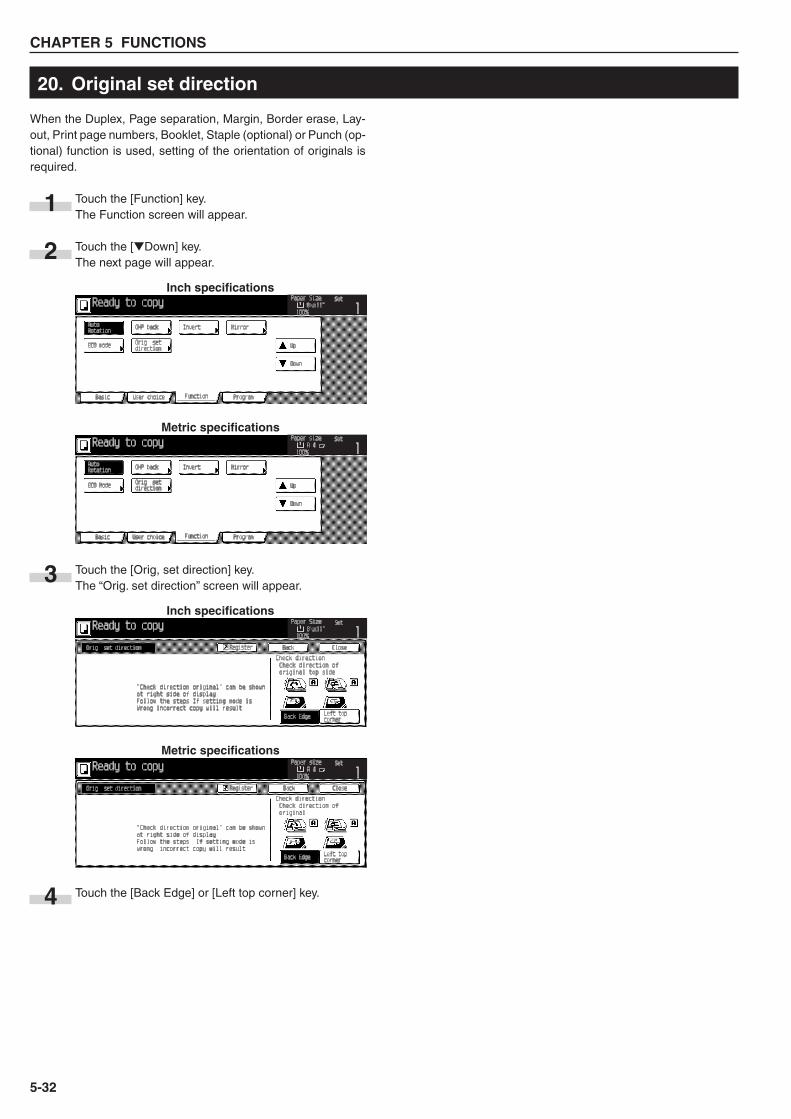
CHAPTER 5 FUNCTIONS
5-32
When the Duplex, Page separation, Margin, Border erase, Lay-out, Print page numbers, Booklet, Staple (optional) or Punch (op-tional) function is used, setting of the orientation of originals isrequired.
Touch the [Function] key.The Function screen will appear.
Touch the [�Down] key.The next page will appear.
Touch the [Orig, set direction] key.The “Orig. set direction” screen will appear.
Touch the [Back Edge] or [Left top corner] key.
20. Original set direction
1
3Inch specifications
Metric specifications
4
2Inch specifications
Metric specifications
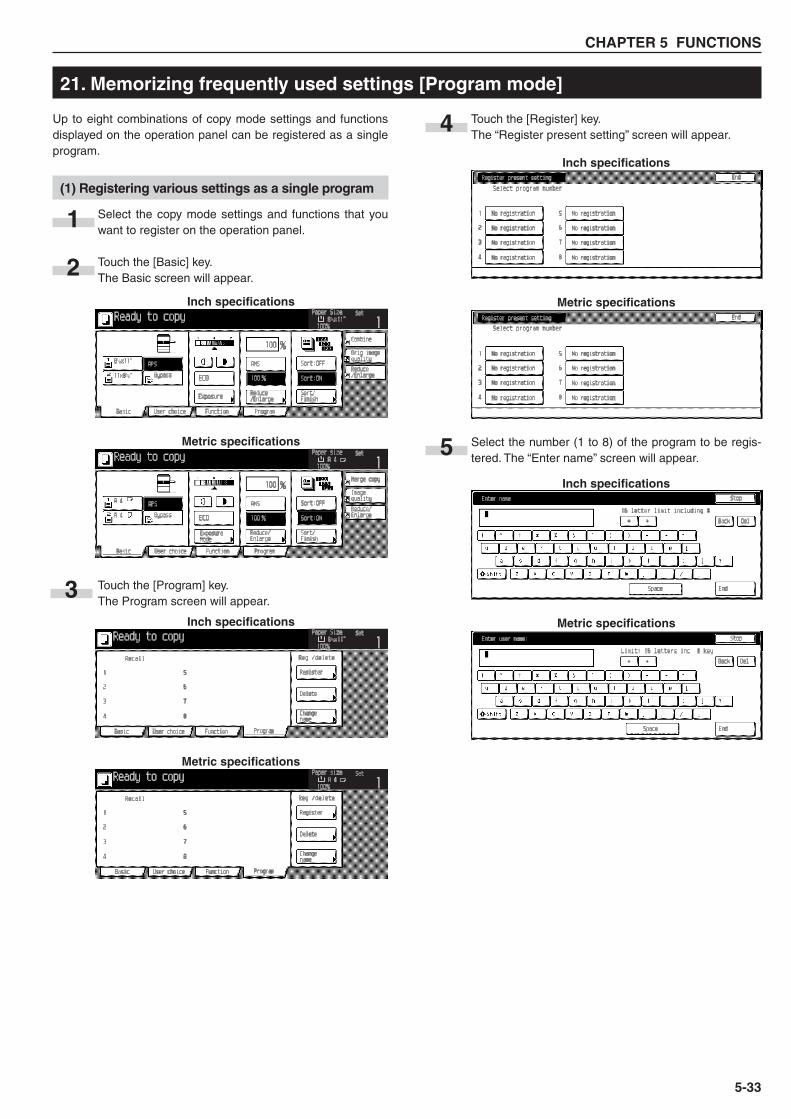
CHAPTER 5 FUNCTIONS
5-33
Up to eight combinations of copy mode settings and functionsdisplayed on the operation panel can be registered as a singleprogram.
(1) Registering various settings as a single program
Select the copy mode settings and functions that youwant to register on the operation panel.
Touch the [Basic] key.The Basic screen will appear.
Touch the [Program] key.The Program screen will appear.
Touch the [Register] key.The “Register present setting” screen will appear.
Select the number (1 to 8) of the program to be regis-tered. The “Enter name” screen will appear.
21. Memorizing frequently used settings [Program mode]
2Inch specifications
Metric specifications
1
3Inch specifications
Metric specifications
4Inch specifications
Metric specifications
5Inch specifications
Metric specifications
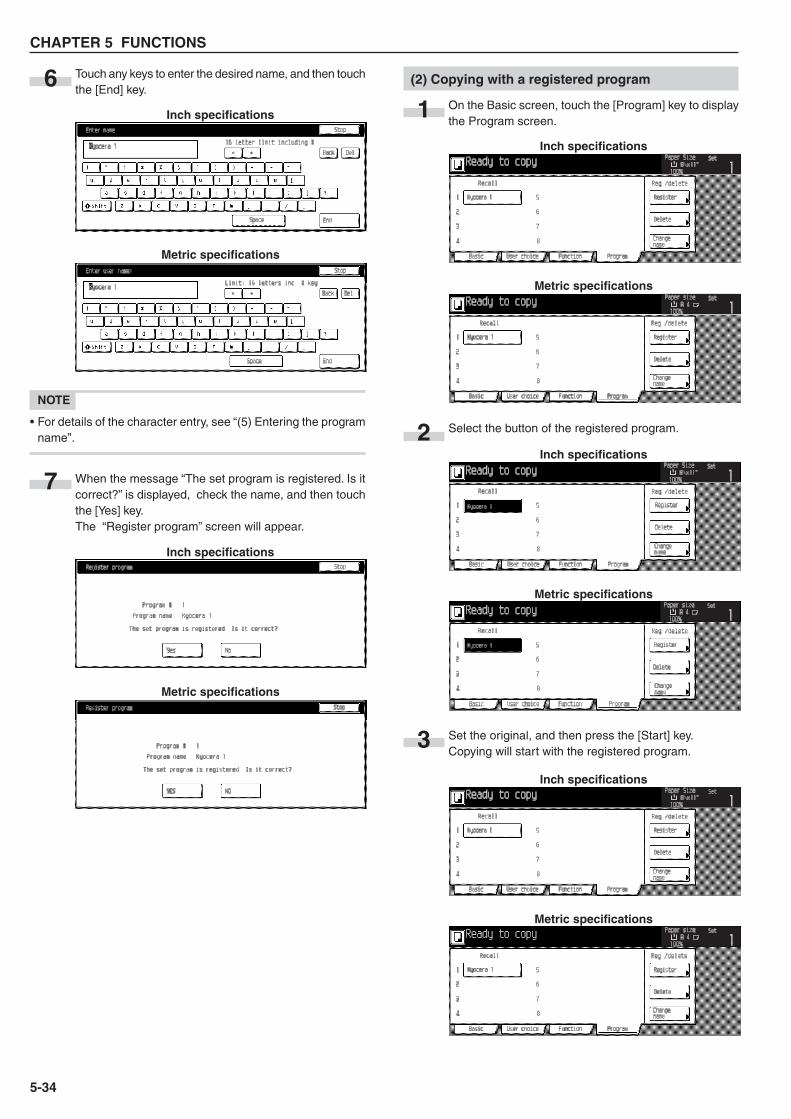
CHAPTER 5 FUNCTIONS
5-34
Touch any keys to enter the desired name, and then touchthe [End] key.
NOTE
• For details of the character entry, see “(5) Entering the programname”.
When the message “The set program is registered. Is itcorrect?” is displayed, check the name, and then touchthe [Yes] key.The “Register program” screen will appear.
(2) Copying with a registered program
On the Basic screen, touch the [Program] key to displaythe Program screen.
Select the button of the registered program.
Set the original, and then press the [Start] key.Copying will start with the registered program.
6
7
Inch specifications
Metric specifications
1Inch specifications
Metric specifications
2Inch specifications
Metric specifications
3
Inch specifications
Metric specifications
Inch specifications
Metric specifications
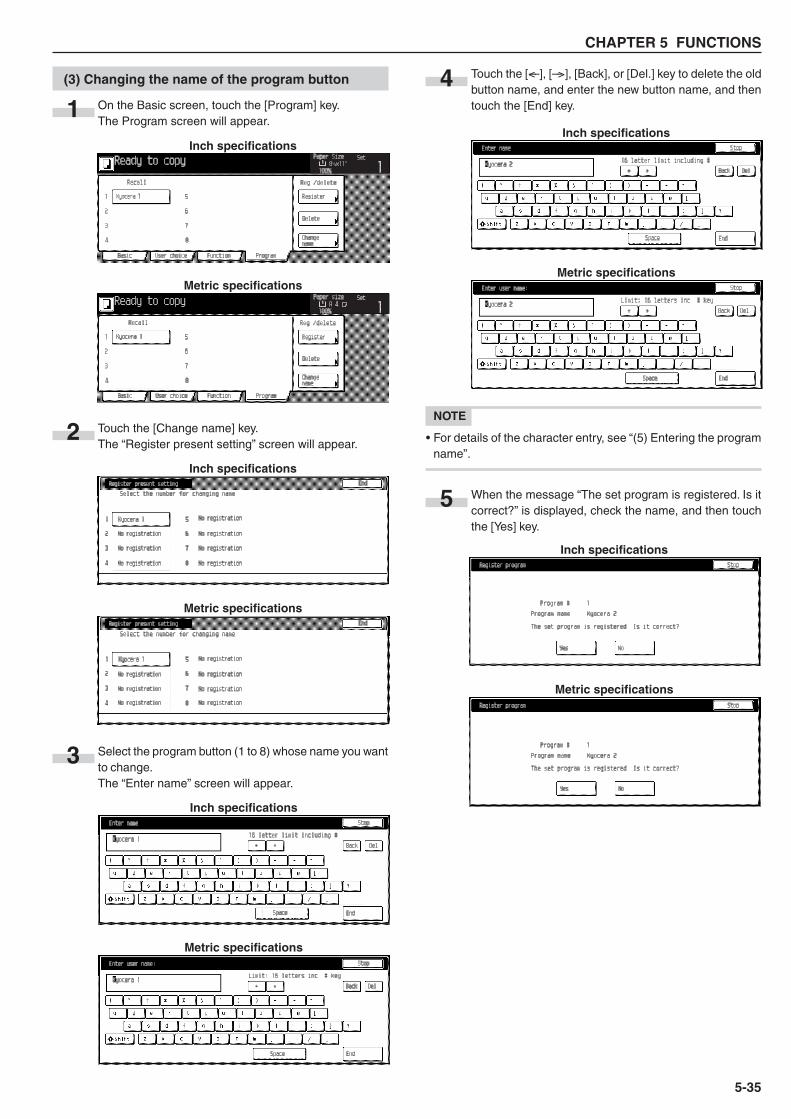
CHAPTER 5 FUNCTIONS
5-35
(3) Changing the name of the program button
On the Basic screen, touch the [Program] key.The Program screen will appear.
Touch the [Change name] key.The “Register present setting” screen will appear.
Select the program button (1 to 8) whose name you wantto change.The “Enter name” screen will appear.
Touch the [<––], [––>], [Back], or [Del.] key to delete the oldbutton name, and enter the new button name, and thentouch the [End] key.
NOTE
• For details of the character entry, see “(5) Entering the programname”.
When the message “The set program is registered. Is itcorrect?” is displayed, check the name, and then touchthe [Yes] key.
1Inch specifications
Metric specifications
2Inch specifications
Metric specifications
3
4
Inch specifications
Metric specifications
5
Inch specifications
Metric specifications
Inch specifications
Metric specifications
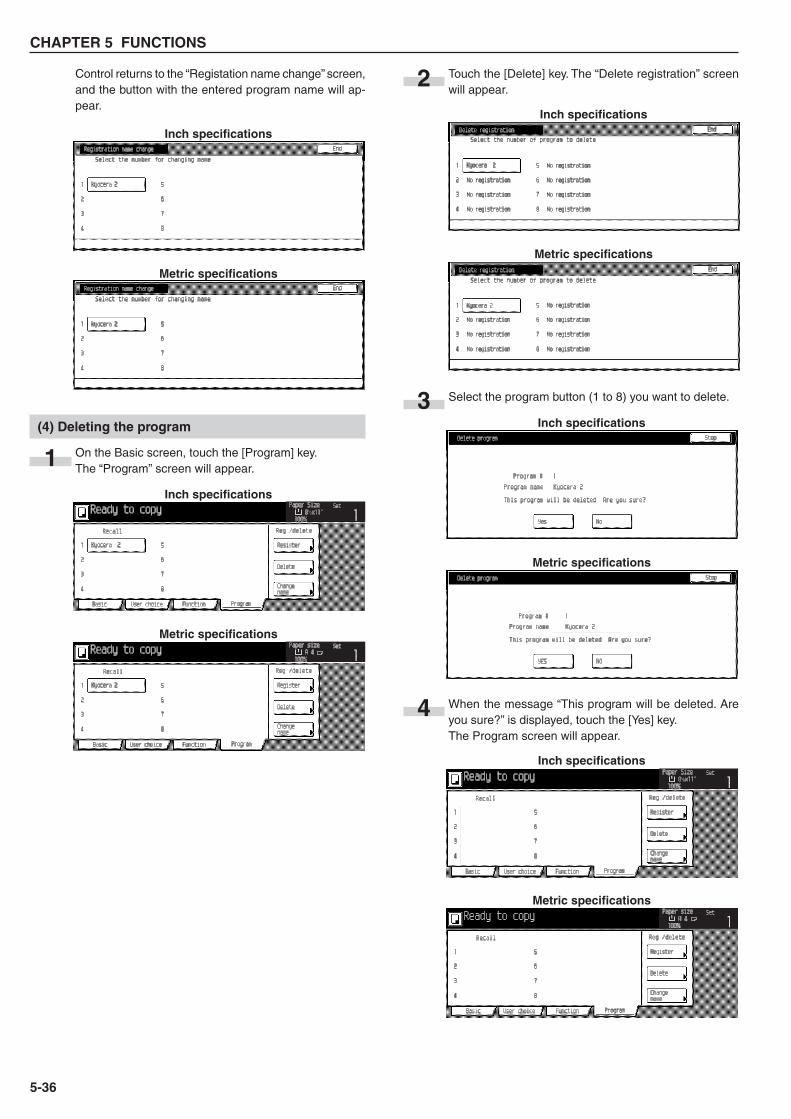
CHAPTER 5 FUNCTIONS
5-36
Control returns to the “Registation name change” screen,and the button with the entered program name will ap-pear.
(4) Deleting the program
On the Basic screen, touch the [Program] key.The “Program” screen will appear.
Touch the [Delete] key. The “Delete registration” screenwill appear.
Select the program button (1 to 8) you want to delete.
When the message “This program will be deleted. Areyou sure?” is displayed, touch the [Yes] key.The Program screen will appear.
1Inch specifications
Metric specifications
4
Inch specifications
Metric specifications
3
2
Inch specifications
Metric specifications
Inch specifications
Metric specifications
Inch specifications
Metric specifications
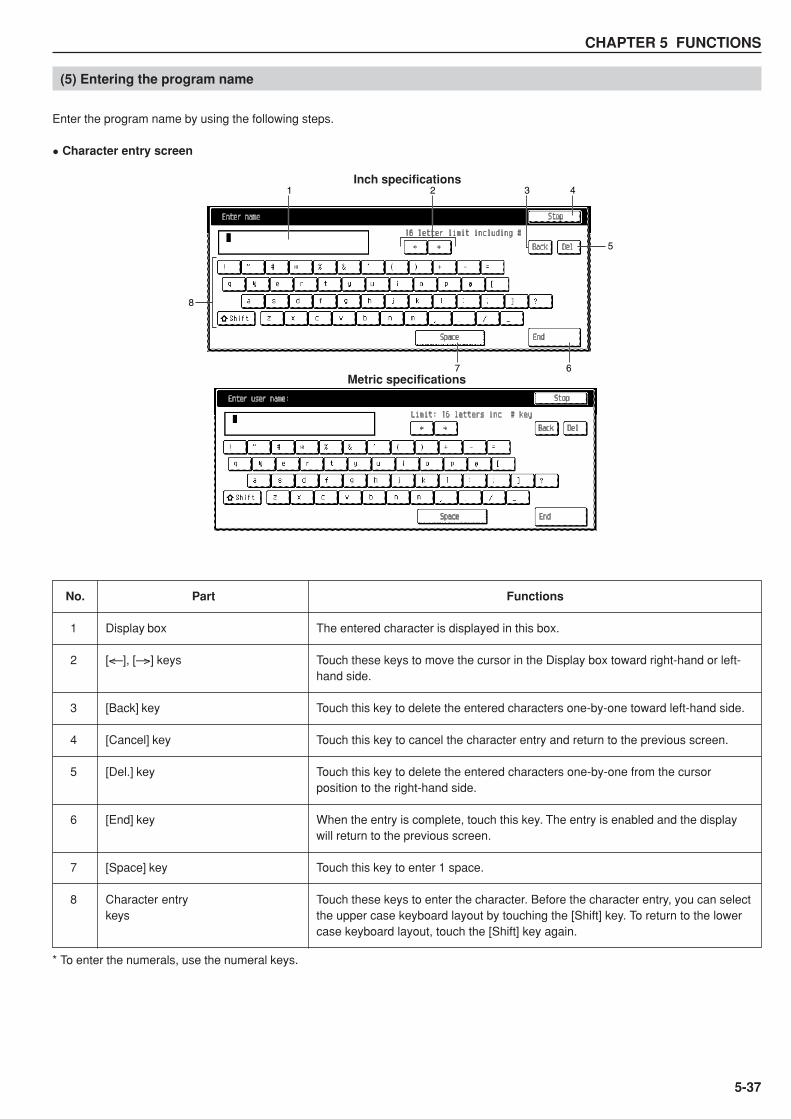
CHAPTER 5 FUNCTIONS
5-37
Display box
[<––], [––>] keys
[Back] key
[Cancel] key
[Del.] key
[End] key
[Space] key
Character entrykeys
No. Part Functions
The entered character is displayed in this box.
Touch these keys to move the cursor in the Display box toward right-hand or left-hand side.
Touch this key to delete the entered characters one-by-one toward left-hand side.
Touch this key to cancel the character entry and return to the previous screen.
Touch this key to delete the entered characters one-by-one from the cursorposition to the right-hand side.
When the entry is complete, touch this key. The entry is enabled and the displaywill return to the previous screen.
Touch this key to enter 1 space.
Touch these keys to enter the character. Before the character entry, you can selectthe upper case keyboard layout by touching the [Shift] key. To return to the lowercase keyboard layout, touch the [Shift] key again.
1
2
3
4
5
6
7
8
* To enter the numerals, use the numeral keys.
(5) Entering the program name
Enter the program name by using the following steps.
• Character entry screen
Inch specifications
Metric specifications
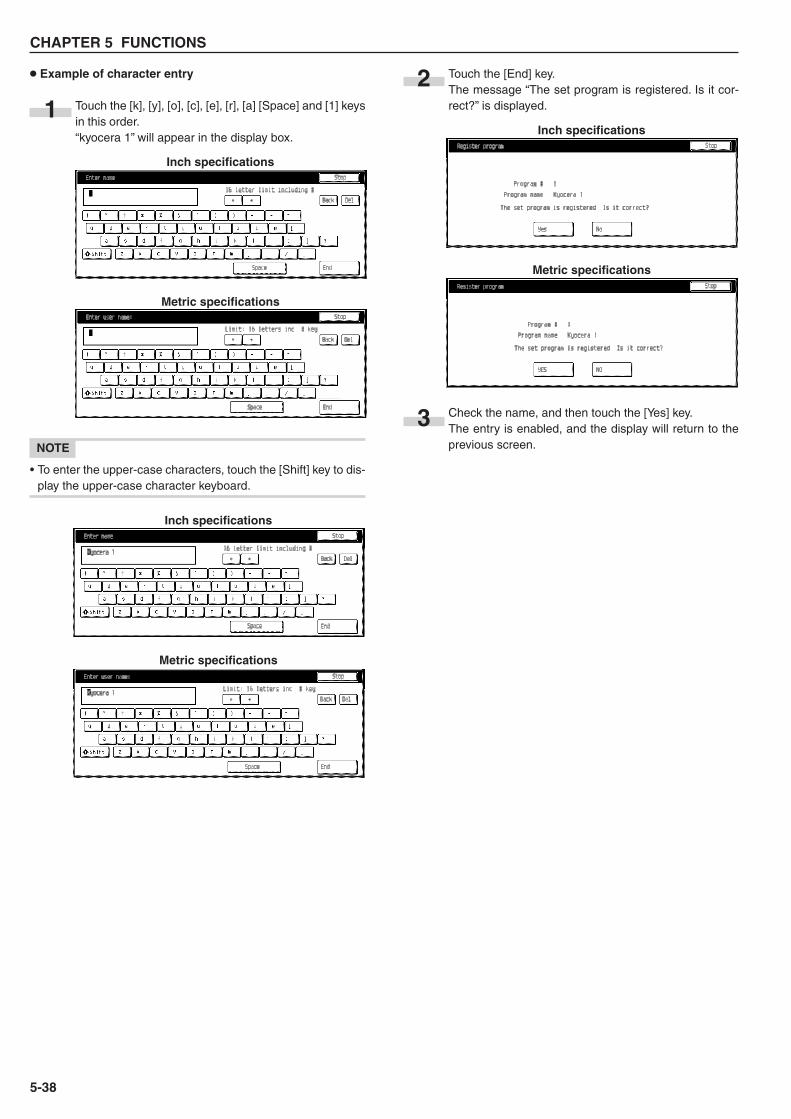
CHAPTER 5 FUNCTIONS
5-38
Inch specifications
Metric specifications
• Example of character entry
Touch the [k], [y], [o], [c], [e], [r], [a] [Space] and [1] keysin this order.“kyocera 1” will appear in the display box.
NOTE
• To enter the upper-case characters, touch the [Shift] key to dis-play the upper-case character keyboard.
12
3
Inch specifications
Metric specifications
Touch the [End] key.The message “The set program is registered. Is it cor-rect?” is displayed.
Check the name, and then touch the [Yes] key.The entry is enabled, and the display will return to theprevious screen.
Inch specifications
Metric specifications
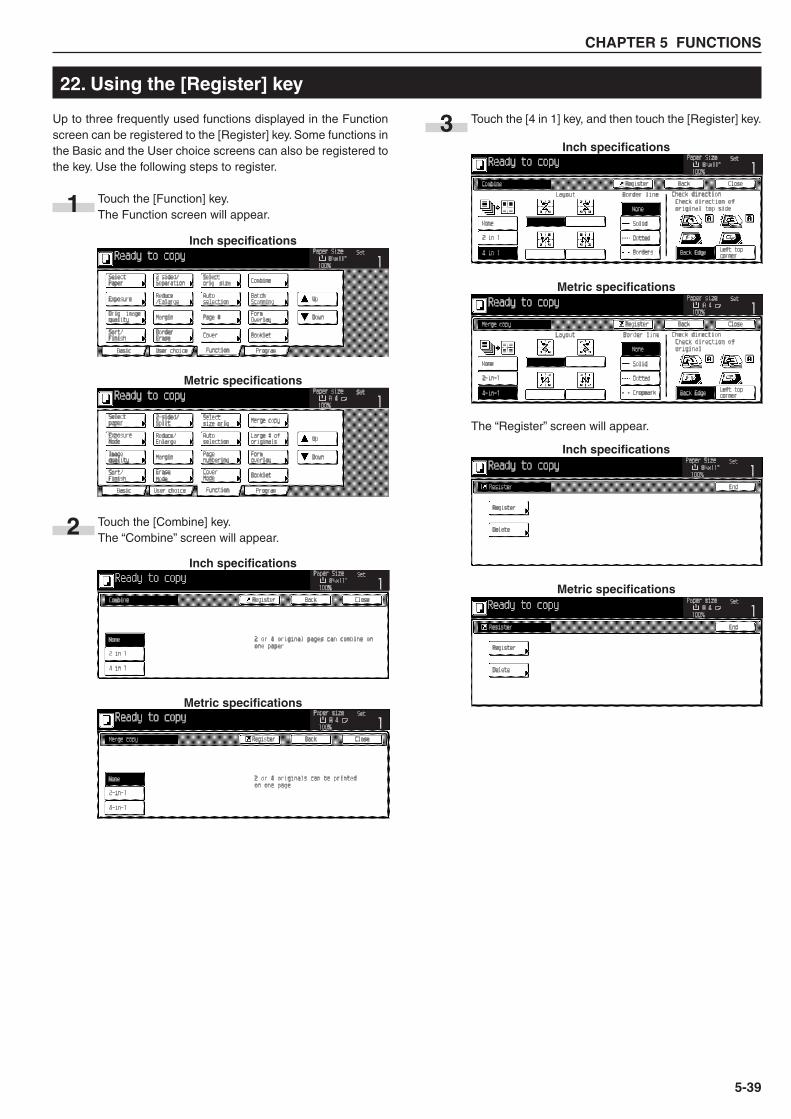
CHAPTER 5 FUNCTIONS
5-39
Touch the [4 in 1] key, and then touch the [Register] key.
The “Register” screen will appear.
22. Using the [Register] key
Up to three frequently used functions displayed in the Functionscreen can be registered to the [Register] key. Some functions inthe Basic and the User choice screens can also be registered tothe key. Use the following steps to register.
Touch the [Function] key.The Function screen will appear.
Touch the [Combine] key.The “Combine” screen will appear.
1
3
Inch specifications
Metric specifications
Inch specifications
Metric specifications
2Inch specifications
Metric specifications
Inch specifications
Metric specifications
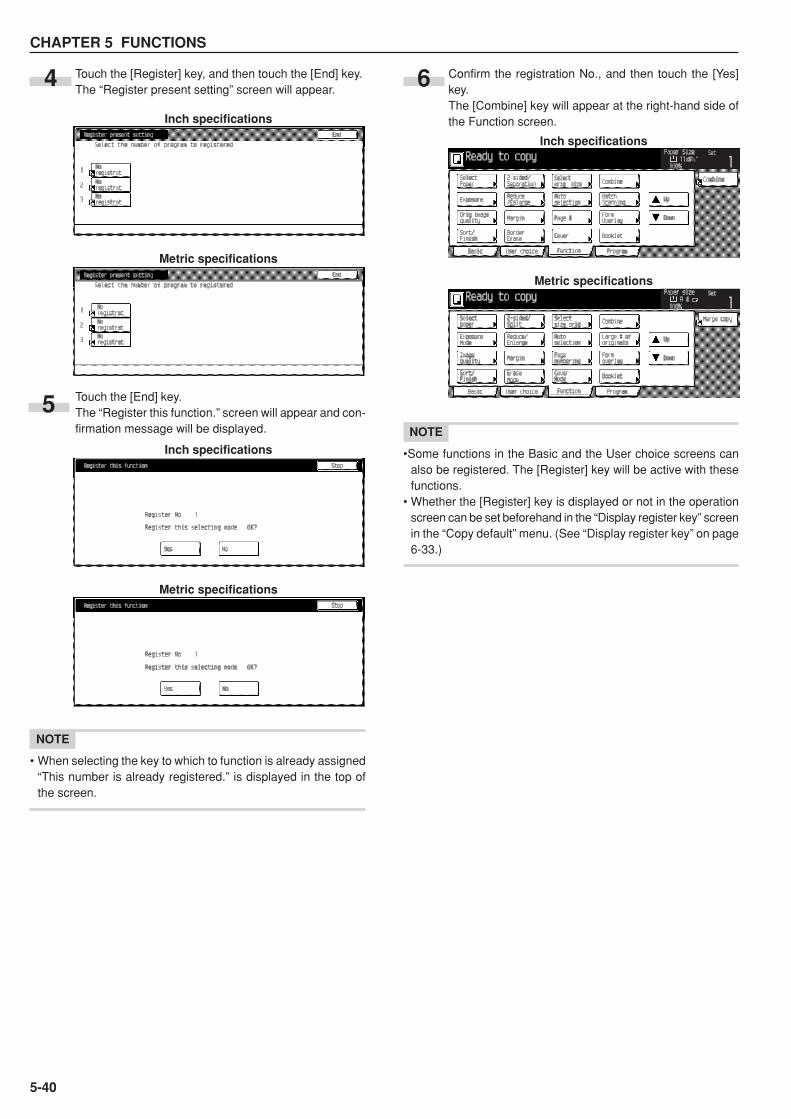
CHAPTER 5 FUNCTIONS
5-40
Touch the [Register] key, and then touch the [End] key.The “Register present setting” screen will appear.
Touch the [End] key.The “Register this function.” screen will appear and con-firmation message will be displayed.
NOTE
• When selecting the key to which to function is already assigned“This number is already registered.” is displayed in the top ofthe screen.
4
5
Confirm the registration No., and then touch the [Yes]key.The [Combine] key will appear at the right-hand side ofthe Function screen.
NOTE
•Some functions in the Basic and the User choice screens canalso be registered. The [Register] key will be active with thesefunctions.
• Whether the [Register] key is displayed or not in the operationscreen can be set beforehand in the “Display register key” screenin the “Copy default” menu. (See “Display register key” on page6-33.)
6
Inch specifications
Metric specifications
Inch specifications
Metric specifications
Inch specifications
Metric specifications
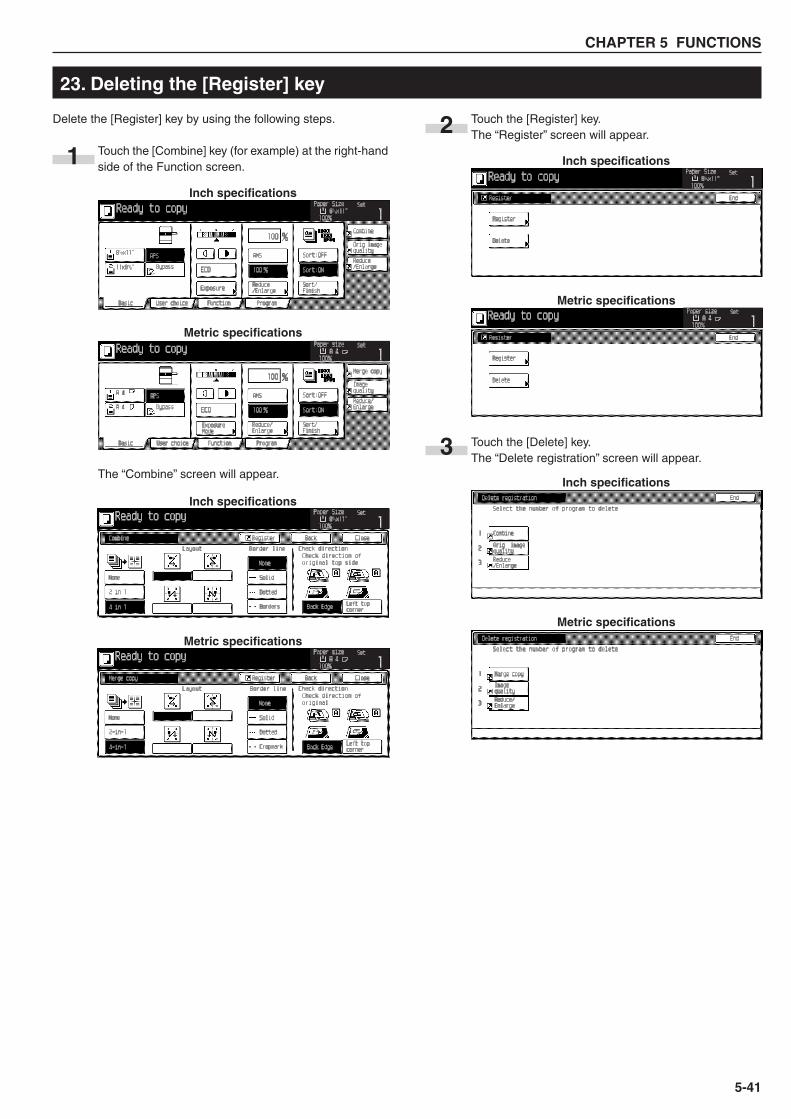
CHAPTER 5 FUNCTIONS
5-41
Delete the [Register] key by using the following steps.
Touch the [Combine] key (for example) at the right-handside of the Function screen.
The “Combine” screen will appear.
Touch the [Register] key.The “Register” screen will appear.
Touch the [Delete] key.The “Delete registration” screen will appear.
1Inch specifications
Metric specifications
2Inch specifications
Metric specifications
3Inch specifications
Metric specifications
Inch specifications
Metric specifications
23. Deleting the [Register] key
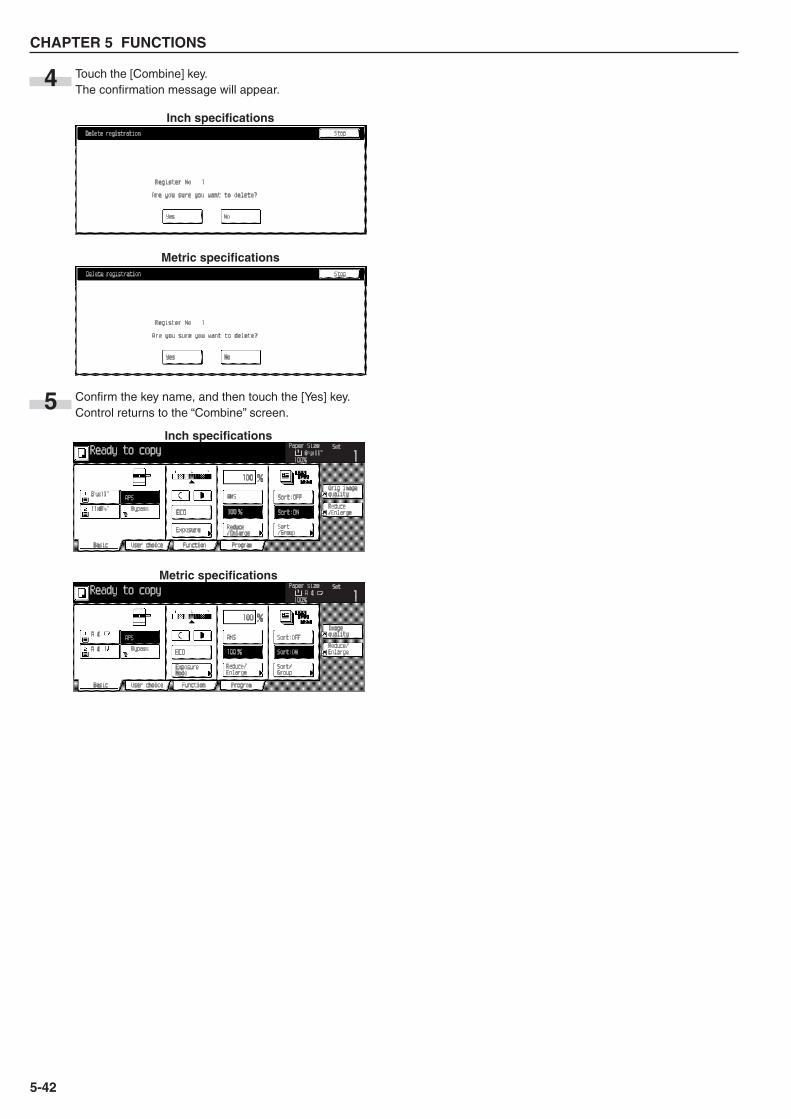
CHAPTER 5 FUNCTIONS
5-42
Touch the [Combine] key.The confirmation message will appear.
Confirm the key name, and then touch the [Yes] key.Control returns to the “Combine” screen.
4
Inch specifications
Metric specifications
5
Inch specifications
Metric specifications
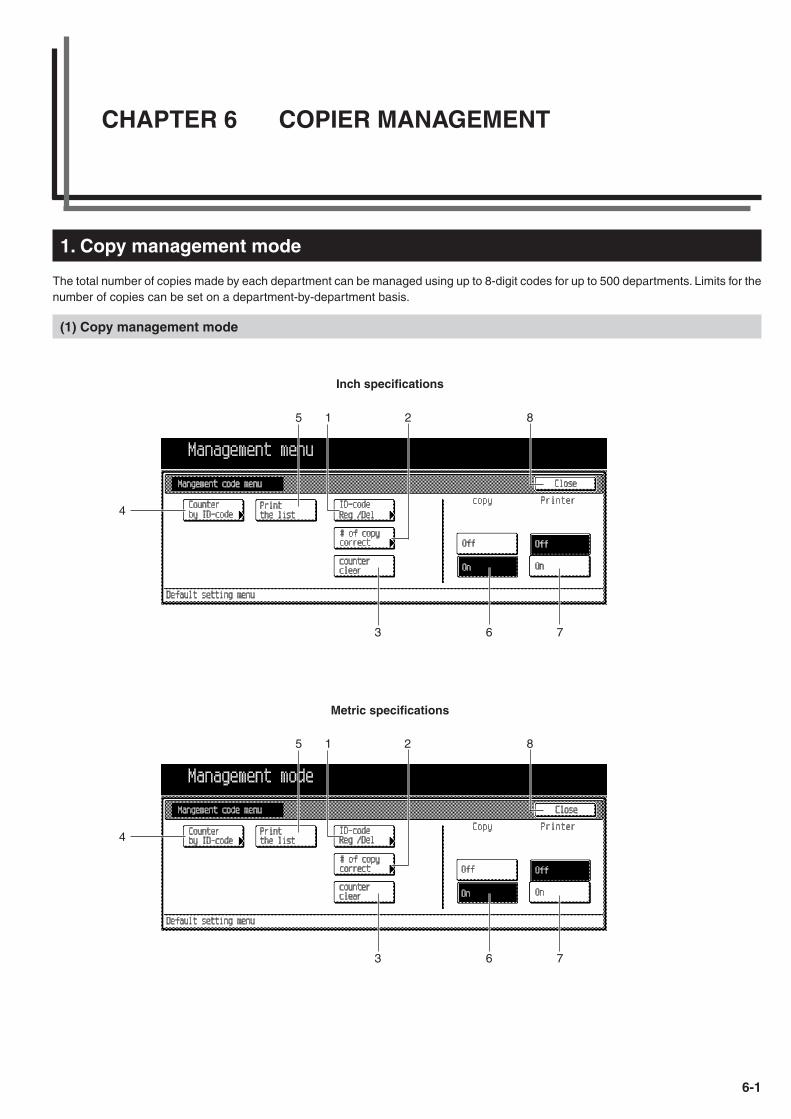
6-1
1. Copy management mode
The total number of copies made by each department can be managed using up to 8-digit codes for up to 500 departments. Limits for thenumber of copies can be set on a department-by-department basis.
(1) Copy management mode
CHAPTER 6 COPIER MANAGEMENT
Metric specifications
1 2 85
4
3 6 7
Inch specifications
1 85
4
3 6 7
2
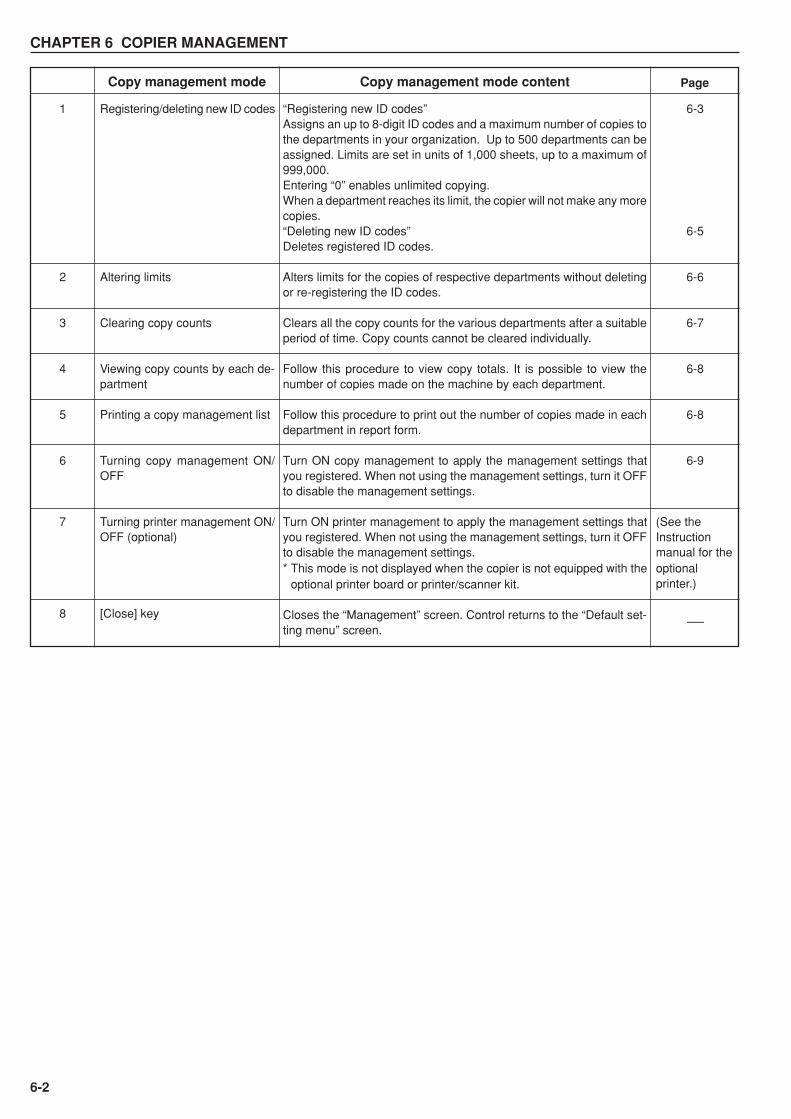
CHAPTER 6 COPIER MANAGEMENT
6-2
Registering/deleting new ID codes
Altering limits
Clearing copy counts
Viewing copy counts by each de-partment
Printing a copy management list
Turning copy management ON/OFF
Turning printer management ON/OFF (optional)
[Close] key
“Registering new ID codes”Assigns an up to 8-digit ID codes and a maximum number of copies tothe departments in your organization. Up to 500 departments can beassigned. Limits are set in units of 1,000 sheets, up to a maximum of999,000.Entering “0” enables unlimited copying.When a department reaches its limit, the copier will not make any morecopies.“Deleting new ID codes”Deletes registered ID codes.
Alters limits for the copies of respective departments without deletingor re-registering the ID codes.
Clears all the copy counts for the various departments after a suitableperiod of time. Copy counts cannot be cleared individually.
Follow this procedure to view copy totals. It is possible to view thenumber of copies made on the machine by each department.
Follow this procedure to print out the number of copies made in eachdepartment in report form.
Turn ON copy management to apply the management settings thatyou registered. When not using the management settings, turn it OFFto disable the management settings.
Turn ON printer management to apply the management settings thatyou registered. When not using the management settings, turn it OFFto disable the management settings.* This mode is not displayed when the copier is not equipped with the
optional printer board or printer/scanner kit.
Closes the “Management” screen. Control returns to the “Default set-ting menu” screen.
PageCopy management mode Copy management mode content
6-3
6-5
6-6
6-7
6-8
6-8
6-9
–
1
2
3
4
5
6
7
8
(See theInstructionmanual for theoptionalprinter.)
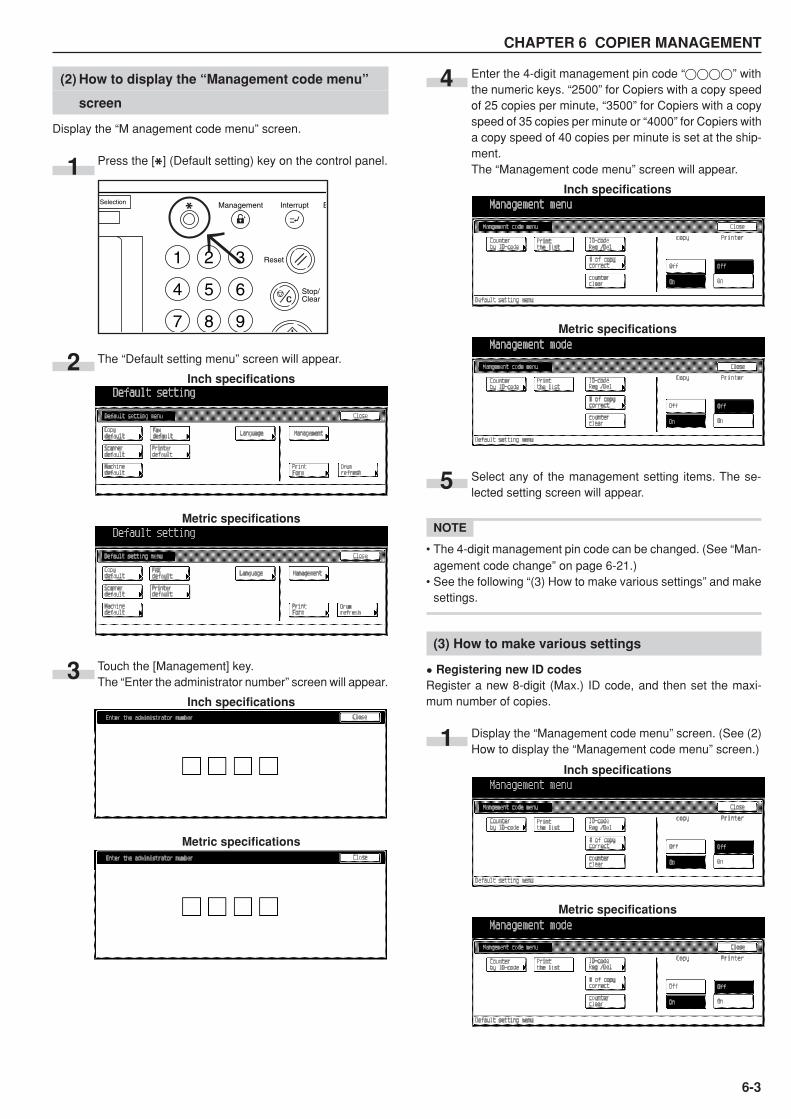
CHAPTER 6 COPIER MANAGEMENT
6-3
Enter the 4-digit management pin code “����” withthe numeric keys. “2500” for Copiers with a copy speedof 25 copies per minute, “3500” for Copiers with a copyspeed of 35 copies per minute or “4000” for Copiers witha copy speed of 40 copies per minute is set at the ship-ment.The “Management code menu” screen will appear.
Select any of the management setting items. The se-lected setting screen will appear.
NOTE
• The 4-digit management pin code can be changed. (See “Man-agement code change” on page 6-21.)
• See the following “(3) How to make various settings” and makesettings.
(3) How to make various settings
• Registering new ID codesRegister a new 8-digit (Max.) ID code, and then set the maxi-mum number of copies.
Display the “Management code menu” screen. (See (2)How to display the “Management code menu” screen.)
(2) How to display the “Management code menu”
screen
Display the “M anagement code menu” screen.
Press the [ ] (Default setting) key on the control panel.
The “Default setting menu” screen will appear.
Touch the [Management] key.The “Enter the administrator number” screen will appear.
1
2
3
4
5
1
Inch specifications
Metric specifications
Inch specifications
Metric specifications
Inch specifications
Metric specifications
Inch specifications
Metric specifications
Stop/ Clear
Reset
InterruptManagement ESelection
1 2 3
4 5 6
7 8 9

CHAPTER 6 COPIER MANAGEMENT
6-4
Touch the [ID-code Reg./Del.] key.The “Register/Delete” screen will appear.
Touch the [Register] key.The “New register” screen will appear.
Touch the upper-side [# keys] key, and then enter IDcode(8-digit: 0 to 99999999) with the numeric keys.
Touch the lower-side [# keys] key, and then enter themaximum number of copies (1,000 to 999,000) with thenumeric keys.
NOTE
• Entering “0” enables unlimited copying.• Touch the [Back] key to display the “Register/Delete” screen.
Re-enter the ID code and the maximum number of copies.
Touch the [Close] key. “Register/Delete” screen will appear.
NOTE
• To register a new ID code, touch the [Next Register] key, andthen repeat steps 4 to 6.
52
3
4
6Inch specifications
Metric specifications
Inch specifications
Metric specifications
Inch specifications
Metric specifications
Inch specifications
Metric specifications
Inch specifications
Metric specifications
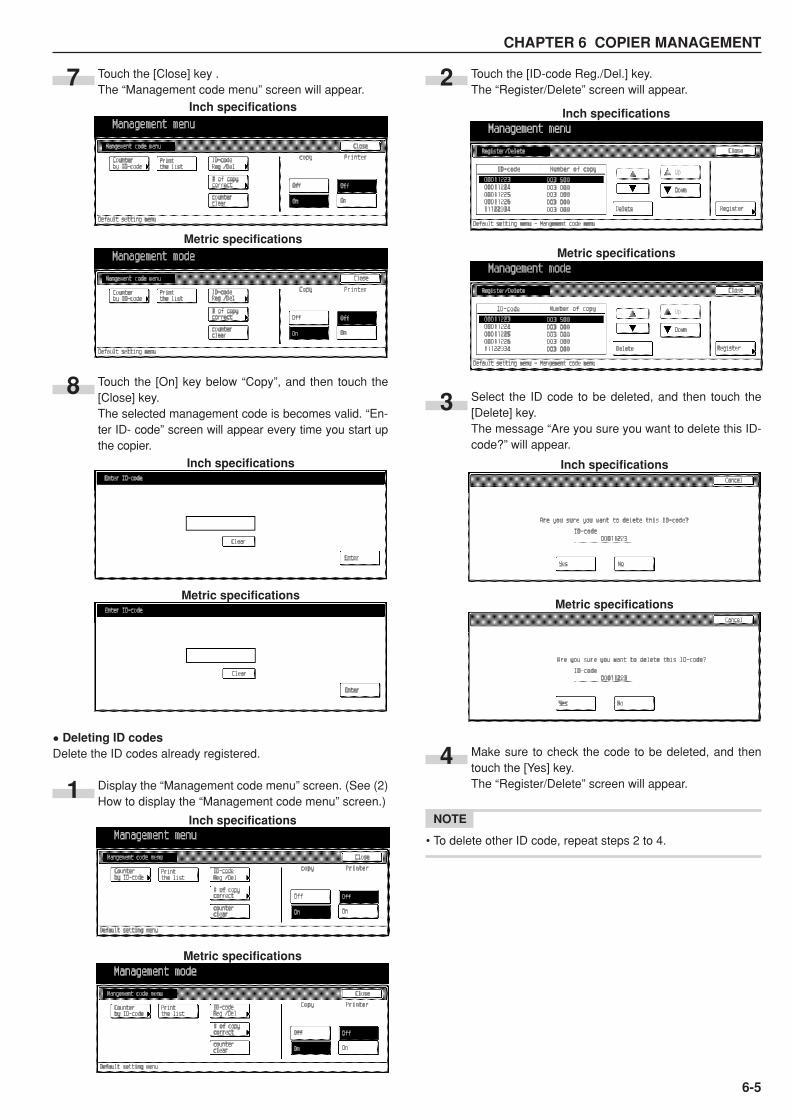
CHAPTER 6 COPIER MANAGEMENT
6-5
Touch the [Close] key .The “Management code menu” screen will appear.
Touch the [On] key below “Copy”, and then touch the[Close] key.The selected management code is becomes valid. “En-ter ID- code” screen will appear every time you start upthe copier.
• Deleting ID codesDelete the ID codes already registered.
Display the “Management code menu” screen. (See (2)How to display the “Management code menu” screen.)
Touch the [ID-code Reg./Del.] key.The “Register/Delete” screen will appear.
Select the ID code to be deleted, and then touch the[Delete] key.The message “Are you sure you want to delete this ID-code?” will appear.
Make sure to check the code to be deleted, and thentouch the [Yes] key.The “Register/Delete” screen will appear.
NOTE
• To delete other ID code, repeat steps 2 to 4.
7
8
1
2
3
4
Inch specifications
Inch specifications
Metric specifications
Inch specifications
Metric specifications
Inch specifications
Metric specifications
Metric specifications
Inch specifications
Metric specifications
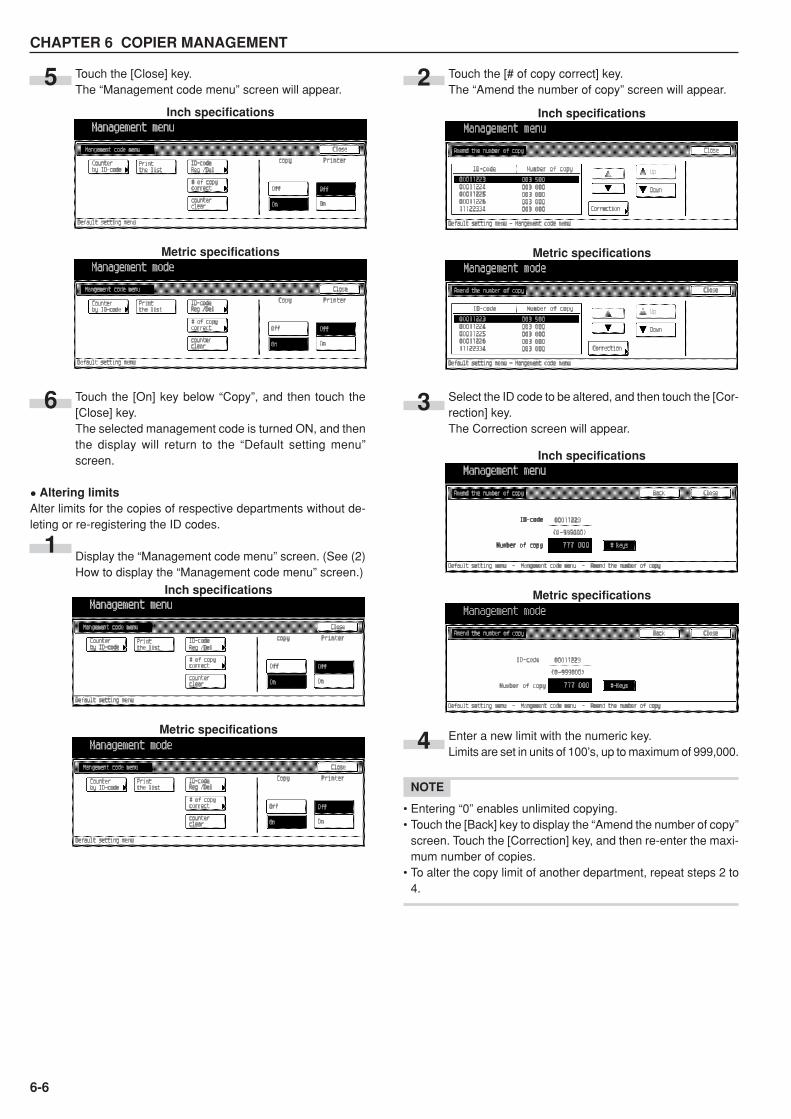
CHAPTER 6 COPIER MANAGEMENT
6-6
Touch the [# of copy correct] key.The “Amend the number of copy” screen will appear.
Select the ID code to be altered, and then touch the [Cor-rection] key.The Correction screen will appear.
Enter a new limit with the numeric key.Limits are set in units of 100’s, up to maximum of 999,000.
NOTE
• Entering “0” enables unlimited copying.• Touch the [Back] key to display the “Amend the number of copy”
screen. Touch the [Correction] key, and then re-enter the maxi-mum number of copies.
• To alter the copy limit of another department, repeat steps 2 to4.
Touch the [Close] key.The “Management code menu” screen will appear.
Touch the [On] key below “Copy”, and then touch the[Close] key.The selected management code is turned ON, and thenthe display will return to the “Default setting menu”screen.
• Altering limitsAlter limits for the copies of respective departments without de-leting or re-registering the ID codes.
Display the “Management code menu” screen. (See (2)How to display the “Management code menu” screen.)
1
2
3
4
Inch specifications
Metric specifications
Inch specifications
Metric specifications
6
Inch specifications
Metric specifications
Inch specifications
Metric specifications
5
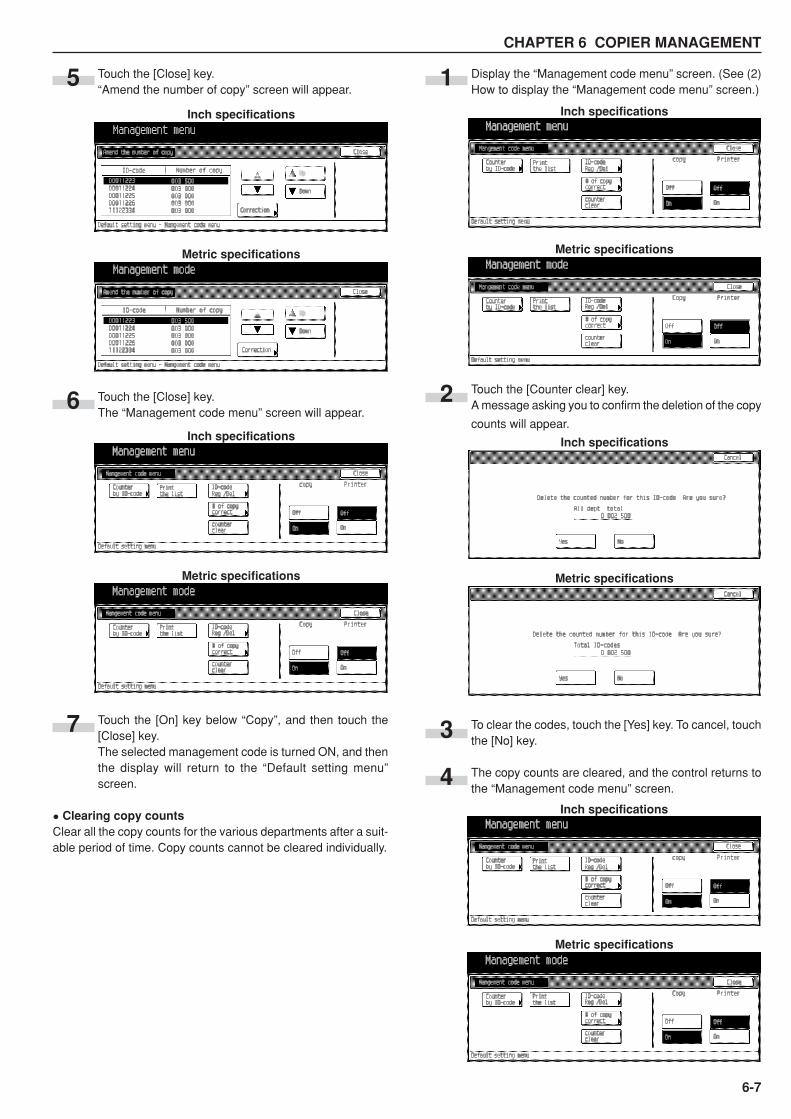
CHAPTER 6 COPIER MANAGEMENT
6-7
Touch the [Close] key.“Amend the number of copy” screen will appear.
Touch the [Close] key.The “Management code menu” screen will appear.
Touch the [On] key below “Copy”, and then touch the[Close] key.The selected management code is turned ON, and thenthe display will return to the “Default setting menu”screen.
• Clearing copy countsClear all the copy counts for the various departments after a suit-able period of time. Copy counts cannot be cleared individually.
Display the “Management code menu” screen. (See (2)How to display the “Management code menu” screen.)
Touch the [Counter clear] key.A message asking you to confirm the deletion of the copy
counts will appear.
To clear the codes, touch the [Yes] key. To cancel, touchthe [No] key.
The copy counts are cleared, and the control returns tothe “Management code menu” screen.
5
6
7
1
2
3
Inch specifications
Metric specifications
Inch specifications
Metric specifications
Inch specifications
Metric specifications
Inch specifications
Metric specifications
Inch specifications
Metric specifications
4
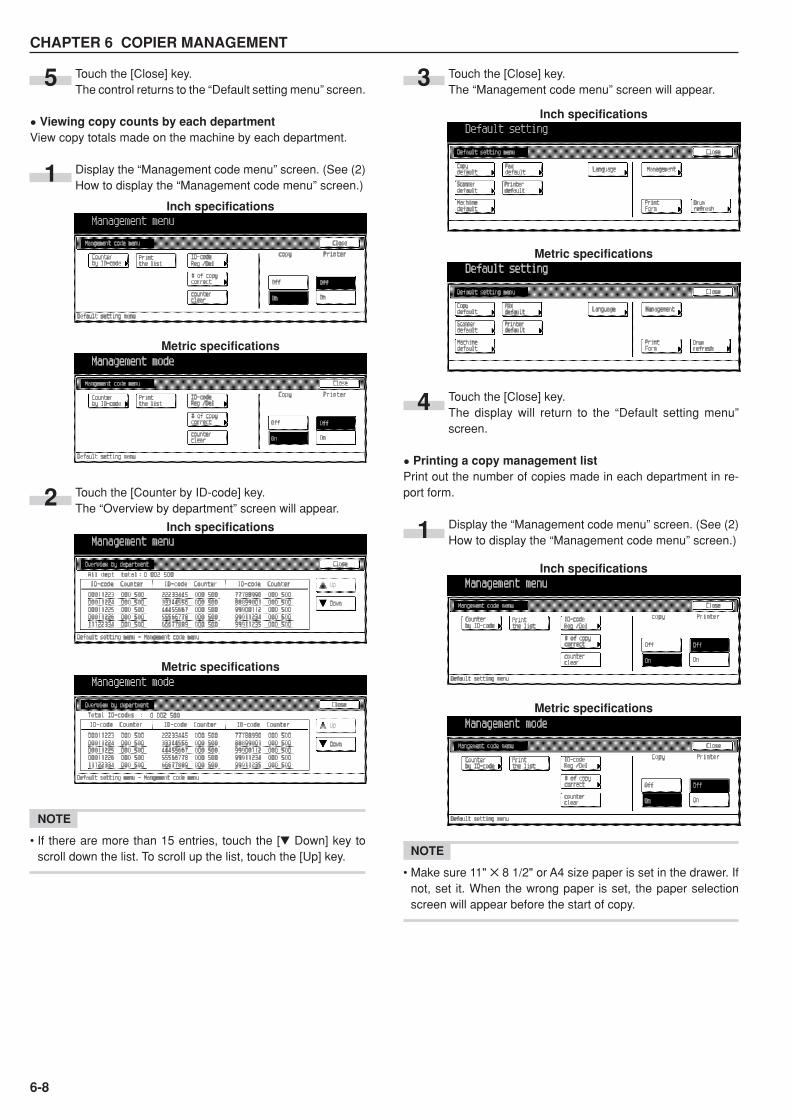
CHAPTER 6 COPIER MANAGEMENT
6-8
Touch the [Close] key.The control returns to the “Default setting menu” screen.
• Viewing copy counts by each departmentView copy totals made on the machine by each department.
Display the “Management code menu” screen. (See (2)How to display the “Management code menu” screen.)
Touch the [Counter by ID-code] key.The “Overview by department” screen will appear.
NOTE
• If there are more than 15 entries, touch the [� Down] key toscroll down the list. To scroll up the list, touch the [Up] key.
Touch the [Close] key.The “Management code menu” screen will appear.
Touch the [Close] key.The display will return to the “Default setting menu”screen.
• Printing a copy management listPrint out the number of copies made in each department in re-port form.
Display the “Management code menu” screen. (See (2)How to display the “Management code menu” screen.)
NOTE
• Make sure 11" ✕ 8 1/2" or A4 size paper is set in the drawer. Ifnot, set it. When the wrong paper is set, the paper selectionscreen will appear before the start of copy.
1
2
3
4
1
Inch specifications
Metric specifications
Inch specifications
Metric specifications
Inch specifications
Metric specifications
Inch specifications
Metric specifications
5
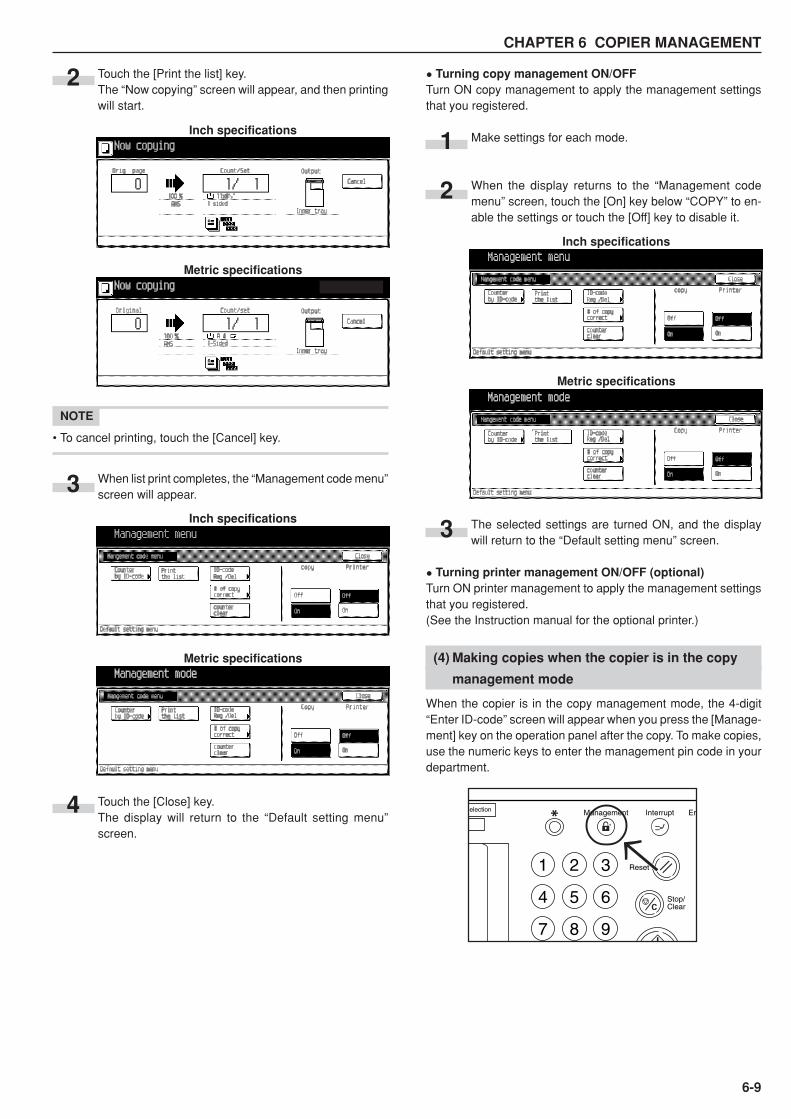
CHAPTER 6 COPIER MANAGEMENT
6-9
Touch the [Print the list] key.The “Now copying” screen will appear, and then printingwill start.
NOTE
• To cancel printing, touch the [Cancel] key.
When list print completes, the “Management code menu”screen will appear.
Touch the [Close] key.The display will return to the “Default setting menu”screen.
• Turning copy management ON/OFFTurn ON copy management to apply the management settingsthat you registered.
Make settings for each mode.
When the display returns to the “Management codemenu” screen, touch the [On] key below “COPY” to en-able the settings or touch the [Off] key to disable it.
The selected settings are turned ON, and the displaywill return to the “Default setting menu” screen.
• Turning printer management ON/OFF (optional)Turn ON printer management to apply the management settingsthat you registered.(See the Instruction manual for the optional printer.)
(4) Making copies when the copier is in the copy
management mode
When the copier is in the copy management mode, the 4-digit“Enter ID-code” screen will appear when you press the [Manage-ment] key on the operation panel after the copy. To make copies,use the numeric keys to enter the management pin code in yourdepartment.
2
4
2
1
3
3Inch specifications
Metric specifications
Inch specifications
Metric specifications
Inch specifications
Metric specifications
Stop/ Clear
Reset
InterruptManagement EnSelection
1 2 3
4 5 6
7 8 9
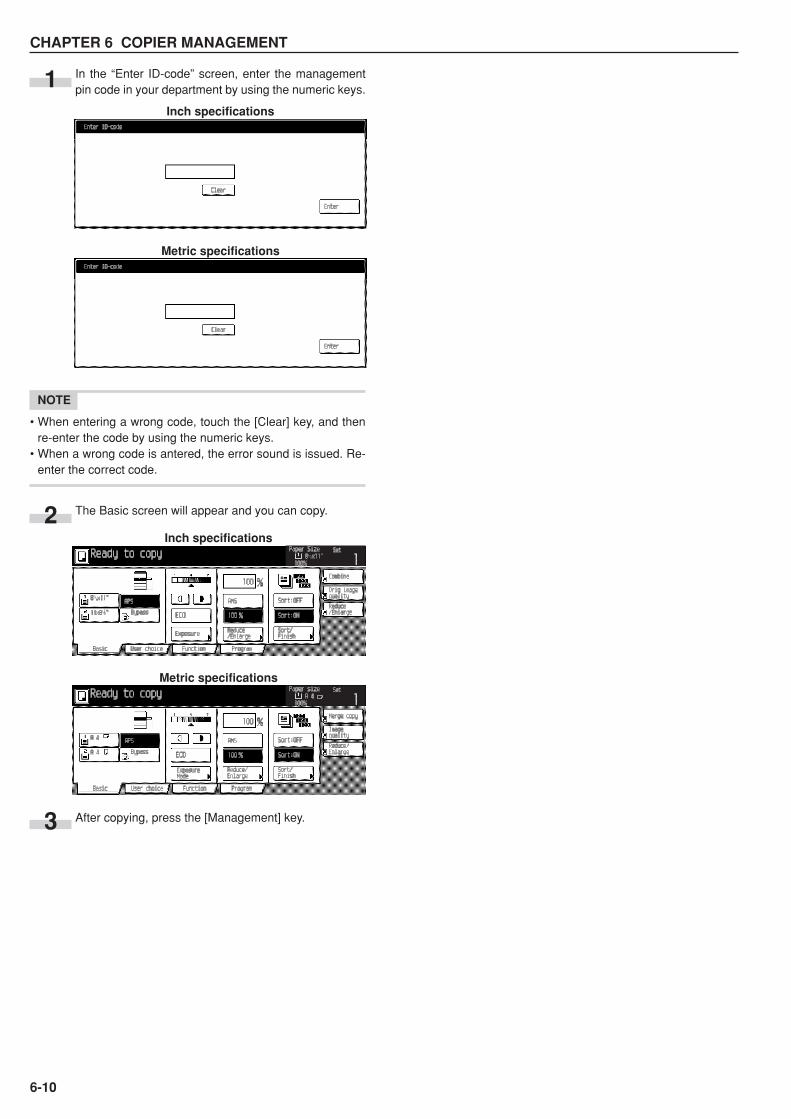
CHAPTER 6 COPIER MANAGEMENT
6-10
In the “Enter ID-code” screen, enter the managementpin code in your department by using the numeric keys.
NOTE
• When entering a wrong code, touch the [Clear] key, and thenre-enter the code by using the numeric keys.
• When a wrong code is antered, the error sound is issued. Re-enter the correct code.
The Basic screen will appear and you can copy.
After copying, press the [Management] key.
2
1Inch specifications
Metric specifications
Inch specifications
Metric specifications
3
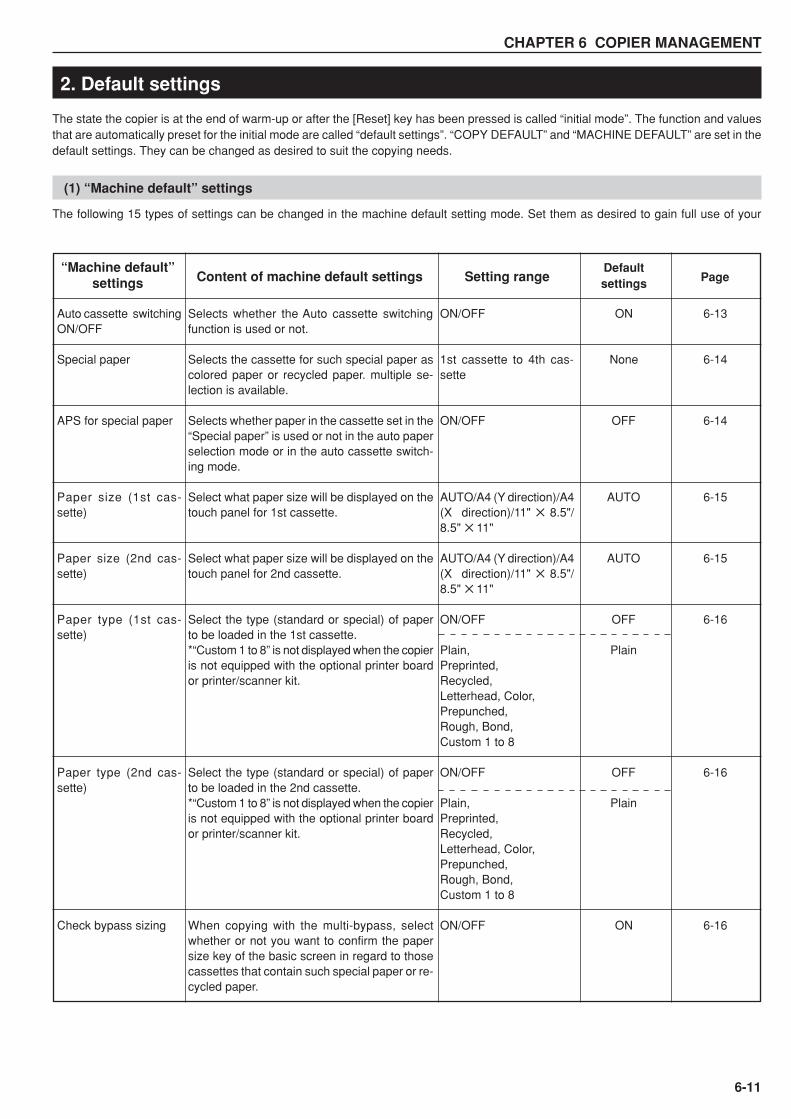
CHAPTER 6 COPIER MANAGEMENT
6-11
2. Default settings
The state the copier is at the end of warm-up or after the [Reset] key has been pressed is called “initial mode”. The function and valuesthat are automatically preset for the initial mode are called “default settings”. “COPY DEFAULT” and “MACHINE DEFAULT” are set in thedefault settings. They can be changed as desired to suit the copying needs.
(1) “Machine default” settings
The following 15 types of settings can be changed in the machine default setting mode. Set them as desired to gain full use of your
Auto cassette switchingON/OFF
Special paper
APS for special paper
Paper size (1st cas-sette)
Paper size (2nd cas-sette)
Paper type (1st cas-sette)
Paper type (2nd cas-sette)
Check bypass sizing
Selects whether the Auto cassette switchingfunction is used or not.
Selects the cassette for such special paper ascolored paper or recycled paper. multiple se-lection is available.
Selects whether paper in the cassette set in the“Special paper” is used or not in the auto paperselection mode or in the auto cassette switch-ing mode.
Select what paper size will be displayed on thetouch panel for 1st cassette.
Select what paper size will be displayed on thetouch panel for 2nd cassette.
Select the type (standard or special) of paperto be loaded in the 1st cassette.*“Custom 1 to 8” is not displayed when the copieris not equipped with the optional printer boardor printer/scanner kit.
Select the type (standard or special) of paperto be loaded in the 2nd cassette.*“Custom 1 to 8” is not displayed when the copieris not equipped with the optional printer boardor printer/scanner kit.
When copying with the multi-bypass, selectwhether or not you want to confirm the papersize key of the basic screen in regard to thosecassettes that contain such special paper or re-cycled paper.
Page“Machine default”
settings Content of machine default settings
6-13
6-14
6-14
6-15
6-15
6-16
6-16
6-16
Defaultsettings
ON
None
OFF
AUTO
AUTO
OFF
Plain
OFF
Plain
ON
ON/OFF
1st cassette to 4th cas-sette
ON/OFF
AUTO/A4 (Y direction)/A4(X direction)/11" ✕ 8.5"/8.5" ✕ 11"
AUTO/A4 (Y direction)/A4(X direction)/11" ✕ 8.5"/8.5" ✕ 11"
ON/OFF
Plain,Preprinted,Recycled,Letterhead, Color,Prepunched,Rough, Bond,Custom 1 to 8
ON/OFF
Plain,Preprinted,Recycled,Letterhead, Color,Prepunched,Rough, Bond,Custom 1 to 8
ON/OFF
Setting range

CHAPTER 6 COPIER MANAGEMENT
6-12
Auto shut-off time
Auto preheat time
Select copy outputmode (optional)
Select FAX output mode(optional)
Select the main mode(optional)
Key sound ON/OFF
Silent mode
Date/Time
Time difference
Management codechange
Auto shut-off ON/OFF
Selects the length of time that you want to elapsewhen the copier is not used. The auto shut-offfunction automatically turns the power to thecopier OFF. It is possible to set this time to any15 minute increment between 15 and 240 min-utes. It is also possible to deactivate the autoshut-off function.The factory default setting is 60 minutes.*It is recommended that you extend the timebefore the auto shut-off function engages if thecopier is used relatively frequently, and shortenthat time when it is used infrequently.
Select the length of time that you want to elapse– after copying ends – before the energy-sav-ing auto preheat function is engaged. The set-ting can be made to any 1-minute incrementbetween 1 minute and 45 minutes, 60 minutes,90 minutes, 120 minutes, 180 minutes or 240minutes.
Selects whether to eject copied paper to copieror either the document finisher or job separator.*This setting is not displayed when the copier isnot equipped with the optional document finisheror job separator.
Selects where to eject facsimile paper: the in-ner tray, job separator, document finisher or mail-box.*This setting is not displayed when the copier isnot equipped with the optional document finisheror job separator.
Selects the initial screen displayed when thepower is turned ON.
Selects whether you want the “beep” that soundswhen you touch the touch panel to be turnedON or OFF.
The copier can be switched to the silent mode,which stops the motor inside the copy machineimmediately after copying has been finished.When “ON” is selected, the motor stops imme-diately after copying has been finished.
Sets the current time for using the optional scan-ner function.
Sets the time difference for using the optionalscanner function.
Changes the pin code that gives you access tothe various default settings and management.*If you do change the management pin code,however, be sure to keep a note of the new code.If you do happen to forget the pin code, consultyour service representation.
Selects whether you want the auto shut-off timefunction to be turned ON or OFF.
15 to 240 (min)
1 to 45, 60, 90, 120,180 and 240 (min)
Inner tray, Job sepa-rator, Finisher maintray, Finisher subtray
Inner tray, Job sepa-rator, Finisher subtray, Mailbox 1
Copy mode, FAXmode
ON/OFF
ON/OFF
Year: 2000 to 2099Month: 1 to 12Day: 1 to 31Time: 00:00 to 23:59
+12:00 to –12:00
0000 to 9999
ON/OFF
60 (min)
15 (min)
Inner tray
Inner tray
Copy mode
ON
OFF
Year: ‘00Month: 01Day: 01Time: 00:00
00:00
2500 (For Copierswith a copy speed of25 copies per minute)3500 (For Copierswith a copy speed of35 copies per minute)4000 (For Copierswith a copy speed of40 copies per minute)
ON
6-17
6-17
6-18
6-18
6-19
6-19
6-20
6-20
6-21
6-21
6-22
Page“Machine default”
settings Content of machine default settings Default settingsSetting range
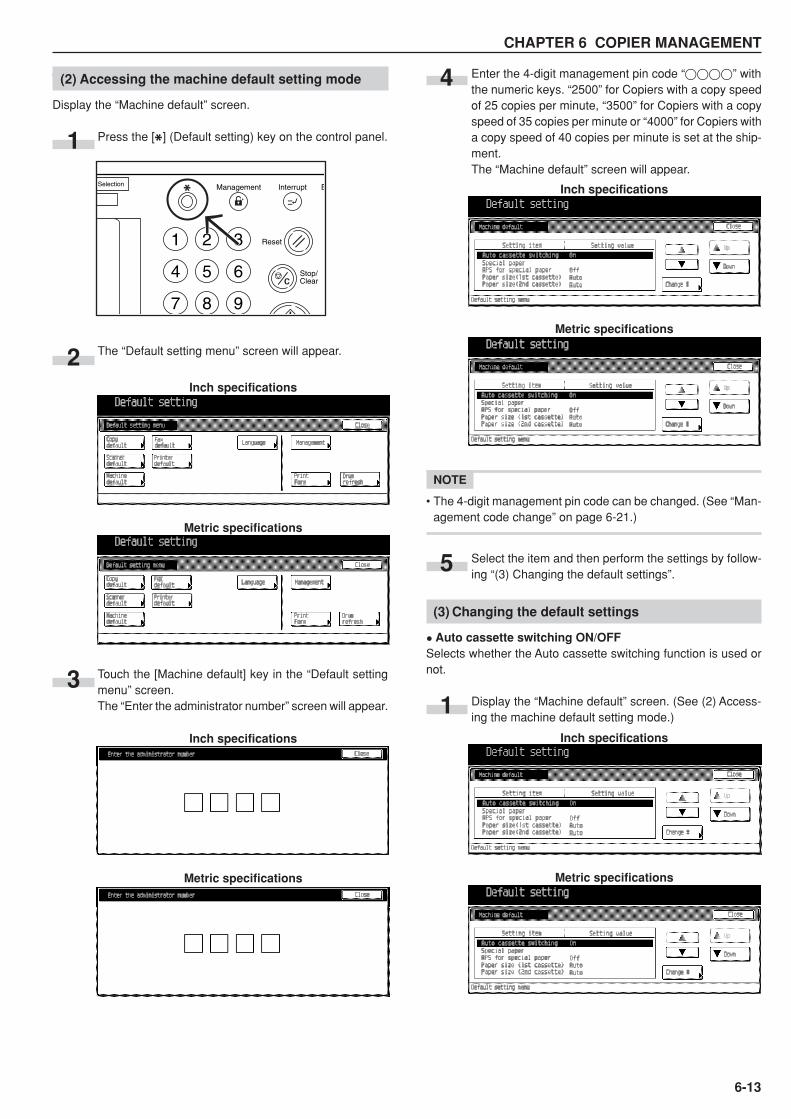
CHAPTER 6 COPIER MANAGEMENT
6-13
copier.(2) Accessing the machine default setting mode
Display the “Machine default” screen.
Press the [ ] (Default setting) key on the control panel.
The “Default setting menu” screen will appear.
Touch the [Machine default] key in the “Default settingmenu” screen.The “Enter the administrator number” screen will appear.
Enter the 4-digit management pin code “����” withthe numeric keys. “2500” for Copiers with a copy speedof 25 copies per minute, “3500” for Copiers with a copyspeed of 35 copies per minute or “4000” for Copiers witha copy speed of 40 copies per minute is set at the ship-ment.The “Machine default” screen will appear.
NOTE
• The 4-digit management pin code can be changed. (See “Man-agement code change” on page 6-21.)
Select the item and then perform the settings by follow-ing “(3) Changing the default settings”.
(3) Changing the default settings
• Auto cassette switching ON/OFFSelects whether the Auto cassette switching function is used ornot.
Display the “Machine default” screen. (See (2) Access-ing the machine default setting mode.)
1
2
3
4
5
1
Inch specifications
Metric specifications
Inch specifications
Metric specifications
Stop/ Clear
Reset
InterruptManagement ESelection
1 2 3
4 5 6
7 8 9
Inch specifications
Metric specifications
Inch specifications
Metric specifications
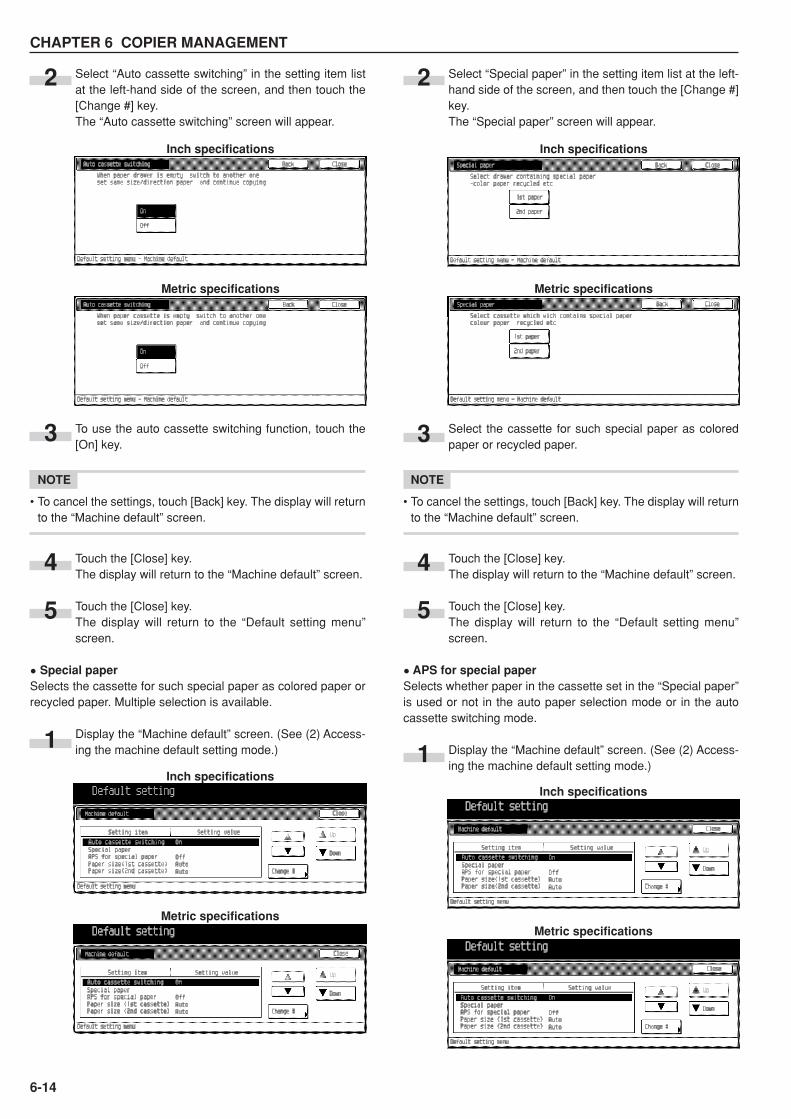
CHAPTER 6 COPIER MANAGEMENT
6-14
Select “Auto cassette switching” in the setting item listat the left-hand side of the screen, and then touch the[Change #] key.The “Auto cassette switching” screen will appear.
To use the auto cassette switching function, touch the[On] key.
NOTE
• To cancel the settings, touch [Back] key. The display will returnto the “Machine default” screen.
Touch the [Close] key.The display will return to the “Machine default” screen.
Touch the [Close] key.The display will return to the “Default setting menu”screen.
• Special paperSelects the cassette for such special paper as colored paper orrecycled paper. Multiple selection is available.
Display the “Machine default” screen. (See (2) Access-ing the machine default setting mode.)
2
3
4
5
1
Select “Special paper” in the setting item list at the left-hand side of the screen, and then touch the [Change #]key.The “Special paper” screen will appear.
Select the cassette for such special paper as coloredpaper or recycled paper.
NOTE
• To cancel the settings, touch [Back] key. The display will returnto the “Machine default” screen.
Touch the [Close] key.The display will return to the “Machine default” screen.
Touch the [Close] key.The display will return to the “Default setting menu”screen.
• APS for special paperSelects whether paper in the cassette set in the “Special paper”is used or not in the auto paper selection mode or in the autocassette switching mode.
Display the “Machine default” screen. (See (2) Access-ing the machine default setting mode.)
2
3
4
5
1
Inch specifications
Metric specifications
Inch specifications
Metric specifications
Inch specifications
Metric specifications
Inch specifications
Metric specifications
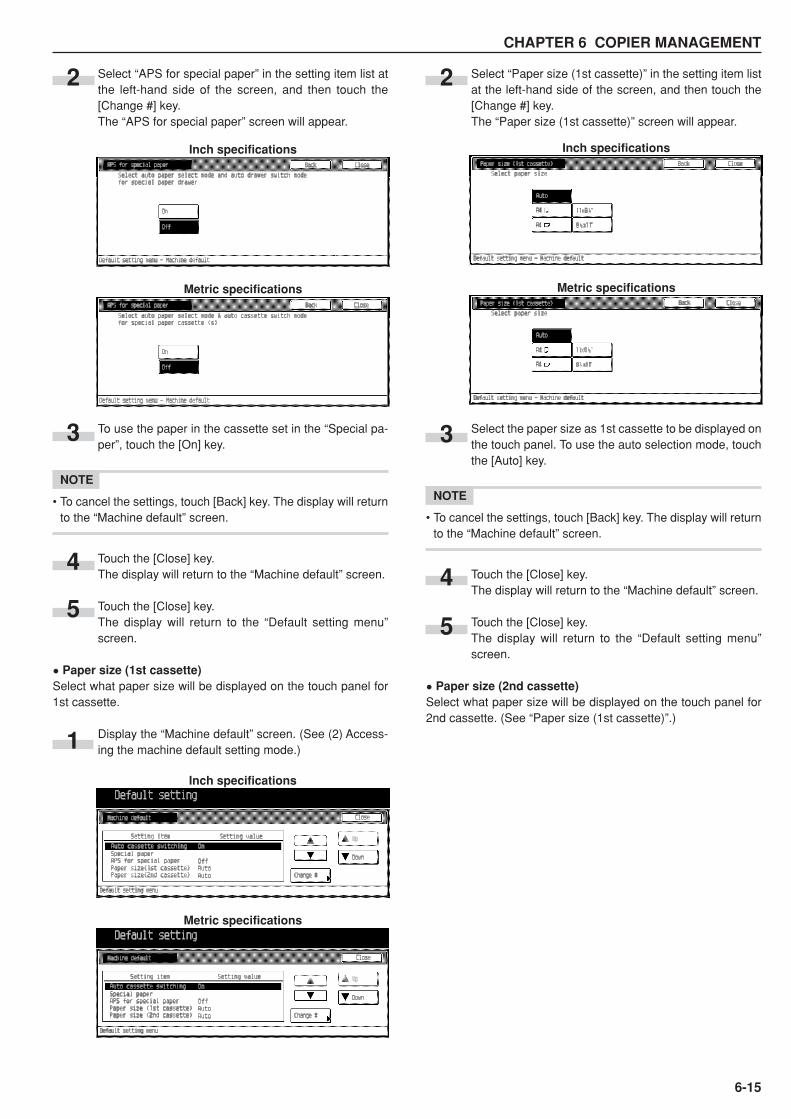
CHAPTER 6 COPIER MANAGEMENT
6-15
Select “APS for special paper” in the setting item list atthe left-hand side of the screen, and then touch the[Change #] key.The “APS for special paper” screen will appear.
To use the paper in the cassette set in the “Special pa-per”, touch the [On] key.
NOTE
• To cancel the settings, touch [Back] key. The display will returnto the “Machine default” screen.
Touch the [Close] key.The display will return to the “Machine default” screen.
Touch the [Close] key.The display will return to the “Default setting menu”screen.
• Paper size (1st cassette)Select what paper size will be displayed on the touch panel for1st cassette.
Display the “Machine default” screen. (See (2) Access-ing the machine default setting mode.)
Select “Paper size (1st cassette)” in the setting item listat the left-hand side of the screen, and then touch the[Change #] key.The “Paper size (1st cassette)” screen will appear.
Select the paper size as 1st cassette to be displayed onthe touch panel. To use the auto selection mode, touchthe [Auto] key.
NOTE
• To cancel the settings, touch [Back] key. The display will returnto the “Machine default” screen.
Touch the [Close] key.The display will return to the “Machine default” screen.
Touch the [Close] key.The display will return to the “Default setting menu”screen.
• Paper size (2nd cassette)Select what paper size will be displayed on the touch panel for2nd cassette. (See “Paper size (1st cassette)”.)
2
3
4
5
1
2
3
4
5
Inch specifications
Metric specifications
Inch specifications
Metric specifications
Inch specifications
Metric specifications
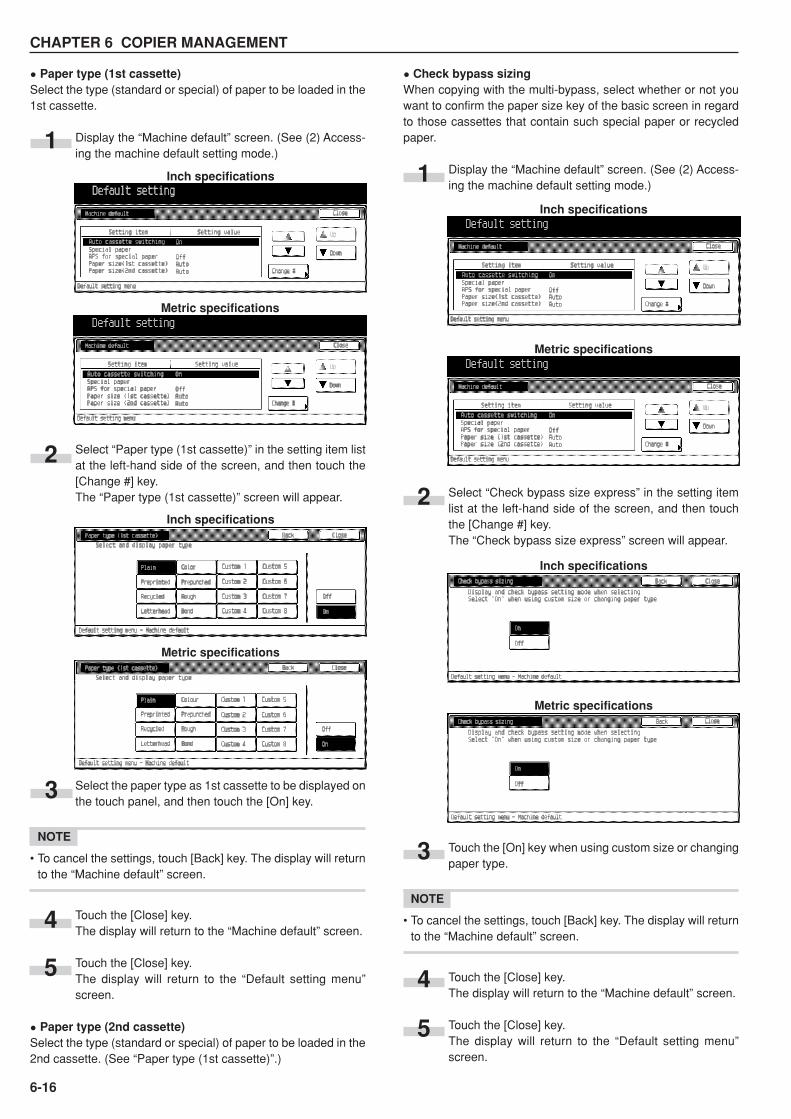
CHAPTER 6 COPIER MANAGEMENT
6-16
• Paper type (1st cassette)Select the type (standard or special) of paper to be loaded in the1st cassette.
Display the “Machine default” screen. (See (2) Access-ing the machine default setting mode.)
Select “Paper type (1st cassette)” in the setting item listat the left-hand side of the screen, and then touch the[Change #] key.The “Paper type (1st cassette)” screen will appear.
Select the paper type as 1st cassette to be displayed onthe touch panel, and then touch the [On] key.
NOTE
• To cancel the settings, touch [Back] key. The display will returnto the “Machine default” screen.
Touch the [Close] key.The display will return to the “Machine default” screen.
Touch the [Close] key.The display will return to the “Default setting menu”screen.
• Paper type (2nd cassette)Select the type (standard or special) of paper to be loaded in the2nd cassette. (See “Paper type (1st cassette)”.)
• Check bypass sizingWhen copying with the multi-bypass, select whether or not youwant to confirm the paper size key of the basic screen in regardto those cassettes that contain such special paper or recycledpaper.
Display the “Machine default” screen. (See (2) Access-ing the machine default setting mode.)
Select “Check bypass size express” in the setting itemlist at the left-hand side of the screen, and then touchthe [Change #] key.The “Check bypass size express” screen will appear.
Touch the [On] key when using custom size or changingpaper type.
NOTE
• To cancel the settings, touch [Back] key. The display will returnto the “Machine default” screen.
Touch the [Close] key.The display will return to the “Machine default” screen.
Touch the [Close] key.The display will return to the “Default setting menu”screen.
2
3
4
5
2
3
4
5
1Inch specifications
Metric specifications
1
Inch specifications
Metric specifications
Inch specifications
Metric specifications
Inch specifications
Metric specifications
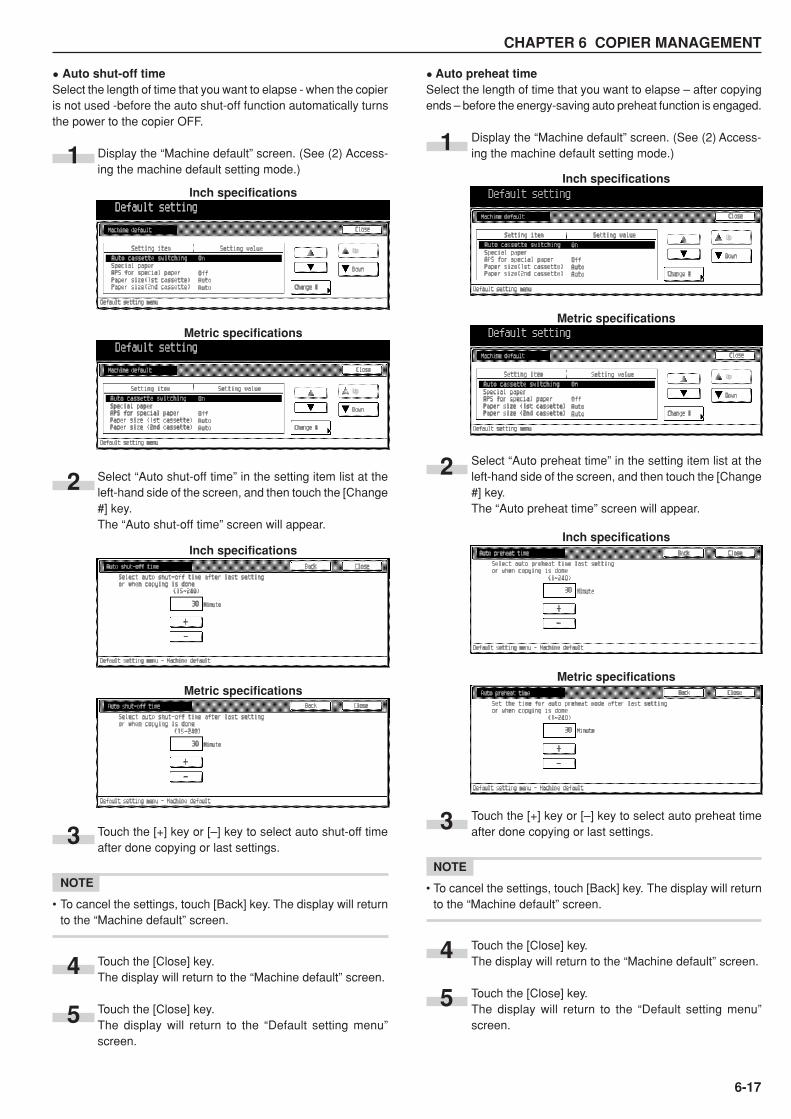
CHAPTER 6 COPIER MANAGEMENT
6-17
• Auto shut-off timeSelect the length of time that you want to elapse - when the copieris not used -before the auto shut-off function automatically turnsthe power to the copier OFF.
Display the “Machine default” screen. (See (2) Access-ing the machine default setting mode.)
Select “Auto shut-off time” in the setting item list at theleft-hand side of the screen, and then touch the [Change#] key.The “Auto shut-off time” screen will appear.
Touch the [+] key or [–] key to select auto shut-off timeafter done copying or last settings.
NOTE
• To cancel the settings, touch [Back] key. The display will returnto the “Machine default” screen.
Touch the [Close] key.The display will return to the “Machine default” screen.
Touch the [Close] key.The display will return to the “Default setting menu”screen.
• Auto preheat timeSelect the length of time that you want to elapse – after copyingends – before the energy-saving auto preheat function is engaged.
Display the “Machine default” screen. (See (2) Access-ing the machine default setting mode.)
Select “Auto preheat time” in the setting item list at theleft-hand side of the screen, and then touch the [Change#] key.The “Auto preheat time” screen will appear.
Touch the [+] key or [–] key to select auto preheat timeafter done copying or last settings.
NOTE
• To cancel the settings, touch [Back] key. The display will returnto the “Machine default” screen.
Touch the [Close] key.The display will return to the “Machine default” screen.
Touch the [Close] key.The display will return to the “Default setting menu”screen.
1Inch specifications
Metric specifications
2
Inch specifications
Metric specifications
3
4
5
1Inch specifications
Metric specifications
2
Inch specifications
Metric specifications
3
4
5

CHAPTER 6 COPIER MANAGEMENT
6-18
• Select copy output mode (optional)Select whether to eject copied paper to copier or either the docu-ment finisher or job separator.
Display the “Machine default” screen. (See (2) Access-ing the machine default setting mode.)
Select “Select Copy output mode” in the setting item listat the left-hand side of the screen, and then touch the[Change #] key.The “Select copy output mode” screen will appear.
Select which to eject copied paper: the inner tray, jobseparator, document finisher main tray or document fin-isher sub tray.
NOTE
• To cancel the settings, touch [Back] key. The display will returnto the “Machine default” screen.
Touch the [Close] key.The display will return to the “Machine default” screen.
Touch the [Close] key.The display will return to the “Default setting menu”screen.
1
3
4
5
Inch specifications
Metric specifications
Inch specifications
Metric specifications
2
• Select FAX output mode (optional)Select where to eject facsimile paper: the inner tray, job separa-tor, document finisher or mailbox.
Display the “Machine default” screen. (See (2) Access-ing the machine default setting mode.)
Select “Select FAX output mode” in the setting item listat the left-hand side of the screen, and then touch the[Change #] key.The “Select FAX output mode” screen will appear.
Select where to eject facsimile paper: the inner tray, jobseparator, document finisher or mailbox.
NOTE
• To cancel the settings, touch [Back] key. The display will returnto the “Machine default” screen.
Touch the [Close] key.The display will return to the “Machine default” screen.
Touch the [Close] key.The display will return to the “Default setting menu”screen.
1
3
4
5
Inch specifications
Metric specifications
Inch specifications
Metric specifications
2

CHAPTER 6 COPIER MANAGEMENT
6-19
• Select the main mode (optional)Select the screen displayed when the power is turned ON.
Display the “Machine default” screen. (See (2) Access-ing the machine default setting mode.)
Select “Select the main mode” in the setting item list atthe left-hand side of the screen, and then touch the[Change #] key.The “Select the main mode” screen will appear.
Select the screen displayed when the power is turnedON.
NOTE
• To cancel the settings, touch [Back] key. The display will returnto the “Machine default” screen.
Touch the [Close] key.The display will return to the “Machine default” screen.
Touch the [Close] key.The display will return to the “Default setting menu”screen.
• Key sound ON/OFFSelect whether you want the “beep” that sounds when you touchthe touch panel to be turned ON or OFF.
Display the “Machine default” screen. (See (2) Access-ing the machine default setting mode.)
Select “Key sound” in the setting item list at the left-handside of the screen, and then touch the [Change #] key.The “Key sound ON/OFF” screen will appear.
Select panel key sound mode ON or OFF.
NOTE
• To cancel the settings, touch [Back] key. The display will returnto the “Machine default” screen.
Touch the [Close] key.The display will return to the “Machine default” screen.
Touch the [Close] key.The display will return to the “Default setting menu”screen.
1
3
4
5
Inch specifications
Metric specifications
Inch specifications
Metric specifications
2
1
2
4
5
Inch specifications
Metric specifications
Inch specifications
3
Metric specifications
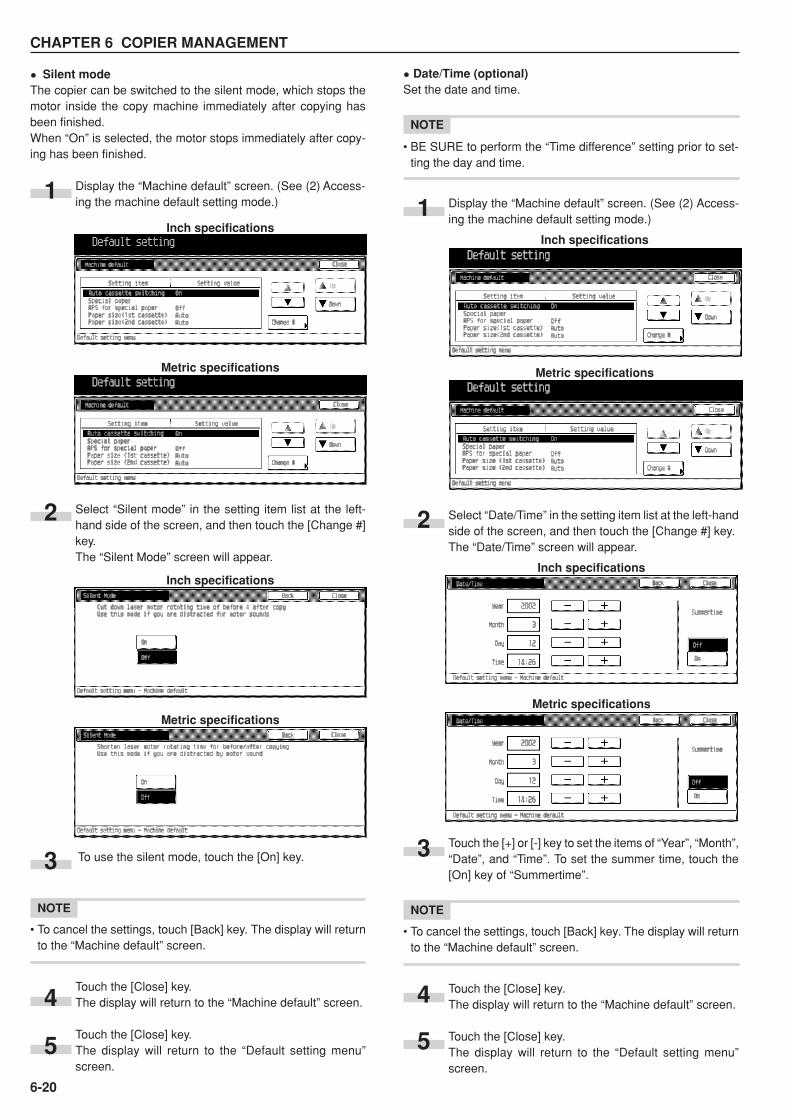
CHAPTER 6 COPIER MANAGEMENT
6-20
• Date/Time (optional)Set the date and time.
NOTE
• BE SURE to perform the “Time difference” setting prior to set-ting the day and time.
Display the “Machine default” screen. (See (2) Access-ing the machine default setting mode.)
Select “Date/Time” in the setting item list at the left-handside of the screen, and then touch the [Change #] key.The “Date/Time” screen will appear.
Touch the [+] or [-] key to set the items of “Year”, “Month”,“Date”, and “Time”. To set the summer time, touch the[On] key of “Summertime”.
NOTE
• To cancel the settings, touch [Back] key. The display will returnto the “Machine default” screen.
Touch the [Close] key.The display will return to the “Machine default” screen.
Touch the [Close] key.The display will return to the “Default setting menu”screen.
1
2
3
• Silent modeThe copier can be switched to the silent mode, which stops themotor inside the copy machine immediately after copying hasbeen finished.When “On” is selected, the motor stops immediately after copy-ing has been finished.
Display the “Machine default” screen. (See (2) Access-ing the machine default setting mode.)
Select “Silent mode” in the setting item list at the left-hand side of the screen, and then touch the [Change #]key.The “Silent Mode” screen will appear.
To use the silent mode, touch the [On] key.
NOTE
• To cancel the settings, touch [Back] key. The display will returnto the “Machine default” screen.
Touch the [Close] key.The display will return to the “Machine default” screen.
Touch the [Close] key.The display will return to the “Default setting menu”screen.
1Inch specifications
Metric specifications
2
Inch specifications
Metric specifications
3
4
5
4
5
Inch specifications
Metric specifications
Inch specifications
Metric specifications
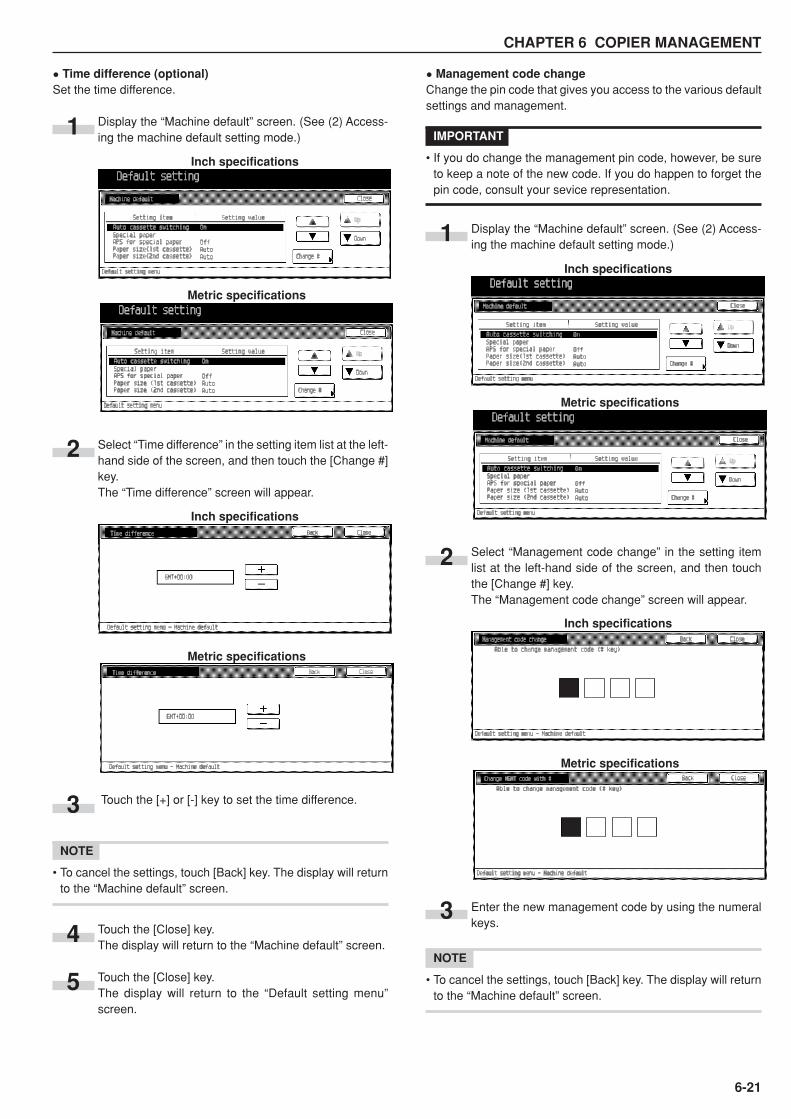
CHAPTER 6 COPIER MANAGEMENT
6-21
• Time difference (optional)Set the time difference.
Display the “Machine default” screen. (See (2) Access-ing the machine default setting mode.)
Select “Time difference” in the setting item list at the left-hand side of the screen, and then touch the [Change #]key.The “Time difference” screen will appear.
Touch the [+] or [-] key to set the time difference.
NOTE
• To cancel the settings, touch [Back] key. The display will returnto the “Machine default” screen.
Touch the [Close] key.The display will return to the “Machine default” screen.
Touch the [Close] key.The display will return to the “Default setting menu”screen.
• Management code changeChange the pin code that gives you access to the various defaultsettings and management.
IMPORTANT
• If you do change the management pin code, however, be sureto keep a note of the new code. If you do happen to forget thepin code, consult your sevice representation.
Display the “Machine default” screen. (See (2) Access-ing the machine default setting mode.)
Select “Management code change” in the setting itemlist at the left-hand side of the screen, and then touchthe [Change #] key.The “Management code change” screen will appear.
Enter the new management code by using the numeralkeys.
NOTE
• To cancel the settings, touch [Back] key. The display will returnto the “Machine default” screen.
3
4
5
2
1
Inch specifications
Metric specifications
Inch specifications
Metric specifications
Inch specifications
Metric specifications
Inch specifications
Metric specifications
2
1
3
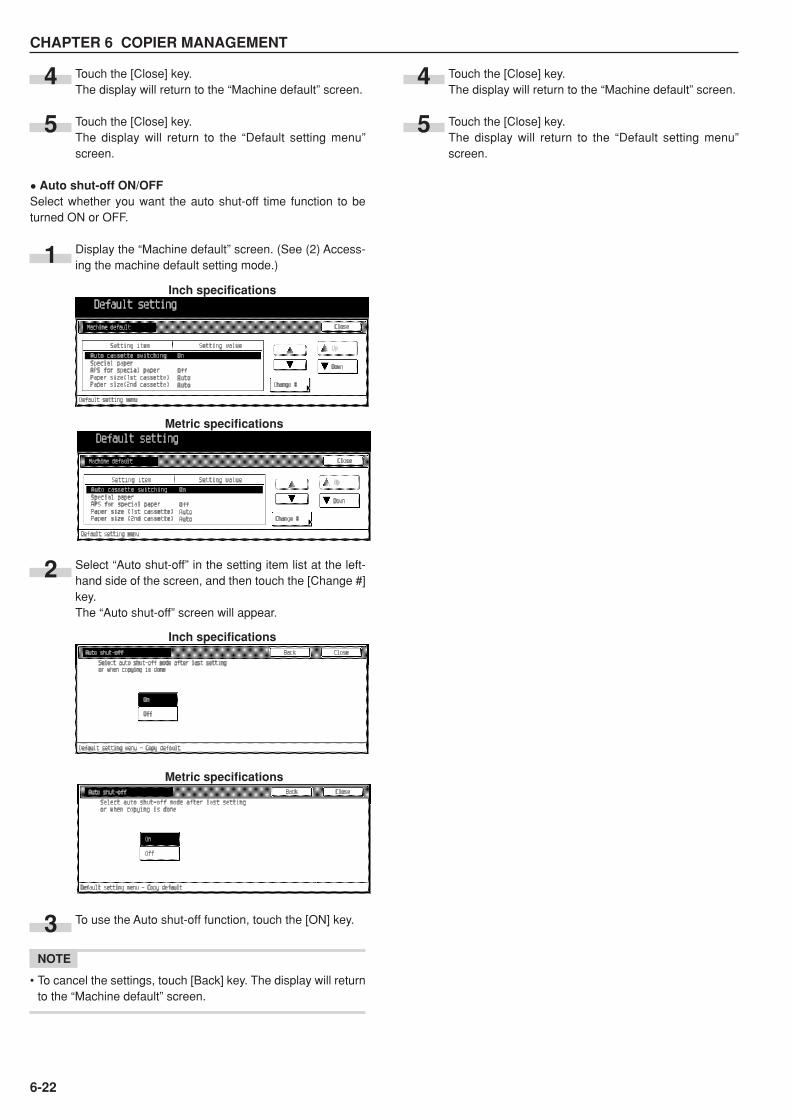
CHAPTER 6 COPIER MANAGEMENT
6-22
Inch specifications
Metric specifications
Touch the [Close] key.The display will return to the “Machine default” screen.
Touch the [Close] key.The display will return to the “Default setting menu”screen.
• Auto shut-off ON/OFFSelect whether you want the auto shut-off time function to beturned ON or OFF.
Display the “Machine default” screen. (See (2) Access-ing the machine default setting mode.)
Select “Auto shut-off” in the setting item list at the left-hand side of the screen, and then touch the [Change #]key.The “Auto shut-off” screen will appear.
To use the Auto shut-off function, touch the [ON] key.
NOTE
• To cancel the settings, touch [Back] key. The display will returnto the “Machine default” screen.
Touch the [Close] key.The display will return to the “Machine default” screen.
Touch the [Close] key.The display will return to the “Default setting menu”screen.
4
5
3
4
5
2
1Inch specifications
Metric specifications
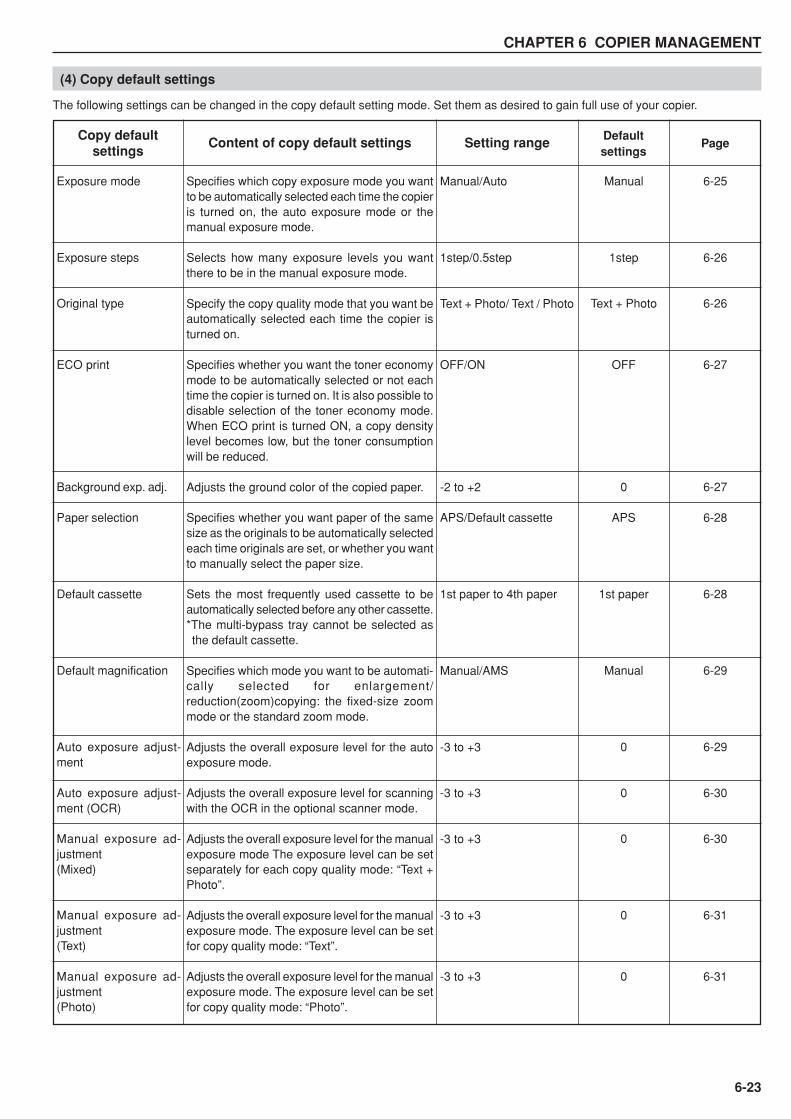
CHAPTER 6 COPIER MANAGEMENT
6-23
(4) Copy default settings
The following settings can be changed in the copy default setting mode. Set them as desired to gain full use of your copier.
Exposure mode
Exposure steps
Original type
ECO print
Background exp. adj.
Paper selection
Default cassette
Default magnification
Auto exposure adjust-ment
Auto exposure adjust-ment (OCR)
Manual exposure ad-justment(Mixed)
Manual exposure ad-justment(Text)
Manual exposure ad-justment(Photo)
Specifies which copy exposure mode you wantto be automatically selected each time the copieris turned on, the auto exposure mode or themanual exposure mode.
Selects how many exposure levels you wantthere to be in the manual exposure mode.
Specify the copy quality mode that you want beautomatically selected each time the copier isturned on.
Specifies whether you want the toner economymode to be automatically selected or not eachtime the copier is turned on. It is also possible todisable selection of the toner economy mode.When ECO print is turned ON, a copy densitylevel becomes low, but the toner consumptionwill be reduced.
Adjusts the ground color of the copied paper.
Specifies whether you want paper of the samesize as the originals to be automatically selectedeach time originals are set, or whether you wantto manually select the paper size.
Sets the most frequently used cassette to beautomatically selected before any other cassette.*The multi-bypass tray cannot be selected asthe default cassette.
Specifies which mode you want to be automati-cally selected for enlargement/reduction(zoom)copying: the fixed-size zoommode or the standard zoom mode.
Adjusts the overall exposure level for the autoexposure mode.
Adjusts the overall exposure level for scanningwith the OCR in the optional scanner mode.
Adjusts the overall exposure level for the manualexposure mode The exposure level can be setseparately for each copy quality mode: “Text +Photo”.
Adjusts the overall exposure level for the manualexposure mode. The exposure level can be setfor copy quality mode: “Text”.
Adjusts the overall exposure level for the manualexposure mode. The exposure level can be setfor copy quality mode: “Photo”.
PageCopy default
settingsContent of copy default settings
6-25
6-26
6-26
6-27
6-27
6-28
6-28
6-29
6-29
6-30
6-30
6-31
6-31
Defaultsettings
Manual
1step
Text + Photo
OFF
0
APS
1st paper
Manual
0
0
0
0
0
Manual/Auto
1step/0.5step
Text + Photo/ Text / Photo
OFF/ON
-2 to +2
APS/Default cassette
1st paper to 4th paper
Manual/AMS
-3 to +3
-3 to +3
-3 to +3
-3 to +3
-3 to +3
Setting range
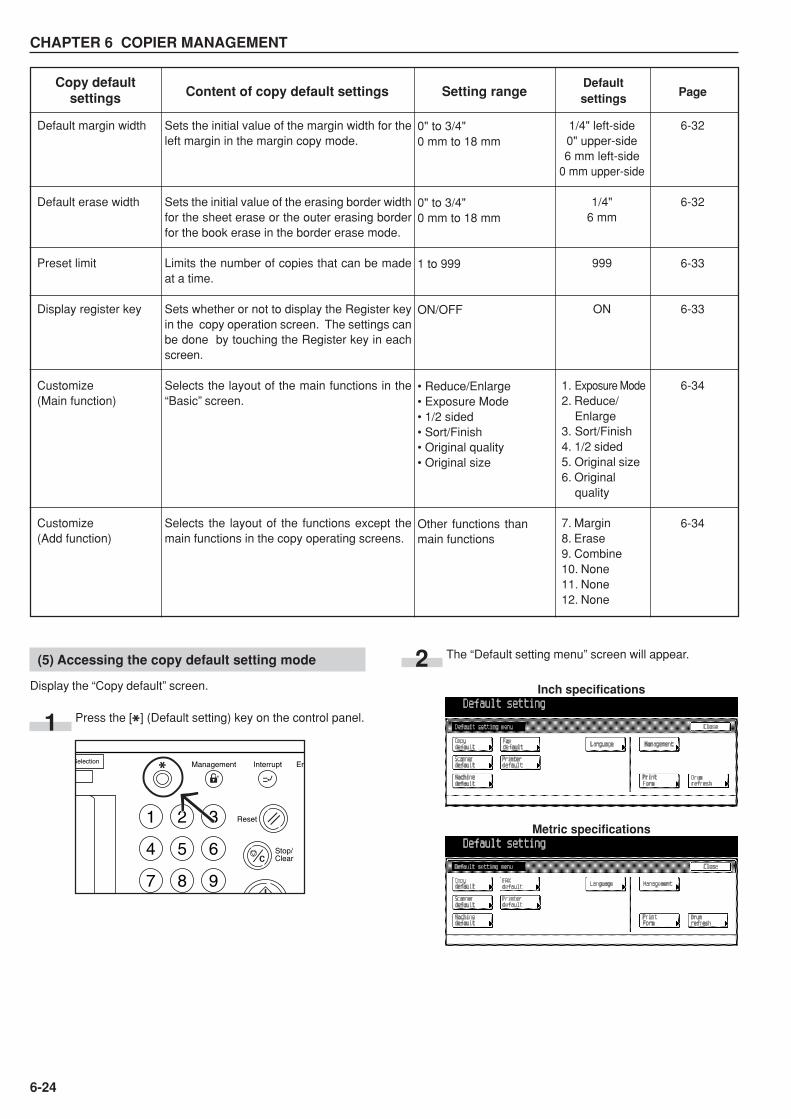
CHAPTER 6 COPIER MANAGEMENT
6-24
(5) Accessing the copy default setting mode
Display the “Copy default” screen.
Press the [ ] (Default setting) key on the control panel.1
The “Default setting menu” screen will appear.2
PageCopy default
settings Content of copy default settingsDefaultsettingsSetting range
Sets the initial value of the margin width for theleft margin in the margin copy mode.
Sets the initial value of the erasing border widthfor the sheet erase or the outer erasing borderfor the book erase in the border erase mode.
Limits the number of copies that can be madeat a time.
Sets whether or not to display the Register keyin the copy operation screen. The settings canbe done by touching the Register key in eachscreen.
Selects the layout of the main functions in the“Basic” screen.
Selects the layout of the functions except themain functions in the copy operating screens.
1/4" left-side0" upper-side6 mm left-side
0 mm upper-side
1/4"6 mm
999
ON
1. Exposure Mode2. Reduce/
Enlarge3. Sort/Finish4. 1/2 sided5. Original size6. Original
quality
7. Margin8. Erase9. Combine10. None11. None12. None
Default margin width
Default erase width
Preset limit
Display register key
Customize(Main function)
Customize(Add function)
0" to 3/4"0 mm to 18 mm
0" to 3/4"0 mm to 18 mm
1 to 999
ON/OFF
• Reduce/Enlarge• Exposure Mode• 1/2 sided• Sort/Finish• Original quality• Original size
Other functions thanmain functions
6-32
6-32
6-33
6-33
6-34
6-34
Inch specifications
Metric specifications
Stop/ Clear
Reset
InterruptManagement EnSelection
1 2 3
4 5 6
7 8 9
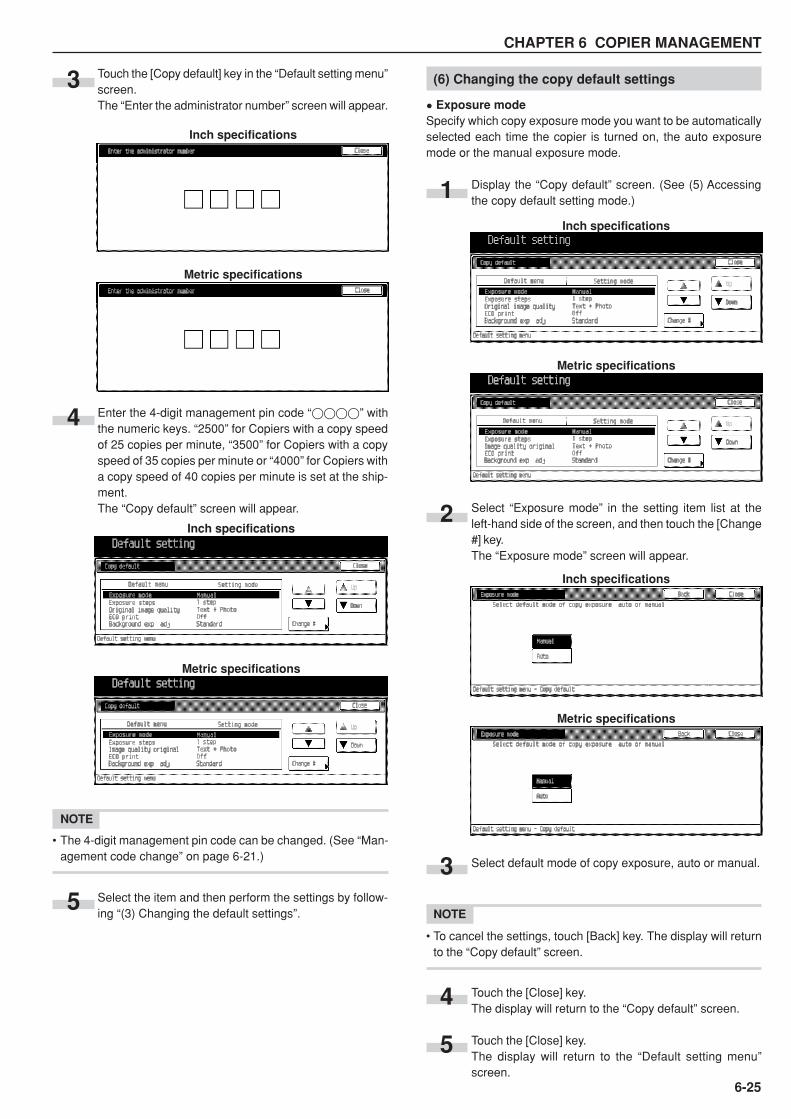
CHAPTER 6 COPIER MANAGEMENT
6-25
Touch the [Copy default] key in the “Default setting menu”screen.The “Enter the administrator number” screen will appear.
Enter the 4-digit management pin code “����” withthe numeric keys. “2500” for Copiers with a copy speedof 25 copies per minute, “3500” for Copiers with a copyspeed of 35 copies per minute or “4000” for Copiers witha copy speed of 40 copies per minute is set at the ship-ment.The “Copy default” screen will appear.
NOTE
• The 4-digit management pin code can be changed. (See “Man-agement code change” on page 6-21.)
Select the item and then perform the settings by follow-ing “(3) Changing the default settings”.
(6) Changing the copy default settings
• Exposure modeSpecify which copy exposure mode you want to be automaticallyselected each time the copier is turned on, the auto exposuremode or the manual exposure mode.
Display the “Copy default” screen. (See (5) Accessingthe copy default setting mode.)
Select “Exposure mode” in the setting item list at theleft-hand side of the screen, and then touch the [Change#] key.The “Exposure mode” screen will appear.
Select default mode of copy exposure, auto or manual.
NOTE
• To cancel the settings, touch [Back] key. The display will returnto the “Copy default” screen.
Touch the [Close] key.The display will return to the “Copy default” screen.
Touch the [Close] key.The display will return to the “Default setting menu”screen.
4
5
1
2
3
4
5
Inch specifications
Metric specifications
Inch specifications
Metric specifications
Inch specifications
Metric specifications
3
Inch specifications
Metric specifications
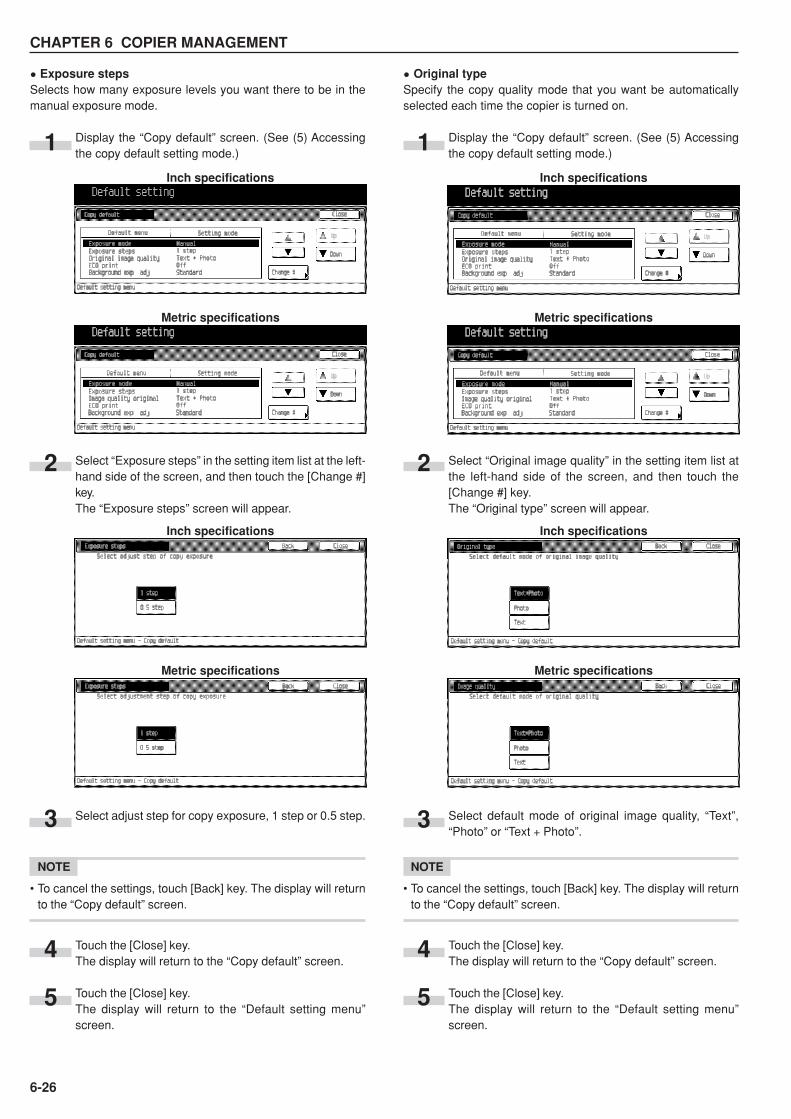
CHAPTER 6 COPIER MANAGEMENT
6-26
• Exposure stepsSelects how many exposure levels you want there to be in themanual exposure mode.
Display the “Copy default” screen. (See (5) Accessingthe copy default setting mode.)
Select “Exposure steps” in the setting item list at the left-hand side of the screen, and then touch the [Change #]key.The “Exposure steps” screen will appear.
Select adjust step for copy exposure, 1 step or 0.5 step.
NOTE
• To cancel the settings, touch [Back] key. The display will returnto the “Copy default” screen.
Touch the [Close] key.The display will return to the “Copy default” screen.
Touch the [Close] key.The display will return to the “Default setting menu”screen.
1
2
3
4
5
• Original typeSpecify the copy quality mode that you want be automaticallyselected each time the copier is turned on.
Display the “Copy default” screen. (See (5) Accessingthe copy default setting mode.)
Select “Original image quality” in the setting item list atthe left-hand side of the screen, and then touch the[Change #] key.The “Original type” screen will appear.
Select default mode of original image quality, “Text”,“Photo” or “Text + Photo”.
NOTE
• To cancel the settings, touch [Back] key. The display will returnto the “Copy default” screen.
Touch the [Close] key.The display will return to the “Copy default” screen.
Touch the [Close] key.The display will return to the “Default setting menu”screen.
1
2
3
4
5
Inch specifications
Metric specifications
Inch specifications
Metric specifications
Inch specifications
Metric specifications
Inch specifications
Metric specifications
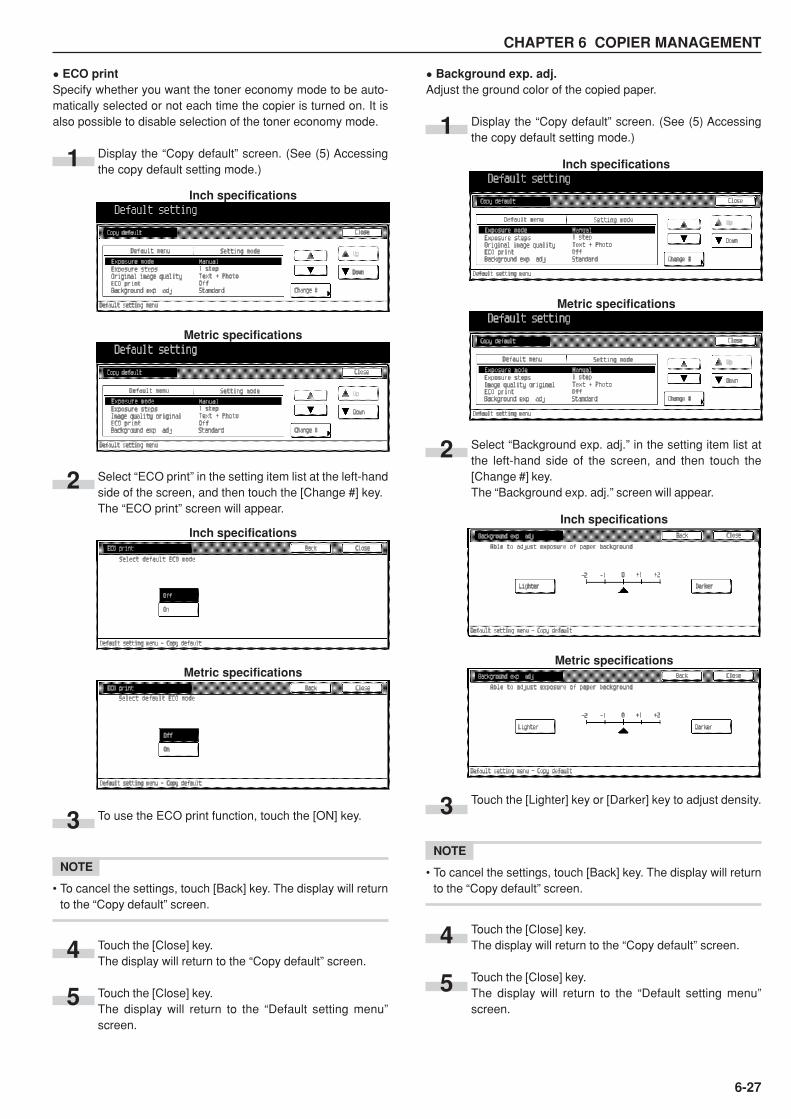
CHAPTER 6 COPIER MANAGEMENT
6-27
• ECO printSpecify whether you want the toner economy mode to be auto-matically selected or not each time the copier is turned on. It isalso possible to disable selection of the toner economy mode.
Display the “Copy default” screen. (See (5) Accessingthe copy default setting mode.)
Select “ECO print” in the setting item list at the left-handside of the screen, and then touch the [Change #] key.The “ECO print” screen will appear.
To use the ECO print function, touch the [ON] key.
NOTE
• To cancel the settings, touch [Back] key. The display will returnto the “Copy default” screen.
Touch the [Close] key.The display will return to the “Copy default” screen.
Touch the [Close] key.The display will return to the “Default setting menu”screen.
• Background exp. adj.Adjust the ground color of the copied paper.
Display the “Copy default” screen. (See (5) Accessingthe copy default setting mode.)
Select “Background exp. adj.” in the setting item list atthe left-hand side of the screen, and then touch the[Change #] key.The “Background exp. adj.” screen will appear.
Touch the [Lighter] key or [Darker] key to adjust density.
NOTE
• To cancel the settings, touch [Back] key. The display will returnto the “Copy default” screen.
Touch the [Close] key.The display will return to the “Copy default” screen.
Touch the [Close] key.The display will return to the “Default setting menu”screen.
1
2
3
4
5
Inch specifications
Metric specifications
Inch specifications
Metric specifications
1
2
3
4
5
Inch specifications
Metric specifications
Inch specifications
Metric specifications
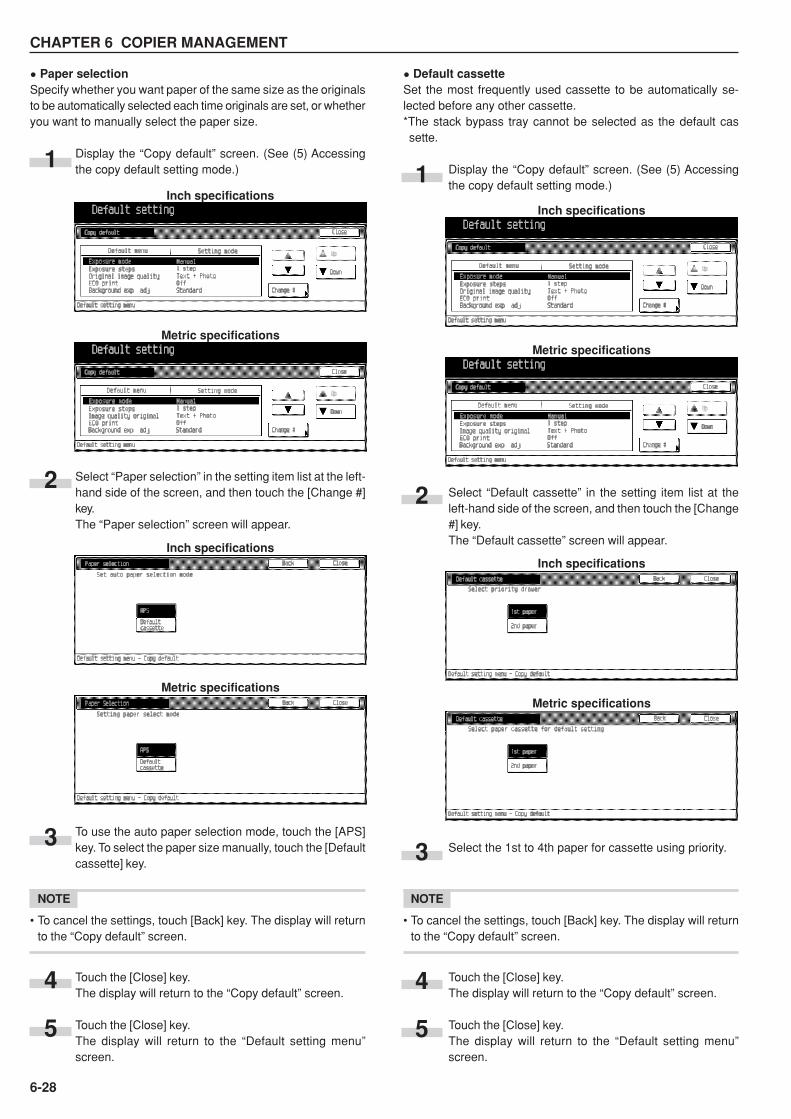
CHAPTER 6 COPIER MANAGEMENT
6-28
• Paper selectionSpecify whether you want paper of the same size as the originalsto be automatically selected each time originals are set, or whetheryou want to manually select the paper size.
Display the “Copy default” screen. (See (5) Accessingthe copy default setting mode.)
Select “Paper selection” in the setting item list at the left-hand side of the screen, and then touch the [Change #]key.The “Paper selection” screen will appear.
To use the auto paper selection mode, touch the [APS]key. To select the paper size manually, touch the [Defaultcassette] key.
NOTE
• To cancel the settings, touch [Back] key. The display will returnto the “Copy default” screen.
Touch the [Close] key.The display will return to the “Copy default” screen.
Touch the [Close] key.The display will return to the “Default setting menu”screen.
1
2
3
4
5
Inch specifications
Metric specifications
Inch specifications
Metric specifications
1
2
3
4
5
Inch specifications
Metric specifications
Inch specifications
Metric specifications
• Default cassetteSet the most frequently used cassette to be automatically se-lected before any other cassette.*The stack bypass tray cannot be selected as the default cassette.
Display the “Copy default” screen. (See (5) Accessingthe copy default setting mode.)
Select “Default cassette” in the setting item list at theleft-hand side of the screen, and then touch the [Change#] key.The “Default cassette” screen will appear.
Select the 1st to 4th paper for cassette using priority.
NOTE
• To cancel the settings, touch [Back] key. The display will returnto the “Copy default” screen.
Touch the [Close] key.The display will return to the “Copy default” screen.
Touch the [Close] key.The display will return to the “Default setting menu”screen.

CHAPTER 6 COPIER MANAGEMENT
6-29
• Auto exposure adjustmentAdjust the overall exposure level for the auto exposure mode.
Display the “Copy default” screen. (See (5) Accessingthe copy default setting mode.)
Select “Auto exposure adjustment” in the setting itemlist at the left-hand side of the screen, and then touchthe [Change #] key.The “Auto exposure adjustment” screen will appear.
Touch the [Lighter] or [Darker] key to adjust default set-ting of copy exposure.
NOTE
• To cancel the settings, touch [Back] key. The display will returnto the “Copy default” screen.
Touch the [Close] key.The display will return to the “Copy default” screen.
Touch the [Close] key.The display will return to the “Default setting menu”screen.
1
2
3
4
5
Inch specifications
Metric specifications
Inch specifications
Metric specifications
• Default magnificationSpecify which mode you want to be automatically selectedfor enlargement/reduction (zoom) copying: the fixed-size zoommode or the standard zoom mode.
Display the “Copy default” screen. (See (5) Accessingthe copy default setting mode.)
Select “Default magnification” in the setting item list atthe left-hand side of the screen, and then touch the[Change #] key.The “Default magnification” screen will appear.
Select default magnification mode, Manual or AMS.
NOTE
• To cancel the settings, touch [Back] key. The display will returnto the “Copy default” screen.
Touch the [Close] key.The display will return to the “Copy default” screen.
Touch the [Close] key.The display will return to the “Default setting menu”screen.
1
2
3
4
5
Inch specifications
Metric specifications
Inch specifications
Metric specifications
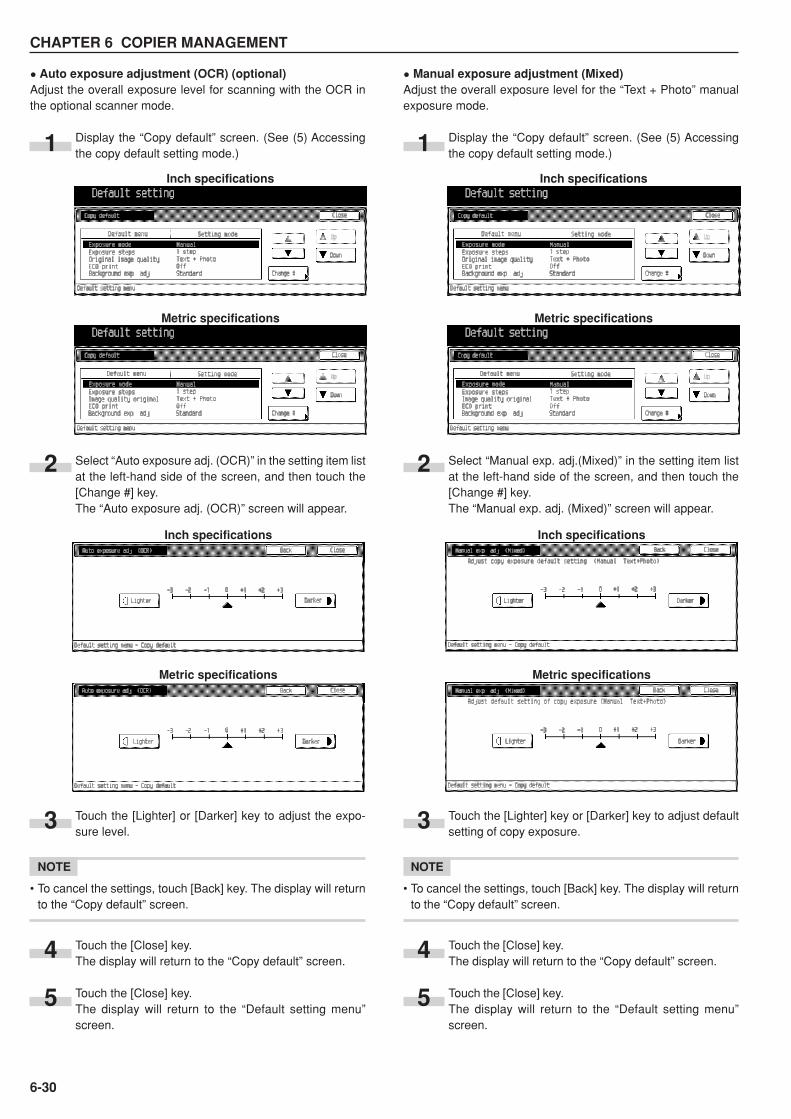
CHAPTER 6 COPIER MANAGEMENT
6-30
• Manual exposure adjustment (Mixed)Adjust the overall exposure level for the “Text + Photo” manualexposure mode.
Display the “Copy default” screen. (See (5) Accessingthe copy default setting mode.)
Select “Manual exp. adj.(Mixed)” in the setting item listat the left-hand side of the screen, and then touch the[Change #] key.The “Manual exp. adj. (Mixed)” screen will appear.
Touch the [Lighter] key or [Darker] key to adjust defaultsetting of copy exposure.
NOTE
• To cancel the settings, touch [Back] key. The display will returnto the “Copy default” screen.
Touch the [Close] key.The display will return to the “Copy default” screen.
Touch the [Close] key.The display will return to the “Default setting menu”screen.
• Auto exposure adjustment (OCR) (optional)Adjust the overall exposure level for scanning with the OCR inthe optional scanner mode.
Display the “Copy default” screen. (See (5) Accessingthe copy default setting mode.)
Select “Auto exposure adj. (OCR)” in the setting item listat the left-hand side of the screen, and then touch the[Change #] key.The “Auto exposure adj. (OCR)” screen will appear.
Touch the [Lighter] or [Darker] key to adjust the expo-sure level.
NOTE
• To cancel the settings, touch [Back] key. The display will returnto the “Copy default” screen.
Touch the [Close] key.The display will return to the “Copy default” screen.
Touch the [Close] key.The display will return to the “Default setting menu”screen.
1
2
3
4
5
Inch specifications
Metric specifications
Inch specifications
Metric specifications
1
2
3
4
5
Inch specifications
Metric specifications
Inch specifications
Metric specifications
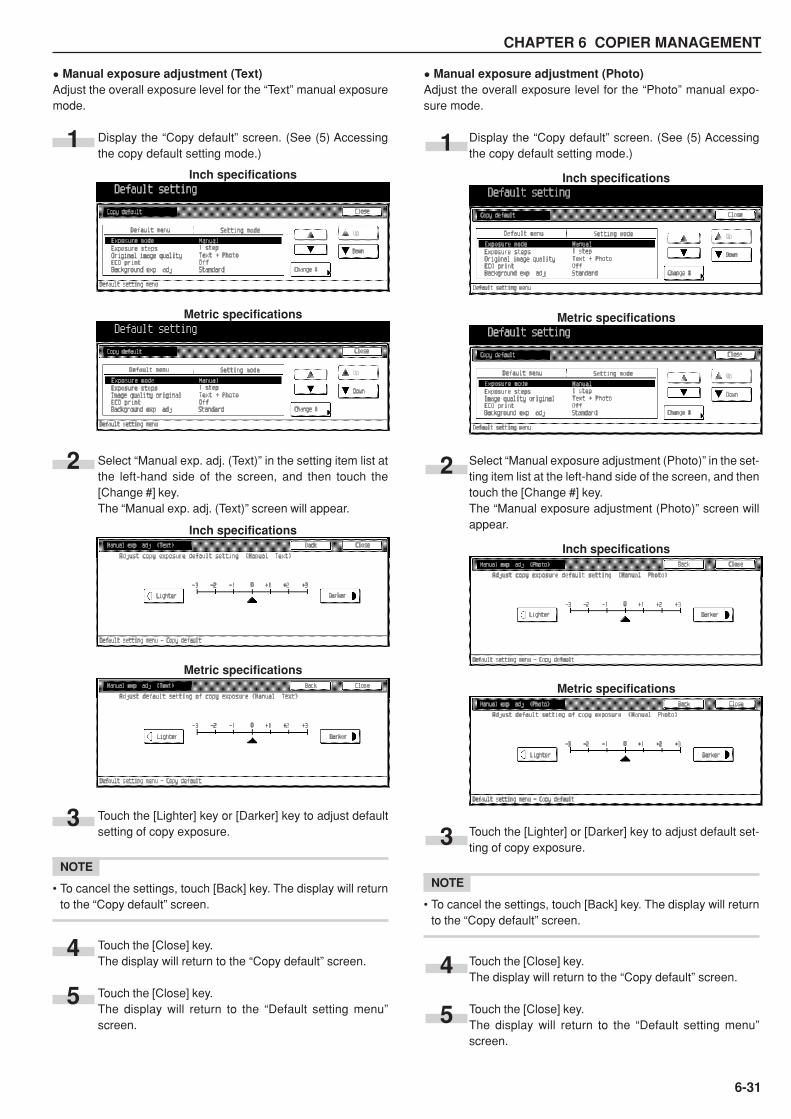
CHAPTER 6 COPIER MANAGEMENT
6-31
• Manual exposure adjustment (Photo)Adjust the overall exposure level for the “Photo” manual expo-sure mode.
Display the “Copy default” screen. (See (5) Accessingthe copy default setting mode.)
Select “Manual exposure adjustment (Photo)” in the set-ting item list at the left-hand side of the screen, and thentouch the [Change #] key.The “Manual exposure adjustment (Photo)” screen willappear.
Touch the [Lighter] or [Darker] key to adjust default set-ting of copy exposure.
NOTE
• To cancel the settings, touch [Back] key. The display will returnto the “Copy default” screen.
Touch the [Close] key.The display will return to the “Copy default” screen.
Touch the [Close] key.The display will return to the “Default setting menu”screen.
• Manual exposure adjustment (Text)Adjust the overall exposure level for the “Text” manual exposuremode.
Display the “Copy default” screen. (See (5) Accessingthe copy default setting mode.)
Select “Manual exp. adj. (Text)” in the setting item list atthe left-hand side of the screen, and then touch the[Change #] key.The “Manual exp. adj. (Text)” screen will appear.
Touch the [Lighter] key or [Darker] key to adjust defaultsetting of copy exposure.
NOTE
• To cancel the settings, touch [Back] key. The display will returnto the “Copy default” screen.
Touch the [Close] key.The display will return to the “Copy default” screen.
Touch the [Close] key.The display will return to the “Default setting menu”screen.
1
2
3
4
5
Inch specifications
Metric specifications
Inch specifications
Metric specifications
1
2
3
4
5
Inch specifications
Metric specifications
Inch specifications
Metric specifications
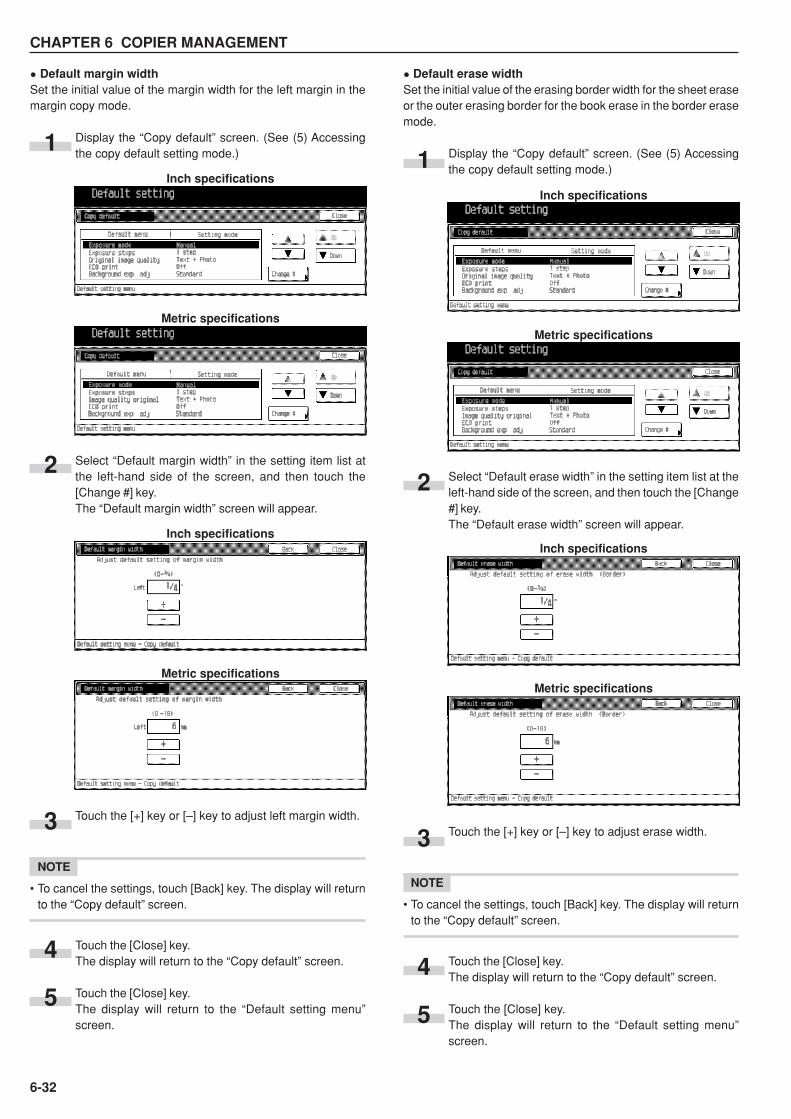
CHAPTER 6 COPIER MANAGEMENT
6-32
• Default erase widthSet the initial value of the erasing border width for the sheet eraseor the outer erasing border for the book erase in the border erasemode.
Display the “Copy default” screen. (See (5) Accessingthe copy default setting mode.)
Select “Default erase width” in the setting item list at theleft-hand side of the screen, and then touch the [Change#] key.The “Default erase width” screen will appear.
Touch the [+] key or [–] key to adjust erase width.
NOTE
• To cancel the settings, touch [Back] key. The display will returnto the “Copy default” screen.
Touch the [Close] key.The display will return to the “Copy default” screen.
Touch the [Close] key.The display will return to the “Default setting menu”screen.
• Default margin widthSet the initial value of the margin width for the left margin in themargin copy mode.
Display the “Copy default” screen. (See (5) Accessingthe copy default setting mode.)
Select “Default margin width” in the setting item list atthe left-hand side of the screen, and then touch the[Change #] key.The “Default margin width” screen will appear.
Touch the [+] key or [–] key to adjust left margin width.
NOTE
• To cancel the settings, touch [Back] key. The display will returnto the “Copy default” screen.
Touch the [Close] key.The display will return to the “Copy default” screen.
Touch the [Close] key.The display will return to the “Default setting menu”screen.
1
2
3
4
5
Inch specifications
Metric specifications
Inch specifications
Metric specifications
1
2
3
4
5
Inch specifications
Metric specifications
Inch specifications
Metric specifications
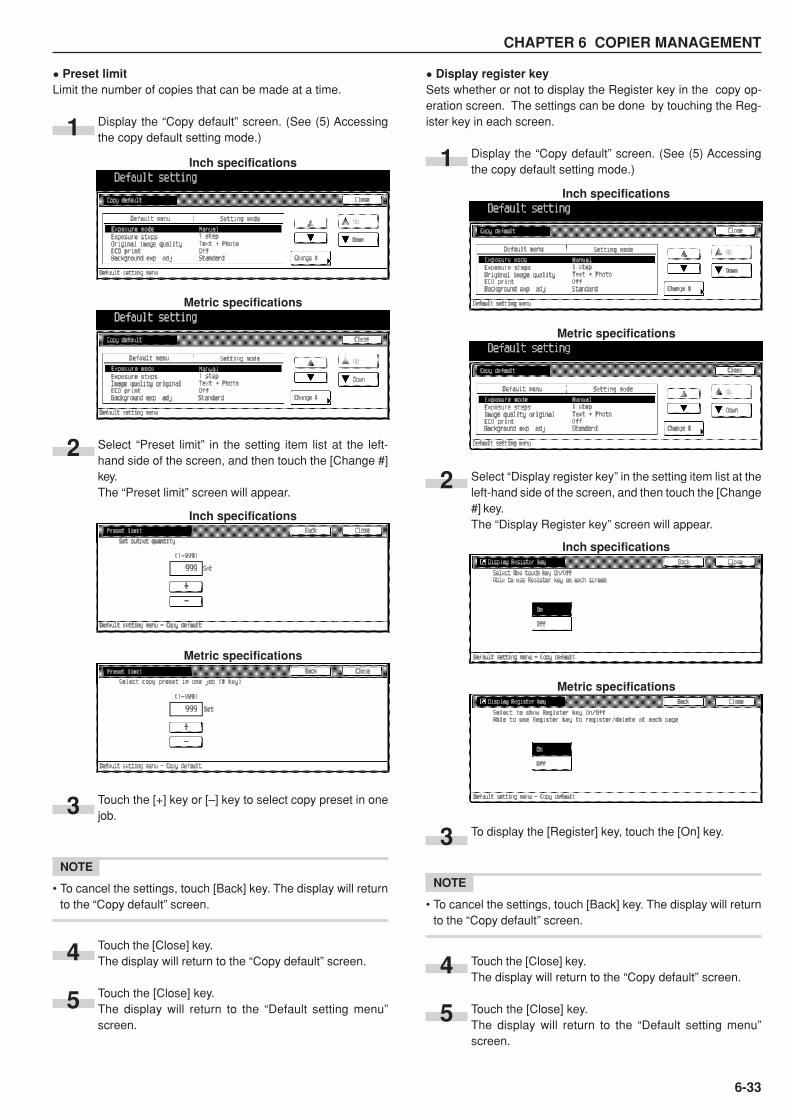
CHAPTER 6 COPIER MANAGEMENT
6-33
• Display register keySets whether or not to display the Register key in the copy op-eration screen. The settings can be done by touching the Reg-ister key in each screen.
Display the “Copy default” screen. (See (5) Accessingthe copy default setting mode.)
Select “Display register key” in the setting item list at theleft-hand side of the screen, and then touch the [Change#] key.The “Display Register key” screen will appear.
To display the [Register] key, touch the [On] key.
NOTE
• To cancel the settings, touch [Back] key. The display will returnto the “Copy default” screen.
Touch the [Close] key.The display will return to the “Copy default” screen.
Touch the [Close] key.The display will return to the “Default setting menu”screen.
• Preset limitLimit the number of copies that can be made at a time.
Display the “Copy default” screen. (See (5) Accessingthe copy default setting mode.)
Select “Preset limit” in the setting item list at the left-hand side of the screen, and then touch the [Change #]key.The “Preset limit” screen will appear.
Touch the [+] key or [–] key to select copy preset in onejob.
NOTE
• To cancel the settings, touch [Back] key. The display will returnto the “Copy default” screen.
Touch the [Close] key.The display will return to the “Copy default” screen.
Touch the [Close] key.The display will return to the “Default setting menu”screen.
1
2
3
4
5
Inch specifications
Metric specifications
Inch specifications
Metric specifications
1
2
3
4
5
Inch specifications
Metric specifications
Inch specifications
Metric specifications
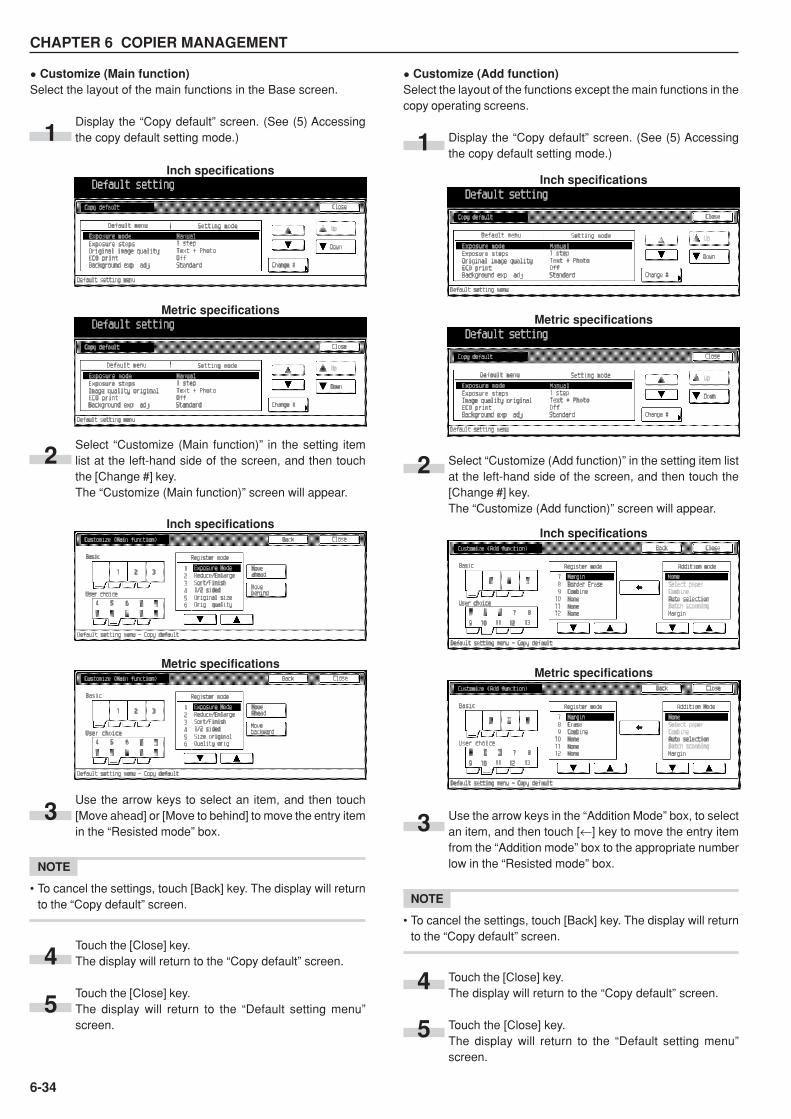
CHAPTER 6 COPIER MANAGEMENT
6-34
• Customize (Main function)Select the layout of the main functions in the Base screen.
Display the “Copy default” screen. (See (5) Accessingthe copy default setting mode.)
Select “Customize (Main function)” in the setting itemlist at the left-hand side of the screen, and then touchthe [Change #] key.The “Customize (Main function)” screen will appear.
Use the arrow keys to select an item, and then touch[Move ahead] or [Move to behind] to move the entry itemin the “Resisted mode” box.
NOTE
• To cancel the settings, touch [Back] key. The display will returnto the “Copy default” screen.
Touch the [Close] key.The display will return to the “Copy default” screen.
Touch the [Close] key.The display will return to the “Default setting menu”screen.
1
2
3
4
5
Inch specifications
Metric specifications
Inch specifications
Metric specifications
• Customize (Add function)Select the layout of the functions except the main functions in thecopy operating screens.
Display the “Copy default” screen. (See (5) Accessingthe copy default setting mode.)
Select “Customize (Add function)” in the setting item listat the left-hand side of the screen, and then touch the[Change #] key.The “Customize (Add function)” screen will appear.
Use the arrow keys in the “Addition Mode” box, to selectan item, and then touch [←] key to move the entry itemfrom the “Addition mode” box to the appropriate numberlow in the “Resisted mode” box.
NOTE
• To cancel the settings, touch [Back] key. The display will returnto the “Copy default” screen.
Touch the [Close] key.The display will return to the “Copy default” screen.
Touch the [Close] key.The display will return to the “Default setting menu”screen.
1
2
3
4
5
Inch specifications
Metric specifications
Inch specifications
Metric specifications

CHAPTER 6 COPIER MANAGEMENT
6-35
Touch the [Print form] key.The “Enter the administrator number” screen will appear.
Enter the 4-digit management pin code “����” withthe numeric keys. “2500” for Copiers with a copy speedof 25 copies per minute, “3500” for Copiers with a copyspeed of 35 copies per minute or “4000” for Copiers witha copy speed of 40 copies per minute is set at the ship-ment.The “Print report menu” screen will appear.
NOTE
• The 4-digit management pin code can be changed. (See “Man-agement code change” on page 6-21.)
3. Print Form
Output the counter report by following the steps as shown.
Report Contents<Copy Report>Outputs the list of the default values selected in the Copy DefaultSetting.<Machine Report>Outputs the list of the default values selected in the MachineDefault Setting.<Counter Report>Outputs the average copy density (black ratio (%) ) for each printsize of the copy, printer or FAX function.
NOTE
• Make sure 11" ✕ 8 1/2" or A4 size paper is set in the drawer. Ifnot, set it. When the wrong paper is set, the paper selectionscreen will appear before the start of copy.
Press the [ ] (Default setting) key on the control panel.
The “Default setting menu” screen will appear.2
1
3
4
Stop/ Clear
Reset
InterruptManagement EnSelection
1 2 3
4 5 6
7 8 9Inch specifications
Metric specifications
Inch specifications
Metric specifications
Inch specifications
Metric specifications
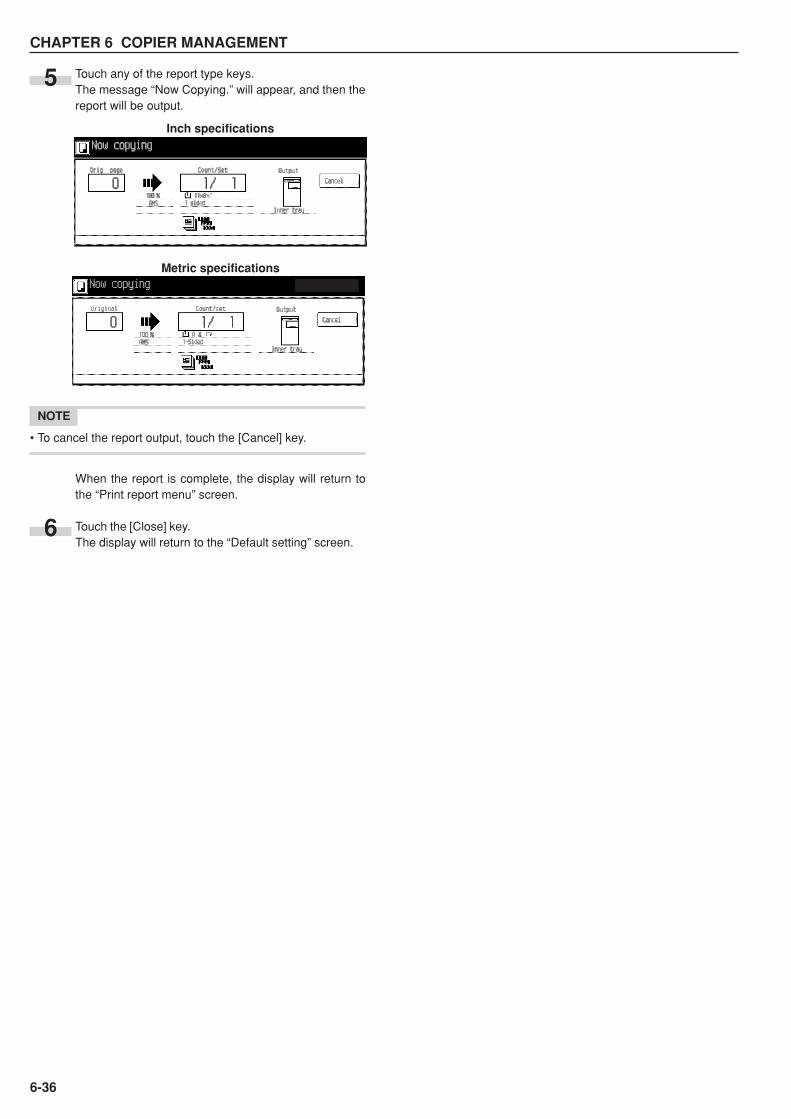
CHAPTER 6 COPIER MANAGEMENT
6-36
Touch any of the report type keys.The message “Now Copying.” will appear, and then thereport will be output.
NOTE
• To cancel the report output, touch the [Cancel] key.
When the report is complete, the display will return tothe “Print report menu” screen.
Touch the [Close] key.The display will return to the “Default setting” screen.
5
6
Metric specifications
Inch specifications
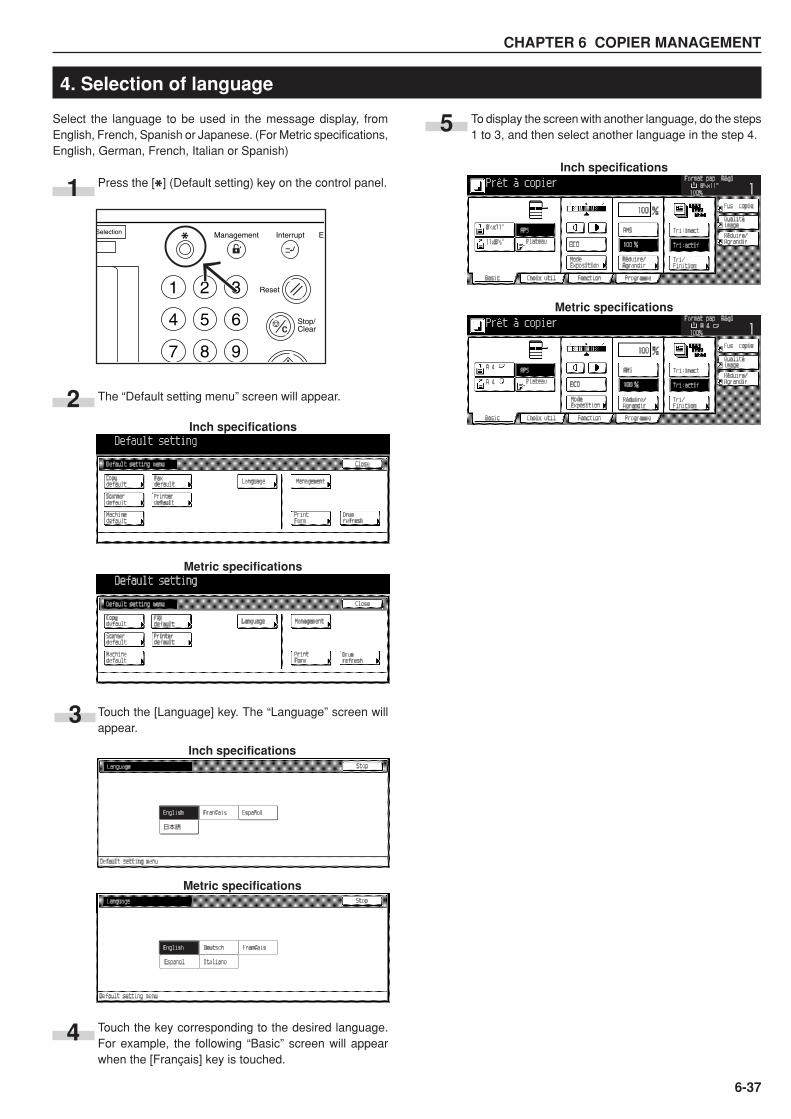
CHAPTER 6 COPIER MANAGEMENT
6-37
Select the language to be used in the message display, fromEnglish, French, Spanish or Japanese. (For Metric specifications,English, German, French, Italian or Spanish)
Press the [ ] (Default setting) key on the control panel.
The “Default setting menu” screen will appear.
Touch the [Language] key. The “Language” screen willappear.
Touch the key corresponding to the desired language.For example, the following “Basic” screen will appearwhen the [Français] key is touched.
2
1
3
4
4. Selection of language
5
Metric specifications
Inch specifications
Metric specifications
Inch specifications
Metric specifications
Inch specifications
To display the screen with another language, do the steps1 to 3, and then select another language in the step 4.
Stop/ Clear
Reset
InterruptManagement EnSelection
1 2 3
4 5 6
7 8 9
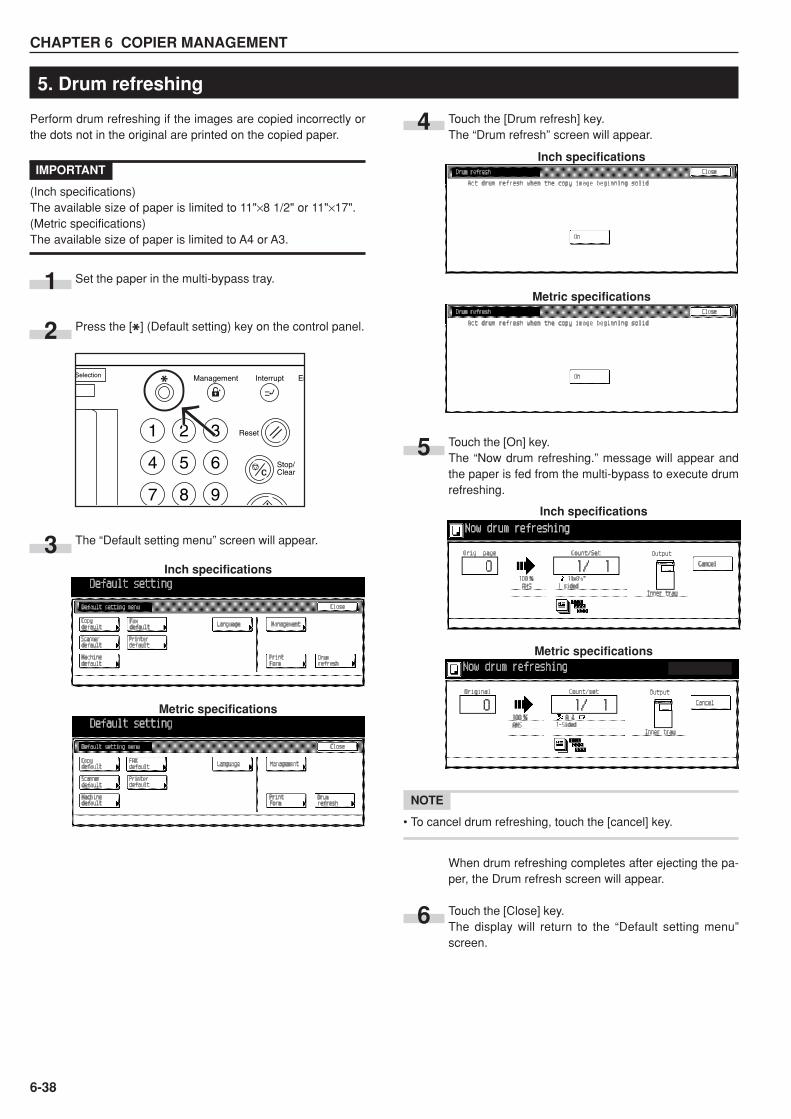
CHAPTER 6 COPIER MANAGEMENT
6-38
Inch specifications
Inch specifications
Metric specifications
5. Drum refreshing
Perform drum refreshing if the images are copied incorrectly orthe dots not in the original are printed on the copied paper.
IMPORTANT
(Inch specifications)The available size of paper is limited to 11"×8 1/2" or 11"×17".(Metric specifications)The available size of paper is limited to A4 or A3.
Set the paper in the multi-bypass tray.
Press the [ ] (Default setting) key on the control panel.
The “Default setting menu” screen will appear.
Touch the [Drum refresh] key.The “Drum refresh” screen will appear.
Touch the [On] key.The “Now drum refreshing.” message will appear andthe paper is fed from the multi-bypass to execute drumrefreshing.
NOTE
• To cancel drum refreshing, touch the [cancel] key.
When drum refreshing completes after ejecting the pa-per, the Drum refresh screen will appear.
Touch the [Close] key.The display will return to the “Default setting menu”screen.
Metric specifications
Inch specifications
1Metric specifications
3
2
5
6
4
Stop/ Clear
Reset
InterruptManagement EnSelection
1 2 3
4 5 6
7 8 9
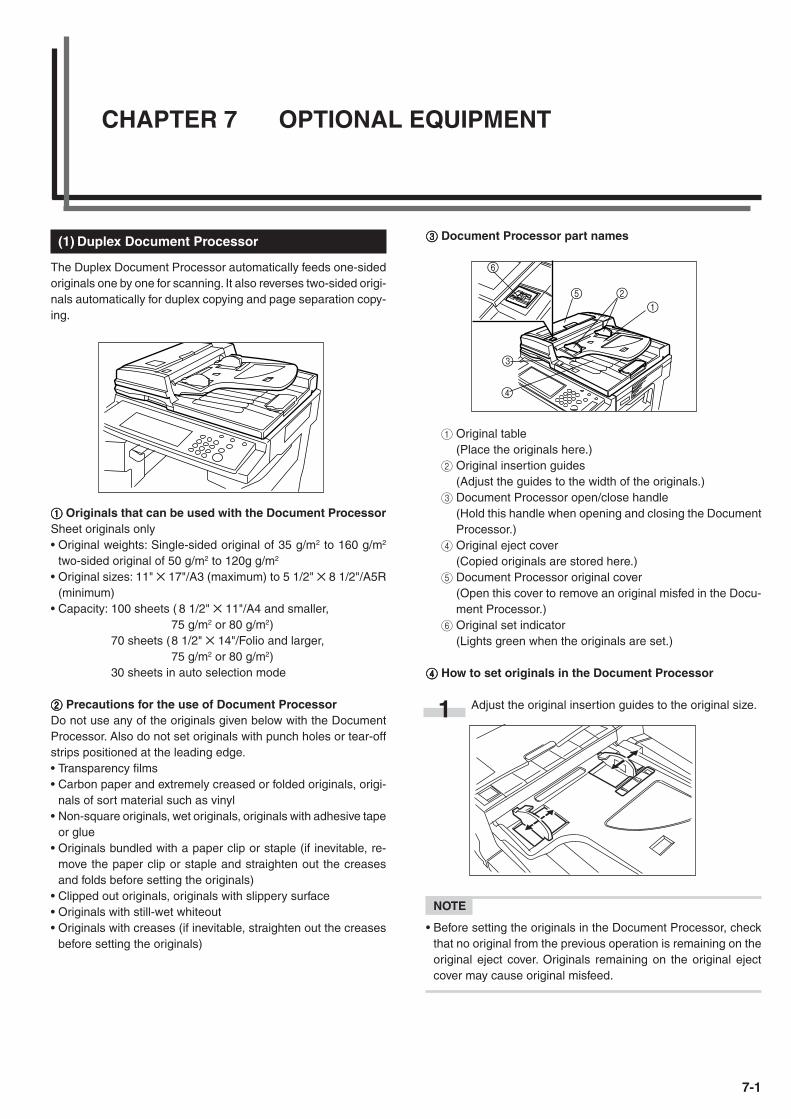
7-1
33333 Document Processor part names
1 Original table(Place the originals here.)
2 Original insertion guides(Adjust the guides to the width of the originals.)
3 Document Processor open/close handle(Hold this handle when opening and closing the DocumentProcessor.)
4 Original eject cover(Copied originals are stored here.)
5 Document Processor original cover(Open this cover to remove an original misfed in the Docu-ment Processor.)
6 Original set indicator(Lights green when the originals are set.)
44444 How to set originals in the Document Processor
Adjust the original insertion guides to the original size.
NOTE
• Before setting the originals in the Document Processor, checkthat no original from the previous operation is remaining on theoriginal eject cover. Originals remaining on the original ejectcover may cause original misfeed.
(1) Duplex Document Processor
The Duplex Document Processor automatically feeds one-sidedoriginals one by one for scanning. It also reverses two-sided origi-nals automatically for duplex copying and page separation copy-ing.
11111 Originals that can be used with the Document ProcessorSheet originals only• Original weights: Single-sided original of 35 g/m2 to 160 g/m2
two-sided original of 50 g/m2 to 120g g/m2
• Original sizes: 11" ✕ 17"/A3 (maximum) to 5 1/2" ✕ 8 1/2"/A5R(minimum)
• Capacity: 100 sheets ( 8 1/2" ✕ 11"/A4 and smaller,75 g/m2 or 80 g/m2)
70 sheets (8 1/2" ✕ 14"/Folio and larger,75 g/m2 or 80 g/m2)
30 sheets in auto selection mode
22222 Precautions for the use of Document ProcessorDo not use any of the originals given below with the DocumentProcessor. Also do not set originals with punch holes or tear-offstrips positioned at the leading edge.• Transparency films• Carbon paper and extremely creased or folded originals, origi-
nals of sort material such as vinyl• Non-square originals, wet originals, originals with adhesive tape
or glue• Originals bundled with a paper clip or staple (if inevitable, re-
move the paper clip or staple and straighten out the creasesand folds before setting the originals)
• Clipped out originals, originals with slippery surface• Originals with still-wet whiteout• Originals with creases (if inevitable, straighten out the creases
before setting the originals)
1
125
6
3
4
CHAPTER 7 OPTIONAL EQUIPMENT
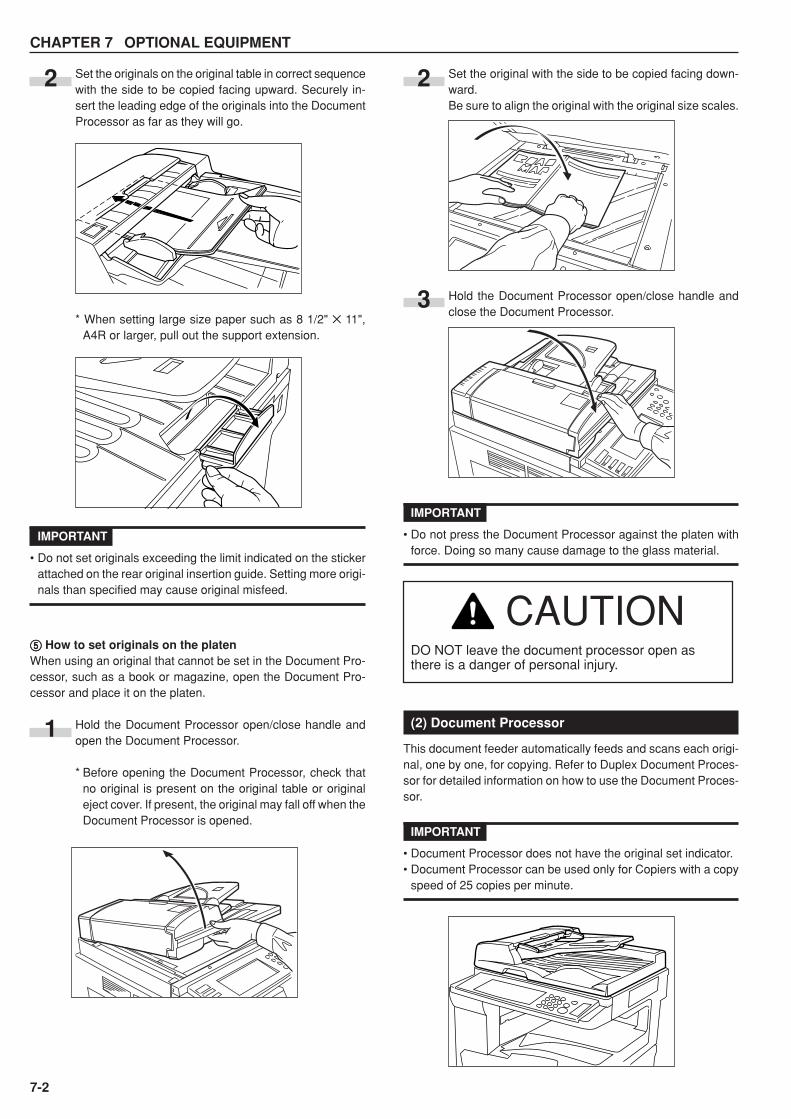
CHAPTER 7 OPTIONAL EQUIPMENT
7-2
Set the originals on the original table in correct sequencewith the side to be copied facing upward. Securely in-sert the leading edge of the originals into the DocumentProcessor as far as they will go.
* When setting large size paper such as 8 1/2" ✕ 11",A4R or larger, pull out the support extension.
IMPORTANT
• Do not set originals exceeding the limit indicated on the stickerattached on the rear original insertion guide. Setting more origi-nals than specified may cause original misfeed.
55555 How to set originals on the platenWhen using an original that cannot be set in the Document Pro-cessor, such as a book or magazine, open the Document Pro-cessor and place it on the platen.
Hold the Document Processor open/close handle andopen the Document Processor.
* Before opening the Document Processor, check thatno original is present on the original table or originaleject cover. If present, the original may fall off when theDocument Processor is opened.
Set the original with the side to be copied facing down-ward.Be sure to align the original with the original size scales.
Hold the Document Processor open/close handle andclose the Document Processor.
IMPORTANT
• Do not press the Document Processor against the platen withforce. Doing so many cause damage to the glass material.
(2) Document Processor
This document feeder automatically feeds and scans each origi-nal, one by one, for copying. Refer to Duplex Document Proces-sor for detailed information on how to use the Document Proces-sor.
IMPORTANT
• Document Processor does not have the original set indicator.• Document Processor can be used only for Copiers with a copy
speed of 25 copies per minute.
2
1
3
2
CAUTIONDO NOT leave the document processor open asthere is a danger of personal injury.
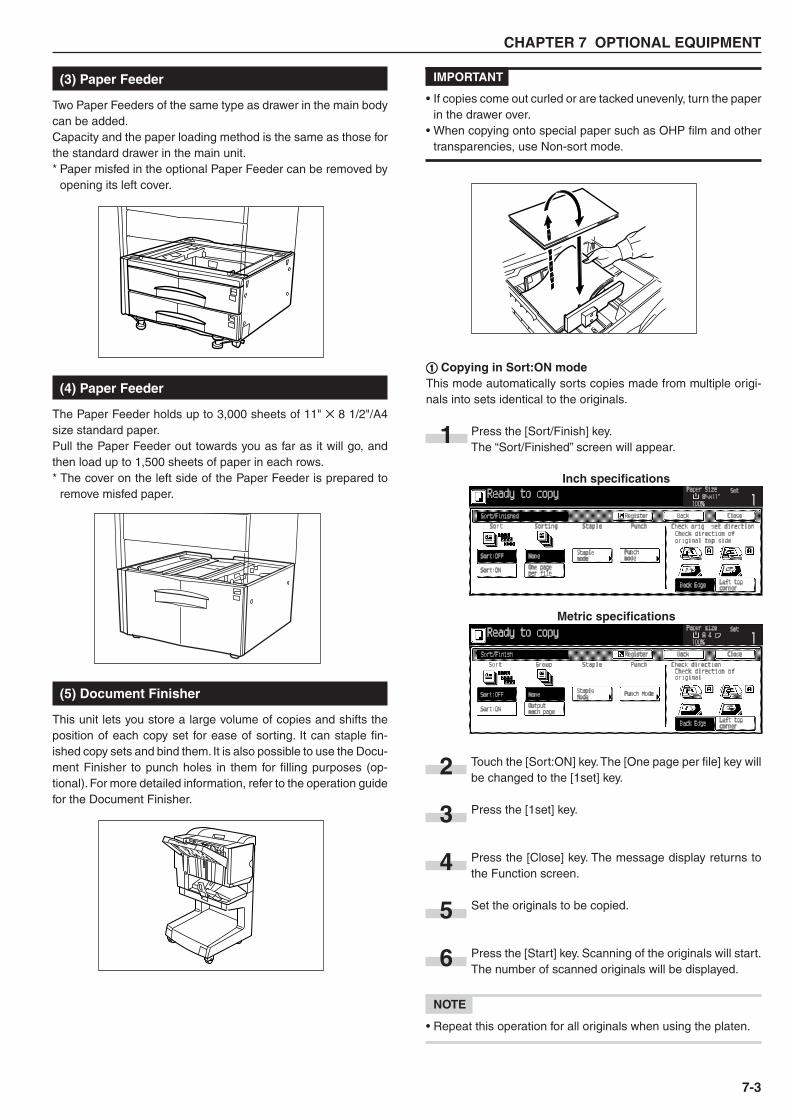
CHAPTER 7 OPTIONAL EQUIPMENT
7-3
IMPORTANT
• If copies come out curled or are tacked unevenly, turn the paperin the drawer over.
• When copying onto special paper such as OHP film and othertransparencies, use Non-sort mode.
11111 Copying in Sort:ON modeThis mode automatically sorts copies made from multiple origi-nals into sets identical to the originals.
Press the [Sort/Finish] key.The “Sort/Finished” screen will appear.
Touch the [Sort:ON] key. The [One page per file] key willbe changed to the [1set] key.
Press the [1set] key.
Press the [Close] key. The message display returns tothe Function screen.
Set the originals to be copied.
Press the [Start] key. Scanning of the originals will start.The number of scanned originals will be displayed.
NOTE
• Repeat this operation for all originals when using the platen.
(3) Paper Feeder
Two Paper Feeders of the same type as drawer in the main bodycan be added.Capacity and the paper loading method is the same as those forthe standard drawer in the main unit.* Paper misfed in the optional Paper Feeder can be removed by
opening its left cover.
(4) Paper Feeder
The Paper Feeder holds up to 3,000 sheets of 11" ✕ 8 1/2"/A4size standard paper.Pull the Paper Feeder out towards you as far as it will go, andthen load up to 1,500 sheets of paper in each rows.* The cover on the left side of the Paper Feeder is prepared to
remove misfed paper.
(5) Document Finisher
This unit lets you store a large volume of copies and shifts theposition of each copy set for ease of sorting. It can staple fin-ished copy sets and bind them. It is also possible to use the Docu-ment Finisher to punch holes in them for filling purposes (op-tional). For more detailed information, refer to the operation guidefor the Document Finisher.
1
2
3
4
5
6
Inch specifications
Metric specifications
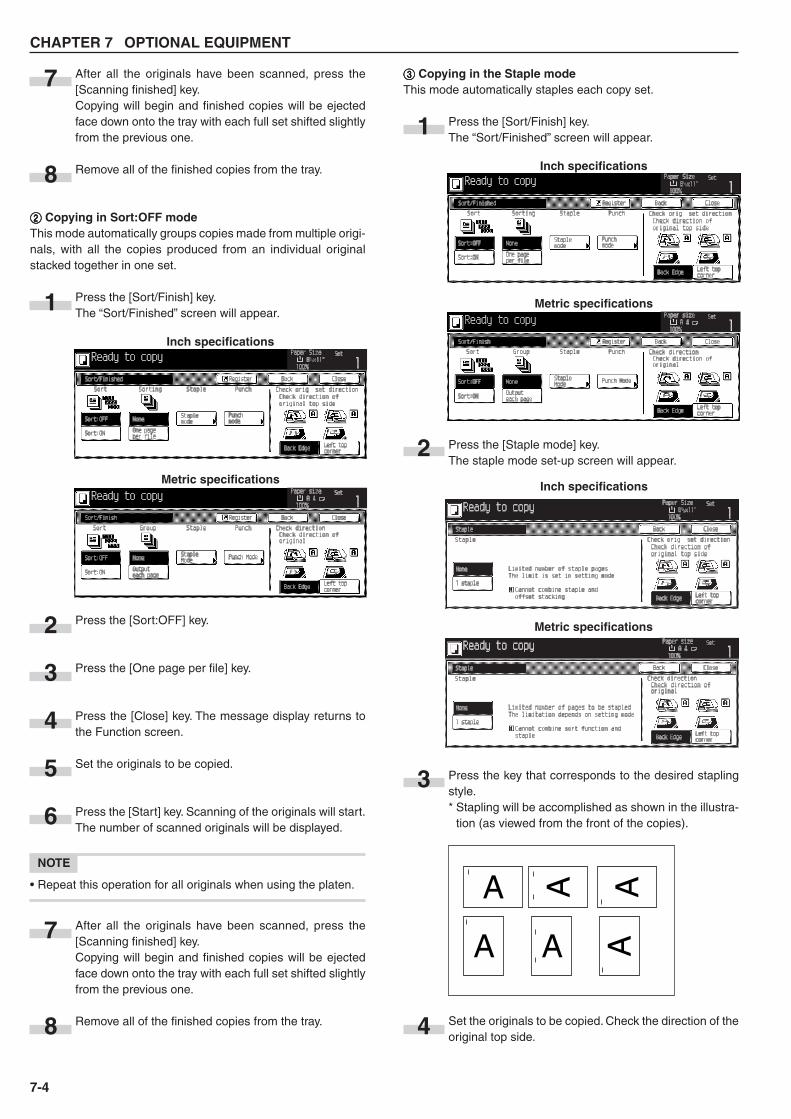
CHAPTER 7 OPTIONAL EQUIPMENT
7-4
After all the originals have been scanned, press the[Scanning finished] key.Copying will begin and finished copies will be ejectedface down onto the tray with each full set shifted slightlyfrom the previous one.
Remove all of the finished copies from the tray.
22222 Copying in Sort:OFF modeThis mode automatically groups copies made from multiple origi-nals, with all the copies produced from an individual originalstacked together in one set.
Press the [Sort/Finish] key.The “Sort/Finished” screen will appear.
Press the [Sort:OFF] key.
Press the [One page per file] key.
Press the [Close] key. The message display returns tothe Function screen.
Set the originals to be copied.
Press the [Start] key. Scanning of the originals will start.The number of scanned originals will be displayed.
NOTE
• Repeat this operation for all originals when using the platen.
After all the originals have been scanned, press the[Scanning finished] key.Copying will begin and finished copies will be ejectedface down onto the tray with each full set shifted slightlyfrom the previous one.
Remove all of the finished copies from the tray.
33333 Copying in the Staple modeThis mode automatically staples each copy set.
Press the [Sort/Finish] key.The “Sort/Finished” screen will appear.
Press the [Staple mode] key.The staple mode set-up screen will appear.
Press the key that corresponds to the desired staplingstyle.* Stapling will be accomplished as shown in the illustra-
tion (as viewed from the front of the copies).
Set the originals to be copied. Check the direction of theoriginal top side.
1
2
3
4
5
6
7
8
1
2
3
4
A A
A A A
A
7
8
Inch specifications
Metric specifications
Inch specifications
Metric specifications
Inch specifications
Metric specifications
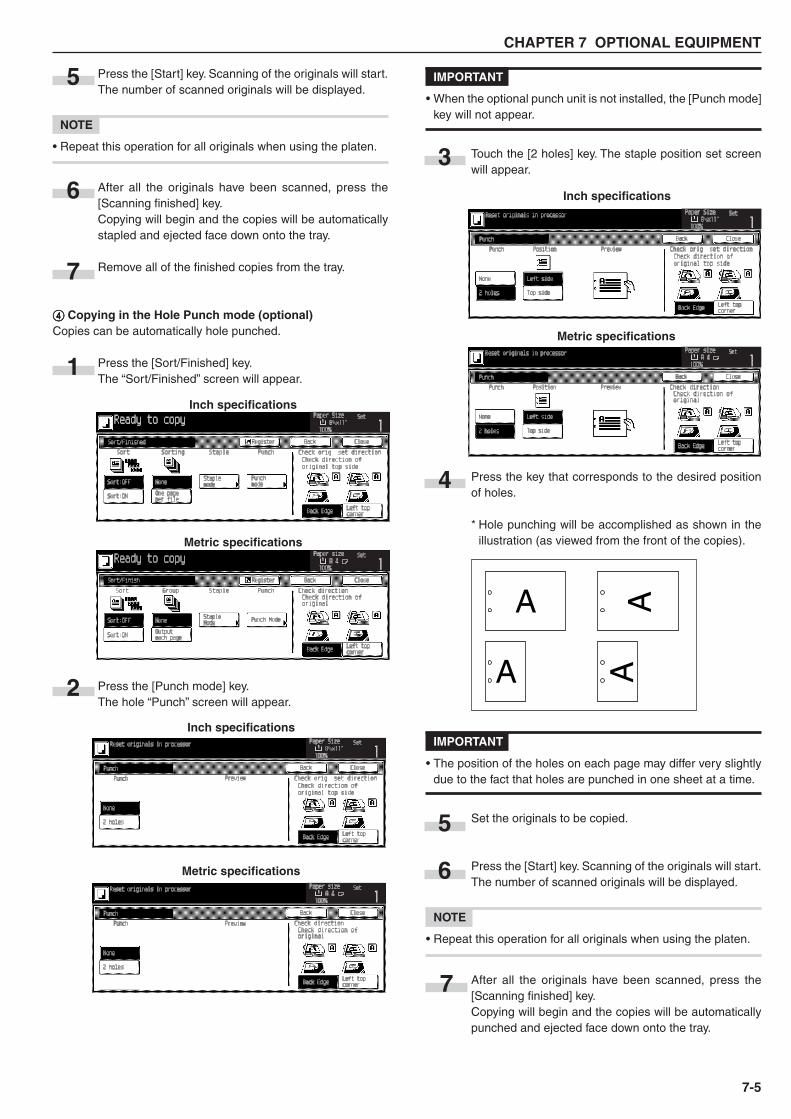
CHAPTER 7 OPTIONAL EQUIPMENT
7-5
Press the [Start] key. Scanning of the originals will start.The number of scanned originals will be displayed.
NOTE
• Repeat this operation for all originals when using the platen.
After all the originals have been scanned, press the[Scanning finished] key.Copying will begin and the copies will be automaticallystapled and ejected face down onto the tray.
Remove all of the finished copies from the tray.
44444 Copying in the Hole Punch mode (optional)Copies can be automatically hole punched.
Press the [Sort/Finished] key.The “Sort/Finished” screen will appear.
Press the [Punch mode] key.The hole “Punch” screen will appear.
IMPORTANT
• When the optional punch unit is not installed, the [Punch mode]key will not appear.
Touch the [2 holes] key. The staple position set screenwill appear.
Press the key that corresponds to the desired positionof holes.
* Hole punching will be accomplished as shown in theillustration (as viewed from the front of the copies).
IMPORTANT
• The position of the holes on each page may differ very slightlydue to the fact that holes are punched in one sheet at a time.
Set the originals to be copied.
Press the [Start] key. Scanning of the originals will start.The number of scanned originals will be displayed.
NOTE
• Repeat this operation for all originals when using the platen.
After all the originals have been scanned, press the[Scanning finished] key.Copying will begin and the copies will be automaticallypunched and ejected face down onto the tray.
1
2
6
7
5
Inch specifications
Metric specifications
Inch specifications
Metric specifications
4
5
A
AA
A
6
3Inch specifications
Metric specifications
7
7
7
7
7
CHAPTER 7 OPTIONAL EQUIPMENT
7-6
Remove all of the finished copies from the tray.
(6) Document Finisher
The Document Finisher stores a large quantity copies, and sortsmultiple sets by shifting the position that each one is ejected. It isalso possible to use the Document Finisher to staple the copysets or punch holes in them for filling purposes.For detailed information, refer to the operation guide for the Docu-ment Finisher. For information on how to use the Document Fin-isher, refer to “(5) Document Finisher”.
* Stacking modeIf the number of copies to be made in the Non-sort mode is set toa number greater than the acceptable limit (250 sheets), the fin-ished copies will be ejected onto the Sort tray.
(7) Built-in Finisher
The finisher stores a large quantity of copies. It can also sortsmultiple copies into sets by shifting the eject position. Paginatedcopies can be stapled, too.
1 Sort tray2 Finisher tray
* Sorted copies are ejected to the Sort tray.
* When setting large size paper such as 8 1/2"✕11, A4R or larger,pull out the support extension.
11111 Refilling the Stapling Unit
Open the stapler front cover towards you.
Pull out the staple holder.
Remove the empty staple cartridge from the stapleholder.
8
1
2
2
3
1
CHAPTER 7 OPTIONAL EQUIPMENT
7-7
Hold the staple holder in one hand and the new staplecartridge in the other and insert the new staple cartridgemaking sure the direction of insertion is correct.
* The arrow on the staple cartridge indicates the correctdirection of insertion.
Make sure the new staple cartridge is completely insertedall the way into the staple holder and then remove thepaper tape covering the staple cartridge.
Replace the staple holder back in its original position inthe Stapling Unit. Once it has been fully inserted, it willclick into place.
22222 Clearing a staple jam
Remove the staple cartridge referring to the “11111 Refillingthe Stapling Unit”.Push up on the tab “A” on the protective faceplate inorder to raise the faceplate.
Remove the jammed staple from the tip of the staplecartridge (the end where staples are set).
Lower the protective faceplate back into its original posi-tion.
Replace the staple holder back in its original position inthe Stapling Unit. Once it has been fully inserted, it willclick into place.
Lift up the Stapling Unit slightly and than lower it into itsoriginal position.
Close the stapler front cover securely.
(8) Duplex unit
If the Duplex unit is installed, duplex copies can be made. Duplexcopies can be made with A3 to A5R [11" ✕ 17" to 5 1/2" ✕ 8 1/2"](75 to 80 g/m2) paper.
4
5
6
1
A
2
3
4
5
6
CHAPTER 7 OPTIONAL EQUIPMENT
7-8
(11) Printer board
If the printer board is installed, this copier can be used as a printer.For more detailed information, see the printer’s operation guide.Since the network board is equipped, this copier can also beused as a network printer, allowing access from multiple comput-ers. The optional printer network kit and hard disk are also avail-able.
(12) Printer/scanner kit
If the printer/scanner kit is installed, this copier can be used as aprinter or a network scanner. For more detailed information, seethe operation guide for the printer/scanner kit. Since the networkboard is equipped, this copier can also be used as a networkprinter, allowing access from multiple computers. The optionalprinter network kit and hard disk are also available.
(13) Fax kit
If the fax kit is installed, this copier can be used as a fax. Also ifthe fax kit is used together with the optional printer/scanner kit,this copier can be used as a network fax, allowing transmissionand reception by a computer. For details, see the operation guidefor the fax.* In some cases, this function may not be used.
(9) Job separator
When using the optional printer function, the paper eject pointcan be changed according to the used function, making it easierto sort paper.Copied paper can be ejected to the job separator (upper sec-tion). See “Select copy output mode” in Machine default settingon page 6-18.* The job separator can store up to 100 copies. When making
101 or more copies, copying will stop when 100 copies are made.Copying will resume automatically when the copied sheets areremoved.
(10) Key counter
The key counter determines the number of copies that have beenmade. It is useful for copier centralized management on a de-partment or even company level.* The key counter may count up when either data from a com-
puter is printed out or fax pages are printed out.
• Setting the key counterInsert the key counter securely into the key counter opening.
NOTE
• When the key counter function is used, copies cannot be madeunless the key counter is inserted into the copier. If the keycounter is not inserted securely, “Insert key counter.” appearson the message display.
8-1
1. Error messages
When any of the messages listed in the table below appear on the message display, take the corrective action as instructed.
“Close xxx cover x.”
“Add paper in cassette.”
“Set cassette.”
“Paper cassette is out of order. Select anotherpaper drawer.”
“Check paper size.”
“Reposition original.”
“Exceeds pre registered copying quantity.”
“Ready to copy. Add toner.”
“Add toner to resume copying.”
“System error.Main switch off/on.”
“System error.Disconnect power plug from the socket.”
“Call service.”
The cover indicated is open. Close the cover securely.
There is no paper in the drawer indicated. Load paper.
One of the drawers is not closed properly. Pull it out and push it back in allthe way.
The drawer currently in use is out of order and cannot be used. Contactyour service representative immediately. Continue copying using anotherdrawer.
No paper that can be used in the selected mode is loaded. Check thepaper.
The orientation of the original and the selected paper are different. Changethe orientation of the original. If the Start key is pressed, same-size copy-ing will be performed.
The number of copies reached the limit set in the copy managementmode and no more copies can be made. Clear the copy count from themanagement mode.
There is not enough toner in the copier. Replace the toner container im-mediately as only one copy can be made at a time.
There is not enough toner in the copier to make copies. Replace thetoner container immediately.
A system error has occurred. Turn the main switch OFF and then ON.
A system error has occurred. Disconnect the power plug from the outletand connect it again.
Open and close the front cover. If the same message appears again,make a note of the “C” and the number appearing with it, turn the mainswitch OFF (�), unplug the power cord from the outlet, and contact yourservice representative.
PageMessage Action
–
3-1
–
–
–
–
6-1
3-4
3-4
8-6
8-6
–
CHAPTER 8 WHEN A PROBLEM OCCURS
* If the optional fax kit is installed in your copier, when the power cord is unplugged from the outlet, original data or reserved communica-tion information stored in the memory may be lost.
CHAPTER 8 WHEN A PROBLEM OCCURS
8-2
“Time for maintenance”
“Memory full.”
“Misfeed in xxx.”
“Misfeed in Doc Proces. Remove original(s).”
“Duplex tray inoperable, call service.”
“Paper capacity exceeded.Remove paper from Job sep.”
“Remove paper form inner tray of Finisher.”
“Out of staples. Add staples.”
“Cannot staple this size.”
“Replace the waste toner box.”
“Close Document processor cover.”
Periodic maintenance is necessary to keep your copier in good condi-tion.Contact your service representative as soon as possible.
The copier memory is full. Either print out or clear all scanned data. It isnot possible to copy or scan another original until one of these two opera-tions is performed.The copier memory size and the capacity for scanning originals are shownbelow.
*When using the standard original specified by our company (A4 paper,Characters account for 6% of the original).
If paper is misfed, the copier will stop and the location of the misfeed willappear on the message display. Remove the misfed paper with the mainswitch turned ON ( | ) by following the appropriate procedure.
Originals have not been fed correctly from the Document Processor (op-tional). Remove the originals with the main switch turned ON (|) by follow-ing the appropriate procedure.
The duplex unit (optional) is out of order and duplex copying is not pos-sible.Contact your service representative immediately.
There are 100 sheets of paper stored on the optional job separator. Re-move the paper and resume copying.
Paper has been misfed inside the document finisher (optional). See thedocument finisher’s operation guide and remove the paper.
There are no staples in the document finisher (optional). See the docu-ment finisher’s operation guide and replace the staple cartridge.
Stapling is not possible with small size paper. For details, see the docu-ment finisher’s operation guide .
The waste toner box is filled with waste toner. Replace the waste tonerbox with a new one.
The document processor original cover of the optional document proces-sor is open. Close the cover securely.
PageMessage Action
–
–
8-3
8-4
–
–
–
–
–
3-4
–
Memory32MB (standard)32MB (standard) + 32MB (optional)32MB (standard) + 64MB (optional)32MB (standard) + 128MB (optional)
Total32MB64MB96MB160MB
Scanning capacity*122 originals292 originals462 originals802 originals
CHAPTER 8 WHEN A PROBLEM OCCURS
8-3
2. When an indicator lights or blinks orange
When the Copy, Printer, Scanner or Fax indicator lights or blinks orange, take appropriate action as instructed by the message.
3. When paper misfeeds
If a paper misfeed occurs, copying will stop. A misfeed message will appear and the misfeed location will be indicated on the messagedisplay.Remove the misfed paper by referring to “(2) Removal procedures” with the main switch.
Inch specifications
Metric specifications
Copier
Printer
Scanner
Fax
IndicatorLights or Blinks orange
ActionTake appropriate measures according to the message.
Page–
CHAPTER 8 WHEN A PROBLEM OCCURS
8-4
(1) Cautions
• Do not reuse misfed paper.• If paper is torn during removal, be sure to remove all loose scraps
from inside the copier, or they could cause misfeed later.• After misfed paper has been removed, warm-up will begin. The
Misfeed indicator will turn off and the copier will return to thesame settings prior to the misfeed.
(2) Removal procedures
11111 Misfeed in paper feed section
• Misfeed in drawer (JAM 10 to 13, 15 to 17)If the message below appears, a misfeed has occurred in thedrawer (or optional paper feeder). Remove the misfed paper us-ing the procedure given below.
Open the drawer.
1
Remove the misfed paper while taking care not to tear it.* If the paper should be torn, remove all the scraps from
the inside the copier.
Close the drawer slowly.* Check that the paper is kept under the claws of the
drawer. If not, reload the paper.
• Misfeed in left cover 1 (JAM 30 to 34, 36 to 52, 60, 61)If the message below appears, a misfeed has occurred in the leftcover 1. Remove the misfed paper using the procedure givenbelow.
Pull up the lock lever to open the left cover 1.
2
3
1
Inch specifications
Metric specifications
WARNINGHigh voltage is present in the charger section. Takesufficient care when working in this area, as there is adanger of electrical shock.
CAUTIONThe copier’s fixing unit is extremely hot. Take sufficientcare when working in this area, as there is a danger ofgetting burned.
Inch specifications
Metric specifications
CHAPTER 8 WHEN A PROBLEM OCCURS
8-5
Remove the misfed paper.
When the duplex unit is installed, raise the duplex unitto remove the misfed paper.
Remove the misfed paper in the output section.
Close the left cover 1.
2
3
4
5
• Misfeed in left cover 1 (JAM 35)If the message below appears, a misfeed has occurred in theleft cover 1. Remove the misfed paper using the procedure givenbelow.
Pull up the lock lever to open the left cover 1.
Remove the misfed paper.
When the duplex unit is installed, raise the duplex unitto remove the misfed paper.
Remove the misfed paper in the output section.
1
Inch specifications
Metric specifications
2
3
4
CAUTIONThe copier’s fixing unit is extremely hot. Take sufficientcare when working in this area, as there is a danger ofgetting burned.
CHAPTER 8 WHEN A PROBLEM OCCURS
8-6
When the optional fax kit is installed, the message be-low appears. Perform the appropriate action by follow-ing the message.
• Misfeed in left cover 2 (JAM 18, 22)If the message below appears, a misfeed has occurred in the leftcover 1. Remove the misfed paper using the procedure givenbelow.
Open the left cover 2.1
Inch specifications
Metric specifications
5 Close the left cover 1.
Press the [START] key after the “Press Start Key. Re-starting.” message appears.The message below appears.
Repeat the steps 1 to 6.
The message below appears. Perform the appropriateaction by following the message.
7
6
8
Inch specifications
Metric specifications
9 CAUTION
The copier’s fixing unit is extremely hot. Take sufficientcare when working in this area, as there is a danger ofgetting burned.
Inch specifications
Metric specifications
Inch specifications
Metric specifications
CHAPTER 8 WHEN A PROBLEM OCCURS
8-7
Remove the misfed paper.
Close the left cover 2.
• Misfeed in multi-bypass (JAM14, 20, 21, 23)If the message below appears, a misfeed has occurred in themulti-bypass.Remove the misfed paper using the procedure given below.
Remove all the paper remaining in the multi-bypass.
Pull up the lever to remove the misfed paper.* If the misfed paper cannot be removed, go to the next
step.
Pull up the lock lever to open the left cover 1.
Remove the misfed paper.
When the duplex unit is installed, raise the duplex unit toremove the misfed paper.
If the misfed paper cannot be removed, go to the nextstep.
Open the front cover.
2
5
3
4
1
6
2
3
Inch specifications
Metric specifications
CHAPTER 8 WHEN A PROBLEM OCCURS
8-8
Turn the knob clockwise to release the misfed paper fromthe internal tray section.
Remove the misfed paper.
Pull out the internal tray.
Open the internal tray cover.
Remove the misfed paper.
If the paper has been torn, remove the internal tray.
Remove the misfed paper.
Replace the internal tray in its original position.
Close the front cover.
22222 Misfeed in Duplex Document Processor (optional) (JAM70 to 76)
If the message below appears, a misfeed has occurred in theDuplex Document Processor. Remove the misfed original usingthe procedure given below.
If the original is on the original table, remove it.
Open the Document Processor original cover.
10
11
12
13
14
9
15
1
2
8
Inch specifications
Metric specifications
7
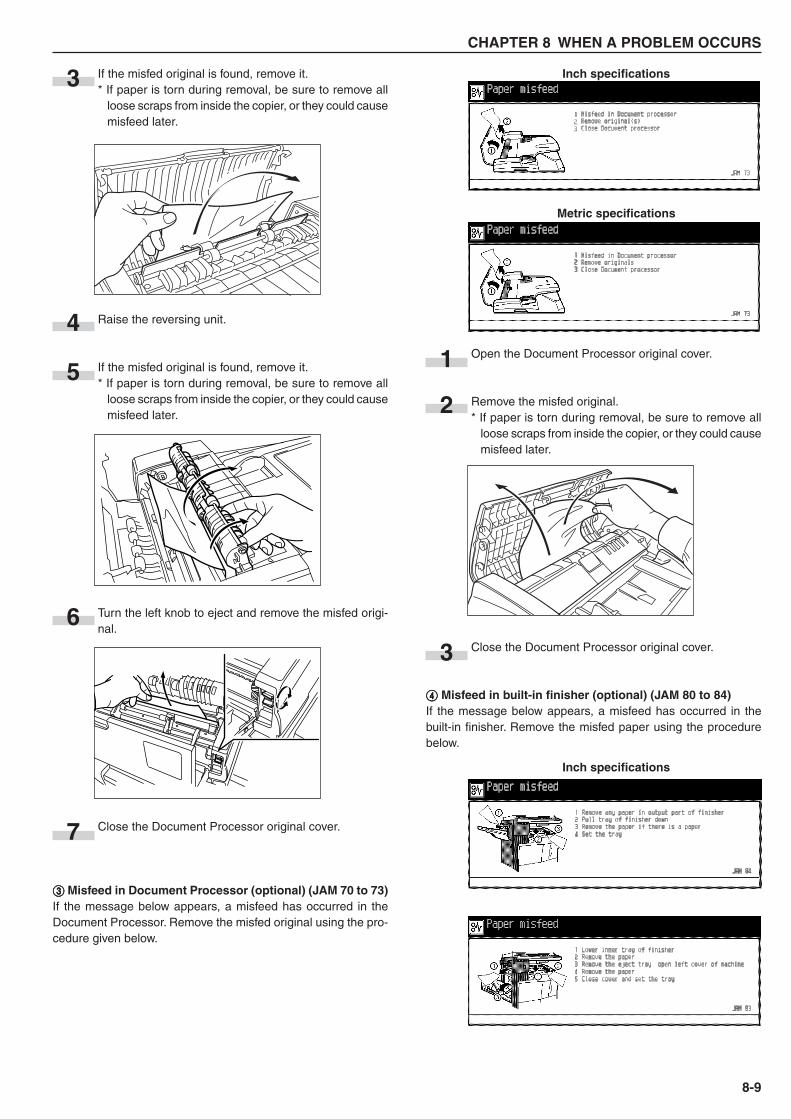
CHAPTER 8 WHEN A PROBLEM OCCURS
8-9
If the misfed original is found, remove it.* If paper is torn during removal, be sure to remove all
loose scraps from inside the copier, or they could causemisfeed later.
Raise the reversing unit.
If the misfed original is found, remove it.* If paper is torn during removal, be sure to remove all
loose scraps from inside the copier, or they could causemisfeed later.
Turn the left knob to eject and remove the misfed origi-nal.
Close the Document Processor original cover.
33333 Misfeed in Document Processor (optional) (JAM 70 to 73)If the message below appears, a misfeed has occurred in theDocument Processor. Remove the misfed original using the pro-cedure given below.
Open the Document Processor original cover.
Remove the misfed original.* If paper is torn during removal, be sure to remove all
loose scraps from inside the copier, or they could causemisfeed later.
Close the Document Processor original cover.
44444 Misfeed in built-in finisher (optional) (JAM 80 to 84)If the message below appears, a misfeed has occurred in thebuilt-in finisher. Remove the misfed paper using the procedurebelow.
3
2
Inch specifications
4
5
6
7
1
3 Inch specifications
Metric specifications
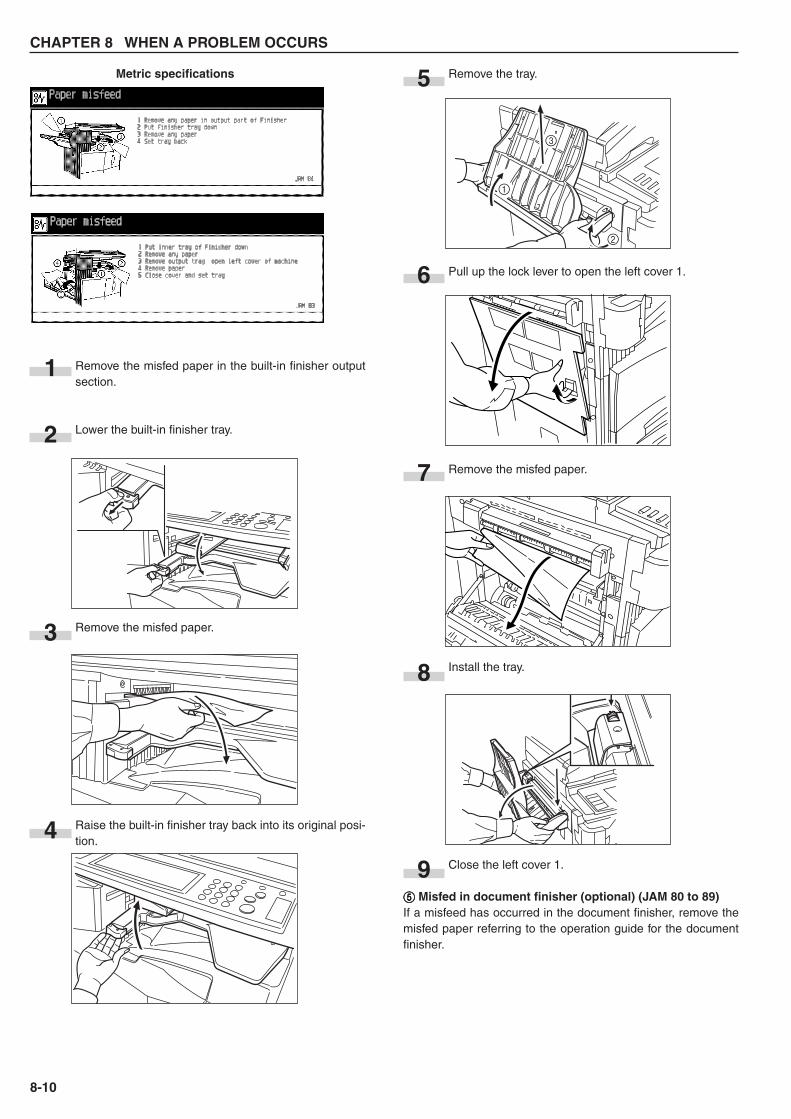
CHAPTER 8 WHEN A PROBLEM OCCURS
8-10
Remove the tray.
Pull up the lock lever to open the left cover 1.
Remove the misfed paper.
Install the tray.
Close the left cover 1.
55555 Misfed in document finisher (optional) (JAM 80 to 89)If a misfeed has occurred in the document finisher, remove themisfed paper referring to the operation guide for the documentfinisher.
Remove the misfed paper in the built-in finisher outputsection.
Lower the built-in finisher tray.
Remove the misfed paper.
Raise the built-in finisher tray back into its original posi-tion.4
5
6
2
1
3
8
9
7
Metric specifications
1
2
3

CHAPTER 8 WHEN A PROBLEM OCCURS
8-11
4. Troubleshooting
Nothing lights on the op-eration panel when themain switch is turned ON.
No copies come out whenthe Start key is pressed.
Copies come out blank.
Copies come out too light.
Is the power plug connected to an ACoutlet?
Is there any message appearing on themessage display?
Are the originals set correctly?
Is the copier in the auto exposuremode?
Is the copier in the manual exposuremode?
Is the add toner message displayed?
Is paper wet?
PageTrouble Checks
–
8-1
4-1
7-2
6-28
4-2
6-306-31
3-4
3-1
Connect the plug to an AC outlet.
Perform the corrective action correspondingto the message.
When setting originals on the platen, placethem face-down.
When setting originals in the optional Docu-ment Processor, place them face-up.
To change the overall exposure, perform theauto exposure adjustment.
Adjust the exposure to the correct degreeusing the copy exposure adjustment keys.
To change the overall exposure, perform theexposure adjustment for the each copy qual-ity mode.
Replace the toner container.
Replace the paper with new paper.
Action
If trouble occurs, carry out the applicable checks and actions given below. If the trouble persists, contact your service representative.
CHAPTER 8 WHEN A PROBLEM OCCURS
8-12
Copies come out too dark.
Copies are dirty.
Copy image is askew.
Misfeed occurs frequently.
Copies are wrinkled.
Black or white lines appearon the copy.
Is the copier in the auto exposure mode?
Is the copier in the manual exposuremode?
Is the platen or the original cover dirty?
Is the transfer roller contaminated?
Are the originals set correctly?
Is the paper set correctly in the drawer?
Is paper curled, folded or wrinkled?
Is there any misfed paper or loose scrapsof paper remaining inside the copier?
Is the separation in the paper feed sec-tion dirty?
Is the electrostatic section dirty?
PageTrouble Checks
6-28
4-2
6-306-31
9-1
3-5
9-2
4-1
7-1
3-1
3-1
8-3
9-1
3-53-6
To change the overall exposure, perform theauto exposure adjustment.
Adjust the exposure to the correct degreeusing the copy exposure adjustment keys.
To change the overall exposure, perform theexposure adjustment for the each copy qual-ity mode.
Clean the platen and/or the original cover.
Open the front cover and pull and push backin the cleaning shaft.
Clean the transfer roller with the cleaningbrush.
When setting originals on the platen, aligntheir edges with the correct original sizescale for their size.
When setting originals in the optional Docu-ment Processor, adjust the original insertionguides to the size of the originals correctly.
Set paper properly.
Replace the paper with new paper.
Carry out the appropriate procedure to re-move the paper.
Clean the separator.
Open the front cover and pull and push backin the cleaning shaft.
Action
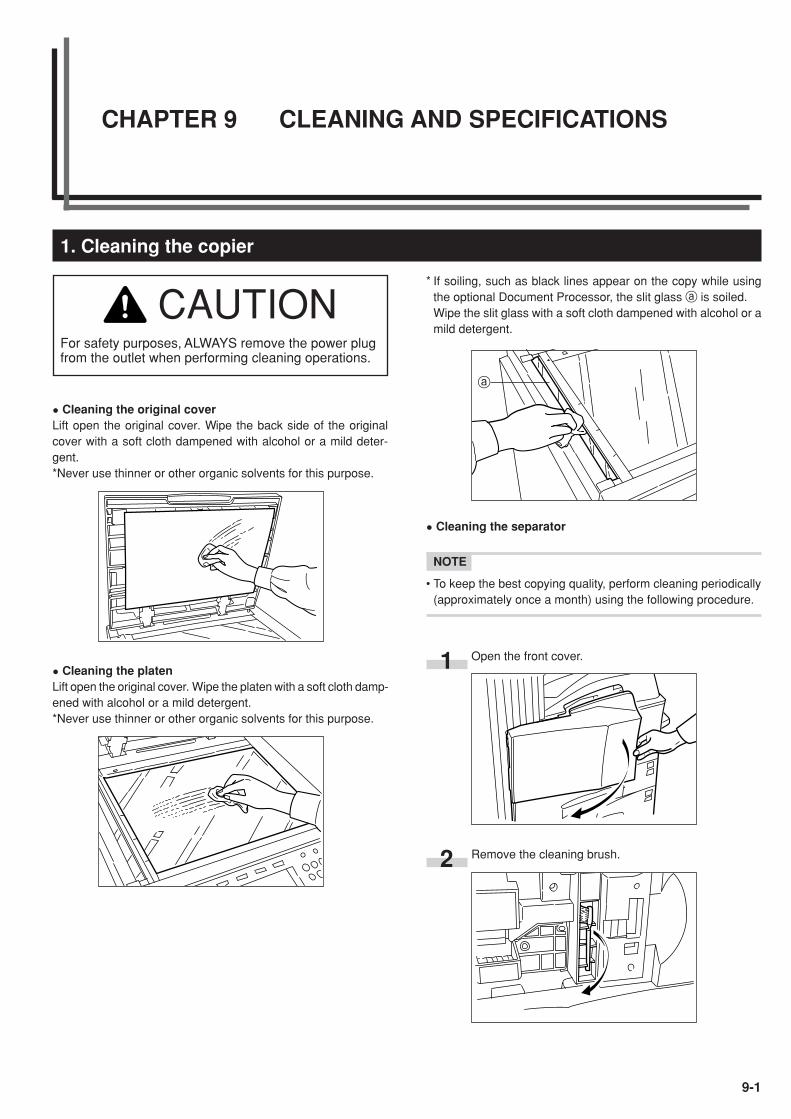
9-1
1. Cleaning the copier
• Cleaning the original coverLift open the original cover. Wipe the back side of the originalcover with a soft cloth dampened with alcohol or a mild deter-gent.*Never use thinner or other organic solvents for this purpose.
• Cleaning the platenLift open the original cover. Wipe the platen with a soft cloth damp-ened with alcohol or a mild detergent.*Never use thinner or other organic solvents for this purpose.
* If soiling, such as black lines appear on the copy while usingthe optional Document Processor, the slit glass a is soiled.Wipe the slit glass with a soft cloth dampened with alcohol or amild detergent.
• Cleaning the separator
NOTE
• To keep the best copying quality, perform cleaning periodically(approximately once a month) using the following procedure.
Open the front cover.
Remove the cleaning brush.
1
2
a
CHAPTER 9 CLEANING AND SPECIFICATIONS
CAUTIONFor safety purposes, ALWAYS remove the power plugfrom the outlet when performing cleaning operations.
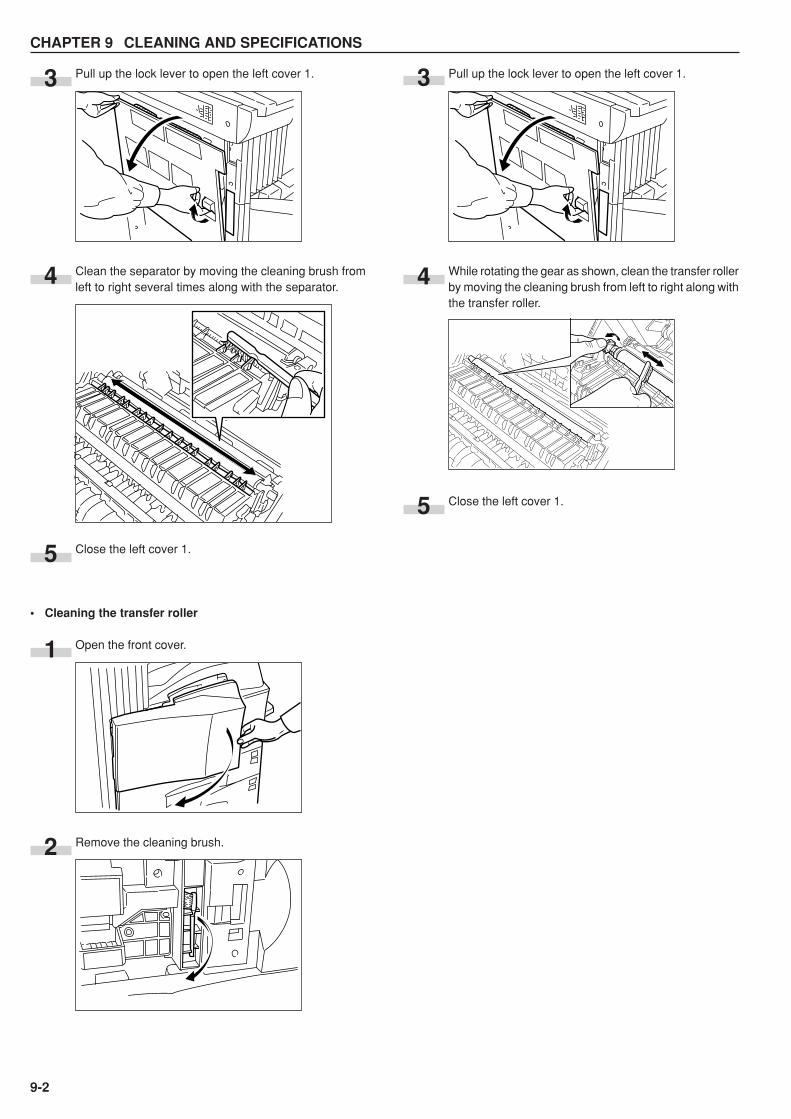
CHAPTER 9 CLEANING AND SPECIFICATIONS
9-2
Pull up the lock lever to open the left cover 1.
Clean the separator by moving the cleaning brush fromleft to right several times along with the separator.
Close the left cover 1.
• Cleaning the transfer roller
Open the front cover.
Remove the cleaning brush.
3
4
5
Pull up the lock lever to open the left cover 1.
While rotating the gear as shown, clean the transfer rollerby moving the cleaning brush from left to right along withthe transfer roller.
Close the left cover 1.
4
5
3
1
2
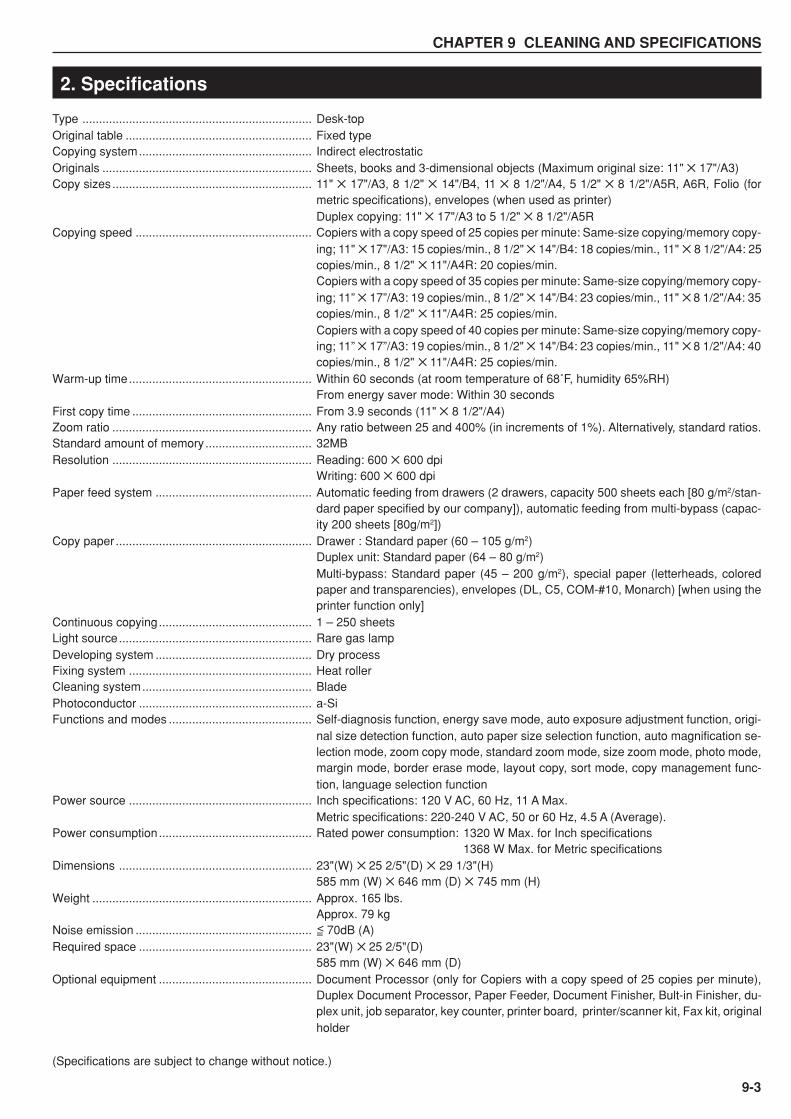
CHAPTER 9 CLEANING AND SPECIFICATIONS
9-3
Type ..................................................................... Desk-topOriginal table ........................................................ Fixed typeCopying system.................................................... Indirect electrostaticOriginals ............................................................... Sheets, books and 3-dimensional objects (Maximum original size: 11" ✕ 17"/A3)Copy sizes............................................................ 11" ✕ 17"/A3, 8 1/2" ✕ 14"/B4, 11 ✕ 8 1/2"/A4, 5 1/2" ✕ 8 1/2"/A5R, A6R, Folio (for
metric specifications), envelopes (when used as printer)Duplex copying: 11" ✕ 17"/A3 to 5 1/2" ✕ 8 1/2"/A5R
Copying speed ..................................................... Copiers with a copy speed of 25 copies per minute: Same-size copying/memory copy-ing; 11" ✕ 17"/A3: 15 copies/min., 8 1/2" ✕ 14"/B4: 18 copies/min., 11" ✕ 8 1/2"/A4: 25copies/min., 8 1/2" ✕ 11"/A4R: 20 copies/min.Copiers with a copy speed of 35 copies per minute: Same-size copying/memory copy-ing; 11” ✕ 17”/A3: 19 copies/min., 8 1/2" ✕ 14"/B4: 23 copies/min., 11" ✕ 8 1/2"/A4: 35copies/min., 8 1/2" ✕ 11"/A4R: 25 copies/min.Copiers with a copy speed of 40 copies per minute: Same-size copying/memory copy-ing; 11” ✕ 17”/A3: 19 copies/min., 8 1/2" ✕ 14"/B4: 23 copies/min., 11" ✕ 8 1/2"/A4: 40copies/min., 8 1/2" ✕ 11"/A4R: 25 copies/min.
Warm-up time....................................................... Within 60 seconds (at room temperature of 68˚F, humidity 65%RH)From energy saver mode: Within 30 seconds
First copy time ...................................................... From 3.9 seconds (11" ✕ 8 1/2"/A4)Zoom ratio ............................................................ Any ratio between 25 and 400% (in increments of 1%). Alternatively, standard ratios.Standard amount of memory................................ 32MBResolution ............................................................ Reading: 600 ✕ 600 dpi
Writing: 600 ✕ 600 dpiPaper feed system ............................................... Automatic feeding from drawers (2 drawers, capacity 500 sheets each [80 g/m2/stan-
dard paper specified by our company]), automatic feeding from multi-bypass (capac-ity 200 sheets [80g/m2])
Copy paper ........................................................... Drawer : Standard paper (60 – 105 g/m2)Duplex unit: Standard paper (64 – 80 g/m2)Multi-bypass: Standard paper (45 – 200 g/m2), special paper (letterheads, coloredpaper and transparencies), envelopes (DL, C5, COM-#10, Monarch) [when using theprinter function only]
Continuous copying.............................................. 1 – 250 sheetsLight source.......................................................... Rare gas lampDeveloping system ............................................... Dry processFixing system ....................................................... Heat rollerCleaning system................................................... BladePhotoconductor .................................................... a-SiFunctions and modes ........................................... Self-diagnosis function, energy save mode, auto exposure adjustment function, origi-
nal size detection function, auto paper size selection function, auto magnification se-lection mode, zoom copy mode, standard zoom mode, size zoom mode, photo mode,margin mode, border erase mode, layout copy, sort mode, copy management func-tion, language selection function
Power source ....................................................... Inch specifications: 120 V AC, 60 Hz, 11 A Max.Metric specifications: 220-240 V AC, 50 or 60 Hz, 4.5 A (Average).
Power consumption.............................................. Rated power consumption: 1320 W Max. for Inch specifications1368 W Max. for Metric specifications
Dimensions .......................................................... 23"(W) ✕ 25 2/5"(D) ✕ 29 1/3"(H)585 mm (W) ✕ 646 mm (D) ✕ 745 mm (H)
Weight .................................................................. Approx. 165 lbs.Approx. 79 kg
Noise emission ..................................................... =< 70dB (A)Required space .................................................... 23"(W) ✕ 25 2/5"(D)
585 mm (W) ✕ 646 mm (D)Optional equipment .............................................. Document Processor (only for Copiers with a copy speed of 25 copies per minute),
Duplex Document Processor, Paper Feeder, Document Finisher, Bult-in Finisher, du-plex unit, job separator, key counter, printer board, printer/scanner kit, Fax kit, originalholder
(Specifications are subject to change without notice.)
2. Specifications
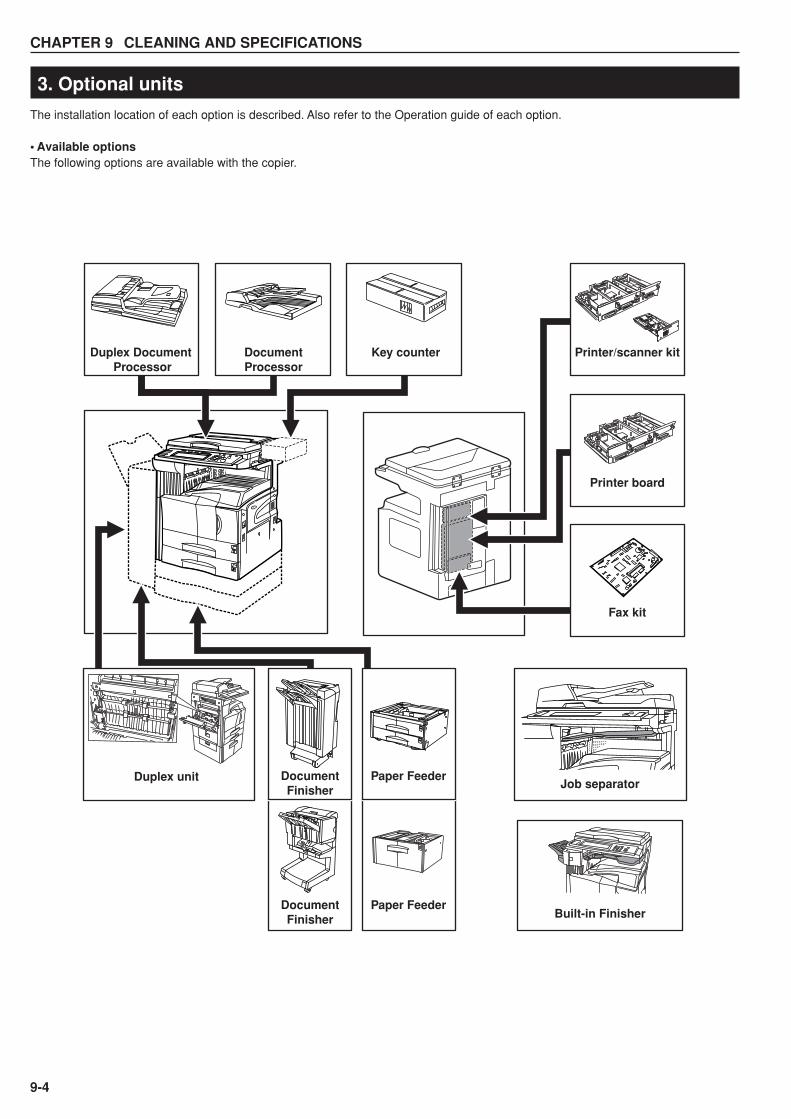
CHAPTER 9 CLEANING AND SPECIFICATIONS
9-4
Duplex Document Processor
DocumentProcessor
Key counter Printer/scanner kit
Fax kit
Paper Feeder
Paper FeederJob separator
Built-in Finisher
Duplex unit DocumentFinisher
DocumentFinisher
Printer board
3. Optional units
The installation location of each option is described. Also refer to the Operation guide of each option.
• Available optionsThe following options are available with the copier.

CHAPTER 9 CLEANING AND SPECIFICATIONS
9-5
Duplex Document ProcessorThe Duplex Document Processor automatically feeds one-sided originals one by one for scanning. It also reverses two-sided originalsautomatically for duplex copying and page separation copying.
Document ProcessorThis document feeder automatically feeds and scans each original, one by one, for copying.
Paper FeederTwo Paper Feeders of the same type as drawer in the main body can be added.Capacity and the paper loading method is the same as those for the standard drawer in the main unit.
Paper FeederThe Paper Feeder holds up to 3,000 sheets of 11" ✕ 8 1/2"/A4 size standard paper.Pull the Paper Feeder out towards you as far as it will go, and then load up to 1,500 sheets of paper in each rows.
Document FinisherThis unit lets you store a large volume of copies and shifts the position of each copy set for ease of sorting. It can staple finished copy setsand bind them. It is also possible to use the Document Finisher to punch holes in them for filling purposes (optional).
Document FinisherThe Document Finisher stores a large quantity copies, and sorts multiple sets by shifting the position that each one is ejected. It is alsopossible to use the Document Finisher to staple the copy sets or punch holes in them for filling purposes.
Built-in FinisherThe finisher stores a large quantity of copies. It can also sorts multiple copies into sets by shifting the eject position. Paginated copies canbe stapled, too.
Duplex unitIf the Duplex unit is installed, duplex copies can be made. Duplex copies can be made with A3 to A5R [11" ✕ 17" to 5 1/2" ✕ 8 1/2"](75 to 80 g/m2) paper.
Job separatorWhen using the optional printer function, the paper eject point can be changed according to the used function, making it easier to sortpaper. Copied paper can be ejected to the job separator (upper section). See “Select copy output mode” in Machine default setting onpage 6-18.
Key counterThe key counter determines the number of copies that have been made. It is useful for copier centralized management on a departmentor even company level.
Printer boardIf the printer board is installed, this copier can be used as a printer.Since the network board is equipped, this copier can also be used as a network printer, allowing access from multiple computers.
Printer/scanner kitIf the printer/scanner kit is installed, this copier can be used as a printer or a network scanner.Since the network board is equipped, this copier can also be used as a network printer, allowing access from multiple computers.
Fax kitIf the fax kit is installed, this copier can be used as a fax. Also if the fax kit is used together with the optional printer/scanner kit, this copiercan be used as a network fax, allowing transmission and reception by a computer.
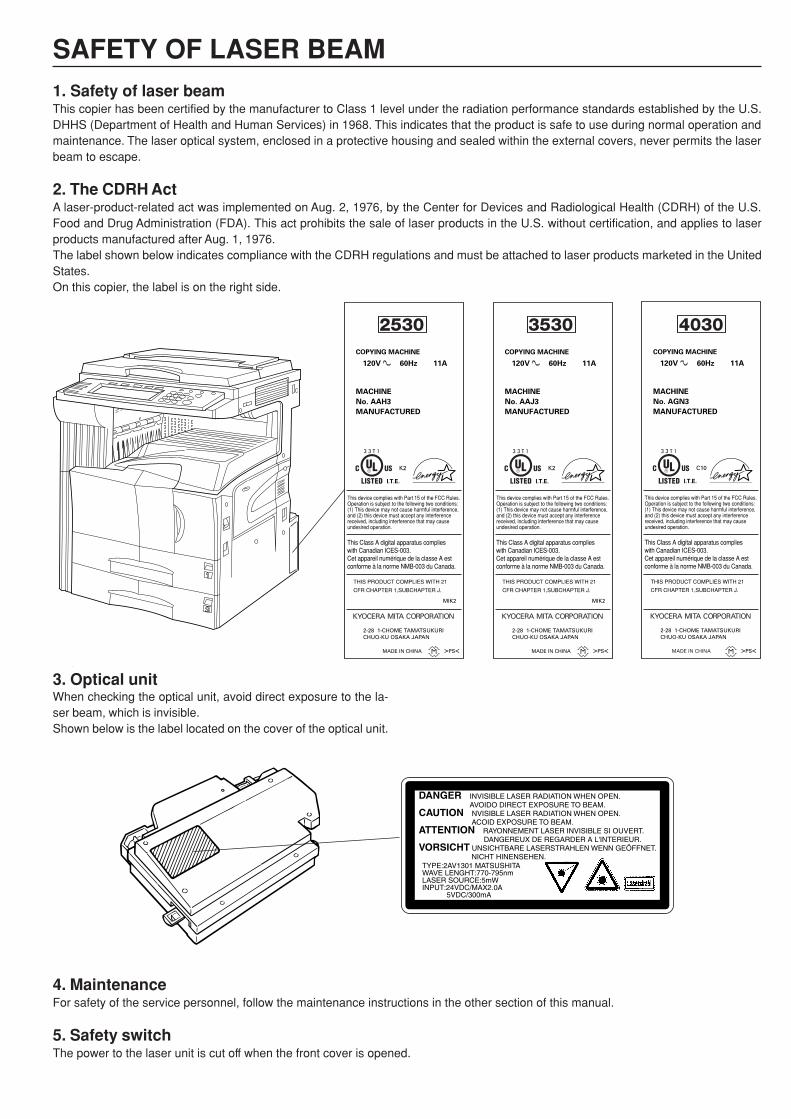
1. Safety of laser beamThis copier has been certified by the manufacturer to Class 1 level under the radiation performance standards established by the U.S.DHHS (Department of Health and Human Services) in 1968. This indicates that the product is safe to use during normal operation andmaintenance. The laser optical system, enclosed in a protective housing and sealed within the external covers, never permits the laserbeam to escape.
2. The CDRH ActA laser-product-related act was implemented on Aug. 2, 1976, by the Center for Devices and Radiological Health (CDRH) of the U.S.Food and Drug Administration (FDA). This act prohibits the sale of laser products in the U.S. without certification, and applies to laserproducts manufactured after Aug. 1, 1976.The label shown below indicates compliance with the CDRH regulations and must be attached to laser products marketed in the UnitedStates.On this copier, the label is on the right side.
3. Optical unitWhen checking the optical unit, avoid direct exposure to the la-ser beam, which is invisible.Shown below is the label located on the cover of the optical unit.
4. MaintenanceFor safety of the service personnel, follow the maintenance instructions in the other section of this manual.
5. Safety switchThe power to the laser unit is cut off when the front cover is opened.
SAFETY OF LASER BEAM
DANGER INVISIBLE LASER RADIATION WHEN OPEN. AVOIDO DIRECT EXPOSURE TO BEAM.CAUTION NVISIBLE LASER RADIATION WHEN OPEN. ACOID EXPOSURE TO BEAM.ATTENTION RAYONNEMENT LASER INVISIBLE SI OUVERT. DANGEREUX DE REGARDER A L'INTERIEUR.VORSICHT UNSICHTBARE LASERSTRAHLEN WENN GEÖFFNET. NICHT HINENSEHEN.TYPE:2AV1301 MATSUSHITAWAVE LENGHT:770-795nmLASER SOURCE:5mWINPUT:24VDC/MAX2.0A 5VDC/300mA
This device complies with Part 15 of the FCC Rules. Operation is subject to the following two conditions:(1) This device may not cause harmful interference, and (2) this device must accept any interference received, including interference that may cause undesired operation.
This Class A digital apparatus complieswith Canadian ICES-003.Cet appareil numérique de la classe A estconforme à la norme NMB-003 du Canada.
THIS PRODUCT COMPLIES WITH 21
CFR CHAPTER 1,SUBCHAPTER J.
CAUTION!
The power plug is the main isolation device! Other switches on the equipment are onlyfunctional switches and are not suitable for isolating the equipment from the power source.
ATTENTION!
Le débranchement de la fiche secteur est le seul moyen de mettre l’appareil hors tension.Les interrupteurs sur l’appareil ne sont que des interrupteurs de fonctionnement : ils nemettent pas l’appareil hors tension.

WARNING
This equipment has been tested and found to comply with the limits for a Class A digitaldevice, pursuant to Part of the FCC Rules. These limits are designed to provide reason-able protection against harmful interference when the equipment is operated in a commer-cial environment. This equipment generates, uses, and can radiate radio frequency energyand, if not installed and used in accordance with the instruction manual, may cause harm-ful interference to radio communications. Operation of this equipment in a residential areais likely to cause harmful interference in which case the user will be required to correct theinterference at his own expense.
CAUTION - The changes or modifications not expressly approved by the party responsiblefor compliance could void the user’s authority to operate the equipment.
* The above warning is valid only in the United States of America.

NEW 2530/3530/4030 COPIER LIMITED WARRANTY
Kyocera Mita America, Inc. and Kyocera Mita Canada, Ltd. (both referred to as “Kyocera Mita”) warrant the Customer’s new copier, and the new accessories installed with the initial installation of the copier, against any defects in material and workmanship for a period of one year, or 400,000 copies/prints from date of installation by an Authorized Kyocera Mita Dealer for the 2530, or 500,000 copies/prints from date of installation by an Authorized Kyocera Mita Dealer for the 3530 and the 4030, whichever first occurs. In the event the copier or an accessory is found to be defective within the warranty period, Kyocera Mita’s only obligation and the Customer’s exclusive remedy shall be replacement of any defective parts. It is understood that Kyocera Mita shall have no obligation to furnish labor.
This warranty is valid only as to the original retail purchaser (referred to as the “Customer”) of a new Kyocera Mita copier in the United States of America, or Canada based upon the country of purchase.
In order to obtain performance of this warranty, the Customer must immediately notify the Authorized Kyocera Mita Dealer from whom the product was purchased. If the Kyocera Mita Dealer is not able to provide service, write to Kyocera Mita at the address below for the name and address of the Authorized Kyocera Mita Dealer in your area.
This warranty does not cover copiers or accessories: (a) which have become damaged due to operator negligence, misuse, accidents, improper storage or unusual physical or electrical stress, (b) which have used parts or supplies which are not genuine Kyocera Mita brand parts or supplies, (c) which have been serviced by a technician not employed by Kyocera Mita or an Authorized Kyocera Mita Dealer, or (d) which have had the serial number modified, altered, or removed.
This warranty does not cover Maintenance Kits or the components of Maintenance Kits, which consist of the drum unit, the fixing unit, and the developing unit. Kyocera Mita shall give the Customer a separate warranty for these items.
This warranty gives the Customer specific legal rights. The Customer may also have other rights, which vary from state to state, or province to province. Neither the seller, nor any other person is authorized to extend the time period, or expand this warranty on behalf of Kyocera Mita.
THIS WARRANTY IS MADE IN LIEU OF ALL OTHER WARRANTIES AND (CONDITIONS), EXPRESS OR IMPLIED, AND KYOCERA MITA SPECIFICALLY DISCLAIMS ANY IMPLIED WARRANTY (OR CONDITION) OF MERCHANTABILITY OR FITNESS FOR A PARTICULAR PURPOSE. THIS WARRANTY SHALL NOT EXTEND TO, AND KYOCERA MITA SHALL NOT BE LIABLE FOR, ANY INCIDENTAL OR CONSEQUENTAL DAMAGES WHICH MAY ARISE OUT OF THE USE, OR INABILITY TO USE, THE COPIER.
1.
2.
3.
4.
5.
6.
7.
KYOCERA MITA CANADA, LTD.6120 Kestrel RoadMississauga, Ontario L5T 1S8Canada
KYOCERA MITA AMERICA, INC.225 Sand RoadP.O. Box 40008Fairfield, New Jersey07004-0008, USA


A1

* For best copy results and machine performance, werecommend that you use only KYOCERA MITA originalsupplies for your KYOCERA MITA copier.

© 2002 KYOCERA MITA CORPORATION
is a trademark of Kyocera Corporation
is a registered trademark of KYOCERA MITA CORPORATION2002. 10
2DF80012C
KYOCERA MITA AMERICA, INC.Headquarters:225 Sand Road, P.O. Box 40008Fairfield, New Jersey 07004-0008TEL : (973) 808-8444FAX : (973) 882-6000
New York Show Room:1410 Broadway 23rd floorNew York, NY 10018TEL : (917) 286-5400FAX : (917) 286-5402
Northeastern Region:225 Sand Road, P.O. Box 40008Fairfield, New Jersey 07004-0008TEL : (973) 808-8444FAX : (973) 882-4401
Midwestern Region:201 Hansen Court Suite 119Wood Dale, Illinois 60191TEL : (630) 238-9982FAX : (630) 238-9487
Western Region:14101 Alton Parkway,Irvine, California 92618-7006TEL : (949) 457-9000FAX : (949) 457-9119
Southeastern Region:1500 Oakbrook Drive,Norcross, Georgia 30093TEL : (770) 729-9786FAX : (770) 729-9873
Southwestern Region:2825 West Story Road,Irving, Texas 75038-5299TEL : (972) 550-8987FAX : (972) 570-4704
Dallas Parts Distribution Center& National Training Center:2825 West Story Road,Irving, Texas 75038-5299TEL : (972) 659-0055FAX : (972) 570-5816
KYOCERA MITA CANADA, LTD.6120 Kestrel Road, Mississauga, Ontario L5T 1S8, CanadaTEL : (905) 670-4425FAX : (905) 670-8116
KYOCERA MITA MEXICO, S.A. DE C.V.Av. 16 de Septiembre #407Col. Santa Inés,02130 AzcapotzalcoMéxico, D.F. MéxicoTEL : (55) 383-2741FAX : (55) 383-7804