Embed Size (px)
Citation preview
MAXIMUM
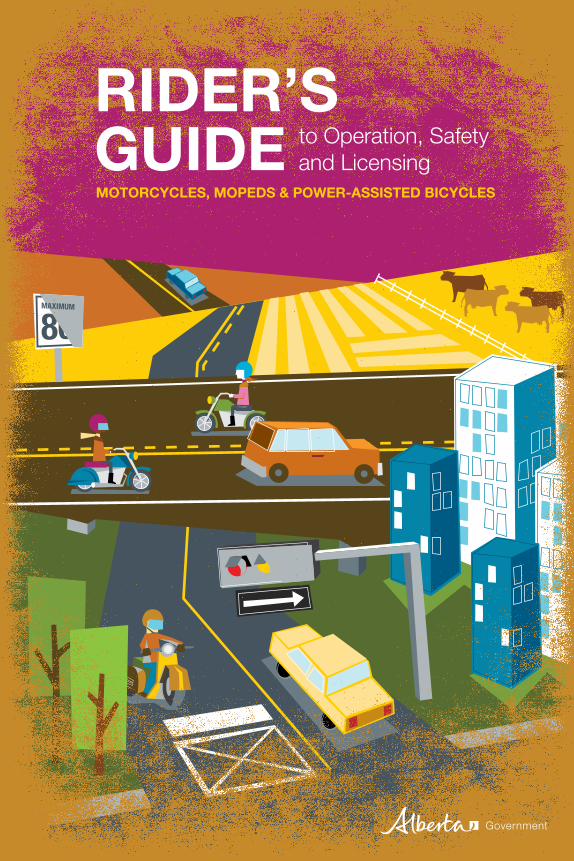
MOTORCYCLES, MOPEDS & POWER-ASSISTED BICYCLES
to Operation, Safety and Licensing
RIDER’S GUIDE
to Operation, Safety and LicensingMotorcycles, Mopeds & power-Assisted Bicycles
rider’s GUide
2 A Rider’s Guide to Operation, Safety and Licensing
Introduction
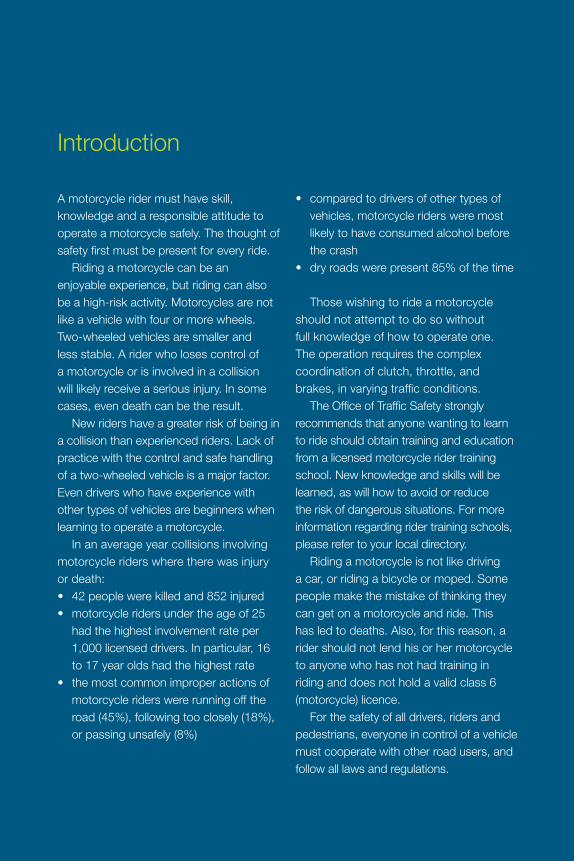
A motorcycle rider must have skill, knowledge and a responsible attitude to operate a motorcycle safely. The thought of safety first must be present for every ride.
Riding a motorcycle can be an enjoyable experience, but riding can also be a high-risk activity. Motorcycles are not like a vehicle with four or more wheels. Two-wheeled vehicles are smaller and less stable. A rider who loses control of a motorcycle or is involved in a collision will likely receive a serious injury. In some cases, even death can be the result.
New riders have a greater risk of being in a collision than experienced riders. Lack of practice with the control and safe handling of a two-wheeled vehicle is a major factor. Even drivers who have experience with other types of vehicles are beginners when learning to operate a motorcycle.
In an average year collisions involving motorcycle riders where there was injury or death:• 42 people were killed and 852 injured • motorcycle riders under the age of 25
had the highest involvement rate per 1,000 licensed drivers. In particular, 16 to 17 year olds had the highest rate
• the most common improper actions of motorcycle riders were running off the road (45%), following too closely (18%), or passing unsafely (8%)
• compared to drivers of other types of vehicles, motorcycle riders were most likely to have consumed alcohol before the crash
• dry roads were present 85% of the time
Those wishing to ride a motorcycle should not attempt to do so without full knowledge of how to operate one. The operation requires the complex coordination of clutch, throttle, and brakes, in varying traffic conditions.
The Office of Traffic Safety strongly recommends that anyone wanting to learn to ride should obtain training and education from a licensed motorcycle rider training school. New knowledge and skills will be learned, as will how to avoid or reduce the risk of dangerous situations. For more information regarding rider training schools, please refer to your local directory.
Riding a motorcycle is not like driving a car, or riding a bicycle or moped. Some people make the mistake of thinking they can get on a motorcycle and ride. This has led to deaths. Also, for this reason, a rider should not lend his or her motorcycle to anyone who has not had training in riding and does not hold a valid class 6 (motorcycle) licence.
For the safety of all drivers, riders and pedestrians, everyone in control of a vehicle must cooperate with other road users, and follow all laws and regulations.

iNtrodUctioN 3
The following guides provide information about the safe operation of cars and light trucks, commercial vehicles, and motorcycles, and the licensing of drivers and riders. These guides provide information for all classes of operator licences in Alberta, and will help you obtain an Alberta operator’s licence. Consider keeping the guides in your vehicle as a reference.
A driver’s GUide to operAtioN, sAfety ANd liceNsiNG Cars and Light TrucksThis guide provides information for all drivers.
A coMMerciAl driver’s GUide to operAtioN, sAfety ANd liceNsiNGTractor-Trailers, Buses, Large Trucks, Ambulances and TaxisThis guide provides information about driving commercial vehicles. It is used with A Driver’s Guide to Operation, Safety and Licensing. Both of these guides should be
used when preparing for the knowledge test and when learning to operate a tractor-trailer unit, large truck, ambulance, taxi, bus or school bus, as well as when handling dangerous goods.
A rider’s GUide to operAtioN, sAfety ANd liceNsiNG Motorcycles, Mopeds and Power- Assisted BicyclesThis guide provides information on the safe operation of motorcycles, mopeds and power-assisted bicycles. It is used with A Driver’s Guide to Operation, Safety and Licensing.
GeAred to Go: A workBook for coAchiNG New driversThis guide assists coaches who are providing supervision to new drivers as they gain experience and skills.
Guides available:
Geared to Go A Workbook for Coaching New Drivers

4 A Rider’s Guide to Operation, Safety and Licensing
This guide is about operating a motorcycle, riding one safely, and obtaining a class 6 (motorcycle) licence. It also has information about mopeds and power-assisted bicycles. It is a supplement to A Driver’s Guide to Operation, Safety and Licensing (Cars and Light Trucks), which outlines the rules of the road for all road users.
These two guides contain the information beginner and experienced riders need to ride safely. They also provide the information needed for the knowledge test for riding a motorcycle and moped, and for the practical road test to obtain a licence to operate a motorcycle.
Some of the information in this guide also applies to mopeds and power-assisted bicycles. However, the term motorcycle will be used throughout this guide. Riders of mopeds and power-assisted bicycles should read relevant sections.
These guides are available at all Alberta registry agent offices. They are also available on-line at www.transportation.alberta.ca in the Drivers and Vehicles section.
The information in this guide explains best practices for motorcycle riding, but cannot cover all circumstances. The motorcycle rider must use judgment and a safety-first attitude to make decisions when riding in real on-road situations.
This guide interprets the laws that govern the movement of vehicles and people on Alberta roadways. It is a guide only, and has no legal authority.
The laws that apply to operating a vehicle can be found in the Traffic Safety Act and its related regulations.
These documents are available at www.qp.alberta.ca/Laws_Online.cfm, and:
Queen’s Printer BookstoreMain Floor, Park Plaza10611–98 AvenueEdmonton, Alberta T5K 2P7
Tel: 780–427–4952 Fax: 780–452–0668For toll free service anywhere in Alberta, call 310-0000, then the number.
For more driver and vehicle information
Some registry agent offices provide knowledge tests and arrange road tests with driver examiners. The driver examiners operate independently and are not employees of the registry.
To find testing services, and information about driver licensing and vehicle registration:• visit www.servicealberta.ca/1641.cfm• visit the Association of Alberta Registries
at www.e-registry.ca• refer to your local directory under
License and Registry Services • call 780–427–7013 (Service Alberta)

Contents licensing
and learning
8 Before you ride
8 Taking a class 6 knowledge test
8 Taking a motorcycle rider training course
8 Practice your riding
9 Taking a class 6 road test
10 Conditions for riders with a class 6 licence who are still in the GDL program
11 Rider Requirements
12 Motorcycle, Moped, and Power Bicycle Defined
preparing to ride
14 Protecting your head, eyes and face
16 Dressing for safety and the weather
18 Responsible riding
18 Cell phones and other distractions
knowing your Motorcycle
20 Choosing the right motorcycle
20 Be familiar with the motorcycle controls and gauges
20 Motorcycle pre-trip inspection
22 Yearly maintenance
the Basics of safe operation and riding
24 Riding position
24 Starting
25 Signalling
25 Manual (standard) transmissions
26 Selecting and changing gears
28 Parking
28 Tires and Traction
29 Braking and stopping
30 Stopping time and distance
30 Turns and corners
30 Curves
31 Skids
Managing risk in traffic
34 Be proactive when riding
34 Blind spots
34 Managing the space around you and being seen
36 Choosing a lane and lane position
37 Changing lanes
38 Intersections
39 Passing
1
2
3
4
5
6 A Rider’s Guide to Operation, Safety and Licensing
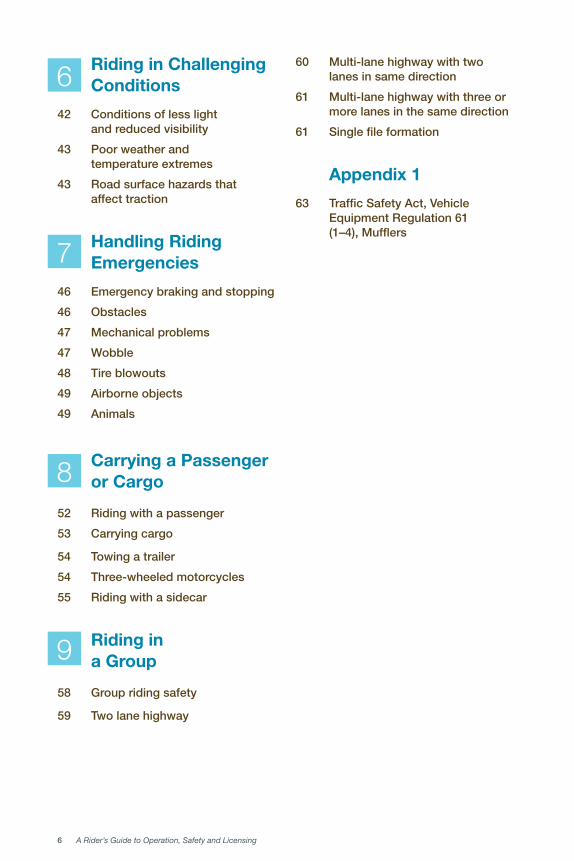
riding in challenging conditions
42 Conditions of less light and reduced visibility
43 Poor weather and temperature extremes
43 Road surface hazards that affect traction
handling riding emergencies
46 Emergency braking and stopping
46 Obstacles
47 Mechanical problems
47 Wobble
48 Tire blowouts
49 Airborne objects
49 Animals
carrying a passenger or cargo
52 Riding with a passenger
53 Carrying cargo
54 Towing a trailer
54 Three-wheeled motorcycles
55 Riding with a sidecar
riding in a Group
58 Group riding safety
59 Two lane highway
60 Multi-lane highway with two lanes in same direction
61 Multi-lane highway with three or more lanes in the same direction
61 Single file formation
Appendix 1
63 Traffic Safety Act, Vehicle Equipment Regulation 61 (1–4), Mufflers
6
7
8
9

1licensing and learning

8 A Rider’s Guide to Operation, Safety and Licensing
Before you rideTo qualify to learn to ride a motorcycle, you must:• be 16 years of age or older• hold a valid operator’s licence• have a person supervise you while you
are learning. A supervisor is required until you have passed a class 6 road test
Taking a class 6 knowledge testThe knowledge test consists of 30 questions about safe-driving practices for motorcycle riders, rules of the road, and traffic control signs and signals, as well as licensing information. This test is done on a computer. The motorcycle (class 6) knowledge test questions are based on this guide and the A Driver’s Guide to Operation, Safety and Licensing (formerly the Alberta Basic Licence Driver’s Handbook).
Knowledge tests can be taken at most Alberta registry agent offices. A test permit must be purchased for the knowledge test. If more than one test is needed, a permit must be purchased for each test.
The motorcycle knowledge test must be passed before the road test is taken.
Taking a motorcycle rider training courseIt is recommended that all new riders take a course to learn how to ride a motorcycle safely. Balance and control skills will be taught at these courses, as well as motorcycle riding theory.
Some specific skills taught may be:• weaving left and right through markers
(serpentine)• making a circle or figure eight pattern
while riding• riding at a slow speed in a straight line • shifting up, shifting down then turning
left and right• changing gears to prepare for curves.• starting and moving on a hill• stopping quickly in an emergency• steering and braking methods to avoid
obstacles or a collision
Practice your ridingAs a learning rider, before you have a class 6 licence, you must have a supervisor. The person supervising you must:• hold a valid full class 6 operator’s
licence (cannot be in the graduated driver licensing program)
• provide supervision at all times by: · being seated on the learning rider’s
motorcycle, or · following on another motorcycle, or · following in a vehicle
liceNsiNG ANd leArNiNG 9chApter oNe
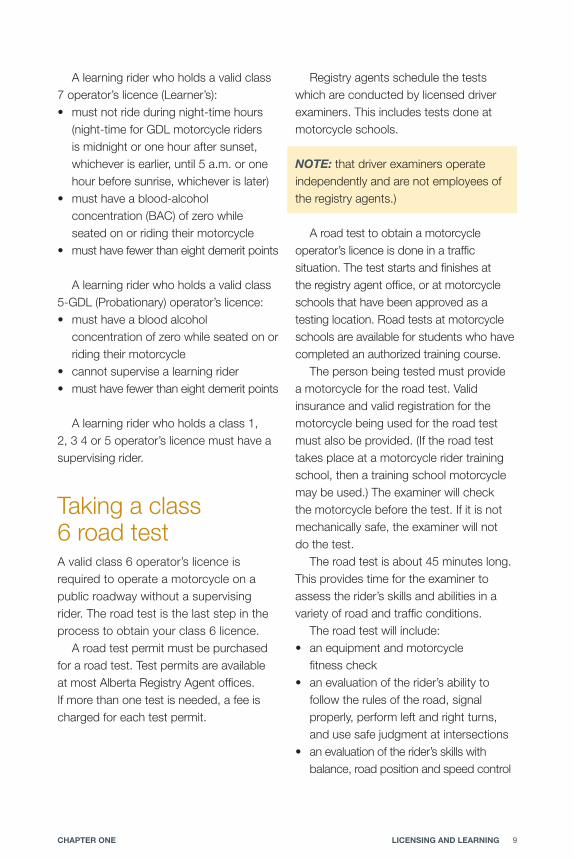
A learning rider who holds a valid class 7 operator’s licence (Learner’s):• must not ride during night-time hours
(night-time for GDL motorcycle riders is midnight or one hour after sunset, whichever is earlier, until 5 a.m. or one hour before sunrise, whichever is later)
• must have a blood-alcohol concentration (BAC) of zero while seated on or riding their motorcycle
• must have fewer than eight demerit points
A learning rider who holds a valid class 5-GDL (Probationary) operator’s licence:• must have a blood alcohol
concentration of zero while seated on or riding their motorcycle
• cannot supervise a learning rider• must have fewer than eight demerit points
A learning rider who holds a class 1, 2, 3 4 or 5 operator’s licence must have a supervising rider.
Taking a class 6 road testA valid class 6 operator’s licence is required to operate a motorcycle on a public roadway without a supervising rider. The road test is the last step in the process to obtain your class 6 licence.
A road test permit must be purchased for a road test. Test permits are available at most Alberta Registry Agent offices. If more than one test is needed, a fee is charged for each test permit.
Registry agents schedule the tests which are conducted by licensed driver examiners. This includes tests done at motorcycle schools.
NOTE: that driver examiners operate independently and are not employees of the registry agents.)
A road test to obtain a motorcycle operator’s licence is done in a traffic situation. The test starts and finishes at the registry agent office, or at motorcycle schools that have been approved as a testing location. Road tests at motorcycle schools are available for students who have completed an authorized training course.
The person being tested must provide a motorcycle for the road test. Valid insurance and valid registration for the motorcycle being used for the road test must also be provided. (If the road test takes place at a motorcycle rider training school, then a training school motorcycle may be used.) The examiner will check the motorcycle before the test. If it is not mechanically safe, the examiner will not do the test.
The road test is about 45 minutes long. This provides time for the examiner to assess the rider’s skills and abilities in a variety of road and traffic conditions.
The road test will include:• an equipment and motorcycle
fitness check• an evaluation of the rider’s ability to
follow the rules of the road, signal properly, perform left and right turns, and use safe judgment at intersections
• an evaluation of the rider’s skills with balance, road position and speed control

10 A Rider’s Guide to Operation, Safety and Licensing
Examiners will assess the road-readiness of clients. One-way radios are used for communication, allowing the examiner to give the rider instructions, advise the rider of immediate dangers, and to discontinue the road test if necessary.
The examiner will follow the motorcycle rider in another vehicle. Instructions will be given to the rider during the test using a one-way radio. During the test you may be asked to pull over to the curb and then park briefly, allowing the examiner to score on the checklist. There are to be three of these stops during the test. These stops are routine test components and will be made regardless of whether any errors have occurred.
After the road test, the driver examiner will explain the results of the test, and areas where you did well or that need more attention. The driver examiner will give you a copy of the test permit and a copy of the Examination Checklist. This checklist will show you which errors were made and the points assigned to each. Some errors will result in the road test being failed regardless of the number of points assessed for other errors. The checklist will also show you your road test results. It is your copy to keep.
If you passed the road test, take your road test permit to a registry to have your licence re-classed. Just passing the road test does not change your operator’s license. You must provide the registry with your permit and pay the fee for re-classing your operator’s license.
If this road test was unsuccessful, practice your riding and then schedule another appointment just as you did this one.
Conditions for riders with a class 6 licence who are still in the GDL programIf you had a class 7 (Learner’s) operator’s licence and then passed the class 6 motorcycle road test: • you will now hold a class 6-GDL
operator’s licence. You will remain in the two year probationary stage and be subject to the conditions and restrictions of the GDL program
• you must meet the requirements of the two year probationary stage and successfully complete an advanced road test, if you choose to exit the GDL program
If you had a class 7 (Learner’s) operator’s licence and then passed the class 5-Gdl basic road test before passing the class 6 motorcycle test:• you will now hold a combination Class
(5,6) GDL operator’s licence. You will remain in the two year probationary stage and be subject to the conditions and restrictions of the GDL program
• you must meet the requirements of the two year probationary stage and successfully complete an advanced road test, if you choose to exit the GDL program

liceNsiNG ANd leArNiNG 11chApter oNe
requirements
Class 6 or 6-GDL
16 years
Required
Required
Approved motorcycle helmet
As a learner Class 7:• no nighttime riding• needs supervising rider• zero blood alcohol concentration• riding privileges suspended at 8 or more demerits
Motorcycles
requirements
Any Class; 1 through 7
14 years
Required
Required
Approved motorcycle helmet
• must ride as far to the right as practical
• no passenger permitted if operator under 16 years of age
• riding privileges suspended at 8 or more demerits
requirements
Not Required
12 years
Not Required
Not Required
Approved motorcycle helmet
• must ride as far to the right as practical
• no passenger permitted if operator under 16 years of age
Moped(includes limited speed motorcycles)
power Bicycles(includes power-assisted bicycles)
Rider requirementsMotorcycle rider requirements
Moped and power-assisted bicycle rider requirements
licence
Minimum Age
registration
insurance
equipment
special laws
licence
Minimum Age
registration
insurance
equipment
special laws

12 A Rider’s Guide to Operation, Safety and Licensing
Motorcycle, moped, and power bicycle defined
Motorcycle means a motor vehicle other than a moped that is mounted on 2 or 3 wheels.
Engine or motor
Not applicable
Not applicable
55 kgs. or greater
Motorcycles in this category, that meet the requirements of the limited-speed motorcycle definition of Transport Canada, can be identified by the federally required compliance label ‘LSM’ in the vehicle-type section of the label.
Electric motor, or has an engine that has a displacement of not more than 50 cc (cubic centimeters).
Minimum seat height of 65 cm from the ground.
Top speed of 70 km/h
Can be any weight
Bicycles in this category, that meets the requirements of the power-assisted bicycle definition of Transport Canada, will be clearly marked as a ‘power-assisted bicycle’ as required by Transport Canada.
Electric motor with a maximum power of 500 watts.
Not applicable
Top speed of 32 km/h
Can be any weight
Motorcycles
Mopeds(includes limited speed motorcycles)
power Bicycles(includes power-assisted bicycles)
definition
powered by
other
speed
weight
definition
definition
powered by
powered by
other
speed
speed
weight
weight
other

2preparing to ride

14 A Rider’s Guide to Operation, Safety and Licensing
Protecting your head, eyes and face
Helmet safety standards
In Alberta, operators and passengers of motorcycles, mopeds and power-assisted bicycles must wear an approved motorcycle helmet. An approved helmet will have a label or mark to show that it meets the safety requirements set by one of the standards organizations, on the date that it was manufactured. • csA – Canadian Standards Association• dot – U.S. Department of Transportation • Bsi – British Standards Institute• sNell – Snell Memorial Foundation
NOTE: It is illegal to buy or sell a safety motorcycle helmet unless it meets current safety standards. For more information, see the Vehicle Equipment Regulation of the Traffic Safety Act at www.transportation.alberta.ca/525.htm
Types of helmets
There are three types of approved helmets. Each type provides a different level of coverage and protection. When choosing your helmet, consider that many motorcycle crashes involve impact to the head, face and chin.
fUll coverAGe (fUll fAce) helMets (recoMMeNded):• provide the best protection for the
entire head• protect the ears and base of the skull
• protect the lower face and chin• have a face shield for eye and face
protection• have the design structure that provides
the greatest strength • provide the best protection from the
weather and airborne objects
three-qUArter coverAGe (opeN fAce) helMets:• provide good protection for the top,
sides and back of the head• protect the ears and base of the skull• can be used with a face shield to
protect the eyes
They do not:• protect the face and chin• protect completely from the weather
prepAriNG to ride 15chApter two
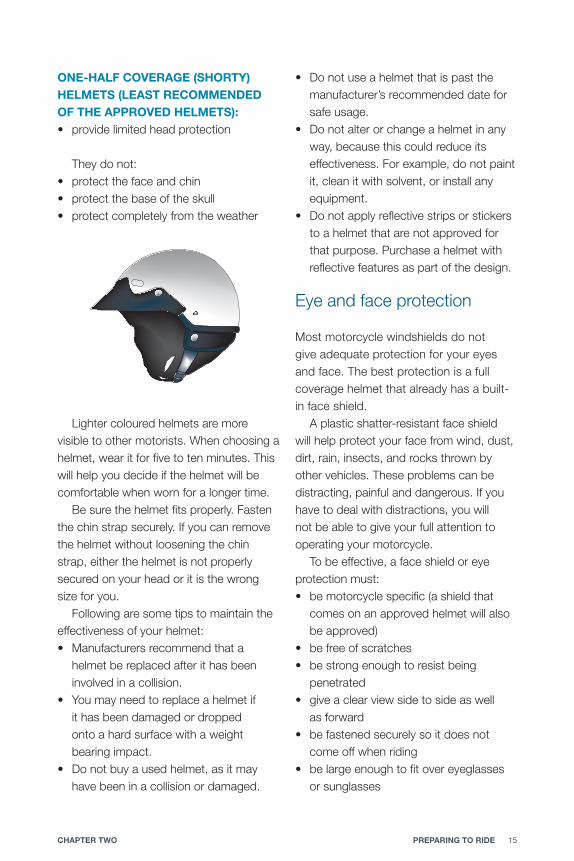
oNe-hAlf coverAGe (shorty) helMets (leAst recoMMeNded of the Approved helMets):• provide limited head protection
They do not:• protect the face and chin• protect the base of the skull• protect completely from the weather
Lighter coloured helmets are more visible to other motorists. When choosing a helmet, wear it for five to ten minutes. This will help you decide if the helmet will be comfortable when worn for a longer time.
Be sure the helmet fits properly. Fasten the chin strap securely. If you can remove the helmet without loosening the chin strap, either the helmet is not properly secured on your head or it is the wrong size for you.
Following are some tips to maintain the effectiveness of your helmet:• Manufacturers recommend that a
helmet be replaced after it has been involved in a collision.
• You may need to replace a helmet if it has been damaged or dropped onto a hard surface with a weight bearing impact.
• Do not buy a used helmet, as it may have been in a collision or damaged.
• Do not use a helmet that is past the manufacturer’s recommended date for safe usage.
• Do not alter or change a helmet in any way, because this could reduce its effectiveness. For example, do not paint it, clean it with solvent, or install any equipment.
• Do not apply reflective strips or stickers to a helmet that are not approved for that purpose. Purchase a helmet with reflective features as part of the design.
Eye and face protection
Most motorcycle windshields do not give adequate protection for your eyes and face. The best protection is a full coverage helmet that already has a built-in face shield.
A plastic shatter-resistant face shield will help protect your face from wind, dust, dirt, rain, insects, and rocks thrown by other vehicles. These problems can be distracting, painful and dangerous. If you have to deal with distractions, you will not be able to give your full attention to operating your motorcycle.
To be effective, a face shield or eye protection must:• be motorcycle specific (a shield that
comes on an approved helmet will also be approved)
• be free of scratches• be strong enough to resist being
penetrated• give a clear view side to side as well
as forward• be fastened securely so it does not
come off when riding• be large enough to fit over eyeglasses
or sunglasses
16 A Rider’s Guide to Operation, Safety and Licensing
If you choose a helmet that does not have full coverage protection, you should consider eyewear specifically designed to protect your eyes when riding. Eyeglasses or sunglasses may not provide adequate protection. If you wear corrective glasses, you should wear goggles that go over the glasses.
Tinted eye protection should not be worn at night or when light conditions are poor. Use a clear replacement shield for your helmet or wear clear goggles in conditions of reduced light and visibility.
Dressing for safety and the weatherYour clothing should be motorcycle-specific for riding. It provides the best protection against scrapes and cuts in a collision as well as contact with the ground or road surface. It also provides protection from the weather and flying debris. Clothing should be worn in layers so that you can adjust to changing weather conditions, and reduce the risk of hypothermia, hyperthermia and dehydration.
Hypothermia
Hypothermia occurs when the body loses heat faster than it can produce heat, causing dangerously low body temperature. The body loses heat due to cold or wind chill. Riders are especially at risk for rapid chilling. Even in warm weather, the constant exposure to wind when riding may cause hypothermia.
If you become chilled, your reflexes and response time will be slowed.
Hypothermia will also reduce your ability to concentrate and respond safely to traffic conditions. Proper riding gear, such as a windproof jacket and insulated layers of clothing, are essential. Motorcycle-specific clothing that you can heat while you are riding is also available.
Hyperthermia and dehydration
Hyperthermia happens when the body overheats. The body temperature can rise when the weather is warm or hot. Wind passing over exposed skin will quickly dry the moisture from the body, increasing the risk of dehydration.
To avoid overheating and dehydration, stay well hydrated by drinking plenty of water before the ride and when taking breaks. Plan for frequent water breaks and rest periods that are out of the direct sunlight.
The effects of hyperthermia and dehydration may be more severe if you ride without a jacket. Some motorcycle riding jackets and helmets come with venting, which allows for airflow. If you wear a proper jacket, you reduce the chance that you will become too hot or dehydrated.
Jackets and pants
Always ride with complete and proper gear recommended for motorcycle riding. • Jackets and pants should cover your
torso, arms and legs completely.• Clothing should be snug enough not to
flap in the wind or get caught in your motorcycle. However, it should be loose enough to move freely while covering your layered clothing.

prepAriNG to ride 17chApter two
• Sturdy synthetic textiles or leather that are designed for riding provides the best protection.
• Denim jackets and pants give only minimum protection and will wear through quickly when a rider is skidding on a road surface.
• Shorts and lightweight pants, and nylon materials are not recommended for riding as they do not give enough protection.
Gear and clothing with colours will help others see you when you are riding. Reflective strips on your motorcycle and clothing will make you more visible at night.
In cold or wet weather, wear proper clothing that will help keep you warm and dry.• A cold weather jacket designed for
riding should resist wind and fit snugly at your neck and wrists.
• A good quality riding rainsuit will not balloon or tear apart at highway speeds. The rainsuit should have a jacket with long sleeves, pants, and extra room to fit comfortably over your regular riding clothes.
Boots and other footwear
Proper footwear should allow you to operate the foot controls effectively. Your boots or footwear should: • cover your ankles• be made of leather or sturdy
synthetic material• have soles made of durable material that
will provide enough grip to keep your feet from slipping even in wet weather
• have short enough heels that they do not catch on rough surfaces or the controls
• have the laces tucked in to prevent them catching on the motorcycle
Gloves
It is best to wear gloves that are designed for motorcycle riding. Do not wear mitts when operating a motorcycle.• Wear gloves that are thin enough
to allow you to grip and operate the controls, but are thick enough to protect your hands in a crash.
• The gloves should be comfortable, flexible, and made of leather or similar durable material.
• They should cover your wrists and overlap the sleeves of the jacket.
• Cold weather and water resistant gloves are also available.
Hearing protection
Wind noise is a hazard for motorcycle riders. When riding the air passing around your head creates wind noise as your speed increases. The noise can lead to fatigue and cause permanent hearing loss. A helmet alone may not offer enough protection. Various types of earplugs are available and should be used when riding, particularly on highways where higher speed limits are in effect.
18 A Rider’s Guide to Operation, Safety and Licensing
Responsible ridingRider fitness
Your physical and mental conditions affect your ability to judge and react to a situation.• Never ride after drinking alcohol or
using drugs. • Be aware of the effects of prescription
and over-the-counter medications. Ask your doctor or pharmacist if any medications you take may affect your ability to judge and react.
• Do not ride when tired or stressed. • Avoid becoming too cold, too hot,
or dehydrated.
Cell phones and other distractions
Cell phones can take your attention away from the complex task of riding. Do not receive or make a cell phone call, or read or text a message while riding. Stop at a safe location at the side of the road to use a cell phone, including a hands-free phone, or to groom, listen to music, eat or drink. Two-way radios and global positioning systems (GPS) are also distractions.
While all forms of distracted riding can be hazardous, the Traffic Safety Act includes fines for certain distractions. These include using a hand-held cell phone, texting or e-mailing, using electronic devices, such as laptop computers, video games, cameras, video entertainment displays and programming portable audio players, entering information on GPS units, reading printed materials, writing, printing or sketching, and personal grooming.

3knowing your Motorcycle
20 A Rider’s Guide to Operation, Safety and Licensing
Choosing the right motorcycle When you choose a motorcycle, consider the type of riding you will be doing. Choose a motorcycle that you are able to handle at your level of experience and skill.
It is important that your motorcycle fits you properly. While sitting on the motorcycle, you should be able to:• have one foot, preferably the left,
flat on the ground. Use the right foot on the brake
• feel comfortable with the position of the foot pegs and hand grips
• reach and operate all controls without straining or stretching
You should also be able to push your motorcycle and park it on the kickstand.
Be familiar with the motorcycle controls and gaugesYou should be familiar with the location, operation, and function of the motorcycle controls and gauges of your motorcycle before riding on the road. Be sure to read the owner’s manual to learn the locations of the controls and gauges and how they work. Do the same if you are riding a motorcycle you are not familiar with.
While you are sitting on the motorcycle, and before you start the engine, practice changing gears by shifting up and down through the gears. Do this by squeezing and releasing the clutch lever and operating the gear selector as you would if you were riding.
Without moving the throttle, go through the motions of rotating and releasing the throttle in coordination with the clutch lever and the gear selector for each shift.
To become familiar with the brakes, move the motorcycle slightly and use the front, then rear, and then both brakes to stop the motorcycle.
Motorcycle pre-trip inspectionIt is important that you do a complete inspection of your motorcycle before every ride. Problems with the tires, lights or brakes have been found on some of the motorcycles involved in collisions where there has been injury or death.
The following are key points for an inspection, and you may want to develop your own inspection routine. Consult your owner’s manual for more information. If you find a problem, repair your motorcycle before riding. If you are unable to repair the problem yourself, have it done professionally.
Tires
inflation. Check that the air pressure in the tires matches the pressure recommended in the owner’s manual.
tread. Check tire for adequate tread depth. As well, look for uneven or worn tread, as this can indicate an alignment problem or that it is time to replace the tires.
objects in tread. Remove objects like rocks that are stuck in the tread.
puncturing objects. Check for an object like a nail, or a piece of metal
kNowiNG yoUr Motorcycle 21chApter three
or glass that has punctured the tire. These objects must be removed and will require the tire to be repaired.
General condition. Check for cuts, bulges, cracks and damage to the sidewalls.
Wheels and rims
wire spoke wheels. Check for loose, damaged, missing or broken spokes.
wheels/rims. Check for damage or cracks.
Bearings. Check for proper lubrication.
seals. Check for leaks.
Exhaust system
Muffler. Check condition and that it is secure. For more information about legal mufflers, see Appendix 1.
Drive system – (depending on which type is on your motorcycle)
chain. Check for lubrication and proper tension.
Belt. Check for wear and proper tension.
shaft. Check for oil leaks.
Lights and electrical
lights. Check that all are clean, securely mounted and not damaged. Check that the tail light and headlight(s) (high and low beam) work. The headlight(s) must come on when the motor is running.
Brake light. Check that it is clean, securely mounted and not damaged.
Check that the foot and hand brake controls activate the brake light easily.
reflectors. Check that all are clean, securely mounted and not damaged.
turn signals. Check that all are clean, securely mounted and not damaged. Check that both lights work by turning the lights on and off.
Battery. Check that the battery is secure, the terminals are clean, and the connections to the battery are secure.
horn. Check that it is working.
engine cut-off switch. Check that it stops the engine.
instrument lights. Check that they are working properly by turning the key to the ‘ON’ position.
Neutral gear light. Check that it lights when in neutral (usually green).
Hazard lights (if equipped). Check that they are working.
safety interlock switch on the sidestand (if equipped). Check that it is working.
Fluids
oil. • Check that the oil is at the
recommended level.• Check the oil colour (yellow is good;
black or dark should be changed).
coolant (if the motorcycle engine is liquid cooled).
• Check that the coolant fluid is at the recommended level.
• Check the hoses for leaks or cracks.
fuel. Check the amount of fuel in the tank.
22 A Rider’s Guide to Operation, Safety and Licensing
Brakes.• Check that the brake fluid is at the
recommended level.
differential. Check that the differential fluid is at the recommended level.
leaks. Check for fluid on the ground under the motorcycle.
Clutch
clutch.• When squeezing the clutch lever,
check that the cable moves freely and feels tight.
• If you have a hydraulic clutch, check that the fluid is at the recommended level according to the owner’s manual.
Throttle
throttle. Check that it moves freely. It should return to the closed position easily, without your assistance.
Mirrors
Mirrors. Check that the mirrors are clean, properly adjusted and securely fastened.
Brakes
Brakes. Apply the front and rear brakes separately. Check that each one keeps the motorcycle stopped when you apply the brake fully and try to move the motorcycle forward or backward.
License plate
license plate. Check that it is securely attached. It should be mounted to the rear mudguard or rear fender, and be clearly visible.
light (if equipped). Check that it is working and clean.
Center stand and sidestand
centre stand. Check that the spring is not broken and for cracks and bends and the stand should be secure when retracted.
sidestand. Check for cracks and bends. The stand should be secure when retracted.
Yearly maintenanceIn the fall, your motorcycle will need to be stored properly for the winter. When you store your motorcycle make sure you take care to protect your tires, deal with remaining fuel in your fuel tank, remove the battery, protect your motorcycle from harsh weather, and address other general storage concerns. Check your owner’s manual for more information about proper storage.
After your motorcycle has been sitting for the winter or in storage for an extended time, some maintenance will be needed. A tune-up and an oil change are a good idea. Check your owner’s manual for more information about preparing your motorcycle to ride after it has been in storage.
4the Basics of safe operating and riding

24 A Rider’s Guide to Operation, Safety and Licensing
Riding position • riding position. Sit on the seat so
that your arms are slightly bent and not tense when you hold the hand grips. This will allow you to steer without stretching or moving your shoulders.
• right hand position. Hold the hand grip lightly but firmly. Start with your right wrist positioned with a slight bend down and no higher than flat. This hand position will prevent you from using too much throttle (accelerator), and will give you access to the front brake and controls.
• left hand position. Use a light but firm hand grip that will allow you to access the clutch lever easily and to reach the signal and headlight switches, and the horn.
• knees. Press your knees lightly against the motorcycle to help you keep your balance when the motorcycle is moving.
• feet. Keep your feet firmly on the foot pegs at all times when the motorcycle is moving. The foot pegs are behind the brake pedal on the right side and the gear shift lever on the left side. Do not point your feet down as they can get caught between the road and the foot
pegs. Your feet need to be in the correct position for effective braking, gear selection, and balance. Do not drag your feet on the ground or rest them on the gear selector or brake pedal.
• eyes. Keep your eyes looking well ahead in the direction you want to go. Do not look down.
Starting It is best for new riders of manual shift and automatic shift motorcycles to practice starting and stopping in a safe, traffic-free area. Other skills that you need to practice in a safe place are turning and lane changing, steering, accelerating, and braking at slow speeds. Looking well ahead and along your intended path will help you develop these basic riding skills.
If you ride a manual shift motorcycle you will also have to practice proper gear shifting to acquire smooth coordination between the clutch lever, brake, and throttle. Too much throttle can cause a rider to lose control; too little can cause the engine to stall.
To prepare your motorcycle for riding, do the following:• If the motorcycle is equipped with an
anti-theft lock, be sure it is released. This will allow the handle bars to move freely for steering.
• Sit on the seat with a leg on each side of the motorcycle.
• While holding the hand grips, move the motorcycle upright and retract the sidestand. Always check that your footing is secure so that you do not lose your balance.
• Continue to keep your feet firmly on the ground.
RIGHT
WRONG
Hand grip position of right hand for throttle control.
the BAsics of sAfe operAtiNG ANd ridiNG 25chApter foUr
• Adjust each mirror so you can see the lane behind, and as much as possible of the other lanes on the road next to you. When properly adjusted, a mirror will show the edge of your arm or shoulder. Remember that objects in your mirrors may be closer than they look. Never rely entirely on your mirrors, especially when changing lanes.
• Ensure your motorcycle is in neutral.• Turn the fuel switch to ON, if equipped.• Set the engine cut-off switch to the
RUN position.• Open the choke (if your motorcycle
has one) or wait until the fuel injection light is OFF.
• Press the starter button until the motorcycle starts, and then release.
• Ensure the engine is warmed and running smoothly.
• Slowly close the choke (if equipped).• Ensure the lights are turned on.
Before starting to ride, be sure your intended path is safe.• Check that the path in front of you is
clear of children, pedestrians, obstacles and other traffic.
• Check each mirror.• Look over your shoulder in the
direction you will be moving to check your blind spot.
• Use your signal light and arm signal (optional). Proceed when it is safe and legal.
• Choose the lane and position in the lane that allows other road users to see you. Ride where drivers can see you when they look ahead or in their rear view mirrors.
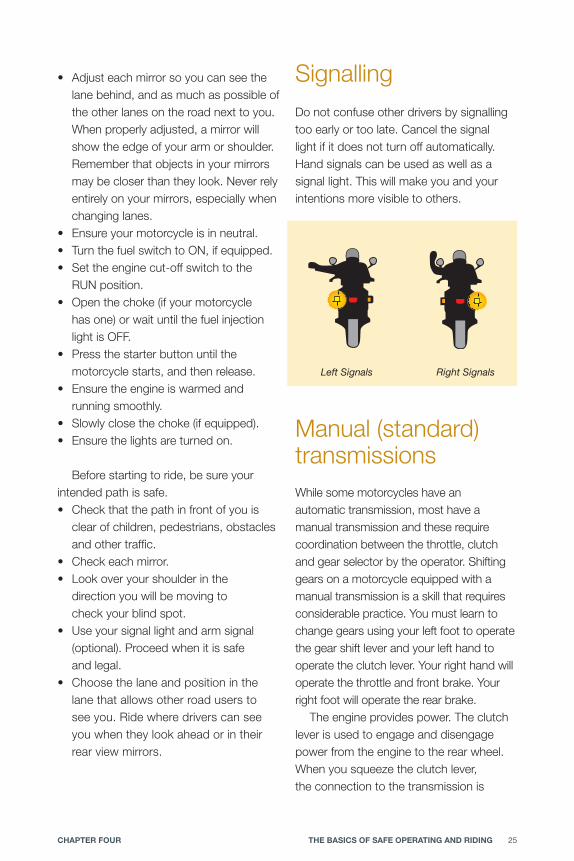
SignallingDo not confuse other drivers by signalling too early or too late. Cancel the signal light if it does not turn off automatically. Hand signals can be used as well as a signal light. This will make you and your intentions more visible to others.
Manual (standard) transmissionsWhile some motorcycles have an automatic transmission, most have a manual transmission and these require coordination between the throttle, clutch and gear selector by the operator. Shifting gears on a motorcycle equipped with a manual transmission is a skill that requires considerable practice. You must learn to change gears using your left foot to operate the gear shift lever and your left hand to operate the clutch lever. Your right hand will operate the throttle and front brake. Your right foot will operate the rear brake.
The engine provides power. The clutch lever is used to engage and disengage power from the engine to the rear wheel. When you squeeze the clutch lever, the connection to the transmission is
Left Signals Right Signals
26 A Rider’s Guide to Operation, Safety and Licensing
disengaged. This prevents the transfer of engine power to the drive wheel. You change gears or come to a stop while the connection is not engaged.
Just before stopping you will also need to squeeze the clutch lever to prevent the motorcycle from stalling.
To start moving again, gradually release the clutch lever and apply a little throttle, the connection will begin to engage again. This can be felt before the clutch lever is fully released. The point where this connection first occurs while you are releasing the clutch lever is called the friction zone.
It is at the friction point that you must coordinate continuing to slowly release the clutch lever while gently using the throttle to achieve a smooth start and prevent the engine from stalling.
Selecting and changing gearsSmooth and timely gear shifting takes practice but, once learned, will help you maintain control of your motorcycle. A smooth shift to the next gear is the result of coordinating the clutch lever release with a small amount of throttle. Start in first gear and gradually shift up to higher gears as your speed increases.
Always be in the correct gear for the speed you are travelling. This will allow you the most effective use of your throttle. It is important that the proper gear is selected so the engine does not lug (move the motorcycle in rough, bumpy fashion) or race (rev the engine but not move the motorcycle effectively). The owner’s manual will explain the
proper use and the best speed range of each gear.
Be sure the motorcycle is travelling at the appropriate speed for the gear you are shifting into. Check your owner’s manual for instructions about this. When downshifting, if the motorcycle is going too fast for the selected gear, the rear wheel may skid.
Changing to a higher gear (upshifting)
• Place your foot under the gear selector lever to prepare for the shift up.
• Roll the throttle back to the off position while squeezing the clutch lever all the way in with your fingers.
• Move the lever upwards to select the next gear and then release. You must shift up one gear at a time.
• Carefully release the clutch lever and apply a little throttle.
• When you have completed shifting to the selected gear, remove your fingers from the clutch lever and return them to the hand grip.
Changing to a lower gear (downshifting one or more gears)
• Place your foot on top of the gear selector lever to prepare for the downshift.
• Roll the throttle back to the off position while squeezing the clutch lever all the way in with your fingers.
• Firmly push the lever down as far as it will go and then release.
• You can shift down several gears at a time by squeezing the clutch lever all the way in, then firmly pushing down
the BAsics of sAfe operAtiNG ANd ridiNG 27chApter foUr
the gear selector lever and releasing, repeatedly, for each gear.
• Carefully release the clutch lever. Unless you are slowing or stopping, gently apply the throttle.
• When you have completed shifting to the selected gear, remove your fingers from the clutch lever and return them to the hand grip.
Slowing or stopping
It is necessary to shift down through each gear when slowing or stopping. This way you will know when you are in first gear. However, it is possible to come to a complete stop while the clutch lever is pulled in and you remain in the current gear. If you do this you will need to pull the clutch lever in and shift down through each gear to get back into first gear.
To stop or reduce speed gradually, downshift through each gear in sequence by pulling in the clutch lever, shifting into the next lower gear and then carefully releasing the clutch lever for each gear. You can also downshift through one or more gears at one time while the clutch lever is pulled in. When downshifting through two or more gears at a time, be sure to reduce your speed to fit the speed with the gear before releasing your clutch lever.
Gear selection and control for curves and corners
If you need to reduce your speed and change gears for a curve or corner, to have the best control, do it before entering the curve or corner. The speed that you enter the curve or turn should allow you to maintain control through the curve or turn
without braking. Any sudden change in acceleration or braking to the rear wheel can affect balance and control, and reduce the tire contact with the road surface. This can cause the wheel to spin or skid.
Starting uphill
It is more difficult to get a motorcycle moving on an uphill slope than when it is on flat ground. There is also a risk of rolling backward or the engine stalling. While seated and straddling your motorcycle, here is one method for starting on an uphill slope:• With your feet firmly on the ground,
and the engine in neutral and running, use your front brake to keep the motorcycle in place.
• Pull the clutch lever all the way in, then use your left foot to shift into first gear, continuing to hold your clutch lever in all the way.
• Place your left foot firmly on the ground again, and then apply the rear brake with your right foot.
• Keep the rear brake on. Release the front brake, and then open the throttle slightly with your right hand.
• Slowly release the clutch lever until reaching the friction point and hold the clutch lever there. Then release the rear brake while gradually applying slightly more power with the throttle.
• Avoid releasing the clutch lever too quickly as this may cause the engine to stall, or the front wheel to come off the road.
• Place your left foot on the foot peg as the motorcycle begins to move forward.
• After you are moving smoothly and the clutch lever is released, remove your fingers from the clutch lever and return them to the hand grip.
28 A Rider’s Guide to Operation, Safety and Licensing
Parking Park where it is safe and legal. Signs, curb markings and common sense will tell you where parking is permitted.
Motorcycles are permitted to angle park where other vehicles are required to park parallel to the curb. Park the motorcycle at an angle of about 45 to 60 degrees to the curb or edge of the roadway, so your motorcycle does not extend too far from the curb. Your rear wheel should be within 50 centimetres (20 inches) of the curb.
When parking your motorcycle, use the side kickstand. Make sure the front wheel is turned all the way to the left and locked. Remove the key from the ignition.
Hill parking
On a hill, it is best to park facing uphill. This is to prevent the motorcycle rolling forward off the stand. If a curb is present, have the rear wheel make contact with the curb to prevent the motorcycle from rolling back.
It is recommended that you do not park your motorcycle facing downhill. If you must do this temporarily, place the motorcycle at about a 45-degree angle to the curb. Ensure the motorcycle is in first gear. Lock the steering to the left. If the motorcycle does move it will likely fall to the left.
Tires and tractionTraction is the amount of grip and contact your tires have with the road surface. Loss of traction can have disastrous results for the operator of any vehicle and especially for the rider of a two-wheeled vehicle.
The rider can control some of the most important factors that affect traction, like speed, acceleration and braking. Other factors are responsible riding, proper brake maintenance, and the characteristics of the tires.
Consider the following when choosing and maintaining your tires:• Material – softer compounds are
available that provide better traction for certain types of riding. These tires can wear out sooner than other tires.
• Tire Pressure – maintain proper pressure according to the manufacturer’s specifications. Under- and over-inflated tires will reduce the amount of traction, due to less contact with the road surface. Improper inflation will also affect how the tire wears.
• Tread patterns – select the type of tire tread for the conditions you expect to be riding in.
• Wear and tread depth – replace tires as recommended by the manufacturer. Worn tires are dangerous to use, and do not provide adequate traction or safety.
Traction can be reduced by wet road surfaces, and metal road parts like metal bridges. Snow and ice, painted lines, and holes and cracks affect the tire contact with the road. Road debris, such as gravel, sand, leaves, antifreeze, oil and spilled materials, reduce traction.
When it is raining, the roads are the most slippery during the first few minutes. Continue to scan the road surface ahead to determine road conditions and beware of hydroplaning.

the BAsics of sAfe operAtiNG ANd ridiNG 29chApter foUr
Always be aware that there is only a certain amount of traction available. If the demand for traction exceeds that amount you need, the result will be a loss of control. Braking, turning a corner, travelling through a curve, and acceleration require the most traction.
Braking and stopping Most motorcycles have two brakes, which operate independently. In most cases, there is a hand-operated front brake and a foot-operated rear brake.
Some motorcycles are equipped with braking systems that link front and rear brake operation together. Anti-lock brake systems are also available on some models. If your motorcycle has either of these systems, read your owner’s manual for instructions on the best way to use the brakes.
When stopping under normal conditions, apply the front brake and rear brake at the same time. When both brakes are applied, there is a transfer of rider weight to the front of the motorcycle. This creates a situation where about three-quarters of your braking traction is on the front tire. This can increase to almost all the braking traction being on the front tire as more braking force is applied. The result can be the rear tire losing contact with the road surface, and possibly a loss of control of the motorcycle.
It is best to apply the brakes by gradually increasing pressure. This gradual increase makes it possible to control the amount of braking force needed to achieve threshold braking. (The threshold braking point is just before the wheels lock.
Here are some tips for slowing and stopping:
Normal braking
• Practice braking and shifting in a safe, traffic-free area.
• To brake effectively, learn to apply even braking force between the front and rear brakes. (You will acquire a feeling for when your tires are about to skid.)
• Downshift smoothly when braking to avoid a skid. Downshifting will allow you to use the engine to help the motorcycle slow down. If you do this without using your brakes, it will not activate the brake light. Motorists behind you will not be warned that you are slowing. For this reason, it is a good idea to brake lightly between each downshift when slowing the motorcycle.
• Use caution when braking in a turn or on a curve, and on slippery or rough roads. When possible, avoid braking when the wheel is turned.
• Downshift through the gears to first gear before stopping so you can move forward quickly if necessary.
• Keep the rear brake firmly applied while stopped.
• Riding with your brake partially applied activates the brake light. This may confuse other drivers, and will cause unnecessary wear on the brakes.
Front brake Rear brake
30 A Rider’s Guide to Operation, Safety and Licensing
Stopping time and distanceNot all riders know how much time or distance it takes to bring a motorcycle to a complete stop. As a result, they may make errors in judgment that can lead to a collision. Three factors that determine the time and distance required to stop are perception, reaction, and braking.
The rider’s visual skills, level of attention, decision making abilities, degree of fatigue, and use of alcohol or other drugs will affect perception, reaction and braking.
perception time is how long it takes you to recognize a situation and understand the need to stop. This can take about three-quarters of a second. Less experienced riders are often slower to recognize a danger. perception distance is how far a motorcycle travels during this time.
reaction (response) time is how long it takes to move your foot or hand over the brake once the need to brake is realized. The average reaction time is three-quarters of a second. reaction distance is how far a motorcycle travels during this time.
Braking time is how long it takes the motorcycle to stop after the brakes are applied. The distance travelled in this time is called the braking distance. The actual braking distance will depend on the speed, weight of the motorcycle, traction of the tires on the road surface, the quality of the brakes, road and weather conditions, and rider skill.
stopping distance is the total of perception distance, reaction distance and braking distance.
Remember, when you increase your speed, you increase how long it takes
you to stop and how far your motorcycle travels before stopping.
Turns and cornersThere are different methods for steering a motorcycle when turning a corner (from one street onto another street), and for traveling around a curve.
Practice turning in a safe and traffic-free area before riding in traffic. Approach a turn at a slow speed (less than 20 to 25 kilometres per hour). Shift to the proper gear before the turn. Use first or second gear.
Control your speed when turning. Turn and steer the front wheel and look in the direction you want to go. This requires good visual skills and balance, as well as coordination between the clutch lever, throttle and rear brake. Use a light but firm grip on the hand grips for all turns.
CurvesTo travel around a curve (at speeds greater than 20 to 25 kilometres per hour), you will need to master the skill of push-steering. (Push-steering is also known as counter-steering.) Push-steering is pushing on one hand grip to cause the motorcycle to lean. Push on the left hand grip to lean the motorcycle to the left to travel to the left. Push on the right hand grip to lean the motorcycle to the right to travel to the right.
When travelling around a curve, you and the motorcycle must lean toward the inside of the curve. When you push-steer, increasing the amount of push on the hand grip will increase the amount
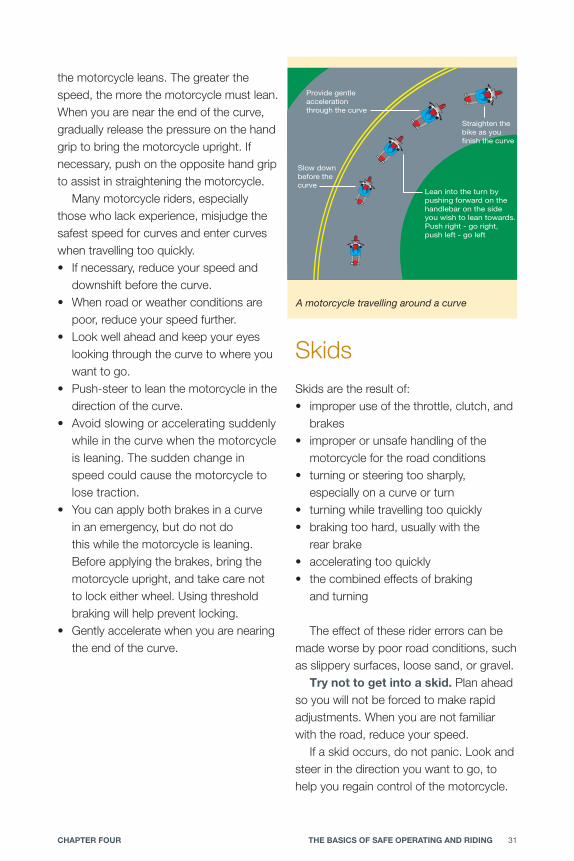
the BAsics of sAfe operAtiNG ANd ridiNG 31chApter foUr
the motorcycle leans. The greater the speed, the more the motorcycle must lean. When you are near the end of the curve, gradually release the pressure on the hand grip to bring the motorcycle upright. If necessary, push on the opposite hand grip to assist in straightening the motorcycle.
Many motorcycle riders, especially those who lack experience, misjudge the safest speed for curves and enter curves when travelling too quickly. • If necessary, reduce your speed and
downshift before the curve.• When road or weather conditions are
poor, reduce your speed further. • Look well ahead and keep your eyes
looking through the curve to where you want to go.
• Push-steer to lean the motorcycle in the direction of the curve.
• Avoid slowing or accelerating suddenly while in the curve when the motorcycle is leaning. The sudden change in speed could cause the motorcycle to lose traction.
• You can apply both brakes in a curve in an emergency, but do not do this while the motorcycle is leaning. Before applying the brakes, bring the motorcycle upright, and take care not to lock either wheel. Using threshold braking will help prevent locking.
• Gently accelerate when you are nearing the end of the curve.
SkidsSkids are the result of:• improper use of the throttle, clutch, and
brakes• improper or unsafe handling of the
motorcycle for the road conditions • turning or steering too sharply,
especially on a curve or turn• turning while travelling too quickly• braking too hard, usually with the
rear brake• accelerating too quickly• the combined effects of braking
and turning
The effect of these rider errors can be made worse by poor road conditions, such as slippery surfaces, loose sand, or gravel.
try not to get into a skid. Plan ahead so you will not be forced to make rapid adjustments. When you are not familiar with the road, reduce your speed.
If a skid occurs, do not panic. Look and steer in the direction you want to go, to help you regain control of the motorcycle.
A motorcycle travelling around a curve
Provide gentleaccelerationthrough the curve
Slow downbefore thecurve
Straighten thebike as youfinish the curve
Lean into the turn bypushing forward on thehandlebar on the sideyou wish to lean towards. Push right - go right, push left - go left
32 A Rider’s Guide to Operation, Safety and Licensing
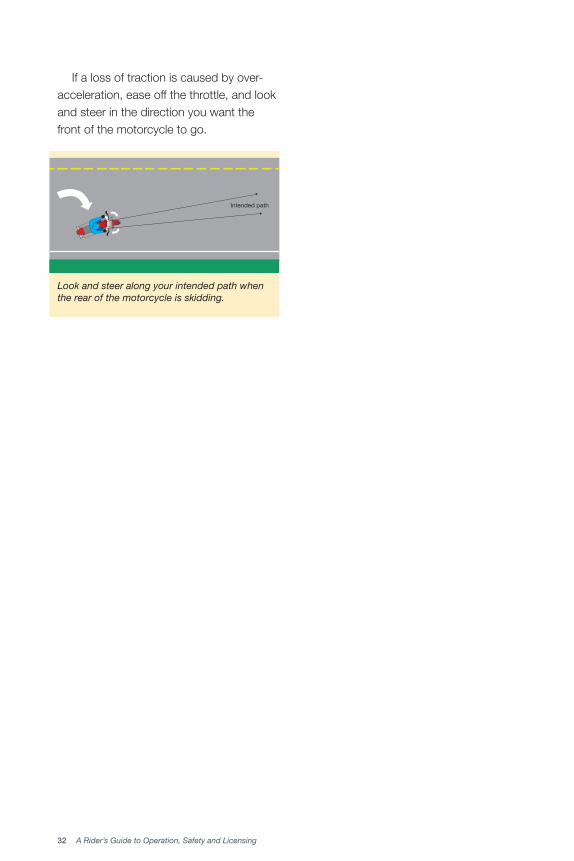
If a loss of traction is caused by over-acceleration, ease off the throttle, and look and steer in the direction you want the front of the motorcycle to go.
Look and steer along your intended path when the rear of the motorcycle is skidding.
Intended path

5Managing risk in traffic
34 A Rider’s Guide to Operation, Safety and Licensing
Be proactive when ridingA proactive approach is needed when riding in traffic. Always ride using extreme caution. Unlike drivers of other vehicles, you do not have a seat belt or protection around you in a collision. Collisions between motorcycles and vehicles often result in injuries to the motorcycle rider.
Motorcycles and their riders can be more difficult to see than cars and other vehicles. Many motorists do not anticipate, see, or hear the motorcycles that share the road. Some drivers involved in collisions with a motorcycle say they never saw the motorcycle and rider.
You cannot be sure that other drivers will see you. Therefore, you must always watch other road users and anticipate their actions. If a driver does not see you, he or she may turn in front of you or change lanes into you. Be sure you are positioned where other drivers have the best chance to see you. You may need to use your horn to alert others that you are near.
Blind spotsEven when all rear view mirrors are properly adjusted, there are large areas behind and to the side of a driver or rider that cannot be seen using only the mirrors. These are called blind spots. When riding, always do a shoulder check to be sure that your blind spot is clear of traffic before you change lanes.
Stay out of other drivers’ blind spots as much as possible. It is easy for a motorcycle and rider to be hidden in a blind spot. If you ride in a driver’s blind
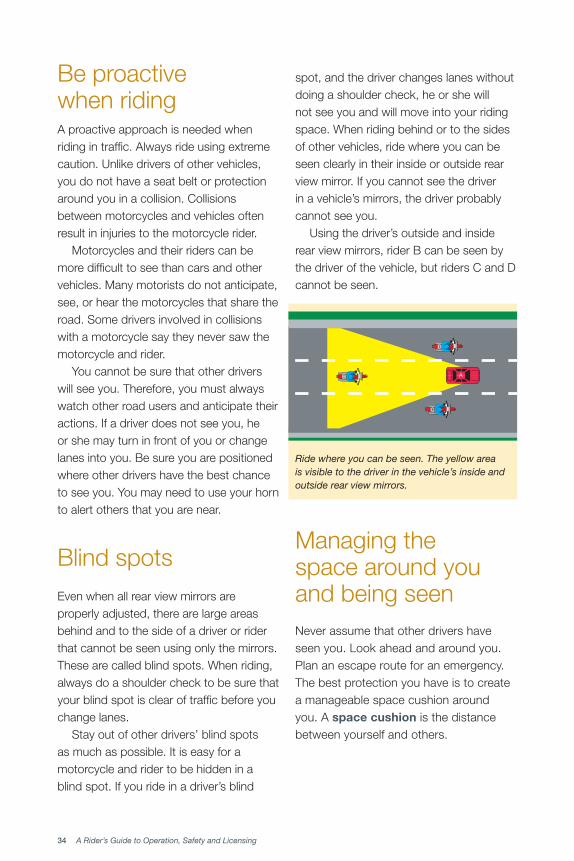
spot, and the driver changes lanes without doing a shoulder check, he or she will not see you and will move into your riding space. When riding behind or to the sides of other vehicles, ride where you can be seen clearly in their inside or outside rear view mirror. If you cannot see the driver in a vehicle’s mirrors, the driver probably cannot see you.
Using the driver’s outside and inside rear view mirrors, rider B can be seen by the driver of the vehicle, but riders C and D cannot be seen.
Managing the space around you and being seenNever assume that other drivers have seen you. Look ahead and around you. Plan an escape route for an emergency. The best protection you have is to create a manageable space cushion around you. A space cushion is the distance between yourself and others.
Ride where you can be seen. The yellow area is visible to the driver in the vehicle’s inside and outside rear view mirrors.
MANAGiNG risk iN trAffic 35chApter five
It allows you: • time and space to take action
to avoid a hazard or collision• an escape route if stopping is
not possible• to reduce the risk of having another
vehicle collide with you from behind• to be seen more easily by drivers of
vehicles coming toward you, from the sides, and from behind
• more time to respond to the actions of others
Space cushion to the front
• Your following distance is the space that is completely controlled by you. Managing your space to the rear and sides can be more challenging, but you, the rider, manage the space ahead.
• Create and maintain a safe following distance. The closer you follow another vehicle, the greater your risk of colliding with it. You will also not have enough time to see and respond to hazards in your lane, like pot holes and debris.
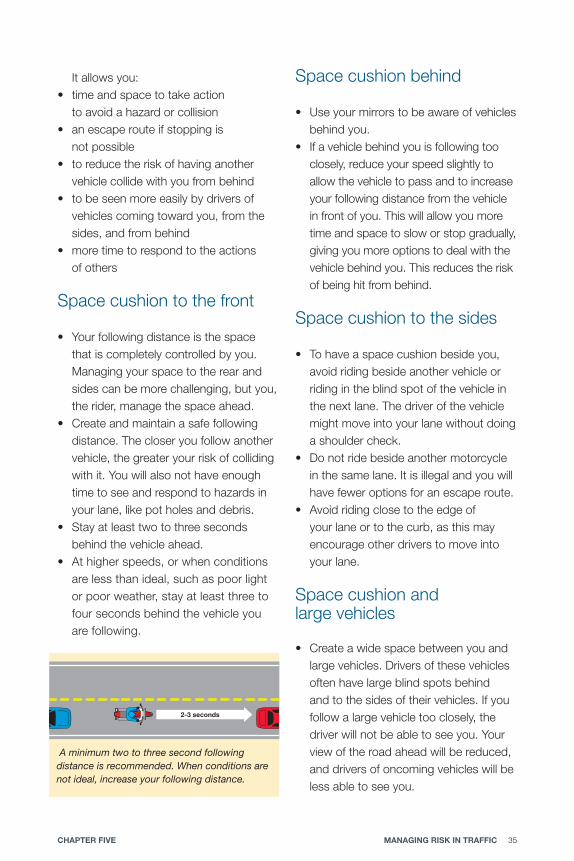
• Stay at least two to three seconds behind the vehicle ahead.
• At higher speeds, or when conditions are less than ideal, such as poor light or poor weather, stay at least three to four seconds behind the vehicle you are following.
Space cushion behind
• Use your mirrors to be aware of vehicles behind you.
• If a vehicle behind you is following too closely, reduce your speed slightly to allow the vehicle to pass and to increase your following distance from the vehicle in front of you. This will allow you more time and space to slow or stop gradually, giving you more options to deal with the vehicle behind you. This reduces the risk of being hit from behind.
Space cushion to the sides
• To have a space cushion beside you, avoid riding beside another vehicle or riding in the blind spot of the vehicle in the next lane. The driver of the vehicle might move into your lane without doing a shoulder check.
• Do not ride beside another motorcycle in the same lane. It is illegal and you will have fewer options for an escape route.
• Avoid riding close to the edge of your lane or to the curb, as this may encourage other drivers to move into your lane.
Space cushion and large vehicles
• Create a wide space between you and large vehicles. Drivers of these vehicles often have large blind spots behind and to the sides of their vehicles. If you follow a large vehicle too closely, the driver will not be able to see you. Your view of the road ahead will be reduced, and drivers of oncoming vehicles will be less able to see you.
A minimum two to three second following distance is recommended. When conditions are not ideal, increase your following distance.
2-3 seconds
36 A Rider’s Guide to Operation, Safety and Licensing
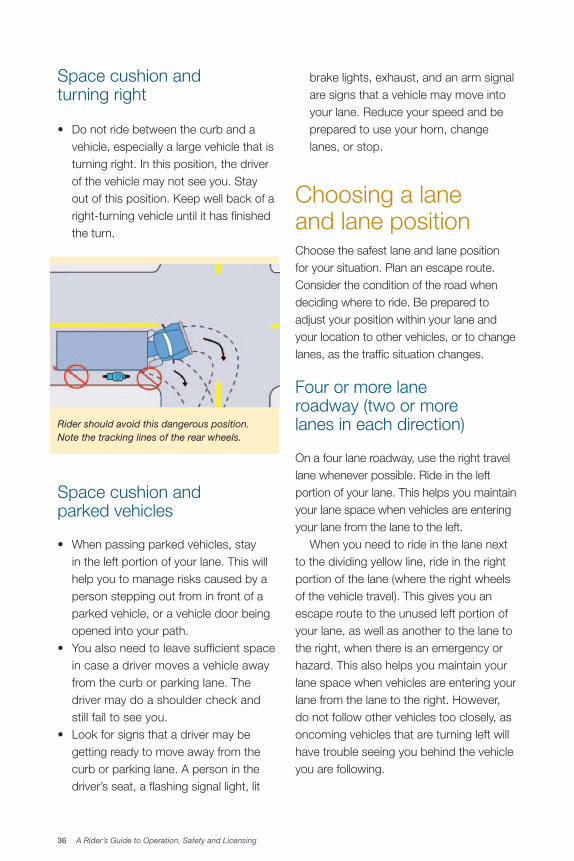
Space cushion and turning right
• Do not ride between the curb and a vehicle, especially a large vehicle that is turning right. In this position, the driver of the vehicle may not see you. Stay out of this position. Keep well back of a right-turning vehicle until it has finished the turn.
Space cushion and parked vehicles
• When passing parked vehicles, stay in the left portion of your lane. This will help you to manage risks caused by a person stepping out from in front of a parked vehicle, or a vehicle door being opened into your path.
• You also need to leave sufficient space in case a driver moves a vehicle away from the curb or parking lane. The driver may do a shoulder check and still fail to see you.
• Look for signs that a driver may be getting ready to move away from the curb or parking lane. A person in the driver’s seat, a flashing signal light, lit
brake lights, exhaust, and an arm signal are signs that a vehicle may move into your lane. Reduce your speed and be prepared to use your horn, change lanes, or stop.
Choosing a lane and lane positionChoose the safest lane and lane position for your situation. Plan an escape route. Consider the condition of the road when deciding where to ride. Be prepared to adjust your position within your lane and your location to other vehicles, or to change lanes, as the traffic situation changes.
Four or more lane roadway (two or more lanes in each direction)
On a four lane roadway, use the right travel lane whenever possible. Ride in the left portion of your lane. This helps you maintain your lane space when vehicles are entering your lane from the lane to the left.
When you need to ride in the lane next to the dividing yellow line, ride in the right portion of the lane (where the right wheels of the vehicle travel). This gives you an escape route to the unused left portion of your lane, as well as another to the lane to the right, when there is an emergency or hazard. This also helps you maintain your lane space when vehicles are entering your lane from the lane to the right. However, do not follow other vehicles too closely, as oncoming vehicles that are turning left will have trouble seeing you behind the vehicle you are following.
Rider should avoid this dangerous position. Note the tracking lines of the rear wheels.

MANAGiNG risk iN trAffic 37chApter five
Two lane roadway (one lane in each direction)
The left portion of a lane, where the left wheels of a vehicle travel, is usually the safest place to ride on a two lane roadway. In this position you can:• be seen more easily by oncoming vehicles• be seen more easily in rear view mirrors
of vehicles you are following• see oncoming vehicles more easily• see and be seen by traffic at road
junctions to your left • be farther away from vehicles entering
from the right• be farther away from pedestrians,
animals, driveways and road debris along the curb
• avoid the slippery areas caused by leaks from vehicles that can form in the centre of the lane
• avoid the centre of the lane that is often higher due to constant traffic weight on the left and right portions of the lane
These points explain why it is best to use the left portion of the lane. However, there are times when it is safer to use the right portion and occasionally the centre portion of the lane to see, be seen, and manage your space cushion.
There is no lane position that is safest for all situations. Here are some other situations where you must decide where in your lane it is safest to ride:• Before the crest of a hill, use the right
portion of your lane. An oncoming vehicle may be coming over the hill and using your lane to pass.
• When riding around a curve, choose a position in your lane that will allow the best view along the curve ahead.
• A large vehicle coming toward you can cause a change in wind conditions. It can block a strong crosswind or create a strong wind as it passes, which can cause you to lose control. When a large vehicle is approaching, ride in the right portion of your lane and keep a firm hold on the hand grips. Wait for a few seconds after the vehicle has passed before returning to your previous lane position.
Changing lanes Changing lanes frequently is not worth the risks. Plan your route well ahead to keep lane changing to a minimum.
When a lane change is required, do the following:• Make sure the lane change location is
safe and legal.• Check for traffic and potential hazards
ahead. Use your mirrors to check for traffic behind you.
• Check your blind spot by glancing over your shoulder to the lane where you intend to move.
• Turn on your signal light and use a hand signal (optional).
• Do a shoulder check again and, if it is safe, change lanes. If it is not safe, start the lane change process again.
Move to the right portion of your lane to prepare for a change in wind conditions.
38 A Rider’s Guide to Operation, Safety and Licensing
Intersections The rules for riding through intersections are the same for motorcycle riders as they are for other drivers. Since intersections have left and right turning as well as straight through traffic, they are high risk areas for collisions. Caution, anticipation, and controlled speed are required at intersections.
Many collisions happen at intersections. Some are the result of poor judgment of time and space when:• the motorcycle rider is turning left in
front of oncoming vehicles.• drivers of oncoming vehicles are turning
left in front of a motorcycle rider who is going straight.
• drivers of vehicles are entering the intersection from roads to the right or left of the motorcycle rider.
To reduce the risk of collisions at intersections, do the following.• When approaching an intersection,
be prepared to reduce your speed and to brake.
• Maintain a proper space cushion all around your motorcycle in your lane so you can see and be seen.
• Scan left, centre and right several times as you approach the intersection to check for pedestrians, traffic, and potential hazards.
• Glance in your mirrors often to be aware of the traffic behind you.
• Be prepared to change lanes or your position in the lane to separate yourself from potential hazards.
The safest position in your lane depends on where other vehicles are located when you approach an intersection.
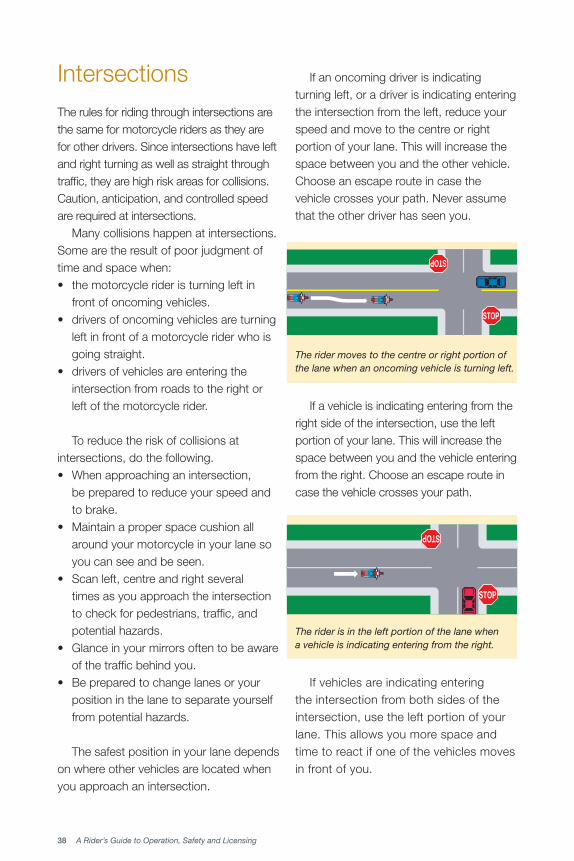
If an oncoming driver is indicating turning left, or a driver is indicating entering the intersection from the left, reduce your speed and move to the centre or right portion of your lane. This will increase the space between you and the other vehicle. Choose an escape route in case the vehicle crosses your path. Never assume that the other driver has seen you.
If a vehicle is indicating entering from the right side of the intersection, use the left portion of your lane. This will increase the space between you and the vehicle entering from the right. Choose an escape route in case the vehicle crosses your path.
If vehicles are indicating entering the intersection from both sides of the intersection, use the left portion of your lane. This allows you more space and time to react if one of the vehicles moves in front of you.
STOP
STOP
The rider moves to the centre or right portion of the lane when an oncoming vehicle is turning left.
STOP
STOP
The rider is in the left portion of the lane when a vehicle is indicating entering from the right.

MANAGiNG risk iN trAffic 39chApter five
If your motorcycle stalls in an intersection and cannot be started, it must be moved out of the intersection. When it is safe, with you on the left side of the motorcycle, walk it clear of all traffic and out of the intersection. If the motorcycle is equipped with emergency hazard lights, turn them on.
Passing Passing other vehicles is a high risk action. Do not pass unless it is necessary. Only pass in a legal passing zone and only when it is safe.
When not to pass
Do not pass a vehicle travelling in the same direction:• that has stopped for a pedestrian• that is slowing unexpectedly• that is approaching or stopped at a
railway crossing
Do not pass:
• near or at the top of a hill• when you are approaching or are within
an intersection• any place where you cannot see clearly
ahead, like a curve• by using the shoulder (emergency
stopping lane) of the road
Do not pass by squeezing between vehicles ahead using the area between lanes. This is illegal and dangerous.
Riders must reduce speed to 60 km/h or the posted speed, whichever is lower, when passing emergency vehicles or tow trucks that are stopped with their lights flashing. This law applies to the lane(s) immediately next to the stopped vehicles. The fine for speeding in these areas is doubled.
If you are not in the lane next to the stopped vehicles, you still need to be watchful and cautious.
Reduce your speed and leave lots of space between yourself and emergency personnel and equipment at the scene. Also, watch for the movement of personnel around the scene.
DO NOT ride or pass by squeezing around or between vehicles.
STOP
STOP
The rider is in the left portion of the lane when vehicles are indicating entering from both sides of the intersection.
40 A Rider’s Guide to Operation, Safety and Licensing
Passing on a two lane highway
When you need to use the oncoming lane to pass on a two lane highway, observe the following rules, and remember that exceeding the speed limit is illegal.• Ride in the left portion of your lane
to increase the distance you can see ahead.
• Maintain a minimum two second following distance until you are ready to pass.
• Check ahead for oncoming traffic to ensure you have enough space and time to complete the pass safely.
• Check your mirrors for traffic to the rear. • Do a shoulder check to the left to
ensure that no one is attempting to pass you.
• Turn on your left signal light and use an arm signal.
• Check ahead again for oncoming traffic.• Check that you still have the space and
time necessary to complete the pass.• Move into the oncoming lane to pass
the vehicle.• Before returning to your lane, be sure
you can see the front of the vehicle you have passed in your right rear view mirror.
• Do a shoulder check over your right shoulder to be sure there is enough space for you in front of the vehicle.
• Signal and move back into your travel lane.
Being passed
When a vehicle is passing you on a two lane highway, maintain a constant speed and
lane position. It is illegal and hazardous to increase your speed when being passed.
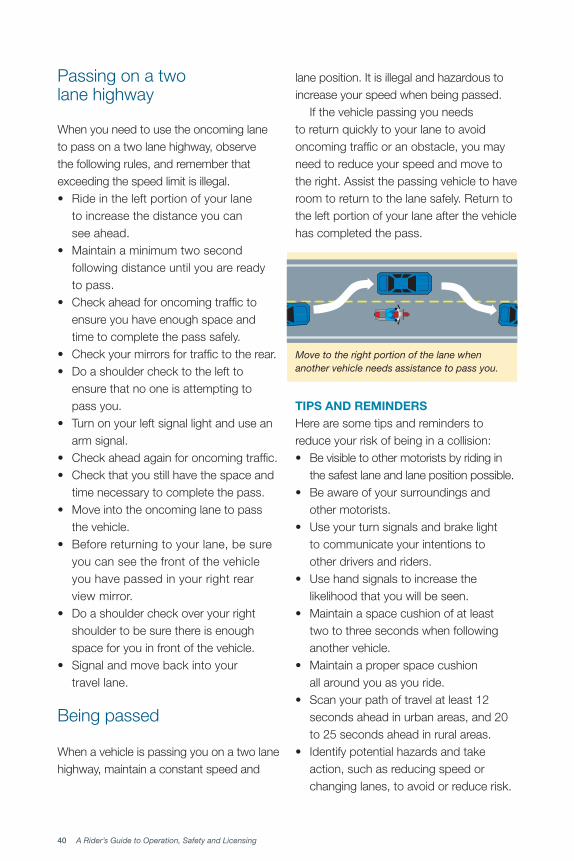
If the vehicle passing you needs to return quickly to your lane to avoid oncoming traffic or an obstacle, you may need to reduce your speed and move to the right. Assist the passing vehicle to have room to return to the lane safely. Return to the left portion of your lane after the vehicle has completed the pass.
tips ANd reMiNdersHere are some tips and reminders to reduce your risk of being in a collision:• Be visible to other motorists by riding in
the safest lane and lane position possible.• Be aware of your surroundings and
other motorists.• Use your turn signals and brake light
to communicate your intentions to other drivers and riders.
• Use hand signals to increase the likelihood that you will be seen.
• Maintain a space cushion of at least two to three seconds when following another vehicle.
• Maintain a proper space cushion all around you as you ride.
• Scan your path of travel at least 12 seconds ahead in urban areas, and 20 to 25 seconds ahead in rural areas.
• Identify potential hazards and take action, such as reducing speed or changing lanes, to avoid or reduce risk.
Move to the right portion of the lane when another vehicle needs assistance to pass you.

6riding in challenging conditions

42 A Rider’s Guide to Operation, Safety and Licensing
Conditions of less light and reduced visibilityBecause it is more difficult to see when there is less light, or when visibility is reduced for other reasons, the risk of losing control or being in a collision increases. • When your ability to see clearly is
decreased, reduce your speed and ride with caution. This will help you to avoid a hazard.
• Distances are more difficult to judge after dark than during daylight. To determine how far away an object is, our eyes rely on the contrast of shadows and light. These contrasts may be missing or distorted under artificial lights after dark. Continue to be aware of your distance from vehicles ahead and adjust your speed accordingly.
• Ride at a speed that allows you to stop easily within the distance your headlights illuminate. If you overdrive your headlights, you will not have time to adjust to hazards or obstructions in your path.
• On poorly lit roads, use your high beam headlights. This will allow you to see further ahead. Change to your low beam headlights before you are 150 metres (492 ft) from the vehicle ahead, and 300 metres (984 ft) or more from oncoming vehicles.
• One way to gather information is to use the headlights of the vehicle ahead to extend your view of the road. Bouncing tail and headlights ahead can alert you to bumps or a rough road.
• Use caution when passing other vehicles after dark and when visibility is reduced.
• Be visible. Wear clothing and use materials that have reflective features, such as reflective tape. (If possible, buy a helmet with reflective material as part of its design.) Reflectors can be added to your motorcycle.
• Keep your goggles, face shield and windshield clean. They should be replaced if they become too scratched. Use only clear untinted lenses at night.
• Always watch for animals, especially at dawn and dusk. Look for animals on or near the road. Scan the road and ditches far ahead for movement or the reflection from an animal’s eyes.
• Stay alert. If you are becoming tired, stop and rest.
When visibility is reduced due to rain, fog, smoke, or dust, take the same precautions you would when riding in conditions of less light. Poor weather combined with less light make reduced visibility worse. Adjust your riding for the conditions by reducing your speed.
Use your low beam headlights when riding in fog. If you use high beam headlights, the light will reflect off the fog back to you and cause glare. This can also occur with smoke, dust, rain and snow.

ridiNG iN chAlleNGiNG coNditioNs 43chApter siX
Poor weather and temperature extremes Poor weather conditions can affect you and your ability to control the motorcycle. Try to avoid riding in poor weather. Be cautious when riding in spring and fall, as you could be surprised by winter weather. Check weather and road condition reports, and make decisions for safety.
Lower temperatures due to cold or wind chill conditions can cause the body to lose internal heat. If you become chilled, your ability to concentrate and respond can be affected. Warm or hot temperatures can cause the body to become dehydrated and can result in heat exhaustion. Wear the proper clothing to protect yourself. (See Chapter 2 for more about temperature extremes.)
Strong or gusty winds can affect your ability to control the motorcycle and may make it difficult to maintain a proper lane position. In windy conditions, grip the motorcycle tightly with your thighs. Keep your upper body relaxed and your arms bent and loose.
If you encounter a strong crosswind, lean into it. Create a good space cushion in case the crosswind suddenly decreases. You can do this by choosing a lane or lane position that will keep you out of oncoming traffic, and a lane position that will allow you to stay in your lane.
Be aware that when you are riding in a strong wind, you may be more easily fatigued. If the wind is extreme, your safest choice is not to ride.
Road surface hazards that affect tractionFluid leaks from other vehicles can settle in the centre of the lane and result in reduced traction. Traction is also reduced when there is moisture on the road surface. Pavement is particularly slippery just after it starts to rain, before the surface oil and dirt are washed to the side of the road. To avoid this danger, do not ride in the centre portion of the lane just after the rain starts.
When there is water on the road, a layer of water may form between the road surface and the tires. Your tires may lose contact with the road surface. This is called hydroplaning. To reduce the risk of hydroplaning on wet roads, reduce your speed without braking. If you start to hydroplane, do not brake. Keep your eyes up and along your intended path, and maintain or very gradually reduce your speed. Try to avoid riding where the tires of vehicles have created areas where the road is lower and water has settled.
Gravel, sand, tar strips, mud, painted road markings, and steel surfaces like utility hole covers reduce traction and should be avoided or ridden over cautiously.
Dirt, gravel and sand collect along the sides of the road, in residential areas and especially on curves and ramps leading to and from highways. Spring can be the worst time for this due to road sanding during the winter. Be aware of what is on the edge of the road when turning sharply, and entering and exiting highways Reduce your speed and adjust your riding for these conditions.
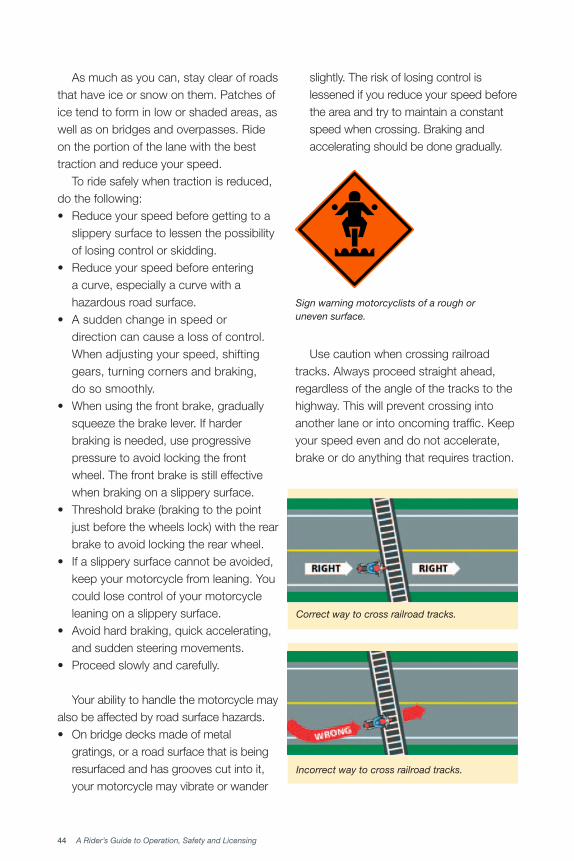
44 A Rider’s Guide to Operation, Safety and Licensing
As much as you can, stay clear of roads that have ice or snow on them. Patches of ice tend to form in low or shaded areas, as well as on bridges and overpasses. Ride on the portion of the lane with the best traction and reduce your speed.
To ride safely when traction is reduced, do the following:• Reduce your speed before getting to a
slippery surface to lessen the possibility of losing control or skidding.
• Reduce your speed before entering a curve, especially a curve with a hazardous road surface.
• A sudden change in speed or direction can cause a loss of control. When adjusting your speed, shifting gears, turning corners and braking, do so smoothly.
• When using the front brake, gradually squeeze the brake lever. If harder braking is needed, use progressive pressure to avoid locking the front wheel. The front brake is still effective when braking on a slippery surface.
• Threshold brake (braking to the point just before the wheels lock) with the rear brake to avoid locking the rear wheel.
• If a slippery surface cannot be avoided, keep your motorcycle from leaning. You could lose control of your motorcycle leaning on a slippery surface.
• Avoid hard braking, quick accelerating, and sudden steering movements.
• Proceed slowly and carefully.
Your ability to handle the motorcycle may also be affected by road surface hazards. • On bridge decks made of metal
gratings, or a road surface that is being resurfaced and has grooves cut into it, your motorcycle may vibrate or wander
slightly. The risk of losing control is lessened if you reduce your speed before the area and try to maintain a constant speed when crossing. Braking and accelerating should be done gradually.
Use caution when crossing railroad tracks. Always proceed straight ahead, regardless of the angle of the tracks to the highway. This will prevent crossing into another lane or into oncoming traffic. Keep your speed even and do not accelerate, brake or do anything that requires traction.
Sign warning motorcyclists of a rough or uneven surface.
Correct way to cross railroad tracks.
Incorrect way to cross railroad tracks.
7handling riding emergencies
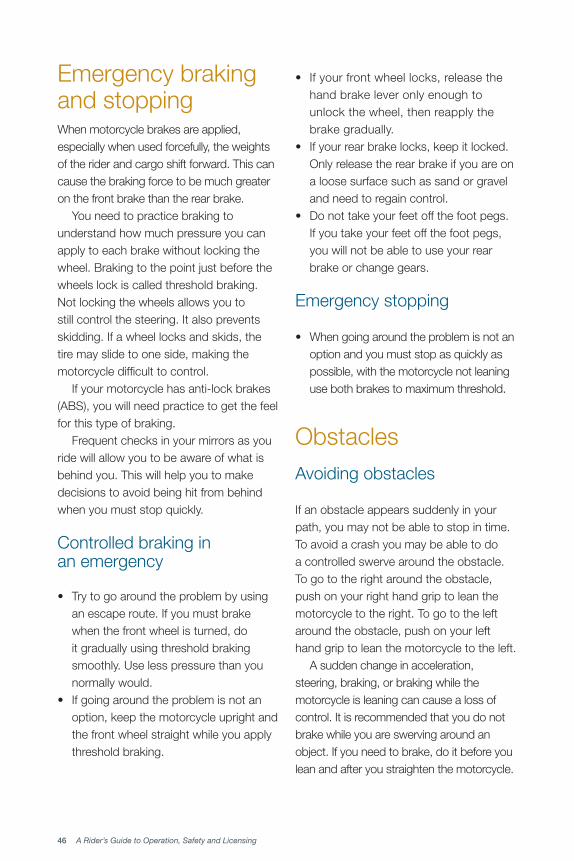
46 A Rider’s Guide to Operation, Safety and Licensing
Emergency braking and stoppingWhen motorcycle brakes are applied, especially when used forcefully, the weights of the rider and cargo shift forward. This can cause the braking force to be much greater on the front brake than the rear brake.
You need to practice braking to understand how much pressure you can apply to each brake without locking the wheel. Braking to the point just before the wheels lock is called threshold braking. Not locking the wheels allows you to still control the steering. It also prevents skidding. If a wheel locks and skids, the tire may slide to one side, making the motorcycle difficult to control.
If your motorcycle has anti-lock brakes (ABS), you will need practice to get the feel for this type of braking.
Frequent checks in your mirrors as you ride will allow you to be aware of what is behind you. This will help you to make decisions to avoid being hit from behind when you must stop quickly.
Controlled braking in an emergency
• Try to go around the problem by using an escape route. If you must brake when the front wheel is turned, do it gradually using threshold braking smoothly. Use less pressure than you normally would.
• If going around the problem is not an option, keep the motorcycle upright and the front wheel straight while you apply threshold braking.
• If your front wheel locks, release the hand brake lever only enough to unlock the wheel, then reapply the brake gradually.
• If your rear brake locks, keep it locked. Only release the rear brake if you are on a loose surface such as sand or gravel and need to regain control.
• Do not take your feet off the foot pegs. If you take your feet off the foot pegs, you will not be able to use your rear brake or change gears.
Emergency stopping
• When going around the problem is not an option and you must stop as quickly as possible, with the motorcycle not leaning use both brakes to maximum threshold.
Obstacles Avoiding obstacles
If an obstacle appears suddenly in your path, you may not be able to stop in time. To avoid a crash you may be able to do a controlled swerve around the obstacle. To go to the right around the obstacle, push on your right hand grip to lean the motorcycle to the right. To go to the left around the obstacle, push on your left hand grip to lean the motorcycle to the left.
A sudden change in acceleration, steering, braking, or braking while the motorcycle is leaning can cause a loss of control. It is recommended that you do not brake while you are swerving around an object. If you need to brake, do it before you lean and after you straighten the motorcycle.
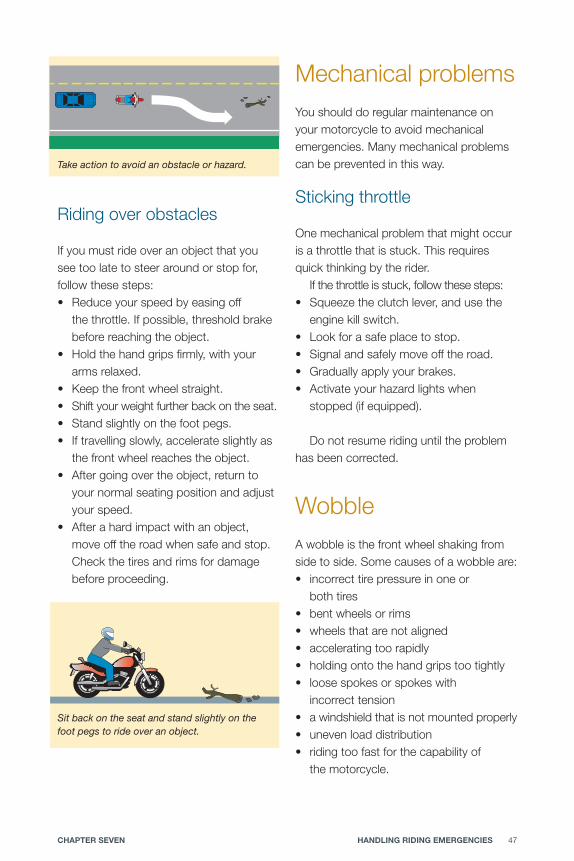
hANdliNG ridiNG eMerGeNcies 47chApter seveN
Riding over obstacles
If you must ride over an object that you see too late to steer around or stop for, follow these steps:• Reduce your speed by easing off
the throttle. If possible, threshold brake before reaching the object.
• Hold the hand grips firmly, with your arms relaxed.
• Keep the front wheel straight.• Shift your weight further back on the seat.• Stand slightly on the foot pegs.• If travelling slowly, accelerate slightly as
the front wheel reaches the object.• After going over the object, return to
your normal seating position and adjust your speed.
• After a hard impact with an object, move off the road when safe and stop. Check the tires and rims for damage before proceeding.
Mechanical problemsYou should do regular maintenance on your motorcycle to avoid mechanical emergencies. Many mechanical problems can be prevented in this way.
Sticking throttle
One mechanical problem that might occur is a throttle that is stuck. This requires quick thinking by the rider.
If the throttle is stuck, follow these steps:• Squeeze the clutch lever, and use the
engine kill switch.• Look for a safe place to stop.• Signal and safely move off the road.• Gradually apply your brakes.• Activate your hazard lights when
stopped (if equipped).
Do not resume riding until the problem has been corrected.
WobbleA wobble is the front wheel shaking from side to side. Some causes of a wobble are:• incorrect tire pressure in one or
both tires • bent wheels or rims• wheels that are not aligned • accelerating too rapidly• holding onto the hand grips too tightly • loose spokes or spokes with
incorrect tension• a windshield that is not mounted properly • uneven load distribution • riding too fast for the capability of
the motorcycle.
Take action to avoid an obstacle or hazard.
Sit back on the seat and stand slightly on the foot pegs to ride over an object.
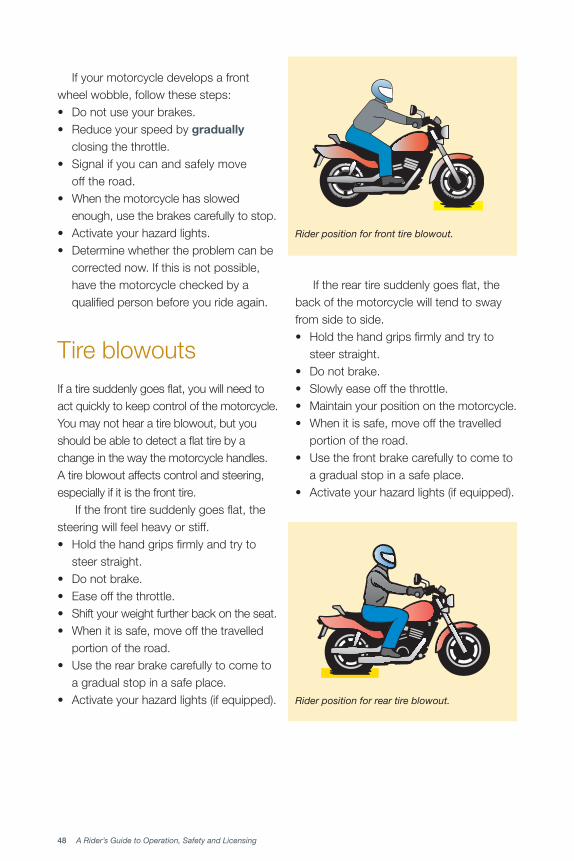
48 A Rider’s Guide to Operation, Safety and Licensing
If your motorcycle develops a front wheel wobble, follow these steps: • Do not use your brakes. • Reduce your speed by gradually
closing the throttle.• Signal if you can and safely move
off the road.• When the motorcycle has slowed
enough, use the brakes carefully to stop.• Activate your hazard lights.• Determine whether the problem can be
corrected now. If this is not possible, have the motorcycle checked by a qualified person before you ride again.
Tire blowouts If a tire suddenly goes flat, you will need to act quickly to keep control of the motorcycle. You may not hear a tire blowout, but you should be able to detect a flat tire by a change in the way the motorcycle handles. A tire blowout affects control and steering, especially if it is the front tire.
If the front tire suddenly goes flat, the steering will feel heavy or stiff.• Hold the hand grips firmly and try to
steer straight.• Do not brake. • Ease off the throttle.• Shift your weight further back on the seat.• When it is safe, move off the travelled
portion of the road.• Use the rear brake carefully to come to
a gradual stop in a safe place. • Activate your hazard lights (if equipped).
If the rear tire suddenly goes flat, the back of the motorcycle will tend to sway from side to side. • Hold the hand grips firmly and try to
steer straight.• Do not brake.• Slowly ease off the throttle.• Maintain your position on the motorcycle.• When it is safe, move off the travelled
portion of the road.• Use the front brake carefully to come to
a gradual stop in a safe place.• Activate your hazard lights (if equipped).
Rider position for front tire blowout.
Rider position for rear tire blowout.
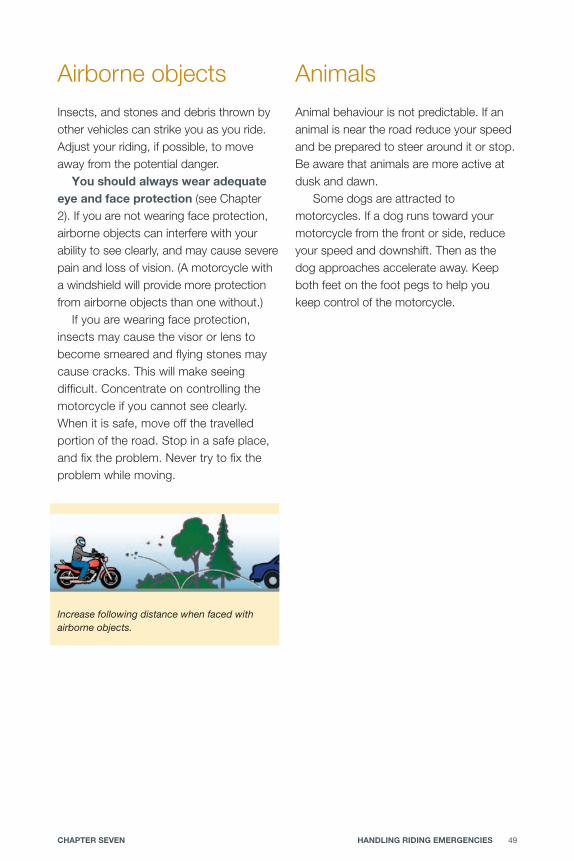
hANdliNG ridiNG eMerGeNcies 49chApter seveN
Airborne objectsInsects, and stones and debris thrown by other vehicles can strike you as you ride. Adjust your riding, if possible, to move away from the potential danger.
you should always wear adequate eye and face protection (see Chapter 2). If you are not wearing face protection, airborne objects can interfere with your ability to see clearly, and may cause severe pain and loss of vision. (A motorcycle with a windshield will provide more protection from airborne objects than one without.)
If you are wearing face protection, insects may cause the visor or lens to become smeared and flying stones may cause cracks. This will make seeing difficult. Concentrate on controlling the motorcycle if you cannot see clearly. When it is safe, move off the travelled portion of the road. Stop in a safe place, and fix the problem. Never try to fix the problem while moving.
Animals Animal behaviour is not predictable. If an animal is near the road reduce your speed and be prepared to steer around it or stop. Be aware that animals are more active at dusk and dawn.
Some dogs are attracted to motorcycles. If a dog runs toward your motorcycle from the front or side, reduce your speed and downshift. Then as the dog approaches accelerate away. Keep both feet on the foot pegs to help you keep control of the motorcycle.
Increase following distance when faced with airborne objects.

50 A Rider’s Guide to Operation, Safety and Licensing

8carrying a passenger or cargo
52 A Rider’s Guide to Operation, Safety and Licensing
Riding with a passengerRiding with a passenger is not recommended until you are an experienced rider. A passenger is legally permitted on a motorcycle only if it has a seat designed to carry an extra person. The motorcycle must also have passenger hand grips and foot rests.
Preparing your motorcycle
Your motorcycle may need adjusting to allow for the extra weight of the passenger. Read your owner’s manual for information.
You may need to:• Adjust the suspension/shock absorbers.• Check the slack in the drive chain.• Adjust the air pressure in the tires.
Check that the pressure is correct for riding with a passenger. There may also be tire inflation information on the motorcycle or tire.
Preparing your passenger before riding
eqUipMeNt• Ensure that your passenger is wearing an
approved helmet. This is required by law.• Ensure that your passenger has
adequate protective clothing, footwear and eye protection.
iNstrUctioN• Instruct your passenger to sit only on
the seat designed for the passenger. • Ensure that your passenger’s feet
can reach and remain on the foot pegs. Both of your passenger’s feet should stay on the foot pegs, even
when stopped. Hot exhaust pipes and mufflers are a hazard for passengers.
• Instruct your passenger to check with you before getting on or off the motorcycle, so you are prepared for the weight transfer.
Operator and passenger – working together when riding
Clear communication and cooperation between you and your passenger are extremely important to reduce the risk of injuries.• To carry a passenger, you will need to
use more strength to hold your body position. This will help you withstand the pushing and pulling forces of the passenger’s weight.
• Have your passenger sit as far forward as possible without crowding you.
• It is recommended that your passenger holds on to your waist. This assists with non-verbal communication between you and your passenger. The passenger may also hold the passenger hand grips.
• Be sure your passenger understands the need to sit still, especially when you are maneuvering the motorcycle. Unexpected or sudden movements by the passenger will make the motorcycle difficult to control.
• Instruct your passenger to move as you do when increasing and decreasing speed.
• Instruct your passenger to look over your shoulder in the direction of an approaching turn or curve. This way the passenger will be ready to lean with you when you and the motorcycle lean during a turn or curve.

cArryiNG A pAsseNGer or cArGo 53chApter eiGht
• Warn your passenger, if possible, if you must move the motorcycle suddenly, such as quick acceleration or changing lanes.
How to operate your motorcycle with a passenger
Carrying a passenger requires that you adjust how you operate the motorcycle from when you ride alone.• Take the motorcycle off the sidestand
before the passenger gets on.• Start with slow speeds in areas free of
traffic and then in light traffic conditions to allow first-time passengers to get used to riding.
• Increase your following distance to three to four seconds as the extra weight increases your stopping distance.
• Operate at a slower speed, particularly on corners, curves or bumps.
• Reduce speed earlier than when riding because the extra weight of your passenger will increase your stopping time and distance.
• Look for larger gaps in traffic whenever crossing, entering or merging with traffic. The extra weight will make your acceleration slower.
• Avoid sudden acceleration that could cause your passenger to lose his or her balance and possibly come off the motorcycle.
Carrying cargo If you carry cargo, it is safest to carry it in tank or saddle bags designed for motorcycles. Small loads can be carried safely if positioned and fastened properly. • Be sure the bags or other items do not
interfere with the controls or your ability to steer and control the motorcycle.
• Load saddle bags with about the same weight on each side of the motorcycle to maintain balance.
• Keep the load as low as practical.• Place the load above or to either side of
the rear axle. Mounting cargo anywhere behind the rear axle can affect control of the motorcycle.
• Fasten the load securely with elastic bungee cords or nets. (Rope tends to stretch, knots can come loose, permitting the load to shift or fall.) Attach several cords spaced along the side of the load.
• Stop and check the load regularly to make sure it has not loosened or moved.
• Never attach items to the front fender or handlebars.
A passenger on the motorcycle means adjusting how you operate your motorcycle.

54 A Rider’s Guide to Operation, Safety and Licensing
Towing a trailerIf you are planning to pull a trailer with your motorcycle, the motorcycle and trailer must be correctly matched for size and weight to be safe. A proper connection between the motorcycle and the trailer is needed, and the cargo must be properly loaded in the trailer. It is important that you practice pulling the trailer before you set out on a trip.
Pre-trip inspection for the trailer
• Check that the motorcycle’s trailer hitch and hardware are secured correctly to your motorcycle.
• Check that the trailer’s hitch is securely attached to the trailer, and has no cracks or faulty welds.
• Check that the signal, brake, and park lights on the trailer are working correctly.
• Check the trailer tires for damage and proper inflation.
• Check that the trailer licence plate is securely attached.
Loading your trailer
Heavy items should be placed in the bottom of the trailer, and over or as close as possible to the axle. Put only light items on top of the load and secure properly. Never overload your trailer as this can affect the handling of your motorcycle. Check the manufacturer’s instruction about maximum load.
The trailer’s load should be slightly weighted toward the front. The tongue weight of your loaded trailer should be 10 to 15 per cent of the trailer weight. (The tongue weight can be measured with a
tongue weight scale. It measures the weight that is placed on the part of the trailer hitch that attaches to the motorcycle.) Be sure the load cannot shift while in motion as this can unbalance the trailer and affect the handling of the motorcycle.
Pulling your trailer
When learning to pull your trailer, start out slowly. Get used to the handling characteristics of a motorcycle and trailer combination. The time and distance required to stop are increased due to the added weight. It will take more time to increase and decrease speed.
If your trailer and motorcycle are correctly matched and maintained, they will perform safely during many different driving conditions.
Three-wheeled motorcyclesThree-wheeled vehicles are available in a variety of configurations and are considered to be motorcycles. However their handling characteristics are quite different from two-wheeled motorcycles and different riding skills are required. These skills should be learned and practiced in a safe area before going into traffic. Keep your speed low until you have mastered the handling characteristics of the vehicle.
Unlike a two-wheeler, three-wheelers do not lean into turns. At first cornering on a three-wheeled motorcycle can feel alarming to an experienced motorcyclist. The rider will find shifting his or her weight in the saddle can help with cornering.
cArryiNG A pAsseNGer or cArGo 55chApter eiGht
Riders will also need to be aware of the additional width of a three-wheeled motorcycle. Allow for the additional width when passing parked vehicles and turning.
Note: When taking a road test using a three-wheeled motorcycle, your Class 6 licence will be restricted to only being able to operate three-wheeled motorcycles.
Riding with a sidecarIf you plan to operate a motorcycle with an attached sidecar, you are encouraged to research and learn how to do this before actually driving on the road.
When driving a motorcycle with a sidecar is new to you, begin cautiously. With a sidecar attached, the motorcycle becomes a three-wheeled vehicle. Practice is needed to gain the skill and techniques to operate it safely. Practice in a parking lot, and be sure you have enough skill to drive the unit safely before riding in more challenging conditions. Steering a motorcycle with a sidecar is somewhat similar to steering a car.
The following information is not meant to provide instructions on driving with a sidecar. The intent of it is to give you some idea of how driving with a sidecar is different from riding a motorcycle, and give you some starting pointers that you can use when you take lessons on driving with a sidecar.
General driving
• As a new driver of a motorcycle with a sidecar, you must overcome the urge to lean the motorcycle and push steer (counter-steer) that you learned for riding without a sidecar.
• A sidecar motorcycle unit must be steered. This is unlike a motorcycle
alone, which leans. The steering is direct steering, meaning you turn the handle bars to point the wheel in the direction you want to go.
• A motorcycle and sidecar unit should be centred in the lane like you would for driving a car, to avoid striking objects on the right with the sidecar.
• When you must avoid a road hazard, such as a pothole, the motorcycle and sidecar will be more difficult to manoeuvre than a motorcycle alone. The movement will be similar to driving a vehicle. Remember the wheel of the sidecar as well as the motorcycle wheels when avoiding a hazard or pothole.
Increasing and decreasing speed
• A motorcycle and sidecar unit may pull to the right during acceleration. Slowing may cause the unit to pull to the left. When increasing or decreasing speed, it is necessary to hold the hand grips firmly to keep the unit straight.
Braking
• Braking forces can cause the motorcycle and sidecar to pull to the side. Depending on your type of brakes, you may have to use more effort on the hand grips to keep the unit pointed in the direction you want to go. It is important to practice stopping to become familiar with how your motorcycle and sidecar respond.
• A brake on the sidecar wheel provides some extra braking force, and will help make a quicker, straighter stop, especially when the sidecar is carrying a
56 A Rider’s Guide to Operation, Safety and Licensing
passenger. The way you brake depends on the type of brake you have on the sidecar. Check your owner’s manual for more information.
• If the sidecar does not have a brake, or the sidecar brake is not adjusted correctly, be aware that the sidecar can cause the motorcycle and sidecar unit to pull to the left during braking. Extra effort on the handgrips will be required by the driver to keep it tracking straight.
• When braking, sidecars can cause the motorcycle sidecar unit to pull away from its intended path. This will require the rider to make steering adjustments to compensate.
Curves
• The sidecar may make the motorcycle more difficult to control so reduce speed when approaching curves. You must drive more slowly in a curve than you would with a motorcycle without a sidecar.
Turns
• You must slow down before a turn. Gear down one or two gears, depending on the angle of the turn and the speed of your approach.
• To turn right, shift your weight to the right and point the front wheel around the turn. After the midpoint of the turn has been reached, and you begin to turn the handle bar back to go straight, you can gently accelerate out of the turn.
• The right turn must be done very carefully. Because a motorcycle and
sidecar unit is off centre, the left push of centrifugal force may cause a sidecar to lift in a right turn. If the sidecar lifts, increase the effort to turn the handlebar smoothly to the right. This will keep the whole unit turning right and prevent it from being pushed to the left.
• To turn left, shift your weight to the left. This helps to keep the rear wheel of the motorcycle on the ground, and reduces the effort required to steer.
9riding in a Group
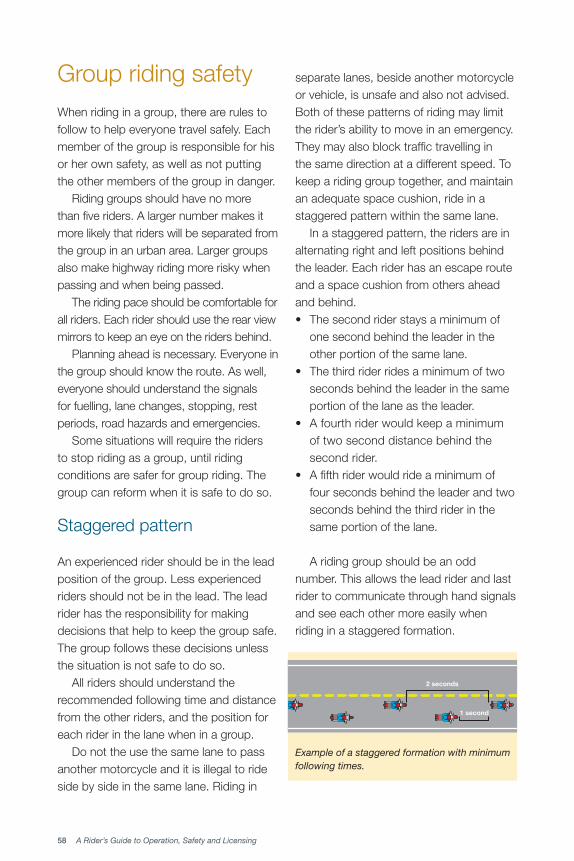
58 A Rider’s Guide to Operation, Safety and Licensing
Group riding safetyWhen riding in a group, there are rules to follow to help everyone travel safely. Each member of the group is responsible for his or her own safety, as well as not putting the other members of the group in danger.
Riding groups should have no more than five riders. A larger number makes it more likely that riders will be separated from the group in an urban area. Larger groups also make highway riding more risky when passing and when being passed.
The riding pace should be comfortable for all riders. Each rider should use the rear view mirrors to keep an eye on the riders behind.
Planning ahead is necessary. Everyone in the group should know the route. As well, everyone should understand the signals for fuelling, lane changes, stopping, rest periods, road hazards and emergencies.
Some situations will require the riders to stop riding as a group, until riding conditions are safer for group riding. The group can reform when it is safe to do so.
Staggered pattern
An experienced rider should be in the lead position of the group. Less experienced riders should not be in the lead. The lead rider has the responsibility for making decisions that help to keep the group safe. The group follows these decisions unless the situation is not safe to do so.
All riders should understand the recommended following time and distance from the other riders, and the position for each rider in the lane when in a group.
Do not the use the same lane to pass another motorcycle and it is illegal to ride side by side in the same lane. Riding in
separate lanes, beside another motorcycle or vehicle, is unsafe and also not advised. Both of these patterns of riding may limit the rider’s ability to move in an emergency. They may also block traffic travelling in the same direction at a different speed. To keep a riding group together, and maintain an adequate space cushion, ride in a staggered pattern within the same lane.
In a staggered pattern, the riders are in alternating right and left positions behind the leader. Each rider has an escape route and a space cushion from others ahead and behind. • The second rider stays a minimum of
one second behind the leader in the other portion of the same lane.
• The third rider rides a minimum of two seconds behind the leader in the same portion of the lane as the leader.
• A fourth rider would keep a minimum of two second distance behind the second rider.
• A fifth rider would ride a minimum of four seconds behind the leader and two seconds behind the third rider in the same portion of the lane.
A riding group should be an odd number. This allows the lead rider and last rider to communicate through hand signals and see each other more easily when riding in a staggered formation.
Example of a staggered formation with minimum following times.
2 seconds
1 second
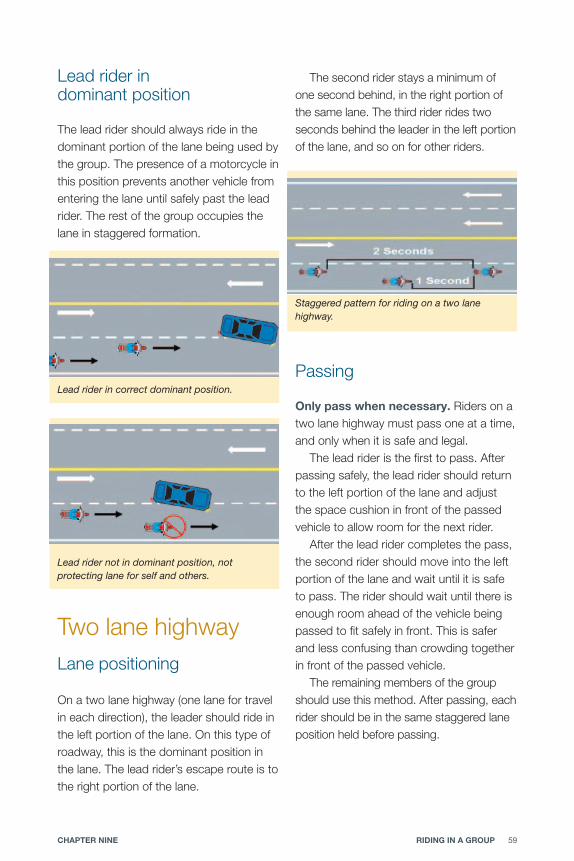
ridiNG iN A GroUp 59chApter NiNe
Lead rider in dominant position
The lead rider should always ride in the dominant portion of the lane being used by the group. The presence of a motorcycle in this position prevents another vehicle from entering the lane until safely past the lead rider. The rest of the group occupies the lane in staggered formation.
Two lane highwayLane positioning
On a two lane highway (one lane for travel in each direction), the leader should ride in the left portion of the lane. On this type of roadway, this is the dominant position in the lane. The lead rider’s escape route is to the right portion of the lane.
The second rider stays a minimum of one second behind, in the right portion of the same lane. The third rider rides two seconds behind the leader in the left portion of the lane, and so on for other riders.
Passing
only pass when necessary. Riders on a two lane highway must pass one at a time, and only when it is safe and legal.
The lead rider is the first to pass. After passing safely, the lead rider should return to the left portion of the lane and adjust the space cushion in front of the passed vehicle to allow room for the next rider.
After the lead rider completes the pass, the second rider should move into the left portion of the lane and wait until it is safe to pass. The rider should wait until there is enough room ahead of the vehicle being passed to fit safely in front. This is safer and less confusing than crowding together in front of the passed vehicle.
The remaining members of the group should use this method. After passing, each rider should be in the same staggered lane position held before passing.
Staggered pattern for riding on a two lane highway.
Lead rider in correct dominant position.
Lead rider not in dominant position, not protecting lane for self and others.

60 A Rider’s Guide to Operation, Safety and Licensing
Multi-lane highway with two lanes in the same directionRight lane – rider position
When the riding group is travelling on a highway with a second lane for travel in the same direction, the group should ride in the travel lane to the right. The lead rider should ride in the left (dominant) portion of this right lane. In this position, the lead rider has an escape route to the right portion of the lane and another to the lane to the left if there is an emergency.
The second rider stays a minimum of one second behind the leader in the right portion of the lane. The third rider rides two seconds behind the leader in the left portion of the lane, and so on for the other riders.
Left lane – rider position
If the left lane must be used, the lead rider should ride in the right portion of the lane. In this situation, this is the dominant position to protect the lane. This position also allows the lead rider an escape route to the left portion of the lane and another to the lane to the right if there is an emergency.
The second rider stays a minimum of one second behind the leader in the left portion of the lane. The third rider rides two seconds behind the leader in the right portion of the lane, and so on for the other riders.
Group lane changing
To change lanes on a multi-lane highway, the lead rider indicates the intent by signalling and using a predetermined arm signal. Each following rider then indicates the intent to change lanes by signalling.
When there is plenty of space in the next lane, the rider in the last position is the first to change lanes. When the last rider has safely moved to the new lane, the rest of the group completes the lane change, one at a time. (The order in which the remainder of the riders make the lane change, other than the last rider who goes first, must be decided by the group before starting the ride. One recommended method is the last rider, fourth, third, second and then the leader.)
If the group has changed lanes to pass another vehicle, the group must wait until all riders have passed the vehicle they are
Staggered pattern for riding on a multi-lane highway if the left lane must be used.
Staggered pattern for riding on a multi-lane highway when riding in the travel lane to the right.

ridiNG iN A GroUp 61chApter NiNe
overtaking before returning to their original lane. The lead rider indicates the intent to return to the original lane by signalling and using a predetermined arm signal. Each rider from the first to the last also then indicates the intent to change lanes by signalling.
After passing the vehicle, and when there is enough space for all the motorcycles, the last rider will be the first to return to the original lane. When the rider in the last position has safely completed the lane change, the rest of the group completes the lane change one at a time. (The order in which the remainder of the riders return to the original lane must be decided by the group before riding.) One recommended method is the last rider, fourth, third, second and then the leader. Riders should occupy the same positions they held before the pass.
Multi-lane highway with three or more lanes in the same directionOn a multi-lane highway, usually the best choice is for the group to ride in the lane farthest to the right. The second choice is the far left lane. If the group must ride in a lane other than these two, the leader should ride in the portion of lane that is dominant for managing that stretch of road. The rest of the group will need to adjust their staggered lane position according to the lead rider’s position.
Single file formationWhen the lead rider decides, the group shifts from group staggered position to single file. This will occur when approaching sharp curves, turns, crest of hills, or narrow roadways and bridges. In single file, the following distance between the riders is a minimum of two seconds. The riders should choose the portion of the lane that allows seeing ahead and being seen.

62 A Rider’s Guide to Operation, Safety and Licensing
ridiNG iN A GroUp 63chApter NiNe
Alberta Regulation 322/2002
Traffic Safety Act Vehicle Equipment Regulation
MUfflers61(1) A motor vehicle propelled by an
internal combustion engine must have an exhaust muffler that is cooling and expelling the exhaust gases from the engine without excessive noise and without producing flames or sparks.
(2) A person shall not drive or operate a motor vehicle propelled by an internal combustion engine if the exhaust outlet of the muffler has been widened.
(3) A person shall not drive or operate a motor vehicle propelled by an internal combustion engine if a device is attached to the exhaust system or the muffler that increases the noise made by the expulsion of gases from the engine or allows a flame to be ignited from the exhaust system.
(4) This section applies to a power bicycle that is propelled by an internal combustion engine.
Appendix 1

64 A Rider’s Guide to Operation, Safety and Licensing

www.saferoads.comJanuary 2013