Embed Size (px)
Citation preview

INSTRUCTIONS AND WARRANTY
RHSB150
RUSSELL HOBBS
HERITAGE KITCHEN MACHINE
Congratulations on purchasing our Russell Hobbs Heritage Kitchen Machine. Each unit is
manufactured to ensure safety and reliability. Before using this appliance for the first time,
please read the instruction manual carefully and keep it for future reference.
FEATURES OF THE RUSSELL HOBBS HERITAGE KITCHEN MACHINE
Powerful 1200W motor – low noise kitchen machine
Planetary mixing action
“Pop-up” head lift system
Classic white injection colour housing
Belt-drive system for optimum mixing results
Intelligent circuitry ensures a consistent operating speed whatever load
Oversized 6.5L stainless steel bowl with transparent splashguard and easy-pour
chute
4 speed control plus pulse
One system for mixing, kneading, blending, chopping and more!
The Heritage kitchen machine includes the following accessories:
0.8L Plastic food processor bowl with chopping blade, mixing blade, slicer and
shredding disk support, slicing disk, shredding disk and spatula
1.5L Glass blending jug
Dough hook
Balloon whisk
Creamer-beater
Includes recipes
For domestic use only
2 year warranty
For more information on optional extra accessories, please visit www.russellhobbs.co.za
or contact your nearest Home of Living Brands Customer Service Department

IMPORTANT SAFEGUARDS
When using any electrical appliance, basic safety precautions should always be followed
including the following:
1. Please read the instructions carefully before using any appliance.
2. Always ensure that the voltage on the rating label corresponds to the mains voltage
in your home.
3. Incorrect operation and improper use can damage the appliance and cause injury to
the user.
4. The appliance is intended for household use only. Commercial use invalids the
warranty and the supplier cannot be held responsible for injury or damage caused
when using the appliance for any other purpose than that intended.
5. Avoid any contact with moving parts. Always use the safety pusher when utilizing
the Food Processing attachment
6. This appliance is not intended for use by persons (including children) with reduced
physical, sensory or mental capabilities, or lack of experience and knowledge,
unless they have been given supervision or instruction concerning use of the
appliance by a person responsible for their safety.
7. Children should be supervised to ensure that they do not play with the appliance.
8. Check the power cord and plug regularly for any damage. If the cord or the plug is
damaged, it must be replaced by the manufacturer or a qualified person in order to
avoid an electrical hazard.
9. Do not use the appliance if it has been dropped or damaged in any way. In case of
damage, take the unit in for examination and/or repair by an authorised service
agent.
10. To reduce the risk of electric shock, do not immerse or expose the motor assembly,
plug or the power cord to water or any other liquid.
11. Never immerse the unit in water or any other liquid for cleaning purposes.
12. Remove the plug from the socket by gripping the plug. Do not pull on the cord to
disconnect the appliance from the mains. Always unplug the unit when not in use,
before cleaning or when adding or removing parts.
13. The use of accessories that are not recommended or supplied by the manufacturer
may result in injuries, fire or electric shock.

14. A short cord is provided to reduce the hazards resulting from becoming entangled in
or tripping over a longer cord.
15. Do not let the cord hang over the edge of a table or counter. Ensure that the cord is
not in a position where it can be pulled on inadvertently.
16. Do not allow the cord to touch hot surfaces and do not place on or near a hot gas or
electric burner or in a heated oven.
17. Do not use the appliance on a gas or electric cooking top or over or near an open
flame.
18. Use of an extension cord with this appliance is not recommended. However, if it is
necessary to use an extension lead, ensure that the lead is suited to the power
consumption of the appliance to avoid overheating of the extension cord, appliance
or plug point. Do not place the extension cord in a position where it can be pulled on
by children or animals or tripped over.
19. This appliance is not suitable for outdoor use. Do not use this appliance for anything
other than its intended use.
20. DO NOT carry the appliance by the power cord.
21. Take care when lifting this appliance as it is heavy. Ensure that the head is locked
and that the bowl, accessories, outlet cover and cord are secure before lifting.
22. Do not leave this appliance unattended during use. Always unplug the unit when not
in use or before cleaning.
23. Always operate the appliance on a smooth, even, stable surface. Do not place the
unit on a hot surface.
24. Ensure that the switch is in the “Off” position after each use.
25. Do not use this appliance to process any substance for which is has not been
intended to process e.g. paint, metals, etc.
26. Do not use the Jug Blender accessory and other accessories at the same time.
27. Do not operate this appliance by means of an external timer or separate remote
control system.
28. The manufacturer does not accept responsibility for any damage or injury caused by
improper or incorrect use, or for repairs carried out by unauthorised personnel.
29. In case of technical problems, switch off the machine and do not attempt to repair it
yourself. Return the appliance to an authorised service facility for examination,
adjustment or repair.

30. Always insist on the use of original spare parts. Failure to comply with the above
mentioned precautions and instructions, could affect the safe operation of this
machine.
THIS APPLIANCE IS FOR HOUSEHOLD USE ONLY
PARTS DIAGRAM
1. Drive outlet cover
2. Drive outlet
3. Speed control
4. Head release lever
5. Stainless steel bowl
6. Filling cap
7. Blender lid
8. Blender jug
9. Creamer-beater
10. Balloon whisk
11. Dough hook
12. Safety pusher
13. Pusher tube
14. Food processor bowl
15. Splash guard
OPERATING INSTRUCTIONS
BEFORE FIRST USE
Before using this appliance for the first time, unpack the appliance and remove all
protective packaging and wrappings.
Please ensure to discard or store the protective packaging and wrappings immediately. It

is important to keep these away from babies, infants and children for safety purposes.
All parts of the kitchen machine need to be thoroughly cleaned before being used for the
first time. (See “Cleaning and maintenance” section).
POSITIONING
Place the kitchen machine on a firm, stable, level surface.
Position the power cord away from the edge of tables or countertops so it cannot be
tripped over or caught.
RAISING THE HEAD
Note: Accessories such as the blender should not be attached when raising the
head.
Ensure that the kitchen machine is switched off and unplugged.
Turn the head release lever clockwise to the unlock position.
The head will lift, with your assistance, allowing removal/replacement of the stainless
steel bowl and/or mixing accessories. At its uppermost position the head will lock into
place and the head release lever will return to the lock position.
LOWERING THE HEAD
Caution: Keep hands and items clear of the head pivoting area to avoid injury or
damage to the appliance.
Ensure that the required mixing accessory is correctly fitted and the mixing bowl is in
position. (See “Bowl” and “Mixing Accessories” section)
Turn the head release lever clockwise to the unlock position.
Gently lower the head by pressing down on the top of the kitchen machine until it locks
into position.
The head release lever will return to the lock position.
SPLASH GUARD
The mixing bowl can be used with or without the splash guard. It is recommended to use
the mixing bowl with the splash guard and chute cover fitted to avoid spatter.
Ensure that the kitchen machine is switched off and unplugged.
Raise the head. (See “Raising the head” section)
Remove any mixing accessories from the mixing accessory drive.
The splash guard fits onto the underside of the head, above the mixing accessory
drive.
FITTING THE SPLASH GUARD
Hold the splash guard by the feeding chute.
Fit the first latch on the splashguard (the latch nearest to the feeding chute) over the
notch on the head.
Push the opposite side of the splash guard upwards until the second latch clicks into
place onto the notch at the rear of the head.
REMOVING THE SPLASH GUARD
Carefully pull down the rear of the splashguard to release the rear latch from the notch
on the rear of the head.
With the rear latch now disengaged, the splashguard can be lowered and removed
from the head.
CHUTE COVER
Caution: Do not insert fingers or utensils into the feeding chute at any time.
To avoid spatter, ensure the chute cover is fitted when the kitchen machine is in use.
The chute cover sits on top of the feeding chute on the splash guard.
Lift the chute cover off to add ingredients.
BOWL
Caution: Only use the bowl supplied - do NOT attempt to use any other bowl.
The head must be raised to allow for fitting or removing the bowl (See “Raising the Head”
Section).
Note: It is much easier to fit and remove the bowl without the mixing accessories
fitted.
FITTING THE BOWL
Fit the bowl in the space provided in the kitchen machine base.
Turn the bowl anti-clockwise to lock it in place.
REMOVING THE BOWL
Turn the bowl clockwise to release it from its fittings.
Lift it out of the kitchen machine base.
MIXING ACCESSORIES
Caution: Fit and remove the mixing accessories with the kitchen machine head
raised and ensure that the unit is switched off and unplugged.
FITTING ACCESSORIES
Ensure that the kitchen machine is switched off and unplugged.
Raise the head (See “Raising the Head” section)
Select the appropriate accessory:
o Creamer-Beater: For making cakes, biscuits, pastry, icing, fillings, éclairs and
mashed potato.
o Balloon Whisk: For eggs, cream, batters, fatless sponges, meringues,
cheesecakes, mousses, soufflé’s. Don’t use the whisk for heavy mixtures (eg
creaming fat and sugar)-you could damage it.
o Dough Hook: For yeast mixtures.
Push the top of the accessory into the mixing accessories drive and turn it anti-
clockwise to lock it into place.
ADJUSTING THE HEIGHT OF YOUR MIXING ACCESSORIES
Your mixing accessories are equipped with a system for adjusting their height in
relation to the mixing bowl for optimum results
Press the head release lever to lift the machine head and insert the creamer-beater,
dough hook or whisk.
Hold it in position.
Now lower the head of the appliance by pressing the head release lever and lower
down until a click sound is heard. This means that the machine head has safely
returned to the correct position.
To adjust the height, use a spanner to loosen the nut located on the mixing tool. Lift the
shaft a little and then tighten the nut. This will allow you to move your mixing accessory
closer to the bowl bottom.
REMOVING ACCESORIES
Press the accessory up into the mixing accessory drive and turn it clockwise.
Pull it down and out of the mixing accessory drive.

POWER UP
Caution: - If the speed control is not set to ‘0' (off position), the kitchen machine will
start when the power supply is connected. Please fit accessories correctly to avoid
damaging the machine.
Check that the speed control is set to "0".
Put the plug into the wall power outlet and switch it on.
SPEED CONTROL
Turn the speed control clockwise to the speed you want.
Turn the speed control back to "0" to turn the motor off.
Turning the speed control anti-clockwise to "P" will give you a pulse at high speed.
Caution: Do not run the motor continuously for more than 10 minutes, it may
overheat. After 10 minutes, switch off for at least 10 minutes to let the motor cool.
PULSE FUNCTION ("P")
Turning the speed control anti-clockwise to "P" will give you a short burst at high
speed.
Use "P" as a "pulse" function, for greater control over the mixing process.
Caution: do not use "P’"pulse function with the dough hook accessory, you may
overload the motor.
Note: the contents of the bowl will rise when you start the motor – the higher the
speed, the more they will rise. It is recommended to fill the bowl to no more than
half of its capacity.

HOT LIQUIDS
Caution: Take extreme care if mixing hot liquids. The mixing accessories may
splash liquids creating a scalding hazard. Ideally, you should not try mixing liquids
that are hotter than you can comfortably handle i.e. temperatures below 40°C. If
your recipe calls for mixing liquids hotter than 40°C, ensure you take steps to
prevent scalding from possible splatter.
POWER DOWN
Turn the speed control to the ‘0’ (off position) and wait until the mixing accessory stops
moving before placing hands or utensils in the bowl or raising the head.
BLENDER JUG
Use the blender jug for blending soups, sauces, smoothies and cocktails. Why not try
making mayonnaise, hollandaise, breadcrumbs and pesto!
BEFORE USE
All parts of the kitchen machine including the blender jug need to be thoroughly cleaned
before being used for the first time. (See the “Cleaning and Maintenance” section)
POSITIONING
Place the Heritage kitchen machine on a firm, stable, level surface.
Position the power cord away from the edge of tables or countertops so it cannot be
tripped over or caught.
Caution: Do not operate the blender accessory empty for more than 1 (one) minute.
Never fill the glass jug with boiling liquid. Allow liquids to cool down to ambient
room temperature. By not following this caution, the appliance could overheat and
the glass of the jug could crack.
USING THE JUG
Caution: The cutting blades are very sharp. Handle the Blender with extreme care
and caution.
Slide the blender drive cover to open the cover and expose the drive for the jug.
Lower the jug onto the drive.
Push the handle towards the rear of the kitchen machine to turn the jug anti-clockwise
and lock it into place.
FILLING THE JUG
Caution: Do not use the jug without fitting the lid.
Place the ingredients into the jug.
Do not fill past the MAX mark as the contents may force their way past the lid when
you start the motor.
Fit the lid on the jug and press it down fully to secure it.
POWER UP
Caution: - If the speed control is not set to the ‘0’ (off position) the kitchen machine
will start when the power supply is connected. If accessories are not fitted correctly
you may damage the machine.
Check that the speed control is set to “0”.
Put the plug into the wall power outlet and switch it on.
SPEED CONTROL
Turn the speed control clockwise to the speed you want.
Turning the speed control anti-clockwise to ‘P’ will give you a pulse at high speed.
Turn the speed control back to “0” to turn the motor off.
CAUTION: Do not run the motor continuously for more than 10 minutes, it may
overheat. After 10 minutes, switch off for at least 10 minutes to let the motor cool.
PULSE FUNCTION (‘P’)
Turning the speed control anti-clockwise to ‘P’ will give you a short burst at high speed.
Use ‘P’ as a “pulse” function, for greater control over the mixing process.
ADDING INGREDIENTS
Ensure that larger pieces of food are cut into small pieces before blending. Their approximate size should be 2 cm × 2cm × 2cm.
If you need to add solid ingredients after you have started blending:
Turn the speed control to “0” (off position)
Wait until the blades stop moving.
Remove the lid.
Add the ingredients.
Replace the lid.
Start the motor.
You may add liquid ingredients (such as oil, cream, water, etc.) to the food when blending.
To do so, use the small hole located on the top of the blender jug lid, by the filler cap.
Ensure to replace the filler cap after adding additional ingredients.
Caution: Check that the added ingredients do not push the volume over the MAX
mark.
POWER DOWN
Turn the speed control to the ‘0’ (off position) and wait until the blades stop moving
before removing the lid from the jug or removing the jug from the motor unit.
To remove the jug, turn it clockwise until the spout points along the head of the kitchen
machine.
Lift the jug off the drive.
HOT LIQUIDS
Caution: Pouring hot liquids into a cold blender jug could cause the jug to break.
Before pouring into the jug, let the liquid cool down to a temperature you can comfortably
handle – i.e. keep the liquid temperature below 40°C.
THE BLADE UNIT
REMOVING THE BLADE UNIT
Remove the lid and turn the jug upside down.
Use the grips to turn the blade unit anti-clockwise to release the latches on the blade
unit from the tabs on the inside of the jug.
Lift the blade unit out of the jug.
Caution: The cutting blades are very sharp. Handle the blade unit with extreme care
and caution, using only the plastic parts.

FITTING THE BLADE UNIT
Lower the blade unit into the upturned jug.
Use the grips to turn the blade unit clockwise to engage the latches on the blade unit
with the tabs on the inside of the jug.
FOOD PROCESSOR
A Food Processor allows you to chop, grate and slice, particularly in large quantities which
will save you masses of time. Vegetables, fruits and nuts are easy as pie. It is ideal if you
want to make a stuffing. It can also evenly chop meat much more efficiently.
Yes, it’s also good at slicing. You can deal with cucumbers, apples, cabbages, potatoes
and whatever needs to be sliced evenly and precisely.
Why not try a whole-egg mayonnaise, for example. It can then be made into chunky tartar
sauce, with capers, cornichons (baby gherkins) and parsley chopped in at the end.
With a little crème fraiche and some butter, a processor will make a lovely smooth, velvety
parsnip purée.
Grating large quantities – not just of breadcrumbs – can be hard work by hand. Make light
work of something really hard, such as fresh coconut, and if you need a large amount of
freshly grated Parmesan, it is all speedily and easily done.
Do not use the food processor to mash potatoes or to process hard spices such as
nutmeg.
BEFORE USE
All parts of the kitchen machine including the blender jug need to be thoroughly cleaned
before being used for the first time. (See the “Cleaning and Maintenance” section)
POSITIONING
Place the Heritage kitchen machine on a firm, stable, level surface.
Position the power cord away from the edge of tables or countertops so it cannot be
tripped over or caught.
Fit the bowl and splash guard cover to the kitchen machine. The kitchen machine’s
drive operates when the motor is running.
Caution: Do not operate the food processor accessory empty for more than 1 (one)
minute. Never fill it with boiling liquid. Allow liquids to cool down to ambient room
temperature. By not following this caution, the appliance could overheat and the
food processor bowl could crack.
USING THE BOWL
Caution: The blades are very sharp, hold only the plastic part. Handle them with
extreme care and caution.
Put the turn axis onto the power outlet.
Put the plastic bowl onto the turn axis, onto the power outlet and turn the handle in a
clockwise direction.
Put the blade support on the axis in the middle of the bowl and press it to the bottom.
Now fit the chopping blade to the blade support. Warning: The blades are sharp.
Please only hold the plastic part while using.
Put the ingredients into the bowl.
Put the cover on the bowl and turn it until you hear the lid fitting correctly into place.
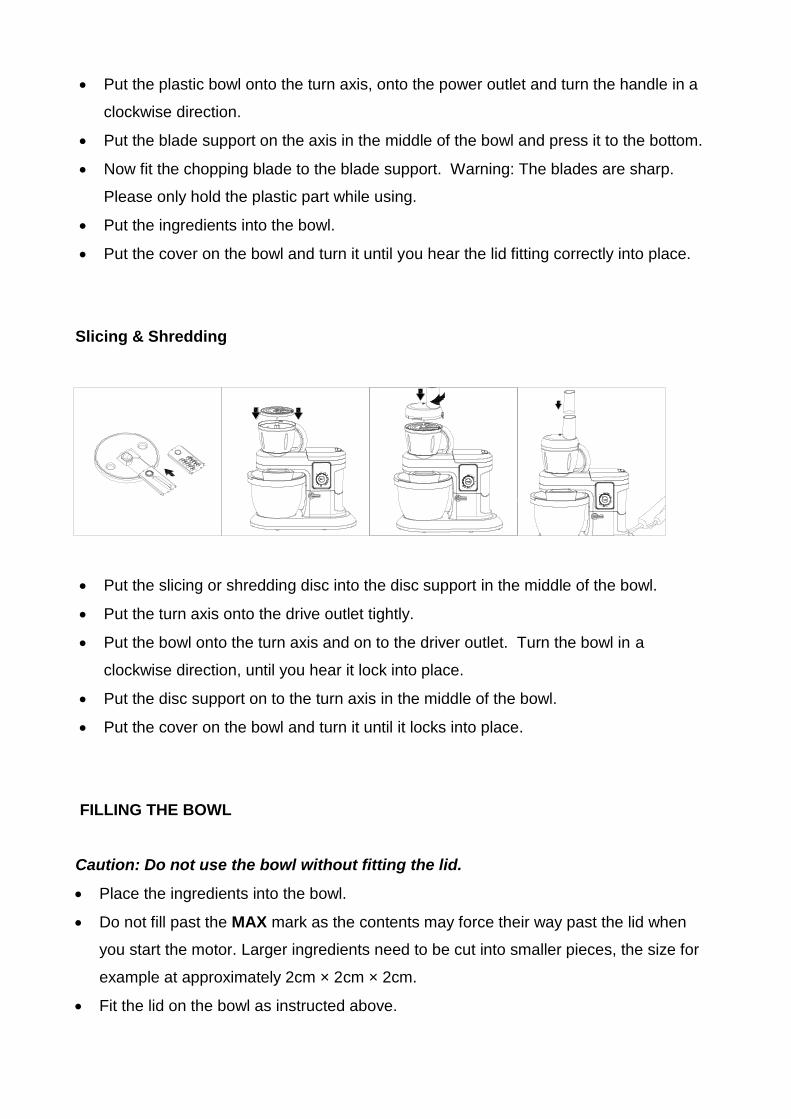
Slicing & Shredding
Put the slicing or shredding disc into the disc support in the middle of the bowl.
Put the turn axis onto the drive outlet tightly.
Put the bowl onto the turn axis and on to the driver outlet. Turn the bowl in a
clockwise direction, until you hear it lock into place.
Put the disc support on to the turn axis in the middle of the bowl.
Put the cover on the bowl and turn it until it locks into place.
FILLING THE BOWL
Caution: Do not use the bowl without fitting the lid.
Place the ingredients into the bowl.
Do not fill past the MAX mark as the contents may force their way past the lid when
you start the motor. Larger ingredients need to be cut into smaller pieces, the size for
example at approximately 2cm × 2cm × 2cm.
Fit the lid on the bowl as instructed above.
POWER UP
Caution: - If the speed control is not set to the ‘0’ (off position) the kitchen machine
will start when the power supply is connected. If accessories are not fitted correctly
you may damage the machine.
Check that the speed control is set to “0”.
Put the plug into the wall power outlet and switch it on.
SPEED CONTROL
Turn the speed control clockwise to the speed you want.
Turning the speed control anti-clockwise to ‘P’ will give you a pulse at high speed.
Turn the speed control back to “0” to turn the motor off.
CAUTION: Do not run the motor continuously for more than 10 minutes, it may
overheat. After 10 minutes, switch off for at least 10 minutes to let the motor cool.
PULSE FUNCTION (‘P’)
Turning the speed control anti-clockwise to ‘P’ will give you a short burst at high speed.
Use ‘P’ as a “pulse” function, for greater control over the mixing process.
ADDING INGREDIENTS
Always ensure that you are using the safety pusher when adding ingredients to the food
processor bowl during processing. Ensure that the safety pusher remains fitted to the
bowl once you have finished adding ingredients.
Caution: Check that the added ingredients do not push the volume over the MAX
mark.
POWER DOWN
Turn the speed control to the ‘0’ (off position) and wait until the blades stop moving before
removing the lid from the bowl or removing the bowl from the drive outlet.
HOT LIQUIDS
Caution: Pouring hot liquids into the processor bowl could cause the bowl to break.
Before pouring into the bowl, let the liquid cool down to a temperature you can comfortably
handle – i.e. keep the liquid temperature below 40°C.
PROCESSING GUIDE
General
Switch the kitchen machine off and scrape the bowl with the spatula frequently.
Use cold ingredients for pastry unless your recipe says otherwise.
Tips for bread making:
o Never exceed the maximum capacities; otherwise you will overload the
appliance.
o If you hear the appliance motor is taking strain/ labouring - switch the kitchen
machine off, remove half the dough and do each half separately.
o The ingredients mix best if you put the liquid in first.
Hints for beating egg whites:-
Before whisking egg whites, make sure that there’s no grease or egg yolk on the whisk
or bowl.
Be sure that the bowl and mixing accessories are clean.
Be sure that there is no egg yolk in the egg white.
Egg whites should be at room temperature for maximum volume.
Use a high setting.
Beating time will vary according to the freshness of the eggs.
Hints for whipping cream:-
Use a heavy cream.
Chill the cream before whipping.
For best results, chill both beaters and bowl.
Start beating at a low speed to prevent spatter, increase to high as the cream thickens.
Beating time will vary according to the fat content, age and temperature of the cream.
Important: Guidelines given in the processing guide and recipes are approximate. Due to
personal differences in taste, some foods may be desired more or less processed/ crisp/
cooked, etc. Therefore, duration may be increased, decreased or varied in any way to suit
individual preference.
Mixing Bowl
Item Max quantities
Comments Accessory
Stiff yeast dough
1600g
Flour and water at a ratio of 5:3 Pre-treatment of dough: From speed 1 for 180 seconds Operation period: Speed 2 for 10 seconds
Soft yeast dough
2000g
Flour and water at a ratio of 1:1 Pre-treatment of dough: From speed1 for 90 seconds Operation period: Speed 2 for 10 seconds
Whipped cream
300ml fresh cream
From speed 1 to 4 for about 5 minutes.
Shakes, cocktails or other liquids
1L
Beating eggs into creamed mixtures. From speed 1 for about 4 minutes.
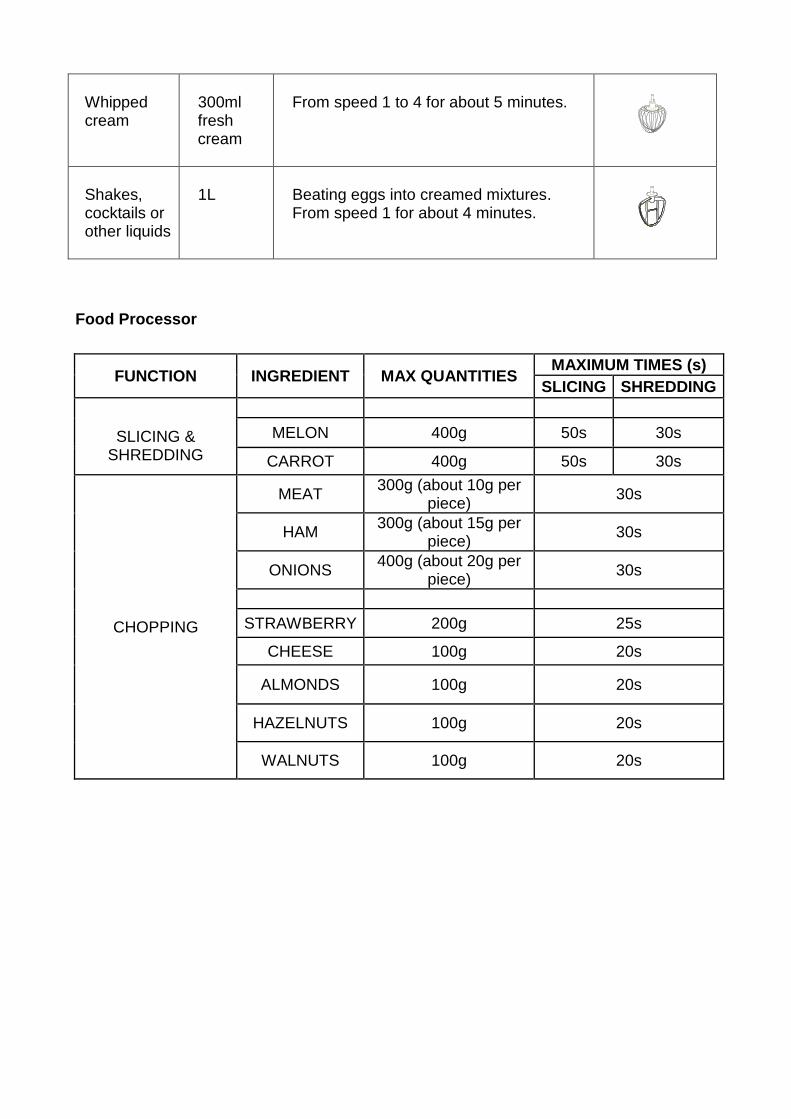
Food Processor
FUNCTION INGREDIENT MAX QUANTITIES MAXIMUM TIMES (s)
SLICING SHREDDING
SLICING &
SHREDDING
MELON 400g 50s 30s
CARROT 400g 50s 30s
CHOPPING
MEAT 300g (about 10g per
piece) 30s
HAM 300g (about 15g per
piece) 30s
ONIONS 400g (about 20g per
piece) 30s
STRAWBERRY 200g 25s
CHEESE 100g 20s
ALMONDS 100g 20s
HAZELNUTS 100g 20s
WALNUTS 100g 20s

CLEANING AND MAINTENANCE
General
Ensure that the kitchen machine is switched off and unplugged before cleaning. Give it
a few minutes to cool down.
Clean the kitchen machine as soon after use as possible to prevent residues setting.
Wash the bowl and accessories in warm soapy water, rinse well.
Leave them to drain and air dry.
Please do not put any of the kitchen machine accessories in the dishwasher.
Wipe the external surfaces of the kitchen machine with a clean damp cloth and
immediately buff with a soft dry cloth.
Do not immerse the motor unit in water or any other liquid.
Do not use harsh or abrasive cleaning agents or solvents.
Blender
Wash the jug and lid in warm soapy water and rinse well. Leave them to drain and air
dry.
Do not put the jug, blade unit or lid in a dishwasher.
Remove the blade unit, (See “Removing the blade unit” section) and wash it in warm
soapy water using a nylon brush to clean the blades.
STORING THE APPLIANCE
Complete cleaning and maintenance as instructed above.
Ensure that all parts are dry before storing.
Store the appliance in its box or in a clean, dry place.
Never store the appliance while it is still wet or dirty.
Never wrap the power cord around the appliance.

SERVICING THE APPLIANCE
There are no user serviceable parts in this appliance. If the unit is not operating correctly,
please check the following:
You have followed the instructions correctly
That the unit has been wired correctly and that the wall socket is switched on.
That the mains power supply is ON.
That the plug is firmly in the mains socket.
If the appliance still does not work after checking the above:
- Consult the retailer for possible repair or replacement. If the retailer fails to resolve the
problem and you need to return the appliance, make sure that:
The unit is packed carefully back into its original packaging.
Proof of purchase is attached.
A reason is provided for why it is being returned.
If the supply cord is damaged, it must be replaced by the manufacturer or an authorised
service agent, in order to avoid any hazard. If service becomes necessary within the
warranty period, the appliance should be returned to an approved Home of Living Brands
(Pty) Limited service centre. Servicing outside the warranty period is still available, but will,
however, be chargeable.
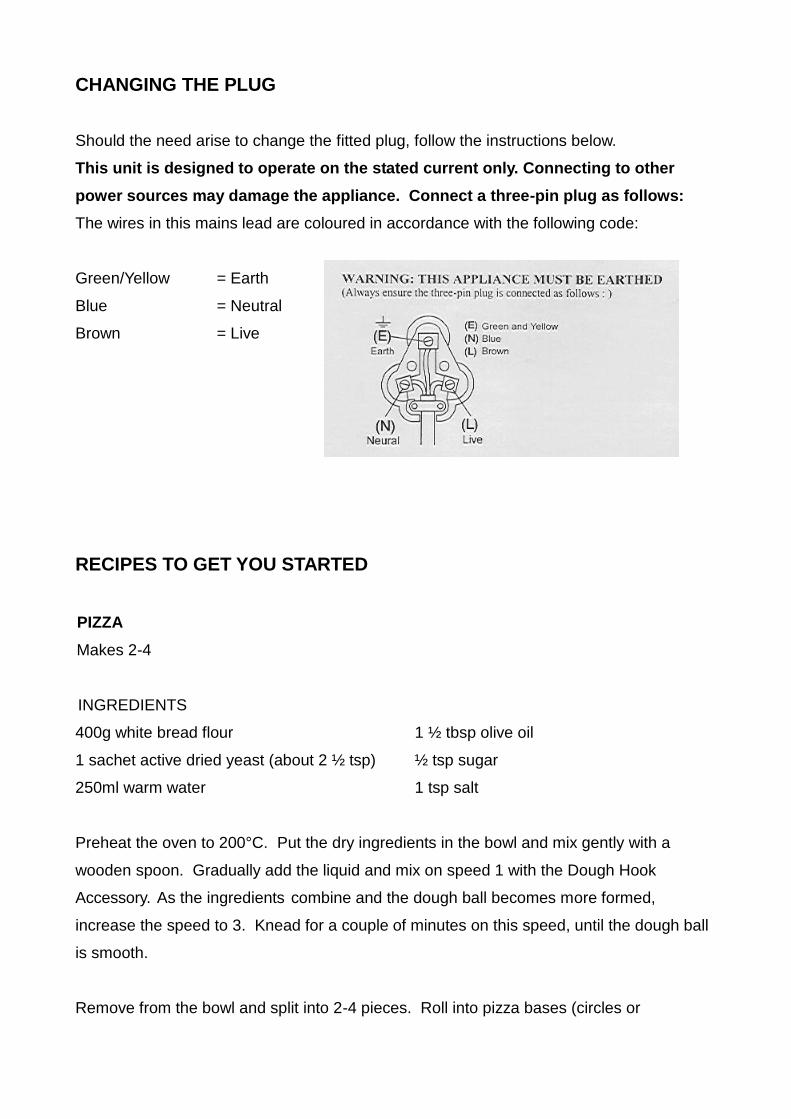
CHANGING THE PLUG
Should the need arise to change the fitted plug, follow the instructions below.
This unit is designed to operate on the stated current only. Connecting to other
power sources may damage the appliance. Connect a three-pin plug as follows:
The wires in this mains lead are coloured in accordance with the following code:
Green/Yellow = Earth
Blue = Neutral
Brown = Live
RECIPES TO GET YOU STARTED
PIZZA
Makes 2-4
INGREDIENTS
400g white bread flour 1 ½ tbsp olive oil
1 sachet active dried yeast (about 2 ½ tsp) ½ tsp sugar
250ml warm water 1 tsp salt
Preheat the oven to 200°C. Put the dry ingredients in the bowl and mix gently with a
wooden spoon. Gradually add the liquid and mix on speed 1 with the Dough Hook
Accessory. As the ingredients combine and the dough ball becomes more formed,
increase the speed to 3. Knead for a couple of minutes on this speed, until the dough ball
is smooth.
Remove from the bowl and split into 2-4 pieces. Roll into pizza bases (circles or
rectangles) on a floured surface, then lay them on a baking sheet or pizza tray. Spread the
pizza bases with tomato puree and add toppings - mushrooms, ham, olives, sun dried
tomatoes, spinach, artichokes etc. Top with dried herbs, pieces of mozzarella and a
drizzle of olive oil. Bake for 15-20 minutes, until the toppings are bubbling and golden
brown
CURRANT BREAD
Makes a 1kg loaf
INGREDIENTS
500g wholemeal flour 150g butter, softened
1 tbsp baking powder ½ tsp salt
150g sugar 150g currants
50g mixed fruit peel 2 eggs (medium)
2 tbsp milk
Preheat the oven to 180°C. Place the flour in the bowl, add the softened butter and mix on
speed 1. When the butter and flour start to blend, add the sugar, salt, currants, fruit peel
and baking powder. Leave it mixing while you beat the eggs and milk together and then
add the egg/milk mixture to the bowl. Increase the speed to 3 and mix until all the
ingredients are combined. Put into a greased loaf tin and bake for 30-35 minutes or until
golden brown. Turn onto a wire rack and allow to cool before slicing. Serve toasted with
butter.
BASIC WHOLEMEAL BREAD
Makes a 1kg loaf
INGREDIENTS
575g wholemeal flour 2 tbsp sunflower oil or butter
1 sachet active dried yeast (about 2 ½ tsp) 1 tbsp light brown sugar
375ml warm water 2 tsp salt
Preheat the oven to 200°C. Put the dry ingredients in the bowl and mix gently with a
wooden spoon. Gradually add the liquid and mix with the Dough Hook Accessory, on
speed 1. As the ingredients combine and the dough ball becomes more formed, increase
the speed to 2. Knead for a couple of minutes on this speed until the dough ball is
smooth.
Put the dough in a bowl, cover and leave in a warm place until it has doubled in size (30-
40 minutes). Remove the dough and punch down to remove air. Knead lightly on a
floured board, shape it into a loaf, or put it in a tin, cover and leave in a warm place to rise
for another 30 minutes. Bake for 25-30 minutes or until golden brown. (If the bottom of the
tin is knocked on, it should produce a hollow sound).
BASIC WHITE BREAD
Makes a 1kg loaf
INGREDIENTS
600g white bread flour 1 tbsp sunflower oil or butter
1 sachet active dried yeast (about 2 ½ tsp) 1 tsp sugar
345ml warm water 2 tsp salt
Preheat the oven to 200°C. Put the dry ingredients in the bowl and mix gently with a
wooden spoon. Gradually add the liquid and mix with the Dough Hook Accessory, on
speed 1. As the ingredients combine and the dough ball becomes more formed, increase
the speed to 2. Knead for a couple of minutes on this speed until the dough ball is formed.
Put the dough in a bowl, cover and leave in a warm place until it has doubled in size (30-
40 minutes). Remove the dough and punch down to remove air. Knead lightly on a
floured board, shape it into a loaf, or put it in a tin, cover and leave in a warm place to rise
for another 30 minutes. Bake for 25-30 minutes or until golden brown. (If the bottom of the
tin is knocked on, it should produce a hollow sound).
SOFT POPPY SEED ROLLS
Makes 8-10
INGREDIENTS
570g white bread flour 1 tbsp sunflower oil
1 sachet active dried yeast (about 2 ½ tsp) 1 ½ tsp sugar
300ml milk, warmed slightly 2 tsp salt
2 eggs (room temperature) 75g poppy seeds
Preheat the oven to 220°C. Mix the milk, eggs, oil, sugar, salt and yeast in a jug or bowl
and leave for 5 minutes. Put the flour and poppy seeds in the bowl and mix on speed 1,
gradually adding the liquid, then increase the speed to 3 and mix for 5 minutes. Remove
the dough to a floured surface, cut into 8-10 pieces and roll into shape. Place on
greaseproof baking paper and leave in a warm place until doubled in size. Brush with a
little egg or milk and bake for 20-25 minutes until golden brown. (If the bottom of the tin is
knocked on, it should produce a hollow sound).
ITALIAN HERB BREAD
Makes a 1kg loaf
INGREDIENTS
575g white bread flour 2 tsp sugar
1 sachet active dried yeast (about 2 ½ tsp) 2 tsp salt
290ml lukewarm water (30°-35°C) 4 tbsp mixed dried herbs
2 tbsp olive oil
Preheat the oven to 200°C. Mix the water, oil, sugar, salt and yeast in a jug or bowl and
leave for 5 minutes. Put the flour and dried herbs in the bowl and mix on speed 1,
gradually adding the liquid, then increase the speed to 3 and mix for 5 minutes. Put the
dough in a bowl, cover and leave in a warm place until doubled in size (20-30 minutes)
Put on a floured surface and knead gently to knock out the air, then shape. Place on
greaseproof baking paper and leave in a warm place until doubled in size. Bake until
golden brown. (If the bottom of the tin is knocked on, it should produce a
hollow sound).

HOT CHOCOLATE SOUFFLÉ
INGREDIENTS
75g butter 50g cake flour
1½ tbsp cocoa powder 450ml milk
4 eggs, separated 50g castor sugar
Preheat the oven to 190°C. Melt the butter in a pan, stir in the flour and cocoa and blend
over a low heat. Add the milk and mix well until thickened slightly. Remove from the heat
and set aside to cool, then add the egg yolks and beat in. Put the egg whites in the bowl,
mix on speed 2 for a few seconds, then add the sugar and continue to whisk until soft
peaks form. Fold in the sauce. Pour the mixture into a greased 1.2 litre dish. Stand the
dish in a roasting tin filled half full with boiling water, put into the oven and bake for 40-45
minutes, until well risen.
BASIC BISCUITS
INGREDIENTS
100g butter 150g castor sugar
1 tsp vanilla essence 1 medium egg
100g plain flour 100g self raising flour
Preheat the oven to 180°C. Cream the butter, sugar and vanilla essence on speed 2 for 1-
2 minutes until light, pale and fluffy. Gradually add in the egg and whisk until everything
has combined. Sift the flours together then gradually add them to the mixture. Remove
the bowl and form the mixture into balls. Flatten them slightly on a greased baking tray
and bake for 12-15 minutes. Cool on the tray and then move to a wire rack.
RUM & APRICOT PANCAKES
INGREDIENTS
100g cake flour 25g ground almonds
50g dried apricots 300ml milk
1 egg 25g butter, melted
Grated rind of ½ lemon 2-3 tbsp rum
Pinch salt oil for frying Cream or ice cream (to serve- optional)
Soak the dried apricots overnight in the rum. Mix the egg, milk, lemon rind and melted
butter in a jug. Sift the flour into the bowl, add the ground almonds and salt. Whisk on
speed 2, gradually adding the liquid, then increase the speed to 3 or 4 and whisk until the
batter is smooth. Heat the oil in a frying pan and drop in tablespoons of batter to make the
pancakes. Cook for a minute or so on each side until golden. Put in a stack and keep
warm. Puree the rum and apricots in a blender, put a little puree on each pancake and roll
up. Serve warm with cream or ice cream.
CHICKEN & PESTO PANCAKE WRAPS
PANCAKE WRAPS
100g cake flour 1 large egg
300ml milk ½ tsp salt
Oil for frying
FILLING
6 tbsp pesto (green or red) 2 cooked chicken fillets, shredded
75g Gruyere cheese, grated 50g Parmesan cheese, grated
Handful of baby plum tomatoes Large handful of fresh basil leaves
Mix the egg and milk in a jug. Sift the flour into the bowl and add the salt. Mix on speed 2,
gradually adding the liquid, then increase the speed to 3 and whisk for a minute, until
smooth and light. Drop small amounts of the batter into a hot saucepan coated with a little
hot oil. Cook for a minute on each side or until golden brown. Set aside and keep warm.
Roughly chop the tomatoes and shred the basil. Spread each of the pancake wraps with a
small amount of the pesto, add cooked chicken, chopped tomatoes and basil. Season
with salt and black pepper, then roll up and put the wraps in an ovenproof dish and
sprinkle with the two cheeses. Brown under a hot grill until golden and bubbling. Serve
immediately.
COFFEE & BRANDY ICE CREAM
INGREDIENTS
3 eggs 75g castor sugar
300ml cream 2 tbsp instant coffee
300ml double cream 2 ½ tbsp. brandy
Add the sugar and eggs to the bowl and process on speed 2 until smooth in texture. In a
saucepan, bring the cream and coffee just to the boil and stir in the egg and sugar mixture.
Transfer the mixture to a heatproof bowl, place over a simmering pan of water and cook
gently, stirring well, until thick enough to coat the back of a spoon. Take off the heat and
leave to cool. Whip the double cream on speed 3 until soft peaks form. Then fold into the
cold egg and sugar mixture with the brandy. Pour into a container, cover and freeze for 2
½-3 hours, until partially frozen. Remove, stir well and then freeze again, until the desired
texture is achieved.
STEAMED TREACLE PUDDING
INGREDIENTS
100g castor sugar 2 eggs
100g self raising flour 5 tbsp golden syrup
100g butter Extra butter for greasing
Grease a 900ml pudding tray and set aside. Put the butter and sugar in the bowl and
whisk on speed 2 until light and fluffy. Add one egg, then a little flour, then the other egg
and mix in the remaining flour. Put the syrup into the greased pudding tray and pour in the
mixture. Cover with greaseproof paper or foil and steam for 1½ - 2 hours. Serve hot with
custard to cream.
CLASSIC VICTORIA SPONGE CAKE
INGREDIENTS
100g butter or margarine 100g castor sugar
2 large eggs 100g self raising flour
1 drop vanilla essence
Preheat the overn to 180ºC. Grease two 18cm straight sided baking tins and line the
bases with greaseproof paper. Beat the butter and sugar together on speed 2 until light
and fluffy. Gradually add the eggs, then the vanilla. Gradually add the flour and when the
ingredients start to combine, increase the speed to 3. Divide the mixture equally between
the two cake tins and level the surfaces. Bake the cakes in the centre of the oven for
about 25 minutes. Cool on a wire rack.
BUTTERY VANILLA CAKE
INGREDIENTS
125g butter 1 vanilla pod
125g self raising flour 125g self raising flour
100g castor sugar 2 eggs
1 tbsp milk
Preheat the oven to 180ºC. Grease two 18cm straight sided baking tins and line with
greaseproof paper. Split the vanilla pod, scrape out the seeds with a knife. Put the butter,
sugar and vanilla seeds in the bowl, and beat on speed 2 for a few seconds. Add one of the
eggs, mix well on speed 3, and then add half the flour. Repeat, adding eggs and flour until
all the ingredients are combined and smooth in texture. Divide into the two tins and bake in
the centre of the oven for 20-25 minutes. Cool on a wire rack. Fill with butter cream or
whipped cream and jam.
WALNUT & RICOTTA CAKE
CAKE
150g butter, softened 150g castor sugar
5 eggs, separated 1 lemon rind, grated
150g ricotta cheese 50g cake flour
1 tsp vanilla extract 100g walnut pieces, chopped and toasted
TOPPING
2 tbsp brandy 50g plain chocolate, grated
Extra handful walnut pieces
Preheat the oven to 190ºC. Grease and line a deep 23cm round cake tin. Put the butter
and half the sugar in the bowl and cream on speed 2 for 2 minutes until light and fluffy.
Add the egg yolks, lemon rind, cheese, flour and walnuts. Mix for a few seconds until
combined. Transfer to another large bowl and set aside. Clean the bowl and fit the whisk
attachment. Whisk the egg whites on speed 3 until fairly stiff then turn to speed 4 and
whisk in the remaining sugar. Remove the bowl from the mixer. Using a large metal
spoon, fold the stiff egg whites into the cheese mixture. Pour into the baking tin and cook
for 25-30 minutes until risen and firm. Remove from the oven and drizzle with the brandy
and leave the cake to cool in the tin. When cool, cover with grated chocolate and walnuts.
FARMHOUSE FRUIT CAKE
INGREDIENTS
150g butter 150g castor sugar
75g glace cherries, chopped 75g each of sultanas and raisins
25g mixed peel Pinch salt
300g self raising flour 3 tbsp milk
1 tsp mixed spice 3 eggs
Preheat the oven to 180°C. Grease a 20cm round cake tin and line with greaseproof
paper. Put the butter, sugar, dried fruits and spices in the bowl, and beat on speed 2 until

combined slightly. Add the eggs and milk and beat for a few seconds, gradually adding the
flour. Continue beating until well mixed. Pour into the cake tin and bake for about 1 ½
hours. Cool in the tin for 15 minutes then turn onto a wire rack.
SPONGE CAKE
INGREDIENTS
500g cake flour 250g soft butter or margarine
250g sugar 2 drops vanilla essence
4 eggs 1 tbsp baking powder
125ml milk Pinch of salt
50g strawberry jam 200g whipped cream
Preheat the oven to 190°C. Grease and line a deep 23cm round cake tin. Put everything
into the bowl, mix on speed 1 for 30 seconds then on speed 3 for 3 minutes, or until
combined. Pour the mixture into the cake tin and bake in the centre of the oven for 50-60
minutes. Before removing the cake from the oven, test to see if it’s done. Pierce the
centre of the cake with a skewer. If no mixture sticks to it, the cake is cooked. Turn the
cake onto a wire tray and allow to cool. Cut in half with a serrated bread knife. Spread the
lower half with the jam and top with cream. Top with other half of sponge and serve.
CORIANDER PESTO
INGREDIENTS
4 handfuls fresh coriander leaves 4 cloves fresh garlic
120g pine nuts 250ml olive oil
120g freshly grated Parmesan cheese
Put the coriander, garlic and pine nuts in the blender jug. Add a tablespoon of oil and
pulse. Repeat until all the oil has been blended through. Transfer to a bowl and mix in the
Parmesan cheese. Season with freshly ground black pepper. Serve as a topping for
soup, tossed through warm pasta or as a dip.
SWEET & SOUR SAUCE
INGREDIENTS
4 shallots, peeled Small piece fresh ginger, peeled
2 cloves fresh garlic 2 tbsp soy sauce
Dash white wine vinegar 2 tsp mustard
2 tsp tomato puree
Put everything in the blender jug and blend on speed 4 until smooth. Serve with chicken
or fish, or as a dip.
BLACK OLIVE & ANCHOVY SAUCE
INGREDIENTS
250g pitted black olives 60g anchovy fillets, drained
3 tbsp capers, drained 150ml olive oil
2 tbsp brandy (optional) Fresh ground black pepper
Put everything but the oil into the blender jug. Add one tbsp. oil and pulse for 5 seconds.
Do this twice more. If it’s too dry, add a little more oil and process again. Toss through
warm pasta or spread on toast.
HORSERADISH & APPLE SAUCE
INGREDIENTS
250ml double cream 2 sharply flavoured apples, peeled and grated
6 tbsp horseradish relish 2 tsp paprika
Put the cream into the blender jug and blend on a medium speed (2-3) until soft peaks
have formed. Transfer the mixture into a mixing bowl and fold in the rest of the
ingredients. Season with fresh ground black pepper. Serve with beef or sausage.

LEEK & POTATO SOUP
Serves: 4
INGREDIENTS
150g leeks, trimmed 150g potatoes, peeled
2 vegetable or chicken stock cubes 800ml water
Salt and pepper to taste
Pulse the leeks and potatoes for a couple of seconds (you want them lumpy, not mushy).
Transfer to a saucepan and add the water and stock cubes. Bring to the boil, stirring,
reduce the heat, cover the pan and simmer for 20 minutes. Let the mixture cool for about
30 minutes, and then blend on high speed 4 until it’s smooth and silky. Return the mixture
to the pan and heat to serving temperature (don’t let it boil). Taste, adjust the seasoning
and serve with toasted bread.
SPICY PUMPKIN SOUP
INGREDIENTS
900g pumpkin 2 leeks, trimmed and sliced
900ml chicken or vegetable stock 2 tbsp vegetable oil
2 cloves garlic, crushed 1 tsp ground ginger
1 tsp ground coriander Bunch of fresh coriander leaves
2 tbsp single cream or crème fraiche Salt and pepper
Peel the pumpkin, remove the seeds and cut the flesh into chunks. Roughly chop the
coriander. Heat the oil in a saucepan and add the leeks, garlic and spices, then stir until
the leeks have softened slightly. Add the pumpkin and stock to the pan, bring to the boil,
then simmer gently until the pumpkin is tender (20-30 minutes). Remove from the heat,
then stir in the coriander and cream. Let the mixture cool for about 30 minutes then blend
on high speed 4 until smooth. Return the mixture to the saucepan and heat to serving
temperature. (Don’t let it boil). Taste, adjust the seasoning and serve with toasted bread.

CHOCOLATE PEAR SMOOTHIE
INGREDIENTS
300ml chocolate milk
2 pears, peeled, cored and roughly chopped
Put everything into the blender jug. Blend on speed 2 for 15 seconds, then 3 for 5
seconds.
MANGO LASSI
INGREDIENTS
200ml natural yoghurt
1 ripe mango
200ml milk
2tsp honey
Stone, peel and roughly chop the mango. Put everything into the blender jug. Blend on
speed 2 for 10 seconds, then 3 for 5 seconds.
STRAWBERRY & BANANA SMOOTHIE
INGREDIENTS
300ml milk
1 large banana, roughly chopped
12 strawberries, stalks removed
Put everything into the blender jug. Blend on speed 2 for 10 seconds, then 3 for 10
seconds.
BANANA, VANILLA & HONEY SMOOTHIE
INGREDIENTS
400ml milk
1 large banana, roughly chopped
4 tsp honey
2 tsp vanilla extract
Put everything into the blender jug. Blend on speed 2 for 10 seconds, then 3 for 5
seconds.
APPLE & MANGO SMOOTHIE
INGREDIENTS
600ml apple juice
1 ripe mango
Stone, peel and roughly chop the mango. Put everything into the blender jug. Blend on
speed 2 for 10 seconds, then 3 for 10 seconds.
CREAMY BLUEBERRY & VANILLA SMOOTHIE
INGREDIENTS
360ml lemonade
125g vanilla ice cream
70g blueberries
Put everything into the blender jug. Blend on speed 2 for 10 seconds, then 3 for 10
seconds.
CRANBERRY, ORANGE & BANANA SMOOTHIE
INGREDIENTS
300ml orange juice
300ml cranberry juice
1 small banana, roughly chopped
Put everything into the blender jug. Blend on speed 2 for 10 seconds, then 3 for 5
seconds.
PEACH & APRICOT SMOOTHIE
INGREDIENTS
4 halves of tinned apricot (in juice) 80ml apricot juice (from tin)
2 peaches 4 tbsp natural yogurt
200ml milk 2 tsp honey
Stone and roughly chop the peaches. Put everything into the blender jug. Blend on speed
2 for 15 seconds, and then 3 for 15 seconds.
BERRY FRUITY SMOOTHIE
INGREDIENTS
300ml apple juice
90g raspberries
12 strawberries, stalks removed
Put everything into the blender jug. Blend on speed 2 for 15 seconds, then 3 for 15
seconds.

APPLE, MELON & KIWI FRUIT SMOOTHIE
INGREDIENTS
400ml apple juice
1 kiwi fruit, peeled and roughly chopped
150g melon, roughly chopped
Put everything into the blender jug. Blend on speed 2 for 10 seconds, then 3 to 10
seconds.
CHOCOLATE CHERRY SMOOTHIE
INGREDIENTS
350ml lemonade 125ml lemonade
125ml chocolate ice cream 100g cherries, stoned
Put everything into the blender jug. Blend on speed 2 for 10 seconds, then 3 for 10
seconds.
BREAKFAST SMOOTHIE
INGREDIENTS
4 tbsp natural yogurt 200ml milk
2 tbsp oatmeal or porridge oats 1 large banana, roughly chopped
2 tsp honey 2 apples, cored and roughly chopped
Put everything into the blender jug. Blend on speed 2 for 10 seconds, then 3 for 15
seconds.
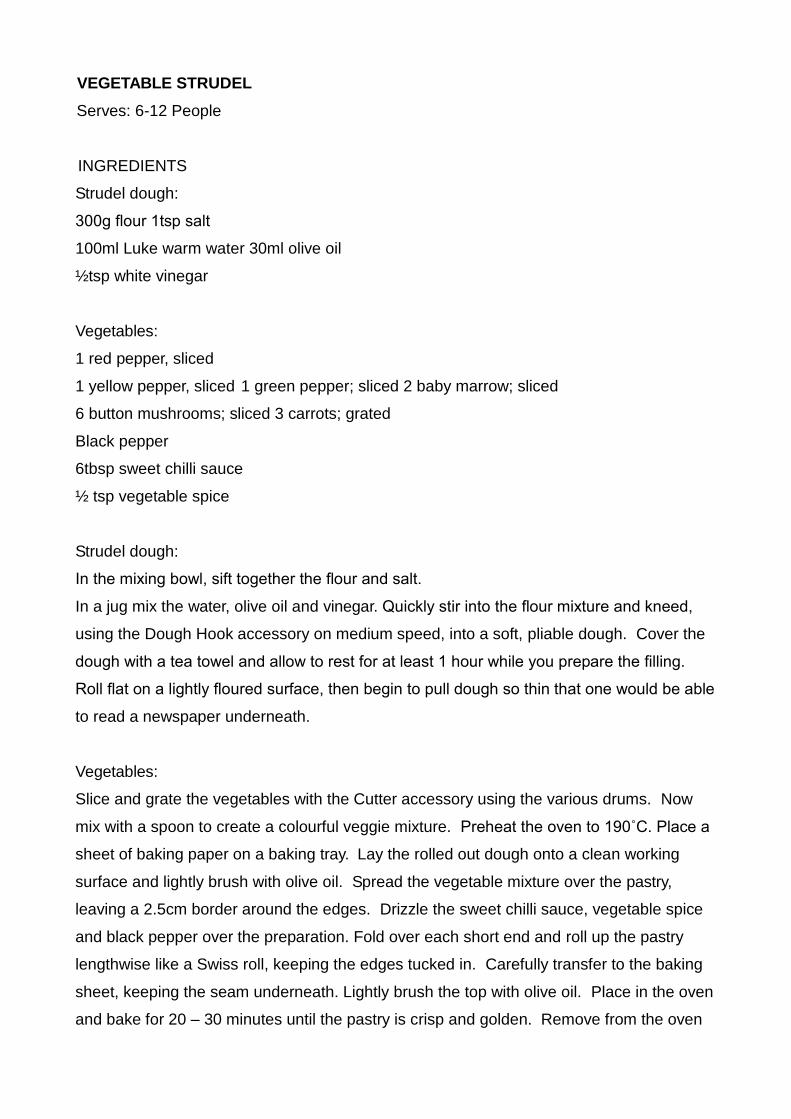
VEGETABLE STRUDEL
Serves: 6-12 People
INGREDIENTS
Strudel dough:
300g flour 1tsp salt
100ml Luke warm water 30ml olive oil
½tsp white vinegar
Vegetables:
1 red pepper, sliced
1 yellow pepper, sliced 1 green pepper; sliced 2 baby marrow; sliced
6 button mushrooms; sliced 3 carrots; grated
Black pepper
6tbsp sweet chilli sauce
½ tsp vegetable spice
Strudel dough:
In the mixing bowl, sift together the flour and salt.
In a jug mix the water, olive oil and vinegar. Quickly stir into the flour mixture and kneed,
using the Dough Hook accessory on medium speed, into a soft, pliable dough. Cover the
dough with a tea towel and allow to rest for at least 1 hour while you prepare the filling.
Roll flat on a lightly floured surface, then begin to pull dough so thin that one would be able
to read a newspaper underneath.
Vegetables:
Slice and grate the vegetables with the Cutter accessory using the various drums. Now
mix with a spoon to create a colourful veggie mixture. Preheat the oven to 190˚C. Place a
sheet of baking paper on a baking tray. Lay the rolled out dough onto a clean working
surface and lightly brush with olive oil. Spread the vegetable mixture over the pastry,
leaving a 2.5cm border around the edges. Drizzle the sweet chilli sauce, vegetable spice
and black pepper over the preparation. Fold over each short end and roll up the pastry
lengthwise like a Swiss roll, keeping the edges tucked in. Carefully transfer to the baking
sheet, keeping the seam underneath. Lightly brush the top with olive oil. Place in the oven
and bake for 20 – 30 minutes until the pastry is crisp and golden. Remove from the oven
and cut into thick slices to serve.
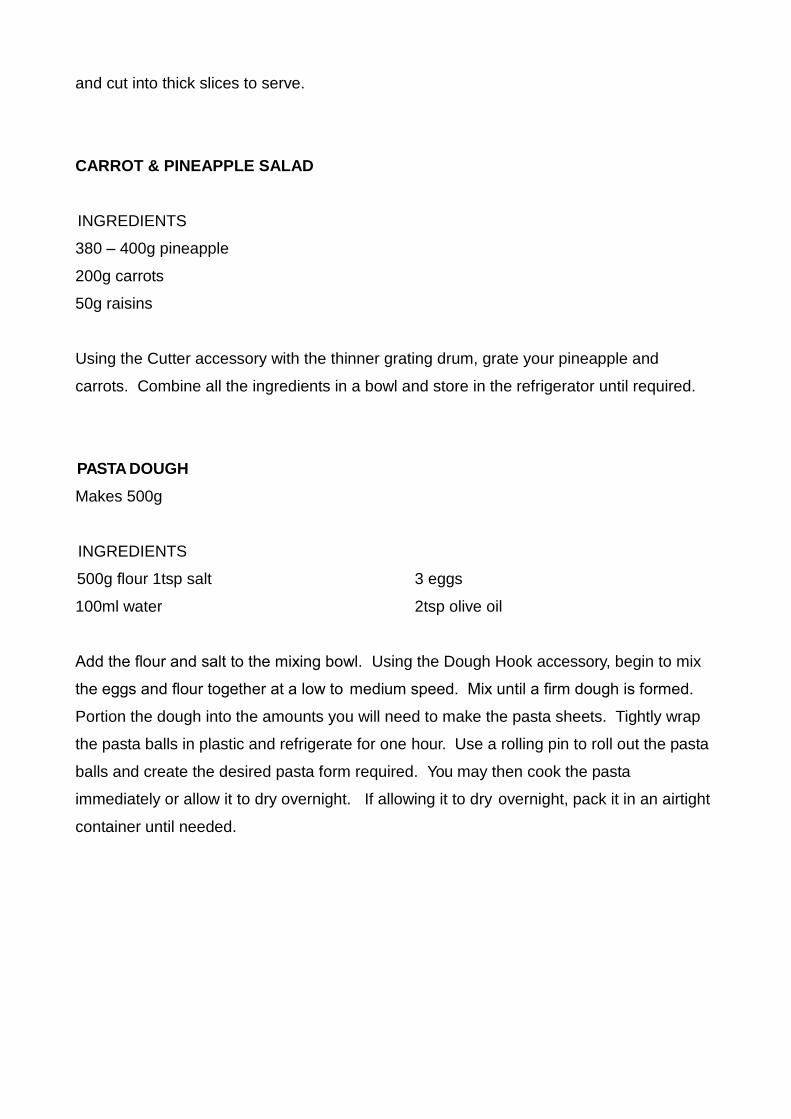
CARROT & PINEAPPLE SALAD
INGREDIENTS
380 – 400g pineapple
200g carrots
50g raisins
Using the Cutter accessory with the thinner grating drum, grate your pineapple and
carrots. Combine all the ingredients in a bowl and store in the refrigerator until required.
PASTA DOUGH
Makes 500g
INGREDIENTS
500g flour 1tsp salt 3 eggs
100ml water 2tsp olive oil
Add the flour and salt to the mixing bowl. Using the Dough Hook accessory, begin to mix
the eggs and flour together at a low to medium speed. Mix until a firm dough is formed.
Portion the dough into the amounts you will need to make the pasta sheets. Tightly wrap
the pasta balls in plastic and refrigerate for one hour. Use a rolling pin to roll out the pasta
balls and create the desired pasta form required. You may then cook the pasta
immediately or allow it to dry overnight. If allowing it to dry overnight, pack it in an airtight
container until needed.

PLEASE AFFIX YOUR PROOF OF PURCHASE/RECEIPT HERE IN THE EVENT OF A CLAIM UNDER WARRANTY THIS RECEIPT MUST BE
PRODUCED.
W A R R A N T Y
1. Home of Living Brands (Pty) Limited (“Home of Living Brands”) warrants to the original purchaser
of this product (“the customer”) that this product will be free of defects in quality and workmanship
which under normal personal, family or household use and purpose may manifest within a period of
2 (two) years from the date of purchase (“warranty period”).
2. Where the customer has purchased a product and it breaks, is defective or does not work properly
for the intended purpose, the customer must notify the supplier from whom the customer bought
the product (“the supplier”) thereof within the warranty period. Any claim in terms of this warranty
must be supported by a proof of purchase. If proof of purchase is not available, then repair, and/or
service charges may be payable by the customer to the supplier.
3. The faulty product must be taken to the supplier's service centre to exercise the warranty.
4. The supplier will refund, repair or exchange the product in terms of this warranty subject to
legislative requirements. This warranty shall be valid only where the customer has not broken the
product himself, or used the product for something that it is not supposed to be used for. The
warranty does not include and will not be construed to cover products damaged as a result of
disaster, misuse, tamper, abuse or any unauthorised modification or repair of the product.
5. This warranty will extend only to the product provided at the date of the purchase and not to any
expendables attached or installed by the customer.
6. If the customer requests that the supplier repairs the product and the product breaks or fails to
work properly within 3 (three) months of the repair and not as a result of misuse, tampering or
modification by or on behalf of the customer, then the supplier may replace the product or pay a
refund to the customer.
7. The customer may be responsible for certain costs where products returned are not in the original
packaging, or if the packaging is damaged. This will be deducted from any refund paid to the
customer.
HOME OF LIVING BRANDS (PTY) LTD (JOHANNESBURG)
JOHANNESBURG TEL NO. (011) 490-9600
CAPE TOWN TEL NO. (021) 552-5161
DURBAN TEL NO. (031) 792-6000
www.homeoflivingbrands.com
www.russellhobbs.co.za
www.facebook.com/RussellHobbsSA