Embed Size (px)
Citation preview
0893Resolute Acclaim Cover
Homeowner’s Installation and Operating Manual
For use in Europe
Do Not Discard This Manual: Retain for Future Use30003843 5/11 Rev. 6
Resolute® AcclaimWoodburning Stove
Model 2490CE
SAFETy NoTiCE: iF ThiS AppliANCE iS NoT pRopERly iNSTAllED, opERATED AND MAiN-TAiNED, A hoUSE FiRE MAy RESUlT. To REDUCE ThE RiSk oF FiRE, FolloW ThE iNSTAllATioN iNSTRUCTioNS. FAilURE To FolloW iNSTRUCTioNS MAy RESUlT iN pRopERTy DAMAgE, boDily iNjURy oR EvEN DEATh. CoNTACT loCAl bUilDiNg oFFiCiAlS AboUT RESTRiCTioNS AND iNSTAllATioN iNSpECTioN REqUiREMENTS iN yoUR AREA.
�
Resolute® Acclaim Woodburning Stove
30003843
introductionThank you for choosing a Vermont Castings Resolute Acclaim. Your stove is one of the finest available. It features high efficiency, non-catalytic performance, using space-age refractory material and the precisely calibrated delivery of air to a concentrated charcoal bed to promote secondary combustion in a controlled environment. If treated properly and operated according to the guidelines in this manual it will provide years of safe, dependable, and economical heating. The Resolute Acclaim has been tested to current standards. The test standards are UL-148� and UL-737 for the United States and EN13�40:�001 + A�:�004 for Europe. The Resolute Acclaim is listed for burning wood. Do not burn other fuels. The Resolute Acclaim is listed and approved for installation in mobile homes only in the United States and only with use of Vermont Castings Mobile Home Installation Kit #3�49.The Vermont Castings Resolute Acclaim is in compliance with the standards set forth by the Federal Environmental Protection Agency, 40 CFR Part 60.53�(b)(�), as stated on the permanent label attached to each stove.In addition to directions on installation and operation, this manual includes directions on maintenance and assembly. We recommend that you hire a professional solid fuel stove installer to install your stove, or to advise you on the installation should you attempt to install it yourself.
Save These instructions.
Table of ContentsSpecifications .........................................3Installation ..............................................4Operation .............................................. 11Draft Management ................................16Maintenance .........................................18Replacement Parts ...............................�3Warranty ...............................................�7
Accessories Warming Shelf #0064 Classic Black #1357 Suede Brown #1351 Sand #1385 Biscuit #1354 Ebony #1387 Chestnut Brown #1355 Bordeaux #1390 Vt. Classic Green #1356 Midnight Blue #1395 Brown Majolica #0184 Rear Heat Shield #0�46 Bottom Heat Shield #0133 Sparkscreen #3�55 Outside Air Adapter (for 3” ducting) #3�49 Mobile Home Kit - includes: Rear and Bottom
Heat Shields, Outside Air Adapter, Ducting and Leg Clips
#0574 Stove Surface Thermometer #34�1 Gasket Kit #4360 Griddle Handle Kit Short Legs #0565 Classic Black #0�98 Vt. Classic Green #0�93 Brown Majolica #�915 Bordeaux #0�95 Biscuit #�916 Midnight Blue #0�96 Chestnut Brown #0�97 Ebony
3
Resolute® Acclaim Woodburning Stove
30003843
RESOLUTEAcclaim
648 mm (25 ")
699 mm(27 ")
660 mm (26")
152 mm(6")
584 mm (23")
495 mm(19 ")
324 mm(12 ")
635 mm (25")
546 mm (21 ")
635 mm(25")
483 mm (19")
546 mm (21 ")
(Reg. Legs)495 mm (19 ")
(Short Legs)
3843Resolute Acclaimspecs806
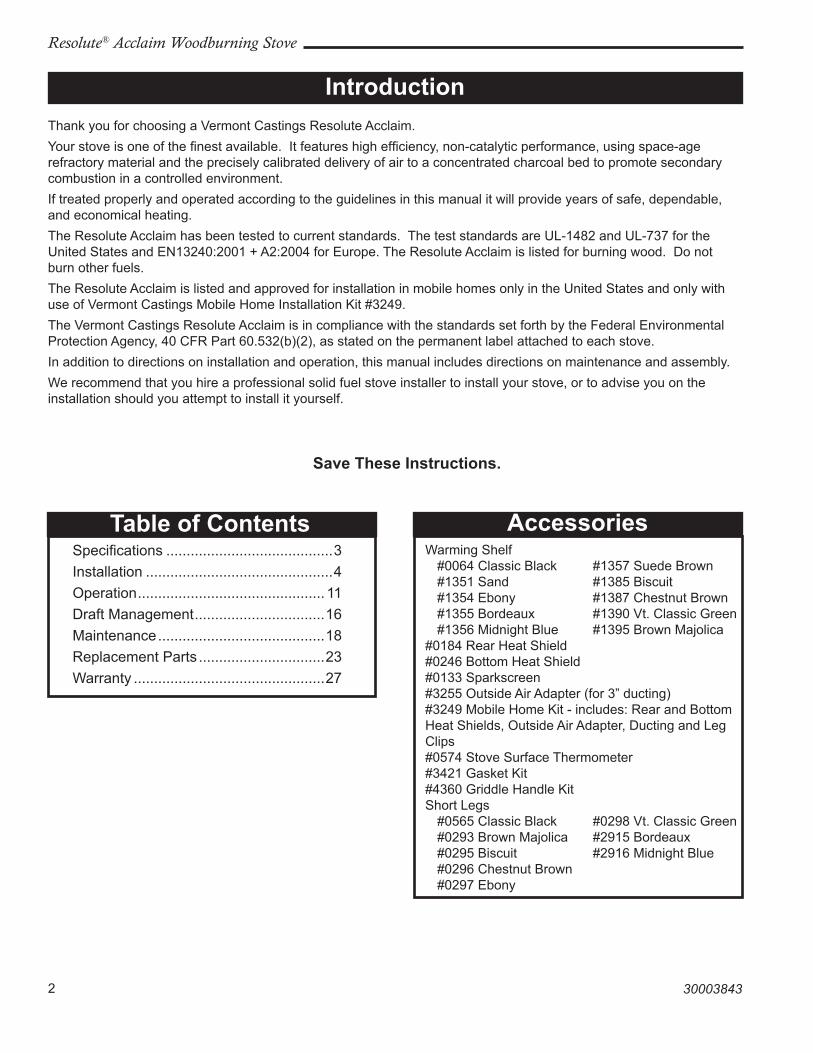
Nominal heat output ........... 10.7 kW (36,500 BTU/hr)1
Minimum flue draught .................... 1� Pa (0.048” WG)Mean flue gas temp ............................ 431° C (807° F)Efficiency (space heating) .................................... 74%Area heated ...................Up to 148 sq m (1600 sq. ft.)�
Fuel size/type ............................... 410 mm (16”) woodFlue mass gas flow ............................................7.� g/sCO emissions (@13%O�) .............................. 700 ppmLoading ...................................................Front and topChimney connector....................15� mm (6”) diameterChimney flue size .... Min. 15� mm (6”) or �03 mm (8”)Flue exit position.......................Reversible, top or rearPrimary air ........................................................ManualSecondary air ....................................................Preset Ash handling system ................... Removable ash pan
SpecificationsResolute Acclaim Model 2490CE
Glass panel.........................High-temperature ceramicWeight ...............................................19� kg (4�5 lbs.)Width (leg-to-leg) ....................................660 mm (�6”)Depth (leg-to-leg) ...................................480 mm (19”)Height to top of flue collar: w/Regular legs ................ 699 mm (�7¹⁄₂") top exit ..........................................635 mm (�5") rear exit w/Short legs .................... 648 mm (�5¹⁄₂") top exit ..........................................584 mm (�3") rear exit
1. This value can vary depending on how the stove is oper-ated, the type and moisture content of the fuel used, as well as the design, construction and climatic location of your home. Figures shown are based on nominal fuel consumption obtained under laboratory conditions and on average efficien-cies.
Fig. 1 Resolute Acclaim dimensions.
DRAWINGS NOT TO SCALE
4
Resolute® Acclaim Woodburning Stove
30003843
installationSAFETy NoTiCE: iF yoUR RESolUTE ACClAiM iS NoT pRopERly iNSTAllED, opERATED AND MAiNTAiNED, A hoUSE FiRE MAy RESUlT. FoR SAFETy, FolloW All iNSTAllATioN, opERA-TioN AND MAiNTENANCE DiRECTioNS. CoNTACT loCAl bUilDiNg oFFiCiAlS AboUT RESTRiC-TioNS AND iNSTAllATioN iNSpECTioN REqUiRE-MENTS iN yoUR AREA.Before you begin an installation, review your plans to see that:
• Your stove and chimney connector will be far enough from combustible material to meet all clearance requirements.
• The floor protector is large enough and is con-structed properly to meet all requirements.
• You have all necessary permits from local author-ities.
Your local building official is the final authority for ap-proving your installation as safe and determining that it meets local and state codes.The metal label permanently attached to the back of every Vermont Castings stove indicates that it has been tested to current standards, and gives the name of the testing laboratory. Clearance and installation information is also printed on the label. Local authorities generally will accept the label as evidence that, when the stove is installed according to the information on the label and in this manual, the installation meets codes and can be approved.Codes vary in different countries, however. Before starting the installation, review your plans with the local building authority. Your local dealer can provide any ad-ditional information needed.iMpoRTANT: FAilURE To FolloW ThESE iN-STAllATioN iNSTRUCTioNS MAy RESUlT iN A DANgERoUS SiTUATioN, iNClUDiNg A ChiMNEy oR hoUSE FiRE. FolloW All iNSTRUCTioNS ExACTly AND Do NoT AlloW MAkEShiFT CoM-pRoMiSES To ENDANgER pRopERTy AND pER-SoNAl SAFETy.
All local regulations, including those referring to national and European standards need to be com-plied with when installing this stove.
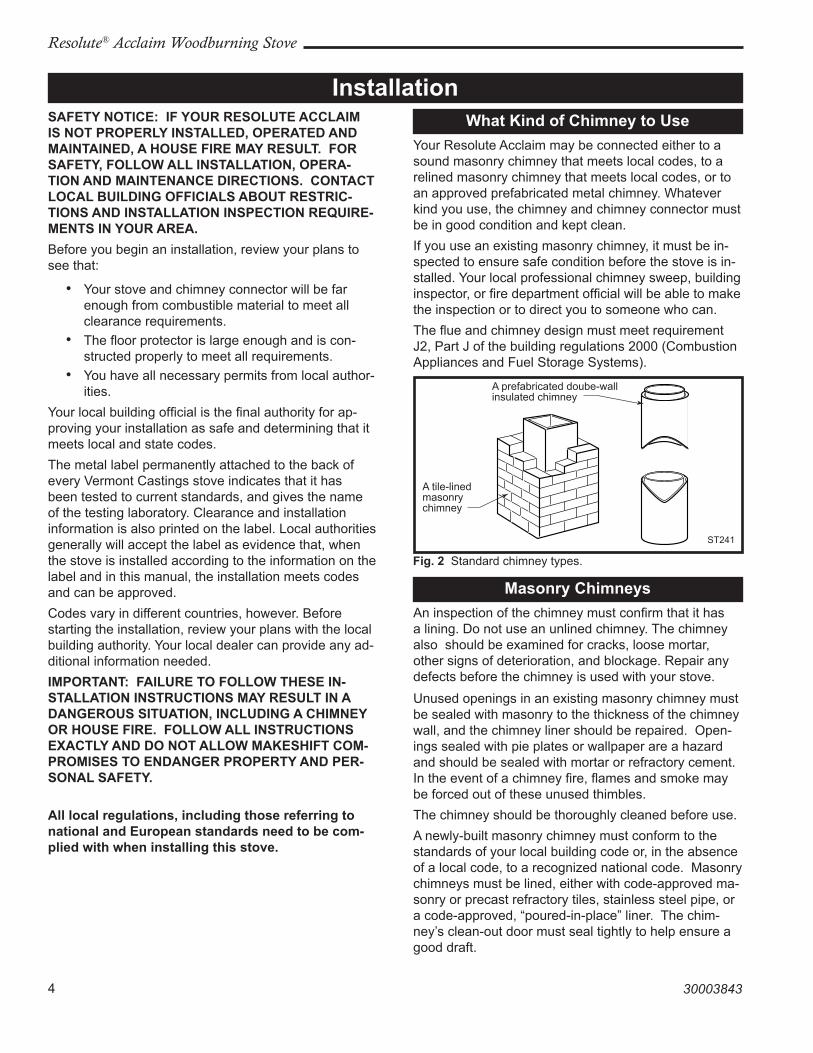
What kind of Chimney to UseYour Resolute Acclaim may be connected either to a sound masonry chimney that meets local codes, to a relined masonry chimney that meets local codes, or to an approved prefabricated metal chimney. Whatever kind you use, the chimney and chimney connector must be in good condition and kept clean.If you use an existing masonry chimney, it must be in-spected to ensure safe condition before the stove is in-stalled. Your local professional chimney sweep, building inspector, or fire department official will be able to make the inspection or to direct you to someone who can.The flue and chimney design must meet requirement J�, Part J of the building regulations �000 (Combustion Appliances and Fuel Storage Systems).
Masonry ChimneysAn inspection of the chimney must confirm that it has a lining. Do not use an unlined chimney. The chimney also should be examined for cracks, loose mortar, other signs of deterioration, and blockage. Repair any defects before the chimney is used with your stove.
ST241�chimney types�12/13/99 djt
A prefabricated doube-wall insulated chimney
A tile-lined masonry chimney
ST�41
Fig. 2 Standard chimney types.
Unused openings in an existing masonry chimney must be sealed with masonry to the thickness of the chimney wall, and the chimney liner should be repaired. Open-ings sealed with pie plates or wallpaper are a hazard and should be sealed with mortar or refractory cement. In the event of a chimney fire, flames and smoke may be forced out of these unused thimbles.The chimney should be thoroughly cleaned before use.A newly-built masonry chimney must conform to the standards of your local building code or, in the absence of a local code, to a recognized national code. Masonry chimneys must be lined, either with code-approved ma-sonry or precast refractory tiles, stainless steel pipe, or a code-approved, “poured-in-place” liner. The chim-ney’s clean-out door must seal tightly to help ensure a good draft.

5
Resolute® Acclaim Woodburning Stove
30003843
prefabricated ChimneysThese should be an internal diameter of 150 mm (6”) and be of the twin wall insulated construction that has been approved for solid fuel use (e.g. Rite Vent ICS of ICID Lite Chimney Systems). Diameters over �00 mm (8”) are not recommended due to the large cross-sec-tion causing excessive cooling of the flue gases.Do NoT CoNNECT ThiS UNiT To A ChiMNEy FlUE SERviNg ANoThER AppliANCE.
Chimney SizeA Resolute Acclaim is approved for venting into a masonry chimney with a flue size of �03 x �03 mm (8” x 8”), and into a round flue size of �03 mm (8”) or 15� mm (6”).It may be vented into larger chimneys as well. How-ever, chimneys with liners larger than �03 x 305 mm (8” x 1�”) may experience rapid cooling of smoke and reduction in draft, especially if they are located out-side the home. These large chimneys may need to be insulated or to have their flues relined for proper stove performance. Accessories to help make the connection between stainless steel chimney liners and your Resolute Ac-claim are available through your local dealer.
Chimney Connector guidelinesA chimney connector is the double-wall or single-wall pipe that connects the stove to the chimney. The chim-ney itself is a masonry or prefabricated structure that encloses the flue. Chimney connectors are used only to make the connection from the stove to the chimney. They are for interior use only.Connecting Flue pipesConnector pipes should meet the requirements of the building regulations. This can be achieved by the use connecting fluepipes included in the following catego-ries:a) Vitreous enamelled steel pipe complying with BS 6999: 1989 (1996);b) Pipes made from stainless steel as descirbed in BS EN 1008-1:1995 grades 1.4401, 1.4404, 1.443� or 1.4436 with flue wall thickness of at least 1 mm; c) Mild steel fluepipes complying with BS 1449: Part 1: 1991, with a flue wall thickness of at least 3 mm;d) Cast iron fluepipes complying with BS 41: 1973 (1998).Flue Pipes with a spigot and socket joint should be fitted with the socket facing upwards, to contain con-densates and moisture within the flue. Joints should be made gas tight using proprietary jointing accessories, or, where appropriate, by packing joint with noncombus-tible rope and fire cement.
Double-wall connectors must be tested and listed for use with solid-fuel burning appliances. Single-wall con-nectors should be made of �4 gauge or heavier steel, and should be 6” (15� mm) in diameter. Do not use galvanized chimney connector; it cannot withstand the high temperatures that can be reached by smoke and exhaust gases, and may release toxic fumes under high heat.If possible, do not pass the chimney connector through a combustible wall or ceiling. If passage through a com-bustible wall is unavoidable, refer to the recommenda-tions in the section following on Wall Pass-Throughs. Do not pass the connector through an attic, a closet or any similar concealed space. The whole chimney con-nector should be exposed and accessible for inspection and cleaning.Install the chimney connector not less than 584 mm (�3”) from the ceiling. Keep it as short and direct as possible, with no more than two (�) 90° turns. If pos-sible, use 45° elbows. Slope horizontal runs of connec-tors upward �0 mm per m (1/4” per foot) going from the stove toward the chimney. The recommended maxi-mum length of a horizontal run is 914 mm (3’), and the total length of chimney connector should be no longer than �.5 m (8’). In cathedral ceiling installations, extend the prefabricat-ed chimney downward to within �.5 m (8’) of the stove.SAFETy NoTE: AlWAyS WEAR glovES AND pRo-TECTivE EyEWEAR WhEN DRilliNg, CUTTiNg oR joiNiNg SECTioNS oF ChiMNEy CoNNECToR.
Double-wall Chimney ConnectorsInformation on assembling and installing double-wall connectors is provided by the manufacturer of the double-wall pipe. Follow the manufacturer’s instructions exactly as you assemble the connector and attach it to the stove and chimney. Using chimneys and connectors from the same manufacturer helps make the assembly and installation straightforward.NoTE: For installations using double-wall connec-tors, minimum clearances must conform to the listed clearances in the clearance chart on page 11.
Single-wall Chimney Connectors• Beginning at the flue collar of the stove, assemble the chimney connector. Insert the first crimped end into the stove’s flue collar, and keep each crimped end pointing toward the stove. Using the holes in the flue collar as guides, drill 3 mm (1/8”) holes in the bottom of the first section of chimney connector and secure it to the flue collar with three (3) #10 x 1/�” sheet metal screws.• Secure each joint between sections of chimney con-nector, including telescoping joints, with at least three

6
Resolute® Acclaim Woodburning Stove
30003843
(3) sheet metal screws. The predrilled holes in the top of each section of chimney connector serve as guides when you drill 3 mm (1/8”) holes in the bot-tom of the next section.• Secure the chimney connector to the chimney. Instructions for various installations follow.• Be sure the installed stove and chimney con-nector are correct distanc-es from nearby combus-tible material.
NoTE: Special slip pipes and thimble sleeves that form telescoping joints between sections of chimney con-nector are available to simplify installations. They often eliminate the need to cut individual connector sections. Consult your local dealer about these special pieces.
Securing the Single-wall Connector to a prefabricated Chimney
Follow the installation instructions of the chimney manufacturer exactly as you install the chimney. The manufacturer of the chimney will supply the acces-sories to support the chimney, either from the roof of the house, at the ceiling of the room where the stove is installed, or from an exterior wall.Special adapters are available from your local dealer to make the connection between the prefabricated chimney and the chimney connector. The top of such adapters attach directly to the chimney or to the chim-ney’s ceiling support package, while the bottom of the adapter is screwed to the chimney connector.These adapters are designed so the top end will fit outside the inner wall of the chimney, and the bottom end will fit inside the first section of chimney connector. When assembled in this way, any soot or creosote fall-ing from the inner walls of the chimney will stay inside the chimney connector.
Securing the Single-wall Connector to a Masonry Chimney
Both freestanding masonry chimneys and fireplace masonry chimneys may be used for installation of your Resolute Acclaim.
Freestanding installations If the chimney connector must pass through a com-bustible wall to reach the chimney, follow the recom-mendations in the Wall Pass-Through section that follows. The opening through the chimney wall to the flue (the “breech”) must be lined with either a ceramic or metal cylinder, called the “thimble”, which is securely cemented in place. Most chimney breeches incorporate thimbles, but the fit must be snug and the joint between the thimble and the chimney wall must be cemented firmly. (Fig. 5)
ST243�thinble connection�
12/13/99 djt
Thimble Sleeve
Chimney Connector
Flue
Keep sleeve end flush with flue tile
ST�43
Fig. 4 The thimble, made of either cermaic or metal, must be cemented securely in place.
ST492Resolute Acclaimfreestanding installation1/01
Chimney
Elbow
Slip Pipe
Standard Connector
Flue Collar
Thimble
Flue Liner
Flue Liner
ST49�
Fig. 5 Chimney connection is a freestanding installation.
ST242�Chimney connector�
12/13/99 djt
Fig. 3 The crimped end of the connector points toward the stove.
A special piece called the “thimble sleeve,” slightly smaller in diameter than standard connector and most thimbles, will facilitate the removal of the chimney connector system for inspection and cleaning. Thimble sleeves should be available from your local dealer.To install a thimble sleeve, slide it into the breech until it is flush with the inner flue wall. Do not extend it into
7
Resolute® Acclaim Woodburning Stove
30003843
the actual flue passage, as this could interfere with the draft. The thimble sleeve should protrude �5-51 mm (1-�”) into the room. Use furnace cement and thin gasketing to seal the sleeve in place in the thimble. Secure the chimney connector to the outer end of the sleeve with sheet metal screws.
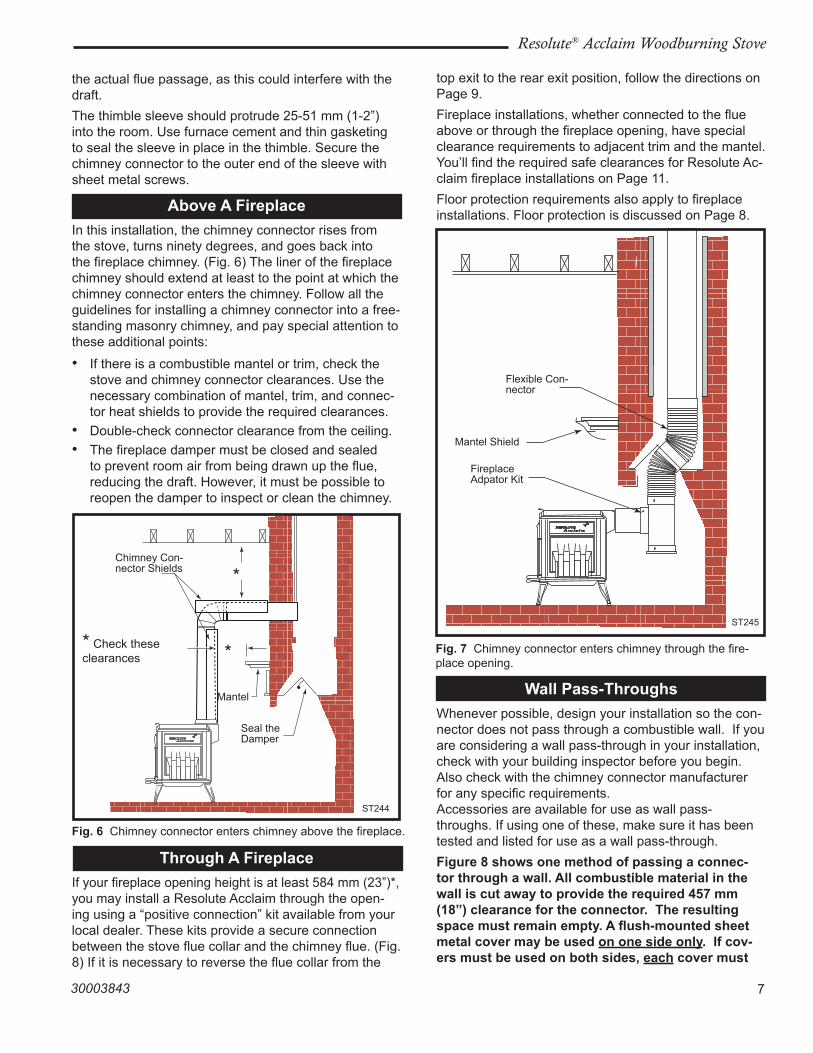
Above A FireplaceIn this installation, the chimney connector rises from the stove, turns ninety degrees, and goes back into the fireplace chimney. (Fig. 6) The liner of the fireplace chimney should extend at least to the point at which the chimney connector enters the chimney. Follow all the guidelines for installing a chimney connector into a free-standing masonry chimney, and pay special attention to these additional points:• If there is a combustible mantel or trim, check the
stove and chimney connector clearances. Use the necessary combination of mantel, trim, and connec-tor heat shields to provide the required clearances.
• Double-check connector clearance from the ceiling.• The fireplace damper must be closed and sealed
to prevent room air from being drawn up the flue, reducing the draft. However, it must be possible to reopen the damper to inspect or clean the chimney.
ST244Plymouthfplc over mantel12/99
RESOLUTEAcc l a im
Chimney Con-nector Shields *
*
Mantel
Seal the Damper
* Check these clearances
ST�44
Fig. 6 Chimney connector enters chimney above the fireplace.
Through A FireplaceIf your fireplace opening height is at least 584 mm (�3”)*, you may install a Resolute Acclaim through the open-ing using a “positive connection” kit available from your local dealer. These kits provide a secure connection between the stove flue collar and the chimney flue. (Fig. 8) If it is necessary to reverse the flue collar from the
top exit to the rear exit position, follow the directions on Page 9. Fireplace installations, whether connected to the flue above or through the fireplace opening, have special clearance requirements to adjacent trim and the mantel. You’ll find the required safe clearances for Resolute Ac-claim fireplace installations on Page 11. Floor protection requirements also apply to fireplace installations. Floor protection is discussed on Page 8.
ST245fireplace flex connector12/99
RESOLUTEAcc l a im
Flexible Con-nector
Mantel Shield
Fireplace Adpator Kit
ST�45
Fig. 7 Chimney connector enters chimney through the fire-place opening.
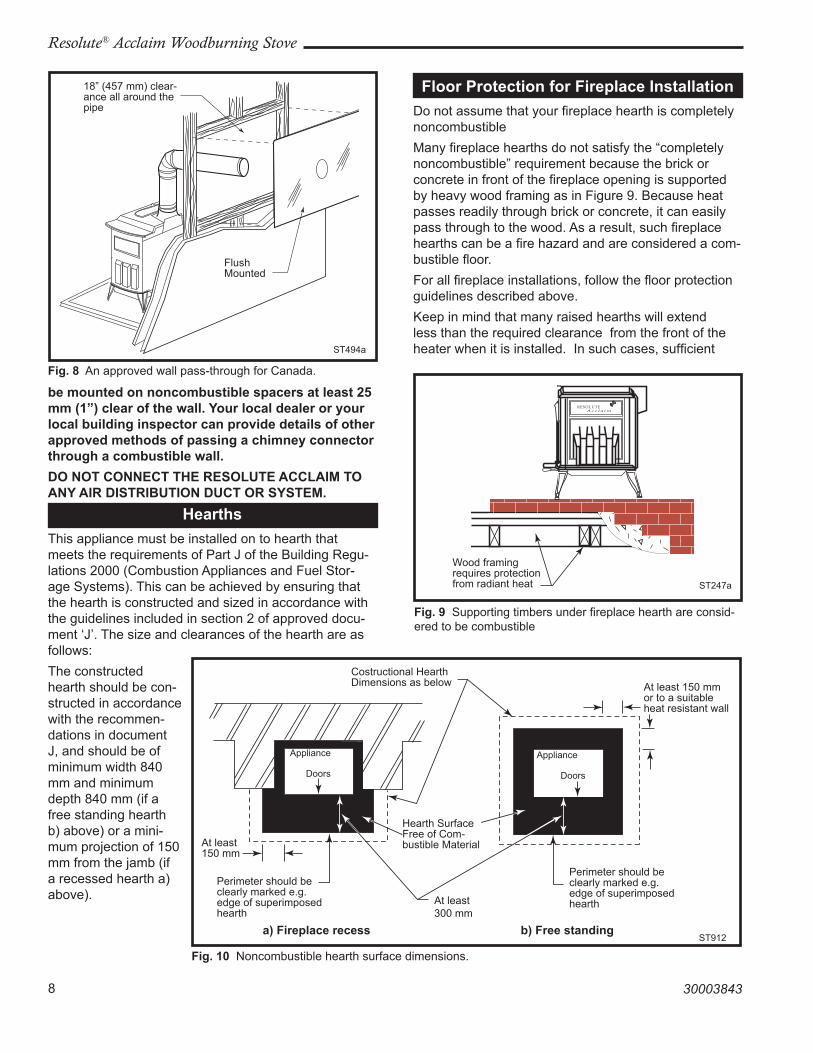
Wall pass-ThroughsWhenever possible, design your installation so the con-nector does not pass through a combustible wall. If you are considering a wall pass-through in your installation, check with your building inspector before you begin. Also check with the chimney connector manufacturer for any specific requirements.Accessories are available for use as wall pass-throughs. If using one of these, make sure it has been tested and listed for use as a wall pass-through.Figure 8 shows one method of passing a connec-tor through a wall. All combustible material in the wall is cut away to provide the required 457 mm (18”) clearance for the connector. The resulting space must remain empty. A flush-mounted sheet metal cover may be used on one side only. if cov-ers must be used on both sides, each cover must
8
Resolute® Acclaim Woodburning Stove
30003843
TT
ST494steelwall pass thru11/00
18” (457 mm) clear-ance all around the pipe
Flush Mounted
ST494a
Fig. 8 An approved wall pass-through for Canada.
ST247Rear exit floor dgrm12/14/99 djt
RESOLUTEA cc l a im
Wood framing requires protection from radiant heat ST�47a
Fig. 9 Supporting timbers under fireplace hearth are consid-ered to be combustible
be mounted on noncombustible spacers at least 25 mm (1”) clear of the wall. your local dealer or your local building inspector can provide details of other approved methods of passing a chimney connector through a combustible wall. Do NoT CoNNECT ThE RESolUTE ACClAiM To ANy AiR DiSTRibUTioN DUCT oR SySTEM.
hearthsThis appliance must be installed on to hearth that meets the requirements of Part J of the Building Regu-lations �000 (Combustion Appliances and Fuel Stor-age Systems). This can be achieved by ensuring that the hearth is constructed and sized in accordance with the guidelines included in section � of approved docu-ment ‘J’. The size and clearances of the hearth are as follows:The constructed hearth should be con-structed in accordance with the recommen-dations in document J, and should be of minimum width 840 mm and minimum depth 840 mm (if a free standing hearth b) above) or a mini-mum projection of 150 mm from the jamb (if a recessed hearth a) above).
Floor protection for Fireplace installationDo not assume that your fireplace hearth is completely noncombustible Many fireplace hearths do not satisfy the “completely noncombustible” requirement because the brick or concrete in front of the fireplace opening is supported by heavy wood framing as in Figure 9. Because heat passes readily through brick or concrete, it can easily pass through to the wood. As a result, such fireplace hearths can be a fire hazard and are considered a com-bustible floor. For all fireplace installations, follow the floor protection guidelines described above.Keep in mind that many raised hearths will extend less than the required clearance from the front of the heater when it is installed. In such cases, sufficient
Costructional Hearth Dimensions as below
At least 300 mm
At least 150 mm or to a suitable heat resistant wall
At least 150 mm
Hearth Surface Free of Com-bustible Material
Perimeter should be clearly marked e.g. edge of superimposed hearth
Perimeter should be clearly marked e.g. edge of superimposed hearth
Appliance
Doors
Appliance
Doors
ST91�
Fig. 10 Noncombustible hearth surface dimensions.
a) Fireplace recess b) Free standing
9
Resolute® Acclaim Woodburning Stove
30003843
floor protection as described above must be added in front of the hearth to satisfy the minimum floor protector requirement from the front of the stove: 410 mm (16”) from the front. Hearth rugs do not satisfy the requirements for floor protection as they are not fire proof. Fireplace installations also have special clearance requirements to the side walls, side decorative trim, and fireplace mantel. Refer to the information on fireplace and mantel trim shields in this section.
keep the Stove a Safe Distance From Surrounding Materials
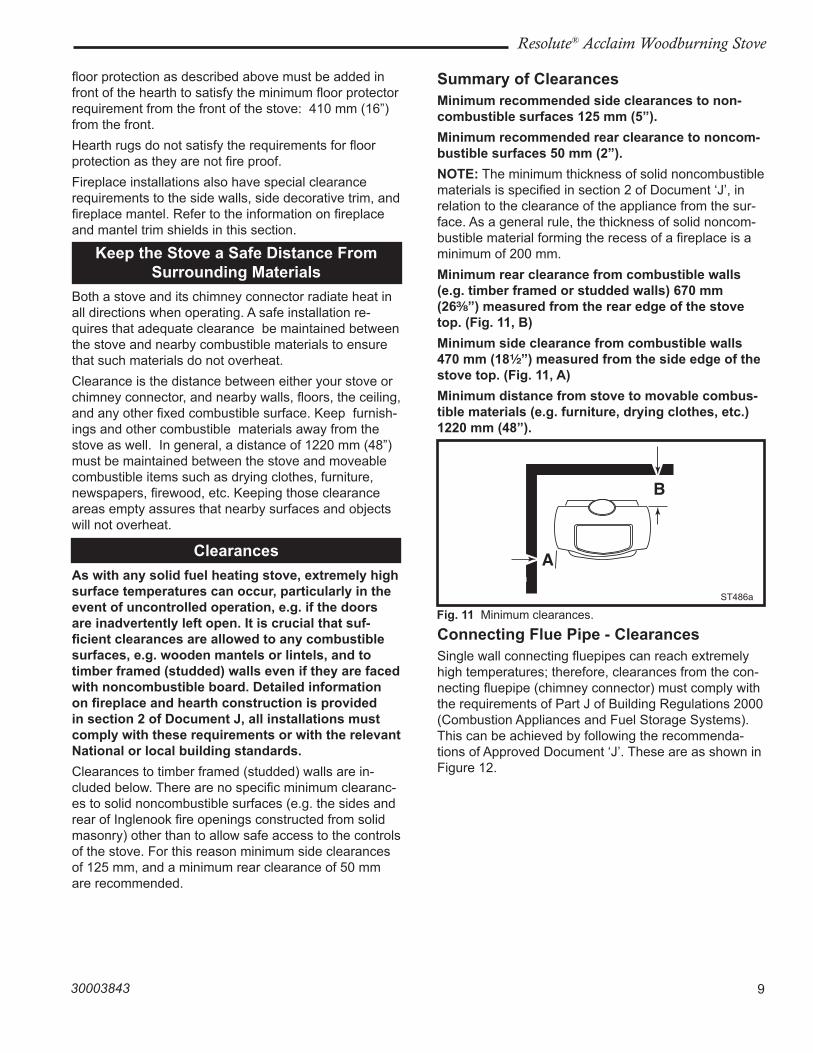
Both a stove and its chimney connector radiate heat in all directions when operating. A safe installation re-quires that adequate clearance be maintained between the stove and nearby combustible materials to ensure that such materials do not overheat.Clearance is the distance between either your stove or chimney connector, and nearby walls, floors, the ceiling, and any other fixed combustible surface. Keep furnish-ings and other combustible materials away from the stove as well. In general, a distance of 1��0 mm (48”) must be maintained between the stove and moveable combustible items such as drying clothes, furniture, newspapers, firewood, etc. Keeping those clearance areas empty assures that nearby surfaces and objects will not overheat.
ClearancesAs with any solid fuel heating stove, extremely high surface temperatures can occur, particularly in the event of uncontrolled operation, e.g. if the doors are inadvertently left open. it is crucial that suf-ficient clearances are allowed to any combustible surfaces, e.g. wooden mantels or lintels, and to timber framed (studded) walls even if they are faced with noncombustible board. Detailed information on fireplace and hearth construction is provided in section 2 of Document j, all installations must comply with these requirements or with the relevant National or local building standards.Clearances to timber framed (studded) walls are in-cluded below. There are no specific minimum clearanc-es to solid noncombustible surfaces (e.g. the sides and rear of Inglenook fire openings constructed from solid masonry) other than to allow safe access to the controls of the stove. For this reason minimum side clearances of 1�5 mm, and a minimum rear clearance of 50 mm are recommended.
Summary of ClearancesMinimum recommended side clearances to non-combustible surfaces 125 mm (5”).Minimum recommended rear clearance to noncom-bustible surfaces 50 mm (2”).NoTE: The minimum thickness of solid noncombustible materials is specified in section � of Document ‘J’, in relation to the clearance of the appliance from the sur-face. As a general rule, the thickness of solid noncom-bustible material forming the recess of a fireplace is a minimum of �00 mm.Minimum rear clearance from combustible walls (e.g. timber framed or studded walls) 670 mm (26C\,”) measured from the rear edge of the stove top. (Fig. 11, b)Minimum side clearance from combustible walls 470 mm (18Z\x”) measured from the side edge of the stove top. (Fig. 11, A)Minimum distance from stove to movable combus-tible materials (e.g. furniture, drying clothes, etc.) 1220 mm (48”).
ST486aDefiant EUClearanceDiagrams10/06
A
B
ST486a
Fig. 11 Minimum clearances.
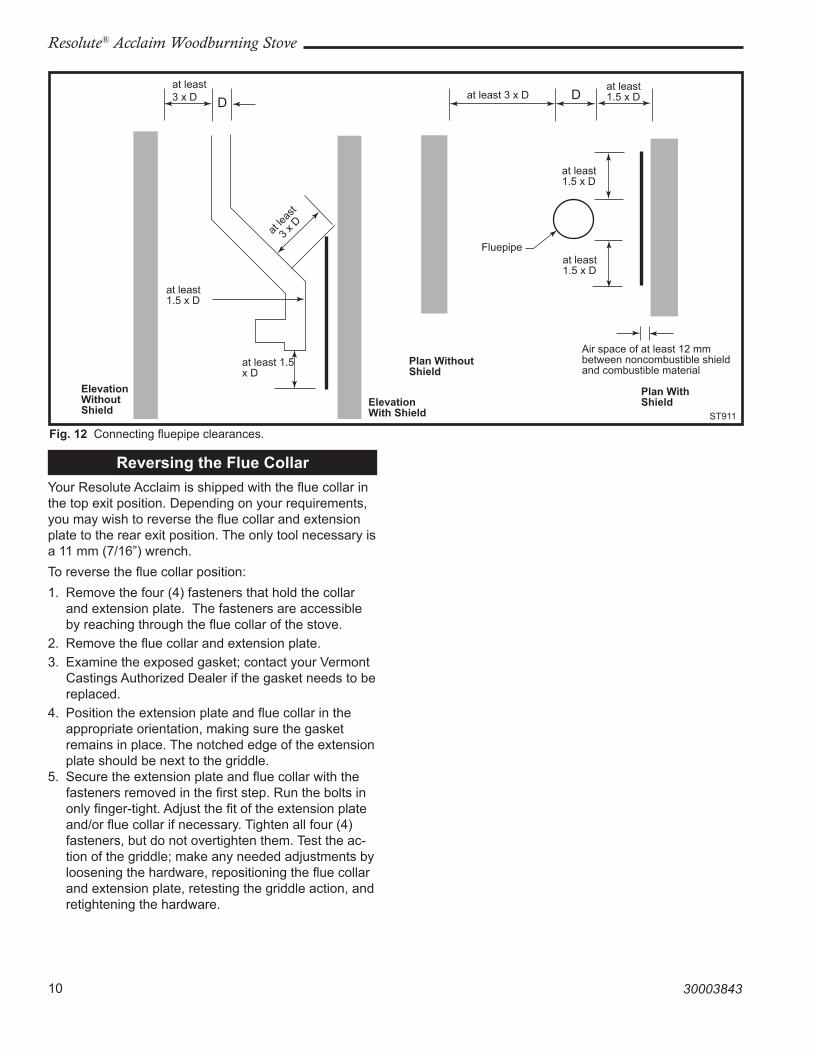
Connecting Flue pipe - ClearancesSingle wall connecting fluepipes can reach extremely high temperatures; therefore, clearances from the con-necting fluepipe (chimney connector) must comply with the requirements of Part J of Building Regulations �000 (Combustion Appliances and Fuel Storage Systems). This can be achieved by following the recommenda-tions of Approved Document ‘J’. These are as shown in Figure 1�.
10
Resolute® Acclaim Woodburning Stove
30003843
Dat least 3 x D
Elevation Without Shield
Elevation With Shield
at lea
st
3 x D
at least 1.5 x D
at least 1.5 x D
plan Without Shield
plan With Shield
Air space of at least 1� mm between noncombustible shield and combustible material
Fluepipeat least 1.5 x D
at least 1.5 x D
at least 3 x D Dat least 1.5 x D
ST911
Fig. 12 Connecting fluepipe clearances.
Reversing the Flue CollarYour Resolute Acclaim is shipped with the flue collar in the top exit position. Depending on your requirements, you may wish to reverse the flue collar and extension plate to the rear exit position. The only tool necessary is a 11 mm (7/16”) wrench.To reverse the flue collar position:1. Remove the four (4) fasteners that hold the collar
and extension plate. The fasteners are accessible by reaching through the flue collar of the stove.
�. Remove the flue collar and extension plate.3. Examine the exposed gasket; contact your Vermont
Castings Authorized Dealer if the gasket needs to be replaced.
4. Position the extension plate and flue collar in the appropriate orientation, making sure the gasket remains in place. The notched edge of the extension plate should be next to the griddle.
5. Secure the extension plate and flue collar with the fasteners removed in the first step. Run the bolts in only finger-tight. Adjust the fit of the extension plate and/or flue collar if necessary. Tighten all four (4) fasteners, but do not overtighten them. Test the ac-tion of the griddle; make any needed adjustments by loosening the hardware, repositioning the flue collar and extension plate, retesting the griddle action, and retightening the hardware.
11
Resolute® Acclaim Woodburning Stove
30003843
Stove Controls Two Controls operate the Stove
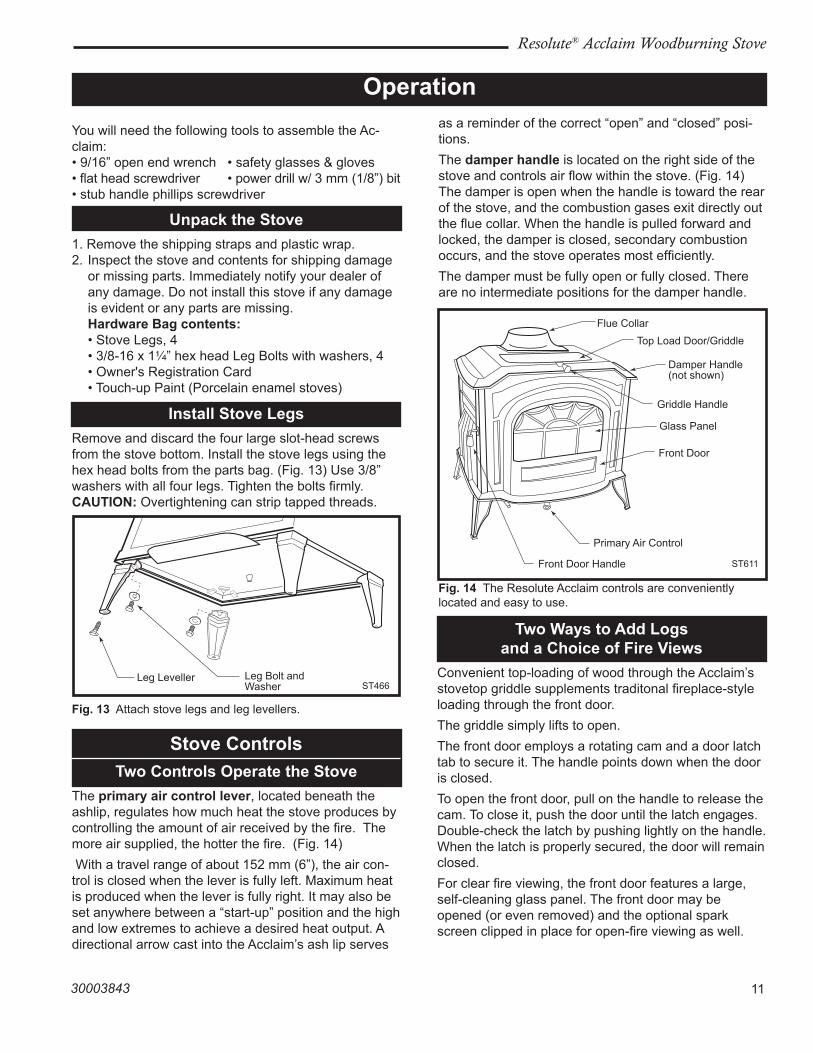
The primary air control lever, located beneath the ashlip, regulates how much heat the stove produces by controlling the amount of air received by the fire. The more air supplied, the hotter the fire. (Fig. 14) With a travel range of about 15� mm (6”), the air con-trol is closed when the lever is fully left. Maximum heat is produced when the lever is fully right. It may also be set anywhere between a “start-up” position and the high and low extremes to achieve a desired heat output. A directional arrow cast into the Acclaim’s ash lip serves
operationas a reminder of the correct “open” and “closed” posi-tions. The damper handle is located on the right side of the stove and controls air flow within the stove. (Fig. 14) The damper is open when the handle is toward the rear of the stove, and the combustion gases exit directly out the flue collar. When the handle is pulled forward and locked, the damper is closed, secondary combustion occurs, and the stove operates most efficiently. The damper must be fully open or fully closed. There are no intermediate positions for the damper handle.
You will need the following tools to assemble the Ac-claim:• 9/16” open end wrench • safety glasses & gloves• flat head screwdriver • power drill w/ 3 mm (1/8”) bit• stub handle phillips screwdriver
Unpack the Stove1. Remove the shipping straps and plastic wrap.�. Inspect the stove and contents for shipping damage
or missing parts. Immediately notify your dealer of any damage. Do not install this stove if any damage is evident or any parts are missing.
hardware bag contents: • Stove Legs, 4 • 3/8-16 x 1¹⁄₄” hex head Leg Bolts with washers, 4 • Owner's Registration Card • Touch-up Paint (Porcelain enamel stoves)
install Stove legsRemove and discard the four large slot-head screws from the stove bottom. Install the stove legs using the hex head bolts from the parts bag. (Fig. 13) Use 3/8” washers with all four legs. Tighten the bolts firmly. CAUTioN: Overtightening can strip tapped threads.
ST466 �Seville �Attach legs
Leg Bolt and Washer
Leg LevellerST466
Fig. 13 Attach stove legs and leg levellers.
Two Ways to Add logs and a Choice of Fire views
Convenient top-loading of wood through the Acclaim’s stovetop griddle supplements traditonal fireplace-style loading through the front door. The griddle simply lifts to open.The front door employs a rotating cam and a door latch tab to secure it. The handle points down when the door is closed. To open the front door, pull on the handle to release the cam. To close it, push the door until the latch engages. Double-check the latch by pushing lightly on the handle. When the latch is properly secured, the door will remain closed. For clear fire viewing, the front door features a large, self-cleaning glass panel. The front door may be opened (or even removed) and the optional spark screen clipped in place for open-fire viewing as well.
ST611Res Acclaimcontrols10/1/02 djt
Flue CollarTop Load Door/Griddle
Damper Handle(not shown)
Griddle Handle
Glass Panel
Front Door
Primary Air Control
Front Door Handle ST611
Fig. 14 The Resolute Acclaim controls are conveniently located and easy to use.
1�
Resolute® Acclaim Woodburning Stove
30003843
Removable Andirons For greater Front-loading Convenience
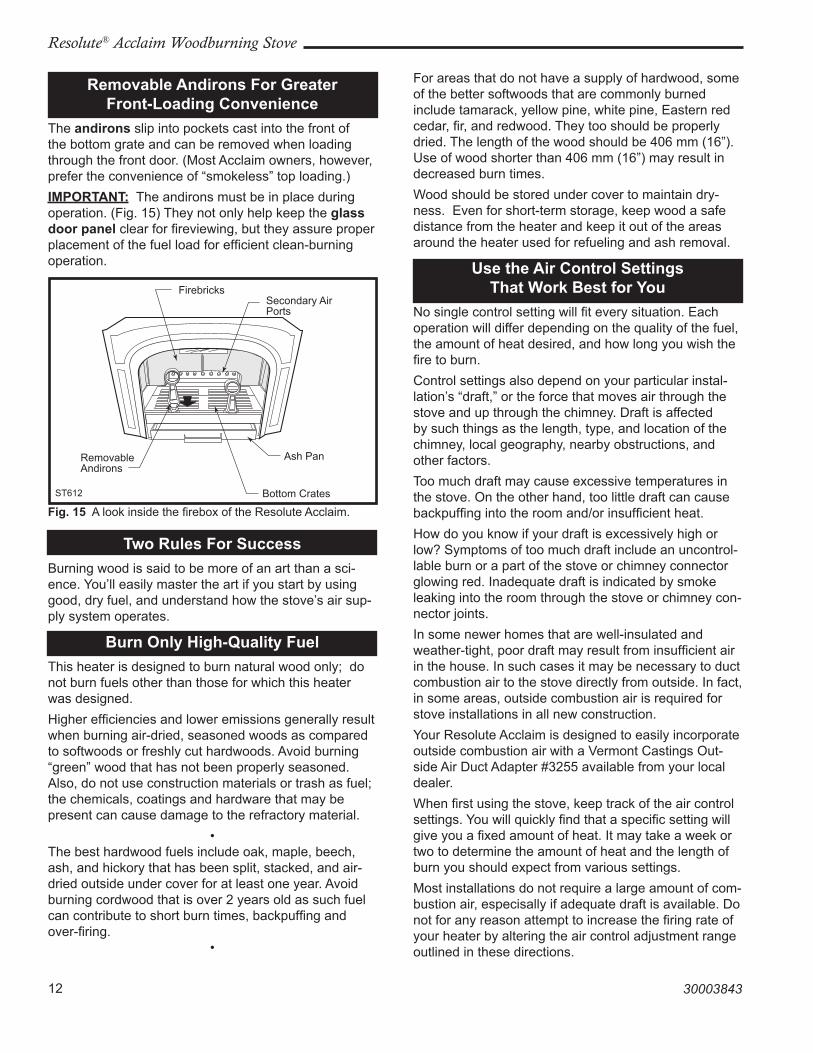
The andirons slip into pockets cast into the front of the bottom grate and can be removed when loading through the front door. (Most Acclaim owners, however, prefer the convenience of “smokeless” top loading.) iMpoRTANT: The andirons must be in place during operation. (Fig. 15) They not only help keep the glass door panel clear for fireviewing, but they assure proper placement of the fuel load for efficient clean-burning operation.
ST612 �Resolute Acclaim �firebox �1/01
FirebricksSecondary Air Ports
Ash Pan
Bottom Crates
Removable Andirons
ST61�
Fig. 15 A look inside the firebox of the Resolute Acclaim.
Two Rules For SuccessBurning wood is said to be more of an art than a sci-ence. You’ll easily master the art if you start by using good, dry fuel, and understand how the stove’s air sup-ply system operates.
burn only high-quality FuelThis heater is designed to burn natural wood only; do not burn fuels other than those for which this heater was designed. Higher efficiencies and lower emissions generally result when burning air-dried, seasoned woods as compared to softwoods or freshly cut hardwoods. Avoid burning “green” wood that has not been properly seasoned. Also, do not use construction materials or trash as fuel; the chemicals, coatings and hardware that may be present can cause damage to the refractory material.
•The best hardwood fuels include oak, maple, beech, ash, and hickory that has been split, stacked, and air-dried outside under cover for at least one year. Avoid burning cordwood that is over � years old as such fuel can contribute to short burn times, backpuffing and over-firing.
•
For areas that do not have a supply of hardwood, some of the better softwoods that are commonly burned include tamarack, yellow pine, white pine, Eastern red cedar, fir, and redwood. They too should be properly dried. The length of the wood should be 406 mm (16”). Use of wood shorter than 406 mm (16”) may result in decreased burn times.Wood should be stored under cover to maintain dry-ness. Even for short-term storage, keep wood a safe distance from the heater and keep it out of the areas around the heater used for refueling and ash removal.
Use the Air Control Settings That Work best for you
No single control setting will fit every situation. Each operation will differ depending on the quality of the fuel, the amount of heat desired, and how long you wish the fire to burn. Control settings also depend on your particular instal-lation’s “draft,” or the force that moves air through the stove and up through the chimney. Draft is affected by such things as the length, type, and location of the chimney, local geography, nearby obstructions, and other factors.Too much draft may cause excessive temperatures in the stove. On the other hand, too little draft can cause backpuffing into the room and/or insufficient heat.How do you know if your draft is excessively high or low? Symptoms of too much draft include an uncontrol-lable burn or a part of the stove or chimney connector glowing red. Inadequate draft is indicated by smoke leaking into the room through the stove or chimney con-nector joints.In some newer homes that are well-insulated and weather-tight, poor draft may result from insufficient air in the house. In such cases it may be necessary to duct combustion air to the stove directly from outside. In fact, in some areas, outside combustion air is required for stove installations in all new construction.Your Resolute Acclaim is designed to easily incorporate outside combustion air with a Vermont Castings Out-side Air Duct Adapter #3�55 available from your local dealer.When first using the stove, keep track of the air control settings. You will quickly find that a specific setting will give you a fixed amount of heat. It may take a week or two to determine the amount of heat and the length of burn you should expect from various settings.Most installations do not require a large amount of com-bustion air, especisally if adequate draft is available. Do not for any reason attempt to increase the firing rate of your heater by altering the air control adjustment range outlined in these directions.
13
Resolute® Acclaim Woodburning Stove
30003843
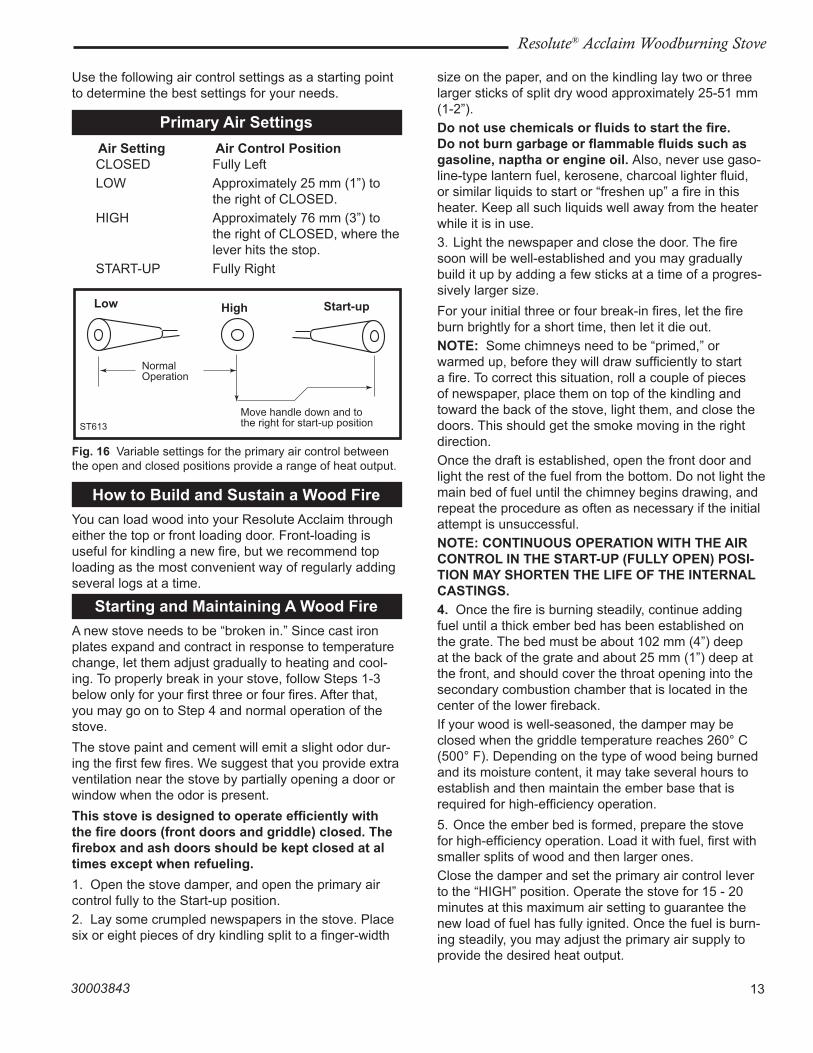
Use the following air control settings as a starting point to determine the best settings for your needs.
primary Air Settings Air Setting Air Control position CLOSED Fully Left LOW Approximately �5 mm (1”) to the right of CLOSED. HIGH Approximately 76 mm (3”) to the right of CLOSED, where the lever hits the stop. START-UP Fully Right
size on the paper, and on the kindling lay two or three larger sticks of split dry wood approximately �5-51 mm (1-�”).Do not use chemicals or fluids to start the fire. Do not burn garbage or flammable fluids such as gasoline, naptha or engine oil. Also, never use gaso-line-type lantern fuel, kerosene, charcoal lighter fluid, or similar liquids to start or “freshen up” a fire in this heater. Keep all such liquids well away from the heater while it is in use.3. Light the newspaper and close the door. The fire soon will be well-established and you may gradually build it up by adding a few sticks at a time of a progres-sively larger size. For your initial three or four break-in fires, let the fire burn brightly for a short time, then let it die out.NoTE: Some chimneys need to be “primed,” or warmed up, before they will draw sufficiently to start a fire. To correct this situation, roll a couple of pieces of newspaper, place them on top of the kindling and toward the back of the stove, light them, and close the doors. This should get the smoke moving in the right direction.Once the draft is established, open the front door and light the rest of the fuel from the bottom. Do not light the main bed of fuel until the chimney begins drawing, and repeat the procedure as often as necessary if the initial attempt is unsuccessful.NoTE: CoNTiNUoUS opERATioN WiTh ThE AiR CoNTRol iN ThE START-Up (FUlly opEN) poSi-TioN MAy ShoRTEN ThE liFE oF ThE iNTERNAl CASTiNgS.4. Once the fire is burning steadily, continue adding fuel until a thick ember bed has been established on the grate. The bed must be about 10� mm (4”) deep at the back of the grate and about �5 mm (1”) deep at the front, and should cover the throat opening into the secondary combustion chamber that is located in the center of the lower fireback. If your wood is well-seasoned, the damper may be closed when the griddle temperature reaches �60° C (500° F). Depending on the type of wood being burned and its moisture content, it may take several hours to establish and then maintain the ember base that is required for high-efficiency operation.5. Once the ember bed is formed, prepare the stove for high-efficiency operation. Load it with fuel, first with smaller splits of wood and then larger ones. Close the damper and set the primary air control lever to the “HIGH” position. Operate the stove for 15 - �0 minutes at this maximum air setting to guarantee the new load of fuel has fully ignited. Once the fuel is burn-ing steadily, you may adjust the primary air supply to provide the desired heat output.
ST613 �Resolute Accaim �air control settings �1/26/01 djt
low high Start-up
Normal Operation
Move handle down and to the right for start-up position
Fig. 16 Variable settings for the primary air control between the open and closed positions provide a range of heat output.
ST613
how to build and Sustain a Wood FireYou can load wood into your Resolute Acclaim through either the top or front loading door. Front-loading is useful for kindling a new fire, but we recommend top loading as the most convenient way of regularly adding several logs at a time.
Starting and Maintaining A Wood FireA new stove needs to be “broken in.” Since cast iron plates expand and contract in response to temperature change, let them adjust gradually to heating and cool-ing. To properly break in your stove, follow Steps 1-3 below only for your first three or four fires. After that, you may go on to Step 4 and normal operation of the stove.The stove paint and cement will emit a slight odor dur-ing the first few fires. We suggest that you provide extra ventilation near the stove by partially opening a door or window when the odor is present.This stove is designed to operate efficiently with the fire doors (front doors and griddle) closed. The firebox and ash doors should be kept closed at al times except when refueling.1. Open the stove damper, and open the primary air control fully to the Start-up position. �. Lay some crumpled newspapers in the stove. Place six or eight pieces of dry kindling split to a finger-width
14
Resolute® Acclaim Woodburning Stove
30003843
You’ll soon find this stove is hoT WhilE iN opERA-TioN! kEEp ChilDREN, CloThiNg, AND FURNi-TURE AWAy. CoNTACT MAy CAUSE SkiN bURNS.Do NoT ovERFiRE ThiS hEATER. Overfiring can result in permanent damage to the stove. If an exterior part of the stove or the chimney connector glows, you are overfiring.
Reloading and Reviving a Wood FireReload your stove while it is still hot and there are plenty of embers to re-kindle the fire quickly. Include some smaller pieces of wood in the new load of fuel to help the stove regain high temperatures quickly.Follow this procedure when you reload your stove:NoTE: Door handles can be hot. A glove has been included with your stove. We recommend using this glove whenever operating door or damper controls and especially when operating the top griddle.
• Open the damper and move the primary air lever to the “HIGH” position.
• Open the front door and check the ash level on the grates and in the ash pan. Clear excess ash from the grates, particularly at the rear area. Level the ember bed. Empty the ash pan if necessary.
• Replace the ash pan and close the front door.• Load wood, smaller pieces first, and close the load-
ing door.NoTE: If the ember bed has burned down to the extent the fire cannot be revived easily, it may be necessary to set the air control to the “Start-up” position until the fire has been re-established.
• Allow the stove to regain its “thermal momentum” before closing the damper. This may take 15 - �0 minutes, and will be confirmed by a temperature on the griddle of at least �60° C (500° F).
• Close the damper, and set the primary air lever for the desired heat output.
NoTE: If the remaining charcoal bed is relatively thick and if your fuel is well seasoned, it is possible to add fresh fuel (smaller pieces first), close the door and damper, and reset the primary air within 5 minutes.
A Surface Thermometer is a guide to performance
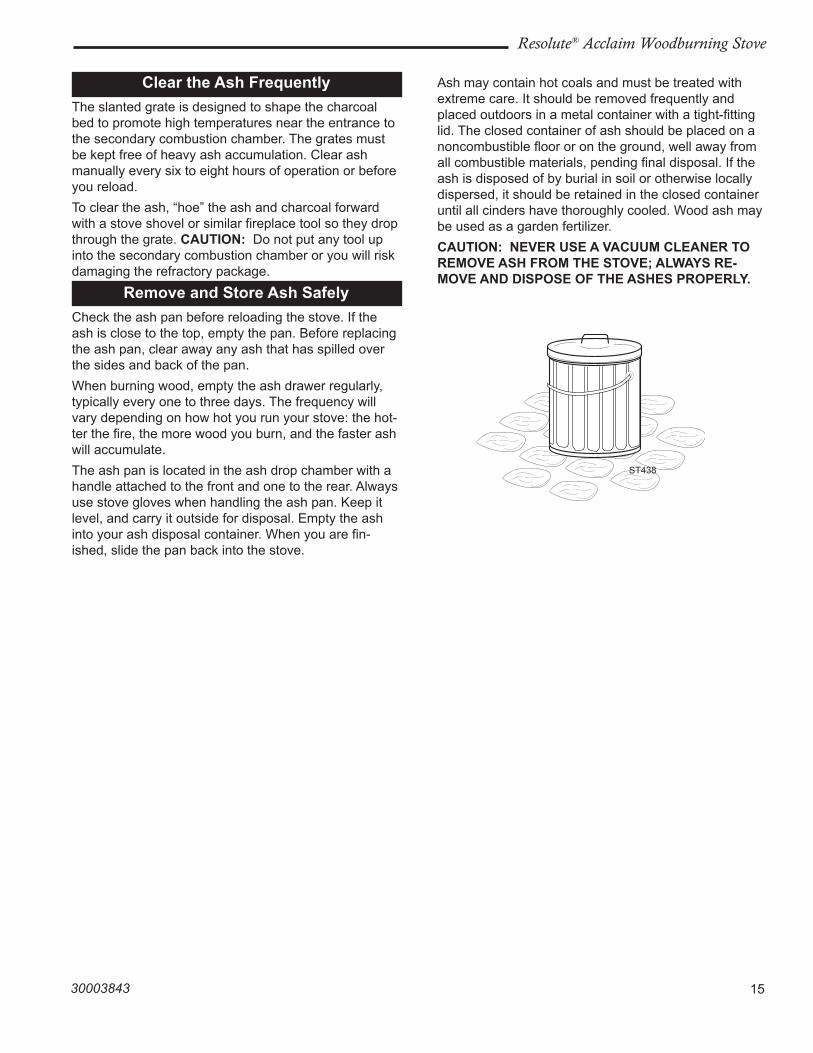
Until you are familiar with how your stove works, moni-tor the griddle surface temperature frequently. Use these temperature ranges as general indicators of heat output: Low to medium 177-�60° C (350-500° F) Medium �60-318° C (500-600° F) High 318-399° C (600-750° F)Continuous operation at griddle temperatures higher than 399° C (750° F) may damage the cast iron parts or the porcelain enamel finish of your Resolute Acclaim.A surface thermometer can also tell you when to adjust the controls and when to refuel the stove. (Fig. 18) During start-up and after re-loading, for example, a thermometer reading of at least �60° C (500° F) signals the stove is hot enough to close the damper and shift into the high-efficiency mode. Readings lower than 177° C (350° F) announce the stove needs loading or it is time to increase the air sup-ply for a higher burn rate. At the other exteme, a temperature over 399° C (750° F) is a warning to slow the burn rate.
ST614 �Resolute Acclaim�Damper control �1/26/01 djt
Damper Control
Closed OpenST614
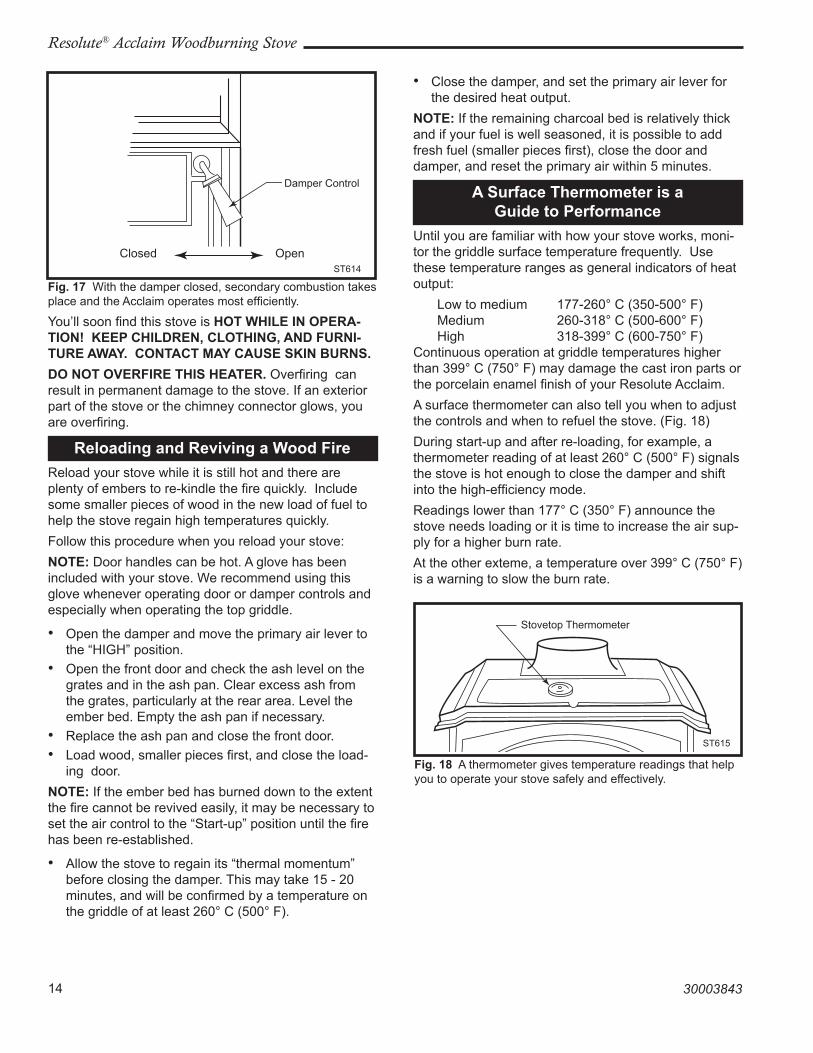
Fig. 17 With the damper closed, secondary combustion takes place and the Acclaim operates most efficiently.
ST615 �Thermostaton griddle
Stovetop Thermometer
ST615
Fig. 18 A thermometer gives temperature readings that help you to operate your stove safely and effectively.
15
Resolute® Acclaim Woodburning Stove
30003843
Clear the Ash FrequentlyThe slanted grate is designed to shape the charcoal bed to promote high temperatures near the entrance to the secondary combustion chamber. The grates must be kept free of heavy ash accumulation. Clear ash manually every six to eight hours of operation or before you reload. To clear the ash, “hoe” the ash and charcoal forward with a stove shovel or similar fireplace tool so they drop through the grate. CAUTioN: Do not put any tool up into the secondary combustion chamber or you will risk damaging the refractory package.
Remove and Store Ash SafelyCheck the ash pan before reloading the stove. If the ash is close to the top, empty the pan. Before replacing the ash pan, clear away any ash that has spilled over the sides and back of the pan.When burning wood, empty the ash drawer regularly, typically every one to three days. The frequency will vary depending on how hot you run your stove: the hot-ter the fire, the more wood you burn, and the faster ash will accumulate.The ash pan is located in the ash drop chamber with a handle attached to the front and one to the rear. Always use stove gloves when handling the ash pan. Keep it level, and carry it outside for disposal. Empty the ash into your ash disposal container. When you are fin-ished, slide the pan back into the stove.
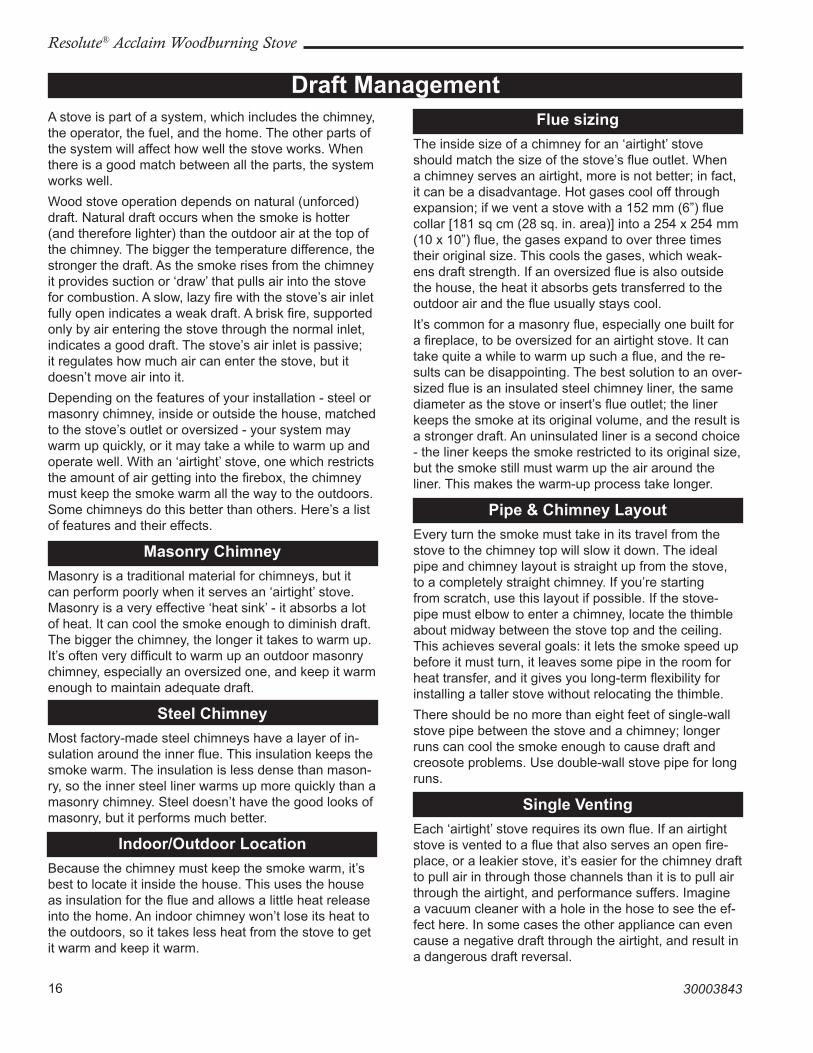
Ash may contain hot coals and must be treated with extreme care. It should be removed frequently and placed outdoors in a metal container with a tight-fitting lid. The closed container of ash should be placed on a noncombustible floor or on the ground, well away from all combustible materials, pending final disposal. If the ash is disposed of by burial in soil or otherwise locally dispersed, it should be retained in the closed container until all cinders have thoroughly cooled. Wood ash may be used as a garden fertilizer. CAUTioN: NEvER USE A vACUUM ClEANER To REMovE ASh FRoM ThE STovE; AlWAyS RE-MovE AND DiSpoSE oF ThE AShES pRopERly.
ST438 �ash pail �7/6/00 djt
ST438
16
Resolute® Acclaim Woodburning Stove
30003843
A stove is part of a system, which includes the chimney, the operator, the fuel, and the home. The other parts of the system will affect how well the stove works. When there is a good match between all the parts, the system works well. Wood stove operation depends on natural (unforced) draft. Natural draft occurs when the smoke is hotter (and therefore lighter) than the outdoor air at the top of the chimney. The bigger the temperature difference, the stronger the draft. As the smoke rises from the chimney it provides suction or ‘draw’ that pulls air into the stove for combustion. A slow, lazy fire with the stove’s air inlet fully open indicates a weak draft. A brisk fire, supported only by air entering the stove through the normal inlet, indicates a good draft. The stove’s air inlet is passive; it regulates how much air can enter the stove, but it doesn’t move air into it. Depending on the features of your installation - steel or masonry chimney, inside or outside the house, matched to the stove’s outlet or oversized - your system may warm up quickly, or it may take a while to warm up and operate well. With an ‘airtight’ stove, one which restricts the amount of air getting into the firebox, the chimney must keep the smoke warm all the way to the outdoors. Some chimneys do this better than others. Here’s a list of features and their effects.
Masonry ChimneyMasonry is a traditional material for chimneys, but it can perform poorly when it serves an ‘airtight’ stove. Masonry is a very effective ‘heat sink’ - it absorbs a lot of heat. It can cool the smoke enough to diminish draft. The bigger the chimney, the longer it takes to warm up. It’s often very difficult to warm up an outdoor masonry chimney, especially an oversized one, and keep it warm enough to maintain adequate draft.
Steel ChimneyMost factory-made steel chimneys have a layer of in-sulation around the inner flue. This insulation keeps the smoke warm. The insulation is less dense than mason-ry, so the inner steel liner warms up more quickly than a masonry chimney. Steel doesn’t have the good looks of masonry, but it performs much better.
indoor/outdoor locationBecause the chimney must keep the smoke warm, it’s best to locate it inside the house. This uses the house as insulation for the flue and allows a little heat release into the home. An indoor chimney won’t lose its heat to the outdoors, so it takes less heat from the stove to get it warm and keep it warm.
Flue sizing The inside size of a chimney for an ‘airtight’ stove should match the size of the stove’s flue outlet. When a chimney serves an airtight, more is not better; in fact, it can be a disadvantage. Hot gases cool off through expansion; if we vent a stove with a 15� mm (6”) flue collar [181 sq cm (�8 sq. in. area)] into a �54 x �54 mm (10 x 10”) flue, the gases expand to over three times their original size. This cools the gases, which weak-ens draft strength. If an oversized flue is also outside the house, the heat it absorbs gets transferred to the outdoor air and the flue usually stays cool. It’s common for a masonry flue, especially one built for a fireplace, to be oversized for an airtight stove. It can take quite a while to warm up such a flue, and the re-sults can be disappointing. The best solution to an over-sized flue is an insulated steel chimney liner, the same diameter as the stove or insert’s flue outlet; the liner keeps the smoke at its original volume, and the result is a stronger draft. An uninsulated liner is a second choice - the liner keeps the smoke restricted to its original size, but the smoke still must warm up the air around the liner. This makes the warm-up process take longer.
pipe & Chimney layoutEvery turn the smoke must take in its travel from the stove to the chimney top will slow it down. The ideal pipe and chimney layout is straight up from the stove, to a completely straight chimney. If you’re starting from scratch, use this layout if possible. If the stove-pipe must elbow to enter a chimney, locate the thimble about midway between the stove top and the ceiling. This achieves several goals: it lets the smoke speed up before it must turn, it leaves some pipe in the room for heat transfer, and it gives you long-term flexibility for installing a taller stove without relocating the thimble. There should be no more than eight feet of single-wall stove pipe between the stove and a chimney; longer runs can cool the smoke enough to cause draft and creosote problems. Use double-wall stove pipe for long runs.
Single ventingEach ‘airtight’ stove requires its own flue. If an airtight stove is vented to a flue that also serves an open fire-place, or a leakier stove, it’s easier for the chimney draft to pull air in through those channels than it is to pull air through the airtight, and performance suffers. Imagine a vacuum cleaner with a hole in the hose to see the ef-fect here. In some cases the other appliance can even cause a negative draft through the airtight, and result in a dangerous draft reversal.
Draft Management
17
Resolute® Acclaim Woodburning Stove
30003843
CreosoteCreosote is a by-product of slow wood-burning. It’s an organic tar that can condense in the flue if it’s dense in the smoke, and slow-moving, and cools off to less than �90°F. Condensed creosote is volatile, and can gener-ate chimney fires if it gets hot enough. All the features that affect chimney draft also affect creosote conden-sation - so use whatever combination of installation features and operational steps that will encourage good draft and minimize creosote production.Because letting the smoke cool off and slow down is one of the keys to creosote production, it makes sense to line a chimney to match the stove’s outlet size, for safety reasons as well as performance. Consult a quali-fied installer and check local and national codes for recommended chimney sizing.
FuelEven the best stove installation will not perform well with poor fuel. The best fuel is hardwood that has air-dried 1�-18 months. Softwood burns, but not as long as hardwood. Fairly ‘green’ wood has a good amount of moisture in it; it will burn, but some of the heat potential is used to drive the remaining moisture off the wood. This reduces the amount that reaches your home and can contribute to a creosote problem. There are mois-ture meters available for firewood; you can also judge your wood by its appearance and weight. If you get it green, lift a piece and get a sense of its weight; it can lose a third or more of its weight as it dries. Also look at the ends of a log; as it dries it shrinks and often cracks. The more weathered and cracked a piece is, the drier it is. Dry wood burns readily with a good chimney draft. But with modern stoves, especially catalytic ones, the wood can be too dry. While extra-dry wood has little creosote in it, the remainder can ‘gas out’ from the wood quickly and densely enough to overload the catalytic burner. If you hear a rumbling or roaring noise, like a propane torch, from the stove, that is a sign that the catalyst is seriously overfiring. The catalyst is a platinum film on a ceramic base; the metal can get to higher temperatures than the ceramic can take, and overfiring the catalyst can break it. Dry wood can also burn out faster than you want. If your dry wood burns out too quickly or overloads the catalyst you can mix in greener wood to slow the fire down.
back-puffingBack-puffing results when the fire produces volatile gases faster than the chimney draft pulls them out of the firebox. The gases back up in the firebox till they’re dense enough and hot enough to ignite. If your stove back-puffs, you should open up the damper to let the
smoke rise to the flue more quickly, let more air into the firebox, and avoid big loads of firewood. Run your stove with enough primary air so that you always see lively, dancing flames in the firebox; a lazy, smoky fire is inefficient and can contribute to creosote buildup in the chimney.
Draft TestingAn easy way to test your chimney draft is to close the stove’s damper, wait a few minutes to let the airflow stabilize, then see whether you can vary the strength of the fire by swinging the air control open and closed. Re-sults are not always instant; you may need to wait a few minutes for a change in the air control setting to have an effect on the fire. If there’s no change, then the draft isn’t strong enough yet to let you close the damper, and you’ll need to open it for a while longer and manage the fire with the air inlet until the draft strengthens. If you keep track of your burning habits and relate them to their effects on the stove’s operation, you’ll be rewarded with good performance and a safe system.
Negative pressureGood draft also depends on a supply of air to the stove; a chimney can’t pull in more air than is available to it. Sluggish draft results when a house is tight enough to prevent the ready flow of air to the stove, or by competi-tion between the stove and other equipment that sends indoor air outside - especially power-driven equipment like range hoods, clothes dryers, etc. If the chimney draws well with all other equipment turned off (or sealed, in the case of fireplaces and/or other stoves), then you simply need to be careful with timing the use of the other equipment. If you need to crack a nearby window or door to enable the chimney to draw well, that’s a sign that you should install an outside-air intake to bring combustion air directly to the stove. Vermont Castings dealers carry adapters to attach to the stove to connect an air duct for outdoor combustion air. In many cases, local or national codes require the installation of permanently open air vents, particularly with larger appliances (i.e. above 5 kW). Refer to these codes to determine specific requirements for your installation.
ConclusionWood-burning is an art rather than a science. Once the stove and chimney system are in place, the stove user can only vary technique, mostly your timing, to achieve good results. If you keep track of your burning habits and relate them to their effects on the stove’s operation, you’ll be rewarded with good performance and a safe system.
18
Resolute® Acclaim Woodburning Stove
30003843
MaintenanceBelow you will find important information on general care, inspection and maintenance of your Vermont Castings stove. Should it become necessary, use only replacement parts recommended by your authorized dealer.
keep your Stove looking New and Working its best
Let the fire in the stove go out and allow the stove to cool completely before beginning any mainteneance procedure.
Care of the Cast iron SurfaceAn occasional dusting with a dry rag will keep the painted cast iron of your Resolute Acclaim looking new. A damp cloth may be used as well, but only when the stove is cool. Make sure no water remains on the stove surface.
If the paint needs retouching, allow the stove to cool completely. Wire-brush areas needing to be painted. Remove non-painted components such as air controls or cover them with masking tape. Touch up the stove with high temperature stove paint available from your local dealer. Apply the paint sparingly. Two light coats are better than one heavy one.
Care of the porcelain Enamel SurfaceUse a dry rag or a soft brush. Do not use water or other liquids. Fingerprints usually can be buffed off with a dry, soft rag. If marks remain, allow the stove to cool com-pletely, then buff with a damp, soft rag. Dry completely before starting a fire so that water drops or wet streaks will not leave marks. Never use abrasives or harsh chemical cleaners on the porcelain enamel finish.
To remove stains or spills from porcelain enamel, first make sure that the stove is completely cool. Use only a kitchen appliance cleaner or polish recommended for enamel surfaces. Apply sparingly with a soft rag and buff away all traces of the cleaner.
Cleaning the glassMost of the carbon deposits on the glass will burn off regularly during hot fires. If you wish to clean the glass more thoroughly, follow this procedure:
• Let the stove and glass cool completely. • Wash the glass with warm water, and a soft paper
towel or rag. • Rinse and dry thoroughly.• Never use abrasives, ashes, or harsh chemicals to
clean your Resolute Acclaim glass.
For stubborn deposits, use a ceramic glass cleaner available from your Vermont Castings’ Authorized Dealer. Do not allow the cleaner to touch brass orna-ments or porcelain finish.
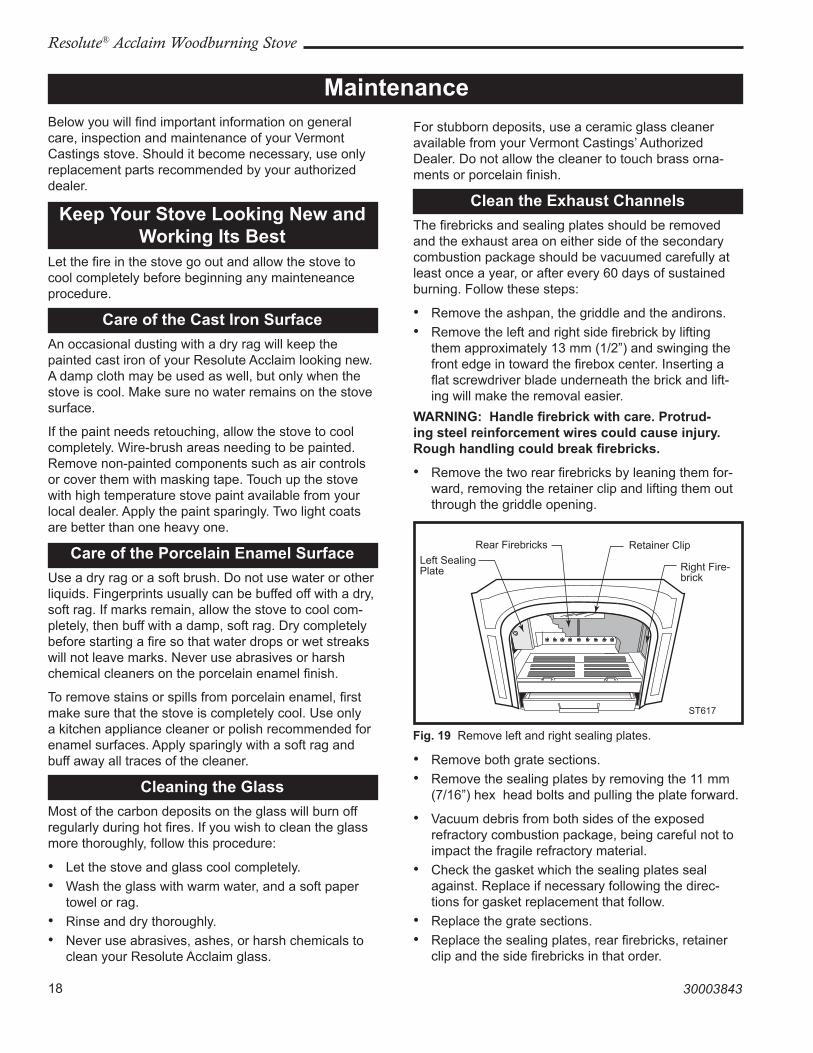
Clean the Exhaust ChannelsThe firebricks and sealing plates should be removed and the exhaust area on either side of the secondary combustion package should be vacuumed carefully at least once a year, or after every 60 days of sustained burning. Follow these steps:
• Remove the ashpan, the griddle and the andirons.• Remove the left and right side firebrick by lifting
them approximately 13 mm (1/�”) and swinging the front edge in toward the firebox center. Inserting a flat screwdriver blade underneath the brick and lift-ing will make the removal easier.
WARNiNg: handle firebrick with care. protrud-ing steel reinforcement wires could cause injury. Rough handling could break firebricks.
• Remove the two rear firebricks by leaning them for-ward, removing the retainer clip and lifting them out through the griddle opening.
ST617 �Resolute Acclaim �clean stove �1/01
Left Sealing Plate
Rear Firebricks Retainer Clip
Right Fire-brick
ST617
Fig. 19 Remove left and right sealing plates.
• Remove both grate sections.• Remove the sealing plates by removing the 11 mm
(7/16”) hex head bolts and pulling the plate forward.
• Vacuum debris from both sides of the exposed refractory combustion package, being careful not to impact the fragile refractory material.
• Check the gasket which the sealing plates seal against. Replace if necessary following the direc-tions for gasket replacement that follow.
• Replace the grate sections.• Replace the sealing plates, rear firebricks, retainer
clip and the side firebricks in that order.
19
Resolute® Acclaim Woodburning Stove
30003843
Repair Air leaks to prevent overheating and Excessive Fuel Consumption
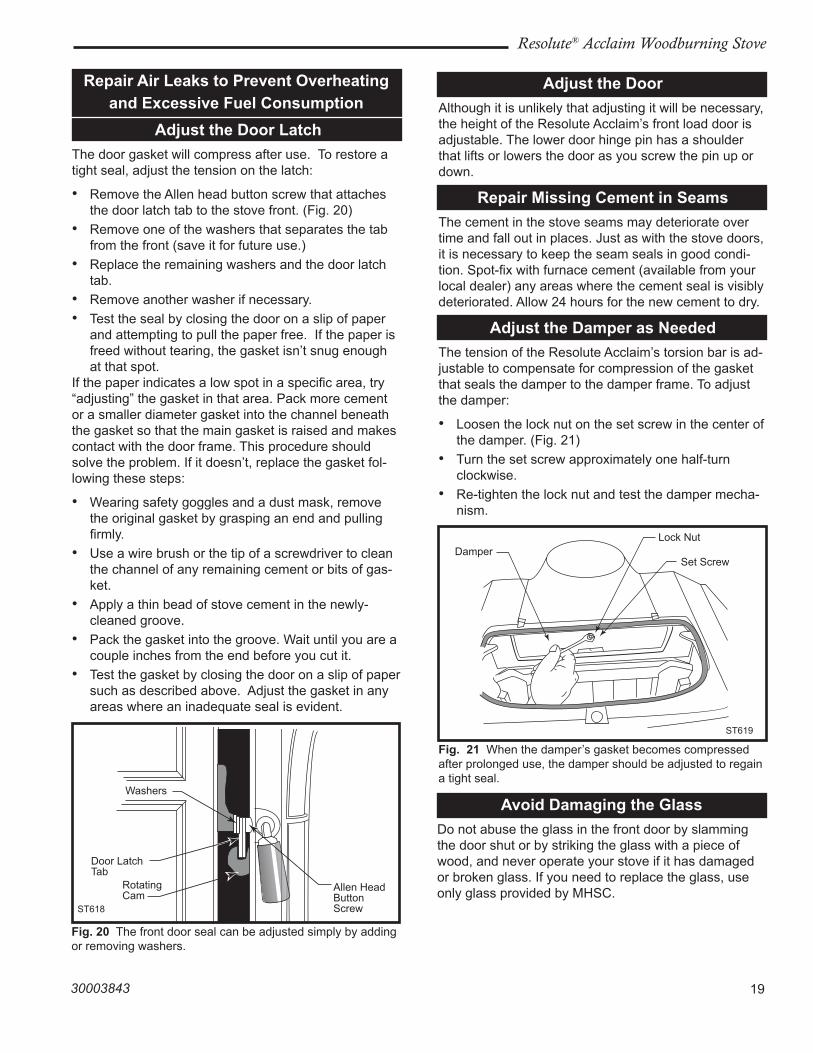
Adjust the Door latch The door gasket will compress after use. To restore a tight seal, adjust the tension on the latch:
• Remove the Allen head button screw that attaches the door latch tab to the stove front. (Fig. �0)
• Remove one of the washers that separates the tab from the front (save it for future use.)
• Replace the remaining washers and the door latch tab.
• Remove another washer if necessary.• Test the seal by closing the door on a slip of paper
and attempting to pull the paper free. If the paper is freed without tearing, the gasket isn’t snug enough at that spot.
If the paper indicates a low spot in a specific area, try “adjusting” the gasket in that area. Pack more cement or a smaller diameter gasket into the channel beneath the gasket so that the main gasket is raised and makes contact with the door frame. This procedure should solve the problem. If it doesn’t, replace the gasket fol-lowing these steps:
• Wearing safety goggles and a dust mask, remove the original gasket by grasping an end and pulling firmly.
• Use a wire brush or the tip of a screwdriver to clean the channel of any remaining cement or bits of gas-ket.
• Apply a thin bead of stove cement in the newly-cleaned groove.
• Pack the gasket into the groove. Wait until you are a couple inches from the end before you cut it.
• Test the gasket by closing the door on a slip of paper such as described above. Adjust the gasket in any areas where an inadequate seal is evident.
Adjust the DoorAlthough it is unlikely that adjusting it will be necessary, the height of the Resolute Acclaim’s front load door is adjustable. The lower door hinge pin has a shoulder that lifts or lowers the door as you screw the pin up or down.
Repair Missing Cement in SeamsThe cement in the stove seams may deteriorate over time and fall out in places. Just as with the stove doors, it is necessary to keep the seam seals in good condi-tion. Spot-fix with furnace cement (available from your local dealer) any areas where the cement seal is visibly deteriorated. Allow �4 hours for the new cement to dry.
Adjust the Damper as Needed The tension of the Resolute Acclaim’s torsion bar is ad-justable to compensate for compression of the gasket that seals the damper to the damper frame. To adjust the damper:
• Loosen the lock nut on the set screw in the center of the damper. (Fig. �1)
• Turn the set screw approximately one half-turn clockwise.
• Re-tighten the lock nut and test the damper mecha-nism.
Avoid Damaging the glassDo not abuse the glass in the front door by slamming the door shut or by striking the glass with a piece of wood, and never operate your stove if it has damaged or broken glass. If you need to replace the glass, use only glass provided by MHSC.
ST618Adjust door latch1/01
Door Latch Tab
Rotating Cam
Washers
Allen Head Button ScrewST618
Fig. 20 The front door seal can be adjusted simply by adding or removing washers.
ST619 �Damper adjustment1/01
DamperLock Nut
Set Screw
ST619
Fig. 21 When the damper’s gasket becomes compressed after prolonged use, the damper should be adjusted to regain a tight seal.
�0
Resolute® Acclaim Woodburning Stove
30003843
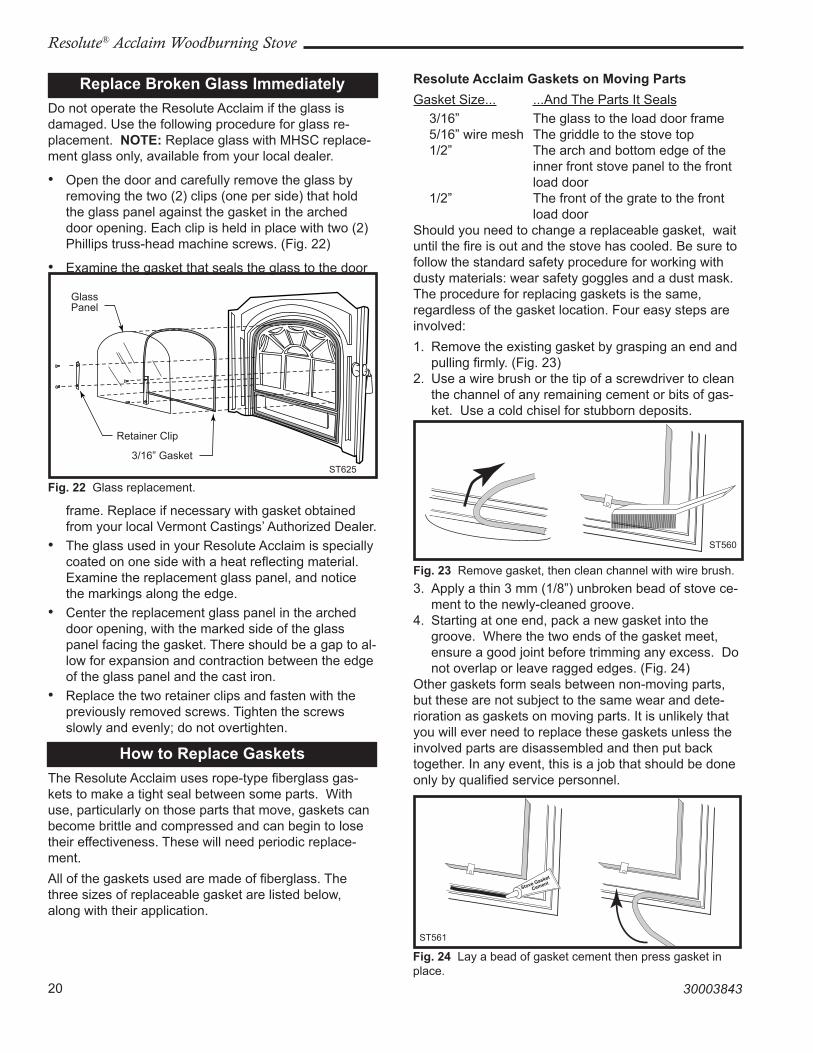
Replace broken glass immediatelyDo not operate the Resolute Acclaim if the glass is damaged. Use the following procedure for glass re-placement. NoTE: Replace glass with MHSC replace-ment glass only, available from your local dealer.
• Open the door and carefully remove the glass by removing the two (�) clips (one per side) that hold the glass panel against the gasket in the arched door opening. Each clip is held in place with two (�) Phillips truss-head machine screws. (Fig. ��)
• Examine the gasket that seals the glass to the door
frame. Replace if necessary with gasket obtained from your local Vermont Castings’ Authorized Dealer.
• The glass used in your Resolute Acclaim is specially coated on one side with a heat reflecting material. Examine the replacement glass panel, and notice the markings along the edge.
• Center the replacement glass panel in the arched door opening, with the marked side of the glass panel facing the gasket. There should be a gap to al-low for expansion and contraction between the edge of the glass panel and the cast iron.
• Replace the two retainer clips and fasten with the previously removed screws. Tighten the screws slowly and evenly; do not overtighten.
how to Replace gaskets The Resolute Acclaim uses rope-type fiberglass gas-kets to make a tight seal between some parts. With use, particularly on those parts that move, gaskets can become brittle and compressed and can begin to lose their effectiveness. These will need periodic replace-ment.All of the gaskets used are made of fiberglass. The three sizes of replaceable gasket are listed below, along with their application.
Resolute Acclaim gaskets on Moving partsGasket Size... ...And The Parts It Seals 3/16” The glass to the load door frame 5/16” wire mesh The griddle to the stove top 1/�” The arch and bottom edge of the inner front stove panel to the front load door 1/�” The front of the grate to the front load door Should you need to change a replaceable gasket, wait until the fire is out and the stove has cooled. Be sure to follow the standard safety procedure for working with dusty materials: wear safety goggles and a dust mask. The procedure for replacing gaskets is the same, regardless of the gasket location. Four easy steps are involved:1. Remove the existing gasket by grasping an end and
pulling firmly. (Fig. �3)�. Use a wire brush or the tip of a screwdriver to clean
the channel of any remaining cement or bits of gas-ket. Use a cold chisel for stubborn deposits.
3. Apply a thin 3 mm (1/8”) unbroken bead of stove ce-ment to the newly-cleaned groove.
4. Starting at one end, pack a new gasket into the groove. Where the two ends of the gasket meet, ensure a good joint before trimming any excess. Do not overlap or leave ragged edges. (Fig. �4)
Other gaskets form seals between non-moving parts, but these are not subject to the same wear and dete-rioration as gaskets on moving parts. It is unlikely that you will ever need to replace these gaskets unless the involved parts are disassembled and then put back together. In any event, this is a job that should be done only by qualified service personnel.
ST559 �Remove �gasket �11/30/00 djt
Fig. 23 Remove gasket, then clean channel with wire brush.
ST560
ST559 �Remove �gasket �11/30/00 djt
CementStove Gasket
ST561
Fig. 24 Lay a bead of gasket cement then press gasket in place.
ST625Res AcclaimGlass replace10/1/02 djt
Glass Panel
Retainer Clip
3/16” GasketST6�5
Fig. 22 Glass replacement.
�1
Resolute® Acclaim Woodburning Stove
30003843
gaskets on Resolute Acclaim Stationary parts
5/16” Between the flue collar and flue collar extension and the stove’s top and back: 5/16” The seal between the upper fireback corners and the lower fireback: 5/16” The seal between the underside of the top plate and the upper edge of the upper fireback 5/16” The damper plate to the reverse side of upper fireback 5/16” The seal between the sealing plates and the vertical ribs of the stove backNoTE: When replacing this last gasket after removing the upper fireback, place two (�) cap screws into the upper fireback mounting holes before you cement the channels and replace the gasket. The new gasket will run inside the cap screws. Remove the screws after the gasket cement dries.
Replacing the Door gaskets• Lift off the door as described previously. Lay it face
down on a padded surface.• Follow steps 1-4 on gasket replacement as de-
scribed previously.
Replacing the griddle gasket• To replace either the damper or the griddle gasket,
follow Steps 1-4 on replacing gaskets described previously.
Replace broken FirebricksIf a firebrick breaks, replace only with Vermont Cast-ings’ custom firebricks, available from your local dealer. MHSC custom firebricks contain metal reinforcements that maintain the brick’s integrity if it cracks. A brick that is cracked but still intact does not need to be replaced.
A Clean Chimney System ss Safer and Works better
learn to Recognize Creosote and Soot When you first begin using the stove, check daily for creosote — a substance that can look like either thick tar or black, crisp flakes. Experience will show how often you need to clean to be safe. The frequency may even vary during the year. In the colder months when the hottest fires producing the least creosote are burned, you may need to clean less frequently. Dur-ing the warmer months when creosote is more likely to result from cooler-burning fires and weaker draft, more frequent cleaning may be necessary.At the very least, inspect the chimney and chimney connector twice monthly. Clean if necessary. Let the stove cool to check if a buildup of creosote or soot has occurred. If a significant layer of creosote has accumu-lated— 3 mm (1/8”) or more—it should be removed to reduce the risk of a chimney fire. Failure to keep the chimney and connector system clean can result in a serious chimney fire. The conditions for a chimney fire develop like this: When wood is burned slowly, it produces tar and other organic vapors, which combine with expelled moisture to form creosote. The creosote vapors condense in the relatively cool chimney flue of a slow-burning fire. As a result, creosote residue accumulates on the flue lining.
ST626 �Res Acclaimdoor gasket10/1/02 djt
Stove front to door: 1/�” gasket
Grate to stove front: 1/�” gasket Glass to door frame:
3/16” gasketST6�6
Fig. 25 Two different gasekt sizes are used to seal the front door.
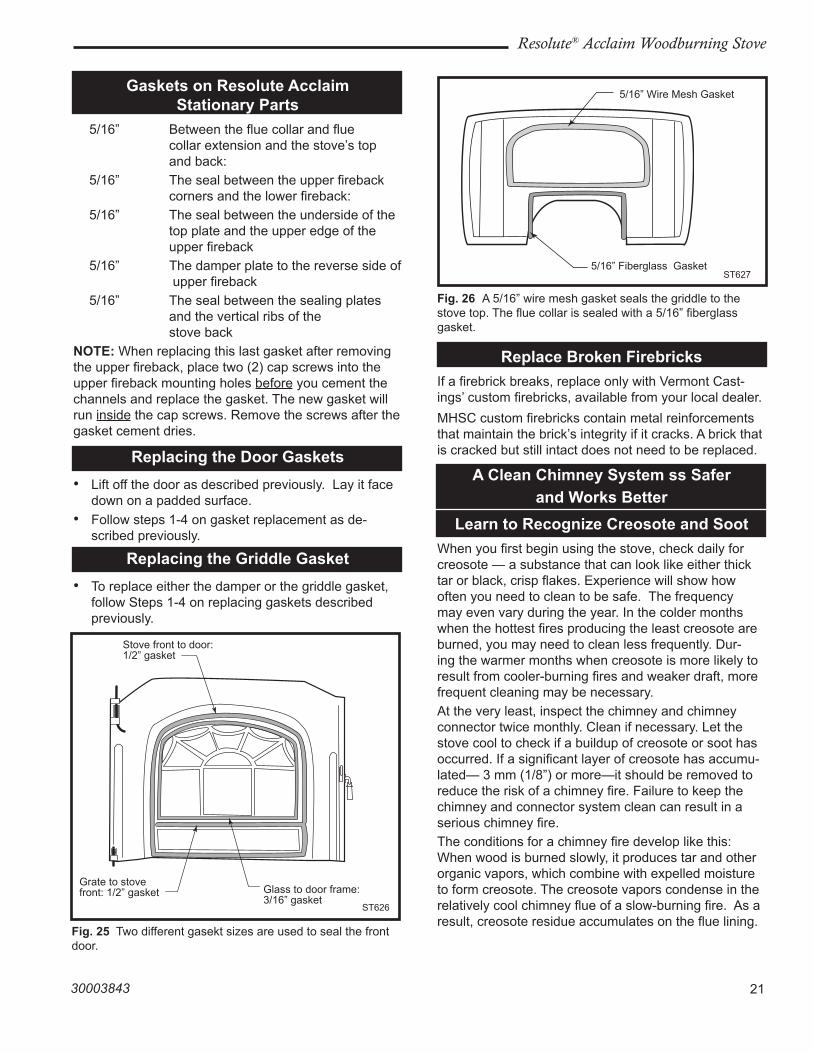
ST627 �griddle gasket2/6/01
5/16” Wire Mesh Gasket
5/16” Fiberglass GasketST6�7
Fig. 26 A 5/16” wire mesh gasket seals the griddle to the stove top. The flue collar is sealed with a 5/16” fiberglass gasket.
��
Resolute® Acclaim Woodburning Stove
30003843
When ignited, this creosote makes an extremely hot fire within the flue system which can damage the chimney and overheat adjacent combustible material.To reduce the amount of creosote that may form, re-member to provide adequate air for combustion and to strive for small, intense fires rather than large, smolder-ing ones.You can never be too safe. Contact your local fire authority for information on what to do in the event of a chimney fire, and have a clearly understood plan on how to handle one.
inspect the Chimney Connector and Chimney Twice Monthly and
Clean as RequiredLet the stove cool completely before you inspect the chimney. Then, use a strong light, and sight up through the flue collar into the chimney flue. If it is not possible to inspect the flue system this way, the stove must be disconnected to provide adequate viewing. Clean the chimney using a specially designed chim-ney cleaning brush, the same size and shape as the flue liner, attached to flexible fiberglass rods designed for this purpose. Run the brush up and down the liner so that any deposits fall to the bottom of the chimney where they can be removed through the clean-out door. The chimney connector should be cleaned by discon-necting the sections, taking them outside, and remov-ing any deposits with a stiff wire brush. Reinstall the connector sections after cleaning, being sure to secure the individual sections with three sheet metal screws per section.If you are unable to inspect and/or clean the chimney system yourself, contact your local dealer or hire a qualified chimney sweep in your area to do the job.
Resolute Acclaim Maintenance Schedule
The stove and chimney system should be inspected and maintained by a qualified engineer and include the following:
Stove:Daily:• Ashes should be removed before they reach the top
of the ash pan. Check at least once a day.• Keep the area around the stove clear of any com-
bustible material.Two Months:
• Check door handle to be sure it is working properly. Gasketing becomes compressed after a period of time.
• Check leg bolts and heat shield screws; tighten if necessary.
• Vacuum exhaust area on either side of secondary combustion package.
yearly Spring Cleaning:
• Check gasketing for wear, and replace if necessary.• Vacuum exhaust area on either side of secondary
combustion package.• Remove ashes from the ash pan and replace with a
moisture absorbing material (such as kitty litter) to keep the interior of the stove dry.
• Clean the dust from the inner sides of bottom, rear or pipe heat shields if your stove is equipped with them. Clean surfaces are better heat reflectors than dirty surfaces.
• Touch up the black paint.
Chimney Connector:Two Weeks:• Inspect the chimney connector and chimney. Clean
if necessary.
Two Months:• Inspect the chimney and chimney connector. Pay
particular attention to the horizontal runs of chimney connector, and the elbows. Clean the system if nec-essary.
yearly Spring Cleaning:
• Disassemble the chimney connector and take it outdoors for inspection and cleaning. Replace weak sections of connector.
• Inspect the chimney for signs of deterioration. Re-pairs to a masonry chimney should be made by a professional mason. Replace damaged sections of prefabricated chimney. Your local dealer or a chim-ney sweep can help determine when replacement is necessary.
• Thoroughly clean the chimney.
�3
Resolute® Acclaim Woodburning Stove
30003843
MHSC reserves the right to make changes in design, materials, specifications, prices and discontinue colors and products at any time, without notice.
1
2
3
6 7
8
4 5
9
11
10
12
14
13
15 16
17
18
25
24
19
20 21
22
23
26
27
53
54
55
52
51
32b
35
37
36
33
32a
31
29
30
34 38
56
57 59
58
62
63
41 61
58
28
65
66
39
40
41
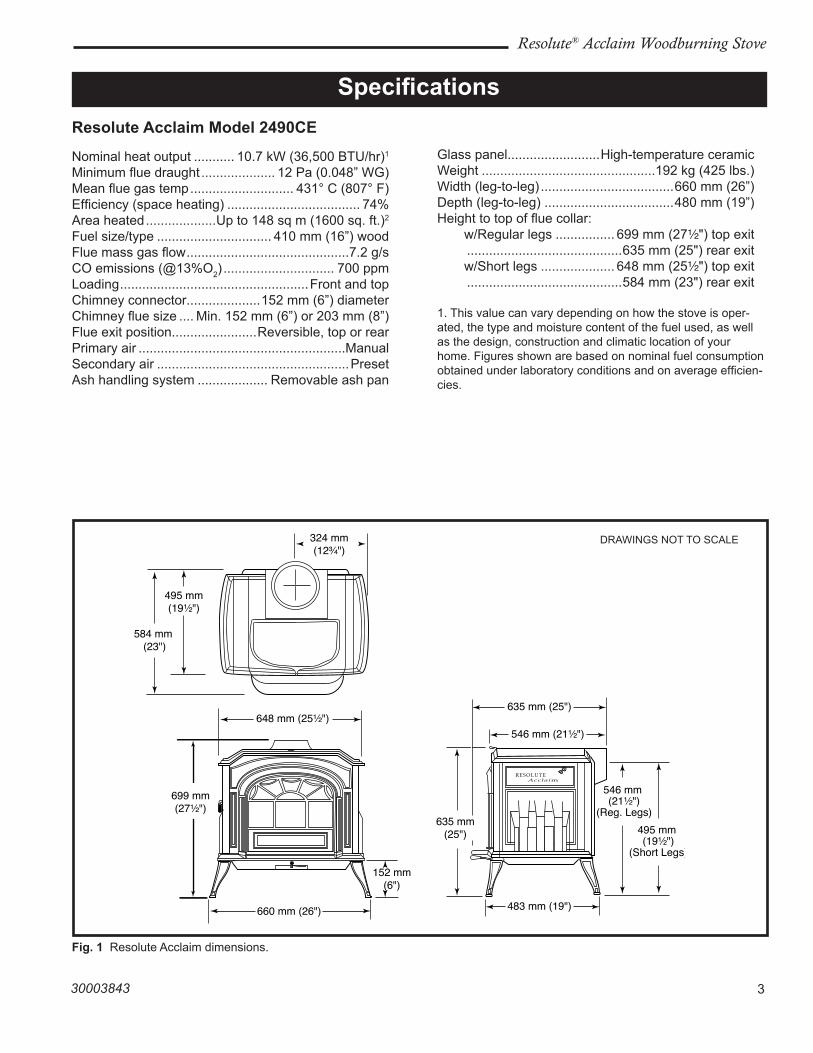
0893 Resolute Acclaim 2490 parts 8/02
83
68
67
69
64 7
7
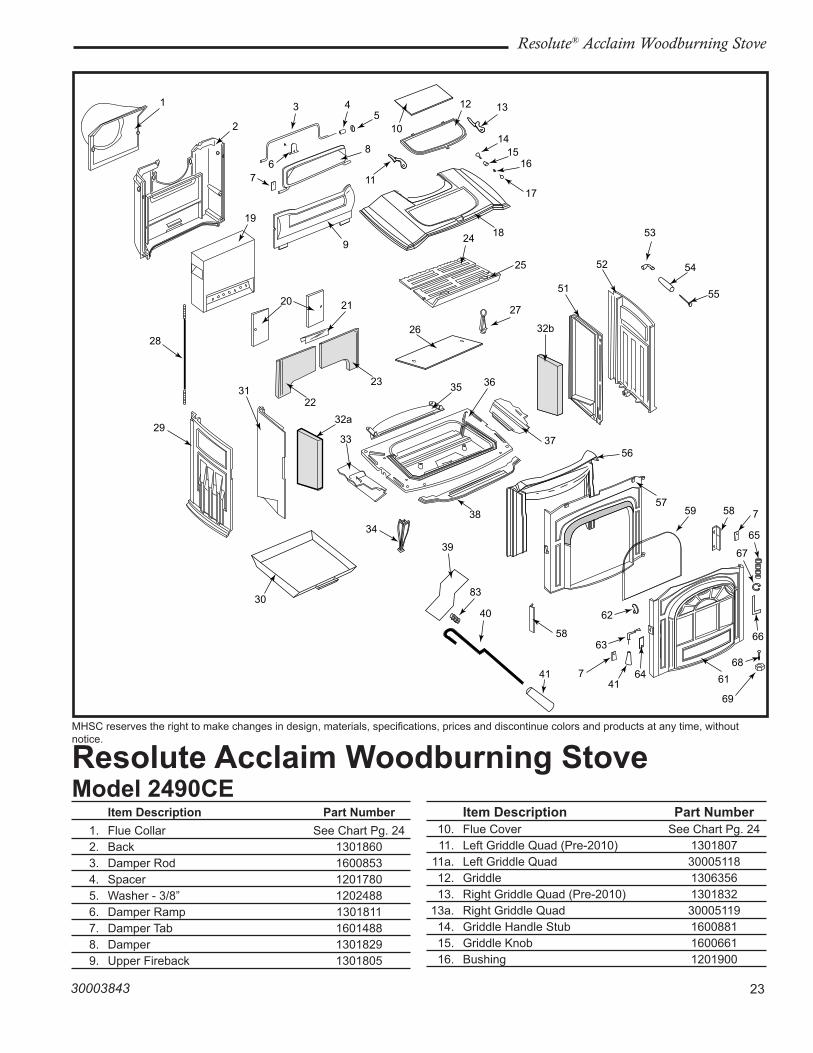
Resolute Acclaim Woodburning StoveModel 2490CE item Description part Number item Description part Number 1. Flue Collar See Chart Pg. �4 �. Back 1301860 3. Damper Rod 1600853 4. Spacer 1�01780 5. Washer - 3/8” 1�0�488 6. Damper Ramp 1301811 7. Damper Tab 1601488 8. Damper 13018�9 9. Upper Fireback 1301805
10. Flue Cover See Chart Pg. �4 11. Left Griddle Quad (Pre-�010) 1301807 11a. Left Griddle Quad 30005118 1�. Griddle 1306356 13. Right Griddle Quad (Pre-�010) 130183� 13a. Right Griddle Quad 30005119 14. Griddle Handle Stub 1600881 15. Griddle Knob 1600661 16. Bushing 1�01900

�4
Resolute® Acclaim Woodburning Stove
30003843
Resolute Acclaim Woodburning StoveModel 2490CE (continued) item Description part Number item Description part Number 17. Griddle Handle Screw 1�01308 18. Top See Chart Pg. �4 19. Combustion Package 160�497 �0. Sealing Plates (�) 1301859 �1. Arch Brick Retainer 1600154 ��. Left Arch Brick 1600151 �3. Right Arch Brick 160015� �4. Rear Grate 1301851 �5. Front Grate 130185� �6. Pit Plate 1301804 �7. Andiron (�) 1301806 �8. Tie Rod (4) 1601640 �9. Left End See Chart Pg. �4 30. Ash Pan 5005775 31. Left Inner Side 1301855 3�a. Left Side Firebrick 1600153 3�b. Right Side Firebrick 30004689 33. Left Shoulder Plate 1301863 34. Leg (4) See Chart Pg. �4 35. Package Support Plate 1301809 36. Bottom 1301854 37. Right Shoulder Plate 1301864
38. Ashlip See Chart Pg. �4 39. Air Valve 1301814 40. Air Valve Shaft 16006�1 41. Air Valve Handle / Door Handle 1600663 51. Right Inner Side 1301856 5�. Right End See Chart Pg. �4 53. Damper Handle Stub w/ Set Screw 3000�7�0 54. Damper Handle 1600664 55. Damper Handle Screw 1�01310 56. Air Manifold 1301803 57. Front 1301861 58. Glass Retainer (�) 1601399 59. Glass 14011�0 61. Door See Chart Pg. �4 6�. Door Hook 1600155 63. Door Handle Shaft 16006�3 64. Latch Retainer 1�01843 65. Compression Spring 1600551 66. Upper Door Pin 1600550 67. C-Clip 1600553 68. Pin, Hinge Bottom 1600419 69. Nut, Hex 5/16-18 1�03�79
Shell Enamel parts - Resolute Acclaim Enamel left Right Flue Flue Color Top Side Side Collar Cover Ashlip Door leg Classic 130186� 1301857 1301858 1301816 1301817 1301819 1301865 1301833 Biscuit 30003118 30003119 300031�0 300031�1 300031�� 30003117 300031�3 30003116 Bordeaux �3�186� �3�1857 �3�1858 �3�1816 �3�1817 �3�1819 �3�1865 �3�1833 Brown Majolica 30004887 30004888 30004889 30004890 30004891 30004886 3000489� 30004885 Chestnut Brown 300031�7 300031�8 300031�9 30003130 30003131 300031�6 3000313� 300031�5 Ebony 30003136 30003137 30003138 30003139 30003140 30003135 30003141 30003134 Forest Green �31186� �311857 �311858 �311816 �311817 �311819 �311865 �311833 Midnight Blue �37186� �371857 �371858 �371816 �371817 �371819 �371865 �371833 Sand 13�186� 13�1857 13�1858 13�1816 13�1817 13�1819 13�1865 13�1833 Suede Brown 3000�560 3000�561 3000�56� 3000�563 3000�564 3000�559 3000�565 3000�558 VT. Classic Green 30003145 30003146 30003147 30003148 30003149 30003144 30003150 30003143

�5
Resolute® Acclaim Woodburning Stove
30003843

�6
Resolute® Acclaim Woodburning Stove
30003843
�7
Resolute® Acclaim Woodburning Stove
30003843
Warranty limited 3 year WarrantyMHSC warrants that this woodburning stove will be free of defects in material and workmanship for a period of three years from the date you receive it, except that the catalyst, thermostat assembly, handles, glass door panels, cement, and gasketing shall be warranted as described below.MHSC will repair or replace, at its option, any part found to be defective upon inspection by a Vermont Castings, Authorized Dealer. The cus-tomer must return the defective part or the stove, with shipping prepaid, to the Authorized Dealer or pay for any Authorized Dealer in-home travel fees or service charges for in-home repair work. It is the dealer’s option whether the repair work will be done in the customer’s home or in the dealer’s shop. If, upon inspection, the damage is found to be the fault of the manufacturer, repairs will be authorized at no charge to the customer for parts and/or labor.Any woodburning stove or part thereof that is repaired or replaced dur-ing the limited warranty period will be warranted under the terms of the limited warranty for a period not to exceed the remaining term of the original limited warranty or six (6) months, whichever is longer.
limited 1 year WarrantyThe following parts of the woodburning stove are warranted to be free of defects in material and workmanship for a period of one year from the date you receive it: The thermostat assembly, handles, glass door panels, cement, and gasketing. Any of these items found to be defec-tive will be repaired or replaced at no charge, upon the return of the part with postage prepaid to a Vermont Castings Authorized Dealer.Any part repaired or replaced during the limited warranty period will be warranted under the terms of the limited warranty for a period not to exceed the remaining term of the original limited warranty or six (6) months, whichever is longer.
limited Catalyst WarrantyThe catalyst will be warranted for a six year period as follows: If the original catalyst or a replacement catalyst proves defective or ceases to maintain 70% of its particulate emission reduction activity (as measured by an approved testing procedure) within �4 months from the date the stove is received, the catalyst itself will be replaced free. From �5 - 7� months a pro-rated credit will be allowed against a re-placement catalyst and the cost of labor necessary for its installation at the time of replacement.For stove purchases made after June 30, 1990, a third year (�5 - 36 months) of no charge replacement will be made when combus-tor failure is due to thermal degradation of the substrate (crumbling of ceramic material). The customer must pay for any in-home travel fees, service charges, or transportation costs for returning the stove to the Authorized Dealer. Amount of Time Credit Towards Since Purchase Replacement Cost 0 - �4 months 100% �5 - 36 months 50 % 37 - 48 months 30% 49 - 60 months �0% 61 - 7� months 10%Any replacement catalyst will be warranted under the terms of the catalyst warranty for the remaining term of the original warranty. The purchaser must provide the following information in order to receive a replacement catalyst under the terms of this limited warranty:
1. Name, address and telephone number.�. Proof of original purchase date.3. Date of failure of catalyst.4. Any relevant information or circumstances regarding determina-
tion of failure.5. In addition, the owner must return the failed catalyst.
Exclusions & limitations1. This warranty is transferable; however, proof of original retail pur-
chase is required.�. This warranty does not cover misuse of the stove. Misuse includes
overfiring which will result if the stove is used in such a manner as to cause one or more of the plates to glow red. Overfiring can be identified later by warped plates and areas where the paint pigment has burned off. Overfiring in enamel fireplaces is identified by bub-bling, cracking, chipping and discoloration of the porcelain enamel finish. MHSC offers no warranty on chipping of enamel surfaces. Inspect your woodburning stove prior to accepting it for any damage to the enamel.
3. This warranty does not cover misuse of the stove as described in the Owner’s Guide, nor does it cover an stove which has been modified unless authorized by a MHSC representative in writing. This warranty does not cover damage to the stove caused by burn-ing salt saturated wood, chemically treated wood, or any fuel not recommended in the Owner’s Guide.
4. This warranty does not cover a stove repaired by someone other than a Vermont Castings Authorized Dealer.
5. Damage to the unit while in transit is not covered by this warranty but is subject to a claim against the common carrier. Contact Vermont CastingsAuthorized Dealer from whom you purchased your stove or MHSC if the purchase was direct. (Do not operate the stove as this may negate the ability to process the claim with the carrier.)
6. Claims are not valid where the installation does not conform to local building and fire codes or, in their absence, to the recommendations in our Owner’s Guide.
7. The salt air environment of coastal areas, or a high-humidity en-vironment, can be corrosive to the porcelain enamel finish. These conditions can cause rusting of the cast iron beneath the porcelain enamel finish, which will cause the porcelain enamel finish to flake off. This warranty does not cover damage caused by a salt air or high-humidity environment.
8. MHSC shall have no obligation to enhance or update any unit once manufactured.
IN NO EVENT SHALL MHSC BE LIABLE FOR INCIDENTAL AND CONSEQUENTIAL DAMAGES. ALL IMPLIED WARRANTIES, INCLUD-ING THE IMPLIED WARRANTIES OF MERCHANTABILITY AND FITNESS, ARE LIMITED TO THE DURATION OF THIS WRITTEN WARRANTY. THIS WARRANTY SUPERCEDES ALL OTHER ORAL OR WRITTEN WARRANTIES.Some states do not allow the exclusion or limitations of incidential and consequential damages or limitations on how long an implied warranty lasts, so the above limitations may not apply to you. This warranty gives you specific rights and you may have other rights which vary from state to state.
how to obtain ServiceIf a defect is noted within the warranty period, the customer should contact a Vermont Castings Authorized Dealer or MHSC if the purchase was direct with the following information:
1. Name, address, and telephone number of the purchaser.�. Date of purchase.3. Serial number from the label on the back.4. Nature of the defect or damage.5. Any relevant information or circumstances, e.g., installation,
mode of operation when defect was noted.A warranty claim will then start in process. MHSC reserves the right to withhold final approval of a warranty claim pending a visual inspection of the defect by authorized representatives.

MhSC149 Cleveland Drive • Paris, Kentucky 40361
www.mhsc.com