Embed Size (px)
Citation preview

RELEASE HYPNOSIS
FACEBOOK LIVE WEBINAR
– September 2017
Lawrence Akers
BUILDING A HYPNOTHERAPY MIXER
What is a hypnotherapy mixer?
Over the past two years of running the 'Recording for Hypnotherapists Workshop', I've
often by asked if I know of a way that a hypnotherapist could deliver their session to their
clients where both the client and the hypnotherapist wore a headset, allowing the ability to
play background music, or binaural beats, or to simply reduce the amount of noise
happening around the clinic room. The hypnotherapy mixer is this very device.
This could be particularly useful in environments that can be rather noisy, helping to block
out any other background noises. I know that personally, in my clinic room space, noises
from neighbouring rooms, the outside lifts, people walking past and the noise of
neighbouring businesses can be a real issue to contend with at times. While you could
offer the suggestion during hypnosis of ignoring or utilising the 'other' noises ("In fact, the
noises will only help you to go deeper still..."), it can still be a real conscious distraction for
some people.
There are obviously other benefits to utilising a hypnotherapy mixer with your clients. It
helps to create focus for your client, as well as adding an additional professional layer to
your service. If you purchase a mixer with some equalisation controls, you can also adjust
the bass and treble of your voice.
Today's online workshop is all about how I went on a mission to discover how I could build
my own hypnotherapy mixer inexpensively while still creating something that can truly
deliver results. Of course, doing a search on Google will reveal many that you can buy
pre-made or that are specially made for hypnotherapy – and these might be better suited
to you. However, what I will show you today is not going to break the bank.
What you're going to need.
• Behringer Xenyx 302USB PA Mixer 3 Channel
http://www.music-group.com/Categories/Behringer/Mixers/Analog-
Mixers/302USB/p/P0ADV
• 2 x 3.5mm M to F/F line splitters
https://www.officeworks.com.au/shop/officeworks/p/comsol-3-5mm-m-to-f-f-audio-
splitter-co35mffsp
• 2 x Verbatim Urban Headgear Multimedia Stereo Headset with Microphone
https://www.officeworks.com.au/shop/officeworks/p/verbatim-multimedia-headset-
vb41646
• A laptop computer
I'm working on the assumption here that most people are going to have a laptop computer;
not including that cost, you'll find that the total cost of the various parts listed comes to
around AUS$140! Not too bad! If you don't have a laptop and wish to play music, you
may need to buy a small MP3 player and an appropriate connecting cable. The majority
of smart phones and MP3 devices are still using a 3.5mm jack, so you would need a cable
that connects the RCA inputs on the Xenyx 302USB to the 3.5mm input on your playing
device (https://www.officeworks.com.au/shop/officeworks/p/comsol-3-5mm-to-2-x-rca-
cable-1m- co352r01)
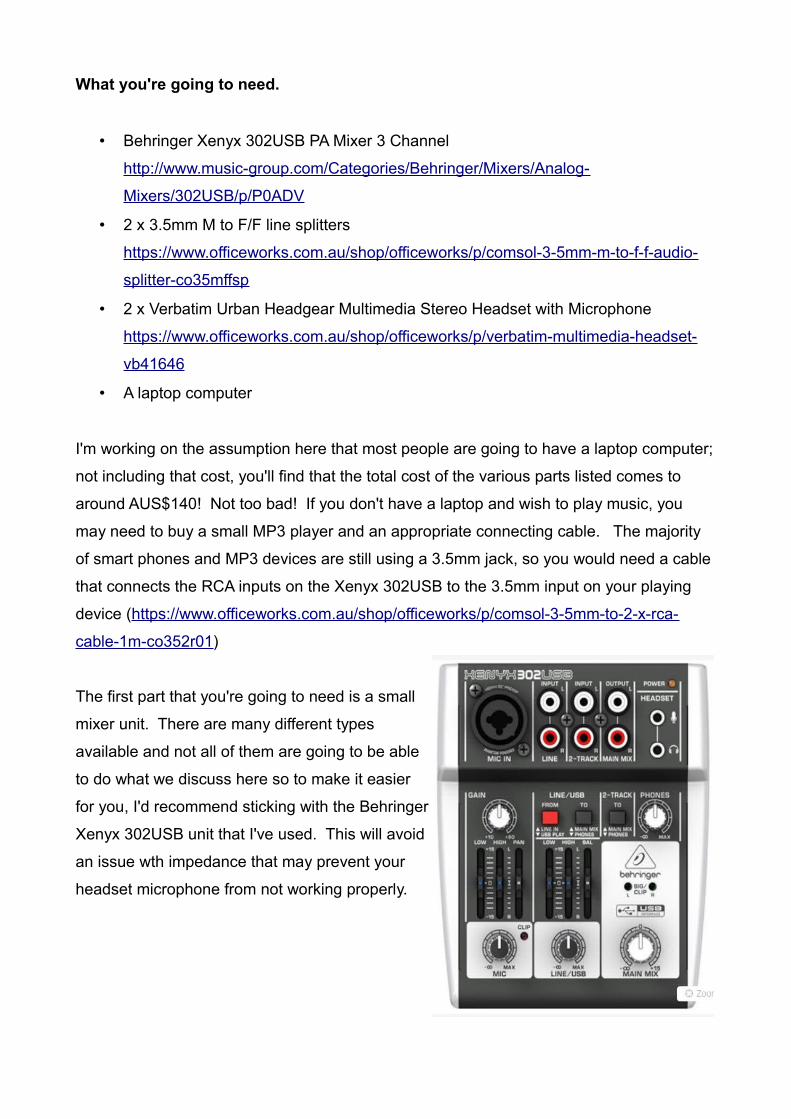
The first part that you're going to need is a small
mixer unit. There are many different types
available and not all of them are going to be able
to do what we discuss here so to make it easier
for you, I'd recommend sticking with the Behringer
Xenyx 302USB unit that I've used. This will avoid
an issue wth impedance that may prevent your
headset microphone from not working properly.

Putting all the pieces together.
Now comes the fun part of placing all of the pieces together. Firstly, take one of the
3.5mm M to F/F line splitters and place that into the headphones line.
Then take your second 3.5mm M to F/F line splitter and place that into the microphone line
directly above it.
Keeping in mind that your microphone is always going to be colour coded pink and your
headphones are always going to be green, take your first headset and plug your
headphones into one of the bottom plugs and your microphone into one of your top plugs.

As I'm sure you're guessing, you can repeat the same with your second headset and the
remaining plugs.
Now I know that when I was researching this, I was repeatedly told by people that you
could easily split the headphone line but you couldn't split the microphone line due to the
voltage required to run the microphones. In my experimentation, this didn't prove to be
true.
Is the quality going to vary? Possibly, however the reality is that it is still going to provide a
better experience for your clients if it helps to reduce unwanted noise and to get them to
focus internally. Additionally, many people who use a set up like this state that it helps
their voice over a long day.
Now that we have our headsets plugged in set up, we will look at connecting it to the
computer to act as our MP3 player. One of the exciting things about connecting a USB
mixer up to a computer is that it will double as an audio soundcard for you. What does this
mean? It means that, if you can download and install a free program like Audacity (which
is also the key program that we work with in the 'Recording for Hypnotherapists
Workshop'), you could utilise that to both PLAY your background music and, if you wanted,
RECORD your session at the same time.
You can download Audacity here: http://www.audacityteam.org/home/
Also consider this; Audacity is a multi-track digital audio workstation, so it means that
you're not limited to just playing one music track. Imagine for a moment that you have a
client who tells you how much they love the ocean and the beach. You might consider
straight away utilising that as a guided visualisation. Imagine what it would be like for your
client if you had a background track ready to go that consisted of the background music
AND some sound effects of the sea. This is where your creativity with Audacity prior to
seeing your clients and utilising it with this technology can really take your sessions to a
whole new level for your clients completely. You might spend some time creating a few
different variations of music with different background environments that you can have
ready to go and then, prior to beginning your session, load up the appropriate background
music and either play it from your computer OR record the session directly to Audacity.
Pretty exciting, yes?
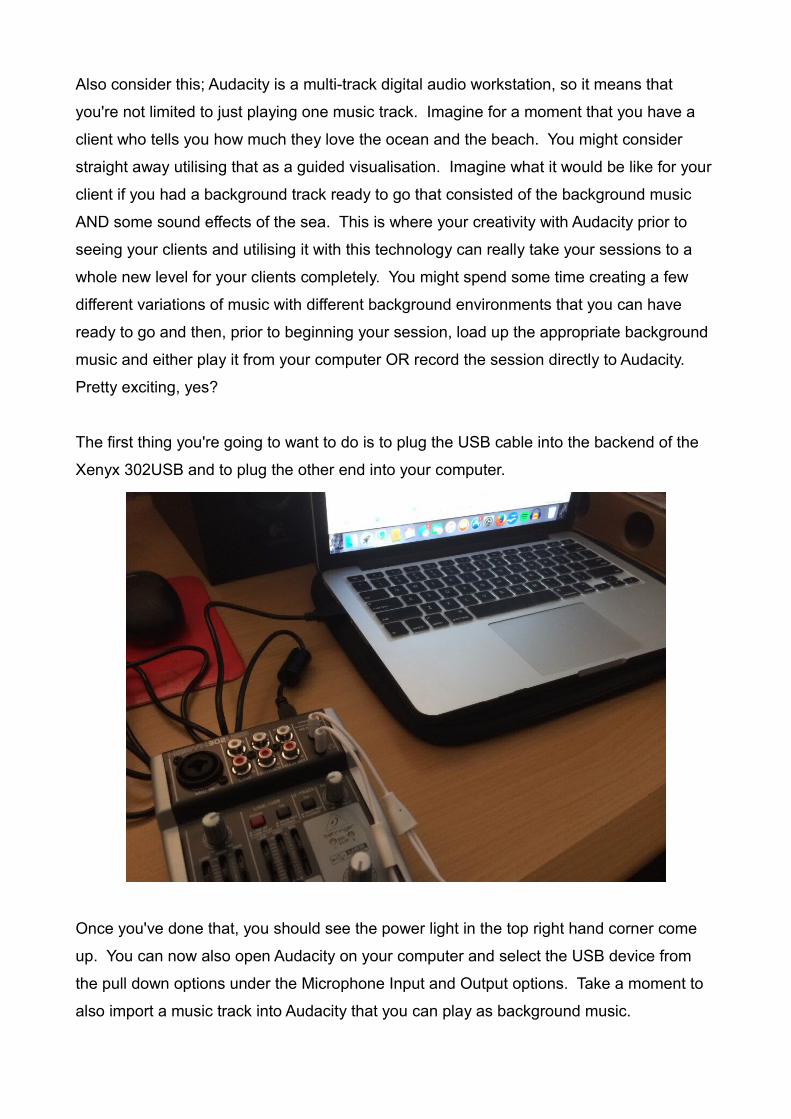
The first thing you're going to want to do is to plug the USB cable into the backend of the
Xenyx 302USB and to plug the other end into your computer.
Once you've done that, you should see the power light in the top right hand corner come
up. You can now also open Audacity on your computer and select the USB device from
the pull down options under the Microphone Input and Output options. Take a moment to
also import a music track into Audacity that you can play as background music.
Now that you've done that, we're up to the 'mixing' part where we get to play around with
the knobs and sliders on the Behringer Xenyx 302USB.
Let's begin by exploring what some of the knobs and dials are. For many USB mixers with
the headset option, including the Xenyx 302USB, when you have your headset
microphone plugged in, that it become controllable by the Microphone and Gain knobs on
the left hand side of the device. You'll also notice a basic equaliser there which can help to
reduce the treble and bass, as well as a pan left / right slider. In my experience, I've found
that reducing the treble can help to reduce some of the background hiss as well, although
you might like to play with that to see what you feel works best.
Keep in mind that, as you've split the lines, whatever you hear is going to be the same as
what your client hears through their headset as well. One thing to keep in mind with the
Verbatim Urban Headgear headsets is that they have a volume slider of their own on each
headset and if you accidentally have it turned down, you may find that when it comes to
adjusting the Mic and Gain knobs to find your level, you might experience feedback. With
that in mind, it is always going to be best to have your mixer set up and ready to go before
a client comes in as well as asking them when they initially put the headset on if the
volume is acceptable for them. You'll also need to indicate what volume should be going
through to your headphones by adjusting the PHONES knob on the right hand side of the
unit. The MAIN MIX knob is not going to turn on any sound to your headphones as this is
the knob that would go out to your speakers if they were connected.

To set up your headsets, adjust your Mic and Gain knobs until you are at a volume that is
acceptable for you without becoming too loud or too much background hiss. What you set
will be the same levels for both your headset and your clients headset so keep that in
mind. The settings below are what I found worked best for me.
In order for your computer to play music to the mixer, press the red button (marked FROM)
down to USB Play and the TO button down to Phones. You can now use the LINE / USB
knob (along with the equaliser and balance sliders) to adjust the volume for the music
coming through from your computer.
If you were connecting an MP3 player (or CD player or Tape Deck) up to your mixer, you
would connect it via the LINE RCA inputs (next to the MIC IN on the top left hand side) and
then press the red button up to Line In instead of USB. If you were choosing this option,
unless you were planning to record your session onto your computer in Audacity, you
might be better to power up the unit via the adapter that comes with it.

And that's really as hard as it gets to set up a basic but very practical USB mixer that can
be used to take your hypnotherapy sessions to a whole new place.
Want to know more about how to use this very same equipment to...
• Record your session
• Edit out mistakes
• Clean up background noise and hiss
• Add different effects
• Add background music
• Create binaural beats
• Explore different hypnotic recording techniques
Then why not come along to the next 'Recording For Hypnotherapists Workshop'!
When: Sunday October 22nd 2017
Where: Hypnotherapy HQ – 370 St Kilda Rd, Melbourne 3004
Time: 10:00am
Tickets available from Eventbrite - https://www.eventbrite.com.au/e/recording-for-
hypnotherapists-workshop-tickets-37052995507
Purchase your ticket before October 1st 2017 to get an early bird discount!
You'll also get as part of your investment:
• 100+ page manual
• Demonstration videos
• Discount on professional background music
• Access to the Recording for Hypnotherapists Workshop Facebook Group for on
going support.
For more information, check out the Release Hypnosis Website –
http://releasehypnosis.com.au/recording-for-hypnotherapists-workshop-october-2017/
Lawrence Akers
[email protected] – www.releasehypnosis.com.au