Embed Size (px)
Citation preview

APTA BTS-SS-RP-004-07 Approved 5/5/07
Copyright © 2007 by The American Public Transportation Association 1666 K Street, NW, Washington, DC, 20006-1215, USA No part of this publication may be reproduced in any form, in an electronic retrieval system or otherwise, without the prior written permission of The American Public Transportation Association.
Recommended Practice for Transit Bus Front and Rear Axle S-Cam Brake Reline
Approved February 1, 2007
APTA Bus Brake Working Group
Approved May 5, 2007
APTA Bus Standards Committee
Abstract: This recommended practice provides guidelines for performing a complete brake reline on
the front and rear axle of a bus with S-cam brakes. The practice includes the disassembly, cleaning,
inspection and assembly. This recommended practice is to be used in conjunction with the
manufacturer’s service manual.
It is recommended that all components be replaced equally on both wheel ends of the axle. Failure to
do so may affect braking performance.
Keywords: Anchor pins, brake shoes, S-cam bushings, brake adjuster, wheel bearings, spider, return
spring, wheel seals, brake shoe rollers, brake rebuild, brake reline, brake maintenance

APTA BTS-SS-RP-004-07 Approved 5/5/07
Copyright © 2007 APTA. All rights reserved. 2
Introduction
This Recommended Practice for Transit Bus Front/Rear Axle Brake Reline reflects the consensus
of the APTA Bus Standards Program members on the items, methods, and procedures that have
provided the best performance record based on the experiences of those present and participating in
meetings of the Program Task Forces and Working Groups. Recommended practices are voluntary,
industry-developed, and consensus-based practices that assist equipment suppliers, vehicle and
component manufacturers, and maintenance personnel in the construction, assembly, operation, and
maintenance of transit bus vehicles. Recommended practices may include test methodologies and
informational documents. Recommended practices are non-exclusive and voluntary; they are
intended to neither endorse nor discourage the use of any product or procedure. All areas and
items included therein are subject to OEM’s and manufacturers’ supplemental or
superseding recommendations. APTA recognizes that for certain applications, the practices, as
implemented by operating agencies, may be either more or less restrictive than those given in this
document.
This document is recommended for:
Individuals or organizations that inspect and maintain transit buses
Individuals or organizations that contract with others for the inspection and maintenance of
transit buses
Individuals or organizations that influence how transit buses are inspected and maintained

APTA BTS-SS-RP-004-07 Approved 5/5/07
Copyright © 2007 APTA. All rights reserved. 3
Table of Contents
1. Overview .................................................................................................................................................. 5
1.1 Scope ................................................................................................................................................................ 5
1.2 Purpose ............................................................................................................................................................ 5
2. References ................................................................................................................................................ 5
3. Definitions, abbreviations and acronyms ................................................................................................ 5
3.1 .......................................................................................................................................................................... 5
3.2 These terms are interchangeable: ..................................................................................................................... 5
4. Hazardous material warning .................................................................................................................... 6
5. Initial inspection ...................................................................................................................................... 7
5.1 Vehicle brake and maintenance history ........................................................................................................... 7
5.2 Overall Performance Based Brake Test ........................................................................................................... 7
5.3 Visual inspection.............................................................................................................................................. 8
5.4 Automatic brake adjuster maintenance, inspection and testing ..................................................................... 10
6. Removal of the wheels, hubs and drums ............................................................................................... 10
6.1 Front wheels, hubs and drums ....................................................................................................................... 10
6.2 Rear wheels, hub and drum ............................................................................................................................ 12
7. Foundation brake disassembly ............................................................................................................... 15
7.1 Inspect brake shoes before removal ............................................................................................................... 15
7.2 Disassemble the foundation brake ................................................................................................................. 15
7.3 Remove the brake adjuster, S-cam and bushings ........................................................................................... 15
8. Cleaning and inspection ......................................................................................................................... 17
8.1 Spider, spindle, and axle tube ........................................................................................................................ 17
8.2 Checking the spider alignment....................................................................................................................... 17
8.3 S-Cam inspection ........................................................................................................................................... 18
8.4 Springs and rollers ......................................................................................................................................... 18
8.5 Brake shoes .................................................................................................................................................... 18
8.6 Wheel bearing inspection ............................................................................................................................... 18
8.7 Drum .............................................................................................................................................................. 19
8.8 Hub/ABS tone ring ........................................................................................................................................ 19

APTA BTS-SS-RP-004-07 Approved 5/5/07
Copyright © 2007 APTA. All rights reserved. 4
9. Assembling the foundation brake .......................................................................................................... 19
9.1 Install S-cam bushings ................................................................................................................................... 19
9.2 Install S-cam seals ......................................................................................................................................... 20
9.3 Install anchor pin bushing .............................................................................................................................. 20
9.4 Install S-cam .................................................................................................................................................. 20
9.5 Install brake adjusters .................................................................................................................................... 21
9.6 Install brake shoes .......................................................................................................................................... 21
9.7 Install brake adjuster hardware ...................................................................................................................... 22
9.8 Install front wheel bearings, seals and hub assembly .................................................................................... 23
9.9 Install rear wheel bearings, seals and hub assembly ...................................................................................... 25
9.10 Brake adjustment ......................................................................................................................................... 26
10. Burnishing, testing, and final inspection ............................................................................................. 27
10.1 Burnishing .................................................................................................................................................... 27
10.2 Performance test .......................................................................................................................................... 27
10.3 Final inspection ............................................................................................................................................ 28

APTA BTS-SS-RP-004-07 Approved 5/5/07
Copyright © 2007 APTA. All rights reserved. 5
1. Overview
This document establishes a recommended practice for transit bus Front/Rear axle brake reline.
Individual operating agencies should modify these guidelines to accommodate their specific
equipment and mode of operation.
1.1 Scope
This recommended practice provides guidelines for disassembly, preparation, inspection, and
reassembly of the typical heavy-duty transit bus s-cam brakes. The components may be
different than pictured and some procedures will vary.
1.2 Purpose
The purpose of this document is to provide a uniform standard for heavy duty transit bus brake
reline.
2. References
This recommended practice is to be used in conjunction with the original equipment
manufacturer (OEM) and brake manufacturer service manuals.
3. Definitions, abbreviations and acronyms
3.1 Definitions
Brake Shoe Assembly – consists of the brake shoe and the brake block
MSDS - Material Safety Data Sheet.
OSHA – Occupational Safety and Health Administration
NIOSH – National Institute for Occupational Safety and Health
MSHA – Mine Safety and Health Administration
HEPA – High Efficiency Particulate Air
NLGI – National Lubricating Grease Institute
3.2 These terms are interchangeable:
Brake Block – friction material, brake lining
Brake adjuster – slack adjuster
S-cam – camshaft
Bearing cups—bearing races

APTA BTS-SS-RP-004-07 Approved 5/5/07
Copyright © 2007 APTA. All rights reserved. 6
Brake chamber—air chamber
Machining – turning, reboring, grinding, sanding, and cutting
Pushrod travel—air chamber power stroke
4. Hazardous material warning
Most brake linings no longer contain asbestos fibers. However, if working with any
component that does contain asbestos, take all the necessary precautions prescribed by OSHA,
and follow all federal, provincial/state, and local safety requirements. The health impact of
non-asbestos fibers (e.g., brake block with glass, mineral wool, ceramic, aramid, carbon etc.) is
not specifically covered under current OSHA regulations. Although medical experts do not
agree about the possible long-term risks of working with, and breathing, non-asbestos fibers,
some experts believe that long-term exposure could cause pneumoconiosis, fibrosis, and
cancer. Therefore, it is recommended that workers avoid dust when working on brakes that
contain non-asbestos materials.
Brake block may also contain crystalline silica, lead, antimony, phenol, and other possibly
hazardous materials. Refer to the material’s MSDS for all necessary precautions. Follow the
general safety procedures listed below when working with braking components.
Whenever possible, work on brakes in a separate area away from other operations.
Always wear a respirator approved by NIOSH or MSHA during all brake service
procedures.
NEVER use compressed air or dry brushing to clean brake parts or assemblies. OSHA
recommends that you use cylinders that enclose the brake. The cylinders have vacuums
with HEPA filters and arm sleeves. If such equipment is not available, carefully clean
parts and assemblies in the open air.
During disassembly, carefully place all parts on the floor or in a suitable cleaning station
to avoid getting dust into the air. After vacuum cleaning, any remaining dust should be
removed using a rag soaked in water and then wrung until nearly dry.
If it is necessary to grind or machine brake linings, additional precautions should be
taken because contact with fiber dust is higher during these operations. In addition to
wearing an approved respirator, such work should be done in an area with exhaust
ventilation.

APTA BTS-SS-RP-004-07 Approved 5/5/07
Copyright © 2007 APTA. All rights reserved. 7
NEVER use compressed air or dry sweeping to clean the work area. Use an industrial
vacuum with HEPA filters and rags soaked in water and wrung until nearly dry. Used
rags should be disposed of with care to avoid getting dust into the air. Use an approved
respirator when emptying vacuum cleaners and handling used rags.
Workers should wash their hands before eating, drinking, or smoking. Work clothes
should not be worn home, but should be vacuumed after use and then laundered
separately, without shaking, to prevent dust from getting into the air.
5. Initial inspection
In cases where components such as brake adjusters, brake chambers and camshafts are not
scheduled for replacement during the reline, each property should establish a schedule for
replacing these components based on the local operating conditions and usage history.
5.1 Vehicle brake and maintenance history
This Recommended Practice for Front/Rear axle brake reline and maintenance also applies to
components of the system that do not have wear indications but are inspected visually or
require disassembly.
To determine a proactive replacement schedule, use the manufacturers’ recommendations for
component replacement/rebuild and/or the agency’s component history. These may be based
on mileage, brake cycles, or time. They may include variables such as climatic considerations,
unique operating parameters or a combination of both. The replacement schedules will vary
from agency to agency.
Any historical data must be accurate, updated as required and meet the challenge of consistent
performance, reliability and repeatability. Agencies that have the expertise of data collection,
evaluation and mechanical knowledge can use this historical data to schedule brake system
component replacement/rebuild intervals. If historical data is unavailable a program of data
collection should be implemented for future needs.
However, scheduled replacement/rebuild intervals MUST NOT exceed the manufactures
recommendations.
5.2 Overall Performance Based Brake Test

APTA BTS-SS-RP-004-07 Approved 5/5/07
Copyright © 2007 APTA. All rights reserved. 8
A Performance Based Brake Test can be used as part of the inspection process to assess the
efficiency of the brake system and its assemblies prior to scheduled repairs. A test can measure
the operator input, (application control line air pressure), and the brake output, (delivered brake
torque through the wheels). An individual brake assembly or axle may lose its effectiveness
and not be detected before the brake block is worn to the normal replacement level. An
ineffective brake can cause side-to-side or axle-to-axle imbalances of the total brake system.
When identified, an ineffective brake assembly can be repaired or replaced in addition to the
already scheduled repairs.
5.2.1 Retarder operation
Service brakes are designed to stop a vehicle in a safe and controlled manner; however for
enhanced drivability and extended brake life, some buses are equipped with supplemental
braking systems. Apparent brake problems could be problems associated with these
supplemental brakes. Because of the many different applications (transmission retarder,
engine brake, driveline retarder) and configurations (auto apply, electronic controlled, air
controlled), consult the OEM manual for proper testing procedures.
5.3 Visual inspection
Removal of wheels or other components will prevent the inspection of selected brake
components. Prior to the disassembly of the foundation brake and related wheel/brake
components, thoroughly inspect the foundation brake system, which includes the automatic
brake adjuster, brake block, drums, brake chambers, mounting fasteners and other system parts.
Safely raise and support the bus by the axles at an appropriate working height.
5.3.1 Confirm need for reline in accordance with agency policies and
procedures.
5.3.2 Visually inspect the brake block
o Check for wear: block should not be worn into the wear line (if equipped) or less than
1/4 inch (for ¼ inch bolt) and 3/8 inch (for 3/8 inch bolt) as measured at the center of
the shoe. At no time should rivets or bolts touch the drum.
o Check for movement: there should be no movement between the brake block and the
shoe.
o Look for cracks: no cracks should have a void greater than 1/16 inch or longer than 1

APTA BTS-SS-RP-004-07 Approved 5/5/07
Copyright © 2007 APTA. All rights reserved. 9
½ inch long.
o Check for missing segments that expose a fastener.
o Inspect for signs of block contamination i.e. oil or grease.
5.3.3 Make sure all components are appropriate for the application; i.e. proper
length brake adjusters, proper brake chamber size, etc.
5.3.4 Dragging/tight wheels. With all four wheels elevated from the ground,
rotate each wheel to find dragging or tight brakes.
5.3.5 Pushrod travel
o Measure pushrod travel at each brake per CVSA standards. Pushrod travel should be
within ¼ inch measurement from left to right wheel on the same axle. Excessive
pushrod travel may be cause to replace the brake adjuster or other foundation brake
parts as required to meet new or original specification.
o During pushrod travel measurements, check camshaft for excessive movement and for
normal return of the foundation brake during release.
5.3.6 Brake Chamber
o During pushrod travel measurements, listen for air leaks in the brake chambers or other
foundation brake components. Additional or extended application of the brake system
may be needed to meet DOT standards for air system leak tests.
o Inspect for dents, bends, alignment, leaks, pushrod return, corrosion, and missing caps.
Hardware
o Check the condition of the clevis, pin and yoke.
o Check the integrity of the return springs.
Lining wear/cam position
The position of the roller on the cam should be closely checked at every brake inspection.
The position of the roller on the s-cam is directly related to brake block and drum wear.
Other factors such as stretched shoes and worn cam bushings may also affect cam to roller
position. Care must be taken when inspecting the brakes to ensure that the roller on the s-
cam will not lock or allow the s-cam to ―cam over‖ before the block wears out.
Air hoses
Inspect for cracks, kinks, routing, leaking, chafing, deterioration, proper size and material.
Visual Inspection of suspension/steering components
Some braking complaints can be caused by steering and/or suspension problems. Worn,
damaged or misaligned steering/suspension components can cause a vehicle to pull or drift

APTA BTS-SS-RP-004-07 Approved 5/5/07
Copyright © 2007 APTA. All rights reserved. 10
during braking. Carefully inspect the torque rod bushings, drag links, tie-rod ends, king-
pins, and shock absorbers as part of every pre-reline inspection. In many cases it’s more
efficient to replace/repair these parts during the reline because the wheel assemblies are
removed.
5.4 Automatic brake adjuster maintenance, inspection and testing
Clean and inspect per manufacturer’s recommendation or replace.
Caution: Do not submerge brake adjusters in solvent, water, or hot tank.
All Automatic Brake Adjusters require inspection at periodic intervals. This should be done at
your normal preventative maintenance inspection. At these times you should do the following:
Measure and record the brake chamber pushrod travel with reservoir pressure between 90
and 100 psi and brakes fully applied.
Grease each brake adjuster.
Inspect each brake adjuster for integrity and connection points at the clevis and brackets, if
used.
Check for a difference in the stroke length between the left and right side of the axle.
There should be no more than ¼‖ difference.
If the stroke exceeds the CVSA or DOT maximum allowances, do not manually adjust the
automatic brake adjuster. Follow the manufacturer’s procedure to determine the cause of
the excessive stroke.
Note: Some brake adjusters use special grease while others use normal chassis grease. It is
important to use the proper grade of grease per manufacturer’s recommendation.
Note: Not all automatic brake adjusters require the same maintenance procedures. Be sure to
follow the specifications of the manufacturer.
6. Removal of the wheels, hubs and drums
6.1 Front wheels, hubs and drums
Back off the brake adjuster until there is enough clearance between the shoes and drum to
allow the drum to be removed.

APTA BTS-SS-RP-004-07 Approved 5/5/07
Copyright © 2007 APTA. All rights reserved. 11
Caution: Do not use impact wrench on the brake adjuster.
Note: The procedure used to back off the brake adjuster will depend on the type of brake
adjuster used. Check with the manufacturer for a detailed procedure.
Check the hubcap for leaks or damage.
If the bus uses oil-lubricated bearings, drain the oil into an appropriate container and
dispose of the oil in accordance with local regulations or company policy.
Remove the cap screws from the hubcap.
Remove the hubcap and discard if damaged. Remove
and discard the gasket.
Bend the tab of the lock washer away from the flat on
the lock nut.
Remove the lock nut, lock washer, pierced locking ring
and adjusting nut.
Caution: Always use the proper size socket when
tightening or loosening the lock nuts. Do not use a hammer
and chisel to loosen and remove the nut.
Note: The procedure above is typical of an adjusting nut,
lock mechanism, and lock nut arrangement. There are also
single nut adjusting and locking arrangements. If
necessary, consult the maintenance manual for the correct
procedures and tools.
Remove the outer wheel-bearing cone.
Note: Proper bearing maintenance must be maintained to
assure safe and reliable bearing performance.
Keep the bearing cup and cone as a matched set.
Replace bearing cups and cones as an assembly.
If bearing is dropped the cup and cone must be
replaced.
Do not ―spin dry‖ the bearing with compressed air.
Use a wheel dolly to remove the wheel, drum, and
hub as an assembly.

APTA BTS-SS-RP-004-07 Approved 5/5/07
Copyright © 2007 APTA. All rights reserved. 12
Remove the front inner wheel seal and wheel bearing. Discard the seal.
Caution: Use a seal removal tool that does not put pressure on the bearing or damage the hub
seal bore.
Wipe all excess grease or oil from spindle.
Warning: Do not use compressed air to remove the brake dust.
6.2 Rear wheels, hub and drum
Attach shop air to the bus and release the parking brake. Ensure the spring brake (parking
brake) is fully released. If the spring brake is not releasing or will not stay released, the
brake will need to be caged or the chamber replaced.
Loosen the brake adjuster until there is enough clearance between the shoes and drum to
allow the drum to be slid over the shoes and removed.
Caution: Do not use impact wrench on brake adjuster.
Note: The procedure used to back off the brake adjuster will depend on the type of brake
adjuster used. Check with the manufacturer for a detailed
procedure.
Loosen the axle nuts.
There are multiple methods for removing the axle:
o Jack screws
o Axle shaft puller-0po889
o Cover the raised boss on the center of the axle
flange and strike with hammer
After breaking the axle loose, remove the nuts,
washers, and alignment dowels.
Remove the axle shaft from the housing.
NOTE: The street side and curbside shafts may differ.
Make sure they get reinstalled on the same side as they
were removed.
Remove and discard any seals and gaskets.

APTA BTS-SS-RP-004-07 Approved 5/5/07
Copyright © 2007 APTA. All rights reserved. 13
Remove the lock nut, lock washer and pierced locking ring.
Remove the outer bearing cone from the wheel hub.
Caution: Always use the proper size socket when tightening or loosening the lock nuts. Do
not use a hammer and chisel to loosen and remove the nut.
Note: The procedure described above is typical of an
adjusting nut, locking mechanism, and lock nut
arrangement. There are also single nut adjusting and
locking arrangements. If necessary, consult the
maintenance manual for the correct procedures and tools.
Proper bearing maintenance must be maintained to assure
safe and reliable bearing performance.
o Keep the bearing cup and cone as a matched set.
o Replace bearing cups and cones as an assembly.
o If bearing is dropped the cup and cone must be
replaced.
o Do not ―spin dry‖ the bearing with compressed
air.
Place a wheel dolly under the dual rear wheel. Use
the wheel dolly to carry the weight of the rear
wheels. Remove the wheels, drum and hub as an
assembly.
If the inside wheel seal uses an oil seal wiper
sleeve, remove it by hitting the oil seal wiper with

APTA BTS-SS-RP-004-07 Approved 5/5/07
Copyright © 2007 APTA. All rights reserved. 14
a hammer to loosen it. Use a punch or chisel to drive the oil wiper sleeve off the housing;
then discard.
If the bus is equipped with an outside wheel seal using an oil seal wiper sleeve, use a
punch to remove the oil seal wiper and cork assembly; then discard.
To replace inner wheel seal, remove the screws attaching the inner seal retainer to the hub.
Remove the inner seal retainer assembly and gasket along with the inner wheel-bearing
cone.
Discard the gasket.
Using a soft punch, drive the seal from the retainer, taking care not to damage the sealing
surface of the retainer.
Thoroughly clean all grease from the wheel and hub.

APTA BTS-SS-RP-004-07 Approved 5/5/07
Copyright © 2007 APTA. All rights reserved. 15
7. Foundation brake disassembly
7.1 Inspect brake shoes before removal
The way the brake block has worn can help determine the condition of the foundation brake.
Look for unusual patterns such as, the angle of wear, uneven lining wear and the condition of
the brake block. See Appendix D for examples of abnormal brake block wear and the likely
cause. When disassembling the brakes for reline, note the condition of each brake component
before disposing.
7.2 Disassemble the foundation brake
On steer axles, turn the spindle to the fully locked position to gain access to the anchor pin
locks.
7.2.1 Remove the brake shoes
Removal the anchor pins
Remove the anchor pin locking fasteners (bolts, snap
ring, anchor pin bracket).
Use a soft drift and drive the anchor pins out.
Note: Anchor pins may be difficult to remove. Take
care to avoid bending the spider when removing the
anchor pins. Frozen anchor pins should always be
removed with a press.
Note: Anchor pins should be replaced as part of every
brake reline.
Removal of the brake shoes
With the anchor pins removed, use a pry bar or
suitable tool to remove the return springs. Take care
not to drop the shoe assemblies when removing the
return springs.
Remove the brake shoes from the spider and discard
the return spring(s).
7.3 Remove the brake adjuster, S-cam and bushings

APTA BTS-SS-RP-004-07 Approved 5/5/07
Copyright © 2007 APTA. All rights reserved. 16
On steer axles, turn the spindle to the fully locked position to gain access to the anchor pin
locks.
Clean any buildup of dirt and grease from the end of the S-cam and brake adjuster.
7.3.1 Remove the brake adjuster
Remove and discard cotter pin. Remove clevis pin and inspect for wear. Replace as
necessary.
Inspect the yoke and brake adjuster bushing for wear.
Replace parts as necessary.
Remove the snap-ring or retaining bolt and washer
from the end of the s-cam.
If equipped, disconnect the brake adjuster adjustment
bracket.
Remove the brake adjuster and the spacing washers.
Inspect all parts and replace as necessary.
7.3.2 Remove S-cam and bushings
Once the brake adjuster and brake shoes have been
removed, the S-cam can be slid out towards the outside
of the bus.
Remove and discard camshaft bushings at every reline.
Camshaft bushings keep the cam and brake shoe
assemblies centered in the brake drum. As the bushings
wear, they allow the camshaft to fall off center, creating
unequal drum clearance between the top and bottom
shoes. This can affect pushrod travel, braking torque,
and braking performance.
To remove the bushings, use a tool specifically designed for bushing removal or a soft driver
such as a brass or aluminum punch. Drive the inner S-cam bushing out towards the center of
the bus.
Remove the outer bushing using the procedure above, driving the bushing from the center of
the bus towards the outside.

APTA BTS-SS-RP-004-07 Approved 5/5/07
Copyright © 2007 APTA. All rights reserved. 17
Note: There is a ridge in the center of the spider that prevents the bushings from being
removed or installed in any manner other than what is described in this document.
8. Cleaning and inspection
8.1 Spider, spindle, and axle tube
Thoroughly clean the axle tube, spindle and spider assembly. Use a cleaner that complies with
local safety and environmental regulations and agency policy.
Warning: Do not use compressed air to remove the dirt and dust from the brake assembly.
After the spider has been cleaned, check for:
Cracks
Worn anchor pin holes
Loose fasteners
Bent spider (brake shoe anchor pins must hold the shoe and lining assemblies parallel to
the brake drum surface).
After the spindle / axle tube has been cleaned, check for:
Cracks
Damaged threads
Damaged seal surface
Damaged bearing seats
8.2 Checking the spider alignment
Proper spider alignment is determined by making sure the
axle tube is parallel to the anchor pin holes. To use this tool, tighten the clamp section around
the axle tube, insert the pin into the anchor pin hole and tighten the knurled nut that holds the

APTA BTS-SS-RP-004-07 Approved 5/5/07
Copyright © 2007 APTA. All rights reserved. 18
pin. If the spider is not bent, the pin will slide all the way through the anchor pinhole. If the
spider is bent, the pin will not slide into the anchor pinhole or will only slide in part way.
If alignment is not correct replace spider and recheck.
8.3 S-Cam inspection
Check the camshaft splines, head and journals for
cracks, wear and corrosion.
Check the journal areas of the camshaft for wear
using a ―go-no-go‖ gauge. When checking the
journal area, check it in several locations because the
journal will not wear evenly.
Replace worn or damaged camshafts.
Note: Do not dress or regrind camshaft.
8.4 Springs and rollers
Replace brake shoe return springs and rollers at each reline.
8.5 Brake shoes
Refer to APTA BT-RP-005-07 Brake Shoe Rebuild for disassembly, cleaning, inspecting and
rebuilding.
8.6 Wheel bearing inspection

APTA BTS-SS-RP-004-07 Approved 5/5/07
Copyright © 2007 APTA. All rights reserved. 19
Roller bearings should be cleaned according to manufacturer’s recommendation and inspected.
It is important to keep bearing cups and cones matched. Remove all the old lubricant using a
cleaner that complies with local safety and environmental regulations and agency policy. Do
not spin dry the bearings with compressed air. Inspect the cup, the cone, the rollers and cage of
all bearings. See Appendix E for examples of bearing wear and damage. Also assure that the
cup does not move in hub.
8.7 Drum
Be sure that drum is free of grease and debris. Measure to determine useful life. The drum
should not exceed OEMs maximum diameter specifications during the life of the reline,
(maximum diameter is normally cast into the drum). Check for cracks, bell mouth, hard spots,
hot spots, heat checks, glazing and blue areas. See Appendix F for examples of abnormal drum
wear and the likely cause.
8.8 Hub/ABS tone ring
Inspect the ABS tone ring for damage. Be sure that hub is free of grease and debris.
Inspect seal bore for scoring or damage.
Check that the bearing cups are secure in the bore.
Check wheel studs for damage.
9. Assembling the foundation brake
9.1 Install S-cam bushings
Install camshaft bushings with a tool specifically designed for installation to assure proper fit
and to avoid distortion to the brake spider. Press the bushings until the outer edge is flush with
the bottom of the seal bore.

APTA BTS-SS-RP-004-07 Approved 5/5/07
Copyright © 2007 APTA. All rights reserved. 20
9.2 Install S-cam seals
Use the appropriate driver to install the camshaft seals. Install both seals with seal lips facing
the brake adjuster. Drive them until they are flush with the bore. Lightly lubricate seal lips,
bushings, and camshaft.
9.3 Install anchor pin bushing
Mark lock-bolt hole on spider and bushing as shown.
Align marks to properly locate new bushing. Use
appropriate tool to drive out old bushing while installing
new bushing.
9.4 Install S-cam
Install the cam head washer (one only), lightly lube the
bearing area with a 12-hydroxy lithium stearate chassis

APTA BTS-SS-RP-004-07 Approved 5/5/07
Copyright © 2007 APTA. All rights reserved. 21
grease, NLGI grade 1 or 2 and slide the S-cam in place. Take care not to damage the seals
while installing the camshaft.
Check S-cam for proper fit, clearance and 360 rotation.
9.5 Install brake adjusters
Install the correct OEM spacer washer between the spider
and the brake adjuster, lubricate the cam shaft spines with
a temperature resistant anti-seize. Slide the brake adjuster
onto the S-cam. Install the shim pack removed earlier and
snap ring or retaining washer and bolt.
Check for .030‖ to .060‖ lateral movement of the brake
adjuster. It may be necessary to reposition the shims or
select different thicknesses of shims to achieve this result.
Ensure there is no interference between pushrod and the
brake chamber and the brake adjuster aligns with the
clevis.
9.6 Install brake shoes
When using combination lining install primary and secondary shoe assemblies in proper
location per manufacturer’s recommendations.
Lubricate the anchor pins with a NLGI Grade #1 or equivalent grease. The grease must
handle the high temperatures without flowing and remain soft under normal service.
Consult the manufacturer’s manual for the correct lubricant.
Slide the anchor pins through the brake shoes, spider and any necessary spacers or washers
taking care that the grease fittings on the anchor pins are at the backside of the spider and
easily accessible for routine maintenance. Install the locking hardware. Check that the
shoes rotate freely on the anchor pin.
Lubricate anchor pins through grease fitting until clean grease is visible between the shoe
and washer. Wipe away any excessive grease.
Note: Do not get grease on the brake shoe lining.
Install brake shoe return spring(s), ensuring they do not interfere with adjacent
components (s-cam, shoes, hub, etc.).

APTA BTS-SS-RP-004-07 Approved 5/5/07
Copyright © 2007 APTA. All rights reserved. 22
CAUTION: Consult manufacturer’s manual for specific brake type or configurations.
If the brake rollers have not been installed, lubricate the roller pockets of the brake shoe
with a NLGI grade #1 or equivalent grease (the grease must handle the high temperatures
without flowing and remain soft under normal service.)
Spread the brake shoes apart and install the brake shoe rollers. Let the shoes snap against
the S-cam to make sure the rollers are seated equally and fully in the brake shoes and the
S-cam pockets.
Note: Ensure there is no lubricant on the contact surfaces between the rollers and S-cam head.
9.7 Install brake adjuster hardware
Rotate the brake adjuster arm into the yoke by turning adjusting hex nut clockwise.
Lubricate and install clevis pin and new cotter pin.
If equipped, install and adjust brake adjuster control arm bracket or other connections as
necessary per manufacturer’s recommendations.
Lubricate all remaining grease fittings.
Ensure proper installation of all components before installing tire, hub and drum.

APTA BTS-SS-RP-004-07 Approved 5/5/07
Copyright © 2007 APTA. All rights reserved. 23
9.8 Install front wheel bearings, seals and hub assembly
9.8.1 Grease- lubricated bearings
Place the cleaned wheel bearings in the grease packer. Pack the bearings with grease
until it comes out all sides.
Lightly lubricate the spindle with the same grease used to pack the wheel bearing.
Fill the hub cavity level to the bearing cups with wheel bearing grease.
Lightly coat the bearing races (cups) with grease.
Place the inner wheel bearing in the inner race.
Clean all grease from the seal mounting area.
Note: Some seal drivers are designed to have the seal and bearing mounted onto the tool for
installation.
9.8.2 Oil-lubricated bearings
Caution: Do not grease pack oil-lubricated wheel bearings
Lightly coat the inner wheel bearing in oil.
Lightly coat the bearing races (cups) with oil.
Place the inner wheel bearing in the inner race.
Clean all oil from the seal mounting area.
Note: Some seal drivers are designed to have the seal
and bearing mounted onto the tool for installation.
9.8.3 Install the wheel seal
Tip the tire/wheel assembly against a solid surface.
Using the seal manufactures approved seal driver or
equivalent; gently tap the seal into place with the lip
facing the inside of the hub. Listen for the sound
changing indicating the seal is seated properly.
If recommended by seal manufacturer apply a
coating of lubricant to the inner seal lip or sealing surface.

APTA BTS-SS-RP-004-07 Approved 5/5/07
Copyright © 2007 APTA. All rights reserved. 24
9.8.4 Preset the ABS and speedometer sensors (If equipped)
If bus is equipped with a wheel-end speedometer sensor, it is normally located on the left
side (street side) front tire. However, there are many variations, so refer to OEMs
recommendations for service and adjusting.
For either the ABS or speedometer to function properly, the sensors must be in good
condition and adjusted properly. Service on both sensors is the same. Inspect the sensors
and wiring for damage. Replace as necessary.
Set pre-adjustment by pushing the sensors fully outboard. When the wheel/hub assembly
and bearings are correctly installed, the air gap for the sensors will properly position itself
automatically.
9.8.5 Install front hub, drum and wheel
Carefully slide the hub (or complete wheel end assembly) over the spindle, supporting it
to avoid damaging the wheel seal and ABS sensor.
Lightly coat the wheel-bearing cone with grease or oil depending on application and
slide the outer wheel-bearing cone over the spindle and into place.
Install the adjusting nut on the spindle and adjust finger tight.
Install the drum and the wheel (if not already installed).
Tighten the adjusting nut to a torque of 200 ft. lbs while rotating the wheel.
Back off the adjusting nut one full turn.
Tighten the adjusting nut to 50 ft. lbs while rotating the wheel.
Back off the (inner) adjusting nut ½ turn.
Install lock washer and/or tab type washer
Install the locking nut and torque to 300-400 ft. lbs.
Use a dial indicator to verify a final endplay of .001-.005 inch.
Refer to appendix G for complete text of TCM RP 618 wheel bearing adjustment procedure.
Install a new gasket, hubcap and bolts. Tighten the hubcap bolts 20-30 ft lbs.
Note: For oil-lubricated bearings add appropriate oil per manufacturer’s recommendations.

APTA BTS-SS-RP-004-07 Approved 5/5/07
Copyright © 2007 APTA. All rights reserved. 25
9.9 Install rear wheel bearings, seals and hub assembly
If equipped, use an appropriate driver to install
inner seal wiper.
9.9.1 Grease-lubricated bearings
For grease-lubricated bearings, place the cleaned wheel bearings in the grease packer.
Pack the bearings with grease until it comes out all sides
Lightly lubricate the axle tube with the same grease used to pack the wheel bearing.
Fill the hub cavity level to the bearing cups with wheel bearing grease.
Lightly coat the bearing races (cups) with grease.
Place the inner wheel bearing in the inner race.
9.9.2 Oil-lubricated bearings
Caution: Do not grease pack oil-lubricated wheel bearings
Lightly coat the inner wheel bearing in oil.
Lightly coat the bearing races (cups) with oil.
Place the inner wheel bearing in the inner race.
9.9.3 Install the wheel seal
Using the seal manufactures approved seal driver or equivalent; gently tap the seal into
the seal retainer. Listen for the sound changing indicating the seal is seated properly.
Lightly coat the lip seal with the same lubricant used on the bearings.
Replace the seal retainer gasket; install seal retainer and torque fasteners to 20–30 ft lbs.
9.9.4 Preset the ABS sensors (If equipped)

APTA BTS-SS-RP-004-07 Approved 5/5/07
Copyright © 2007 APTA. All rights reserved. 26
For the ABS or speedometer to function properly, sensors must be in good condition and
adjusted properly. Inspect the sensors and wiring for damage. Replace as necessary.
Set pre-adjustment by pushing the sensors fully outboard. When the wheel/hub assembly
and bearings are correctly installed, the air gap for the sensors will properly position itself
automatically.
9.9.5 Install hub, drum and wheel
Use a wheel dolly to install the wheel / drum and hub as an assembly. Take care not to
damage the wheel seal while installing the assembly.
For oil lubricated bearings, fill hub with same type lubricant used in the axle sump or
hub assembly.
Ensure there is a light coat of lubricant on the outer wheel bearing.
Install the outer bearing cone onto the axle housing tube.
Install the adjustment nut and tighten the adjusting nut to a torque of 200 ft. lbs while
rotating the wheel.
Back off the adjusting nut one full turn.
Tighten the adjusting nut to a final torque of 50 ft.
lbs while rotating the wheel.
Back off adjusting nut ¼ turn.
Install lock washer and / or tab type washer.
Install the locking nut and torque to 300-400 ft. lbs
for dowel style washers or 200-275 for tab style
washers.
Use a dial indicator to verify a final endplay of
.001-.005 inch.
Refer to appendix G for complete text of TCM RP 618 wheel bearing adjustment procedure.
Install new gaskets and/or seal on hub.
Install the axle shafts in the correct side of the housing.
Install the dowels, washers, and nuts. Torque to manufactures recommendations using a
cross tightening sequence.
9.10 Brake adjustment
Brake adjuster manufacturers very in their adjustment procedure, so it is important to follow

APTA BTS-SS-RP-004-07 Approved 5/5/07
Copyright © 2007 APTA. All rights reserved. 27
their recommended practice. However the general rule is to tighten the brake adjuster until the
block touches the drum and then back off the brake adjuster ½ to ¾ turn.
CAUTION: This is not the final brake adjustment and any final testing at this point will be
invalid. The brake adjusters will continue to automatically adjust to their home position
through brake applications during the burnishing process and road test.
Lower the bus and use a torque wrench to tighten the lug nuts to the appropriate value in the
manufacturer recommended sequence.
Note: Recheck wheel lug nut torque after the bus has been in service between 200 and 500
miles.
10. Burnishing, testing, and final inspection
10.1 Burnishing
Burnishing procedures may be modified for each agency’s requirements, but should be similar
to the following steps:
a) Turn the retarder off, if possible, until the burnishing procedure is complete.
b) Use the service brake to slow the vehicle from 20 to 5 mph at approximately 0.3 g
deceleration, or a moderate brake application (snubbing). Repeat this snubbing process a
minimum of 10 times at regular intervals of approximately 500 ft. or 0.1 mile without
stopping the vehicle.
CAUTION: Do not permit wheel lock up.
c) After completing the snubbing process in ―b‖, make one complete stop from 20 to 0 MPH.
d) Immediately after burnishing, compare brake temperatures measured in the exact same
location at each wheel (example, on the drum or wheel stud). Any significant temperature
differential (approximately 50°F side to side, 100°F front to rear) indicates a braking
problem. Inspect the vehicle for brake defects and repair as necessary. After repairs have
been made, repeat burnishing process.
10.2 Performance test
Test the vehicle using APTA Recommended Practice for In-Service Brake Testing, BT-RP-
001-05. Verify that the vehicle meets your agency or government regulations.

APTA BTS-SS-RP-004-07 Approved 5/5/07
Copyright © 2007 APTA. All rights reserved. 28
10.3 Final inspection
Visually check brakes for:
Loose or broken components
Leaks (oil, air, and grease)
Measure push rod travel at each wheel. Refer to the CVSA Brake Adjustment Limit listed
below.
Clamp Type Brake Chamber
Type Brake Adjustment Limit Type Brake Adjustment Limit
9 1 3/8" 24 1 3/4"
12 1 3/8" 30 2"
16 1 3/4" 36 2 1/4"
20 1 3/4" DD3 2 1/4"
Long Stroke Type Brake Chamber
Type Brake Adjustment Limit Type Brake Adjustment Limit
16L 2" 24L3* 2 1/2"
20L 2" 30L3* 2 1/2"
24L 2"
* Not yet added to CVSA criteria

APTA BTS-SS-RP-004-07 Approved 5/5/07
Copyright © 2007 APTA. All rights reserved. 29
APPENDIX A - Background
The function of brakes is to stop the vehicle, control speed and hold it stationary. The action of
applying the brakes sets up a force effective at the road surface, which acts in the opposite
direction to the motion of the vehicle causing it to slow down or decelerate. The ability of the
brakes to perform their function is known as braking efficiency and can be measured. There are
legal regulations that require all vehicles to have an efficient braking system.
FMVSS 121 requires vehicle manufacturers to have a braking system capable of achieving a
specific minimum deceleration. If correctly maintained and operated within its designed load
limits the braking system will achieve the minimum braking efficiency required. Brakes are
designed to a specific geometry. If any part of the foundation brake assembly is bent or distorted,
brake performance may become erratic and unpredictable. Always replace bent or distorted parts
in order to make sure the brakes function correctly. The key to good brake maintenance is
consistency. Both material and procedures must be the same each time a reline is done.
Consistent procedures and standard component replacement contribute to reliable brake
performance.

APTA BTS-SS-RP-004-07 Approved 5/5/07
Copyright © 2007 APTA. All rights reserved. 30
APPENDIX B - Brake Adjusters
Brake adjusters are the link between the brake chamber and the foundation brake. The
length of adjuster arm affects the force transmitted to the brake by the air chamber. The
longer the brake adjuster length the higher the force leveraged to the brake. This is normally
referred to as the AL (Area times Length) factor.
The purpose of a brake adjuster is to provide an acceptable shoe-to-drum clearance in the
brake. Increased shoe-to-drum clearance will result in increased air chamber stroke.
Excessive shoe-to-drum clearance can result in decreased braking power and increase
stopping distances. Excessive air chamber stroke may be related to worn components in the
foundation brake including the brake adjuster.
Total air chamber stroke is established by three elements when the brakes are applied.
Free stroke – the rotation of the cam shaft closing the shoe-to-drum clearance.
Foundation brake parts binding to each other to close tolerances.
Foundation brake elasticity [aka stretch], includes cam-shaft wrap, wing bracket
movement and brake drum stretch.
Manual Brake Adjusters are common on vehicles manufactured prior to October 1994 with
S-cam drum brakes. These adjusters require periodic manual adjustment to maintain proper
shoe-to-drum clearance in the brake. Manual brake adjusters contain a locking ring and
adjustment nut to adjust the brake. The need to perform brake adjustments will vary widely
depending on the severity of service.
Automatic brake adjusters are required on vehicles manufactured after October 1994 with S-
cam drum brakes. Automatic brake adjusters perform the same function as manual brake
adjusters; however they’re able to do it without the need for periodic manual adjustment.
Some of the benefits of the automatic brake adjuster are:
Automatic brake adjustment
Reduced down time and maintenance cost
Improved brake balance and performance
Reduced air chamber travel and less air consumption
Higher margin of braking safety
Automatic brake adjusters do require attention during routine maintenance inspections but
are not intended to be adjusted manually to improve braking performance.
Brake Adjuster Angle and Pushrod Length
Brake adjuster angles are determined by the length of the pushrod with yoke attached. The

APTA BTS-SS-RP-004-07 Approved 5/5/07
Copyright © 2007 APTA. All rights reserved. 31
angle of the adjuster [as determined by brake engineers] when the air chamber is fully caged
[released] sets the operation of the adjuster to perform properly.
Pushrod length is measured from the face of the air chamber to the
center of the clevis pin when the air chamber is fully caged. This
measurement is determined by the brake manufacture and/or the bus
OE to set up the correct angle of the brake adjuster between the air
chamber pushrod and cam shaft. Brake adjuster performance is
determined by the angle of the automatic brake adjuster set by the
brake designer. Changes to shorten or extend the pushrod length of a
―stroke-sensing adjuster‖ may cause the brake adjuster to over or
under adjust.
Some types of automatic brake adjusters have an additional connecting
rod from the yoke to the adjuster. The correct pushrod length is
designed to activate the point of adjustment on the applied stroke.
Maintaining the correct pushrod length is important for all automatic
brake adjusters for maximum braking performance .
The 90 degree rule – This rule was commonly used when manual
brake adjusters where the norm. The brake adjuster should not exceed a 90 degree angle in
the brake applied position. By properly setting the pushrod length and adjusting the brake,
the angle would not exceed the 90 degree position. The theory is to maximize braking force.
This rule was never adopted into written law but was referred to in numerous documents to
visually determine the re-adjustment limit of a manual brake adjuster.
Today’s design criteria allow the adjuster to operate from 85 degrees to 105 degrees to
provide proper input torque to the brake. In some cases, designers start the automatic brake
adjuster at a 90 position to provide proper input torque to the brake. This condition must not
be changed. The 90 degree rule hence becomes subject to degrees of interpretation as
opposed to intended brake design.
Free Stroke – Checking or measuring free stroke is most beneficial when checking the
brakes with the vehicle wheels on the ground. Determine free stroke movement by
measuring the distance of movement of the pushrod when using a pry bar or specially
designed tool to manually apply the brakes. An average distance of 1/2 inch is considered
acceptable. If free stroke is less than 3/8 inch, check for a dragging brake. Use a feeler
gauge between the brake drum and brake shoe or elevate and rotate the wheel to determine a

APTA BTS-SS-RP-004-07 Approved 5/5/07
Copyright © 2007 APTA. All rights reserved. 32
dragging brake.
Power Stroke – Power stroke is determined by measuring the total travel distance of the
pushrod from any point along the rod using 90-100 psi reservoir brake pressure.
Power stroke meeting CVSA maximums should be considered an out-of-service brake and
a sign of improper brake operation. Adjustment to the automatic brake adjuster without
a repair is considered an unsafe practice. Identify the cause of the problem and make the
necessary repairs to bring the braking system back into proper condition.

APTA BTS-SS-RP-004-07 Approved 5/5/07
Copyright © 2007 APTA. All rights reserved. 33
APPENDIX C.-.Reline Check List
BRAKE RELINE CHECK OFF LIST
Remove the wheels and drum assembly. road side: _______ curb side: ________
Clean and inspect bearings. road side: _______ curb side: ________
Clean hubs. road side: _______ curb side: ________
Remove brake shoes. road side: _______ curb side: ________
Remove and replace bushings, wipers & seals. road side: _______ curb side: ________
Remove and clean the brake adjuster. road side: _______ curb side: ________
Install and adjust the brake adjuster. road side: _______ curb side: ________
Install shoes springs and rollers road side: _______ curb side: ________
Pack bearings and install inner wheel seal. road side: _______ curb side: ________
Install wheel and drum assembly. road side: _______ curb side: ________
Adjust wheel bearings end play. road side: _______ curb side: ________
Install gasket, seal and hardware. road side: _______ curb side: ________
Burnish and performance test. road side: _______ curb side: ________
QUALITY CONTROL CHECK LIST
TASK SIGN OFF
Remove wheels and drums
Clean and inspect bearings
Clean hubs
Remove brake shoes
Remove and replace bushings
Remove and replace wipers
Remove brake adjuster and S-cam

APTA BTS-SS-RP-004-07 Approved 5/5/07
Copyright © 2007 APTA. All rights reserved. 34
TASK SIGN OFF
Retrieve a set of turned brake drums
Retrieve reline kit from inventory
TASK SIGN OFF
Install brake adjuster and S-cam
Install shoes, springs and rollers
Pack bearings and install inner wheel seal
Install wheel and drum assembly
Adjust wheel bearing end play
Install gaskets, seals, axles and hardware
Burnish and performance test

APTA BTS-SS-RP-004-07 Approved 5/5/07
Copyright © 2007 APTA. All rights reserved. 35
APPENDIX D - Inspection of Brake Shoes
For additional information and examples refer to TMC RP 607B.
The following pictures are examples of commonly found brake wear problems.
This is an example of excessive heat that could
have been caused by:
Overworking of the brakes.
Weak return spring (if lower shoe only).
Brakes adjusted too tight.
Wrong friction material for the application.
This is an example of wear caused by a bent or
misaligned spider.
This is an example of a bell mouth drum.

APTA BTS-SS-RP-004-07 Approved 5/5/07
Copyright © 2007 APTA. All rights reserved. 36
This is an example of an oversize drum.
This is an example of cracked lining that could
be caused by:
Bent shoe table
Improper installation of brake block
Improper brake block for application.
This is an example of a missing or broken
segment.
APTA BTS-SS-RP-004-07 Approved 5/5/07
Copyright © 2007 APTA. All rights reserved. 37
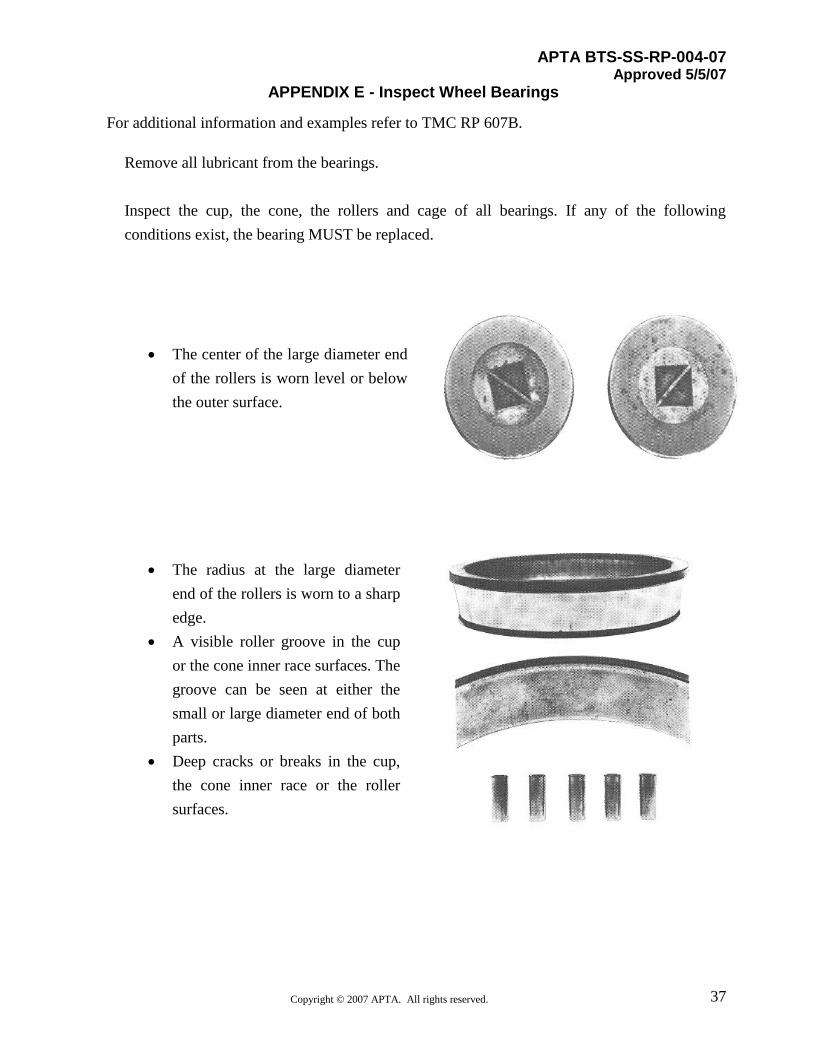
APPENDIX E - Inspect Wheel Bearings
For additional information and examples refer to TMC RP 607B.
Remove all lubricant from the bearings.
Inspect the cup, the cone, the rollers and cage of all bearings. If any of the following
conditions exist, the bearing MUST be replaced.
The center of the large diameter end
of the rollers is worn level or below
the outer surface.
The radius at the large diameter
end of the rollers is worn to a sharp
edge.
A visible roller groove in the cup
or the cone inner race surfaces. The
groove can be seen at either the
small or large diameter end of both
parts.
Deep cracks or breaks in the cup,
the cone inner race or the roller
surfaces.

APTA BTS-SS-RP-004-07 Approved 5/5/07
Copyright © 2007 APTA. All rights reserved. 38
Bright wear marks on the outer
surface of the roller cage.
damage on the rollers and on the
surfaces of the cup and the cone
inner race that touches the rollers.
damage on the cup and the cone
inner surfaces that touch the
rollers.

APTA BTS-SS-RP-004-07 Approved 5/5/07
Copyright © 2007 APTA. All rights reserved. 39
Appendix F.-.Inspection of Brake Drums
To achieve maximum drum life and optimum performance, proper brake maintenance and brake
balance are essential. Consult your bus manufacturer’s maintenance manual for proper
maintenance of the braking mechanism.
The following procedures are suggested as a means of obtaining maximum service and to
determine the need for replacement.
NOTICE: When replacing lining or brake drum on one end of the axle, replace the same
components on the other end of the axle. This will maintain proper braking load on the axle.
A1. Inspection of Brake Drums
When relining brakes, the brake drum should be cleaned and inspected. To be suitable for
further service, the brake drum should pass the following checks:
A. The braking surface should be free of scoring, excessive heat checks
and free of cracks.
B. The braking surface diameter should be within the maximum diameter
cast or stamped on the drum or minimum thickness cast or stamped on
the rotor.
C. The mounting holes and pilot must be round and true.
D. The mounting surface must be clean and flat.
CAUTION: If any of the above conditions are not met, the brake drum should be replaced.
NOTICE: Brake drums should be replaced in pairs to achieve the same braking power on the axle.
A2. Machining the Brake Surface
It may be desirable to turn or resurface the braking surface to remove small heat checks or other
surface defects. The following should be noted when turning:

APTA BTS-SS-RP-004-07 Approved 5/5/07
Copyright © 2007 APTA. All rights reserved. 40
When resurfacing a drum, allow a margin under the maximum diameter for additional wear
depending on agency experiences.
Example: For a wear allowance of 0.040 the drum may be machined a total of 0.290‖ over the
brake surface diameter of a new brake drum with a nominal diameter of 14.500‖.
Maximum Diameter 14.830
Wear Margin 0.040
Machining Allowance 0.290
New Drum Diameter 14.500
WARNING: DO NOT WEAR A BRAKE DRUM BEYOND THE MAXIMUM
DIAMETER STAMPED OR CAST ON THE BRAKE DRUM.
The maximum diameter or discard diameter is the maximum diameter to which the brake drum
may be worn, and still be usable. If any portion of the brake surface exceeds the maximum
diameter it must be discarded. The maximum diameter cast into the back plate portions of the
brake drum supersedes all published information.

APTA BTS-SS-RP-004-07 Approved 5/5/07
Copyright © 2007 APTA. All rights reserved. 41
A3. Brake Drum Wear Information
A. Cracked Brake Drums
Problem Cause Solution
1. If drum is new
Mishandling Replace brake drum
2. If drum is used (see picture at left)
Heat checks connect together and grow through drum
Replace brake drum. Check brake balance and brake system. (see Heavy Heat Check.
3. If used and low mileage
Improper shoe contact
Replace brake drum. Shoes must contact the drum at the center of the shoe.
B. Heat Checked Drums
Problem Cause Solution
1. Light Normal condition Does not impair brake performance. Brake drum may be turned within normal limits
2. Heavy
Imbalanced brake system, dragging brakes or driver abuse. It is caused by constant heating and cooling of brake surface
Replace brake drum. Check brake balance, brake return springs, brake adjustment, and lining type within vehicle combination.
3. Used, low mileage
Improper shoe contact Replace brake drum. Shoes must contact the drum at the center of the shoe.
A-Cracked

APTA BTS-SS-RP-004-07 Approved 5/5/07
Copyright © 2007 APTA. All rights reserved. 42
C. Grooved Drums
Problem Probable Cause Solution
1.Fine Grooving Abrasive foreign material or poor quality brake lining
Rebore brake drum within normal limits or replace the drum and lining
2. Grooves along edges of lining
Abrasive foreign material collecting at edges of lining
Dust shield may cause or cure this problem
3. Grooves coincide with rivet holes
Loose rivets, bolts or foreign material collecting in rivet or bolt holes
Rebore brake drum within normal limits or replace. Use rivet hole plugs
B1-Heat Check-Light B2-Heat Check-Heavy
C1-Grooving-Fine Grooves C2-Grooving-Grooves along edges
of lining
B2-Heat Check-Heavy

APTA BTS-SS-RP-004-07 Approved 5/5/07
Copyright © 2007 APTA. All rights reserved. 43
D. Miscellaneous Drum Wear
Problem Probable Cause
Solution
1. Blue or discolored braking surface
Excessive heat Rebore brake drum within normal limits or replace
2. Scale on outside
Excessive heat
Check brake balance, weak or broken return springs, brake adjustment and lining.
3. Grooves coincide with rivet holes
Loose rivets, bolts or foreign material collecting in rivet or bolt holes
Rebore brake drum within normal limits or replace. Use rivet hole plugs.
4 Excessive wear
Abrasive foreign material or poor quality lining
.Check maximum diameter and rebore within limit or replace.
D1-Blue or Discolored Brake Surface
D1-Scale on outside
D2–Scale On Outside

APTA BTS-SS-RP-004-07 Approved 5/5/07
Copyright © 2007 APTA. All rights reserved. 44
D. Miscellaneous Drum Wear
Problem Probable Cause
Solution
5. Heat spotted or hard
spots in brake surface
Highly localized
heating and
cooling
cycles
Grind hard spot
and re-bore brake
drum within
normal limits
6. Greased
Stained
Drums
Leaking oil seal;
improper
lubrication of
brake components
Repair source of
oil or grease leak;
clean the brake
drum and replace
linings
7. Faded or diminished
brake power
High temperature
in brake system,
improperly
adjusted brakes or
inferior brake
lining
Check brake
drum, brake
lining condition,
brake adjustment,
and brake
balance. Avoid
operation
conditions or
loads which
create excessive
brake
temperature.
8. Noise, chatter or
pulsating during
brake application
Heat spotted
drums, greased-
stained drums,
loose brake drum,
or brake
components
The bake drums
should be
removed and
checked for one
or more of these
conditions and
the appropriate
action taken to
resolve the
condition.
D6-Greased Stained Drums
D5-Heat spotted or Hard Spots

APTA BTS-SS-RP-004-07 Approved 5/5/07
Copyright © 2007 APTA. All rights reserved. 45
E. Out-of-round
Problem Probable Cause Solution
1. Balance Balance weight has fallen off or a balanced drum was not specified
Specify balanced brake drums when ordering.
2. Variation in diameter Heat distortion Rebore brake drum within normal limits or replace.
3. Concentricity Improper fit to pilot or improper seating on wheel or hub
Clean all mounting surfaces check for correct fit and clearance to wheel.
D. Miscellaneous Drum Wear Problem Probable Cause Solution
9. Polished Brake Surface
a. Non-asbestos lining
Normal condition
b. Glazed surface
Insufficient braking input force, ( i.e. overly aggressive retarder or lining material, improper brake balance)
Remove glaze with emery cloth or rebore drum within normal limits.
D9-Polished / Glazed Braking
Surface

APTA BTS-SS-RP-004-07 Approved 5/5/07
Copyright © 2007 APTA. All rights reserved. 46
Appendix G - Wheel bearing Adjustment

APTA BTS-SS-RP-004-07 Approved 5/5/07
Copyright © 2007 APTA. All rights reserved. 47

APTA BTS-SS-RP-004-07 Approved 5/5/07
Copyright © 2007 APTA. All rights reserved. 48

APTA BTS-SS-RP-004-07 Approved 5/5/07
Copyright © 2007 APTA. All rights reserved. 49