Embed Size (px)
Citation preview

1
Rational DOORS Next Generation
Quick Start Tutorial

2
Contents 1. Introduction ................................................................................................................................ 2
2. Terminology ................................................................................................................................ 3
3. Project Area Preparation ............................................................................................................. 3
3.1 Creating the project area ...................................................................................................... 3
4 Browsing Artifacts and Modules .................................................................................................. 5
4.1 Navigating through the artifacts list ..................................................................................... 6
4.2 Using Filters and Views ......................................................................................................... 8
4.3 Modules Structure .............................................................................................................. 11
5. Managing Artifacts and Modules .............................................................................................. 13
5.1 Creating a Module and adding Artifacts ............................................................................. 13
5.2 Importing a Module ............................................................................................................ 19
5.3 Viewing artifact history ....................................................................................................... 25
5.4 Creating project baselines ................................................................................................... 27
5.5 Commenting on artifacts and modules ............................................................................... 28
5.6 Reviewing Artifacts.............................................................................................................. 31
1. Introduction Rational DOORS Next Generation (RDNG) is a web-based requirements management tool
developed as part of Collaborative Lifecycle Management (in the Jazz Requirement Management application) to empowers teams to define, manage, and report on requirements in complex systems and software engineering environments. RDNG helps engineers work more effectively across disciplines, time zones, and supply chains to achieve better project outcomes.
Rational DOORS Next Generation empowers teams to define, manage, and report on requirements in a lifecycle development of complex software projects. This tutorial is based on version 4.0.1 of RDNG.
This tutorial explains the basic features and helps getting started with Rational DOORS Next Generation.
More information can be found in the online library of Jazz.net: https://jazz.net/library If you have comments or questions regarding this document, Jazz or Rational DOORS Next
Generation, please contact [email protected]

3
2. Terminology
Artifact: An entity that is used or produced by a software development process. Examples of artifacts are models, source files, scripts, and binary executable files. Artifact Type: A class of objects that is specific to a requirement definition technique. Artifact types include document, business process sketch, user interface sketch, user interface sketch part, screen flow, storyboard, use case diagram, requirement, glossary, and term. Module: A module is a special artifact type that hierarchically organizes other artifacts, thus creating requirement specification like documents. Attribute: A defined quality and values that can be assigned to an artifact. For example, a work item artifact might have a 'priority' or 'severity' attribute. Report: A set of data deliberately laid out to communicate business information. Requirement: A condition or capability that a system must provide. This condition is either derived direction from user needs or stated in a contract, standard, specification, or other document. RDNG: Rational Doors Next Generation. Tag: An identifier that groups related artifact.
3. Project Area Preparation Before start creating and managing requirements you have to create your project area and
prepare it. For this tutorial we will start with a sample project and then view it and modified to have an overview of the features of Rational Doors Next Generation.
3.1 Creating the project area
1. Start your Rational Jazz Team Server and go to your dashboard at https://<server_name>:9443/jts (In the case of your installation for this tutorial probably your <server_name> is localhost).
2. Scroll down the dashboard to the Application Administration Section, and click the link of Create Project Area under the Requirements Management subsection.

4
3. Write a project name and description and click Next.
4. Now we will choose a template to populate the project, check the checkbox and choose the Automated Water Meter Sample (this is only for this tutorial, on a real project you will start with a blank project or you can use a template to prepare for certain needed structure). Then click Finish.

5
5. The wizard will create a project populated with some artefacts and modules, like it is shown in the following figure.
4. Browsing Artifacts and Modules You can use rich-text artifacts to define requirements and requirements documents. You can
also create and link to supporting artifacts, such as business process diagrams, use-case diagrams, and other images, to elaborate requirements and put them in the broader context of the system and business processes. Finally you can organize artifacts into a special artefact type called Module, which hierarchically organizes artifacts and thus create documents such as requirements specifications.

6
4.1 Navigating through the artifacts list Our project is already populated with a set of artifacts, so the best way to start understanding
artifacts and modules is to browse them to see how they are composed and organized.
1. Click on Artifacts and then on Browse Artifacts to open the Browse
Artifacts view (shouls be open after you created the project). On the left you
will see directories that contain artifacts, in the center a list of artifacts (that
appear depending on the views or filters you choose on the left column) and
on the right a column that gives an view of recent artifacts, comments,
baselines and reviews.
2. Click the Requirements folder. Some artifacts will appear on the center
column. Hover over one the first artifact and you will see an overview of the
artifact and its main attributes. Two of the most important attributes are
Type and Module. Different artifact types and formats mean different set of
attributes for the artifact.
3. You can modify which attributes appear on the artifacts list. Open the
_Requirements for Reuse artifacts folder.
4. Click the Change Column Display Settings icon.

7
5. On the Change Column Display Settings view you can select which
attributes or links you want to see on the artifact list. Browse the list to find
the Used in Modules attribute and then click Add.
6. Click Ok. Now on the last column you will see an icon that shows if the
artifact is used in modules ( ). If you hover over the icon you will also see
in how many and in which modules the artifact is used.
8
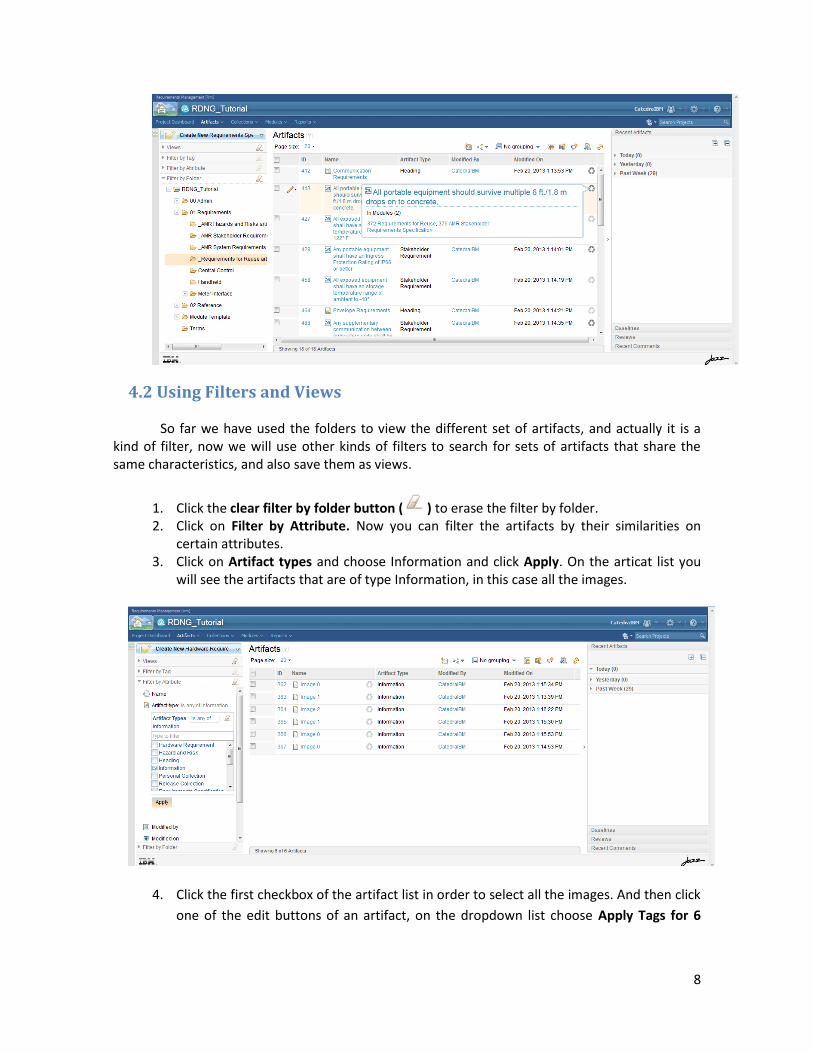
4.2 Using Filters and Views
So far we have used the folders to view the different set of artifacts, and actually it is a kind of filter, now we will use other kinds of filters to search for sets of artifacts that share the same characteristics, and also save them as views.
1. Click the clear filter by folder button ( ) to erase the filter by folder. 2. Click on Filter by Attribute. Now you can filter the artifacts by their similarities on
certain attributes. 3. Click on Artifact types and choose Information and click Apply. On the articat list you
will see the artifacts that are of type Information, in this case all the images.
4. Click the first checkbox of the artifact list in order to select all the images. And then click
one of the edit buttons of an artifact, on the dropdown list choose Apply Tags for 6

9
Artifacts. This will let you add tags to these artifacts in order to distinguish them from
the others and search for them easily.
5. On the Apply Tags window click on New Tag. Write the tag name, in this case it can be
“image”. Click Ok.
6. Click Ok again to apply the “image” tag to these artifacts.
7. Click the clear filter by attribute button ( ) to erase the filter by attribute.
8. Click filter by tag. Here you can search the artifacts that have a certaint tags. For
example, click on the tag “images” and you will see the images we tagged in the past
steps.
10
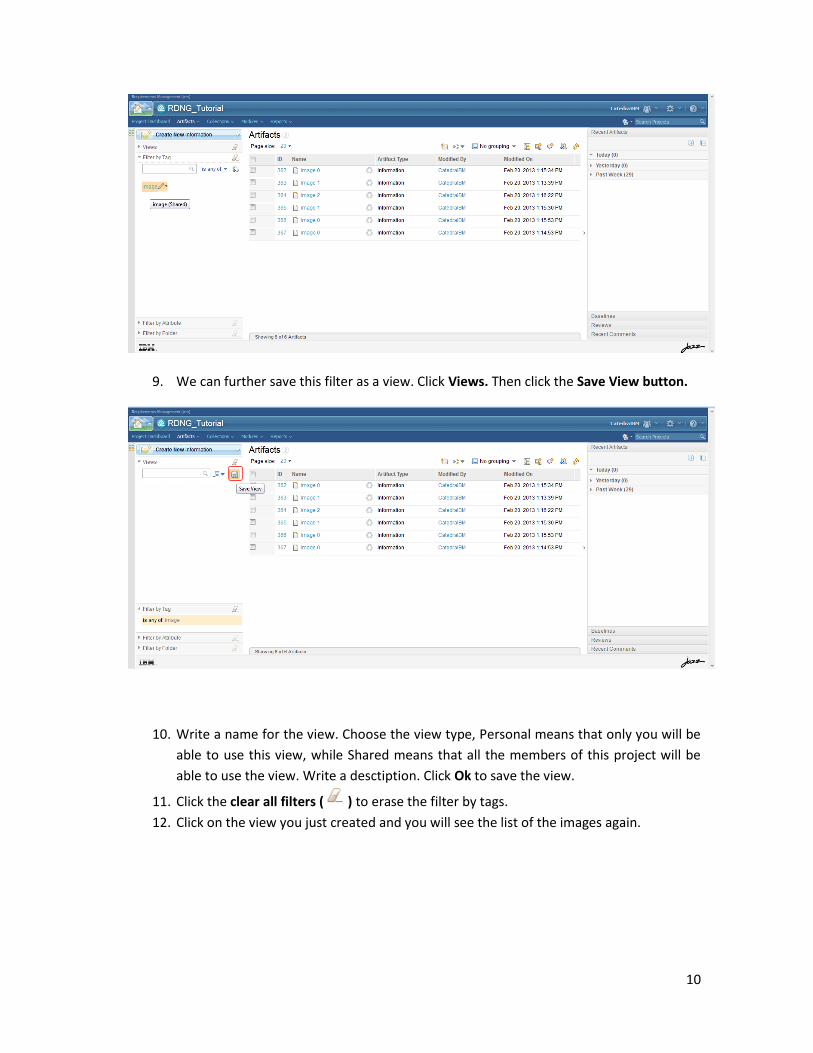
9. We can further save this filter as a view. Click Views. Then click the Save View button.
10. Write a name for the view. Choose the view type, Personal means that only you will be
able to use this view, while Shared means that all the members of this project will be
able to use the view. Write a desctiption. Click Ok to save the view.
11. Click the clear all filters ( ) to erase the filter by tags.
12. Click on the view you just created and you will see the list of the images again.
11
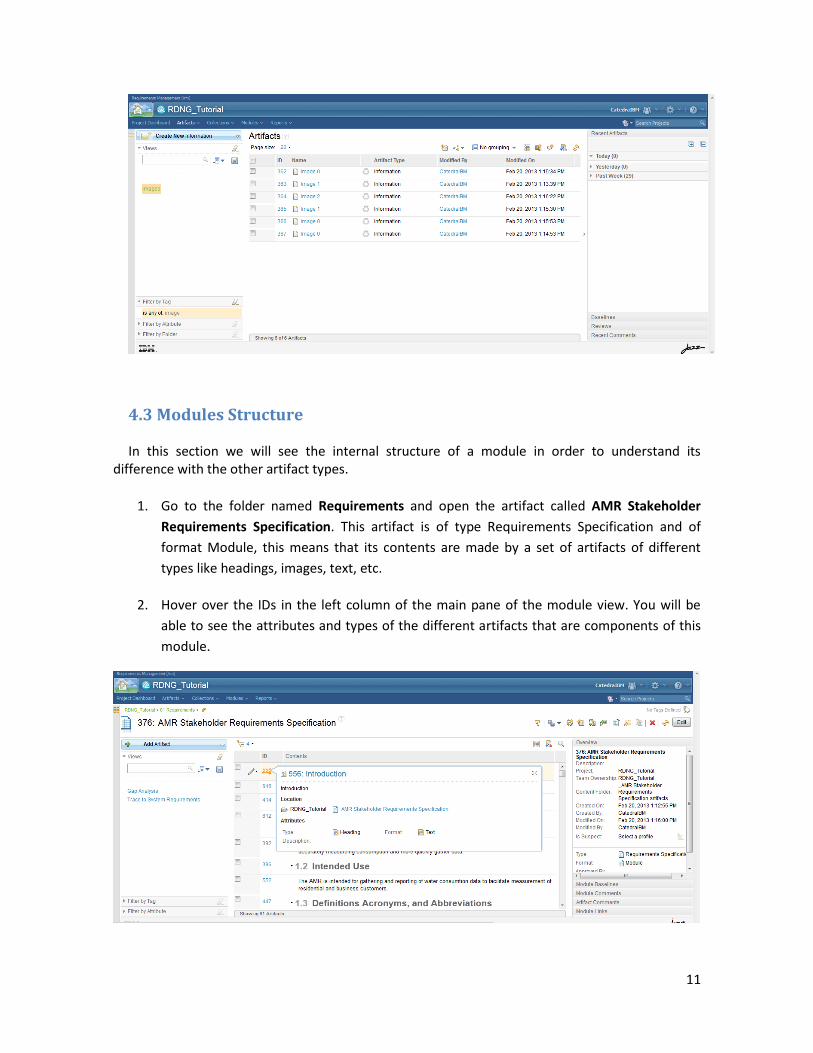
4.3 Modules Structure In this section we will see the internal structure of a module in order to understand its
difference with the other artifact types.
1. Go to the folder named Requirements and open the artifact called AMR Stakeholder
Requirements Specification. This artifact is of type Requirements Specification and of
format Module, this means that its contents are made by a set of artifacts of different
types like headings, images, text, etc.
2. Hover over the IDs in the left column of the main pane of the module view. You will be
able to see the attributes and types of the different artifacts that are components of this
module.

12
3. The artifacts inside a module are organized in a hierarchical order. Using the icon
you can play with the different levels of hierarchy you want to view. For example the next
screenshot displays only the first level of hierarchy which are the main headings of the
Specification.
4. On modules you can also use filters and views to find specific artifacts or to see different
attributes of the artifacts. Click on the Gap Analysis view. This view shows which of the
parts of the document are not yet satisfied by other requirements. If you click the Trace to
System Requirements view, you will see which parts of the document are satisfied by
other requirements (artifacts of type System Requirement).
5. Now try the filter by tag as done in the artifacts view on the last section with the tag of
“images” and you’ll be able to see the images of the module.
13
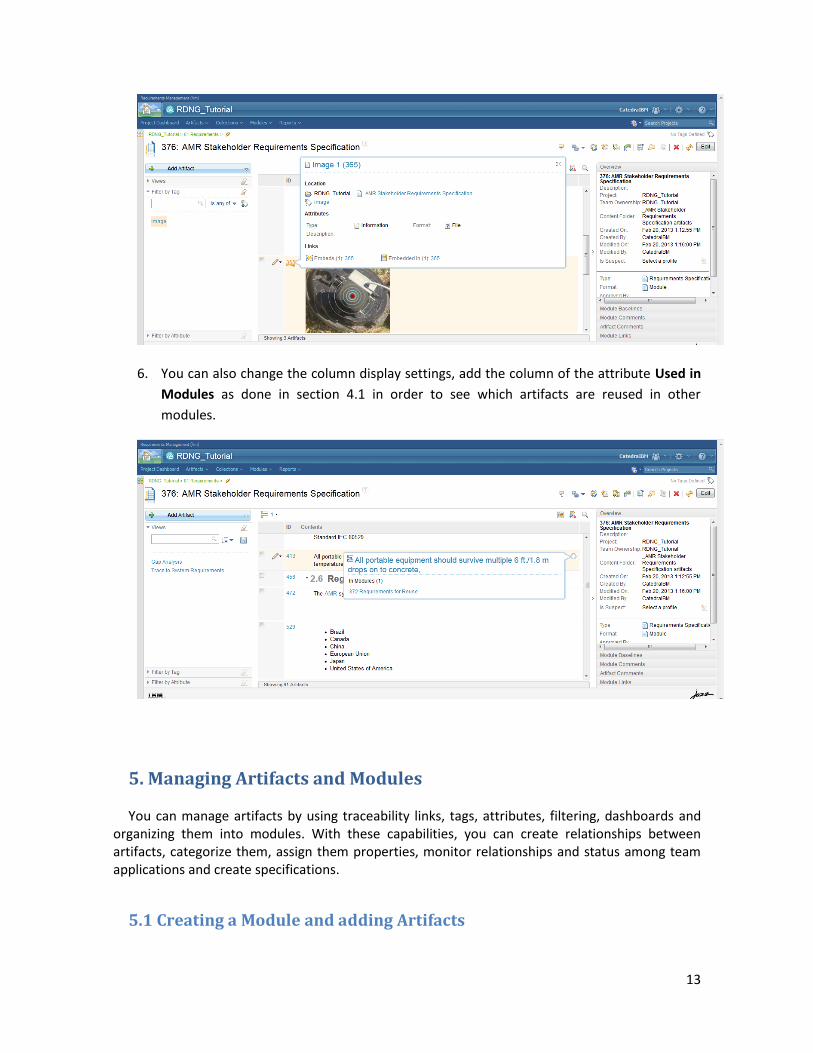
6. You can also change the column display settings, add the column of the attribute Used in
Modules as done in section 4.1 in order to see which artifacts are reused in other
modules.
5. Managing Artifacts and Modules You can manage artifacts by using traceability links, tags, attributes, filtering, dashboards and
organizing them into modules. With these capabilities, you can create relationships between artifacts, categorize them, assign them properties, monitor relationships and status among team applications and create specifications.
5.1 Creating a Module and adding Artifacts

14
1. Click Artifacts and then Requirements Specification on the dropdown list. 2. Choose a name and a description. Check the box Open Artifact to open the artifact after
creation. Click Finish.
3. Now you have the possibility to add artifacts to the module, these can be either new artifacts or already existing artifacts. Start by adding a new artifact, click on Create New Artifacts.
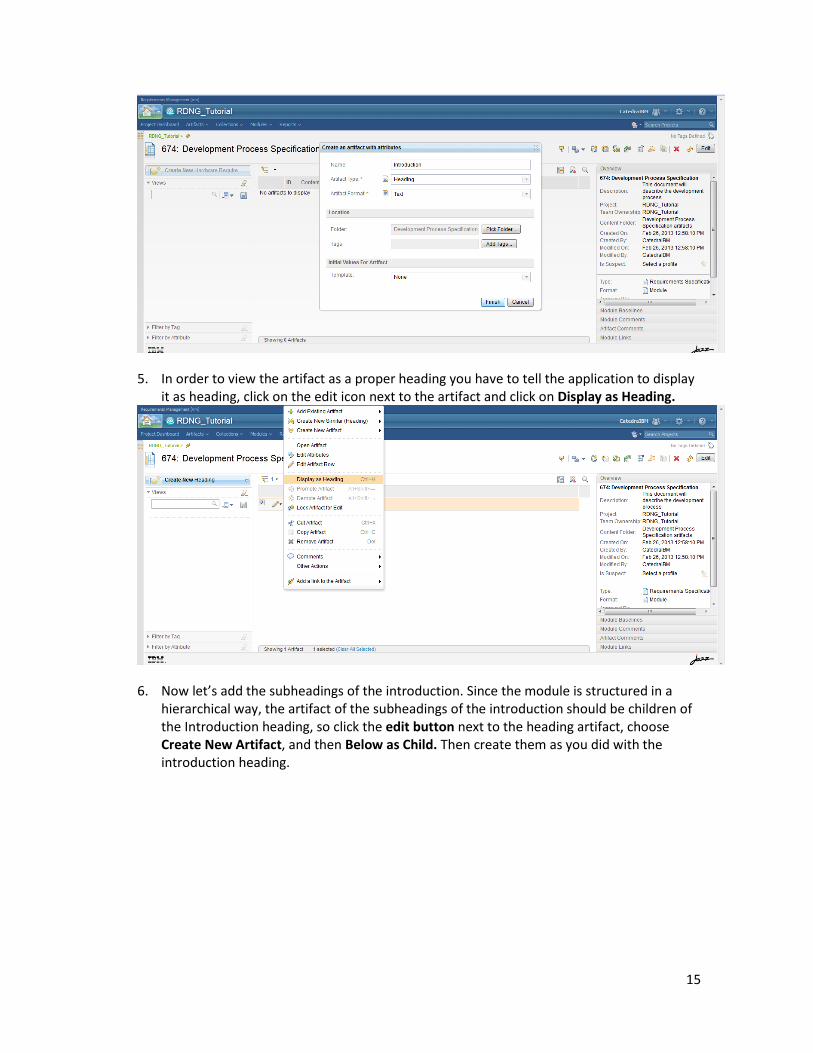
4. Add a Heading for the introduction of the document. Choose the Name for the artifact (this will be, at first the text that will be displayed in the module, but then you can change the content, what is displayed in the module, and keep this as the name of the artifact), choose Heading in the Artifact Type dropdown list. Then click Finish.
15
5. In order to view the artifact as a proper heading you have to tell the application to display it as heading, click on the edit icon next to the artifact and click on Display as Heading.
6. Now let’s add the subheadings of the introduction. Since the module is structured in a hierarchical way, the artifact of the subheadings of the introduction should be children of the Introduction heading, so click the edit button next to the heading artifact, choose Create New Artifact, and then Below as Child. Then create them as you did with the introduction heading.
16
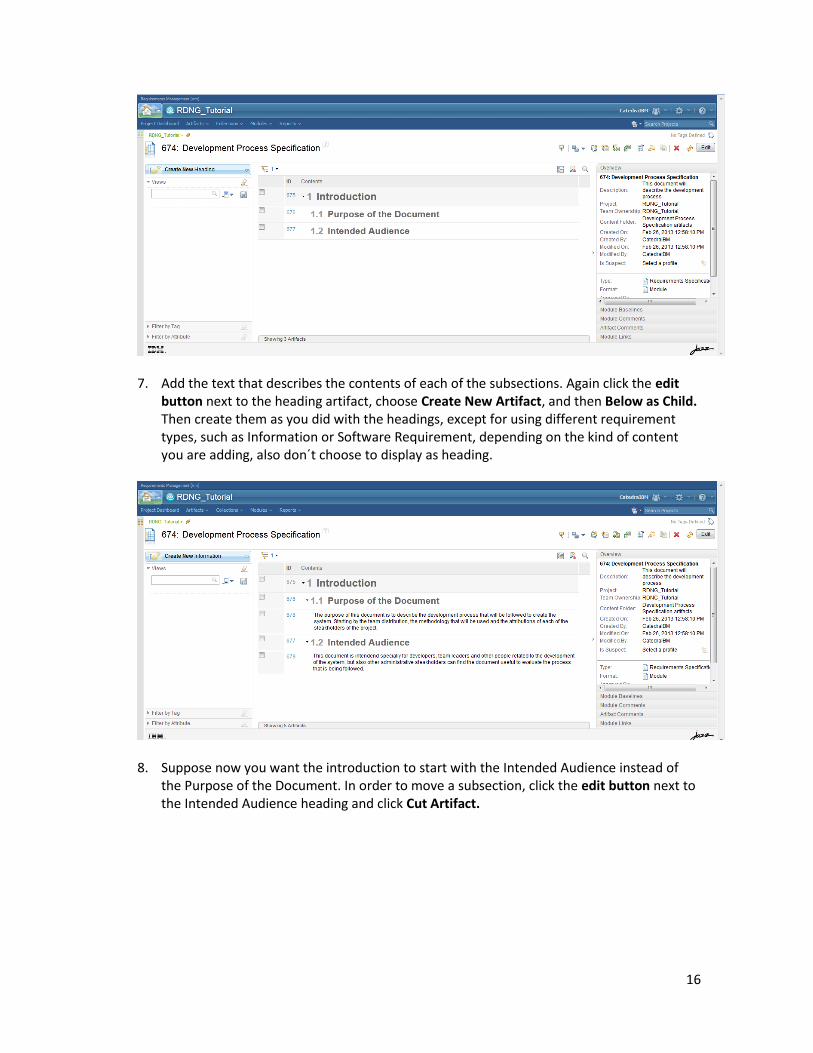
7. Add the text that describes the contents of each of the subsections. Again click the edit
button next to the heading artifact, choose Create New Artifact, and then Below as Child. Then create them as you did with the headings, except for using different requirement types, such as Information or Software Requirement, depending on the kind of content you are adding, also don´t choose to display as heading.
8. Suppose now you want the introduction to start with the Intended Audience instead of
the Purpose of the Document. In order to move a subsection, click the edit button next to the Intended Audience heading and click Cut Artifact.
17
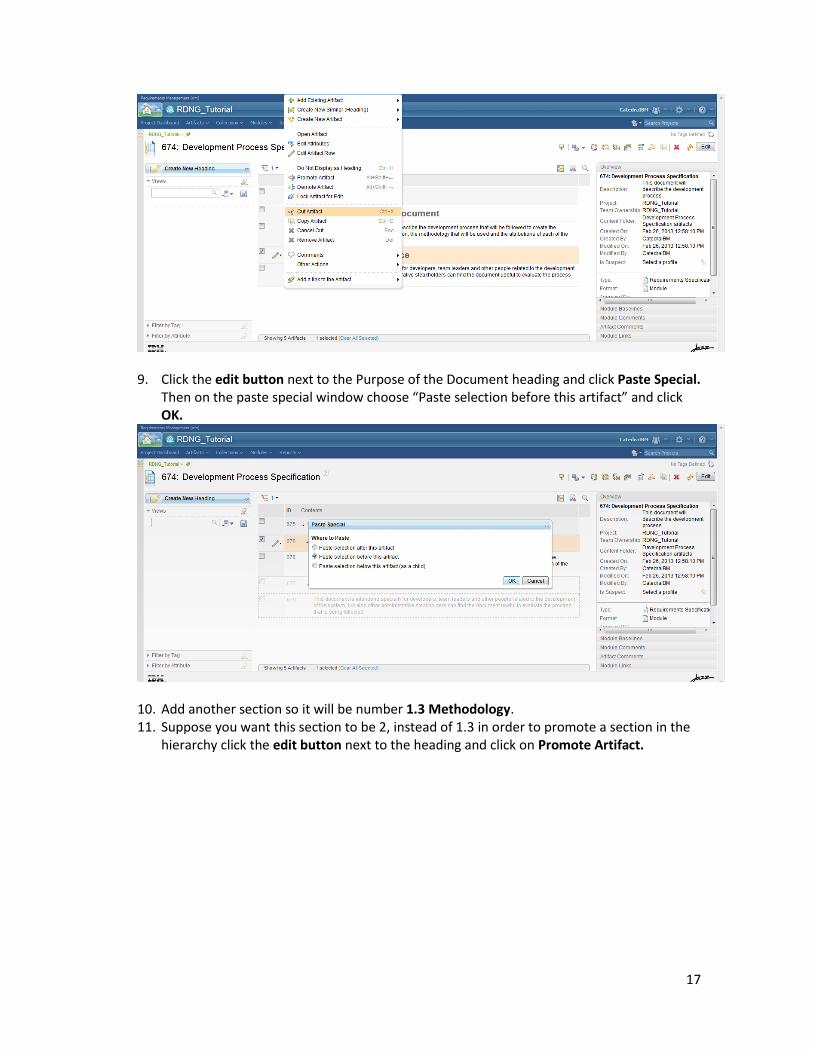
9. Click the edit button next to the Purpose of the Document heading and click Paste Special.
Then on the paste special window choose “Paste selection before this artifact” and click OK.
10. Add another section so it will be number 1.3 Methodology. 11. Suppose you want this section to be 2, instead of 1.3 in order to promote a section in the
hierarchy click the edit button next to the heading and click on Promote Artifact.
18
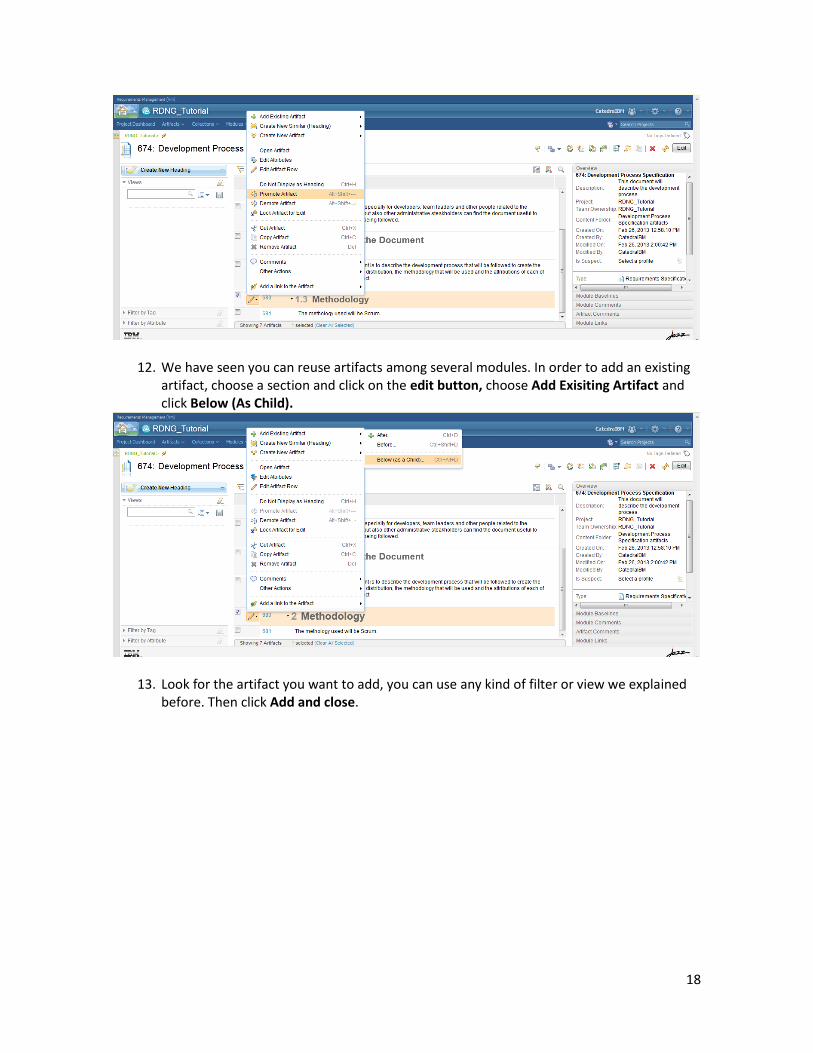
12. We have seen you can reuse artifacts among several modules. In order to add an existing artifact, choose a section and click on the edit button, choose Add Exisiting Artifact and click Below (As Child).
13. Look for the artifact you want to add, you can use any kind of filter or view we explained before. Then click Add and close.

19
14. Since a module is a set of artifacts, all the artifacts it contains are saved in a directory. Go to Artifacts > Browse Artifacts.
15. Look for the folder Development Process Specification artifacts. There you will see all the artifacts that you have added to the module you just created, except for the one that is being reused.
5.2 Importing a Module Rational DOORS Next Generation lets you import artifacts and modules from several sources. In
this tutorial we will import a Specification made in Microsoft Word to be broken down into artifacts and maintained in a module.
We will start by creating the word document. The hierarchical structure of our module will be
given by the hierarchy of the headings added in our word document, which are given by the styles you put on those headings.
1. Open Microsoft Word.
2. Create a document like the following.

20
3. You can observe that the Introduction and Vision headings are in a higher hierarchy than
the Purpose of the document and Intended Audience headings; this will be reflected in the
module that will be created when importing this document. You can switch to the
“Scheme View” to observe this hierarchical ordering in the Word document.
21
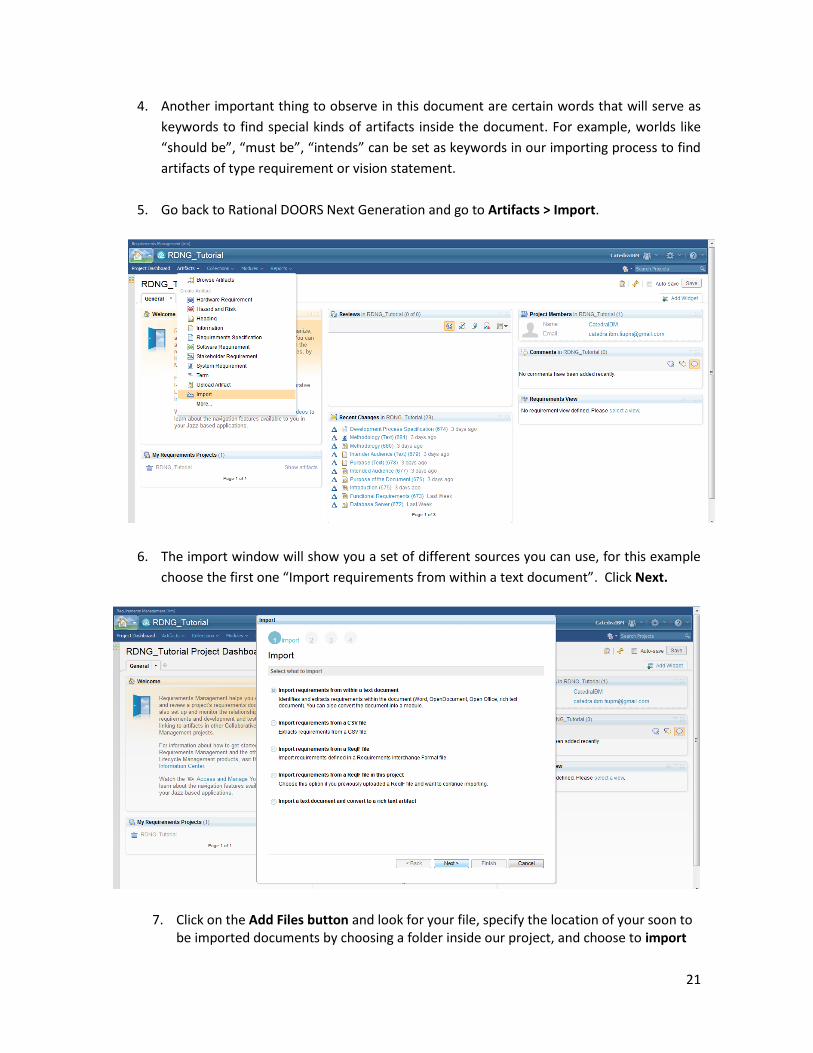
4. Another important thing to observe in this document are certain words that will serve as
keywords to find special kinds of artifacts inside the document. For example, worlds like
“should be”, “must be”, “intends” can be set as keywords in our importing process to find
artifacts of type requirement or vision statement.
5. Go back to Rational DOORS Next Generation and go to Artifacts > Import.
6. The import window will show you a set of different sources you can use, for this example
choose the first one “Import requirements from within a text document”. Click Next.
7. Click on the Add Files button and look for your file, specify the location of your soon to be imported documents by choosing a folder inside our project, and choose to import

22
the requirements and create a module. Choose the name and type of the module that will be created. Click Next.
8. Now you can set instructions to automatically add the types to the imported artifacts. Choose headings to be of type heading, and choose images to be of type information.
9. You can add keywords in order to find special artifacts types inside the document. For example you can choose that all sentences with the word “should” be mapped into an artifact of type Requirement. Click on Add Keyword, write the keyword, then if it should be taken as a sentence or a paragraph and finally the artifact type to create.

23
10. You can add text delimiters in order to find certain types of artifacts within the document. For example that all sentences that start with a “<” and end with a “>” be of type Information. To add a text delimiter click Add Delimiter, choose the starting delimiter, the ending delimiter and the artifact type.
11. Finally choose the artifact type for all the remaining text. Usually type Information. Click Next.
12. The tool will show you the results of the analysis process. Click Finish in order to view the create the artifacts and the module.
24
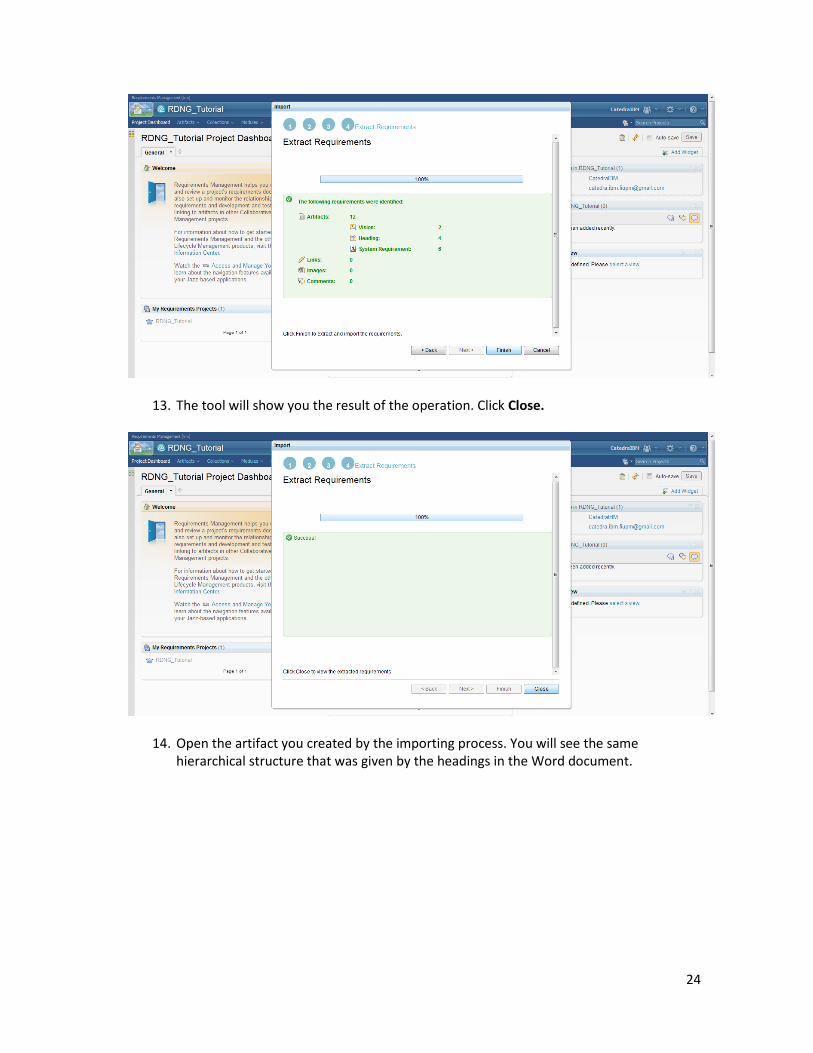
13. The tool will show you the result of the operation. Click Close.
14. Open the artifact you created by the importing process. You will see the same hierarchical structure that was given by the headings in the Word document.

25
15. Hover over the IDs of the artifacts to view the artifact types that where automatically found by the tool using the instructions of the importing process.
5.3 Viewing artifact history You can view the history of most artifacts. A revision is created each time you save an artifact.
Read-only revisions are organized by time period (today, yesterday, past week, past month and earlier). You can restore a previous revision of an artifact as the latest revision and view the details of the changes that were made to the artifact over time.
1. Open an artifact.
2. In the editor toolbar, click the Open History icon . A history view of the artifact opens in
the Show Previous Revisions tab, with each revision represented by a revision icon.

26
3. Hover over a revision icon in one of the time groups for details about the revision.
Click Show more ->show changes in the hover window for more specifics about what
changed.
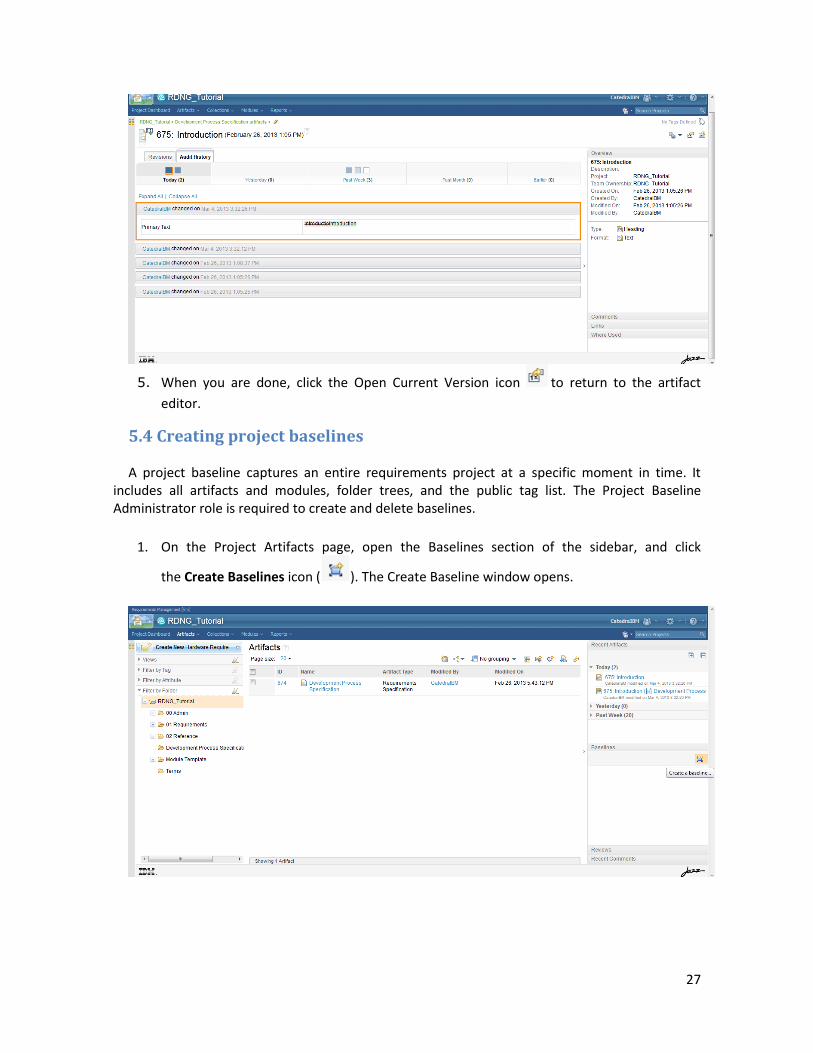
4. Click on Audit History. You will be able to see all the past revisions and expand them to se
the specifics of what changed.
27
5. When you are done, click the Open Current Version icon to return to the artifact
editor.
5.4 Creating project baselines A project baseline captures an entire requirements project at a specific moment in time. It
includes all artifacts and modules, folder trees, and the public tag list. The Project Baseline Administrator role is required to create and delete baselines.
1. On the Project Artifacts page, open the Baselines section of the sidebar, and click
the Create Baselines icon ( ). The Create Baseline window opens.

28
2. Type a name and description of the project baseline, and then click OK. You can create
baseline at any date in the past, not just at the current time, by selecting the date in the
Create Baseline window.
3. The baseline is now visible in the Baselines section of the sidebar. Click on it to open it.
The baseline viewer opens and displays a list of the artifacts in the baseline. You can view
all artifacts and their history and create reports, but you cannot modify the baseline of
add comments.
4. To close the baseline and go to the current project click the Open Current Project icon.
5.5 Commenting on artifacts and modules

29
A comment is a textual discussion item that is associated with an artifact or an element within an artifact. You can use comments to provide team feedback during the development of an artifact. Comments are displayed in the Comments section of an artifact sidebar, in the Recent Comments section of the Project Artifacts page sidebar, and in Recent Comments for Me on the User Dashboard.
1. Open an artifact. In the Comments section of the sidebar, click the Comments icon.
2. The Create a New Comment window open. Write a subject and comment. Optionally, you can select a specific person for this comment. It is important to notice that RDNG comes with a rich text editor that lets you format the text of artifacts and comments.
3. The comment will now be visible in the Comments section of the sidebar. Members of the project can reply, edit, resolve and delete the comment.
30
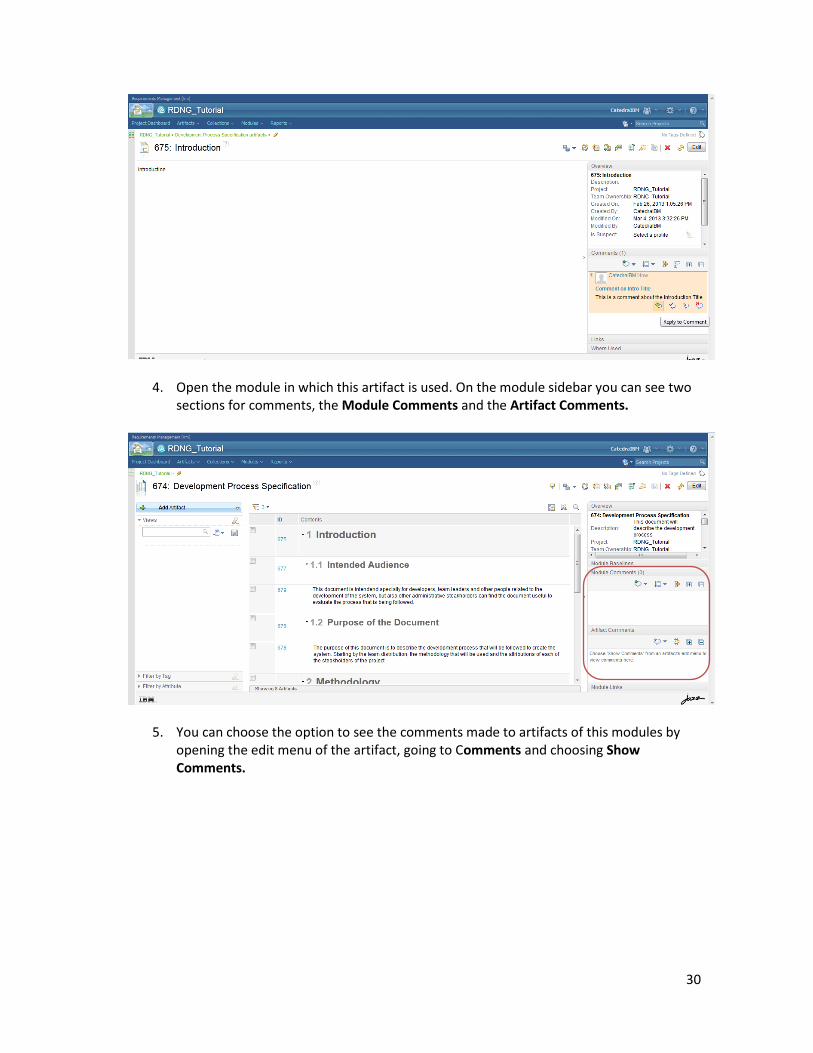
4. Open the module in which this artifact is used. On the module sidebar you can see two sections for comments, the Module Comments and the Artifact Comments.
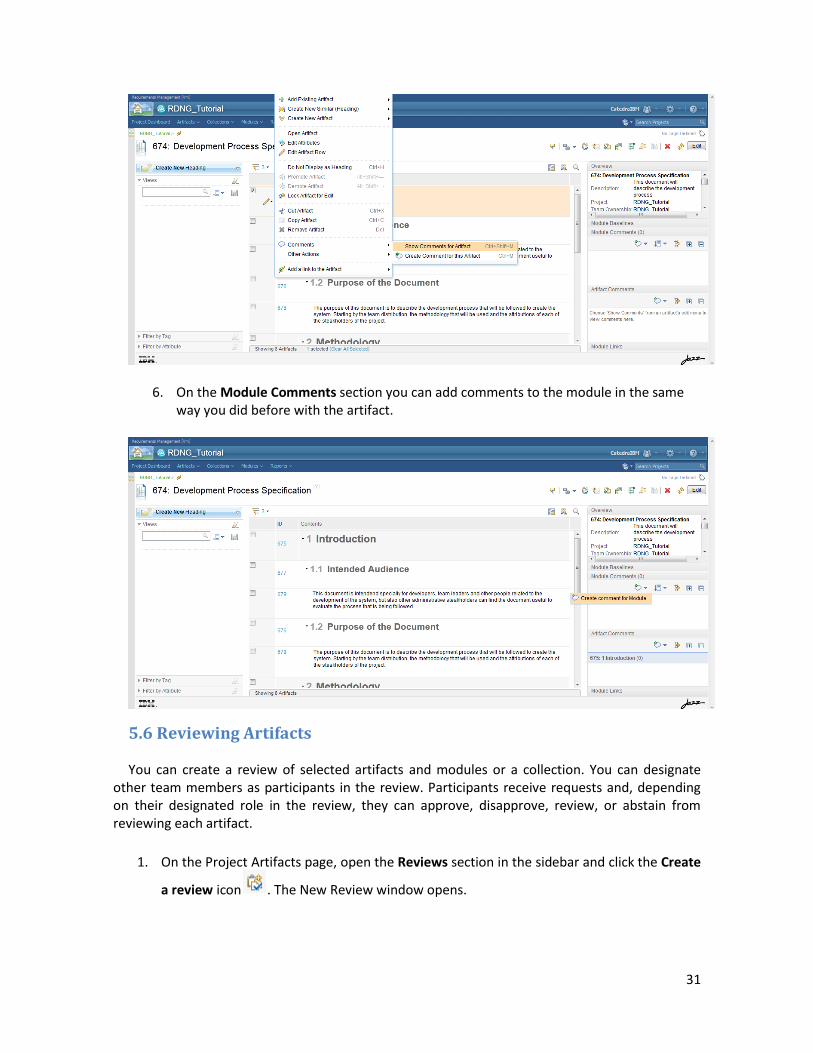
5. You can choose the option to see the comments made to artifacts of this modules by opening the edit menu of the artifact, going to Comments and choosing Show Comments.
31
6. On the Module Comments section you can add comments to the module in the same way you did before with the artifact.
5.6 Reviewing Artifacts You can create a review of selected artifacts and modules or a collection. You can designate
other team members as participants in the review. Participants receive requests and, depending on their designated role in the review, they can approve, disapprove, review, or abstain from reviewing each artifact.
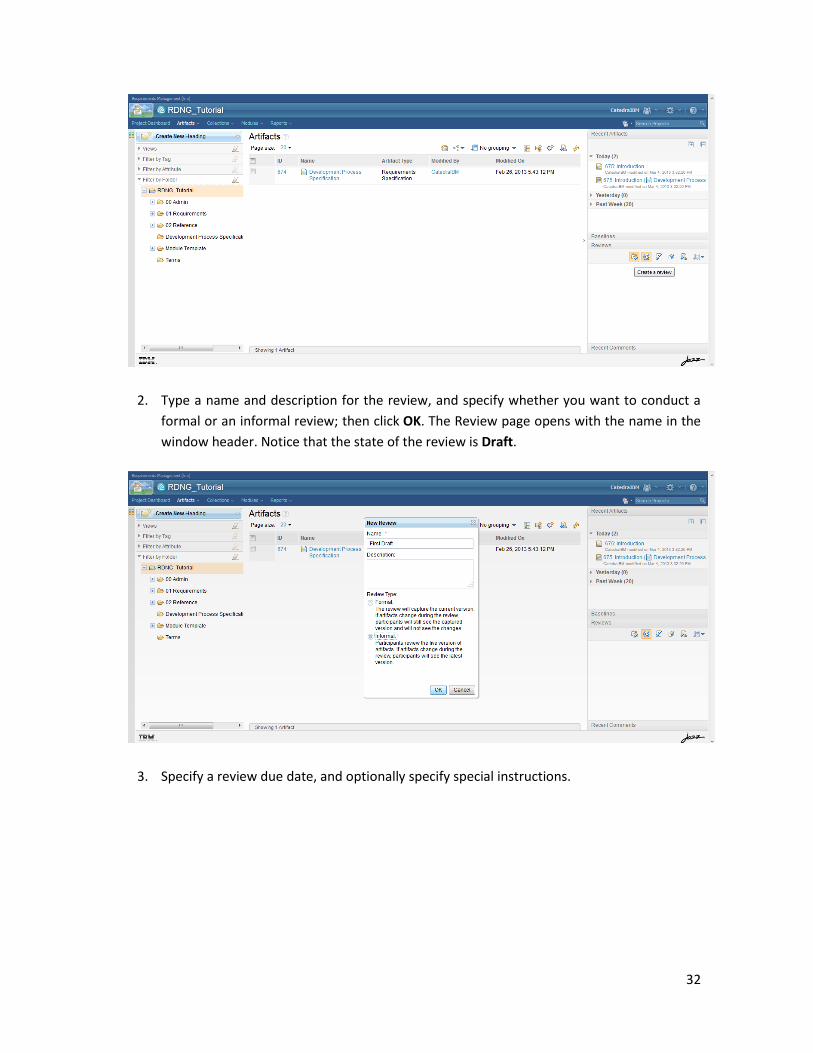
1. On the Project Artifacts page, open the Reviews section in the sidebar and click the Create
a review icon . The New Review window opens.
32
2. Type a name and description for the review, and specify whether you want to conduct a
formal or an informal review; then click OK. The Review page opens with the name in the
window header. Notice that the state of the review is Draft.
3. Specify a review due date, and optionally specify special instructions.

33
4. Add reviewers to the review:
a. Click Add Participants. The Select Users window opens.
b. Enter a partial user name or wildcard to access a list of team members to
participate in the review.
c. Select one or more users in the Matching users section. Press Ctrl and click to
select more than one name.
d. Specify whether the members are reviewers, approvers, or optional reviewers.
Optional reviewers have the full review capability, but their progress does not
affect the status of the review.
e. Click Add to add the users as participants in the review.
f. Search for other users, if necessary. When your selections are complete,
click Close.
5. If the artifacts are not already there, add the artifacts (or modules) you want to be
reviewed. To do this:
a. Click Add Artifacts. The Select Artifacts window opens.
b. Search for artifacts by type, name, text, or folder.
c. Select one or more artifacts and click Add. The artifacts that you selected are
displayed in the Artifacts section.
d. When your selections are complete, click Close.
6. Click Save Review or Start Review. When you start the review:
o The review is listed on the participants' dashboard in the Reviews section.
o The review is displayed in the Reviews section in the sidebar of the Project
Artifacts page.
o The state of the review changes from Draft to Started.
34
7. When participants join the review, they double-click the artifacts to view them, and then,
depending on the role assigned to them, click Approve, Disapprove, Mark as Reviewed, or
Abstain from reviewing the artifact.