Embed Size (px)
Citation preview
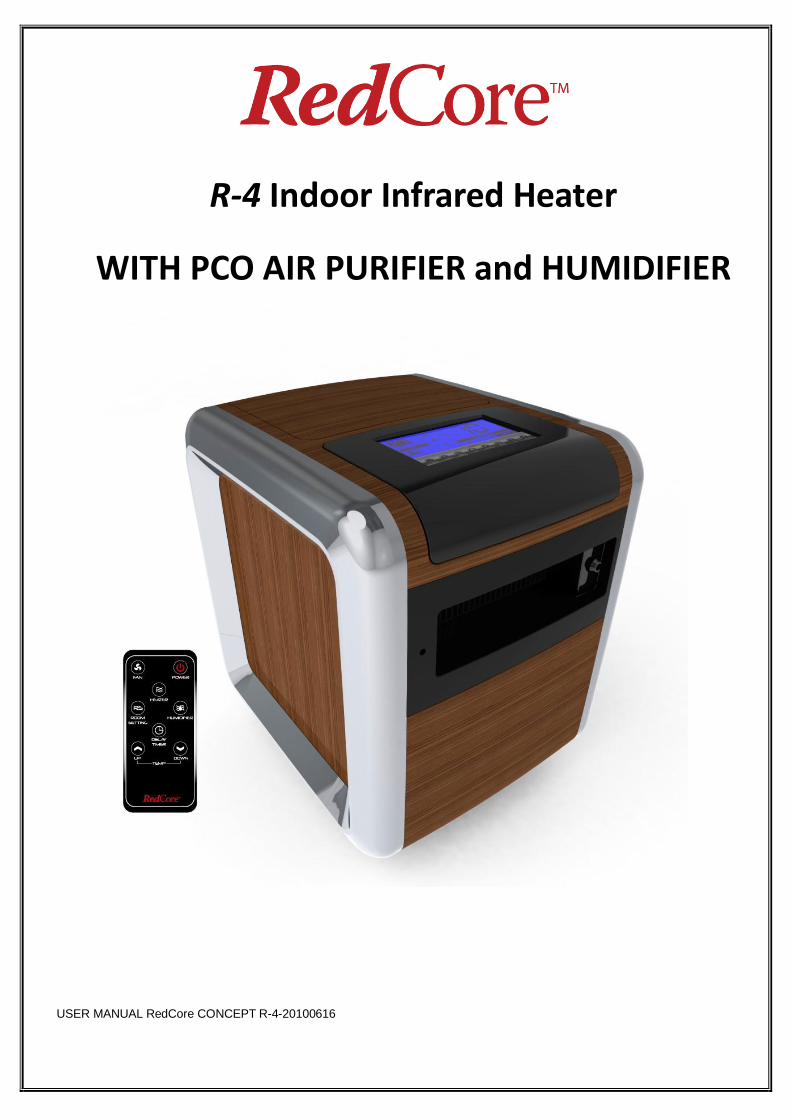
R-4 Indoor Infrared Heater
WITH PCO AIR PURIFIER and HUMIDIFIER
USER MANUAL RedCore CONCEPT R-4-20100616
Thanks for choosing the RedCoreTM Indoor Infrared Heater! We help our customers save money on
energy bills while improving their comfort with safe, therapeutic heating products. The RedCore™
Concept R4 is a 3-in-1 product, producing soft infrared heating, humidification, and superior year-round
air purification all in one convenient product.
Please refer to our website, www.redcore.com, for further information on all RedCore™ products.
For Service and Support Questions, please contact:
American Comfort Worldwide LLC
Moonachie, NJ 07074 USA
www.redcore.com
877-305-5519
PRECAUTION
1. Read all instructions before using this appliance.
2. The heater is hot when in use. To avoid burns, do not place any objects such as furniture, papers,
clothes, and curtains closer than 3 feet (0.9 m) to the front of the heater and keep them away from the
sides and rear when the heater is plugged in.
3. Extreme caution should be taken when using any appliance around children, elderly, or disabled
persons, or whenever the heater is operating unattended. Children under 14 years of age should not be
allowed to operate this heater. This product is for adult use only and all children must be supervised when
using this product.
4. Always unplug heater when not in use.
5. Do not operate heater with a damaged cord or plug, after the heater malfunctions, or if the heater has
been dropped or damaged in any manner. Discard heater or return to an authorized service facility for
examination and/or repair.
6. Do not use outdoors.
7. This heater is not intended for use in bathrooms, laundry areas, and similar indoor locations. Never
locate appliance where it may fall into a bathtub or other water container.
8. Do not run cord under carpeting. Do not cover cord with throw rugs, runners, or similar coverings. Do
not route cord under furniture or appliances. Arrange cord away from traffic areas and where it will not be
tripped over.
9. To disconnect the appliance, turn controls to off, wait for heater to cool down and shut off, and then
remove plug from outlet.
10. Connect to properly polarized outlets only. This product requires a three prong outlet with ground.
11. Do not insert or allow foreign objects to enter into ventilation opening as this may cause an electric
shock, fire or damage the appliance.
12. To prevent a possible fire, do not block air intakes or exhaust in any manner. Do not use on soft
surfaces, like a bed, where openings may become blocked.
13. The heater has hot parts and sparking parts inside. Do not use in areas where gasoline, paint, or
flammable liquids are used or stored.
WARNING 1: WHEN USING ELECTRICAL APPLIANCES, BASIC PRECAUTIONS
SHOULD ALWAYS BE FOLLOWED TO REDUCE RISK OF FIRE, ELECTRIC
SHOCK, AND INJURY TO PERSONS.
WARNING 2: RISK OF ELECTRIC SHOCK NO USER-SERVICABLE
PARTS INSIDE EXCEPT TO CLEAN THE AIR FILTER AND ADD WATER
TO THE HUMIDIFIER.
14. Use this appliance only as described in this manual. Any use not recommended by the manufacturer
may cause fire, electric shock, or injury to persons.
15. Always plug heaters directly into a wall outlet receptacle. Do not use an extension cord.
16. To prevent overload and blown fuses, be sure that no other appliance is plugged into the same outlet
on the same circuit.
17. It is normal for the heater’s plug and cord to feel warm to the touch. A plug or cord which becomes hot
to the touch or becomes distorted in shape may be a result of a worn electrical outlet (receptacle). Worn
outlets or receptacles should be replaced prior to further use of the heater. Plugging this heater into a
worn outlet (receptacle) may result in overheating of the power cord or fire.
18. Be sure that the plug is fully inserted into an appropriate receptacle. Please remember that
receptacles also deteriorate due to aging and continuous use: check outlet and cord periodically for signs
of overheating or deformations of the plug. If any overheating or deformation is present, immediately
discontinue using the receptacle and contact a qualified electrician.
19. CAUTION: To prevent electric shock, match wide blade of plug to wide slot of receptacle and insert
completely.
20. Do not cover the appliance while it is functioning in order to avoid overheating and/or risk of fire.
21. Do not place the heater near a bed because objects such as pillows or blankets can fall off the bed
and be ignited by the heater.
22. Check your heater cord and plug connections.
a) Faulty wall outlet connections or loose plugs can cause the outlet or plug to overheat. Be sure the plug
fits tight in outlet.
b) Heaters draw more current than small appliances. Overheating of the outlet may occur even if it has
not occurred with the use of other appliances.
c) During use, check frequently to determine if your plug outlet or faceplate is HOT!
d) If so, discontinue use of the heater and have a qualified electrician check and/or replace faulty
outlet(s).
23. Do not locate against walls or behind drapes or furniture.
24. Be certain to clean the outer air filter in the rear of the heater periodically by vacuuming it and/or
washing it to remove dust particles. Be certain to dry the filter completely prior to reinserting it into its
position on the heater and prior to re-starting the heater.
SAVE THESE INSTRUCTIONS
Product specification and basic features
Voltage 120V-60HZ
Heating power: Up to1500 Watts.
Temperature control range:60-90 degrees Fahrenheit
Heating element: Infrared PTC heater
Air purifier: lifetime washable air filter and PCO cell
Humidifier: ultrasonic atomized design with separate control from heater operation
Delay Timer: 1-23 hour delay time setting for heater
LCD display and touch button operation, including remote control
Tip-over safety switch… automatically shuts off heater if it tips over
Coverage: Up to 1,000 square feet.
Dimensions:17.8” high X 13.9” wide X 16.5” deep 16.54
Weight: 29.5 pounds
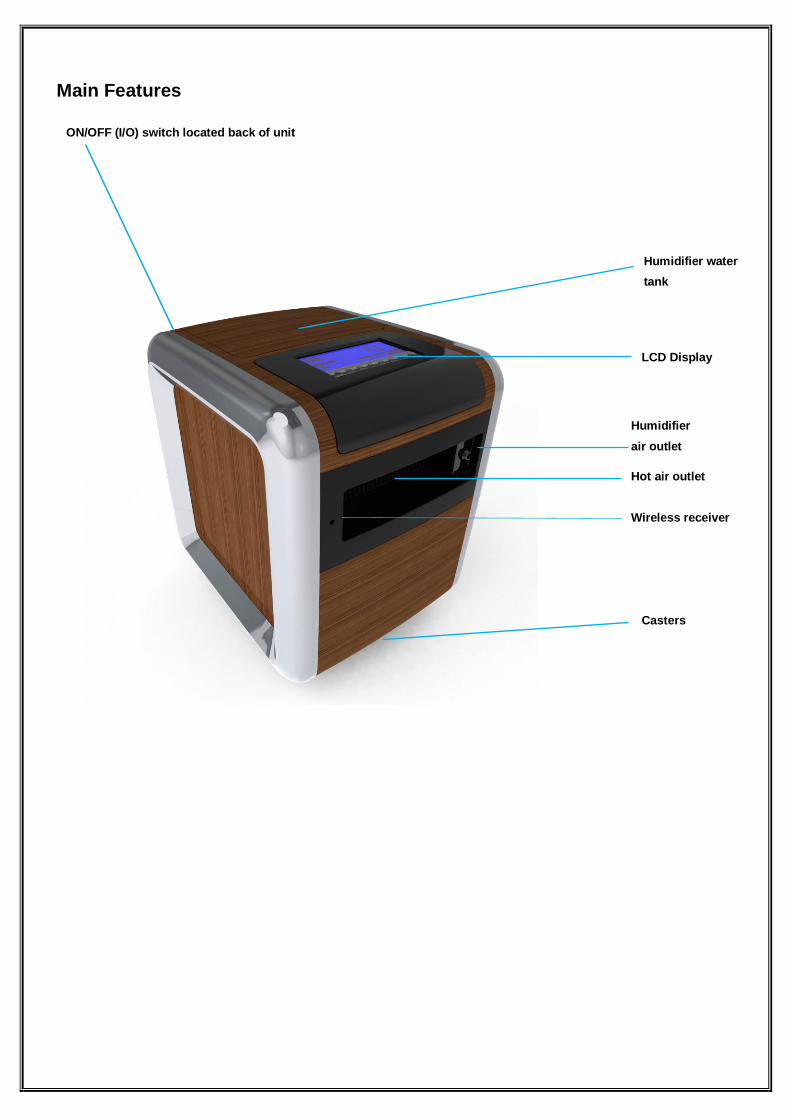
Main Features
ON/OFF (I/O) switch located back of unit
LCD Display
Humidifier
air outlet
Hot air outlet
Wireless receiver
Casters
Humidifier water
tank
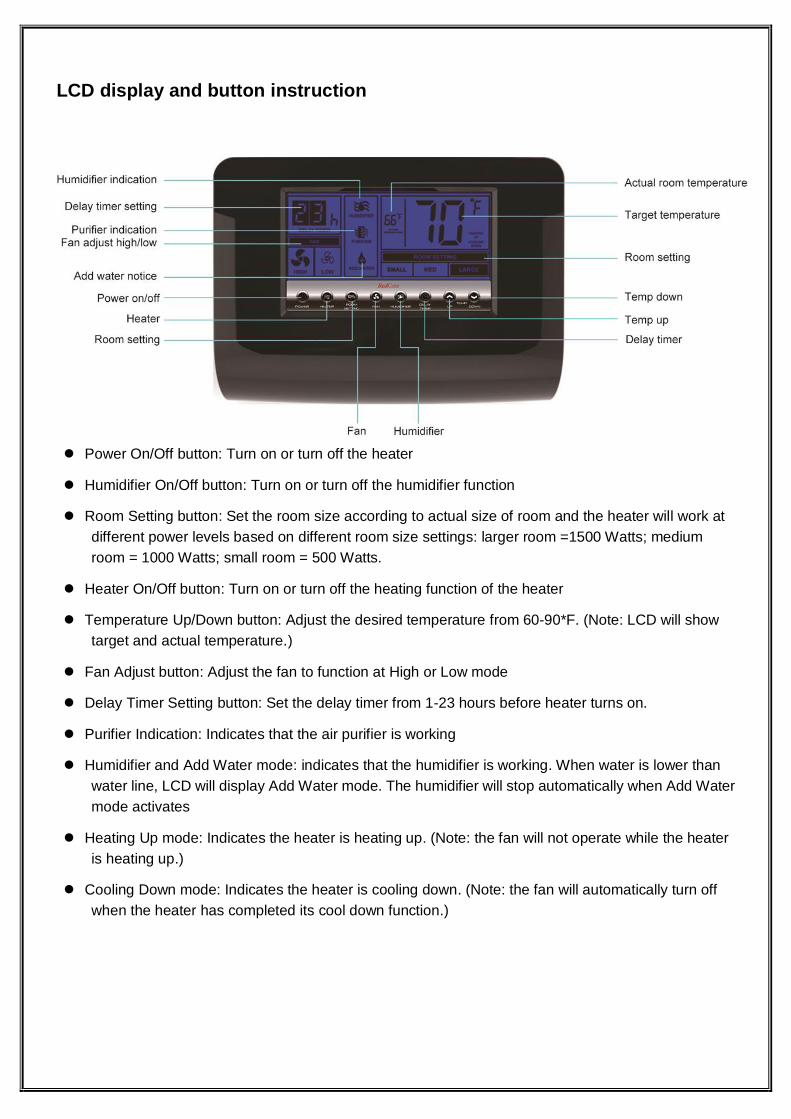
LCD display and button instruction
Power On/Off button: Turn on or turn off the heater
Humidifier On/Off button: Turn on or turn off the humidifier function
Room Setting button: Set the room size according to actual size of room and the heater will work at
different power levels based on different room size settings: larger room =1500 Watts; medium
room = 1000 Watts; small room = 500 Watts.
Heater On/Off button: Turn on or turn off the heating function of the heater
Temperature Up/Down button: Adjust the desired temperature from 60-90*F. (Note: LCD will show
target and actual temperature.)
Fan Adjust button: Adjust the fan to function at High or Low mode
Delay Timer Setting button: Set the delay timer from 1-23 hours before heater turns on.
Purifier Indication: Indicates that the air purifier is working
Humidifier and Add Water mode: indicates that the humidifier is working. When water is lower than
water line, LCD will display Add Water mode. The humidifier will stop automatically when Add Water
mode activates
Heating Up mode: Indicates the heater is heating up. (Note: the fan will not operate while the heater
is heating up.)
Cooling Down mode: Indicates the heater is cooling down. (Note: the fan will automatically turn off
when the heater has completed its cool down function.)
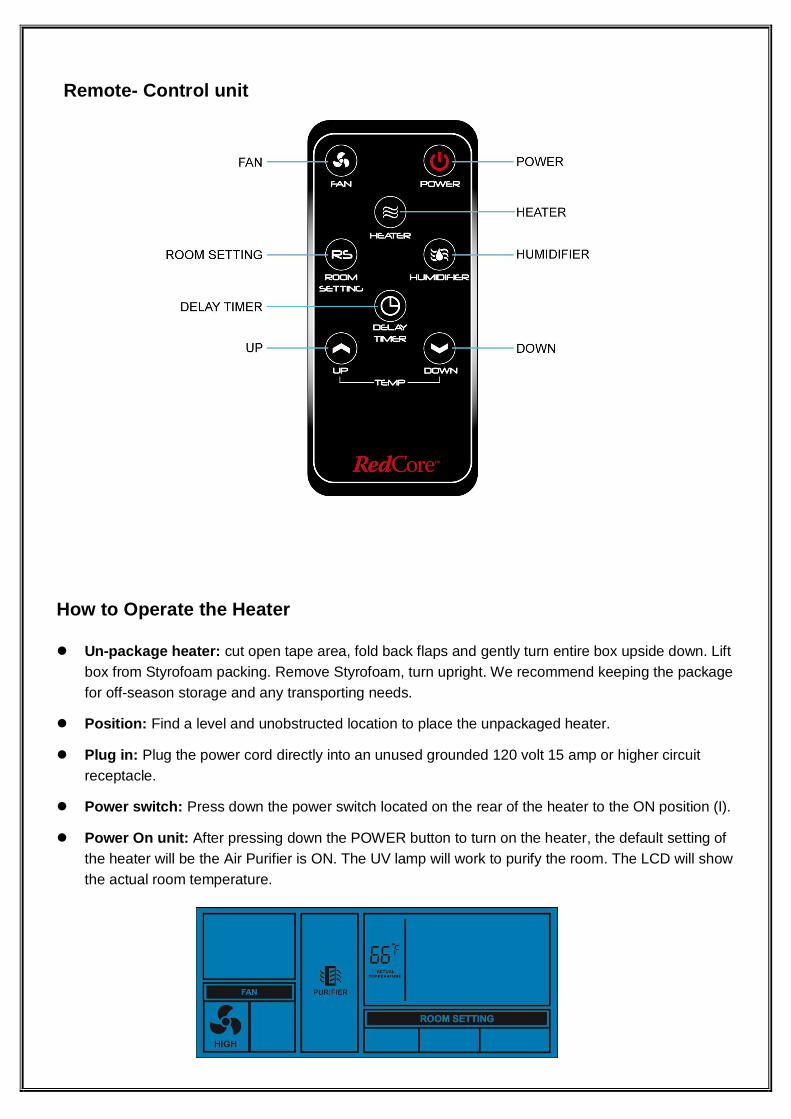
Remote- Control unit
How to Operate the Heater
Un-package heater: cut open tape area, fold back flaps and gently turn entire box upside down. Lift
box from Styrofoam packing. Remove Styrofoam, turn upright. We recommend keeping the package
for off-season storage and any transporting needs.
Position: Find a level and unobstructed location to place the unpackaged heater.
Plug in: Plug the power cord directly into an unused grounded 120 volt 15 amp or higher circuit
receptacle.
Power switch: Press down the power switch located on the rear of the heater to the ON position (I).
Power On unit: After pressing down the POWER button to turn on the heater, the default setting of
the heater will be the Air Purifier is ON. The UV lamp will work to purify the room. The LCD will show
the actual room temperature.
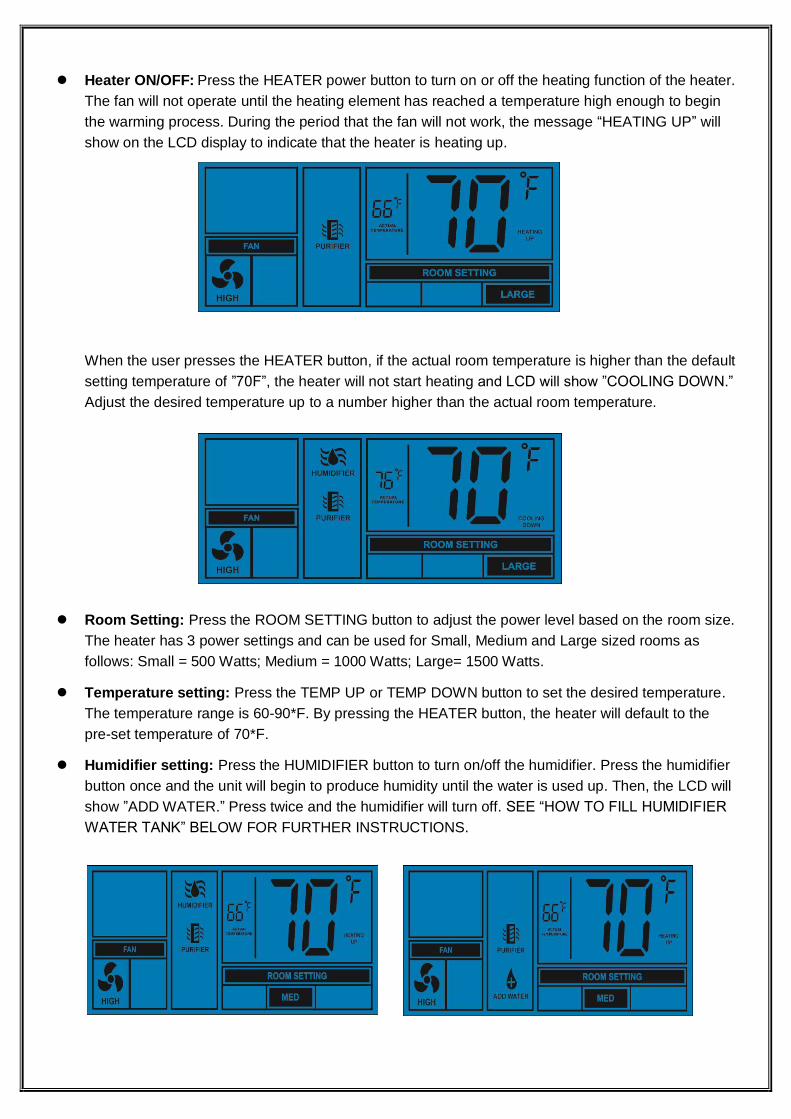
Heater ON/OFF: Press the HEATER power button to turn on or off the heating function of the heater.
The fan will not operate until the heating element has reached a temperature high enough to begin
the warming process. During the period that the fan will not work, the message “HEATING UP” will
show on the LCD display to indicate that the heater is heating up.
When the user presses the HEATER button, if the actual room temperature is higher than the default
setting temperature of ”70F”, the heater will not start heating and LCD will show ”COOLING DOWN.”
Adjust the desired temperature up to a number higher than the actual room temperature.
Room Setting: Press the ROOM SETTING button to adjust the power level based on the room size.
The heater has 3 power settings and can be used for Small, Medium and Large sized rooms as
follows: Small = 500 Watts; Medium = 1000 Watts; Large= 1500 Watts.
Temperature setting: Press the TEMP UP or TEMP DOWN button to set the desired temperature.
The temperature range is 60-90*F. By pressing the HEATER button, the heater will default to the
pre-set temperature of 70*F.
Humidifier setting: Press the HUMIDIFIER button to turn on/off the humidifier. Press the humidifier
button once and the unit will begin to produce humidity until the water is used up. Then, the LCD will
show ”ADD WATER.” Press twice and the humidifier will turn off. SEE “HOW TO FILL HUMIDIFIER
WATER TANK” BELOW FOR FURTHER INSTRUCTIONS.
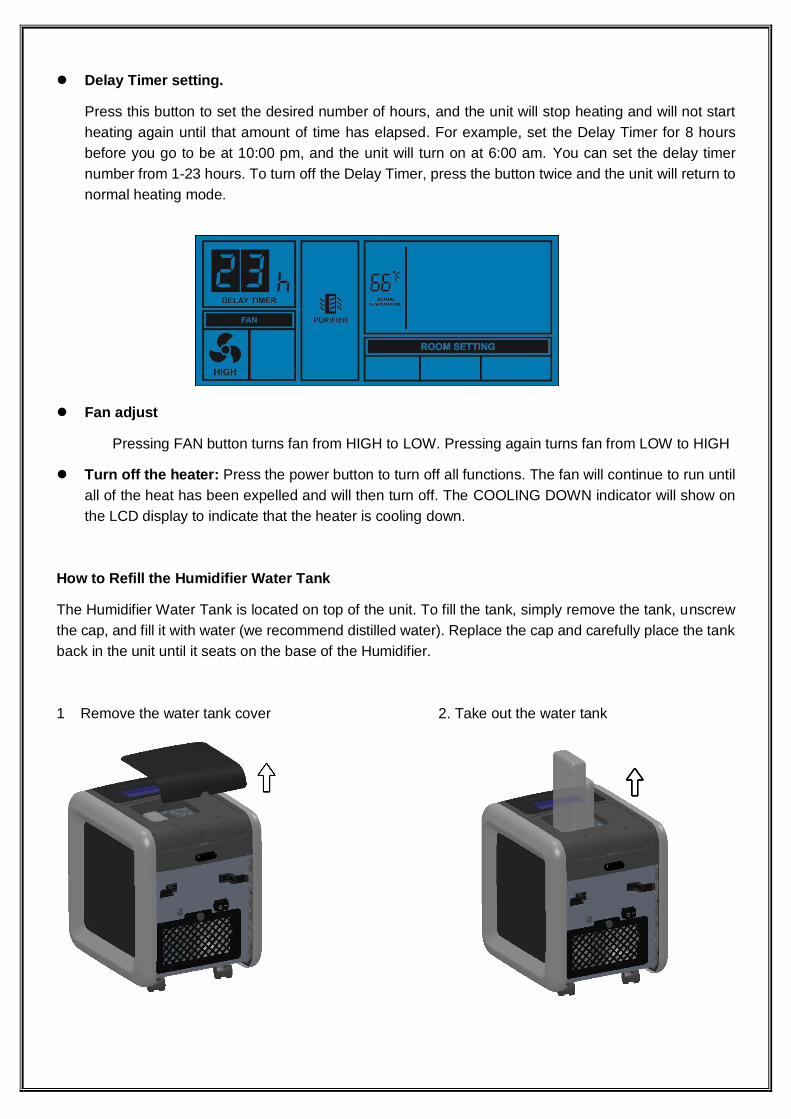
Delay Timer setting.
Press this button to set the desired number of hours, and the unit will stop heating and will not start
heating again until that amount of time has elapsed. For example, set the Delay Timer for 8 hours
before you go to be at 10:00 pm, and the unit will turn on at 6:00 am. You can set the delay timer
number from 1-23 hours. To turn off the Delay Timer, press the button twice and the unit will return to
normal heating mode.
Fan adjust
Pressing FAN button turns fan from HIGH to LOW. Pressing again turns fan from LOW to HIGH
Turn off the heater: Press the power button to turn off all functions. The fan will continue to run until
all of the heat has been expelled and will then turn off. The COOLING DOWN indicator will show on
the LCD display to indicate that the heater is cooling down.
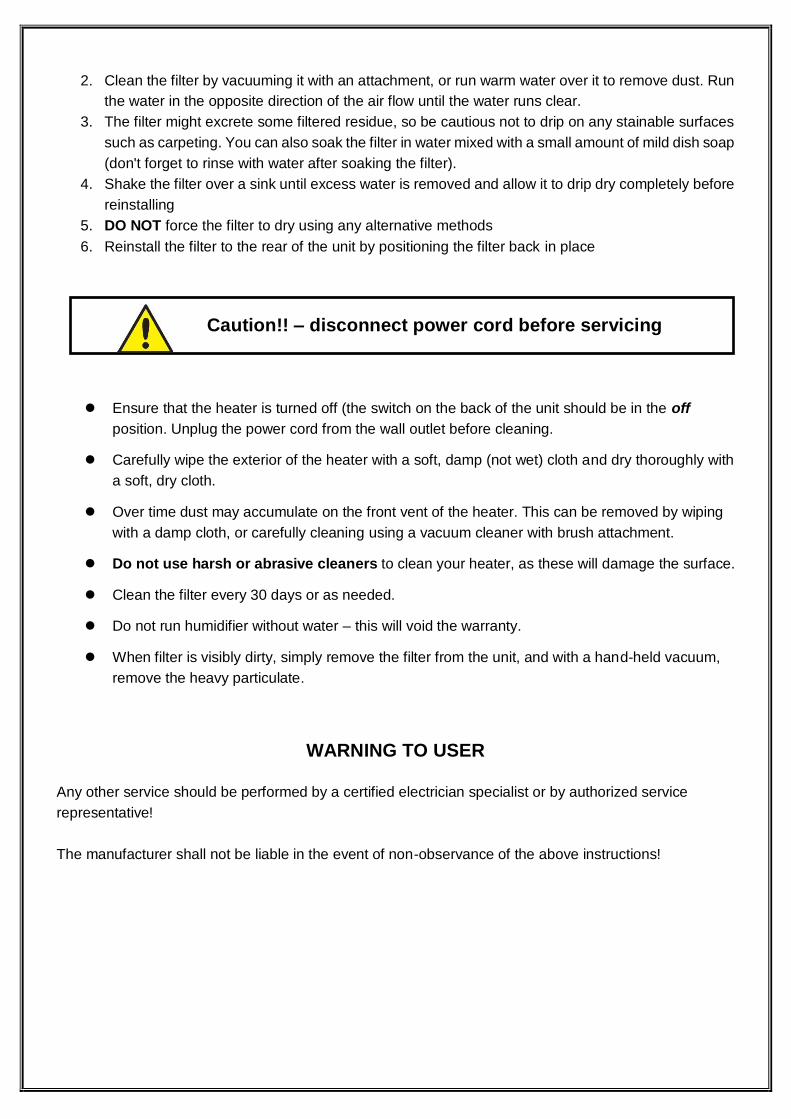
How to Refill the Humidifier Water Tank
The Humidifier Water Tank is located on top of the unit. To fill the tank, simply remove the tank, unscrew
the cap, and fill it with water (we recommend distilled water). Replace the cap and carefully place the tank
back in the unit until it seats on the base of the Humidifier.
1 Remove the water tank cover 2. Take out the water tank

3. Unscrew the cap 4. Add distilled water and replace tank
How to Clean the Humidifier
DO NOT USE VINEGAR TO CLEAN THIS HUMIDIFIER. If you are not going to use the humidifier for an
extended period of time (during warm weather), drain all water out of the bottle and chamber and dry it out
as much as possible using a soft towel. Do not attempt to run humidifier without water as this will
damage the unit and nullify the warranty.
How to Clean the Air Purifier Filter
Your Concept R4 heater comes with a PCO (Photo-Catalytic Oxidation) air purifier that combines
high-intensity UV light with superior activated carbon honeycomb filter technology
The lifetime washable air filter needs to be cleaned on a regular basis to ensure maximum performance of
the air purifier and of the heater itself. To clean the Air Purifier, follow these simple steps:
1. Remove the filter by opening the filter cover on the back of the heater and carefully pulling the filter
out.
2. Clean the filter by vacuuming it with an attachment, or run warm water over it to remove dust. Run
the water in the opposite direction of the air flow until the water runs clear.
3. The filter might excrete some filtered residue, so be cautious not to drip on any stainable surfaces
such as carpeting. You can also soak the filter in water mixed with a small amount of mild dish soap
(don't forget to rinse with water after soaking the filter).
4. Shake the filter over a sink until excess water is removed and allow it to drip dry completely before
reinstalling
5. DO NOT force the filter to dry using any alternative methods
6. Reinstall the filter to the rear of the unit by positioning the filter back in place
Ensure that the heater is turned off (the switch on the back of the unit should be in the off
position. Unplug the power cord from the wall outlet before cleaning.
Carefully wipe the exterior of the heater with a soft, damp (not wet) cloth and dry thoroughly with
a soft, dry cloth.
Over time dust may accumulate on the front vent of the heater. This can be removed by wiping
with a damp cloth, or carefully cleaning using a vacuum cleaner with brush attachment.
Do not use harsh or abrasive cleaners to clean your heater, as these will damage the surface.
Clean the filter every 30 days or as needed.
Do not run humidifier without water – this will void the warranty.
When filter is visibly dirty, simply remove the filter from the unit, and with a hand-held vacuum,
remove the heavy particulate.
WARNING TO USER
Any other service should be performed by a certified electrician specialist or by authorized service
representative!
The manufacturer shall not be liable in the event of non-observance of the above instructions!
Caution!! – disconnect power cord before servicing
PERFORMANCE SUGGESTIONS
To assure maximum performance of the heater, please note the following recommendations:
1) For best result, do not locate the heater in an area with a high rate of air filtration and movement as the
warm air will be exhausted.
2) Try placing the heater near a warmer inside wall and direct the output towards a cooler outside wall.
The cooler outside wall will tend to draw the generated heat towards itself, which will allow for more
efficient heating.
3) Placing the heater next to a cold air return will draw the heat away from area to be heated. Try closing
or covering the cold air return. This will allow for more efficient heating. Experiment with the placement of
the heater to see what works best for you.
4) To ensure maximum efficiency, a 40% (minimum) relative humidity should be maintained in the heated
environment.
5) The heater is designed to operate for maximum efficiency up to 80-82 degree range. Due to the soft
heat concept, temperatures at 68 degrees feel as though it were 72 degrees. This is due to the heat
mixing with humidity evenly for “head-to-toe” comfort.
6) When the heater is placed in an isolated area, i.e. basement or recreation area, the delivery registers
and air return grills of the existing system should be closed in that area if possible.
7) Try placing the heater a few feet above the floor in rooms with large areas of bare concrete. Make sure
the heater is secure and won't fall. This will allow for more efficient heating since concrete acts as a heat
sink and will tend to draw the heat in its direction.
8) Try lowering your central heating system to a lower temperature and placing the heater in the area you
spend the majority of your time. Now set the heater to your comfort level. This will help reduce your
overall energy consumption.
9) When heating larger areas, place the heater in a central location. If a ceiling fan is nearby, try using it at
the same time to help distribute the heat evenly.
10) If used in an extremely dirty or dusty area, the filter must be cleaned more frequently as the filter can
clog and cause the heater to stop working. Please refer to “How to Clean the Air Purifier Filter” in this
manual for cleaning instructions.
11) The heater grill is hot when in use. To avoid burns, do not let bare skin touch the hot surface. Keep
combustible materials, such as furniture, pillows, bedding, papers, clothes, and curtains at least three feet
from the front of the heater and keep them away from the sides and rear.
12) Extreme caution is necessary when any heater is used by or near children or invalids and whenever

the heater is left operating and unattended.
13) To disconnect heater, turn controls to off, then remove plug from outlet. Always unplug heater when
not in use.
QUESTIONS AND ANSWERS
Why does the blower fan not work after I have turned on the heater power button?
The blower fan will not work until the heating element is hot enough to heat the air passing by. It will
normally turn on after about 10 seconds.
Why does the blower fan keep running after I have turned off the power button?
The blower fan will continue to run until the proprietary heat chambers have cooled down. After a few
minutes the fan will shut off automatically.
The heater's airflow seems to have diminished?
Make sure the rear intake is not blocked and that the filter is clean. Follow the filter maintenance
procedure to clean the filter.
Once I initially plug the unit in and turn it on, how long will it take to heat my room?
Generally, it takes less than an hour. Please remember that with any type of heating process there are
many variables: size of the room, how well the room is insulated, how many doors/windows, how much
bare concrete (which acts as a heat sink with any type of heating), the opening and closing of an exterior
door, and the outside temperature etc.
Can I use the heater to heat multiple rooms at the same time?
Yes. Keep in mind the heating will vary based on how open your floor plan is and the sizes of the rooms
involved. In some cases, running a ceiling fan will help in heating multiple rooms simultaneously by
placing the unit in a central room.
My home is not insulated very well, will this heater help me?
Yes, but it will take a little longer to heat the room initially and the outside temperature will also have an
impact on heating time. Once the room has reached the desired temperature it will cycle on and off
accordingly.
Can the heater be used in a bathroom?
It is not recommended due to the high level of moisture in a bathroom.
Will I be able to use the heater in a basement or garage?
Yes, but keep in mind that rooms with little insulation will not retain the heat as efficiently. Bare concrete
floors which act as a heat sink with any type of heating will absorb some of the heat. Placing the heater a
few feet above the floor will allow for more efficient heating.

Can I use more than one heater at a time?
Yes, but you should make sure they are not on the same circuit. Each heater and appliance should be on
its own circuit.
Can I use the heater on a job/construction site?
The heater was not designed to be used in a high dust construction environment. Using the heater for this
purpose will void your warranty.
Can I move the heater around while it is operating?
It is not recommended to move any portable heater while it is operating. We recommend moving the
heater only once the fan has completely turned off.
What is zone heating?
Zone heating is about focusing heat where people spend the most time. After all, there is no point to
heating multiple rooms to 68+ degrees when not in use.
Can I use the heater and another appliance at the same time?
Yes, as long as they are not on the same circuit. Zone heaters are considered to be an appliance. You
should not run more than one large appliance on a single circuit breaker. Your freezer, refrigerator,
microwave oven, washing machine, dryer, and other such appliances should not share a circuit breaker.
Can I use an extension cord, surge protector, or power strip with my heater?
It is not recommended. It is designed to plug directly into a grounded 120 volt 15 amp or higher circuit
receptacle. However, if you have to use an extension cord, the cord should be No. 14 AWG minimum size
and rated not less than 2000 watts. The extension cord should be a 3 wire cord with a grounding type
cord and plug connector.
I don't have a grounded outlet; can I use a cord adaptor or remove the grounding plug?
NO. If you don't have a grounded outlet, contact a licensed electrician in your area for advice. Removing
or altering any part of the heater is unsafe and also will void the warranty.
American Comfort Worldwide
Limited Warranty &
Limited Lifetime Warranty on PTC Heating Element Only
Am er ican Co m f o r t Wo r ld w id e LLC (“ACW”) w ar ran t s t h is Red Co re™ p o r t ab le ro o m h eat er t o t h e o r ig in al ret ail p urch aser
(“Pur ch aser ”), f o r o n e year f ro m t h e d at e o f p urch ase, again st d ef ect s in m at er ial an d w o rkm an sh ip un d er n o rm al use an d
service. ACW f ur t h er w ar ran t s t h e f o llo w in g co m p o n en t s:
1. f an , f o r t h ree (3) years f ro m d at e o f p urch ase;
2. q uar t z h eat in g elem en t (if in co rp o rat ed in p ro d uct ) f o r t h ree (3) years f ro m d at e o f p urch ase;
3. PTC ceram ic h eat in g elem en t (if in co rp o rat ed in p ro d uct ) f o r li f et im e o f p ro d uct .
Sh o uld yo ur Red Co re™ ro o m h eat er p ro ve d ef ect ive w i t h in o n e year f ro m t h e d at e o f p ur ch ase, p lease f o llo w o ur r et urn
p ro ced u re t o ret urn t h e d ef ect ive un it . Wit h in t h e f ir st 30 d ays, ACW is resp o n sib le f o r t h e f reigh t co st t o an d f rom o ur
aut h o r ized service cen t er f o r all un it s w it h an ACW aut h o r ized RMA. Af t er 30 d ays an d up t o lif e o f w ar ran t y, t h e cust o m er
is resp o n sib le f o r f reigh t co st s t o an d f ro m o ur aut h o r ized service cen t er .
Un d er n o circum st an ces are p ro d u ct s d am aged in sh ip p in g co vered un d er t h is w ar ran t y.
ACW’s so le o b ligat io n un d er t h is w ar ran t y is t o rep lace, o r at ACW’s d iscret io n , t o rep air , f ree o f ch arge, all d ef ect ive p ar t s
acco rd in g t o t h e t im elin e d escr ib ed ab o ve . All rep lacem en t p ar t s an d un it s w ill b e n ew , rem an uf act u red , o r ref urb ish ed .
ANY IMPLIED WARRANTY OF MERCHANTABILITY IS SIMILARLY LIMITED TO ONE (1) YEAR FROM DATE OF ORIGINAL PURCHASE AND NO
ACTION BASED UPON ANY IMPLIED WARRANTY OF MERCHANTABILITY OR OTHERWISE MAY BE COMMENCED AFTER EXPIRATION OF
ONE (1) YEAR FROM DATE OF ORIGINAL RETAIL PURCHASE. So m e st at es d o n o t allo w lim i t at io n s o n h o w lo n g an im p lied
w ar ran t y last s, so t h e ab o ve lim it at io n m ay n o t ap p ly t o yo u.
Th e p ro visio n s o f t h is w ar ran t y sh all n o t ap p ly t o an y p ro d uct w h ich in ACW’s jud gm en t h as b een (1) su b ject t o m isuse o r
n eglect . (2) d am aged in an accid en t o r in sh ip p in g, (3) u sed f o r a p u rp o se f o r w h ich it w as n o t d esign ed , o r (4) rep ai red o r
alt ered in an y w ay t h at ad ver sely af f ect ed it s p er f o r m an ce o r reliab ili t y. Do not attempt to “open unit”, except for filter
servicing and/or humidifier tank refilling. Opening unit will void manufacturer’s warranty.
THIS WARRANTY DOES NOT COVER:
Dam age, accid en t al o r o t h erw ise, t o t h e un it w h ile in t h e po ssessio n o f t h e co n sum er n o t caused b y a d ef ect in
m at er ial o r w o rkm an sh ip .
Dam age cau sed b y co n su m er m isuse, t am p er in g, o r f ailure t o f o llo w t h e care an d sp ecial h an d lin g p ro visio n s in t h e
in st ruct io n s.
Dam age t o t h e f in ish o f t h e case, o r o t h er ap p earan ce p ar t s caused b y t h e w ear .
Dam age cau sed b y rep ai rs o r alt erat io n s o f t h e un it b y an yo n e o t h er t h an t h o se aut h o r ize d b y ACW.
Freigh t an d In suran ce co st f o r t h e w ar ran t y ser vice b eyo n d 30 d ays f ro m d at e o f p urch ase up t o lif e o f w ar ran t y .
Th is w ar ran t y co vers o n ly n ew p ro d uct s p u rch ased f ro m o ur aut h o r ized d ealers o r ret ailer s. It d o es n o t co ver used ,
salvaged , o r ref urb ish ed p ro d u ct s.
To o b t ain w ar ran t y ser vice, t h e d ef ect ive p ro d uct o r p ar t m ust b e sh ip p ed o r d elivered t o : Am er ican Co m f o r t Wo r ld w id e.
If warranty applies under ACW’s approved terms, all shipping charges and insurance are covered by purchaser.
AMERICAN COMFORT WORLDWIDE LLC NEITHER ASSUMES NOR AUTHORIZES ANY PERSON TO ASSUME FOR IT ANY OTHER LIABILITY IN
CONNECTION WITH ITS PRODUCTS. THERE ARE NO WARRANTIES WHICH EXTEND BEYOND THE DESCRIPTION ON THE FACE HEREOF. NO
RESPONSIBILITY IS ASSUMED FOR INCIDENTAL OR CONSEQUENTIAL DAMAGES THAT MAY RESULT FROM THE USE OF An ACW PRODUCT,
NOR FOR THE DAMAGES DUE TO ACCIDENT, ABUSE, LACK OF RESPONSIBLE CARE, THE AFFIXING OF ANY UNAUTHORIZED
ATTACHMENT, LOSS OF PARTS, OR USE AT A VOLTAGE OTHER THAN SPECIFIED. So m e st at es d o n o t allo w t h e exclusio n o f
lim it at io n o f in cid en t al o r con seq uen t ial d am ages, so t h ese lim it at io n s m ay n o t ap p ly t o yo u. ACW d isclaim s all liab ili t ies f o r
d ef ect s o r d am ages caused b y use o f rep lacem en t p ar t s o b t ain ed f ro m o r b y service at an y ser vice cen t er o t h er t h an ACW.
Th is w ar ran t y g ives yo u sp ecif ic legal r igh t s, an d yo u m ay also h ave o t h er r igh t s w h ich vary f ro m st at e t o st at e.
QUESTIONS? Call 1- 877-305-5519 or visit www.redcore.com
For Service and Support Questions, please contact:
American Comfort Worldwide LLC
Moonachie, NJ 07074 USA
www.redcore.com
877-305-5519