Embed Size (px)
Citation preview

Copyright 2007
Qwizdom InteractUser Guide for Windows

Table of Contents
Part I Introduction 4
Part II Getting Started 4
................................................................................................................................... 41 Installing Qwizdom on Windows
Part III Creating Folders 6
................................................................................................................................... 61 Deleting a Folder
................................................................................................................................... 62 Renaming a Folder
Part IV Creating Activities 6
................................................................................................................................... 71 Deleting Activities
................................................................................................................................... 72 Duplicating an Activity
................................................................................................................................... 73 Renaming an Activity
Part V Creating Slides 7
................................................................................................................................... 91 About Slide Editor
................................................................................................................................... 122 Adding Multimedia
.......................................................................................................................................................... 16Media Search
................................................................................................................................... 163 Equation Editor
................................................................................................................................... 184 Narration Setup
.......................................................................................................................................................... 19Recording and Adding Your Own Narration
Part VI Creating a Class 19
................................................................................................................................... 201 Adding Students
................................................................................................................................... 222 Importing and Exporting Class Lists and Students
................................................................................................................................... 233 Managing Teachers
.......................................................................................................................................................... 24Log In
................................................................................................................................... 244 Building Groups
................................................................................................................................... 255 Seating Chart
................................................................................................................................... 266 Attendance
................................................................................................................................... 277 Managing Class Lists and Students
Part VII Remote Setup 28
................................................................................................................................... 311 Q3 IR Remote Diagram
................................................................................................................................... 332 Q4 RF Remote Diagram
................................................................................................................................... 333 Q5 RF Remote Diagram
................................................................................................................................... 364 RF Remote Setup
Qwizdom Interact User GuideI
Qwizdom, Inc. 2007

................................................................................................................................... 375 Student Remote Login
Part VIII Presentation 38
................................................................................................................................... 401 Response Graphs
Part IX Spontaneous Questions and Surveys 41
................................................................................................................................... 421 Answer Key Surveys
................................................................................................................................... 432 Spontaneous Survey Bar
................................................................................................................................... 443 Collecting Spontaneous and Survey Feedback
Part X Create an Answer Key 44
................................................................................................................................... 451 Changing Answers in an Answer Key
................................................................................................................................... 462 Taking Multiple Activities with an Answer Key
................................................................................................................................... 463 Resuming Answer Keys
................................................................................................................................... 464 Using an Existing Activity as an Answer Key
Part XI Creating Games 47
Part XII Grade Book 48
................................................................................................................................... 491 Grade Scales
................................................................................................................................... 492 Locking and Unlocking Activities
................................................................................................................................... 503 Adding Paper-based Activities to the Gradebook
................................................................................................................................... 504 Activity Score Adjustments
................................................................................................................................... 505 Exporting Grades
.......................................................................................................................................................... 50Exporting and Importing Class Data (.XML)
Part XIII Reports Overview 51
................................................................................................................................... 521 Emailing, Printing, and Saving Reports
Part XIV Printing Activities 53
Part XV Standards 54
Part XVI Student Mode 55
Part XVII Importing and Exporting Activities andFolders 56
Part XVIII Importing PowerPoint Slides 56
Part XIX Importing ExamView 57
Part XX Web CT 57
................................................................................................................................... 581 Exporting Grades to Web CT
IIContents
II
Qwizdom, Inc. 2007

Part XXI Games 58
................................................................................................................................... 591 Baseball
................................................................................................................................... 602 Fast Track
................................................................................................................................... 613 K-Bowl
................................................................................................................................... 614 Mars Mission
................................................................................................................................... 625 Millionaire
................................................................................................................................... 636 Quandary
................................................................................................................................... 647 World Cup
Part XXII Backing up and Restoring the Database 65
Part XXIII Troubleshooting 66
................................................................................................................................... 771 Initializing the Host
................................................................................................................................... 792 Programming a Remote
................................................................................................................................... 793 RF Remotes
Part XXIV Glossary 80
Qwizdom Interact User GuideIII
Qwizdom, Inc. 2007

4
Qwizdom, Inc. 2007
1 Introduction
Qwizdom Interactive Learning and Assessment System
This is a user guide for the Qwizdom Interactive Learning and Assessment System. This guideprovides information with tips and special notes on using Qwizdom.
If you need technical support, use the Troubleshooting section to identify and solve problems relatedwith using Qwizdom Interact. You may also use our interactive video tutorials that are available onour website to assist you with our program. Contact Tech Support if you are in need of furtherassistance.
Website www.qwizdom.com
Phone (253) 770-1285 ext 223
E-mail [email protected]@qwizdom.com
Office Hours 6 AM to 4:30 PM PST
Address Qwizdom, Inc.12617 Meridian EastPuyallup, WA 98373
2 Getting Started
Here is what you need to setup and complete before using the program:1. Install Qwizdom Interact. This is the main program that needs to be installed to use the remotes.
Qwizdom Interact must be installed first before installing curriculum. SeeInstalling Qwizdom on Windows for directions on installing the software.
2. Take the USB cable and host, plug the host (normally located in the pouch of the remote case)into an open USB port. See Initializing the Host to install the USB drivers for the host.
3. The Q3 IR and Q4 RF remotes need two AA batteries (the provided AA batteries are located in thepouch of the remote case). The Q5 RF student and Q5 RF instructor remotes need to be chargedfor 24 hours before first use.
4. After the software and hardware are properly installed, you are ready to use Qwizdom Interact. Ifyou need assistance with setting up your Qwizdom set, please contact Tech Support.
2.1 Installing Qwizdom on Windows
System RequirementsWindows 98/00/ME/XP800 MHz Pentium III and later128 MB RAM (256 MB recommended)Hard drive with 100 MB free space16 bit color displayCD-ROM drivePowered USB PortMicrosoft PowerPoint 2000 or later (for importing PowerPoint slides)
Before installing your new software, exit all applications. You may need to have administrator levelaccess in order to install your software.
Qwizdom Interact User Guide5
Qwizdom, Inc. 2007
Qwizdom Interact and Qwizdom TA are two separate programs and will not interfere with one another.If you currently have Qwizdom TA on your computer, leave it as is. Do not uninstall Qwizdom TA ifyou have materials and classes that need to be imported into Qwizdom Interact. If you do not have anyclasses or materials you want to import into Qwizdom Interact, then you can uninstall Qwizdom TA.
You need the Qwizdom Interact software to install on Windows computers. If you did notreceive the Windows version of Qwizdom Interact (received the Mac version by error), pleasecall Technical Support.Windows 98/2000/NT/ME/XP1. Insert your Qwizdom Interact into the CD-ROM drive.2. The Interact Install window will appear. Click on the Install Interact button3. The Qwizdom Interact-InstallShield wizard will appear. Click Next.4. Click on the Install button. The License Agreement appears. Please read the Qwizdom, Inc.
License Agreement and select 'I do accept the terms of the license agreement.'5. Click on Next to install software. This will take a few moments.6. Once the installation is complete, restart your computer if prompted to do so.7. Double-click on the Qwizdom Interact icon on your desktop to launch the program. You will be
prompted to register your software. The product code used to register the software is located onthe back of the software case.
After the software has been successfully installed and registered, you will need to setup the hardware.1. Using the USB cable located in the pouch of the remote case, plug the host into an open USB port
on your computer. Go to Initializing the Host to setup the host. The host must be properlyinstalled before remotes can be used.
2. Now go to Remote Setup to setup your remotes.
NOTE: If a 'Bad Media I/O Error' prompt appears when installing Qwizdom software or if thesoftware fails during installation, the disc may be defective. Contact Tech Support forassistance.
Uninstalling Qwizdom InteractBefore uninstalling, be sure to export any information such as activities and students to save so thatthe information isn't deleted.1. Go to Add/Remove programs in the Control Panel.2. Search for Qwizdom Interact and click Remove.3. Qwizdom Interact - InstallShield Wizard will appear and follow the instructions.4. Do not restart your computer when finished.5. Double-click on the My Computer icon.6. Double-click on the C: Drive.7. Double-click on the Program Files.8. Double-click on the Qwizdom folder.9. Select the Qwizdom Interact folder and delete it. If the folder will not delete, restart the computer
and follow steps 5-9 to delete the Qwizdom Interact folder.10. Restart the computer for changes to take effect.
Software UpdatesSoftware updates are available online for customers with existing software. Updates are not fullversions of the software. You must have existing software installed onto your computer beforeinstalling the latest update. If you have Qwizdom TA and are trying to install the Qwizdom Interactupdate, it will not work. If you do not have any version of our software installed, you cannot install theupdate because it isn't the full version of the software. To get the full version of the software, call 800-347-3050 to get information on purchasing.
Installing CurriculumIf you purchased a curriculum package, follow the directions below. Before installing your newsoftware, exit all applications. You may need to have administrator level access in order to install yoursoftware. Qwizdom Interact must be installed first before installing curriculum. You cannot install
6
Qwizdom, Inc. 2007
curriculum if Qwizdom Interact is not installed.
Windows 98/2000/NT/ME/XP1. Insert the curriculum disc into the CD-ROM drive. The Interact Install window will appear.2. Click on the Install Curriculum button.3. Enter the curriculum product code. Entering the product code here is for the program to know
which software to install. This is not registration. You register the curriculum within the program.The Installation Type windows will appear.
4. Click on Stand-Alone Installation. The curriculum will begin to install. This will take a fewmoments.
5. When the installation is complete, double-click on the Qwizdom Interact icon on your desktop tolaunch the program. A New Activities Detected window will appear.
6. Check the units you want imported into Qwizdom Interact. Each unit may take 2-5 minutes.7. After all the units have imported, you will need to register your curriculum.8. Go to the Help menu and select Register Content.9. Type in the product key and click Add, then Done to register your content.
3 Creating Folders
Folders organize the created or imported activities.
1. Open Qwizdom Interact and click on the Content tab; or if Interact is already open, click on theContent tab.
2. Click on the New Folder button.3. Enter the folder name and click OK.4. The folder will appear in the content tree on the left side of the screen. The folder is automatically
saved in the content tree and is marked by a folder icon.
TIP: To rearrange activities or folders, simply click, drag, and drop the activity or folder in thedesired location.
3.1 Deleting a Folder
1. In the content tree, select the folder you would like to delete.2. Go to the File menu and select Delete Folder and Contents.3. The folder is deleted and removed from the content tree.
3.2 Renaming a Folder
1. Select the folder you want to rename in the content tree.2. Double click on the name of the folder. A box will appear around the name.3. You are now able to change or revise the name of the folder.
4 Creating Activities
Activities are composed of slides and can be presented as lessons, tests, games, etc.
1. Open Qwizdom Interact and click on the Content tab; or if Interact is already open, click on theContent tab.
2. Select a folder you want the activity to appear in (optional).

Qwizdom Interact User Guide7
Qwizdom, Inc. 2007
3. Click on the New Activity button.4. Enter the activity name and click OK.5. The activity will appear in the content tree. The activity is automatically saved in the content tree.
TIP: To rearrange activities or folders, simply click, drag, and drop the activity or folder in thedesired location.
4.1 Deleting Activities
1. In the content tree, select the activity you would like to delete.2. Go to the File menu and select Delete Activity.3. The activity is deleted and removed from the content tree.
4.2 Duplicating an Activity
1. Select an activity in the content tree you want to duplicate.2. Go to the File menu and select Duplicate As.3. Enter the new name of the duplicated activity and click on OK.4. The duplicated activity will appear in the content tree.
4.3 Renaming an Activity
1. Select the activity you want to rename in the content tree.2. Double-click on the activity. The Activity Properties window will appear.3. Under the Generic Properties tab, change or revise the name of the activity in the Name box.4. Click on Done when finished.
5 Creating Slides
Slides display information, images, sound, and animations for presentation purposes. (Go toAdding Multimedia for more information about adding multimedia.)
Below are the types of slides that can be created:· Information- used for lesson review so that the instructor is able to talk while presenting the
Information slide (or present it on paper). Only one slide per slide set is allowed for lessons.· True or False-students answer by remote (or paper) True or False.· Yes or No-students answer by remote (or paper) Yes or No.· Multiple Choice-students select A-F choices for the correct answer by remote (or paper).· Multiple Mark-students are able to select more than one choice for the answer; eliminates having to
choose E or F for 'all of the above response.'· Numeric Problem-students answer by remote (or paper) by keying in the answer and hitting the Send
key.· Sequence-students answer by remote (or paper) in sequence (i.e. What order do these go in?)· Multiple Answer List-students answer by being called on by the teacher or answer on paper; students
see all choices listed and in the Number of Answers Needed window, you would specify the numberof choices.
· Fill In Completion-students answer by being called on by the teacher or answer on paper.· Short Answer Specific-students answer by being called on by the teacher or answer on paper.· Essay-teacher can print out the essay slides on paper for students to answer.

8
Qwizdom, Inc. 2007
· Rating Scale-students answer a rating scale question by remote (i.e. on a scale from 1-7, how wouldyou rate this?)
Creating an Information Slide1. Open Qwizdom Interact and click on the Content tab; or if Interact is already open, click on the
Content tab.2. Select an activity to create a slide in or create a new activity.
3. Click on the New Set button. You will be taken to the Slide Editor screen.4. In the Properties tab, on the left side of the screen, is where you will set up your slide.5. Select Information as the slide type.6. Set the difficulty level, the time limit, and number of points (optional).7. Now select the layout of the slide.8. Enter text and add multimedia (optional) to the slide.9. After creating the slide, there are two ways to exit out of the Slide Editor. Either go to File and
select Close; or click on the New Q button and you will be taken to a new slide. Slides youcreate will appear on the Content screen. Slides and any changes made to them are automaticallysaved in the activity.
TIP: You can rearrange slides in an activity simply by clicking and dragging the slides from leftto right while in the Content screen.
Creating a Question and Answer Slide Set1. Open Qwizdom Interact and click on the Content tab; or if Interact is already open, click on the
Content tab.2. Select an activity to create a slide in or create a new activity.
3. Click on the New Set button. You will be taken to the Slide Editor screen.4. In the Properties tab, on the left side of the screen, is where you will set up your slide.5. Select a question type such as Multiple Choice, Yes/No, True/False, etc.6. Set the difficulty level, the time limit, and number of points (optional).7. Now select the layout of the slide.8. Enter text and add multimedia (optional) to the slide.9. Select the correct answer in the answer menu below the Layout and the answer slide will
automatically generate.10. After creating the slide, there are two ways to exit out of the Slide Editor. Either go to File and
select Close; or click on the New Q button and you will be taken to a new slide. Slides youcreate will appear on the Content screen. Slides and any changes made to them are automaticallysaved in the activity.
Creating Slides for GamesIf you are creating an activity to play a game, question and answer slide sets are mandatory. Gamescannot be played with non-remote answerable slides such as Information, Fill In Completion, etc.Answer slides are required for games even though the answer slides do not display during gamemode. You cannot play a game with slides that do not have answer slides if you are wanting to use theremotes.
1. Open Qwizdom Interact and click on the Content tab; or if Interact is already open, click on theContent tab.
2. Select an activity to create a slide in or create a new activity.
Qwizdom Interact User Guide9
Qwizdom, Inc. 2007
3. Click on the New Set button. You will be taken to the Slide Editor screen.4. In the Properties tab, on the left side of the screen, is where you will set up your slide.5. Select a question type such as Multiple Choice, Yes/No, True/False, etc.6. Set the difficulty level, the time limit, and number of points (optional).7. Now select the layout of the slide.8. Enter text and add multimedia (optional) to the slide.9. Select the correct answer in the answer menu below the Layout and the answer slide will
automatically generate.10. After creating the slide, there are two ways to exit out of the Slide Editor. Either go to File and
select Close; or click on the New Q button and you will be taken to a new slide. Slides youcreate will appear on the Content screen. Slides and any changes made to them are automaticallysaved in the activity.
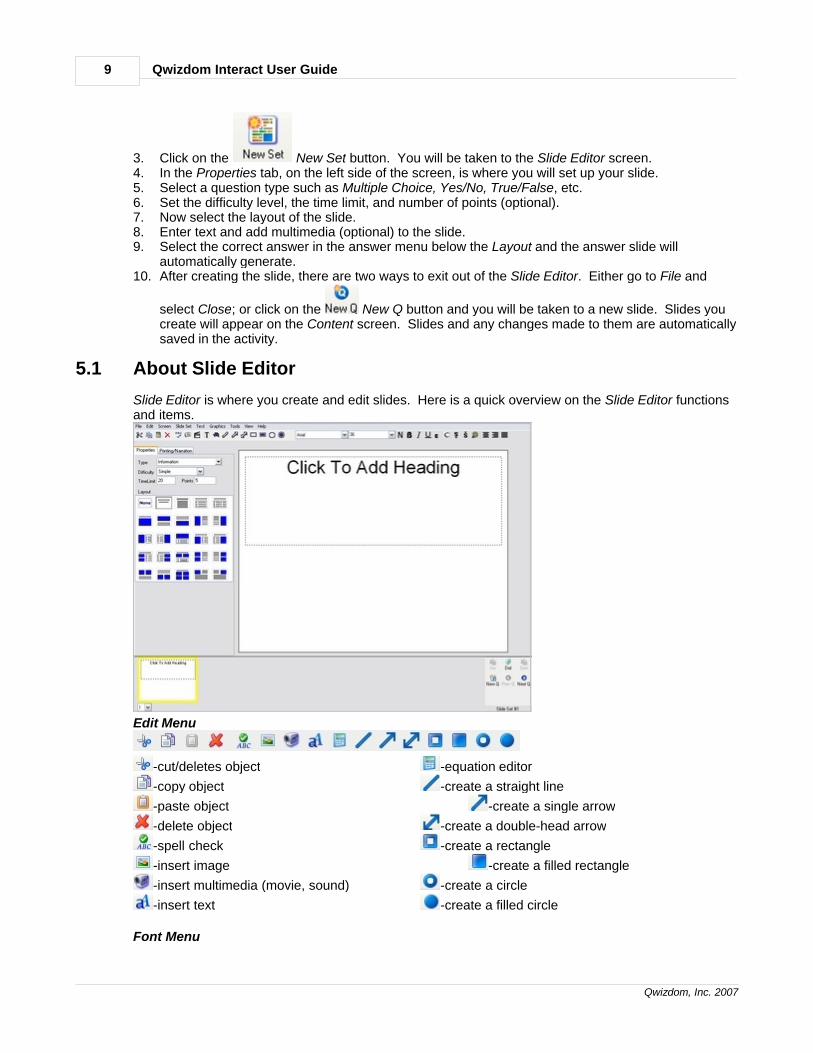
5.1 About Slide Editor
Slide Editor is where you create and edit slides. Here is a quick overview on the Slide Editor functionsand items.
Edit Menu
-cut/deletes object -equation editor
-copy object -create a straight line
-paste object -create a single arrow
-delete object -create a double-head arrow
-spell check -create a rectangle
-insert image -create a filled rectangle
-insert multimedia (movie, sound) -create a circle
-insert text -create a filled circle
Font Menu

10
Qwizdom, Inc. 2007
-font selector -converts font to uppercase
-font size selector -superscript
-normal font -subscript
-bolds font -color palette to change font and object color
-changes font to italics -center justify paragraph
-underlines font -right justify paragraph
-converts font to lowercase -full justify paragraph
History Window
The history window is the undo feature.
-redo all
-redo
-undo
-undo all
-clear history
Slide Properties
· Type-select the type of slide; i.e. multiple choice, true/false, short answer, etc.· Difficulty-slide difficulty can be set as Simple, Intermediate, Advanced, and Expert.

Qwizdom Interact User Guide11
Qwizdom, Inc. 2007
· Time Limit-the time limit can be set on every slide; you want to give an ample amount of responsetime (in seconds only, not minutes) for students.
· Points-each slide can be assigned a number of points· Layout-choose from many templates (image w/text, text only, images w/headline)
Printing/Narration Properties
Narration is a special order feature. To order Narration, please contact 1-800-347-3050. For moreinformation on narration, see Narration Setup.· Information on the slide will be displayed under the Question section; click on Customize to edit the
text.· Answer choices will be displayed under the Answer section; click on Customize to edit the text.
· Click on the to have the slide read aloud by the computer narrator; click on Customize to edit thetext.
Media Search
Type in the keyword(s) for image and multimedia files. You can also add keywords to the image andmultimedia search.

12
Qwizdom, Inc. 2007
Answer Menu
After creating a question slide, you will select the answer to the question. The answer menu is whereyou select the correct answer(s) and is located under the Properties tab. Once you select the correctanswer(s), an answer slide is automatically generated after the question slide. Thecorrect answer(s) will be highlighted by an asterisk.
Quick Creator Menu
The Quick Creator menu is located in the bottom right corner of the Slide Editor. Instead of going to
File, selecting Close, and clicking on the New Set button to create a new slide, you can just
click on the New Q button.
-insert/adds slides in slide set -create new question slide
-delete slide -go back to previous question
-generate answer slide -go to next question
5.2 Adding Multimedia
Adding ImagesYou can add .jpeg, .TIFF, .bmp, and .gif files to slides. There are three different ways to add images:
· Click on the Image icon on the slide.· Go to Graphics menu and select Set Image.
· Click on the Image button in the toolbar.1. Open Qwizdom Interact and click on the Content tab; or if Interact is already open, click on the
Content tab.
2. Select an activity in the content tree or create a new activity by clicking on the NewActivity button.
3. Click on the New Set button. You will then be taken to the Slide Editor screen.4. Under Type in the Properties tab, select the type of slide you want to create (Information, Multiple
Choice, etc.).5. Select a layout that has a multimedia template. Multimedia templates have blue

Qwizdom Interact User Guide13
Qwizdom, Inc. 2007
squares/rectangles in the layout. If you do not want to use a multimedia template, you can insert
an image by clicking on the Image button in the toolbar or go to the Graphics menu and selectSet Image.
6. Click on the Image icon on the slide (using the multimedia template) and the Open windowwill appear.
7. Search for the image you want to use and select it.8. Click on Open. The image will appear on the slide.9. Add text or color to the slide (optional).10. When finished, go to the File menu and select Close.
Using Images from Qwizdom InteractThere are images available in Qwizdom Interact to use. The images will be in the Images folder withinthe Qwizdom Interact folder.1. Open Qwizdom Interact and click on the Content tab; or if Interact is already open, click on the
Content tab.
2. Select an activity in the content tree or create a new activity by clicking on the NewActivity button.
3. Click on the New Set button. You will then be taken to the Slide Editor screen.4. Under Type in the Properties tab, select the type of slide you want to create (Information, Multiple
Choice, etc.).5. Select a layout that has a multimedia template. Multimedia templates have blue
squares/rectangles in the layout. If you do not want to use a multimedia template, you can insert
an image by clicking on the Image button in the toolbar or go to the Graphics menu and selectSet Image.
6. Click on the Image icon on the slide (using the multimedia template) and the Open windowwill appear.
7. If it does not show the Qwizdom folder, drop down the Look in: menu and search for the Qwizdomfolder under My Computer, C: drive, Program Files, and then you will see the Qwizdom folder.
8. Double-click on the Qwizdom Interact folder. There will be an Images folder. The imagescontained within that folder are ours and you are able to use them.
9. Double-click on the Images folder. You will see folders 0_9 through Z.10. Double-click on any folder to view the images.11. Select an image and click on Open. The image will appear on the slide.12. Add text or color to the slide (optional).13. When finished, go to the File menu and select Close.
Adding SoundThere are a few ways to add sound:
· Click on the Multimedia icon on the slide· Go to the Graphics menu and select Add Multimedia
· Click on the Multimedia icon in the toolbar1. Open Qwizdom Interact and click on the Content tab; or if Interact is already open, click on the
Content tab.
2. Select an activity in the content tree or create a new activity by clicking on the New

14
Qwizdom, Inc. 2007
Activity button.
3. Click on the New Set button. You will then be taken to the Slide Editor screen.4. Under Type in the Properties tab, select the type of slide you want to create (Information, Multiple
Choice, etc.).5. Select the layout that has a multimedia template. Multimedia templates have blue
squares/rectangles in the layout. If you do not want to use a multimedia template, you can add
sound by clicking on the Multimedia button in the toolbar or go to the Graphics menu andselect Add Multimedia.
6. Click on the Multimedia icon on the slide (using the multimedia template) and the Openwindow will appear.
7. Search for the sound file you want to add. You may need to change the file type in the Files ofType drop-down menu to view the file you're searching for.
8. When you find the sound file you want to add to the slide, select it and click on Open. The Sound button will appear on the right side of the slide indicating there is a sound file on the slide.
NOTE: To remove a sound file from the slide, click on the sound icon and press the Delete keyon your keyboard.
9. Click on the Sound button drop-down menu, located in the right corner of the slide.10. Select Properties. The Multimedia Options window will appear.11. Check options such as Play when clicked, Repeat, Play automatically, and any other options you
prefer. The checked options turn on during presentation.12. Click OK to exit the Multimedia Options window.
13. To play the sound, click on the Sound button drop-down menu and select Play/Stop.14. Go to File and select Close.
Using Sound from Qwizdom Interact1. Open Qwizdom Interact and click on the Content tab; or if Interact is already open, click on the
Content tab.
2. Select an activity in the content tree or create a new activity by clicking on the NewActivity button.
3. Click on the New Set button. You will then be taken to the Slide Editor screen.4. Under Type in the Properties tab, select the type of slide you want to create (Information, Multiple
Choice, etc.).5. Select the layout that has a multimedia template. Multimedia templates have blue
squares/rectangles in the layout. If you do not want to use a multimedia template, you can add
sound by clicking on the Multimedia button in the toolbar or go to the Graphics menu andselect Add Multimedia.
6. Click on the Multimedia icon on the slide (using the multimedia template) and the Openwindow will appear. Double-click on the Qwizdom Interact folder. If it does not show the Qwizdomfolder, drop down the Look in: menu and search for the Qwizdom folder under My Computer, C:drive, Program Files, and then you will see the Qwizdom folder.
7. Double-click on the '4Tutorials' folder. If you do not see the '4Tutorials' folder, drop down the Lookin: menu and select the C: drive and double-click on Program Files, the Qwizdom folder, and theQwizdom Interact folder.
8. Change the Files of Type to (.wav, .mp3) and search for 'quetzal.wav.'
Qwizdom Interact User Guide15
Qwizdom, Inc. 2007
9. Select 'quetzal.wav' and click on Open. The Sound button will appear on the right side ofthe slide indicating that there is sound on the slide.
NOTE: To remove a sound file from the slide, click on the sound icon and press the Delete keyon your keyboard.
10. Click on the Sound button drop-down menu and select Properties. The Multimedia Optionswindow will appear.
11. Check options such as Play when clicked, Repeat, Play automatically, and any other options youprefer. The checked options turn on during presentation.
12. Click OK to exit the Multimedia Options window.
13. To play the sound, click on the Sound button drop-down menu and select Play/Stop.14. Go to File and select Close.
Adding VideoThere are a few ways to add multimedia:
· Click on the Multimedia icon on the slide· Go to the Graphics menu and select Add Multimedia
· Click on the Multimedia icon in the toolbar1. Open Qwizdom Interact and click on the Content tab; or if Interact is already open, click on the
Content tab.
2. Select an activity in the content tree or create a new activity by clicking on the NewActivity button.
3. Under Type in the Properties tab, select the type of slide you want to create (Information, MultipleChoice, etc.).
4. Select the layout that has a multimedia template. Multimedia templates have bluesquares/rectangles in the layout. If you do not want to use a multimedia template, you can add
sound by clicking on the Multimedia button in the toolbar or go to the Graphics menu andselect Add Multimedia.
5. Click on the Multimedia icon on the slide (using the multimedia template) and the Openwindow will appear.
6. Search for the movie you want to add. You may need to change the file type in the Files of Typedrop-down menu to the specific movie file you're searching for.
7. When you find the movie file you want to add to the slide, select it and click on Open. The movie
should display on the slide and the Multimedia icon will appear on the right side of the slideindicating that there is a movie on the slide.
8. Click on the Multimedia drop-down menu and select Properties. The Multimedia Optionswindow will appear.
9. Check options such as Repeat, Visible in presentation, Play automatically, and any other optionsyou prefer. The checked options turn on during presentation.
10. Click OK to exit the Multimedia Options window.11. To play the movie, double-click the movie, to stop it, click on the red X.12. Go to File and select Close.
Using Video from Qwizdom Interact1. Open Qwizdom Interact and click on the Content tab; or if Interact is already open, click on the
Content tab.
16
Qwizdom, Inc. 2007
2. Select an activity in the content tree or create a new activity by clicking on the NewActivity button.
3. Under Type in the Properties tab, select the type of slide you want to create (Information, MultipleChoice, etc.).
4. Select the layout that has a multimedia template. Multimedia templates have bluesquares/rectangles in the layout. If you do not want to use a multimedia template, you can add
sound by clicking on the Multimedia button in the toolbar or go to the Graphics menu andselect Add Multimedia.
5. Click on the Multimedia icon on the slide (using the multimedia template) and the Openwindow will appear.
6. If it does not show the Qwizdom folder, drop down the Look in: menu and search for the Qwizdomfolder under My Computer, C: drive, Program Files, and then you will see the Qwizdom folder.
7. Double-click on the Qwizdom Interact folder.8. Double-click on the Images folder.9. Double-click on the 'W' folder.10. Change the file type to Shockwave Files (.swf) and search for 'WaterCyc.swf.
11. Select 'WaterCyc.swf' and click on Open. The movie should display on the slide and the Multimedia icon will appear on the right of the slide indicating that there is a movie on the slide.
12. Click on the Multimedia drop-down menu and select Properties. The Multimedia Optionswindow will appear.
13. Check options such as Repeat, Visible in presentation, Play automatically, and any other optionsyou prefer. The checked options turn on during presentation.
14. Click OK to exit the Multimedia Options window.15. To play the movie, double-click the movie, to stop it, click on the red X.16. Go to File and select Close.
5.2.1 Media Search
Searching for Multimedia Files1. Open Qwizdom Interact and click on the Content tab; or if Interact is already open, click on the
Content tab.
2. Select an activity in the content tree or create a new activity by clicking on the NewActivity button.
3. Click on the New Set button. You will be taken to the Slide Editor screen.4. Go to the Edit menu and click on the Media tab.5. Type in a keyword and click on Search. If any images or multimedia files match the keyword, the
files will appear in the Media tab window.6. Click and drag the desired file and drop it onto the slide. If you drop an image file onto the slide,
you may have to adjust/resize the image.
5.3 Equation Editor
Equations can be created using the Equation Editor within Qwizdom Interact. Equation Editor has it'sown help guide that you can access. Within the Equation Editor window, go to the Help menu andselect Equation Editor Help Topics. Below are a few things you should learn about Equation Editor.
Qwizdom Interact User Guide17
Qwizdom, Inc. 2007
Creating an Equation1. Open Qwizdom Interact and click on the Content tab; or if Interact is already open, click on the
Content tab.
2. Select an activity in the content tree or click on the New Activity button to create a newactivity.
3. Click on the New Set button. You will then be taken to the Slide Editor screen.4. Under Type in the Properties tab, select the type of slide you are wanting to create (Numeric,
Multiple Choice, etc.) and select a layout.
5. There are two ways to insert an equation onto the slide-click on the Equation button in thetoolbar OR go to the Text menu and select Create Equation to activate Equation Editor. You willnotice your mouse cursor will change into a plus sign.
6. Move the cursor so that it's on the slide and click the mouse. A text box will appear and theEquation Editor window will open.
7. Click on a button that has the equation template you want to use and select the template. Thetemplate will appear in the Equation Editor window.
8. Create the equation.9. When finished, go to File and select Exit and Return to Qwizdom Interact. You will be taken back
to the Slide Editor screen and the equation will appear on the slide.10. If the equation is too small or large, resize the equation to the desired size. Read Resizing
Equations below for more information.
Inserting an Equation in the Line of Text1. Open Qwizdom Interact and click on the Content tab; or if Interact is already open, click on the
Content tab.
2. Select the an activity in the content tree or click on the New Activity button to create anew activity.
3. Click on the New Set button. You will then be taken to the Slide Editor screen.4. Under Type in the Properties tab, select the type of slide you are wanting to create (Numeric,
Multiple Choice, etc.) and select a layout with a text template OR click on the Text button tocreate a text box.
5. Place the cursor over a text box. There are two ways to place an equation in the line of text-right-click the mouse and select Equation OR go to the Text menu and select Insert Equation. TheEquation Editor window will appear.
6. Click on a button that has the equation template you want to use and select the template. Thetemplate will appear in the Equation Editor window.
7. Create the equation.8. When complete, go to File and select Exit and Return to Qwizdom Interact. You will be taken
back to the Slide Editor screen and the equation will appear in the text box on the slide.9. If the equation is too small or large, resize the equation to the desired size. Read Resizing
Equations below for more information.
Editing an Equation1. Double-click on the equation on the slide. The Equation Editor window will open.2. Edit the equation.3. When you are finished, go to File and select Update and then select Exit and Return to Qwizdom
Interact.

18
Qwizdom, Inc. 2007
Changing the Font Size1. Double-click on the equation on the slide. The Equation Editor window will open.2. Go to the Size menu and select Define. The Sizes window will appear.3. In the Full box, type in the number for the preferred font size. A font size of 50-80 works best.
Usually font sizes in this range do not need to be resized on the slide.4. Click Apply and then Okay. You will be taken back to the Equation Editor window.5. Highlight the equation, go to the Sizes menu, and select Full. The font size will change to the size
you set it as.6. Go to File and select Exit and Return to Qwizdom Interact.
Resizing Equations1. Double-click on a slide with an equation on it. The Slide Editor will open.2. Left click once on the equation and you will see black handles flash on the inside of the equation
box (not the white handles, white handles are for the text box and will not resize the equation).3. Move the mouse over to where you saw one of the black handles. When the cursor is over one of
the black handles, your cursor will change into a double-headed arrow.4. Click on the black handles and drag with the mouse to resize the equation to the desired size.
This can be tricky at first, but once you get it down, it will become easier.
5.4 Narration Setup
Narration ('Laura and Aaron' voices) is a special order feature. To order Narration, please contact 1-800-347-3050.
1. Open Qwizdom Interact and click on the Content tab; or if Interact is already open, click on theContent tab.
2. Select an activity in the content tree or click on the New Activity button to create a newactivity.
3. Click on the New Set button. The Slide Editor will open.4. Go to the Edit menu and select Speech Options. The Speech Options window will appear.5. Select the narrator and adjust his or her voice as you like.6. When you are done, click on OK to take you back to the Slide Editor.7. Go to the File menu and select Close to go to the Content screen.
Customizing Narration within a Slide1. Double-click on a slide you want to customize narration for. The Slide Editor will open.2. Click on the Printing/Narration tab.
3. Click on the Sound button to hear how the narrator will read the slide.4. If you want to alter the way she reads the slide (pronouncing words, pausing in between
words/choices), go down to the Narration for Current Screen and check the Customize box.5. When finished, go to the File menu and select Close. You will be taken back to the Content
screen.6. Click on the Present button. The Presentation Setup window will appear.7. To activate the narrator for the presentation, check the Narrate Slides box under 4 Play Options or
check the Narration box (depending on the version of software).8. Check the preferred options and select the class.9. Click Okay when finished.10. The narrator will begin reading while students listen and respond in with their remotes when
necessary.

Qwizdom Interact User Guide19
Qwizdom, Inc. 2007
5.4.1 Recording and Adding Your Own Narration
Narration can be created and added to the slides. A microphone is needed to record your ownnarration.
Recording Your Narration1. Open Qwizdom Interact and click on the Content tab; or if Interact is already open, click on the
Content tab.2. Select an activity that you would like to add narration to.3. Go to the Edit menu and select Record Narration. The recorder will appear.4. Click on the record button (red circle) to record the narration. The timer will start and the play
button (triangle) will turn into the stop button (square).5. When you are done recording the narration, click on the stop button (square).
NOTE: If you want to add more to the narration, click on the Record button (red circle) tocontinue recording. After the file is saved as a sound file, you cannot add or edit the originalfile.
Applying Your Narration1. Select a slide in the activity you want to apply the narration to.2. Now go to the Edit menu. You will see these options:Save Narration-saves the narration to insert at a later time.Save and Add Narration to Selected Slide-saves the file and inserts the narration to a selected slide.You must first select a slide before you choose this option.Cancel Narration-closes the recording window without saving.3. Select Save and Add Narration to Selected Slide. If this option is grayed out, it is because you
need to select a slide (a selected slide will be highlighted with a yellow outline around the slide).4. Double-click on the slide you added the narration to. Slide Editor will open. You will see the
sound icon in the upper right corner of the slide, indicating a sound file has been inserted.
6 Creating a Class
Class lists are created to organize and track students. A class list is also necessary in running apresentation (see Presentation for more information).
Creating a Class1. Open Qwizdom Interact and click on the Students tab; or if Interact is already open, go to the
Students tab.2. Go to Class and select New Class. The Class Information window will appear.· Name-name of the class· Type-Normal; regular class, Anonymous; list matches number of remotes (go to Anonymous Class
below for more information).· Grade Scale-different options to grade all work; Grade Scale, Credit-No Credit, European Scale,
GPA Scale· Remotes-number of remotes in class that will be in use-this option is designated for an Anonymous
class. (Go to Anonymous Class below for more information.)· Comments-type in comments about class· Lecture #-(optional) type in the number of the lecture· Lab #-(optional) type in the number of the lab3. Type in the name of the class.4. Select Normal in the Type drop-down menu. You may include and fill in any other information.5. Click on Done and you will be taken back to the Students screen. Go to Adding Students to
learn how to add students to the class.

20
Qwizdom, Inc. 2007
Anonymous ClassAnonymous classes allows the program to take the responses from unassigned remotes. Theanonymous option tells the programs to read the number of remotes in the class (e.g., if you have 32remotes in class, it will read remotes #1-32 to be in use for presentation). Anonymous classes workbest with surveys (see the Survey section for more information) but you can use anonymous classesfor any type of activity.
1. Open Qwizdom Interact; or go to the Students tab.2. Go to the Class menu and select New Class. The Class Information window will appear.3. Type in the name of the class and select Anonymous under type.4. Enter in the number of remotes in your class (e.g., 24 for 24 remotes). The number of remotes
will be the number of users in the anonymous class (e.g. 24 remotes-there will be 24 anonymoususers in the class). You may include and fill in any other information.
5. Click on Done when finished.
6.1 Adding Students
You can either add new students or existing students into a class. To import students, go toImporting and Exporting Class Lists and Students for more information.
Creating a New Student1. Open Qwizdom Interact and click on the Students tab; or if Interact is already open, click on the
Students tab.2. Select the class you want to add students to in the Class drop-down menu.
3. Click on the Add Student button. The Add a Student window will appear.4. Select 'I want to create a new student who is not already in the system' and them click on the
Create New Student button. The Student Information window will appear.
NOTE: The fields marked in red are required; Name, Gender, Student ID, etc.5. Fill out the required fields (in red)-Last Name, First Name, Gender, Student ID, and Remote
Number. All other fields are optional.6. Click on Done when complete.Student Information tab window:· Student section; Last Name, First Name, Middle Name, Email, Date of Birth, Gender, Student ID

Qwizdom Interact User Guide21
Qwizdom, Inc. 2007
· User Information section; Username, Password, Retype Password· Student Settings for this Class section; Current Grade, Remote, Ability, Group, Pick Chance· Comments (optional)· The student ID is used for student remote registration. Student remote registration allows students
to log into presentation if they are not using their assigned remote number. This option is helpfulwhen you want students to be able to use any remote number and/or have absent students. Eachstudent should have a unique student ID assigned to their name. Student ID's can be 1-10+numbers long and cannot be repeated twice.
· The username and password are for students to log into student mode to complete activities, tests,and any other assignment they missed.
· Pick Chance is an option to set the chance of student being selected for random picks inpresentation (presentation feature where you can call on random students with the teacher remote oruse the mouse). 0 = Never, 1 = Normal, 2 = Twice as Likely.
Personal Information tab window:· Attributes section; Generic and Ethnicity· Contact Information; Primary and Secondary. When e-mailing the student's reports, the reports
will be sent to the e-mail address that is located on this tab.· Notes
Student photos can be added to the student's information. To add a photo:
1. Click on the Update Photo button.2. Search in the location (e.g., My Documents) where the student photo would be in.3. Select the image file (the photo of the student) and click Open. The student's photo will appear in
the box in the upper left-hand corner.4. Check the necessary boxes under the Generic and Ethnicity tabs.5. Fill out the Primary and Secondary (optional) contacts under Contact Information.6. Include any other information you would like.7. Click Done when complete.
Adding Existing Students by Student IDs1. Open Qwizdom Interact and click on the Students tab; or if Interact is already open, click on the
Students tab.2. Select the class you want to add students to in the Class drop-down menu.
3. Click on the Add Student button. The Add a Student window will appear.4. Select 'I want to add an existing student for whom I know the Student ID.'5. Type in the student's ID in the Student ID field.6. Click on the Add button to add the student to the class.7. Click on Done when complete.
Adding Existing Students from the Master List1. Open Qwizdom Interact and click on the Students tab; or if Interact is already open, click on the
Students tab.2. Select the class you want to add students to in the Class drop-down menu.
3. Click on the Add Student button. The Add a Student window will appear.4. Select ''I want to add an existing student from the Master Student List.'5. Click on the gray column to highlight the student. To select more than one student at a time, hold
down the Control key while selecting students with the mouse.6. Click on the Add Selected Student(s) button to add the student(s) to class.

22
Qwizdom, Inc. 2007
6.2 Importing and Exporting Class Lists and Students
Class lists can be imported from Qwizdom Teaching Assistant (TA), Excel or grade book programs in.CSV or .txt file format. Go to theExporting from Qwizdom TA (Teaching Assistant) Classes and Importing in Interact sectionbelow for importing Qwizdom TA class lists.
If you created a class list in Microsoft Excel and save it as a .CSV file, you can import it into QwizdomInteract.1. In Microsoft Excel, go to the File menu and select Save As. The Save As window will open.2. Type in the name of the class list.3. Click on the Save as Type drop-down menu.4. Select CSV (Comma Delimited) (*.csv) as the file type the class will be saved as.5. Select a location you want the class to be saved in and click on Save.Now follow the instructions (below) for Importing a .CSV File into Interact.
Importing a .CSV File into Interact1. Open Qwizdom Interact and click on the Students tab; or if Interact is already open, click on the
Students tab.2. Go to the Class menu and select New Class.3. Type in the name of the class along with filling out other necessary information and click Done.4. Go to the File menu and select Import, then Students.5. Search for the file (should be in .CSV file format-comma delimited or it can be in a .txt file format).6. Select the file and click Open. The Student Import window will appear.NOTE: When importing the student's gender, the code for the gender should be either M or
True for male and F or False for females7. You are able to drop down the fields to select the information that will be imported. Be sure the
fields on the right match up to the information on the left.8. Uncheck the 'First Record is Header' if the first record aren't headers. If the first record is a
header, the information on the left will not have student information. It will have the columnheading information from where you are importing the file from (e.g., First name, Last name, etc.).See image below.
9. Click on Import. The created class will appear.
Exporting Students from Interact into ExcelYou are also able to export students into Excel, other grade book programs, or into Interact on another
computer.1. Open Qwizdom Interact; or go to the Students tab.2. Go to the Class drop-down menu and select the class you want to export. The class you selected
will open.3. Go to File and select Export then Students.4. The Student Export window will appear.5. Select Student Information under 'What would you like to Export?' and Comma Delimited.6. What would you like to Export?Student Information-exports Student ID, Full Name, Email, Gender, Current Level, Ability, Birth Date,Group Number, Remote Number, Class Comments, and Generic Comments.Contact Information-exports Contact Name, Address, Phone Number, Email, and Contact Method.Demographic Information-exports Learning Disabled, Physically Challenged, Exceptional, Speech,Economically Challenged, Migrant, ESL, Title 1 Math, Title 1 Reading, American-Indian, Asian, Black,Hispanic, White, and Multi-Racial.Export Options
Comma Delimited-exports as a .CSV fileTab Delimited-exports as a .txt fileQuotes around Fields-uses quotation marks to separate fields
7. Select the destination of where the file will be saved and then click Export when finished. The filewill export and save to where it was directed to (e.g., My Documents, Desktop).

Qwizdom Interact User Guide23
Qwizdom, Inc. 2007
Exporting from Qwizdom TA (Teaching Assistant) Classes and Importing into InteractClass lists must be exported from Qwizdom TA before you can import the class into Interact. If youalready have class lists exported, skip to the section where you begin importing the Qwizdom TA classinto Interact. If you do not have any classes created in TA, skip this section.
Exporting a Class List from Qwizdom TA
1. Open Qwizdom TA and click on the Students button.2. Double-click on the class you would like to export.3. Go to the File menu and select Export.4. A prompt will appear asking 'Which do you want to export?'5. Select Students. The Export Students window will appear.6. Select the fields that have information such as Last and First Name, ID, Username. Do not export
fields that are blank.7. Click on Export. An export file window will appear.8. Find a location to save the class and click on Save. It will save in a .txt file format.9. Click the Quit button to exit out of Qwizdom TA.
Importing a Qwizdom TA Class into Qwizdom Interact1. Open Qwizdom Interact; or go to the Students tab.2. Go to the Class menu and select New Class.3. Type in the name of the class along with any other information you would like to fill out. For more
information, see Creating a Class.4. Click Done when class information entry is complete.5. Go to the File menu and select Import, then Students. The Open window will appear.6. Search for the exported class (it will be in a .txt file format) and select it.7. Click on Open. The Student Import window will appear.NOTE: When importing the student's gender, the code for the gender should be M or True for
male and F or False for females8. Select the appropriate columns for each field (e.g., Scott Jenkins; Scott goes into the First Name
column, Jenkins goes into the Last Name column). You only need to select the matching columnsfor each field for one student to set all other students in the class. If you do not know or can'tremember what the imported field is for, select it as 'None' in the Qwizdom Interact column.
9. If the student's information appears under the Imported File column, uncheck the First Record isHeader box. If there are heading names under the Imported File column, check the First Recordis Header box. The first record in the image above is not a header so the box is unchecked.
10. Click on Import when complete. The class will appear in the grade book.
6.3 Managing Teachers
Adding and Editing Teachers1. Open Qwizdom Interact and click on the Students tab; or if Interact is already open, click on the
Students tab.2. Go to the Class menu and select Edit Teachers.3. These are the required fields; First Name, Last Name, Username, Password, and Re-type
Password.
4. Click on the Add New button and begin typing in the first name, middle initial, and

24
Qwizdom, Inc. 2007
last name.5. Type in a username and password. This is what you will use to log into Interact and is a
necessary security feature.6. Check the 'Has Administrative Rights' box. This feature allows you to disable and enable the login
feature (for security and Student Mode).
7. Click on Update to add the teacher and save changes.
8. Click on Done when finished.
Deleting Teachers1. Open Qwizdom Interact; or go to the Students tab.2. Go to the Class menu and select Edit Teachers.3. Select the name of the teacher under the Teachers section and click on Delete to remove teacher.4. When you click on Delete, if the teacher has assigned classes, a window will appear asking you to
either reassign or delete the classes.
5. Click Done when finished and you will be taken back to the Students tab.
6.3.1 Log In
You must be a teacher with administrative rights to enable and disable the login. SeeCreating Teachers for more information.
Enable Log InFor security reasons, enable login to prompt users to type in a username and password to access
Qwizdom Interact.1. Open Qwizdom Interact.2. Go to File and select Enable Log In. Be sure to have created your username and password (go to
Adding, Editing, and Deleting Teachers for more information).Log in must be enabled for Student Mode (go to Student Mode for more information).
Disable Log InDisabling login allows anyone to have access to Qwizdom Interact.1. Open Qwizdom Interact.2. Go to File and select Disable Log In.Log in must be enabled for Student Mode (go to Student Mode for more information).
If you are unable to log in, please contact Tech Support.
6.4 Building Groups
There are two ways of creating groups-automatically and manually. Groups are necessary for certaingames (see Games for more information).
Automatically Creating Groups1. Open Qwizdom Interact and click on the Students tab; or if Interact is already open, click on the
Students tab.2. Select the class, in the Class drop-down menu, you want to create groups for.
3. Click on the Groups button. The Group Management window will open.4. In the Automatic tab, select the Grouping Action.5. There are three different ways to group students:
a) Balance-groups students by abilityb) Group-groups students evenly; one team may be odd depending on the number of students
in your class

Qwizdom Interact User Guide25
Qwizdom, Inc. 2007
c) Random-groups students randomly; groups may be odd/evenGroup Size-specify the number of students in each groupExclude Absent Students-check this box to ignore students who are absent (go to Attendance formore information)Select an Activity-use this drop-down menu to select the activity when you are assigning partnersbased on selected activity performance.Assign Partners Based On-you are able to assign partners based on ability and performance
Overall Performance-based on overall grade in classSelected Activity Performance-based on overall grade on a particular activityPredefined Ability Rating-based on student's capability of learning
6. Under Grouping Action, select Balance.7. Select Overall Performance under Assign Partners Based On.8. Click on Create and then click on Done when finished.
Manually Creating Groups
1. Click on the Groups button. The Group Management window will open.2. Select the Manual tab.3. Click on the Clear button to clear the previously made groups.4. Click on New Group to make groups (e.g., Group 1, Group 2).5. Click on a student and then drag and drop the selected student into the desired group.
Clear-clears out groups createdNew Group-creates groups (e.g., Group 1, Group 2)Remove-removes the selected student from that group
6. Click Done when you are finished.
6.5 Seating Chart
The seating chart is used to track student seating and needs to be completed to take attendance. SeeAttendance for more information.
1. Open Qwizdom Interact and click on the Students tab; or if Interact is already open, click on theStudents tab.
2. Select the class you want to setup the seating chart for and click on the Seating Chartbutton to bring up the seating chart.
-displays the list of student names with their user ID and remote number
-displays the seating chart
-prints the list of student names with their user ID and remote numberClear-clears all students from the grid back into the column on the right-hand side of the windowArrange-organizes students in vertical and horizontal rowsDone-click to complete the seating chart and be taken back to the previous screenCancel-exits out of the seating chart3. The name of the class will appear at the top and the students will be in a column on the right.4. Click on the Arrange button. The Seat Setting window will appear.5. In the Seat Setting window, select the seating pattern, choose the furniture (you can select to
show the teacher desk), and type in the number of rows and columns under Arrangement.6. Click the Arrange Seat button when finished.

26
Qwizdom, Inc. 2007
7. You can manually move students around by clicking on the student and dragging them to thedesired location to adjust the seating arrangements.
8. Click on Save when you are finished.
6.6 Attendance
The seating chart must be completed before you start taking attendance (see Seating Chart for moreinformation).
1. Open Qwizdom Interact and click on the Students tab; or if Interact is already open, click on theStudents tab.
2. Select the class you want to take attendance in. Before you go into the attendance chart, be sureto have your class list and seating chart done.
3. Click on the Attendance button to bring up the attendance chart.4. Mark the attendance of each student.5. Click on Save when finished.
-displays the list of student names with their user ID and remote number
-displays the seating chart gridSave-click to complete attendance and be taken back to the previous screenCancel-exits out of attendanceStudents will be marked by clicking once (to get the color indicated on the legend) on a student.Present-greenLate-yellowExcused-orangeUnexcused (or absent)-red
Taking Attendance by Student Login1. Open Qwizdom Interact and click on the Students tab; or if Interact is already open, click on the
Students tab.2. Select the class you want to take attendance in. Before you go into the attendance chart, be sure
to have your class list and seating chart done.
3. Click on the Attendance button to bring up the attendance chart.4. Select 'Use Remotes.' The host will initialize. All the students will be marked absent (red) until

Qwizdom Interact User Guide27
Qwizdom, Inc. 2007
they log in with their ID.5. Under Remote #, select Use Roster #, Random, or Fixed Remote #. Students can either sign in
with their ID or turn on their remotes to log in.6. Using the RF remotes to log in, press the Menu key.7. Select Login and press the Send (double arrows) key.8. The students would enter their ID and press the Send (double arrows) key.9. Click on Save when finished.
6.7 Managing Class Lists and Students
To Edit a Class List1. Open Qwizdom Interact and click on the Students tab; or if Interact is already open, click on the
Students tab.2. Go to the Class drop-down menu to select the class you want to edit.3. Go to the Class menu and select Class Properties to edit the class such as the class name.
5. When complete, click Done to save changes and exit out of the window.
To Edit a Student1. Open Qwizdom Interact; or go to the Students tab.2. Go to the Class drop-down menu and select the class of the student you would like to edit. The
class you selected will open.3. Double-click on the student you would like to edit.
4. When complete, click Done to save changes and exit out of the window.
To Delete a Student1. Open Qwizdom Interact; or go to the Students tab.2. Go to the Class drop-down menu and select the class of the student you would like to delete.3. There are two ways in deleting a student from the class: select the student and click on the
Delete button OR double-click on the student and click on the Delete From Class button.
4. To completely delete a student out of the program, click on the DeleteFrom Master List button.
NOTE: To permanently delete a student from Qwizdom Interact, you must delete the studentfrom the master list.
5. A prompt will appear asking 'are you sure you want to delete this student from the current class?(this will also delete student's answers/scores).'
6. Click OK to delete the student or Cancel.
Deleting a Student from the Master List1. Open Qwizdom Interact; or go to the Students tab.2. Go to the Class menu and select Edit Master List.3. Select the student you want to delete and click on the Delete button. You can select more than
one student at a time by holding down the Control key as you select the students. When youdelete a student from the master list, you are permanently removing the student from QwizdomInteract.
4. Click on Done when finished.
To Delete a Class List1. Open Qwizdom Interact; or go to the Students tab.2. Go to the Class drop-down menu and select the class you would like to delete.3. Go to the Class menu and select Delete Class.

28
Qwizdom, Inc. 2007
4. A prompt will appear asking 'are you certain you wish to delete the current class?'5. Click OK to delete the class or Cancel.
7 Remote Setup
Testing your remotes ensures that the student and teacher remotes are sending and receiving signalsto and from the host; and the host is operating properly.
Q3 Remote Setup
· Change-this is where you select the correct remote type you are using· Teacher Remote-make sure this option is checked in order to activate the teacher remote· Student Remotes; Lowest Number/Highest Number-the lowest number would be the first remote in
the remote set and the highest number would be the last remote in the remote set. (e.g., a 32remote set; lowest number is 1, highest number is 32)
· Test-this is where you test that your remotes and receiver are responding correctly. You only needto test your remotes once to make sure all remotes are responding correctly. The only other timeyou should use this option is when you think your remote/host isn't working properly.
· Renumber-reassigns class remotes. When you click on Renumber, a window will appear asking ifyou would like to reassign remote numbers for Current Class, My Classes, or All Classes. Select theoption of your choice to reassign the remotes. The remotes will be reassigned in numeric order fromthe first student in alphabetic order.
1. Open Qwizdom Interact and click on the Content tab; or if Interact is already open, click on theContent tab.
2. Click on the Remotes button. The Remote Options window will appear.3. The Remote Type area is where you select the type of remote you have. Click on the Change
button under Remote Type. The Change Remote Type window will appear.4. Select your remote type to the Q3 Blue with 19 Buttons (2002-Present) and click OK when done.
You will be taken back to the Remote Options window.5. The Teacher Remote box should be checked (if you are not using a teacher remote, then leave
the box unchecked).

Qwizdom Interact User Guide29
Qwizdom, Inc. 2007
6. The Lowest number is the first remote of the set and the Highest number is the last remote of theset (e.g., set of 1-24 remotes, lowest-1, highest-24).
Testing IR Remotes1. Click on Test. The host will initialize and the Test Remote screen will appear. There will be a gray
box of each remote number on the screen. (If it doesn't initialize, be sure the correct remote typeyou are using was selected. Go to Initializing the Host for troubleshooting.)
2. Press any key on the remote to test it; the number of the remote will light up in blue on the screen(e.g., press the 2 key on remote #5, remote #5 will light up in blue on screen) and the right/wronglights on the remote will flash.
3. Select Close once you are done to exit the Test Remote screen and you will be taken back to theRemote Options window. Click OK to exit.
Q4 RF and Q5 RF Remote Setup
· Change-this is where you select the remote type you are using· Classroom Set-select this option if the same group of remotes will always be used with the same
host (receiver). This scenario is most common in K-12 settings. If you are going to share the set ofremotes, you can still use this mode as long as the remotes always stay with the same host. Theremotes are assigned a fixed number and the session ID is permanently assigned to the remotes.Students may still log in using their student ID/user ID if you select the option in the PresentationSetup window. This option allows the student to pick up any remote rather than having to use thesame remote each time.
· Roaming or Student Owned-check this option for university settings or situations where the studentswill keep possession of the remotes and may be in several classes where different hosts are used.In this mode, the students must have a numerical student ID/user ID to put into the remote, and eachtime the remote is used a new session ID must be entered into the remote.
· Enable Backlight-select to activate the remotes Backlight· Teacher Remote-select to activate the instructor remote· Student Remotes; Lowest Number/Highest Number-the lowest number would be the first remote in
the remote set and the highest number would be the last remote in the remote set. (e.g., a 32remote set; lowest number is 1, highest number is 32)
· Test-this is where you test that your remotes and host are responding correctly. You only need totest your remotes once to make sure all remotes are responding correctly. The only other time youshould use this option is when you think your remote/host isn't working properly.
· Assign Fixed Numbers-click this button if you selected Classroom Set to assign remotes a fixed

30
Qwizdom, Inc. 2007
number. Assigning fixed numbers assigns an internal number on the remote (e.g. remote #1,remote #2, etc.).
· Renumber-reassigns class remotes. When you click on Renumber, a window will appear asking ifyou would like to reassign remote numbers for Current Class, My Classes, or All Classes. Select theoption of your choice to reassign the remotes. The remotes will be reassigned in numeric order fromthe first student in alphabetic order.
The Q5 RF student and instructor remotes need to be charged 24 hours before using.1. Open Qwizdom Interact and click on the Content tab; or if Interact is already open, click on the
Content tab.
2. Click on the Remotes button. The Remote Options window will appear.3. The Remote Type area is where you select the type of remote you have.4. Click on the Change button under Remote Type. The Change Remote Type window will appear.5. Select your remote type to one of the RF remotes and click OK when done. The host will initialize
(if the USB drivers were properly installed and the correct remote type was selected). If the hostdoes not initialize, please see Initializing the Host for troubleshooting. You will be taken back tothe Remote Options window.
6. Select Classroom Set or Roaming or Student Owned. Most users will select Classroom Set.Roaming or Student Owned are intended for higher education such as colleges, universities, etc.
7. The Teacher Remote box should be checked (if you are not using a teacher remote, then leavethe box unchecked).
8. The Lowest number is the first remote of the set and the Highest number is the last remote of theset (e.g., set of 1-24 remotes, lowest-1, highest-24).
Assigning Fixed NumbersIf you have selected Classroom Set, follow the steps below. If you have selected to use Roaming orStudent Owned, you do not need to assign fixed numbers.1. Be sure the remotes are turned off and click on the Assign Fixed Numbers button. The Assign
Remotes screen will open. There will be a gray box of each remote number on the screen.2. Turn on a student remote, enter in the session ID (session ID is located in the remote options title
bar), and press the Send key. The number of the remote will light up in blue on the screen and theremote number will appear on the LCD display on the remote.
3. Repeat step 2 for the rest of the remotes. The remotes will number sequentially in the order youturn them on.
4. After all the remotes have been assigned fixed number, click on the Save button. You will betaken back to the Remote Options window.
5. Click OK to exit out of the Remote Options window.
Testing RF RemotesYou only need to test the remotes once to ensure the remotes are responding correctly. The only othertime you should need to test remotes again is when you suspect a remote or host isn't workingproperly. If you have selected to use Roaming or Student Owned, you do not need to test yourremotes.1. Click on the Test button in the Remote Options window. The Test Remotes screen will open.
There will be a gray box of each remote number on the screen.2. Turn on the student remotes. The number of the remote will light up in blue on the screen.3. After all the remotes have tested correctly, click on Close to exit the Test Remote screen and you
will be taken back to the Remote Options window.4. Click OK to exit out of the Remote Options window.

Qwizdom Interact User Guide31
Qwizdom, Inc. 2007
7.1 Q3 IR Remote Diagram
Q3 IR Student Remote
1. CLR (Clear) key-clears the information from the remote queue2. Question [?] key-signals help to instructor3. Delta (triangle) key-allows students to change their answer during an answer key presentation4. Send key-press to submit answer5. Right/Wrong indicator-lets students know if their response is correct/incorrect (this feature can be
disabled) or received (both lights will flash)6. True/Yes and False/No keys-use to answer True/False and Yes/No questions
Q3 Instructor Remote

32
Qwizdom, Inc. 2007
1. CLR [Clear] key-toggles the status bar during presentation and hides the response graph/chart2. Question [?] key-press this with an answer and then hit the Send key to pose a spontaneous
question3. Delta [triangle] key-displays/hides the response graph/chart4. Send key-toggles the menu bar, enters spontaneous questions, and exit out of scores or student
log in information screen5. T [Right] and F [Wrong] keys-mark students correct/incorrect6. 7 [<< Left double arrow] key-goes back to the previous slide set7. 8 [Pick] key-randomly calls on a student and displays their name8. 9 [>> Right double arrow] key-advances to the next slide set and game setup/options menus9. . [< Left single arrow] key-goes back to the previous slide within a slide set or to a different
response graph10. 0 [Play] key-starts, pauses, and continues an autopilot presentation or video/sound clip. To
manually play a video on a slide, press Play and then 1 on the instructor remote. If there are twovideos on one slide, press Play and 1 for the first video and then Play and 2 for the second video.You can set options for the video to play automatically Go to Adding Multimedia for moreinformation.
11. / [> Right single arrow] key-advances to each individual slide within a slide set or to a differentresponse graph
12. - [Show] key-displays students groups, scores, and remote assignments

Qwizdom Interact User Guide33
Qwizdom, Inc. 2007
7.2 Q4 RF Remote Diagram
Q4 RF Student Remote
1. Send key-press to submit answer
2. Menu [power] key-press to view menu options (use the scroll keys to scroll through
options and press Send key to select the option). Holding the Menu button for two secondswill turn the remote on/off. The remotes do not automatically turn off. Turn off remotes if they arenot in use. Search, Sess. ID, and User ID, and Exit are options available in the Menu. Whenyou're in presentation, the menu items are Help, Login User Id, and Exit.
3. Help-press Menu during presentation to request help.4. Clear [C] key-press to delete response
5. Scroll keys-to scroll through menu options or answer choices6. True/Yes and False/No keys--use to answer True/False and Yes/No questions
7.3 Q5 RF Remote Diagram
Q5 RF Student Remote

34
Qwizdom, Inc. 2007
1. Send key-press to submit answer2. Clear [C] key-press to delete response or change an answer in an answer key presentation3. Thumb pad-press to navigate between letters when keying in answer and press the button in the
middle to select a letter or to scroll through menu options4. Question [?] key-signals help to instructor during presentation5. Menu key-displays menu options such as entering session ID and search again for host. Use the
thumb pad to scroll through the menu options. Search, Sess. ID, and User ID, and Exit areoptions available in the Menu. When you're in presentation, the menu items are Help, Login UserId, and Exit.
6. Help-press Menu during presentation to request help.7. True/Yes and False/No keys-use to answer True/False and Yes/No questions8. Power switch-turns remote on/off. The remotes do not automatically turn off. Turn off remotes if
they are not in use.9. Light switch-turns Backlight on/off
Q5 RF Instructor remote (this is the instructor remote for Q4 and Q5 remotes)

Qwizdom Interact User Guide35
Qwizdom, Inc. 2007
1. Send key-press to submit command2. C [Clear] key-press to hide/show status bar and buzz in box3. Thumb pad-press right or left to navigate between slide sets and menu options; press up or down
to navigate between question and answer slides. Press the button in the middle to select anoption.
4. Help List [?] key-displays list of students who requested help on the LCD screen5. Menu key-view menu options such as entering session ID and search again for host6. True/Right and False/Wrong keys-press to mark student responses correct or incorrect7. New Q [-] key-press to pose a spontaneous question. See
Spontaneous Questions and Surveys for more information.8. Pick [.] key-randomly calls on a student and displays their name on screen
9. LCD Graph [0] key-displays the results of the class as a graph on the LCD screen of theinstructor's remote
10. Screen Graph [/] key-displays the results of the class as a graph on the computer(projector, television screen, etc.) screen for everyone to view. Use the up and down controls onthe thumb pad to scroll through the different graphs.
11. Show [7] key-displays student groups, scores, and remote assignments12. Play [8] key-starts, pauses, or continues an autopilot presentation or video/sound clip. To
manually play a video on a slide, press Play and then 1 on the instructor remote. If there are twovideos on one slide, press Play and 1 for the first video and then Play and 2 for the second video.You can set options for the video to play automatically Go to Adding Multimedia for moreinformation.
13. Fn (Function) key-executes a unique function (this customized option must be special ordered toaccess)
14. Power switch-turns remote on/off15. Light switch-turns Backlight on/off. The 'Enable Backlight' box in the Remote Options window
needs to be checked to turn on the Backlight feature.

36
Qwizdom, Inc. 2007
7.4 RF Remote Setup
Place the AA batteries in the Q4 RF remotes and charge the Q5 RF remotes.
Session IDs help Q4 RF and Q5 RF remotes identify where to send information to. The session IDsprevent the remotes sending the information to another host.
1. Open Qwizdom Interact and click on the Content tab; or if Interact is already open, click on theContent tab.
2. When using Q4 RF or Q5 RF remotes for the first time, the remotes may ask for a session ID.
3. Click on the Remotes button. The Remote Options window will appear. Here is one ofthe places you will find the session ID. Go to Remote Setup for more information.
4. The session ID is located in the title bar of the Remote Options window.5. Pick up the RF remote. Enter the session ID and press the Send (double arrow) key. Doing this
'assigns' the remote to the host you will be using. All information sent from the remote will go tothat host only. Session IDs only need to be entered in once (or when prompted on the remote todo so). If you switch hosts or use an RF remote from another set, you will need to enter a newsession ID so the remote(s) will send information to that host only.
6. Enter the session ID for the Q5 RF Instructor remote.7. The remotes will say 'Inactive' because you are not in presentation mode.8. If you accidentally enter in the wrong session ID, wait for the remote to say 'Host not Found' or 'No
Net.' Push the Menu button and select Enter Session ID and press the Send key (double arrowkey). Enter the session ID and press Send (double arrow).
9. Click OK to exit the Remote Options window.
10. Select an activity in the content tree and click on the Present button. The PresentationSetup window will appear.
11. Check the preferred options and select the class.12. Click OK and the presentation will begin.13. If the RF remotes are on, the may have gone to 'sleep.' The LCD screen will either be blank or
say 'Push Key' or 'Not Active.' If the remotes are asleep, press any key on the remote to 'wake itup.'
14. The instructor remote will say 'Last Key' and displays what key was last pressed.
15. If you are in presentation and need to enter in a session ID, click on the Toggle button in thepresentation menu at the top left part of the screen.
16. The session ID will appear in the title bar at the top of the screen.17. When the question slide appears on screen, the choices will display on the remote. For example,
if a multiple choice slide is up, the remote will show the letter choices that are available.18. The student would select the letter and then press the Send key to send their response.When the presentation is over, turn off remotes. The remotes do not automatically shut off. For theQ4 RF remote, hold down the Menu key to turn the remote off. For the Q5 RF remote, use the powerswitch (located on the top right side of the remote) to turn the remote off.
Changing Session IDsIf the RF remote says 'No Net,' it could be that the session ID has been entered incorrectly.1. To change the session ID, wait for the remote to say 'No Net.'2. Press the Menu key when the remote says 'No Net.'3. Use the arrows to scroll to Enter Session ID or Sess. ID.4. Press the Send (double arrows) key to select the option. For the Q4 remotes, the remotes will
display the current session ID and will ask if you would like to change the ID. Press T (Yes) tochange the session ID.
5. Enter the session ID and press the Send (double arrows) key.
Qwizdom Interact User Guide37
Qwizdom, Inc. 2007
7.5 Student Remote Login
Student remote login allows any student to use a remote and sign in. It does not have to be theirassigned remote. This option is helpful when you:· do not have assigned remotes· have absent students· have random people using remotes (e.g., during lectures, presentations)To have students sign in, they must have a student ID. Student ID's are setup in the StudentInformation window. (Go to Creating a Class for more information about student information). Eachstudent should have a unique student ID assigned to their name. Student ID's can only be numericand 50 numbers long. An ID cannot be used for more than one student (student IDs cannot beduplicated).
IR Remote Log In1. Open Qwizdom Interact and click on the Content tab; or if Interact is already open, click on the
Content tab.
2. Select an activity and click on the Present button. The Presentation Setup window willappear.
3. To enable students to login with their ID, check the Log In By User ID box under the Remotessection.
4. Check the preferred options and select the class.5. Click Okay when you are finished setting up the presentation.6. The registration screen will appear.7. Have each student type in their student ID and hit the Send key. Their name along with the
number of the remote will appear on screen. (e.g., a student will press 0-4-3-1-0-4 on the remoteand then hit the Send key to log on)
8. If the student keys in the incorrect ID, have them hit the Clear button on their remote and thenenter in their student ID.
RF Remote Log In1. Open Qwizdom Interact and click on the Content tab; or if Interact is already open, click on the
Content tab.
2. Select an activity and click on the Present button. The Presentation Setup window willappear.
3. To enable students to login with their ID, check the Log In By User ID box under the Remotessection.
4. Check the preferred options and select the class.5. Click Okay when you are finished setting up the presentation.6. The registration screen will appear.7. Have each student type in their student ID and hit the Send key. (e.g., a student will press 0-4-3-
1-0-4 on the remote and then hit the Send key to log on)8. Their name and the number of their remote will appear on screen.9. If the student keys in the incorrect ID, or two or more students attempt to enter the same student
ID, the name of the student will appear in the Login Conflict log.10. The instructor can choose to Kick, Keep, or Remove the students attempting to log in with a
duplicate student ID.· Kick-denies student access to the presentation· Keep-allows that student to use the student ID· Remove-removes the student and has them re-enter the correct student IDIf a student enters in a non-existing student ID for that class, the remote will refuse it and ask for theuser ID again.

38
Qwizdom, Inc. 2007
11. After all students have logged in, click on OK to begin the presentation.
8 Presentation
There are many options that can be set in presenting an activity. Follow this tutorial to familiarizeyourself with the available options.
1. Open Qwizdom Interact and click on the Content tab; or if Interact is already open, click on theContent tab.
2. Select an activity in the content tree and click on the Present button. The PresentationSetup window will appear.Presentation Setup windows may vary depending on the version of the software you have.Go to www.qwizdom.com to check for updates.
3. Check the preferred options and select the class.4. When the setup is complete, click OK.5. After clicking OK, two messages will flash across the screen. The first one will read 'Initializing
Host.' This means the computer is responding and reading the host. It is attempting to establishcommunications with the host. Once the computer successfully establishes communications withthe host, a second message 'host Initialized' will display. You should now see the first slide of thepresentation.
· Group-select the class from the list that will be going into presentation.· Play Mode-select Normal, AutoPilot, Answer Key, Review, Spontaneous Survey, or Game.· Record Answers/Scores-checking this box records the responses/score for an activity.· Just Participation-a presentation for sensitive material (survey) and does not record the
responses/score but appears in the grade book to show that the users participated. You are able toview the responses with the response chart.
· Game-select game type.· Display Options-allows features such as Answer Slides, Countdown Timer, Slide Number, and

Qwizdom Interact User Guide39
Qwizdom, Inc. 2007
Warning if % Wrong for viewing during presentation.· Remote Options-allows user to setup remote options for a presentation.· Randomize Slide Order-rearranges the slide order for that presentation only.· Narrate Slides-checking this box turns on the narrator for the presentation-see Narration Setup for
more information.· Use Groups-turns on group mode when checked-be sure groups have been created in the Students
section. See Building Groups for more information.· Time Limit-allows user to set time limit for question response or use time from each slide set.
Below is the presentation menu bar that displays during presentation:
*Not all options will be available, depending on thepresentation type.
-Exits presentation and returns to Content tab.
-Hides/shows the drop-down menu at the top of the screen.
-Returns to the previous slide.
-Advances to the next slide.
-Marks student right.
-Mark student wrong.
-Picks a student at random.
-Shows current game scores during game mode presentation.
-Shows the question slide of the current slide set.
-Shows the answer slide of the current slide set.
-Shows the information slide of the current slide set.
Presentation Options
· To navigate through slides in a presentation, click on the and buttons; on the IR instructorremote press the 7 and 9 keys (double arrows) or for the RF instructor remote, press the left andright arrows (on the thumb pad) to navigate through slides in a presentation.
· To navigate through individual slides (e.g., question, then show the answer), click on the , ,
or buttons; on the IR instructor remote press the . and / keys (single arrow) or for the RFinstructor remote, press the up and down arrows (on the thumb pad) to navigate through individualslides.
· To toggle full screen and hide/show the top menu bar, click on the button; on the IR instructorremote, press the Send key or on the RF instructor remote, press the C (clear) key to toggle fullscreen and hide/show the top menu bar.
· Press the Control key with the letter G key to display the response graph/chart; on the IR instructorremote, press the Delta (triangle) key or on the RF instructor remote, press the / key (chart witharrow pointing to right) to display the response graph/chart.
· To exit the presentation, click on the button.· For the IR instructor remote, press the 0 key (Play) or for the RF instructor remote, press the 8 key
to toggle the autopilot on/off.
The Buzz In Box and Status BarThe Buzz In Box displays the remote numbers at the bottom of the screen during presentation (pressthe Control key with the letter B key show/hide Buzz In Box bar, press the Control key with the letter Hkey to show/hide the Status Bar; on the IR instructor remote, use the CLR key or on the RF instructorremote, press the C (clear) key to show/hide both status bars).

40
Qwizdom, Inc. 2007
The Status Bar allows you to see which remote has or has not responded in by the boxes changingcolor. Colored boxes indicate that the person with that remote has responded in; it does not indicatethat the student is right or wrong.
Presentation Options Associated with Remotes
· The icon displays when the student(s) are required to input their answer and hit the Send keyon their remote. This is only necessary for multiple mark, numeric, and sequential questions.
· The icon will appear when spontaneous questions are posed.· If a student needs help during presentation, on the IR remotes, they can press the ? (question mark)
key or on the RF remotes, press the Menu key to select Help and press Send on their remote to
request for help. This icon will display. The 1 represents the number of students thatrequested help (only one student needs help); the arrow will point away from the number to indicatethe number of students that requested help. Click on the arrow to display the numbers of the
student remotes that need help (e.g., the student with remote 16 requested help); thearrow will point in to show the remote number(s) that requested help. On the RF instructor remote, alist of the names requesting help will appear on the LCD.
· Press the 1 key on the IR instructor remote, select Clear All and press Send, or use the mouse toclick on the icon to clear out the requested help.
8.1 Response Graphs
Response graphs show the number of student responses with the available choices; or each individualstudent answer to that particular question.
1. Open Qwizdom Interact and click on the Content tab; or if Interact is already open, click on theContent tab.
2. Double-click on a folder you would like to choose an activity from and select an activity. Be sure toselect a Q&A activity (remote answerable slides).
3. Click on the Present button. The Presentation Setup window will appear.4. Check the preferred options and select the class.5. Click Okay when finished to start the presentation.6. Use the student remotes to respond to the first question.7. Using the IR instructor remote, press the Delta (triangle) key or on the RF instructor remote, press
the backslash key to display the response graph; or for use without teacher remote, go to theShow menu and select Question Response Graph. If you do not see a menu at the top of thepresentation, click on the M button or press the letter M key on the keyboard to bring up the menu.
8. There are four types of charts; bar, scatter, pie, and individual. To access the different charts,either press the / (right single arrow) key or . (left single arrow) key to select a graph OR use themouse to click on the icons in the upper left-hand corner of the graph window.
Bar Graph-each bar represents the number of students that responded in with the answer choices.Scatter Graph-shows dot with the number of responses to the answer choices.

Qwizdom Interact User Guide41
Qwizdom, Inc. 2007
Pie Graph-shows pie slices with the number of responses to the answer choices.Individual Response Chart-the chart shows each individual student's response.
9 Spontaneous Questions and Surveys
During a presentation, you may want to pose a spontaneous question to students to test theirknowledge or gather opinions.
Posing a Spontaneous Question using the IR Instructor Remote1. Open Qwizdom Interact; or if Interact is already open, click on the Content tab.
2. Select an activity in the content tree and click on the Present button.3. Check the preferred options and select the class.4. Click OK to start the presentation.5. Anytime during the presentation, ask the class a question and give them answers to choose from
(A, B, C, True or False, etc.).6. After asking the question, press the ? (question mark) key on the instructor remote.
7. Press the answer and then the Send key. A question mark icon will appear. This icon tellsstudents a question has been posed.
8. Students will select the answer and press the Send key (double arrows) to send in their response.After the students have responded in, press the Delta (triangle) key on the teacher remote to pullup the graph. The graph shows how many students answered each of the following choices.
9. When the presentation is complete, exit by clicking on the blue X in the upper left corner of thescreen. A prompt will appear letting you know that the feedback for the spontaneous questionshave been saved as a .csv file in the Qwizdom Interact folder.
10. To retrieve the feedback, go to Collecting Spontaneous and Survey Feedback for moreinformation.
Posing a Spontaneous Question using the RF Instructor Remote1. Open Qwizdom Interact; or if Interact is already open, click on the Content tab.
2. Select an activity in the content tree and click on the Present button.3. Check the preferred options and select the class.4. Click OK to start the presentation.5. Anytime during the presentation, ask the class a question and give them answers to choose from
(A, B, C, True or False, etc.).6. After asking the question, press the - (New Q) key on the instructor remote.7. Select the question type by pressing the circle key (in the middle of the thumb pad) or the Send
key (double arrows).8. Select the answer by pressing the circle key (in the middle of the thumb pad) or the Send key
(double arrows). A question mark icon will appear. This icon tells students a question hasbeen posed.
9. Students will select the answer and press the Send key (double arrows) to send in their response.After the students have responded in, there are two ways to view their results. Either press the /key (chart with arrow pointing to right) so that everyone can view the results or press the 0 key(chart) to privately view the results on the instructor remote.
10. When the presentation is complete, exit by clicking on the blue X in the upper left corner of thescreen. A prompt will appear letting you know that the feedback for the spontaneous questionshave been saved as a .csv file in the Qwizdom Interact folder. Go toCollecting Spontaneous and Survey Feedback for more information.

42
Qwizdom, Inc. 2007
SurveysSurveys are for feedback and you will be able to get instant feedback when participants answerquestions in presentation mode. An anonymous class is used for users to participate in a survey. SeeAnonymous Class in the Creating a Class section for more information.
1. Open Qwizdom Interact; or click on the Content tab.2. There are a couple of ways to create a survey. You are able to:· use an existing activity-surveys can be presented by using pre-made activities, or· create an activity-surveys can be presented by slides that are created with questions on them.
3. Click on the New Activity button.4. Type in the activity name. The activity will appear in the content tree.
5. Click on the New Set button. The Slide Editor will open.6. Create question slides for the survey. All slides must be remote answerable (Multiple Choice,
True/False, Numeric, etc.)
7. After the questions have been created, click on the Present button. The PresentationSetup window will appear.
8. Select the anonymous class and click OK when finished.9. Participants will answer using the remotes.10. Use the instructor remote to pull up a response graph to show the results as each slide is
answered.11. You can also generate reports to view the results. After the presentation is finished, exit out by
clicking on the blue X in the upper left corner of the screen.12. Click on the Students tab and click on the Reports button. The Reporting wizard will appear.13. Select the class and activity.14. Select the report type and click on View or Done (depending on the version of the software). The
report will generate for you to view, e-mail, print, or save.
9.1 Answer Key Surveys
Answer keys* can be used for surveys using an anonymous class. As an example of how one can usean answer key survey, let's create a poll to elect a new class president. In order to do an answer keysurvey, you will need an anonymous class. Go to Creating a Class to create an anonymous class.*Answer keys can only be used with the RF remotes.
1. Open Qwizdom Interact and click on the Content tab; or if Interact is already open, click on theContent tab.
2. Go to the New Activity button to the drop down menu and select Answer Key.3. Type in the name of the answer key and click on OK. The answer key grid will appear.4. Select the question type (Multiple Choice, Yes/No, True/False) and select Survey as the answer.
5. Click on Insert to add more questions.
6. When the answer key is complete, click on the Save button.
7. Click on the Present button. The Presentation Setup window will appear.
Qwizdom Interact User Guide43
Qwizdom, Inc. 2007
8. Select the anonymous class and check the preferred options.9. Click OK and a prompt will appear asking 'Do you want survey mode? When a user is finished,
another user can start by pressing Send or Minus. This continues until you close presentation.'10. Click on Survey. The answer key grid will appear.11. Users can send their response in using the remotes. Say that you only have 30 remotes but there
will be 100 users participating. After a user sends in his/her response, another user can pick upthat same remote and send in his/her response.
12. Using the IR remote, the next user would press the Send or - key on the remote and then send inhis/her answer. Using the RF remote, the next user will press the right arrow, enter his/herresponse, and press the Send key (double arrows).
13. When the survey is complete, exit the presentation by clicking on the blue X in the upper leftcorner of the screen.
14. Click on the Students tab and click on the Reports button. The Reporting wizard will appear.15. Select the class and activity.16. Select the report type and click on View or Done (depending on the version of the software) to
generate a report. The report will generate for you to view, e-mail, print, or save. To retrieve thefeedback, go to Collecting Spontaneous and Survey Feedback for more information.
9.2 Spontaneous Survey Bar
The Spontaneous Survey bar comes in handy because it is a free floating bar that allows questions tobe asked using an activity* or another program.*The activity must only contain one information slide. This is required to receive accurate results.
1. Open Qwizdom Interact; or if Interact is already open, click on the Content tab.2. Select an activity that contains only one information slide. If you do not have one, then create a
new activity with one information slide.
3. Click on the Present button. The Presentation Setup window will appear.4. In the Presentation Setup window, check the appropriate boxes and select the correct class.5. Check the Use As Spontaneous Survey box.6. Click Okay when finished and the presentation will start.7. Interact will minimize and run in the background. The survey menu will appear at the top of the
screen.NOTE: Double-click on the owl to toggle between Qwizdom Interact and another program.8. You can choose to type the question in the text box for everyone to view.9. Select Multiple Choice as the question type and 4 Answer as the number of answer choices.10. Click on the Start button for the survey to begin.11. Ask the question and give the answer choices for the class to choose from.12. Students will send their responses using the remotes.13. When all responses have been received, the graph will show 100% have responded.14. Click on the Stop button.15. Either select the correct answer or leave the answer as Survey.16. Click the pie chart icon to bring up the response graph. For more information on response graphs,
see Response Graphs.17. Click on the New button to ask another question. When you are finished with the survey, click on
the red X button to end the presentation.18. A prompt will appear asking you if you want to save your spontaneous question answers.19. Click on Save.20. Another prompt will appear telling you where the spontaneous answers are saved at. The
spontaneous session files are saved as a .CSV file on the hard drive in the Spontaneous Sessionsfolder in Qwizdom Interact (double-click on My Computer, double-click on Program Files folder,

44
Qwizdom, Inc. 2007
double-click on Qwizdom folder, double-click on Qwizdom Interact folder, double-click onSpontaneous Sessions folder). Open Microsoft Excel, Wordpad, Microsoft Works Spreadsheet orother .CSV supported programs to see the results. To retrieve the feedback, go toCollecting Spontaneous and Survey Feedback for more information.
21. Since this is a survey, there will not be grades for the activity, only responses.22. Select the activity and click on the Reports button.23. Select Class Answer, Student Answer, or the Quick Class report to view the results of the
spontaneous activity.
9.3 Collecting Spontaneous and Survey Feedback
You have the option to export answer data into Microsoft Excel or certain grade book programs thatsupport the .csv file format. The grades will be exported in .CSV file format.
1. Open Qwizdom Interact and click on the Students tab; or if Interact is already open, go to theStudents tab.
2. Select the class you would like to export answer data from.3. Click on the activity name in the grade book. The column will highlight in yellow.4. Go to File and select Export Answer Data.5. The Activity Answers Export window will appear.6. Click on the Export button. An Open window will appear.7. Find a location to save the file (e.g., My Documents, Desktop) and type in the file name.8. Click on Save. The file will be saved in .CSV file format which is supported by Microsoft Excel or
other .csv supported programs.9. Double-click on the My Computer icon.10. Double-click on the C Drive.11. Double-click on the Program Files folder.12. Double-click on the Qwizdom folder.13. Double-click on the Qwizdom Interact folder.14. Double-click on the Spontaneous Sessions folder. You will find the feedback (.csv file).
There is another way to get the feedback collected during presentation. You can also export theanswer data.1. To export class data, click on the Students tab (after exiting the presentation).2. Click on the activity name in the grade book (the column will highlight in yellow) and go to the File
menu.3. Select Export Class Data and the Save window will appear.4. Save the file in a desired location and click on Save. The file will save as a .csv file.
10 Create an Answer Key
Answer keys* can be created for any activity (excluding lessons) in Qwizdom Interact or availableassignments you may have on hand. For instance, you have a review that was created from one of theschool books. Create an answer key for that assignment, present it to students, and it will beautomatically graded for you! An answer key is used to allow students to work from a paper-basedactivity/assignment (e.g., test, review, quiz) and use their remotes to answer the questions at their ownpace. Students are allowed to change their answers if the teacher permits.*Answer keys can only be used with the RF remotes.
1. Open Qwizdom Interact; or if Interact is already open, click on the Content tab.

Qwizdom Interact User Guide45
Qwizdom, Inc. 2007
2. Click on the New Activity drop-down menu and select Add Answer Key.3. Type in the name of the answer key. The answer key will appear in the content tree (on the left
and the answer key grid will appear on the right).There are six columns in the answer key:· Number-the number of the question· Type-the type of question being presented (e.g., multiple choice, short answer, numeric, etc.)· Answer-correct answer to the question· Answer 2 (Alt, Min)-alternate answer or more than one answer to the question (e.g., answer is 70.9,
but it can be rounded to 71 and be correct as well).· Answer 3 (Alt, Max)-alternate answer or more than one answer to the question (e.g., selecting more
than one choice for the answer)· Points-number of points assigned to the question (e.g., question #1 is worth 25 points).Select a question type and type in the answer for question one.
4. Click on the Insert button below. This will create another question.5. Repeat step 4 and 5 until the answer key is complete.
6. Click on the Save button to save the completed answer key.7. Print and pass out the questions (generated from text books, another program, etc.) to the
students. If you are printing a Qwizdom Interact activity, select the activity in the content tree, and
click on the Print button. The Qwizdom Printing window will appear.8. Click on Print and pass out the activity. Students will work off the paper and use the remotes to
send the answers.
9. Select the answer key activity and click on the Present button. The Presentation Setupwindow will appear.
10. Select the correct class under Groups and click OK. A prompt will appear asking 'Do you want thestudents to be able to change their answers? If you choose Yes, the Right/Wrong feedback will bedisabled.' Select Yes or No. The presentation will start.
10.1 Changing Answers in an Answer Key
When the presentation starts, it will ask 'Do you want the students to be able to change their answer?If you choose Yes, Right/Wrong feedback will be disabled.' Disabling the right/wrong feedback willdiscourage cheating. Being able to change answers will allow students to come back to certainquestions they are having difficulty with.
During presentation, a student is working on an answer key* activity. The student is on a question butwould like to go back to change the answer for previous question.*Answer keys can only be used with the RF remotes.
Using RF Remotes1. During an answer key, press the left and right arrows to go to the question that you would like to
change the answer for.2. When the question number of the answer you want to change appears, press the Clear button.

46
Qwizdom, Inc. 2007
3. Select the answer and press the Send (double arrows) key.4. Use the left and right arrows to get back to the question number you left off on.
10.2 Taking Multiple Activities with an Answer Key
Students can take different tests using one answer key*.*Answer keys can only be used with the RF remotes.
1. Open Qwizdom Interact and click on the Content tab; or if Interact is already open, click on theContent tab.
2. Select the activities in the Content Tree to print and pass out to students. Students will see thetest ID on the activity printout (header).
3. Click on the Present button drop down menu.4. Select Present Multiple Tests (Answer Key Mode). The Presentation Setup window will appear.5. Select the class and click OK when finished.6. A prompt will appear asking if you would like to allow students to change their answer. Select Yes
or No.7. The answer key grid will appear. Students will enter the activity ID using their remotes. The
activity ID lets the program know which student is taking a particular activity.8. You will see the final student's score once the activity has been completed.9. When all the students have completed their activities, exit the presentation.10. Click on the Students tab to go to the grade book to view the scores.
10.3 Resuming Answer Keys
Answer keys* can be partially completed and finished later. Follow the instructions below to resume apartially completed answer key.*Answer keys can only be used with the RF remotes.
1. Select the answer key that needs to be completed and click on the Present button. ThePresentation Setup window will appear.
2. Select the class under Groups and click Okay. The presentation will begin.3. A prompt will ask you if you would like to Resume, Start Over, or Cancel. Click on Resume. The
answer key will appear.4. Students will scroll to the question number they left off on and complete the rest of the activity.
10.4 Using an Existing Activity as an Answer Key
Let's use an existing activity as an answer key*! The answers are already provided since it is a pre-existing activity. You can use any pre-existing Q & A activity as an answer key. This means anyquestion and answer activity; lessons are excluded.*Answer keys can only be used with the RF remotes.
1. Open Qwizdom Interact; or if Interact is already open, click on the Content tab.
2. Select an activity in the content tree and click on the Print button. The QwizdomPrinting window will appear.
3. Click on Print and pass out the activity. Students will work off the paper and use the remotes tosend in their answers.
4. Click on the Present button.5. Select the correct class under Groups and select Answer Key as the Play Mode or check the Use

Qwizdom Interact User Guide47
Qwizdom, Inc. 2007
as Answer Key box (options may vary due to version of software).6. Click OK and it will start the presentation.7. The Paper-Based Score Entry window will appear. You will see the student names with their ID
and remote number. As the students are taking the answer key, you will see the questions as theyare being completed (percentages will appear in columns). You can also track the studentsprogress by viewing their names (percentages will appear in rows).
8. Press the Results Graph button to view the results of the class (results will remain onscreen). You must press it each time you want to view the progress of the class.
9. A prompt will appear asking if you would like to allow students to change their answers. SelectYes or No. If you allow them the option to change their answers, the right/wrong feedback will beturned off; which means, when they respond in, they will not know if the answer sent in is right orwrong.
11 Creating Games
Almost any activity can be used as a game. There are a couple requirements to use an activity (youcreate or pre-existing) as a game.· Activities should contain 25 slides or more.· Slides in the activities must be remote answerable question types such as Multiple Choice,
True/False, Yes/No, Numeric, or Short Answer-Specific (Q5 RF remotes only).· Each slide set must have a question and answer slide.
Presenting an Activity as a GameWhen you present an activity as a game, the activity temporarily converts into a game for that
presentation only.1. Open Qwizdom Interact; or if Interact is already open, click on the Content tab.2. Select an activity in the content tree. The activity must consist of 25 slide or more. There slides
must be remote answerable (Multiple Choice, True/False, etc.) and have an answer slide.
3. Click on the Present button. The Presentation Setup window will open.4. Select the class you want to present the game to.5. Click on the Play Mode drop-down menu and select Game.6. Click on the Game drop-down menu and select the game type.7. If groups are required to play the game, select 'Use Groups.' See Building Groups for
information on creating groups. Certain games require you to play in group mode or limits thenumber of players so you may need to play in groups. See Games for player limitation and groupmode play.
8. Click OK to begin the game. The host will initialize and the game setup screen will appear. Theonly game that doesn't have a setup screen is K-Bowl.
9. Select the options in the game setup screen and click on >> or Continue to begin the game. SeeGames for directions on playing a game.
Creating a Quandary ActivityQuandary activities must consist of 25 slides and 5 topics in order to fill the game board.
1. Open Qwizdom Interact; or if Interact is already open, click on the Content tab.2. Click on the New Activity button.3. Type the activity name and click OK.4. Click on the New Set button. The Slide Editor will open.5. Create 25 question and answer slides (five slides for each of the five categories). Only remote
answerable slides are allowed (Multiple Choice, True/False, etc.). Every question must have ananswer slide.
48
Qwizdom, Inc. 2007
6. When all 25 slides have been created, go to the Edit menu and select Edit Quandary Topics. TheEdit Quandary Topics window appears.
7. Type in the topic names. Topic 1 will apply to the first 5 slides, topic 2 will apply to the next 5slides, and so on.
8. Click on OK when done.9. Click on the Present button to present the activity. The Presentation Setup window appears.10. In the 1 General Options area, select Game as the Play Mode and Quandary as the Game.11. Select the class and check the desired options.12. When the setup is complete, click OK and the presentation will begin.
Creating a Quandary from Existing Activities1. Open Qwizdom Interact; or if Interact is already open, click on the Content tab.2. Click on the New Activity button.3. Type the activity name and click OK.4. What you're going to do is copy and paste slides (a total of 25 slides) from other activities into this
activity to create a Quandary game.5. Select an activity in the content tree. There are two ways to copy slides. Either you can select the
slides, go to the Edit menu and select Copy or drag and drop the selected slides into the activity(in the content tree).
6. Copy 25 slides into the activity (that will be presented as Quandary).7. Once you have 25 slides in the activity, go to the Edit menu and select Edit Quandary Topics. The
Edit Quandary Topics window appears.8. Type in the topic names. Topic 1 will apply to the first 5 slides, topic 2 will apply to the next 5
slides, and so on.9. Click on OK when done.10. Click on the Present button to present the activity. The Presentation Setup window appears.11. Depending on the version of the software-in the 1 General Options area, select Game as the Play
Mode and Quandary as the Game or select the game under the Game Type drop-down menu inthe Game Options area.
12. Select the class and check the desired options.13. When the setup is complete, click OK and the presentation will begin.
12 Grade Book
Qwizdom Interact has its own grade book system to track student answers, scores, and overall grades.In order to have grades, you must record them. The option to record answers/scores is available in thePresentation Setup window.
1. Open Qwizdom Interact and click on the Content tab; or if Interact is already open, click on theContent tab.
2. Double-click on a folder you would like to choose an activity from and select the activity you wouldlike to present.
3. Click on the Present button. The Presentation Setup window will appear.4. Select the class, check the preferred options, and be sure the 'Record Answers/Scores' box is
checked. This option is checked by default.5. Click OK when finished. The presentation will begin.6. Have the students answer each question in the presentation. When the presentation is complete,
exit the presentation by clicking on the blue X in the upper left corner. You will be taken back tothe Content screen.
7. Click on the Students tab. You will see the results of the class in the grade book.8. You can change the view of the grades to percentage, fractions, or points. To change the way the

Qwizdom Interact User Guide49
Qwizdom, Inc. 2007
results are displayed, click on the Views button.· Points-shows the total number of points awarded for each correct answer. Points are assigned in
each slide. See Creating Slides for more information.· Fractions-shows grades as a fraction of the number of correct responses over the total number of
questions. e.g., 8/10-the student got 8 correct out of 10· Percentages-shows grades in percentage form based on the number of correct responses. e.g.,
96%· Grades-shows the letter grade based on number of correct responses. e.g., A-To print a report, go to Emailing, Printing, and Saving Reports for more information.
12.1 Grade Scales
The grade scale you would like to set for the class can be adjusted.
1. Open Qwizdom Interact and click on the Students tab; or if Interact is already open, click on theStudents tab.
2. Go to the Class menu and select Edit Grade Scales. There are four different grade scales thatcan be set to your grading standards. Select the grade scale or create a new grade scale to editto your grading standards.
3. To create a new grade scale, click on the New button and type in the name of the grade scale inthe GradeScale column.
4. Create the grades in the Grades Scales Settings column.5. Click Done when finished.
12.2 Locking and Unlocking Activities
When activities have been graded, they become locked. There will be a green lock icon on the activityindicating that it has been graded. The reason why activities become locked is so that the activity can'tbe edited because it may alter the grades that were recorded for that activity. You can duplicate alocked activity or unlock the activity to edit it.
1. If you try to change the activity in any way, a prompt will appear asking if you would like to create aduplicate of the activity and also suggests to unlock the activity.
2. Click on Duplicate.3. Type in the name of the duplicated activity and click Ok.NOTE: Each activity name should be different (activity names should not be duplicated).4. The activity will be duplicated with the new activity name in the content tree.
Unlocking an ActivityUnlocking an activity deletes the activity and grades from all the classes that have taken the activity. Ifyou want to keep the grades recorded for that activity, duplicating the activity would be the bestsuggestion.1. To unlock an activity, open Qwizdom Interact and click on the Content tab; or if Interact is already
open, click on the Content tab.2. Select the activity that you would like to unlock.3. Go to the File menu and select Unlock. A prompt will appear letting you know that by unlocking an
activity, the activity will be deleted along with the grades for that activity.4. Click Yes to unlock the activity.5. Click on the Students tab and go into a class grade book. The activity and grades for that activity
have been deleted.

50
Qwizdom, Inc. 2007
12.3 Adding Paper-based Activities to the Gradebook
You are able to add paper-based activities into the grade book to have Interact keep record of gradesfor all classes.
1. Open Qwizdom Interact and click on the Students tab; or if Interact is already open, click on theStudents tab.
2. Select the class you would like to add an activity to.
3. Click on the Add Activity button.4. Type in the name of the paper-based activity you would like to enter in.5. Click OK. A prompt will appear asking the maximum points of the activity.6. A prompt will appear asking you to specify the maximum amount of possible points. Enter in the
maximum number of possible points.7. The added activity will appear in the grade book (in alphabetical order).To adjust scores for the added activity, please go to Activity Score Adjustments for more
information.
12.4 Activity Score Adjustments
Scores in the grade book can be added or adjusted. This is useful for adding extra credit points.
1. Open Qwizdom Interact and click on the Students tab; or if Interact is already open, click on theStudents tab.
2. Select the class you would like to adjust the scores for.3. Double-click on a field under the activity column. The Activity Score Adjustments window will
appear.4. Type in a student's score in the Score column. The Adjustments column adds or subtracts bonus
and extra credit points.5. The information in the Score and Adjustments column will automatically calculate and appear in
the Total column.6. Click Done when finished adjusting scores. The scores will appear in the grade book.
12.5 Exporting Grades
You have the option to export grades into Microsoft Excel or certain grade book programs that supportthe .CSV file format. The grades will be exported in .CSV file format. You cannot import grades as a.csv file. If you are wanting to import grades, see Exporting and Importing Class Data (.XML) formore information.
1. Open Qwizdom Interact and click on the Students tab; or if Interact is already open, click on theStudents tab.
2. Go to the File menu and select Export, then Grades.3. The Grade Export window will appear asking you what else you would like to export. It is best to
leave all options under this section unchecked. An export window will appear.4. Find a location to save the file (e.g., My Documents, Desktop) and type in the file name.5. Click on Save. The file will be saved in .CSV file format which is supported by Microsoft Excel or
grade book programs (that support .CSV files).
12.5.1 Exporting and Importing Class Data (.XML)
Exporting Class Data (.XML)You can export student names and grades together in one file using the class data .xml export.1. Open Qwizdom Interact and click on the Students tab; or if Interact is already open, click on the

Qwizdom Interact User Guide51
Qwizdom, Inc. 2007
Students tab.2. Go to the File menu and select Export Class Data (XML). The XML Export window will appear.3. Select the class(es) you want to export and click on Export. The Save As window will appear.4. Choose the location of where you want the file to export to and click on Save.5. The file has exported as an .XML file.
Importing Class Data (.XML)You can export a class with grades to another computer that has Qwizdom Interact.1. Open Qwizdom Interact and click on the Students tab; or if Interact is already open, click on the
Students tab.2. Go to the File menu and select Import Class Data (.XML). The Open window will appear.3. Search for the file. When you find it, select it, and click on Open. A prompt will appear asking
'Would you like to Merge this data with your current class (YES) or import the data as (a) newclass(es) (NO)?'
4. Select either Yes or No to import the class data into the grade book.
13 Reports Overview
Reports detail: grades, student information, and attendance. They can be printed and e-mailed. Toset up the e-mail function please go to Emailing, Printing, and Saving Reports for more information.If your reporting window does not match the one below, you may need to update your version ofQwizdom Interact.
Under the Class tab:Overall Data ReportsClass Attendance-daily attendance report for each student.Class Roster-displays student names, remote number, group number.Group Designations-displays the students in their assigned group with their remote number.Detailed Class Roster-displays student names, remote number, group number, student ID, username,and password.Grade Distribution-displays activity information with student information, responses, and total scorewith pie chart and bar graph.Grade Book-displays activity information with student information, total grade, and responses.
Specific Activity ReportsSub-Group Summary Graph-grade distribution chart, demographic chart sub-group chart, class high-low-average chart

52
Qwizdom, Inc. 2007
Question Summary-class responses by questionOverall Score-summative scores by studentClass Answer Report-answer report for all students per questionDetailed Class Answer-detailed answer report by student per questionQuestion Standards-specific standards attachedClass Standards Mastery-lists all standards tested and class average for each standard
Under the Student tab:Overall Data ReportsScore Report-individual score per activityProgress Report-individual student grade reportAttendance-daily attendance report for individual student
Specific Activity RecordsQuestion Summary-student score by questionStudent/Class Comparison-individual student answer summaryStandards Mastery-individual student standards mastery report
13.1 Emailing, Printing, and Saving Reports
Emailing Reports (version released in October 2004-January 2006)1. Open Qwizdom Interact and click on the Content tab; or if Interact is already open, click on the
Students tab.
2. Click on the Reports button. The Qwizdom Reporting Tool wizard will appear.3. Select the report type and/or activity name and student name.4. Click on Finish. The report will generate.
5. Click on the E-mail button. You have to set up e-mail before you can e-mail reports. Go toSetting up E-mail for more information.
6. Click on the names of the person(s) you want to send the report to. You can also CC the report.7. Click on Send to send the report.
Emailing Reports (version released in February 2006 and on)1. Open Qwizdom Interact and click on the Content tab; or if Interact is already open, click on the
Students tab.
2. Click on the Reports button. The Reporting wizard will appear.3. Click on the Student tab.4. Select the report type and/or activity name and student name.
5. Click on the E-mail button. The report will be sent to the e-mail address that's located inthe Personal Information section of the student's information. Go to Adding Students for moreinformation.
Printing Reports (version released in October 2004-January 2006)1. Open Qwizdom Interact and click on the Content tab; or if Interact is already open, click on the
Students tab.

Qwizdom Interact User Guide53
Qwizdom, Inc. 2007
2. Click on the Reports button. The Qwizdom Reporting Tool wizard will appear.3. Select the report type and click on Finish. The report will generate.
4. Click on the Print button to print the report.
Printing Reports (version released in February 2006 and on)1. Open Qwizdom Interact and click on the Content tab; or if Interact is already open, click on the
Students tab.
2. Click on the Reports button. The Reporting wizard will appear.
3. Select the report type and click on the Print button.
Saving Reports (version released in February 2006 and on)1. Open Qwizdom Interact and click on the Content tab; or if Interact is already open, click on the
Students tab.
2. Click on the Reports button. The Reporting wizard will appear.
3. Select the report type and click on the Save button. The report will save as a .PDFfile. Adobe Acrobat Reader is required to view the saved report. If you do not have Acrobat Reader,download the Acrobat Reader to view the reports.
14 Printing Activities
There are activities that require printing and passing them out to students. For answer key activities,students will work from their papers and respond in with their remotes.
1. Open Qwizdom Interact and click on the Content tab; or if Interact is already open, go to theContent tab.
2. Select the activity you would like to print.
3. Click on the Print button or go to the File menu and select Print. The Qwizdom InteractPrinting window will open. A preview will generate and a thumbnail view of the activity will bedisplayed with the following options below.
· Show Name Line-name, class, and date will appear at the top of the page· Header/Footer -the header is the title of the printed material and can be changed. The footer
is the activity name and cannot be changed.· Questions Per Page-set the number of thumbnail slides you would like to print on a single page
4. Click on the Print button to print the activity.

54
Qwizdom, Inc. 2007
15 Standards
Standards are located on the Qwizdom Interact disc. You can access each state standard at any timeby either installing or importing (see Importing Standards below for more information).
Installing StandardsQwizdom Interact must be closed before installing Standards.1. Place the Qwizdom Interact disc in the CD-ROM drive. The Qwizdom Interact Install window will
appear.2. Click on 'Install Standards.' A list of each state standard will appear.3. Check the standards you would like to install and click Install. A prompt will appear saying
'Standard Installation Completed' when finished.4. Click Done to exit.
Applying StandardsSelect any activity you would like to link standards to.1. Open Qwizdom Interact and click on the Content tab; or if Interact is already open, click on the
Content tab.2. Select an activity that the standards will be linked to.
3. Click on the Standards button. The Standards window will appear.4. In the Current Standard drop-down list, select the standards for your state.5. Select the standards you would like to apply and click on Add.6. Select either standards applied to the whole activity or to selected slides. To delete individual
standards that do not apply to the activity, highlight the standard and hit the Remove button.Clicking on the Remove button will delete all standards.
7. Click Done when complete.8. To view the applied standards, go to the View menu and select Properties. The Properties tab will
appear at the bottom of the Content screen.9. Click on the Standards tab. All of the standards that have been applied to that particular
activity/slide will display.10. Go to the View menu and uncheck the Properties option to hide the Properties window.
Importing Standards1. Insert the Qwizdom Interact CD.2. Open Qwizdom Interact and click on the Content tab; or if Interact is already open, click on the
Content tab.3. Go to the File menu and select Import, then Standards. An Open window will appear.4. Drop down the Look in: menu and select My Computer.5. Double-click on the drive the Qwizdom Interact disc is in (it may be in the D: or E: drive).6. Double-click on the Standards folder.7. Search for your state standards in the Standards folder. It will be in .IS file format.8. Select the file and click on Open to import.9. A prompt will appear stating the standards have successfully imported into Interact.10. Click on the Content tab and select the activity you would like to apply the standards to.
11. Click on the Standards button.12. You will now be able to select the state standards you imported and apply it to the activity of your
choice.

Qwizdom Interact User Guide55
Qwizdom, Inc. 2007
16 Student Mode
Student mode allows students to complete missed assignments and tests. Students must have ausername along with password to access student mode. Go to Adding Students for moreinformation on how to set up usernames and passwords.
1. Open Qwizdom Interact and click on the Content tab; or if Interact is already open, click on theContent tab.
2. Open the 'Curriculum Samples' category/course.3. Double-click on a folder to choose an activity from.4. Select an activity. The Activity Properties window will appear.5. Click on Student Mode Properties.6. Under the Student Access Mode section, select if the make-up assignment will be a:· Test-student enters in answer, hits submit, and clicks on the next question arrow· Test With Feedback-after student selects/inputs answer, the program will display whether the
answer is right or wrong· Lesson/Review-student enters an answer, the program will display whether the answer is right or
wrong and shows the answer slide7. Select Test With Feedback.8. Set the Time Limit to 0:45 minutes.9. Set the Available make-up date. You are allowing them to make-up the assignment within a
limited time period.10. In the Allow Individual Access drop-down menu, select a class. In the list below, check the names
of the students that will be making-up the particular assignment you are assigning them.You may select Prerequisites. This is optional. Prerequisites are assignments that must be completedbefore the student can begin their assigned activity.11. Click Done.
Logging into Student ModeBe sure students have a username/password and login enabled to use Student Mode.1. Exit out of Interact.2. Double-click on the Interact icon.3. You will be asked for a username and password.4. Type in a student username and password.5. Click on Done. The Student Mode window will appear.6. Select the assigned activity that needs to be completed.7. Click on Run Test to begin.8. The first question of the activity will appear.9. Enter in the answer and click on Submit. Proceed to the next question.10. When the activity is completed, a prompt will appear displaying your score.11. Click OK once you've reviewed your score. You will be taken back to the Student Mode window.
The activity that was completed will be in red.12. Click on Done to exit out of Interact.
56
Qwizdom, Inc. 2007
17 Importing and Exporting Activities and Folders
Importing Qwizdom Teaching Assistant Activities1. Open Qwizdom Interact; or if Interact is already open, click on the Content tab.2. Go to File and select Show TA Convert Form. The TA Resource Conversion window will appear.3. Check the resources you would like to convert into Qwizdom Interact.4. Click on the Convert button to start importing the TA resources into Interact.
Exporting Qwizdom Interact Activities1. Open Qwizdom Interact; or click on the Content tab.2. Select the activity you would like to export.3. Go to the File menu and select Export Activity. The Export Content window will appear.
4. Click on the (browse) to change the path to the desired location of where you would like toexport the activity.
5. Click Export and the activity will be exported to the directed location. The activity will be saved asa .qza file format.
Exporting Qwizdom Interact Folders1. Open Qwizdom Interact; or click on the Content tab.2. Select the folder you would like to export.3. Go to the File menu and select Export Folder. The Export Content window will appear.
4. Click on the (browse) to change the path to the desired location of where you would like toexport the activity.
5. Click Export and the folder will be exported to the directed location. The folder will be saved as a.qza file format (all activities within the folder will be compressed into one single file).
Importing Qwizdom Interact Activities1. Open Qwizdom Interact; or click on the Content tab.2. Go to the File menu and select Import Activity or Archive (qza). The Open window will appear.3. Search for the activity (it will be in qza. file format). Answer key activities will be in .key file format.4. Select the activity and click Open. The activity will import into the content tree.
Importing Qwizdom Interact Folders1. Open Qwizdom Interact; or click on the Content tab.2. Go to the File menu and select Import Activity or Archive (qza). The Open window will appear.3. Search for the folder (it will be in qza. file format) you would like to import.4. Select the folder and click Open. The folder will import into the content tree.
18 Importing PowerPoint Slides
Microsoft PowerPoint slides import into Qwizdom Interact as objects (.jpeg image). The slides are setas information regardless of the original format.
1. Open Qwizdom Interact and click on the Content tab; or if Interact is already open, click on theContent tab.
2. Go to the File menu and select Import, then PowerPoint Slides. An Open window will appear.3. Search for a PowerPoint file that you would like to import. It will be in .ppt file format.NOTE: Microsoft PowerPoint files that are imported into Qwizdom Interact cannot have
symbols in the file name (e.g. -.?/#@!$).4. Select the PowerPoint file and click on Open. The slides will import into Qwizdom Interact.
Microsoft PowerPoint slides import into Qwizdom Interact as objects (.jpeg format). All the slideswill be information slides. You will need to edit each slide to set it to the correct question format inorder to use remotes for the imported Microsoft PowerPoint activity.
If you import question and answer slides, the program doesn't know to put the matching answer slide

Qwizdom Interact User Guide57
Qwizdom, Inc. 2007
with the question slide. In the Content screen, you will see how the slides import. You will see thequestion slide and then you will probably see the answer for it on the next slide. The question andanswer slides need to be in one slide set, not separated in different slide sets. You will need to copythe answer slide into the slide set that has the question slide.
Editing an Imported Microsoft PowerPoint Activity1. Double-click on the imported Microsoft PowerPoint slide.2. Under Type, select a question type such as Multiple Choice, Yes/No, True/False, etc.3. Select the correct answer and an answer slide will generate. You will notice that the answer slide
is blank. This is because the Microsoft PowerPoint slide came in as an object (image) on theslide.
NOTE: If you need to edit information on the Microsoft PowerPoint slide, you will need to openthe original Microsoft PowerPoint file and reimport it into Qwizdom Interact.4. The corresponding answer slide is probably in another slide set. If you want that answer slide with
the question slide, click on the Next Q button to go to the next slide. You will see theanswer slide that goes with the question on the previous slide set.
5. Go to Edit and choose Select All.6. Go back to Edit and select Copy.
7. Now click on Prev Q to go back to the last slide set. The previous slide set will appear withthe question slide.
8. Click on the answer slide thumbnail on the bottom right of the screen. The answer slide will show.9. Go to the Edit menu and select Paste. The answer (image) will paste into the answer slide.10. You will need to do this with every imported Microsoft PowerPoint question and answers slides.
19 Importing ExamView
Save ExamView files as .XML files to import into Qwizdom Interact. ExamView files import intoQwizdom Interact as answer keys only (answer slides only).
1. Open Qwizdom Interact and click on the Content tab; or if Interact is already open, click on theContent tab.
2. Go to the File menu and select Import, then ExamView XML File. An Open window will appear.3. Search for an ExamView file you would like to import. It will be in .XML file format.4. Select the ExamView .XML file and click Open. The ExamView answers will then import into
Qwizdom Interact as an answer key only.5. Print the activity (questions) from ExamView and pass out to students.6. Click on the Present button. The Presentation Setup window will appear.7. All options for an answer key activity will automatically be checked.8. Select the class and click Okay when finished.9. A prompt will appear asking if you want the students to be able to change their answers. Select
Yes or No.10. The answer key will appear and the students can then begin the activity.
20 Web CT
For users who want to be able to download class lists from online registration or want to export to WebCT, follow the instructions below.1. Be sure to have Qwizdom Interact closed before starting.2. Go to www.qwizdom.com and download the 'plugins.zi' file.3. Unzip the file and save it to your desktop.4. Right click on the Interact icon on the desktop and select Properties.5. Click on the Shortcut tab and click on the Find Target button. This opens the Qwizdom Interact

58
Qwizdom, Inc. 2007
folder window.6. Select the files and drag and drop them into the Qwizdom Interact folder.7. Go to web address your school has been assigned to.8. Select the state and the name of the school.9. Click on Continue.10. Log in with your username and password (the administrator assigns a username and password for
you).11. Click on Login.12. The Class Management page opens.13. Select the class you want to download under Manage Existing Classes.14. Click on the Download Roster button.15. A File Download prompt will appear.16. Click on Save and the Save As window will open.17. Save the downloaded class on your computer (e.g. My Documents, desktop).18. The file should read as 'class name.QML.XML.'19. Open Qwizdom Interact and click on the Students tab.20. Go to the Class menu and select Edit Teachers.21. Click on the Add New button and create yourself as a teacher. See
Adding, Editing, and Deleting Teachers for more information.22. Click on Done when finished.23. Go back to the Class menu and select New Class.24. Type in the name of the class and click OK.25. Go to File and select Import Interact Online Class Data.26. Search for the .XML file in the location you saved it in.27. Once you find it, select it and click on Open. All the students who signed up (before you
downloaded the class information file) will appear in the class (and in the master list).
20.1 Exporting Grades to Web CT
Users that have Web CT can export grades from Qwizdom Interact into Web CT.1. Open Qwizdom Interact and click on the Content tab; or if Interact is already open, click on the
Content tab2. Click on the Students tab.3. Select the class and click on the File menu.4. Select Export and then Web CT Class Data.
21 Games
Qwizdom's Interactive Learning and Assessment Games make learning fun! Using Qwizdom'sactivities and those you create as games, gives students a creative hands-on learning experience.
Here is what's needed to get started:· An activity (Interact activity or one that was created) with remote answerable slides (e.g. Multiple
Choice, True/False, etc.)· A class list with assigned remotes and groups so students are able to participate and record scores· In the Presentation Setup window, be sure to load the correct class list and check all appropriate
boxes like Record Answers/Scores, Use Remotes, select game type if needed, and check if gamewill play in Individual or Group mode.
Some games restrict the number of players and can be played without remotes. Charts and solutionslides are not available in game mode. Groups cannot be applied if you are using Roaming or StudentOwned.
Baseball Individual and group; individuals and groups separated into two teams

Qwizdom Interact User Guide59
Qwizdom, Inc. 2007
Fast Track Remote only game, individual and groups; up to 80 individuals or groups-remotes areneeded in order to play
K-Bowl Individual and group; up to 32 individuals or groups-non-remote game
Mars Mission Remote only game, individual and groups; up to 80 individuals or groups-remotes areneeded in order to play
Millionaire Individual and group; 2-8 individuals or groups
Quandary Individual and group; up to 64 individuals separated into 8 teams
World Cup Individual and group; individuals and groups separated into two groups
21.1 Baseball
How to Play BaseballIndividual and team; individuals and groups split into two teams.
1. Before starting a Baseball learning game, open a Baseball activity or select an activity and selectthe game option as Baseball; select Individual or Team mode.
2. Open Qwizdom Interact.
NOTE: Baseball should be played with an activity with several slides. Their should at least beten slides per inning. If you will be playing seven innings, there should be seventy slides.
3. Select the activity.4. Click on the Present button.5. The Presentation Setup window will appear.6. Select the correct class that will be playing, check all the appropriate boxes needed for this
activity, and select the game type as Baseball.7. Click OK.
Playing Baseball Using Remotes1. Type in the name of the teams.2. Set groups to be either odd/even or high/low teams.3. Type in the number of players.4. Set the Max Innings and Scoring Options.5. Click Continue or press the 9 (double arrow) key on the teacher remote to proceed.6. Click on Continue or press the 9 (double arrow) key on the teacher remote to present the question.7. A question is shown for the team at bat to answer.8. Everyone from both teams responds to each question. The outcome for each play is determined
by comparing the number of correct responses from each team. The outfield team controls thepitcher and therefore has first choice. Harder questions have a better chance of hitting a double,triple, or home run. The difficulty for each question is set in the Slide Editor screen. An incorrectanswer is an out; a correct answer is a hit.
9. To show the answer after everyone has answered, on the IR instructor remote, press the 7 key(<< Left Arrows) or on the RF instructor remote, press the left arrow on the thumb pad.
10. When you are done playing the game, you have the option to save.When you exit the game, you have the option to save. When entering into an activity that waspreviously recorded by the same class, you will receive a prompt that will ask you if you would like toload, erase, or skip.Load will resume the previously saved game for that class period.Erase will erase the scores of that previously saved game and start new.Skip will skip the previously recorded scores and play as new.When you are done with the activity, you will be asked if you want to save. Then you will be prompted

60
Qwizdom, Inc. 2007
if you want to overwrite previously recorded scores.
Playing Baseball Without Remotes1. Type in the name of the teams.2. Set the Max Innings and Scoring Options.3. Click Continue to proceed.4. Click on Continue present the question.5. A question is shown for the team at bat to answer.6. When the team determines the answer, click on the Pick a Student button.7. Click on the green check mark if they are right; click on the red X if they are wrong.8. The outcome for each play is determined by comparing the number of correct responses from
each team. The outfield team controls the pitcher and therefore has first choice. Harderquestions have a better chance of hitting a double, triple, or home run. The difficulty for eachquestion is set in the Slide Editor screen.
9. An incorrect answer is an out; a correct answer is a hit.10. To show the answer after everyone has answered, click on the << (Left Arrows).11. When you exit the game, you have the option to save. When entering into an activity that was
previously recorded by the same class, you will receive a prompt that will ask you if you would liketo load, erase, or skip.
· Load will resume the previously saved game for that class period.· Erase will erase the scores of that previously saved game and start new.· Skip will skip the previously recorded scores and play as new.When you are done with the activity, you will be asked if you want to save. Then you will be promptedif you want to overwrite previously recorded scores.
21.2 Fast Track
How to Play Fast TrackRemote only game, individual and group; up to 80 individuals or groups-remotes are needed in order toplay
1. Open Qwizdom Interact.2. Select an activity.3. Click on the Present button.4. The Presentation Setup window will appear.5. Select the correct class that will be playing, check all the appropriate boxes needed for this
activity, and select the game type as Fast Track.6. Click OK.
NOTE: Multi-key remotes must be used in order to play this game. This is a remote only game.
In Fast Track, students or teams compete to answer the most questions correctly in the fastest time.This game is designed for up to 80 teams or players to play.The game has four scoring modes:
1-Points are awarded based on how fast players respond; wrong answers = -300 points2-Points are awarded based on how fast players respond; wrong answers = 0 points3-Points are awarded based on order of response; wrong answer = -300 points4-Points are awarded based on order of response; wrong answer = 0 points
· To show the answer (using remotes) after everyone has answered, on the IR instructor remote,press the 7 key (<< Left Arrows) or on the RF instructor remote, press the left arrow on the thumbpad.
· To show the answer (not using remotes) after everyone has answered, click on the << (Left Arrows).
TIP: The time limit can be set for all questions, or it can be indivually set with different timelimits within each slide set.

Qwizdom Interact User Guide61
Qwizdom, Inc. 2007
When you exit the game, you have the option to save. When entering into an activity that waspreviously recorded by the same class, you will receive a prompt that will ask you if you would like toload, erase, or skip.Load will resume the previously saved game for that class period.Erase will erase the scores of that previously saved game and start new.Skip will skip the previously recorded scores and play as new.When you are done with the activity, you will be asked if you want to save. Then you will be promptedif you want to overwrite previously recorded scores.
21.3 K-Bowl
How to Play K-BowlIndividual and team; up to 32 individuals or groups-non-remote game
1. Open Qwizdom Interact.2. Select an activity.3. Click on the Present button.4. The Presentation Setup window will appear.5. Select the correct class that will be playing, check all the appropriate boxes needed for this
activity, and select the game type as K-Bowl.6. Click OK.
1. If a team or individual answers the question correctly within the allotted time, press the Right keyon the teacher remote; or click the Right button on screen and the points will be added to theirscore.
2. If a team or individual answers the question incorrectly within the allotted time, press the Wrongkey on the teacher remote; or click the Wrong button and the points will be subtracted from theirscore. The next team or individual that responded will now have a chance to answer the question.
3. This process continues until an individual or team is marked right or the next question is broughtup on screen.
4. The individual/team that has the most points wins!5. When you are done playing the game, you have the option to save.When you exit the game, you have the option to save. When entering into an activity that waspreviously recorded by the same class, you will receive a prompt that will ask you if you would like toload, erase, or skip.Load will resume the previously saved game for that class period.Erase will erase the scores of that previously saved game and start new.Skip will skip the previously recorded scores and play as new.When you are done with the activity, you will be asked if you want to save. Then you will be promptedif you want to overwrite previously recorded scores.
21.4 Mars Mission
How to Play Mars MissionRemote only game, individual and team; up to 80 individuals or groups-remotes are needed in order toplay
1. Open Qwizdom Interact.2. Select an activity.3. Click on the Present button.4. The Presentation Setup window will appear.5. Select the correct class that will be playing, check all the appropriate boxes needed for this
activity, and select the game type as Mars Mission.6. Click OK.
NOTE: Multi-key remotes must be used in order to play this game. This is a remote only game.

62
Qwizdom, Inc. 2007
In Mars Mission, students or groups compete to answer the most questions correctly in the fastesttime. This game is designed for up to 80 groups or players to play.The game has four scoring modes:
1-Points are awarded based on how fast players respond; wrong answers = -300 points2-Points are awarded based on how fast players respond; wrong answers = 0 points3-Points are awarded based on order of response; wrong answer = -300 points4-Points are awarded based on order of response; wrong answer = 0 points
· To show the answer (using remotes) after everyone has answered, on the IR instructor remote,press the 7 key (<< Left Arrows) or on the RF instructor remote, press the left arrow on the thumbpad.
· To show the answer (not using remotes) after everyone has answered, click on the << (Left Arrows).
TIP: The time limit can be set for all questions, or it can be indivually set with different timelimits within each slide set.
When you exit the game, you have the option to save. When entering into an activity that waspreviously recorded by the same class, you will receive a prompt that will ask you if you would like toload, erase, or skip.Load will resume the previously saved game for that class period.Erase will erase the scores of that previously saved game and start new.Skip will skip the previously recorded scores and play as new.When you are done with the activity, you will be asked if you want to save. Then you will be promptedif you want to overwrite previously recorded scores.
21.5 Millionaire
How to Play MillionaireIndividual and Team; 2-8 individuals or groups
1. Open Qwizdom Interact.2. Select an activity.3. Click on the Present button.4. The Presentation Setup window will appear.5. Select the correct class that will be playing, check all the appropriate boxes needed for this
activity, and select the game type as Millionaire.6. Click OK.
In Millionaire, groups compete to be the first to answer enough questions to win the million dollar prize.This game is designed for use with 2 to 8 individuals/groups. There are two different modes ofoperation; sequential and toss up.· In sequential mode, questions are alternated between individuals/groups.· In toss up mode, whoever buzzes in first answers the question. The first respondent with the correct
answer has an opportunity to try to earn points by answering the next question correctly. (Everyother question is a toss up question.)
In each game mode, the individual/team has a chance to move up the scale to a million dollars ifhe/she answers a question correctly. If the individual/team does not know an answer, he/she canchoose to use one of the Help Lines. Help Lines include:Helping Hand-an individual/team chooses one of the other individuals/groups to help out and both earn(or lose) money based on their answer.Leave 2-if the question is a multiple choice question, the choices will be narrowed down to two possibleanswers, one of which is the correct answer.Skip-the individual/team can 'pass' on this question and choose to be given a new question.Hot Potato-the question can be passed onto another team and that team must answer the questioncorrectly or drop two spots on the million dollar scale. This team does not earn money on the question.The original team will still earn money for a correct answer, but will not lose money from an incorrectanswer.

Qwizdom Interact User Guide63
Qwizdom, Inc. 2007
Once a Help Line has been used by an individual/team, that Help Line option is no longer available.You can only use each Help Line option once.You can bring up the slides and mark students right/wrong using the Next and Right/Wrong keys onthe teacher remote. Help Lines can be selected by using the 1-5 keys (Help Lines are numbered).Without a teacher remote, responses will be indicated via the computer keyboard.When you exit the game, you have the option to save. When entering into an activity that waspreviously recorded by the same class, you will receive a prompt that will ask you if you would like toload, erase, or skip.Load will resume the previously saved game for that class period.Erase will erase the scores of that previously saved game and start new.Skip will skip the previously recorded scores and play as new.When you are done with the activity, you will be asked if you want to save. Then you will be promptedif you want to overwrite previously recorded scores.
21.6 Quandary
How to Play QuandaryIndividual and team; up to 64 individuals or groups
1. Open Qwizdom Interact and click on the Content tab; or if Interact is already open, click on theContent tab.
2. There are requirements for using an activity for Quandary.· There may be as many as 25 slides.· There should be five different groups of slides (e.g. There should be five slides that are math, five
slides that are science or five slides that are adding, five slides that are subtracting, etc.)· The slides must be remote answerable (lessons cannot be used and the questions must be
multiple choice, true/false, yes/no, or numeric).NOTE: Quandary requires 25 slides in an activity to completely fill the game board (five
columns with five slides in each column).3. Select the activity that will be presented as Quandary.4. Go to the Edit menu and select Edit Quandary Topics. The Edit Quandary Topics window will
appear.5. Type in the five topic headings for the game and select the number of choices to appear in each
topic. The slides will be grouped in the activity by topics.6. The first topic will apply to the first 5 slides, the second topic will apply to next five slides, etc.
Also, the slides in each topic should be ordered by difficulty (the easiest question will be for 100while the hardest question will be for 500).
7. Click OK to exit the Edit Quandary Topics window. Let's present the activity.8. Select the activity and click on the Present button.9. The Presentation Setup window will appear.10. Select the correct class that will be playing, check all the appropriate boxes needed for this
activity, and select the game type as Quandary..11. Click OK.
Up to 64 individuals or groups with remotes can compete in Quandary. Without remotes, up to 16groups can compete.1. Select the game mode you would like to play in:
Mode 1-Traditional. (non-remote game) The 1st player to answer correctly gets all the points.Points are deducted for incorrect answers. Up to 64 individuals or groups can play.Mode 2-All Respond (remotes required). Everyone responds and earns points for their correctanswers. Up to 8 groups can play.Mode 3-All Respond with Penalty (remotes required). Everyone earns points for correct answers.Points are deducted for wrong answers. Up to 8 groups can play. In individual mode, individualresponses count toward a team total.
2. Start the game by selecting an individual or team to select a topic and point value from the gameboard. The student can select any column but must choose the lowest available point in that

64
Qwizdom, Inc. 2007
column.3. Select a column by using the 1-5 keys on the teacher remote (left to right to select a topic). Use
the 1-5 keys on the teacher remote (after selecting the column) to select the point value (top tobottom; e.g., 1=100, 2=200). If you are using the mouse, just click on the desired square.
4. If students are using remotes, the team or individual that responds first will have a chance toanswer the question. If you are not using remotes, you will need to decide the order of responsesand track scores manually.
5. If the individual/team answers correctly within the allotted time, use the teacher remote to mark thestudent right; or on the computer, click the Right button. Optional: Hit the / (slash) key on theteacher remote to show the answer slide; or click on the A button to show the answer.
6. Hit the 9 (double arrow) key on the teacher remote to return to the game board; on the computer,click the Next button.
7. If the student answers incorrectly or time runs out, press the Wrong key on the teacher remote; oron the computer, click the Wrong button and the name of the next individual or team thatresponded will have an opportunity to answer. The order of responses is indicated in the bottomgray bar beneath the question.
8. After a point value in the column has been selected, it disappears.9. The individual or team that responded correctly has control of the game and selects the next topic
and point value.10. An individual or team that wants to answer the question uses the remote or raises their hands.
The first to respond correctly will get to select the next question on the game board.11. This process continues until the game board has been completely cleared; or when you select
Quit from the File menu. The individual/team with the most points wins!When you exit the game, you have the option to save. When entering into an activity that waspreviously recorded by the same class, you will receive a prompt that will ask you if you would like toload, erase, or skip.Load will resume the previously saved game for that class period.Erase will erase the scores of that previously saved game and start new.Skip will skip the previously recorded scores and play as new.When you are done with the activity, you will be asked if you want to save. Then you will be promptedif you want to overwrite previously recorded scores.
21.7 World Cup
How to Play World CupIndividual and team; individuals and groups split into two teams.
1. Open Qwizdom Interact.2. Select an activity.3. Click on the Present button.4. The Presentation Setup window will appear.5. Select the correct class that will be playing, check all the appropriate boxes needed for this
activity, and select the game type as World Cup.6. Click OK.
Playing World Cup Using Remotes1. Type in the name of the teams.2. Type in the number of players.3. Set the time limit of the game.4. Set the Scoring Options and Groups.5. Click Continue or press the 9 (double arrow) key on the teacher remote to proceed.6. Click on Continue or press the 9 (double arrow) key on the teacher remote to present the question.7. A question is shown, to be answered by the team who has control of the ball.8. Everyone from both teams responds to each question. The outcome for each play (who has
control of the ball, out of bounds, making goals) is determined by comparing the number of correctresponses from each team. Harder questions have a better chance of controlling the ball andmaking a goal. The difficulty for each question is set in the Slide Editor screen.

Qwizdom Interact User Guide65
Qwizdom, Inc. 2007
9. An incorrect answer is a missed goal; a correct answer is a goal.10. To show the answer after everyone has answered, on the IR instructor remote, press the 7 key
(<< Left Arrows) or on the RF instructor remote, press the left arrow on the thumb pad11. When you are done playing the game, you have the option to save.
Playing World Cup Without Remotes1. Type in the name of the teams.2. Type in the number of players.3. Set the time limit of the game.4. Set the Scoring Options and Groups.5. Click Continue to proceed.6. Click on Continue present the question.7. A question is shown for the team who has control of the ball to answer.8. When the team determines the answer, click on the Pick a Student button.9. Click on the green check mark if they are right; click on the red X if they are wrong.10. The outcome for each play (who has control of the ball, out of bounds, making goals) is
determined by comparing the number of correct responses from each team. Harder questionshave a better chance of controlling the ball and making a goal. The difficulty for each question isset in the Slide Editor screen.
11. An incorrect answer is a missed goal; a correct answer is a goal.12. To show the answer after everyone has answered, click on the << (Left Arrows).
When you exit the game, you have the option to save. When entering into an activity that waspreviously recorded by the same class, you will receive a prompt that will ask you if you would like toload, erase, or skip.Load will resume the previously saved game for that class period.Erase will erase the scores of that previously saved game and start new.Skip will skip the previously recorded scores and play as new.When you are done with the activity, you will be asked if you want to save. Then you will be promptedif you want to overwrite previously recorded scores.
22 Backing up and Restoring the Database
Backing up the DatabaseYou can backup the Interact database. It will save within the Qwizdom Interact folder. From there, youcan move that backup folder into another location if you like. Backing up the database does notbackup the activities. To save activities, you must export them to a disc or another location on yourcomputer. See Importing and Exporting Activities and Folders for more information.1. To backup a database, open Qwizdom Interact if it isn't already open.2. Go to the File menu and select Backup Database. A prompt will appear letting you know that the
backup is complete.3. Click OK.
Restoring the DatabaseIf you accidentally delete material or information in Interact, you can restore your database to a priordate.1. To restore a database, open Qwizdom Interact if it isn't already open.2. Go to the File menu and select Restore Database. A window will appear.3. Double-click on the Backup folder and select the date of the backup you would like to revert to.4. After the restoration is complete, you will be prompted to exit and then re-enter the program for
changes to take effect.

66
Qwizdom, Inc. 2007
23 Troubleshooting
Use this troubleshooter to identify and solve problems related to using Qwizdom Interact. Select thetopic(s) that best describe the problem and then try the suggested steps. You may also go through ourvideo tutorials to assist you with our program.
1) What do I do if I am being prompted to type in my username and password, but it's notworking OR I don't have one?
2) When I launch Qwizdom Interact, it says that I have a certain number of days before mytrial period ends. Why am I receiving that prompt if I purchased the software?
3) How do I register Qwizdom Interact?4) Does my computer need internet connection to register?5) Why is it saying 'Invalid code' when I enter the product code?6) Why am I getting a prompt that says 'You are missing the license(s) to the following
Curriculum...'?7) How do I register content?8) Why is there a '0' or negative number (in the Content Manager window) rather than
showing the name of the curriculum I registered?9) Why is the Present button grayed out when I try to present an activity?10) How do I convert Qwizdom TA resources into Qwizdom Interact?11) I converted the Qwizdom TA resources into Qwizdom Interact but the images are missing.
How do I get the images to appear?12) How do I export activities that I've created or imported into Qwizdom Interact?13) How do I import activities that I've exported from other computers with Qwizdom Interact?14) I created slides at home, how do I get those slides into Qwizdom Interact on my computer
at school?15) How do I save in Qwizdom Interact?16) I can't edit my slides anymore; most of my options are grayed out. What happened?17) How do I unlock an activity?18) How do backup the work I've done within Qwizdom Interact?19) How do I restore my Qwizdom Interact to an earlier date?20) How do I move my Qwizdom TA classes into Qwizdom Interact?21) How do I import my class lists into Qwizdom Interact?22) How do I export my class lists that I've created in Microsoft Excel or another program so
that I can import them into Qwizdom Interact?23) Why am I getting a prompt that says 'Invalid Lines' when I try to import my class list into
Qwizdom Interact?24) In the Remote Options window, how do I know if I should use Classroom set or Roaming or
Student Owned mode?25) What is a session ID and where do I find it?26) When do I need to change my session ID and how do I do this?27) I have an RF remote and entered in the wrong session ID. How do I change the session ID?28) I am receiving an error that says 'There is a problem with the base...' What do I need to do
to get my host to initialize?29) How do I get the green light to come on the host?30) The green light on the host is on, but the host still won't initialize. What do I do?31) My remotes are not responding. How do I get the remotes to respond?32) Why aren't the remote boxes changing color when I'm testing the remotes in the test
screen?33) One of my Q3 IR remotes lights up as a different number than what is labeled on the
remote. How can I change the number?34) What is assign fixed numbers and how do I do it?35) What is the difference between Assign Fixed Numbers and Renumber buttons in the
Remote Options window?

Qwizdom Interact User Guide67
Qwizdom, Inc. 2007
36) My RF remotes says 'No Host Found' or 'No Net.' What do I do?37) I received more remotes. How will the program know that I have more remotes?38) How do I set the timer for the presentation?39) I don't want to use the timer, how do I turn it off?40) During presentation, how do I toggle between the question and answer slides using the
instructor remote?41) Only 15/16 remotes show up at the bottom of the screen during presentation. I have more
than 15/16 remotes, why aren't all of my remotes showing up?42) During presentation, how do I know which students have responded and which haven't?43) Can I display the student responses after they answer? How do I display their results?44) Why can't I see all the remote numbers at the bottom of the screen during presentation?45) I want to give two different versions of a test to discourage cheating. Can I present both
versions at the same time using Interact?46) How do students change their answer?47) Using an instructor remote during presentation, how do I toggle between the question and
answer slides?48) Using an instructor remote during presentation, how do I go to the next slide or go back to
the previous slide?49) How do I pose a spontaneous question using the instructor remote?50) In the Remote Assignments screen, the session ID is not appearing. I can see the word
'session' but there isn't a number. What's going on?51) In the Assign Fixed Numbers screen, the Save button is missing. How do I get my Save
button to appear?52) My activities are printing weird characters. How do I get the activities to print out normal?53) Are there software updates available online?
If you need technical assistance, contact us. Please provide the following questions below as we willneed this information when you call:· What operating system you are working on (Windows/Mac)?· How long have you had your Qwizdom product?· Where is the problem occurring?· If you are getting an error, what does it say? When an error occurs, it is helpful to write down what it
says.
Website www.qwizdom.com
Phone (253) 770-1285
e-mail [email protected]@qwizdom.com
Office Hours 8 AM to 4:30 PM PST
Address Qwizdom, Inc.12617 Meridian EastPuyallup, WA 98373
1) What do I do if I am being prompted to type in my username and password, but it's notworking OR I don't have one?Please contact Tech Support at 253-770-1285 to receive help to log into Qwizdom Interact.
2) When I launch Qwizdom Interact, it says that I have a certain number of days before my trialperiod ends. Why am I receiving that prompt if I purchased the software?If you've purchased the software and are receiving that prompt, you haven't registered the software.
3) How do I register Qwizdom Interact?

68
Qwizdom, Inc. 2007
To register Qwizdom Interact, go to the Help menu and select Register Qwizdom Interact. You do notneed to be connected to the internet to register. Fill out your information, enter the product code(located on the back of the software case), and click on Activate.
4) Does my computer need internet connection to register?No, you do not need to have internet connection to register.
5) Why is it saying 'Invalid code' when I enter the product code?If you enter the product code incorrectly, it will say it's an invalid code. The letters i, o, and numbers 1,0 are a bit tricky to read. The letter i will be a straight line ( I ), the letter o will be a perfect circle ( O ),the number 1 will be a straight line with a slant going down to the left, and the number zero will be askinny circle ( 0 ).
6) Why am I getting a prompt that says 'You are missing the license(s) to the followingCurriculum...'?
The reason you are getting that prompt is because you need to register the content. When you firstinstall the curriculum, you have to enter th e product code for the software to know which curriculumunits you have purchased. This is not registration.
7) How do I register content?To register, open Qwizdom Interact. Go to the Help menu and select Register Content. The ContentManager window will appear. Enter the product code (located on the back of the software case), clickon Add and then Done. The name of the curriculum will appear in the Content Manager window.
8) Why is there a '0' or negative number (in the Content Manager window) rather than showingthe name of the curriculum I registered?The product code was entered in wrong. Delete the incorrect entry and correctly re-enter the productcode. The letters i, o, and numbers 1, 0 are a bit tricky to read. The letter i will be a straight line ( I ),the letter o will be a perfect circle ( O ), the number 1 will be a straight line with a slant going down tothe left, and the number zero will be a skinny circle ( 0 ).
9) Why is the Present button grayed out when I try to present an activity?The Present button is grayed out because you are attempting to present unregistered curriculum. Youneed to register the curriculum before presenting it.
10) How do I import Qwizdom TA resources into Qwizdom Interact?When you open Qwizdom Interact, it will automatically detect if there are any Qwizdom TeachingAssistant resources on your computer. The Show TA Convert Form window will appear if there areany Qwizdom Teaching Assistant Resources detected. Check the resources you would like to convertinto Qwizdom Interact and click on Convert. This process may take a few minutes to import,depending on the file size. If you are having problems converting the resources, please call TechSupport at 253-770-1285.
11) I converted the Qwizdom TA resources into Qwizdom Interact but the images are missing.How do I get the images to appear?The images folder in the Qwizdom Teaching Assistant folder needs to be copied into the QwizdomInteract folder.1. Right click on the Qwizdom TA icon, select Properties, click on the Shortcut tab, and click on the
Find Target button. This opens the Qwizdom TA folder. Set this window aside and go back to thedesktop.
2. Right click on the Qwizdom Interact icon, select Properties, click on the Shortcut tab, and click onthe Find Target button. This opens the Qwizdom Interact folder window.
3. Now, go back to the Qwizdom TA folder window and click on the images folder.4. Drag and drop the images folder into the Qwizdom Interact folder. Be sure not to drop it into
another folder. There is an existing images folder in the Qwizdom Interact folder so you will beprompted 'This folder already contains a folder named images.'
5. Click on the Yes to All button. After the images have completed copying over to the Qwizdom
Qwizdom Interact User Guide69
Qwizdom, Inc. 2007
Interact folder, close out the windows and open Qwizdom Interact. All your images that weremissing before, should now appear.
12) How do I export activities that I've created or imported into Qwizdom Interact?Select the activity and go to the File menu. Select Export Activity and save the activity in the desiredlocation.
13) How do I import activities that I've exported from other computers with Qwizdom Interact?First, you must export the activity and save the file onto a disc, drop it into an email, etc. to get it to theother computer. When you're at the other computer with your exported file, open Interact and go to theFile menu and select Import Activity or Archive. The activity will import into Qwizdom Interact.
14) I created slides at home, how do I get those slides into Qwizdom Interact on my computerat school?On your home computer, open Qwizdom Interact and select the activity you want to export. Go to theFile menu and select Export Activity. Save the exported activity and drop it onto a disc, email, flashdrive, etc. On the computer at school, open Qwizdom Interact and go to the File menu and selectImport Activity or Archive. Direct the path to the location of the exported file (disc, flash drive, etc.)Click on Open and the activity will import into the Qwizdom Interact.
15) How do I save in Qwizdom Interact?The program automatically saves things you create, install, grade, etc.
16) I can't edit my slides anymore; most of my options are grayed out. What happened?It sounds like your activity has been locked. Look at the activity name in the content tree. You will see asmall lock symbol on it. If you have presented an activity and recorded scores, the activity willautomatically become locked. This is because the grades in the grade book are tied to the way that theactivity appeared when it was presented…if it becomes altered after recording scores, then the reportsbecome invalid. The activity becomes locked to keep consistency in the grade book.
17) How do I unlock an activity?There are two different choices.1. You can select the activity in the content tree, go to the File menu, and select Unlock. This willpermanently remove the grades/responses that were recorded for the activity from the grade book.2. You can duplicate the activity. Select the activity in the content tree, go to the File menu, and selectDuplicate As. Type in the name of the duplicated activity and click on OK. This option leaves thepreviously recorded data in the grade book. This is the best choice if you want to compare scores of anactivity taken more than once by a group, or if you want to present the same activity to two differentgroups (with a slight change or two in the activity).
18) How do I backup the work I've done within Qwizdom Interact?Go to the File menu and select Backup Database. It is best to backup your database every day oronce a week so if anything ever happens to your database, you will always have a backup.
19) How do I restore my Qwizdom Interact to an earlier date?1. Go to the File menu and select Restore Database. The Browse for Folder window will appear.2. The Backups folder should already be selected. Double click on the Backups folder and select the
date you want to restore Qwizdom Interact to.3. Click OK and exit out of Qwizdom Interact to restore the database to the date you specified.
20) How do I move my Qwizdom TA classes into Qwizdom Interact?1. First, you will need to export the class lists from Qwizdom TA. Open Qwizdom TA and click on the
Students button.2. Double-click on the class you want to export.3. Go to the File menu and select Export. A prompt will appear asking you what you would like to
export.4. Select Students. The Export Students window will appear.

70
Qwizdom, Inc. 2007
5. Select the fields you want to export. Do not select fields that are blank for this may cause somedifficulties in importing.
6. Click on Export and save the class list.7. Open Qwizdom Interact and click on the Students tab.8. Go to the Class menu and select New Class.9. Enter the name of the class and click Done.10. Go to the File menu and select Import Students. The Open window will appear for you to search
and select the class file.11. Click on Import and the Student Import window. Match the fields on the right with the imported. If
the information on the left are headers, check the 'First Record is Header' box. If the informationon the right displays student information, uncheck the 'First Record is Header' box.
12. Click on Import and the class list will appear in the grade book.
21) How do I import my class lists into Qwizdom Interact?For .txt (tab delimited) or .csv (comma-delimited) class lists:1. Open Qwizdom Interact and click on the Students tab.2. Go to the Class menu and select New Class.3. Select the teacher and type in the name of the class.4. Click Done when finished.5. Now go to the File menu and select Import Students. The Open window will appear.6. Search and choose the class you want to import.7. Click on Open and the Student Import window will open.8. Match the fields on the right with the imported information on the left. If the fields on the left are
headers (First Name, Last Name, Remote Number, etc.), check the box that says 'First Record isHeader.' If the fields on the left are actual student information (Greg Myers, 10), uncheck the boxthat says 'First Record is Header.'
9. Click on Import and the students will appear in the class.
For .XML class lists:1. Open Qwizdom Interact and click on the Students tab.2. Go to the File menu and select Import Class Data. The Open window will appear. Search and
choose the class you want to import.3. Click on Open and the Student Import window will open.4. Match the fields on the right with the imported information on the left. If the fields on the left are
headers (First Name, Last Name, Remote Number, etc.), check the box that says 'First Record isHeader.' If the fields on the left are actual student information (Greg Myers, 10), uncheck the boxthat says 'First Record is Header.'
5. Click on Import and the students will appear in the class.
22) How do I export my class lists that I've created in Microsoft Excel or another program sothat I can import them into Qwizdom Interact?If the program you are using can export .csv files (comma-delimited), then you will be able to importthe students into Qwizdom Interact. You should be able to save the class lists as .csv files using thesave or export function if the program you're using supports .csv. Open Microsoft Excel and save theclass list as a .csv file. Now you will be able to import the class list into Qwizdom Interact.
23) Why am I getting a message that says 'Invalid Lines' when I try to import my class list intoQwizdom Interact?You will get this message when the fields in the class list aren't separated correctly. Each field like lastname, first name, etc., needs to be separated by quotation marks and commas. You will need to openthe file to check if the fields in the class file are separated correctly. If the file you're trying to import isa .csv file, right click on the file and select Open With Notepad. The file will open as a text documentfor you to edit. Edit the fields by placing quotation marks around each field and then separating thosefields with quotation marks by a commas. There shouldn't be a comma after the last field in the line.So if you only have three fields on each line, it should look something like this "Last Name", "FirstName", "Remote Number"

Qwizdom Interact User Guide71
Qwizdom, Inc. 2007
24) In the Remote Options window, how do I know if I should use Classroom set or Roaming orStudent Owned mode?Classroom set mode should be used if the same group of remotes will always be used with the samehost (receiver). This scenario is most common in K-12 settings. If you are going to share the set ofremotes, you can still use this mode as long as the remotes always stay with the same host. Theremotes are assigned a fixed number and the session ID is permanently assigned to the remotes.Students may still log in using their student ID/user ID if you select the option in the Presentation Setupwindow. This option allows the student to pick up any remote rather than having to use the sameremote each time.Roaming or Student Owned mode is best suited to university settings or situations where the studentswill keep possession of the remotes and may be in several classes where different hosts are used. Inthis mode, the students must have a numerical student ID/user ID to put into the remote. Each timethe remote is used, a new session ID has to be entered into the remote.
25) What is a session ID and where do I find it?A session ID is used to identify which host (receiver) your remotes will be sending information to. If youare using Classroom set mode, the session ID will be six digits long. There are a few ways to find whatthe host's session ID is-there may be a sticker with the session ID on the bottom of the host, click onthe Remotes button and the session ID will be in the title bar of the Remote Options window, and clickon the Toggle button during presentation to display the session ID at the top of the screen. The Togglebutton is the square image next to the Close (X) button. You can also press the Send key on theinstructor remote to toggle the screen to show the session ID at the top of the screen.If you are using Roaming or Student Owned, the session ID will be four digits long. The session ID canbe found on the Remote Assignments screen during presentation.
26) When do I need to change my session ID and how do I do this?Note: Q3 IR remotes do not require session IDs.For Q4 remotes: If your remote says 'No Net,' the session ID for the remote may be incorrect.Choose the appropriate instructions from the following.* If you are the teacher using Classroom set mode for the first time:1. Make sure all of the remotes in the set are turned off.2. Click on the Remotes button.3. Click on the Assign Fixed Numbers button.4. Check to make sure that the correct number of remotes has been entered in the Lowest and
Highest Number boxes. Then, click on the Assign Fixed Numbers button.5. Turn on a remote. When it says 'No Net,' press the Menu key. Use the arrow keys to scroll over to
the option that says 'Sess. ID' and press the Send key (double arrows) to select it. Enter in thesession ID, located at the top of the screen, and press the Send key.
6. This remote will then be assigned #1 and the box on the computer screen will turn blue. Turn onall the remotes and repeat this procedure. The remotes will be numbered in the order in whichthey are logged in with the session ID.
7. When all the remotes have been set up and are communicating with the host (they should say'Qwizdom' on their LCD screens and all the boxes on the computer screen should be blue), clickon the Save button.
8. Click on OK to exit Remote Options and you are ready to present.
If you are using Classroom set mode, the remotes have been assigned fixed numbers, and youare currently in presentation:If all the remotes go to 'No Net,' you probably have a different host than the remotes were originallyassigned to and you should go through assigning fixed numbers again. (see above)If a small number of remotes say 'No Net,' press the Menu key on the remotes with that message. Usethe arrow keys to scroll over to the option that says 'Sess. ID' and press the Send key (double arrows)to select it. Some versions of Q4 remotes will display the session ID that is currently assigned to theremote. It will ask if you want to change it. You can respond yes or no by pressing the T (Yes) or F (No)keys. When the remote is ready, it will ask you to enter session ID. Enter the session ID and press theSend key. The remote will say 'Find Net' until it finds the active session ID.

72
Qwizdom, Inc. 2007
*If you are a student/instructor in a class using Roaming or Student Owned mode:Most likely the session ID was mistyped. Push the Menu key on the remote. Use the arrow keys toscroll over to the option that says 'Sess. ID' and press the Send key (double arrows). Some versions ofQ4 remotes will display the session ID that is currently assigned to the remote. It will ask if you want tochange it. You can respond yes or no by using the T (Yes) or the F (No) keys. When the remote isready, it will ask you to enter session ID. Enter in the session ID and press the Send key. The remotewill say 'Find Net' until it finds the active session ID.
For Q5 remotes: When the remote says 'Session ID: XXXX Not found,' the wrong session ID hasbeen put into the remote and you need to put in the correct session ID. Choose the appropriateinstructions from the following.*If you are the teacher using Classroom set mode for the first time:1. Make sure all of the remotes in the set are turned off.2. Click on the Remotes button.3. Click on the Assign Fixed Numbers button.4. Check to make sure that the correct number of remotes has been entered in the Lowest and
Highest Number boxes. Then, click on the Assign Fixed Numbers button.5. Turn on a remote and when it says 'Not Found' press the Menu key. Use the arrow keys on the
thumb pad to scroll down to the 'Enter Session ID' option. Press the circle key (in the thumb pad)to select it or by pressing the Send key (double arrows). Enter the session ID, located at the top ofthe screen, and press the Send key.
6. The remote will then be assigned #1 and the box on the computer screen will turn blue. Turn on allthe remotes and repeat this procedure. The remotes will be numbered in the order in which theyare logged with the session ID.
7. When all of the remotes have been set up and are communicating with the host (they should say'Remote #XX' on their LCD screens and all the boxes on the computer screen should be blue),click on the 'Save' button.
8. Click on OK to exit the Remote Options window and you are ready to present.
*If you are using Classroom set mode, the remotes have been assigned fixed numbers, and youare currently inside of a presentation:If all the remotes go to 'No Net,' you probably have a different host than the remotes were originallyassigned to and you should go through assigning fixed numbers again. (see above)If a small number of remotes say 'No Net,' press the Menu key on the remotes with that message.Press the Menu key and use the arrow keys to scroll down to the 'Enter Session ID' option. Press thecircle key, in the center of the thumb pad, or the Send key (double arrows) to select it. Enter thesession ID, located at the top of the screen, and press the Send key. When the remotes arecommunicating with the host the LCD screens will display 'Remote #XX.'
27) I have an RF remote and entered in the wrong session ID. How do I change the session ID?For Q4 remotes, press the menu key and use the left/right arrows to find Enter Session. Press theSend key (double arrow) to confirm your selection. Key in the session ID and press the Send key(double arrow).For Q5 remotes, press the menu key and use the arrows on the thumb pad to move through theselections. Select Enter Session ID and press the center key (in the thumb pad) or press the Send key(double arrow) to confirm your selection. Key in the session ID and press the Send key (double arrow).
28) I am receiving an error that says 'There is a problem with the base...' What do I need to doto get my host to initialize?It may be that the USB Drivers weren't installed. Refer to Installing the USB Drivers for installationdirections.
29) How do I get the green light to come on the host?Check the USB cable to make sure it's plugged in correctly. The green light should appear when thedrivers are installed and the host is working correctly. If you've installed the drivers and checked theCOM number the host is on, try switching the USB cable to see if the cable is bad.

Qwizdom Interact User Guide73
Qwizdom, Inc. 2007
30) The green light on the host is on, but the host still won't initialize. What do I do?The COM number the host is on may not be correct.1. Go to the Start menu and open the Control Panel.2. Double click on System and click on the Hardware tab.3. Click on the Device Manager button. The Device Manager window opens.4. Open Ports and see what COM number the Qwizdom Remote Host or Qwizdom USB Base is.
The COM number should be anywhere from 1-9. If it's higher than 9, then that's the reason whythe host isn't initializing.
5. Right click on the Qwizdom Remote Host or Qwizdom USB Base and select Properties.6. Click on the Port Settings tab and click on the Advanced button.7. Change the COM number in the upper-left corner of the window. COM 1-9 may be in use. Pick
COM 5 or 6 to overwrite. Normally, printers, mouse, etc. take up COM 1-3.8. After changing the COM number, click on OK.9. Open Qwizdom Interact and test the host.
31) My remotes are not responding. How do I get the remotes to respond?The host must initialize for the remotes to respond during test mode, assign fixed numbers, and/orpresentation. Refer to Initializing the Host for more information if the host isn't initializing.Q3 IR remotes require two AA batteries. There is a diagram in the area where you place the batteries.It shows that the left battery goes in negative up, positive down and the battery on the right goes inpositive up, negative down. It may not seem like the batteries go in that way because of the springsare on one side but they do. The remotes only respond in the test screen or presentation.Q4 RF remotes require two AA batteries. The session ID needs to be entered in the remote. Thesession ID is found in a few places; on the bottom of the RF host, in the title bar of the Remote Optionswindow, and in the title bar of the presentation (click on the square button next to the X button to showthe menu bar at the top of the window). After entering the session ID, the remotes only respond in thetest/assign fixed numbers screen and presentation.Q5 RF remotes have rechargeable batteries. The remotes must be charged for 24 hours. Thesession ID needs to be entered in the remote. The session ID is found in a few places; on the bottomof the RF host, in the title bar of the Remote Options window, and in the title bar of the presentation(click on the square button next to the X button to show the menu bar at the top of the window). Afterentering the session ID, the remotes only respond in the test/assign fixed numbers screen andpresentation.
32) Why aren't the remote boxes changing color when I'm testing the remotes in the testscreen?For the Q3 IR remotes, be sure the batteries are in correctly. For the RF remotes, be sure that theremotes have the correct session IDs and that they have been assigned fixed numbers.
33) One of my Q3 IR remotes lights up as a different number than what is labeled on theremote. How can I change the number?You are able to reprogram the remote using the software.1. Right-click on the Qwizdom Interact icon on the desktop and select Properties.2. Click on the Shortcut tab and click on the Find Target button. This opens the Qwizdom Interact
folder window.3. Double-click on 'RmtTest.exe.' The Qwizdom Remote Tester window will appear.4. Enter the number of the remote in the # field and select 256 as the remote type. Be sure to put
away the other remotes so that they aren't accidentally reprogrammed.5. Press any key on the remote and the key you pressed will light up on screen. When you see the
key you pressed change color, that indicates that the remote has been reprogrammed.
34) What is assign fixed numbers and how do I do it?Assign fixed numbers is where you assign the remote numbers for the RF remotes. Click on theRemotes button and the Remote Options window will open.
35) What is the difference between Assign Fixed Numbers and Renumber buttons in theRemote Options window?

74
Qwizdom, Inc. 2007
Assign fixed numbers is where the remote is assigned a number. Renumbering does not affect thehardware. It affects the remote numbers in the class. Renumbering renumbers the student remotes inthe class, it does not affect the actual remotes. This feature renumbers the remotes in numeric orderin alphabetic order. This comes in handy when the remote numbers in the class are offset. You canrenumber the current class or all classes.
36) My RF remotes says 'No Host Found' or 'No Net.' What do I do?The remotes may not have the correct session ID. Please refer to RF Remotes for more information.
37) I received more remotes. How will the program know that I have more remotes?You will need to change the lowest/highest number settings in Remote Options. In the Content orStudent screen, click on the Remotes button. This is Remote Options. Set the lowest number as 1 (orthe lowest number remote you have) and set the highest number as the last number remote you have(e.g. 24). Click on Done to save changes.
38) How do I set the timer for the presentation?There are two ways to set the timer-within each slide set or the Presentation Setup window. To set thetimer in the slides, double-click on a slide. On the Properties tab, type in the number of seconds youwant the slide to display for in the TimeLimit box. Slide times can vary. After you set the time for allthe slides, click on the Present button. The Presentation Setup window will appear. If you want to usethe time set in each slide of the activity, check the 'Use Time from Each Question' option under the 4Play Options box.You can also set the timer in the Presentation Setup window. In the 4 Play Options box, select theoption to enter in the number of seconds that you want each slide to be displayed for. This timer willapply for all the slides so that all the slides will have the same time limit.
39) I don't want to use the timer, how do I turn it off?The only time the timer applies to the presentation is during games and presentations on auto-pilotloop. There isn't a way to turn the timer off. If you are not playing a game or using auto-pilot loop, theinstructor must advance the slides using the instructor remote or the mouse.
40) During presentation, how do I toggle between the question and answer slides using theinstructor remote?You can toggle between the question/answer/information slides within a slide set by using the up anddown arrows on the thumb pad of the remote.
41) Only 15/16 remotes show up at the bottom of the screen during presentation. I have morethan 15/16 remotes, why aren't all of my remotes showing up?Be sure you loaded the correct class. If you only see 15 remotes at the bottom, it sounds like you mayhave selected Period1 as the class, which is our default class that has 15 students. If you only see 16remotes, chances are that you're playing a game. If that's the case, some games have limits on thenumber of players. Refer to the Games section to see how many players can participate in eachgame. Also, check the number of remotes you have set up in Remote Options. In the Content orStudents screen, click on the Remotes button. This is Remote Options. Set the lowest number as 1(or the lowest number remote you have) and set the highest number as the last number remote youhave (e.g. 24). Click on Done to save changes.
42) During presentation, how do I know which students have responded and which haven't?The buzz-in bar, at the bottom of the presentation, shows the remote numbers in the class. Everyremote number box is gray until a student send in their answer. When a student send in their answer,their remote number box will change color. The colors do not indicate if the student got the answerincorrect/correct, or if their response was first. Remote number boxes that are still gray, means thatthe student with that remote number has not yet responded.
43) Can I display the student responses after they answer? How do I display their results?Yes, you can display the results by showing the response graph. There are four different ways to showthe results-bar, pie, scatter, and individual response.
Qwizdom Interact User Guide75
Qwizdom, Inc. 2007
IR remotes- using the instructor remote, press the Delta (triangle) key to display the response graph.Press the Delta (triangle) key again to close the response graph. Use the slash key (>) to scrollthrough the different graphs.RF remotes- using the instructor remote, press the slash (bar graph arrow) key to display the responsegraph. Press it again to close the response graph. Use the left and right arrows on the thumb pad toscroll through the different graphs.The keypad short cut to display graph is Ctrl+G.
44) Why can't I see all the remote numbers at the bottom of the screen during presentation?There are a few reasons why this may occur:A lesson or non-remote answerable slide is being presented:Remotes cannot be used during a lesson presentation. The slides must be remote-answerable aswell. If the question type is essay, fill-in-the-blank, you will not be able to use remotes. Also, if theslides do not have answer slides, the remotes will not be able to respond.The Windows taskbar may be covering the remote boxes:Right-click on the taskbar and select Properties. In the Taskbar tab, select the 'Auto-hide the taskbar'option and click OK.The correct class wasn't loaded:If you select a class that only has 15 students, only 15 remote boxes will appear at the bottom of thescreen.Playing a game:Certain games limit the number of players. See the games section in the user guide for moreinformation.Remote Lowest/Highest Numbers haven't been set.Click on the Remotes button and check the Lowest/Highest Numbers. The lowest number is the firstremote number in your set (usually that is 1) and the highest number is the last remote number in yourset (e.g. 32).
45) I want to give two different versions of a test to discourage cheating. Can I present bothversions at the same time using Interact?Yes, you can do this by presenting multiple answer keys.1. Create the answer keys for each version you want to present to the class.2. After the answer keys have been created, select one of the answer keys in the content tree. The
test number for the answer key will appear in the title bar at the top of the screen.3. Write the number down and then select the other answer key to get the test number for these
numbers are needed for the presentation.4. Print and pass out the paper version of the tests to the students.5. Click on the drop-down menu on the Present button and select Present Multiple Answer Keys.
The Presentation Setup window appear.6. Select the correct class and click OK. The remotes will prompt the students to enter an activity ID.
The activity ID is the test number you wrote down from the answer keys.7. Have students enter in their activity ID number and press the Send (double arrow) key. By
entering in the activity ID (test number), the remote will recognize which test the student is takingand it will display the proper answer choices based on the answer key that you created.
Students scroll between questions by using the left/right arrow keys. The question # that they are on isvisible in the upper left corner of the remote. The computer screen will display the remote numberswith a box next to it that will say "-" if the student hasn't started taking the test yet, "IP" if the test is inprogress, and "+" when the student has completed the test.
46) How do students change their answer?In the Presentation Setup window, make sure the Right/Wrong Feedback is disabled. This way,students will not know if their response is correct or incorrect. Also, uncheck the 'One Response PerRemote' option.If presenting an answer key:A prompt will appear asking if you want students to be allowed to change their answers.Click Yes to allow students to change their answers.To change answers:

76
Qwizdom, Inc. 2007
Presenting an answer key using Q3 IR remotes:1. Press the Delta (triangle) key on the student remote.2. Press the number of the question you want to go back to and press the Send key. The question
number the student requested to go back to will appear next to the student's remote number. Theboxes will highlight in red. The student will now be able to change the answer and press the Sendkey to submit the new answer.
3. After the answer is changed, the next consecutive question will appear next to their remotenumber.
To change answers:Using an answer key using Q4/Q5 RF remotes:
1. Use the left arrow to go back to a previous question.2. When the question number of the answer you want to change appears on the remote (in the upper
right corner), press the C (Clear) key to delete the previous answer.3. Enter in the new answer and press the Send key.When you are finished changing your answers, press the right arrow key until the remote asks if youare done. If you have completed the test, press Yes; if you have not completed the test, press No.Once you press Yes, you cannot go back so be sure everything is correct.
47) Using an instructor remote during presentation, how do I toggle between the question andanswer slides?You can toggle between the question/answer/information slides within a slide set by using the up anddown arrows on the thumb pad of the remote.
48) Using an instructor remote during presentation, how do I go to the next slide or go back tothe previous slide?Use left/right arrows on the thumb pad to scroll through the slides.
49) How do I pose a spontaneous question using the instructor remote?For IR-During presentation, press the ? key, key in the answer (letter or numeric), followed by the Sendkey (double arrows). A question mark icon will appear on the screen. This lets students know to pressthe Send key (double arrows) after they've entered their response.For RF-The instructor remote must be version .64 or higher. During presentation, press the dash key(New Q) and the question types will appear on the instructor remote. Using the up/down arrows on thethumb pad, select the question type you'd like to pose, and press the Send key (double arrows). Thechoices for the question type you selected will appear on the instructor remote. Select the answer andpress the Send key (double arrows). If you choose to not have an answer, press the Send key (doublearrows) without selecting an answer for it to be recognized as a survey type question.
50) In the Remote Assignments screen, the session ID is not appearing. I can see the word'session' but there isn't a number. What's going on?It may be that the screen resolution is too large.1. Go into the Control Panel and double-click on Display.2. Click on the Resolution tab and change the screen resolution.3. Click on OK and the session ID should now appear in the Remotes Assignments screen.
51) In the Assign Fixed Numbers screen, the Save button is missing. How do I get my Savebutton to appear?It sounds like the DPI setting on your computer is too large.1. Go into the Control Panel and double-click on Display.2. Click on the Resolution tab and click on the Advanced button.3. Click on the General tab and change the DPI setting to Normal (96).
52) My activities are printing weird characters. How do I get the activities to print out normal?If activities or reports are printing with overlapping fonts/characters and is completely ineligible, theproblem is a printer driver issue. Each printer driver issue will have different directions because of thebrand. The directions below are for Brother printers.

Qwizdom Interact User Guide77
Qwizdom, Inc. 2007
1. Go to the Control Panel double-click on Printers and Faxes.2. Find your default printed and right click on the printer and select Properties.3. Click on the Advanced tab and then click on the Printing Defaults button.4. Click on the Advanced tab and then click on the button that has the image of the tool wrench on it.5. In the column on the right, select Print Setting.6. Uncheck 'Use Printer TrueType Fonts' box.7. Click on OK to apply and close the remaining open windows.
53) Are there software updates available online?Updates are available online for existing customers at http://www.qwizdom.com/downloads.htm.Updates are not full versions of the software. You must have existing software installed onto yourcomputer before installing the latest update. If you have Qwizdom TA and are trying to install theQwizdom Interact update, it will not work. If you do not have any version of our software installed, youcannot install the update because it isn't the full version of the software. To get the full version of thesoftware, call 800-347-3050 to get information on purchasing.
23.1 Initializing the Host
The host is needed in order for the remotes to respond in. Your host isn't working properly if:· The green light on the host is not on.· You receive an error message that reads 'There is a problem with the host. Make sure it is plugged
in if it has a power connector. Try unplugging the power connector and plugging it in again or if it isUSB, unplug and plug back in the USB cable.'
If the light on the host isn't coming on and/or if you are receiving the error message above, the USBDrivers need to be installed.
Port NumberThe Qwizdom USB Host COM number should be anywhere from 1-9. If the number is higher than 9,the host will not initialize. Follow the steps below to change the COM number.1. Go to the Start menu and click on Control Panel.2. Double-click on System and click on the Hardware tab.3. Click on the Device Manager button.4. Go to Ports and search for the Qwizdom USB Base or Qwizdom RF Host and double-click on
Qwizdom USB Base or Qwizdom RF Host.5. Click on the Port Settings tab.6. Click on the Advanced button.7. Change the COM Port number to read anywhere from 1-9 and then click Okay.8. Open up the program to see if the host will initialize.
Installing USB Drivers on Windows 98You will need to do this procedure twice (because there are two drivers).1. Insert the Qwizdom Interact disc into the computer and make sure the host is plugged in properly.2. From the Start menu, go to Settings.3. Go to the Control Panel and double-click on the System icon.4. Click on the Device Manager tab.5. Select the option View Devices by Type.6. Scroll to Universal Serial Bus Controllers and expand the file. The Qwizdom USB Base or
Qwizdom RF Host might also be located under Unknown or Other Devices.7. Look to find the Qwizdom USB Base or Qwizdom RF Host. When you find it, select the file and
then click on the Properties button on the bottom.8. Click on the Driver tab and click on the button that says Update Driver. The installation wizard will
appear.9. Click Next and select 'search for a better driver than the one your device is using now.'10. Click Next.11. Check the CD-ROM drive and Specify Location.12. Click on the Browse button. Go to the drive the Interact disc is in and then select the
USB_Drivers.

78
Qwizdom, Inc. 2007
13. Click OK and then Next. A prompt will appear that says the drivers have not passed the MicrosoftWindows Update testing.
14. Click on Continue Anyway and then Finish.15. Repeat the above steps once more and then restart your computer.
Installing USB Drivers on Windows 2000/XPYou will need to do this procedure twice (because there are two drivers).1. Insert the Qwizdom Interact disc into the computer and make sure the host is plugged in properly.2. From the Start menu, go to the Control Panel or go to Settings and then Control Panel.3. Double-click on the System icon and click on the Hardware tab.4. Click on the Device Manager button.5. Select the option View Devices by Type under the View menu.6. Scroll to Universal Serial Bus Controllers and Ports (under Ports, the COM number assigned to
the Qwizdom USB Base or Qwizdom RF Host should be a number from 1-9). A number higherthan 9 will not allow the host to initialize; expand both of the files. The Qwizdom USB Base orQwizdom RF Host might also be located under Unknown or Other Devices.
7. Look to find the Qwizdom USB Base or Qwizdom RF Host.8. When you find it, double-click on it and click on the Driver tab.9. Click on the button that says Update Driver. The installation wizard will appear.10. Select 'Install from a list or specific location' and click Next.11. Select 'Search for the best driver in these locations' and check the 'Search removable media' and
'Include this location in search' boxes.12. Click on the Browse button, click on My Computer, click on the drive that Interact is in, and then
find the folder that says USB_Drivers. (Do not open the folder).13. Click OK and then Next. A prompt will appear that says the drivers have not passed the Microsoft
Windows Update testing, click on Continue Anyway and then Finish.14. Repeat the above steps once more and then restart your computer.
Testing the HostTest your host to see if the host is initializing and responding properly.1. Open Qwizdom Interact and click on the Remotes button. The Remote Options window will
appear.2. The Remote Type should be set to Blue 19 button, the Teacher Remote box should be checked,
and the lowest/highest number should be set (e.g., If you have 24 student remotes, the lowestnumber will be 1 and the highest number will be 24).
3. Click on Test. A prompt will appear saying the 'Host is initializing' and 'Host initialized on port...'4. You should now be in the remote testing screen. Remote numbers will appear in gray boxes.5. Press any key on the student remote. The number of the remote that is responding in will change
to blue on the screen (e.g., if you are testing and responding in with remote 2, the number 2 boxon screen will change to blue).
Uninstalling the USB DriversIf the host is still not initializing after following the steps above, then the hardware needs to becompletely removed and then reinstalled. Follow the steps below.1. Go to your Control Panel from either your Settings or Start menu.2. Double-click on System and click on the Hardware tab or Device Manager tab. If you go to the
Hardware tab, click on the Device Manager button.3. Search for the Qwizdom USB Base or Qwizdom RF Host under Universal Serial Bus Controllers,
Ports, and/or Other or Unknown Devices.4. Double-click on the file and click on the Driver tab.5. Select Uninstall.6. Unplug your host after it is uninstalled and go back to the Control Panel.7. Double-click on Add or Remove Programs and search for FTDI Universal Serial Converter Drivers.8. When you find it, remove the file.9. Now plug your host in. A prompt or wizard will appear notifying you of new hardware.10. Follow the steps above for Windows 98/2000/XP.

Qwizdom Interact User Guide79
Qwizdom, Inc. 2007
23.2 Programming a Remote
If you have a remote that is not entering in the number as it appears on the remote, then it needs to beprogrammed to the correct number.
Follow these steps to program Q3 IR remotes.1. Double-click on the My Computer icon on your desktop.2. Double-click on the C: Drive.3. Double-click on the Program Files folder.4. Double-click on the Qwizdom folder.5. Double-click on the Qwizdom Interact folder.6. Search for the file that reads RmtTest and double-click it.7. Before you program a remote, be sure to put away the other remotes (place in bag and zip). If
other remotes come in view with the host as you are programming a remote, it will also beprogrammed to that remote number.
8. A window will appear that looks like a remote.9. The Clr and Change Answer (triangle) key will already be neon green.10. In the middle of the screen, check the circle that reads 256.11. In the upper right-hand corner, type in the number of the remote (for the teacher remote, the
number will be 0).12. Now hit any key on the remote.13. The key you hit on the remote will change the key on screen to neon green.14. After the on screen key changes to neon green, the remote has been successfully programmed.
You should test your programmed remote in Qwizdom Interact.1. Open Qwizdom Interact and click on the Remotes button. The Remote Options window will
appear.2. The Remote Type should be set to match the ones you have (Q3 IR, Q4 RF, or Q5 RF), the
Teacher Remote box should be checked, and the lowest/highest number should be set (e.g., Ifyou have 24 student remotes, the lowest number will be 1 and the highest number will be 24).
3. Click on Test. A prompt will appear saying the 'Host is initializing' and 'Host initialized on port...'4. You should now be in the remote testing screen. There will be remote numbers in a gray boxes.5. Press any key on the student remote. The number of the remote that is responding in will change
to blue on the screen (e.g., if you are testing and responding in with remote 2, the number 2 boxon screen will change to blue).
23.3 RF Remotes
Entering the Session IDSession IDs help Q4 RF and Q5 RF remotes identify where to send information to. The session IDsprevent the remotes sending the information to another host.
Be sure the AA batteries are placed in the Q4 RF remotes and Q5 RF remotes have been charged.1. Open Qwizdom Interact and click on the Content tab; or if Interact is already open, click on the
Content tab.2. When using Q4 RF or Q5 RF remotes for the first time, the remotes may ask for a session ID.3. Click on the Remotes button. The Remote Options window will appear. Here is one of the places
you will find the session ID. Go to Remote Setup for more information.4. The session ID is located in the title bar of the Remote Options window.5. Pick up the RF remote. Enter the session ID and press the Send (double arrow) key. Doing this
'assigns' the remote to the host you will be using. All information sent from the remote will go tothat host only. Session IDs only need to be entered in once (or when prompted on the remote todo so). If you switch hosts or use an RF remote from another set, you will need to enter a newsession ID so the remote(s) will send information to that host only.
6. Enter the session ID for the Q5 RF Instructor remote.7. The remotes will say 'Inactive' because you are not in presentation mode.8. If you accidentally enter in the wrong session ID, wait for the remote to say 'Host not Found' or 'No
80
Qwizdom, Inc. 2007
Net.' Push the Menu button and select Enter Session ID and press the Send key (double arrowkey). Enter the session ID and press Send (double arrow).
9. Click OK to exit the Remote Options window.10. Select an activity in the content tree and click on the Present button. The Presentation Setup
window will appear.11. Check the preferred options and select the class.12. Click OK and the presentation will begin.13. If the RF remotes are on, the may have gone to 'sleep.' The LCD screen will either be blank or
say 'Push Key' or 'Not Active.' If the remotes are asleep, press any key on the remote to 'wake itup.'
14. The instructor remote will say 'Last Key' and displays what key was last pressed.15. If you are in presentation and need to enter in a session ID, click on the Toggle button in the
presentation menu at the top left part of the screen.16. The session ID will appear in the title bar at the top of the screen.17. When the question slide appears on screen, the choices will display on the remote. For example,
if a multiple choice slide is up, the remote will show the letter choices that are available.18. The student would select the letter and then press the Send key to send their response.When the presentation is over, turn off remotes. The remotes do not automatically shut off. For theQ4 RF remote, hold down the Menu key to turn the remote off. For the Q5 RF remote, use the powerswitch (located on the top right side of the remote) to turn the remote off.
If the remotes say 'No Net' and will not establish a connection to the host, please contacttechnical support.
24 Glossary
Activity-contains slide sets that are presented as lessons, tests, games, etc.Anonymous Class-anonymous users are generated by the entered number of remotes to create ananonymous class.Answer Key-paper based activity that only requires the question type with correct answer, points, andtime; student works off a paper and answers with the remote.
Categories-are how the slides are organized for the Quandary game; 5 categories represents the 5columns to choose from.Classroom Set-when the hardware (remotes and host) are used in the same room; this mode is bestsuited for K-12 and corporate settings.Content-materials such as activities and folders created in the Content screen.Content screen-screen where the content tree and slides are managed and stored; considered the
main screen.Content Tree-column located on the left side of the Content screen where all activities and folders are
managed and stored.Curriculum-subject materials such as Science, Math, History, etc.
Database-where grade book, classes, students, and activity names are saved and stored.Difficulty-difficulty of question slide; can be set as Simple, Intermediate, Advanced, and Expert.
Equation Editor-where equations are created to insert onto the slide.Essay-question type; teacher can print out the essay slides on paper for students to answer.
Fill In Completion-question type; alphanumeric input can be entered using the Q5 RF remote (only).First Record is Header-when importing a class list, if the first record shows headers such as 'FirstName,' 'Last Name,' 'Student ID,' etc., then the box needs to be checked. If there is actual informationshowing as the first record, then the First Record is Header box is unchecked.Folder-contains and organizes activities.
Grade Book-manages classes, students, and grades; located in Students screen.

Qwizdom Interact User Guide81
Qwizdom, Inc. 2007
Grade Scales-grade scales can be created and customized to suit the grading system that best fits theclass requirements.
Host-is the round, disc-shaped USB device that plugs into the computer to communicate with theremotes to collect and send data.
Information-question type; non-remote answerable slide. Only one slide per slide set is allowed forlessons.IR-infrared
Layout-is where you select a template from.Locking-a graded activity becomes locked so that the slides within the activity cannot be edited toprevent grade alteration.
Master List-where all created and imported students are stored.Multimedia-images, sound, or movie filesMultiple Answer List-question type; more than one multiple choice is the answer in a list form.Multiple Choice-students select A-F choices for the correct answer by remote (or paper).Multiple Mark-students are able to select more than one choice for the answer; eliminates having tochoose E or F for 'all of the above responses.'
Narration-computer generated voice that reads the slides out loud during presentation.New Set-a slide setNumeric Problem-question type; students answer by remote (or paper) by keying in the answer andhitting the Send key on the remote.
Points-value; points determine score.Product Code-16 character code that is used to register and install softwareProduct Key-see Product Code
Q3 IR-Blue 19 button remotes; infraredQ4 RF-Red/Gray small LCD remotes; radio frequencyQ5 RF-Red/Gray large LCD remotes that allows alphanumeric input; radio frequency
Rating Scale-question type; students answer a rating scale question by remote (i.e. on a scale from 1-7, how would you rate this?)Remotes-interactive handheld devicesResponse graph-displays results of question during presentation modeRF-radio frequencyRoaming or Student Owned-student owns the remote or remote goes with the student to differentclasses to use with a different host and session ID
Sequence-question type; students answer by remote (or paper) in sequence (i.e. What order do thesego in?)Session ID-this is the unique host ID number that the remotes need to communicate with the host;session IDs are entered into the remote so that the remote knows which host to send the informationto.Short Answer Specific-question type; alphanumeric input can be entered using the Q5 RF remote(only).Slides-displays information, images, sound, and animations for presentation purposes.Slide Editor-screen where slides are created.Slide Set-a slide set holds up to five individual slides; normally contains two slides which are thequestion and answer slides or one slide as an information slide.Spontaneous Survey Bar-free floating bar that can be used in other programs and still be able to
collect data from remotes.Standards-state standardized objectives

82
Qwizdom, Inc. 2007
Students screen-screen where grade book, classes, and students are managedStudent ID-student ID is a unique ID for students (IDs can only numeric); students IDs are required
when logging in with remotes into a presentation.Student Mode-individual works within the program on assignments that the teacher assigns (on thecomputer). This is one-on-one learning mode for students to work at their own pace and make upmissed assignments, tests, etc.
Template-used to organize information such as text and multimedia on a slide; located in Layouts.Time Limit-time set for students to answer the question.True or False-question type; students answer by remote (or paper) T for true or F for false.Type-is the format of the slide; i.e. Information, Multiple Choice, True/False, Short Answer, etc.
Unlocking-removes the lock from an activity and deletes any scores attached to that activity.User ID-see Student ID
Yes or No-question type; students answer by remote (or paper) T for yes or F for no.