Embed Size (px)
Citation preview
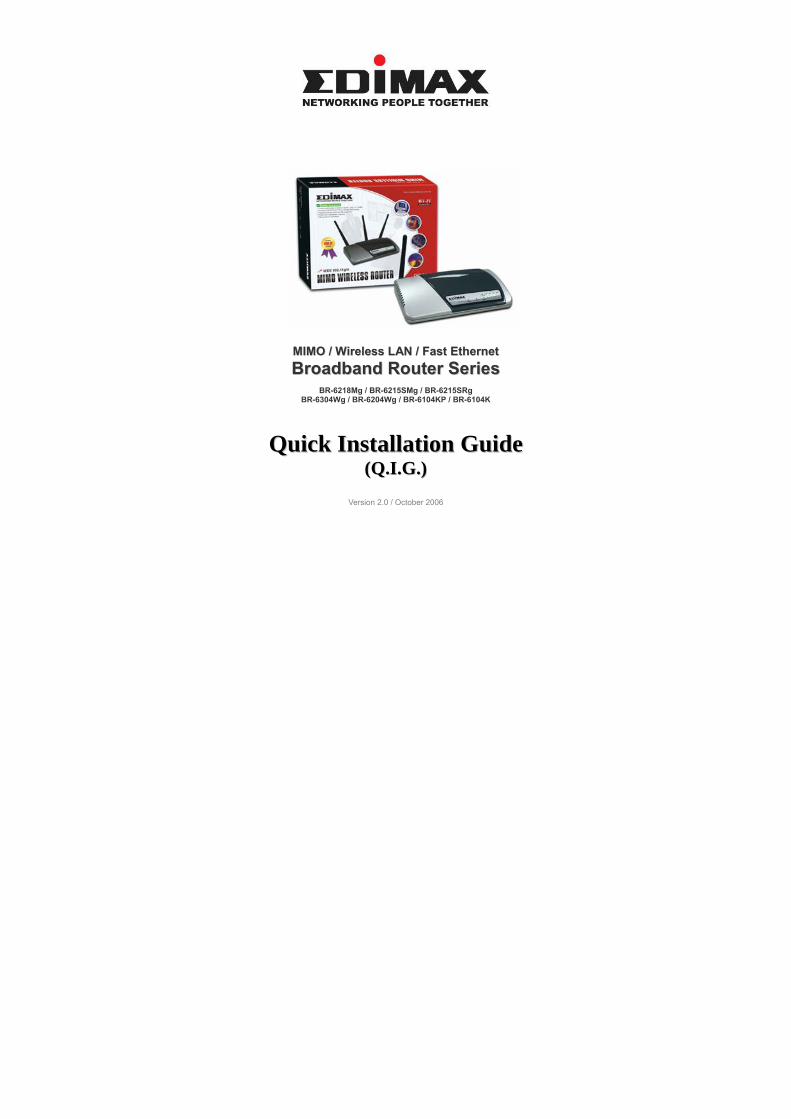
MMIIMMOO // WWiirreelleessss LLAANN // FFaasstt EEtthheerrnneett BBrrooaaddbbaanndd RRoouutteerr SSeerriieess
BR-6218Mg / BR-6215SMg / BR-6215SRg BR-6304Wg / BR-6204Wg / BR-6104KP / BR-6104K
QQuuiicckk IInnssttaallllaattiioonn GGuuiiddee ((QQ..II..GG..))
Version 2.0 / October 2006

0
1
MMuullttii--LLaanngguuaaggeess QQIIGG oonn tthhee CCDD ==============================================================
ČČeesskkýý: Českého průvodce rychlou instalací naleznete na přiloženém CD s ovladači
DDeeuuttsscchh:: Finden Sie bitte das deutsche S.A.L. beiliegend in der Treiber CD
EEssppaaññooll: Incluido en el CD el G.R.I. en Español.
FFrraannççaaiiss:: Veuillez trouver l’français G.I.R ci-joint dans le CD
IIttaalliiaannoo:: Incluso nel CD il Q.I.G. in Italiano.
MMaaggyyaarr:: A magyar telepítési útmutató megtalálható a mellékelt CD-n
NNeeddeerrllaannddss: De nederlandse Q.I.G. treft u aan op de bijgesloten CD
PPoollsskkii: Skrócona instrukcja instalacji w języku polskim znajduje się na załączonej płycie CD
PPoorrttuugguuêêss: Incluído no CD o G.I.R. em Portugues
РРууссссккиийй:: Найдите Q.I.G. на pусскoм языке на приложеном CD
TTüürrkkççee:: Ürün ile beraber gelen CD içinde Türkçe Hızlı Kurulum Kılavuzu'nu bulabilirsiniz
2
Copyright© by Edimax Technology Co, LTD. all rights reserved. No part of this publication may be reproduced, transmitted, transcribed, stored in a retrieval system, or translated into any language or computer language, in any form or by any means, electronic, mechanical, magnetic, optical, chemical, manual or otherwise, without the prior written permission of this company This company makes no representations or warranties, either expressed or implied, with respect to the contents hereof and specifically disclaims any warranties, merchantability or fitness for any particular purpose. Any software described in this manual is sold or licensed "as is". Should the programs prove defective following their purchase, the buyer (and not this company, its distributor, or its dealer) assumes the entire cost of all necessary servicing, repair, and any incidental or consequential damages resulting from any defect in the software. Further, this company reserves the right to revise this publication and to make changes from time to time in the contents hereof without obligation to notify any person of such revision or changes. All brand and product names mentioned in this manual are trademarks and/or registered trademarks of their respective holders.
Linux Open Source Code
Certain Edimax products include software code developed by third parties, including software code subject to the GNU General Public License ("GPL") or GNU Lesser General Public License ("LGPL"). Please see the GNU (www.gnu.org) and LPGL (www.gnu.org) Web sites to view the terms of each license. The GPL Code and LGPL Code used in Edimax products are distributed without any warranty and are subject to the copyrights of their authors. For details, see the GPL Code and LGPL Code licenses. You can download the firmware-files at http://www.edimax.com.tw under "Download" page.

3
English Version. GGeettttiinngg SSttaarrtteedd Instructions for using the router to share the Internet with multiple PCs. (Power on the Modem and the Router.) CCaabblliinngg iinnssttaallllaattiioonn:: 1. Connect the Ethernet cable from the router’s WAN port to the
LAN port of the modem.
2. Connect another Ethernet cable from the any LAN ports (1~4)
on router to the Ethernet socket on the PC.
3. Check to make sure the router’s LINK LED is lit; to confirm the cable connections are made correctly.
4
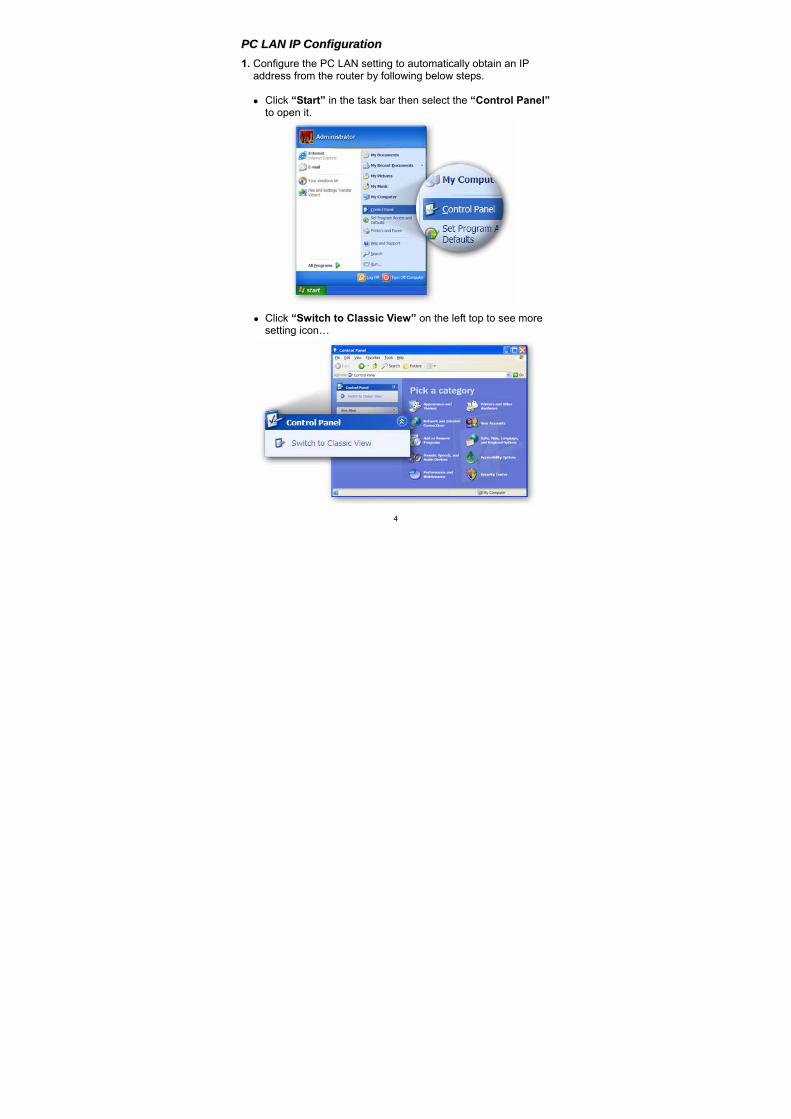
PPCC LLAANN IIPP CCoonnffiigguurraattiioonn 1. Configure the PC LAN setting to automatically obtain an IP
address from the router by following below steps.
Click “Start” in the task bar then select the “Control Panel” to open it.
Click “Switch to Classic View” on the left top to see more setting icon…
5
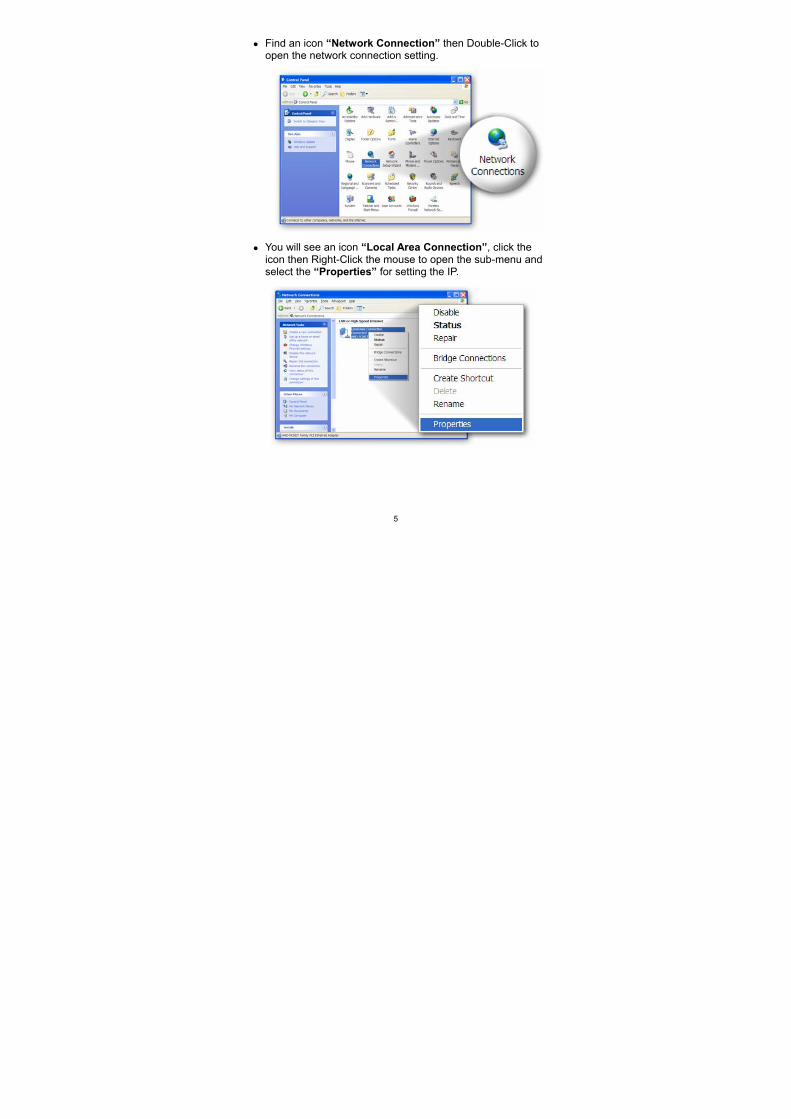
Find an icon “Network Connection” then Double-Click to open the network connection setting.
You will see an icon “Local Area Connection”, click the icon then Right-Click the mouse to open the sub-menu and select the “Properties” for setting the IP.
6
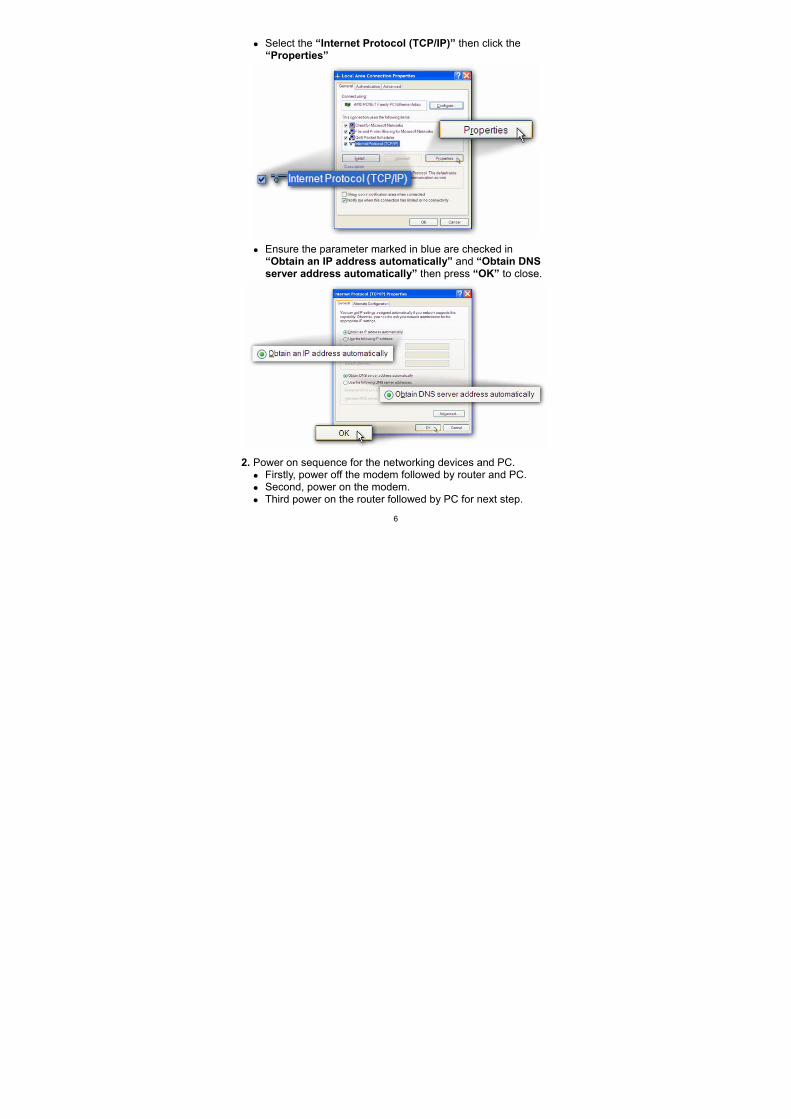
Select the “Internet Protocol (TCP/IP)” then click the “Properties”
Ensure the parameter marked in blue are checked in
“Obtain an IP address automatically” and “Obtain DNS server address automatically” then press “OK” to close.
2. Power on sequence for the networking devices and PC. Firstly, power off the modem followed by router and PC. Second, power on the modem. Third power on the router followed by PC for next step.
7
RRoouutteerr CCoonnffiigguurraattiioonn –– PPPPPPooEE NNoottee:: PPlleeaassee ddoo nnoott rruunn tthhee PPPPPPooEE ssooffttwwaarree;; ootthheerrwwiissee tthhee IInntteerrnneett ccoonnnneeccttiioonn ffoorr tthhee rroouutteerr mmaayy ffaaiill..
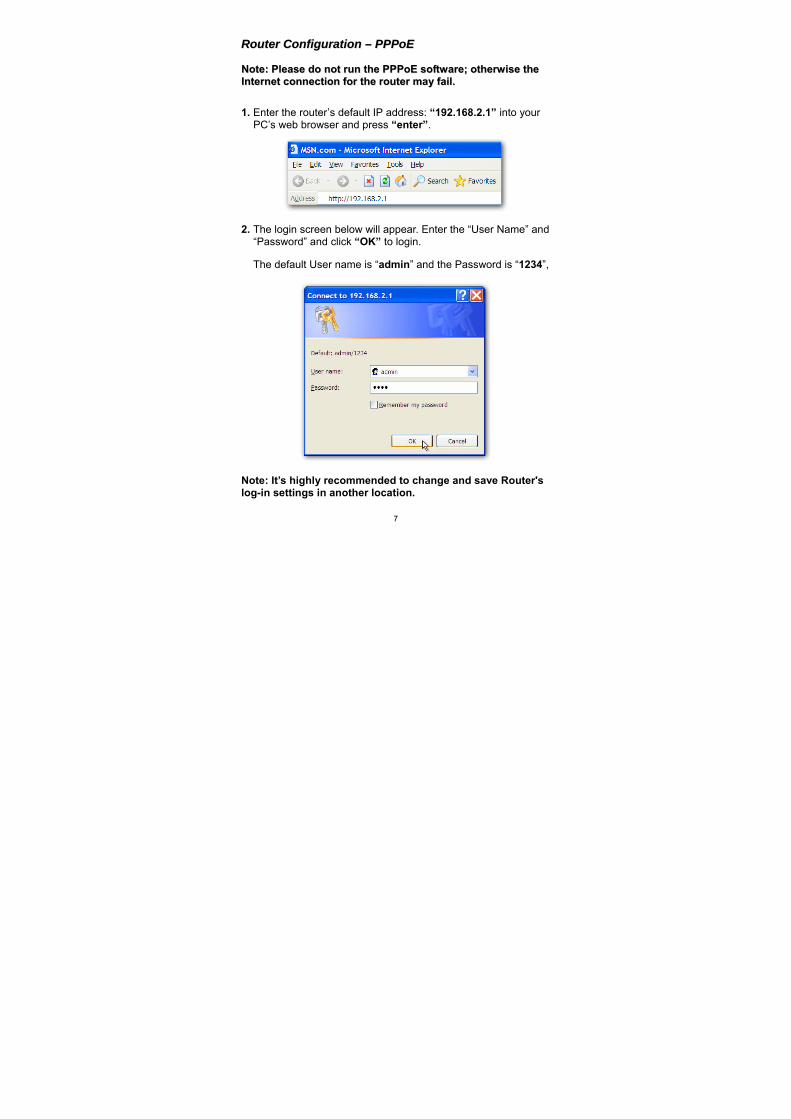
1. Enter the router’s default IP address: “192.168.2.1” into your PC’s web browser and press “enter”.
2. The login screen below will appear. Enter the “User Name” and “Password” and click “OK” to login.
The default User name is “admin” and the Password is “1234”,
Note: It’s highly recommended to change and save Router's log-in settings in another location.
8
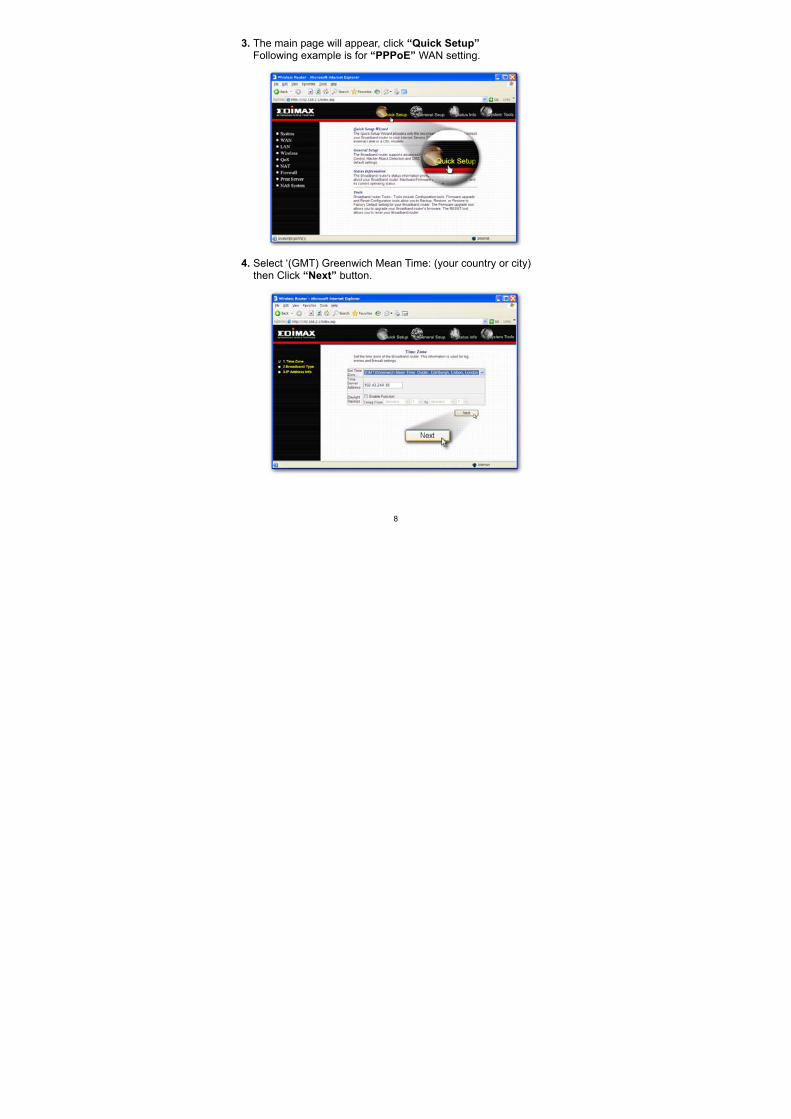
3. The main page will appear, click “Quick Setup” Following example is for “PPPoE” WAN setting.
4. Select ‘(GMT) Greenwich Mean Time: (your country or city) then Click “Next” button.
9
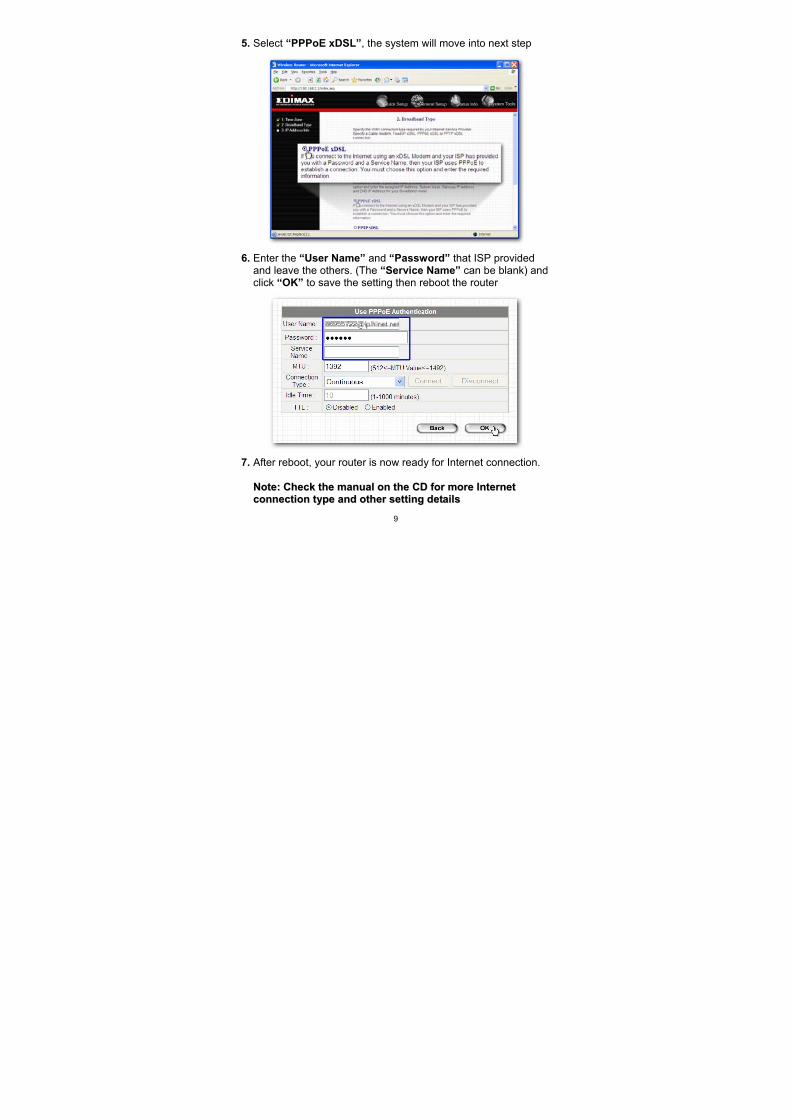
5. Select “PPPoE xDSL”, the system will move into next step
6. Enter the “User Name” and “Password” that ISP provided and leave the others. (The “Service Name” can be blank) and click “OK” to save the setting then reboot the router
7. After reboot, your router is now ready for Internet connection.
NNoottee:: CChheecckk tthhee mmaannuuaall oonn tthhee CCDD ffoorr mmoorree IInntteerrnneett ccoonnnneeccttiioonn ttyyppee aanndd ootthheerr sseettttiinngg ddeettaaiillss
10
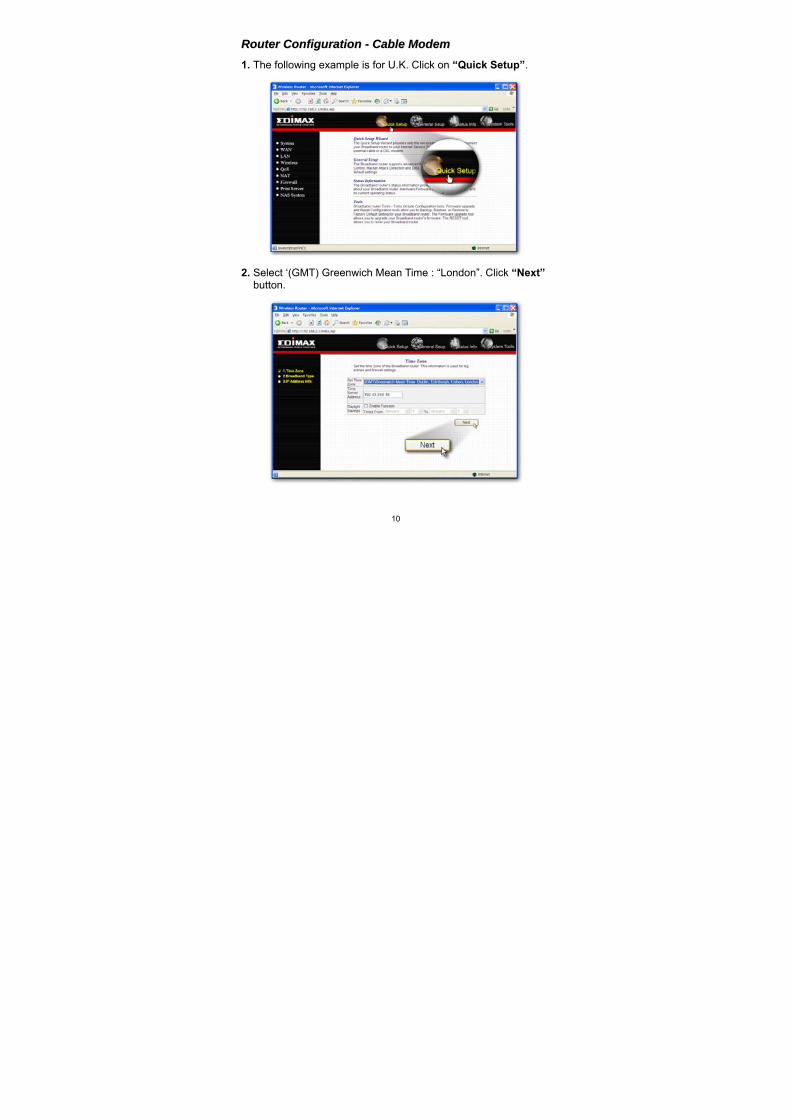
RRoouutteerr CCoonnffiigguurraattiioonn -- CCaabbllee MMooddeemm 1. The following example is for U.K. Click on “Quick Setup”.
2. Select ‘(GMT) Greenwich Mean Time : “London”. Click “Next” button.
11
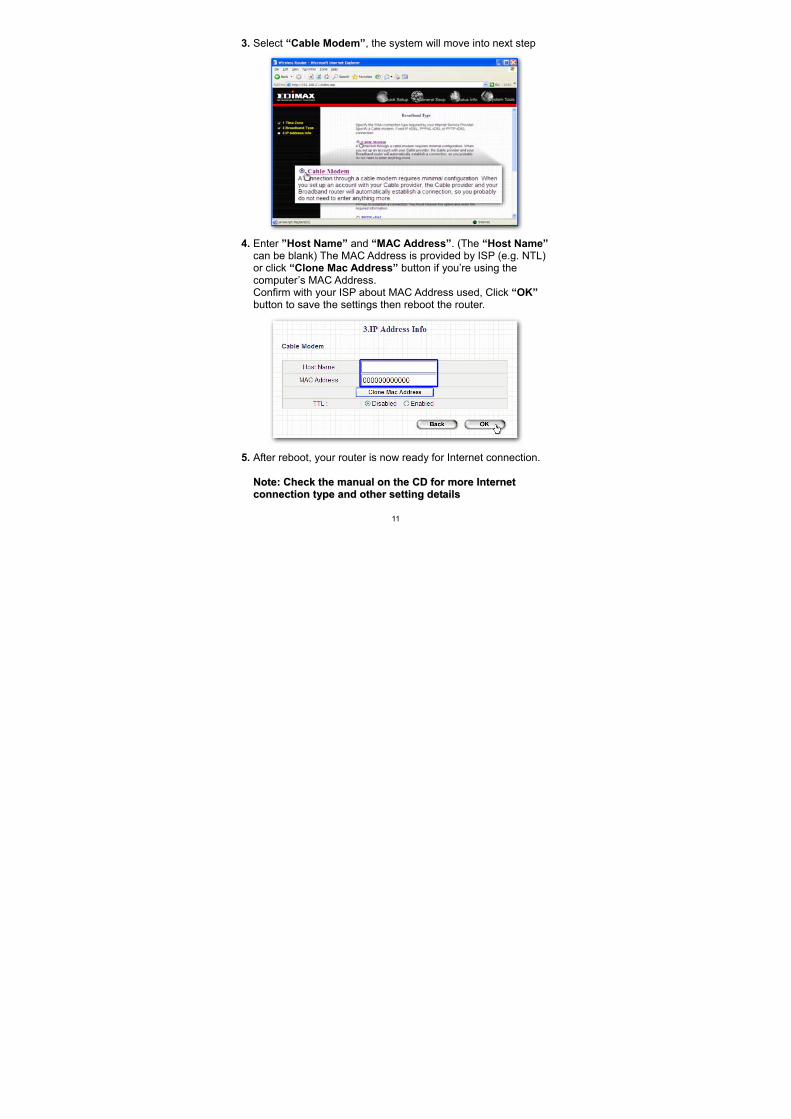
3. Select “Cable Modem”, the system will move into next step
4. Enter ”Host Name” and “MAC Address”. (The “Host Name”
can be blank) The MAC Address is provided by ISP (e.g. NTL) or click “Clone Mac Address” button if you’re using the computer’s MAC Address. Confirm with your ISP about MAC Address used, Click “OK” button to save the settings then reboot the router.
5. After reboot, your router is now ready for Internet connection.
NNoottee:: CChheecckk tthhee mmaannuuaall oonn tthhee CCDD ffoorr mmoorree IInntteerrnneett ccoonnnneeccttiioonn ttyyppee aanndd ootthheerr sseettttiinngg ddeettaaiillss
12
FFeeddeerraall CCoommmmuunniiccaattiioonn CCoommmmiissssiioonn IInntteerrffeerreennccee SSttaatteemmeenntt
This equipment has been tested and found to comply with the limits for a Class B digital device, pursuant to Part 15 of FCC Rules. These limits are designed to provide reasonable protection against harmful interference in a residential installation. This equipment generates, uses, and can radiate radio frequency energy and, if not installed and used in accordance with the instructions, may cause harmful interference to radio communications. However, there is no guarantee that interference will not occur in a particular installation. If this equipment does cause harmful interference to radio or television reception, which can be determined by turning the equipment off and on, the user is encouraged to try to correct the interference by one or more of the following measures: 1. Reorient or relocate the receiving antenna. 2. Increase the separation between the equipment and receiver. 3. Connect the equipment into an outlet on a circuit different from that to which the receiver is connected. 4. Consult the dealer or an experienced radio technician for help. FCC Caution This device and its antenna must not be co-located or operating in conjunction with any other antenna or transmitter. This device complies with Part 15 of the FCC Rules. Operation is subject to the following two conditions: (1) this device may not cause harmful interference, and (2) this device must accept any interference received, including interference that may cause undesired operation. Any changes or modifications not expressly approved by the party responsible for compliance could void the authority to operate equipment. Federal Communications Commission (FCC) Radiation Exposure Statement This equipment complies with FCC radiation exposure set forth for an uncontrolled environment. In order to avoid the possibility of exceeding the FCC radio frequency exposure limits, human proximity to the antenna shall not be less than 2.5cm (1 inch) during normal operation.
13
Federal Communications Commission (FCC) RF Exposure Requirements SAR compliance has been established in the laptop computer(s) configurations with PCMCIA slot on the side near the center, as tested in the application for Certification, and can be used in laptop computer(s) with substantially similar physical dimensions, construction, and electrical and RF characteristics. Use in other devices such a PDAs or lappads is not authorized. This transmitter is restricted for use with the specific antenna(s) tested in the application for Certification. The antenna(s) used for this transmitter must not be co-located or operating in conjunction with any other antenna or transmitter. R&TTE Compliance Statement This equipment complies with all the requirements of DIRECTIVE 1999/5/EC OF THE EUROPEAN PARLIAMENT AND THE COUNCIL of March 9, 1999 on radio equipment and telecommunication terminal Equipment and the mutual recognition of their conformity (R&TTE) The R&TTE Directive repeals and replaces in the directive 98/13/EEC (Telecommunications Terminal Equipment and Satellite Earth Station Equipment) As of April 8, 2000. Safety This equipment is designed with the utmost care for the safety of those who install and use it. However, special attention must be paid to the dangers of electric shock and static electricity when working with electrical equipment. All guidelines of this and of the computer manufacture must therefore be allowed at all times to ensure the safe use of the equipment. EU Countries Intended for Use The ETSI version of this device is intended for home and office use in Austria, Belgium, Denmark, Finland, France, Germany, Greece, Ireland, Italy, Luxembourg, the Netherlands, Portugal, Spain, Sweden, and the United Kingdom. The ETSI version of this device is also authorized for use in EFTA member states: Iceland, Liechtenstein, Norway, and Switzerland. EU Countries not intended for use None

14