Embed Size (px)
Citation preview
© 2014 by Pulse Secure, LLC. All rights reserved
Pulse Policy Secure
Enterprise Guest User Access Manager Feature
Guide
Product Release 5.1
Document Revision 1.0 Published: 2014-12-15
© 2014 by Pulse Secure, LLC. All rights reserved
Pulse Secure, LLC 2700 Zanker Road, Suite 200 San Jose, CA 95134 http://www.pulsesecure.net
© 2014 by Pulse Secure, LLC. All rights reserved
Pulse Secure and the Pulse Secure logo are trademarks of Pulse Secure, LLC in the United States. All other trademarks, service marks, registered
trademarks, or registered service marks are the property of their respective owners.
Pulse Secure, LLC assumes no responsibility for any inaccuracies in this document. Pulse Secure, LLC reserves the right to change, modify, transfer,
or otherwise revise this publication without notice. Pulse Policy Secure Enterprise Guest User Access Manager Feature Guide
The information in this document is current as of the date on the title page.
END USER LICENSE AGREEMENT
The Pulse Secure product that is the subject of this technical documentation consists of (or is intended for use with) Pulse Secure software. Use of
such software is subject to the terms and conditions of the End User License Agreement (“EULA”) posted at http://www.pulsesecure.net/support/eula.
By downloading, installing or using such software, you agree to the terms and conditions of that EULA.
Revision History
2014-12-15 – Changes for rebranding
© 2014 by Pulse Secure, LLC. All rights reserved i
Table of Contents
About the Documentation ............................................................................................. ix
Documentation and Release Notes ................................................................................ ix
Supported Platforms ......................................................................................................... ix
Documentation Conventions ....................................................................................... ix
Requesting Technical Support ................................................................................... xii
Self-Help Online Tools and Resources ................................................................ xii
Opening a Case with PSGSC ............................................................................................ xii
Part 1 Overview
Chapter 1 Enterprise Guest Access ............................................................................................................. 3
Enterprise Guest Access Overview .................................................................................... 3
Chapter 2 Guest Access Mode..................................................................................................5
Guest Access Mode Overview ............................................................................................. 5
Chapter 3 Deployments .................................................................................................................. 7
Guest Access Mode Deployment Overview ....................................................................... 7
Layer 2 Bridge Enforcer Deployment Overview ........................................................ 7
Layer 2 Bridge Interface Configuration ............................................................................ 9
Layer 2 Bridge Administration ............................................................................................ 9
Understanding Guest Access Mode Cluster Deployments ............................................... 10
Part 2 Configuration
Chapter 4 Guest User Access Management Framework ......................................................... 13
Using Task Guidance ................................................................................................................... 13
Configuring the Guest User Access Management Framework........................................ 14
Before You Begin ......................................................................................................... 15
Configuring the Local Authentication Server ............................................................... 15
Configuring a Role for Guest User Account Managers .............................................. 17
Configuring a Role for Guest Users ............................................................................... 21
Configuring a Guest Realm .............................................................................................. 25
Configuring Role Mapping Rules ................................................................................... 26
Configuring a Sign-In Policy for Guests ....................................................................... 27
Configuring Resource Access Policies for Guests ..................................................... 28
iv © 2014 by Pulse Secure, LLC. All rights reserved
Enterprise Guest User Access Manager Feature Guide
Configuring a Guest User Account Manager Account .............................................. 31
Customizing the Guest User Account Manager Pages ........................................................ 32
Guest User Account Manager Pages Overview ...................................................... 32
Customizing the Guest User Account Manager Home Page ..................................... 35
Downloading the Sample Template Files ............................................................... 38
Modifying the Sample Template Files ........................................................................... 39
Uploading Your Customized Files ................................................................................... 44
Using the Customized Pages ............................................................................................... 46
Verifying the Customization ...................................................................................... 48
SMS Gateway Settings for Guest User Accounts ................................................................ 49
Part 3 Administration
Chapter 5 Guest User Account Managers ................................................................................ 55
Creating Temporary Guest User Accounts .......................................................................... 55
© 2014 by Pulse Secure, LLC. All rights reserved v
List of Figures
Part 1 Overview
Chapter 3 Deployments .................................................................................................................. 7
Figure 1: Layer 2 Bridge Deployment ........................................................................................ 8
Part 2 Configuration
Chapter 4 Guest User Access Management Framework .......................................................... 13
Figure 2: Task Guidance ............................................................................................................ 14
Figure 3: Guest User Auth Server .................................................................................................. 16
Figure 4: GUAM User Role Configuration ............................................................................ 18
Figure 5: Guest User Role Configuration ............................................................................. 22
Figure 6: Guest Access User Realm ..................................................................................... 26
Figure 7: Example Role Mapping Rules .......................................................................................27
Figure 8: Sign-in Policy ............................................................................................................. 28
Figure 9: Resource Access Policy – Allow All ................................................................. 29
Figure 10: Resource Access Policy – Deny ......................................................................... 30
Figure 11: GUAM User Account ........................................................................................................ 31
Figure 12: GUAM Home Page .............................................................................................................. 32
Figure 13: New Local User Page.......................................................................................................... 33
Figure 14: Create Many Page ............................................................................................................... 33
Figure 15: Update Local User Page ................................................................................................... 34
Figure 16: Print Details Page .................................................................................................................. 35
Figure 17: GUAM Role ...................................................................................................................... 36
Figure 18: GUAM page .................................................................................................................... 38
Figure 19: Custom Sign-in Page ........................................................................................................... 39
Figure 20: Admin Console Sign-in Page .................................................................................. 39
Figure 21: UserAdmin-add-user.thtml ............................................................................. 40
Figure 22: Custom New Local User Page: One-Time Use Option Removed .............. 42
Figure 23: Custom New Local User Page: Controls Added to Calculate Account
Expiration ............................................................................................................................. 43
Figure 24: Custom New Local User Page: Data Entry Validation............................. 44
Figure 25: Sign-in Page ................................................................................................................. 45
Figure 26: Custom Template Upload Successful ............................................................... 46
Figure 27: Sign-in Policy Page ............................................................................................................. 47
Figure 28: Sign-in Policy Page Showing Customized Pages ..............................................48
Figure 29: Customized New Local User Page .........................................................................48
Figure 30: SMS Gateway Settings ......................................................................................... 50
Figure 31: Guest Access SMS Gateway Settings ...................................................................... 51
vi © 2014 by Pulse Secure, LLC. All rights reserved
Enterprise Guest User Access Manager Feature Guide
Part 3 Administration
Chapter 5 Guest User Account Managers ................................................................................ 55
Figure 32: GUAM Page After Log In ......................................................................................... 55
Figure 33: Guest User – Create New Local User Page ........................................................ 56
Figure 34: Guest User – Create Many Configuration Page .................................................. 58
Figure 35: Guest User – Update Local User Page ........................................................... 60
Figure 36: Guest User – Print Details Page .............................................................................. 60

© 2014 by Pulse Secure, LLC. All rights reserved vii
List of Tables
About the Documentation ............................................................................... ix
Table 1: Notice Icons ..................................................................................................................... x
Table 2: Text and Syntax Conventions ................................................................................ x
Part 1 Overview
Chapter 3 Deployments .................................................................................................................. 7
Table 3: Layer 2 Bridge Administration Tasks Summary .................................................. 9
Part 2 Configuration
Chapter 4 Guest User Access Management Framework .......................................................... 13
Table 4: Local Authentication Server Guest Access Configurations ............................... 17
Table 5: Role Settings the GUAM User .................................................................................. 18
Table 6: Role Settings for Guest Users ................................................................................. 22
Table 7: Guidelines for Configuring the GUAM Role ........................................................... 37
Table 8: Variables ............................................................................................................................ 40
Table 9: Guidelines for Configuring a Customized Collection ....................................... 45
Table 10: Guest Access SMS Gateway Settings ......................................................................... 51
Part 3 Administration
Chapter 5 Guest User Account Managers ................................................................................ 55
Table 11: Guest User – New Local User Configuration Page Settings ........................... 56
Table 12: Guest User – Create Many Configuration Page Settings ............................... 58
© 2014 by Pulse Secure, LLC. All rights reserved ix
Enterprise Guest User Access Manager Feature Guide About the Documentation
Documentation and Release Notes on page ix
Supported Platforms on page ix
Documentation Conventions on page ix
Requesting Technical Support on page xii
Documentation and Release Notes
To obtain the latest version of all Pulse Secure technical documentation, see the product
documentation page at http://www.juniper.net/techpubs.
Supported Platforms
For the features described in this document, the following platforms are supported:
MAG Series
Documentation Conventions
Table 1 on page x defines notice icons used in this guide.
x © 2014 by Pulse Secure, LLC. All rights reserved
Enterprise Guest User Access Manager Feature Guide
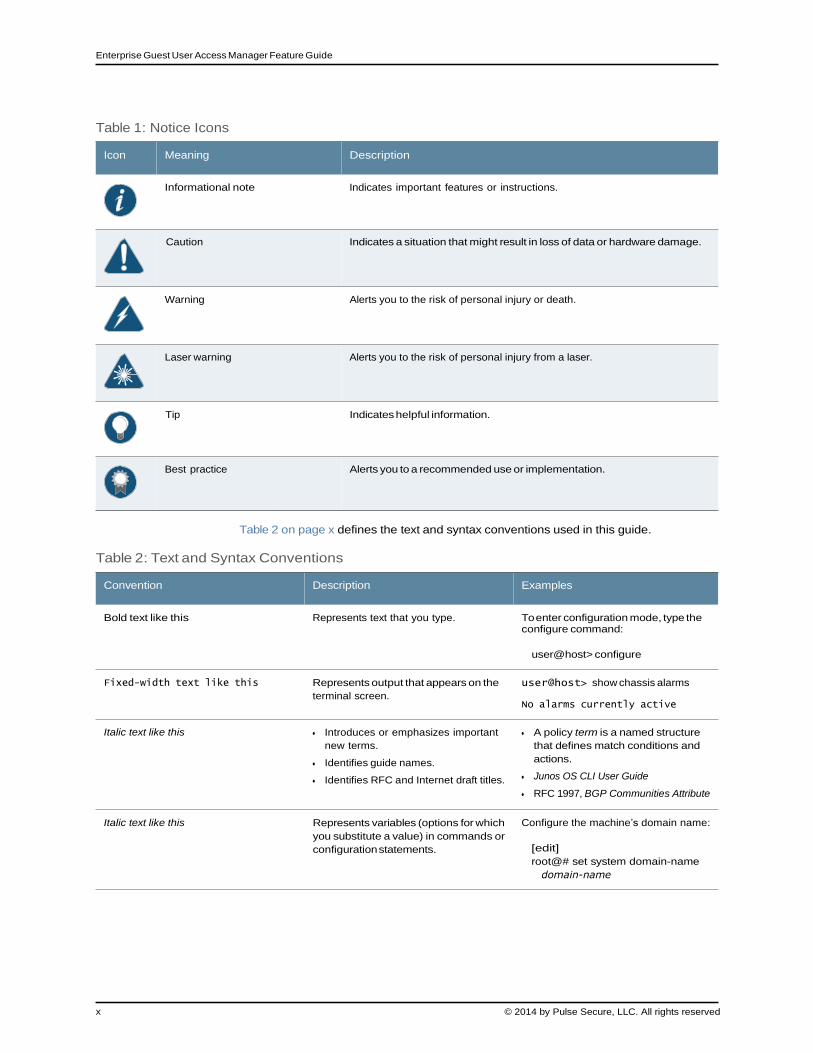
Table 1: Notice Icons
Icon Meaning Description
Informational note Indicates important features or instructions.
Caution Indicates a situation that might result in loss of data or hardware damage.
Warning Alerts you to the risk of personal injury or death.
Laser warning Alerts you to the risk of personal injury from a laser.
Tip Indicates helpful information.
Best practice Alerts you to a recommended use or implementation.
Table 2 on page x defines the text and syntax conventions used in this guide.
Table 2: Text and Syntax Conventions
Convention Description Examples
Bold text like this Represents text that you type. To enter configuration mode, type the
configure command:
user@host> configure
Fixed-width text like this Represents output that appears on the
terminal screen.
user@host> show chassis alarms
No alarms currently active
Italic text like this Introduces or emphasizes important
new terms.
Identifies guide names.
Identifies RFC and Internet draft titles.
A policy term is a named structure
that defines match conditions and
actions.
Junos OS CLI User Guide
RFC 1997, BGP Communities Attribute
Italic text like this Represents variables (options for which
you substitute a value) in commands or
configuration statements.
Configure the machine’s domain name:
[edit]
root@# set system domain-name
domain-name
© 2014 by Pulse Secure, LLC. All rights reserved xi
About the Documentation
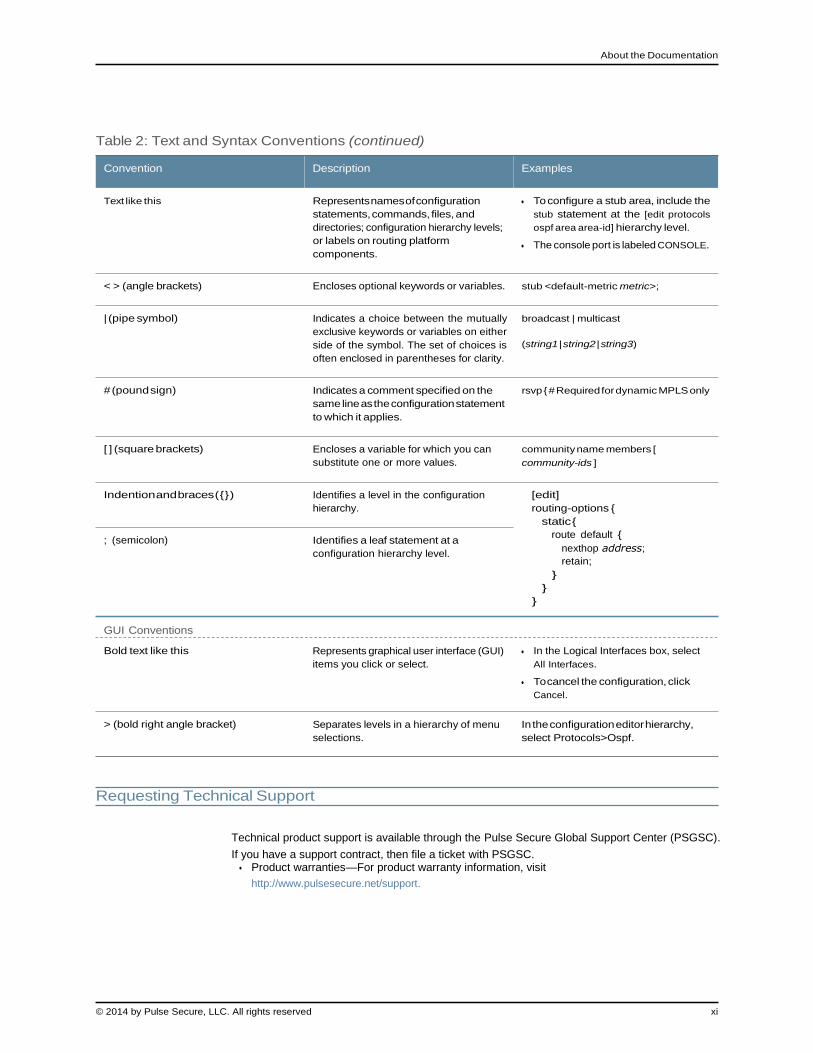
Table 2: Text and Syntax Conventions (continued)
Convention Description Examples
Text like this Represents names of configuration
statements, commands, files, and
directories; configuration hierarchy levels;
or labels on routing platform
components.
To configure a stub area, include the
stub statement at the [edit protocols
ospf area area-id] hierarchy level.
The console port is labeled CONSOLE.
< > (angle brackets) Encloses optional keywords or variables. stub <default-metric metric>;
| (pipe symbol) Indicates a choice between the mutually
exclusive keywords or variables on either
side of the symbol. The set of choices is
often enclosed in parentheses for clarity.
broadcast | multicast
(string1 | string2 | string3)
# (pound sign) Indicates a comment specified on the
same line as the configuration statement
to which it applies.
rsvp { # Required for dynamic MPLS only
[ ] (square brackets) Encloses a variable for which you can
substitute one or more values.
community name members [
community-ids ]
Indention and braces ( { } )
; (semicolon)
Identifies a level in the configuration
hierarchy.
Identifies a leaf statement at a
configuration hierarchy level.
[edit]
routing-options {
static {
route default {
nexthop address;
retain;
}
}
}
GUI Conventions
Bold text like this
Represents graphical user interface (GUI)
items you click or select.
In the Logical Interfaces box, select
All Interfaces.
To cancel the configuration, click
Cancel.
> (bold right angle bracket) Separates levels in a hierarchy of menu
selections.
In the configuration editor hierarchy,
select Protocols>Ospf.
Requesting Technical Support
Technical product support is available through the Pulse Secure Global Support Center (PSGSC).
If you have a support contract, then file a ticket with PSGSC. Product warranties—For product warranty information, visit
http://www.pulsesecure.net/support.
xii © 2014 by Pulse Secure, LLC. All rights reserved
Enterprise Guest User Access Manager Feature Guide
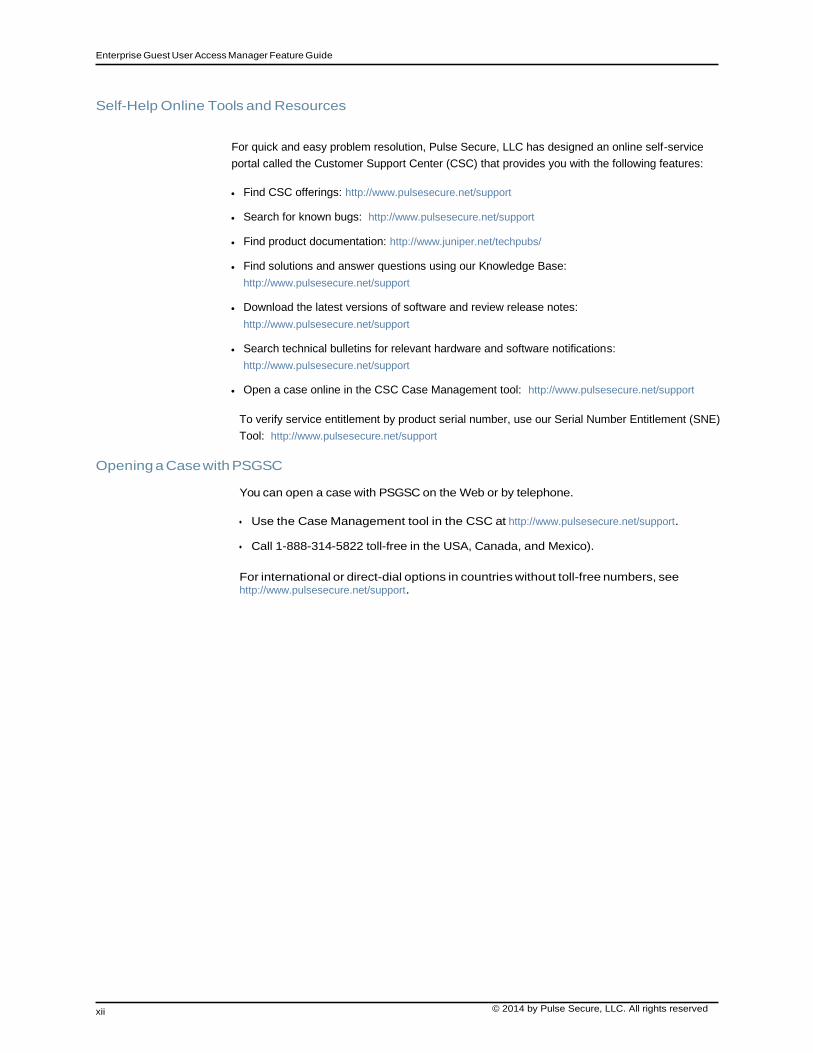
Self-Help Online Tools and Resources
For quick and easy problem resolution, Pulse Secure, LLC has designed an online self-service
portal called the Customer Support Center (CSC) that provides you with the following features:
Find CSC offerings: http://www.pulsesecure.net/support
Search for known bugs: http://www.pulsesecure.net/support
Find product documentation: http://www.juniper.net/techpubs/
Find solutions and answer questions using our Knowledge Base:
http://www.pulsesecure.net/support
Download the latest versions of software and review release notes: http://www.pulsesecure.net/support
Search technical bulletins for relevant hardware and software notifications: http://www.pulsesecure.net/support
Open a case online in the CSC Case Management tool: http://www.pulsesecure.net/support
To verify service entitlement by product serial number, use our Serial Number Entitlement (SNE)
Tool: http://www.pulsesecure.net/support
Opening a Case with PSGSC
You can open a case with PSGSC on the Web or by telephone.
Use the Case Management tool in the CSC at http://www.pulsesecure.net/support.
Call 1-888-314-5822 toll-free in the USA, Canada, and Mexico).
For international or direct-dial options in countries without toll-free numbers, see http://www.pulsesecure.net/support.
© 2014 by Pulse Secure, LLC. All rights reserved 1
Enterprise Guest User Access Manager Feature Guide
PART 1
Overview
Enterprise Guest Access on page 3
Guest Access Mode on page 5
Deployments on page 7

© 2014 by Pulse Secure, LLC. All rights reserved 3
Enterprise Guest User Access Manager Feature Guide
CHAPTER 1
Enterprise Guest Access
Enterprise Guest Access Overview on page 3
Enterprise Guest Access Overview
More and more enterprises require the capability of giving guest users temporary access
to the Internet. Guests to an enterprise can include customers, vendors, partners,
conference participants, and job applicants.
The guest user access manager (GUAM) feature enables you to deploy a MAG Series
device as a Layer 2 bridge that provisions and enforces secure guest access to the Internet.
In Guest Access mode, the MAG Series device is deployed between guest users and the
Internet gateway. It functions as an all-in-one guest access user access control appliance
that performs not only the guest user provisioning and authentication function, but also
the guest user access enforcement function.
You can also use GUAM features in a traditional unified access control (UAC) deployment,
where the Access Control Service performs the user access provisioning function and a
UAC Infranet Enforcer performs the resource access enforcement function.
The benefits of Guest Access mode include:
Secure guest access to the Internet for up to 200 guest users per MAG Series gateway
or service module.
Turns a MAG Series gateway into an all-in-one, in-line guest user access control
appliance.
Support for both wired and wireless environments.
Agentless service, with no client software required on endpoint devices.
An easy interface for administrative or support staff, or any corporate employee, to
sponsor guest users.
Comprehensive endpoint device posture and integrity assessment.
Supports endpoints on Microsoft Windows, Apple Mac OS, and Linux-based devices,
as well as Apple iOS and Google Android mobile devices.
Related
Documentation
Guest Access Mode Overview on page 5
Guest Access Mode Deployment Overview on page 7

© 2014 by Pulse Secure, LLC. All rights reserved 5
Enterprise Guest User Access Manager Feature Guide
CHAPTER 2
Guest Access Mode
Guest Access Mode Overview on page 5
Guest Access Mode Overview
Guest Access mode is supported on the following MAG Series platforms: MAG2600,
MAG4610, MAG4611, MAG6610, and MAG6611. Guest Mode is not supported on IC Series
platforms.
Guest Mode allows you to create up to 200 total users. The limit includes guest
administrator and guest user accounts.
Guest Access mode enables a subset of Access Control Service features related to guest
user access management. It does not support the following Access Control Service
features:
Authentication protocol sets
Client delivery mechanism (Pulse Secure client and Odyssey Access Client)
Ability to upload custom sign-in pages
MAC address authentication
Infranet Enforcer compatibility (ScreenOS firewall or SRX Series Services gateway)
IDP compatibility
IF-MAP server/client functionality (in Guest Access Mode, the device can only export
sessions to an IF-MAP server)
Virtual appliance
Active/active clustering (active/passive is supported)
To enable Guest Access mode, go to System > Configuration > Licensing > Device Modes
and select Guest Access.
Related
Documentation
Enterprise Guest Access Overview on page 3
Guest Access Mode Deployment Overview on page 7
Enterprise Guest Access Licensing and Upgrade Overview
8 © 2014 by Pulse Secure, LLC. All rights reserved
Enterprise Guest User Access Manager Feature Guide
CHAPTER 3
Deployments
Guest Access Mode Deployment Overview on page 7
Understanding Guest Access Mode Cluster Deployments on page 10
Guest Access Mode Deployment Overview
This topic describes a deployment where a MAG Series Gateway is provisioned in Guest
Access mode. It includes the following information:
Layer 2 Bridge Enforcer Deployment Overview on page 7
Layer 2 Bridge Interface Configuration on page 9
Layer 2 Bridge Administration on page 9
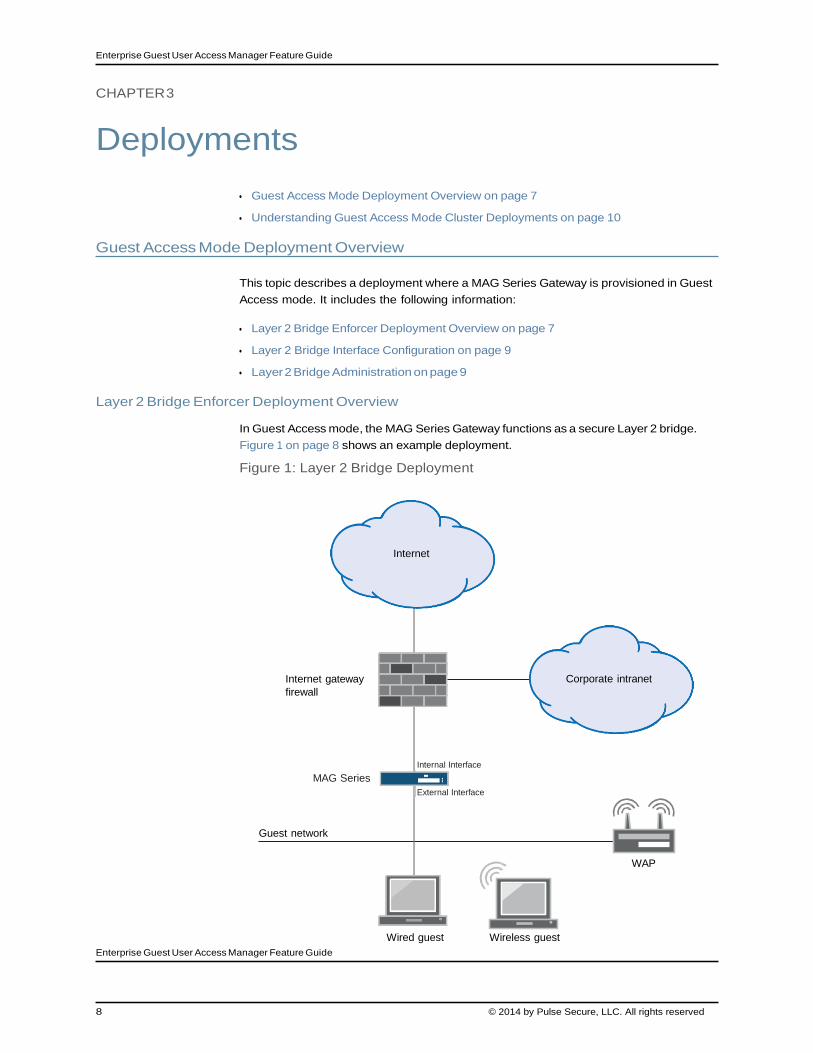
Layer 2 Bridge Enforcer Deployment Overview
In Guest Access mode, the MAG Series Gateway functions as a secure Layer 2 bridge.
Figure 1 on page 8 shows an example deployment.
Figure 1: Layer 2 Bridge Deployment
Internet
Internet gateway
firewall
Corporate intranet
MAG Series
Internal Interface
External Interface
Guest network
WAP
Wired guest Wireless guest
Enterprise Guest User Access Manager Feature Guide
8 © 2014 by Pulse Secure, LLC. All rights reserved
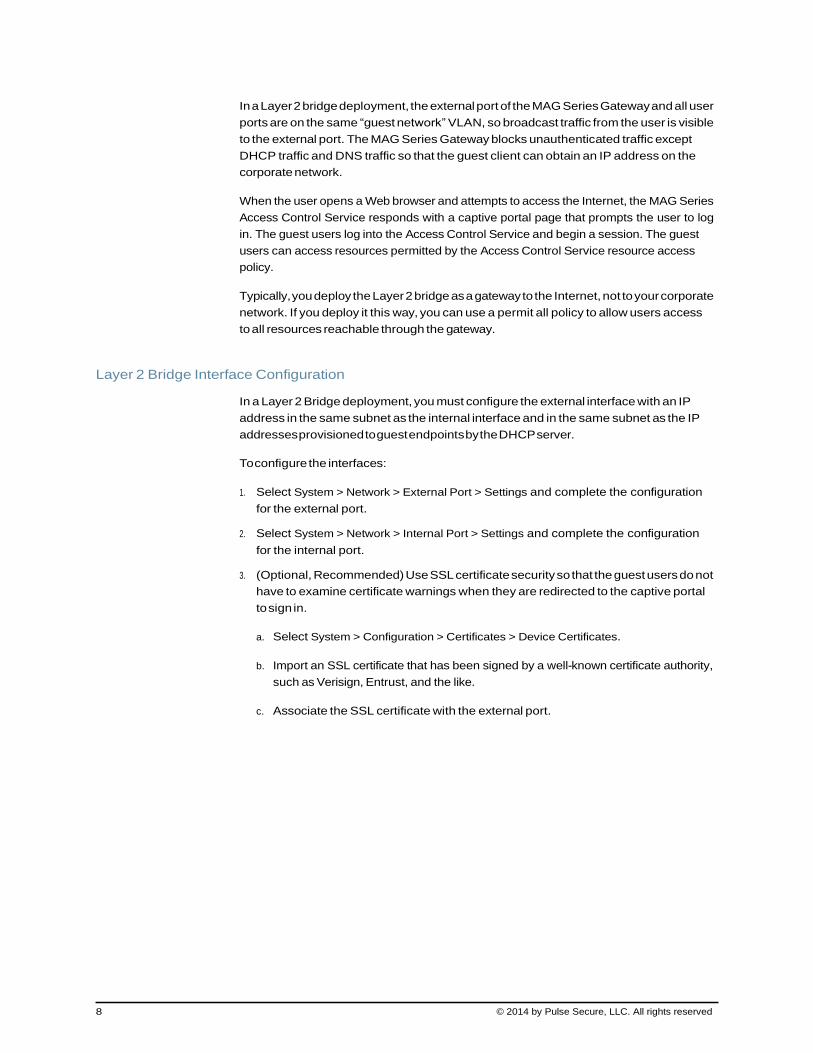
In a Layer 2 bridge deployment, the external port of the MAG Series Gateway and all user
ports are on the same “guest network” VLAN, so broadcast traffic from the user is visible
to the external port. The MAG Series Gateway blocks unauthenticated traffic except
DHCP traffic and DNS traffic so that the guest client can obtain an IP address on the
corporate network.
When the user opens a Web browser and attempts to access the Internet, the MAG Series
Access Control Service responds with a captive portal page that prompts the user to log
in. The guest users log into the Access Control Service and begin a session. The guest
users can access resources permitted by the Access Control Service resource access
policy.
Typically, you deploy the Layer 2 bridge as a gateway to the Internet, not to your corporate
network. If you deploy it this way, you can use a permit all policy to allow users access
to all resources reachable through the gateway.
Layer 2 Bridge Interface Configuration
In a Layer 2 Bridge deployment, you must configure the external interface with an IP
address in the same subnet as the internal interface and in the same subnet as the IP
addresses provisioned to guest endpoints by the DHCP server.
To configure the interfaces:
1. Select System > Network > External Port > Settings and complete the configuration
for the external port.
2. Select System > Network > Internal Port > Settings and complete the configuration
for the internal port.
3. (Optional, Recommended) Use SSL certificate security so that the guest users do not
have to examine certificate warnings when they are redirected to the captive portal
to sign in.
a. Select System > Configuration > Certificates > Device Certificates.
b. Import an SSL certificate that has been signed by a well-known certificate authority,
such as Verisign, Entrust, and the like.
c. Associate the SSL certificate with the external port.

© 2014 by Pulse Secure, LLC. All rights reserved 9
Chapter 3: Deployments
Layer 2 Bridge Administration
Table 3 on page 9 provides a summary of Layer 2 bridge administration tasks.
Table 3: Layer 2 Bridge Administration Tasks Summary
Tasks Procedures
Monitoring To verify whether the bridge is up, select System > Status > Overview and check the Bridge diode
under Enforcer Status. The Bridge diode is green when Layer 2 bridging is available.
Logging To view logs, select System > Log/Monitoring > Events . Activate logging for Layer 2 bridge using
Bridge Events and Bridge Rule Trace to aid you in troubleshooting issues.
Troubleshooting
Related
Documentation
To troubleshoot the Bridge Enforcer, select Maintenance > Troubleshooting > Bridge Enforcer.
If necessary, select Recreate Rules to re-create bridge rules based on the current endpoint sessions
and resource access policies. Use this procedure when you suspect that the bridge is not creating
appropriate rules. It verifies whether an endpoint should have access to a protected resource.
Enterprise Guest Access Overview on page 3
Using Task Guidance on page 13
Configuring the Guest User Access Management Framework on page 14
Understanding Guest Access Mode Cluster Deployments on page 10
Understanding Guest Access Mode Cluster Deployments
Active-passive clustering is supported with Guest Access mode. In an active/passive
cluster, you configure only the active node. In the event of failover, the new active node
(previously the passive node) creates the Layer 2 bridge and the passive node (previously
the active node) deletes its bridge. The external interface of each node detects user
traffic, but only the active node actually bridges the traffic. There must be a physical
connection from the switch to the external interface on each node so that Layer 2 bridge
functionality is not interrupted during node transition.
It is not recommended for the backup device to be deployed in Guest Access mode. Guest
Access mode is only required on the primary device.
If both devices do not have Guest Access mode enabled, and the cluster is deleted or
one node is removed from the cluster, there will be two bridges on the network, potentially
causing a bridge loop.
Related Documentation
Enterprise Guest Access Overview on page 3 Guest Access Mode Overview on page 5
10 © 2014 by Pulse Secure, LLC. All rights reserved
Enterprise Guest User Access Manager Feature Guide
Understanding Guest Access Mode Cluster Deployments
Active-passive clustering is supported with Guest Access mode. In an active/passive
cluster, you configure only the active node. In the event of failover, the new active node
(previously the passive node) creates the Layer 2 bridge and the passive node (previously
the active node) deletes its bridge. The external interface of each node detects user
traffic, but only the active node actually bridges the traffic. There must be a physical
connection from the switch to the external interface on each node so that Layer 2 bridge
functionality is not interrupted during node transition.
It is not recommended for the backup device to be deployed in Guest Access mode. Guest
Access mode is only required on the primary device.
If both devices do not have Guest Access mode enabled, and the cluster is deleted or
one node is removed from the cluster, there will be two bridges on the network, potentially
causing a bridge loop.
Related
Documentation
Enterprise Guest Access Overview on page 3
Guest Access Mode Overview on page 5

© 2014 by Pulse Secure, LLC. All rights reserved 11
PART 2
Configuration
Guest User Access Management Framework on page 13
© 2014 by Pulse Secure, LLC. All rights reserved 13
Enterprise Guest User Access Manager Feature Guide
CHAPTER 4
Guest User Access Management Framework
Using Task Guidance on page 13
Configuring the Guest User Access Management Framework on page 14
Customizing the Guest User Account Manager Pages on page 32
SMS Gateway Settings for Guest User Accounts on page 49
Using Task Guidance
Figure 2 on page 14 shows the Task Guidance menu for enterprise guest access (EGA).
You can use Task Guidance to navigate through the tasks required to configure EGA.
To display Task Guidance:
1. Select the Guidance link at the top of the Web console.
2. Click System Setup to display guidance for setting the date and time, upgrading
software, and installing licenses.
3. Click Guest Users to display guidance for configuring the local authentication server,
user roles, user realms, sign-in policies, and resource access policies for guest users.
14 © 2014 by Pulse Secure, LLC. All rights reserved
Enterprise Guest User Access Manager Feature Guide
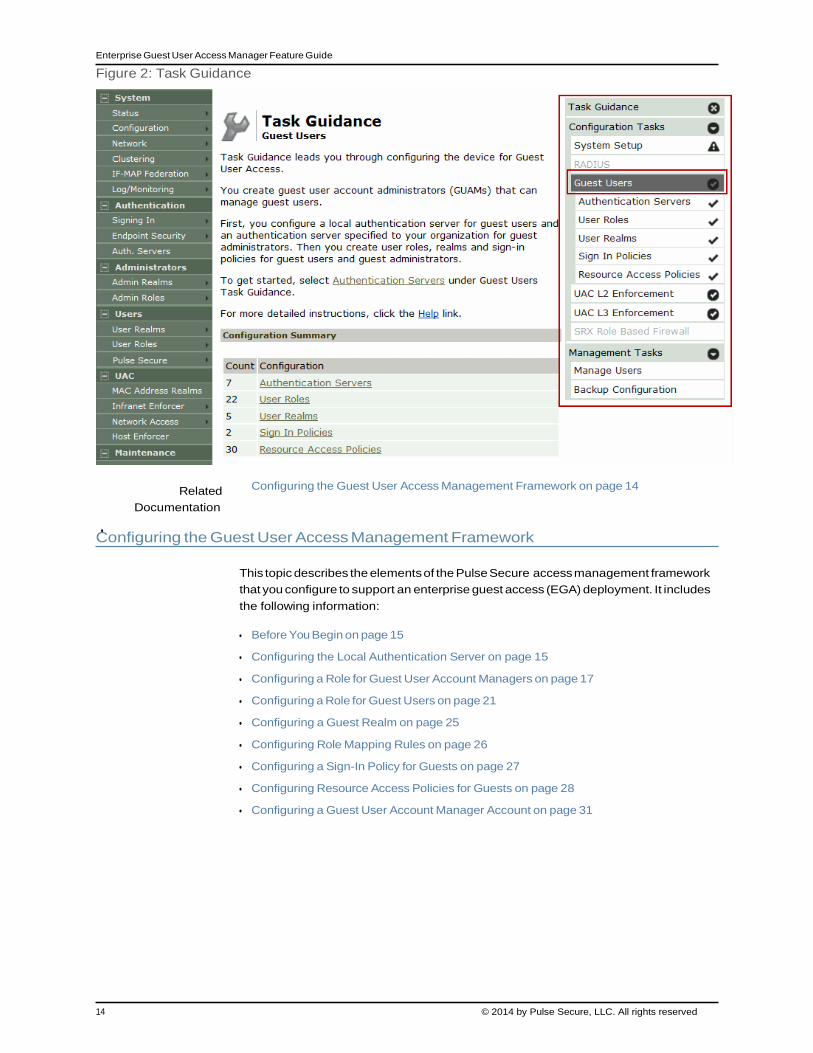
Figure 2: Task Guidance
Related
Documentation
Configuring the Guest User Access Management Framework on page 14
Configuring the Guest User Access Management Framework
This topic describes the elements of the Pulse Secure access management framework
that you configure to support an enterprise guest access (EGA) deployment. It includes
the following information:
Before You Begin on page 15
Configuring the Local Authentication Server on page 15
Configuring a Role for Guest User Account Managers on page 17
Configuring a Role for Guest Users on page 21
Configuring a Guest Realm on page 25
Configuring Role Mapping Rules on page 26
Configuring a Sign-In Policy for Guests on page 27
Configuring Resource Access Policies for Guests on page 28
Configuring a Guest User Account Manager Account on page 31
© 2014 by Pulse Secure, LLC. All rights reserved 15
Chapter 4: Guest User Access Management Framework
Before You Begin
This configuration example assumes the following tasks have been completed:
Installed the MAG Series hardware.
Upgraded the Access Control Service software to the latest version.
Enabled Guest Access mode.
Configured basic host and network settings. Keep in mind the following best practices:
Configure NTP. Synchronization to standard network clock is not only a requirement
for meaningful logging but is also necessary for security features that examine
time-based validity, such as SSL certificate security. Select System > Status to
display the system status page; then click the Edit link next to System Date and Time
to display the configuration page for NTP.
Configure a hostname. Hostname is used to construct the HTTP redirect URL for the
captive portal page presented to guest users. If hostname is not specified, the URL
is based on the SSL certificate distinguished name (DN) in the SSL certificate
associated with the external port. If none, the URL uses the IP address of the external
port. We recommend specifying a hostname to create a more user friendly captive
portal URL. Select System > Network > Overview to display the configuration page
for hostname.
Configure DNS. Guest users depend on the DNS servers you specify when they initially
attempt to connect to the network. In addition, the captive portal HTTP redirect
presents a hostname in the URL only if DNS can resolve the hostname. Select System
> Network > Overview to display the configuration page for DNS.
Configure SSL certificate security. Use SSL certificate security so that the guest users
do not have to examine certificate warnings when they are redirected to the captive
portal to sign in. Select System > Configuration > Certificates > Device Certificates to
display the device certificate configuration page. You can use this page to import an
SSL certificate that has been signed by a well known certificate authority, such as
VeriSign, Entrust, and the like. Use this page to associate the certificate with the
external port.
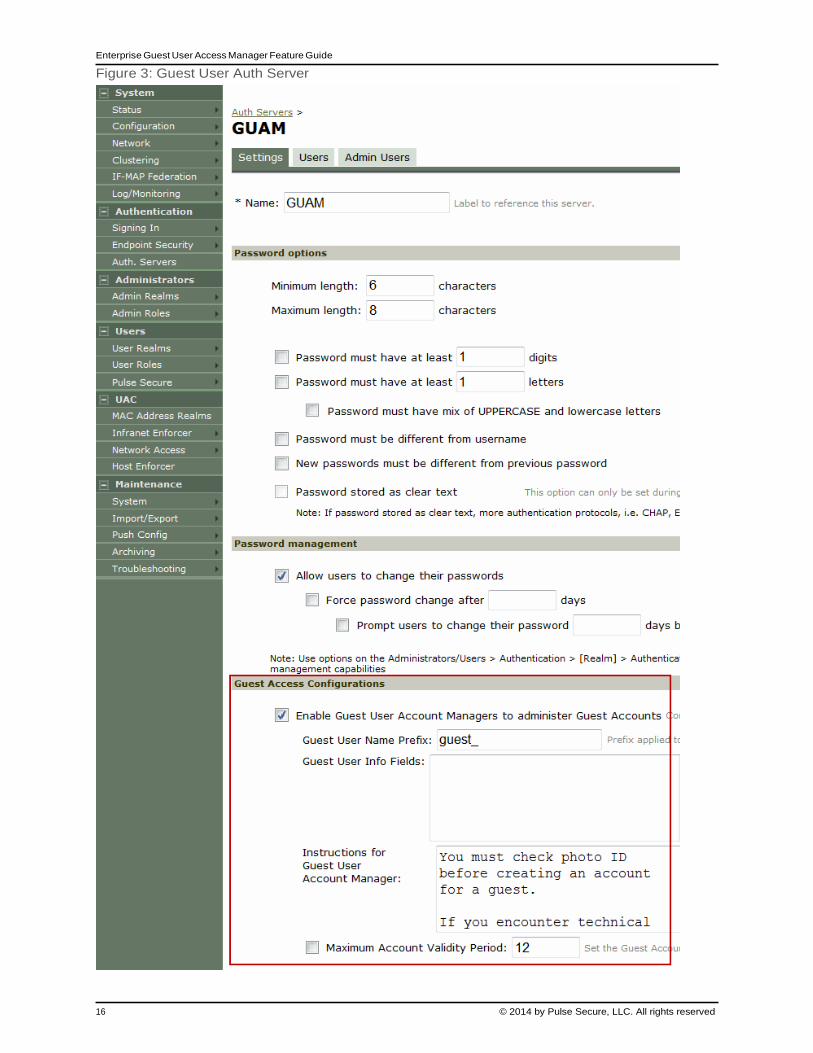
Configuring the Local Authentication Server
Select System > Authentication > Auth. Server and create a new local authentication
server for guest users. Figure 3 on page 16 shows a local authentication server
configuration. Table 4 on page 17 describes the guest access configuration.
16 © 2014 by Pulse Secure, LLC. All rights reserved
Enterprise Guest User Access Manager Feature Guide
Figure 3: Guest User Auth Server
© 2014 by Pulse Secure, LLC. All rights reserved 17
Chapter 4: Guest User Access Management Framework
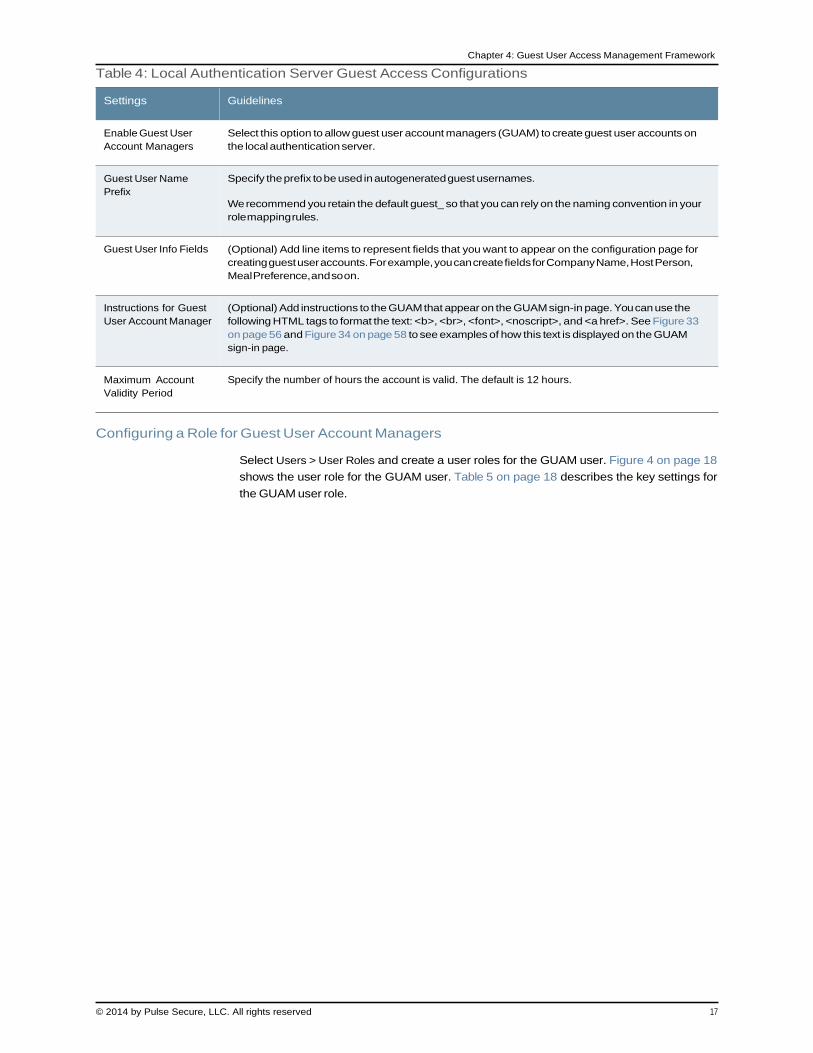
Table 4: Local Authentication Server Guest Access Configurations
Settings Guidelines
Enable Guest User
Account Managers
Select this option to allow guest user account managers (GUAM) to create guest user accounts on
the local authentication server.
Guest User Name
Prefix
Specify the prefix to be used in autogenerated guest usernames.
We recommend you retain the default guest_ so that you can rely on the naming convention in your
role mapping rules.
Guest User Info Fields (Optional) Add line items to represent fields that you want to appear on the configuration page for
creating guest user accounts. For example, you can create fields for Company Name, Host Person,
Meal Preference, and so on.
Instructions for Guest
User Account Manager
(Optional) Add instructions to the GUAM that appear on the GUAM sign-in page. You can use the
following HTML tags to format the text: <b>, <br>, <font>, <noscript>, and <a href>. See Figure 33
on page 56 and Figure 34 on page 58 to see examples of how this text is displayed on the GUAM
sign-in page.
Maximum Account
Validity Period
Specify the number of hours the account is valid. The default is 12 hours.
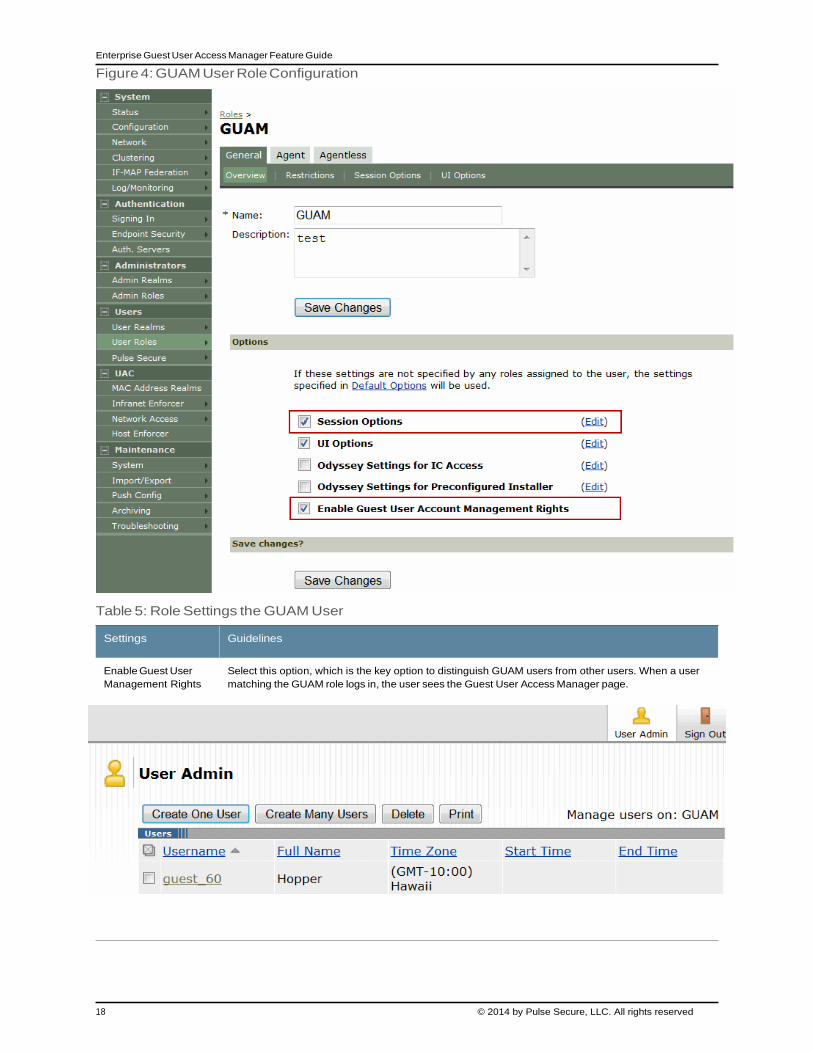
Configuring a Role for Guest User Account Managers
Select Users > User Roles and create a user roles for the GUAM user. Figure 4 on page 18
shows the user role for the GUAM user. Table 5 on page 18 describes the key settings for
the GUAM user role.
18 © 2014 by Pulse Secure, LLC. All rights reserved
Enterprise Guest User Access Manager Feature Guide
Figure 4: GUAM User Role Configuration
Table 5: Role Settings the GUAM User
Settings Guidelines
Enable Guest User
Management Rights
Select this option, which is the key option to distinguish GUAM users from other users. When a user
matching the GUAM role logs in, the user sees the Guest User Access Manager page.
© 2014 by Pulse Secure, LLC. All rights reserved 19
Chapter 4: Guest User Access Management Framework
Table 5: Role Settings the GUAM User (continued)
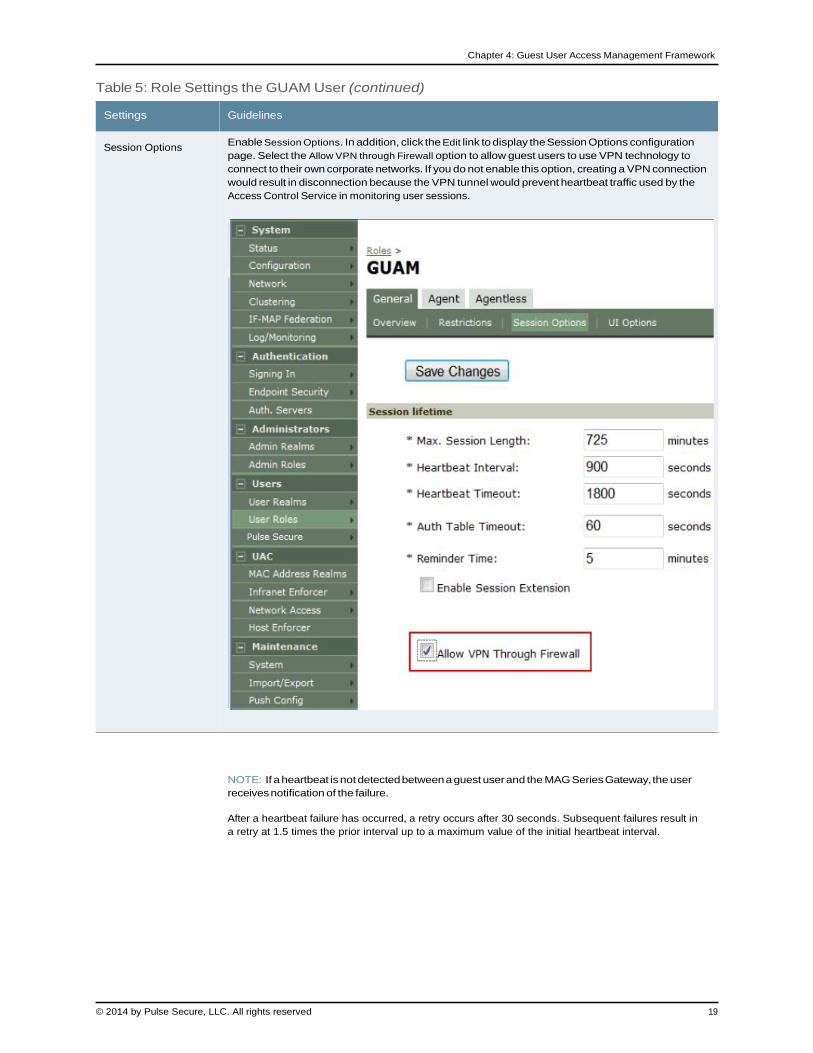
Settings Guidelines
Session Options
Enable Session Options. In addition, click the Edit link to display the Session Options configuration
page. Select the Allow VPN through Firewall option to allow guest users to use VPN technology to
connect to their own corporate networks. If you do not enable this option, creating a VPN connection
would result in disconnection because the VPN tunnel would prevent heartbeat traffic used by the
Access Control Service in monitoring user sessions.
NOTE: If a heartbeat is not detected between a guest user and the MAG Series Gateway, the user
receives notification of the failure.
After a heartbeat failure has occurred, a retry occurs after 30 seconds. Subsequent failures result in
a retry at 1.5 times the prior interval up to a maximum value of the initial heartbeat interval.
20 © 2014 by Pulse Secure, LLC. All rights reserved
Enterprise Guest User Access Manager Feature Guide
Table 5: Role Settings the GUAM User (continued)
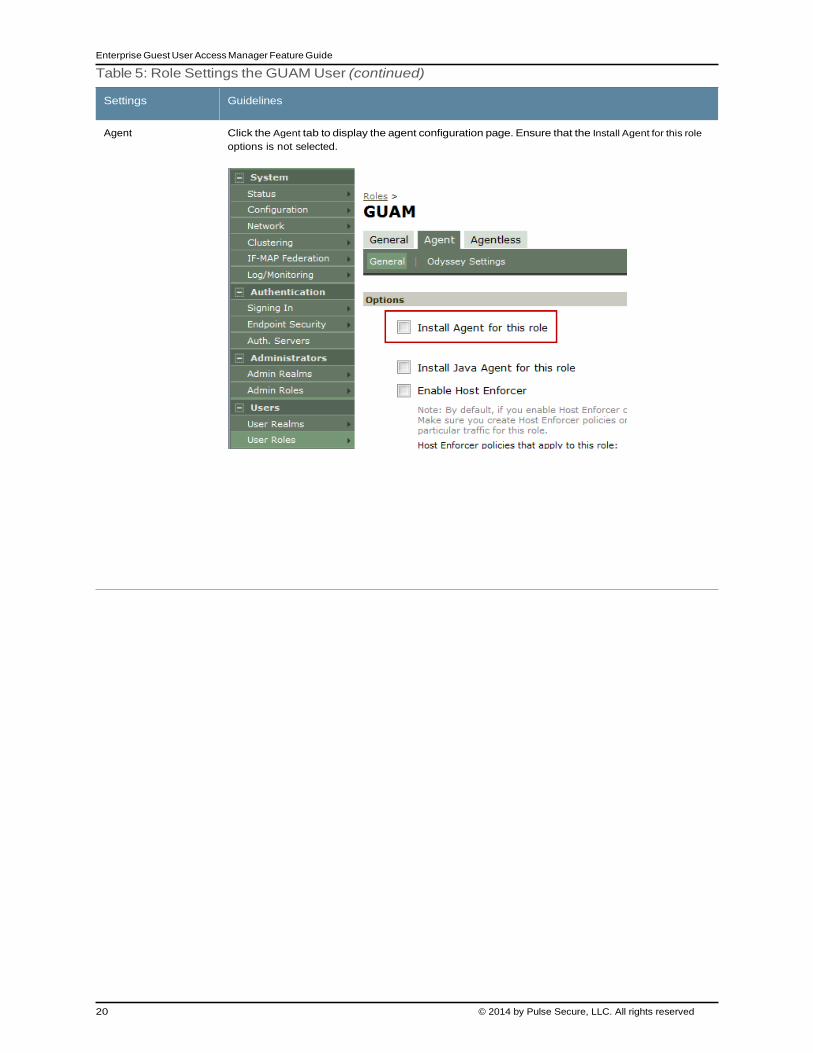
Settings Guidelines
Agent Click the Agent tab to display the agent configuration page. Ensure that the Install Agent for this role
options is not selected.
© 2014 by Pulse Secure, LLC. All rights reserved 21
Chapter 4: Guest User Access Management Framework
Table 5: Role Settings the GUAM User (continued)
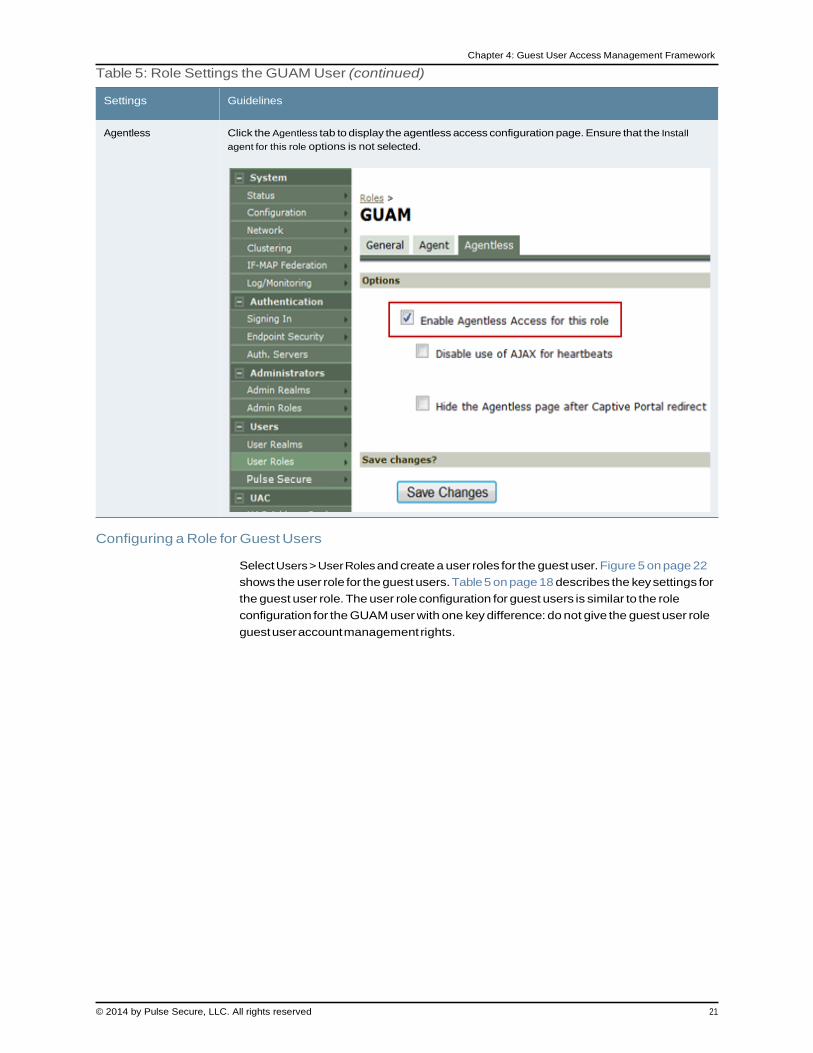
Settings Guidelines
Agentless Click the Agentless tab to display the agentless access configuration page. Ensure that the Install
agent for this role options is not selected.
Configuring a Role for Guest Users
Select Users > User Roles and create a user roles for the guest user. Figure 5 on page 22
shows the user role for the guest users. Table 5 on page 18 describes the key settings for
the guest user role. The user role configuration for guest users is similar to the role
configuration for the GUAM user with one key difference: do not give the guest user role
guest user account management rights.
22 © 2014 by Pulse Secure, LLC. All rights reserved
Enterprise Guest User Access Manager Feature Guide
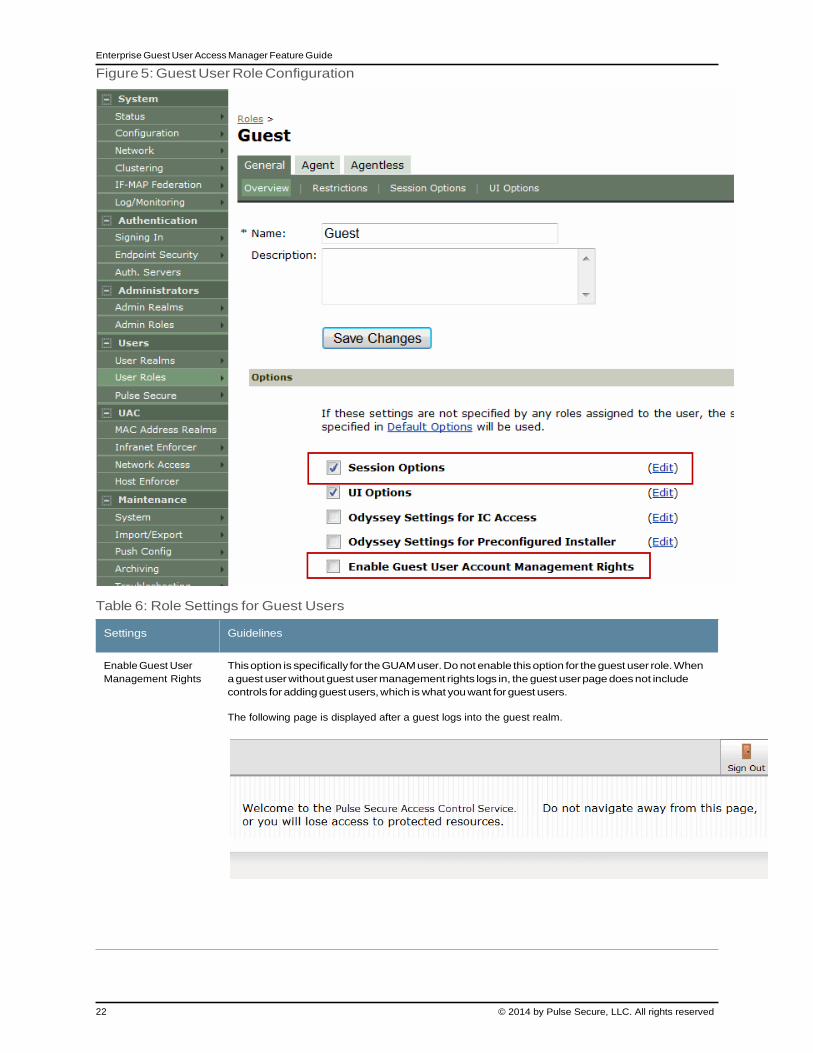
Figure 5: Guest User Role Configuration
Table 6: Role Settings for Guest Users
Settings Guidelines
Enable Guest User
Management Rights
This option is specifically for the GUAM user. Do not enable this option for the guest user role. When
a guest user without guest user management rights logs in, the guest user page does not include
controls for adding guest users, which is what you want for guest users.
The following page is displayed after a guest logs into the guest realm.
© 2014 by Pulse Secure, LLC. All rights reserved 23
Chapter 4: Guest User Access Management Framework
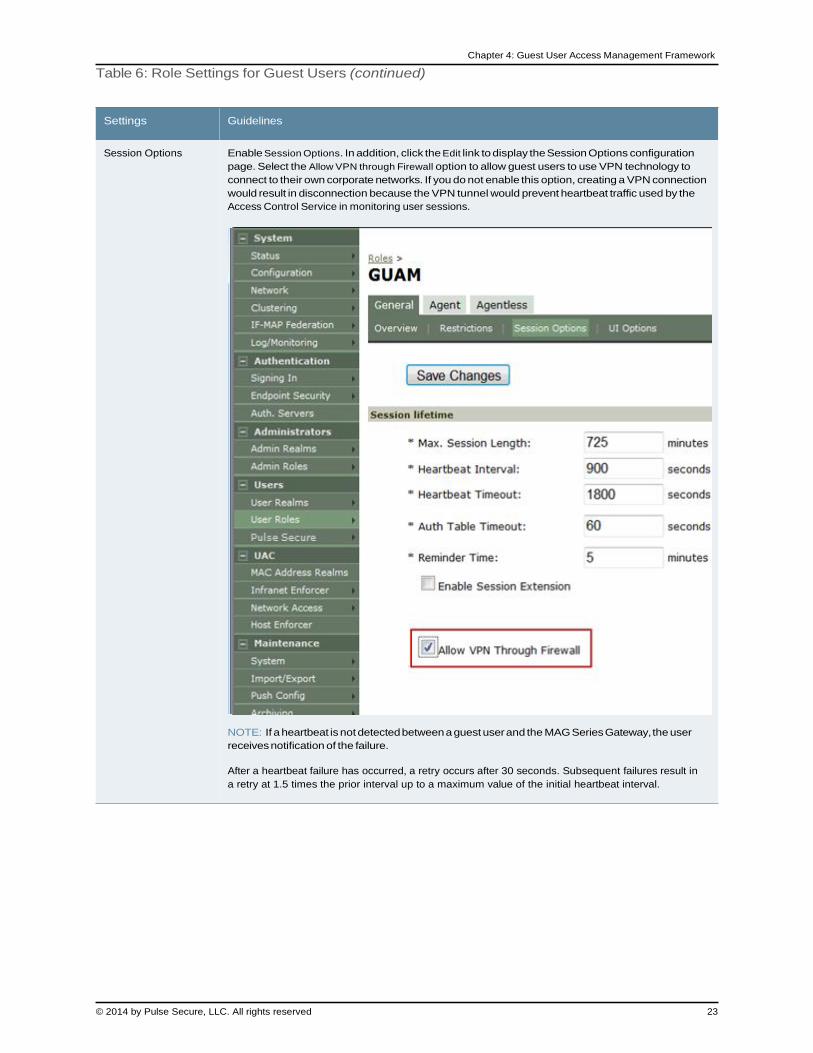
Table 6: Role Settings for Guest Users (continued)
Settings Guidelines
Session Options Enable Session Options. In addition, click the Edit link to display the Session Options configuration
page. Select the Allow VPN through Firewall option to allow guest users to use VPN technology to
connect to their own corporate networks. If you do not enable this option, creating a VPN connection
would result in disconnection because the VPN tunnel would prevent heartbeat traffic used by the
Access Control Service in monitoring user sessions.
NOTE: If a heartbeat is not detected between a guest user and the MAG Series Gateway, the user
receives notification of the failure.
After a heartbeat failure has occurred, a retry occurs after 30 seconds. Subsequent failures result in
a retry at 1.5 times the prior interval up to a maximum value of the initial heartbeat interval.
24 © 2014 by Pulse Secure, LLC. All rights reserved
Enterprise Guest User Access Manager Feature Guide
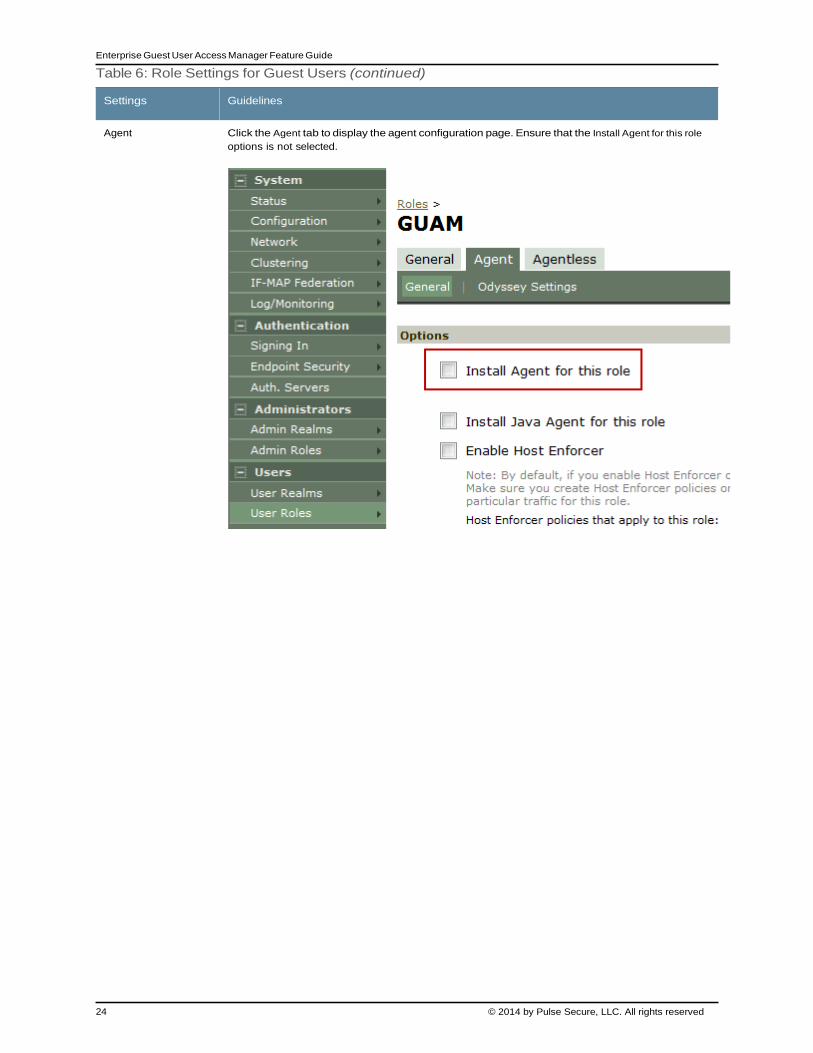
Table 6: Role Settings for Guest Users (continued)
Settings Guidelines
Agent Click the Agent tab to display the agent configuration page. Ensure that the Install Agent for this role
options is not selected.
© 2014 by Pulse Secure, LLC. All rights reserved 25
Chapter 4: Guest User Access Management Framework
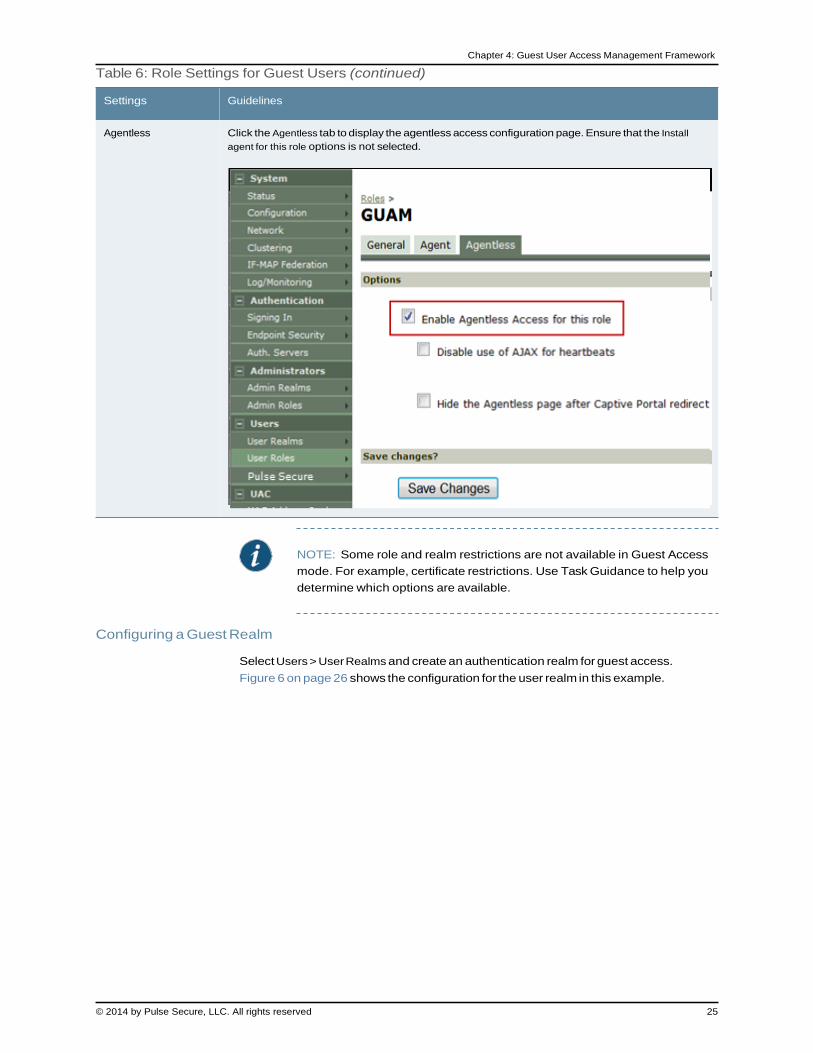
Table 6: Role Settings for Guest Users (continued)
Settings Guidelines
Agentless Click the Agentless tab to display the agentless access configuration page. Ensure that the Install
agent for this role options is not selected.
NOTE: Some role and realm restrictions are not available in Guest Access
mode. For example, certificate restrictions. Use Task Guidance to help you
determine which options are available.
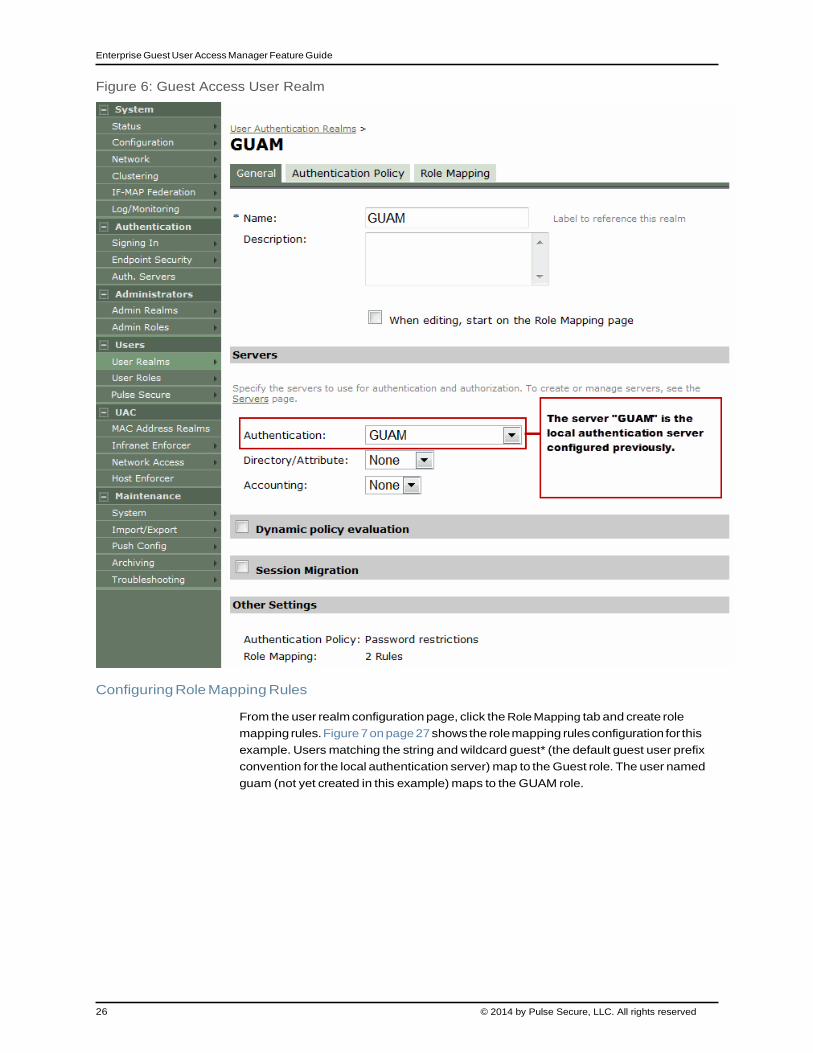
Configuring a Guest Realm
Select Users > User Realms and create an authentication realm for guest access.
Figure 6 on page 26 shows the configuration for the user realm in this example.
26 © 2014 by Pulse Secure, LLC. All rights reserved
Enterprise Guest User Access Manager Feature Guide
Figure 6: Guest Access User Realm
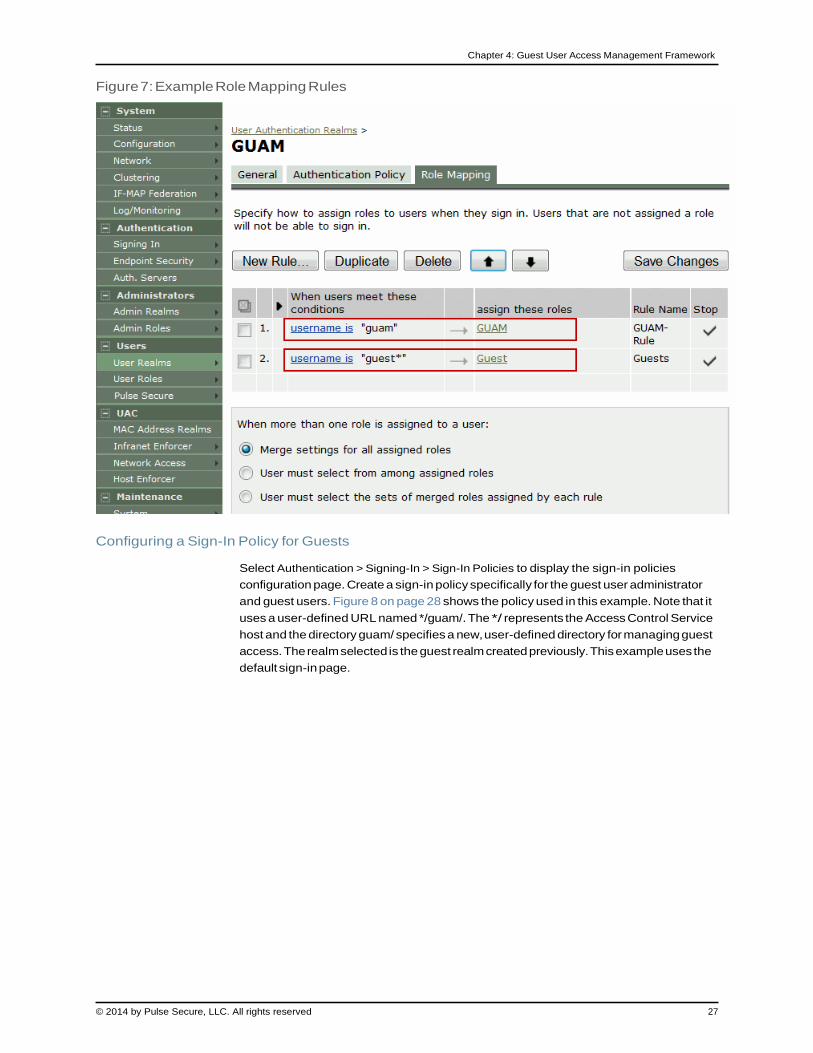
Configuring Role Mapping Rules
From the user realm configuration page, click the Role Mapping tab and create role
mapping rules. Figure 7 on page 27 shows the role mapping rules configuration for this
example. Users matching the string and wildcard guest* (the default guest user prefix
convention for the local authentication server) map to the Guest role. The user named
guam (not yet created in this example) maps to the GUAM role.
© 2014 by Pulse Secure, LLC. All rights reserved 27
Chapter 4: Guest User Access Management Framework
Figure 7: Example Role Mapping Rules
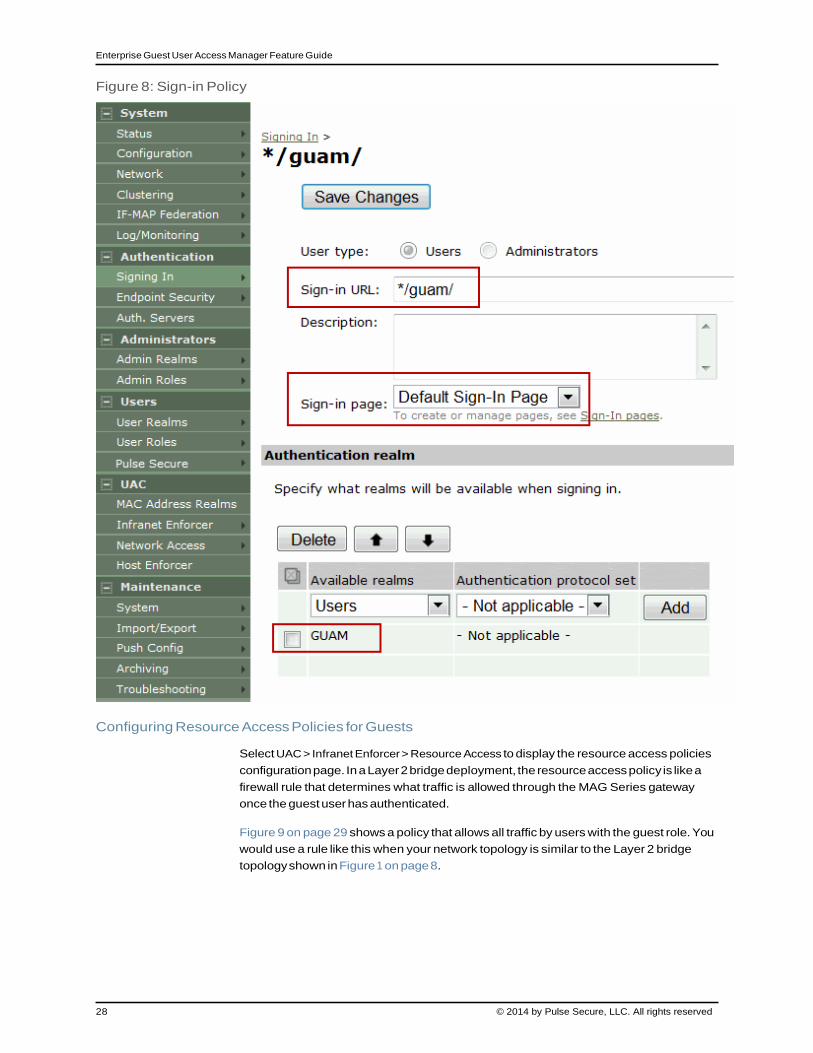
Configuring a Sign-In Policy for Guests
Select Authentication > Signing-In > Sign-In Policies to display the sign-in policies
configuration page. Create a sign-in policy specifically for the guest user administrator
and guest users. Figure 8 on page 28 shows the policy used in this example. Note that it
uses a user-defined URL named */guam/. The */ represents the Access Control Service
host and the directory guam/ specifies a new, user-defined directory for managing guest
access. The realm selected is the guest realm created previously. This example uses the
default sign-in page.
28 © 2014 by Pulse Secure, LLC. All rights reserved
Enterprise Guest User Access Manager Feature Guide
Figure 8: Sign-in Policy
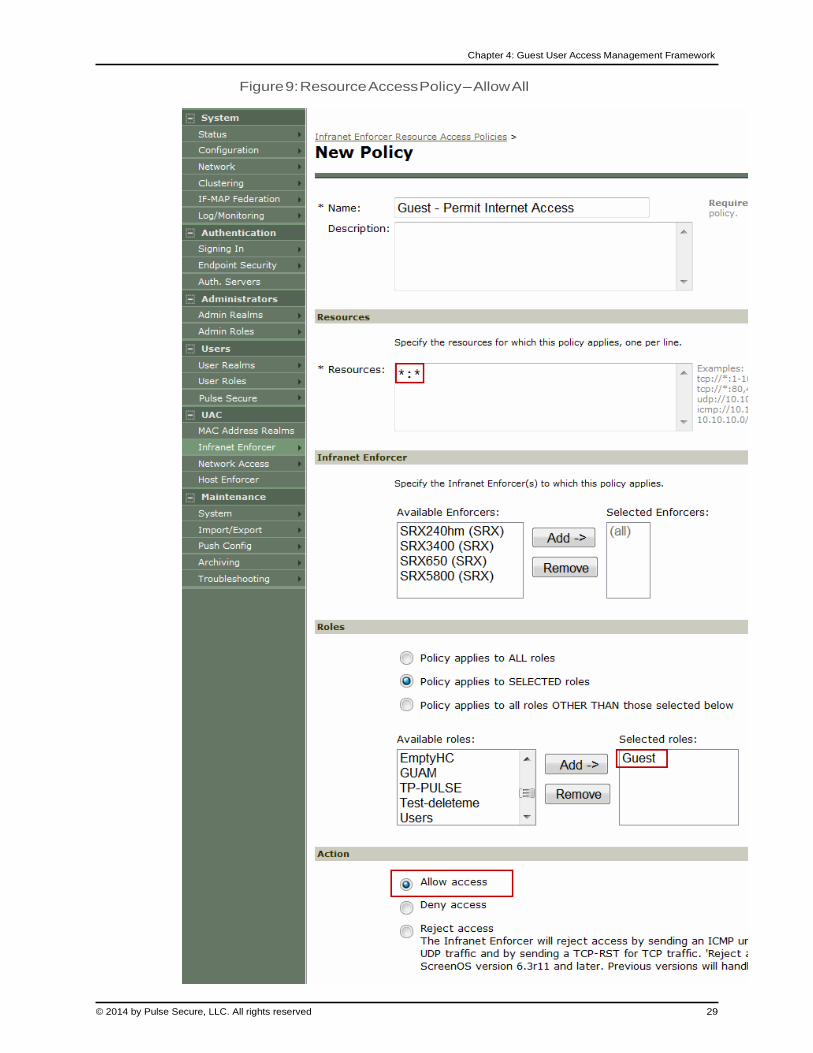
Configuring Resource Access Policies for Guests
Select UAC > Infranet Enforcer > Resource Access to display the resource access policies
configuration page. In a Layer 2 bridge deployment, the resource access policy is like a
firewall rule that determines what traffic is allowed through the MAG Series gateway
once the guest user has authenticated.
Figure 9 on page 29 shows a policy that allows all traffic by users with the guest role. You
would use a rule like this when your network topology is similar to the Layer 2 bridge
topology shown in Figure 1 on page 8.
© 2014 by Pulse Secure, LLC. All rights reserved 29
Chapter 4: Guest User Access Management Framework
Figure 9: Resource Access Policy – Allow All
30 © 2014 by Pulse Secure, LLC. All rights reserved
Enterprise Guest User Access Manager Feature Guide
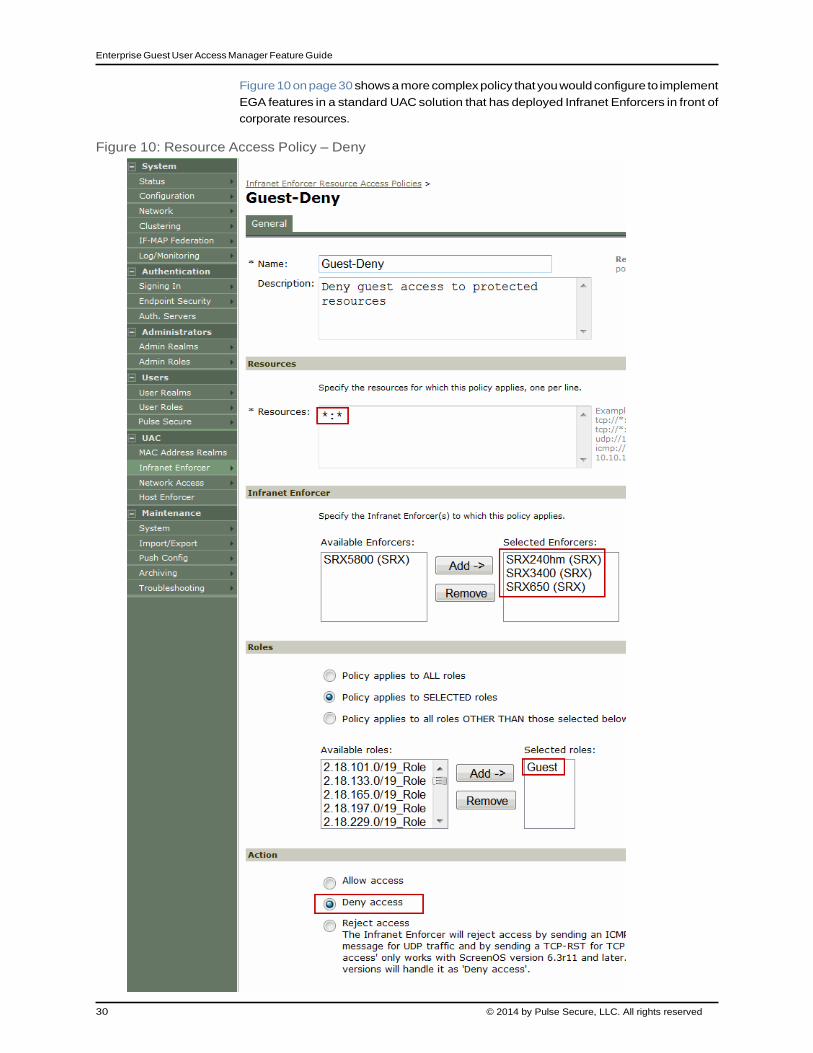
Figure 10 on page 30 shows a more complex policy that you would configure to implement
EGA features in a standard UAC solution that has deployed Infranet Enforcers in front of
corporate resources.
Figure 10: Resource Access Policy – Deny
© 2014 by Pulse Secure, LLC. All rights reserved 31
Chapter 4: Guest User Access Management Framework
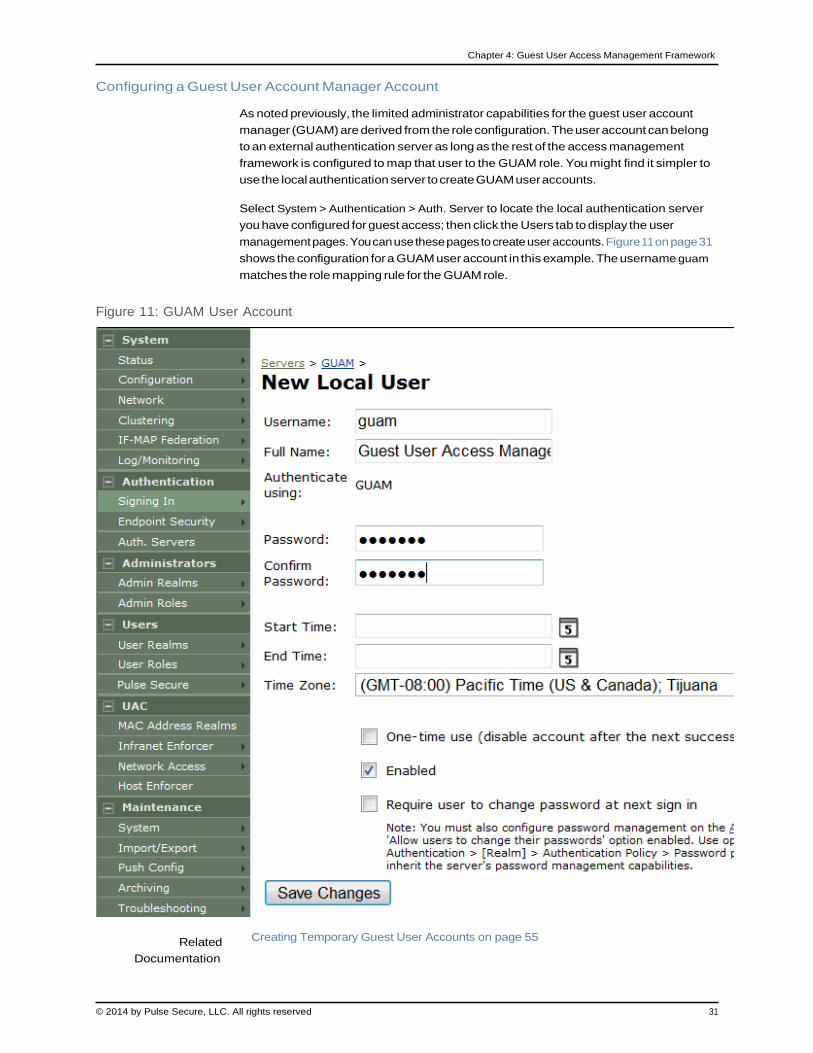
Configuring a Guest User Account Manager Account
As noted previously, the limited administrator capabilities for the guest user account
manager (GUAM) are derived from the role configuration. The user account can belong
to an external authentication server as long as the rest of the access management
framework is configured to map that user to the GUAM role. You might find it simpler to
use the local authentication server to create GUAM user accounts.
Select System > Authentication > Auth. Server to locate the local authentication server
you have configured for guest access; then click the Users tab to display the user
management pages. You can use these pages to create user accounts. Figure 11 on page 31
shows the configuration for a GUAM user account in this example. The username guam
matches the role mapping rule for the GUAM role.
Figure 11: GUAM User Account
Related
Documentation
Creating Temporary Guest User Accounts on page 55

32 © 2014 by Pulse Secure, LLC. All rights reserved
Enterprise Guest User Access Manager Feature Guide
Enterprise Guest Access Overview on page 3
Using Task Guidance on page 13
Customizing the Guest User Account Manager Pages
This topic describes how to customize the Guest User Account Manager (GUAM) page.
It includes the following information:
Guest User Account Manager Pages Overview on page 32
Customizing the Guest User Account Manager Home Page on page 35
Downloading the Sample Template Files on page 38
Modifying the Sample Template Files on page 39
Uploading Your Customized Files on page 44
Using the Customized Pages on page 46
Verifying the Customization on page 48
Guest User Account Manager Pages Overview
The GUAM user interface includes the following pages:
GUAM Home Page
New Local User Page
Create Many Users Page
Update User Account Page
Print Details Page
Figure 12 on page 32 shows the GUAM home page. You can use the administrator console
to change the look and feel, as well as some functionality, presented on this page.
Figure 12: GUAM Home Page
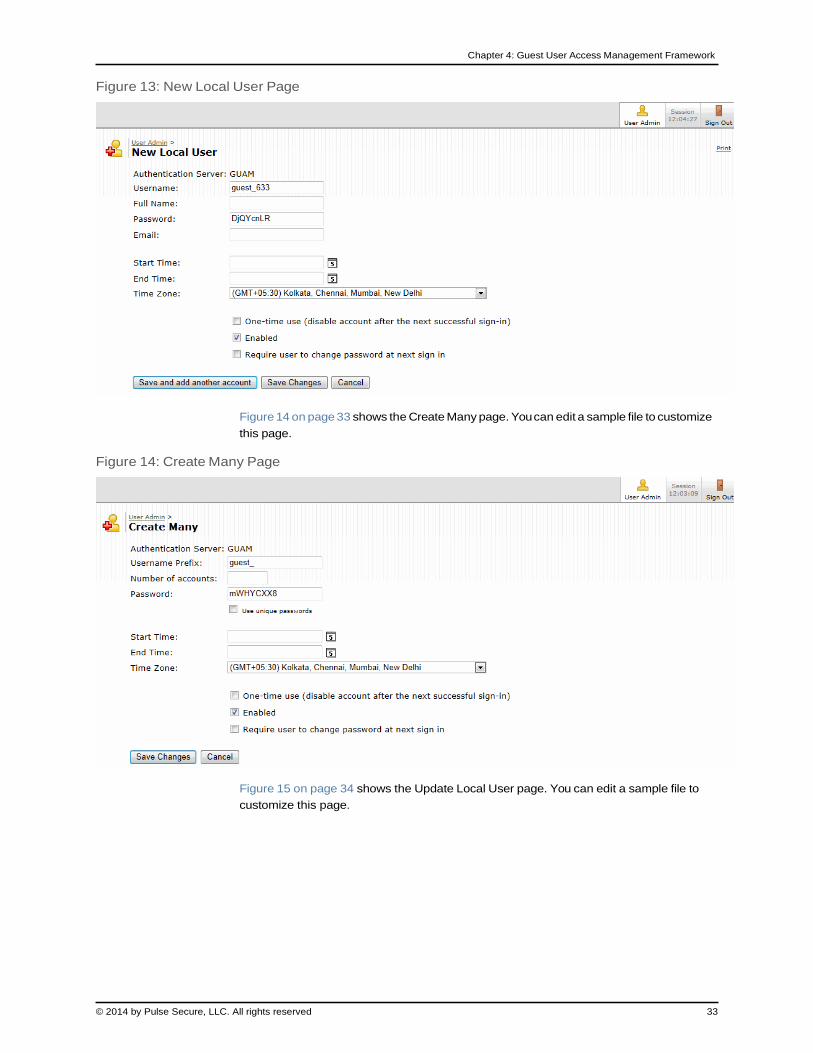
Figure 13 on page 33 shows the New Local User page. You can edit a sample file to
customize this page.
© 2014 by Pulse Secure, LLC. All rights reserved 33
Chapter 4: Guest User Access Management Framework
Figure 13: New Local User Page
Figure 14 on page 33 shows the Create Many page. You can edit a sample file to customize
this page.
Figure 14: Create Many Page
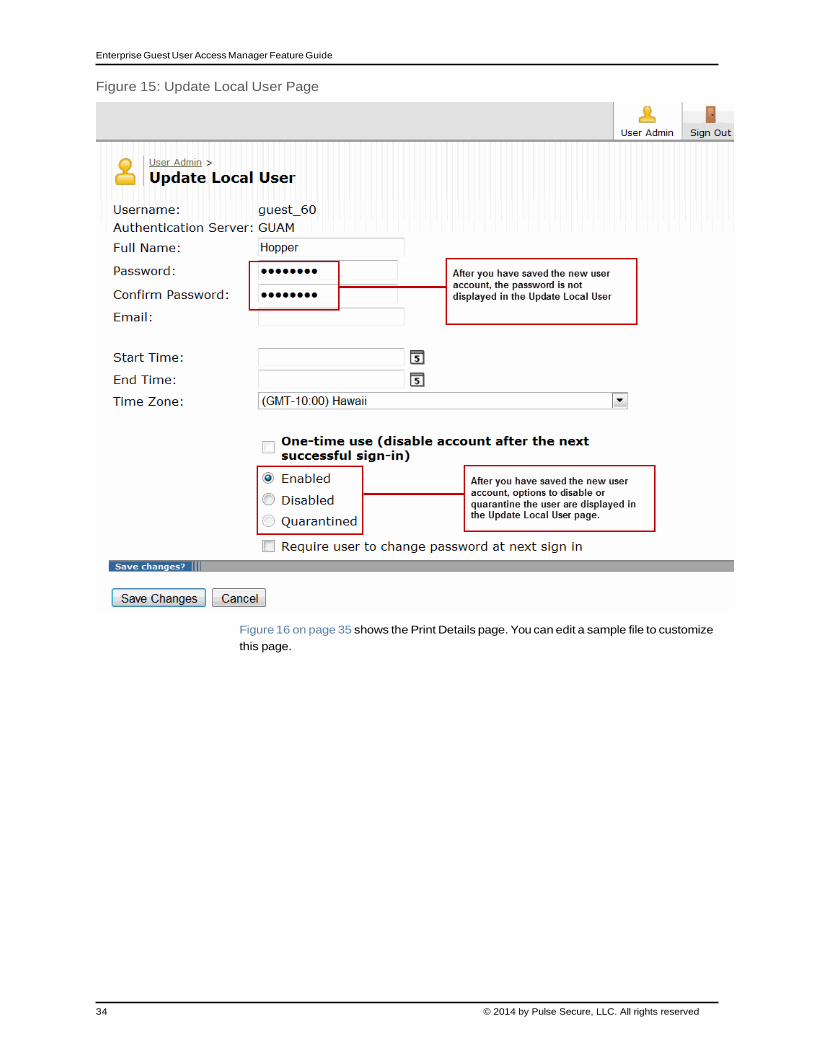
Figure 15 on page 34 shows the Update Local User page. You can edit a sample file to
customize this page.
34 © 2014 by Pulse Secure, LLC. All rights reserved
Enterprise Guest User Access Manager Feature Guide
Figure 15: Update Local User Page
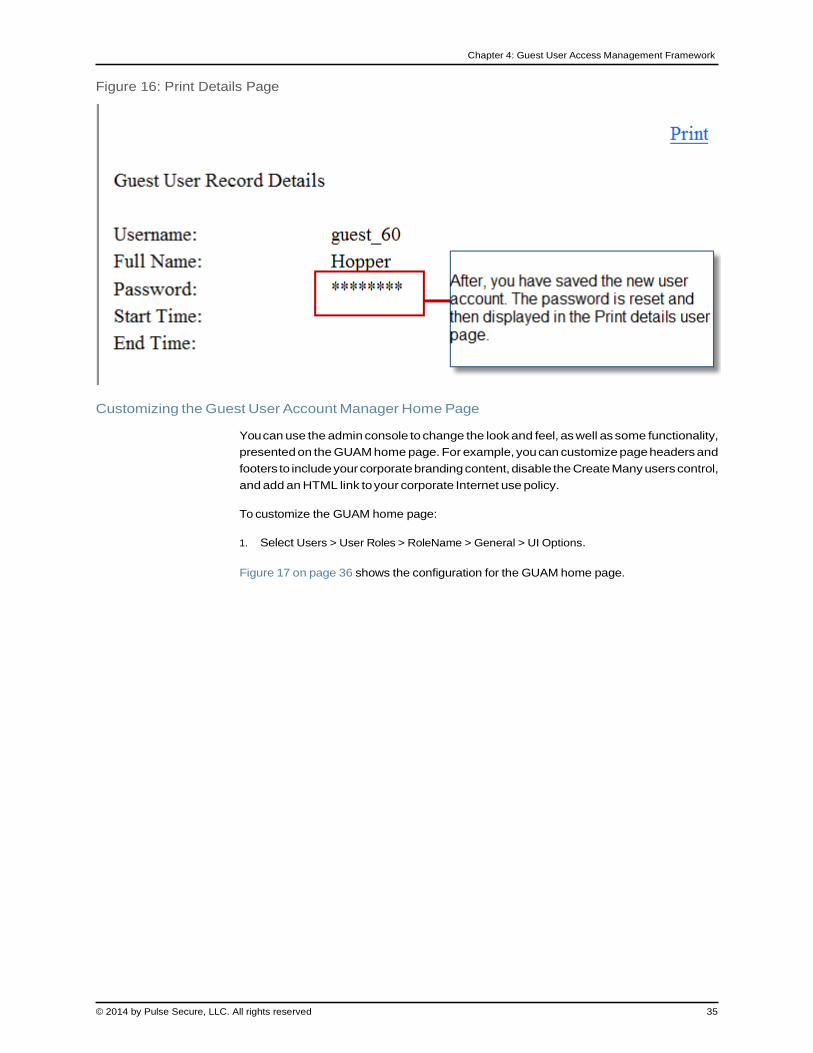
Figure 16 on page 35 shows the Print Details page. You can edit a sample file to customize
this page.
© 2014 by Pulse Secure, LLC. All rights reserved 35
Chapter 4: Guest User Access Management Framework
Figure 16: Print Details Page
Customizing the Guest User Account Manager Home Page
You can use the admin console to change the look and feel, as well as some functionality,
presented on the GUAM home page. For example, you can customize page headers and
footers to include your corporate branding content, disable the Create Many users control,
and add an HTML link to your corporate Internet use policy.
To customize the GUAM home page:
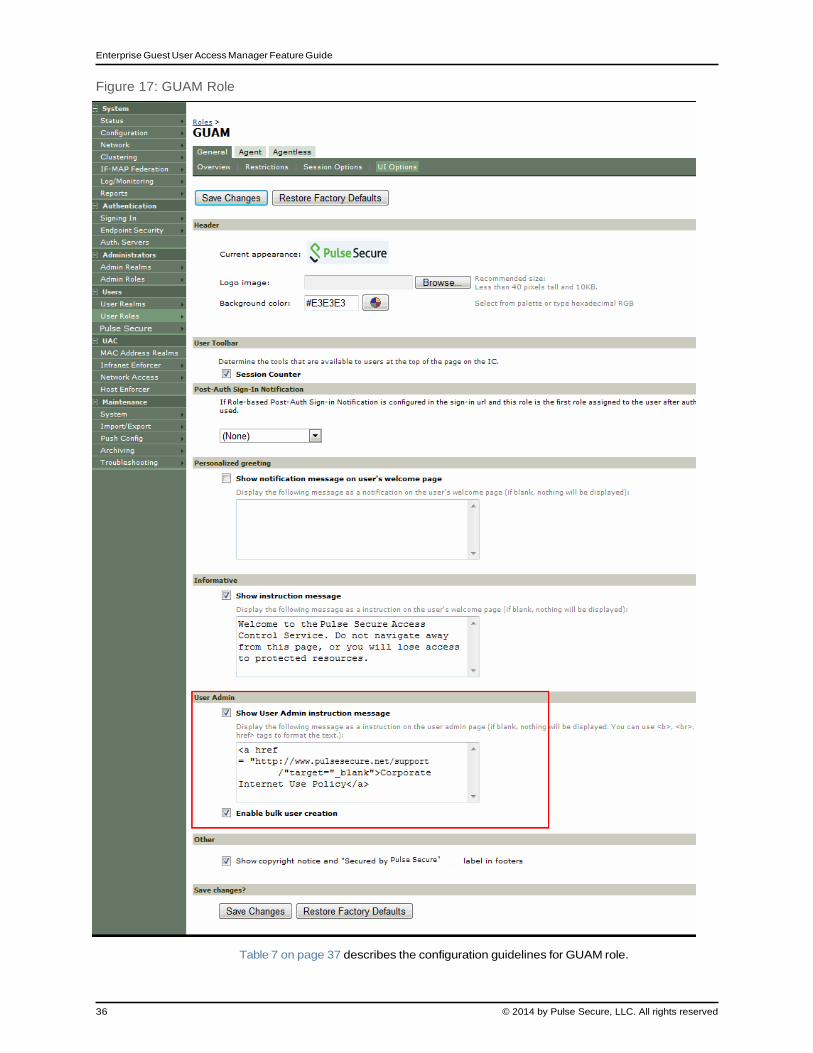
1. Select Users > User Roles > RoleName > General > UI Options.
Figure 17 on page 36 shows the configuration for the GUAM home page.
36 © 2014 by Pulse Secure, LLC. All rights reserved
Enterprise Guest User Access Manager Feature Guide
Figure 17: GUAM Role
Table 7 on page 37 describes the configuration guidelines for GUAM role.

© 2014 by Pulse Secure, LLC. All rights reserved 37
Chapter 4: Guest User Access Management Framework
Table 7: Guidelines for Configuring the GUAM Role
Settings
Header
Guidelines
Current appearance
Display the image that is currently used.
Logo image (Optional) Click Browse and locate your custom image file. The new logo appears in the Current
appearance box only after you save your changes.
Background color
User Toolbar
(Optional) Specify an alternate background color for the header area of the Access Control Service
welcome page. Type the hexadecimal number for the background color or click the Color Palette icon
and pick the desired color. The Current appearance box updates immediately.
Session Counter
Select the check box to display both a session countdown timer and an Extend button that allows
agentless users to extend their session time to the maximum session length if the Enable Session
Extension option is selected.
Post-Auth Sign-In Notification
(Optional) Select a post authentication message that you configured earlier. If you select this option,
the user receives an information page (for example, an end-user license agreement or EULA) that
you have created. If you defined a post sign-in notification and you select a message for a role, the
user is presented with the notification message after authentication. The user is prompted to click
Proceed or Decline. If the user clicks Proceed, the protected resource is available to the user. If the
user clicks Decline, they are immediately logged off and returned to the authentication page.
Personalized greeting
Show notification
message on user's
welcome page
Informative
Select the check box, and enter a message in the associated text box.
The message is displayed as a header on the device welcome page after the user is authenticated.
You can format text and add links using the following HTML tags: <i>, <b>,<br>,<font>,and <ahref>.
This information does not appear on the initial sign-in page that is displayed prior to authentication.
You can also use device system variables and attributes in this field.
NOTE:
The length of the personalized greeting cannot exceed 12K, (12,288 characters).
If you use unsupported HTML tags in your custom message, the device might display the user’s
device home page incorrectly.
Show instruction
message
User Admin
(Optional) Add instructions to the users welcome page.
38 © 2014 by Pulse Secure, LLC. All rights reserved
Enterprise Guest User Access Manager Feature Guide
Table 7: Guidelines for Configuring the GUAM Role (continued)
Settings Guidelines
Instructions for Guest
User Account Manager
(Optional) Add instructions to the GUAM that will appear on the GUAM sign-in page. You can use the
following HTML tags to format the text: <b>, <br>, <font>, <noscript>, and <a href>. See
Figure 18 on page 38 to see an example of how this text is displayed on the GUAM sign-in page. If you
include a link to an external website, a warning message appears informing the user of loss of access
privileges if they leave the current page. To avoid this, add a tag for opening links in a new browser
window. For example: <a href=”http://pulsesecure.net/support target=”_blank”>Corporate Internet
Usage Policy</a> displays the linked text “Corporate Internet Usage Policy”, and the link opens in a
new browser window. The instruction message supports non-English languages.
NOTE: The length of the custom instruction cannot exceed 12K (12,288 characters).
Enable bulk user
creation
Other
Select this option to enable bulk user creation. This option is selected by default. Uncheck this option
to disable bulk user creation.
Show copyright notice
and "Secured by
Pulse Secure" label
in footers
Specify whether or not to display the copyright notice and label in the footer. This setting applies only
to users whose license permits disabling the copyright notice. For more information about this feature,
call Pulse Secure Global Support Centre (PSGSC).
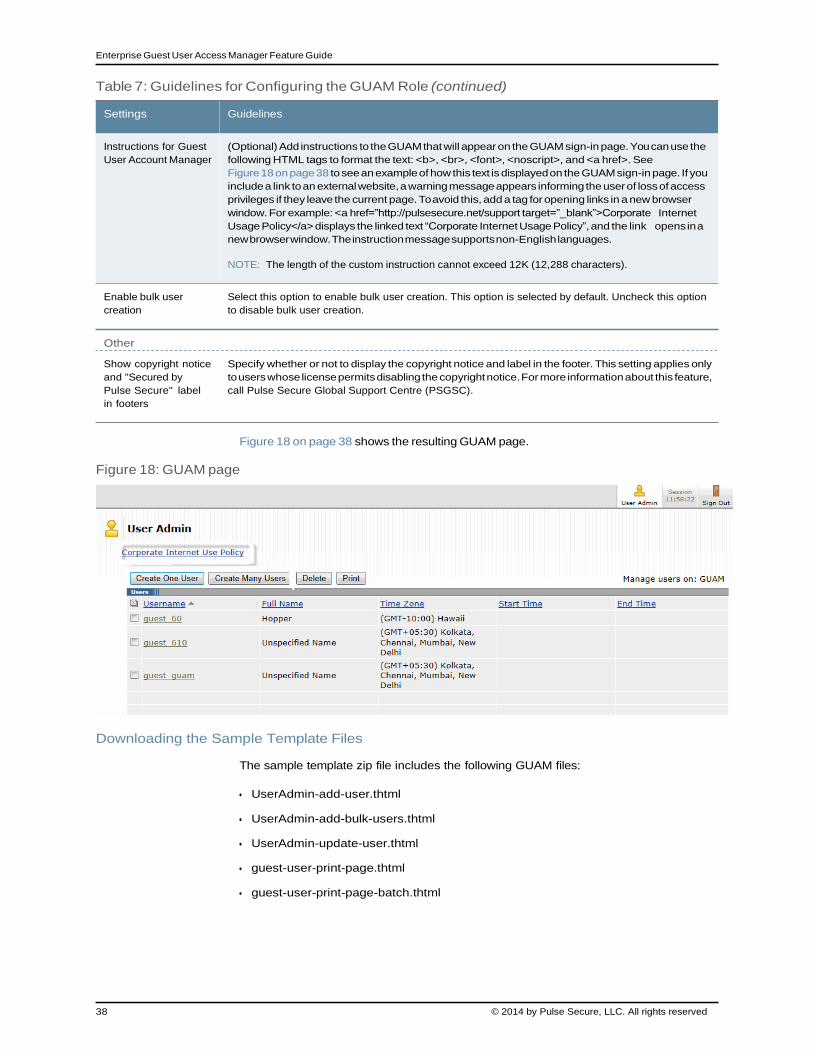
Figure 18 on page 38 shows the resulting GUAM page.
Figure 18: GUAM page
Downloading the Sample Template Files
The sample template zip file includes the following GUAM files:
UserAdmin-add-user.thtml
UserAdmin-add-bulk-users.thtml
UserAdmin-update-user.thtml
guest-user-print-page.thtml
guest-user-print-page-batch.thtml
© 2014 by Pulse Secure, LLC. All rights reserved 39
Chapter 4: Guest User Access Management Framework
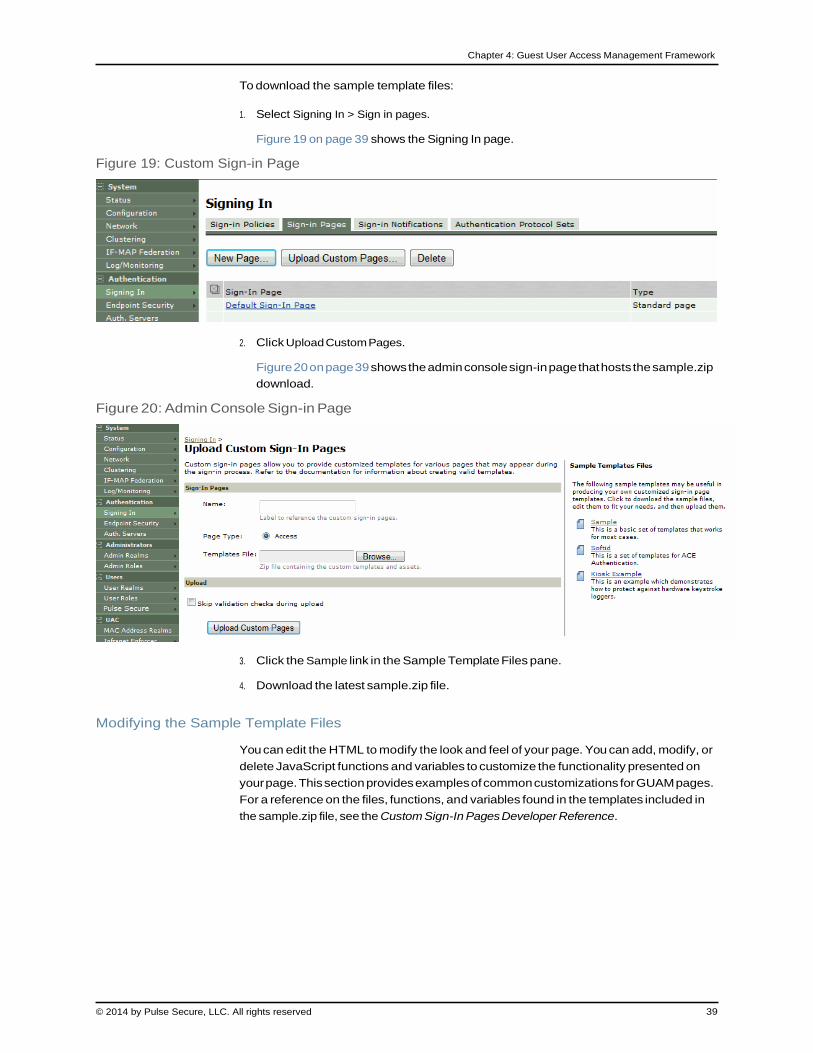
To download the sample template files:
1. Select Signing In > Sign in pages.
Figure 19 on page 39 shows the Signing In page.
Figure 19: Custom Sign-in Page
2. Click Upload Custom Pages.
Figure 20 on page 39 shows the admin console sign-in page that hosts the sample.zip
download.
Figure 20: Admin Console Sign-in Page
3. Click the Sample link in the Sample Template Files pane.
4. Download the latest sample.zip file. Modifying the Sample Template Files
You can edit the HTML to modify the look and feel of your page. You can add, modify, or
delete JavaScript functions and variables to customize the functionality presented on
your page. This section provides examples of common customizations for GUAM pages.
For a reference on the files, functions, and variables found in the templates included in
the sample.zip file, see the Custom Sign-In Pages Developer Reference.
40 © 2014 by Pulse Secure, LLC. All rights reserved
Enterprise Guest User Access Manager Feature Guide
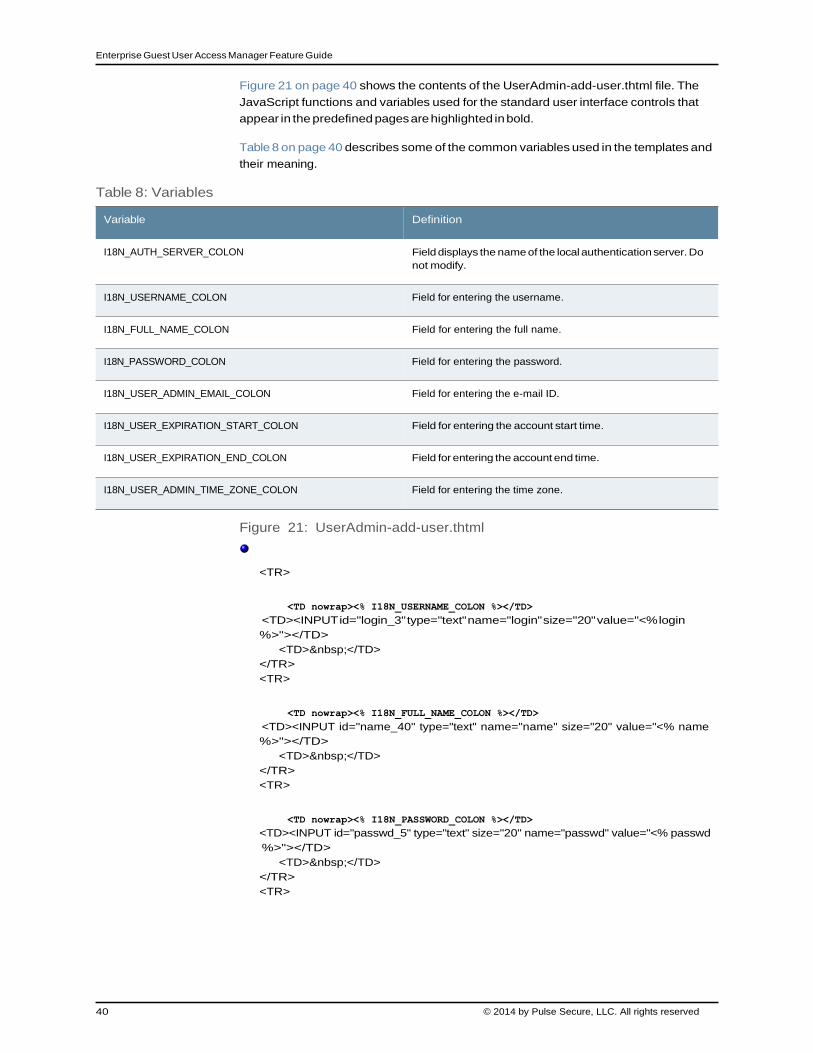
Figure 21 on page 40 shows the contents of the UserAdmin-add-user.thtml file. The
JavaScript functions and variables used for the standard user interface controls that
appear in the predefined pages are highlighted in bold.
Table 8 on page 40 describes some of the common variables used in the templates and
their meaning.
Table 8: Variables
Variable Definition
I18N_AUTH_SERVER_COLON Field displays the name of the local authentication server. Do
not modify.
I18N_USERNAME_COLON Field for entering the username.
I18N_FULL_NAME_COLON Field for entering the full name.
I18N_PASSWORD_COLON Field for entering the password.
I18N_USER_ADMIN_EMAIL_COLON Field for entering the e-mail ID.
I18N_USER_EXPIRATION_START_COLON Field for entering the account start time.
I18N_USER_EXPIRATION_END_COLON Field for entering the account end time.
I18N_USER_ADMIN_TIME_ZONE_COLON Field for entering the time zone.
Figure 21: UserAdmin-add-user.thtml
<TR>
<TD nowrap><% I18N_USERNAME_COLON %></TD>
<TD><INPUT id="login_3" type="text" name="login" size="20" value="<% login
%>"></TD>
<TD> </TD>
</TR>
<TR>
<TD nowrap><% I18N_FULL_NAME_COLON %></TD>
<TD><INPUT id="name_40" type="text" name="name" size="20" value="<% name
%>"></TD>
<TD> </TD>
</TR>
<TR>
<TD nowrap><% I18N_PASSWORD_COLON %></TD>
<TD><INPUT id="passwd_5" type="text" size="20" name="passwd" value="<% passwd
%>"></TD>
<TD> </TD>
</TR>
<TR>

© 2014 by Pulse Secure, LLC. All rights reserved 41
Chapter 4: Guest User Access Management Framework
<TD nowrap><% I18N_USER_ADMIN_EMAIL_COLON %></TD>
<TD><INPUT id="email_4" type="text" name="email" size="20" value="<% email
%>"></TD>
<TD> </TD>
</TR>
<TR>
<TD nowrap><% I18N_USER_EXPIRATION_START_COLON %></TD>
<td><input id="start_timestamp_4" type="text" name="start_timestamp" value="<%
startTimeDisplay %>">
<script language="JavaScript">
new tcal ({
'formname': 'frmNewUser', /// form name
'controlname': 'start_timestamp' /// input
name
}, 8);
</script></td>
<TD> </TD>
</TR>
<td><input id="expiration_timestamp_4" type="text"
name="expiration_timestamp" value="<% expirationDisplay %>">
<script language="JavaScript">
new tcal ({
'formname': 'frmNewUser', /// form name
'controlname': 'expiration_timestamp' /// input name
}, 17);
</script></td>
<TR>
<TD nowrap><% I18N_USER_ADMIN_TIME_ZONE_COLON %></TD>
<TD colspan=3>
<select id="cmbTimeZoneAddLocal" name="cmbTimeZoneAddLocal">
<% SET count = 0 %>
<% FOREACH tz = tzList %>
<option id="option_addlocal_time_<%count%>" <%tz.selected%>
value="<%tz.value%>"><%tz.display%></option>
<% SET count = count + 1 %>
<% END %>
</select>
</TD>
</TR>
You can remove fields from the user interface form by deleting the HTML and JavaScript
that define them from the sample file. For example, to delete the “one-time use” option
box, delete the following HTML and variables:
Example
<table id="table_useradmaddlocal_4" border="0" cellpadding="2" cellspacing="0">
<tr>
<td><input type="checkbox" name="oneTimeUser" id="oneTimeUser" <%disabled%>
value="ON" <%IF oneTimeUser == 1%>checked<%END%>></td>
<td><%I18N_ONE_TIME_USE_NO_COLON%>
(<%I18N_ONE_TIME_USE_DISABLE_ACCOUNT%>)I18N_ONE_TIME_USE_NO_COLON%>
42 © 2014 by Pulse Secure, LLC. All rights reserved
Enterprise Guest User Access Manager Feature Guide
(<%I18N_ONE_TIME_USE_DISABLE_ACCOUNT%>)</td>
</tr>
</table>
NOTE: Never delete or modify the following variables:
authServer– Specifies the Internal ID of the authentication server.
errorMsg– Specifies the error message. The device generates the error
message in case of an error otherwise it will be empty.
Never delete or modify the <%isUAC%> variable tag.
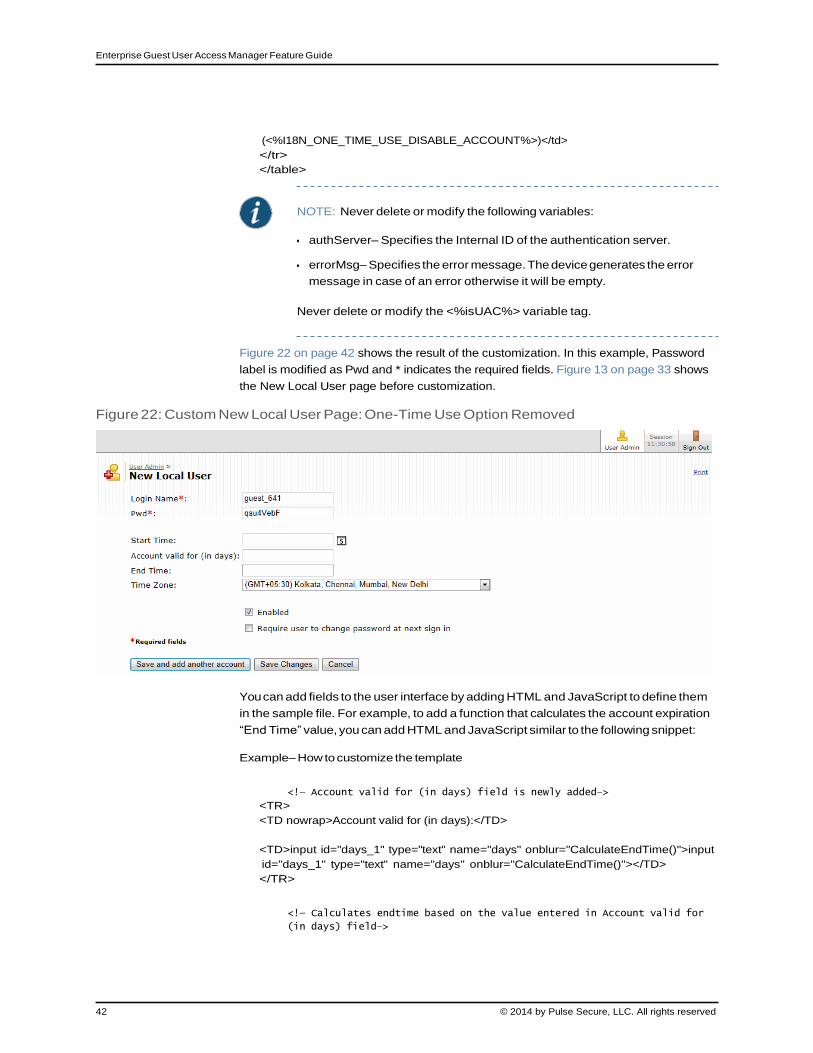
Figure 22 on page 42 shows the result of the customization. In this example, Password
label is modified as Pwd and * indicates the required fields. Figure 13 on page 33 shows
the New Local User page before customization.
Figure 22: Custom New Local User Page: One-Time Use Option Removed
You can add fields to the user interface by adding HTML and JavaScript to define them
in the sample file. For example, to add a function that calculates the account expiration
“End Time” value, you can add HTML and JavaScript similar to the following snippet:
Example– How to customize the template
<!— Account valid for (in days) field is newly added–>
<TR>
<TD nowrap>Account valid for (in days):</TD>
<TD>input id="days_1" type="text" name="days" onblur="CalculateEndTime()">input
id="days_1" type="text" name="days" onblur="CalculateEndTime()"></TD>
</TR>
<!— Calculates endtime based on the value entered in Account valid for
(in days) field–>

© 2014 by Pulse Secure, LLC. All rights reserved 43
Chapter 4: Guest User Access Management Framework
function CalculateEndTime() {
var someDate = new Date(document.forms["frmNewUser"]["start_timestamp"].value);
var numberOfDaysToAdd = document.forms["frmNewUser"]["days"].value;
var millisecondOffset = numberOfDaysToAdd * 24 * 60 * 60 * 1000;
someDate.setTime(someDate.getTime() + millisecondOffset);
//-Formatting to mm/dd/yyyy :
var dd = someDate.getDate();
var mm = someDate.getMonth() + 1;
var y = someDate.getFullYear();
var hh = someDate.getHours();
var min = someDate.getMinutes();
var expirationDisplay= mm + '/'+ dd + '/'+ y + ' ' + '5:00 pm';
document.forms["frmNewUser"].display_expiration.value = expirationDisplay;
}
NOTE: Figure 23 on page 43 shows the result of the customization.
Figure 23: Custom New Local User Page: Controls Added to Calculate Account Expiration
You can also add HTML and JavaScript commonly used to validate data entry. For
example, the following snippet shows a validation function and the HTML that would
indicate to the administrator how to correct the data entry that has failed the validation
check.
Example– How to customize the template
<!–Validates and alerts the users if the Login name is more than 10
characters>
function validate()
{
var y= document.forms["frmNewUser"]["login"].value;

44 © 2014 by Pulse Secure, LLC. All rights reserved
Enterprise Guest User Access Manager Feature Guide
if (y.length > 10)
{
alert("Login name should be less than 10 characters");
return false;
}
document.forms["frmNewUser"]["expiration_timestamp"].value =
document.forms["frmNewUser"]["display_expiration"].value
}
Figure 24 on page 44 shows the result of the customization shown in this example.
Figure 24: Custom New Local User Page: Data Entry Validation
Uploading Your Customized Files
After you have edited the sample template files, save the files with the same name and
add them to the sample.zip file (replacing the previous files).
To upload the files to the system:
1. Select Signing In > Sign-in pages.
2. Click Browse to select the sample.zip file containing the custom templates and assets.
3. Click Upload Custom Pages.
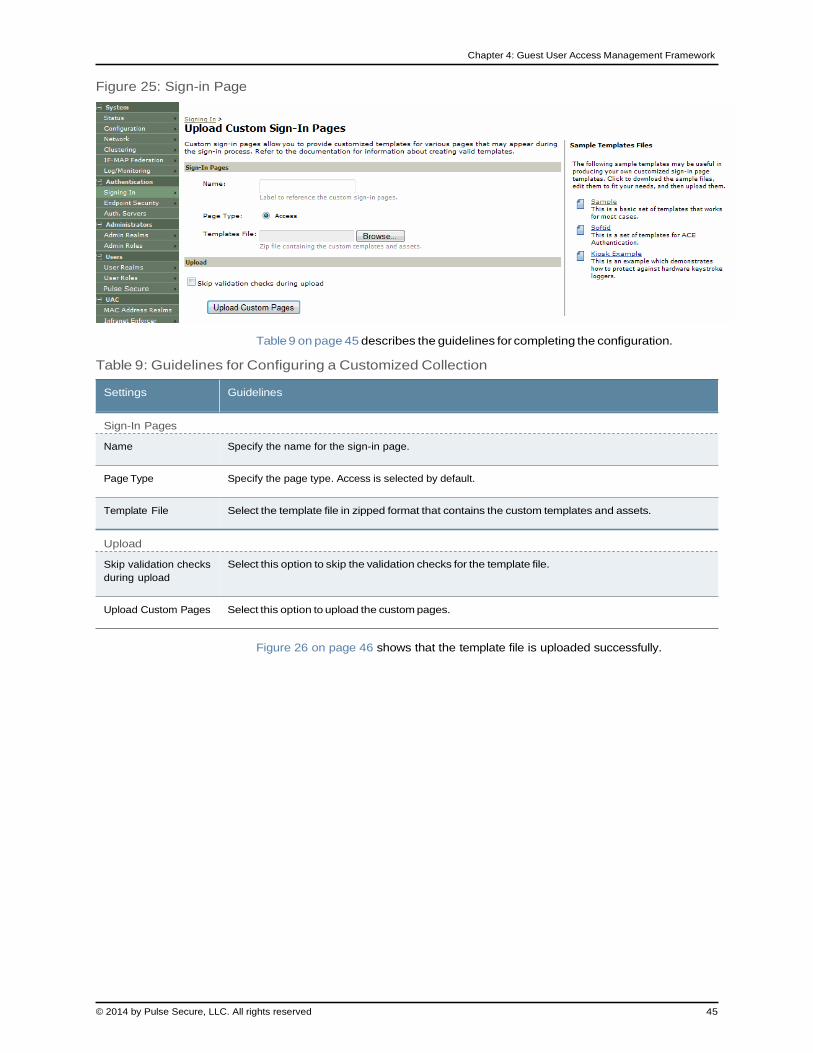
Figure 25 on page 45 shows the admin console sign-in page that hosts the sample.zip
download.
© 2014 by Pulse Secure, LLC. All rights reserved 45
Chapter 4: Guest User Access Management Framework
Figure 25: Sign-in Page
Table 9 on page 45 describes the guidelines for completing the configuration.
Table 9: Guidelines for Configuring a Customized Collection
Settings
Sign-In Pages
Guidelines
Name
Specify the name for the sign-in page.
Page Type Specify the page type. Access is selected by default.
Template File
Upload
Select the template file in zipped format that contains the custom templates and assets.
Skip validation checks
during upload
Select this option to skip the validation checks for the template file.
Upload Custom Pages Select this option to upload the custom pages.
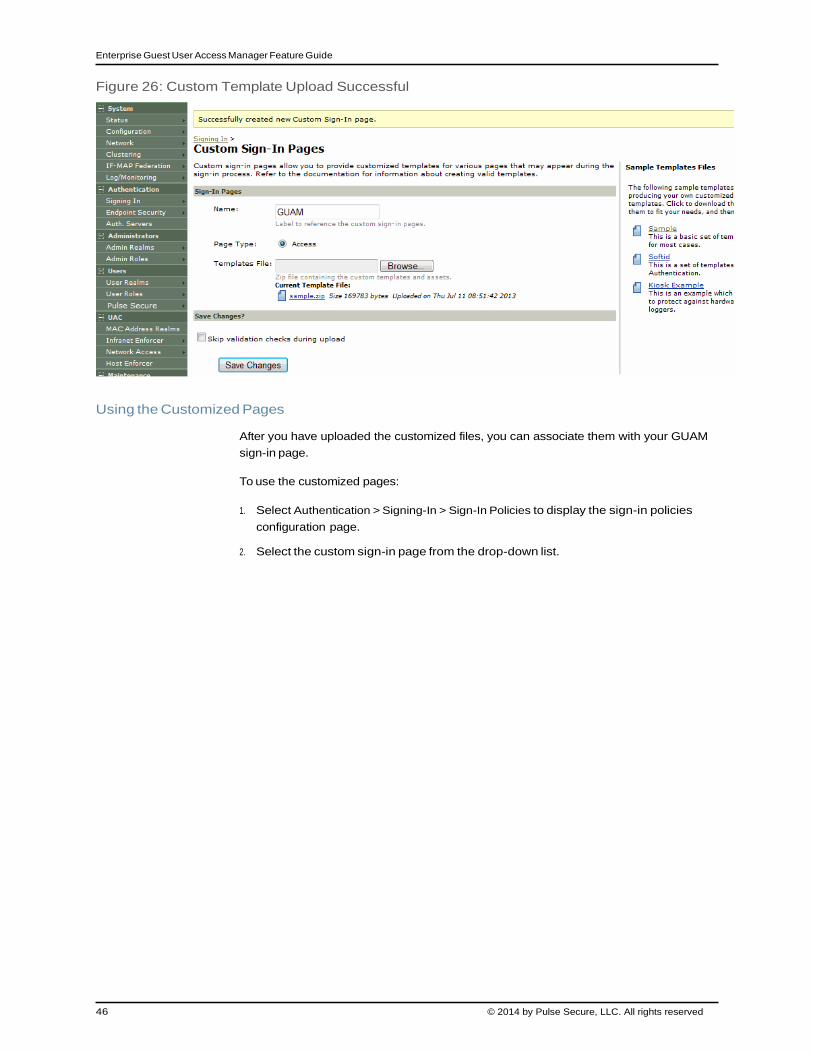
Figure 26 on page 46 shows that the template file is uploaded successfully.
46 © 2014 by Pulse Secure, LLC. All rights reserved
Enterprise Guest User Access Manager Feature Guide
Figure 26: Custom Template Upload Successful
Using the Customized Pages
After you have uploaded the customized files, you can associate them with your GUAM
sign-in page.
To use the customized pages:
1. Select Authentication > Signing-In > Sign-In Policies to display the sign-in policies
configuration page.
2. Select the custom sign-in page from the drop-down list.
© 2014 by Pulse Secure, LLC. All rights reserved 47
Chapter 4: Guest User Access Management Framework
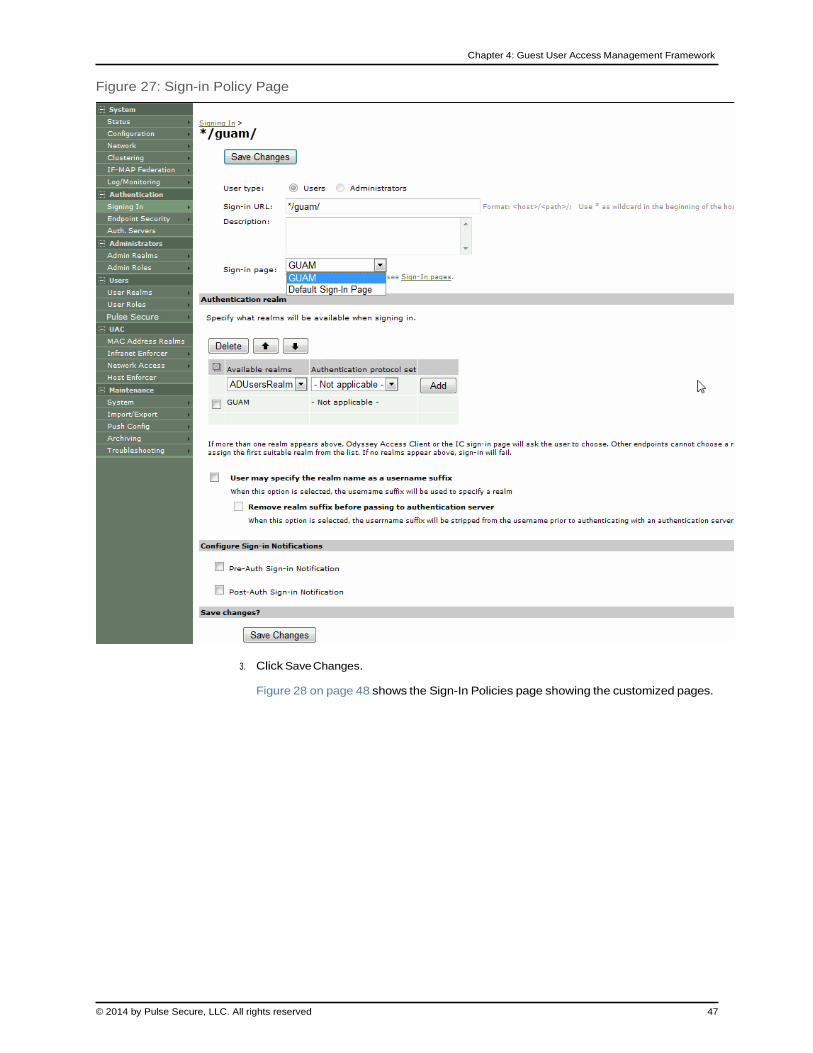
Figure 27: Sign-in Policy Page
3. Click Save Changes.
Figure 28 on page 48 shows the Sign-In Policies page showing the customized pages.

48 © 2014 by Pulse Secure, LLC. All rights reserved
Enterprise Guest User Access Manager Feature Guide
Figure 28: Sign-in Policy Page Showing Customized Pages
Verifying the Customization
Sign in to the GUAM sign-in page as a guest user account manager and verify that the
customizations you have made were applied.
Figure 29 on page 48 shows the customized New Local User page.
Figure 29: Customized New Local User Page
Related
Documentation
Creating Temporary Guest User Accounts on page 55
Configuring the Guest User Access Management Framework on page 14
Enterprise Guest Access Overview on page 3
Custom Sign-In Pages Developer Reference, Release 8.0/5.0

© 2014 by Pulse Secure, LLC. All rights reserved 49
Chapter 4: Guest User Access Management Framework
SMS Gateway Settings for Guest User Accounts
Short Message Service (SMS) is delivered through an SMS gateway service that supports
HTTP, HTTPS, and SMTP (Simple Mail Transport Protocol) delivery. You need to subscribe
to an external service to be able to deliver guest details using SMS. The SMS gateway
sends SMS in formatted text message using HTTP/HTTPS interface (SMS message)
and can also allow email message to be sent as an SMS. An example of an SMS gateway
is clickatell.com. You should have a valid account with this third party.
To create an account with Clickatell:
1. Go to http://www.clickatell.com/products/sms_gateway.php, and choose the
appropriate API sub-product (connection method) you wish to use.
2. Click on the registration hyperlink.
3. Select the Account type you would like to use (Local or International)
4. Enter your personal information to complete the registration form.
5. Accept the Terms & Conditions.
6. Click Continue - An email containing your login details such as account login name,
password, and clientID will be sent to the email address you have provided.
7. Activate your account – When user has logged in, and user will be on the Clickatell
Central landing page and HTTP API will be added to the account and client API ID will
be issued to the account. A single account may have multiple API IDs associated with
it.
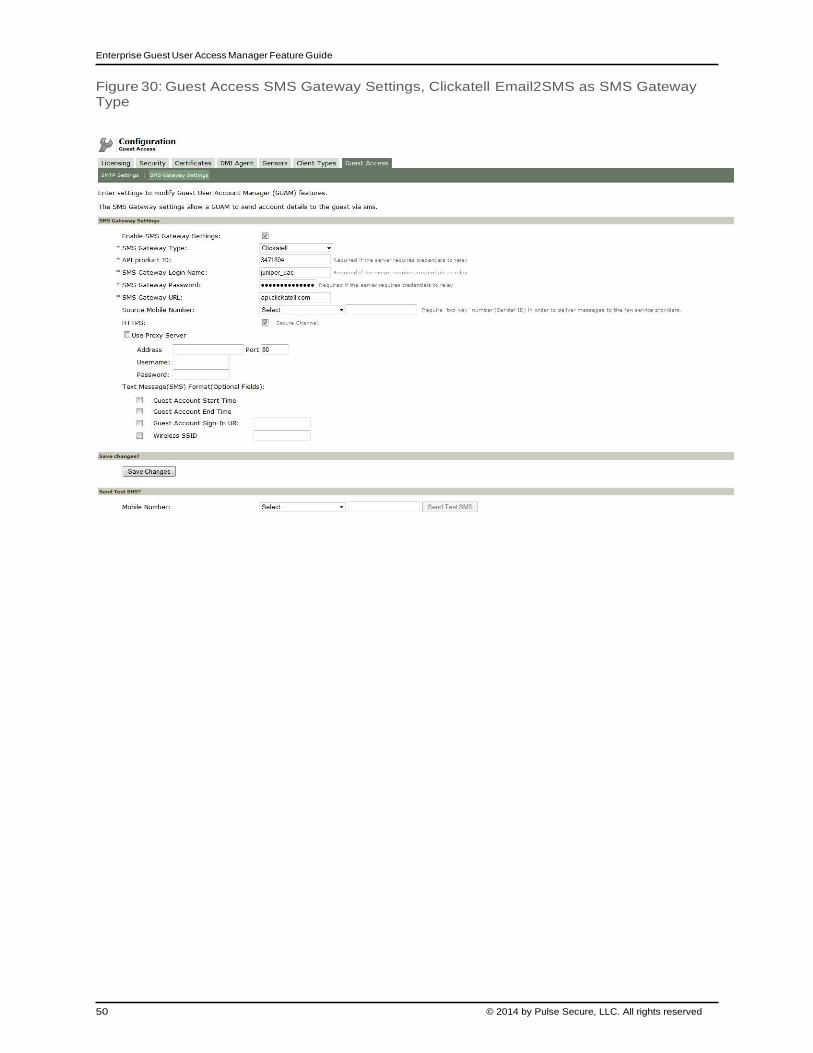
To enable the SMS gateway settings using Policy Secure:
1. In the admin console, select Configuration > Guest Access.
2. Select the Enable SMS Gateway Settings.
Figure 30 on page 50 and Figure 31 on page 51 shows the configuration page for SMS
gateway settings.
3. Complete the configuration settings as described in Table 10 on page 51.
4. Click Save Changes.
5. Click Send Test SMS.
50 © 2014 by Pulse Secure, LLC. All rights reserved
Enterprise Guest User Access Manager Feature Guide
Figure 30: Guest Access SMS Gateway Settings, Clickatell Email2SMS as SMS Gateway Type
© 2014 by Pulse Secure, LLC. All rights reserved 51
Chapter 4: Guest User Access Management Framework
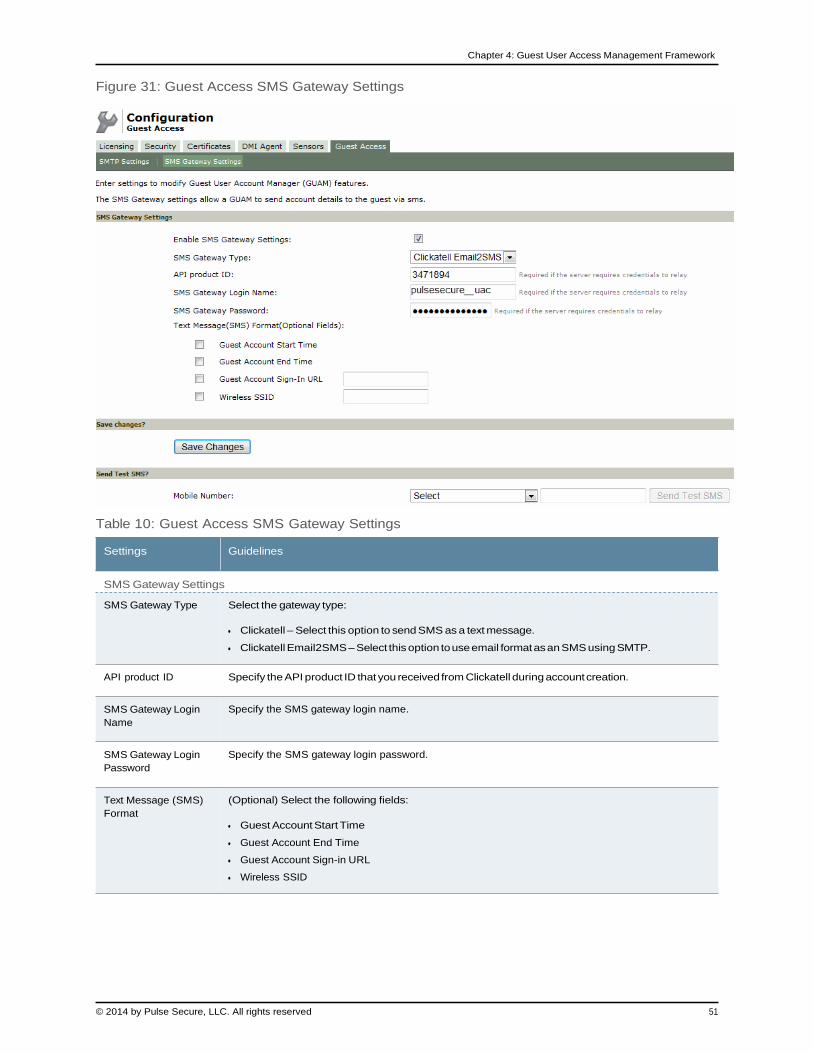
Figure 31: Guest Access SMS Gateway Settings
Table 10: Guest Access SMS Gateway Settings
Settings
SMS Gateway Settings
Guidelines
SMS Gateway Type
Select the gateway type:
Clickatell – Select this option to send SMS as a text message.
Clickatell Email2SMS – Select this option to use email format as an SMS using SMTP.
API product ID Specify the API product ID that you received from Clickatell during account creation.
SMS Gateway Login
Name
Specify the SMS gateway login name.
SMS Gateway Login
Password
Specify the SMS gateway login password.
Text Message (SMS)
Format
(Optional) Select the following fields:
Guest Account Start Time
Guest Account End Time
Guest Account Sign-in URL
Wireless SSID

52 © 2014 by Pulse Secure, LLC. All rights reserved
Enterprise Guest User Access Manager Feature Guide
Table 10: Guest Access SMS Gateway Settings (continued)
Settings Guidelines
The following options apply if you select Clickatell as gateway type.
SMS Gateway URL Specify the SMS Gateway URL.
(Default) https://api.clickatell.com or http://api.clickatell.com
HTTPS Select this option to use a secure connection. If you don't select this option user will be notified about
clear text transmission of guest user credentials.
Use Proxy Server Select this option to access the internet or SMS gateway URL using a proxy server.
Address Specify the address of the proxy server and its port.
Username Specify the username of the proxy server.
Password
Send Test SMS
Specify the password of the proxy server.
Mobile Number
Source Mobile Number
Related
Documentation
Select the country name and then specify a valid phone number of the guest user. The phone number
should not include country code or any special character such as +,*, and so on.
The Policy Secure sends a test SMS with the login credentials to this mobile number through SMS. Specify the sender ID configured in Clickatell Account
Enterprise Guest Access Overview on page 3
Configuring the Guest User Access Management Framework on page 14
© 2014 by Pulse Secure, LLC. All rights reserved 53
PART 3
Administration
Guest User Account Managers on page 55
© 2014 by Pulse Secure, LLC. All rights reserved 55
CHAPTER 5
Guest User Account Managers
Creating Temporary Guest User Accounts on page 55
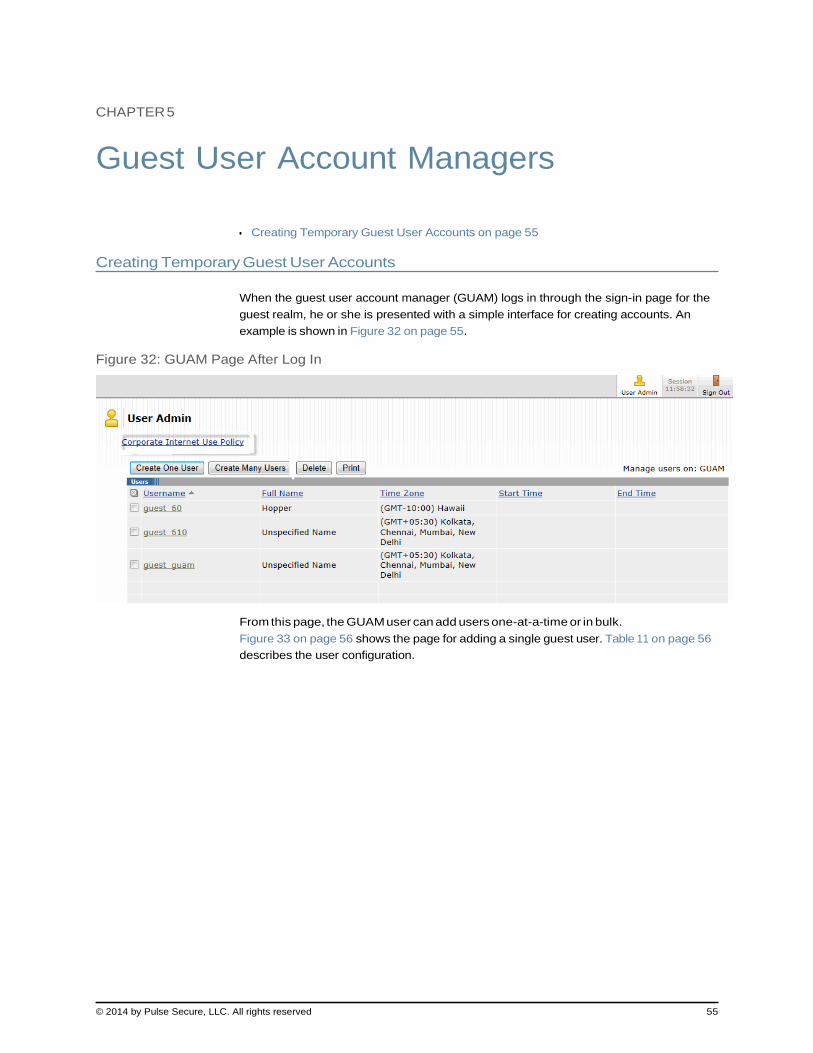
Creating Temporary Guest User Accounts
When the guest user account manager (GUAM) logs in through the sign-in page for the
guest realm, he or she is presented with a simple interface for creating accounts. An
example is shown in Figure 32 on page 55.
Figure 32: GUAM Page After Log In
From this page, the GUAM user can add users one-at-a-time or in bulk.
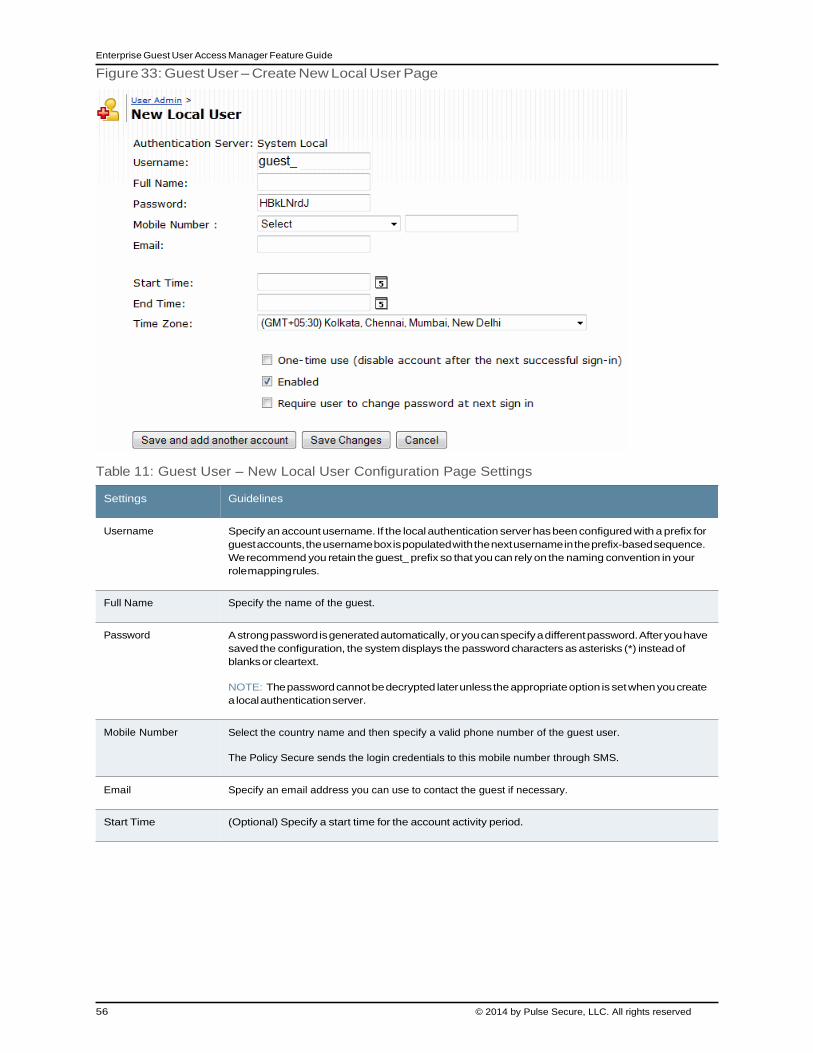
Figure 33 on page 56 shows the page for adding a single guest user. Table 11 on page 56
describes the user configuration.
56 © 2014 by Pulse Secure, LLC. All rights reserved
Enterprise Guest User Access Manager Feature Guide
Figure 33: Guest User – Create New Local User Page
Table 11: Guest User – New Local User Configuration Page Settings
Settings Guidelines
Username Specify an account username. If the local authentication server has been configured with a prefix for
guest accounts, the username box is populated with the next username in the prefix-based sequence.
We recommend you retain the guest_ prefix so that you can rely on the naming convention in your
role mapping rules.
Full Name Specify the name of the guest.
Password A strong password is generated automatically, or you can specify a different password. After you have
saved the configuration, the system displays the password characters as asterisks (*) instead of
blanks or cleartext.
NOTE: The password cannot be decrypted later unless the appropriate option is set when you create
a local authentication server.
Mobile Number Select the country name and then specify a valid phone number of the guest user.
The Policy Secure sends the login credentials to this mobile number through SMS.
Email Specify an email address you can use to contact the guest if necessary.
Start Time (Optional) Specify a start time for the account activity period.
© 2014 by Pulse Secure, LLC. All rights reserved 57
Chapter 5: Guest User Account Managers
Table 11: Guest User – New Local User Configuration Page Settings (continued)
Settings Guidelines
End Time (Optional) Specify an end of the account activity period. Once a user account has expired, it is deleted
from the system.
The process that deletes the guest user account runs every ten minutes. There may be a delay of
some minutes before the account is purged. Even if the time or date on the system is moved ahead
past the expiration time, the account could still be valid until the purge process runs. One-time user
accounts are not affected by the ten-minute delay: one-time accounts are deleted immediately after
the user exits.
Time Zone Specify the time zone for the guest user, which might be different from the time zone for the Access
Control Service.
One-time use Select this option if you want the account deleted immediately after the guest user exits the browser
or signs out.
Enabled Select this option to enable the account.
Require user to change
password
Select this option to prompt the user to change the configured password.
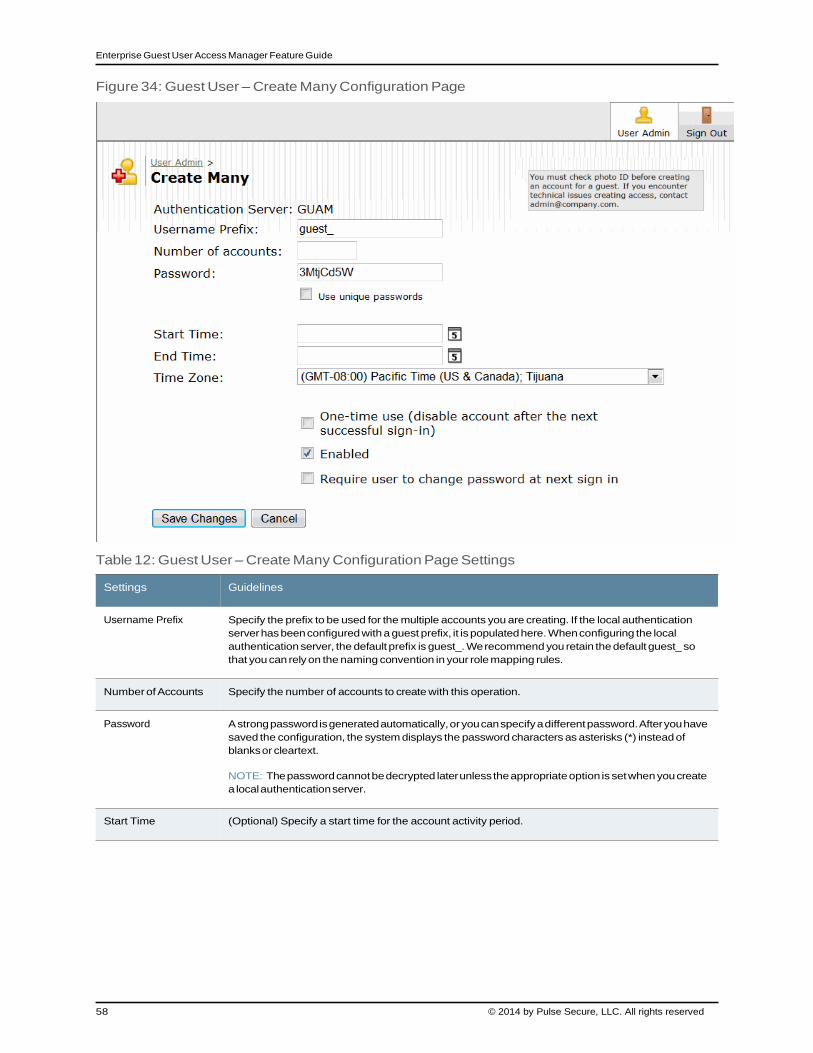
Figure 34 on page 58 shows the page for adding many users. Table 12 on page 58 describes
the user configuration.
58 © 2014 by Pulse Secure, LLC. All rights reserved
Enterprise Guest User Access Manager Feature Guide
Figure 34: Guest User – Create Many Configuration Page
Table 12: Guest User – Create Many Configuration Page Settings
Settings Guidelines
Username Prefix Specify the prefix to be used for the multiple accounts you are creating. If the local authentication
server has been configured with a guest prefix, it is populated here. When configuring the local
authentication server, the default prefix is guest_. We recommend you retain the default guest_ so
that you can rely on the naming convention in your role mapping rules.
Number of Accounts Specify the number of accounts to create with this operation.
Password A strong password is generated automatically, or you can specify a different password. After you have
saved the configuration, the system displays the password characters as asterisks (*) instead of
blanks or cleartext.
NOTE: The password cannot be decrypted later unless the appropriate option is set when you create
a local authentication server.
Start Time (Optional) Specify a start time for the account activity period.
© 2014 by Pulse Secure, LLC. All rights reserved 59
Chapter 5: Guest User Account Managers
Table 12: Guest User – Create Many Configuration Page Settings (continued)
Settings Guidelines
End Time (Optional) Specify an end of the account activity period. Once a user account has expired, it is deleted
from the system.
The process that deletes the guest user account runs every ten minutes. There may be a delay of
some minutes before the account is purged. Even if the time or date on the system is moved ahead
past the expiration time, the account could still be valid until the purge process runs. One-time user
accounts are not affected by the ten-minute delay: one-time accounts are deleted immediately after
the user exits.
Time Zone Specify the time zone for the guest user, which might be different from the time zone for the Access
Control Service.
One-time use Select this option if you want the account deleted immediately after the guest user exits the browser
or signs out.
Enabled Select this option to enable the account.
Require user to change
password
Select this option to prompt the user to change the configured password.
From the GUAM page, the GUAM user can click the link for a guest user account to modify
some guest user account details. Figure 35 on page 60 shows the guest account update
page.
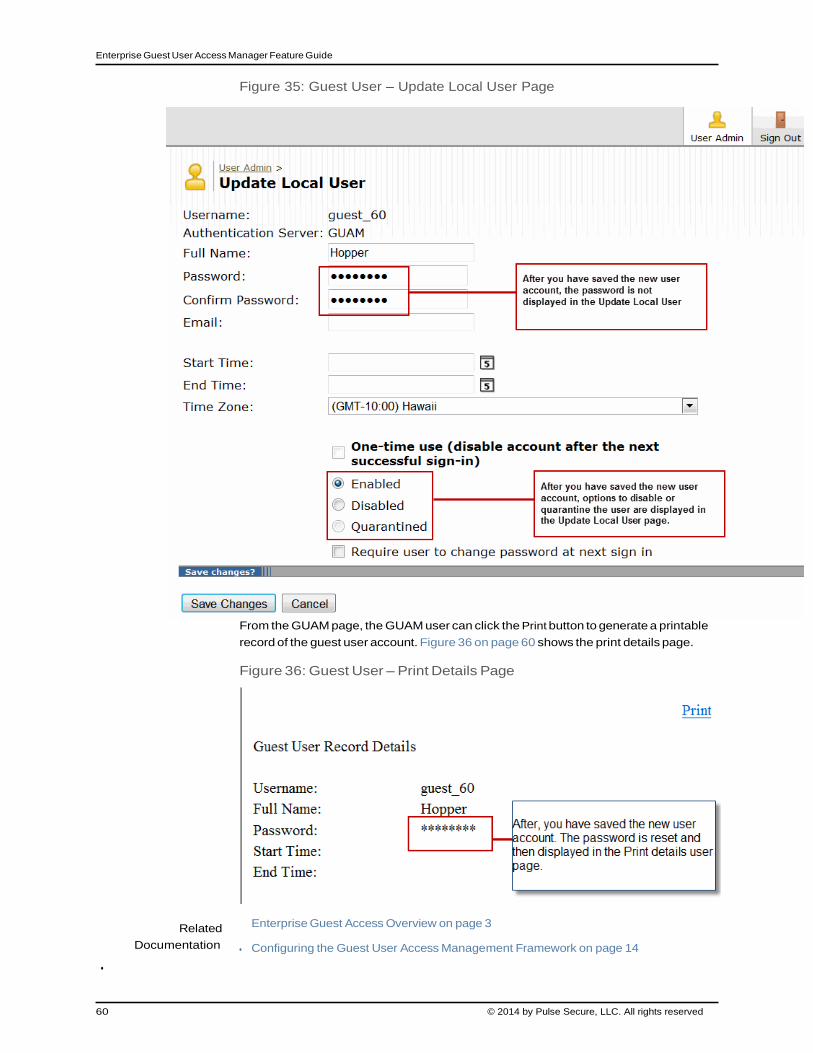
60 © 2014 by Pulse Secure, LLC. All rights reserved
Enterprise Guest User Access Manager Feature Guide
Figure 35: Guest User – Update Local User Page
From the GUAM page, the GUAM user can click the Print button to generate a printable
record of the guest user account. Figure 36 on page 60 shows the print details page.
Figure 36: Guest User – Print Details Page
Related
Documentation
Enterprise Guest Access Overview on page 3
Configuring the Guest User Access Management Framework on page 14

© 2014 by Pulse Secure, LLC. All rights reserved