Embed Size (px)
Citation preview
Pulse Connect Secure Getting Started Guide for PSA Series and MAG Series Appliances
PPuubblliisshheedd DDaattee May 2016
3.0 Document Revision

Getting Started Guide for PSA Series and MAG Series Appliances
© 2016 by Pulse Secure, LLC. All rights reserved 2
Pulse Secure, LLC
2700 Zanker Road, Suite 200
San Jose, CA 95134
This product includes the Envoy SNMP Engine, developed by Epilogue Technology, an Integrated Systems
Company. Copyright © 1986-1997, Epilogue Technology Corporation. All rights reserved. This program and its
documentation were developed at private expense, and no part of them is in the public domain.
This product includes memory allocation software developed by Mark Moraes, copyright © 1988, 1989, 1993,
University of Toronto.
This product includes FreeBSD software developed by the University of California, Berkeley, and its contributors.
All of the documentation and software included in the 4.4BSD and 4.4BSD-Lite Releases is copyrighted by the
Regents of the University of California. Copyright © 1979, 1980, 1983, 1986, 1988, 1989, 1991, 1992, 1993, 1994.
The Regents of the University of California. All rights reserved.
GateD software copyright © 1995, the Regents of the University. All rights reserved. Gate Daemon was
originated and developed through release 3.0 by Cornell University and its collaborators. Gated is based on
Kirton’s EGP, UC Berkeley’s routing daemon (routed), and DCN’s HELLO routing protocol. Development of Gated
has been supported in part by the National Science Foundation. Portions of the GateD software copyright ©
1988, Regents of the University of California. All rights reserved. Portions of the GateD software copyright ©
1991, D. L. S. Associates.
This product includes software developed by Maker Communications, Inc., copyright © 1996, 1997, Maker
Communications, Inc.
Pulse Secure, Pulse and Steel-Belted Radius are registered trademarks of Pulse Secure, LLC. in the United States
and other countries. The Pulse Secure Logo, the Pulse logo, and PulseE are trademarks of Pulse Secure, LLC. All
other trademarks, service marks, registered trademarks, or registered service marks are the property of their
respective owners.
Pulse Secure assumes no responsibility for any inaccuracies in this document. Pulse Secure reserves the right to
change, modify, transfer, or otherwise revise this publication without notice.
Products made or sold by Pulse Secure or components thereof might be covered by one or more of the
following patents that are owned by or licensed to Pulse Secure: U.S. Patent Nos. 5,473,599, 5,905,725,
5,909,440, 6,192,051, 6,333,650, 6,359,479, 6,406,312, 6,429,706, 6,459,579, 6,493,347, 6,538,518, 6,538,899,
6,552,918, 6,567,902, 6,578,186, and 6,590,785.
Pulse Connect Secure Getting Started Guide for PSA Series and MAG Series Appliances
Revision History
2016—Revised for Pulse Connect Secure 8.2.
The information in this document is current as of the date on the title page.
END USER LICENSE AGREEMENT
The Pulse Secure product that is the subject of this technical documentation consists of (or is intended for use
with) Pulse Secure software. Use of such software is subject to the terms and conditions of the End User License
Agreement (“EULA”) posted at http://www.pulsesecure.net/support. By downloading, installing or using such
software, you agree to the terms and conditions of that EULA.
Getting Started Guide for PSA Series and MAG Series Appliances
© 2016 by Pulse Secure, LLC. All rights reserved 3
Contents
REQUESTING TECHNICAL SUPPORT ............................................................................................................................................4
PART 1 ............................................................................................................................................................................................5
PULSE CONNECT SECURE: INSTALLATION, CONFIGURATION AND START-UP PROCEDURES FOR PSA SERIES AND MAG
SERIES APPLIANCES .......................................................................................................................................................................5
CHAPTER 1 .....................................................................................................................................................................................6
GETTING STARTED WITH THE PSA SERIES AND MAG SERIES APPLIANCES .........................................................................6
INTRODUCTION TO PULSE CONNECT SECURE ............................................................................................................................6 STEP 1: INSTALLING THE HARDWARE ..........................................................................................................................................7 STEP 2: PERFORMING BASIC SETUP ...........................................................................................................................................8 STEP 3: DOWNLOADING PULSE CONNECT SECURE SOFTWARE AND LICENSE ............................................................................10
Obtain Licenses ................................................................................................................................................................10 Apply License Keys ...........................................................................................................................................................12 Download Software..........................................................................................................................................................12
PART 2 ............................................................................................................................................................................................14
APPENDIX .......................................................................................................................................................................................14
APPENDIX A ....................................................................................................................................................................................15
GUIDELINES TO DEPLOY PULSE CONNECT SECURE SOLUTION .......................................................................................15
LOGICAL DIAGRAM .....................................................................................................................................................................15 VERIFY PULSE CONNECT SECURE CONNECTIVITY ........................................................................................................................15
APPENDIX B ....................................................................................................................................................................................17
UPGRADE SA TO MAG SERIES HARDWARE .............................................................................................................................17
APPENDIX C ....................................................................................................................................................................................18
PULSE CONNECT SECURE CONFIGURATION .........................................................................................................................18

Getting Started Guide for PSA Series and MAG Series Appliances
© 2016 by Pulse Secure, LLC. All rights reserved 4
Requesting Technical Support
Technical product support is available through the Pulse Secure Global Support Center (PSGSC). If you have a
support contract, then file a ticket with PSGSC.
• Product warranties—For product warranty information, visit https://www.pulsesecure.net
• Find product documentation: https://www.pulsesecure.net/techpubs/
• Find solutions and answer questions using our Knowledge Base: https://www.pulsesecure.net/support
Opening a Case with PSGSC
You can open a case with PSGSC on the Web or by telephone.
• Use the Case Management tool in the PSGSC at https://www.pulsesecure.net/support.
• Call Phone: 1-844-751-7629 (Toll Free, US).
For international or direct-dial options in countries without toll-free numbers, see
https://www.pulsesecure.net/support
Getting Started Guide for PSA Series and MAG Series Appliances
© 2016 by Pulse Secure, LLC. All rights reserved 5
PART 1
Pulse Connect Secure: Installation, Configuration and Start-Up
Procedures for PSA Series and MAG Series Appliances
• Getting Started with the PSA Series and MAG Series Appliances

Getting Started Guide for PSA Series and MAG Series Appliances
© 2016 by Pulse Secure, LLC. All rights reserved 6
CHAPTER 1
Getting Started with the PSA Series and MAG Series Appliances
Thank you for choosing Pulse Connect Secure, one of the leading desktop and mobile VPN to enable secure
access from any device to enterprise apps and services in the data center or cloud.
Introduction to Pulse Connect Secure
Pulse Connect Secure enables you to give your employees, partners, and customers secure and controlled
access to your corporate data and applications including file servers, Web servers, native messaging and e-mail
clients, hosted servers, and more from outside your trusted network.
You can install Pulse Connect Secure and start configuring your system using the following easy steps:
Step 1: Installing the Hardware
Step 2: Performing Basic Setup
Step 3: Downloading Pulse Connect Secure Software and License
Note: After installing and setting up Pulse Connect Secure, refer to the Initial Configuration task
guide in the administrator Web console to install the most current Pulse Connect Secure software,
license your Pulse Connect Secure appliance, and create a test user to verify user accessibility. To test
initial setup and continue configuring Pulse Connect Secure, refer to the “Initial Verification and Key
Concepts” section of the Pulse Connect Secure Administration Guide.
To download a PDF version of the Pulse Connect Secure Administration Guide and other related documents,
go to the Pulse Connect Secure Product Documentation page at:
https://www.pulsesecure.net/techpubs/pulse-connect-secure/pcs.
Getting Started Guide for PSA Series and MAG Series Appliances
© 2016 by Pulse Secure, LLC. All rights reserved 7
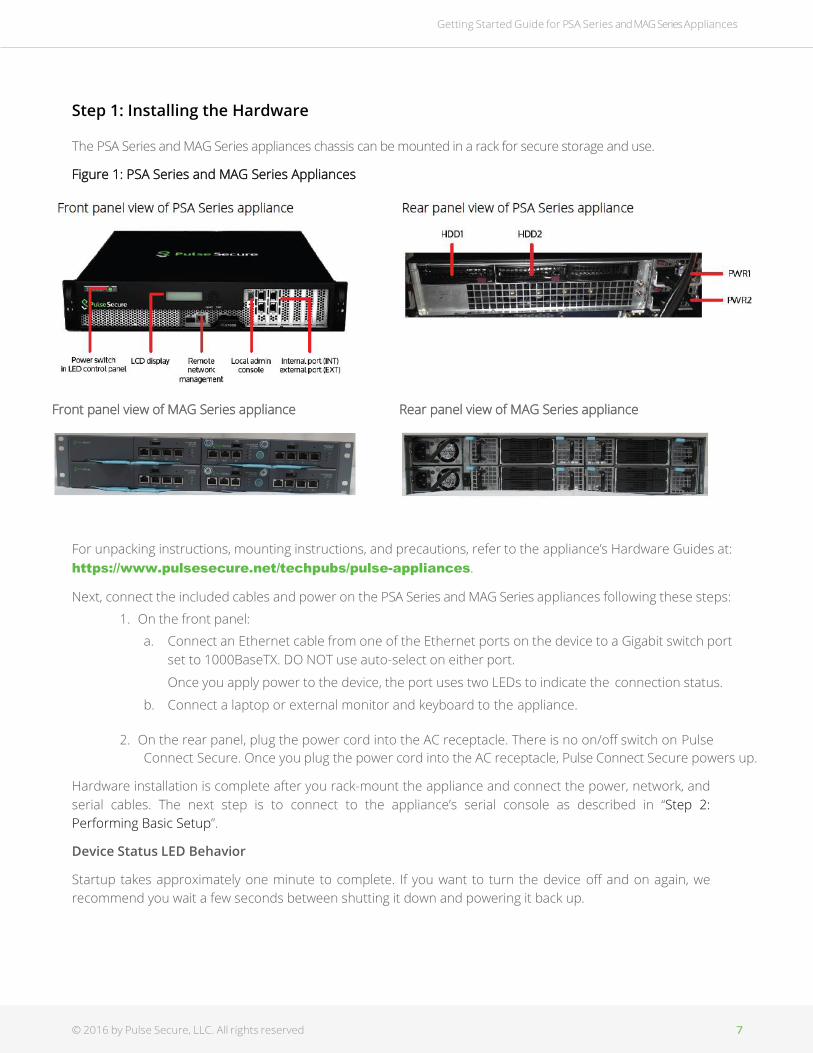
Step 1: Installing the Hardware
The PSA Series and MAG Series appliances chassis can be mounted in a rack for secure storage and use.
Figure 1: PSA Series and MAG Series Appliances
Front panel view of MAG Series appliance Rear panel view of MAG Series appliance
For unpacking instructions, mounting instructions, and precautions, refer to the appliance’s Hardware Guides at:
https://www.pulsesecure.net/techpubs/pulse-appliances.
Next, connect the included cables and power on the PSA Series and MAG Series appliances following these steps:
1. On the front panel:
a. Connect an Ethernet cable from one of the Ethernet ports on the device to a Gigabit switch port
set to 1000BaseTX. DO NOT use auto-select on either port.
Once you apply power to the device, the port uses two LEDs to indicate the connection status.
b. Connect a laptop or external monitor and keyboard to the appliance.
2. On the rear panel, plug the power cord into the AC receptacle. There is no on/off switch on Pulse
Connect Secure. Once you plug the power cord into the AC receptacle, Pulse Connect Secure powers up.
Hardware installation is complete after you rack-mount the appliance and connect the power, network, and
serial cables. The next step is to connect to the appliance’s serial console as described in “Step 2:
Performing Basic Setup”.
Device Status LED Behavior
Startup takes approximately one minute to complete. If you want to turn the device off and on again, we
recommend you wait a few seconds between shutting it down and powering it back up.
Getting Started Guide for PSA Series and MAG Series Appliances
© 2016 by Pulse Secure, LLC. All rights reserved 8
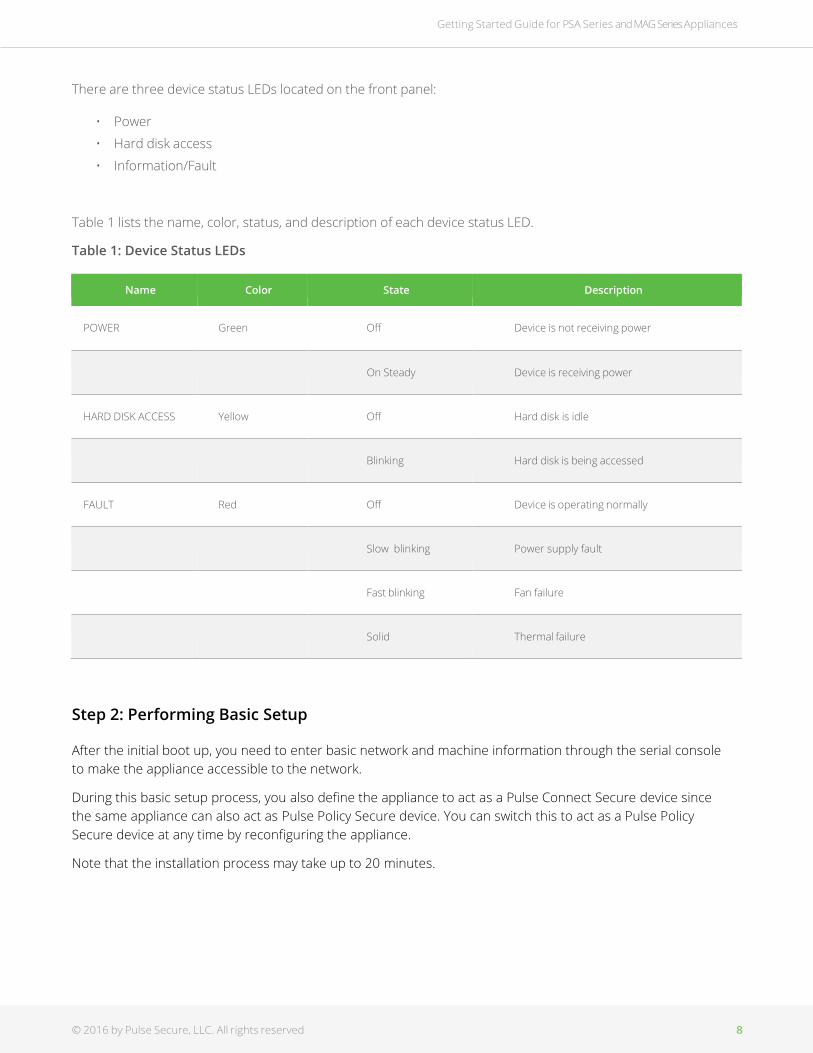
There are three device status LEDs located on the front panel:
• Power
• Hard disk access
• Information/Fault
Table 1 lists the name, color, status, and description of each device status LED.
Table 1: Device Status LEDs
Name Color State Description
POWER
Green
Off
Device is not receiving power
On Steady
Device is receiving power
HARD DISK ACCESS
Yellow
Off
Hard disk is idle
Blinking
Hard disk is being accessed
FAULT
Red
Off
Device is operating normally
Slow blinking
Power supply fault
Fast blinking
Fan failure
Solid
Thermal failure
Step 2: Performing Basic Setup
After the initial boot up, you need to enter basic network and machine information through the serial console
to make the appliance accessible to the network.
During this basic setup process, you also define the appliance to act as a Pulse Connect Secure device since
the same appliance can also act as Pulse Policy Secure device. You can switch this to act as a Pulse Policy
Secure device at any time by reconfiguring the appliance.
Note that the installation process may take up to 20 minutes.

Getting Started Guide for PSA Series and MAG Series Appliances
© 2016 by Pulse Secure, LLC. All rights reserved 9
To do the basic set up:
1. Configure a console terminal or terminal emulation utility running on a computer, such as HyperTerminal
or PuTTY, to use these serial connection parameters. These defaults are usually set already, but check
them if there are connection problems:
• 9600 bits per second
• 8-bit no parity (8N1)
• 1 stop bit
• No flow control
2. Connect the terminal or laptop to the serial cable plugged in to the appliance’s console port and press
Enter until you are prompted by the initialization script.
3. Enter y to proceed and then y to accept the license terms (or r to read the license first).
4. Follow the directions in the serial console and enter the machine information for which you are
prompted, including the:
• IP address of the internal port (you configure the external port through the administrator Web console
after initial configuration)
• Network mask
• Default gateway address
• Primary DNS server address
• Secondary DNS server address (optional)
• Default DNS domain name (for example, acmegizmo.com)
• WINS server name or address (optional)
• Administrator username
• Administrator password
• Common machine name (for example, connect.acmegizmo.com)
• Organization name (for example, Acme Gizmo, Inc.)
Note: Pulse Connect Secure uses the common machine and organization names to create a self-
signed digital certificate for use during product evaluation and initial setup.
We strongly recommend that you import a signed digital certificate from a trusted certificate
authority (CA) before deploying Pulse Connect Secure for production use.
For more information, refer to the “Certificates” chapter in the Pulse Connect Secure
Administration Guide.
5. In a browser, enter the machine’s IP address followed by “/admin” to access the administrator sign-in
page. The URL is in the format: https://a.b.c.d/admin, where a.b.c.d is the machine ’s IP address you
entered in step 4.
6. When prompted with the security alert to proceed without a signed certificate, click Yes. When the
administrator sign-in page appears, you have successfully connected your Pulse Connect Secure
appliance to the network.
7. On the sign-in page, enter the administrator user name and password you created in step 4 and then
click Sign In. The administrator Web console opens to the System > Status > Overview page.
Getting Started Guide for PSA Series and MAG Series Appliances
© 2016 by Pulse Secure, LLC. All rights reserved 10
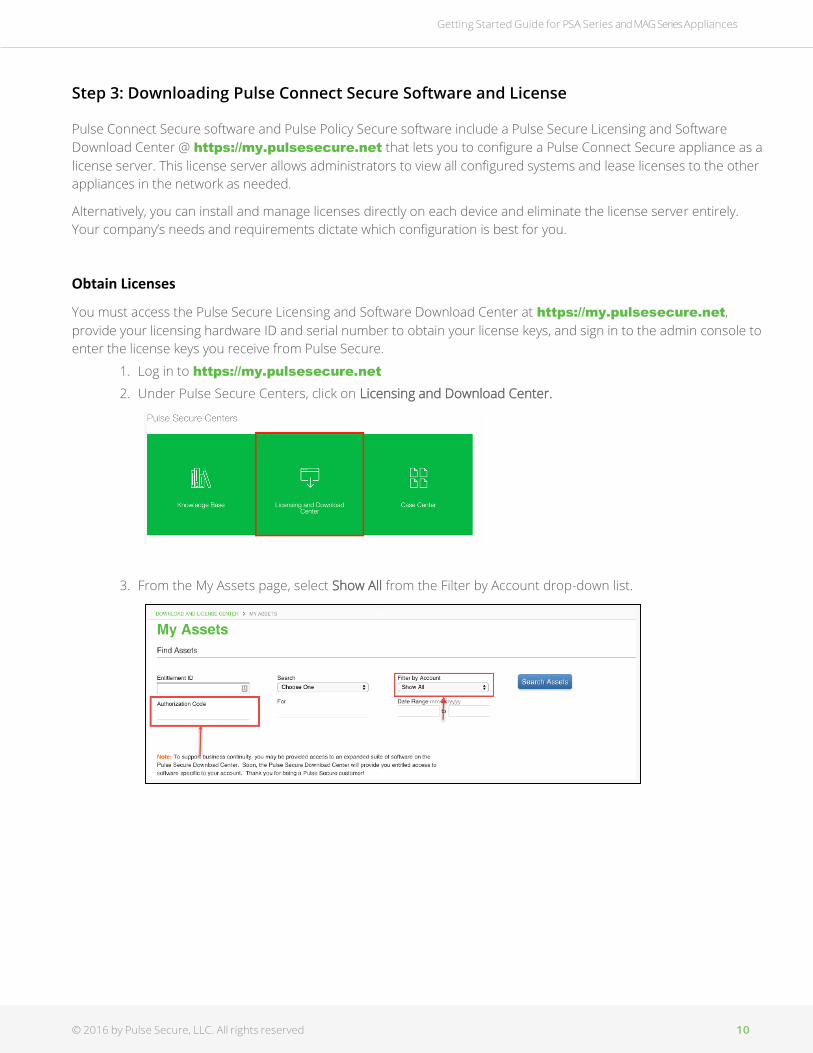
Step 3: Downloading Pulse Connect Secure Software and License
Pulse Connect Secure software and Pulse Policy Secure software include a Pulse Secure Licensing and Software
Download Center @ https://my.pulsesecure.net that lets you to configure a Pulse Connect Secure appliance as a
license server. This license server allows administrators to view all configured systems and lease licenses to the other
appliances in the network as needed.
Alternatively, you can install and manage licenses directly on each device and eliminate the license server entirely.
Your company’s needs and requirements dictate which configuration is best for you.
Obtain Licenses
You must access the Pulse Secure Licensing and Software Download Center at https://my.pulsesecure.net,
provide your licensing hardware ID and serial number to obtain your license keys, and sign in to the admin console to
enter the license keys you receive from Pulse Secure.
1. Log in to https://my.pulsesecure.net
2. Under Pulse Secure Centers, click on Licensing and Download Center.
3. From the My Assets page, select Show All from the Filter by Account drop-down list.
Getting Started Guide for PSA Series and MAG Series Appliances
© 2016 by Pulse Secure, LLC. All rights reserved 11
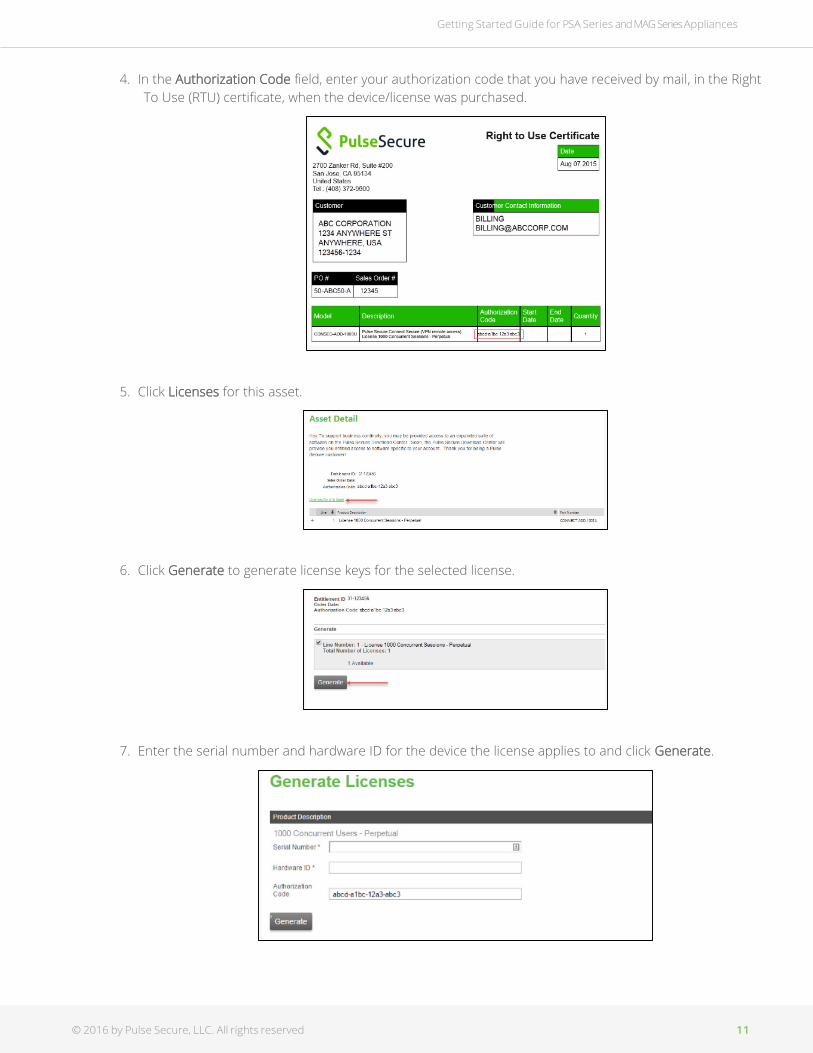
4. In the Authorization Code field, enter your authorization code that you have received by mail, in the Right
To Use (RTU) certificate, when the device/license was purchased.
5. Click Licenses for this asset.
6. Click Generate to generate license keys for the selected license.
7. Enter the serial number and hardware ID for the device the license applies to and click Generate.
Getting Started Guide for PSA Series and MAG Series Appliances
© 2016 by Pulse Secure, LLC. All rights reserved 12
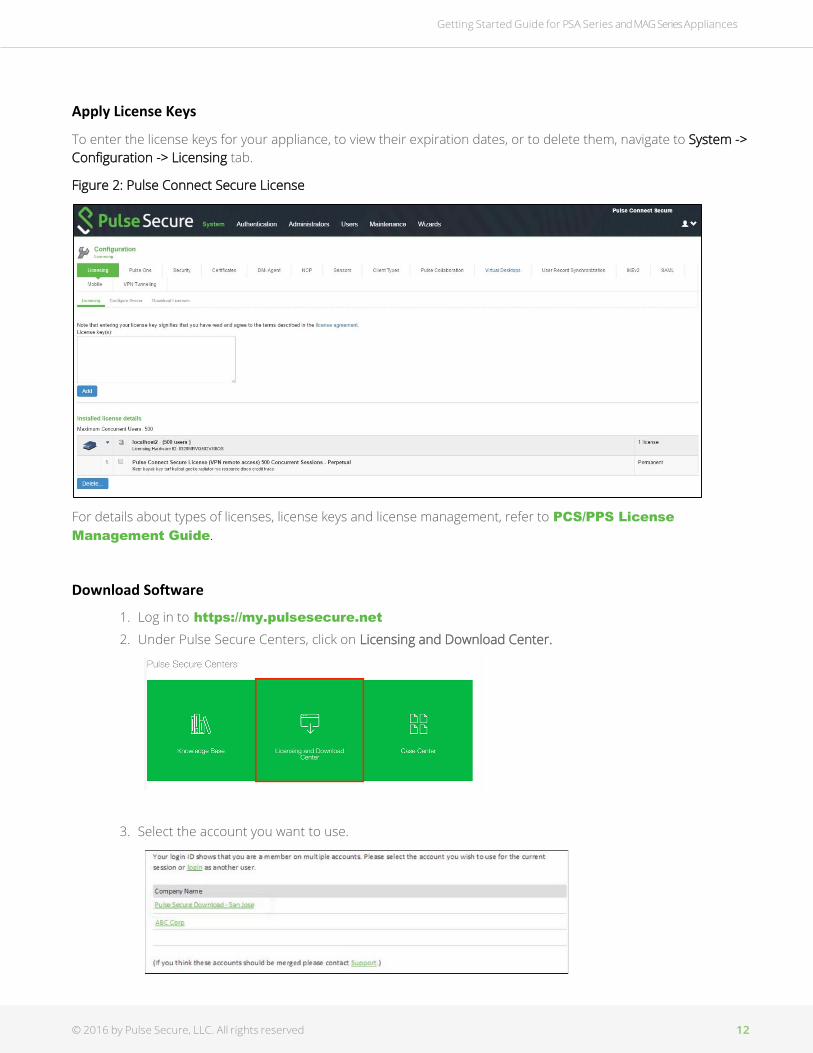
Apply License Keys
To enter the license keys for your appliance, to view their expiration dates, or to delete them, navigate to System ->
Configuration -> Licensing tab.
Figure 2: Pulse Connect Secure License
For details about types of licenses, license keys and license management, refer to PCS/PPS License
Management Guide.
Download Software
1. Log in to https://my.pulsesecure.net
2. Under Pulse Secure Centers, click on Licensing and Download Center.
3. Select the account you want to use.
Getting Started Guide for PSA Series and MAG Series Appliances
© 2016 by Pulse Secure, LLC. All rights reserved 13
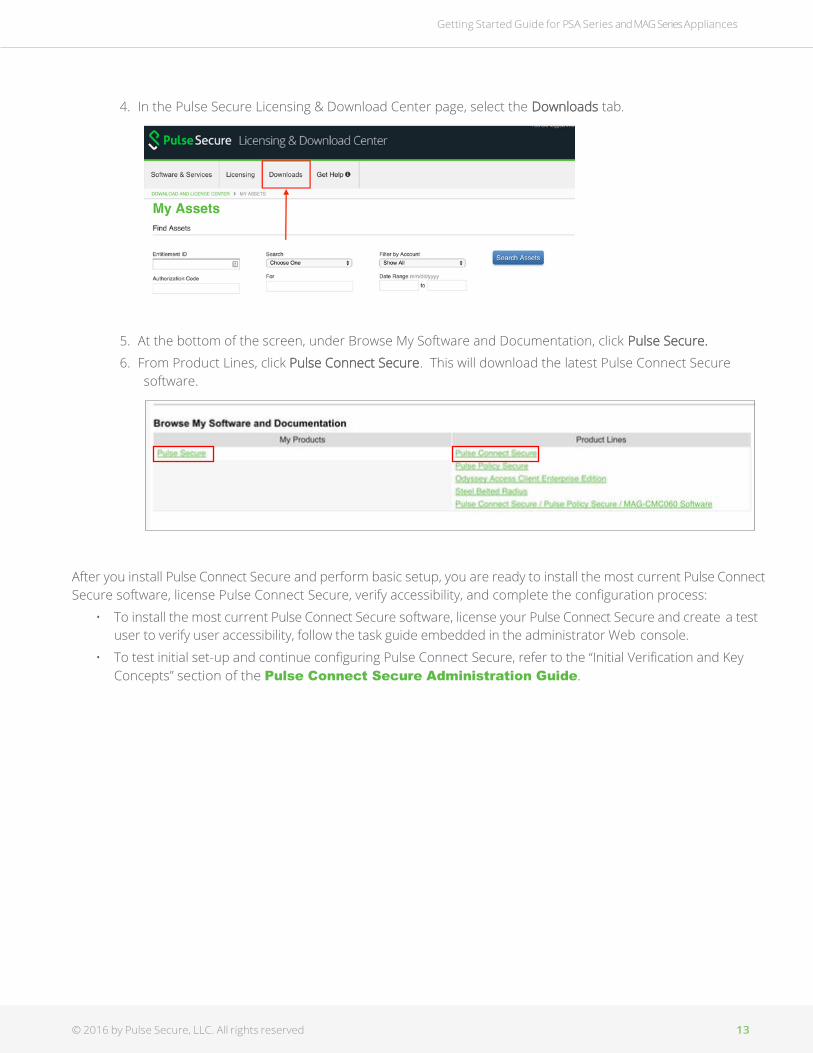
4. In the Pulse Secure Licensing & Download Center page, select the Downloads tab.
5. At the bottom of the screen, under Browse My Software and Documentation, click Pulse Secure.
6. From Product Lines, click Pulse Connect Secure. This will download the latest Pulse Connect Secure
software.
After you install Pulse Connect Secure and perform basic setup, you are ready to install the most current Pulse Connect
Secure software, license Pulse Connect Secure, verify accessibility, and complete the configuration process:
• To install the most current Pulse Connect Secure software, license your Pulse Connect Secure and create a test
user to verify user accessibility, follow the task guide embedded in the administrator Web console.
• To test initial set-up and continue configuring Pulse Connect Secure, refer to the “Initial Verification and Key
Concepts” section of the Pulse Connect Secure Administration Guide.
Getting Started Guide for PSA Series and MAG Series Appliances
© 2016 by Pulse Secure, LLC. All rights reserved 14
PART 2
Appendix
• Guidelines to Deploy Pulse Connect Secure Solution
• Upgrade SA/MAG to PSA Series Hardware
• Pulse Connect Secure Configuration
Getting Started Guide for PSA Series and MAG Series Appliances
© 2016 by Pulse Secure, LLC. All rights reserved 15
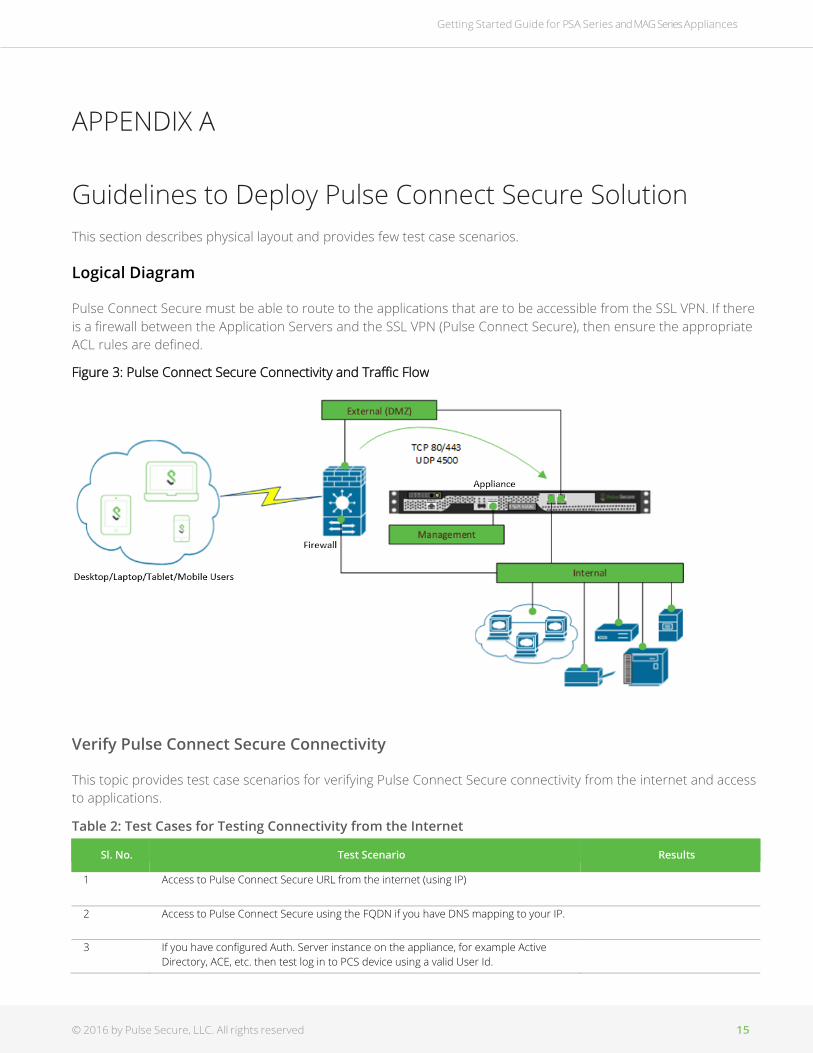
APPENDIX A
Guidelines to Deploy Pulse Connect Secure Solution
This section describes physical layout and provides few test case scenarios.
Logical Diagram
Pulse Connect Secure must be able to route to the applications that are to be accessible from the SSL VPN. If there
is a firewall between the Application Servers and the SSL VPN (Pulse Connect Secure), then ensure the appropriate
ACL rules are defined.
Figure 3: Pulse Connect Secure Connectivity and Traffic Flow
Verify Pulse Connect Secure Connectivity
This topic provides test case scenarios for verifying Pulse Connect Secure connectivity from the internet and access
to applications.
Table 2: Test Cases for Testing Connectivity from the Internet
Sl. No. Test Scenario Results
1 Access to Pulse Connect Secure URL from the internet (using IP)
2 Access to Pulse Connect Secure using the FQDN if you have DNS mapping to your IP.
3 If you have configured Auth. Server instance on the appliance, for example Active
Directory, ACE, etc. then test log in to PCS device using a valid User Id.
Getting Started Guide for PSA Series and MAG Series Appliances
© 2016 by Pulse Secure, LLC. All rights reserved 16
Table 3: Test Cases for Accessing Applications
Sl. No. Test Scenario Results
1 Example: End point attempts to access an application after the Pulse Secure Client has
established a tunnel to the Pulse Connect Secure successfully.
2 Example: Access Server/IP in the allowed network range through the Pulse Connect
Secure VPN.
3 Access the applications configured via client-based access, for example OWA bookmark.

Getting Started Guide for PSA Series and MAG Series Appliances
© 2016 by Pulse Secure, LLC. All rights reserved 17
APPENDIX B
Upgrade SA/MAG to PSA Series Hardware
For customers who have older hardware, there are a set of guidelines and procedures for successfully upgrading the
older Secure Access/MAG platforms to the new PSA series hardware platforms, installed both as a standalone
configuration or as an HA solution, either in a 2-node or in a multi-node configuration.
For details about “preparation for upgrade” and “step-by-step procedure for export/import binary configuration”,
refer to Pulse Secure SA/MAG Series to PSA Series Hardware Upgrade Guide.
Getting Started Guide for PSA Series and MAG Series Appliances
© 2016 by Pulse Secure, LLC. All rights reserved 18
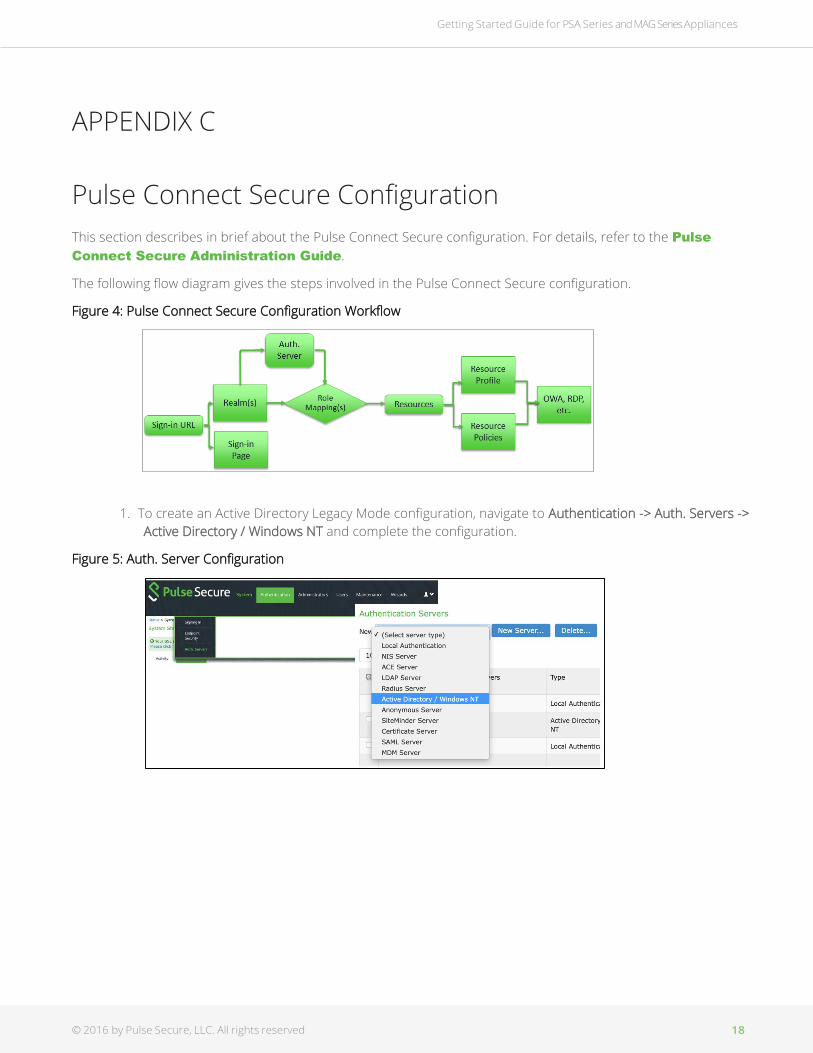
APPENDIX C
Pulse Connect Secure Configuration
This section describes in brief about the Pulse Connect Secure configuration. For details, refer to the Pulse
Connect Secure Administration Guide.
The following flow diagram gives the steps involved in the Pulse Connect Secure configuration.
Figure 4: Pulse Connect Secure Configuration Workflow
1. To create an Active Directory Legacy Mode configuration, navigate to Authentication -> Auth. Servers ->
Active Directory / Windows NT and complete the configuration.
Figure 5: Auth. Server Configuration
Getting Started Guide for PSA Series and MAG Series Appliances
© 2016 by Pulse Secure, LLC. All rights reserved 19
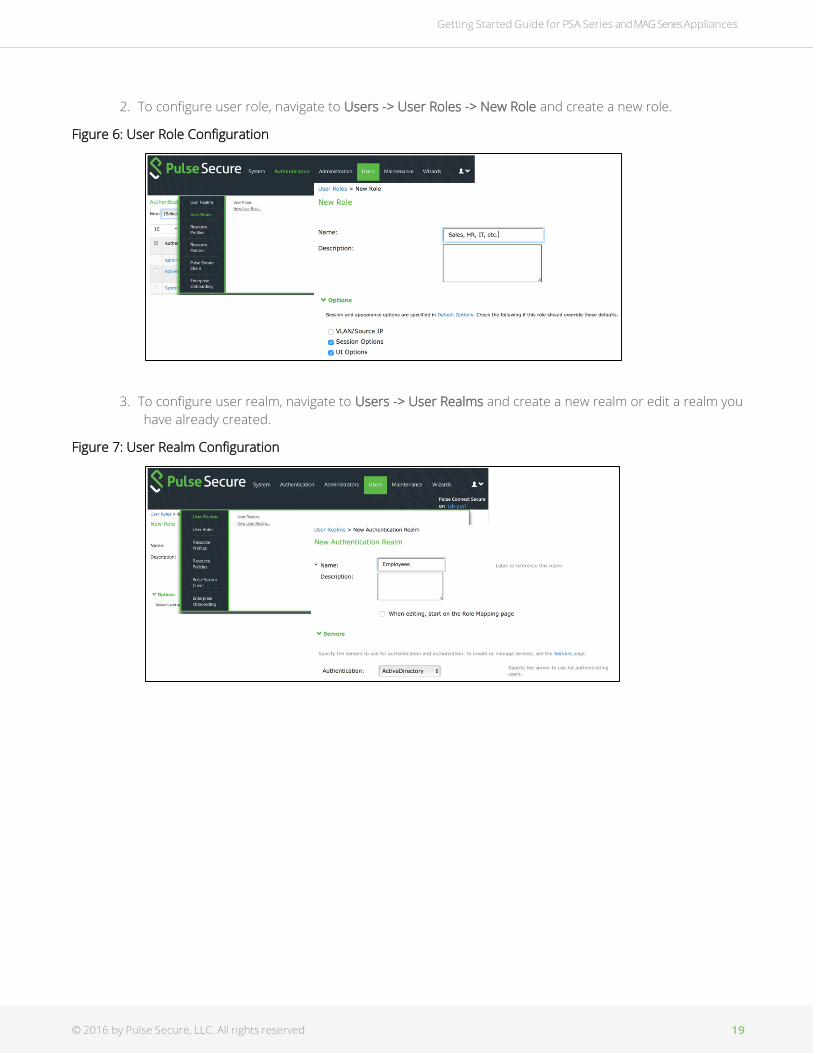
2. To configure user role, navigate to Users -> User Roles -> New Role and create a new role.
Figure 6: User Role Configuration
3. To configure user realm, navigate to Users -> User Realms and create a new realm or edit a realm you
have already created.
Figure 7: User Realm Configuration
Getting Started Guide for PSA Series and MAG Series Appliances
© 2016 by Pulse Secure, LLC. All rights reserved 20
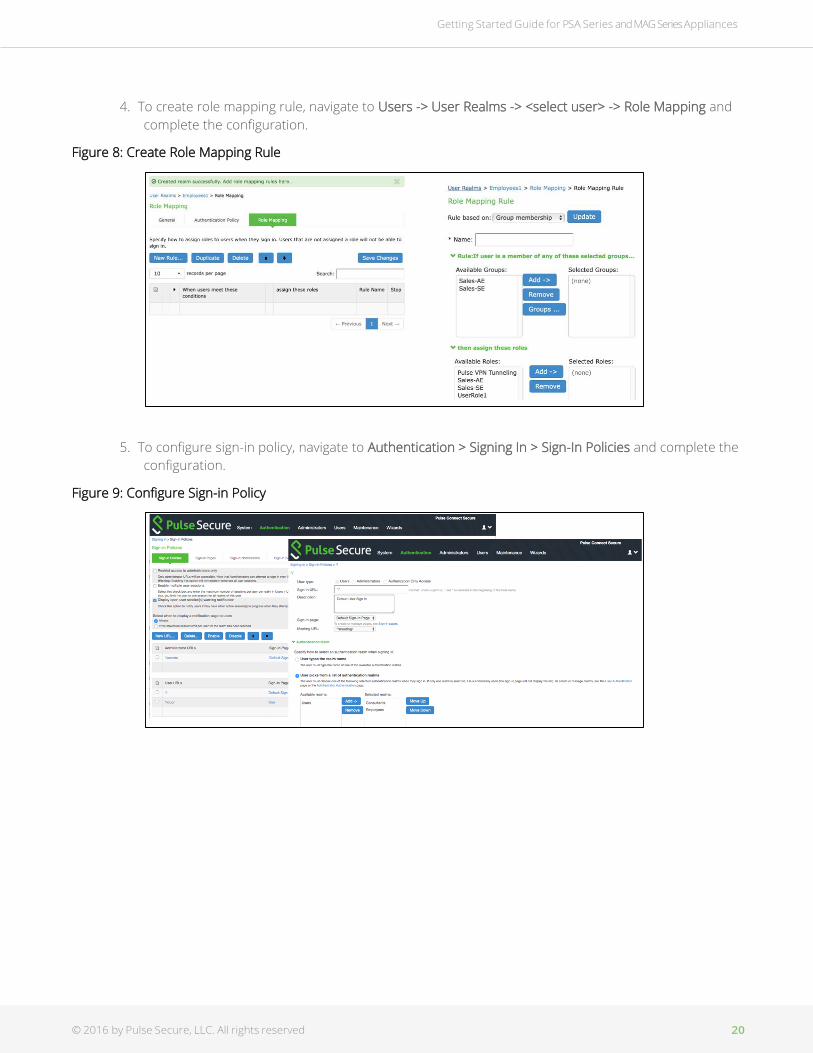
4. To create role mapping rule, navigate to Users -> User Realms -> <select user> -> Role Mapping and
complete the configuration.
Figure 8: Create Role Mapping Rule
5. To configure sign-in policy, navigate to Authentication > Signing In > Sign-In Policies and complete the
configuration.
Figure 9: Configure Sign-in Policy
Getting Started Guide for PSA Series and MAG Series Appliances
© 2016 by Pulse Secure, LLC. All rights reserved 21
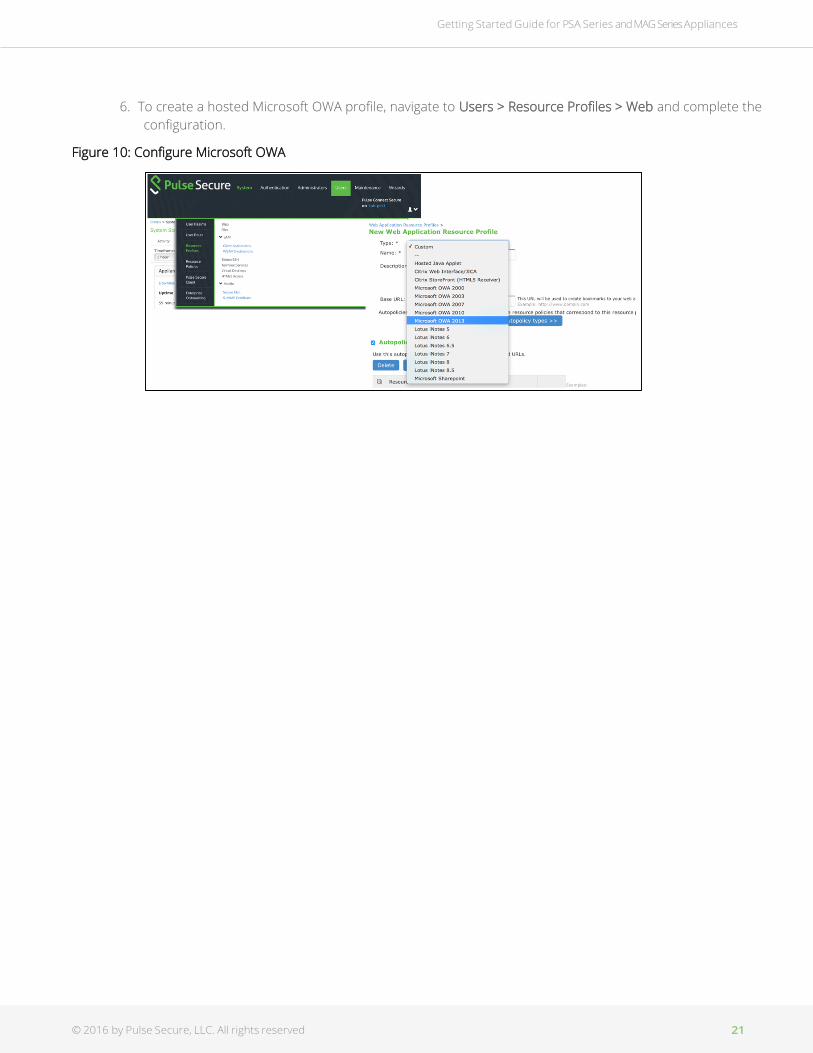
6. To create a hosted Microsoft OWA profile, navigate to Users > Resource Profiles > Web and complete the
configuration.
Figure 10: Configure Microsoft OWA