Embed Size (px)
Citation preview

12-1 PULLMAN CAR/S SCALEFrom Scenery Unlimited, 310 Lathrop
OVERVIEW
Passenger cars have always held a place of honor on themodel railroad. The fancy-name. crack passenger trains thatused to run across our country have given rise to this in-terest in passenger equipment.
One name was more revered than others in the passengerbusiness after the turn of the century and that name wasPullman. Pullman dominated the passenger car market. and inthe late 1920's and early 1930's. there were nearly 10.000Pullman cars assigned to various railroads in parlor. club.dining and sleeping services. Pullman cars were even used inMexico and Canada.
With the introduction of steel sheathed cars, the stage I
was set for standardization of design of Pullman equipment.Between 1910 and 1930. Pullman's Calumet Shops built morethan 8.000 steel sleeping. parlor and club/lounge cars. al-most half of which were the famous lZ-section, l-drawingroom(thus the term lZ-l) sleeping cars. Pullman had abouteight other basic designs.
From 1910 to 1925, the NYC. SP and Penney used more Pull—man cars than any other road. 0n the north-south traderoutes, the C&EI. L&N. Southern and Atlantic Coast Line usednumerous 12—1 cars.REFERENCE MATERIAIS
If you want the best prototype information on Pullmans.obtain a copy of Mainline Modeler. starting with the Jan-uary/February, 19 1 issue. hat issue begins a five-partseries on Pullmans. and includes background material, num-erous photographs and a very helpful S scale plan(pages b6-97, Jan/Feb. 1981 issue) of the 12-1 sleeper drawn byRobert L. Hundman, editor. Individual copies of MainlineModeler are $2.75: yearly subscriptions are $28.00. and areavailable from 5115 Monticello Dr., Edmonds. WA 98020.
Walthers' Passenger Car Plans($3.00) includes a 12-section‘Pullman car in drawings on page h0—hlu there are no dimen-sions given. Write 5601 W. Florist Ave.. Milw.. Wis. 53218.THE MODEL
Our S scale 12-1 Pullman model uses urethane sides andends to keep the costs of production within reason. Injec-tion molding would require thousands of dollars to pro—duce this same effect. Roof and floors are of Northeasternwood. Cast metal detail parts make up the remainder of thekit.
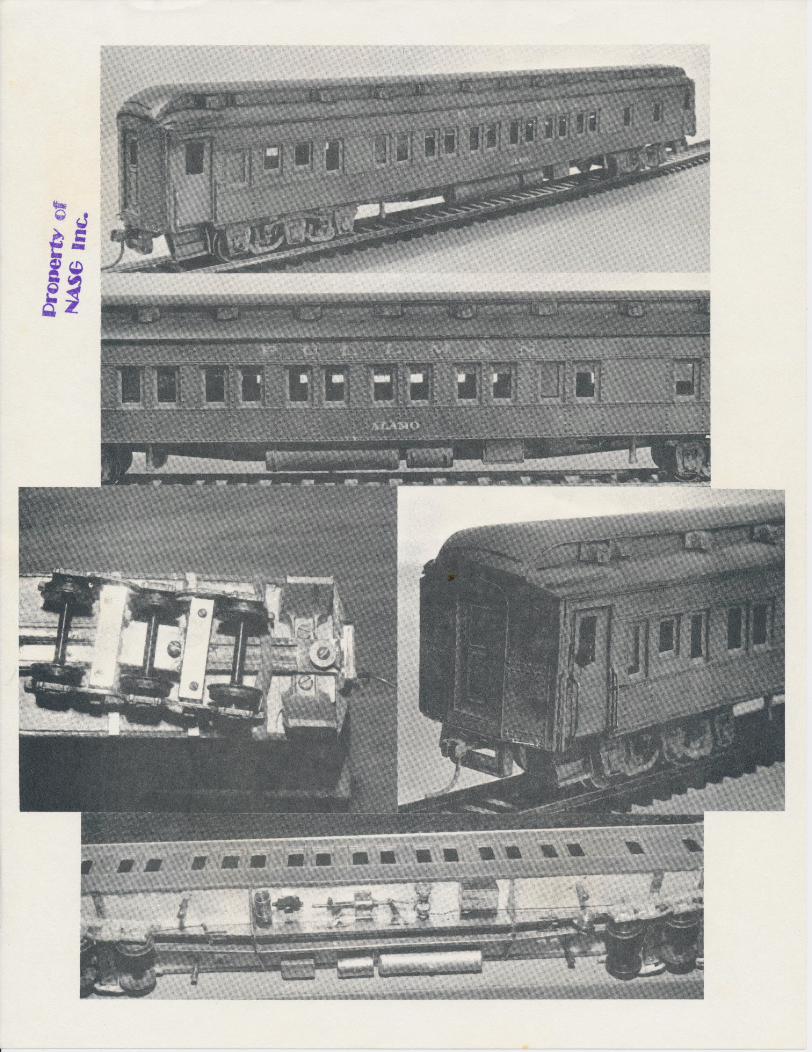
The pilot model shown was built by S scaler LeonardNormand. who worked for the Pullman Company between 19uu-1906. servicing Pullman cars on New York Central property.Leonard's pilot model utilizes a scratchbuilt brass fish-belly centersill and some brass underbody detail castingshe fashioned himself. A Northeastern wood centersill hasbeen provided in the kit should you not wish to constructyour own. Additional underbody details may be added if youdesire. other than those provided.
Leonard used Elmer's Epoxy for most of the gluing re-quirements. While epoxy requires setting time. it pro-duces a very strong bond that veteran modelers will tell you:is worth the wait. ACC-type glues such as Hot Stuff can alsobe used. but caution should be exercised and material sur—faces tested before they are glued. Crazing may result.Another caution: urethane in the long side length providedin this kit is brittle; it can snap fairly easy if nothandled with care. We have no replacement sides for thiskit. so exercise extreme care in gluing the sides and endstogether. Also, knife/razor marks readily show up onurethane; avoid stray knife marks. Urethane can also warp.and you will probably notice small imperfections and evensome warping on the urethane sides already. This is normalon urethane castings. but do not aggrevate the problem byleaving the sides or ends out in the hot sun or in a hotattic. It is also best to brace the sides with §" plasticangle stock(Plastruct is good) below the windows to helppfievin: warping. and you can do this as soon as you receivee i .
PARTS LIST1 Wood roof. uncut to length1 Wood floor. uncut to length1 Wood centersill. uncut to length2 Urethane sides, 2 urethane endsDetail parts: 11 fans. 1“ vents, 1 air reservoir. 1water tank. 1 steam trap. 2 brake cylinders. 2 bolsters.1 battery box. 1 tool box, 1 air conditioner. N steps.1 UC valve, grabirons.
GENERAL
Study all the drawings and instructions carefully beforeyou proceed with construction. During assembly, try each
property ofNASG Inc-
Ave.. River Forest, IL 60305piece in its intended location before applying cement to in-sure proper fit. Wipe off any excess cement around Jointsbefore it dries. Drill holes for grabirons, etc.. to avoidsplitting wood or urethane. When drilling truck kingpinholes. be sure they are perpendicular to the floor. other-wise car will lean to one side and present operating pro-ems.
SEQUENCE OP CONSTRUCTION
It's best to build the frame first. then add the under-body details. couplers. etc.. then proceed with the sides.ends and roof. Since the frame is what everything else mustconform to. the frame must be built first-—and correctly.FLOORZFRAME
Use the urethane sides supplied to determine the lengthof the floor. Cut the centersill to length and bevel it atthe ends and cement it in place. Add the bolsters to thefloor(see bolster below). The middle truck center is 11 Sscale feet from the end of the car(minus diaphragms). asaccording to the Mainline Modeler diagram. Place the trucksin position to insure proper spacing before attaching. Ifnecessary. review prototype photos and information beforeattaching trucks. Be sure trucks will clear steps. Add twocentersill braces the width of the car, as shown in themodel photos in instructions. Make these of wood. styreneor brass: they must be shaped to conform to the undersideof the car.1 All holes should be drilled now while the floor can belaid out flat on the work surface. This includes mountingholes for brake parts. steam traps, trucks. etc. Use thedrawing provided to locate underbody detail. Note thatLeonard used different style bolsters on his pilot modelthan what is supplied: other construction materials usedmay vary slightly from what is supplied. and what isshown on the pilot model. Some minor parts such as wire.chain and coupler hangers are not supplied. These can comefrom your scrap box. Additional steam traps can be made fromsmall finishing nails cut to length.ROOF
To construct a removeable roof. extend a very long woodscrew through the truck into a block of wood glued to theunderside of the roof interior. Or. drill a hole in thecenter of the frame under the trucks so that a rod can beplaced through the hole and attached with small woodblocks on the bottom of the interior of the roof(seedrawing). Secure rod with a bicycle spoke nut at the truckend. The wood blocks can be glued and/or screwed to theroof.
Couplers on the pilot model are Kadee No. lh(have a longshank). A washer is first placed over the coupler hole(forstability). then the coupler, then a second washer, thenthe screw. The coupler hangers are of 3/32" thick brassstock. but they can be made from wood or styrene. Stepsare attached with small flathead 1/8" long screws into thefloor.
As mentioned. Leonard made his own bolsters. He made themfrom l/Bx 3/16" brass bar stock. but should you wish tomake your own. you could make them from wood(see drawing).PLACEMENT 0F UNDERBODY DETAILS
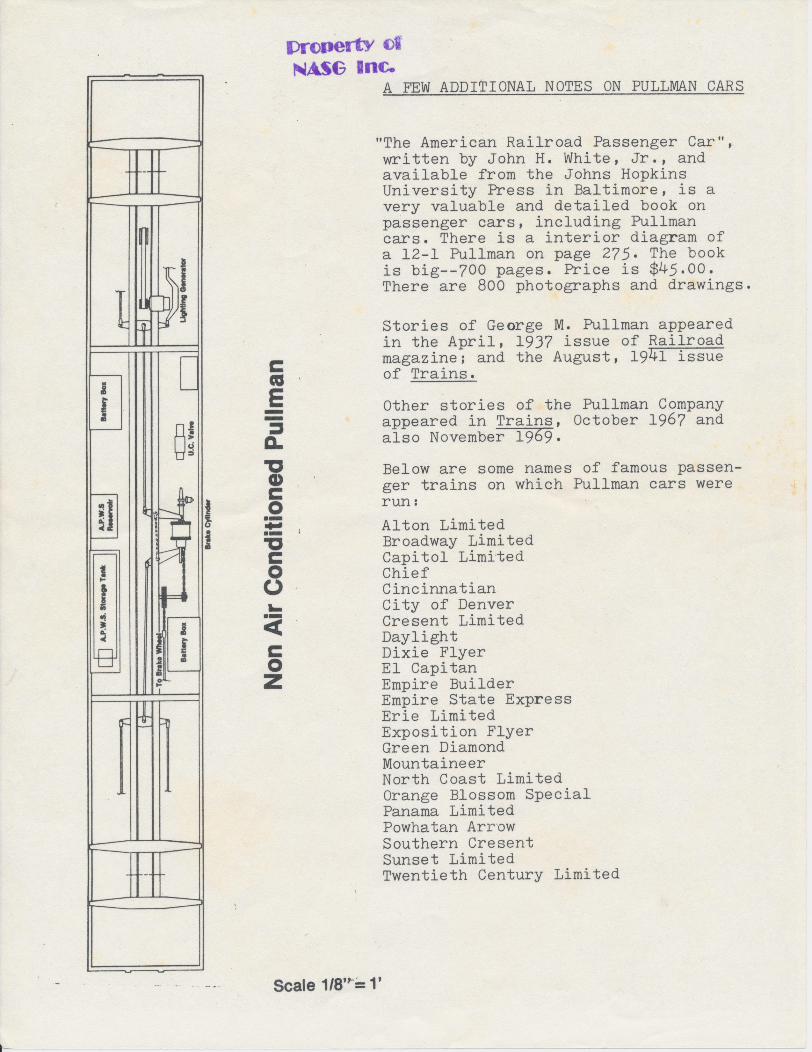
Refer to the drawing for location of underbody details;as you will note. details varied according to the air con-itioning system. These underbody plans are courtesy MainlineModeler.SIDES NDS
Using epoxy. rough the inside of the urethane endslightly with sandpaper and epoxy the sides to the ends.making sure everything is in alignment. Take your time toline up the sides and ends square. Glue the ends and sidesto the frame using fi" plastic angle stock to support thecorners. If corners do not mate completely. use body filler.Paint interior of walls now if you are going to light thecar. Paint walls black.ROOFlROOF DETAILS
You will have to cut the roof to length and shape theroof ends. See templates provided for shaping the roof ends.Take your time!Bevel ends of roof as per template "A"; roof templates canbe cemented to a thin cardstock backing. then cut outcarefully. Form lower deck curve to match template "B".Build up curved end beading. let dry. then shape upperdeck(clerestory)curves. Work carefully here. as it is easyto remove too much wood. Curves should be whittled with aknife or razor blade, followed with coarse, fine and extrafine sandpaper.

Expect to sand and seal the roof as many as five timesfor a really smooth surface. Leonard used Testor's HotFuel sanding sealer. He put a coat on. let it dry completelyand soak in. and then sanded it with 2—80 sandpaper. Besure to dust roof off between sanding.
Leonard used a 5" diameter saw or mill to cut the roofends and to notch the inside ends of the roof so they wouldfit over the urethane car ends. Drip lines over the doorsare of 1/32" wood stock; they go over all doors and bothends of the car.
While the number of fans and vents on the roof varied.we put 7 vents on one side. 7 on the other; 5 fans on oneside. 6 on the other(see drawing).
Railings are of .025 steel wire. formed with a pair ofpliers. Holes were hand-drilled. Clear styrene was usedfor the windowa(not supplied) and individually cemented inwith Ambroid cement. Floquil Gun Metal No. 108 was paintedover.the styrene to represent curtains. Bathroom windowswere not painted. but roughed up with sandpaper to makefrosted windows.PAINTINGALETTERING
Ploquil Pullman green was air-brushed on the car. In- 'sert windows after painting. Once dried. paint FloquilGloss over the paint before lettering above the windows.This makes a smooth surface for the decals. The word"Pullman" came from Champion alphabet lettering(L-131 Ex-press Deluxe Gold Alphabet and Numeral Set). Or. you can 5
use Extended Roman. The car name "Alamo" was made from {
regular 3/32" Roman letters(Champ or Walthers). ;
After lettering is applied. Leonard “dusted" on Floquil!“Grime' (RR 86) to weather the car. Apply Grime by letting‘it lightly dust the car. Do not spray directly on the car.;This technique will make your Pullman look as if it hasbeen plying the rails for years! It will give it an gut—standin appearance. Test the dusting technique on some—thing first to insure you are satisfied with the results.Thinning the Grime will also help. .
RESULTS
If you have followed the instructions carefully andtaken your time, the results. especially for the veteranmode er, will be breathtaking. We'd like to see a blackand w ite photo of your finished car if it turned outexceptionally well. If you send us a photo(at least 5x7")of your model. we'll send you a small gift to show ourappreciation. with the understanding that we'll use thephoto for advertising/promotionpurposes. And since we canonly use a few photos. we reserve the right to limit thisoffer.SUMMARY
We're very hopeful that this kit has provided you withmany hours of enjoyment and satisfaction. It's certainlythe kind of kit and model that you'll be proud to show offonce it's finished. Naturally. operating it will requireat least 36" radius curves to look right. larger radiuscurves if possible.
Wood bolster constructionif not using metalbolster supplied
Removeable roof anchorblock with wood screwsand rod
greatsmall wood(I saws
{41 (algal ins id?L.)00¢1 {1) (LCCIqD
weed weer rod
Roof contour; follow templates
A“ we.ROOF LOWER DECK
END OF ROOE CARLWES.E ENDSILLS
.__aa""I’)——‘~—’_——*‘\“\~\‘___
"D. "E-UPPER EDGE OF CENTER IJNE 0F
CLERESTORY CLERESTORY
MIixfixw _
AEWS
LEI}.
m
Tull
“.6.
VI".
IIW
m
Non
Air
Condi
ioned
Pullman
Dronerty ofNASG Inc.
A FEW ADDITIONAL NOTES ON PULLMAN CARS
"The American Railroad Passenger Car",written by John H. White, Jr., andavailable from the Johns HopkinsUniversity Press in Baltimore, is avery valuable and detailed book onpassenger cars, including Pullmancars. There is a interior diagram ofa 12-1 Pullman on page 275. The bookis big-~7OO pages. Price is $45.00.There are 800 photographs and drawings.
Stories of George M. Pullman appearedin the April, 1937 issue of Railroadmagazine; and the August, 1931 issueof Trains.Other stories of the Pullman Companyappeared in Trains, October 1967 andalso November 1969.Below are some names of famous passen-ger trains on which Pullman cars wererun: ,
Alton LimitedBroadway LimitedCapitol LimitedChiefCincinnatianCity of DenverCresent LimitedDaylightDixie FlyerEl CapitanEmpire BuilderEmpire State ExpressErie LimitedExposition FlyerGreen DiamondMountaineerNorth Coast LimitedOrange Blossom SpecialPanama LimitedPowhatan ArrowSouthern CresentSunset LimitedTwentieth Century Limited
Scale 1/8”": 1’