Embed Size (px)
Citation preview
Properly Wiring Art for Gallery Presentation and Security ©2015 by Allen L. Clapp
Properly wired art will hang parallel to the wall and will be attached to the wall in a manner that will
allow the art to be levelled and remain that way. To hang properly, the unframed art or art frame must
be wired properly. Emphasis should be placed on the word wired.
Wire attachments
Sawtooth brackets should not be used. First, it is almost impossible to attach a sawtooth bracket so that
the artwork will hang level—especially over time as vibrations allow it to move. Second, sawtooth
brackets do not fit normal wall hanging clips in general use and particularly do not work well with
adjustable museum and gallery hanging systems.
When properly wired, the wires are terminated on D-rings, such as those shown in the photos below.
Notice that the screw attaching the D-ring to the stretcher or frame is oriented at 90 degrees to the
direction of the pull and, thus, resists the tension of the wire much better than an eye hook. Eye hooks
should never be used except on very small, lightweight items.
Holes for the screws should be drilled with a drill bit that matches the size of the shank of the screw, so
that the threads cleanly spiral in between fibers without crushing them. The screw threads wind around
the shank. If screws are forced into the wood without first removing wood of the shank diameter, the
wood fibers will be crushed and the screw will pull out at about one-quarter or less of the full holding
power of the screw when inserted into a properly drilled hole.
The D-rings must be attached high enough on the frame and the wire must be pulled tight enough that
the art will hug the wall and not hang away from the wall at the top. How high to attach the wire and
how tight to pull the wire is a function of the size and shape of the piece.
D-rings should be attached at the same level below the top of the art. This makes it easy to slide the
painting from side to side on the wall hooks to get it level. It is particularly critical on heavy pieces,
because heavy pieces are often hung directly from the D-rings themselves.
NOTE: When hanging large pieces, and especially heavy pieces, it is easier to support the paintings
properly and level them if two wall hangers are used. Placing each hanger at approximately half way
between the center and its side of the painting, i.e., at the quarter points, works well to both make it easy
to hang the painting and to level it.
The most crucial part of wiring a painting is securing the wire properly. It can be a catastrophe when an
improperly secured wire pulls loose and the painting drops to the floor. Security is everything. Many
galleries will not hang improperly wired pieces because of the liability and, because they don’t have the
time or temperament to rewire the pieces, improperly wired pieces will be refused by the galleries.
Improper wiring is grounds for rejection in juried shows.
D-ring location
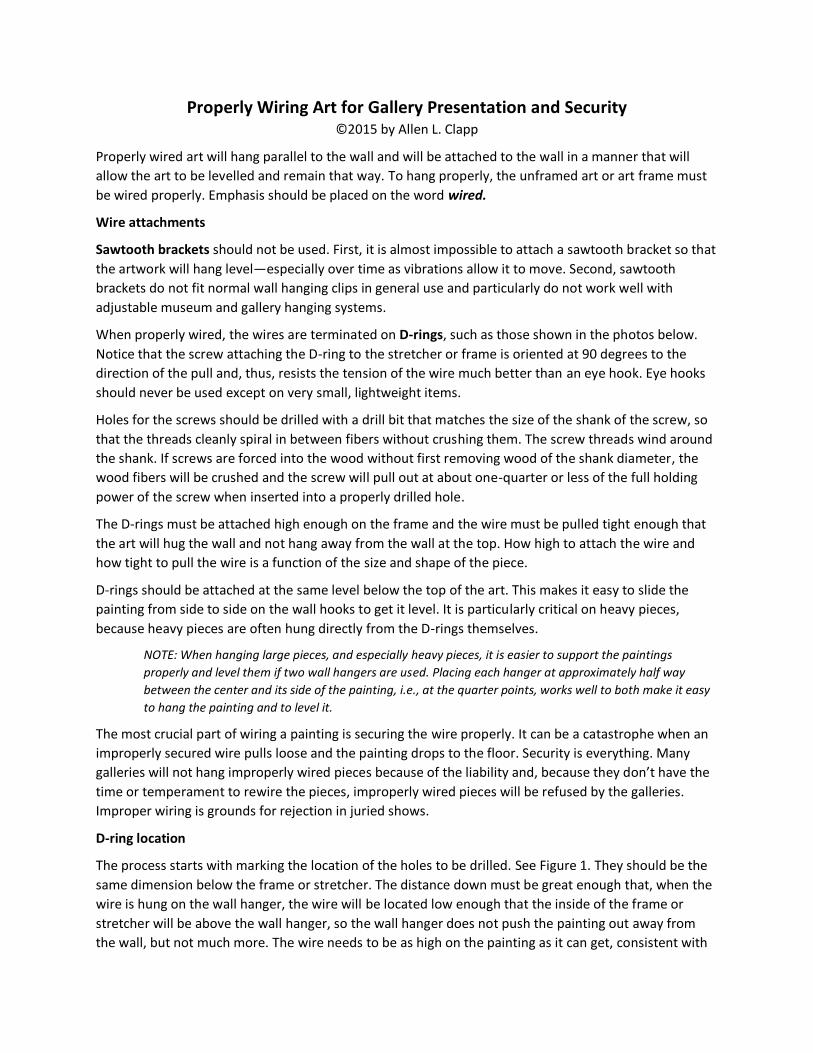
The process starts with marking the location of the holes to be drilled. See Figure 1. They should be the
same dimension below the frame or stretcher. The distance down must be great enough that, when the
wire is hung on the wall hanger, the wire will be located low enough that the inside of the frame or
stretcher will be above the wall hanger, so the wall hanger does not push the painting out away from
the wall, but not much more. The wire needs to be as high on the painting as it can get, consistent with
the need to keep the frame/stretcher above the wall hanger, in order to help the painting hug the wall.
A loose wire mounted down too low helps in installing the painting, but the resulting fall-away from the
wall detracts from the presentation of the painting.
NOTE: Some wire manufacturers will suggest that
attaching the wire about one-third down from the top of
the painting and leaving enough wire to reach just below
the frame or stretcher is correct. It is for them, because it
sells more wire—and it certainly makes hanging easier—
but it is absolutely not correct from the standpoint of
properly presenting the painting to its best advantage.
A good rule of thumb is this: if it is easy to hang the
piece, you have too much wire. It should be tight enough
that you have a small amount of difficulty attaching the
wire to the wall hanger—not a lot, but at least a little
difficulty.
Wiring a medium sized or lightweight large painting with
one wire
The majority of paintings can be wired with one wire, because they are light enough for normal painting
wire to hold them securely. A discussion of wiring heavy paintings will follow this discussion.
There are many choices of wire available. The basic choices to be made are (1) single strand or multi
stranded wire, (2) coated or uncoated wire and (3) regular or high-strength wire.
A single strand can be used for very small paintings of light weight. However, multi-stranded wire can be
used for any size and weight. In addition, a nick that might sever one strand of a multi-stranded wire
could catastrophically affect a small single strand. Further, the stranded wire bends more easily than a
single strand of the same strength.
Plastic-coated wire is preferred for three reasons. First, it does not corrode over time and mark the
walls. Second, the plastic limits the opportunity for one of the strands to puncture the finger when tying
it off or moving the painting. Third, it is often easier to move sideways in hangers to level the painting.
Once in place, it can be more secure in the wall hanger(s) if the painting is bumped.
Wire security
Wires cannot be leisurely run through a D-ring and wound
back around the main wire. To do so puts the wire
security in jeopardy. The vast majority of paintings that
fall off of walls had improperly secured ends of the wire.
Securing the end of the wire
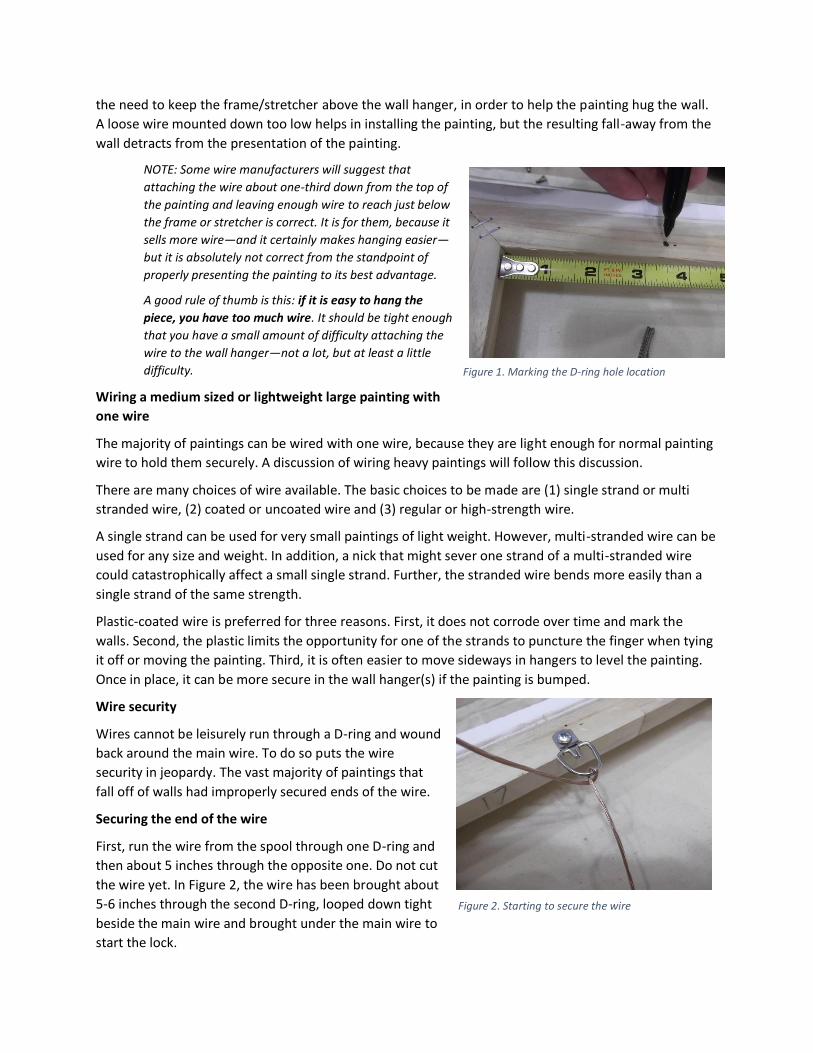
First, run the wire from the spool through one D-ring and
then about 5 inches through the opposite one. Do not cut
the wire yet. In Figure 2, the wire has been brought about
5-6 inches through the second D-ring, looped down tight
beside the main wire and brought under the main wire to
start the lock.
Figure 1. Marking the D-ring hole location
Figure 2. Starting to secure the wire

In Figure 3, the end is pulled up tightly against the D-ring and started back down through to make the
lock. In Figure 4, the end is pulled tight to lock the end tightly. Tightness is critical.
In Figure 5, the end is circled tightly around the main wire to start the wrap. In Figure 6, the wrap is
almost finished
In Figure 7, the end is bent toward the canvas and then cut off. In Figure 8, the wire is about to be cut
about 5 inches beyond the other D-ring.
Figure 3. Pulling the end up tight against the main wire and running it back through the D-ring
Figure 4. Pulling the end tight to form the lock
Figure 5. Starting the wrap Figure 6. Finishing the wrap—about ¾ inch long
Figure 7. Cutting off the excess Figure 8. Ready to cut the wire and secure the 2nd end
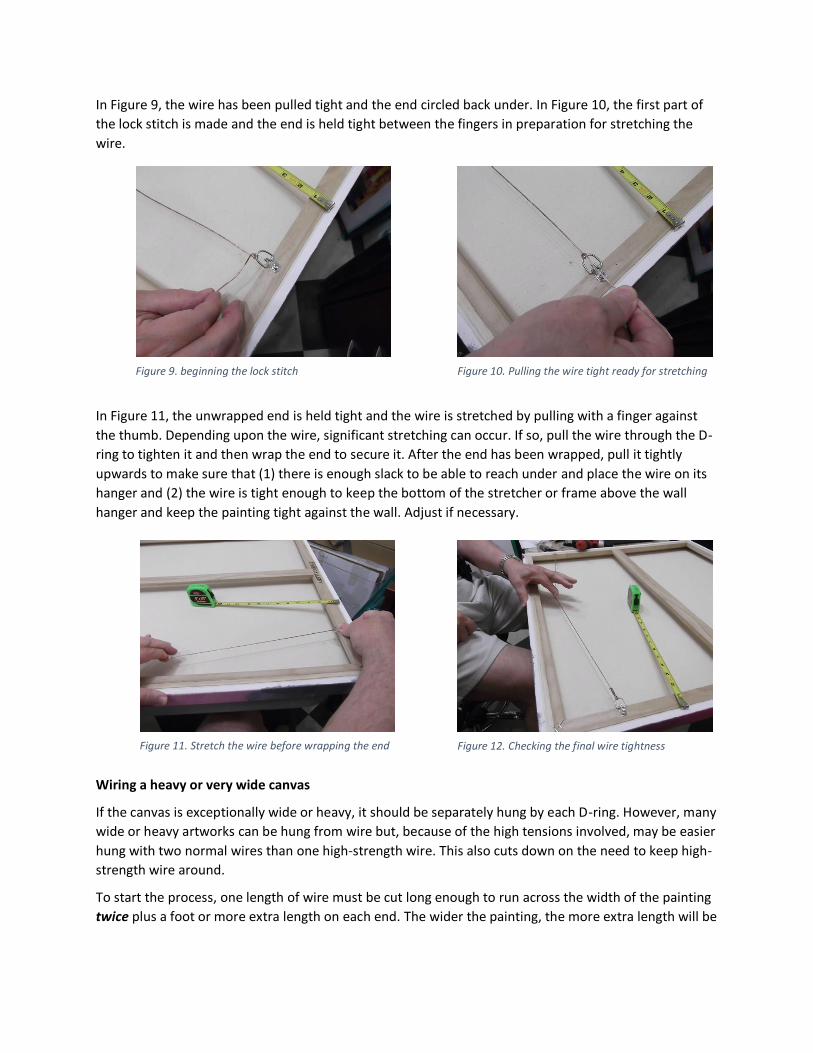
In Figure 9, the wire has been pulled tight and the end circled back under. In Figure 10, the first part of
the lock stitch is made and the end is held tight between the fingers in preparation for stretching the
wire.
In Figure 11, the unwrapped end is held tight and the wire is stretched by pulling with a finger against
the thumb. Depending upon the wire, significant stretching can occur. If so, pull the wire through the D-
ring to tighten it and then wrap the end to secure it. After the end has been wrapped, pull it tightly
upwards to make sure that (1) there is enough slack to be able to reach under and place the wire on its
hanger and (2) the wire is tight enough to keep the bottom of the stretcher or frame above the wall
hanger and keep the painting tight against the wall. Adjust if necessary.
Wiring a heavy or very wide canvas
If the canvas is exceptionally wide or heavy, it should be separately hung by each D-ring. However, many
wide or heavy artworks can be hung from wire but, because of the high tensions involved, may be easier
hung with two normal wires than one high-strength wire. This also cuts down on the need to keep high-
strength wire around.
To start the process, one length of wire must be cut long enough to run across the width of the painting
twice plus a foot or more extra length on each end. The wider the painting, the more extra length will be
Figure 9. beginning the lock stitch Figure 10. Pulling the wire tight ready for stretching
Figure 11. Stretch the wire before wrapping the end Figure 12. Checking the final wire tightness
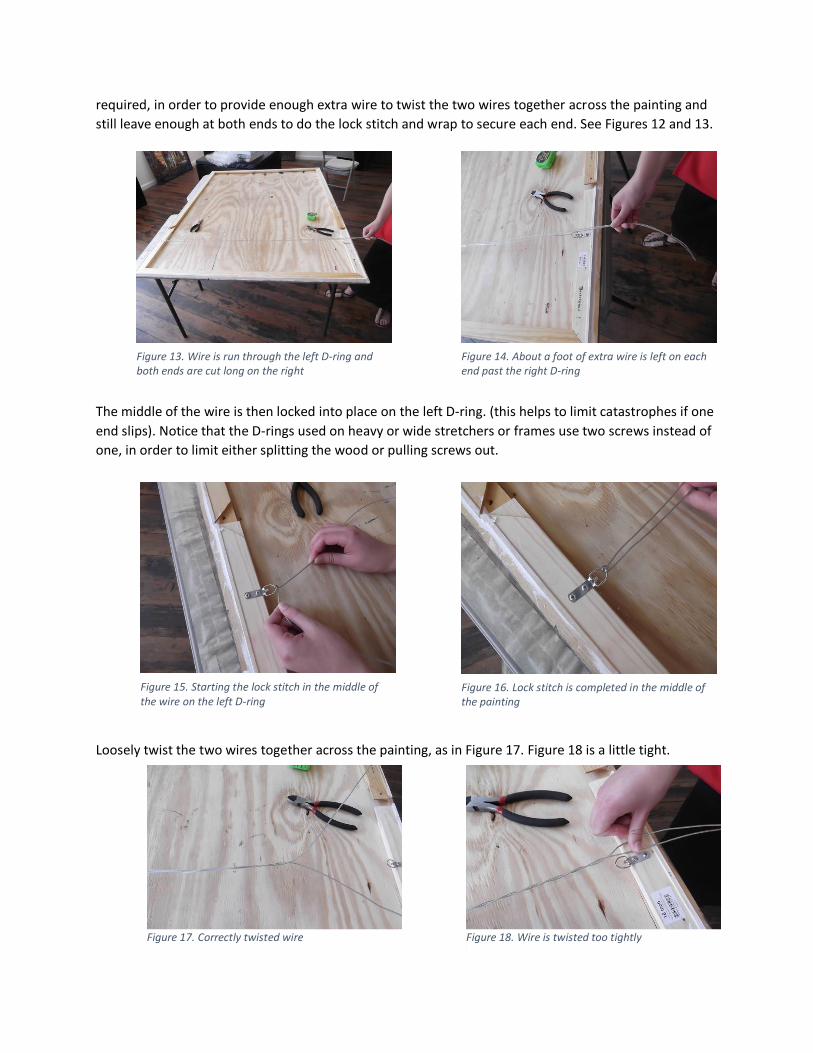
required, in order to provide enough extra wire to twist the two wires together across the painting and
still leave enough at both ends to do the lock stitch and wrap to secure each end. See Figures 12 and 13.
The middle of the wire is then locked into place on the left D-ring. (this helps to limit catastrophes if one
end slips). Notice that the D-rings used on heavy or wide stretchers or frames use two screws instead of
one, in order to limit either splitting the wood or pulling screws out.
Loosely twist the two wires together across the painting, as in Figure 17. Figure 18 is a little tight.
Figure 13. Wire is run through the left D-ring and both ends are cut long on the right
Figure 14. About a foot of extra wire is left on each end past the right D-ring
Figure 15. Starting the lock stitch in the middle of the wire on the left D-ring
Figure 16. Lock stitch is completed in the middle of the painting
Figure 17. Correctly twisted wire Figure 18. Wire is twisted too tightly

Start the lock stitch on each end, as in Figure 19. Then pull back through as in Figure 20.
Hold the ends of the wires and pull to stretch the two wires and fully seat the lock stitch on the other D-
ring, as in Figure 21. Make sure the stretched wire does not come up high enough to have the frame
interfere with the wall hanger. Remove slack, if necessary. Then start to spread the wires starting at the
end D-ring, as in Figure 22.
Spread the wires back far enough to get room to wrap each end, as in Figure 23. It may be useful to use
something to keep the wires apart while wrapping, as in Figure 24.
Figure 19. Starting the lock stitch on each end Figure 20. Completing each lock stitch
Figure 21. Stretching the twisted wires Figure 22. Starting to spread the wires
Figure 23. Spreading the wires to get room to wrap Figure 24. Holding the wires apart with plier weight

Each end is then wrapped in the normal fashion, as in Figure 25. With heavier paintings, use a longer
wrap than that used with a lighter painting.
Author’s Note: The assistance of Summer Rezeli, who served as an intern at 311 Gallery, Raleigh NC during the
summers of 2014 and 2015 is greatly appreciated. She alternated with me as both photographer and hand model
for this set of instructions.


![6. Wiring Diagram - weidefamily.net coil Transmission control module ... WIRING DIAGRAM 6. Wiring Diagram. MEMO: 21 WIRING DIAGRAM ... 76 6-3 [D6R2] WIRING DIAGRAM 6](https://img.dokumen.tips/doc/110x75/5aa0cc3b7f8b9a62178ea5e7/6-wiring-diagram-coil-transmission-control-module-wiring-diagram-6-wiring.jpg)