Embed Size (px)
Citation preview
Printer manualRicoh MP C2500
For use by: Employees, students and guestsVersion: 1.2Date: 02-03-2009Owner: SSC ICT
Win
dow
s XP
SP
3
1
Table of contents
1. Printing 2 1.1 Installing a printer in the ‘dastud’ domain 2 1.2 Printing preferences 4
1.2.1 Opening the printing preferences 4
1.2.2 Adjusting papersize, orientation and printing quality 4
1.2.3 Printing on both sides 5
1.2.4 Using the automatic staple option 5
1.2.5 Printing in color or black and white 5
1.2.6 Reducing and enlarging printjobs 6
1.3 Secure printing: sending a ‘locked print job’ to the printer 7
2 Copying 11 2.1 Logging on to the copy function 11 2.2 How to make a normal print with default settings 12 2.3 Adjustingthefinalresult 14
2.3.1 Printing color or black and white 14
2.3.2 Enlarging and reducing 14
2.3.3 Printing single and double sided copies 15
2.3.4 Staples 15
3 Scanning 16 3.1 How to scan to your emailadres 16
3.1.1 Adjustingqualityandfilesize 17
3.1.2 Adjusting paper size of the scan 18
3.2 How to scan to your Home Folder (H:\-drive) 19 3.3 Making batch scans 19 3.4 Inspecting the job log 20
2
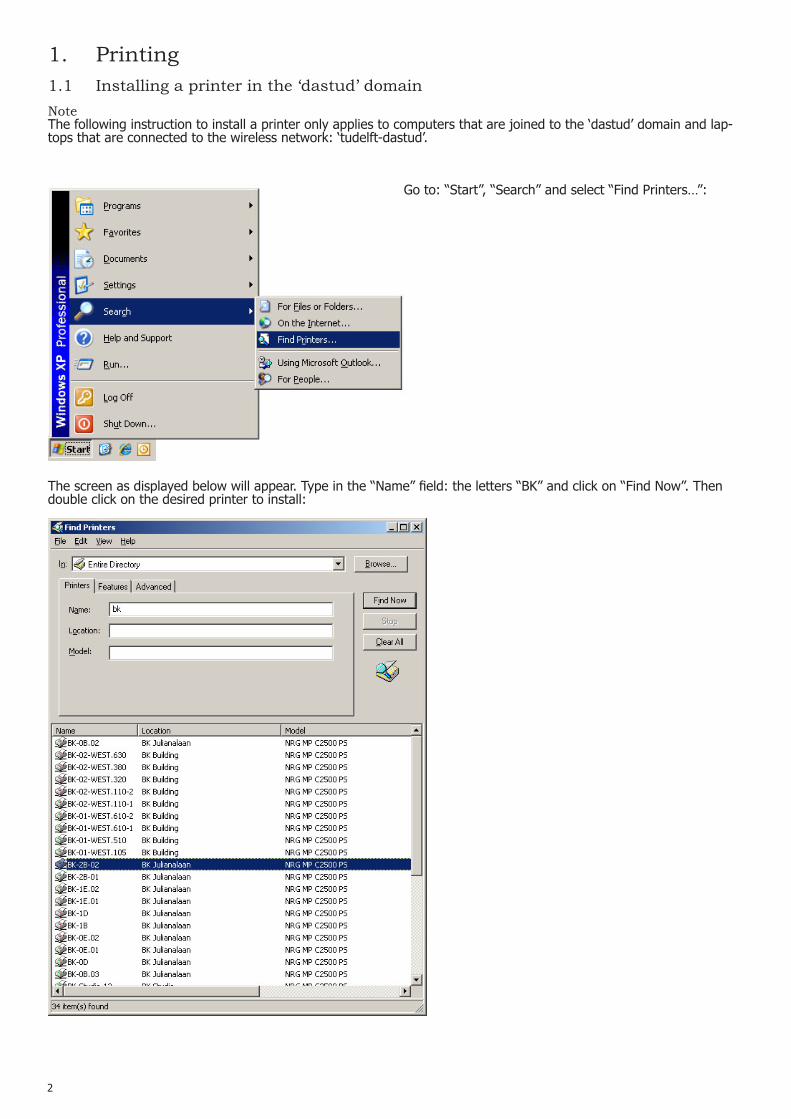
1.1 Installing a printer in the ‘dastud’ domain
Go to: “Start”, “Search” and select “Find Printers…”:
Thescreenasdisplayedbelowwillappear.Typeinthe“Name”field:theletters“BK”andclickon“FindNow”.Thendouble click on the desired printer to install:
1. Printing
NoteThe following instruction to install a printer only applies to computers that are joined to the ‘dastud’ domain and lap-tops that are connected to the wireless network: ‘tudelft-dastud’.
3
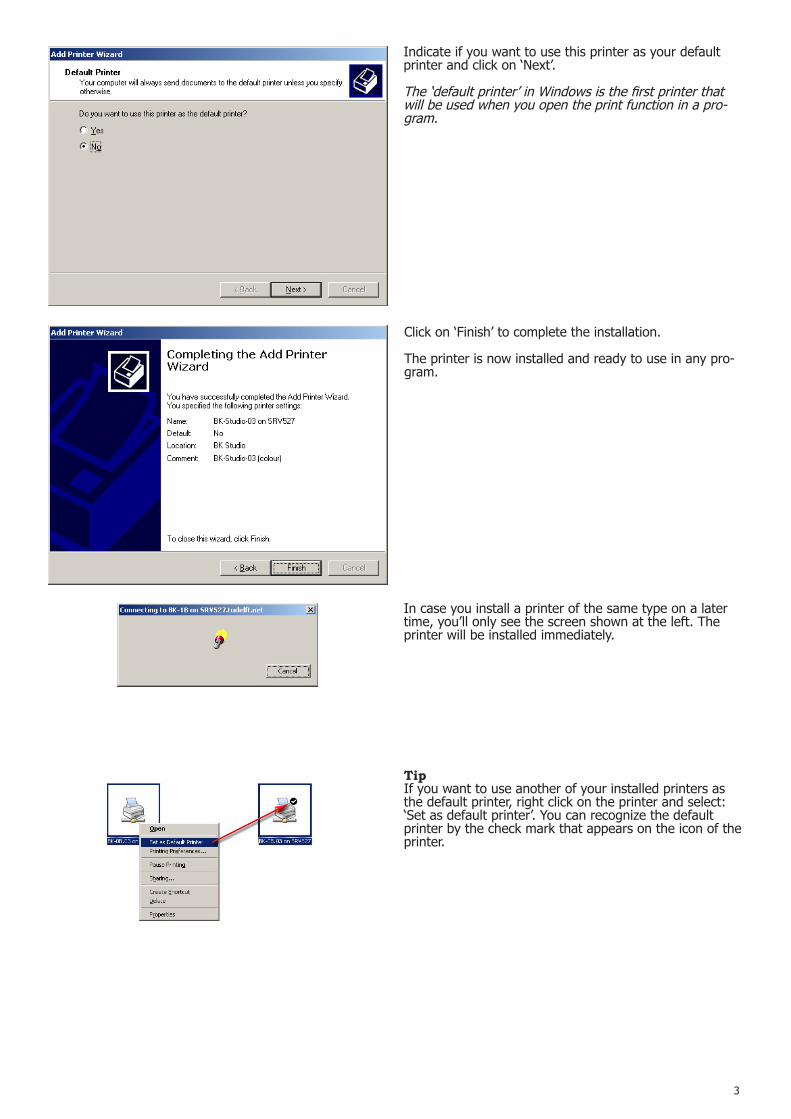
Indicate if you want to use this printer as your default printer and click on ‘Next’.
The‘defaultprinter’inWindowsisthefirstprinterthatwill be used when you open the print function in a pro-gram.
Click on ‘Finish’ to complete the installation.
The printer is now installed and ready to use in any pro-gram.
In case you install a printer of the same type on a later time, you’ll only see the screen shown at the left. The printer will be installed immediately.
TipIf you want to use another of your installed printers as the default printer, right click on the printer and select: ‘Set as default printer’. You can recognize the default printer by the check mark that appears on the icon of the printer.

4
1.2 Printing preferences
1.2.2 Adjusting papersize, orientation and printing quality
Open via ‘Start’ the ‘Control Panel’ and from here ‘Printers and Faxes’:
In the ‘Printers and Faxes’ window, right click on the printer for which you want to adjust the preferences and choose ‘Printing Preferences´:
Open the tab ‘Paper/Quality’
Choose the desired orientation of the image on the paper under ‘Orientation’. A rule of thumb: the orientation should be identical to how it’s displayed on your screen. We call an orientation ‘Portrait’ when the paper is stand-ing on it’s short edge and ‘Landscape’ is when it’s lying on it’s longer edge.
Under ‘Paper Options’ you can choose the ‘Paper Size’ you want to use for your print. Under ‘Paper Source’ you can select the drawer from which the printer should take the paper to make your print on.
Select the printing resolution under ‘Print Quality’.
1.2.1 Opening the printing preferences
Note
In the following paragraphs the preferences for a printer will be changed via the Control Panel. If you change the preferences via the Control Panel, these changes will be applied immediately and will be the same in any program that you use the printer in. If you would change the preferences from within a program, these will only apply to that mo-ment and program. If you don’t want to use these settings any more, go back to the Control Panel, change them back and click on ‘Apply’.
5
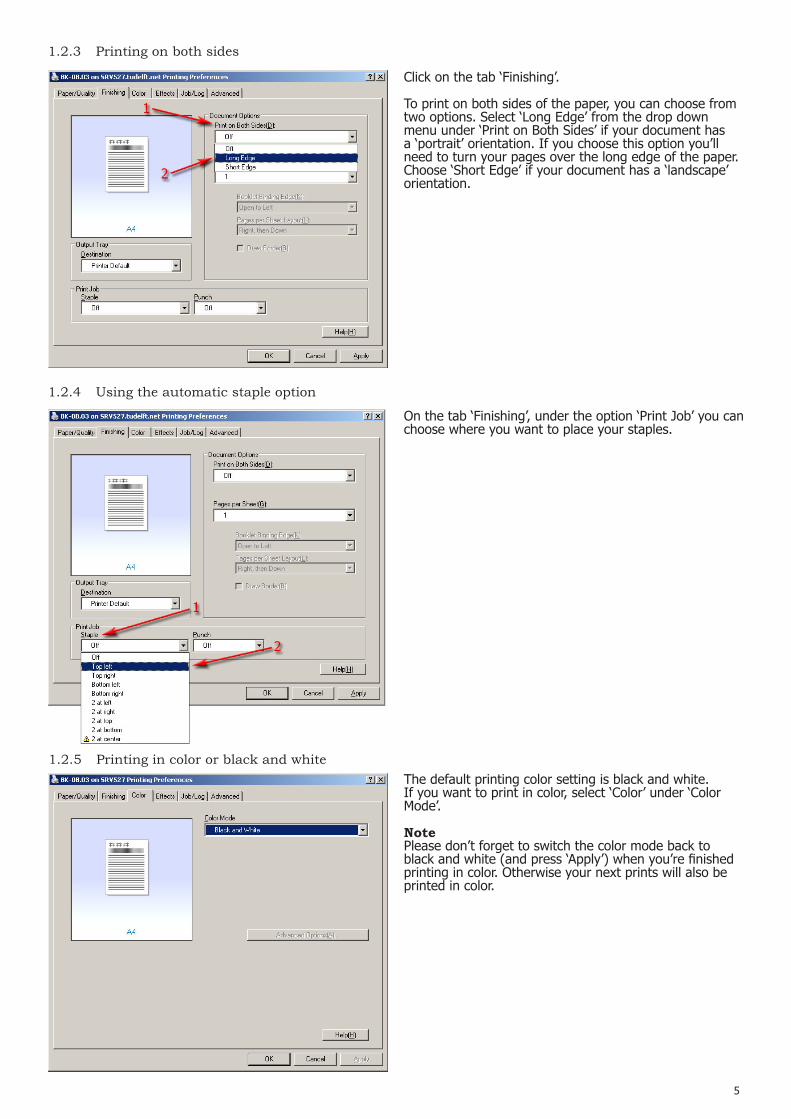
Click on the tab ‘Finishing’.
To print on both sides of the paper, you can choose from two options. Select ‘Long Edge’ from the drop down menuunder‘PrintonBothSides’ifyourdocumenthasa ‘portrait’ orientation. If you choose this option you’ll need to turn your pages over the long edge of the paper. Choose ‘Short Edge’ if your document has a ‘landscape’ orientation.
1.2.3 Printing on both sides
1.2.4 Using the automatic staple option
On the tab ‘Finishing’, under the option ‘Print Job’ you can choose where you want to place your staples.
1.2.5 Printing in color or black and whiteThe default printing color setting is black and white. If you want to print in color, select ‘Color’ under ‘Color Mode’.
NotePlease don’t forget to switch the color mode back to blackandwhite(andpress‘Apply’)whenyou’refinishedprinting in color. Otherwise your next prints will also be printed in color.
6
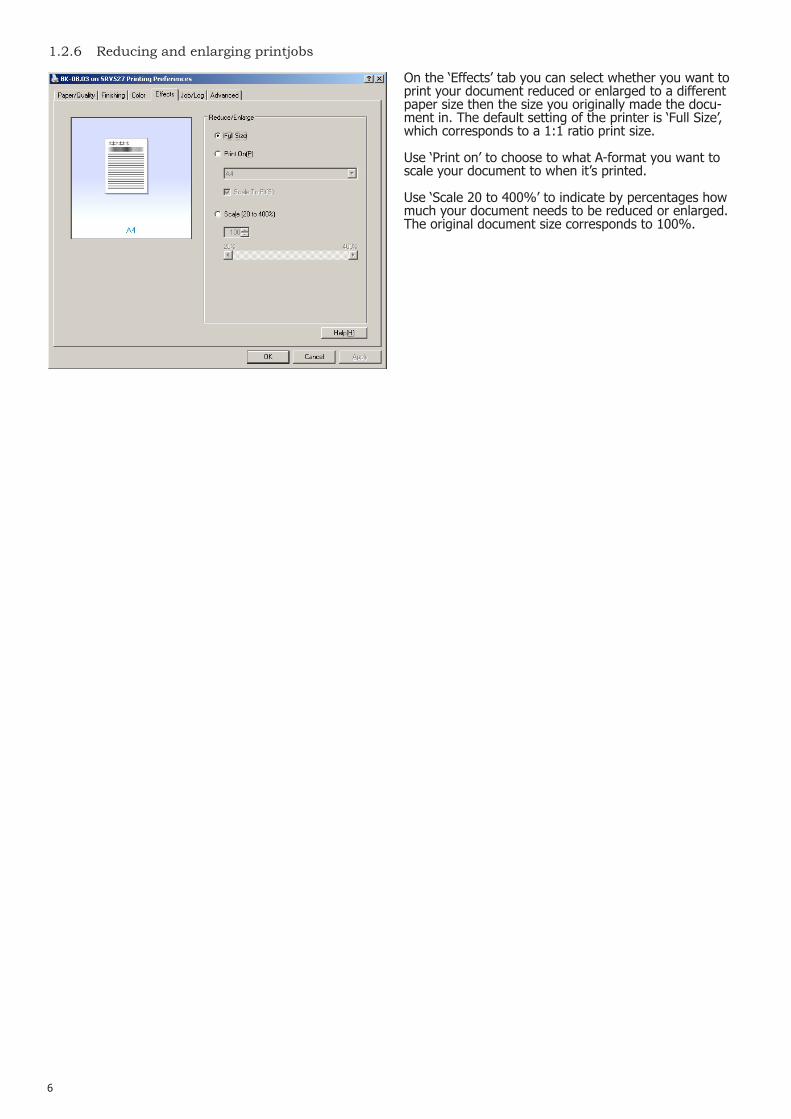
1.2.6 Reducing and enlarging printjobs
On the ‘Effects’ tab you can select whether you want to print your document reduced or enlarged to a different paper size then the size you originally made the docu-ment in. The default setting of the printer is ‘Full Size’, which corresponds to a 1:1 ratio print size.
Use ‘Print on’ to choose to what A-format you want to scale your document to when it’s printed.
Use ‘Scale 20 to 400%’ to indicate by percentages how much your document needs to be reduced or enlarged. The original document size corresponds to 100%.

7
The following screen will appear on the printer’s touch screen. Choose ‘Print Jobs’ on the touchscreen.
You need to make up a unique ‘User-ID’ and password for every secure print job that you send to the printer. This user-id and password are sent to the printer along with the print job. Once the print job is secured it can only be printedwhenthisuser-idandpasswordareenteredintotheprinteritself.Byusingthisoptionyoucanpreventyourdocument from being printed to the printer while you’re not in front of the printer itself. This way printed documents with sensitive information can’t be taken or read by people who are not entitled to do so.
Important noteOnly employees are allowed to make secure print jobs. Secure print jobs that are not yet printed will be deleted from the print queue automatically after one day.
Follow the next steps to make a secure print job.
1.3 Secure printing: sending a ‘locked print job’ to the printer
Open the printing preferences of the printer (see para-graph 1.2.1) where you want to send a secure print job to and open the tab: ‘Job/Log’.
Make up a name, consisting of up to 8 alpha numeric charactersandenterthisinthefield‘UserID’.Inthisexample we use ‘abba30’.
Select ‘Locked Print’ under ‘Job Type’, then enter a ‘Pass-word’ consisting of 4 to 8 numbers.
Nowclickon‘Apply’andOK.Fromnowon,alldocumentsthat are sent to the printer will become locked print jobs.
Print your document in the application from where you want to print. The print job has now been sent as a locked print job and will be kept on the printer for as long as a day.
Now go over to the printer an push on the ‘printer button’ to start the print mode.
8
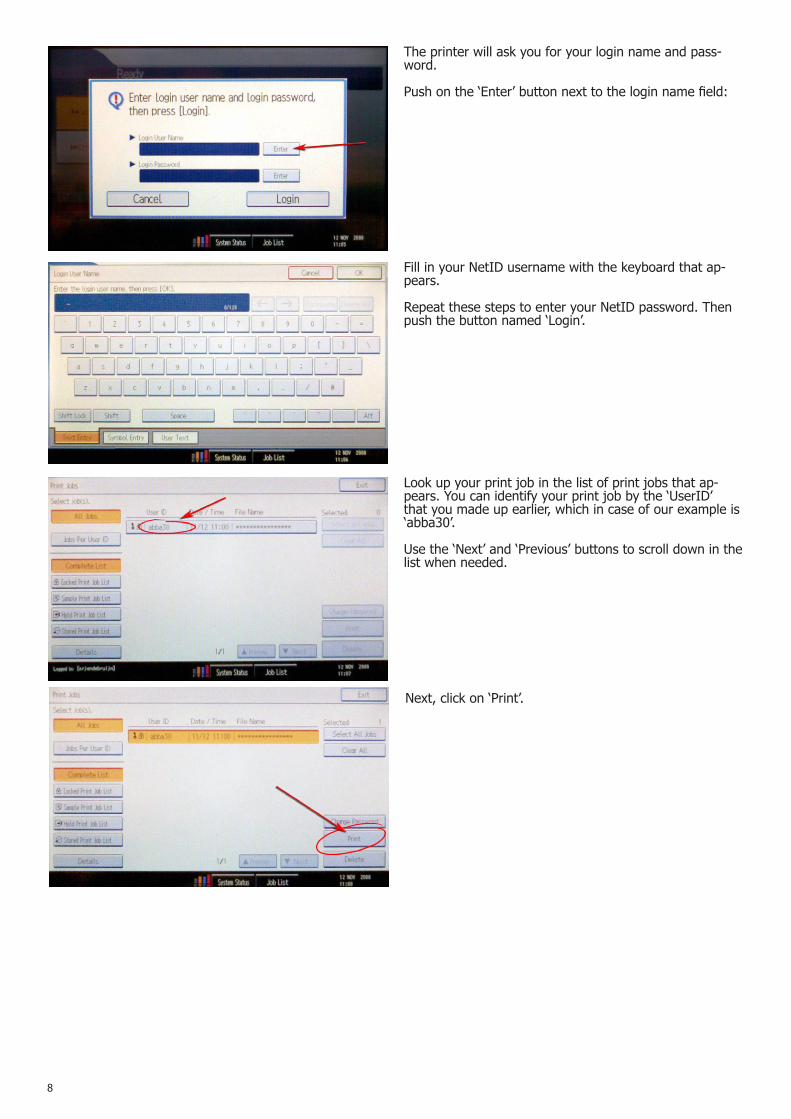
The printer will ask you for your login name and pass-word.
Pushonthe‘Enter’buttonnexttotheloginnamefield:
Look up your print job in the list of print jobs that ap-pears. You can identify your print job by the ‘UserID’ that you made up earlier, which in case of our example is ‘abba30’.
Use the ‘Next’ and ‘Previous’ buttons to scroll down in the list when needed.
Fill in your NetID username with the keyboard that ap-pears.
Repeat these steps to enter your NetID password. Then push the button named ‘Login’.
Next, click on ‘Print’.
9
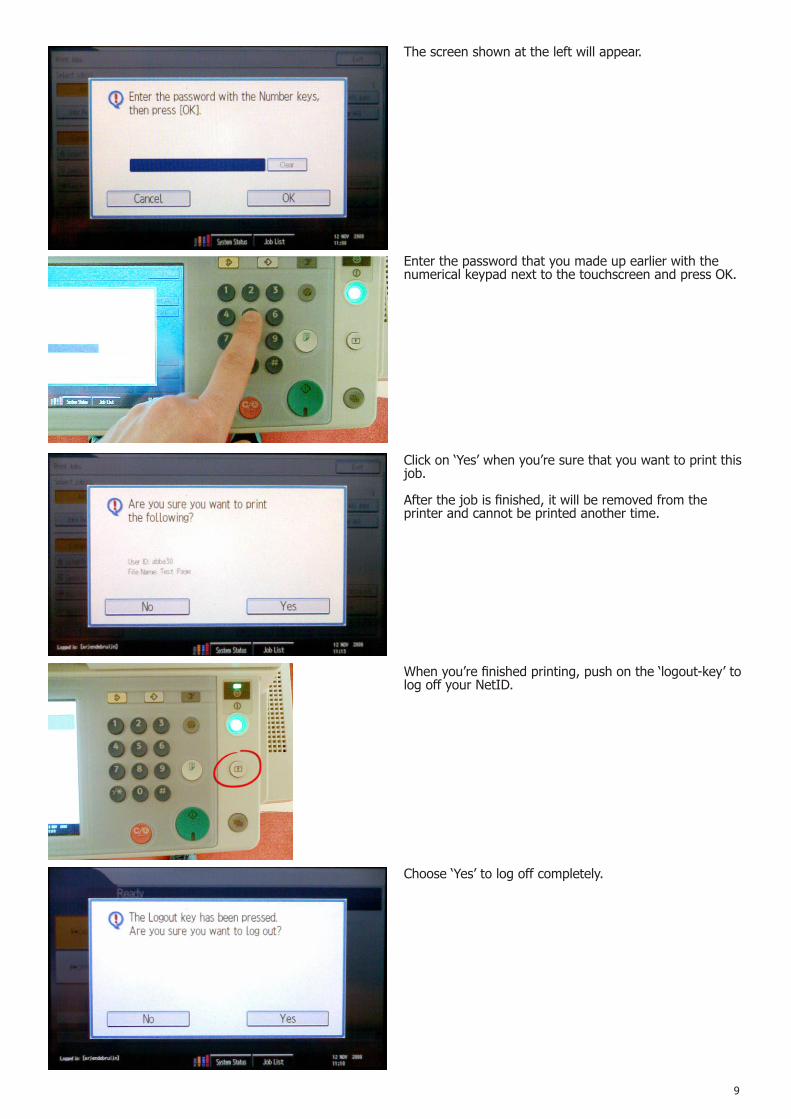
The screen shown at the left will appear.
Click on ‘Yes’ when you’re sure that you want to print this job.
Afterthejobisfinished,itwillberemovedfromtheprinter and cannot be printed another time.
Whenyou’refinishedprinting,pushonthe‘logout-key’tolog off your NetID.
Choose ‘Yes’ to log off completely.
Enter the password that you made up earlier with the numericalkeypadnexttothetouchscreenandpressOK.

10
Important note
When you’re finished printing your locked print jobs, adjust the settings for ‘Job Type’ back to ‘Nor-mal Print’. If you don’t, every job that you sent to the printer will keep on becoming a locked print job.
In the image on the left you can see how to switch back to normal print jobs:1. delete your password2. delete your UserID3. change the job type back to ‘Normal Print’4.alwaysclickon‘Apply’toconfirmallsettings
11
2 Copying
2.1 Logging on to the copy function
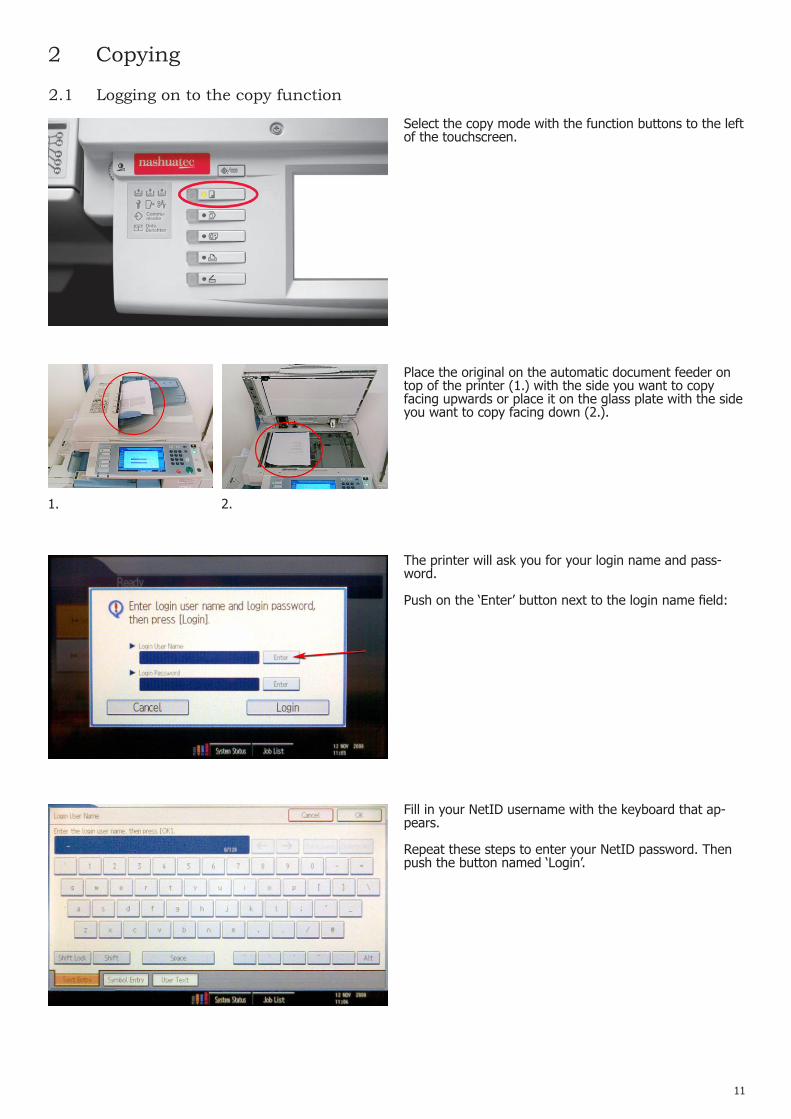
Select the copy mode with the function buttons to the left of the touchscreen.
Place the original on the automatic document feeder on top of the printer (1.) with the side you want to copy facing upwards or place it on the glass plate with the side you want to copy facing down (2.).
1. 2.
Fill in your NetID username with the keyboard that ap-pears.
Repeat these steps to enter your NetID password. Then push the button named ‘Login’.
The printer will ask you for your login name and pass-word.
Pushonthe‘Enter’buttonnexttotheloginnamefield:
12
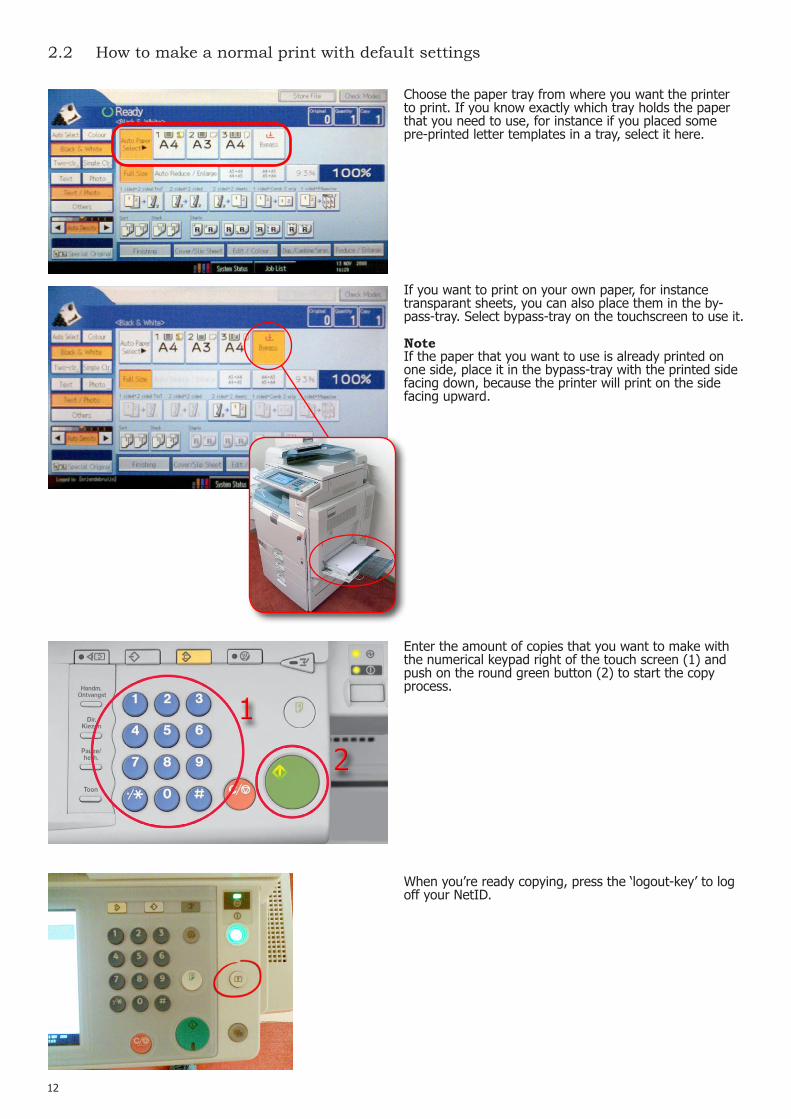
Choose the paper tray from where you want the printer to print. If you know exactly which tray holds the paper that you need to use, for instance if you placed some pre-printed letter templates in a tray, select it here.
If you want to print on your own paper, for instance transparant sheets, you can also place them in the by-pass-tray. Select bypass-tray on the touchscreen to use it.
NoteIf the paper that you want to use is already printed on one side, place it in the bypass-tray with the printed side facing down, because the printer will print on the side facing upward.
Enter the amount of copies that you want to make with the numerical keypad right of the touch screen (1) and push on the round green button (2) to start the copy process.
2.2 How to make a normal print with default settings
When you’re ready copying, press the ‘logout-key’ to log off your NetID.
13
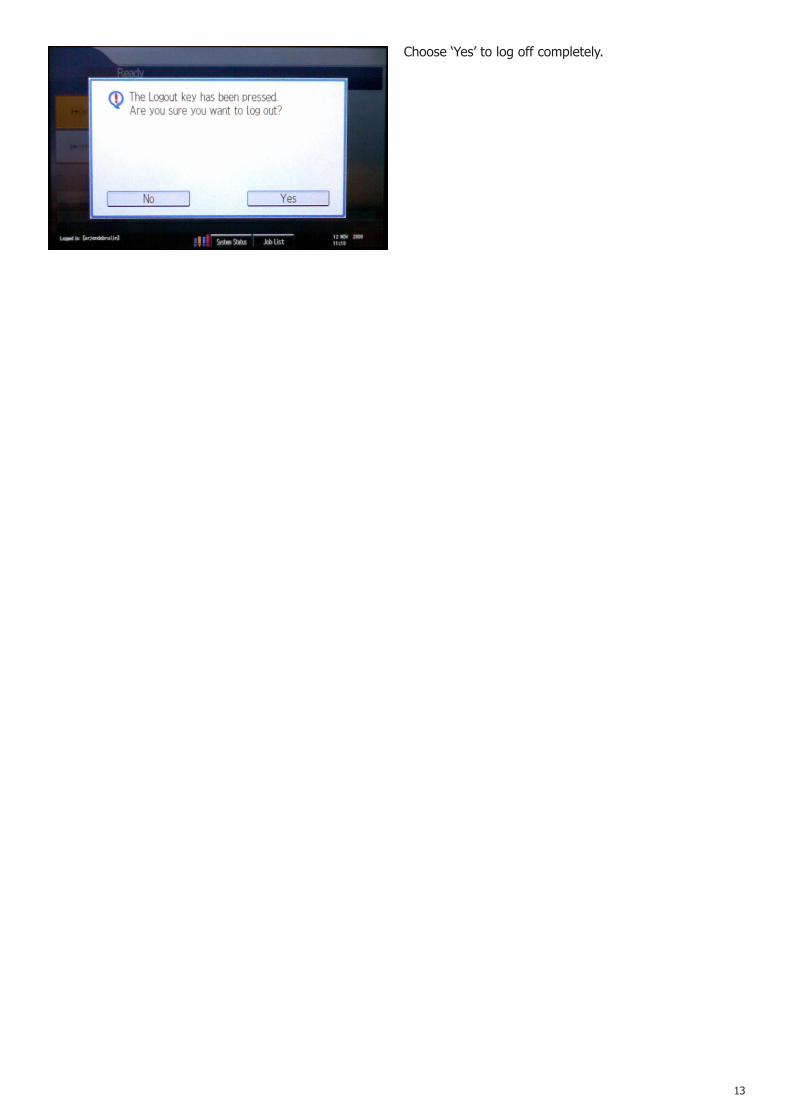
Choose ‘Yes’ to log off completely.
14
2.3 Adjusting the final result
1
2
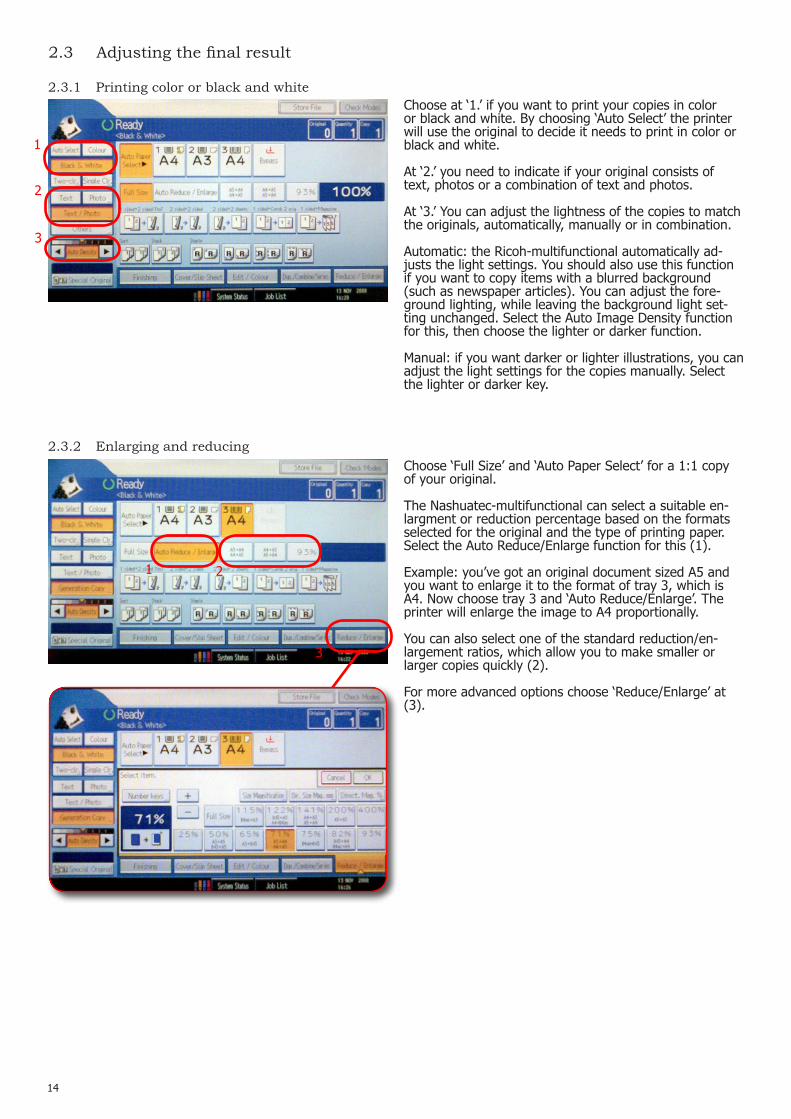
Choose at ‘1.’ if you want to print your copies in color orblackandwhite.Bychoosing‘AutoSelect’theprinterwill use the original to decide it needs to print in color or black and white.
At ‘2.’ you need to indicate if your original consists of text, photos or a combination of text and photos.
At ‘3.’ You can adjust the lightness of the copies to match the originals, automatically, manually or in combination.
Automatic: the Ricoh-multifunctional automatically ad-justs the light settings. You should also use this function if you want to copy items with a blurred background (such as newspaper articles). You can adjust the fore-ground lighting, while leaving the background light set-ting unchanged. Select the Auto Image Density function for this, then choose the lighter or darker function.
Manual: if you want darker or lighter illustrations, you can adjust the light settings for the copies manually. Select the lighter or darker key.
3
2.3.1 Printing color or black and white
Choose ‘Full Size’ and ‘Auto Paper Select’ for a 1:1 copy of your original.
The Nashuatec-multifunctional can select a suitable en-largment or reduction percentage based on the formats selected for the original and the type of printing paper. Select the Auto Reduce/Enlarge function for this (1).
Example: you’ve got an original document sized A5 and you want to enlarge it to the format of tray 3, which is A4. Now choose tray 3 and ‘Auto Reduce/Enlarge’. The printer will enlarge the image to A4 proportionally.
You can also select one of the standard reduction/en-largement ratios, which allow you to make smaller or larger copies quickly (2).
For more advanced options choose ‘Reduce/Enlarge’ at (3).
1 2
3
2.3.2 Enlarging and reducing
15
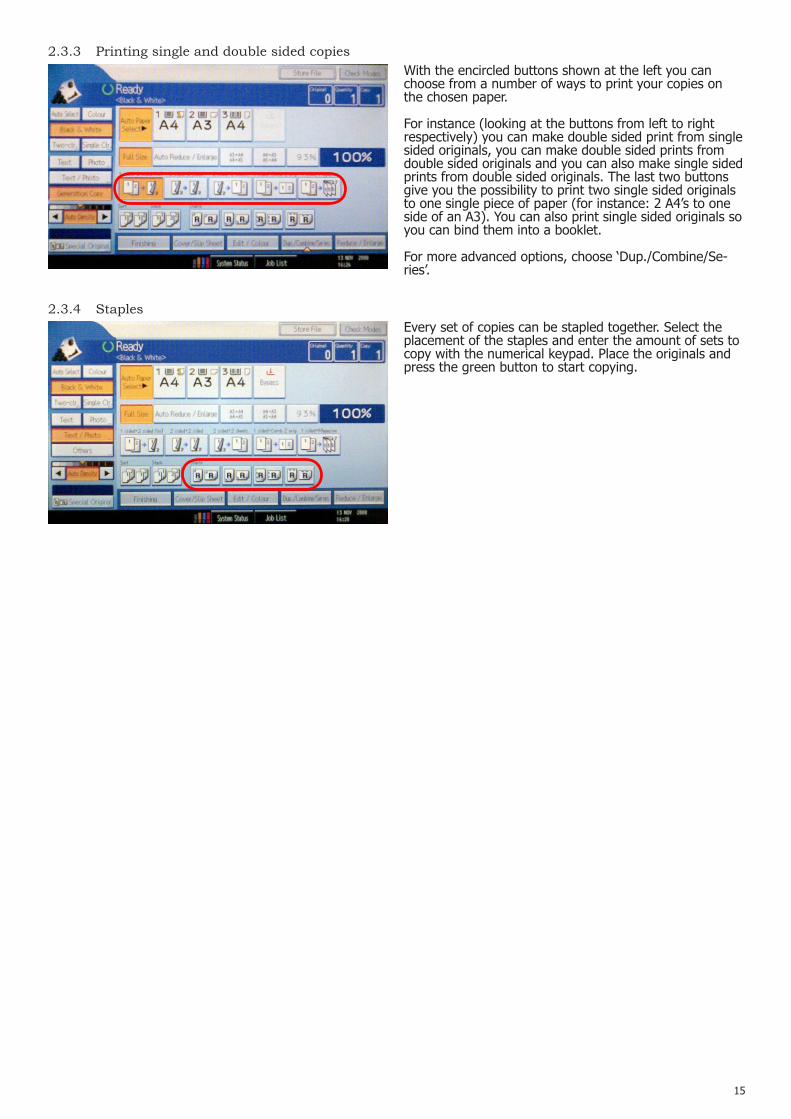
2.3.3 Printing single and double sided copiesWith the encircled buttons shown at the left you can choose from a number of ways to print your copies on the chosen paper.
For instance (looking at the buttons from left to right respectively) you can make double sided print from single sided originals, you can make double sided prints from double sided originals and you can also make single sided prints from double sided originals. The last two buttons give you the possibility to print two single sided originals to one single piece of paper (for instance: 2 A4’s to one side of an A3). You can also print single sided originals so you can bind them into a booklet.
For more advanced options, choose ‘Dup./Combine/Se-ries’.
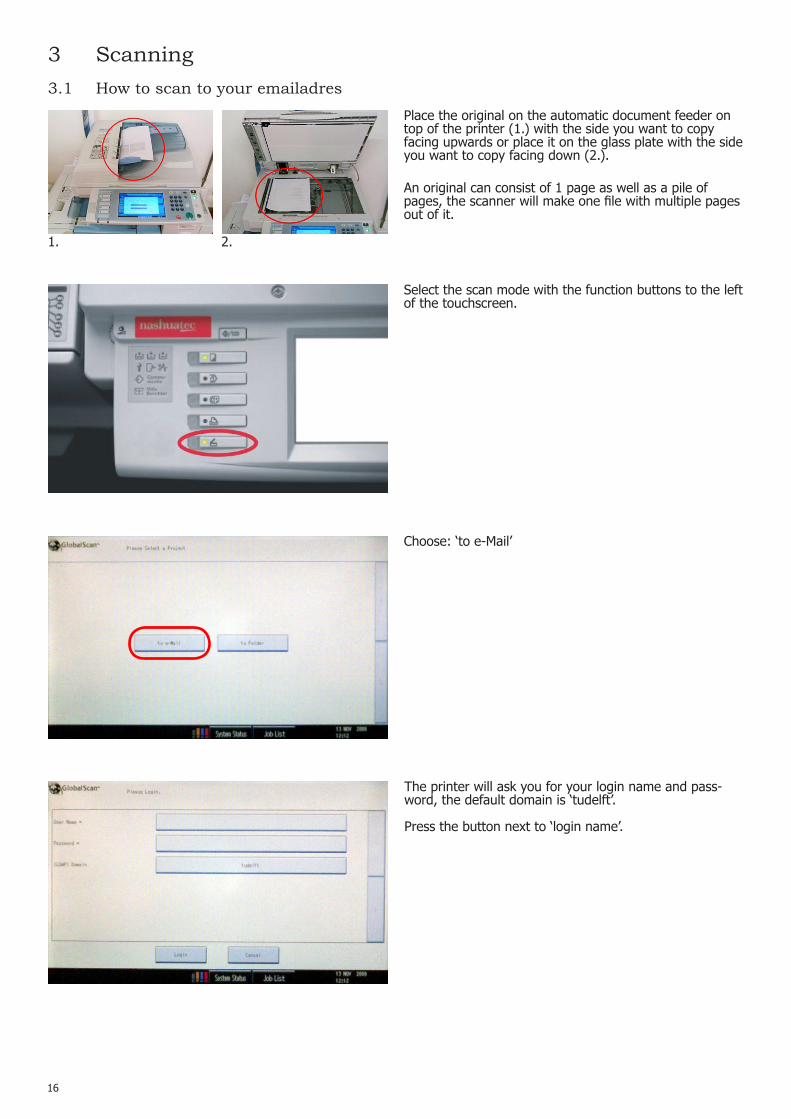
2.3.4 StaplesEvery set of copies can be stapled together. Select the placement of the staples and enter the amount of sets to copy with the numerical keypad. Place the originals and press the green button to start copying.
16
3 Scanning
Select the scan mode with the function buttons to the left of the touchscreen.
Place the original on the automatic document feeder on top of the printer (1.) with the side you want to copy facing upwards or place it on the glass plate with the side you want to copy facing down (2.).
An original can consist of 1 page as well as a pile of pages,thescannerwillmakeonefilewithmultiplepagesout of it.
1. 2.
3.1 How to scan to your emailadres
The printer will ask you for your login name and pass-word, the default domain is ‘tudelft’.
Press the button next to ‘login name’.
Choose: ‘to e-Mail’

17
Themostefficiëntwaytosentyourscanfiletootherpeople is to scan it to your own e-mail address and to forward it to other people from there.
Youre-mailaddressisalreadyfilledinwhenyoulogon,so you can start scanning right away.
Fill in your NetID with the keyboard that appears and pressOK.RepeatthesestepstoenteryourNetIDpass-word.
NOTEChange the domain to ‘dastud’.
Whenyou’refinishedenteringyourlogincredentialspress the ‘login’ button.
Select the ‘Scan Settings’ tab.On this tab you can adjust the following things: the resolutionofthescanfile,indicatewhethertheoriginalissingle-ordoublesidedandinwhatfileformatyouwantto save your scans.
Here are some guidelines:
-Toreducefilesize,choosealowresolution(200dpi),for instance when your original only consists of text.-Forafinalresultwithahigherquality(moredetail)youneed to choose a higher resolution.- When you select ‘Color Scan’ you can also select JPEG insteadoftheTIFFfileformat.SelectingJPEGwillmakethe scanner send every scanned page separately to your e-mailaccount,insteadofbundlingthemintoonefile.The advantage is that you can edit these images sepa-rately right away.
3.1.1 Adjusting quality and file size
On the green ‘start’ button a green light will switch on. Push this button to start scanning.
When the last original has been scanned, the scan job will be completed and will be send immediately.
After you’ve finished scanning, it will take some time before your scan file appears in your inbox.

18
AttentionThe following option will only work if you place the original on the glass plate and not if you use the automatic document feeder.
Push the ‘Scan Size’ button in the lower right corner of the screen.- Choose ‘Auto Detect’ to have the scanner detect what format (paper size) your original is and to have it saved in this format.- You can also choose from a whole set of other standard papersizesyoucansaveyourfileinto.
To return to the main page press ‘General’.
3.1.2 Adjusting paper size of the scan

19
3.2 How to scan to your Home Folder (H:\-drive)Select the scan mode with the function buttons to the left of the touchscreen. Select the option: ‘to Folder’ and log in with your NetID as described in 3.1.
The following screen will appear. Press the text ‘My documents\Scanned Documents’ and then on the arrow pointing right.
The location ‘My documents\Scanned Documents’ has now been moved to the right column, which shows the networklocationswherethescannedfilewillbesavedto.
InthiscasethescannedfilewillbesavedintoyourHomeFolder in the folder: H:\My Documents\Scanned Docu-ments.
Using the batch scan button allows you to place large documents in smaller, separate piles on the automatic document feeder and have them send to you bundled intoonefile.
In case you scan from the glass plate, for instance when you scan separate pages from a book one by one, this function will be activated automatically.
3.3 Making batch scans
20
The printer will ask after every ‘part’ to press either the ‘start’ button (the big, round green button) or to press the ‘#’ button. With ‘#’ you will close the batch scan, which will be send to you shortly.
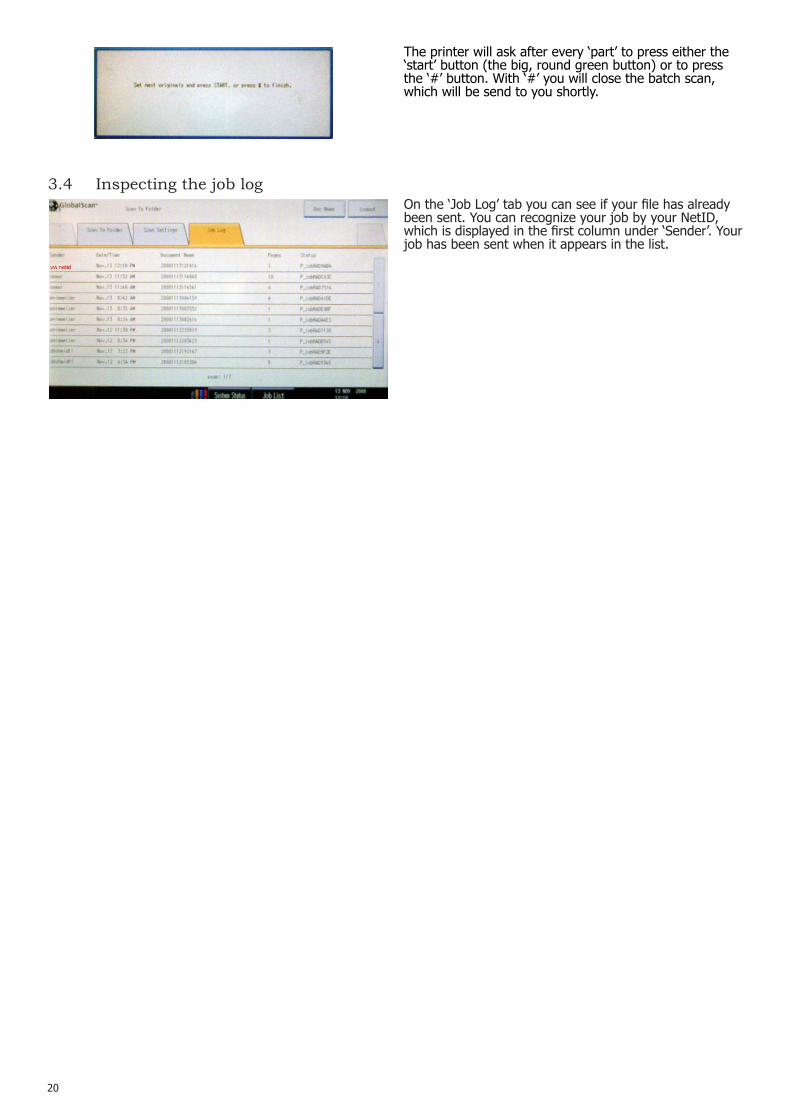
Onthe‘JobLog’tabyoucanseeifyourfilehasalreadybeen sent. You can recognize your job by your NetID, whichisdisplayedinthefirstcolumnunder‘Sender’.Yourjob has been sent when it appears in the list.
3.4 Inspecting the job log