Embed Size (px)
Citation preview

Precision Novi™ Implantable Pulse Generator
Directions for Use
91005926-01 REV DCAUTION: Federal law restricts this device to sale, distribution and use by or on the order of a physician.

Precision Novi™ Implantable Pulse Generator
Precision Novi™ Implantable Pulse Generator Directions for Use 91005926-01 REV D i of iii
TrademarksAll trademarks are the property of their respective owners.
GuaranteesBoston Scientific Corporation reserves the right to modify, without prior notice, information relating to its products in order to improve their reliability or operating capacity.Drawings are for illustration purposes only.
Additional InformationFor indications and related information, see the Indications DFU. For contraindications, warnings, precautions, adverse events summary, physician instructions, sterilization, component disposal, and contact information for Boston Scientific, refer to the Information for Prescribers DFU for your spinal cord stimulator system. For other device-specific information not included in this manual, labeling symbols, and warranty information, refer to the appropriate DFU for your SCS System as listed on your Reference Guide.
For information regarding the Patient Identification Card, FCC rules and for clinical studies supporting the clinical use of the neurostimulation system, refer to the Information for Prescribers manual.Product Model Numbers
Model Number DescriptionSC-1140 Precision Novi™ Implantable Pulse Generator Kit

Precision Novi™ Implantable Pulse Generator Directions for Use 91005926-01 REV D ii of iii
Table of ContentsDescription ......................................................................................................................1
Compatible Leads...........................................................................................................1
Package Contents ..........................................................................................................2
Precision Novi IPG Kit .................................................................................................2
Maximum Current Amplitude per Electrode Versus Impedance ................................3
Maximum Amplitude Based on Frequency and Pulse Width .....................................3
Specifications and Technical Data ................................................................................4
Materials ..........................................................................................................................4
Radiopaque Identification Tag ......................................................................................4
Registration Information ................................................................................................4
Instructions for Use ........................................................................................................5
IPG Handling and Storage ..........................................................................................5
Pre-Op Instructions .....................................................................................................5
IPG Implantation .........................................................................................................5
Tunneling the Lead or Lead Extension .......................................................................6
Connecting the Lead, Extension, Splitter, or Connector to the IPG ............................8
IPG Explant or Replacement.....................................................................................10
IPG Battery Life.............................................................................................................10
Table of Contents

Precision Novi™ Implantable Pulse Generator
Precision Novi™ Implantable Pulse Generator Directions for Use 91005926-01 REV D iii of iii
This page intentionally left blank.

Description
Precision Novi™ Implantable Pulse Generator Directions for Use 91005926-01 REV D 1 of 11
DescriptionThe Precision Novi implantable pulse generator (IPG) system is intended to treat chronic pain by electrically stimulating the spinal cord. The multi-channel, multi-electrode device capability provides flexibility in conjunction with ease of programming. A non-rechargeable battery provides output capability while eliminating the need to charge. The IPG is controlled by a hand-held Remote Control, and can be engaged by a clinician programmer using proprietary programming software. As a non-rechargeable IPG, the IPG battery will eventually become depleted.The Precision Novi System supports a total of 16 active contacts: two 8-contact percutaneous leads, one 16-contact percutaneous lead, or one 16-contact (2x8) surgical lead.
Compatible LeadsThe following leads are compatible with the Precision Novi System:Infinion™ 16 xxcm 16 Contact LeadInfinion CX 16 xxcm 16 Contact Lead Linear™ xxcm 8 Contact LeadLinear ST xxcm 8 Contact LeadLinear 3-4 xxcm 8 Contact LeadLinear 3-6 xxcm 8 Contact LeadArtisan™ 2x8 Surgical LeadPrecision™ M8 xxcm AdapterPrecision S8 xxcm Adapter 8 Contact Extensions2x4 Splitters2x8 SplittersNote: xx denotes length (cm)

Precision Novi™ Implantable Pulse Generator
Precision Novi™ Implantable Pulse Generator Directions for Use 91005926-01 REV D 2 of 11
Package Contents
Precision Novi IPG Kit(1) Implantable Pulse Generator (1) Torque Wrench (1) Tunneling Tool Assembly (1) IPG Pocket Template (2) Port Plugs Product Literature

Maximum Current Amplitude per Electrode Versus Impedance
Precision Novi™ Implantable Pulse Generator Directions for Use 91005926-01 REV D 3 of 11
Maximum Current Amplitude per Electrode Versus Impedance
Maximum Amplitude Based on Frequency and Pulse Width

Precision Novi™ Implantable Pulse Generator
Precision Novi™ Implantable Pulse Generator Directions for Use 91005926-01 REV D 4 of 11
Specifications and Technical DataParameter Range DefaultAreas (Channels) 4 —Amplitude 0 – 25.5 mA 0 mARate 2 – 1200 ppsa 40 ppsWidth 20 – 1000 μsecb 210 μsecCycle 1 sec – 90 min, OFF OFFRamp ON 1 – 10 sec 3 secContacts 1 – 16, case: +100% to -100%, OFF 1 – 16, case: OFF
a. Only one Area is available if the rate is >130 pps.b. Amplitude × Width ≤ 12.7 µC.
MaterialsCase TitaniumHeader EpoxyStrain Relief SiliconeSize/Volume 70.9 mm x 49.5 mm x 11.3 mm / 33 cm3 (including header)
Radiopaque Identification TagThe IPG contains a radiopaque identification tag “BSC S1140”. The identification tag is visible using standard x-ray procedures.
Registration InformationIn accordance with international practice and regulatory legislation in some countries, a registration form is packed with each Boston Scientific neurostimulator. The purpose of this form is to maintain traceability of all products and to secure warranty rights. It also allows the institution involved in the evaluation or replacement of a specific device to gain quick access to pertinent data from the manufacturer.
Fill out the registration form included in the package contents. Return one copy to Boston Scientific, keep one copy for patient records, provide one copy to the patient, and one copy to the physician.Boston Scientific Neuromodulation Corporation 25155 Rye Canyon Loop Valencia, California 91355, USA Attention: Customer Service Department

Instructions for Use
Precision Novi™ Implantable Pulse Generator Directions for Use 91005926-01 REV D 5 of 11
Instructions for Use
IPG Handling and Storage• Handle the IPG and all components with care.• Keep sharp instruments away from the components.• Do not use the IPG if it has been dropped.• Do not incinerate an IPG. Improper disposal of the device could result in an explosion.
Devices should be explanted in the case of cremation, and returned to Boston Scientific Neuromodulation Corporation. An explant kit is available.
• Store the IPG between 0 °C and 45 °C (32°F and 113 °F). Devices should always be kept in temperature-regulated areas within the acceptable temperature range. IPG damage can occur at temperatures outside of this range.
Pre-Op Instructions1. Check that the sterile package is intact. (See “Sterilization” in the Information for Prescribers
manual.)2. If intra-operative stimulation testing is desired, ensure that a Trial Stimulator is available for
use. Refer to the Clinician Trial Manual for additional instructions.
IPG Implantation1. Ensure that the area surrounding the lead entry site is incised to a dimension that will
accommodate the tunneling tool.2. Check that the lead is securely anchored.3. Select and mark the intended IPG site, using the IPG template, and create an incision for
the IPG pocket.4. Create a subcutaneous pocket no larger than the IPG outline. The IPG pocket can be made
as deep as is comfortable for the patient.5. Tunnel the lead(s) to the IPG site.Note: Using the IPG template will help guide the correct pocket sizing. Select an IPG site
several inches away from the previously externalized trial lead site to reduce risk of infection.

Precision Novi™ Implantable Pulse Generator
Precision Novi™ Implantable Pulse Generator Directions for Use 91005926-01 REV D 6 of 11
Tunneling the Lead or Lead ExtensionNote: If using an Infinion™ CX Lead(s), it is recommended to use the Long Tunneling Tool
(35 cm).1. If not already assembled, attach the tunneling tool handle to the shaft by turning the locking
mechanism clockwise.Tool Handle
Locking Mechanism
Shaft
2. Mark the desired route of the tunnel.
3. Administer the appropriate local anesthetic along the tunneling path.4. OPTIONAL. If necessary, bend the tool shaft to conform to the patient’s body.5. Make a small incision at the desired exit site.
Instructions for Use
Precision Novi™ Implantable Pulse Generator Directions for Use 91005926-01 REV D 7 of 11
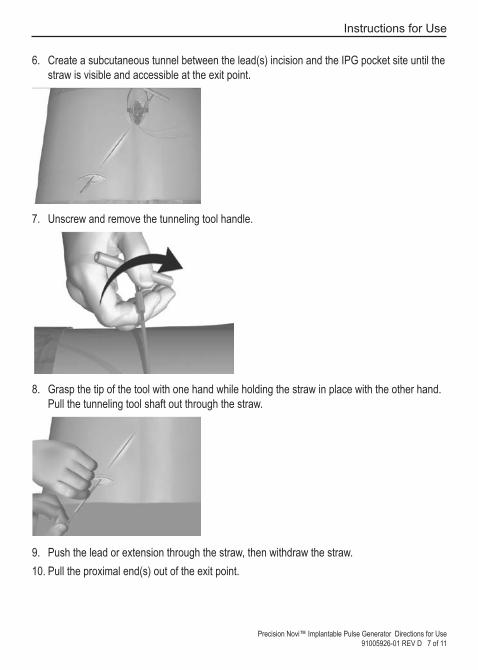
6. Create a subcutaneous tunnel between the lead(s) incision and the IPG pocket site until the straw is visible and accessible at the exit point.
7. Unscrew and remove the tunneling tool handle.
8. Grasp the tip of the tool with one hand while holding the straw in place with the other hand. Pull the tunneling tool shaft out through the straw.
9. Push the lead or extension through the straw, then withdraw the straw.10. Pull the proximal end(s) out of the exit point.

Precision Novi™ Implantable Pulse Generator
Precision Novi™ Implantable Pulse Generator Directions for Use 91005926-01 REV D 8 of 11
11. Wipe the proximal end(s) clean.
CAUTION: Do not tunnel the splitter.
Note: If using the 2x8 Splitter and performing a permanent trial, the splitter tails may be tunneled to the exit site.
Note: The following Codman Disposable Catheter Passers may be used in place of the Boston Scientific tunneling tool:REF 82-1515 (36 cm); REF 82-1516 (55 cm); REF 82-1517 (65 cm)
Note: When using a Codman Disposable Catheter Passer, tunnel from the midline incision to the IPG pocket using the standard technique.
Connecting the Lead, Extension, Splitter, or Connector to the IPGIPG ports are labeled as follows:
Connecting to the IPG:• Leads connect to IPG ports C or D. • For the Infinion 16, connect the splitter tail with laser-etched bands (contacts 1-8 of the
Infinion 16 lead) to the left port C and the unmarked splitter tail (contacts 9-16 of the Infinion 16 lead) to the right port D.
• For the Infinion CX Lead, connect the tail with the single marker band (contacts 1-8 of the Infinion CX Lead) to the left port C and the tail with two marker bands (contacts 9-16 of the Infinion CX Lead) to the right port D.
• For the Artisan 2x8 surgical lead, connect the left side to the left port C. Connect the right side (the laser-etched tail), contacts 9-16, to the right port D.
Instructions for Use
Precision Novi™ Implantable Pulse Generator Directions for Use 91005926-01 REV D 9 of 11
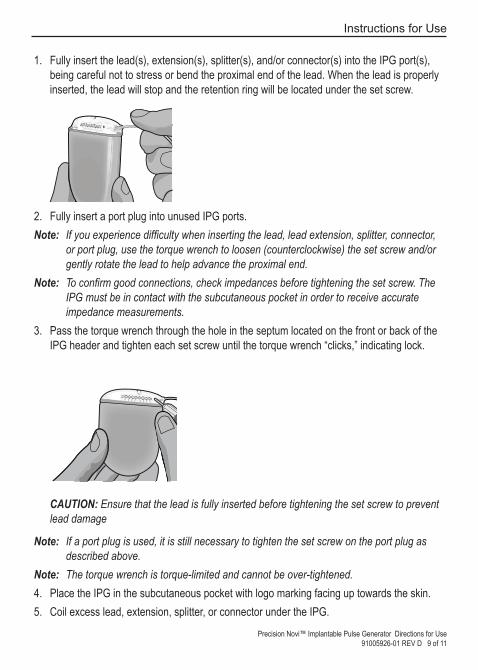
1. Fully insert the lead(s), extension(s), splitter(s), and/or connector(s) into the IPG port(s), being careful not to stress or bend the proximal end of the lead. When the lead is properly inserted, the lead will stop and the retention ring will be located under the set screw.
2. Fully insert a port plug into unused IPG ports.Note: If you experience difficulty when inserting the lead, lead extension, splitter, connector,
or port plug, use the torque wrench to loosen (counterclockwise) the set screw and/or gently rotate the lead to help advance the proximal end.
Note: To confirm good connections, check impedances before tightening the set screw. The IPG must be in contact with the subcutaneous pocket in order to receive accurate impedance measurements.
3. Pass the torque wrench through the hole in the septum located on the front or back of the IPG header and tighten each set screw until the torque wrench “clicks,” indicating lock.
CAUTION: Ensure that the lead is fully inserted before tightening the set screw to prevent lead damage
Note: If a port plug is used, it is still necessary to tighten the set screw on the port plug as described above.
Note: The torque wrench is torque-limited and cannot be over-tightened.4. Place the IPG in the subcutaneous pocket with logo marking facing up towards the skin.5. Coil excess lead, extension, splitter, or connector under the IPG.

Precision Novi™ Implantable Pulse Generator
Precision Novi™ Implantable Pulse Generator Directions for Use 91005926-01 REV D 10 of 11
6. If desired, secure the IPG in the pocket by suturing through the holes in the IPG header.
CAUTION: Do not suture through the leads or the splitter.
7. Close and dress the wound(s).
IPG Explant or Replacement1. Turn off the IPG.2. Surgically open the IPG pocket and withdraw the device. Please try to preserve the integrity
of all components so that complete device assessment can be performed.3. Loosen the connector set screws to release and remove the leads, extensions, or splitters.4. For replacement, connect the new IPG following the instructions for “Connecting the Lead,
Extension, Splitter, or Connector to the IPG” on page 8. Or, to terminate therapy, surgically remove the implanted lead system.
5. Notify Boston Scientific to document the reason for explant or replacement and to arrange for return of IPG and components.
IPG Battery LifeFor information on battery longevity, see the Information for Prescribers manual. The clinician programmer and the patient remote control provide notice when the IPG battery has entered Elective Replacement Mode and when the IPG battery has reached its end of service (EOS). Refer to the Programming Manual and the Remote Control Directions for Use for additional information.Failure to replace the IPG may lead to reduced programming capabilities, limited communication with the stimulator, and loss of stimulation.

This page intentionally left blank.

© 2017 Boston Scientific Corporation or its affiliates. All rights reserved.
91005926-01 REV D 2017-03
Legal Manufacturer
Boston Scientific NeuromodulationCorporation25155 Rye Canyon Loop Valencia, CA 91355 USA (866) 789-5899 in US and Canada (661) 949-4000, (661) 949-4022 Fax (866) 789-6364 TTY www.bostonscientific.com Email: [email protected]
AUS Australian Sponsor Address
Boston Scientific (Australia) Pty LtdPO Box 332BOTANYNSW 1455AustraliaFree Phone 1800 676 133Free Fax 1800 836 666
EU Authorised Representative
Boston Scientific Limited Ballybrit Business Park Galway, IrelandT: +33 (0) 1 39 30 97 00 F: +33 (0) 1 39 30 97 99