Embed Size (px)
Citation preview

by Tim Celeski© 2018 Tim Celeski
Popular WoodworkingComplete Guide to Building
The
BLACKER ENTRY MIRROR
2 The Blacker Entry Mirror Back to Top
3 HISTORY
4 ABOUT THE PROJECT
7 GETTING STARTED
9 JIGS MAKE THE DIFFERENCE
15 lOOSE TENON JOINERY
16 JOINERY TIME
21 COMPlETE THE PATTERNS
24 SHAPING
25 MIRROR ASSEMBlY
27 RABBET THE MIRROR
30 PIllOWED PlUGS & SPlINES
41 FINAl ClEAN UP
44 FITTING SPlINES & PlUGS
48 COMPlETING THE MIRROR
51 MIRROR ASSEMBlY
53 WRAP UP & PlANS
CONTENTs
3 The Blacker Entry Mirror Back to Top
THE BLACKER MIRROR An elegant mirror
with a great history
O f the handful of the great Greene & Greene “ultima-
te bungalows”, the 1907 Robert R. Blacker House in
Pasadena is a masterpiece. The architecture, details
and furniture inside can only be described as breathta-
king. This is Greene and Greene design to the max. For
furniture makers, the famous and challenging to build
Blacker living Room Chairs get most of the attention.
But, one of the lessor known pieces is a personal favo-
rite — a small vertical mirror that lives in the entrance
above a beautifully carved cabinet. The Blacker Entry
Mirror. It’s a rare combination of elegance, subtly and
great design that fits any environment from the con-
temporary to classic. For woodworkers, this is a great
woodworking project with some interesting challen-
ges.
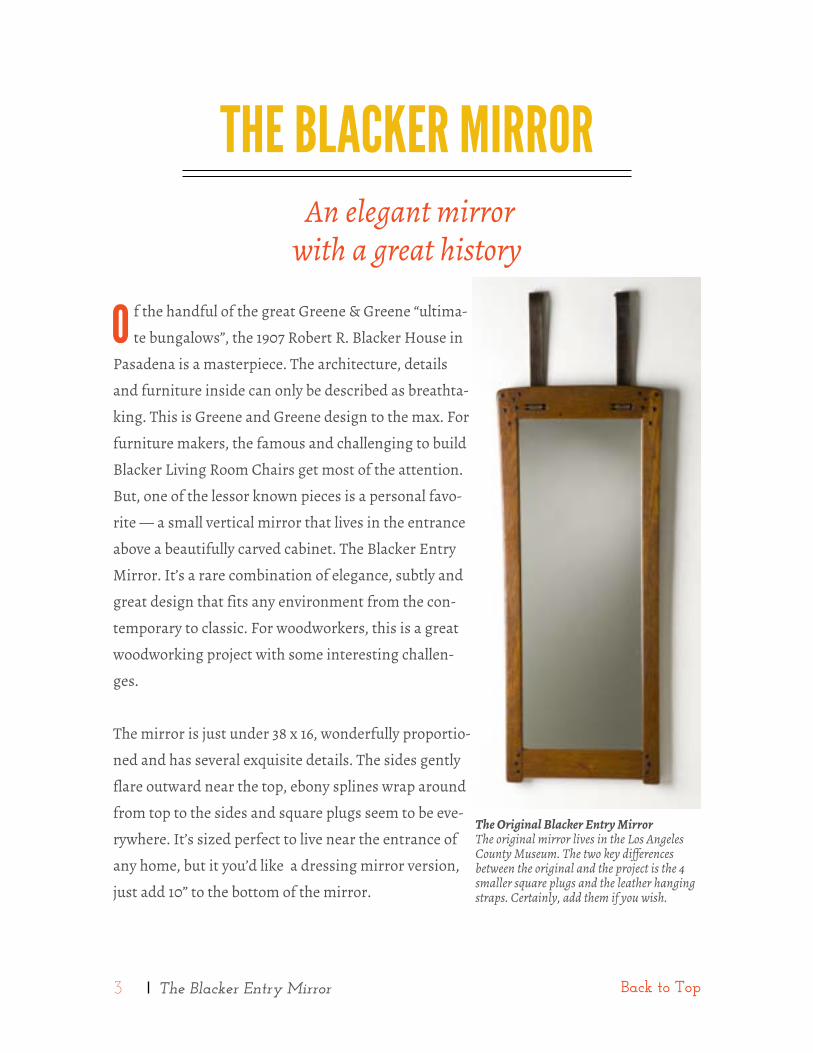
The mirror is just under 38 x 16, wonderfully proportio-
ned and has several exquisite details. The sides gently
flare outward near the top, ebony splines wrap around
from top to the sides and square plugs seem to be eve-
rywhere. It’s sized perfect to live near the entrance of
any home, but it you’d like a dressing mirror version,
just add 10” to the bottom of the mirror.
The Original Blacker Entry Mirror The original mirror lives in the Los Angeles County Museum. The two key differences between the original and the project is the 4 smaller square plugs and the leather hanging straps. Certainly, add them if you wish.

4 The Blacker Entry Mirror Back to Top
ABOuT THE PROJECTA Design That Works Everywhere
A s a designer and furniture maker, I naturally focus on my own creations, but with the
Blacker Mirror, I prefer to make a precise a copy with just a few minor changes. First,
I leave off the leather hanging straps on the original mirror since few homes have the ar-
chitectural ledger to hang it— certainly, add them if you wish. The other change is a few of
the 18 square plugs are slightly smaller than the others. I find them distracting and prefer
all plugs to be the same.
Over the years, I’ve built dozens and taught many students its secrets. I’ve given many
mirrors away — particularly as a wedding or house warming gift. And, I’ve sold a number
of them. This mirror has been very popular because it’s very striking and yet it fits well in
any home. From the most contemporary spaces to period designs, it really works. That’s
the sign of a timeless design.
Raw materialsIt takes only a little wood and a few simple jigs to make the Blacker Mirror. Why not build two or more while your at it? The photo shows all the parts, jigs and patterns and extra scrap pieces for joint making practice.
5 The Blacker Entry Mirror Back to Top
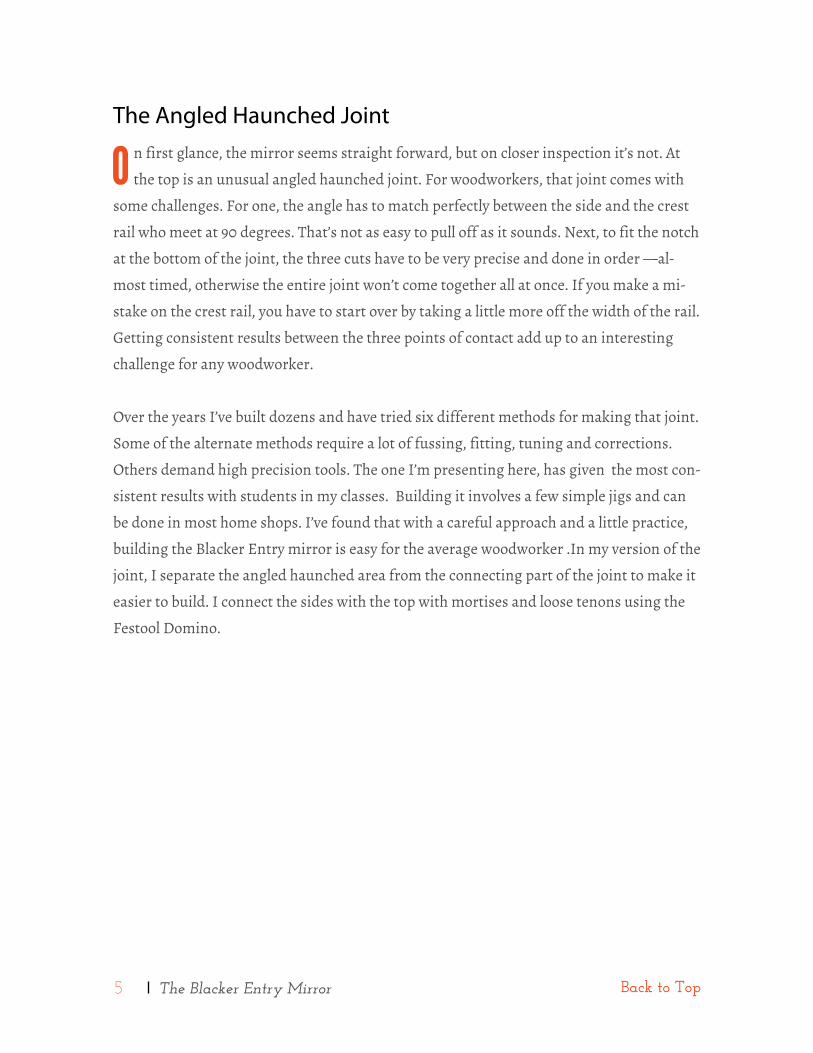
The Angled Haunched Joint
O n first glance, the mirror seems straight forward, but on closer inspection it’s not. At
the top is an unusual angled haunched joint. For woodworkers, that joint comes with
some challenges. For one, the angle has to match perfectly between the side and the crest
rail who meet at 90 degrees. That’s not as easy to pull off as it sounds. Next, to fit the notch
at the bottom of the joint, the three cuts have to be very precise and done in order —al-
most timed, otherwise the entire joint won’t come together all at once. If you make a mi-
stake on the crest rail, you have to start over by taking a little more off the width of the rail.
Getting consistent results between the three points of contact add up to an interesting
challenge for any woodworker.
Over the years I’ve built dozens and have tried six different methods for making that joint.
Some of the alternate methods require a lot of fussing, fitting, tuning and corrections.
Others demand high precision tools. The one I’m presenting here, has given the most con-
sistent results with students in my classes. Building it involves a few simple jigs and can
be done in most home shops. I’ve found that with a careful approach and a little practice,
building the Blacker Entry mirror is easy for the average woodworker .In my version of the
joint, I separate the angled haunched area from the connecting part of the joint to make it
easier to build. I connect the sides with the top with mortises and loose tenons using the
Festool Domino.
6 The Blacker Entry Mirror Back to Top
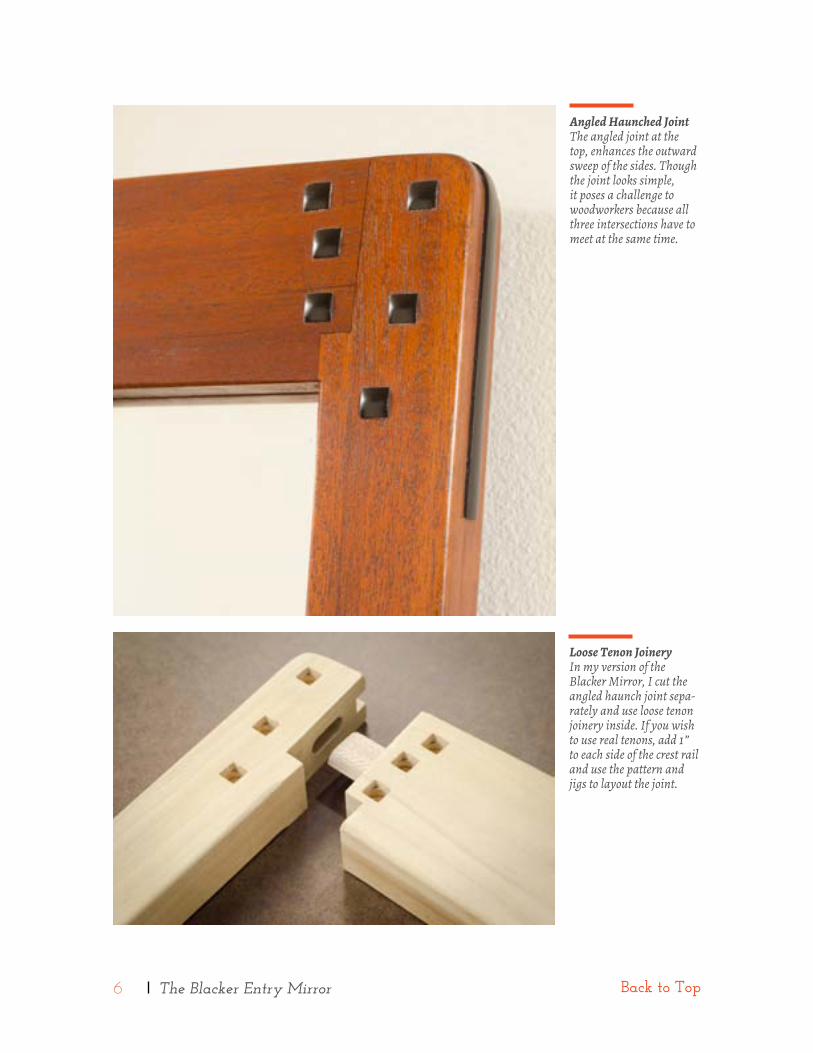
Loose Tenon JoineryIn my version of the Blacker Mirror, I cut the angled haunch joint sepa-rately and use loose tenon joinery inside. If you wish to use real tenons, add 1” to each side of the crest rail and use the pattern and jigs to layout the joint.
Angled Haunched JointThe angled joint at the top, enhances the outward sweep of the sides. Though the joint looks simple, it poses a challenge to woodworkers because all three intersections have to meet at the same time.
7 The Blacker Entry Mirror Back to Top
gETTINg sTARTEdAccuracy
T his is a project where accuracy is particularly important. The jigs and the parts to have
to match perfectly. So, take your time, use rulers, squares and calipers and frequently
check all measurements as you go.
Wood choice is important
F or each mirror, you’ll need less than six Bft of 6/4 material. Ideally, try to make each
mirror out of a single board to ensure perfect color, grain and pattern. Wood choice on
this project is important. like many Greene and Greene furniture makers, I’ve found that
Sapele or Khaya Mahogany are ideal choices. Consistent grain, smooth texture and rich
color with just the right amount of glimmer from chatoyance are perfect to highlight the
exquisite design elements and over-the-top detailing that make Greene and Greene furni-
ture exceptional.
Rather than using contrasty woods, a medium brown, tight grain, evenly textured wood
works best. Of the two, Sapele is more consistent in appearance and slightly more dense,
Khaya has stronger ribbon patterns. A good alternative is Cherry with its deep warm color.
For a darker look, walnut could work, but for a lighter look consider hard maple. Open gra-
in woods like ash or figured oak might distract from the ebony plugs. So, keep your wood
choice simple and keep contrast to a minimum. Figured, loud or exotic woods set up a
collision that distracts from the Greene and Greene design details. A designer’s advice: let
the design speak for itself. Don’t distract. Save special woods for other projects.
For plugs and splines, a small amount of black, Gabon Ebony is needed. look carefully
for crack free pieces that will net out 4 strips that are 3/8” x 3/8” x 8”. But, wait to cut your
ebony stock until it’s time to fit it in the square holes.
8 The Blacker Entry Mirror Back to Top
Patterns
F or the patterns, I prefer to use 1/2” MDF but, Baltic Birch plywood works just as well.
Make up pieces that are 3-1/2” x 13-1/4” and one or two sides that are 2-1/8” x 38”. These
are the same dimensions as your blank mirror parts so, cut the pattern stock the same
time you cut your blank wood stock. But, hold off on cutting anything to shape for now.
Keep everything square. We’ll use the blank pattern stock for joinery practice.
Stock Preparation
A ll of the major steps in building the mirror are done while the parts are straight and
square. So, don’t jump ahead. It’s only after all joinery is complete and the square holes
are cut for the plugs do the patterns and the parts gets shaped and finished.
Start by face planing and squaring up your wood stock on a jointer. While your at it, mill
up a few hard wood scrap pieces 12” or so long the same thickness and widths of the crest
rail and side for joint cutting practice. Any medium density hardwood will do — I usually
use inexpensive Poplar. Finally, mill your 6/4 material to 1.25” thick using calipers to verify.
Keep off cuts that we’ll put to use later for setups.
Sapele and Khaya Mahogany sometime spring or twist a little when first cut, so I suggest
after joining adjacent sides at 90 degrees, rough cut your stock 1/4” over width and rest on
stickers a few days before squaring up again and cutting to final dimensions.
Dimensions
F or final dimensions, all stock needs to be square. Don’t get ahead of the process and
precut shapes or the notches. The crest rail needs to be 1.250” x 3.5” x 13.25”. For the two
sides, two pieces cut 1.250” x 2.125” x 38”. The bottom rail is 1” x 2.75” x 13” — thinner than
the other three parts and longer than the top. It will be trimmed to length later on. To keep
the color and grain the same, I prefer to start with the same 1.25” material and mill down
to the final 1” thickness. Hold off on preparing the ebony strips until the square holes are
cut. Also, don’t order glass until you’ve assembled the mirror, rabbetted the back and me-
asured the opening.
9 The Blacker Entry Mirror Back to Top
JIgs MAKE THE dIFFERENCETwo Simple Jigs Make the Mirror Easy to Build
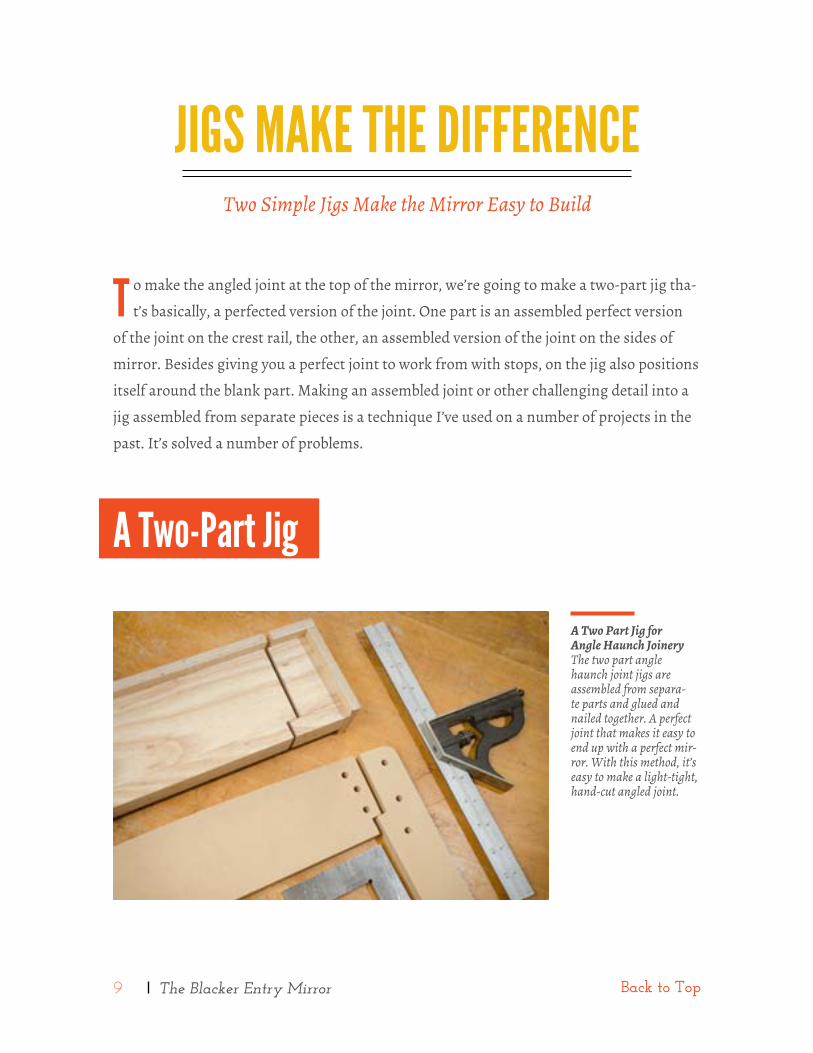
T o make the angled joint at the top of the mirror, we’re going to make a two-part jig tha-
t’s basically, a perfected version of the joint. One part is an assembled perfect version
of the joint on the crest rail, the other, an assembled version of the joint on the sides of
mirror. Besides giving you a perfect joint to work from with stops, on the jig also positions
itself around the blank part. Making an assembled joint or other challenging detail into a
jig assembled from separate pieces is a technique I’ve used on a number of projects in the
past. It’s solved a number of problems.
A Two Part Jig for Angle Haunch JoineryThe two part angle haunch joint jigs are assembled from separa-te parts and glued and nailed together. A perfect joint that makes it easy to end up with a perfect mir-ror. With this method, it’s easy to make a light-tight, hand-cut angled joint.
A Two-Part Jig
10 The Blacker Entry Mirror Back to Top
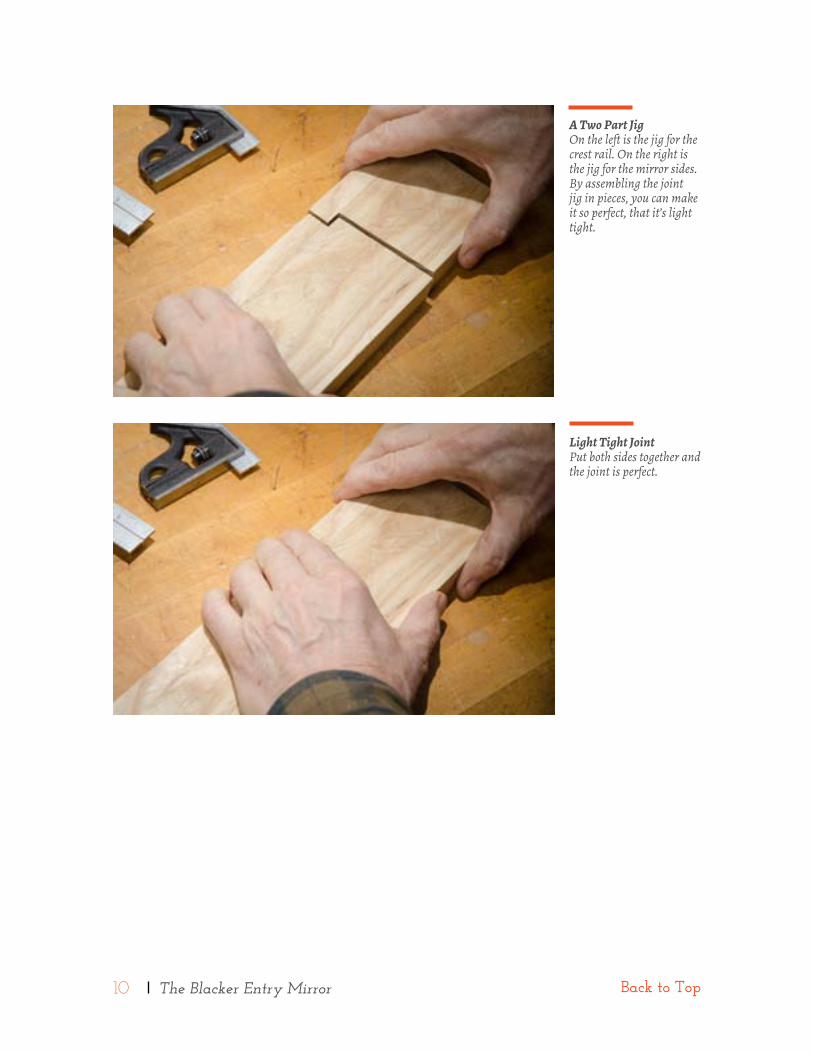
Light Tight JointPut both sides together and the joint is perfect.
A Two Part JigOn the left is the jig for the crest rail. On the right is the jig for the mirror sides. By assembling the joint jig in pieces, you can make it so perfect, that it’s light tight.
11 The Blacker Entry Mirror Back to Top
Prepare your jig stock
s tart by preparing a piece of scrap hardwood to a final dimension of 1” x 4.5” x 18”. As
with all parts of this project, it’s critical that all materials are accurately measured,
face planed, milled and squared precisely. From this board use your table saw to rip a 5/8”
piece. Rip the remainder to 3-1/2”. Setup a miter saw or a miter gauge setup on a table saw
to make a 87 degree cut. Measure from one end of 3-1/2” wide board and mark at 12-1/2”.
This will be long end of the 3 degree angle you’re about to cut. Once you’ve reset everything
back to square, cut a 13” long piece from the 5/8” long strip cut earlier. You now have the
major parts you need to assemble the jig.
Put the parts together
F rom the short side of the angled end of the 3-1/2” piece use a square to mark a line along
the 1” thick bottom of the board that’s 1/2” from the end. To assemble the jig, we’re
going to attach the 5/8” piece to the larger piece. For assembly, I prefer to use brad nailer
because it’s quick but other methods will work if you don’t have one. Because the finished
jig is under a lot of pressure under use, apply glue before you attach the smaller strip at the
1/2” line on the bottom of the larger piece. Once the strip is aligned to the mark and every-
thing is flush on the sides, nail it in place. Don’t worry about the extra wood hanging off
the end. It will be trimmed off later.
For the second part of the jig, clamp the part you just completed on your work bench long
side down. Move the angled cutoff section of the wide board until it’s tight to assembled
crest rail section being held down. Now, move what’s left of your small strip on top until
it meets up with the inset piece that’s already glued and nailed. The idea here is to reas-
semble these parts into what is essentially, a solid board. Before nailing, I suggest placing
a lamp behind the assembly to check for light leaks. Once you can not see light coming
through where the two jig sections intersect, hold everything tight and glue and nail it
together.
12 The Blacker Entry Mirror Back to Top
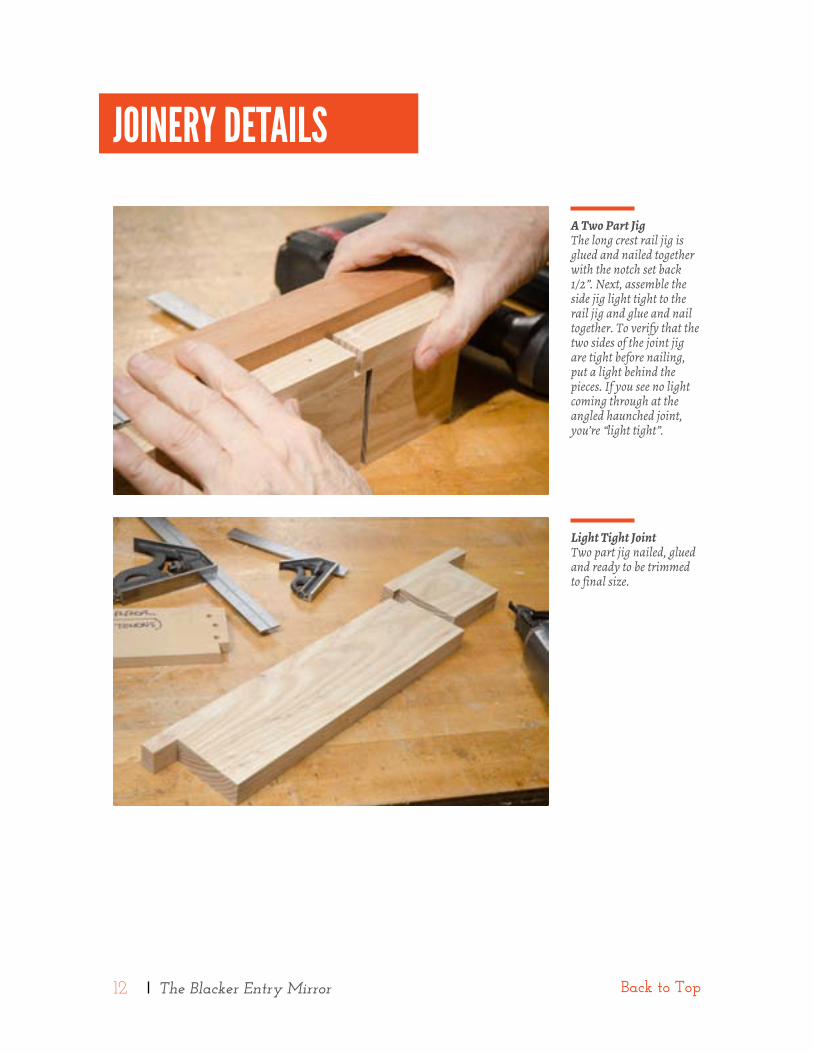
A Two Part JigThe long crest rail jig is glued and nailed together with the notch set back 1/2”. Next, assemble the side jig light tight to the rail jig and glue and nail together. To verify that the two sides of the joint jig are tight before nailing, put a light behind the pieces. If you see no light coming through at the angled haunched joint, you’re “light tight”.
Light Tight JointTwo part jig nailed, glued and ready to be trimmed to final size.
JOINERY dETAILs
13 The Blacker Entry Mirror Back to Top
Trim the jig
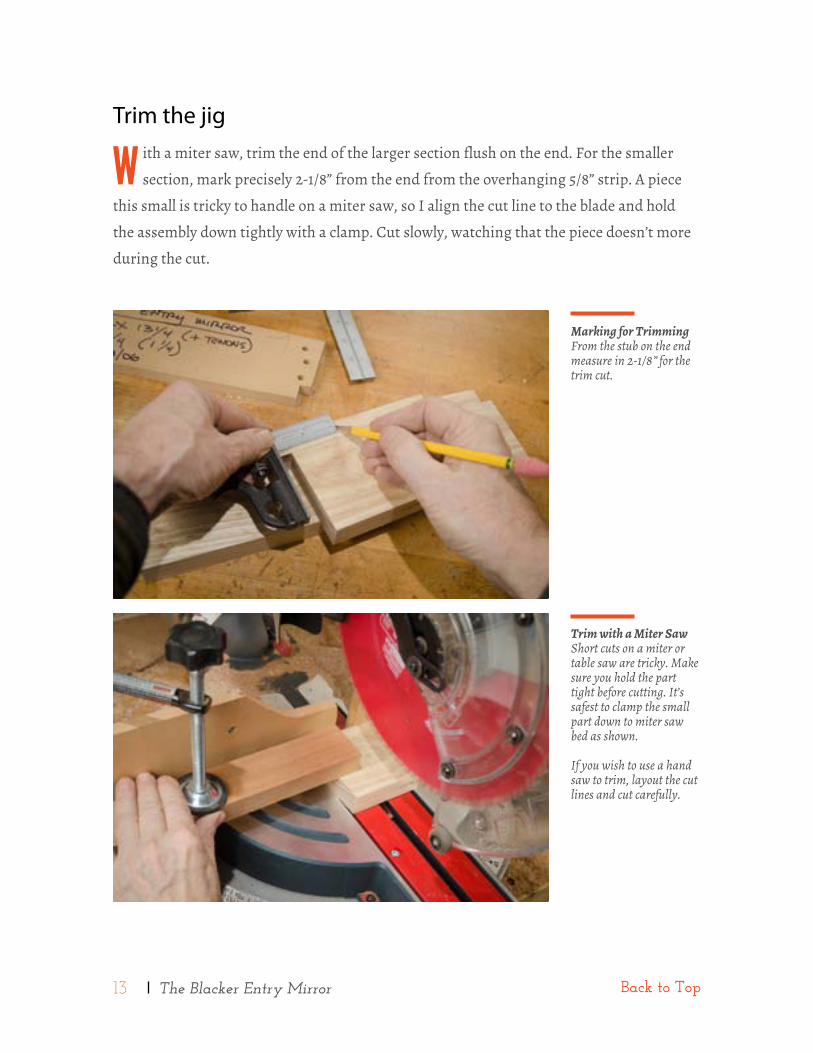
W ith a miter saw, trim the end of the larger section flush on the end. For the smaller
section, mark precisely 2-1/8” from the end from the overhanging 5/8” strip. A piece
this small is tricky to handle on a miter saw, so I align the cut line to the blade and hold
the assembly down tightly with a clamp. Cut slowly, watching that the piece doesn’t more
during the cut.
Marking for TrimmingFrom the stub on the end measure in 2-1/8” for the trim cut.
Trim with a Miter SawShort cuts on a miter or table saw are tricky. Make sure you hold the part tight before cutting. It’s safest to clamp the small part down to miter saw bed as shown.
If you wish to use a hand saw to trim, layout the cut lines and cut carefully.

14 The Blacker Entry Mirror Back to Top
Add the Fence
T he fence registers the jig to the square parts. For the two-sided stop, rip enough 2” x
3/8” or 1/2” solid core or Baltic Birch plywood for a 20” long piece. Cut pieces to fit as
shown in the photo. This jig flips over to work both sides of the mirror. To do that, we need
to center 1” thick blocks on the 2” wide plywood strips. So that the plywood strips overhang
top and bottom, use a 1/2” piece of MDF or plywood to support each hardwood piece while
you glue and brad nail the fence parts into position.
On the larger assembly, inset the solid wood 1/16” from the end of the plywood fence. For
the side jig, note that plywood wraps around two sides so it can rest on the corner of the
square mirror side blank parts.
Add the Jig FencesThe two sided plywood fence overhangs both sides of the jig. Use a 1/2” piece of MDF to raise up the hardwood pieces.
Inset the Crest Rail on the FenceOn the crest rail jig, inset the jig 1/16” from the jig fence.
15 The Blacker Entry Mirror Back to Top
I prefer to use loose tenon joinery for the mirror. This kind of joinery is accurate, strong
and with a Festool Domino, fast. If you prefer to make a real haunched tenon by hand,
just increase each side of the crest rail dimensions by 1”, mark out your tenon and mortise
position on the mirror sides using the same centerline. The jig will take you rest of the way
for cutting and tuning the tenon. With either joinery method, it’s easier to do the joinery
while the parts are still square and before you cut the haunched joints at the top.
Mark the mortises while the stock is still square
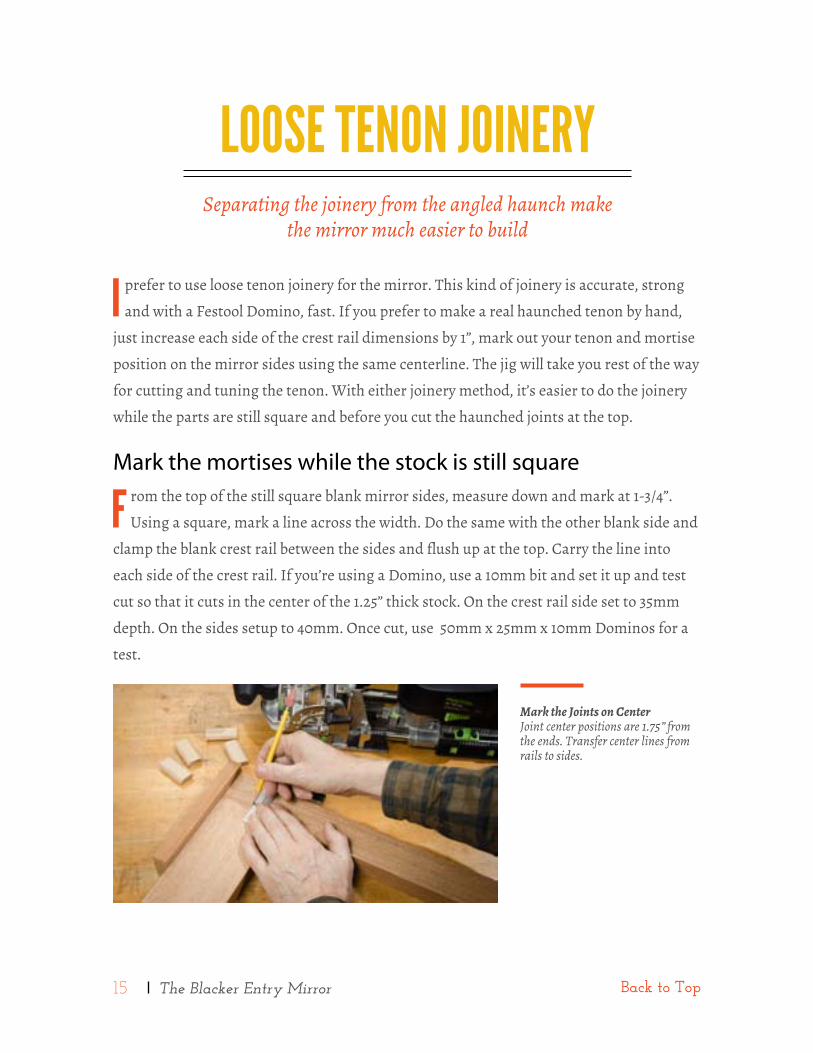
F rom the top of the still square blank mirror sides, measure down and mark at 1-3/4”.
Using a square, mark a line across the width. Do the same with the other blank side and
clamp the blank crest rail between the sides and flush up at the top. Carry the line into
each side of the crest rail. If you’re using a Domino, use a 10mm bit and set it up and test
cut so that it cuts in the center of the 1.25” thick stock. On the crest rail side set to 35mm
depth. On the sides setup to 40mm. Once cut, use 50mm x 25mm x 10mm Dominos for a
test.
LOOsE TENON JOINERYSeparating the joinery from the angled haunch make
the mirror much easier to build
Mark the Joints on CenterJoint center positions are 1.75” from the ends. Transfer center lines from rails to sides.
16 The Blacker Entry Mirror Back to Top
A s any serious musician will tell you, effective practice will improve your performance.
The same is true for hand tool work, especially this angled haunch joint, so it’s time
for a little warm up. In my classes, students start by using their square MDF patterns as
first tests. For the sides, flush the jig to the corner of the MDF and use a pencil to mark
the line you’ll be cutting. At the bandsaw, cut to 1/16” from the line. After securing jig and
pattern to your bench with two clamps, hold your chisel tight to the 1” thick wall of the jig
and press and make a line along the lines of the cut with your chisel. Well outside that line,
start to shave off the excess with chisel and mallet. Don’t be too greedy.
A little at a time is the way to go. If you try to chop too much off at one time, the jig might
walk out of position or cuts will angle. Once you’re close to scribed line, then hold your
chisel tight to the jig and cleanly shave off the rest until your cut is flush. On the crest rail,
flush to the top wall and position the part at the end of the jig fence that hangs out 1/16”
past the core. Once both parts are done, check your fit.
Your goal is the equal the “light-tight” jig you made. Once satisfied, move on to the extra
hardwood pieces you milled up earlier. Again, it’s critical that the blank parts and jigs are
held firmly to your bench with two clamps. After marking and rough cutting your hard
wood scrap pieces, sharpen your chisels for final practice. Check your work with a small
square and chisel edge to make sure you’re cutting evenly across the cut and not drifting.
Thanks to the thick and rigid jigs it’s easy to perfect both sides of the haunched joint. Once
your satisfied with these practice sessions, it’s time to go to work on the real parts.
JOINERY TIMEThis project gives you three opportunities to practice
making the angled haunched joint
17 The Blacker Entry Mirror Back to Top
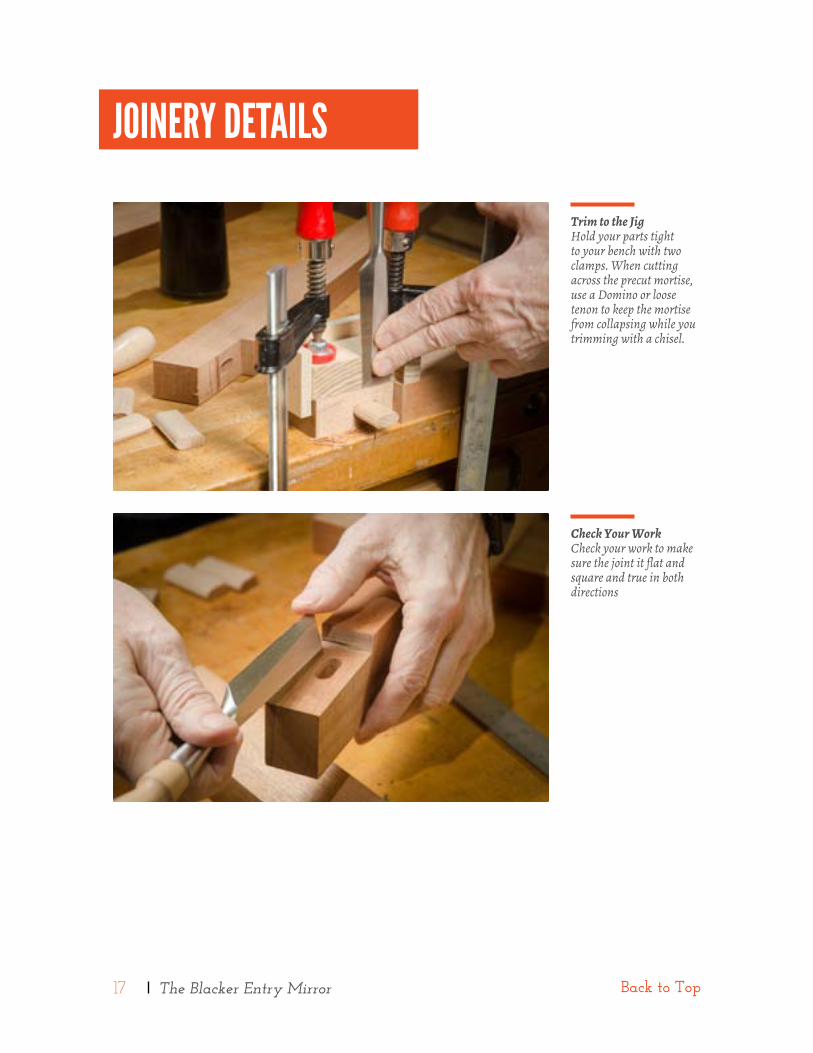
Trim to the JigHold your parts tight to your bench with two clamps. When cutting across the precut mortise, use a Domino or loose tenon to keep the mortise from collapsing while you trimming with a chisel.
Check Your WorkCheck your work to make sure the joint it flat and square and true in both directions
JOINERY dETAILs
18 The Blacker Entry Mirror Back to Top
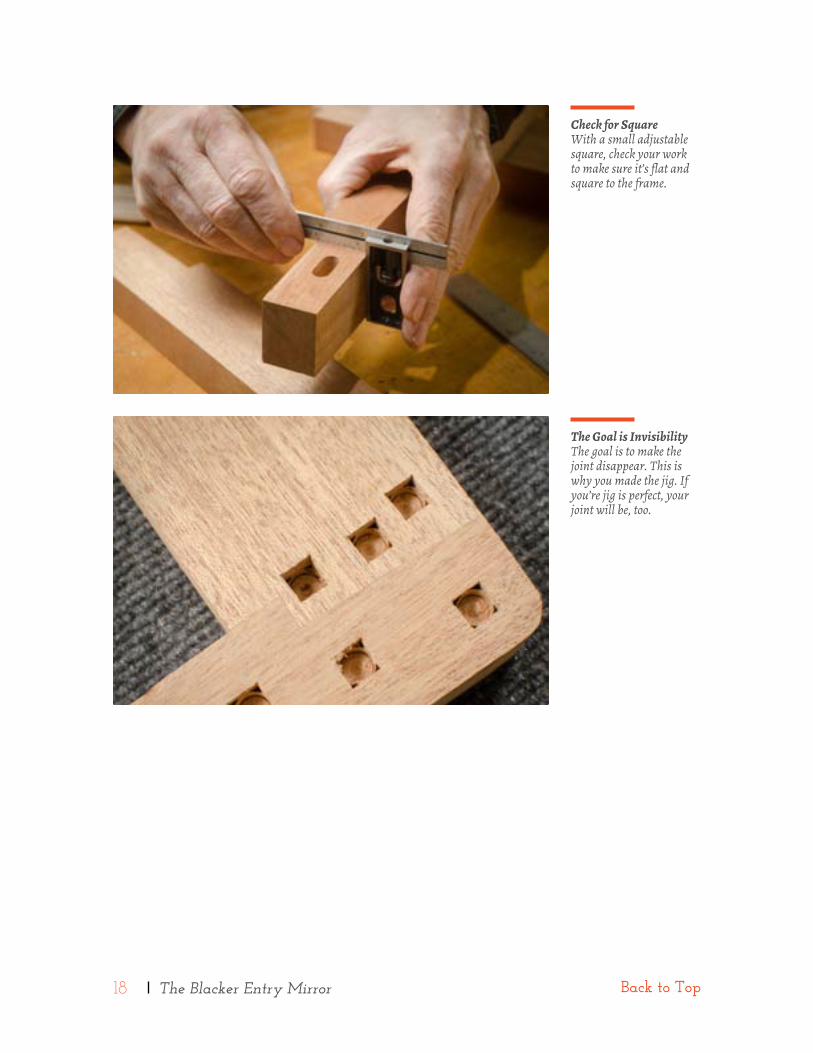
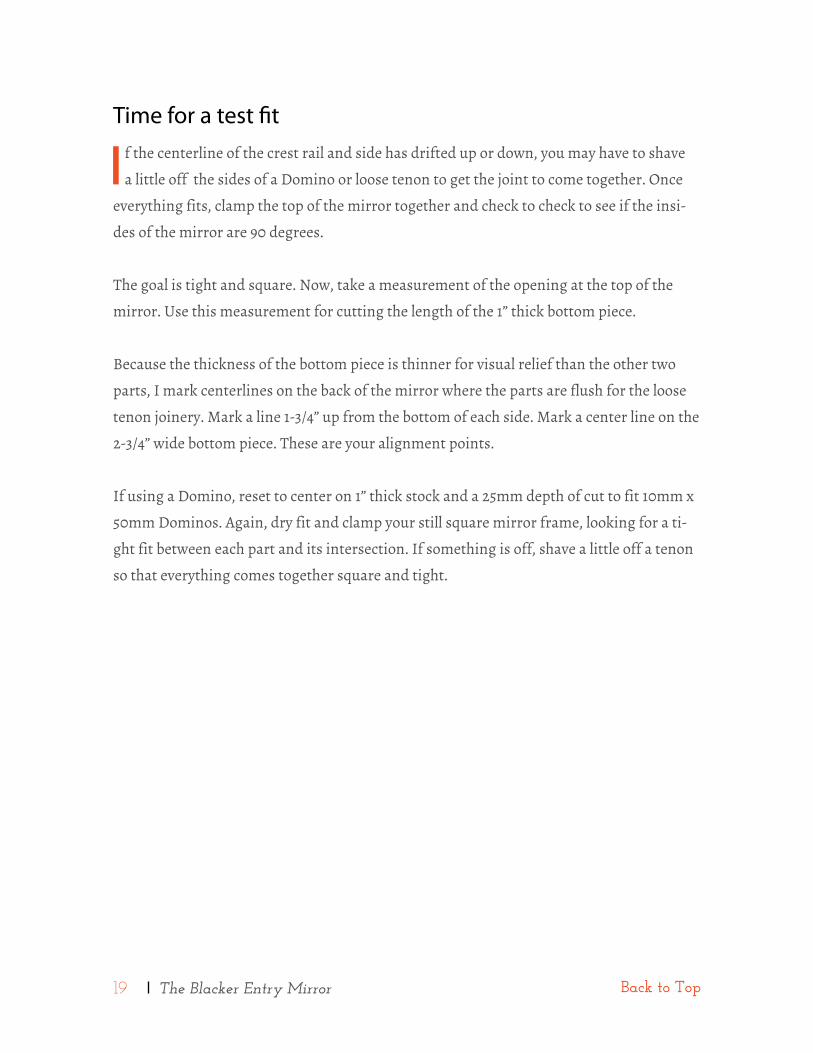
Check for SquareWith a small adjustable square, check your work to make sure it’s flat and square to the frame.
The Goal is InvisibilityThe goal is to make the joint disappear. This is why you made the jig. If you’re jig is perfect, your joint will be, too.
19 The Blacker Entry Mirror Back to Top
Time for a test fit
I f the centerline of the crest rail and side has drifted up or down, you may have to shave
a little off the sides of a Domino or loose tenon to get the joint to come together. Once
everything fits, clamp the top of the mirror together and check to check to see if the insi-
des of the mirror are 90 degrees.
The goal is tight and square. Now, take a measurement of the opening at the top of the
mirror. Use this measurement for cutting the length of the 1” thick bottom piece.
Because the thickness of the bottom piece is thinner for visual relief than the other two
parts, I mark centerlines on the back of the mirror where the parts are flush for the loose
tenon joinery. Mark a line 1-3/4” up from the bottom of each side. Mark a center line on the
2-3/4” wide bottom piece. These are your alignment points.
If using a Domino, reset to center on 1” thick stock and a 25mm depth of cut to fit 10mm x
50mm Dominos. Again, dry fit and clamp your still square mirror frame, looking for a ti-
ght fit between each part and its intersection. If something is off, shave a little off a tenon
so that everything comes together square and tight.
20 The Blacker Entry Mirror Back to Top
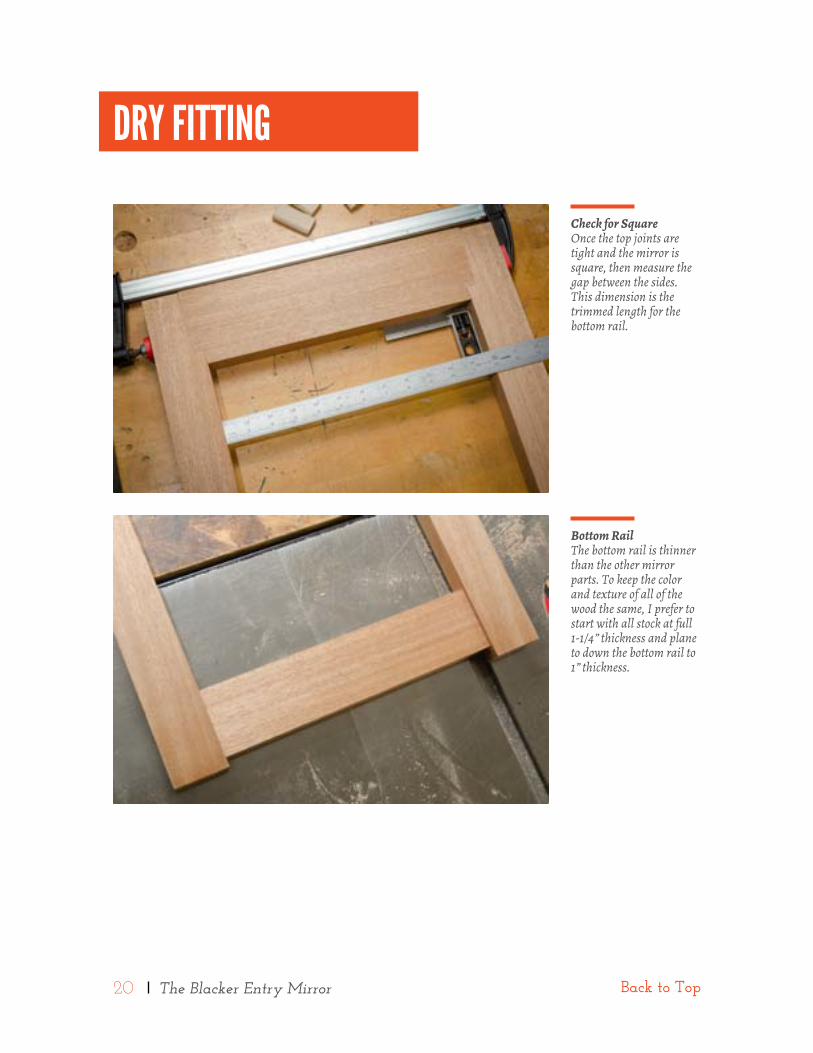
Check for SquareOnce the top joints are tight and the mirror is square, then measure the gap between the sides. This dimension is the trimmed length for the bottom rail.
Bottom RailThe bottom rail is thinner than the other mirror parts. To keep the color and texture of all of the wood the same, I prefer to start with all stock at full 1-1/4” thickness and plane to down the bottom rail to 1” thickness.
dRY FITTINg
21 The Blacker Entry Mirror Back to Top
COMPLETE THE PATTERNs
T o complete the patterns, use the grid on the drawing as reference. One method is to
print from the PDF plan that will be available as an Online Extra at my Popular Wo-
odworking blog. Because the mirror is 38” long, use the print tiling feature to generate
overlapping pages for 8-1/2” x 11” sheets. Use the background grid for alignment and tape
the pages together, trimming off the excess overlaps. Then, spray glue the paper drawings
and attach them to the 1/2” MDF square pattern stock. All patterns designs align to the
bottom of the pattern stock and the inside lines of the mirror. All excess wood is cut off the
top for the crest rail. The mirror side pattern aligns flush to the inside and the bottom so
that excess is removed from the outside.
To complete the patterns, rough cut outside the line with a band saw or jig saw and smo-
oth with rasps, files and sandpaper. Use a .250” drill bit to cut all the plug locations. Once
everything is smooth, remove the paper and your patterns are ready to go to work.
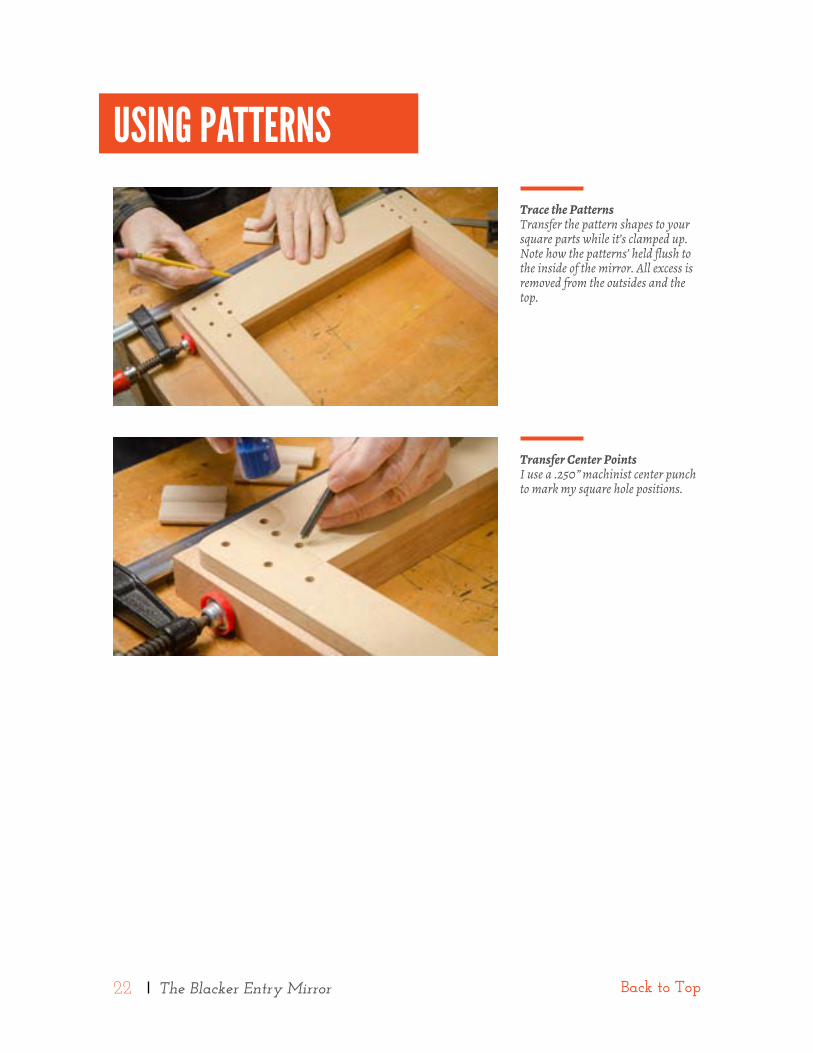
Hold your completed patterns on your blank parts and with a pencil, transfer the outer
shapes to your square parts.
To transfer the plug locations, I like to use a .250 machinist center punch. It just fits in
those .250 holes on the pattern. With a light tap of a hammer, your marks should be dead
center. But, hold off on cutting your final stock to the transferred shapes on the patterns.
While the stock is still square, we need to cut out the square holes for the plugs, first.
22 The Blacker Entry Mirror Back to Top
Trace the PatternsTransfer the pattern shapes to your square parts while it’s clamped up. Note how the patterns’ held flush to the inside of the mirror. All excess is removed from the outsides and the top.
Transfer Center PointsI use a .250” machinist center punch to mark my square hole positions.
usINg PATTERNs
23 The Blacker Entry Mirror Back to Top
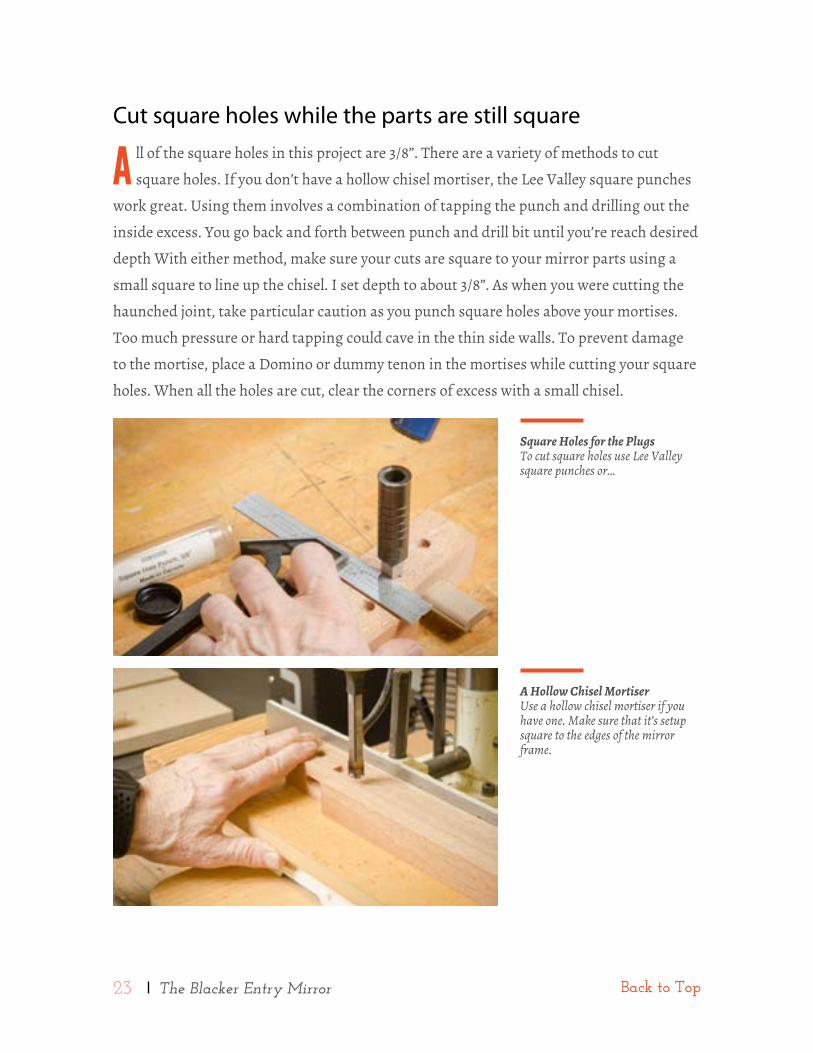
Cut square holes while the parts are still square
A ll of the square holes in this project are 3/8”. There are a variety of methods to cut
square holes. If you don’t have a hollow chisel mortiser, the lee Valley square punches
work great. Using them involves a combination of tapping the punch and drilling out the
inside excess. You go back and forth between punch and drill bit until you’re reach desired
depth With either method, make sure your cuts are square to your mirror parts using a
small square to line up the chisel. I set depth to about 3/8”. As when you were cutting the
haunched joint, take particular caution as you punch square holes above your mortises.
Too much pressure or hard tapping could cave in the thin side walls. To prevent damage
to the mortise, place a Domino or dummy tenon in the mortises while cutting your square
holes. When all the holes are cut, clear the corners of excess with a small chisel.
Square Holes for the PlugsTo cut square holes use Lee Valley square punches or…
A Hollow Chisel MortiserUse a hollow chisel mortiser if you have one. Make sure that it’s setup square to the edges of the mirror frame.
24 The Blacker Entry Mirror Back to Top
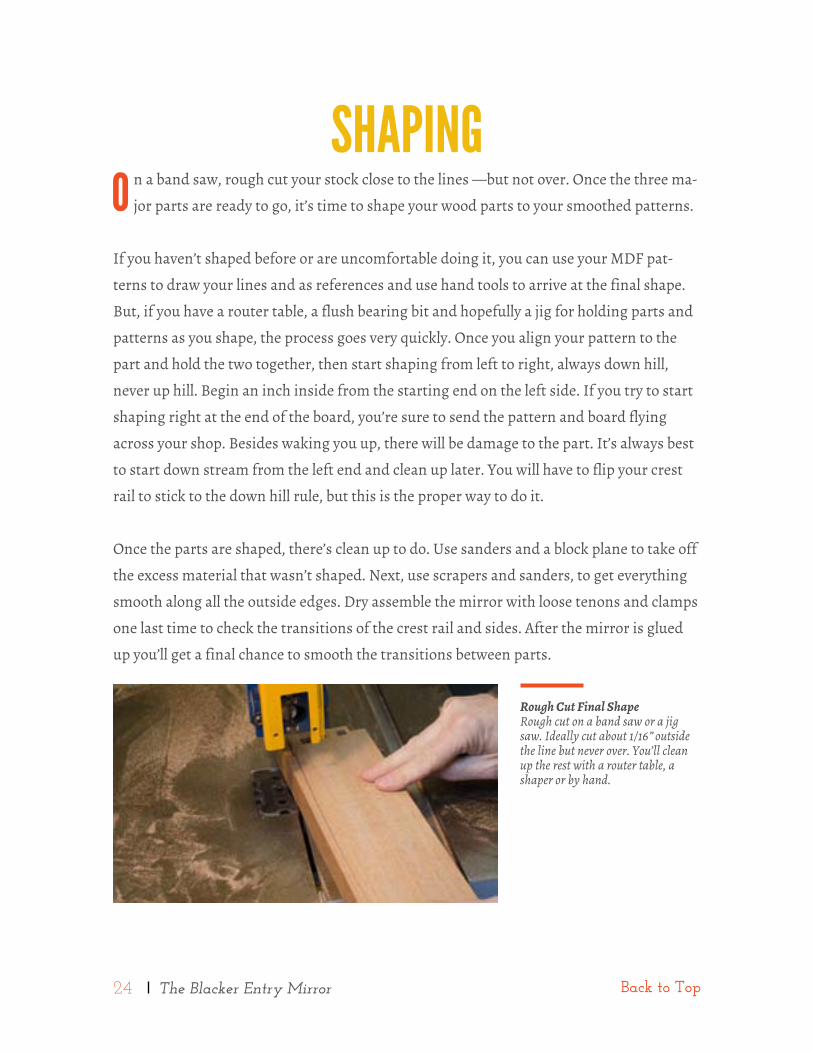
sHAPINgO n a band saw, rough cut your stock close to the lines —but not over. Once the three ma-
jor parts are ready to go, it’s time to shape your wood parts to your smoothed patterns.
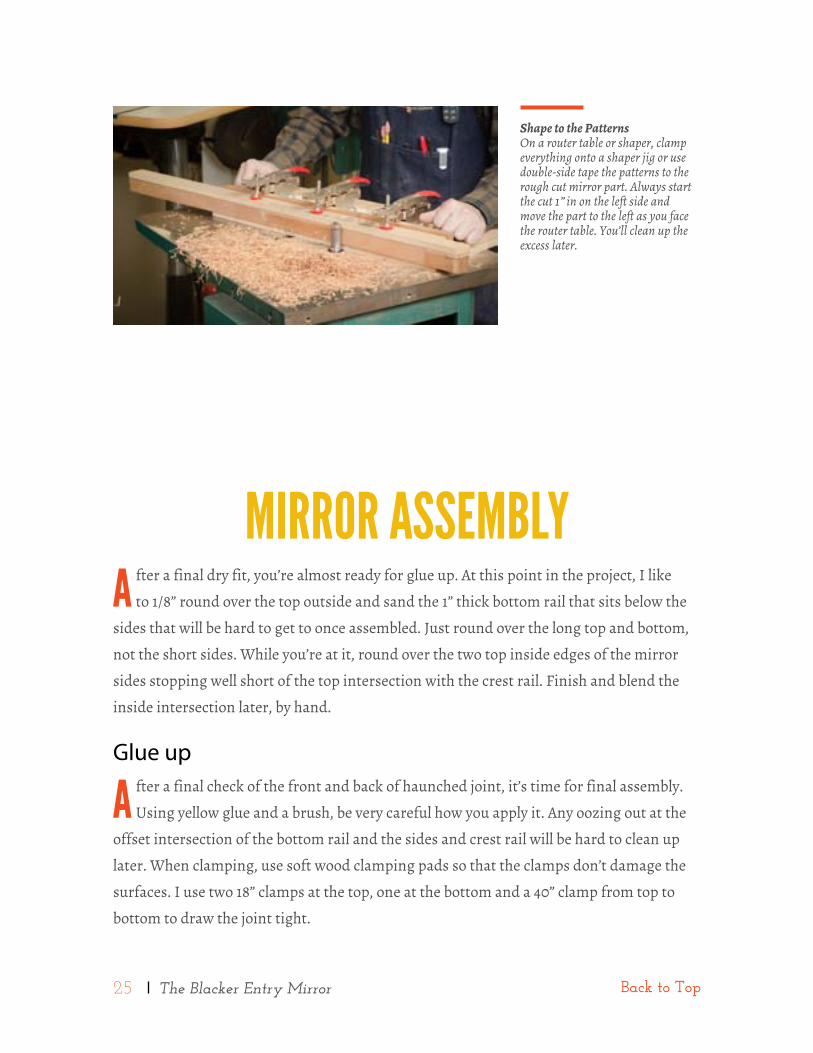
If you haven’t shaped before or are uncomfortable doing it, you can use your MDF pat-
terns to draw your lines and as references and use hand tools to arrive at the final shape.
But, if you have a router table, a flush bearing bit and hopefully a jig for holding parts and
patterns as you shape, the process goes very quickly. Once you align your pattern to the
part and hold the two together, then start shaping from left to right, always down hill,
never up hill. Begin an inch inside from the starting end on the left side. If you try to start
shaping right at the end of the board, you’re sure to send the pattern and board flying
across your shop. Besides waking you up, there will be damage to the part. It’s always best
to start down stream from the left end and clean up later. You will have to flip your crest
rail to stick to the down hill rule, but this is the proper way to do it.
Once the parts are shaped, there’s clean up to do. Use sanders and a block plane to take off
the excess material that wasn’t shaped. Next, use scrapers and sanders, to get everything
smooth along all the outside edges. Dry assemble the mirror with loose tenons and clamps
one last time to check the transitions of the crest rail and sides. After the mirror is glued
up you’ll get a final chance to smooth the transitions between parts.
Rough Cut Final ShapeRough cut on a band saw or a jig saw. Ideally cut about 1/16” outside the line but never over. You’ll clean up the rest with a router table, a shaper or by hand.
25 The Blacker Entry Mirror Back to Top
MIRROR AssEMBLYA fter a final dry fit, you’re almost ready for glue up. At this point in the project, I like
to 1/8” round over the top outside and sand the 1” thick bottom rail that sits below the
sides that will be hard to get to once assembled. Just round over the long top and bottom,
not the short sides. While you’re at it, round over the two top inside edges of the mirror
sides stopping well short of the top intersection with the crest rail. Finish and blend the
inside intersection later, by hand.
Glue up
A fter a final check of the front and back of haunched joint, it’s time for final assembly.
Using yellow glue and a brush, be very careful how you apply it. Any oozing out at the
offset intersection of the bottom rail and the sides and crest rail will be hard to clean up
later. When clamping, use soft wood clamping pads so that the clamps don’t damage the
surfaces. I use two 18” clamps at the top, one at the bottom and a 40” clamp from top to
bottom to draw the joint tight.
Shape to the PatternsOn a router table or shaper, clamp everything onto a shaper jig or use double-side tape the patterns to the rough cut mirror part. Always start the cut 1” in on the left side and move the part to the left as you face the router table. You’ll clean up the excess later.
26 The Blacker Entry Mirror Back to Top
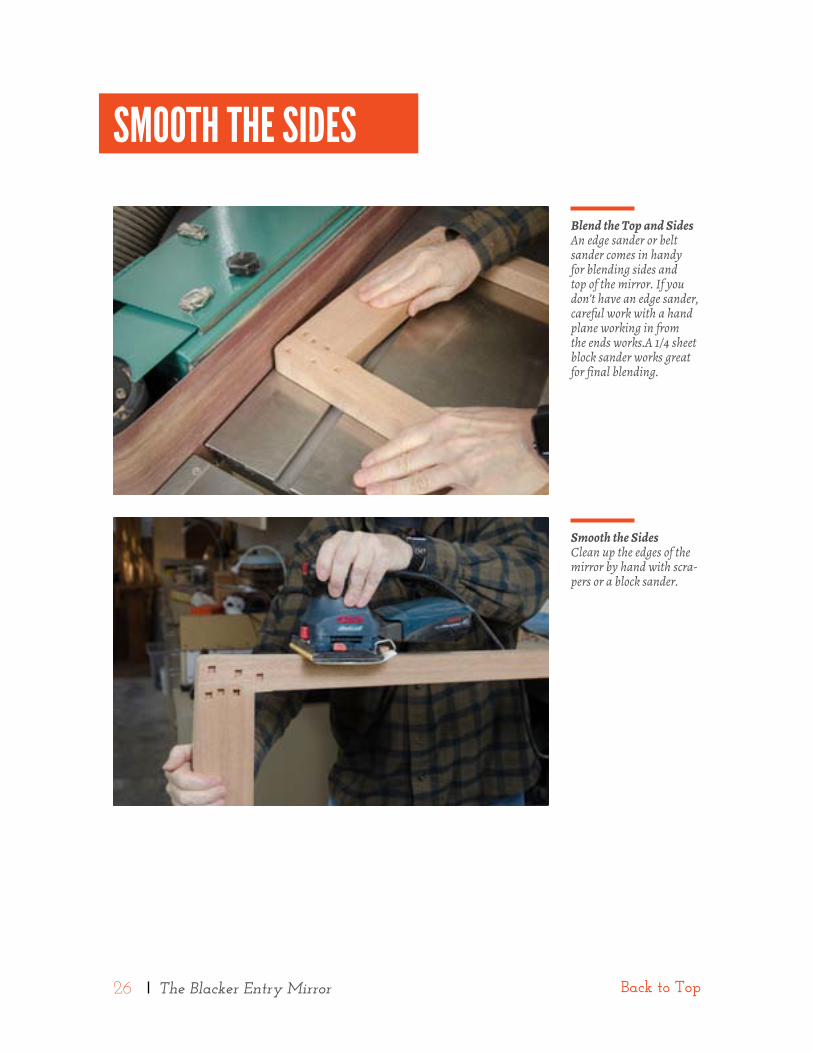
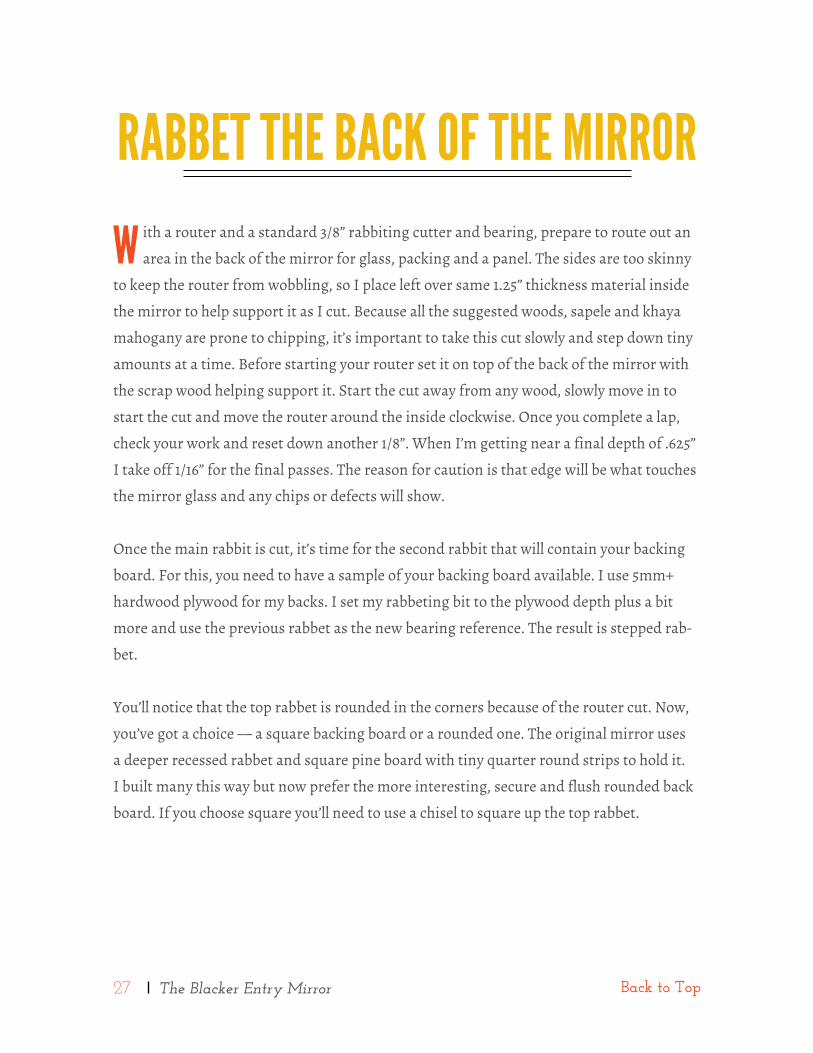
Blend the Top and SidesAn edge sander or belt sander comes in handy for blending sides and top of the mirror. If you don’t have an edge sander, careful work with a hand plane working in from the ends works.A 1/4 sheet block sander works great for final blending.
Smooth the SidesClean up the edges of the mirror by hand with scra-pers or a block sander.
sMOOTH THE sIdEs
27 The Blacker Entry Mirror Back to Top
RABBET THE BACK OF THE MIRROR
W ith a router and a standard 3/8” rabbiting cutter and bearing, prepare to route out an
area in the back of the mirror for glass, packing and a panel. The sides are too skinny
to keep the router from wobbling, so I place left over same 1.25” thickness material inside
the mirror to help support it as I cut. Because all the suggested woods, sapele and khaya
mahogany are prone to chipping, it’s important to take this cut slowly and step down tiny
amounts at a time. Before starting your router set it on top of the back of the mirror with
the scrap wood helping support it. Start the cut away from any wood, slowly move in to
start the cut and move the router around the inside clockwise. Once you complete a lap,
check your work and reset down another 1/8”. When I’m getting near a final depth of .625”
I take off 1/16” for the final passes. The reason for caution is that edge will be what touches
the mirror glass and any chips or defects will show.
Once the main rabbit is cut, it’s time for the second rabbit that will contain your backing
board. For this, you need to have a sample of your backing board available. I use 5mm+
hardwood plywood for my backs. I set my rabbeting bit to the plywood depth plus a bit
more and use the previous rabbet as the new bearing reference. The result is stepped rab-
bet.
You’ll notice that the top rabbet is rounded in the corners because of the router cut. Now,
you’ve got a choice — a square backing board or a rounded one. The original mirror uses
a deeper recessed rabbet and square pine board with tiny quarter round strips to hold it.
I built many this way but now prefer the more interesting, secure and flush rounded back
board. If you choose square you’ll need to use a chisel to square up the top rabbet.
28 The Blacker Entry Mirror Back to Top
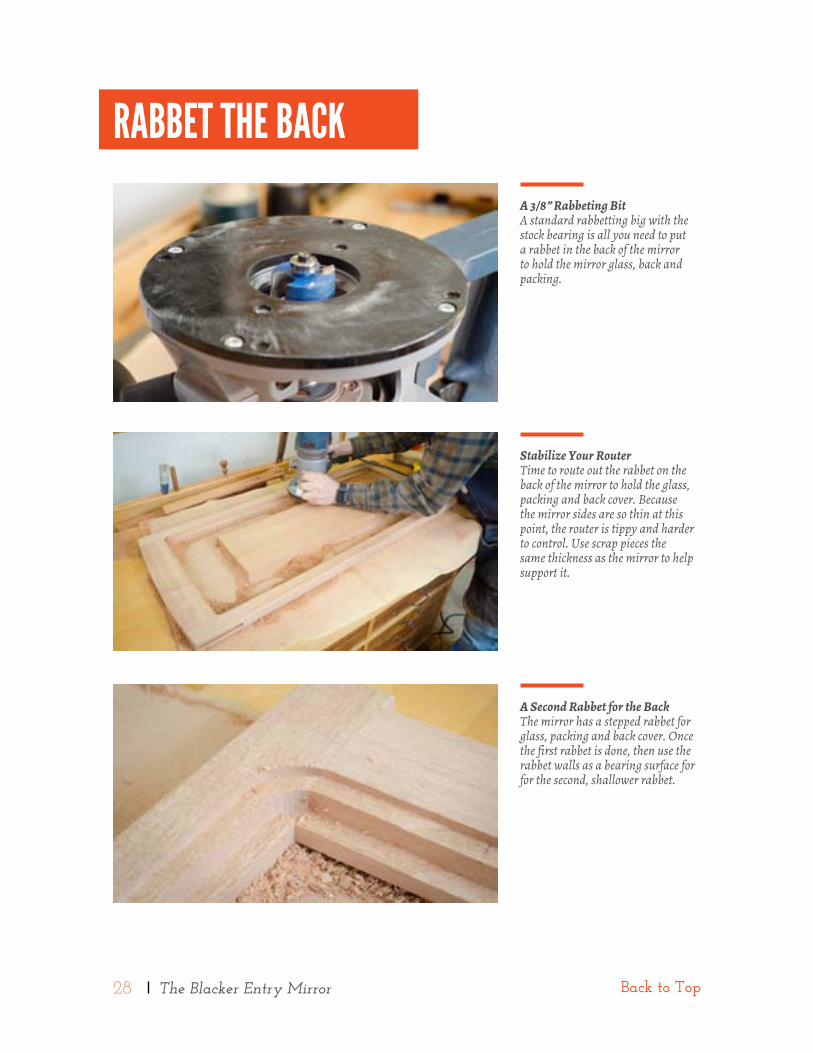
A 3/8” Rabbeting BitA standard rabbetting big with the stock bearing is all you need to put a rabbet in the back of the mirror to hold the mirror glass, back and packing.
Stabilize Your RouterTime to route out the rabbet on the back of the mirror to hold the glass, packing and back cover. Because the mirror sides are so thin at this point, the router is tippy and harder to control. Use scrap pieces the same thickness as the mirror to help support it.
A Second Rabbet for the BackThe mirror has a stepped rabbet for glass, packing and back cover. Once the first rabbet is done, then use the rabbet walls as a bearing surface for for the second, shallower rabbet.
RABBET THE BACK
29 The Blacker Entry Mirror Back to Top
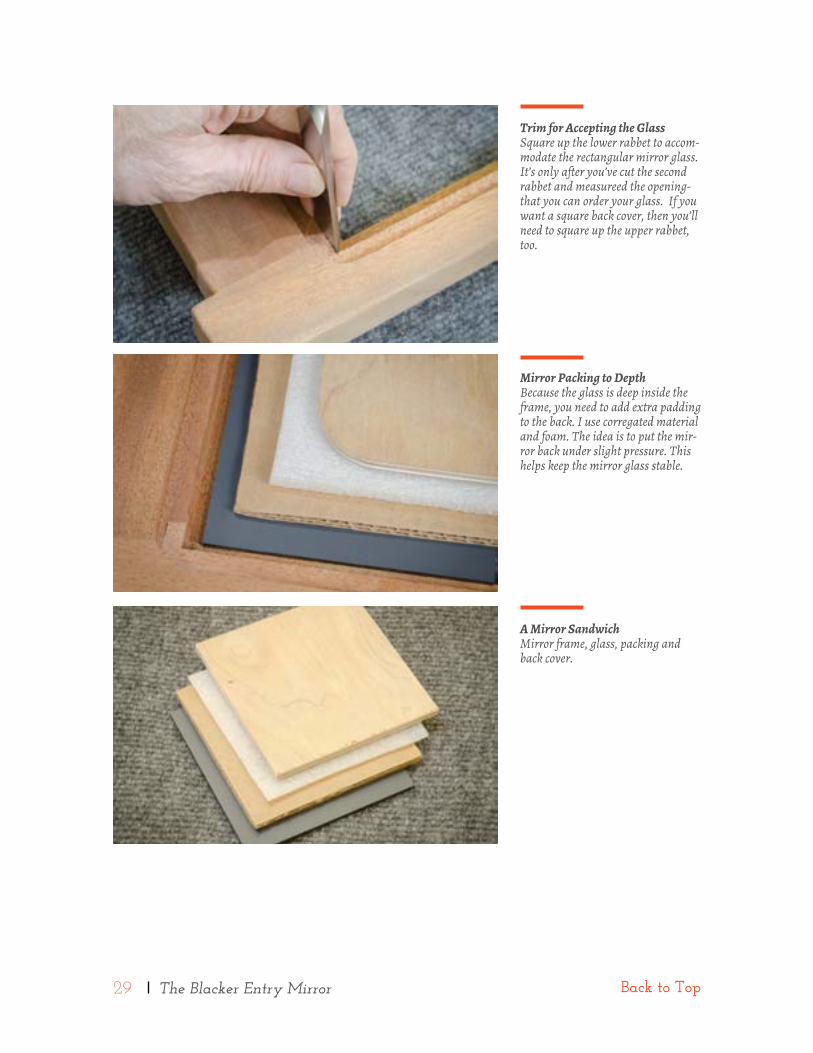
Trim for Accepting the GlassSquare up the lower rabbet to accom-modate the rectangular mirror glass. It’s only after you’ve cut the second rabbet and measureed the opening-that you can order your glass. If you want a square back cover, then you’ll need to square up the upper rabbet, too.
Mirror Packing to DepthBecause the glass is deep inside the frame, you need to add extra padding to the back. I use corregated material and foam. The idea is to put the mir-ror back under slight pressure. This helps keep the mirror glass stable.
A Mirror SandwichMirror frame, glass, packing and back cover.
30 The Blacker Entry Mirror Back to Top
PILLOWEd PLugs ANd sPLINEsT o make enough plugs and splines for this project, you need to end up with 4, 8” strips of
3/8” x 3/8” Gabon Ebony. A small piece from a supplier should provide enough to work
with. If you can find a long piece, say 12” -16”, it’s easier to work with. I start with a piece
that’s under 1/2” thick by 2” wide. I set up my jointer to the thinest possible cut and joint
one wide side an adjacent thin side. To keep these as reference surfaces I put squiggly pen-
cil lines all over them.
The next challenge is to thickness the flat stock to just fit in the plug holes. First we need
some square holes to test with. With scrap from the mirror frame I punch a couple of test
3/8” square holes to the same depth as the holes on the assembled mirror. To cut ebony
to thickness is a little challenging because the pieces are so small. There are a number of
ways to do this. I have an old table top planer that I use for delicate work like this. I check
my thickness with digital calipers after each pass and when I’m about 1/32” away, I do final
thickening on a wide belt sander, but you could complete it on a small planer or drum san-
der if you have one. Again, check fit after every pass. When close, I start testing a corner of
the ebony block in my test holes. When I can just barely fit a corner in, I’m very close. It’s
important to not over do this and wind up with stock, too thin and loose plugs, so go slow
as you fit the stock to the square holes. Once satisfied, it’s time to head to the bandsaw.
On the band saw, I use a fence and cut plug strips a little too thick. I cut off a strip and
back at my jointer, I joint a new clean edge on the rest of my stock and put a pencil line
on it. Back to the band saw for another cut and so on until you have the strips you need.
To clean up that one ragged edge on each strip, it’s back to my wide belt until the entire
square profile strip just fits in a test hole.
31 The Blacker Entry Mirror Back to Top
Alternative
I f you don’t have the convenience of these kind of power tools, for final passes, you could
make a simple jig out of pieces of very dense hardwood. A great trick developed by Chris
Schwarz. I use Jarra, but anything super hard will do. Just mill a few 1” strips to the exact
thickness you need to fit in a square hole. I use a pin nailer and glue to tack them to small
piece of plywood with enough room between them for the ebony strips. The harder wood
strips will support the scraper and keep it square while the softer ebony is being shaved
with a hand scraper until you get to the thickness needed. Set aside two strips for splines
and the rest for pillowed plugs
Pillowing plugs
O nce you have enough Ebony strips that fit your square holes, there are a number of
ways to pillow plugs. I’ve seen a number of methods work including just holding the
stick upright with the other hand moving a pad sander over the top until it’s perfectly
pillowed. But, that’s hard to do. In my case, I use a simple jig, designed to hold the plug
stock at a shallow angle. This jig mounts in the miter slot of my disk sander. I put the stock
in the hole and rotate it as fast as I can. When you pull it out it’s round and pillowed on the
end. I do both ends of each stick. But, still a little rough. So, I setup 3 or 4 grits of sander
paper resting on foam pads and using a sweeping motion, I brush back and forth and ro-
tate 90 degrees and brush again. I step my way up to 400 grit to get a very smooth pillowed
surface. If you have a buffer wheel handy, take it another step.
I have a tiny micro adjustable cut off sled for my band saw. It too rests in a miter gauge
slot to keep it in line. Once I make a few test cuts for depth of the pillows I pound them
into my test square holes. When everything is setup just right then it’s back to disk sander
and sanding pads, the bandsaw and back again until I have the 18 plugs I need for the mir-
ror. I make installation easier by putting a tiny bevel with a chisel on the bottom of each
plug. It only takes a few minutes to prepare all 18. It’s alway a good idea to make a hand
full of extras for testing or just in case you need to replace one during installation. Since
there are little patches of black ebony dust around my disk sander and bandsaw, I use a
fine brush to collect it in a jar for use later.

32 The Blacker Entry Mirror Back to Top
Two Jigs Made From ScrapUsing MDF or plwood and scrap wood, make these two jigs to round and pillow your ebony plugs and trim to length.
Pillow and TrimHere’s the two jigs assembled. The top jig has holes to pass through ebony sticks. It holds the sticks at a low angle to round them over on a disk sander. The bottom jig is simply a mineature cut off sled. Both jigs use wood strips on their bottoms to register in the miter slots of a disk and sander and bandsaw.
PLugs ANd sPLINEs
Scrape to ThicknessThere are number of ways to plane ebony to the thickness needed for square plug holes. Here’s a simple jig made out of hardwood for scraping down ebony to the size you need.
33 The Blacker Entry Mirror Back to Top
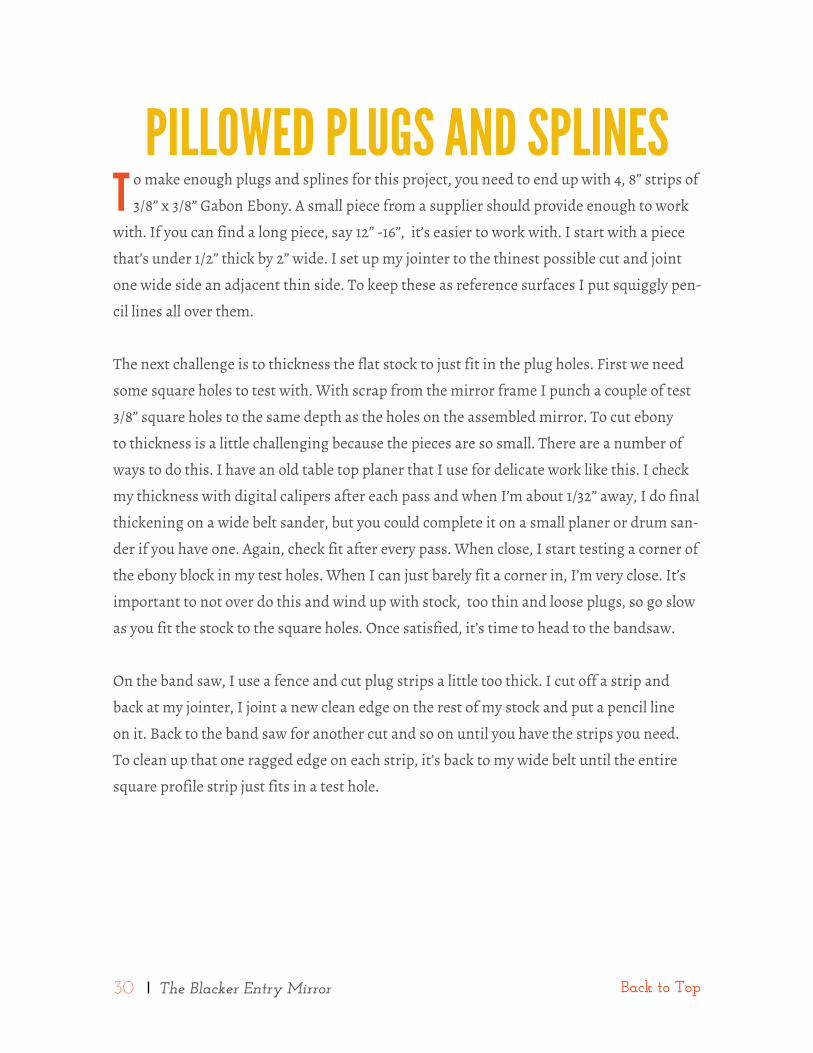
The Pillowing JigAs long as your at it, drill holes to accomadate other ebony plug dimen-sions. I often use 3/8” and 1/2” stock.
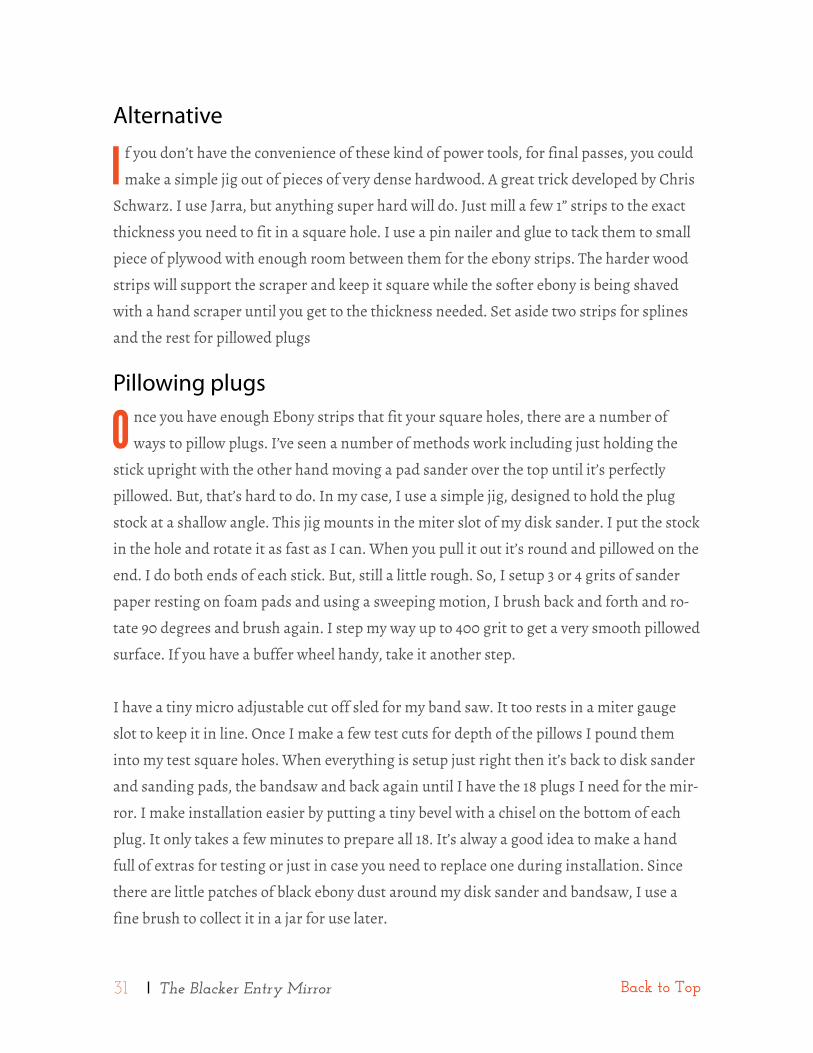
The Cutoff JigA simple jig to fine tuning cuts for plugs. A buried nut holds the screw on the left. Use it to fine tune the length of your cuts on a bandsaw. Because the jig can trim 1/2” mate-rial, too, the thin strips are to raise up the 3/8” stock to center it on the adjusting screw.
Ready for ActionMy square plug making setup all ready to go. Band saw and disk sander close by. Headphones, good tunes and a comfortable stool makes time fly.
34 The Blacker Entry Mirror Back to Top
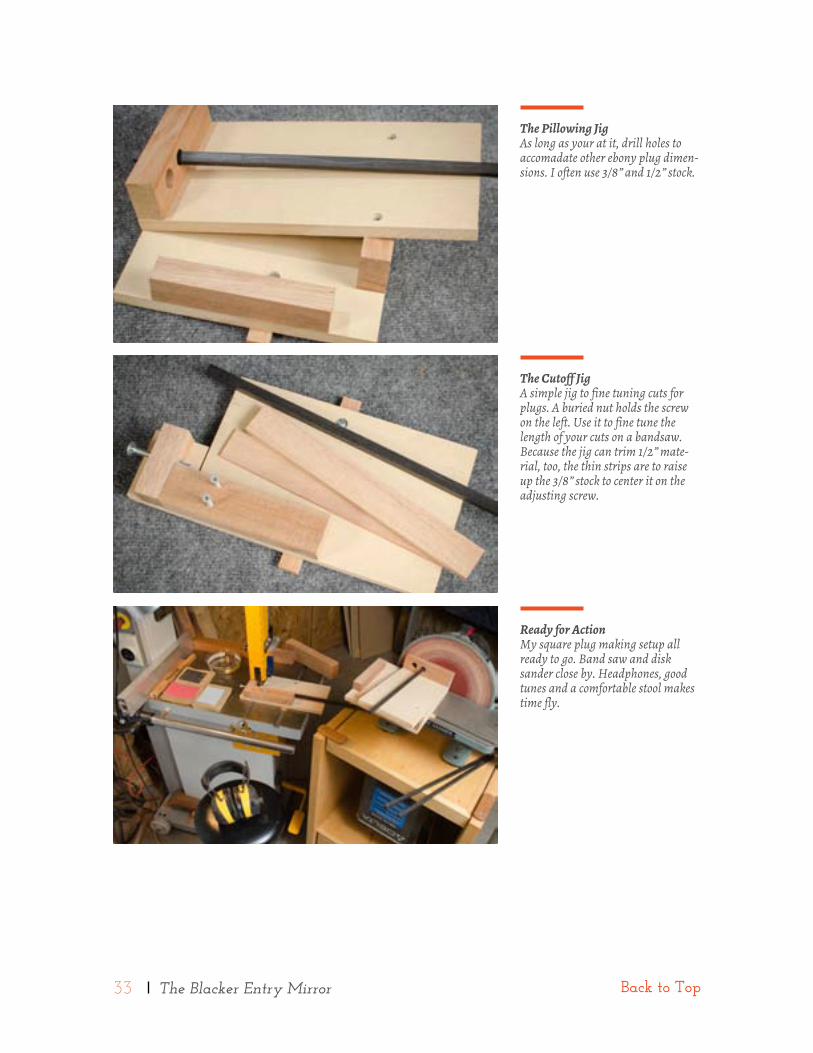
Hold Steady and Rotate QuicklyRapidly spin each end of your square stock
Smoothing Out the PillowFollow the pillowing effect created on the disk sander with a sweeping motion through several grades of sand paper. I sand to 400-600 grit. If you have a buffing wheel take it a step farther. Once smooth, then cut to plug height at the band saw using the miniature cut off jig.
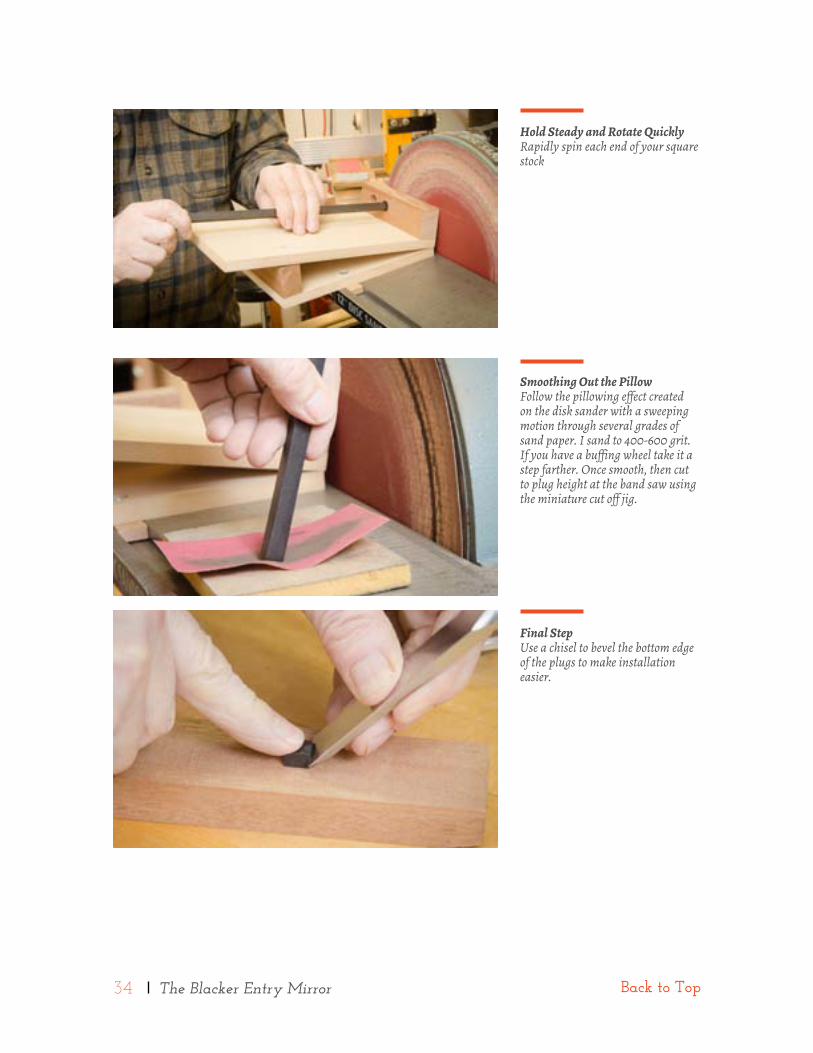
Final StepUse a chisel to bevel the bottom edge of the plugs to make installation easier.
35 The Blacker Entry Mirror Back to Top
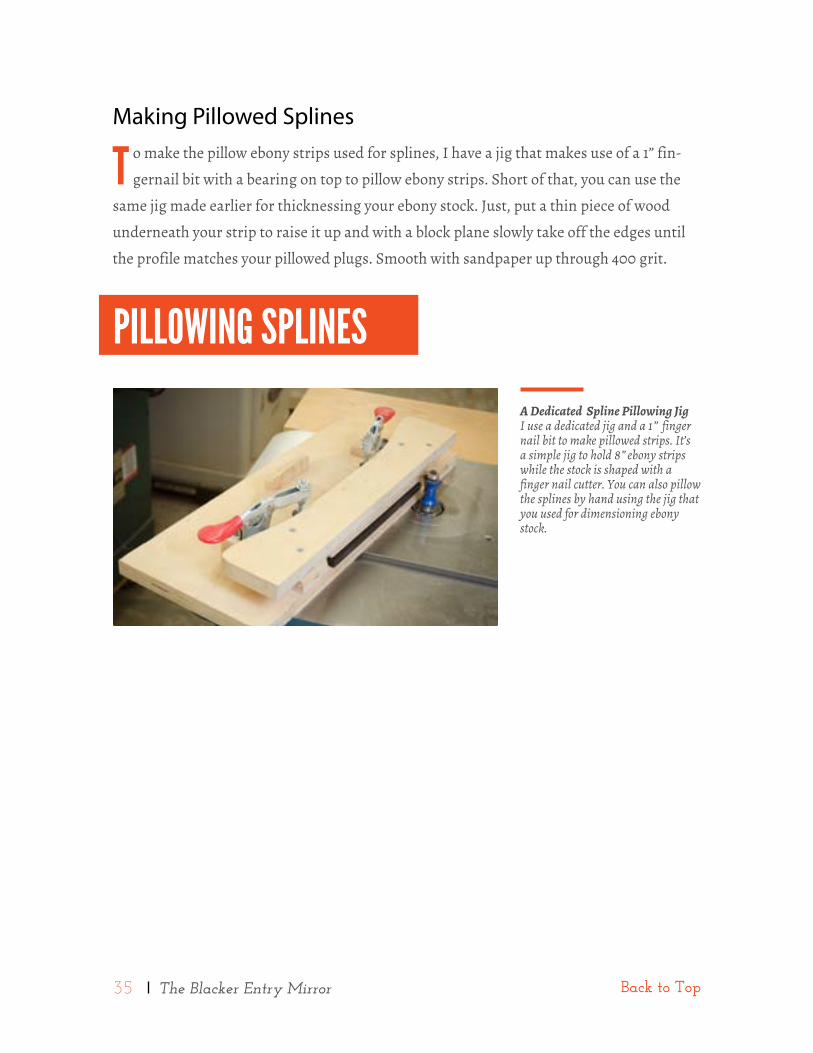
Making Pillowed Splines
T o make the pillow ebony strips used for splines, I have a jig that makes use of a 1” fin-
gernail bit with a bearing on top to pillow ebony strips. Short of that, you can use the
same jig made earlier for thicknessing your ebony stock. Just, put a thin piece of wood
underneath your strip to raise it up and with a block plane slowly take off the edges until
the profile matches your pillowed plugs. Smooth with sandpaper up through 400 grit.
A Dedicated Spline Pillowing JigI use a dedicated jig and a 1” finger nail bit to make pillowed strips. It’s a simple jig to hold 8” ebony strips while the stock is shaped with a finger nail cutter. You can also pillow the splines by hand using the jig that you used for dimensioning ebony stock.
PILLOWINg sPLINEs
36 The Blacker Entry Mirror Back to Top
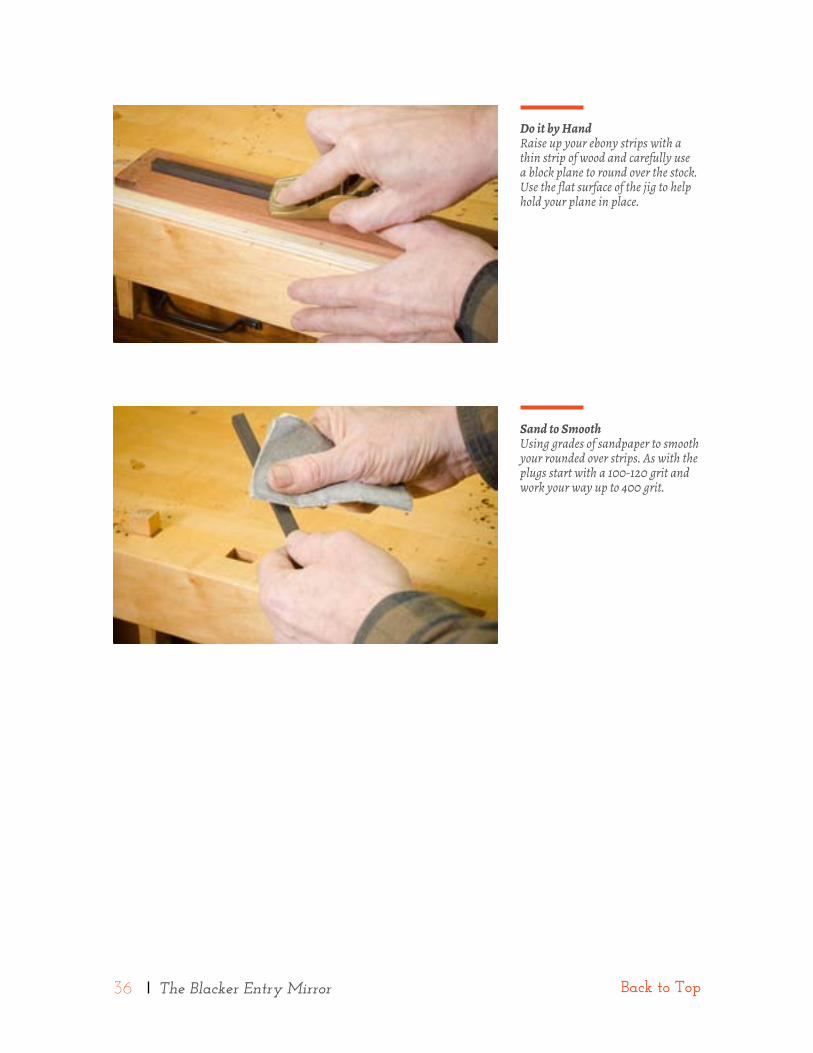
Do it by HandRaise up your ebony strips with a thin strip of wood and carefully use a block plane to round over the stock. Use the flat surface of the jig to help hold your plane in place.
Sand to SmoothUsing grades of sandpaper to smooth your rounded over strips. As with the plugs start with a 100-120 grit and work your way up to 400 grit.
37 The Blacker Entry Mirror Back to Top
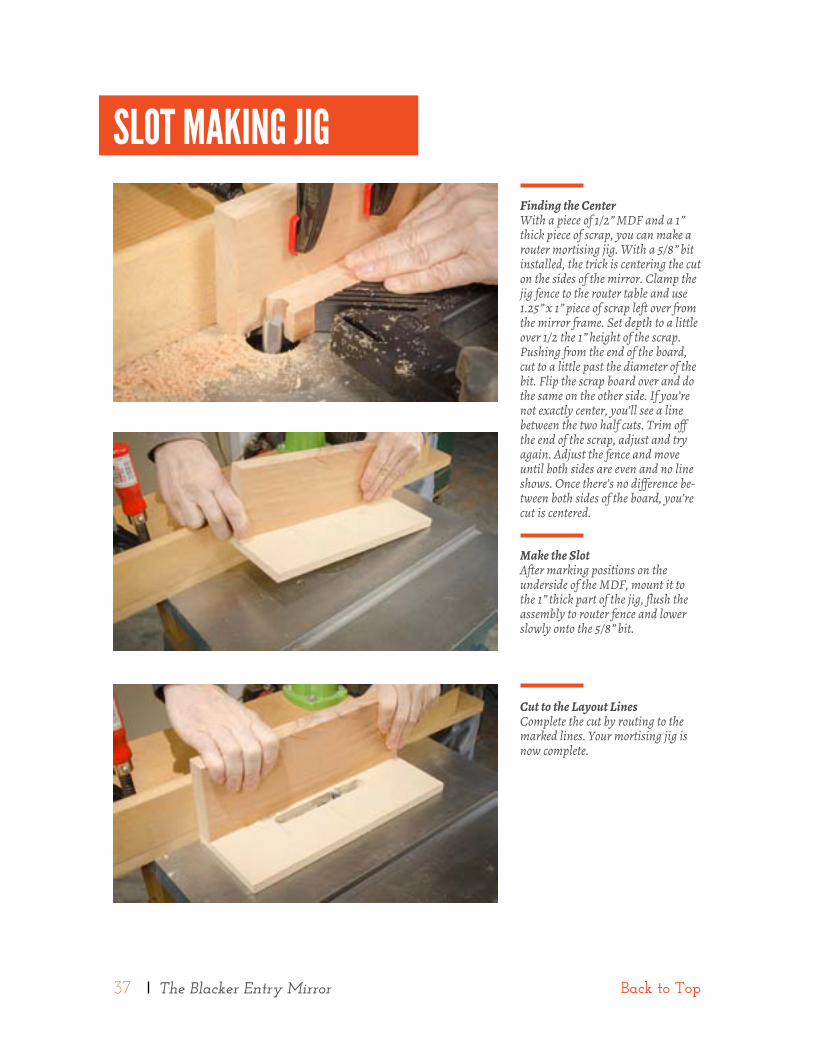
Finding the CenterWith a piece of 1/2” MDF and a 1” thick piece of scrap, you can make a router mortising jig. With a 5/8” bit installed, the trick is centering the cut on the sides of the mirror. Clamp the jig fence to the router table and use 1.25” x 1” piece of scrap left over from the mirror frame. Set depth to a little over 1/2 the 1” height of the scrap. Pushing from the end of the board, cut to a little past the diameter of the bit. Flip the scrap board over and do the same on the other side. If you’re not exactly center, you’ll see a line between the two half cuts. Trim off the end of the scrap, adjust and try again. Adjust the fence and move until both sides are even and no line shows. Once there’s no difference be-tween both sides of the board, you’re cut is centered.
Make the SlotAfter marking positions on the underside of the MDF, mount it to the 1” thick part of the jig, flush the assembly to router fence and lower slowly onto the 5/8” bit.
Cut to the Layout LinesComplete the cut by routing to the marked lines. Your mortising jig is now complete.
sLOT MAKINg JIg
38 The Blacker Entry Mirror Back to Top
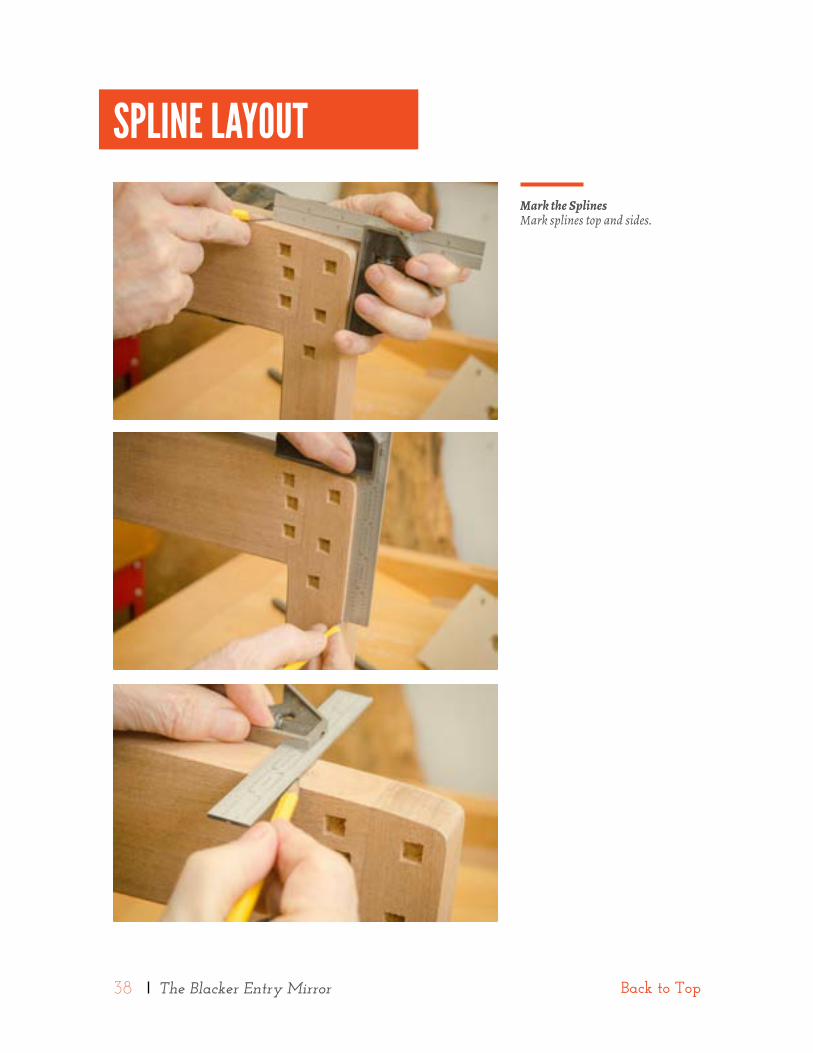
Mark the SplinesMark splines top and sides.
sPLINE LAYOuT
39 The Blacker Entry Mirror Back to Top
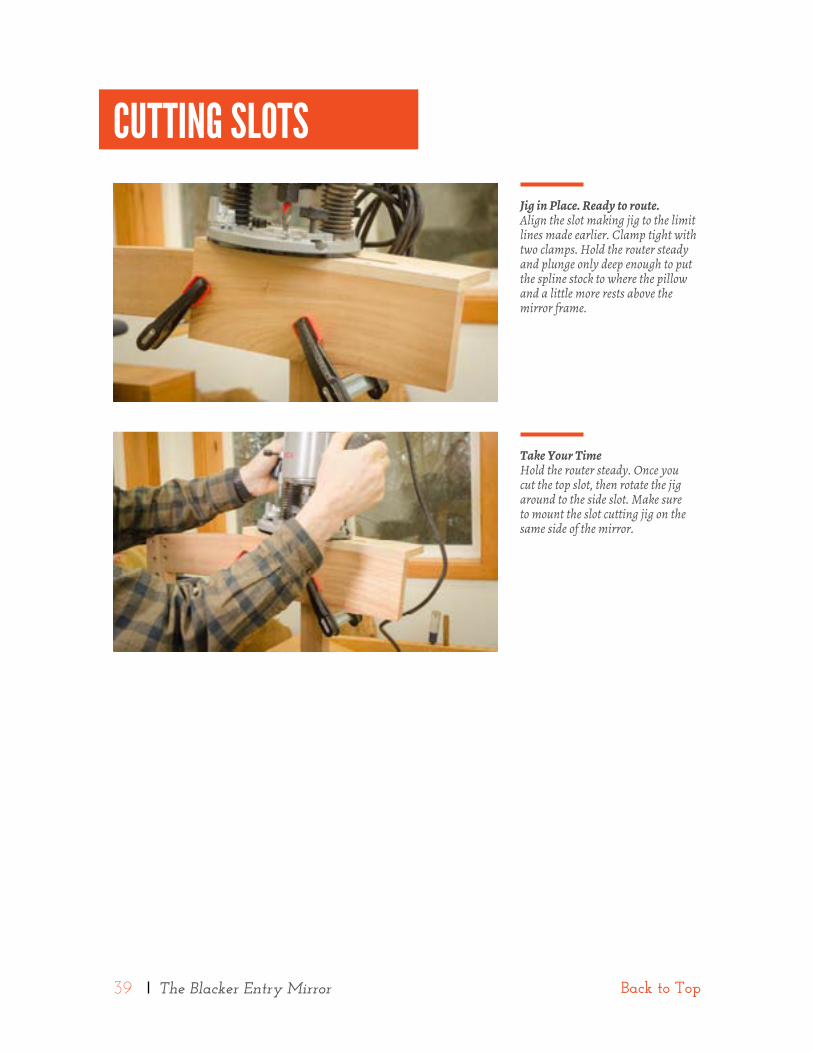
Jig in Place. Ready to route.Align the slot making jig to the limit lines made earlier. Clamp tight with two clamps. Hold the router steady and plunge only deep enough to put the spline stock to where the pillow and a little more rests above the mirror frame.
Take Your TimeHold the router steady. Once you cut the top slot, then rotate the jig around to the side slot. Make sure to mount the slot cutting jig on the same side of the mirror.
CuTTINg sLOTs
40 The Blacker Entry Mirror Back to Top
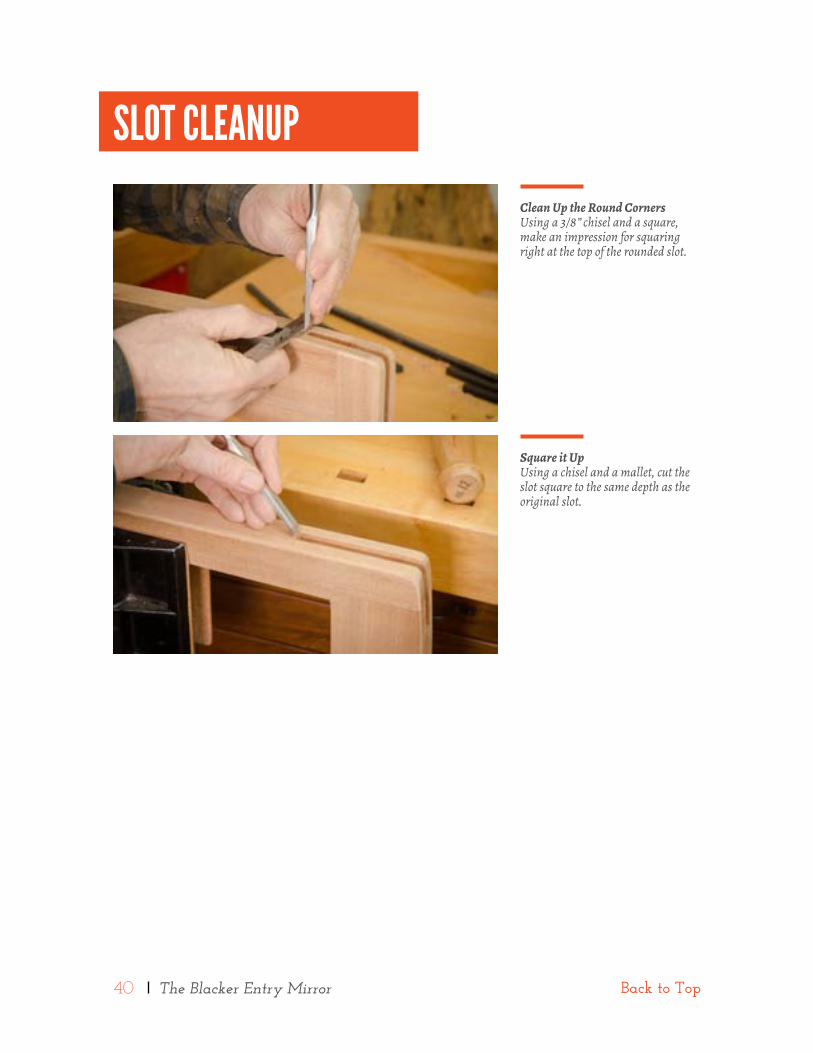
Clean Up the Round CornersUsing a 3/8” chisel and a square, make an impression for squaring right at the top of the rounded slot.
Square it UpUsing a chisel and a mallet, cut the slot square to the same depth as the original slot.
sLOT CLEANuP
41 The Blacker Entry Mirror Back to Top
FINAL CLEAN uPI hand sand the mirror with sanding blocks from 120 all the way through 400 grit. I put a
lot of emphasis softness of the edges and corners to make sure that everything is smooth
to the touch. Once everything is smooth, it’s best to raise the grain of wood first so that
you end up with a glass smooth surface before finishing. I use a sponge and water and
wipe all surfaces of the mirror and set it aside to dry over night. To knock that down the
raised nibs, use sandpaper with a gentle touch with very little downward pressure other-
wise you’re just pushing this fibers back down to the surface.
Clean up
B ecause the mirror has pillowed plugs that sit above the surface, all sanding for this pro-
ject has to be done before adding plugs and splines.
Blend the intersection at the top of the mirror between the sides the crest rail until the
transition is seamless and smooth. Round over the rest of the mirror, stopping short of
the top inside intersection. Best to blend those by hand so that the inside corners are crisp
and not rounded over. Sand progressively from 120 to 320 grit. Don’t skip grits along the
way.
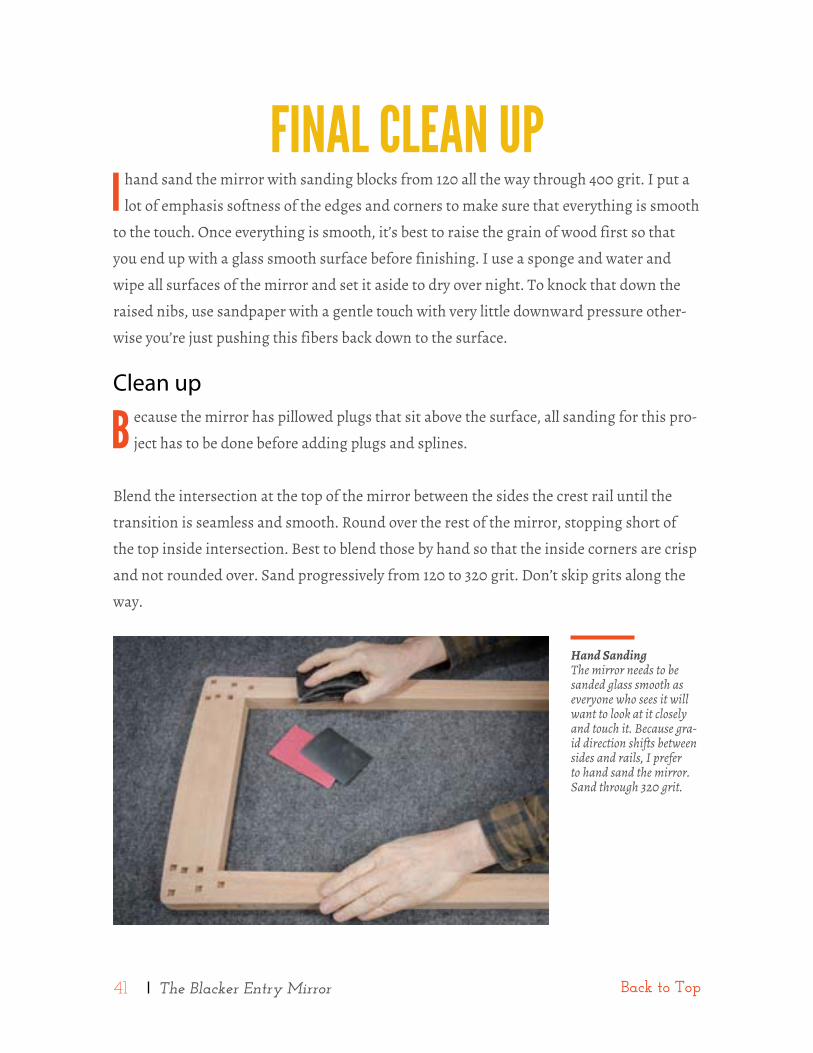
Hand SandingThe mirror needs to be sanded glass smooth as everyone who sees it will want to look at it closely and touch it. Because gra-id direction shifts between sides and rails, I prefer to hand sand the mirror. Sand through 320 grit.
42 The Blacker Entry Mirror Back to Top
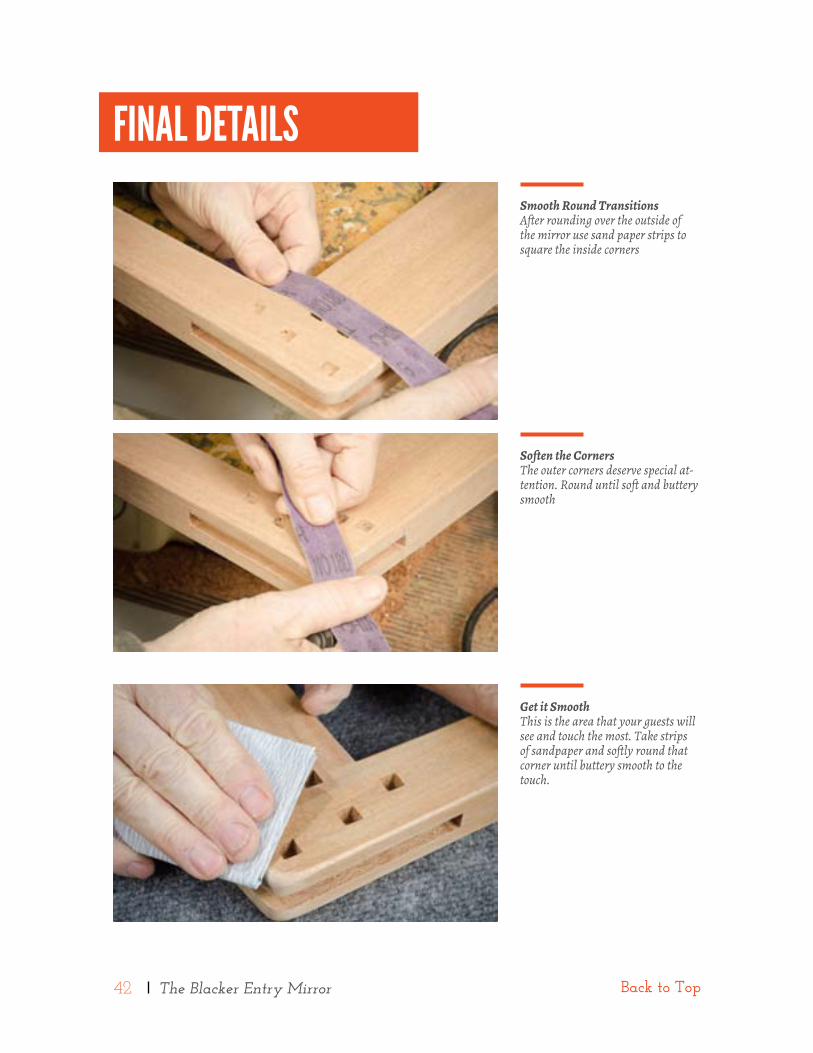
Smooth Round TransitionsAfter rounding over the outside of the mirror use sand paper strips to square the inside corners
Soften the CornersThe outer corners deserve special at-tention. Round until soft and buttery smooth
Get it SmoothThis is the area that your guests will see and touch the most. Take strips of sandpaper and softly round that corner until buttery smooth to the touch.
FINAL dETAILs
43 The Blacker Entry Mirror Back to Top
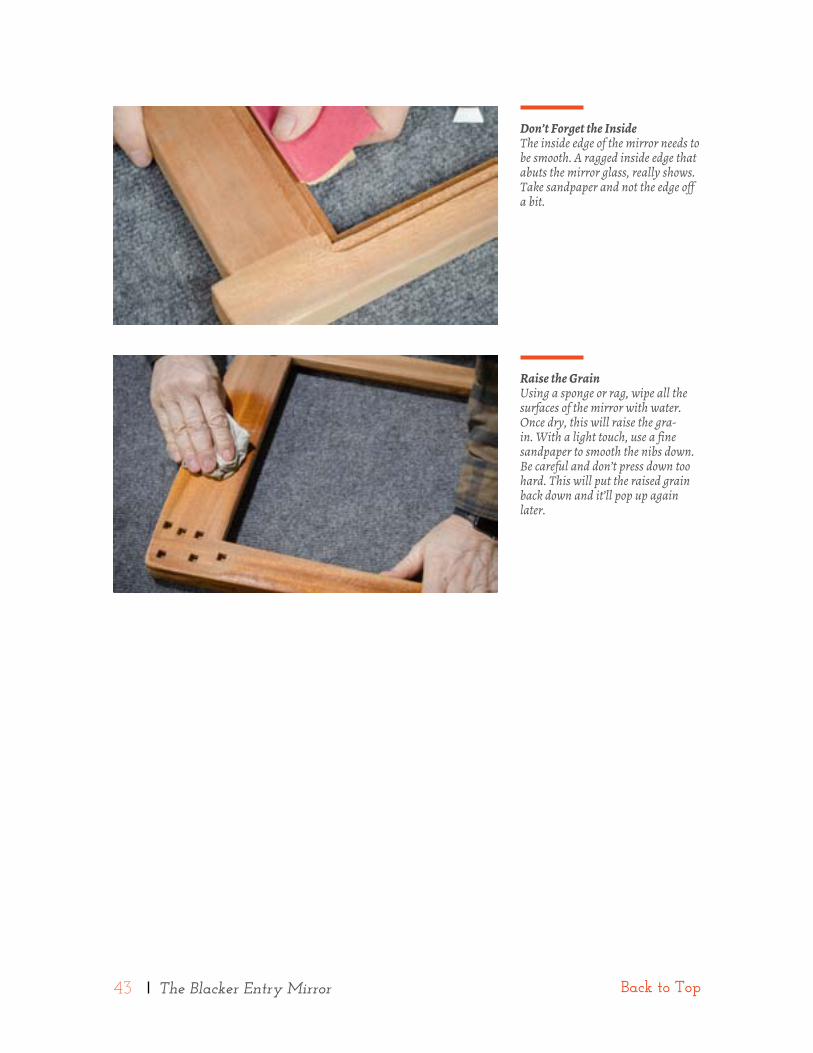
Don’t Forget the InsideThe inside edge of the mirror needs to be smooth. A ragged inside edge that abuts the mirror glass, really shows. Take sandpaper and not the edge off a bit.
Raise the GrainUsing a sponge or rag, wipe all the surfaces of the mirror with water. Once dry, this will raise the gra-in. With a light touch, use a fine sandpaper to smooth the nibs down. Be careful and don’t press down too hard. This will put the raised grain back down and it’ll pop up again later.
44 The Blacker Entry Mirror Back to Top
FITTINg sPLINEs ANd PLugsO nce the mirror frame has slots and is final sanded, it’s time for plugs and splines. Po-
unding in plugs might disturb a just glued in spline, so I glue splines first and let them
dry. Each corner spline is made up of two parts, a vertical and a slightly sloping horizontal
piece. You need to fit each piece. Start with the sides. Mount your mirror vertically in a
bench vise. Start by tapping in a pillowed strip until it bottoms out on the squared up side
slot. Make sure the strip is just proud of the mirror edge and positioned so you just see the
edge of the strip along the side of the mirror. This will be its final position. Then about 1/2”
above the top of the mirror mark the strip. Remove it and cut with a handsaw. Put the cut
piece back in place. Next we’ll fit the horizontal strip until it flushes up to the vertical pie-
ce. Final fitting of the piece is usually done with a disk sander or sand paper so start with
pieces cut over length. Once it all fits together and just proud of the mirror edge take this
time to put two layers of painters tape around all edges of the splines. This protects the
mirror during glue up and when your blending the ebony pieces to go around the corner.
Remove the ebony pieces by tapping that extra bit at the top of the vertical piece and using
a small screw driver for the horizontal strip. Mark the pieces, set aside and repeat for the
other side of the mirror. It’s time to glue them into place. For this delicate operation, only
apply glue to the slots and not the ebony. Using a cut down flux brush, I very carefully
apply glue to just the inside walls of the slot. Then gently tap in the top piece until it’s just
right. With a tiny dab of glue on the end of the horizontal piece, I tap and rotate in the ver-
tical piece until positioned and touching the horizontal piece. Do the same with the other
side of the mirror and let dry.
Once completely dry, it’s time to blend the two piece into one. Start by cutting on any
excess on the vertical piece with a fine dovetail saw. With rasps, files, and sandpaper, wrap
the pillowed surfaces around the bend to match the curve of the mirror. Take your time.
This is where finesse counts. Once you’ve blended the two pieces, the jet black ebony looks
like a single piece of wood. If there are any cracks showing at the top, you can use cyano-
acrylate glue and ebony powder to fill. Sand the splines smooth through 600 grit.
45 The Blacker Entry Mirror Back to Top
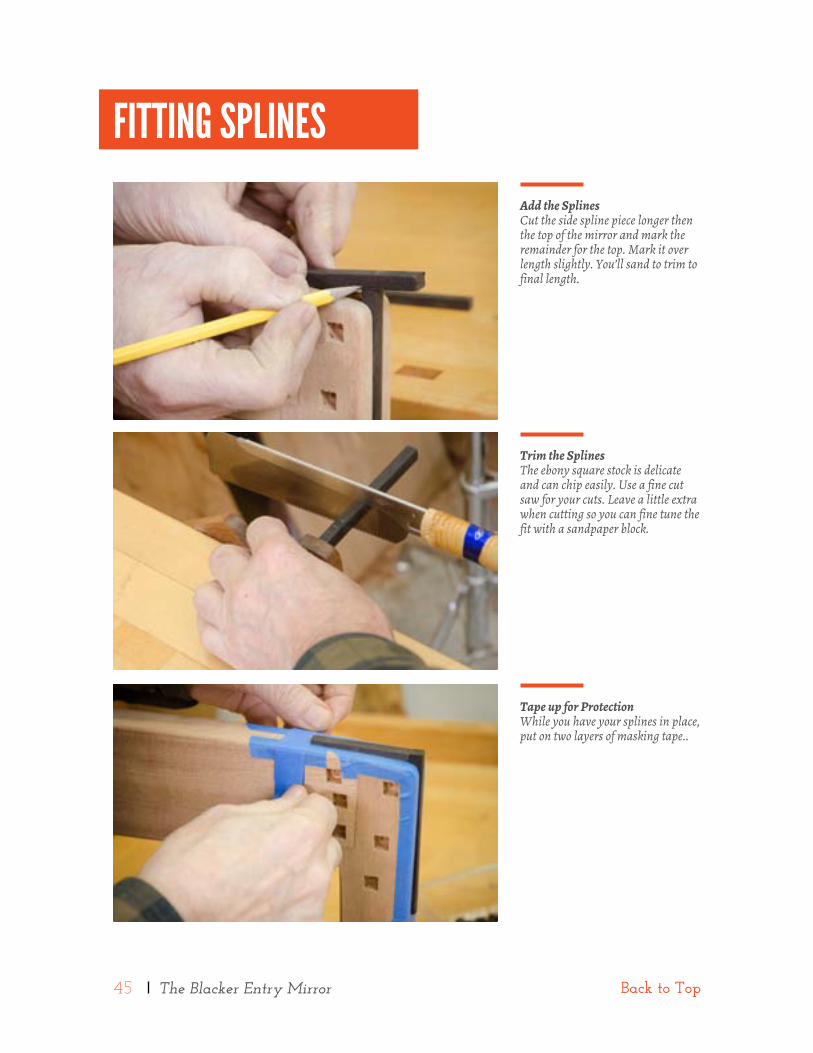
Add the SplinesCut the side spline piece longer then the top of the mirror and mark the remainder for the top. Mark it over length slightly. You’ll sand to trim to final length.
Trim the SplinesThe ebony square stock is delicate and can chip easily. Use a fine cut saw for your cuts. Leave a little extra when cutting so you can fine tune the fit with a sandpaper block.
Tape up for ProtectionWhile you have your splines in place, put on two layers of masking tape..
FITTINg sPLINEs
46 The Blacker Entry Mirror Back to Top
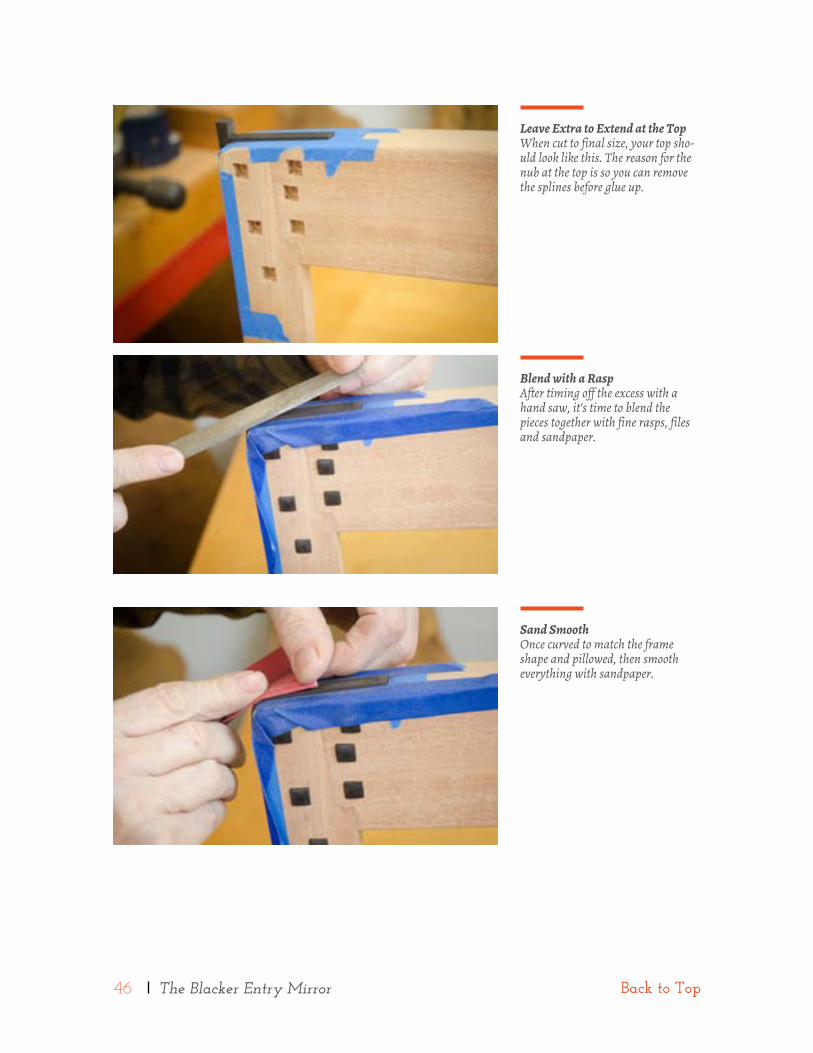
Leave Extra to Extend at the TopWhen cut to final size, your top sho-uld look like this. The reason for the nub at the top is so you can remove the splines before glue up.
Blend with a RaspAfter timing off the excess with a hand saw, it’s time to blend the pieces together with fine rasps, files and sandpaper.
Sand SmoothOnce curved to match the frame shape and pillowed, then smooth everything with sandpaper.
47 The Blacker Entry Mirror Back to Top
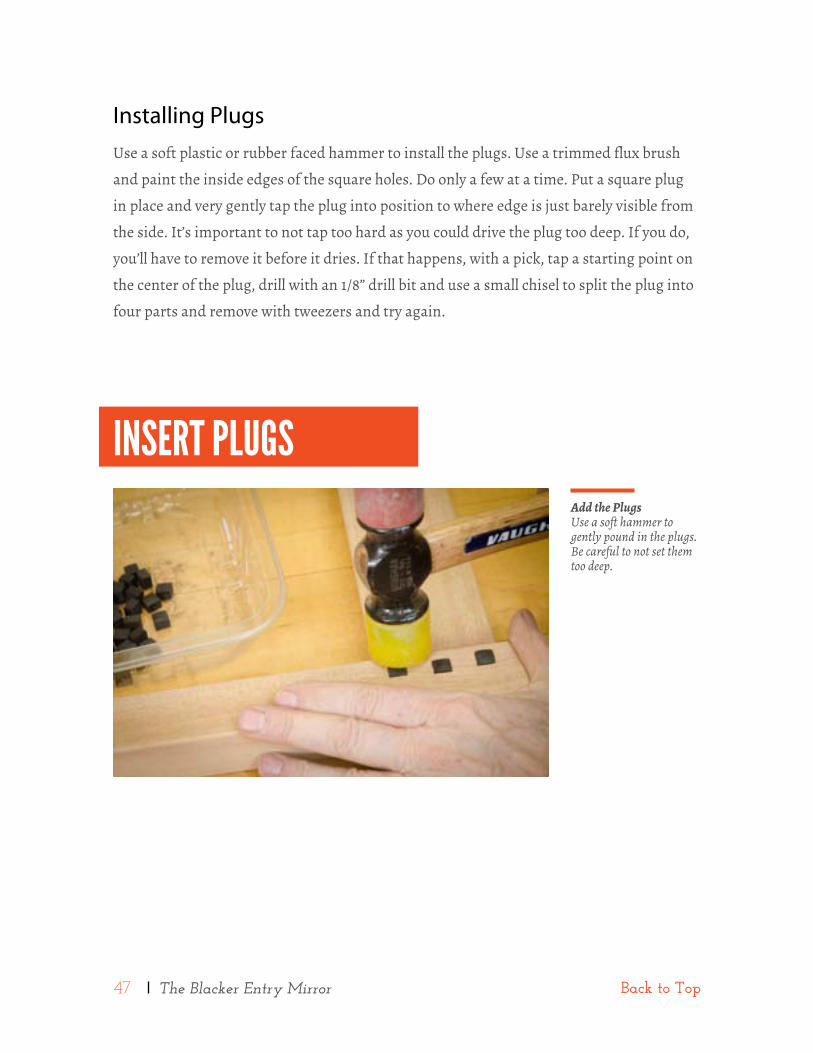
Add the PlugsUse a soft hammer to gently pound in the plugs. Be careful to not set them too deep.
INsERT PLugs
Installing PlugsUse a soft plastic or rubber faced hammer to install the plugs. Use a trimmed flux brush
and paint the inside edges of the square holes. Do only a few at a time. Put a square plug
in place and very gently tap the plug into position to where edge is just barely visible from
the side. It’s important to not tap too hard as you could drive the plug too deep. If you do,
you’ll have to remove it before it dries. If that happens, with a pick, tap a starting point on
the center of the plug, drill with an 1/8” drill bit and use a small chisel to split the plug into
four parts and remove with tweezers and try again.
48 The Blacker Entry Mirror Back to Top
COMPLETINg THE MIRRORT here are a variety of ways to finish the Blacker Mirror frame. With Sapele or Mahogany,
I prefer to treat or stain the wood before applying final finish. Two ways to do this.
My personal preference is to first treat the mahogany or sapele with Potassium Dichro-
mate. This is a chemical oxidizing process that forces the tannins in the wood to age and
darken the wood. It has a particularly strong effect on Mahogany. But, applying it is not
for the faint of heart. The effect is nearly instantaneous, meaning you have to work at
lightning speed and apply it everywhere, evenly, otherwise streaks will appear. It’s a chal-
lenging process.
An easier choice is to use water based dies. These come in liquid concentrates or powder
form. I like a mix of medium brown mahogany with a little red mahogany. Wipe on the
dissolved die on with a staining sponge and wipe off excess before it dries. The final color
needs to be built up over 3, or 4 applications.
After these treatments dry, the grain may raised up a bit, again. Use steel wool to smooth
it out, vacuum or blow off any dust and follow up with a tack cloth to clean everything up.
With this piece, I prefer a very clear, hard finish because viewers will be just inches away
and the mirror will be handled a lot. I use a hand-applied, satin rubbing varnish for base
coats. My first coat is thinned with mineral spirits —resulting in a sealing effect, not unli-
ke shellac. When dry, I build up 3 more thin coats, lightly sanding between coats with 400
grit sandpaper, if necessary. At this time, I also apply one or two coats to the plywood mir-
ror back. For depth, I finish the frame with thin coats of gel varnish applied with a cloth.
The final result resembles an oil/varnish hand rubbed finish, but it’s bullet proof. After a
few coats of wax, the mirror frame is complete.
49 The Blacker Entry Mirror Back to Top
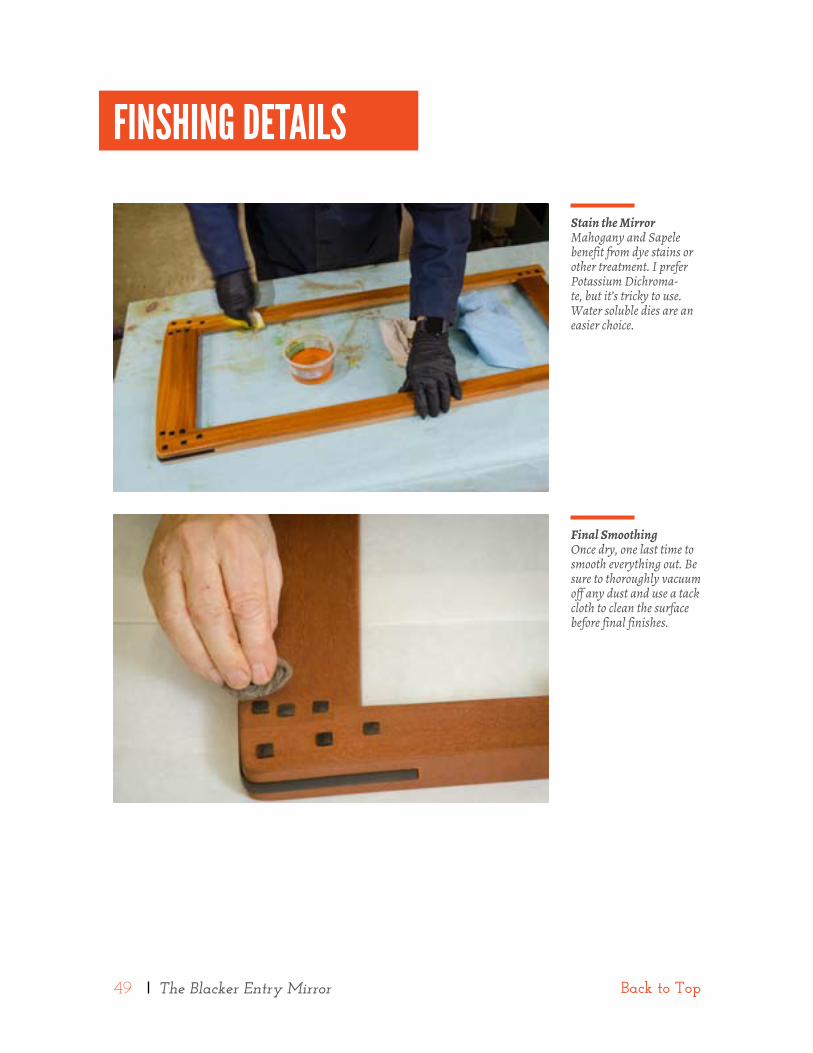
Stain the MirrorMahogany and Sapele benefit from dye stains or other treatment. I prefer Potassium Dichroma-te, but it’s tricky to use. Water soluble dies are an easier choice.
Final SmoothingOnce dry, one last time to smooth everything out. Be sure to thoroughly vacuum off any dust and use a tack cloth to clean the surface before final finishes.
FINsHINg dETAILs
50 The Blacker Entry Mirror Back to Top
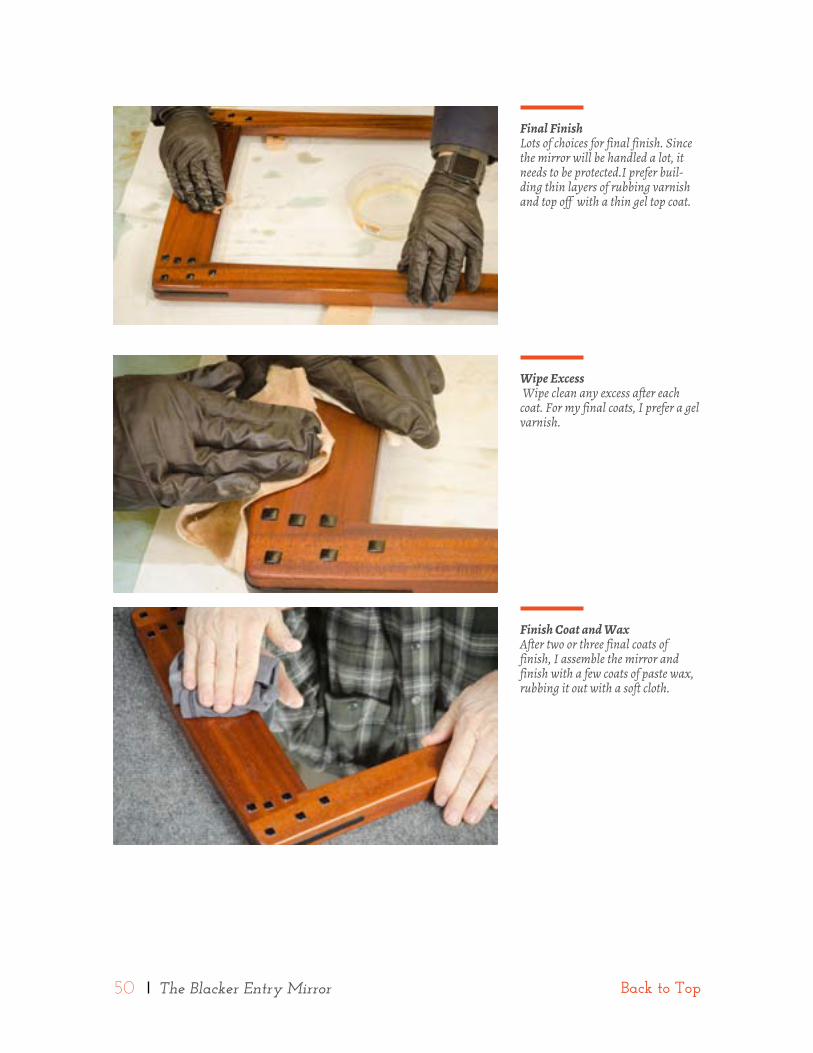
Final FinishLots of choices for final finish. Since the mirror will be handled a lot, it needs to be protected.I prefer buil-ding thin layers of rubbing varnish and top off with a thin gel top coat.
Wipe Excess Wipe clean any excess after each coat. For my final coats, I prefer a gel varnish.
Finish Coat and WaxAfter two or three final coats of finish, I assemble the mirror and finish with a few coats of paste wax, rubbing it out with a soft cloth.
51 The Blacker Entry Mirror Back to Top
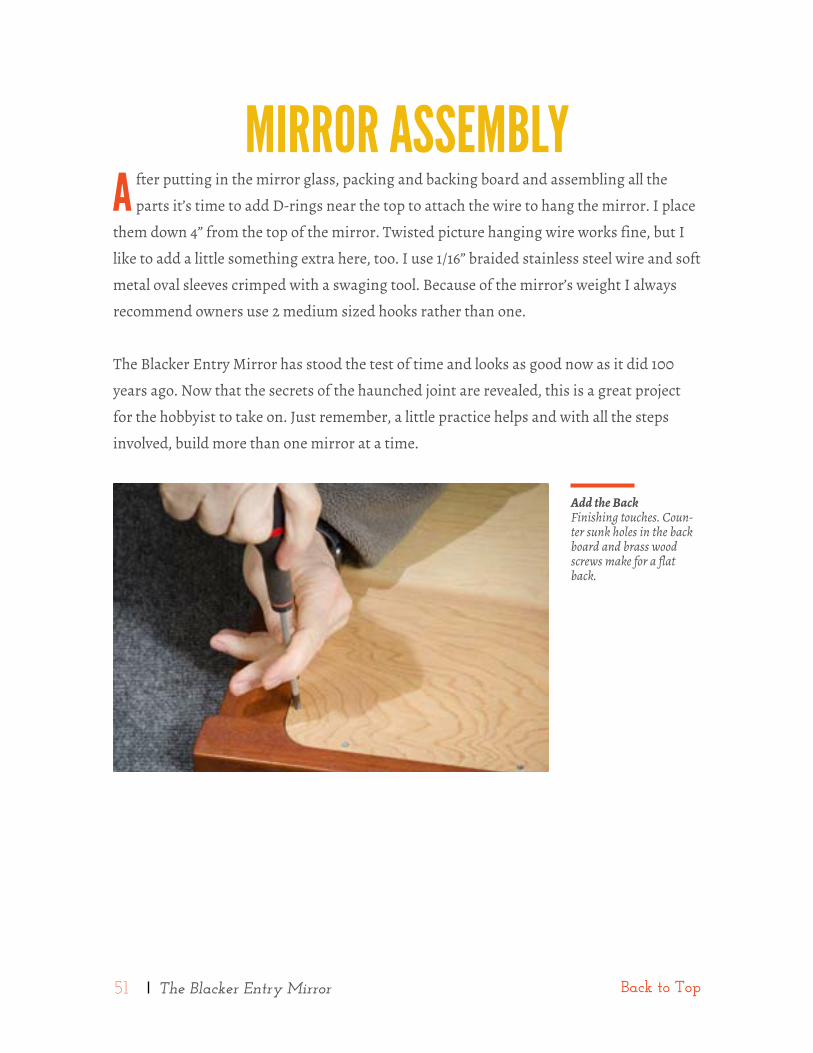
MIRROR AssEMBLYA fter putting in the mirror glass, packing and backing board and assembling all the
parts it’s time to add D-rings near the top to attach the wire to hang the mirror. I place
them down 4” from the top of the mirror. Twisted picture hanging wire works fine, but I
like to add a little something extra here, too. I use 1/16” braided stainless steel wire and soft
metal oval sleeves crimped with a swaging tool. Because of the mirror’s weight I always
recommend owners use 2 medium sized hooks rather than one.
The Blacker Entry Mirror has stood the test of time and looks as good now as it did 100
years ago. Now that the secrets of the haunched joint are revealed, this is a great project
for the hobbyist to take on. Just remember, a little practice helps and with all the steps
involved, build more than one mirror at a time.
Add the BackFinishing touches. Coun-ter sunk holes in the back board and brass wood screws make for a flat back.
52 The Blacker Entry Mirror Back to Top
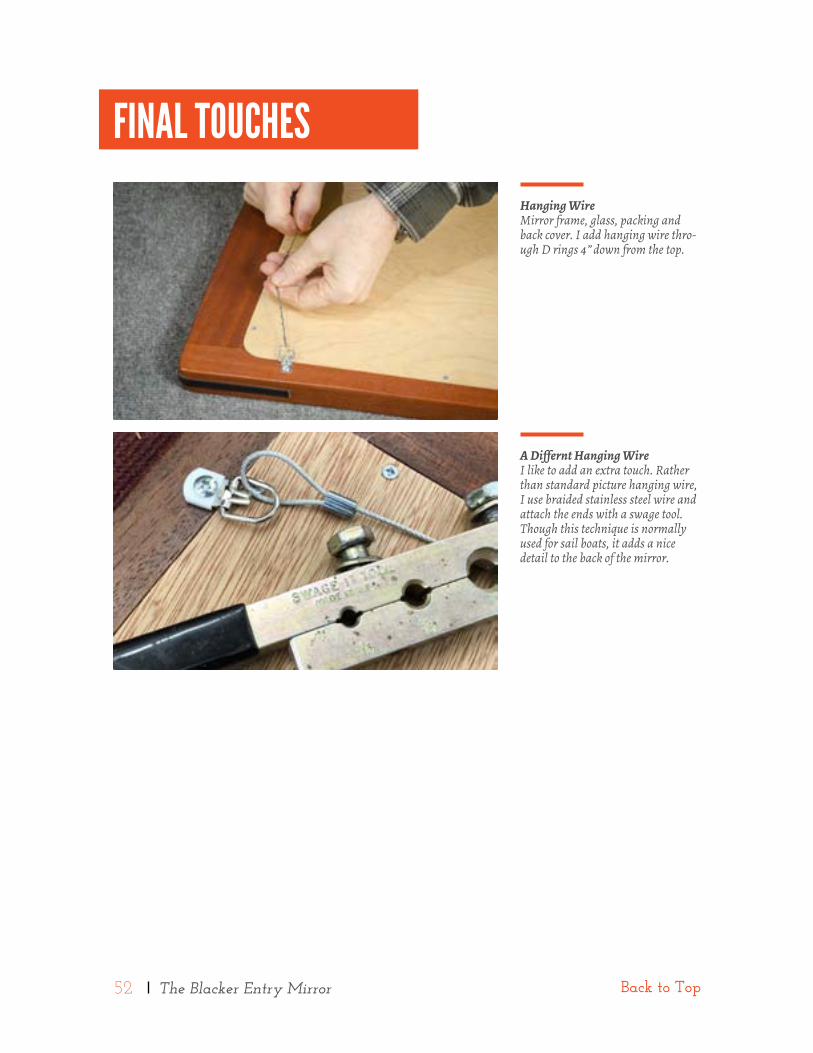
Hanging WireMirror frame, glass, packing and back cover. I add hanging wire thro-ugh D rings 4” down from the top.
A Differnt Hanging WireI like to add an extra touch. Rather than standard picture hanging wire, I use braided stainless steel wire and attach the ends with a swage tool. Though this technique is normally used for sail boats, it adds a nice detail to the back of the mirror.
FINAL TOuCHEs
53 The Blacker Entry Mirror Back to Top
WRAP uP & PLANsT he Blacker Entry Mirror has stood the test of time and looks as good now as it did 100
years ago. Now that the secrets of the haunched joint are revealed, this is a great project
for the hobbyist to take on. Just remember, use the right materials, a little practice helps
and with all the steps involved, it makes sense to build more than one mirror at a time.
You won’t regret making extras for family and friends. A great mirror deserves a home.
Tim Celeski
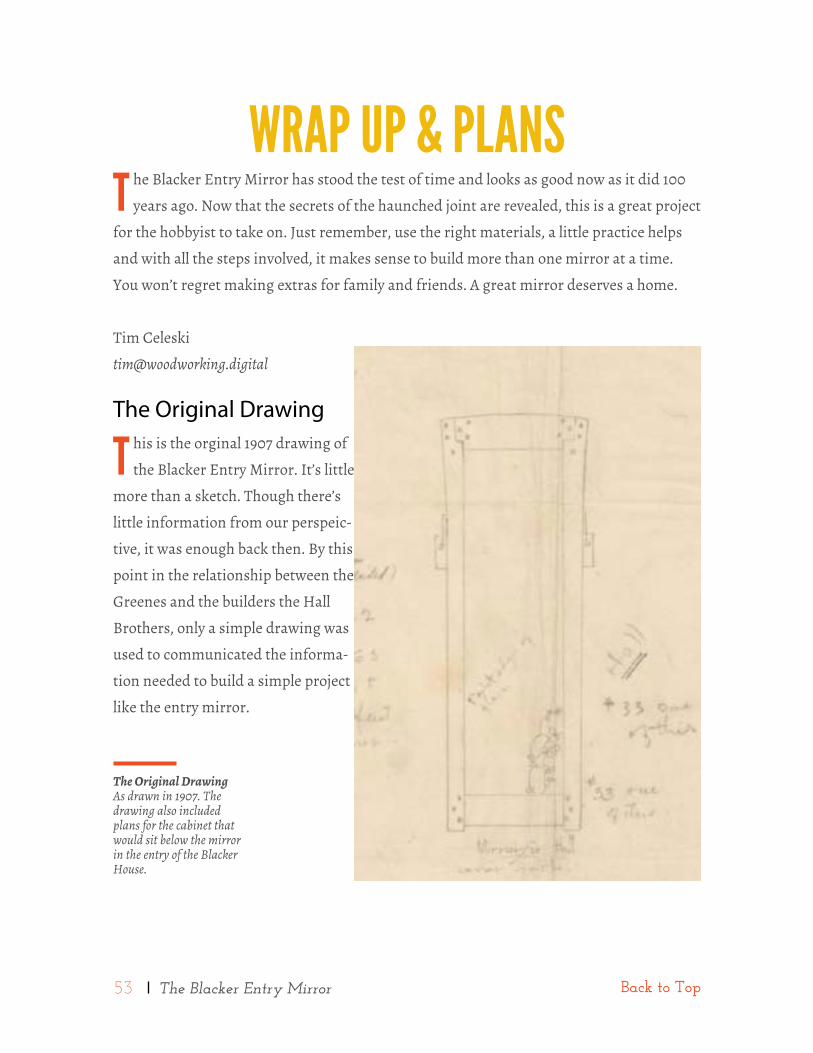
The Original Drawing
T his is the orginal 1907 drawing of
the Blacker Entry Mirror. It’s little
more than a sketch. Though there’s
little information from our perspeic-
tive, it was enough back then. By this
point in the relationship between the
Greenes and the builders the Hall
Brothers, only a simple drawing was
used to communicated the informa-
tion needed to build a simple project
like the entry mirror.
The Original DrawingAs drawn in 1907. The drawing also included plans for the cabinet that would sit below the mirror in the entry of the Blacker House.
54 The Blacker Entry Mirror Back to Top
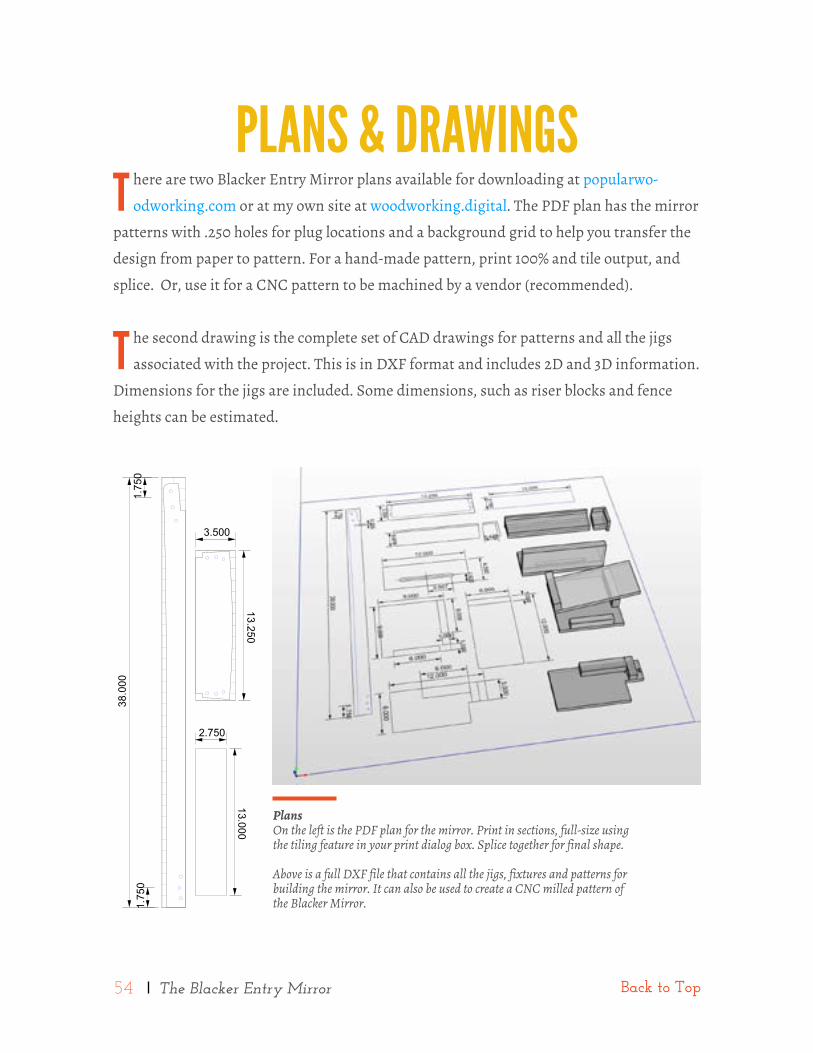
PLANs & dRAWINgsT here are two Blacker Entry Mirror plans available for downloading at popularwo-
odworking.com or at my own site at woodworking.digital. The PDF plan has the mirror
patterns with .250 holes for plug locations and a background grid to help you transfer the
design from paper to pattern. For a hand-made pattern, print 100% and tile output, and
splice. Or, use it for a CNC pattern to be machined by a vendor (recommended).
T he second drawing is the complete set of CAD drawings for patterns and all the jigs
associated with the project. This is in DXF format and includes 2D and 3D information.
Dimensions for the jigs are included. Some dimensions, such as riser blocks and fence
heights can be estimated.
13.000
2.750
1.75
038
.000
1.75
0
13.250
3.500
Plans On the left is the PDF plan for the mirror. Print in sections, full-size using the tiling feature in your print dialog box. Splice together for final shape.
Above is a full DXF file that contains all the jigs, fixtures and patterns for building the mirror. It can also be used to create a CNC milled pattern of the Blacker Mirror.