Embed Size (px)
Citation preview

CHAPTER
4Many of us plan our work-
shops around big things – workbenches, table saws,
planers and jointers. It’s a chal-lenge to arrange these large tools so the shop is efficient and com-fortable, especially when space is limited. But as we ponder the best layout for these giants it’s the small tools that can catch us by surprise.
It begins innocently enough. We typically have so few tools at the start that it hardly seems to matter where we store them; many woodworkers dive in with only a few used hand tools and a couple basic power tools. They all seem to fit handily in a couple of cardboard boxes. But in time, shops and tool collections have a way of getting bigger and more complicated. Eventually we have to deal with a jumble of small tools that accumu-lated in our shops while we weren’t paying attention.
Cardboard boxes won’t work any longer. There are too many tools, and they are too valuable to dump together in a box or a drawer where they can bang against each other. Moreover, some of them are used all the time, some only rarely. And mixing layout tools with router bits, or chisels with sandpa-per, will seem a lot less than help-ful when you’re in a hurry to find the right tool for the job.
Setting Up Shop:Small Tool Organization
Most woodworking shops keep dozens of small tools on hand, many of them with sharp or delicate edges. Keeping track of them and protecting them from damage is an organizational challenge.
WOODWORKINGESSENTIALS
BY SCOTT GIBSON
PoPular WoodWorking
Start by Identifying Tools You Need All the TimeFor a lot of furnituremakers, the work-bench is the hub of the shop, like a traffic circle through which every major road must pass. Dozens of tasks take place here: joinery is laid out and cut, lumber planed and sanded and furni-ture parts glued and assembled. We might even eat lunch here.
Given this central role for the work-bench, one way to organize small tools is by gathering the ones you use most frequently and keeping them nearby. It’s not hard to come up with a good list: chisels, planes, a square or two, a hammer or mallet, a marking knife (or a handful of sharp pencils), rules or mea-suring tapes, scrapers and more than likely a few other odds and ends.
These tools should be the first ones that are housed at or near the bench, within arm’s reach of where you will be using them. Although it may take a little experimentation, when the
arrangement works you will know it. You should be able to reach for exactly the tool you need without spending any unnecessary time scouting for it and without moving your feet.
Tool collections can become more specialized as time goes on, forcing you to make decisions about which tools need a front-row seat and which can be relegated to more distant storage. For example, you may routinely need a block plane, a smoothing plane, a small rab-beting plane and a jointer. That’s four planes you use frequently. But you use that old moulding plane you picked up at a flea market only once in a blue moon. Why clog up shelves or cabinets near the bench with tools you rarely need?
Virtually any tool category can use the same kind of attention. An adjust-able square or try square is something you’ll pick up a dozen times a day so keep it close at hand. But a framing square may not be used more than once a month so it can happily live on an overhead rafter or on a nail in the wall some distance away. A little common sense will go a long way in helping you identify what you need close at hand.
No one’s list of “must haves” will be exactly the same. Every discipline has its own list of everyday tools, and those needs and habits will become evident with time in your shop as well.
A Tool Cabinet Keeps Important Tools CloseThumb through any book about wood-working shops and you’re likely to see all kinds of bins, shelves and cabinets that inventive woodworkers have devised to organize their tool collec-tions. Browsing is an excellent way of getting ideas for your own shop. After all, few ideas are really brand-new.
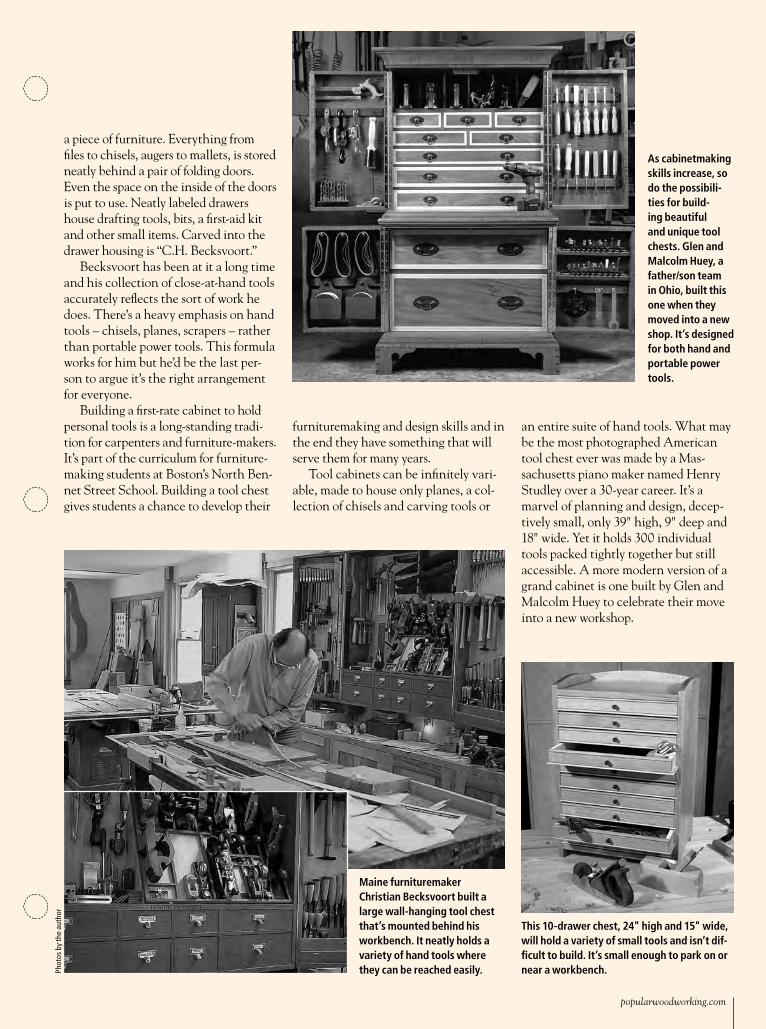
But a common theme in many shops is a large, wall-mounted tool cabinet. Christian Becksvoort, a Maine artisan specializing in Shaker-style furniture, has just such a cabinet mounted on the wall behind his workbench. It’s a beautiful piece of furniture in its own right, made from cherry, the wood that Becksvoort uses for virtually all of the furniture he makes.
More important, it holds many if not all of the bench tools he needs to make
Racking up frequently used tools near the workbench keeps them close to their point of use and cuts down on wasted steps to distant cabinets or drawers.
This traditional European workbench has more than a flat, sturdy top; drawers and cabinets provide abundant storage space for hand and portable power tools.
Infrequently used tools may exist happily on a shelf in the corner of the shop, but their hap-hazard arrangement will make it tough to find the one you want to use and heaping tools together is an invitation to damage.
popularwoodworking.com
a piece of furniture. Everything from files to chisels, augers to mallets, is stored neatly behind a pair of folding doors. Even the space on the inside of the doors is put to use. Neatly labeled drawers house drafting tools, bits, a first-aid kit and other small items. Carved into the drawer housing is “C.H. Becksvoort.”
Becksvoort has been at it a long time and his collection of close-at-hand tools accurately reflects the sort of work he does. There’s a heavy emphasis on hand tools – chisels, planes, scrapers – rather than portable power tools. This formula works for him but he’d be the last per-son to argue it’s the right arrangement for everyone.
Building a first-rate cabinet to hold personal tools is a long-standing tradi-tion for carpenters and furniture-makers. It’s part of the curriculum for furniture-making students at Boston’s North Ben-net Street School. Building a tool chest gives students a chance to develop their
furnituremaking and design skills and in the end they have something that will serve them for many years.
Tool cabinets can be infinitely vari-able, made to house only planes, a col-lection of chisels and carving tools or
As cabinetmaking skills increase, so do the possibili-ties for build-ing beautiful and unique tool chests. Glen and Malcolm Huey, a father/son team in Ohio, built this one when they moved into a new shop. It’s designed for both hand and portable power tools.
an entire suite of hand tools. What may be the most photographed American tool chest ever was made by a Mas-sachusetts piano maker named Henry Studley over a 30-year career. It’s a marvel of planning and design, decep-tively small, only 39" high, 9" deep and 18" wide. Yet it holds 300 individual tools packed tightly together but still accessible. A more modern version of a grand cabinet is one built by Glen and Malcolm Huey to celebrate their move into a new workshop.
Maine furnituremaker Christian Becksvoort built a large wall-hanging tool chest that’s mounted behind his workbench. It neatly holds a variety of hand tools where they can be reached easily.
This 10-drawer chest, 24" high and 15" wide, will hold a variety of small tools and isn’t dif-ficult to build. It’s small enough to park on or near a workbench. Ph
otos
by
the
auth
or

PoPular WoodWorking
If you have the space, a wall cabinet can grow into more of a tool locker with space for small power tools as well as hand tools. A larger cabinet not only helps keep shop clutter to a minimum but it also can provide security if you live in an area where crime is a worry. With a cabinet bolted to the wall and doors equipped with sturdy locks, tools are a lot safer than they would be if left out in the open.
You might want to leave a tool cabi-net of any size and complexity for the future, until individual preferences and needs are a little clearer (to say noth-ing of developing the skills required to make one). Start with a more modest wall cabinet for tools. It’s an excellent project that doesn’t have to consume a lot of expensive materials or take a lot of time. Tool chests can be very simple and as your skills improve you can move on to more complex designs.
Don’t Overlook Ready-made CabinetsAnother possible route is to buy inex-pensive storage cabinets at used office-supply or furniture stores. Older steel cabinets and open shelving units can handle a lot of weight. Even if they need a fresh coat of paint and have a dent or ding here and there, these cabinets will provide a lot of useful storage at a rela-tively low cost.
Be more cautious about buying used kitchen cabinets. Some of them will be fine as either wall-mounted or free-standing storage, but inexpensive stock cabinets are often made from thin par-ticleboard or plywood and won’t stand much abuse. It’s worth checking the classified ads in your local newspaper but look the cabinets over carefully.
As libraries convert from paper to digital files they are getting rid of those classic wood card catalogues. If you can manage to get your hands on one, adopt it right away; the small drawers are ideal for storing everything from nails and screws to router bits and collet wrenches.
Tool Boards Keep Everything in SightIf your workbench is against a wall, you can arrange a surprising number of tools directly in front of you on nails or hooks. It doesn’t take much time to move a tool if you decide it’s in the wrong spot. The down side is that you’re not going to squeeze the volume of tools here that you would be able to put in a well-designed cabinet. But they are in plain sight and instantly accessible.
We’ve all probably been in a garage or two where one wall was devoted to 1⁄4" perforated hardboard and the out-lines of different tools neatly painted in
Tool cabinets can be more than utilitarian cupboards. At their best, they are expressions of personal tastes and skill.
These very simple, stackable storage boxes are a good example of low-tech ways of orga-nizing tools. Drop-down doors make it easy to find what you need, and the materials list won’t break the bank.
A machinist’s tool chest includes a tool tray under a hinged top plus a number of drawers that can be protected by a fold-up front piece. Handles make it easy to move.
Chairmaker David Fleming keeps part of his hand-tool arsenal hanging within easy reach on a wall. Tools are close at hand and sharp edges won’t get dinged.
popularwoodworking.com
red or white. A strict arrangement like that probably encourages the owner to put tools back where they came from, and being able to move hooks quickly from one spot to another is an advan-tage. But driving nails or screws right into the wall works just as well. If your workshop has been clad in drywall, you might want to add a layer of plywood so you can put a nail or screw in wherever you want. T1-11 plywood 3⁄8" or 1⁄2" thick is inexpensive and attractive.
For tools that won’t hang (chisels, files, carving tools, screwdrivers and the like), you can make simple racks and attach them to the wall. One easy way to make a rack for chisels or files is to cut a series of slots in a board with a dado blade and then glue another board to it. The width and depth of the slots can be made to suit tools of different sizes. A series of holes in graduated sizes bored through the face of a board will handle chisels or screwdrivers. Mag-netic strips will accomplish the same thing. Racks don’t have to be fancy to be useful.
For the variety of odds and ends that almost always end up on a bench, drill holes in scrap blocks of wood and put them on a low shelf over the back of your bench. Blocks can store drill bits, nail sets, awls and similarly slender tools with points or sharp edges. You won’t lose track of them and their delicate edges will be well protected. It’s also a great way to preserve and make use
of the especially beautiful offcuts of a prized piece of lumber you just can’t seem to throw away.
Rolling Cabinets Keep Like Tools TogetherThere are two good approaches to mak-ing a tool cabinet mobile. One is, in effect, to take the cabinet off the wall and stick a pair of casters underneath it to create a rolling tool garage and workbench. The other is to make one or more rolling workstations dedicated to a single power tool.
Mobile workbenches and tool cad-dies can be as elaborate or as simple as you want to make them. For example, a design by David Thiel, Popular Wood-working Books executive editor, is actu-ally a modular bench consisting of two 213⁄4"-high rolling boxes and a 6'-long bench that spans them. Adjustable sup-port assemblies attached to the sides of the boxes can be raised to support the benchtop at a variety of working heights or hold a tool, such as a drill press, router table or a hollow-chisel mortise machine, when it’s needed.
It’s a good design for a small shop (Thiel’s is in a two-car garage) because the boxes can be used alone or together depending on the need, and parked out of the way when it’s time to bring the cars in for the night. Another successful design from Thiel and Michael Rabkin incorporates fold-out lids, roomy storage
compartments and a series of shallow drawer for fasteners and tools.
In this or a similar work cart, drawers can be built to suit your interests and internally divided in whatever manner makes the most sense for the user. Use a power sander a lot? Devote one of the drawers to your collection of random-orbit and block sanders with separate trays for different grades of sandpaper and other accessories. A heavy bottom
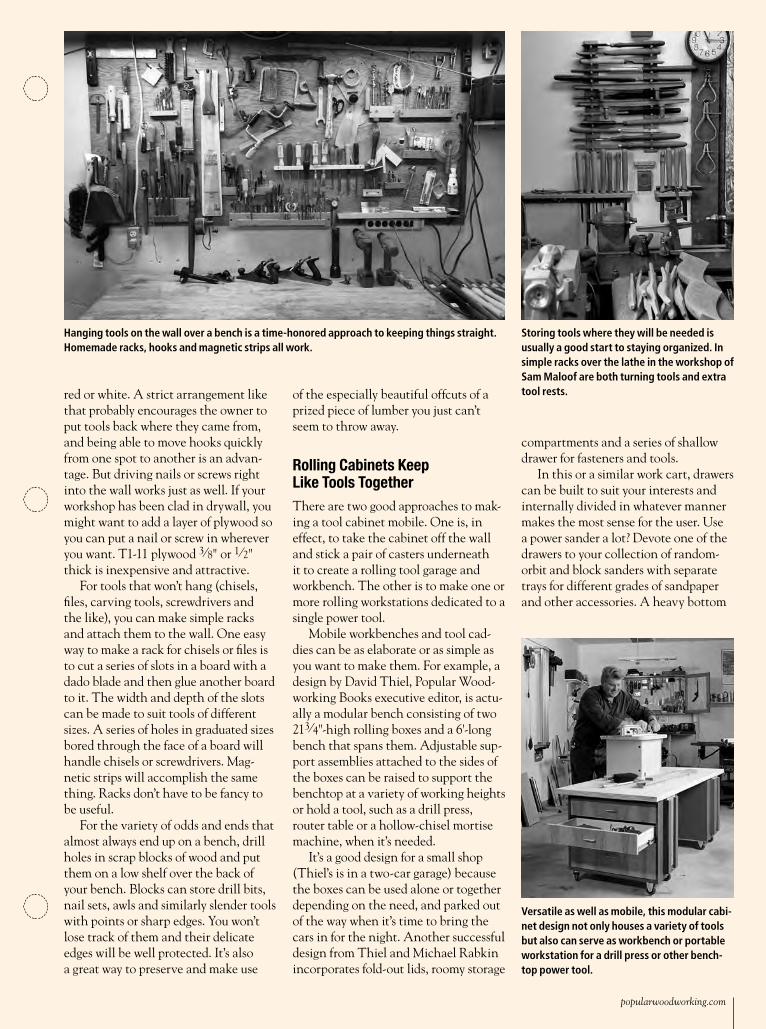
Storing tools where they will be needed is usually a good start to staying organized. In simple racks over the lathe in the workshop of Sam Maloof are both turning tools and extra tool rests.
Hanging tools on the wall over a bench is a time-honored approach to keeping things straight. Homemade racks, hooks and magnetic strips all work.
Versatile as well as mobile, this modular cabi-net design not only houses a variety of tools but also can serve as workbench or portable workstation for a drill press or other bench-top power tool.
PoPular WoodWorking
shelf could be used for a belt sander. Repair a lot of chairs? Build a mobile tool station that houses just those sup-plies and can be rolled to any part of the shop where it might be needed.
A rolling cabinet devoted to a single tool saves space in a small shop because it can be pushed into a corner when it’s not needed. More than that, having one or more of these rolling worksta-tions helps parcel tools and their many accessories into dedicated spaces where they won’t get lost.
As an example, consider the router. Many woodworkers eventually will own several: A laminate trimmer, a mid-size router and a big plunge router all might be found in a single shop. Each has a collet wrench (or wrenches), one or more bases, edge guides and a tram-mel for cutting circles and curves. Plus there are a lot of bits in one or more shank diameters. It all adds up to a lot of tooling. Building a rolling cart around a router table is a good way of keeping it all straight. Devote a drawer to bits, divided for 1⁄4" and 1⁄2" shanks, and another for bases and edge guides. Routers themselves can go in a large enclosure at the base of the cabinet.
Tools that Travel: Totes & Rolls
In addition to working at a bench or around the shop, many furniture mak-ers will also find it necessary to leave the shop once in a while with some of their tools. Maybe it’s a repair around the house or construction of a shed or outbuilding or even a working stint a good distance from home. Tools that travel need to be organized and protected from damage just as much as those that never leave the shop.
Depending on how often you need them, carpentry tools can be kept in a separate, out-of-the-way cabinet or seg-regated on their own shelf. These tools are just as specialized as woodworking and cabinetmaking tools – just a little different. They aren’t generally used for woodworking so there’s no sense in mixing the two together.
One way of keeping them straight is to build a wooden tote with a handle and keep it in a corner of the shop where it won’t get in the way. When you need to fix something in the house – trim a sticky door, for instance, or patch a hole in a drywall ceiling – the tools are ready and waiting.
Totes can be very simple and still very useful; even a box with rope handles made from scraps of plywood or rough lumber and nailed together at the corners will prove practical. Make it long enough to house at least a 2' level and a handsaw. Adding a row of shal-low drawers in the bottom of the tote is a good way of organizing small things – drill bits, a compass, drivers and the like – as well as protecting tools with sharp edges that would be dulled if they were thrown in with everything else. Or you can build internal trays and dividers to make it easier to find things as well as protect sharp edges.
Tool rolls are another way of keeping sharp-edged tools safe when you travel.
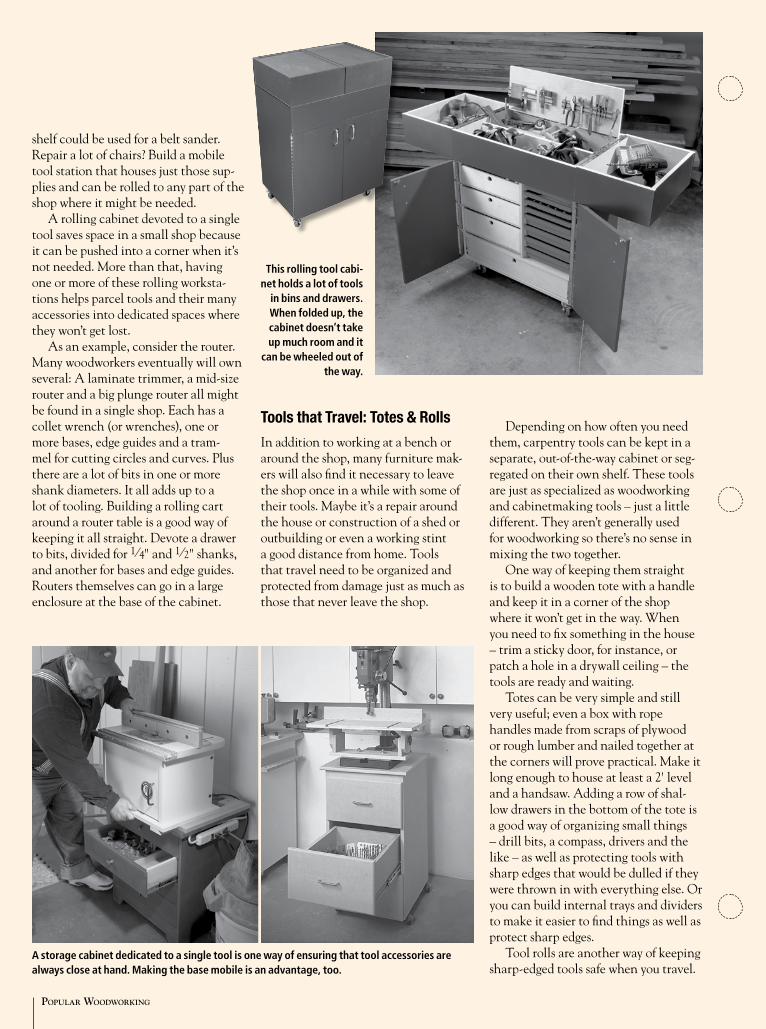
A storage cabinet dedicated to a single tool is one way of ensuring that tool accessories are always close at hand. Making the base mobile is an advantage, too.
This rolling tool cabi-net holds a lot of tools
in bins and drawers. When folded up, the cabinet doesn’t take up much room and it
can be wheeled out of the way.

popularwoodworking.com
These are simply pieces of leather or canvas with a series of pockets sewn into them. Tools are tucked into a protective sleeve and the whole thing rolled up and tied. They are equally as useful for housing tools that aren’t used all the time and must be stored in a drawer. For example, a set of augers isn’t an everyday item in many shops but you may have an old set you use from time to time. Investing in an inexpensive canvas roll is a good way of protecting sharp edges when the bits have to share drawer space with other tools.
Power Tools Deserve A Space of Their OwnPortable power tools represent a differ-ent kind of organizational challenge; they are not as delicate and easily dam-aged as many hand tools, but they are generally heavier and bulkier and they often come with a number of accesso-ries of which you have to keep track.
Although they can be kept in cabi-nets or drawers, heavy power tools will be easier to get if they are stored on a shelf about waist high or in a simple ply-wood cubby. An open-faced cabinet or set of shelves a couple of feet square and divided into individual compartments is a good way of housing power tools. They can be kept in the same general part of the shop but all given their own space.
The surprising number of acces-sories, ranging from wrenches for changing blades to replacement motor brushes, should be kept nearby. Devot-ing one drawer or part of one cabinet to repair and replacement parts for power tools helps to keep these important bits of hardware from getting lost.
In the same general area, keep all parts lists and operating manuals for the tools in the shop. When you need to replace a part or adjust the tool the manual will be invaluable. An expand-ing plastic organizer, available at any office supply store, makes a good library for tool manuals. A separate organizer can be used for small replacement parts, such as O-rings, gaskets and drive belts.
Accessories for larger power tools are easy to find when they are kept as close to the tool as possible rather than in some distant cabinet across the shop. The space beneath a table saw exten-sion is a good place to tuck a small cabinet that can house saw blades, dado blades, wrenches and other supplies. A separate drawer in the same cabinet can also be used for router bits or drill bits.
Grouping tool parts in this way makes them a lot easier to find and will protect them from damage.
If you can, try housing cordless tools in the same general area and mount your chargers on a nearby wall. Having all of the tools and batteries in a single location is a plus.
Finding Room For All Those ClampsMost of us apparently believe that old chestnut about woodworking: there is no such thing as too many clamps. We do, in fact, need a lot of clamps and they come in a variety of sizes and styles.
If you have a large collection of bar and pipe clamps (and assuming you have the space for it) consider making a rolling or stationary clamp rack. Build-ing in a series of crossbars at different heights makes it convenient to hang clamps of different lengths. The rack should be tapered top to bottom, and in the shape of an “A” when viewed from the side, so the clamps are not easily jounced off as the cart is moved.
A canvas or leather tool roll is a simple way of protect-ing and organizing tools whether you’re in the shop or traveling.
Kentucky craftsman Don Weber with a sturdy traveling tool chest that he designed and built. Keeping tools organized on the road presents its own challenges.
Devoting a cabinet to power tools is a good way of making even a large collection easily accessible. This cabinet is at Cerritos College in Norwalk, Calif.

Everything you need to know about setting up your shop!From getting the most out of your space, to choosing machinery loca-tion, lighting, power and material storage, this seven-chapter series offers all the answers.
Chapter 5
Material StorageProper lumber and sheet-good storage keeps the materials straight and handy.
Chapter 6
Dust CollectionKeep your shop (and your lungs) dust-free by planning ahead for any task.
Chapter 7
Workstations & BenchesBeyond machines, worksta-tions and benches are where everything gets done in a woodshop. Choose well.
Chapter 1 (issue #157)
The Right LocationLearn the pros and cons of basement, garage and out-building shops – and how to make the most of any shop.
Chapter 2 (issue #158)
Lighting & PowerTask versus ambient light-ing? 110v or 220v power? Learn the best options for your shop.
Chapter 3 (issue #159)
Placing MachineryThe right machines in the right locations will make your woodworking smooth.
IN FUTURE ISSUES
IN PAST ISSUES
Order back issues online at popularwoodworking.com or call 800-258-0929.
Chapter 4Small Tool OrganizationTips and strategies for tack-ling storage issues for the smaller tools in your shop.
PoPular WoodWorking
Racks can provide two separate sides for storage so they can hold a large number of clamps conveniently. A wall-mounted or freestanding storage rack also keeps long clamps available and out of the way, but when you need a lot of clamps for a big glue-up it’s a lot easier to wheel a rack over than it is to make a half-dozen trips across the shop.
If you work in a basement shop, or in any shop with a low, unfinished ceil-ing, you’ll find an ideal storage area for spring clamps and handscrews by looking up; the bottom edge of a joist or rafter will hold many clamps and keep them within easy reach. To store a row of spring clamps beneath a shelf, string a length of heavy wire between two eye-screws so it hangs an inch or two below the shelf. Compress the clamp, pop it over the wire and release it.
Keeping Up with the ClutterProviding specialized storage cabinets, shelving and rolling racks is certainly a big part of winning the war against shop clutter and keeping small tools organized. These fixtures can represent a significant investment of time and materials, but you don’t have to build a shop full of them right away. Let your ideas percolate for a while, take a look at what other woodworkers have done to
solve the same problems you have and then set about to fix one storage problem at a time.
The other side of it, of course, is taking the time to keep tools organized once you’ve made room for everything. Few people return a tool to its proper place the instant they’ve finished using it. We’re more likely to put it aside and get the next tool we need. In the end, though, shops with plans for manag-ing that mountain of small tools will be more efficient, safer and happier places to work. pW
Many shops have sizeable numbers of clamps, although few will rival the collection of Sam Maloof. A tapered rack keeps them organized. Adding casters would make the rack portable, an advantage in any shop.
Don’t over-look the space beneath a table saw extension table. This cabi-net holds extra saw blades and other accessories.


![[Woodworking plans]](https://img.dokumen.tips/doc/110x75/58a0c2aa1a28ab6d018b47eb/woodworking-plans-58a0c6bcaf227.jpg)