Embed Size (px)
Citation preview
Polycom, Inc. 1
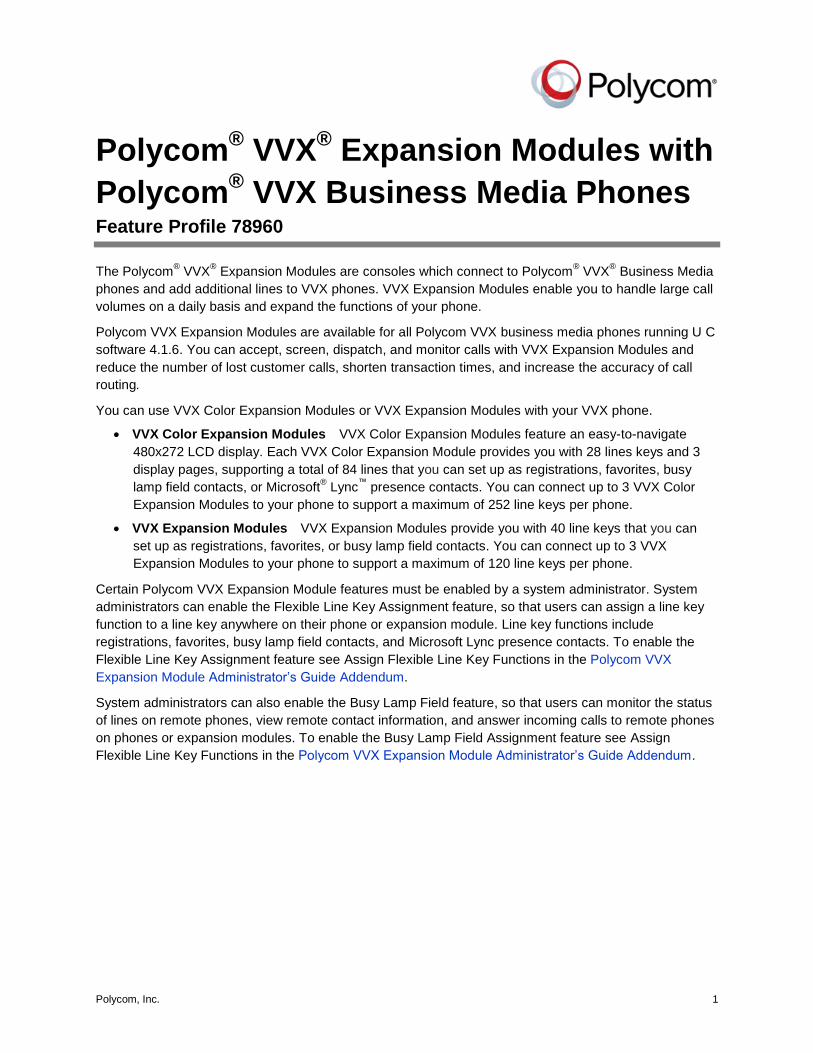
Polycom® VVX
® Expansion Modules with
Polycom® VVX Business Media Phones
Feature Profile 78960
The Polycom® VVX
® Expansion Modules are consoles which connect to Polycom
® VVX
® Business Media
phones and add additional lines to VVX phones. VVX Expansion Modules enable you to handle large call
volumes on a daily basis and expand the functions of your phone.
Polycom VVX Expansion Modules are available for all Polycom VVX business media phones running U C
software 4.1.6. You can accept, screen, dispatch, and monitor calls with VVX Expansion Modules and
reduce the number of lost customer calls, shorten transaction times, and increase the accuracy of call
routing.
You can use VVX Color Expansion Modules or VVX Expansion Modules with your VVX phone.
VVX Color Expansion Modules VVX Color Expansion Modules feature an easy-to-navigate
480x272 LCD display. Each VVX Color Expansion Module provides you with 28 lines keys and 3
display pages, supporting a total of 84 lines that you can set up as registrations, favorites, busy
lamp field contacts, or Microsoft® Lync
™ presence contacts. You can connect up to 3 VVX Color
Expansion Modules to your phone to support a maximum of 252 line keys per phone.
VVX Expansion Modules VVX Expansion Modules provide you with 40 line keys that you can
set up as registrations, favorites, or busy lamp field contacts. You can connect up to 3 VVX
Expansion Modules to your phone to support a maximum of 120 line keys per phone.
Certain Polycom VVX Expansion Module features must be enabled by a system administrator. System
administrators can enable the Flexible Line Key Assignment feature, so that users can assign a line key
function to a line key anywhere on their phone or expansion module. Line key functions include
registrations, favorites, busy lamp field contacts, and Microsoft Lync presence contacts. To enable the
Flexible Line Key Assignment feature see Assign Flexible Line Key Functions in the Polycom VVX
Expansion Module Administrator’s Guide Addendum.
System administrators can also enable the Busy Lamp Field feature, so that users can monitor the status
of lines on remote phones, view remote contact information, and answer incoming calls to remote phones
on phones or expansion modules. To enable the Busy Lamp Field Assignment feature see Assign
Flexible Line Key Functions in the Polycom VVX Expansion Module Administrator’s Guide Addendum.
Feature Profile 78960 Using Polycom VVX Expansion Modules with Polycom VVX Business Media Phones UC Software 4.1.6
Polycom, Inc. 2
The following table summarizes supported phone models, software, and supporting documentation:
Feature Profile Table at a Glance
Released: October, 2013 Interoperability Issues:
You cannot connect VVX Color Expansion Modules and VVX Expansion Modules to VVX phones at the same time
Applies to models: VVX 600, 500, 400, 410, 300, and 310
Supporting Documentation:
Polycom UC Software 4.1.6 Administrator’s Guide Addendum and Quick Start Guide for Polycom VVX Expansion Modules
Software version: UC Software 4.1.6 Limitations: None
Main business size:
Medium to Large businesses
Maintenance: One-time set up
Primary audience: VVX phone users
Dependencies: A registered VVX phone
Licenses Required: Feature license required when registering phones with Lync Server
Resources Required: None
Supported server versions:
SIP Server and Microsoft Lync
Security: None
This feature profile explains how to set up and use Polycom VVX Expansion Modules with your VVX
phones. The following topics are included:
Assign Functions
Identify Line Key Assignments
Generate Configured Line Key Information
Place a Call
Answer a Call
Assign Favorites
Assign Microsoft Lync Presence Contacts
Change the Backlight
Feature Profile 78960 Using Polycom VVX Expansion Modules with Polycom VVX Business Media Phones UC Software 4.1.6
Polycom, Inc. 3
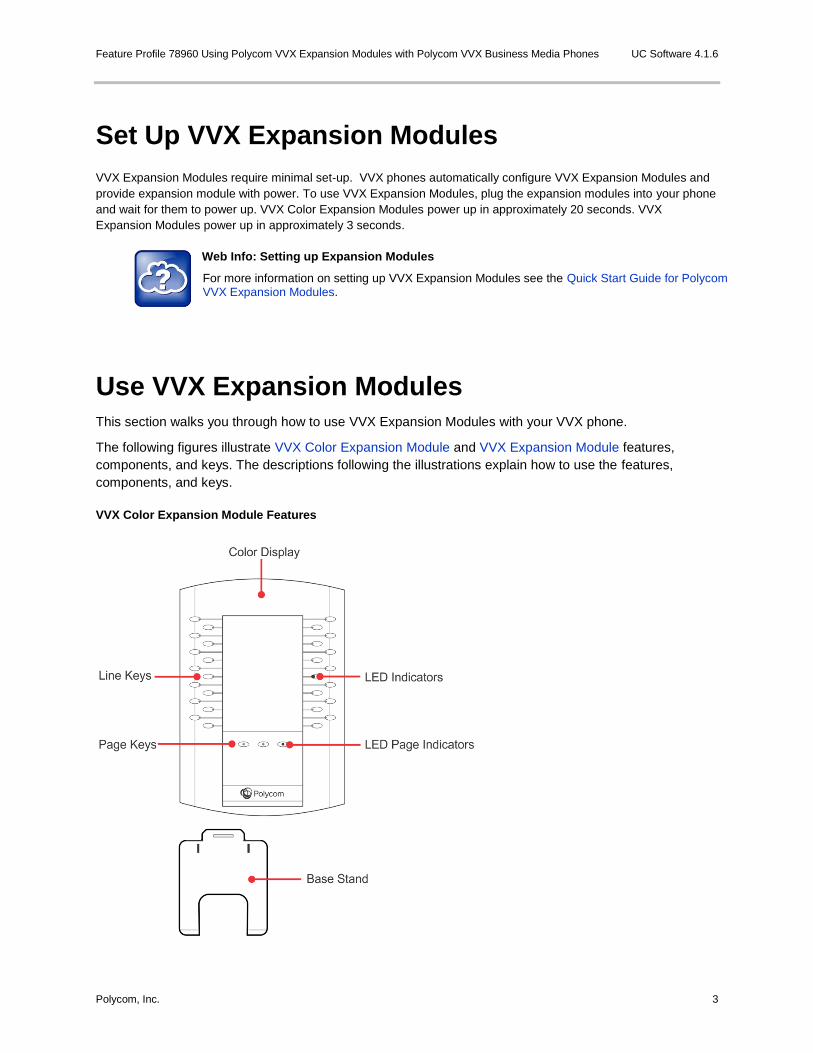
Set Up VVX Expansion Modules
VVX Expansion Modules require minimal set-up. VVX phones automatically configure VVX Expansion Modules and
provide expansion module with power. To use VVX Expansion Modules, plug the expansion modules into your phone
and wait for them to power up. VVX Color Expansion Modules power up in approximately 20 seconds. VVX
Expansion Modules power up in approximately 3 seconds.
Web Info: Setting up Expansion Modules
For more information on setting up VVX Expansion Modules see the Quick Start Guide for Polycom VVX Expansion Modules.
Use VVX Expansion Modules This section walks you through how to use VVX Expansion Modules with your VVX phone.
The following figures illustrate VVX Color Expansion Module and VVX Expansion Module features,
components, and keys. The descriptions following the illustrations explain how to use the features,
components, and keys.
VVX Color Expansion Module Features
Feature Profile 78960 Using Polycom VVX Expansion Modules with Polycom VVX Business Media Phones UC Software 4.1.6
Polycom, Inc. 4
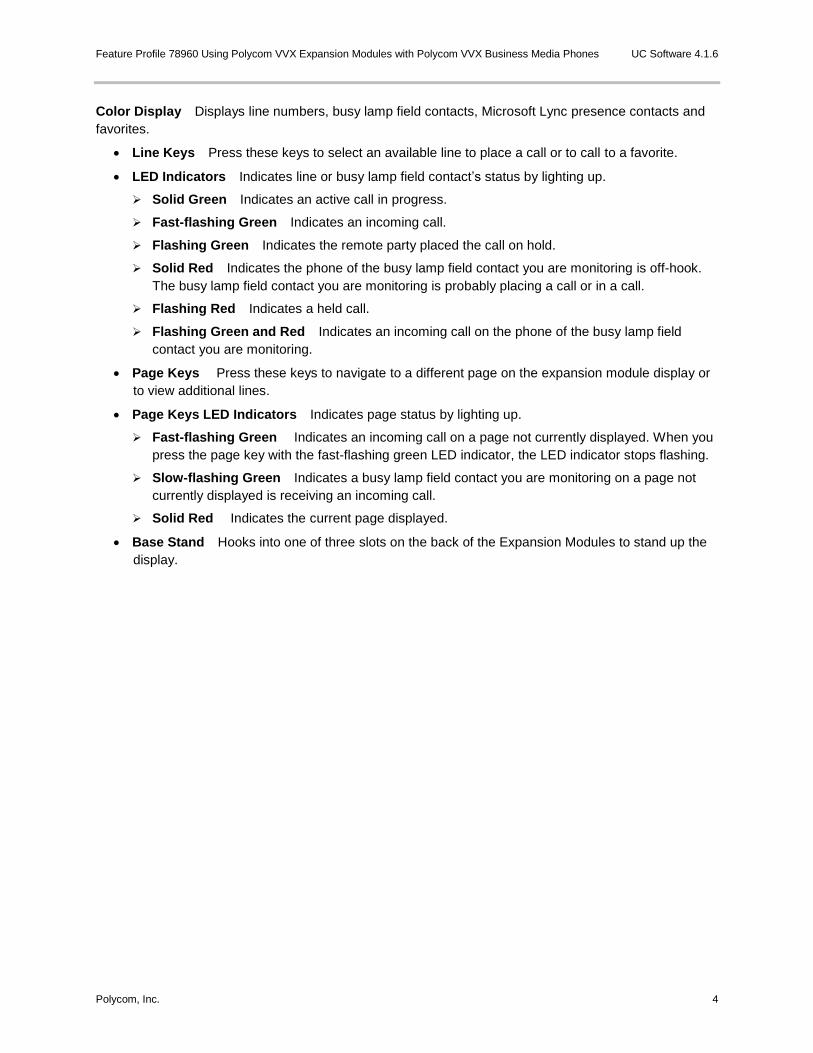
Color Display Displays line numbers, busy lamp field contacts, Microsoft Lync presence contacts and
favorites.
Line Keys Press these keys to select an available line to place a call or to call to a favorite.
LED Indicators Indicates line or busy lamp field contact’s status by lighting up.
Solid Green Indicates an active call in progress.
Fast-flashing Green Indicates an incoming call.
Flashing Green Indicates the remote party placed the call on hold.
Solid Red Indicates the phone of the busy lamp field contact you are monitoring is off-hook.
The busy lamp field contact you are monitoring is probably placing a call or in a call.
Flashing Red Indicates a held call.
Flashing Green and Red Indicates an incoming call on the phone of the busy lamp field
contact you are monitoring.
Page Keys Press these keys to navigate to a different page on the expansion module display or
to view additional lines.
Page Keys LED Indicators Indicates page status by lighting up.
Fast-flashing Green Indicates an incoming call on a page not currently displayed. When you
press the page key with the fast-flashing green LED indicator, the LED indicator stops flashing.
Slow-flashing Green Indicates a busy lamp field contact you are monitoring on a page not
currently displayed is receiving an incoming call.
Solid Red Indicates the current page displayed.
Base Stand Hooks into one of three slots on the back of the Expansion Modules to stand up the
display.
Feature Profile 78960 Using Polycom VVX Expansion Modules with Polycom VVX Business Media Phones UC Software 4.1.6
Polycom, Inc. 5
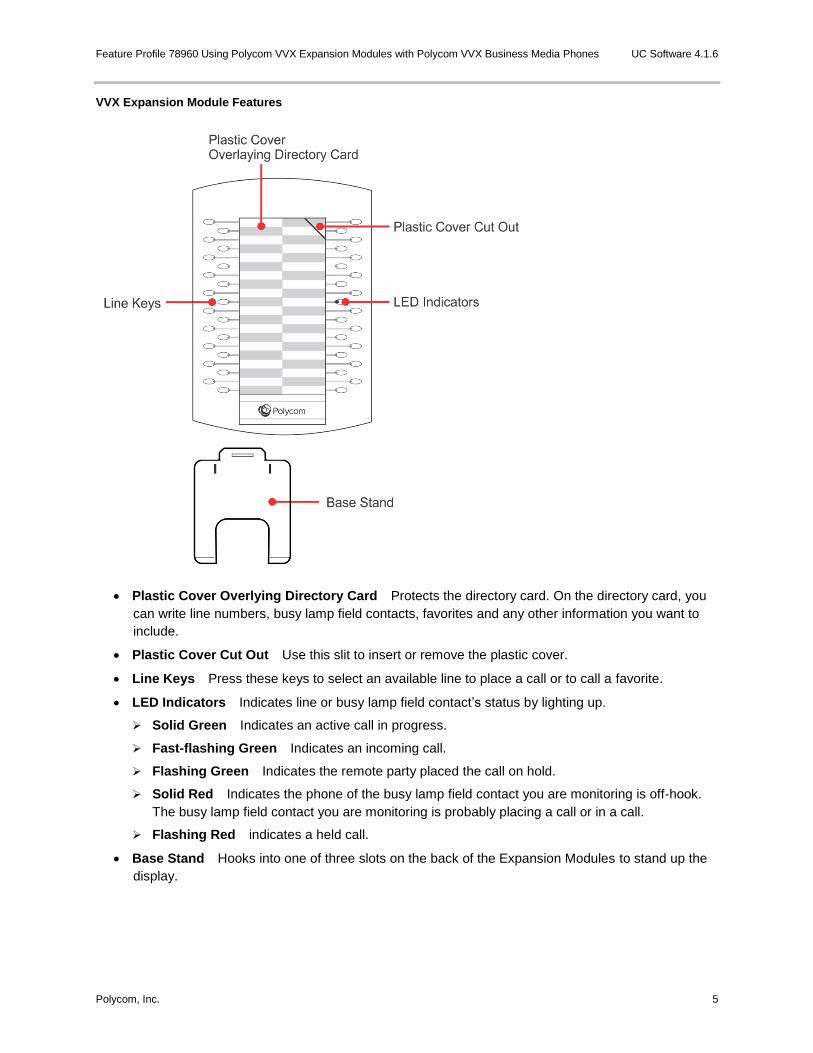
VVX Expansion Module Features
Plastic Cover Overlying Directory Card Protects the directory card. On the directory card, you
can write line numbers, busy lamp field contacts, favorites and any other information you want to
include.
Plastic Cover Cut Out Use this slit to insert or remove the plastic cover.
Line Keys Press these keys to select an available line to place a call or to call a favorite.
LED Indicators Indicates line or busy lamp field contact’s status by lighting up.
Solid Green Indicates an active call in progress.
Fast-flashing Green Indicates an incoming call.
Flashing Green Indicates the remote party placed the call on hold.
Solid Red Indicates the phone of the busy lamp field contact you are monitoring is off-hook.
The busy lamp field contact you are monitoring is probably placing a call or in a call.
Flashing Red indicates a held call.
Base Stand Hooks into one of three slots on the back of the Expansion Modules to stand up the
display.
Feature Profile 78960 Using Polycom VVX Expansion Modules with Polycom VVX Business Media Phones UC Software 4.1.6
Polycom, Inc. 6
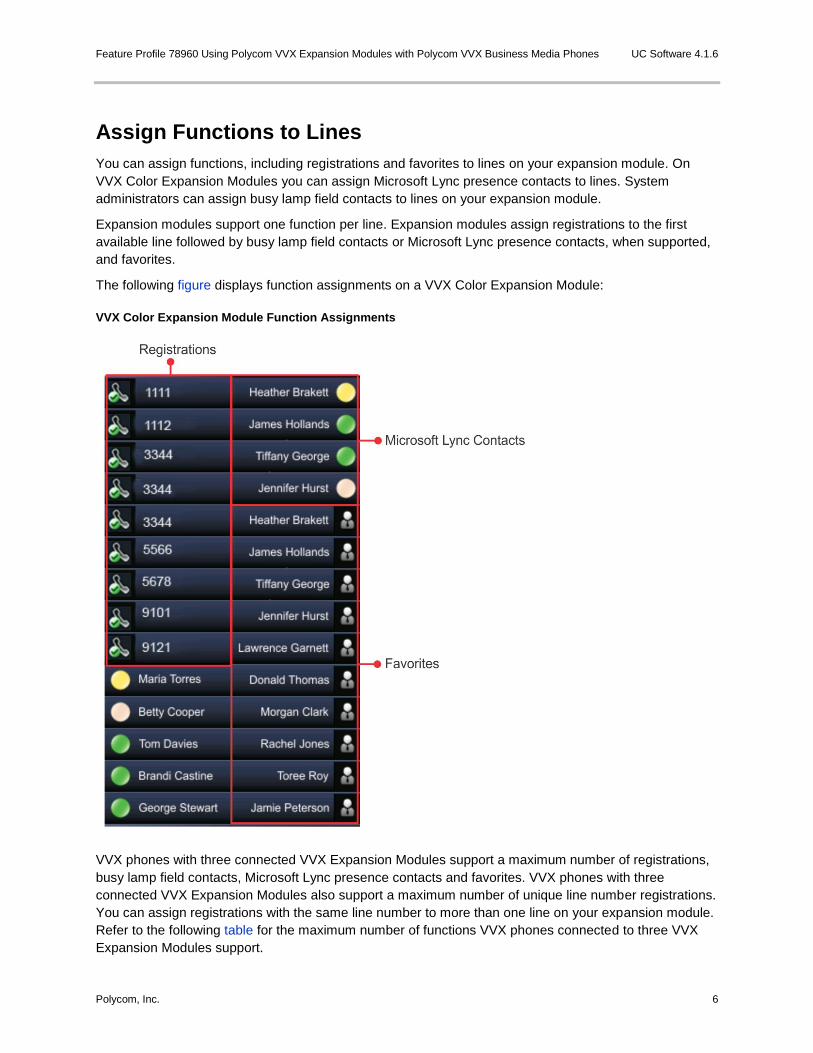
Assign Functions to Lines
You can assign functions, including registrations and favorites to lines on your expansion module. On
VVX Color Expansion Modules you can assign Microsoft Lync presence contacts to lines. System
administrators can assign busy lamp field contacts to lines on your expansion module.
Expansion modules support one function per line. Expansion modules assign registrations to the first
available line followed by busy lamp field contacts or Microsoft Lync presence contacts, when supported,
and favorites.
The following figure displays function assignments on a VVX Color Expansion Module:
VVX Color Expansion Module Function Assignments
VVX phones with three connected VVX Expansion Modules support a maximum number of registrations,
busy lamp field contacts, Microsoft Lync presence contacts and favorites. VVX phones with three
connected VVX Expansion Modules also support a maximum number of unique line number registrations.
You can assign registrations with the same line number to more than one line on your expansion module.
Refer to the following table for the maximum number of functions VVX phones connected to three VVX
Expansion Modules support.

Feature Profile 78960 Using Polycom VVX Expansion Modules with Polycom VVX Business Media Phones UC Software 4.1.6
Polycom, Inc. 7
Maximum Number of Supported Functions on VVX Phones Connected to Three VVX Expansion Modules
Function Type Maximum Number Supported
Registrations 48
Busy Lamp Field contacts 50
Microsoft Lync Presence
contacts
200
Favorites 500
Unique Line Number
Registrations
34
Assign Registrations
VVX phones support a maximum number of registrations. When you have reached the maximum number
of registrations your phone supports, the next registration you add is assigned to the first line on your
expansion module. Refer to the following table for the maximum number of registrations your phone
supports.
Maximum Number of Supported Registrations on VVX Phones
VVX Phone Model Maximum Number of
Supported Registrations
VVX 500 12
VVX 600 16
VVX 400/410 12
VVX 300/310 6
When you system administrator enables the Flexible Line Key feature you can assign registrations to any
line on your expansion module. To learn more about the Flexible Line Key feature contact your system
administrator.
Note: Line Numbers are Always Sequential
Line numbers on VVX phones and expansion modules are always sequential. The line numbering on your expansion module depends on how many lines your phone supports. For example, a VVX 600 phone supports 16 lines, numbered 1-16. The first line on an expansion module connected to a VVX 600 phone is line 17.
Feature Profile 78960 Using Polycom VVX Expansion Modules with Polycom VVX Business Media Phones UC Software 4.1.6
Polycom, Inc. 8
Assign Busy Lamp Field Contacts, Microsoft Lync Contacts, and
Favorites
The default view on your phone screen, which is called Lines View, displays registrations, busy lamp field
contacts, Microsoft Lync presence contacts and favorites. Each function occupies a display in a space in
Lines View. VVX phones support a maximum number of display spaces. When you have reached the
maximum number of display spaces your phone supports, the next function you add is assigned to the
first available line on your expansion module. Refer to the following table for the maximum number of
display spaces your phone supports.
Maximum Number of Display Spaces on VVX Phones
VVX Phone Model Maximum Display Spaces Supported
VVX 500 12
VVX 600 16
VVX 400/410 12
VVX 300/310 6
When you system administrator enables the Flexible Line Key feature you can assign functions to any
line on your expansion module. To learn more about the Flexible Line Key feature contact your system
administrator.
Note: Additional Favorites and Microsoft Lync Presence Contacts Display in Your Contact Directory
After you fill all the display spaces in Lines View on your phone and assign functions to all the lines on your expansion module, additional favorites or Microsoft Lync presence contacts display in your Contact Directory.
Identify Line Key Assignments
With your phone in front of you, you can identify what registrations, busy lamp field contacts, Microsoft
Lync presence contacts, and favorites are assigned to each line key on your expansion module from your
VVX phone.
To identify line key assignments:
1 Press to display Home view.
2 Tap or select Settings > Status > Line Key Information
3 Press a line key. The assignment and line number for the line key you pressed displays on your
phone screen.
4 Press the line key twice to return to the previous menu, or tap or select Back.
Feature Profile 78960 Using Polycom VVX Expansion Modules with Polycom VVX Business Media Phones UC Software 4.1.6
Polycom, Inc. 9
Generate Configured Line Key Information
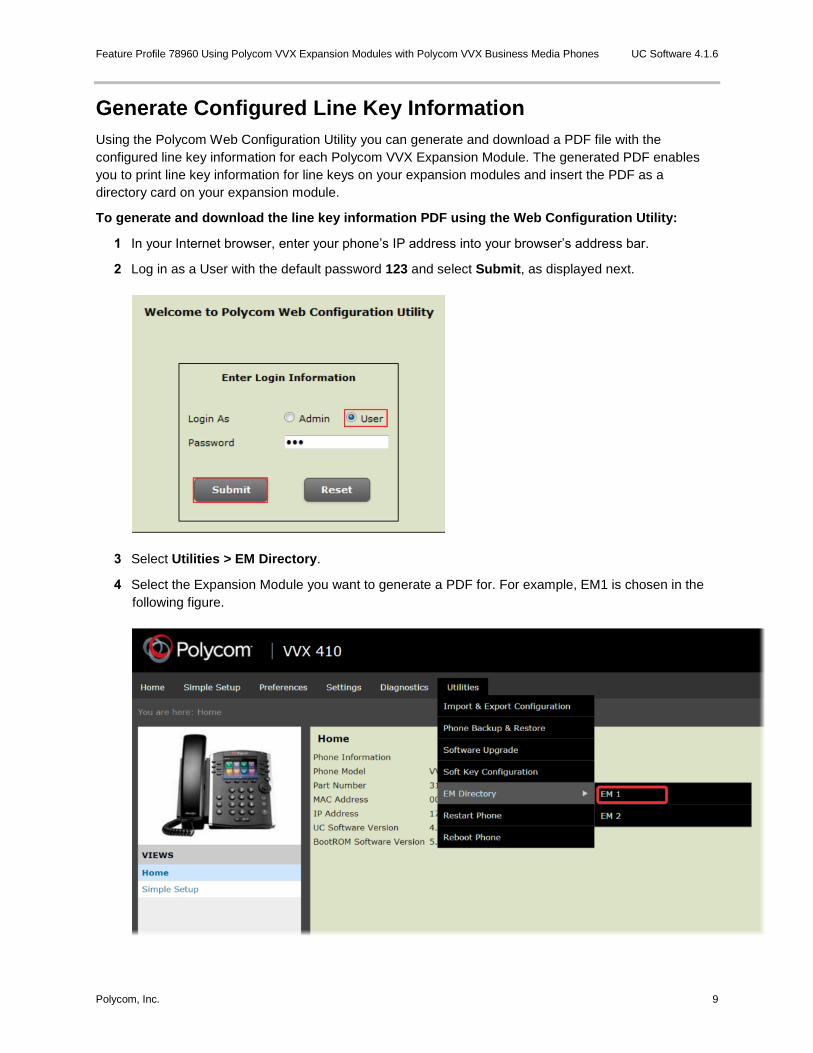
Using the Polycom Web Configuration Utility you can generate and download a PDF file with the
configured line key information for each Polycom VVX Expansion Module. The generated PDF enables
you to print line key information for line keys on your expansion modules and insert the PDF as a
directory card on your expansion module.
To generate and download the line key information PDF using the Web Configuration Utility:
1 In your Internet browser, enter your phone’s IP address into your browser’s address bar.
2 Log in as a User with the default password 123 and select Submit, as displayed next.
3 Select Utilities > EM Directory.
4 Select the Expansion Module you want to generate a PDF for. For example, EM1 is chosen in the
following figure.
Feature Profile 78960 Using Polycom VVX Expansion Modules with Polycom VVX Business Media Phones UC Software 4.1.6
Polycom, Inc. 10
5 In the confirmation dialog, select Yes to download the PDF for the configured lines for your
expansion module.
6 Select Save > Open.
The PDF with the configured line key information for your expansion module displays.
After you download the PDF with configured line key information for your expansion module, you can print
the PDF and insert the PDF as the directory card template for the expansion module.
Place a Call
You can place a call from your VVX Expansion Module. Line Keys on VVX Expansion Modules activate
available lines.
To place a call:
Do one of the following:
1 Press a line key corresponding to an available line and dial the number.
2 Press line key of the favorite you want to call.
Answer a Call
You can answer a call from your VVX Expansion Module or from your VVX phone.
To answer a call:
Do one of the following:
Press the expansion module line key with the flashing green LED indicator.
Tap or select Answer on your phone.
Activate a Held Call
You can activate a held call on your VVX Expansion Module.
To activate a held call:
» Press the line key corresponding to line with the held call you want to activate.
Assign Favorites
You can assign favorites to line keys on VVX expansion modules so that when you press a line key you
automatically call a contact. You create favorites from the Contact Directory on your VVX phone. To make
a contact a favorite, assign a contact a favorite index number from the Contact Directory. Normally
favorites display consecutively according to their index number, with the contact with the lowest number
displaying first. However, expansion modules automatically assign favorites to the next available line key
regardless of their index number. You can reorder your favorites once they are created by changing the
value of their index number. To learn more about how expansion modules assign favorites, see Assigning
Busy Lamp Field Contacts, Microsoft Lync Contacts, and Favorites.
Feature Profile 78960 Using Polycom VVX Expansion Modules with Polycom VVX Business Media Phones UC Software 4.1.6
Polycom, Inc. 11
To assign a favorite on your VVX 500 and 600 phone:
Do one of the following:
From your Contact Directory, tap the contact. From the contact’s information screen, tap Add to
Favorites.
From your Recent Calls list, tap next to a call record. From the call details screen, tap Add to
Favorites.
A green star displays next to the contact’s name in the Contact Directory. The favorite displays
in Lines View on your phone or on your expansion module.
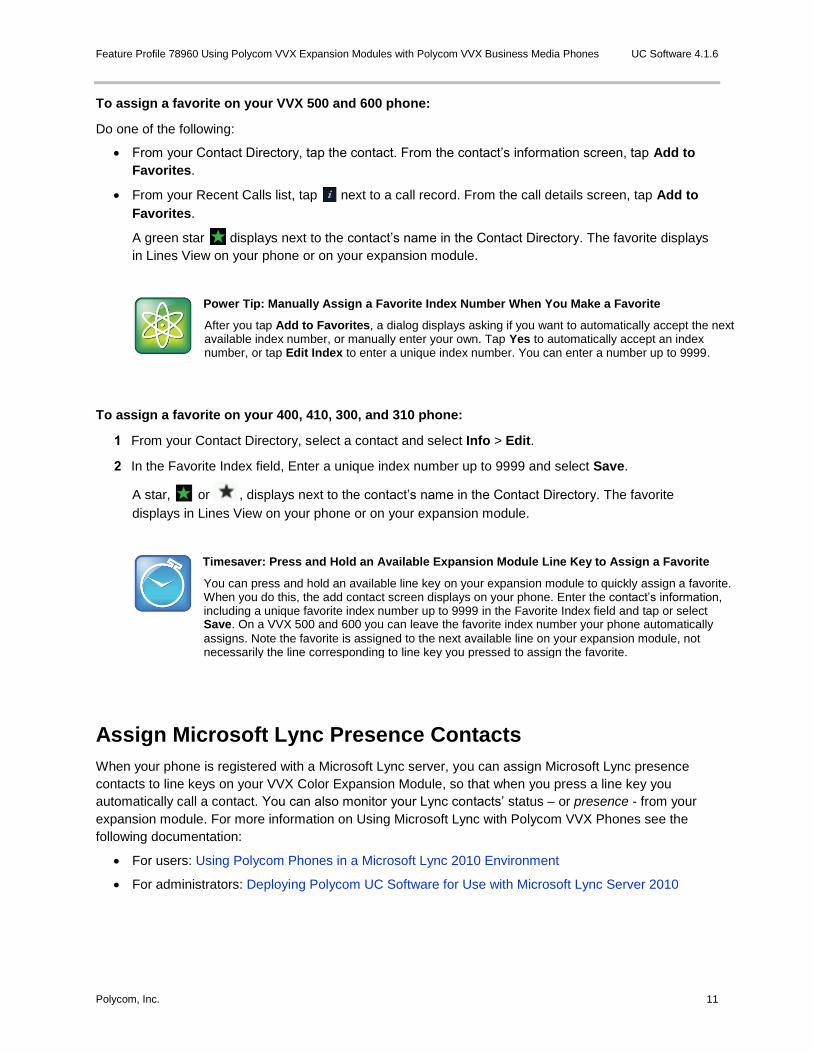
Power Tip: Manually Assign a Favorite Index Number When You Make a Favorite
After you tap Add to Favorites, a dialog displays asking if you want to automatically accept the next available index number, or manually enter your own. Tap Yes to automatically accept an index number, or tap Edit Index to enter a unique index number. You can enter a number up to 9999.
To assign a favorite on your 400, 410, 300, and 310 phone:
1 From your Contact Directory, select a contact and select Info > Edit.
2 In the Favorite Index field, Enter a unique index number up to 9999 and select Save.
A star, or , displays next to the contact’s name in the Contact Directory. The favorite
displays in Lines View on your phone or on your expansion module.
Timesaver: Press and Hold an Available Expansion Module Line Key to Assign a Favorite
You can press and hold an available line key on your expansion module to quickly assign a favorite. When you do this, the add contact screen displays on your phone. Enter the contact’s information, including a unique favorite index number up to 9999 in the Favorite Index field and tap or select Save. On a VVX 500 and 600 you can leave the favorite index number your phone automatically
assigns. Note the favorite is assigned to the next available line on your expansion module, not necessarily the line corresponding to line key you pressed to assign the favorite.
Assign Microsoft Lync Presence Contacts
When your phone is registered with a Microsoft Lync server, you can assign Microsoft Lync presence
contacts to line keys on your VVX Color Expansion Module, so that when you press a line key you
automatically call a contact. You can also monitor your Lync contacts’ status – or presence - from your
expansion module. For more information on Using Microsoft Lync with Polycom VVX Phones see the
following documentation:
For users: Using Polycom Phones in a Microsoft Lync 2010 Environment
For administrators: Deploying Polycom UC Software for Use with Microsoft Lync Server 2010
Feature Profile 78960 Using Polycom VVX Expansion Modules with Polycom VVX Business Media Phones UC Software 4.1.6
Polycom, Inc. 12
Note: Assigning Microsoft Lync Presence Contacts is not supported on VVX Expansion Modules
Assigning Microsoft Lync Presence contacts is not supported on VVX Expansion Modules. This feature is only supported on VVX Color Expansion Modules.
VVX Color Expansion Modules automatically assign Microsoft Lync presence contacts to the first
available line key. To learn more about how expansion modules assign Microsoft Lync presence contacts,
see Assigning Busy Lamp Field Contacts, Microsoft Lync Presence Contacts, and Favorites.
To assign a Microsoft Lync presence contact on your VVX phone:
1 Press to display Home view.
2 Tap or select Settings > Features > Presence > Contacts > Add.
3 From the Add Contact screen, enter the contact’s name and tap or select Submit.
The Microsoft Lync presence contact displays and you can monitor the contact’s presence.
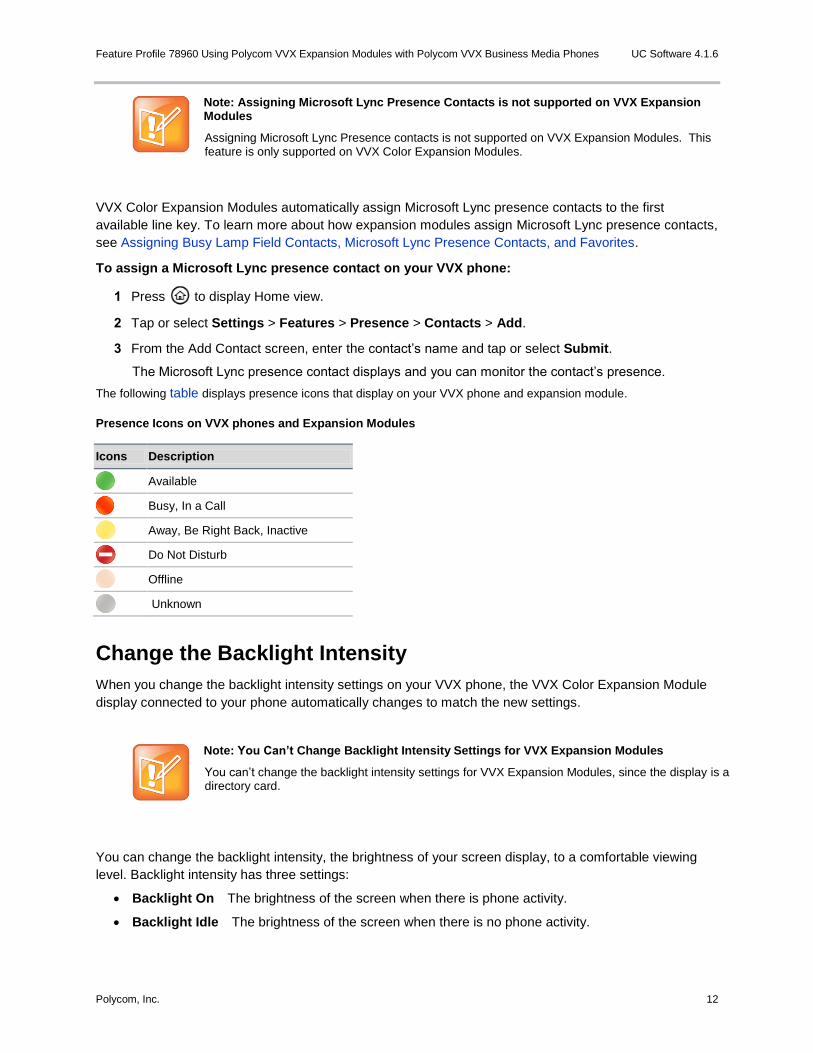
The following table displays presence icons that display on your VVX phone and expansion module.
Presence Icons on VVX phones and Expansion Modules
Icons Description
Available
Busy, In a Call
Away, Be Right Back, Inactive
Do Not Disturb
Offline
Unknown
Change the Backlight Intensity
When you change the backlight intensity settings on your VVX phone, the VVX Color Expansion Module
display connected to your phone automatically changes to match the new settings.
Note: You Can’t Change Backlight Intensity Settings for VVX Expansion Modules
You can’t change the backlight intensity settings for VVX Expansion Modules, since the display is a directory card.
You can change the backlight intensity, the brightness of your screen display, to a comfortable viewing
level. Backlight intensity has three settings:
Backlight On The brightness of the screen when there is phone activity.
Backlight Idle The brightness of the screen when there is no phone activity.
Feature Profile 78960 Using Polycom VVX Expansion Modules with Polycom VVX Business Media Phones UC Software 4.1.6
Polycom, Inc. 13
Maximum Intensity The brightness scale that applies to both Backlight On and Backlight Idle
intensity levels.
You can change the Backlight On intensity and the Backlight Idle intensity separately. You can choose a
high, medium, or low intensity, or turn off the backlight entirely.
When you change the Maximum Intensity, you modify the entire backlight intensity scale. For example, if
you decrease the Maximum Intensity, the low, medium, and high levels for both Backlight On and
Backlight Idle intensities decrease.
To change the backlight intensity on VVX Color Expansion Modules connected to VVX phones:
1 Press to display Home view.
2 Tap or select Settings > Basic > Backlight Intensity.
3 Tap or select one of the following options:
Backlight On Intensity.
Tap or select High, Medium, or Low to select the desired intensity. The default setting is
High.
The checkbox next to High, Medium, or Low is checked and the backlight intensity of your
screen display immediately changes.
Backlight Idle Intensity
Tap or select High, Medium, or Low to select the desired intensity. The default setting is
Low.
The checkbox next to High, Medium, or Low is checked and the backlight intensity of your
screen display changes the next time your phone is idle.
Maximum Intensity
Tap or select Up or Down to increase or decrease the maximum intensity the screen
displays. When you have a VVX 500 or 600 phone, you can also drag your finger along the
slider to increase or decrease the maximum intensity the screen displays.
4 To navigate back to Home view press . On a VVX 500 or 600 phone, to navigate back to Lines
view press again. On a VVX 400, 410, 300, or 310 phone, to navigate back to Lines view press
two times. You can also tap or select Back to navigate back through previous phone menus.
Feature Profile Using Polycom VVX Expansion Modules with Polycom VVX Business Media Phones UC Software 4.1.6
Polycom, Inc. 14
Get Help This section provides a list of Polycom documents referred to in this guide as well as partner resources
you can use. If you are looking for help or technical support for your phones, the following types of
documents are available on the Polycom Voice Support site:
Quick Start Guides, which describe how to assemble phones.
Quick User Guides, which describe basic phone features.
User Guides, which describe both basic and advanced phone features.
Administrators’ Guide, which provides instructions for installing, provisioning, and administering
Polycom phones.
Polycom and Partner Resources
For more information about installing, configuring, and administering Polycom products, refer to
Documents and Downloads at Polycom Support.
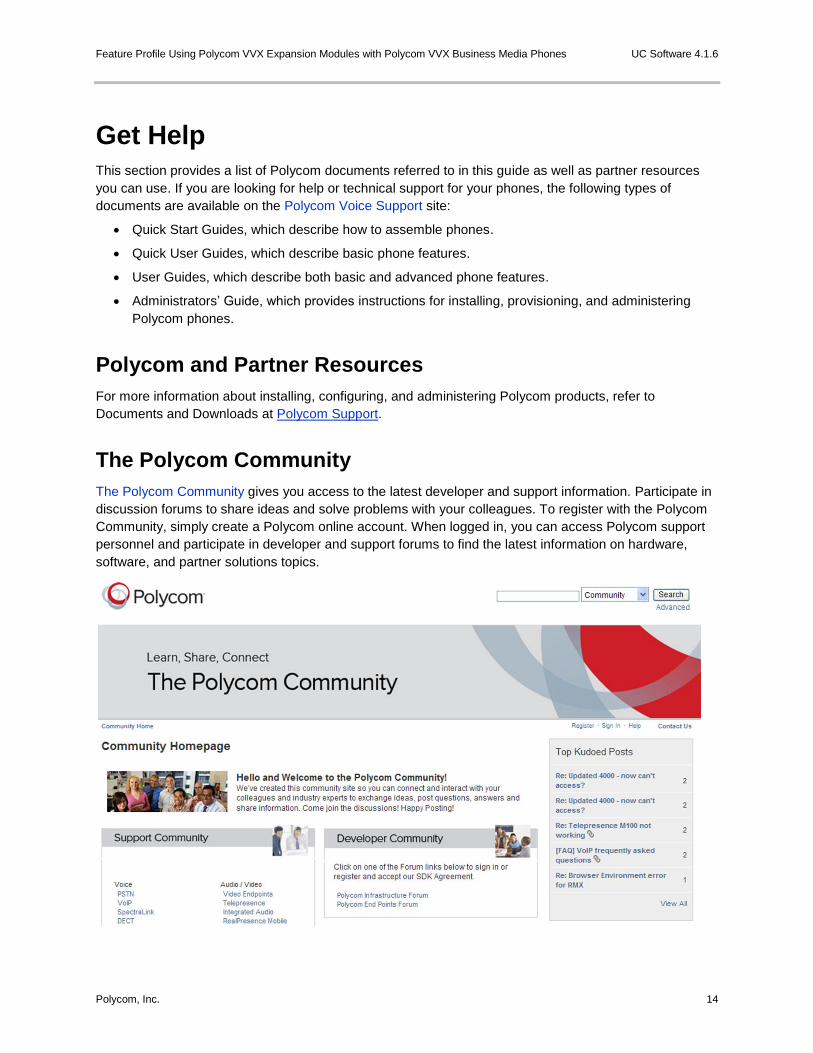
The Polycom Community
The Polycom Community gives you access to the latest developer and support information. Participate in
discussion forums to share ideas and solve problems with your colleagues. To register with the Polycom
Community, simply create a Polycom online account. When logged in, you can access Polycom support
personnel and participate in developer and support forums to find the latest information on hardware,
software, and partner solutions topics.
Feature Profile Using Polycom VVX Expansion Modules with Polycom VVX Business Media Phones UC Software 4.1.6
Polycom, Inc. 15
Copyright ©2013, Polycom, Inc. All rights reserved. No part of this document may be reproduced, translated into another language or format, or transmitted in any form or by any means, electronic or mechanical, for any purpose, without the express written permission of Polycom, Inc.
6001 America Center Drive San Jose, CA 95002 USA
Trademarks
Polycom®, the Polycom logo and the names and marks associated with Polycom products are trademarks and/or service marks of Polycom, Inc. and are registered and/or common law marks in the United States and various other countries. All other trademarks are property of their respective owners. No portion hereof may be reproduced or transmitted in any form or by any means, for any purpose other than the recipient's personal use, without the express written permission of Polycom.
End User License Agreement
By installing, copying, or otherwise using this product, you acknowledge that you have read, understand and agree to be bound by the terms and conditions of the End User License Agreement for this product.
Patent Information
The accompanying product may be protected by one or more U.S. and foreign patents and/or pending patent applications held by Polycom, Inc.
Open Source Software Used in this Product
This product may contain open source software. You may receive the open source software from Polycom up to three (3) years after the distribution date of the applicable product or software at a charge not greater than the cost to Polycom of shipping or distributing the software to you. To receive software information, as well as the open source software code used in this product, contact Polycom by email at [email protected].
Disclaimer
While Polycom uses reasonable efforts to include accurate and up-to-date information in this document, Polycom makes no warranties or representations as to its accuracy. Polycom assumes no liability or responsibility for any typographical or other errors or omissions in the content of this document.
Limitation of Liability
Polycom and/or its respective suppliers make no representations about the suitability of the information contained in this document for any purpose. Information is provided “as is” without warranty of any kind and is subject to change without notice. The entire risk arising out of its use remains with the recipient. In no event shall Polycom and/or its respective suppliers be liable for any direct, consequential, incidental, special, punitive or other damages whatsoever (including without limitation, damages for loss of business profits, business interruption, or loss of business information), even if Polycom has been advised of the possibility of such damages.
Customer Feedback
We are striving to improve our documentation quality and we appreciate your feedback. Email your opinions and comments to [email protected].
Visit the Polycom Support Center for End User License Agreements, software downloads, product documents, product licenses, troubleshooting tips, service requests, and more.