Embed Size (px)
DESCRIPTION
plastenik
Citation preview
Portable Poly Pipe High Tunnel Hoop House Construction Plans
Steve Upson
An Agricultural Division Publication NF-HO-12-02

1
Contents
Introduction .................................................................................................................. 3
Cost and Size Considerations ...................................................................................... 4
Site Preparation ........................................................................................................... 6
Ground Post Fabrication and Installation ..................................................................... 7
Hoop Fabrication and Installation ............................................................................. 15
End Wall Installation ................................................................................................. 18
Rope Purlin Installation ............................................................................................. 19
Rope Strap Installation .............................................................................................. 25
Split Vent Installation ................................................................................................. 29
Poly Film Application ................................................................................................. 45
Parts List ................................................................................................................... 61

2
3
IntroductionThe Noble Foundation poly pipe hoop house was developed in response to the needs of growers for a low cost, portable structure. It is the product of three years of research and development conducted at the Foundation’s Headquarters Farm.
The vast majority of hoop house structures use hoops (bows) made of steel tubing. From a strength standpoint, galvanized steel tubing continues to be the material of choice for constructing wide, clear span structures.
Due to the rising cost of steel, many new growers eager to experience the benefits of hoop house growing are opting for less expensive materials such as PVC pipe to construct houses. Similarly sized diameter schedule 40 PVC pipe is considerably cheaper than galvanized steel tubing. Because it lacks the rigidity of steel pipe, I only recommend PVC pipe for use in narrow span structures. Another drawback of PVC pipe is its tendency to fracture when bent excessively, a situation that can occur when PVC hoops are subjected to strong winds. As PVC pipe ages, it becomes more brittle, making it more prone to fracturing.
Two-inch diameter SDR-11 black poly pipe is a better choice than PVC pipe for constructing houses up to 14 feet in width. This thick-walled, high density polyethylene pipe is commonly used in the oil and gas industry and in geothermal energy systems. It is more flexible and has a slower rate of photo-degradation (the process that causes brittleness) compared to PVC. Because it comes in a roll, a pipe bender is not required to fabricate hoops. Because polyeth-ylene is a product of natural gas, the cost of poly pipe will reflect the cost of natural gas. Typically, the cost of SDR-11 poly pipe is less than similarly sized diameter galvanized steel pipe and more than similarly sized diameter PVC pipe.
The Noble Foundation poly pipe house is a ‘hybrid’ portable structure incorporating features of both permanent and completely portable structures. With the exception of the ground posts, every component of the structure can be disassembled. To reduce cost and make it easier to attach and detach the poly film covering, we elected to use rope straps positioned over the top of the structure as an alternative to poly fastener (Wiggle Wire™) or lath to secure the film to the frame. While the structure is designed to be portable, it is also suitable for use as a permanent structure. Equipped with the Noble Foundation portable end wall or a comparable end wall, the Noble Foundation poly pipe high tunnel hoop house offers the market gardener an alternative, cost competitive, season extension structure with a long service life.
4
Cost and Size Considerations
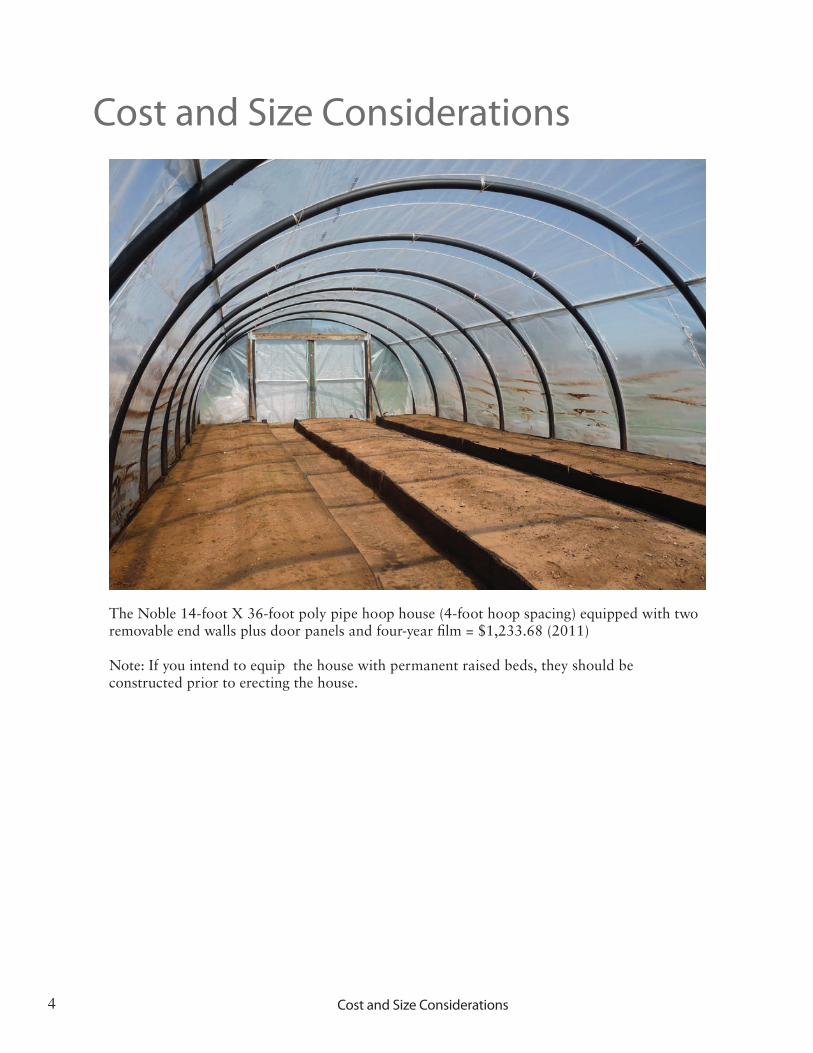
The Noble 14-foot X 36-foot poly pipe hoop house (4-foot hoop spacing) equipped with two removable end walls plus door panels and four-year film = $1,233.68 (2011)
Note: If you intend to equip the house with permanent raised beds, they should be constructed prior to erecting the house.
Cost and Size Considerations
5
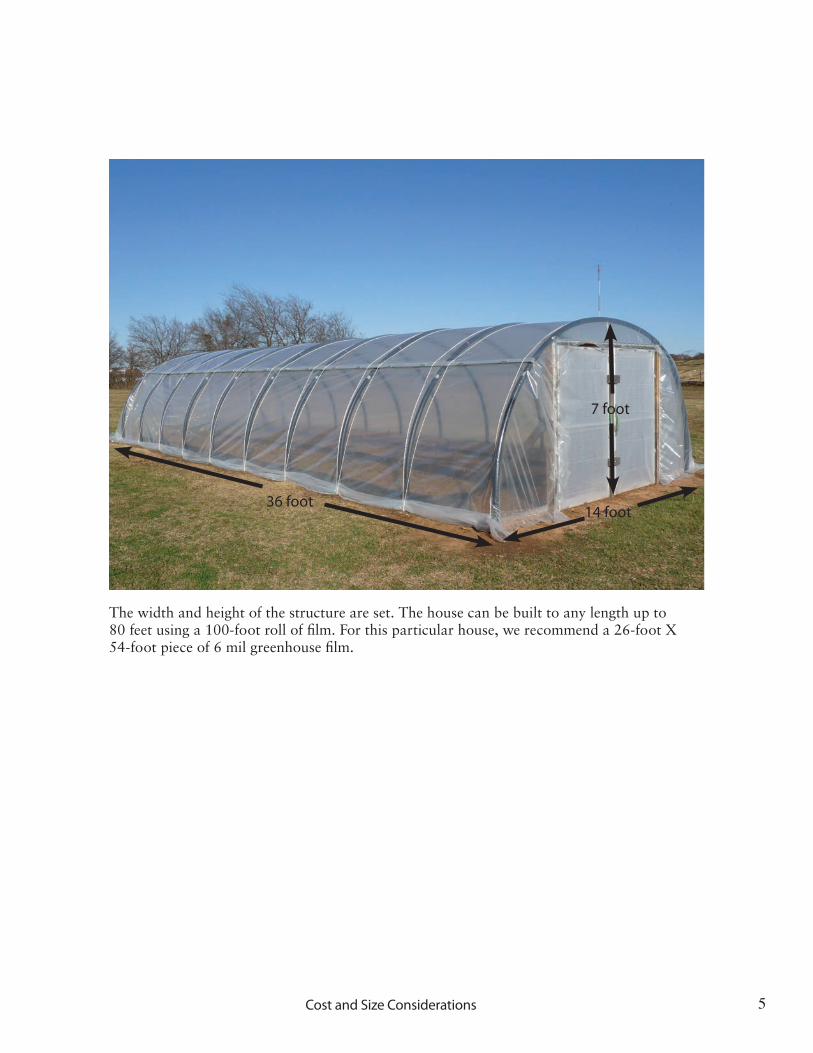
The width and height of the structure are set. The house can be built to any length up to 80 feet using a 100-foot roll of film. For this particular house, we recommend a 26-foot X 54-foot piece of 6 mil greenhouse film.
36 foot
7 foot
14 foot
Cost and Size Considerations
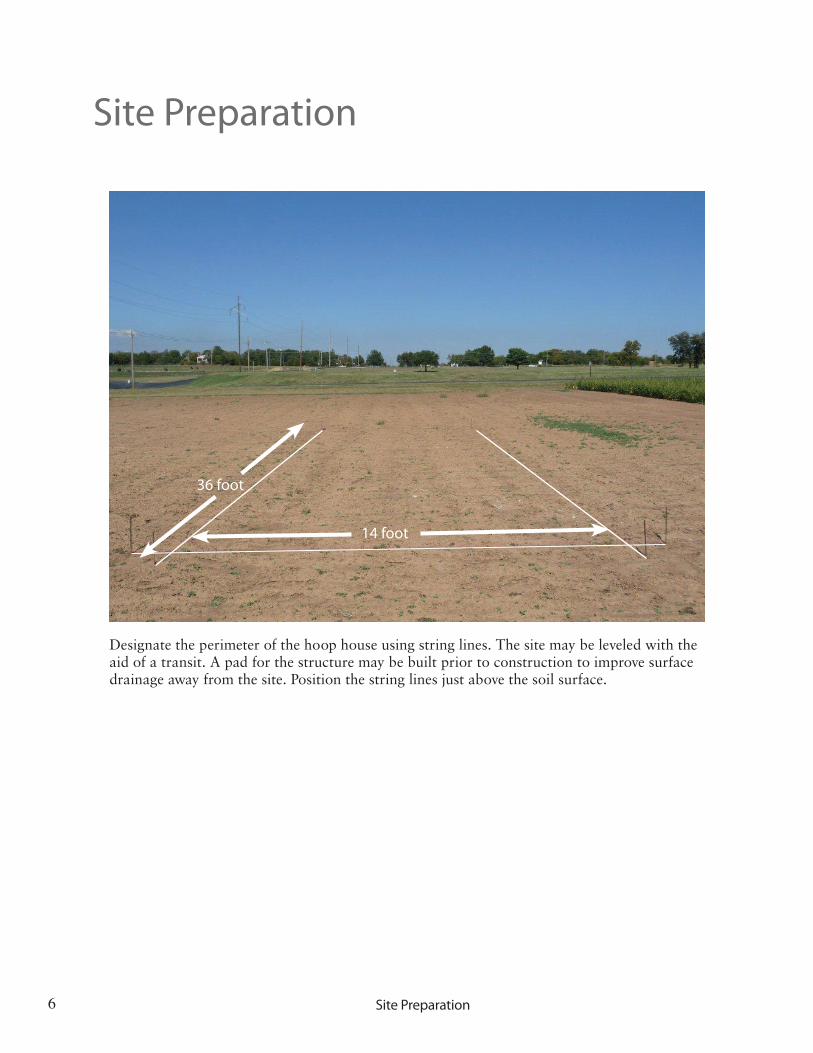
Designate the perimeter of the hoop house using string lines. The site may be leveled with the aid of a transit. A pad for the structure may be built prior to construction to improve surface drainage away from the site. Position the string lines just above the soil surface.
6
Site Preparation
36 foot
14 foot
Site Preparation
7
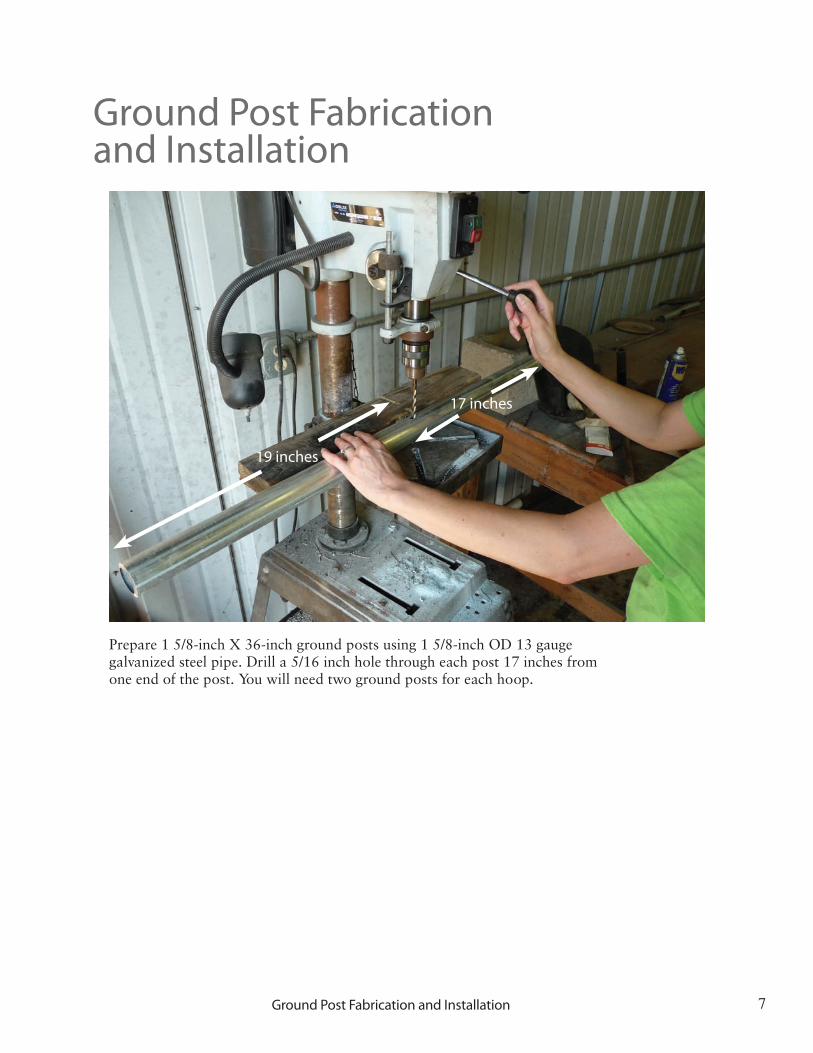
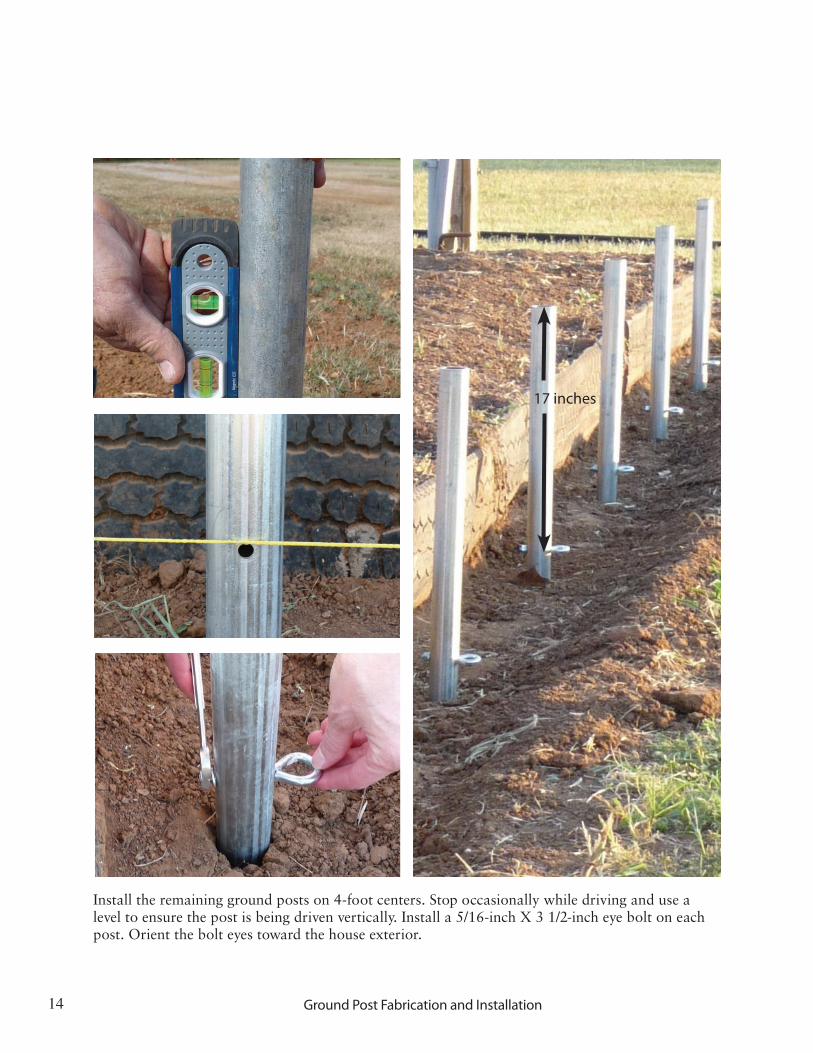
Prepare 1 5/8-inch X 36-inch ground posts using 1 5/8-inch OD 13 gauge galvanized steel pipe. Drill a 5/16 inch hole through each post 17 inches from one end of the post. You will need two ground posts for each hoop.
Ground Post Fabrication and Installation
19 inches
17 inches
Ground Post Fabrication and Installation
8
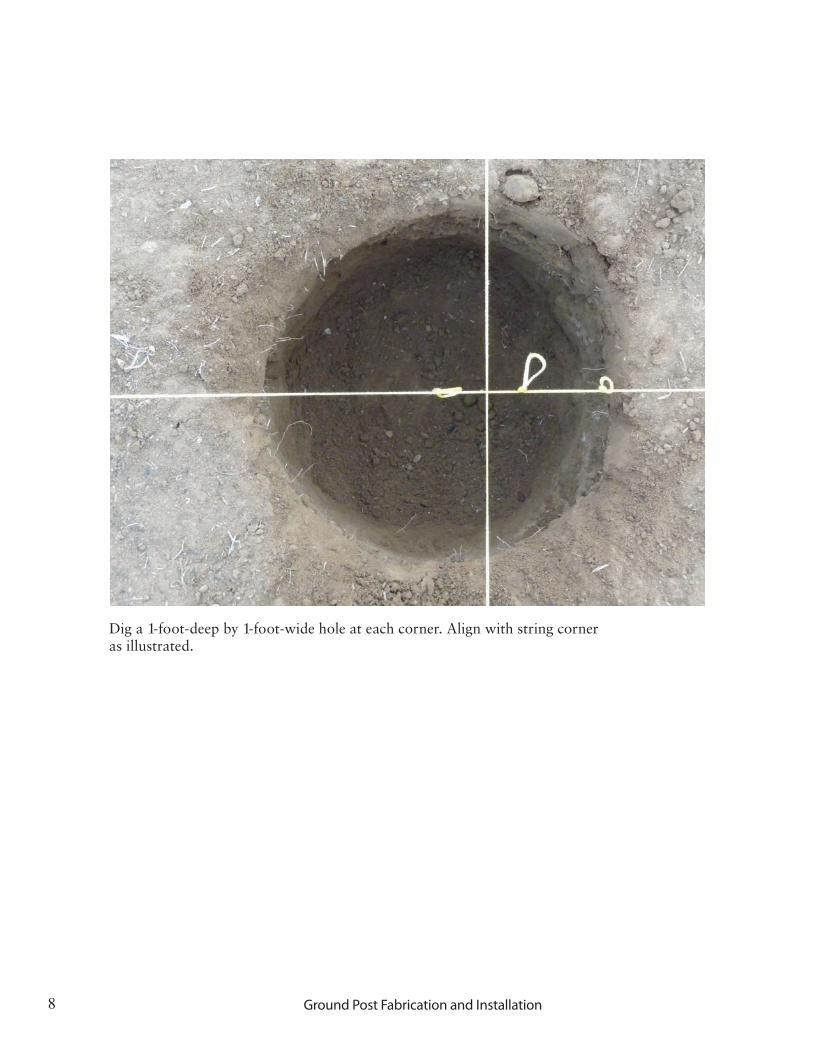
Dig a 1-foot-deep by 1-foot-wide hole at each corner. Align with string corner as illustrated.
Ground Post Fabrication and Installation
9
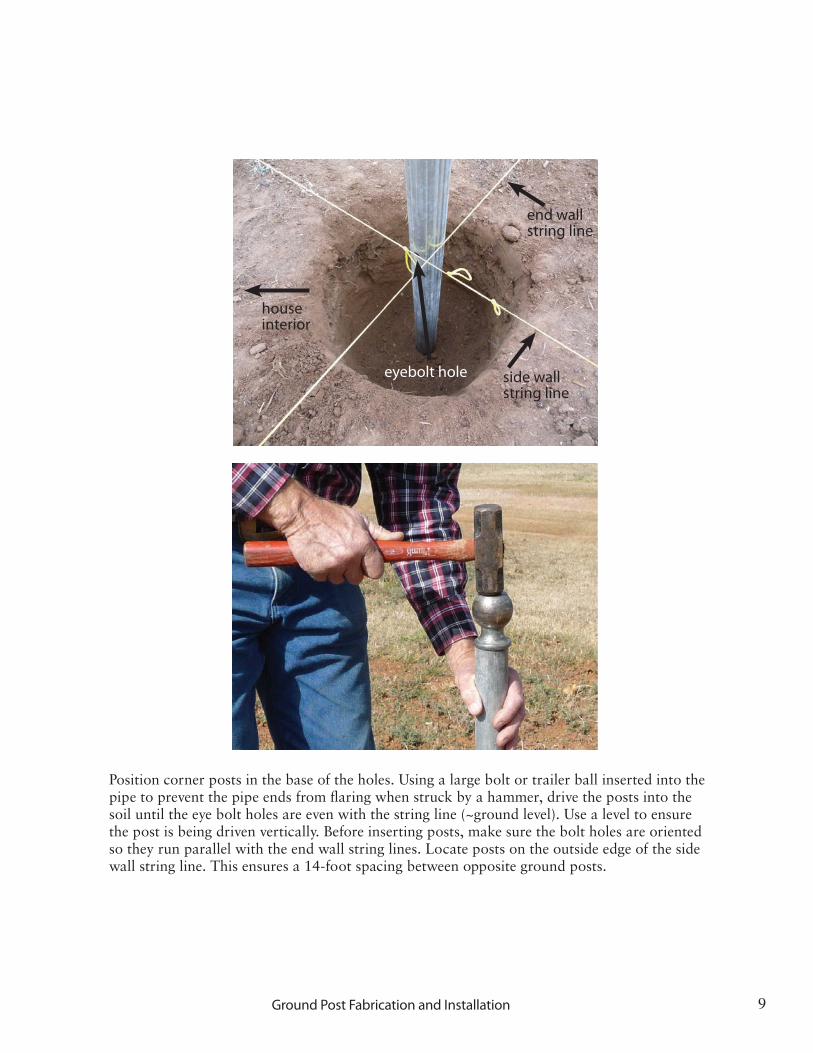
Position corner posts in the base of the holes. Using a large bolt or trailer ball inserted into the pipe to prevent the pipe ends from flaring when struck by a hammer, drive the posts into the soil until the eye bolt holes are even with the string line (~ground level). Use a level to ensure the post is being driven vertically. Before inserting posts, make sure the bolt holes are oriented so they run parallel with the end wall string lines. Locate posts on the outside edge of the side wall string line. This ensures a 14-foot spacing between opposite ground posts.
eyebolt hole
end wallstring line
house interior
side wall string line
Ground Post Fabrication and Installation
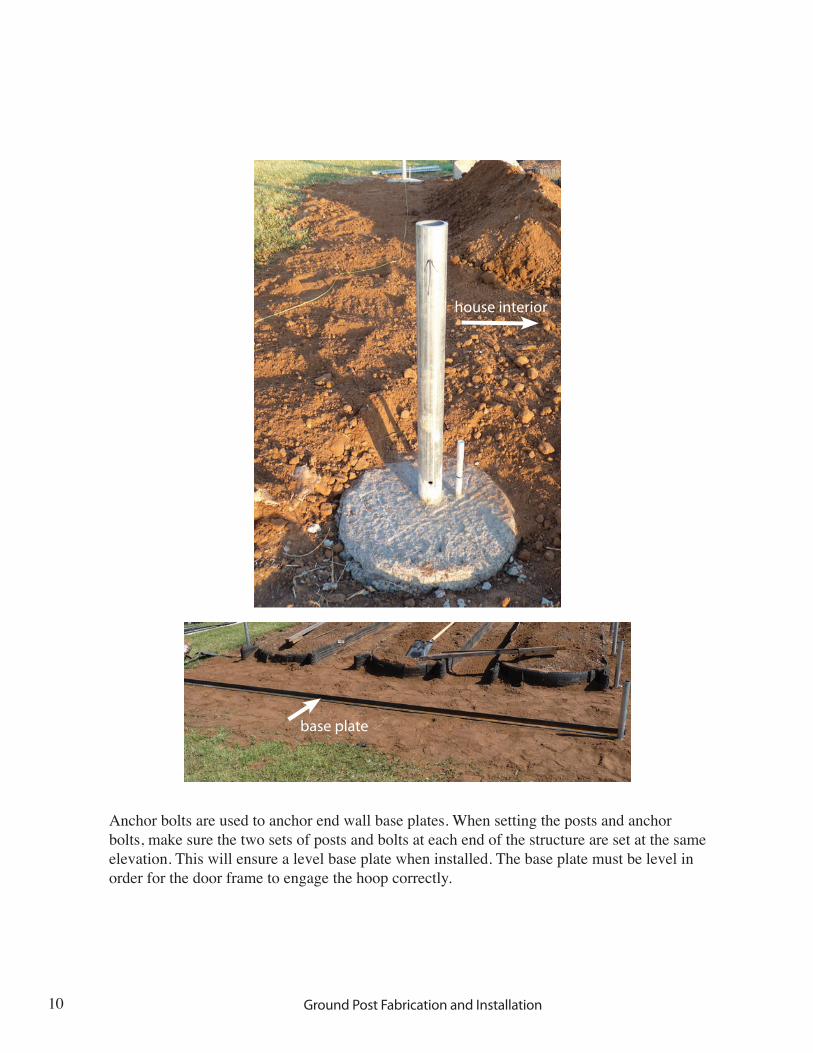
Anchor bolts are used to anchor end wall base plates. When setting the posts and anchor bolts, make sure the two sets of posts and bolts at each end of the structure are set at the same elevation. This will ensure a level base plate when installed. The base plate must be level in order for the door frame to engage the hoop correctly.
10
house interior
base plate
Ground Post Fabrication and Installation
11
11
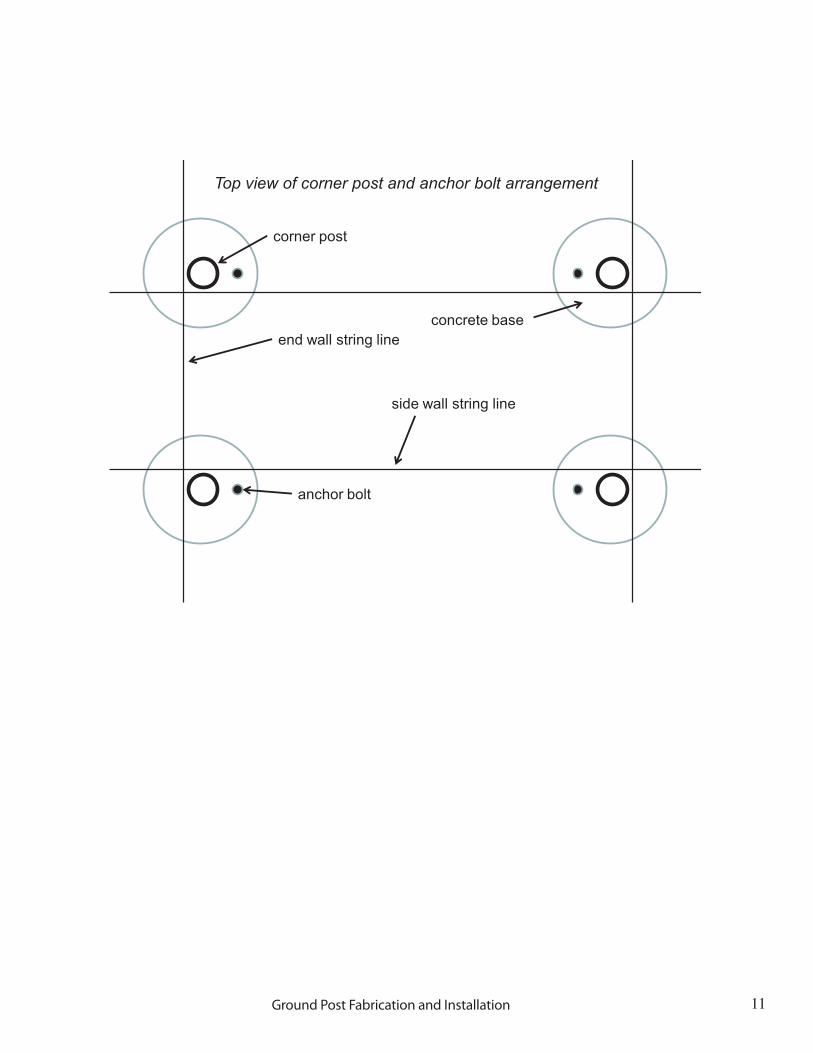
Top view of corner post and anchor bolt arrangement
side wall string line
end wall string line
anchor bolt
corner post
concrete base
Ground Post Fabrication and Installation
12
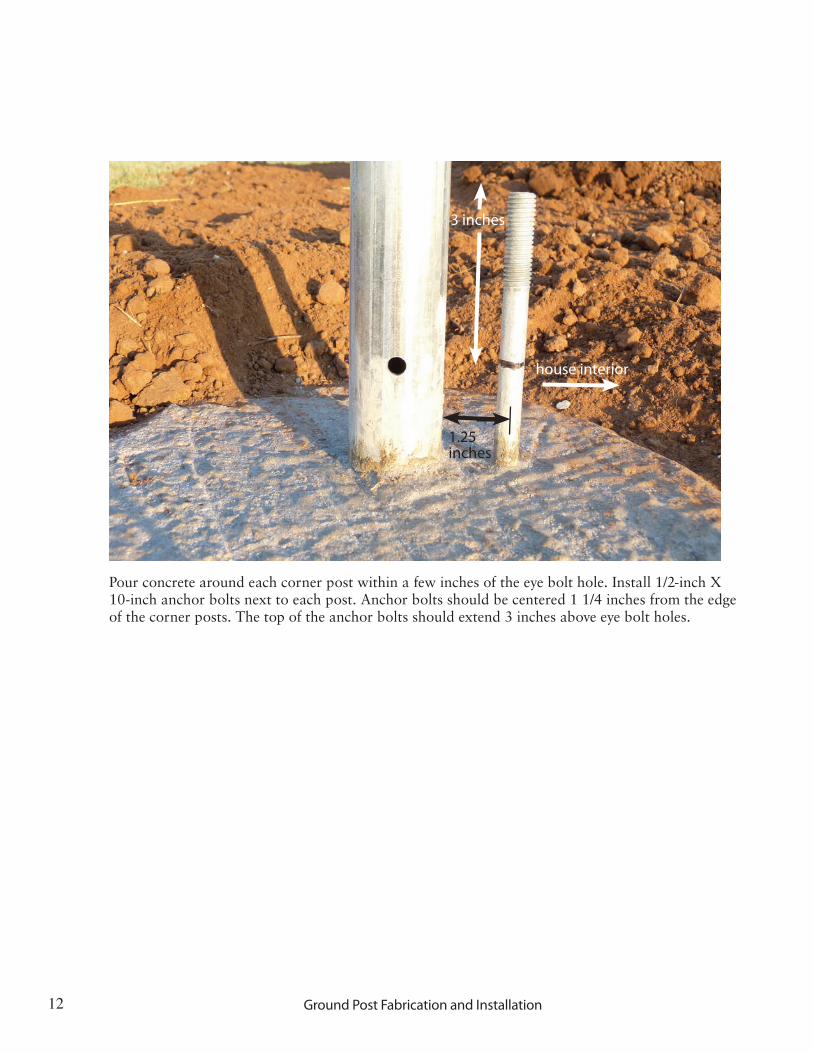
Pour concrete around each corner post within a few inches of the eye bolt hole. Install 1/2-inch X 10-inch anchor bolts next to each post. Anchor bolts should be centered 1 1/4 inches from the edge of the corner posts. The top of the anchor bolts should extend 3 inches above eye bolt holes.
house interior
3 inches
1.25 inches
Ground Post Fabrication and Installation
13
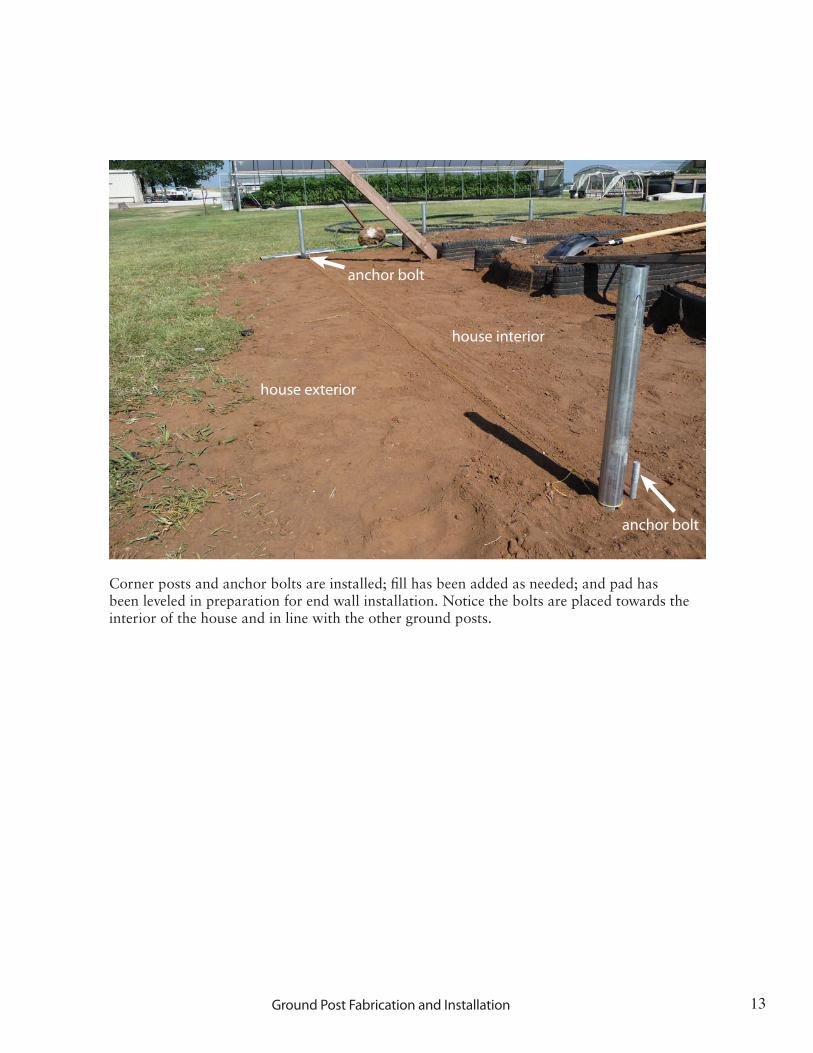
Corner posts and anchor bolts are installed; fill has been added as needed; and pad has been leveled in preparation for end wall installation. Notice the bolts are placed towards the interior of the house and in line with the other ground posts.
anchor bolt
house exterior
house interior
anchor bolt
Ground Post Fabrication and Installation
14
Install the remaining ground posts on 4-foot centers. Stop occasionally while driving and use a level to ensure the post is being driven vertically. Install a 5/16-inch X 3 1/2-inch eye bolt on each post. Orient the bolt eyes toward the house exterior.
17 inches
Ground Post Fabrication and Installation
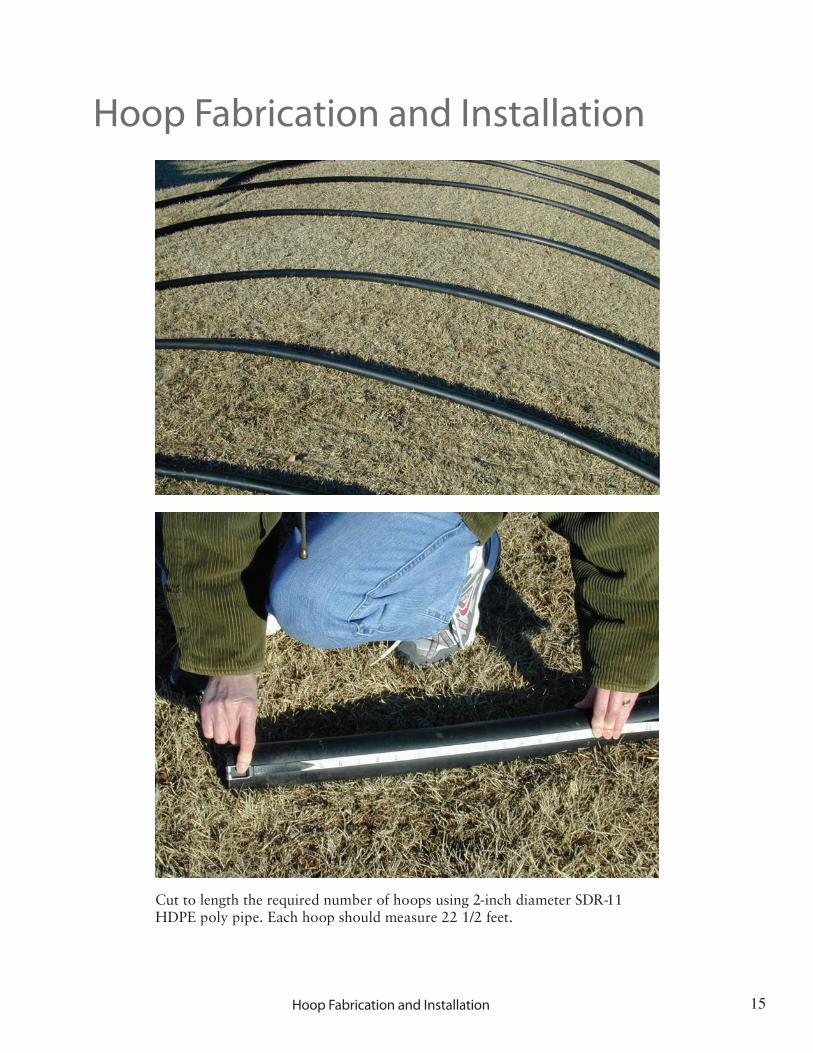
Cut to length the required number of hoops using 2-inch diameter SDR-11 HDPE poly pipe. Each hoop should measure 22 1/2 feet.
15
Hoop Fabrication and Installation
Hoop Fabrication and Installation
16
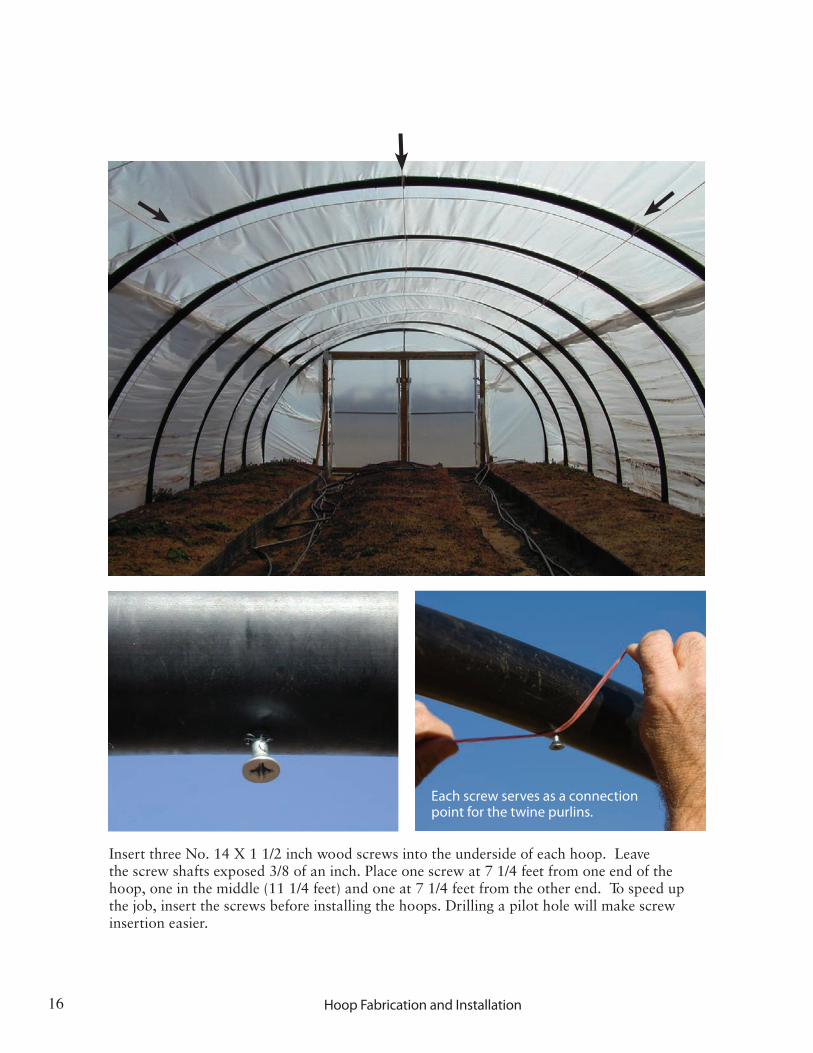
Insert three No. 14 X 1 1/2 inch wood screws into the underside of each hoop. Leave the screw shafts exposed 3/8 of an inch. Place one screw at 7 1/4 feet from one end of the hoop, one in the middle (11 1/4 feet) and one at 7 1/4 feet from the other end. To speed up the job, insert the screws before installing the hoops. Drilling a pilot hole will make screw insertion easier.
Each screw serves as a connection point for the twine purlins.
Hoop Fabrication and Installation
17
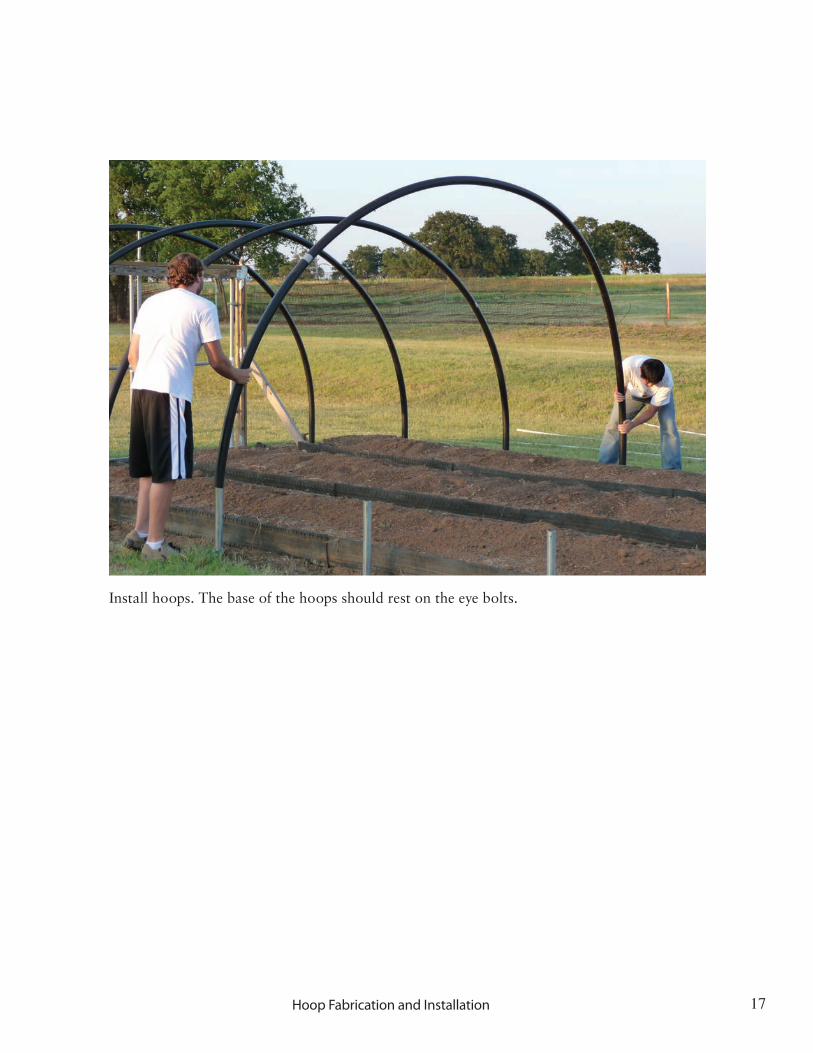
Install hoops. The base of the hoops should rest on the eye bolts.
Hoop Fabrication and Installation
18
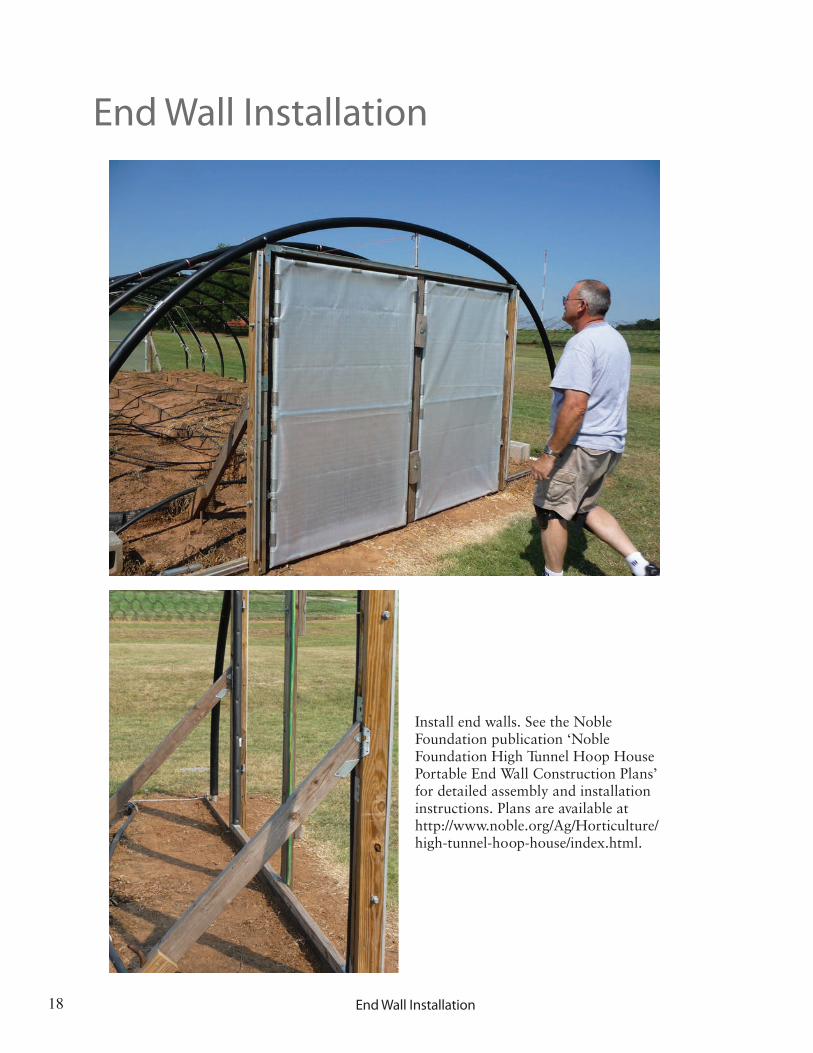
Install end walls. See the Noble Foundation publication ‘Noble Foundation High Tunnel Hoop House Portable End Wall Construction Plans’ for detailed assembly and installation instructions. Plans are available at http://www.noble.org/Ag/Horticulture/high-tunnel-hoop-house/index.html.
End Wall Installation
End Wall Installation
19
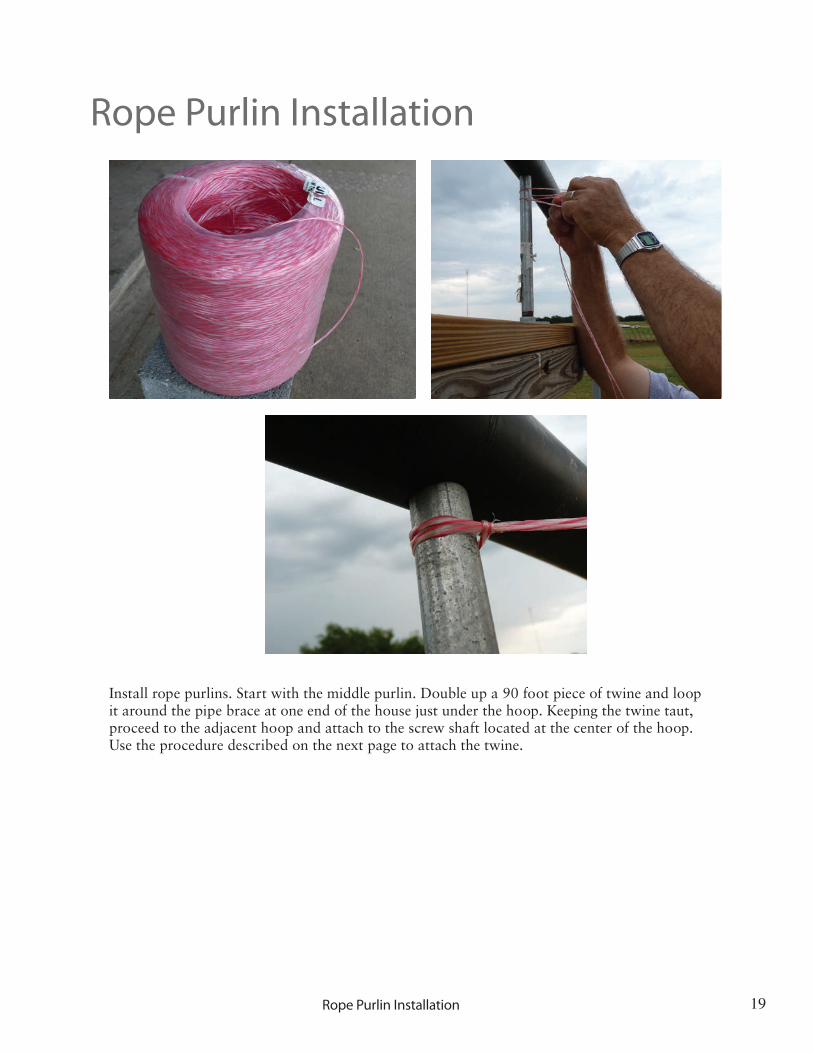
Install rope purlins. Start with the middle purlin. Double up a 90 foot piece of twine and loop it around the pipe brace at one end of the house just under the hoop. Keeping the twine taut, proceed to the adjacent hoop and attach to the screw shaft located at the center of the hoop. Use the procedure described on the next page to attach the twine.
Rope Purlin Installation
Rope Purlin Installation
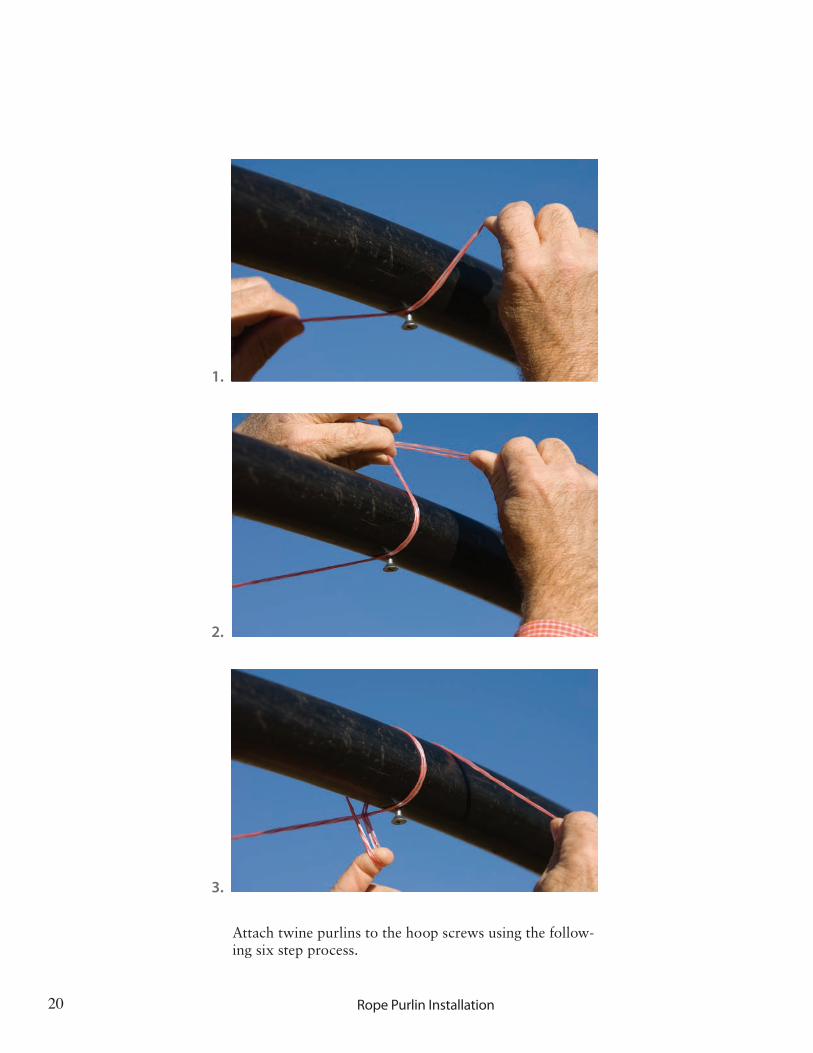
1.
2.
3.
20
Attach twine purlins to the hoop screws using the follow-ing six step process.
Rope Purlin Installation
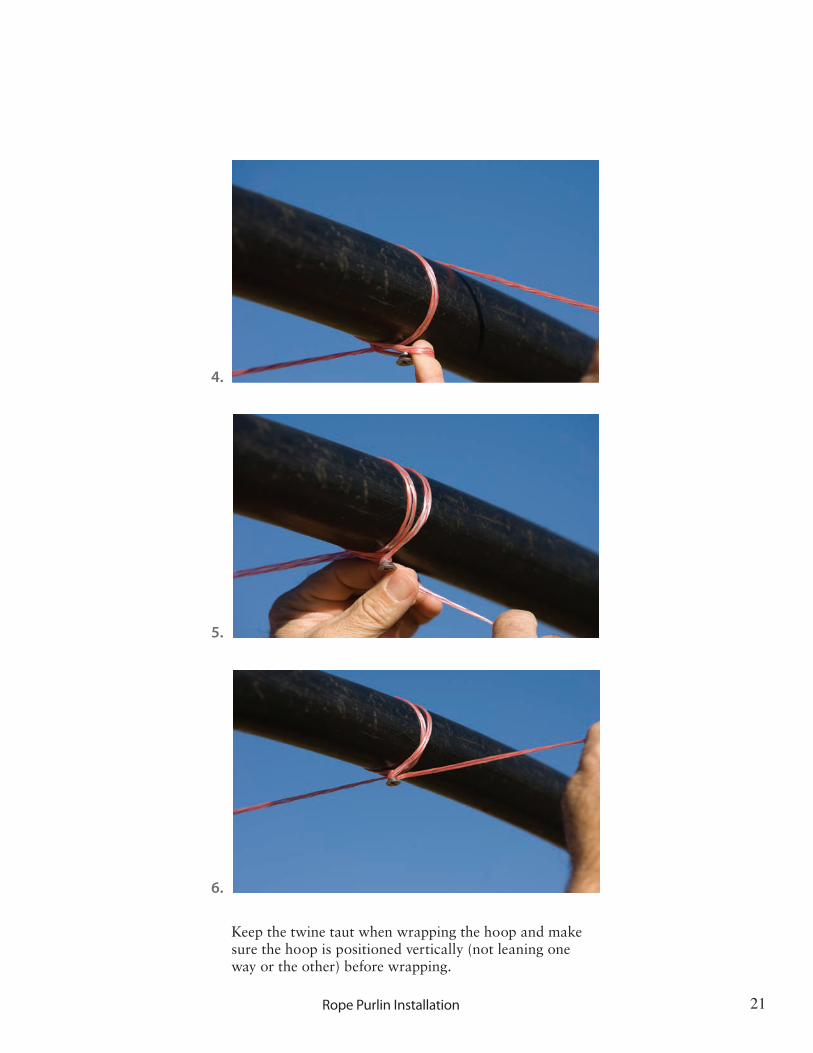
4.
5.
6.
21
Keep the twine taut when wrapping the hoop and make sure the hoop is positioned vertically (not leaning one way or the other) before wrapping.
Rope Purlin Installation
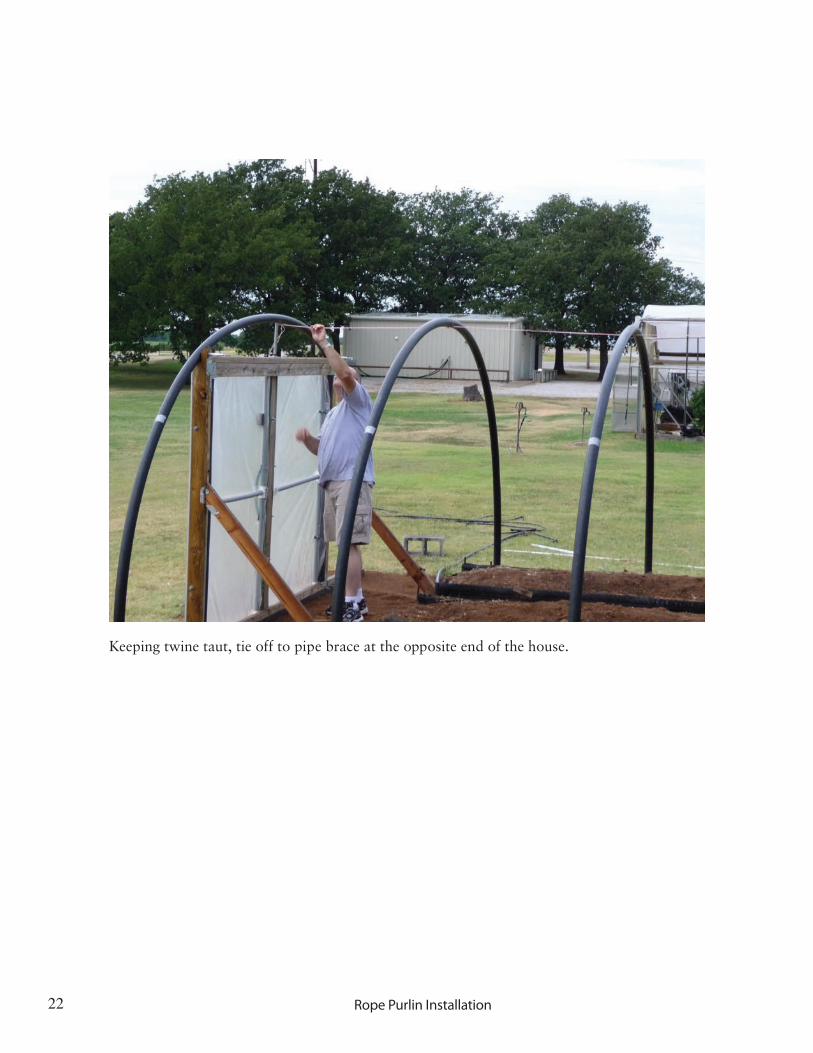
Keeping twine taut, tie off to pipe brace at the opposite end of the house.
22 Rope Purlin Installation
23
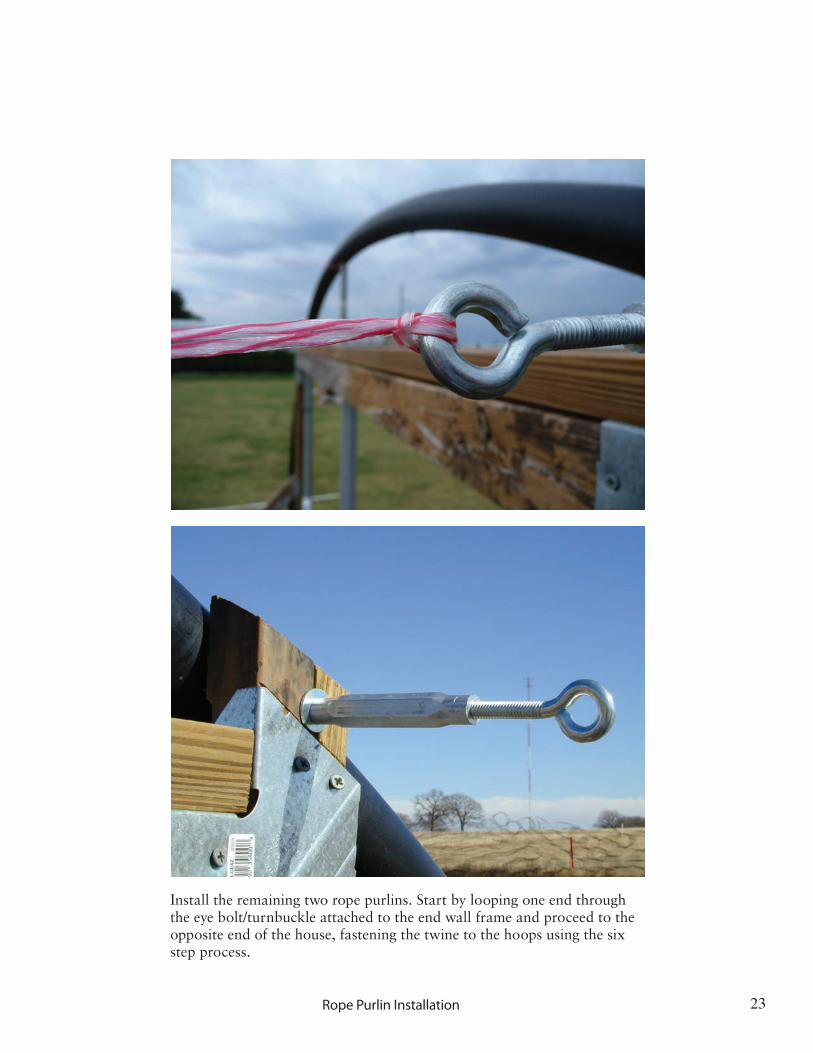
Install the remaining two rope purlins. Start by looping one end through the eye bolt/turnbuckle attached to the end wall frame and proceed to the opposite end of the house, fastening the twine to the hoops using the six step process.
Rope Purlin Installation
24
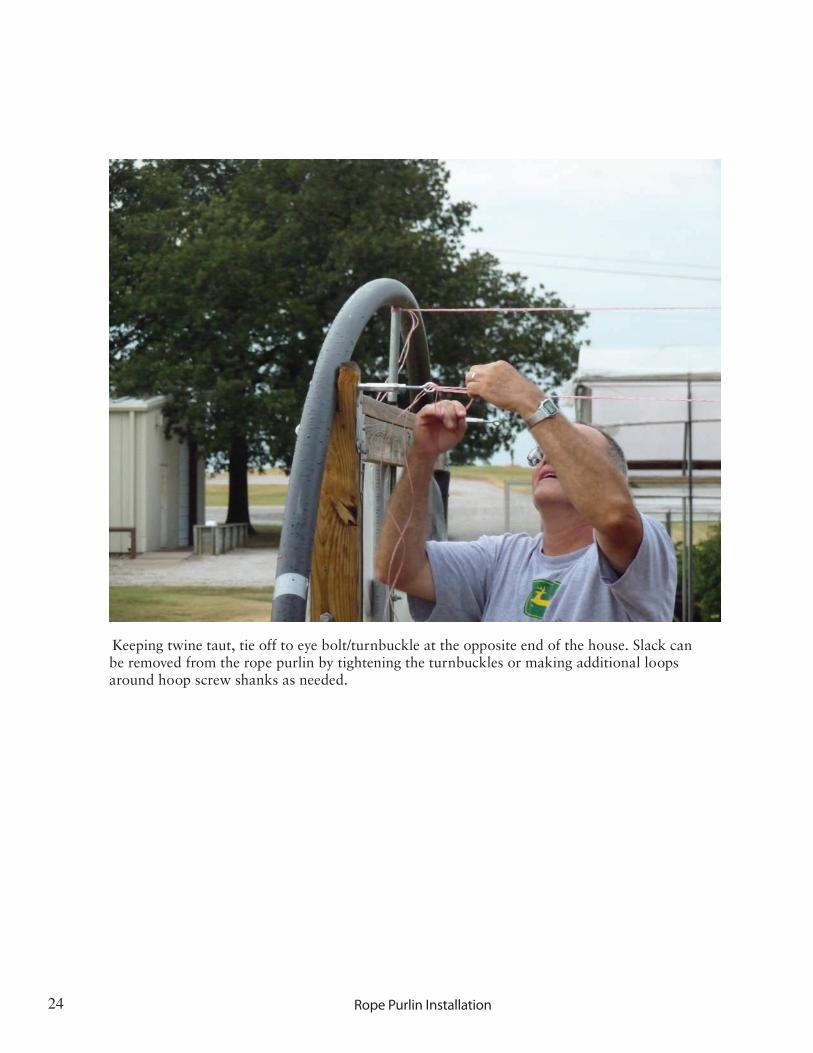
Keeping twine taut, tie off to eye bolt/turnbuckle at the opposite end of the house. Slack can be removed from the rope purlin by tightening the turnbuckles or making additional loops around hoop screw shanks as needed.
Rope Purlin Installation
25
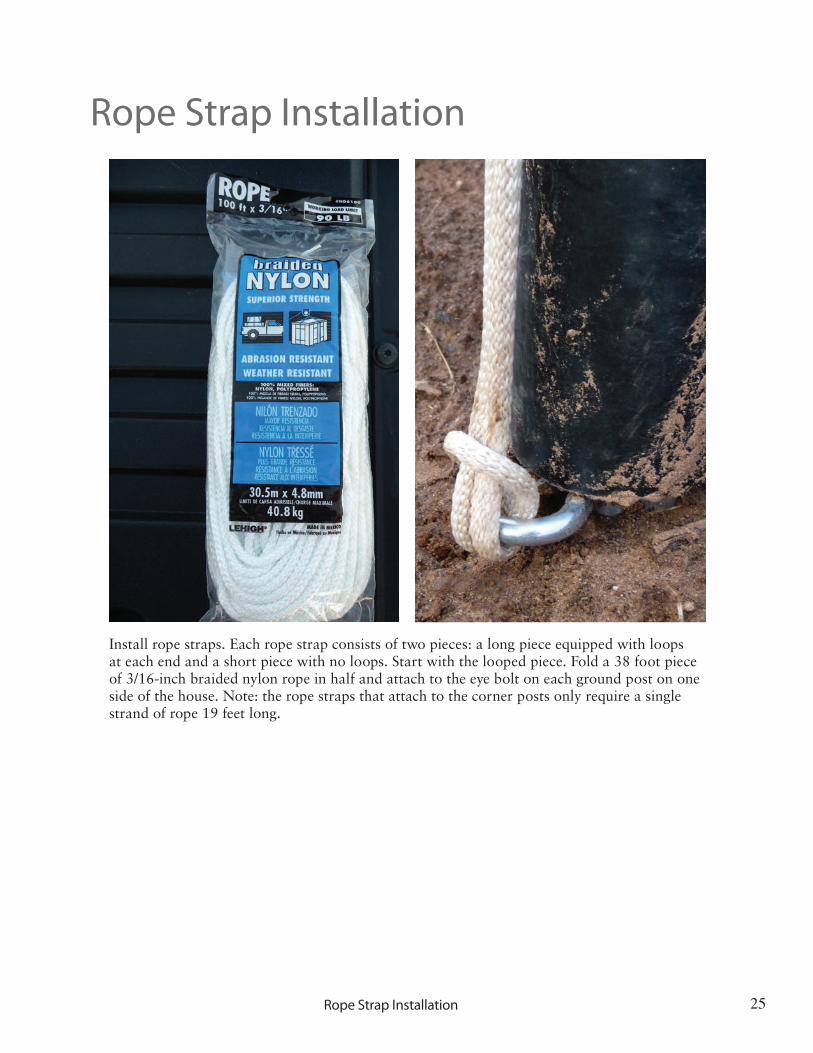
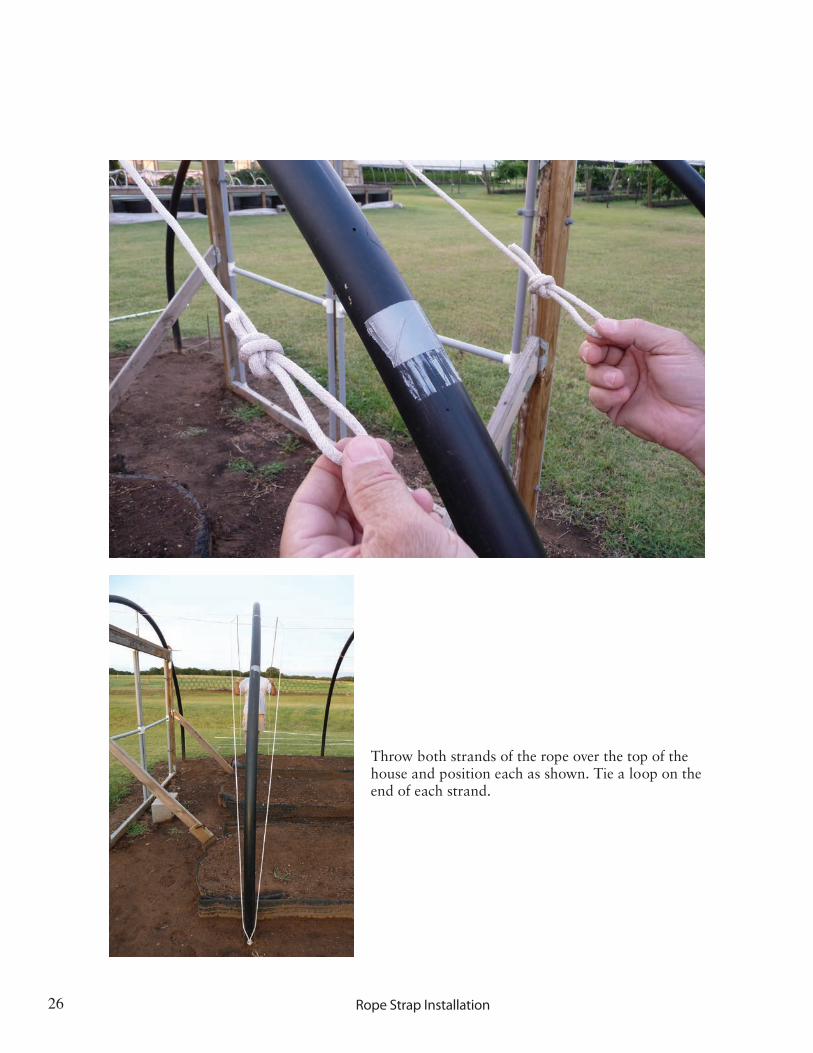
Install rope straps. Each rope strap consists of two pieces: a long piece equipped with loops at each end and a short piece with no loops. Start with the looped piece. Fold a 38 foot piece of 3/16-inch braided nylon rope in half and attach to the eye bolt on each ground post on one side of the house. Note: the rope straps that attach to the corner posts only require a single strand of rope 19 feet long.
Rope Strap Installation
Rope Strap Installation
26
Throw both strands of the rope over the top of the house and position each as shown. Tie a loop on the end of each strand.
Rope Strap Installation
27
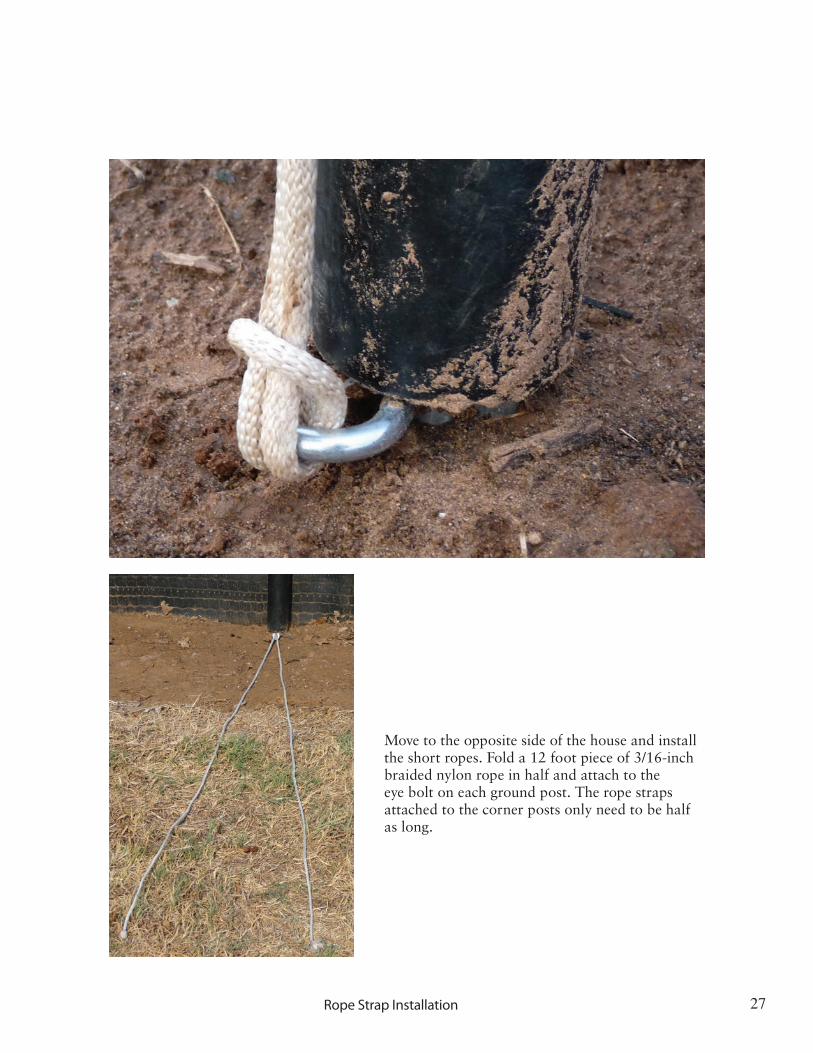
Move to the opposite side of the house and install the short ropes. Fold a 12 foot piece of 3/16-inch braided nylon rope in half and attach to the eye bolt on each ground post. The rope straps attached to the corner posts only need to be half as long.
Rope Strap Installation
28
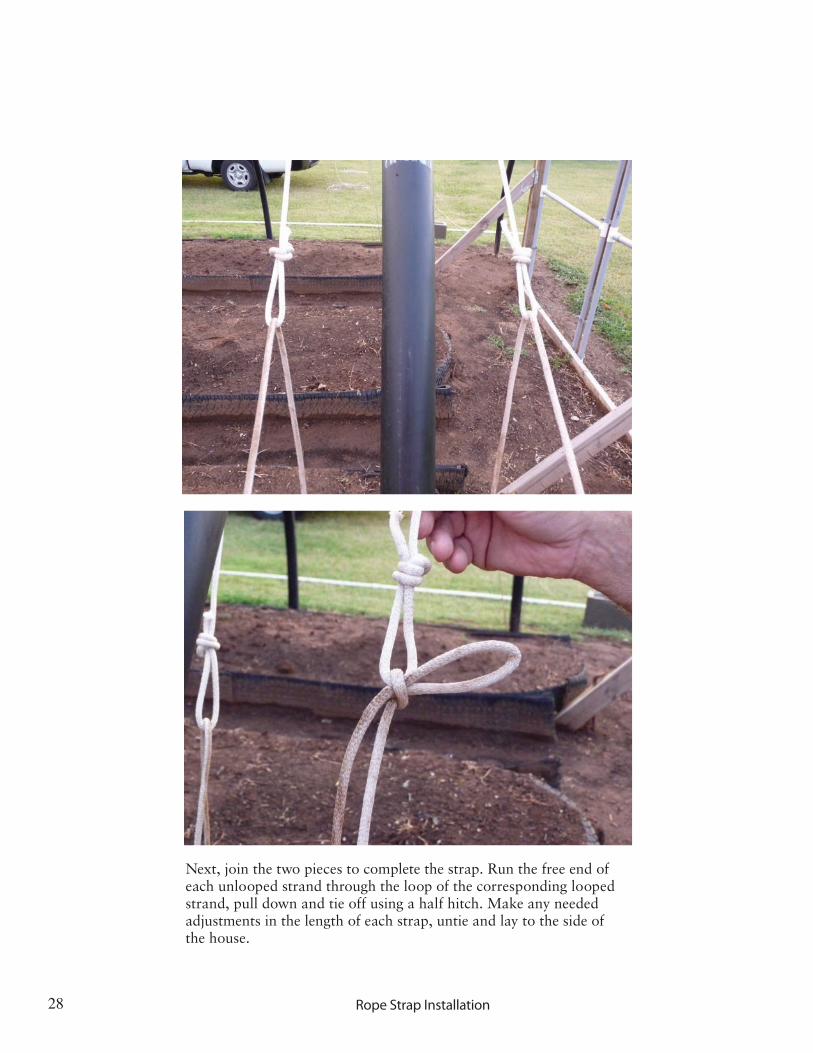
Next, join the two pieces to complete the strap. Run the free end of each unlooped strand through the loop of the corresponding looped strand, pull down and tie off using a half hitch. Make any needed adjustments in the length of each strap, untie and lay to the side of the house.
Rope Strap Installation
29
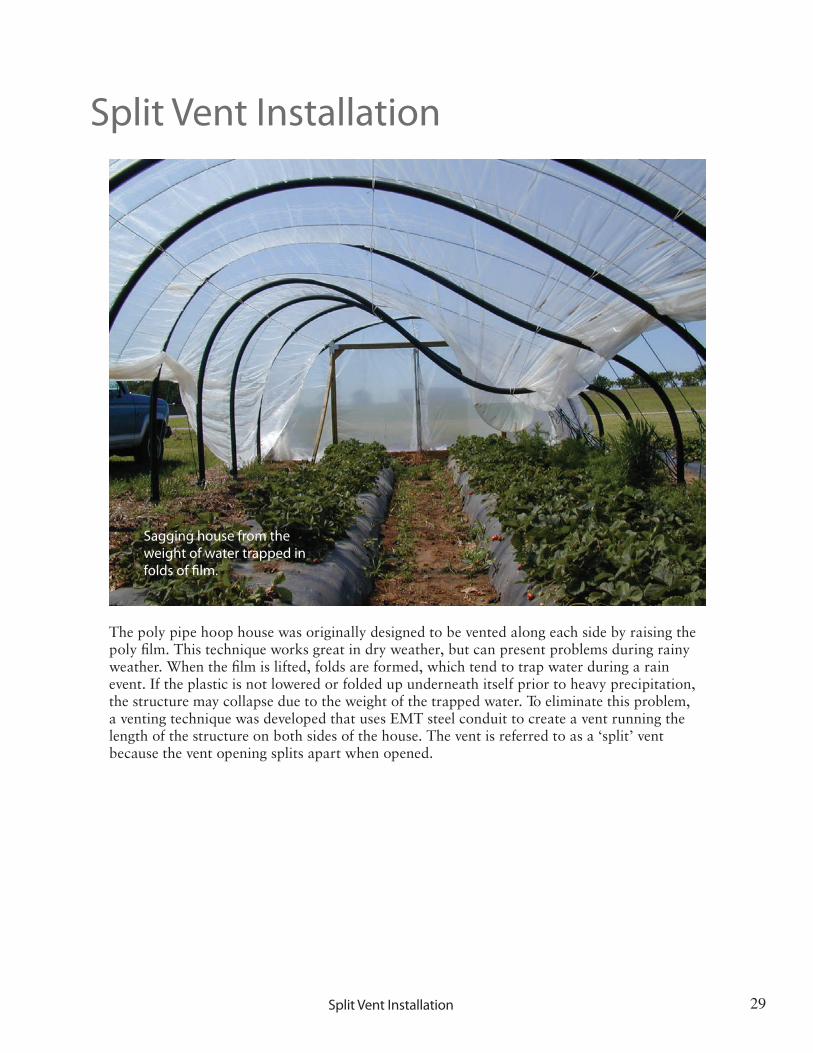
The poly pipe hoop house was originally designed to be vented along each side by raising the poly film. This technique works great in dry weather, but can present problems during rainy weather. When the film is lifted, folds are formed, which tend to trap water during a rain event. If the plastic is not lowered or folded up underneath itself prior to heavy precipitation, the structure may collapse due to the weight of the trapped water. To eliminate this problem, a venting technique was developed that uses EMT steel conduit to create a vent running the length of the structure on both sides of the house. The vent is referred to as a ‘split’ vent because the vent opening splits apart when opened.
Split Vent Installation
Sagging house from the weight of water trapped in folds of �lm.
Split Vent Installation
30
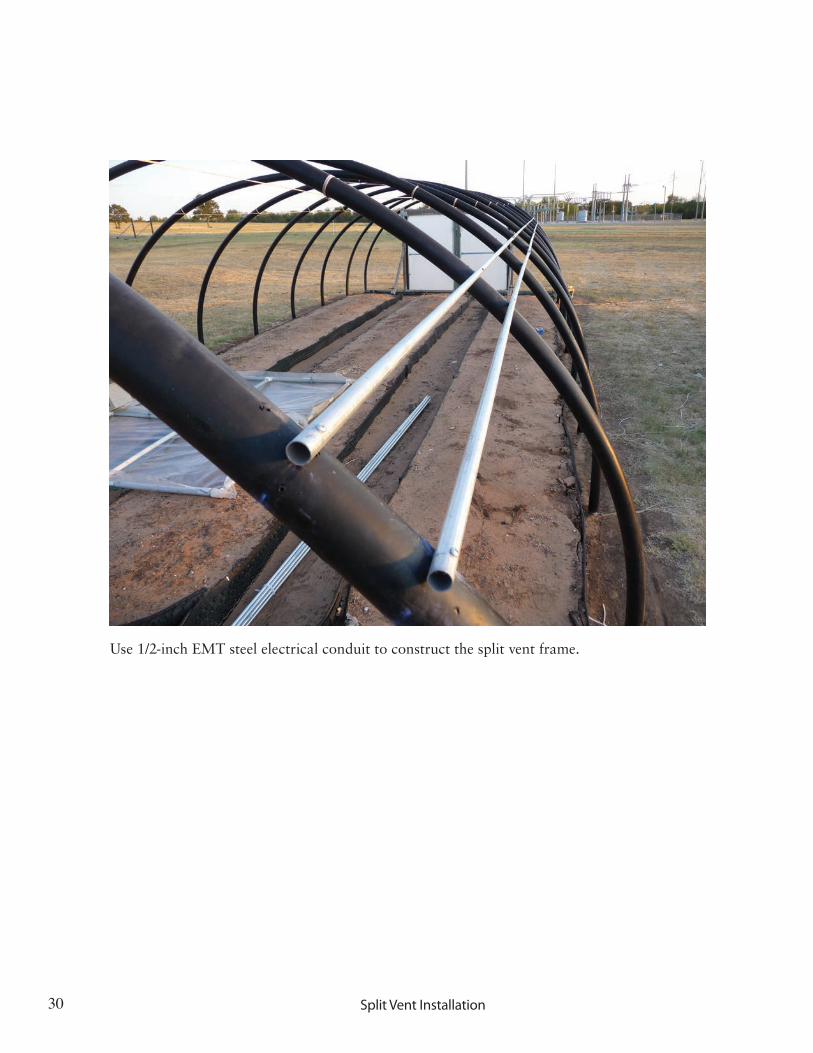
Use 1/2-inch EMT steel electrical conduit to construct the split vent frame.
Split Vent Installation
31
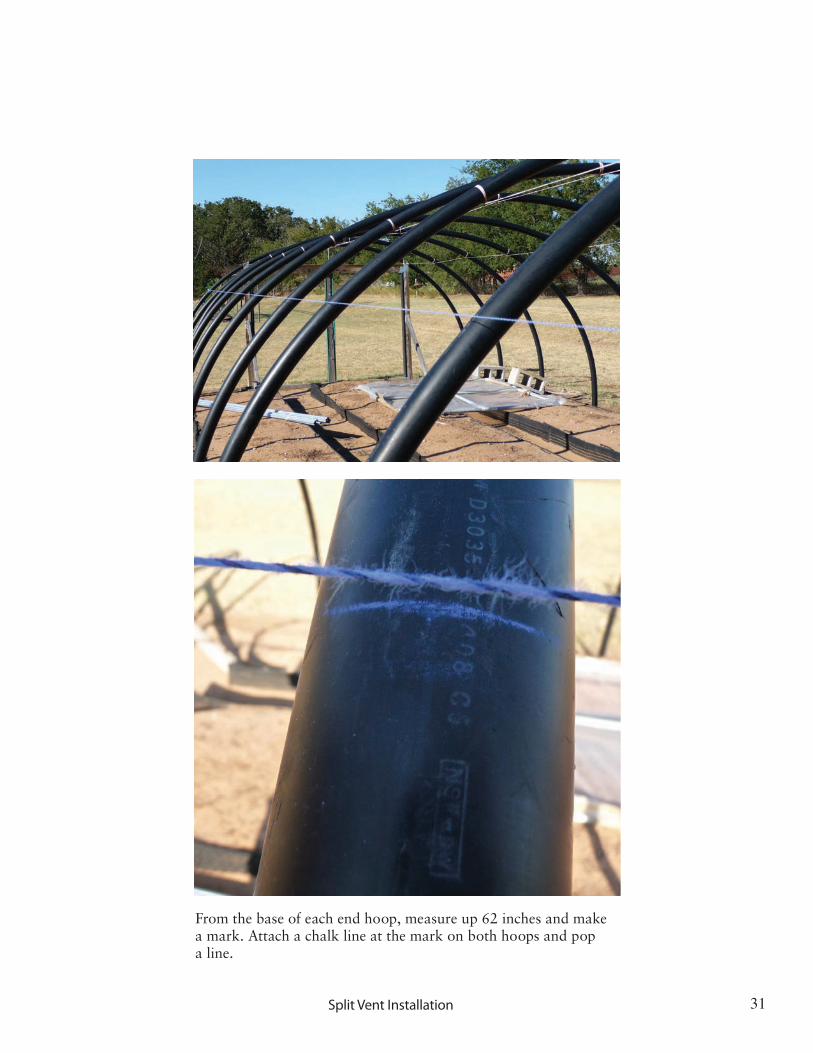
From the base of each end hoop, measure up 62 inches and make a mark. Attach a chalk line at the mark on both hoops and pop a line.
Split Vent Installation
32
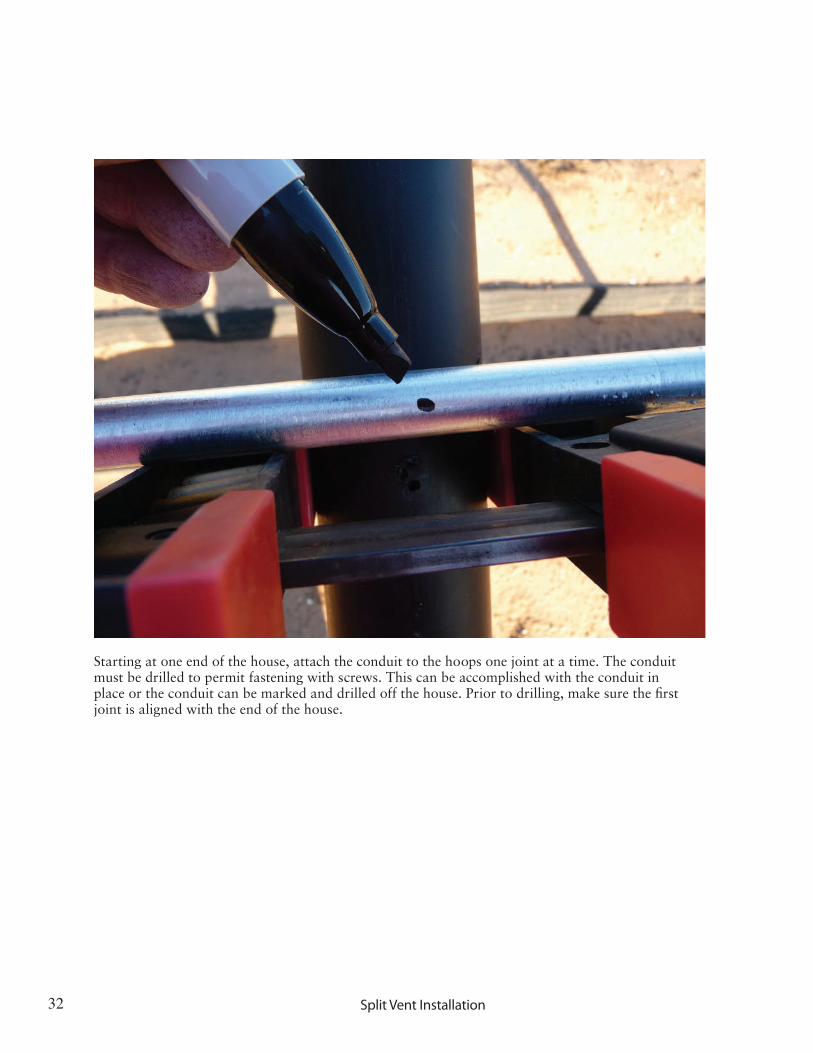
Starting at one end of the house, attach the conduit to the hoops one joint at a time. The conduit must be drilled to permit fastening with screws. This can be accomplished with the conduit in place or the conduit can be marked and drilled off the house. Prior to drilling, make sure the first joint is aligned with the end of the house.
Split Vent Installation
33
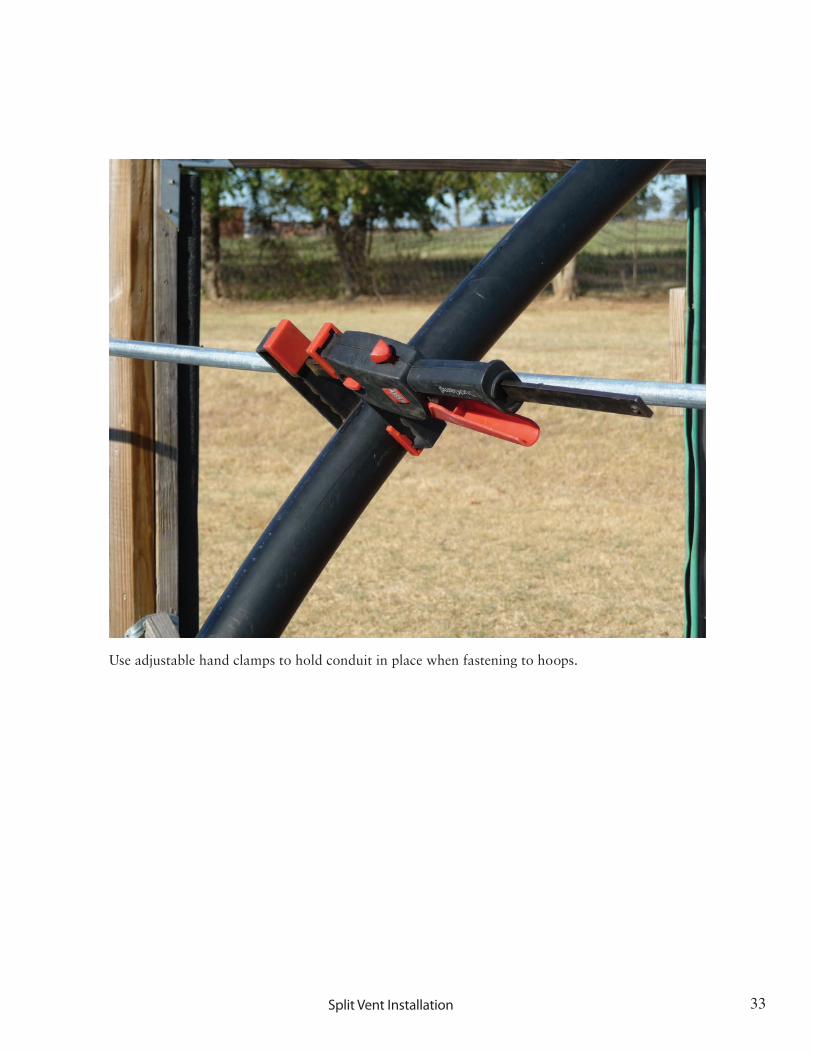
Use adjustable hand clamps to hold conduit in place when fastening to hoops.
Split Vent Installation
34
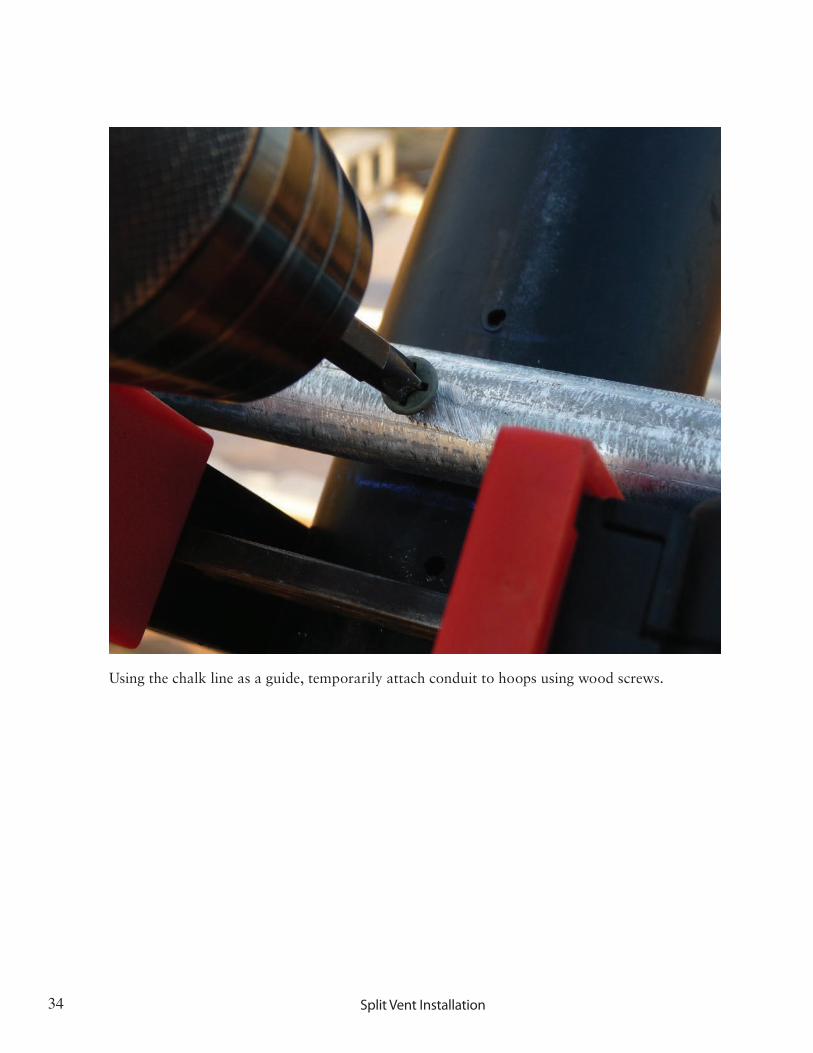
Using the chalk line as a guide, temporarily attach conduit to hoops using wood screws.
Split Vent Installation

35
Use set screw couplers to connect conduit joints.
Split Vent Installation
36
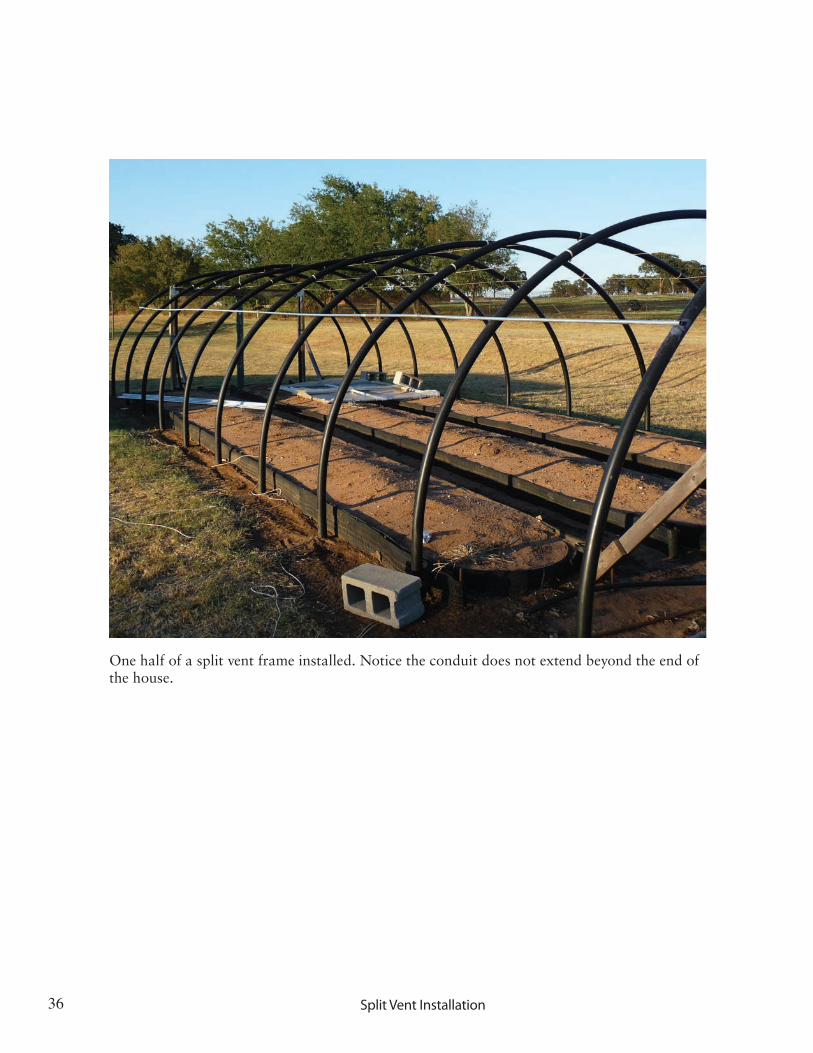
One half of a split vent frame installed. Notice the conduit does not extend beyond the end of the house.
Split Vent Installation
37
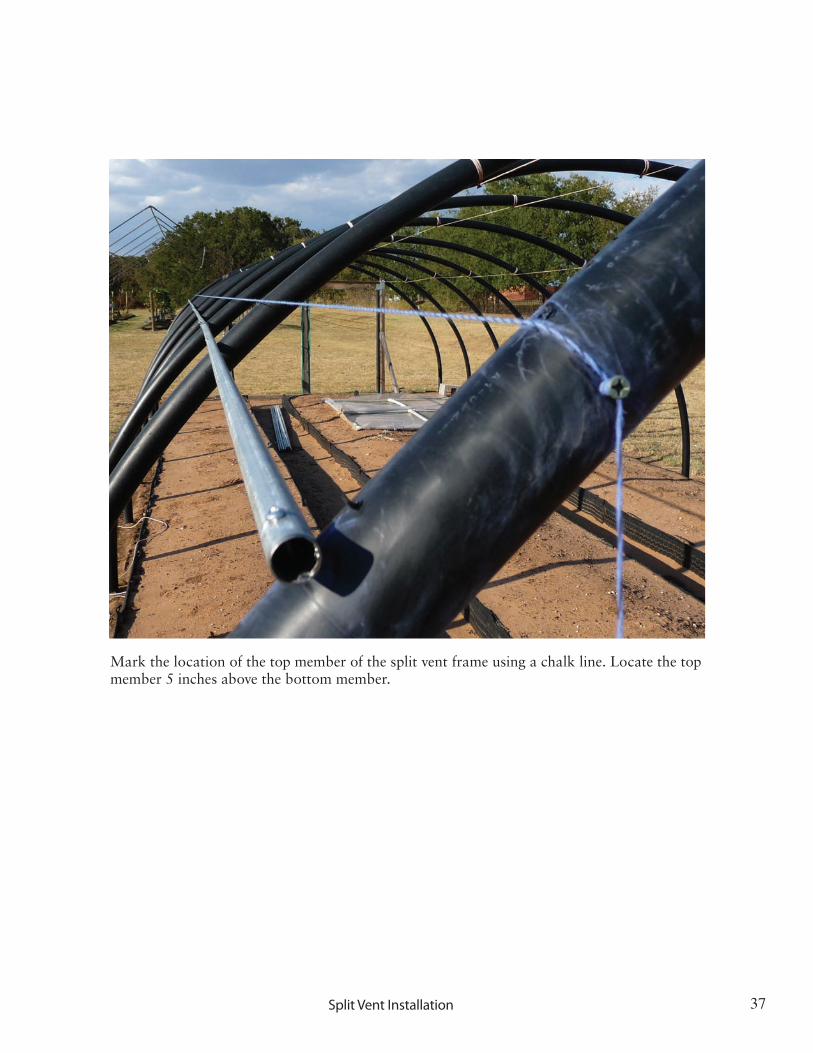
Mark the location of the top member of the split vent frame using a chalk line. Locate the top member 5 inches above the bottom member.
Split Vent Installation

38
Use the same procedure to attach the top frame member.
Split Vent Installation
39
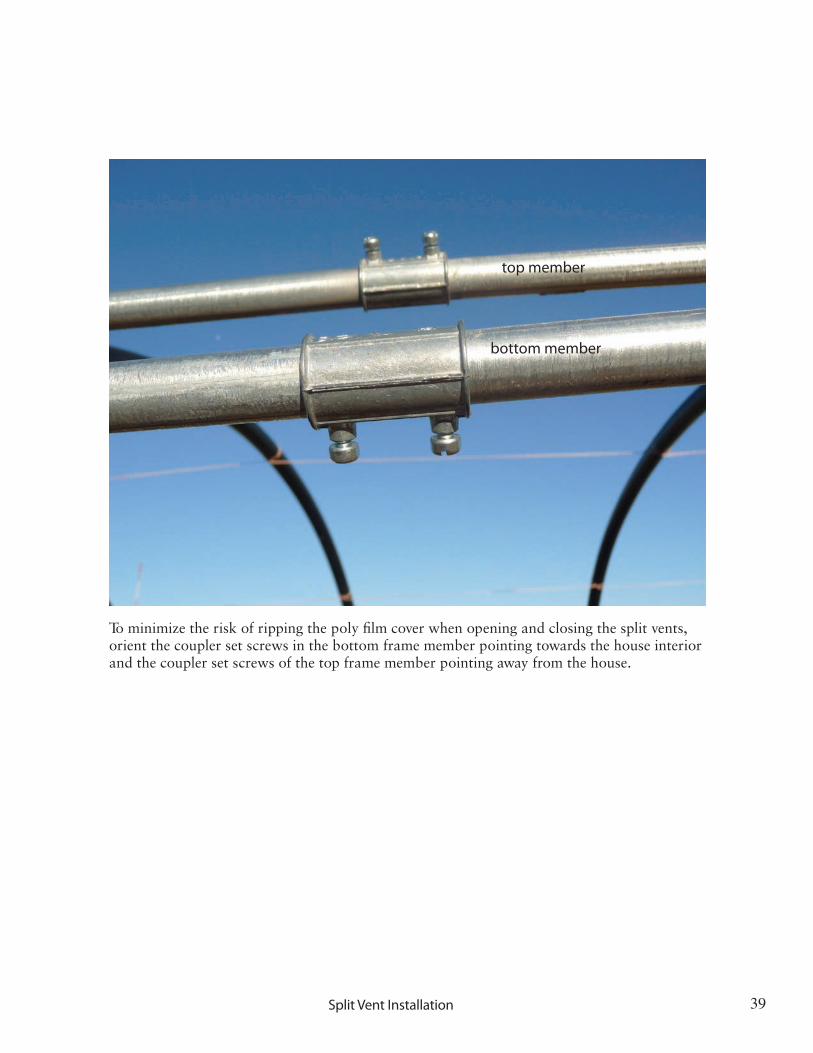
To minimize the risk of ripping the poly film cover when opening and closing the split vents, orient the coupler set screws in the bottom frame member pointing towards the house interior and the coupler set screws of the top frame member pointing away from the house.
top member
bottom member
Split Vent Installation
40
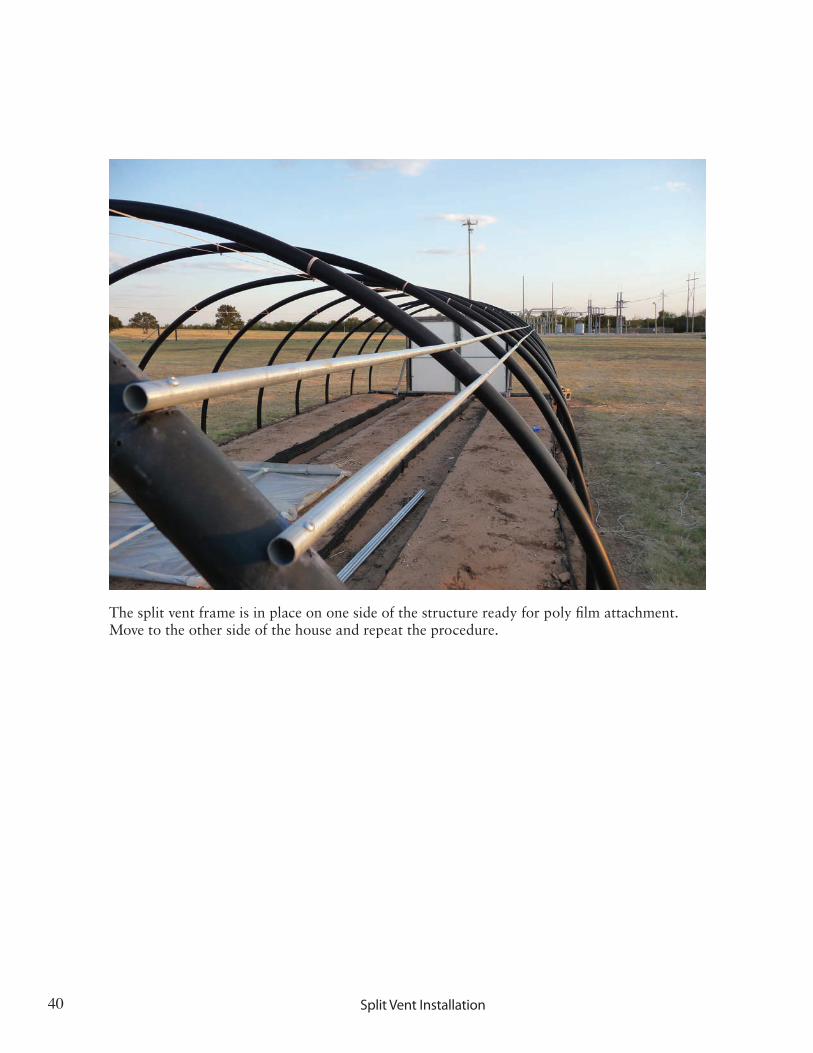
The split vent frame is in place on one side of the structure ready for poly film attachment. Move to the other side of the house and repeat the procedure.
Split Vent Installation
41
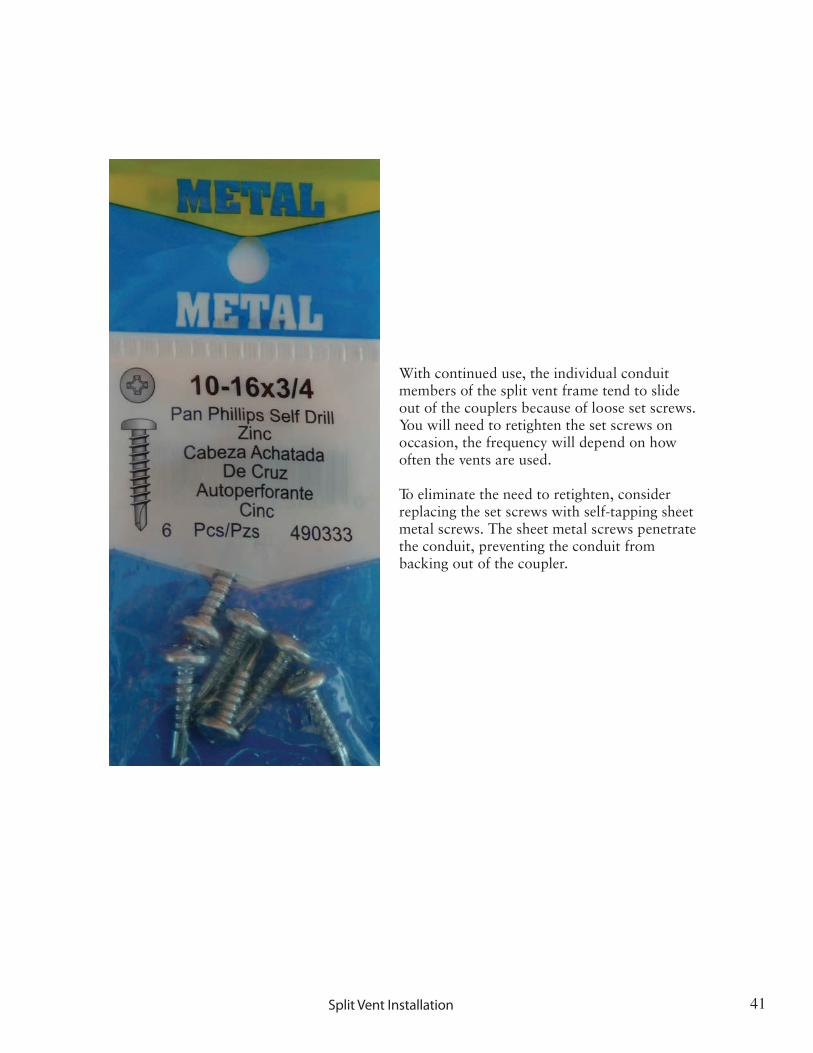
With continued use, the individual conduit members of the split vent frame tend to slide out of the couplers because of loose set screws. You will need to retighten the set screws on occasion, the frequency will depend on how often the vents are used.
To eliminate the need to retighten, consider replacing the set screws with self-tapping sheet metal screws. The sheet metal screws penetrate the conduit, preventing the conduit from backing out of the coupler.
Split Vent Installation
42
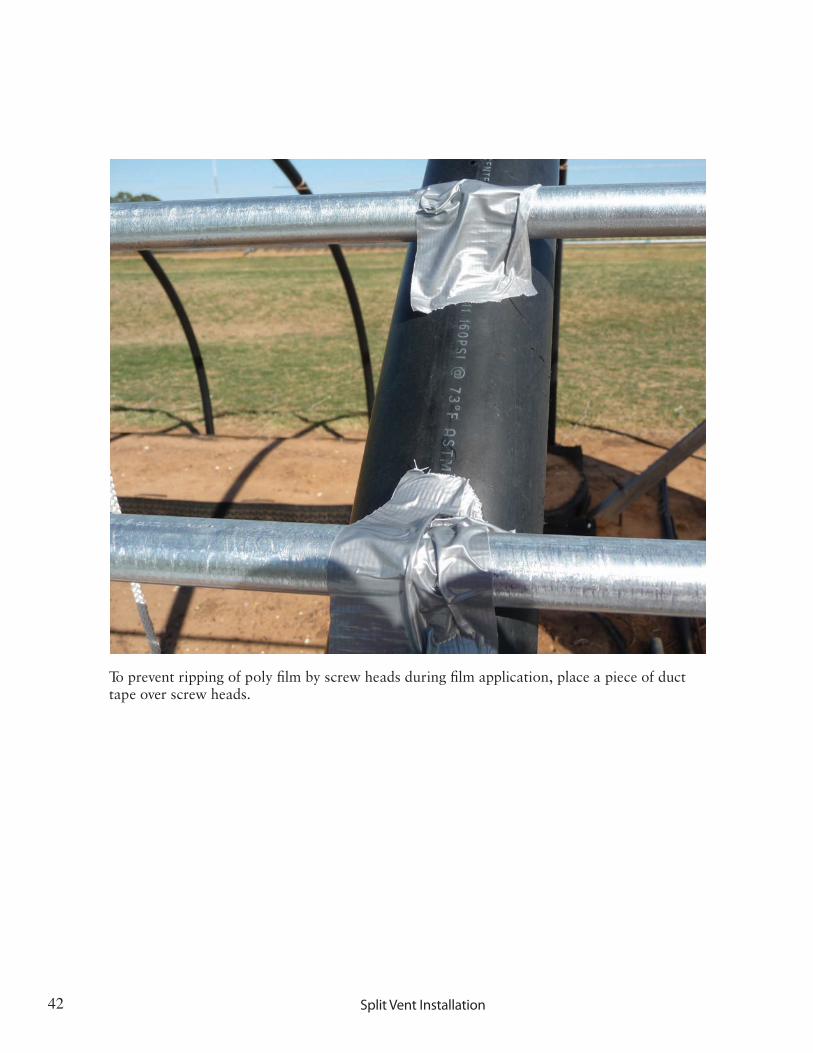
To prevent ripping of poly film by screw heads during film application, place a piece of duct tape over screw heads.
Split Vent Installation
43
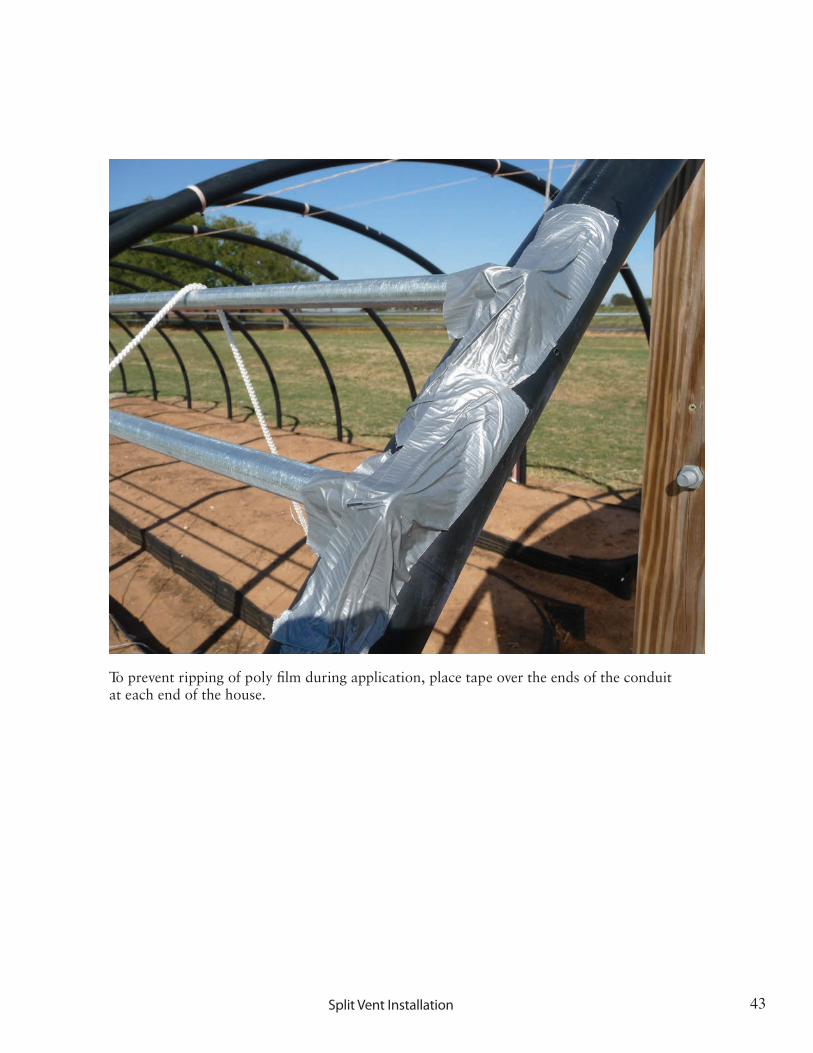
To prevent ripping of poly film during application, place tape over the ends of the conduit at each end of the house.
Split Vent Installation

44
Prior to selecting EMT steel conduit for use in split vent construction, we recommended PVC pipe for use in vent construction. PVC pipe is prone to warping when exposed to high tempera-tures, a common occurrence during Oklahoma summers. Consequently, we no longer recommend the use of PVC pipe for vent construction.
Split Vent Installation
45
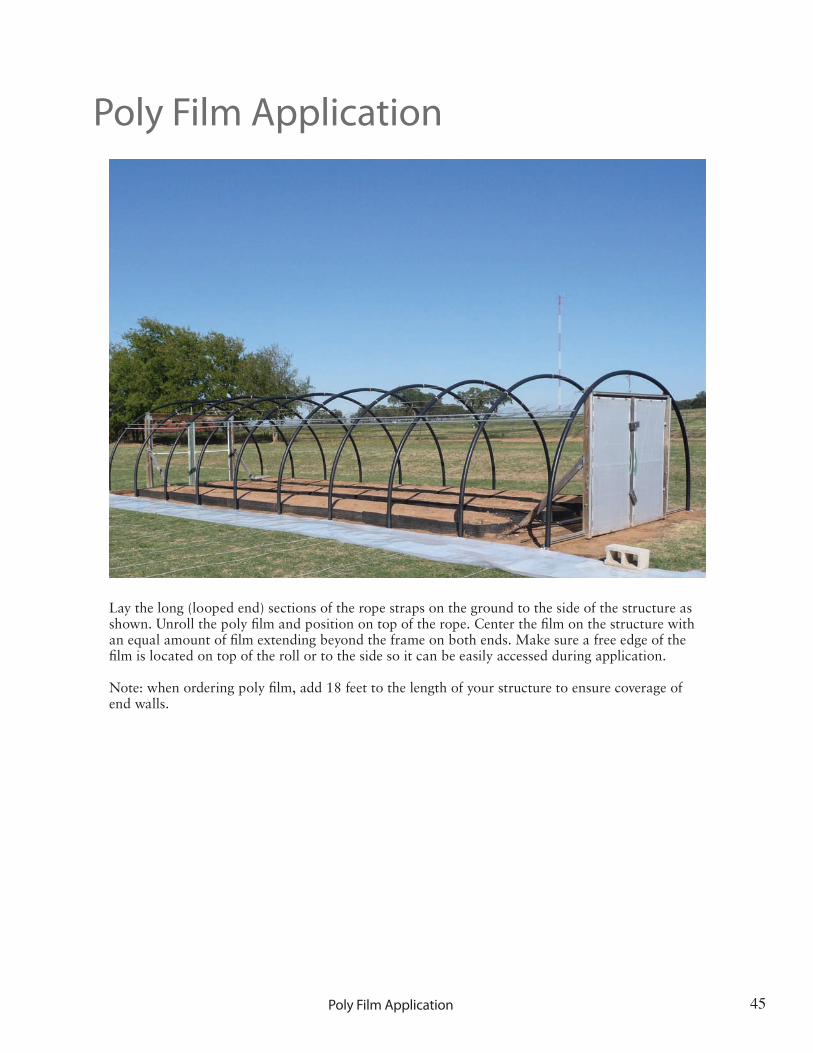
Lay the long (looped end) sections of the rope straps on the ground to the side of the structure as shown. Unroll the poly film and position on top of the rope. Center the film on the structure with an equal amount of film extending beyond the frame on both ends. Make sure a free edge of the film is located on top of the roll or to the side so it can be easily accessed during application.
Note: when ordering poly film, add 18 feet to the length of your structure to ensure coverage of end walls.
Poly Film Application
Poly Film Application
46
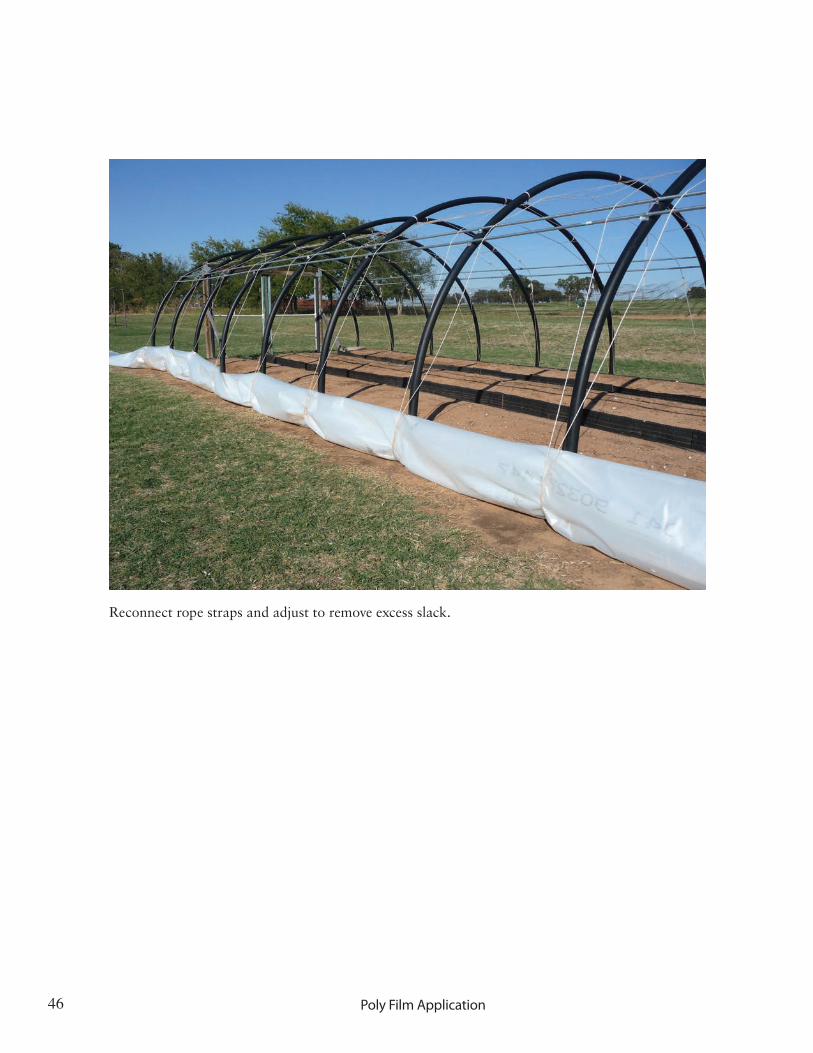
Reconnect rope straps and adjust to remove excess slack.
Poly Film Application
47
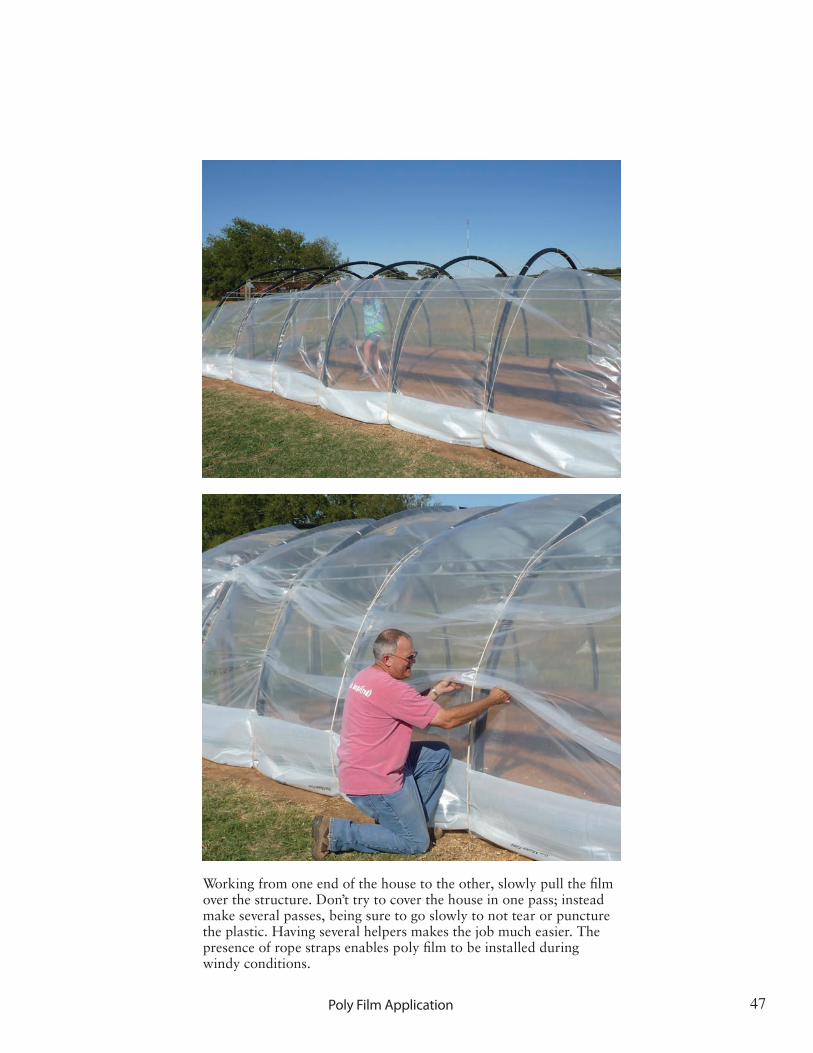
Working from one end of the house to the other, slowly pull the film over the structure. Don’t try to cover the house in one pass; instead make several passes, being sure to go slowly to not tear or puncture the plastic. Having several helpers makes the job much easier. The presence of rope straps enables poly film to be installed during windy conditions.
Poly Film Application

48
After centering poly film on structure, attach film to the top and side members of the end wall frames using a poly fastener such as Wiggle Wire. Do not worry about excess slack in the poly film on the end walls at this stage of the process, since the poly fastener wire will need to be removed and reattached after the split vents become operational.
Poly Film Application

49
Tighten the fit of the poly film on the hoops by cinching up rope straps. Do not over tighten at this stage of the process.
Poly Film Application
50
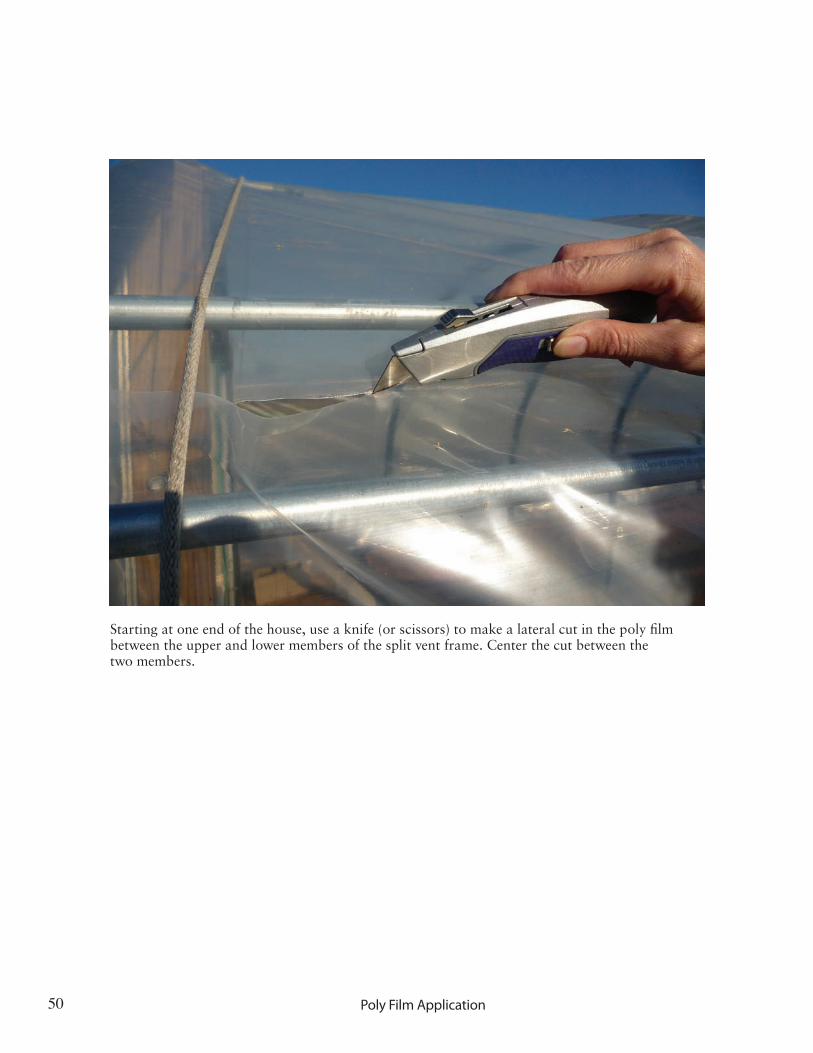
Starting at one end of the house, use a knife (or scissors) to make a lateral cut in the poly film between the upper and lower members of the split vent frame. Center the cut between the two members.
Poly Film Application
51
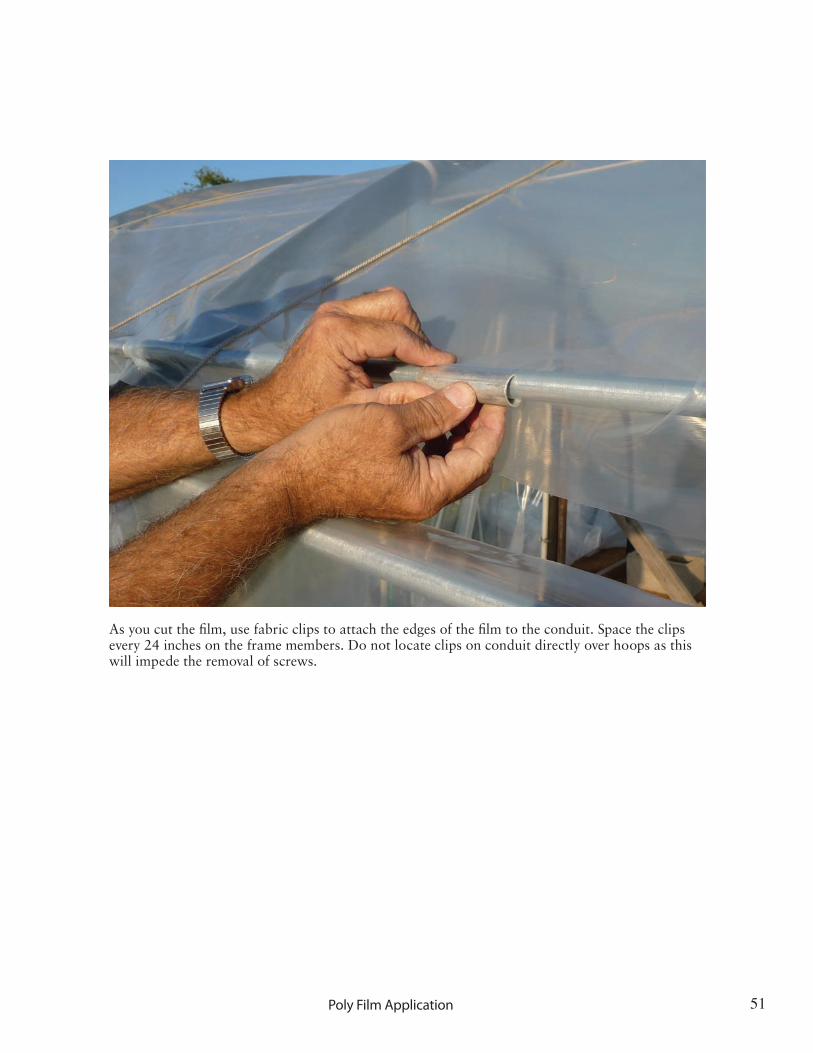
As you cut the film, use fabric clips to attach the edges of the film to the conduit. Space the clips every 24 inches on the frame members. Do not locate clips on conduit directly over hoops as this will impede the removal of screws.
Poly Film Application
52
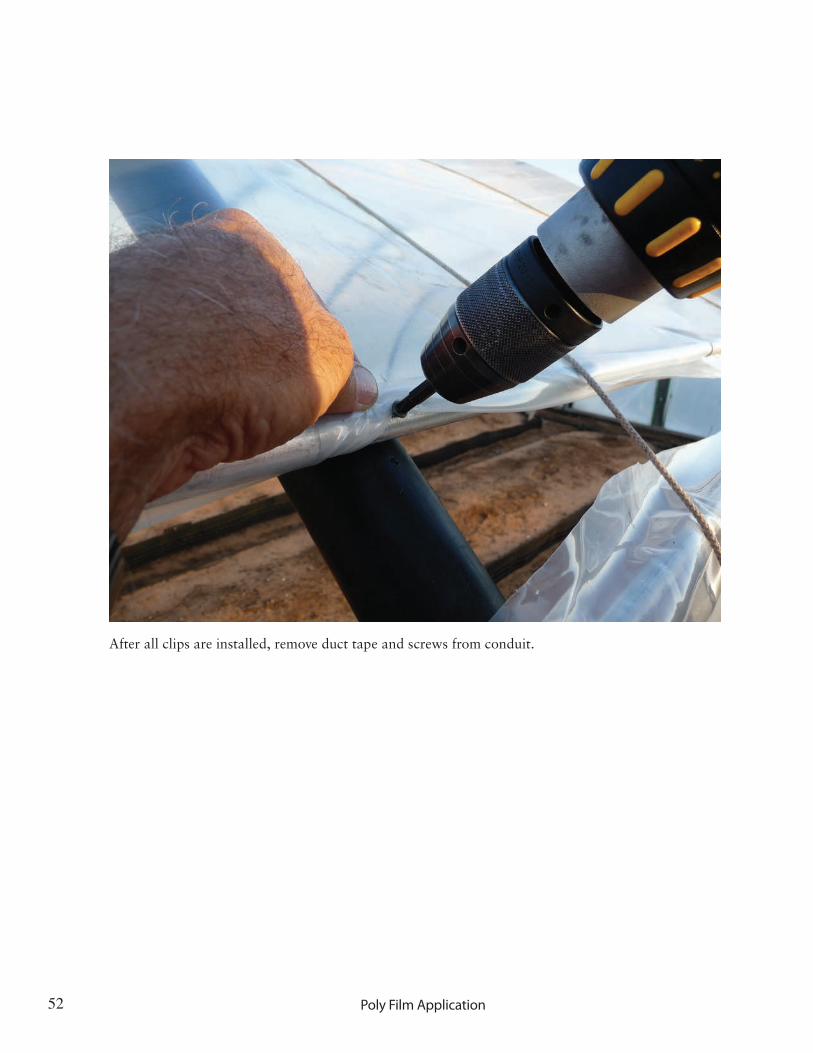
After all clips are installed, remove duct tape and screws from conduit.
Poly Film Application
53
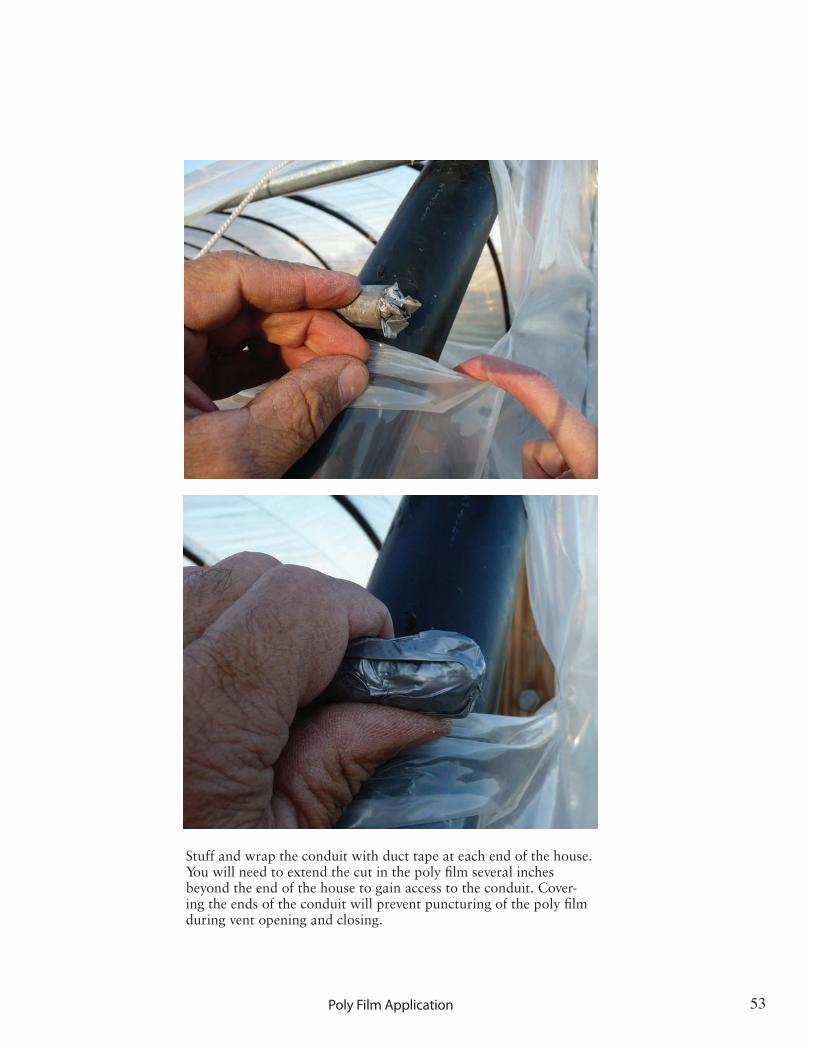
Stuff and wrap the conduit with duct tape at each end of the house. You will need to extend the cut in the poly film several inches beyond the end of the house to gain access to the conduit. Cover-ing the ends of the conduit will prevent puncturing of the poly film during vent opening and closing.
Poly Film Application
54
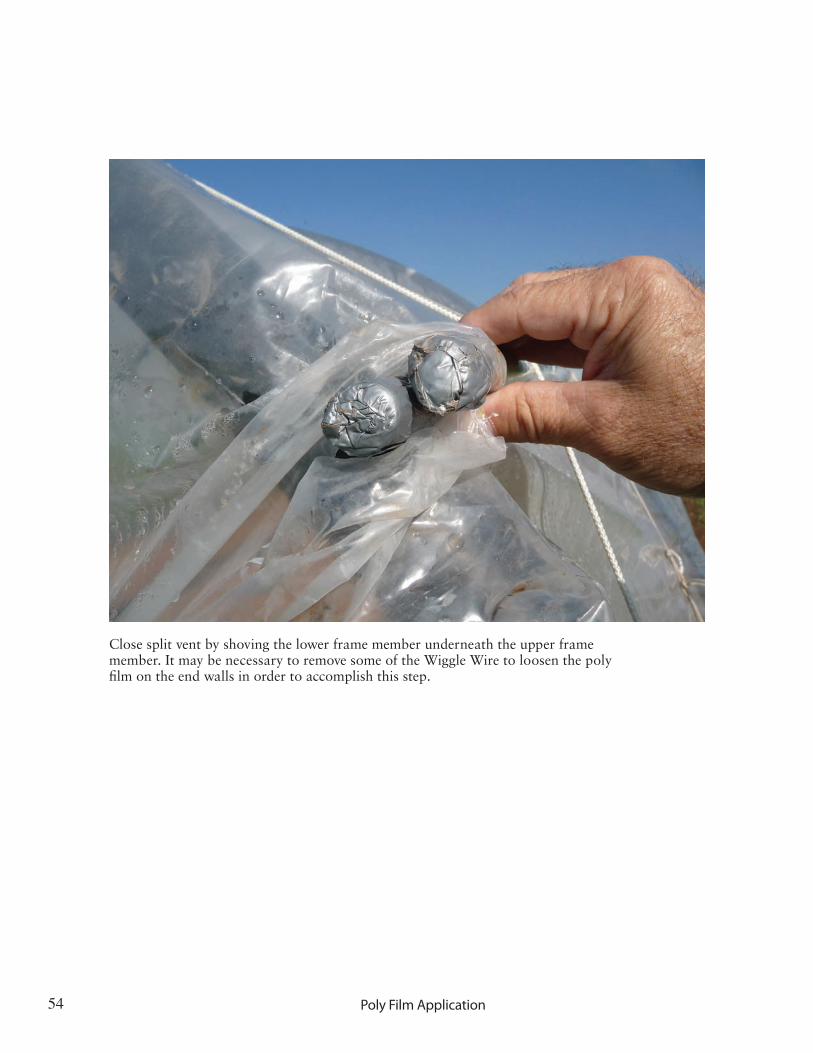
Close split vent by shoving the lower frame member underneath the upper frame member. It may be necessary to remove some of the Wiggle Wire to loosen the poly film on the end walls in order to accomplish this step.
Poly Film Application
55
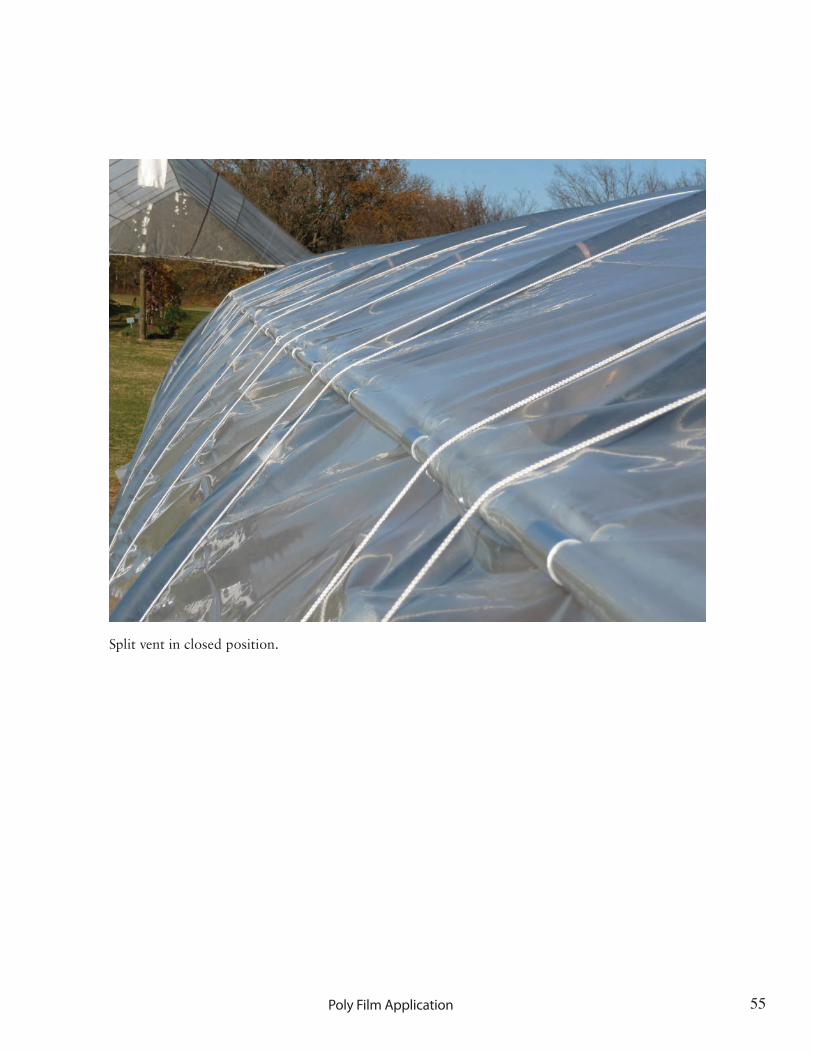
Split vent in closed position.
Poly Film Application
56
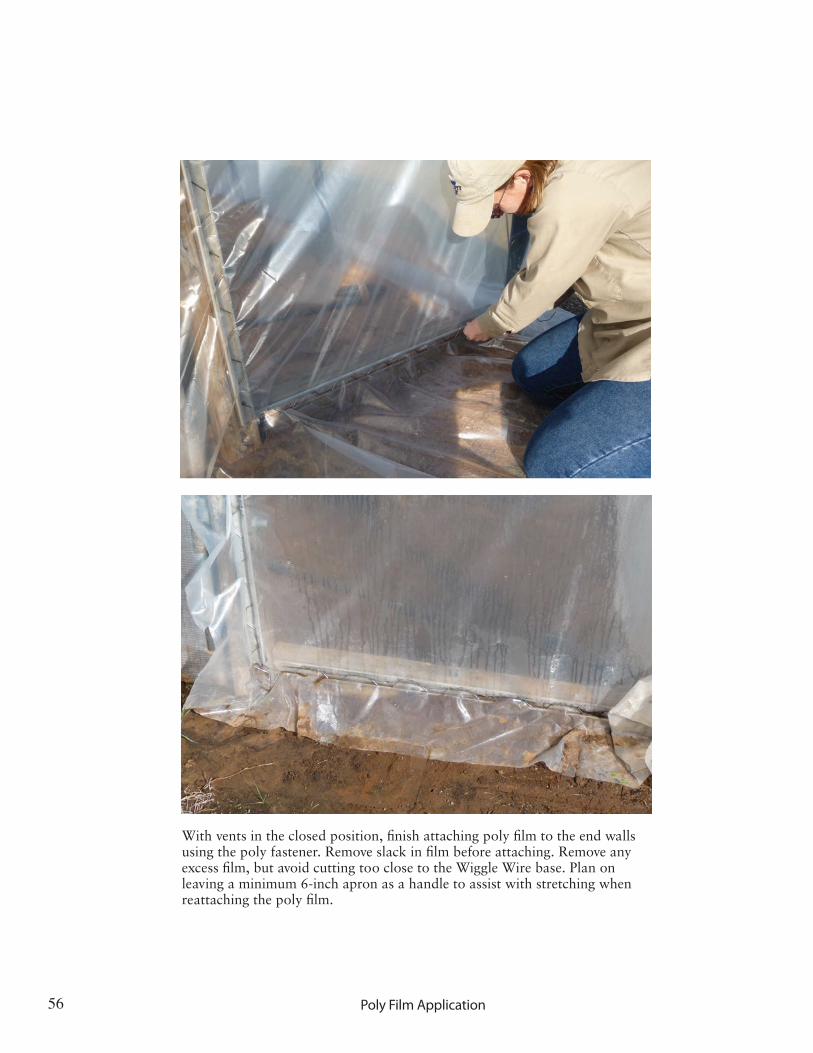
With vents in the closed position, finish attaching poly film to the end walls using the poly fastener. Remove slack in film before attaching. Remove any excess film, but avoid cutting too close to the Wiggle Wire base. Plan on leaving a minimum 6-inch apron as a handle to assist with stretching when reattaching the poly film.
Poly Film Application
57
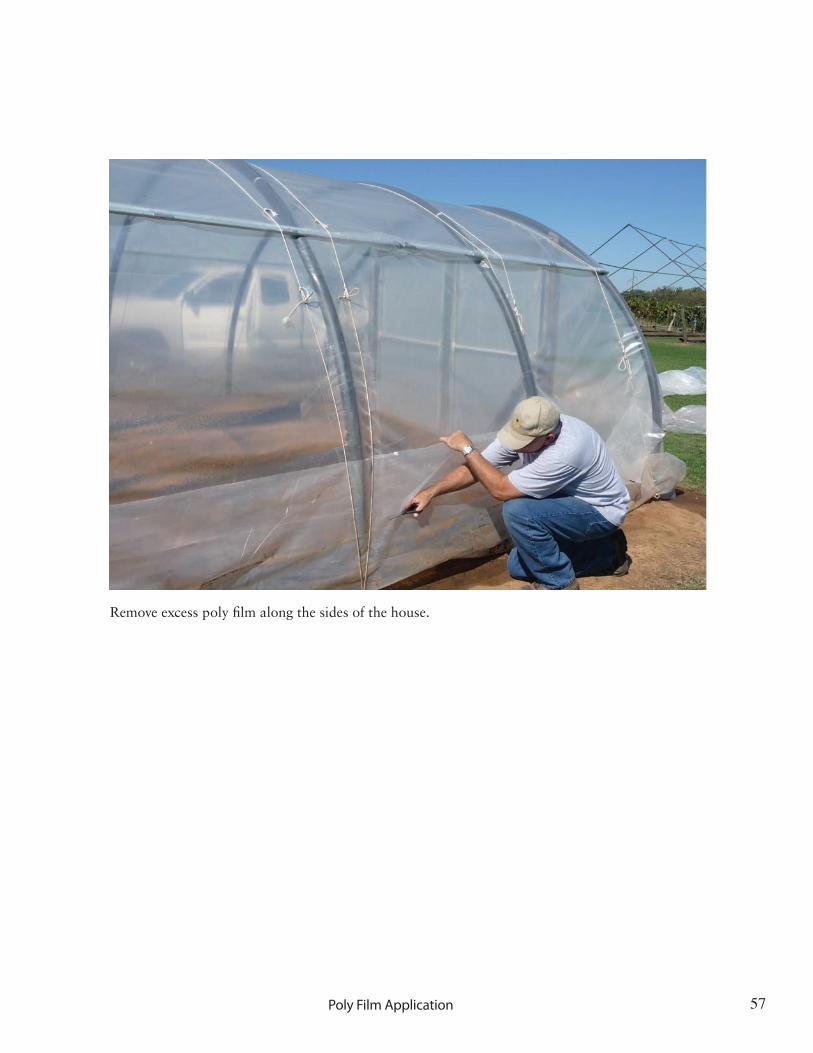
Remove excess poly film along the sides of the house.
Poly Film Application
58
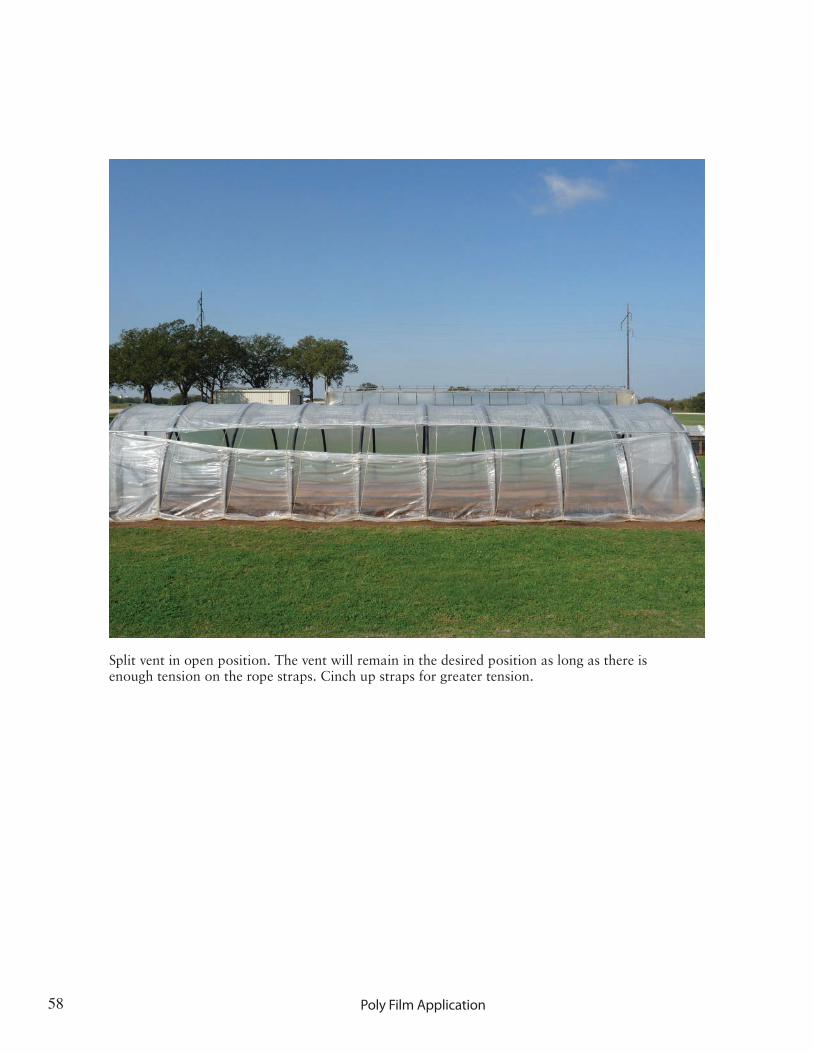
Split vent in open position. The vent will remain in the desired position as long as there is enough tension on the rope straps. Cinch up straps for greater tension.
Poly Film Application
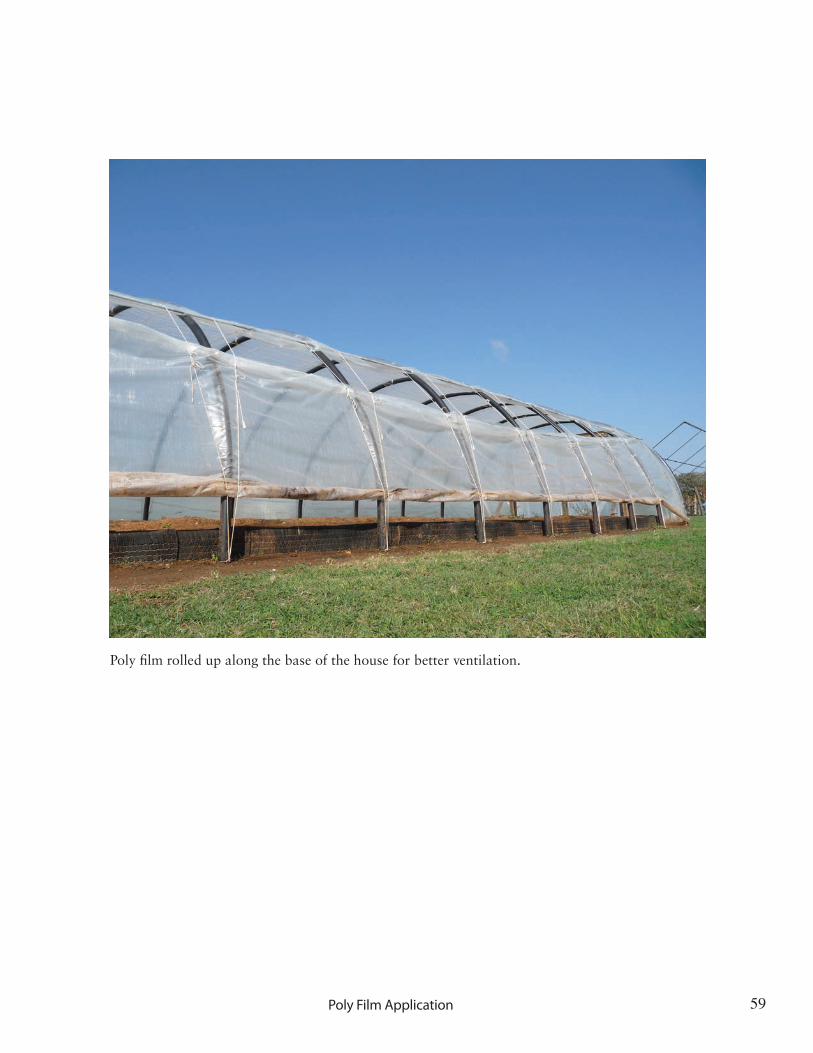
59
Poly film rolled up along the base of the house for better ventilation.
Poly Film Application
60
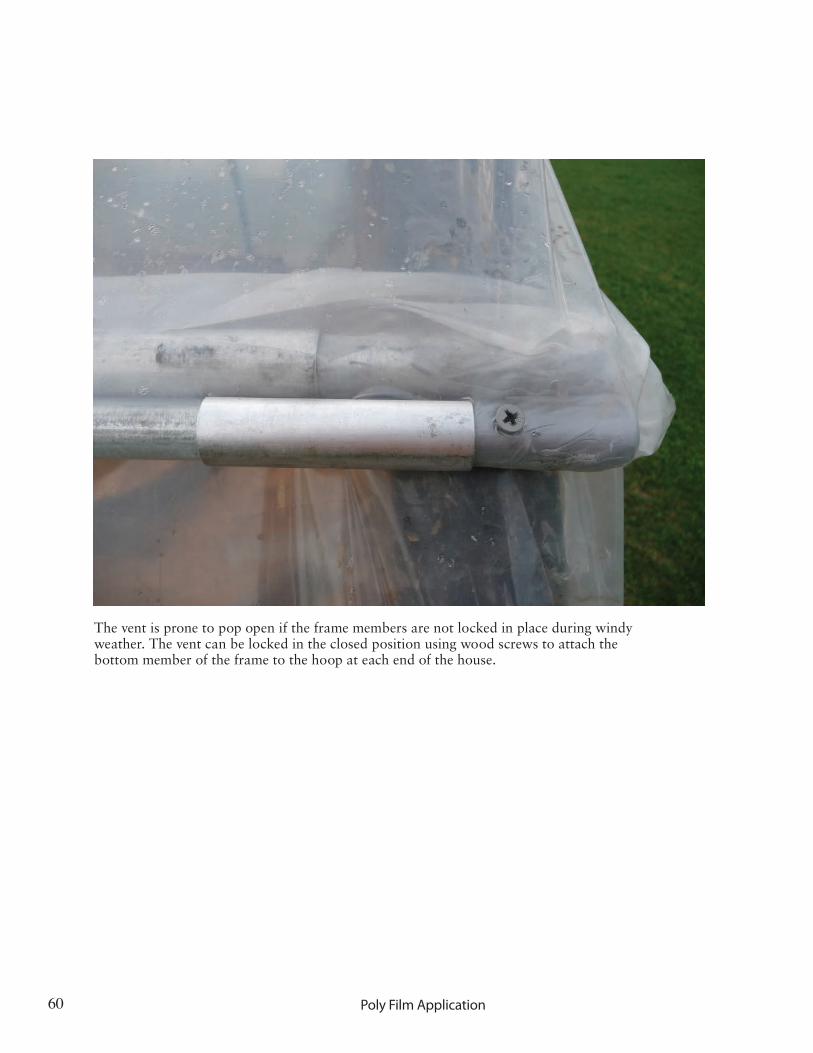
The vent is prone to pop open if the frame members are not locked in place during windy weather. The vent can be locked in the closed position using wood screws to attach the bottom member of the frame to the hoop at each end of the house.
Poly Film Application
61
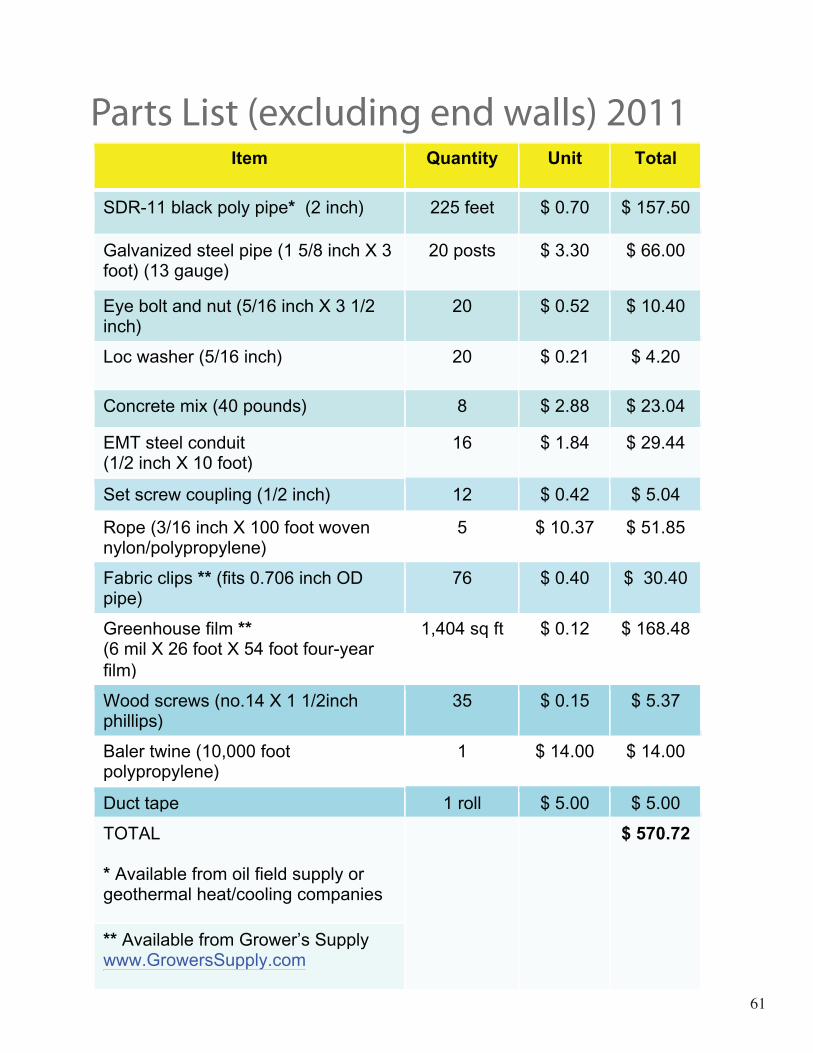
Parts List (excluding end walls) 2011Item Quantity Unit Total
SDR-11 black poly pipe* (2 inch) 225 feet $ 0.70 $ 157.50
Galvanized steel pipe (1 5/8 inch X 3
foot) (13 gauge) 20 posts $ 3.30 $ 66.00
Eye bolt and nut (5/16 inch X 3 1/2
inch) 20 $ 0.52 $ 10.40
Loc washer (5/16 inch) 20 $ 0.21 $ 4.20
Concrete mix (40 pounds) 8 $ 2.88 $ 23.04
EMT steel conduit
(1/2 inch X 10 foot) 16 $ 1.84 $ 29.44
Set screw coupling (1/2 inch) 12 $ 0.42 $ 5.04
Rope (3/16 inch X 100 foot woven
nylon/polypropylene) 5 $ 10.37 $ 51.85
Fabric clips ** (fits 0.706 inch OD
pipe) 76 $ 0.40 $ 30.40
Greenhouse film **
(6 mil X 26 foot X 54 foot four-year
film)
1,404 sq ft $ 0.12 $ 168.48
Wood screws (no.14 X 1 1/2inch
phillips) 35 $ 0.15 $ 5.37
Baler twine (10,000 foot polypropylene)
1 $ 14.00 $ 14.00
Duct tape 1 roll $ 5.00 $ 5.00
TOTAL
* Available from oil field supply or geothermal heat/cooling companies
$ 570.72
** Available from Grower’s Supply www.GrowersSupply.com


![ZAVRŠNI RAD ČAKOVEC, 2019. - CORE · 2020. 1. 18. · 3. 1. Plastenik Prema [4], plastenik je poseban tip zaštićenog prostora koji je svojim oblikom, veličinom i opremom u potpunosti](https://img.dokumen.tips/doc/110x75/60b588efcfcd312cee136ab5/zavrni-rad-oeakovec-2019-core-2020-1-18-3-1-plastenik-prema-4-plastenik.jpg)