Embed Size (px)
Citation preview

myAVR myAVR myAVR myAVR
www.myAVR.de © Laser & Co. Solutions GmbH – 11/2009 www.myAVR.com
Anwendungsbeispiel / Application Note Jingle Bells am mySmartControl
Jingle Bells on mySmartControl
myAVR Jingle Bells
Inhalt Contents Einleitung .......................................................................3
Vorraussetzungen.......................................................3 Schaltplan...................................................................4
Vorlage zum Ausschneiden............................................5 Vorgehensweise.............................................................6
myAVR Laborkarte .....................................................6 LEDs...........................................................................6 Speaker, Steckerleiste, Taster und Potentiometer .....7 Verbindung der LEDs .................................................7 Verbindung zum Mikrocontroller und zur Masse.........8 Verbindung von Taster, Speaker und Potentiometer ..8
Fertigstellen....................................................................9 Programmierung.........................................................9
3D Weihnachtsbaum......................................................9 Schaltplan zum 3D Weihnachtsbaum.......................11
Introduction ....................................................................3 Properties ...................................................................3 Circuit diagram............................................................4
Template for cutting out..................................................5 Approach........................................................................6
Prototyping board .......................................................6 LEDs...........................................................................6 Speaker, buttons and potentiometer...........................7 Connection of the LEDs..............................................7 Connection to microcontroller and ground ..................8 Connection of button, speaker and potentiometer ......8
Finishing.........................................................................9 Programming ..............................................................9
3D Christmas tree ..........................................................9 Circuit diagram for the 3D christmas tree .................11
Jingle Bells am mySmartControl / Jingle Bells on mySmartControl 2/11
www.myAVR.de © Laser & Co. Solutions GmbH – 11/2009 www.myAVR.com
Die Informationen in diesem Produkt werden ohne Rücksicht auf einen eventuellen Patentschutz veröffentlicht. Warennamen werden ohne Gewährleistung der freien Verwendbarkeit benutzt. Bei der Zusammenstellung von Texten und Abbildungen wurde mit größter Sorgfalt vorgegangen. Trotzdem können Fehler nicht vollständig ausgeschlossen werden. Die Autoren können für fehlerhafte Angaben und deren Folgen weder eine juristische Verantwortung noch irgendeine Haftung übernehmen. Für Verbesserungsvorschläge und Hinweise auf Fehler sind die Autoren dankbar.
In spite of the great care taken while writing this document the author is not responsible for the topicality, correctness, completeness or quality of the information provided. Liability claims regarding damage caused by the use of any information provided, including any kind of information which is incomplete or incorrect,will therefore be rejected.
Alle Rechte vorbehalten, auch die der fotomechanischen Wiedergabe und der Speicherung in elektronischen Medien. Die gewerbliche Nutzung der in diesem Produkt gezeigten Modelle und Arbeiten ist nicht zulässig.
All rights reserved. Unless otherwise specified, no part of this publication may be reproduced or utilized in any form or by any means, electronic or mechanical, including photocopying and microfilm, without permission in writing from the publisher.
Fast alle Hardware- und Softwarebezeichnungen, die in diesem Dokument erwähnt werden, sind gleichzeitig auch eingetragene Warenzeichen und sollten als solche betrachtet werden.
All trademarks and registered trademarks appearing in this document are the property of their respective owners.
ü© Laser & Co. Solutions GmbH Promenadenring 8 02708 Löbau Deutschland www.myAVR.de
Tel: ++49 (0) 358 470 222 Fax: ++49 (0) 358 470 233
© Laser & Co. Solutions GmbH Promenadenring 8 02708 Löbau Germany www.myAVR.com
Tel: ++49 (0) 358 470 222 Fax: ++49 (0) 358 470 233
Jingle Bells am mySmartControl / Jingle Bells on mySmartControl 3/11
www.myAVR.de © Laser & Co. Solutions GmbH – 11/2009 www.myAVR.com
Einleitung
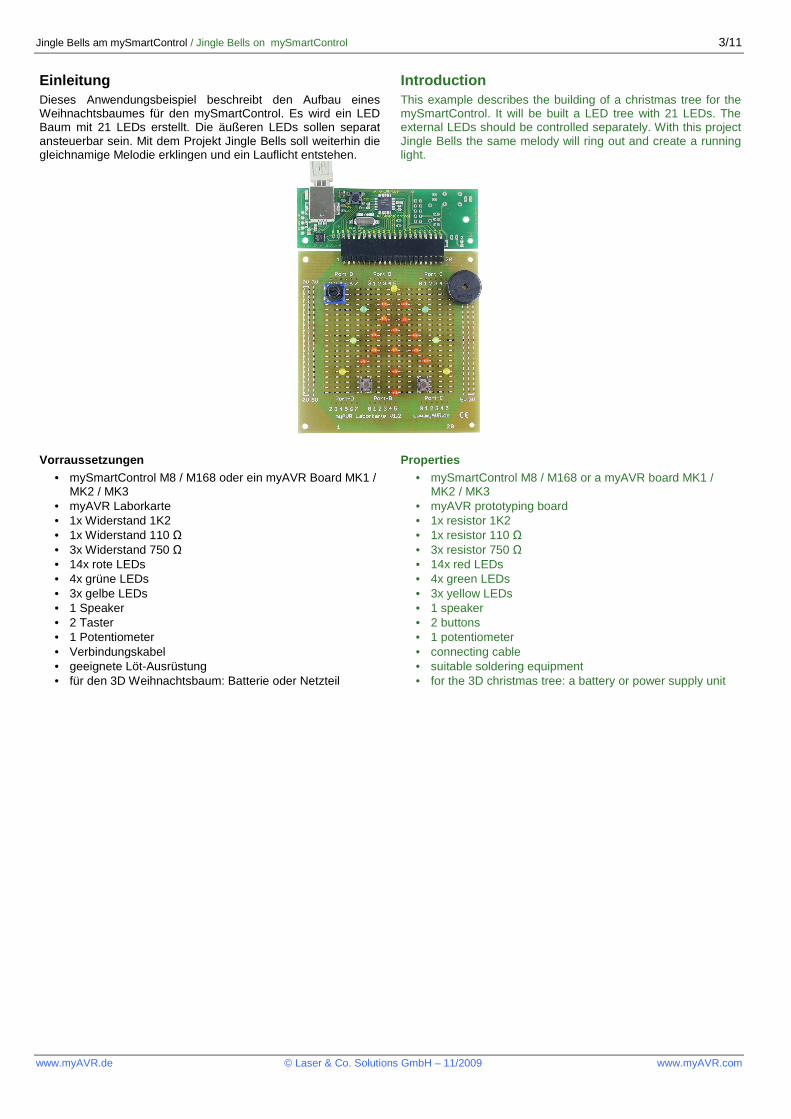
Introduction Dieses Anwendungsbeispiel beschreibt den Aufbau eines Weihnachtsbaumes für den mySmartControl. Es wird ein LED Baum mit 21 LEDs erstellt. Die äußeren LEDs sollen separat ansteuerbar sein. Mit dem Projekt Jingle Bells soll weiterhin die gleichnamige Melodie erklingen und ein Lauflicht entstehen.
This example describes the building of a christmas tree for the mySmartControl. It will be built a LED tree with 21 LEDs. The external LEDs should be controlled separately. With this project Jingle Bells the same melody will ring out and create a running light.
Vorraussetzungen • mySmartControl M8 / M168 oder ein myAVR Board MK1 /
MK2 / MK3 • myAVR Laborkarte • 1x Widerstand 1K2 • 1x Widerstand 110 Ω • 3x Widerstand 750 Ω • 14x rote LEDs • 4x grüne LEDs • 3x gelbe LEDs • 1 Speaker • 2 Taster • 1 Potentiometer • Verbindungskabel • geeignete Löt-Ausrüstung • für den 3D Weihnachtsbaum: Batterie oder Netzteil
Properties
• mySmartControl M8 / M168 or a myAVR board MK1 / MK2 / MK3
• myAVR prototyping board • 1x resistor 1K2 • 1x resistor 110 Ω • 3x resistor 750 Ω • 14x red LEDs • 4x green LEDs • 3x yellow LEDs • 1 speaker • 2 buttons • 1 potentiometer • connecting cable • suitable soldering equipment • for the 3D christmas tree: a battery or power supply unit
Jingle Bells am mySmartControl / Jingle Bells on mySmartControl 4/11
www.myAVR.de © Laser & Co. Solutions GmbH – 11/2009 www.myAVR.com
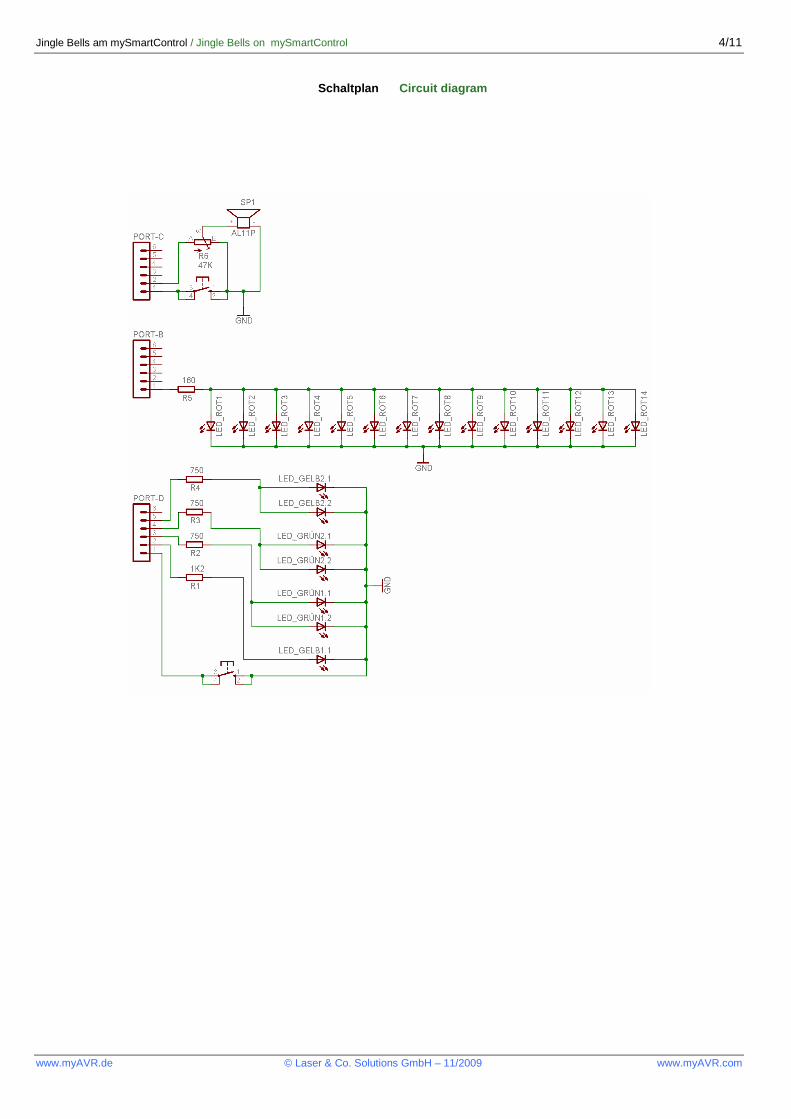
Schaltplan Circuit diagram
Jingle Bells am mySmartControl / Jingle Bells on mySmartControl 5/11
www.myAVR.de © Laser & Co. Solutions GmbH – 11/2009 www.myAVR.com
Vorlage zum Ausschneiden
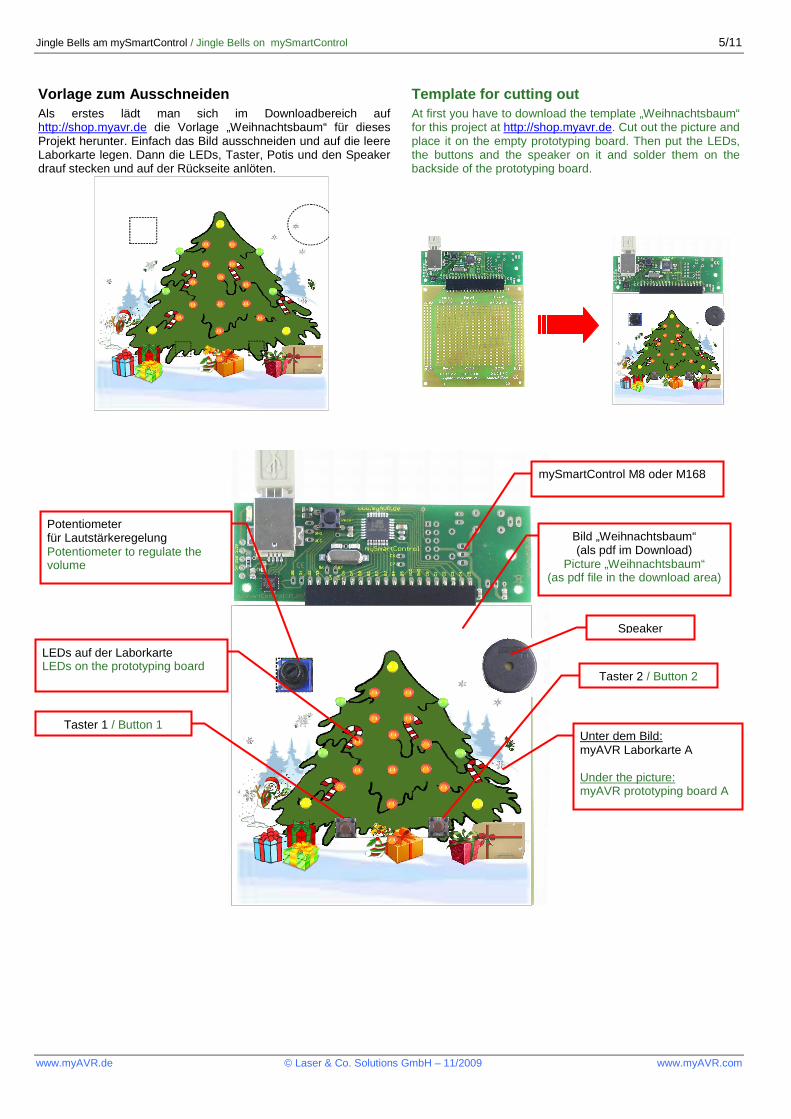
Template for cutting out Als erstes lädt man sich im Downloadbereich auf http://shop.myavr.de die Vorlage „Weihnachtsbaum“ für dieses Projekt herunter. Einfach das Bild ausschneiden und auf die leere Laborkarte legen. Dann die LEDs, Taster, Potis und den Speaker drauf stecken und auf der Rückseite anlöten.
At first you have to download the template „Weihnachtsbaum“ for this project at http://shop.myavr.de. Cut out the picture and place it on the empty prototyping board. Then put the LEDs, the buttons and the speaker on it and solder them on the backside of the prototyping board.
mySmartControl M8 oder M168
Potentiometer für Lautstärkeregelung Potentiometer to regulate the volume
Taster 2 / Button 2
Taster 1 / Button 1
Bild „Weihnachtsbaum“ (als pdf im Download)
Picture „Weihnachtsbaum“ (as pdf file in the download area)
Unter dem Bild: myAVR Laborkarte A Under the picture: myAVR prototyping board A
LEDs auf der Laborkarte LEDs on the prototyping board
Speaker
Jingle Bells am mySmartControl / Jingle Bells on mySmartControl 6/11
www.myAVR.de © Laser & Co. Solutions GmbH – 11/2009 www.myAVR.com
Vorgehensweise
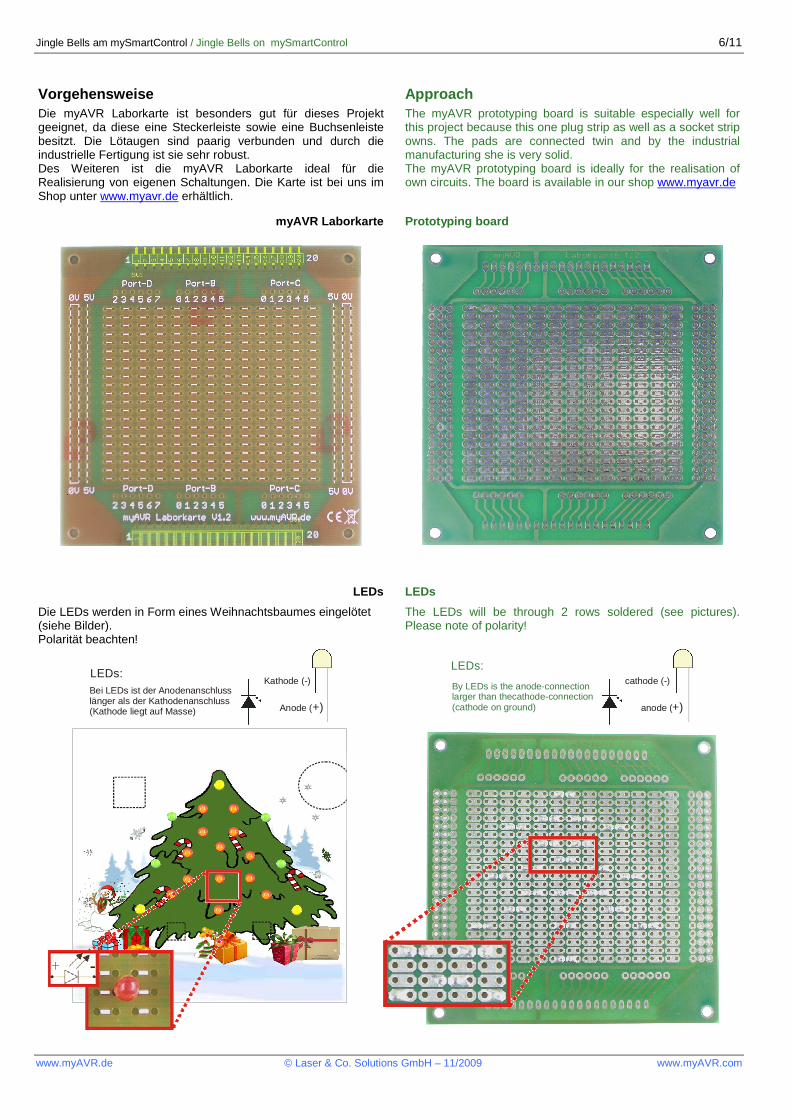
Approach Die myAVR Laborkarte ist besonders gut für dieses Projekt geeignet, da diese eine Steckerleiste sowie eine Buchsenleiste besitzt. Die Lötaugen sind paarig verbunden und durch die industrielle Fertigung ist sie sehr robust. Des Weiteren ist die myAVR Laborkarte ideal für die Realisierung von eigenen Schaltungen. Die Karte ist bei uns im Shop unter www.myavr.de erhältlich.
The myAVR prototyping board is suitable especially well for this project because this one plug strip as well as a socket strip owns. The pads are connected twin and by the industrial manufacturing she is very solid. The myAVR prototyping board is ideally for the realisation of own circuits. The board is available in our shop www.myavr.de
myAVR Laborkarte
Prototyping board
LEDs
LEDs
Die LEDs werden in Form eines Weihnachtsbaumes eingelötet (siehe Bilder). Polarität beachten!
The LEDs will be through 2 rows soldered (see pictures). Please note of polarity!
LEDs:Bei LEDs ist der Anodenanschlusslänger als der Kathodenanschluss(Kathode liegt auf Masse)
Kathode (-)
Anode (+)
LEDs:
By LEDs is the anode-connectionlarger than thecathode-connection(cathode on ground)
cathode (-)
anode (+)
Jingle Bells am mySmartControl / Jingle Bells on mySmartControl 7/11
www.myAVR.de © Laser & Co. Solutions GmbH – 11/2009 www.myAVR.com
Speaker, Steckerleiste, Taster und Potentiometer
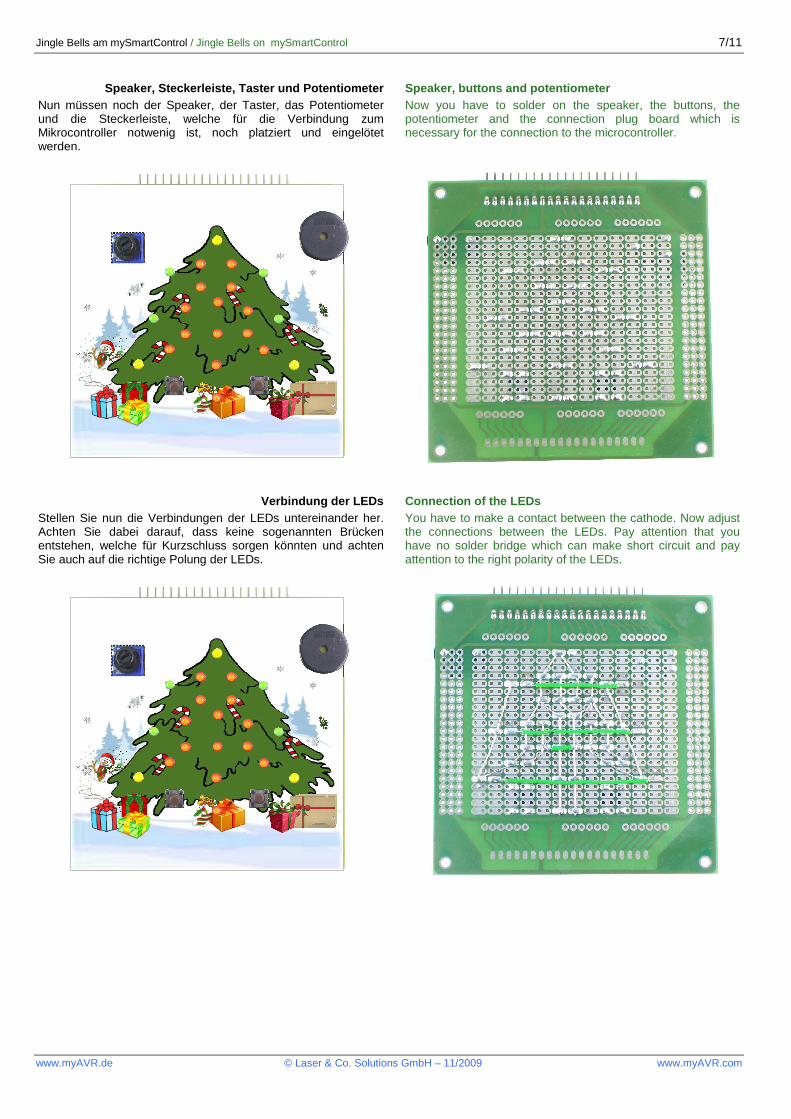
Speaker, buttons and potentiometer Nun müssen noch der Speaker, der Taster, das Potentiometer und die Steckerleiste, welche für die Verbindung zum Mikrocontroller notwenig ist, noch platziert und eingelötet werden.
Now you have to solder on the speaker, the buttons, the potentiometer and the connection plug board which is necessary for the connection to the microcontroller.
Verbindung der LEDs
Connection of the LEDs Stellen Sie nun die Verbindungen der LEDs untereinander her. Achten Sie dabei darauf, dass keine sogenannten Brücken entstehen, welche für Kurzschluss sorgen könnten und achten Sie auch auf die richtige Polung der LEDs.
You have to make a contact between the cathode. Now adjust the connections between the LEDs. Pay attention that you have no solder bridge which can make short circuit and pay attention to the right polarity of the LEDs.
Jingle Bells am mySmartControl / Jingle Bells on mySmartControl 8/11
www.myAVR.de © Laser & Co. Solutions GmbH – 11/2009 www.myAVR.com
Verbindung zum Mikrocontroller und zur Masse
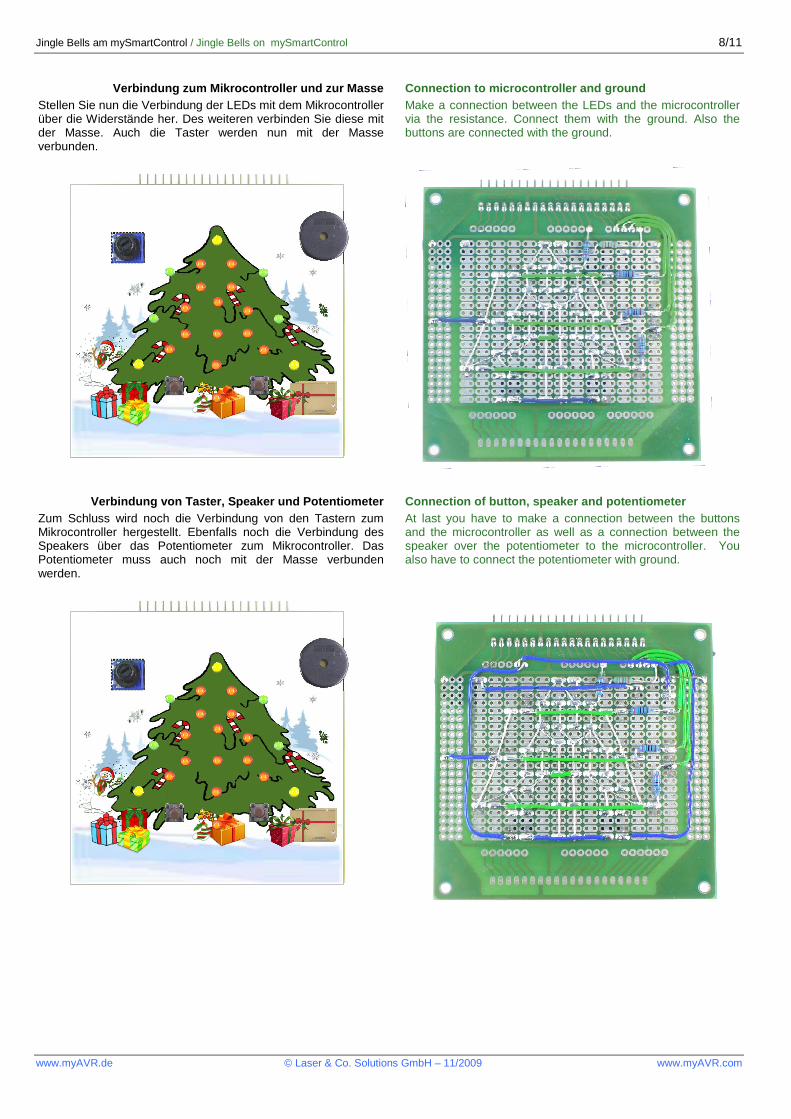
Connection to microcontroller and ground Stellen Sie nun die Verbindung der LEDs mit dem Mikrocontroller über die Widerstände her. Des weiteren verbinden Sie diese mit der Masse. Auch die Taster werden nun mit der Masse verbunden.
Make a connection between the LEDs and the microcontroller via the resistance. Connect them with the ground. Also the buttons are connected with the ground.
Verbindung von Taster, Speaker und Potentiometer
Connection of button, speaker and potentiometer Zum Schluss wird noch die Verbindung von den Tastern zum Mikrocontroller hergestellt. Ebenfalls noch die Verbindung des Speakers über das Potentiometer zum Mikrocontroller. Das Potentiometer muss auch noch mit der Masse verbunden werden.
At last you have to make a connection between the buttons and the microcontroller as well as a connection between the speaker over the potentiometer to the microcontroller. You also have to connect the potentiometer with ground.
Jingle Bells am mySmartControl / Jingle Bells on mySmartControl 9/11
www.myAVR.de © Laser & Co. Solutions GmbH – 11/2009 www.myAVR.com
Fertigstellen
Finishing Stellen Sie die Verbindung zwischen dem PC und dem mySmartControl über ein USB Kabel her. In unserem Downloadbereich finden Sie den Quelltext zu diesem Projekt.
Make the connection between the PC and the mySmartControl via USB. You will find the source code to this project in our download area.
Programmierung
Programming Laden Sie sich den Quelltext herunter und brennen Sie diesen auf das mySmartControl. Dies ist mit folgenden Programmen möglich:
• myAVR ProgTool • myAVR WorkPad SE / PLUS • SiSy AVR
Download the source code and burn it on the mySmartControl. You can use the following software:
• myAVR ProgTool • myAVR WorkPad SE / PLUS • SiSy AVR
3D Weihnachtsbaum
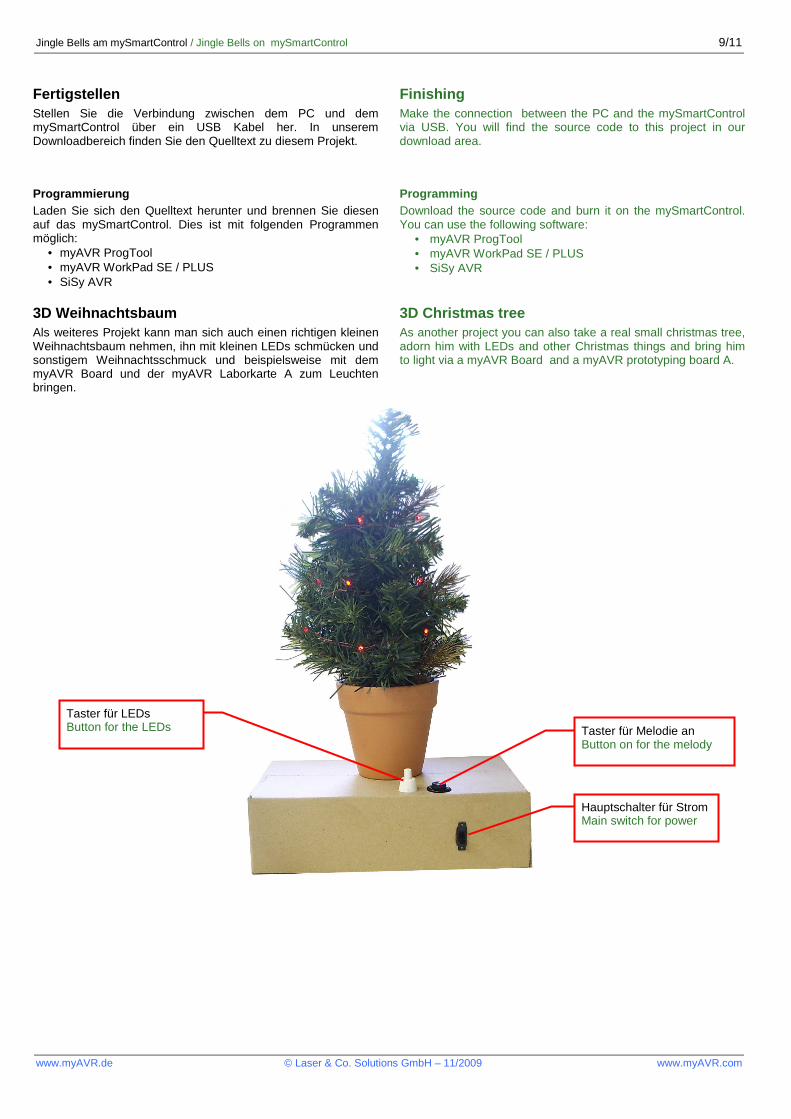
3D Christmas tree Als weiteres Projekt kann man sich auch einen richtigen kleinen Weihnachtsbaum nehmen, ihn mit kleinen LEDs schmücken und sonstigem Weihnachtsschmuck und beispielsweise mit dem myAVR Board und der myAVR Laborkarte A zum Leuchten bringen.
As another project you can also take a real small christmas tree, adorn him with LEDs and other Christmas things and bring him to light via a myAVR Board and a myAVR prototyping board A.
Taster für Melodie an Button on for the melody
Hauptschalter für Strom Main switch for power
Taster für LEDs Button for the LEDs
Jingle Bells am mySmartControl / Jingle Bells on mySmartControl 10/11
www.myAVR.de © Laser & Co. Solutions GmbH – 11/2009 www.myAVR.com
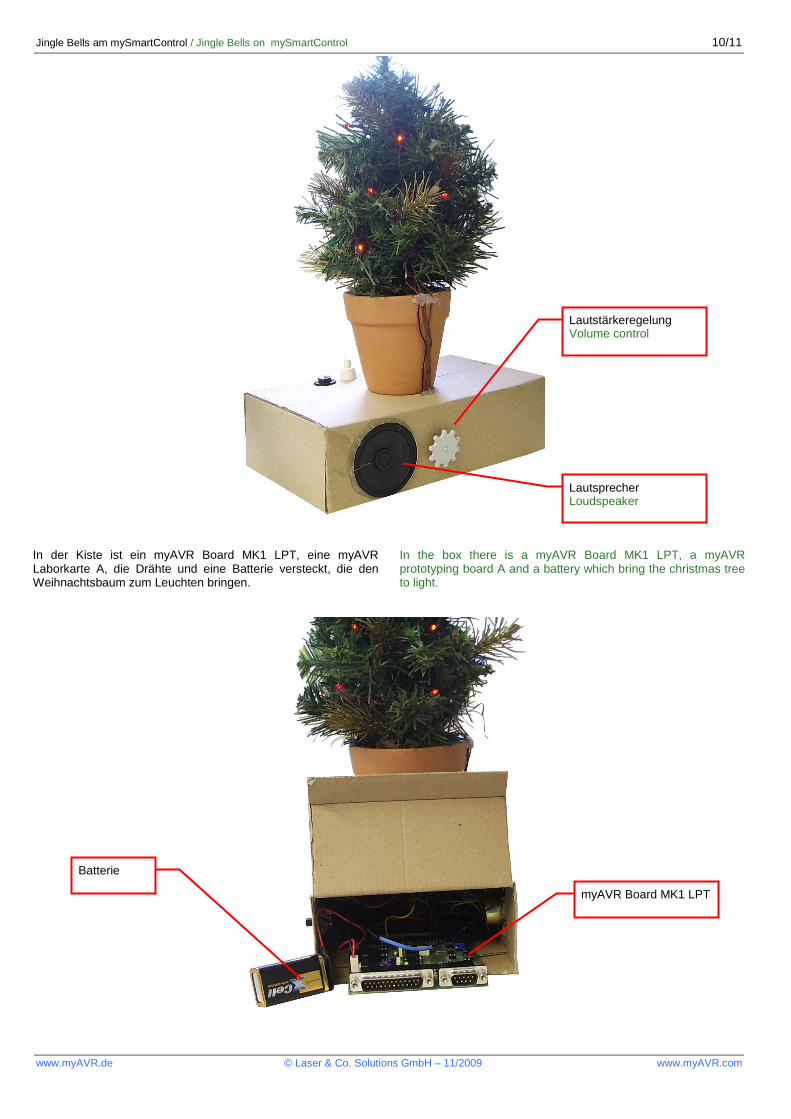
In der Kiste ist ein myAVR Board MK1 LPT, eine myAVR Laborkarte A, die Drähte und eine Batterie versteckt, die den Weihnachtsbaum zum Leuchten bringen.
In the box there is a myAVR Board MK1 LPT, a myAVR prototyping board A and a battery which bring the christmas tree to light.
Lautstärkeregelung Volume control
Lautsprecher Loudspeaker
myAVR Board MK1 LPT
Batterie

Jingle Bells am mySmartControl / Jingle Bells on mySmartControl 11/11
www.myAVR.de © Laser & Co. Solutions GmbH – 11/2009 www.myAVR.com
Schaltplan zum 3D Weihnachtsbaum
Circuit diagram for the 3D christmas tree