Embed Size (px)
Citation preview
Pin Slide Disc Brake Service Manual
Pin Slide Disc Brakes
Service Manualwww.bosch.us
Pin Slide Disc Brake Service Manual
Correspondence concerning this manual should be addressed to:
Robert Bosch LLCATTN: Hydraulic Actuation & Truck Brake Engineering401 North Bendix DriveSouth Bend, Indiana 46628
FAX: 574-237-5603
3rd EditionMay 2008
Important Service NotesThe information in this publication was current at the time of printing. The information pre-sented in this publication is subject to change without notice or liability.
The information contained in this publication is intended for use by properly trained and equipped professional technicians and is NOT for the “Do It Yourselfer.”
Failure to follow all the safety and vehicle repair procedures either contained in this manual, in the chassis and vehicle manufacturer’s repair manuals or in accordance with other accepted methods can result in personal injury, death, or damage to components, vehicles or personal property.
•
weindex.info
Pin Slide Disc Brake Service Manual
Contents
Introduction: ZOPS and ZOH-T Hydraulic Brakes ................................................................................1 ZOH-T Pin Slide Disc Brake Components ..............................................................................................2 General Description ................................................................................................................................3
Caliper Assembly Anchor Plate Leading and Trailing Pin and Caliper Mounting BoltDisc Brake PadsAnchor Plate Assembly
Introduction For Service Procedures .....................................................................................................13
Brake Pad Replacement .........................................................................................................................13
Caliper Assembly Rebuild Instructions .................................................................................................17
Procedure for Reusing Caliper Mounting Bolt .....................................................................................28
Anchor Plate Repair Instructions ........................................................................................................29
Anchor Plate Replacement Instructions ...............................................................................................39
Prepare Brake System for Use .............................................................................................................42
Lubrication ...........................................................................................................................................43 Fastener Torque Chart .........................................................................................................................44
Special Tools ........................................................................................................................................45
Specifications .......................................................................................................................................46
Troubleshooting ...................................................................................................................................47
Rotors ..................................................................................................................................................51
weindex.info
Pin Slide Disc Brake Service Manual�
The ZOH-T anchor plate leading and trailing pins and caliper mounting bolts are NOT separately interchangeable or backward compatible with the original ZOPS anchor plate leading and trailing pins and caliper mounting bolts due to the change in the bolt length and thread form (from coarse thread to fine thread).
When changed out as a complete set, the ZOH-T anchor plate leading and trailing pins and caliper mounting bolts are interchangeable and can be used in anchor plate and caliper housings produced prior to June 3, 2002.
The ZOH-T leading and trailing pin designs are unique and MUST be installed in the correct anchor plate position.
Leading pin must be installed in the leading anchor plate location.
Trailing pin must be installed in the trailing anchor plate location. Reference page 25 Figure 24 for leading and trailing definition.
Because your vehicle may have had prior brake servicing, vehicles built prior to June 3, 2002, may have been upgraded to the ZOH-T pin and bolt design.
•
•
•
•
•
•
Introduction: ZOPS and ZOH-T Hydraulic Brakes
The Zero Offset Pin Slide (ZOPS) disc brake caliper assemblies were in production prior to June 3, 2002.
The Zero Offset Harmonized – Truck (ZOH-T) disc brake caliper assemblies were introduced into production on June 3, 2002. The new caliper assembly has differences from its predecessor, the ZOPS caliper assembly, as follows:
Anchor plate leading and trailing pins: The trailing pin has identification notches and a rubber bushing (reference page ��).Caliper mounting bolts: The bolt is longer, dark in color, has a flange head and fine threads, and is tightened to a higher torque. The bolt may be plain or have an adhesive patch.
•
•
NOTE
For additional details, refer to the Anchor Plate Leading and Trailing Pins and Caliper Mounting Bolt section of this manual.
The correct anchor plate leading and trailing pins and caliper mounting bolts and bolt torque must be used. Brake function could be affected and result in loss of brake function and loss of vehicle control, which could cause personal injury, death, or vehicle, component or property damage.
•
weindex.info
Pin Slide Disc Service Manual2
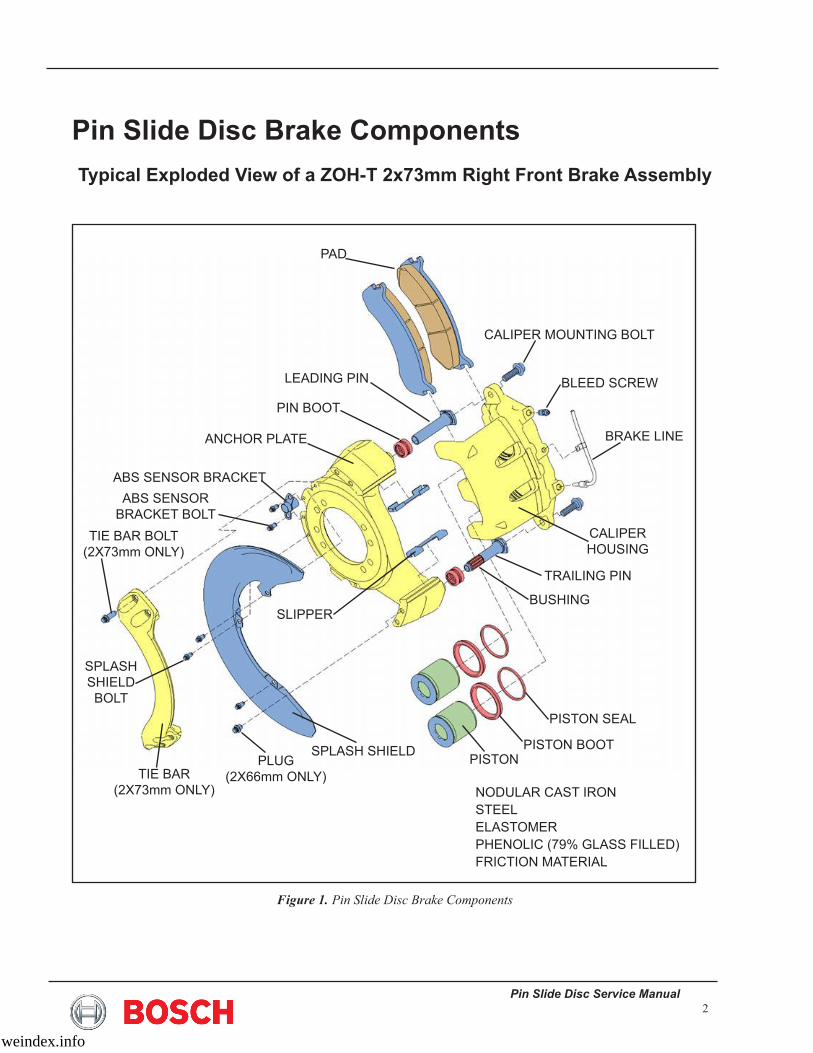
Pin Slide Disc Brake ComponentsTypical Exploded View of a ZOH-T 2x73mm Right Front Brake Assembly
Figure 1. Pin Slide Disc Brake Components
Pad
LeadiNg PiN
PiN BOOT
ancHOR pLaTe
abs sensOR bRackeTabs sensOR
bRackeT bOLTTie baR bOLT
(2x73mm OnLy)
SPLaSHSHieLdBOLT
Tie baR(2x73mm OnLy)
PLUg(2x66mm OnLy)
SPLaSH SHieLd
sLippeR
PiSTONPiSTON BOOT
PiSTON SeaL
BUSHiNg
TRaiLing pin
caLipeR HOUSiNg
bRake Line
bLeed scRew
caLipeR mOunTing bOLT
nOduLaR casT iROnSTeeLeLasTOmeRpHenOLic (79% gLass FiLLed)FRicTiOn maTeRiaL
weindex.info

Pin Slide Disc Brake Service Manual3
General DescriptionThis section provides basic information about the components that comprise a hydraulic disc brake and their intended function. Service information is contained later in this manual.
The Bosch hydraulic pin slide disc brake is a two-piston sliding caliper brake and is used at both front and rear wheel vehicle locations. Each pin slide caliper disc brake wheel installation is made up of three major components as shown in Figure 2.
Caliper assemblyAnchor plate assemblyBrake pads
•••
Figure 2. Pin Slide Disc Brake Components
ancHOR pLaTe aSSeMBLY
caLipeR aSSeMBLY
bRake pads
Pin Slide Disc Service Manual�
The disc brake caliper assembly is just one part of the entire vehicle brake system. The caliper assembly contains two hydraulic piston bores. The piston bores contain pistons, piston seals and piston boots. The caliper assembly attaches to and slides on sealed pins located in the anchor plate, hence the term sliding or pin slide caliper assembly. The front anchor plate is mounted on the front steering knuckle flange, while the rear anchor plate mounts on the rear axle flange.
The caliper assembly comes in two sizes: 2x73mm and 2x66mm. Either size may be on the front or rear vehicle location, based on GVWR (gross vehicle weight rating). Refer to vehicle manufacturer’s vehicle specifications for details.
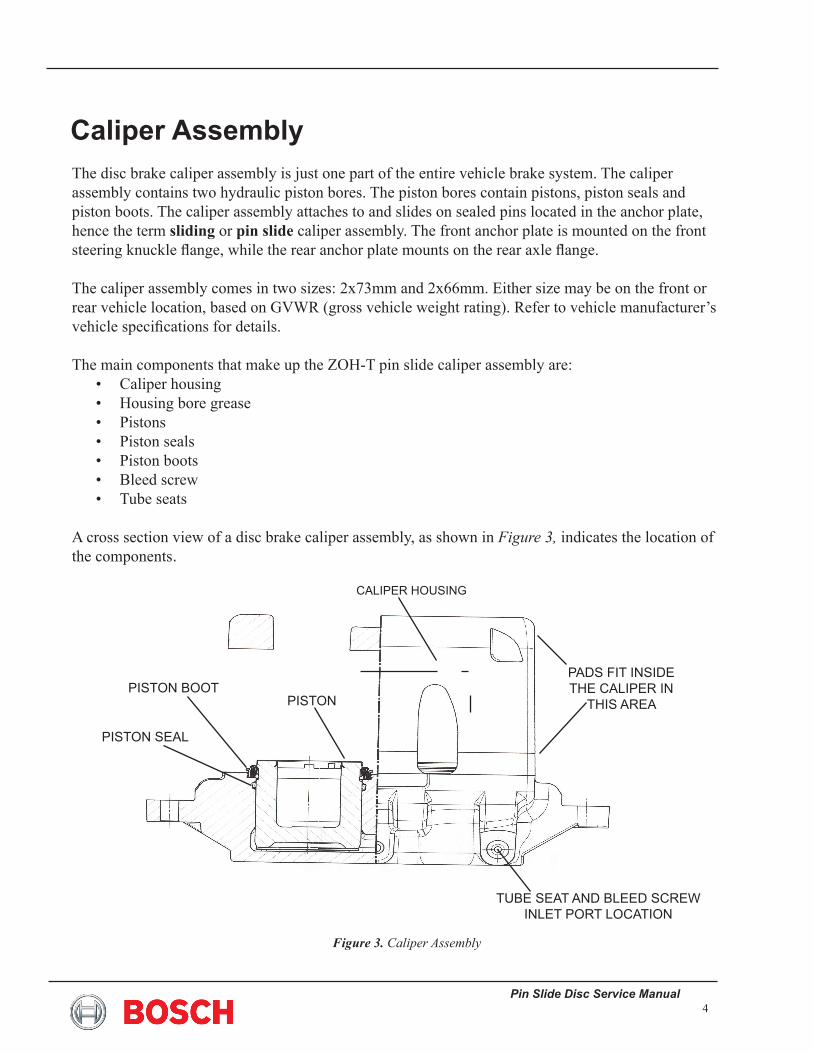
The main components that make up the ZOH-T pin slide caliper assembly are:Caliper housingHousing bore greasePistonsPiston sealsPiston bootsBleed screwTube seats
A cross section view of a disc brake caliper assembly, as shown in Figure 3, indicates the location of the components.
•••••••
Caliper Assembly
Figure 3. Caliper Assembly
PadS FiT iNSide THe caLipeR in
THis aRea
caLipeR HOusing
PiSTON SeaL
PiSTON BOOTPiSTON
Tube seaT and bLeed scRew inLeT pORT LOcaTiOn
Pin Slide Disc Brake Service Manual�
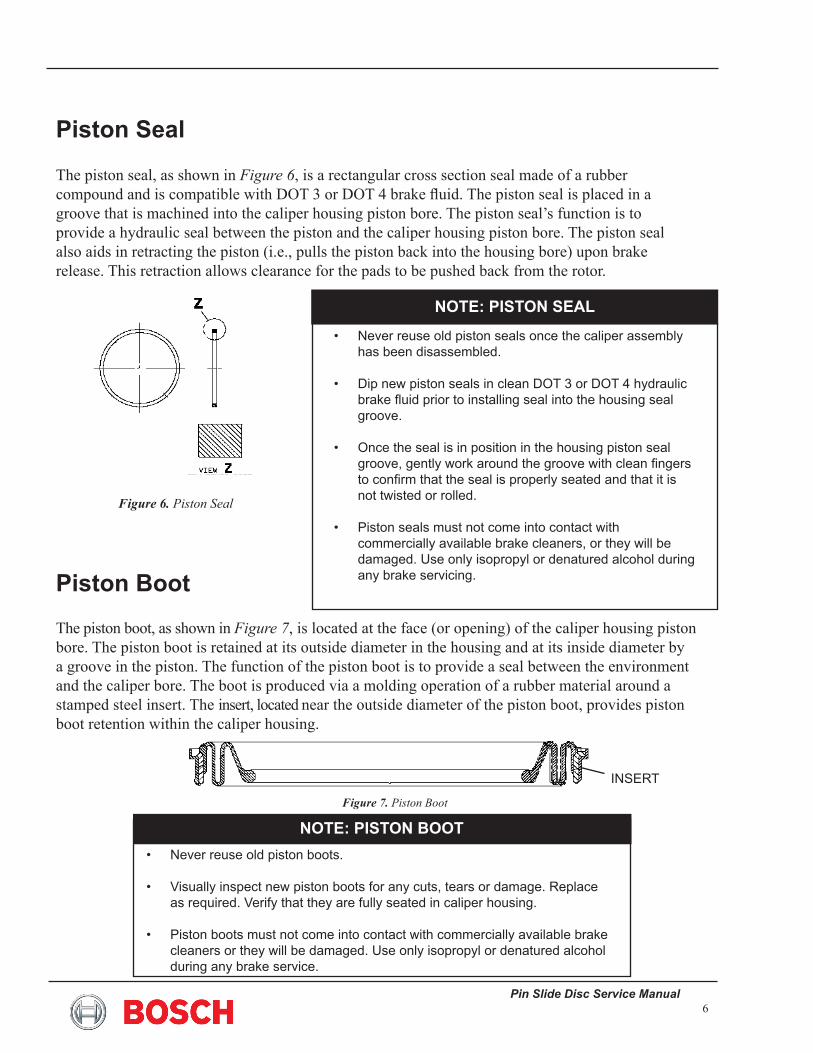
Piston
NOTE: PISTON
The piston must be intact and free of pitting, scoring or excessive wear. if damage or defects are found, replace as required.
Clean pistons with isopropyl or denatured alcohol before visual inspection.
•
•
The piston, as shown in Figure 5, is cylindrical in shape and is retained within the caliper housing piston bore. The function of the piston is to react to the applied hydraulic brake fluid pressure by sliding out of the caliper housing piston bore. It is this movement of the piston out of the caliper housing that results in pad contact with the rotor. The contact of the pad with the rotor produces torque and the braking action of the vehicle. The piston is molded and machined from a phenolic material and has a stainless steel cap.
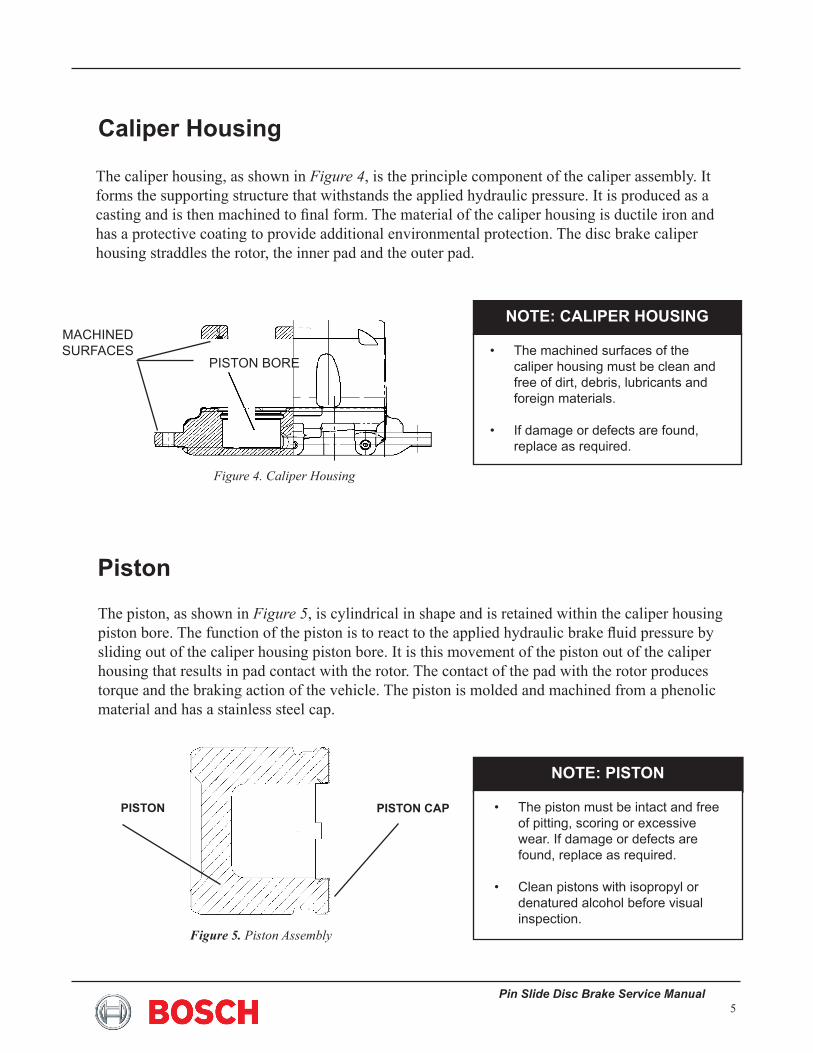
NOTE: CALIPER HOUSING
The machined surfaces of the caliper housing must be clean and free of dirt, debris, lubricants and foreign materials.
if damage or defects are found, replace as required.
•
•
The caliper housing, as shown in Figure 4, is the principle component of the caliper assembly. It forms the supporting structure that withstands the applied hydraulic pressure. It is produced as a casting and is then machined to final form. The material of the caliper housing is ductile iron and has a protective coating to provide additional environmental protection. The disc brake caliper housing straddles the rotor, the inner pad and the outer pad.
Caliper Housing
pisTOn bORe
MaCHiNed suRFaces
Figure 4. Caliper Housing
Figure 5. Piston Assembly
PISTON CAP PISTON
Pin Slide Disc Service Manual6
Piston Seal
Never reuse old piston seals once the caliper assembly has been disassembled.
dip new piston seals in clean dOT 3 or dOT 4 hydraulic brake fluid prior to installing seal into the housing seal groove.
Once the seal is in position in the housing piston seal groove, gently work around the groove with clean fingers to confirm that the seal is properly seated and that it is not twisted or rolled.
Piston seals must not come into contact with commercially available brake cleaners, or they will be damaged. use only isopropyl or denatured alcohol during any brake servicing.
•
•
•
•
NOTE: PISTON SEAL
The piston seal, as shown in Figure 6, is a rectangular cross section seal made of a rubber compound and is compatible with DOT 3 or DOT 4 brake fluid. The piston seal is placed in a groove that is machined into the caliper housing piston bore. The piston seal’s function is to provide a hydraulic seal between the piston and the caliper housing piston bore. The piston seal also aids in retracting the piston (i.e., pulls the piston back into the housing bore) upon brake release. This retraction allows clearance for the pads to be pushed back from the rotor.
Figure 6. Piston Seal
The piston boot, as shown in Figure 7, is located at the face (or opening) of the caliper housing piston bore. The piston boot is retained at its outside diameter in the housing and at its inside diameter by a groove in the piston. The function of the piston boot is to provide a seal between the environment and the caliper bore. The boot is produced via a molding operation of a rubber material around a stamped steel insert. The insert, located near the outside diameter of the piston boot, provides piston boot retention within the caliper housing.
Piston Boot
NOTE: PISTON BOOTnever reuse old piston boots.
Visually inspect new piston boots for any cuts, tears or damage. Replace as required. Verify that they are fully seated in caliper housing.
Piston boots must not come into contact with commercially available brake cleaners or they will be damaged. use only isopropyl or denatured alcohol during any brake service.
•
•
•
Figure 7. Piston Boot
inseRT
Pin Slide Disc Brake Service Manual7
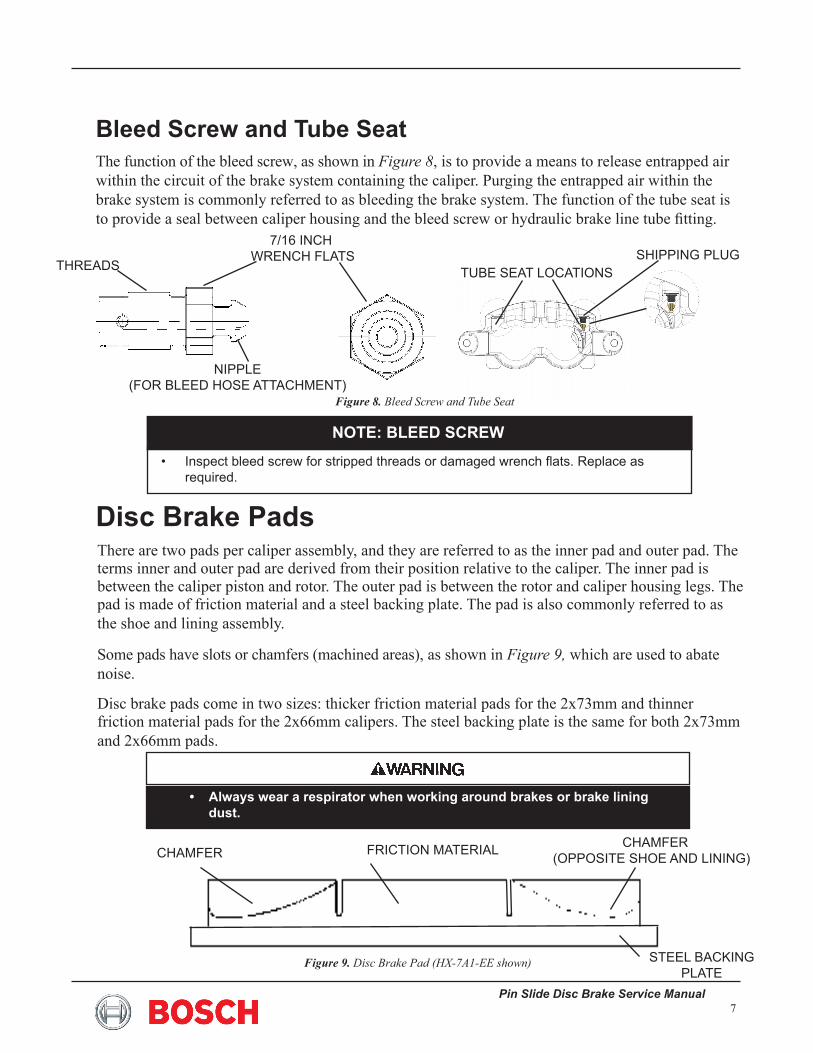
Bleed Screw and Tube SeatThe function of the bleed screw, as shown in Figure 8, is to provide a means to release entrapped air within the circuit of the brake system containing the caliper. Purging the entrapped air within the brake system is commonly referred to as bleeding the brake system. The function of the tube seat is to provide a seal between caliper housing and the bleed screw or hydraulic brake line tube fitting.
Figure 8. Bleed Screw and Tube Seat
7/16 iNCH wRencH FLaTs
THReads
NiPPLe (FOR bLeed HOse aTTacHmenT)
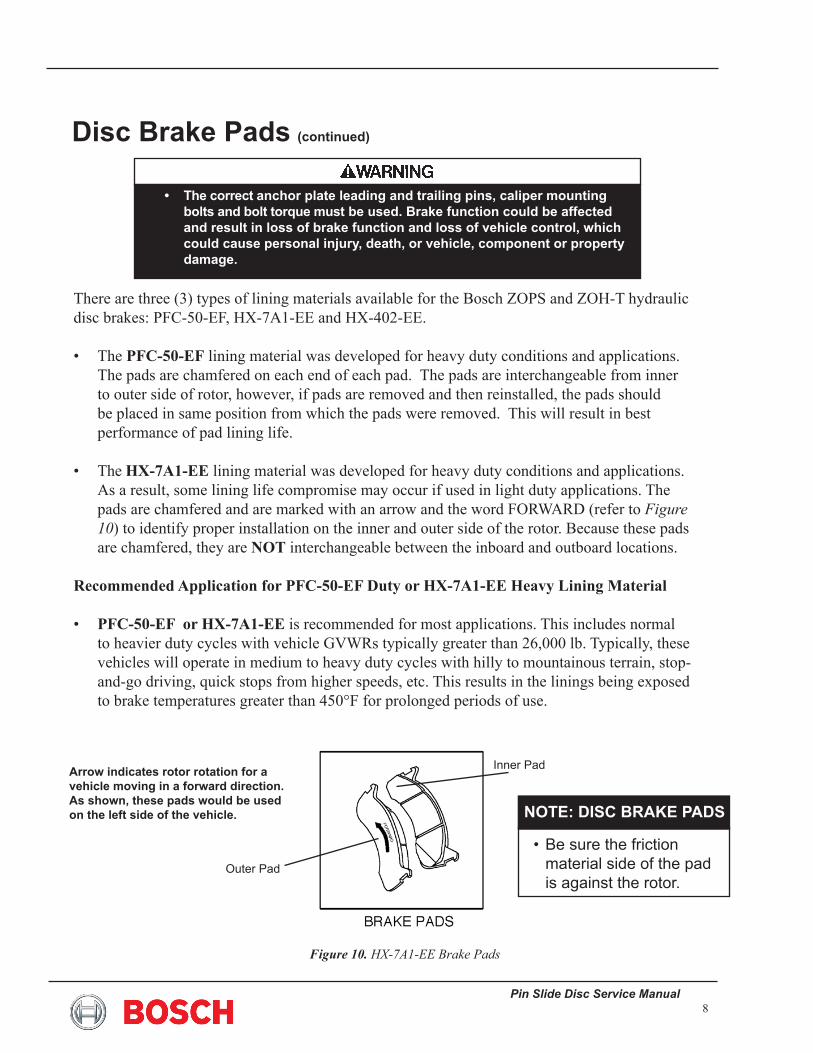
Disc Brake Pads There are two pads per caliper assembly, and they are referred to as the inner pad and outer pad. The terms inner and outer pad are derived from their position relative to the caliper. The inner pad is between the caliper piston and rotor. The outer pad is between the rotor and caliper housing legs. The pad is made of friction material and a steel backing plate. The pad is also commonly referred to as the shoe and lining assembly.
Some pads have slots or chamfers (machined areas), as shown in Figure 9, which are used to abate noise.
Disc brake pads come in two sizes: thicker friction material pads for the 2x73mm and thinner friction material pads for the 2x66mm calipers. The steel backing plate is the same for both 2x73mm and 2x66mm pads.
Always wear a respirator when working around brakes or brake lining dust.
•
Figure 9. Disc Brake Pad (HX-7A1-EE shown)
FRicTiOn maTeRiaL
sTeeL backing PLaTe
cHamFeR (OppOsiTe sHOe and Lining)cHamFeR
TUBe SeaT LOCaTiONS
NOTE: BLEED SCREW
inspect bleed screw for stripped threads or damaged wrench flats. Replace as required.
•
SHiPPiNg PLUg
Pin Slide Disc Service Manual�
Disc Brake Pads (continued)
There are three (3) types of lining materials available for the Bosch ZOPS and ZOH-T hydraulic disc brakes: PFC-50-EF, HX-7A1-EE and HX-402-EE.
The PFC-50-EF lining material was developed for heavy duty conditions and applications. The pads are chamfered on each end of each pad. The pads are interchangeable from inner to outer side of rotor, however, if pads are removed and then reinstalled, the pads should be placed in same position from which the pads were removed. This will result in best performance of pad lining life.
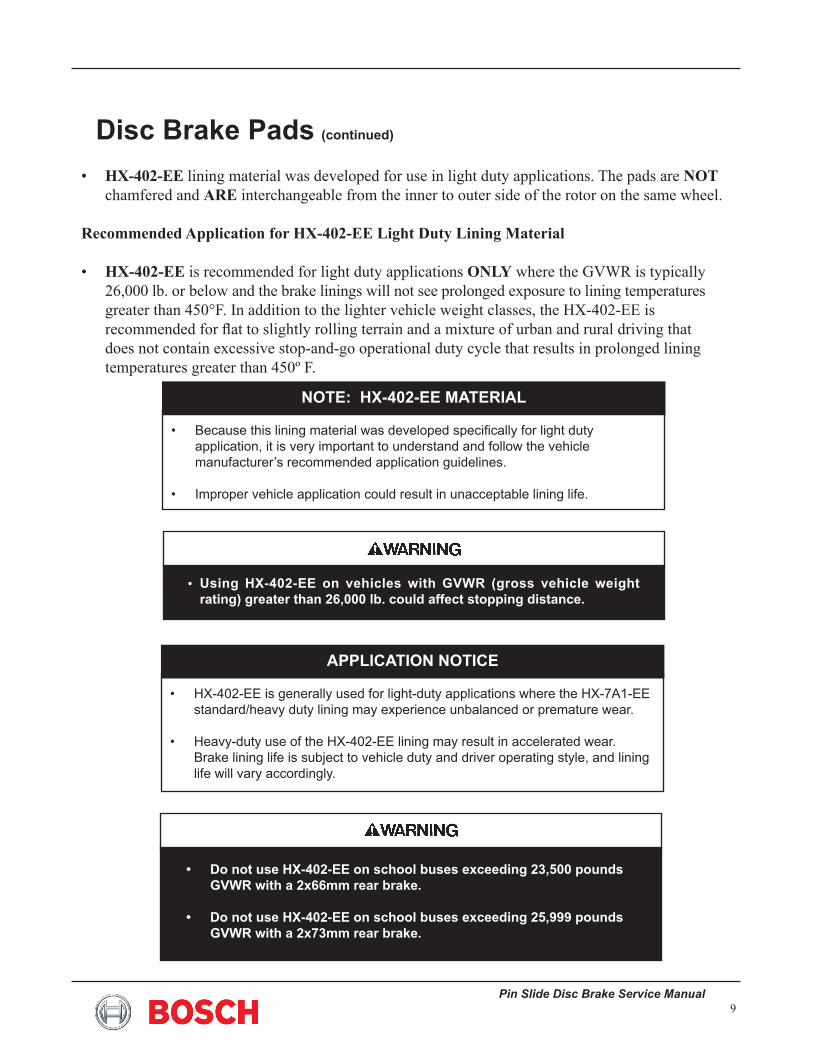
The HX-7A1-EE lining material was developed for heavy duty conditions and applications. As a result, some lining life compromise may occur if used in light duty applications. The pads are chamfered and are marked with an arrow and the word FORWARD (refer to Figure 10) to identify proper installation on the inner and outer side of the rotor. Because these pads are chamfered, they are NOT interchangeable between the inboard and outboard locations.
Recommended Application for PFC-50-EF Duty or HX-7A1-EE Heavy Lining Material
• PFC-50-EF or HX-7A1-EE is recommended for most applications. This includes normal to heavier duty cycles with vehicle GVWRs typically greater than 26,000 lb. Typically, these vehicles will operate in medium to heavy duty cycles with hilly to mountainous terrain, stop-and-go driving, quick stops from higher speeds, etc. This results in the linings being exposed to brake temperatures greater than ��0°F for prolonged periods of use.
•
•
Figure 10. HX-7A1-EE Brake Pads
Arrow indicates rotor rotation for a vehicle moving in a forward direction.As shown, these pads would be used on the left side of the vehicle.
inner Pad
Outer Pad
NOTE: DISC BRAKE PADS
• Be sure the friction material side of the pad is against the rotor.
The correct anchor plate leading and trailing pins, caliper mounting bolts and bolt torque must be used. Brake function could be affected and result in loss of brake function and loss of vehicle control, which could cause personal injury, death, or vehicle, component or property damage.
•
Pin Slide Disc Brake Service Manual�
Disc Brake Pads (continued)
NOTE: HX-402-EE MATERIAL
because this lining material was developed specifically for light duty application, it is very important to understand and follow the vehicle manufacturer’s recommended application guidelines.
improper vehicle application could result in unacceptable lining life.
•
•
• Using HX-402-EE on vehicles with GVWR (gross vehicle weight rating) greater than 26,000 lb. could affect stopping distance.
• HX-402-EE lining material was developed for use in light duty applications. The pads are NOT chamfered and ARE interchangeable from the inner to outer side of the rotor on the same wheel.
Recommended Application for HX-402-EE Light Duty Lining Material
• HX-402-EE is recommended for light duty applications ONLY where the GVWR is typically 26,000 lb. or below and the brake linings will not see prolonged exposure to lining temperatures greater than ��0°F. In addition to the lighter vehicle weight classes, the HX-�02-EE is recommended for flat to slightly rolling terrain and a mixture of urban and rural driving that does not contain excessive stop-and-go operational duty cycle that results in prolonged lining temperatures greater than ��0º F.
APPLICATION NOTICE
Hx-402-ee is generally used for light-duty applications where the Hx-7a1-ee standard/heavy duty lining may experience unbalanced or premature wear.
Heavy-duty use of the HX-402-ee lining may result in accelerated wear. Brake lining life is subject to vehicle duty and driver operating style, and lining life will vary accordingly.
•
•
Do not use HX-402-EE on school buses exceeding 23,500 pounds GVWR with a 2x66mm rear brake.
Do not use HX-402-EE on school buses exceeding 25,999 pounds GVWR with a 2x73mm rear brake.
•
•
Pin Slide Disc Service Manual�0
NOTE
The ZOH-T anchor plate leading and trailing pins and caliper mounting bolts are NOT separately interchangeable or backward compatible with the original ZOPS caliper pins and mounting bolts due to the change in the bolt length and thread form (from coarse thread to fine thread).
When changed out as a complete set, the ZOH-T caliper pins and mounting bolts are interchangeable and can be used in anchor plate and caliper housings produced prior to June 3, 2002.
The ZOH-T leading and trailing pin designs are unique and MUST be installed in the correct anchor plate position.
Leading pin MUST be installed in the leading anchor plate locationTrailing pin MUST be installed in the trailing anchor plate location.Reference page 25 Figure 24 for leading and trailing definition.
Because your vehicle may have had prior brake servicing, vehicles built prior to June 3, 2002, may have been upgraded to the ZOH-T pin and bolt design.
•
•
•
••
•
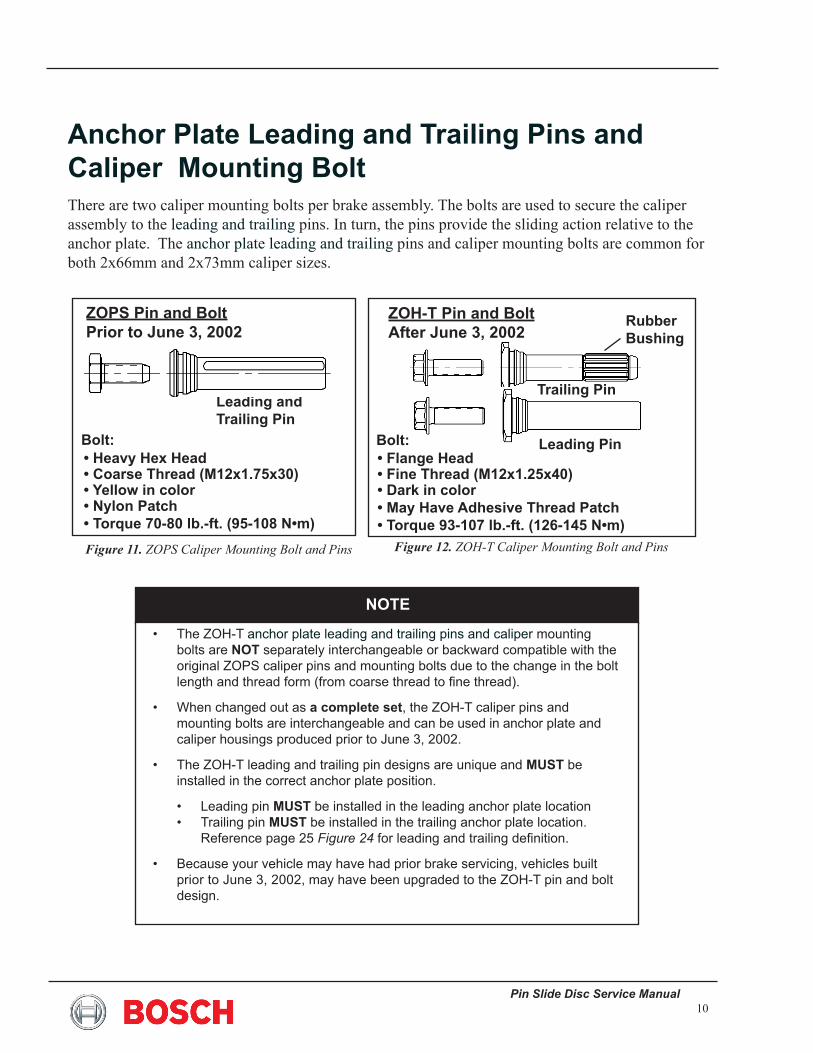
There are two caliper mounting bolts per brake assembly. The bolts are used to secure the caliper assembly to the leading and trailing pins. In turn, the pins provide the sliding action relative to the anchor plate. The anchor plate leading and trailing pins and caliper mounting bolts are common for both 2x66mm and 2x73mm caliper sizes.
Figure 11. ZOPS Caliper Mounting Bolt and Pins Figure 12. ZOH-T Caliper Mounting Bolt and Pins
Anchor Plate Leading and Trailing Pins and Caliper Mounting Bolt
ZOH-T Pin and BoltAfter June 3, 2002
Leading and Trailing Pin
ZOPS Pin and BoltPrior to June 3, 2002
Bolt:
Trailing Pin
Leading PinBolt:
Rubber Bushing
• Heavy Hex Head• Coarse Thread (M12x1.75x30)• Yellow in color• Nylon Patch• Torque 70-80 lb.-ft. (95-108 N•m)
• Flange Head• Fine Thread (M12x1.25x40)• Dark in color• May Have Adhesive Thread Patch• Torque 93-107 lb.-ft. (126-145 N•m)
Pin Slide Disc Brake Service Manual��
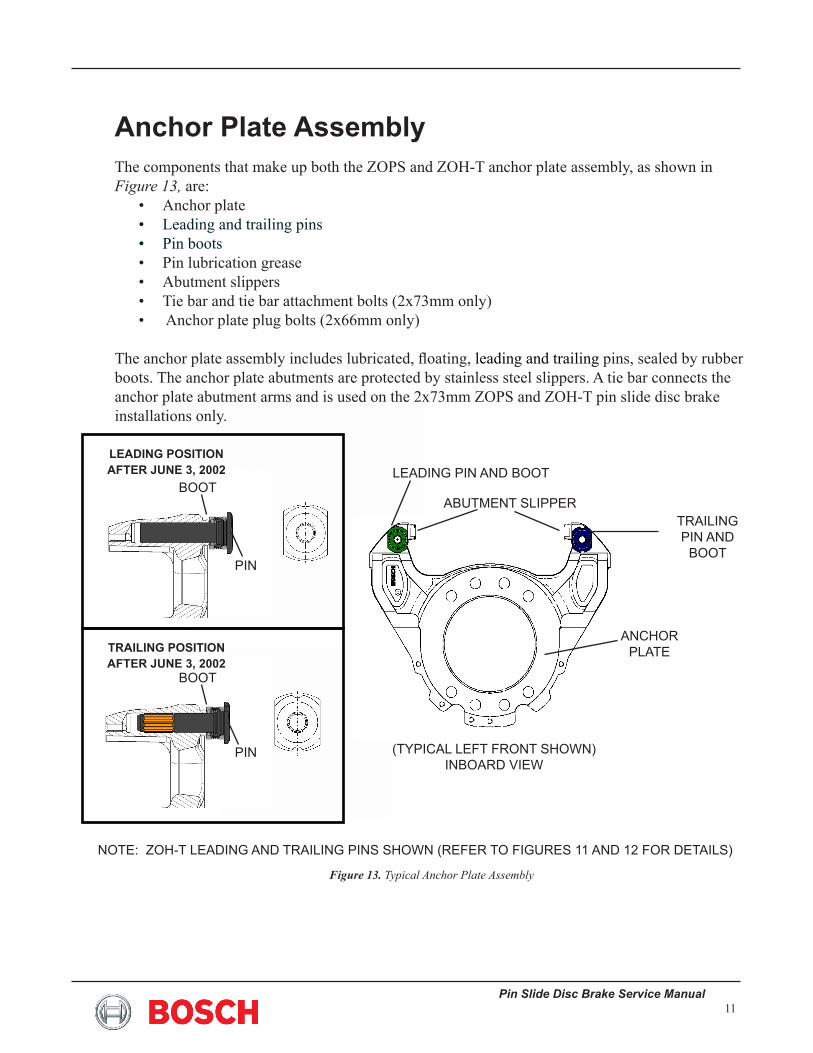
The components that make up both the ZOPS and ZOH-T anchor plate assembly, as shown in Figure 13, are:
Anchor plateLeading and trailing pinsPin bootsPin lubrication greaseAbutment slippersTie bar and tie bar attachment bolts (2x73mm only) Anchor plate plug bolts (2x66mm only)
The anchor plate assembly includes lubricated, floating, leading and trailing pins, sealed by rubber boots. The anchor plate abutments are protected by stainless steel slippers. A tie bar connects the anchor plate abutment arms and is used on the 2x73mm ZOPS and ZOH-T pin slide disc brake installations only.
•••••••
Anchor Plate Assembly
LEADING POSITION AFTER JUNE 3, 2002
TRAILING POSITION AFTER JUNE 3, 2002
abuTmenT sLippeRTRaiLingPiN aNd
BOOT
ancHOR PLaTe
LeadiNg PiN aNd BOOTBOOT
PiN
PiN (TypicaL LeFT FROnT sHOwn) inbOaRd View
nOTe: ZOH-T Leading and TRaiLing pins sHOwn (ReFeR TO FiguRes 11 and 12 FOR deTaiLs)
Figure 13. Typical Anchor Plate Assembly
BOOT
Pin Slide Disc Service Manual�2
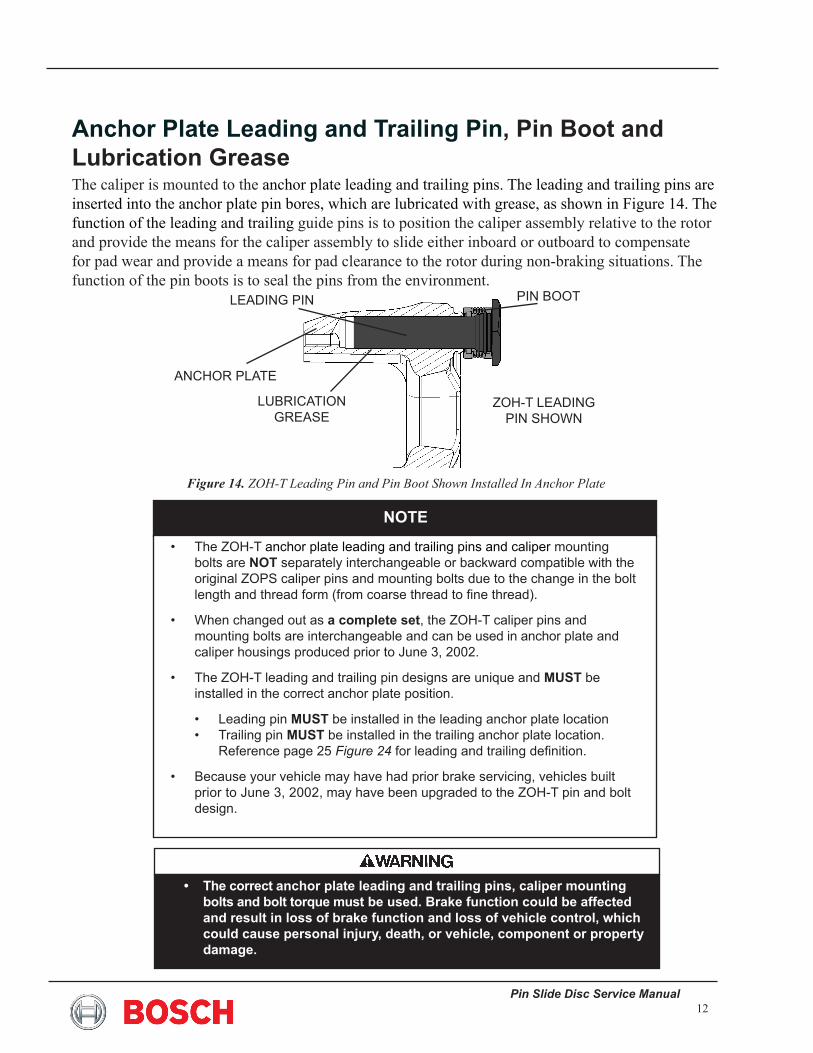
The caliper is mounted to the anchor plate leading and trailing pins. The leading and trailing pins are inserted into the anchor plate pin bores, which are lubricated with grease, as shown in Figure ��. The function of the leading and trailing guide pins is to position the caliper assembly relative to the rotor and provide the means for the caliper assembly to slide either inboard or outboard to compensate for pad wear and provide a means for pad clearance to the rotor during non-braking situations. The function of the pin boots is to seal the pins from the environment.
Anchor Plate Leading and Trailing Pin, Pin Boot and Lubrication Grease
Figure 14. ZOH-T Leading Pin and Pin Boot Shown Installed In Anchor Plate
PiN BOOTLeadiNg PiN
ancHOR pLaTe
LubRicaTiOn gRease
ZOH-T LeadiNg PiN SHOWN
NOTE
The ZOH-T anchor plate leading and trailing pins and caliper mounting bolts are NOT separately interchangeable or backward compatible with the original ZOPS caliper pins and mounting bolts due to the change in the bolt length and thread form (from coarse thread to fine thread).
When changed out as a complete set, the ZOH-T caliper pins and mounting bolts are interchangeable and can be used in anchor plate and caliper housings produced prior to June 3, 2002.
The ZOH-T leading and trailing pin designs are unique and MUST be installed in the correct anchor plate position.
Leading pin MUST be installed in the leading anchor plate locationTrailing pin MUST be installed in the trailing anchor plate location.Reference page 25 Figure 24 for leading and trailing definition.
Because your vehicle may have had prior brake servicing, vehicles built prior to June 3, 2002, may have been upgraded to the ZOH-T pin and bolt design.
•
•
•
••
•
The correct anchor plate leading and trailing pins, caliper mounting bolts and bolt torque must be used. Brake function could be affected and result in loss of brake function and loss of vehicle control, which could cause personal injury, death, or vehicle, component or property damage.
•
Pin Slide Disc Brake Service Manual�3
Failure to follow all the safety and vehicle repair procedures either contained in this manual, in the chassis and vehicle manufacturer’s repair manuals or in accordance with other accepted methods can result in personal injury, death, or damage to components, vehicles, or personal property.
•
Introduction For Service ProceduresThe sections that follow provide the recommended service procedures to be used on the Bosch Hydraulic Disc Brake Assembly. All procedures are applicable for both ZOPS and ZOH-T designs, except as noted.
Brake Pad ReplacementPosition vehicle on suitable floor stands and remove wheel (tire and rim).
Remove the brake hose retaining fastener. This will allow easier pad removal. (Not required on all applications.)
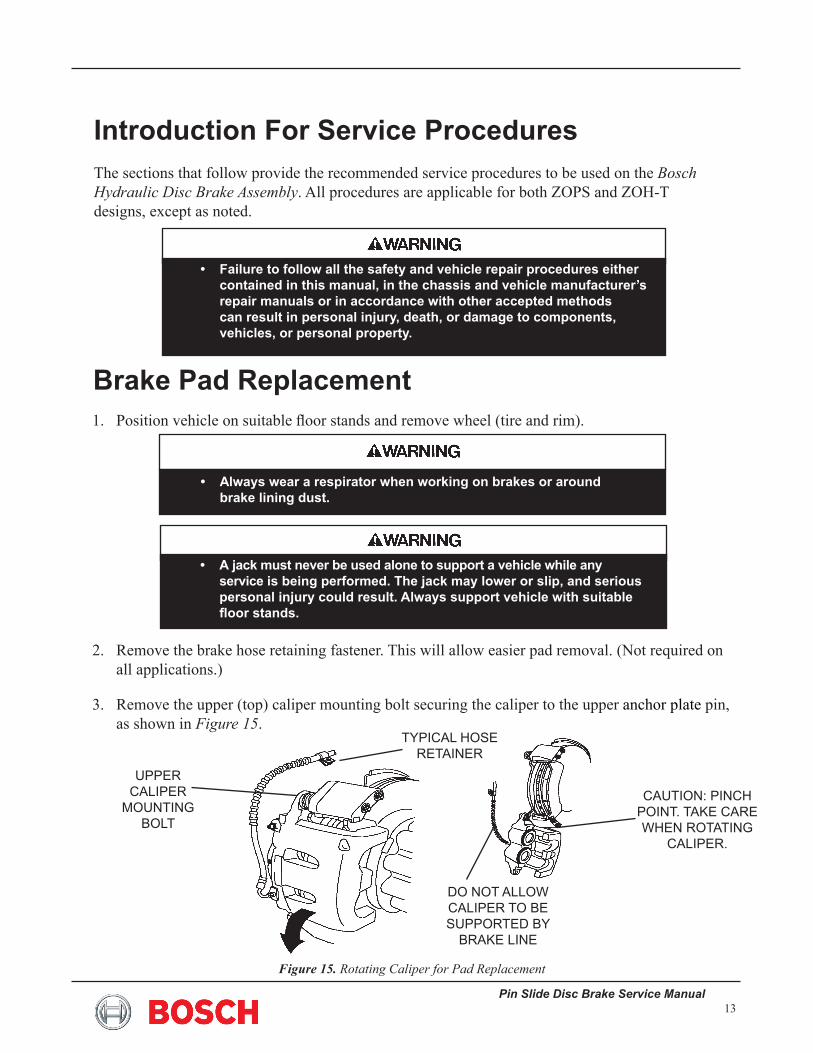
Remove the upper (top) caliper mounting bolt securing the caliper to the upper anchor plate pin, as shown in Figure 15.
�.
2.
3.
A jack must never be used alone to support a vehicle while any service is being performed. The jack may lower or slip, and serious personal injury could result. Always support vehicle with suitable floor stands.
•
Figure 15. Rotating Caliper for Pad Replacement
uppeR caLipeR
MOUNTiNg BOLT
TYPiCaL HOSe ReTaineR
CaUTiON: PiNCH pOinT. Take caRe wHen ROTaTing
caLipeR.
dO NOT aLLOW caLipeR TO be suppORTed by
bRake Line
Always wear a respirator when working on brakes or around brake lining dust.
•
Pin Slide Disc Service Manual��
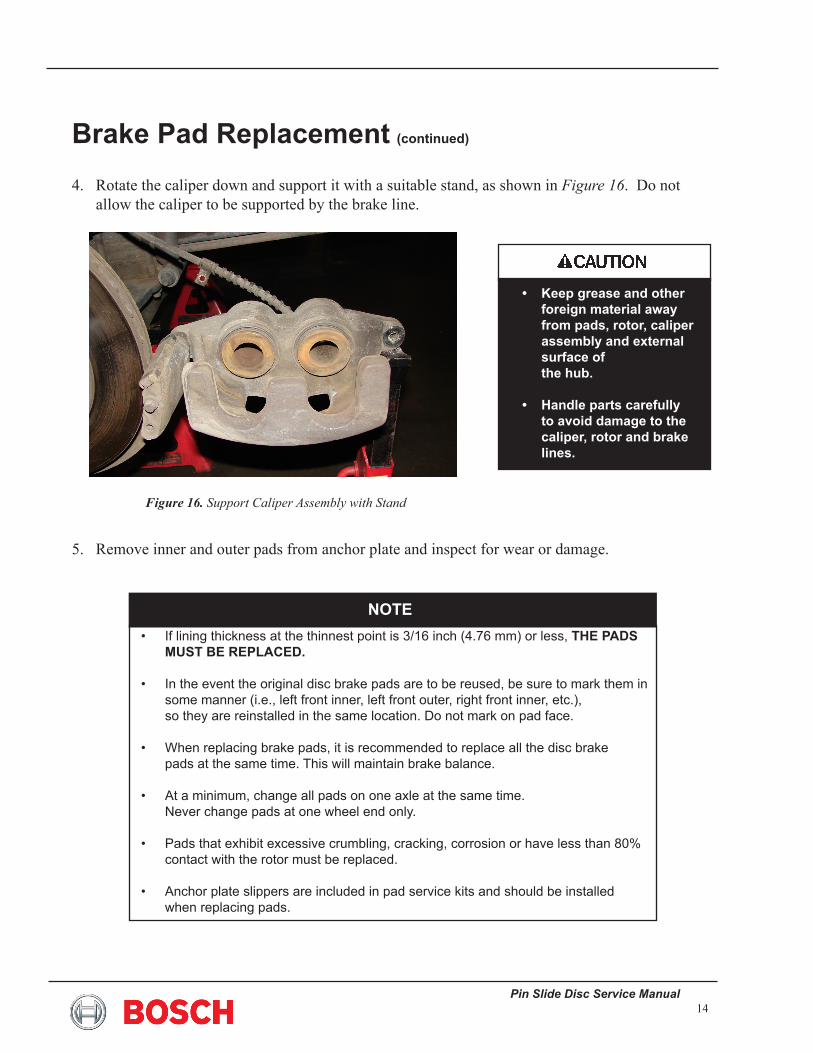
Rotate the caliper down and support it with a suitable stand, as shown in Figure 16. Do not allow the caliper to be supported by the brake line.
Remove inner and outer pads from anchor plate and inspect for wear or damage.
�.
�.
if lining thickness at the thinnest point is 3/16 inch (4.76 mm) or less, THE PADS MUST BE REPLACED.
in the event the original disc brake pads are to be reused, be sure to mark them in some manner (i.e., left front inner, left front outer, right front inner, etc.), so they are reinstalled in the same location. do not mark on pad face.
When replacing brake pads, it is recommended to replace all the disc brake pads at the same time. This will maintain brake balance.
at a minimum, change all pads on one axle at the same time. never change pads at one wheel end only.
Pads that exhibit excessive crumbling, cracking, corrosion or have less than 80% contact with the rotor must be replaced.
anchor plate slippers are included in pad service kits and should be installed when replacing pads.
•
•
•
•
•
•
Brake Pad Replacement (continued)
Keep grease and other foreign material away from pads, rotor, caliper assembly and external surface of the hub.
Handle parts carefully to avoid damage to the caliper, rotor and brake lines.
•
•
Figure 16. Support Caliper Assembly with Stand
NOTE
Pin Slide Disc Brake Service Manual��
Brake Pad Replacement (continued)
When replacing pads, use the SAME lining material type on both front and rear axles. Using different lining materials can alter brake performance and lining wear.
Pads that have been contaminated with grease, oil, solvents or other foreign material must be replaced.
•
•
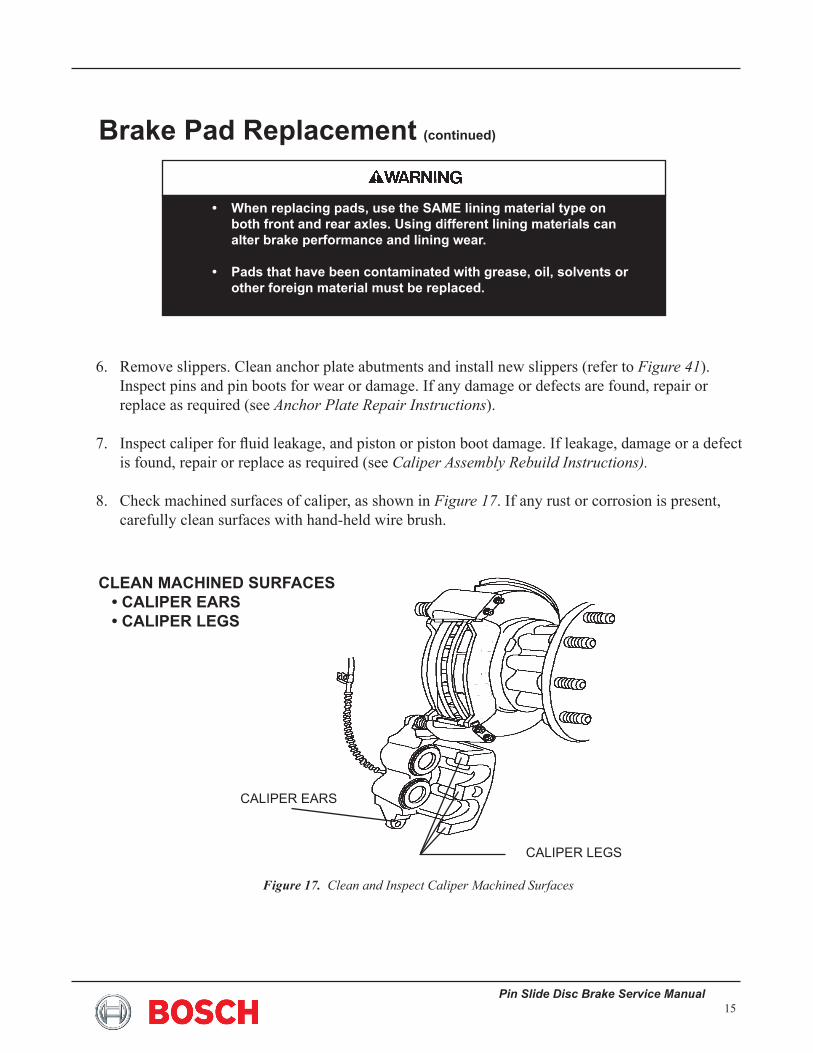
Figure 17. Clean and Inspect Caliper Machined Surfaces
CLEAN MACHINED SURFACES • CALIPER EARS • CALIPER LEGS
Remove slippers. Clean anchor plate abutments and install new slippers (refer to Figure 41). Inspect pins and pin boots for wear or damage. If any damage or defects are found, repair or replace as required (see Anchor Plate Repair Instructions).
Inspect caliper for fluid leakage, and piston or piston boot damage. If leakage, damage or a defect is found, repair or replace as required (see Caliper Assembly Rebuild Instructions).
Check machined surfaces of caliper, as shown in Figure 17. If any rust or corrosion is present, carefully clean surfaces with hand-held wire brush.
6.
7.
�.
caLipeR eaRs
caLipeR Legs
Pin Slide Disc Service Manual16
Inspect the rotor for scoring, warping, cracks or other damage or defects per rotor, chassis or vehicle manufacturer’s service manual. If any damage or defects are found, repair or replace per vehicle manufacturer’s service procedure (see Rotor section).
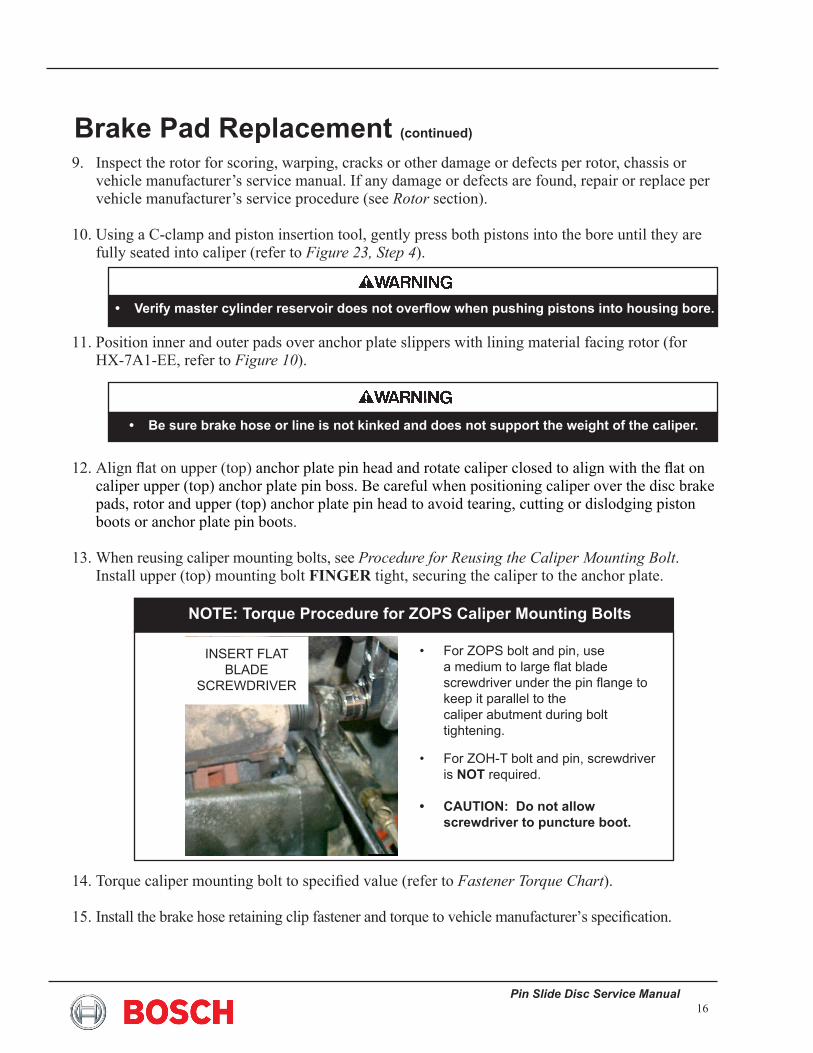
Using a C-clamp and piston insertion tool, gently press both pistons into the bore until they are fully seated into caliper (refer to Figure 23, Step 4).
Position inner and outer pads over anchor plate slippers with lining material facing rotor (for HX-7A1-EE, refer to Figure 10).
Align flat on upper (top) anchor plate pin head and rotate caliper closed to align with the flat on caliper upper (top) anchor plate pin boss. Be careful when positioning caliper over the disc brake pads, rotor and upper (top) anchor plate pin head to avoid tearing, cutting or dislodging piston boots or anchor plate pin boots.
When reusing caliper mounting bolts, see Procedure for Reusing the Caliper Mounting Bolt. Install upper (top) mounting bolt FINGER tight, securing the caliper to the anchor plate.
Torque caliper mounting bolt to specified value (refer to Fastener Torque Chart).
Install the brake hose retaining clip fastener and torque to vehicle manufacturer’s specification.
�.
�0.
��.
�2.
�3.
��.
��.
Brake Pad Replacement (continued)
Be sure brake hose or line is not kinked and does not support the weight of the caliper.•
Verify master cylinder reservoir does not overflow when pushing pistons into housing bore.•
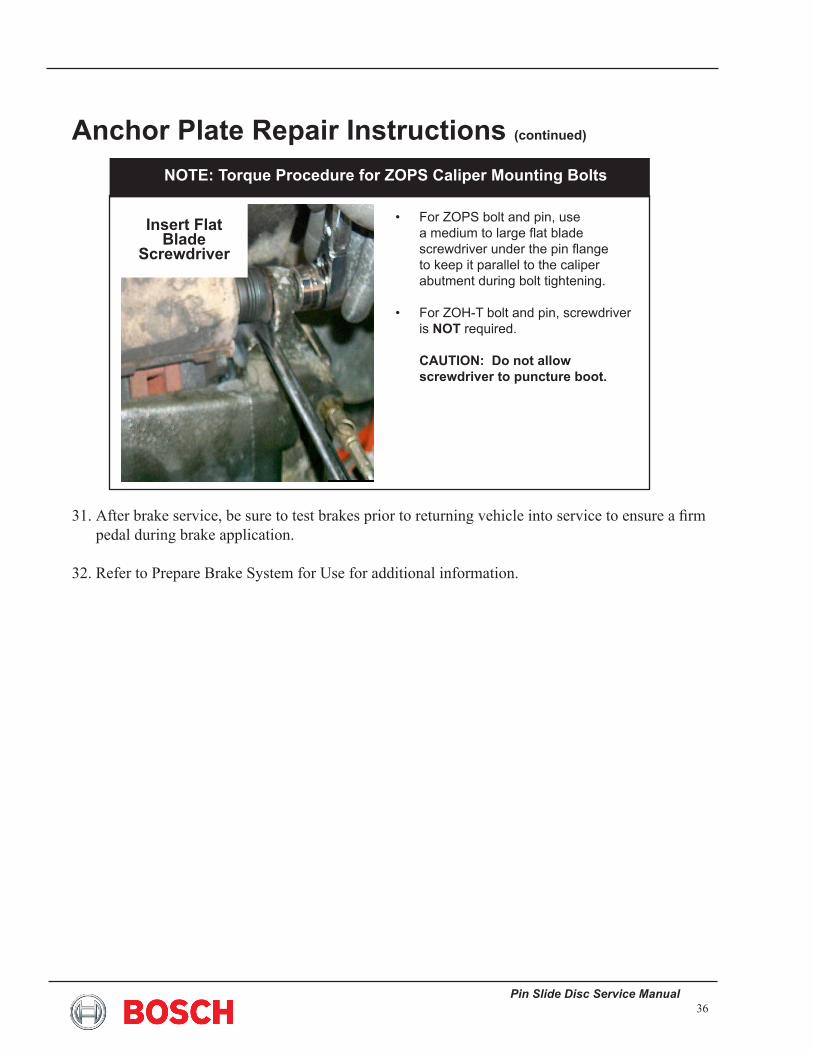
NOTE: Torque Procedure for ZOPS Caliper Mounting Bolts
For ZOPS bolt and pin, use a medium to large flat blade screwdriver under the pin flange to keep it parallel to the caliper abutment during bolt tightening.
For ZOH-T bolt and pin, screwdriver is NOT required.
CAUTION: Do not allow screwdriver to puncture boot.
•
•
•
inseRT FLaTBLade
scRewdRiVeR
Pin Slide Disc Brake Service Manual17
Position vehicle on suitable floor stands and remove wheel (tire and rim).
Remove the brake hose retaining fastener. This will allow easier caliper removal and installation (required if caliper is removed from vehicle).
Disconnect brake fluid line from caliper and cap line to prevent brake fluid leakage or contamination in the brake line (refer to Figure 18).
Remove upper (top) caliper mounting bolt securing the caliper to the upper anchor plate pin.
Remove lower (bottom) caliper mounting bolt securing the caliper to the lower anchor plate pin.
�.
2.
3.
�.
�.
Caliper Assembly Rebuild InstructionsRemove Caliper
Keep grease and other foreign materials away from caliper assembly, disc brake pads, brake rotor and external surfaces of hub. Handle parts carefully to avoid damage to caliper, rotor, disc brake pads and brake lines.
A jack must never be used alone to support a vehicle while under-chassis service is being performed. The jack may lower or slip, and serious personal injury could result. Always support vehicle with suitable floor stands.
Always wear eye protection.
When disconnecting the brake line from the caliper, do not use clamps on the flexible brake hose to seal line. Brake hose damage may occur.
Always wear a respirator when working around brakes or brake lining dust.
•
•
•
•
•
Brake Pad Replacement (continued)
If any hydraulic lines were opened or removed, bleed brake system per the vehicle manufacturer’s recommended procedure (for additional information, refer to Preparing Brake System for Use).Install wheel (tire and rim) on vehicle and torque wheel attachment nuts per vehicle manufacturer’s specification. Remove floor stands.
Before starting engine, depress brake pedal several times to reseat brake lining to the rotor. Check the master cylinder reservoir and fill if necessary. Consult vehicle service manual for proper brake fluid level.
After brake service, be sure to test brakes prior to returning vehicle into service to ensure a firm
16.
17.
��.
��.
Pin Slide Disc Service Manual��
Remove Caliper (continued)
Use care to avoid damaging or dislodging the upper or lower guide pin boots. Do not pull on leading or trailing pins. This may dislodge guide pin boot from either the leading or trailing pin or anchor plate grooves.
•
in the event the original disc brake pads are to be reused, be sure to mark them in some manner (i.e., left front inner, left front outer, right front inner, etc.) so that they are reinstalled in the same location.do not mark on pad face.
inboard and outboard brake pads may not be interchangeable.The word FORwaRd and a forward rotor rotation direction arrow may appear on each pad backing plate (refer to the Disc Brake Pads section for complete details).
•
•
NOTE
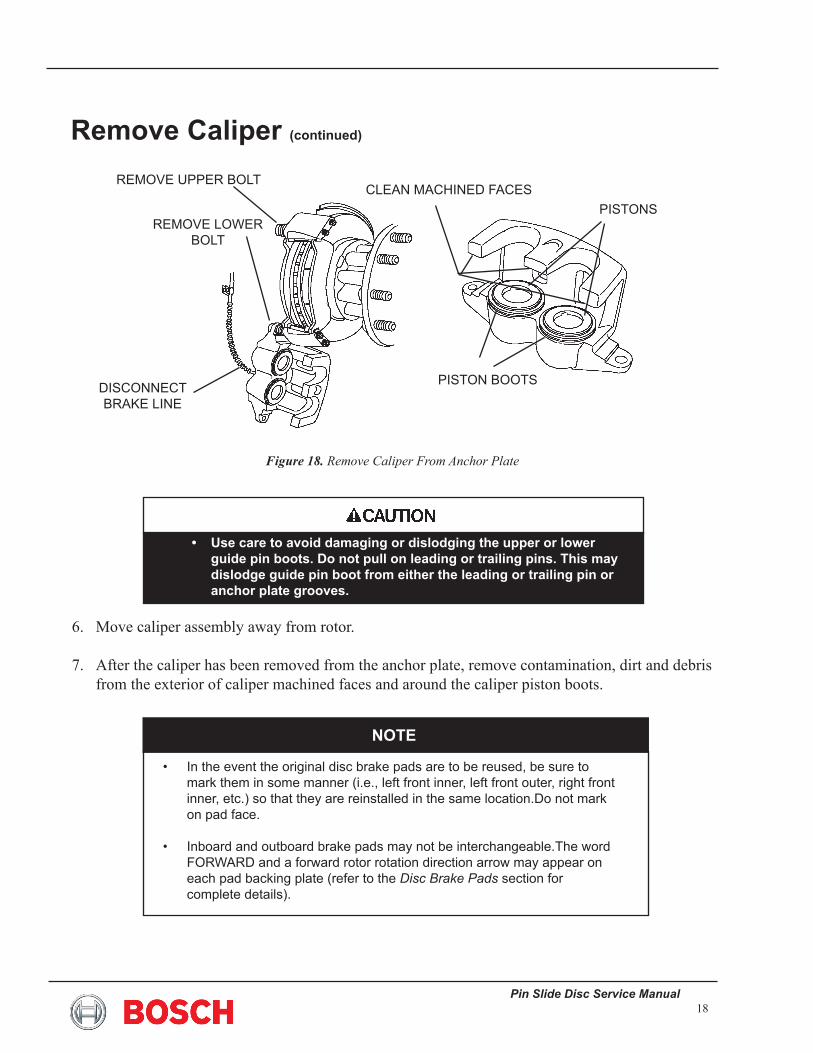
diSCONNeCT bRake Line
CLeaN MaCHiNed FaCeS
RemOVe LOweR BOLT
PiSTONS
PiSTON BOOTS
Figure 18. Remove Caliper From Anchor Plate
RemOVe uppeR bOLT
Move caliper assembly away from rotor.
After the caliper has been removed from the anchor plate, remove contamination, dirt and debris from the exterior of caliper machined faces and around the caliper piston boots.
6.
7.
Pin Slide Disc Brake Service Manual��
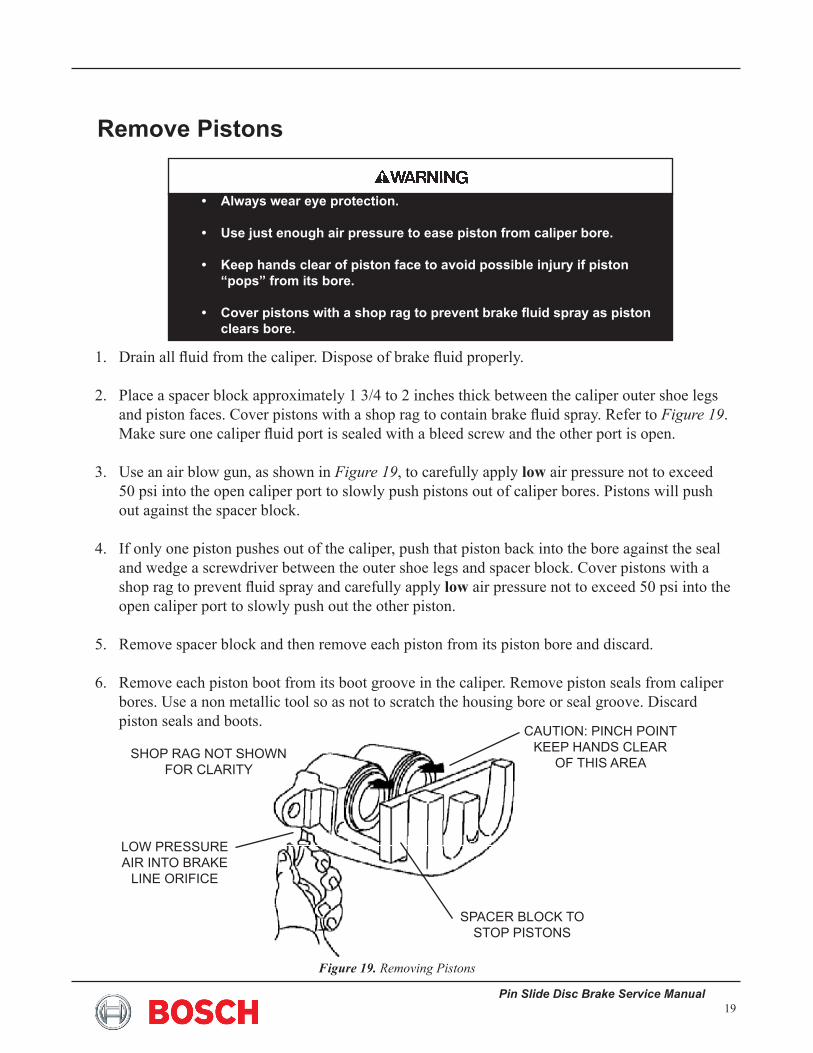
Figure 19. Removing Pistons
Remove Pistons
Drain all fluid from the caliper. Dispose of brake fluid properly.
Place a spacer block approximately 1 3/4 to 2 inches thick between the caliper outer shoe legs and piston faces. Cover pistons with a shop rag to contain brake fluid spray. Refer to Figure 19. Make sure one caliper fluid port is sealed with a bleed screw and the other port is open.
Use an air blow gun, as shown in Figure 19, to carefully apply low air pressure not to exceed �0 psi into the open caliper port to slowly push pistons out of caliper bores. Pistons will push out against the spacer block.
If only one piston pushes out of the caliper, push that piston back into the bore against the seal and wedge a screwdriver between the outer shoe legs and spacer block. Cover pistons with a shop rag to prevent fluid spray and carefully apply low air pressure not to exceed 50 psi into the open caliper port to slowly push out the other piston.
Remove spacer block and then remove each piston from its piston bore and discard.
Remove each piston boot from its boot groove in the caliper. Remove piston seals from caliper bores. Use a non metallic tool so as not to scratch the housing bore or seal groove. Discard piston seals and boots.
�.
2.
3.
�.
�.
6.
Always wear eye protection.
Use just enough air pressure to ease piston from caliper bore.
Keep hands clear of piston face to avoid possible injury if piston “pops” from its bore.
Cover pistons with a shop rag to prevent brake fluid spray as piston clears bore.
•
•
•
•
CaUTiON: PiNCH POiNT keep Hands cLeaR
OF THis aRea
LOw pRessuRe aiR inTO bRake
Line ORiFice
spaceR bLOck TO STOP PiSTONS
sHOp Rag nOT sHOwn FOR cLaRiTy
Pin Slide Disc Service Manual20
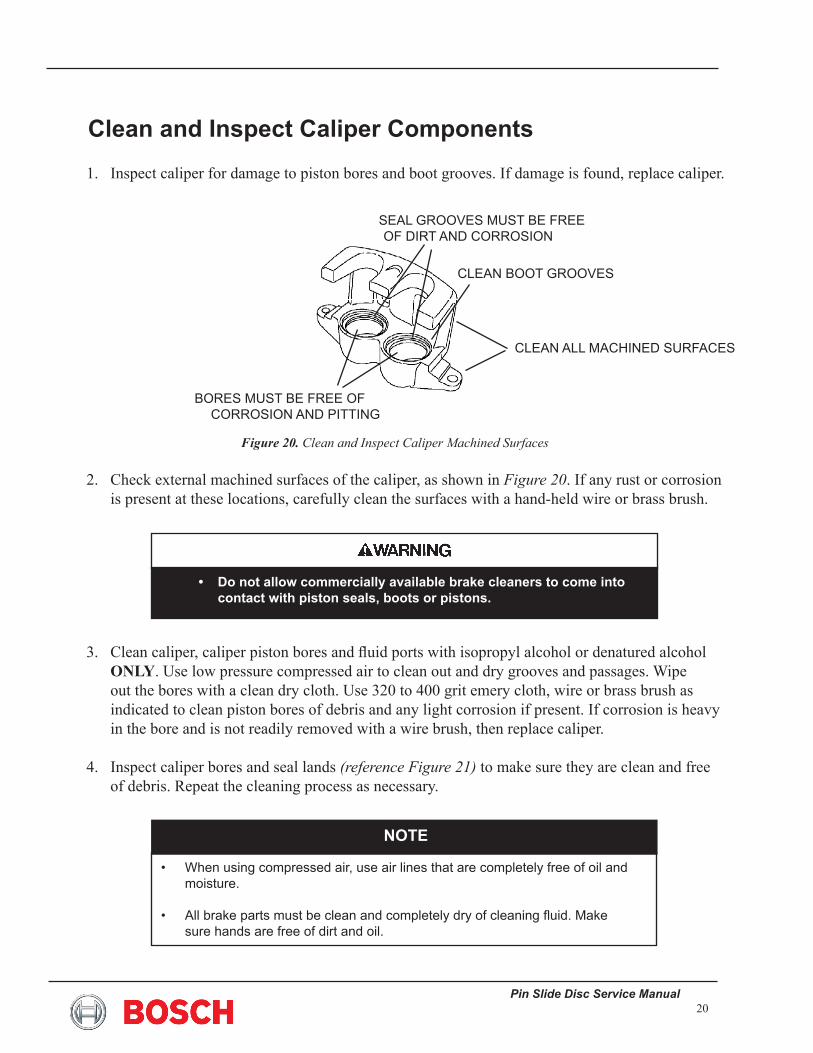
Inspect caliper for damage to piston bores and boot grooves. If damage is found, replace caliper.
Check external machined surfaces of the caliper, as shown in Figure 20. If any rust or corrosion is present at these locations, carefully clean the surfaces with a hand-held wire or brass brush.
Clean caliper, caliper piston bores and fluid ports with isopropyl alcohol or denatured alcohol ONLY. Use low pressure compressed air to clean out and dry grooves and passages. Wipe out the bores with a clean dry cloth. Use 320 to �00 grit emery cloth, wire or brass brush as indicated to clean piston bores of debris and any light corrosion if present. If corrosion is heavy in the bore and is not readily removed with a wire brush, then replace caliper.
Inspect caliper bores and seal lands (reference Figure 21) to make sure they are clean and free of debris. Repeat the cleaning process as necessary.
�.
2.
3.
�.
Clean and Inspect Caliper Components
Figure 20. Clean and Inspect Caliper Machined Surfaces
cLean aLL macHined suRFaces
seaL gROOVes musT be FRee OF diRT and cORROsiOn
cLean bOOT gROOVes
bORes musT be FRee OF cORROsiOn and piTTing
Do not allow commercially available brake cleaners to come into contact with piston seals, boots or pistons.
•
NOTE
When using compressed air, use air lines that are completely free of oil and moisture.
all brake parts must be clean and completely dry of cleaning fluid. make sure hands are free of dirt and oil.
•
•
Pin Slide Disc Brake Service Manual2�
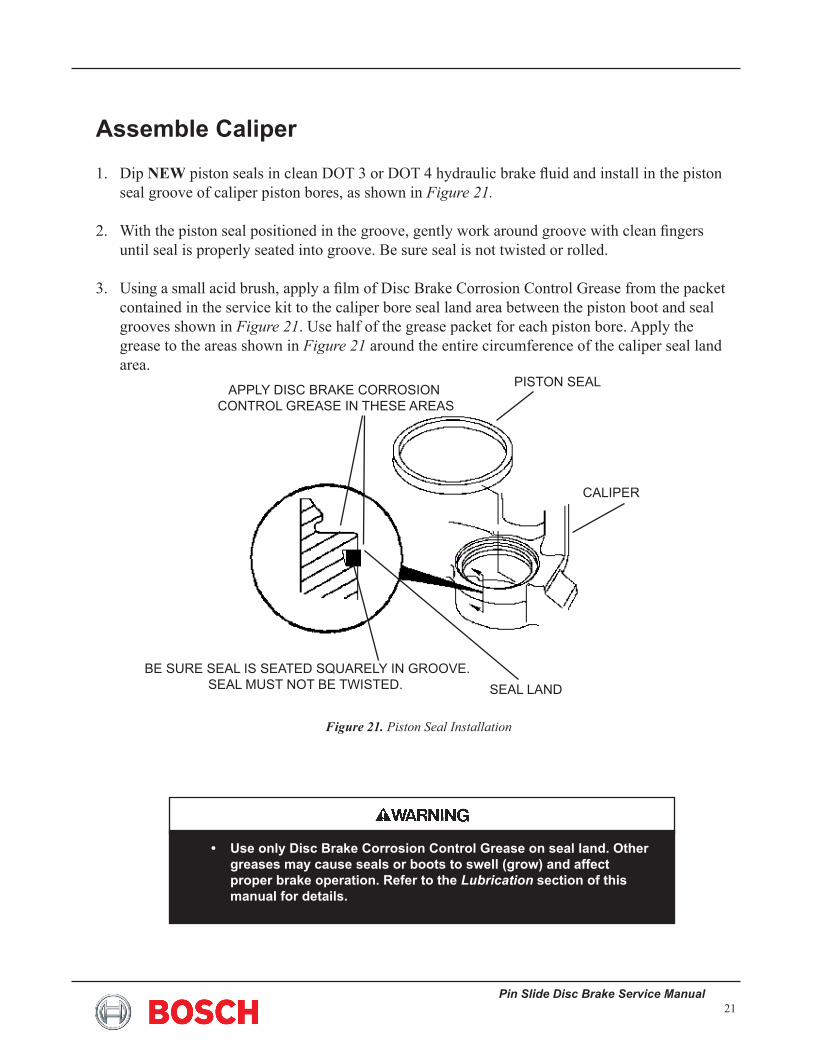
Assemble Caliper
Dip NEW piston seals in clean DOT 3 or DOT 4 hydraulic brake fluid and install in the piston seal groove of caliper piston bores, as shown in Figure 21.
With the piston seal positioned in the groove, gently work around groove with clean fingers until seal is properly seated into groove. Be sure seal is not twisted or rolled.
Using a small acid brush, apply a film of Disc Brake Corrosion Control Grease from the packet contained in the service kit to the caliper bore seal land area between the piston boot and seal grooves shown in Figure 21. Use half of the grease packet for each piston bore. Apply the grease to the areas shown in Figure 21 around the entire circumference of the caliper seal land area.
�.
2.
3.
Figure 21. Piston Seal Installation
appLy disc bRake cORROsiOn cOnTROL gRease in THese aReas
PiSTON SeaL
caLipeR
SeaL LaNd be suRe seaL is seaTed sQuaReLy in gROOVe.
seaL musT nOT be TwisTed.
Use only Disc Brake Corrosion Control Grease on seal land. Other greases may cause seals or boots to swell (grow) and affect proper brake operation. Refer to the Lubrication section of this manual for details.
•
Pin Slide Disc Service Manual22
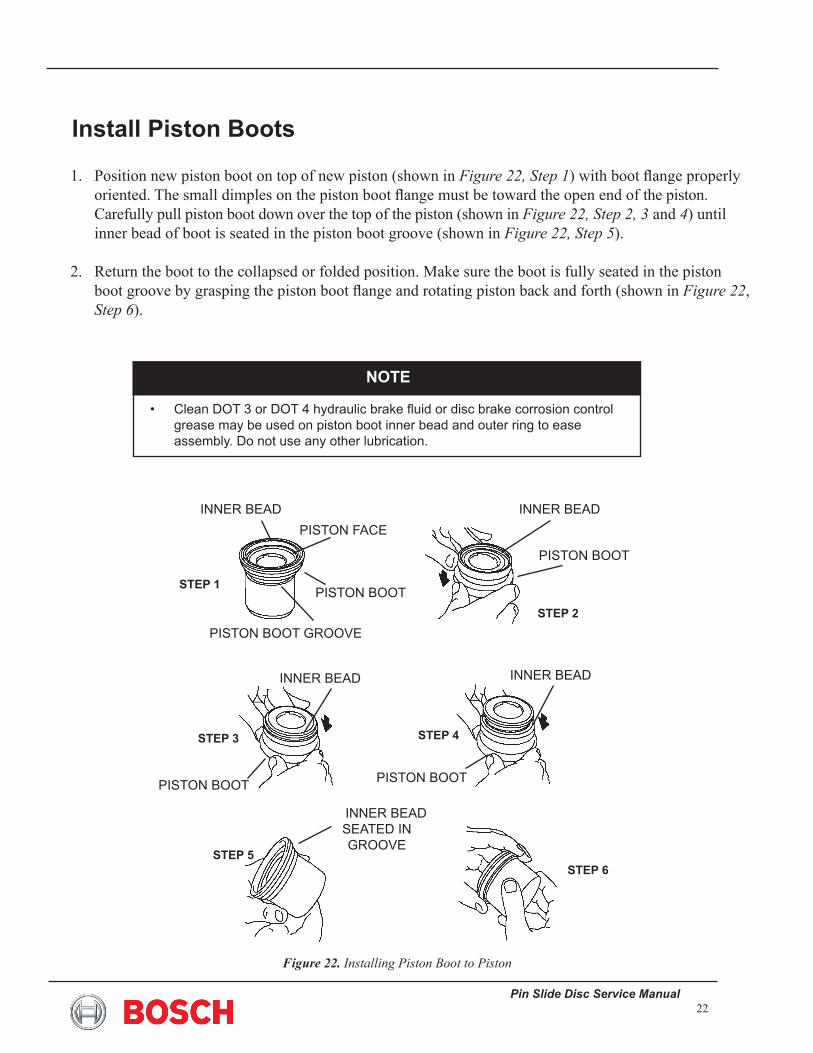
Install Piston Boots
Position new piston boot on top of new piston (shown in Figure 22, Step 1) with boot flange properly oriented. The small dimples on the piston boot flange must be toward the open end of the piston. Carefully pull piston boot down over the top of the piston (shown in Figure 22, Step 2, 3 and 4) until inner bead of boot is seated in the piston boot groove (shown in Figure 22, Step 5).
Return the boot to the collapsed or folded position. Make sure the boot is fully seated in the piston boot groove by grasping the piston boot flange and rotating piston back and forth (shown in Figure 22, Step 6).
�.
2.
NOTE
clean dOT 3 or dOT 4 hydraulic brake fluid or disc brake corrosion control grease may be used on piston boot inner bead and outer ring to ease assembly. do not use any other lubrication.
•
Figure 22. Installing Piston Boot to Piston
PiSTON BOOT
STEP 2
STEP 4
STEP 6
inneR bead inneR bead
PiSTON BOOT
PiSTON BOOT
PiSTON FaCe
inneR beadinneR bead
inneR bead SeaTed iN gROOVe
PiSTON BOOT
STEP 1
STEP 3
STEP 5
pisTOn bOOT gROOVe
Pin Slide Disc Brake Service Manual23
Install Pistons
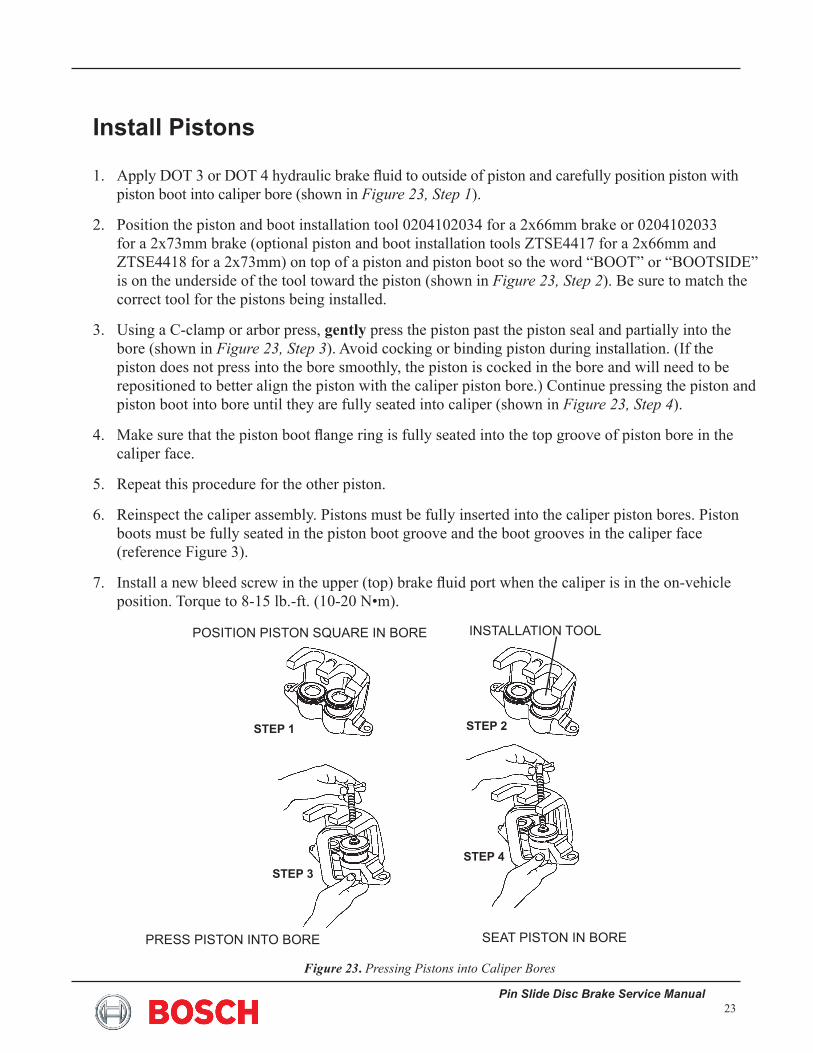
Apply DOT 3 or DOT 4 hydraulic brake fluid to outside of piston and carefully position piston with piston boot into caliper bore (shown in Figure 23, Step 1).
Position the piston and boot installation tool 0204102034 for a 2x66mm brake or 0204102033 for a 2x73mm brake (optional piston and boot installation tools ZTSE4417 for a 2x66mm and ZTSE4418 for a 2x73mm) on top of a piston and piston boot so the word “BOOT” or “BOOTSIDE” is on the underside of the tool toward the piston (shown in Figure 23, Step 2). Be sure to match the correct tool for the pistons being installed.
Using a C-clamp or arbor press, gently press the piston past the piston seal and partially into the bore (shown in Figure 23, Step 3). Avoid cocking or binding piston during installation. (If the piston does not press into the bore smoothly, the piston is cocked in the bore and will need to be repositioned to better align the piston with the caliper piston bore.) Continue pressing the piston and piston boot into bore until they are fully seated into caliper (shown in Figure 23, Step 4).
Make sure that the piston boot flange ring is fully seated into the top groove of piston bore in the caliper face.
Repeat this procedure for the other piston.
Reinspect the caliper assembly. Pistons must be fully inserted into the caliper piston bores. Piston boots must be fully seated in the piston boot groove and the boot grooves in the caliper face (reference Figure 3).
Install a new bleed screw in the upper (top) brake fluid port when the caliper is in the on-vehicle position. Torque to �-�� lb.-ft. (�0-20 N•m).
�.
2.
3.
�.
�.
6.
7.
Figure 23. Pressing Pistons into Caliper Bores
iNSTaLLaTiON TOOL
seaT pisTOn in bORe
STEP 1 STEP 2
STEP 3STEP 4
pOsiTiOn pisTOn sQuaRe in bORe
pRess pisTOn inTO bORe
Pin Slide Disc Service Manual2�
Make sure the leading and trailing pin flanges, mounting bolts and mating caliper surfaces are clear of any grease or foreign matter. Use clean shop cloth and isopropyl or denatured alcohol to remove foreign debris.
Install inner and outer pads over the slippers and replace them in the same location from which they were removed.
Verify the type of caliper mounting bolt and anchor plate pin installed in the anchor plate. (Refer to the Anchor Plate Leading and Trailing Pin and Caliper Mounting Bolt Section, Figures 11 and 12).
Align flat on lower (bottom) anchor plate pin head with the flat on caliper housing lower (bottom) anchor plate pin boss. Be careful when positioning caliper over the disc brake pads, rotor and lower (bottom) anchor plate pin head to avoid tearing, cutting or dislodging piston boots or anchor plate pin boots.
When reusing caliper mounting bolts, see Procedure for Reusing the Caliper Mounting Bolt. Install lower (bottom) mounting bolt FINGER tight, securing the caliper to the anchor plate.
Align the flat on the upper pin flange, and then carefully rotate the caliper closed and install upper mounting bolt FINGER tight.
�.
2.
3.
�.
�.
6.
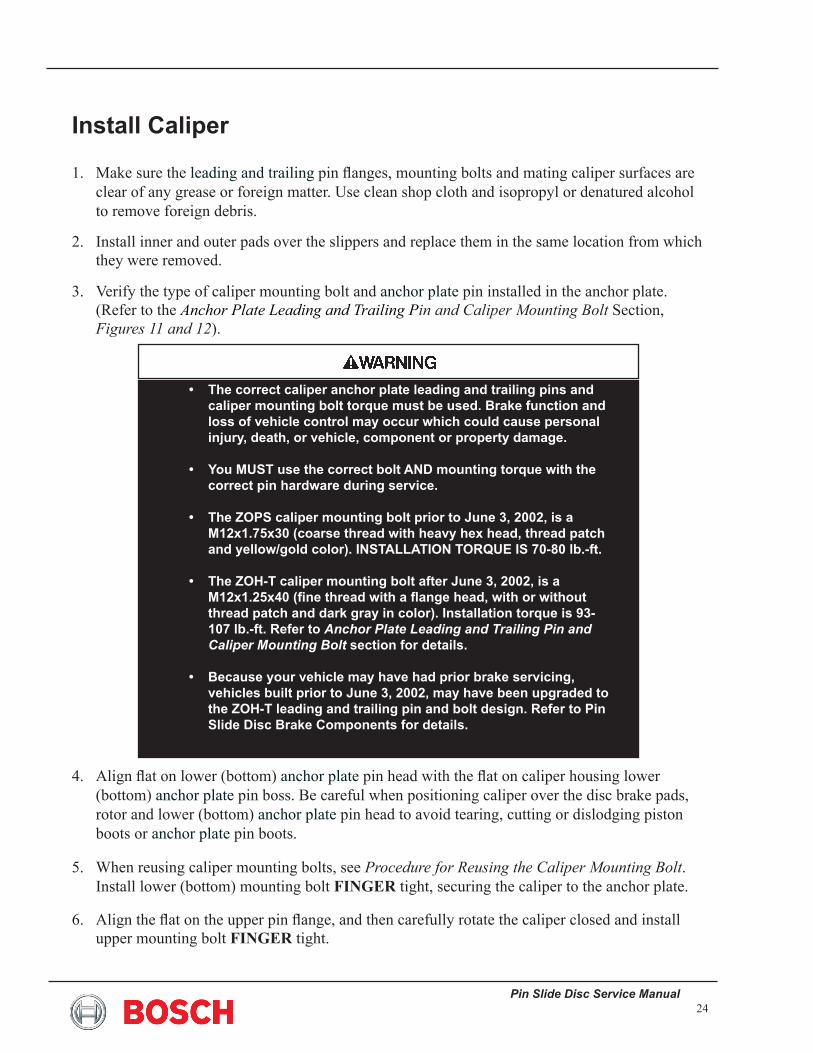
Install Caliper
The correct caliper anchor plate leading and trailing pins and caliper mounting bolt torque must be used. Brake function and loss of vehicle control may occur which could cause personal injury, death, or vehicle, component or property damage.
You MUST use the correct bolt AND mounting torque with the correct pin hardware during service.
The ZOPS caliper mounting bolt prior to June 3, 2002, is a M12x1.75x30 (coarse thread with heavy hex head, thread patch and yellow/gold color). INSTALLATION TORQUE IS 70-80 lb.-ft.
The ZOH-T caliper mounting bolt after June 3, 2002, is a M12x1.25x40 (fine thread with a flange head, with or without thread patch and dark gray in color). Installation torque is 93-107 lb.-ft. Refer to Anchor Plate Leading and Trailing Pin and Caliper Mounting Bolt section for details.
Because your vehicle may have had prior brake servicing, vehicles built prior to June 3, 2002, may have been upgraded to the ZOH-T leading and trailing pin and bolt design. Refer to Pin Slide Disc Brake Components for details.
•
•
•
•
•
Pin Slide Disc Brake Service Manual2�
Figure 24. Definition of Leading and Trailing
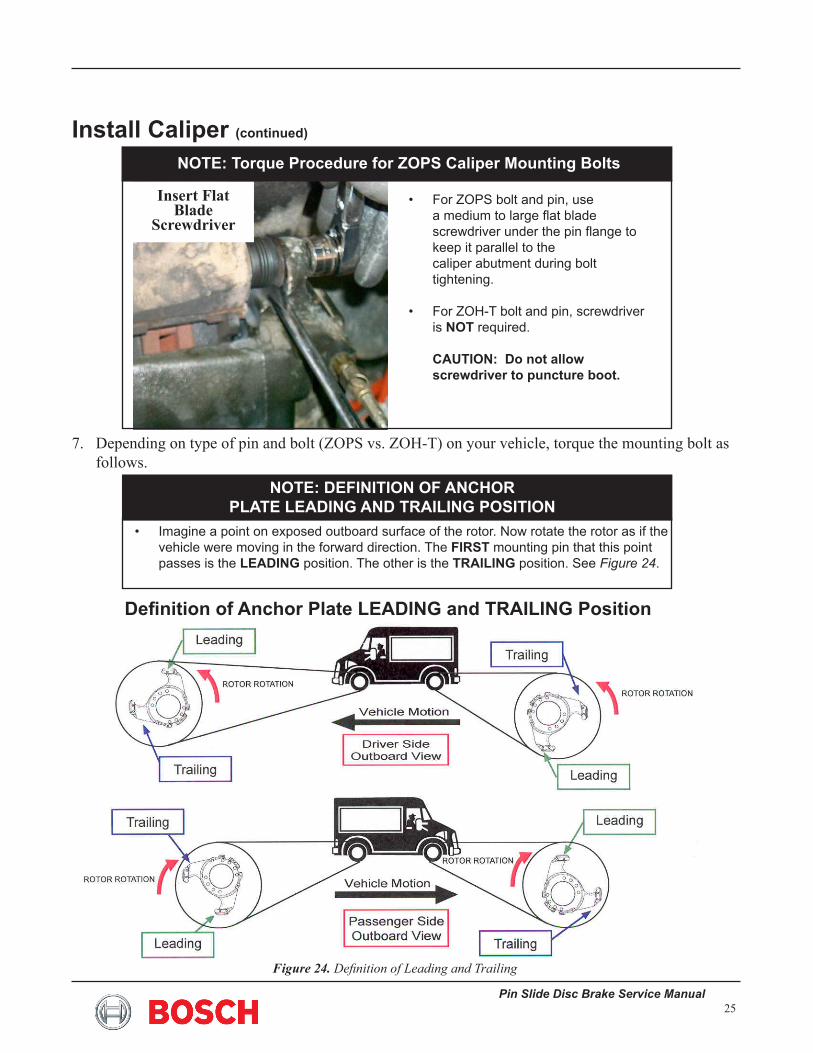
Insert FlatBlade
Screwdriver
Install Caliper (continued)
imagine a point on exposed outboard surface of the rotor. now rotate the rotor as if the vehicle were moving in the forward direction. The FIRST mounting pin that this point passes is the LEADING position. The other is the TRAILING position. see Figure 24.
•
NOTE: DEFINITION OF ANCHOR PLATE LEADING AND TRAILING POSITION
NOTE: Torque Procedure for ZOPS Caliper Mounting Bolts
For ZOPS bolt and pin, use a medium to large flat blade screwdriver under the pin flange to keep it parallel to the caliper abutment during bolt tightening.
For ZOH-T bolt and pin, screwdriver is NOT required. CAUTION: Do not allow screwdriver to puncture boot.
•
•
Definition of Anchor Plate LEADING and TRAILING Position
Depending on type of pin and bolt (ZOPS vs. ZOH-T) on your vehicle, torque the mounting bolt as follows.
7.
Pin Slide Disc Service Manual26
Install Caliper (continued)
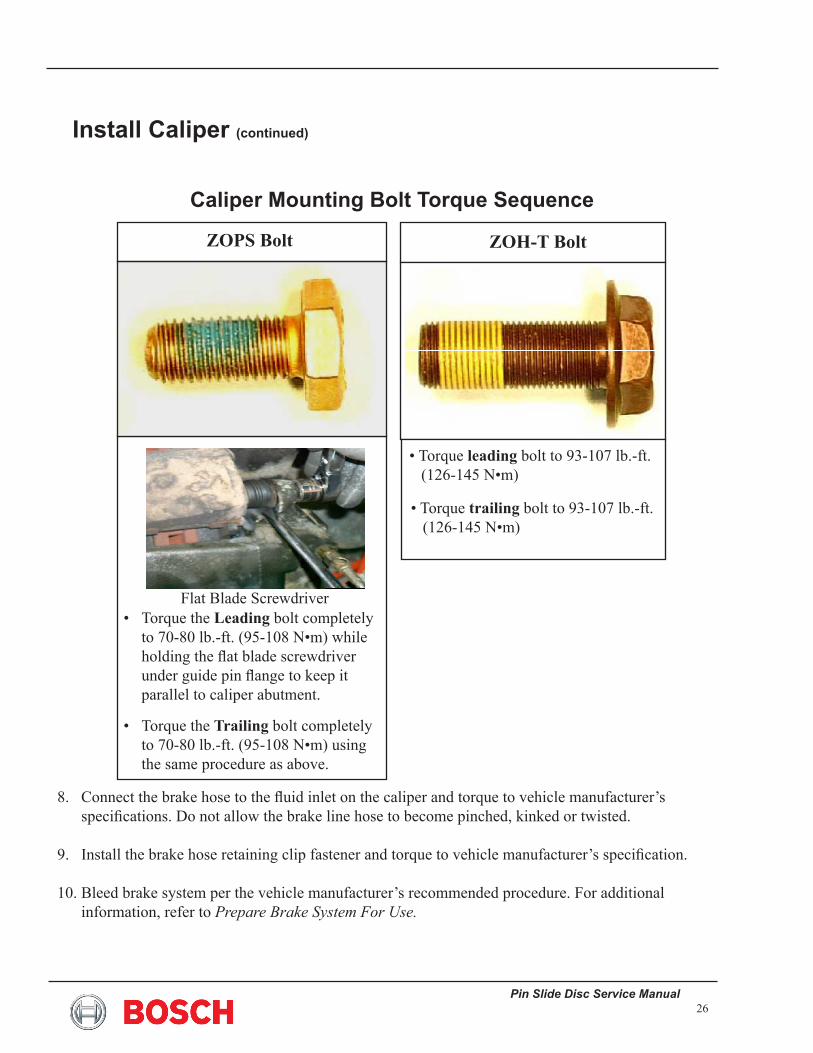
Caliper Mounting Bolt Torque Sequence
ZOPS Bolt
• Torque the Leading bolt completely to 70-80 lb.-ft. (95-108 N•m) while holding the flat blade screwdriver under guide pin flange to keep it parallel to caliper abutment.
• Torque the Trailing bolt completely to 70-80 lb.-ft. (95-108 N•m) using the same procedure as above.
Flat Blade Screwdriver
ZOH-T Bolt
• Torque leading bolt to 93-107 lb.-ft. (126-145 N•m)
• Torque trailing bolt to 93-107 lb.-ft. (126-145 N•m)
Connect the brake hose to the fluid inlet on the caliper and torque to vehicle manufacturer’s specifications. Do not allow the brake line hose to become pinched, kinked or twisted.
Install the brake hose retaining clip fastener and torque to vehicle manufacturer’s specification.
Bleed brake system per the vehicle manufacturer’s recommended procedure. For additional information, refer to Prepare Brake System For Use.
�.
�.
�0.
Pin Slide Disc Brake Service Manual27
Install Caliper (continued)
Make sure the bleed screw is properly torqued. •
Install wheel (tire and wheel) on vehicle and torque wheel attachment nuts per vehicle manufacturer’s specification. Remove floor stands.
Before starting engine, depress brake pedal several times to reseat the brake lining to rotor. Check for leaks at the brake hose to caliper connection. Check the master cylinder reservoir and fill if necessary. Consult vehicle service manual for proper brake fluid level.
After brake service, be sure to test brakes prior to returning vehicle to service to ensure a firm pedal during application.
��.
�2.
�3.
Pin Slide Disc Service Manual2�
Procedure for Reusing Caliper Mounting Bolt
caliper mounting bolts should be replaced after the third use. if unsure, replace with new bolts.
in the sketches that follow, a ZOH-T bolt is shown, but the same procedure applies to the ZOps bolt.
•
•
NOTE
Visually inspect the removed bolts for any thread damage, contamination or corrosion. If damaged, replace.
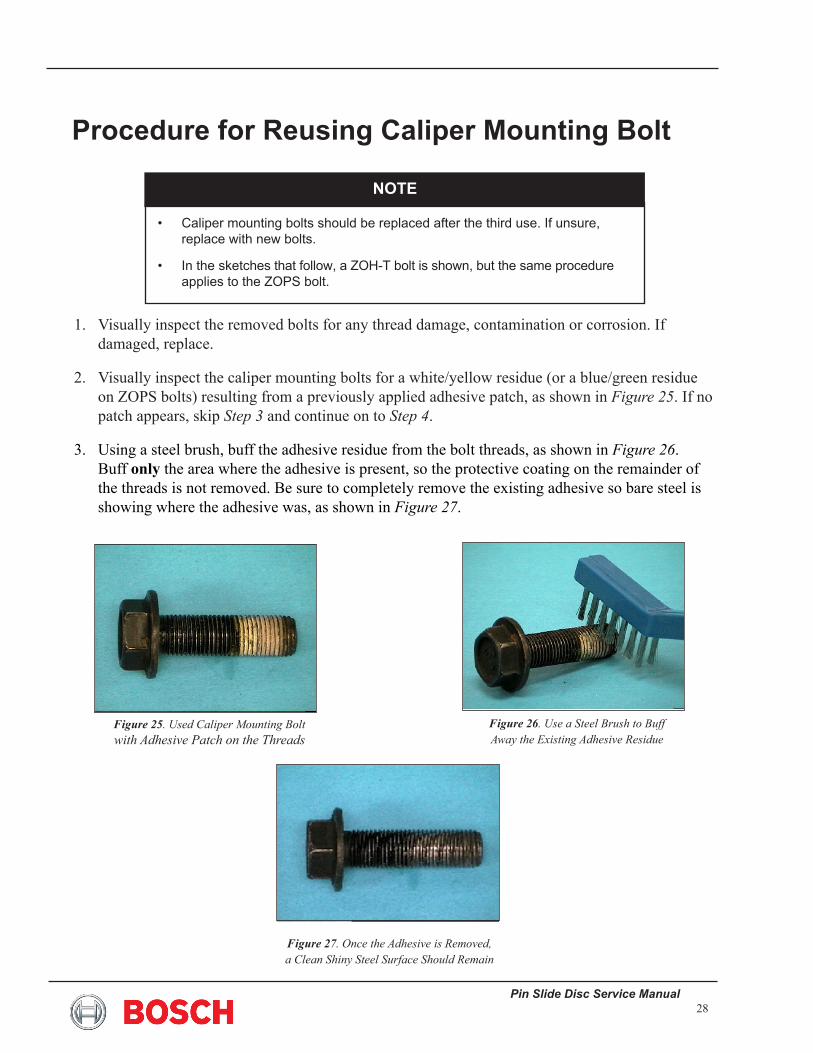
Visually inspect the caliper mounting bolts for a white/yellow residue (or a blue/green residue on ZOPS bolts) resulting from a previously applied adhesive patch, as shown in Figure 25. If no patch appears, skip Step 3 and continue on to Step 4.
Using a steel brush, buff the adhesive residue from the bolt threads, as shown in Figure 26. Buff only the area where the adhesive is present, so the protective coating on the remainder of the threads is not removed. Be sure to completely remove the existing adhesive so bare steel is showing where the adhesive was, as shown in Figure 27.
�.
2.
3.
Figure 25. Used Caliper Mounting Bolt with Adhesive Patch on the Threads
Figure 26. Use a Steel Brush to Buff Away the Existing Adhesive Residue
Figure 27. Once the Adhesive is Removed, a Clean Shiny Steel Surface Should Remain
Pin Slide Disc Brake Service Manual2�
Procedure for Reusing Caliper Mounting Bolt (continued)
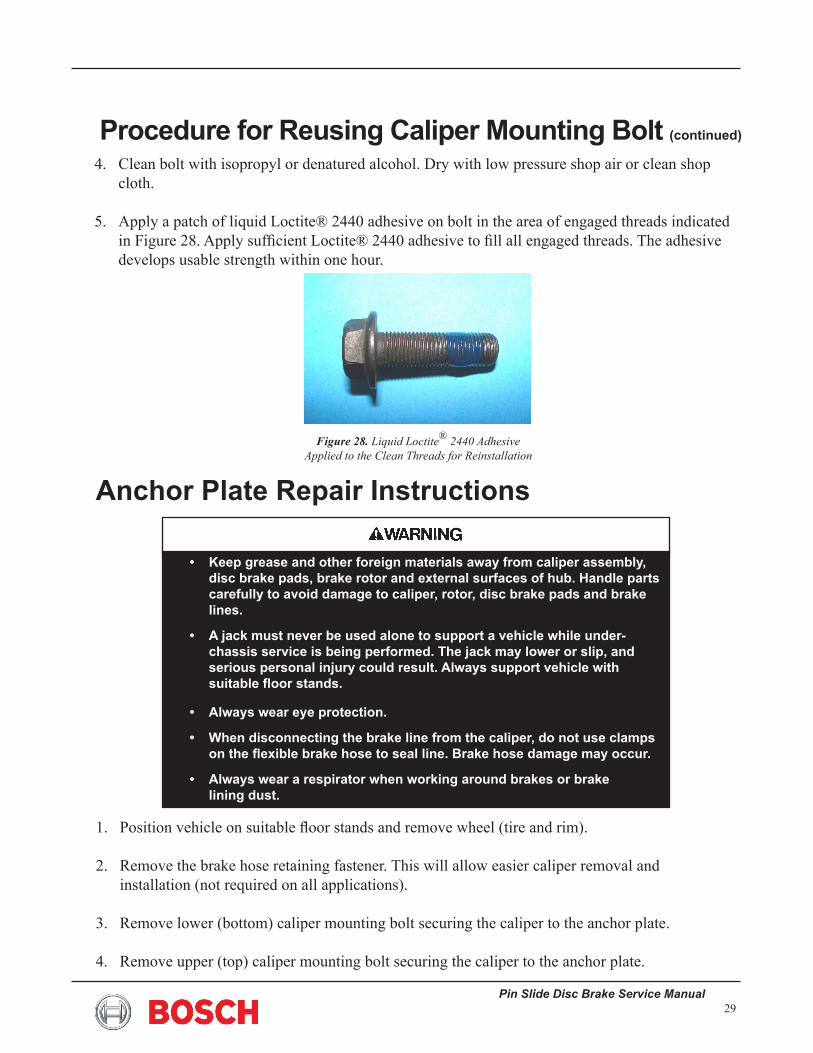
Figure 28. Liquid Loctite® 2440 Adhesive Applied to the Clean Threads for Reinstallation
Position vehicle on suitable floor stands and remove wheel (tire and rim).
Remove the brake hose retaining fastener. This will allow easier caliper removal and installation (not required on all applications).
Remove lower (bottom) caliper mounting bolt securing the caliper to the anchor plate.
Remove upper (top) caliper mounting bolt securing the caliper to the anchor plate.
�.
2.
3.
�.
Anchor Plate Repair Instructions
Keep grease and other foreign materials away from caliper assembly, disc brake pads, brake rotor and external surfaces of hub. Handle parts carefully to avoid damage to caliper, rotor, disc brake pads and brake lines.
A jack must never be used alone to support a vehicle while under-chassis service is being performed. The jack may lower or slip, and serious personal injury could result. Always support vehicle with suitable floor stands. Always wear eye protection.
When disconnecting the brake line from the caliper, do not use clamps on the flexible brake hose to seal line. Brake hose damage may occur.
Always wear a respirator when working around brakes or brake lining dust.
•
•
•
•
•
Clean bolt with isopropyl or denatured alcohol. Dry with low pressure shop air or clean shop cloth.
Apply a patch of liquid Loctite® 2��0 adhesive on bolt in the area of engaged threads indicated in Figure 28. Apply sufficient Loctite® 2440 adhesive to fill all engaged threads. The adhesive develops usable strength within one hour.
�.
�.
Pin Slide Disc Service Manual30
Move caliper assembly away from rotor and place it in a secure location on the vehicle suspension or place on suitable stand. Secure the caliper assembly so that it does not fall.
Remove inboard and outboard disc brake pads from anchor plate pad abutment slippers and inspect pads (refer to Disc Brake Pads section of this manual for details).
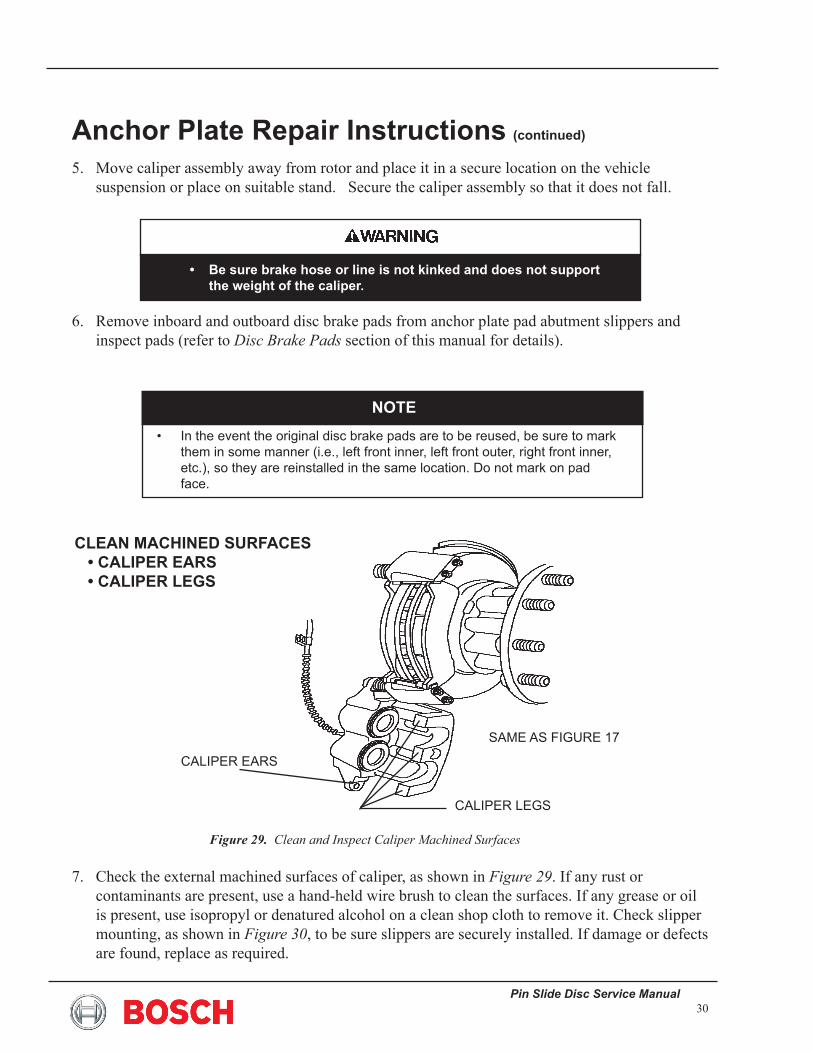
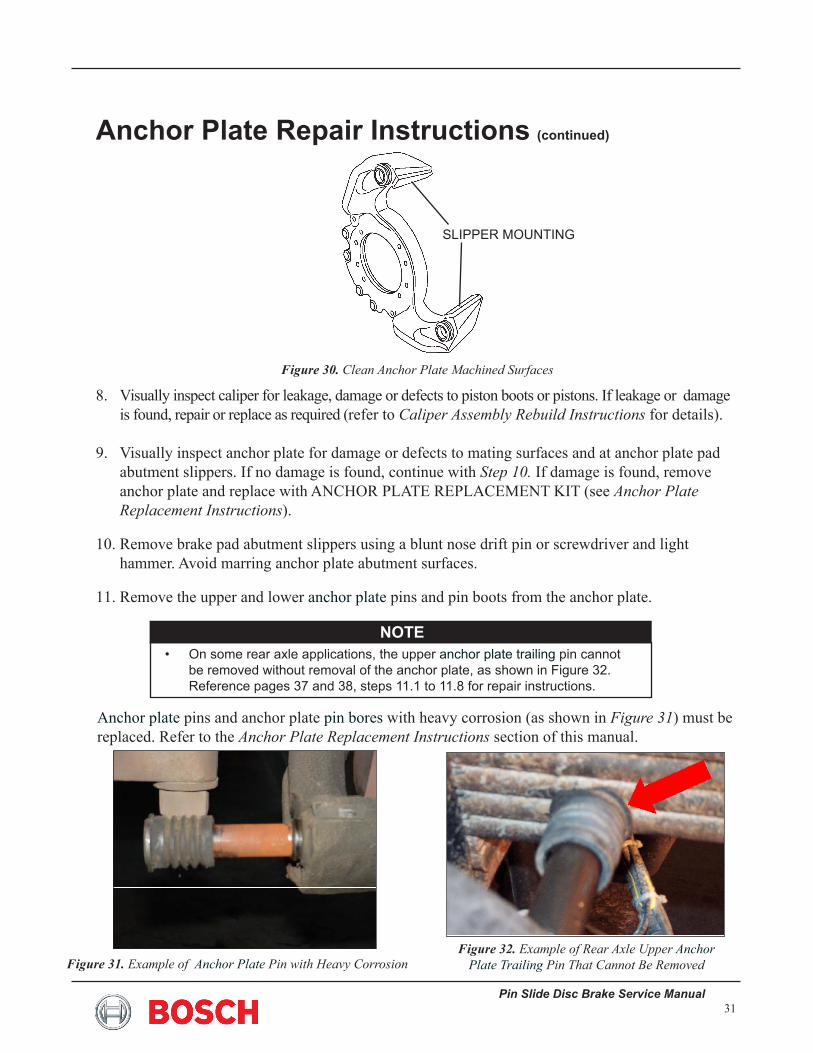
Check the external machined surfaces of caliper, as shown in Figure 29. If any rust or contaminants are present, use a hand-held wire brush to clean the surfaces. If any grease or oil is present, use isopropyl or denatured alcohol on a clean shop cloth to remove it. Check slipper mounting, as shown in Figure 30, to be sure slippers are securely installed. If damage or defects are found, replace as required.
�.
6.
7.
in the event the original disc brake pads are to be reused, be sure to mark them in some manner (i.e., left front inner, left front outer, right front inner, etc.), so they are reinstalled in the same location. do not mark on pad face.
•
NOTE
Anchor Plate Repair Instructions (continued)
Figure 29. Clean and Inspect Caliper Machined Surfaces
caLipeR eaRs
CLEAN MACHINED SURFACES • CALIPER EARS • CALIPER LEGS
caLipeR Legs
same as FiguRe 17
Be sure brake hose or line is not kinked and does not support the weight of the caliper.
•
Pin Slide Disc Brake Service Manual3�
Anchor Plate Repair Instructions (continued)
sLippeR mOunTing
Figure 30. Clean Anchor Plate Machined Surfaces
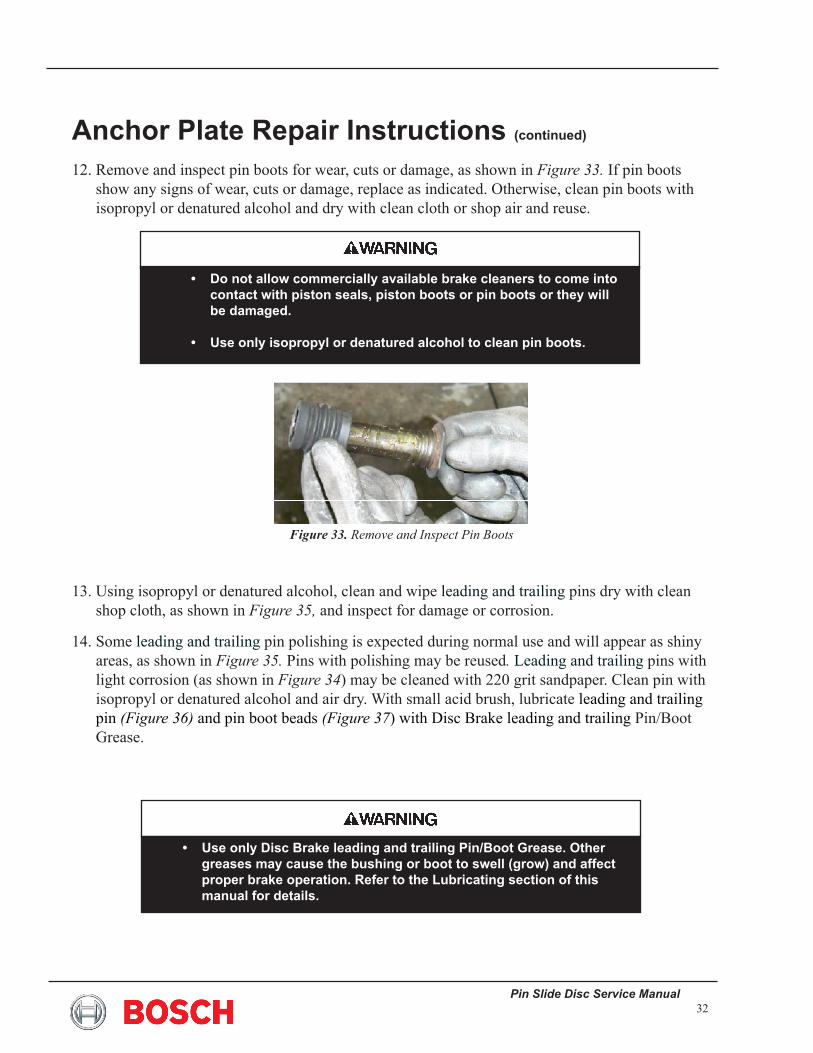
Anchor plate pins and anchor plate pin bores with heavy corrosion (as shown in Figure 31) must be replaced. Refer to the Anchor Plate Replacement Instructions section of this manual.
Figure 31. Example of Anchor Plate Pin with Heavy Corrosion
Visually inspect caliper for leakage, damage or defects to piston boots or pistons. If leakage or damage is found, repair or replace as required (refer to Caliper Assembly Rebuild Instructions for details).
Visually inspect anchor plate for damage or defects to mating surfaces and at anchor plate pad abutment slippers. If no damage is found, continue with Step 10. If damage is found, remove anchor plate and replace with ANCHOR PLATE REPLACEMENT KIT (see Anchor Plate Replacement Instructions).
Remove brake pad abutment slippers using a blunt nose drift pin or screwdriver and light hammer. Avoid marring anchor plate abutment surfaces.
Remove the upper and lower anchor plate pins and pin boots from the anchor plate.
�.
�.
�0.
��.
Figure 32. Example of Rear Axle Upper Anchor Plate Trailing Pin That Cannot Be Removed
On some rear axle applications, the upper anchor plate trailing pin cannot be removed without removal of the anchor plate, as shown in Figure 32. Reference pages 37 and 38, steps 11.1 to 11.8 for repair instructions.
•NOTE
Pin Slide Disc Service Manual32
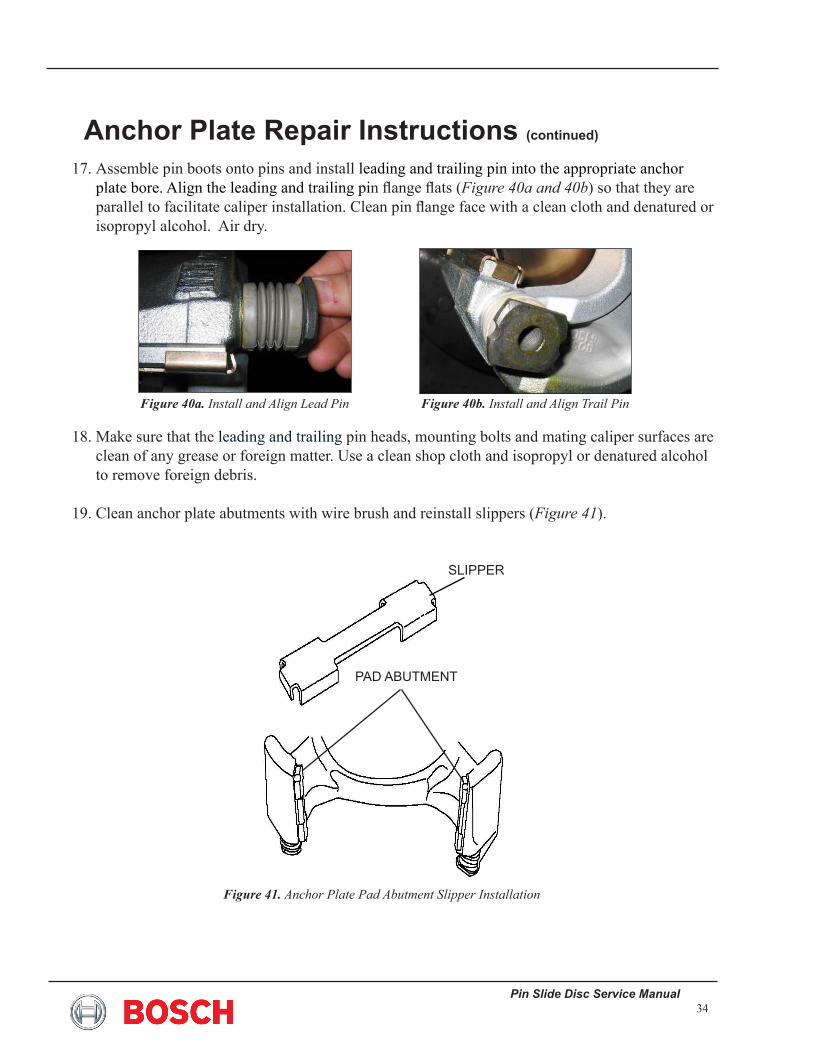
Remove and inspect pin boots for wear, cuts or damage, as shown in Figure 33. If pin boots show any signs of wear, cuts or damage, replace as indicated. Otherwise, clean pin boots with isopropyl or denatured alcohol and dry with clean cloth or shop air and reuse.
Using isopropyl or denatured alcohol, clean and wipe leading and trailing pins dry with clean shop cloth, as shown in Figure 35, and inspect for damage or corrosion.
Some leading and trailing pin polishing is expected during normal use and will appear as shiny areas, as shown in Figure 35. Pins with polishing may be reused. Leading and trailing pins with light corrosion (as shown in Figure 34) may be cleaned with 220 grit sandpaper. Clean pin with isopropyl or denatured alcohol and air dry. With small acid brush, lubricate leading and trailing pin (Figure 36) and pin boot beads (Figure 37) with Disc Brake leading and trailing Pin/Boot Grease.
�2.
�3.
��.
Anchor Plate Repair Instructions (continued)
Figure 33. Remove and Inspect Pin Boots
Do not allow commercially available brake cleaners to come into contact with piston seals, piston boots or pin boots or they will be damaged.
Use only isopropyl or denatured alcohol to clean pin boots.
•
•
Use only Disc Brake leading and trailing Pin/Boot Grease. Other greases may cause the bushing or boot to swell (grow) and affect proper brake operation. Refer to the Lubricating section of this manual for details.
•

Pin Slide Disc Brake Service Manual33
Cleaning and lubricating anchor plate bores: Using a round wire (5/8-inch diameter) brush (Figure 38) and isopropyl or denatured alcohol, wire brush both upper and lower anchor plate pin bores. Clean out any remaining loose residue with a clean shop cloth or swab. Carefully air dry pin bores. With small acid brush, lubricate (Figure 39) anchor plate bore with Disc Brake Leading and Trailing Pin/Boot Grease.
To aid in leading and trailing pin installation, it may be necessary to loosen the anchor plate tie bar bolts that are opposite the caliper leading and trailing pins on 2x73mm caliper assemblies or anchor plate plug bolts on 2x66mm caliper assemblies. Be sure bolts are properly torqued per manufacturer’s recommendation after pin installation.
��.
16.
Anchor Plate Repair Instructions (continued)
Figure 36. Lubricate Leading and Trailing Pins
Figure 34. Leading Pin with Light Corrosion Figure 35. Clean Leading and Trailng Pins
Figure 37. Lubricate Boot Bead
Figure 38. Wire Brush Anchor Plate Bore Figure 39. Lubricate Anchor Plate Bore
Pin Slide Disc Service Manual3�
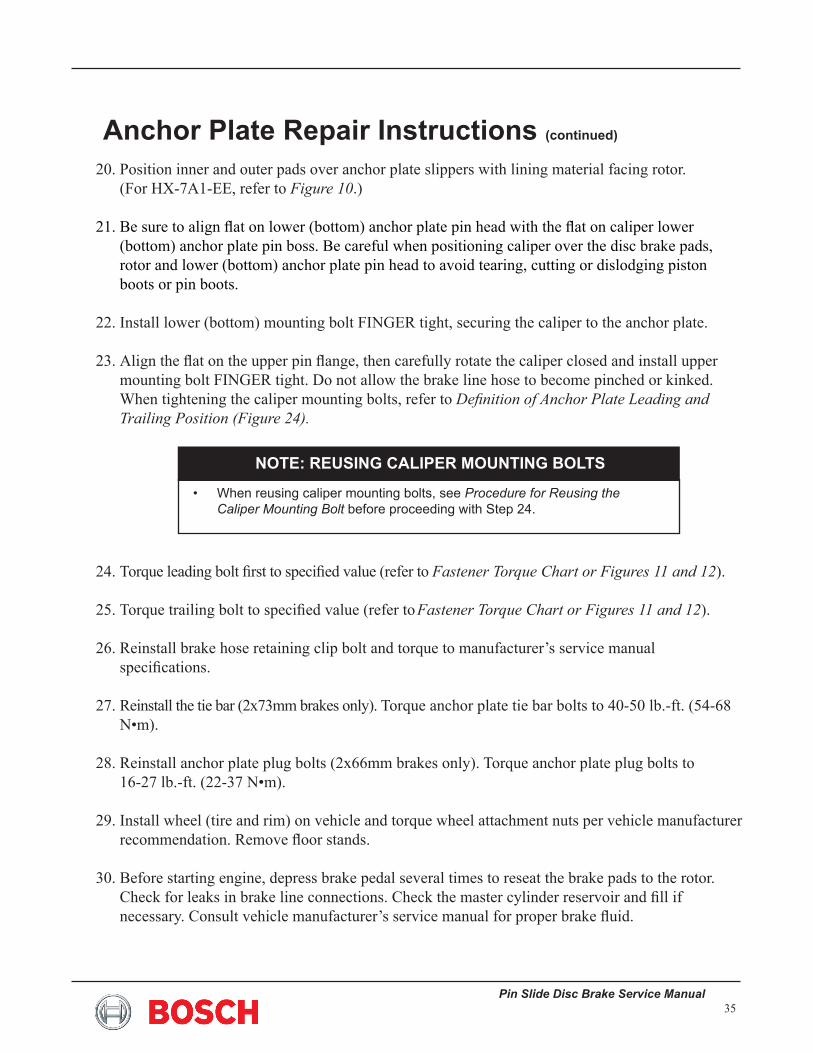
Assemble pin boots onto pins and install leading and trailing pin into the appropriate anchor plate bore. Align the leading and trailing pin flange flats (Figure 40a and 40b) so that they are parallel to facilitate caliper installation. Clean pin flange face with a clean cloth and denatured or isopropyl alcohol. Air dry. Make sure that the leading and trailing pin heads, mounting bolts and mating caliper surfaces are clean of any grease or foreign matter. Use a clean shop cloth and isopropyl or denatured alcohol to remove foreign debris.
Clean anchor plate abutments with wire brush and reinstall slippers (Figure 41).
17.
��.
��.
Anchor Plate Repair Instructions (continued)
Figure 40a. Install and Align Lead Pin
Pad aBUTMeNT
Figure 41. Anchor Plate Pad Abutment Slipper Installation
sLippeR
Figure 40b. Install and Align Trail Pin
Pin Slide Disc Brake Service Manual3�
Position inner and outer pads over anchor plate slippers with lining material facing rotor. (For HX-7A1-EE, refer to Figure 10.)
Be sure to align flat on lower (bottom) anchor plate pin head with the flat on caliper lower (bottom) anchor plate pin boss. Be careful when positioning caliper over the disc brake pads, rotor and lower (bottom) anchor plate pin head to avoid tearing, cutting or dislodging piston boots or pin boots.
Install lower (bottom) mounting bolt FINGER tight, securing the caliper to the anchor plate.
Align the flat on the upper pin flange, then carefully rotate the caliper closed and install upper mounting bolt FINGER tight. Do not allow the brake line hose to become pinched or kinked. When tightening the caliper mounting bolts, refer to Definition of Anchor Plate Leading and Trailing Position (Figure 24).
Torque leading bolt first to specified value (refer to Fastener Torque Chart or Figures 11 and 12).
Torque trailing bolt to specified value (refer to Fastener Torque Chart or Figures 11 and 12).
Reinstall brake hose retaining clip bolt and torque to manufacturer’s service manual specifications.
Reinstall the tie bar (2x73mm brakes only). Torque anchor plate tie bar bolts to 40-50 lb.-ft. (54-68 N•m).
Reinstall anchor plate plug bolts (2x66mm brakes only). Torque anchor plate plug bolts to 16-27 lb.-ft. (22-37 N•m).
Install wheel (tire and rim) on vehicle and torque wheel attachment nuts per vehicle manufacturer recommendation. Remove floor stands.
Before starting engine, depress brake pedal several times to reseat the brake pads to the rotor. Check for leaks in brake line connections. Check the master cylinder reservoir and fill if necessary. Consult vehicle manufacturer’s service manual for proper brake fluid.
20.
2�.
22.
23.
2�.
2�.
26.
27.
2�.
2�.
30.
Anchor Plate Repair Instructions (continued)
When reusing caliper mounting bolts, see Procedure for Reusing the Caliper Mounting Bolt before proceeding with step 24.
•
NOTE: REUSING CALIPER MOUNTING BOLTS
Pin Slide Disc Service Manual36
NOTE: Torque Procedure for ZOPS Caliper Mounting Bolts
For ZOPS bolt and pin, use a medium to large flat blade screwdriver under the pin flange to keep it parallel to the caliper abutment during bolt tightening.
For ZOH-T bolt and pin, screwdriver is NOT required. CAUTION: Do not allow screwdriver to puncture boot.
•
•
Anchor Plate Repair Instructions (continued)
Insert FlatBlade
Screwdriver
After brake service, be sure to test brakes prior to returning vehicle into service to ensure a firm pedal during brake application.
Refer to Prepare Brake System for Use for additional information.
3�.
32.
Pin Slide Disc Brake Service Manual37
Anchor Plate Repair Instructions (continued)
Rear Axle Upper (Top) Anchor Plate Trailing Pin Only
��.� Pull the trailing pin out of the anchor plate bore as far as possible.
��.2 Use a clean cloth dampened with isopropyl or denatured alcohol to clean trailing pin and pin boot. Air dry with low pressure shop air.
��.3 Inspect trailing pin and pin boot.
��.� If pin boots show any signs of wear, cuts or damage, replace as indicated. Otherwise, clean with isopropyl or denatured alcohol, dry with a clean cloth or shop air, lubricate with Disc Brake Leading and Trailing Pin/Boot Grease and reuse.
��.� Cut off damaged boot.
11.6 Lubricate trailing pin with Disc Brake Leading and Trailing Pin/Boot Grease.
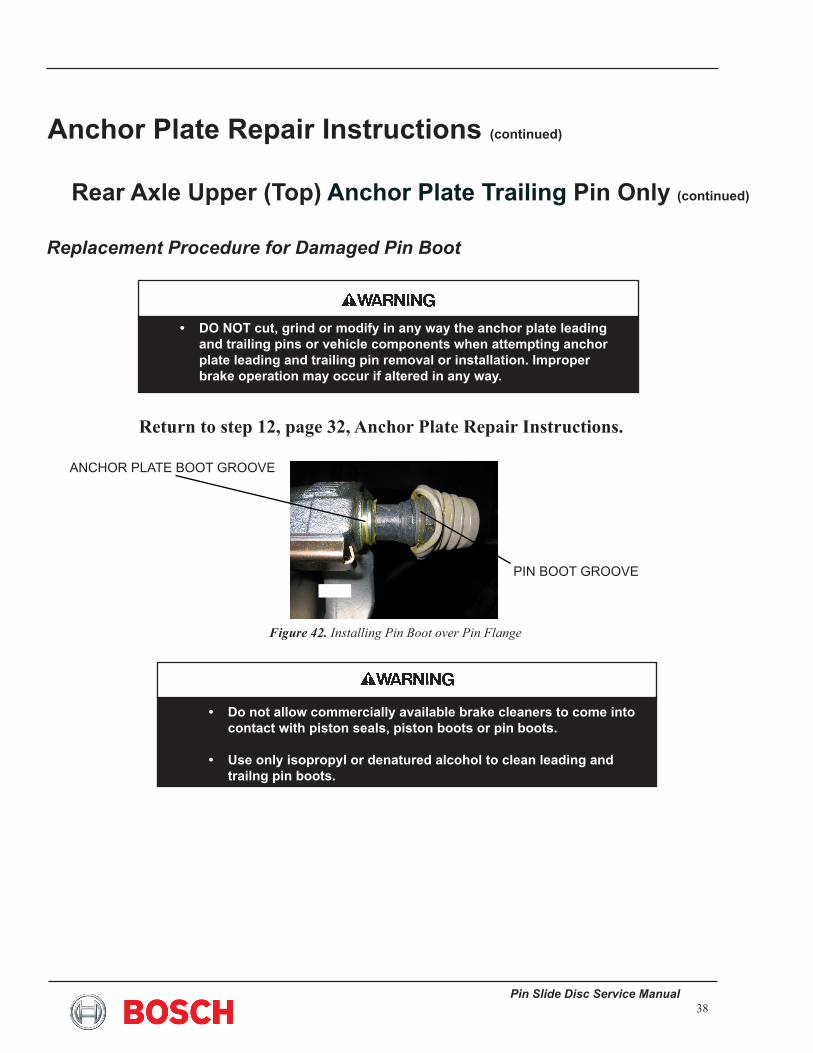
11.7 Carefully install new boot over pin flange and seat boot into groove, as shown in Figure 42. Verify that the boot was not torn during installation.
��.� Push trailing pin into anchor plate bore and seat boot onto anchor plate boot groove.
DO NOT use liquid alcohol directly on anchor plate pins or in anchor plate bore. It may collect in anchor plate bore and degrade leading and trailing pin lubricating grease.
•
On some rear axle applications, the upper caliper anchor plate trailing pin cannot be removed without removal of the anchor plate, as shown in Figure 32.
•NOTE
Pin Slide Disc Service Manual3�
Replacement Procedure for Damaged Pin Boot
Return to step 12, page 32, Anchor Plate Repair Instructions.
Figure 42. Installing Pin Boot over Pin Flange
Anchor Plate Repair Instructions (continued)
Rear Axle Upper (Top) Anchor Plate Trailing Pin Only (continued)
Do not allow commercially available brake cleaners to come into contact with piston seals, piston boots or pin boots. Use only isopropyl or denatured alcohol to clean leading and trailng pin boots.
•
•
DO NOT cut, grind or modify in any way the anchor plate leading and trailing pins or vehicle components when attempting anchor plate leading and trailing pin removal or installation. Improper brake operation may occur if altered in any way.
•
ancHOR pLaTe bOOT gROOVe
pin bOOT gROOVe
Pin Slide Disc Brake Service Manual3�
Rear Axle Upper (Top) Anchor Plate Trailing Pin Only (continued)
Anchor Plate Replacement Instructions
Remove caliper assembly, pads and tie bar as described in Anchor Plate Repair Instructions.
Remove hub, rotor and anchor plate according to vehicle manufacturer’s service procedure.
Remove splash shield and ABS sensor bracket from anchor plate, as shown in Figure 43.
�.
2.
3.
Keep grease and other foreign materials away from caliper assembly, disc brake pads, brake rotor and external surfaces of hub. Handle parts carefully to avoid damage to caliper, rotor, disc brake pads and brake lines.
A jack must never be used alone to support a vehicle while under-chassis service is being performed. The jack may lower or slip, and serious personal injury could result. Always support vehicle with suitable floor stands.
Always wear eye protection.
When disconnecting the brake line from the caliper, do not use clamps on the flexible brake hose to seal line. Brake hose damage may occur.
Always wear a respirator when working around brakes or brake lining dust.
•
•
•
•
•
Pin Slide Disc Service Manual�0
Anchor Plate Replacement Instructions (continued)
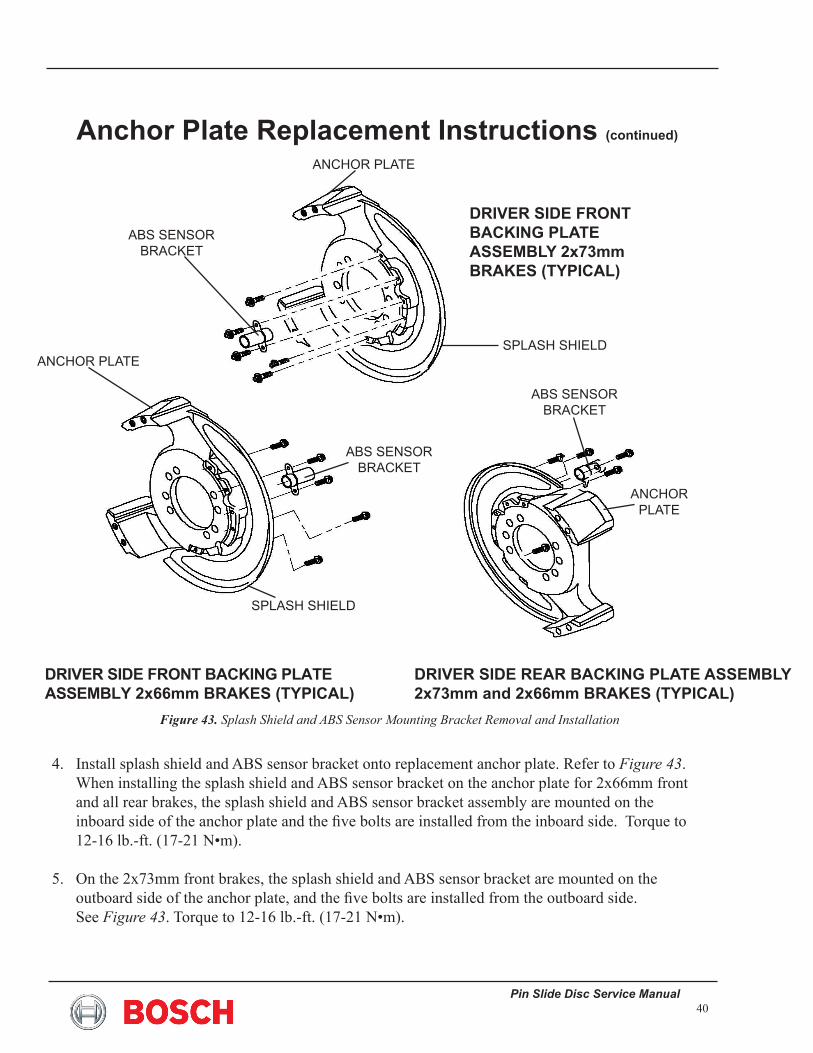
Figure 43. Splash Shield and ABS Sensor Mounting Bracket Removal and Installation
abs sensOR bRackeT
SPLaSH SHieLd
abs sensOR bRackeT
DRIVER SIDE FRONT BACKING PLATE ASSEMBLY 2x66mm BRAKES (TYPICAL)
DRIVER SIDE FRONT BACKING PLATE ASSEMBLY 2x73mm BRAKES (TYPICAL)
DRIVER SIDE REAR BACKING PLATE ASSEMBLY 2x73mm and 2x66mm BRAKES (TYPICAL)
abs sensOR bRackeT
ancHOR PLaTe
ancHOR pLaTe
ancHOR pLaTe
SPLaSH SHieLd
Install splash shield and ABS sensor bracket onto replacement anchor plate. Refer to Figure 43. When installing the splash shield and ABS sensor bracket on the anchor plate for 2x66mm front and all rear brakes, the splash shield and ABS sensor bracket assembly are mounted on the inboard side of the anchor plate and the five bolts are installed from the inboard side. Torque to 12-16 lb.-ft. (17-21 N•m).
On the 2x73mm front brakes, the splash shield and ABS sensor bracket are mounted on the outboard side of the anchor plate, and the five bolts are installed from the outboard side. See Figure 43. Torque to 12-16 lb.-ft. (17-21 N•m).
�.
�.
Pin Slide Disc Brake Service Manual��
Remove all traces of dirt, grease, oil, etc., from knuckle or axle flange.
Position and secure anchor plate assembly to the front steering knuckle or to the rear axle flange. Refer to vehicle manufacturer’s service information for installation procedure and torque specs.
Install brake hub and rotor according to vehicle manufacturer’s service information.
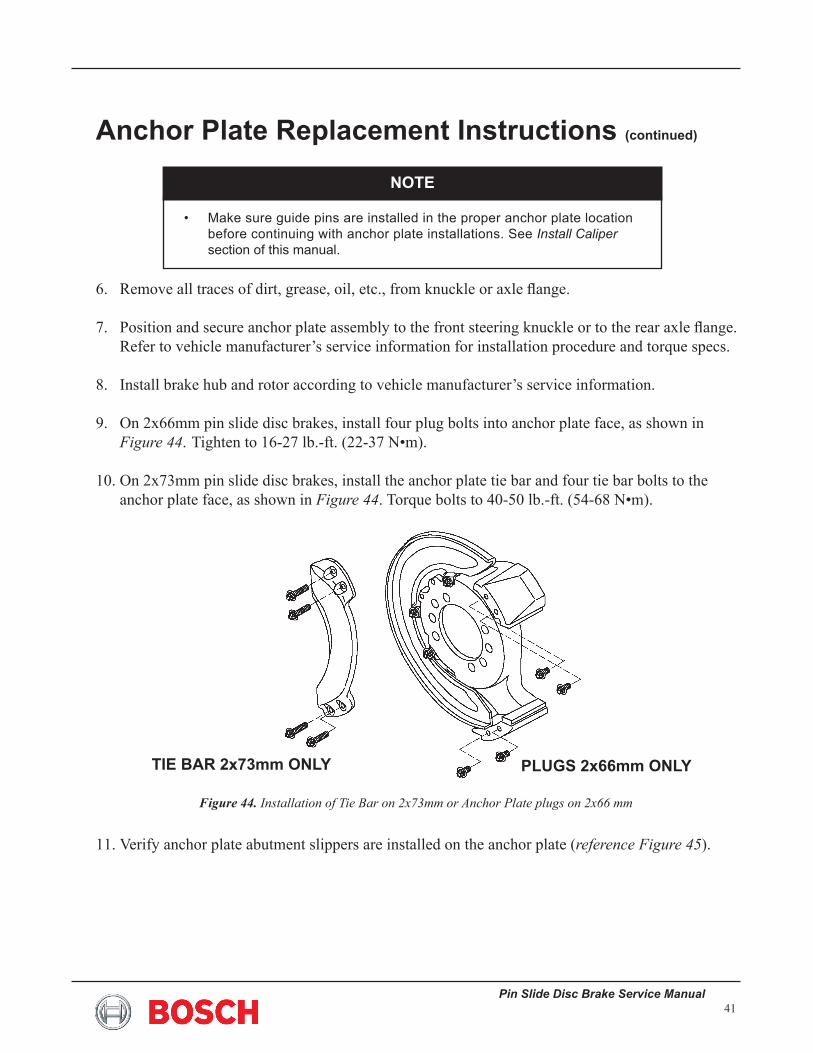
On 2x66mm pin slide disc brakes, install four plug bolts into anchor plate face, as shown in Figure 44. Tighten to 16-27 lb.-ft. (22-37 N•m).
On 2x73mm pin slide disc brakes, install the anchor plate tie bar and four tie bar bolts to the anchor plate face, as shown in Figure 44. Torque bolts to 40-50 lb.-ft. (54-68 N•m).
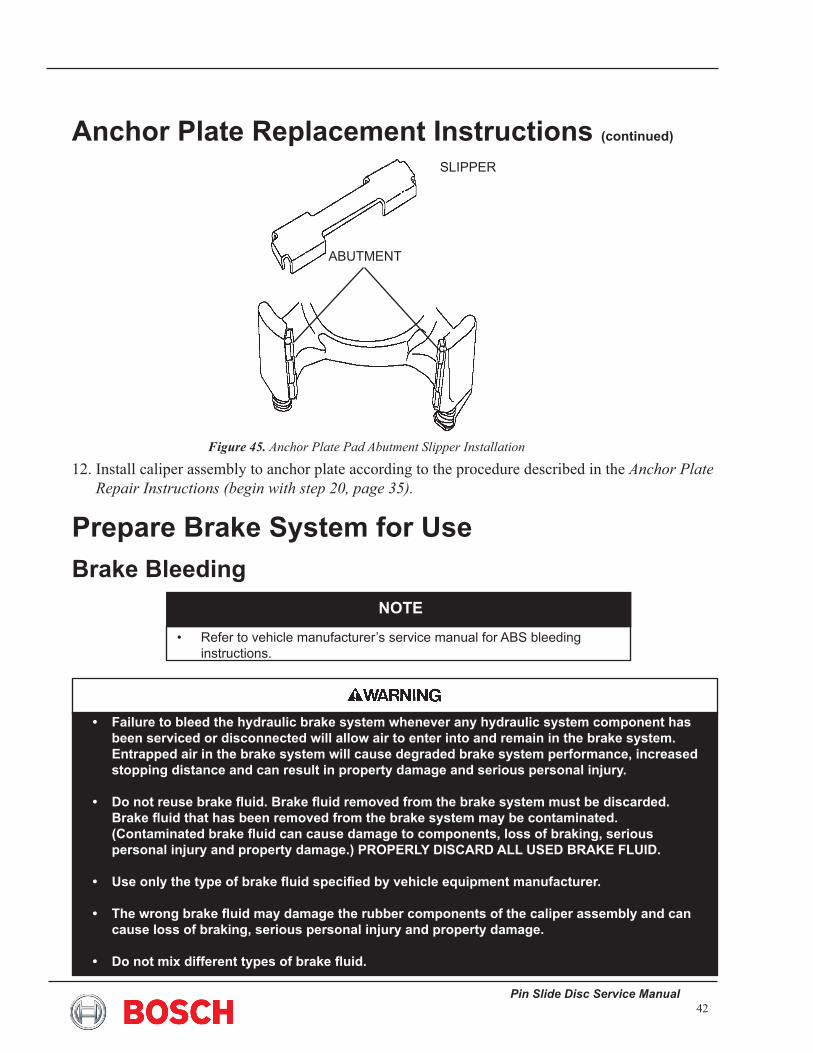
Verify anchor plate abutment slippers are installed on the anchor plate (reference Figure 45).
6.
7.
�.
�.
�0.
��.
Anchor Plate Replacement Instructions (continued)
Figure 44. Installation of Tie Bar on 2x73mm or Anchor Plate plugs on 2x66 mm
PLUGS 2x66mm ONLYTIE BAR 2x73mm ONLY
NOTE
Make sure guide pins are installed in the proper anchor plate location before continuing with anchor plate installations. see Install Caliper section of this manual.
•
Pin Slide Disc Service Manual�2
Prepare Brake System for Use Brake Bleeding
NOTE
Refer to vehicle manufacturer’s service manual for abs bleeding instructions.
•
Failure to bleed the hydraulic brake system whenever any hydraulic system component has been serviced or disconnected will allow air to enter into and remain in the brake system. Entrapped air in the brake system will cause degraded brake system performance, increased stopping distance and can result in property damage and serious personal injury.
Do not reuse brake fluid. Brake fluid removed from the brake system must be discarded. Brake fluid that has been removed from the brake system may be contaminated. (Contaminated brake fluid can cause damage to components, loss of braking, serious personal injury and property damage.) PROPERLY DISCARD ALL USED BRAKE FLUID.
Use only the type of brake fluid specified by vehicle equipment manufacturer.
The wrong brake fluid may damage the rubber components of the caliper assembly and can cause loss of braking, serious personal injury and property damage.
Do not mix different types of brake fluid.
•
•
•
•
•
Figure 45. Anchor Plate Pad Abutment Slipper Installation
Anchor Plate Replacement Instructions (continued)
aBUTMeNT
sLippeR
Install caliper assembly to anchor plate according to the procedure described in the Anchor Plate Repair Instructions (begin with step 20, page 35).
�2.
Pin Slide Disc Brake Service Manual�3
Anchor Plate Leading and Trailing Pins and Anchor Plate Pin BoresUse only Disc Brake Leading and Trailing Pin/Boot Grease, Shell Albida® MPS-1 Grease, as required when servicing the leading and trailing pins, pin boots and anchor plate pin bores. Use 1/8 ounce of grease or one chamber of the Shell Albida® MPS-� Grease packet in the service kit, Bosch part number 020�3022��, to thoroughly lubricate each leading and trailing pin and anchor plate bore set.
Caliper Piston BoresUse only Disc Brake Corrosion Control Grease (Batco) or 1/2 of grease packet, Bosch part number 0204262951, for each caliper piston bore.
NOTE
Lubrication
Use only specified lubricants. Other greases may cause seals and boots to swell (grow) and affect proper brake operation.
•
Check the master cylinder reservoir and fill if necessary with DOT 3 or DOT 4 brake fluid.
Bleed the entire brake system per vehicle manufacturer’s service instructions.
Bleed the caliper assemblies in the following order.
Tighten bleed screw to �-�� lb.-ft. (�0-20 N•m).
�.
2.
3.
�.
NOTE
use only dOT 3 or 4 brake fluid with bosch hydraulic pin slide disc brakes.•
Brake Bleeding (continued)
Right rearLeft rearRight frontLeft front
••••
Pin Slide Disc Service Manual��
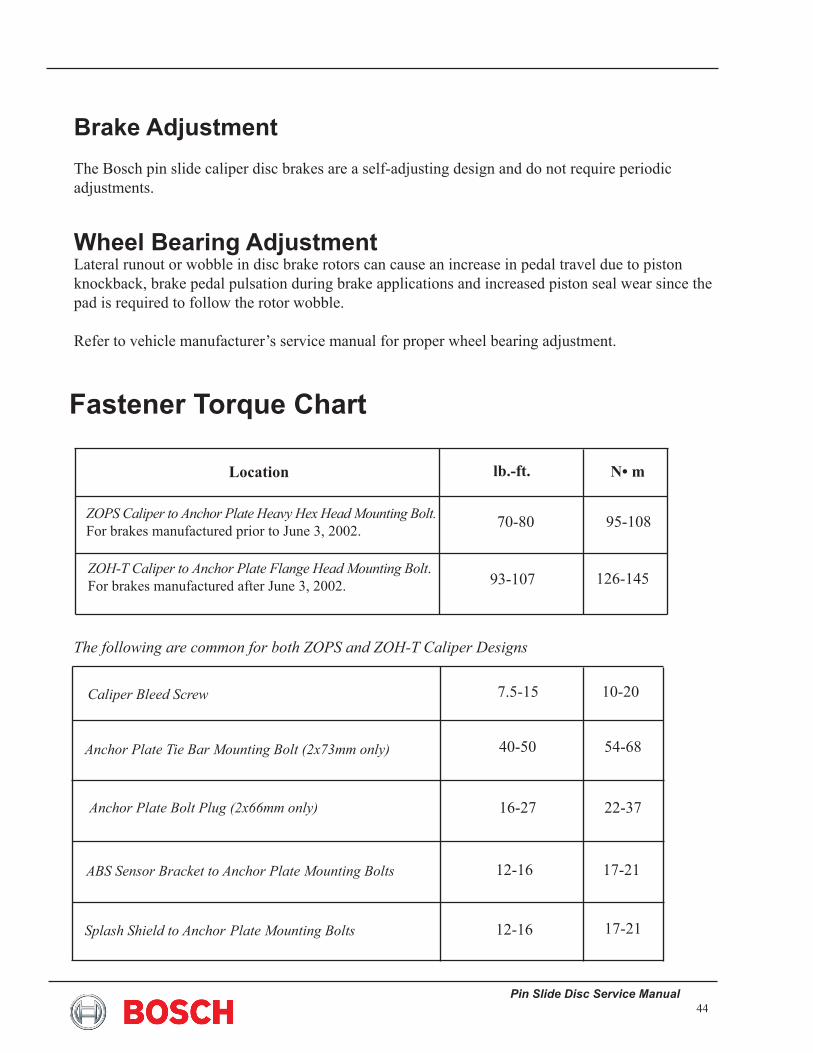
Fastener Torque Chart
N• mLocation lb.-ft.
ZOPS Caliper to Anchor Plate Heavy Hex Head Mounting Bolt. For brakes manufactured prior to June 3, 2002. 70-80 95-108
126-145 ZOH-T Caliper to Anchor Plate Flange Head Mounting Bolt. For brakes manufactured after June 3, 2002. 93-107
The following are common for both ZOPS and ZOH-T Caliper Designs
�0-20Caliper Bleed Screw 7.5-15
Anchor Plate Tie Bar Mounting Bolt (2x73mm only) �0-�0 54-68
22-37
17-21
16-27
ABS Sensor Bracket to Anchor Plate Mounting Bolts 12-16
Anchor Plate Bolt Plug (2x66mm only)
Splash Shield to Anchor Plate Mounting Bolts 12-16 17-21
Brake AdjustmentThe Bosch pin slide caliper disc brakes are a self-adjusting design and do not require periodic adjustments.
Wheel Bearing AdjustmentLateral runout or wobble in disc brake rotors can cause an increase in pedal travel due to piston knockback, brake pedal pulsation during brake applications and increased piston seal wear since the pad is required to follow the rotor wobble.
Refer to vehicle manufacturer’s service manual for proper wheel bearing adjustment.
Pin Slide Disc Brake Service Manual��
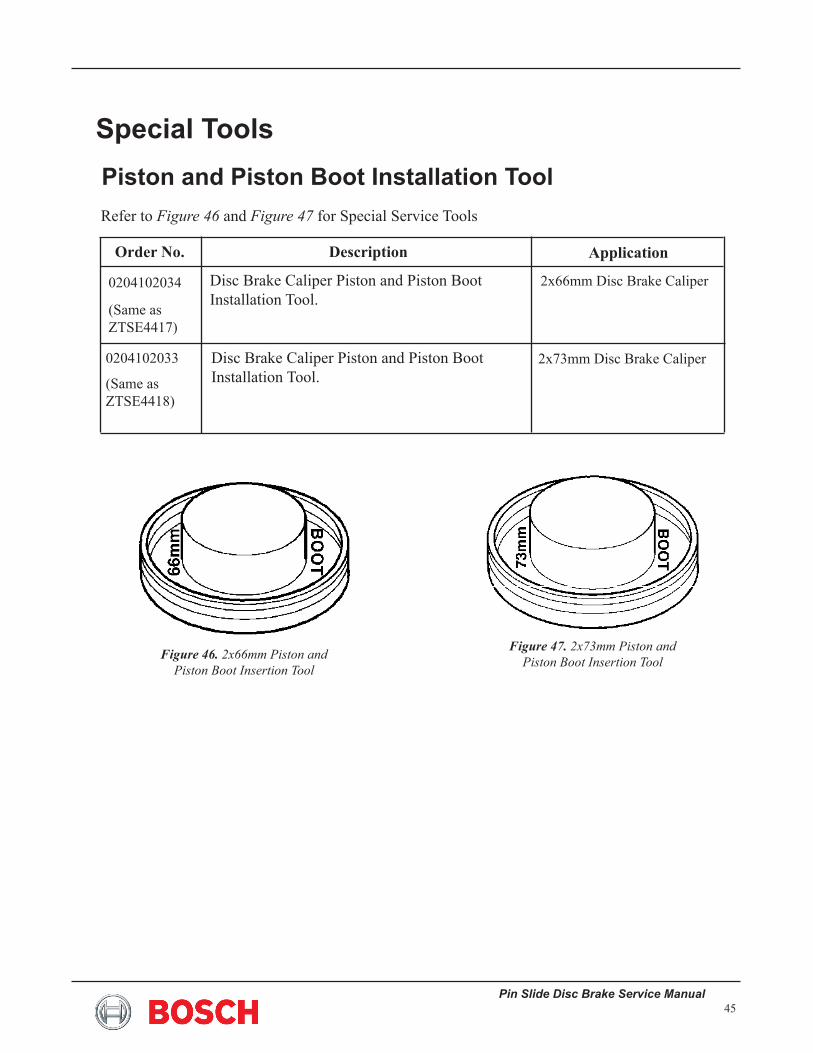
Special ToolsPiston and Piston Boot Installation Tool
Figure 46. 2x66mm Piston and Piston Boot Insertion Tool
Figure 47. 2x73mm Piston and Piston Boot Insertion Tool
Refer to Figure 46 and Figure 47 for Special Service Tools
Application
Disc Brake Caliper Piston and Piston Boot Installation Tool.
2x66mm Disc Brake Caliper
2x73mm Disc Brake CaliperDisc Brake Caliper Piston and Piston Boot Installation Tool.
020��0203�
(Same asZTSE4417)
020��02033
(Same asZTSE����)
Order No. Description
Pin Slide Disc Service Manual46
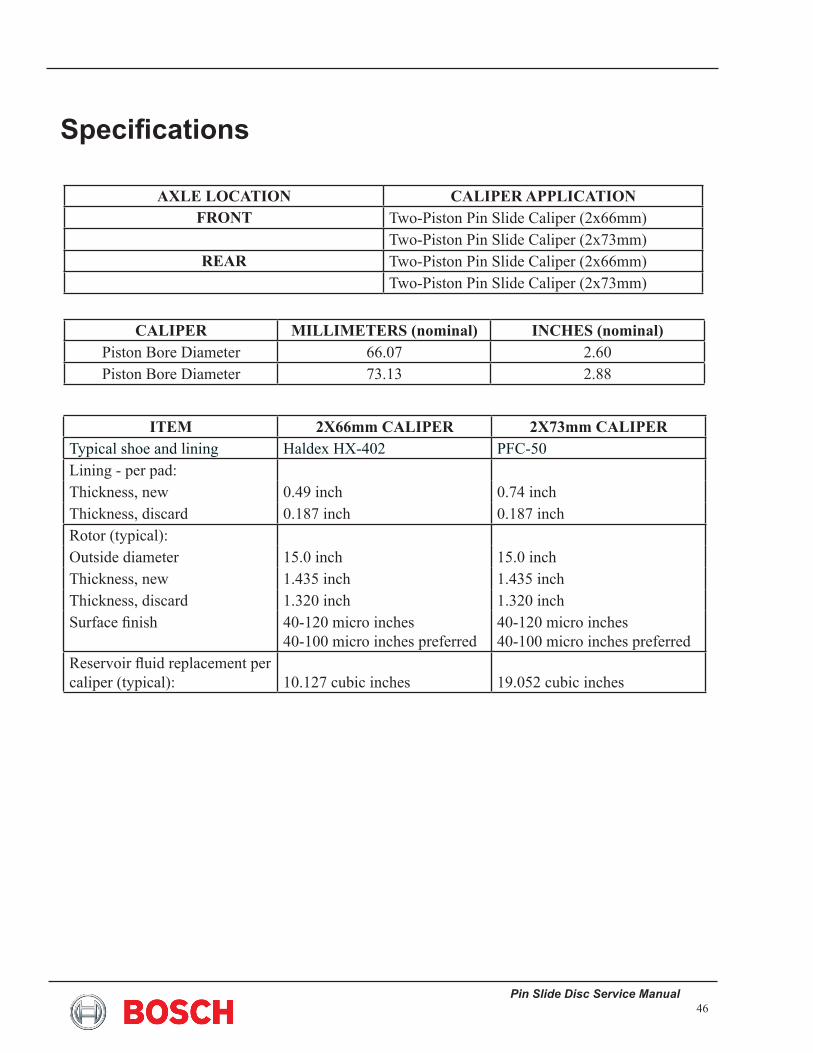
Specifications
AXLE LOCATION CALIPER APPLICATIONFRONT Two-Piston Pin Slide Caliper (2x66mm)
Two-Piston Pin Slide Caliper (2x73mm)REAR Two-Piston Pin Slide Caliper (2x66mm)
Two-Piston Pin Slide Caliper (2x73mm)
CALIPER MILLIMETERS (nominal) INCHES (nominal)Piston Bore Diameter 66.07 2.60Piston Bore Diameter 73.13 2.��
ITEM 2X66mm CALIPER 2X73mm CALIPERTypical shoe and lining Haldex HX-402 PFC-�0Lining - per pad:Thickness, new 0.�� inch 0.74 inchThickness, discard 0.187 inch 0.187 inchRotor (typical):Outside diameter ��.0 inch ��.0 inchThickness, new �.�3� inch �.�3� inchThickness, discard �.320 inch �.320 inchSurface finish �0-�20 micro inches
�0-�00 micro inches preferred�0-�20 micro inches�0-�00 micro inches preferred
Reservoir fluid replacement per caliper (typical):
10.127 cubic inches
��.0�2 cubic inches
Pin Slide Disc Brake Service Manual47
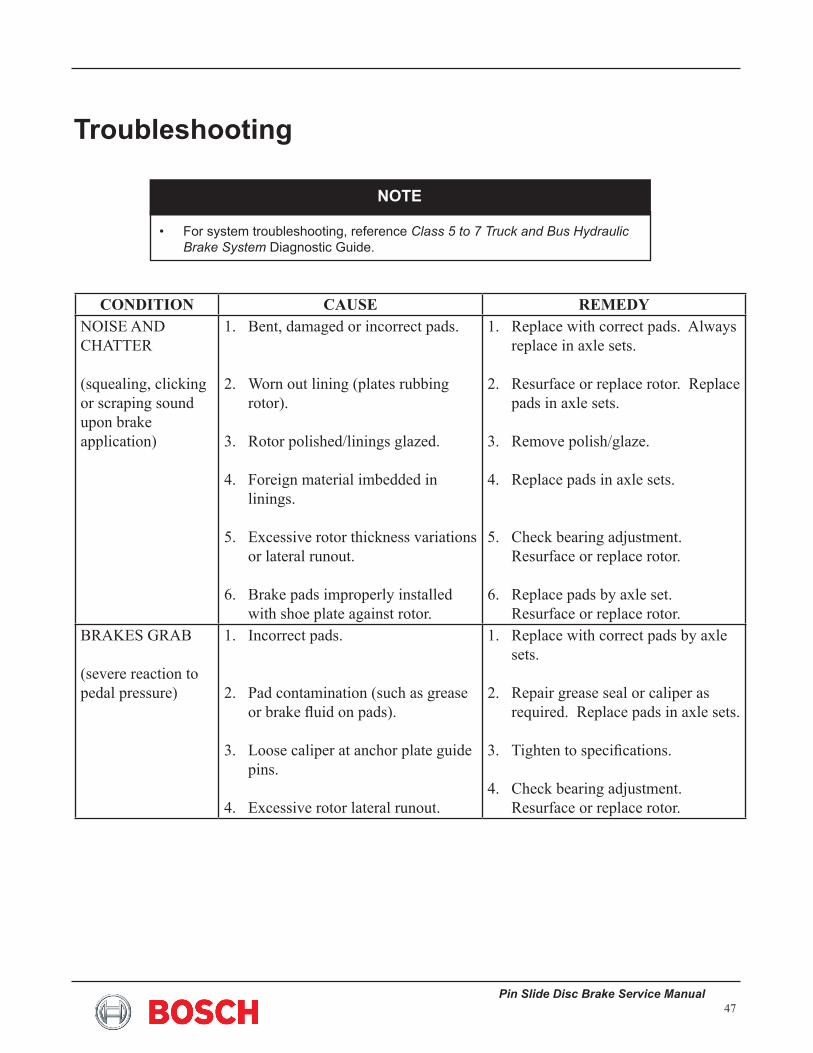
Troubleshooting
CONDITION CAUSE REMEDYNOISE AND CHATTER (squealing, clicking or scraping sound upon brake application)
Bent, damaged or incorrect pads.
Worn out lining (plates rubbing rotor).
Rotor polished/linings glazed.
Foreign material imbedded in linings.
Excessive rotor thickness variations or lateral runout.
Brake pads improperly installed with shoe plate against rotor.
�.
2.
3.
�.
�.
6.
Replace with correct pads. Always replace in axle sets.
Resurface or replace rotor. Replace pads in axle sets.
Remove polish/glaze.
Replace pads in axle sets.
Check bearing adjustment. Resurface or replace rotor.
Replace pads by axle set. Resurface or replace rotor.
�.
2.
3.
�.
�.
6.
BRAKES GRAB (severe reaction to pedal pressure)
Incorrect pads.
Pad contamination (such as grease or brake fluid on pads).
Loose caliper at anchor plate guide pins.
Excessive rotor lateral runout.
�.
2.
3.
�.
Replace with correct pads by axle sets.
Repair grease seal or caliper as required. Replace pads in axle sets.
Tighten to specifications.
Check bearing adjustment. Resurface or replace rotor.
�.
2.
3.
�.
NOTE
For system troubleshooting, reference Class 5 to 7 Truck and Bus Hydraulic Brake System diagnostic guide.
•
Pin Slide Disc Service Manual��
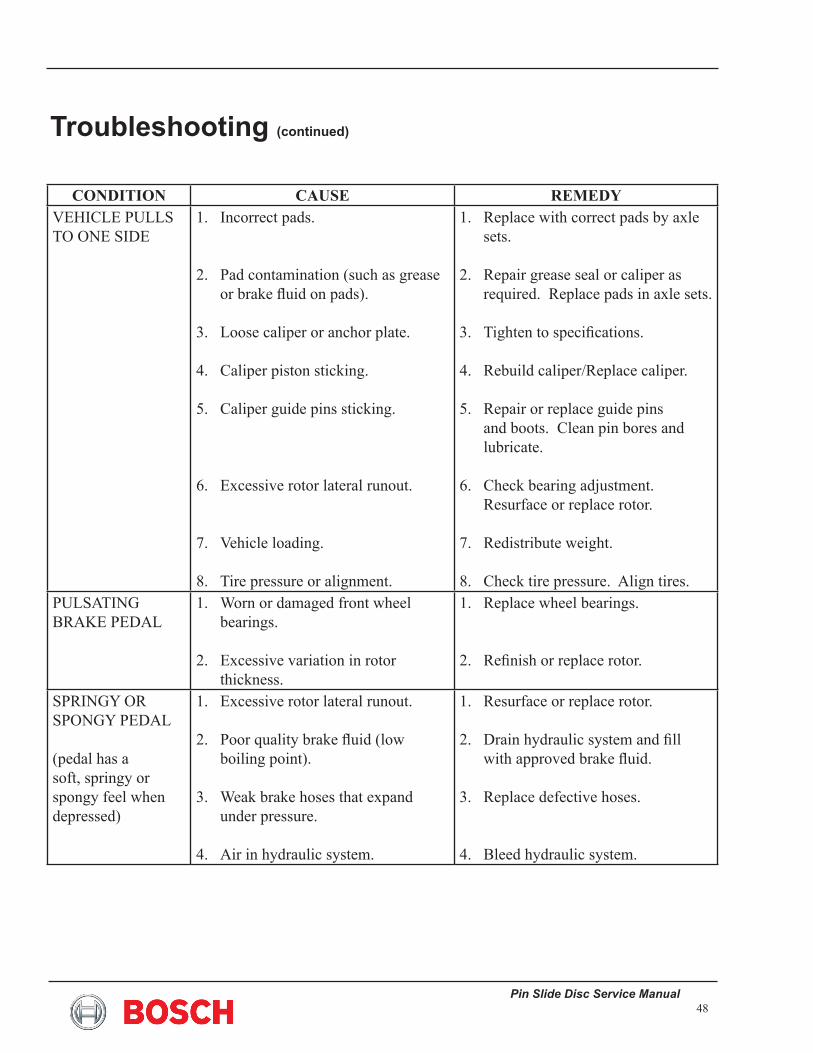
CONDITION CAUSE REMEDYVEHICLE PULLS TO ONE SIDE
Incorrect pads.
Pad contamination (such as grease or brake fluid on pads).
Loose caliper or anchor plate.
Caliper piston sticking.
Caliper guide pins sticking.
Excessive rotor lateral runout.
Vehicle loading.
Tire pressure or alignment.
�.
2.
3.
�.
�.
6.
7.
�.
Replace with correct pads by axle sets.
Repair grease seal or caliper as required. Replace pads in axle sets.
Tighten to specifications.
Rebuild caliper/Replace caliper.
Repair or replace guide pins and boots. Clean pin bores and lubricate.
Check bearing adjustment. Resurface or replace rotor.
Redistribute weight.
Check tire pressure. Align tires.
�.
2.
3.
�.
�.
6.
7.
�.PULSATING BRAKE PEDAL
Worn or damaged front wheel bearings.
Excessive variation in rotor thickness.
�.
2.
Replace wheel bearings.
Refinish or replace rotor.
�.
2.
SPRINGY OR SPONGY PEDAL
(pedal has a soft, springy or spongy feel when depressed)
Excessive rotor lateral runout.
Poor quality brake fluid (low boiling point).
Weak brake hoses that expand under pressure.
Air in hydraulic system.
�.
2.
3.
�.
Resurface or replace rotor.
Drain hydraulic system and fill with approved brake fluid.
Replace defective hoses.
Bleed hydraulic system.
�.
2.
3.
�.
Troubleshooting (continued)
Pin Slide Disc Brake Service Manual��
Troubleshooting (continued)
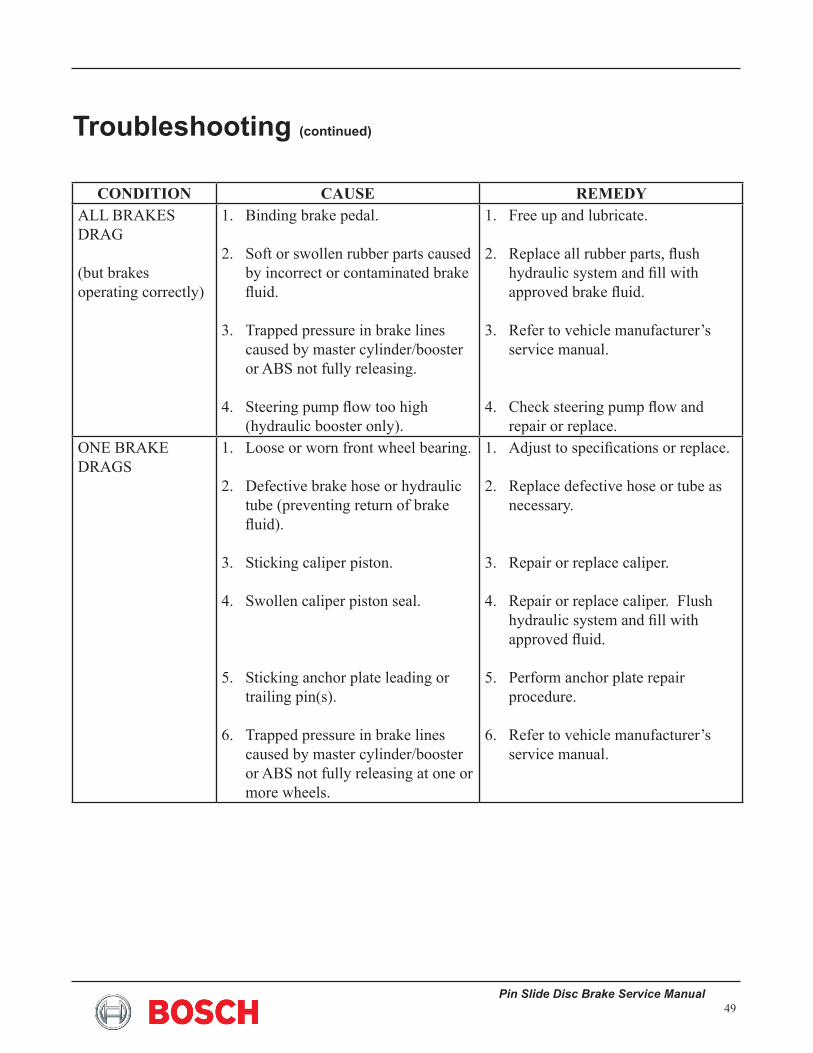
CONDITION CAUSE REMEDYALL BRAKES DRAG
(but brakes operating correctly)
Binding brake pedal.
Soft or swollen rubber parts caused by incorrect or contaminated brake fluid.
Trapped pressure in brake lines caused by master cylinder/booster or ABS not fully releasing.
Steering pump flow too high (hydraulic booster only).
�.
2.
3.
�.
Free up and lubricate.
Replace all rubber parts, flush hydraulic system and fill with approved brake fluid.
Refer to vehicle manufacturer’s service manual.
Check steering pump flow and repair or replace.
�.
2.
3.
�.
ONE BRAKE DRAGS
Loose or worn front wheel bearing.
Defective brake hose or hydraulic tube (preventing return of brake fluid).
Sticking caliper piston.
Swollen caliper piston seal.
Sticking anchor plate leading or trailing pin(s).
Trapped pressure in brake lines caused by master cylinder/booster or ABS not fully releasing at one or more wheels.
�.
2.
3.
�.
�.
6.
Adjust to specifications or replace.
Replace defective hose or tube as necessary.
Repair or replace caliper.
Repair or replace caliper. Flush hydraulic system and fill with approved fluid.
Perform anchor plate repair procedure.
Refer to vehicle manufacturer’s service manual.
�.
2.
3.
�.
�.
6.
Pin Slide Disc Service Manual�0
Troubleshooting (continued)
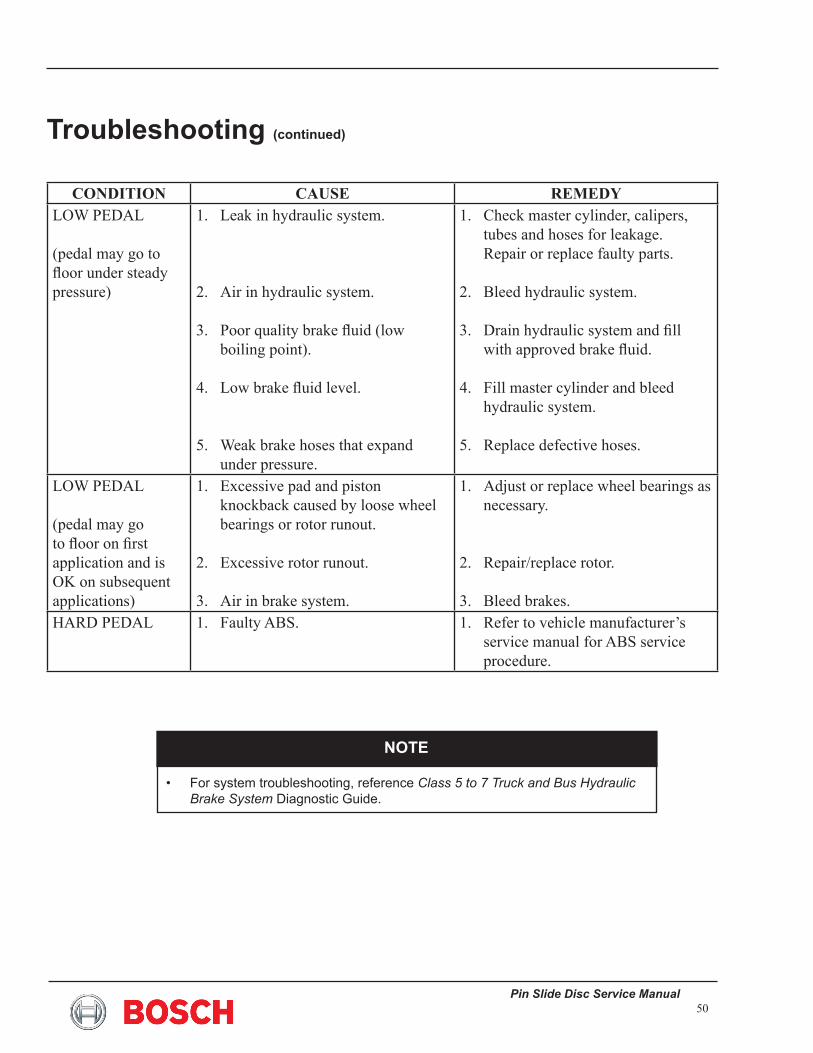
CONDITION CAUSE REMEDYLOW PEDAL
(pedal may go to floor under steady pressure)
Leak in hydraulic system.
Air in hydraulic system.
Poor quality brake fluid (low boiling point).
Low brake fluid level.
Weak brake hoses that expand under pressure.
�.
2.
3.
�.
�.
Check master cylinder, calipers, tubes and hoses for leakage. Repair or replace faulty parts.
Bleed hydraulic system.
Drain hydraulic system and fill with approved brake fluid.
Fill master cylinder and bleed hydraulic system.
Replace defective hoses.
�.
2.
3.
�.
�.
LOW PEDAL
(pedal may go to floor on first application and is OK on subsequent applications)
Excessive pad and piston knockback caused by loose wheel bearings or rotor runout.
Excessive rotor runout.
Air in brake system.
�.
2.
3.
Adjust or replace wheel bearings as necessary.
Repair/replace rotor.
Bleed brakes.
�.
2.
3.HARD PEDAL Faulty ABS.�. Refer to vehicle manufacturer’s
service manual for ABS service procedure.
�.
NOTE
For system troubleshooting, reference Class 5 to 7 Truck and Bus Hydraulic Brake System diagnostic guide.
•
Pin Slide Disc Brake Service Manual��
Rotors
Always refer to rotor or vehicle manufacturer’s service manual for specific details. The following is offered as a general guide.
InspectionA regular inspection of the braking system should be included as a part of a preventive maintenance program. This can significantly reduce your per mile brake maintenance cost compared to reacting to brake problems as they occur.
The common rotor problems shown here can easily be seen by removing the tire and rim and inspecting the rotor surface. The following are the most common problems experienced with rotors in the normal operation of the braking system. If one or more of these problems exist, the proper corrective action indicated should be taken immediately to ensure proper braking on demand.
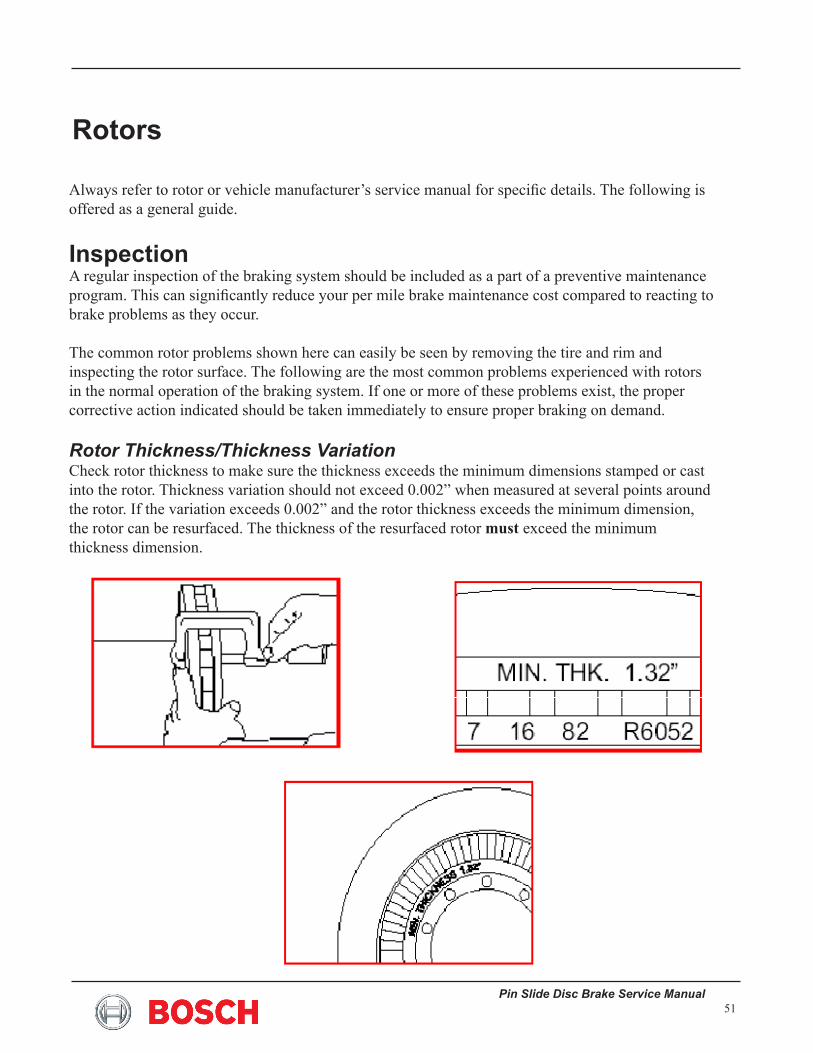
Rotor Thickness/Thickness VariationCheck rotor thickness to make sure the thickness exceeds the minimum dimensions stamped or cast into the rotor. Thickness variation should not exceed 0.002” when measured at several points around the rotor. If the variation exceeds 0.002” and the rotor thickness exceeds the minimum dimension, the rotor can be resurfaced. The thickness of the resurfaced rotor must exceed the minimum thickness dimension.

Pin Slide Disc Service Manual�2
Lateral RunoutMeasure lateral runout using a dial indicator placed on the outer braking surface approximately 1” in from the rotor outside diameter.
Lateral runout should not exceed a total indicator reading of 0.020” during one full revolution on properly adjusted wheel bearings. If lateral runout exceeds 0.020” total indicator reading, check the mounting surfaces between the rotor and the wheel or hub, fastener torques and wheel bearing adjustment.
Radial RunoutUsing a dial indicator, check the radial runout as measured at the outside diameter of the braking surface. The radial runout should not exceed 0.035” total indicator reading. If the radial runout of the rotor exceeds 0.035”, replace the rotor.
Clogged or Restricted Vent HolesVehicles operating in severe-duty environments may experience clogged or restricted vent holes due to the accumulation of mud, gravel or other debris. Such restrictions must be removed to provide even cooling of the rotor during normal operation. Worn RotorsIf the thickness of the rotors is at or below the minimum thickness dimension, the rotor must be replaced.
If there is a sufficient thickness remaining on the rotor, it may be resurfaced as long as the resulting thickness does not fall below the minimum thickness dimension. Check the rotor to make sure that the wear is approximately equal on both braking surfaces. If one surface is worn more than the other, inspect the brake system for proper operation.
Scored RotorsA scored rotor has a rough, grooved appearance on the braking surface. If the scoring exceeds .015” and the rotor thickness exceeds the minimum dimension, the rotor can be resurfaced. The thickness of the resurfaced rotor must exceed the minimum thickness dimension.
Rotors (continued)
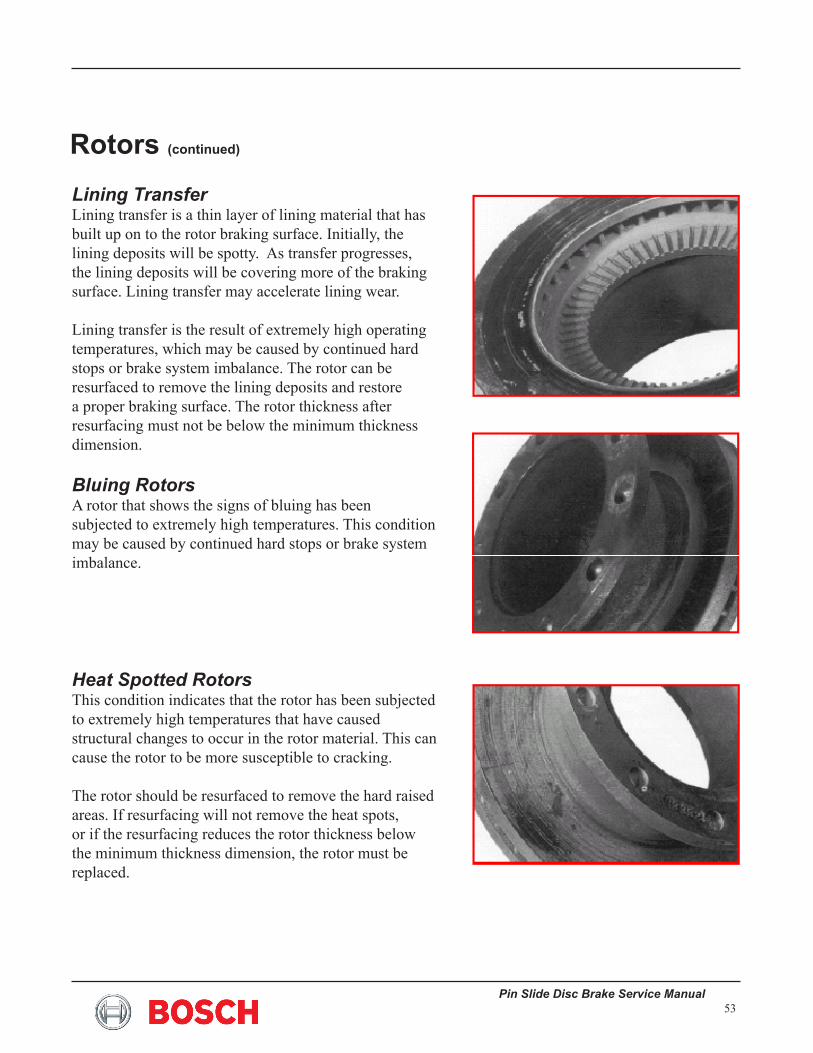
Pin Slide Disc Brake Service Manual�3
Rotors (continued)
Lining TransferLining transfer is a thin layer of lining material that has built up on to the rotor braking surface. Initially, the lining deposits will be spotty. As transfer progresses, the lining deposits will be covering more of the braking surface. Lining transfer may accelerate lining wear.
Lining transfer is the result of extremely high operating temperatures, which may be caused by continued hard stops or brake system imbalance. The rotor can be resurfaced to remove the lining deposits and restore a proper braking surface. The rotor thickness after resurfacing must not be below the minimum thickness dimension.
Bluing RotorsA rotor that shows the signs of bluing has been subjected to extremely high temperatures. This condition may be caused by continued hard stops or brake system imbalance.
Heat Spotted RotorsThis condition indicates that the rotor has been subjected to extremely high temperatures that have caused structural changes to occur in the rotor material. This can cause the rotor to be more susceptible to cracking.
The rotor should be resurfaced to remove the hard raised areas. If resurfacing will not remove the heat spots, or if the resurfacing reduces the rotor thickness below the minimum thickness dimension, the rotor must be replaced.
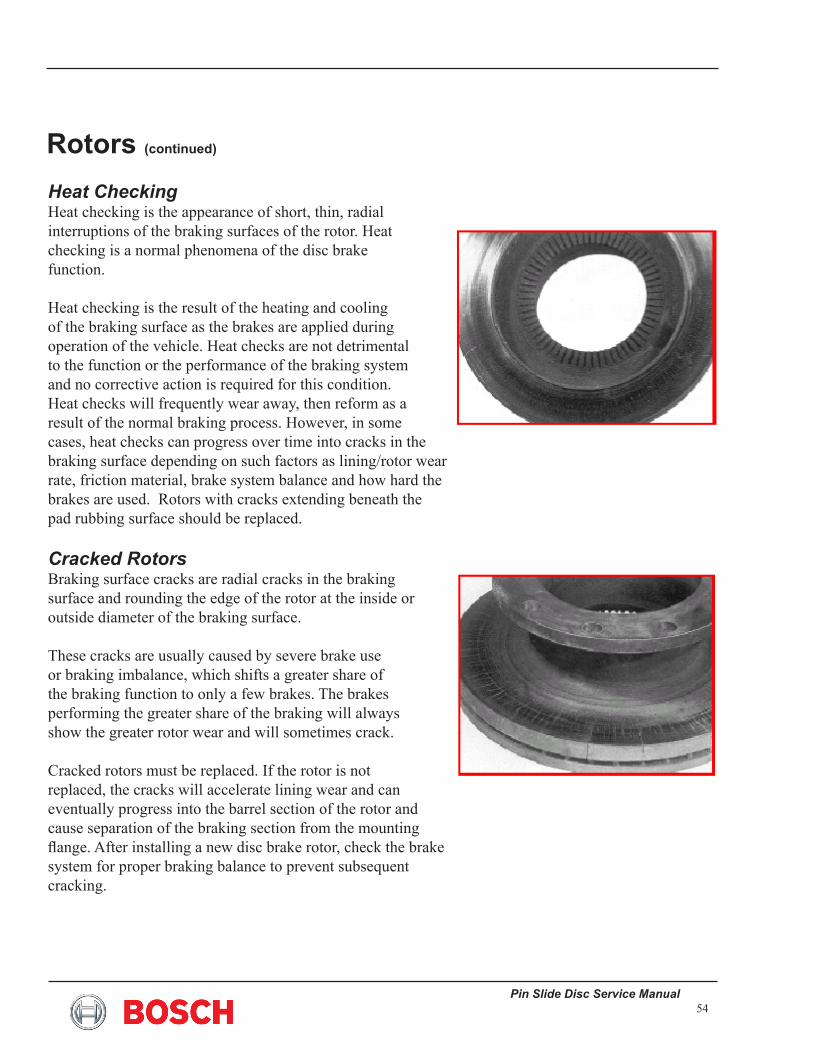
Pin Slide Disc Service Manual��
Rotors (continued)
Heat CheckingHeat checking is the appearance of short, thin, radial interruptions of the braking surfaces of the rotor. Heat checking is a normal phenomena of the disc brake function.
Heat checking is the result of the heating and cooling of the braking surface as the brakes are applied during operation of the vehicle. Heat checks are not detrimental to the function or the performance of the braking system and no corrective action is required for this condition. Heat checks will frequently wear away, then reform as a result of the normal braking process. However, in some cases, heat checks can progress over time into cracks in the braking surface depending on such factors as lining/rotor wear rate, friction material, brake system balance and how hard the brakes are used. Rotors with cracks extending beneath the pad rubbing surface should be replaced.
Cracked RotorsBraking surface cracks are radial cracks in the braking surface and rounding the edge of the rotor at the inside or outside diameter of the braking surface.
These cracks are usually caused by severe brake use or braking imbalance, which shifts a greater share of the braking function to only a few brakes. The brakes performing the greater share of the braking will always show the greater rotor wear and will sometimes crack.
Cracked rotors must be replaced. If the rotor is not replaced, the cracks will accelerate lining wear and can eventually progress into the barrel section of the rotor and cause separation of the braking section from the mounting flange. After installing a new disc brake rotor, check the brake system for proper braking balance to prevent subsequent cracking.

Pin Slide Disc Brake Service Manual��
Rotors (continued)
Grease-Stained RotorsGrease-stained brake rotors will show discolored spots on the braking surface, with oil and/or grease spattered on the brake assembly. This condition can be caused by a faulty hub lubrication system. To correct the problem, the source of the grease and/or oil must be repaired. Remove the brake assembly and clean component. Replace the linings if they are soaked with oil or grease.
Pin Slide Disc Service Manual56
Resurfacing Rotors
Rotors are considered acceptable for continued use without resurfacing when:Lateral runout and thickness variation is within specification.Rotor braking surface area is smooth with even wear. Light grooving or heat checking is acceptable.Brake pads are being replaced with the SAME lining material type.Rotor thickness is more than the minimum allowable thickness dimension.
Rotors can be resurfaced to provide a new, smooth braking surface. The rotors should be resurfaced when:
Lateral runout or thickness variation exceed maximum specification.Rotor braking surfaces are worn unevenly, have deep grooves, are scored, heat spotted, heat checked or have excessive lining transfer.Replacing brake pads with a different lining material type.
If the rotor thickness after resurfacing is less than the minimum thickness dimension, the rotor must be replaced.
Be sure to use good, sharp cutting tools and proper cutting feed and speed when resurfacing the rotor. Avoid dull cutting tools and tool chatter. After remachining, the rotor braking surfaces must be clean and smooth with a surface finish of 40-120 microinch (1.016-3.048 micrometers). Check rotor surface finish radially across both braking surfaces.
Check rotor thickness and thickness variation to ensure they are within specifications.
After installing hub and rotor on the vehicle, wash rotor braking surfaces with high grade denatured alcohol to remove all traces of grease, oil or other residue. DO NOT use gasoline, mineral spirits or oil. Check rotor lateral runout to ensure it is within a specification.
Replacement RotorsDisc brake rotors are carefully engineered to meet the specific requirements of each brake system. All replacement rotors must meet the quality and performance standard set by the vehicle manufacturer. Replacing worn or damaged rotors with rotors of equal quality allows the braking system to operate efficiently, which will result in maximum stopping performance, longer service life between relining and overall lower brake maintenance costs.
�.2.
3.�.
�.2.
3.
Pin Slide Disc Brake Service Manual
Printed in the United States of AmericaCopyright © 200� Robert Bosch LLC
Correspondence concerning this manual should be addressed to:
Robert Bosch LLCAttn: Hydraulic Actuation & Truck Brake Engineering
401 North Bendix Drive South Bend, Indiana 46628
Fax: 574-237-5603


![INDEX []€¦ · INDEX Type Page Changeover Slide Switch "DSS" Series 2.54mm Pin to Pin THT & SMT 2 Rotary Switch "DRD" Series Vertical Operation 3:3 & 1:4 Pin-out SMT 2.54mm Pin](https://img.dokumen.tips/doc/110x75/60a3c3753ea666478d2dc2f3/index-index-type-page-changeover-slide-switch-dss-series-254mm.jpg)