Embed Size (px)
Citation preview

1
DIGITAL PHOTOGRAPHY BASICS FOR BEGINNERS
by Robert Berdan [email protected] www.canadiannaturephotographer.com
These notes are free to use by anyone learning or teaching photography. 1. Choosing a camera - there are 2 main types of compact cameras A) Point and Shoot Camera (some have interchangeable lenses most don't) - you view the scene on a liquid crystal display (LCD) screen, some cameras also offer viewfinders.
B) Single Lens Reflex (SLR) - cameras with interchangeable lenses let you see the image through the lens that is attached to the camera. What you see is what you get - this feature is particularly valuable when you want to use different types of lenses.
Digital SLR Camera with Interchangeable zoom lens

2
Point and shoot cameras are small, light weight and can be carried in a pocket. These cameras tend to be cheaper then SLR cameras. Many of these cameras offer a built in macro mode allowing extreme close-up pictures. Generally the quality of the images on compact cameras is not as good as that from SLR cameras, but they are capable of taking professional quality images. SLR cameras are bigger and usually more expensive. SLRs can be used with a wide variety of interchangeable lenses such as telephoto lenses and macro lenses. SLR cameras offer excellent image quality, lots of features and accessories (some might argue too many features). SLR cameras also shoot a higher frame rates then compact cameras making them better for action photography. Their disadvantages include: higher cost, larger size and weight. They are called Single Lens Reflex, because you see through the lens attached to the camera, the light is reflected by a mirror through a prism and then the viewfinder. The mirror is pulled away (reflex) when the user pushes the button to take a picture and allows light to hit the sensor behind the mirror. Important Camera controls: 1. ISO Speed - determines the digital sensors sensitivity to light and the amount of "grain" in your pictures. When there is lots of light e.g. sunny day, set your camera ISO speed to 100-200. If you want to shoot inside without using a flash, then set your camera to ISO 400, 800,1600 or higher. The higher the ISO speed the grainier your image will be. Always try use the lowest ISO speed that allows you to shoot with a shutter speed of 1\30 or faster if you are not using a tripod. Doubling the ISO speed e.g. from 100 to 200 doubles the camera's sensitivity to light (equal to one F-stop or one shutter speed). Advances in noise reduction allow digital cameras to achieve low grain images even at high ISO speeds around 1600 or more. Some cameras change the ISO speed automatically depending on the ambient light - I recommend you control the ISO speed.
2. Camera Shooting Modes: A, S, M, P, B -some cameras also include additional automated modes. Use P Program or "party" mode when you don't want to think, use A or aperture priority mode most of the time to control depth of field. In A mode you control the lens F-stop and hence the depth of field - just keep an eye on the shutter speed which should always be 1\30 of a second or faster if the camera is being hand held. Other modes are used less often, e.g. S shutter speed might be used in sports to lock in a fast shutter speed. M or manual might be used to lock exposure for taking panoramas. B or bulb keeps the shutter open as long the shutter button is held down. B mode is useful for long exposures at night time e.g. fireworks, and lightening but requires a tripod. Sometimes B setting falls under the M or manual control mode. I recommend using A or Aperture priority mode most of the time if you want to control the camera and the depth of field in the picture.

3
3. Exposure meter - most new cameras have several types of metering systems - they all measure light reaching your digital sensor. The choices include: 1) multisegment also called Matrix, evaluative, or honeycomb 2) Center weighted and 3) spot meter. Spot metering is used in difficult lighting or backlit situations and requires the most skill to use properly. I recommend you set your camera to use Matrix metering most of the time (i.e. 99% of the time). 4. The Histogram feature is used to evaluate exposure particularly in bright light outdoors. The graph simply indicates how many pixels in a picture are light in tone, medium or dark. The left side of the histogram represents total black, the right side total white with intermediate tones in between. The height of the histogram represents the number of pixels in your picture with a particular tone. If the histogram is too far left - the picture may be underexposed; if it is too far to the right the picture is overexposed. Overexposure is the worst thing you can do because it can not be fixed afterwards. A good histogram is centered as much as possible - see images below.
Left picture shows histogram from underexposed image, middle - proper exposure, right - over exposed image. See your manual how to call up your histogram and evaluate exposure. Some cameras show overexposed regions by flashing on screen - use exposure compensation to reduce the exposure and flashing areas.

4
5. Exposure Compensation Sometimes even the best light meters can be fooled if the background is really bright or really dark. Many digital cameras offer the ability to alter the exposure by making the picture lighter or darker using an exposure compensation button. The exposure compensation button often has a +\- sign beside it, if not check your camera manual. Sometimes this feature is buried in a menu. When you press this button you may have to press another button to change the exposure so it is lighter + lighter or - darker. When you are finished taking the shot don't forget to reset the button back to zero! See example photos below where the expousure was made darker or lighter - this is an important camera control you will want to master.
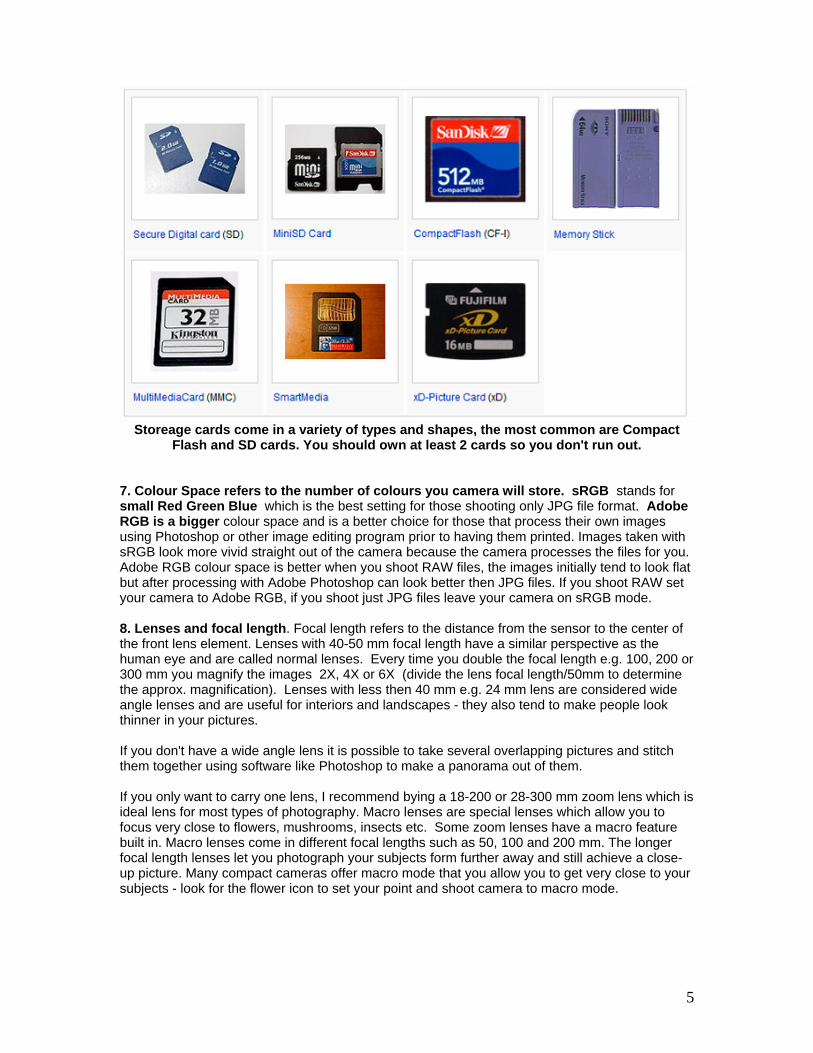
5. File type to store you images: JPG is the most common file type and usually comes in S, M, L sizes - always choose L the Largest file for best quality (Some cameras call this size FINE - bigger files are better). If your camera offers different quality settings always pick the maximum quality - you can easily reduce an image in size, but we can't always enlarge a JPG file without degrading the image. All digital SLR cameras offer the ability to shoot a RAW file format, unfortunately only a few compact cameras offer this feature. RAW files are bigger then JPG files and the quality of the images after processing is better (more data and colours). RAW files, however must be processed in software before you can print the files. RAW files permit you to enlarge your images 200% or more and it is possible to modify exposure and white balance afterwards - you get a second chance to improve the exposure! Most cameras will also permit you to shoot both RAW and JPG files simultaneously. RAW is best if you want high quality and flexibility. JPG files are easier to work with, smaller and can be taken to a be printed as is. Currently the file extension for RAW files various between camera manufacturers and at this time there is no one accepted Standard (Adobe is trying to set .DNG as the standard). RAW files must also be processed in software before they are placed within a web page, printed or sent by email. 6. Storeage Cards - come in a variety of shapes and sizes, writing speeds and total memory size. the number of photos you can take with a particular card is usually indicated on your camera. I recommend having at least one extra card. If you are planning to shoot a lot e.g. on a vacation or at a wedding get more. A questions I often get is "Should I spend more money on getting a faster card"? Generally no as your camera has a built in memory buffer. Faster cards are better for those shooting HD video or those shooting many photos in bursts of 10-20 images.
5
Storeage cards come in a variety of types and shapes, the most common are Compact
Flash and SD cards. You should own at least 2 cards so you don't run out. 7. Colour Space refers to the number of colours you camera will store. sRGB stands for small Red Green Blue which is the best setting for those shooting only JPG file format. Adobe RGB is a bigger colour space and is a better choice for those that process their own images using Photoshop or other image editing program prior to having them printed. Images taken with sRGB look more vivid straight out of the camera because the camera processes the files for you. Adobe RGB colour space is better when you shoot RAW files, the images initially tend to look flat but after processing with Adobe Photoshop can look better then JPG files. If you shoot RAW set your camera to Adobe RGB, if you shoot just JPG files leave your camera on sRGB mode. 8. Lenses and focal length. Focal length refers to the distance from the sensor to the center of the front lens element. Lenses with 40-50 mm focal length have a similar perspective as the human eye and are called normal lenses. Every time you double the focal length e.g. 100, 200 or 300 mm you magnify the images 2X, 4X or 6X (divide the lens focal length/50mm to determine the approx. magnification). Lenses with less then 40 mm e.g. 24 mm lens are considered wide angle lenses and are useful for interiors and landscapes - they also tend to make people look thinner in your pictures. If you don't have a wide angle lens it is possible to take several overlapping pictures and stitch them together using software like Photoshop to make a panorama out of them. If you only want to carry one lens, I recommend bying a 18-200 or 28-300 mm zoom lens which is ideal lens for most types of photography. Macro lenses are special lenses which allow you to focus very close to flowers, mushrooms, insects etc. Some zoom lenses have a macro feature built in. Macro lenses come in different focal lengths such as 50, 100 and 200 mm. The longer focal length lenses let you photograph your subjects form further away and still achieve a close-up picture. Many compact cameras offer macro mode that you allow you to get very close to your subjects - look for the flower icon to set your point and shoot camera to macro mode.

6
Macro symbol
VR (vibration reduction - Nikon) or IS (Image stabilization - Canon) lenses - are special lenses that reduce vibration due to camera shake while hand holding. These are especially useful when you are using a telephoto lens which magnifies any movement or camera shake. Vibration reduction is not particularly useful for wide angle lenses or when the camera is mounted on a tripod (on a tripod you may get better results by turning IS off). If you are considering purchasing a telephoto lens that offers VR - it is worth it to pay extra for VR. Some compact cameras offer shake reduction built in and it is useful when shooting indoors or under low light without a flash. If your lens offers more then one type of vibration reduction - be sure to read your lens manual. 9. Holding your Camera Steady Sharp pictures are a result of holding your camera steady when you shoot. How steady you can hold the camera depends on a number of factors: 1). Shutter speed, the faster it is the easier it is to get sharp pictures, generally you should not try to hand hold a camera if the shutter speed is less then 1\30 of a second. If you use a telephoto lens the rule is most folks can hand hold the slowest shutter speed of 1\focal length of the lens. In other words if you have a 300 mm lens 1\300 sec is the slowest shutter speed you should try to hand hold. Vibration reduction or image stabilization heps you steady your lens even more and this is a great feature to have, but nothing beats a tripod for low light photography. To get faster shutter speeds have your lens set to its widest aperture and\or increase the camera ISO speed. Holding your camera properly can make a big difference - hold the camera close to your face with your elbows tucked in, feet spread apart with one foot slightly forward. When you shoot hold your breath. If you lean on a wall, fence post or other object this can help you steady your camera. Otherwise there are tools such as bean bags, monopods and tripods that will allow you to support your camera and get sharper pictures. Professionals will often use a tripod when ever they photograph a landscape, take a macro photograph or shoot a group photo. Another accessory used to reduce camera shake when the camera is on a tripod is a cable release, a remote control release or you can even use the camera's self timer. Using a tripod and\or cable release takes more time to set kup, but it often results in a better composed and sharper picture. At slow shutter speeds between 1\4 and 1\15 of a second vibration can be introduced into a picture by the mirror "slap" during the exposure- the fix try to use a faster or slower (with tripod) shutter speeds. 10. Filters - do you need them and if so which ones are Important? Most camera stores will try to sell you a UV or Skylight filter to protect your lens - and they do protect it, but I don't feel they are necessary. Use your lens hood and lens cap to protect you lens. The only time I use a clear UV filter is when kayaking on salt water because it protects my lens coatings from the salt spray which can etch the lens coatings like acid. One filter that every SLR photographer should own for their wide angle or macro lenses is a circular polarizer - these filters reduce reflections and increase colour saturation. They also reduce the amount of light coming in through your lens by 2 F-stops or 2 shutter speeds so it is

7
important not to use one on a telephoto lens used for wildlife. Polarizers are not just for sunny days, but are effective in increasing colour saturation on overcast days especially after rain.
Grad filters are used for landscape photography usually at sunrise or sunset - see my article on
How to use Grad filters - http://www.canadiannaturephotographer.com/gradfilters.html. 11. White Balance - refers to the "colour" of the light you are shooting in. If you are shooting indoors the lights tend to be warm or "yellow in colour" because of tungsten light bulbs. If you shoot outside the light often has a greater amount of blue and pictures can appear "cold". To get the most accurate colour you want to match your white balance to the type of light you are shooting under. If you are shooting JPG files it is important to match the white balance as close as possible. Sometimes autowhitebalance (AWB) will work fine, but if you are not happy with the results set the white balance manually. If you shoot RAW files its possible to change the white balance afterwards in the software so I usually just leave my camera set to AWB and make adjustments when processing my files in Adobe Photoshop. Custom white balance is usually used in studio photography.
White balance symbols - if shooting JPG files either use AWB or for even better results set the white balance to match the lighting under which you are taking photographs. If you are shooting RAW files I recommend using AWB and then fine tune the white balance when opening the files in Adobe Photoshop.

8
12. F-stops and Apertures Perhaps more then any other aspect of photography this simple lens control confuses beginners. F-stop is a ratio - that is you take the length of the lens (focal length) and divide it by the diameter of the lens opening which results in a number called an F-stop. E.g. 50 mm focal length lens\25 mm diameter opening = F2.0 50 mm focal length lens\12 mm diameter opening = F4.0
As the lens opening gets smaller the F ratio gets bigger. The largest F-stop on your camera or lens varies, compact cameras might have a maximum aperture of F8 or F11 where an SLR camera lense can have F-stops of F16, F22 or F32. These large F-stops have small openings or apertures and allow the greatest depth of field (see above). The reason F-stops are important is that they control how much light comes into the camera (hence the shutter speed you can use) and they control the depth of field that is visible in your picture. Each F-stop is also equal to halving or doubling of your shutter speed. E.g. F1.4 to F2 will mean if you were using a shutter speed of 1\30 sec going to F2 means you need to shoot at 1\15 sec. F-stops 11, 16, 22 - have small apertures - these are preferred when you shoot landscapes where you want a large depth of field so that elements in the foreground and the elements in the background are both sharp and in focus. F-stop 2.8, 4.0 - are wide openings and let a large amount of light in so you can use faster shutter speeds, and result in shallow depth of field. These F-stops are often preferred for making the backgrounds soft and blurry in portrait shots. Controlling depth of field in your photos is one of the most important controls a photographer has which is why I use my camera in aperture priority mode most of the time. Wildlife and sports photographers use the widest opening (lowest F-stop) on their telephoto lenses so they can use the fastest shutter speed available. If you find this confusing - set your camera to different F-stops and focus on a person about two feet away and take a series of pictures and view the results. But remember depth of field is also determined by how close or far away your subject is. The closer something is to you and your

9
camera - the smaller the depth of field will be. In macrophotography the depth of field (where everything appears sharp) even at small apertures like F22 might only be a a few millimeters. Some SLR cameras have a depth of preview button that when you push it the lens closes the aperture to what it would be when you press the camera shutter, the viewfinder will get darker and you will should be able to see the true depth of field. The reason you don't see the depth of field normally is that most cameras leave the aperture at its widest setting and only close it down when you press the shutter button. A depth of field preview button is usually only found on more expensive digital SLR cameras. Controlling the F-stop which is usually done on digital cameras by putting your camera in A or aperture priority mode and dialing in the F-stop. On some point and shoot cameras you may have to go into a menu to alter the F-stop. I have my cameras set to A - aperture priority mode 95% of the time. 13. Important Camera Accessories A camera bag will protect your gear and help you carry your equipment. The size and type of bag depends on the size of your camera, how many lenses and accessories you own or intend to purchase in the future. Look for something that is rainproof and comfortable to carry and ideally does not advertise that you are carrying expensive camera gear. Tamrac, Lowenpro, Kata, and Crumpler are well known brand names for camera bags. Lens cloth or paper are important to clean your lenses. Some photographers prefer to buy a lens pen with brush and soft cleaning chamois. All lenses should have a lens cap which is placed over the lens when its carried in your bag. It's a good idea to use proper lens cleaning fluid and always put the fluid on the lens paper not the lens before cleaning. Blow or brush away any grit off the lens before cleaning it with paper so you don't scratch the lens surface. Never place a high pressure air can nozzle close to your lens - keep it at least a few inches away. Never ever touch the mirror or shutter on the inside of your SLR camera! Keep your fingers off the lens surface or acid from your skin will etch your finger prints into the lens coating permanently. Extra Batteries are essential if you plan to take a lot of pictures. Every photographer should have at least one spare battery for their camera. Two may not be enough if you shoot in cold weather. If you are going on a special trip, I recommend 3 batteries. I carry 4-6 with me just in case. Tripod - Do you Need One? Tripods are not necessary for candid portraits unless you intend to sell your images. If you become serious about taking landscapes, macro-photography, group portraits or low light photography then a tripod becomes essential. If you do consider buying a tripod they range in price from $25 to $1,000 - do some research. First decide how much weight are you willing to carry. How big a tripod you need depends on the size and weight of the gear you plan to support and how and where you travel. Small SLR cameras with lenses under 300 mm don't need a big tripod. Here are some tips on what to look for 1) Carbon fiber is better then aluminum 2) legs with rubber insulation are better if you shoot in cold weather but you can always add tape or pipe insulation to the tripod legs 3) Check if the the tripod can be placed flat on the ground if you want to photograph flowers or other macro subjects. 4) Check how tight and secure the leg locks are - if you lock the leg - can you push the legs in or out? If the legs slide either get someone to tighten the legs or look at a different tripod model. 5) Determine how tall you want to be able to set the tripod, for most folks if it reaches your chest or eye level that is high enough for most circumstances. Also you have many choices for the type of tripod head (see below) to choose from. In general ball heads are fast to set up and preferred by wildlife photographers. For sports or bird photography some folks prefer to use a monopod so they cna follow the action. I have 4 tripods of varying size, a monopod, bean bags and several types of window mounts - but I make my living taking pictures. Almost any tripod is better then no tripod, and a tripod will also help you slow down and compose more carefully. You might start with an economical tripod and if you get more serious about your photography you can always invest in a better one later.

10
Flash - most point and shoot cameras and some DSLRs come with an on-camera flash. The flash is very useful even in daylight as it can be used to fill in shadows, reduce contrast outside and put a small highlight in your subjects eye making your pictures look more professional. Most built in camera flashes are only bright enough to illuminate subjects about 6-12 feet (1-3 meters) from the camera (but this also depends on the ISO setting and F-stop your are using). If you use flash often then you might want to invest in a more powerful flash. Most cameras today use TTL or Through The Lens metering which automatically provides correct exposure most of the time. Some cameras also permit you to alter the flash output with a +\- compensation button. Mastering flash requires practice and experience. Read the flash section of your manual if you plan to use flash and do some testing before an important event. Most cameras are set by default to use front curtain sync flash which is suitable for most situations, but in low light can leave the background appearing black. Some cameras also offer slow-sync flash which simply means the camera shutter stays open for a while even after the flash fires to allow some of the ambient room light to become part of the exposure. Slow synch often requires the use of a tripod for best results. For most purposes the on camera flash is suitable for indoor and outdoor photographs when your subjects are close to the camera. Some cameras offer red-eye reduction which outputs a weak strobe light before the main flash fires. This causes the pupil in our eyes to get smaller - normally the pupil is large in low light and as a result a single bright flash can reflect of the retina of our eyes and we see red reflected from the back of the eye. Another way to reduce the 'red eye' effect is to have the flash head above or to the side of the lens - rather then right next to it as is the case in most point and shoot cameras. Camera manuals Many people dislike reading camera manuals which can exceed hundreds of pages. Keep in mind that some modern digital camera's are so complex that even pros may carry their manuals with them. Always read the first section of your manual on basic camera operations and warnings to avoid doing anything that might damage your camera or image files - like pulling the compact flash card out while the camera is writing to the card! The manual is meant to be a reference not a novel - so browse to see what it covers then go to a particular section when you want to learn more. Also consider that there are other books that may be easier to read and understand. I like the Magic Lantern Guide books on various camers and flash units. These books are availabl in larger camera and book stores. Alternatively consider buying a DVD from the jumpstart series that covers your camera available (www.jumpstartguides.com). These DVDs show you the various controls on your specific camera or better yet take a workshop or class they can be fun, you can make friends and you might even bring back a few good pictures.

11
YOU JUST RECIEVED A NEW CAMERA - NOW WHAT DO YOU DO? 1) Read the first part of your manual or a the minimum read the quick start guide 2) Start taking pictures around your home or backyard and play with the various features 3) To learn more consider a beginner workshop, a course, or private training. 4) Pick up some books on photography at your local library or local store 5) Search the web, try Youtube and visit www.canadiannaturephotographer.com 6) Take lots of pictures, experiment, play and have fun with your camera Learning to use a digital camera is nowhere as as difficult as learning how to use a computer or how to play a musical instrument. The basic camera controls can be learned in a few hours. Taking great pictures, however is a life long pursuit that never ends depending on how interested you become in photography. The good news is that the more experience you get, the better photographs you will be able to take and no matter what age you are. The pursuit of photography can be casual or you can travel the world seeing out subjects to photograph. Keep in mind that although the camera is a useful tool for self expression, the mechanics, science and technological components are not the most important part of photography. Vision and seeing are the most important elements. Good seeing and understanding composition usually takes time to learn. You become good by shooting often, studying the work of other photographers and artists and thinking about what it is you want to show in your pictures. You don't have to know every button on your camera - focus on the basics at first. The good news is that even though digital cameras have a lot more buttons and controls then film cameras, the ability to see your picture immediately after taking it will help you learn faster then was ever possible before. WARNING Photography can be addictive and you could get "Lens fever" the desire for more lenses and\or additional accessories - there is no known cure. :-) Seeing & Composition: First and most importantly - there are no rules in photography that you or anyone else needs to follow! There are no specific instructions or recipes that will guarantee a great shot. There are, however guidelines that if you follow them may make your pictures more interesting, but understand that guidelines are simply starting points or suggestions and that is all they are. Start by photographing what interests you. A good picture is one that commands attention, holds attention and makes someone think. Most beginners try to put too many elements in their pictures or they put the main subject smack in the middle and until you become an "artist" it is a good idea to avoid this. Once you become an artist you can do anything you like - I am serious just look at some of the books on photography and you will know what I mean. Putting things in the middle sometimes works, but often there are better places to place your most important subject. First - to improve your pictures don't try to get everything in your picture! Get closer to your subject and check if there is anything in the view that doesn't need to be there. Ask yourself what is important in the picture and what do you want to show or communicate. Sometimes just moving in closer or a little to one side can result in a significantly better picture. Simplify as much as you can. Second - if you are shooting a landscape avoid putting the the horizon in the middle of the frame. Either move the horizon down and emphasize the sky or move it up in the frame and emphasize the foreground. An exception might be when you have symmetrical reflections in a body of water.

12
Third - when shooting people or animals - try not to put them in the center of your frame, move them off to the side. Photographers often refer to "the rule of thirds" which is simply a guide to improve composition by moving your subject away from the center of the frame and near one of the points of intersection. Some photographers divide the frame into thirds and place important elements at an intersection (see below) and this can result in more effective pictures. If your camera has guide lines you might want to try and turn them on for a while - think of them as training wheels to get you started.
Many photographers take all their pictures in a horizontal format because it is easier to hold the camera horizontally, however some subjects like people might look better if you compose your pictures vertically. Good photographers often shoot important scenes using both horizontal and vertical formats to increase their sales potential. If you would like to learn more ab out composition see my article "Composition and the Elements of Visual Design" http://www.canadiannaturephotographer.com/composition.html and read Freeman Pattesons Book "The Art of Seeing". Once you are comfortable with your camera, experiment, have fun and take lots of pictures - practice as much as you can. Like playing a musical instrument, the more often you play, the more comfortable you will get with your camera and the more you will be able to concentrate on composition and timing. Concentrate on seeing and learning how a camera sees differently, once you understand this you will begin to make more effective pictures - most of all have fun with your camera. Recommended Books:
Freeman Patterson " The Art of Seeing" by Key Porter books. Tim Fitzharris "Landscape Photography" Firefly books.
Recommended Web sites:
Articles, pictures, videos, online learning - www.canadiannaturephotographer.com Articles on composition - photoinf.com The place to go and read before you buy a camera - www.dpreview.com