Embed Size (px)
Citation preview

1 REV 10 06/05/2018A-2575
A-2575ARNOTT FRONT AIR SPRING
MERCEDES-BENZ ML-CLASS (W164)MERCEDES-BENZ GL-CLASS (X164)
Arnott® is committed to the quality of its products. If you have a question or problem with any Arnott product,please contact Arnott by calling 800-251-8993 during normal business hours or email [email protected].
(In the EU please call +31 (0)73 7850 580 or email [email protected])
WARNING: The air suspension system is under pressure (up to 10 bar, or 150 lbf/in). Verify pressure has been relieved and disconnect power to the air suspension system prior to disassembly. Do not allow dirt or grease to enter the system. Always wear standard hand, ear, and eye protection when servicing the air suspension system.
Congratulations on your purchase of an Arnott® air suspension product. We at Arnott Incorporated are proud to offer a high quality product at the industry’s most competitive pricing. Thank you for your confidence in us
and our product.
Proper installation is essential to experience and appreciate the benefits of this system. Please take a moment to review these installation instructions before you begin to install these components on your vehicle. The
removal and installation of air suspension products should only be performed by a fully qualified, ASE Certified, professional.
It is equally important to be aware of all necessary safety measures while installing your new Air Suspension System. This includes proper lifting and immobilizing of the vehicle and isolation of any stored energy to
prevent personal injury or property damage.
"Engineered to Ride, Built to Last®"
2 REV 10 06/05/2018A-2575
A-2575ARNOTT FRONT AIR SPRING
MERCEDES-BENZ ML-CLASS (W164)MERCEDES-BENZ GL-CLASS (X164)
AIR STRUT REMOVAL
1. SET THE STEERING TO STRAIGHT AHEAD.
2. RAISE THE VEHICLE.
3. REMOVE THE FRONT WHEEL.
4. DISCONNECT THE AIR SHOCK ADS CONTROL CABLE CONNECTOR (LOCATED IN THE FENDER WELL).
5. DISCONNECT THE SWAY BAR ARM LINKAGE (FIGURE A).
FIGURE A
GENERAL INFORMATION:
Reading this manual signifies your agreement to the terms of the general release, waiver of liability, and hold harmless agreement, the full text of which is available at www.arnottinc.com.
• Not to be stored below 5oF (-15oC) or above 122oF (50oC).• Avoid damage to air lines and cables.• Removal and installation is only to be performed by fully qualified personnel.• Use car manufacturer’s diagnostic software.
CAUTION: Damage to the vehicle and air suspension system can be incurred if work is carried out in a manner other than specified in the instructions or in a different sequence.
To avoid the possibility of short circuits while working with electric components consult your owner's manual on how to disconnect your battery.
Consult your vehicle owner's manual, service manual, or car dealer for the correct jacking points on your vehicle and for additional care, safety and maintenance instructions. Under no circumstances should any work be completed underneath the vehicle if it is not adequately supported, as serious injuries and death can occur.

3 REV 10 06/05/2018A-2575
A-2575ARNOTT FRONT AIR SPRING
MERCEDES-BENZ ML-CLASS (W164)MERCEDES-BENZ GL-CLASS (X164)
6. REMOVE THE LOWER SHOCK MOUNTING NUT AND BOLT. (FIGURE B)
7. REMOVE THE BALL JOINT NUT AND SEPARATE FROM THE UPPER CONTROL ARM. (FIGURE C)
8. REMOVE THE WIRE HARNESS MOUNT FROM SHOCK. (FIGURE D)
FIGURE B
FIGURE C
FIGURE D
4 REV 10 06/05/2018A-2575
A-2575ARNOTT FRONT AIR SPRING
MERCEDES-BENZ ML-CLASS (W164)MERCEDES-BENZ GL-CLASS (X164)
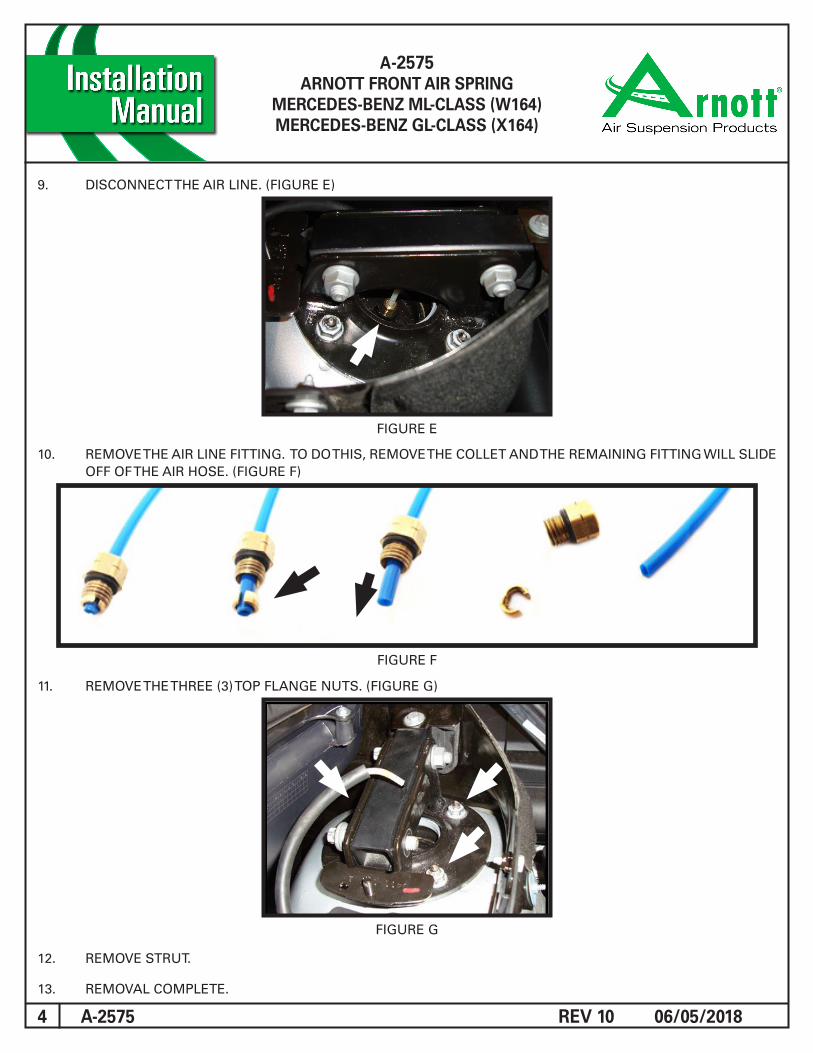
9. DISCONNECT THE AIR LINE. (FIGURE E)
10. REMOVE THE AIR LINE FITTING. TO DO THIS, REMOVE THE COLLET AND THE REMAINING FITTING WILL SLIDE OFF OF THE AIR HOSE. (FIGURE F)
11. REMOVE THE THREE (3) TOP FLANGE NUTS. (FIGURE G)
12. REMOVE STRUT.
13. REMOVAL COMPLETE.
FIGURE E
FIGURE F
FIGURE G
5 REV 10 06/05/2018A-2575
A-2575ARNOTT FRONT AIR SPRING
MERCEDES-BENZ ML-CLASS (W164)MERCEDES-BENZ GL-CLASS (X164)
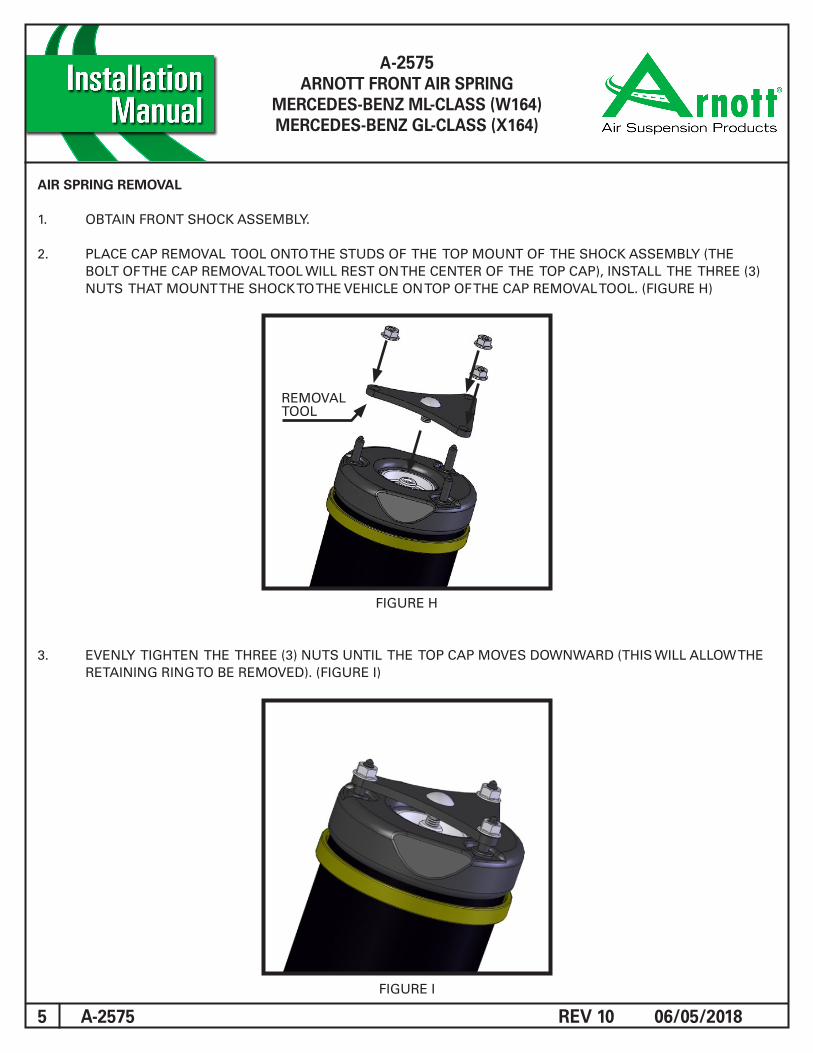
AIR SPRING REMOVAL
1. OBTAIN FRONT SHOCK ASSEMBLY.
2. PLACE CAP REMOVAL TOOL ONTO THE STUDS OF THE TOP MOUNT OF THE SHOCK ASSEMBLY (THE BOLT OF THE CAP REMOVAL TOOL WILL REST ON THE CENTER OF THE TOP CAP), INSTALL THE THREE (3) NUTS THAT MOUNT THE SHOCK TO THE VEHICLE ON TOP OF THE CAP REMOVAL TOOL. (FIGURE H)
3. EVENLY TIGHTEN THE THREE (3) NUTS UNTIL THE TOP CAP MOVES DOWNWARD (THIS WILL ALLOW THE RETAINING RING TO BE REMOVED). (FIGURE I)
FIGURE I
FIGURE H
REMOVAL TOOL
6 REV 10 06/05/2018A-2575
A-2575ARNOTT FRONT AIR SPRING
MERCEDES-BENZ ML-CLASS (W164)MERCEDES-BENZ GL-CLASS (X164)
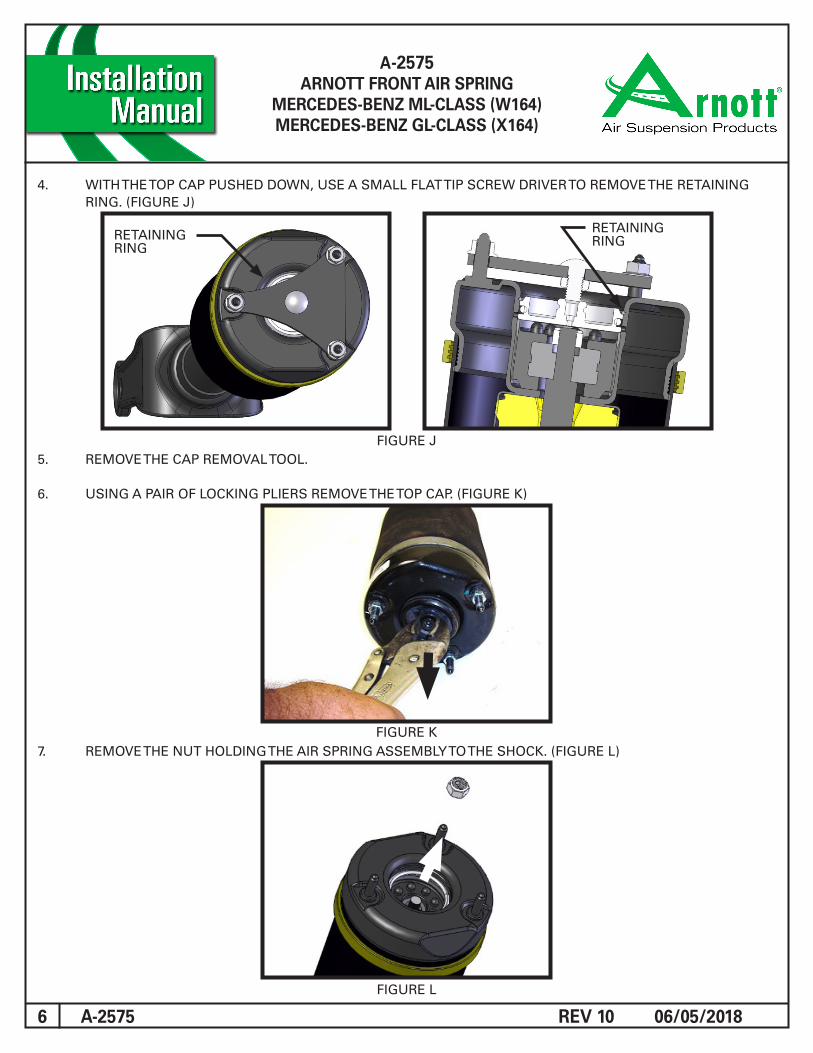
4. WITH THE TOP CAP PUSHED DOWN, USE A SMALL FLAT TIP SCREW DRIVER TO REMOVE THE RETAINING RING. (FIGURE J)
5. REMOVE THE CAP REMOVAL TOOL.
6. USING A PAIR OF LOCKING PLIERS REMOVE THE TOP CAP. (FIGURE K)
7. REMOVE THE NUT HOLDING THE AIR SPRING ASSEMBLY TO THE SHOCK. (FIGURE L)FIGURE K
FIGURE L
FIGURE J
RETAINING RING
RETAINING RING
7 REV 10 06/05/2018A-2575
A-2575ARNOTT FRONT AIR SPRING
MERCEDES-BENZ ML-CLASS (W164)MERCEDES-BENZ GL-CLASS (X164)
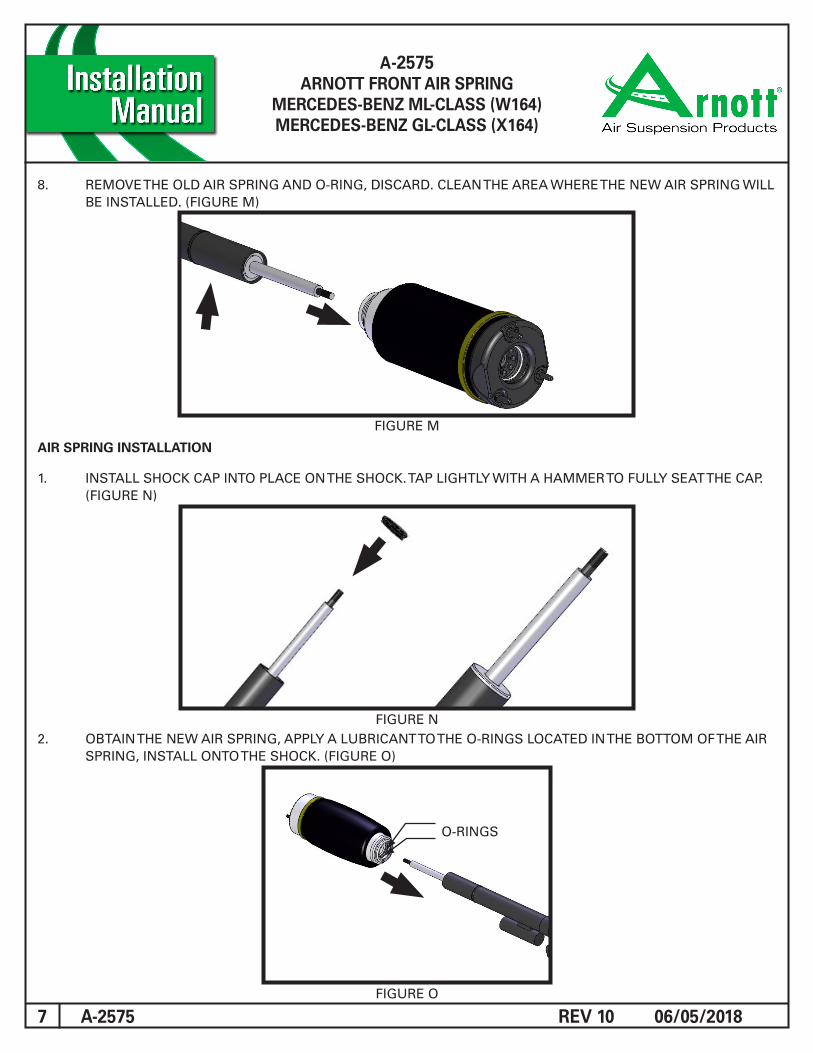
8. REMOVE THE OLD AIR SPRING AND O-RING, DISCARD. CLEAN THE AREA WHERE THE NEW AIR SPRING WILL BE INSTALLED. (FIGURE M)
AIR SPRING INSTALLATION
1. INSTALL SHOCK CAP INTO PLACE ON THE SHOCK. TAP LIGHTLY WITH A HAMMER TO FULLY SEAT THE CAP. (FIGURE N)
2. OBTAIN THE NEW AIR SPRING, APPLY A LUBRICANT TO THE O-RINGS LOCATED IN THE BOTTOM OF THE AIR SPRING, INSTALL ONTO THE SHOCK. (FIGURE O)
FIGURE M
FIGURE N
FIGURE O
O-RINGS

8 REV 10 06/05/2018A-2575
A-2575ARNOTT FRONT AIR SPRING
MERCEDES-BENZ ML-CLASS (W164)MERCEDES-BENZ GL-CLASS (X164)
3. INSTALL LOCKNUT ONTO SHAFT OF THE SHOCK AND TIGHTEN TO MANUFACTURER'S SPECIFICATIONS. (FIGURE P)
4. WITH THE NUT SECURED PROPERLY, LUBRICATE THE INSIDE OF THE TOP MOUNT BEFORE THREADING THE SUPPLIED CAP. (FIGURE Q, R)
5. TIGHTEN THE SUPPLIED CAP TO 36NM (26.5 FT-LB). (FIGURE S)
FIGURE P
FIGURE R
FIGURE S
FIGURE Q

9 REV 10 06/05/2018A-2575
A-2575ARNOTT FRONT AIR SPRING
MERCEDES-BENZ ML-CLASS (W164)MERCEDES-BENZ GL-CLASS (X164)
6. THREAD THE SUPPLIED VOSS FITTING INTO THE CAP AND TIGHTEN TO 2NM (1.5 FT LBS). (FIGURE T)
7. AIR STRUT ASSEMBLY COMPLETE.
AIR STRUT INSTALLATION
1. INSTALLATION IS IN REVERSE ORDER OF AIR STRUT REMOVAL.
2. REMOVE THE WHITE SHIPPING PIN AND INSERT AIR LINE INTO THE NEW AIR LINE FITTING. (FIGURE U)
FIGURE T
FIGURE U
Tighten all nuts and bolts to manufacturer's specifications during the installation process.
REMOVE & DISPOSE OF SHIP-PING PIN
INSERT THE AIR LINE INTO THE FITTING AND PRESS UNTIL FIRMLY SEATED
PULL AIR LINE OUTWARD TO LOCK AND ENSURE A SECURE CONNECTION
10 REV 10 06/05/2018A-2575
A-2575ARNOTT FRONT AIR SPRING
MERCEDES-BENZ ML-CLASS (W164)MERCEDES-BENZ GL-CLASS (X164)
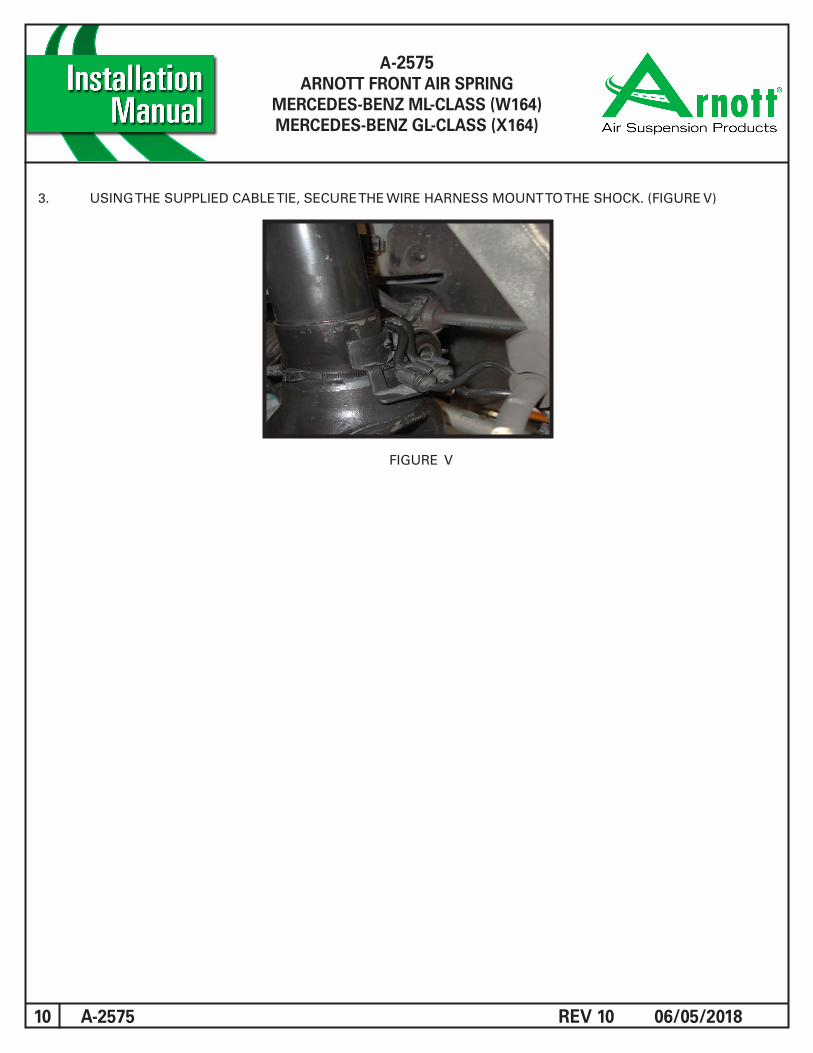
3. USING THE SUPPLIED CABLE TIE, SECURE THE WIRE HARNESS MOUNT TO THE SHOCK. (FIGURE V)
FIGURE V