Embed Size (px)
Citation preview

PC120 Create and Maintain Projects
Training Guide

COPYRIGHT & TRADEMARKS Copyright © 1998, 2009, 2010 Oracle, IBM and Grant MacEwan University and/or its affiliates. All rights reserved.
Oracle is a registered trademark of Oracle Corporation and/or its affiliates. Other names may be trademarks of their respective owners.
This software and related documentation are provided under a license agreement containing restrictions on use and disclosure and are protected by intellectual property laws. Except as expressly permitted in your license agreement or allowed by law, you may not use, copy, reproduce, translate, broadcast, modify, license, transmit, distribute, exhibit, perform, publish or display any part, in any form, or by any means. Reverse engineering, disassembly, or decompilation of this software, unless required by law for interoperability, is prohibited.
The information contained herein is subject to change without notice and is not warranted to be error-free. If you find any errors, please report them in writing to: Information and Technology Services, Grant MacEwan University, P.O. Box 1796, Edmonton, AB T5J 2P2.
This software is developed for general use in a variety of information management applications. It is not developed or intended for use in any inherently dangerous applications, including applications which may create a risk of personal injury. If you use this software in dangerous applications, then you shall be responsible to take all appropriate fail-safe, backup, redundancy and other measures to ensure the safe use of this software. Oracle Corporation and its affiliates disclaim any liability for any damages caused by use of this software in dangerous applications.
This software and documentation may provide access to or information on content, products and services from third parties. Oracle Corporation and its affiliates are not responsible for and expressly disclaim all warranties of any kind with respect to third party content, products and services. Oracle Corporation and its affiliates will not be responsible for any loss, costs, or damages incurred due to your access to or use of third party content, products or services.

Training Guide PC120 Create and Maintain Projects
PC120 Create and Maintain Projects Page iii
Table of Contents PC120 Create and Maintain Projects ......................................................................................... 1
Create a Project ....................................................................................................................................... 1 Create a Project ..................................................................................................................................................... 1
Create a Project Activity ...................................................................................................................... 20 Create an Activity for a Project ........................................................................................................................... 20
Maintain and Modify a Project ............................................................................................................ 39 Modify a Project Activity ................................................................................................................................... 39 Add a Resource to a Project ................................................................................................................................ 43

Training Guide PC120 Create and Maintain Projects
PC120 Create and Maintain Projects Page 1 of 50
PC120 Create and Maintain Projects
Create a Project
Create a Project Procedure In this topic you will learn how to Create a Project.
Step Action 1. Click the Project Costing link.
2. Click the Project Definitions link.
3. Click the General Information link.

Training Guide PC120 Create and Maintain Projects
PC120 Create and Maintain Projects Page 2 of 50
Step Action 4. Click the Add a New Value link.
5. Click the Look up Business Unit (Alt+5) button.
6. Click the MCEWN link.
7. Leave the Project field as NEXT. The system will automatically pull the next number in the
sequence to add to your Project. Click the Create list.

Training Guide PC120 Create and Maintain Projects
PC120 Create and Maintain Projects Page 3 of 50
Step Action 8. Choose the correct type from the Create list.
Click the Blank Project list item.
Training Guide PC120 Create and Maintain Projects
PC120 Create and Maintain Projects Page 4 of 50
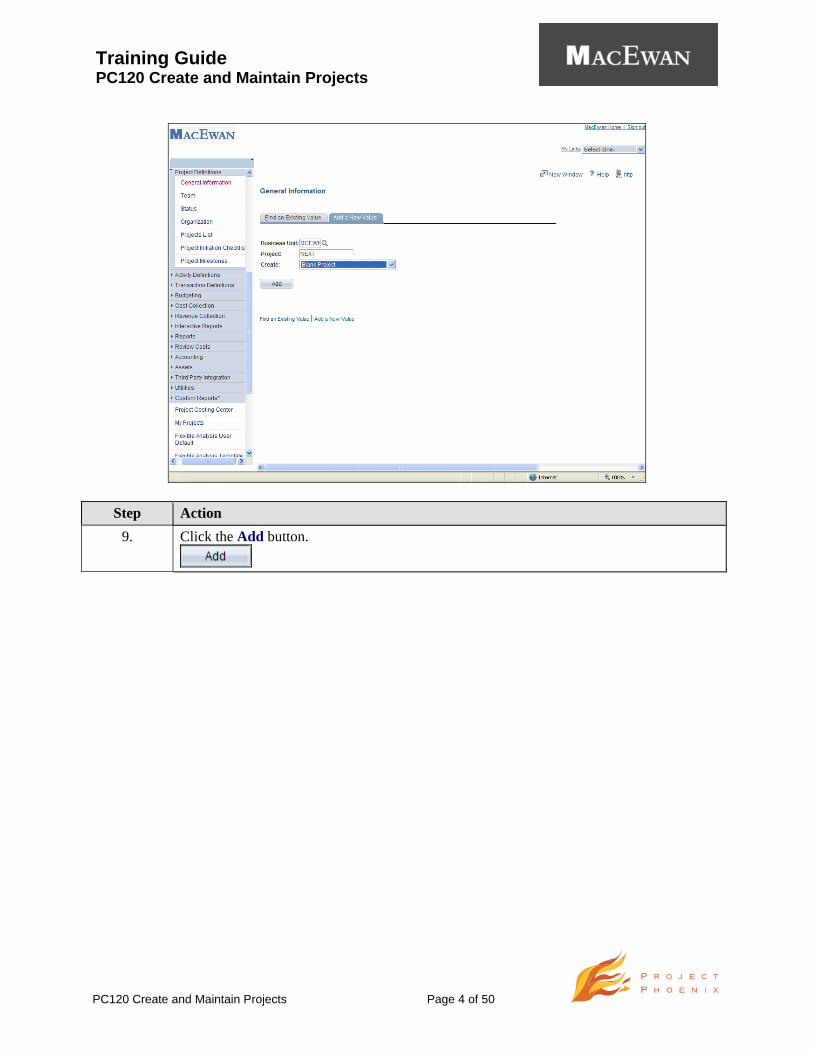
Step Action 9. Click the Add button.

Training Guide PC120 Create and Maintain Projects
PC120 Create and Maintain Projects Page 5 of 50
Step Action 10. In the General Information tab, begin entering the appropriate details for your Project.
Enter the desired information into the Description field. Enter "Project 1".
11. The Integration field is used to enter the integration template that is used to integrate this project with other financial applications. Click the Look up Integration (Alt+5) button.
12. Click the MCEWN link.
13. Use the Project Status field to enter the projects status when you are in Add mode. After
you save the project, the field becomes read only on this page and appears as a link to the Project Definitions - Status page so you can update the status.
14. Use the Calculate field to calculate one of the entries based on the other two. Click the Calculate list.

Training Guide PC120 Create and Maintain Projects
PC120 Create and Maintain Projects Page 6 of 50
Step Action 15. Click the Duration list item.
Training Guide PC120 Create and Maintain Projects
PC120 Create and Maintain Projects Page 7 of 50
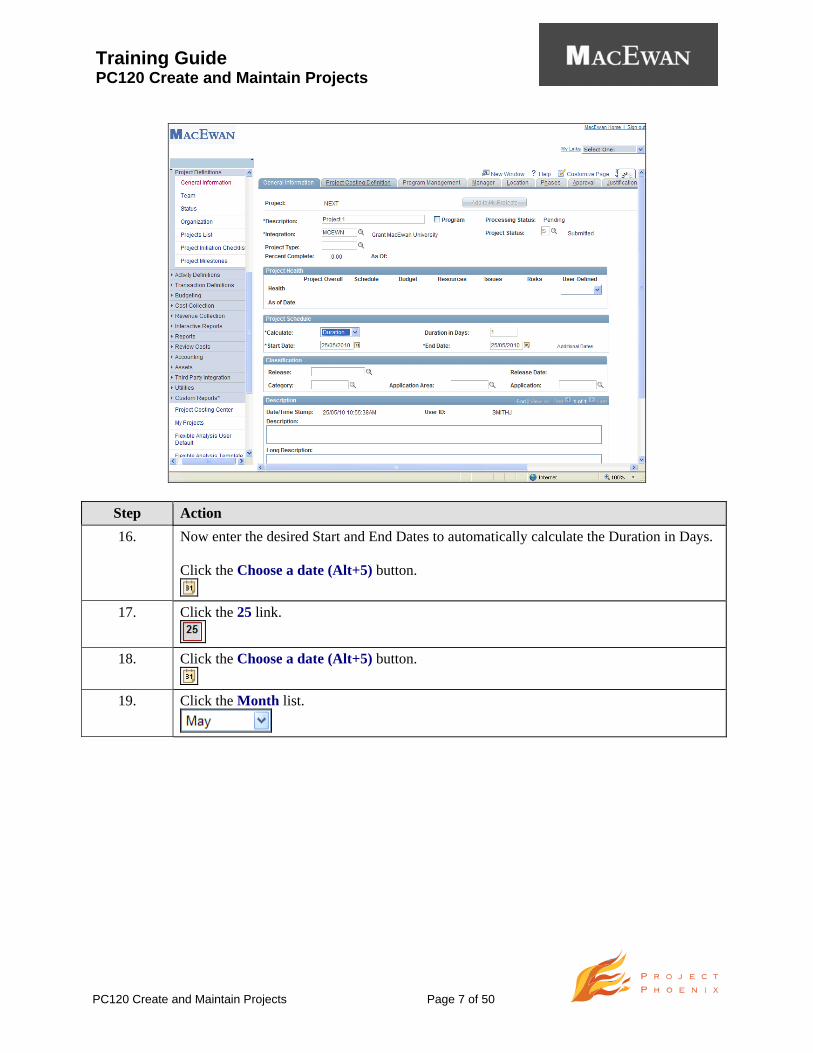
Step Action 16. Now enter the desired Start and End Dates to automatically calculate the Duration in Days.
Click the Choose a date (Alt+5) button.
17. Click the 25 link.
18. Click the Choose a date (Alt+5) button.
19. Click the Month list.

Training Guide PC120 Create and Maintain Projects
PC120 Create and Maintain Projects Page 8 of 50
Step Action 20. Click the June list item.

Training Guide PC120 Create and Maintain Projects
PC120 Create and Maintain Projects Page 9 of 50
Step Action 21. Click the 30 link.
22. Click the space below the scroll bar to move the screen down. 23. You must save each page before moving on to the next tab.
Click the Save button.
24. Click the space above the scroll bar to move the screen up. 25. Click the Project Costing Definition link.

Training Guide PC120 Create and Maintain Projects
PC120 Create and Maintain Projects Page 10 of 50
Step Action 26. Click the Allow Interest Calculation option if it applies to this project.
27. Click the Save button.
28. Click the Program Management link.

Training Guide PC120 Create and Maintain Projects
PC120 Create and Maintain Projects Page 11 of 50
Step Action 29. Click the Look up Budget Approver (Alt+5) button.
30. Choose the appropriate Budget Approver from the Search Results.
Click the Gallagher,Mike link.
31. Click the Realtime Calculations option.
32. Click the Enable Change Control option.
33. Click the space below the scroll bar to move the screen down. 34. Click the Save button.
35. Click the OK button.
36. Click the space above the scroll bar to move the screen up. 37. Click the Manager link.
38. For a project, the Project Manager value defaults from the Program.

Training Guide PC120 Create and Maintain Projects
PC120 Create and Maintain Projects Page 12 of 50
Step Action 39. Click the Location tab.

Training Guide PC120 Create and Maintain Projects
PC120 Create and Maintain Projects Page 13 of 50
Step Action 40. Assign the physical location of the project.
Click the Look up Location Code (Alt+5) button.
41. Choose the correct location from the Search Results list.
Click the City Centre Campus link.
42. Use the Refresh button to refresh the screen if the address information has not displayed.
Click the Save button.

Training Guide PC120 Create and Maintain Projects
PC120 Create and Maintain Projects Page 14 of 50
Step Action 43. Click the Phases tab.
44. Use the Phases page to track time spent on stages of a project.
Click the Look up Phase Type (Alt+5) button.
45. Choose the desired Phase Type from the Search Results.
Click the Design link.
46. Enter a Description and modify the Status as required.
Click the Choose a date (Alt+5) button.
47. Choose a start date.
Click the Current Date link.
48. Click the Choose a date (Alt+5) button.

Training Guide PC120 Create and Maintain Projects
PC120 Create and Maintain Projects Page 15 of 50
Step Action 49. Choose an end date.
Click the 31 link.
50. Click the Save button.
51. Click the Approval tab.
52. Use the Approval page to enter detailed information about the approval event that you
would like to define. Remember to click the Save button after any entry to save the details.
Step Action 53. Click the Show following tabs button.
54. Click the Justification tab.

Training Guide PC120 Create and Maintain Projects
PC120 Create and Maintain Projects Page 16 of 50
Step Action 55. As required, enter the Justification details.
Click the Look up Justification Type (Alt+5) button.
56. Choose the desired Justification Type to enter.
Click the Cancel button to return to the previous screen without adding a Justification Type.
57. Click the User Fields tab.

Training Guide PC120 Create and Maintain Projects
PC120 Create and Maintain Projects Page 17 of 50
Step Action 58. At this time, the Rates tab is not required. Skip to the Attachments tab.
Click the Attachments tab.

Training Guide PC120 Create and Maintain Projects
PC120 Create and Maintain Projects Page 18 of 50
Step Action 59. Click the Add Attachments button.
60. Click the Browse... button.

Training Guide PC120 Create and Maintain Projects
PC120 Create and Maintain Projects Page 19 of 50
Step Action 61. Choose the desired document from your computer.
Click the Doc1.docx list item.
62. Click the Open button.

Training Guide PC120 Create and Maintain Projects
PC120 Create and Maintain Projects Page 20 of 50
Step Action 63. Click the Upload button.
64. Click the Save button.
65. At this time the Asset Integration Rules and Budget Alert tabs are not in use. These tabs
will become active after January 1, 2011. For now, they can be skipped. 66. You have successfully completed the topic on how to Create a Project.
End of Procedure.
Create a Project Activity
Create an Activity for a Project Procedure In this topic you will learn how to create an Activity for a Project.

Training Guide PC120 Create and Maintain Projects
PC120 Create and Maintain Projects Page 21 of 50
Step Action 1. Click the Project Costing link.
2. Click the Activity Definitions link.
3. Click the Project Activities link.

Training Guide PC120 Create and Maintain Projects
PC120 Create and Maintain Projects Page 22 of 50
Step Action 4. Enter the desired information into the Business Unit field. Enter "MCEWN". 5. Click the Search button.
6. Click the space below the scroll bar to move the screen down. 7. Choose the correct Project from the Search Results.
Click the Project 1 link.

Training Guide PC120 Create and Maintain Projects
PC120 Create and Maintain Projects Page 23 of 50
Step Action 8. Click the Collapse Menu (Ctrl+Y) button to minimize the portal menu and give you more
viewing space on the screen.
9. Use the Project Activities screen to enter the details of the activities you will be applying to this project. Enter the desired information into the Activity Name field. Enter "Design meeting".
10. Enter the Duration of this activity (in days), or leave it as the default 1. Because the Calculate field is set to End Date, the system will automatically calculate the End Date for you, once you've entered the Start Date .
11. Use caution when changing these dates AFTER the project is open; a Change Request will be required. Click the Choose a date (Alt+5) button.
12. Choose the Start Date for this activity. Use the Month and Year fields as required.
Click the 26 link.
13. Click the Save button to save the activity and to assign an Activity number to it.

Training Guide PC120 Create and Maintain Projects
PC120 Create and Maintain Projects Page 24 of 50
Step Action 14. To add more rows, and thus more activities, click the 1 checkbox on row 1.
15. Click in the Number Rows field.
16. Remove the default.
Press [Delete]. 17. Enter the desired information into the Number Rows field. Enter "2". 18. Click the Add button.
19. Two rows have been added to the Project Activities page. 20. Unselect row 1.
Click the 1 option.
21. To remove unwanted rows, select them using the checkbox on the row.
Click the 3 option.
22. Click the Delete button.
23. That row will be removed. 24. Enter the desired information into the Activity Name field. Enter "Complete design
plans". 25. Change the Duration.
Enter the desired information into the Duration (Days) field. Enter "7".
26. Click the Choose a date (Alt+5) button.
27. Select the appropriate Start Date for the new activity. Click the 27 link.
28. Click the Save button.
29. To establish Predecessor Activities for the current activity,
click the Create Predecessors button.

Training Guide PC120 Create and Maintain Projects
PC120 Create and Maintain Projects Page 25 of 50
Step Action 30. Click the Look up Predecessor Activity (Alt+5) button.
31. Choose the correct predecessor activity from the Search Results list.
Click the 00004 link.
32. Click the OK button.
33. The activity is now linked to a Predecessor Activity.

Training Guide PC120 Create and Maintain Projects
PC120 Create and Maintain Projects Page 26 of 50
Step Action 34. Click the space beside the scroll bar to move the screen to the right.
35. Use the Resources button to add resources to the activity. Click the Drill to Resources by Activity button.

Training Guide PC120 Create and Maintain Projects
PC120 Create and Maintain Projects Page 27 of 50
Step Action 36. Enter any details required regarding the Resources required for this activity.
Click the Return to Project Activities link.

Training Guide PC120 Create and Maintain Projects
PC120 Create and Maintain Projects Page 28 of 50
Step Action 37. Click the More Dates tab.
38. Use the More Dates page to enter further dates associated with the activity. 39. Click the space to the right of the scroll bar to move the screen to the right. 40. More date fields exist.
Click the space to the left of the scroll bar to move the screen back.
41. Click the Details tab.
42. The Details page can be used to enter an Activity Type.
Click the Look up Activity Type (Alt+5) button.
43. Click the Design link.
44. Click the Look up Activity Type (Alt+5) button.
45. Click the Build link.

Training Guide PC120 Create and Maintain Projects
PC120 Create and Maintain Projects Page 29 of 50
Step Action 46. Click the space to the right of the scroll bar to move the screen to the right.
47. The Details page is also where you can set the activity as Milestone, using the checkbox on the appropriate row. You can choose to Allow Interest Calculation or not for each activity, using the checkbox for that action.
48. Click the space to the left of the scroll bar to move the screen back.
49. Click the Save button.
50. Click the Schedule tab.
51. To view or enter activity definitions, use the button at the end of the row.
Click the Activity Definition button.
52. You are routed to the Activity Definition page.
Starting on the General Information tab, enter any additional details you wish to have for this activity. The only Required fields for entry are those noted with an asterisk (*).

Training Guide PC120 Create and Maintain Projects
PC120 Create and Maintain Projects Page 30 of 50
Step Action 53. Move through each tab to enter further details.
Click the Definition tab.
54. Use this screen to select further options associated with the Activity.
The links at the bottom of the screen allow you to view more information or to return to the Project Activities screen. Use the Save button to save any information changed or entered.
Training Guide PC120 Create and Maintain Projects
PC120 Create and Maintain Projects Page 31 of 50
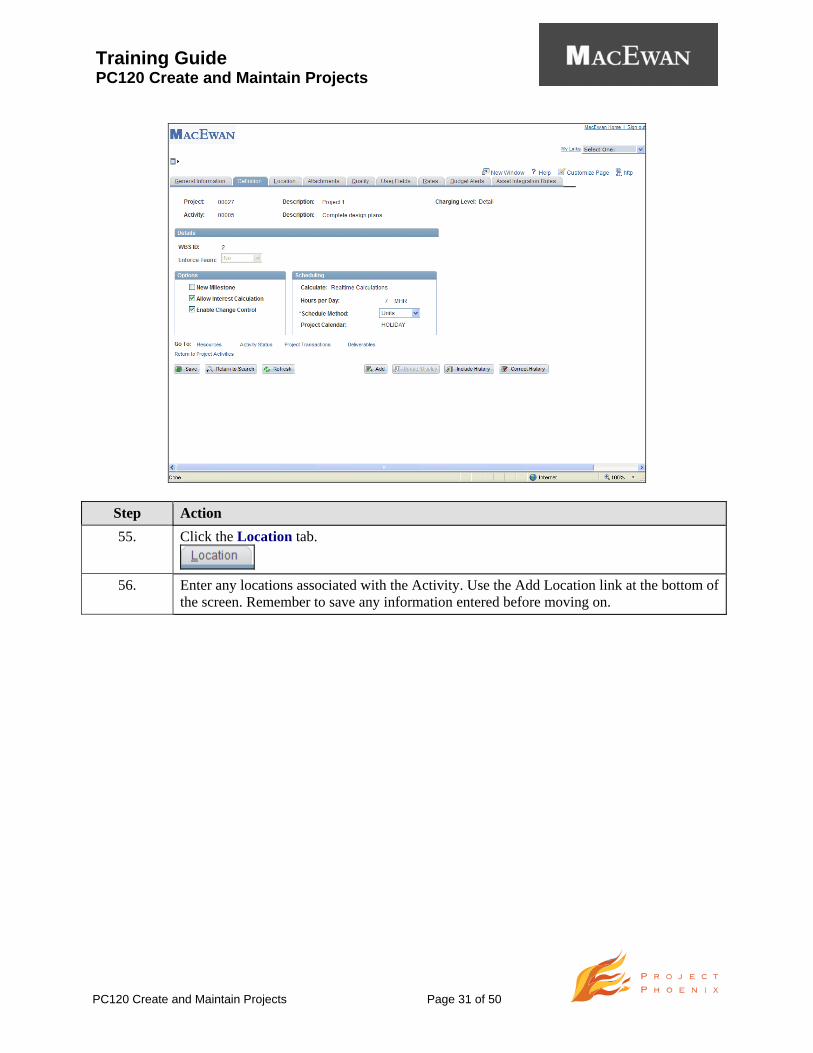
Step Action 55. Click the Location tab.
56. Enter any locations associated with the Activity. Use the Add Location link at the bottom of
the screen. Remember to save any information entered before moving on.
Training Guide PC120 Create and Maintain Projects
PC120 Create and Maintain Projects Page 32 of 50
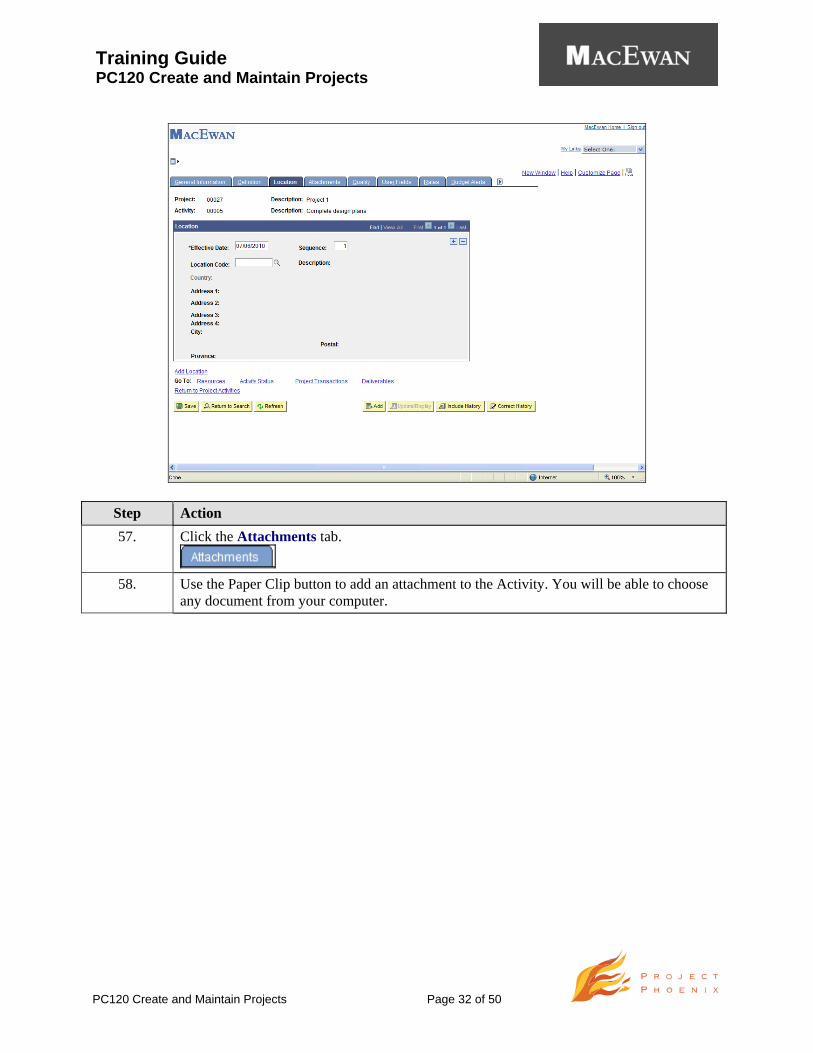
Step Action 57. Click the Attachments tab.
58. Use the Paper Clip button to add an attachment to the Activity. You will be able to choose
any document from your computer.

Training Guide PC120 Create and Maintain Projects
PC120 Create and Maintain Projects Page 33 of 50
Step Action 59. Click the Quality tab.
60. Use this screen to capture any Quality details. Remember, only fields noted with an asterisk (*) are required; all other fields provide further details but are not necessary for processing or saving.

Training Guide PC120 Create and Maintain Projects
PC120 Create and Maintain Projects Page 34 of 50
Step Action 61. Click the User Fields tab.
62. Enter User information as you see fit for this activity, using the fields provided.

Training Guide PC120 Create and Maintain Projects
PC120 Create and Maintain Projects Page 35 of 50
Step Action 63. Click the Rates tab.
64. Enter Rate information as required or necessary for your Activity, using the fields provided.

Training Guide PC120 Create and Maintain Projects
PC120 Create and Maintain Projects Page 36 of 50
Step Action 65. Click the Budget Alerts tab.
66. If you would like to enter a Budget Alert, use this screen to enter and save your alert
details.

Training Guide PC120 Create and Maintain Projects
PC120 Create and Maintain Projects Page 37 of 50
Step Action 67. Click the Show following tabs button.
68. Click the Asset Integration Rules tab.
69. Use this screen to enter details about Asset Integration, if required, for your Activity.

Training Guide PC120 Create and Maintain Projects
PC120 Create and Maintain Projects Page 38 of 50
Step Action 70. Click the space below the scroll bar to move the screen down. 71. Remember to use the Save button to save any information entered in these tabs, before
returning to the Project Activities page. Click the Return to Project Activities link at the bottom of any tab screen to return.
Training Guide PC120 Create and Maintain Projects
PC120 Create and Maintain Projects Page 39 of 50
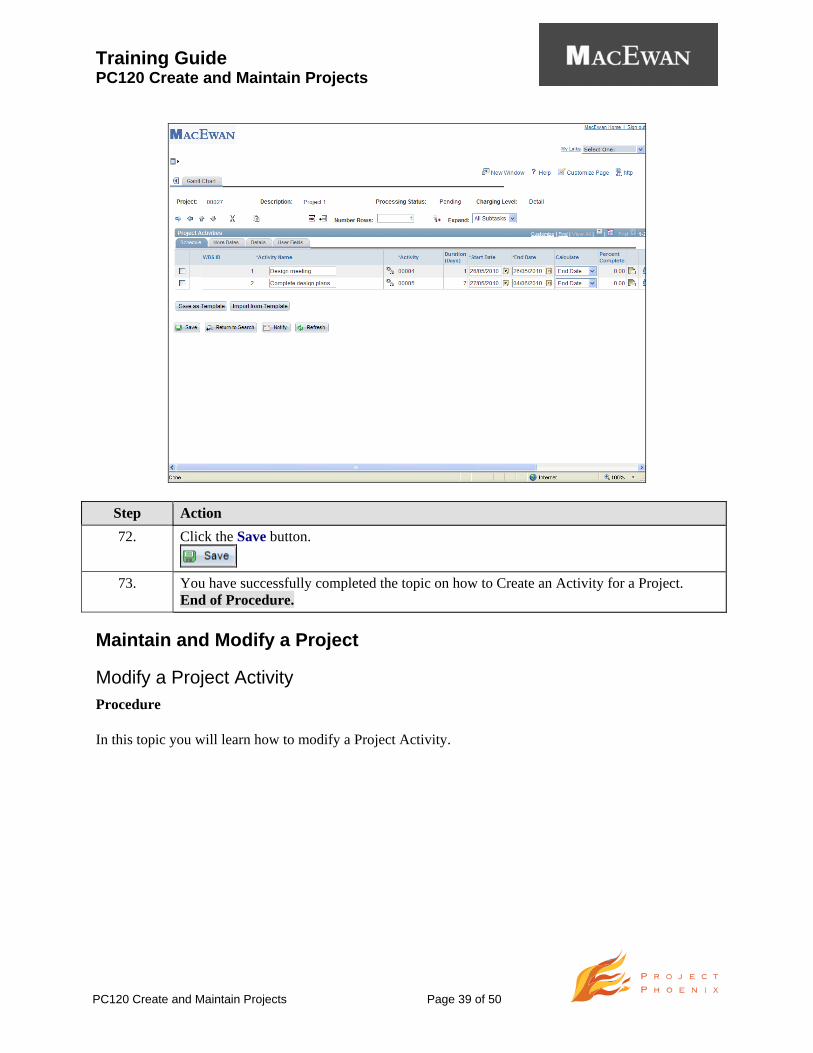
Step Action 72. Click the Save button.
73. You have successfully completed the topic on how to Create an Activity for a Project.
End of Procedure.
Maintain and Modify a Project
Modify a Project Activity Procedure In this topic you will learn how to modify a Project Activity.

Training Guide PC120 Create and Maintain Projects
PC120 Create and Maintain Projects Page 40 of 50
Step Action 1. Click the Project Costing link.
2. Click the Activity Definitions link.
3. Click the Project Activities link.

Training Guide PC120 Create and Maintain Projects
PC120 Create and Maintain Projects Page 41 of 50
Step Action 4. Enter the desired information into the Business Unit field. Enter "MCEWN". 5. Click the Search button.
6. Select the correct Project from the Search Results.
Click the Project 1 link.
Training Guide PC120 Create and Maintain Projects
PC120 Create and Maintain Projects Page 42 of 50
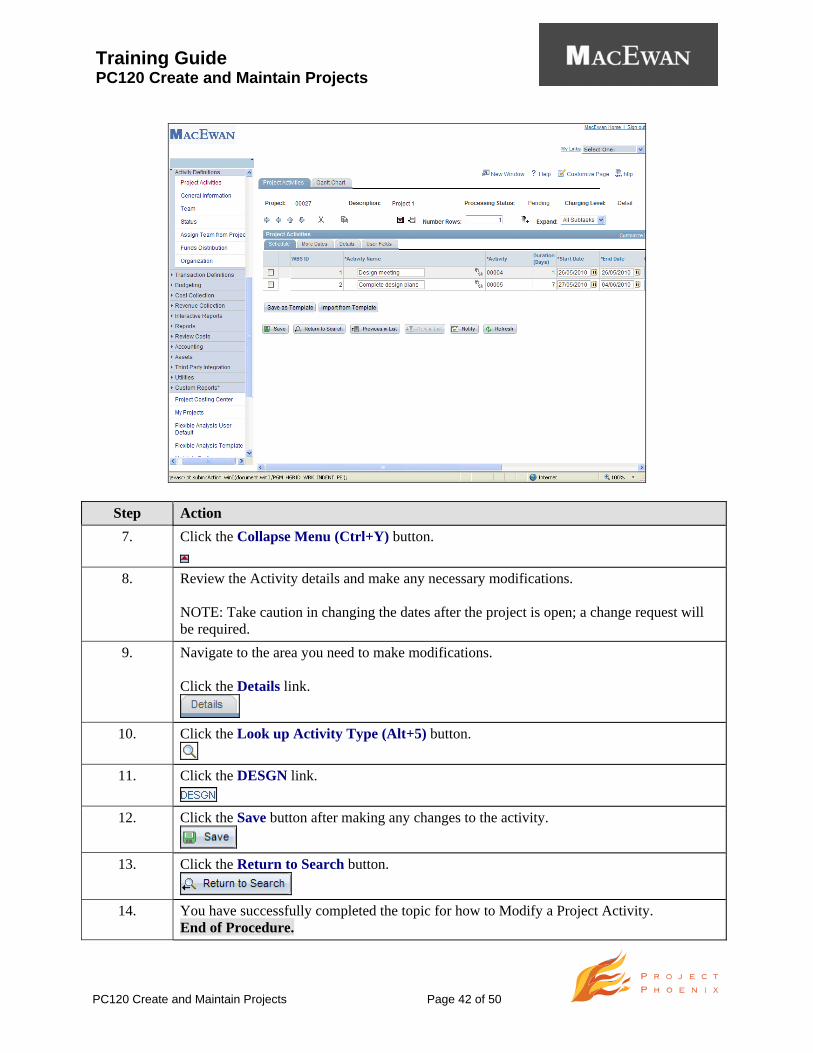
Step Action 7. Click the Collapse Menu (Ctrl+Y) button.
8. Review the Activity details and make any necessary modifications.
NOTE: Take caution in changing the dates after the project is open; a change request will be required.
9. Navigate to the area you need to make modifications. Click the Details link.
10. Click the Look up Activity Type (Alt+5) button.
11. Click the DESGN link.
12. Click the Save button after making any changes to the activity.
13. Click the Return to Search button.
14. You have successfully completed the topic for how to Modify a Project Activity.
End of Procedure.

Training Guide PC120 Create and Maintain Projects
PC120 Create and Maintain Projects Page 43 of 50
Add a Resource to a Project Procedure In this topic you will learn how to add a Resource to a Project.
Step Action 1. Click the Project Costing link.
2. Click the Project Definitions link.
3. Click the Team link.

Training Guide PC120 Create and Maintain Projects
PC120 Create and Maintain Projects Page 44 of 50
Step Action 4. Enter the desired information into the Business Unit field. Enter "MCEWN". 5. Click the Search button.
6. Click the space below the scroll bar to move the screen down. 7. Choose the correct Project from the Search Results list.
Click the 00027 link.

Training Guide PC120 Create and Maintain Projects
PC120 Create and Maintain Projects Page 45 of 50
Step Action 8. Click the Collapse Menu (Ctrl+Y) button to minimize the portal menu and give yourself
more viewing space.
9. Click the Look up ID Number (Alt+5) button.
10. Choose the correct Employee ID from the Search Results. Click the 0002380 link.
11. Click the Look up Project Role (Alt+5) button.
12. Choose the correct Role for the individual from the Search Results.
Click the PROJECT MGR link.
13. Click the Add button.
14. Click the Resource Name Hyperlink to assign workflow for a Project Manager.
Click the James Ross link.

Training Guide PC120 Create and Maintain Projects
PC120 Create and Maintain Projects Page 46 of 50
Step Action 15. Click the space below the scroll bar to move the screen down. 16. Click the Project Manager checkbox.
17. Click the Save button.

Training Guide PC120 Create and Maintain Projects
PC120 Create and Maintain Projects Page 47 of 50
Step Action 18. You will be routed to the Change Control User Input screen when you make a change to the
Project. Enter justification comments for the change. Enter the comments into the Justification for Change field. Enter "New project manager".
19. Click the Save and Return button.
20. You have successfully completed the topic to Add a Resource to a Project.
End of Procedure.


![Lesson 10: Create/Maintain General Orders - Enrollees...Part 2 Relating an enrollee to a new order Chapter 10 Create/Maintain General Orders 10-3 [Rev Nov 8, 2006] Relating an enrollee](https://img.dokumen.tips/doc/110x75/6126eb9c03bd4a6a851591ae/lesson-10-createmaintain-general-orders-enrollees-part-2-relating-an-enrollee.jpg)