Embed Size (px)
DESCRIPTION
Patching Procedure
Citation preview
Oracle® ApplicationsPatching Procedures
Release 12
Part No. B31567-01
December 2006
Oracle Applications Patching Procedures, Release 12
Part No. B31567-01
Copyright © 2000, 2006, Oracle. All rights reserved.
Primary Author: Joycelyn Wee
Contributors: Carole Eubanks, Henriette Fux, William Greene, My-Xuan Ho, Danny Lo, Ruth Mamo, Maniesh Sailoz, Yun Shaw, Kiran Srirama, Sean Tuck
The Programs (which include both the software and documentation) contain proprietary information; they are provided under a license agreement containing restrictions on use and disclosure and are also protected by copyright, patent, and other intellectual and industrial property laws. Reverse engineering, disassembly, or decompilation of the Programs, except to the extent required to obtain interoperability with other independently created software or as specified by law, is prohibited.
The information contained in this document is subject to change without notice. If you find any problems in the documentation, please report them to us in writing. This document is not warranted to be error-free. Except as may be expressly permitted in your license agreement for these Programs, no part of these Programs may be reproduced or transmitted in any form or by any means, electronic or mechanical, for any purpose.
If the Programs are delivered to the United States Government or anyone licensing or using the Programs on behalf of the United States Government, the following notice is applicable:
U.S. GOVERNMENT RIGHTS Programs, software, databases, and related documentation and technical data delivered to U.S. Government customers are "commercial computer software" or "commercial technical data" pursuant to the applicable Federal Acquisition Regulation and agency-specific supplemental regulations. As such, use, duplication, disclosure, modification, and adaptation of the Programs, including documentation and technical data, shall be subject to the licensing restrictions set forth in the applicable Oracle license agreement, and, to the extent applicable, the additional rights set forth in FAR 52.227-19, Commercial Computer Software—Restricted Rights (June 1987). Oracle USA, Inc., 500 Oracle Parkway, Redwood City, CA 94065
The Programs are not intended for use in any nuclear, aviation, mass transit, medical, or other inherently dangerous applications. It shall be the licensee's responsibility to take all appropriate fail-safe, backup, redundancy and other measures to ensure the safe use of such applications if the Programs are used for such purposes, and we disclaim liability for any damages caused by such use of the Programs.
Oracle, JD Edwards, and PeopleSoft are registered trademarks of Oracle Corporation and/or its affiliates. Other names may be trademarks of their respective owners.
The Programs may provide links to Web sites and access to content, products, and services from third parties. Oracle is not responsible for the availability of, or any content provided on, third-party Web sites. You bear all risks associated with the use of such content. If you choose to purchase any products or services from a third party, the relationship is directly between you and the third party. Oracle is not responsible for: (a) the quality of third-party products or services; or (b) fulfilling any of the terms of the agreement with the third party, including delivery of products or services and warranty obligations related to purchased products or services. Oracle is not responsible for any loss or damage of any sort that you may incur from dealing with any third party.
iii
Contents
Preface ................................................................................................................................................................ vii
Audience...................................................................................................................................................... viiDocumentation Accessibility .................................................................................................................... viiRelated Documents ................................................................................................................................... viiiConventions ............................................................................................................................................... viii
1 Patching Concepts and Utilities
Patching Concepts .................................................................................................................................... 1-1Codelevels and Codelines................................................................................................................. 1-1Patch Types ......................................................................................................................................... 1-2Patch Formats ..................................................................................................................................... 1-2Patch File Structure ............................................................................................................................ 1-3Patch Driver File................................................................................................................................. 1-3
Patching Utilities ...................................................................................................................................... 1-5Command Line Patching Utilities ................................................................................................... 1-5Web-based Patching Utilities ........................................................................................................... 1-5
2 Patch Tracking Utilities
Patch Wizard.............................................................................................................................................. 2-1Preparing to Use Patch Wizard........................................................................................................ 2-1Setting up OracleMetaLink Credentials........................................................................................... 2-1The Patch Information Bundle ......................................................................................................... 2-2Concurrent Programs ........................................................................................................................ 2-2The Patch Wizard Interface .............................................................................................................. 2-3Accessing Patch Wizard .................................................................................................................... 2-3Patch Wizard Main Page................................................................................................................... 2-4Patch Wizard Preferences ................................................................................................................. 2-6Define Patch Filters ............................................................................................................................ 2-7Recommend/Analyze Patches......................................................................................................... 2-8Download Patches ............................................................................................................................. 2-9Recommended Patches Results..................................................................................................... 2-10Codelevels Introduced in the Patches .......................................................................................... 2-11Patch Impact Analysis .................................................................................................................... 2-12
Registered Flagged Files ...................................................................................................................... 2-13The Registered Flagged Files Interface ........................................................................................ 2-14
iv
Accessing Registered Flagged Files.............................................................................................. 2-14Registered Flagged Files Page....................................................................................................... 2-14Adding a Registered Flagged File ................................................................................................ 2-15
3 Patch Application Utilities
AutoPatch................................................................................................................................................... 3-1Preparing your System for Patching ............................................................................................... 3-2Log Files............................................................................................................................................... 3-2Prompts................................................................................................................................................ 3-3Preparing for Non-interactive Patching.......................................................................................... 3-4Messages.............................................................................................................................................. 3-5Backup Directory................................................................................................................................ 3-6The AutoPatch Interface.................................................................................................................... 3-6Running AutoPatch ........................................................................................................................... 3-6AutoPatch Modes............................................................................................................................... 3-7Command Line Arguments.............................................................................................................. 3-8Stopping AutoPatch........................................................................................................................ 3-11Restarting AutoPatch...................................................................................................................... 3-11
AD Merge Patch..................................................................................................................................... 3-12Source and Destination Directories .............................................................................................. 3-12The AD Merge Patch Interface ...................................................................................................... 3-13Running AD Merge Patch.............................................................................................................. 3-13
4 Patch Reporting Utilities
Applied Patches ........................................................................................................................................ 4-1How Patch Information Is Stored .................................................................................................... 4-1AutoPatch Modes............................................................................................................................... 4-2The Applied Patches Interface ......................................................................................................... 4-2Accessing Applied Patches Information......................................................................................... 4-3Applied Patches Search Pages.......................................................................................................... 4-3File History Search Pages.................................................................................................................. 4-6Patch Details........................................................................................................................................ 4-8Codelevels Introduced ...................................................................................................................... 4-9Timing Details .................................................................................................................................... 4-9Files Copied......................................................................................................................................... 4-9Bug Fixes........................................................................................................................................... 4-10Action Summary ............................................................................................................................. 4-11Action Details .................................................................................................................................. 4-11
Timing Reports ...................................................................................................................................... 4-12The Timing Reports Interface........................................................................................................ 4-13Accessing Timing Reports ............................................................................................................. 4-13Timing Reports Main Page ............................................................................................................ 4-14AutoPatch Timing Details.............................................................................................................. 4-14AD Administration Timing Details .............................................................................................. 4-17In-Progress Timing Details ............................................................................................................ 4-17Job Timing ........................................................................................................................................ 4-18Phase Information ........................................................................................................................... 4-19
v
Exceptions ........................................................................................................................................ 4-20View Log Files ................................................................................................................................. 4-20
Software Updates .................................................................................................................................. 4-22The Software Updates Interface.................................................................................................... 4-22Accessing Software Updates ........................................................................................................ 4-23Software Updates Page .................................................................................................................. 4-23
5 Patching Procedures
Performing Interactive Patching ........................................................................................................... 5-1Applying a Patch Interactively......................................................................................................... 5-2Applying Unified Drivers................................................................................................................. 5-5Testing a Patch Before Applying It.................................................................................................. 5-6Enabling Password Validation......................................................................................................... 5-6Applying Emergency Patches .......................................................................................................... 5-7
Performing Non-interactive Patching .................................................................................................. 5-8Applying a Patch Non-interactively................................................................................................ 5-8Applying a Single Patch Driver ....................................................................................................... 5-9Applying a Non-standard Patch................................................................................................... 5-10Restarting a Non-interactive AutoPatch Session........................................................................ 5-10Abandoning a Non-interactive AutoPatch Session.................................................................... 5-11
Patching NLS Systems.......................................................................................................................... 5-12Applying a Single Patch to an NLS Installation ......................................................................... 5-12Applying Multiple Patches to an NLS Installation .................................................................... 5-13Applying an Emergency NLS Patch............................................................................................. 5-13
Applying Patches to a Multi-node System ....................................................................................... 5-14Running a Unified Driver on Multiple Nodes............................................................................ 5-14Patching the APPL_TOP in a Shared Application Tier File System........................................ 5-15
Reducing Downtime............................................................................................................................. 5-15Creating a Merged Patch................................................................................................................ 5-16Deferring the Upload of Patch Information ................................................................................ 5-18Distributing the Processing Tasks ................................................................................................ 5-19Using a Staged Applications System............................................................................................ 5-20
Keeping Patches Current ..................................................................................................................... 5-23Creating a List of Recommended Patches ................................................................................... 5-23Downloading Recommended Patches ......................................................................................... 5-26Determining Patch Impact on System Files ................................................................................ 5-29
Analyzing Applied Patches ................................................................................................................. 5-31Determining If a Patch Was Applied ........................................................................................... 5-32Searching for Patch Details ............................................................................................................ 5-33Searching for Translation Patches................................................................................................. 5-36Viewing Applied Patches in a Report Format ............................................................................ 5-37Monitoring Patches in Progress .................................................................................................... 5-39
Backing Out Patches ............................................................................................................................. 5-41Restoring from a Failed Copy Section of a Unified Driver ....................................................... 5-41Restoring from a Failed Database Portion of a Unified Driver ................................................ 5-42
Index

vi
vii
Preface
This manual describes how to patch the Oracle Applications file system and the database. Its companion manuals, Oracle Applications Maintenance Utilities and Oracle Applications Maintenance Procedures, provide information about the utilities used for installing, upgrading, and maintaining Oracle Applications products, and how to maintain the Oracle Applications file system and the database, respectively.
AudienceThis book is intended for database administrators and system administrators who are responsible for performing Oracle Applications patching tasks.
Documentation AccessibilityOur goal is to make Oracle products, services, and supporting documentation accessible, with good usability, to the disabled community. To that end, our documentation includes features that make information available to users of assistive technology. This documentation is available in HTML format, and contains markup to facilitate access by the disabled community. Accessibility standards will continue to evolve over time, and Oracle is actively engaged with other market-leading technology vendors to address technical obstacles so that our documentation can be accessible to all of our customers. For more information, visit the Oracle Accessibility Program Web site at
http://www.oracle.com/accessibility/
Accessibility of Code Examples in DocumentationScreen readers may not always correctly read the code examples in this document. The conventions for writing code require that closing braces should appear on an otherwise empty line; however, some screen readers may not always read a line of text that consists solely of a bracket or brace.
Accessibility of Links to External Web Sites in DocumentationThis documentation may contain links to Web sites of other companies or organizations that Oracle does not own or control. Oracle neither evaluates nor makes any representations regarding the accessibility of these Web sites.
TTY Access to Oracle Support ServicesOracle provides dedicated Text Telephone (TTY) access to Oracle Support Services within the United States of America 24 hours a day, seven days a week. For TTY support, call 800.446.2398. Outside the United States, call +1.407.458.2479.
viii
Related DocumentsThis book was current as of the time it was initially published. It is included in the Oracle Applications Document Library, which is supplied in the Release 12 software bundle. Later versions of this and other documents that have changed sufficiently between releases to warrant re-publishing are made available at the following URL:
http://www.oracle.com/technology/documentation/applications.html
A full list of documentation resources is also published on OracleMetaLink. See Oracle Applications Documentation Resources, Release 12 (Doc ID: 394692.1). You can also purchase hard-copy documentation from the Oracle Store at:
http://oraclestore.oracle.com.
The following references are specifically related to maintenance tasks:
■ Oracle Applications Maintenance Procedures
■ Oracle Applications Maintenance Utilities
■ Oracle Applications Patching Procedures
■ Oracle Applications System Administrator’s Guide — Configuration
■ Oracle Applications System Administrator’s Guide — Maintenance
■ Oracle Applications System ADministrator’s Guide — Security
ConventionsThe following text conventions are used in this document:
Convention Meaning
boldface Boldface type indicates graphical user interface elements associated with an action, or terms defined in text or the glossary.
italic Italic type indicates book titles, emphasis, or placeholder variables for which you supply particular values.
monospace Monospace type indicates commands within a paragraph, URLs, code in examples, text that appears on the screen, or text that you enter.
Patching Concepts and Utilities 1-1
1Patching Concepts and Utilities
Applying a patch updates your existing system in various ways, from adding a new feature or product to improving system performance. This chapter describes the various types of patches, and the utilities you use to apply them and monitor their effect on your system. It contains these sections:
■ Patching Concepts
■ Patching Utilities
Patching ConceptsThroughout the course of the Oracle Applications life cycle, patches are applied for a number of reasons, including:
■ Updating to a higher maintenance level
■ Applying the latest product enhancements
■ Adding a new feature or functionality
■ Fixing an existing issue
Depending on the type of patch, it may update the file system, or the database, or both.
Codelevels and CodelinesIn release 12, Oracle Applications introduces codelines and codelevels to ease tracking of patch prerequisites, dependencies, and compatibilities. Patches are associated with a codeline, which not only identifies the set of product features, but also the order of the various patches released to provide fixes to that set of features.
A codeline begins with a base point that consists of a unique set of product features, and progresses to include all the patches created to provide fixes to that base point. For example, Oracle Financials and Oracle Human Resources are active in your system. The initial set of features or base point of Oracle Financials and Oracle Human Resources are FIN.A and HR.A, respectively.
When fixes are required for the base point, a patch (or a set of patches) is released, and the order in which the patch created is indicated by a number appended to the base point. Each new patch is called a codelevel. For example, codelevel FIN.A.1 is the first set of fixes to base point, FIN.A, and FIN.A.2 is the second set of fixes, and so on.
Note: All Oracle Applications patches are available from OracleMetaLink.
Patching Concepts
1-2 Oracle Applications Patching Procedures
Codelevels are cumulative -- each one contains the initial set of features plus all the fixes created to date (except those replaced by subsequent patches) for that product family.
Some patches may contain new features. These patches create new base points or start new codelines. For example, when Oracle Financials releases new features in a patch (instead of being part of a complete upgrade of Oracle Applications), the patch starts a new codeline, FIN.B. Then, the subsequent release of patches (or codelevels) with fixes to the expanded set of features are named accordingly: FIN.B.1, FIN.B.2, FIN.B.3, and so on.
As a user, you can choose to accept a patch to fix your existing codeline or you can accept a patch on a more recent codeline, which will not only provide fixes to your products, but will also add feature enhancements to your system.
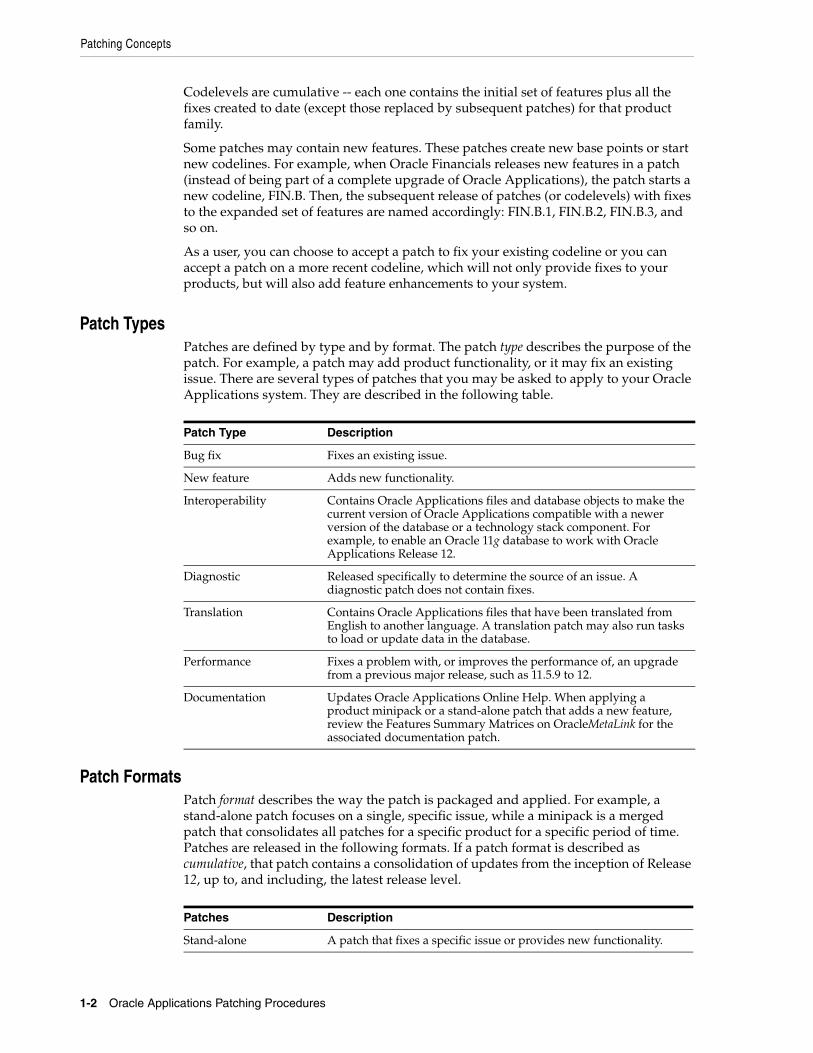
Patch TypesPatches are defined by type and by format. The patch type describes the purpose of the patch. For example, a patch may add product functionality, or it may fix an existing issue. There are several types of patches that you may be asked to apply to your Oracle Applications system. They are described in the following table.
Patch FormatsPatch format describes the way the patch is packaged and applied. For example, a stand-alone patch focuses on a single, specific issue, while a minipack is a merged patch that consolidates all patches for a specific product for a specific period of time. Patches are released in the following formats. If a patch format is described as cumulative, that patch contains a consolidation of updates from the inception of Release 12, up to, and including, the latest release level.
Patch Type Description
Bug fix Fixes an existing issue.
New feature Adds new functionality.
Interoperability Contains Oracle Applications files and database objects to make the current version of Oracle Applications compatible with a newer version of the database or a technology stack component. For example, to enable an Oracle 11g database to work with Oracle Applications Release 12.
Diagnostic Released specifically to determine the source of an issue. A diagnostic patch does not contain fixes.
Translation Contains Oracle Applications files that have been translated from English to another language. A translation patch may also run tasks to load or update data in the database.
Performance Fixes a problem with, or improves the performance of, an upgrade from a previous major release, such as 11.5.9 to 12.
Documentation Updates Oracle Applications Online Help. When applying a product minipack or a stand-alone patch that adds a new feature, review the Features Summary Matrices on OracleMetaLink for the associated documentation patch.
Patches Description
Stand-alone A patch that fixes a specific issue or provides new functionality.
Patching Concepts
Patching Concepts and Utilities 1-3
Patch File StructurePatches generally consist of a top-level directory, several files in the top-level directory, and one or more subdirectories. The top-level directory is named <patchnum>, where <patchnum> is the number of the patch. The most important files in the top-level directory are: README.txt, README.html and the u<patchnum>.drv driver file. For most patches, applying the patch driver file is the only action required.
The README.txt or README.html files for each patch describes what the patch does, and how to generate customized installation instructions for applying the patch.
Patch Driver FileThe unified driver contains the commands necessary to change files and database objects, and to generate new objects.
Unified DriverThe unified driver now contains copy, database, and generate portions in a single driver file. It is named u<patchnum>.drv. Run the unified driver on all APPL_TOPs and AutoPatch runs only the actions that are required for the current APPL_TOP.
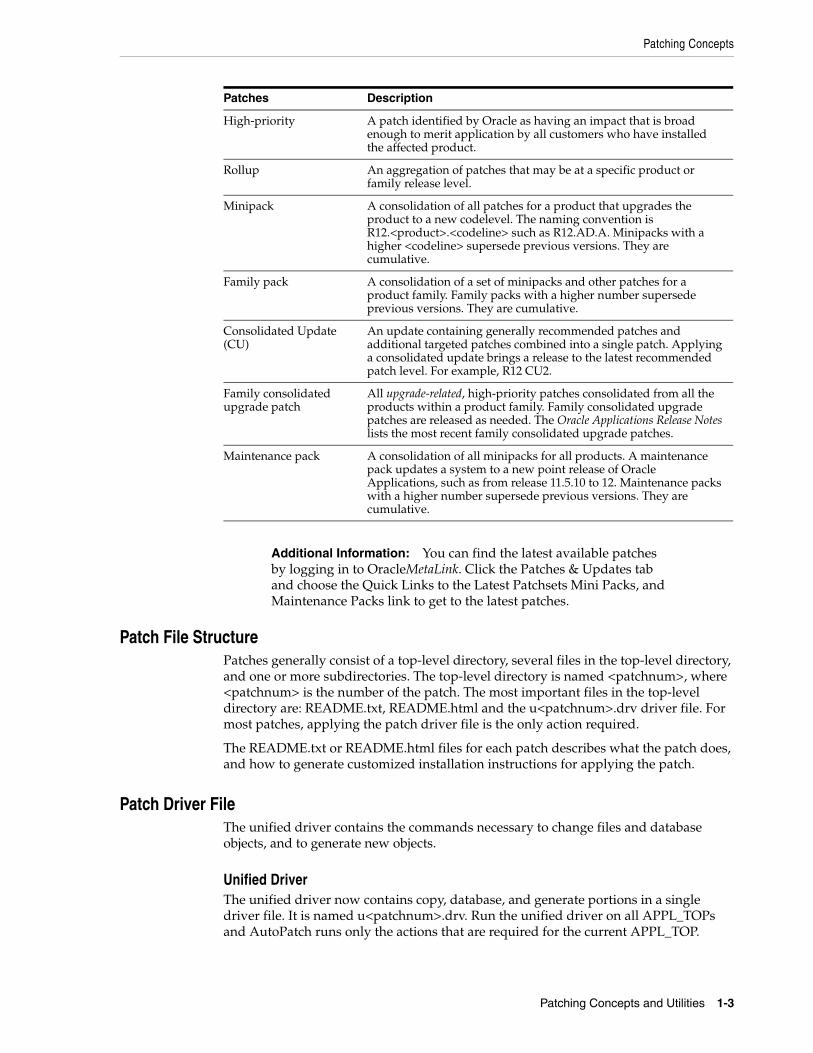
High-priority A patch identified by Oracle as having an impact that is broad enough to merit application by all customers who have installed the affected product.
Rollup An aggregation of patches that may be at a specific product or family release level.
Minipack A consolidation of all patches for a product that upgrades the product to a new codelevel. The naming convention is R12.<product>.<codeline> such as R12.AD.A. Minipacks with a higher <codeline> supersede previous versions. They are cumulative.
Family pack A consolidation of a set of minipacks and other patches for a product family. Family packs with a higher number supersede previous versions. They are cumulative.
Consolidated Update (CU)
An update containing generally recommended patches and additional targeted patches combined into a single patch. Applying a consolidated update brings a release to the latest recommended patch level. For example, R12 CU2.
Family consolidated upgrade patch
All upgrade-related, high-priority patches consolidated from all the products within a product family. Family consolidated upgrade patches are released as needed. The Oracle Applications Release Notes lists the most recent family consolidated upgrade patches.
Maintenance pack A consolidation of all minipacks for all products. A maintenance pack updates a system to a new point release of Oracle Applications, such as from release 11.5.10 to 12. Maintenance packs with a higher number supersede previous versions. They are cumulative.
Additional Information: You can find the latest available patches by logging in to OracleMetaLink. Click the Patches & Updates tab and choose the Quick Links to the Latest Patchsets Mini Packs, and Maintenance Packs link to get to the latest patches.
Patches Description
Patching Concepts
1-4 Oracle Applications Patching Procedures
Copy Portion of a Unified Driver When the copy portion of a unified driver runs, AutoPatch performs the following actions:
■ Extracts the appropriate files from the C library of each product.
■ Compares the extracted object modules with their corresponding files in the patch directory. It also makes this type of comparison with files such as forms, reports, and SQL scripts.
■ Backs up any product file with a more recent version in the patch directory to a subdirectory in the patch directory. For example, if <patch_dir> is the patch directory, <system_name> is the Applications System name, <appl_top_name> is the APPL_TOP name, and <prod> is the name of the product being patched, it backs up:
<PROD>_TOP/<subdir(s)>/<old_file_name>
to
<patch_dir>/backup/<system_name>/<appl_top_name>/ \ <prod>/<subdir(s)>/<old_file_name>
■ Replaces the outdated files of each product with newer files from the patch directory.
■ Loads the new object modules into the C libraries.
■ Relinks the Oracle Applications products with the operating system, Oracle server, and other Oracle products libraries.
■ Applies changed Java class files and regenerates JAR files as needed.
■ Copies any specified HTML or media files to their respective destinations.
■ Compiles out-of-date Java Server Page (JSP) files (if any JSP files are included in the patch).
Database Portion of a Unified Driver When the database portion of a driver runs, AutoPatch performs these actions:
■ Gets a list of current invalid objects in the APPS schema.
■ Determines whether the action was performed in a previous patch.
■ Runs SQL scripts and EXEC commands, which change Oracle Applications database objects. By default, AutoPatch runs scripts and commands in parallel.
■ Compiles invalid objects in the database.
■ Assembles a list of current invalid objects in the APPS schema.
Generate Portion of a Unified Driver Apply the generate portion of a unified driver on all APPL_TOP directories containing one or more files being generated by the patch. If in
Note: The Applications system name and the APPL_TOP name are determined during the Rapid Install process.
Note: In release 12, a separate MRC schema is not required, so Invoker’s Rights processing (included in previous releases) has been removed.
Patching Utilities
Patching Concepts and Utilities 1-5
doubt, apply it to all APPL_TOP directories on all nodes. When the generate portion of a driver runs, AutoPatch performs these actions:
■ Generates Oracle Forms PL/SQL library files.
■ Generates Oracle Forms menu files.
■ Generates Oracle Forms executable files.
■ Generates Oracle Reports PL/SQL library files.
■ Generates Oracle Reports files.
■ Generates message files.
■ Generates Oracle Workflow resource files.
Patching UtilitiesPatches are applied and tracked as needed by using one of the utilities designed specifically for that purpose. Some of these utilities are run from the command line, and others are Web-based.
Command Line Patching UtilitiesThe following utilities are run from the command line.
AutoPatchAutoPatch is the utility used to apply all patches to the Oracle Applications file system or database.
AD Merge PatchWhen you apply patches individually, you must perform patching tasks multiple times. For example, for every individual patch there may be duplicate link and generate processes. AD Merge Patch merges multiple patches into a single patch so that the required patching tasks and processes are performed only once.
Web-based Patching UtilitiesThe following utilities are Web-based. You access them through Oracle Applications Manager (OAM).
Applied PatchesThe Applied Patches utility allows you to query the patch history database for a list of patches that have been applied to your system. From the Applied Patches interface, you can view patch information such as patch number and type, driver file name, platform and version, location of applied patch, patch content and language, files changed or copied, bug fixes in each driver file, whether patch application was successful, and timing information.
File HistoryThe ile History utility allows you to view files that have been updated by a patch. You can view file history information such as: APPL_TOP on which the file resides, directory in which the file resides, product family that owns the file, name of the file, version of the file, date on which the file was changed, patch details report, and action summary report for the updates to the file.
Patching Utilities
1-6 Oracle Applications Patching Procedures
Patch WizardAn important part of the patching process is to keep abreast of new patches that are recommended, and analyze their effects before you actually apply them. With the Patch Wizard utility, you can determine patches that have not been applied to your system, but are recommended to keep the system current. Patch Wizard also advises you about the effects on your system of applying an individual patch before you apply it.
Timing ReportsThe Timing Reports utility allows you to monitor a job that is running or to view statistics of completed AutoPatch and AD Administration maintenance sessions. You can view information such as task name, time taken to complete the task, start time and end time, and so on.
Registered Flagged FilesThe Registered Flagged Files utility allows you to record customizations made to any file in one place. Use Registered Flagged files to import, export, add, delete and view records of customized files. This utility replaces the applcust.txt file from previous releases of Oracle Applications.
Manage Downtime SchedulesFor more information on Manage Downtime Schedules, see Managing Downtime in Restricted Mode in Oracle Applications System Administrator’s Guide - Maintenance.
Patch Tracking Utilities 2-1
2Patch Tracking Utilities
This chapter describes Patch Wizard, the utility you use to determine patches that you have not applied to your system. This chapter also describes Registered Flagged Files, the utility you use to maintain customized files on your system. It contains these sections:
■ Patch Wizard
■ Registered Flagged Files
Patch WizardWith Patch Wizard, you can determine patches that have not been applied to your system. It does not report on all available patches. It compares the patches you have already applied against a list of all recommended Oracle Applications patches. Recommended patches can include high-priority patches or patches that update to a new codelevel, such as maintenance packs, family packs, and minipacks.
Preparing to Use Patch WizardBefore you submit a request for a patch analysis or to download patches, you must access the Patch Wizard main page and prepare to submit the request. This page provides access to various setup tasks, including:
■ Setting preferences, both site-specific and general, that include the staging directory and various defaults that will apply to the patches you download.
■ Setting up filters that report only those patches that may affect your system.
■ Setting up your OracleMetaLink credentials.
■ Downloading the Patch Information Bundle from OracleMetaLink.
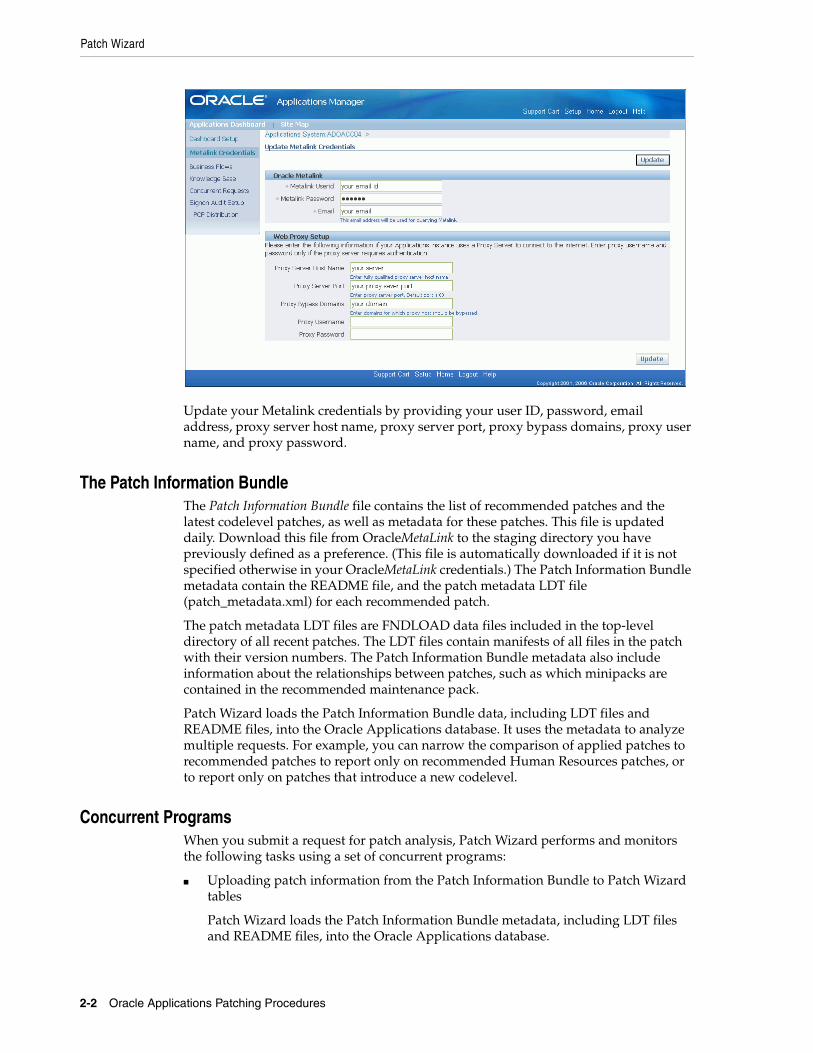
Setting up OracleMetaLink CredentialsBefore running Patch Wizard, set up your OracleMetaLink credentials in the OAM Update Metalink Credentials page. From the Patch Wizard main page, click Setup in the Oracle Applications Manager title bar.
From any page of the OAM interface, click the Setup link in the top right corner. The Dashboard Setup page appears. Click the Metalink Credentials link on the left side. The Update Metalink Credentials page appears.
Patch Wizard
2-2 Oracle Applications Patching Procedures
Update your Metalink credentials by providing your user ID, password, email address, proxy server host name, proxy server port, proxy bypass domains, proxy user name, and proxy password.
The Patch Information BundleThe Patch Information Bundle file contains the list of recommended patches and the latest codelevel patches, as well as metadata for these patches. This file is updated daily. Download this file from OracleMetaLink to the staging directory you have previously defined as a preference. (This file is automatically downloaded if it is not specified otherwise in your OracleMetaLink credentials.) The Patch Information Bundle metadata contain the README file, and the patch metadata LDT file (patch_metadata.xml) for each recommended patch.
The patch metadata LDT files are FNDLOAD data files included in the top-level directory of all recent patches. The LDT files contain manifests of all files in the patch with their version numbers. The Patch Information Bundle metadata also include information about the relationships between patches, such as which minipacks are contained in the recommended maintenance pack.
Patch Wizard loads the Patch Information Bundle data, including LDT files and README files, into the Oracle Applications database. It uses the metadata to analyze multiple requests. For example, you can narrow the comparison of applied patches to recommended patches to report only on recommended Human Resources patches, or to report only on patches that introduce a new codelevel.
Concurrent ProgramsWhen you submit a request for patch analysis, Patch Wizard performs and monitors the following tasks using a set of concurrent programs:
■ Uploading patch information from the Patch Information Bundle to Patch Wizard tables
Patch Wizard loads the Patch Information Bundle metadata, including LDT files and README files, into the Oracle Applications database.
Patch Wizard
Patch Tracking Utilities 2-3
■ Recommending patches based on the current environment and the Patch Information Bundle
Patch Wizard reports which patches update Oracle Applications at the current codelevel and which update to a new codelevel.
■ Downloading patches (ad hoc or based on the list of recommended patches)
Patch Wizard can download patches from OracleMetaLink then merge the patches in the Patch Wizard staging directory.
■ Analyzing lists of patches after downloading them from OracleMetaLink
Patch Wizard uploads the metadata for a specific patch or set of patches for you to view information reported from the metadata. For example, you can upload the metadata for a patch, and then view any recommended patches that have not yet been applied and the impact of applying this new patch.
The Patch Wizard InterfacePatch Wizard is a Web-based utility in Oracle Applications Manager (OAM). Since Patch Wizard is accessed through OAM, all the pages share a uniform look and feel.
Main PageFrom this page, you have access to task icons used to set up the Patch Wizard staging directory, manage patch filters, submit concurrent requests, and view recommended patches. In addition, the Recommended Results section of this page displays a list of patches based on submitted requests.
Task IconsFrom the main page, access the other Patch Wizard pages by clicking on Task icons. The icons provide links to the following pages: Patch Wizard Preferences, Define Patch Filters, Recommended/Analyze Patches, Download Patches, and Aggregate Patch Impact.
Details IconsMany Patch Wizard pages allow you to drill down to see more detail. For example, from the Recommended Patches Results section of the main page, click the Details icon for a specific recommended patch request to view the recommended patch results.
Accessing Patch WizardTo access Patch Wizard, log in to Oracle Applications Manager (OAM) and choose Patch Wizard from the Site Map.
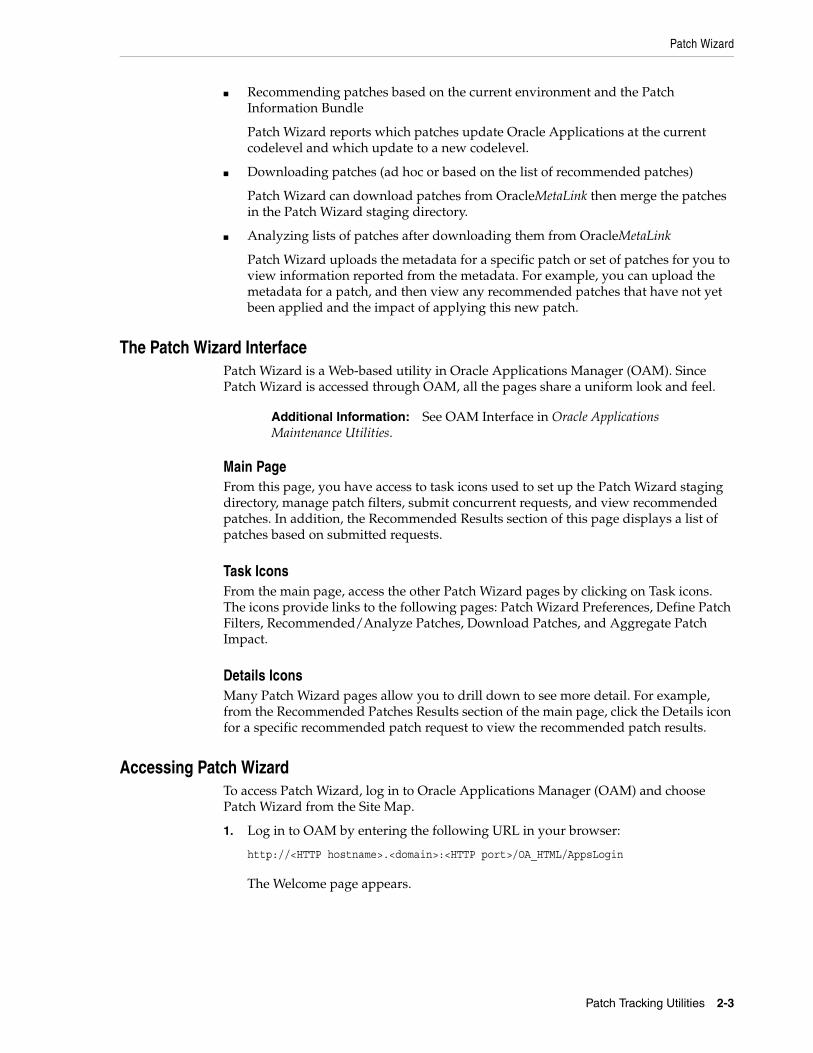
1. Log in to OAM by entering the following URL in your browser:
http://<HTTP hostname>.<domain>:<HTTP port>/OA_HTML/AppsLogin
The Welcome page appears.
Additional Information: See OAM Interface in Oracle Applications Maintenance Utilities.
Patch Wizard
2-4 Oracle Applications Patching Procedures
Enter your user name and password, and click Login. The OAM Applications Dashboard appears. From the Applications Dashboard, click the Site Map tab.
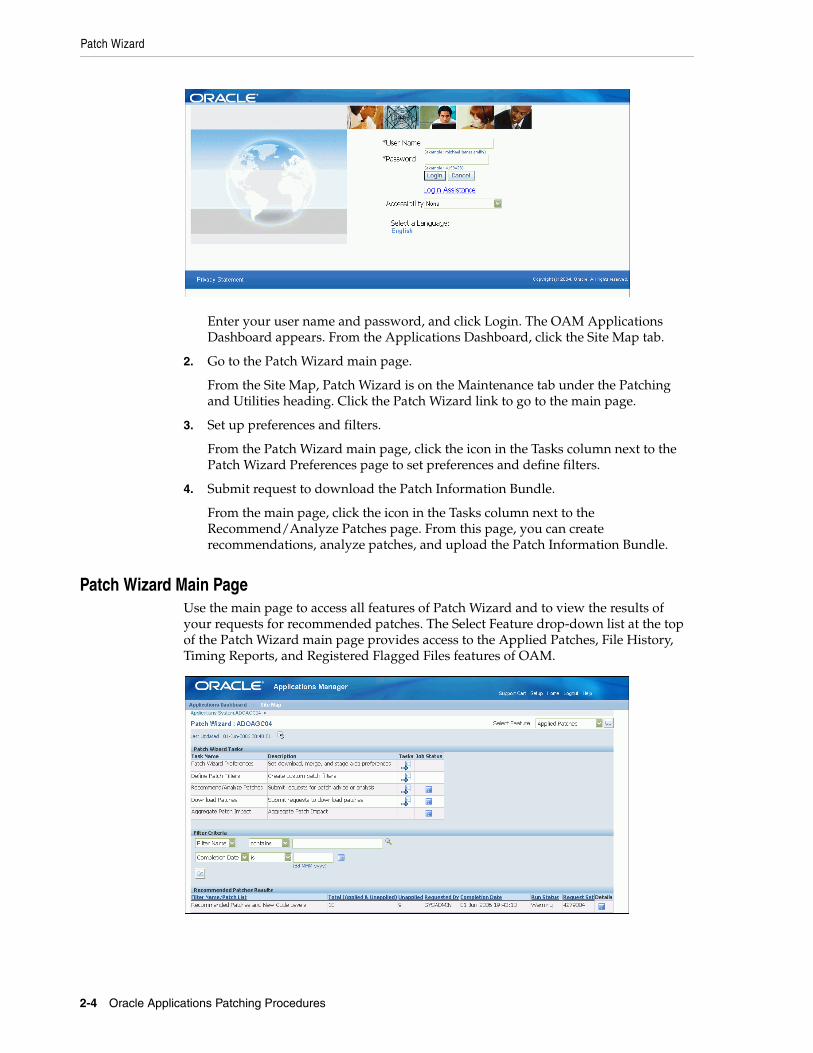
2. Go to the Patch Wizard main page.
From the Site Map, Patch Wizard is on the Maintenance tab under the Patching and Utilities heading. Click the Patch Wizard link to go to the main page.
3. Set up preferences and filters.
From the Patch Wizard main page, click the icon in the Tasks column next to the Patch Wizard Preferences page to set preferences and define filters.
4. Submit request to download the Patch Information Bundle.
From the main page, click the icon in the Tasks column next to the Recommend/Analyze Patches page. From this page, you can create recommendations, analyze patches, and upload the Patch Information Bundle.
Patch Wizard Main PageUse the main page to access all features of Patch Wizard and to view the results of your requests for recommended patches. The Select Feature drop-down list at the top of the Patch Wizard main page provides access to the Applied Patches, File History, Timing Reports, and Registered Flagged Files features of OAM.
Patch Wizard
Patch Tracking Utilities 2-5
Patch Wizard Tasks TableThe Patch Wizard Tasks table identifies the tasks available in Patch Wizard. The table contains the following columns of information for each task:
■ Task Name: This is the name of the Patch Wizard task.
■ Description: This is the task description.
■ Tasks: This link accesses the page associated with the Patch Wizard task.
■ Job Status: This link accesses request submission status of the Patch Wizard task.
From the Patch Wizard Tasks table in the Patch Wizard main page, choose the Tasks icons to view:
■ The Patch Wizard Preferences page
From the Preferences page, set the staging directory, merge patch defaults, the languages and platform defaults for downloading patches, and whether to display or hide hidden patches. You must define the values in the Preferences page before using Patch Wizard. Use this page for initial setup or when you want to modify existing preferences.
■ The Define Patch Filters page
You usually need to see only those patches that are recommended for your system. Use the Define Patch Filters page to set up filters that report only those patches that may affect your system.
■ The Recommend/Analyze Patches page
You can select a filter, then submit the request to run a report of recommended patches based on the filter. You can also analyze specific patches by entering a comma-separated list of patch numbers. Or use this page to upload the Patch Information Bundle with no analysis.
■ The Download Patches page
You can download patches, specify the language of patches to download, and merge patches from this page.
■ The Aggregate Patch Impact page
For more information on Aggregate Patch Impact, refer to Oracle Applications System Administrator’s Guide - Maintenance Release 12.
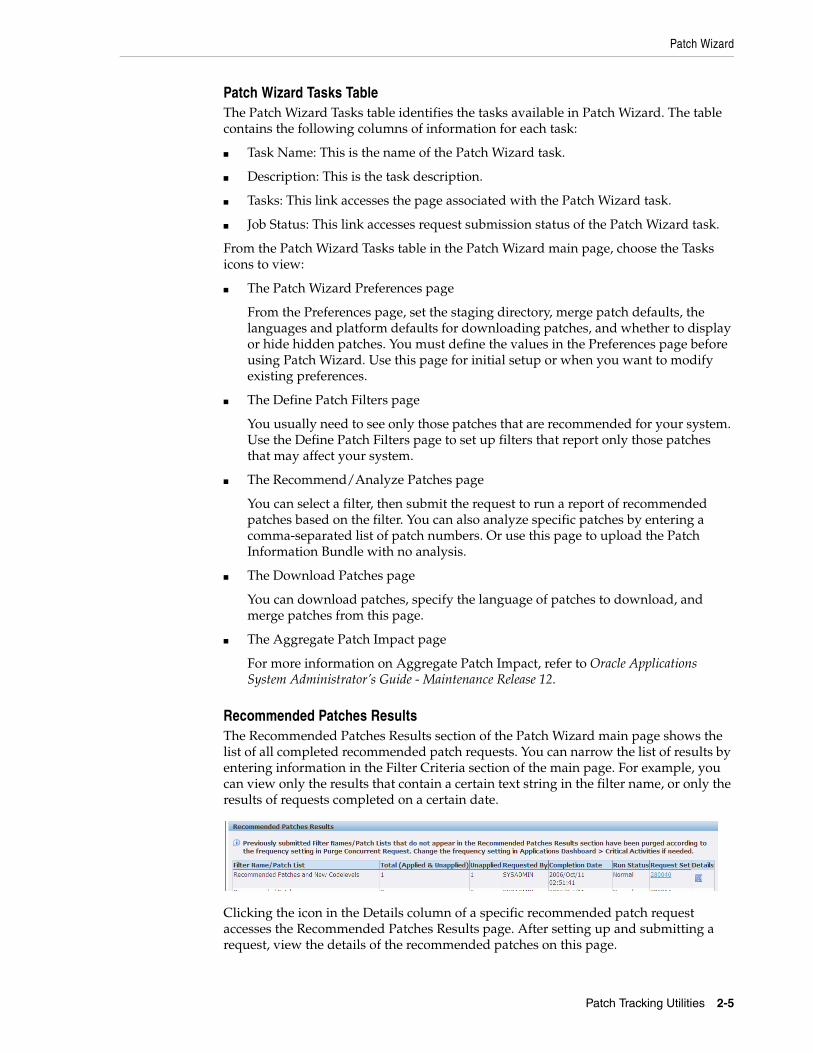
Recommended Patches ResultsThe Recommended Patches Results section of the Patch Wizard main page shows the list of all completed recommended patch requests. You can narrow the list of results by entering information in the Filter Criteria section of the main page. For example, you can view only the results that contain a certain text string in the filter name, or only the results of requests completed on a certain date.
Clicking the icon in the Details column of a specific recommended patch request accesses the Recommended Patches Results page. After setting up and submitting a request, view the details of the recommended patches on this page.

Patch Wizard
2-6 Oracle Applications Patching Procedures
Patch Wizard PreferencesThe site-specific information you set on the Patch Wizard Preferences page applies to other functions of Patch Wizard, such as Recommend/Analyze Patches and Download Patches. From the Patch Wizard main page, click the Tasks icon to show the Patch Wizard Preferences page.
Staging DirectoryThe staging directory is where you store files used by Patch Wizard. It is also used by Patch Wizard to create temporary files and subdirectories. These temporary files and directories are deleted after processing.
Merge Option DefaultsYou can choose to automatically merge patches that you download. You can choose to merge all patches into one merged patch, create two merged patches (one for US patches and one for all non-US patches), or create multiple merged patches (such as one for each separate language).
Language and Platform DetailsYou can select one or more languages, which are the languages of patches that Patch Wizard will recommend and download. You can also select the platform of the patches you want recommended and downloaded.
Display Option DefaultsHidden patches are patches that you choose not to see in your reports. For example, if Patch Wizard recommends patches for products you do not need for your system, you can choose to hide these patches.
However, checking the Show Hidden Patches box on the Preferences screen overrides the hidden patch setting, and all patches, even hidden patches, are reported.
Note: Oracle recommends you pick a staging directory and use the same directory each time you run Patch Wizard.
Patch Wizard
Patch Tracking Utilities 2-7
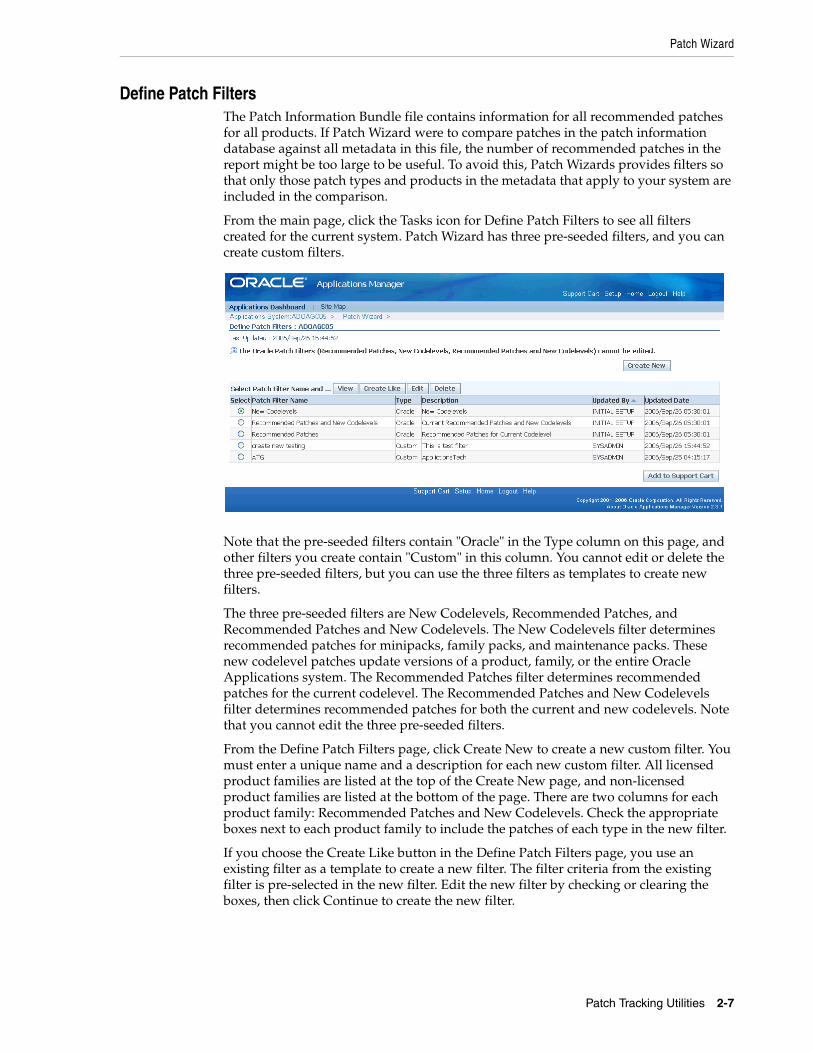
Define Patch FiltersThe Patch Information Bundle file contains information for all recommended patches for all products. If Patch Wizard were to compare patches in the patch information database against all metadata in this file, the number of recommended patches in the report might be too large to be useful. To avoid this, Patch Wizards provides filters so that only those patch types and products in the metadata that apply to your system are included in the comparison.
From the main page, click the Tasks icon for Define Patch Filters to see all filters created for the current system. Patch Wizard has three pre-seeded filters, and you can create custom filters.
Note that the pre-seeded filters contain "Oracle" in the Type column on this page, and other filters you create contain "Custom" in this column. You cannot edit or delete the three pre-seeded filters, but you can use the three filters as templates to create new filters.
The three pre-seeded filters are New Codelevels, Recommended Patches, and Recommended Patches and New Codelevels. The New Codelevels filter determines recommended patches for minipacks, family packs, and maintenance packs. These new codelevel patches update versions of a product, family, or the entire Oracle Applications system. The Recommended Patches filter determines recommended patches for the current codelevel. The Recommended Patches and New Codelevels filter determines recommended patches for both the current and new codelevels. Note that you cannot edit the three pre-seeded filters.
From the Define Patch Filters page, click Create New to create a new custom filter. You must enter a unique name and a description for each new custom filter. All licensed product families are listed at the top of the Create New page, and non-licensed product families are listed at the bottom of the page. There are two columns for each product family: Recommended Patches and New Codelevels. Check the appropriate boxes next to each product family to include the patches of each type in the new filter.
If you choose the Create Like button in the Define Patch Filters page, you use an existing filter as a template to create a new filter. The filter criteria from the existing filter is pre-selected in the new filter. Edit the new filter by checking or clearing the boxes, then click Continue to create the new filter.
Patch Wizard
2-8 Oracle Applications Patching Procedures
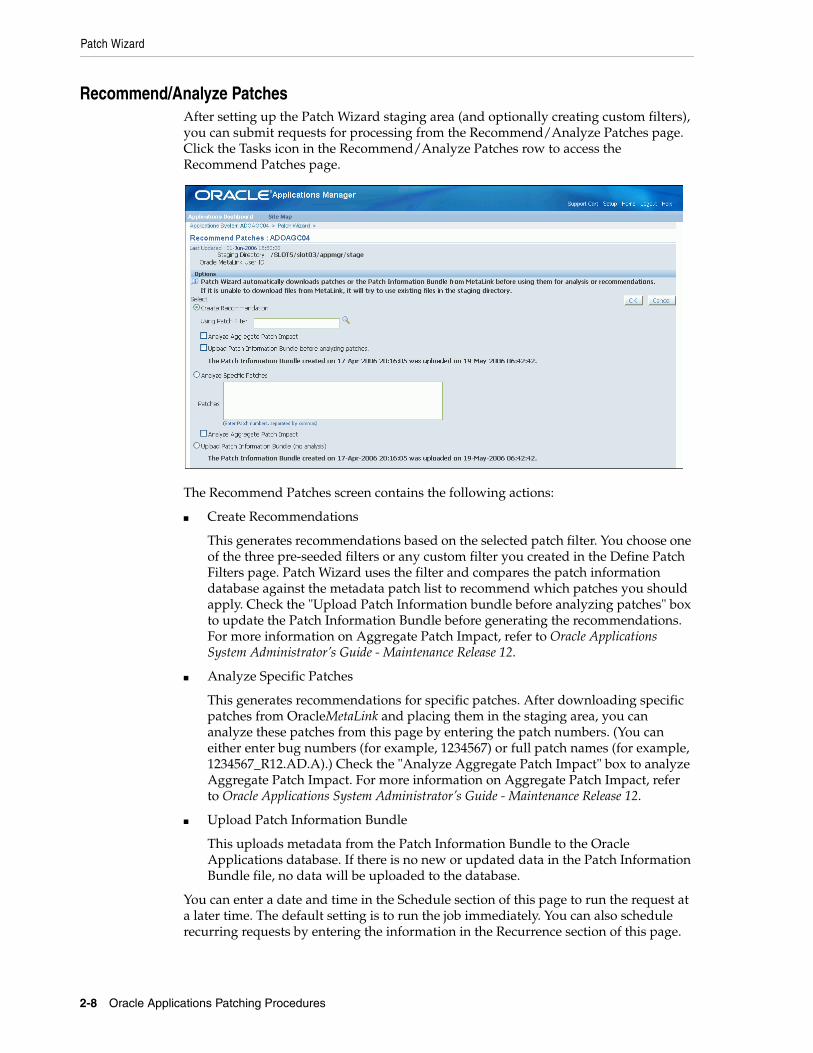
Recommend/Analyze PatchesAfter setting up the Patch Wizard staging area (and optionally creating custom filters), you can submit requests for processing from the Recommend/Analyze Patches page. Click the Tasks icon in the Recommend/Analyze Patches row to access the Recommend Patches page.
The Recommend Patches screen contains the following actions:
■ Create Recommendations
This generates recommendations based on the selected patch filter. You choose one of the three pre-seeded filters or any custom filter you created in the Define Patch Filters page. Patch Wizard uses the filter and compares the patch information database against the metadata patch list to recommend which patches you should apply. Check the "Upload Patch Information bundle before analyzing patches" box to update the Patch Information Bundle before generating the recommendations. For more information on Aggregate Patch Impact, refer to Oracle Applications System Administrator’s Guide - Maintenance Release 12.
■ Analyze Specific Patches
This generates recommendations for specific patches. After downloading specific patches from OracleMetaLink and placing them in the staging area, you can analyze these patches from this page by entering the patch numbers. (You can either enter bug numbers (for example, 1234567) or full patch names (for example, 1234567_R12.AD.A).) Check the "Analyze Aggregate Patch Impact" box to analyze Aggregate Patch Impact. For more information on Aggregate Patch Impact, refer to Oracle Applications System Administrator’s Guide - Maintenance Release 12.
■ Upload Patch Information Bundle
This uploads metadata from the Patch Information Bundle to the Oracle Applications database. If there is no new or updated data in the Patch Information Bundle file, no data will be uploaded to the database.
You can enter a date and time in the Schedule section of this page to run the request at a later time. The default setting is to run the job immediately. You can also schedule recurring requests by entering the information in the Recurrence section of this page.
Patch Wizard
Patch Tracking Utilities 2-9
Each time you submit a request to upload a Patch Information Bundle, to analyze specific patches, or to recommend patches, Patch Wizard creates a request ID. The request ID is shown on the Results section of the Patch Wizard main page. To check the status of your request, click on the Job Status icon corresponding to your request on the Patch Wizard Tasks table.
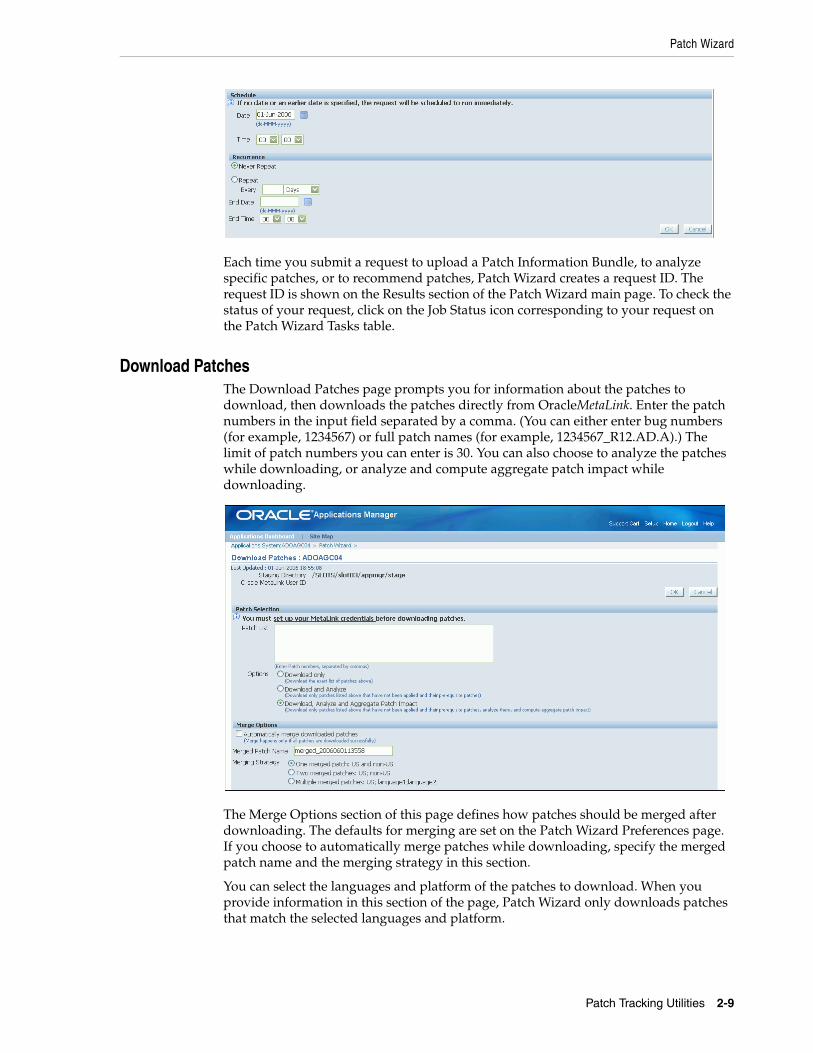
Download PatchesThe Download Patches page prompts you for information about the patches to download, then downloads the patches directly from OracleMetaLink. Enter the patch numbers in the input field separated by a comma. (You can either enter bug numbers (for example, 1234567) or full patch names (for example, 1234567_R12.AD.A).) The limit of patch numbers you can enter is 30. You can also choose to analyze the patches while downloading, or analyze and compute aggregate patch impact while downloading.
The Merge Options section of this page defines how patches should be merged after downloading. The defaults for merging are set on the Patch Wizard Preferences page. If you choose to automatically merge patches while downloading, specify the merged patch name and the merging strategy in this section.
You can select the languages and platform of the patches to download. When you provide information in this section of the page, Patch Wizard only downloads patches that match the selected languages and platform.
Patch Wizard
2-10 Oracle Applications Patching Procedures
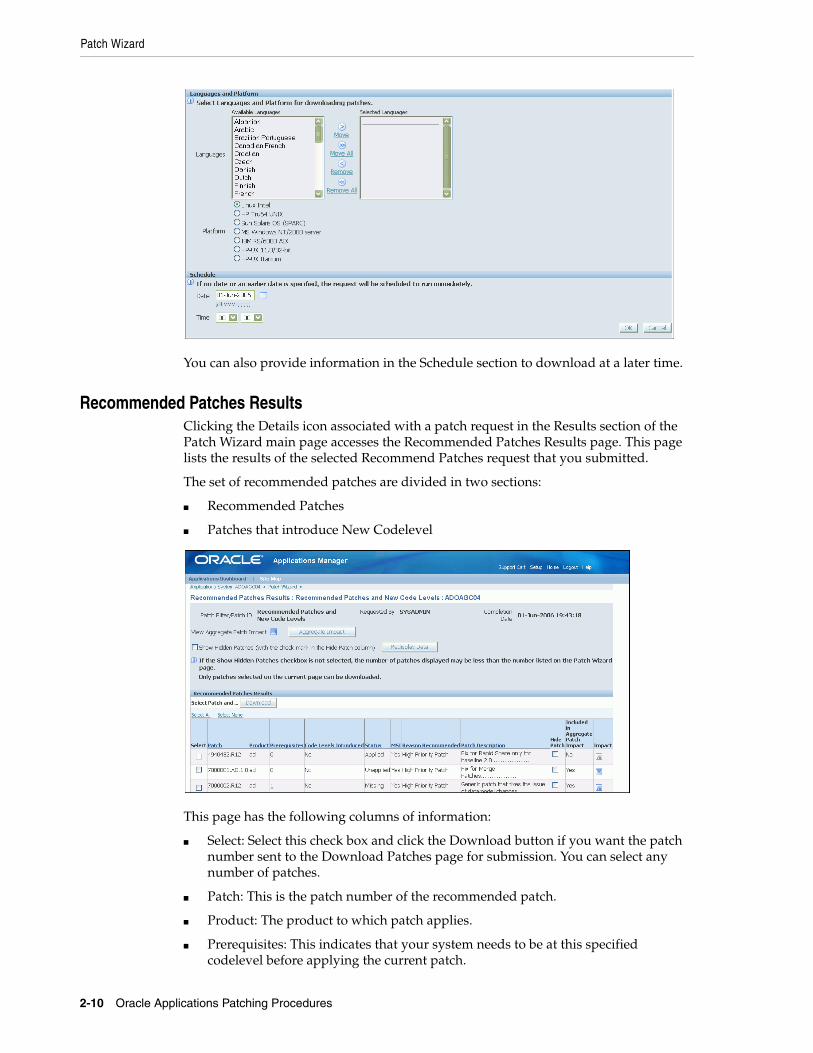
You can also provide information in the Schedule section to download at a later time.
Recommended Patches ResultsClicking the Details icon associated with a patch request in the Results section of the Patch Wizard main page accesses the Recommended Patches Results page. This page lists the results of the selected Recommend Patches request that you submitted.
The set of recommended patches are divided in two sections:
■ Recommended Patches
■ Patches that introduce New Codelevel
This page has the following columns of information:
■ Select: Select this check box and click the Download button if you want the patch number sent to the Download Patches page for submission. You can select any number of patches.
■ Patch: This is the patch number of the recommended patch.
■ Product: The product to which patch applies.
■ Prerequisites: This indicates that your system needs to be at this specified codelevel before applying the current patch.
Patch Wizard
Patch Tracking Utilities 2-11
■ Codelevel Introduced: This indicates whether the patch introduces a new codelevel.
■ Status: This indicates whether the patch is applied, unapplied, missing, or obsolete.
■ MSI: This indicates whether there are manual steps you have to perform.
■ Reason Recommended: The reason the patch is recommended, for example, it is part of a minipack or a family pack.
■ Patch Description: A brief description of the patch.
■ Hide Patch: Select this check box to hide the patch from the list of recommended patches. Use this feature to hide patches that you do not want to apply to your system. To hide or show selected patches, use the Show Hidden Patches check box at the top of the page and click Redisplay Data to refresh the page. The default values are set in the Patch Wizard Preferences page.
■ Included in Aggregate Patch Impact: For more information on Aggregate Patch Impact, refer to Oracle Applications System Administrator’s Guide - Maintenance Release 12.
■ Impact: Click this icon to access the Patch Impact Summary page. If you submitted a specific patch to analyze, click the Impact icon on the Recommended Patches Request page to view the Patch Impact Analysis Report.
Clicking the Download button carries the selected patch number(s) to the Download Patches page for submission.
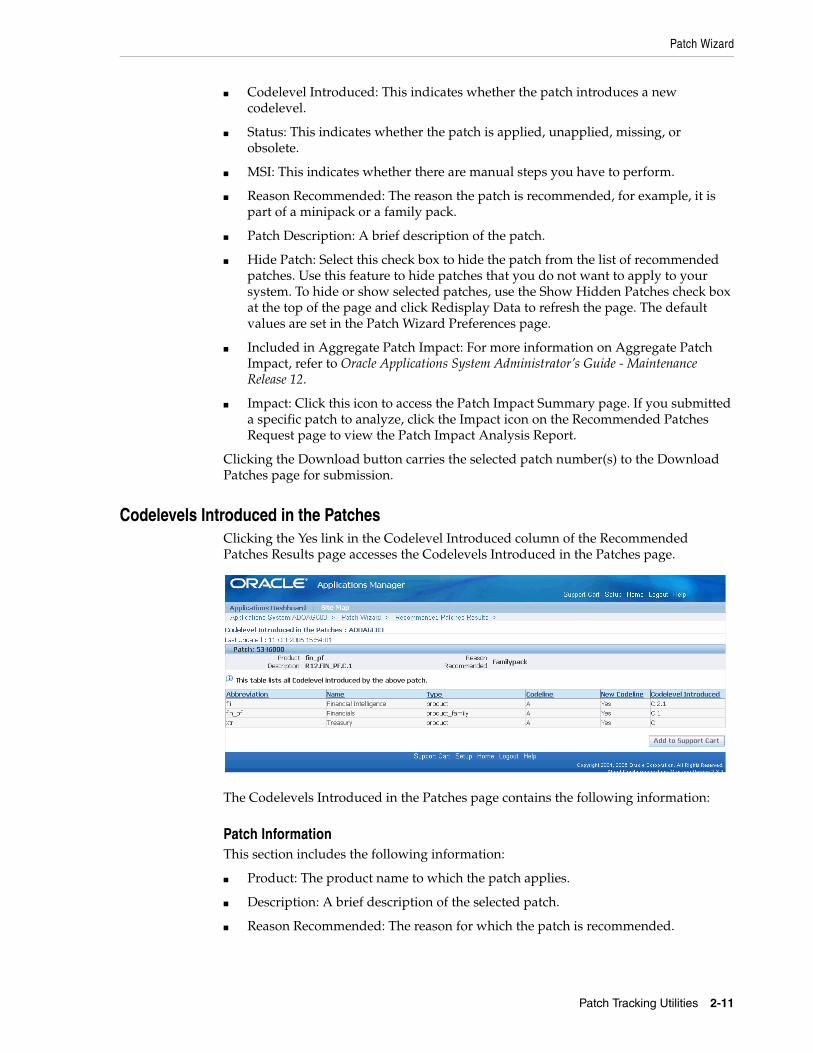
Codelevels Introduced in the PatchesClicking the Yes link in the Codelevel Introduced column of the Recommended Patches Results page accesses the Codelevels Introduced in the Patches page.
The Codelevels Introduced in the Patches page contains the following information:
Patch InformationThis section includes the following information:
■ Product: The product name to which the patch applies.
■ Description: A brief description of the selected patch.
■ Reason Recommended: The reason for which the patch is recommended.
Patch Wizard
2-12 Oracle Applications Patching Procedures
Codelevels InformationThis section includes the following information:
■ Abbreviation: The abbreviation for the product, product family, or feature to which this patch applies.
■ Name: The full name of the product, product family, or feature to which this patch applies.
■ Type: Indicates whether this patch applies to a product, product family, or feature.
■ Codeline: This indicates the codeline of the product, product family, or feature in your current system.
■ New Codeline: This indicates whether this patch introduces a new codeline.
■ Codelevel Introduced: The new codelevel that this patch introduces for the product, product family, or feature.
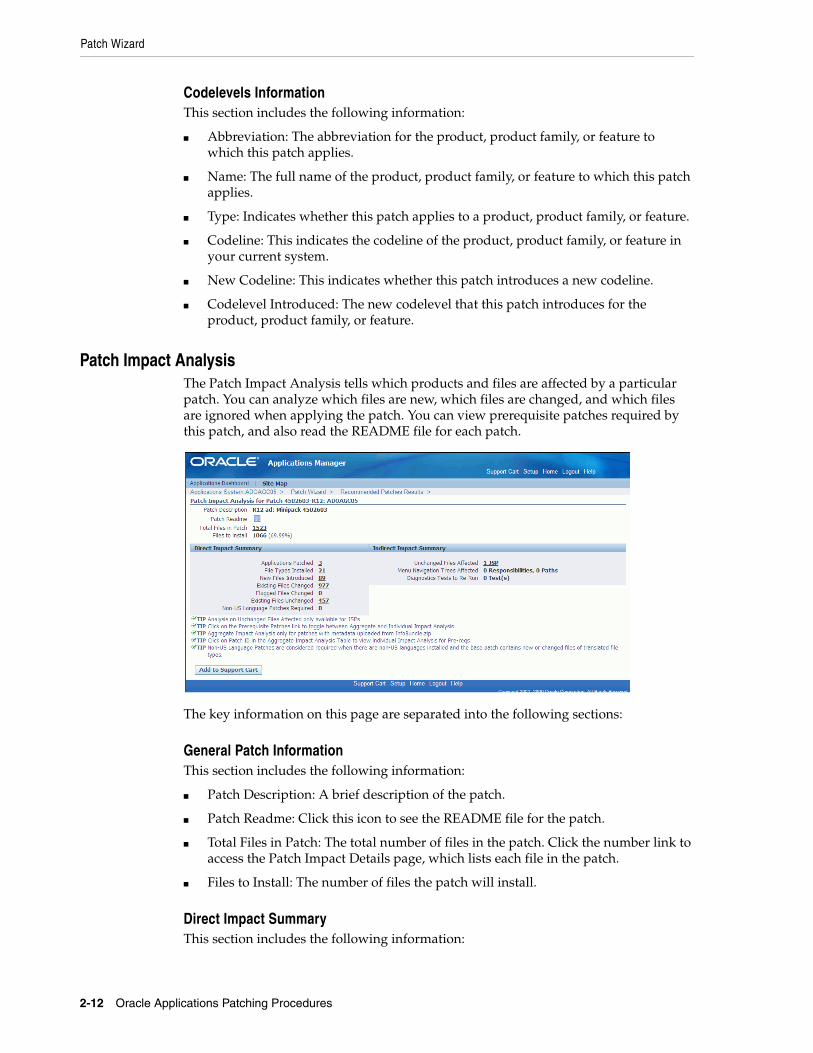
Patch Impact AnalysisThe Patch Impact Analysis tells which products and files are affected by a particular patch. You can analyze which files are new, which files are changed, and which files are ignored when applying the patch. You can view prerequisite patches required by this patch, and also read the README file for each patch.
The key information on this page are separated into the following sections:
General Patch InformationThis section includes the following information:
■ Patch Description: A brief description of the patch.
■ Patch Readme: Click this icon to see the README file for the patch.
■ Total Files in Patch: The total number of files in the patch. Click the number link to access the Patch Impact Details page, which lists each file in the patch.
■ Files to Install: The number of files the patch will install.
Direct Impact SummaryThis section includes the following information:
Registered Flagged Files
Patch Tracking Utilities 2-13
■ Applications Patched: The number of products that will have files updated. Click the number link to access the Patch Impact Details page, which lists each product impacted and how they are impacted.
■ File Types Installed: The number of different file types in the patch. Click the number link to access the Patch Impact Details page, which lists the file types and how they impact the system.
■ New Files Introduced: The number of new files that will be introduced by the patch. Click the number link to access the Patch Impact Details page, which lists details about each new file introduced.
■ Existing Files Changed: The number of existing files in the system that will be changed by the patch. Click the number link to access the Patch Impact Details page, which lists the existing files changed and the new version numbers.
■ Flagged Files Changed: The number of custom files that will be changed by this patch.
■ Existing Files Unchanged: The number of files unchanged because the version in the patch is older than the version in the system. Click the number link to access the Patch Impact Details page, which lists the files in the patch that are the same or earlier versions than those currently in the system.
■ Non-US Language Patches Required: The number of non-US language patches required.
Indirect Impact SummaryThis section includes the following information:
■ Unchanged Files Affected: The number of system files with dependencies on patched files.
■ Menu Navigation Trees Affected: The number of menu navigation trees that will be updated by the patch.
■ Diagnostics Tests to Re-Run: The number of diagnostic tests to be re-executed after patching.
Registered Flagged FilesWith the Registered Flagged Files tool, you can record any files in which you have made customizations. The Registered Flagged Files tool replaces the need to maintain the applcust.txt file. In previous releases of Oracle Applications, the applcust.txt file contains the record for all customized files.
The Registered Flagged Files tool displays the following information about customized files:
■ Product abbreviation
■ Directory where the files are located
■ Name of modified file
■ Comments you want to include
Registered Flagged Files
2-14 Oracle Applications Patching Procedures
The Registered Flagged Files InterfaceThe Registered Flagged Files tool is a Web-based utility in Oracle Applications Manager. From the Registered Flagged Files home page, you can import, export, add, delete, and view records of customized files.
Accessing Registered Flagged FilesTo access the Registered Flagged Files tool, log in to Oracle Applications Manager and choose Registered Flagged Files from the Site Map.
Step 1 Log in to Oracle Applications ManagerFollow the instructions in Accessing Patch Wizard on page 2-3 to access OAM. From the Applications Dashboard, click the Site Map tab.
Step 2 Go the Registered Flagged Files home pageFrom the Site Map, Registered Flagged Files is on the Maintenance tab under the Patching and Utilities heading. Click the Registered Flagged Files link to go to the Registered Flagged Files home page.
Step 3 Select filter criteriaFrom the Registered Flagged Files home page, you can search the records of customized files by product abbreviation, directory, file name, or a combination of product abbreviation, and directory or file name.
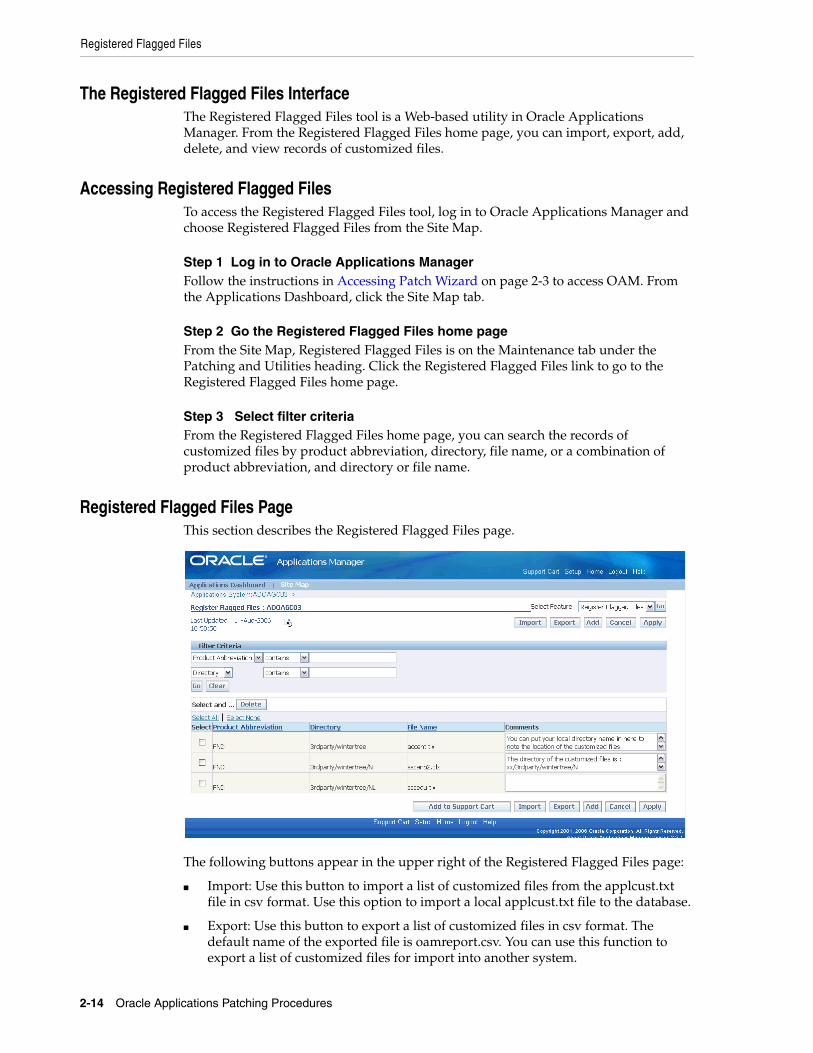
Registered Flagged Files PageThis section describes the Registered Flagged Files page.
The following buttons appear in the upper right of the Registered Flagged Files page:
■ Import: Use this button to import a list of customized files from the applcust.txt file in csv format. Use this option to import a local applcust.txt file to the database.
■ Export: Use this button to export a list of customized files in csv format. The default name of the exported file is oamreport.csv. You can use this function to export a list of customized files for import into another system.
Registered Flagged Files
Patch Tracking Utilities 2-15
■ Add: Use this button to add a record of a customized file.
■ Cancel: Use this button to return to the Applications Dashboard home page.
■ Apply: Use this button to apply and save any changes made to the Comments field of the list of customized files.
There are two fields in the Filter Criteria section:
■ Product Abbreviation: Enter the abbreviation of the product for which the customization is made to search by product abbreviation.
■ Directory/File Name: You can filter the results by directory or file name. Enter the directory or file name for which the customization is made.
You can filter results either by product abbreviation, by directory/file name, or by a combination of product abbreviation, and directory or file name.
List of Customized FilesThe list of customized files appear at the bottom of the Registered Flagged Files home page. Each line item represents a customized file.
The details provided for each line item are:
■ Select: Use this box to select and delete the corresponding customized file. You can select and delete either one or multiple files at a time.
■ Product Abbreviation: This describes the abbreviated name of the Oracle Applications product family for which there is a customization.
■ Directory: This describes the location of the customized file.
■ File name: This describes the name of the modified file.
■ Comments: Use this area to add any comments associated with the customization. Oracle recommends using this area to record the exact location of the customized file.
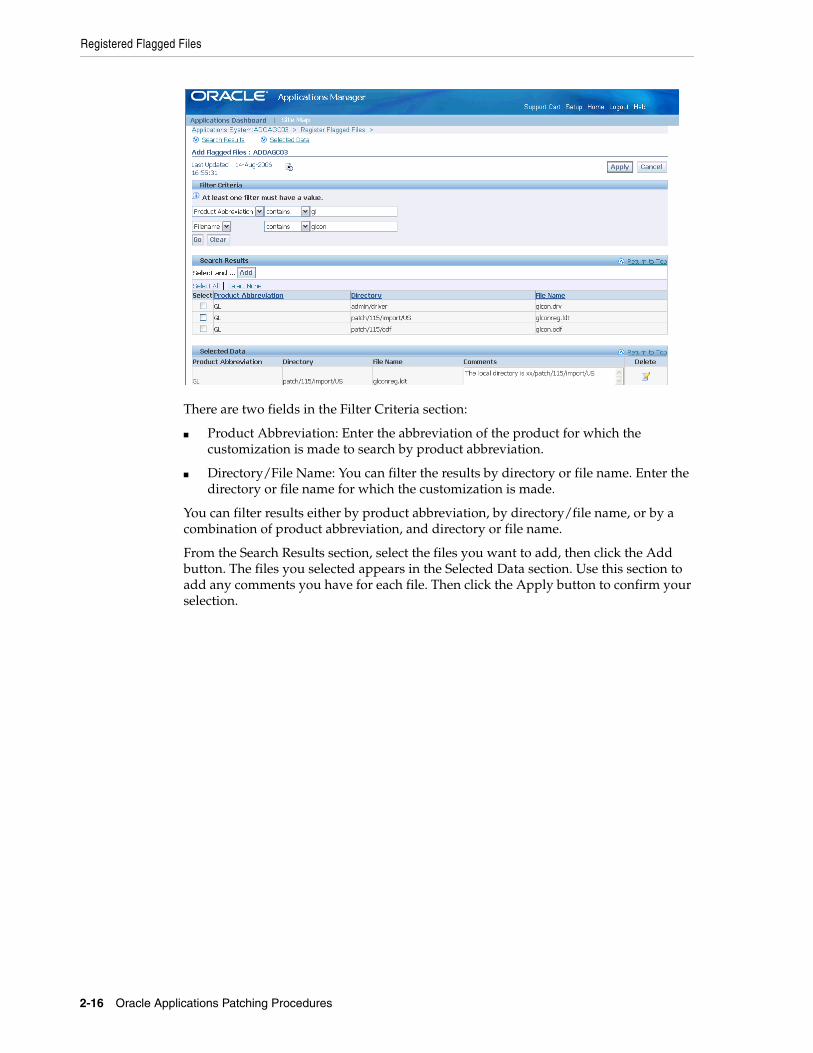
Adding a Registered Flagged FileClicking the Add button on the Registered Flagged Files main page accesses the Add Flagged Files page. From the Add Flagged Files page, you can add customized files. Use the Filter Criteria section to search for files you want to add.
Registered Flagged Files
2-16 Oracle Applications Patching Procedures
There are two fields in the Filter Criteria section:
■ Product Abbreviation: Enter the abbreviation of the product for which the customization is made to search by product abbreviation.
■ Directory/File Name: You can filter the results by directory or file name. Enter the directory or file name for which the customization is made.
You can filter results either by product abbreviation, by directory/file name, or by a combination of product abbreviation, and directory or file name.
From the Search Results section, select the files you want to add, then click the Add button. The files you selected appears in the Selected Data section. Use this section to add any comments you have for each file. Then click the Apply button to confirm your selection.
Patch Application Utilities 3-1
3Patch Application Utilities
This chapter describes AutoPatch, the command line utility you use to apply patches to your system. This chapter also describes AD Merge Patch, the command line utility you use to merge patches to reduce patch application time. It contains these sections:
■ AutoPatch
■ AD Merge Patch
AutoPatchUse AutoPatch to apply patches to the Oracle Applications file system or database. It gathers necessary information about your system through a series of prompts. When you have completed the prompts, AutoPatch performs all the tasks required to apply the patch, including the following:
■ Reads patch metadata to determine patch dependencies and requirements.
■ Uploads patch information from a prior patch session to the database (if needed).
■ Reads and validates the patch driver file and reads the product driver files.
■ Compares version numbers of object modules from the product libraries and version numbers of the existing files against the patch files.
■ Backs up all existing files that will be changed by the patch.
■ Copies files.
■ Archives files in libraries.
■ Relinks executables.
■ Generates forms, reports, message, graphics, and Java archive (JAR) files.
■ Compiles JSP files and invalid database objects.
■ Updates database objects.
■ Runs AutoConfig to update configuration files, if any template files are introduced or updated by the patch.
■ Saves patch information to the database.
AutoPatch takes no action if a patch contains no new updates to files or database objects in your system. If AutoPatch detects that there is a previously failed AutoPatch session, it will attempt to recover that session.
AutoPatch
3-2 Oracle Applications Patching Procedures
Preparing your System for PatchingBefore you begin a patching session, there are some important tasks you need to complete.
Enable Maintenance ModeBefore you initiate an AutoPatch session, you must shut down the Workflow Business Events System and set up function security so that no Oracle Applications functions are available to users. This ensures optimal performance and reduces downtime when applying a patch. Maintenance mode provides a clear separation between normal runtime operation of Oracle Applications and system downtime for maintenance.
During a maintenance mode downtime, user login is restricted. Users are redirected to a system downtime URL, which informs them that the maintenance session is in progress. The Oracle Applications Manager (OAM) Maintenance Mode page allows you to schedule system downtime and send alert messages to notify users of the downtime schedule.
To enable or disable maintenance mode, use the Change Maintenance Mode menu in AD Administration.
Shut Down ServicesIf you are applying a patch that updates or relinks files, shut down the corresponding concurrent manager, Web server listeners, or forms server listeners. For example, if the files are on the node that contains the concurrent processing server, shut down the concurrent managers.
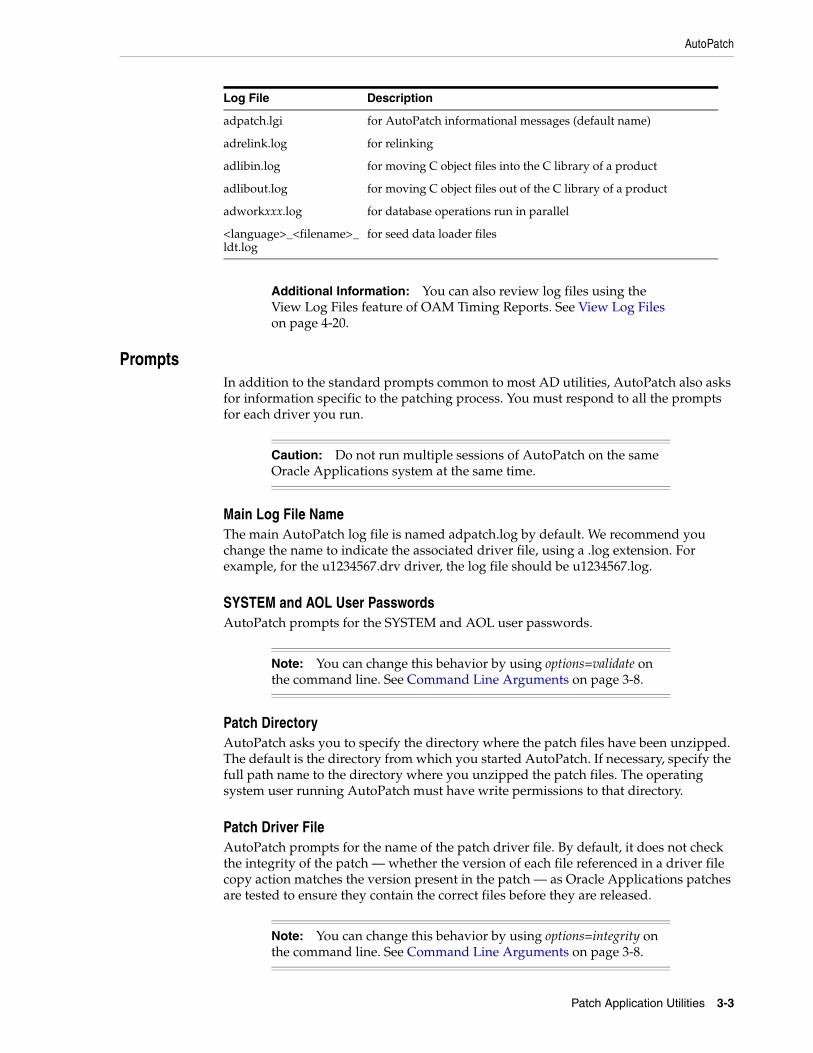
Log FilesIn addition to the main log file (adpatch.log), AutoPatch also creates several other log files for specific purposes, for example, to record all the actions associated with parallel workers. The log files are written to $APPL_TOP/admin/<SID>/log (UNIX), where <SID> is the value of your ORACLE_SID or TWO_TASK variable, or in %APPL_TOP%\admin \<SID>\log (Windows), where <SID> is the value of ORACLE_SID or LOCAL. Review these files when the AutoPatch session is complete.
The log directory contains adpatch.log and adpatch.lgi, and may contain one or more additional files as described in the following table. If AutoPatch does not perform an action, it does not generate the log file associated with that type of action.
Caution: You can run AutoPatch by using options=hotpatch on the command line when maintenance mode is disabled. However, applying a "hot patch" causes significant performance degradation. For more information on "hot patch," see AutoPatch Options on page 3-9.
Additional Information: See Changing Maintenance Mode in Oracle Applications Maintenance Utilities.
Additional Information: See Applying a Patch Interactively on page 5-2.
Log File Description
adpatch.log main AutoPatch log file (default name)
AutoPatch
Patch Application Utilities 3-3
PromptsIn addition to the standard prompts common to most AD utilities, AutoPatch also asks for information specific to the patching process. You must respond to all the prompts for each driver you run.
Main Log File NameThe main AutoPatch log file is named adpatch.log by default. We recommend you change the name to indicate the associated driver file, using a .log extension. For example, for the u1234567.drv driver, the log file should be u1234567.log.
SYSTEM and AOL User PasswordsAutoPatch prompts for the SYSTEM and AOL user passwords.
Patch DirectoryAutoPatch asks you to specify the directory where the patch files have been unzipped. The default is the directory from which you started AutoPatch. If necessary, specify the full path name to the directory where you unzipped the patch files. The operating system user running AutoPatch must have write permissions to that directory.
Patch Driver FileAutoPatch prompts for the name of the patch driver file. By default, it does not check the integrity of the patch — whether the version of each file referenced in a driver file copy action matches the version present in the patch — as Oracle Applications patches are tested to ensure they contain the correct files before they are released.
adpatch.lgi for AutoPatch informational messages (default name)
adrelink.log for relinking
adlibin.log for moving C object files into the C library of a product
adlibout.log for moving C object files out of the C library of a product
adworkxxx.log for database operations run in parallel
<language>_<filename>_ldt.log
for seed data loader files
Additional Information: You can also review log files using the View Log Files feature of OAM Timing Reports. See View Log Files on page 4-20.
Caution: Do not run multiple sessions of AutoPatch on the same Oracle Applications system at the same time.
Note: You can change this behavior by using options=validate on the command line. See Command Line Arguments on page 3-8.
Note: You can change this behavior by using options=integrity on the command line. See Command Line Arguments on page 3-8.
Log File Description
AutoPatch
3-4 Oracle Applications Patching Procedures
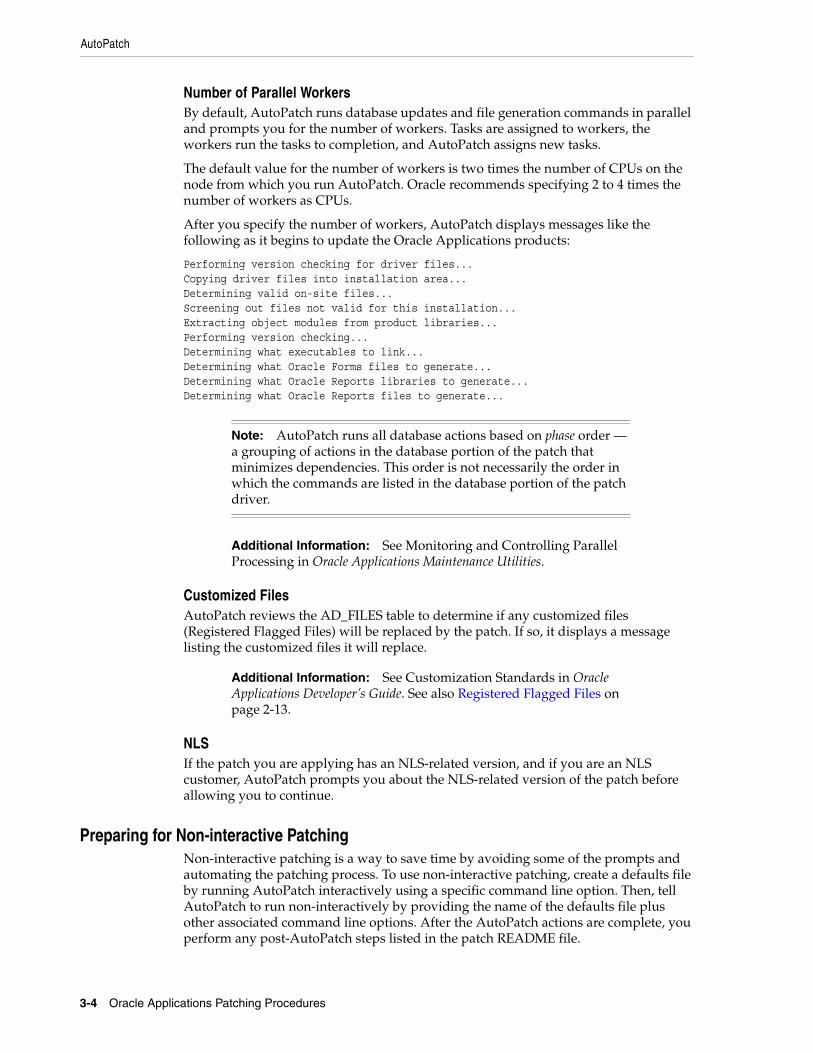
Number of Parallel WorkersBy default, AutoPatch runs database updates and file generation commands in parallel and prompts you for the number of workers. Tasks are assigned to workers, the workers run the tasks to completion, and AutoPatch assigns new tasks.
The default value for the number of workers is two times the number of CPUs on the node from which you run AutoPatch. Oracle recommends specifying 2 to 4 times the number of workers as CPUs.
After you specify the number of workers, AutoPatch displays messages like the following as it begins to update the Oracle Applications products:
Performing version checking for driver files...Copying driver files into installation area...Determining valid on-site files...Screening out files not valid for this installation...Extracting object modules from product libraries...Performing version checking...Determining what executables to link...Determining what Oracle Forms files to generate...Determining what Oracle Reports libraries to generate...Determining what Oracle Reports files to generate...
Customized FilesAutoPatch reviews the AD_FILES table to determine if any customized files (Registered Flagged Files) will be replaced by the patch. If so, it displays a message listing the customized files it will replace.
NLSIf the patch you are applying has an NLS-related version, and if you are an NLS customer, AutoPatch prompts you about the NLS-related version of the patch before allowing you to continue.
Preparing for Non-interactive PatchingNon-interactive patching is a way to save time by avoiding some of the prompts and automating the patching process. To use non-interactive patching, create a defaults file by running AutoPatch interactively using a specific command line option. Then, tell AutoPatch to run non-interactively by providing the name of the defaults file plus other associated command line options. After the AutoPatch actions are complete, you perform any post-AutoPatch steps listed in the patch README file.
Note: AutoPatch runs all database actions based on phase order — a grouping of actions in the database portion of the patch that minimizes dependencies. This order is not necessarily the order in which the commands are listed in the database portion of the patch driver.
Additional Information: See Monitoring and Controlling Parallel Processing in Oracle Applications Maintenance Utilities.
Additional Information: See Customization Standards in Oracle Applications Developer’s Guide. See also Registered Flagged Files on page 2-13.
AutoPatch
Patch Application Utilities 3-5
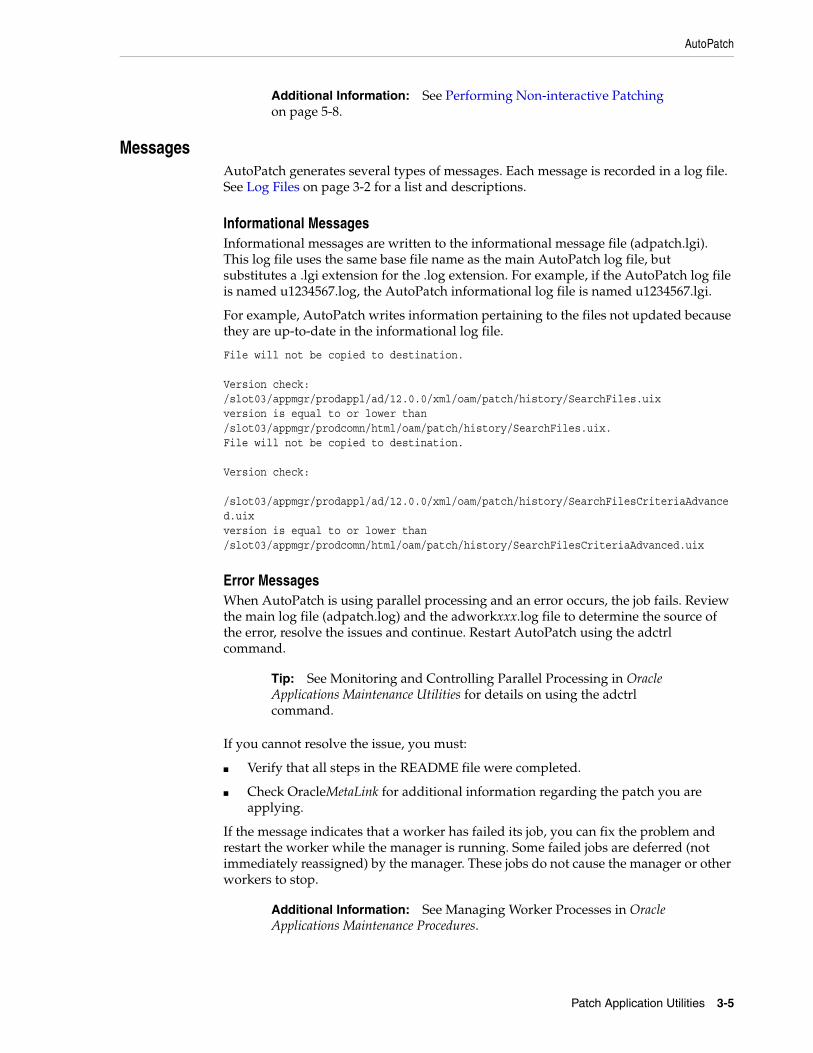
MessagesAutoPatch generates several types of messages. Each message is recorded in a log file. See Log Files on page 3-2 for a list and descriptions.
Informational MessagesInformational messages are written to the informational message file (adpatch.lgi). This log file uses the same base file name as the main AutoPatch log file, but substitutes a .lgi extension for the .log extension. For example, if the AutoPatch log file is named u1234567.log, the AutoPatch informational log file is named u1234567.lgi.
For example, AutoPatch writes information pertaining to the files not updated because they are up-to-date in the informational log file.
File will not be copied to destination. Version check:/slot03/appmgr/prodappl/ad/12.0.0/xml/oam/patch/history/SearchFiles.uixversion is equal to or lower than/slot03/appmgr/prodcomn/html/oam/patch/history/SearchFiles.uix.File will not be copied to destination. Version check: /slot03/appmgr/prodappl/ad/12.0.0/xml/oam/patch/history/SearchFilesCriteriaAdvanced.uixversion is equal to or lower than/slot03/appmgr/prodcomn/html/oam/patch/history/SearchFilesCriteriaAdvanced.uix
Error MessagesWhen AutoPatch is using parallel processing and an error occurs, the job fails. Review the main log file (adpatch.log) and the adworkxxx.log file to determine the source of the error, resolve the issues and continue. Restart AutoPatch using the adctrl command.
If you cannot resolve the issue, you must:
■ Verify that all steps in the README file were completed.
■ Check OracleMetaLink for additional information regarding the patch you are applying.
If the message indicates that a worker has failed its job, you can fix the problem and restart the worker while the manager is running. Some failed jobs are deferred (not immediately reassigned) by the manager. These jobs do not cause the manager or other workers to stop.
Additional Information: See Performing Non-interactive Patching on page 5-8.
Tip: See Monitoring and Controlling Parallel Processing in Oracle Applications Maintenance Utilities for details on using the adctrl command.
Additional Information: See Managing Worker Processes in Oracle Applications Maintenance Procedures.
AutoPatch
3-6 Oracle Applications Patching Procedures
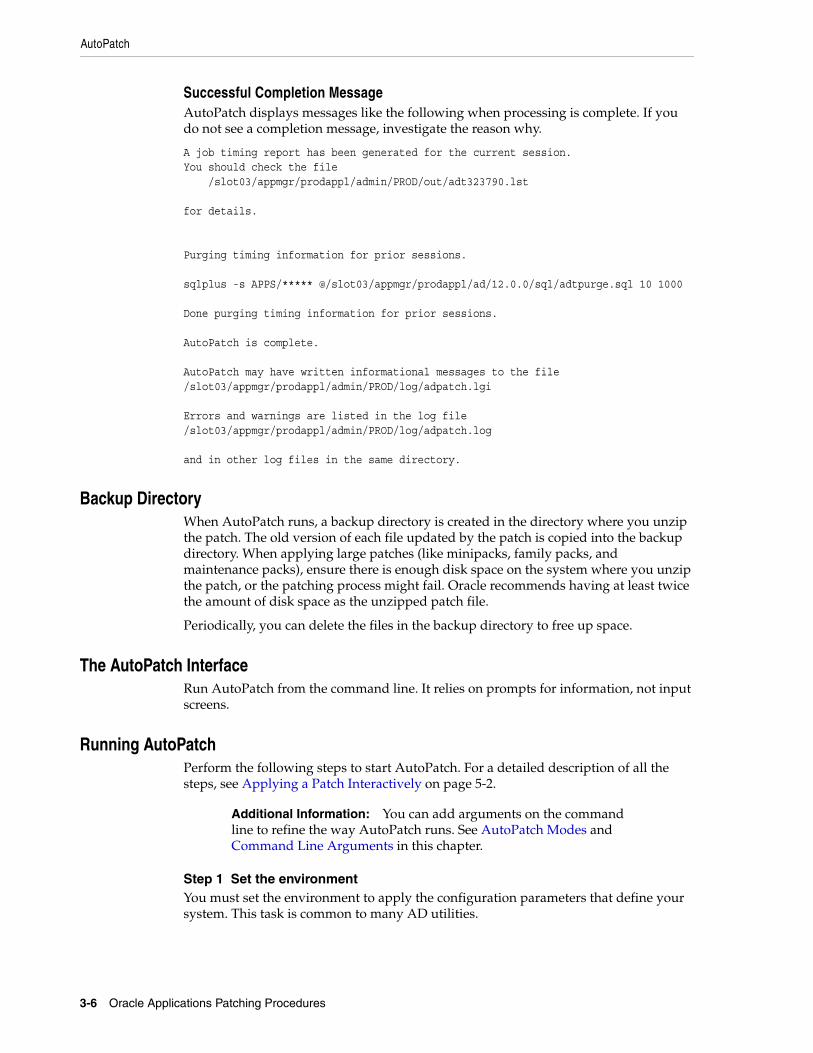
Successful Completion MessageAutoPatch displays messages like the following when processing is complete. If you do not see a completion message, investigate the reason why.
A job timing report has been generated for the current session.You should check the file /slot03/appmgr/prodappl/admin/PROD/out/adt323790.lst for details. Purging timing information for prior sessions. sqlplus -s APPS/***** @/slot03/appmgr/prodappl/ad/12.0.0/sql/adtpurge.sql 10 1000 Done purging timing information for prior sessions. AutoPatch is complete. AutoPatch may have written informational messages to the file/slot03/appmgr/prodappl/admin/PROD/log/adpatch.lgi Errors and warnings are listed in the log file/slot03/appmgr/prodappl/admin/PROD/log/adpatch.log and in other log files in the same directory.
Backup DirectoryWhen AutoPatch runs, a backup directory is created in the directory where you unzip the patch. The old version of each file updated by the patch is copied into the backup directory. When applying large patches (like minipacks, family packs, and maintenance packs), ensure there is enough disk space on the system where you unzip the patch, or the patching process might fail. Oracle recommends having at least twice the amount of disk space as the unzipped patch file.
Periodically, you can delete the files in the backup directory to free up space.
The AutoPatch InterfaceRun AutoPatch from the command line. It relies on prompts for information, not input screens.
Running AutoPatchPerform the following steps to start AutoPatch. For a detailed description of all the steps, see Applying a Patch Interactively on page 5-2.
Step 1 Set the environmentYou must set the environment to apply the configuration parameters that define your system. This task is common to many AD utilities.
Additional Information: You can add arguments on the command line to refine the way AutoPatch runs. See AutoPatch Modes and Command Line Arguments in this chapter.
AutoPatch
Patch Application Utilities 3-7
Step 2 Unzip the patchCreate a patch top directory, if it does not already exist. Download the patch into the patch top directory and unzip it.
Step 3 Review the information in the README fileIn the directory where you unzipped the patch, you will find a README.txt file and a README.html file. Review either README file for information about the patch and for instructions on running the admsi.pl script.
Step 4 Run the admsi.pl scriptRun the admsi.pl script to generate customized installation instructions for the patch. Follow the steps in the customized installation instructions to complete the patching process.
AutoPatch ModesAutoPatch can apply patches in two specialized modes: pre-install and test. The patch README file instructs you when to use each of these modes.
Pre-install ModePre-install mode is generally used during the upgrade process to update AD utilities, apply family consolidated upgrade patches, or work around other patching issues. AutoPatch asks all startup questions except those relating to the database.
To run AutoPatch in pre-install mode, include preinstall=y on the AutoPatch command line. It performs the following actions:
■ Compares version numbers.
■ Copies files.
■ Relinks FND and AD executables.
■ Saves patch information to the file system.
Test ModeIn test mode, AutoPatch does not apply the patch. Instead, it lists each file it would have copied, relinked, executed, or generated and shows exactly what actions it would have performed had it applied the patch. It also runs AutoConfig in test mode to determine any impending changes to the configuration files. This allows you to see the effects of the patch on your production system before you apply it.
Note: Run AutoPatch in pre-install mode only if the patch README instructs you to do so.
Note: Because AutoPatch does not read driver files in pre-install mode, it copies all product files in the patch to the APPL_TOP directory, even if they should not exist on that node. For example, it will copy Forms files to an APPL_TOP that implements only the administration server. Additionally, even if a file in the patch should be both in the APPL_TOP and in another directory (such as in $OA_HTML), AutoPatch copies the file only to the APPL_TOP.
AutoPatch
3-8 Oracle Applications Patching Procedures
To run AutoPatch in test mode, include apply=no on the AutoPatch command line. This runs as if AutoPatch is applying the patch, except it does not. It performs the following actions:
■ Copy any files from the patch directory to the Oracle Applications file system.
■ Archive any object modules into the product libraries.
■ Relink any executables.
■ Generate any forms, reports, PL/SQL libraries, or menu files.
■ Run any SQL or EXEC commands (commands that change the database).
■ Instantiate new configuration files.
■ Update the patch information files.
■ Update patch information and release version in the database.
Command Line ArgumentsYou can direct the way the AutoPatch operates by adding modifiers to the AutoPatch start command. These modifiers may be in the form of arguments or options. They refine the actions performed by AutoPatch.
Command line arguments and options are in the "token=value" format, where token is the name of the modifier. You should enter both the argument and the value in lowercase type (AutoPatch automatically converts the "token" portion to lowercase, but it cannot convert the "value").
For example:
$ adpatch LOGFILE=TEST.LOG
The token ("LOGFILE") will be converted to lowercase, but the value (TEST.LOG) is not recognized by the utility. The correct way to enter this command is:
$ adpatch logfile=test.log
You can enter more than one token=value argument on a single command line by separating them with one blank space as in the following AutoPatch command.
$ adpatch printdebug=y flags=hidepw
In some cases, you can include more than one value for a token. In this case, separate the values with commas. For example:
$ adpatch flags=nohidepw,trace
Comma-separated lists must not contain blank spaces. For example, this command is not valid:
$ adpatch flags=nohidepw, trace
The following arguments are specific to AutoPatch and can be used to modify and refine its behavior.
Additional Information: See Testing a Patch Before Applying It on page 5-6.
Note: In the following table, the default value is the value used if you do not specify a value.
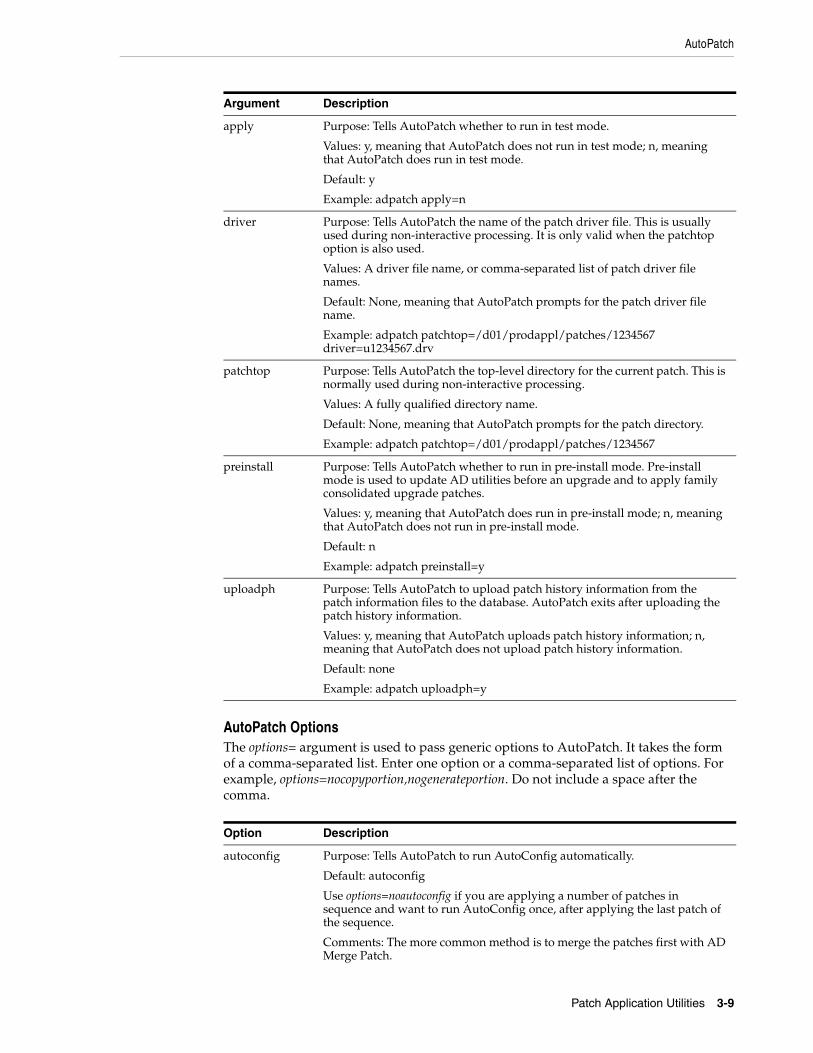
AutoPatch
Patch Application Utilities 3-9
AutoPatch OptionsThe options= argument is used to pass generic options to AutoPatch. It takes the form of a comma-separated list. Enter one option or a comma-separated list of options. For example, options=nocopyportion,nogenerateportion. Do not include a space after the comma.
Argument Description
apply Purpose: Tells AutoPatch whether to run in test mode.
Values: y, meaning that AutoPatch does not run in test mode; n, meaning that AutoPatch does run in test mode.
Default: y
Example: adpatch apply=n
driver Purpose: Tells AutoPatch the name of the patch driver file. This is usually used during non-interactive processing. It is only valid when the patchtop option is also used.
Values: A driver file name, or comma-separated list of patch driver file names.
Default: None, meaning that AutoPatch prompts for the patch driver file name.
Example: adpatch patchtop=/d01/prodappl/patches/1234567 driver=u1234567.drv
patchtop Purpose: Tells AutoPatch the top-level directory for the current patch. This is normally used during non-interactive processing.
Values: A fully qualified directory name.
Default: None, meaning that AutoPatch prompts for the patch directory.
Example: adpatch patchtop=/d01/prodappl/patches/1234567
preinstall Purpose: Tells AutoPatch whether to run in pre-install mode. Pre-install mode is used to update AD utilities before an upgrade and to apply family consolidated upgrade patches.
Values: y, meaning that AutoPatch does run in pre-install mode; n, meaning that AutoPatch does not run in pre-install mode.
Default: n
Example: adpatch preinstall=y
uploadph Purpose: Tells AutoPatch to upload patch history information from the patch information files to the database. AutoPatch exits after uploading the patch history information.
Values: y, meaning that AutoPatch uploads patch history information; n, meaning that AutoPatch does not upload patch history information.
Default: none
Example: adpatch uploadph=y
Option Description
autoconfig Purpose: Tells AutoPatch to run AutoConfig automatically.
Default: autoconfig
Use options=noautoconfig if you are applying a number of patches in sequence and want to run AutoConfig once, after applying the last patch of the sequence.
Comments: The more common method is to merge the patches first with AD Merge Patch.
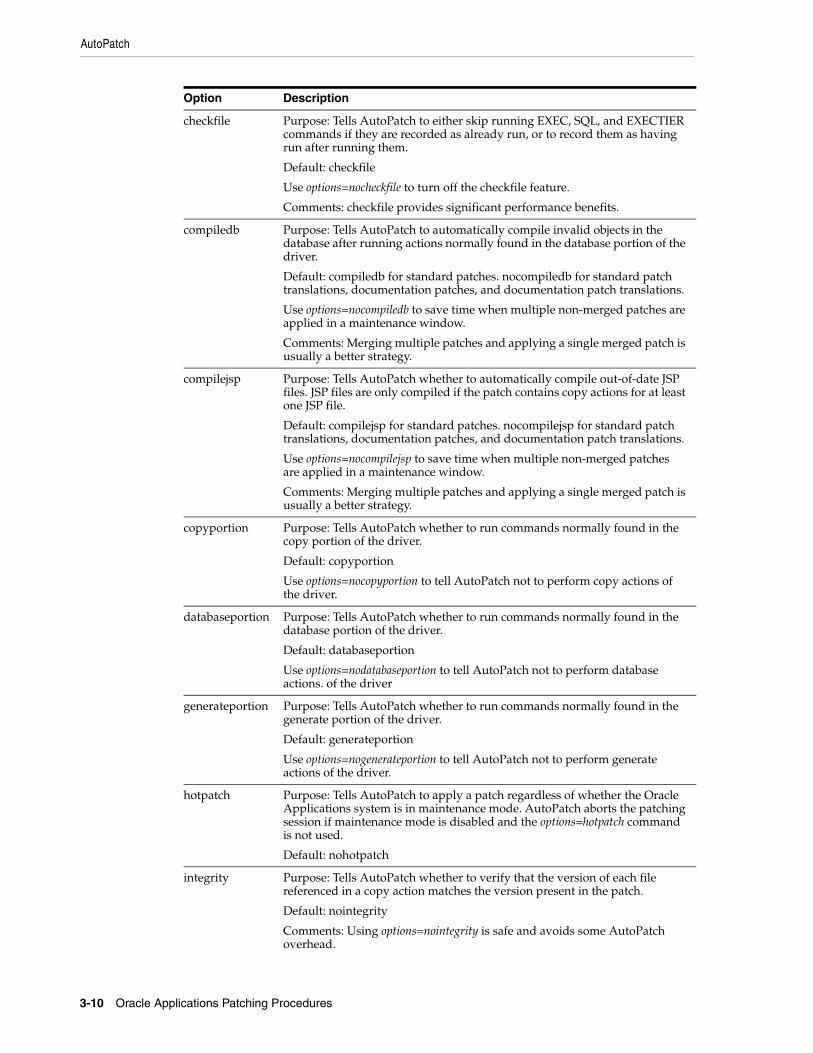
AutoPatch
3-10 Oracle Applications Patching Procedures
checkfile Purpose: Tells AutoPatch to either skip running EXEC, SQL, and EXECTIER commands if they are recorded as already run, or to record them as having run after running them.
Default: checkfile
Use options=nocheckfile to turn off the checkfile feature.
Comments: checkfile provides significant performance benefits.
compiledb Purpose: Tells AutoPatch to automatically compile invalid objects in the database after running actions normally found in the database portion of the driver.
Default: compiledb for standard patches. nocompiledb for standard patch translations, documentation patches, and documentation patch translations.
Use options=nocompiledb to save time when multiple non-merged patches are applied in a maintenance window.
Comments: Merging multiple patches and applying a single merged patch is usually a better strategy.
compilejsp Purpose: Tells AutoPatch whether to automatically compile out-of-date JSP files. JSP files are only compiled if the patch contains copy actions for at least one JSP file.
Default: compilejsp for standard patches. nocompilejsp for standard patch translations, documentation patches, and documentation patch translations.
Use options=nocompilejsp to save time when multiple non-merged patches are applied in a maintenance window.
Comments: Merging multiple patches and applying a single merged patch is usually a better strategy.
copyportion Purpose: Tells AutoPatch whether to run commands normally found in the copy portion of the driver.
Default: copyportion
Use options=nocopyportion to tell AutoPatch not to perform copy actions of the driver.
databaseportion Purpose: Tells AutoPatch whether to run commands normally found in the database portion of the driver.
Default: databaseportion
Use options=nodatabaseportion to tell AutoPatch not to perform database actions. of the driver
generateportion Purpose: Tells AutoPatch whether to run commands normally found in the generate portion of the driver.
Default: generateportion
Use options=nogenerateportion to tell AutoPatch not to perform generate actions of the driver.
hotpatch Purpose: Tells AutoPatch to apply a patch regardless of whether the Oracle Applications system is in maintenance mode. AutoPatch aborts the patching session if maintenance mode is disabled and the options=hotpatch command is not used.
Default: nohotpatch
integrity Purpose: Tells AutoPatch whether to verify that the version of each file referenced in a copy action matches the version present in the patch.
Default: nointegrity
Comments: Using options=nointegrity is safe and avoids some AutoPatch overhead.
Option Description
AutoPatch
Patch Application Utilities 3-11
Stopping AutoPatchYou can stop AutoPatch by entering the abort command at any prompt. However, after the workers have started running, you can only stop AutoPatch by shutting down the workers in AD Controller.
Restarting AutoPatchIf you have shut down the workers, or if AutoPatch quits while performing processing actions, it saves all the actions completed up to that point in restart files. Investigate and resolve the problem that caused the failure, then restart AutoPatch. After you restart AutoPatch, it will ask if you want to continue with the previous session (at the point where the processing stopped), or start a new session.
parallel Purpose: Tells AutoPatch whether to run actions that update the database in parallel (like SQL) and actions that generate files in parallel (like genform).
Default: parallel
Comments: Oracle does not recommend changing the default, as Oracle Applications patches are tested on systems using parallel processing.
phtofile Purpose: Tells AutoPatch whether to upload patch history information to the database after applying the patch or to write it to the patch information files in the file system.
Default: nophtofile
Use options=phtofile to tell AutoPatch not to upload patch history information to the database.
Comments: Using phtofile allows you to defer the uploading of patch history information to the database until after the system downtime. Use the adpatch uploadph=y command to upload patch history information from the patch information files to the database during uptime.
prereq Purpose: Tells AutoPatch whether to check that prerequisite patches have been applied prior to running patch driver files that contain actions normally found in the copy portion of the driver.
Default: noprereq
Use options=prereq to turn on prerequisite patch checking.
Comments: options=prereq prevents you from applying a patch without first applying all required prerequisite patches.
validate Purpose: Tells AutoPatch whether to connect to all registered Oracle Applications schemas at the start of the patch.
Default: novalidate
Use options=validate to validate password information for all Oracle Applications schemas.
Comments: Useful for finding problems with incorrectly registered Oracle Applications schemas or schemas with invalid passwords.
Additional Information: See Exiting or Stopping a Utility for detailed instructions on shutting down workers in Oracle Applications Maintenance Utilities.
Additional Information: See Restarting a Utility in Oracle Applications Maintenance Utilities.
Option Description
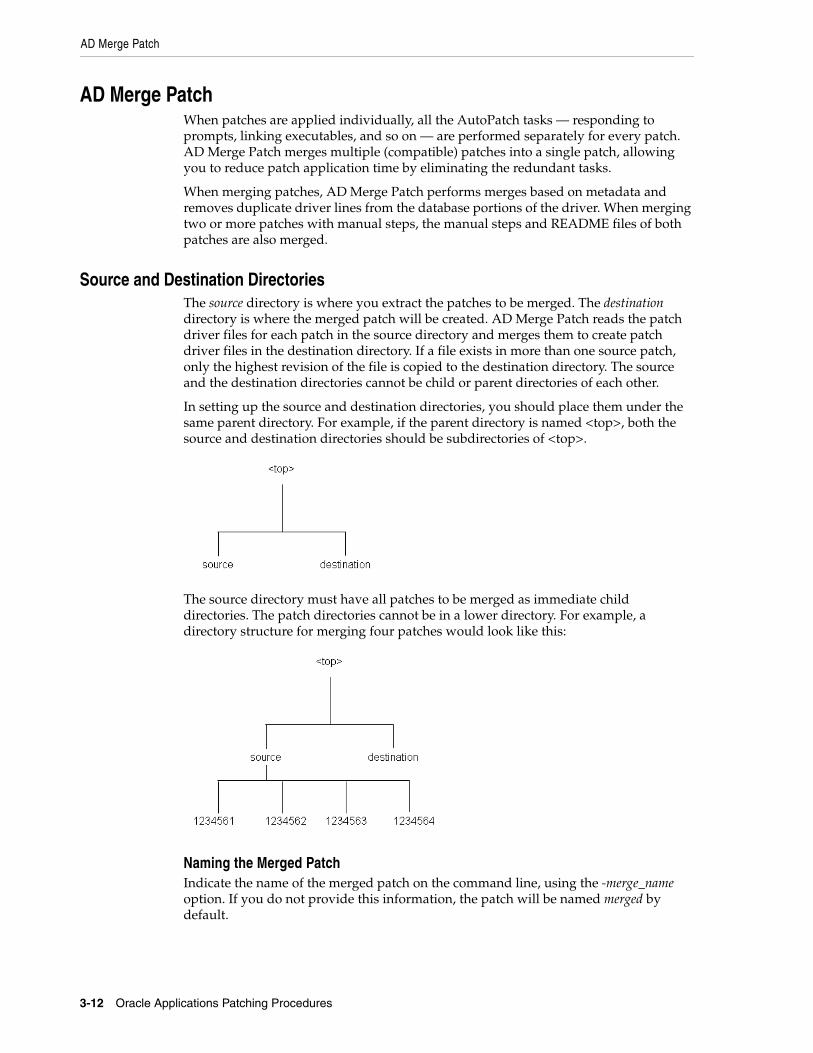
AD Merge Patch
3-12 Oracle Applications Patching Procedures
AD Merge PatchWhen patches are applied individually, all the AutoPatch tasks — responding to prompts, linking executables, and so on — are performed separately for every patch. AD Merge Patch merges multiple (compatible) patches into a single patch, allowing you to reduce patch application time by eliminating the redundant tasks.
When merging patches, AD Merge Patch performs merges based on metadata and removes duplicate driver lines from the database portions of the driver. When merging two or more patches with manual steps, the manual steps and README files of both patches are also merged.
Source and Destination DirectoriesThe source directory is where you extract the patches to be merged. The destination directory is where the merged patch will be created. AD Merge Patch reads the patch driver files for each patch in the source directory and merges them to create patch driver files in the destination directory. If a file exists in more than one source patch, only the highest revision of the file is copied to the destination directory. The source and the destination directories cannot be child or parent directories of each other.
In setting up the source and destination directories, you should place them under the same parent directory. For example, if the parent directory is named <top>, both the source and destination directories should be subdirectories of <top>.
The source directory must have all patches to be merged as immediate child directories. The patch directories cannot be in a lower directory. For example, a directory structure for merging four patches would look like this:
Naming the Merged PatchIndicate the name of the merged patch on the command line, using the -merge_name option. If you do not provide this information, the patch will be named merged by default.
AD Merge Patch
Patch Application Utilities 3-13
Merging Zipped PatchesUse the -manifest option to use a manifest file that contains the name and location of the patch zip files. AD Merge Patch references this file, and unzips the patches listed. It copies the unzipped files into the source directory and includes them, along with any other files in the source directory, in the merged patch.
The manifest file is a text file in which you document the location and names of the patch zip files. The contents of a manifest file will resemble the following:
/d01/prodappl/patches/p3903945_12_GENERIC.zip/d01/prodappl/patches/p3892799_12_GENERIC.zip/d01/prodappl/patches/p3874740_12_LINUX.zip
The AD Merge Patch InterfaceRun AD Merge Patch and supply the information it needs from the command line. There are no menus or input screens.
Running AD Merge PatchAD Merge Patch is located in the AD_TOP/bin directory. However, you run it from the parent directory (<top>) of the source directory.
Step 1 Set the environmentYou must set the environment to indicate the location of the configuration parameters that define your system. This task is common to many AD utilities.
UNIX:
The environment file is typically APPS<CONTEXT_NAME>.env, and is located under the APPL_TOP. From a Bourne, Korn, or Bash shell, enter the following:
$ . APPS<CONTEXT_NAME>.env
Windows:
Run %APPL_TOP%\envshell.cmd using either Windows Explorer or the Run command from the Start menu. This creates a Command Prompt window that contains the required environment settings for Oracle Applications. Run all subsequent commands in this Command Prompt window.
Step 2 Run AD Merge PatchFrom the parent directory (<top>), run AD Merge patch as follows:
admrgpch -s <source directory> -d <destination directory> \-merge_name <name> [-manifest <manifest filename>]
For example, if you have four patches called 1234561, 1234562, 1234563, and 1234564 located in the source directory /d01/patch_merge/source, and the destination directory is /d01/patch_merge/destination. To create a merged patch named "merge99", you would use the following commands:
UNIX:
$ cd /d01/patch_merge$ admrgpch -s /d01/patch_merge/source -d /d01/patch_merge/destination \ -merge_name merge99
Windows:
AD Merge Patch
3-14 Oracle Applications Patching Procedures
C:\> cd \d01\patch_mergeC:\> admrgpch -s d:\patch_merge\source -d d:\patch_merge\destination \ -merge_name merge99
Patch Reporting Utilities 4-1
4Patch Reporting Utilities
This chapter describes Applied Patches, Timing Reports, and Software Updates, the reporting and tracking utilities in Oracle Applications. It contains the following sections:
■ Applied Patches
■ Timing Reports
■ Software Updates
As you use your Oracle Applications, you apply patches and perform other maintenance tasks that modify and enhance your system. Oracle Applications supply numerous reports about system status. For example, you can query the patch information files to see lists of patches applied and files affected, or you can generate a report about the version and translation level of your files. You can also generate reports that contain statistics about how many maintenance sessions are complete, number of jobs in each session, and the time it took to complete the session and individual jobs.
Applied PatchesWith the Applied Patches reporting tool, you can view information about the patches applied to your system. This patch history includes information such as:
■ Patch number
■ Driver file name
■ Platform
■ APPL_TOP on which the patch was applied
■ Contents and language of the patch
■ Files changed or copied
■ Bug fixes included in each driver file
■ Whether the fix was applied successfully, or reason it was not applied
■ Timing information (start time, end time, elapsed time during application, restart time)
How Patch Information Is StoredAutoPatch stores patch information in the database automatically each time it successfully applies a patch. However, if the patch is not applied successfully, or when
Applied Patches
4-2 Oracle Applications Patching Procedures
you run AutoPatch in pre-install mode, patch history is not written directly to the database, but instead is written to these patch information files:
■ javaupdates<YYYYMMDDhhmiss>.txt, which contains information about changes to Java files
■ adpsv<YYYYMMDDhhmiss>.txt, which contains information about changes to all files except Java files
Both files are located in the <APPL_TOP>/admin/<SID> directory. Each time you run AutoPatch, it checks this directory for the existence of the patch information files. If it finds them, it automatically uploads the information they contain to the patch history database. If the upload is successful, AutoPatch then deletes the files. The AutoPatch log file records whether the upload was successful or unsuccessful.
AutoPatch ModesThe way you run AutoPatch affects the way it stores patch history information.
Test ModeWhen you apply a patch in test mode (using apply=no on the command line), AutoPatch does not write to the patch information files, and it does not upload patch history information to the database.
Pre-install ModeWhen you apply a patch in pre-install mode (using preinstall=y on the command line), AutoPatch writes patch history information to the patch information files, and it uploads the contents of these files to the database the next time it runs.
The Applied Patches InterfaceThe Applied Patches reporting tool is a Web-based utility in Oracle Applications Manager. The Simple Search page serves as a home page.
Simple Search pageFrom this page, you can perform a simple search or access the Advanced Search page. You can use either of these pages to query the database for applied patches (the default) or to see a history of changed files. The results of either type of query appear at the bottom of the search page.
Patch Details pageIn the search results for both applied patches or file history, there is a Details column. Clicking any link in this column accesses the Patch Details page. From this page, you can go to the Timing Details page, the Files Copied page, the Bug Fixes page, or the Action Summary page.
Note: In the file name, hh is in 24-hour format.
Additional Information: See AutoPatch Modes on page 4-2.
Note: Running AutoPatch interactively or non-interactively does not affect the way information is stored in the database.
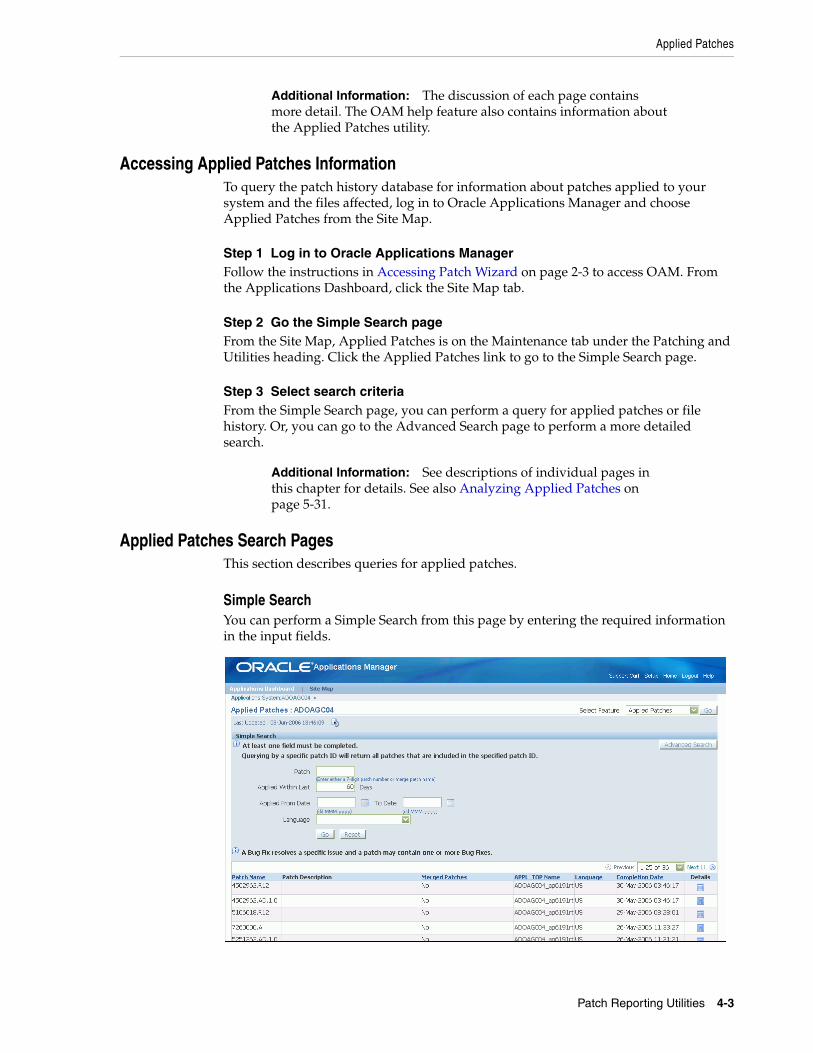
Applied Patches
Patch Reporting Utilities 4-3
Accessing Applied Patches InformationTo query the patch history database for information about patches applied to your system and the files affected, log in to Oracle Applications Manager and choose Applied Patches from the Site Map.
Step 1 Log in to Oracle Applications ManagerFollow the instructions in Accessing Patch Wizard on page 2-3 to access OAM. From the Applications Dashboard, click the Site Map tab.
Step 2 Go the Simple Search pageFrom the Site Map, Applied Patches is on the Maintenance tab under the Patching and Utilities heading. Click the Applied Patches link to go to the Simple Search page.
Step 3 Select search criteriaFrom the Simple Search page, you can perform a query for applied patches or file history. Or, you can go to the Advanced Search page to perform a more detailed search.
Applied Patches Search PagesThis section describes queries for applied patches.
Simple SearchYou can perform a Simple Search from this page by entering the required information in the input fields.
Additional Information: The discussion of each page contains more detail. The OAM help feature also contains information about the Applied Patches utility.
Additional Information: See descriptions of individual pages in this chapter for details. See also Analyzing Applied Patches on page 5-31.
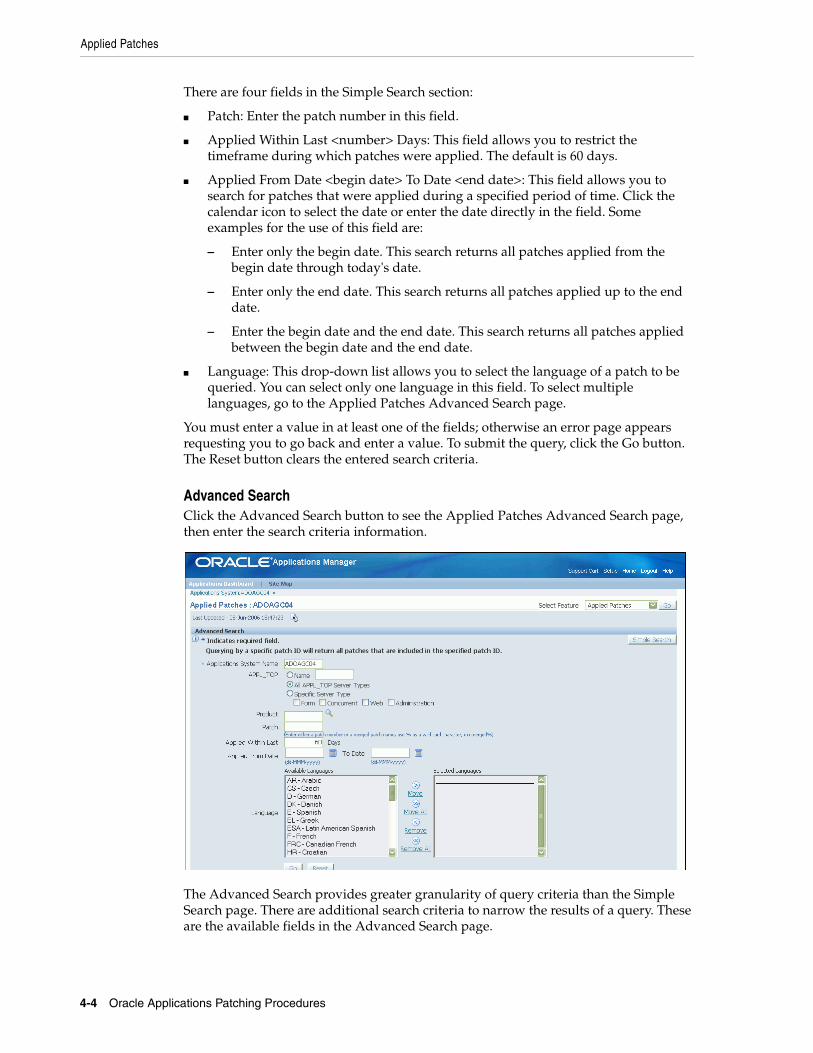
Applied Patches
4-4 Oracle Applications Patching Procedures
There are four fields in the Simple Search section:
■ Patch: Enter the patch number in this field.
■ Applied Within Last <number> Days: This field allows you to restrict the timeframe during which patches were applied. The default is 60 days.
■ Applied From Date <begin date> To Date <end date>: This field allows you to search for patches that were applied during a specified period of time. Click the calendar icon to select the date or enter the date directly in the field. Some examples for the use of this field are:
– Enter only the begin date. This search returns all patches applied from the begin date through today's date.
– Enter only the end date. This search returns all patches applied up to the end date.
– Enter the begin date and the end date. This search returns all patches applied between the begin date and the end date.
■ Language: This drop-down list allows you to select the language of a patch to be queried. You can select only one language in this field. To select multiple languages, go to the Applied Patches Advanced Search page.
You must enter a value in at least one of the fields; otherwise an error page appears requesting you to go back and enter a value. To submit the query, click the Go button. The Reset button clears the entered search criteria.
Advanced SearchClick the Advanced Search button to see the Applied Patches Advanced Search page, then enter the search criteria information.
The Advanced Search provides greater granularity of query criteria than the Simple Search page. There are additional search criteria to narrow the results of a query. These are the available fields in the Advanced Search page.
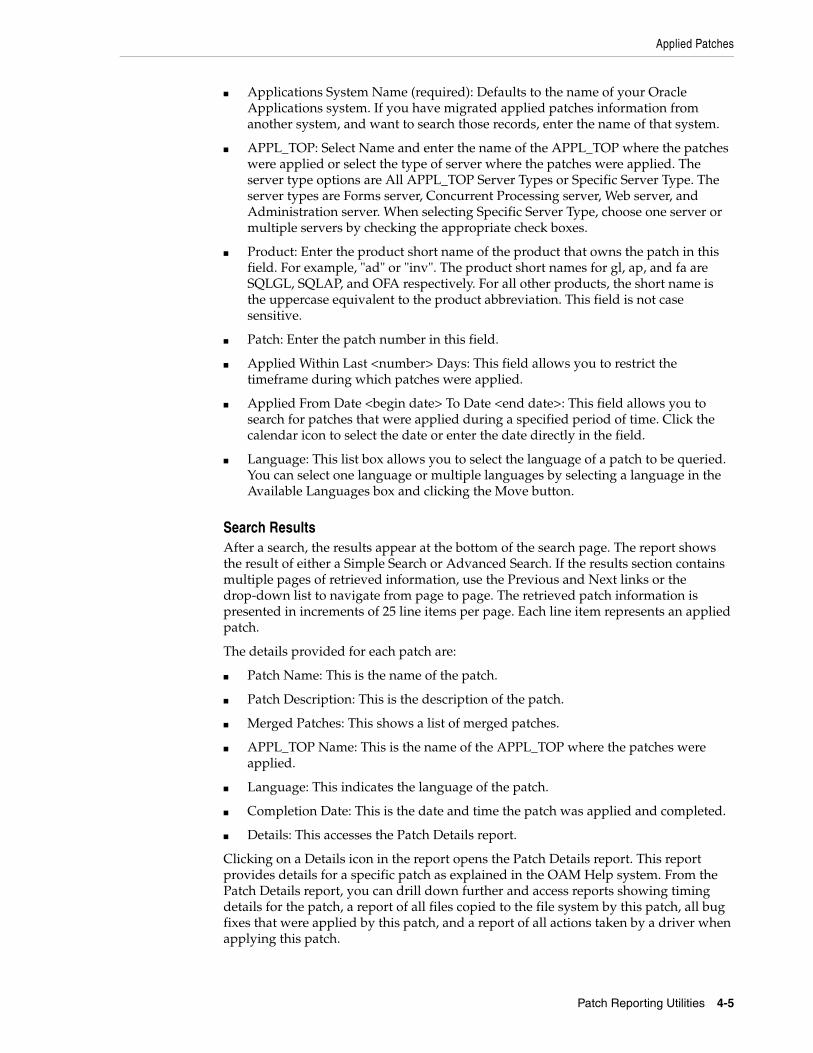
Applied Patches
Patch Reporting Utilities 4-5
■ Applications System Name (required): Defaults to the name of your Oracle Applications system. If you have migrated applied patches information from another system, and want to search those records, enter the name of that system.
■ APPL_TOP: Select Name and enter the name of the APPL_TOP where the patches were applied or select the type of server where the patches were applied. The server type options are All APPL_TOP Server Types or Specific Server Type. The server types are Forms server, Concurrent Processing server, Web server, and Administration server. When selecting Specific Server Type, choose one server or multiple servers by checking the appropriate check boxes.
■ Product: Enter the product short name of the product that owns the patch in this field. For example, "ad" or "inv". The product short names for gl, ap, and fa are SQLGL, SQLAP, and OFA respectively. For all other products, the short name is the uppercase equivalent to the product abbreviation. This field is not case sensitive.
■ Patch: Enter the patch number in this field.
■ Applied Within Last <number> Days: This field allows you to restrict the timeframe during which patches were applied.
■ Applied From Date <begin date> To Date <end date>: This field allows you to search for patches that were applied during a specified period of time. Click the calendar icon to select the date or enter the date directly in the field.
■ Language: This list box allows you to select the language of a patch to be queried. You can select one language or multiple languages by selecting a language in the Available Languages box and clicking the Move button.
Search ResultsAfter a search, the results appear at the bottom of the search page. The report shows the result of either a Simple Search or Advanced Search. If the results section contains multiple pages of retrieved information, use the Previous and Next links or the drop-down list to navigate from page to page. The retrieved patch information is presented in increments of 25 line items per page. Each line item represents an applied patch.
The details provided for each patch are:
■ Patch Name: This is the name of the patch.
■ Patch Description: This is the description of the patch.
■ Merged Patches: This shows a list of merged patches.
■ APPL_TOP Name: This is the name of the APPL_TOP where the patches were applied.
■ Language: This indicates the language of the patch.
■ Completion Date: This is the date and time the patch was applied and completed.
■ Details: This accesses the Patch Details report.
Clicking on a Details icon in the report opens the Patch Details report. This report provides details for a specific patch as explained in the OAM Help system. From the Patch Details report, you can drill down further and access reports showing timing details for the patch, a report of all files copied to the file system by this patch, all bug fixes that were applied by this patch, and a report of all actions taken by a driver when applying this patch.
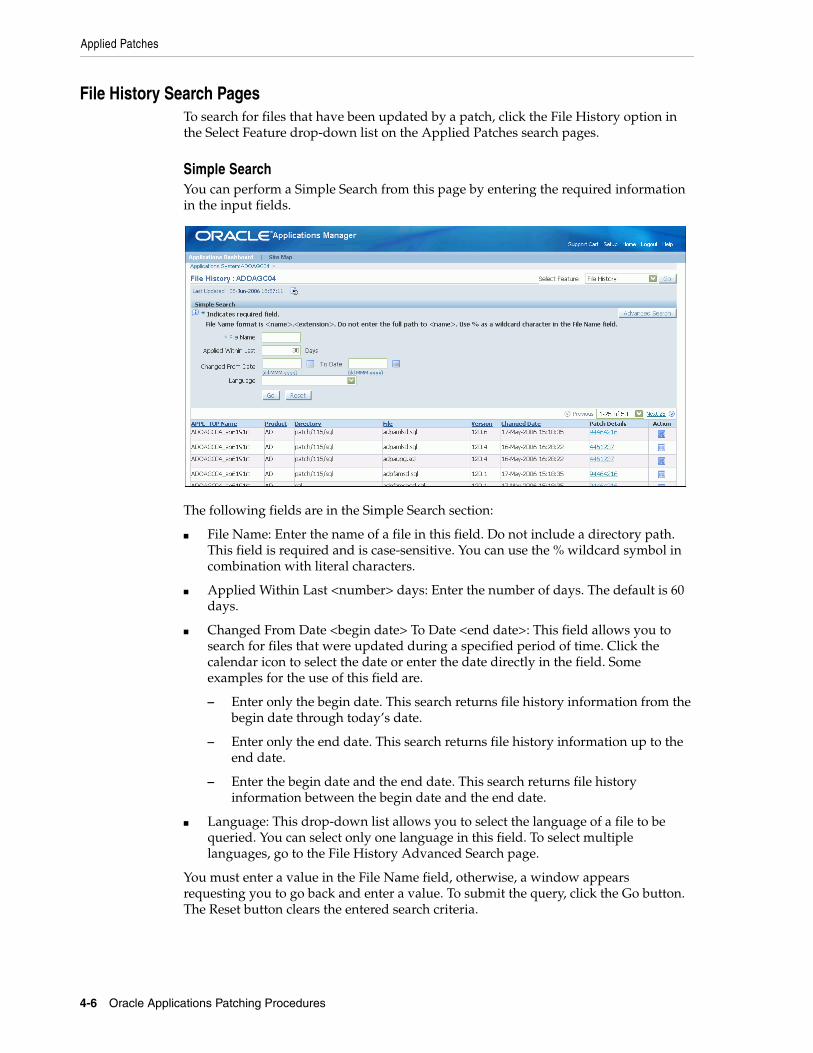
Applied Patches
4-6 Oracle Applications Patching Procedures
File History Search PagesTo search for files that have been updated by a patch, click the File History option in the Select Feature drop-down list on the Applied Patches search pages.
Simple SearchYou can perform a Simple Search from this page by entering the required information in the input fields.
The following fields are in the Simple Search section:
■ File Name: Enter the name of a file in this field. Do not include a directory path. This field is required and is case-sensitive. You can use the % wildcard symbol in combination with literal characters.
■ Applied Within Last <number> days: Enter the number of days. The default is 60 days.
■ Changed From Date <begin date> To Date <end date>: This field allows you to search for files that were updated during a specified period of time. Click the calendar icon to select the date or enter the date directly in the field. Some examples for the use of this field are.
– Enter only the begin date. This search returns file history information from the begin date through today’s date.
– Enter only the end date. This search returns file history information up to the end date.
– Enter the begin date and the end date. This search returns file history information between the begin date and the end date.
■ Language: This drop-down list allows you to select the language of a file to be queried. You can select only one language in this field. To select multiple languages, go to the File History Advanced Search page.
You must enter a value in the File Name field, otherwise, a window appears requesting you to go back and enter a value. To submit the query, click the Go button. The Reset button clears the entered search criteria.
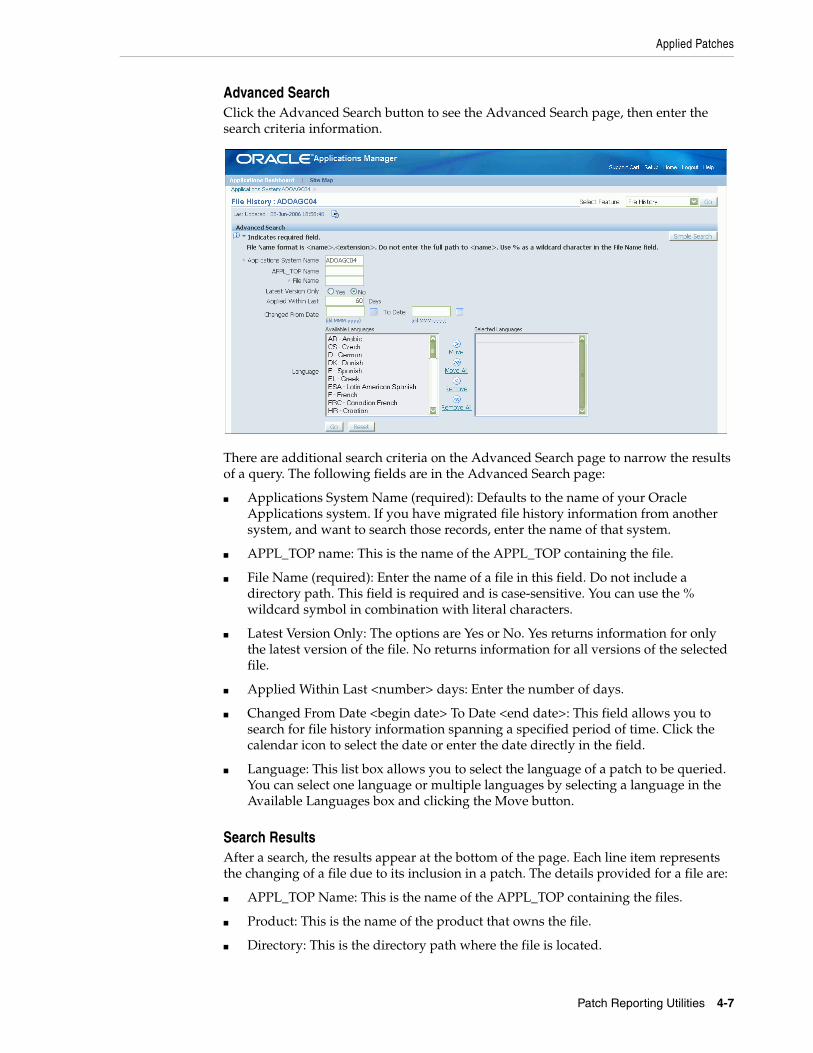
Applied Patches
Patch Reporting Utilities 4-7
Advanced SearchClick the Advanced Search button to see the Advanced Search page, then enter the search criteria information.
There are additional search criteria on the Advanced Search page to narrow the results of a query. The following fields are in the Advanced Search page:
■ Applications System Name (required): Defaults to the name of your Oracle Applications system. If you have migrated file history information from another system, and want to search those records, enter the name of that system.
■ APPL_TOP name: This is the name of the APPL_TOP containing the file.
■ File Name (required): Enter the name of a file in this field. Do not include a directory path. This field is required and is case-sensitive. You can use the % wildcard symbol in combination with literal characters.
■ Latest Version Only: The options are Yes or No. Yes returns information for only the latest version of the file. No returns information for all versions of the selected file.
■ Applied Within Last <number> days: Enter the number of days.
■ Changed From Date <begin date> To Date <end date>: This field allows you to search for file history information spanning a specified period of time. Click the calendar icon to select the date or enter the date directly in the field.
■ Language: This list box allows you to select the language of a patch to be queried. You can select one language or multiple languages by selecting a language in the Available Languages box and clicking the Move button.
Search ResultsAfter a search, the results appear at the bottom of the page. Each line item represents the changing of a file due to its inclusion in a patch. The details provided for a file are:
■ APPL_TOP Name: This is the name of the APPL_TOP containing the files.
■ Product: This is the name of the product that owns the file.
■ Directory: This is the directory path where the file is located.

Applied Patches
4-8 Oracle Applications Patching Procedures
■ File: This is the name of the file.
■ Version: This is the version number of the file.
■ Changed Date: This is the date this version of the file was updated by a patch.
■ Patch Details: Click on the patch number to see the Patch Details report for the patch in which the file was included.
■ Action: Click on the icon to see the Action Summary report for the action that updated the file.
If a file has never been patched, "The above criteria resulted in no rows" appears in the APPL_TOP Name column.
Patch DetailsClicking the Details icon in a selected row from the results section of the Applied Patches page opens the Patch Details report. The Patch Details report provides details for a specific patch. The patch summary information is carried over from the Results section of the Applied Patches Search page and appears at the top of the Patch Details report.
This report contains the following information:
■ Select: This option button determines which driver file details are presented in the Timing Details report, Files Copied report, the Bug Fixes report, or the Action Summary report.
■ Driver File: This is the name of the driver file.
■ Start Date: This is the date and time the application of the driver file began.
■ End Date: This is the date and time the application of the driver file completed.
■ AutoPatch Options: This column displays any command line options used to run the driver file.
■ Platform: This is the platform of the driver file.
■ Patch Top: This is the location of the driver when it was run.
■ Codelevel Introduced: This links to the Codelevel Introduced report for the patch.
To see additional details for a patch, click one of the following buttons on the report:
■ Timing Details: Clicking this button takes you to the AutoPatch Timing Details report.
■ Files Copied: Clicking this button takes you to the Files Copied report.
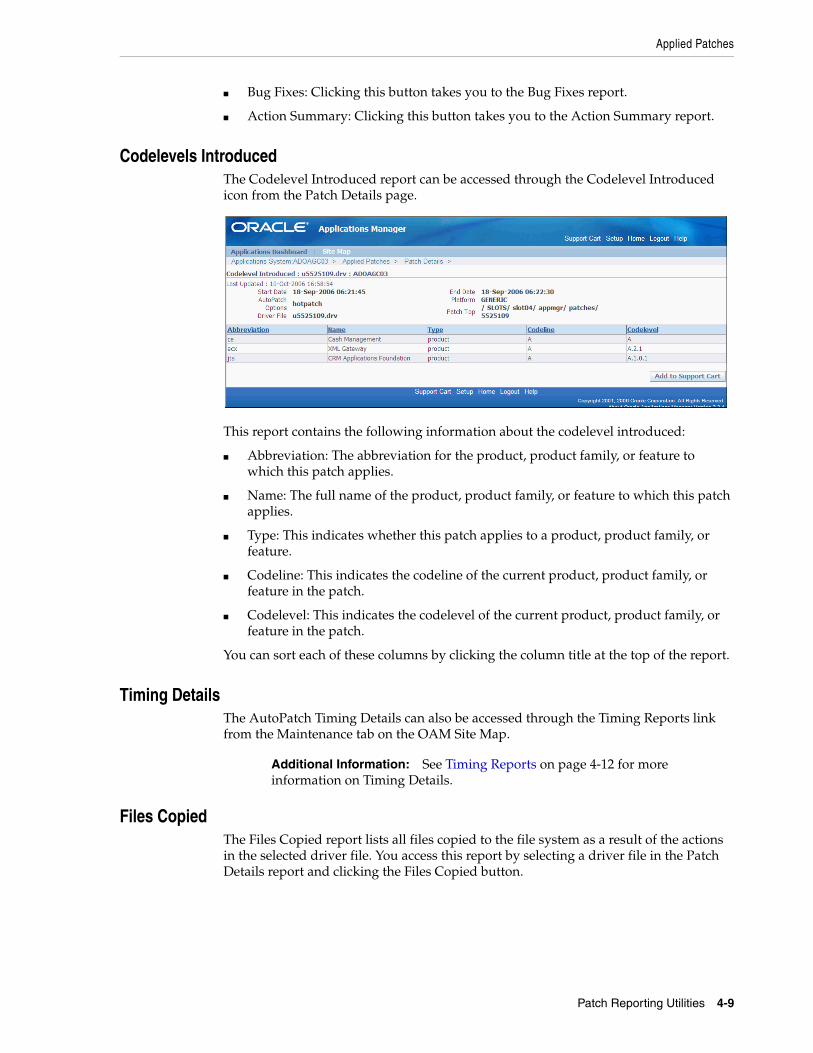
Applied Patches
Patch Reporting Utilities 4-9
■ Bug Fixes: Clicking this button takes you to the Bug Fixes report.
■ Action Summary: Clicking this button takes you to the Action Summary report.
Codelevels IntroducedThe Codelevel Introduced report can be accessed through the Codelevel Introduced icon from the Patch Details page.
This report contains the following information about the codelevel introduced:
■ Abbreviation: The abbreviation for the product, product family, or feature to which this patch applies.
■ Name: The full name of the product, product family, or feature to which this patch applies.
■ Type: This indicates whether this patch applies to a product, product family, or feature.
■ Codeline: This indicates the codeline of the current product, product family, or feature in the patch.
■ Codelevel: This indicates the codelevel of the current product, product family, or feature in the patch.
You can sort each of these columns by clicking the column title at the top of the report.
Timing DetailsThe AutoPatch Timing Details can also be accessed through the Timing Reports link from the Maintenance tab on the OAM Site Map.
Files CopiedThe Files Copied report lists all files copied to the file system as a result of the actions in the selected driver file. You access this report by selecting a driver file in the Patch Details report and clicking the Files Copied button.
Additional Information: See Timing Reports on page 4-12 for more information on Timing Details.
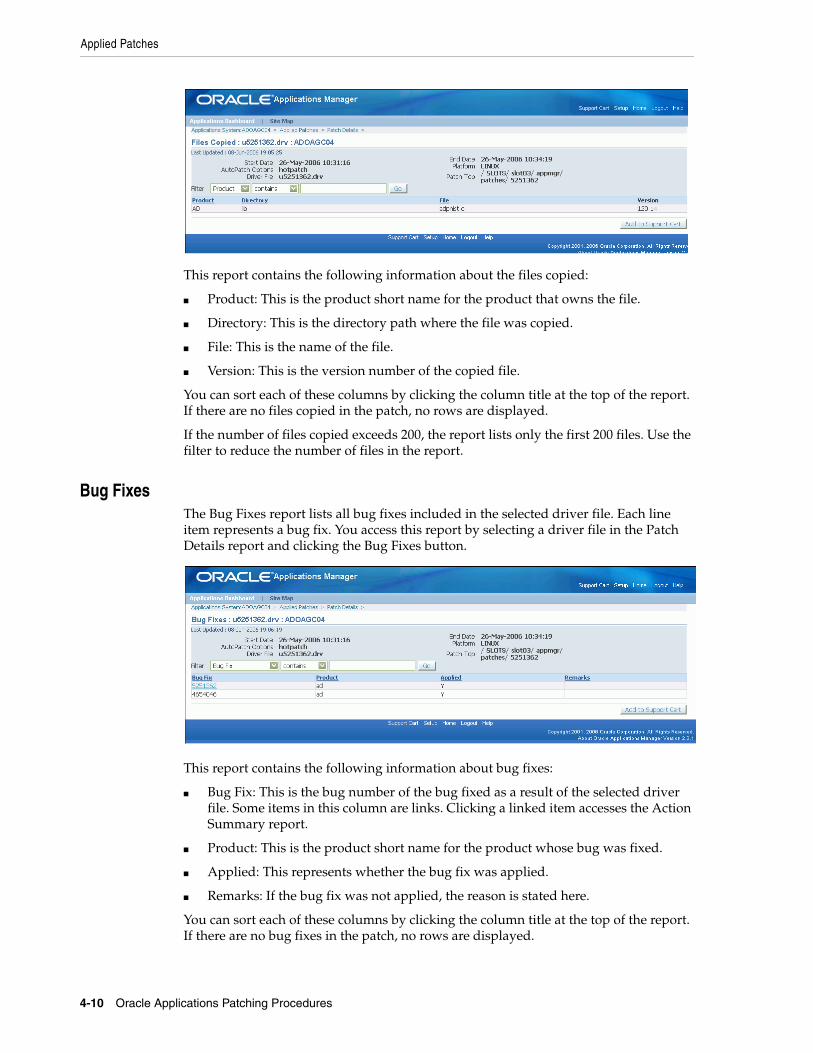
Applied Patches
4-10 Oracle Applications Patching Procedures
This report contains the following information about the files copied:
■ Product: This is the product short name for the product that owns the file.
■ Directory: This is the directory path where the file was copied.
■ File: This is the name of the file.
■ Version: This is the version number of the copied file.
You can sort each of these columns by clicking the column title at the top of the report. If there are no files copied in the patch, no rows are displayed.
If the number of files copied exceeds 200, the report lists only the first 200 files. Use the filter to reduce the number of files in the report.
Bug FixesThe Bug Fixes report lists all bug fixes included in the selected driver file. Each line item represents a bug fix. You access this report by selecting a driver file in the Patch Details report and clicking the Bug Fixes button.
This report contains the following information about bug fixes:
■ Bug Fix: This is the bug number of the bug fixed as a result of the selected driver file. Some items in this column are links. Clicking a linked item accesses the Action Summary report.
■ Product: This is the product short name for the product whose bug was fixed.
■ Applied: This represents whether the bug fix was applied.
■ Remarks: If the bug fix was not applied, the reason is stated here.
You can sort each of these columns by clicking the column title at the top of the report. If there are no bug fixes in the patch, no rows are displayed.
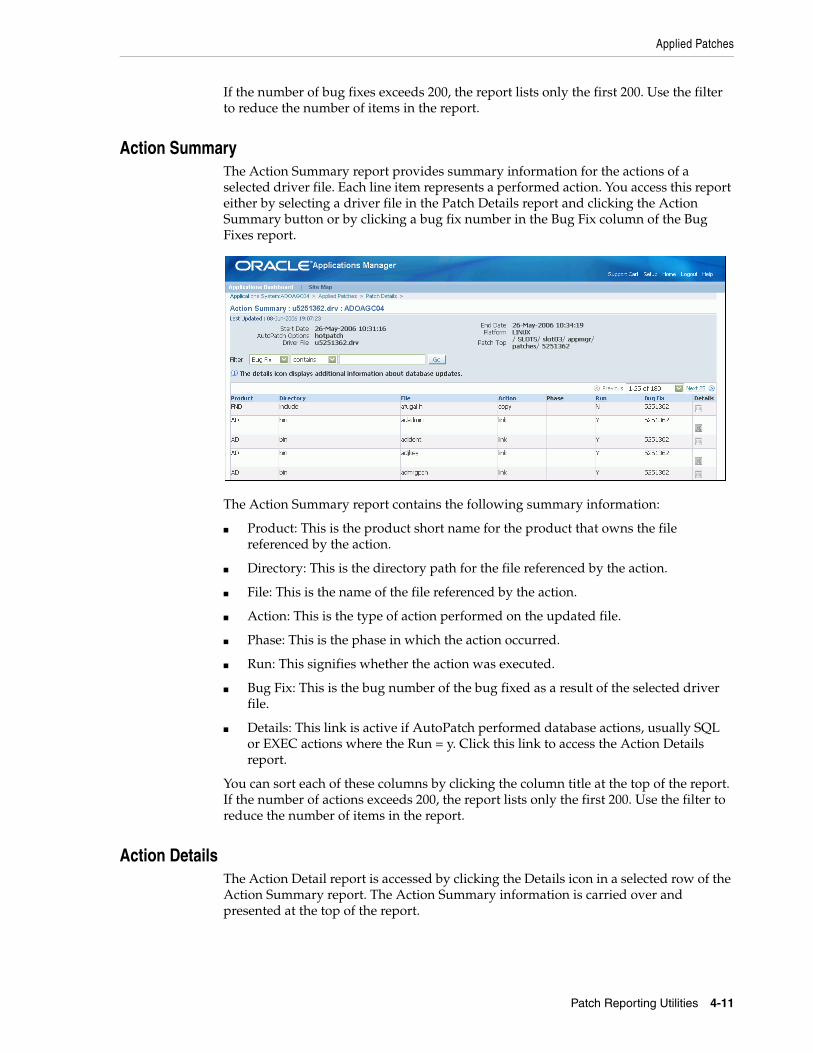
Applied Patches
Patch Reporting Utilities 4-11
If the number of bug fixes exceeds 200, the report lists only the first 200. Use the filter to reduce the number of items in the report.
Action SummaryThe Action Summary report provides summary information for the actions of a selected driver file. Each line item represents a performed action. You access this report either by selecting a driver file in the Patch Details report and clicking the Action Summary button or by clicking a bug fix number in the Bug Fix column of the Bug Fixes report.
The Action Summary report contains the following summary information:
■ Product: This is the product short name for the product that owns the file referenced by the action.
■ Directory: This is the directory path for the file referenced by the action.
■ File: This is the name of the file referenced by the action.
■ Action: This is the type of action performed on the updated file.
■ Phase: This is the phase in which the action occurred.
■ Run: This signifies whether the action was executed.
■ Bug Fix: This is the bug number of the bug fixed as a result of the selected driver file.
■ Details: This link is active if AutoPatch performed database actions, usually SQL or EXEC actions where the Run = y. Click this link to access the Action Details report.
You can sort each of these columns by clicking the column title at the top of the report. If the number of actions exceeds 200, the report lists only the first 200. Use the filter to reduce the number of items in the report.
Action DetailsThe Action Detail report is accessed by clicking the Details icon in a selected row of the Action Summary report. The Action Summary information is carried over and presented at the top of the report.
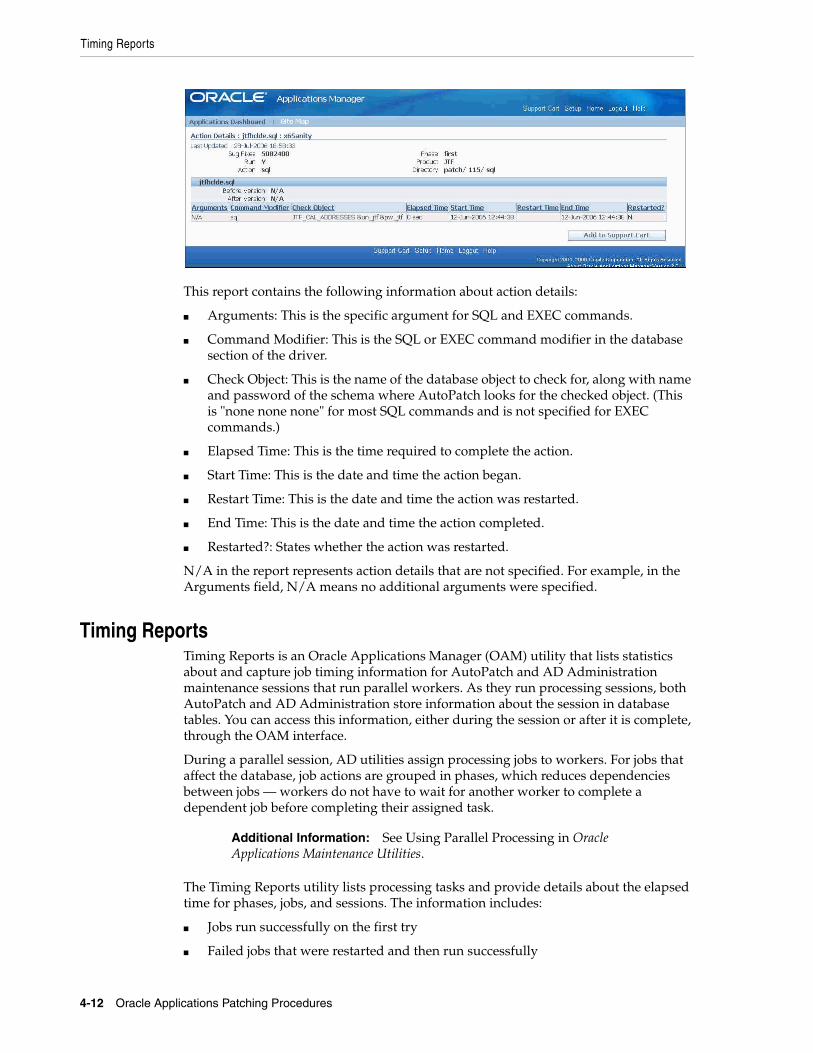
Timing Reports
4-12 Oracle Applications Patching Procedures
This report contains the following information about action details:
■ Arguments: This is the specific argument for SQL and EXEC commands.
■ Command Modifier: This is the SQL or EXEC command modifier in the database section of the driver.
■ Check Object: This is the name of the database object to check for, along with name and password of the schema where AutoPatch looks for the checked object. (This is "none none none" for most SQL commands and is not specified for EXEC commands.)
■ Elapsed Time: This is the time required to complete the action.
■ Start Time: This is the date and time the action began.
■ Restart Time: This is the date and time the action was restarted.
■ End Time: This is the date and time the action completed.
■ Restarted?: States whether the action was restarted.
N/A in the report represents action details that are not specified. For example, in the Arguments field, N/A means no additional arguments were specified.
Timing ReportsTiming Reports is an Oracle Applications Manager (OAM) utility that lists statistics about and capture job timing information for AutoPatch and AD Administration maintenance sessions that run parallel workers. As they run processing sessions, both AutoPatch and AD Administration store information about the session in database tables. You can access this information, either during the session or after it is complete, through the OAM interface.
During a parallel session, AD utilities assign processing jobs to workers. For jobs that affect the database, job actions are grouped in phases, which reduces dependencies between jobs — workers do not have to wait for another worker to complete a dependent job before completing their assigned task.
The Timing Reports utility lists processing tasks and provide details about the elapsed time for phases, jobs, and sessions. The information includes:
■ Jobs run successfully on the first try
■ Failed jobs that were restarted and then run successfully
Additional Information: See Using Parallel Processing in Oracle Applications Maintenance Utilities.
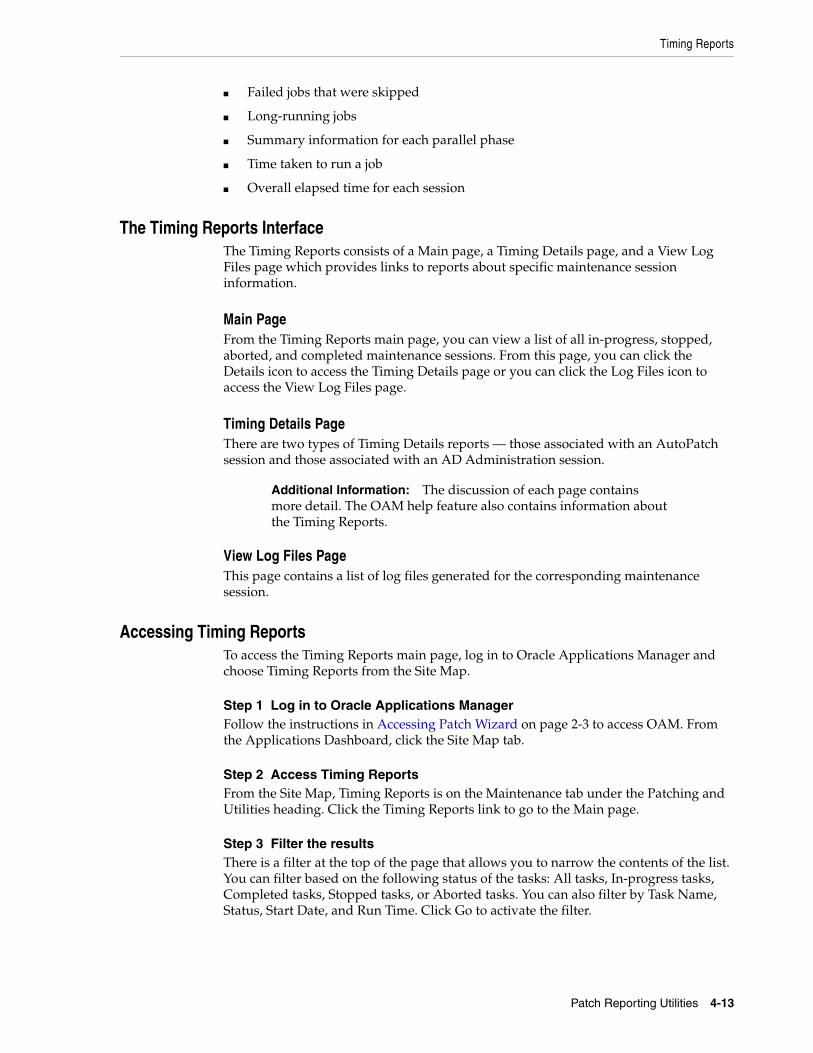
Timing Reports
Patch Reporting Utilities 4-13
■ Failed jobs that were skipped
■ Long-running jobs
■ Summary information for each parallel phase
■ Time taken to run a job
■ Overall elapsed time for each session
The Timing Reports InterfaceThe Timing Reports consists of a Main page, a Timing Details page, and a View Log Files page which provides links to reports about specific maintenance session information.
Main PageFrom the Timing Reports main page, you can view a list of all in-progress, stopped, aborted, and completed maintenance sessions. From this page, you can click the Details icon to access the Timing Details page or you can click the Log Files icon to access the View Log Files page.
Timing Details PageThere are two types of Timing Details reports — those associated with an AutoPatch session and those associated with an AD Administration session.
View Log Files PageThis page contains a list of log files generated for the corresponding maintenance session.
Accessing Timing ReportsTo access the Timing Reports main page, log in to Oracle Applications Manager and choose Timing Reports from the Site Map.
Step 1 Log in to Oracle Applications ManagerFollow the instructions in Accessing Patch Wizard on page 2-3 to access OAM. From the Applications Dashboard, click the Site Map tab.
Step 2 Access Timing ReportsFrom the Site Map, Timing Reports is on the Maintenance tab under the Patching and Utilities heading. Click the Timing Reports link to go to the Main page.
Step 3 Filter the resultsThere is a filter at the top of the page that allows you to narrow the contents of the list. You can filter based on the following status of the tasks: All tasks, In-progress tasks, Completed tasks, Stopped tasks, or Aborted tasks. You can also filter by Task Name, Status, Start Date, and Run Time. Click Go to activate the filter.
Additional Information: The discussion of each page contains more detail. The OAM help feature also contains information about the Timing Reports.
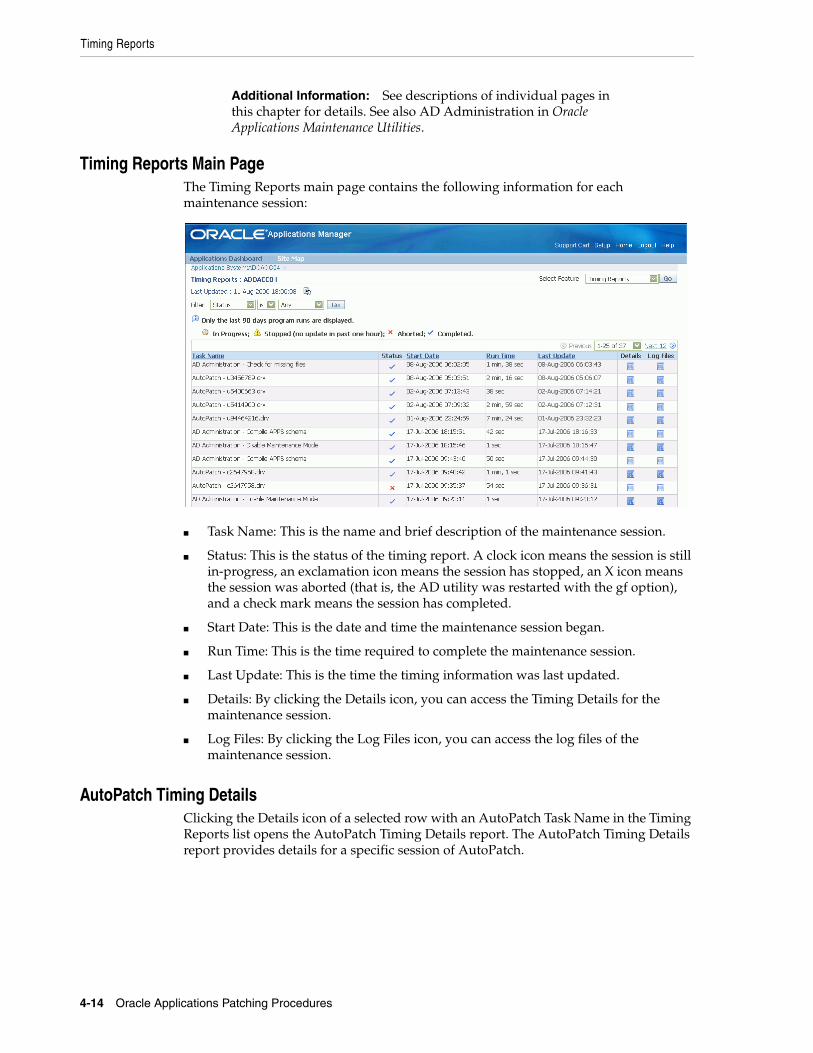
Timing Reports
4-14 Oracle Applications Patching Procedures
Timing Reports Main PageThe Timing Reports main page contains the following information for each maintenance session:
■ Task Name: This is the name and brief description of the maintenance session.
■ Status: This is the status of the timing report. A clock icon means the session is still in-progress, an exclamation icon means the session has stopped, an X icon means the session was aborted (that is, the AD utility was restarted with the gf option), and a check mark means the session has completed.
■ Start Date: This is the date and time the maintenance session began.
■ Run Time: This is the time required to complete the maintenance session.
■ Last Update: This is the time the timing information was last updated.
■ Details: By clicking the Details icon, you can access the Timing Details for the maintenance session.
■ Log Files: By clicking the Log Files icon, you can access the log files of the maintenance session.
AutoPatch Timing DetailsClicking the Details icon of a selected row with an AutoPatch Task Name in the Timing Reports list opens the AutoPatch Timing Details report. The AutoPatch Timing Details report provides details for a specific session of AutoPatch.
Additional Information: See descriptions of individual pages in this chapter for details. See also AD Administration in Oracle Applications Maintenance Utilities.
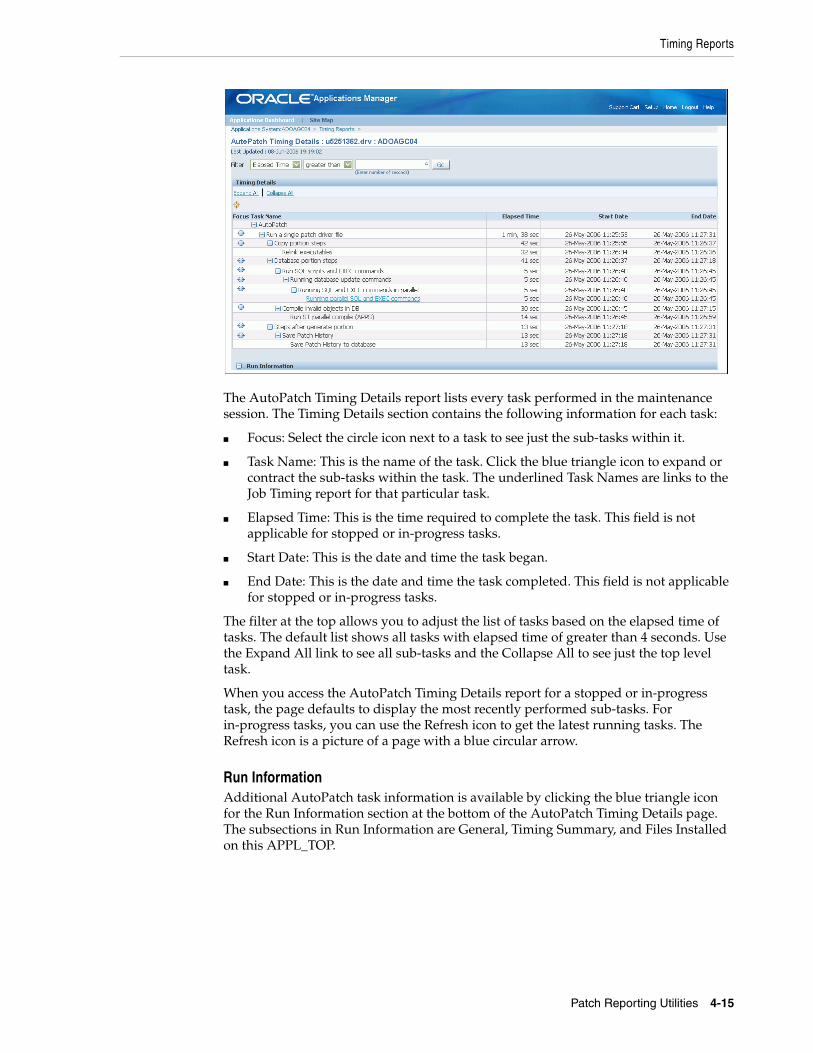
Timing Reports
Patch Reporting Utilities 4-15
The AutoPatch Timing Details report lists every task performed in the maintenance session. The Timing Details section contains the following information for each task:
■ Focus: Select the circle icon next to a task to see just the sub-tasks within it.
■ Task Name: This is the name of the task. Click the blue triangle icon to expand or contract the sub-tasks within the task. The underlined Task Names are links to the Job Timing report for that particular task.
■ Elapsed Time: This is the time required to complete the task. This field is not applicable for stopped or in-progress tasks.
■ Start Date: This is the date and time the task began.
■ End Date: This is the date and time the task completed. This field is not applicable for stopped or in-progress tasks.
The filter at the top allows you to adjust the list of tasks based on the elapsed time of tasks. The default list shows all tasks with elapsed time of greater than 4 seconds. Use the Expand All link to see all sub-tasks and the Collapse All to see just the top level task.
When you access the AutoPatch Timing Details report for a stopped or in-progress task, the page defaults to display the most recently performed sub-tasks. For in-progress tasks, you can use the Refresh icon to get the latest running tasks. The Refresh icon is a picture of a page with a blue circular arrow.
Run InformationAdditional AutoPatch task information is available by clicking the blue triangle icon for the Run Information section at the bottom of the AutoPatch Timing Details page. The subsections in Run Information are General, Timing Summary, and Files Installed on this APPL_TOP.
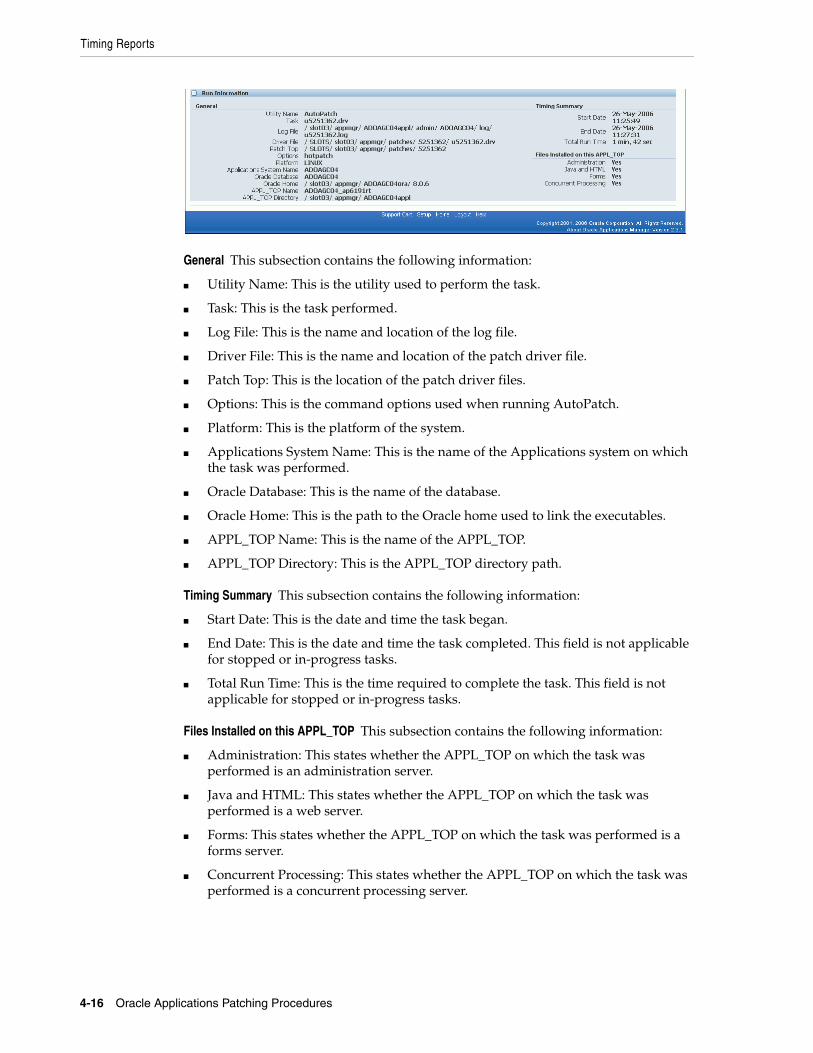
Timing Reports
4-16 Oracle Applications Patching Procedures
General This subsection contains the following information:
■ Utility Name: This is the utility used to perform the task.
■ Task: This is the task performed.
■ Log File: This is the name and location of the log file.
■ Driver File: This is the name and location of the patch driver file.
■ Patch Top: This is the location of the patch driver files.
■ Options: This is the command options used when running AutoPatch.
■ Platform: This is the platform of the system.
■ Applications System Name: This is the name of the Applications system on which the task was performed.
■ Oracle Database: This is the name of the database.
■ Oracle Home: This is the path to the Oracle home used to link the executables.
■ APPL_TOP Name: This is the name of the APPL_TOP.
■ APPL_TOP Directory: This is the APPL_TOP directory path.
Timing Summary This subsection contains the following information:
■ Start Date: This is the date and time the task began.
■ End Date: This is the date and time the task completed. This field is not applicable for stopped or in-progress tasks.
■ Total Run Time: This is the time required to complete the task. This field is not applicable for stopped or in-progress tasks.
Files Installed on this APPL_TOP This subsection contains the following information:
■ Administration: This states whether the APPL_TOP on which the task was performed is an administration server.
■ Java and HTML: This states whether the APPL_TOP on which the task was performed is a web server.
■ Forms: This states whether the APPL_TOP on which the task was performed is a forms server.
■ Concurrent Processing: This states whether the APPL_TOP on which the task was performed is a concurrent processing server.

Timing Reports
Patch Reporting Utilities 4-17
AD Administration Timing DetailsClicking the Details icon of a selected row with an AD Administration Task Name in the Timing Reports list opens the AD Administration Timing Details report. The AD Administration Timing Details report provides details for a specific session of AD Administration.
The Timing Details and Run Information sections contain the same types of information for each task as the AutoPatch Timing Details report.
In-Progress Timing DetailsWhen there is a job running, the In-Progress Timing Details page appears.
In the In-Progress AD Utility section, you can filter the results by elapsed time.
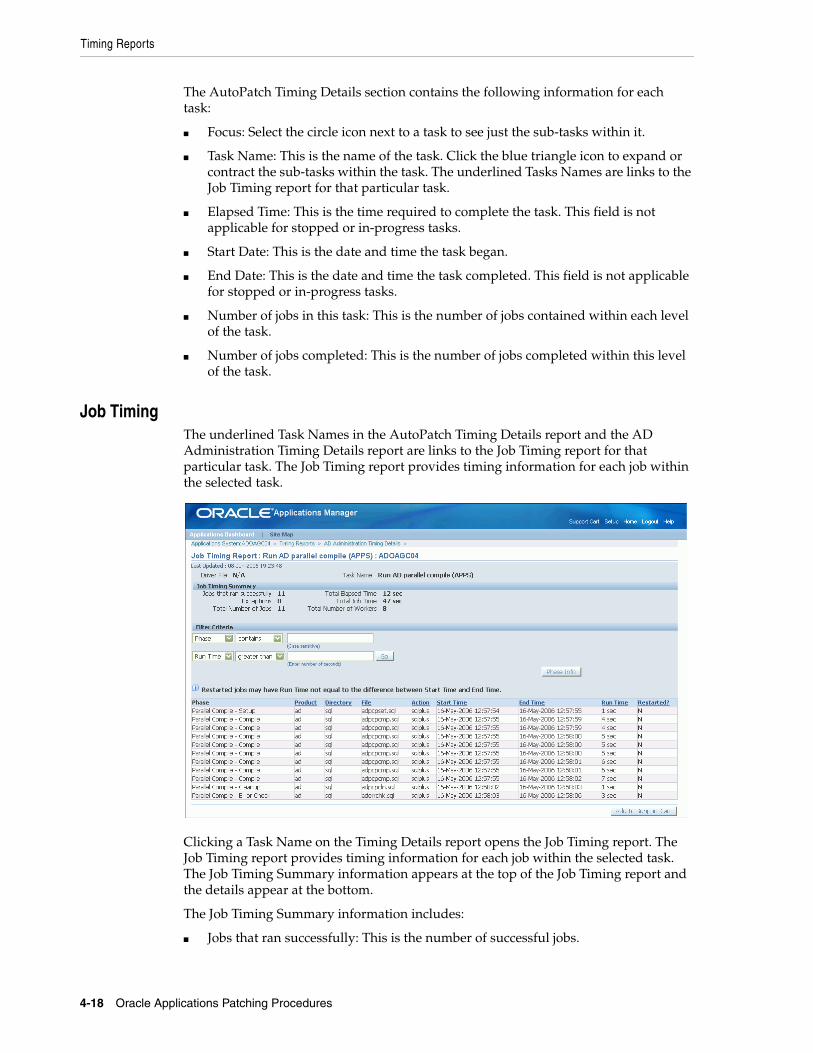
Timing Reports
4-18 Oracle Applications Patching Procedures
The AutoPatch Timing Details section contains the following information for each task:
■ Focus: Select the circle icon next to a task to see just the sub-tasks within it.
■ Task Name: This is the name of the task. Click the blue triangle icon to expand or contract the sub-tasks within the task. The underlined Tasks Names are links to the Job Timing report for that particular task.
■ Elapsed Time: This is the time required to complete the task. This field is not applicable for stopped or in-progress tasks.
■ Start Date: This is the date and time the task began.
■ End Date: This is the date and time the task completed. This field is not applicable for stopped or in-progress tasks.
■ Number of jobs in this task: This is the number of jobs contained within each level of the task.
■ Number of jobs completed: This is the number of jobs completed within this level of the task.
Job TimingThe underlined Task Names in the AutoPatch Timing Details report and the AD Administration Timing Details report are links to the Job Timing report for that particular task. The Job Timing report provides timing information for each job within the selected task.
Clicking a Task Name on the Timing Details report opens the Job Timing report. The Job Timing report provides timing information for each job within the selected task. The Job Timing Summary information appears at the top of the Job Timing report and the details appear at the bottom.
The Job Timing Summary information includes:
■ Jobs that ran successfully: This is the number of successful jobs.
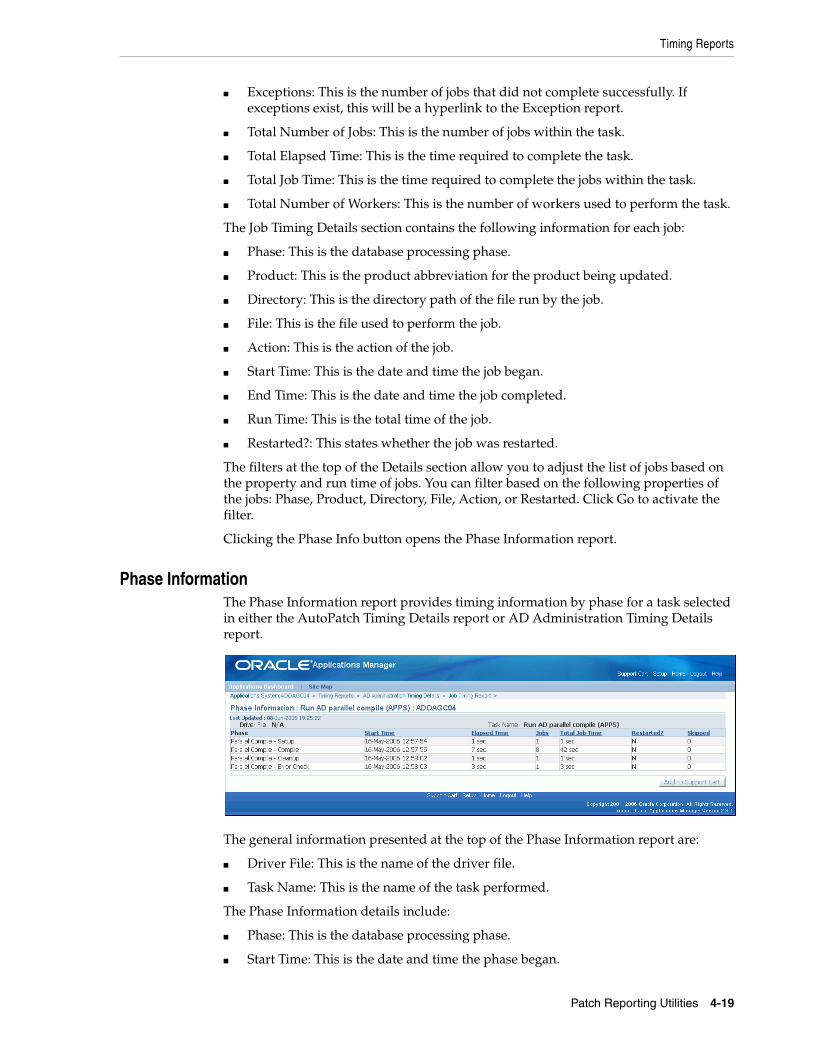
Timing Reports
Patch Reporting Utilities 4-19
■ Exceptions: This is the number of jobs that did not complete successfully. If exceptions exist, this will be a hyperlink to the Exception report.
■ Total Number of Jobs: This is the number of jobs within the task.
■ Total Elapsed Time: This is the time required to complete the task.
■ Total Job Time: This is the time required to complete the jobs within the task.
■ Total Number of Workers: This is the number of workers used to perform the task.
The Job Timing Details section contains the following information for each job:
■ Phase: This is the database processing phase.
■ Product: This is the product abbreviation for the product being updated.
■ Directory: This is the directory path of the file run by the job.
■ File: This is the file used to perform the job.
■ Action: This is the action of the job.
■ Start Time: This is the date and time the job began.
■ End Time: This is the date and time the job completed.
■ Run Time: This is the total time of the job.
■ Restarted?: This states whether the job was restarted.
The filters at the top of the Details section allow you to adjust the list of jobs based on the property and run time of jobs. You can filter based on the following properties of the jobs: Phase, Product, Directory, File, Action, or Restarted. Click Go to activate the filter.
Clicking the Phase Info button opens the Phase Information report.
Phase InformationThe Phase Information report provides timing information by phase for a task selected in either the AutoPatch Timing Details report or AD Administration Timing Details report.
The general information presented at the top of the Phase Information report are:
■ Driver File: This is the name of the driver file.
■ Task Name: This is the name of the task performed.
The Phase Information details include:
■ Phase: This is the database processing phase.
■ Start Time: This is the date and time the phase began.
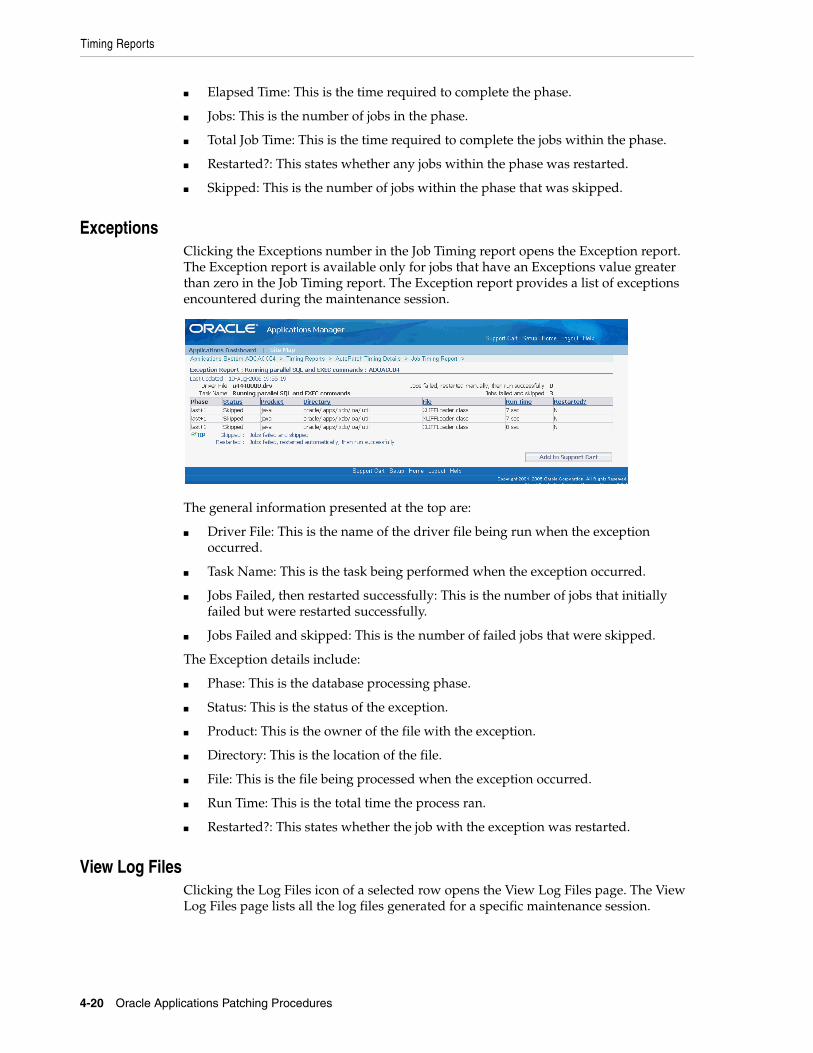
Timing Reports
4-20 Oracle Applications Patching Procedures
■ Elapsed Time: This is the time required to complete the phase.
■ Jobs: This is the number of jobs in the phase.
■ Total Job Time: This is the time required to complete the jobs within the phase.
■ Restarted?: This states whether any jobs within the phase was restarted.
■ Skipped: This is the number of jobs within the phase that was skipped.
ExceptionsClicking the Exceptions number in the Job Timing report opens the Exception report. The Exception report is available only for jobs that have an Exceptions value greater than zero in the Job Timing report. The Exception report provides a list of exceptions encountered during the maintenance session.
The general information presented at the top are:
■ Driver File: This is the name of the driver file being run when the exception occurred.
■ Task Name: This is the task being performed when the exception occurred.
■ Jobs Failed, then restarted successfully: This is the number of jobs that initially failed but were restarted successfully.
■ Jobs Failed and skipped: This is the number of failed jobs that were skipped.
The Exception details include:
■ Phase: This is the database processing phase.
■ Status: This is the status of the exception.
■ Product: This is the owner of the file with the exception.
■ Directory: This is the location of the file.
■ File: This is the file being processed when the exception occurred.
■ Run Time: This is the total time the process ran.
■ Restarted?: This states whether the job with the exception was restarted.
View Log FilesClicking the Log Files icon of a selected row opens the View Log Files page. The View Log Files page lists all the log files generated for a specific maintenance session.

Timing Reports
Patch Reporting Utilities 4-21
The top of the View Log Files page contains the following information:
■ Task Name: This is the name of the task for which these log files have been generated.
■ Status: This is the status of the task.
■ Log Directory: This is the location of the listed log files. This location is defined by the user when the task is run. This is a required field.
■ Start Date: This is the date and time the task was started.
■ Last Updated: This is the date and time the task was completed.
■ Run Time: This is the time required to complete the task.
The following buttons appear at the top of the Log Files section:
■ View: Use this button to view a log file after you have selected the radio button of the corresponding log file.
■ Download: Use this button to download a log file after you have selected the radio button of the corresponding log file.
The Log Files section contains the following information for each log file:
■ Select: Use this radio button to select the corresponding log file for viewing or downloading.
■ Log File: This is the name of the log file.
■ Log Type: This is the type of log file.
View Log DetailsDetails of each log file is available by selecting the radio button of the corresponding log file and clicking the View button. The View log Details page automatically defaults to the last page of the log file. By default, this page displays 500 lines.
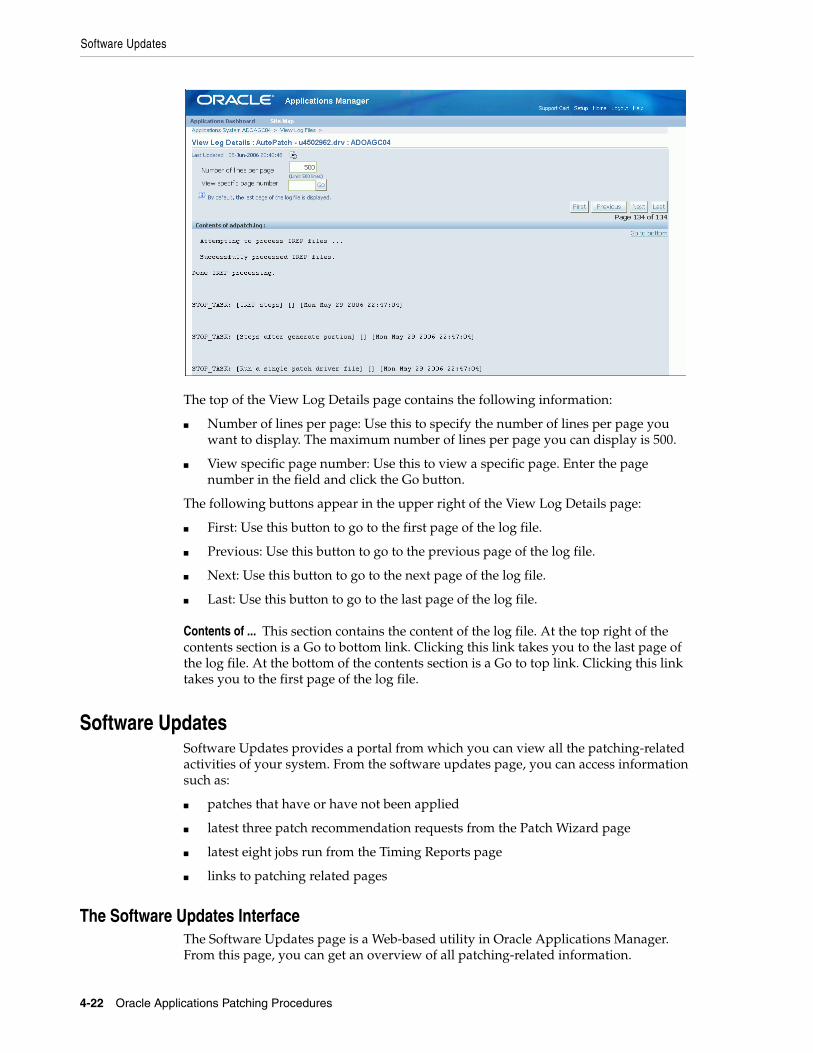
Software Updates
4-22 Oracle Applications Patching Procedures
The top of the View Log Details page contains the following information:
■ Number of lines per page: Use this to specify the number of lines per page you want to display. The maximum number of lines per page you can display is 500.
■ View specific page number: Use this to view a specific page. Enter the page number in the field and click the Go button.
The following buttons appear in the upper right of the View Log Details page:
■ First: Use this button to go to the first page of the log file.
■ Previous: Use this button to go to the previous page of the log file.
■ Next: Use this button to go to the next page of the log file.
■ Last: Use this button to go to the last page of the log file.
Contents of ... This section contains the content of the log file. At the top right of the contents section is a Go to bottom link. Clicking this link takes you to the last page of the log file. At the bottom of the contents section is a Go to top link. Clicking this link takes you to the first page of the log file.
Software UpdatesSoftware Updates provides a portal from which you can view all the patching-related activities of your system. From the software updates page, you can access information such as:
■ patches that have or have not been applied
■ latest three patch recommendation requests from the Patch Wizard page
■ latest eight jobs run from the Timing Reports page
■ links to patching related pages
The Software Updates InterfaceThe Software Updates page is a Web-based utility in Oracle Applications Manager. From this page, you can get an overview of all patching-related information.
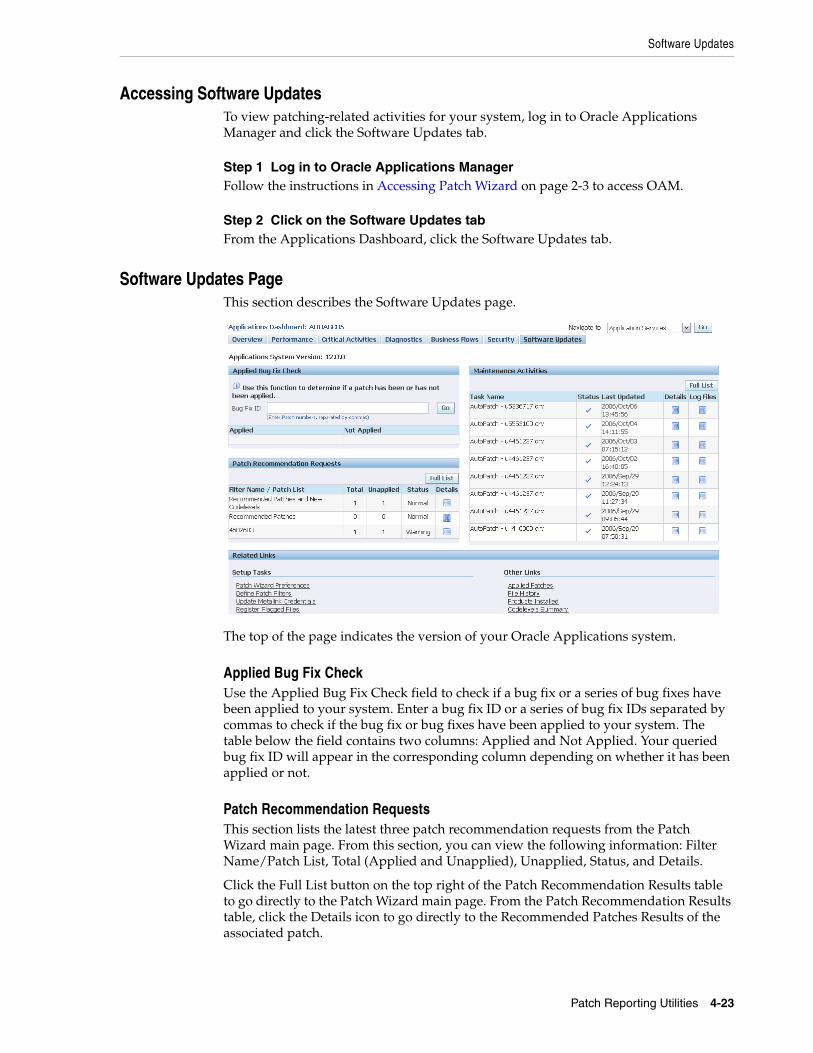
Software Updates
Patch Reporting Utilities 4-23
Accessing Software Updates To view patching-related activities for your system, log in to Oracle Applications Manager and click the Software Updates tab.
Step 1 Log in to Oracle Applications ManagerFollow the instructions in Accessing Patch Wizard on page 2-3 to access OAM.
Step 2 Click on the Software Updates tabFrom the Applications Dashboard, click the Software Updates tab.
Software Updates PageThis section describes the Software Updates page.
The top of the page indicates the version of your Oracle Applications system.
Applied Bug Fix CheckUse the Applied Bug Fix Check field to check if a bug fix or a series of bug fixes have been applied to your system. Enter a bug fix ID or a series of bug fix IDs separated by commas to check if the bug fix or bug fixes have been applied to your system. The table below the field contains two columns: Applied and Not Applied. Your queried bug fix ID will appear in the corresponding column depending on whether it has been applied or not.
Patch Recommendation RequestsThis section lists the latest three patch recommendation requests from the Patch Wizard main page. From this section, you can view the following information: Filter Name/Patch List, Total (Applied and Unapplied), Unapplied, Status, and Details.
Click the Full List button on the top right of the Patch Recommendation Results table to go directly to the Patch Wizard main page. From the Patch Recommendation Results table, click the Details icon to go directly to the Recommended Patches Results of the associated patch.
Software Updates
4-24 Oracle Applications Patching Procedures
Maintenance ActivitiesThis section lists the latest eight jobs from the Timing Reports page. From this section, you can view the following information: Task Name, Status, Last Updated, Details, and Log Files.
Click the Full List button on the top right of the Maintenance Activities table to go directly to the Timing Reports main page. From the Maintenance Activities table, click the Details icon to go directly to the Timing Details report of the associated task. From the same table, click the Log Files icon to go directly to the View Log Files page of the associated task.
Related LinksThis section lists the links related to patching activities for your system.
Additional Information: See Patch Wizard on page 2-1 for more information on Patch Wizard.
Additional Information: See Timing Reports on page 4-12 for more information.
Patching Procedures 5-1
5Patching Procedures
This chapter contains information about applying patches to an Oracle Applications system. It includes the following sections:
■ Performing Interactive Patching
■ Performing Non-interactive Patching
■ Patching NLS Systems
■ Applying Patches to a Multi-node System
■ Reducing Downtime
■ Keeping Patches Current
■ Analyzing Applied Patches
■ Backing Out Patches
Performing Interactive PatchingPatches and updates to the Oracle Applications file system or database are applied using AutoPatch, which identifies the servers set up during your installation and performs the actions required by the patch on each APPL_TOP. In a shared application tier file system, changes made during patching sessions on one node are immediately available on all nodes.
You can apply a patch interactively or non-interactively. Interactive patching — the "normal" patching method — means that you supply all the information that AutoPatch needs by responding to a series of prompts. You can also apply a patch non-interactively to avoid having to respond to some of the AutoPatch prompts and to accommodate special types of patches.
To ensure optimal performance and reduce downtime during patching sessions, AutoPatch requires that you enable maintenance mode when you apply a patch. Enabling the maintenance mode feature shuts down the Workflow Business Events System and sets up function security so that Oracle Applications functions are unavailable to users. This provides a clear separation between normal runtime operation and system downtime for patching.
When the patching session is complete, maintenance mode can be disabled, allowing users full access to the newly updated system.
Additional Information: See AutoPatch on page 3-1. See also Performing Non-interactive Patching on page 5-8.

Performing Interactive Patching
5-2 Oracle Applications Patching Procedures
Applying a Patch Interactively
Business RequirementHow do I apply a patch?
DiscussionAfter you have determined that you need to apply a patch, download the patch and use AutoPatch to apply it to your system. Apply the unified driver to all APPL_TOPs, and AutoPatch sorts out which actions are required for the current APPL_TOP.
Patches may require prerequisite patches and manual steps. Run the admsi.pl script to generate customized installation instructions for the patch. These instructions contain all the required manual steps.
ActionThis procedure describes the typical steps for applying a patch. Subsequent procedures describe command line options that change the default behavior of AutoPatch.
1. Log in as applmgr (Applications file system owner) and set the environment. To set the environment:
UNIX:
The environment file is typically APPS<CONTEXT_NAME>.env, and is located under the APPL_TOP. From a Bourne, Korn, or Bash shell, enter the following:
$ . APPS<CONTEXT_NAME>.env
Windows:
Caution: When maintenance mode is disabled, you can run AutoPatch by using options=hotpatch on the command line, if necessary. However, doing so can cause a significant degradation of performance.
Additional Information: See Preparing your System for Patching on page 3-2.
Note: Some of the installation instructions generated by the admsi.pl script may specify pre-install mode. If so, follow the instructions to use pre-install mode. See AutoPatch Modes on page 3-7.
Caution: It is very important that you back up the file system and database before you apply large patches (like minipacks, family packs, or maintenance packs). If the patching process fails when running the database portion of the unified driver, you will not be able to back out the patch. You must restart the patching process with a restored backup of the file system and database.
Performing Interactive Patching
Patching Procedures 5-3
Run %APPL_TOP%\envshell.cmd using either Windows Explorer or the Run command from the Start menu. This creates a Command Prompt window that contains the required environment settings for Oracle Applications. Run all subsequent commands in this Command Prompt window.
If you are running on a Windows platform, ensure that all necessary tools are installed properly. In addition, all %JAVA_TOP% and %JAVA_TOP%\loadjava.zip files are included in the set CLASSPATH statement of %APPL_TOP%\admin\adovars.cmd.
2. Create a patch top directory, if it does not already exist. Download the patch into a staging directory and unzip the patch into the patch top directory. Do not use the patch subdirectory under the <PROD>_TOP directories as your patch top directory.
3. Change directory to the patch top directory where you unzipped the patch.
4. Review the README file in the patch top directory.
Review the README file (README.txt or README.html), located in the directory where you unzipped the patch. The README contains an abstract of the patch and instructions for running the admsi.pl script.
5. Run the admsi.pl script to generate customized installation instructions for applying the patch. You will need to provide the location of your patch top directory and the applmgr password.
admsi.pl
The following general steps are contained in the customized installation instructions generated by the admsi.pl script. Additional steps are also detailed in the customized installation instructions depending on the patch, the state of your system, and the products you have installed.
Use the following steps, in addition to the steps detailed in the customized installation instructions, to apply the patch.
6. Shut down services.
Run the adstpall.sh script to shut down the services appropriate to your system. You will need to provide the applmgr user name and password.
UNIX:
$ adstpall.sh
Windows:
C:\> adstpall.cmd
7. Enable Maintenance Mode.
Use the Change Maintenance Mode menu of AD Administration to enable maintenance mode. Select option 1 to enable maintenance mode.
Note: For more information on patching a multi-node system, see Applying Patches to a Multi-node System on page 5-14.
Caution: You must complete all tasks associated with applying a patch before you access Oracle Applications.

Performing Interactive Patching
5-4 Oracle Applications Patching Procedures
8. Start AutoPatch.
Use the adpatch command to start AutoPatch from the patch top directory (the directory where you downloaded the patch files). You can customize the way AutoPatch runs by adding arguments to the command line. See Command Line Arguments on page 3-8.
9. Respond to the AutoPatch prompts. You are prompted for the following information required to apply the patch:
■ APPL_TOP name where you want to apply the patch.
■ Log file name: Select a name for the log file, for example, u<patchnum>.log.
■ Email where you want to receive notifications.
■ Batch size, the default is 1000.
■ Database name.
■ Patch top directory where you unzipped the patch.
■ Driver file name: Provide the name of the driver file located in the patch top directory, for example, u<patchnum>.drv.
10. Apply the driver.
When AutoPatch prompts for the driver name, specify the name of the driver.
11. Review customizations.
Customized files are registered in the Registered Flagged Files page of OAM. If AutoPatch displays a message indicating that previously registered, customized files will be replaced by the patch, review those files in the Registered Flagged Files page to determine if the customizations need to be reregistered or removed.
12. After AutoPatch exits, review the log files.
Review the AutoPatch log file after the application of each driver file for warnings or errors. The log file is located in <APPL_TOP>/admin/<SID>/log. This is the file you named u<patchnum>.log in step 9. In addition, some patch tasks may create separate log files in the same directory. If the patching process used multiple workers, each worker creates its own log file. You can also review log files using the View Log Files feature in Timing Reports.
13. Preallocate space for packages, functions, and sequences (optional).
If AutoPatch has modified Oracle Applications database objects, you may want to run ADXGNPIN.sql and ADXGNPNS.sql to allocate space ("pin") for new packages and sequences in the Oracle System Global Area. These scripts are located in AD_TOP/sql.
See Also:
Additional Information: See Registered Flagged Files on page 2-13 for more information.
Additional Information: See Log Files on page 3-2 and View Log Files on page 4-20.
Additional Information: See Pre-allocating Space for Packages and Functions in Oracle Applications Maintenance Procedures.
Performing Interactive Patching
Patching Procedures 5-5
14. Disable Maintenance Mode.
Use the Change Maintenance Mode menu of AD Administration to disable maintenance mode. Select option 2 to disable maintenance mode.
15. Restart server processes.
After verifying that the patch was applied successfully, start all server processes and allow users to access the system.
UNIX:
$ adstrtal.sh
Windows:
C:\> adstrtal.cmd
16. Delete or archive AutoPatch backup files (optional).
After you have tested the patched system, you can delete the backup copies of files from the patch top directories to recover disk space, as necessary. Oracle recommends archiving these files if you have space available.
Applying Unified Drivers
Business RequirementI received a patch that contains a unified driver, however, the instructions state that I run only the database portion of the patch.
DiscussionCertain procedures, such as patching with a staged APPL_TOP, may require you to apply only the database portion of a unified driver. In these cases, you use command line options to tell AutoPatch which portions of the patch to omit. AutoPatch will apply all portions of the patch except the ones that you specifically omit on the command line.
ActionComplete the following steps:
1. Follow the instructions in Steps 1 – 7 in the Applying a Patch Interactively section.
2. Enter the adpatch command as indicated in Step 8, adding the following options on the command line: nocopyportion,nogenerateportion. The command line syntax should look like this:
$ adpatch options=nocopyportion,nogenerateportion
3. At the prompt for the driver name, specify the unified (u) driver. AutoPatch runs the driver, applying only the database portion of the patch.
Additional Information: See Stopping or Starting Application Tier Services in Oracle Applications Maintenance Procedures.
Additional Information: See Compressing, Archiving, and Deleting Files in Oracle Applications Maintenance Procedures.
Additional Information: See Command Line Arguments on page 3-8.
Performing Interactive Patching
5-6 Oracle Applications Patching Procedures
4. Respond to the AutoPatch prompts. See AutoPatch on page 3-1 for more information.
5. Finish applying the patch as directed in Steps 12 – 16 in the Applying a Patch Interactively section.
Testing a Patch Before Applying It
Business RequirementCan I test the effects of a patch on my system before I apply it?
DiscussionOne way to see how applying a patch will affect your system is to first apply it on a test system.
If you do not, or cannot, use a test system, you can apply the patch on your production system using the AutoPatch test mode (apply=no) to see all the actions AutoPatch will take. In general, running AutoPatch in test mode lists each file it will copy, generate, relink, or execute, but it does not actually perform these actions.
In test mode, AutoPatch reads and validates the patch driver file, reads product file driver files, extracts object modules from product libraries (for version checking), performs version checking, and runs AutoConfig (in test mode). It does not, however, update the database or file system.
To determine how a patch will affect the files in your system, use the Patch Impact Analysis Report in Patch Wizard.
ActionComplete the following steps:
1. Follow the steps in the Applying a Patch Interactively section of this chapter.
2. When directed to run AutoPatch, add the test mode argument to the command line:
$ adpatch apply=no
3. Complete steps 12 and 11 in the Applying a Patch Interactively section. You must also complete steps 14 and 15 if you shut down your servers and enabled maintenance mode before you applied the patch.
Enabling Password Validation
Business RequirementHow can I validate passwords before I apply a patch?
Additional Information: See AutoConfig Test Mode in Oracle Applications Maintenance Utilities.
Additional Information: See Determining Patch Impact on System Files on page 5-29.
Performing Interactive Patching
Patching Procedures 5-7
DiscussionTo reduce the time it takes to apply a patch, AutoPatch (by default) does not validate Oracle schema passwords. If you need to enable password validation, you can do so by supplying the validate option (options=validate) on the command line when you run AutoPatch.
If you are applying multiple patches, Oracle recommends you use AD Merge Patch to combine the patches (where compatible) so that you apply them in a single AutoPatch session. In this case, you need to validate passwords only once.
If you have several patches that cannot be merged, you can save time by turning on the validate option only for the application of the first patch, and then leaving it off for the subsequent patches.
ActionComplete the following steps:
1. Follow the instructions in the Applying a Patch Interactively section of this chapter.
2. When directed to run AutoPatch, use the validate command. It should look like this:
$ adpatch options=validate
3. Complete the remaining steps in the Applying a Patch Interactively section.
Applying Emergency Patches
Business RequirementCan I apply a patch without shutting down system services?
DiscussionIf an emergency patch can be applied without shutting down services, the patch README will explicitly state so. If the patch README does not explicitly state this, assume that you need to shut down services and enable maintenance mode before applying the patch.
ActionComplete the following steps:
1. Apply the patch on a test version of your production database. Be sure the test copy is recent so that it closely approximates your production system.
2. Run AutoPatch using options=hotpatch and apply the patch. You may not have to shut down the server processes.
Additional Information: See Creating a Merged Patch on page 5-16.
Note: You can always apply documentation patches (Oracle Applications Online Help) without shutting down servers.
Additional Information: See AutoPatch Options on page 3-9.
Performing Non-interactive Patching
5-8 Oracle Applications Patching Procedures
Performing Non-interactive PatchingYou can apply patches interactively or non-interactively. Interactive patching means that you supply basic information that AutoPatch needs by responding to a series of prompts. See Performing Interactive Patching in this chapter for more information.
Applying a patch non-interactively substantially reduces the need for user intervention when AutoPatch processes patching tasks. You create a defaults file that contains much of the information you would have supplied at the AutoPatch prompts. Then, when you run AutoPatch, you specify the name of the defaults file, the location of the patch top directory, the name of a driver file, and other parameters on the command line.
Applying a Patch Non-interactively
Business RequirementHow do I apply a patch non-interactively?
DiscussionInstead of responding to AutoPatch prompts each time you initiate a patching session, you can store the responses in a defaults file. Then, you specify the name of the defaults file when you run patches non-interactively. As it runs, AutoPatch uses the responses to complete the information for the corresponding prompts, and completes patch processing with little or no user intervention.
To set up a non-interactive patching session, first create and save a defaults file by using the defaultsfile=<defaults file name> argument when you run AutoPatch. This causes the information you provide at the prompts, and other pertinent information, to be captured and saved.
ActionComplete the following steps:
1. Create the defaults file.
Start AutoPatch, using the defaultsfile= argument, and specify the file name and the path to the defaults file. This creates a defaults file for the current environment.
UNIX:
The file must be under the $APPL_TOP/admin/<SID> directory, where <SID> is the database name (ORACLE_SID/TWO_TASK). For example:
$ adpatch defaultsfile=$APPL_TOP/admin/testdb1/adpatchdef.txt
Windows:
Caution: Back up the file system and the database before you apply large patches such as minipacks, family packs, or maintenance packs.
Note: AutoConfig automatically creates a defaults file (adalldefaults.txt) each time it runs. This file can be used as a template to create a customized defaults file. However, we recommend that you create the defaults file as described in this procedure.
Performing Non-interactive Patching
Patching Procedures 5-9
The file must be under the %APPL_TOP%\admin\<SID> directory, where <SID> is the database name (LOCAL). For example:
C:\> adpatch defaultsfile=%APPL_TOP%\admin\testdb1\adpatchdef.txt
2. Run AutoPatch to the point where it prompts for the directory where the Oracle Applications patch has been unloaded. Enter abort at this prompt.
3. Verify that the defaults file exists.
4. Run AutoPatch non-interactively to apply a single patch driver, all drivers, or any of the other procedures in this section.
Applying a Single Patch Driver
Business RequirementHow do I apply a single patch driver non-interactively?
DiscussionIf you have created a defaults file, specify AutoPatch to run non-interactively and specify the location and name of the defaults file and the driver.
ActionComplete the following steps:
1. Create the defaults file as described in Applying a Patch Non-interactively on page 5-8.
2. Follow steps 1 – 7 in the Applying a Patch Interactively section.
3. Run the AutoPatch command, adding the following parameters: location of the defaults file (defaultsfile=), a name for the log file (logfile=), location of the patch top directory (patchtop=), name of the driver file (driver=), number of workers to use for applying the patch (workers=), and interactive=no.
For example, if the defaults file is APPL_TOP/admin/testdb1/def.txt, the driver file is u1234567.drv for patch 1234567 (located in APPL_TOP/patches/1234567), you will use three parallel workers, and the AutoPatch log file name is 1234567.log, you would enter the following.
UNIX:
$ adpatch defaultsfile=$APPL_TOP/admin/testdb1/def.txt logfile=1234567.log \ patchtop=$APPL_TOP/patches/1234567 driver=u1234567.drv workers=3 \ interactive=no
Windows:
C:\> adpatch defaultsfile=%APPL_TOP%\admin\testdb1\def.txt \ logfile=1234567.log patchtop=%APPL_TOP%\patches\1234567 \ driver=u1234567.drv workers=3 interactive=no
4. Perform the remaining steps in the Applying a Patch Interactively section (as necessary).

Performing Non-interactive Patching
5-10 Oracle Applications Patching Procedures
Applying a Non-standard Patch
Business RequirementI need to apply a patch that was not created with the standard patch naming convention. I would like to apply it non-interactively.
DiscussionA non-standard patch is one where the structure is standard, but the naming convention is not. That is, the last component of the patch directory is not a 6- to 8-digit number, or the patch driver files are not named *<patchnum>.drv, or both. Most merged patches are non-standard because of the way they are named.
ActionComplete the following steps:
1. Create the defaults file as described in Applying a Patch Non-interactively on page 5-8.
2. Follow steps 1 – 7 in the Applying a Patch Interactively section.
3. Run the AutoPatch command as described in Applying a Single Patch Driver on page 5-9. For the driver=<values> argument, use a comma-separated list of the patch driver names.
4. Perform the remaining steps in the Applying a Patch Interactively section (as necessary).
Restarting a Non-interactive AutoPatch Session
Business RequirementAutoPatch errored out while I was applying patches non-interactively. I have resolved the issue that caused the error and want to restart the failed session.
DiscussionWhen AutoPatch is running non-interactively and encounters an error, it exits to the operating system and reports a failure. The restart argument is intended specifically for this circumstance. When AutoPatch sees the restart=yes argument, it assumes that there is an old session, and expects to find one. If it cannot, it will fail. Do not indicate restart=yes to start a new AutoPatch session.
ActionComplete the following steps:
1. Look through the log files, diagnose the error, and fix it.
2. Use the same command line options that you used initially, but add restart=yes. As an example, here is the command to restart the Applying a Single Patch Driver example:
UNIX:
Note: If you are applying all drivers for a patch non-interactively on a multi-node system, you must apply the patch on the administration server before you apply it on other servers.
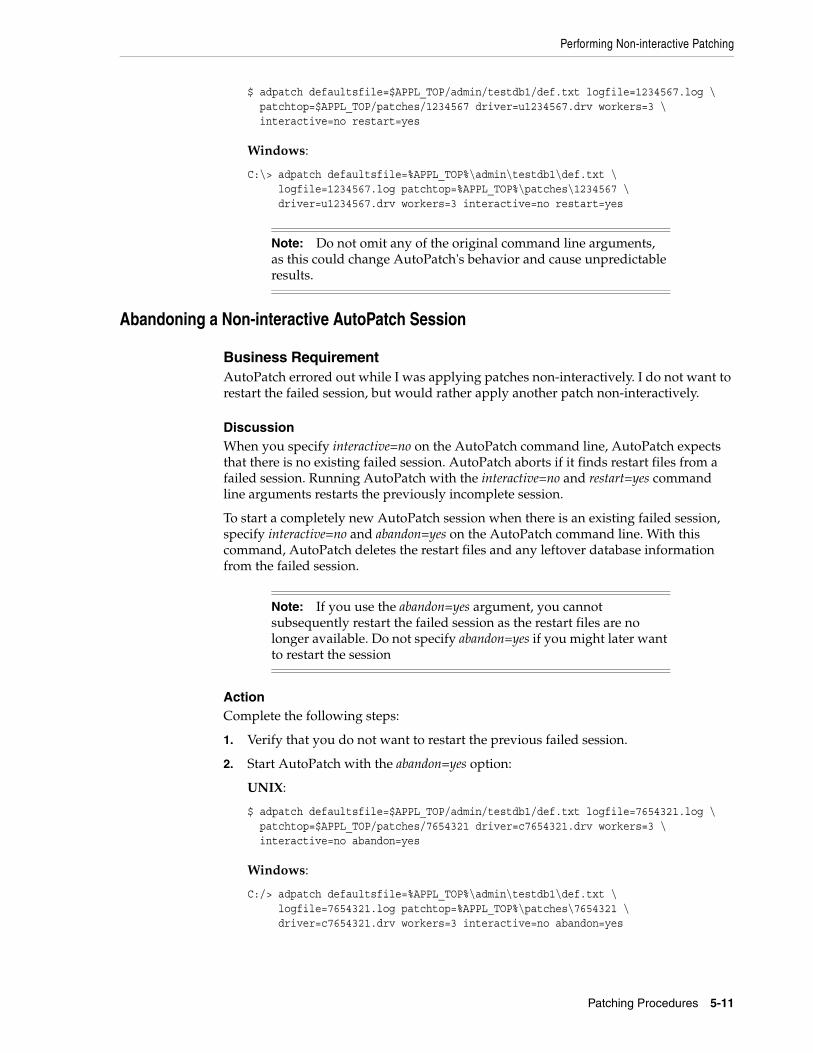
Performing Non-interactive Patching
Patching Procedures 5-11
$ adpatch defaultsfile=$APPL_TOP/admin/testdb1/def.txt logfile=1234567.log \ patchtop=$APPL_TOP/patches/1234567 driver=u1234567.drv workers=3 \ interactive=no restart=yes
Windows:
C:\> adpatch defaultsfile=%APPL_TOP%\admin\testdb1\def.txt \ logfile=1234567.log patchtop=%APPL_TOP%\patches\1234567 \ driver=u1234567.drv workers=3 interactive=no restart=yes
Abandoning a Non-interactive AutoPatch Session
Business RequirementAutoPatch errored out while I was applying patches non-interactively. I do not want to restart the failed session, but would rather apply another patch non-interactively.
DiscussionWhen you specify interactive=no on the AutoPatch command line, AutoPatch expects that there is no existing failed session. AutoPatch aborts if it finds restart files from a failed session. Running AutoPatch with the interactive=no and restart=yes command line arguments restarts the previously incomplete session.
To start a completely new AutoPatch session when there is an existing failed session, specify interactive=no and abandon=yes on the AutoPatch command line. With this command, AutoPatch deletes the restart files and any leftover database information from the failed session.
ActionComplete the following steps:
1. Verify that you do not want to restart the previous failed session.
2. Start AutoPatch with the abandon=yes option:
UNIX:
$ adpatch defaultsfile=$APPL_TOP/admin/testdb1/def.txt logfile=7654321.log \ patchtop=$APPL_TOP/patches/7654321 driver=c7654321.drv workers=3 \ interactive=no abandon=yes
Windows:
C:/> adpatch defaultsfile=%APPL_TOP%\admin\testdb1\def.txt \ logfile=7654321.log patchtop=%APPL_TOP%\patches\7654321 \ driver=c7654321.drv workers=3 interactive=no abandon=yes
Note: Do not omit any of the original command line arguments, as this could change AutoPatch's behavior and cause unpredictable results.
Note: If you use the abandon=yes argument, you cannot subsequently restart the failed session as the restart files are no longer available. Do not specify abandon=yes if you might later want to restart the session
Patching NLS Systems
5-12 Oracle Applications Patching Procedures
Patching NLS SystemsThese patching procedures apply regardless of whether you are running American English (US) and one additional language, or American English (US) and several additional languages. If your system uses multiple languages, you can use AD Merge Patch to create merged patches in the following ways:
■ A single, merged patch that contains all languages (including US)
■ One merged patch for US and a second merged patch for all other languages
■ A separate merged patch for each language
The first option is easiest because there is only one patch to apply, however, it has the longest system downtime of the three options, as the patch can be large. The second option is relatively easy to apply and allows you to bring US users back online while you apply the patch for non-US languages. The third option is the most difficult to apply but allows you to bring users for various non-US languages back online in a phased approach, which could be useful for multi-national corporations in some situations. Oracle generally recommends the second option because it provides the best compromise between easy application and minimum downtime.
When merging multiple language patches, AD Merge Patch converts the character set according to the NLS_LANG variable in the Oracle Applications environment file. If you changed your character set since the initial installation, you might need to update the NLS_LANG variable. If this variable is not set properly, run OAM AutoConfig to update the Oracle Applications context with the correct character set information, then run the AutoConfig script to recreate the Oracle Applications environment file. Reset the environment using the new environment file before merging patches.
Applying a Single Patch to an NLS Installation
Business RequirementI need to apply a single patch to an Oracle Applications NLS installation.
DiscussionIf an Oracle Applications system contains languages other than American English (US), the recommended method is to apply the US patch first and then apply the translation patch for each installed language. If you have installed more than one additional language, you can merge all the translation patches and apply them as a single, merged NLS patch.
You can also merge US patches with the additional language patches. However, depending on your downtime window and your system topology, it may be necessary to keep the US and non-US patches separate. (See Applying an Emergency NLS Patch on page 5-13).
ActionThis procedure assumes that you will apply US and language patches separately.
1. Use AutoPatch to apply the patch driver of the US patch.
Additional Information: See AD Merge Patch on page 3-12. See also Managing Configuration Parameters in Oracle Applications Maintenance Utilities.
Patching NLS Systems
Patching Procedures 5-13
2. Use AutoPatch to apply the patch drivers of each NLS patch. If you have merged the individual NLS patches for a system that runs multiple languages, apply the driver for the merged NLS patch.
Applying Multiple Patches to an NLS Installation
Business RequirementI need to apply several patches to an Oracle Applications NLS installation.
DiscussionIf an Oracle Applications system contains multiple languages other than American English (US) and you are applying multiple patches for each language, the recommended method is to merge all US patches into a single patch and all patches for every non-US language into a single patch. Then, apply the merged US patch followed by the merged language patch.
You can also merge US patches with the additional language patches or merge each language in separate language-specific patches. Depending on your downtime window and your system topology, it may be necessary to keep the US and non-US patches separate. This procedure assumes that you will apply US and language patches separately.
ActionPerform the following steps. The example assumes the system has American English, French, and German installed.
1. Use AD Merge Patch to merge the US (American English) patches into a single patch.
2. Use AD Merge Patch to merge the French and German patches into a single NLS patch.
3. Use AutoPatch to apply all drivers of the merged US patch.
4. Use AutoPatch to apply all drivers of the merged NLS patch.
Applying an Emergency NLS Patch
Business RequirementI do not want to shut down my system to apply all the translation patches.
DiscussionWhen applying a patch that requires a language translation, you can defer the application of the database portion of the translation driver until after you have applied the other drivers. This allows the system to be available to all users during the time the language translation is being applied. Remember that you can merge NLS patches if you have several to apply.
Additional Information: See Applying a Patch Interactively on page 5-2.
Additional Information: See Applying an Emergency NLS Patch on page 5-13.
Applying Patches to a Multi-node System
5-14 Oracle Applications Patching Procedures
ActionComplete the following steps:
1. Shut down the system (all services) and log off users.
2. Enable Maintenance Mode.
3. Apply the US copy portion of the unified driver to all servers.
4. Apply the US database portion of the unified driver to the administration server.
5. Apply the US generate portion of the unified driver to all servers.
6. Disable Maintenance Mode.
7. Bring up the system and allow US users to log on.
8. Apply the translation copy portion of the unified driver to all servers using options=hotpatch on the command line.
9. Apply the translation generate portion of the unified driver to all servers using options=hotpatch on the command line.
10. Allow translation users to log on.
11. Apply the translation database portion of the unified driver to the administration server using options=hotpatch on the command line.
Applying Patches to a Multi-node SystemIn a multi-node system, servers are installed on more than one node. The core technology directories (admin, ad, au, and fnd) and all product directories are installed under the APPL_TOP on all nodes, except for any node that contains only a RDBMS. You can maintain the APPL_TOPs separately, or you can configure your system to share an APPL_TOP.
In a shared application tier file system, the APPL_TOP, COMMON_TOP, 10.1.2 Oracle home, and 10.1.3 Oracle home file systems are installed on a shared disk resource mounted to each node in the system. Any changes made to a shared file system are immediately available on all nodes.
Running a Unified Driver on Multiple Nodes
Business Requirement How do I run a unified driver patch on a multi-node system?
DiscussionApply the unified driver to all APPL_TOPs, and AutoPatch sorts out which actions in the unified driver are required for the current APPL_TOP.
Additional Information: See Creating a Merged Patch on page 5-16.
Additional Information: See AutoPatch Options on page 3-9.
Additional Information: See Multi-node Systems in Installing Oracle Applications. See also Shared Application Tier File System in Oracle Applications Concepts and Patching the APPL_TOP in a Shared Application Tier File System on page 5-15.
Reducing Downtime
Patching Procedures 5-15
ActionApply the unified driver as follows:
1. Complete Steps 1 – 9 in the Applying a Patch Interactively section on page 5-2.
2. Apply the unified driver on the node where the administration server is located.
3. Apply the unified driver on the node where the concurrent processing server is located.
4. Start the concurrent managers.
5. Apply the unified driver on the remaining nodes in the application tier.
6. Disable Maintenance Mode.
Use the Change Maintenance Mode menu of AD Administration to disable maintenance mode. See Changing Maintenance Mode in Oracle Applications Maintenance Utilities.
7. Start other services and restart Web server, if necessary.
Patching the APPL_TOP in a Shared Application Tier File System
Business RequirementHow do I apply patches to a system with a shared application tier file system configuration?
DiscussionA traditional multi-node system requires the application tier file system on each node. In a shared application tier file system, the APPL_TOP, COMMON_TOP, 10.1.2 Oracle home, and 10.1.3 Oracle home file systems are installed on a shared disk resource mounted to each node in the system. These nodes can be used to provide standard application tier services, such as forms, Web, and concurrent processing. Any changes, including patching, made to a shared file system are immediately visible on all nodes.
Although it is possible to apply patches from any node, Oracle recommends you choose one node as primary and apply all patches from this node. When you choose a primary node, AutoPatch and AutoConfig log files are consistently written to the same location.
You can further reduce patching downtime by employing more than one node when applying patches. See Distributing the Processing Tasks on page 5-19 in this chapter.
ActionFor the APPL_TOP of a shared application tier file system, apply the patch once — as outlined in the Applying a Patch Interactively section of this chapter.
Reducing DowntimeThis section contains procedures designed to help reduce the time it takes to apply patches, and consequently reduce the time your system is offline and unavailable to users.
Reducing Downtime
5-16 Oracle Applications Patching Procedures
Creating a Merged Patch
Business RequirementI need to apply several patches. Is there a way to reduce the time it takes to apply them?
DiscussionYou can merge multiple patches into a single patch by using AD Merge Patch. This AD command line utility merges multiple AutoPatch-compatible patches into a single, integrated patch. After the merged patch is created, you use AutoPatch to apply it in a single operation. Applying a merged patch reduces the time it takes to complete the patching process.
In general, you can safely merge any Oracle Applications patch with another Oracle Applications patch. Patches can and should be merged with their listed prerequisite patches to make patch application easier.
However, patches that affect the Applications DBA (AD) product must be handled separately. AD patches can be merged with other AD patches, but AD patches and non-AD patches cannot be merged because AD patches may change the AutoPatch utility itself. Merged AD patches must be created separately and applied before you apply non-AD patches.
When merging patches on systems that use languages other than American English, different considerations apply. For information about merging and applying NLS patches, see Applying Multiple Patches to an NLS Installation on page 5-12.
ActionUse either the command-line procedure or the OAM (Web-based) procedure to create a merged patch.
Command-line procedure:Complete the following steps:
1. Create directories.
AD Merge Patch merges the set of files in individual patches under a source directory according to file revision and copies them to a destination directory. Run AD Merge Patch from the parent directory of the source directory. The destination directory should be located in the same parent directory.
In the patch top area, create a source directory and a destination directory. Choose any name for these directories.
Additional Information: See AD Merge Patch on page 3-12.
Note: AD Merge Patch cannot merge patches of different releases, different parallel modes, or different platforms. However, it can merge patches for a specific platform with a generic patch, or patches with different source character sets. AD Merge Patch notifies you if you try to merge incompatible patches.
Additional Information: See Source and Destination Directories on page 3-12 for information on setting up the directories.
Reducing Downtime
Patching Procedures 5-17
2. Download patches.
Download all the patches you want to merge to the source directory.
3. Review the patch README files.
Some patches require special attention and additional steps if the patch is to be merged. Carefully review the README file and follow the instructions.
4. Run AD Merge Patch.
The merged patch is created in the destination directory. Run AD Merge Patch and supply the arguments for the destination directory name, and the source directory name. Specify the merged patch name, or accept the default.
$ admrgpch -s <source directory> -d <destination directory>
You can merge patches before you unzip them by running AD Merge Patch with the -manifest command line argument. You must initially create a manifest file, which lists only the zip files. AD Merge Patch unzips these files into the source directory and includes them, along with any existing files in the source directory, in the merged patch. To use a manifest file, add the -manifest argument to the command line.
$ admrgpch -s <source directory> -d <destination directory> \-merge_name <name> [-manifest <manifest filename>]
5. Check AD Merge Patch log files.
After AD Merge Patch runs, check the admrgpch.log file for errors. The file is located in the current working directory (where AD Merge Patch was run).
6. Apply the patch.
After a merged patch is created, apply it just like a single patch, either interactively or non-interactively. If you apply it non-interactively, follow the instructions for Applying a Non-standard Patch on page 5-10.
OAM (Web-based) procedure:Complete the following steps:
1. Access the Oracle Applications Manager.
Follow the instructions in Accessing Patch Wizard on page 2-3 to access OAM.
2. From the Patch Wizard Tasks table, click the Tasks icon corresponding to Download Patches.
The Download Patches page appears.
Note: If you do not want to create a manifest file, unzip all the patches to be merged into the source directory. Omit the manifest file argument.
Additional Information: See Merging Zipped Patches on page 3-13 for information on creating a manifest file.
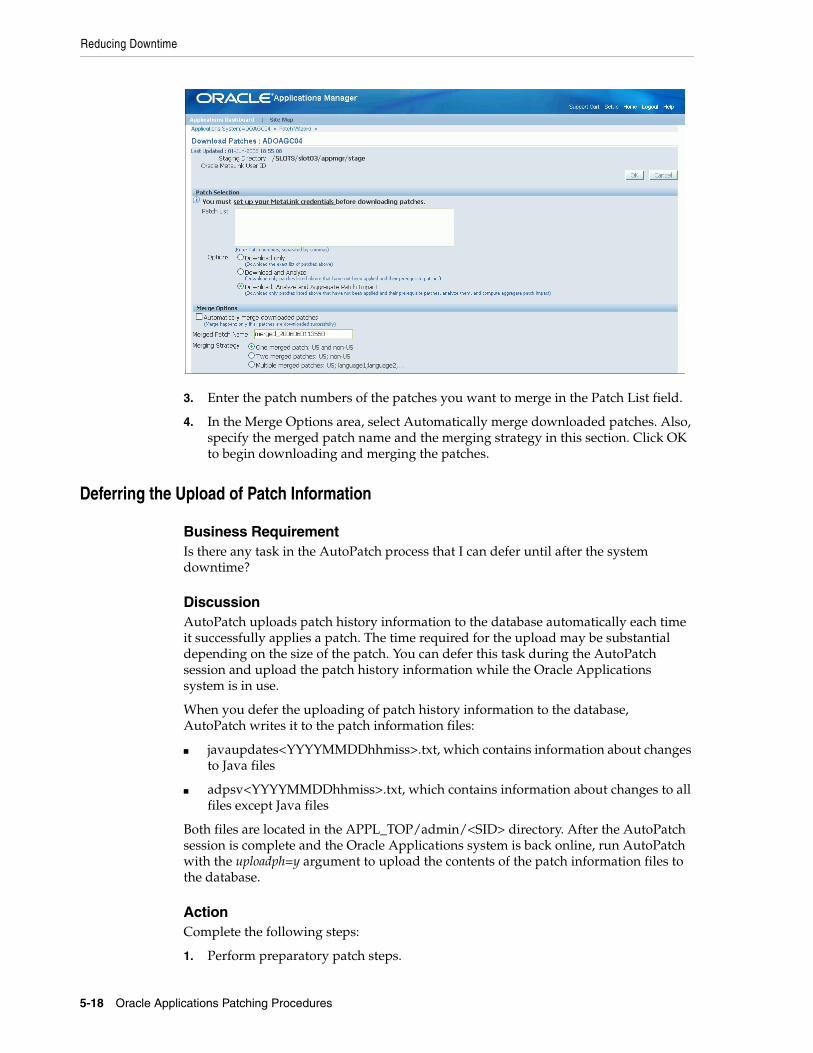
Reducing Downtime
5-18 Oracle Applications Patching Procedures
3. Enter the patch numbers of the patches you want to merge in the Patch List field.
4. In the Merge Options area, select Automatically merge downloaded patches. Also, specify the merged patch name and the merging strategy in this section. Click OK to begin downloading and merging the patches.
Deferring the Upload of Patch Information
Business RequirementIs there any task in the AutoPatch process that I can defer until after the system downtime?
DiscussionAutoPatch uploads patch history information to the database automatically each time it successfully applies a patch. The time required for the upload may be substantial depending on the size of the patch. You can defer this task during the AutoPatch session and upload the patch history information while the Oracle Applications system is in use.
When you defer the uploading of patch history information to the database, AutoPatch writes it to the patch information files:
■ javaupdates<YYYYMMDDhhmiss>.txt, which contains information about changes to Java files
■ adpsv<YYYYMMDDhhmiss>.txt, which contains information about changes to all files except Java files
Both files are located in the APPL_TOP/admin/<SID> directory. After the AutoPatch session is complete and the Oracle Applications system is back online, run AutoPatch with the uploadph=y argument to upload the contents of the patch information files to the database.
ActionComplete the following steps:
1. Perform preparatory patch steps.
Reducing Downtime
Patching Procedures 5-19
2. Apply the patch by running AutoPatch with the defer patch history information upload option.
$ adpatch options=phtofile
3. After the patch session is complete, disable maintenance mode, start all services and allow users to access the system.
4. Run AutoPatch with the upload patch history information argument.
$ adpatch uploadph=y
AutoPatch uploads the patch history information to the database and exits.
Distributing the Processing Tasks
Business RequirementHow can I use the processing capacity on the other nodes in my system when I apply a patch?
DiscussionCreating a multi-node system with a shared application tier file system saves patching time because you apply patches only once, on the primary node. However, when applying a patch that includes a large number of processes that affect the database, you can reduce the downtime even further by distributing the worker processes across multiple servers on multiple nodes.
This distributed AD feature of AutoPatch and AD Controller allows you to assign workers to run not only on the primary node but also on the secondary nodes that share the application tier file system.
ActionComplete the following steps:
1. Start AutoPatch on the primary node with the following command options:
$ adpatch workers=<total number of workers> localworkers=<number of workers on primary node>
For example, this command runs an AutoPatch session with three workers on the primary node and five workers on a remote note:
$ adpatch workers=8 localworkers=3
2. Start an interactive AD Controller session on each of the secondary nodes that will run workers by using the distributed=y argument.
$ adctrl distributed=y
3. On each secondary node, AD Controller prompts for the range of workers to start. For example, to start workers 5 through 8 on a node, enter "5-8" in response to the "Enter the worker range" prompt.
Additional Information: See Applying a Patch Interactively on page 5-2.
Additional Information: See Distributing Processing Tasks Across Nodes in Chapter 1 of Oracle Applications Maintenance Utilities.
Reducing Downtime
5-20 Oracle Applications Patching Procedures
Enter the worker range: 5-8
Using a Staged Applications System
Business RequirementHow can I reduce the time my system is down when I apply large patches?
DiscussionA staged Oracle Applications system represents an exact copy (clone) of your production system, including all APPL_TOPs as well as a copy of the production database. You can apply patches to a staged system while the production system remains in operation. Then, you connect the staged system to the production system, update the database, and synchronize the APPL_TOPs.
The downtime for the production system begins only after all patches have been successfully applied to the staged system, and you have tested the newly patched environment.
After the patches are applied to the staged system, and the production system is updated, you must export applied patches information from the staged system and import it to the production system. This ensures that the OAM patch history database in the production system is up-to-date and that you can continue to use patch-related features.
ActionThere are several phases to creating a staged system, patching it, and updating the production system.
Complete Prerequisite Tasks:A staged system must be an exact duplicate of the production system. Each physical APPL_TOP in the production system must exist in the staged system. Note the following conditions:
■ The APPL_TOPs in the staged system must have the same name as the APPL_TOPs in the production system to ensure consistency of the patching history in the production system. When patch history data is imported from the staged system to the production system, it must have the same APPL_TOP names.
■ The database in the staged system should have a different <SID> to avoid accidental connections to the production system. Passwords, ports, and any process or service-related parameters can be changed to further reduce risks.
■ You must have different Oracle Applications system names for the staged and the production systems. AutoPatch will correct the historical information.
Note: Workers must be in contiguous groups. For example, you cannot start workers 4, 6, 8 on one node, and 5, 7, 9 on another.
Caution: The AD minipack level of the staged system and the production system must be identical. You cannot use a staged system to apply AD minipacks or new product patches associated with a maintenance pack.
Reducing Downtime
Patching Procedures 5-21
Complete the following tasks:
1. Update the production system snapshot.
Verify that your system current view snapshot is up-to-date by running the Maintain Current Snapshot task in AD Administration. Run the task on all APPL_TOPs in your system. See Maintain Applications Files Tasks in Chapter 4 of Oracle Applications Maintenance Utilities.
2. Create the staged system.
Create a clone of the production database, the application tier components, and each APPL_TOP to use as the staged system. See Cloning in Oracle Applications Maintenance Procedures.
Apply Patches to the Staged System:You patch the staged system in the same way that you patch any other system by using AutoPatch to apply the patch drivers. See AutoPatch on page 3-1 and Performing Interactive Patching on page 5-1 for details. If you need to apply more than one patch, consider merging the patches to further reduce downtime.
While you are completing this phase, do not apply any other patches to the production system. If you do, you will have to recreate the staged system.
Apply Patches to the Production System:After the patching is complete on the staged system, you are ready to update the production system.
1. Enable a connection from the staged system to the production system.
Add the production system information to the tnsnames file on the staged system. Update the s_ifile AutoConfig variable in the APPL_TOP context file on the staged system to "<iAS Oracle Home>/network/admin/globaltns.ora". See Managing Configuration Parameters in Chapter 1 of Oracle Applications Maintenance Procedures for instructions on updating configuration parameters and variables.
2. Shut down the production system.
On the production system, set the environment, shut down all services, and enable maintenance mode.
3. Update the production database.
On the staged system, set the environment, then run AutoPatch from the Administration server to apply patches to the production system.
For each patch, apply the driver for the patch with the options=nocopyportion,nogenerateportion options to the AutoPatch start command (adpatch). Make sure the database name in the AutoPatch prompt is correct.
4. Update the Production APPL_TOPs.
Synchronize all the production APPL_TOPs with the staged APPL_TOPs. To minimize downtime, you can complete this task while the production database is being updated. You can do a simple copy or use utilities such as rdist, rcp, cp, or zip.
Note these conditions:
■ If your staged system contains multiple APPL_TOPs, you must synchronize each one to the respective APPL_TOP on the production system.
Reducing Downtime
5-22 Oracle Applications Patching Procedures
■ If you share a single APPL_TOP, you need to synchronize only one APPL_TOP.
■ The COMMON_TOP directory, which may reside outside the APPL_TOP, must be updated for each APPL_TOP.
Certain configuration files, log directories, and environment scripts are specific to an APPL_TOP. You do not have to copy the following files and directories when you copy the APPL_TOP:
$APPL_TOP/admin/<SID>$FND_TOP/out$FND_TOP/log$COMMON_TOP/html/_pages$APPL_TOP/log/
If you use the rdist utility, you can use a distfile to exclude these files. Run AutoConfig on the production APPL_TOP to configure the environment.
Create a Complete Production Patch History:At this point, the copy and generate portions of the patch history for patches applied to the staged system are stored in the staged system database, and the database portion of the patch history is stored in both the staged system database and the production system database. To create a complete copy of the patch history on the production system, use the adphmigr.pl utility to load the applied patches information from the copy and generate portions of all patches into the production database.
For each patch applied to the staged system, you must export patch history for each APPL_TOP in the staged system and import it for the corresponding APPL_TOP in the production system. Users do not have to log off the production system while you perform the import and export tasks. Finish consolidating the production system patch history before you apply any additional patches to it, or before you use any patch-related Oracle Applications Manager (OAM) features.
Complete these tasks:
1. Export applied patches information.
From the staged APPL_TOP, run the adphmigr.pl script (located in <AD_TOP>/bin). Enter adphmigr.pl -help to see all valid options for running the utility. Oracle recommends you export patch history separately for each APPL_TOP, as you will need to import it separately.
Specify nodatabaseportion=y on the command line to ensure that the patch history data for the database portion of the patches applied is not exported. For example:
$ perl $AD_TOP/bin/adphmigr.pl userid=apps/apps \startdate=’2003/10/10 00:00:00’ enddate=’2003/14/10 00:00:00’ \appsystemname=stage appltopname=tafnwl nodatabaseportion=Y
You can obtain the appsystemname and the appltopname by looking up the values of s_atName and s_systemname in the AutoConfig-generated environment xml file.
2. Verify export data.
The script generates two data files for each run of AutoPatch on the staged APPL_TOP, one for java updates and one for all other patch actions. Check adphmigr.log to ensure the data files represent the patch runs you wish to export, and that the start and end times specified did not include any unwanted AutoPatch runs.
Keeping Patches Current
Patching Procedures 5-23
3. Import applied patches information.
For each APPL_TOP in the production system, copy the data files extracted for the corresponding APPL_TOP in the staged system to the <APPL_TOP>/admin/<SID> directory. The next time you run AutoPatch in this APPL_TOP, it will automatically upload these files.
To load the files immediately, run AutoPatch interactively, answer the prompts until you are prompted for the name of the patch driver file. At that point, exit AutoPatch by entering abort at the patch driver file prompt.
Keeping Patches CurrentEach time you apply a patch, AutoPatch stores the associated information in the Oracle Applications Manager (OAM) patch history database. The OAM Patch Wizard and Applied Patches tools provide graphical user interfaces that you can use to query the database for a complete history of patches applied to your system, to search for the patches you have already applied, and to determine existing patches that should be applied to keep your system current.
Patch Wizard determines which recommended patches you should apply to your system, and the impact of applying these patches. Before running Patch Wizard, you must set up OracleMetaLink credentials and download a Patch Information Bundle. This Patch Information Bundle is updated daily and contains the list of recommended patches, as well as associated metadata.
You must also set up preferences and filters that govern the way you download patches. To see how to complete these one-time tasks, as well as learn about navigating the Patch Wizard pages and submitting requests, see Patch Wizard on page 2-1.
Creating a List of Recommended Patches
Business RequirementHow do I determine if there are patches that I have not yet applied?
DiscussionPatch Wizard creates a list of patches by comparing the patches in the patch history database against a list of recommended patches in a Patch Information Bundle that you download from OracleMetaLink before you run Patch Wizard.
Patch Wizard determines which of the recommended patches you should apply to your system. It reports the contents of the patch and the files that it will update when applied. It does not report on all available patches, but only patches at the current codeline, such as high-priority patches, and those that update your system to a new codeline (maintenance packs, family packs, and minipacks).
Note: The FNDLOAD method of transferring patch history is no longer recommended. The adphmigr.pl script method is easier to use and more efficient.
Note: To use Patch Wizard, you need to define filters and set up preferences. See Patch Wizard on page 2-1 for instructions.
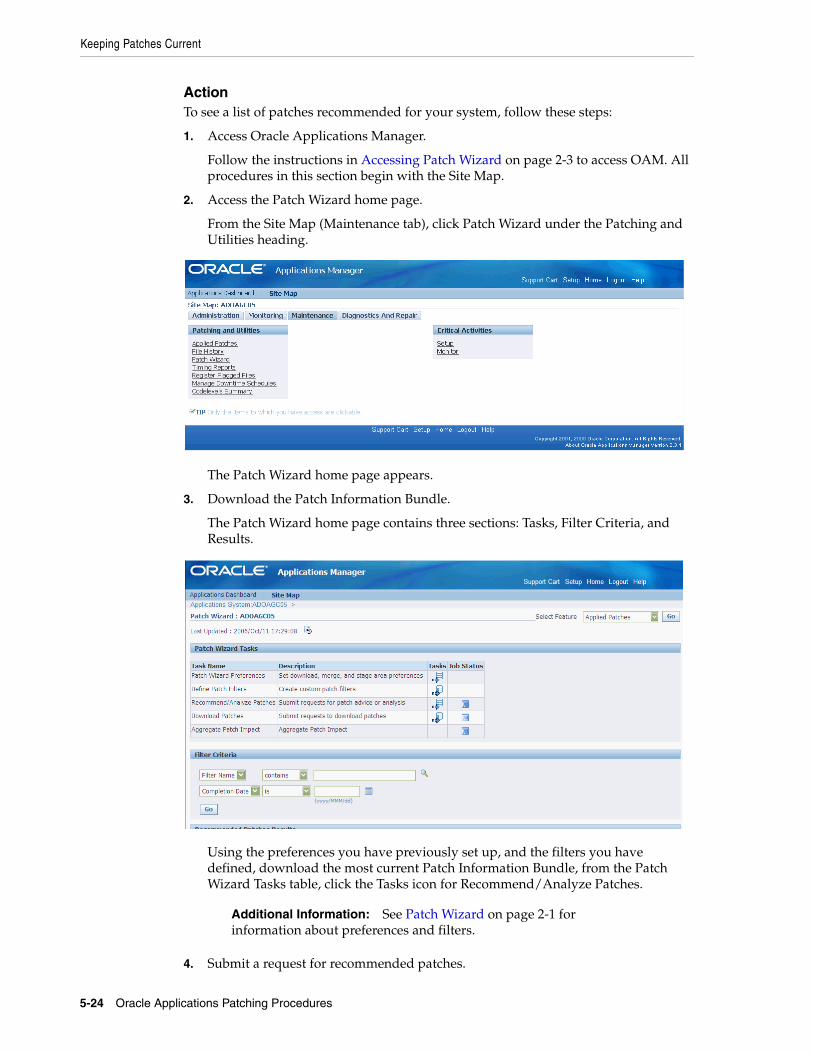
Keeping Patches Current
5-24 Oracle Applications Patching Procedures
ActionTo see a list of patches recommended for your system, follow these steps:
1. Access Oracle Applications Manager.
Follow the instructions in Accessing Patch Wizard on page 2-3 to access OAM. All procedures in this section begin with the Site Map.
2. Access the Patch Wizard home page.
From the Site Map (Maintenance tab), click Patch Wizard under the Patching and Utilities heading.
The Patch Wizard home page appears.
3. Download the Patch Information Bundle.
The Patch Wizard home page contains three sections: Tasks, Filter Criteria, and Results.
Using the preferences you have previously set up, and the filters you have defined, download the most current Patch Information Bundle, from the Patch Wizard Tasks table, click the Tasks icon for Recommend/Analyze Patches.
4. Submit a request for recommended patches.
Additional Information: See Patch Wizard on page 2-1 for information about preferences and filters.
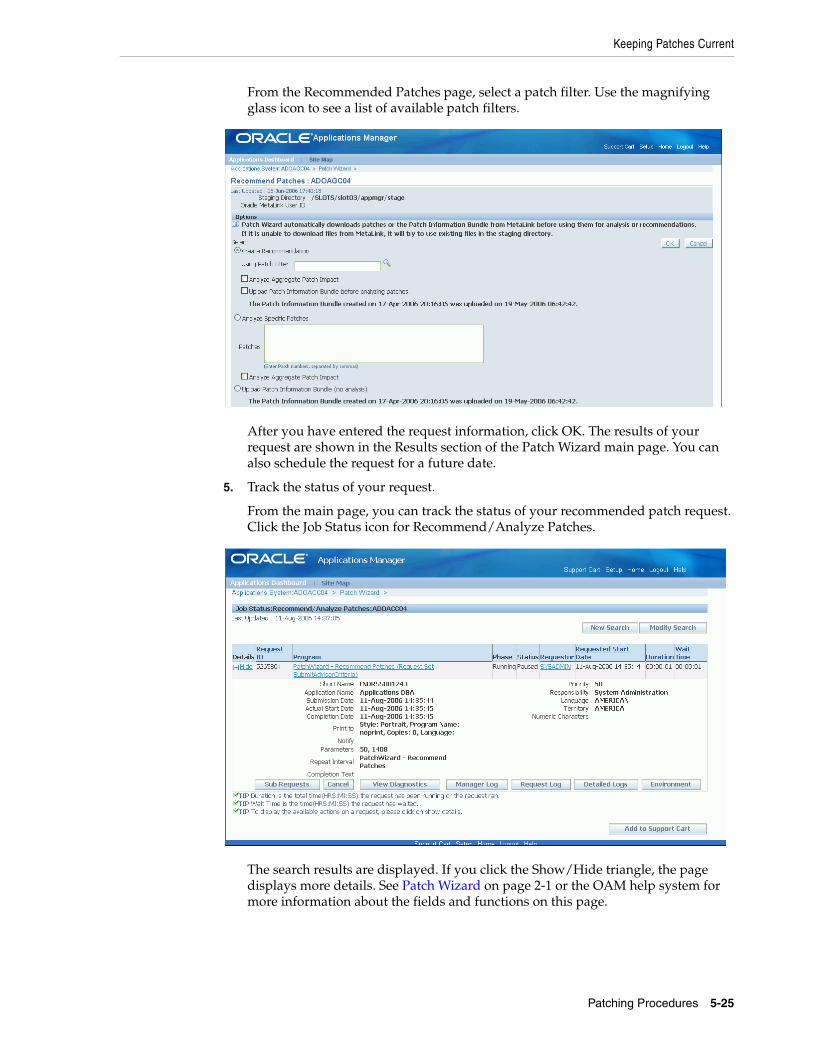
Keeping Patches Current
Patching Procedures 5-25
From the Recommended Patches page, select a patch filter. Use the magnifying glass icon to see a list of available patch filters.
After you have entered the request information, click OK. The results of your request are shown in the Results section of the Patch Wizard main page. You can also schedule the request for a future date.
5. Track the status of your request.
From the main page, you can track the status of your recommended patch request. Click the Job Status icon for Recommend/Analyze Patches.
The search results are displayed. If you click the Show/Hide triangle, the page displays more details. See Patch Wizard on page 2-1 or the OAM help system for more information about the fields and functions on this page.
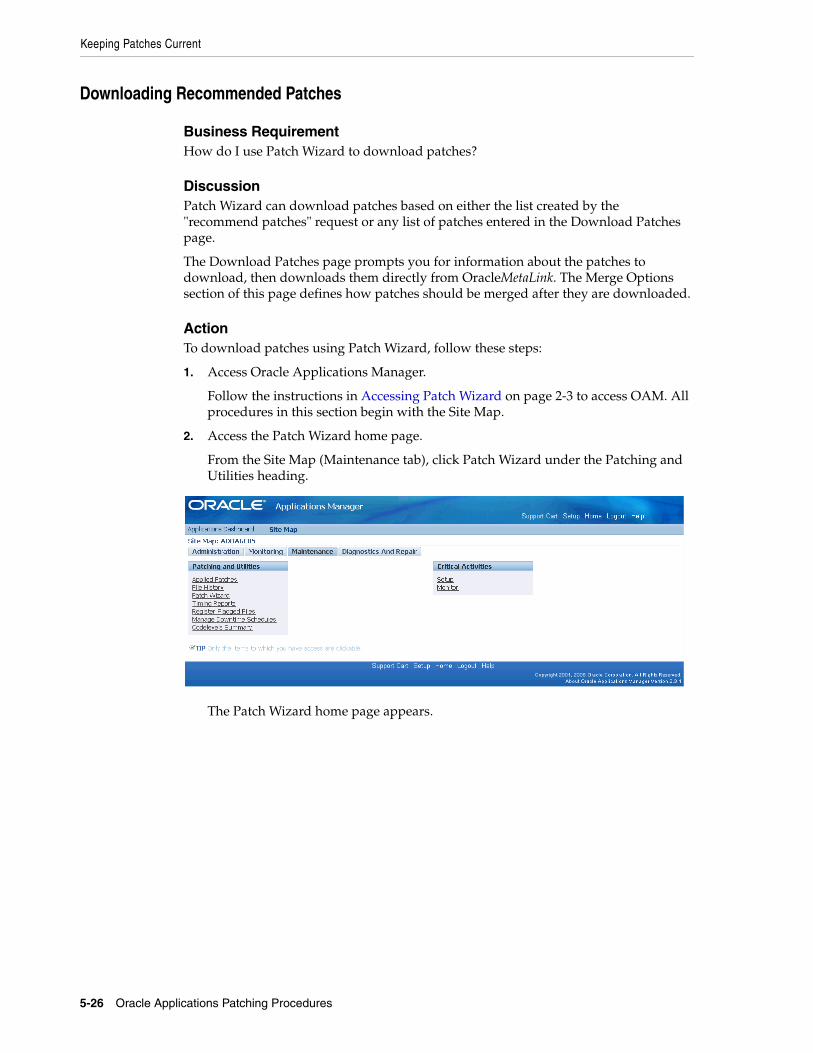
Keeping Patches Current
5-26 Oracle Applications Patching Procedures
Downloading Recommended Patches
Business RequirementHow do I use Patch Wizard to download patches?
DiscussionPatch Wizard can download patches based on either the list created by the "recommend patches" request or any list of patches entered in the Download Patches page.
The Download Patches page prompts you for information about the patches to download, then downloads them directly from OracleMetaLink. The Merge Options section of this page defines how patches should be merged after they are downloaded.
ActionTo download patches using Patch Wizard, follow these steps:
1. Access Oracle Applications Manager.
Follow the instructions in Accessing Patch Wizard on page 2-3 to access OAM. All procedures in this section begin with the Site Map.
2. Access the Patch Wizard home page.
From the Site Map (Maintenance tab), click Patch Wizard under the Patching and Utilities heading.
The Patch Wizard home page appears.
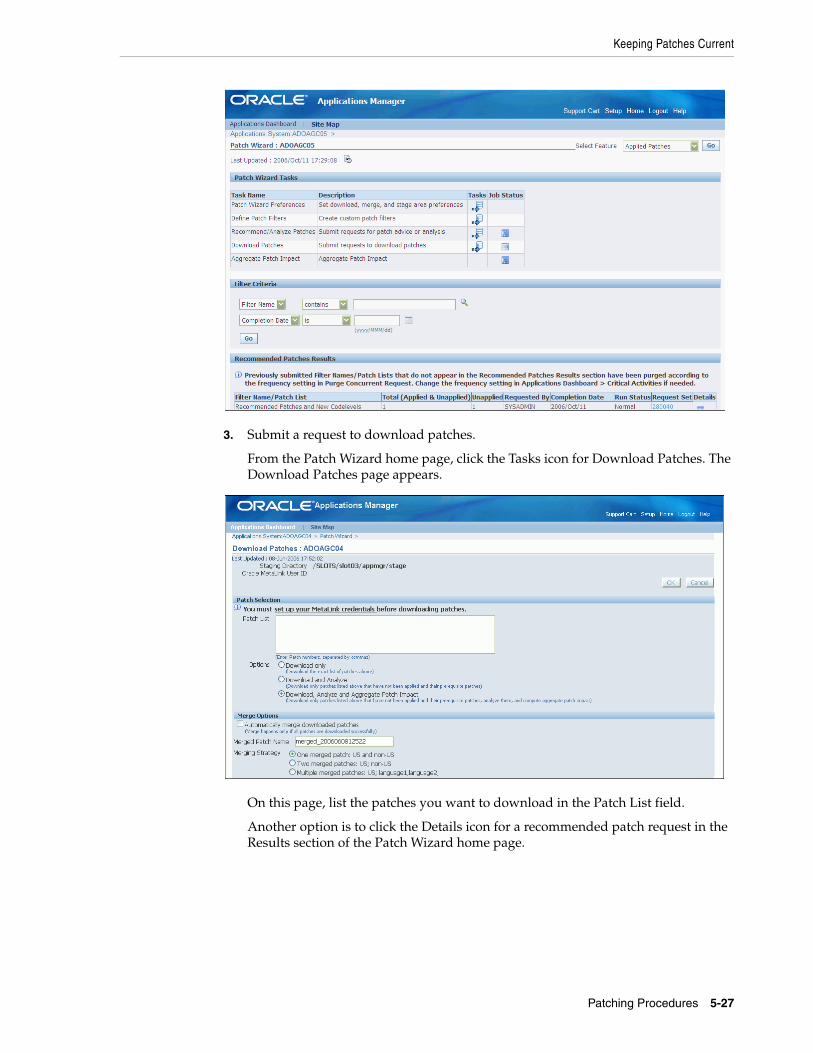
Keeping Patches Current
Patching Procedures 5-27
3. Submit a request to download patches.
From the Patch Wizard home page, click the Tasks icon for Download Patches. The Download Patches page appears.
On this page, list the patches you want to download in the Patch List field.
Another option is to click the Details icon for a recommended patch request in the Results section of the Patch Wizard home page.
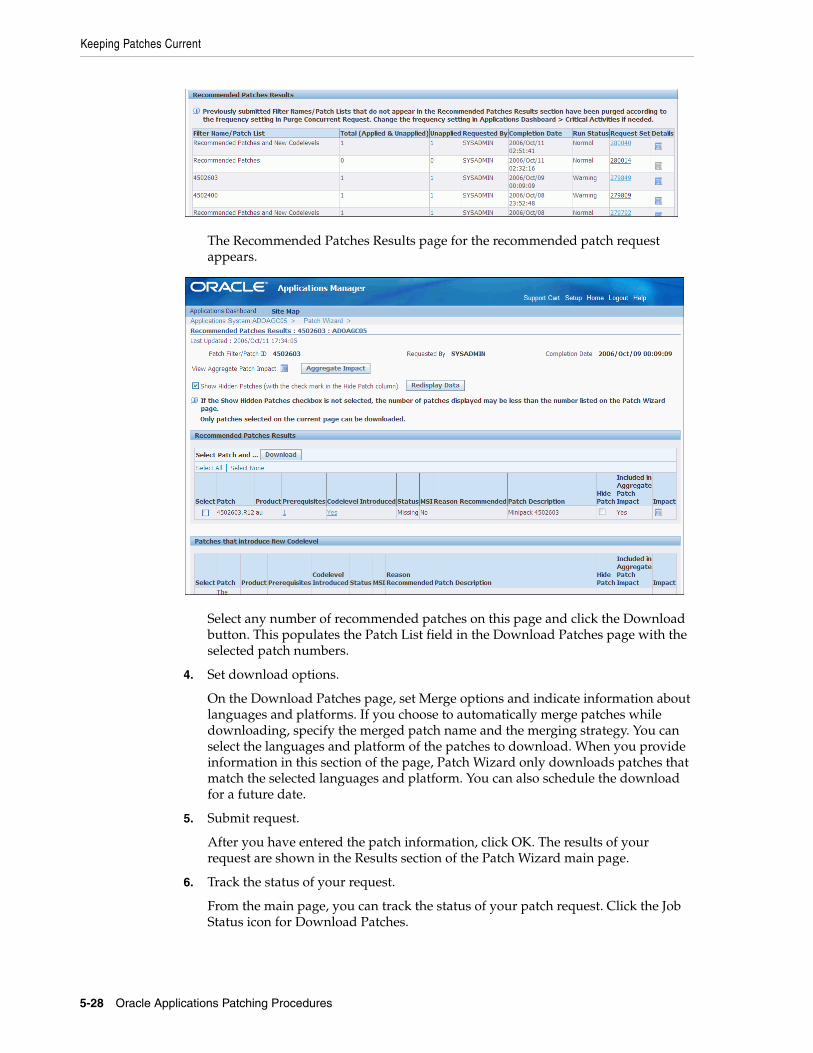
Keeping Patches Current
5-28 Oracle Applications Patching Procedures
The Recommended Patches Results page for the recommended patch request appears.
Select any number of recommended patches on this page and click the Download button. This populates the Patch List field in the Download Patches page with the selected patch numbers.
4. Set download options.
On the Download Patches page, set Merge options and indicate information about languages and platforms. If you choose to automatically merge patches while downloading, specify the merged patch name and the merging strategy. You can select the languages and platform of the patches to download. When you provide information in this section of the page, Patch Wizard only downloads patches that match the selected languages and platform. You can also schedule the download for a future date.
5. Submit request.
After you have entered the patch information, click OK. The results of your request are shown in the Results section of the Patch Wizard main page.
6. Track the status of your request.
From the main page, you can track the status of your patch request. Click the Job Status icon for Download Patches.
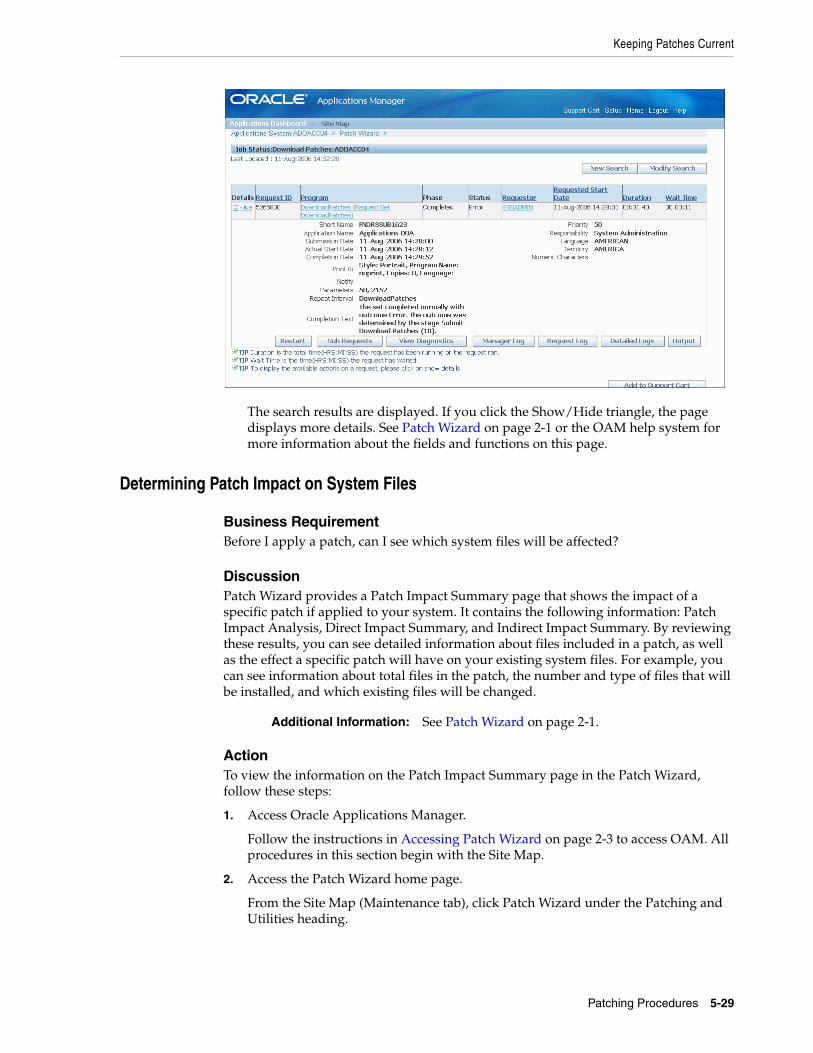
Keeping Patches Current
Patching Procedures 5-29
The search results are displayed. If you click the Show/Hide triangle, the page displays more details. See Patch Wizard on page 2-1 or the OAM help system for more information about the fields and functions on this page.
Determining Patch Impact on System Files
Business RequirementBefore I apply a patch, can I see which system files will be affected?
DiscussionPatch Wizard provides a Patch Impact Summary page that shows the impact of a specific patch if applied to your system. It contains the following information: Patch Impact Analysis, Direct Impact Summary, and Indirect Impact Summary. By reviewing these results, you can see detailed information about files included in a patch, as well as the effect a specific patch will have on your existing system files. For example, you can see information about total files in the patch, the number and type of files that will be installed, and which existing files will be changed.
ActionTo view the information on the Patch Impact Summary page in the Patch Wizard, follow these steps:
1. Access Oracle Applications Manager.
Follow the instructions in Accessing Patch Wizard on page 2-3 to access OAM. All procedures in this section begin with the Site Map.
2. Access the Patch Wizard home page.
From the Site Map (Maintenance tab), click Patch Wizard under the Patching and Utilities heading.
Additional Information: See Patch Wizard on page 2-1.
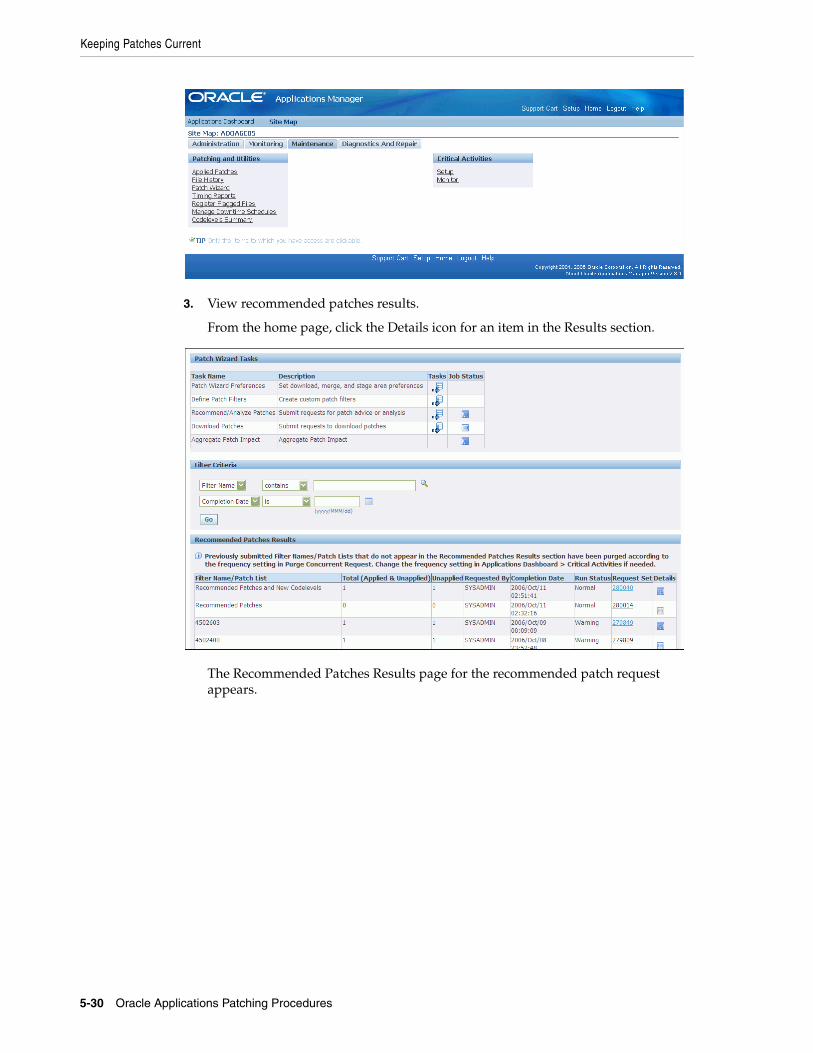
Keeping Patches Current
5-30 Oracle Applications Patching Procedures
3. View recommended patches results.
From the home page, click the Details icon for an item in the Results section.
The Recommended Patches Results page for the recommended patch request appears.
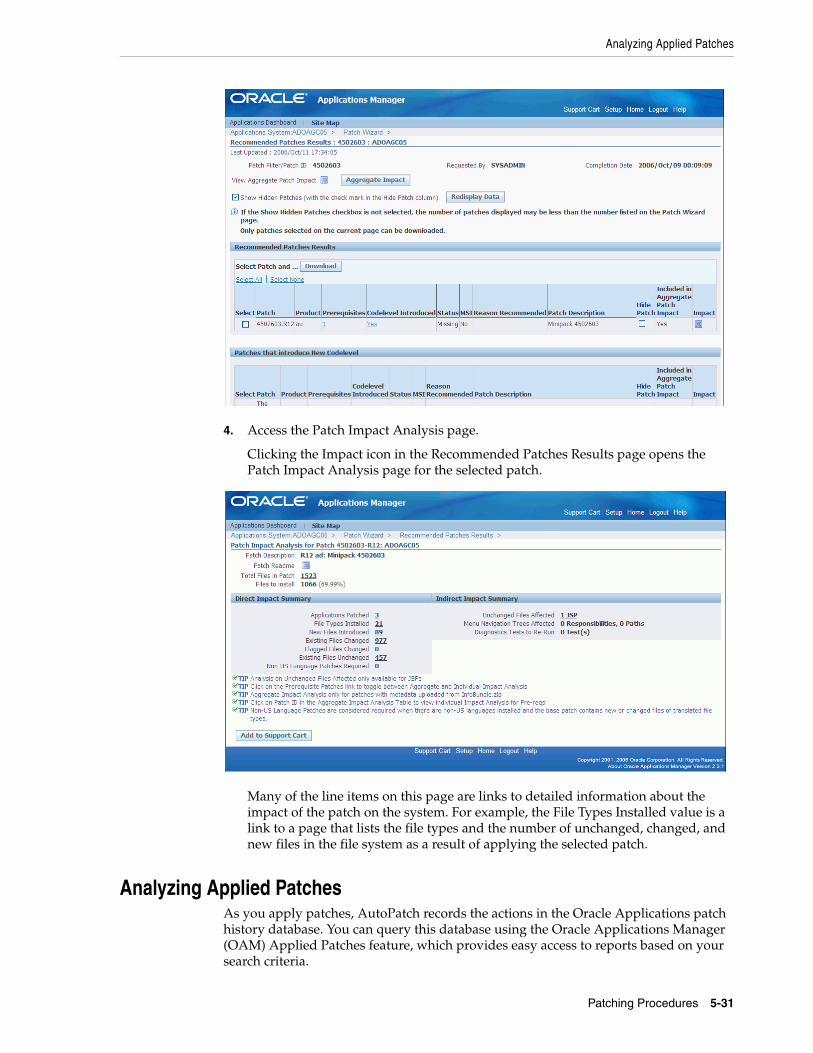
Analyzing Applied Patches
Patching Procedures 5-31
4. Access the Patch Impact Analysis page.
Clicking the Impact icon in the Recommended Patches Results page opens the Patch Impact Analysis page for the selected patch.
Many of the line items on this page are links to detailed information about the impact of the patch on the system. For example, the File Types Installed value is a link to a page that lists the file types and the number of unchanged, changed, and new files in the file system as a result of applying the selected patch.
Analyzing Applied PatchesAs you apply patches, AutoPatch records the actions in the Oracle Applications patch history database. You can query this database using the Oracle Applications Manager (OAM) Applied Patches feature, which provides easy access to reports based on your search criteria.
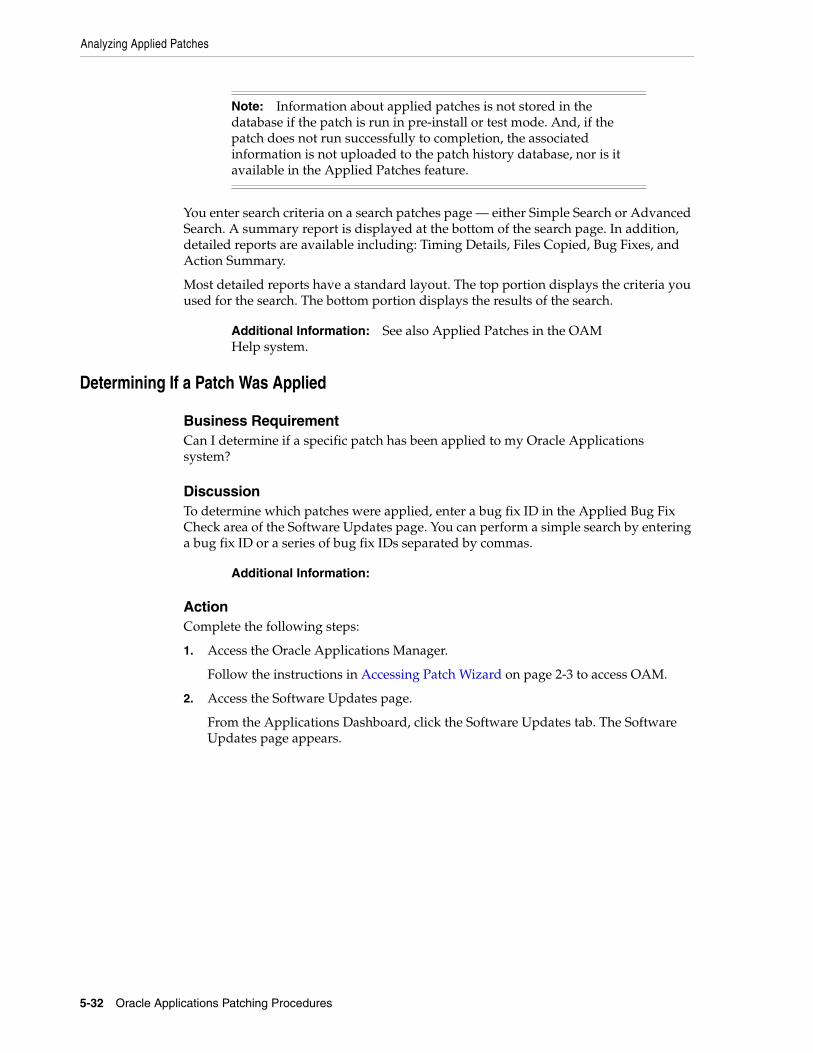
Analyzing Applied Patches
5-32 Oracle Applications Patching Procedures
You enter search criteria on a search patches page — either Simple Search or Advanced Search. A summary report is displayed at the bottom of the search page. In addition, detailed reports are available including: Timing Details, Files Copied, Bug Fixes, and Action Summary.
Most detailed reports have a standard layout. The top portion displays the criteria you used for the search. The bottom portion displays the results of the search.
Determining If a Patch Was Applied
Business RequirementCan I determine if a specific patch has been applied to my Oracle Applications system?
DiscussionTo determine which patches were applied, enter a bug fix ID in the Applied Bug Fix Check area of the Software Updates page. You can perform a simple search by entering a bug fix ID or a series of bug fix IDs separated by commas.
ActionComplete the following steps:
1. Access the Oracle Applications Manager.
Follow the instructions in Accessing Patch Wizard on page 2-3 to access OAM.
2. Access the Software Updates page.
From the Applications Dashboard, click the Software Updates tab. The Software Updates page appears.
Note: Information about applied patches is not stored in the database if the patch is run in pre-install or test mode. And, if the patch does not run successfully to completion, the associated information is not uploaded to the patch history database, nor is it available in the Applied Patches feature.
Additional Information: See also Applied Patches in the OAM Help system.
Additional Information:
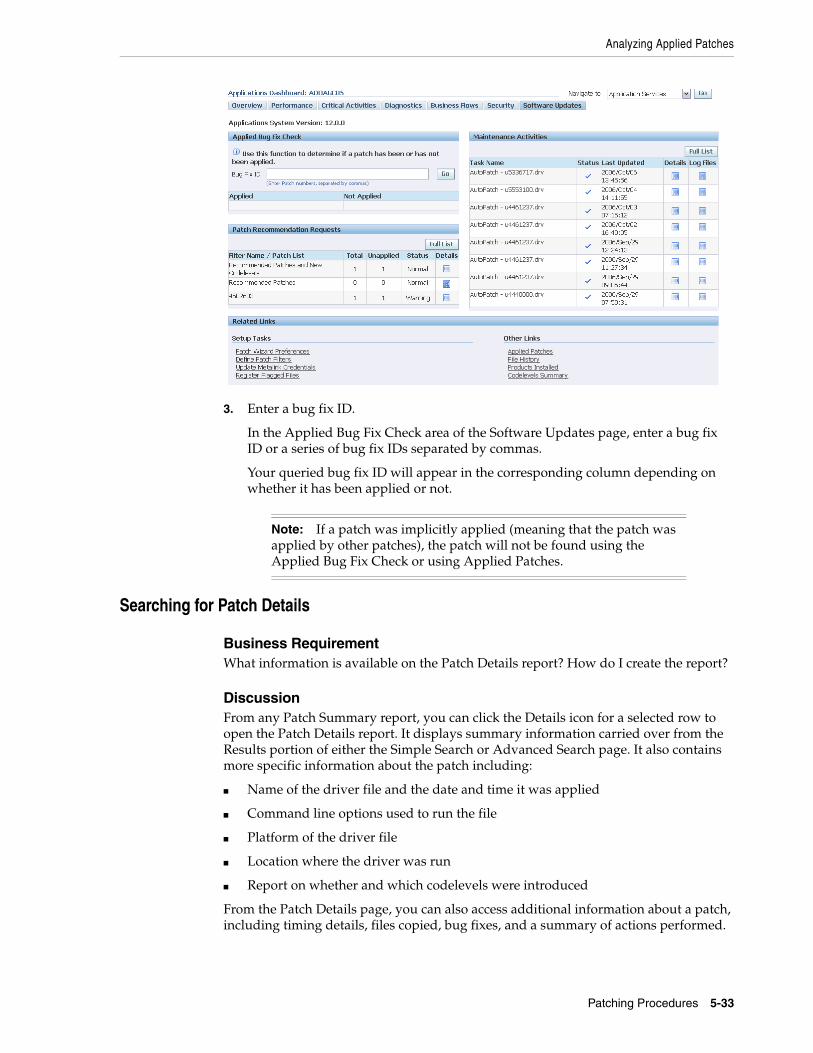
Analyzing Applied Patches
Patching Procedures 5-33
3. Enter a bug fix ID.
In the Applied Bug Fix Check area of the Software Updates page, enter a bug fix ID or a series of bug fix IDs separated by commas.
Your queried bug fix ID will appear in the corresponding column depending on whether it has been applied or not.
Searching for Patch Details
Business RequirementWhat information is available on the Patch Details report? How do I create the report?
DiscussionFrom any Patch Summary report, you can click the Details icon for a selected row to open the Patch Details report. It displays summary information carried over from the Results portion of either the Simple Search or Advanced Search page. It also contains more specific information about the patch including:
■ Name of the driver file and the date and time it was applied
■ Command line options used to run the file
■ Platform of the driver file
■ Location where the driver was run
■ Report on whether and which codelevels were introduced
From the Patch Details page, you can also access additional information about a patch, including timing details, files copied, bug fixes, and a summary of actions performed.
Note: If a patch was implicitly applied (meaning that the patch was applied by other patches), the patch will not be found using the Applied Bug Fix Check or using Applied Patches.
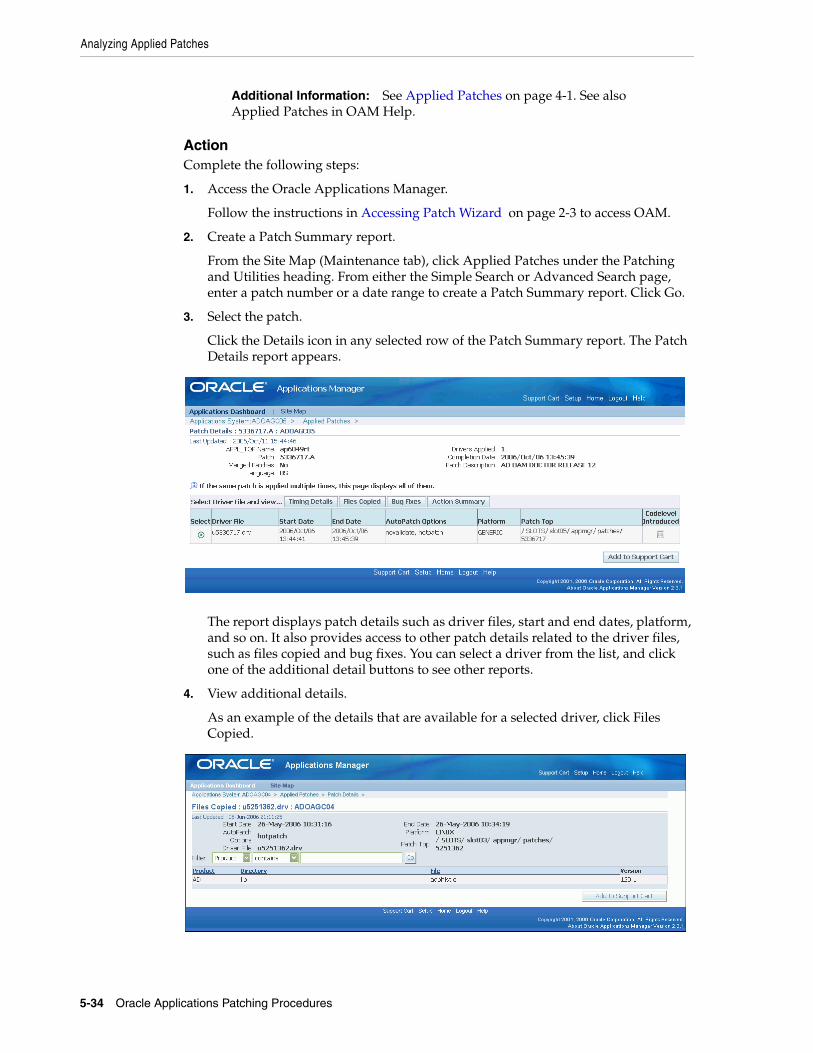
Analyzing Applied Patches
5-34 Oracle Applications Patching Procedures
ActionComplete the following steps:
1. Access the Oracle Applications Manager.
Follow the instructions in Accessing Patch Wizard on page 2-3 to access OAM.
2. Create a Patch Summary report.
From the Site Map (Maintenance tab), click Applied Patches under the Patching and Utilities heading. From either the Simple Search or Advanced Search page, enter a patch number or a date range to create a Patch Summary report. Click Go.
3. Select the patch.
Click the Details icon in any selected row of the Patch Summary report. The Patch Details report appears.
The report displays patch details such as driver files, start and end dates, platform, and so on. It also provides access to other patch details related to the driver files, such as files copied and bug fixes. You can select a driver from the list, and click one of the additional detail buttons to see other reports.
4. View additional details.
As an example of the details that are available for a selected driver, click Files Copied.
Additional Information: See Applied Patches on page 4-1. See also Applied Patches in OAM Help.
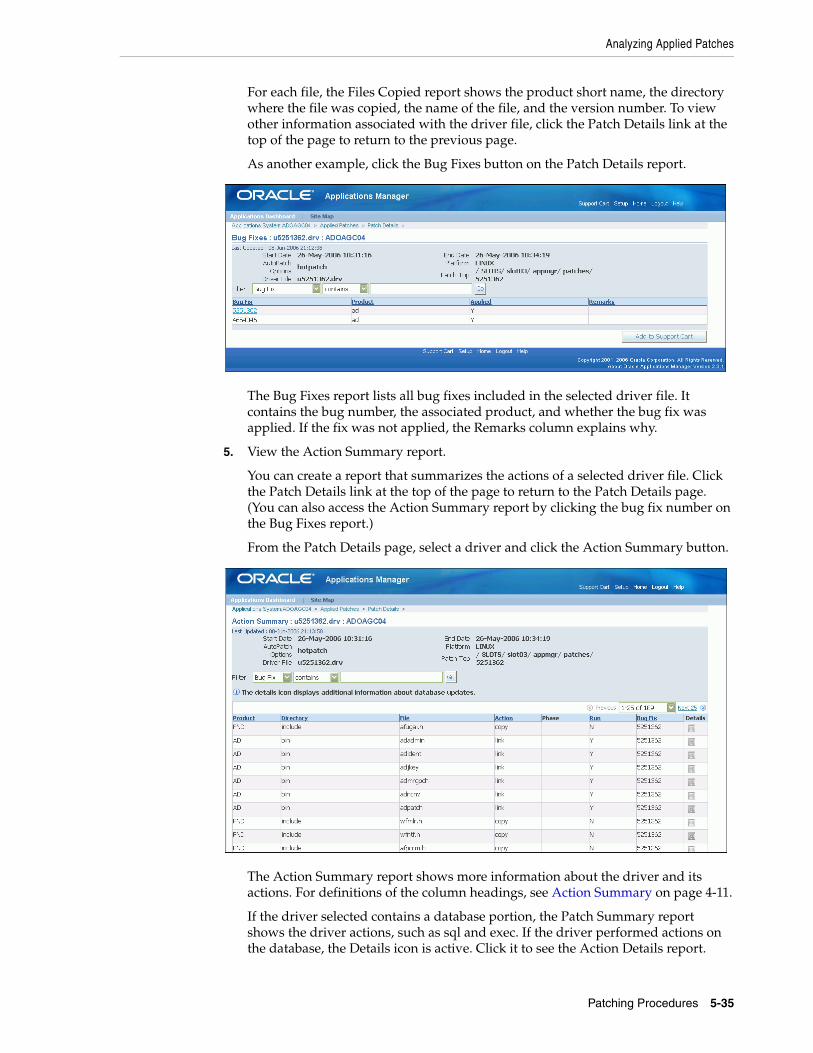
Analyzing Applied Patches
Patching Procedures 5-35
For each file, the Files Copied report shows the product short name, the directory where the file was copied, the name of the file, and the version number. To view other information associated with the driver file, click the Patch Details link at the top of the page to return to the previous page.
As another example, click the Bug Fixes button on the Patch Details report.
The Bug Fixes report lists all bug fixes included in the selected driver file. It contains the bug number, the associated product, and whether the bug fix was applied. If the fix was not applied, the Remarks column explains why.
5. View the Action Summary report.
You can create a report that summarizes the actions of a selected driver file. Click the Patch Details link at the top of the page to return to the Patch Details page. (You can also access the Action Summary report by clicking the bug fix number on the Bug Fixes report.)
From the Patch Details page, select a driver and click the Action Summary button.
The Action Summary report shows more information about the driver and its actions. For definitions of the column headings, see Action Summary on page 4-11.
If the driver selected contains a database portion, the Patch Summary report shows the driver actions, such as sql and exec. If the driver performed actions on the database, the Details icon is active. Click it to see the Action Details report.
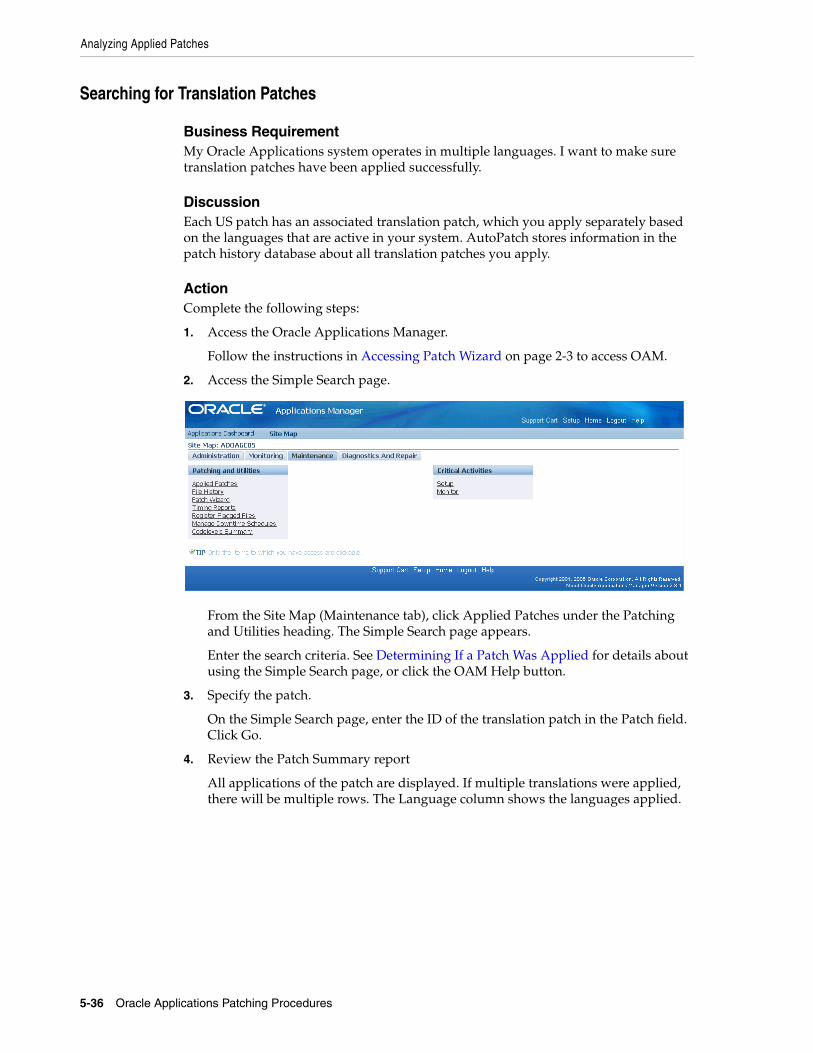
Analyzing Applied Patches
5-36 Oracle Applications Patching Procedures
Searching for Translation Patches
Business RequirementMy Oracle Applications system operates in multiple languages. I want to make sure translation patches have been applied successfully.
DiscussionEach US patch has an associated translation patch, which you apply separately based on the languages that are active in your system. AutoPatch stores information in the patch history database about all translation patches you apply.
ActionComplete the following steps:
1. Access the Oracle Applications Manager.
Follow the instructions in Accessing Patch Wizard on page 2-3 to access OAM.
2. Access the Simple Search page.
From the Site Map (Maintenance tab), click Applied Patches under the Patching and Utilities heading. The Simple Search page appears.
Enter the search criteria. See Determining If a Patch Was Applied for details about using the Simple Search page, or click the OAM Help button.
3. Specify the patch.
On the Simple Search page, enter the ID of the translation patch in the Patch field. Click Go.
4. Review the Patch Summary report
All applications of the patch are displayed. If multiple translations were applied, there will be multiple rows. The Language column shows the languages applied.
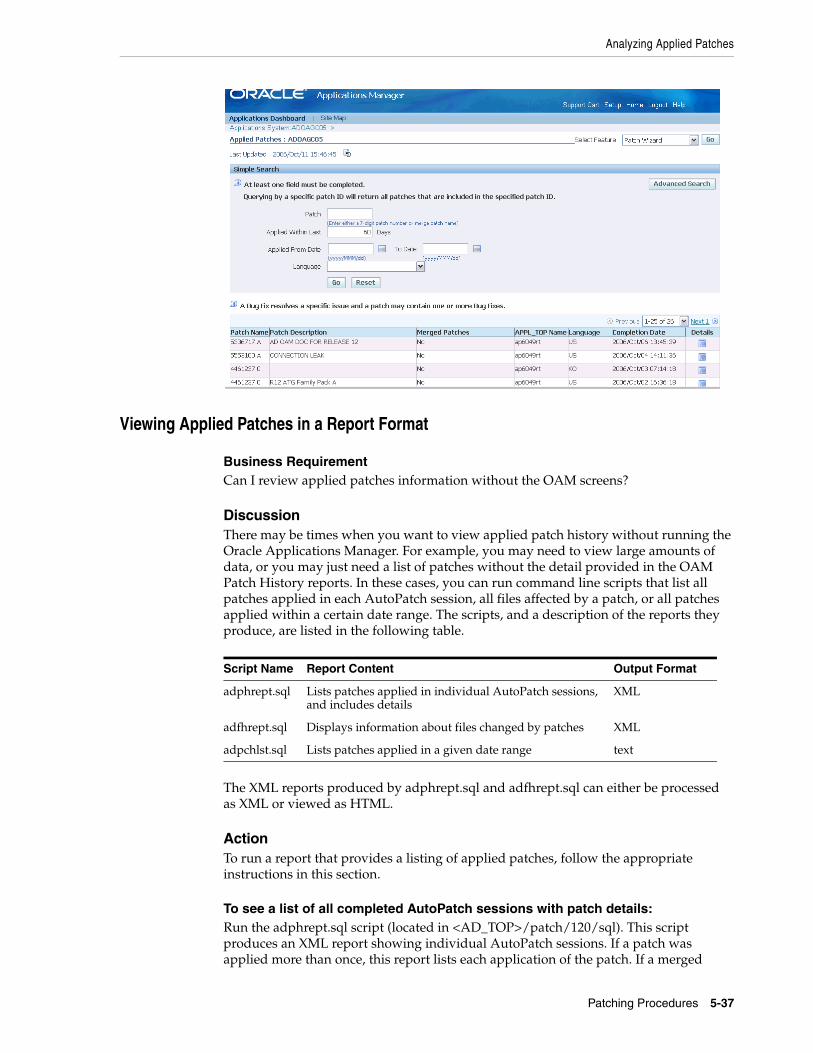
Analyzing Applied Patches
Patching Procedures 5-37
Viewing Applied Patches in a Report Format
Business RequirementCan I review applied patches information without the OAM screens?
DiscussionThere may be times when you want to view applied patch history without running the Oracle Applications Manager. For example, you may need to view large amounts of data, or you may just need a list of patches without the detail provided in the OAM Patch History reports. In these cases, you can run command line scripts that list all patches applied in each AutoPatch session, all files affected by a patch, or all patches applied within a certain date range. The scripts, and a description of the reports they produce, are listed in the following table.
The XML reports produced by adphrept.sql and adfhrept.sql can either be processed as XML or viewed as HTML.
ActionTo run a report that provides a listing of applied patches, follow the appropriate instructions in this section.
To see a list of all completed AutoPatch sessions with patch details:Run the adphrept.sql script (located in <AD_TOP>/patch/120/sql). This script produces an XML report showing individual AutoPatch sessions. If a patch was applied more than once, this report lists each application of the patch. If a merged
Script Name Report Content Output Format
adphrept.sql Lists patches applied in individual AutoPatch sessions, and includes details
XML
adfhrept.sql Displays information about files changed by patches XML
adpchlst.sql Lists patches applied in a given date range text
Analyzing Applied Patches
5-38 Oracle Applications Patching Procedures
patch was applied, it lists the merged patch by patch name. It does not list the individual patches within the merged patch.
To run adphrept.sql, use the following parameters:
<query_depth> <bug_number or ALL> <bug_product or ALL> \<start_date_from (mm/dd/rr or ALL)> <end_date_to (mm/dd/yyyy or ALL)> \<patchname/ALL> <patchtype/ALL> <level/ALL> <language/ALL> \<appltop/ALL> <limit to forms server? (Y/N)> \<limit to web server? (Y/N)> \<limit to node server? (Y/N)> \<limit to admin server? (Y/N)> \<only patches that change DB? (Y/N)> <report_name>.xml
For <query_depth>, specify 1 (details of patches only), 2 (details of patches and their bug fixes only), or 3 (details of patches, bug fixes, and bug actions).
At the command prompt, enter the report command and enter values for the parameters and prompts. For example, to see complete patch details for AutoPatch sessions that were run during October 2006, enter the following, using the mm/dd/yyyy date format:
UNIX:$ cd $AD_TOP/patch/120/sql$ sqlplus <APPS username>/<APPS password> @adphrept.sql 3 ALL ALL 10/01/2006 \ 10/31/2006 ALL ALL ALL ALL ALL N N N N N oct06.xml
Windows:C:>\ cd %AD_TOP%\patch\120\sqlC:>\ sqlplus <APPS username>/<APPS password> @adphrept.sql 3 ALL ALL \ 10/01/2006 10/31/2006 ALL ALL ALL ALL ALL N N N N N oct06.xml
The <AD_TOP>/html directory contains the adpchrep.xsl style sheet for displaying the XML output file in HTML format. To view the XML file as HTML, copy both the adpchrep.xsl style sheet and XML output report to a directory accessible by a browser. Open the directory in your browser and click the XML filename.
To display information about files changed by patches:Run the adfhrept.sql script (located in <AD_TOP>/patch/120/sql) to produce an XML report named adfilerep.xml. Use the following parameters:
<filename> <latest file version only? (Y/N) \<start_date (mm/dd/rr or ALL)> <end_date (mm/dd/yyyy or ALL)> \<patchtype/ALL> <language/ALL> \<appltop/ALL> <limit to forms server? (Y/N)> \<limit to web server? (Y/N)> \<limit to node server? (Y/N)> \<limit to admin server? (Y/N)> \<only patches that change DB? (Y/N)>
At the command prompt, enter the report command and enter values for the parameters and prompts. For example, to see the complete file version history for admorgb.pls considering only patches applied in October 2006, enter the following, using mm/dd/yyyy format:
UNIX:$ cd $AD_TOP/patch/120/sql$ sqlplus <APPS username>/<APPS password> @adfhrept.sql admorgb.pls \
Analyzing Applied Patches
Patching Procedures 5-39
N 10/01/2006 10/31/2006 ALL ALL ALL N N N N N
Windows:C:>\ cd %AD_TOP%\patch\120\sqlC:>\ sqlplus <APPS username>/<APPS password> @adfhrept.sql admorgb.pls \ N 10/01/2006 10/31/2006 ALL ALL ALL N N N N N
The <AD_TOP>/html directory contains the adfilerep.xsl style sheet for displaying the XML output file in HTML format. To view the XML file as HTML, copy both the adfilerep.xsl style sheet and XML output report to a directory accessible by a browser. Open the directory in your browser and click on the XML filename.
To see a list of all patches in a given date range:The adpchlst.sql report (located in <AD_TOP>/patch/120/sql) produces a list (adpchlst.lst) of all patches in a date range, without patch detail. It differs from adphrept.sql in two ways: it lists a patch only once regardless of how many times it was applied, and it lists individual patches included within a merged patch. For example, if you combine patches 123, 124, and 125 in a merged patch called merged1, the report lists patches 123, 124, and 125, but not merged1.
At the command prompt, enter the report command and enter the date parameters in mm/dd/yyyy format. For example, to see a list of patches applied in October 2006, enter the following:
UNIX:$ cd $AD_TOP/patch/120/sql$ sqlplus <APPS username>/<APPS password> @adpchlst.sql 10/01/2006 10/31/2006
Windows:C:>\ cd %AD_TOP%\patch\120\sqlC:>\ sqlplus <APPS username>/<APPS password> @adpchlst.sql 10/01/2006 10/31/2006
Monitoring Patches in Progress
Business RequirementCan I monitor the progress of a patch while it is being applied?
DiscussionDepending on the size and complexity of a patch, it may take from several minutes to several hours to completely apply it to your system. It is useful to know what a patch is currently doing and how long individual steps are taking.
When applying patches, the Oracle Applications system is in maintenance mode and the application tier services, including the Web server, are shut down. This prevents access to Oracle Applications and the Oracle Applications Manager. In order to access the Timing Reports to track an in-progress patching session, the Web server must be started in restricted mode and OAM accessed through a restricted mode URL.
When using Timing Reports to track an in-progress patching session, the timing report displays the most recently performed tasks. Use the Refresh icon to get the latest running tasks.
ActionComplete the following steps:
Analyzing Applied Patches
5-40 Oracle Applications Patching Procedures
1. Set up the ad_monitor user account. Use the ad_monitor user account to log in to OAM in restricted mode.
■ Log in to SQL*Plus as SYSTEM.
■ Unlock the ad_monitor user.
SQL> alter user ad_monitor account unlock;
■ Log in to SQL*Plus as the ad_monitor user and reset the password. The default password is lizard.
2. Shut down all application tier services.
3. Enable maintenance mode.
4. Start the Web server in restricted mode. The script to start and stop this service is in the $COMMON_TOP/admin/scripts/<CONTEXT_NAME> directory.
UNIX:
$ adaprstctl.sh start
Windows:
C:\> adaprstctl.cmd start
5. Run AutoPatch to start the patch session.
6. Access OAM through the restricted mode URL: <host>:<port>/servlets/weboamLocal/oam/oamLogin
7. Log in to OAM as the ad_monitor user.
8. Navigate to the Timing Reports (Navigation: Sitemap>Maintenance>Patching and Utilities>Timing Reports).
9. When the patching session completes, shut down the restricted mode Web server.
UNIX:
$ adaprstctl.sh stop
Windows:
C:\> adaprstctl.cmd stop
10. Disable maintenance mode.
11. Restart all services.
You can also monitor the progress of the patching process by reviewing:
■ AutoPatch messages
As AutoPatch runs, it displays messages on the screen about the status and progress of the patching process.
■ Patch log files
AutoPatch creates log files in the current directory. Each log file contains information about completed patching actions.
Additional Information: See Timing Reports on page 4-12.
Additional Information: See Log and Restart Files in Oracle Applications Maintenance Utilities.
Backing Out Patches
Patching Procedures 5-41
■ Worker status
For jobs run in parallel, use AD Controller to view the status of the concurrent manager and workers assigned to process jobs.
Backing Out PatchesAlthough you can back out patches that you have applied to your Oracle Applications system and restore it to its pre-patched state, Oracle recommends you use this course of action only if you have no other choice.
Restoring from a Failed Copy Section of a Unified Driver
Business RequirementThe copy portion of a unified driver failed during a patching procedure. I need to restore my system.
DiscussionYou should always test the application of a patch several times on a test system, particularly if the patch is a minipack, family pack, or maintenance pack. After the test application is successful, apply the patch on the production system.
Before applying a large number of patches, a series of minipacks, family packs, or a maintenance pack, back up the Oracle Applications file system and database.
ActionComplete the following steps:
1. Determine the cause of the failure.
In many cases, the issue can be resolved and the patching process restarted at the point of failure.
2. Determine the actions of the copy portion of a unified driver.
If there is no feasible method of resolving the issue, review the log files and the copy portion of a unified driver to determine the files copied by the patch and the update actions performed.
3. Restore files.
If a file in the patch top directory is a more recent version than the product’s current file, AutoPatch backs up the current file into a subdirectory of the patch top directory. If <patches> is the patch top directory, <system_name> is the Applications system name, <APPL_TOP_name> is the APPL_TOP name, and <prod> is the name of the product being patched, AutoPatch backs up:
<PROD>_TOP/<subdir(s)>/<old_file_name>
to
<patches>/backup/<system_name>/<appl_top_name>/<prod>/<subdir(s)>/ \
Additional Information: See Reviewing Worker Status in Oracle Applications Maintenance Procedures. See also AD Controller in Oracle Applications Maintenance Utilities.
Caution: There is no automated method of backing out patches.
Backing Out Patches
5-42 Oracle Applications Patching Procedures
<old_file_name>
Use these backup files to restore the files on the Oracle Applications system. If the patch is large and you copied many files, restore the entire file system with the backup you created before you applied the patch. If you restore the entire file system you do not have to perform Steps 4-7.
4. Relink files.
If the copy portion of the unified driver includes actions to relink files, determine the files affected and relink them using AD Administration or, for AD programs, use AD Relink.
5. Restore Java files.
If the patch included Java updates, restore the Oracle Applications Java files by running the following command from the <patches>/backup/ <system_name>/<appl_top_name> directory.
$ adjava -mx256m oracle.apps.ad.jri.adjcopy @undoScript.cmd
6. Generate JAR files.
If Java files are included in the patch, generate JAR files using AD Administration.
7. Generate other files.
If there are forms, reports, graphics, or message files included in the patch, generate these files using AD Administration.
Restoring from a Failed Database Portion of a Unified Driver
Business RequirementCan I restore my system after a failed database portion of a unified driver?
DiscussionThere is no general method of backing out changes a patch makes to the Oracle Applications database. To avoid the need to restore a database, you should always test the application of a patch several times on a test system, particularly if the patch is a minipack, family pack, or maintenance pack. After the test application is successful, apply the patch on the production system.
Note: The Oracle Applications system name and the APPL_TOP name are determined during the Rapid Install process.
Additional Information: See Oracle Applications Maintenance Utilities for more information.
Additional Information: See AD Administration in Oracle Applications Maintenance Utilities.
Additional Information: See Managing Files in Oracle Applications Maintenance Procedures.
Index-1
Index
Symbols<language>_<filename>_ldt.log, 3-3
AAction Detail report, 4-11Action Summary report, 4-11, 5-35AD Administration
defaults file, 5-8Timing Details report, 4-17
AD Controller, 3-11, 5-19AD Merge Patch
about, 1-5, 3-12admrgpch, 3-13destination directory, 3-12directory structure, 3-12log files, 5-17merging patch zip files, 3-13merging patches with, 3-12source directory, 3-12using, 5-7, 5-16, 5-17
AD Relink, using, 5-42AD utilities
AD Merge Patch, 3-12AutoPatch, 3-1command line arguments, 3-8
AD_FILES table, 3-4ad_monitor, 5-40adaprstctl.cmd, 5-40adaprstctl.sh, 5-40adfhrept.sql, 5-37adlibin.log, 3-3adlibout.log, 3-3admrgpch, 3-13, 5-17admrgpch.log, 5-17admsi.pl
customized installation instructions, 5-3script, 3-7, 5-3
adpatch.lgi, 3-3adpatch.log, 3-2adpchlst.sql, 5-37adphmigr.pl, 5-22adphrept.sql, 5-37adrelink.log, 3-3adworkxxx.log, 3-3
ADXGNPIN.sql, 5-4ADXGNPNS.sql, 5-4Aggregate Patch Impact page, 2-5APPL_TOP name, 1-4applcust.txt file, 2-14Application Object Library (AOL)
validating passwords, 3-3Applied Bug Fix Check, 4-23Applied Patches
about, 1-5, 5-31accessing, 4-3Action Detail report, 4-11Action Summary report, 4-11, 5-35Advanced Search page, 4-4Bug Fixes report, 4-10, 5-35Files Copied report, 4-9, 5-34Patch Details report, 4-8, 5-33reporting tool, 4-1Simple Search page, 4-3using, 5-31
apply=no, 5-6APPS schema, 1-4AutoConfig test mode, 5-6AutoPatch
abort command, 3-11about, 1-5, 3-1adpatch.lgi, 3-3adpatch.log, 3-2arguments
apply, 3-9driver, 3-9patchtop, 3-9preinstall, 3-9uploadph, 3-9
command line arguments, 3-8 to 3-11log files, 3-2, 5-4modes, 3-7, 4-2non-interactive patching, 5-8options
about, 3-9autoconfig, 3-9checkfile, 3-10compiledb, 3-10compilejsp, 3-10copyportion, 3-10databaseportion, 3-10
Index-2
generateportion, 3-10hotpatch, 3-10integrity, 3-10parallel, 3-11phtofile, 3-11prereq, 3-11validate, 3-11
phase order, 3-4prompts, 3-3responding to prompts, 5-4restarting, 3-11running, 3-6
in pre-install mode, 3-7in test mode, 3-7non-interactively, 3-4
specifying parallel workers, 3-4Timing Details report, 4-14validating passwords, 3-11
Bbacking out patches
copy portion of a unified driver, 5-41database driver, 5-42
backup files, 5-2deleting after patching, 3-6, 5-5to restore a system, 5-42
bug fix, 1-2Bug Fixes report, 4-10, 5-35
CCodelevel Introduced report, 4-9codelevels
about, 1-2Codelevel Introduced report, 4-9current and new, 2-3
codeline, 1-3codelines, 1-1, 2-12, 4-9, 5-23command line patching utilities, 1-5concurrent programs, 2-2Consolidated Update (CU), 1-3copy portion of a unified driver
about, 1-4failed, 5-41
custom filters for Patch Wizard, 2-7customized files, 2-15, 3-4customized installation instructions, 5-3
Ddatabase portion of a unified driver
about, 1-4failed, 5-42
defaults filefor non-interactive patching, 5-8for non-standard patches, 5-10
diagnostic patch, 1-2distributed AD
using, 5-19documentation library
contents, viiidocumentation patch, 1-2Download Patches page, 2-9driver
copy portion, 1-4database portion, 1-4failed copy portion, 5-41failed database portion, 5-42generate portion, 1-4unified, 1-3
driver file actions, 5-33
Eemergency patches
applying, 5-7error messages, 3-5Exception Report, 4-20
Ffamily consolidated upgrade patch, 1-3family pack, 1-3, 3-6family packs, 2-7File History
about, 1-5, 4-6Advanced Search page, 4-7Simple Search page, 4-6
Files Copied report, 4-9, 5-34filters for Patch Wizard
custom filters, 2-7pre-seeded, 2-7
Ggenerate portion of a unified driver, 1-4
Hhide patch, 2-11high-priority patch, 1-3
Iinformational messages, 3-5In-Progress Timing Details page, 4-17interactive patching
definition of, 5-1, 5-8interoperability patch, 1-2Invoker’s Rights processing, 1-4
JJAR files, generating after failed driver, 5-42Java files, restoring after failed driver, 5-42Job Timing report, 4-18
Llog files
<language>_<filename>_ldt.log, 3-3
Index-3
about, 3-2adlibin.log, 3-3adlibout.log, 3-3adpatch.lgi, 3-3adpatch.log, 3-2adrelink.log, 3-3adworkxxx.log, 3-3AutoPatch, 3-3viewing from Timing Reports main page, 4-14viewing from View Log Files page, 4-20writing to the same location, 5-15
Mmaintenance mode
about, 3-2disabling, 5-5, 5-15downtime alert messages, 3-2enabling, 5-3
maintenance pack, 1-3, 2-7, 3-6Manage Downtime Schedules, 1-6manifest command line argument, 5-17manual steps for patching, 2-11merge option defaults, 2-6merge options, 2-9merged patches
creating, 5-16incompatible patches, 5-16naming, 3-12NLS, 5-13
messageserror, 3-5informational, 3-5successful completion, 3-6
minipack, 1-3, 2-7, 3-6MRC schema, 1-4
NNew Codelevels filter, 2-7new feature patch, 1-2NLS
deferring translation driver, 5-13merging patches, 5-12, 5-13multiple patches, 5-13prompts for AutoPatch, 3-4single patch, 5-12
non-interactive patchingabandoning, 5-11definition of, 5-1non-standard patches, 5-10preparing for, 3-4restarting in AutoPatch, 5-10
non-standard patchapplying non-interactively, 5-10definition of, 5-10
Oonline help, 1-2options=hotpatch, 3-2, 3-10, 5-2, 5-14
options=nocopyportion, 5-5options=nogenerateportion, 5-5options=validate, 5-7Oracle Applications Manager (OAM)
Applied Patches, 4-1File History, 4-6Manage Downtime Schedules, 1-6Patch Impact Analysis, 2-12Patch Wizard, 2-3Registered Flagged Files, 2-13Timing Reports, 4-12URL for, 2-3
Oracle Store, viiiOracleMetaLink credentials, 5-23OracleMetaLink credentials, 2-1
Pparallel workers
specifying in AutoPatch, 3-4passwords
validating for patching, 5-6validating in AutoPatch, 3-3
patchcodelevels, 1-1codelines, 1-1copy portion of a unified driver, 1-4database portion of a unified driver, 1-4driver files, 1-3generate portion of a unified driver, 1-4information files, 4-2readme file, 1-3structure, 1-3unified driver, 1-3
Patch Details report, 4-8, 5-33patch directory, specifying, 3-3patch history
database, 2-3, 4-1, 5-18, 5-31searching for, 4-3
patch history XML reportsadfhrept.sql, 5-37adpchlst.sql, 5-37adphrept.sql, 5-37
Patch Impact Analysis report, 2-11, 5-6patch information bundle
about, 2-2uploading, 2-8
Patch Summary report, 5-36patch types
bug fix, 1-2diagnostic, 1-2documentation, 1-2interoperability, 1-2new feature, 1-2performance, 1-2translation, 1-2
Patch Wizardabout, 1-6accessing, 2-3concurrent programs, 2-2
Index-4
Download Patches page, 2-9downloading patches
display option defaults, 2-6language and platform details, 2-6merge option defaults, 2-6
filterscreating, 2-7custom filters, 2-7defining, 2-7pre-seeded filters, 2-7
generating patch recommendations, 2-8Main page, 2-4Patch Impact Analysis, 2-12patch information bundle, 2-2Preferences page, 2-6preparing to use, 2-1Recommend Patches page, 2-8Recommended Patches Results page, 2-10scheduling requests, 2-8setting up, 2-6staging directory, 2-6using, 5-6, 5-29
patchesbacking out, 5-41compatibilities, 1-1Consolidated Update (CU), 1-3dependencies, 1-1determining if applied, 5-32directions for applying, 5-2downloading with Patch Wizard, 2-9emergency, 5-7family consolidated upgrade patch, 1-3family pack, 1-3high-priority, 1-3maintenance pack, 1-3merged, 5-16merging
destination directory, 3-12source directory, 3-12
minipack, 1-3monitor the progress of, 5-39non-standard, 5-10Patch Impact Analysis report, 5-6prerequisite, 1-1, 5-2README files, 5-3recommended, 5-23rollup, 1-3stand-alone, 1-2testing, 5-6unzipping, 5-3using Patch Wizard, 5-6
patchingabout, 1-1, 5-1applying part of a unified driver, 5-5customization issues, 5-4interactive, 5-1NLS systems, 5-12, 5-13non-interactive, 5-1, 5-8password validation, 5-7patch top directory, 5-3
pinning SGA packages, 5-4relinking files, 5-42restarting server processes, 5-5restoring from failed copy portion of a unified
driver, 5-41restoring from failed database portion of a unified
driver, 5-42reviewing log files, 5-4shutting down services for, 5-3supplying driver name, 5-4supplying unified driver name, 5-5test mode, 5-6with unified driver on multi-node systems, 5-14
performance patch, 1-2Phase Information report, 4-19phase order
in AutoPatch, 3-4Preferences page, 2-6pre-install mode
arguments for, 3-9information not stored when using, 5-32running AutoPatch in, 3-7
prerequisite patcheswhen to apply, 5-2
pre-seeded filters, 2-7
RREADME files, 1-3, 2-2, 2-12, 3-4, 3-7, 5-3Recommend Patches page, 2-8Recommended Patches and New Codelevels
filter, 2-7Recommended Patches filter, 2-7Recommended Patches Results page, 2-10Registered Flagged Files
about, 1-6, 2-13accessing, 2-14adding, 2-15exporting, 2-14importing, 2-14registering customized files, 5-4
relinkingafter failed driver, 5-42
reportsAction Detail, 4-11Action Summary, 4-11AD Administration Timing Details, 4-17AutoPatch Timing Details, 4-14Bug Fixes, 4-10Codelevel Introduced, 4-9Exception, 4-20Files Copied, 4-9Job Timing, 4-18Patch Details, 4-8, 5-33Patch Impact Analysis, 2-11, 5-6Patch Summary, 5-36Phase Information, 4-19
request ID, 2-9restart=yes, 5-10restricted mode
Index-5
URL, 5-40using, 5-39
rollup patch, 1-3
Sserver processes
restarting after patching, 5-5SGA
pinning packages after patchig, 5-4shared application tier file system, 5-14, 5-19
patching, 5-15Software Updates
about, 4-22accessing, 4-23, 5-32
Software Updates page, 4-22staged APPL_TOP
applying patches to, 5-21creating, 5-21updating patch history, 5-22using, 5-5, 5-20
staging directory, 2-3stand-alone patch, 1-2successful completion message, 3-6system downtime see maintenance mode, 3-2SYSTEM passwords
validating, 3-3
Ttest mode
arguments for, 3-9information not stored when using, 5-32running AutoPatch in, 3-7using, 5-6
Timing Reportsabout, 1-6, 4-12accessing, 4-13AD Administration Timing Details report, 4-17AutoPatch Timing Details report, 4-14Exception report, 4-20Job Timing report, 4-18Main Page, 4-14Phase Information report, 4-19restricted mode, 5-39
translation patch, 1-2translations
deferring database portion of the driver, 5-13emergency patches, 5-13searching for patches, 5-36
Uunified driver
about, 1-3applying part of, 5-5
updatessee patching
VView Log Files page., 4-20
WWeb server
restricted mode, 5-40Web-based patching utilities, 1-5workers, 3-2, 3-4, 3-5, 3-11, 5-19Workflow Business Events System, 3-2

Index-6