Embed Size (px)
Citation preview
Page 1 [email protected]
Paper Clip
Fusion 360 Tutorial
Before using these instructions, it is helpful to watch this video screencast of the CAD drawing actually
being done in the software. Click this link for Video instructions
Using the
Sweep tool to
create a paper
clip from a
circle profile
and a sketched
path.
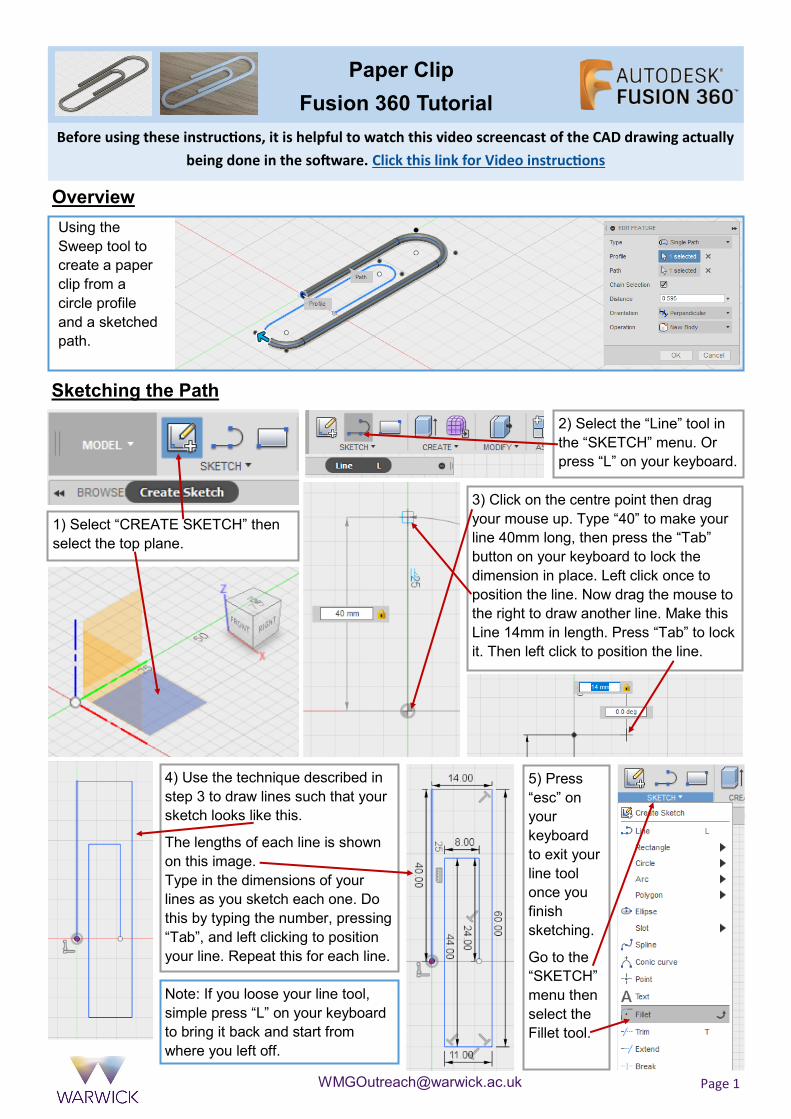
Overview
Sketching the Path
1) Select “CREATE SKETCH” then
select the top plane.
2) Select the “Line” tool in
the “SKETCH” menu. Or
press “L” on your keyboard.
3) Click on the centre point then drag
your mouse up. Type “40” to make your
line 40mm long, then press the “Tab”
button on your keyboard to lock the
dimension in place. Left click once to
position the line. Now drag the mouse to
the right to draw another line. Make this
Line 14mm in length. Press “Tab” to lock
it. Then left click to position the line.
4) Use the technique described in
step 3 to draw lines such that your
sketch looks like this.
The lengths of each line is shown
on this image.
Type in the dimensions of your
lines as you sketch each one. Do
this by typing the number, pressing
“Tab”, and left clicking to position
your line. Repeat this for each line.
Note: If you loose your line tool,
simple press “L” on your keyboard
to bring it back and start from
where you left off.
5) Press
“esc” on
your
keyboard
to exit your
line tool
once you
finish
sketching.
Go to the
“SKETCH”
menu then
select the
Fillet tool.
Page 2 [email protected]
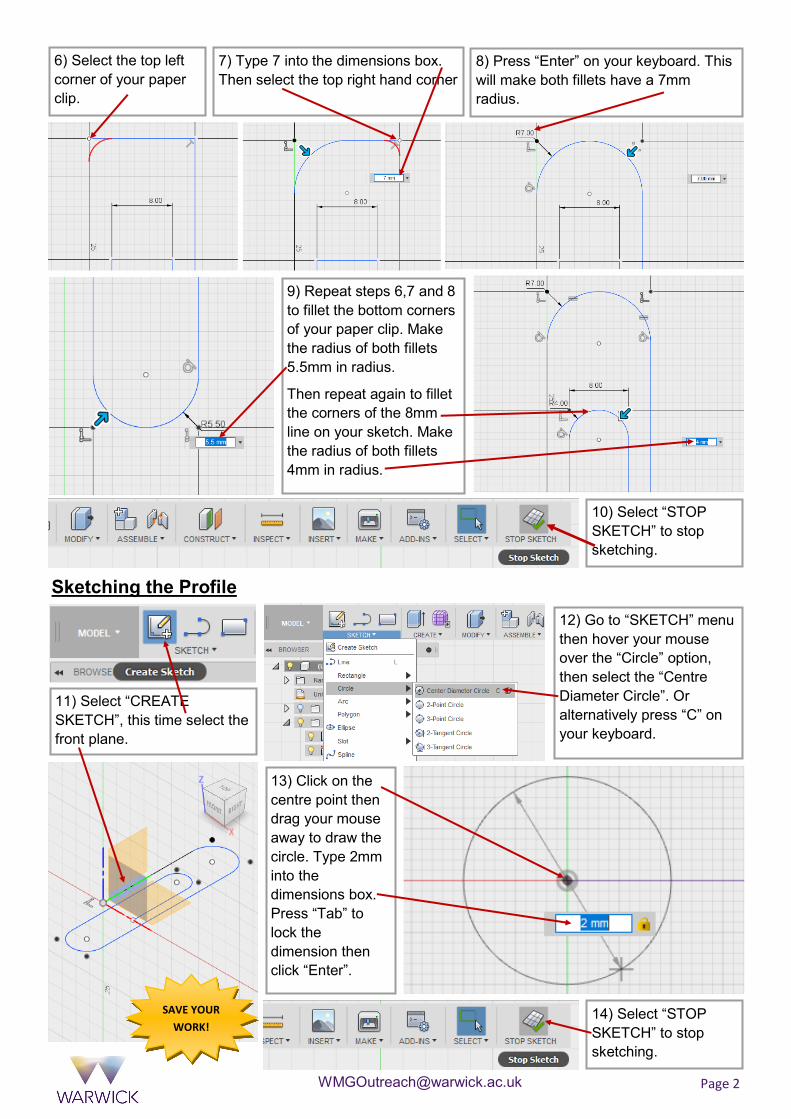
6) Select the top left
corner of your paper
clip.
7) Type 7 into the dimensions box.
Then select the top right hand corner
8) Press “Enter” on your keyboard. This
will make both fillets have a 7mm
radius.
9) Repeat steps 6,7 and 8
to fillet the bottom corners
of your paper clip. Make
the radius of both fillets
5.5mm in radius.
Then repeat again to fillet
the corners of the 8mm
line on your sketch. Make
the radius of both fillets
4mm in radius.
10) Select “STOP
SKETCH” to stop
sketching.
Sketching the Profile
11) Select “CREATE
SKETCH”, this time select the
front plane.
12) Go to “SKETCH” menu
then hover your mouse
over the “Circle” option,
then select the “Centre
Diameter Circle”. Or
alternatively press “C” on
your keyboard.
14) Select “STOP
SKETCH” to stop
sketching.
13) Click on the
centre point then
drag your mouse
away to draw the
circle. Type 2mm
into the
dimensions box.
Press “Tab” to
lock the
dimension then
click “Enter”.
SAVE YOUR
WORK!

Page 3 [email protected]
Using Sweep Tool
15) Click the home
button on the view
cube.
16) Go to “CREATE” menu then select the “Sweep” tool.
17) Select the circle sketch as the profile for
the sweep.
18) Select the “Path” option.
19) Start by
selecting
the line that
is attached
to the circle
to initiate
the path
around your
paper clip
sketch.
20) Then select the next section of line
which follows on from the last line you
selected.
21) Continue to select the next line section in your sketch
until you have selected all of your paper clip sketch and it
looks like the image below. Then Click “OK”.
You have finished the paper clip tutorial. Now if you want, you can go back and edit your sketch to add
your own design features to your paper clip. For Example you could sketch a hat or a flower on top.
To edit your sketch
go to the timeline at
the bottom of the
page. Right click on
the first sketch then
select “Edit Sketch”.


![Autodesk Fusion 360 Security Whitepaper Final[2]...Autodesk Fusion 360 Security Whitepaper September 2018 1 trust.autodesk.com Introduction Autodesk® Fusion 360 is the first 3D CAD,](https://img.dokumen.tips/doc/110x75/5f4942ce16d09b63341d26d0/autodesk-fusion-360-security-whitepaper-final2-autodesk-fusion-360-security.jpg)


