Embed Size (px)
Citation preview

Padlet Tutorial
Step 3: Once you’ve created your account click CREATE NEW PADLET
Step 2: Enter your email address and a password. Click SIGN UP.
Step 1: To create a padlet wall go to padlet.com and click SIGN UP.
1. Accessing padlet2. Creating a board on a desktop PC3. Creating a board on an android tablet4. Creating a board on an iPad5. Editing the settings
1. Accessing padlet
1

2. Creating a board on a desktop PC
There are multiple ways to add content to your board.
This will reveal a new area where you can:
choose to upload an image
link to an image that’s already on the web
use your webcam to take a picture
To remove or edit something you’ve posted, hover over it to reveal two icons at the top. A single click will open a larger version of the post.
edit the post
delete the post
If the images or documents are saved on your desktop then you can drag them onto the board and they will upload automatically. Alternatively, double click anywhere on the wall background.
2

3. Creating a board on an android tablet
Double-tap anywhere on the padlet board. This will reveal a new area where you can:
choose to upload an image
link to an image that’s already on the web
use your webcam to take a picture
To remove or edit something you’ve posted, double tap on it to reveal two icons at the top. A single click will open a larger version of the post.
edit the post
delete the post
3

4. Creating a board on an iPad
Double-tap anywhere on the padlet board. This will reveal a new area where you can:
choose to upload an image
link to an image that’s already on the web
use your webcam to take a picture
To remove or edit something you’ve posted, double tap on it to reveal two icons at the top. A single click will open a larger version of the post.
edit the post
delete the post
4

5. Editing the settings
Home Page
This page contains the following options:
• Padlets - all the boards you have created, have worked on or have access to.
• Activity - recent changes you have made to your boards.
• Collaborators - If you choose to share your boards with others, or they choose to share their boards with you, then they will appear in a list here.
• Files - All the files you have uploaded to all your boards.
• Links - All the links you have pasted to your boards.
• Settings - This is where you can change your email address, username, screen name, pass-word, profile picture and subscriptions settings.
• Profile - Your screen name, profile picture and any publicly available padlets you have created will be visible here.
Create a new wall Choose this option to create a new padlet. Your previous one will be automatically saved.
Profile (this will show your username)
You can quickly access all the same information as through the homepage here.
On the right side of the screen is the options menu where you can configure your padlet board, share it with friends or find further help. These settings are the same for all devices.
5

Share / Export
At certain points in the course we may ask you to share your boards with other learners by posting the link/URL in the comments thread of the platform.
The link can be found under MOBILIZE at the bottom of the sharing options. Copy this link and paste it into the platform.
If you wish to share or export to another platform then you have multiple options, including Facebook and Twitter, or you can download the board as a file to keep on your computer or device.
Get More Info
This gives a brief overview of the current board - when it was created, who by and how many posts there are.
Get Help
If you need further information, such as help with keyboard navigation, then this can be found here. If further help is needed then padlet junction (http://jn.padlet.com/) is comprehensive and up-to-date.
Modify This Wall
• Basic info Here is where you can choose a title, a descrip-tion and a portrait. If you choose to share your board you should give it a meaningful title and a brief description.
• Wallpaper Padlet comes with preset wallpaper or you can choose to upload your own.
6
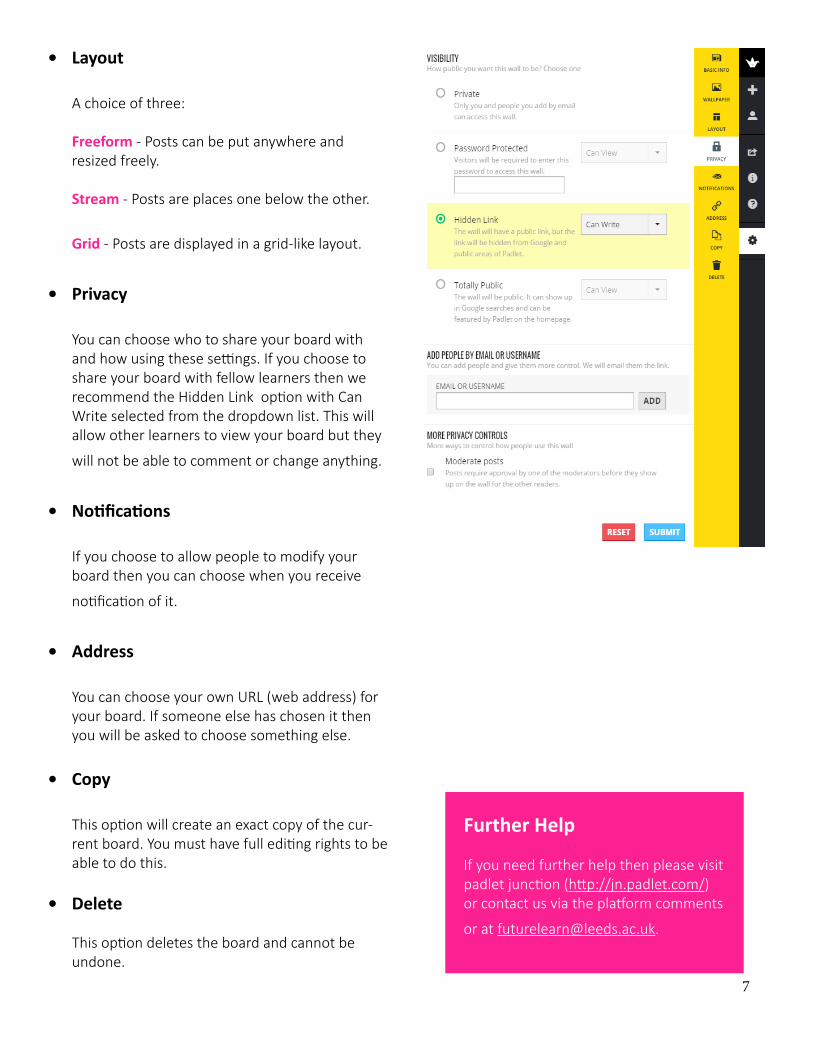
• Layout A choice of three: Freeform - Posts can be put anywhere and resized freely. Stream - Posts are places one below the other.
Grid - Posts are displayed in a grid-like layout.
• Privacy You can choose who to share your board with and how using these settings. If you choose to share your board with fellow learners then we recommend the Hidden Link option with Can Write selected from the dropdown list. This will allow other learners to view your board but they
will not be able to comment or change anything.
• Notifications If you choose to allow people to modify your board then you can choose when you receive
notification of it.
• Address You can choose your own URL (web address) for your board. If someone else has chosen it then you will be asked to choose something else.
• Copy This option will create an exact copy of the cur-rent board. You must have full editing rights to be able to do this.
• Delete This option deletes the board and cannot be undone.
Further Help
If you need further help then please visit padlet junction (http://jn.padlet.com/) or contact us via the platform comments
or at [email protected].
7