Embed Size (px)
Citation preview
May 23, 2016
Overview
• Login at computer with your standard office login and password (do not use @office, as in computer labs). • The Scanning Menu will appear automatically.
The first time you login, you may need to click the Enable Content button if you see the following:
• Choose to scan a TEST/QUIZ or FACULTY EVALUATIONS or a SURVEY. • Follow the onscreen prompts to complete the scanning and process the results.
• Be Certain To Log Off Before You Leave This Station. TESTS/QUIZZES provide options to verify student network IDs using your Blackboard Rosters, several reports you can Preview, Print, Email to yourself, or Save to your network drive or other location, options to upload test results to Blackboard Gradebook, options to revise the Answer Key (automatic re-scoring occurs after you make your changes), and options to revise Student test information. FACULTY EVALUATIONS will be saved as RAW Data files (text files) either to your flash drive, floppy disk, to your network drive, or emailed to you. Faculty Evaluation RAW Data Files should be processed and stored within your department's Evaluations database for the purposes of producing reports and for future analysis of the raw data – to compare courses across semesters. SURVEYS provide options to create/save/upload Questions and Answer Choices (replacing the defaults of Question1: A, B, C, D, E, F, G, and so on), produce a Frequency report with or without Bar Charts that you may Preview, Print, Email to yourself, or Save to your network drive or other location; export your data to Excel, Text file, SPSS, or SAS.
May 23, 2016
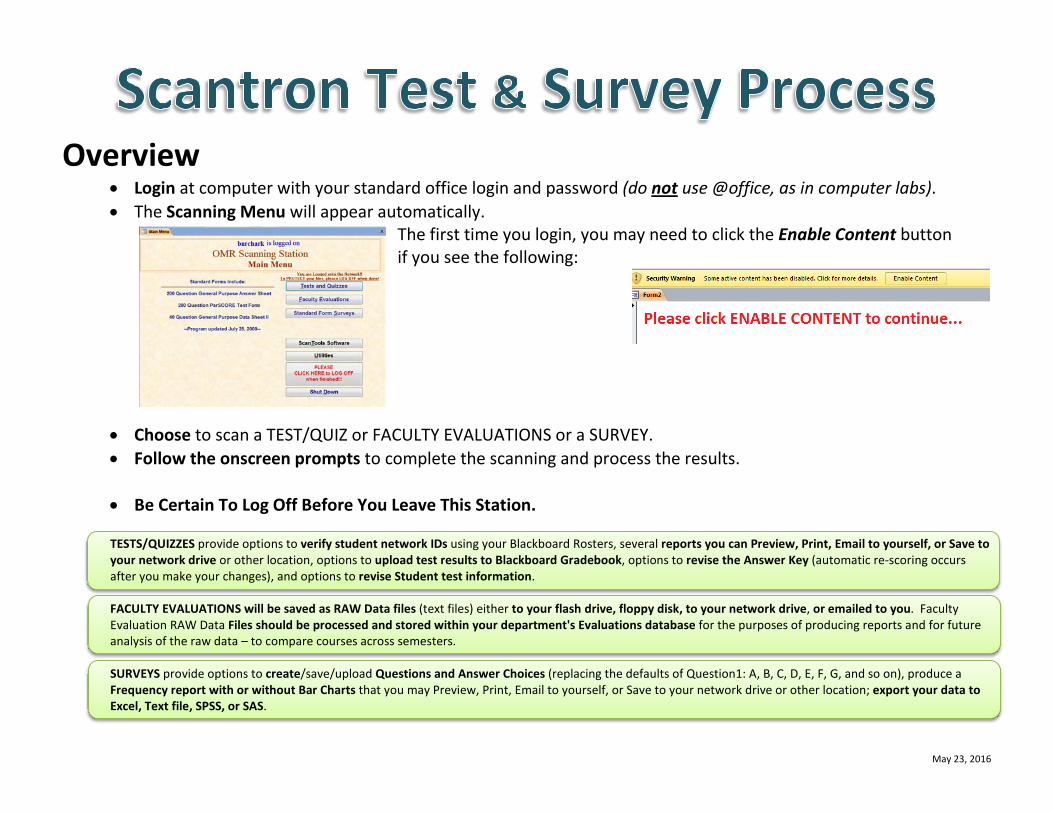
Check the display panel on the scanner. If nothing appears, then the scanner may be in sleep mode.
Press On button (left button below display panel) to wake the scanner.
Before starting your scanning session, you may want to verify that the scanner is set up properly. If Select Stacker is attached…
Check for a light on the Select Stacker. It may be red if the scanner is in sleep mode. It should turn green when the scanner is on.
Make sure the cable is connected between the Select Stacker and the Scanner (on back).
Pull the two wire handles out to their full extent to help prevent sheets from jamming.
If a single output tray is attached… Extend the Adjustment bar to fit the length of the sheets to be scanned. This will help prevent jamming.
Power Light
Select Stacker Cable
Output Tray
Printer Cover
Read Head
Sheet Deflector
Input Tray
Adjustment Bar
Display Panel
Pull Wire Handles until extended fully
Ensure that the covers on the sheet deflector,
read head, and printer
are closed and fully seated.
May 23, 2016
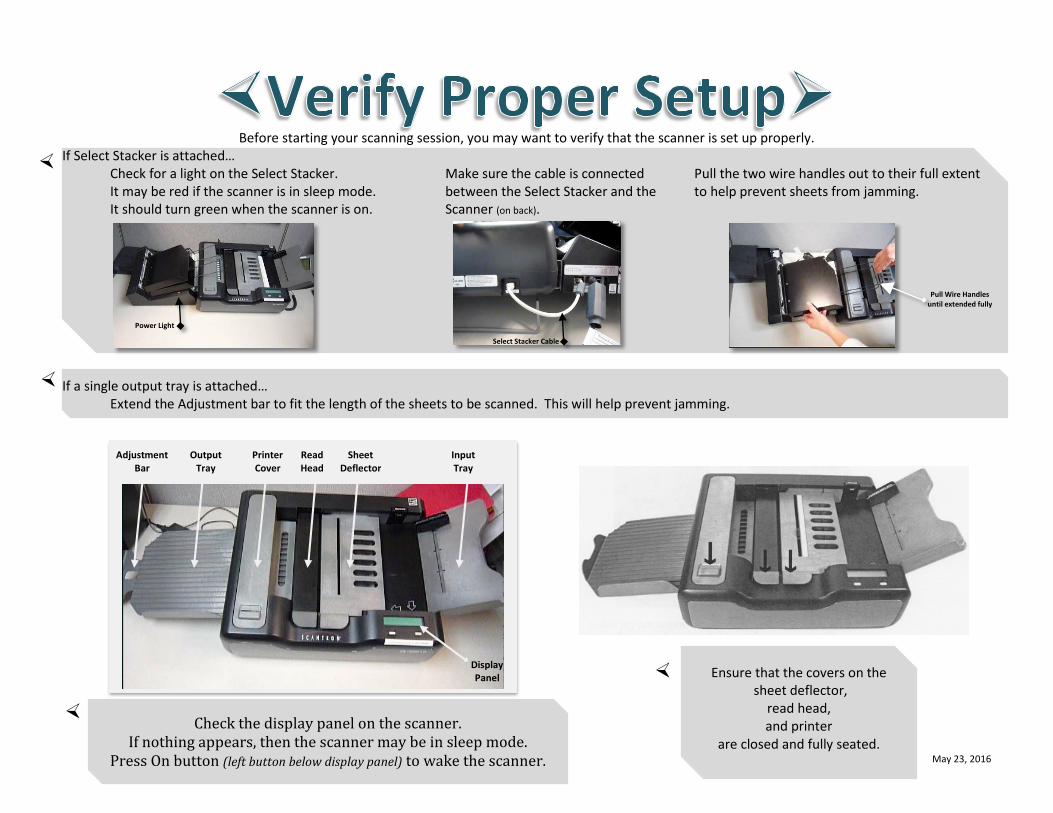
Answer Key(s) should have 99999999
filled in the G-Number section, and
correct answers marked for each question to be scored. Questions left blank on Answer Key will be ignored. It is a good idea (not required) to fill in the Network ID of the Instructor.
Student tests must have Network ID filled in to identify students. This is the same ID students use to access Blackboard, GVSU Email, and to login to lab computers. If you have more than one Answer Key for a test, mark each key with a different Test Form option (A,B,C, or D); Student tests must have the appropriate Test Form option filled in to match with the corresponding Answer Key.
Note: This is the correct orientation for placing the sheets into the Scanner’s Input Tray. The black timing marks along this bottom edge should always be near the front of the scanner.
Fan the sheets to help prevent them from sticking together. Tap the sheets on a hard surface to line them up evenly – all in the same direction.
May 23, 2016
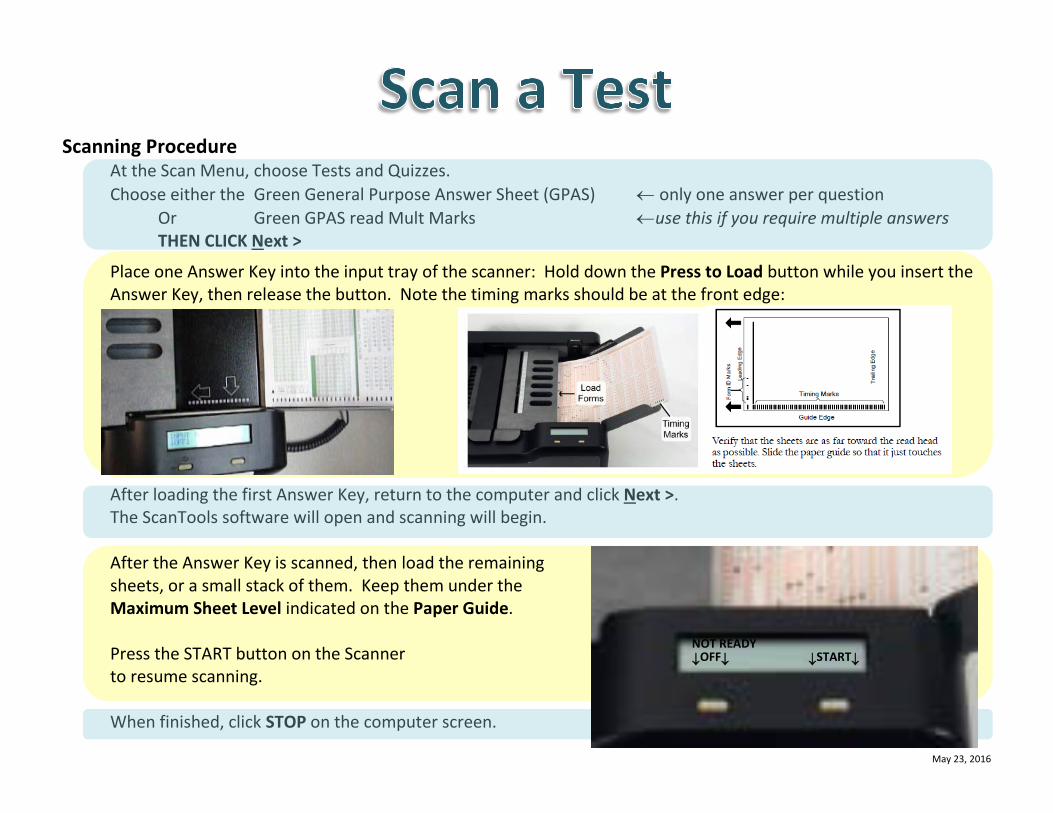
Scanning Procedure At the Scan Menu, choose Tests and Quizzes. Choose either the Green General Purpose Answer Sheet (GPAS) ← only one answer per question Or Green GPAS read Mult Marks ←use this if you require multiple answers THEN CLICK Next >
Place one Answer Key into the input tray of the scanner: Hold down the Press to Load button while you insert the Answer Key, then release the button. Note the timing marks should be at the front edge:
After loading the first Answer Key, return to the computer and click Next >. The ScanTools software will open and scanning will begin. After the Answer Key is scanned, then load the remaining sheets, or a small stack of them. Keep them under the Maximum Sheet Level indicated on the Paper Guide. Press the START button on the Scanner to resume scanning. When finished, click STOP on the computer screen.
NOT READY ↓OFF↓ ↓START↓
May 23, 2016
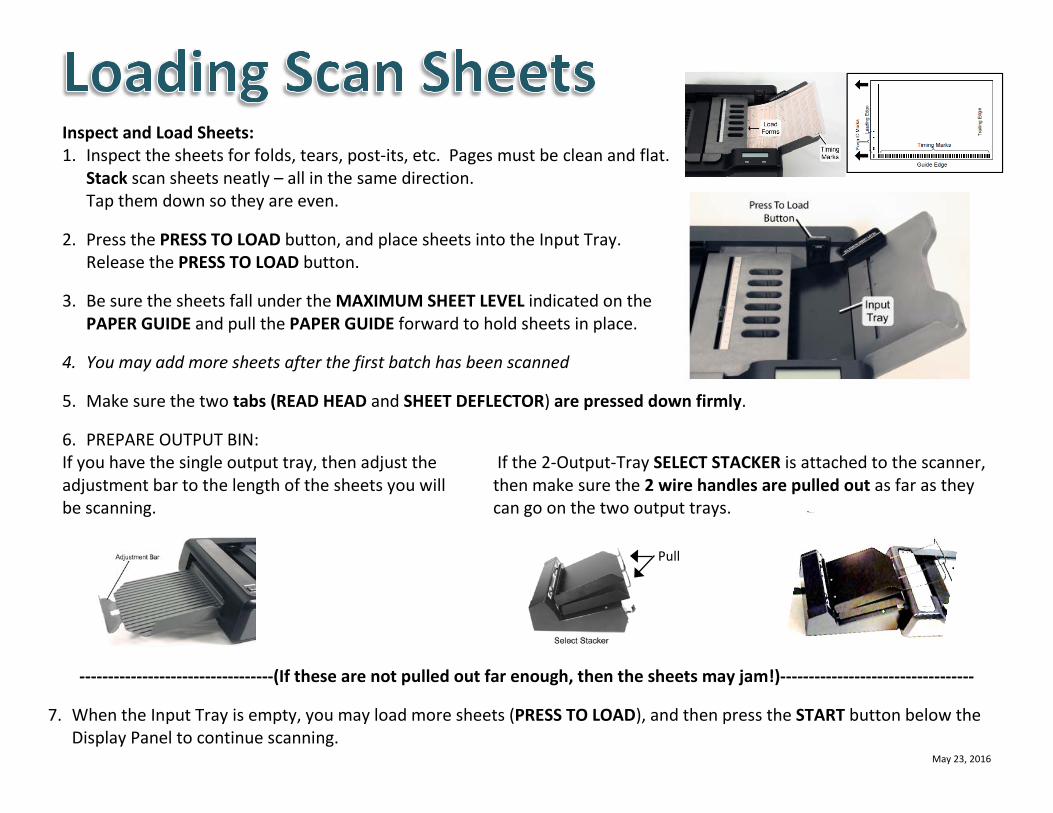
Inspect and Load Sheets: 1. Inspect the sheets for folds, tears, post-its, etc. Pages must be clean and flat.
Stack scan sheets neatly – all in the same direction. Tap them down so they are even.
2. Press the PRESS TO LOAD button, and place sheets into the Input Tray. Release the PRESS TO LOAD button.
3. Be sure the sheets fall under the MAXIMUM SHEET LEVEL indicated on the PAPER GUIDE and pull the PAPER GUIDE forward to hold sheets in place.
4. You may add more sheets after the first batch has been scanned
5. Make sure the two tabs (READ HEAD and SHEET DEFLECTOR) are pressed down firmly.
6. PREPARE OUTPUT BIN: If you have the single output tray, then adjust the adjustment bar to the length of the sheets you will be scanning.
If the 2-Output-Tray SELECT STACKER is attached to the scanner, then make sure the 2 wire handles are pulled out as far as they can go on the two output trays.
----------------------------------(If these are not pulled out far enough, then the sheets may jam!)----------------------------------
7. When the Input Tray is empty, you may load more sheets (PRESS TO LOAD), and then press the START button below the Display Panel to continue scanning.
Pull

5/23/2016 12:07:00 PM
Troubleshooting Chart Problem Possible Solution / Check the following The scanner will not scan / feed documents
1. Power is on. 2. Scanner covers are completely closed. 3. Sheets in the input tray were lightly pushed all the way to the left with the Press To Load button depressed
during loading. 4. The number of sheets in the input tray is less than approximately 100 sheets / below the MAXIMUM SHEET
LEVEL line on the paper guide. 5. You try powering the scanner down, and then up again. (Power switch is on the back of the scanner.)
Documents are Jamming or multiple documents are feeding
Make sure that: 1. The paper guide is adjusted for the width of the sheets you are scanning. 2. The output tray is adjusted for the width of the sheets you are scanning.
If the Select Stacker (with 2 output trays) is attached, make sure it is powered on (there is a light on the Select Stacker that should be on) and make sure that it is connected to the scanner by a cable on the back.
Sometimes, we have found this connecting cable has been removed from the scanner, or loosened. If it is not fully connected, then pages will stop on entering the bottom of the Select Stacker.
3. The leading and timing track edges have been tapped on a hard surface (jogged). 4. All staples and paper clips have been removed from the sheets. 5. All jammed sheets have been removed from the paper path. 6. The scanner has been cleaned. (See: Cleaning the Scanner)
Documents are skewed during scanning
Make sure that: 1. The paper guide is adjusted for the width of the sheets you are scanning. 2. The leading and timing track edges have been tapped on a hard surface (jogged). 3. The scanner covers are firmly closed. 4. The scanner has been cleaned. (See: Cleaning the Scanner)
Scanner pauses excessively during scanning or is running too slow
Make sure that: 1. All other applications are closed on the computer. 2. There is enough free space on the hard disk drive.
Data is not captured as expected
Make sure that: 1. Respondents have properly filled out the form. 2. The timing track edge of the sheets is positioned
against the guide rail (edge of input tray closest to the front of the scanner).
3. You are scanning the correct side of the sheet.
4. You are scanning the correct form. 5. There are no stray marks on the sheet. 6. Nothing is obstructing the read head glass. 7. The read head is fully seated.
May 23, 2016
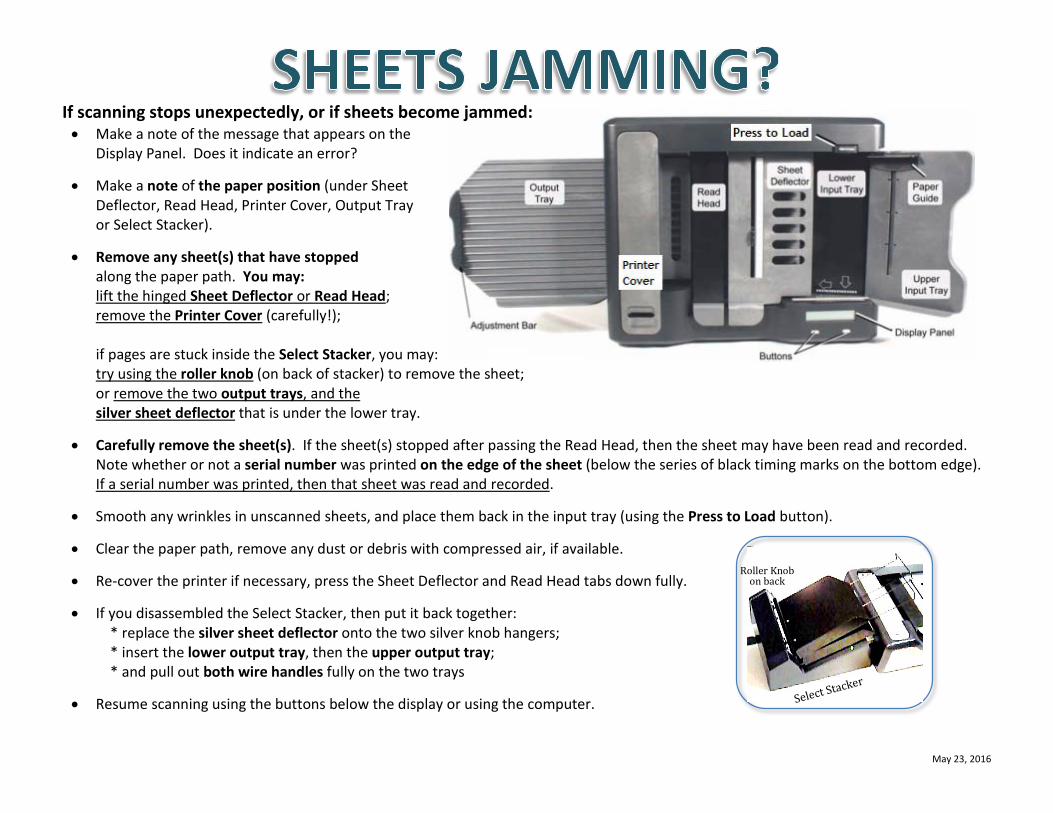
Roller Knob on back
If scanning stops unexpectedly, or if sheets become jammed: • Make a note of the message that appears on the
Display Panel. Does it indicate an error?
• Make a note of the paper position (under Sheet Deflector, Read Head, Printer Cover, Output Tray or Select Stacker).
• Remove any sheet(s) that have stopped along the paper path. You may: lift the hinged Sheet Deflector or Read Head; remove the Printer Cover (carefully!); if pages are stuck inside the Select Stacker, you may: try using the roller knob (on back of stacker) to remove the sheet; or remove the two output trays, and the silver sheet deflector that is under the lower tray.
• Carefully remove the sheet(s). If the sheet(s) stopped after passing the Read Head, then the sheet may have been read and recorded. Note whether or not a serial number was printed on the edge of the sheet (below the series of black timing marks on the bottom edge). If a serial number was printed, then that sheet was read and recorded.
• Smooth any wrinkles in unscanned sheets, and place them back in the input tray (using the Press to Load button).
• Clear the paper path, remove any dust or debris with compressed air, if available.
• Re-cover the printer if necessary, press the Sheet Deflector and Read Head tabs down fully.
• If you disassembled the Select Stacker, then put it back together: * replace the silver sheet deflector onto the two silver knob hangers; * insert the lower output tray, then the upper output tray; * and pull out both wire handles fully on the two trays
• Resume scanning using the buttons below the display or using the computer.
May 23, 2016
• Verify that the last two sheets in the output tray were scanned (see listing on computer screen). There may have been multiple sheets pulled just prior to the error message.
• Remove any sheet(s) in the paper path, along with any that you found unscanned in the output tray, and place back into the Input tray
• You may wish to temporarily remove all but one sheet from the input tray – to make sure the next sheet pulled through the scanner will not be multiple sheets.
• Make sure the tabs are pressed down firmly (read head and sheet deflector)
• Press the WHITE button on the scanner to RESUME Scanning (Retry)
• If the error occurred on your first sheet scanned, or if the second or third pass results in the same error, and if you are certain the TABS are pressed down firmly and sheets are loaded properly (neat, and using Press To Load button), then you may have to reset the scanner.
• To do this, stop the current job (on the computer screen), and return to the Main Menu.
• Then turn the scanner OFF by pressing the button on the BACK of the Scanner (just to the left of the PRESS TO LOAD button, but down on the back side of the scanner).
• After a few seconds, turn the scanner on again, and retry the process—this time load only one sheet and begin scanning.
• Once the first sheet has scanned successfully, you may load a stack of the remaining sheets.
The scanner sets its internal SHEET THICKNESS measurement based on the thickness of the first sheet scanned. Scanning only one sheet at the beginning will prevent the scanner from grabbing multiple sheets – which is generally the cause of the SHEET TOO THIN error.
May 23, 2016
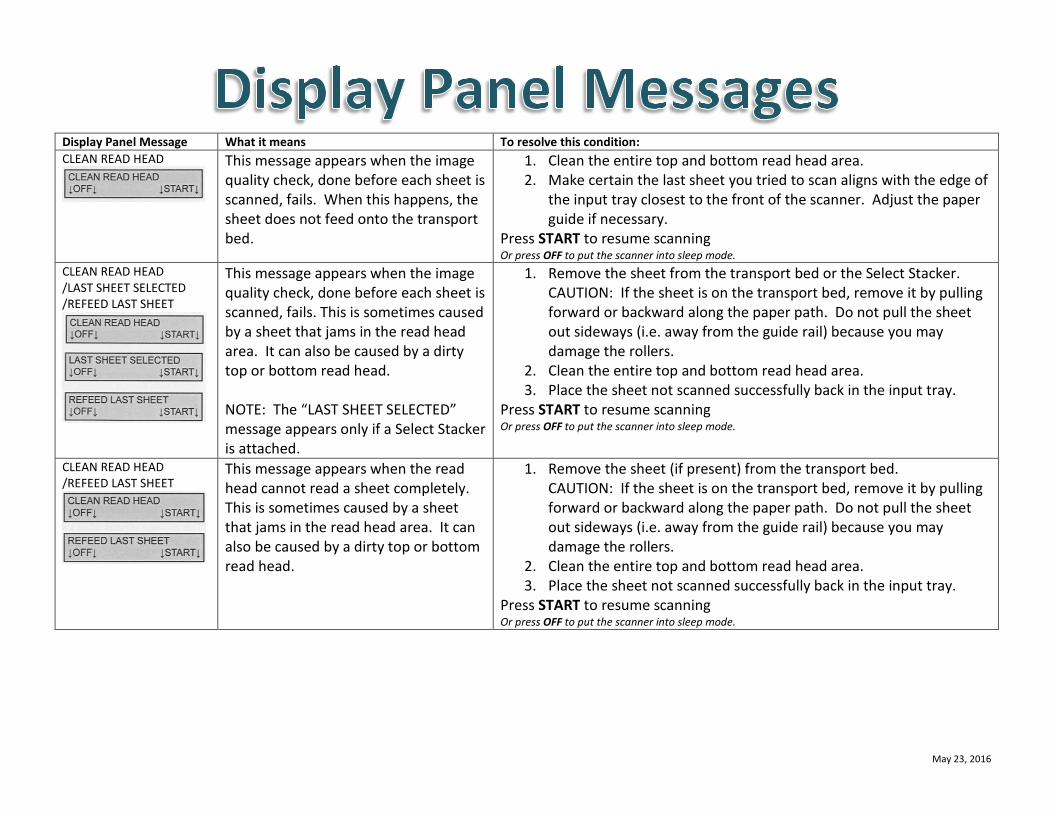
Display Panel Message What it means To resolve this condition: CLEAN READ HEAD
This message appears when the image quality check, done before each sheet is scanned, fails. When this happens, the sheet does not feed onto the transport bed.
1. Clean the entire top and bottom read head area. 2. Make certain the last sheet you tried to scan aligns with the edge of
the input tray closest to the front of the scanner. Adjust the paper guide if necessary.
Press START to resume scanning Or press OFF to put the scanner into sleep mode.
CLEAN READ HEAD /LAST SHEET SELECTED /REFEED LAST SHEET
This message appears when the image quality check, done before each sheet is scanned, fails. This is sometimes caused by a sheet that jams in the read head area. It can also be caused by a dirty top or bottom read head. NOTE: The “LAST SHEET SELECTED” message appears only if a Select Stacker is attached.
1. Remove the sheet from the transport bed or the Select Stacker. CAUTION: If the sheet is on the transport bed, remove it by pulling forward or backward along the paper path. Do not pull the sheet out sideways (i.e. away from the guide rail) because you may damage the rollers.
2. Clean the entire top and bottom read head area. 3. Place the sheet not scanned successfully back in the input tray.
Press START to resume scanning Or press OFF to put the scanner into sleep mode.
CLEAN READ HEAD /REFEED LAST SHEET
This message appears when the read head cannot read a sheet completely. This is sometimes caused by a sheet that jams in the read head area. It can also be caused by a dirty top or bottom read head.
1. Remove the sheet (if present) from the transport bed. CAUTION: If the sheet is on the transport bed, remove it by pulling forward or backward along the paper path. Do not pull the sheet out sideways (i.e. away from the guide rail) because you may damage the rollers.
2. Clean the entire top and bottom read head area. 3. Place the sheet not scanned successfully back in the input tray.
Press START to resume scanning Or press OFF to put the scanner into sleep mode.
May 23, 2016
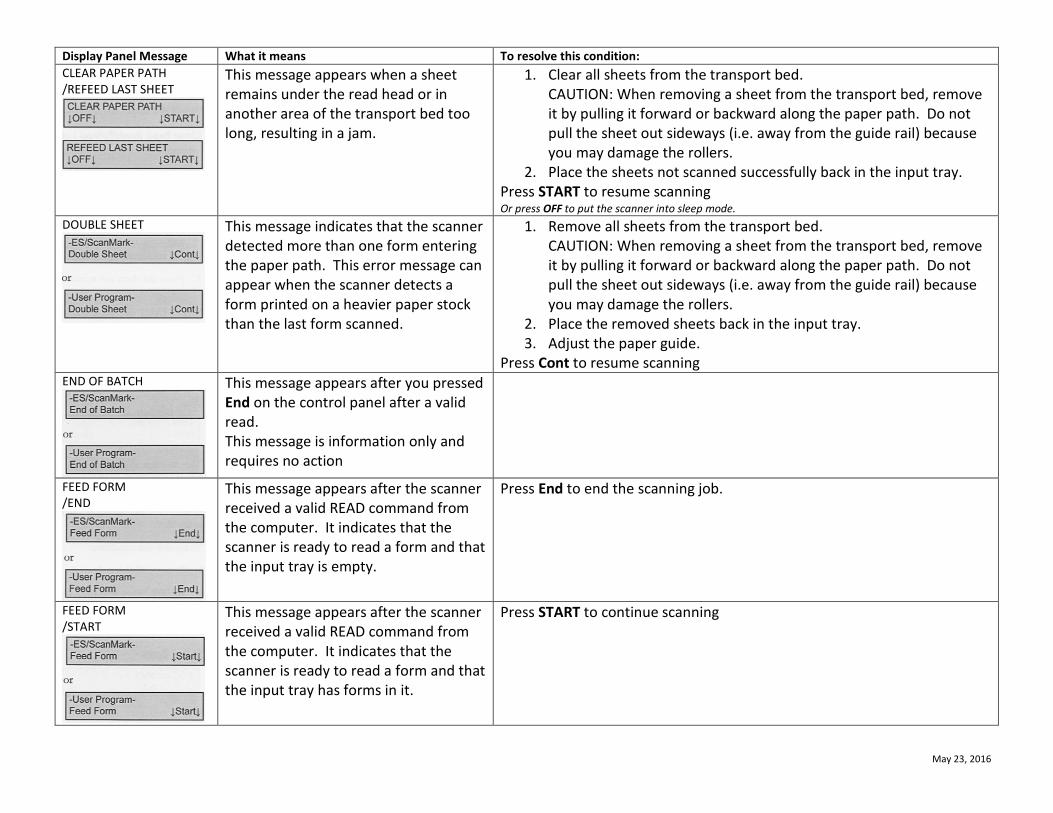
Display Panel Message What it means To resolve this condition: CLEAR PAPER PATH /REFEED LAST SHEET
This message appears when a sheet remains under the read head or in another area of the transport bed too long, resulting in a jam.
1. Clear all sheets from the transport bed. CAUTION: When removing a sheet from the transport bed, remove it by pulling it forward or backward along the paper path. Do not pull the sheet out sideways (i.e. away from the guide rail) because you may damage the rollers.
2. Place the sheets not scanned successfully back in the input tray. Press START to resume scanning Or press OFF to put the scanner into sleep mode.
DOUBLE SHEET
This message indicates that the scanner detected more than one form entering the paper path. This error message can appear when the scanner detects a form printed on a heavier paper stock than the last form scanned.
1. Remove all sheets from the transport bed. CAUTION: When removing a sheet from the transport bed, remove it by pulling it forward or backward along the paper path. Do not pull the sheet out sideways (i.e. away from the guide rail) because you may damage the rollers.
2. Place the removed sheets back in the input tray. 3. Adjust the paper guide.
Press Cont to resume scanning END OF BATCH
This message appears after you pressed End on the control panel after a valid read. This message is information only and requires no action
FEED FORM /END
This message appears after the scanner received a valid READ command from the computer. It indicates that the scanner is ready to read a form and that the input tray is empty.
Press End to end the scanning job.
FEED FORM /START
This message appears after the scanner received a valid READ command from the computer. It indicates that the scanner is ready to read a form and that the input tray has forms in it.
Press START to continue scanning
May 23, 2016
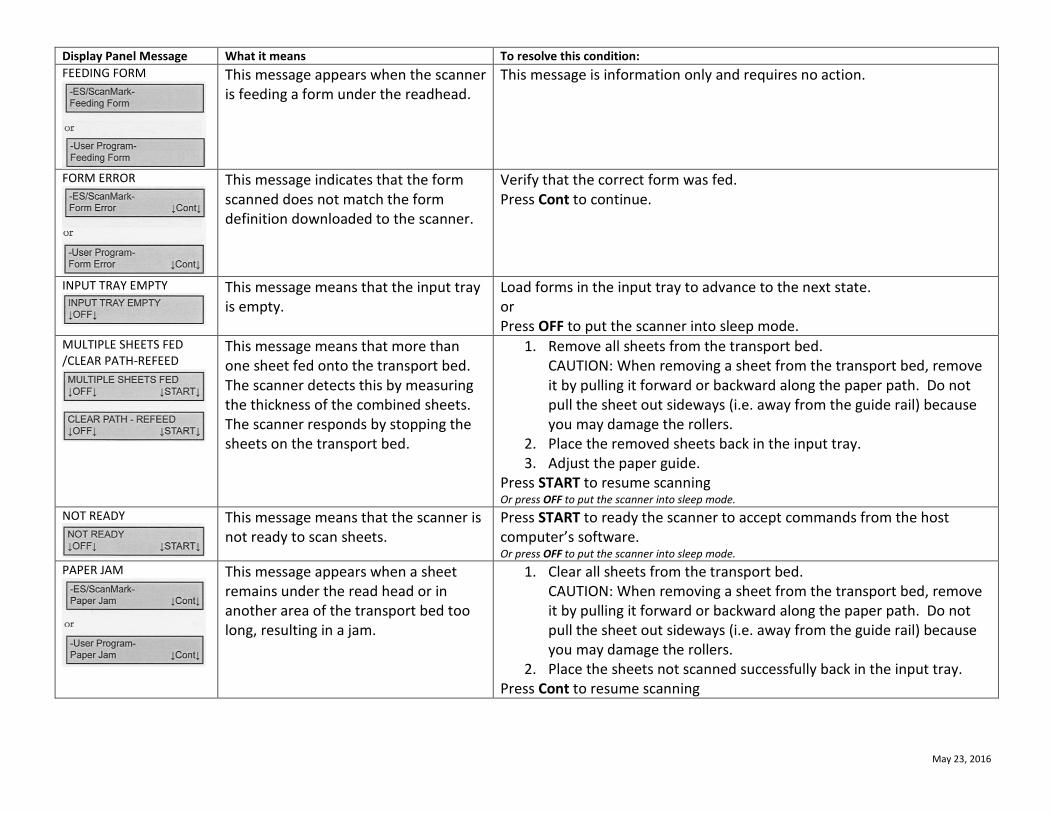
Display Panel Message What it means To resolve this condition: FEEDING FORM
This message appears when the scanner is feeding a form under the readhead.
This message is information only and requires no action.
FORM ERROR
This message indicates that the form scanned does not match the form definition downloaded to the scanner.
Verify that the correct form was fed. Press Cont to continue.
INPUT TRAY EMPTY
This message means that the input tray is empty.
Load forms in the input tray to advance to the next state. or Press OFF to put the scanner into sleep mode.
MULTIPLE SHEETS FED /CLEAR PATH-REFEED
This message means that more than one sheet fed onto the transport bed. The scanner detects this by measuring the thickness of the combined sheets. The scanner responds by stopping the sheets on the transport bed.
1. Remove all sheets from the transport bed. CAUTION: When removing a sheet from the transport bed, remove it by pulling it forward or backward along the paper path. Do not pull the sheet out sideways (i.e. away from the guide rail) because you may damage the rollers.
2. Place the removed sheets back in the input tray. 3. Adjust the paper guide.
Press START to resume scanning Or press OFF to put the scanner into sleep mode.
NOT READY
This message means that the scanner is not ready to scan sheets.
Press START to ready the scanner to accept commands from the host computer’s software. Or press OFF to put the scanner into sleep mode.
PAPER JAM
This message appears when a sheet remains under the read head or in another area of the transport bed too long, resulting in a jam.
1. Clear all sheets from the transport bed. CAUTION: When removing a sheet from the transport bed, remove it by pulling it forward or backward along the paper path. Do not pull the sheet out sideways (i.e. away from the guide rail) because you may damage the rollers.
2. Place the sheets not scanned successfully back in the input tray. Press Cont to resume scanning
May 23, 2016
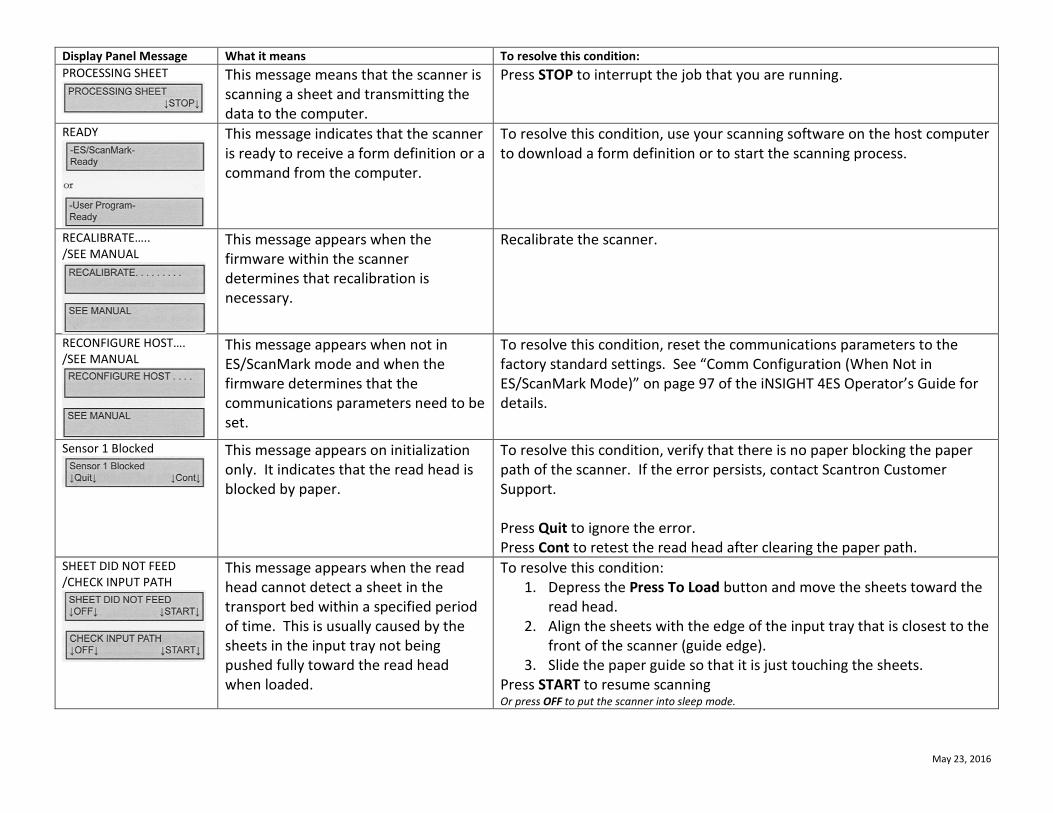
Display Panel Message What it means To resolve this condition: PROCESSING SHEET
This message means that the scanner is scanning a sheet and transmitting the data to the computer.
Press STOP to interrupt the job that you are running.
READY
This message indicates that the scanner is ready to receive a form definition or a command from the computer.
To resolve this condition, use your scanning software on the host computer to download a form definition or to start the scanning process.
RECALIBRATE….. /SEE MANUAL
This message appears when the firmware within the scanner determines that recalibration is necessary.
Recalibrate the scanner.
RECONFIGURE HOST…. /SEE MANUAL
This message appears when not in ES/ScanMark mode and when the firmware determines that the communications parameters need to be set.
To resolve this condition, reset the communications parameters to the factory standard settings. See “Comm Configuration (When Not in ES/ScanMark Mode)” on page 97 of the iNSIGHT 4ES Operator’s Guide for details.
Sensor 1 Blocked
This message appears on initialization only. It indicates that the read head is blocked by paper.
To resolve this condition, verify that there is no paper blocking the paper path of the scanner. If the error persists, contact Scantron Customer Support. Press Quit to ignore the error. Press Cont to retest the read head after clearing the paper path.
SHEET DID NOT FEED /CHECK INPUT PATH
This message appears when the read head cannot detect a sheet in the transport bed within a specified period of time. This is usually caused by the sheets in the input tray not being pushed fully toward the read head when loaded.
To resolve this condition: 1. Depress the Press To Load button and move the sheets toward the
read head. 2. Align the sheets with the edge of the input tray that is closest to the
front of the scanner (guide edge). 3. Slide the paper guide so that it is just touching the sheets.
Press START to resume scanning Or press OFF to put the scanner into sleep mode.

May 23, 2016
Display Panel Message What it means To resolve this condition: SHEET DID NOT FEED /CHECK SHEET DEFLECTOR
This message appears when the sheet deflector is not completely closed. The sheet deflector must be completely down for the scanner to properly sense sheets.
To resolve this condition, press down firmly on the sheet deflector so that it is fully seated. Press START to resume scanning Or press OFF to put the scanner into sleep mode.
SHEET DID NOT LEAVE OUTPUT STACKER
The scanner displays this message when a sheet jams. This error is also displayed as a result of a dirty sensor and/or dirty conditions surrounding the sensor area.
To resolve this condition: 1. Clear all sheets from the scanner and Select Stacker transport bed. 2. Blow canned air (Scantron recommends a non-condensing
propellant) onto the output sensor and surrounding area to remove paper dust and debris.
3. Place any sheet(s) not processed by the host software back in the input tray.
Press START to continue scanning after taking corrective action. Or press OFF to put the scanner into sleep mode.
SHEET DID NOT LEAVE SELECT STACKER
The scanner displays this message when a sheet jams. This message is also displayed as a result of a dirty sensor and/or dirty conditions surrounding the sensor area. NOTE: Repair a sheet if it is torn, or otherwise damaged. If repair is not possible, copy the marks from a damaged sheet onto a new sheet.
To resolve this condition: 1. Clear all sheets from the scanner and Select Stacker transport bed. 2. Blow canned air (Scantron recommends a non-condensing
propellant) onto the select sensor and surrounding area to remove paper dust and debris.
3. Place any sheet(s) not processed by the host software back in the input tray.
Press START to continue scanning after taking corrective action. Or press OFF to put the scanner into sleep mode.
May 23, 2016
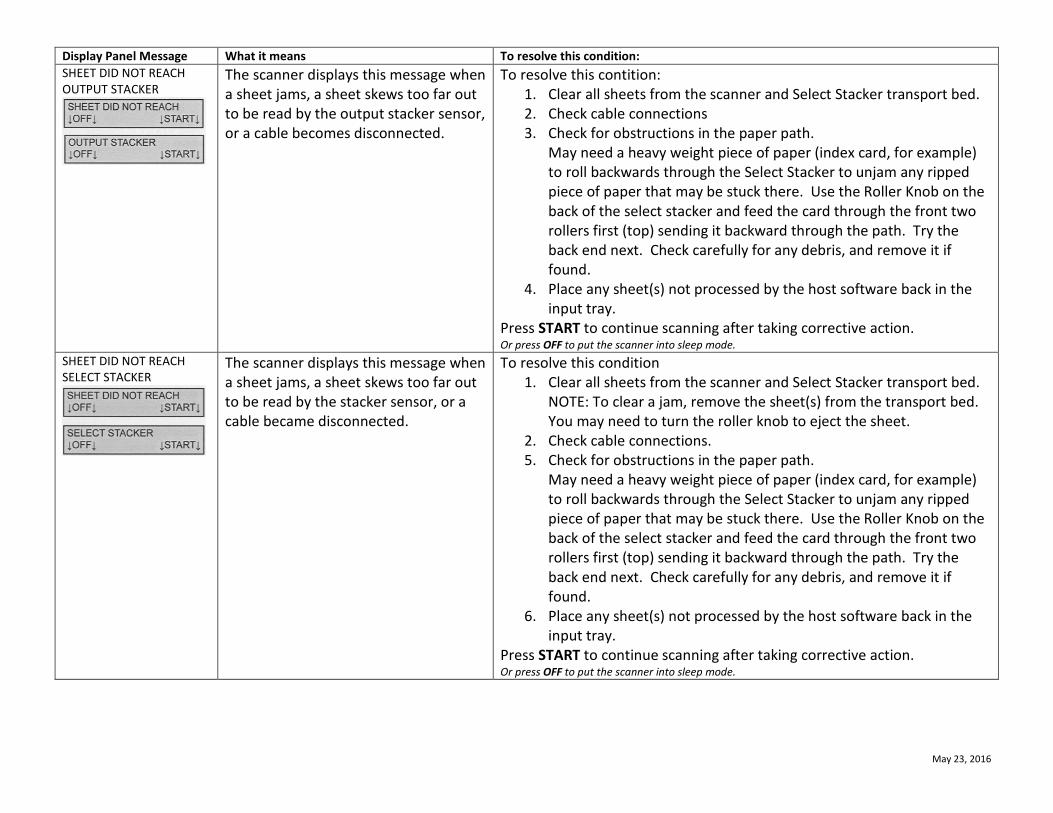
Display Panel Message What it means To resolve this condition: SHEET DID NOT REACH OUTPUT STACKER
The scanner displays this message when a sheet jams, a sheet skews too far out to be read by the output stacker sensor, or a cable becomes disconnected.
To resolve this contition: 1. Clear all sheets from the scanner and Select Stacker transport bed. 2. Check cable connections 3. Check for obstructions in the paper path.
May need a heavy weight piece of paper (index card, for example) to roll backwards through the Select Stacker to unjam any ripped piece of paper that may be stuck there. Use the Roller Knob on the back of the select stacker and feed the card through the front two rollers first (top) sending it backward through the path. Try the back end next. Check carefully for any debris, and remove it if found.
4. Place any sheet(s) not processed by the host software back in the input tray.
Press START to continue scanning after taking corrective action. Or press OFF to put the scanner into sleep mode.
SHEET DID NOT REACH SELECT STACKER
The scanner displays this message when a sheet jams, a sheet skews too far out to be read by the stacker sensor, or a cable became disconnected.
To resolve this condition 1. Clear all sheets from the scanner and Select Stacker transport bed.
NOTE: To clear a jam, remove the sheet(s) from the transport bed. You may need to turn the roller knob to eject the sheet.
2. Check cable connections. 5. Check for obstructions in the paper path.
May need a heavy weight piece of paper (index card, for example) to roll backwards through the Select Stacker to unjam any ripped piece of paper that may be stuck there. Use the Roller Knob on the back of the select stacker and feed the card through the front two rollers first (top) sending it backward through the path. Try the back end next. Check carefully for any debris, and remove it if found.
6. Place any sheet(s) not processed by the host software back in the input tray.
Press START to continue scanning after taking corrective action. Or press OFF to put the scanner into sleep mode.

May 23, 2016
Display Panel Message What it means To resolve this condition: SHEET SKEWED / LAST SHEET SELECTED / REFEED LAST SHEET
This message appears when a sheet feeds onto the transport bed at an angle or when a sheet has a torn or bent edge. When this error is detected, the sheet is stopped on the transport bed. NOTE: The “LAST SHEET SELECTED” message appears only if a Select Stacker is attached.
To resolve this condition: 1. Remove the sheet from the transport bed (or from the lower tray of
the Select Stacker if installed). 2. Repair the sheet if it is torn or otherwise damaged. If you cannot
repair the sheet, copy the marks from the damaged sheet onto a new sheet. NOTE: Tape on a sheet may result in a “Multiple Sheets Fed” error.
3. Place the sheet (or replacement sheet) back in the input tray. 4. Adjust the paper guide so that it is just touching the sheets.
Press START to resume scanning Or press OFF to put the scanner into sleep mode.
SHEET TOO THIN / SEE MANUAL
This message appears when the last sheet that the scanner attempted to scan was thinner than the one before it. This condition can occur when the sheet thickness error detection is being performed by the scanner. After the scanner stops and is restarted, the thickness of the first sheet is measured and stored as the reference. If multiple sheets are picked (as the first sheet after the scanner is restarted), the thickness value is larger than it should be. Consequently, the second sheet (not a multiple) will cause a “Sheet Too Thin” message to be displayed.
To resolve this condition: 1. Verify that the last two sheets in the output tray were processed
correctly. - The sheet left on the transport bed needs to be rescanned. - The last sheet in the output tray needs to be checked.
NOTE: If two sheets are stuck together they may both be in the output tray. If so, they should be separated and rescanned.
2. If necessary, perform error recovery in your software application on the host computer.
Press START to resume scanning Or press OFF to put the scanner into sleep mode.
May 23, 2016
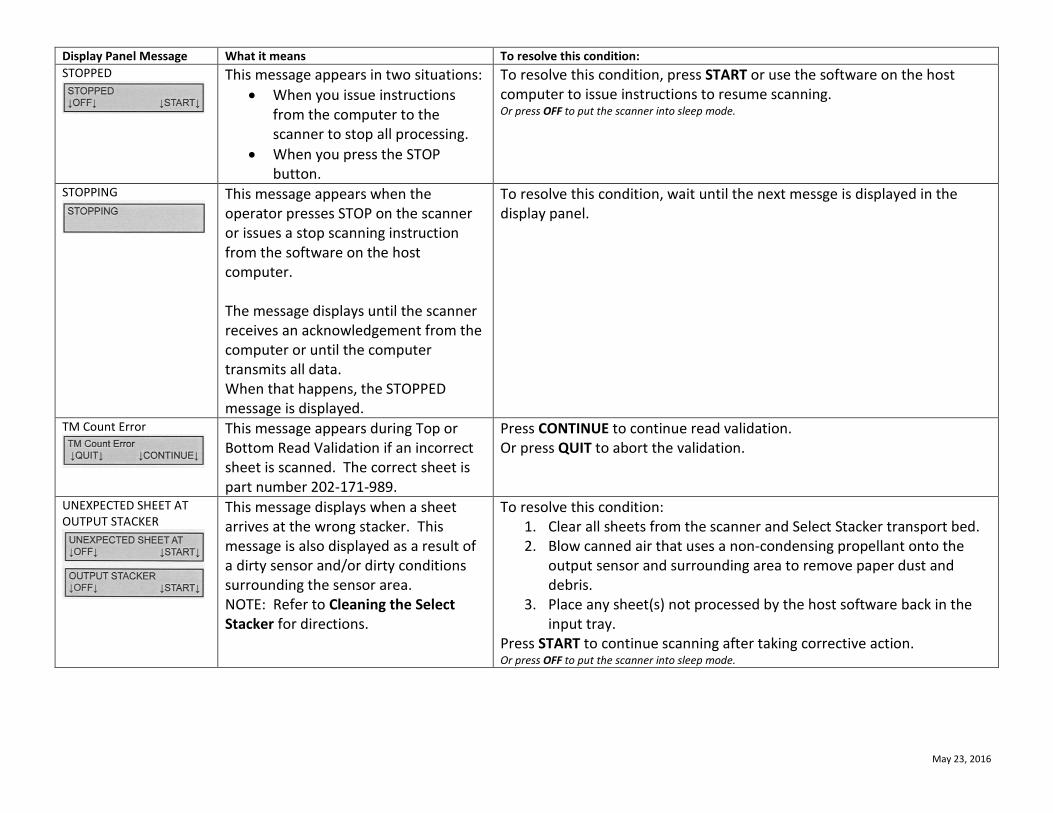
Display Panel Message What it means To resolve this condition: STOPPED
This message appears in two situations: • When you issue instructions
from the computer to the scanner to stop all processing.
• When you press the STOP button.
To resolve this condition, press START or use the software on the host computer to issue instructions to resume scanning. Or press OFF to put the scanner into sleep mode.
STOPPING
This message appears when the operator presses STOP on the scanner or issues a stop scanning instruction from the software on the host computer. The message displays until the scanner receives an acknowledgement from the computer or until the computer transmits all data. When that happens, the STOPPED message is displayed.
To resolve this condition, wait until the next messge is displayed in the display panel.
TM Count Error
This message appears during Top or Bottom Read Validation if an incorrect sheet is scanned. The correct sheet is part number 202-171-989.
Press CONTINUE to continue read validation. Or press QUIT to abort the validation.
UNEXPECTED SHEET AT OUTPUT STACKER
This message displays when a sheet arrives at the wrong stacker. This message is also displayed as a result of a dirty sensor and/or dirty conditions surrounding the sensor area. NOTE: Refer to Cleaning the Select Stacker for directions.
To resolve this condition: 1. Clear all sheets from the scanner and Select Stacker transport bed. 2. Blow canned air that uses a non-condensing propellant onto the
output sensor and surrounding area to remove paper dust and debris.
3. Place any sheet(s) not processed by the host software back in the input tray.
Press START to continue scanning after taking corrective action. Or press OFF to put the scanner into sleep mode.

May 23, 2016
Display Panel Message What it means To resolve this condition: UNEXPECTED SHEET AT SELECT STACKER
This message is displayed when a sheet arrives at the wrong stacker. This message is also displayed as a result of a dirty sensor and/or dirty conditions surrounding the sensor area. NOTE: Refer to Cleaning the Select Stacker for directions.
To resolve this condition: 1. Clear all sheets from the scanner’s transport bed. 2. Blow canned air onto the Select sensor and surrounding area to
remove paper dust and debris. 3. Place any sheet(s) not processed by the host software back in the
input tray. Press START to continue scanning after taking corrective action. Or press OFF to put the scanner into sleep mode.
WAITING FOR COMPUTER
This message means that the scanner is ready to scan and is waiting for instructions from the computer. It appears after forms have been loaded and the START button has been pressed.
Press STOP to take the scanner out of the “ready” state. Press OFF to put the scanner into sleep mode.
May 23, 2016
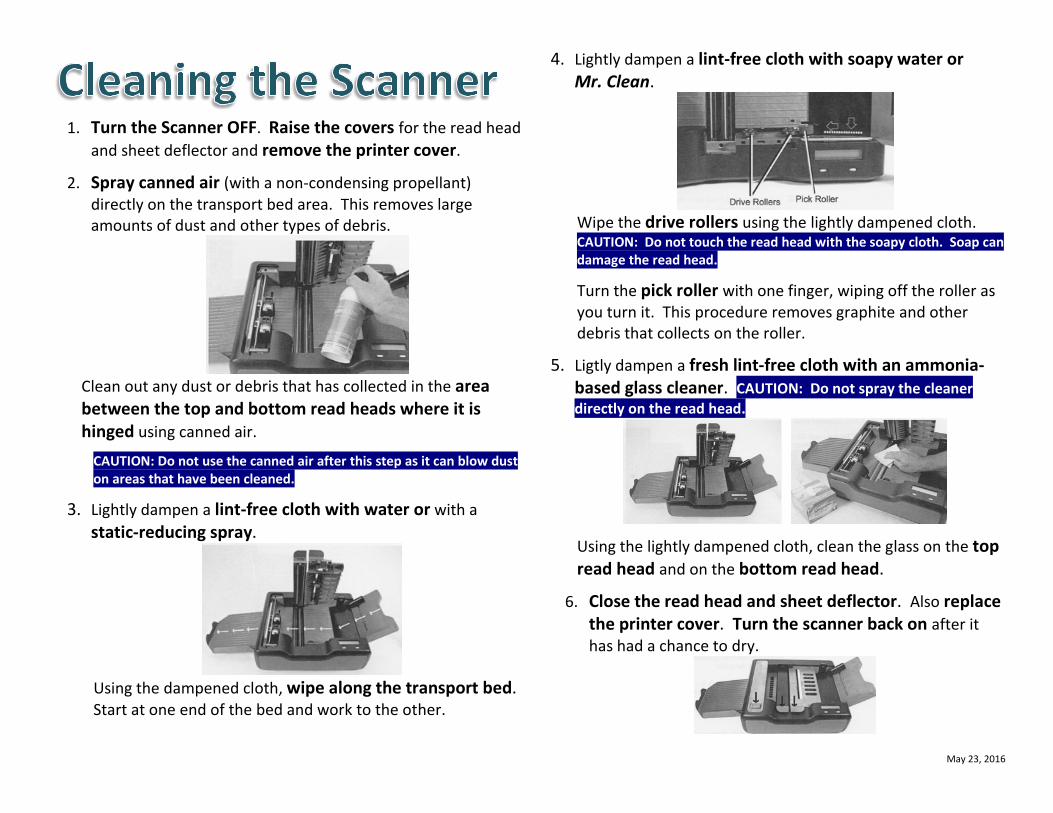
1. Turn the Scanner OFF. Raise the covers for the read head and sheet deflector and remove the printer cover.
2. Spray canned air (with a non-condensing propellant) directly on the transport bed area. This removes large amounts of dust and other types of debris.
Clean out any dust or debris that has collected in the area between the top and bottom read heads where it is hinged using canned air.
CAUTION: Do not use the canned air after this step as it can blow dust on areas that have been cleaned.
3. Lightly dampen a lint-free cloth with water or with a static-reducing spray.
Using the dampened cloth, wipe along the transport bed. Start at one end of the bed and work to the other.
4. Lightly dampen a lint-free cloth with soapy water or Mr. Clean.
Wipe the drive rollers using the lightly dampened cloth. CAUTION: Do not touch the read head with the soapy cloth. Soap can damage the read head.
Turn the pick roller with one finger, wiping off the roller as you turn it. This procedure removes graphite and other debris that collects on the roller.
5. Ligtly dampen a fresh lint-free cloth with an ammonia-based glass cleaner. CAUTION: Do not spray the cleaner directly on the read head.
Using the lightly dampened cloth, clean the glass on the top read head and on the bottom read head.
6. Close the read head and sheet deflector. Also replace the printer cover. Turn the scanner back on after it has had a chance to dry.

May 23, 2016
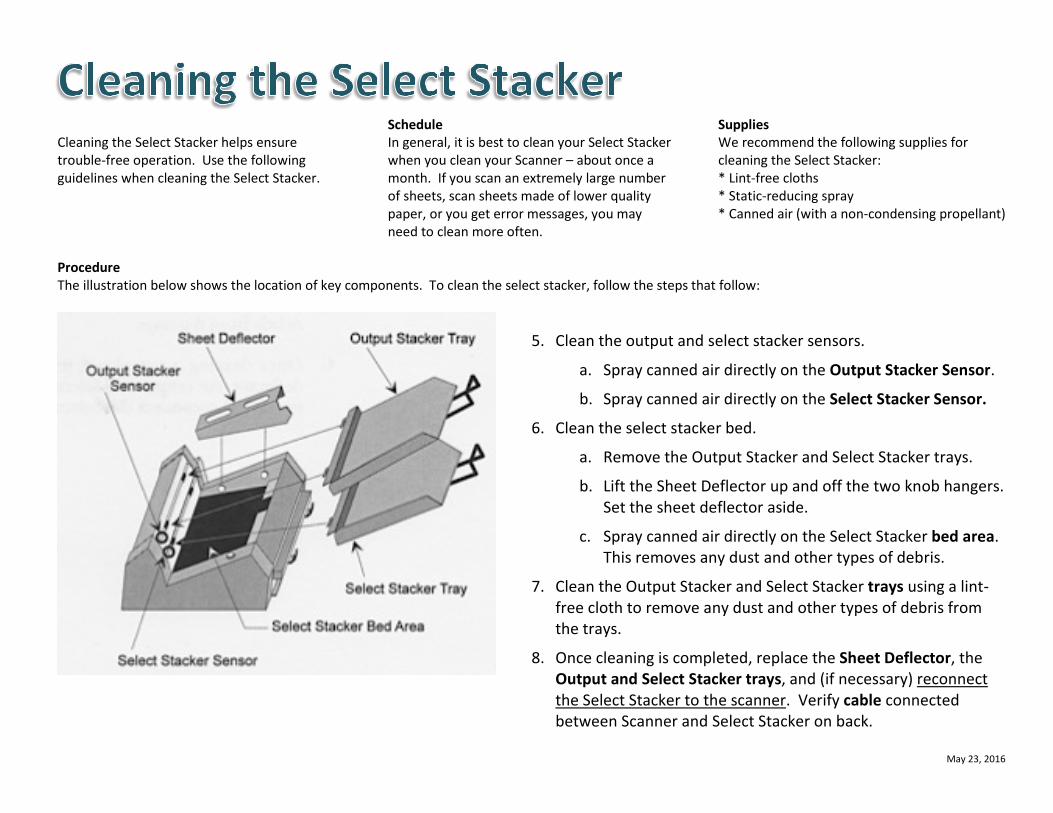
Cleaning the Select Stacker helps ensure trouble-free operation. Use the following guidelines when cleaning the Select Stacker.
Schedule In general, it is best to clean your Select Stacker when you clean your Scanner – about once a month. If you scan an extremely large number of sheets, scan sheets made of lower quality paper, or you get error messages, you may need to clean more often.
Supplies We recommend the following supplies for cleaning the Select Stacker: * Lint-free cloths * Static-reducing spray * Canned air (with a non-condensing propellant)
Procedure The illustration below shows the location of key components. To clean the select stacker, follow the steps that follow:
1. Clean the output and select stacker sensors.
a. Spray canned air directly on the Output Stacker Sensor.
b. Spray canned air directly on the Select Stacker Sensor.
2. Clean the select stacker bed.
a. Remove the Output Stacker and Select Stacker trays.
b. Lift the Sheet Deflector up and off the two knob hangers. Set the sheet deflector aside.
c. Spray canned air directly on the Select Stacker bed area. This removes any dust and other types of debris.
3. Clean the Output Stacker and Select Stacker trays using a lint-free cloth to remove any dust and other types of debris from the trays.
4. Once cleaning is completed, replace the Sheet Deflector, the Output and Select Stacker trays, and (if necessary) reconnect the Select Stacker to the scanner. Verify cable connected between Scanner and Select Stacker on back.

May 23, 2016
7. Turn the Scanner OFF. Raise the covers for the read head and sheet deflector and remove the printer cover.
8. Spray canned air (with a non-condensing propellant) directly on the transport bed area. This removes large amounts of dust and other types of debris.
Clean out any dust or debris that has collected in the area between the top and bottom read heads where it is hinged using canned air.
CAUTION: Do not use the canned air after this step as it can blow dust on areas that have been cleaned.
9. Lightly dampen a lint-free cloth with water or with a static-reducing spray.
Using the dampened cloth, wipe along the transport bed. Start at one end of the bed and work to the other.
10. Lightly dampen a lint-free cloth with soapy water or Mr. Clean.
Wipe the drive rollers using the lightly dampened cloth. CAUTION: Do not touch the read head with the soapy cloth. Soap can damage the read head.
Turn the pick roller with one finger, wiping off the roller as you turn it. This procedure removes graphite and other debris that collects on the roller.
11. Ligtly dampen a fresh lint-free cloth with an ammonia-based glass cleaner. CAUTION: Do not spray the cleaner directly on the read head.
Using the lightly dampened cloth, clean the glass on the top read head and on the bottom read head.
12. Close the read head and sheet deflector. Also replace the printer cover. Turn the scanner back on after it has had a chance to dry.
May 23, 2016
Cleaning the Select Stacker helps ensure trouble-free operation. Use the following guidelines when cleaning the Select Stacker.
Schedule In general, it is best to clean your Select Stacker when you clean your Scanner – about once a month. If you scan an extremely large number of sheets, scan sheets made of lower quality paper, or you get error messages, you may need to clean more often.
Supplies We recommend the following supplies for cleaning the Select Stacker: * Lint-free cloths * Static-reducing spray * Canned air (with a non-condensing propellant)
Procedure The illustration below shows the location of key components. To clean the select stacker, follow the steps that follow:
5. Clean the output and select stacker sensors.
a. Spray canned air directly on the Output Stacker Sensor.
b. Spray canned air directly on the Select Stacker Sensor.
6. Clean the select stacker bed.
a. Remove the Output Stacker and Select Stacker trays.
b. Lift the Sheet Deflector up and off the two knob hangers. Set the sheet deflector aside.
c. Spray canned air directly on the Select Stacker bed area. This removes any dust and other types of debris.
7. Clean the Output Stacker and Select Stacker trays using a lint-free cloth to remove any dust and other types of debris from the trays.
8. Once cleaning is completed, replace the Sheet Deflector, the Output and Select Stacker trays, and (if necessary) reconnect the Select Stacker to the scanner. Verify cable connected between Scanner and Select Stacker on back.
May 23, 2016
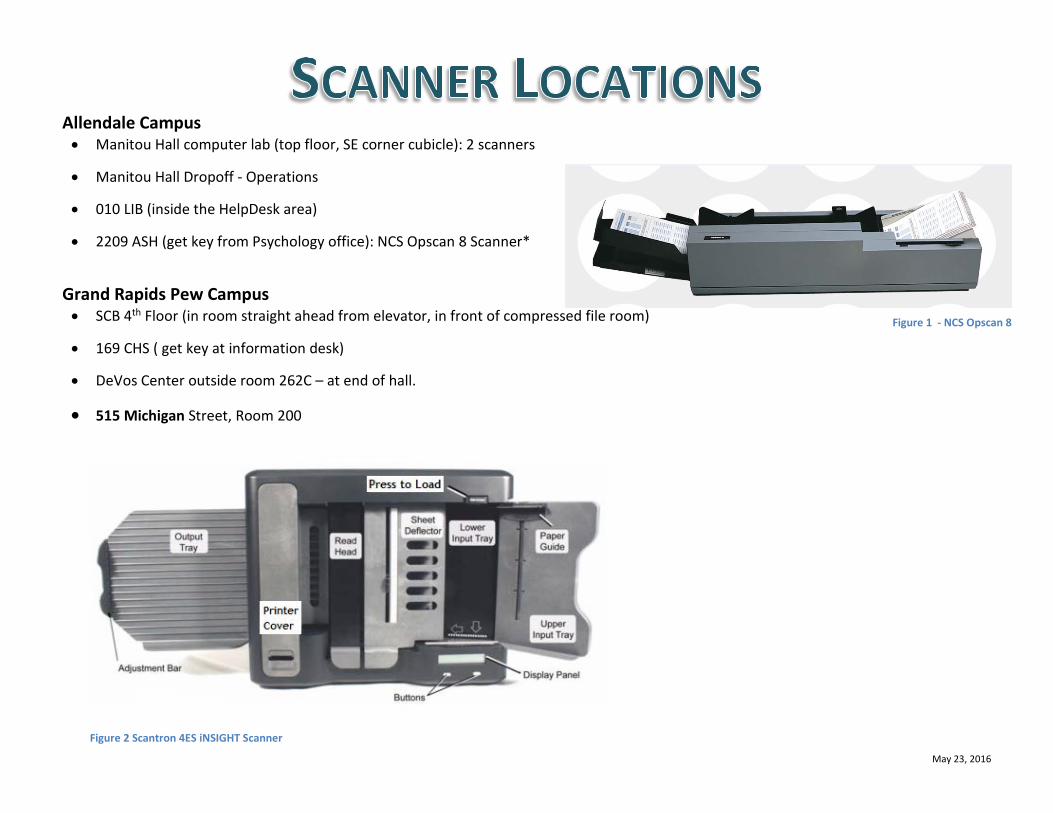
Figure 1 - NCS Opscan 8
Allendale Campus • Manitou Hall computer lab (top floor, SE corner cubicle): 2 scanners
• Manitou Hall Dropoff - Operations
• 010 LIB (inside the HelpDesk area)
• 2209 ASH (get key from Psychology office): NCS Opscan 8 Scanner*
Grand Rapids Pew Campus • SCB 4th Floor (in room straight ahead from elevator, in front of compressed file room)
• 169 CHS ( get key at information desk)
• DeVos Center outside room 262C – at end of hall.
• 515 Michigan Street, Room 200
Figure 2 Scantron 4ES iNSIGHT Scanner