Embed Size (px)
Citation preview
Page 1 / 15
Outlook configuration
Content Outlook 2013 (Windows) ............................................................................................................. 2
Outlook 2016 (Windows) ............................................................................................................. 2
Outlook 2011 (Mac) ..................................................................................................................... 9
Outlook 2016 (Mac) ..................................................................................................................... 9
Outlook configuration
Page 2 / 15
Outlook 2016 (Windows) The first time you start Outlook 2016 on your computer, you need to go through a number of configuration steps in order to configure the application for the access to your mailbox. These steps are explained below.
Please note that depending on the specific setup of your system, your dialogue boxes may differ slightly from the screenshots shown below:
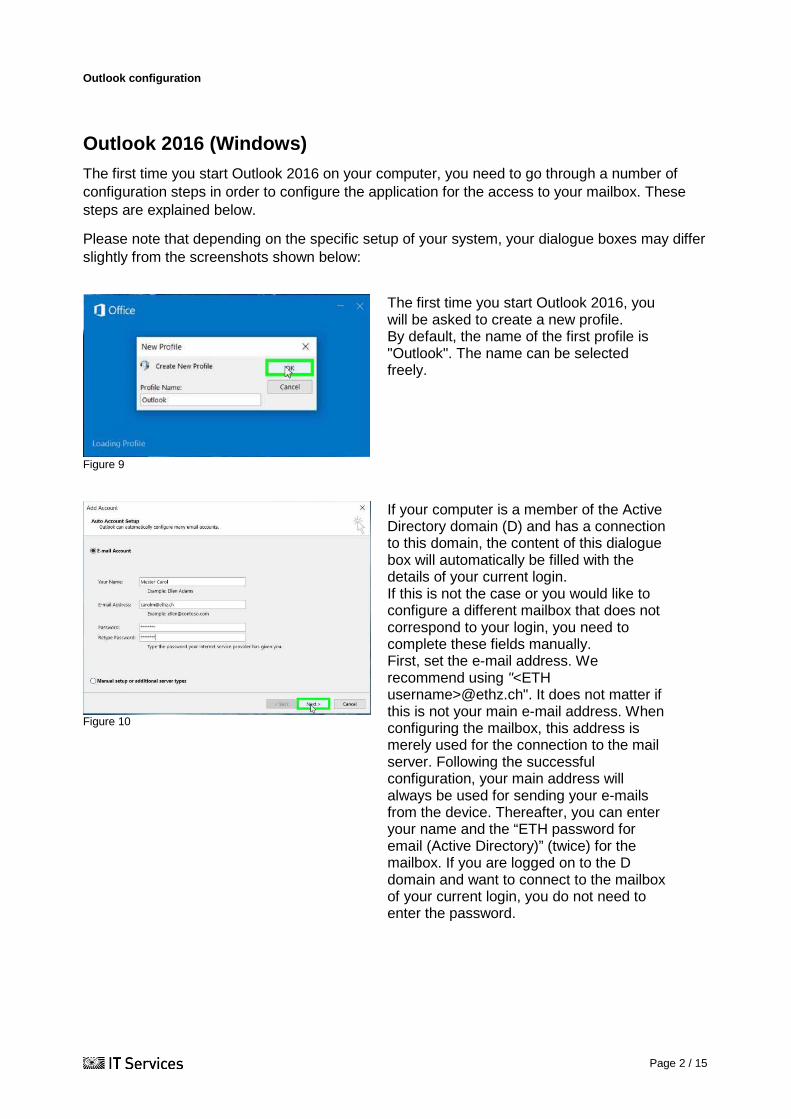
Figure 9
The first time you start Outlook 2016, you will be asked to create a new profile. By default, the name of the first profile is "Outlook". The name can be selected freely.
Figure 10
If your computer is a member of the Active Directory domain (D) and has a connection to this domain, the content of this dialogue box will automatically be filled with the details of your current login. If this is not the case or you would like to configure a different mailbox that does not correspond to your login, you need to complete these fields manually. First, set the e-mail address. We recommend using "<ETH username>@ethz.ch". It does not matter if this is not your main e-mail address. When configuring the mailbox, this address is merely used for the connection to the mail server. Following the successful configuration, your main address will always be used for sending your e-mails from the device. Thereafter, you can enter your name and the “ETH password for email (Active Directory)” (twice) for the mailbox. If you are logged on to the D domain and want to connect to the mailbox of your current login, you do not need to enter the password.
Outlook configuration
Page 3 / 15
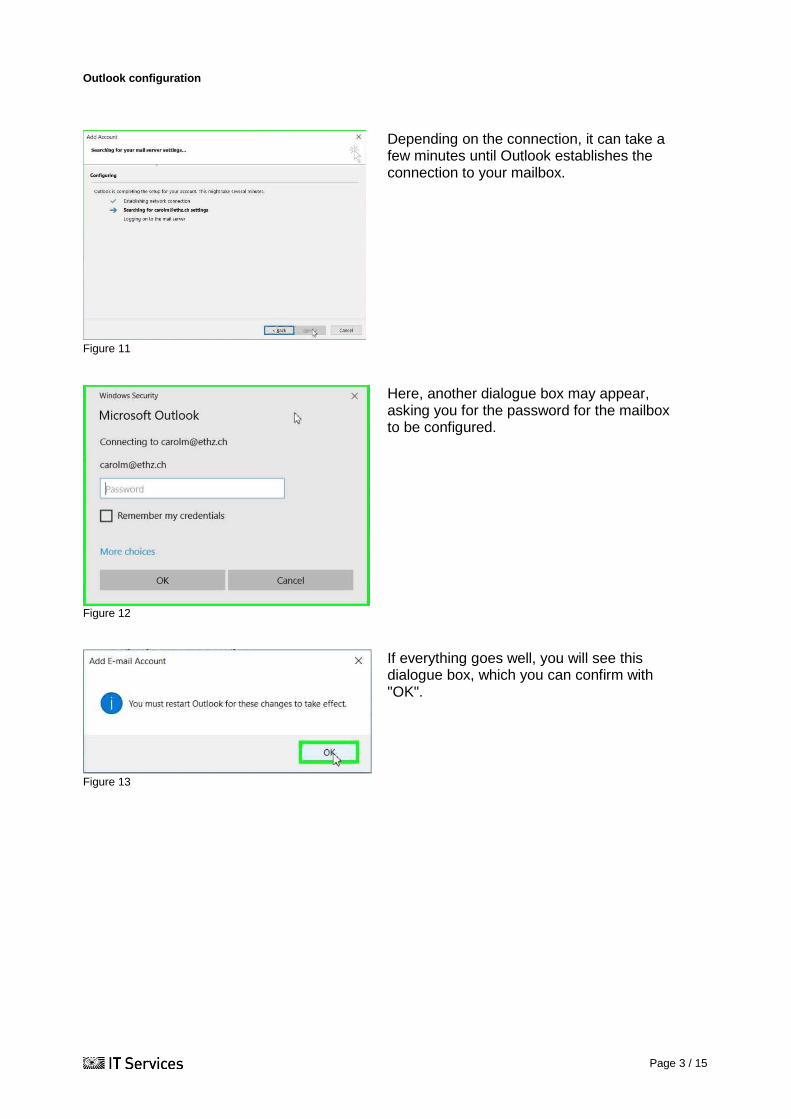
Figure 11
Depending on the connection, it can take a few minutes until Outlook establishes the connection to your mailbox.
Figure 12
Here, another dialogue box may appear, asking you for the password for the mailbox to be configured.
Figure 13
If everything goes well, you will see this dialogue box, which you can confirm with "OK".
Outlook configuration
Page 4 / 15
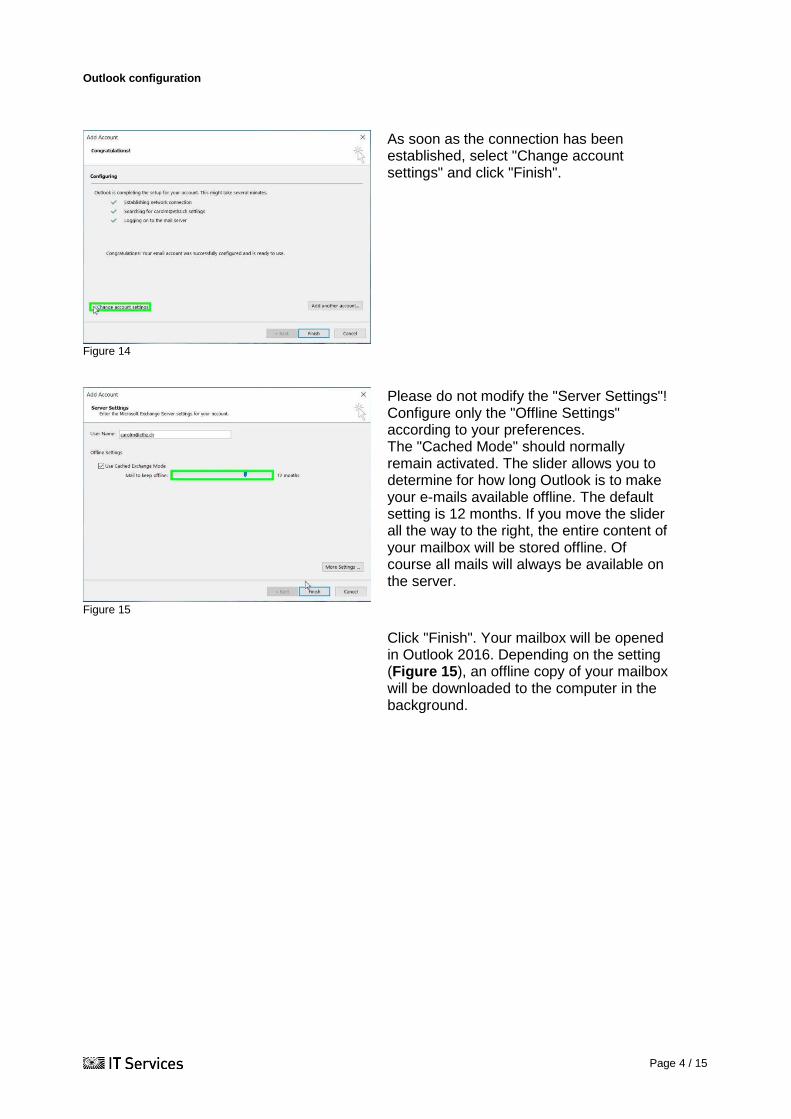
Figure 14
As soon as the connection has been established, select "Change account settings" and click "Finish".
Figure 15
Please do not modify the "Server Settings"! Configure only the "Offline Settings" according to your preferences. The "Cached Mode" should normally remain activated. The slider allows you to determine for how long Outlook is to make your e-mails available offline. The default setting is 12 months. If you move the slider all the way to the right, the entire content of your mailbox will be stored offline. Of course all mails will always be available on the server.
Click "Finish". Your mailbox will be opened in Outlook 2016. Depending on the setting (Figure 15), an offline copy of your mailbox will be downloaded to the computer in the background.
Outlook configuration
Page 5 / 15
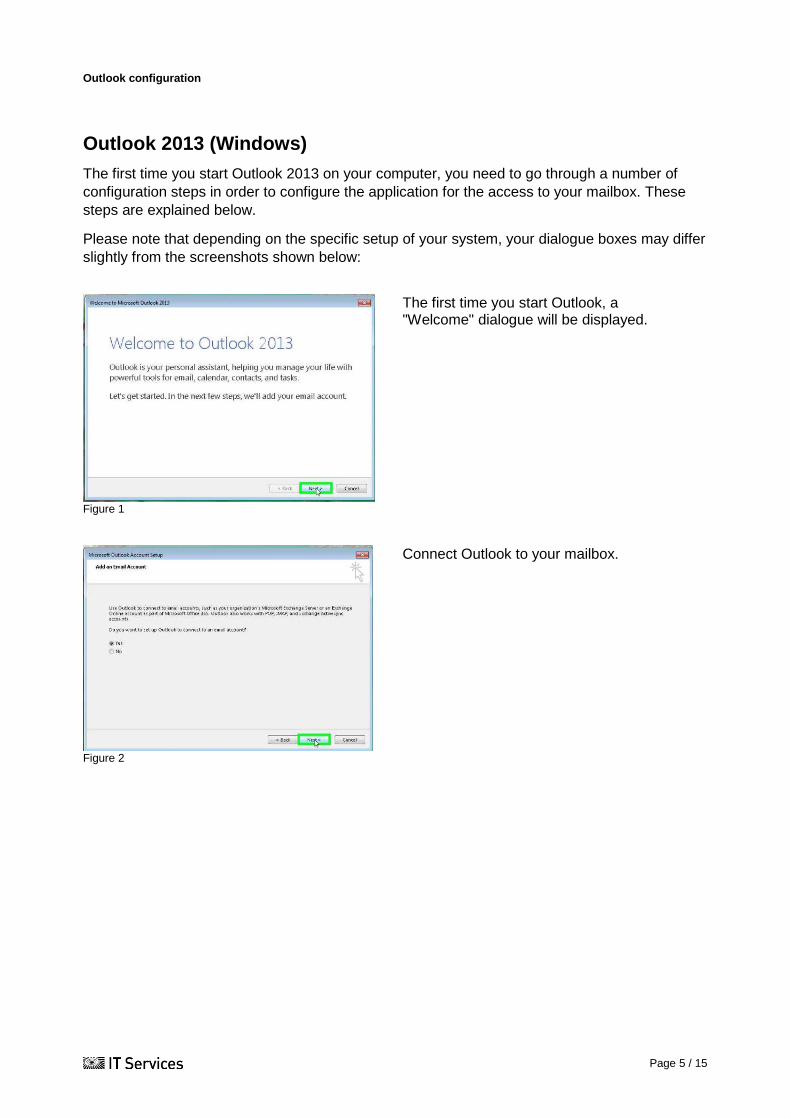
Outlook 2013 (Windows) The first time you start Outlook 2013 on your computer, you need to go through a number of configuration steps in order to configure the application for the access to your mailbox. These steps are explained below.
Please note that depending on the specific setup of your system, your dialogue boxes may differ slightly from the screenshots shown below:
Figure 1
The first time you start Outlook, a "Welcome" dialogue will be displayed.
Figure 2
Connect Outlook to your mailbox.
Outlook configuration
Page 6 / 15
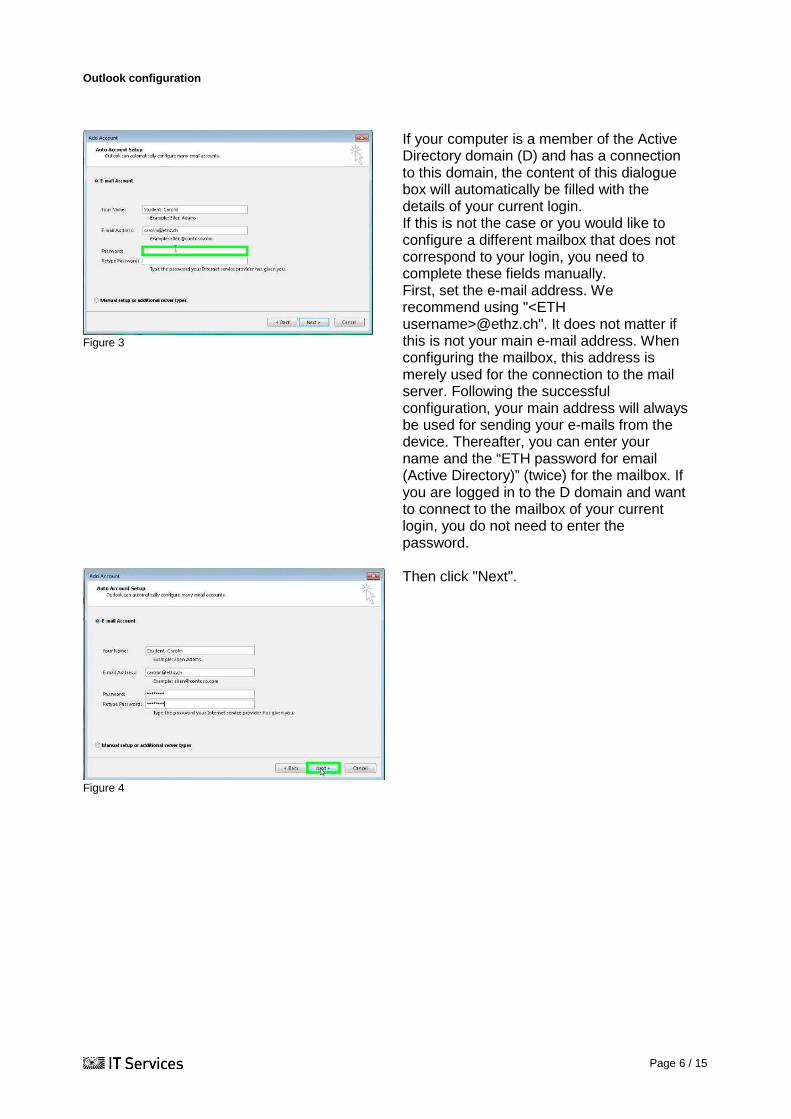
Figure 3
If your computer is a member of the Active Directory domain (D) and has a connection to this domain, the content of this dialogue box will automatically be filled with the details of your current login. If this is not the case or you would like to configure a different mailbox that does not correspond to your login, you need to complete these fields manually. First, set the e-mail address. We recommend using "<ETH username>@ethz.ch". It does not matter if this is not your main e-mail address. When configuring the mailbox, this address is merely used for the connection to the mail server. Following the successful configuration, your main address will always be used for sending your e-mails from the device. Thereafter, you can enter your name and the “ETH password for email (Active Directory)” (twice) for the mailbox. If you are logged in to the D domain and want to connect to the mailbox of your current login, you do not need to enter the password.
Figure 4
Then click "Next".
Outlook configuration
Page 7 / 15
Figure 5
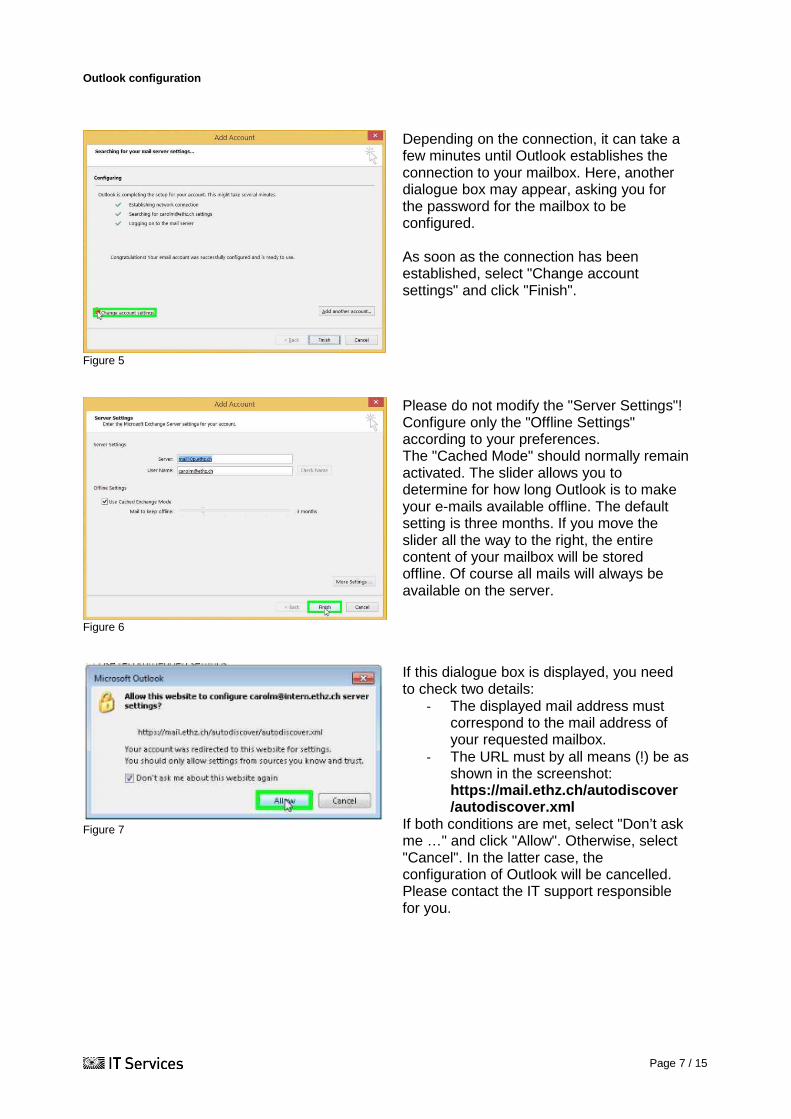
Depending on the connection, it can take a few minutes until Outlook establishes the connection to your mailbox. Here, another dialogue box may appear, asking you for the password for the mailbox to be configured. As soon as the connection has been established, select "Change account settings" and click "Finish".
Figure 6
Please do not modify the "Server Settings"! Configure only the "Offline Settings" according to your preferences. The "Cached Mode" should normally remain activated. The slider allows you to determine for how long Outlook is to make your e-mails available offline. The default setting is three months. If you move the slider all the way to the right, the entire content of your mailbox will be stored offline. Of course all mails will always be available on the server.
Figure 7
If this dialogue box is displayed, you need to check two details:
- The displayed mail address must correspond to the mail address of your requested mailbox.
- The URL must by all means (!) be as shown in the screenshot: https://mail.ethz.ch/autodiscover /autodiscover.xml
If both conditions are met, select "Don’t ask me …" and click "Allow". Otherwise, select "Cancel". In the latter case, the configuration of Outlook will be cancelled. Please contact the IT support responsible for you.
Outlook configuration
Page 8 / 15
Figure 1
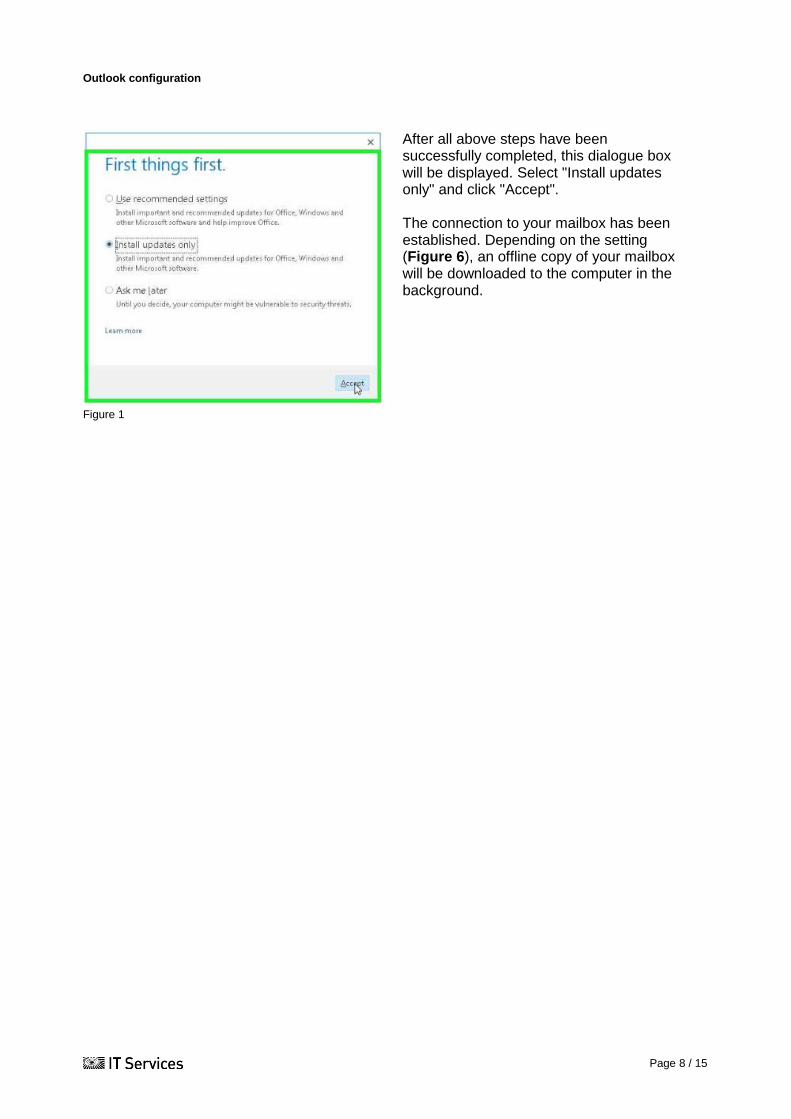
After all above steps have been successfully completed, this dialogue box will be displayed. Select "Install updates only" and click "Accept". The connection to your mailbox has been established. Depending on the setting (Figure 6), an offline copy of your mailbox will be downloaded to the computer in the background.
Outlook configuration
Page 9 / 15
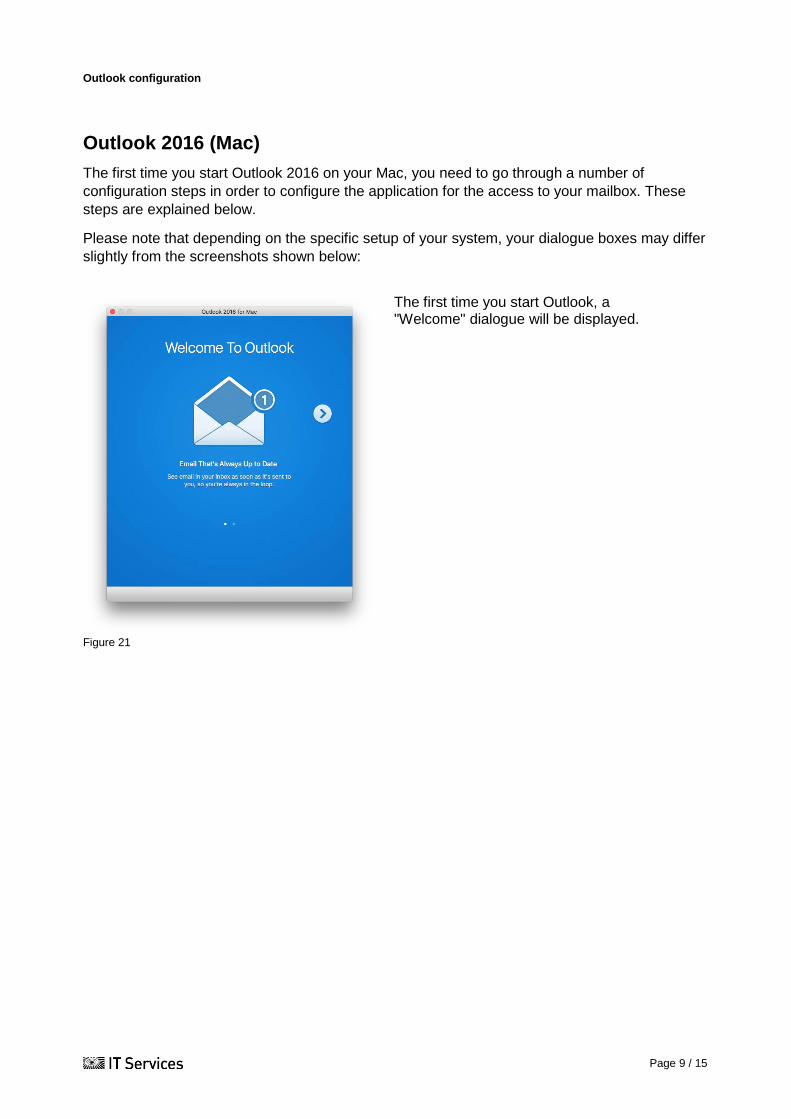
Outlook 2016 (Mac) The first time you start Outlook 2016 on your Mac, you need to go through a number of configuration steps in order to configure the application for the access to your mailbox. These steps are explained below.
Please note that depending on the specific setup of your system, your dialogue boxes may differ slightly from the screenshots shown below:
Figure 21
The first time you start Outlook, a "Welcome" dialogue will be displayed.
Outlook configuration
Page 10 / 15
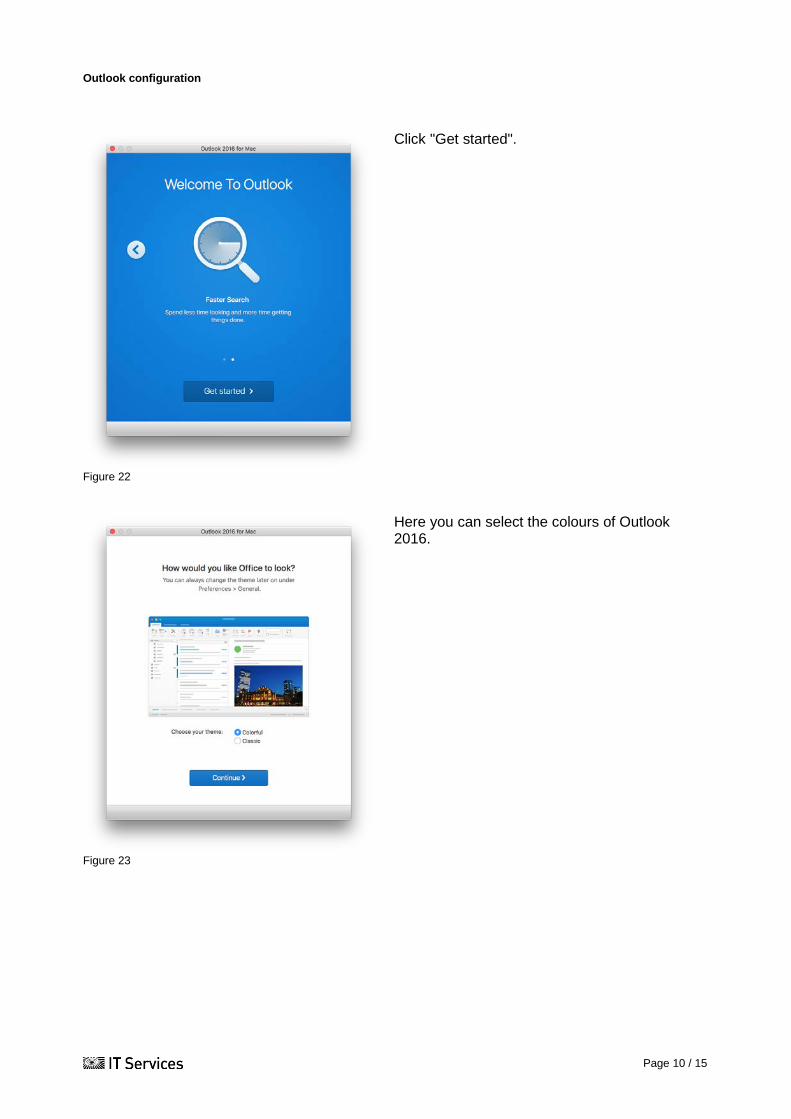
Figure 22
Click "Get started".
Figure 23
Here you can select the colours of Outlook 2016.
Outlook configuration
Page 11 / 15
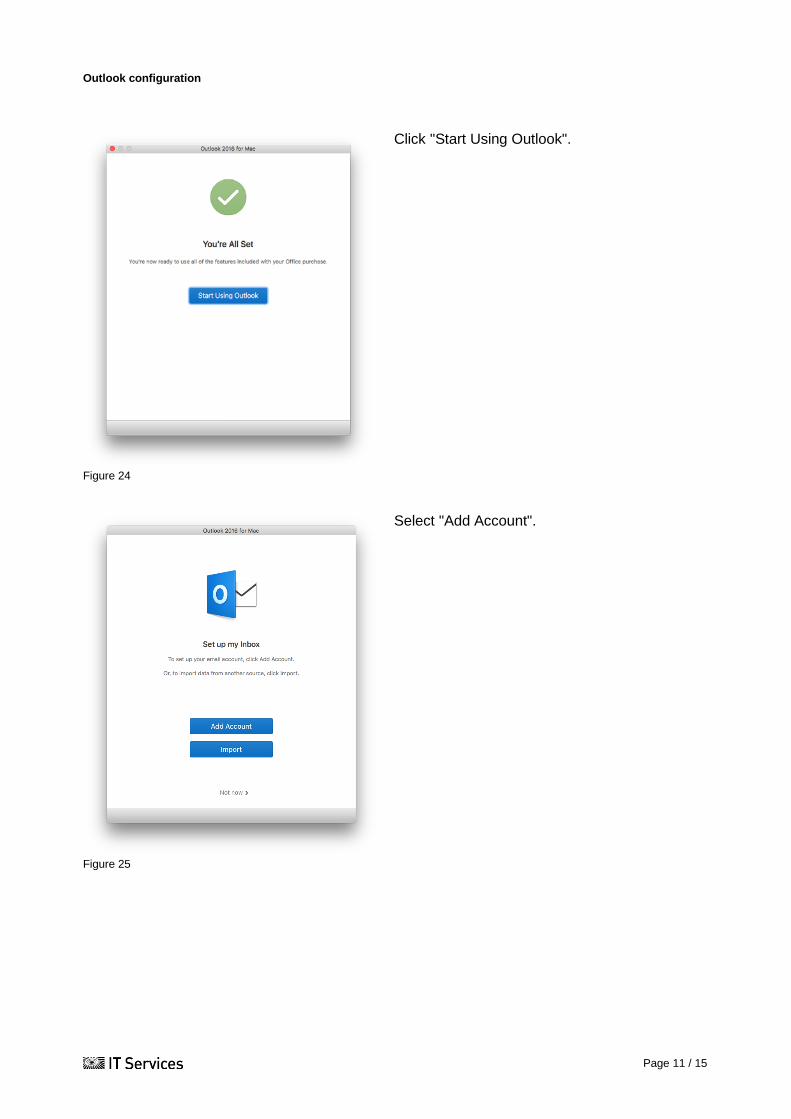
Figure 24
Click "Start Using Outlook".
Figure 25
Select "Add Account".

Outlook configuration
Page 12 / 15
Figure 26
Select "Exchange or Office 365".
Here, enter all required details for the mailbox to be configured. For "E-Mail address", we recommend using the format "<ETH username>@ethz.ch". It does not matter if this is not your main e-mail address. When configuring the mailbox, this address is merely used for the connection to the mail server. Following the successful configuration, your main address will always be used for sending your e-mails from the device. For "User name", please enter your mailbox login in the form "d\<ETH username>". Do not forget to select the option "Configure automatically". Then click "Add Account".
Figure 27
The application will now try to contact the mail server and your mailbox. Depending on the connection, this can take a few minutes.
Outlook configuration
Page 13 / 15
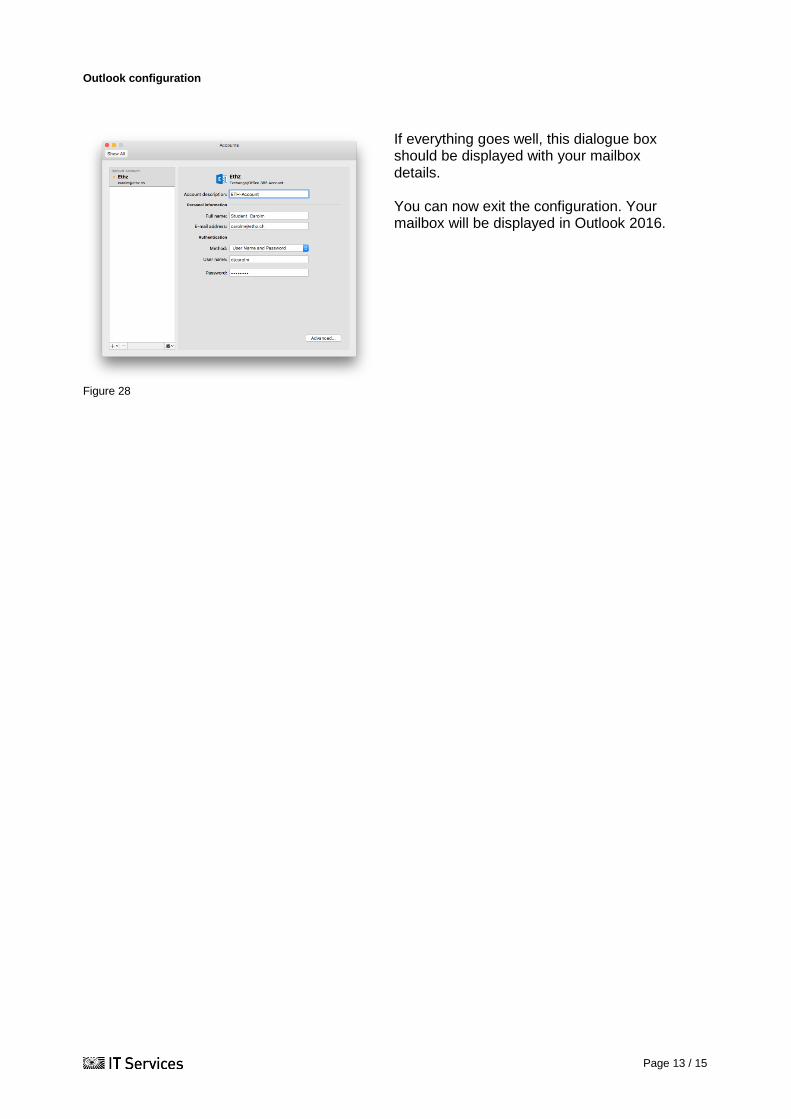
Figure 28
If everything goes well, this dialogue box should be displayed with your mailbox details. You can now exit the configuration. Your mailbox will be displayed in Outlook 2016.
Outlook configuration
Page 14 / 15
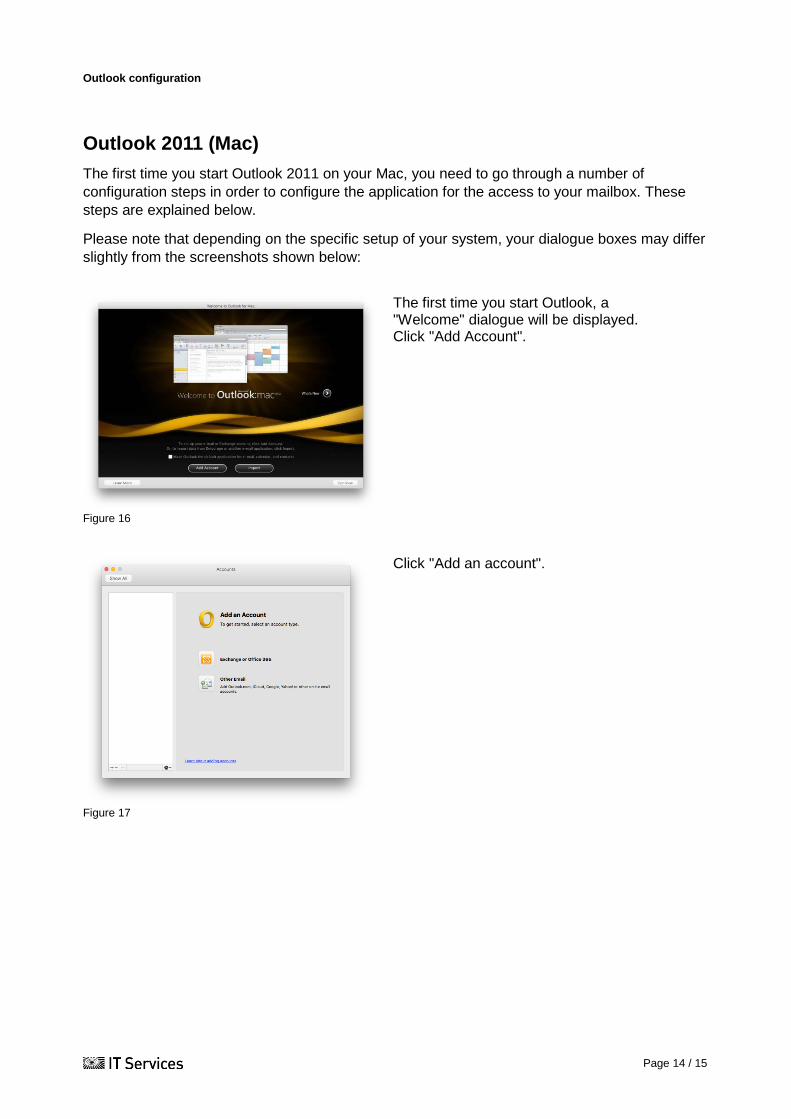
Outlook 2011 (Mac) The first time you start Outlook 2011 on your Mac, you need to go through a number of configuration steps in order to configure the application for the access to your mailbox. These steps are explained below.
Please note that depending on the specific setup of your system, your dialogue boxes may differ slightly from the screenshots shown below:
Figure 16
The first time you start Outlook, a "Welcome" dialogue will be displayed. Click "Add Account".
Figure 17
Click "Add an account".
Outlook configuration
Page 15 / 15
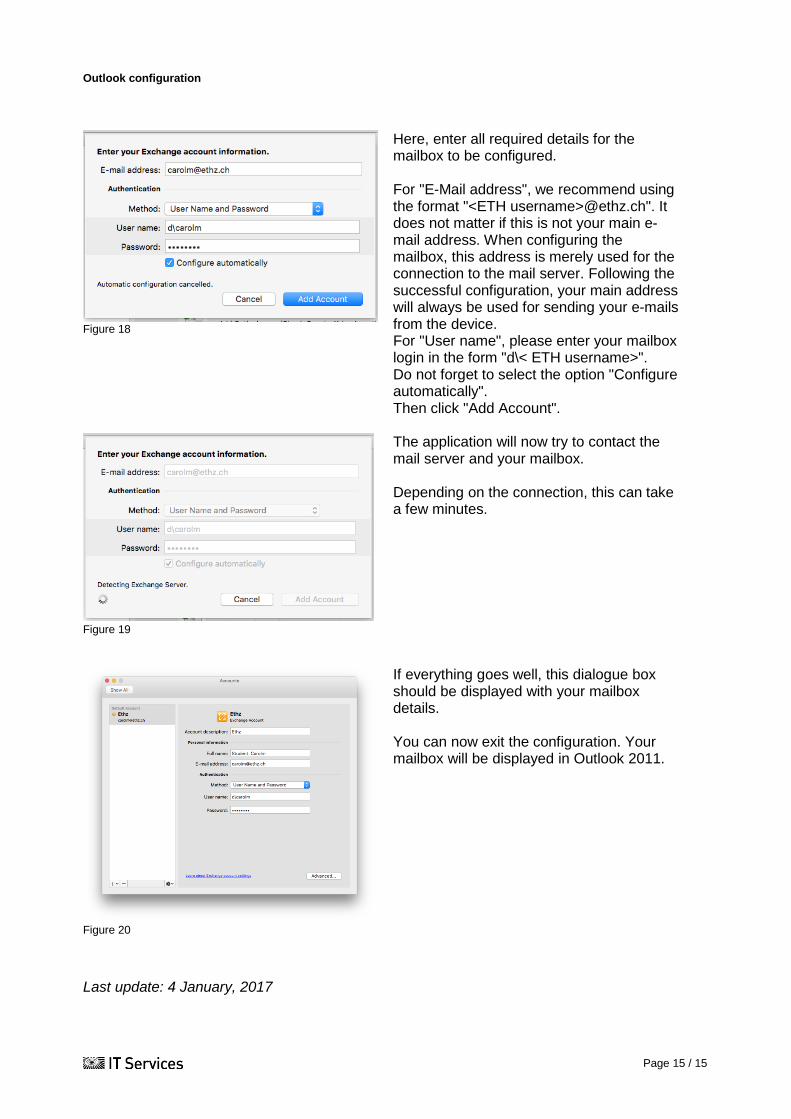
Figure 18
Here, enter all required details for the mailbox to be configured. For "E-Mail address", we recommend using the format "<ETH username>@ethz.ch". It does not matter if this is not your main e-mail address. When configuring the mailbox, this address is merely used for the connection to the mail server. Following the successful configuration, your main address will always be used for sending your e-mails from the device. For "User name", please enter your mailbox login in the form "d\< ETH username>". Do not forget to select the option "Configure automatically". Then click "Add Account".
Figure 19
The application will now try to contact the mail server and your mailbox. Depending on the connection, this can take a few minutes.
Figure 20
If everything goes well, this dialogue box should be displayed with your mailbox details. You can now exit the configuration. Your mailbox will be displayed in Outlook 2011.
Last update: 4 January, 2017