Embed Size (px)
Citation preview
v9.1
OrthoMation™ by GACCase Presentation System
OrthoMation™ User’s Manual
©2015 DENTSPLY GAC International
1
OrthoMation™ 9.1 DENTSPLY GAC TechnoCenter®
by DENTSPLY GAC
OrthoMation™ User’s Manual
©2015 DENTSPLY GAC International
2
OrthoMation™ 9.1 ©2015 DENTSPLY GAC International All rights reserved. No parts of this work may be reproduced in any form or by any means - graphic, electronic, or mechanical, including photocopying, recording, taping, or information storage and retrieval systems - without the written permission of the publisher. Products that are referred to in this document may be either trademarks and/or registered trademarks of the respective owners. The publisher and the author make no claim to these trademarks. While every precaution has been taken in the preparation of this document, the publisher and the author assume no responsibility for errors or omissions, or for damages resulting from the use of information contained in this document or from the use of programs and source code that may accompany it. In no event shall the publisher and the author be liable for any loss of profit or any other commercial damage caused or alleged to have been caused directly or indirectly by this document.
Support DENTSPLY GAC TechnoCenter® 888-422-2376 [email protected] Online Support www.dentsplygac.com
OrthoMation™ User’s Manual
©2015 DENTSPLY GAC International
3
INTRODUCTION............................................................................................................................................................ 6
CREDITS ....................................................................................................................................................................... 6
ORTHOMATION LICENSE .............................................................................................................................................. 6
COPYRIGHT ............................................................................................................................... ........................................... 6
LIABILITY DISCLAIMER ............................................................................................................................................................. 6
RESTRICTIONS ....................................................................................................................................................................... 7
OPERATING LICENSE .............................................................................................................................................................. 7
LICENSE TRANSFER ................................................................................................................................................................ 7
BACK‐UP ............................................................................................................................................................................. 7
UPGRADE/SUPPORT .............................................................................................................................................................. 8
TERMS ................................................................................................................................................................................ 8
OTHER RIGHTS AND RESTRICTIONS ............................................................................................................................... ............. 8
GAC SOFTWARE RETURN POLICY .................................................................................................................................. 9
CONDITIONS: ....................................................................................................................................................................... 9
WARRANTY: ......................................................................................................................................................................... 9
NON‐RETURNABLE PRODUCTS: ................................................................................................................................................ 9
GAC SOFTWARE 30‐DAY MONEY BACK GUARANTEE: ................................................................................................................... 9
SYSTEM REQUIREMENTS ............................................................................................................................................ 12
UNSUPPORTED ENVIRONMENTS ............................................................................................................................................. 12
INSTALLATION ........................................................................................................................................................... 14
INSTALLATION TYPES ............................................................................................................................... ............................. 14
PRODUCT AUTHORIZATION .................................................................................................................................................... 14
OrthoMation Online .................................................................................................................................................... 14
Send Home CDs ........................................................................................................................................................... 15
Authorization Information ............................................................................................................................... ........... 15
SERVER INSTALLATION .......................................................................................................................................................... 16
WORKSTATION INSTALLATION ............................................................................................................................... ................. 18
STAND ALONE INSTALLATION ................................................................................................................................................. 20
UPDATE INSTALLATION ......................................................................................................................................................... 20
REINSTALLING ORTHOMATION ............................................................................................................................................... 20
ORTHOMATION OVERVIEW ........................................................................................................................................ 22
ORTHOMATION LAYOUT ....................................................................................................................................................... 22
MENUS ............................................................................................................................................................................. 22
File Menu ............................................................................................................................... ..................................... 22
Edit Menu ................................................................................................................................................................... 22
Tools Menu ................................................................................................................................................................. 23
Help Menu ............................................................................................................................... ................................... 23
TOOLBAR ........................................................................................................................................................................... 23
MEDIA DISPLAY ............................................................................................................................... ................................... 23
Text Display Area ........................................................................................................................................................ 24
Media Controls Area ................................................................................................................................................... 24
PREFERENCES ..................................................................................................................................................................... 24
CUSTOMIZING ORTHOMATION............................................................................................................................................... 24
Editing Media ............................................................................................................................................................. 25
Media Name ............................................................................................................................................................... 25
Media Text ............................................................................................................................... ................................... 25
Edit Attributes ............................................................................................................................................................. 25
OrthoMation™ User’s Manual
©2015 DENTSPLY GAC International
4
Edit QTP ............................................................................................................................... ....................................... 25
Edit Sound ................................................................................................................................................................... 25
MEDIA SEARCH ................................................................................................................................................................... 25
FAVORITES ......................................................................................................................................................................... 25
ADDING CUSTOM IMAGES ..................................................................................................................................................... 26
CASE STUDY ....................................................................................................................................................................... 26
SLIDESHOW OPTIONS ........................................................................................................................................................... 27
Slideshow ............................................................................................................................... ..................................... 27
PRINTING .......................................................................................................................................................................... 27
Printing Single Images or Movies ............................................................................................................................... . 27
INFORMED CONSENT ............................................................................................................................... ............................. 27
ORTHOMATION INTRODUCTION ............................................................................................................................................. 27
Customizing the Introduction ............................................................................................................................... ....... 28
Replacing Introduction Images ............................................................................................................................... .... 28
VISTADENT® OC 4.3 INTEGRATION ......................................................................................................................................... 29
TREATMENT PLANS .................................................................................................................................................... 32
CREATING TREATMENT PLANS ............................................................................................................................... ................. 32
What is a Treatment Plan? ......................................................................................................................................... 32
The Treatment Checklist ............................................................................................................................................. 32
Creating Custom Treatment Plans .............................................................................................................................. 32
Default Method of Creating Treatment Plans ............................................................................................................. 33
Loading Treatment Plans ............................................................................................................................... ............. 33
Editing Existing Treatment Plans ............................................................................................................................... .. 33
RECORDABLE TREATMENT PLANS ............................................................................................................................... ............. 33
QTP ................................................................................................................................................................................. 33
QTP Customization ..................................................................................................................................................... 34
PRINTING TREATMENT PLANS ............................................................................................................................... ................. 34
SENDING HOME CDS ........................................................................................................................................................... 34
INTERNET INTEGRATION ........................................................................................................................................................ 35
TROUBLESHOOTING ................................................................................................................................................... 38
INSTALLATION PROBLEMS ...................................................................................................................................................... 38
SLIDESHOW ISSUES .............................................................................................................................................................. 38
TECHNICAL SUPPORT ............................................................................................................................... ............................. 38
OrthoMation™ User’s Manual
©2015 DENTSPLY GAC International
5
I
OrthoMation™ User’s Manual
©2015 DENTSPLY GAC International
6
Introduction
OrthoMation 9.1 User's Guide
Copyright © 1997 - 2015 DENTSPLY GAC
No part of this manual may be reproduced or transmitted in any forms or by any means, electronic or mechanical, including photocopying, recording or by any information storage and retrieval system, without permission in writing from DENTSPLY GAC. OrthoMation is a trademark of DENTSPLY. Other brand and product names are trademarks or registered trademarks of their respective holders. Credits We would like to thank the following contributors for their support in donation of images and in reviewing the program. Dr. Jeffrey Backus, Dr. Francine Lo and Dr. Robert Elliot, Dr. David Harmon, Dr. Keith Hilliard, Dr. Carlos Navarro, Drs. Barry, David and Jonny Feldman, Dr. David Sarver and Dr. Mark Yanosky, Dr. David Freeman, Dr. Jerry Clark, and Dr. Gary Opin. Also, instrumental in the development of the program: Jeremy Fisher, Charlie Dunham, Hale Brownlee, Carolyn Friedman and Jason Wolens. OrthoMation License The installation and use of this product indicates your understanding and acceptance of the following terms and conditions. This license shall supersede any verbal, or prior verbal or written, statement or agreement to the contrary. If you do not understand or accept these terms, or your local regulations prohibit "after sale" license agreements or limited disclaimers, you must cease and desist using this product immediately. Copyright laws supersede all local regulations. Copyright This product (in whole or in part, including all files, data, and documentation, from here on referred to as "Product") is Copyright © 1997-2013 DENTSPLY GAC, all rights reserved, and is protected by United States copyright laws, international treaties and all other applicable national or international laws. This product may not, in whole or in part, be copied, photocopied, translated, or reduced to any electronic medium or machine readable form, without prior consent in writing, from DENTSPLY GAC and according to all applicable laws. The sole owner of this product is DENTSPLY GAC. Liability Disclaimer This product and/or license is provided exclusively by DENTSPLY GAC on an "as is" basis, without any representation or warranty of any kind, either express or implied, including without limitation any representations or endorsements regarding the use of, the results of, or performance of the product, its appropriateness, accuracy, reliability, or correctness. The entire risk as to the use of this product is assumed by the user and/or licensee. DENTSPLY GAC does not assume liability for the use of this product beyond the original purchase price. In no event will DENTSPLY GAC be liable for additional direct or indirect damages including any lost profits, lost savings, or other incidental or consequential damages arising from any defects, or the use or inability to use this product, even if DENTSPLY GAC has been advised of the possibility of such damages.
OrthoMation™ User’s Manual
©2015 DENTSPLY GAC International
7
Restrictions You may not use, copy, modify, translate, or transfer the product or any copy except as expressly defined in this agreement. You may not attempt to unlock or bypass any copy-protection or authentication algorithm utilized by this product. You may not remove or modify any copyright notice, nor any "about" dialog or the method by which it may be invoked. Operating License You have the non-exclusive right to use the software in one (1) physical location, on multiple computers. This one physical location, unless specified on the original software invoice, is defined as the "Ship To" address on the original software invoice. This will be from here on referred to as a Single Site license. Use over a local area network (within the Single Site License) is permitted. The use of the software over a wide area network (outside the Single Site License) is strictly prohibited without the purchase and allocation of an additional site license. Any additional installation and/or use of the software for locations other than Single Site License will REQUIRE an Additional Site License to be purchased for and allocated to the additional physical location(s). Purchase of one (1) Additional Site License will license one (1) additional physical location for use of the software on multiple computers. The GAC TechnoCenter will not provide software authorization or technical support for any computer located at a physical location for which an Additional Site License has not been purchased and allocated. Any violation immediately cancels all rights of use to the software. License Transfer You may transfer the software Single Site License (any Additional Site Licenses purchased for the Single Site License is automatically included in ANY Single Site License transfer) to another party. This can ONLY be done if the other party agrees to the terms and conditions of the software End User License Agreement (EULA). The EULA is “accepted” upon installation of the software. A copy can be requested from the GAC TechnoCenter in pdf format. To transfer the software Single Site License you MUST contact the GAC TechnoCenter to provide current Single Site License account information and account information for the party to which the Single Site License will be transferred. The GAC TechnoCenter will provide you with the EULA. You must sign, date and return the EULA, as you received it, to the GAC TechnoCenter. Any alteration/edit to the EULA will nullify the agreement. DENTSPLY GAC does not consider the sale of a practice, including sale of existing hardware and software, to be a valid software Single Site License transfer. The EULA completion and Upgrade / Support purchase (as stated above) are still required for the software Single Site License to be transferred to the new party. Without this, the Single Site License for the software will be retained by the original purchaser at the Single Site License physical location. The transfer of the software Single Site License will be finalized upon the GAC account for the party to which the Single Site License is to be transferred must be invoiced for one year of Upgrade / Support service (and any applicable missed version fees as noted on the EULA) for the software. This order will be placed by the GAC TechnoCenter. If you transfer the software Single Site License you must, at the same time, transfer the documentation and back-up copy (detailed below), or transfer the documentation and destroy the back-up copy. You may not retain any portion of the software, in any form, under any circumstance. Back-up You may make one copy of the software part of the product solely for back-up purposes, as prescribed by Canadian, United States, and international copyright laws. You must reproduce and include the copyright notice on the back-up copy.

OrthoMation™ User’s Manual
©2015 DENTSPLY GAC International
8
Upgrade/Support Upon purchase of the software, the End User will receive one (1) year of Upgrade / Support (U/S) service at no charge. The start of the one (1) year is defined as the date on which the software is originally invoiced. The Upgrade portion of this service provides the End User with any upgrades released to the software within the first year after invoice. The Support portion of this service provides the End User with unlimited technical support for the software via phone, fax or email within the first year after invoice. Web based technical support is provided if deemed necessary by the GAC TechnoCenter upon the End User contacting the GAC TechnoCenter via phone, fax or email. To use Software identified as an upgrade, you must first be licensed for the software identified by DENTSPLY GAC Intl as eligible for the upgrade. After installing the upgrade, you may no longer use the original software that formed the basis for your upgrade eligibility, except as part of the upgraded software. At completion of the first year of Upgrade / Support, the End User will be charged a yearly cost for U/S dependent on (a) the software that has been purchased and (b) the number of Additional Site Licenses (as detailed above) purchased for the Single Site License. The yearly cost will cover development, programming, manufacturing and distribution expenditures incurred by DENTSPLY GAC Intl when updating the software. This cost will also cover expenditures incurred by DENTSPLY GAC Intl while providing technical support for the software. The End User will be notified of the automatic renewal of service (detailed above) within one year of software’s original invoice date (not the date of installation) via two (2) letters from the GAC TechnoCenter. These letters will state the End User’s Upgrade / Support service is scheduled for automatic renewal as well as the cost for the yearly Upgrade/Support. This billing process will take place unless the GAC TechnoCenter is notified by the End User that they would prefer the U/S service not be renewed. GAC TechnoCenter contact # is (1-888-422-2376) If the Upgrade/Support service has already been billed to the End User, credit will be issued based on the GAC Software Return Policy. The Upgrade / Support can be canceled at any time at the request of the End User and they will be placed on GAC’s “No Support” list for the software product specified. If the End User has elected to forgo the Upgrade / Support, they can avail themselves of technical support for the software at the current hourly rate and any upgrades (if applicable) of the software at the current retail price. Terms This license is effective until terminated. You may terminate it by destroying the complete product and all copies thereof. This license will also terminate if you fail to comply with any terms or conditions of this agreement. You agree upon such termination to destroy all copies of the software and of the documentation, or return them to DENTSPLY GAC for disposal. Other Rights and Restrictions All other rights and restrictions not specifically granted in this license are reserved by DENTSPLY GAC.

OrthoMation™ User’s Manual
©2015 DENTSPLY GAC International
9
GAC Software Return Policy Conditions: All DENTSPLY/GAC products are manufactured to the highest standards under strict quality control procedures. GAC reserves the right to modify, improve and change product specifications; to discontinue products; and to change price schedule as it may deem necessary without notice or incurring obligation. Warranty: All products manufactured by GAC are warranted to be defect free in material and workmanship for one year from date of purchase. GAC’s sole responsibility will be, at its option, to replace, repair or credit the purchase price of a product in the event of a manufacturing defect. Unsatisfied customers may return any GAC TechnoCenter software product or service within 90 of purchase for credit under the following conditions: 1. Products must be standard catalog items in unused and resalable condition, and only from the original
purchaser. 2. Products must be of current design. 3. Written explanation must accompany the return stating the reason for dissatisfaction with the product. 4. Returned merchandise must be properly packaged to withstand shipping. The customer must prepay all
postage fees, including insurance value of the package, and use a method that provides a tracking number. 5. Returns after 90 days will NOT be credited without prior clearance and/or letter of explanation, and WILL be
subject to a minimum 20% restocking fee. 6. That the merchandise is NOT categorized as a Non-Returnable product. To return a product to DENTSPLY GAC you must call Customer Service at 1-888-GACINTL (422-4685) and request a Return Merchandise Authorization number (RMA#). If a product is returned without an RMA number, it will be returned to the customer and not processed. Non-Returnable Products: The following products are non-returnable: 1. GAC TechnoCenter software (upon receipt of a Permanent Authorization code). 2. GAC TechnoCenter Network License (upon receipt of a Permanent Authorization code). 3. GAC TechnoCenter Additional Site Licenses (upon receipt of a Permanent Authorization code for the location
the Additional Site License to which the license was allocated). 4. GAC TechnoCenter hardware. 5. GAC TechnoCenter Upgrade/Support
a. Full Credit allowed if request for credit is received by the GAC TechnoCenter within 90 days of invoice for service and service has gone unused for all licensed offices.
b. Pro-Rated Credit allowed if request for credit is received by the GAC TechnoCenter over 90 days after invoice for service and service has gone unused for all licensed offices. The pro-rated amount of credit is to be based on time left in year of service when request for credit is received by the GAC TechnoCenter.
GAC Software 30-Day Money Back Guarantee: The customer is granted a 30-day money back guarantee for GAC TechnoCenter software that begins at the date of Authorization code*. At this time, the customer will install the software and request a TRIAL/DEMO Authorization code from the GAC TechnoCenter in order to evaluate the product. The length of the TRIAL/DEMO period will vary based on the software that has been purchased. At the end of the TRIAL/DEMO period the customer can request a Permanent Authorization code and keep the software OR choose to return the software for credit. Any software return should follow the guidelines outlined above. Any customer who receives a Permanent Authorization code will NOT receive credit for the purchase. *Please note: All software returns must be completed within 90 days of purchase even if the Authorization code that was granted was a TRIAL/DEMO. No credit will be issued for customers who received a TRIAL/DEMO code but DO NOT return the product within 90 days of the original invoice.

OrthoMation™ User’s Manual
©2015 DENTSPLY GAC International
10
OrthoMation™ User’s Manual
©2015 DENTSPLY GAC International
11
II
OrthoMation™ User’s Manual
©2015 DENTSPLY GAC International
12
System Requirements Welcome to OrthoMation, an advanced treatment plan presentation manager. OrthoMation is a full-featured, yet easy to use application that allows you to construct and present multimedia treatment plans for your patients. OrthoMation allows you to display, print and send home treatment plans, customize treatment plans, and import your own media. OrthoMation is a Windows® based program, so your computer should meet the following requirements:
Microsoft Windows XP, Vista, Windows 7 or Server 2008 Recent (2005 or newer) Intel or AMD processor 1GB RAM 1 GB free hard drive space Video card supporting at least 1024x768 resolution - DirectX 9 compatible CD-ROM drive
To install and run OrthoMation 9.1 your screen resolution must be set to a minimum of 1024x768 in order to accommodate the DVD quality videos. Unsupported Environments There are situations when the GAC TechnoCenter cannot support OrthoMation due to constraints in the environment in which the end user wishes to use the program. Please contact Technical Support if you have a situation that may not be "normal". The GAC TechnoCenter does not support OrthoMation in the following scenarios: Terminal Services/Remote Desktop/Citrix - Due to the nature of OrthoMation, we have not been able to achieve good results running the program using Terminal Services/Remote Desktop or Citrix. These products update the client screen at a rate lower than the videos play back. These programs update the screens between 5-10 times/second while the videos play at 30 frames/second. The combination of slow refresh rate and quick video frame rate makes the videos appear jumpy. We recommend installing OrthoMation locally to make the videos play properly. Dual boot Systems - OrthoMation is only supported on computers that have ONE Windows operating system loaded on them. Windows Emulation - OrthoMation is not supported under any non-Windows operating system that emulates the Windows environment. OrthoMation was not built or designed to run on any other platform than Windows. For instance, OrthoMation is not supported on a Mac running VMWare or Parallels. Windows 95/98/2000/Me - OrthoMation is no longer supported on these operating systems.
OrthoMation™ User’s Manual
©2015 DENTSPLY GAC International
13
III
OrthoMation™ User’s Manual
©2015 DENTSPLY GAC International
14
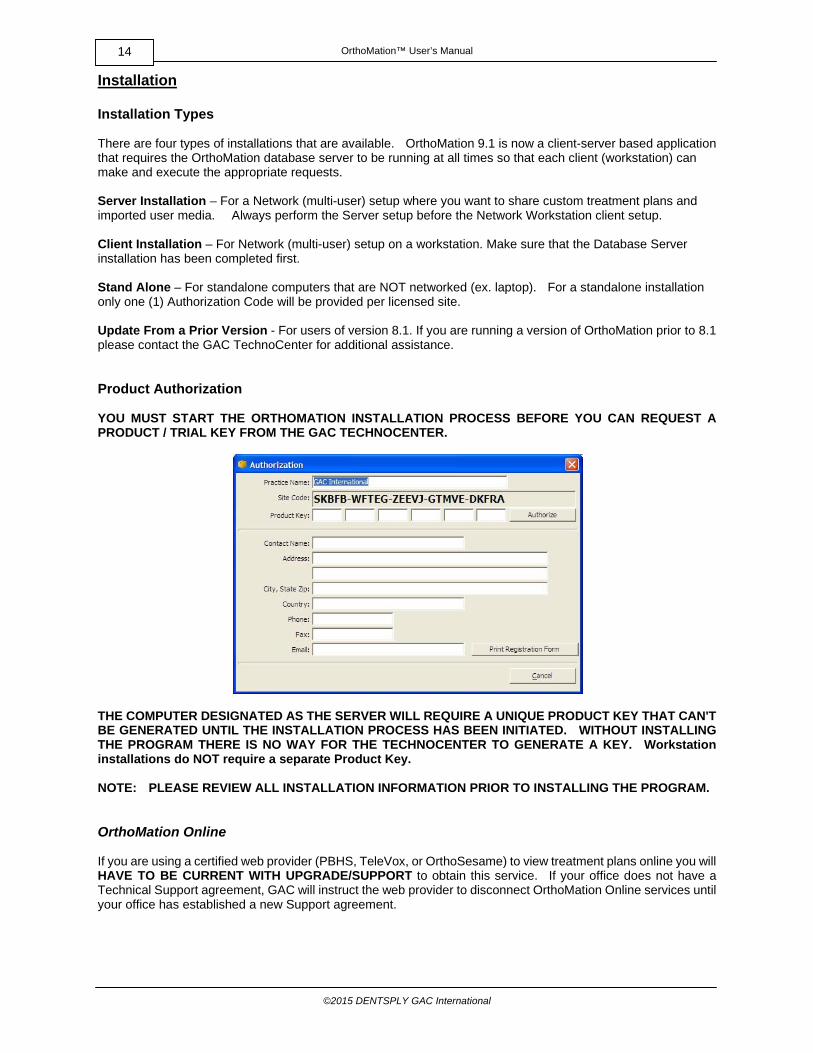
Installation Installation Types There are four types of installations that are available. OrthoMation 9.1 is now a client-server based application that requires the OrthoMation database server to be running at all times so that each client (workstation) can make and execute the appropriate requests. Server Installation – For a Network (multi-user) setup where you want to share custom treatment plans and imported user media. Always perform the Server setup before the Network Workstation client setup. Client Installation – For Network (multi-user) setup on a workstation. Make sure that the Database Server installation has been completed first. Stand Alone – For standalone computers that are NOT networked (ex. laptop). For a standalone installation only one (1) Authorization Code will be provided per licensed site. Update From a Prior Version - For users of version 8.1. If you are running a version of OrthoMation prior to 8.1 please contact the GAC TechnoCenter for additional assistance. Product Authorization YOU MUST START THE ORTHOMATION INSTALLATION PROCESS BEFORE YOU CAN REQUEST A PRODUCT / TRIAL KEY FROM THE GAC TECHNOCENTER.
THE COMPUTER DESIGNATED AS THE SERVER WILL REQUIRE A UNIQUE PRODUCT KEY THAT CAN'T BE GENERATED UNTIL THE INSTALLATION PROCESS HAS BEEN INITIATED. WITHOUT INSTALLING THE PROGRAM THERE IS NO WAY FOR THE TECHNOCENTER TO GENERATE A KEY. Workstation installations do NOT require a separate Product Key. NOTE: PLEASE REVIEW ALL INSTALLATION INFORMATION PRIOR TO INSTALLING THE PROGRAM. OrthoMation Online If you are using a certified web provider (PBHS, TeleVox, or OrthoSesame) to view treatment plans online you will HAVE TO BE CURRENT WITH UPGRADE/SUPPORT to obtain this service. If your office does not have a Technical Support agreement, GAC will instruct the web provider to disconnect OrthoMation Online services until your office has established a new Support agreement.
OrthoMation™ User’s Manual
©2015 DENTSPLY GAC International
15
Send Home CDs If you would like the ability to Burn Treatment Plans to CD you will HAVE TO BE CURRENT WITH UPGRADE/SUPPORT to obtain this functionality. If your office does not have a Technical Support agreement, OrthoMation will automatically disable the CD burning functionality until your office has established a new Support agreement. Authorization Information There are two Types of Product Keys that you can request from the TechnoCenter - (1) Permanent Product Key or (2) Trial Product Key. To obtain the Product Key you will need to contact the GAC TechnoCenter via phone, fax or e-mail:
DENTSPLY GAC TechnoCenter Hours of operation: M - F 8:30AM – 6:00PM EST Phone (US and Canada): 1-888-422-2376 E-mail: [email protected]
Permanent Product Key If you have already purchased OrthoMation or you want to waive your Trial period you will need to request a Permanent Product Key.
ONCE THE PERMANENT PRODUCT KEY HAS BEEN ISSUED THE PROGRAM IS NON-REFUNDABLE
A Permanent Product Key ends the evaluation period and allows the use of OrthoMation indefinitely. The Product Key is a sequence of letters provided by GAC Intl., which is unique to each computer. Thus, if you have two computers (A & B) and request a Product Key for computer A, this Product Key will not work on computer B. To obtain your Product Key, you must install OrthoMation in order to view the Authorization dialog. If you would like to get a permanent Product Key while in the Demo period contact the GAC TechnoCenter. Via fax: Enter a contact name and an e-mail address. Select the Print Registration Form button to print out your Authorization request form. Fax the form to (631) 357-8793. Once the GAC TechnoCenter receives the fax and grants the authorization (via Product Key) you will receive a fax, which will contain this Product Key. To enter the Product Key into your program return to the Authorization box and enter the code EXACTLY AS SHOWN in the fax. Click the Authorize button and then the "OK" button to complete the Authorization process. Trial Key If you have recently purchased the program (i.e. do not already own a license) and you want to take advantage of the 30-day Money Back Guarantee (see GAC Software Return Policy) then please call the DENTSPLY GAC TechnoCenter (888-422-2376) and let the Customer Service Representative know that you need a "Trial Key" for evaluating the software. All OrthoMation functions will be available to you during this period. The Trial Key is a sequence of letters provided by DENTSPLY GAC Intl., which is unique to each computer. Thus, if you have two computers (A & B) and request a Trial Key for computer A, this Trial Key will not work on computer B. At the end of the thirty days, the program will prompt you for a Permanent Product Key. All access to OrthoMation will cease until this Permanent Product Key is obtained. Please note that you may obtain this Permanent Product Key at any time during your 30-day evaluation period. To obtain your Trial Key, you must install OrthoMation in order to view the Authorization dialog. Click the Authorize button from the Splash screen. The Authorization dialog will then appear. You may send a request for your Trial Key via phone, e-mail or fax.
OrthoMation™ User’s Manual
©2015 DENTSPLY GAC International
16
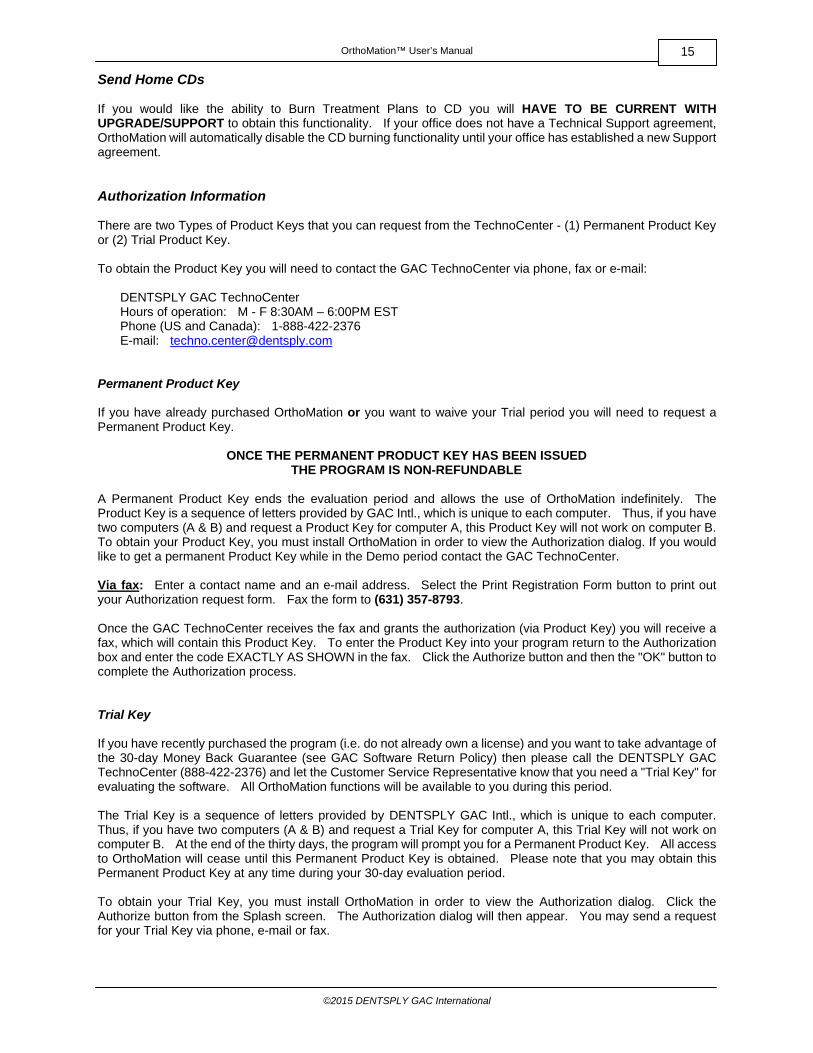
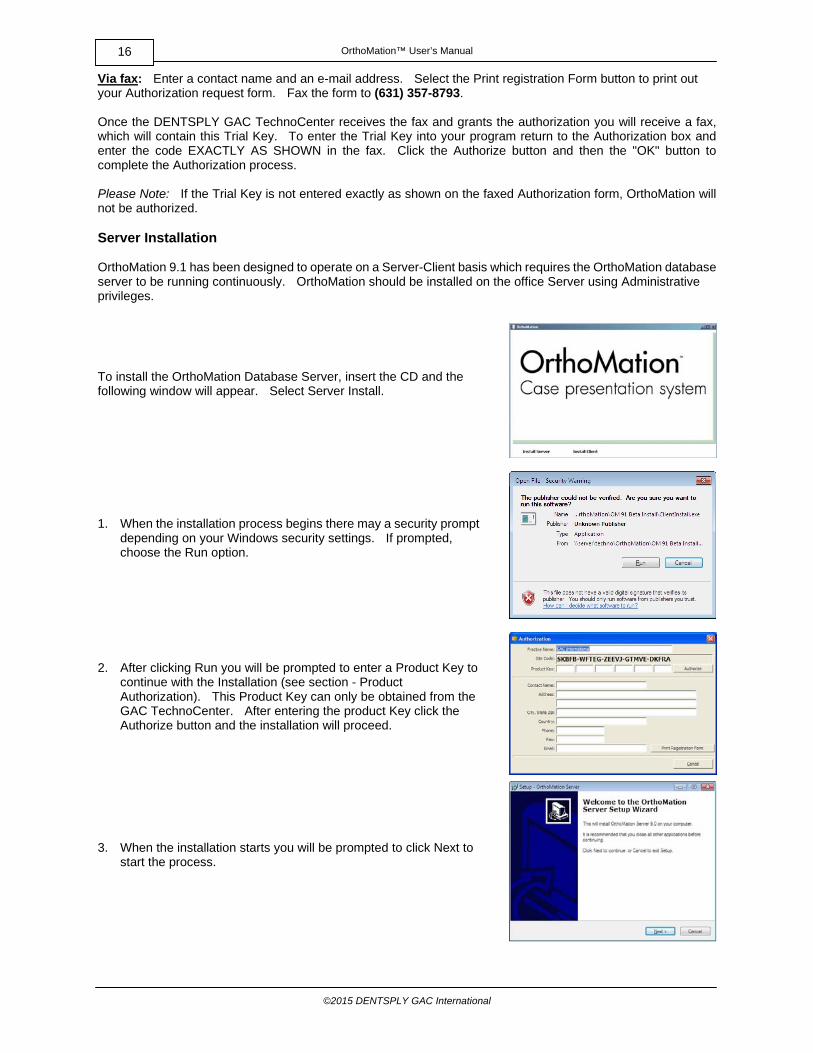
Via fax: Enter a contact name and an e-mail address. Select the Print registration Form button to print out your Authorization request form. Fax the form to (631) 357-8793. Once the DENTSPLY GAC TechnoCenter receives the fax and grants the authorization you will receive a fax, which will contain this Trial Key. To enter the Trial Key into your program return to the Authorization box and enter the code EXACTLY AS SHOWN in the fax. Click the Authorize button and then the "OK" button to complete the Authorization process. Please Note: If the Trial Key is not entered exactly as shown on the faxed Authorization form, OrthoMation will not be authorized. Server Installation OrthoMation 9.1 has been designed to operate on a Server-Client basis which requires the OrthoMation database server to be running continuously. OrthoMation should be installed on the office Server using Administrative privileges.
To install the OrthoMation Database Server, insert the CD and the following window will appear. Select Server Install.
1. When the installation process begins there may a security prompt depending on your Windows security settings. If prompted, choose the Run option.
2. After clicking Run you will be prompted to enter a Product Key to continue with the Installation (see section - Product Authorization). This Product Key can only be obtained from the GAC TechnoCenter. After entering the product Key click the Authorize button and the installation will proceed.
3. When the installation starts you will be prompted to click Next to start the process.
OrthoMation™ User’s Manual
©2015 DENTSPLY GAC International
17
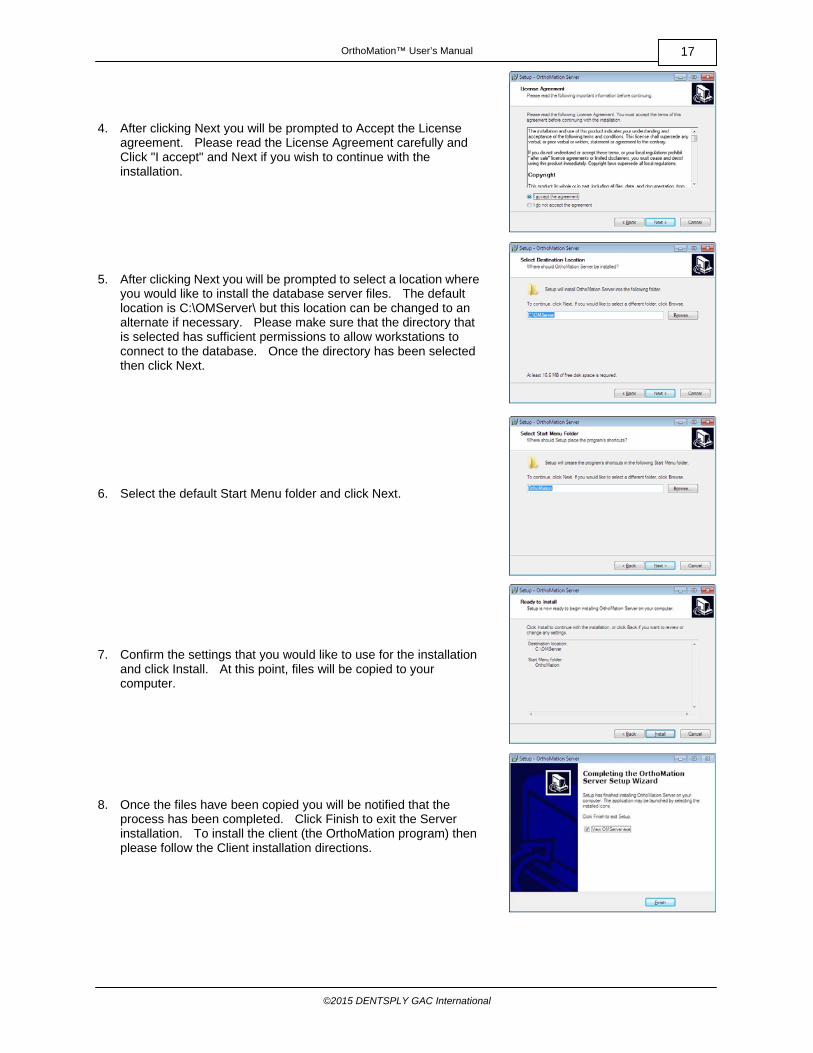
4. After clicking Next you will be prompted to Accept the License agreement. Please read the License Agreement carefully and Click "I accept" and Next if you wish to continue with the installation.
5. After clicking Next you will be prompted to select a location where you would like to install the database server files. The default location is C:\OMServer\ but this location can be changed to an alternate if necessary. Please make sure that the directory that is selected has sufficient permissions to allow workstations to connect to the database. Once the directory has been selected then click Next.
6. Select the default Start Menu folder and click Next.
7. Confirm the settings that you would like to use for the installation
and click Install. At this point, files will be copied to your computer.
8. Once the files have been copied you will be notified that the process has been completed. Click Finish to exit the Server installation. To install the client (the OrthoMation program) then please follow the Client installation directions.
OrthoMation™ User’s Manual
©2015 DENTSPLY GAC International
18
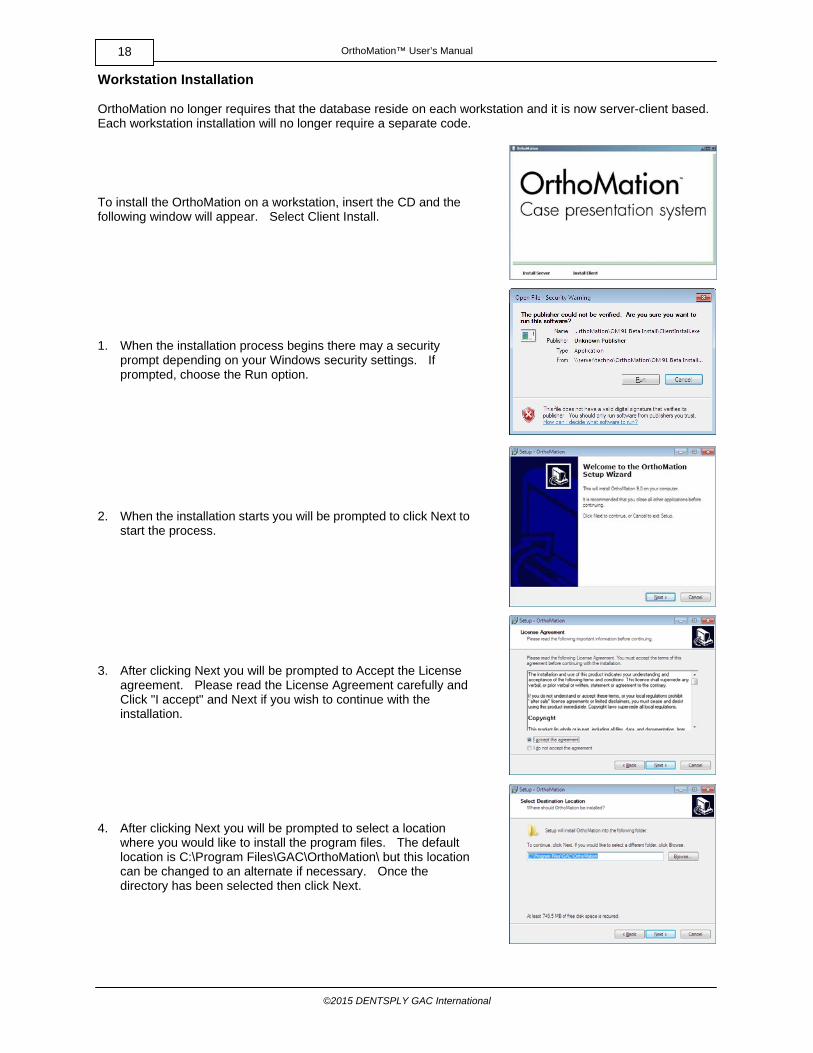
Workstation Installation OrthoMation no longer requires that the database reside on each workstation and it is now server-client based. Each workstation installation will no longer require a separate code.
To install the OrthoMation on a workstation, insert the CD and the following window will appear. Select Client Install.
1. When the installation process begins there may a security prompt depending on your Windows security settings. If prompted, choose the Run option.
2. When the installation starts you will be prompted to click Next to start the process.
3. After clicking Next you will be prompted to Accept the License agreement. Please read the License Agreement carefully and Click "I accept" and Next if you wish to continue with the installation.
4. After clicking Next you will be prompted to select a location where you would like to install the program files. The default location is C:\Program Files\GAC\OrthoMation\ but this location can be changed to an alternate if necessary. Once the directory has been selected then click Next.
OrthoMation™ User’s Manual
©2015 DENTSPLY GAC International
19
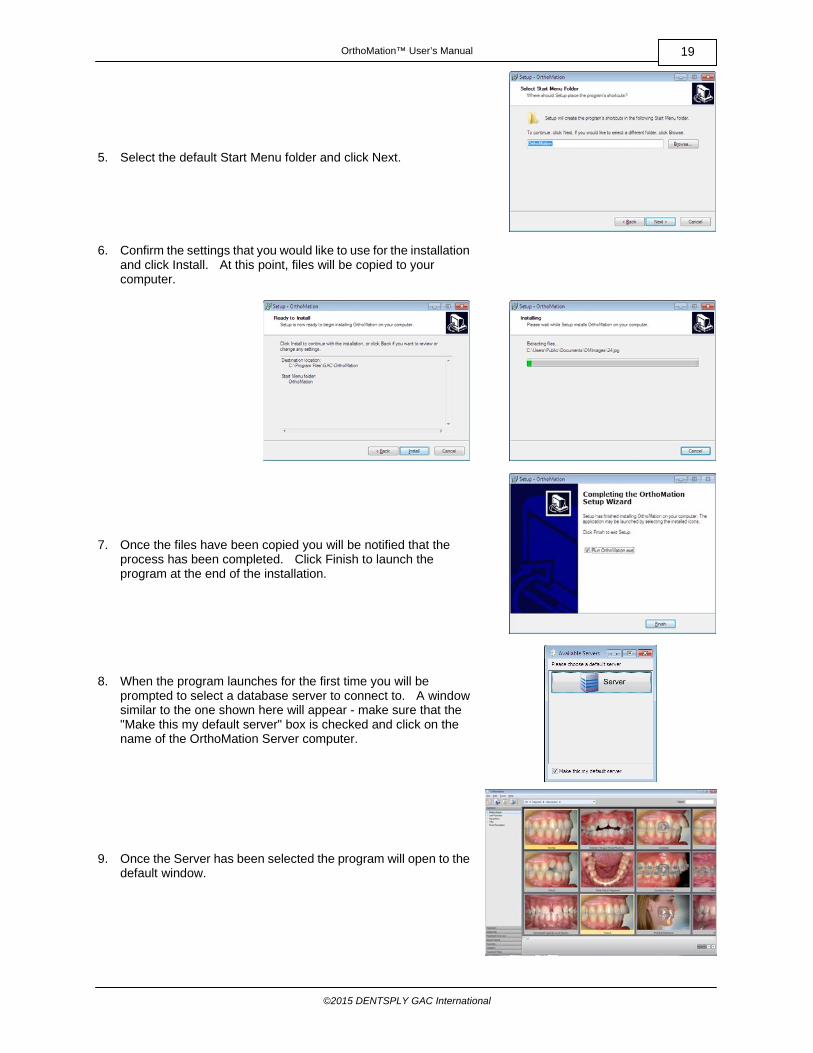
5. Select the default Start Menu folder and click Next.
6. Confirm the settings that you would like to use for the installation and click Install. At this point, files will be copied to your computer.
7. Once the files have been copied you will be notified that the
process has been completed. Click Finish to launch the program at the end of the installation.
8. When the program launches for the first time you will be prompted to select a database server to connect to. A window similar to the one shown here will appear - make sure that the "Make this my default server" box is checked and click on the name of the OrthoMation Server computer.
9. Once the Server has been selected the program will open to the default window.
OrthoMation™ User’s Manual
©2015 DENTSPLY GAC International
20
Stand Alone Installation For Stand Alone installation you will need to run the Server and Client installations as described on the previous sections. Update Installation When you update the program you will have to contact Technical Support to obtain a new Product Key for OrthoMation 9.1. By default, the update from OrthoMation 8.1 to 9.1 will not automatically convert any treatment plans or custom media. Please contact the GAC TechnoCenter and speak to a Support Technician to have this data converted. Reinstalling OrthoMation **PLEASE DO NOT UNINSTALL/REINSTALL OrthoMation 9.1 without contacting the GAC TechnoCenter. Depending on your configuration, you may lose all customization done to the program. NOTE: When you reinstall the program on the same computer you do NOT have to contact Technical Support to obtain a new Product Key for the existing version of the software. If you change servers then this WILL require a new Product Key.
OrthoMation™ User’s Manual
©2015 DENTSPLY GAC International
21
IV
OrthoMation™ User’s Manual
©2015 DENTSPLY GAC International
22
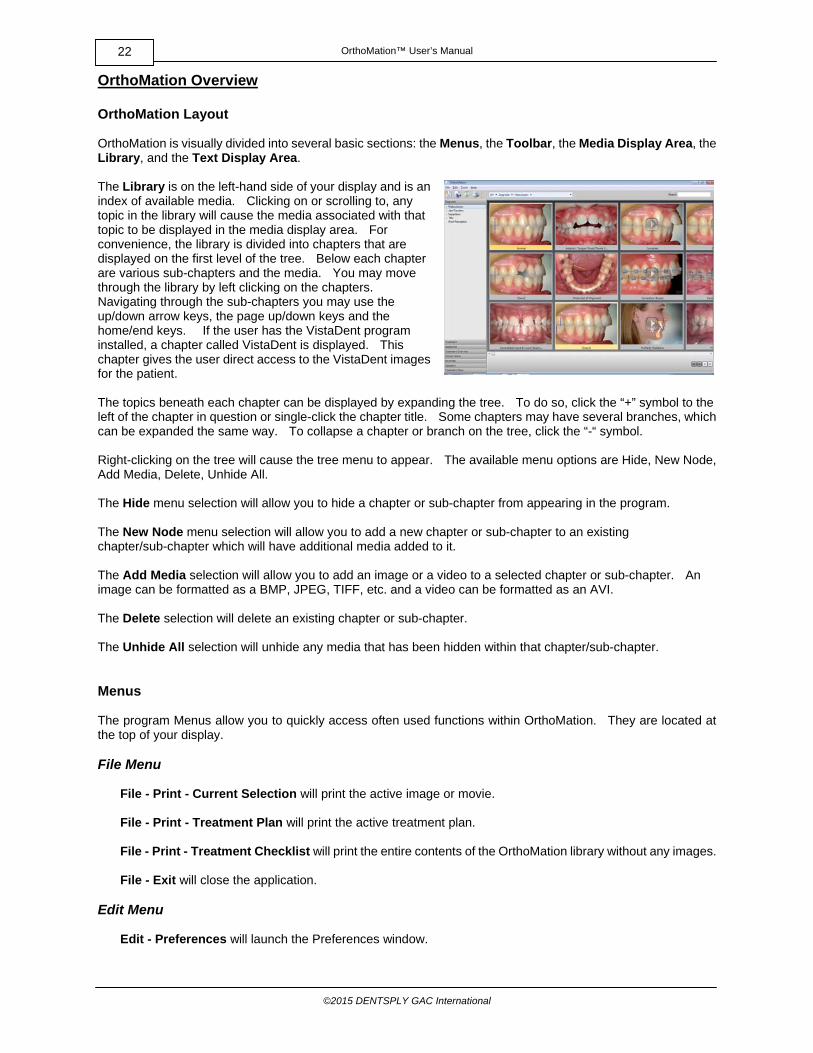
OrthoMation Overview OrthoMation Layout OrthoMation is visually divided into several basic sections: the Menus, the Toolbar, the Media Display Area, the Library, and the Text Display Area. The Library is on the left-hand side of your display and is an index of available media. Clicking on or scrolling to, any topic in the library will cause the media associated with that topic to be displayed in the media display area. For convenience, the library is divided into chapters that are displayed on the first level of the tree. Below each chapter are various sub-chapters and the media. You may move through the library by left clicking on the chapters. Navigating through the sub-chapters you may use the up/down arrow keys, the page up/down keys and the home/end keys. If the user has the VistaDent program installed, a chapter called VistaDent is displayed. This chapter gives the user direct access to the VistaDent images for the patient. The topics beneath each chapter can be displayed by expanding the tree. To do so, click the “+” symbol to the left of the chapter in question or single-click the chapter title. Some chapters may have several branches, which can be expanded the same way. To collapse a chapter or branch on the tree, click the “-“ symbol. Right-clicking on the tree will cause the tree menu to appear. The available menu options are Hide, New Node, Add Media, Delete, Unhide All. The Hide menu selection will allow you to hide a chapter or sub-chapter from appearing in the program. The New Node menu selection will allow you to add a new chapter or sub-chapter to an existing chapter/sub-chapter which will have additional media added to it. The Add Media selection will allow you to add an image or a video to a selected chapter or sub-chapter. An image can be formatted as a BMP, JPEG, TIFF, etc. and a video can be formatted as an AVI. The Delete selection will delete an existing chapter or sub-chapter. The Unhide All selection will unhide any media that has been hidden within that chapter/sub-chapter. Menus The program Menus allow you to quickly access often used functions within OrthoMation. They are located at the top of your display. File Menu
File - Print - Current Selection will print the active image or movie. File - Print - Treatment Plan will print the active treatment plan. File - Print - Treatment Checklist will print the entire contents of the OrthoMation library without any images. File - Exit will close the application.
Edit Menu
Edit - Preferences will launch the Preferences window.
OrthoMation™ User’s Manual
©2015 DENTSPLY GAC International
23
Tools Menu
Tools - Change Language will allow you to switch the application to any other available language. Tools - Informed Consent will launch the Informed Consent wizard.
Help Menu Help - About OrthoMation will give you information about the version of OrthoMation you are running. Help - Contents will launch the Help file. Help - Online Support will launch your web browser to the TechnoCenter Technical Support website.
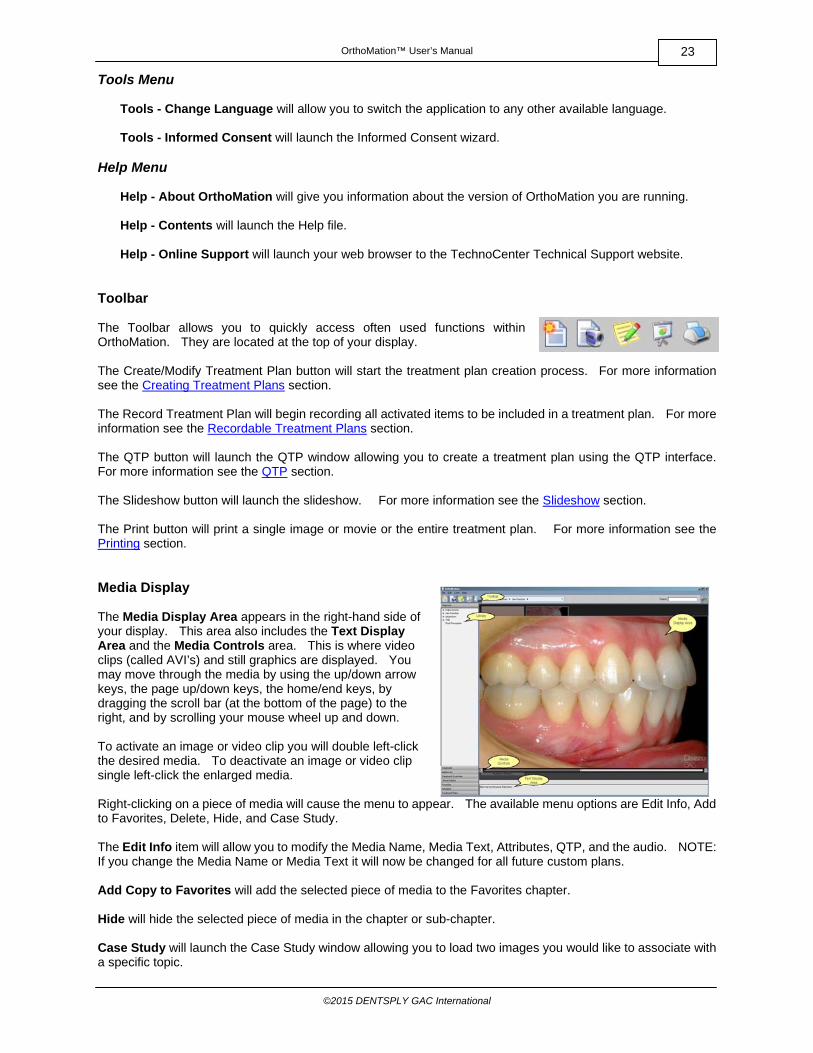
Toolbar The Toolbar allows you to quickly access often used functions within OrthoMation. They are located at the top of your display. The Create/Modify Treatment Plan button will start the treatment plan creation process. For more information see the Creating Treatment Plans section. The Record Treatment Plan will begin recording all activated items to be included in a treatment plan. For more information see the Recordable Treatment Plans section. The QTP button will launch the QTP window allowing you to create a treatment plan using the QTP interface. For more information see the QTP section. The Slideshow button will launch the slideshow. For more information see the Slideshow section. The Print button will print a single image or movie or the entire treatment plan. For more information see the Printing section. Media Display The Media Display Area appears in the right-hand side of your display. This area also includes the Text Display Area and the Media Controls area. This is where video clips (called AVI’s) and still graphics are displayed. You may move through the media by using the up/down arrow keys, the page up/down keys, the home/end keys, by dragging the scroll bar (at the bottom of the page) to the right, and by scrolling your mouse wheel up and down. To activate an image or video clip you will double left-click the desired media. To deactivate an image or video clip single left-click the enlarged media. Right-clicking on a piece of media will cause the menu to appear. The available menu options are Edit Info, Add to Favorites, Delete, Hide, and Case Study. The Edit Info item will allow you to modify the Media Name, Media Text, Attributes, QTP, and the audio. NOTE: If you change the Media Name or Media Text it will now be changed for all future custom plans. Add Copy to Favorites will add the selected piece of media to the Favorites chapter. Hide will hide the selected piece of media in the chapter or sub-chapter. Case Study will launch the Case Study window allowing you to load two images you would like to associate with a specific topic.
OrthoMation™ User’s Manual
©2015 DENTSPLY GAC International
24
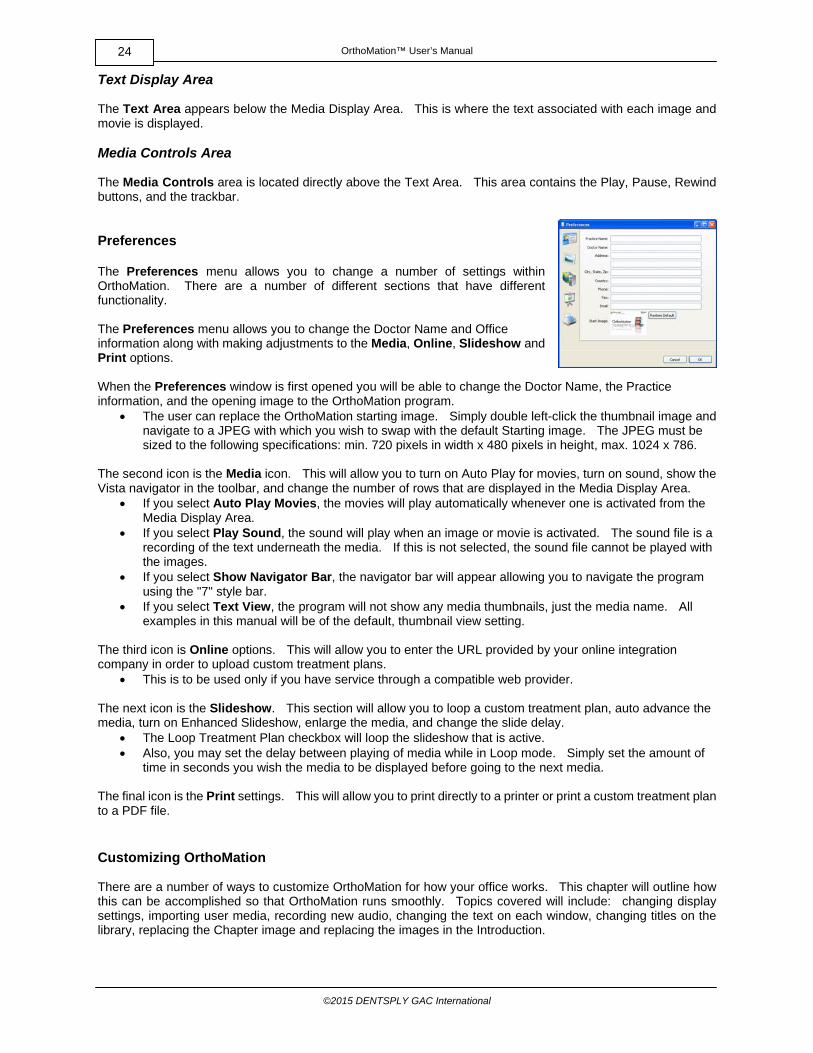
Text Display Area The Text Area appears below the Media Display Area. This is where the text associated with each image and movie is displayed. Media Controls Area The Media Controls area is located directly above the Text Area. This area contains the Play, Pause, Rewind buttons, and the trackbar. Preferences The Preferences menu allows you to change a number of settings within OrthoMation. There are a number of different sections that have different functionality. The Preferences menu allows you to change the Doctor Name and Office information along with making adjustments to the Media, Online, Slideshow and Print options. When the Preferences window is first opened you will be able to change the Doctor Name, the Practice information, and the opening image to the OrthoMation program.
The user can replace the OrthoMation starting image. Simply double left-click the thumbnail image and navigate to a JPEG with which you wish to swap with the default Starting image. The JPEG must be sized to the following specifications: min. 720 pixels in width x 480 pixels in height, max. 1024 x 786.
The second icon is the Media icon. This will allow you to turn on Auto Play for movies, turn on sound, show the Vista navigator in the toolbar, and change the number of rows that are displayed in the Media Display Area.
If you select Auto Play Movies, the movies will play automatically whenever one is activated from the Media Display Area.
If you select Play Sound, the sound will play when an image or movie is activated. The sound file is a recording of the text underneath the media. If this is not selected, the sound file cannot be played with the images.
If you select Show Navigator Bar, the navigator bar will appear allowing you to navigate the program using the "7" style bar.
If you select Text View, the program will not show any media thumbnails, just the media name. All examples in this manual will be of the default, thumbnail view setting.
The third icon is Online options. This will allow you to enter the URL provided by your online integration company in order to upload custom treatment plans.
This is to be used only if you have service through a compatible web provider. The next icon is the Slideshow. This section will allow you to loop a custom treatment plan, auto advance the media, turn on Enhanced Slideshow, enlarge the media, and change the slide delay.
The Loop Treatment Plan checkbox will loop the slideshow that is active. Also, you may set the delay between playing of media while in Loop mode. Simply set the amount of
time in seconds you wish the media to be displayed before going to the next media. The final icon is the Print settings. This will allow you to print directly to a printer or print a custom treatment plan to a PDF file. Customizing OrthoMation There are a number of ways to customize OrthoMation for how your office works. This chapter will outline how this can be accomplished so that OrthoMation runs smoothly. Topics covered will include: changing display settings, importing user media, recording new audio, changing the text on each window, changing titles on the library, replacing the Chapter image and replacing the images in the Introduction.
OrthoMation™ User’s Manual
©2015 DENTSPLY GAC International
25
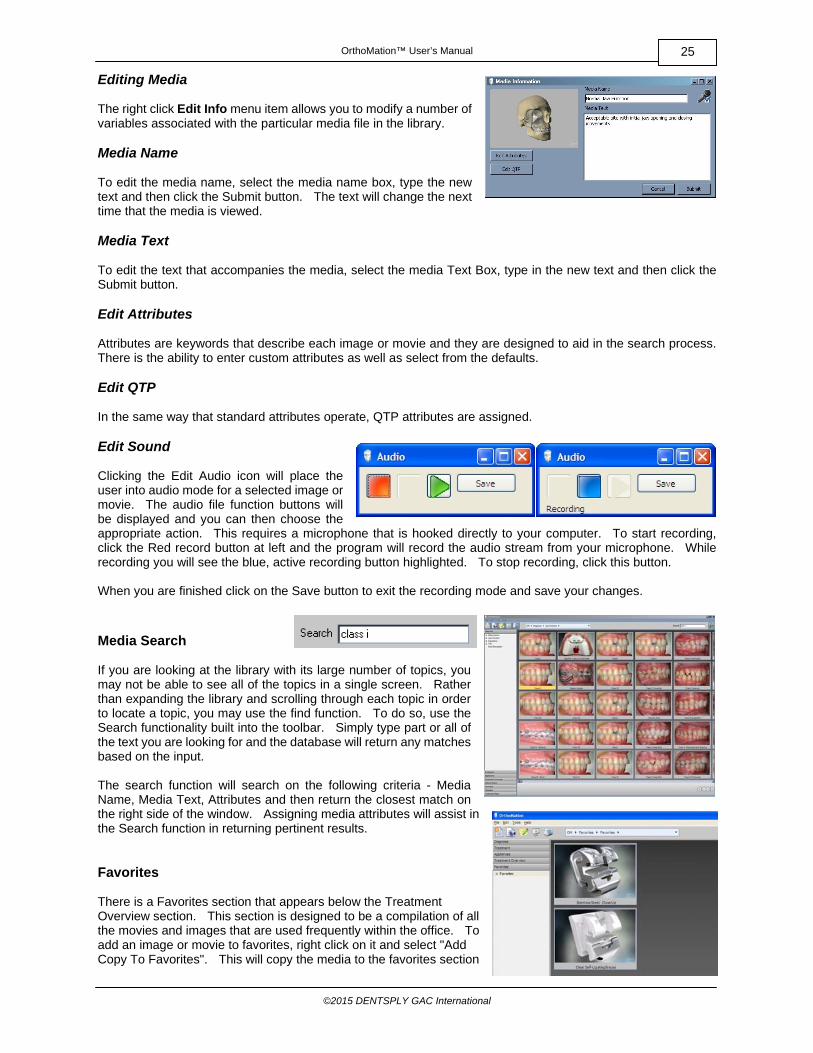
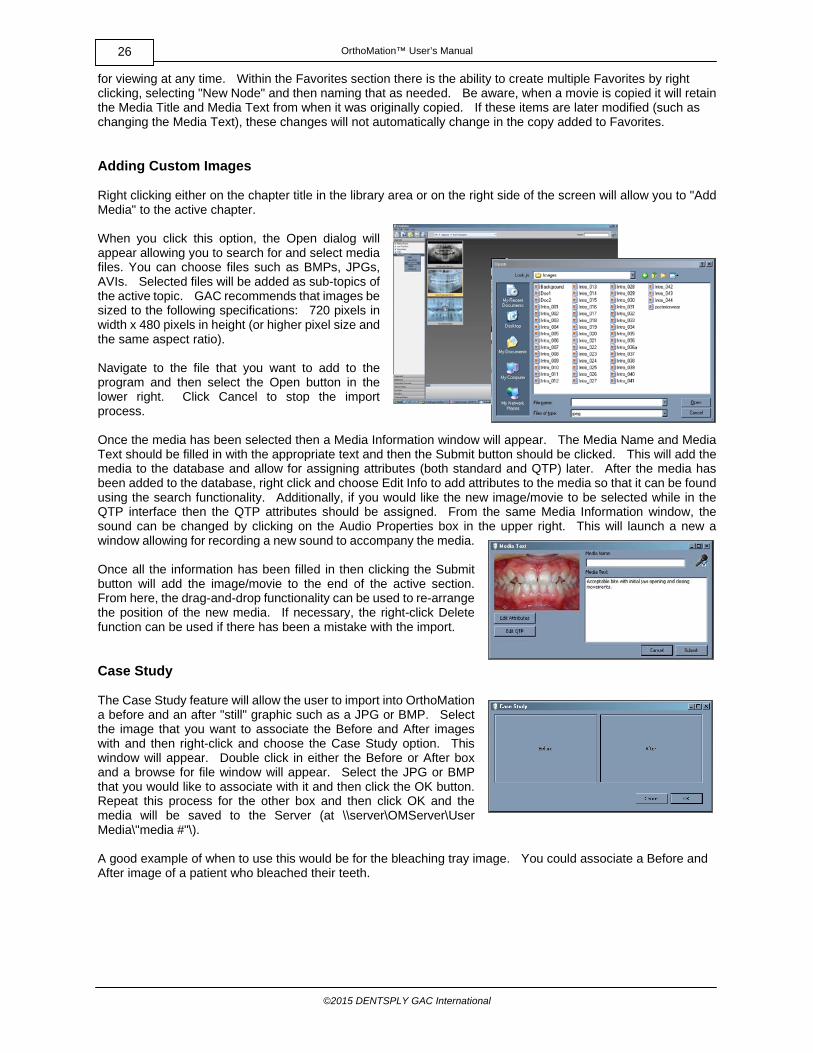
Editing Media The right click Edit Info menu item allows you to modify a number of variables associated with the particular media file in the library. Media Name To edit the media name, select the media name box, type the new text and then click the Submit button. The text will change the next time that the media is viewed. Media Text To edit the text that accompanies the media, select the media Text Box, type in the new text and then click the Submit button. Edit Attributes Attributes are keywords that describe each image or movie and they are designed to aid in the search process. There is the ability to enter custom attributes as well as select from the defaults. Edit QTP In the same way that standard attributes operate, QTP attributes are assigned. Edit Sound Clicking the Edit Audio icon will place the user into audio mode for a selected image or movie. The audio file function buttons will be displayed and you can then choose the appropriate action. This requires a microphone that is hooked directly to your computer. To start recording, click the Red record button at left and the program will record the audio stream from your microphone. While recording you will see the blue, active recording button highlighted. To stop recording, click this button. When you are finished click on the Save button to exit the recording mode and save your changes. Media Search If you are looking at the library with its large number of topics, you may not be able to see all of the topics in a single screen. Rather than expanding the library and scrolling through each topic in order to locate a topic, you may use the find function. To do so, use the Search functionality built into the toolbar. Simply type part or all of the text you are looking for and the database will return any matches based on the input. The search function will search on the following criteria - Media Name, Media Text, Attributes and then return the closest match on the right side of the window. Assigning media attributes will assist in the Search function in returning pertinent results. Favorites There is a Favorites section that appears below the Treatment Overview section. This section is designed to be a compilation of all the movies and images that are used frequently within the office. To add an image or movie to favorites, right click on it and select "Add Copy To Favorites". This will copy the media to the favorites section
OrthoMation™ User’s Manual
©2015 DENTSPLY GAC International
26
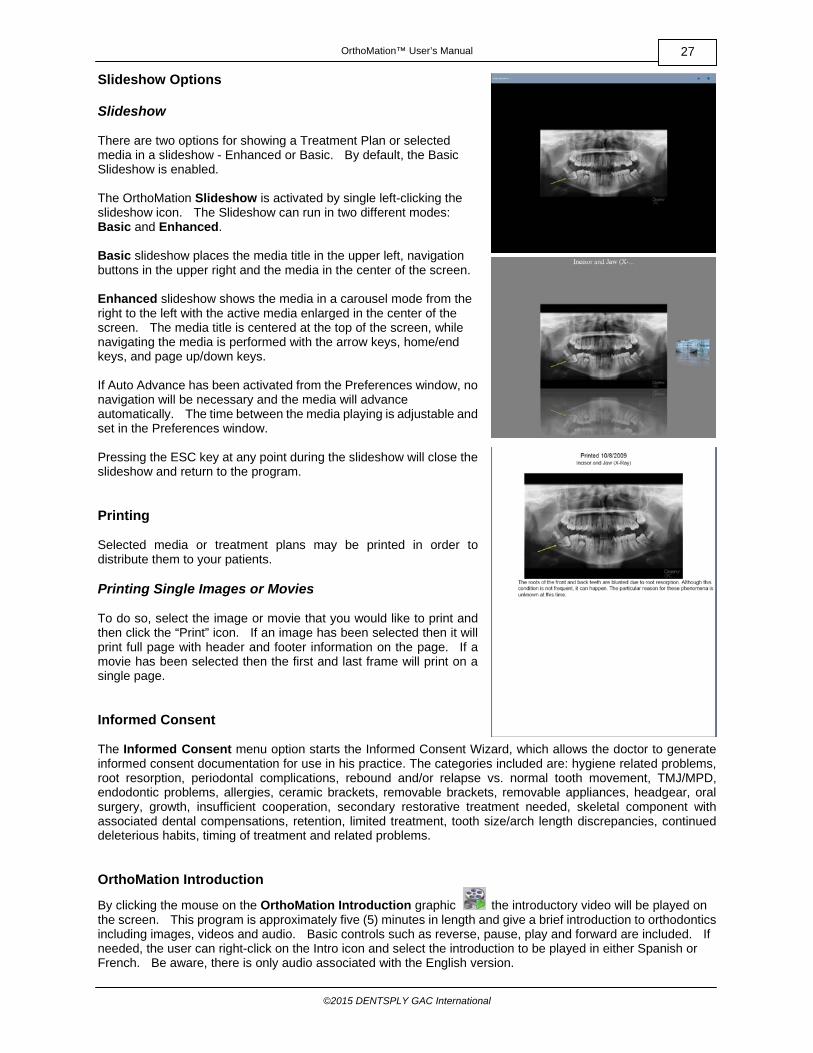
for viewing at any time. Within the Favorites section there is the ability to create multiple Favorites by right clicking, selecting "New Node" and then naming that as needed. Be aware, when a movie is copied it will retain the Media Title and Media Text from when it was originally copied. If these items are later modified (such as changing the Media Text), these changes will not automatically change in the copy added to Favorites. Adding Custom Images Right clicking either on the chapter title in the library area or on the right side of the screen will allow you to "Add Media" to the active chapter. When you click this option, the Open dialog will appear allowing you to search for and select media files. You can choose files such as BMPs, JPGs, AVIs. Selected files will be added as sub-topics of the active topic. GAC recommends that images be sized to the following specifications: 720 pixels in width x 480 pixels in height (or higher pixel size and the same aspect ratio). Navigate to the file that you want to add to the program and then select the Open button in the lower right. Click Cancel to stop the import process. Once the media has been selected then a Media Information window will appear. The Media Name and Media Text should be filled in with the appropriate text and then the Submit button should be clicked. This will add the media to the database and allow for assigning attributes (both standard and QTP) later. After the media has been added to the database, right click and choose Edit Info to add attributes to the media so that it can be found using the search functionality. Additionally, if you would like the new image/movie to be selected while in the QTP interface then the QTP attributes should be assigned. From the same Media Information window, the sound can be changed by clicking on the Audio Properties box in the upper right. This will launch a new a window allowing for recording a new sound to accompany the media. Once all the information has been filled in then clicking the Submit button will add the image/movie to the end of the active section. From here, the drag-and-drop functionality can be used to re-arrange the position of the new media. If necessary, the right-click Delete function can be used if there has been a mistake with the import. Case Study The Case Study feature will allow the user to import into OrthoMation a before and an after "still" graphic such as a JPG or BMP. Select the image that you want to associate the Before and After images with and then right-click and choose the Case Study option. This window will appear. Double click in either the Before or After box and a browse for file window will appear. Select the JPG or BMP that you would like to associate with it and then click the OK button. Repeat this process for the other box and then click OK and the media will be saved to the Server (at \\server\OMServer\User Media\"media #"\).
A good example of when to use this would be for the bleaching tray image. You could associate a Before and After image of a patient who bleached their teeth.
OrthoMation™ User’s Manual
©2015 DENTSPLY GAC International
27
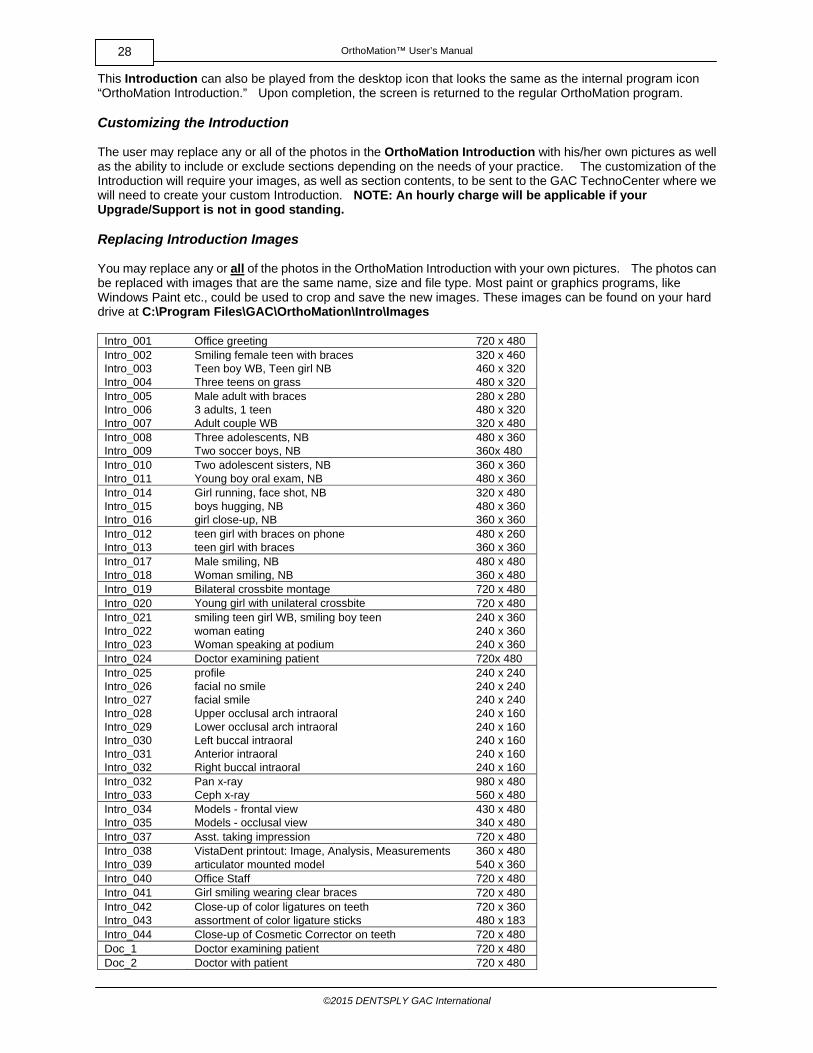
Slideshow Options Slideshow There are two options for showing a Treatment Plan or selected media in a slideshow - Enhanced or Basic. By default, the Basic Slideshow is enabled. The OrthoMation Slideshow is activated by single left-clicking the slideshow icon. The Slideshow can run in two different modes: Basic and Enhanced. Basic slideshow places the media title in the upper left, navigation buttons in the upper right and the media in the center of the screen. Enhanced slideshow shows the media in a carousel mode from the right to the left with the active media enlarged in the center of the screen. The media title is centered at the top of the screen, while navigating the media is performed with the arrow keys, home/end keys, and page up/down keys. If Auto Advance has been activated from the Preferences window, no navigation will be necessary and the media will advance automatically. The time between the media playing is adjustable and set in the Preferences window. Pressing the ESC key at any point during the slideshow will close the slideshow and return to the program. Printing Selected media or treatment plans may be printed in order to distribute them to your patients. Printing Single Images or Movies To do so, select the image or movie that you would like to print and then click the “Print” icon. If an image has been selected then it will print full page with header and footer information on the page. If a movie has been selected then the first and last frame will print on a single page. Informed Consent The Informed Consent menu option starts the Informed Consent Wizard, which allows the doctor to generate informed consent documentation for use in his practice. The categories included are: hygiene related problems, root resorption, periodontal complications, rebound and/or relapse vs. normal tooth movement, TMJ/MPD, endodontic problems, allergies, ceramic brackets, removable brackets, removable appliances, headgear, oral surgery, growth, insufficient cooperation, secondary restorative treatment needed, skeletal component with associated dental compensations, retention, limited treatment, tooth size/arch length discrepancies, continued deleterious habits, timing of treatment and related problems. OrthoMation Introduction
By clicking the mouse on the OrthoMation Introduction graphic the introductory video will be played on the screen. This program is approximately five (5) minutes in length and give a brief introduction to orthodontics including images, videos and audio. Basic controls such as reverse, pause, play and forward are included. If needed, the user can right-click on the Intro icon and select the introduction to be played in either Spanish or French. Be aware, there is only audio associated with the English version.
OrthoMation™ User’s Manual
©2015 DENTSPLY GAC International
28
This Introduction can also be played from the desktop icon that looks the same as the internal program icon “OrthoMation Introduction.” Upon completion, the screen is returned to the regular OrthoMation program. Customizing the Introduction The user may replace any or all of the photos in the OrthoMation Introduction with his/her own pictures as well as the ability to include or exclude sections depending on the needs of your practice. The customization of the Introduction will require your images, as well as section contents, to be sent to the GAC TechnoCenter where we will need to create your custom Introduction. NOTE: An hourly charge will be applicable if your Upgrade/Support is not in good standing. Replacing Introduction Images You may replace any or all of the photos in the OrthoMation Introduction with your own pictures. The photos can be replaced with images that are the same name, size and file type. Most paint or graphics programs, like Windows Paint etc., could be used to crop and save the new images. These images can be found on your hard drive at C:\Program Files\GAC\OrthoMation\Intro\Images
Intro_001 Office greeting 720 x 480 Intro_002 Smiling female teen with braces 320 x 460 Intro_003 Teen boy WB, Teen girl NB 460 x 320 Intro_004 Three teens on grass 480 x 320 Intro_005 Male adult with braces 280 x 280 Intro_006 3 adults, 1 teen 480 x 320 Intro_007 Adult couple WB 320 x 480 Intro_008 Three adolescents, NB 480 x 360 Intro_009 Two soccer boys, NB 360x 480 Intro_010 Two adolescent sisters, NB 360 x 360 Intro_011 Young boy oral exam, NB 480 x 360 Intro_014 Girl running, face shot, NB 320 x 480 Intro_015 boys hugging, NB 480 x 360 Intro_016 girl close-up, NB 360 x 360 Intro_012 teen girl with braces on phone 480 x 260 Intro_013 teen girl with braces 360 x 360 Intro_017 Male smiling, NB 480 x 480 Intro_018 Woman smiling, NB 360 x 480 Intro_019 Bilateral crossbite montage 720 x 480 Intro_020 Young girl with unilateral crossbite 720 x 480 Intro_021 smiling teen girl WB, smiling boy teen 240 x 360 Intro_022 woman eating 240 x 360 Intro_023 Woman speaking at podium 240 x 360 Intro_024 Doctor examining patient 720x 480 Intro_025 profile 240 x 240 Intro_026 facial no smile 240 x 240 Intro_027 facial smile 240 x 240 Intro_028 Upper occlusal arch intraoral 240 x 160 Intro_029 Lower occlusal arch intraoral 240 x 160 Intro_030 Left buccal intraoral 240 x 160 Intro_031 Anterior intraoral 240 x 160 Intro_032 Right buccal intraoral 240 x 160 Intro_032 Pan x-ray 980 x 480 Intro_033 Ceph x-ray 560 x 480 Intro_034 Models - frontal view 430 x 480 Intro_035 Models - occlusal view 340 x 480 Intro_037 Asst. taking impression 720 x 480 Intro_038 VistaDent printout: Image, Analysis, Measurements 360 x 480 Intro_039 articulator mounted model 540 x 360 Intro_040 Office Staff 720 x 480 Intro_041 Girl smiling wearing clear braces 720 x 480 Intro_042 Close-up of color ligatures on teeth 720 x 360 Intro_043 assortment of color ligature sticks 480 x 183 Intro_044 Close-up of Cosmetic Corrector on teeth 720 x 480 Doc_1 Doctor examining patient 720 x 480 Doc_2 Doctor with patient 720 x 480
OrthoMation™ User’s Manual
©2015 DENTSPLY GAC International
29
After locating the files, it is recommended that the original images be renamed for use as backups.
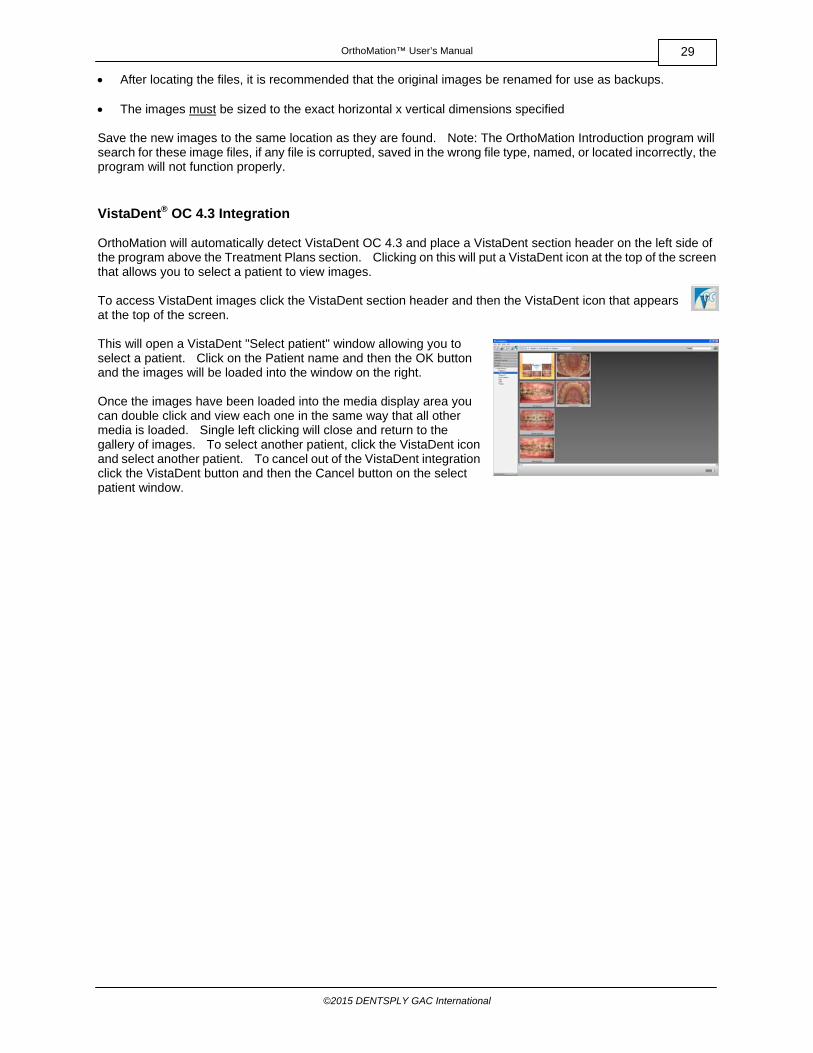
The images must be sized to the exact horizontal x vertical dimensions specified Save the new images to the same location as they are found. Note: The OrthoMation Introduction program will search for these image files, if any file is corrupted, saved in the wrong file type, named, or located incorrectly, the program will not function properly. VistaDent® OC 4.3 Integration OrthoMation will automatically detect VistaDent OC 4.3 and place a VistaDent section header on the left side of the program above the Treatment Plans section. Clicking on this will put a VistaDent icon at the top of the screen that allows you to select a patient to view images. To access VistaDent images click the VistaDent section header and then the VistaDent icon that appears at the top of the screen. This will open a VistaDent "Select patient" window allowing you to select a patient. Click on the Patient name and then the OK button and the images will be loaded into the window on the right. Once the images have been loaded into the media display area you can double click and view each one in the same way that all other media is loaded. Single left clicking will close and return to the gallery of images. To select another patient, click the VistaDent icon and select another patient. To cancel out of the VistaDent integration click the VistaDent button and then the Cancel button on the select patient window.

OrthoMation™ User’s Manual
©2015 DENTSPLY GAC International
30
OrthoMation™ User’s Manual
©2015 DENTSPLY GAC International
31
V
OrthoMation™ User’s Manual
©2015 DENTSPLY GAC International
32
Treatment Plans Creating Treatment Plans What is a Treatment Plan? OrthoMation allows you to create custom treatment plans for presentation to your patients. A treatment plan is defined as a collection of images and movies that pertain to a specific topic or patient. By creating a custom treatment plan, you can display only those media files applicable to that patient’s treatment. This chapter will guide you through the process of creating a custom treatment plan. Once created, these treatment plans can be printed so that the patient can view them on their home computers. The Treatment Checklist You may find it convenient to have an assistant prepare the custom treatment plan based upon your notes. At some point you will want to print a worksheet to be used for this purpose. With the default library loaded, click File, Print and then Treatment Checklist. Please be aware that this will take 15 pages. The Treatment Checklist will print all available media. You will probably want to make copies of this worksheet for future use. After you have determined what type of treatment you will provide, check off the media files you wish to make part of the treatment plan. Creating Custom Treatment Plans
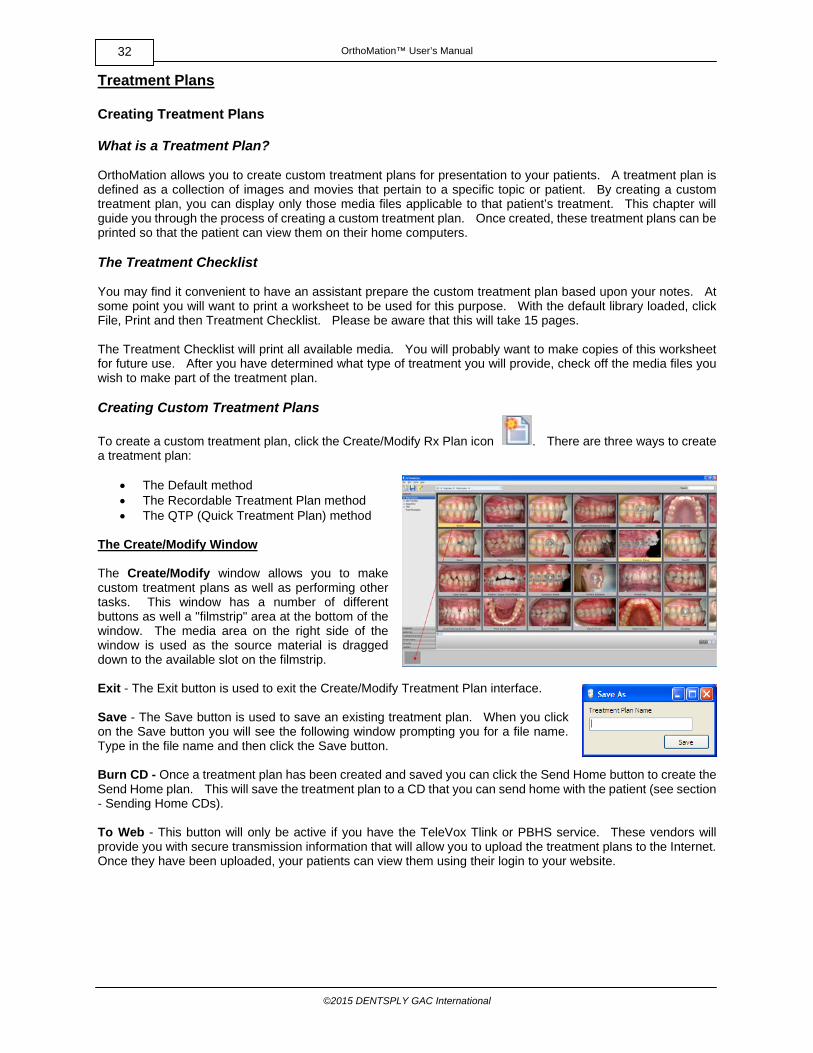
To create a custom treatment plan, click the Create/Modify Rx Plan icon . There are three ways to create a treatment plan:
The Default method The Recordable Treatment Plan method The QTP (Quick Treatment Plan) method
The Create/Modify Window
The Create/Modify window allows you to make custom treatment plans as well as performing other tasks. This window has a number of different buttons as well a "filmstrip" area at the bottom of the window. The media area on the right side of the window is used as the source material is dragged down to the available slot on the filmstrip. Exit - The Exit button is used to exit the Create/Modify Treatment Plan interface. Save - The Save button is used to save an existing treatment plan. When you click on the Save button you will see the following window prompting you for a file name. Type in the file name and then click the Save button. Burn CD - Once a treatment plan has been created and saved you can click the Send Home button to create the Send Home plan. This will save the treatment plan to a CD that you can send home with the patient (see section - Sending Home CDs). To Web - This button will only be active if you have the TeleVox Tlink or PBHS service. These vendors will provide you with secure transmission information that will allow you to upload the treatment plans to the Internet. Once they have been uploaded, your patients can view them using their login to your website.
OrthoMation™ User’s Manual
©2015 DENTSPLY GAC International
33
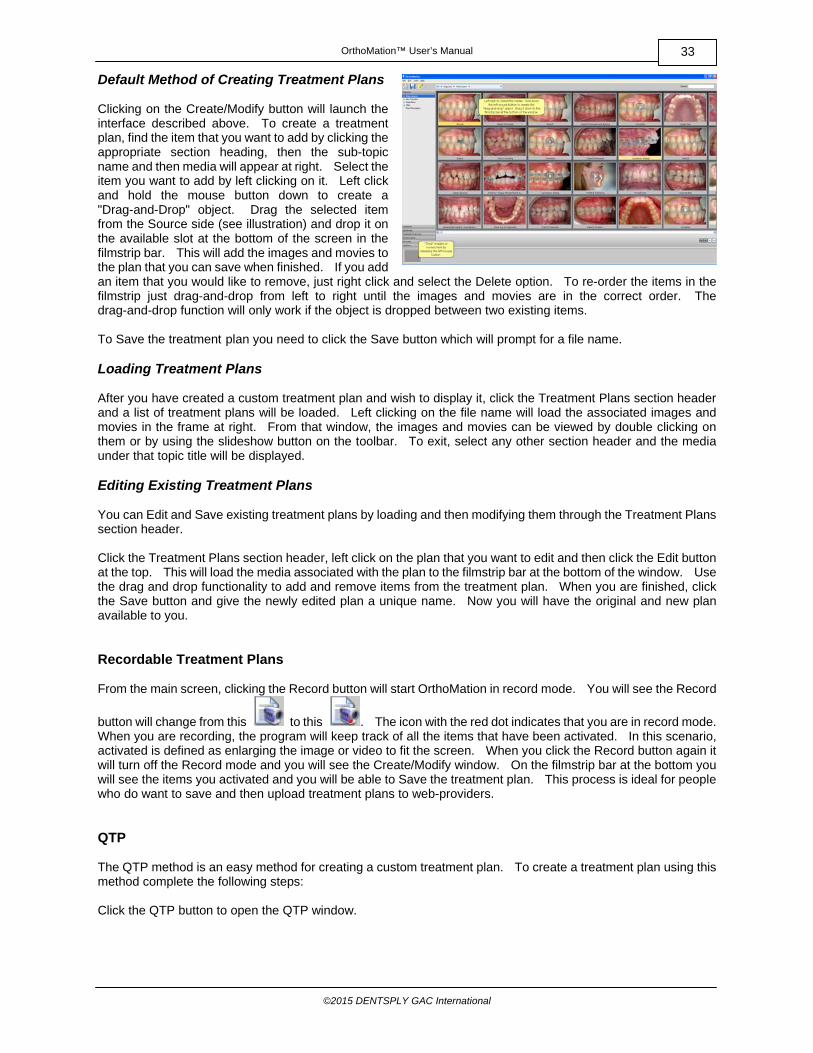
Default Method of Creating Treatment Plans Clicking on the Create/Modify button will launch the interface described above. To create a treatment plan, find the item that you want to add by clicking the appropriate section heading, then the sub-topic name and then media will appear at right. Select the item you want to add by left clicking on it. Left click and hold the mouse button down to create a "Drag-and-Drop" object. Drag the selected item from the Source side (see illustration) and drop it on the available slot at the bottom of the screen in the filmstrip bar. This will add the images and movies to the plan that you can save when finished. If you add an item that you would like to remove, just right click and select the Delete option. To re-order the items in the filmstrip just drag-and-drop from left to right until the images and movies are in the correct order. The drag-and-drop function will only work if the object is dropped between two existing items. To Save the treatment plan you need to click the Save button which will prompt for a file name. Loading Treatment Plans After you have created a custom treatment plan and wish to display it, click the Treatment Plans section header and a list of treatment plans will be loaded. Left clicking on the file name will load the associated images and movies in the frame at right. From that window, the images and movies can be viewed by double clicking on them or by using the slideshow button on the toolbar. To exit, select any other section header and the media under that topic title will be displayed. Editing Existing Treatment Plans You can Edit and Save existing treatment plans by loading and then modifying them through the Treatment Plans section header. Click the Treatment Plans section header, left click on the plan that you want to edit and then click the Edit button at the top. This will load the media associated with the plan to the filmstrip bar at the bottom of the window. Use the drag and drop functionality to add and remove items from the treatment plan. When you are finished, click the Save button and give the newly edited plan a unique name. Now you will have the original and new plan available to you. Recordable Treatment Plans From the main screen, clicking the Record button will start OrthoMation in record mode. You will see the Record
button will change from this to this . The icon with the red dot indicates that you are in record mode. When you are recording, the program will keep track of all the items that have been activated. In this scenario, activated is defined as enlarging the image or video to fit the screen. When you click the Record button again it will turn off the Record mode and you will see the Create/Modify window. On the filmstrip bar at the bottom you will see the items you activated and you will be able to Save the treatment plan. This process is ideal for people who do want to save and then upload treatment plans to web-providers. QTP The QTP method is an easy method for creating a custom treatment plan. To create a treatment plan using this method complete the following steps: Click the QTP button to open the QTP window.
OrthoMation™ User’s Manual
©2015 DENTSPLY GAC International
34
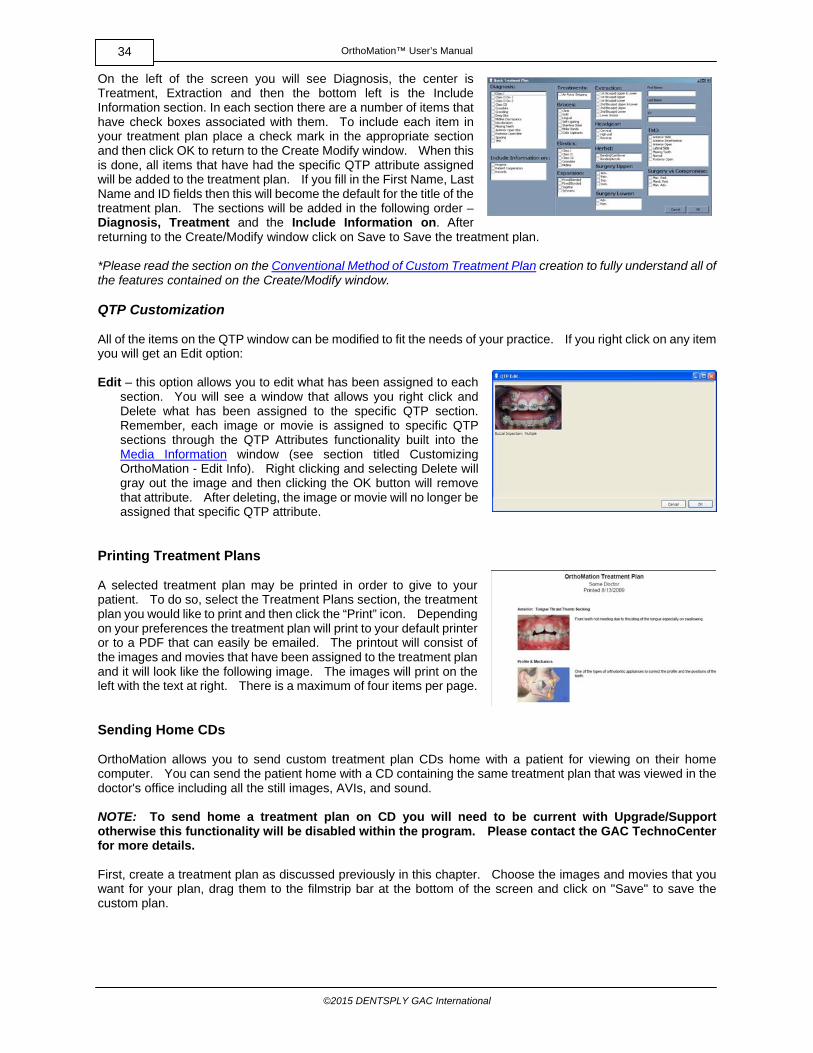
On the left of the screen you will see Diagnosis, the center is Treatment, Extraction and then the bottom left is the Include Information section. In each section there are a number of items that have check boxes associated with them. To include each item in your treatment plan place a check mark in the appropriate section and then click OK to return to the Create Modify window. When this is done, all items that have had the specific QTP attribute assigned will be added to the treatment plan. If you fill in the First Name, Last Name and ID fields then this will become the default for the title of the treatment plan. The sections will be added in the following order – Diagnosis, Treatment and the Include Information on. After returning to the Create/Modify window click on Save to Save the treatment plan. *Please read the section on the Conventional Method of Custom Treatment Plan creation to fully understand all of the features contained on the Create/Modify window. QTP Customization All of the items on the QTP window can be modified to fit the needs of your practice. If you right click on any item you will get an Edit option: Edit – this option allows you to edit what has been assigned to each
section. You will see a window that allows you right click and Delete what has been assigned to the specific QTP section. Remember, each image or movie is assigned to specific QTP sections through the QTP Attributes functionality built into the Media Information window (see section titled Customizing OrthoMation - Edit Info). Right clicking and selecting Delete will gray out the image and then clicking the OK button will remove that attribute. After deleting, the image or movie will no longer be assigned that specific QTP attribute.
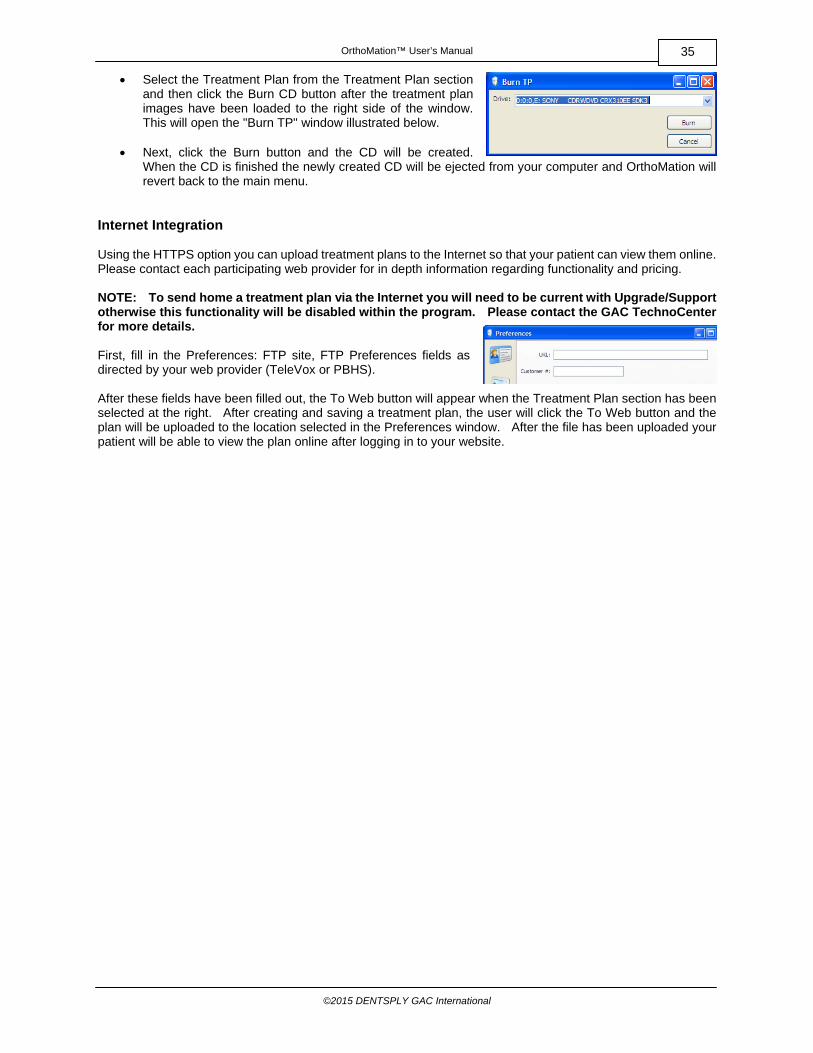
Printing Treatment Plans A selected treatment plan may be printed in order to give to your patient. To do so, select the Treatment Plans section, the treatment plan you would like to print and then click the “Print” icon. Depending on your preferences the treatment plan will print to your default printer or to a PDF that can easily be emailed. The printout will consist of the images and movies that have been assigned to the treatment plan and it will look like the following image. The images will print on the left with the text at right. There is a maximum of four items per page. Sending Home CDs OrthoMation allows you to send custom treatment plan CDs home with a patient for viewing on their home computer. You can send the patient home with a CD containing the same treatment plan that was viewed in the doctor's office including all the still images, AVIs, and sound. NOTE: To send home a treatment plan on CD you will need to be current with Upgrade/Support otherwise this functionality will be disabled within the program. Please contact the GAC TechnoCenter for more details. First, create a treatment plan as discussed previously in this chapter. Choose the images and movies that you want for your plan, drag them to the filmstrip bar at the bottom of the screen and click on "Save" to save the custom plan.
OrthoMation™ User’s Manual
©2015 DENTSPLY GAC International
35
Select the Treatment Plan from the Treatment Plan section and then click the Burn CD button after the treatment plan images have been loaded to the right side of the window. This will open the "Burn TP" window illustrated below.
Next, click the Burn button and the CD will be created.
When the CD is finished the newly created CD will be ejected from your computer and OrthoMation will revert back to the main menu.
Internet Integration Using the HTTPS option you can upload treatment plans to the Internet so that your patient can view them online. Please contact each participating web provider for in depth information regarding functionality and pricing. NOTE: To send home a treatment plan via the Internet you will need to be current with Upgrade/Support otherwise this functionality will be disabled within the program. Please contact the GAC TechnoCenter for more details. First, fill in the Preferences: FTP site, FTP Preferences fields as directed by your web provider (TeleVox or PBHS). After these fields have been filled out, the To Web button will appear when the Treatment Plan section has been selected at the right. After creating and saving a treatment plan, the user will click the To Web button and the plan will be uploaded to the location selected in the Preferences window. After the file has been uploaded your patient will be able to view the plan online after logging in to your website.

OrthoMation™ User’s Manual
©2015 DENTSPLY GAC International
36
OrthoMation™ User’s Manual
©2015 DENTSPLY GAC International
37
VI
OrthoMation™ User’s Manual
©2015 DENTSPLY GAC International
38
Troubleshooting Installation Problems Most of the problems encountered when installing on XP, Vista, Server 2008 and Windows 7 result from not having sufficient Administrative privileges. Please make sure that you are logged on with Administrative privileges and that no other programs are running during the installation/uninstall process. Open software programs can jeopardize the integrity of the installation. Slideshow Issues The enhanced slideshow has been designed to be used on computers that have advanced graphics hardware and Direct9X compatible drivers. Due to the higher requirements there may be instances where the Enhanced Slideshow displays white boxes, a black background or is very slow. These issues are similar in scope to problems with 3D gaming and directly related to the computer video driver and Microsoft's DirectX 9. The enhanced slideshow uses DirectX 9 for rendering. There may be issues running the slideshow that can be resolved by upgrading to a newer video driver or by upgrading the physical hardware. If you have an older machine without DirectX 9 installed, the Microsoft DirectX 9 redistributable can be found at the following location. http://tinyurl.com/6hls4 If you have DirectX 9 installed, make sure that Direct3D is enabled. To verify this, start the Windows utility dxdiag (Start, Run, type in dxdiag and click Enter) and check under "Display" tab. Technical Support For Technical Support please contact the DENTSPLY GAC TechnoCenter: DENTSPLY GAC TechnoCenter Toll Free: 888-422-2376 E-mail: [email protected] www.dentsplygac.com www.gotoassist.com/ph/gac - For live Remote Assistance during normal TechnoCenter business hours
OrthoMation™ User’s Manual
©2015 DENTSPLY GAC International
39
A
Adding images ................................................................................... 26
Authorization ..................................................................................... 14
B
Basic ................................................................................................... 27
Burn ................................................................................................... 34
C
Case Study ......................................................................................... 26
CD 34
Citrix ................................................................................................... 12
Client .................................................................................................. 18
Credits .................................................................................................. 6
Custom Media .................................................................................... 24
Customizing ....................................................................................... 24
D
Display ............................................................................................... 23
E
Edit ..................................................................................................... 32
Enhanced ........................................................................................... 27
EULA .................................................................................................... 6
F
Favorites ............................................................................................ 25
H
Hardware ........................................................................................... 12
I
Informed Consent .............................................................................. 27
Installation ......................................................................................... 14
Introduction ....................................................................................... 27
L
Laptop Installation ............................................................................. 20
Layout ................................................................................................ 22
Library ................................................................................................ 22
License ................................................................................................. 6
M
Mac .................................................................................................... 12
Media ................................................................................................. 22
Menu ................................................................................................. 22
Move .................................................................................................. 32
O
OrthoSesame ..................................................................................... 35
P
Parallels ............................................................................................. 12
PBHS .................................................................................................. 35
Plans .................................................................................................. 32
Preferences ........................................................................................ 24
Print .............................................................................................. 27, 34
Printing .............................................................................................. 34
Program update ................................................................................. 20
Q
QTP .................................................................................................... 33
Qucik Treatment Plan ........................................................................ 33
R
Record ................................................................................................ 33
Recordable Treatement Plan ............................................................. 33
Reinstall ............................................................................................. 20
Remote Desktop ................................................................................ 12
Replace Images .................................................................................. 27
Requirements .................................................................................... 12
Return .................................................................................................. 9
Return Policy ........................................................................................ 9
S
Save ................................................................................................... 32
Search ................................................................................................ 25
Server ................................................................................................. 16
Slideshow ........................................................................................... 27
Stand Alone Installation ..................................................................... 20
Support .............................................................................................. 38
T
Tech ................................................................................................... 38
Televox............................................................................................... 35
Toolbar............................................................................................... 23
Treatment Plan .................................................................................. 32
Troubleshooting ................................................................................. 38
U
Uninstall ............................................................................................. 20
Update ............................................................................................... 20
Upload ............................................................................................... 35
V
VistaDent ........................................................................................... 29
VMWare............................................................................................. 12
W
Web ................................................................................................... 35
Workstation ....................................................................................... 18

Manufacturer:DENTSPLY GAC InternationalOne CA Plaza, Suite 100Islandia, NY 11749 USAP: 631-419-1700F: 631-357-8793 (FAX)www.dentsplysirona.com DFU-0106 Rev. 02
Made in USA