Embed Size (px)
Citation preview

4/18/2015 README for 8626084
https://updates.oracle.com/ARULink/PatchDetails/view_readme?aru=13669601 1/43
Patches
README for 8626084
Patch Details
Oracle® Application Server Patch Set Notes10g Release 3 (10.1.3) Patch Set 5 (10.1.3.5.0)
Oracle® Application ServerPatch Set Notes
10g Release 3 (10.1.3) Patch Set 5 (10.1.3.5.0)
August 2009
This document accompanies Oracle Application Server 10g Release 3 (10.1.3) Patch Set 5 (10.1.3.5.0).
This document contains the following sections:
Section 1, "What is a Patch Set?"
Section 2, "About This Patch Set"
Section 3, "Patch Set Documentation"
Section 4, "Additional Documentation and Release Notes"
Section 5, "Patch Set Requirements"
Section 6, "Patch Set Application"
Section 7, "Postapplication Tasks"
Section 8, "Known Issues"
Section 9, "Fixed PlatformSpecific Bugs for Windows"
Section 10, "Patch Set Components"
Section 11, "Documentation Accessibility"
1 What is a Patch Set?
4/18/2015 README for 8626084
https://updates.oracle.com/ARULink/PatchDetails/view_readme?aru=13669601 2/43
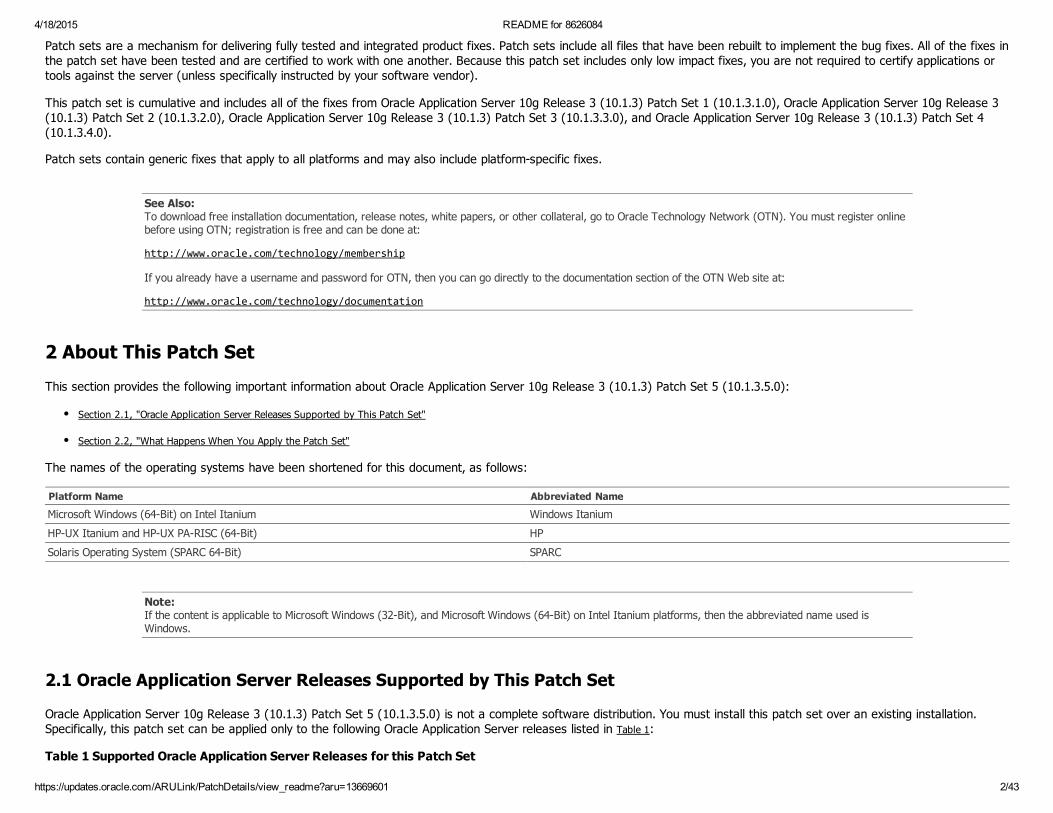
Patch sets are a mechanism for delivering fully tested and integrated product fixes. Patch sets include all files that have been rebuilt to implement the bug fixes. All of the fixes inthe patch set have been tested and are certified to work with one another. Because this patch set includes only low impact fixes, you are not required to certify applications ortools against the server (unless specifically instructed by your software vendor).
This patch set is cumulative and includes all of the fixes from Oracle Application Server 10g Release 3 (10.1.3) Patch Set 1 (10.1.3.1.0), Oracle Application Server 10g Release 3(10.1.3) Patch Set 2 (10.1.3.2.0), Oracle Application Server 10g Release 3 (10.1.3) Patch Set 3 (10.1.3.3.0), and Oracle Application Server 10g Release 3 (10.1.3) Patch Set 4(10.1.3.4.0).
Patch sets contain generic fixes that apply to all platforms and may also include platformspecific fixes.
See Also:To download free installation documentation, release notes, white papers, or other collateral, go to Oracle Technology Network (OTN). You must register onlinebefore using OTN; registration is free and can be done at:
http://www.oracle.com/technology/membership
If you already have a username and password for OTN, then you can go directly to the documentation section of the OTN Web site at:
http://www.oracle.com/technology/documentation
2 About This Patch Set
This section provides the following important information about Oracle Application Server 10g Release 3 (10.1.3) Patch Set 5 (10.1.3.5.0):
Section 2.1, "Oracle Application Server Releases Supported by This Patch Set"
Section 2.2, "What Happens When You Apply the Patch Set"
The names of the operating systems have been shortened for this document, as follows:
Platform Name Abbreviated Name
Microsoft Windows (64Bit) on Intel Itanium Windows Itanium
HPUX Itanium and HPUX PARISC (64Bit) HP
Solaris Operating System (SPARC 64Bit) SPARC
Note:If the content is applicable to Microsoft Windows (32Bit), and Microsoft Windows (64Bit) on Intel Itanium platforms, then the abbreviated name used isWindows.
2.1 Oracle Application Server Releases Supported by This Patch Set
Oracle Application Server 10g Release 3 (10.1.3) Patch Set 5 (10.1.3.5.0) is not a complete software distribution. You must install this patch set over an existing installation.Specifically, this patch set can be applied only to the following Oracle Application Server releases listed in Table 1:
Table 1 Supported Oracle Application Server Releases for this Patch Set

4/18/2015 README for 8626084
https://updates.oracle.com/ARULink/PatchDetails/view_readme?aru=13669601 3/43
Platform Supported Oracle Application Server Releases
Linux x86WindowsAIXHPLinux Itanium
10g Release 3 (10.1.3.0.0)10g Release 3 (10.1.3.1.0), which included the Oracle SOA Suite10g Release 3 (10.1.3.2.0), which included the Oracle WebCenter Suite10g Release 3 Patch Set 3 (10.1.3.3.0)10g Release 3 (10.1.3.4.0)10g Release 3 (10.1.3.n) standalone installations10g Release 3 (10.1.3.n) that has been patched with 10g Release 3 (10.1.3) Patch Set 1 (10.1.3.1.0), 10g Release 3 (10.1.3) Patch Set 2(10.1.3.2.0), or Oracle Application Server 10g Release 3 (10.1.3) Patch Set 3 (10.1.3.3.0), or Oracle Application Server 10g Release 3(10.1.3) Patch Set 4 (10.1.3.4.0)
SPARC10g Release 3 (10.1.3.1.0), which included the Oracle SOA Suite10g Release 3 Patch Set 3 (10.1.3.3.0)10g Release 3 (10.1.3.4.0)10g Release 3 (10.1.3.n) standalone installationOracle Application Server 10g Release 3 (10.1.3) Patch Set 4 (10.1.3.4.0)
Linux on POWER 10g Release 3 (10.1.3.0.0)10g Release 3 (10.1.3.1.0), which included the Oracle SOA Suite10g Release 3 Patch Set 3 (10.1.3.3.0)10g Release 3 (10.1.3.4.0)10g Release 3 (10.1.3.n) standalone installation10g Release 3 (10.1.3.n) that has been patched with 10g Release 3 (10.1.3) Patch Set 1 (10.1.3.1.0), 10g Release 3 (10.1.3) Patch Set 2(10.1.3.2.0), or Oracle Application Server 10g Release 3 (10.1.3) Patch Set 3 (10.1.3.3.0), or Oracle Application Server 10g Release 3(10.1.3) Patch Set 4 (10.1.3.4.0)
Refer to the following sections for specific information about applying and using the patch set with supported Oracle Application Server release:
Section 2.1.1, "Notes When Applying the Patch Set to a 10g Release 3 (10.1.3.0.0) Oracle Home"
Section 2.1.2, "Notes When Applying the Patch Set to a 10g Release 3 (10.1.3.1.0) Oracle Home"
Section 2.1.3, "Notes When Applying the Patch Set to a 10g Release 3 (10.1.3.2.0) Oracle Home"
Section 2.1.4, "Using Oracle Web Cache with Oracle Application Server 10g Release 3 (10.1.3) Patch Set 4 (10.1.3.4.0)"
2.1.1 Notes When Applying the Patch Set to a 10g Release 3 (10.1.3.0.0) Oracle Home
Oracle Application Server 10g Release 3 (10.1.3.0.0) was a significant new release that provided a complete Java 2 Platform, Enterprise Edition (J2EE) 1.4compliant environment.
Oracle Application Server 10g Release 3 (10.1.3) Patch Set 5 (10.1.3.5.0) updates specific software and configuration files contained in your existing 10g Release 3 (10.1.3.0.0)Oracle home. The result is improvements to the reliability and performance of the software.
In addition, Oracle Application Server 10g Release 3 (10.1.3) Patch Set 5 (10.1.3.5.0) provides additional functionality to several key Oracle Application Server 10g Release 3(10.1.3.0.0) features. For example, the Xm[sx] flag specifies the initial size, in bytes, of the memory allocation pool for each OC4J instance. This value must be a multiple of1024, and greater than 1MB. Append the letter k or K to indicate kilobytes, or m or M to indicate megabytes. The default value is 2MB if nothing is specified. It is the same asspecifying –Xms2M. Note there is no space between –Xms, the number and the letter.
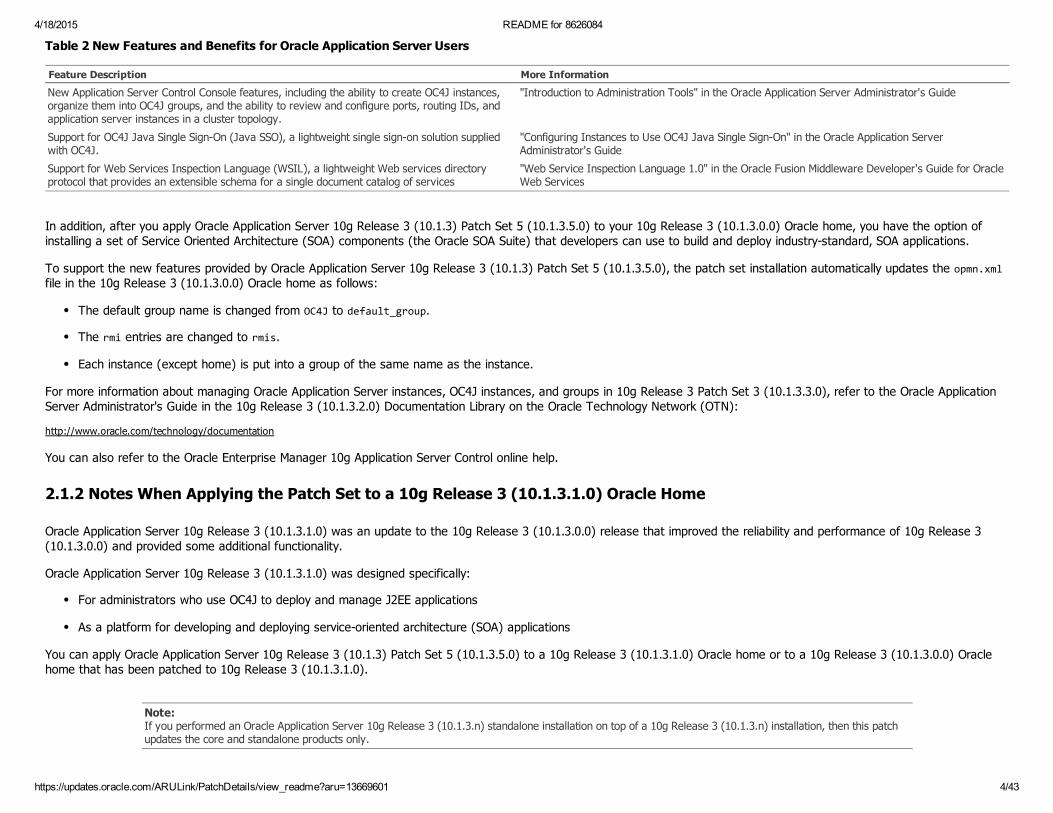
Table 2 provides a summary of the additional features available after you apply this patch set to a 10g Release 3 (10.1.3.0.0) Oracle home.
4/18/2015 README for 8626084
https://updates.oracle.com/ARULink/PatchDetails/view_readme?aru=13669601 4/43
Table 2 New Features and Benefits for Oracle Application Server Users
Feature Description More Information
New Application Server Control Console features, including the ability to create OC4J instances,organize them into OC4J groups, and the ability to review and configure ports, routing IDs, andapplication server instances in a cluster topology.
"Introduction to Administration Tools" in the Oracle Application Server Administrator's Guide
Support for OC4J Java Single SignOn (Java SSO), a lightweight single signon solution suppliedwith OC4J.
"Configuring Instances to Use OC4J Java Single SignOn" in the Oracle Application ServerAdministrator's Guide
Support for Web Services Inspection Language (WSIL), a lightweight Web services directoryprotocol that provides an extensible schema for a single document catalog of services
"Web Service Inspection Language 1.0" in the Oracle Fusion Middleware Developer's Guide for OracleWeb Services
In addition, after you apply Oracle Application Server 10g Release 3 (10.1.3) Patch Set 5 (10.1.3.5.0) to your 10g Release 3 (10.1.3.0.0) Oracle home, you have the option ofinstalling a set of Service Oriented Architecture (SOA) components (the Oracle SOA Suite) that developers can use to build and deploy industrystandard, SOA applications.
To support the new features provided by Oracle Application Server 10g Release 3 (10.1.3) Patch Set 5 (10.1.3.5.0), the patch set installation automatically updates the opmn.xmlfile in the 10g Release 3 (10.1.3.0.0) Oracle home as follows:
The default group name is changed from OC4J to default_group.
The rmi entries are changed to rmis.
Each instance (except home) is put into a group of the same name as the instance.
For more information about managing Oracle Application Server instances, OC4J instances, and groups in 10g Release 3 Patch Set 3 (10.1.3.3.0), refer to the Oracle ApplicationServer Administrator's Guide in the 10g Release 3 (10.1.3.2.0) Documentation Library on the Oracle Technology Network (OTN):
http://www.oracle.com/technology/documentation
You can also refer to the Oracle Enterprise Manager 10g Application Server Control online help.
2.1.2 Notes When Applying the Patch Set to a 10g Release 3 (10.1.3.1.0) Oracle Home
Oracle Application Server 10g Release 3 (10.1.3.1.0) was an update to the 10g Release 3 (10.1.3.0.0) release that improved the reliability and performance of 10g Release 3(10.1.3.0.0) and provided some additional functionality.
Oracle Application Server 10g Release 3 (10.1.3.1.0) was designed specifically:
For administrators who use OC4J to deploy and manage J2EE applications
As a platform for developing and deploying serviceoriented architecture (SOA) applications
You can apply Oracle Application Server 10g Release 3 (10.1.3) Patch Set 5 (10.1.3.5.0) to a 10g Release 3 (10.1.3.1.0) Oracle home or to a 10g Release 3 (10.1.3.0.0) Oraclehome that has been patched to 10g Release 3 (10.1.3.1.0).
Note:If you performed an Oracle Application Server 10g Release 3 (10.1.3.n) standalone installation on top of a 10g Release 3 (10.1.3.n) installation, then this patchupdates the core and standalone products only.

4/18/2015 README for 8626084
https://updates.oracle.com/ARULink/PatchDetails/view_readme?aru=13669601 5/43
2.1.3 Notes When Applying the Patch Set to a 10g Release 3 (10.1.3.2.0) Oracle Home
Oracle Application Server 10g Release 3 (10.1.3.2.0) provides the 10g Release 3 (10.1.3.1.0) core J2EE functionality (OC4J, its related technologies and Oracle HTTP Server), andalso provides support for the Oracle WebCenter Suite. Oracle WebCenter Suite includes Oracle WebCenter Services and Oracle Content DB.
If you installed Oracle Application Server 10g Release 3 (10.1.3.2.0) and the Oracle WebCenter Suite, then Oracle recommends that you apply Oracle Application Server 10gRelease 3 (10.1.3) Patch Set 5 (10.1.3.5.0) to update the core J2EE components.
Note:If you performed an Oracle Application Server 10g Release 3 (10.1.3.n) standalone installation on top of a 10g Release 3 (10.1.3.n) installation, then this patchupdates the core and standalone products only.
2.1.4 Using Oracle Web Cache with Oracle Application Server 10g Release 3 (10.1.3) Patch Set 4 (10.1.3.4.0)
Oracle Web Cache is not included in Oracle Application Server 10g Release 3 (10.1.3). However, Oracle Application Server 10g Release 2 is fully compatible with release 3(10.1.3) and this patch set.
Customers who require Oracle Web Cache in a release 10.1.3 environment should download Oracle Web Cache release 10.1.2, and apply the latest patch set for release 10.1.2.Oracle Web Cache must be installed in a separate Oracle home.
2.2 What Happens When You Apply the Patch Set
When you apply Oracle Application Server 10g Release 3 (10.1.3) Patch Set 5 (10.1.3.5.0), the application program updates specific software and configuration files contained inthe selected Oracle Application Server middletier Oracle home. The Oracle home is the full path of the Oracle directory that contains the Oracle Application Server installation.ORACLE_HOME will be used in this documentation to refer to the directory where the product is installed.
Note:ORACLE_HOME should be replaced with the full path name of the installed Oracle Application Server instance.
This patch set updates the J2EE software for all the installation types for each of the supported releases. The patch set application procedure automatically determines which setof software patches is appropriate for your installation.
For a list of products included in this patch set, see the Section 10, "Patch Set Components" section.
2.2.1 Changes to Oracle JDeveloper
The following is a change for Oracle JDeveloper:
In the MQOutboundHeader.wsdl file, there is no element named CodedCharSetId. This needs to be added manually for Oracle JDeveloper. If you want to assign theCodedCharSetId element to the outbound WSDL, then do the following:
1. After creating the Outbound service for MQAdapter, open the MQAdapterOutboundHeader.wsdl file and add the following to the MQOutboundHeader element:
4/18/2015 README for 8626084
https://updates.oracle.com/ARULink/PatchDetails/view_readme?aru=13669601 6/43
<element name="CodedCharSetId" type="string" minOccurs="0" />
2. Restart Oracle JDeveloper.
3. Create an Invoke activity, and in the Adapters tab, create an Outbound header variable.
4. Use the Outbound Header variable created in Step 3 to assign the CodedCharSetID element for Outbound.
3 Patch Set Documentation
The following documents and resources are related to this release of the Oracle Application Server patch set:
Oracle Application Server Patch Set Notes 10g Release 3 (10.1.3) Patch Set 5 (10.1.3.5.0) (this document). It provides the following information:
System requirements and instructions needed to apply or remove the patch set.
A list of known issues related to the Oracle Application Server 10g Release 3 (10.1.3) Patch Set 5 (10.1.3.5.0).
The document is contained in the file /SHIPHOME/Disk1/doc/readme.html in the patch set distribution.
Oracle Application Server Fixed Bugs List 10g Release 3 (10.1.3) Patch Set 5 (10.1.3.5.0). It provides a list of all generic (common to all operating platforms) bugs relatedto Oracle Application Server that have been fixed in this release, sorted by product group.
The document is contained in the file /SHIPHOME/Disk1/doc/bugsfixed.html in the patch set distribution.
To download free documentation, release notes, white papers, or other collateral pertaining to the Oracle Application Server 10g Release 3 (10.1.3.5.0) release, go toOracle Technology Network (OTN).
You must register online before downloading software. Registration is free and can be done at the following URL:
http://www.oracle.com/technology/membership
If you already have a user name and password for OTN, you can go directly to the software section of the OTN Web site at the following URL:
http://www.oracle.com/technology/documentation/index.html
In addition, the following My Oracle Support (formerly MetaLink) notes have information related to this patch set:
OracleMetaLink Note 845044.1 Oracle Application Server Patch Set Notes Addendum 10g Release 3 (10.1.3) Patch Set 5 (10.1.3.5.0)
OracleMetaLink Note 397022.1 Oracle Application Server 10g Release 3 (10.1.3) Support Status and Alerts
My Oracle Support is available at
https://support.oracle.com
4 Additional Documentation and Release Notes
In addition to information in the Oracle Application Server 10g Release 3 (10.1.3.5.0) library available on OTN, this section describes additional features and release notes. Itincludes the following sections:
Section 4.1, "Oracle MQ Series Adapter Supports Setting Context Information"

4/18/2015 README for 8626084
https://updates.oracle.com/ARULink/PatchDetails/view_readme?aru=13669601 7/43
Section 4.2, "Do Not Set the Environment Variables OC4J_USERNAME and OC4J_PASSWORD"
Section 4.3, "Instances of Undeployed Resequencerbased Services Remain in ProcessingState"
4.1 Oracle MQ Series Adapter Supports Setting Context Information
In the 10.1.3.5 release, Oracle MQ Series Adapter supports setting context information on outbound messages. The MQ message has an associated context, which can bepopulated with values passed through the adapter outbound header. The MQ message supports the following types of contexts:
Section 4.1.1, "Identity Context"
Section 4.1.2, "Origin Context"
4.1.1 Identity Context
The Identity context provides information about the identity of message. For the Identity context, you can specify the applicationIdData, accountingToken and UserIdentifierproperties.
4.1.2 Origin Context
The Origin context provides information about the origin or source of the message. For the Origin context, you can specify the applicationOriginData, putApplicationName,putApplicationType, and putDateTime properties.
Note that you can specify the Identity context only or both Identity and the Origin contexts.
You must assign the values for contextrelated headers such as ApplIdentityData, ApplOriginData, PutApplName, PutApplType, and UserIdentifier in the Properties tab in theInvoke activity in the BPEL process. After you have assigned the values, the .bpel file looks like the one shown in the following example:
<bpelx:inputProperty name="jca.mq.MQMD.ApplIdentityData" variable="setAppId"/> <bpelx:inputProperty name="jca.mq.MQMD.ApplOriginData" variable="setAppOrigin"/> <bpelx:inputProperty name="jca.mq.MQMD.PutApplName" variable="setAppName"/> <bpelx:inputProperty name="jca.mq.MQMD.PutApplType" variable="setAppDataType"/> <bpelx:inputProperty name="jca.mq.MQMD.UserIdentifier" variable="setUser"/>
In the preceding example, setAppId, setAppOrigin, setAppName, setAppDataType, and setUser are userdefined variables, which contain the values for contextrelated headers.
4.2 Do Not Set the Environment Variables OC4J_USERNAME and OC4J_PASSWORD
Security is now enabled for all xref scripts:
xrefimport
xreftool
4/18/2015 README for 8626084
https://updates.oracle.com/ARULink/PatchDetails/view_readme?aru=13669601 8/43
xrefexport
These scripts now prompt you to enter the OC4J_USERNAME and OC4J_PASSWORD values on the command line. Therefore, do not set these variables in your environment. Thischange applies to both the Linux and Windows operating system versions of these scripts.
4.3 Instances of Undeployed Resequencerbased Services Remain in ProcessingState
If a resequencerbased service is undeployed, existing instances do not become stale. Instead, they remain in the status of being processed.
This is the expected behavior. The resequencer uses a storeandforward mechanism for processing messages. After undeployment, messages persisted in the resequencer storeawait processing.
5 Patch Set Requirements
Refer to your installation guide and release notes for the base requirements for your system.
Refer to the following sections for detailed patch set requirements:
Section 5.1, "Required Software"
Section 5.2, "Preinstallation Requirements"
Note:If your system does not meet one of the minimum requirements listed in this section, then log a service request to request assistance with this patch set.
5.1 Required Software
The following is a list of the required system software that must be installed before installing this patch set:
Oracle Application Server 10g Release 3 (10.1.3.0.0), Oracle Application Server 10g Release 3 (10.1.3.1.0), 10g Release 3 (10.1.3.2.0), 10g Release 3 Patch Set 3(10.1.3.3.0), or 10g Release 3 (10.1.3.4.0).
You can verify the release number by checking the release number in the following properties file:
For UNIX:
ORACLE_HOME/config/ias.properties
For Windows:
ORACLE_HOME\config\ias.properties
One of the following supported operating platforms:
Linux x86
Microsoft Windows (32Bit)

4/18/2015 README for 8626084
https://updates.oracle.com/ARULink/PatchDetails/view_readme?aru=13669601 9/43
Microsoft Windows (64Bit) on Intel Itanium
AIX Based Systems (64Bit)
Linux on POWER
Linux Itanium
HPUX Itanium
HPUX PARISC (64Bit)
Solaris Operating System (SPARC 64Bit)
5.2 Preinstallation Requirements
The following list is the preinstallation requirements for this patch set:
Ensure the system configuration meets the recommended system configuration described in your documentation.
Ensure the environment variables for the tmp and temp directories for Microsoft Windows are set as described in the Oracle Application Server Administrator's Guide.
Back up your Oracle software and inventory before applying this patch set, or before making any other changes to your existing Oracle software. Refer to youradministrator's guide for instructions on backing up your Oracle software and inventory.
Depending on your environment, you may need to perform the following procedures before applying the patch:
Section 5.2.1, "Run Upgrade Scripts on Oracle Application Server 10g Release 3 (10.1.3.1.0)"
Section 5.2.2, "Run Upgrade Scripts on Oracle Application Server 10g Release 3 Patch Set 3 (10.1.3.3.0), 10g Release (10.1.3.3.1) or MLRpatched Instance"
5.2.1 Run Upgrade Scripts on Oracle Application Server 10g Release 3 (10.1.3.1.0)
Before applying 10g Release 3 (10.1.3) Patch Set 5 (10.1.3.5.0) to the Oracle Application Server 10g Release 3 (10.1.3.1.0) instance, complete the following procedure:
1. Connect to the Oracle database as the orabpel user.
2. Run the following script based on your database and operating system for your BPEL environment:
For UNIX: upgrade_10131_10135_oracle.sql
The preceding script is located in the SHIPHOME/Disk1/install/soa_schema_upgrade/bpel/scripts directory.
For Windows with Oracle Database: upgrade_10131_10135_oracle.sql
The preceding script is located in the preceding script is located in the SHIPHOME\Disk1\install\soa_schema_upgrade\bpel\scripts directory.
3. Connect to the Oracle database as the oraesb user.
4. Run the following script based on your database and operating system for your ESB environment.
4/18/2015 README for 8626084
https://updates.oracle.com/ARULink/PatchDetails/view_readme?aru=13669601 10/43
For UNIX: upgrade_10131_10135_oracle.sql
The preceding script is located in the SHIPHOME/Disk1/install/soa_schema_upgrade/esb/sql/other directory.
For Windows with Oracle Database: upgrade_10131_10135_oracle.sql
The preceding script is located in the SHIPHOME\Disk1\install\soa_schema_upgrade\esb\sql\other directory.
5. Restart the instances.
5.2.2 Run Upgrade Scripts on Oracle Application Server 10g Release 3 Patch Set 3 (10.1.3.3.0), 10g Release (10.1.3.3.1) orMLRpatched Instance
Before applying 10g Release 3 (10.1.3) Patch Set 5 (10.1.3.5.0) to an Oracle Application Server 10g Release 3 Patch Set 3 (10.1.3.3.0), 10g Release 3 (10.1.3.3.1), or an MLRpatched instance, complete the following procedure:
1. Connect to the Oracle database as the orabpel user.
2. Run the following script based on your database and operating system for your BPEL environment:
For UNIX: upgrade_10133_10135_oracle.sql
The preceding script is located in the SHIPHOME/Disk1/install/soa_schema_upgrade/bpel/scripts directory.
For Windows with Oracle Database: upgrade_10133_10135_oracle.sql
The preceding script is located in the SHIPHOME\Disk1\install\soa_schema_upgrade\bpel\scripts directory.
3. Run the following script based on your database and operating system for your ESB environment. You will be prompted to log in as the oraesb user, with the oraesbpassword.
For UNIX: upgrade_10133_10135_oracle.sql
The preceding script is located in the SHIPHOME/Disk1/install/soa_schema_upgrade/esb/sql/other directory.
For Windows with Oracle Database: upgrade_10133_10135_oracle.sql
The preceding script is located in the SHIPHOME\Disk1\install\soa_schema_upgrade\esb\sql\other directory.
4. Restart the instances.
6 Patch Set Application
This section contains the following topics:
Section 6.1, "Applying Oracle Application Server 10g Release 3 (10.1.3) Patch Set 5 (10.1.3.5.0)"
Section 6.2, "Silent and NonInteractive Patch Application"
Section 6.3, "Applying the Patch Set in a Clustered Environment"
4/18/2015 README for 8626084
https://updates.oracle.com/ARULink/PatchDetails/view_readme?aru=13669601 11/43
Section 6.4, "Applying the Patch Set to a 10g Release 3 (10.1.3.1.0) Enterprise Deployment Topology"
6.1 Applying Oracle Application Server 10g Release 3 (10.1.3) Patch Set 5 (10.1.3.5.0)
This section describes the application procedure for Oracle Application Server 10g Release 3 (10.1.3) Patch Set 5 (10.1.3.5.0). It includes the following steps:
Section 6.1.1, "Back up Your Existing Environment"
Section 6.1.2, "Apply Oracle Application Server 10g Release 3 (10.1.3) Patch Set 5 (10.1.3.5.0)"
6.1.1 Back up Your Existing Environment
There is no automatic procedure for removing 10g Release 3 (10.1.3) Patch Set 5 (10.1.3.5.0). Oracle strongly recommends that you make a backup of your existing environmentbefore you install Oracle Application Server 10g Release 3 (10.1.3) Patch Set 5 (10.1.3.5.0). If you choose to remove Oracle Application Server 10g Release 3 (10.1.3) Patch Set 5(10.1.3.5.0), or if you encounter a problem with application of the patch, then you can restore your original environment.
You must make a back up of the database schema that is being used so that the database can be reverted back to the original state.
See Also:"Introduction to Backup and Recovery" in the Oracle Application Server Administrator's Guide for complete information about Oracle Application Server Backupand Recovery.
6.1.2 Apply Oracle Application Server 10g Release 3 (10.1.3) Patch Set 5 (10.1.3.5.0)
The following procedure describes how to apply the patch set:
1. If you are applying 10g Release 3 (10.1.3) Patch Set 5 (10.1.3.5.0) to a 10g Release 3 (10.1.3.0.0) Oracle home and your system uses Enterprise Javabeans 3.0applications, then you must undeploy your applications before applying the patch.
This step is not necessary if you are applying the patch set to a 10g Release 3 (10.1.3.1.0) or 10g Release 3 (10.1.3.2.0) Oracle home.
The following procedure describes how to undeploy the applications:
a. Log in to the Application Server Control Console as the same user name as the one used for the original installation. If the application is deployed to a specific OC4Jinstance, then navigate to the OC4J Home page for the OC4J instance. If the application is deployed to a group, then navigate to the Group page.
See Also:'Introduction to Administration Tools" in the Oracle Application Server Administrator's Guide for more information about Application Server Control
b. Click Applications to display a list of the applications.
c. Select the EJB 3.0 applications.
d. Click Undeploy.
4/18/2015 README for 8626084
https://updates.oracle.com/ARULink/PatchDetails/view_readme?aru=13669601 12/43
2. If you use JDK release 1.4.2 with an OC4J instance, then you will need to perform the following steps to replace JDK release 1.4.2 before applying the patch set. Afterapplying the patch, you will replace release 1.5 with release 1.4.2.
a. Stop Oracle Process Manager and Notification Server and all managed processes.
b. Back up the ORACLE_HOME/opmn/conf/opmn.xml file.
c. Remove Java system properties in the <data> element with the id=java‐bin. The <data> element is in the <category id="startparameters"> element in theopmn.xml file.
For example, if the opmn.xml has the following lines:
<ias‐component id="default_group"> <process‐type id="test_oc4j_instance" \ module‐id="OC4J" status="enabled"> <module‐data> <category id="start‐paramters"> <data id="java‐bin" value="/myhost/jdk1.4.2/bin/java" /> <data id="java‐options" value="‐server \ ‐XX:MaxPermSize=512M ‐ms512M ‐mx1024M"/> </category> </module‐data> </process‐type></ias‐compoent>
You should edit the file to look like the following:
<ias‐component id="default_group"> <process‐type id="test_oc4j_instance" \ module‐id="OC4J" status="enabled"> <module‐data> <category id="start‐paramters"> <data id="java‐options" value="‐server" \ ‐XX:MaxPermSize=512M ‐ms512M ‐mx1024M"/> </category> </module‐data> </process‐type></ias‐compoent>
d. Restart Oracle Process Manager and Notification Server and all managed processes.
3. If you are applying Oracle Application Server 10g Release 3 (10.1.3) Patch Set 5 (10.1.3.5.0) to a 10g Release 3 (10.1.3.0.0) Oracle home and your environment usesOracleAS Cold Failover Cluster topology, then you will need to perform the following steps:
a. Open the opmn.xml file and search for the following line in the notificationserver section:
<ipaddr remote="virtual_hostname" request="virtual_hostname"/>
If this entry does not appear, then add it to the opmn.xml file. In the preceding example, virtual_hostname is the actual virtual hostname. It should be the same asthe VIRTUAL_HOSTNAME variable.
b. Restart Oracle Process Manager and Notification Server (OPMN).
4. If you have edited the dsa.conf file, then make a copy of it. The file will be overwritten during patch application.
5. If you use adapters, then make copies of the oc4j‐ra.xml files. The files will be overwritten during patch application.

4/18/2015 README for 8626084
https://updates.oracle.com/ARULink/PatchDetails/view_readme?aru=13669601 13/43
6. Ensure the following values are set in the ORACLE_HOME/owsm/bin/install.properties file:
install.http.host=hostnameinstall.http.port=7777
7. Ensure the OC4J instances are running. You can check the status using the following command:
For UNIX:
ORACLE_HOME/opmn/bin/opmnctl status
For Windows:
ORACLE_HOME\opmn\bin\opmnctl status
8. Insert Disk1 of the Oracle Application Server 10g Release 3 (10.1.3) Patch Set 5 (10.1.3.5.0) media, or navigate to the Disk1 subdirectory in the directory that contains theunpacked patch set software.
9. Start Oracle Universal Installer:
For UNIX:
Run the runInstaller command.
For Windows:
Doubleclick setup.exe.
Table 3 describes the steps and screens you will encounter during the application of the patch set.
Note:The online help available during the installation procedure provides information for both a full installation of Oracle Application Server 10g Release 3(10.1.3.1.0), as well as the patch set installation. As a result, it is not specific to the patch set installation procedure. Refer to Table 3 for specific informationon using the Oracle Universal Installer screens to install 10g Release 3 (10.1.3) Patch Set 5 (10.1.3.5.0).
Table 3 Screens Displayed while Applying Oracle Application Server Patch
Screen Action
Welcome Review the Oracle Universal Installer Welcome screen and click Next.
The Welcome screen provides information about Oracle Universal Installer.
The following buttons appear on the installation screens:
Deinstall Products: Deinstall individual components or the entire product. This button appears only on the Welcome screen.About Oracle Universal Installer: View the release number of the installer.Help: Access detailed information about the functionality of each screen.Installed Products: View currently installed products or deinstall the entire product or components.Back: Return to the previous screen. This button is disabled on the Welcome screen.Next: Proceed to the next screen.Install: Install the selected product. This button is disabled on the Welcome screen.Cancel: Quit the installation process and exit the installer.
4/18/2015 README for 8626084
https://updates.oracle.com/ARULink/PatchDetails/view_readme?aru=13669601 14/43
Specify File Locations The Specify File Locations screen allows you to verify the full path for the source and select a destination location for Oracle Application Server10g Release 3 (10.1.3) Patch Set 5 (10.1.3.5.0):
Source: This is the full path to the products.xml file from which the product will be installed. If you started the installer by using therunInstaller command or the setup.exe file, then the installer detects and uses the default values of the products.xml file. Do notchange the path.Name: Select the name of the Oracle home you want to patch.
Oracle homes are identified by name. When you select a name from the dropdown menu, the Path field is updated automatically toshow the location of the selected Oracle home.
Path: This field is filled in automatically when you select an existing Oracle home from the Name dropdown menu.Browse: Use this button to navigate the file system and select the source or destination locations.
Click Next after specifying the file location.
Administrator (oc4jadmin) Password Enter the oc4jadmin user password for the Oracle Application Server instance that is being patched.
Click Next.
Prompt This screen informs you that the middle tier will be shutdown.
Click OK.
Summary Verify your selections and click Install.
Install Progress This screen shows the progress of the patch set installation.
Configuration Assistants This screen shows the progress of the configuration assistants. Configuration assistants configure components automatically at the end of theinstallation.
The locations for specific Oracle Application Server configuration assistant log files are described in the Oracle Fusion Middleware InstallationConcepts and Repository Creation Utility User's Guide.
End of Installation Click Exit to quit the installer.
Note:When applying the patch set BPEL, ESB and OWSM environments, ensure that the configuration assistants complete successfully during patch setapplication. If a configuration assistant fails, then retry the configuration assistant. If that is not successful, then check that OPMN is up and all requiredapplications are running. Once OPMN is up, retry the configuration assistant.
If you choose to cancel the patch application, the contact Oracle Support to learn how to run the configuration assistants outside of the patch application.
10. Replace the current dsa.conf file with the copy made in step 4.
11. Replace the oc4j‐ra.xml files with the copies made in step 5.
6.2 Silent and NonInteractive Patch Application
This section describes how to apply Oracle Application Server 10g Release 3 (10.1.3) Patch Set 5 (10.1.3.5.0) either by silent or noninteractive methods:
Use silent patch application when you want to do similar applications to more than one computer. You can also use silent patch application to apply the patch from aremote location using the command line.
Use noninteractive patch application when you want to see specific screens, or when you want to enter some information interactively.

4/18/2015 README for 8626084
https://updates.oracle.com/ARULink/PatchDetails/view_readme?aru=13669601 15/43
To do a silent or noninteractive patch application, you supply the installer with a text file called a response file. The installer uses the variables and parameter values in theresponse file to provide responses to some or all of the installer prompts.
This section includes the following topics:
Section 6.2.1, "Silent Installation"
Section 6.2.2, "Noninteractive Installation"
Section 6.2.3, "Response Files"
Section 6.2.4, "Performing Silent or Noninteractive Patch Application"
6.2.1 Silent Installation
With silent installation, you do not need to monitor the installation because you do not enter information, and you do not have a graphical user interface to watch.
To do a silent installation, supply the installer with a response file and specify the ‐silent flag on the command line.
6.2.2 Noninteractive Installation
With noninteractive installation, the installer displays a graphical user interface as in a normal installation. If your response file does not have an entry for a particular installerprompt, then you must provide the response during the installation.
6.2.3 Response Files
You must create a response file before you apply the patch set. You can edit the response files with any text editor. Start by copying the response file templateoracle.as.j2ee.patchset.Custom.rsp provided in the following directory of your Oracle Application Server 10g Release 3 (10.1.3) Patch Set 5 (10.1.3.5.0):
For UNIX: Disk1/stage/Response
For Windows: Disk1\stage\Response
In the template, parameters have three types of values:
Constants
Optional Values
Required Values
The following sections describe the parameters.
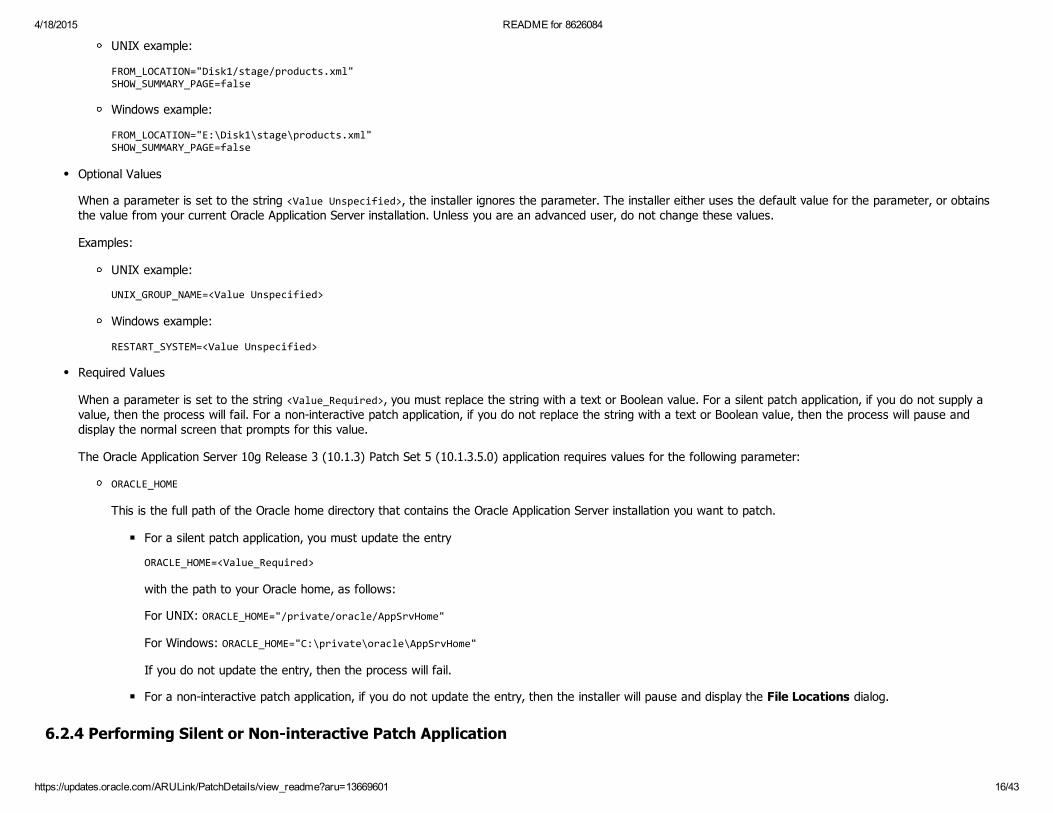
Constants
These are text or Boolean values that are preset to give you a successful patch set application. Unless you are an advanced user, do not change these values.
Examples:
4/18/2015 README for 8626084
https://updates.oracle.com/ARULink/PatchDetails/view_readme?aru=13669601 16/43
UNIX example:
FROM_LOCATION="Disk1/stage/products.xml"SHOW_SUMMARY_PAGE=false
Windows example:
FROM_LOCATION="E:\Disk1\stage\products.xml"SHOW_SUMMARY_PAGE=false
Optional Values
When a parameter is set to the string <Value Unspecified>, the installer ignores the parameter. The installer either uses the default value for the parameter, or obtainsthe value from your current Oracle Application Server installation. Unless you are an advanced user, do not change these values.
Examples:
UNIX example:
UNIX_GROUP_NAME=<Value Unspecified>
Windows example:
RESTART_SYSTEM=<Value Unspecified>
Required Values
When a parameter is set to the string <Value_Required>, you must replace the string with a text or Boolean value. For a silent patch application, if you do not supply avalue, then the process will fail. For a noninteractive patch application, if you do not replace the string with a text or Boolean value, then the process will pause anddisplay the normal screen that prompts for this value.
The Oracle Application Server 10g Release 3 (10.1.3) Patch Set 5 (10.1.3.5.0) application requires values for the following parameter:
ORACLE_HOME
This is the full path of the Oracle home directory that contains the Oracle Application Server installation you want to patch.
For a silent patch application, you must update the entry
ORACLE_HOME=<Value_Required>
with the path to your Oracle home, as follows:
For UNIX: ORACLE_HOME="/private/oracle/AppSrvHome"
For Windows: ORACLE_HOME="C:\private\oracle\AppSrvHome"
If you do not update the entry, then the process will fail.
For a noninteractive patch application, if you do not update the entry, then the installer will pause and display the File Locations dialog.
6.2.4 Performing Silent or Noninteractive Patch Application

4/18/2015 README for 8626084
https://updates.oracle.com/ARULink/PatchDetails/view_readme?aru=13669601 17/43
The following procedure describes how to perform silent or noninteractive patch application:
Note:If any files are in use during a silent patch application, such as a user has an open file, then the process may terminate. If that happens, then the open file mustbe determined and its corresponding process shut down. The patch application can be restarted after shutting down the process.
1. Copy the response file template from the product installation media to your computer.
2. Make the necessary changes to the copy of the file, and save it.
3. If you have edited the dsa.conf file, then make a copy of it. The file will be overwritten during patch application.
4. If you use adapters, then make copies of the oc4j‐ra.xml files. The files will be overwritten during patch application.
5. Start the patch application. Specify the response file path and filename as the value of the installer's responseFile parameter. For a silent installation, also specify thesilent parameter. In the following Microsoft Windows examples, E is the installation media drive.
Examples:
Silent patch application:
For UNIX:
> ./runInstaller ‐silent ‐responseFile absolute_path_and_filename
For Windows:
E:\> setup.exe ‐silent ‐responseFile absolute_path_and_filename
Noninteractive patch application
For UNIX:
> ./runInstaller ‐responseFile absolute_path_and_filename
For Windows:
E:\> setup.exe ‐responseFile absolute_path_and_filename
Note:To perform a silent patch application for Oracle BAM 10.1.3.5.0, run the following command from the E:\Disk1\BAM directory, where E is theinstallation media drive:
E:\Disk1\BAM> setup_bam.bat <BAM Install Location> ‐silent
For example if you have installed Oracle BAM in C:\OracleBAM, then use the following command to execute the patch in silent mode:
E:\Disk1\BAM> setup_bam.bat C:\OracleBAM ‐silent
6. Check the log files in your inventory directory for any errors. The log files are located in the following directory:

4/18/2015 README for 8626084
https://updates.oracle.com/ARULink/PatchDetails/view_readme?aru=13669601 18/43
For UNIX:
/oracle_inventory_path/logs/installActiontodays_date_time.log/oracle_inventory_path/logs/silentinstalltimestamp.log
The value of oracle_inventory_path is stored in the following file:
/oraInst.loc
For Windows:
C:\oracle_inventory_path\logs\installActiontodays_date_time.logC:\oracle_inventory_path\logs\installAction\silentinstalltimestamp.log
The value of oracle_inventory_path is the following directory:
C:\Program Files\Oracle\Inventory
In the preceding examples, the C:\ drive is assumed to be the location of the file. To determine the location of the file, check theHKEY_LOCAL_MACHINE\SOFTWARE\Oracle\inst_loc registry entry.
The log file name has the format installActionstodays_date_time.log.
7. Replace the current dsa.conf file with the copy made in step 6.
8. Replace the oc4j‐ra.xml files with the copies made in step 4.
6.3 Applying the Patch Set in a Clustered Environment
If you are managing Oracle Application Server 10g Release 3 (10.1.3.0.0), 10g Release 3 (10.1.3.1.0), 10g Release 3 (10.1.3.2.0), 10g Release 3 (10.1.3.3.0), or 10g Release 3(10.1.3.4.0) cluster topology, then you can apply Oracle Application Server 10g Release 3 (10.1.3) Patch Set 5 (10.1.3.5.0) to each application server instance in the cluster, asfollows:
See Also:Refer to Oracle Application Server Enterprise Deployment Guide for more information about configuring ESB runtime instances.
1. Review the information in Section 2, "About This Patch Set" that applies specifically to the release you are updating.
For example, if you are applying the patch set to a 10g Release 3 (10.1.3.0.0) environment, then be sure to carefully review the information in Section 2.1.1, "Notes WhenApplying the Patch Set to a 10g Release 3 (10.1.3.0.0) Oracle Home".
2. Use the instructions in Section 6.1, "Applying Oracle Application Server 10g Release 3 (10.1.3) Patch Set 5 (10.1.3.5.0)" to apply the patch set to one application server instance in thecluster.
3. After the patch is applied, verify that the newlypatched instance is up and running.
For example, navigate to the Application Server Control Console and verify that the newlypatched instance is listed as a member of the cluster. Verify that the instance isup, and then drill down to the application server home page or the OC4J Home page for that instance.
4. Perform any tasks described in Section 7, "Postapplication Tasks" that apply to your environment.
4/18/2015 README for 8626084
https://updates.oracle.com/ARULink/PatchDetails/view_readme?aru=13669601 19/43
5. Repeat steps 2 through 4 for the remaining application server instances in the cluster.
Note:If you are patching a 10g Release 3 (10.1.3.0.0) cluster, refer to the Oracle Fusion Middleware Upgrade Guide for Enterprise Deploymentsin the 10g Release 3(10.1.3.1.0) documentation library for more information.
6.4 Applying the Patch Set to a 10g Release 3 (10.1.3.1.0) Enterprise Deployment Topology
This section describes how to apply 10g Release 3 (10.1.3) Patch Set 5 (10.1.3.5.0) to a 10g Release 3 (10.1.3.1.0) Enterprise Deployment topology with minimum downtime.During patch application, the installer will patch all containers in an Oracle home.
6.4.1 Before You Apply this Patch Set
Before you apply the patch set, review the information in Oracle Application Server Enterprise Deployment Guide.
The following assumptions are used for the patch application procedure:
It is assumed that you are applying the patch to the 10g Release 3 (10.1.3.1.0) mySOACompany topology as described in Oracle Application Server Enterprise Deployment Guide.
The 10g Release 3 (10.1.3.1.0) mySOACompany topology contains only Oracle homes that were created by using the standalone BPEL, ESB, and OWSM installers. If youcreated any Oracle homes by running the consolidated Oracle SOA Suite installer and disabling the unused components, you may still follow the procedure. However, youshould make sure that you perform all of the application tier steps that apply to the enabled components before applying the patch. Refer to Chapter 3, "Installing andConfiguring the mySOACompany Web and Application Tiers" in Oracle Application Server Enterprise Deployment Guide for more information.
Perform a complete backup of all Oracle homes and all oraInventory information in your topology. Refer to the Oracle Application Server Administrator's Guide for moreinformation.
6.4.2 Applying the Patch Set
The following procedure describes how to apply 10g Release 3 (10.1.3) Patch Set 5 (10.1.3.5.0) to your 10g Release 3 (10.1.3.1.0) mySOACompany Enterprise DeploymentTopology:
1. Run the following upgrade script based on your database and operating system for your BPEL environment. You will be prompted to log in as the ORABPEL user.
For UNIX: upgrade_10131_10135_oracle.sql
The preceding script is located in the SHIPHOME/Disk1/install/soa_schema_upgrade/bpel/scripts directory.
For Windows with Oracle Database: upgrade_10131_10135_oracle.sql
The preceding script is located in the SHIPHOME\Disk1\install\soa_schema_upgrade\bpel\scripts directory.
Note:Do not restart the instances until you have applied 10g Release 3 (10.1.3) Patch Set 5 (10.1.3.5.0).
4/18/2015 README for 8626084
https://updates.oracle.com/ARULink/PatchDetails/view_readme?aru=13669601 20/43
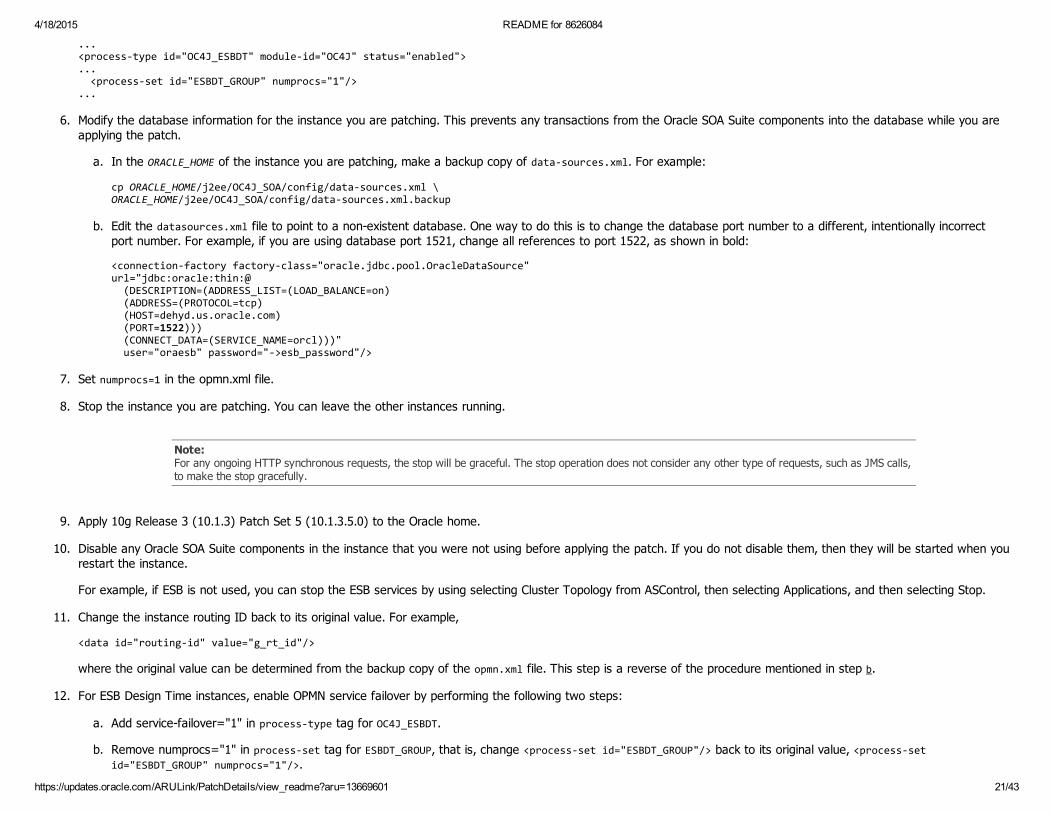
2. Run the following upgrade script based on your database and operating system for your ESB environment. You will be prompted to log in as the ORAESB user.
For UNIX: upgrade_10131_10135_oracle.sql
The preceding script is located in the SHIPHOME/disk1/install/soa_schema_upgrade/esb/sql/other directory.
For Windows with Oracle Database: upgrade_10131_10135_oracle.sql
The preceding script is located in the SHIPHOME\disk1\install\soa_schema_upgrade\esb\sql\other directory.
Note:Do not restart the instances until you have applied 10g Release 3 (10.1.3) Patch Set 5 (10.1.3.5.0).
3. Choose one middletier instance to patch first. It can be a BPEL, ESB Runtime (ESBR), or ESB Design Time (ESBD) instance.
4. Modify the routing ID of the instance you are patching, by performing the following steps. This prevents any new HTTP requests from being accepted and avoids anyundesired execution of processes by the instance.
a. Make a backup copy of the opmn.xml file. The value of ORACLE_HOME corresponds to ORA‐HOME1, ORA‐HOME2, or ORA‐HOME3, as referenced in Oracle Application ServerEnterprise Deployment Guide, depending on the instance you are patching. For example:
cp ORACLE_HOME/opmn/conf/opmn.xml ORACLE_HOME/opmn/conf/opmn.xml.backup
b. Edit the opmn.xml file and modify the routing ID for the instance you are patching. For example, if you are patching the OC4J_SOA instance, add a line specifying therouting ID as shown in bold. Note that you may be running BPEL, ESB, or OWSM in this instance.
<ias‐component id="default_group"> <process‐type id="OC4J_SOA" module‐id="OC4J" status="enabled"> <module‐data> <category id="start‐parameters"> <data id="routing‐id" value="Y"/>
Note:Oracle recommends you use the routing ID to prevent routing to OC4J instead of modifying the hardware LBR. If you change your LBR configuration,then you are only preventing routing to Oracle HTTP Server. However, the other Oracle HTTP Server instances in the configuration can crossrouterequests to the OC4J to which you are applying the patch. Note that this method prevents the execution of any new HTTP requests. Otherinvocations, such as JMS, will continue to be served until the container is stopped.
5. For ESB Design Time (ESBD) instances only:
Edit the opmn.xml file and remove the service failover configuration. This reverts the instance to the nonactivepassive configuration for ESBD. For example, if your filecontains the following entry:
...<process‐type id="OC4J_ESBDT" module‐id="OC4J" service‐failover="1" status="enabled">"... <process‐set id="ESBDT_GROUP"/>...
Modify it as follows:
4/18/2015 README for 8626084
https://updates.oracle.com/ARULink/PatchDetails/view_readme?aru=13669601 21/43
...<process‐type id="OC4J_ESBDT" module‐id="OC4J" status="enabled">... <process‐set id="ESBDT_GROUP" numprocs="1"/>...
6. Modify the database information for the instance you are patching. This prevents any transactions from the Oracle SOA Suite components into the database while you areapplying the patch.
a. In the ORACLE_HOME of the instance you are patching, make a backup copy of data‐sources.xml. For example:
cp ORACLE_HOME/j2ee/OC4J_SOA/config/data‐sources.xml \ORACLE_HOME/j2ee/OC4J_SOA/config/data‐sources.xml.backup
b. Edit the datasources.xml file to point to a nonexistent database. One way to do this is to change the database port number to a different, intentionally incorrectport number. For example, if you are using database port 1521, change all references to port 1522, as shown in bold:
<connection‐factory factory‐class="oracle.jdbc.pool.OracleDataSource"url="jdbc:oracle:thin:@ (DESCRIPTION=(ADDRESS_LIST=(LOAD_BALANCE=on) (ADDRESS=(PROTOCOL=tcp) (HOST=dehyd.us.oracle.com) (PORT=1522))) (CONNECT_DATA=(SERVICE_NAME=orcl)))" user="oraesb" password="‐>esb_password"/>
7. Set numprocs=1 in the opmn.xml file.
8. Stop the instance you are patching. You can leave the other instances running.
Note:For any ongoing HTTP synchronous requests, the stop will be graceful. The stop operation does not consider any other type of requests, such as JMS calls,to make the stop gracefully.
9. Apply 10g Release 3 (10.1.3) Patch Set 5 (10.1.3.5.0) to the Oracle home.
10. Disable any Oracle SOA Suite components in the instance that you were not using before applying the patch. If you do not disable them, then they will be started when yourestart the instance.
For example, if ESB is not used, you can stop the ESB services by using selecting Cluster Topology from ASControl, then selecting Applications, and then selecting Stop.
11. Change the instance routing ID back to its original value. For example,
<data id="routing‐id" value="g_rt_id"/>
where the original value can be determined from the backup copy of the opmn.xml file. This step is a reverse of the procedure mentioned in step b.
12. For ESB Design Time instances, enable OPMN service failover by performing the following two steps:
a. Add servicefailover="1" in process‐type tag for OC4J_ESBDT.
b. Remove numprocs="1" in process‐set tag for ESBDT_GROUP, that is, change <process‐set id="ESBDT_GROUP"/> back to its original value, <process‐setid="ESBDT_GROUP" numprocs="1"/>.
4/18/2015 README for 8626084
https://updates.oracle.com/ARULink/PatchDetails/view_readme?aru=13669601 22/43
13. Set the value of numproc back to its original value in the opmn.xml file.
14. Change the instance data source configuration back to its original state by restoring the backup copy of data‐sources.xml you created in step 6.
cp ORACLE_HOME/j2ee/OC4J_SOA/config/data‐sources.xml.backup ORACLE_HOME/j2ee/OC4J_SOA/config/data‐sources.xml
15. Restart the instance.
16. Repeat steps 3 15 for the other BPEL, ESB Runtime (ESBR), and ESB Design Time (ESBD) instances, patching one ORACLE_HOME at a time.
7 Postapplication Tasks
This section describes postapplication tasks for Oracle Application Server 10g Release 3 (10.1.3) Patch Set 5 (10.1.3.5.0). It contains the following topics:
Section 7.1, "Perform a Complete Backup"
Section 7.2, "Enable PHP"
Section 7.3, "Restore JDK to Release 1.4.2"
Section 7.4, "Change JDBC factoryClass in BPEL Connection Pool"
Section 7.5, "Redeploy Applications that Use Custom Security Settings"
Section 7.6, "Enable Java Single SignOn"
Section 7.7, "Deploy Your Enterprise Javabeans 3.0 Applications"
Section 7.8, "Deploy the WSIL Application Manually"
Section 7.9, "Update Oracle Enterprise Service Bus Services"
Section 7.10, "Run the ADF Installer for WebCenter Applications"
Section 7.11, "Migrate and Redeploy Oracle ADF Applications"
Section 7.12, "Postapplication Tasks For Oracle WebCenter Applications"
Section 7.13, "Disable HTTP TRACE Support"
7.1 Perform a Complete Backup
It is necessary to perform a complete backup of your Oracle Application Server environment after installing the patch set. This will ensure you can restore the newlypatchedenvironment.
In addition, if you are patching a 10g Release 3 (10.1.3.0.0) environment, then note that earlier backups will not work with the 10g Release 3 (10.1.3.2.0) Oracle ApplicationServer Backup and Recovery Tool.
See Also:"Introduction to Backup and Recovery" in the Oracle Application Server Administrator's Guide for complete information about Oracle Application Server Backupand Recovery.
4/18/2015 README for 8626084
https://updates.oracle.com/ARULink/PatchDetails/view_readme?aru=13669601 23/43
7.2 Enable PHP
After applying Oracle Application Server 10g Release 3 (10.1.3) Patch Set 5 (10.1.3.5.0), you should enable PHP. The following procedure describes how to enable PHP:
1. Make the following modifications to the Oracle HTTP Server httpd.conf configuration file:
a. Locate and open the Oracle HTTP Server configuration file:
For UNIX:
ORACLE_HOME/Apache/Apache/conf/httpd.conf
For Windows:
ORACLE_HOME\Apache\Apache\conf\httpd.conf
b. Use the comment character (#) to comment the following PHP 4.0 directive:
For UNIX:
#LoadModule php4_module libexec/libphp4.so#AddModule mod_php4.c
For Windows:
#LoadModule php4_module modules/php4apache.dll#AddModule mod_php4.c
c. Add the following PHP 5.0 LoadModule directive:
For UNIX:
LoadModule php5_module libexec/libphp5.soAddModule mod_php5.c
For Windows:
LoadModule php5_module modules/php5apache.dllAddModule mod_php5.c
d. Add the following AddType directives:
AddType application/x‐httpd‐php .php .php5 AddType application/x‐httpd‐php‐source .phps
e. Save and close the httpd.conf file.
2. Set the PHPRC environment variable to point to the php5.ini file:
For UNIX:
setenv PHPRC ORACLE_HOME/Apache/Apache/conf/php5.ini

4/18/2015 README for 8626084
https://updates.oracle.com/ARULink/PatchDetails/view_readme?aru=13669601 24/43
For Windows:
set PHPRC = ORACLE_HOME\Apache\Apache\conf\php5.ini
7.3 Restore JDK to Release 1.4.2
After applying Oracle Application Server 10g Release 3 (10.1.3) Patch Set 5 (10.1.3.5.0), you will need to restore JDK to release 1.4.2. The following procedure describes theprocedure:
1. Stop OPMN and all management processes.
2. Remove the line ‐XX:AppendRatio=3 from the <data id="javaoptions"> element in the opmn.xml file for the particular OC4J instance that was changed in Section 6.1.2,"Apply Oracle Application Server 10g Release 3 (10.1.3) Patch Set 5 (10.1.3.5.0)".
3. Set the Java system properties in the <data> element where the id attribute is javabin. The following is how the file should look after you have edited it:
<ias‐component id="default_group"> <process‐type id="test_oc4j_instance" \ module‐id="OC4J" status="enabled"> <module‐data> <category id="start‐paramters"> <data id="java‐bin" value="/myhost/jdk1.4.2/bin/java" /> <data id="java‐options" value="‐server \ ‐XX:MaxPermSize=512M ‐ms512M ‐mx1024M"/> </category> </module‐data> </process‐type></ias‐compoent>
4. Restart Oracle Process Manager and Notification Server and all managed processes.
7.4 Change JDBC factoryClass in BPEL Connection Pool
Edit the datasources.xml file to change the JDBC factoryClass parameter from oracle.jdbc.OracleDriver to oracle.jdbc.pool.OracleDataSource for theBPELPM_CONNECTION_POOL parameter. The following example shows, in bold, what should be set in the file:
<connection‐factory factory‐class="oracle.jdbc.pool.OracleDataSource"url="jdbc:oracle:thin:scott/tiger@stadd14:1521:db5617"/>
You can edit the datasources.xml file directly, or use Oracle Enterprise Manager, as described in Oracle Containers for J2EE Resource Adapter Administrator's Guide.
7.5 Redeploy Applications that Use Custom Security Settings
If your applications were configured with custom security settings, such as using Oracle Single SignOn, then you must reconfigure the applications and redeploy them afterapplying 10g Release 3 (10.1.3.4.0).
7.6 Enable Java Single SignOn
If you apply 10g Release 3 (10.1.3.3.0) to Oracle Application Server 10g Release 3 (10.1.3.0.0) installation, then you will need to edit the jazn.xml file enable Java Single SignOn. After editing the jazn.xml file, you will need to restart the instance. Detailed instructions are provided in the Oracle Containers for J2EE Security Guide.
4/18/2015 README for 8626084
https://updates.oracle.com/ARULink/PatchDetails/view_readme?aru=13669601 25/43
7.7 Deploy Your Enterprise Javabeans 3.0 Applications
If you are patching a 10g Release 3 (10.1.3.0.0) environment and you undeployed Enterprise Javabeans 3.0 applications before applying the patch set, then you must deploythem again after applying the patch set. The following procedure describes how to deploy an application:
1. Log in to the Application Server Control Console.
2. If the application will be deployed on a specific OC4J instance, then navigate to the OC4J Home page for the OC4J instance. If the application will be deployed to a group,then navigate to the Group page.
3. Click Applications.
4. Click Deploy and follow the instructions on the screen. If you need more information, then click Help.
7.8 Deploy the WSIL Application Manually
Oracle Application Server 10g Release 3 (10.1.3.1.0) and later support Web Services Inspection Language (WSIL). WSIL allows you to inspect all the Web services deployed onyour instance.
If you are patching a 10g Release 3 (10.1.3.0.0) environment and you want to take advantage of WSIL, then you will need to deploy it manually. The following proceduredescribes how to deploy the WSIL application. It is assumed that you have a running instance of OC4J.
1. Log in to the Application Server Control Console.
2. Click Applications on the OC4J Home Page. This allows you to view the list of deployed applications.
3. Click Deploy to display the Deploy: Select Archive page.
4. Perform the following steps on the Deploy: Select Archive page:
a. Select Archive is already present on the server where Application Server Control is running.
b. Enter the following path to the wsil‐ias.ear file:
../../webservices/lib/wsil‐ias.ear
c. Click Next to display the Deploy: Application Attributes page.
5. Perform the following steps on the Deploy: Application Attributes page:
a. Enter a name for the WSIL application in the Application Name field.
b. Ensure that Parent Application is set to default.
c. Ensure that Bind Web Module to Site is set to defaultwebsite.
d. Ensure that Context Root is set to /inspection.wsil.
e. Click Next to open the Deploy: Deployment Settings page.
6. Click Next to deploy the WSIL application. The Confirmation Page will report that the WSIL application deployed successfully.
4/18/2015 README for 8626084
https://updates.oracle.com/ARULink/PatchDetails/view_readme?aru=13669601 26/43
7. You can now access the WSIL application at the following Web address:
http://hostname:port/inspection.wsil
In the preceding URL, hostname is the host name of the server running OracleAS Web Services and port is the port number of the server running OracleAS Web Services.
7.9 Update Oracle Enterprise Service Bus Services
If Oracle Enterprise Service Bus is installed, and you plan to clone or change the IP or hostname of the machine that is hosting any of your middletier installations, then youmust perform the following procedure:
See Also:For more information about updating Oracle Enterprise Service Bus services, refer to Oracle Application Server Administrator's Guide.
1. Run the following script to set the Oracle Home and system variables:
For UNIX:
ORACLE_HOME/integration/esb/bin/esbdevprompt.sh
For Windows:
ORACLE_HOME\integration\esb\bin\esbdevprompt.bat
2. In the commandline window from which you ran the script, run the following command to export the Oracle Enterprise Service Bus services:
ant export‐params ‐Dparamfile ORACLE_HOME\integration\DateTimeStamp\esbparam.properties ‐DDB_URL=jdbc_connectString:@//hostname:port/db_service_name‐DDB_USER=oraesb ‐DDB_PASSWORD=esb_password‐DDB_DRIVER=oracle.jdbc.driver.OracleDriver
In the preceding command, hostname is the host containing the repository for Oracle Enterprise Service Bus, port is the port for the repository, db_service_name is thedatabase service name, and esb_pwd is the password for the ORAESB user. For example, on Windows:
ant export‐params ‐Dparamfile ORACLE_HOME\integration\20060828_1503\esbparam.properties ‐DDB_URL=jdbc:oracle:thin:@//sta.example.com:1521/oexam.us.example.com‐DDB_USER=oraesb ‐DDB_PASSWORD=esb_password‐DDB_DRIVER=oracle.jdbc.driver.OracleDriver
3. Make the updates to your operating system to properly change the hostname, domain name, or both.
4. Restart the host, if necessary for your operating system.
5. Verify that you can ping the host from another host in your network. Be sure to ping using the new hostname to make sure everything is resolving properly.
6. Edit the esbparam.properties file as follows:
If you are changing the IP address or hostname, then change the DT_OC4J_HOST property to the new hostname. For example, if the new hostname isnewhost.example.com, then the value of the property would be:
4/18/2015 README for 8626084
https://updates.oracle.com/ARULink/PatchDetails/view_readme?aru=13669601 27/43
DT_OC4J_HOST=newhost.example.com
If you are cloning a local machine, then update the DT_OC4J_HTTP_PORT to the new port.
If you are cloning a remote machine, then update the DT_OC4J_HOST property to the new hostname and the DT_OC4J_HTTP_PORT property to the new port.
7. Run the following command from the same commandline window used in step 2:
ant import‐params ‐Dparamfile ORACLE_HOME\integration\DateTimeStamp\esbparam.properties ‐DDB_URL=jdbc_connectString:@//hostname:port/db_service_name‐DDB_USER=oraesb ‐DDB_PASSWORD=esb_password ‐DDB_DRIVER=oracle.jdbc.driver.OracleDriver
In the preceding command, hostname is the host containing the repository for Oracle Enterprise Service Bus, port is the port for the repository, db_service_name is thedatabase service name, and esb_pwd is the password for the ORAESB user. For example, on Windows:
ant import‐params‐Dparamfile ORACLE_HOME\integration\20060828_1503\esbparam.properties ‐DDB_URL=jdbc:oracle:thin:@//sta.example.com:1521/oexam.us.example.com‐DDB_USER=oraesb ‐DDB_PASSWORD=PASSWORD ‐DDB_DRIVER=oracle.jdbc.driver.OracleDriver\
8. Start each middletier instance on your host by running the following command in each Oracle home:
For UNIX:
ORACLE_HOME/opmn/bin/opmnctl startall
For Windows:
ORACLE_HOME\opmn\bin\opmnctl startall
9. If you disabled any processes to automatically start Oracle Application Server at the beginning of this procedure, then enable them.
10. Verify that the services are listed in the ESB Console and the applications run correctly.
7.10 Run the ADF Installer for WebCenter Applications
After you install 10g Release 3 (10.1.3) Patch Set 5 (10.1.3.5.0), you must run the ADF installer against all OC4J instances you have created for your WebCenter applications. Ifyou do not, then your custom applications will not have access to the latest ADF shared libraries.
For information on running the ADF installer, see section 34.2 "Installing the ADF Runtime Libraries" in Oracle Fusion Middleware Fusion Developer's Guide for Oracle ApplicationDevelopment Framework.
7.11 Migrate and Redeploy Oracle ADF Applications
To ensure you apply all the bug fixes available with this patch, you must migrate and redeploy your Oracle ADF applications after applying Oracle Application Server 10g Release3 (10.1.3) Patch Set 5 (10.1.3.5.0). The following procedure describes how to migrate and redeploy the applications:
1. Download Oracle JDeveloper 10.1.3.3.0 from Oracle Technology Network (OTN) at
http://www.oracle.com/technology/index.html

4/18/2015 README for 8626084
https://updates.oracle.com/ARULink/PatchDetails/view_readme?aru=13669601 28/43
2. Migrate the workspaces as follows:
If you are installing Oracle JDeveloper 10.1.3.4.0 on the same system as Oracle JDeveloper 10.1.3.2.0, then click Yes at the prompt, "Do you want to migrate from aprevious version of JDeveloper?", and point to the system folder from the 10.1.3.2.0 JDeveloper build. This will migrate user settings, including database connectionsto JDeveloper 10.1.3.4.0.
If you are installing Oracle JDeveloper 10.1.3.4.0 on a different system than Oracle JDeveloper 10.1.3.2.0, then click No at the prompt, "Do you want to migrate froma previous version of JDeveloper?". (In this case, database connections are not migrated to Oracle JDeveloper 10.1.3.4.0. In JDeveloper 10.1.3.2.0, databaseconnections were stored in IDEConnections.xml, which is located under the Oracle JDeveloper system directory. Therefore, for Oracle JDeveloper 10.1.3.4.0 to accessdatabase connections from Oracle JDeveloper 10.1.3.2.0, you must migrate the system directory.) Copy the workspaces for any Oracle ADF applications from theOracle JDeveloper 10.1.3.2.0 instance to the Oracle JDeveloper 10.1.3.4.0 environment, and open the application workspaces. When the prompt, "Do you want tomigrate the workspace from a previous version?", is displayed, click Yes.
3. Repackage the Oracle ADF applications to new EAR files using Oracle JDeveloper. This will update the contained JAR files.
4. Deploy the EAR files to the target instance. See the Oracle Application Development Framework Developer's Guide for the deployment steps to be performed.
7.12 Postapplication Tasks For Oracle WebCenter Applications
After applying Oracle Application Server 10g Release 3 (10.1.3) Patch Set 5 (10.1.3.5.0), you must perform the following tasks before using your Oracle WebCenter applications:
Section 7.12.1, "Migrate and Redeploy Oracle WebCenter Applications that Use JCR Data Controls"
Section 7.12.2, "Redefine Page Permissions for Migrated Applications"
Section 7.12.3, "Copy Portlet Customizations from a 10g Release 3(10.1.3.2.0) Instance"
Section 7.12.4, "Migrate Applications that Consume Portlets from Preconfigured OC4J"
Section 7.12.5, "Migrate Applications that Consume OmniPortlets and WSRP Portlets from Preconfigured OC4J"
Section 7.12.6, "Reconfigure Proxy Settings for Omniportlet and Web Clipping Producers"
Section 7.12.7, "Recreate Export EAR Files with 10.1.3.5.0 Predeployment Tool"
7.12.1 Migrate and Redeploy Oracle WebCenter Applications that Use JCR Data Controls
If you have used JCR Data Controls to integrate and publish decentralized content in your Oracle WebCenter application, then to ensure that you can access the contentrepositories after applying Oracle Application Server 10g Release 3 (10.1.3) Patch Set 5 (10.1.3.5.0), you must perform the following steps:
1. Perform steps 1 and 2 in Section 7.11, "Migrate and Redeploy Oracle ADF Applications".
2. Create an application server connection by performing the following steps:
a. In the Connections Navigator, rightclick Application Server and select New Application Server Connection.
b. If you are on the Welcome page, click Next to display the Type page.
c. In the Connection Name field, specify a name for your connection.
d. From the Connection Type list, select Standalone OC4J 10g 10.1.3.

4/18/2015 README for 8626084
https://updates.oracle.com/ARULink/PatchDetails/view_readme?aru=13669601 29/43
e. Click Next to display the Authentication page.
f. Specify the user name and password to be used for authentication to the OC4J instance.
g. Click Next to display the Connection page.
h. Specify the host name and port number to be used for accessing the OC4J instance. Specify the host name to be localhost if the OC4J instance is installed on thesame computer as Oracle JDeveloper.
i. Click Finish.
3. Repackage the Oracle WebCenter application to a new EAR file using Oracle JDeveloper. This will update the contained JAR files.
4. Deploy the EAR file to the target instance. See the Oracle WebCenter Framework Developer's Guide for the deployment steps to be performed.
Note:You must first associate the new application server connection with the Oracle WebCenter application. To do this, perform the following steps:
a. Under the Resources node, rightclick the deployment profile that was created for the Oracle WebCenter application.b. In the WAR Deployment Profile Properties dialog box, select Platform in the left pane, and under Target Connection, select the application serverconnection you just created.
c. Click OK.
7.12.2 Redefine Page Permissions for Migrated Applications
When you migrate your applications to , authorization information about secured pages is not migrated along with the applications. Therefore, if you had defined ADF security forthe application before upgrading, then you must redefine page permissions in the instance. See Oracle WebCenter Framework Developer's Guide for the steps to be performed.
7.12.3 Copy Portlet Customizations from a 10g Release 3(10.1.3.2.0) Instance
Customizations made to PDKJava portlets deployed to the preconfigured OC4J, are stored within the PDKJava application. Therefore, when you patch the Oracle ApplicationServer instance from 10g Release 3 (10.1.3) Patch Set 2 (10.1.3.2.0) to , the customizations you made for 10g Release 3 (10.1.3) Patch Set 2 (10.1.3.2.0) are not available. Ifyou want these customizations to be available for environments, you must perform the following steps:
1. Export the customizations using the portlet‐client‐deploy.jar file.
See Oracle WebCenter Framework Developer's Guide for the steps to export and import customizations.
2. Rerun the portlet‐client‐deploy.jar file on EAR file and import the customizations.
3. Restart the OC4J_WebCenter instance.
7.12.4 Migrate Applications that Consume Portlets from Preconfigured OC4J
Perform this task if you clicked No to the prompt, "Do you want to migrate from a previous version of JDeveloper?" when you started the Oracle JDeveloper after applying .
Customizations made to portlets deployed to the preconfigured OC4J are stored within the PDKJava application. If you did not migrate from the previous release of OracleJDeveloper, then the portlet customizations made in the previous installation are not available in the new Oracle JDeveloper installation. If you want these customizations to be
4/18/2015 README for 8626084
https://updates.oracle.com/ARULink/PatchDetails/view_readme?aru=13669601 30/43
available, then you must manually copy the customizations to the application in the new Oracle JDeveloper installation.
Customizations made to Omniportlet, WebClipping, WSRP, and PDK sample portlets can be manually copied from the previous JDeveloper_home/portal/portletdata directory tothe new Oracle JDeveloper installation. If you have custom PDKJava portlets deployed to the preconfigured OC4J, refer to "Portlets Preference Store Migration Utilities" in OracleWebCenter Framework Developer's Guide for information on preserving these customizations using Portlet Preference Store Migration Tool.
7.12.5 Migrate Applications that Consume OmniPortlets and WSRP Portlets from Preconfigured OC4J
Perform this task if you clicked Yes at the prompt, "Do you want to migrate from a previous version of JDeveloper?" when you started the Oracle JDeveloper after applying .
In this case, customizations to most portlets deployed t the preconfigured OC4J will be automatically migrated as a part of the entire Oracle JDeveloper migration. However,customizations made to PDKJava portlets must be manually copied to the 10.1.3.4.0 instance. Refer to "Portlets Preference Store Migration Utilities" in the Oracle WebCenterFramework Developer's Guide for information on how other PDK customizations can be preserved using Portlet Preference Store Migration Tool.
7.12.6 Reconfigure Proxy Settings for Omniportlet and Web Clipping Producers
If your application contains OmniPortlet and Web Clipping portlets, then you must reconfigure proxy settings for these portlets after applying Oracle Application Server 10gRelease 3 (10.1.3) Patch Set 5 (10.1.3.5.0). This must be done because the provider configuration information is not migrated from the 10g Release 3 (10.1.3.2.0) instance.
Refer to the appendix "Additional Portlet Configuration" in the Oracle WebCenter Framework Developer's Guide for information about configuring HTTP proxy settings forOmniPortlet and Web Clipping producers.
7.12.7 Recreate Export EAR Files with 10.1.3.5.0 Predeployment Tool
If you are transporting an Oracle WebCenter application from a 10g Release 3 (10.1.3.2.0) environment to a 10g Release 3 (10.1.3.5.0) environment, then when you exportcustomizations using the predeployment tool to create an export EAR file, the.jspx pages are also exported. If you make changes to any jspx pages during migration of yourapplication using Oracle JDeveloper 10g Release 3 (10.1.3.5.0), then when you deploy the application and import customizations from the export EAR file created by 10g Release3 (10.1.3.2.0), you will lose the page changes you made in Oracle JDeveloper. To avoid overwriting edited pages, copy the 10g Release 3 (10.1.3.5.0) version of the portletclientdeploy.jar file to the 10g Release 3 (10.1.3.2.0) installation environment and recreate the export EAR file using the 10g Release 3 (10.1.3.5.0) predeployment tool.
See Oracle WebCenter Framework Developer's Guide for information about how to export and import customizations using the predeployment tool.
7.13 Disable HTTP TRACE Support
The HTTP TRACE method returns the contents requested by client HTTP in the entitybody of the TRACE response. This behavior makes the confidential information contained inthe HTTP headers of the request, such as cookies or authentication data vulnerable to attacks.
To avoid this problem, use the apache mod_write module to deny HTTP TRACE requests or to permit only the methods required to meet site requirements and policy. Add thefollowing additional configuration information to the Apache HTTP Server's configuration file:
RewriteEngine OnRewriteCond %REQUEST_METHOD ^TRACERewriteRule .* ‐ [F]
8 Known Issues
The following sections are known issues for Oracle Application Server 10g Release 3 (10.1.3) Patch Set 5 (10.1.3.5.0):
4/18/2015 README for 8626084
https://updates.oracle.com/ARULink/PatchDetails/view_readme?aru=13669601 31/43
Section 8.1, "Directories and Files Backed up by Oracle Universal Installer"
Section 8.2, "Erroneous Stack Trace Generated During OC4J Instance Creation"
Section 8.3, "Error Message in opmn/logs Directory (Microsoft Windows)"
Section 8.4, "Installation Screen Display Issues on UNIX"
Section 8.5, "Configuration Assistant Failure during Silent Installation"
Section 8.6, "Error When Setting Oracle Notification Server Communication"
Section 8.7, "OPMN Fails When Changing JDKs"
Section 8.8, "Unable to Accesss Content Database Web Page"
Section 8.9, "Problem with ONS Client Port Usage (Linux only)"
Section 8.10, "End of Installation Warning for Oracle Business Activity Monitoring (Microsoft Windows)"
Section 8.11, "Exception on Oracle SOA Suite Installation (Microsoft Windows)"
Section 8.12, "When DataSource File is Modified, the OC4J Instance Must be Restarted"
Section 8.13, "Backup the Current JDK"
Section 8.14, "Change File Permissions Before Upgrading JDK"
Section 8.15, "Apply Patch for SOA Installation"
Section 8.16, "Oracle Universal Installer Does not Display Correctly for Some East Asian Languages on Linux"
Section 8.17, "Links to User Documentation Not Operational"
Section 8.18, "Mandatory Patch Application"
Section 8.19, "B2B–BPEL Integration: 10.1.3.5 Patch"
Section 8.20, "Nonperformant recovery in OC4J"
Section 8.21, "Installation of 10.1.3 Advanced Installation With J2EE Server and Process Management Fails on HPUX PARISC, When Patching With 10.1.3.5 Patchset"
Section 8.22, "Installation of the 10.1.3.5 Patch Set on AIX Requires Executing /usr/bin/slibclean"
Section 8.23, "org.xml.sax.SAXNotRecognizedException Error on AIX, Linux on POWER, and IBM zSeries Based Linux"
Section 8.24, "Add OForceclone Option While Cloning Core Install Area (Only Microsoft Windows on Intel Itanium)"
Section 8.25, "OPMN Must Be Shutdown Before Patching Companion CD on HPUX PARISC"
Section 8.26, "OMPN CA Fails During The Installation of 10.1.3.0 on Linux on POWER"
Section 8.27, "While Upgrading to Application Server 10.1.3.4 or 10.1.3.5 on Sun Solaris SPARC (64bit), Oracle Web Services Manager Application CCORE is Not Available"

4/18/2015 README for 8626084
https://updates.oracle.com/ARULink/PatchDetails/view_readme?aru=13669601 32/43
8.1 Directories and Files Backed up by Oracle Universal Installer
Table 4 lists the OracleAS Portal directories backed up by Oracle Universal Installer during installation of Oracle Application Server 10g Release 3 (10.1.3) Patch Set 5 (10.1.3.5.0).
Table 4 OracleAS Portal Directories Backed up by Oracle Universal Installer
From To
ORACLE_HOME/j2ee/OC4J_Portal/applications/jpdk/jpdk/htdocs ORACLE_HOME/j2ee/OC4J_Portal.timestamp/applications/jpdk/jpdk/htdocs
ORACLE_HOME/j2ee/OC4J_Portal/applications/jpdk/jpdk/WEB‐INF ORACLE_HOME/j2ee/OC4J_Portal.timestamp/applications/jpdk/jpdk/WEB‐INF
ORACLE_HOME/j2ee/OC4J_Portal/application_deployments/jpdk ORACLE_HOME/j2ee/OC4J_Portal.timestamp/application_deployments/jpdk
ORACLE_HOME/j2ee/OC4J_Portal/applications/jpdk/pdkstruts/htdocs ORACLE_HOME/j2ee/OC4J_Portal.timestamp/applications/jpdk/pdkstruts/htdocs
ORACLE_HOME/j2ee/OC4J_Portal/applications/jpdk/pdkstruts/WEB_INF ORACLE_HOME/j2ee/OC4J_Portal.timestamp/applications/jpdk/pdkstruts/WEB_INF
ORACLE_HOME/j2ee/OC4J_Portal/applications/portalTools/providerBuilder/WEB‐INF
ORACLE_HOME/j2ee/OC4J_Portal.timestamp/applications/portalTools/providerBuilder/WEB‐INF
ORACLE_HOME/j2ee/OC4J_Portal/applications/portalTools/omniPortlet/WEB‐INF ORACLE_HOME/j2ee/OC4J_Portal.timestamp/applications/portalTools/omniPortlet/WEB‐INF
ORACLE_HOME/j2ee/OC4J_Portal/applications/portalTools/omniPortlet/plugins ORACLE_HOME/j2ee/OC4J_Portal.timestamp/applications/portalTools/omniPortlet/plugins
ORACLE_HOME/j2ee/OC4J_Portal/applications/portalTools/webClipping/WEB‐INF ORACLE_HOME/j2ee/OC4J_Portal.timestamp/applications/portalTools/webClipping/WEB‐INF
ORACLE_HOME/portal/conf ORACLE_HOME/portal.timestamp/conf
Table 5 lists the OracleAS Portal files backed up by Oracle Universal Installer during installation of Oracle Application Server 10g Release 3 (10.1.3) Patch Set 5 (10.1.3.5.0):
Table 5 OracleAS Portal Files Backed up by Oracle Universal Installer
From To
ORACLE_HOME/portal/pdkjava/providerGroups/iasProviders.xml ORACLE_HOME/portal.timestamp/pdkjava/providerGroups/iasProviders.xml
ORACLE_HOME/portal/jlib/portaltools.jar ORACLE_HOME/portal.timestamp/jlib/portaltools.jar
ORACLE_HOME/j2ee/OC4J_Portal/applications/portal/portal/WEB‐INF/web.xml ORACLE_HOME/j2ee/OC4J_portal.timestamp/applications/portal/portal/WEB‐INF/web.xml
8.2 Erroneous Stack Trace Generated During OC4J Instance Creation
During OC4J instance creation an erroneous stack trace is generated. The stack trace is located in the opmn/logs directory and the typical file name is$OH/opmn/logs/default_group~home~default_group~1.log.
This stack trace will not cause any functional impact and can be ignored.
8.3 Error Message in opmn/logs Directory (Microsoft Windows)
Following application of the 10g Release 3 (10.1.3) Patch Set 5 (10.1.3.5.0) to an Oracle Application Server 10.1.3.2 Install of Oracle Web Center, on Microsoft Windows, with a10g R1 Oracle database you may see a warning message in the your opmn/logs directory.
The warning message can be ignored.
4/18/2015 README for 8626084
https://updates.oracle.com/ARULink/PatchDetails/view_readme?aru=13669601 33/43
8.4 Installation Screen Display Issues on UNIX
When applying 10g Release 3 (10.1.3) Patch Set 5 (10.1.3.5.0) some of the user buttons (for example, Help, Next, Installed Product, etc.) do not display correctly and some ofthe text is erroneously truncated.
To workaround this issue, specify a newer Java Runtime Engine when applying the patch by using the ‐jreLoc argument with the ./runInstaller command.
8.5 Configuration Assistant Failure during Silent Installation
When setting the staticports.ini file for port values during silent installation the Oracle Web Services Inspection Language Configuration Assistant fails.
Do not attempt to provide ports using the staticports.ini file in the response file. Instead use the default ports (b_autoPortDetect=true) and then change the port values afterinstallation using Oracle Enterprise Manager 10g or file text editor method.
8.6 Error When Setting Oracle Notification Server Communication
When trying to setup Oracle Notification Server (ONS) communication between an Oracle Application Server 10.1.3.5 SOA and an Oracle 11.1.0.7 database, you may see errors offollowing kind in the ORACLE_HOME/opmn/logs file:
09/06/19 11:52:29 [2] libnnz10.so dlopen failed:libnnz10.so: cannot open shared object file: No such file or directory09/06/19 11:52:29 [1] SSL disabled09/06/19 11:53:14 [2] libnnz10.so dlopen failed:libnnz10.so: cannot open shared object file: No such file or directory09/06/19 11:53:14 [1] SSL disabled
To fix this issue, apply the patch for bug 6750049, "libnnz10.so dlopen failed when trying to start ons (nodeapps)", must be applied on the clusterware software or RACdatabase.
Download the bug 6750049 patch for your platform on Oracle My Support:
http://support.oracle.com
8.7 OPMN Fails When Changing JDKs
After you install 10g Release 3 (10.1.3) Patch Set 5 (10.1.3.5.0) and change the default JDK to JDK15, OPMN will fail to start.
To resolve this issue, open the opmn.xml file with a text editor and remove the AppendRatio=3 tag.
8.8 Unable to Accesss Content Database Web Page
Following installation of Oracle Application Server Web Center 10.1.3.2, you can access the Content Database Web Page launch page athttp://computer_name:OHS_PORT/content.
However, after you apply the 10g Release 3 (10.1.3) Patch Set 5 (10.1.3.5.0), you can no longer access the Content Database Web Page launch page.
There is no work around for this issue.
8.9 Problem with ONS Client Port Usage (Linux only)
4/18/2015 README for 8626084
https://updates.oracle.com/ARULink/PatchDetails/view_readme?aru=13669601 34/43
After application of 10g Release 3 (10.1.3) Patch Set 5 (10.1.3.5.0) on an Oracle SOA Suite installation with a configured OC4J Java Single SignOn (Java SSO), the ONS clientwithin the Oracle Database listener is somehow connecting to the OPMN local port.
The Oracle Database installation ons.config file is configured to use the exact same local port as OPMN. The ONS server is not running, and so the ONS client within thedatabase listener constantly connects to the OPMN local port but sending an invalid connection handshake, which OPMN logs.
Oracle recommends never using the same OPMN ports that are configured for any Oracle Database instance on the same system.
For example:
1. Install Oracle Application Server SOA 10.1.3. Select Advanced Option Select OHS on computer 1.
2. Install Oracle Application Server 10.1.3 advanced SOA (includes all products) on Computer 2. During configuration, select the option to make this AS instance as Admininstance. Select the check box Access this AS instance from remote OHS and Enter Remote OHS URL of Host1.
3. Configure Java SSO for computer 2 accessing Oracle Enterprise Manager 10g using the OHS installation on computer 1.
To work around this issue, configure and distribute computer 2 advanced SOA installation so that the Oracle Database Oracle Home directory and the Oracle Application ServerSOA Oracle Home directory are on separate computers.
8.10 End of Installation Warning for Oracle Business Activity Monitoring (Microsoft Windows)
When installing 10g Release 3 (10.1.3) Patch Set 5 (10.1.3.5.0) for Oracle Business Activity Monitoring (Oracle BAM), you will be prompted to enter your email address and/ormetalink password if you want to be notified of security updates and other information pertaining to your installation. If you choose not to provide their information, theinstallation will proceed normally. However, if you provide your notification information, a configuration assistant error message will be displayed towards the end of theinstallation similar to the following message:
"Some of the configuration assistants failed. However these are optional assistants, so they are not required for the correct configuration of your system. If you want to try torun those assistants again, select the failed assistants and click the 'Retry' button."
If you click OK when receiving the above error message, a warning message similar to the following will appear:
"One or more configuration assistants have not completed successfully. However these are optional, so they are not required for the correct configuration of your system. A listof the configuration assistants that need to be run is generated in the log of this session which is located at: c:\Program Files\Oracle\Inventory\logs\installActions....."
After you click OK a second time after the 2nd error message, a warning message similar to the following will appear:
"End of Installation. The installation of Oracle Application Server Patch Set was successful, but some optional configuration assistants failed, were cancelled or skipped."
The 10g Release 3 (10.1.3) Patch Set 5 (10.1.3.5.0) has been applied successfully but some of the optional configuration assistants have not run.
To run the optional configuration assistants:
1. Set JAVA_HOME to JDK 1.3.0 or greater.
If the C:\OracleBAM\ClientForBAM\jdk directory exists, then set your JAVA_HOME to this location.
Otherwise, download and install JDK 1.3.0 or greater before proceeding to next step.
2. Go to the C:\OracleBam\ccr\bin directory.
3. Run setupCCR.exe ‐R c:\OracleBAM\ocm.rsp.
4/18/2015 README for 8626084
https://updates.oracle.com/ARULink/PatchDetails/view_readme?aru=13669601 35/43
8.11 Exception on Oracle SOA Suite Installation (Microsoft Windows)
When 10g Release 3 (10.1.3) Patch Set 5 (10.1.3.5.0) is applied to a Oracle SOA Suite 10.1.3.1 (standalone) on Microsoft Windows, an exception is logged in the the 10gRelease 3 (10.1.3) Patch Set 5 (10.1.3.5.0) install logs.
This exception is harmless and can be ignored. There is no workaround.
8.12 When DataSource File is Modified, the OC4J Instance Must be Restarted
When you modiy datasources.xml manually, the OC4J instance must be restarted.
When you try to add new the new datasource entry from Oracle Enterprise Manager 10g Application Server Control Console (Application Server Control Console),you do not needto restart OC4J instance.
However, if you try to modify an existing data source entry, or you make a typo and you try to modify the incorrect data source entry, you have to restart the OC4J instanceafter you finish modification.
8.13 Backup the Current JDK
If you want to use the JDK you currently have on your computer rather than the JDK version that accompanies the 10g Release 3 (10.1.3) Patch Set 5 (10.1.3.5.0), you mustbackup your preferred JDK before patch application.
To make a backup of your current JDK:
1. Shutdown all running processes and make a backup of your custom JDK folder.
2. Apply the 10g Release 3 (10.1.3) Patch Set 5 (10.1.3.5.0).
3. Shutdown all running system processes and replace the 10.1.3.5 JDK folder with the current JDK you have backed up.
8.14 Change File Permissions Before Upgrading JDK
If you upgrade your JDK version from the default version to a different version, make sure that before you apply the 10g Release 3 (10.1.3) Patch Set 5 (10.1.3.5.0) that all fileslocated under the Oracle_Home/jdk directory have read and write permission enabled.
8.15 Apply Patch for SOA Installation
If you are planning to run Oracle SOA Suite with an Oracle RAC database (versions 10.2.0.4 or 11.1.0.7), you must apply the patch for bugs 8764374 and 7281435.
8.16 Oracle Universal Installer Does not Display Correctly for Some East Asian Languages on Linux
When you use JDK v. 1.5.0.18 to install 10g Release 3 (10.1.3) Patch Set 5 (10.1.3.5.0) some of the installation screens will not display correctly on Linux for some East Asianlanguages such as Japanese and Chinese.
To workaround this issue, specify the JDK/JRE 1.6 when launching the Oracle Universal Installer.
For example:
4/18/2015 README for 8626084
https://updates.oracle.com/ARULink/PatchDetails/view_readme?aru=13669601 36/43
\runInstaller ‐jreLoc $JRE_HOME
8.17 Links to User Documentation Not Operational
After you have applied 10g Release 3 (10.1.3) Patch Set 5 (10.1.3.5.0) to your system and open the Oracle Enterprise Manager 10g Application Server Control Console, the linksto the Oracle Web Service Manager User and Administrator's Guide and Oracle Web Service Manager's Deployment Guide are not operational.
There is no workaround.
8.18 Mandatory Patch Application
Application of the patch for bug 8800528 is mandatory following application of the 10g Release 3 (10.1.3) Patch Set 5 (10.1.3.5.0).
8.19 B2B–BPEL Integration: 10.1.3.5 Patch
The b2bbpel(p5105622_101300_GENERIC.zip) patch released for 10.1.3.4 is no longer compatible with the 10.1.3.5 release.
To address b2bbpel integration, download patch 8713566 from My Oracle Support.
8.20 Nonperformant recovery in OC4J
If you shut down your OC4J instance repeatedly using the opmnctl shutdown command, you may create duplicate entries in the generated log files.
Typically, OC4J clears the resources txlog file (for example, txlogs/OPMN_dadvmc0142.us.oracle.com_OC4J_SOA.default_group.1.resources) during a clean shutdown. However,when the shutdown of OC4J is forced and then you subsequently restart OC4J, new entries are appended to the end of the resources txlog file. If you again perform a forceshutdown of OC4J is duplicate entries will be created. Additional forced shutdown will increase the size of the resources txlog file.
The above detailed scenario only occurs if there are repeated forceful shutdowns of OC4J. Recovery of your system is processed conducted correctly, however.
There are a number routines (for example, the network calls of the xaresource.recover scans) which can take a considerable amount time; especially in RAC environments inwhich routines are repeated unnecessarily. Therefore, recovery times and resultant/reliant runtime processing performance suffers.
Oracle recommends noting an entry exists in the resources txlog file is present before writing to it.
8.21 Installation of 10.1.3 Advanced Installation With J2EE Server and Process Management Fails on HPUX PARISC, When Patching With 10.1.3.5 Patchset
10.1.3 Advanced Installation with J2EE server and process management fails when patching with 10.1.3.5 patchset. This happens due to missing Perl Interpreter. Perl must bepresent for the patchset to install correctly or else it will show the following error:
Query Exception: FileNotFoundException
To resolve this issue complete the following steps:
1. Install 10.1.3 Advanced installation with J2EE Server and Process Management
2. Obtain and download the Perl Interpreter patch from My Oracle Support:

4/18/2015 README for 8626084
https://updates.oracle.com/ARULink/PatchDetails/view_readme?aru=13669601 37/43
Patch 8708718
3. Apply Perl Interpreter patch on 10.1.3 Advanced installation ORACLE_HOME
4. Install 10.1.3.5 patchset
8.22 Installation of the 10.1.3.5 Patch Set on AIX Requires Executing /usr/bin/slibclean
Although the 10.1.3.5 Patch Set installer prompts the user to execute /usr/bin/slibclean during the installation process, Oracle recommends executing /usr/bin/slibcleancontinuously as the root user throughout the installation process to prevent Text file busy errors that occur when the installation tries to overwrite files already present inmemory.
For silent installation, running /usr/bin/slibclean continuously during the installation process is mandatory because there is no opportunity for intervention by users during silentinstallations.
A simple example script to execute /usr/bin/slibclean continuously is as follows:
# cat /tmp/my_slibclean_filewhile truedo/usr/sbin/slibcleansleep 3done
This file should be executed as the root user and it will execute /usr/sbin/slibclean continously every 3 seconds. To add logging, add a date and echo /usr/sbin/slibclean ordo any one of the two actions before the slibclean line. This execution can also be saved as output to a log file to monitor it:
# cat /tmp/my_slibclean_filewhile truedodateecho /usr/sbin/slibclean/usr/sbin/slibcleansleep 3done# /tmp/my_slibclean_file > /tmp/my_slibclean_file.log 2>&1&# tail ‐f /tmp/my_slibclean_file.log
The execution of this inifinite loop can be stopped by executing ps and then killing the parent process of the sleep process.
8.23 org.xml.sax.SAXNotRecognizedException Error on AIX, Linux on POWER, and IBM zSeries Based Linux
Depending on how an application is coded, the following exception may be seen in $ORACLE_HOME/opmn/logs/opmn.log when the 10.1.3.5 Patch Set runs with IBM JDK's on AIX,Linux on POWER, and zSeries Based Linux:
Jan 12, 2009 1:16:17 PM org.apache.commons.digester.Digester getParserSEVERE: Digester.getParser:org.xml.sax.SAXNotRecognizedException:http://apache.org/xml/features/validation/dynamic atoracle.xml.jaxp.JXSAXParserFactory.setFeature(JXSAXParserFactory.java:128) atorg.apache.commons.digester.parser.XercesParser.configureXerces(XercesParser.java:185)
4/18/2015 README for 8626084
https://updates.oracle.com/ARULink/PatchDetails/view_readme?aru=13669601 38/43
atorg.apache.commons.digester.parser.XercesParser.newSAXParser(XercesParser.java:138) atorg.apache.commons.digester.ParserFeatureSetterFactory.newSAXParser(ParserFeatureSetterFactory.java:73) at org.apache.commons.digester.Digester.getParser(Digester.java:682)
If you get this exception, add the following system property to $ORACLE_HOME/opmn/conf/opmn.xml within the java‐options line of the start‐parameters section of the OC4Jinstance in which the application is running, and then restart the OC4J instance:
‐Djavax.xml.parsers.SAXParserFactory=org.apache.xerces.jaxp.SAXParserFactoryImpl
Example:
Change the following within $ORACLE_HOME/opmn/conf/opmn.xml:
<process‐type id="oc4j_soa" module‐id="OC4J" status="enabled"> <module‐data> <category id="start‐parameters"> <data id="java‐options" value="‐Xss512k ‐ms512M ‐mx1024M..."/>
To:
<process‐type id="oc4j_soa" module‐id="OC4J" status="enabled"> <module‐data> <category id="start‐parameters"> <data id="java‐options" value="‐Djavax.xml.parsers.SAXParserFactory=org.apache.xerces.jaxp.SAXParserFactoryImpl ‐Xss512k ‐ms512M ‐mx1024M ..."/>
And then execute opmnctl stopall followed by opmnctl startall.
8.24 Add OForceclone Option While Cloning Core Install Area (Only Microsoft Windows on Intel Itanium)
To clone core 10.1.3.0.0. install area, perform the following steps:
1. Set ORACLE_HOME
2. Set PERL5LIB=%ORACLE_HOME%\perl\5.8.3\lib;%
ORACLE_HOME%\perl\site\5.8.3\lib;%PERL5LIB%
3. Execute the following command with option ‐O‐forceclone
C:\>%ORACLE_HOME%\perl\5.8.3\bin\MSWin32‐IA64‐multi‐thread\perl5.8.3 %ORACLE_HOME%\clone\bin\clone.pl ORACLE_HOME=%ORACLE_HOME%ORACLE_HOME_NAME=b8_cln2_0807_oh ‐instance b8_cln2_0807_inst ‐debug‐oc4jadmin_old_password "welcome1" ‐oc4jadmin_new_password "welcome1" ‐O‐forceclone
8.25 OPMN Must Be Shutdown Before Patching Companion CD on HPUX PARISC

4/18/2015 README for 8626084
https://updates.oracle.com/ARULink/PatchDetails/view_readme?aru=13669601 39/43
When applying patchset 10.1.3.5 on Apache2.0 ORACLE_HOME, the patchset installation fails with the following errors:
Error in writing to file $ORACLE_HOME/lib32/libons.sl (Text file busy)Error in writing to file $ORACLE_HOME/opmn/bin/opmn (Text file busy)
To workaround this issue, shutdown all opmn processes from Apache2.0 ORACLE_HOME before patching Apache2.0 install area with patchset 10.1.3.5.
8.26 OMPN CA Fails During The Installation of 10.1.3.0 on Linux on POWER
Installation of Application Server 10.1.3.0 on Linux on POWER platform fails with the installation log showing the following error:
OPMN CA fails due to Oracle HTTP Server not starting
This occurs due to empty ewallet.p12, which genwallet fails to regenerate during the installation process. It works properly after setting the environment variableJAVA_COMPILER=NONE in orapki.
To workaround this issue, download and apply the following patch from My Oracle Support:
Patch 8784091
Restart the installation of 10.1.3.0 on Linux on POWER.
8.27 While Upgrading to Application Server 10.1.3.4 or 10.1.3.5 on Sun Solaris SPARC (64bit), Oracle WebServices Manager Application CCORE is Not Available
Oracle Web Services Manager (OWSM) application "ccore" may not be available via http://hostname:port/ccore on certain upgrade paths to Application Server 10.1.3.4 or 10.1.3.5on Sun Solaris SPARC platform. The following error is seen in $ORACLE_HOME/opmn/logs/default*log file:
java.lang.IllegalArgumentException: Expected name instead of @
To avoid this issue, perform the following steps before upgrading:
1. Modify $ORACLE_HOME/owsm/templates/gdkapp_template.xml.
a. Search for two instances of "zn_".
b. Replace both instances of "zn_" with "zh_".
2. Execute: $ORACLE_HOME/owsm/bin/wsmadmin.sh undeploy all.
3. Execute: $ORACLE_HOME/owsm/bin/wsmadmin.sh deploy all.
4. Retry accessing the "ccore" application by going to http://hostname:port/ccore.
9 Fixed PlatformSpecific Bugs for Windows
Table 6 describes the bugs fixed for Windows in the Oracle Application Server 10g Release 3 (10.1.3) Patch Set 5 (10.1.3.5.0).
Table 6 Fixed PlatformSpecific Bugs for Windows
Bug Number Fixed in Release Description
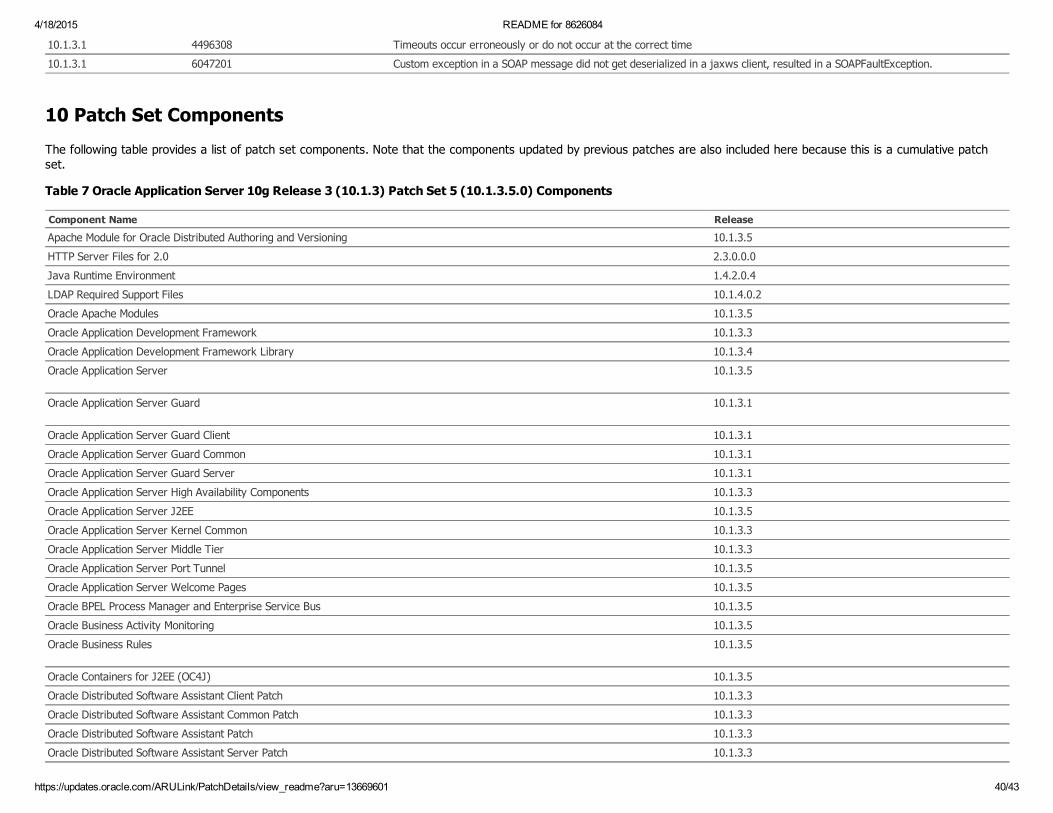
4/18/2015 README for 8626084
https://updates.oracle.com/ARULink/PatchDetails/view_readme?aru=13669601 40/43
10.1.3.1 4496308 Timeouts occur erroneously or do not occur at the correct time
10.1.3.1 6047201 Custom exception in a SOAP message did not get deserialized in a jaxws client, resulted in a SOAPFaultException.
10 Patch Set Components
The following table provides a list of patch set components. Note that the components updated by previous patches are also included here because this is a cumulative patchset.
Table 7 Oracle Application Server 10g Release 3 (10.1.3) Patch Set 5 (10.1.3.5.0) Components
Component Name Release
Apache Module for Oracle Distributed Authoring and Versioning 10.1.3.5
HTTP Server Files for 2.0 2.3.0.0.0
Java Runtime Environment 1.4.2.0.4
LDAP Required Support Files 10.1.4.0.2
Oracle Apache Modules 10.1.3.5
Oracle Application Development Framework 10.1.3.3
Oracle Application Development Framework Library 10.1.3.4
Oracle Application Server 10.1.3.5
Oracle Application Server Guard 10.1.3.1
Oracle Application Server Guard Client 10.1.3.1
Oracle Application Server Guard Common 10.1.3.1
Oracle Application Server Guard Server 10.1.3.1
Oracle Application Server High Availability Components 10.1.3.3
Oracle Application Server J2EE 10.1.3.5
Oracle Application Server Kernel Common 10.1.3.3
Oracle Application Server Middle Tier 10.1.3.3
Oracle Application Server Port Tunnel 10.1.3.5
Oracle Application Server Welcome Pages 10.1.3.5
Oracle BPEL Process Manager and Enterprise Service Bus 10.1.3.5
Oracle Business Activity Monitoring 10.1.3.5
Oracle Business Rules 10.1.3.5
Oracle Containers for J2EE (OC4J) 10.1.3.5
Oracle Distributed Software Assistant Client Patch 10.1.3.3
Oracle Distributed Software Assistant Common Patch 10.1.3.3
Oracle Distributed Software Assistant Patch 10.1.3.3
Oracle Distributed Software Assistant Server Patch 10.1.3.3
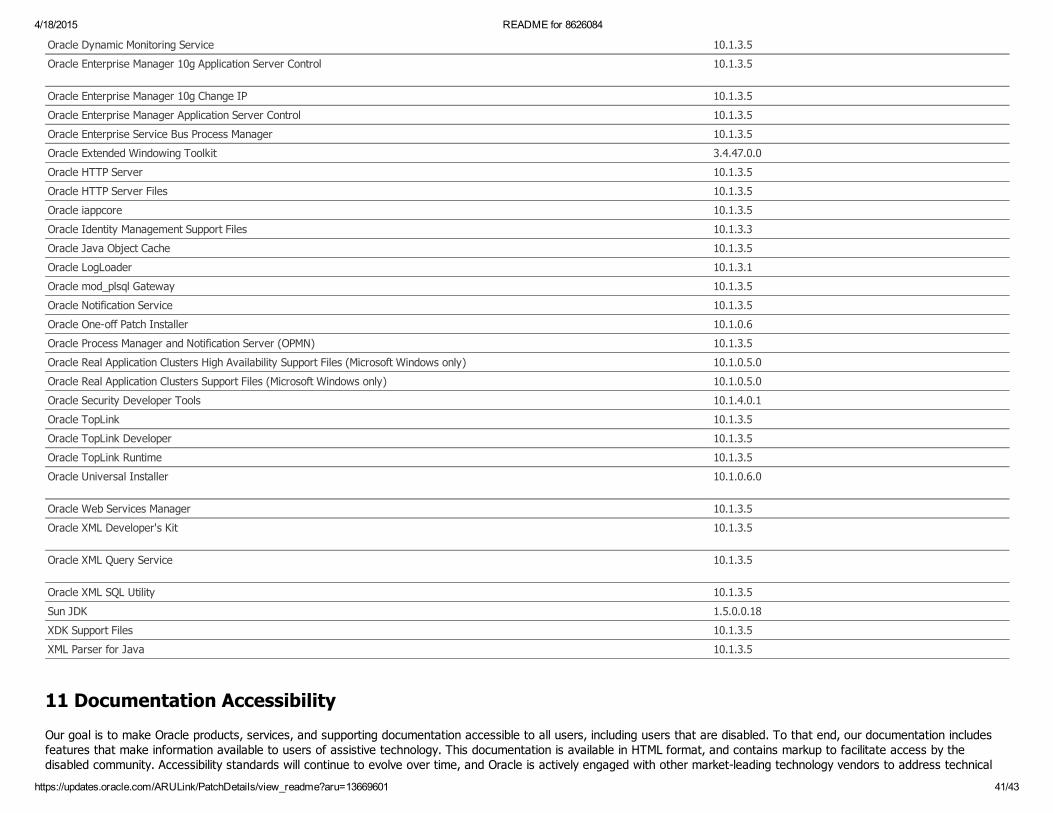
4/18/2015 README for 8626084
https://updates.oracle.com/ARULink/PatchDetails/view_readme?aru=13669601 41/43
Oracle Dynamic Monitoring Service 10.1.3.5
Oracle Enterprise Manager 10g Application Server Control 10.1.3.5
Oracle Enterprise Manager 10g Change IP 10.1.3.5
Oracle Enterprise Manager Application Server Control 10.1.3.5
Oracle Enterprise Service Bus Process Manager 10.1.3.5
Oracle Extended Windowing Toolkit 3.4.47.0.0
Oracle HTTP Server 10.1.3.5
Oracle HTTP Server Files 10.1.3.5
Oracle iappcore 10.1.3.5
Oracle Identity Management Support Files 10.1.3.3
Oracle Java Object Cache 10.1.3.5
Oracle LogLoader 10.1.3.1
Oracle mod_plsql Gateway 10.1.3.5
Oracle Notification Service 10.1.3.5
Oracle Oneoff Patch Installer 10.1.0.6
Oracle Process Manager and Notification Server (OPMN) 10.1.3.5
Oracle Real Application Clusters High Availability Support Files (Microsoft Windows only) 10.1.0.5.0
Oracle Real Application Clusters Support Files (Microsoft Windows only) 10.1.0.5.0
Oracle Security Developer Tools 10.1.4.0.1
Oracle TopLink 10.1.3.5
Oracle TopLink Developer 10.1.3.5
Oracle TopLink Runtime 10.1.3.5
Oracle Universal Installer 10.1.0.6.0
Oracle Web Services Manager 10.1.3.5
Oracle XML Developer's Kit 10.1.3.5
Oracle XML Query Service 10.1.3.5
Oracle XML SQL Utility 10.1.3.5
Sun JDK 1.5.0.0.18
XDK Support Files 10.1.3.5
XML Parser for Java 10.1.3.5
11 Documentation Accessibility
Our goal is to make Oracle products, services, and supporting documentation accessible to all users, including users that are disabled. To that end, our documentation includesfeatures that make information available to users of assistive technology. This documentation is available in HTML format, and contains markup to facilitate access by thedisabled community. Accessibility standards will continue to evolve over time, and Oracle is actively engaged with other marketleading technology vendors to address technical
4/18/2015 README for 8626084
https://updates.oracle.com/ARULink/PatchDetails/view_readme?aru=13669601 42/43
obstacles so that our documentation can be accessible to all of our customers. For more information, visit the Oracle Accessibility Program Web site athttp://www.oracle.com/accessibility/.
Accessibility of Code Examples in Documentation
Screen readers may not always correctly read the code examples in this document. The conventions for writing code require that closing braces should appear on an otherwiseempty line; however, some screen readers may not always read a line of text that consists solely of a bracket or brace.
Accessibility of Links to External Web Sites in Documentation
This documentation may contain links to Web sites of other companies or organizations that Oracle does not own or control. Oracle neither evaluates nor makes anyrepresentations regarding the accessibility of these Web sites.
Deaf/Hard of Hearing Access to Oracle Support Services
To reach Oracle Support Services, use a telecommunications relay service (TRS) to call Oracle Support at 1.800.223.1711. An Oracle Support Services engineer will handletechnical issues and provide customer support according to the Oracle service request process. Information about TRS is available at http://www.fcc.gov/cgb/consumerfacts/trs.html,and a list of phone numbers is available at http://www.fcc.gov/cgb/dro/trsphonebk.html.
Oracle Application Server Patch Set Notes, 10g Release 3 (10.1.3) Patch Set 5 (10.1.3.5.0)
Copyright © 2006, 2009, Oracle and/or its affiliates. All rights reserved.
This software and related documentation are provided under a license agreement containing restrictions on use and disclosure and are protected by intellectual property laws.Except as expressly permitted in your license agreement or allowed by law, you may not use, copy, reproduce, translate, broadcast, modify, license, transmit, distribute, exhibit,perform, publish, or display any part, in any form, or by any means. Reverse engineering, disassembly, or decompilation of this software, unless required by law forinteroperability, is prohibited.
The information contained herein is subject to change without notice and is not warranted to be errorfree. If you find any errors, please report them to us in writing.
If this software or related documentation is delivered to the U.S. Government or anyone licensing it on behalf of the U.S. Government, the following notice is applicable:
U.S. GOVERNMENT RIGHTS Programs, software, databases, and related documentation and technical data delivered to U.S. Government customers are "commercial computersoftware" or "commercial technical data" pursuant to the applicable Federal Acquisition Regulation and agencyspecific supplemental regulations. As such, the use, duplication,disclosure, modification, and adaptation shall be subject to the restrictions and license terms set forth in the applicable Government contract, and, to the extent applicable by theterms of the Government contract, the additional rights set forth in FAR 52.22719, Commercial Computer Software License (December 2007). Oracle USA, Inc., 500 OracleParkway, Redwood City, CA 94065.
This software is developed for general use in a variety of information management applications. It is not developed or intended for use in any inherently dangerous applications,including applications which may create a risk of personal injury. If you use this software in dangerous applications, then you shall be responsible to take all appropriate failsafe,backup, redundancy, and other measures to ensure the safe use of this software. Oracle Corporation and its affiliates disclaim any liability for any damages caused by use of thissoftware in dangerous applications.
Oracle is a registered trademark of Oracle Corporation and/or its affiliates. Other names may be trademarks of their respective owners.
This software and documentation may provide access to or information on content, products, and services from third parties. Oracle Corporation and its affiliates are notresponsible for and expressly disclaim all warranties of any kind with respect to thirdparty content, products, and services. Oracle Corporation and its affiliates will not beresponsible for any loss, costs, or damages incurred due to your access to or use of thirdparty content, products, or services.

4/18/2015 README for 8626084
https://updates.oracle.com/ARULink/PatchDetails/view_readme?aru=13669601 43/43