Embed Size (px)
Citation preview
Oracle8
Backup and Recovery Guide
Release 8.0
December, 1997
Part No. A58396-01

Oracle8 Backup and Recovery Guide
Part No. A58396-01
Release 8.0
Copyright © 1997, Oracle Corporation. All rights reserved.
Primary Authors: Connie Dialeris, Joyce Fee
Contributors: Bill Bridge, Sandra Cheevers, John Frazzini, Tim Berry-Hart, Gordon Larimer, Bill Lee,Diana Lorentz, Greg Pongracz, Lyn Pratt, Tuomas Pystynen, Daniel Semler, Slartibartfast, Steve Werthe-imer, Min Zhou
Graphic Designer: Valerie Moore
The programs are not intended for use in any nuclear, aviation, mass transit, medical, or other inher-ently dangerous applications. It shall be licensee's responsibility to take all appropriate fail-safe, backup, redundancy and other measures to ensure the safe use of such applications if the Programs areused for such purposes, and Oracle disclaims liability for any damages caused by such use of the Pro-grams.
This Program contains proprietary information of Oracle Corporation; it is provided under a licenseagreement containing restrictions on use and disclosure and is also protected by copyright patent andother intellectual property law. Reverse engineering of the software is prohibited.
The information contained in this document is subject to change without notice. If you find any problemsin the documentation, please report them to us in writing. Oracle Corporation does not warrant that thisdocument is error free.
If this Program is delivered to a U.S. Government Agency of the Department of Defense, then it is deliv-ered with Restricted Rights and the following legend is applicable:
Restricted Rights Legend Programs delivered subject to the DOD FAR Supplement are 'commercialcomputer software' and use, duplication and disclosure of the Programs shall be subject to the licensingrestrictions set forth in the applicable Oracle license agreement. Otherwise, Programs delivered subject tothe Federal Acquisition Regulations are 'restricted computer software' and use, duplication and disclo-sure of the Programs shall be subject to the restrictions in FAR 52..227-14, Rights in Data -- General,including Alternate III (June 1987). Oracle Corporation, 500 Oracle Parkway, Redwood City, CA 94065.
Oracle, Net8, and SQL*Plus are registered trademarks of Oracle Corporation. Oracle8, Server Manager,Enterprise Manager, Recovery Manager, Oracle Parallel Server and PL/SQL are trademarks of OracleCorporation.
All other products or company names are used for identification purposes only, and may be trademarksof their respective owners.
Contents
Send Us Your Comments ................................................................................................................. xiii
Preface ......................................................................................................................................................... xv
1 Why Perform Backups?
What Is a Backup?............................................................................................................................... 1-2Why Are Backups Important? .................................................................................................... 1-2When to Take Backups ................................................................................................................ 1-2Types of Failures........................................................................................................................... 1-3
Physical Database Structures ........................................................................................................... 1-4Control Files .................................................................................................................................. 1-4Online Redo Log Files.................................................................................................................. 1-5Datafiles ......................................................................................................................................... 1-5Rollback Segments........................................................................................................................ 1-6Archived Logs ............................................................................................................................... 1-7
2 What Are You Backing Up?
The Online Redo Log ......................................................................................................................... 2-2Online Redo Log File Contents................................................................................................... 2-2How Online Redo Log Files Are Written.................................................................................. 2-3Checkpoints ................................................................................................................................... 2-5Multiplexed Online Redo Log Files ........................................................................................... 2-9Threads of Online Redo Log and the Oracle Parallel Server ............................................... 2-13
The Archived Redo Log ................................................................................................................... 2-13
i
The Mechanics of Archiving ..................................................................................................... 2-14Archived Redo Log File Contents ............................................................................................ 2-15Duplexing the Archived Redo Log .......................................................................................... 2-15
Database Archiving Modes............................................................................................................. 2-16NOARCHIVELOG Mode (Media Recovery Disabled) ......................................................... 2-16ARCHIVELOG Mode (Media Recovery Enabled)................................................................. 2-16
Control Files ....................................................................................................................................... 2-19Control File Contents ................................................................................................................. 2-19Multiplexed Control Files.......................................................................................................... 2-20
Types of Backups .............................................................................................................................. 2-21Whole Database Backups........................................................................................................... 2-21Tablespace Backups.................................................................................................................... 2-24Datafile Backups ......................................................................................................................... 2-24Control File Backups .................................................................................................................. 2-24Archivelog Backups.................................................................................................................... 2-25
Backup Formats ................................................................................................................................. 2-26Backup Sets .................................................................................................................................. 2-26Datafile Copies ............................................................................................................................ 2-27Operating System Backups........................................................................................................ 2-27Logical Backups .......................................................................................................................... 2-28
3 When to Perform Backups
Guidelines for Database Backups ................................................................................................... 3-2Perform Backups Frequently and Regularly ............................................................................ 3-2Backup Appropriate Portions of the Database When Making Structural Changes............ 3-3Back Up Often-used Tablespaces Frequently ........................................................................... 3-3Back Up after Performing Unrecoverable/Unlogged Operations ........................................ 3-4Keep Older Backups ..................................................................................................................... 3-4Database Backups After Using the RESETLOGS Option ....................................................... 3-5Export Database Data for Added Protection and Flexibility.................................................. 3-6Consider Distributed Database Backups................................................................................... 3-6Test Backup and Recovery Strategies ........................................................................................ 3-7
Creating a Backup Strategy ............................................................................................................... 3-7Backup Strategies in NOARCHIVELOG Mode ....................................................................... 3-7Backup Strategies in ARCHIVELOG Mode.............................................................................. 3-8
ii
Backing Up Online Redo Logs......................................................................................................... 3-9The Dangers Associated with Backing Up Online Redo Logs............................................. 3-12
4 Choosing Recovery Strategies
Recovery Concepts and Strategies................................................................................................... 4-2Important Recovery Data Structures ....................................................................................... 4-3
Recovery Planning.............................................................................................................................. 4-5Factors Determining Your Recovery Strategy ........................................................................ 4-5Recovery Operations................................................................................................................... 4-7
5 Choosing a Backup Method
Backup Methods and Requirements............................................................................................... 5-2Recovery Manager........................................................................................................................ 5-2Operating System (O/S) .............................................................................................................. 5-2Export ............................................................................................................................................. 5-3Enterprise Backup Utility ............................................................................................................ 5-3
Recovery Manager .............................................................................................................................. 5-3Using Oracle Enterprise Manager to Perform Recovery Manager Backups ....................... 5-3Recovery Manager is Different from Traditional Operating System Backups.................... 5-4Backups to Disk ............................................................................................................................ 5-4Backups to Sequential Media...................................................................................................... 5-5
Feature Comparison of Backup Methods....................................................................................... 5-7
6 Getting Started with Recovery Manager
Decisions to Make Before Using Recovery Manager .................................................................. 6-2Will You Use a Recovery Catalog?............................................................................................ 6-2Decide Whether or Not to Use Password Files ....................................................................... 6-6Decide How to Back Up init.ora Files and Password Files .................................................... 6-7
Recovery Manager Connection Options ........................................................................................ 6-7Connecting to Recovery Manager Without a Recovery Catalog........................................... 6-7Connecting to Recovery Manager With a Recovery Catalog................................................. 6-8
Running Recovery Manager Commands ....................................................................................... 6-9Running Recovery Manager Commands Interactively: Example 1 ...................................... 6-9Using Command Files: Example 2 ........................................................................................... 6-10
iii
Using Stored Scripts: Example 3............................................................................................... 6-10Specifying Time Parameters in Recovery Manager............................................................... 6-11
Recovery Manager Sample Scripts and Scenarios...................................................................... 6-11Prerequisites for Performing Backups to Tape............................................................................ 6-11
Linking with a Media Manager ................................................................................................ 6-12 Generating Unique File Names ............................................................................................... 6-12Know Your Media Manager’s Maximum File Size Limit ..................................................... 6-13
7 Recovery Manager Concepts
Introduction to Recovery Manager.................................................................................................. 7-2Backing Up to Sequential Media.............................................................................................. 7-4
The Recovery Catalog ........................................................................................................................ 7-5Operating with a Recovery Catalog ......................................................................................... 7-5Operating without a Recovery Catalog ................................................................................... 7-7Snapshot Control File ................................................................................................................. 7-9Stored Scripts................................................................................................................................ 7-9
Recovery Manager Backup Types .................................................................................................. 7-10Backup Sets ................................................................................................................................. 7-10Full and Incremental Backup Sets.......................................................................................... 7-12Image Copies .............................................................................................................................. 7-17
Corruption Detection ....................................................................................................................... 7-18Channel Control ................................................................................................................................ 7-19Parallelization .................................................................................................................................... 7-20
Factors Affecting Degree of Parallelization.......................................................................... 7-20Multiplexed Backup Sets ......................................................................................................... 7-22
Report Generation ............................................................................................................................ 7-23User Tags for Recovery Manager Backups ................................................................................... 7-24Backup Constraints........................................................................................................................... 7-25Restore Constraints........................................................................................................................... 7-26Integrity Checking ............................................................................................................................ 7-26
Fractured Block Detection During Open Database Backups in Recovery Manager ..................................................................................................................... 7-26
Tracking Archive Logs ..................................................................................................................... 7-27Cataloging Image Copies and Archive Logs................................................................................ 7-27
iv
8 Performing Backup and Recovery with Recovery Manager
Installing the Recovery Catalog ....................................................................................................... 8-2Registering a Database................................................................................................................. 8-2
Maintaining the Recovery Catalog.................................................................................................. 8-3Registering a Target Database with the Recovery Catalog .................................................... 8-3Resetting the Information in the Recovery Catalog ................................................................ 8-4Resynchronizing the Recovery Catalog with a Target Database........................................... 8-4Changing the Availability of a Backup Set or File Copy ........................................................ 8-6Cataloging User-Created Backup Files...................................................................................... 8-8Recovering a Lost or Damaged Recovery Catalog Database ................................................. 8-9
Using Channel Control Commands ................................................................................................ 8-9Channel Control Commands .................................................................................................... 8-10
Generating Reports .......................................................................................................................... 8-12Generating a Report ................................................................................................................... 8-13Generating Lists .......................................................................................................................... 8-17
Maintaining Scripts.......................................................................................................................... 8-19Creating and Replacing Scripts ................................................................................................ 8-19Deleting Scripts ........................................................................................................................... 8-19Printing Scripts............................................................................................................................ 8-19
Configuring the Snapshot Control File Location........................................................................ 8-19Backing Up Files ............................................................................................................................... 8-20
Performing Backups................................................................................................................... 8-21Backing Up: Scenario ................................................................................................................. 8-27
Copying Files ..................................................................................................................................... 8-28Copy Command Specifiers........................................................................................................ 8-28
Restoring Files ................................................................................................................................... 8-30Database Point-In-Time Recovery............................................................................................ 8-30File Selection................................................................................................................................ 8-30Restore Destination for Datafiles.............................................................................................. 8-31Restore Destination for Control Files....................................................................................... 8-31Replicating Control Files ........................................................................................................... 8-31Restore Destination for Archived Logs ................................................................................... 8-32Guidelines for Restoring Datafiles ........................................................................................... 8-32Restore Command Operand List.............................................................................................. 8-33
Switching Datafiles .......................................................................................................................... 8-35
v
Recovering Datafiles......................................................................................................................... 8-35Guidelines for Recovering Datafiles ........................................................................................ 8-36Database Point-In-Time Recovery............................................................................................ 8-36Recovery Commands ................................................................................................................. 8-37Recover Command Object List ................................................................................................. 8-38
Monitoring Backups and Restores ................................................................................................ 8-39Connecting a Session to Channels............................................................................................ 8-39Monitoring Progress................................................................................................................... 8-40
9 Recovery Manager Scenarios
Backing Up in NOARCHIVELOG Mode....................................................................................... 9-2Backing Up Databases and Tablespaces......................................................................................... 9-2
Backing Up a Database ................................................................................................................ 9-2Backing Up a Tablespace ............................................................................................................. 9-3Backing Up Individual Datafiles ................................................................................................ 9-3Backing Up the Control File ........................................................................................................ 9-3Backing Up Archived Logs ......................................................................................................... 9-3
Backing Up in a Parallel Server Environment............................................................................... 9-5Copying Datafiles................................................................................................................................ 9-5Incremental Backups .......................................................................................................................... 9-6Handling Errors ................................................................................................................................... 9-6Using O/S Utilities To Make Copies ............................................................................................... 9-7 Keeping Backups ............................................................................................................................... 9-7Restoring and Recovering ................................................................................................................. 9-8
Restore and Recover When the Database Is Open................................................................... 9-8Restore .......................................................................................................................................... 9-10
Database Point-In-Time Recovery ................................................................................................. 9-10Querying the Recovery Catalog ..................................................................................................... 9-11Using the Report Command for Complex Recovery Catalog Queries ................................... 9-12
10 Recovery Manager Tablespace Point-in-Time Recovery
Introduction to Recovery Manager Tablespace Point-in-Time Recovery .............................. 10-2Planning for Recovery Manager Tablespace Point-in-Time Recovery ................................... 10-3
Limitations ................................................................................................................................... 10-4Recovery Manager TSPITR Planning Requirements............................................................. 10-7
vi
Performing Recovery Manager Tablespace Point-In-Time Recovery..................................... 10-9Back Up Tablespaces After Recovery Manager TSPITR Is Complete............................... 10-10
Tuning Considerations .................................................................................................................. 10-10Specify a New Name for Datafiles in Auxiliary Set Tablespaces ...................................... 10-10Set the Clone Name and Use a Datafile Copy for Recovery Manager TSPITR ............... 10-11Use the Converted Datafile Name ......................................................................................... 10-13
11 Performing Operating System Backups
Performing Backups ......................................................................................................................... 11-2Listing Database Files Before Backup...................................................................................... 11-2Performing Whole Database Backups ..................................................................................... 11-3Performing Tablespace, Datafile, Control File or Archivelog Backups.............................. 11-5Performing Control File Backups........................................................................................... 11-10
Recovering From a Failed Online Tablespace Backup ............................................................ 11-12Using the Export and Import Utilities for Supplemental Database Protection.................. 11-13
Using Export.............................................................................................................................. 11-13Using Import ............................................................................................................................. 11-14
12 Recovering a Database
Coordinate Distributed Recovery.................................................................................................. 12-2Coordinate Time-Based and Change-Based Distributed Database Recovery ............... 12-2Recover Database with Snapshots ......................................................................................... 12-3
Recovery Scenarios ........................................................................................................................... 12-3Recovering a Closed Database ................................................................................................ 12-3Recovering an Offline Tablespace in an Open Database ...................................................... 12-4Starting Recovery During Instance Startup ......................................................................... 12-4Applying Redo Log Files........................................................................................................... 12-4Applying Log Files ..................................................................................................................... 12-5Interrupting Media Recovery ................................................................................................... 12-9
Restoring a Whole Database Backup, NOARCHIVELOG Mode ........................................... 12-9Specifying Parallel Recovery........................................................................................................ 12-11Preparing for Media Recovery ..................................................................................................... 12-11
Media Recovery Commands................................................................................................... 12-11Issues Common to All Media Recovery Operations ........................................................... 12-12
Performing Complete Media Recovery ...................................................................................... 12-15
vii
Performing Closed Database Recovery ................................................................................. 12-15Performing Open-Database, Offline-Tablespace Individual Recovery ............................ 12-17Performing Open-Database, Offline-Tablespace Individual Recovery ............................ 12-19
Performing Incomplete Media Recovery ................................................................................... 12-21Performing Cancel-based Recovery....................................................................................... 12-22Performing Time-based Recovery.......................................................................................... 12-26Performing Change-based Recovery ..................................................................................... 12-31
Preparing for Disaster Recovery .................................................................................................. 12-35Planning and Creating a Standby Database ......................................................................... 12-35Altering the Physical Structure of the Primary Database ................................................... 12-39
Unrecoverable Objects and Recovery ......................................................................................... 12-43Read-only Tablespaces and Recovery ......................................................................................... 12-44
Using a Backup Control File ................................................................................................... 12-44Re-creating a Control File ........................................................................................................ 12-44
Recovery Procedure Examples...................................................................................................... 12-45Types of Media Failures........................................................................................................... 12-45Loss of Datafiles ........................................................................................................................ 12-45Loss of Online Redo Log Files ................................................................................................ 12-46Loss of Archived Redo Log Files ............................................................................................ 12-51Loss of Control Files ................................................................................................................. 12-51Recovery From User Errors..................................................................................................... 12-53
13 Performing Tablespace Point-in-Time Recovery
Introduction to Tablespace Point-in-Time Recovery ................................................................. 13-2Planning for Tablespace Point-in-Time Recovery ...................................................................... 13-3
Limitations Advisory ................................................................................................................. 13-4TSPITR Requirements ................................................................................................................ 13-6
Performing Tablespace Point-In-Time Recovery ........................................................................ 13-7Step 1: Find Out if Objects Will be Lost when Performing TSPITR .................................... 13-8 Step 2: Research and Resolve Dependencies on the Primary Database ............................ 13-8Step 3: Prepare the Primary Database for TSPITR............................................................... 13-12Step 4: Prepare the Parameter Files for the Clone Database............................................... 13-12Step 5: Prepare Clone Database for TSPITR.......................................................................... 13-13Step 6: Recover the Clone Database ....................................................................................... 13-14Step 7: Open the Clone Database............................................................................................ 13-15
viii

Step 8: Prepare the Clone Database for Export .................................................................... 13-15Step 9: Export the Clone Database ......................................................................................... 13-15Step 10: Copy the Recovery Set Clone Files to the Primary Database .............................. 13-15Step 11: Import into the Primary Database........................................................................... 13-15Step 12: Prepare the Primary Database for Use ................................................................... 13-16Step 13: Back Up the Recovered Tablespaces in the Primary Database ........................... 13-16
Performing Partial TSPITR of Partitioned Tables.................................................................... 13-16Step 1: Create a Table on the Primary Database for EachPartition Being Recovered....................................................................................................... 13-17Step 2: Drop the Indexes on the Partition Being Recovered............................................... 13-17Step 3: Exchange Partitions with Stand-Alone Tables ........................................................ 13-18Step 4:Take the Recovery Set Tablespace Offline ................................................................ 13-18Step 5: Create Tables at Clone Database ............................................................................... 13-18Step 6: Drop Indexes on Partitions Being Recovered .......................................................... 13-18Step 7: Exchange Partitions with Stand-Alone Tables ........................................................ 13-18Step 8: Export the Clone Database ......................................................................................... 13-18Step 9: Copy the Recovery Set Datafiles to the Primary Database.................................... 13-19Step 10: Import into the Primary Database........................................................................... 13-19Step 11: Bring Recovery Set Tablespace Online ................................................................... 13-19Step 12: Exchange Partitions with Stand-Alone Tables ...................................................... 13-19Step 13: Back Up the Recovered Tablespaces in the Primary Database ........................... 13-20
Performing TSPITR of Partitioned Tables When a Partition Has Been Dropped ............. 13-21Step 1: Find the Low and High Range of the Partition that Was Dropped...................... 13-21Step 2: Create a Temporary Table .......................................................................................... 13-22Step 3: Delete Records From Partitioned Table.................................................................... 13-22Step 4: Take Recovery Set Tablespaces Offline .................................................................... 13-22Step 5: Create Tables at Clone Database ............................................................................... 13-22Step 6: Drop Indexes on Partitions Being Recovered .......................................................... 13-22Step 7: Exchange Partitions with Stand-Alone Tables ........................................................ 13-22Step 8: Export the Clone Database ......................................................................................... 13-22Step 9: Copy the Recovery Set Datafiles to the Primary Database.................................... 13-23Step 10: Import into the Primary Database........................................................................... 13-23Step 11: Bring Recovery Set Tablespace Online ................................................................... 13-23Step 12: Insert Stand-Alone Tables into Partitioned Tables ............................................... 13-23Step 13: Back Up the Recovered Tablespaces in the Primary Database ........................... 13-24
ix
Performing TSPITR of Partitioned Tables When a Partition Has Been Split ..................... 13-25Step 1: Drop the Lower of the Two Partitions at the Primary Database........................... 13-25Step 2: Drop Indexes of Partitions Being Recovered ........................................................... 13-26Step 3: Exchange Partitions with Stand-Alone Tables......................................................... 13-26Step 4: Take Recovery Set Tablespaces Offline..................................................................... 13-26Step 5: Create Tables at Clone Database................................................................................ 13-26Step 6: Drop Indexes in Partitions Being Recovered ........................................................... 13-26Step 7: Exchange Partitions with Stand-Alone Tables......................................................... 13-26Step 8: Export the Clone Database ......................................................................................... 13-27Step 9: Copy the Recovery Set Datafiles to the Primary Database .................................... 13-27Step 10: Import into the Primary Database ........................................................................... 13-27Step 11: Bring Recovery Set Tablespace Online ................................................................... 13-27Step 12: Exchange Partitions with Stand-Alone Tables....................................................... 13-27Step 13: Back Up the Recovered Tablespaces in the Primary Database ........................... 13-28
TSPITR Tuning Considerations ................................................................................................... 13-28Recovery Set Location Considerations .................................................................................. 13-28Backup Control File Considerations ...................................................................................... 13-29
A Recovery Manager Command Syntax
allocateForDelete................................................................................................................................. A-2allocate................................................................................................................................................... A-3archivelogRecordSpecifier................................................................................................................. A-4atClause................................................................................................................................................. A-5backup ................................................................................................................................................... A-6backupSpec .......................................................................................................................................... A-7catalog.................................................................................................................................................... A-9change................................................................................................................................................. A-10connect................................................................................................................................................ A-11copy ..................................................................................................................................................... A-12copyOption........................................................................................................................................ A-13createScript ........................................................................................................................................ A-14deleteScript........................................................................................................................................ A-15host...................................................................................................................................................... A-16inputfile.............................................................................................................................................. A-17list........................................................................................................................................................ A-18
x

listObjList........................................................................................................................................... A-19needBackupOperand ....................................................................................................................... A-20primary_key ....................................................................................................................................... A-21printScript .......................................................................................................................................... A-22recover ................................................................................................................................................. A-23register................................................................................................................................................. A-24release.................................................................................................................................................. A-25replaceScript ...................................................................................................................................... A-26replicate............................................................................................................................................... A-27report ................................................................................................................................................... A-28reportObject ....................................................................................................................................... A-29reset...................................................................................................................................................... A-30restoreObject...................................................................................................................................... A-31restore .................................................................................................................................................. A-32restoreSpecOperand ......................................................................................................................... A-33resync................................................................................................................................................... A-34releaseForDelete................................................................................................................................ A-35rmanCmd ............................................................................................................................................ A-36reportObsoleteOperand................................................................................................................... A-37run ........................................................................................................................................................ A-38set ......................................................................................................................................................... A-39setPragma ........................................................................................................................................... A-40sql......................................................................................................................................................... A-41switch .................................................................................................................................................. A-42untilClause ......................................................................................................................................... A-43validate................................................................................................................................................ A-44
Glossary
Index
xi

xii

Send Us Your Comments
Oracle8 Backup and Recovery Guide, Release 8.0
Part No. A58396-01
Oracle Corporation welcomes your comments and suggestions on the quality and usefulness of thispublication. Your input is an important part of the information used for revision.
■ Did you find any errors?■ Is the information clearly presented?■ Do you need more information? If so, where?■ Are the examples correct? Do you need more examples?■ What features did you like most about this manual?
If you find any errors or have any other suggestions for improvement, please indicate the chapter,section, and page number (if available). You can send comments to us in the following ways:
■ email: [email protected]■ fax: (650) 506-7228 Attn: Server Technologies Documentation Manager■ letter: Server Technologies Documentation Manager
Oracle Corporation 500 Oracle Parkway Redwood Shores, CA 94065
If you would like a reply, please give your name, address, and telephone number below.
xiii

xiv

Preface
Welcome to the world of Oracle backup and recovery! This new book in the OracleServer documentation library includes all of the conceptual and task-oriented infor-mation you will need to perform backup, restore, and recovery procedures whetheryou use the new Recovery Manager utility or existing operating system backups.
Attention: The Oracle8 Backup and Recovery Guide contains infor-mation that describes the features and functionality of the Oracle8and the Oracle8 Enterprise Edition products. Oracle8 and Oracle8Enterprise Edition have the same basic features. However, severaladvanced features are available only with the Enterprise Edition,and some of these are optional. For example, to perform auto-mated tablespace point-in-time recovery (using Recovery Man-ager), you must have the Enterprise Edition.
For information about the differences between Oracle8 and theOracle8 Enterprise Edition and the features and options that areavailable to you, please refer to Getting to Know Oracle8 and theOracle8 Enterprise Edition.
xv
StructureThis book contains the following parts and chapters.
Part / Chapter Contents
PART 1 Getting Started
Chapter 1: Why PerformBackups?
Describes the fundamental data structures you need to under-stand before moving on to the following chapters. The struc-tures described here are the fundamental building blocks forOracle backup, restore and recovery procedures.
Chapter 2: What AreYou Backing Up?
Describes in detail all of the fundamental concepts necessary tounderstand Oracle backup and recovery. These concepts alsoapply to the Recovery Manager utility.
Chapter 3: When to Per-form Backups
A comprehensive description of the guidelines and strategies tofollow for performing backups.
Chapter 4: ChoosingRecovery Strategies
An overview of the guidelines and strategies to follow whenperforming database recovery. Here you will find descriptionsof recovery situations along with recommendations for appro-priate recovery procedures.
Chapter 5: Choosing aBackup Method
Describes different ways to implement the guidelines and strate-gies described in Chapter 3.
PART 2 Backup and Recovery—Recovery Manager
Chapter 6: GettingStarted with RecoveryManager
Describes issues to consider before using Recovery Manager, aswell as some tips for getting a “quick start” with Recovery Man-ager
Chapter 7: RecoveryManager Concepts
A comprehensive description of the Recover Manager utility,and includes fundamental Recovery Manager concepts.
Chapter 8: PerformingBackup and Recoverywith Recovery Manager
Provides instructions for using the Oracle Recovery Managerutility to manage your enterprise’s backup, restore and recoveryoperations.
Chapter 9: RecoveryManager Scenarios
Provides examples of specific situations in which you woulduse Recovery Manager and also includes appropriate RecoveryManager commands
Chapter 10: RecoveryManager TablespacePoint-in-Time Recovery
Describes all the planning and limitations to consider beforeusing the step-by-step directions for using Recovery Manager toperform automated tablespace point-in-time recovery.
PART 3 Backup and Recovery—Operating System
Chapter 11: PerformingOperating System Back-ups
Provides step-by-step instructions for performing operating sys-tem backups. The information in this appendix previouslyappeared in the Oracle7 Server Administrator’s Guide.
xvi

AudienceThis guide is for people who administer the backup, restore, and recovery opera-tions of an Oracle database system.
Knowledge Assumed of the ReaderReaders of this guide are assumed to be familiar with relational database concepts.They are also assumed to be familiar with the operating system environment underwhich they are running Oracle.
How to Use This GuideEvery reader of this guide should read Chapter 1 of the Oracle8 Concepts manual,“Introduction to the Oracle Server.” This overview of the concepts and terminologyrelated to Oracle provides a foundation for the more detailed information in thisguide. The rest of the Oracle8 Concepts manual explains the Oracle architecture andfeatures, and how they operate in more detail.
Chapter 12: PerformingOperating System Recov-ery
Provides step-by-step instructions for performing operating sys-tem recovery. The information in this appendix previouslyappeared in the Oracle7 Server Administrator’s Guide.
Chapter 13: PerformingTablespace Point-in-Time Recovery
Provides planning guidelines and step-by-step instructions formanually performing tablespace point-in-time recovery.
Appendix A, RecoveryManager Command Syn-tax
Includes the basic Recovery Manager command syntax dia-grams.
Part / Chapter Contents
xvii

xviii

Part I
Getting Started
Why Perform Back
1
Why Perform Backups?This chapter introduces database concepts that are fundamental to backup andrecovery, and explains why taking backups is crucial for successful databaseoperations. The following topics are included:
■ What Is a Backup?
■ Physical Database Structures
ups? 1-1

What Is a Backup?
What Is a Backup?Simply speaking, a database backup is a representative copy of data. When theoriginal data is lost, you can use the backup to reconstruct lost information (thephysical files that constitute your Oracle database). This copy includes importantparts of your database, such as the control file, archive logs and datafiles—structures described later in this chapter and throughout this book. In the event of amedia failure, your database backup is the key to successfully recovering your data.
Why Are Backups Important?Imagine the magnitude of lost revenue (not to mention the degree of customerdissatisfaction!) if the production database of a catalog company, express deliveryservice, bank or airline suddenly became unavailable, even for just 5 or 10 minutes;or, if you lose datafiles due to media failure and cannot restore or recover thembecause you do not have a backup. From your enterprise’s perspective, the resultsmay be quite grim. You must restore and recover your data quickly to resumeoperations. The key to your success in this situation is a well-defined backup andrecovery strategy.
When to Take BackupsYou should tailor your backup strategy to the needs of your business. For example,if it is acceptable to lose data in the event of a disk failure, you may not need toperform frequent backups. What if your database must be available twenty-fourhours a day, seven days a week? In this case, your database would have to befrequently backed up. The frequency of your backups and types of backupsperformed is determined in large part by the needs of your business.
1-2 Oracle8 Backup and Recovery Guide
What Is a Backup?
Types of FailuresAn unfortunate aspect of every database system is the possibility of a system orhardware failure. The most common types of failure are described below.
statement and processfailure
Statement failure occurs when there is a logicalfailure in the handling of a statement in an Oracleprogram (for example, the statement is not a validSQL construction). When statement failure occurs,the effects (if any) of the statement are automaticallyundone by Oracle and control is returned to the user.
A process failure is a failure in a user processaccessing Oracle, such as an abnormaldisconnection or process termination. The faileduser process cannot continue work, although Oracleand other user processes can.
instance failure Instance failure occurs when a problem arises thatprevents an instance (system global area andbackground processes) from continuing work.Instance failure may result from a hardwareproblem such as a power outage, or a softwareproblem such as an operating system crash. Whenan instance failure occurs, the data in the buffers ofthe system global area is not written to the datafiles.Oracle automatically recovers from instance failurewhen the database opens.
user or application error User errors can require a database to be recoveredto a point in time before the error occurred. Forexample, a user might accidentally delete data froma table that is still required (for example, payrolltaxes). To allow recovery from user errors andaccommodate other unique recovery requirements,Oracle provides for exact point-in-time recovery.For example, if a user accidentally deletes data, thedatabase can be recovered to the instant in timebefore the data was deleted.
Why Perform Backups? 1-3
Physical Database Structures
Physical Database StructuresThe following sections give a brief overview of the physical database structures ofan Oracle database. These topics will be covered in more detail in subsequentchapters of this book.
Control FilesEvery Oracle database has a control file. A control file is an extremely importantdatafile that contains entries specifying the physical structure of the database, andprovide database consistency information used during recovery. For example, itcontains the following types of information:
■ database name
■ names and locations of a database’s datafiles and redo log files
■ time stamp of database creation
■ backup information (when using the Recovery Manager utility)
Like the redo log, Oracle allows the control file to be mirrored for protection of thecontrol file.
Use of Control FilesEvery time an instance of an Oracle database is mounted, its control file is used toidentify the datafiles and redo log files that must be opened for database operationto proceed. If the physical makeup of the database is altered (for example, a newdatafile or redo log file is created), the database’s control file is automaticallymodified by Oracle to reflect the change.
media (disk) failure An error can arise when trying to write or read a filethat is required to operate the database. This iscalled disk failure because there is a physicalproblem reading or writing physical files on disk. Acommon example is a disk head crash, which causesthe loss of all files on a disk drive. Different filesmay be affected by this type of disk failure,including the datafiles, the redo log files, and thecontrol files. Also, because the database instancecannot continue to function properly, the data in thedatabase buffers of the system global area cannot bepermanently written to the datafiles.
1-4 Oracle8 Backup and Recovery Guide
Physical Database Structures
You should back up the control file any time there are structural changes to thedatabase.
Online Redo Log FilesEvery Oracle database has a set of two or more redo log files. The set of redo log filesfor a database is collectively known as the database’s redo log. Oracle uses the redolog to record all changes made to data. For example, a failure has preventedmodified data from being permanently written to the datafiles. In this situation,you can obtain the modified data from the redo log and permanently write it to thedatafiles, all-the-while preventing loss of work.
Redo log files are critical in protecting a database against failures. To protect againsta failure involving the redo log itself, Oracle allows the redo log to be multiplexed.This means Oracle will maintain two or more copies of the redo log on differentdisks.
You do not need to back up the online redo log, nor should you ever need to restoreit.
The Use of Redo Log FilesThe information in a redo log file is used only to recover the database from asystem or media failure that prevents database data from being written to adatabase’s datafiles.
For example, if an unexpected power outage abruptly terminates databaseoperation, data in memory cannot be written to the datafiles and the data is lost.After power is restored, any lost data is recovered when the database is opened. Byapplying the information in the most recent redo log files to the database’sdatafiles, Oracle restores the database to the time at which the power failureoccurred.
The process of applying the redo logs to datafiles and control files in order torecover them is called rolling forward.
DatafilesEvery Oracle database has one or more physical datafiles. A database’s datafilescontain all the database data. The data of logical database structures such as tablesand indexes is physically stored in the datafiles allocated for a database.
The following are characteristics of datafiles:
■ A datafile can be associated with only one database.
Why Perform Backups? 1-5
Physical Database Structures
■ Database files can have certain characteristics set to allow them to automati-cally extend when the database runs out of space.
■ One or more datafiles form a logical unit of database storage called a tablespace.
The Use of DatafilesThe data in a datafile is read, as needed, during normal database operation andstored in the memory cache of Oracle. For example, assume that a user wants toaccess some data in a table of a database. If the requested information is not alreadyin the memory cache for the database, it is read from the appropriate datafiles andstored in memory.
Modified or new data is not necessarily written to a datafile immediately. To reducethe amount of disk access and increase performance, data is pooled in memory andwritten to the appropriate datafiles all at once, as determined by the DBW0background process of Oracle.
Rollback SegmentsEvery database contains one or more rollback segments, which are portions of thedatabase that record the actions of transactions in the event that a transaction isrolled back. You use rollback segments to provide read consistency, rollbacktransactions, and to put a database in a transaction-consistent state as part ofrecovery.
The Use of Rollback SegmentsRollback segments are used for a number of functions in the operation of an Oracledatabase. In general, the rollback segments of a database store the old values ofdata changed by ongoing transactions (that is, uncommitted transactions). Amongother things, the information in a rollback segment is used during databaserecovery to “undo” any “uncommitted” changes applied from the redo log to thedatafiles. Therefore, if database recovery is necessary, the data is in a consistentstate after the rollback segments are used to remove all uncommitted data from thedatafiles.
1-6 Oracle8 Backup and Recovery Guide
Physical Database Structures
Archived LogsArchived log files are redo logs that have been filled with redo, made inactive andcopied or archived to a backup location. You can archive online redo files beforereusing them; this creates the archived log. The presence or absence of an archivedredo log is determined by the mode that the database is using:
When in ARCHIVELOG mode, the database can be completely recovered fromboth instance and disk failure. The database can also be backed up while it is openand available for use. However, additional administrative operations are requiredto maintain the archived redo log.
Typically, your only recovery option for databases operating in NOARCHIVELOGmode is to restore the whole database. Your only backup option is to back up thedatabase while it is completely closed. Because no archived redo log is created, noextra work is required by the database administrator.
ARCHIVELOG The filled online redo log files are archived beforethey are reused in the cycle.
NOARCHIVELOG The filled online redo log files are not archived.
Note: The only time you can recover a database while operatingin NOARCHIVELOG is when you have not already overwrittenthe online log files that were current at the time of the most recentbackup.
Why Perform Backups? 1-7

Physical Database Structures
1-8 Oracle8 Backup and Recovery Guide
What Are You Backing
2
What Are You Backing Up?This chapter describes the structures comprising a database, as well as key backupand recovery concepts, and includes the following topics:
■ The Online Redo Log
■ The Archived Redo Log
■ Database Archiving Modes
■ Control Files
■ Types of Backups
Recovery processes vary depending on the type of failure that occurred, thestructures affected, and the type of backups available for performing recovery. If nofiles are lost or damaged, recovery may amount to no more than restarting aninstance.
Several structures of an Oracle database safeguard data against possible failures.This chapter briefly introduce each of these structures and their use in backup andrecovery.
Up? 2-1
The Online Redo Log
The Online Redo LogEvery instance of an Oracle database has an associated online redo log to protectthe database in case the database experiences an instance failure. An online redolog consists of two or more pre-allocated files that store all changes made to thedatabase as they occur.
Online Redo Log File ContentsOnline redo log files are filled with redo entries. Redo entries record data that can beused to reconstruct all changes made to the database, including the rollbacksegments. Therefore, the online redo log also protects rollback data.
Redo entries are buffered in a “circular” fashion in the redo log buffer of the SGAand are written to one of the online redo log files by the Oracle background processLog Writer (LGWR). Whenever a transaction is committed, LGWR writes thetransaction’s redo entries from the redo log buffer of the system global area (SGA)to an online redo log file, and a system change number (SCN) is assigned to identifythe redo entries for each committed transaction.
However, redo entries can be written to an online redo log file before thecorresponding transaction is committed. If the redo log buffer fills, or anothertransaction commits, LGWR flushes all of the redo log entries in the redo log bufferto an online redo log file, even though some redo entries may not be committed.
Note: Oracle does not recommend backing up the online redolog. See “Online Redo Log Backups Not Recommended” onpage 2-25 for more information.
Note: Redo entries store low-level representations of databasechanges that cannot be mapped to user actions. Therefore, the con-tents of an online redo log file should never be edited or altered,and cannot be used for any application purposes such as auditing.
2-2 Oracle8 Backup and Recovery Guide

The Online Redo Log
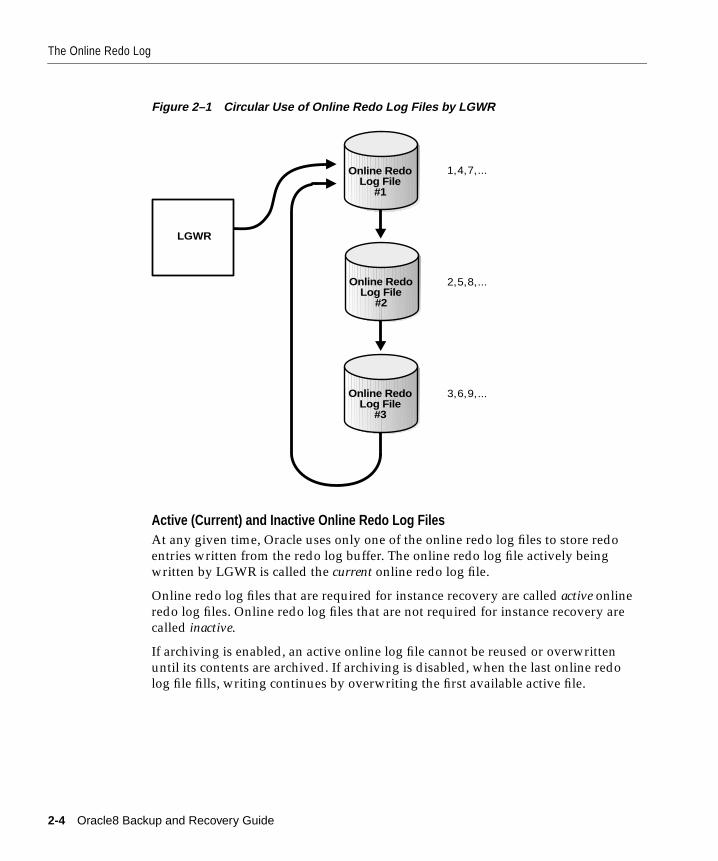
How Online Redo Log Files Are WrittenThe online redo log of a database consists of two or more online redo log files.Oracle requires two files to guarantee that one is always available for writing whilethe other is being archived, if desired.
LGWR writes to online redo log files in a circular fashion; when the current onlineredo log file is filled, LGWR begins writing to the next available online redo log file.When the last available online redo log file is filled, LGWR returns to the firstonline redo log file and writes to it, starting the cycle again. Figure 2–1 illustratesthe circular writing of the online redo log file. The numbers next to each lineindicate the sequence in which LGWR writes to each online redo log file.
Filled online redo log files are “available” to LGWR for reuse depending onwhether archiving is enabled:
■ If archiving is disabled, a filled online redo log file is available once the check-point involving the online redo log file has completed.
■ If archiving is enabled, a filled online redo log file is available to LGWR oncethe checkpoint involving the online redo log file has completed and once thefile has been archived.
What Are You Backing Up? 2-3
The Online Redo Log
Figure 2–1 Circular Use of Online Redo Log Files by LGWR
Active (Current) and Inactive Online Redo Log FilesAt any given time, Oracle uses only one of the online redo log files to store redoentries written from the redo log buffer. The online redo log file actively beingwritten by LGWR is called the current online redo log file.
Online redo log files that are required for instance recovery are called active onlineredo log files. Online redo log files that are not required for instance recovery arecalled inactive.
If archiving is enabled, an active online log file cannot be reused or overwrittenuntil its contents are archived. If archiving is disabled, when the last online redolog file fills, writing continues by overwriting the first available active file.
LGWR
1, 4, 7, ...
3, 6, 9, ...
2, 5, 8, ...
Online RedoLog File
#3
Online RedoLog File
#2
Online RedoLog File
#1
2-4 Oracle8 Backup and Recovery Guide
The Online Redo Log
Log Switches and Log Sequence NumbersThe point at which Oracle ends writing to one online redo log file and beginswriting to another is called a log switch. A log switch always occurs when thecurrent online redo log file is completely filled and writing must continue to thenext online redo log file. The database administrator can also force log switches.
Oracle assigns each online redo log file a new log sequence number every time that alog switch occurs and LGWR begins writing to it. If online redo log files arearchived, the archived redo log file retains its log sequence number. The onlineredo log file that is cycled back for use is given the next available log sequencenumber.
Each redo log file (including online and archived) is uniquely identified by its logsequence number. During instance or media recovery, Oracle properly applies redolog files in ascending order by using the log sequence number of necessaryarchived and online redo log files.
CheckpointsAn event called a checkpoint occurs when the Oracle background process, DBW0writes all the modified database buffers in the SGA, including both committed anduncommitted data, to the data files. Checkpoints are implemented for the followingreasons:
■ Checkpoints ensure that data blocks in memory that change frequently are writ-ten to datafiles regularly. Because of the least-recently-used algorithm ofDBW0, a data block that changes frequently might never qualify as the leastrecently used block and thus might never be written to disk if checkpoints didnot occur.
■ Because all database changes up to the checkpoint have been recorded in thedatafiles, redo log entries before the checkpoint no longer need to be applied tothe datafiles if instance recovery is required. Therefore, checkpoints are usefulbecause they can expedite instance recovery.
Though some overhead is associated with a checkpoint, Oracle does not haltactivity nor are current transactions affected. Because DBW0 continuously writesdatabase buffers to disk, a checkpoint does not necessarily require many datablocks to be written all at once. Rather, the completion of a checkpoint simplyguarantees that all data blocks modified since the previous checkpoint are actuallywritten to disk.
Checkpoints occur whether or not filled online redo log files are archived. Ifarchiving is disabled, a checkpoint affecting an online redo log file must complete
What Are You Backing Up? 2-5
The Online Redo Log
before the online redo log file can be reused by LGWR. If archiving is enabled, acheckpoint must complete and the filled online redo log file must be archivedbefore it can be reused by LGWR.
Checkpoints can occur for all datafiles of the database (called database checkpoints)or can occur for only specific datafiles. The following list explains whencheckpoints occur and what type happens in each situation:
■ A database checkpoint automatically starts at every log switch. If a previousdatabase checkpoint is currently in progress, a checkpoint forced by a logswitch overrides the current checkpoint.
■ An initialization parameter, LOG_CHECKPOINT_INTERVAL, can be set toforce a database checkpoint when a predetermined number of redo log blockshave been written to disk relative to the last database checkpoint. You can setanother parameter, LOG_CHECKPOINT_TIMEOUT, to force a database check-point a specific number of seconds after the previous database checkpointstarted. These parameters are useful when extremely large redo log files areused and additional checkpoints are desired between log switches. Databasecheckpoints signaled to start by these initialization parameters are not per-formed until the previous checkpoint has completed.
■ When the beginning of an online tablespace backup is indicated, a checkpointis forced only on the datafiles that constitute the tablespace being backed up. Acheckpoint at this time overrides any previous checkpoint still in progress.Also, since this type of checkpoint only affects the datafiles being backed up, itdoes not reduce the amount of redo that would be needed for instance recovery.
■ If the administrator takes a tablespace offline with normal or temporary prior-ity, a checkpoint is forced only on the online datafiles of that tablespace.
■ If the database administrator shuts down an instance (NORMAL or IMMEDI-ATE shutdown transaction), Oracle forces a database checkpoint to completebefore the instance is shut down. A database checkpoint forced by instanceshutdown overrides any previously running checkpoint.
■ The database administrator can force a database checkpoint to happen ondemand. A checkpoint forced on demand overrides any previously runningcheckpoint.
2-6 Oracle8 Backup and Recovery Guide

The Online Redo Log
Incremental CheckpointingIncremental checkpointing improves the performance of crash and instancerecovery (but not media recovery). An incremental checkpoint records the positionin the redo thread (log) from which crash/instance recovery needs to begin. Thislog position is determined by the oldest dirty buffer in the buffer cache. Theincremental checkpoint information is maintained periodically with minimal or nooverhead during normal processing.
Recovery performance is roughly proportional to the number of buffers that hadnot been written to the database prior to the crash. You can influence theperformance of crash or instance recovery by setting the parameterDB_BLOCK_MAX_DIRTY_TARGET, which specifies an upper bound on thenumber of dirty buffers that can be present in the buffer cache of an instance at anymoment in time. Thus, it is possible to influence recovery time for situations wherethe buffer cache is very large and/or where there are stringent limitations on theduration of crash/instance recovery. Smaller values of this parameter imposehigher overhead during normal processing since more buffers have to be written.On the other hand, the smaller the value of this parameter, the better the recoveryperformance, since fewer blocks need to be recovered.
Incremental checkpoint information is maintained automatically by the Oracle8server without affecting other checkpoints (such as log switch checkpoints anduser-specified checkpoints). In other words, incremental checkpointing occursindependently of other checkpoints occurring in the instance.
Incremental checkpointing is beneficial for recovery in a single instance as well as amulti-instance environment.
Note: Checkpoints also occur at other times if the Oracle ParallelServer is used; see Oracle8 Parallel Server Concepts and Administra-tionfor more information.
What Are You Backing Up? 2-7

The Online Redo Log
The Mechanics of a CheckpointWhen a checkpoint occurs, the checkpoint background process (CKPT) remembersthe location of the next entry to be written in an online redo log file and signals thedatabase writer background process (DBW0) to write the modified database buffersin the SGA to the datafiles on disk. CKPT then updates the headers of all controlfiles and datafiles to reflect the latest checkpoint.
When a checkpoint is not happening, DBW0 only writes the least-recently-useddatabase buffers to disk to free buffers as needed for new data. However, as acheckpoint proceeds, DBW0 writes data to the data files on behalf of both thecheckpoint and ongoing database operations. DBW0 writes a number of modifieddata buffers on behalf of the checkpoint, then writes the least recently used buffers,as needed, and then writes more dirty buffers for the checkpoint, and so on, untilthe checkpoint completes.
Depending on what signals a checkpoint to happen, the checkpoint can be either“normal” or “fast.” With a normal checkpoint, DBW0 writes a small number ofdata buffers each time it performs a write on behalf of a checkpoint. With a fastcheckpoint, DBW0 writes a large number of data buffers each time it performs awrite on behalf of a checkpoint.
Therefore, by comparison, a normal checkpoint requires more I/Os to completethan a fast checkpoint. Because a fast checkpoint requires fewer I/Os, thecheckpoint completes very quickly. However, a fast checkpoint can also detractfrom overall database performance if DBW0 has a lot of other database work tocomplete. Events that trigger normal checkpoints include log switches andcheckpoint intervals set by initialization parameters; events that trigger fastcheckpoints include online tablespace backups, instance shutdowns, and databaseadministrator-forced checkpoints.
Until a checkpoint completes, all online redo log files written since the lastcheckpoint are needed in case a database failure interrupts the checkpoint andinstance recovery is necessary. Additionally, if LGWR cannot access an online redolog file for writing because a checkpoint has not completed, database operationsuspends temporarily until the checkpoint completes and an online redo log filebecomes available. In this case, the normal checkpoint becomes a fast checkpoint,so it completes as soon as possible.
2-8 Oracle8 Backup and Recovery Guide
The Online Redo Log
For example, if only two online redo log files are used, and LGWR requires anotherlog switch, the first online redo log file is unavailable to LGWR until the checkpointfor the previous log switch completes.
You can set the initialization parameter LOG_CHECKPOINTS_TO_ALERT todetermine if checkpoints are occurring at the desired frequency. The default valueof NO for this parameter does not log checkpoints. When you set the parameter toYES, information about each checkpoint is recorded in the ALERT file.
Multiplexed Online Redo Log FilesOracle provides the capability to multiplex an instance’s online redo log files tosafeguard against damage to its online redo log files. With multiplexed online redolog files, LGWR concurrently writes the same redo log information to multipleidentical online redo log files, thereby eliminating a single point of online redo logfailure.
Figure 2–2 illustrates duplexed (two sets of) online redo log files.
Note: The information that is recorded in the datafiles and con-trol files as part of a checkpoint varies if the Oracle Parallel Serverconfiguration is used; see Oracle8 Parallel Server Concepts and Admin-istration.
Note: Oracle recommends that you multiplex your redo log files;the loss of the log file information can be catastrophic if a recoveryoperation is required.
What Are You Backing Up? 2-9
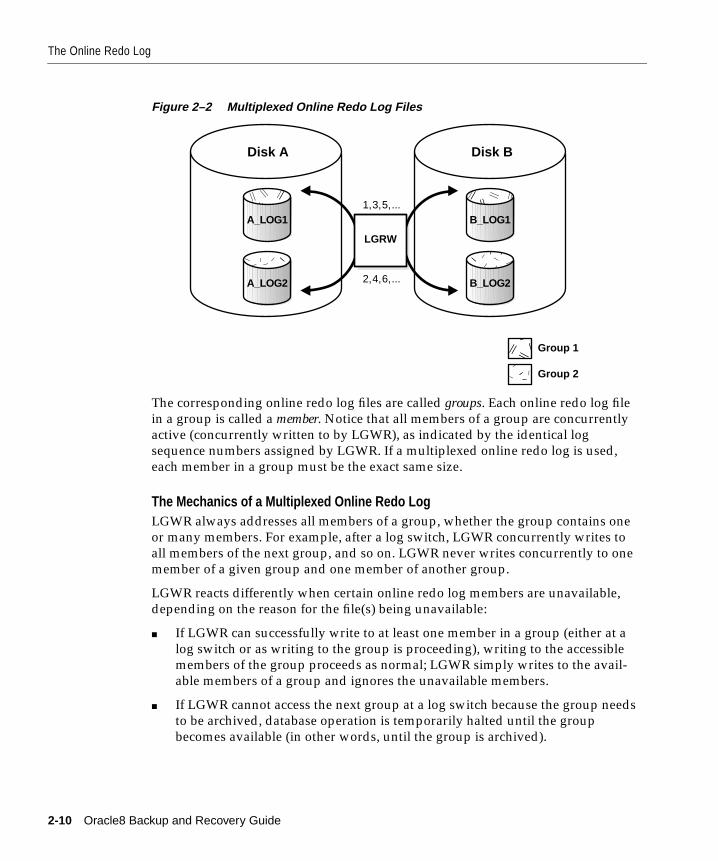
The Online Redo Log
Figure 2–2 Multiplexed Online Redo Log Files
The corresponding online redo log files are called groups. Each online redo log filein a group is called a member. Notice that all members of a group are concurrentlyactive (concurrently written to by LGWR), as indicated by the identical logsequence numbers assigned by LGWR. If a multiplexed online redo log is used,each member in a group must be the exact same size.
The Mechanics of a Multiplexed Online Redo LogLGWR always addresses all members of a group, whether the group contains oneor many members. For example, after a log switch, LGWR concurrently writes toall members of the next group, and so on. LGWR never writes concurrently to onemember of a given group and one member of another group.
LGWR reacts differently when certain online redo log members are unavailable,depending on the reason for the file(s) being unavailable:
■ If LGWR can successfully write to at least one member in a group (either at alog switch or as writing to the group is proceeding), writing to the accessiblemembers of the group proceeds as normal; LGWR simply writes to the avail-able members of a group and ignores the unavailable members.
■ If LGWR cannot access the next group at a log switch because the group needsto be archived, database operation is temporarily halted until the groupbecomes available (in other words, until the group is archived).
Disk BDisk A
LGRW
1, 3, 5, ...
2, 4, 6, ...
������
Group 1
Group 2
����B_LOG1����
B_LOG2
����A_LOG1����
A_LOG2
2-10 Oracle8 Backup and Recovery Guide

The Online Redo Log
■ If all members of the next group are inaccessible to LGWR at a log switchbecause of one or more disk failures, an error is returned and the databaseinstance is immediately shut down. In this case, the database may need mediarecovery from the loss of an online redo log file. However, if the database check-point has moved beyond the lost log (this is not the current log in this exam-ple), media recovery is not necessary. Simply drop the inaccessible log group. Ifthe log was not archived, you can disable archiving before the log can bedropped by using the ALTER DATABASE CLEAR UNARCHIVED LOG com-mand.
■ If all members of a group suddenly become inaccessible to LGWR as they arebeing written, an error is returned and the database instance is immediatelyshut down. In this case, the database might need media recovery from the lossof an online redo log file. If the media containing the log is not actually lost —for example, if the drive for the log was inadvertently turned off — mediarecovery might not be needed. In this example, all that is necessary is to turnthe drive back on and do instance recovery.
Whenever LGWR cannot write to a member of a group, Oracle marks that memberas stale and writes an error message to the LGWR trace file and to the database’sALERT file to indicate the problem with the inaccessible file(s).
To safeguard against a single point of online redo log failure, a multiplexed onlineredo log should be completely symmetrical: all groups of the online redo logshould have the same number of members. However, Oracle does not require that amultiplexed online redo log be symmetrical. For example, one group can have onlyone member, while other groups can have two members. Oracle allows thisbehavior to provide for situations that temporarily affect some online redo logmembers but leave others unaffected (for example, a disk failure). The onlyrequirement for an instance’s online redo log, multiplexed or non-multiplexed, isthat it be comprised of at least two groups. Figure 2–3 shows a legal and illegalmultiplexed online redo log configuration. The second configuration is illegalbecause it has only one group.
What Are You Backing Up? 2-11
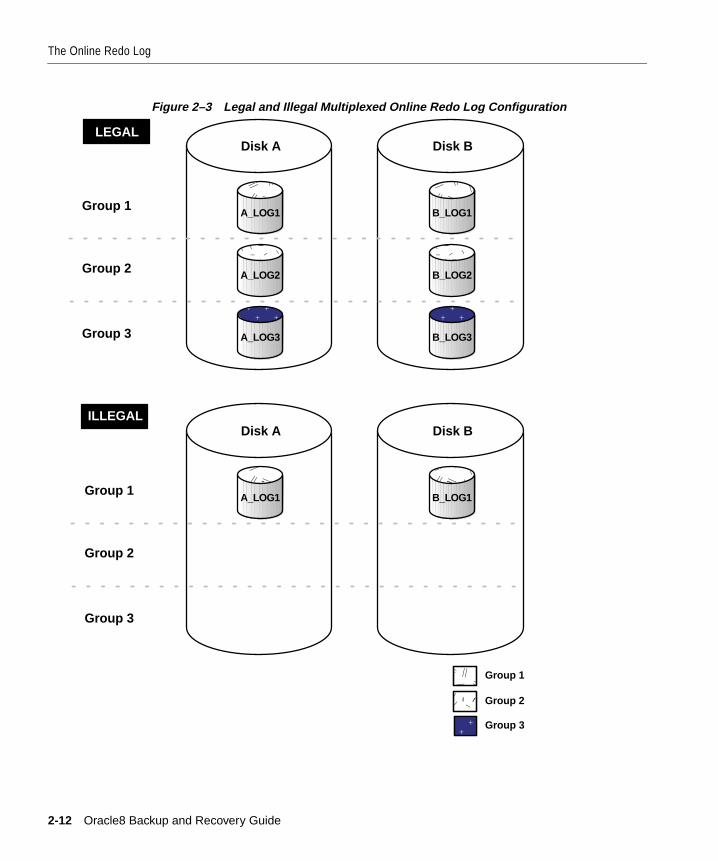
The Online Redo Log
Figure 2–3 Legal and Illegal Multiplexed Online Redo Log Configuration
����
A_LOG3Group 3
��Group 1
Group 2
��Group 3
Group 1
Group 2
ILLEGAL
LEGALDisk A
��A_LOG1
��A_LOG2
����
B_LOG3
��B_LOG2
Group 3
Group 1
Group 2
Disk A
��A_LOG1
Disk B
��B_LOG1
Disk B
��B_LOG1
2-12 Oracle8 Backup and Recovery Guide
�
The Archived Redo Log
Threads of Online Redo Log and the Oracle Parallel ServerEach database instance has its own online redo log groups. These online redo loggroups, multiplexed or not, are called an instance’s “thread” of online redo. Intypical configurations, only one database instance accesses an Oracle database, thusonly one thread is present. However, when running the Oracle Parallel Server, twoor more instances concurrently access a single database; each instance in this typeof configuration has its own thread.
This manual describes how to configure and manage the online redo log when theOracle Parallel Server is not used. The thread number can be assumed to be 1 in alldiscussions and examples of commands. For complete information aboutconfiguring the online redo log with the Oracle Parallel Server, see Oracle8 ParallelServer Concepts and Administration.
The Archived Redo LogOracle allows the optional archiving of filled groups of online redo log files, whichcreates archived (offline) redo logs. The archiving of filled groups has two keyadvantages relating to database backup and recovery options:
■ A database backup, together with online and archived redo log files, guaran-tees that all committed transactions can be recovered in the event of an operat-ing system or disk failure.
■ A backup taken while the database is open and in normal system use can beused if an archived log is kept permanently.
The choice of whether or not to enable the archiving of filled groups of online redolog files depends on the availability and reliability requirements of the applicationrunning on the database. If you cannot afford to lose any data in your database inthe event of a disk failure, you must use ARCHIVELOG mode. However, thearchiving of filled online redo log files can require the database administrator toperform extra administrative operations.
What Are You Backing Up? 2-13
The Archived Redo Log
The Mechanics of ArchivingDepending on how you configure archiving, the mechanics of archiving redo loggroups are performed by either the optional Oracle background process ARCH(when automatic archiving is used) or the user process that issues a SQL statementto archive a group manually.
ARCH can archive a group after the group becomes inactive and the log switch tothe next group has completed. The ARCH process can access any members of thegroup, as needed, to complete the archiving of the group. If ARCH attempts toopen or read a member of a group and it is not accessible (for example, due to adisk failure), ARCH automatically tries to use another member of the group, and soon, until it finds a member of the group that is available for archiving. If ARCH isarchiving a member of a group, and the information in the member is detected asinvalid or a disk failure occurs as archiving proceeds, ARCH automaticallyswitches to another member of the group to continue archiving the group where itwas interrupted.
A group of online redo log files does not become available to LGWR for reuse untilARCH has archived the group. This restriction is important because it guaranteesthat LGWR cannot accidentally write over a group that has not been archived,which would prevent the use of all subsequent archived redo log files during adatabase recovery.
When archiving is used, an archiving destination is specified by setting theparameter LOG_ARCHIVE_DEST. This destination is usually a storage deviceseparate from the disk drives that hold the datafiles, online redo log files, andcontrol files of the database. Typically, the archiving destination is another diskdrive of the database server. This way, archiving does not contend with other filesrequired by the instance and completes quickly so the group can become availableto LGWR. Ideally, archived redo log files (and corresponding database backups)
Note: For simplicity, the remainder of this section is based on theassumption that automatic archiving is enabled and the ARCHbackground process is responsible for archiving filled online redolog groups.
Note: A missing archive log will render all subsequent archivelogs useless.
2-14 Oracle8 Backup and Recovery Guide
The Archived Redo Log
should be moved permanently to inexpensive offline storage media, such as tape,that can be stored in a safe place, separate from the database server.
At log switch time, when no more information will be written to a redo log, arecord is created in the database’s control file. Each record contains the threadnumber, log sequence number, low SCN for the group, and next SCN after thearchived log file; this information is used during database recovery in ParallelServer configurations to automate the application of redo log files.
A record is also created whenever a log is successfully archived. This recordcontains the name of the archived log as well as the low and high SCN, and logsequence number.
See Also: See Oracle8 Parallel Server Concepts and Administration for additionalinformation.
Archived Redo Log File ContentsAn archived redo log file is a simple copy of the identical filled members thatconstitute an online redo log group. Therefore, an archived redo log file includesthe redo entries present in the identical members of a group at the time the groupwas archived. The archived redo log file also preserves the group’s log sequencenumber.
If archiving is enabled, LGWR is not allowed to reuse an online redo log groupuntil it has been archived. Therefore, it is guaranteed that the archived redo logcontains a copy of every group (uniquely identified by log sequence numbers)created since archiving was enabled.
Duplexing the Archived Redo LogIt is possible to write out two copies of an online redo log group to archive. Manysites may choose to do this in order to further protect the archived redo log againstmedia failure.
The parameter LOG_ARCHIVE_DUPLEX_DEST determines the second location.Any time a redo log file is archived, it will be archived to bothLOG_ARCHIVE_DEST and LOG_ARCHIVE_DUPLEX_DEST.
If set, the parameter LOG_ARCHIVE_MIN_SUCCEED_DEST determines thenumber of archive log destinations that a redo log group must be successfullyarchived to. For additional information see the Oracle8 Reference.
What Are You Backing Up? 2-15
Database Archiving Modes
Database Archiving ModesA database can operate in two distinct modes: NOARCHIVELOG mode (mediarecovery disabled) or ARCHIVELOG mode (media recovery enabled).
NOARCHIVELOG Mode (Media Recovery Disabled)If a database is used in NOARCHIVELOG mode, the archiving of the online redolog is disabled. Information in the database’s control file indicates that filled groupsare not required to be archived. Therefore, once a filled group becomes inactive andthe checkpoint at the log switch completes, the group is available for reuse byLGWR.
NOARCHIVELOG mode protects a database only from instance failure, not fromdisk (media) failure. Only the most recent changes made to the database, stored inthe groups of the online redo log, are available for instance recovery.
ARCHIVELOG Mode (Media Recovery Enabled)If an Oracle database is operated in ARCHIVELOG mode, the archiving of theonline redo log is enabled. Information in a database control file indicates that agroup of filled online redo log files cannot be reused by LGWR until the group isarchived. A filled group is immediately available to the process performing thearchiving once a log switch occurs (when a group becomes inactive); the processperforming the archiving does not have to wait for the checkpoint of a log switch tocomplete before it can access the inactive group for archiving. Figure 2–4 illustrateshow the database’s online redo log files are used in ARCHIVELOG mode and howthe archived redo log is generated by the process archiving the filled groups (forexample, ARCH in this illustration).
2-16 Oracle8 Backup and Recovery Guide

Database Archiving Modes
Figure 2–4 Online Redo Log File Use in ARCHIVELOG Mode
ARCHIVELOG mode permits complete recovery from disk failure as well asinstance failure, because all changes made to the database are permanently savedin an archived redo log.
Automatic Archiving and the ARCH (Archiver) Background ProcessAn instance can be configured to have an additional background process, Archiver(ARCH), automatically archive groups of online redo log files once they becomeinactive. Therefore, automatic archiving frees the database administrator fromhaving to keep track of, and archive, filled groups manually. For this conveniencealone, automatic archiving is the choice of most database systems that have anarchived redo log.
LGWR
ARCH ARCH ARCH
LGWR LGWR
0001
0002
0001
0002
0003
TIME
LGWR
ArchivedRedo Log Files
OnlineRedo LogFiles
Log0004
Log0003
Log0002
0001 0002
0001
0003
0002
0001
Log0001
What Are You Backing Up? 2-17
Database Archiving Modes
If you request automatic archiving at instance startup by setting theLOG_ARCHIVE_START initialization parameter, Oracle starts ARCH duringinstance startup. Otherwise, ARCH is not started during instance startup.
However, the database administrator can interactively start or stop automaticarchiving at any time. If automatic archiving was not specified to start at instancestartup, and the administrator subsequently starts automatic archiving, the ARCHbackground process is created. ARCH then remains for the duration of theinstance, even if automatic archiving is temporarily turned off and turned on again.
ARCH always archives groups in order, beginning with the lowest sequencenumber. ARCH automatically archives filled groups as they become inactive. Arecord of every automatic archival is written in the ARCH trace file by the ARCHprocess. Each entry shows the time the archive started and stopped. Thisinformation is also recorded in the database’s control file, and can be viewed byquerying the view V$ARCHIVED_LOG.
If ARCH encounters an error when attempting to archive a group (for example,due to an invalid or filled destination), ARCH continues trying to archive thegroup. An error is also written in the ARCH trace file and the ALERT file. If theproblem is not resolved, eventually all online redo log groups become full, yet notarchived, and the system halts because no group is available to LGWR. Therefore, ifproblems are detected, you should either resolve the problem so that ARCH cancontinue archiving (such as by changing the archive destination) or manuallyarchive groups until the problem is resolved.
Manual Archiving If a database is operating in ARCHIVELOG mode, the database administrator canmanually archive the filled groups of inactive online redo log files, as necessary,regardless of whether automatic archiving is enabled or disabled. If automaticarchiving is disabled, the database administrator is responsible for archiving allfilled groups.
For most systems, automatic archiving is chosen because the administrator doesnot have to watch for a group to become inactive and available for archiving.Furthermore, if automatic archiving is disabled and manual archiving is notperformed fast enough, database operation can be suspended temporarilywhenever LGWR is forced to wait for an inactive group to become available forreuse.
2-18 Oracle8 Backup and Recovery Guide
Control Files
The manual archiving option is provided so that the database administrator can:
■ archive a group when automatic archiving has been stopped because of a prob-lem (for example, the offline storage device specified as archived redo log desti-nation has experienced a failure or become full)
■ archive a group in a non-standard fashion (for example, one group to oneoffline storage device, the next group to a different offline storage device, andso on)
■ re-archive a group if the original archived version is lost or damaged
When a group is archived manually, the user process issuing the statement toarchive a group actually performs the process of archiving the group. Even if theARCH background process is present for the associated instance, it is the userprocess that archives the group of online redo log files.
Control FilesThe control file of a database is a small binary file necessary for the database tostart and operate successfully. A control file is updated continuously by Oracleduring database use, so it must be available for writing whenever the database ismounted. If for some reason the control file is not accessible, the database will notfunction properly.
Each control file is associated with only one Oracle database.
Control File ContentsA control file contains information about the associated database that is requiredfor the database to be accessed by an instance, both at startup and during normaloperation. A control file’s information can be modified only by Oracle; no databaseadministrator or end-user can edit a database’s control file.
Among other things, a control file contains information such as:
■ the database name
■ the timestamp of database creation
■ the names and locations of associated datafiles and online redo log files
■ the current log sequence number
■ checkpoint information
■ backup information (when using Recovery Manager)
What Are You Backing Up? 2-19
Control Files
The database name and timestamp originate at database creation. The database’sname is taken from either the name specified by the initialization parameterDB_NAME or the name used in the CREATE DATABASE statement.
Each time that a datafile or an online redo log file is added to, renamed in, ordropped from the database, the control file is updated to reflect this physicalstructure change. These changes are recorded so that:
■ Oracle can identify the datafiles and online redo log files to open during data-base startup.
■ Oracle can identify files that are required or available in case database recoveryis necessary.
Therefore, if you make a change to your database’s physical structure, you shouldimmediately make a new backup of your control file.
Control files also record information about checkpoints. When a checkpoint starts,the control file records information to remember the next entry that must beentered into the online redo log. This information is used during database recoveryto tell Oracle that all redo entries recorded before this point in the online redo loggroup are not necessary for database recovery; they were already written to thedatafiles.
Multiplexed Control FilesAs with online redo log files, Oracle allows multiple, identical control files to beopen concurrently and written for the same database. By storing multiple controlfiles for a single database on different disks, you can safeguard against a singlepoint of failure with respect to control files. If a single disk containing a control filecrashes, the current instance fails when Oracle attempts to access the damagedcontrol file. However, if the control file is multiplexed, other copies of the currentcontrol file are available on different disks. This allows the instance to be restartedeasily without the need for database recovery.
The permanent loss of all copies of a database’s control file is a serious problem tosafeguard against. If any copy of a control file fails during operation, the instance isaborted and media recovery is required. If the control file is not multiplexed, thenthe recovery procedure will be more complex. Therefore, it is stronglyrecommended that multiplexed control files be used with each database, with eachcopy stored on a different physical disk.
2-20 Oracle8 Backup and Recovery Guide
Types of Backups
Types of BackupsThis section defines and describes the following types of backups:
■ Whole Database Backups
– Consistent Whole Database Backups
– Inconsistent Whole Database Backups
■ Tablespace Backups
■ Datafile Backups
■ Controlfile Backups
■ Archivelog Backups
Logical Backups, also known as Exports, are described in detail in Oracle8 Utilities.
Whole Database BackupsA whole database backup contains the control file, and all database files whichbelong to that database. Whole database backups are the most common type ofbackups performed by database administrators. Before performing whole databasebackups (or any other type of backup), you should first be familiar with yourenterprise’s backup strategy. Specifically, you should be aware of the implicationsof backing up when in ARCHIVELOG mode and NOARCHIVELOG mode
During a whole database backup, all datafiles and control files belonging to thatdatabase are backed up (you should not need to back up the online redo logs).
Whole database backups do not require the database to be operated in a specificarchiving mode; they can be taken whether a database is operating inARCHIVELOG or NOARCHIVELOG mode.
If the database is in ARCHIVELOG mode, you can choose to back up the databasewhile it is open or closed. A database running in NOARCHIVELOG mode shouldonly be backed up when it is closed by a clean shutdown (for example, a shutdownusing the immediate or normal options). A backup of a database running inNOARCHIVELOG mode and not shutdown cleanly is useless. In such cases, the backedup files are inconsistent with respect to a point-in-time, and because the database isin NOARCHIVELOG mode, there are no logs available to make the databaseconsistent. Recovery Manager does not allow you to back up a database that hasbeen running in NOARCHIVELOG mode and shutdown abnormally, because thebackup is not usable for recovery.
What Are You Backing Up? 2-21
Types of Backups
You should always back up the parameter files associated with the database, aswell as the instance’s password file (if the instance uses password files) wheneverthey are modified.
There are two types of whole database backups: consistent and inconsistent.
Consistent Whole Database BackupsA consistent whole database backup is a backup where all files (datafiles andcontrol files) are consistent to the same point in time (for example, checkpointed atthe same SCN). The only tablespaces in a consistent backup that are allowed tohave older timestamps (SCNs) are read-only and offline normal tablespaces, whichare still consistent with the other datafiles in the backup.
You can open the set of files resulting from a consistent whole database backupwithout applying redo logs because the data is already consistent; no action isrequired to make the data in the restored datafiles correct.
A consistent whole database backup is the only valid backup option for databasesrunning in NOARCHIVELOG mode. The only way to take a consistent wholedatabase backup is to shut down the database cleanly and take the backup whilethe database is closed.
To make a consistent database backup current (or to take it to a later point in time)you will either need to apply redo to it, or, if you are using Recovery Manager toperform your backups, you may have the option of applying a combination ofincremental backups and redo. The redo is located in the archived logs, and theonline logs (if you are recovering to the current time).
Note: In ARCHIVELOG mode, a whole database backup can beconstructed using backups of datafiles taken at different times. Forexample, if a database is composed of seven tablespaces, and eachnight a different tablespace is backed up (the control file is backedup every night), after seven nights all tablespaces in the database,and the control file will have been backed up—this can be consid-ered a whole database backup.
2-22 Oracle8 Backup and Recovery Guide
Types of Backups
If a database is not shut down cleanly (for example, an instance failure occurred, ora SHUTDOWN ABORT statement was issued), the database’s datafiles will mostlikely be inconsistent.
Inconsistent Whole Database BackupsIf you are in a situation where your database must be up and running 24 hours aday, 7 days a week, you will need to perform inconsistent whole database backups.A backup of an open database is inconsistent because portions of the database(hence, datafiles in the database) are being modified and written to disk while thebackup is progressing. The database must be in ARCHIVELOG mode to be able toperform open backups.
Deciding whether or not to perform an open backup depends only upon theavailability requirements of your data—open backups are the only choice if thedata being backed up must always be available.
Inconsistent backups are also created if a database is backed up after a system crashfailure or shutdown abort. This type of backup is valid if the database is running inARCHIVELOG mode, because all logs are available to make the backup consistent.
After open (also called “hot”) or inconsistent closed backups, you should alwaysarchive the current online log file. Archive the current online log by issuing theSQL command ALTER SYSTEM ARCHIVE ALL. After archiving the current logfile, back up all archivelogs produced since the backup began; this ensures that youcan use the backup. If you do not have all archived logs produced during thebackup, the backup cannot be recovered (because you do not have all the logsnecessary to make the it consistent).
Unless you are taking a consistent whole database backup, you should back upyour control file using the ALTER DATABASE command with the BACKUPCONTROLFILE option. A database must be consistent before it can be opened.
WARNING: A backup control file created during a consistentwhole database backup should only be used if you are restoringthe whole database backup and do not intend to perform anyrecovery. If you intend to perform recovery and have a current con-trol file, you should not restore an older control file.
Note: Oracle recommends that you do not take inconsistent,closed database backups.
What Are You Backing Up? 2-23
Types of Backups
Inconsistent whole database backups are made consistent by applying incrementalbackups and redo logs (archived and online).
Tablespace BackupsA tablespace backup is a backup of a subset of the database.
Tablespace backups are only valid if the database is operating in ARCHIVELOGmode. The only time a tablespace backup is valid for a database running inNOARCHIVELOG mode is when that tablespace (and all datafiles in thattablespace), is read-only or offline-normal.
Datafile BackupsA datafile backup is a backup of a single datafile. Database administrators usuallytake tablespace backups rather than datafile backups, because the tablespace is alogical unit of a database to back up.
Datafile backups are only valid if the database is operating in ARCHIVELOGmode. The only time a datafile backup is valid for a database running inNOARCHIVELOG mode is if that datafile is the only file in a tablespace. Forexample, the backup is a tablespace backup, but the tablespace only contains onefile and is read-only or offline-normal.
Control File BackupsA control file backup is a backup of a database’s control file. If the database is openyou can issue the following statement:
ALTER DATABASE BACKUP CONTROLFILE to ‘location’;
You can also use Recovery Manager to back up the control file.
Note: Inconsistent whole database backups of databases runningin NOARCHIVELOG mode are usable only if the logs relating tothat backup are available. For databases running in NOAR-CHIVELOG mode, you should aim to have a backup that is usablewithout performing any recovery. This aim is defeated if you needto apply redo from logs to recover a backup. If you need redo tomake a database consistent, the database should really operate inARCHIVELOG mode, because this is the way online logs arebacked up.
2-24 Oracle8 Backup and Recovery Guide
Types of Backups
If you are going to take an O/S backup of the control file, you must shut down thedatabase first.
Archivelog BackupsIf a database is operating in ARCHIVELOG mode, online logs are archived to theLOG_ARCHIVE_DEST, from where they are typically backed up to tertiary storage(such as magnetic tape).
Some sites require very fast recovery times, so they may make a copies of theirarchivelogs to another disk filesystem, as well as to tertiary storage. You can set theparameter LOG_ARCHIVE_DUPLEX_DEST so that it will archive a second copy ofeach online log to this location. The on-disk archivelog copies are typically kept fora short time (for example, 48 hours) before being deleted.
See Also: “Duplexing the Archived Redo Log” on page 2-15.
The frequency of archivelog backups depends on:
■ the number and size of archivelogs produced
■ the size of the filesystem that the logs are archived to
Online Redo Log Backups Not RecommendedThe best way to back up the contents of the current online log is to archive it, thenback up the archived log.
Oracle recommends you do not copy a current online log, because when you do so,and then restore that copy, the copy will appear as the end of the redo thread.However, additional redo may have been generated in the thread. If you everattempt to execute recovery supplying the redo log copy, recovery will erroneouslydetect the end of the redo thread and prematurely terminate, possibly corruptingthe database.
What Are You Backing Up? 2-25

Backup Formats
Backup FormatsEach of the backup types described in the preceding sections can be made in thefollowing formats:
■ Backup Sets
– Datafiles
– Archived Redo Log Files
■ Datafile Copies
■ Operating System Backups
Backup SetsBackup sets are created using the Recovery Manager backup command, and cancontain either archive logs or datafiles, but not both.
An Oracle server process reads the datafiles being backed up and creates thebackup set. This is why backup sets of open database files (made by RecoveryManager) do not need to be preceded by the ALTER TABLESPACE BEGINBACKUP statement.
For additional information see “Fractured Block Detection During Open DatabaseBackups in Recovery Manager” on page 7-26.
Backup sets are written out in an Oracle proprietary format. Files in a backup setcannot be used by an Oracle instance until they are restored to an instance-usable(usually datafile) format by Recovery Manager. For example, a tablespace backupin a backup set is a compressed version of each file in the tablespace and theRecovery Manager command restores the datafiles from the backup set to aninstance-usable format.
You can back up any logical unit of an Oracle database in a backup set:
■ If you direct Recovery Manager to perform a whole database backup, it willautomatically back up every file in that database, as well as the control file.
■ If you direct Recovery Manager to perform a tablespace backup, it will back upeach datafile in that tablespace.
■ If you direct Recovery Manager to perform a datafile backup, it will back upthe datafiles you specify.
■ If you direct Recovery Manager to perform an ARCHIVELOG backup, it willback up the archivelogs you specify (this could be ‘all’ archivelogs generated).
2-26 Oracle8 Backup and Recovery Guide
Backup Formats
You can also direct Recovery Manager to include a control file backup in anydatafile backup set.
Datafile CopiesA datafile copy is created using the Recovery Manager copy command.
An Oracle server process reads the datafile and writes the copy out to disk, not anO/S routine. This is why datafile copies of open database files (made by RecoveryManager) do not need to be preceded by the ALTER TABLESPACE BEGINBACKUP statement.
See Also: “Fractured Block Detection During Open Database Backups in RecoveryManager” on page 7-26.
Datafile copies can be used immediately by an Oracle instance—they are already inan instance-usable (usual datafile) format.
Operating System BackupsOperating system (O/S) backups are created using an operating system command.O/S backups can be written to disk or tape in any format that your O/S utilitiessupport.
Recovery Manager can catalog and use O/S backups that are image backups ondisk.
Note: Archivelogs and datafiles cannot be combined in the samebackup set.
Note: Datafile copies can only be made to disk.
What Are You Backing Up? 2-27
Backup Formats
Logical BackupsLogical backups store information about the schema objects created for a database.You can use the Export utility to write data from an Oracle database to operatingsystem files that have an Oracle database format.
Because the Oracle Export utility can selectively export specific objects or portionsof an object (for example, partitioned tables), you might consider exportingportions or all of a database for supplemental protection and flexibility in adatabase’s backup strategy. Database exports are not a substitute for physicalbackups and cannot provide the same complete recovery advantages that the built-in functionality of Oracle offers.
See Also: For more information about the Export Utility, see the Oracle ServerUtilities Guide.
2-28 Oracle8 Backup and Recovery Guide

When to Perform Ba
3
When to Perform BackupsThis chapter offers guidelines and strategies to follow when planning backups, andincludes the following topics:
■ Guidelines for Database Backups
■ Creating a Backup Strategy
■ Backing Up Online Redo Logs
ckups 3-1
Guidelines for Database Backups
Guidelines for Database BackupsThis section describes guidelines that can help you decide when to performdatabase backups, what parts of a database need backing up, and includes thefollowing topics:
■ Perform Backups Frequently and Regularly
■ Backup Appropriate Portions of the Database When Making StructuralChanges
■ Back Up Often-used Tablespaces Frequently
■ Keep Older Backups
■ Database Backups After Resetlogs
■ Export Database Data for Added Protection and Flexibility
■ Consider Distributed Database Backups
■ Back Up after Performing Unrecoverable/Unlogged Operations
■ Test Backup and Recovery Strategies
Before you create an Oracle database, you should decide how you plan to protectthe database against potential disk failures, and whether or not to enable point-in-time recovery. If such planning is not considered before database creation, databaserecovery may not be possible if a disk failure damages the datafiles, online redo logfiles, or control files of a database.
Perform Backups Frequently and RegularlyFrequent and regular whole database or tablespace backups are essential for anyrecovery scheme. The frequency of backups should be based on the rate orfrequency of changes to database data (such as insertions, updates, and deletions ofrows in existing tables, and addition of new tables). If a database’s data is changedat a high rate, database backup frequency should be proportionally high.Alternatively, if a database is mainly read-only, and updates are issued onlyinfrequently, the database can be backed up less frequently.
3-2 Oracle8 Backup and Recovery Guide
Guidelines for Database Backups
Backup Appropriate Portions of the Database When Making Structural ChangesIf you make any of the following structural changes, perform a backup of theappropriate portion of your database immediately before and after completing thealteration:
■ create or drop a tablespace
■ add or rename (relocate) a datafile in an existing tablespace
■ add, rename (relocate), or drop an online redo log group or member
Backing up the appropriate portion of the database depends on the archiving modeof the database, as described below:
■ If a database is operated in ARCHIVELOG mode, only a control file backup(using the ALTER DATABASE command with the BACKUP CONTROLFILEoption) is required before and after a structural alteration. However, you canback up other parts of the database.
■ If the database is operated in NOARCHIVELOG mode, a consistent wholedatabase backup should be taken immediately before and after themodification, including all datafiles and control files.
Back Up Often-used Tablespaces FrequentlyIf a database is operated in ARCHIVELOG mode, it is acceptable to back up thedatafiles of an individual tablespace or even a single datafile. This option is usefulif a portion of a database is used more extensively than others, such as the SYSTEMtablespace and tablespaces that contain rollback segments. By taking more frequentbackups of the extensively used datafiles of a database, you gather more recentcopies of the datafiles. As a result, if a disk failure damages the extensively useddatafiles, the more recent backup can restore the damaged files. Only a smallnumber of changes to data need to be applied to roll the restored file forward to thetime of the failure, or desired point-in-time recovery, thereby reducing databaserecovery time.
When to Perform Backups 3-3
Guidelines for Database Backups
Back Up after Performing Unrecoverable/Unlogged OperationsIf users are creating tables or indexes using the UNRECOVERABLE option,consider taking backups after the objects are created. When tables and indexes arecreated as UNRECOVERABLE, no redo is logged, and these objects cannot berecovered from existing backups.
See Also: For information about the UNRECOVERABLE option, see the CREATETABLE...AS SELECT and CREATE INDEX commands in the Oracle8 SQL Reference.
Keep Older BackupsHow long you should keep an older database backup depends on the choices youwant for database recovery. If you want to recover to a past time, you need adatabase backup which completed before that time. For a database operating inNOARCHIVELOG mode, this means a consistent whole database backup. For adatabase operating in ARCHIVELOG mode, this means a whole database backupwhich need not be consistent, which completed before that time (the control fileshould reflect the database’s structure at the point-in-time of recovery), and allarchived logs necessary to recover the datafiles to the required point-in-time.
For added protection, consider keeping two or more backups (and all archive logsthat go with these backups) previous to the current backup. Thus, if your mostrecent backups are not usable (for example, the tape drive used for backups writesbad backups), you will not lose all of your data.
Note: If using Recovery Manager, you can take an incrementalbackup.
WARNING: After opening the database with the RESETLOGSoption, existing backups cannot be used for subsequent recoverybeyond the time when the logs were reset. You should thereforeshutdown the database and make a consistent whole databasebackup. Doing so will enable recovery of database changes subse-quent to using the RESETLOGS option.
3-4 Oracle8 Backup and Recovery Guide

Guidelines for Database Backups
Database Backups After Using the RESETLOGS OptionAfter you have opened a database with the RESETLOGS option, Oraclerecommends that you immediately perform a whole database backup. If you donot, and a disaster occurs, you will lose all work performed since opening thedatabase (because it requires a restore of all or part of your database).
When a database is opened with the RESETLOGS option, Oracle automatically:
■ creates a new “incarnation” of the database
■ resets the log sequence number to 1
■ reformats the online redo log files if they exist (otherwise they are created)
Oracle performs these actions so that it can identify which archived redo logs applyto which incarnations of the database.
Backup Options While in NOARCHIVELOG modeIf you are operating in NOARCHIVELOG mode, your only option is to make a coldconsistent whole database backup.
Backup Options While in ARCHIVELOG modeIf you are operating in ARCHIVELOG mode, you can either perform a consistent(closed) whole database backup, or an inconsistent (open) database backup. Theoption you choose depends on:
■ the amount of time before the database absolutely must be available
■ the importance of data entered after opening the database with theRESETLOGS option
If your most important criteria is getting the database up and available, your onlyoption is to perform open database backups.
There is a risk in performing an open database backup— if the backups do notcomplete before you have another media failure, you will lose all changes madesince opening the database with the RESETLOGS option (you cannot use a backup
Note: There is one exception to this rule. See “Recovery AfterUsing the RESETLOGS Option” on page 3-10 for details.
When to Perform Backups 3-5
Guidelines for Database Backups
taken before opening the database with RESETLOGS to recover this incarnation ofthe database).
If the most important criteria is to restore in case of another failure, then you mayelect to take a consistent (closed) database backup.
Time permitting, Oracle recommends that you perform a consistent whole databasebackup.
Export Database Data for Added Protection and FlexibilityBecause the Oracle Export utility can selectively export specific objects, you mightconsider exporting portions or all of a database for supplemental protection andflexibility in a database’s backup strategy. Database exports are not a substitute forwhole database backups and cannot provide the same complete recoveryadvantages that the built-in functionality of Oracle offers.
See Also: For more information on the Export utility, see the Oracle8 Utilities guide.
Consider Distributed Database BackupsIf a database is a node in a distributed database, consider the following guidelines:
■ All databases in the distributed database system should be operated in thesame archiving mode.
■ If the databases in a distributed database system are operating inARCHIVELOG mode, backups at each node can be performed autonomously(individually, without time coordination).
■ If the databases in a distributed database system are operating inNOARCHIVELOG mode, consistent whole database backups must beperformed at the same (global) time, to plan for global distributed databaserecovery. For example, if a database in New York is backed up at midnight EST,the database in San Francisco should be backed up at 9 PM PST.
Note: There is one and only one exception to this. See “RecoveryAfter Using the RESETLOGS Option” on page 3-10.
3-6 Oracle8 Backup and Recovery Guide
Creating a Backup Strategy
Test Backup and Recovery StrategiesTest your backup and recovery strategies in a test environment before and after youmove to a production system. By doing so, you can test the thoroughness of yourstrategies and minimize problems before they occur in a real situation.
Performing test recoveries regularly ensures that your archiving, backup, andrecovery procedures work. It also helps you stay familiar with recoveryprocedures, so that you are less likely to make a mistake in a crisis.
Creating a Backup StrategyBefore you create an Oracle database, decide how you plan to protect the databaseagainst potential failures. Answer the following questions before developing yourbackup strategy:
■ Is it acceptable to lose any data if a disk failure damages some of the filesthat constitute a database? If it is not acceptable to lose any data, the databasemust be operated in ARCHIVELOG mode, ideally with a multiplexed onlineredo log. If it is acceptable to lose a limited amount of data if there is a diskfailure, you can operate the database in NOARCHIVELOG mode and avoid theextra work required to archive filled online redo log files.
■ Will you ever need to recover to arbitrary past points in time? If you need torecover to a past point in time to correct an erroneous operational orprogrammatic change to the database, be sure to run in ARCHIVELOG modeand perform control file backups whenever making structural changes.Recovery to a past point in time is facilitated by having a backup control filethat reflects the database structure at the desired point-in-time.
■ Does the database need to be available at all times (twenty-four hours perday, seven days per week)? If so, do not operate the database inNOARCHIVELOG mode because the required whole database backups, takenwhile the database is shutdown, cannot be made frequently, if at all. Therefore,high-availability databases always operate in ARCHIVELOG mode to takeadvantage of open datafile backups.
Backup Strategies in NOARCHIVELOG ModeIf a database is operated in NOARCHIVELOG mode, filled groups of online redolog files are not archived. Therefore, the only protection against a disk failure is themost recent whole backup of the database.
When to Perform Backups 3-7

Creating a Backup Strategy
Plan to take whole database backups regularly, according to the amount of workthat you can afford to lose. For example, if you can afford to lose the amount ofwork accomplished in one week, make a whole database, closed backup once perweek. If you can afford to lose only a day’s work, make a whole database, closedbackup every day. For large databases with a high amount of activity, it is usuallyunacceptable to lose work. Therefore, the database should be operated inARCHIVELOG mode, and the appropriate backup strategies should be used.
Whenever you alter the physical structure of a database operating inNOARCHIVELOG mode, immediately take a consistent whole database backup. Awhole database backup fully reflects the new structure of the database.
Backup Strategies in ARCHIVELOG ModeIf a database is operating in ARCHIVELOG mode, filled groups of online redo logfiles are being archived. Therefore, the archived redo log coupled with the onlineredo log and datafile backups can protect the database from a disk failure,providing for complete recovery from a disk failure to the instant that the failureoccurred (or, to the desired past point-in-time). Following are common backupstrategies for a database operating in ARCHIVELOG mode:
■ When the database is initially created, perform a whole database, closedbackup of the entire database. This initial whole database backup is thefoundation of your backups because it provides backups of all datafiles and thecontrol file of the associated database.
■ Subsequent whole database backups are not required, and if a database mustremain open at all times, whole database, closed backups are not feasible.Instead, you can take open database or tablespace backups to keep yourdatabase backups up-to-date.
■ Take open or closed datafile backups to update backed up information for thedatabase (supplementing the initial whole database backup). In particular, thedatafiles of extensively used tablespaces should be backed up frequently toreduce database recovery time, should recovery ever be required. If a morerecent datafile backup restores a damaged datafile, less redo (or incremental
Note: When you perform this initial whole database backup,make sure that the database is in ARCHIVELOG mode first.Otherwise, the backed up control files will contain theNOARCHIVELOG mode setting.
3-8 Oracle8 Backup and Recovery Guide
Backing Up Online Redo Logs
backups) need to be applied to the restored datafile to roll it forward to thetime of the failure.
Whether you should take open or closed datafile backups depends on the avail-ability requirements of the data. Open datafile backups are the only choice ifthe data being backed up must always be available.
You can also use a datafile copy, taken while the database is open and thetablespace is online, to restore datafiles. However, the data in the restored data-files is inconsistent. Therefore, the appropriate redo log files (online andarchived) must be reapplied to these restored datafiles to make the data consis-tent and bring it forward to the specified point in time.
■ Every time you make a structural change to the database, take a control filebackup. If operating in ARCHIVELOG mode and the database is open, useeither Recovery Manager or the ALTER DATABASE command with theBACKUP CONTROLFILE option.
Backing Up Online Redo LogsYou should never back up online logs for the following reasons:
■ The way you protect the online logs against media failure is by multiplexingthem (having multiple log members per group, on different disks and differentdisk controllers).
■ If your database is in ARCHIVELOG mode, the logs are being backed up whenthey are archived.
■ If your database is in NOARCHIVELOG mode, the only type of backups thatshould be performed are closed, consistent, whole database backups. To makethe backup consistent, the database must be closed by either a shutdownimmediate, shutdown transactional, or shutdown normal. The files in this typeof backup are all consistent, and do not need recovery, hence the online logs arenot needed.
Note: After backing up the control file, apply redo to it up untilthe point when the datafile was added. Then issue an ALTERDATABASE CREATE DATAFILE statement, and continue withrecovery. Do not use operating system utilities to back up thecontrol file in ARCHIVELOG mode, unless you are performing aclosed backup.
When to Perform Backups 3-9

Backing Up Online Redo Logs
If a database crashes, and all multiplexed copies of the online redo log are lost, then:
■ If your database is in ARCHIVELOG mode, you should restore the wholedatabase and recover the database up until the last archived log. You must thenopen the database with the RESETLOGS option.
Having an old backup of online logs in this situation is of no use because theinformation in the online logs will not be needed for recovery (in fact, the infor-mation in the online log files already exists in an archived log).
■ If your database is in NOARCHIVELOG mode, your backup method should beto perform consistent whole database backups. The database can then beopened with the RESETLOGS option; no recovery is required because thedatabase is already consistent.
Recovery After Using the RESETLOGS OptionIn releases prior to Oracle8, DBAs typically backed up online logs whenperforming cold consistent backups to avoid opening the database with theRESETLOGS option (if they were planning to restore immediately). A classicexample of this occurred during disk maintenance, which requires the database tobe backed up, deleted, the disks reconfigured, and the database restored. If youavoided RESETLOGS, you would not have to perform a whole database backupimmediately after the database was restored. The backup was required since it wasimpossible to perform recovery using a backup taken before using RESETLOGS(especially if any errors occurred after resetting the logs).
This is no longer the case. There is now only one situation where—if you have aconsistent backup of the database, taken immediately before you open the databasewith the RESETLOGS option, and a control file that is valid after you open thedatabase with RESETLOGS—that you can still use this backup to roll forward.
The following scenario illustrates a situation when this is possible.
The DBA wishes to perform hardware striping reconfiguration, which requires thedatabase files to be backed up and deleted, the hardware reconfigured, and thedatabase restored.
Note: Recovery Manager will not backup a NOARCHIVELOGmode database unless it has been shutdown cleanly.
3-10 Oracle8 Backup and Recovery Guide
Backing Up Online Redo Logs
On Friday night the DBA performs the following actions:
■ Cleanly shut down the database (SHUTDOWN IMMEDIATE)
■ Whole database backup (control files and datafiles)
■ O/S maintenance
■ Restore database and control files
■ STARTUP MOUNT DATABASE
■ OPEN DATABASE RESETLOGS
On Saturday morning the following occurs:
■ Scheduled batch jobs run, generating a lot of records in the redo log
If a hardware error occurs on Saturday night, and requires restoration of the wholedatabase, it is possible to restore the backup taken immediately before opening thedatabase with the RESETLOGS option, and to roll forward using the logs producedon Saturday.
On Saturday night the following takes place:
■ SHUTDOWN ABORT INSTANCE (if it still exists)
■ Restore all damaged files from the backup made on Friday night
Note: At this point you (the DBA) must not reopen the database.
Note: If you have the current control file, do not restore it;otherwise you must restore a control file that was valid afteropening the database with RESETLOGS.
When to Perform Backups 3-11
Backing Up Online Redo Logs
■ Roll forward
In this scenario, if the DBA had opened the database after the Friday night backupand before opening the database with RESETLOGS, or, did not have a control filefrom after opening the database, the DBA would not be able to use the Friday nightbackup to roll forward. The DBA must have a backup after opening the databasewith the RESETLOGS option in order to be able to recover.
It is always good practice to perform a complete backup of your database afteropening a database with the RESETLOGS option.
See Also: For additional information see “Database Backups After Using theRESETLOGS Option” on page 3-5.
The Dangers Associated with Backing Up Online Redo LogsThere is no real danger in backing up online logs. The real danger is that you mayaccidentally restore them while not intending to. There are a number of situationswhere restoring the online logs would cause very significant problems in therecovery process. Following are two scenarios that illustrate how restoring backedup online logs severely compromises recovery.
Unintentional Restore of Online Redo LogsWhen a crisis occurs, it is easy to make a simple mistake. DBAs and systemadministrators frequently encounter dangers is during a database restore. Whenrestoring the whole database, it is possible to also accidentally restore the onlineredo logs, thus overwriting the current logs with the older (and useless) backups.This action forces the DBA to perform an incomplete recovery, when the intentionwas to perform a complete recovery, and ultimately losing the ability to recovervaluable transactions.
WARNING: It is possible to recover after opening a database withthe RESETLOGS option only if you have:
■ A consistent backup taken immediately before opening thedatabase, that is, you must not have opened the databasesubsequent to the backup and before opening it with theRESETLOGS option.
■ A control file that was valid after opening the database withthe RESETLOGS option.
3-12 Oracle8 Backup and Recovery Guide

Backing Up Online Redo Logs
Erroneously Creating Multiple Parallel Redo Log Time LinesYou can unintentionally create multiple parallel redo log timelines for a singleinstance database. However, you can avoid this mistake if the online logs cannot berestored (the database must be opened with the RESETLOGS option, whicheffectively creates the new logs, and also a new database incarnation).
If you faces a problem where the best course of action is to restore the databasefrom a consistent backup (and not perform any recovery) you may think it is safe torestore the online logs, and avoid opening the database with the RESETLOGSoption.
If you do this, the database will generate a log sequence number that was alreadygenerated by the database during the previous timeline. If you then face anotherdisaster and need to restore from this backup and roll forward, it would be difficultto identify which log sequence number is actually the correct one to apply. In thisexample, if the logs had been reset, a new incarnation of the database would becreated. Any logs created by this new incarnation could only be applied to thisincarnation.
Note: Recovery Manager and EBU do not back up online logs forthe reasons given in these scenarios.
When to Perform Backups 3-13

Backing Up Online Redo Logs
3-14 Oracle8 Backup and Recovery Guide
Choosing Recovery Strat
4
Choosing Recovery StrategiesThis chapter offers guidelines and strategies to follow when preparing for databaserecovery, and includes the following topics:
■ Recovery Concepts and Strategies
■ Recovery Planning
egies 4-1
Recovery Concepts and Strategies
Recovery Concepts and StrategiesBefore recovering a database, familiarize yourself with the fundamental data struc-tures, concepts and strategies of Oracle recovery. This section describes basic recov-ery issues, and includes the following topics:
■ Important Recovery Data Structures
■ Recovery Planning
■ Recovery Operations
Of course, before learning about the data structures important to recovery opera-tions, you should first understand what is meant by restoring and recovering data.
You restore a file by reconstructing or retrieving an original copy of it from a backup.
When you recover a file, you are making a restored file current, or current to a spe-cific point in time. This process of recovery is also known as “‘rolling forward.”
There are two types of recovery commands:
■ SQL
The SQL RECOVER command rolls a restored file forward by applying redo(archived and online redo logs).
■ Recovery Manager
A Recovery Manager recover command rolls a restored datafile forward byapplying incremental backups (if they exist) and then applying redo (archivedand online redo logs).
4-2 Oracle8 Backup and Recovery Guide
Recovery Concepts and Strategies
Important Recovery Data StructuresTable 4–1 describes important data structures involved in recovery processes. Befamiliar with these data structures before starting any recovery procedure.
Table 4–1 Recovery Data Structures
Data Structure Description
Control File The control file contains records that describe andmaintain information about the physical structure ofa database. The control file is updated continuouslyduring database use, and must be available for writ-ing whenever the database is open. If the control fileis not accessible, the database will not function prop-erly.
System ChangeNumber (SCN)
The system change number is a clock value for theOracle database that describes a committed versionof the database. The SCN functions as a sequencegenerator for a database, and controls concurrenceand redo record ordering. Think of the SCN as atimestamp that helps ensure transaction consistency.
Rollback Segments Information in a rollback segment is used duringdatabase recovery to undo any uncommitted changesapplied from the redo log to the datafiles. After therollback segments are used to remove all uncommit-ted data from the datafiles, data is in a consistentstate.
Redo Records A redo record is a group of change vectors describinga single, atomic change to the database. Redo recordsare constructed for all data block changes and savedon disk in the redo log. Redo records allow multipledatabase blocks to be changed so that either allchanges occur or no changes occur, despite arbitraryfailures.
Redo Logs All changes to the Oracle database are recorded inredo logs, which consist of at least two redo log filesthat are separate from the datafiles. During databaserecovery from an instance or media failure, Oracleapplies the appropriate changes in the database’sredo log to the datafiles; this updates database datato the instant that the failure occurred.
Choosing Recovery Strategies 4-3

Recovery Concepts and Strategies
Backup A database backup is a copy of the physical files thatconstitute the Oracle database. When original data islost, you can use the backup to reconstruct the lostinformation.
Incremental Back-ups (RecoveryManager only)
An incremental backup consists of one or more data-files containing only those blocks that have beenmodified since a previous backup.
Recovery Catalog(Recovery Man-ager only)
A repository of information used and maintained byRecovery Manager. Contains information about thefollowing:
datafile and archivelog backup sets and pieces
datafile copies
archived redo logs and copies of them
tablespaces and datafiles at the target database
user-created stored scriptsCheckpoint A checkpoint is a data structure in the control file
that defines a consistent point of the database acrossall threads of a redo log. Checkpoints are similar toSCNs, and also describe which threads exist at thatSCN. Checkpoints are used by recovery to ensurethat Oracle starts reading the log threads for the redoapplication at the correct point. For Parallel Server,each checkpoint has its own redo information.
Table 4–1 Recovery Data Structures (Cont.)
4-4 Oracle8 Backup and Recovery Guide
Recovery Planning
Recovery PlanningBefore recovering a database, you should create a recovery plan or strategy. Thissection describes important issues to consider when defining your plan.
Factors Determining Your Recovery StrategyYour recovery strategy will depend upon the answers to the following questions:
■ Is the Database Running in ARCHIVELOG Mode?
■ What Files Were Lost or Damaged?
■ Has a User Accidentally Destroyed Data?
■ Have You Tested Backup and Recovery Strategies?
After answering these questions, you can choose a recovery strategy that is appro-priate for your particular situation.The following sections describe the types ofrecovery to perform in specific situations.
Is the Database Running in ARCHIVELOG Mode?If your database is not running in ARCHIVELOG mode, you should restore thedatabase from a consistent database backup. This is your only option when thedatabase is not in ARCHIVELOG mode. The control file and all datafiles arerestored from a consistent backup and the database is opened. All changes madesubsequent to the backup are lost.
What Files Were Lost or Damaged?If one or more datafiles are lost, but the database stays open, you should performtablespace (or datafile) recovery while the database is open. The tablespaces or data-files are taken offline, restored from backups, recovered and placed online. Nochanges are lost and the database remains available during the recovery.
If an archive log or online log that is required for recovery is also lost, then youshould perform point-in-time database or tablespace recovery.
If one or more datafiles and/or all control files are lost, and the database is notopen, then you cannot use this procedure. All lost files are restored from backups,
Note: The only time you can recover a database while operatingin NOARCHIVELOG is when you have not already overwrittenthe online log files that were current at the time of the most recentbackup.
Choosing Recovery Strategies 4-5
Recovery Planning
recovered and the database is opened. No changes are lost, but the database isunavailable during recovery. If an archive log or online log required for recovery isalso lost, then you should perform point-in-time database recovery.
Has a User Accidentally Destroyed Data?You should perform point-in-time database recovery when an archive log or onlinelog required for recovery is lost, or to recover from user errors. All datafiles and thecontrol file are restored from backups taken before the point-in-time, recovered tothe point-in-time and the database is opened. All changes made subsequent to thepoint-in-time are lost. If the database remains open and no tablespaces that containrollback segments are lost, you can also use point-in-time tablespace recovery.
Point-in-Time Tablespace Recovery All changes made to the recovered tablespacesafter the point-in-time are lost. The database, excluding the recovered tablespaces,is available during recovery.
Have You Tested Backup and Recovery Strategies?You should test your backup and recovery strategies in a test environment beforemoving to a production system. You should continue to test your system regularly.That way, you can test the thoroughness of your strategies and later avoid real-lifecrises. Performing test recoveries regularly ensures that your archiving and backupprocedures work. It also keeps you familiar with recovery procedures, so that youare less likely to make mistakes in a crisis.
4-6 Oracle8 Backup and Recovery Guide
Recovery Planning
Recovery OperationsMedia recovery restores a database’s datafiles to a point-in-time before disk failure,and includes the committed data in memory that was lost due to failure. Followingis a list of media recovery operations:
■ Complete Media Recovery
Complete media recovery includes the application of all necessary redo orincremental backups ever generated for the particular incarnation of the data-base being recovered. Complete media recovery can be performed on offlinedatafiles while the database is open. Complete media recovery may require anopen resetlogs operation if a backup control file is included in the recovery, or aresetlogs operation creating a new control file has been performed. Types ofcomplete media recovery are:
– Closed Database Recovery
– Open-Database, Offline-Tablespace Recovery
– Open-Database, Offline-Tablespace, Individual Datafile Recovery
■ Incomplete Media Recovery
Incomplete media recovery produces a version of the database as it was atsome time in the past. Incomplete media recovery must either continue on tobecome a complete media recovery, or be terminated by an open resetlogs oper-ation that creates a new incarnation of the database. The database must beclosed for incomplete media recovery operations. Types of incomplete mediarecovery are:
– Time-based Recovery
You specify the point in time to recover to
– Cancel-based Recovery
You decide to cancel during the recovery operation
– Change-based Recovery
For Recovery Manager, types of incomplete media recovery are:
– Time-based Recovery
– Change-based Recovery
– Log Sequence Recovery (replaces cancel-based recovery, above)
Recovers up to a specified log sequence number
Choosing Recovery Strategies 4-7

Recovery Planning
4-8 Oracle8 Backup and Recovery Guide

Choosing a Backup M
5
Choosing a Backup MethodThis chapter describes the different backup methods available and situations wheneach should be used, and contains the following topics:
■ Backup Methods and Requirements
■ Recovery Manager
■ Feature Comparison of Backup Methods
ethod 5-1
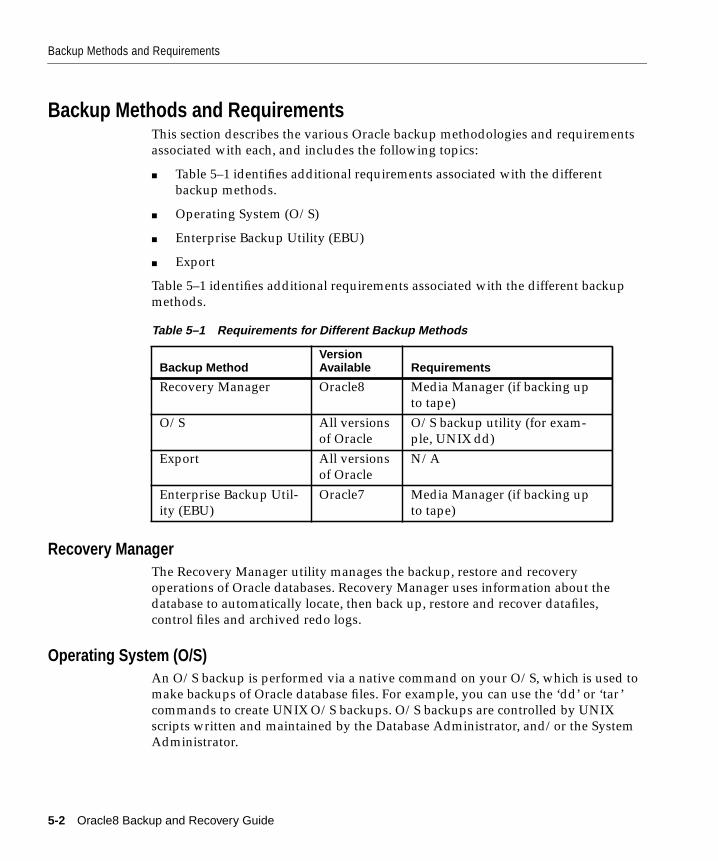
Backup Methods and Requirements
Backup Methods and RequirementsThis section describes the various Oracle backup methodologies and requirementsassociated with each, and includes the following topics:
■ Table 5–1 identifies additional requirements associated with the differentbackup methods.
■ Operating System (O/S)
■ Enterprise Backup Utility (EBU)
■ Export
Table 5–1 identifies additional requirements associated with the different backupmethods.
Recovery ManagerThe Recovery Manager utility manages the backup, restore and recoveryoperations of Oracle databases. Recovery Manager uses information about thedatabase to automatically locate, then back up, restore and recover datafiles,control files and archived redo logs.
Operating System (O/S)An O/S backup is performed via a native command on your O/S, which is used tomake backups of Oracle database files. For example, you can use the ‘dd’ or ‘tar’commands to create UNIX O/S backups. O/S backups are controlled by UNIXscripts written and maintained by the Database Administrator, and/or the SystemAdministrator.
Table 5–1 Requirements for Different Backup Methods
Backup MethodVersionAvailable Requirements
Recovery Manager Oracle8 Media Manager (if backing upto tape)
O/S All versionsof Oracle
O/S backup utility (for exam-ple, UNIX dd)
Export All versionsof Oracle
N/A
Enterprise Backup Util-ity (EBU)
Oracle7 Media Manager (if backing upto tape)
5-2 Oracle8 Backup and Recovery Guide
Recovery Manager
See Also: For information about the utilities available on your operating system,see your operating system-specific documentation.
ExportThe Oracle Export utility writes data from an Oracle database to operating systemfiles in an Oracle database format. Export files store information about schemaobjects created for a database. Because the Oracle Export utility can selectivelyexport specific objects, you may consider exporting portions of or all of a databasefor supplemental protection and flexibility. Database exports are not a substitute forwhole database backups and don’t provide the same recovery advantages that thebuilt-in functionality of Oracle offers.
See Also: For information about using exports to supplement your backupstrategy, see Oracle8 Utilities.
Enterprise Backup UtilityThe Oracle Enterprise Backup Utility is available to back up Oracle7 databases; it isnot compatible with Oracle8 databases.
See Also: For information about using the EBU to back up an Oracle7 database, seethe Oracle7 Enterprise Backup Utility Administrator’s Guide.
Recovery ManagerThe Recovery Manager utility manages the backup, restore and recoveryoperations of Oracle databases. Recovery Manager uses information about thedatabase to automatically locate, then back up, restore and recover datafiles,control files and archived redo logs.
Recovery Manager gets the required information from either the databases’ controlfile, or via a central repository of information called a recovery catalog, which ismaintained by Recovery Manager.
Using Oracle Enterprise Manager to Perform Recovery Manager BackupsYou can perform Recovery Manager backups using Oracle Enterprise Manager.Oracle Enterprise Manager-Backup Manager is a GUI interface to RecoveryManager that enables you to perform backup and recovery via a point-and-clickmethod.
See Also: For information about performing backup and recovery using OracleEnterprise Manager, see the Oracle Enterprise Manager Administrator’s Guide.
Choosing a Backup Method 5-3
Recovery Manager
Recovery Manager is Different from Traditional Operating System BackupsRecovery Manager is a command line interface (CLI) that directs an Oracle serverprocess to back up, restore or recover the database it is connected to.
The Recovery Manager program issues commands to an Oracle server process.TheOracle server process reads the datafile, control file or archived redo log beingbacked up, or writes the datafile, control file or archived redo log being restored orrecovered.
When an Oracle server process reads datafiles, it detects any split blocks and re-reads them to get a consistent block. Hence, you should not put tablespaces in hotbackup mode when using Recovery Manager to perform open backups.
See Also: “Fractured Block Detection During Open Database Backups in RecoveryManager” on page 7-26.
Recovery Manager performs backup and recovery procedures, and greatlysimplifies the tasks administrators perform during these processes. For example,Recovery Manager provides a way to:
■ Configure frequently executed backup operations
■ Generate a printable log of all backup and recovery actions
■ Use the recovery catalog to automate both media restore and recovery opera-tions
■ Perform automatic parallelization of backups and restores
■ Find datafiles that require a backup based on user-specified limits on theamount of redo that must be applied
■ Back up the database, individual tablespaces or datafiles
Backups to DiskYou can use Recovery Manager to perform backups to disk. You don’t need tointegrate Oracle with any Media Managers if you only intend to write backups todisk.
5-4 Oracle8 Backup and Recovery Guide

Recovery Manager
Backups to Sequential Media
To make backups to sequential media (such as tape) using Recovery Manager, youmust have media management software integrated with the Oracle software.
Figure 5–1 shows the architecture for media management software integrated withOracle.
Attention: In order to utilize tape storage for your Oracledatabase backups, Recovery Manager requires you to install amedia management product. The Oracle Backup SolutionsProgram (BSP) provides customers with a range of mediamanagement products that are compliant with the Oracle MediaManagement interface specification. One of these products is theLegato Storage Manager (LSM), which is available for a number ofplatforms, and is included in the Oracle software shipped for thoseplatforms.
Refer to your platform-specific documentation for informationregarding availability of the Legato product on your platform.The Legato Storage Manager Administrator’s Guide describes thefeatures supported by this product. If other BSP mediamanagement products are included with your shipment, they willbe documented in your platform-specific documentation.
Several other products may be available for your platform directlyfrom a media management vendor. For a current list of availableproducts, refer to the Oracle Backup Solutions Program (BSP) website at:
http://www.oracle.com/st/products/features/backup.html
You can also contact your Oracle representative for a complete list.
If you wish to use a particular media management product, contactthe media management vendor directly to determine if they are amember of the Oracle Backup Solutions Program.
Choosing a Backup Method 5-5
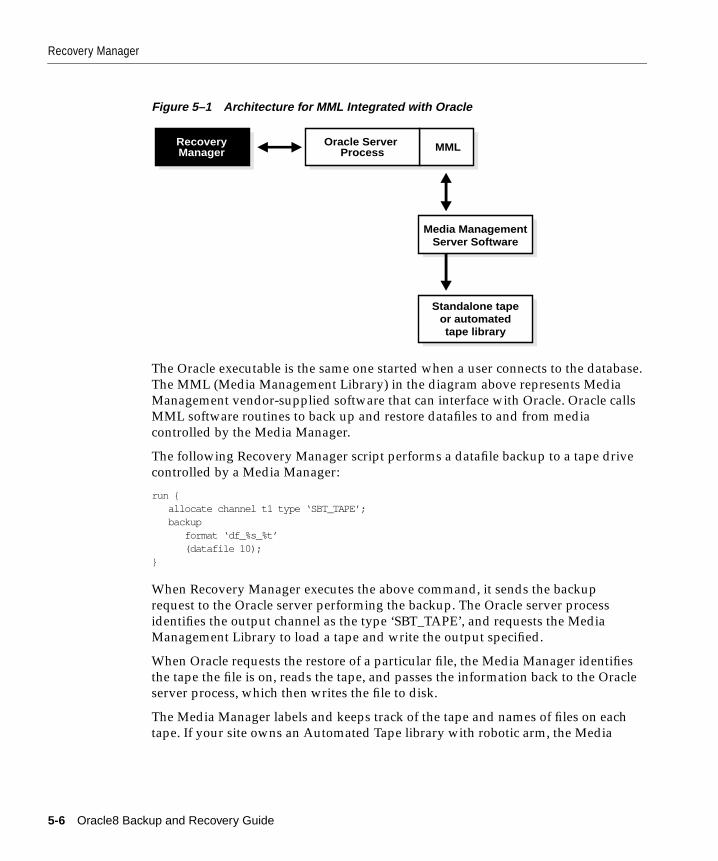
Recovery Manager
Figure 5–1 Architecture for MML Integrated with Oracle
The Oracle executable is the same one started when a user connects to the database.The MML (Media Management Library) in the diagram above represents MediaManagement vendor-supplied software that can interface with Oracle. Oracle callsMML software routines to back up and restore datafiles to and from mediacontrolled by the Media Manager.
The following Recovery Manager script performs a datafile backup to a tape drivecontrolled by a Media Manager:
run { allocate channel t1 type ‘SBT_TAPE’; backup format ‘df_%s_%t’ (datafile 10);}
When Recovery Manager executes the above command, it sends the backuprequest to the Oracle server performing the backup. The Oracle server processidentifies the output channel as the type ‘SBT_TAPE’, and requests the MediaManagement Library to load a tape and write the output specified.
When Oracle requests the restore of a particular file, the Media Manager identifiesthe tape the file is on, reads the tape, and passes the information back to the Oracleserver process, which then writes the file to disk.
The Media Manager labels and keeps track of the tape and names of files on eachtape. If your site owns an Automated Tape library with robotic arm, the Media
MMLOracle Server Process
RecoveryManager
Media ManagementServer Software
Standalone tapeor automatedtape library
5-6 Oracle8 Backup and Recovery Guide
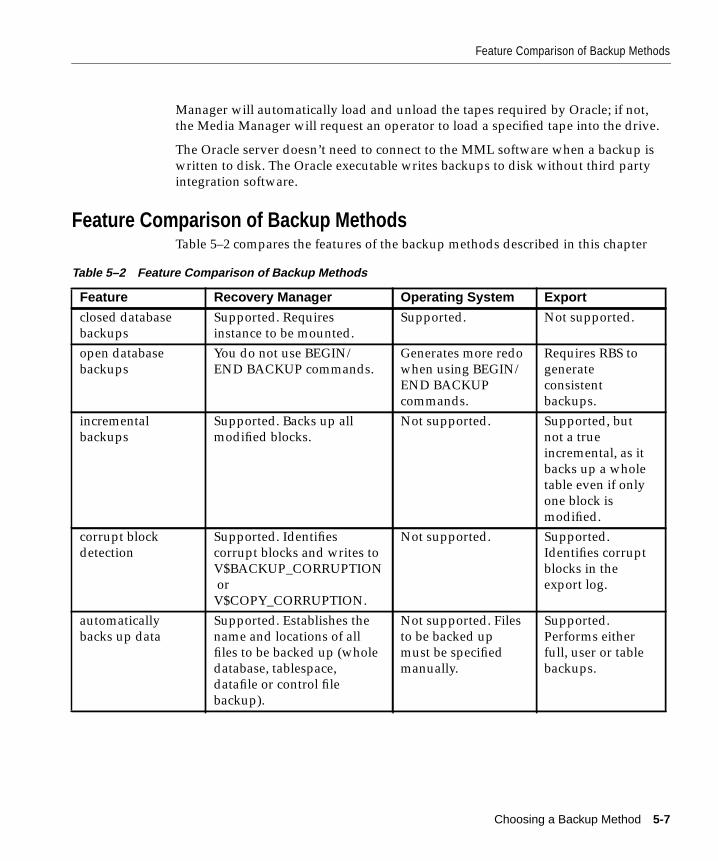
Feature Comparison of Backup Methods
Manager will automatically load and unload the tapes required by Oracle; if not,the Media Manager will request an operator to load a specified tape into the drive.
The Oracle server doesn’t need to connect to the MML software when a backup iswritten to disk. The Oracle executable writes backups to disk without third partyintegration software.
Feature Comparison of Backup MethodsTable 5–2 compares the features of the backup methods described in this chapter
Table 5–2 Feature Comparison of Backup Methods
Feature Recovery Manager Operating System Export
closed databasebackups
Supported. Requiresinstance to be mounted.
Supported. Not supported.
open databasebackups
You do not use BEGIN/END BACKUP commands.
Generates more redowhen using BEGIN/END BACKUPcommands.
Requires RBS togenerateconsistentbackups.
incrementalbackups
Supported. Backs up allmodified blocks.
Not supported. Supported, butnot a trueincremental, as itbacks up a wholetable even if onlyone block ismodified.
corrupt blockdetection
Supported. Identifiescorrupt blocks and writes toV$BACKUP_CORRUPTION orV$COPY_CORRUPTION.
Not supported. Supported.Identifies corruptblocks in theexport log.
automaticallybacks up data
Supported. Establishes thename and locations of allfiles to be backed up (wholedatabase, tablespace,datafile or control filebackup).
Not supported. Filesto be backed upmust be specifiedmanually.
Supported.Performs eitherfull, user or tablebackups.
Choosing a Backup Method 5-7

Feature Comparison of Backup Methods
catalogs backupsperformed
Supported. Backups arecataloged to the recoverycatalog and to the controlfile, or just to the control file.
Not supported. Not supported.
makes backups totape
Supported. Interfaces with aMedia Manager.
Supported. Backupto tape is manual ormanaged by a MediaManager.
Supported.
Backs up init.oraand password files
Not supported. Supported. Not supported.
Operating SystemIndependentlanguage
An O/S independentscripting language.
O/S dependent. O/S independentscripting language.
Table 5–2 Feature Comparison of Backup Methods (Cont.)
Feature Recovery Manager Operating System Export
5-8 Oracle8 Backup and Recovery Guide
Part II
Backup and Recovery—Recovery Manager
Getting Started with Recovery Ma
6
Getting Started with Recovery ManagerThis chapter is a “quick start” to using Recovery Manager, and includes thefollowing topics:
■ Decisions to Make Before Using Recovery Manager
■ Recovery Manager Connection Options
■ Running Recovery Manager Commands
■ Recovery Manager Sample Scripts and Scenarios
■ Prerequisites for Performing Backups to Tape
nager 6-1
Decisions to Make Before Using Recovery Manager
Decisions to Make Before Using Recovery ManagerYou will need to make the following decisions before you start using RecoveryManager:
■ Will You Use a Recovery Catalog?
■ Decide Whether or Not to Use Password Files
■ Decide How to Back Up init.ora Files and Password Files
Will You Use a Recovery Catalog?There are costs and benefits associated with using and not using a RecoveryCatalog. Following is a brief overview of some of these costs and benefits.
Costs and Benefits When Using a Recovery CatalogWhen you use a recovery catalog, Recovery Manager can perform a wider varietyof automated backup and recovery functions; however, Recovery Manager requiresthat you maintain a recovery catalog schema, and any associated space used bythat schema.
If you use a recovery catalog, you must decide which database you will use toinstall the recovery catalog schema, and also how you will back this database up.
The size of the recovery catalog schema:
■ is dependent on the number of databases monitored by the catalog
■ is dependent on the number and size of Recovery Manager scripts stored in thecatalog
■ will grow as the numbers of archived logs and backups for each database grow
If you use Recovery Manager to back up many databases, you may wish to create aseparate recovery catalog database, and create the Recovery Manager user in thatdatabase. You should also decide whether or not to operate this database inARCHIVELOG mode.
6-2 Oracle8 Backup and Recovery Guide
Decisions to Make Before Using Recovery Manager
If you store the recovery catalog in a separate database, you will require a smallamount of disk space for the following:
■ system
■ temp
■ rollback segment tablespaces
■ online redo log
An additional benefit of maintaining a separate recovery catalog is that it is onlyunavailable at the DBA’s discretion. Most of the space used in this database isdevoted to supporting tablespaces (for example, system, temp, and rollback).
Table 6–1 lists typical space requirements for 1 year.
If you have more than one database to back up, you can create more than onerecovery catalog and have each database serve as the other’s recovery catalog. Forexample, assume there are two production databases, one called “prd1,” and asecond called “prd2.” You can install the recovery catalog for “prd1” in the “prd2”database, and the recovery catalog for the “prd2” database in ”prd1.” This enablesyou to avoid the extra space requirements and memory overhead of maintaining aseparate recovery catalog database. However, this solution is not practical if therecovery catalog databases for both reside in tablespaces residing on the samephysical disk.
Table 6–1 Typical Recovery Catalog Space Requirements for 1 Year
Type of Space Space Requirement
system 50 megabytes
temp 5 megabytes
rollback 5 megabytes
recovery catalog 10 megabytes
online logs 1 megabyte each (3 groups, each with 2 members)
Note: You must install the recovery catalog schema in a differentdatabase from the target database you will be backing up. If youdon’t, the benefits of using a recovery catalog are lost if you losethe database and need to restore.
Getting Started with Recovery Manager 6-3

Decisions to Make Before Using Recovery Manager
See Also: For more information, see Chapter 7, “Recovery Manager Concepts”.
Costs and Benefits When not Using a Recovery CatalogThe following recovery features are not available when you do not use a recoverycatalog:
■ tablespace point-in-time recovery
■ stored scripts
■ recovery when the control file is lost or damaged
In order to restore and recover your database without using a recovery catalog,Oracle recommends that you:
■ Use multiplexed control files (minimum of two), and have each control file onseparate disks to protect against media failure.
■ Keep excellent record of what files were backed up, the date they were backedup, and also the names of the backup pieces each file was written to. Keep allRecovery Manager backup logs.
WARNING: Ensure that the recovery catalog and target databasesdo not reside on the same disks. If they are on the same disks andyou lose one, you will most likely lose the other.
WARNING: It is difficult to restore and recover if you lose yourcontrol files and do not use a recovery catalog. The only way torestore and recover when you have lost all control files and needto restore and recover datafiles, is to call Oracle WorldWide Cus-tomer Support (WWCS). WWCS will need to know the following:
■ current schema of the database
■ which files were backed up
■ what time the files were backed up
■ names of the backup pieces containing the files
Also, Oracle recommends using Recovery Manager with a recov-ery catalog.
6-4 Oracle8 Backup and Recovery Guide
Decisions to Make Before Using Recovery Manager
Setting Up the Recovery Catalog SchemaWhen you use a recovery catalog, you need to set up the schema. Oracle suggestsyou put the recovery catalog schema in its own tablespace; however, it could be putin the system tablespace, if necessary.
To Set Up the Recovery Catalog Schema
1. Using Server Manager (LineMode) connectinternal (or as SYSDBA) to the database containing the recovery catalog.
2. Issue the following commands:
spool create_rman.log connect internal create user rman identified by rman temporary tablespace temp default tablespace rcvcat quota unlimited on rcvcat; grant recovery_catalog_owner to rman; connect rman/rman @?/rdbms/admin/catrman
3. Check the create_rman.log file for any errors before continuing.
Assume the following for the recovery catalog schema created here:
■ there is a tablespace called “rcvcat” that stores the recovery catalog
■ there is a tablespace called “temp”
■ the database is configured in the same way as all “normal” databases (forexample, catalog.sql and catproc.sql have successfully run)
Also, you must install the recovery catalog schema in a different database from thetarget database you will be backing up. If you don’t, the benefits of using arecovery catalog are lost if you lose the database and need to restore.
Note: You must not run catrman.sql script in the SYS schema.Run the catrman.sql script in the recovery catalog schema.
WARNING: Ensure that the recovery catalog and target data-bases do not reside on the same disks; if they do and you loseone, you will most likely lose the other.
Getting Started with Recovery Manager 6-5

Decisions to Make Before Using Recovery Manager
Decide When and How to Back Up the Recovery CatalogIt is important that you maintain regular backups of your recovery catalog—Oraclerecommends a daily backup.
You should also use 2 different methods to back up your Recovery Catalog. Forexample, you could use Recovery Manager and the Export utility, or RecoveryManager and an operating system utility.
If you use Recovery Manager to back up the recovery catalog database, create asecond recovery catalog in a separate database (such as the production databaseyou are backing up). If you use the recovery catalog to back itself up, and lose thisdatabase due to media failure, you won’t easily be able to restore it.
Decide How to Resynchronize the Recovery CatalogYou should automate recovery catalog resynchronizations so that aresychronization is performed at least once a day. If your site generates manyarchived logs each day, then you should resynchronize the catalog once an hour.
It typically takes a short amount of time to resynchronize the catalog, and theshorter the time lapse between resynchronizations, the faster the resynchronizationprocess will be.
At least once a week verify that the automatic catalog resynchronization processyou set up, works.
Decide Whether or Not to Use Password FilesGenerally, you need to use a password file when connecting to the target databaseover a non-secure Net8 connection, especially when you do the following:
■ You run Recovery Manager remotely (from a different machine than thedatabase you wish to back up). For example, if you choose to use OracleEnterprise Manager— Backup Manager GUI.
■ You wish to use Recovery Manager, and use a TNS alias in the connect stringfor the target database.
■ You have a Parallel Server database, and wish to backup this database frommore than one node in the cluster concurrently, while using only one RecoveryManager session.
Note: You should manually resynchronize the catalog wheneveryou make any structural changes to the database (such as adding afile, or dropping a tablespace).
6-6 Oracle8 Backup and Recovery Guide
Recovery Manager Connection Options
See Also: Oracle8 Parallel Server Concepts and Administration, for an example of abackup distributed over two nodes in an OPS cluster.
Decide How to Back Up init.ora Files and Password FilesRecovery Manager does not back up init.ora and password files. You must planhow you will protect these files from media failure.
Recovery Manager Connection OptionsThis section includes the following sample Recovery Manager connection options:
■ Connecting to Recovery Manager Without a Recovery Catalog
■ Connecting to Recovery Manager With a Recovery Catalog
To Perform a General Connect to Recovery Manager The following is the general form ofthe Recovery Manager connect string:
rman target internal/<pwd>@prd1 rcvcat rman/rman@rcat
Connecting to Recovery Manager Without a Recovery CatalogIn this example, assume that:
■ the target database is called “prod1” (and has the same TNS alias)
■ “scott” has been granted SYSDBA privileges (password is “tiger”)
If the target database does not have a password file, the user you are logged in asmust be validated using O/S authentication (similar to svrmgrl, and connectinternal).
To Connect to Recovery Manager Without Password Files Set your ORACLE_SID to bethe target database, and issue the following statement:
rman nocatalogRMAN> connect target
Note: The examples in this section are not used with OracleEnterprise Manager Backup Manager GUI. Also, there are manymore Recovery Manager connection options than shown in theexamples here.
Getting Started with Recovery Manager 6-7
Recovery Manager Connection Options
To Connect to Recovery Manager With Password Files If the target database usespassword files, you can connect using:
rman target internal/kernel@prod1 nocatalog
or
rman nocatalogRMAN> connect target internal/kernel@prod1
Recovery Manager automatically requests a connection to the target database asSYSDBA.
If you wish to connect as a DBA user who has SYSDBA privileges, issue thefollowing statement:
rman target scott/tiger@prod1 nocatalog
Connecting to Recovery Manager With a Recovery Catalog In this example, assume that:
■ the recovery catalog database is called “rcat” (and has the same TNS alias)
■ the schema containing the recovery catalog is “rman” (password is “rman”)
■ the target database is called “prod1” (and has the same TNS alias)
■ “scott” has been granted SYSDBA privileges (password is “tiger”)
To Perform a Connect Using Password Files In the following statement theadministrator is connecting using password files for the target database, and thepassword to connect internal is ‘kernel’.
rman target internal/kernel@prod1 rcvcat rman/rman@rcat
To Perform a Connect Without Using Password Files In this statement Recovery Manageris running on the same machine as the target database. The administrator startsRecovery Manager by setting the ORACLE_SID to the target instance, then issuingthe following statement:
rman rcvcat rman/rman@rcatRMAN> connect target
To Connect as a Specific User with SYSDBA Here, Recovery Manager automaticallyrequests a connection to the target database as SYSDBA using O/S authentication,not a password file:
rman target scott/tiger@prod1 rcvcat rman/rman@rcat
6-8 Oracle8 Backup and Recovery Guide
Running Recovery Manager Commands
Running Recovery Manager CommandsThis section includes the following topics:
■ Running Recovery Manager Commands Interactively: Example 1
■ Using Command Files: Example 2
■ Using Stored Scripts: Example 3
■ Specifying Time Parameters in Recovery Manager
Catalog maintenance commands are executed outside of a run command as follows:
rman target internal/kernel@prod1 rcvcat rman/rman@rcatRMAN> resync catalog;
Commands such as backup, restore, and allocate must be executed within a runcommand as follows:
rman target internal/kernel@prod1 rcvcat rman/rman@rcatRMAN> run {2> allocate channel c1 type disk;3> copy datafile 5 to ‘/dev/backup/prod1/prod1_tab7.dbf’;4> }
Running Recovery Manager Commands Interactively: Example 1To run Recovery Manager commands interactively, you need to start RecoveryManager, then type the commands into the command line interface, as follows:
rman target internal/kernel@prod1 rcvcat rman/rman@rcat RMAN> register database; RMAN> run { 2> allocate channel d1 type disk; 3> allocate channel d2 type disk; 4> allocate channel d3 type disk; 5> backup 6> incremental level 0 7> tag db_level_0 8> filesperset 6 9> format ‘/dev/backup/prod1/df/df_t%t_s%s_p%p’ 10> (database); 11> sql ‘alter system archive log current’; 12> backup 13> filesperset 20 14> format ‘/dev/backup/prod1/al/al_t%t_s%s_p%p’ 15> (archivelog all 16> delete input); 17> }
Getting Started with Recovery Manager 6-9
Running Recovery Manager Commands
Using Command Files: Example 2You can type Recovery Manager commands into a file, and then run the commandfile by specifying its name on the command line.
The contents of the command file should be identical to commands entered at thecommand line.
Here, the Recovery Manager script from Example 1 has been placed into a file(called” b_whole_l0.rcv”). This file is run from the command line as follows.
rman target internal/kernel@prod1 rcvcat rman/rman@rcat cmdfile b_whole_l0.rcv
Using Stored Scripts: Example 3A stored script is a set of Recovery Manager commands (enclosed in braces) that arestored in the recovery catalog. A stored script only relates to one database. Youcannot use stored scripts if you do not use a recovery catalog.
To create a stored script, you can either enter your script interactively into theRecovery Manager command line interface (as in Example 1), or type yourRecovery Manager commands into a command file, and run the command file (asin Example 2).
Following is a stored script:
replace script b_whole_l0 { # Backup Whole database, and archived logs allocate channel d1 type disk; allocate channel d2 type disk; allocate channel d3 type disk; backup incremental level 0 tag b_whole_l0 filesperset 6 format ‘/dev/backup/prod1/df/df_t%t_s%s_p%p’ (database); sql ‘alter system archive log current’; backup filesperset 20 format ‘/dev/backup/prod1/al/al_t%t_s%s_p%p’ (archivelog all delete input); }
6-10 Oracle8 Backup and Recovery Guide
Prerequisites for Performing Backups to Tape
Specifying Time Parameters in Recovery ManagerBefore invoking Recovery Manager, set the NLS_DATE_FORMAT and NLS_LANGenvironment variables. These variables specify the format used for the timeparameters in Recovery Manager commands, such as:
■ restore and recover
■ report
The following example shows typical environment variables:
NLS_LANG=americanNLS_DATE_FORMAT=’Mon DD YYYY HH24:MI:SS’
Recovery Manager Sample Scripts and ScenariosThere are a number of sample scripts in the RDBMS demo directory. These files areexecutable Recovery Manager command files and are fully commented to explainthe features used. You can edit them to customize them for your site.
The file case1.rcv creates a number of stored scripts that back up, restore andrecover a database. These scripts are typical of how some DBAs back up theirdatabases, and you can use them as a starting point for developing backup, restoreand recovery scripts.
The following files contain either a backup or recovery scenario. These scripts showmore of the Recovery Manager syntax flexibility and power than appears in thesample scripts:
case2.rcv - incomplete recoverycase3.rcv - disaster recoverycase4.rcv - consistent backup
See Also: Additional backup and recovery scenarios are in Chapter 9, “RecoveryManager Scenarios”.
Prerequisites for Performing Backups to TapeTo back up to and restore from sequential media, such as tape, you must have aMedia Manager integrated with Oracle.
Note: Both NLS_LANG and NLS_DATE_FORMAT must be setfor NLS_DATE_FORMAT to be used.
Getting Started with Recovery Manager 6-11
Prerequisites for Performing Backups to Tape
This section includes the following topics:
■ Linking with a Media Manager
■ Generating Unique File Names
■ Know Your Media Manager’s Maximum File Size Limit
Linking with a Media ManagerTo integrate Oracle with a Media Manager, you must:
■ have Media Manager software and hardware installed and configured
■ obtain that Media Management Vendor’s library interface software (MediaManagement Library) from that Vendor
The Media Management Library (MML) is then linked with the Oracle kernelsoftware. This enables Oracle server processes to call the Media Manager.
Generating Unique File NamesYou should use the substitution variables provided by Recovery Manager togenerate unique backup piece names when writing backups to a Media Manager. Abackup piece name is determined by the format string specified either in thebackup command, or in the allocate channel command.
The Media Manager considers the backup piece name as the ‘file name backed up’,so this name must be unique in the Media Manager catalog.
You can use the following substitution variables to make unique format strings:
%d - database name (uppercase)
%t - backup set stamp
%s - backup set number
Note: For instructions on how to achieve this on your platform,see your operating system-specific Oracle documentation and thedocumentation supplied by your Media Manager.
WARNING: When a backup generates a file whose name alreadyexists in the Media Manager’s catalog, the original file having thatname is deleted.
6-12 Oracle8 Backup and Recovery Guide
Prerequisites for Performing Backups to Tape
%p - piece number in the set
%u - an 8 character id composed of compressed representations of the backupset number and the time the backup set was created
Know Your Media Manager’s Maximum File Size LimitSome Media Managers have limits on the maximum size of files they can back upor restore.
As Recovery Manager multiplexes multiple datafiles into one output file (onebackup piece), it is possible that the piece size is in excess of the size that manyMedia Managers or file systems are able to store.
To avoid problems, find out what operational limits on file sizes exist, and ensurethe files written out by Recovery Manager do not exceed these limits.To limitbackup piece file sizes, use the keyword kbytes in a setlimit channel command(see scenario case1.rcv in the demo directory for an example).
Note: Some Media Managers only support a 14-character backuppiece name. See your Media Management documentation todetermine the limit for your Media Manager.
Getting Started with Recovery Manager 6-13

Prerequisites for Performing Backups to Tape
6-14 Oracle8 Backup and Recovery Guide
Recovery Manager Con
7
Recovery Manager ConceptsThis chapter describes the basic concepts for the Oracle Recovery Manager utility,and includes the following topics:
■ Introduction to Recovery Manager
■ Backing Up to Sequential Media
■ Recovery Manager Backup Types
■ Corruption Detection
■ Parallelization
■ Report Generation
■ User Tags for Recovery Manager Backups
■ Backup Constraints
■ Restore Constraints
■ Integrity Checking
■ Fractured Block Detection During Open Database Backups in RecoveryManager
■ Cataloging Image Copies and Archive Logs
cepts 7-1

Introduction to Recovery Manager
Introduction to Recovery ManagerRecovery Manager is an Oracle utility you use to back up, restore, and recoverdatabase files. Recovery Manager starts Oracle server processes on the database tobe backed up or restored (called the target database). These Oracle server processesactually perform the backup and restore. For example, during a backup, the serverprocess reads the files to be backed up, and writes out the files out to your targetstorage device.
Recovery Manager performs important backup and recovery procedures, andgreatly simplifies the tasks administrators perform during these processes. Forexample, Recovery Manager provides a way to:
■ Configure frequently executed backup operations
■ Generate a printable log of all backup and recovery actions
■ Use the recovery catalog to automate both restore and recovery operations
■ Perform automatic parallelization of backups and restores
■ Find datafiles that require a backup based on user-specified limits on theamount of redo that must be applied
■ Back up the whole database, selected tablespaces, or selected datafiles
7-2 Oracle8 Backup and Recovery Guide

Introduction to Recovery Manager
Figure 7–1 Recovery Manager
Recovery Manager has a command language interpreter (CLI), and can be executedin interactive or batch mode. You may also specify a log file on the command lineto record significant Recovery Manager actions.You can also use Recovery Managervia the Enterprise Manager Recovery Manager application.
When running in batch mode, Recovery Manager reads input from a command fileand writes output messages to a log file (if specified). The command file is parsedin its entirety before any commands are compiled and executed. Batch mode ismost suitable for performing regularly scheduled backups via an operating systemjob control facility.
Recovery Manager provides the following categories of commands:
■ backup, restore, copy and recover
■ Recovery catalog maintenance commands
■ Stored script maintenance commands
■ report and list commands
OracleRecoveryCatalog
Recovery Manager
TargetOracle
Databases
Tertiary Storage Subsystems
Oracle Server Processes
EnterpriseManager
DiskDisk
Oracle Server Process
Oracle Server Process
Oracle Server Process
Oracle Server Process
Recovery Manager Concepts 7-3
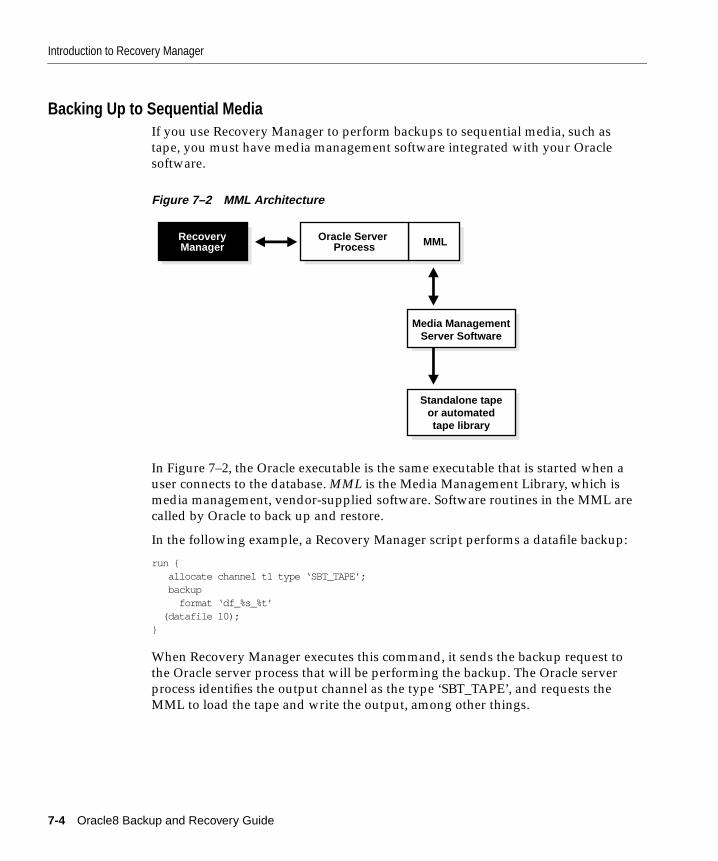
Introduction to Recovery Manager
Backing Up to Sequential MediaIf you use Recovery Manager to perform backups to sequential media, such astape, you must have media management software integrated with your Oraclesoftware.
Figure 7–2 MML Architecture
In Figure 7–2, the Oracle executable is the same executable that is started when auser connects to the database. MML is the Media Management Library, which ismedia management, vendor-supplied software. Software routines in the MML arecalled by Oracle to back up and restore.
In the following example, a Recovery Manager script performs a datafile backup:
run { allocate channel t1 type ‘SBT_TAPE’; backup format ‘df_%s_%t’ (datafile 10);}
When Recovery Manager executes this command, it sends the backup request tothe Oracle server process that will be performing the backup. The Oracle serverprocess identifies the output channel as the type ‘SBT_TAPE’, and requests theMML to load the tape and write the output, among other things.
MMLOracle Server Process
RecoveryManager
Media ManagementServer Software
Standalone tapeor automatedtape library
7-4 Oracle8 Backup and Recovery Guide

The Recovery Catalog
If the channel type was disk, Oracle would not have connected to the MMLsoftware because Oracle can write to disk without the assistance of third-partyintegration software.
See Also: For information about vendors offering software integrated withRecovery Manager, see your Oracle representative.
Backing Up Using Enterprise ManagerYou can perform Recovery Manager backups using Oracle Enterprise Manager-Backup Manager software, which is a graphical user interface to Recovery Manager.
See Also: See your operating system-specific documentation for more information.
The Recovery CatalogThe recovery catalog is a repository of information that is used and maintained byRecovery Manager. Recovery Manager uses the information in the recovery catalogto determine how to execute requested backup and restore actions.
The recovery catalog contains informations about the following:
■ datafile and archivelog backup sets and backup pieces
■ datafile copies
■ archived redo logs and copies of them
■ tablespaces and datafiles at the target database
■ named user-created sequences of Recovery Manager and SQL commandscalled stored scripts
Operating with a Recovery CatalogOracle recommends you use Recovery Manager with a recovery catalog, especiallyif you have 20 (or more) datafiles. You must frequently resynchronize the recoverycatalog with the target database control file to keep it up to date. The more up-to-date the recovery catalog is, the easier it will be to recover. For example, if you have25 archive logs that have been created subsequent to the last resynchronization,and you experience a failure requiring that you restore the entire database andcontrol file, you must first catalog these files with the recovery catalog before youcan use them.
The recovery catalog is maintained solely by Recovery Manager, and the targetdatabase never accesses it directly. Recovery Manager propagates information
Recovery Manager Concepts 7-5

The Recovery Catalog
about the database structure, archived redo logs, backup sets and datafile copiesinto the recovery catalog from the target database’s control file.
You do not need an additional database which is solely for the recovery catalog.You can put the recovery catalog in an existing database. It is the databaseadministrator’s responsibility to make the recovery catalog database available toRecovery Manager. Database administrators are also responsible for takingbackups of the recovery catalog. Since the recovery catalog resides in an Oracledatabase, administrators can use Recovery Manager to back it up by reversing theroles of the recovery catalog database and the target database. In other words, thetarget database can become the recovery catalog database and the recovery catalogdatabase can be treated as a target database.
A single recovery catalog is able to store information for multiple target databases.
If the recovery catalog is destroyed and no backups are available, then you canpartially reconstruct the catalog from the current control file or control file backups.However, you should always aim to have a valid, recent backup of your recoverycatalog.
Propagating Information from the Control FileThe size of the target database’s control file will grow, depending on the number of:
■ backups performed
■ archive logs created
■ days (minimum number) this information is stored in the control file
You can specify the minimum number of days this information is kept in thecontrol file using the parameter CONTROL_FILE_RECORD_KEEP_TIME. Entriesolder than the number of days are candidates for overwrites by newer information.The larger the CONTROL_FILE_RECORD_KEEP_TIME setting is, the larger thecontrol file will be.
At a minimum, you should resynchronize your recovery catalog at intervals lessthan the CONTROL_FILE_RECORD_KEEP_TIME setting, because after thisnumber of days, the information in the control file will be overwritten with themost recently created information; if you have not resynchronized, and informationhas been overwritten, this information can not be propagated to the recoverycatalog.
Note: The maximum size of the control file is port specific. Seeyour see your operating system-specific Oracle documentation.
7-6 Oracle8 Backup and Recovery Guide
The Recovery Catalog
See Also: For more information about theCONTROL_FILE_RECORD_KEEP_TIME parameter, see the Oracle8 Reference.
Operating without a Recovery Catalog
Because most information in the recovery catalog is also available in the targetdatabase’s control file, Recovery Manager supports an operational mode where ituses the target database control file instead of a recovery catalog. This operationalmode is appropriate for small databases where installation and administration ofanother database for the sole purpose of maintaining the recovery catalog would beburdensome.
Note that the following features are not supported in this operational mode:
■ tablespace point-in-time recovery
■ stored scripts
■ restore and recovery when the control file is lost or damaged
To restore and recover your database without using a recovery catalog, Oraclerecommends that you:
■ Use multiplexed control files (minimum of two), and have each control file onseparate disks to protect against media failure.
Note: You are not required to maintain a recovery catalog withRecovery Manager; however, Oracle recommends that you use one.
Recovery Manager Concepts 7-7

The Recovery Catalog
■ Keep excellent record of what files were backed up, the date they were backedup, and also the names of the backup pieces each file was written to. Keep allRecovery Manager backup logs.
Keeping Information in the Control FileThe size of the target database’s control file will grow, depending on the number of:
■ backups performed
■ archive logs created
■ days (minimum) this information is stored in the control file
You can specify the minimum number of days this information is kept in thecontrol file using the parameter CONTROL_FILE_RECORD_KEEP_TIME. Entriesolder than this number of days are candidates to be overwritten by newerinformation. The larger the CONTROL_FILE_RECORD_KEEP_TIME is, the largerthe control file will be.
If you do not use a recovery catalog, you may wish to set theCONTROL_FILE_RECORD_KEEP_TIME parameter to the duration (in days) youintend to keep your backups. This way, the backup information in the control filewill not be overwritten before the backups become obsolete.
See Also: For more information about theCONTROL_FILE_RECORD_KEEP_TIME parameter, see the Oracle8 Reference.
WARNING: It is difficult to restore and recover if you lose yourcontrol files and do not use a recovery catalog. The only way torestore and recover when you have lost all control files and needto restore and recover datafiles, is to call Oracle WorldWideSupport (WWS). WWS will need to know the following:
■ current schema of the database
■ which files were backed up
■ what time the files were backed up
■ names of the backup pieces containing the files
Note: The maximum size of the control file is port specific. Seeyour see your operating system-specific Oracle documentation.
7-8 Oracle8 Backup and Recovery Guide
The Recovery Catalog
Snapshot Control FileRecovery Manager generates a snapshot control file, which is a temporary backupcontrol file each time it refreshes the recovery catalog. This snapshot control fileensures that Recovery Manager has a consistent view of the control file either whenrefreshing the recovery catalog or when querying the control file (if you are notusing a recovery catalog). Because the snapshot control file is for RecoveryManager’s short term use, it is not registered in the recovery catalog. RecoveryManager records the snapshot control file checkpoint in the recovery catalog toindicate precisely how current the recovery catalog is.
The Oracle8 server ensures only one Recovery Manager session accesses a snapshotcontrol file at any point in time. This is necessary to ensure that two RecoveryManager sessions do not interfere with each other’s use of the snapshot control file.
Stored ScriptsDatabase administrators can store a sequence of Recovery Manager commands,called a stored script, in the recovery catalog for execution at a later time. Thisallows the administrator to plan, develop and test a set of commands for backingup, restoring, and recovering the database. Stored scripts also minimize thepotential for operator errors. Each stored script relates to only one database.
Note: It is possible to specify the name and location of a snapshotcontrol file. For information on how to do this, see “Configuringthe Snapshot Control File Location” on page 8-19.
Recovery Manager Concepts 7-9

Recovery Manager Backup Types
Figure 7–3 Recovery Manager Stored Scripts
Recovery Manager Backup TypesRecovery Manager supports two basic types of backups:
■ Backup Sets
■ Image Copies
Backup SetsA backup set contains one or more datafiles or archivelogs; however, it cannotcontain both datafiles and archivelogs. Datafile backup sets can also contain acontrol file backup.
Backup sets are in an Oracle proprietary format (similar to Export files). You mustperform a restore operation to extract a file from a backup set.
A backup set is also complete set of backup pieces that constitute a full orincremental backup of the objects specified in the backup command.
The pieces of a backup set are written serially. (Striping a backup set acrossmultiple output devices is not supported.) If multiple output devices are available,you can partition your backups so that multiple backup sets are created in parallel.Recovery Manager performs this backup partitioning automatically, if desired.
OracleRecoveryCatalog
Stored Scripts
Recovery Manager
TargetedOracle8
Database(s)
7-10 Oracle8 Backup and Recovery Guide
Recovery Manager Backup Types
A backup set can:
■ be written to disk or tertiary storage
■ be full or incremental
■ span multiple O/S files (each file is a piece of the set—typically, one set iscomprised of only one piece)
You can write backup sets to either normal operating system disk files or tosequential output media (for example, magnetic tape) using a sequential outputdevice or media management system that is available and supported by Oracle onyour operating system. To determine which device types are supported by youroperating system or Media Manager, query the V$BACKUP_DEVICE view.
A backup set containing archived logs is called an archivelog backup set. You cannotarchive directly to tape. However, Recovery Manager allows you to back uparchived logs from disk to tape. Also, during recovery Recovery Managerautomatically stages the required archived logs from tape to disk.
See Also: For details about V$BACKUP_DEVICE, see the Oracle8 Reference.
Backup PiecesA backup set is composed of one or more backup pieces, each piece being a singleoutput file. You should restrict the size of a backup piece to whatever is themaximum file size supported by your Media Manager or O/S (if writing to disk). Ifyou do not restrict this size, a backup set will be comprised of only one file.
Each backup piece contains control and checksum information that allows theOracle server process to validate the correctness of the backup piece during arestore.
Backup Set CompressionDatafile blocks that have never been used are not written out to backup sets. Imagecopy backups of a datafile always contain all datafile blocks.
File MultiplexingDatafile blocks included in the same backup set are multiplexed together. Thismeans that the blocks from all of the files in the set are interspersed with all theother blocks.
You can control the number of datafiles that are backed up concurrently to abackup set using the filesperset parameter. Controlling concurrency is helpful ifyou want to keep a tape device streaming without saturating a single datafile with
Recovery Manager Concepts 7-11
Recovery Manager Backup Types
too many read requests (which can subsequently degrade online performance). Youcan limit the read rate by using the set limit readrate channel command.
See Also: For a detailed description, see “Multiplexed Backup Sets” on page 7-22.
Full and Incremental Backup SetsDatafile backup sets can be full or incremental. A full backup is a backup of one ormore datafiles that contain all blocks of the datafile(s). An incremental backup is abackup of one or more datafiles that contain only those blocks that have beenmodified since a previous backup. These concepts are described in more detail inthe following sections.
Full Backup SetsA full backup copies all blocks into the backup set, skipping only datafile blocks thathave never been used. No blocks are skipped when backing up archivelogs orcontrol files.
A full backup is not the same as a whole database backup; full is an indicator that thebackup is not incremental.
Also, a full backup has no effect on subsequent incremental backups, and is notconsidered part of the incremental strategy (in other words, a full backup does notaffect which blocks are included in subsequent incremental backups).
Oracle allows you to create and restore full backups of the following:
■ datafile
■ datafile copy
■ tablespace
■ control file (current or backup)
■ database
Archivelog backup sets are always full backups.
Incremental Backup SetsAn incremental backup is a backup of one or more datafiles that contain only thoseblocks that have been modified since a previous backup at the same or lower level;unused blocks are not written out.
7-12 Oracle8 Backup and Recovery Guide
Recovery Manager Backup Types
A control file may be included in an incremental backup set; however, it is alwaysincluded in its entirety (in other words, the full control file is always included; noblocks are skipped).
Oracle allows you to create and restore incremental backups of the following:
■ datafile
■ tablespace
■ database
The multi-level incremental backup feature allows you to create different levels ofincremental backups. Each level is denoted by an integer. By default, anincremental backup at any particular level consists of those blocks that have beenmodified since the last backup at that level or lower.
A level 0 incremental backup copies all blocks containing data; a level 0incremental backup is the base for subsequent incremental backups.
An incremental backup at a level greater than 0 copies only those blocks that havechanged since a previous incremental backup at the same or lower level. Hence, thebenefit of performing incremental backups is that you don’t back up all of theblocks all of the time. Incremental backups at levels greater than 0 only copyblocks that were modified. This means the backup size may be significantlysmaller, and require much less time. The size of the backup file depends solelyupon the number of blocks modified, as well as the incremental backup levelchosen by the DBA.
The multi-level incremental backup feature allows you to devise a backup schemethat enables you to restore the database within a given time constraint. Forexample, you could implement a three-level backup scheme so that a level 0backup was a monthly full backup; a level 1 backup was a weekly incremental, anda level 2 was a daily incremental.
Cumulative Incremental Backup SetsOracle provides an option to make cumulative incremental backups at level 1 orgreater. Cumulative incremental backups reduce the work needed for a restore byensuring that you only need one incremental backup from any particular level atrestore time. However, cumulative backups require more space and time becausethey duplicate the work done by previous backups at the same level.
A cumulative incremental backup copies all blocks that have changed since aprevious incremental backup at a lower level.
Recovery Manager Concepts 7-13
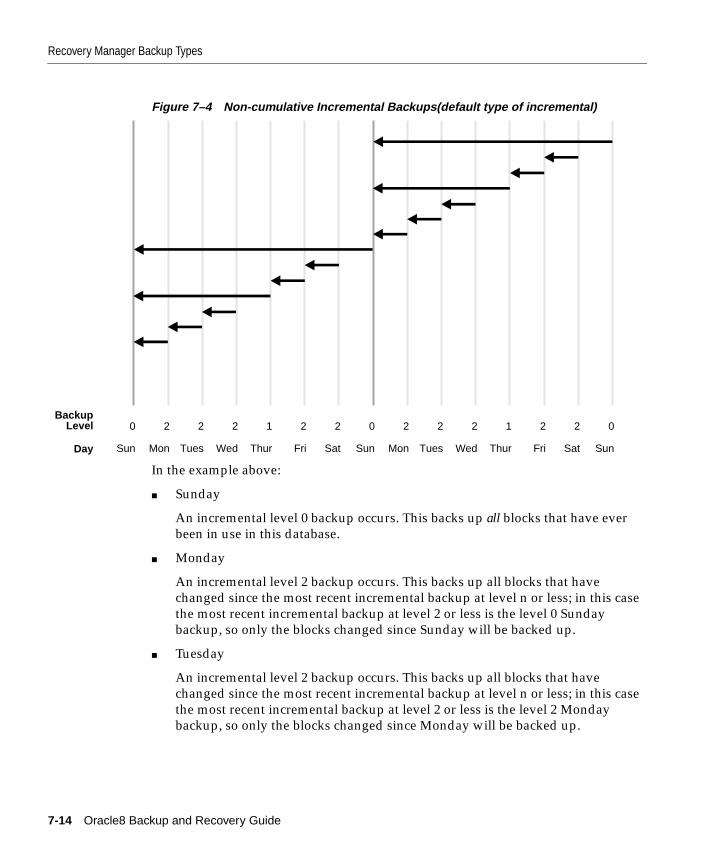
Recovery Manager Backup Types
Figure 7–4 Non-cumulative Incremental Backups(default type of incremental)
In the example above:
■ Sunday
An incremental level 0 backup occurs. This backs up all blocks that have everbeen in use in this database.
■ Monday
An incremental level 2 backup occurs. This backs up all blocks that havechanged since the most recent incremental backup at level n or less; in this casethe most recent incremental backup at level 2 or less is the level 0 Sundaybackup, so only the blocks changed since Sunday will be backed up.
■ Tuesday
An incremental level 2 backup occurs. This backs up all blocks that havechanged since the most recent incremental backup at level n or less; in this casethe most recent incremental backup at level 2 or less is the level 2 Mondaybackup, so only the blocks changed since Monday will be backed up.
SunDay
BackupLevel
Mon Tues Wed Thur Fri Sat Sun
0 2 2 2 1 2 2 0
Mon Tues Wed Thur Fri Sat Sun
2 2 2 1 2 2 0
7-14 Oracle8 Backup and Recovery Guide

Recovery Manager Backup Types
■ Wednesday
An incremental level 2 backup occurs. This backs up all blocks that havechanged since the most recent incremental backup at level n or less; in this casethe most recent incremental backup at level 2 or less is the level 2 Tuesdaybackup, so only the blocks changed since Tuesday will be backed up.
■ Thursday
An incremental level 1 backup occurs. This backs up all blocks that havechanged since the most recent incremental backup at level n or less; in this casethe most recent incremental backup at level 1 or less is the level 0 Sundaybackup, so only the blocks changed since the Sunday level 0 backup will bebacked up.
■ Friday
An incremental level 2 backup occurs. This backs up all blocks that havechanged since the most recent incremental backup at level n or less; in this casethe most recent incremental backup at level 2 or less is the level 1 Thursdaybackup, so only the blocks changed since the Thursday level 1 backup will bebacked up.
■ Saturday
An incremental level 2 backup occurs. This backs up all blocks that havechanged since the most recent incremental backup at level n or less; in this casethe most recent incremental backup at level 2 or less is the level 2 Thursdaybackup, so only the blocks changed since the Friday level 2 backup will bebacked up.
■ The cycle is repeated.
Recovery Manager Concepts 7-15
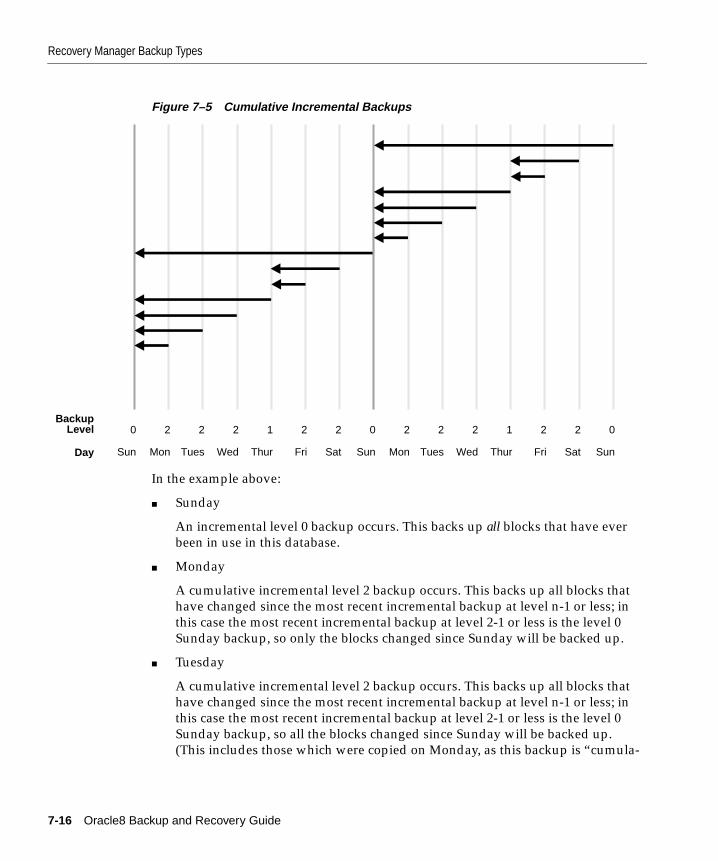
Recovery Manager Backup Types
Figure 7–5 Cumulative Incremental Backups
In the example above:
■ Sunday
An incremental level 0 backup occurs. This backs up all blocks that have everbeen in use in this database.
■ Monday
A cumulative incremental level 2 backup occurs. This backs up all blocks thathave changed since the most recent incremental backup at level n-1 or less; inthis case the most recent incremental backup at level 2-1 or less is the level 0Sunday backup, so only the blocks changed since Sunday will be backed up.
■ Tuesday
A cumulative incremental level 2 backup occurs. This backs up all blocks thathave changed since the most recent incremental backup at level n-1 or less; inthis case the most recent incremental backup at level 2-1 or less is the level 0Sunday backup, so all the blocks changed since Sunday will be backed up.(This includes those which were copied on Monday, as this backup is “cumula-
SunDay
BackupLevel
Mon Tues Wed Thur Fri Sat Sun
0 2 2 2 1 2 2 0
Mon Tues Wed Thur Fri Sat Sun
2 2 2 1 2 2 0
7-16 Oracle8 Backup and Recovery Guide
Recovery Manager Backup Types
tive” and includes the blocks copied at backups taken at the same incrementallevel as the current backup).
■ Wednesday
A cumulative incremental level 2 backup occurs. This backs up all blocks thathave changed since the most recent incremental backup at level n-1 or less; inthis case the most recent incremental backup at level 2-1 or less is the level 0Sunday backup, so all the blocks changed since Sunday will be backed up.(This includes those which were copied on Monday & Tuesday, as this backupis cumulative and includes the blocks copied at backups taken at the sameincremental level as the current backup).
■ Thursday
A cumulative incremental level 1 backup occurs. This backs up all blocks thathave changed since the most recent incremental backup at level n-1 or less; inthis case the most recent incremental backup at level 1-1 or less is the level 0Sunday backup, so all the blocks changed since Sunday will be backed up.
■ Friday
A cumulative incremental level 2 backup occurs. This backs up all blocks thathave changed since the most recent incremental backup at level n-1 or less; inthis case the most recent incremental backup at level 2-1 or less is the level 1Thursday backup, so all the blocks changed since Thursday will be backed up.
■ Saturday
A cumulative incremental level 2 backup occurs. This backs up all blocks thathave changed since the most recent incremental backup at level n-1 or less; inthis case the most recent incremental backup at level 2-1 or less is the level 1Thursday backup, so all the blocks changed since Sunday will be backed up.
■ The cycle is repeated.
Image CopiesAn image copy contains a single file (datafile, archivelog, or control file) that you canuse as-is to perform recovery. An image copy backup is similar to an O/S copy of asingle file, except it is produced by an Oracle server process, which performsadditional actions like validating the blocks in the file, and registering the copy inthe control file. An image copy differs from a backup set because it is notmultiplexed, nor is there any additional header or footer control information storedin the copy.
Recovery Manager Concepts 7-17
Corruption Detection
Image copy backups may be written only to disk.
If the image copy is of a datafile, then no restore operation is required; a switchcommand is provided to point the control file at the copy and update the recoverycatalog to indicate that the copy has been “consumed;” this is equivalent to the SQLstatement ALTER DATABASE RENAME DATAFILE. You can then perform mediarecovery to make the copy current.
An image copy can be restored to another location to prevent the “consumption” ofthe copy, but a restore is not strictly necessary because the datafile can be renamedto the image copy.
User-Created Image CopiesImage copies (also known as O/S copies) created by mechanisms other thanRecovery Manager are supported. However, database administrators must catalogsuch O/S copies with Recovery Manager before using them in a restore or switch.
Support for both closed and open O/S copies is provided for users who have othermechanisms for creating image copies of datafiles. For example, some sites storetheir datafiles on mirrored disk volumes. This permits the creation of image copiesby simply breaking the mirrors. After the mirror has been broken, RecoveryManager can be notified of the existence of a new copy, thus making it a candidatefor use in a restore. The database administrator must notify Recovery Managerwhen the copy is no longer available for restore (using the change ... uncatalogcommand). In this example, if the mirror is resilvered (not including other copies ofthe broken mirror), you must use a change ... uncatalog to update the recoverycatalog and indicate that this copy is no longer available.
Corruption DetectionAs it is an Oracle server process which is performing a backup or copy, the serverprocess is able to detect many types of corrupt blocks. Each new corrupt block notpreviously encountered in a backup or copy operation is recorded in the control fileand in the alert log.
Recovery Manager queries this information at the completion of a backup andstores it in the recovery catalog. You can query this information from the controlfile using the views V$BACKUP_CORRUPTION and V$COPY_CORRUPTION.
If you encounter a datafile block during a backup that has already been identifiedas corrupt by the database, then the corrupt block is copied into the backup and thecorruption is reported to the control file as either a logical or media corruption.
7-18 Oracle8 Backup and Recovery Guide

Channel Control
If a datafile block is encountered with a corrupt header that has not already beenidentified as corrupt by the database, then the block is written to the backup with areformatted header indicating the block is media corrupt.
Channel ControlA channel must be allocated before issuing a backup, copy, restore, or recovercommand. Each allocate channel command establishes a connection fromRecovery Manager to a target database instance by starting a server process on thetarget instance. The allocate channel command also specifies the type of I/Odevice that the server process will use to perform the backup or restore operation.Each channel usually corresponds to one output device, unless your MML (MediaManagement Library) is capable of hardware multiplexing. Oracle does notrecommend hardware multiplexing of Oracle backups. Note that there is only oneRecovery Manager process communicating with one or many server processesattached to the target database.
You can allocate multiple channels, thus allowing multiple backup sets or filecopies to be read or written in parallel by a single Recovery Manager command.Thus, the degree of parallelism within a command is affected by the number ofchannels (connections) that are allocated.
Each allocate channel command uses a separate connection to the target database.You can specify a different connect string for each channel, to connect to differentinstances of the target database. This is useful in an Oracle Parallel Serverconfiguration for distributing the workload across different nodes.
Channel control commands can be used to:
■ control the O/S resources Recovery Manager uses when performing backup,copy, restore, and recover commands
■ affect the degree of parallelism (in conjunction with filesperset)
■ specify limits on I/O bandwidth consumption (set limit read rate)
■ specify limits on the size of backup pieces (set limit kbytes)
■ specify limits on the number of concurrently open files (set limit maxopenfiles)
On some platforms, these commands specify the name or type of I/O device to use.On other platforms, these commands specify which O/S access method or I/Odriver to use. Not all platforms support the selection of I/O device through this
Note: Not all types of corruptions can be detected at this time.
Recovery Manager Concepts 7-19

Parallelization
interface; on some platforms, I/O device selection is controlled through platform-specific mechanisms.
Whether or not the allocate channel command actually causes O/S resources to beallocated is O/S dependent. Some operating systems allocate resources at the timethe command is issued; others do not allocate resources until a file is opened forreading or writing. Furthermore, when type disk is specified, no O/S resources areallocated, other than for the creation of the server process.
A channel must be allocated before issuing a change ... delete command, whichcalls the O/S to delete a file. A channel which is allocated in this way is useful onlyfor deleting files. It cannot be used as an input or output channel for a job. Onlyone such channel can be allocated at a time.
ParallelizationRecovery Manager may parallelize its operations, establishing multiple logonsessions and conducting multiple backup sets or file copies in parallel. Concurrentbackup sets or image copies must operate on disjoint sets of database files.
Factors Affecting Degree of ParallelizationParallelization of backup, copy, and restore commands is handled internally by theRecovery Manager. You only need to specify:
■ more than one allocate channel commands
■ the objects to be backed up, copied, or restored
Parallelizing Backup Set CreationYou typically must specify the number of files per set for backup sets. For example,if you allocate 20 channels, but perform a simple backup (database) of a databasecontaining 20 files without any other options specified, only one channel will beused, even though 20 are allocated. If you add ‘filesperset 4’, then RecoveryManager will use 5 channels (limiting each channel to 4 files). Specifying’filesperset 1’ indicates that each channel can operate on only 1 file; thus all 20channels will be used.
In the example above, if you back up the same database (20 files) and each filecorresponds one-to-one with a tablespace, and you write the backup command asfollows, you do not need to use filesperset to parallelize:
backup (tablespace 1 tablespace 2 ... tablespace 20)
7-20 Oracle8 Backup and Recovery Guide
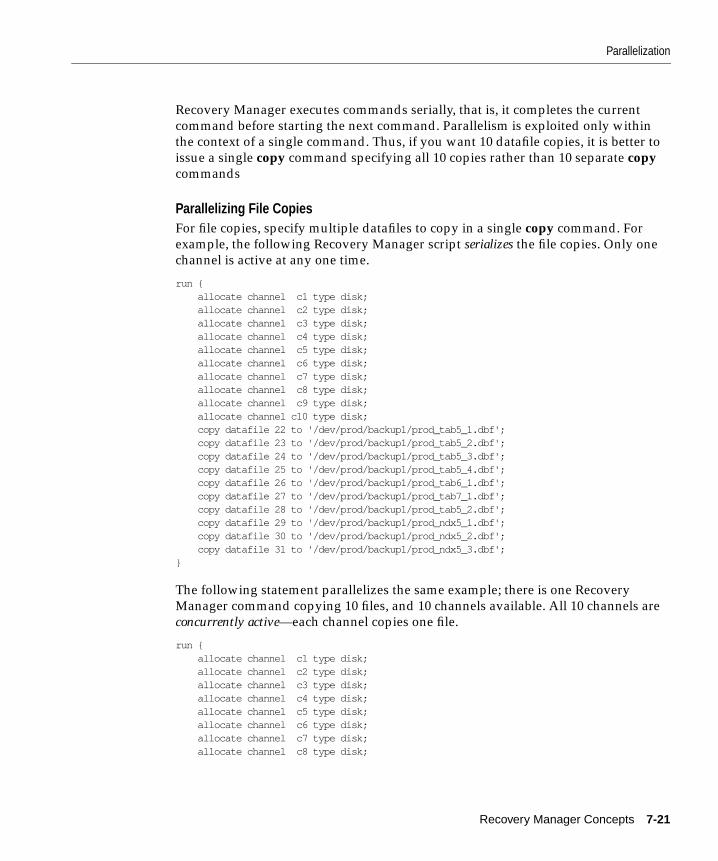
Parallelization
Recovery Manager executes commands serially, that is, it completes the currentcommand before starting the next command. Parallelism is exploited only withinthe context of a single command. Thus, if you want 10 datafile copies, it is better toissue a single copy command specifying all 10 copies rather than 10 separate copycommands
Parallelizing File CopiesFor file copies, specify multiple datafiles to copy in a single copy command. Forexample, the following Recovery Manager script serializes the file copies. Only onechannel is active at any one time.
run { allocate channel c1 type disk; allocate channel c2 type disk; allocate channel c3 type disk; allocate channel c4 type disk; allocate channel c5 type disk; allocate channel c6 type disk; allocate channel c7 type disk; allocate channel c8 type disk; allocate channel c9 type disk; allocate channel c10 type disk; copy datafile 22 to '/dev/prod/backup1/prod_tab5_1.dbf'; copy datafile 23 to '/dev/prod/backup1/prod_tab5_2.dbf'; copy datafile 24 to '/dev/prod/backup1/prod_tab5_3.dbf'; copy datafile 25 to '/dev/prod/backup1/prod_tab5_4.dbf'; copy datafile 26 to '/dev/prod/backup1/prod_tab6_1.dbf'; copy datafile 27 to '/dev/prod/backup1/prod_tab7_1.dbf'; copy datafile 28 to '/dev/prod/backup1/prod_tab5_2.dbf'; copy datafile 29 to '/dev/prod/backup1/prod_ndx5_1.dbf'; copy datafile 30 to '/dev/prod/backup1/prod_ndx5_2.dbf'; copy datafile 31 to '/dev/prod/backup1/prod_ndx5_3.dbf';}
The following statement parallelizes the same example; there is one RecoveryManager command copying 10 files, and 10 channels available. All 10 channels areconcurrently active—each channel copies one file.
run { allocate channel c1 type disk; allocate channel c2 type disk; allocate channel c3 type disk; allocate channel c4 type disk; allocate channel c5 type disk; allocate channel c6 type disk; allocate channel c7 type disk; allocate channel c8 type disk;
Recovery Manager Concepts 7-21
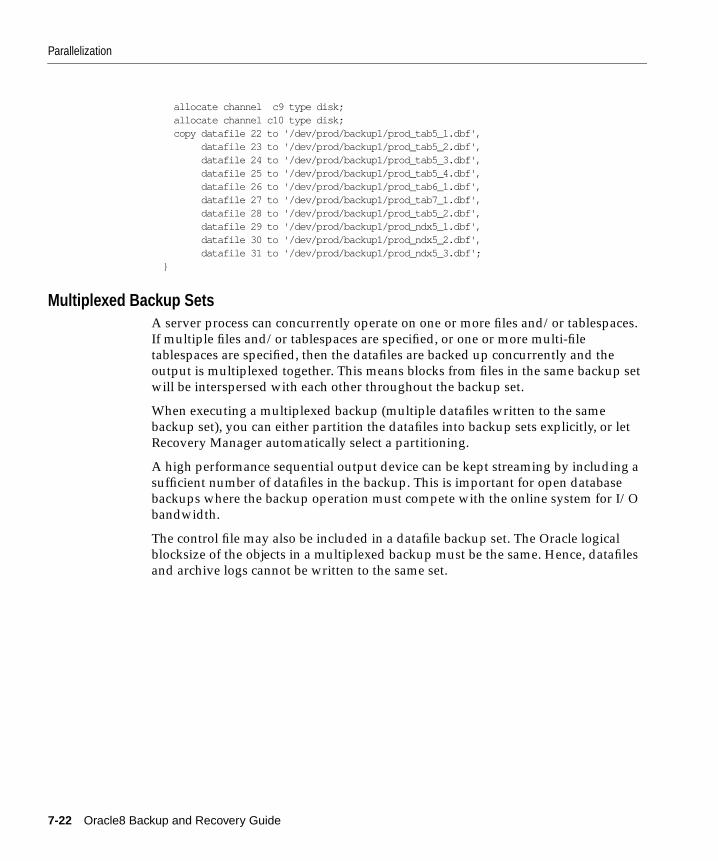
Parallelization
allocate channel c9 type disk; allocate channel c10 type disk; copy datafile 22 to '/dev/prod/backup1/prod_tab5_1.dbf', datafile 23 to '/dev/prod/backup1/prod_tab5_2.dbf', datafile 24 to '/dev/prod/backup1/prod_tab5_3.dbf', datafile 25 to '/dev/prod/backup1/prod_tab5_4.dbf', datafile 26 to '/dev/prod/backup1/prod_tab6_1.dbf', datafile 27 to '/dev/prod/backup1/prod_tab7_1.dbf', datafile 28 to '/dev/prod/backup1/prod_tab5_2.dbf', datafile 29 to '/dev/prod/backup1/prod_ndx5_1.dbf', datafile 30 to '/dev/prod/backup1/prod_ndx5_2.dbf', datafile 31 to '/dev/prod/backup1/prod_ndx5_3.dbf'; }
Multiplexed Backup SetsA server process can concurrently operate on one or more files and/or tablespaces.If multiple files and/or tablespaces are specified, or one or more multi-filetablespaces are specified, then the datafiles are backed up concurrently and theoutput is multiplexed together. This means blocks from files in the same backup setwill be interspersed with each other throughout the backup set.
When executing a multiplexed backup (multiple datafiles written to the samebackup set), you can either partition the datafiles into backup sets explicitly, or letRecovery Manager automatically select a partitioning.
A high performance sequential output device can be kept streaming by including asufficient number of datafiles in the backup. This is important for open databasebackups where the backup operation must compete with the online system for I/Obandwidth.
The control file may also be included in a datafile backup set. The Oracle logicalblocksize of the objects in a multiplexed backup must be the same. Hence, datafilesand archive logs cannot be written to the same set.
7-22 Oracle8 Backup and Recovery Guide
Report Generation
Report GenerationThe report and list commands provide information about backups and imagecopies. While the list command simply lists the contents of the recovery catalog,the report command performs a more detailed analysis of the recovery catalog. Theoutput from these commands is written to the message log file.
The report command produces reports that can answer questions such as:
■ what files need a backup?
■ what files haven’t been backed up recently?
■ what backup files can be deleted?
■ what files are not recoverable because of unrecoverable operations?
■ what was the physical schema of the database at some previous point in time?
The report need backup and report unrecoverable commands should be used on aregular basis to ensure that the necessary backups are available to performrecovery, and to ensure that the recovery can be performed within a reasonablelength of time. The report command lists backup sets and datafile copies that canbe deleted either because they are redundant or because they could never be usedby a recover command.
A datafile is considered unrecoverable if an unrecoverable operation has beenperformed against an object residing in the datafile subsequent to the last backup.
The list command queries the recovery catalog and produces a listing of itscontents. You can use it to find out what backups or copies are available:
■ backup sets containing a backup of a specified list of datafiles
■ copies of a specified list of datafiles
■ backup sets containing a backup of any datafile which is a member of aspecified list of tablespaces
■ copies of any datafile that is a member of a specified list of tablespaces
Note: A datafile that does not have a backup is not consideredunrecoverable. Such datafiles can be recovered through the use ofthe create datafile command, provided that logs starting fromwhen the file was created still exist.
Recovery Manager Concepts 7-23

User Tags for Recovery Manager Backups
■ backup sets containing a backup of any archivelogs with a specified name and/or within a specified range
■ copies of any archivelog with a specified name and/or within a specified range
■ incarnations of a specified database.
See Also: For more details on the Recovery Manager report command, seeAppendix A, “Recovery Manager Command Syntax”.
User Tags for Recovery Manager BackupsYou can optionally assign a user-specified character string called a tag to backupsets and image copies (either Oracle-created copies or user-created copies). A tag isessentially a symbolic name for a backup set or file copy, and can be specified whenexecuting the restore or change command. A tag provides a symbolic way to referto a collection of file copies or backup sets. The maximum length of a tag is 30characters.
Tags need not be unique: multiple backup sets or image copies can have the sametag. When a tag is not unique, then with respect to a given datafile, the tag isunderstood to refer to the most current suitable file (that is, the most currentsuitable backup containing that file may not be the most recent backup; thissituation would occur when performing a point-in-time recovery). For example, ifdatafile copies are created each Monday evening and are always tagged“mondayPMcopy”, then the tag is considered to refer to the most recently createdcopy. Thus, the following command switches datafile three to the most recentlycreated Monday evening copy:
switch datafile 3 to datafilecopy tag mondayPMcopy;
Tags can indicate the intended purpose or usage of different classes of backups orfile copies. For example, datafile copies that are suitable for use in a switch can betagged differently from file copies that should be used only for restore.
Note: By default, Recovery Manager selects the most recent back-ups to restore, unless qualified by a tag or an until clause.
7-24 Oracle8 Backup and Recovery Guide
Backup Constraints
See Also: For information about the switch and restore commands, see AppendixA, “Recovery Manager Command Syntax.”
Backup ConstraintsBackup operations may be performed only by an instance that has the databasemounted or open. In an Oracle parallel server environment, if the instance wherethe backup operation is being performed does not have the database open, then thedatabase must not be open by any instance.
Backups are supported at both the tablespace and datafile level. Backups of thecontrol file may also be created. Backups of online logs are not supported. (Ifbackups of the online logs are desired, you must run the database inARCHIVELOG mode.)
■ If the database is in NOARCHIVELOG mode, you can make whole databasebackups only if the database is shutdown cleanly. You can make tablespace ordatafile backups if the datafiles to be backed up are in an offline normaltablespace, or tablespaces are in read-only mode.
■ If the database is in ARCHIVELOG mode, then backups may be taken whenthe database is open and in use. Only current datafiles may be backed up.Datafiles which have been restored from backups may not be backed up untilthey have been made current by performing media recovery. Backups of adatabase that was not shutdown cleanly are allowed, but not recommended.
Recovery Manager does not back up:
■ Parameter files associated with the database
■ Password files associated with the database
■ Operating system files
■ Online redo logs
See Also: “Backing Up Online Redo Logs” on page 3-9.
WARNING: You can use a tag to specify the input files to arestore or switch command. If a tag is specified, Recovery Man-ager will consider only backup sets with a matching tag whenchoosing which particular backup set or image copy to use.
Recovery Manager Concepts 7-25
Restore Constraints
Restore ConstraintsRestore operations must be performed on a started instance, however, the instanceneed not have the database mounted. This allows restore operations to beperformed when the control file has been lost. A tablespace/datafile that is to berestored must be offline, or the database must be closed.
A restore may either overwrite the existing datafiles or its output may be directedto a new file via the set newname command.
Integrity CheckingOracle prohibits any attempts to perform operations which would result inunusable backup files or corrupt restored datafiles. Among the integrity checks thatthe Oracle Server performs are:
■ ensures that restore operations do not corrupt the database by applyingbackups from a previous incarnation of the database
■ ensures that incremental backups are applied in the correct order
■ prohibits accessing datafiles that are in the process of being restored orrecovered
■ allows only one restore operation per datafile at a time
■ prohibits backups of unrecovered backup files
■ control information stored in backups ensure that corrupt backup files aredetected
Fractured Block Detection During Open Database Backups in Recovery ManagerWhen performing open backups without using Recovery Manager, tablespacesmust be put in hot backup mode in case the operating system reads a block forbackup that is currently being written by DBW0, and is thus inconsistent. Thisphenomenon is known as “split” or “fractured blocks.”
When performing a backup using Recovery Manager, an Oracle server processreads the datafiles, not an operating system utility. The Oracle server process readswhole Oracle blocks, and checks to see whether the block is fractured bycomparing control information stored in the header and footer of each block. If afractured block is detected, the Oracle server process rereads the block. This is why,when using Recovery Manager to back up or copy database files, tablespaces donot need to be in hot backup mode.
7-26 Oracle8 Backup and Recovery Guide
Cataloging Image Copies and Archive Logs
See Also: For information about hot backup mode, see Chapter 11, “PerformingOperating System Backups”.
Tracking Archive LogsThe control file tracks the location of logs archived by the ARCH backgroundprocess. Each time a log is successfully archived, a record is added to the controlfile. The record contains the archived log filename and other relevant information.
You can specify the number of archive log records maintained when creating thecontrol file. Any number may be specified provided that the limit on total controlfile size is not exceeded. These records are reused in a circular fashion. RecoveryManager queries these records and propagates them into the recovery catalog.
If there is a media failure in an online log, it may not be possible to archive it. Youmay therefore choose to issue an ALTER DATABASE CLEAR UNARCHIVED LOGstatement. In this case, an archive log record is still created, but it indicates that noarchive log exists for this log sequence number/SCN range.
Cataloging Image Copies and Archive LogsRecovery Manager can catalog an image copy and read the meta-data. This isimportant when the recovery catalog is lost and you must perform disasterrecovery. Only image copies and archived logs can be cataloged.
Recovery Manager Concepts 7-27

Cataloging Image Copies and Archive Logs
7-28 Oracle8 Backup and Recovery Guide
Performing Backup and Recovery with Recovery Ma
8
Performing Backup and Recovery withRecovery Manager
This chapter describes how to use Recovery Manager to manage backups, restoresand recovery of your database, and includes the following topics:
■ Installing the Recovery Catalog
■ Maintaining the Recovery Catalog
■ Using Channel Control Commands
■ Generating Reports
■ Maintaining Scripts
■ Configuring the Snapshot Control File Location
■ Backing Up Files
■ Copying Files
■ Restoring Files
■ Switching Datafiles
■ Recovering Datafiles
■ Monitoring Backups and Restores
nager 8-1

Installing the Recovery Catalog
Installing the Recovery CatalogRecovery Manager can operate with or without a recovery catalog. If you wish touse a recovery catalog, you must install it before using Recovery Manager.
To Install the Recovery Catalog
1. Create or identify the user who will own the catalog. If you wish, you can cre-ate a separate tablespace that will contain the recovery catalog.
create user rman identified by rman temporary tablespace temp default tablespace rcvcat quota unlimited on rcvcat; grant recovery_catalog_owner to rman;
2. Connect using the userid created in Step 1, and create the recovery catalogschema:
connect rman/rman @?/rdbms/admin/catrman
3. To connect to target databases over the network (for example, non-local targetdatabases) you will need to configure a password file. Local databases can useoperating system authentication. See the Oracle8 Administrator’s Guide for infor-mation about creating and maintaining password files.
4. Start rman
You can now use Recovery Manager.
Registering a DatabaseIf you are creating a new database or migrating an existing Oracle7 database, issuethe following command:
register database;
If Recovery Manager is installed for use with an existing version 8.x database, issuethe following command:
register database;
If there are any existing user-created backups on disk that were created underversion 8.x, these should be added to the recovery catalog by issuing the followingcommand:
catalog datafilecopy ‘filename’;
8-2 Oracle8 Backup and Recovery Guide
Maintaining the Recovery Catalog
For an Oracle7 backup to be usable for recovery in an Oracle8 database, it musthave been part of a tablespace that was offline normal or read-only when thedatabase was migrated.
Any existing archivelogs should be cataloged as follows:
catalog archivelog ‘filename’;
See Also: For more information about the recovery catalog, see Chapter 3, “Whento Perform Backups”.
Maintaining the Recovery CatalogThis section describes how to maintain and manipulate the recovery catalog, andincludes the following topics:
■ Registering a Target Database with the Recovery Catalog
■ Resetting the Information in the Recovery Catalog
■ Resynchronizing the Recovery Catalog with a Target Database
■ Changing the Availability of a Backup Set or File Copy
■ Deleting and Modifying from the Recovery Catalog and Operating SystemBackup
Registering a Target Database with the Recovery CatalogBefore using Recovery Manager with a particular target database for the first time,you must register the target database in the recovery catalog. Recovery Managerobtains all information it needs to register the target database from the targetdatabase itself. The target database must be mounted for this operation.
Oracle uses an internal, uniquely generated number called the “db identifier” todistinguish one database from another. This number is generated at the time youcreate the database. Typically, each database has a unique identifier; however, anexception occurs with databases created by copying files from an existing database(instead of using a create database statement). In these cases, the duplicatedatabase identifiers are detected and the register database command fails. If thisoccurs, you can create a second recovery catalog in another user’s schema by re-executing the catrman.sql script from a different Oracle userid. Then, the database
Performing Backup and Recovery with Recovery Manager 8-3
Maintaining the Recovery Catalog
with a duplicate database identifier can be registered into the newly createdrecovery catalog in the new schema.
Resetting the Information in the Recovery CatalogBefore you can use Recovery Manager again with a target database that has beenopened with the RESETLOGS option, you must notify Recovery Manager that thedatabase incarnation has been reset. The reset database command tells RecoveryManager to create a new database incarnation record in the recovery catalog. Thisnew incarnation record becomes the “current” incarnation. All subsequent backupsand log archiving done by the target database will be associated with the newdatabase incarnation.
If you issue the ALTER DATABASE OPEN RESETLOGS command, but do not resetthe database, then Recovery Manager will not access the recovery catalog becauseit cannot distinguish between a RESETLOGS command and an accidentalrestoration of an old control file. Resetting the database tells Recovery Managerthat the database has been opened with the RESETLOGS option.
In the rare situation when you wish to undo the effects of opening with theRESETLOGS option by restoring backups of some prior incarnation of thedatabase, you can use the reset database to incarnation key command to changethe current incarnation to an older incarnation. You must specify the primary keyof the dbinc record for the desired database incarnation. You can obtain the keyvalue by issuing the list incarnation of database identifier command. Then, afterissuing the reset database to incarnation command, issue the restore and recovercommands to restore and recover the database files from the prior incarnation.
Resynchronizing the Recovery Catalog with a Target DatabaseYou must resynchronize the recovery catalog on a regular basis because therecovery catalog is not updated automatically when a log switch occurs or when alog is archived. Instead, information about log switches and archivelogs is stored inthe control file, which must be propagated periodically into the recovery catalog.How frequently you resynchronize the recovery catalog depends upon the rate atwhich logs are archived. The cost of the operation is proportional to the number ofrecords in the control file that have been inserted or changed since the previous
Note: If you are using Recovery Manager with different targetdatabases that have the same database name and identifier, beextremely careful to always specify the correct recovery catalogschema when invoking Recovery Manager.
8-4 Oracle8 Backup and Recovery Guide

Maintaining the Recovery Catalog
resynchronzie. If no records have been inserted or changed, then the cost ofresynchronization is very low. Thus, it is feasible to perform this operationfrequently (for example, hourly) without incurring undue costs.
If the recovery catalog is unavailable during a backup or copy, you shouldresynchronize it.
You must also resynchronize the recovery catalog after making any change to thephysical structure of the target database. As with log archive operations, therecovery catalog is not updated automatically when a physical schema change ismade. A physical schema change includes any of the following operations:
■ Adding or dropping a tablespace
■ Adding a new datafile to an existing tablespace
■ Adding or dropping a rollback segment
When resynchronizing the recovery catalog, Recovery Manager compares therecovery catalog to either the current control file of the target database, or a backupcontrol file, and updates the recovery catalog with information that is missing orchanged. When resynchronizing from the current control file, Recovery Managerautomatically detects the records in the control file that have been updated andresynchronizes only those records. If the target database is open, then informationabout rollback segments is also updated in the recovery catalog (this information isused for Tablespace Point-In-Time Recovery). When resynchronizing from abackup control file, Recovery Manager does not verify that the backup pieces or filecopies actually exist. Thus, it may be necessary to use the change...uncatalogcommand to remove records for files that no longer exist.
The following classes of recovery catalog records are resynchronized:
log historyThese records are created when a log switch occurs. Recovery Manager tracks thisinformation so that it knows what archive logs it should expect to find.
Note: The backup, copy, restore and switch commands updatethe recovery catalog automatically if:
■ the target database control file is available
■ the recovery catalog database is available when the commandis executed
Performing Backup and Recovery with Recovery Manager 8-5

Maintaining the Recovery Catalog
archivelogThese are records associated with archived logs that were created by archiving anonline log, by copying an existing archivelog, or restoring an archivelog backup set.
backup historyThese are records associated with backup sets, backup pieces, backup set members,and file copies. The resync catalog command updates these records when a backupor copy command is executed.
physical schemaThese are records associated with datafiles and tablespaces. If the target database isopen, then rollback segment information is also updated.
Physical schema information in the recovery catalog is updated only when thetarget database has the current control file mounted. If the target database hasmounted a backup control file, a freshly created control file, or a control file that isless current than a control file that was seen previously, then physical schemainformation in the recovery catalog is not updated. Physical schema information isnot updated when you use the resync catalog from backup controlfile command.
If the target database is open when you resynchronize, a new consistency point iscreated in the recovery catalog.
Changing the Availability of a Backup Set or File CopyThe Recovery Manager change command enables you to make the followingrecord changes:
■ remove references to a backup piece, datafile copy, or archivelog from therecovery catalog (change...uncatalog)
– Works only when you have a recovery catalog
■ remove references to a backup piece, datafile copy, or archivelog from thecontrolfile, recovery catalog, and physically delete the file from the operatingsystem (change...delete)
– Works with or without a recovery catalog
■ remove references to a backup piece, datafile copy, or archivelog from thecontrol file and recovery catalog when that file no longer exists on disk(change...validate)
– Works with or without a recovery catalog
8-6 Oracle8 Backup and Recovery Guide
Maintaining the Recovery Catalog
■ mark a backup piece, datafile copy, or archivelog as unavailable(change...unavailable)
– Works only when you have a recovery catalog
■ mark a backup piece, datafile copy, or archivelog as available(change...available)
– Works only when you have a recovery catalog
You can use the change...uncatalog operand to remove records that refer to a filethat is no longer in the recovery catalog. It is important that you use this commandto notify Recovery Manager when a backup piece, file copy, or archivelog is deletedby some means other than a change...delete command. change...uncatalog canonly be used when operating with a recovery catalog.
The delete operand functions like the uncatalog operand, but in addition, theoperating system or Media Manager is called to delete the backup piece or backupset. This command must be preceded by an allocate channel for delete command,which specifies the device type appropriate for the file being deleted.
When a large number of files have been deleted from disk, the most efficientmethod of reconciling the recovery catalog with what remains on disk is to use achange...validate command. This command validates that the specified backuppieces, file copies and archived logs that should be available on disk, are physicallythere; if a file is not there, the reference to that file is removed from the recoverycatalog and the control file.
The unavailable operand is provided for cases when the file cannot be found orhas migrated off site. A file that is marked unavailable will not be used in a restoreor recover command. If the file is later found or returns to the main site, then it canbe marked available again by using the available operand.
The change command operates only on files that are recorded in the recoverycatalog (or the control file) and belong to the current database incarnation. Thesame is true for other commands except catalog and resync from controlfilecopy.
Deleting a Catalog Record: ExampleIf a cataloged file is deleted through some means other than Recovery Manager, oris otherwise lost or damaged, then you should delete the catalog record.
If the file is on disk issue the following statements:
change datafilecopy <primary_key> delete;change archivelog <primary key> delete;
Performing Backup and Recovery with Recovery Manager 8-7

Maintaining the Recovery Catalog
If the file is stored by a Media Manager issue the following statements:
allocate channel for delete type ‘tape’;change backuppiece <primary_key> delete;release channel;
You can obtain the primary keys of the records to be deleted by issuing a listcommand.
Deleting Many Catalog Records: ExampleIf you need to reconcile the recovery catalog with what is on disk when a largenumber of files have already been deleted, you may wish to use the followingchange...validate statements:
change datafilecopy <primary_key> validate; change archivelog all validate;
Cataloging User-Created Backup FilesOften it is useful to make Recovery Manager aware of the existence of file copiesthat are created via means other than Recovery Manager.
You can use the catalog command to add information about a datafile copy,archivelog, or controlfile copy to the recovery catalog and control file.
You can also use the catalog command to catalog a datafile copy as a level 0backup, thus enabling you to perform an incremental backup later, using thedatafile copy as the base of the incremental.
Oracle 8.x continues to support the ALTER TABLESPACE BEGIN/END BACKUPcommand, which allows open database operating system backups. AlthoughRecovery Manager does not create such backups, they can be added to the recoverycatalog so that Recovery Manager is aware of them.
Any such backup must be accessible on disk, and must be a complete image copyof a single file. A datafile backup may be either a consistent or inconsistent wholedatabase, tablespace or datafile backup. Recovery Manager treats all such backupsas datafile copies.
For example, if datafiles are stored on mirrored disk drives, then it is possible tocreate an operating system copy by simply breaking the mirror. In this scenario, thecatalog command is used to notify Recovery Manager of the existence of theoperating system copy after breaking the mirror. Before the mirror is reformed, achange... uncatalog command should be issued to notify Recovery Manager thatthe file copy is being deleted.
8-8 Oracle8 Backup and Recovery Guide
Using Channel Control Commands
The catalog command is restricted to cataloging only those files associated with thecurrent incarnation of the database. Archivelogs and control file copies that werecreated from version 7.x or earlier cannot be cataloged.
Datafile copies that were created from version 7.x or earlier can be cataloged if thefile belongs to a tablespace that was offline normal or read-only when the databasewas migrated to Oracle8.
Recovering a Lost or Damaged Recovery Catalog DatabaseIf the recovery catalog database is lost or damaged, and recovery of the recoverycatalog database via the normal Oracle recovery mechanisms is not possible, thenyou have two options for partially re-creating its contents:
1. Issue catalog commands to re-catalog archivelogs, backup control files, anddatafile copies.
2. Use the resync catalog from backup controlfile command to extract informa-tion from a backup control file and rebuild the recovery catalog from it.
You can re-create information about backup sets only by using the resync catalogfrom backup controlfile command(because the catalog command does not supportre-cataloging of backup pieces or backup sets). Recovery Manager does not verifythat the files being re-cataloged still exist, so the resynchronization may addrecords for files that no longer exist. You should remove such records by issuingchange...uncatalog commands.
Using Channel Control CommandsYou can use channel control commands to perform the following tasks:
■ Control the operating system resources Recovery Manager uses whenexecuting backup, copy, restore, and recover commands
■ Control the degree of parallelism
■ Specify limits on I/O bandwidth consumption and the size of backup pieces
Each channel allocation establishes a connection from Recovery Manager to a targetdatabase instance. Multiple channels can be allocated simultaneously, thusallowing multiple backup sets or file copies to be read or written in parallel by asingle job. Thus, the degree of parallelism within a job is controlled by the numberof channels (connections) that are allocated.
Performing Backup and Recovery with Recovery Manager 8-9
Using Channel Control Commands
Each channel allocation uses a separate connection. You can specify a differentconnect string for each channel. This is useful in an OPS (Oracle Parallel Server)configuration for distributing the workload across different nodes.
Whether or not the allocate channel command actually causes operating systemresources to be allocated is operating system dependent. On some platforms,operating system resources are allocated at the time the command is issued. Onother platforms, operating system resources are not allocated until a file is openedfor reading or writing. Furthermore, when type disk is specified, no operatingsystem resources at all are allocated by this command.
At least one allocate channel command must precede a backup, copy, restore orrecover command. The copy command can use only channels that specify typedisk. Other devices types that happen to be allocated when a copy commandexecutes are ignored.
See Also: For more information about channel commands, see your operatingsystem-specific Oracle documentation.
Channel Control Commands
allocate channelThe allocate channel command establishes a connection to a target databaseinstance. Each connection operates on one backup set at a time (for backup,restore, or recover) or one file copy at a time (for copy). If multiple connections areestablished, then each connection operates on a separate backup set or file copy.
If a backup set is to be written to or read from disk, then you must use the typedisk allocate operand. Otherwise, it is assumed that the device is a sequential I/Odevice (for example, tape). Copies are always written to disk, therefore they can useonly channels that have type disk specified.
The allocated channel must be given a name (channel_id) that is used whenreleasing the channel and when reporting I/O errors. The channel_id is any blank-delimited character string, other than a keyword, that is meaningful to the user.
Following are descriptions of allocate channel operands:
typeThis operand specifies either disk or a quoted string. If disk is speci-fied, then all backup sets written or read by this connection are on disk.If a quoted string is specified, then it is assumed to be a platform-spe-cific specification of some type of sequential I/O device or accessmethod.
8-10 Oracle8 Backup and Recovery Guide

Using Channel Control Commands
The exact syntax and semantics of sequential I/O device types are plat-form-specific. If you do not specify this operand, then you must specifythe name operand to identify a particular sequential I/O device.
nameThis port-specific string specifies the name of the sequential I/O deviceto allocate. If you do not specify, then any available device of the speci-fied type is used. Do not use this operand if type disk is specified.
parmsThis port-specific string specifies parameters regarding the device toallocate. Do not use this operand if you’ve specified type disk.
connectThis parameter specifies a connect string to the target database instancewhere Recovery Manager should conduct the backup or restore conver-sation. This parameter is intended for use by OPS installations thatwant to spread the work of backup or restore across different OPSinstances. If you do not specify this parameter, then all conversationsare conducted on the target database instance specified by the targetcommand-line parameter.
formatThis parameter specifies the format to use for the names of backuppieces that are created on this channel. This format will only be used ifno format option is specified in the backup command. See the descrip-tion of the format operand of the backup command.
release channel
The release channel command releases a sequential I/O device. However, theconnection is maintained for additional channel allocation commands. The operandis simply the channel_id specified when the channel was allocated.
set limit channel
The set limit channel commands specify limits that apply to any backup or copycommand that executes using this device.
Performing Backup and Recovery with Recovery Manager 8-11
Generating Reports
Following are descriptions of set limit channel operands:
readrateThis limit specifies the maximum number of buffers (each of sizedb_blocksize * db_file_direct_io_count) per second, which will be readfor backup or copy from each of the input datafiles. Use this parameterto ensure that the command does not consume excessive disk band-width, and thereby degrade online performance.
kbytesThis specifies the maximum size of the backup pieces created on thischannel.
maxopenfilesThis limit controls the maximum number of input files that a backupwill have open at any particular instant. This parameter is used for pre-venting "too many open files" operating system errors when backingup a large number of files into a single backup set.
If maxopenfiles is not specified, then a maximum of 32 input files maybe open concurrently.
Generating ReportsYou can use the report command to produce two kinds of reports that answerquestions such as the following:
■ What files need a backup?
■ What files haven’t had a backup in a while?
■ What files are not recoverable due to unrecoverable operations?
■ What backup files can be deleted?
■ What was the physical schema of the database at some previous point in time?
The list command queries the recovery catalog and produces a listing of itscontents. The following information may be listed:
■ backup sets containing a backup of a specified list of datafiles
■ copies of a specified list of datafiles
■ backup sets containing a backup of any datafile which is a member of aspecified list of tablespaces
8-12 Oracle8 Backup and Recovery Guide

Generating Reports
■ copies of any datafile that is a member of a specified list of tablespaces
■ all backup sets or copies of all datafiles in the database, optionally restricted bytime, datafile copy filename, device name, or tag
■ backup sets containing a backup of any archivelogs with a specified name and/or within a specified range
■ copies of any archivelog with a specified name and/or within a specified range
■ incarnations of a specified database or of all databases known to the recoverycatalog
The report and list commands produce similar output. The list commands simplylist the contents of the recovery catalog. The report commands perform moredetailed analyses of the recovery catalog. The output from the report and listcommands is written to the message log file.
The report need backup and report unrecoverable commands should be used on aregular basis to ensure that the necessary backups are available to performrecovery, and to ensure that the recovery can be performed within a reasonablelength of time. The list commands can be used to query what backups or copies areavailable.
Generating a ReportYou can use the report command to produce one of the following types of reports:
■ report unrecoverable report_object_list device_type_list
■ report need backup need_backup_operand report_object_list device_type_list
■ report obsolete report_obsolete_operand_list device_type_list
■ report schema at_clause
Where:
report_object_listSpecifies the datafiles to be reported on. The report can include theentire database (optionally skipping certain tablespaces), a list oftablespaces, or a list of datafiles.
device_type_listCan be used to limit the backup sets that will be considered whendeciding whether or not a file is unrecoverable or is in need of a morerecent backup. If specified, only backup sets residing on one of the
Performing Backup and Recovery with Recovery Manager 8-13
Generating Reports
specified device types will be considered. If not specified, all availablebackup sets will be considered. Datafile copies will always be consid-ered.
Reporting Unrecoverable DatafilesYou can use the report unrecoverable command to list all datafiles that areunrecoverable. A datafile is considered unrecoverable if an UNRECOVERABLEoperation has been performed against an object residing in the datafile since thelast backup of the datafile.
Note that the non-existence of any backup of a datafile is not sufficient reason toconsider it unrecoverable. Such datafiles can be recovered through the use of thecreate datafile command, provided that logs starting from when the file wascreated are still in existence.
Example: Datafiles Requiring a New Backup The following command lists all datafilesthat cannot be completely recovered from the existing backups because redo maybe missing:
report unrecoverable;
Reporting Datafiles that Need to be Backed UpThe report need backup command lists all datafiles that need a new backup. Thereport assumes that the most recent backup would be used in the event of a restore.
Following are descriptions of need_backup operands:
incrementalAn integer specifying a threshold number of incremental backups. Ifcomplete recovery of a datafile would require the application of morethan this many incremental backups, then the datafile is considered inneed of a new full backup. This assumes the most efficient strategy,which is to use the lowest level of incremental backup whenever thereis a choice. This is the same strategy that would be used if the file wereactually being recovered by the recover command. Note that files forwhich no backups exist will not appear in this list. They can be foundby using the report need backup days command.
8-14 Oracle8 Backup and Recovery Guide

Generating Reports
daysAn integer specifying a threshold number of days of log files that willneed application during recovery of this file. For online files, this is thenumber of days since the last full or incremental backup of a file. Thetime of day is not considered when calculating the age of a backup set(i.e. a backup taken anytime yesterday is 1 day old). If multiple copiesof a backup set exist, the completion time of the original backup set isused. If the most recent backup of this file is older than this number ofdays, then the file is in need of a new backup.
If the target database controlfile is mounted and current, the followingoptimizations will be made to this report:
1. Files that are offline and whose most recent backup contains allchanges to the file will not be included.
2. Files that were offline and are now online, and whose most recentbackup contains all changes up to the offline time, will only bereported if they have been online for more than the specified numberof days.
redundancyAn integer specifying the minimum level of redundancy considerednecessary. redundancy 2 means that there must be at least 2 backups ofeach datafile for it for it to be considered not in need of a backup.
Example: Datafiles That Need to be Backed Up The following command reports alldatafiles in the database that would require the application of three or moreincremental backups to be recovered to their current state:
report need backup incremental 3 database;
The following command reports all datafiles from tablespace “system” that haven’thad a backup (full or incremental) in 5 or more days:
report need backup days 5 tablespace system;
Reporting Obsolete Datafile BackupsYou can use the report obsolete command to list backup sets and datafile copiesthat can be deleted because they are redundant.
Performing Backup and Recovery with Recovery Manager 8-15
Generating Reports
A backup is obsolete if it meets one of the following criteria:
■ It is a backup of a file which no longer exists, or did not exist at the specifieduntil-time
■ n more recent backups of the same file exist and are available, where n is thedesired redundancy
■ It is from an orphan incarnation, if the orphan option is specified
Following are descriptions of report_obsolete operands:
redundancyAn integer specifying the minimum level of redundancy considerednecessary. If more than this many full backups or copies exist for agiven datafile, then the remainder of the backups are obsolete. Thismust be non-zero. The default value is one.
orphanSpecifies that backups and copies that can never be used (because theybelong to incarnations of the database that are not predecessors of thecurrent incarnation), will be considered obsolete.
until-clauseIf an until-clause is specified, then no backup will be considered obso-lete or redundant if it contains any changes beyond the specified time.This is useful if the database must be recoverable to a point in time ear-lier than the present time.
Reporting Datafiles at the Current TimeThe report schema command lists the names of all datafiles and tablespaces at thespecified point in time, or at the current time. A point in time may be specified as atime, an SCN, or a redo log.
The at_clause has the following structure:
at timeA quoted string specifying the time.
at scnAn integer representing the SCN is specified.
8-16 Oracle8 Backup and Recovery Guide

Generating Reports
at logseq integer thread integerIntegers that specify the log sequence number and thread number toconsider. This is the time when the specified log and thread were firstopened.
Generating ListsYou can use the list command to produce a detailed report of all information abouta specified group of backup sets or copies known to the recovery catalog. Thefollowing list commands are available:
■ list copy of list_object_list list_qualifier_list
List information about datafiles copies and archivelogs.
■ list backupset of list_object_list list_qualifier_list
List information about backup sets.
■ list incarnation of identifier list_qualifier_list
List information about the incarnations of a database. The listing will includethe primary keys of all database incarnation records for the specified databasename. The key can then be specified in a reset database command to changethe incarnation that Recovery Manager considers to be current to a previousincarnation. If no identifier is specified, then all databases registered in therecovery catalog are listed.
list_object_listThis specifies the tablespaces, datafiles, or archivelogs whose backup sets or copiesare to be listed.
database skip_clauseBackup sets or datafile copies of all files in the current database arelisted. Optionally, tablespaces may be skipped by using the skip_clause.
tablespaceA list of tablespace names. Backup sets or datafile copies that includeat least one datafile from a specified tablespace are listed.
datafileA list of datafile names or numbers. Backup sets or datafile copies thatcontain at least one of the specified datafiles are listed.
Performing Backup and Recovery with Recovery Manager 8-17
Generating Reports
archivelog_record_specifier
list_qualifier_listList qualifiers are specifications that can be used to limit the objects whose backupsets or copies are to be listed:
tag tagDatafile copies and backup sets may be restricted by specifying the tagof the copy or backup. If tag is specified, only copies/backups with thespecified tag will be listed.
like file_name_patternDatafile copies and archived logs may be restricted by specifying a filename pattern. The pattern may contain Oracle pattern matching charac-ters ‘%’ and ‘_’. If file_name_pattern is specified, only files whose namematches the pattern will be listed.
from/until timeAll files may be qualified with a time range. If from or until is speci-fied, only copies or backups that completed within the specified timeperiod will be listed. Either or both of these options may be specified.
device_type_listThis option applies only to the list backupset command. If specified,only backup sets residing on one of the specified device types will belisted. If not specified, all available backup sets will be listed.
Example: Listing Backups of a DatafileThe following command lists all known backups of datafile ‘?/dbs/foo.f’:
list backupset of datafile “?/dbs/foo.f”;
Example: Listing Copies of the Datafiles of a TablespaceThe following command lists all copies of datafiles in tablespace “system”:
list copy of tablespace system;
8-18 Oracle8 Backup and Recovery Guide
Configuring the Snapshot Control File Location
Maintaining ScriptsA stored script is a named entity that you can assign any meaningful name. Theexecute script command is used to execute a stored script. The execute scriptcommand is legal only within a job_command_list.
Four stored script commands are available:
■ create a stored script
■ replace a stored script
■ delete a stored script
■ print a stored script to the log file (CLI) or a screen
The stored script feature is provided primarily to provide a common repository forfrequently executed collections of Recovery Manager commands. For example, theRecovery Manager commands needed to perform nightly backups can be collectedinto a single script called “nightlybackup”. Storing the script in the recoverycatalog instead of in an operating system text file has the advantage that it isaccessible to any database administrator using Recovery Manager, regardless ofwhich machine Recovery Manager is executed upon.
Creating and Replacing ScriptsThe create or replace commands either create or replace a stored script and store itin the recovery catalog for future reference. The script is not executed immediately.The execute script command must be used to execute the stored script. The replacescript command also creates a script if one doesn’t already exist.
Deleting ScriptsUse the delete script command to delete a stored script from the recovery catalog.
Printing ScriptsUse the print script command to print a stored script to the Recovery Manager logfile.
Configuring the Snapshot Control File LocationWhen Recovery Manager needs to read a read-consistent version of the control file,it creates a temporary backup of the control file. By default, the location the nameand location of the snapshot control file is port specific.
Performing Backup and Recovery with Recovery Manager 8-19

Backing Up Files
However, it is possible to choose the name and location this file is written to byusing the set snapshot controlfile name to command. Any subsequent snapshotcontrol files will be created according to the name and location specified in thecommand. For example:
set snapshot controlfile name to ’/oracle/dba/prod/snap_prod.ctl’;
It is also possible to set the snapshot control file name to a raw device. This isimportant for OPS databases where more than one instance in the cluster will useRecovery Manager; this is because server processes on each node must be able tocreate a snapshot control file with the same name and location. For example:
set snapshot controlfile name to ’/dev/vgd_1_0/rlvt5’;
See Also: Oracle8 Parallel Server Concepts and Administration.
Backing Up FilesWhen backing up files, the target database must be started and mounted. Thecontrol file must be current—not a backup control file.
You must give each backup piece a unique name using the format operand. Severalsubstitution variables are available to aid in generating unique names. You canspecify the format operand in the backup command, in the backup_specificationlevel, or in the allocate channel command.
You can also limit the number of files to place into a single backup set. Generally,for datafile or datafile copy backups, you should group multiple datafiles into asingle backup set to the extent necessary to keep an output tape device streaming,or to prevent the backup from consuming too much bandwidth from a particulardatafile. The fewer files there are in a backup set, the faster one of them can berestored, since there is less data belonging to other datafiles that must be skipped.For archivelog backup sets, it is advisable to group logs from the same time periodinto a backup set because it is likely that they will need to be restored at the sametime.
I/O errors encountered when reading files or writing to the backup pieces causejobs to be aborted. The backup pieces that were being written at the time of theerror will need to be re-written from the beginning. Any backup sets that weresuccessfully written prior to the abort are retained.
8-20 Oracle8 Backup and Recovery Guide
Backing Up Files
Datafile Backup SetsIf the database is in ARCHIVELOG mode, then the target database can be open orclosed. It is not necessary for the database to be closed cleanly. If the database is inNOARCHIVELOG mode, then it must be closed cleanly prior to taking a backup.
You can also back up offline or read-only tablespaces.
Corrupt datafile blocks are identified by the server process as corrupt and writtenout to the backup. Oracle records the address of the corrupt block and the type ofcorruption in the control file. You can access these control file records in theV$BACKUP_CORRUPTION view. You can specify the maximum number ofcorruptions allowed in a datafile being backed up using set maxcorrupt.
set maxcorruptThis sets a limit on the number of previously undetected block corrup-tions that will be allowed in a specified datafile or list of datafiles. If abackup or copy command detect more than this number of corrup-tions, then the command is aborted. The default limit is zero, meaningno corrupt blocks will be tolerated.
Performing BackupsUse the backup command to create one or more backup sets. Each resulting backupset contains one or more datafiles, datafile copies, or archivelogs from the targetdatabase. You can also place a backup of the control file into a datafile backup set.A file cannot be split across different backup sets. Archivelogs and datafiles cannotbe mixed into a single backup set.
The number of backup sets produced during a backup depends on the number ofbackup_specifications in the command, the number of files specified or implied ineach backup_object_list, and the value of the FILESPERSET limit. Eachbackup_specification produces at least one backup set. If the number of files specifiedor implied in its backup_object_list exceeds the FILESPERSET limit, then thebackup_specification will produce multiple backup sets. If no limit is specified, theneach backup_specification produces exactly one backup set.
If multiple backup sets are to be created and multiple channels are allocated, thenRecovery Manager automatically parallelizes its operation and writes multiple
Note: If the database is in ARCHIVELOG mode, it is not neces-sary to shutdown cleanly for a cold backup. However, Oracle rec-ommends you do so that the backup is consistent.
Performing Backup and Recovery with Recovery Manager 8-21

Backing Up Files
backup sets in parallel. A single backup set cannot be striped across multiplechannels. Recovery Manager automatically assigns a backup set to a device. It ispossible to specify that all backup sets for a backup_specification be written to aspecific channel.
Types of Recovery Manager Backups The backup_type applies to all backup_specificationsin the backup_specification_list. The following two backup types are available:
fullThis is the default if neither full nor incremental is specified. A fullbackup copies all blocks into the backup set, skipping only datafileblocks that have never been used. No blocks are skipped when backingup archivelogs or control files.
A full backup has no effect on subsequent incremental backups, and isnot considered to be part of the incremental backup strategy.
incrementalAn incremental backup at a level greater than 0 copies only thoseblocks that have changed since the last incremental backup. An incre-mental backup at level 0 is identical in content to a full backup, but thelevel 0 backup is considered to be part of the incremental strategy.
Certain checks are performed when attempting to create an incremen-tal backup at a level greater than zero. These checks ensure that theincremental backup would be usable by a subsequent recover com-mand. Among the checks performed are:
- A level 0 backup set must exist, or level 0 datafile copies must existfor each datafile in the backup command. These must also not bemarked unavailable.
- Sufficient incremental backups taken since the level 0 must exist andbe available such that the incremental backup about to be createdcould be used.
Multiple levels of incremental backup are supported. A level N incre-mental backup copies only those blocks that have changed since themost recent incremental backup at level N or less.
If incremental is specified, then all backup_object_lists in the commandmust specify one of the following: datafile, datafilecopy, tablespace, ordatabase. Incremental backups of control files, archivelogs or backupsets are not supported.
8-22 Oracle8 Backup and Recovery Guide
Backing Up Files
Backup Command Operand ListYou can specify a number of operands that apply to the entire backup command.Some of these operands may also be specified at the backup_specification level.
tagA backup set can be given a user-specified identifier called a tag, whichis a character string that is not a reserved word, typically with a mean-ingful name like “monday_evening_backup” or“weekly_full_backup”. Tags must be 30 characters or less.
The syntax allows specification of the tag at the backup_command levelor the backup_specification level. If specified at the command level, thenall backup sets created by this command are given this tag. If specifiedat the backup_specification level, then backup sets created as a result ofdifferent backup specifications can have different tags. If specified atboth levels, then the tag in the backup_specification takes precedence.
cumulativeCauses an incremental backup to re-copy all the blocks that the previ-ous backup at the same level copied, in addition to those blocks thathave changed in the interim.
nochecksumThis suppresses block checksums. Unless this option is specified, achecksum is computed for each block and stored in the backup. Thechecksum is verified when restoring from the backup and also writtento the datafile when restored.
If the database is already maintaining block checksums, then this flaghas no effect. The checksum is always verified and stored in thebackup in this case.
filespersetThis specifies the maximum number of files to place in one backup set.If the number of files specified or implied by the backup specificationis greater than filesperset, then the backup specification will cause mul-tiple backup sets to be created.
When you specify this parameter, Recovery Manager uses the mini-mum value of the calculated and specified value, which ensures that alldevices are used. If you do not specify filesperset, the Recovery Man-ager uses the minimum value of the calculated value and 64, again
Performing Backup and Recovery with Recovery Manager 8-23
Backing Up Files
ensuring that all channels are used, but limiting the number of files in abackup set.
Recovery Manager always attempts to create enough backup sets sothat all allocated channels have work to do. An exception to this occurswhen there are more channels than files to back up.
setsizeThis enables users to specify a maximum size for a backup set. Thelimit is specified in units of 1K (1024 bytes). Thus, to limit a backup setto 3Mb, you would specify setsize=3000. Recovery Manager attemptsto limit all backup sets to this size. This is a particularly useful optionwhen you wish to make each backup set no larger than 1 tape.
Backup Specification ListA backup_specification_list contains a list of one or more backup_specifications. Abackup_specification minimally contains a list of objects to backup and a formatoperand to specify a filename template for the backup pieces.
Each backup_specification creates one or more backup sets. A backup_specification willcause multiple backup sets to be created if the number of datafiles specified in orimplied by its backup_object_list exceeds the filesperset limit.
Backup Object ListEach backup_specification contains exactly one backup_object_list. Thebackup_object_list specifies which objects to backup.
databaseIndicates all datafiles, in addition to the control file, are backed up.
tablespaceThis specifies a list of one or more tablespaces to back up. All datafilesthat are currently part of the tablespaces will be backed up. Any num-ber of tablespaces can be specified.
The keywords database and tablespace are provided merely as a con-venience. These forms are translated internally into a list of datafiles.
datafileThis specifies a list of one or more datafiles to back up. Datafiles can bespecified either by filename or by datafile number. If a filename is speci-fied, then it must be the name of a current datafile as listed in the recov-
8-24 Oracle8 Backup and Recovery Guide
Backing Up Files
ery catalog (when a recovery catalog is used); otherwise, as listed in thecontrol file.
If file1 (the first file of the system tablespace) is backed up, the controlfile is automatically included.
datafilecopyThis specifies a list of one or more datafile copies to back up. The filescan be specified either by filename or by tag. If specified by tag, andmultiple datafile copies with this tag exist, then only the most currentdatafile copy of any particular datafile is backed up.
archivelogThis specifies a filename pattern, and/or a time-range or log sequencerange used to choose which archivelogs to include in a backup. Allarchivelogs that meet the specification are included in the backup. Ifthe range is specified by time, then the logs that were current at thebegin and end times are included in the backup.
current control fileThis specifies that the current control file is backed up.
backup controlfileThis specifies the filename of a backup control file to back up.
backupsetThis specifies the primary key of a backup set to back up. The backupset must be on disk.
Backup Operand ListThis is a list of operands specifying attributes for the backup sets and backuppieces that are to be created for this backup_specification.
tagIf specified, the backup sets are given the specified tag. The tag value isnull otherwise.
parmsThis is a quoted string containing OS-specific information. The string ispassed to the OSD layer each time a backup piece is created.
Performing Backup and Recovery with Recovery Manager 8-25

Backing Up Files
formatThis specifies the file name to use for the backup pieces. The namemust be enclosed in quotation marks. Any name that is legal as asequential filename on the platform is allowed, provided that eachbackup piece gets a unique name. If backing up to disk, then any legaldisk filename is allowed, provided it is unique.
The format operand may be specified in any of these places:
- the backup_specification
- the backup command
- the allocate channel command
If specified in more than one of these places, Recovery Manager willsearch for the format operand in the order shown above.
The following substitution variables are available in format strings toaid in generating unique filenames:
%pThe backup piece number within the backup set. This value starts at 1for each backup set and is incremented by 1 as each backup piece is cre-ated.
%sThe backup set number. This is a counter in the control file that is incre-mented for each backup set. The counter value starts at 1 and is uniquefor the lifetime of the control file. If a backup control file is restored,then duplicate values may result. Also, CREATE CONTROLFILE ini-tializes the counter back to 1.
%dThe database name.
%nThe padded database name.
%tThe backup set stamp. This is a 4-byte value derived as the number ofseconds since a fixed reference date/time. The combination of %s and%t can be used to form a unique name for the backup set.
8-26 Oracle8 Backup and Recovery Guide

Backing Up Files
%uAn 8-character name composed of compressed representations of thebackup set number and the time the backup set was created.
include current control fileThis operand creates a snapshot of the current control file and places itinto each backup set produced by this backup_specification.
filespersetThis specifies the maximum number of datafiles to place in one backupset. If the number of datafiles specified or implied by the backup speci-fication is greater than filesperset, then the backup specification createsmultiple backup sets.
channelThe name of a channel to use when creating the backup sets for thisbackup_specification. If this operand is not specified, then Recovery Man-ager dynamically assigns the backup sets for this backup_specification toany available channels during job execution.
delete inputThis operand causes the input files to be deleted upon successful cre-ation of the backup set. May be specified only when backing uparchived logs or datafile copies. It is equivalent to issuing achange...delete command for all of the input files.
Backing Up: ScenarioLet’s assume there is a database called FOO that a database administrator wants tobackup. The administrator has 3 tape drives available for the backup, and thedatabase has 26 datafiles in it. The administrator wants to multiplex the backup,placing 4 files into each backup set, so chooses the number 4 because it is sufficientto keep the tape drive streaming. The administrator is not concerned about howdatafiles are grouped into backup sets.
The administrator issues the following commands:
create script foo_full { allocate channel t1 type ‘SBT_TAPE’; allocate channel t2 type ‘SBT_TAPE’; allocate channel t3 type ‘SBT_TAPE’; backup full filesperset 4 database format ‘FOO.FULL.%n.%s.%p’); run {
Performing Backup and Recovery with Recovery Manager 8-27
Copying Files
execute script foo_full; }
This script will back up the whole database, including all datafiles and the controlfile. Since there are 27 files to be backed up (26 datafiles and a control file) and amaximum of 4 files per backup set, 7 backup sets will be created. The backup piecefilenames will have the following format: FOO.FULL.database_name.x.y. Assumingno backup sets have been recorded in the recovery catalog prior to this job, then xwill range from 1 through 7, and y will start at 1 for each backup set and willincrement as backup pieces are created.
Copying FilesIn many cases, copying datafiles can be more beneficial than backing them up,because when you copy files, the output is suitable for use without any additionalprocessing. In contrast, a backup set must be processed by a restore commandbefore it is usable. So, you can perform media recovery on a datafile copy, but notdirectly on a backup set, even if it contains only one datafile and is composed ofonly a single backup piece.
Use the copy command when you wish to create a copy of a file. The output file isalways written to disk.
The following types of files can be copied:
■ a current datafile
■ a datafile copy created by a previous COPY command or by some other means
■ an archivelog
■ the current control file
■ a backup control file
Copy Command SpecifiersThe copy command has one or more copy_specifiers, each of which specify one inputfile and one output file. At least one allocate channel command specifying typedisk must precede a copy command.
If the copy command contains multiple copy_specifiers and multiple channels areallocated, then it is executed in parallel, with the degree of parallelism determinedby the number of allocate channel commands.
8-28 Oracle8 Backup and Recovery Guide
Copying Files
Following are descriptions of the copy command specifiers:
datafileThis makes a copy of a current datafile. The datafile may be specifiedeither by filename or filenumber. If the filename is used, then the file-name must be the name of a datafile listed in the control file.
datafilecopyThis makes a copy of an existing datafile copy. The existing copy mayhave been created by either a previous copy command or by someexternal operating system facility. The input file can be specified by file-name or tag. The filename must not be the name of a current datafilelisted in the control file.
archivelogThis makes a copy of an archive log. The archive log may have beencreated by the Oracle log archiving process or by a previous copy com-mand. You must specify the archive log by filename.
current control fileThis makes a copy of the current control file.
backup control fileThis makes a copy of an existing backup control file. You can specifythe control file either by filename or by tag.
Optionally, you can supply the following keywords to the copy command:
tagWhen you specify this option, the output file is assigned the specifiedtag.
level 0When you specify this option, the datafile copy is included in the incre-mental backup strategy, and thus can serve as a basis for subsequentincremental backup sets. If you do not specify this option, the datafilecopy has no impact on the incremental backup strategy.
Performing Backup and Recovery with Recovery Manager 8-29
Restoring Files
Restoring FilesWith Recovery Manager you can restore datafiles from backup sets or from copieson disk. The restore may be directed at either the current datafile location(overlaying the file currently there) or to a new location (by using the set newnamecommand). If datafiles are restored to a new location, then they are considereddatafile copies and are recorded as such in the control file and recovery catalog.
It is also possible to restore backup sets containing archive logs, which is notnormally necessary because Recovery Manager performs this automatically asneeded during recovery. However, you can improve the recovery performance bypre-restoring archive log backup sets that will be needed during the recovery.
Database Point-In-Time RecoveryAn easy way of specifying the time to restore and recover to, is by using the setuntil command. This command affects any subsequent restore, switch and recovercommands that are in the same run command:
set untilThis specifies a point in time for a subsequent restore or recover com-mand. The point in time may be specified using the following keywords:
- time string
- logseq integer thread integer
- scn integer
If the time keyword is specified then string must be a formatted accord-ing to the NLS date format specification currently in effect. This formatis specified by the NLS_DATE_FORMAT environment variable onmost platforms.
File SelectionRecovery Manager uses the recovery catalog (or target database control file if norecovery catalog is available) to select the best available backup sets or copies foruse in the restore. Preference is given to copies rather than backup sets, and whenmultiple choices are available, the most current backup sets or copies are used,taking into account the until_clause if specified.
All specifications (from_tag, from_type, and until_clause) must be satisfied before abackup set or file copy is selected for restoration. Restore also considers the device
8-30 Oracle8 Backup and Recovery Guide

Restoring Files
types of the allocated channels when performing automatic selection. If noavailable backup or copy in the recovery catalog satisfies all the specified criteria,then Recovery Manager returns an error during compilation of the restore job. Ifthe file cannot be restored because no backup sets or datafile copies reside onmedia compatible with the device types allocated in the job, then cancel the job.You can then create a new job specifying channel allocation for devices that arecompatible with the existing backup sets or datafile copies.
Restore Destination for DatafilesBy default, the restore command restores datafiles to their current location asspecified in the recovery catalog (for example, the current datafiles are overlaid). Ifthis is not desired, then issue set newname prior to restoring. In this case, therestored datafiles are considered datafile copies, and you must perform a switch tomake them the current datafiles. The specified filename is created or overwritten ifit already exists.
set newnameThis sets the default name for all subsequent restore or switch com-mands that affect the specified datafile. If this command is not usedprior to a datafile restore, then Recovery Manager restores the file to itsdefault location, as explained above.
Restore Destination for Control FilesYou must specify a destination name when restoring a control file. The specifiedfilename is created or overwritten if it already exists.
Replicating Control FilesYou can use the replicate command to copy a control file to multiple destinations.You specify the input control file by name, and the output destination files in thecontrol_files initialization parameter of the target database.
You can use the replicate command following a restore command, which hasrestored the control file, to prepare the database for mounting. This is equivalent tomultiple copy controlfile commands. At least one allocate channel commandspecifying type disk must precede a replicate command.
Performing Backup and Recovery with Recovery Manager 8-31
Restoring Files
Restore Destination for Archived LogsArchived logs are restored to files whose names are constructed using theLOG_ARCHIVE_DEST and LOG_ARCHIVE_FORMAT initialization parameters ofthe target database. These parameters are combined in a port-specific fashion toderive the name of the restored archived log file. You can overrideLOG_ARCHIVE_DEST by specifying the archive log destination prior to restoringby using the set archivelog destination to command. The restored archived logsare created or overwritten if they already exist.
Using set archivelog destination, it is possible to manually stage many archivedlogs to many different locations while a database restore is occurring. RecoveryManager knows where to find the newly restored archive logs; it does not requirethem to be in the LOG_ARCHIVE_DEST for recovery to find them.
set archivelog destinationThis overrides the log_archive_dest initialization parameter in the tar-get database when forming names for restored archive logs during sub-sequent restore and recover commands.
For example, if you specify a different destination than the one in the init.oraLOG_ARCHIVE_DEST parameter and restore archivelog backups, subsequentrestore and recovery operations will detect this new location and will not look forthe files in LOG_ARCHIVE_DEST.
Guidelines for Restoring DatafilesA restore restores full datafile backup sets, incremental level 0 backups or datafilecopies. Incremental backups at levels greater than 0 are not restored via the restorecommand. Instead, you would perform a recovery to apply an incremental backupto a level 0 backup. You typically restore when a media failure has damaged thecurrent copy of a datafile. You also restore prior to performing a point-in-timerecovery.
If you issue set newname commands to restore datafiles to a new location, with theintention of performing a recovery afterwards, then you must perform a switchafter restoring but before recovering to make the restored datafiles the currentdatafiles. A to_specifier clause is required when restoring the control file: there is nodefault location to which the control file is restored.
If you do not specify set newname when restoring datafiles, then either thedatabase must be closed, or the datafiles must be offline. If the entire database is tobe restored, then it must be closed.
8-32 Oracle8 Backup and Recovery Guide
Restoring Files
If the target database is mounted, then its control file will be updated with anyapplicable datafile copy and archived log records to describe the restored files.
At least one channel allocation must precede a restore. If you use the from copyoperand, then the allocated channels should be of type disk. If using the frombackup operand, then the appropriate type of sequential I/O devices must beallocated for the backup sets that will need restoration. If the appropriate type ofdevice is not allocated, then you may not be able to find a candidate backup set orcopy for restoration, and the restore fails.
Files within a single restore are restored in parallel if multiple channels areallocated, with the degree of parallelism controlled by the number of allocatedchannels. You can restore files in separate restore_specifications from the samebackup set if the best candidates for restoration are on the same backup set andthere are no conflicting PARM or CHANNEL operands on either of the respectiverestore_specifications.
Restore Command Operand ListThe following operands apply to the restore command. Some of these operandscan also be specified at the restore_specification level.
from backupset/datafilecopyThis specifies whether a restore should restore from file copies on diskor from backup sets. If this operand is not specified, then the restorechooses the most recent backup set or file copy. “Most recent” is the filecopy or backup set that needs the least media recovery.
untilIn the absence of any other criteria, Recovery Manager will select themost current file copy or backup set to restore. If this is not desired,then an until clause may be specified to limit the selection to thosebackup sets or file copies that would be suitable for performing a point-in-time recovery to a specified time.
tagBy default, a restore chooses the most recent backup set or file copyavailable. This automatic selection can be overridden by specifying afrom_tag. The from_tag restricts the automatic selection to backup setsor file copies that have a specified tag. If multiple backup sets or filecopies are available with a matching tag, then the most recent one isselected.
Performing Backup and Recovery with Recovery Manager 8-33
Restoring Files
channelThe name of a channel to use for this restore. If no channel is specified,then restore will use any available channel which is allocated with thecorrect device type to restore the required files.
parmsThis is a quoted string containing operating system specific informa-tion. The string is passed to the OSD layer each time a backup piece isrestored.
Restore Specification ListA restore_specification_list consists of one or more restore_specifications. Eachrestore_specification contains a list of objects to restore and, optionally, restoreoptions that will override the options from the restore_command_operand_list.
Restore SpecificationEach restore_specification contains exactly one restore_object_list. The restore operatesagainst a list of restore_objects.
databaseAll datafiles in the database will be restored. Note that, unlike abackup, this does not also include the control file. You can use anoptional skip argument to skip restoring certain tablespaces. This isuseful for avoiding restoration of tablespaces containing only tempo-rary data.
tablespaceAll datafiles in the specified tablespaces will be restored.
datafileThe specified datafiles will be restored.
controlfileThe control file will be restored to the specified location.
archivelogThe specified archive logs will be restored.
The tablespace and database forms of restore_object are provided simply forconvenience. They are translated into the corresponding list of datafile numbers.
8-34 Oracle8 Backup and Recovery Guide
Recovering Datafiles
It is a mistake to specify a datafile more than once in one restore job. For example,the following is considered illegal since datafile 1 is specified both explicitly andimplied by the system tablespace:
restore (tablespace system) (datafile 1);
Switching DatafilesWhen you switch datafiles, you are converting a datafile copy into a currentdatafile. By “current datafile” we mean the file that the control file points to (forexample, the filename of the datafile copy becomes the new filename of the datafileas listed in the control file). Media recovery will be required for the datafile.
You should switch datafiles when you want to have a datafile copy become thecurrent version of a datafile. This is equivalent to using the ALTER DATABASERENAME DATAFILE command. Note that this effectively causes the location ofthe current datafile to change. Also note that switching “consumes” the copy. Thecorresponding records in the recovery catalog and the control file are deleted.
The datafile that is the target of the switch can be specified either by filename or byfilenumber. You can specify the datafile copy to use either by filename or tag. If thetag is ambiguous, then the most current copy is used (the one that requires the leastmedia recovery).
If you do not specify the target of the switch, then the filename specified in a priorset newname for this file number is used as the switch target. If you specify switchdatafile all, then all datafiles for which a set newname has been issued in this jobare switched to their new name.
Recovering DatafilesYou can use the Recovery Manager recover command to perform media recoveryand apply incremental backups. Only current datafiles may be recovered or haveincremental backups applied to them. Archive log backup sets are restored asneeded to perform the media recovery. By default, the logs are restored to thecurrent log archive destination as specified in the init.ora file. An operand isprovided for specifying a different location.
If Recovery Manager has a choice between applying an incremental backup orapplying redo, then it always chooses to use the incremental backup. If over-lapping levels of incremental backup are available, then the lowest level ofincremental backup (the one covering the longest period of time) is chosenautomatically.
Performing Backup and Recovery with Recovery Manager 8-35
Recovering Datafiles
Guidelines for Recovering DatafilesIf possible, the recovery catalog should be made available to perform the recovery.If it is not available, then Recovery Manager uses information from the targetdatabase control file to perform the recovery if possible. Note that if control filerecovery is required, then the recovery catalog must be available. RecoveryManager cannot operate when neither the recovery catalog nor the target databasecontrolfile are available.
At least one allocate channel command must precede the recover command unlessit is known that no archive log or incremental datafile backup sets will needrestoration. Furthermore, the appropriate type of device(s) must be allocated forthe backup sets that will need restoration. If the appropriate type of device is notavailable, then the recover command will fail. The restores of datafile incrementalbackup sets are performed in parallel if multiple channels are allocated, with thedegree of parallelism controlled by the number of allocate channel commands.
Database Point-In-Time RecoveryAn easy way of specifying the time to is to use set until. This command affects anysubsequent restore, switch and recover commands in the same run command. If aset until command is specified after a restore and before a recover, you may not beable to recover the database to the point in time required, as the files restored mayalready have timestamps more recent than that time; for this reason, the set untilcommand is usually specified before the restore or switch command.
set untilThis specifies a point in time for a subsequent restore or recover com-mand. The point in time may be specified using one of the followingkeywords:
- time string
- logseq integer thread integer
- scn integer
If the time keyword is specified then string must be a formatted accord-ing to the NLS date format specification currently in effect. This formatis specified by the NLS_DATE_FORMAT environment variable onmost platforms.
8-36 Oracle8 Backup and Recovery Guide

Recovering Datafiles
Recovery CommandsThere are three forms of Recovery Manager recover commands:
■ recover database
■ recover tablespace
■ recover datafile
For datafile and tablespace recovery, the target database must be started andmounted. If it is open, then the datafile(s) or tablespace(s) to be recovered must beoffline.
For database recovery, the database must be started but not open. If possible, thetarget database should be mounted. If the target database is not mounted, thenRecovery Manager uses the values of the db_name and db_domain init.oraparameters to determine which target database it is operating against. If thedb_name parameter is not specified in the target database init.ora file, then therecover command will fail. If there are multiple target databases with the samename and domain in the recovery catalog, again, the recover command will fail.
Datafile RecoveryPerform this form of recovery when a media failure has damaged one or moredatafiles.
Tablespace RecoveryPerform this form of recovery when a media failure has damaged all datafiles for atablespace, or when a tablespace is to be recovered to a previous point-in-time.
Performing tablespace recovery is also an easy way of naming the files that are tobe recovered. Any files not requiring recovery are simply ignored.
Database RecoveryPerform database recovery under the following circumstances:
■ media failure has damaged the entire database
■ the entire database is to be recovered to a previous point-in-time
■ media failure has damaged the control file
■ create controlfile has been executed
Performing Backup and Recovery with Recovery Manager 8-37
Recovering Datafiles
Recover Command Object List
datafileThis specifies a list of one or more datafiles to recover. Datafiles may bespecified by filename or filenumber. The name must be the currentname of the datafile as known in the recovery catalog. If the datafilehas been renamed in the control file since the last time it was backedup or the last time a resync catalog was performed, then the old nameof the datafile must be used.
tablespaceThis specifies a list of one or more tablespaces to recover.
databaseThis specifies that the entire database is to be recovered. You can spec-ify an optional until_clause that causes the recovery to stop when thespecified until condition has been reached.
An optional skip clause may also be specified. The skip clause liststablespaces that should not be recovered. This is useful for avoidingrecovery of tablespaces containing only temporary data, or for postpon-ing recovery of some tablespaces until a later time.
The skip clause causes Recovery Manager to take the datafiles belong-ing to the specified tablespaces offline before starting media recovery.These files are left offline after the media recovery is complete. If anincomplete recovery is being performed, then skip is not allowed.Instead, you must use skip forever, with the intention of dropping theskipped tablespaces after opening the database with the RESETLOGSoption.
The skip forever clause causes Recovery Manager to take the datafilesoffline using the drop option. Only use skip forever when the speci-fied tablespaces will be dropped after opening the database.
8-38 Oracle8 Backup and Recovery Guide
Monitoring Backups and Restores
Monitoring Backups and RestoresThere are a number of ways to identify what a server process performing a backup,restore or copy is doing. This section discusses two options.
Connecting a Session to ChannelsTo identify which server processes correspond to which Recovery Managerchannels, use set command id and query the V$SESSION.CLIENT_INFO column.
set command idThis enters the specified string into the V$SESSION.CLIENT_INFO col-umn of all channels. This can be used to identify which Oracle serverprocesses correspond to which channels.
The V$SESSION.CLIENT_INFO column will contain information for eachRecovery Manager server process, in one of the following formats:
■ id=string
This form appears for the first connection to the target database established byRecovery Manager.
■ id=string, ch=channel_id
This form appears for all allocated channels.
Example: Using set command id
run { set command id to 'rman'; allocate channel t1 type ’SBT_TAPE’; allocate channel t2 type ’SBT_TAPE’; backup incremental level 0 format ’df_%t_%s_%p’ filesperset 5 (tablespace data_1); sql ’alter system archive log all’;}
Performing Backup and Recovery with Recovery Manager 8-39
Monitoring Backups and Restores
Monitoring ProgressYou can monitor the progress of backups, copies, and restores by querying the viewV$SESSION_LONGOPS.
Each server process performing a backup, restore or copy reports its progresscompared to the total amount of work to do for that particular part of the restore.
For example, if a restore was being performed using two channels, and eachchannel had two backup sets to restore (a total of 4 sets), each server process wouldupdate report its progress through a single set. When that set was completelyrestored, it would then start reporting progress on the next set to restore.
The information can be queried using the following SQL statement:
SELECT sid, serial#, context, sofar, totalwork round(sofar/totalwork*100,2) "% Complete", FROM v$session_longops WHERE compnam = 'dbms_backup_restore';
8-40 Oracle8 Backup and Recovery Guide
Recovery Manager Scen
9
Recovery Manager ScenariosThis chapter provides scenarios that use Recovery Manager, and includes thefollowing topics:
■ Backing Up in NOARCHIVELOG Mode
■ Backing Up Databases and Tablespaces
■ Backing Up in a Parallel Server Environment
■ Copying Datafiles
■ Incremental Backups
■ Handling Errors
■ Using O/S Utilities To Make Copies
■ Keeping Backups
■ Restoring and Recovering
■ Database Point-In-Time Recovery
■ Querying the Recovery Catalog
■ Using the Report Command for Complex Recovery Catalog Queries
arios 9-1

Backing Up in NOARCHIVELOG Mode
Backing Up in NOARCHIVELOG ModeIn this scenario the database is operating in NOARCHIVELOG mode, and theadministrator has chosen to shut it down cleanly and back it up.
It is possible to skip tablespaces, but any skipped tablespace that has not beenoffline or read-only since its last backup will be lost if the database has to berestored from a backup.
You must use Server Manager/LineMode to shutdown the database.
SVRMGR> shutdown; SVRMGR> startup mount
Then start Recovery Manager and enter the following:
run { # backup the database to disk allocate channel dev1 type disk; backup (database format '/oracle/backups/bp_%s_%p'); }
The filename of the backup piece is generated using the format string. When thebackup is written to disk, it is important to make sure that the destination (filesystem or raw device) has enough free space.
Backing Up Databases and TablespacesIn the following examples, the database is running in ARCHIVELOG mode.
Backing Up a DatabaseTo back up a database to tape you must first allocate a tape device. QueryV$BACKUP_DEVICE to see what devices are available to you.
The following example shows how to back up the database (except tablespaces thatare offline):
run { allocate channel dev1 type 'sbt_tape'; backup skip offline (database format '%d_%u'); }
A read-only tablespace needs to be backed up only once or twice after it has beenmade read-only. You can use the skip read only option to skip read-only datafiles.If you use the skip offline option, then the backup will not attempt to access offlinedatafiles. Use this option if the offline datafiles are not available.
9-2 Oracle8 Backup and Recovery Guide
Backing Up Databases and Tablespaces
Backing Up a TablespaceThe following example shows how to back up individual tablespaces. It isimportant to back up tablespaces that contain important data frequently (includingsystem data and any tablespace that contains rollback segments). Tablespacescontaining only temporary segments need not be backed up. Because this examplebacks up to disk, the format string determines the name of the backup file.
run { allocate channel dev1 type disk; backup (tablespace system,tbs_1,tbs_2,tbs_3,tbs_4,tbs_5 format '/oracle/backups/bp_%s_%p'); }
Backing Up Individual DatafilesYou can also use Recovery Manager to back up individual datafiles as follows:
run { allocate channel dev1 type 'sbt_tape'; backup (datafile '?/dbs/t_dbs1.f' format '%d_%u'); }
Backing Up the Control FileThe current control file is automatically backed up when the first datafile of thesystem tablespace is backed up. The current control file can also be explicitlyincluded in a backup or backed up individually.
run { allocate channel dev1 type 'sbt_tape'; backup (tablespace tbs_5 include current controlfile format '%d_%u'); }
Backing Up Archived LogsYou can also back up archived logs to tape. The range of archived logs can bespecified by time or log sequence. Note that specifying an archive log range doesnot guarantee that all redo in the range is backed up. For example, the last archivedlog may end before the end of the range, or an archived log in the range may be
Recovery Manager Scenarios 9-3
Backing Up Databases and Tablespaces
missing. Recovery Manager simply backs up the logs it finds and does not issue awarning. Note that online logs cannot be backed up; they must be archived first.
NLS_LANG=american NLS_DATE_FORMAT='Mon DD YYYY HH24:MI:SS'
run { allocate channel dev1 type 'sbt_tape'; backup (archivelog from time 'Nov 13 1996 20:57:13' until time 'Nov 13 1996 21:06:05' all format '%d_%u'); }
Here we back up all archived logs from sequence# 288 to sequence# 301 and deletethe archived logs after the backup is complete. If the backup fails the logs are notdeleted.
run { allocate channel dev1 type 'sbt_tape'; backup (archivelog low logseq 288 high logseq 301 thread 1 all delete input format '%d_%u'); }
The following commands back up all archived logs generated during the last 24hours. We archive the current log first to ensure that all redo generated up to thepresent gets backed up.
run { allocate channel dev1 type 'sbt_tape'; sql "alter system archive log current"; backup (archivelog from time 'SYSDATE-1' all format '%d_%u') ; }
See Also: For more information about your environment variables, see youroperating system-specific documentation.
Hint: Set the NLS_LANG and NLS_DATE_FORMAT environ-ment variables before invoking Recovery Manager.
9-4 Oracle8 Backup and Recovery Guide
Copying Datafiles
Backing Up in a Parallel Server EnvironmentThe following script distributes datafile and archivelog backups across twoinstances in a parallel server environment:
run {
allocate channel node_1 type disk connect 'internal/kernel@node_1'; allocate channel node_2 type disk connect 'internal/kernel@node_2'; backup filesperset 1 format 'df_%s_%p' (tablespace system, rbs, data1, data2 channel node_1) (tablespace temp, reccat, data3, data4 channel node_2); backup filesperset 20 format 'al_%s_%p' (archivelog until time 'SYSDATE' thread 1 delete input channel node_1); (archivelog until time 'SYSDATE' thread 2 delete input channel node_2); release channel node_1; release channel node_2; }
Copying DatafilesHere we use Recovery Manager to make copies of datafiles to disk. A datafile copyis an image copy of the datafile.
run { allocate channel dev1 type disk; copy datafile '?/dbs/tbs_01.f/dbs/tbs_01.f' to '?/copy/temp3.f'; }
Recovery Manager Scenarios 9-5
Incremental Backups
Incremental BackupsAn incremental backup contains only blocks that have been changed since theprevious backup. The first incremental backup must be a level 0 backup thatcontains all used blocks.
run { allocate channel dev1 type 'sbt_tape'; backup incremental level 0 (database format '%d_%u'); }
The next incremental backup at level 1 or higher will contain all blocks changedsince the previous level 0 or level 1 backup.
run { allocate channel dev1 type 'sbt_tape'; backup incremental level 1 (database format '&d_%u'); }
If a new datafile or tablespace is added to the database then make a level 0 backupbefore the incremental backup. Otherwise the incremental backup of the tablespaceor the database will fail because Recovery Manager doesn't find a parent backupfor the new datafiles.
run { allocate channel dev1 type 'sbt_tape'; backup incremental level 0 (tablespace new_tbs format '%d_%u'); }
You can perform incremental backups in NOARCHIVELOG mode.
Handling ErrorsBy default a checksum is calculated for every block read from a datafile and storedin the backup. If you use the nochecksum option then checksums are notcalculated. However, if the block already contains a checksum, the checksum isvalidated and stored in the backup. If the validation fails, the block is markedcorrupt in the backup.
9-6 Oracle8 Backup and Recovery Guide
Keeping Backups
The set maxcorrupt clause determines how many corrupt blocks backup tolerates.If any datafile has more corrupt blocks than specified by maxcorrupt, the backupwill terminate.
By default, backup will terminate if it cannot access a datafile. If the skipinaccessible option is specified, then backup will skip inaccessible datafiles andcontinue to back up other files. If skip offline is used, then backup will not attemptto access offline files.
run { allocate channel dev1 type 'sbt_tape'; set maxcorrupt 5; backup (database format 'bp_%s_%p'); }
Using O/S Utilities To Make CopiesDatafile copies you make using O/S utilities can be catalogued in the recoverycatalog. Note that only copies made to disk can be catalogued. Because the formatof backup pieces is proprietary, O/S utilities cannot write backups that RecoveryManager can read.
The datafile copies must be made using Oracle7 techniques. If the database is openand the datafile is online, you must first issue ALTER TABLESPACE BEGINBACKUP. The resultant backup can be cataloged:
catalog datafilecopy '?/dbs/tbs_33.f';
Keeping BackupsHow long backups and copies must be kept depends on factors such as:
■ How frequently backups are taken
■ How long the past point-in-time recovery is needed
For example, if all datafiles are backed up daily, no point-in-time recovery isneeded and only one backup per datafile is sufficient, then previous backups can bedeleted as soon as the new one completes.
# list all files#### # delete a specific datafilecopy change datafilecopy '?/dbs/tbs_35.f' delete;
# delete archivelogs older than 31 days change archivelog until time 'SYSDATE-31' delete';
Recovery Manager Scenarios 9-7
Restoring and Recovering
There is currently no way to delete all the pieces of a multi-piece backup set with asingle command. You must delete all the backup pieces individually.The deletion ofany piece of a backup set automatically removes that backup set fromconsideration for restore and recovery.
You must allocate a channel before deleting a backup piece. The specified backuppiece must have been created on the same type of device. Note that the allocatechannel for delete command is not issued inside of a run command.
# delete a backup piece allocate channel for delete type 'sbt_tape'; change backuppiece 'testdb_87fa39e0' delete; release channel;
Restoring and RecoveringWhen and how to restore and/or recover information depends on the state of thedatabase and the location of its datafiles.
The first step toward restoring/recovery is to determine the status of the databaseby executing the following query:
select status, parallel from v$instance;
Restore and Recover When the Database Is OpenIf the status is open, then the database is open, but it is possible that sometablespaces and their datafiles need to be restored or recovered.
To recover or restore, execute the following query:
select file#, status, error, recover, tablespace_name, name from v$datafile_header;
If the error column is not null, then either the datafile could not be accessed or itsheader could not be validated. Unless the error is caused by a temporary hardwareor operating system problem, the datafile must be restored or switched to a copy ofthat datafile:
run { # recover tablespace tbs_1 while the database is open allocate channel dev1 type 'sbt_tape'; sql "alter tablespace tbs_1 offline immediate" ; restore tablespace tbs_1 ; recover tablespace tbs_1 ; sql "alter tablespace tbs_1 online" ; release channel dev1 ; }
9-8 Oracle8 Backup and Recovery Guide

Restoring and Recovering
If a datafile cannot be accessed due to a disk failure, it is likely that it must berestored to a new location or switched to an existing datafile copy. The followingrestore example allocates one disk channel and one 'sbt_tape' channel to allowrestore to use datafile copies on disk and backups on 'sbt_tape'. This exampleallocates one disk device and one tape device to allow Recovery Manager to restoreboth from disk and tape.
run { allocate channel dev1 type disk; allocate channel dev2 type 'sbt_tape'; sql "alter tablespace tbs_1 offline immediate" ; set newname for datafile 'disk7/oracle/tbs11.f' to 'disk9/oracle/tbs11.f' ; restore (tablespace tbs_1) ; switch datafile all ; recover tablespace tbs_1 ; sql "alter tablespace tbs_1 online" ; release channel dev1; release channel dev2; }
Because V$DATAFILE_HEADER only reads the header block of each datafile itdoes not detect all problems that require the datafile to be restored. For example, ifthe datafile contains unreadable data blocks, but its header block is intact, no erroris reported.
If the file can be accessed (error is null), but the recover column returns “yes,” thenthe file should be recovered. The Recovery Manager recover command first appliesany suitable incremental backups and then applies archived logs and/or onlinelogs. The incremental backups and archived logs are restored as needed.
run { # recover tablespace tbs_1 while the database is open allocate channel dev1 type disk ; sql "alter tablespace tbs_1 offline" ; recover tablespace tbs_1 ; sql "alter tablespace tbs_1 online" ; release channel dev1 ; }
Recovery Manager Scenarios 9-9
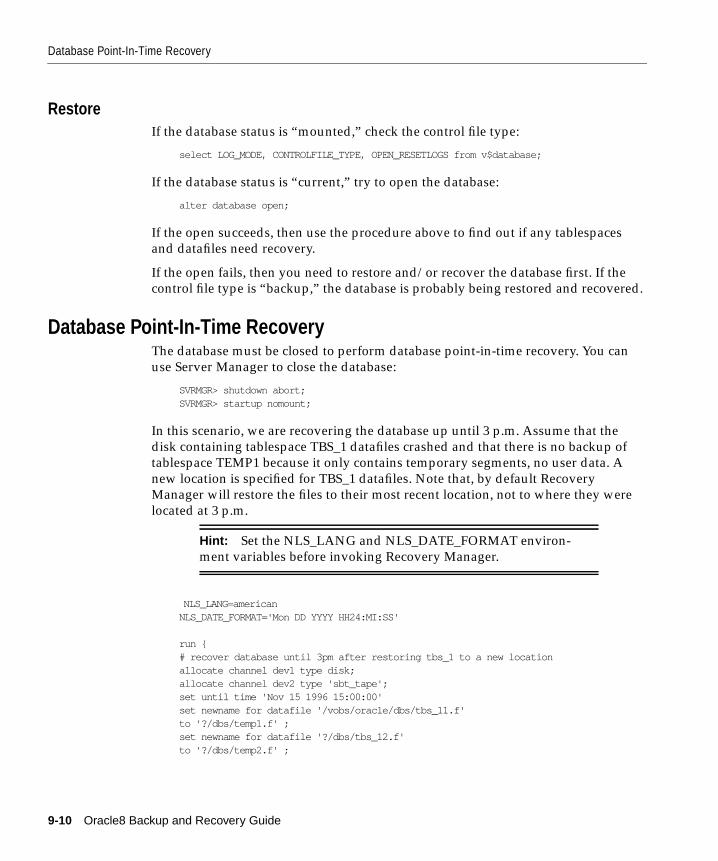
Database Point-In-Time Recovery
RestoreIf the database status is “mounted,” check the control file type:
select LOG_MODE, CONTROLFILE_TYPE, OPEN_RESETLOGS from v$database;
If the database status is “current,” try to open the database:
alter database open;
If the open succeeds, then use the procedure above to find out if any tablespacesand datafiles need recovery.
If the open fails, then you need to restore and/or recover the database first. If thecontrol file type is “backup,” the database is probably being restored and recovered.
Database Point-In-Time RecoveryThe database must be closed to perform database point-in-time recovery. You canuse Server Manager to close the database:
SVRMGR> shutdown abort; SVRMGR> startup nomount;
In this scenario, we are recovering the database up until 3 p.m. Assume that thedisk containing tablespace TBS_1 datafiles crashed and that there is no backup oftablespace TEMP1 because it only contains temporary segments, no user data. Anew location is specified for TBS_1 datafiles. Note that, by default RecoveryManager will restore the files to their most recent location, not to where they werelocated at 3 p.m.
NLS_LANG=american NLS_DATE_FORMAT='Mon DD YYYY HH24:MI:SS'
run { # recover database until 3pm after restoring tbs_1 to a new location allocate channel dev1 type disk; allocate channel dev2 type 'sbt_tape'; set until time 'Nov 15 1996 15:00:00' set newname for datafile '/vobs/oracle/dbs/tbs_11.f' to '?/dbs/temp1.f' ; set newname for datafile '?/dbs/tbs_12.f' to '?/dbs/temp2.f' ;
Hint: Set the NLS_LANG and NLS_DATE_FORMAT environ-ment variables before invoking Recovery Manager.
9-10 Oracle8 Backup and Recovery Guide

Querying the Recovery Catalog
restore controlfile to '/vobs/oracle/dbs/cf1.f' ; replicate controlfile from '/vobs/oracle/dbs/cf1.f'; sql "alter database mount" ; restore database skip tablespace temp1; switch datafile all; recover database skip tablespace temp1; sql "alter database open resetlogs"; sql "drop tablespace temp1"; sql "create tablespace temp1 datafile '/vobs/oracle/dbs/temp1.f' size 10M"; release channel dev1; release channel dev2; }
Now assume that log sequence 1234 was lost due to a disk crash and the databaseneeds to be recovered using available archivelogs. We know that tablespaceREADONLY1 has not changed since logseq 1234, so we don't restore it.
run { # recover database until log sequence 1234 allocate channel dev1 type disk; allocate channel dev2 type 'sbt_tape'; set until logseq 1234 thread 1; restore controlfile to '/vobs/oracle/dbs/cf1.f' ; replicate controlfile from '/vobs/oracle/dbs/cf1.f'; sql "alter database mount" ; restore database skip tablespace temp1, readonly1; recover database skip tablespace temp1; sql "alter database open resetlogs"; sql “drop tablespace temp1”; sql "create tablespace temp1 datafile '/vobs/oracle/dbs/temp1.f' size 10M"; release channel dev1; release channel dev2; }
Querying the Recovery CatalogYou can use the list command to query the contents of the recovery catalog, or thetarget database control file if no recovery catalog is used.
# list all backups of files in tablespace tbs_1 that were made since # November first. list until time 'Nov 1 1996 00:00:00' backupset of tablespace tbs_1; # list all backups on device type 'sbt_tape' list device type 'sbt_tape' backupset of database; # list all copies of a datafile, qualified by tag and directory. list tag foo like '/somedir/%' copy of datafile 21; # list all database incarnations registered in the recovery catalog list incarnation of database;
Recovery Manager Scenarios 9-11
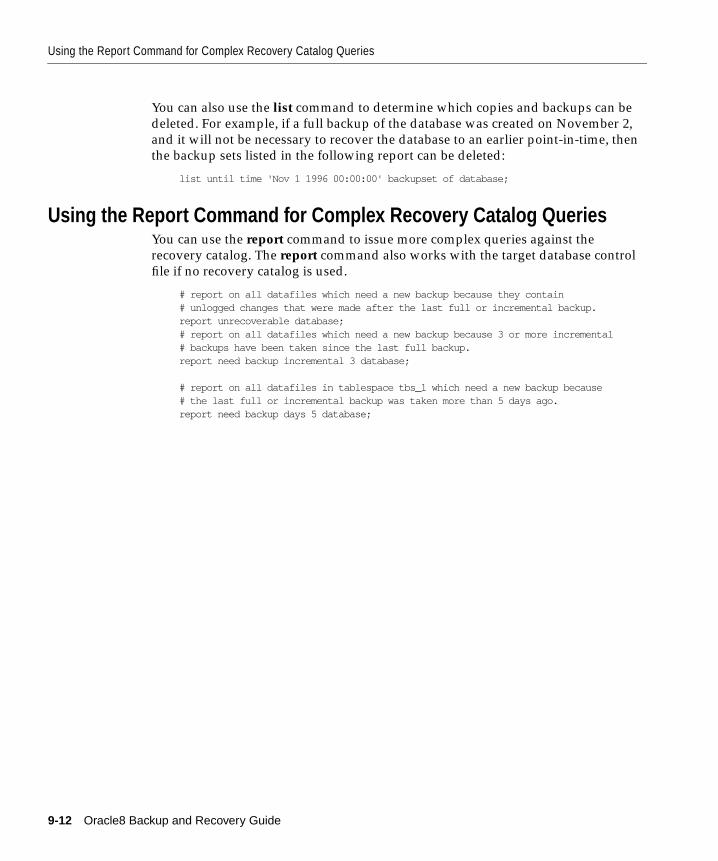
Using the Report Command for Complex Recovery Catalog Queries
You can also use the list command to determine which copies and backups can bedeleted. For example, if a full backup of the database was created on November 2,and it will not be necessary to recover the database to an earlier point-in-time, thenthe backup sets listed in the following report can be deleted:
list until time 'Nov 1 1996 00:00:00' backupset of database;
Using the Report Command for Complex Recovery Catalog QueriesYou can use the report command to issue more complex queries against therecovery catalog. The report command also works with the target database controlfile if no recovery catalog is used.
# report on all datafiles which need a new backup because they contain # unlogged changes that were made after the last full or incremental backup. report unrecoverable database; # report on all datafiles which need a new backup because 3 or more incremental # backups have been taken since the last full backup. report need backup incremental 3 database;
# report on all datafiles in tablespace tbs_1 which need a new backup because # the last full or incremental backup was taken more than 5 days ago.
report need backup days 5 database;
9-12 Oracle8 Backup and Recovery Guide

Recovery Manager Tablespace Point-in-Time Rec
10
Recovery Manager Tablespace Point-in-Time Recovery
This chapter describes how to use Recovery Manager (RMAN) to performtablespace point-in-time recovery (TSPITR), and includes the following topics:
■ Introduction to Recovery Manager Tablespace Point-in-Time Recovery
■ Planning for Recovery Manager Tablespace Point-in-Time Recovery
■ Performing Recovery Manager Tablespace Point-In-Time Recovery
■ Tuning Considerations
Attention: Due to the complex nature of tablespace point-in-timerecovery, Oracle recommends that you contact and work withWorldwide Customer Support Services before using theprocedures described here.
overy 10-1
Introduction to Recovery Manager Tablespace Point-in-Time Recovery
Introduction to Recovery Manager Tablespace Point-in-Time RecoveryRecovery Manager (RMAN) automated Tablespace Point-In-Time Recovery(TSPITR) enables you to quickly recover one or more tablespaces to a point-in-timethat is different from that of the rest of the database. TSPITR is most useful in thefollowing situations:
■ To recover from an erroneous drop or truncate table operation.
■ To recover a table that has become logically corrupted.
■ To recover from an incorrect batch job or other DML statement that has affectedonly a subset of the database.
■ In cases where there are multiple logical databases in separate tablespaces ofone physical database, and where one logical database must be recovered to apoint different from that of the rest of the physical database.
■ For VLDBs (very large databases) even if a full database point-in-time recoverywould suffice, you might choose to do tablespace point-in-time recovery ratherthan restore the whole database from a backup and perform a complete data-base roll-forward (see “Planning for Recovery Manager Tablespace Point-in-Time Recovery” on page 10-3 before making any decisions).
Similar to a table export, RMAN TSPITR enables you to recover a consistent dataset; however, the data set is the entire tablespace rather than just one object.
Prior to Oracle8, point-in-time recovery could only be used on a subset of a data-base by:
1. Creating a copy of the database
2. Rolling the copied database forward to the desired point in time
3. Exporting the desired objects from the copied database
4. Dropping the relevant objects from the production database
5. Importing the objects into the production database
However, there was a performance overhead associated with exporting and import-ing large objects.
Familiarize yourself with the following terms and abbreviations, which are usedthroughout this chapter:
TSPITRTablespace Point-in-Time Recovery
10-2 Oracle8 Backup and Recovery Guide
Planning for Recovery Manager Tablespace Point-in-Time Recovery
Clone DatabaseThe copied database used for recovery in Oracle 8 TSPITR is called a "clone data-base", and has various substantive differences from a regular database.
Recovery SetTablespaces that require point-in-time recovery to be performed on them.
Auxiliary SetAny other items required for TSPITR, including:
■ backup control file
■ system tablespaces
■ datafiles containing rollback segments
■ temporary tablespace (optional)
A small amount of space is required by export for sort operations. If a copy of thetemporary tablespace is not included in the auxiliary set, then you must providesort space either by creating a new temporary tablespace after the clone has beenstarted up, or by setting autoextend to ON on the system tablespace files.
Planning for Recovery Manager Tablespace Point-in-Time RecoveryRecovery Manager TSPITR is a complicated procedure and requires careful plan-ning. Before proceeding you should read all of this chapter thoroughly.
WARNING: You should not perform RMAN TSPITR for the firsttime on a production system, or during circumstances wherethere is a time constraint.
Attention: Many of the limitations and planning steps in thischapter can also be found in Chapter 13, “Performing TablespacePoint-in-Time Recovery”; however, differences in limitations andplanning exist. These differences are explicitly called to your atten-tion in this chapter.
Recovery Manager Tablespace Point-in-Time Recovery 10-3
Planning for Recovery Manager Tablespace Point-in-Time Recovery
LimitationsThis section describes the limitations associated with performing RMAN TSPITR.As you begin the planning stage, familiarize yourself with these limitations.
The primary issue you should consider when deciding whether or not to performRMAN TSPITR is the possibility of application-level inconsistencies between tablesin recovered and unrecovered tablespaces (due to implicit rather than explicit refer-ential dependencies). You must understand these dependencies, and also have themeans to resolve any possible inconsistencies before proceeding.
Recovery Manager Only Supports Recovery Sets Containing Whole Tables
Recovery Manager TSPITR only supports recovery sets that contain whole tables.If, for example, you are performing RMAN TSPITR on partitioned tables, and havepartitions spread across more than one table, RMAN will return an error messageduring the export phase of TSPITR. Recovery sets that contain tables without theirconstraints, or only the constraints without the table, will also result in errors.
Recovery Manager Does Not Support Tables Containing Rollback Segments
If you are performing manual TSPITR, you can take rollback segments in the recov-ery set offline—thus preventing changes being made to the recovery set beforerecovery is complete. However, RMAN TSPITR does not support recovery oftablespaces containing rollback segments. For more information about TSPITR androllback segments, see “Step 3: Prepare the Primary Database for TSPITR” onpage 13-12.
TS_PITR_CHECK Does Not Check for Objects Owned by SYSThe TS_PITR_CHECK view provides information on dependencies and restrictionsthat can prevent TSPITR from proceeding. However, TS_PITR_CHECK does notprovide information about dependencies and restrictions for objects owned by SYS.
If there are any objects, including undo segments, owned by SYS in the recoveryset, there is no guarantee that you can successfully recover these objects (becauseTSPITR utilizes the Export and Import utilities, which do not operate on objects
Note: This limitation is specific to RMAN TSPITR.
Note: This limitation is specific to RMAN TSPITR.
10-4 Oracle8 Backup and Recovery Guide

Planning for Recovery Manager Tablespace Point-in-Time Recovery
owned by SYS). To find out which recovery set objects are owned by SYS, issue thefollowing statement:
SELECT OBJECT_NAME, OBJECT_TYPE FROM SYS.DBA_OBJECTS WHERE TABLESPACE_NAME IN (’<tablespacename1>’,’<tablespacename’,’ <tablespace name N’) and owner = ’SYS’;
See Also: For more details about the TS_PITR_CHECK view, see “Step 2: Researchand Resolve Dependencies on the Primary Database” on page 13-8.
TS_PITR_CHECK Does Not Detect Snapshot TablesThe TS_PITR_CHECK view does not detect snapshot tables (it does detect snapshotlogs); they are exported as stand-alone tables. Thus, if a snapshot is dropped attime 3, and a backup from time 1 is used to roll forward to time 2, after TSPITR iscomplete the snapshot table will have been created as a stand-alone table, but with-out its associated snapshot view.
Partitioned Tables and TS_PITR_CHECKIf any of the tablespaces supplied to the predicate contain the first segment of a par-titioned table, then the result set of the TS_PITR_CHECK view is inverted. Iftablespaces supplied to the predicate do not include the first segment of a parti-tioned table, then one row is returned for the partition in question. If thetablespaces supplied to the predicate contain the first segment of a partitionedtable, the results are inverted (for example, one row is returned for every tablespacecontaining partitions of that partitioned table, but not the tablespace that was sup-plied to the predicate). Returned rows indicate that there is a conflict that you mustresolve by exchanging the partitions with stand-alone tables.
Bitmap IndexesYou must drop and re-create bitmap indexes after you complete TSPITR. If youdon’t, they will be unusable. If any bitmap indexes exist on the tables, imports willfail even if the bitmap indexes have been dropped from the primary database. Anincorrect index segment will also be created, despite the failure, and you will haveto drop and re-build the index.
Non-Partitioned Global IndexesThe TS_PITR_CHECK view does not detect non-partitioned global indexes of parti-tioned tables that are outside the recovery set. This is apparent when the view isqueried manually and also during the export and import phase of TSPITR. After
Recovery Manager Tablespace Point-in-Time Recovery 10-5
Planning for Recovery Manager Tablespace Point-in-Time Recovery
TSPITR completes, the old index still exists on the recovered table, even though noerrors are returned. You must drop and re-create the index.
General RestrictionsIn addition to the preceding limitations, RMAN TSPITR has the following restric-tions:
■ You cannot use RMAN TSPITR to recover dropped tablespaces.
■ You cannot use RMAN TSPITR to recover a tablespace that has been droppedand re-created with the same name.
■ You cannot use RMAN TSPITR to remove a datafile that has been added to thewrong tablespace. If the file was added after the point to which RMAN TSPITRis being performed, then the file will still be part of the tablespace (and will beempty) after RMAN TSPITR is complete.
■ You cannot use DML statements on the clone database—the clone database isfor recovery purposes only.
■ After RMAN TSPITR is complete, you cannot use existing backups of the recov-ery set datafiles for recovery; instead, you must take fresh backups of the recov-ered files. If you attempt to recover using a backup taken prior to performingTSPITR, recovery will fail (with the error message ORA 1247, 00000, “databaserecovery through TSPITR of tablespace %s”).
■ RMAN TSPITR does not recover optimizer statistics for objects that have hadstatistics calculated on them; statistics must be re-calculated after performingTSPITR.
Note: Because the index is still valid, queries that use the indexwill return incorrect rows.
10-6 Oracle8 Backup and Recovery Guide
Planning for Recovery Manager Tablespace Point-in-Time Recovery
■ The following object types are not allowed within the RMAN TSPITR recoveryset:
■ replicated master tables
■ tables with varray columns
■ tables with nested tables
■ tables with external Bfiles
■ snapshot logs
■ snapshot tables
■ objects owned by SYS (including rollback segments)
Data Consistency and Recovery Manager TSPITRTSPITR provides views that can detect any data relationships between objects thatare in the tablespaces being recovered and objects in the rest of the database.TSPITR will not successfully complete unless these relationships are managed,either by removing or suspending the relationship, or by including the relatedobject within the recovery set.
See Also: For more information see “Step 2: Research and Resolve Dependencieson the Primary Database” on page 13-8, and “TS_PITR_CHECK Does Not Checkfor Objects Owned by SYS” on page 10-4.
Recovery Manager TSPITR Planning RequirementsYou must satisfy the following requirements before performing RMAN TSPITR.
Create an Oracle Password File for the Clone InstanceFor information about creating and maintaining Oracle password files, see “Pass-word File Administration” on page 1-9 of the Oracle8 Administrator’s Guide.
Set init.ora Parameters for Clone InstanceYou must set the following parameters in the init.ora file used by the clone instance.
■ CONTROL_FILES
■ DB_FILE_NAME_CONVERT
■ LOG_FILE_NAME_CONVERT
Recovery Manager Tablespace Point-in-Time Recovery 10-7
Planning for Recovery Manager Tablespace Point-in-Time Recovery
These settings will apply to the control file name, converted datafile names, andconverted logfile names at the clone database.
Example of init.ora Parameter Settings for Clone Instance: Following are examples of theinit.ora parameter settings you must make for the clone instance.
control_files=/oracle/clone/cf/clon_prod_cf.fdb_file_name_convert=("/oracle/prod/datafile","/oracle/clone/datafile")log_file_name_convert=("/oracle/prod/redo_log","/oracle/clone/redo_log")
See Also: For details about DB_FILE_NAME_CONVERT, see “Tuning Consider-ations” on page 10-10.
Create a Clone DatabaseBefore beginning RMAN TSPITR, you must have a clone database up (startupNOMOUNT) and running.
Start the Recovery Manager Command Line InterfaceUse either of the following two methods to start the RMAN command line interface.
Connect To the Clone Instance, Target Instance and Recovery Catalog To connect to theclone instance, target instance and recovery catalog, you must supply the followinginformation when starting up Recovery Manager:
rman target sys/<tsyspwd>@<target_str> rcvcat rman /<rmanpwd>@<rcvcat_str> clone sys/<csyspwd>@<clone_str>
Where:
Attention: After setting these parameters, ensure that you do notoverwrite the init.ora settings for the production files at the targetdatabase.
<tsyspwd> The "connect sys" password specified in the target database’sorapwd file
<target_str> The TNS alias for the target database
<rmanpwd> The "connect rman" password specified in the recovery cata-log’s orapwd file
<rcvcat_str> The TNS alias for the recovery catalog database
10-8 Oracle8 Backup and Recovery Guide
Performing Recovery Manager Tablespace Point-In-Time Recovery
Start Up the Recovery Manager Without the Connection to the Clone Instance You can startthe Recovery Manager command line interface without a connection to the cloneinstance, and then use the connect clone Recovery Manager command to make theclone connection, as follows:
RMAN> connect clone sys/<syspwd>@<clone_str>;
Performing Recovery Manager Tablespace Point-In-Time RecoveryAfter you have completed all planning requirements you can perform RMANTSPITR.
To perform RMAN TSPITR, issue the following commands (where <tbslist> is thelist of tablespace names in the recovery set):
’allocate clone channel’’recover tablespace <tbslist> until’
At least one clone channel must be allocated with the allocate clone channel com-mand.
The following example statement runs RMAN TSPITR:
RMAN> run { allocate clone channel dev1 type ’SBT_TAPE’; recover tablespace tbs_2, tbs_3 until time ’Jan 10 1998 20:00:00’; }
<csyspwd> The "connect sys" password specified in the clone database’sorapwd file.
<clone_str> The TNS alias for the clone database.
Reminder: The tablespace recovery set should not contain the sys-tem tablespace or any tablespace with rollback segments.
Recovery Manager Tablespace Point-in-Time Recovery 10-9
Tuning Considerations
Back Up Tablespaces After Recovery Manager TSPITR Is CompleteThe tablespaces in the recovery set will remain offline until after RMAN TSPITRcompletes successfully.
You must make backups of tablespaces in the recovery set before placing thesetablespaces online; all previous backups of datafiles in the recovery set are nolonger valid.
RMAN TSPITR is not repeatable after completing successfully. At this point, alltablespaces and datafiles in the recovery set are assigned a new SCN. However,when you make a backup after RMAN TSPITR, you can perform another RMANTSPITR to an until_time after this backup set creation time.
The clone database is not usable after a successful RMAN TSPITR; therefore, youshould release the memory using the SHUTDOWN ABORT statement.
Should RMAN TSPITR be unsuccessful, SHUTDOWN ABORT the clone instanceand restart (using NOMOUNT) after identifying and correcting the error. For exam-ple, if there is a conflict between the target database and the converted filename,the user should shutdown the clone instance, correct the converted datafile name,restart (using NOMOUNT), and run RMAN TSPITR again.
Also, after a successful RMAN TSPITR you can remove the following:
■ clone auxiliary set datafiles restored to temporary locations during RMANTSPITR
■ clone database control files
■ clone database redo log files
Tuning ConsiderationsThis section describes issues that can affect the performance of RMAN TSPITR.
Specify a New Name for Datafiles in Auxiliary Set TablespacesRecovery Manager restores and recovers all datafiles belonging to the tablespacesin the recovery set and auxiliary set at the clone instance (Remember that the auxil-iary set includes the system tablespace plus all the tablespaces with rollback seg-ments). You can specify a new name for any datafiles in the auxiliary set tablespaceusing the set newname Recovery Manager command. Recovery Manager will usethis new name as the temporary location in which to restore and recover the data-file. This new name will also override the setting in the
10-10 Oracle8 Backup and Recovery Guide
Tuning Considerations
DB_FILE_NAME_CONVERT init.ora parameter. You can specify a new name forany datafiles in recovery set tablespaces.
If you specify a new name for datafiles in the recovery set tablespace, the datafile(s)will replace the original datafile in the control file at the target database—so thenew filename replaces the existing filename.
Recovery Manager does not check for conflicts between datafile names at the cloneand target databases. Any conflicts will result in an RMAN error.
Set the Clone Name and Use a Datafile Copy for Recovery Manager TSPITRUsing a datafile copy on disk is much faster than restoring a datafile. Hence, youmay wish to use an appropriate copy of a datafile in the recovery or auxiliary set,instead of restoring and recovering a datafile.
Recovery Manager will use a datafile copy if the following 2 conditions are met:
1. The datafile copy name is registered in the recovery catalog as the clone nameof the corresponding datafile via the following command (where <datafile> isthe datafile name or number, and <clone_datafilename> is the datafile clonename):
RMAN> set clonename for datafile <datafile> to <clone_datafilename>
2. The datafile copy was made before the recovery "until_time" using the follow-ing RMAN command (where <datafile> is the datafile name):
RMAN> run { copy datafile <datafile> to clonename; ...}
ExamplesThe following commands are examples of the conditions required by RecoveryManager:
RMAN> set clonename for datafile ’/oracle/prod/datafile_1_1.dbf’ to ’/oracle/prod_copy/datafile_1_1.dbf’;
RMAN> run { allocate channel dev1 type disk; copy datafile ’/oracle/prod/datafile_1_1.dbf’ to clonename; }
Recovery Manager Tablespace Point-in-Time Recovery 10-11

Tuning Considerations
Recovery Manager will not use a datafile copy if you use set newname for thesame datafile.
If Recovery Manager uses a datafile copy and TSPITR completes successfully, theclone_datafilename will be marked "deleted" in the recovery catalog. The originaldatafile at the target will be replaced by this datafile copy after RMAN TSPITR iscomplete.
10-12 Oracle8 Backup and Recovery Guide

Tuning Considerations
Use the Converted Datafile NameIf neither a new name nor clone name is set for a datafile in an auxiliary settablespace, Recovery Manager can use the converted filename specified in the clonedatabase control file to perform the restore and recovery. Recovery Manager checksfor conflicts between datafile names at the clone and target databases. Any conflictsresult in error.
If neither a new name nor clone name is set for a datafile in a recovery settablespace, or the file at the clone name is unusable, Recovery Manager uses theoriginal location of the datafile.
Recovery Manager Tablespace Point-in-Time Recovery 10-13

Tuning Considerations
10-14 Oracle8 Backup and Recovery Guide
Part III
Backup and Recovery—Operating System

Performing Operating System Ba
11
Performing Operating System BackupsThis chapter explains how to back up the data in an Oracle database, and includesthe following topics:
■ Performing Backups
■ Recovering from an Inconsistent Backup
■ Using the Export and Import Utilities for Supplemental Database Protection
See Also: This chapter contains several references to Oracle Enterprise Manager.For more information about performing specific tasks using Enterprise Manager/GUI or Server Manager/LineMode, see the Oracle Enterprise Manager Administra-tor’s Guide.
ckups 11-1

Performing Backups
Performing BackupsThis section describes the various aspects of taking database backups, and includesthe following topics:
■ Listing Database Files Before Backup
■ Performing Whole Database Backups
■ Performing Tablespace, Datafile, Control File and Archivelog Backups
■ Performing Control File Backups
Listing Database Files Before BackupBefore taking a whole database (or tablespace, datafile, control file or archivlog)backup, identify the files to be backed up. Obtain a list of datafiles by querying theV$DATAFILE view:
SELECT name FROM v$datafile;
Then obtain a list of online redo log files for a database using the query below:
SELECT member FROM v$logfile;
These queries list the datafiles and online redo log files of a database, respectively,according to the information in the current control file of the database.
Finally, obtain the names of the current control files of the database by issuing thefollowing statement within Enterprise Manager:
SHOW PARAMETER control_files;
Whenever you take a control file backup (using the ALTER DATABASE commandwith the BACKUP CONTROLFILE TO ’filename’ option), save a list of all datafilesand online redo log files with the control file backup. To obtain this list use theALTER DATABASE command with the BACKUP CONTROLFILE TO TRACEoption. By saving the control file backup with the output of the TO TRACE invoca-tion, the database’s physical structure at the time of the control file backup isclearly documented.
11-2 Oracle8 Backup and Recovery Guide
Performing Backups
Performing Whole Database BackupsTake a whole database backup of all files that constitute a database after the data-base is shut down to system-wide use in normal priority. A whole database backuptaken while the database is open, after an instance crash or shutdown abort is inconsistent.In such cases, the backup is not a consistent whole database backup because thefiles are inconsistent with respect to a current point-in-time.
Whole database backups do not require the database to be operated in a specificarchiving mode. A whole database backup can be taken if a database is operatingin either ARCHIVELOG or NOARCHIVELOG mode. If the database is in NOAR-CHIVELOG mode, then the backup must be consistent (meaning the database isshut down cleanly before the backup).
The set of backup files that result from a consistent whole database backup are con-sistent because all files correspond to the same point in time. If a database restore isnecessary, these files can completely restore the database to an exact point in time.After restoring the backup files, you may perform additional recovery steps torecover the database to a more current time if the database is operated inARCHIVELOG mode. Also, you can take inconsistent whole database backups ifyour database is in ARCHIVELOG mode.
See also: For more information about backing up control files, see “PerformingControl File Backups” on page 11-10.
Preparing to Take a Consistent Whole Database BackupTo guarantee that a database’s datafiles are consistent, always shut down the data-base with normal or immediate priority before making a whole database backup.Never perform a whole database backup after an instance failure or after the data-base is shut down with abort priority (that is, using a SHUTDOWN ABORT state-ment) unless your database is in ARCHIVELOG mode. In this case, the datafiles areprobably not consistent with respect to a specific point-in-time.
WARNING: A backup control file created during a whole data-base backup should only be used with the other files taken inthat backup, to restore the backup. It should not be used for com-plete or incomplete database recovery. Unless you are taking aconsistent whole database backup, you should back up your con-trol file using the ALTER DATABASE command with theBACKUP CONTROLFILE option.
Performing Operating System Backups 11-3
Performing Backups
To Prepare for a Whole Database Backup
1. Shut down the database with normal or immediate priority.
To make a whole database backup, all database files must be closed by shuttingdown the database. Do not make a whole database backup when the instance isaborted or stopped because of a failure. Reopen the database and shut it downcleanly first.
2. Back up all files that constitute the database.
Use operating system commands or a backup utility to make backups of alldatafiles, and a single control file of the database. Also back up the parameterfiles associated with the database.
You can perform OS backups:
■ within Enterprise Manager, using the HOST command
■ outside Enterprise Manager, with the operating system commands or abackup utility
3. Restart the database.
After you have finished backing up all datafiles and a single control file of thedatabase, you can restart the database.
Verifying BackupsDB_VERIFY is an external command-line utility that performs a physical data struc-ture integrity check on an offline database. Use DB_VERIFY primarily when youneed to ensure that a backup database (or datafile) is valid before it is restored or asa diagnostic aid when you have encountered data corruption problems.
See Also: The name and location of DB_VERIFY is dependent on your operatingsystem (for example, dbv on Sun/Sequent systems). For more information aboutmaking operating system backups of files, see your operating system-specific Ora-cle documentation.
For more information on DB_VERIFY, see the Oracle8 Utilities guide.
11-4 Oracle8 Backup and Recovery Guide
Performing Backups
Performing Tablespace, Datafile, Control File or Archivelog BackupsTablespace, datafile, control file and archivelog backups should only be taken (andin some cases can only be taken) if a database is operating in ARCHIVELOG mode.Such backups cannot be used to restore a database operating in NOARCHIVELOGmode.
Backing Up Online Tablespaces and DatafilesYou can back up all datafiles of an individual online tablespace or specific datafilesof an online tablespace while the database is open.
When you back up an individual datafile or online tablespace, Oracle stops record-ing the occurrence of checkpoints in the headers of the online datafiles beingbacked up. Oracle stops recording checkpoints as a direct result of issuing theALTER TABLESPACE BEGIN BACKUP statement. This means the database is inhot backup mode, and that when a datafile is restored, it has “knowledge” of themost recent datafile checkpoint that occurred before the online tablespace backup,not any that occurred during it. As a result, Oracle asks for the appropriate set ofredo log files to apply should recovery be needed. After the datafile copy is com-pleted, Oracle advances the file header to the current database checkpoint. This isdone after the ALTER TABLESPACE END BACKUP statement is executed.
To Back Up Online Tablespaces in an Open Database
1. Identify the datafiles.
If you are backing up a specific datafile, use the fully specified filename of thedatafile.
Before beginning a backup on an entire tablespace, identify all of thetablespace’s datafiles using the DBA_DATA_FILES data dictionary view. Forexample, assume that the USERS tablespace is to be backed up. To identify theUSERS tablespace’s datafile, you can query the DBA_DATA_FILES view:
SELECT tablespace_name, file_name FROM sys.dba_data_files WHERE tablespace_name = ’USERS’;
TABLESPACE_NAME FILE_NAME ------------------------------- ----------------- USERS filename1 USERS filename2
Here, filename1 and filename2 are fully specified filenames corresponding to thedatafiles of the USERS tablespace.
Performing Operating System Backups 11-5
Performing Backups
2. Mark the beginning of the online tablespace backup.
To prepare the datafiles of an online tablespace for backup (and put them in hotbackup mode), use either the Start Online Backup menu item of EnterpriseManager, or the SQL command ALTER TABLESPACE with the BEGINBACKUP option.
The following statement marks the start of an online backup for the tablespaceUSERS:
ALTER TABLESPACE users BEGIN BACKUP;
3. Back up the online datafiles.
At this point, you can back up the online datafiles of the online tablespace fromwithin Enterprise Manager, using the HOST command, by exiting EnterpriseManager and entering the operating system commands, or starting the Backuputility
4. Mark the end of the online tablespace backup.
After backing up the datafiles of the online tablespace, indicate the end of theonline backup using either the End Online Tablespace Backup dialog box ofEnterprise Manager, or the SQL command ALTER TABLESPACE with the ENDBACKUP option.
The following statement ends the online backup of the tablespace USERS:
ALTER TABLESPACE users END BACKUP;
If you forget to indicate the end of an online tablespace backup, and an instance fail-ure or SHUTDOWN ABORT occurs, Oracle assumes that media recovery (possiblyrequiring archived redo logs) is necessary at the next instance start up. To avoid
WARNING: If you forget to mark the beginning of an onlinetablespace backup, or neglect to assure that the BEGIN BACKUPcommand has completed before backing up an online tablespace,the backup datafiles are not useful for subsequent recovery oper-ations. Attempting to recover such a backup is a risky procedure,and can return errors that result in inconsistent data later. Forexample, the attempted recovery operation will issue a “fuzzyfiles” warning, and lead to an inconsistent database that will notopen.
11-6 Oracle8 Backup and Recovery Guide
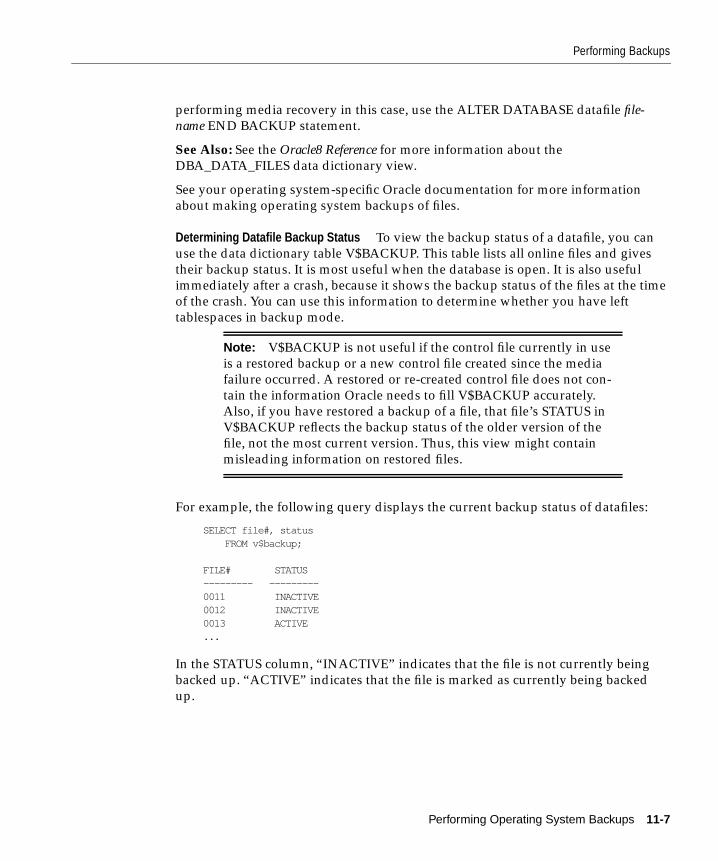
Performing Backups
performing media recovery in this case, use the ALTER DATABASE datafile file-name END BACKUP statement.
See Also: See the Oracle8 Reference for more information about theDBA_DATA_FILES data dictionary view.
See your operating system-specific Oracle documentation for more informationabout making operating system backups of files.
Determining Datafile Backup Status To view the backup status of a datafile, you canuse the data dictionary table V$BACKUP. This table lists all online files and givestheir backup status. It is most useful when the database is open. It is also usefulimmediately after a crash, because it shows the backup status of the files at the timeof the crash. You can use this information to determine whether you have lefttablespaces in backup mode.
For example, the following query displays the current backup status of datafiles:
SELECT file#, status FROM v$backup;
FILE# STATUS --------- --------- 0011 INACTIVE 0012 INACTIVE 0013 ACTIVE ...
In the STATUS column, “INACTIVE” indicates that the file is not currently beingbacked up. “ACTIVE” indicates that the file is marked as currently being backedup.
Note: V$BACKUP is not useful if the control file currently in useis a restored backup or a new control file created since the mediafailure occurred. A restored or re-created control file does not con-tain the information Oracle needs to fill V$BACKUP accurately.Also, if you have restored a backup of a file, that file’s STATUS inV$BACKUP reflects the backup status of the older version of thefile, not the most current version. Thus, this view might containmisleading information on restored files.
Performing Operating System Backups 11-7
Performing Backups
Backing Up Several Online Tablespaces If you have to back up several onlinetablespaces, use either of the following procedures:
■ Back up the online tablespaces in parallel. Forexample, prepare all online tablespaces for backup:
ALTER TABLESPACE ts1 BEGIN BACKUP; ALTER TABLESPACE ts2 BEGIN BACKUP; ALTER TABLESPACE ts3 BEGIN BACKUP;
Next, back up all files of the online tablespaces and indicate that the online backupshave been completed:
ALTER TABLESPACE ts1 END BACKUP; ALTER TABLESPACE ts2 END BACKUP; ALTER TABLESPACE ts3 END BACKUP;
■ Back up the online tablespaces serially. For example, individually prepare, backup, and end the backup of each online tablespace:
ALTER TABLESPACE ts1 BEGIN BACKUP; backup files ALTER TABLESPACE ts1 END BACKUP; ALTER TABLESPACE ts2 BEGIN BACKUP; backup files ALTER TABLESPACE ts2 END BACKUP;
The second option minimizes the time between ALTER TABLESPACE... BEGIN/END BACKUP commands and is recommended. During online backups, moreredo information is generated for the tablespace.
Backing Up Offline Tablespaces and DatafilesAll or some of the datafiles of an individual tablespace can be backed up while thetablespace is offline. All other tablespaces of the database can remain open andavailable for system-wide use.
Note: You cannot take the SYSTEM tablespace or any tablespacewith active rollback segments offline. The following procedure can-not be used for such tablespaces.
11-8 Oracle8 Backup and Recovery Guide
Performing Backups
To take tablespaces offline and online, you must have the MANAGE TABLESPACE system privi-lege.
1. Identify the datafiles of the offline tablespace.
Use the fully specified filename of the datafile.
Before taking the tablespace offline, identify the names of its datafiles by query-ing the data dictionary view DBA_DATA_FILES. (See Step 1 on on page 11-4.)
2. Take the tablespace offline, using normal priority if possible.
Use of normal priority, if possible, is recommended because it guarantees thatthe tablespace can be subsequently brought online without the requirement fortablespace recovery.
To take a tablespace and all associated datafiles offline with normal priority,use the Take Offline menu item of Enterprise Manager, or the SQL commandALTER TABLESPACE with the OFFLINE parameter. The following statementtakes a tablespace named USERS offline normally:
ALTER TABLESPACE users OFFLINE NORMAL;
After a tablespace is taken offline with normal priority, all datafiles of thetablespace are closed.
3. Back up the offline datafiles.
At this point, you can back up the datafiles of the offline tablespace fromwithin Enterprise Manager using the HOST command, by exiting EnterpriseManager and entering the operating system commands, or starting the Backuputility.
4. Bring the tablespace online. (Optional)
Bring the tablespace online using either the Place Online menu item of Enter-prise Manager, or the SQL command ALTER TABLESPACE with the ONLINEoption. The following statement brings an offline tablespace named USERSonline:
ALTER TABLESPACE users ONLINE;
Note: If you took the tablespace offline using temporary or imme-diate priority, the tablespace may not be brought online unlesstablespace recovery is performed.
Performing Operating System Backups 11-9

Performing Backups
After a tablespace is brought online, the datafiles of the tablespace are openand available for use.
See Also: For more information about making operating system backups of files,see your operating system-specific Oracle documentation.
Performing Control File BackupsYou should back up the control file of a database after making a structural modifica-tion to a database operating in ARCHIVELOG mode.
To back up a database’s control file, you must have the ALTER DATABASE systemprivilege.
You can take a backup of a database’s control file using the SQL command ALTERDATABASE with the BACKUP CONTROLFILE option. The following statementbacks up a database’s control file:
ALTER DATABASE BACKUP CONTROLFILE TO ’ filename ’ REUSE;
Here, filename is a fully specified filename that indicates the name of the new con-trol file backup.
The REUSE option allows you to have the new control file overwrite a control filethat currently exists.
Backing Up the Control File to the Trace FileThe TRACE option of the ALTER DATABASE BACKUP CONTROLFILE commandhelps you manage and recover your control file. TRACE prompts Oracle to writeSQL commands to the database’s trace file, rather than making a physical backupof the control file. These commands start up the database, re-create the control file,and recover and open the database appropriately, based on the current control file.Each command is Commented. Thus, you can copy the commands from the tracefile into a script file, edit them as necessary, and use the script to recover the data-base if all copies of the control file are lost (or to change the size of the control file).
For example, assume the SALES database has three enabled threads, of whichthread 2 is public and thread 3 is private. It also has multiplexed redo log files, andone offline and one online tablespace.
ALTER DATABASEBACKUP CONTROLFILE TO TRACE NORESETLOGS;
3-JUN-1992 17:54:47.27:# The following commands will create a new control file and use it# to open the database.
11-10 Oracle8 Backup and Recovery Guide
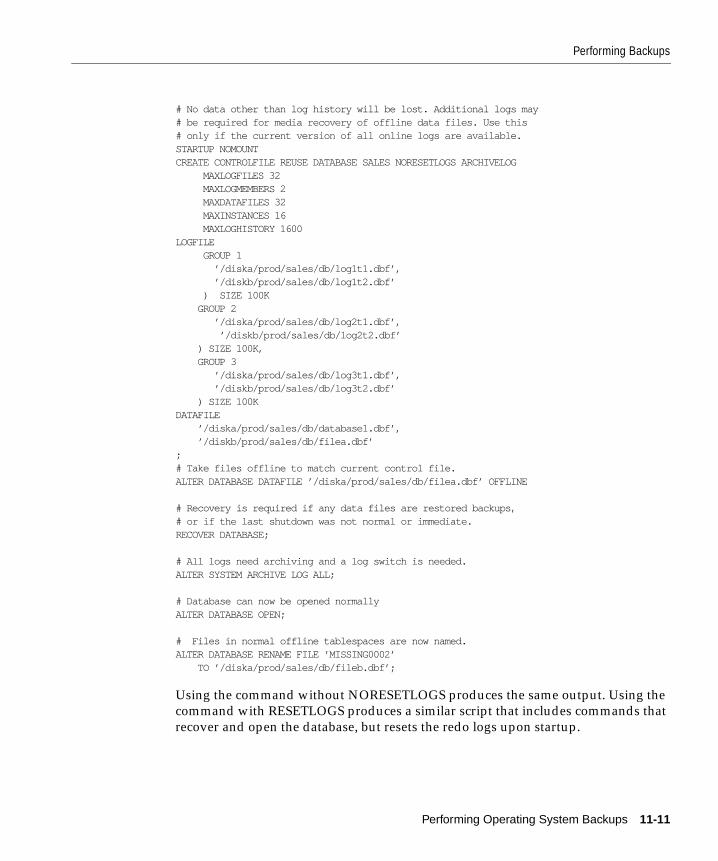
Performing Backups
# No data other than log history will be lost. Additional logs may# be required for media recovery of offline data files. Use this# only if the current version of all online logs are available.STARTUP NOMOUNTCREATE CONTROLFILE REUSE DATABASE SALES NORESETLOGS ARCHIVELOG
MAXLOGFILES 32MAXLOGMEMBERS 2MAXDATAFILES 32MAXINSTANCES 16MAXLOGHISTORY 1600
LOGFILEGROUP 1
’/diska/prod/sales/db/log1t1.dbf’,’/diskb/prod/sales/db/log1t2.dbf’
) SIZE 100KGROUP 2
’/diska/prod/sales/db/log2t1.dbf’,’/diskb/prod/sales/db/log2t2.dbf’
) SIZE 100K,GROUP 3
’/diska/prod/sales/db/log3t1.dbf’,’/diskb/prod/sales/db/log3t2.dbf’
) SIZE 100KDATAFILE
’/diska/prod/sales/db/database1.dbf’,’/diskb/prod/sales/db/filea.dbf’
;# Take files offline to match current control file.ALTER DATABASE DATAFILE ’/diska/prod/sales/db/filea.dbf’ OFFLINE
# Recovery is required if any data files are restored backups,# or if the last shutdown was not normal or immediate.RECOVER DATABASE;
# All logs need archiving and a log switch is needed.ALTER SYSTEM ARCHIVE LOG ALL;
# Database can now be opened normallyALTER DATABASE OPEN;
# Files in normal offline tablespaces are now named.ALTER DATABASE RENAME FILE ’MISSING0002’
TO ’/diska/prod/sales/db/fileb.dbf’;
Using the command without NORESETLOGS produces the same output. Using thecommand with RESETLOGS produces a similar script that includes commands thatrecover and open the database, but resets the redo logs upon startup.
Performing Operating System Backups 11-11
Recovering From a Failed Online Tablespace Backup
Recovering From a Failed Online Tablespace BackupThe following situations can cause a tablespace backup to fail and be incomplete:
■ You did not indicate the end of the online tablespace backup operation (usingthe ALTER TABLESPACE command with the END BACKUP option), and thedatabase was subsequently shut down with the ABORT option.
■ A system or instance failure, or SHUTDOWN ... ABORT interrupted thebackup.
Upon detecting an incomplete online tablespace backup at startup, Oracle assumesthat media recovery (possibly requiring archived redo log) is necessary for startupto proceed. You can avoid performing media recovery by using the ALTER DATA-BASE DATAFILE ... END BACKUP command. Remember to list all the datafiles ofthe tablespaces that were in the process of being backup up before the databasewas restarted. You can determine whether datafiles were in the process of beingbacked up by querying the V$BACKUP view.
After you have restarted your database, you can perform the recovery in either oftwo ways:
■ Use the STARTUP RECOVER command to start and recover the database auto-matically.
■ Start an instance, open and mount the database, and issue the statementRECOVER DATABASE.
The first method is easier because it prompts Oracle to perform recovery only if it isneeded.
See Also: For information on recovering a database, see Chapter 12, “Recovering aDatabase”.
WARNING: Do not use ALTER DATABASE DATAFILE ... ENDBACKUP if you have restored any of the affected files from abackup.
11-12 Oracle8 Backup and Recovery Guide
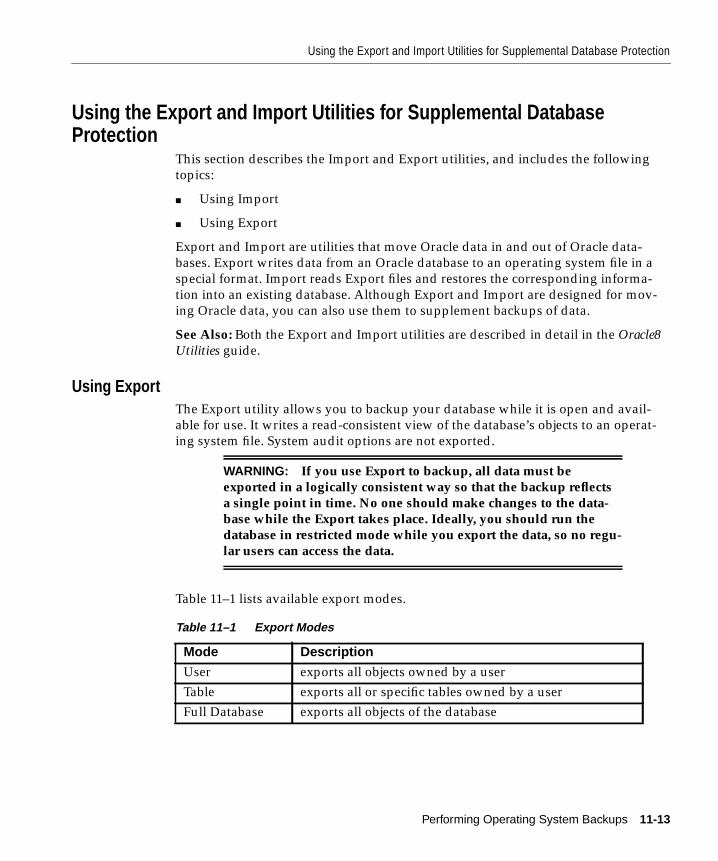
Using the Export and Import Utilities for Supplemental Database Protection
Using the Export and Import Utilities for Supplemental DatabaseProtection
This section describes the Import and Export utilities, and includes the followingtopics:
■ Using Import
■ Using Export
Export and Import are utilities that move Oracle data in and out of Oracle data-bases. Export writes data from an Oracle database to an operating system file in aspecial format. Import reads Export files and restores the corresponding informa-tion into an existing database. Although Export and Import are designed for mov-ing Oracle data, you can also use them to supplement backups of data.
See Also: Both the Export and Import utilities are described in detail in the Oracle8Utilities guide.
Using ExportThe Export utility allows you to backup your database while it is open and avail-able for use. It writes a read-consistent view of the database’s objects to an operat-ing system file. System audit options are not exported.
Table 11–1 lists available export modes.
WARNING: If you use Export to backup, all data must beexported in a logically consistent way so that the backup reflectsa single point in time. No one should make changes to the data-base while the Export takes place. Ideally, you should run thedatabase in restricted mode while you export the data, so no regu-lar users can access the data.
Table 11–1 Export Modes
Mode Description
User exports all objects owned by a userTable exports all or specific tables owned by a userFull Database exports all objects of the database
Performing Operating System Backups 11-13
Using the Export and Import Utilities for Supplemental Database Protection
Following are descriptions of Export types:
Using ImportThe Import utility allows you to restore the database information held in previ-ously created Export files. It is the complement utility to Export.
To recover a database using Export files and the Import utility:
■ Re-create the database structure, including all tablespaces and users.
■ Import the appropriate Export files to restore the database to the most currentstate possible. Depending on how your Export schedule is performed, importsof varying degrees will be necessary to restore a database.
Incremental Export Only database data that has changed since the lastincremental, cumulative, or complete export isexported. An incremental export exports the object’sdefinition and all its data. Incremental exports aretypically performed more often than cumulative orcomplete reports.For example, if tables A, B, and C exist, and onlytable A’s information has been modified since thelast incremental export, only table A is exported.
Cumulative Exports Only database data that has been changed since thelast cumulative or complete export is exported.Perform this type of export on a limited basis, suchas once a week, to condense the information con-tained in numerous incremental exports.For example, if tables A, B, and C exist, and onlytable A’s and table B’s information has been modi-fied since the last cumulative export, only thechanges to tables A and B are exported.
Complete Exports All database data is exported.Perform this type of export on a limited basis, suchas once a month, to export all data contained in adatabase.
Note: These re-created structures should not have objects in them.
11-14 Oracle8 Backup and Recovery Guide
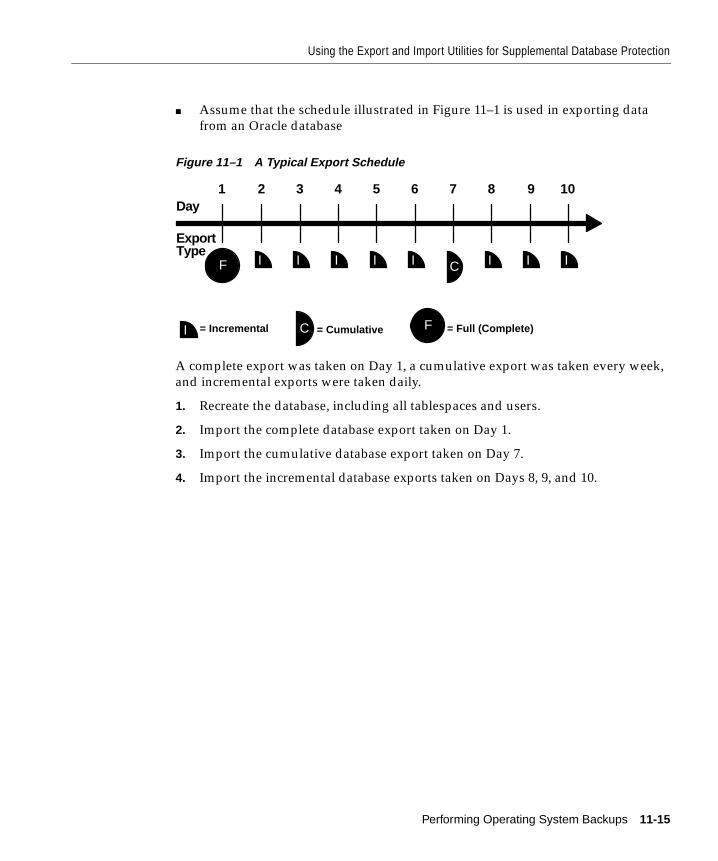
Using the Export and Import Utilities for Supplemental Database Protection
■ Assume that the schedule illustrated in Figure 11–1 is used in exporting datafrom an Oracle database
Figure 11–1 A Typical Export Schedule
A complete export was taken on Day 1, a cumulative export was taken every week,and incremental exports were taken daily.
1. Recreate the database, including all tablespaces and users.
2. Import the complete database export taken on Day 1.
3. Import the cumulative database export taken on Day 7.
4. Import the incremental database exports taken on Days 8, 9, and 10.
1 2 3 4 5 6 7 8 9 10
FCI = Incremental = Cumulative = Full (Complete)
F I CI I I I I I I
Day
ExportType
Performing Operating System Backups 11-15

Using the Export and Import Utilities for Supplemental Database Protection
11-16 Oracle8 Backup and Recovery Guide
Recovering a Data
12
Recovering a DatabaseThis chapter describes how to recover a database, and includes the following topics:
■ Coordinate Distributed Recovery
■ Recovery Scenarios
■ Restoring a Whole Database Backup, NOARCHIVELOG Mode
■ Specifying Parallel Recovery
■ Preparing for Media Recovery
■ Performing Complete Media Recoveryy
■ Performing Incomplete Media Recovery
■ Preparing for Disaster Recovery
■ Unrecoverable Objects and Recovery
■ Read-only Tablespaces and Recovery
■ Recovery Procedure Examples
See Also: Occasionally, this chapter refers you to Oracle Enterprise Manager. Tolearn how to use Enterprise Manager/GUI or Server Manager/LineMode, see theOracle Enterprise Manager User’s Guide.
base 12-1
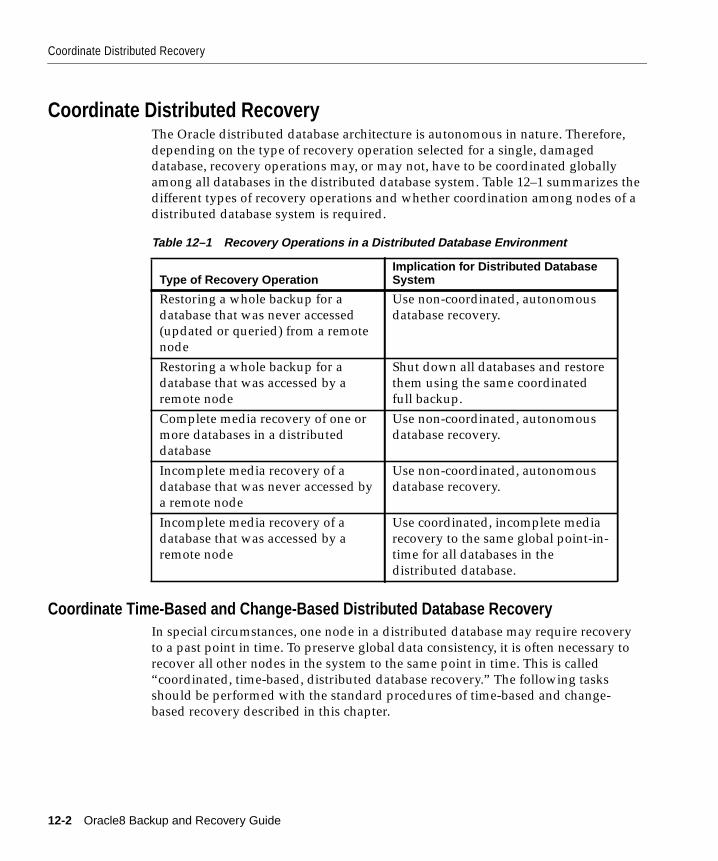
Coordinate Distributed Recovery
Coordinate Distributed RecoveryThe Oracle distributed database architecture is autonomous in nature. Therefore,depending on the type of recovery operation selected for a single, damageddatabase, recovery operations may, or may not, have to be coordinated globallyamong all databases in the distributed database system. Table 12–1 summarizes thedifferent types of recovery operations and whether coordination among nodes of adistributed database system is required.
Coordinate Time-Based and Change-Based Distributed Database RecoveryIn special circumstances, one node in a distributed database may require recoveryto a past point in time. To preserve global data consistency, it is often necessary torecover all other nodes in the system to the same point in time. This is called“coordinated, time-based, distributed database recovery.” The following tasksshould be performed with the standard procedures of time-based and change-based recovery described in this chapter.
Table 12–1 Recovery Operations in a Distributed Database Environment
Type of Recovery OperationImplication for Distributed DatabaseSystem
Restoring a whole backup for adatabase that was never accessed(updated or queried) from a remotenode
Use non-coordinated, autonomousdatabase recovery.
Restoring a whole backup for adatabase that was accessed by aremote node
Shut down all databases and restorethem using the same coordinatedfull backup.
Complete media recovery of one ormore databases in a distributeddatabase
Use non-coordinated, autonomousdatabase recovery.
Incomplete media recovery of adatabase that was never accessed bya remote node
Use non-coordinated, autonomousdatabase recovery.
Incomplete media recovery of adatabase that was accessed by aremote node
Use coordinated, incomplete mediarecovery to the same global point-in-time for all databases in thedistributed database.
12-2 Oracle8 Backup and Recovery Guide

Recovery Scenarios
1. Recover the database that requires the recovery operation using time-basedrecovery. For example, if a database needs to be recovered because of a usererror (such as an accidental table drop), recover this database first using time-based recovery. Do not recover the other databases at this point.
2. After you have recovered the database and opened it using the RESETLOGSoption, look in the ALERT file of the database for the RESETLOGS message.
If the message is, “RESETLOGS after complete recovery through changennnnnnnn,” you have applied all the changes in the database and performed acomplete recovery. Do not recover any of the other databases in the distributedsystem, or you will unnecessarily remove changes in them. Recovery is com-plete.
If the reset message is, “RESETLOGS after incomplete recovery UNTILCHANGE nnnnnnnn,” you have successfully performed an incomplete recov-ery. Record the change number from the message and proceed to the next step.
3. Recover all other databases in the distributed database system using change-based recovery, specifying the change number (SCN) from Step 2.
Recover Database with Snapshots If a master database is independently recovered to a past point in time (that is,coordinated, time-based distributed database recovery is not performed), anydependent remote snapshot that was refreshed in the interval of lost time will beinconsistent with its master table. In this case, the administrator of the masterdatabase should instruct the remote administrators to perform a complete refreshof any inconsistent snapshot.
Recovery ScenariosThe following scenarios describe various ways to invoke media recovery.
Recovering a Closed DatabaseAfter the database is mounted, but closed, start closed database recovery (completeor incomplete) using either Enterprise Manager’s Apply Recovery Archives dialogbox, or the RECOVER command with the DATABASE parameter.
The following statement recovers the database up to a specified time using acontrol file backup:
RECOVER DATABASEUNTIL TIME ’1992-12-31:12:47:30’ USING BACKUP CONTROLFILE;
Recovering a Database 12-3
Recovery Scenarios
Recovering an Offline Tablespace in an Open DatabaseAfter the tablespaces of interest are taken offline, you can start open-database,offline-tablespace recovery using the RECOVER command with the TABLESPACEparameter. You can recover one or more offline tablespaces. The remainder of thedatabase may be left open and online for normal database operation.
The following statement recovers two offline tablespaces:
RECOVER TABLESPACE ts1, ts2;
After the tablespaces that contain the damaged files have been taken offline, andyou are positive the associated datafiles are also offline (check the file’s status inV$DATAFILE), recover selected datafiles using the RECOVER command with theDATAFILE parameter:
RECOVER DATAFILE ’filename1’, ’filename2’;
Generally, you should perform database recovery using Enterprise Manager, whichprompts you for information and returns messages from the system. The SQLcommand equivalent of Enterprise Manager media recovery options is the ALTERDATABASE command with the RECOVER clause. If you want to design your ownrecovery application using SQL commands, use the ALTER DATABASE command.
Starting Recovery During Instance StartupYou can start complete media recovery using the STARTUP command with theRECOVER option in Enterprise Manager. After an instance is started, and thedatabase is mounted, complete media recovery proceeds as described in “CompleteMedia Recovery” on page “Performing Complete Media Recovery” on page 12-15.
See Also: For information about taking tablespaces offline, see “Backing Up OfflineTablespaces and Datafiles” on page 11-8.
Applying Redo Log FilesDuring complete or incomplete media recovery, redo log files (online and archived)are applied to the datafiles during the roll forward phase of media recovery.Because rollback data is recorded in the redo log, rolling forward regenerates thecorresponding rollback segments. Rolling forward proceeds through as many redolog files as necessary to bring the database forward in time. As a log file is needed,Oracle suggests the name of the file. For example, if you are using EnterpriseManager, it returns the following lines and prompts:
12-4 Oracle8 Backup and Recovery Guide
Recovery Scenarios
ORA-00279: Change #### generated at DD/MM/YY HH:MM:SS needed for thread #ORA-00289: Suggestion : logfileORA-00280: Change #### for thread # is in sequence #Specify log: [<RET> for suggested | AUTO | FROM logsource | CANCEL ]
Similar messages are returned when using an ALTER DATABASE... RECOVERstatement. However, no prompt is displayed.
Applying Log FilesThis section describes how log files can be applied in different environments.
Suggested Log FilenamesOracle suggests log filenames by concatenating the current values of theinitialization parameters LOG_ARCHIVE_DEST and LOG_ARCHIVE_FORMATand using information from the control file. Thus, if all the required archived logfiles are mounted at LOG_ARCHIVE_DEST, and the value forLOG_ARCHIVE_FORMAT is never altered, Oracle can suggest and apply log filesto complete media recovery automatically without your intervention. If thelocation specified by LOG_ARCHIVE_DEST is not available (for example, becauseof media failure), you can change the value for this parameter, move the log files tothe new location, and start a new instance before beginning media recovery.
In some cases, you might want to override the current setting forLOG_ARCHIVE_DEST as a source for log files. For example, assume that adatabase is open and an offline tablespace must be recovered, but not enough spaceis available to mount the necessary log files at the location specified byLOG_ARCHIVE_DEST. In this case, you can mount the log files to an alternatelocation, then specify the alternate location to Oracle for the recovery operation. Tospecify the location where required log files can be found, use the LOGSOURCEparameter of the SET command in Enterprise Manager. Use the RECOVER...FROMparameter of the ALTER DATABASE command in SQL.
Consider overriding the current setting for LOG_ARCHIVE_DEST when notenough space is available to mount all the required log files at any one location. Inthis case, you can set the log file source to an operating system variable (such as alogical or an environment variable) that acts as a search path to several locations.
Note: Overriding the log source does not affect the archive logdestination for filled online groups being archived.
Recovering a Database 12-5
Recovery Scenarios
See Also: Such functionality is operating system-dependent. See your operatingsystem-specific Oracle documentation for more information.
Applying Log Files when Using Enterprise ManagerIf the suggested archived redo log file is correct, apply it. You do not have tospecify a filename unless the suggested file is incorrect. After a filename isprovided, Oracle applies the redo log file to roll forward the restored datafiles.
In Enterprise Manager, you can have Oracle automatically apply the redo log filesthat it suggests by choosing either of the following options:
■ Before starting media recovery, issue the following Enterprise Managerstatement to turn on automatic recovery:
SET AUTORECOVERY ON;
Automatic application of the suggested redo log starts once recovery begins.
■ After media recovery is started, enter “auto” when prompted for a redo log file.Automatic application of the suggested redo log starts from this point.
Suggested redo log files are automatically applied until one is incorrect or recoveryis complete. You might need to specify online redo log files manually when usingcancel-based recovery or a backup of the control file.
See Also: For examples of logfile application, see your operating system-specificOracle documentation.
Application of Log Files When Using SQL CommandsApplication of redo log files is similar to the application of log files. However, aprompt for log files is not displayed after media recovery is started. Instead, youmust provide the correct log file using an ALTER DATABASE RECOVER LOGFILEstatement. For example, if a message suggests LOG1.ARC, you can apply thesuggestion using the following statement:
ALTER DATABASE RECOVER LOGFILE ’log1.arc’;
As a result, recovering a tablespace requires several statements, as indicated in thefollowing example (DBA input is boldfaced; variable information is italicized.):
> ALTER DATABASE RECOVER TABLESPACE users;ORA-00279: Change #### generated at DD/MM/YY HH:MM:SS needed for thread #ORA-00289: Suggestion : logfile1ORA-00280: Change #### for thread # is in sequence #> ALTER DATABASE RECOVER LOGFILE ’ logfile1 ’;ORA-00279: Change #### generated at DD/MM/YY HH:MM:SS needed for thread # <D%0>
12-6 Oracle8 Backup and Recovery Guide
Recovery Scenarios
ORA-00289: Suggestion : logfile2ORA-00280: Change #### for thread # is in sequence #> ALTER DATABASE RECOVER LOGFILE ’ logfile2 ’;(Repeat until all logs are applied.)Statement processed.> ALTER TABLESPACE users ONLINE;Statement processed.
In this example, assume that the backup files have been restored, and that the userhas administrator privileges.
Like the method you used with Enterprise Manager, automatic application of theredo logs can be started with the following statements, before and during recovery,respectively:
ALTER DATABASE RECOVER AUTOMATIC ...;ALTER DATABASE RECOVER AUTOMATIC LOGFILEsuggested_log_file ;
An example of the first statement follows:
> ALTER DATABASE RECOVER AUTOMATIC TABLESPACE users;
Statement processed.> ALTER TABLESPACE users ONLINE;
Statement processed.
In this example, it is assumed that the backup files have been restored, and that theuser has administrator privileges.
An example of the ALTER DATABASE RECOVER AUTOMATIC LOGFILEstatement follows:
> ALTER DATABASE RECOVER TABLESPACE users;ORA-00279: Change #### generated at DD/MM/YY HH:MM:SS needed for thread #ORA-00289: Suggestion : logfile1ORA-00280: Change #### for thread # is in sequence #> ALTER DATABASE RECOVER AUTOMATIC LOGFILE ’logfile1 ’;Statement processed.> ALTER TABLESPACE users ONLINE;
Statement processed.
Recovering a Database 12-7
Recovery Scenarios
In this example, assume that the backup files have been restored, and that the userhas administrator privileges.
See Also: For information about the content of all recovery-related views, see theOracle8 Reference.
Successful Application of Redo LogsIf you are using Enterprise Manager’s recovery options (not SQL statements), eachtime Oracle finishes applying a redo log file, the following message is returned:
Log applied.
Make sure that the message “Log applied” is returned after each application of aredo log file. If the suggested file is incorrect or you provide an incorrect filename,an error message is returned instead. If you see an error message instead of “Logapplied,” a redo log file required for recovery has not been applied. Recoverycannot continue until the required redo log file is applied.
If an error message is returned after supplying a redo log filename, one of thefollowing errors has been detected:
■ If the error message says that the file cannot be found, you may have enteredthe wrong filename. Re-enter the correct filename.
■ If the redo log file is found, but cannot be opened, then it may be locked.Unlock the redo log file and re-enter the filename.
■ If a redo log file is found and opened, but cannot be read, an I/O error isreturned. In this case, the redo log file may have been only partially written ormay have been corrupted. If you can locate an uncorrupted or complete copyof the log, you can simply apply that copy; you do not need to restart recovery.Otherwise, if no other copy of the log exists and you know the time of the lastvalid redo entry, you can perform time-based or change-based recovery; in thiscase, you must restart recovery from the beginning, including restoringbackups.
Note: After issuing the ALTER DATABASE RECOVER command,you can view all files that have been considered for recovery in theV$RECOVERY_FILE_STATUS view. You can access status informa-tion for each file in the V$RECOVERY_STATUS view. These viewsare not accessible after you terminate the recovery session.
12-8 Oracle8 Backup and Recovery Guide
Restoring a Whole Database Backup, NOARCHIVELOG Mode
Interrupting Media RecoveryIf you start a media recovery operation and must then interrupt it (for example,because a recovery operation must end for the night and resume the next morning),you can interrupt recovery at any time by taking either of the following actions:
■ Enter the word “cancel” when prompted for a redo log file.
■ Use your operating system’s interrupt signal (if you must abort whenrecovering an individual datafile, or when automated recovery is in progress).
After recovery is canceled, it must be completed before opening a database fornormal operation. To resume recovery, restart it. Recovery resumes where it left offwhen it was canceled.
Restoring a Whole Database Backup, NOARCHIVELOG ModeIf a database is in NOARCHIVELOG mode and a media failure damages some orall of the datafiles, usually the only option for recovering the database is to restorethe most recent whole database backup. If you are using Export to supplementregular backups, you can instead restore the database by importing an exportedbackup of the database.
The disadvantage of NOARCHIVELOG mode is that to recover your database fromthe time of the most recent full backup up to the time of the media failure, you haveto re-enter manually all of the changes executed in that interval. However, if yourdatabase was in ARCHIVELOG mode, the redo log covering this interval wouldhave been available as archived log files or online log files. This would haveenabled you to use complete or incomplete recovery to reconstruct your databaseand minimize the amount of lost work.
If you have a database damaged by media failure and operating inNOARCHIVELOG mode, and you want to restore from your most recent wholedatabase backup (your only option at this point), perform the following tasks.
WARNING: There are several reasons why, after starting recov-ery, you may want to restart. If, for example, you want to restartwith a different backup or want to use the same backup, butneed to change the end-time to an earlier point in time than youinitially specified, then the entire operation must recommence byrestoring a backup. Failure to do so may result in “file inconsis-tent” error messages when attempting to open the database.
Recovering a Database 12-9
Restoring a Whole Database Backup, NOARCHIVELOG Mode
To Restore the Most Recent Whole Database Backup (NOARCHIVELOG Mode)
1. If the database is open, shut it down using the Enterprise Manager ShutdownAbort mode of the Shutdown Database dialog box, or the SHUTDOWN com-mand with the ABORT option.
2. If the hardware problem that caused the media failure has been corrected sothat the backup database files can be restored to their original locations, followonly Step 2a before proceeding to Step 3. If, on the other hand, the hardwareproblem has not been corrected and some or all of the database files must berestored to alternative locations, follow Steps 2a through 2d
a. Restore the most recent whole database backup. All of the datafiles andcontrol files of the whole database backup must be restored, not just thedamaged files. This guarantees that the entire database is consistent to asingle point in time.
b. If necessary, edit the restored parameter file to indicate the new location ofthe control files.
c. Start an instance using the restored and edited parameter file and mount,but do not open, the database.
d. Perform the steps necessary to record the relocation of the restored data-files. If applicable, perform the steps necessary to record the relocation ofonline redo log files.
3. Issue the RECOVER DATABASE UNTIL CANCEL command, which mimicsincomplete database recovery.
4. Issue the ALTER DATABASE OPEN RESETLOGS command, which opens thedatabase and resets the current log sequence to 1. It also invalidates all redoentries in the online redo log file. Restoring from a whole database backup andthen resetting the log discards all changes to the database made from the timethe backup was taken to the time of the media failure.
See Also: For more information about renaming and relocating datafiles, see theOracle8 Administrator’s Guide.
12-10 Oracle8 Backup and Recovery Guide

Preparing for Media Recovery
Specifying Parallel RecoveryThe RECOVERY_PARALLELISM initialization parameter specifies the number ofconcurrent recovery processes to use for any recovery operation. Because crashrecovery occurs at instance startup, this parameter is useful for specifying thenumber of processes to use for crash recovery. The value of this parameter is alsothe default number of processes used for media recovery if the PARALLEL clauseof the RECOVER command is not specified. The value of this parameter must begreater than one and cannot exceed the value of the PARALLEL_MAX_SERVERSparameter.
In general, parallel recovery is most effective at reducing recovery time whenseveral datafiles on several different disks are being recovered concurrently. Crashrecovery (recovery after instance failure) and media recovery of many datafiles ondifferent disk drives are good candidates for parallel recovery. Parallel recoveryrequires a minimum of eight recovery processes to improve upon serial recovery.
See Also: For more information on parallel recovery, see Oracle8 Parallel ServerConcepts and Administration.
For more information about initialization parameters, see Oracle8 Reference.
Preparing for Media RecoveryThis section describes issues related to media recovery preparation, and includesthe following topics:
■ Media Recovery Commands
■ Issues Common to All Media Recovery Operations
■ Restoring a Whole Database Backup, NOARCHIVELOG Mode
■ Specifying Parallel Recovery
See Also: For information about the appropriate method of recovery for each typeof problem, see “Recovery Procedure Examples” on page 12-45.
Media Recovery CommandsThere are three basic media recovery commands, which differ only in the way theset of files being recovered is determined. They all use the same criteria fordetermining if files can be recovered. Media recovery signals an error if it cannotget the lock for a file it is attempting to recover. This prevents two recovery sessionsfrom recovering the same file. It also prevents media recovery of a file that is in use.
Recovering a Database 12-11
Preparing for Media Recovery
You should be familiar with all media recovery commands before performingmedia recovery.
RECOVER DATABASE CommandRECOVER DATABASE performs media recovery on all online datafiles that requireredo to be applied. If all instances were cleanly shutdown, and no backups wererestored, RECOVER DATABASE indicates a no recovery required error. It also failsif any instances have the database open (since they have the datafile locks). Toperform media recovery on an entire database (all tablespaces), the database mustbe mounted EXCLUSIVE and closed.
RECOVER TABLESPACE CommandRECOVER TABLESPACE performs media recovery on all datafiles in thetablespaces listed. The tablespaces must be offline to perform the recovery. An erroris indicated if none of the files require recovery.
RECOVER DATAFILE CommandRECOVER DATAFILE lists the datafiles to be recovered. The database can be openor closed, provided the media recovery locks can be acquired. If the database isopen in any instance, then datafile recovery can only recover offline files.
See Also: For more information about recovery commands, see the Oracle8 SQLReference.
Issues Common to All Media Recovery OperationsThis section describes topics common to all complete and incomplete mediarecovery operations. You should be familiar with these topics before proceedingwith any recovery process.
Determining Which Files to RecoverYou can often use the table V$RECOVER_FILE to determine which files to recover.This table lists all files that need to be recovered, and explains why they need to berecovered.
Note: The table is not useful if the control file currently in use is arestored backup or a new control file created since the media fail-ure occurred. A restored or re-created control file does not containthe information Oracle needs to fill V$RECOVER_FILE accurately.
12-12 Oracle8 Backup and Recovery Guide

Preparing for Media Recovery
The following query displays the file ID numbers of datafiles that require recovery:
SELECT file#, online, error FROM v$recover_file;
FILE# ONLINE ERROR-------- -------- --------------------------- 0014 ONLINE 0018 ONLINE FILE NOT FOUND 0032 OFFLINE OFFLINE NORMAL...
Use the data dictionary view V$DATAFILE, which contains the file’s NAME andFILE#, to find the name of a file based on its file number.
Restoring Damaged DatafilesIf a media failure permanently damages one or more datafiles of a database, youmust restore backups of the damaged datafiles before you can recover the damagedfiles.
Relocating Damaged FilesIf a damaged datafile cannot be restored to its original location (for example, a diskmust be replaced, so the files are restored to an alternate disk), the new locations ofthese files must be indicated to the control file of the associated database.
Recovering a Datafile Without a BackupIf a datafile is damaged and no backup of the file is available, the datafile can stillbe recovered if:
■ all log files written since the creation of the original datafile are available
■ the control file contains the name of the damaged file (that is, the control file iscurrent, or is a backup taken after the damaged datafile was added to thedatabase
Use the CREATE DATAFILE clause of the ALTER DATABASE command to create anew, empty datafile, replacing a damaged datafile that has no correspondingbackup. However, you cannot create a new file based on the first datafile of theSYSTEM tablespace because it contains information not covered by redo logs. Forexample, assume that the datafile “disk1:users1” has been damaged, and nobackup is available. The following statement re-creates the original datafile (samesize) on disk 2:
ALTER DATABASE CREATE DATAFILE ’disk1:users1’ AS ’disk2:users1’;
Recovering a Database 12-13

Preparing for Media Recovery
This statement enables you to create an empty file that matches the lost file. Oraclelooks at information in the control file and the data dictionary to obtain sizeinformation. Next, you must perform media recovery on the empty datafile. Allarchived redo logs written since the original datafile was created must be mountedand reapplied to the new, empty version of the lost datafile during recovery. If thedatabase was created in NOARCHIVELOG mode, the original datafiles of theSYSTEM tablespace cannot be restored using an ALTER DATABASE CREATEDATAFILE statement because the necessary archived redo logs are not available.
Restoring Necessary Archived Redo Log FilesAll archived redo log files required for the pending media recovery eventuallyneed to be on disk, so that they are readily available to Oracle.
To determine which archived redo log files you need, you can use the tablesV$LOG_HISTORY and V$RECOVERY_LOG. V$LOG_HISTORY lists all of thearchived logs, including their probable names, given the current archived log filenaming scheme (as set by the parameter LOG_ARCHIVE_FORMAT).V$RECOVERY_LOG lists only the archived redo logs that Oracle needs to performrecovery. It also includes the probable names of the files, usingLOG_ARCHIVE_FORMAT. Be aware that you will need all the redo informationfrom the time the datafile was added to the database.
If space is available, restore all of the required archived redo log files to the locationcurrently specified by the initialization parameter LOG_ARCHIVE_DEST. By doingthis, you enable Oracle to locate automatically the correct archived redo log filewhen required during media recovery. If sufficient space is not available at thelocation indicated by LOG_ARCHIVE_DEST, you can restore some or all of therequired archived redo log files to any disk accessible to Oracle. In this case, youcan specify the location of the archived redo log files before or during mediarecovery.
After an archived log is applied, you can delete the restored copy of the archivedredo log file to free disk space. However, make sure that a copy of each archivedlog group still exists on offline storage.
See Also: For more information about tables, see the Oracle8 Reference.
Note: The old datafile is renamed as the new datafile when anALTER DATABASE CREATE DATAFILE statement is executed.
12-14 Oracle8 Backup and Recovery Guide

Performing Complete Media Recovery
Starting Media RecoveryIf a damaged database is in ARCHIVELOG mode, it is a candidate for eithercomplete media recovery or incomplete media recovery operations. To begin mediarecovery operations, use one of the following options of Enterprise Manager:
■ the Apply Recovery Archives dialog box
■ the Enterprise Manager RECOVER command
■ the SQL command ALTER DATABASE
To start any type of media recovery, you must have administrator privileges. Allrecovery sessions must be compatible. One session cannot start complete mediarecovery while another performs incomplete media recovery. Also, you cannot startmedia recovery if you are connected to the database via a multi-threaded serverprocess.
Performing Complete Media RecoveryThis section describes the steps necessary to complete media recovery operations,and includes the following topics:
■ Performing Closed Database Recovery
■ Performing Open-Database, Offline-Tablespace Recovery
■ Performing Open-Database, Offline-Tablespace Individual Recovery
Do not depend solely on the steps in the following procedures to understand all thetasks necessary to recover from a media failure. If you haven’t already done so,familiarize yourself with the fundamental recovery concepts and strategies inChapter 4.
Performing Closed Database RecoveryThis section describes steps to perform closed database recovery of either alldamaged datafiles in one operation, or individual recovery of each damageddatafile in separate operations.
Recovering a Database 12-15

Performing Complete Media Recovery
To Perform Closed Database Recovery
1. If the database is open, shut it down using the Enterprise Manager ShutdownAbort mode of the Shutdown Database dialog box, or the SHUTDOWN com-mand with the ABORT option.
2. If you’re recovering from a media error, correct it if possible.
3. If files are permanently damaged, restore the most recent backup files (taken aspart of a full or partial backup) of only the datafiles damaged by the media fail-ure. Do not restore any undamaged datafiles or any online redo log files. If thehardware problem has been repaired, and damaged datafiles can be restored totheir original locations, do so, and skip Step 6 of this procedure. If the hard-ware problem persists, restore the datafiles to an alternative storage device ofthe database server and continue with this procedure.
4. Start Enterprise Manager and connect to Oracle with administrator privileges.
5. Start a new instance and mount, but do not open, the database using either theEnterprise Manager Startup Database dialog box (with the Startup Mountradio button selected), or the STARTUP command with the MOUNT option.
6. If one or more damaged datafiles were restored to alternative locations in Step3, the new location of these files must be indicated to the control file of the asso-ciated database. Therefore, use the operation described in “Renaming and Relo-cating Datafiles” in the Oracle8 Administrator’s Guide, as necessary.
7. All datafiles you want to recover must be online during complete media recov-ery. To get the datafile names, check the list of datafiles that normally accompa-nies the current control file, or query the V$DATAFILE view. Then, issue theALTER DATABASE command with the DATAFILE ONLINE option to ensurethat all datafiles of the database are online. For example, to guarantee that adatafile named USERS1 (a fully specified filename) is online, enter the follow-ing statement:
Attention: If the hardware problem that caused the media failurewas temporary, and the data was undamaged (for example, a diskor controller power failure), stop at this point.
Note: If you do not have a backup of a specific datafile, youmight be able to create an empty replacement file that can be recov-ered.
12-16 Oracle8 Backup and Recovery Guide

Performing Complete Media Recovery
ALTER DATABASE DATAFILE ’users1’ ONLINE;
If a specified datafile is already online, Oracle ignores the statement.
8. To start closed database recovery of all damaged datafiles in one step, useeither the Enterprise Manager Apply Recovery Archive dialog box, or an equiv-alent RECOVER DATABASE statement.
To start closed database recovery of an individual damaged datafile, use theRECOVER DATAFILE statement in Enterprise Manager.
9. Now Oracle begins the roll forward phase of media recovery by applying thenecessary redo log files (archived and online) to reconstruct the restored data-files. Unless the application of files is automated, Oracle prompts you for eachrequired redo log file.
Oracle continues until all required archived redo log files have been applied to therestored datafiles. The online redo log files are then automatically applied to therestored datafiles and notifies you when media recovery is complete. If no archivedredo log files are required for complete media recovery, Oracle does not prompt forany. Instead, all necessary online redo log files are applied, and media recovery iscomplete.
After performing closed database recovery, the database is recovered up to themoment that media failure occurred. You can then open the database using the SQLcommand ALTER DATABASE with the OPEN option.
See Also: For more information about applying redo log files, see “Applying RedoLog Files” on page 12-4.
Performing Open-Database, Offline-Tablespace Individual RecoveryAt this point, an open database has experienced a media failure, and the databaseremains open while the undamaged datafiles remain online and available for use.The damaged datafiles are automatically taken offline by Oracle.
This procedure cannot be used to perform complete media recovery on thedatafiles of the SYSTEM tablespace. If the media failure damages any datafiles ofthe SYSTEM tablespace, Oracle automatically shuts down the database.
Note: For maximum performance, use parallel recovery torecover the datafiles.
Recovering a Database 12-17
Performing Complete Media Recovery
See Also: To proceed with complete media recovery, follow the procedure in“Performing Closed Database Recovery” on page 12-15.
To Perform Open-Database, Offline-Tablespace Individual Recovery
1. The starting point for this recovery operation can vary, depending on whetheryou left the database open after the media failure occurred.
– If the database was shut down, start a new instance, and mount and open thedatabase. Perform this operation using the Enterprise Manager StartupDatabase dialog box (with the Startup Open radio button selected), or withthe STARTUP command with the OPEN option. After the database is open,take all tablespaces that contain damaged datafiles offline.
– If the database is still open and only damaged datafiles of the database areoffline, take all tablespaces containing damaged datafiles offline. Oracleidentifies damaged datafiles via error messages. Tablespaces can be takenoffline using either the Take Offline menu item of Enterprise Manager, orthe SQL command ALTER TABLESPACE with the OFFLINE option, asdescribed in “Backing Up Offline Tablespaces and Datafiles” on page 11-8.If possible, take the damaged tablespaces offline with temporary priority(to minimize the amount of recovery).
2. Correct the hardware problem that caused the media failure. If the hardwareproblem cannot be repaired quickly, you can proceed with database recoveryby restoring damaged files to an alternative storage device.
3. If files are permanently damaged, restore the most recent backup files of onlythe datafiles damaged by the media failure. Do not restore undamaged data-files, online redo log files, or control files. If the hardware problem has beenrepaired and the datafiles can be restored to their original locations, do so. Ifthe hardware problem persists, restore the datafiles to an alternative storagedevice of the database server.
4. If one or more damaged datafiles were restored to alternative locations (Step 3),indicate the new locations of these files to the control file of the associated data-base by using the procedure in “Renaming and Relocating Datafiles” in theOracle8 Administrator’s Guide, as necessary.
Note: If you do not have a backup of a specific datafile, you cancreate an empty replacement file, which can be recovered.
12-18 Oracle8 Backup and Recovery Guide

Performing Complete Media Recovery
5. After connecting with administrator privileges, use the RECOVERTABLESPACE statement in Enterprise Manager to start offline tablespace recov-ery of all damaged datafiles in one or more offline tablespaces using one step.
6. Oracle begins the roll forward phase of media recovery by applying the neces-sary redo log files (archived and online) to reconstruct the restored datafiles.Unless the applying of files is automated, Oracle prompts for each requiredredo log file.
Oracle continues until all required archived redo log files have been applied tothe restored datafiles. The online redo log files are then automatically appliedto the restored datafiles to complete media recovery.
If no archived redo log files are required for complete media recovery, Oracledoes not prompt for any. Instead, all necessary online redo log files are applied,and media recovery is complete.
7. The damaged tablespaces of the open database are now recovered up to themoment that media failure occurred. You can bring the offline tablespacesonline using the Place Online menu item of Enterprise Manager, or the SQLcommand ALTER TABLESPACE with the ONLINE option.
See Also: For more information about redo log application, see “Applying RedoLog Files” on page 12-4.
For more information about creating datafiles, see the Oracle8 Administrator’s Guide.
Performing Open-Database, Offline-Tablespace Individual RecoveryIdentical to the preceding operation, here an open database has experienced amedia failure, and remains open while the undamaged datafiles remain online andavailable for use. The damaged datafiles are automatically taken offline by Oracle.
Note: For maximum performance, use parallel recovery torecover the datafiles.
Note: This procedure cannot be used to perform complete mediarecovery on the datafiles of the SYSTEM tablespace. If the mediafailure damages any datafiles of the SYSTEM tablespace, Oracleautomatically shuts down the database.
Recovering a Database 12-19
Performing Complete Media Recovery
To Perform Open-Database, Offline-Tablespace Individual Recovery
1. The starting point for this recovery operation can vary, depending on whetheryou left the database open after the media failure occurred.
– If the database was shut down, start a new instance, and mount and open thedatabase. Perform this operation using the Enterprise Manager StartupDatabase dialog box (with the Startup Open radio button selected), or withthe STARTUP command with the OPEN option. After the database is open,take all tablespaces that contain damaged datafiles offline.
– If the database is still open and only damaged datafiles of the database areoffline, take all tablespaces containing damaged datafiles offline. Oracleidentifies damaged datafiles via error messages. Tablespaces can be takenoffline using either the Take Offline menu item of Enterprise Manager, orthe SQL command ALTER TABLESPACE with the OFFLINE option. If pos-sible, take the damaged tablespaces offline with temporary priority (to min-imize the amount of recovery).
2. Correct the hardware problem that caused the media failure. If the hardwareproblem cannot be repaired quickly, you can proceed with database recoveryby restoring damaged files to an alternative storage device.
3. If files are permanently damaged, restore the most recent backup files (taken aspart of a full or partial backup) of only the datafiles damaged by the media fail-ure. Do not restore undamaged datafiles, online redo log files, or control files. Ifthe hardware problem has been repaired and the datafiles can be restored totheir original locations, do so. If the hardware problem persists, restore thedatafiles to an alternative storage device of the database server.
4. If one or more damaged datafiles were restored to alternative locations (Step 3),indicate the new locations of these files to the control file of the associated data-base.
5. After connecting with administrator privileges use the RECOVER DATAFILEstatement in Enterprise Manager to start recovery of an individual damageddatafile in an offline tablespace.
Note: If you do not have a backup of a specific datafile, you cancreate an empty replacement file, which can be recovered.
Note: For maximum performance, use parallel recovery torecover the datafiles.
12-20 Oracle8 Backup and Recovery Guide
Performing Incomplete Media Recovery
6. Oracle begins the roll forward phase of media recovery by applying the neces-sary redo log files (archived and online) to reconstruct the restored datafiles.Unless the application of files is automated, Oracle prompts for each requiredredo log file.
Oracle continues until all required archived redo log files have been applied tothe restored datafiles. The online redo log files are then automatically appliedto the restored datafiles to complete media recovery.
If no archived redo log files are required for complete media recovery, Oracledoes not prompt for any. Instead, all necessary online redo log files are applied,and media recovery is complete.
7. The damaged tablespaces of the open database are now recovered up to themoment that media failure occurred. You can bring the offline tablespacesonline using the Place Online menu item of Enterprise Manager, or the SQLcommand ALTER TABLESPACE with the ONLINE option.
See Also: For information about how to proceed with complete media recovery, see“Performing Closed Database Recovery” on page 12-15.
For more information about creating datafiles, see the Oracle8 Administrator’s Guide.
Performing Incomplete Media RecoveryThis section describes the steps necessary to complete the different types ofincomplete media recovery operations, and includes the following topics:
■ Performing Cancel-based Recovery
■ Performing Time-based Recovery
■ Performing Change-based Recovery
See Also: Do not rely solely on this section to understand the procedures necessaryto recover from a media failure.
Changing the System Time on a Running DatabaseIf your database is affected by seasonal time changes (for example, daylight savingstime), you may experience a problem if a time appears twice in the redo log andyou want to recover to the second, or later time. To deal with time changes,perform cancel-based or change-based recovery to the point in time where theclock is set back, then continue with the time-based recovery to the exact time.
Recovering a Database 12-21
Performing Incomplete Media Recovery
Performing Cancel-based RecoveryThis section describes how to perform cancel-based recovery.
To Perform Cancel-based Recovery
1. If the database is still open and incomplete media recovery is necessary, shutdown the database using the Enterprise Manager Shutdown Abort mode of theShutdown Database dialog box, or the SHUTDOWN command with theABORT option.
2. Make a whole backup of the database (all datafiles, a control file, and theparameter files of the database) as a precautionary measure, in case an error ismade during the recovery procedure.
3. If a media failure occurred, correct the hardware problem that caused themedia failure.
4. If the current control files do not match the physical structure of the database atthe intended time of recovery (for example, if a datafile was added after thepoint in time to which you intend to recover), then restore a backup of the con-trol file that reflects the database’s physical file structure (contains the names ofdatafiles and online redo log files) at the point at which incomplete mediarecovery is intended to finish. Review the list of files that correspond to the cur-rent control file as well as each control file backup to determine the correct con-trol file to use. If necessary, replace all current control files of the database withthe correct control file backup. You can, alternatively, create a new control fileto replace the missing one.
5. Restore backup files (taken as part of a full or partial backup) of all the datafilesof the database. All backup files used to replace existing datafiles must havebeen taken before the intended time of recovery. For example, if you intend torecover to redo log sequence number 38, then restore all datafiles with backupscompleted before redo log sequence number 38.
If you do not have a backup of a specific datafile, you can create an emptyreplacement file, which can be recovered.
Note: If a database control file cannot function or be replacedwith a control file backup, you must edit the parameter file associ-ated with the database to modify the CONTROL_FILES parameter.
12-22 Oracle8 Backup and Recovery Guide
Performing Incomplete Media Recovery
If a datafile was added after the intended time of recovery, it is not necessary torestore a backup for this file, as it will no longer be used for the database afterrecovery is complete.
If the hardware problem that caused a media failure has been solved and alldatafiles can be restored to their original locations, do so, and skip Step 8 of thisprocedure. If a hardware problem persists, restore damaged datafiles to analternative storage device.
6. Start Enterprise Manager and connect to Oracle with administrator privileges.
7. Start a new instance and mount the database. You can perform this operationusing the Enterprise Manager Startup Database dialog box with the StartupMount radio button selected, or the STARTUP command with the MOUNToption.
8. If one or more damaged datafiles were restored to alternative locations inStep 5, the new locations of these files must be indicated to the control file ofthe associated database.
9. If a backup of the control file is being used with this incomplete recovery (thatis, a control file backup or re-created control file was restored in Step 4), indi-cate this in the dialog box or command used to start recovery (that is, specifythe USING BACKUP CONTROLFILE parameter).
10. Use Enterprise Manager Apply Recovery Archives dialog box, or an equivalentRECOVER DATABASE UNTIL CANCEL statement to begin cancel-basedrecovery.
11. Oracle begins the roll forward phase of media recovery by applying the neces-sary redo log files (archived and online) to reconstruct the restored datafiles.Unless the application of files is automated, Oracle supplies the name it expectsto find from LOG_ARCHIVE_DEST and requests you to stop or proceed withapplying the log file. If the control file is a backup file, you must supply namesof online logs.
Oracle continues to apply redo log files.
12. Continue applying redo log files until the most recent, undamaged redo log filehas been applied to the restored datafiles.
Note: Files in read-only tablespaces should be offline if you areusing a control file backup. Otherwise, recovery will try to updatethe headers of the read-only files.
Recovering a Database 12-23
Performing Incomplete Media Recovery
13. Enter “CANCEL” to cancel recovery after Oracle has applied the redo log filejust prior to the damaged file. Cancel-based recovery is now complete.
Oracle returns a message indicating whether recovery is successful.
Opening the Database After Successful Cancel-based RecoveryThe first time you open the database subsequent to incomplete media recovery, youmust explicitly specify whether to reset the log sequence number by includingeither the RESETLOGS or NORESETLOGS option. Resetting the redo log:
■ discards any redo information that was not applied during recovery, ensuringthat it will never be applied
■ reinitializes the control file information about online redo logs and redo threads
■ clears the contents of the online redo logs
■ creates the online redo log files if they do not currently exist
■ resets the log sequence number to 1
Use the following rules when deciding to specify RESETLOGS or NORESET-LOGS:
■ Reset the log sequence number if you used a backup of the control file inrecovery, no matter what type of recovery was performed (complete orincomplete).
■ Reset the log sequence number if the recovery was actually incomplete. Forexample, you must have specified a previous time or SCN, not one in thefuture.
■ Do not reset logs if recovery was complete (unless you used a backup controlfile). This applies when you intentionally performed complete recovery andwhen you performed incomplete recovery but actually recovered all changes inthe redo logs anyway. See the explanation in step 12 for how to examine theALERT file to see if incomplete recovery was actually complete.
■ Do not reset logs if you are using the archived logs of this database for astandby database. If the log must be reset, then you will have to re-create yourstandby database.
WARNING: Resetting the redo log discards all changes to thedatabase made since the first discarded redo information.Updates entered after that time must be re-entered manually.
12-24 Oracle8 Backup and Recovery Guide
Performing Incomplete Media Recovery
To preserve the log sequence number when opening a database after recovery,use the SQL command ALTER DATABASE with the OPEN NORESETLOGSoption. To reset the log sequence number when opening a database after recov-ery, use the SQL command ALTER DATABASE with the OPEN RESETLOGSoption. (If you attempt to reset the log when you should not, or if you neglectto reset the log when you should, Oracle returns an error and does not open thedatabase. Correct the error and try again.)
If the log sequence number is reset when opening a database, different mes-sages are returned, depending on whether the recovery was complete or incom-plete. If the recovery was complete, the following message appears in theALERT file:
RESETLOGS after complete recovery through change scn
If the recovery was incomplete, the following message is reported in theALERT file:
RESETLOGS after incomplete recovery UNTIL CHANGE scn
If you reset the redo log sequence when opening the database, immediately shutdown the database normally and make a whole database backup. Otherwise, youwill not be able to recover changes made after you reset the logs. Until you take awhole database backup, the only way to recover will be to repeat the proceduresyou just finished, up to resetting the logs. (You do not need to back up the databaseif you did not reset the log sequence.)
After opening the database using the RESETLOGS option, check the ALERT log tosee if Oracle has detected inconsistencies between the data dictionary and thecontrol file (for example, a datafile that the data dictionary includes but does notlist in the new control file).
If a datafile exists in the data dictionary but not in the new control file, Oraclecreates a placeholder entry in the control file under MISSINGnnnn (where nnnn isthe file number in decimal). MISSINGnnnn is flagged in the control file as beingoffline and requiring media recovery. The actual datafile corresponding toMISSINGnnnn can be made accessible by renaming MISSINGnnnn, so that it pointsto the datafile only when the datafile was read-only or offline normal. If, on theother hand, MISSINGnnnn corresponds to a datafile that was not read-only oroffline normal, then the rename operation cannot be used to make the datafileaccessible, because the datafile requires media recovery that is precluded by theresults of RESETLOGS. In this case, the tablespace containing the datafile must bedropped.
Recovering a Database 12-25

Performing Incomplete Media Recovery
In contrast, if a datafile indicated in the control file is not present in the datadictionary, Oracle removes references to it from the new control file. In both cases,Oracle includes an explanatory message in the ALERT file to let you know whatwas found.
See Also: For more information about creating datafiles, see “Restoring DamagedDatafiles” on page 12-13.
To relocate or rename datafiles, see the Oracle8 Administrator’s Guide.
For more information about applying redo logs, see “Applying Redo Log Files” onpage 12-4.
Performing Time-based RecoveryWhen you are performing time-based, incomplete media recovery, and you arerecovering with a backup control file and have read-only tablespaces, contactOracle Support before attempting this recovery procedure.
To Perform Time-based Recovery
1. If the database is still open and incomplete mediarecovery is necessary, shut down the database using the Enterprise ManagerShutdown Abort mode of the Shutdown Database dialog box, or the SHUT-DOWN command with the ABORT option.
2. Make a whole backup of the database (all datafiles, a control file, and theparameter files of the database) as a precautionary measure, in case an error ismade during the recovery procedure.
3. If a media failure occurred, correct the hardware problem that caused themedia failure.
4. If the current control files do not match the physical structure of the database atthe intended time of recovery (for example, if a datafile was added after thepoint in time to which you intend to recover), then restore a backup of the con-trol file that reflects the database’s physical file structure (contains the names ofdatafiles and online redo log files) at the point at which incomplete mediarecovery is intended to finish. Review the list of files that corresponds to thecurrent control file and each control file backup to determine the correct controlfile to use. If necessary, replace all current control files of the database with the
12-26 Oracle8 Backup and Recovery Guide
Performing Incomplete Media Recovery
correct control file backup. You can, alternatively, create a new control file toreplace the missing one.
5. Restore backup files of all the datafiles of the database. All backup files used toreplace existing datafiles must have been taken before the intended time ofrecovery. For example, if you intend to recover to redo log sequence number38, then restore all datafiles with backups completed before redo log sequencenumber 38.
If you do not have a backup of a specific datafile, you can create an emptyreplacement file, which can be recovered.
If a datafile was added after the intended time of recovery, it is not necessary torestore a backup for this file, as it will no longer be used for the database afterrecovery is complete.
If the hardware problem that caused a media failure has been solved and alldatafiles can be restored to their original locations, do so, and skip Step 8 of thisprocedure. If a hardware problem persists, restore damaged datafiles to analternative storage device.
6. Start Enterprise Manager and connect to Oracle with administrator privileges.
7. Start a new instance and mount the database. This operation can be performedwith the Enterprise Manager Startup Database dialog box with the StartupMount radio button selected, or the STARTUP command with the MOUNToption.
8. If one or more damaged datafiles were restored to alternative locations inStep 5, the new locations of these files must be indicated to the control file ofthe associated database.
Note: If a database control file cannot function or be replacedwith a control file backup because the hardware problem causingthe media failure persists, you must edit the parameter file associ-ated with the database to modify the CONTROL_FILES parameter.
Note: Files in read-only tablespaces should be offline if you areusing a control file backup. Otherwise, the recovery will try toupdate the headers of the read-only files.
Recovering a Database 12-27

Performing Incomplete Media Recovery
9. All datafiles of the database must be online unless an offline tablespace wastaken offline normally. To get the names of all datafiles to recover, check the listof datafiles that normally accompanies the control file being used or query theV$DATAFILE view. Then, use the ALTER DATABASE command and theDATAFILE ONLINE option to make sure that all datafiles of the database areonline. For example, to guarantee that a datafile named USERS1 (a fully speci-fied filename) is online, enter the following statement:
ALTER DATABASE DATAFILE ’users1’ ONLINE;
If a backup of the control file is being used with this incomplete recovery (thatis, a control file backup or re-created control file was restored), indicate this inthe dialog box or command used to start recovery. If a specified datafile isalready online, Oracle ignores the statement.
10. Issue the RECOVER DATABASE UNTIL TIME statement to begin time-basedrecovery. The time is always specified using the following format, delimited bysingle quotation marks: ’YYYY-MM-DD:HH24:MI:SS’.
11. Oracle begins the roll forward phase of media recovery by applying the neces-sary redo log files (archived and online) to reconstruct the restored datafiles.Unless the application of files is automated, Oracle supplies the name it expectsto find from LOG_ARCHIVE_DEST and requests you to stop or proceed withapplying the log file. If the control file is a backup file, you must supply namesof online logs. Oracle continues to apply redo log files.
12. Continue applying redo log files until the last required redo log file has beenapplied to the restored datafiles. Oracle automatically terminates the recoverywhen it reaches the correct time, and returns a message indicating whetherrecovery is successful.
Opening the Database After Successful Time-based RecoveryThe first time you open the database subsequent to incomplete media recovery, youmust explicitly specify whether to reset the log sequence number by includingeither the RESETLOGS or NORESETLOGS option. Resetting the redo log:
■ discards any redo information that was not applied during recovery, ensuringthat it will never be applied
■ reinitializes the control file information about online redo logs and redo threads
■ clears the contents of the online redo logs
■ creates the online redo log files if they do not currently exist
12-28 Oracle8 Backup and Recovery Guide

Performing Incomplete Media Recovery
■ resets the log sequence number to 1
Use the following rules when deciding to specify RESETLOGS or NORESET-LOGS:
■ Reset the log sequence number if you used a backup of the control file inrecovery, no matter what type of recovery was performed (complete orincomplete).
■ Reset the log sequence number if the recovery was actually incomplete. Forexample, you must have specified a previous time or SCN, not one in thefuture.
■ Do not reset logs if recovery was complete (unless you used a backup controlfile). This applies when you intentionally performed complete recovery andwhen you performed incomplete recovery but actually recovered all changes inthe redo logs anyway. See the explanation in step 12 for how to examine theALERT file to see if incomplete recovery was actually complete.
■ Do not reset logs if you are using the archived logs of this database for astandby database. If the log must be reset, then you will have to re-create yourstandby database.
To preserve the log sequence number when opening a database after recovery,use the SQL command ALTER DATABASE with the OPEN NORESETLOGSoption. To reset the log sequence number when opening a database after recov-ery, use the SQL command ALTER DATABASE with the OPEN RESETLOGSoption. (If you attempt to reset the log when you should not, or if you neglectto reset the log when you should, Oracle returns an error and does not open thedatabase. Correct the error and try again.)
If the log sequence number is reset when opening a database, different mes-sages are returned, depending on whether the recovery was complete or incom-plete. If the recovery was complete, the following message appears in theALERT file:
RESETLOGS after complete recovery through change scn
If the recovery was incomplete, the following message is reported in theALERT file:
WARNING: Resetting the redo log discards all changes to thedatabase made since the first discarded redo information.Updates entered after that time must be re-entered manually.
Recovering a Database 12-29
Performing Incomplete Media Recovery
RESETLOGS after incomplete recovery UNTIL CHANGE scn
If you reset the redo log sequence when opening the database, immediately shutdown the database normally and make a whole database backup. Otherwise, youwill not be able to recover changes made after you reset the logs. Until you take awhole database backup, the only way to recover will be to repeat the proceduresyou just finished, up to resetting the logs. (You do not need to back up the databaseif you did not reset the log sequence.)
After opening the database using the RESETLOGS option, check the ALERT log tosee if Oracle has detected inconsistencies between the data dictionary and thecontrol file (for example, a datafile that the data dictionary includes but does notlist in the new control file).
If a datafile exists in the data dictionary but not in the new control file, Oraclecreates a placeholder entry in the control file under MISSINGnnnn (where nnnn isthe file number in decimal). MISSINGnnnn is flagged in the control file as beingoffline and requiring media recovery. The actual datafile corresponding toMISSINGnnnn can be made accessible by renaming MISSINGnnnn, so that it pointsto the datafile only when the datafile was read-only or offline normal. If, on theother hand, MISSINGnnnn corresponds to a datafile that was not read-only oroffline normal, then the rename operation cannot be used to make the datafileaccessible, because the datafile requires media recovery that is precluded by theresults of RESETLOGS. In this case, the tablespace containing the datafile must bedropped.
In contrast, if a datafile indicated in the control file is not present in the datadictionary, Oracle removes references to it from the new control file. In both cases,Oracle includes an explanatory message in the ALERT file to let you know whatwas found.
See Also: For more information see the Oracle8 Administrator’s Guide.
For more information about applying redo logs, see “Applying Redo Log Files” onpage 12-4.
12-30 Oracle8 Backup and Recovery Guide
Performing Incomplete Media Recovery
Performing Change-based RecoveryThis section describes how to perform change-based recovery.
To Perform Change-based Recovery
1. If the database is still open and incomplete media recovery is necessary, shutdown the database using the Enterprise Manager Shutdown Abort mode of theShutdown Database dialog box, or the SHUTDOWN command with theABORT option.
2. Make a whole backup of the database (all datafiles, a control file, and theparameter files of the database) as a precautionary measure, in case an error ismade during the recovery procedure.
3. If a media failure occurred, correct the hardware problem that caused themedia failure.
4. If the current control files do not match the physical structure of the database atthe intended time of recovery (for example, if a datafile was added after thepoint in time to which you intend to recover), then restore a backup of the con-trol file that reflects the database’s physical file structure (contains the names ofdatafiles and online redo log files) at the point at which incomplete mediarecovery is intended to finish. Review the list of files that correspond to the cur-rent control file as well as each control file backup to determine the correct con-trol file to use. If necessary, replace all current control files of the database withthe correct control file backup. You can, alternatively, create a new control fileto replace the missing one.
5. Restore backup files of all the datafiles of the database. All backup files used toreplace existing datafiles must have been taken before the intended time ofrecovery. For example, if you intend to recover to redo log sequence number38, then restore all datafiles with backups completed before redo log sequencenumber 38.
If you do not have a backup of a specific datafile, you can create an emptyreplacement file, which can be recovered.
Note: If a database control file cannot function or be replacedwith a control file backup, you must edit the parameter file associ-ated with the database to modify the CONTROL_FILES parameter.
Recovering a Database 12-31

Performing Incomplete Media Recovery
If a datafile was added after the intended time of recovery, it is not necessary torestore a backup for this file, as it will no longer be used for the database afterrecovery is complete.
If the hardware problem that caused a media failure has been solved and alldatafiles can be restored to their original locations, do so, and skip Step 8 of thisprocedure. If a hardware problem persists, restore damaged datafiles to analternative storage device.
6. Start Enterprise Manager and connect to Oracle with administrator privileges.
7. Start a new instance and mount the database. You can perform this operationusing the Enterprise Manager Startup Database dialog box with the StartupMount radio button selected, or the STARTUP command with the MOUNToption.
8. If one or more damaged datafiles were restored to alternative locations inStep 5, the new locations of these files must be indicated to the control file ofthe associated database.
9. To get the names of all datafiles to recover, check the list of datafiles that nor-mally accompany the control file being used or query the V$DATAFILE view.Then, use the ALTER DATABASE command with the DATAFILE ONLINEoption to make sure that all datafiles of the database are online. For example, toguarantee that a datafile named USERS1 (a fully specified filename) is online,enter the following statement:
ALTER DATABASE DATAFILE ’users1’ ONLINE;
If a specified datafile is already online, Oracle ignores the statement.
If a backup of the control file is being used with this incomplete recovery (thatis, a control file backup or re-created control file was restored), specify theUSING BACKUP CONTROLFILE parameter in the dialog box or commandused to start recovery.
10. Issue the RECOVER DATABASE UNTIL CHANGE statement to begin change-based recovery. The SCN is specified as a decimal number without quotationmarks.
Note: Files in read-only tablespaces should be offline if you areusing a control file backup. Otherwise, recovery will try to updatethe headers of the read-only files.
12-32 Oracle8 Backup and Recovery Guide

Performing Incomplete Media Recovery
11. Oracle begins the roll forward phase of media recovery by applying the neces-sary redo log files (archived and online) to reconstruct the restored datafiles.Unless the application of files is automated, Oracle supplies the name it expectsto find from LOG_ARCHIVE_DEST and requests you to stop or proceed withapplying the log file. If the control file is a backup file, you must supply namesof online logs. Oracle continues to apply redo log files.
12. Continue applying redo log files until the last required redo log file has beenapplied to the restored datafiles. Oracle automatically terminates the recoverywhen it reaches the correct time, and returns a message indicating whetherrecovery is successful.
Opening the Database After Successful Change-based RecoveryThe first time you open the database subsequent to incomplete media recovery, youmust explicitly specify whether to reset the log sequence number by includingeither the RESETLOGS or NORESETLOGS option. Resetting the redo log:
■ discards any redo information that was not applied during recovery, ensuringthat it will never be applied
■ reinitializes the control file information about online redo logs and redo threads
■ clears the contents of the online redo logs
■ creates the online redo log files if they do not currently exist
■ resets the log sequence number to 1
Use the following rules when deciding to specify RESETLOGS or NORESET-LOGS:
■ Reset the log sequence number if you used a backup of the control file inrecovery, no matter what type of recovery was performed (complete orincomplete).
■ Reset the log sequence number if the recovery was actually incomplete. Forexample, you must have specified a previous time or SCN, not one in thefuture.
WARNING: Resetting the redo log discards all changes to thedatabase made since the first discarded redo information.Updates entered after that time must be re-entered manually.
Recovering a Database 12-33
Performing Incomplete Media Recovery
■ Do not reset logs if recovery was complete (unless you used a backup controlfile). This applies when you intentionally performed complete recovery andwhen you performed incomplete recovery but actually recovered all changes inthe redo logs anyway. See the explanation in step 12 for how to examine theALERT file to see if incomplete recovery was actually complete.
■ Do not reset logs if you are using the archived logs of this database for astandby database. If the log must be reset, then you will have to re-create yourstandby database.
To preserve the log sequence number when opening a database after recovery,use the SQL command ALTER DATABASE with the OPEN NORESETLOGSoption. To reset the log sequence number when opening a database after recov-ery, use the SQL command ALTER DATABASE with the OPEN RESETLOGSoption. (If you attempt to reset the log when you should not, or if you neglectto reset the log when you should, Oracle returns an error and does not open thedatabase. Correct the error and try again.)
If the log sequence number is reset when opening a database, different mes-sages are returned, depending on whether the recovery was complete or incom-plete. If the recovery was complete, the following message appears in theALERT file:
RESETLOGS after complete recovery through change scn
If the recovery was incomplete, the following message is reported in theALERT file:
RESETLOGS after incomplete recovery UNTIL CHANGE scn
If you reset the redo log sequence when opening the database, immediately shutdown the database normally and make a full database backup. Otherwise, you willnot be able to recover changes made after you reset the logs. Until you take a fullbackup, the only way to recover will be to repeat the procedures you just finished,up to resetting the logs. (You do not need to back up the database if you did notreset the log sequence.)
After opening the database using the RESETLOGS option, check the ALERT log tosee if Oracle has detected inconsistencies between the data dictionary and thecontrol file (for example, a datafile that the data dictionary includes but does notlist in the new control file).
If a datafile exists in the data dictionary but not in the new control file, Oraclecreates a placeholder entry in the control file under MISSINGnnnn (where nnnn isthe file number in decimal). MISSINGnnnn is flagged in the control file as being
12-34 Oracle8 Backup and Recovery Guide
Preparing for Disaster Recovery
offline and requiring media recovery. The actual datafile corresponding toMISSINGnnnn can be made accessible by renaming MISSINGnnnn, so that it pointsto the datafile only when the datafile was read-only or offline normal. If, on theother hand, MISSINGnnnn corresponds to a datafile that was not read-only oroffline normal, then the rename operation cannot be used to make the datafileaccessible, because the datafile requires media recovery that is precluded by theresults of RESETLOGS. In this case, the tablespace containing the datafile must bedropped.
In contrast, if a datafile indicated in the control file is not present in the datadictionary, Oracle removes references to it from the new control file. In both cases,Oracle includes an explanatory message in the ALERT file to let you know whatwas found.
See Also: For more information about applying redo logs, see “Applying Redo LogFiles” on page 12-4.
Preparing for Disaster RecoveryThis section describes how to plan for and implement disaster recovery proceduresfor your primary database, and includes the following topics:
■ Planning and Creating a Standby Database
■ Altering the Physical Structure of the Primary Database
Planning and Creating a Standby DatabaseA standby database maintains a duplicate, or standby copy of your primary (alsoknown as production) database and provides continued primary databaseavailability in the event of a disaster (when all media is destroyed at yourproduction site). A standby database is constantly in recovery mode. If a disasteroccurs, you can take the standby database out of recovery mode and activate it foronline use. A standby database is intended only for recovery of the primarydatabase; you cannot query or open it for any purpose other than to activatedisaster recovery. Once you activate your standby database, you cannot return it tostandby recovery mode unless you re-create it as another standby database.
WARNING: Activating a standby database resets the online logsof the standby database. Hence, after activation, the logs fromyour standby database and production database are incompatible.
Recovering a Database 12-35

Preparing for Disaster Recovery
You must place the data files, log files, and control files of your primary andstandby databases on separate physical media. Therefore, it is impossible to use thesame control file for both your primary and standby databases.
Creating a Standby DatabaseThis section lists the steps and rules to follow when creating a standby database.
To Create a Standby Database
1. Back up (either online or offline) the data files from your primary database.
2. Create the control file for your standby database by issuing the ALTER DATA-BASE CREATE STANDBY CONTROLFILE AS ’filename’ command, which cre-ates a modified copy of the primary database’s control file.
3. Archive the current online logs of the primary database by issuing the ALTERSYSTEM ARCHIVE LOG CURRENT command. Issuing the ALTER SYSTEMARCHIVE LOG CURRENT command also ensures consistency among the datafiles in step 1, the control file in step 2, and the log files.
4. Transfer the standby database control file, archived log files, and backed updata files to the remote (standby) site using operating system commands or util-ities. Use an appropriate method if transferring binary files.
See Also: For information about setting name conversion parameters when youcreate your standby database, see “Converting Data File and Log File Names” onpage 12-37.
Maintaining a Standby DatabaseThis section provides the tasks for maintaining your standby database, includinginformation about clearing standby logfiles.
WARNING: Oracle encourages you to use a datafile namingscheme that keeps the datafile names the same at both the pri-mary and standby databases. If this is not possible, then you canuse the datafile name conversion parameters. If you do not useeither of these suggested datafile naming schemes, you may endup crashing your standby database.
12-36 Oracle8 Backup and Recovery Guide
Preparing for Disaster Recovery
To Maintain Your Standby Database In Recovery Mode
1. Start up the Oracle instance atthe standby database using the NO MOUNT clause.
2. Issue the ALTER DATABASE MOUNT STANDBY DATABASE [EXCLUSIVE /PARALLEL] command.
3. Transfer the archived redo logs from the primary database to the remote(standby) site. Use an appropriate operating system utility for transferringbinary data.
4. Place the standby database in recovery mode by issuing the RECOVER [FROM’location’] STANDBY DATABASE command.
Clearing Online Logfiles You can clear standby database online logfiles to optimizeperformance as you maintain your standby database. If you prefer not to performthis operation during maintenance, the online logfiles will be cleared automaticallyduring activation. You can clear logfiles using the following statement:
ALTER DATABASE CLEAR LOGFILE GROUP integer;
Converting Data File and Log File NamesYou can set the following initialization parameters so that all filenames from yourprimary database control file are converted for use by your standby database:
■ DB_FILE_NAME_CONVERT
■ LOG_FILE_NAME_CONVERT
If your primary and standby databases exist on the same machine (of course, theyshould not, but if they are), setting these parameters is advisable, because theyallow you to make your standby database filenames distinguishable from yourprimary database filenames.
The DB_FILE_NAME_CONVERT and LOG_FILE_NAME_CONVERT parametersmust have two strings. The first string is a sequence of characters to be looked forin a primary database filename. If that sequence of characters is matched, it isreplaced by the second string to construct the standby database filename.
Note: As the archived logs are generated, you must continuallytransfer and apply them to the standby database. Also, you canonly apply logs that have been archived at the primary database tothe standby database.
Recovering a Database 12-37
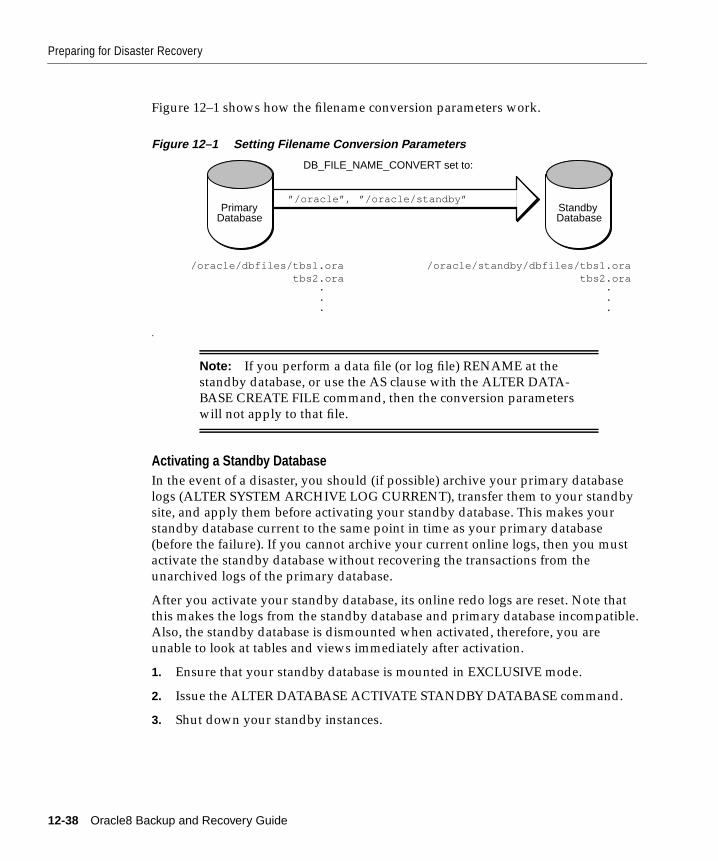
Preparing for Disaster Recovery
Figure 12–1 shows how the filename conversion parameters work.
Figure 12–1 Setting Filename Conversion Parameters
.
Activating a Standby DatabaseIn the event of a disaster, you should (if possible) archive your primary databaselogs (ALTER SYSTEM ARCHIVE LOG CURRENT), transfer them to your standbysite, and apply them before activating your standby database. This makes yourstandby database current to the same point in time as your primary database(before the failure). If you cannot archive your current online logs, then you mustactivate the standby database without recovering the transactions from theunarchived logs of the primary database.
After you activate your standby database, its online redo logs are reset. Note thatthis makes the logs from the standby database and primary database incompatible.Also, the standby database is dismounted when activated, therefore, you areunable to look at tables and views immediately after activation.
1. Ensure that your standby database is mounted in EXCLUSIVE mode.
2. Issue the ALTER DATABASE ACTIVATE STANDBY DATABASE command.
3. Shut down your standby instances.
Note: If you perform a data file (or log file) RENAME at thestandby database, or use the AS clause with the ALTER DATA-BASE CREATE FILE command, then the conversion parameterswill not apply to that file.
”/oracle”, ”/oracle/standby”Primary
DatabaseStandbyDatabase
/oracle/dbfiles/tbsl.oratbs2.ora
.
.
.
DB_FILE_NAME_CONVERT set to:
/oracle/standby/dbfiles/tbs1.oratbs2.ora
.
.
.
12-38 Oracle8 Backup and Recovery Guide
Preparing for Disaster Recovery
4. As soon as possible, back up your new production database. At this point, theformer standby database is now your production database. This task, while notrequired, is a recommended safety measure, because you cannot recoverchanges made after activation without a backup.
5. Startup the new production instance.
Altering the Physical Structure of the Primary DatabaseAltering the physical structure of your primary database can have an impact onyour standby database. The following sections describe the effects of primarydatabase structural alterations on a standby database.
Adding Data FilesAdding a data file to your primary database generates redo information that, whenapplied at your standby database, automatically adds the data file name to thestandby control file. If the standby database locates the new file with the newfilename, the recovery process continues. If the standby database is unable to locatethe new data file, the recovery process will stop.
If the recovery process stops, then perform either of the following procedures beforeresuming the standby database recovery process:
■ Copy a backup of the added data file from the primary database to the standbydatabase.
■ Issue the ALTER DATABASE CREATE DATAFILE command at the standbydatabase.
If you don’t want the new data file in the standby database, you can take it offlineusing the DROP option.
See Also: For more information on offline datafile alterations, see “Taking Datafilesin the Standby Database Offline” on page 12-41.
Renaming FilesData file renames on your primary database do not take effect at the standbydatabase until the standby database control file is refreshed. If you want the datafiles at your primary and standby databases to remain in sync when you rename
Note: After you activate your standby database, all transactionsfrom unarchived logs at your original production database are lost.
Recovering a Database 12-39
Preparing for Disaster Recovery
primary database data files, then perform analogous operations on the standbydatabase.
Altering Log FilesYou can add log file groups or members to the primary database without affectingyour standby database. Likewise, you can drop log file groups or members fromthe primary database without affecting your standby database. Similarly, enablingand disabling of threads at the primary database has no effect on the standbydatabase.
You may want to keep the online log file configuration the same at the primary andstandby databases. If so, when you enable a log file thread with the ALTERDATABASE ENABLE THREAD at the primary database, you should create a newcontrol file for your standby database before activating it. See “Refreshing theStandby Database Control File” on page -42 for refresh procedures.
If you clear log files at the primary database by issuing the ALTER DATABASECLEAR UNARCHIVED LOGFILE command, or open the primary database usingthe RESETLOGS option, you invalidate the standby database. Because the standbydatabase recovery process will not have the archived logs it requires to continue,you will need to re-create the standby database.
Altering Control FilesIf you use the CREATE CONTROLFILE command at the primary database toperform any of the following, you may invalidate the standby database’s controlfile:
■ change the maximum number of redo log file groups or members
■ change the maximum number of instances that can concurrently mount andopen the database
If you’ve invalidated the standby database’s control file, you must re-create it usingthe procedures in “Refreshing the Standby Database Control File” on page 12-42.
Using the CREATE CONTROLFILE command with the RESETLOGS option onyour primary database will force the next open of the primary database to reset theonline logs, thereby invalidating the standby database.
Configuring Initialization ParametersMost initialization parameters at your primary and standby databases should beidentical. Specific initialization parameters such as CONTROL_FILES andDB_FILE_STANDBY_NAME_CONVERT should be changed. Differences in other
12-40 Oracle8 Backup and Recovery Guide
Preparing for Disaster Recovery
initialization parameters may cause performance degradation at the standbydatabase, and in some cases, bring standby database operations to a halt.
The following initialization parameters play a key role in the standby databaserecovery process:
■ COMPATIBLE
The COMPATIBLE parameter must be the same at the primary and standbydatabases. If it is not, you may not be able to apply the logs from your primarydatabase to your standby database.
■ DB_FILES
MAXDATAFILES must be the same at both databases so that you allow thesame number of files at the standby database as you allow at the primary data-base.
■ CONTROL_FILES
CONTROL_FILES must be different between the primary and standby data-bases. The names of the control files that you list in this parameter for thestandby database must exist at the standby database.
■ DB_FILE_STANDBY_NAME_CONVERT (orLOG_FILE_STANDBY_NAME_CONVERT)
Set the DB_FILE_STANDBY_NAME_CONVERT (orLOG_FILE_STANDBY_NAME_CONVERT) parameter when you want tomake your standby database filenames distinguishable from your primary data-base filenames. For more information on this parameter see “Converting DataFile and Log File Names” on page 12-37.
See Also: For more information on initialization parameters, see the Oracle8Reference.
Taking Datafiles in the Standby Database OfflineYou can take standby database datafiles offline as a means to support a subset ofyour primary database’s datafiles. For example, you decide it is undesirable torecover the primary database’s temporary tablespaces on the standby database. Soyou take the datafiles offline using the ALTER DATABASE DATAFILE ’fn’OFFLINE DROP command on the standby database. If you do this, then thetablespace containing the offline files must be dropped after opening the standbydatabase.
Recovering a Database 12-41

Preparing for Disaster Recovery
Performing Direct Path OperationsWhen you perform a direct load originating from either direct path load, tablecreate via subquery, or index create on the primary database, the performanceimprovement applies only to the primary database; there is no correspondingrecovery process performance improvement on the standby database. The standbydatabase recovery process still sequentially reads and applies the redo informationgenerated by the unrecoverable direct load.
Primary database processes using the UNRECOVERABLE option are notpropagated to the standby database. Why? Because these processes do not appearin the archived redo logs. If you want to propagate such processes to your standbydatabase, perform any one of the following tasks.
To Propagate UNRECOVERABLE Processes to Standby Database
1. Take the affected datafiles offline in the standby database, and drop thetablespace after activation.
2. Re-create the standby database from a new database backup.
3. Back up the affected tablespace and archive the current logs in the primarydatabase. Transfer the datafiles to the standby database. Then resume standbyrecovery. This is the same procedure that you would perform to guarantee ordi-nary database recoverability after an UNRECOVERABLE operation.
If you perform an unrecoverable operation at the primary database, and attempt torecover at the standby database, you will not receive error messages duringrecovery. Such error messages appear in the standby database alert log. Thus, youshould check the standby database alert log periodically.
See Also: For more details, see “Taking Datafiles in the Standby Database Offline”on page 12-41.
Refreshing the Standby Database Control FileThe following steps describe how to refresh, or create a copy of changes you’vemade to the primary database control file.
12-42 Oracle8 Backup and Recovery Guide

Unrecoverable Objects and Recovery
To Refresh the Standby Database Control File
1. Issue the CANCEL command on the standby database to halt its recovery pro-cess.
2. Shut down the standby instances.
3. Issue the ALTER DATABASE CREATE STANDBY CONTROLFILE AS ’file-name’ statement on the primary database to create the control file for thestandby database.
4. Issue the ALTER SYSTEM ARCHIVE LOG CURRENT statement on the pri-mary database to archive the current online logs of your primary database.
5. Transfer the standby control file and archived log files to the standby site.
6. Restart and mount (but do not open) the standby database by issuing theALTER DATABASE MOUNT STANDBY DATABASE [EXCLUSIVE/PARAL-LEL] statement.
7. Restart the recovery process on the standby database by issuing the RECOVER[FROM ’location’] STANDBY DATABASE statement.
Unrecoverable Objects and RecoveryYou can create tables and indexes using the CREATE TABLE AS SELECTcommand. You can also specify that Oracle create them as unrecoverable. When youcreate a table or index as unrecoverable, Oracle does not generate redo log recordsfor the operation. Thus, objects created unrecoverable cannot be recovered, even ifyou are running in ARCHIVELOG mode.
Be aware that when you perform a media recovery, and some tables or indexes arecreated as recoverable while others are unrecoverable, the unrecoverable objectswill be marked logically corrupt by the RECOVER operation. Any attempt toaccess the unrecoverable objects returns an ORA-01578 error message. You shoulddrop the unrecoverable objects, and recreate them, if needed.
Because it is possible to create a table unrecoverable and then create a recoverableindex on that table, the index is not marked as logically corrupt after you perform amedia recovery. However, the table was unrecoverable (and thus marked as
Note: If you cannot afford to lose tables or indexes created unre-coverable, take a backup after the unrecoverable table or index iscreated.
Recovering a Database 12-43
Read-only Tablespaces and Recovery
corrupt after recovery), so the index points to corrupt blocks. The index must bedropped, and the table and index must be re-created if necessary.
See Also: You can find more information about the impact of UNRECOVERABLEoperations on a standby database on page 12-42.
Read-only Tablespaces and RecoveryThis section describes how read-only tablespaces affect instance and mediarecovery.
Using a Backup Control FileMedia recovery with the USING BACKUP CONTROLFILE option checks for read-only files. It is an error to attempt recovery of a read-only file. You can avoid thiserror by taking all datafiles from read-only tablespaces offline before doingrecovery with a backup control file. Therefore, it is very important to have thecorrect version of the control file for the recovery. If the tablespace will be read-onlywhen the recovery is complete, then the control file must be from a time when thetablespace was read-only. Similarly, if the tablespace will be read-write at the end ofrecovery, it should be read-write in the control file. If the appropriate control file isnot available, you should create a new control file with the CREATECONTROLFILE command.
Re-creating a Control FileIf you need to re-create a control file for a database with read-only tablespaces, youmust follow some special procedures. Issue the ALTER DATABASE BACKUPCONTROLFILE TO TRACE command to get a listing of the procedure that youneed to follow. The procedure is similar to the procedure for offline normaltablespaces, except that you need to bring the tablespace online after the databaseis open.
Re-creating a control file can also affect the recovery of read-write tablespaces thatwere at one time read-only. If you re-create the control file after making thetablespace writable, Oracle can no longer determine when the tablespace waschanged from read-only to read-write. Thus, you can no longer recover from theread-only version of the tablespace. Instead, you must recover from the time of themost recent backup. It is important to backup a tablespace immediately aftermaking it read-write.
12-44 Oracle8 Backup and Recovery Guide
Recovery Procedure Examples
Recovery Procedure ExamplesThis section describes how to recover from common media failures, and includesthe following topics:
■ Types of Media Failures
■ Loss of Datafiles
■ Loss of Online Redo Log Files
■ Loss of Archived Redo Log Files
■ Loss of Control Files
■ Recovery From User Errors
Types of Media FailuresMedia failures fall into two general categories: permanent and temporary.Permanent media failures are serious hardware problems that cause the permanentloss of data on the disk. Lost data cannot be recovered except by repairing orreplacing the failed storage device and restoring backups of the files stored on thedamaged storage device. Temporary media failures are hardware problems thatmake data temporarily inaccessible; they do not corrupt the data. Following aretwo examples of temporary media failures:
■ A disk controller fails. Once the disk controller is replaced, the data on the diskcan be accessed.
■ Power to a storage device is cut off. Once the power is returned, the storagedevice and all associated data is accessible again.
Loss of DatafilesIf a media failure affects datafiles of a database, the appropriate recovery proceduredepends on the archiving mode of the database, the type of media failure, and theexact files affected by the media failure. The following sections explain theappropriate recovery strategies in various situations.
Loss of Datafiles, NOARCHIVELOG ModeIf either a permanent or temporary media failure affects any datafiles of a databaseoperating in NOARCHIVELOG mode, Oracle automatically shuts down thedatabase. Depending on the type of media failure, you can use one of two recoverypaths:
Recovering a Database 12-45
Recovery Procedure Examples
■ If the media failure is temporary, correct the temporary hardware problem andrestart the database. Usually, instance recovery is possible, and all committedtransactions can be recovered using the online redo log.
■ If the media failure is permanent, follow the steps on page -16 to recover fromthe media failure.
Loss of Datafiles, ARCHIVELOG ModeIf either a permanent or temporary media failure affects the datafiles of a databaseoperating in ARCHIVELOG mode, the following situations can exist:
■ If a temporary or permanent media failure affects any datafiles of the SYSTEMtablespace or any datafiles that contain active rollback segments, the databasebecomes inoperable and should be immediately shut down if it has not alreadybeen shut down by Oracle.
If the hardware problem is temporary, correct the problem and restart the data-base. Usually, instance recovery is possible, and all committed transactions canbe recovered using the online redo log.
If the hardware problem is permanent, follow the procedure in “PerformingClosed Database Recovery” on page 12-15.
■ If a temporary or permanent media failure affects only datafiles not mentionedin the previous item, the affected datafiles are unavailable and taken offlineautomatically by Oracle, but the database can continue to operate.
If the unaffected portions of the database must remain available, do not shutdown the database. First take all tablespaces that contain problem datafilesoffline using the temporary option. Then follow the procedure in “PerformingClosed Database Recovery” on page 12-15.
Loss of Online Redo Log FilesIf a media failure has affected the online redo log of a database, the appropriaterecovery procedure depends on the configuration of the online redo log (mirroredor non-mirrored), the type of media failure (temporary or permanent), and thetypes of online redo log files affected by the media failure (current, active, not yetarchived, or inactive online redo log files). The following sections describe theappropriate recovery strategies in various situations.
12-46 Oracle8 Backup and Recovery Guide
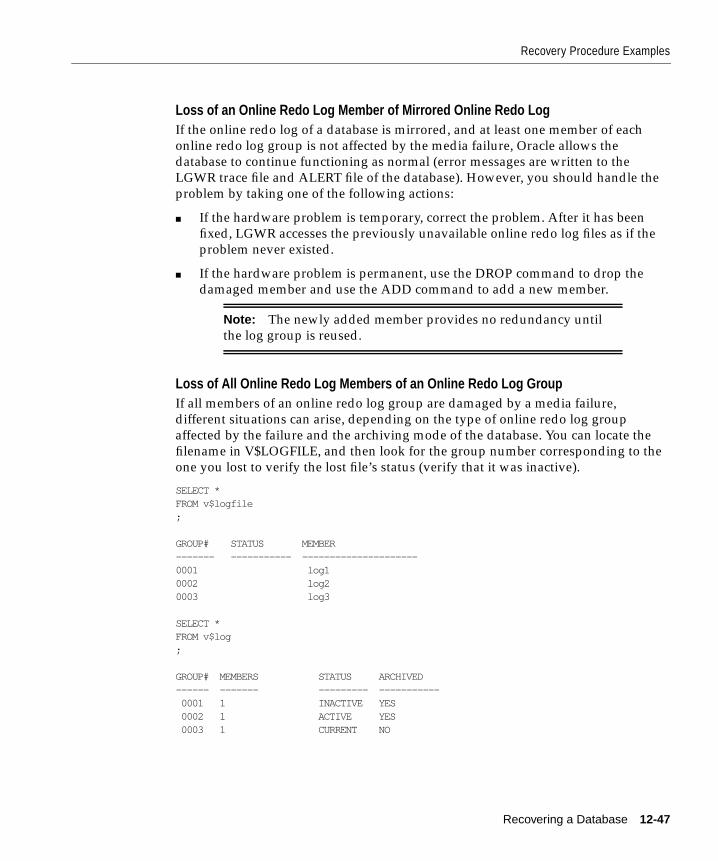
Recovery Procedure Examples
Loss of an Online Redo Log Member of Mirrored Online Redo LogIf the online redo log of a database is mirrored, and at least one member of eachonline redo log group is not affected by the media failure, Oracle allows thedatabase to continue functioning as normal (error messages are written to theLGWR trace file and ALERT file of the database). However, you should handle theproblem by taking one of the following actions:
■ If the hardware problem is temporary, correct the problem. After it has beenfixed, LGWR accesses the previously unavailable online redo log files as if theproblem never existed.
■ If the hardware problem is permanent, use the DROP command to drop thedamaged member and use the ADD command to add a new member.
Loss of All Online Redo Log Members of an Online Redo Log GroupIf all members of an online redo log group are damaged by a media failure,different situations can arise, depending on the type of online redo log groupaffected by the failure and the archiving mode of the database. You can locate thefilename in V$LOGFILE, and then look for the group number corresponding to theone you lost to verify the lost file’s status (verify that it was inactive).
SELECT *FROM v$logfile;
GROUP# STATUS MEMBER------- ----------- ---------------------0001 log10002 log20003 log3
SELECT *FROM v$log;
GROUP# MEMBERS STATUS ARCHIVED------ ------- --------- ----------- 0001 1 INACTIVE YES 0002 1 ACTIVE YES 0003 1 CURRENT NO
Note: The newly added member provides no redundancy untilthe log group is reused.
Recovering a Database 12-47
Recovery Procedure Examples
Loss of an Inactive, Online Redo Log Group If all members of an inactive online redolog group are damaged, the following situations can arise:
■ If a temporary media failure affects only an inactive online redo log group,correct the problem; LGWR can reuse the group when required.
■ If a media failure permanently prevents access to only an inactive online redolog group, the damaged inactive online redo log group will eventually haltnormal database operation.
If you notice the problem before the database shuts down, use the ALTERDATABASE CLEAR LOGFILE command.
If the database has already shut down, perform the following tasks:
To Recover From Loss of an Inactive, Online Redo Log Group
1. Abort the current instance immediately with the Enterprise Manager Shut-down Database dialog box with the Shutdown Abort radio button selected, orthe SHUTDOWN command with the ABORT option.
2. Start a new instance and mount the database, but do not open it. This operationcan be performed with the Enterprise Manager Startup Database dialog boxwith the Startup Mount radio button selected, or the STARTUP command withthe MOUNT option.
3. If the lost log was archived, issue the ALTER DATABASE CLEAR LOGFILEcommand.
4. If the lost log was unarchived, issue the ALTER DATABASE CLEAR UNAR-CHIVED LOGFILE command, and immediately backup the database. Alsobackup the database’s control file (using the ALTER DATABASE commandwith the BACKUP CONTROLFILE option).
Clearing a log that has not been archived allows it to be reused withoutarchiving it. However, this will make backups unusable if they were startedbefore the last change in the log (unless the file was taken offline prior to thefirst change in the log). Hence, if the cleared logfile is needed for recovery of abackup, it will not be possible to recover that backup.
If there is an offline datafile that requires the cleared unarchived log to bring itonline, the keywords UNRECOVERABLE DATAFILE are required. The datafile
12-48 Oracle8 Backup and Recovery Guide

Recovery Procedure Examples
and its entire tablespace will have to be dropped from the database because theredo necessary to bring it online is being cleared, and there is no copy of it.
At this point, you can complete recovery by executing, in order, the followingcommands:
■ ADD a logfile under a new name.
■ DROP the logfile under the old name.
You can now open the database.
Loss of an Active Online Redo Log Group If your database is still running and the lostactive log is not the current log, you can use the ALTER SYSTEM CHECKPOINTcommand. If successful, your active log is rendered inactive, and you can followthe steps on page 12-48.
If unsuccessful, or if your database has already halted, you cannot use the steps onpage 12-48. Instead, perform the following tasks:
Note: The ALTER DATABASE CLEAR LOGFILE command couldfail (with an I/O error due to media failure) in two cases:
■ When it is not possible to relocate the logfile onto alternativemedia by re-creating it under the currently configured logfilename.
■ When it is not possible to reuse the currently configured logfilename to recreate the logfile because the name itself is invalid orunusable (for example, due to media failure).
In these two cases, the CLEAR LOGFILE command (beforereceiving the I/O error) would have successfully updated thecontrol file to change the state of the logfile to “being cleared” and“not requiring archiving.” The I/O error occurred at the step inwhich CLEAR LOGFILE attempts to create the new logfile andwrite zeros to it.
Recovering a Database 12-49
Recovery Procedure Examples
To Recover From Loss of an Active Online Redo Log Group
1. If the media failure is temporary, correct the problem so that Oracle can reusethe group when required.
2. If the database is in NOARCHIVELOG mode and a permanent media failureprevents access to an active online redo log group, restore the database from awhole database backup.
After restoring the database, redo the work and open the database using theRESETLOGS option. Updates done after the backup have been lost and mustbe re-executed. Shut down the database and take a whole database backup.
3. If the database was in ARCHIVELOG mode, incomplete media recovery mustbe performed. Use the procedure given in “Performing Complete Media Recov-ery” on page 12-15, recovering up through the log before the damaged log.Ensure that the current name of the lost redo log can be used for a newly cre-ated file. If not, issue the RENAME command to rename the damaged onlineredo log group to a new location.
4. Open the database using the RESETLOGS option.
Loss of Multiple Redo Log Groups If you have lost multiple groups of the online redolog, use the recovery method for the most difficult log to recover. The order ofdifficulty, from most difficult to least, follows:
1. the current online redo log
2. the active online redo log
3. the unarchived redo log
4. the inactive online redo log
Note: All updates executed from the endpoint of the incompleterecovery to the present must be re-executed.
12-50 Oracle8 Backup and Recovery Guide
Recovery Procedure Examples
Loss of Archived Redo Log FilesIf the database is operating so that filled online redo log groups are being archived,and the only copy of an archived redo log file is damaged, it does not affect thepresent operation of the database. However, the following situations can arise ifmedia recovery is required in the future:
■ If all datafiles have been backed up after the filled online redo log group (whichis now archived) was written, the archived version of the filled online redo loggroup is not required for complete media recovery operation.
■ Assume the most recent backup file of a datafile was taken before the filledonline redo log group was written. The group now corresponds to thedamaged archived redo log file. At some future point, the correspondingdatafile is damaged by a permanent media failure. The most recent backup ofthe damaged datafile must be used, and incomplete media recovery can onlyrecover the database up to the damaged archived redo log file.
■ If time-based recovery is needed, the damaged archived redo log file may berequired if you use old datafile backups that were taken before the originalonline redo log group was written. In this case, the incomplete media recoverycan only recover the database up to the damaged archived redo log group.
Loss of Control FilesIf a media failure has affected the control files of a database (whether control filesare mirrored or not), the database continues to run until the first time that anOracle background process needs to access the control files. At this point, thedatabase and instance are automatically shut down.
If the media failure is temporary and the database has not yet shut down,immediately correcting the media failure can avoid the automatic shut down of thedatabase. However, if the database shuts down before the temporary media failureis corrected, you can restart the database after fixing the problem (and restoringaccess to the control files).
The appropriate recovery procedure for media failures that permanently preventaccess to control files of a database depends on whether you have mirrored thecontrol files. The following sections describe the appropriate procedures.
WARNING: If you know that an archived redo log group hasbeen damaged, immediately backup all datafiles so that you willhave a whole database backup that does not require the damagedarchived redo log.
Recovering a Database 12-51
Recovery Procedure Examples
Loss of a Member of a Mirrored Control FileUse the following steps to recover a database after one or more control files of adatabase have been damaged by a permanent media failure, and at least onecontrol file has not been damaged by the media failure.
To Recover a Database After Control Files Are Damaged
1. If the instance is still running, immediately abort the current instance with theEnterprise Manager Shutdown Abort option of the Shutdown Database dialogbox, or the SHUTDOWN command with the ABORT option.
2. Correct the hardware problem that caused the media failure. If the hardwareproblem cannot be repaired quickly, you can proceed with database recoveryby restoring damaged control files to an alternative storage device.
3. Use an intact copy of the database’s control file to copy over the damaged con-trol files. If possible, copy the intact control file to the original locations of alldamaged control files. If the hardware problem persists, copy the intact controlfile to alternative locations. If you restored all damaged control files to theiroriginal location, proceed to Step 5. If all damaged control files were notrestored, or not restored to their original location, proceed to Step 4.
4. If all damaged control files were not restored, or not restored to their originallocation in Step 3, the parameter file of the database must be edited so that theCONTROL_FILES parameter reflects the current locations of all control filesand excludes all control files that were not restored.
5. Start a new instance. Mount and open the database.
Loss of All Copies of the Current Control FileIf all control files of a database have been lost or damaged by a permanent mediafailure, but all online redo logfiles remain intact, you can recover by creating a newcontrol file (using the CREATE CONTROLFILE command with theNORESETLOGS option). Then execute RECOVER DATABASE followed by ALTERDATABASE OPEN.
Depending on the existence and currency of a control file backup, you have thefollowing options for generating the text of the CREATE CONTROLFILE command:
Note: If all control files of a mirrored control file configurationhave been damaged, follow the instructions for recovering fromthe loss of non-mirrored control files.
12-52 Oracle8 Backup and Recovery Guide

Recovery Procedure Examples
■ If you have executed ALTER DATABASE BACKUP CONTROLFILE TOTRACE NORESETLOGS since you made the last structural change to thedatabase, and if you have saved the SQL command output, then you can usethe CREATE CONTROLFILE command from the output as-is. If, however,your most recent execution of ALTER DATABASE BACKUP CONTROLFILETO TRACE was performed before you made a structural change to thedatabase, then you must edit the output of ALTER DATABASE BACKUPCONTROLFILE TO TRACE to reflect that structural change. For example, ifyou recently added a datafile to the database, then you should add that datafileto the DATAFILE clause of the CREATE CONTROLFILE command.
■ If you have not backed up the control file using the TO TRACE option, butinstead have used the TO filename option of the ALTER DATABASE BACKUPCONTROLFILE command, then you can use the control file copy to obtain SQLcommand output. You can do this by copying the backup control file andexecuting STARTUP MOUNT before executing ALTER DATABASE BACKUPCONTROLFILE TO TRACE NORESETLOGS. If your control file copy predateda recent structural change, you must edit the TO TRACE output to reflect thatstructural change.
■ If you do not have a backup of the control file (in either TO TRACE format orTO filename format), then you must generate the CREATE CONTROLFILEcommand manually.
Recovery From User ErrorsAn accidental or erroneous operational or programmatic change to the databasecan cause loss or corruption of data. Recovery may require a return to a state priorto the error.
1. Back up the existing, intact database.
2. Leave the existing database intact, but reconstruct a temporary copy of the data-base up to the time of the user error using time-based recovery.
3. Export the lost or corrupted data from the reconstructed, temporary copy of thedatabase.
Note: If the database administrator has properly granted power-ful privileges (such as DROP ANY TABLE) to only selected, appro-priate users, user errors that require database recovery areminimized.
Recovering a Database 12-53

Recovery Procedure Examples
4. Import the lost or corrupted data into the permanent database.
5. Delete the files associated with the temporary copy of the reconstructed data-base to conserve disk space.
The following scenario describes how to recover a table that has been accidentallydropped.
1. The database that experienced the user error can remain online and availablefor normal use. The database can remain open or be shut down. Back up alldatafiles of the existing database in case an error is made during the remainingsteps of this procedure.
2. Create a temporary copy of the database to a past point-in-time using time-based recovery. Be careful not to cause a conflict with the existing control file ofthe permanent database. Restore a single control file backup to an alternativelocation (Step 4) and edit the parameter file, as necessary, or create a new con-trol file at the alternative location. Also, restore all datafiles to alternative loca-tions (Step 5) so that you do not affect the permanent copy of the database.
3. Export the lost data using the Oracle utility Export from the temporary,restored version of the database. In this case, export the accidentally droppedtable.
4. Import the exported data (Step 3) into the permanent copy of the databaseusing the Oracle Import utility.
5. Delete the files of the temporary, reconstructed copy of the database to con-serve space.
See Also: For more information about the Import and Export utilities, see Oracle8Utilities.
Note: System audit options are exported.
12-54 Oracle8 Backup and Recovery Guide

Performing Tablespace Point-in-Time Rec
13
Performing Tablespace Point-in-TimeRecovery
This chapter describes how to perform tablespace point-in-time recovery (TSPITR),and includes the following topics:
■ Introduction to Tablespace Point-in-Time Recovery
■ Planning for Tablespace Point-in-Time Recovery
■ Performing Tablespace Point-In-Time Recovery
■ Performing Partial TSPITR of Partitioned Tables
■ Performing TSPITR of Partitioned Tables When a Partition Has Been Dropped
■ Performing TSPITR of Partitioned Tables When a Partition Has Been Split
■ TSPITR Tuning Considerations
Attention: Due to the complex nature of tablespace point-in-timerecovery, Oracle recommends that you contact and work withWorldwide Customer Support Services before using theprocedures described here.
overy 13-1
Introduction to Tablespace Point-in-Time Recovery
Introduction to Tablespace Point-in-Time RecoveryTablespace Point-In-Time Recovery (TSPITR) enables you to quickly recover one ormore tablespaces to a point-in-time that is different from that of the rest of thedatabase. TSPITR is most useful in the following situations:
■ To recover from an erroneous drop or truncate table operation.
■ To recover a table that has become logically corrupted.
■ To recover from an incorrect batch job or other DML statement that has affectedonly a subset of the database.
■ In cases where there are multiple logical databases in separate tablespaces ofone physical database, and where one logical database must be recovered to apoint different from that of the rest of the physical database.
■ For VLDBs (very large databases) even if a full database point-in-time recoverywould suffice, you might choose to do tablespace point-in-time recovery ratherthan restore the whole database from a backup and perform a complete data-base roll-forward (see “Planning for Tablespace Point-in-Time Recovery” onpage 13-3 before making any decisions).
Similar to a table export, TSPITR enables you to recover a consistent data set;however, the data set is the entire tablespace rather than just one object.
Prior to Oracle8, point-in-time recovery could only be used on a subset of adatabase by:
1. Creating a copy of the database
2. Rolling the copied database forward to the desired point in time
3. Exporting the desired objects from the copied database
4. Dropping the relevant objects from the production database
5. Importing the objects into the production database
However, there was a performance overhead associated with exporting andimporting large objects.
TSPITR enables you to recover a subset of a database, and optimizes the export/import phase by enabling you to make an operating system-level datafile copy (ofthe relevant files of the recovered database) to the production database. Datadictionary information about the file’s content (for example, the recoveredsegments within the file) is transferred to the production database by means of ameta-data export/import from the copied database. The copied file is also added tothe production database via this import.
13-2 Oracle8 Backup and Recovery Guide
Planning for Tablespace Point-in-Time Recovery
Familiarize yourself with the following terms and abbreviations, which are usedthroughout this chapter:
TSPITRTablespace Point-in-Time Recovery
Clone DatabaseThe copied database used for recovery in Oracle 8 TSPITR is called a "clonedatabase", and has various substantive differences from a regular database.
Recovery SetTablespaces that require point-in-time recovery to be performed on them.
Auxiliary SetAny other items required for TSPITR, including:
■ backup control file
■ system tablespaces
■ datafiles containing rollback segments
■ temporary tablespace (optional)
A small amount of space is required by export for sort operations. If a copy of thetemporary tablespace is not included in the auxiliary set, then you must providesort space either by creating a new temporary tablespace after the clone has beenstarted up, or by setting autoextend to ON on the system tablespace files.
Planning for Tablespace Point-in-Time RecoveryTSPITR is a complicated procedure and requires careful planning. Beforeproceeding you should read all of this chapter thoroughly.
WARNING: You should not perform TSPITR for the first timeon a production system, or during circumstances where there is atime constraint.
Performing Tablespace Point-in-Time Recovery 13-3

Planning for Tablespace Point-in-Time Recovery
Limitations AdvisoryThis section describes the limitations of TSPITR.
The primary issue you should consider when deciding whether or not to performTSPITR is the possibility of application-level inconsistencies between tables inrecovered and unrecovered tablespaces (due to implicit rather than explicitreferential dependencies). You must understand these dependencies, and also havethe means to resolve any possible inconsistencies before proceeding.
TS_PITR_CHECK Does Not Check for Objects Owned by SYSThe TS_PITR_CHECK view provides information on dependencies and restrictionsthat can prevent TSPITR from proceeding. However, TS_PITR_CHECK does notprovide information about dependencies and restrictions for objects owned by SYS.
If there are any objects, including undo segments, owned by SYS in the recoveryset, there is no guarantee that you can successfully recover these objects (becauseTSPITR utilizes the Export and Import utilities, which do not operate on objectsowned by SYS). To find out which recovery set objects are owned by SYS, issue thefollowing statement:
SELECT OBJECT_NAME, OBJECT_TYPE FROM SYS.DBA_OBJECTS WHERE TABLESPACE_NAME IN (’<tablespacename1>’,’<tablespacename’,’ <tablespace name N’) and owner = ’SYS’;
See Also: For more details about the TS_PITR_CHECK view, see “Step 2: Researchand Resolve Dependencies on the Primary Database” on page 13-8.
TS_PITR_CHECK Does Not Detect Snapshot TablesThe TS_PITR_CHECK view does not detect snapshot tables (it does detect snapshotlogs); they are exported as stand-alone tables. Thus, if a snapshot is dropped attime 3, and a backup from time 1 is used to roll forward to time 2, after TSPITR iscomplete the snapshot table will have been created as a stand-alone table, butwithout its associated snapshot view.
Partitioned Tables and TS_PITR_CHECKIf any of the tablespaces supplied to the predicate contain the first segment of apartitioned table, then the result set of the TS_PITR_CHECK view is inverted. Iftablespaces supplied to the predicate do not include the first segment of apartitioned table, then one row is returned for the partition in question. If thetablespaces supplied to the predicate contain the first segment of a partitionedtable, the results are inverted (for example, one row is returned for every tablespace
13-4 Oracle8 Backup and Recovery Guide

Planning for Tablespace Point-in-Time Recovery
containing partitions of that partitioned table, but not the tablespace that wassupplied to the predicate). Returned rows indicate that there is a conflict that youmust resolve by exchanging the partitions with stand-alone tables.
See Also: For more information see “Performing Partial TSPITR of PartitionedTables” on page 13-16.
Bitmap IndexesYou must drop and re-create bitmap indexes after you complete TSPITR. If youdon’t, they will be unusable. If any bitmap indexes exist on the tables, imports willfail even if the bitmap indexes have been dropped from the primary database. Anincorrect index segment will also be created, despite the failure, and you will haveto drop and re-build the index.
Non-Partitioned Global IndexesThe TS_PITR_CHECK view does not detect non-partitioned global indexes ofpartitioned tables that are outside the recovery set. This is apparent when the viewis queried manually and also during the export and import phase of TSPITR. AfterTSPITR completes, the old index still exists on the recovered table, even though noerrors are returned. You must drop and re-create the index.
General RestrictionsIn addition to the preceding limitations, TSPITR has the following restrictions:
■ You cannot use TSPITR to recover dropped tablespaces.
■ You cannot use TSPITR to recover a tablespace that has been dropped and re-created with the same name.
■ You cannot use TSPITR to remove a datafile that has been added to the wrongtablespace. If the file was added after the point to which TSPITR is being per-formed, then the file will still be part of the tablespace (and will be empty) afterTSPITR is complete.
■ You cannot use DML statements on the clone database—the clone database isfor recovery purposes only.
■ After TSPITR is complete, you cannot use existing backups of the recovery setdatafiles for recovery; instead, you must take fresh backups of the recovered
Note: Because the index is still valid, queries that use the indexwill return incorrect rows.
Performing Tablespace Point-in-Time Recovery 13-5
Planning for Tablespace Point-in-Time Recovery
files. If you attempt to recover using a backup taken prior to performingTSPITR, recovery will fail (with the error message ORA 1247, 00000, “databaserecovery through TSPITR of tablespace %s”).
■ TSPITR does not recover optimizer statistics for objects that have had statisticscalculated on them; statistics must be re-calculated after performing TSPITR.
■ The following object types are not allowed within the TSPITR recovery set:
■ replicated master tables
■ tables with varray columns
■ tables with nested tables
■ tables with external Bfiles
■ snapshot logs
■ snapshot tables
■ objects owned by SYS (including rollback segments)
Data Consistency and TSPITRTSPITR provides views that can detect any data relationships between objects thatare in the tablespaces being recovered and objects in the rest of the database.TSPITR will not successfully complete unless these relationships are managed,either by removing or suspending the relationship, or by including the relatedobject within the recovery set.
See Also: For more information see “Step 2: Research and Resolve Dependencieson the Primary Database” on page 13-8, and “TS_PITR_CHECK Does Not Checkfor Objects Owned by SYS” on page 13-4.
TSPITR RequirementsYou must satisfy the following requirements before performing TSPITR.
■ All files that comprise the recovery set tablespaces must be present in the recov-ery set, otherwise the export phase of TSPITR will fail (with the error message“1230: cannot make read only, file %s is offline”).
■ You must create the control file backup in the auxiliary set using the followingSQL statement:
ALTER DATABASE BACKUP CONTROLFILE TO ’<controlfile_name>’
13-6 Oracle8 Backup and Recovery Guide
Performing Tablespace Point-In-Time Recovery
This control file backup must be created at a later time than the backup that isbeing used. If it’s not, then you may encounter an error message (ORA-01152,file 1 was not restored from a sufficiently old backup).
■ You must have enough disk space to accommodate the clone database (forexample, the auxiliary set and the recovery set).
■ You must have enough real memory to start up the clone instance.
See Also: For more information, see “Step 4: Prepare the Parameter Files for theClone Database” on page 13-12.
Performing Tablespace Point-In-Time RecoveryThis section describes how to perform TSPITR, and includes the following steps:
■ Step 1: Find Out if Objects Will be Lost when Performing TSPITR
■ Step 2: Research and Resolve Dependencies on the Primary Database
■ Step 3: Prepare the Primary Database for TSPITR
■ Step 4: Prepare the Parameter Files for the Clone Database
■ Step 5: Prepare Clone Database for TSPITR
■ Step 6: Recover the Clone Database
■ Step 7: Open the Clone Database
■ Step 8: Prepare the Clone Database for Export
■ Step 9: Export the Clone Database
■ Step 10: Copy the Recovery Set Clone Files to the Primary Database
■ Step 11: Import into the Primary Database
■ Step 12: Prepare the Primary Database for Use
■ Step 13: Back Up the Recovered Tablespaces in the Primary Database
Performing Tablespace Point-in-Time Recovery 13-7
Performing Tablespace Point-In-Time Recovery
Step 1: Find Out if Objects Will be Lost when Performing TSPITRWhen TSPITR is performed on a tablespace, any objects created after the point towhich TSPITR is being performed will be lost. To see which objects will be lost,query the TS_PITR_OBJECTS_TO_BE_DROPPED view on the primary database.The contents of the view are described in Table 13–1:
When querying TS_PITR_OBJECTS_TO_BE_DROPPED, you must supply all theelements of the date field, otherwise the default setting will be used. You shouldalso use the to_char and to_date functions. For example, with a recovery setconsisting of TS1 and TS2, and a recovery point in time of ’1997-06-02:07:03:11’, youshould issue the following query:
SVRMGR1> select owner, name, tablespace_name, 2> to_char(creation_time, ’YYYY-MM-DD:HH24:MI:SS’), 3> from ts_pitr_objects_to_be_dropped 4> where tablespace_name in (’TS1’,’TS2’) 5> and 6> creation_time > to_date(’97-JUN-02:07:03:11’,’YY-MON- DD:HH24:MI:SS’) 7> order by tablespace_name, creation_time 8> / The information you find in TS_PITR_OBJECTS_TO_BE_DROPPED and TS_PITR_CHECK can help you decide whether or not to perform TSPITR.
Step 2: Research and Resolve Dependencies on the Primary DatabaseYou can use the TS_PITR_CHECK view to identify relationships between objectsthat overlap the recovery set boundaries. If this view returns rows when queried,you must investigate and correct the problem. TSPITR can proceed only whenTS_PITR_CHECK view returns no rows. You should record all actions performedduring this step so that you can retrace these relationships after completing TSPITR.
Table 13–1 TS_PITR_OBJECTS_TO_BE_DROPPED View
Column Name Null? Type
OWNER NOT NULL VARCHAR2(30)
NAME NOT NULL VARCHAR2(30)
CREATION_TIME NOT NULL DATE
TABLESPACE_NAME VARCHAR2(30)
13-8 Oracle8 Backup and Recovery Guide
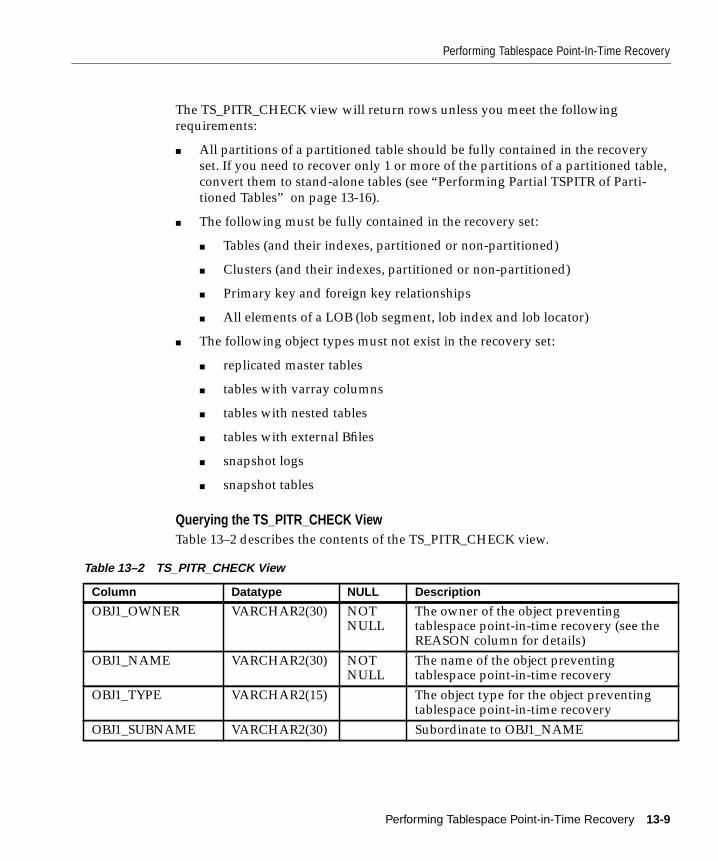
Performing Tablespace Point-In-Time Recovery
The TS_PITR_CHECK view will return rows unless you meet the followingrequirements:
■ All partitions of a partitioned table should be fully contained in the recoveryset. If you need to recover only 1 or more of the partitions of a partitioned table,convert them to stand-alone tables (see “Performing Partial TSPITR of Parti-tioned Tables” on page 13-16).
■ The following must be fully contained in the recovery set:
■ Tables (and their indexes, partitioned or non-partitioned)
■ Clusters (and their indexes, partitioned or non-partitioned)
■ Primary key and foreign key relationships
■ All elements of a LOB (lob segment, lob index and lob locator)
■ The following object types must not exist in the recovery set:
■ replicated master tables
■ tables with varray columns
■ tables with nested tables
■ tables with external Bfiles
■ snapshot logs
■ snapshot tables
Querying the TS_PITR_CHECK ViewTable 13–2 describes the contents of the TS_PITR_CHECK view.
Table 13–2 TS_PITR_CHECK View
Column Datatype NULL Description
OBJ1_OWNER VARCHAR2(30) NOTNULL
The owner of the object preventingtablespace point-in-time recovery (see theREASON column for details)
OBJ1_NAME VARCHAR2(30) NOTNULL
The name of the object preventingtablespace point-in-time recovery
OBJ1_TYPE VARCHAR2(15) The object type for the object preventingtablespace point-in-time recovery
OBJ1_SUBNAME VARCHAR2(30) Subordinate to OBJ1_NAME
Performing Tablespace Point-in-Time Recovery 13-9
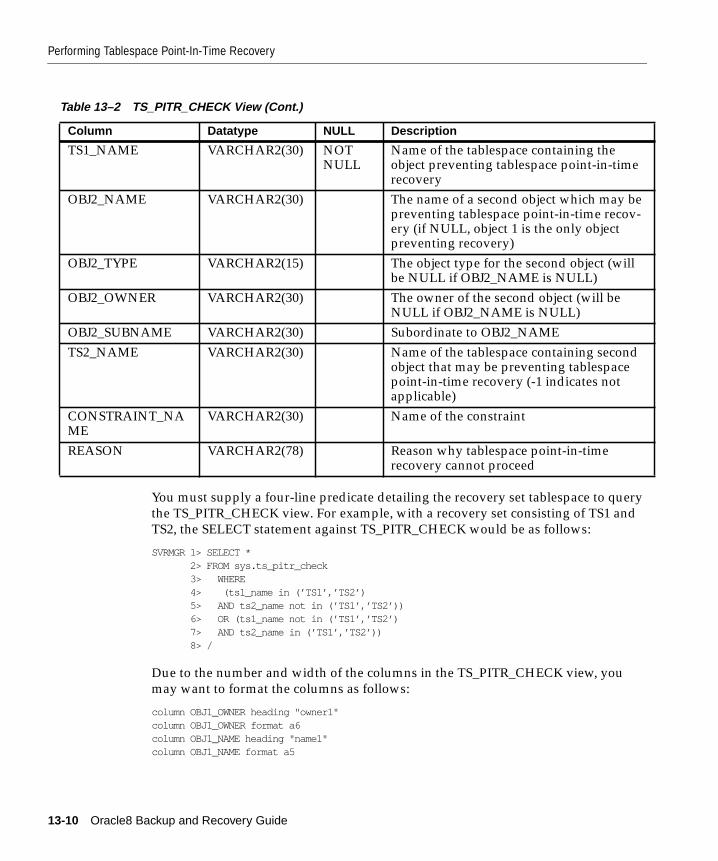
Performing Tablespace Point-In-Time Recovery
You must supply a four-line predicate detailing the recovery set tablespace to querythe TS_PITR_CHECK view. For example, with a recovery set consisting of TS1 andTS2, the SELECT statement against TS_PITR_CHECK would be as follows:
SVRMGR 1> SELECT * 2> FROM sys.ts_pitr_check 3> WHERE 4> (ts1_name in (’TS1’,’TS2’) 5> AND ts2_name not in (’TS1’,’TS2’)) 6> OR (ts1_name not in (’TS1’,’TS2’) 7> AND ts2_name in (’TS1’,’TS2’)) 8> /
Due to the number and width of the columns in the TS_PITR_CHECK view, youmay want to format the columns as follows:
column OBJ1_OWNER heading "owner1"column OBJ1_OWNER format a6column OBJ1_NAME heading "name1"column OBJ1_NAME format a5
TS1_NAME VARCHAR2(30) NOTNULL
Name of the tablespace containing theobject preventing tablespace point-in-timerecovery
OBJ2_NAME VARCHAR2(30) The name of a second object which may bepreventing tablespace point-in-time recov-ery (if NULL, object 1 is the only objectpreventing recovery)
OBJ2_TYPE VARCHAR2(15) The object type for the second object (willbe NULL if OBJ2_NAME is NULL)
OBJ2_OWNER VARCHAR2(30) The owner of the second object (will beNULL if OBJ2_NAME is NULL)
OBJ2_SUBNAME VARCHAR2(30) Subordinate to OBJ2_NAMETS2_NAME VARCHAR2(30) Name of the tablespace containing second
object that may be preventing tablespacepoint-in-time recovery (-1 indicates notapplicable)
CONSTRAINT_NAME
VARCHAR2(30) Name of the constraint
REASON VARCHAR2(78) Reason why tablespace point-in-timerecovery cannot proceed
Table 13–2 TS_PITR_CHECK View (Cont.)
Column Datatype NULL Description
13-10 Oracle8 Backup and Recovery Guide

Performing Tablespace Point-In-Time Recovery
column OBJ1_SUBNAME heading "subname1"column OBJ1_SUBNAME format a8column OBJ1_TYPE heading "obj1type"column OBJ1_TYPE format a8 word_wrappedcolumn TS1_NAME heading "ts1_name"column TS1_NAME format a8column OBJ2_NAME heading "name2"column OBJ2_NAME format a5column OBJ2_SUBNAME heading "subname2"column OBJ2_SUBNAME format a8column OBJ2_TYPE heading "obj2type"column OBJ2_TYPE format a8 word_wrappedcolumn OBJ2_OWNER heading "owner2"column OBJ2_OWNER format a6column TS2_NAME heading "ts2_name"column TS2_NAME format a8column CONSTRAINT_NAME heading "cname"column CONSTRAINT_NAME format a5column REASON heading "reason"column REASON format a57 word_wrapped
Sample Output If the partitioned table TP has two partitions, P1 and P2, which existin tablespaces TS1 and TS2 respectively, and there is a partitioned index defined onTP called TPIND, which has two partitions ID1 and ID2 (that exist in tablespacesID1 and ID2 respectively) you would get the following output whenTS_PITR_CHECK is queried against tablespaces TS1 and TS2 (assumingappropriate formatting):
owner1 name1 subname1 obj1type ts1_name name2 subname2 obj2type owner2 ts2_name cname
reason
----- ---- ----- ------ ------- ---- ------ -------- ------- ------ -----SYSTEM TP P1 TABLE TS1 TPIND IP1 INDEX PARTITION PARTITION SYS ID1
Partitioned Objects not fully contained in the recovery set
SYSTEM TP P1 TABLE TS1 TPIND IP2 INDEX PARTITION PARTITION SYS ID2Partitioned Objects not fully contained in the recovery set
You can see here that the table SYSTEM.TP has a partitioned index TPIND, whichconsists of two partitions, IP1 in tablespace ID1 and IP2 in tablespace ID2. Thus,you must decide to either drop TPIND or include ID1 and ID2 in the recovery set.
Performing Tablespace Point-in-Time Recovery 13-11
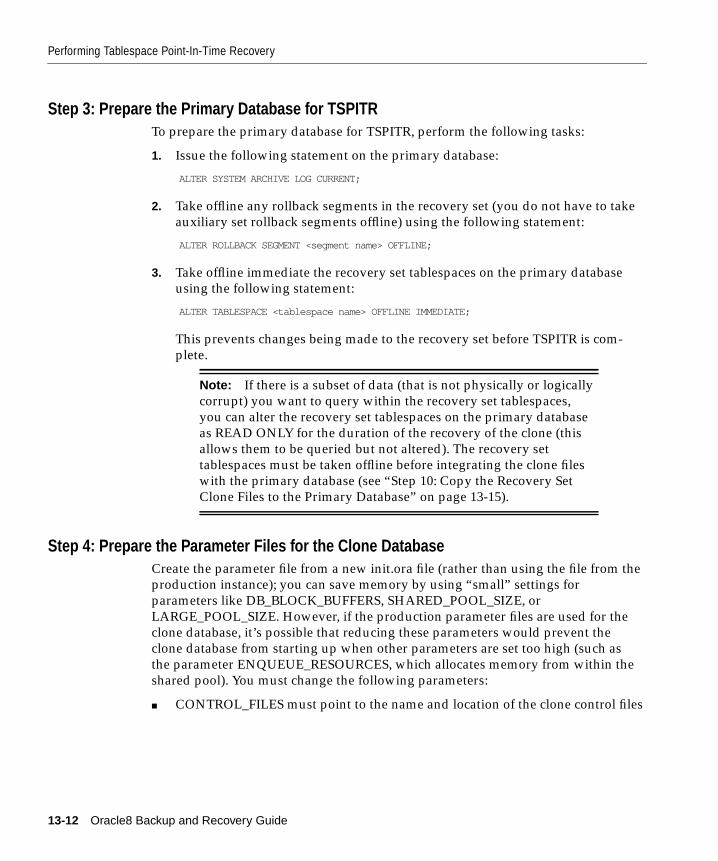
Performing Tablespace Point-In-Time Recovery
Step 3: Prepare the Primary Database for TSPITRTo prepare the primary database for TSPITR, perform the following tasks:
1. Issue the following statement on the primary database:
ALTER SYSTEM ARCHIVE LOG CURRENT;
2. Take offline any rollback segments in the recovery set (you do not have to takeauxiliary set rollback segments offline) using the following statement:
ALTER ROLLBACK SEGMENT <segment name> OFFLINE;
3. Take offline immediate the recovery set tablespaces on the primary databaseusing the following statement:
ALTER TABLESPACE <tablespace name> OFFLINE IMMEDIATE;
This prevents changes being made to the recovery set before TSPITR is com-plete.
Step 4: Prepare the Parameter Files for the Clone DatabaseCreate the parameter file from a new init.ora file (rather than using the file from theproduction instance); you can save memory by using “small” settings forparameters like DB_BLOCK_BUFFERS, SHARED_POOL_SIZE, orLARGE_POOL_SIZE. However, if the production parameter files are used for theclone database, it’s possible that reducing these parameters would prevent theclone database from starting up when other parameters are set too high (such asthe parameter ENQUEUE_RESOURCES, which allocates memory from within theshared pool). You must change the following parameters:
■ CONTROL_FILES must point to the name and location of the clone control files
Note: If there is a subset of data (that is not physically or logicallycorrupt) you want to query within the recovery set tablespaces,you can alter the recovery set tablespaces on the primary databaseas READ ONLY for the duration of the recovery of the clone (thisallows them to be queried but not altered). The recovery settablespaces must be taken offline before integrating the clone fileswith the primary database (see “Step 10: Copy the Recovery SetClone Files to the Primary Database” on page 13-15).
13-12 Oracle8 Backup and Recovery Guide
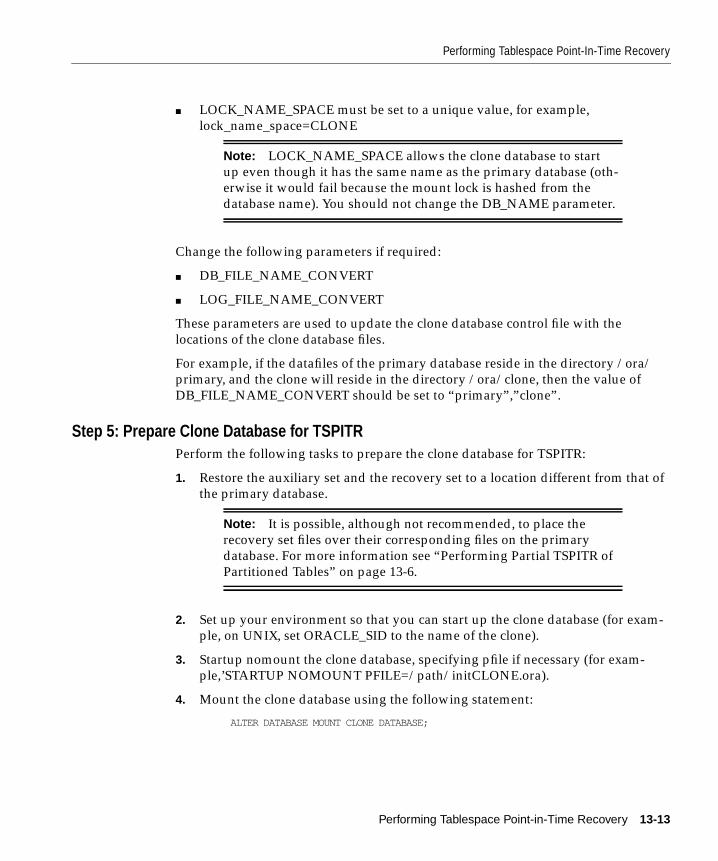
Performing Tablespace Point-In-Time Recovery
■ LOCK_NAME_SPACE must be set to a unique value, for example,lock_name_space=CLONE
Change the following parameters if required:
■ DB_FILE_NAME_CONVERT
■ LOG_FILE_NAME_CONVERT
These parameters are used to update the clone database control file with thelocations of the clone database files.
For example, if the datafiles of the primary database reside in the directory /ora/primary, and the clone will reside in the directory /ora/clone, then the value ofDB_FILE_NAME_CONVERT should be set to “primary”,”clone”.
Step 5: Prepare Clone Database for TSPITRPerform the following tasks to prepare the clone database for TSPITR:
1. Restore the auxiliary set and the recovery set to a location different from that ofthe primary database.
2. Set up your environment so that you can start up the clone database (for exam-ple, on UNIX, set ORACLE_SID to the name of the clone).
3. Startup nomount the clone database, specifying pfile if necessary (for exam-ple,’STARTUP NOMOUNT PFILE=/path/initCLONE.ora).
4. Mount the clone database using the following statement:
ALTER DATABASE MOUNT CLONE DATABASE;
Note: LOCK_NAME_SPACE allows the clone database to startup even though it has the same name as the primary database (oth-erwise it would fail because the mount lock is hashed from thedatabase name). You should not change the DB_NAME parameter.
Note: It is possible, although not recommended, to place therecovery set files over their corresponding files on the primarydatabase. For more information see “Performing Partial TSPITR ofPartitioned Tables” on page 13-6.
Performing Tablespace Point-in-Time Recovery 13-13
Performing Tablespace Point-In-Time Recovery
At this point, the database is automatically taken out of archivelog modebecause it is a clone. All files are offline at this point as well. Even if the filename conversion parameters DB_FILE_NAME_CONVERT andLOG_FILE_NAME_CONVERT have been set, you cannot assume that all thefiles of the clone database will be in the locations specified by theseparameters—there may be some clone database files that have been restored todifferent locations due to constraints of disk space. Additionally, the only filesnecessary to the clone database are in the recovery set and the auxiliary set;there may be many other database files that do not fall into these two sets thatyou can leave offline.
5. If DB_FILE_NAME_CONVERT and LOG_FILE_NAME_CONVERT have notbeen set, you must use the following statement to rename the files to reflecttheir new locations:
ALTER DATABASE RENAME FILE ’<name of file in primary location>’ TO ’<name of corresponding file in clone location>’;
6. If DB_FILE_NAME_CONVERT and LOG_FILE_NAME_CONVERT have beenset, but there are files that have been restored to different locations, then theymust be renamed at this point. Bring online all recovery set and auxiliary setfiles using the following SQL statement:
ALTER DATABASE DATAFILE ’<datafile name>’ ONLINE;
Step 6: Recover the Clone DatabaseRecover the clone database up to the desired point by specifying the USINGBACKUP CONTROLFILE option. You can use any form of interrupted recovery,including time-based or cancel-based recovery, as follows:
RECOVER DATABASE USING BACKUP CONTROLFILE UNTIL TIME ’YYYY-MM-DD:HH24:MI:SS’;
RECOVER DATABASE USING BACKUP CONTROLFILE UNTIL CANCEL;
If the clone database files are not online you will get an error message (’ORA 264:no recovery required’).
Note: the export phase of TSPITR will not work if all the files ofeach recovery set tablespace are not online.
13-14 Oracle8 Backup and Recovery Guide

Performing Tablespace Point-In-Time Recovery
Step 7: Open the Clone DatabaseAlter the clone database open resetlogs using the following statement:
ALTER DATABASE OPEN RESETLOGS;
Because the database is a clone database, only the SYSTEM rollback segment isbrought online at this point; this prevents you from executing DML statementsagainst any user tablespace. Any attempt to bring a user rollback segment onlinewill fail (message ORA 1698’a clone database may only have SYSTEM rollbacksegment online’).
Step 8: Prepare the Clone Database for ExportPrepare the clone database for export using the TS_PITR_CHECK view andresolving the dependencies just as you did for the primary database (see “Step 2:Research and Resolve Dependencies on the Primary Database” on page 13-8). Onlywhen TS_PITR_CHECK returns no rows will the export phase of TSPITR complete.
Step 9: Export the Clone DatabaseExport the meta-data for the recovery set tablespaces using the following statement:
exp sys/<password> point_in_time_recover=yrecovery_tablespaces=<tablespace1>,<tablespace2>,<tablespaceN>
If the export phase fails (with the error message “ORA 29308 viewTS_PITR_CHECK failure”), re-query TS_PITR_CHECK, resolve the problem, andre-run the export. You need to perform the export phase of TSPITR as the user SYS,otherwise the export will fail (with the error message “ORA-29303: user does notlogin as SYS”). Shut down the clone database after a successful export.
Step 10: Copy the Recovery Set Clone Files to the Primary DatabaseIf any recovery set tablespaces are READ ONLY on the primary database, youshould change them to OFFLINE. Copy the recovery set files from the clonedatabase to the primary database, taking care not to overwrite any auxiliary setfiles on the primary database.
Step 11: Import into the Primary DatabaseImport the recovery set meta-data into the primary database using the followingcommand:
imp sys/<password> point_in_time_recover=true
Performing Tablespace Point-in-Time Recovery 13-15
Performing Partial TSPITR of Partitioned Tables
This import also updates the copied file’s file headers and integrates them with theprimary database.
Step 12: Prepare the Primary Database for UseFirst bring the recovery set tablespaces online in the primary database. Thenchange the recovery set tablespaces to READ WRITE (if they had been altered toREAD ONLY, see “Step 3: Prepare the Primary Database for TSPITR” onpage 13-12).
To prepare the primary database for use, undo all the steps taken to resolvedependencies; for example, rebuild indexes or re-enable constraints (see “Step 2:Research and Resolve Dependencies on the Primary Database” on page 13-8). Ifstatistics existed on the recovery set objects before TSPITR was performed, you willneed to recalculate them. For partitioned tables, you have to exchange the stand-alone tables into the partitions of their partitioned tables (for more information, see“Performing Partial TSPITR of Partitioned Tables” on page 13-16).
Step 13: Back Up the Recovered Tablespaces in the Primary DatabaseAfter TSPITR on a tablespace is complete, back up the tablespace.
Performing Partial TSPITR of Partitioned TablesThis section describes how to perform partial TSPITR of partitioned tables thathave a range that has not changed or expanded, and includes the following steps:
■ Step 1: Create a Table on the Primary Database for Each Partition Being Recov-ered
■ Step 2: Drop the Indexes on the Partition Being Recovered
■ Step 3: Exchange Partitions with Stand-Alone Tables
■ Step 4:Take the Recovery Set Tablespace Offline
WARNING: it is critical that you back up the tablespace. Failureto do so could result in the loss of that tablespace. For example,you could lose the tablespace in the event of media failurebecause the archived logs from the last backup of that databasedo not logically link to the recovered tablespaces. If you attemptto recover any recovery set tablespaces from a backup takenbefore TSPITR, you will fail (and receive error message “ORA1246, recovering files through TSPITR of tablespace %s”).
13-16 Oracle8 Backup and Recovery Guide
Performing Partial TSPITR of Partitioned Tables
■ Step 5: Create Tables at Clone Database
■ Step 6: Drop Indexes on Partitions Being Recovered
■ Step 7: Exchange Partitions with Stand-Alone Tables
■ Step 8: Export the Clone Database
■ Step 9: Copy the Recovery Set Datafiles to the Primary Database
■ Step 10: Import into the Primary Database
■ Step 11: Bring Recovery Set Tablespace Online
■ Step 12: Exchange Partitions with Stand-Alone Tables
■ Step 13: Back Up the Recovered Tablespaces in the Primary Database
Step 1: Create a Table on the Primary Database for Each Partition Being RecoveredCreate a table on the primary database for each partition you wish to recover. Thistable should have the exact same column names and column datatypes as thepartitioned table you are recovering. You can create the table using the followingstatement:
CREATE TABLE <new table> AS SELECT * FROM <partitioned table> where 1=2;
These tables will be used to swap each recovery set partition (see Step 3).
Step 2: Drop the Indexes on the Partition Being RecoveredDrop the indexes on the partition you wish to recover, or create identical, non-partitioned indexes that exist on the partition you wish to recover (on the tablecreated in Step 1). If you drop the indexes on the partition being recovered you willalso need to drop them on the clone database (see Step 6). You will also have torebuild the indexes after TSPITR is complete.
Note: Often, along with recovering a partition whose range hasexpanded, you will also have to recover the dropped partition. Ifthis is the case, see “Performing TSPITR of Partitioned TablesWhen a Partition Has Been Dropped” on page 13-21.
Performing Tablespace Point-in-Time Recovery 13-17

Performing Partial TSPITR of Partitioned Tables
Step 3: Exchange Partitions with Stand-Alone TablesExchange each partition in the recovery set with its associated stand-alone table(created in Step 1) by issuing the following command:
ALTER TABLE <table name> EXCHANGE PARTITION <partition name> WITH TABLE <table name>;
Step 4:Take the Recovery Set Tablespace OfflineOn the primary database, take each recovery set tablespace offline by issuing thefollowing statement:
ALTER TABLESPACE <tablespace name> OFFLINE IMMEDIATE;
This prevents any further changes to the recovery set tablespaces on the primarydatabase.
Step 5: Create Tables at Clone DatabaseAfter recovering the clone and opening resetlogs, create a table that has the exactsame column names and column datatypes as the partitioned table you arerecovering—do this for each partition you wish to recover. These tables will beused later to swap each recovery set partition.
Step 6: Drop Indexes on Partitions Being RecoveredDrop the indexes on the partition you wish to recover, or create identical, non-partitioned indexes that exist on the partition you wish to recover (on the tablecreated in Step 1).
Step 7: Exchange Partitions with Stand-Alone TablesFor each partition in the clone database recovery set, exchange the partitions withthe stand-alone tables (created in Step 5) by issuing the following statement:
ALTER TABLE <partitioned_table_name> EXCHANGE PARTITION <partition_name> WITH TABLE<table_name>;
Step 8: Export the Clone DatabaseExecute export against the clone database for the recovery set tablespaces using thefollowing statement:
exp sys/<password> point_in_time_recover=yrecovery_tablespaces=<tablespace1>,<tablespace2>,<tablespaceN>
13-18 Oracle8 Backup and Recovery Guide

Performing Partial TSPITR of Partitioned Tables
If the export phase fails (with the error message “ORA 29308 viewTS_PITR_CHECK failure”), re-query TS_PITR_CHECK, resolve the problem, andre-run the export. You need to perform the export phase of TSPITR as the user SYS,otherwise the export will fail (with the error message “ORA-29303: user does notlogin as SYS”). Shut down the clone database after a successful export.
Step 9: Copy the Recovery Set Datafiles to the Primary DatabaseIf any recovery set tablespaces are READ ONLY on the primary database, youshould change them to OFFLINE. Copy the recovery set datafiles from the clonedatabase to the primary database, taking care not to overwrite any auxiliary setfiles on the primary database.
Step 10: Import into the Primary DatabaseImport the recovery set meta-data into the primary database using the followingcommand:
imp sys/<password> point_in_time_recover=true
This import also updates the copied file’s file headers and integrates them with theprimary database.
Step 11: Bring Recovery Set Tablespace OnlineAt the primary database, bring each recovery set tablespace online by issuing thefollowing statement:
ALTER TABLESPACE <tablespace name> ONLINE;
Step 12: Exchange Partitions with Stand-Alone TablesFor each recovered partition on the primary database, swap its associated stand-alone table back in using the following statement:
ALTER TABLE <table name> EXCHANGE PARTITION <partition name> WITH TABLE <table name>;
If the associated indexes have been dropped, you must re-create them.
Performing Tablespace Point-in-Time Recovery 13-19
Performing Partial TSPITR of Partitioned Tables
Step 13: Back Up the Recovered Tablespaces in the Primary DatabaseBack up the recovered tablespaces on the primary database. Failure to do so willresult in loss of data in the event of media failure.
WARNING: It is critical that you back up the tablespace. Failureto do so could result in the loss of that tablespace. For example,you could lose the tablespace in the event of media failurebecause the archived logs from the last backup of that databasedo not logically link to the recovered tablespaces. If you attemptto recover any recovery set tablespaces from a backup takenbefore TSPITR, you will fail (and receive error message “ORA1246, recovering files through TSPITR of tablespace %s”).
13-20 Oracle8 Backup and Recovery Guide

Performing TSPITR of Partitioned Tables When a Partition Has Been Dropped
Performing TSPITR of Partitioned Tables When a Partition Has BeenDropped
This section describes how to perform TSPITR on partitioned tables when apartition has been dropped, and includes the following steps:
■ Step 1: Find the Low and High Range of the Partition that Was Dropped
■ Step 2: Create a Temporary Table
■ Step 3: Delete Records From Partitioned Table
■ Step 4: Take Recovery Set Tablespaces Offline
■ Step 5: Create Tables at Clone Database
■ Step 6: Drop Indexes on Partitions Being Recovered
■ Step 7: Exchange Partitions with Stand-Alone Tables
■ Step 8: Export the Clone Database
■ Step 9: Copy the Recovery Set Datafiles to the Primary Database
■ Step 10: Import into the Primary Database
■ Step 11: Bring Recovery Set Tablespace Online
■ Step 12: Insert Stand-Alone Tables into Partitioned Tables
■ Step 13: Back Up the Recovered Tablespaces in the Primary Database
Step 1: Find the Low and High Range of the Partition that Was DroppedWhen a partition is dropped, the range of the partition above it expandsdownwards. Therefore, there may be records in the partition above that shouldactually be in the dropped partition after it has been recovered. To ascertain this,issue the following command at the primary database:
SELECT * FROM <partitioned table> WHERE <relevant key> BETWEEN <low range of partitionthat was dropped> and <high range of partition that was dropped>;
Performing Tablespace Point-in-Time Recovery 13-21

Performing TSPITR of Partitioned Tables When a Partition Has Been Dropped
Step 2: Create a Temporary TableIf any records are returned, create a temporary table in which to store these recordsso that they can be inserted into the recovered partition later (if required).
Step 3: Delete Records From Partitioned TableDelete all the records stored in the temporary table from the partitioned table.
Step 4: Take Recovery Set Tablespaces OfflineAt the primary database, take each recovery set tablespace offline by issuing thefollowing statement:
ALTER TABLESPACE <tablespace name> OFFLINE IMMEDIATE;
Step 5: Create Tables at Clone DatabaseAfter recovering the clone and opening resetlogs, create a table that has the exactsame column names and column datatypes as the partitioned table you arerecovering—do this for each partition you wish to recover. These tables will beused later to swap each recovery set partition.
Step 6: Drop Indexes on Partitions Being RecoveredDrop the indexes on the partition you wish to recover, or create identical, non-partitioned indexes that exist on the partition you wish to recover.
Step 7: Exchange Partitions with Stand-Alone TablesFor each partition in the clone recovery set, exchange the partitions into the stand-alone tables created in Step 5 by issuing the following statement:
ALTER TABLE <partitioned_table_name> EXCHANGE PARTITION <partition_name> WITH TABLE<table_name>;
Step 8: Export the Clone DatabaseExecute export against the clone database for the recovery set tablespaces using thefollowing statement:
exp sys/<password> point_in_time_recover=yrecovery_tablespaces=<tablespace1>,<tablespace2>,<tablespaceN>
If the export phase fails (with the error message “ORA 29308 viewTS_PITR_CHECK failure”), re-query TS_PITR_CHECK, resolve the problem, and
13-22 Oracle8 Backup and Recovery Guide

Performing TSPITR of Partitioned Tables When a Partition Has Been Dropped
re-run the export. You need to perform the export phase of TSPITR as the user SYS,otherwise the export will fail (with the error message “ORA-29303: user does notlogin as SYS”). Shut down the clone database after a successful export.
Step 9: Copy the Recovery Set Datafiles to the Primary DatabaseIf any recovery set tablespaces are READ ONLY on the primary database, youshould change them to OFFLINE. Copy the recovery set datafiles from the clonedatabase to the primary database, taking care not to overwrite any auxiliary setfiles on the primary database.
Step 10: Import into the Primary DatabaseImport the recovery set meta-data into the primary database using the followingcommand:
imp sys/<password> point_in_time_recover=true
This import also updates the copied file’s file headers and integrates them with theprimary database.
Step 11: Bring Recovery Set Tablespace OnlineOnline each recovery set tablespace at the primary database by issuing thefollowing statement:
ALTER TABLESPACE <tablespace name> ONLINE;
Step 12: Insert Stand-Alone Tables into Partitioned TablesAt this point you must insert the stand-alone tables into the partitioned tables; youcan do this by first issuing the following statement:
ALTER TABLE <table name> SPLIT PARTITION <partition name> AT (<key value>) INTO (PARTITION <partition 1 name> TABLESPACE <tablespace name>, PARTITION <partition 2 name> TABLESPACE <tablespace name>);
Note that at this point, partition 2 is empty because keys in that range have alreadybeen deleted from the table.
Issue the following statement to swap the stand-alone table into the partition:
ALTER TABLE EXCHANGE PARTITION <partition name> WITH TABLE <table name>;
Performing Tablespace Point-in-Time Recovery 13-23
Performing TSPITR of Partitioned Tables When a Partition Has Been Dropped
Now insert the records saved in Step 2 into the recovered partition (if desired).
Step 13: Back Up the Recovered Tablespaces in the Primary DatabaseBack up the recovered tablespaces in the primary database. Failure to do so willresult in loss of data in the event of media failure.
Note: If the partition that has been dropped is the last partition inthe table, it can be added using the following statement:
ALTER TABLE ADD PARTITION;
WARNING: It is critical that you back up the tablespace. Failureto do so could result in the loss of that tablespace. For example,you could lose the tablespace in the event of media failurebecause the archived logs from the last backup of that databasedo not logically link to the recovered tablespaces. If you attemptto recover any recovery set tablespaces from a backup takenbefore TSPITR, you will fail (and receive error message “ORA1246, recovering files through TSPITR of tablespace %s”).
Note: As described in “Limitations Advisory” on page 13-4,TSPITR cannot be used to recover a tablespace that has beendropped. Therefore, if the associated tablespace of the partition hasbeen dropped as well as the partition, you cannot recover that par-tition using TSPITR. You will have to perform ordinary export/import recovery. Specifically, you will have to:
■ Make a copy of the database
■ Roll it forward
■ Open the database
■ Exchange the partition for a stand-alone table
■ Make a table-level export of the stand-alone table
■ Import the table into the primary database and insert it intothe partitioned table using the following statement:
ALTER TABLE SPLIT PARTITION or ALTER TABLE ADDPARTITION;
13-24 Oracle8 Backup and Recovery Guide

Performing TSPITR of Partitioned Tables When a Partition Has Been Split
Performing TSPITR of Partitioned Tables When a Partition Has BeenSplit
This section describes how to recover partitioned tables when a partition has beensplit, and includes the following sections:
■ Step 1: Drop the Lower of the Two Partitions at the Primary Database
■ Step 2: Drop Indexes of Partitions Being Recovered
■ Step 3: Exchange Partitions with Stand-Alone Tables
■ Step 4: Take Recovery Set Tablespaces Offline
■ Step 5: Create Tables at Clone Database
■ Step 6: Drop Indexes in Partitions Being Recovered
■ Step 7: Exchange Partitions with Stand-Alone Tables
■ Step 8: Export the Clone Database
■ Step 9: Copy the Recovery Set Datafiles to the Primary Database
■ Step 10: Import into the Primary Database
■ Step 11: Bring Recovery Set Tablespace Online
■ Step 12: Exchange Partitions with Stand-Alone Tables
■ Step 13: Back Up the Recovered Tablespaces in the Primary Database
Step 1: Drop the Lower of the Two Partitions at the Primary DatabaseAt the primary database, for each partition you wish to recover whose range hasbeen split, drop the lower of the two partitions so that the higher of the twopartitions expands downwards (in other words, has the same range as before thesplit). For example, if P1 was split into two partitions P1A and P1B, then P1B mustbe dropped, meaning that partition P1A now has the same range as P1.
For each partition that you wish to recover whose range has split, create a table thathas exactly the same column names and column datatypes as the partitioned tableyou are recovering by issuing the following statement:
CREATE TABLE <new table> AS SELECT * FROM <partitioned table> where 1=2;
These tables will be used to exchange each recovery set partition Step 3.
Performing Tablespace Point-in-Time Recovery 13-25

Performing TSPITR of Partitioned Tables When a Partition Has Been Split
Step 2: Drop Indexes of Partitions Being RecoveredEither drop the indexes of the partition you wish to recover or create identical, non-partitioned indexes on the table created in Step 1 as the indexes that exist on thepartition you wish to recover. Dropping the indexes on the partition you wish torecover means that you will need also to drop them an the clone database (see Step6), and will of course mean that they need to be rebuilt once the recovery iscomplete.
Step 3: Exchange Partitions with Stand-Alone TablesExchange each partition in the recovery set with its associated stand-alone table(created in Step 1) by issuing the following command:
ALTER TABLE <table name> EXCHANGE PARTITION <partition name> WITH TABLE <table name>;
Step 4: Take Recovery Set Tablespaces OfflineAt the primary database, take each recovery set tablespace offline by issuing thefollowing statement:
ALTER TABLESPACE <tablespace name> OFFLINE IMMEDIATE;
This prevents any further changes to the recovery set tablespaces at the primarydatabase.
Step 5: Create Tables at Clone DatabaseAt the clone database, after recovering the clone and opening resetlogs: For eachpartition you wish to recover, create a table that has exactly the same columnnames and column datatypes as the partitioned table you are recovering. Thesetables will be used to swap each recovery set partition (see Step 7).
Step 6: Drop Indexes in Partitions Being RecoveredEither drop the indexes on the partition you wish to recover, or create identical,non-partitioned indexes on the table created in Step 1 as the indexes that exist onthe partition you wish to recover.
Step 7: Exchange Partitions with Stand-Alone TablesFor each partition in the clone recovery set, exchange the partitions into the stand-alone tables created in Step 5 by issuing the following statement:
ALTER TABLE <partitioned_table_name> EXCHANGE PARTITION <partition_name> WITH TABLE<table_name>;
13-26 Oracle8 Backup and Recovery Guide
Performing TSPITR of Partitioned Tables When a Partition Has Been Split
Step 8: Export the Clone DatabaseExecute export against the clone database for the recovery set tablespaces using thefollowing statement:
exp sys/<password> point_in_time_recover=yrecovery_tablespaces=<tablespace1>,<tablespace2>,<tablespaceN>
If the export phase fails (with the error message “ORA 29308 viewTS_PITR_CHECK failure”), re-query TS_PITR_CHECK, resolve the problem, andre-run the export. You need to perform the export phase of TSPITR as the user SYS,otherwise the export will fail (with the error message “ORA-29303: user does notlogin as SYS”). Shut down the clone database after a successful export.
Step 9: Copy the Recovery Set Datafiles to the Primary DatabaseIf any recovery set tablespaces are READ ONLY on the primary database, youshould change them to OFFLINE. Copy the recovery set datafiles from the clonedatabase to the primary database, taking care not to overwrite any auxiliary setfiles on the primary database.
Step 10: Import into the Primary DatabaseImport the recovery set meta-data into the primary database using the followingcommand:
imp sys/<password> point_in_time_recover=true
This import also updates the copied file’s file headers and integrates them with theprimary database.
Step 11: Bring Recovery Set Tablespace OnlineBring each recovery set tablespace at the primary database online by issuing thefollowing statement:
ALTER TABLESPACE <tablespace name> ONLINE;
Step 12: Exchange Partitions with Stand-Alone TablesFor each recovered partition at the primary database, exchange its associated stand-alone table using the following statement:
ALTER TABLE <table name> EXCHANGE PARTITION <partition name> WITH TABLE <table name>;
If the associated indexes have been dropped, you must re-create them.
Performing Tablespace Point-in-Time Recovery 13-27
TSPITR Tuning Considerations
Step 13: Back Up the Recovered Tablespaces in the Primary DatabaseBack up the recovered tablespaces in the primary database. Failure to do so willresult in loss of data in the event of media failure.
See Also: For more information see “Performing TSPITR of Partitioned TablesWhen a Partition Has Been Dropped” on page 13-21.
TSPITR Tuning ConsiderationsThis section describes tuning issues relevant to TSPITR, and includes the followingtopics:
■ Recovery Set Location Considerations
■ Backup Control File Considerations
Recovery Set Location ConsiderationsIf space is at a premium, it is possible to recover the recovery set files ’in place’, inother words, over their corresponding files on the primary database. This is not therecommended best practice—the recommended best practice is that you restore thefiles to a separate location and then copy across before the import phase of TSPITRis complete (see “Step 11: Import into the Primary Database” on page 13-15).
Following are advantages and disadvantages of the two approaches.
Advantages and Disadvantages of Recovering to a Separate LocationAn advantage of recovering to a separate location is basically greater availabilityand flexibility. If the recovery is abandoned at a point before integrating therecovery set with the primary database then there is no need to restore the recoveryset files on the primary database and recover them using normal means. Also, therecovery set tablespaces can be accessible on the primary database while recoveryoccurs on the clone. For example, there may be a subset of undamaged data within
WARNING: it is critical that you back up the tablespace. Failureto do so could result in the loss of that tablespace. For example,you could lose the tablespace in the event of media failurebecause the archived logs from the last backup of that databasedo not logically link to the recovered tablespaces. If you attemptto recover any recovery set tablespaces from a backup takenbefore TSPITR, you will fail (and receive error message “ORA1246, recovering files through TSPITR of tablespace %s”).
13-28 Oracle8 Backup and Recovery Guide

TSPITR Tuning Considerations
the recovery set tablespaces that you wish to access (see “Step 3: Prepare thePrimary Database for TSPITR” on page 13-12). If this is the case, you can changethe recovery set tablespaces to READ ONLY on the primary database so that youcan query them while preventing any further changes to them. If the files arerecovered in place this is not possible.
A disadvantage of recovering to s separate location is that more space is requiredfor the clone database.
Advantages and Disadvantages of Recovering in PlaceAn advantage of recovering in place is that the amount of space taken up by therecovery set files is saved. After recovery of the clone is complete, there is no needto copy the recovery set files over to the primary database.
If the recovery is abandoned at a point before integrating the recovery set with theprimary database (see “Step 11: Import into the Primary Database” on page 13-15)then the overwritten recovery set files of the primary database must be restoredfrom a backup and recovered by normal means, prolonging data unavailability—this is a disadvantage. You cannot query any undamaged data within the recoveryset tablespaces while recovery is going on.
Backup Control File ConsiderationsThe error “ORA-01152 file 1 was not restored from a sufficiently old backup” willbe encountered in the situation where no recovery is performed on the clone beforegrafting it to the primary. For example, if a backup is taken at time A, and adatabase at time B requires TSPITR to be done on a particular tablespace to takethat tablespace to time A, what actually happens is that the clone database isopened resetlogs without any recovery having been done, i.e. when recovering theclone, the commands would be:
SVRMGRL> recover database using backup controlfile until cancel;SVRMGRL> cancel;SVRMGRL> open database resetlogs;
At this point no logs have been applied, but we wish to open the database.However, since we save checkpoints to the control file in Oracle 8, it is arequirement for clone and standby databases that the backup control files need tobe taken at a point after the rest of the backup was taken. Unless this is the case,“ORA-01152 file 1 was not restored from a sufficiently old backup” will be
Performing Tablespace Point-in-Time Recovery 13-29

TSPITR Tuning Considerations
encountered on open, not because file 1 is too recent (because it is in sync with therest of the database), but because it is more recent than the control file.
Note: A resetlogs would work with a regular database if a clean,consistent backup and an old backup control file is used, otherwisethe behavior would not be compatible with existing backup scripts.
13-30 Oracle8 Backup and Recovery Guide
Recovery Manager Command S
A
Recovery Manager Command SyntaxThis appendix includes the Recovery Manager command syntax.
yntax A-1

allocateForDelete
allocateForDelete
ALLOCATE CHANNEL FOR DELETE
TYPE= DISK
quoted_string
NAME=
quoted_string
allocateForDelete
PARMS=
quoted_string
CONNECT quoted_string
DEBUG=
integer
FORMAT=
quoted_string;
A-2 Oracle8 Server Backup and Recovery Guide
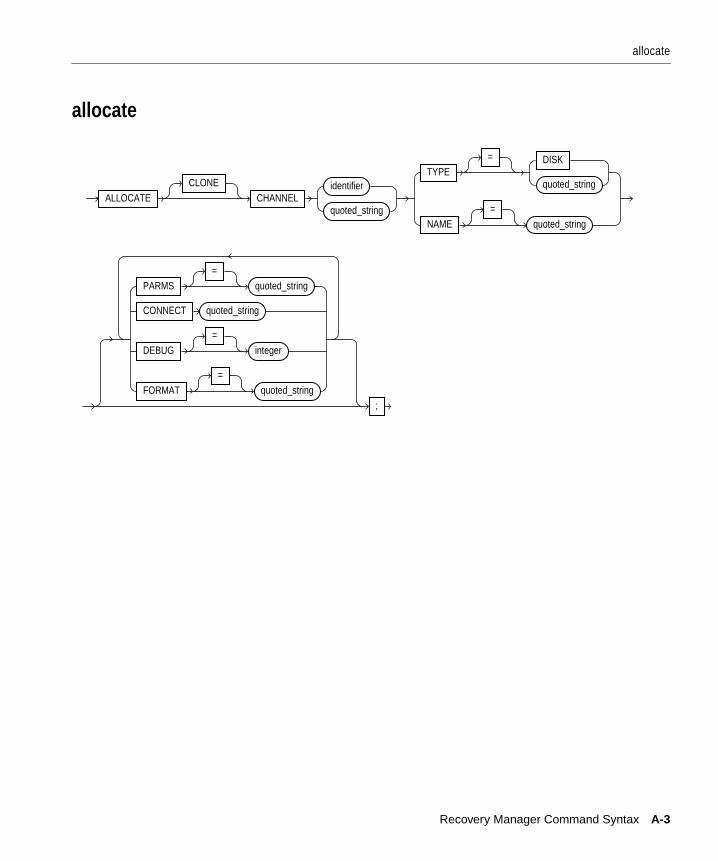
allocate
allocate
ALLOCATECLONE
CHANNELidentifier
quoted_string
TYPE= DISK
quoted_string
NAME=
quoted_string
PARMS=
quoted_string
CONNECT quoted_string
DEBUG=
integer
FORMAT=
quoted_string;
Recovery Manager Command Syntax A-3

archivelogRecordSpecifier
archivelogRecordSpecifier
ARCHIVELOG
ALL
LIKE quoted_string
UNTIL TIME=
quoted_string
FROM TIME=
quoted_stringUNTIL TIME
=quoted_string
UNTIL SCN=
integer
FROM SCN=
integerUNTIL SCN
=integer
FROM LOGSEQ=
integer UNTIL LOGSEQ=
integer THREAD=
integer
archivelogRecordSpecifier
1
2
3
LIKE quoted_string THREAD=
integer
2
3
1
A-4 Oracle8 Server Backup and Recovery Guide
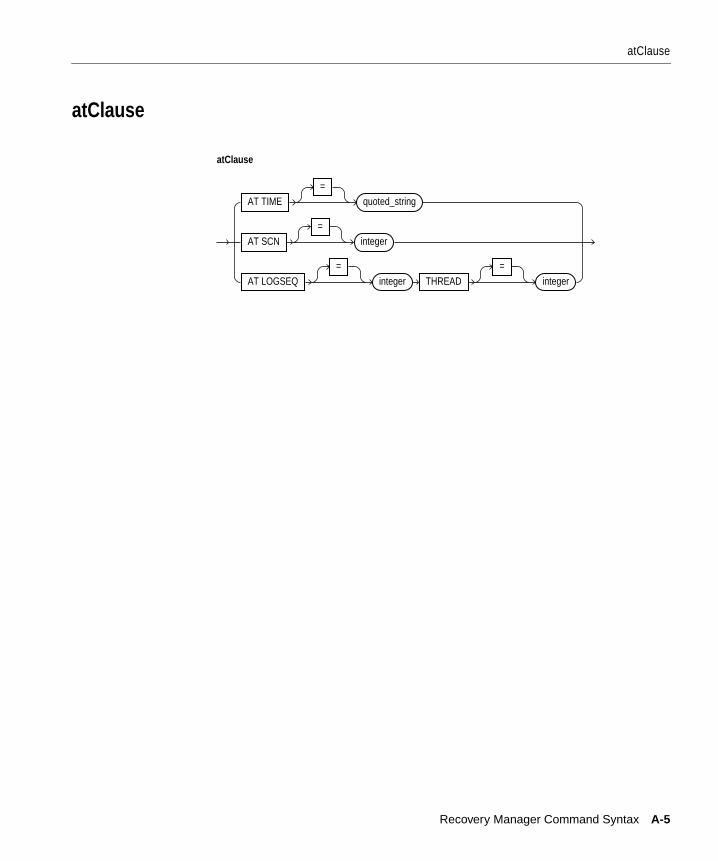
atClause
atClause
AT TIME=
quoted_string
AT SCN=
integer
AT LOGSEQ=
integer THREAD=
integer
atClause
Recovery Manager Command Syntax A-5
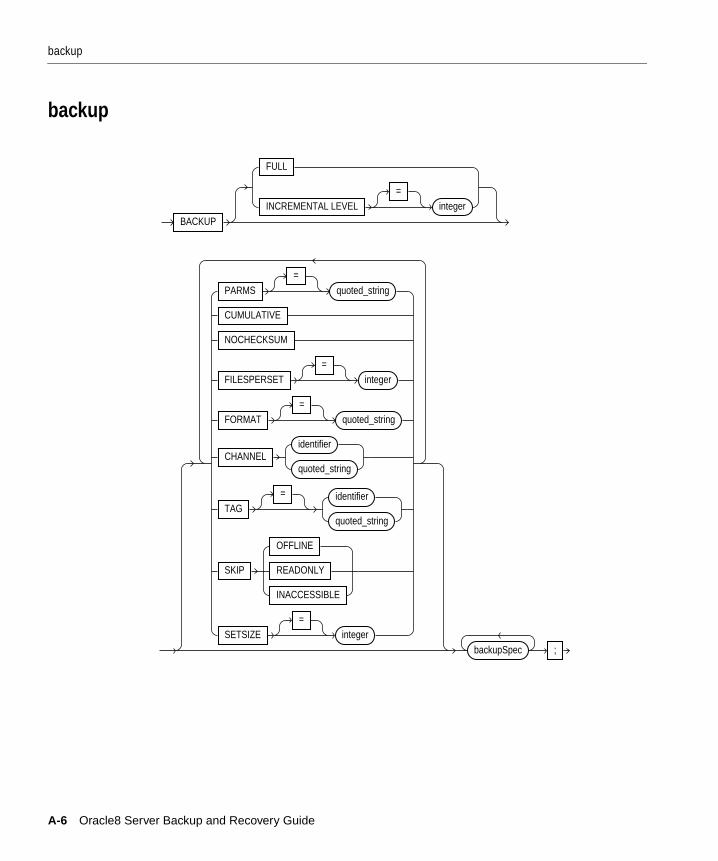
backup
backup
BACKUP
FULL
INCREMENTAL LEVEL=
integer
PARMS=
quoted_string
CUMULATIVE
NOCHECKSUM
FILESPERSET=
integer
FORMAT=
quoted_string
CHANNELidentifier
quoted_string
TAG= identifier
quoted_string
SKIP
OFFLINE
READONLY
INACCESSIBLE
SETSIZE=
integerbackupSpec ;
A-6 Oracle8 Server Backup and Recovery Guide
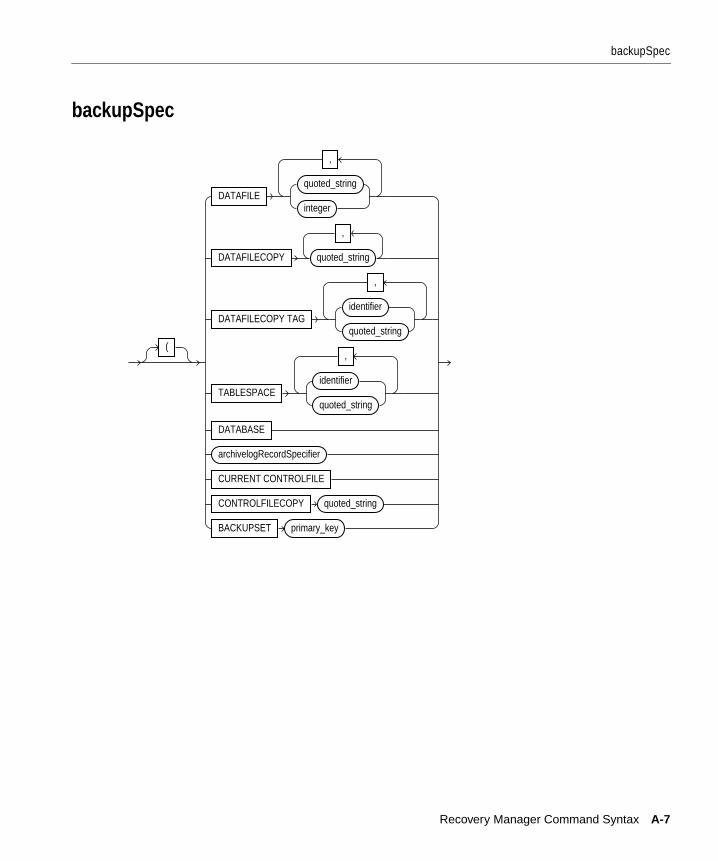
backupSpec
backupSpec
(
DATAFILEquoted_string
integer
,
DATAFILECOPY quoted_string
,
DATAFILECOPY TAGidentifier
quoted_string
,
TABLESPACEidentifier
quoted_string
,
DATABASE
archivelogRecordSpecifier
CURRENT CONTROLFILE
CONTROLFILECOPY quoted_string
BACKUPSET primary_key
Recovery Manager Command Syntax A-7
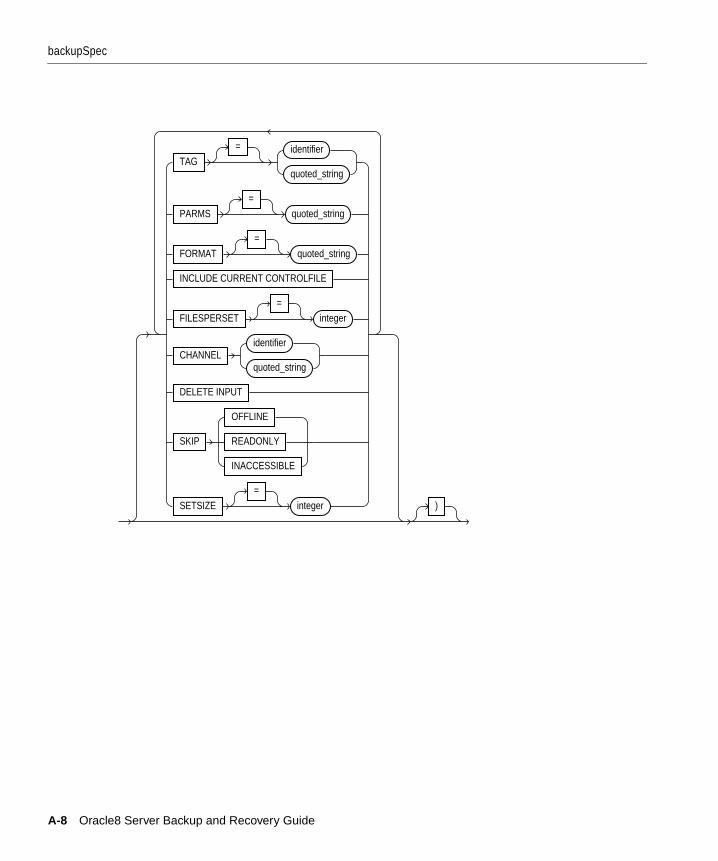
backupSpec
TAG= identifier
quoted_string
PARMS=
quoted_string
FORMAT=
quoted_string
INCLUDE CURRENT CONTROLFILE
FILESPERSET=
integer
CHANNELidentifier
quoted_string
DELETE INPUT
SKIP
OFFLINE
READONLY
INACCESSIBLE
SETSIZE=
integer )
A-8 Oracle8 Server Backup and Recovery Guide

catalog
catalog
CATALOG
CONTROLFILECOPY quoted_string
,
DATAFILECOPY quoted_string
,
ARCHIVELOG quoted_string
,
TAG= identifier
quoted_string
LEVEL integer;
Recovery Manager Command Syntax A-9
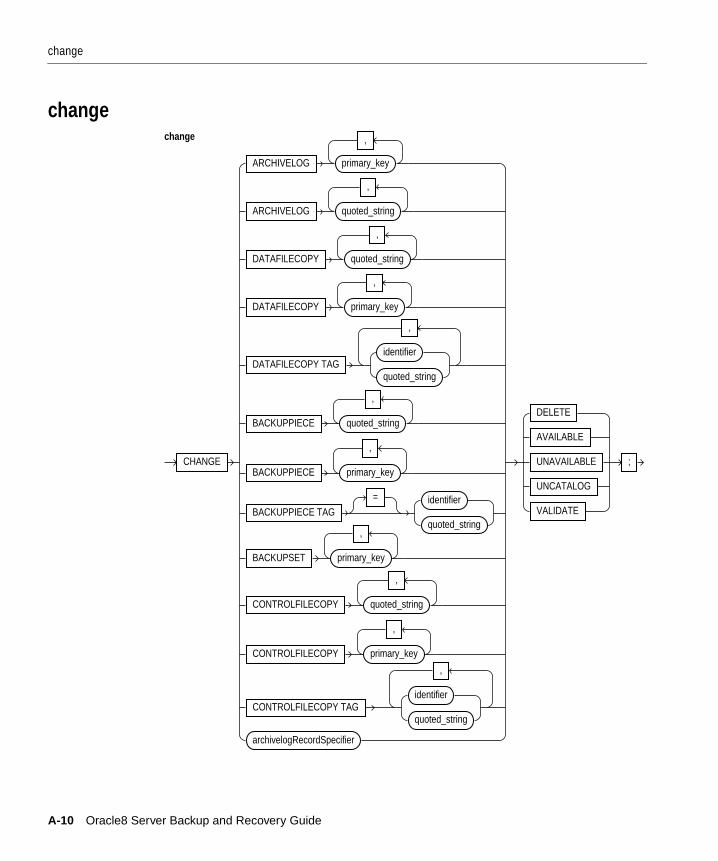
change
change
CHANGE
ARCHIVELOG primary_key
,
ARCHIVELOG quoted_string
,
DATAFILECOPY quoted_string
,
DATAFILECOPY primary_key
,
DATAFILECOPY TAGidentifier
quoted_string
,
BACKUPPIECE quoted_string
,
BACKUPPIECE primary_key
,
BACKUPPIECE TAG= identifier
quoted_string
BACKUPSET primary_key
,
CONTROLFILECOPY quoted_string
,
CONTROLFILECOPY primary_key
,
CONTROLFILECOPY TAGidentifier
quoted_string
,
archivelogRecordSpecifier
DELETE
AVAILABLE
UNAVAILABLE
UNCATALOG
VALIDATE
;
change
A-10 Oracle8 Server Backup and Recovery Guide

connect
connect
CONNECT TARGET
CONNECT CLONE
CONNECT RCVCAT
CONNECT TARGET
quoted_connect_string
unquoted_connect_string
;
Recovery Manager Command Syntax A-11
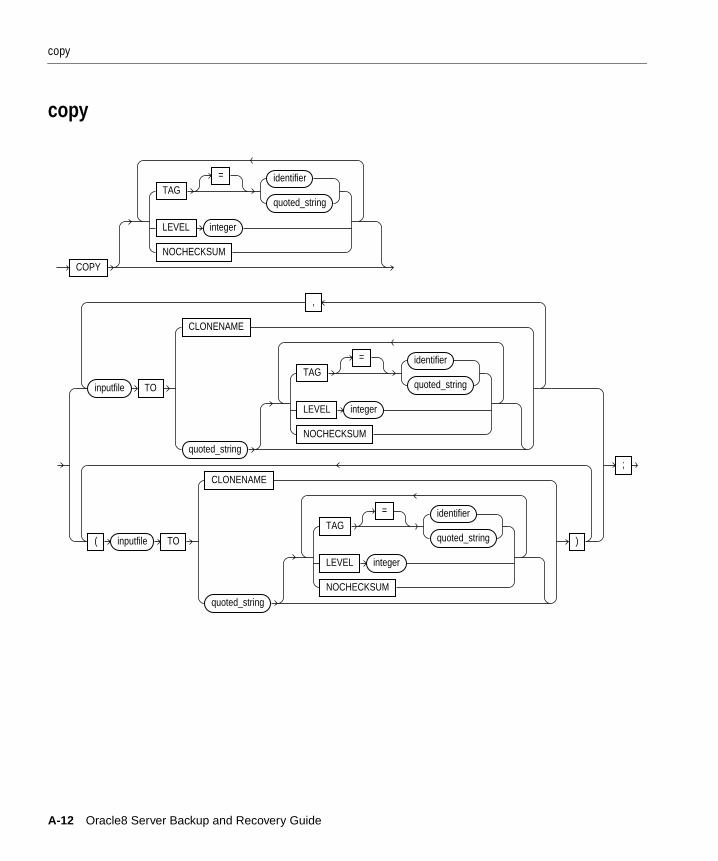
copy
copy
inputfile TO
CLONENAME
quoted_string
TAG= identifier
quoted_string
LEVEL integer
NOCHECKSUM
,
( inputfile TO
CLONENAME
quoted_string
TAG= identifier
quoted_string
LEVEL integer
NOCHECKSUM
)
;
COPY
TAG= identifier
quoted_string
LEVEL integer
NOCHECKSUM
A-12 Oracle8 Server Backup and Recovery Guide

copyOption
copyOption
TAGidentifier
quoted_string
LEVEL integer
NOCHECKSUM
copyOption
Recovery Manager Command Syntax A-13

createScript
createScript
CREATE SCRIPTidentifier
quoted_string{
allocate
backup
change
@
@@filename
copy
EXECUTE SCRIPTidentifier
quoted_string;
host
recover
release
replicate
restore
resync
setPragma
sql
switch
validate
}
A-14 Oracle8 Server Backup and Recovery Guide
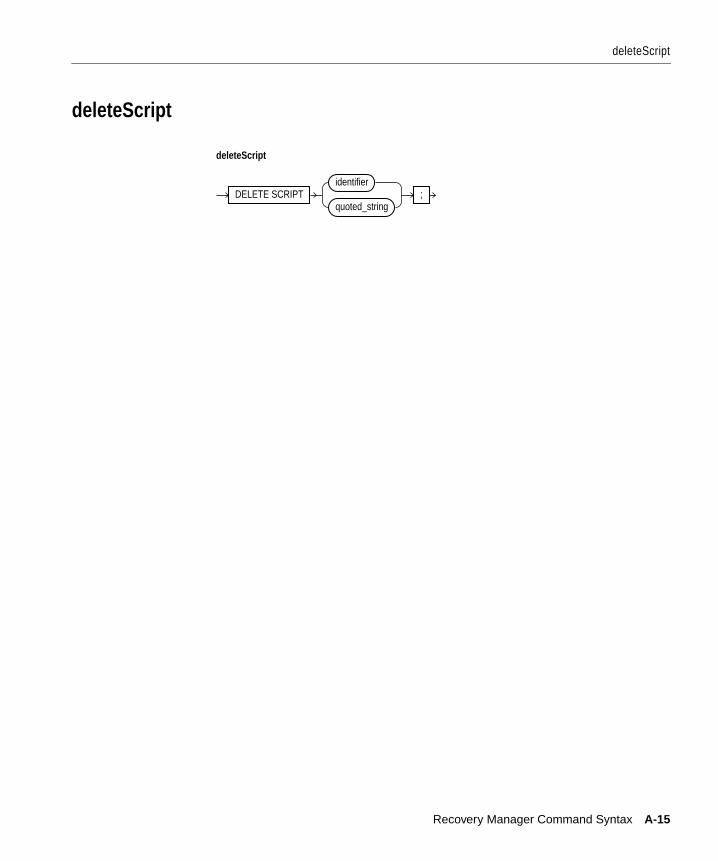
deleteScript
deleteScript
DELETE SCRIPTidentifier
quoted_string;
deleteScript
Recovery Manager Command Syntax A-15

host
host
HOSTquoted_string
;
host
A-16 Oracle8 Server Backup and Recovery Guide

inputfile
inputfile
DATAFILEquoted_string
integer
DATAFILECOPY quoted_string
DATAFILECOPY TAG= identifier
quoted_string
ARCHIVELOG quoted_string
CURRENT CONTROLFILE
CONTROLFILECOPY quoted_string
CONTROLFILECOPY TAG= identifier
quoted_string
inputfile
Recovery Manager Command Syntax A-17
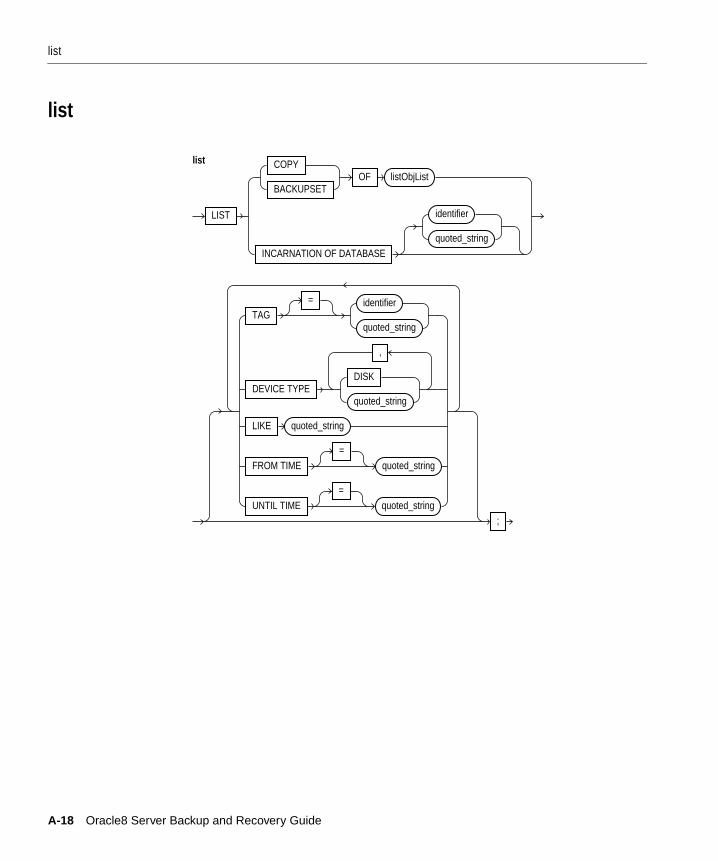
list
list
LIST
COPY
BACKUPSETOF listObjList
INCARNATION OF DATABASE
identifier
quoted_string
list
TAG= identifier
quoted_string
DEVICE TYPEDISK
quoted_string
,
LIKE quoted_string
FROM TIME=
quoted_string
UNTIL TIME=
quoted_string;
A-18 Oracle8 Server Backup and Recovery Guide
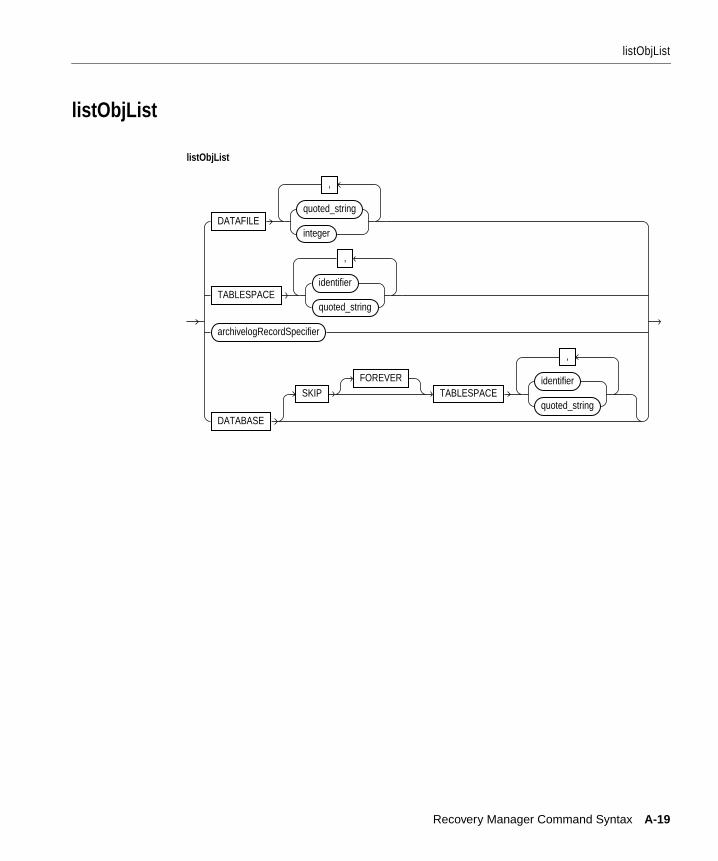
listObjList
listObjList
DATAFILEquoted_string
integer
,
TABLESPACEidentifier
quoted_string
,
archivelogRecordSpecifier
DATABASE
SKIPFOREVER
TABLESPACEidentifier
quoted_string
,
listObjList
Recovery Manager Command Syntax A-19
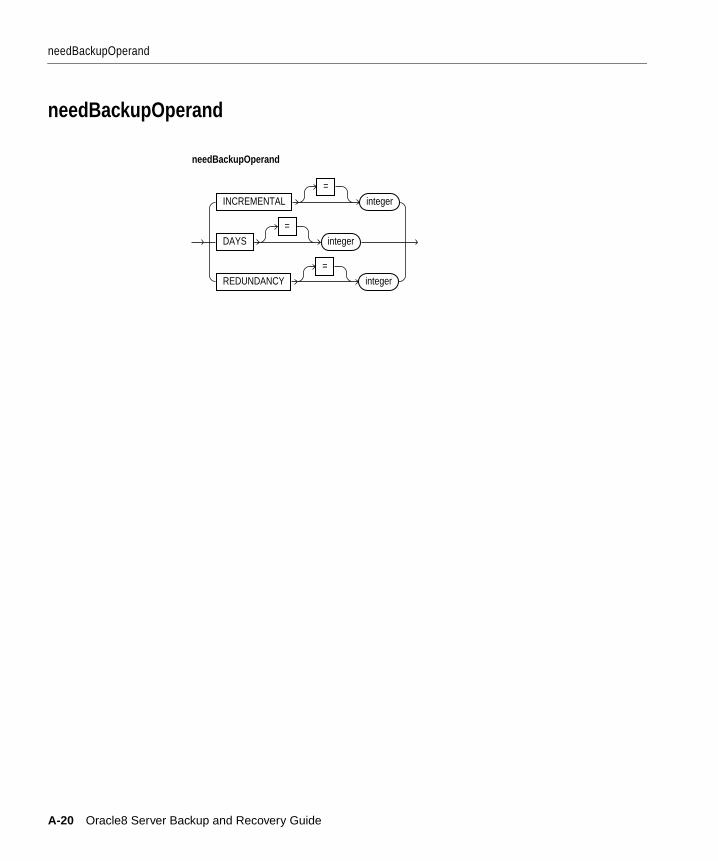
needBackupOperand
needBackupOperand
INCREMENTAL=
integer
DAYS=
integer
REDUNDANCY=
integer
needBackupOperand
A-20 Oracle8 Server Backup and Recovery Guide

primary_key
primary_key
integer
primary_key
Recovery Manager Command Syntax A-21

printScript
printScript
PRINT SCRIPTidentifier
quoted_string;
printScript
A-22 Oracle8 Server Backup and Recovery Guide

recover
recover
DATABASE
untilClause
untilClauseSKIP
FOREVERTABLESPACE
identifier
quoted_string
,
TABLESPACEidentifier
quoted_string
,
untilClause
DATAFILEquoted_string
integer
,
DELETE ARCHIVELOG
CHECK READONLY
,
;
RECOVER
Recovery Manager Command Syntax A-23

register
register
REGISTER DATABASE ;
register
A-24 Oracle8 Server Backup and Recovery Guide
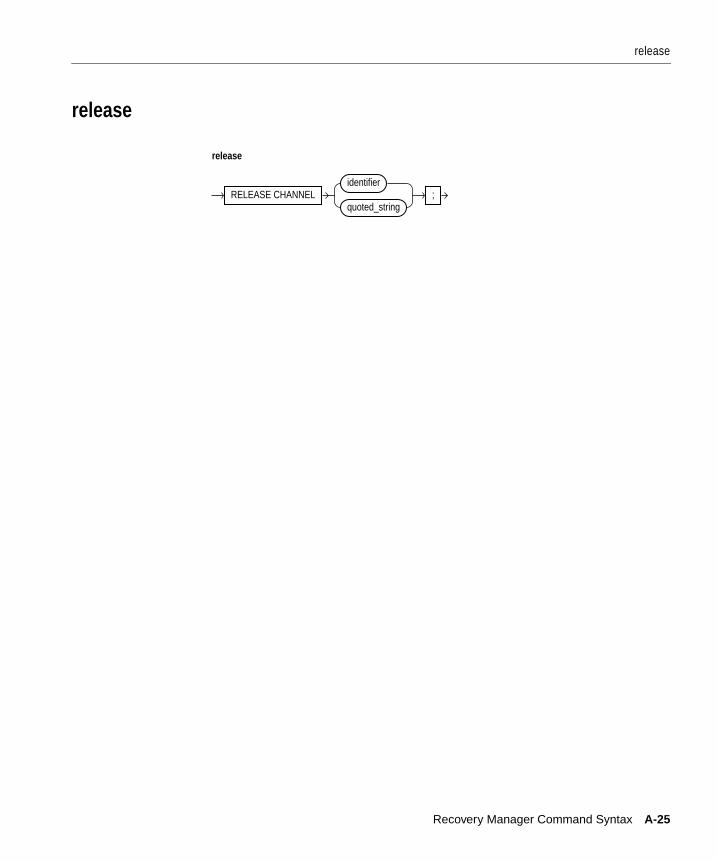
release
release
RELEASE CHANNELidentifier
quoted_string;
release
Recovery Manager Command Syntax A-25

replaceScript
replaceScript
REPLACE SCRIPTidentifier
quoted_string{
allocate
backup
change
@
@@filename
copy
EXECUTE SCRIPTidentifier
quoted_string;
host
recover
release
replicate
restore
resync
setPragma
sql
switch
validate
}
A-26 Oracle8 Server Backup and Recovery Guide

replicate
replicate
REPLICATE CONTROLFILE FROM quoted_string ;
replicate
Recovery Manager Command Syntax A-27
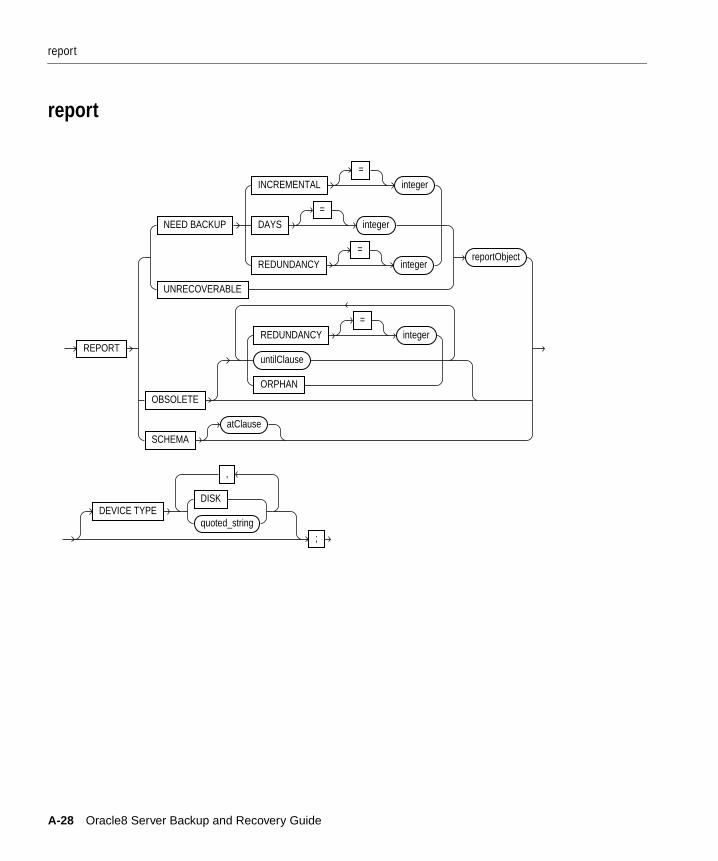
report
report
REPORT
NEED BACKUP
INCREMENTAL=
integer
DAYS=
integer
REDUNDANCY=
integer
UNRECOVERABLE
reportObject
OBSOLETE
REDUNDANCY=
integer
untilClause
ORPHAN
SCHEMAatClause
DEVICE TYPEDISK
quoted_string
,
;
A-28 Oracle8 Server Backup and Recovery Guide
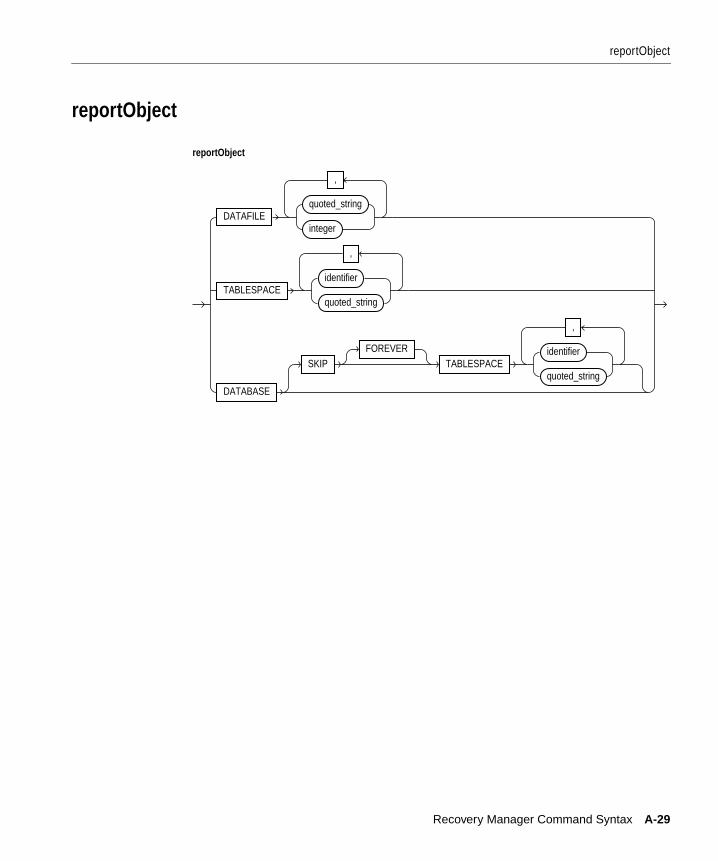
reportObject
reportObject
DATAFILEquoted_string
integer
,
TABLESPACEidentifier
quoted_string
,
DATABASE
SKIPFOREVER
TABLESPACEidentifier
quoted_string
,
reportObject
Recovery Manager Command Syntax A-29

reset
reset
RESET DATABASETO INCARNATION primary_key
;
reset
A-30 Oracle8 Server Backup and Recovery Guide

restoreObject
restoreObject
CONTROLFILETO quoted_string
DATABASE
SKIPFOREVER
TABLESPACEidentifier
quoted_string
,
DATAFILEquoted_string
integer
,
TABLESPACEidentifier
quoted_string
,
archivelogRecordSpecifier
restoreObject
Recovery Manager Command Syntax A-31
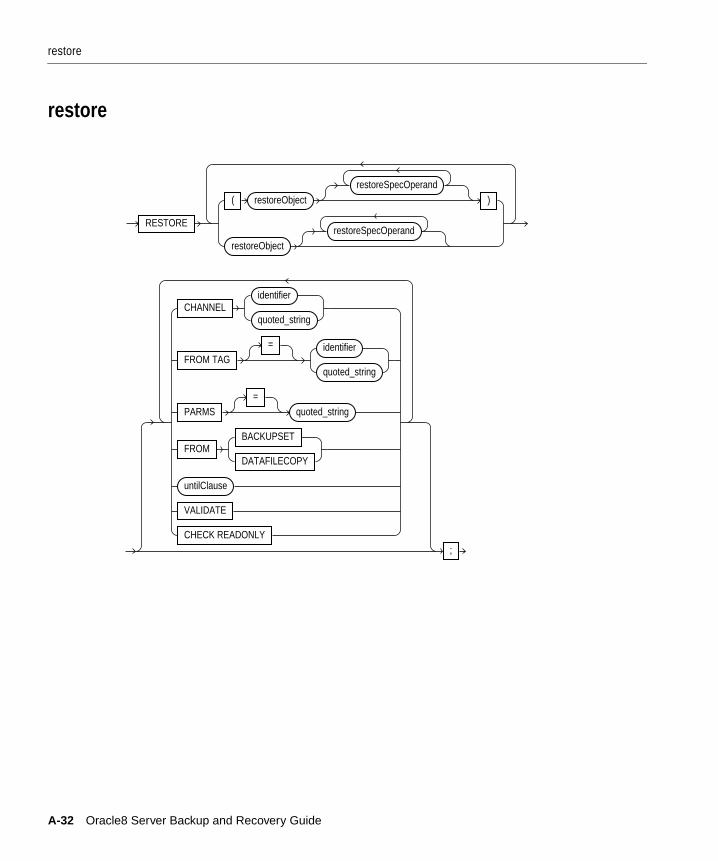
restore
restore
RESTORE
( restoreObjectrestoreSpecOperand
)
restoreObjectrestoreSpecOperand
CHANNELidentifier
quoted_string
FROM TAG= identifier
quoted_string
PARMS=
quoted_string
FROMBACKUPSET
DATAFILECOPY
untilClause
VALIDATE
CHECK READONLY;
A-32 Oracle8 Server Backup and Recovery Guide

restoreSpecOperand
restoreSpecOperand
CHANNELidentifier
quoted_string
FROM TAG= identifier
quoted_string
PARMS=
quoted_string
restoreSpecOperand
Recovery Manager Command Syntax A-33

resync
resync
RESYNC CATALOGFROM CONTROLFILECOPY quoted_string
;
resync
A-34 Oracle8 Server Backup and Recovery Guide

releaseForDelete
releaseForDelete
RELEASE CHANNEL ;
releaseForDelete
Recovery Manager Command Syntax A-35

rmanCmd
rmanCmd
allocateForDelete
@
@@filename
catalog
change
connect
createScript
deleteScript
EXIT
host
list
printScript
register
releaseForDelete
replaceScript
report
reset
resync
run
set
sql
A-36 Oracle8 Server Backup and Recovery Guide

reportObsoleteOperand
reportObsoleteOperand
REDUNDANCY=
integer
UNTIL TIME quoted_string
UNTIL SCN integer
UNTIL LOGSEQ integer THREAD integer
ORPHAN
reportObsoleteOperand
Recovery Manager Command Syntax A-37

run
run
RUN {
allocate
backup
change
@
@@filename
copy
EXECUTE SCRIPTidentifier
quoted_string;
host
recover
release
replicate
restore
resync
setPragma
sql
switch
validate
}
A-38 Oracle8 Server Backup and Recovery Guide
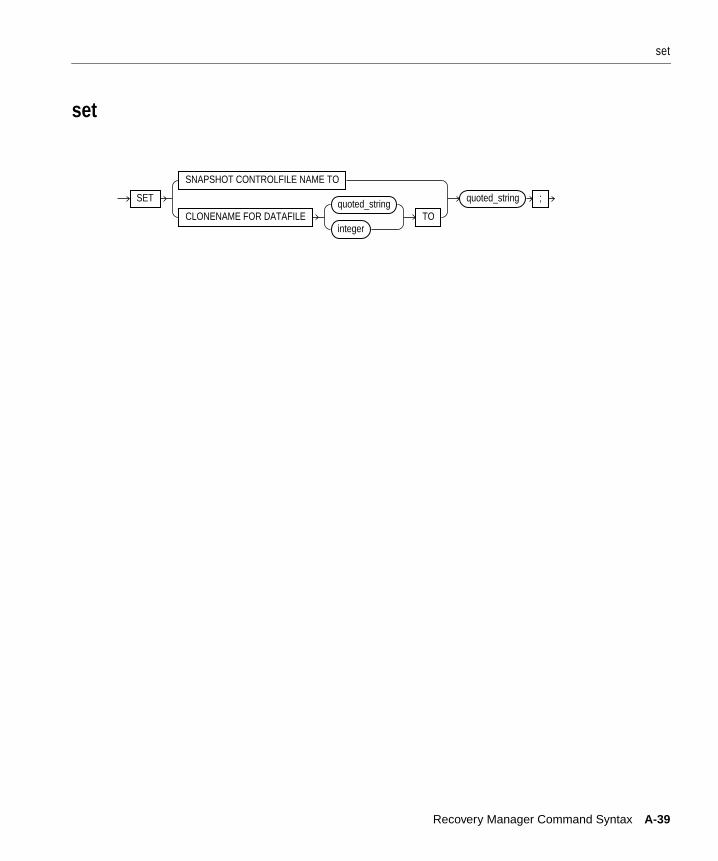
set
set
SET
SNAPSHOT CONTROLFILE NAME TO
CLONENAME FOR DATAFILEquoted_string
integerTO
quoted_string ;
Recovery Manager Command Syntax A-39
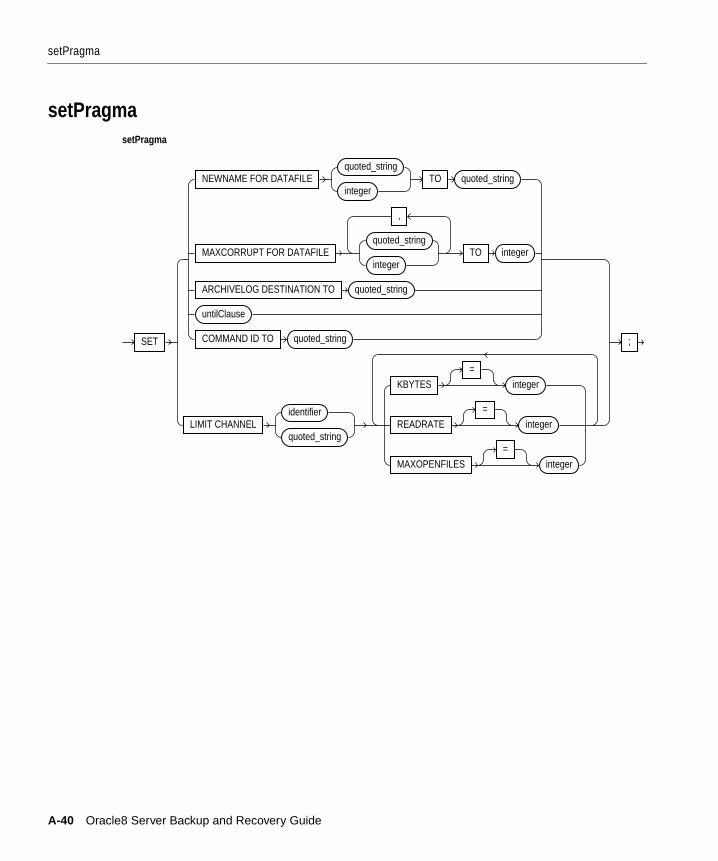
setPragma
setPragma
SET
NEWNAME FOR DATAFILEquoted_string
integerTO quoted_string
MAXCORRUPT FOR DATAFILEquoted_string
integer
,
TO integer
ARCHIVELOG DESTINATION TO quoted_string
untilClause
COMMAND ID TO quoted_string
LIMIT CHANNELidentifier
quoted_string
KBYTES=
integer
READRATE=
integer
MAXOPENFILES=
integer
;
setPragma
A-40 Oracle8 Server Backup and Recovery Guide

sql
sql
SQL quoted_string ;
sql
Recovery Manager Command Syntax A-41

switch
switch
SWITCH
DATAFILEquoted_string
integer
TO
DATAFILECOPY quoted_string
DATAFILECOPY TAG= identifier
quoted_string
DATAFILE ALL
;
switch
A-42 Oracle8 Server Backup and Recovery Guide
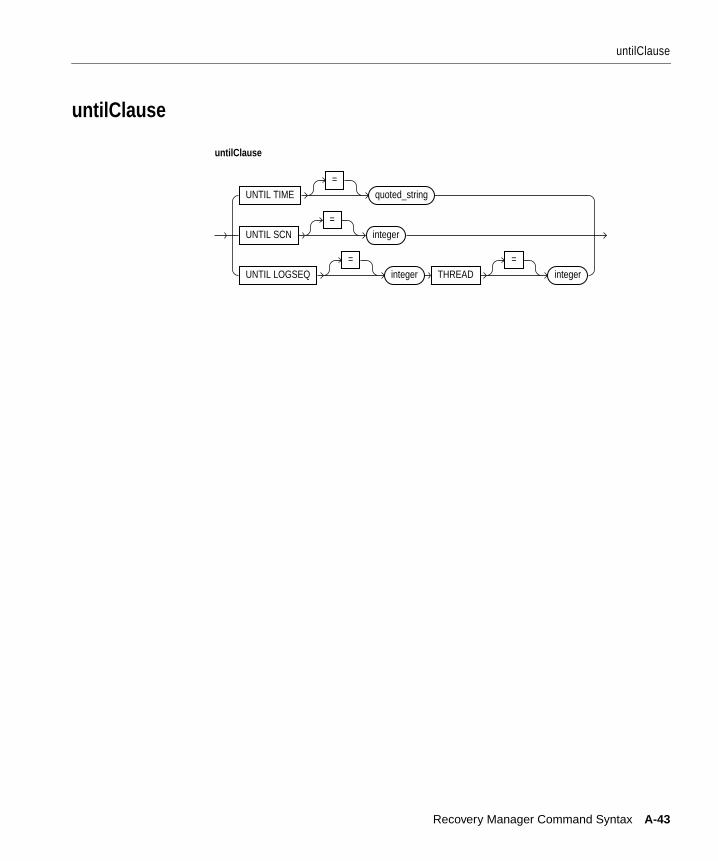
untilClause
untilClause
UNTIL TIME=
quoted_string
UNTIL SCN=
integer
UNTIL LOGSEQ=
integer THREAD=
integer
untilClause
Recovery Manager Command Syntax A-43
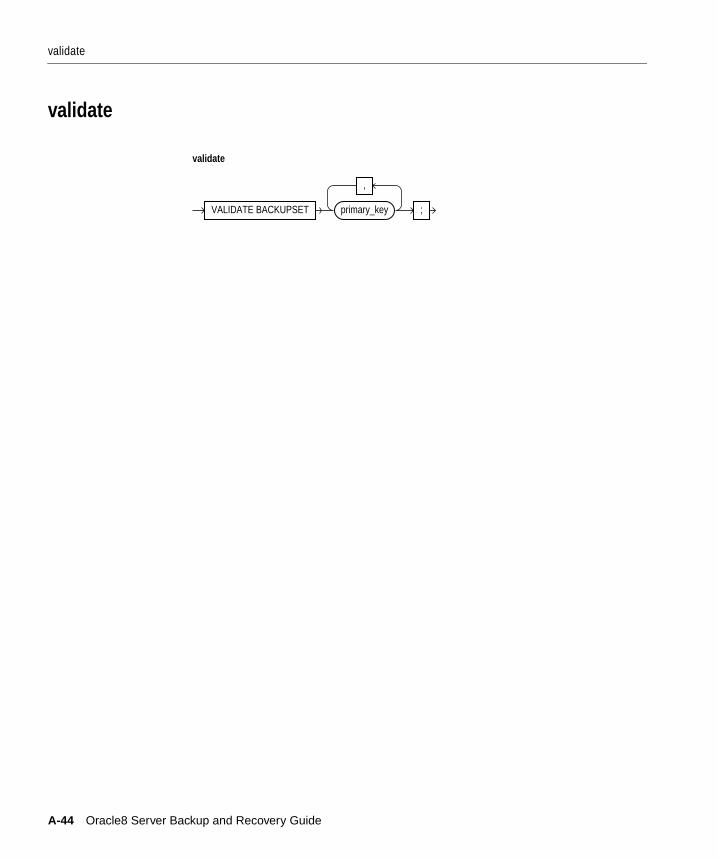
validate
validate
VALIDATE BACKUPSET primary_key
,
;
validate
A-44 Oracle8 Server Backup and Recovery Guide

Glossary
ATL (automated tape library)
A unit which contains one or more tape drives, a robotic arm, and a shelf of tapes.The ATL is able to load and unload tapes into the tape drive from the shelf withoutoperator intervention. More sophisticated tape libraries are able to identify eachtape; for example, the robotic arm may have a bar-code reader which allows it toscan each tape’s barcode and identify it. Synonymous with tape silo.
auxiliary set
A term used in tablespace point-in-time recovery. The auxiliary set is the set of filesnot in the recovery set, which must also be restored in the clone database, for thepoint-in-time recovery set to be successful. These include:
■ Backup control file
■ System tablespace
■ Any datafiles containing rollback segments
■ Temporary tablespace (optional).
A small amount of space is required by export for sort operations, and if a copy ofthe temporary tablespace is not included in the auxiliary set then it will be neces-sary to provide sort space either by creating a new temporary tablespace after theclone has been started up, or by setting autoextend to ON on the system tablespacefiles. See also recovery set.
backup
A representative copy of data, made by taking a backup. In the context of Oracle, abackup could be made by:
■ taking a file copy of the data (via export)
Glossary-1
■ using Recovery Manager to make a backup (datafile copy or backup set)
■ either to disk or to tape using operating system utilities (such as cp, tar, dd,VMS)
To take an image copy of datafiles, control files and other Oracle database struc-tures.
To backup: To make a representative copy of data. If the original data is lost, thebackup can be used to reconstruct the lost information.
backup—Recovery Manager command
A keyword recognized by Recovery Manager. This keyword tells recovery Man-ager that the user wishes to backup data, and the data should be written out in abackup-set format (compare this to copy (2)).
backup sets
A backup set is a backup for (one or more) Oracle files, where the files are multi-plexed together. The reason for multiplexing is to give performance benefits by:
■ not flooding a particular datafile with reads
■ keeping high-speed tape drives streaming
Files in a backup set must be extracted using a restore command. There are twotypes of backup sets:
■ datafile backup set
Is created when a user backs up any datafiles, or a control file. This type ofbackup only contains datafile blocks that have been used; unused blocks areomitted (see never used blocks and compression).
■ archivelog backup set
Created when a user backs up archived logs.
A backup set is comprised of one or more physical files, called backup pieces.
Glossary-2
backup piece
A backup piece belongs to only one backup set. Typically, a backup set would con-sist of only one backup piece. The only time Recovery Manager creates more thanone backup piece is when the piece size is explicitly limited by the user—this is byspecifying the keyword ‘KBYTES’ in a setlimit command. The only reason to spec-ify KBYTES in a backup command, is when the storage or media manager you arewriting your backup to is not able to support writing a file larger than ‘KBYTES’ insize.
backup—whole database
A whole backup is a backup of the control file and all datafiles which belong to adatabase. Whole backups can be taken at any time (i.e. the database can bemounted, open, closed etc.).
block—Oracle
The smallest unit of an Oracle database, the size of which is determined by theparameter DB_BLOCK_SIZE at database creation.
change vector
A single change to a single data block. A change vector is the smallest unit ofchange. Also see redo record.
channel
A channel is a Recovery Manager resource allocation. Every channel allocatedstarts a new Oracle server process, which performs backup restore and recoveryactions. The more channels allocated the greater the potential degree of parallelismfor backup, restore and recovery. The type of channel specified will determinewhether the Oracle server process will attempt to read and write to disk, orthrough the Media Management Interface e.g.
■ If the channel is of type disk, the server process will attempt to read backupsfrom, or write backups to disk.
■ If the channel is of type ‘SBT_TAPE’, the server process will attempt to readbackups from or write backups to a Media Manager.
Channels are always able to read and write datafiles to and from disk, no matterwhat their type.
Glossary-3

checkpoint
When a checkpoint occurs, all modified database buffers in the SGA are written tothe datafiles by DBWR. Once the checkpoint completes, the datafiles and controlfiles are modified to reflect the fact that it has successfully completed.
checksum
An Oracle internal computed number stored in an Oracle block, which allows Ora-cle servers to validate the consistency of the block.
clean shutdown (see shutdown clean)
clone database
A subset of a database which is restored to a new location, and started up with anew instance name. The intended use of a clone database is usually to performtablespace point-in-time recovery. A clone database consists of the recovery set andauxiliary set. The clone database has various substantive differences from a regulardatabase copy.
closed backup
A backup of one or more database files taken while the database is closed. Typi-cally, closed backups are also whole database backups. If the database was closedcleanly, it means the all the files in the backup are consistent (see database backups- consistent, for more information). If the database was closed using a shutdownabort or the instance terminated abnormally, the backup must be recovered beforeit is consistent.
closed database
See database—closed
cold backup
See closed backup
complete recovery
See recovery—complete
control file
A file associated with a database that maintains the physical structure and times-tamps of all files in that database. The control file is updated continuously duringdatabase use, and must be available for writing whenever the database is mountedor open.
Glossary-4
control file—backup
A backup control file is a backup of the control file. Backup control files are typi-cally restored when all copies of the current control file are damaged, and are some-times restored before performing certain kinds of point-in-time recovery.
control file—current
The current control file is the control file on disk - it is the most recently modifiedcontrol file for that incarnation of the database. For a control file to be consideredcurrent during recovery, it must not have been restored from backup.
consistent database backups
See database backups—consistent
copy—generic term
To copy:
To make a replica of an original.
It is possible to take copies of Oracle datafiles, control files, and archived redo logsin two ways: 1. using Operating System utilities (on Unix one could use cp, or dd).2. using the Recovery Manager copy command.
copy—Recovery Manager command
A Recovery Manager keyword, which when used, will make a replica of a data-base's datafiles, control file or archived redo log. This replica is made by Oracleserver process, allocated to a Recovery Manager channel, which reads the Oraclefile, and writes a replica out to disk. An open database's datafiles can be copiedusing Recovery Manager without putting the databases' tablespaces into hotbackup mode.
corrupt block
An Oracle block which is not in a recognized Oracle format, or whose internal con-tents are not consistent. Oracle identifies corrupt blocks as one of two types:
■ logically corrupt: The block was corrupted by the application of redo
■ media corrupt: The block format is not correct. To be identified as media cor-rupt, the block may:
– have an impossible format
– have a wrong data block Address
– impossible block type
Glossary-5
The only way a media corrupt block can be repaired, is:
■ by replacing the block, and recovering. For example, the block is replacedwhen the datafile is restored, or when the block is replaced by a newer versionwhen applying an incremental backup.
■ by renewing the block. This happens when the table is dropped, and the blocksare reused for another object
If the media corruption is due to faulty hardware, neither solution above will workuntil the hardware fault is rectified.
corrupt datafile
A datafile that contains one or more corrupt blocks.
database backup—consistent
A consistent backup is whole database backup (all datafiles and control file) whichcan be opened with the RESETLOGS option without requiring any recovery (thatis, you do not need to apply redo to any files in this backup for it to be consistent).Such a backup would have to be taken after a database has been shutdown cleanly.The database must remain closed until the backup has completed.
All files in a consistent backup (including the control file) must be checkpointed atthe same SCN, and must not contain changes past that SCN. The only files in a con-sistent backup which are allowed to have older SCNs, are files in tablespaces whichare read-only or offline normal.
database backup—inconsistent
An inconsistent database backup is a backup whereby some of the files in thebackup contain changes which were made after the files have been checkpointed.This type of backup needs recovery before it can be made consistent. This type ofbackup is usually created by taking open-database backups; that is, the database isopen while the files are being backed up. An inconsistent backup can also be cre-ated by backing up datafiles while a database is closed, either:
■ immediately after an Oracle instance crashed (all instances in an Oracle ParallelServer cluster)
■ after shutting down the database using shutdown abort
database—closed
A database which is not available to users to query and update. Although the data-base is closed:
Glossary-6
■ the database could be mounted (but not open)
■ the instance could be started (but not have the control file mounted)
database—mounted
An instance which is started, and has the control file s associated with the database,mounted (that is, the control file s are open). A database is typically put in amounted (but not opened) state for maintenance, or for restore and recovery.
database—open
A database which is available to users to query and update. The database is openedeither automatically via a startup command or explicitly, via an alter database opencommand.
datafile
A datafile is a physical Operating System file on disk created by Oracle, which con-tains data structures such as tables and indexes. A datafile can only belong to onedatabase (and in fact, can only belong to one tablespace).
datafile—inaccessible
A datafile which Oracle is attempting to read, but cannot be found. Attempts toaccess an inaccessible file results in errors. Typically, a file is inaccessible becausethe media on which it is stored is faulty, or the file has been moved or deleted.
datafile copy
A copy of a datafile on disk produced by either:
■ a Recovery Manager copy command, or
■ an Operating System backup of a datafile, which has been cataloged
datafile header
See file header
duplexed archived redo log
The Oracle archiver process (ARCH) is able to archive two copies of a redo log.This is called duplexing the archived redo log. This is done by settingLOG_ARCHIVE_DUPLEX_DEST in your init.ora file.
Glossary-7
file header
The first few blocks of an Oracle datafile. The file header contains bookkeepinginformation related to that file.
fractured block
A type of media corruption which could occur when backing up an open database.This phenomenon occurs when DBWR is writing a block, at the same time an Oper-ating System utility is reading the block for backup. The block the Operating Sys-tem read may be 'split' i.e. the top of the block is written at one point in time, andthe bottom of the block is written at another point in time. If this backup were usedto restore from, and Oracle were to read the block, the block would be consideredto be “corrupt.”
fractured block and Operating System Backups
This possible timing mismatch between Oracle writing a block, and the OperatingSystem reading the same block is the reason tablespaces must be put in hot-backupmode before initiating Operating System backups. A database in hot backup modewrites whole Oracle data blocks out to the redo log, hence if a block is split in thebackup, it will be repaired by rolling forward using the redo. Recovery Managerdoes not suffer from this problem, as the server process performing the backup(backup set or copy) detects if a block it reads for backup is split, and re-reads theblock to get a consistent version.
full backup
A Recovery Manager backup set, which is not an incremental. Note that full doesnot refer to how much of the database, full refers to the fact that the backup was notan incremental backup. Hence it is possible to take a full backup of one datafile.Note it is possible to apply incremental backups of levels > 0 on top of a fullbackup, if it will roll the datafiles forward to a later time. The only differencebetween a full backup and an incremental level 0, is the full backup will not affectthe number of blocks backed up by any subsequent incrementally. Compare thiswith backup—whole database.
full export
An export of the whole database.
full resync
See resync— full
Glossary-8

hot backup
See open backup
hot backup mode
A tablespace is put into “hot backup mode” when the command ALTERTABLESPACE <tablespace name> BEGIN BACKUP is run. This command is exe-cuted before taking open-database (that is, hot) backups.
This command is necessary before a user takes an operating system backup of (oneor more) datafiles which compose the tablespace being backed up. It is not correctto use hot-backup mode when you use Recovery Manager to take backups. See frac-tured block
inaccessible datafile
See datafile—inaccessible
incarnation (database)
This term is used to identify the different “versions” of the same physical database.The incarnation of the database changes once it has been opened with the RESET-LOGS option, to be able to distinguish it from the previous “version.”
inconsistent database backups
See database backups—inconsistent.
incremental backup
Incremental backups are a method by which you only backup modified blocks. Anincremental level 0 backup, performs the same function as a full backup in thatthey both backup all blocks that have ever been used. The difference between anincremental level 0 backup and a full backup, is that a full backup will not affectwhat blocks are backed up by subsequent incremental backups, whereas an incre-mental backup will affect what blocks are copied out by subsequent incrementalbackups.
Incremental backups of levels > 0 backup only blocks which have changed sinceprevious incremental backups. Blocks which have not changed will not be backedup.
Glossary-9

instance
A set of memory structures and Oracle code (including the background processes)resident in memory. The way an instance becomes created and resident in memoryis by issuing a startup command. An instance can become resident in memory byissuing any of the following commands:
■ STARTUP NOMOUNT—the instance starts, but does not mount the controlfiles nor open the database.
■ STARTUP MOUNT—The instance starts, then mounts the database’s controlfile s. It does not open the database. See database—mounted.
■ STARTUP—The instance starts, mounts the database’s control files, and opensthe database. See database—open. An instance is removed from memory byissuing a shutdown command.
media manager
A utility provided by a third party vendor which is capable of actions such as load-ing, labelling and unloading sequential media, such as tape drives. Media Manag-ers also allow you to configure media expiration and recycling, and typically havethe ability to control Automated Tape Libraries.
media management interface
(also known as:
■ the Media Management Layer
■ Media Management Library—MML
■ SBT Interface)
An Oracle published interface to which Media Management vendors have writtencompatible software libraries. This software integrates with Oracle so that an Ora-cle server process is able to issue commands to the Media Manager to write backupfiles out to sequential storage, and read files from sequential storage. The mediamanager will handle the actions required to load, label and unload the correct tape,when Oracle issues a request to backup or restore a file.
mirror
A term used to indicate there is more than one exact copy of data. This term is mostwidely used to indicate that hard disks are mirrored, so that if one of the disksbecomes unavailable, the other disk can continue to service requests without inter-ruptions.
Glossary-10
mirror—breaking
To break a mirror is to tell the operating system or hardware managing the mirrorthat you no longer want the mirror image to be kept up-to-date. This is one methodused for creating operating system database backups: all the tablespaces in the data-base are put in hot backup mode and the mirror is broken. All tablespaces are thentaken out of hot-backup mode. A backup to tape is then taken from the broken halfof the mirror. After the backup is complete, the mirror can then be resilvered.
mirror—resilvering
To resilver a mirror is to tell the operating system or hardware managing the mirrorthat you want to refresh the old broken mirror from the half that is up-to-date, andthen maintain both sides of the mirror.
mirrored control file
See multiplexed control file
mirrored online redo log
See multiplexed online redo log
multiplexed
■ online logs
Oracle is able to maintain more than one copy of the online log automatically:this is called multiplexing the online log. This is controlled by creating multiplemembers in each redo log group. The degree of multiplexing is directly relatedto the number of members in each group. Also known as mirrored online redologs
■ control file
Oracle is able to maintain more than one copy of a database’s control file; this iscalled multiplexed control files. This is controlled by specifying multipleentries in the init.ora CONTROL_FILES parameter. Also known as mirroredcontrol files.
■ backup set
Datafile blocks included in the same backup set are multiplexed together. Thismeans that blocks from files in this set are interspersed with blocks from theother files in that set.
■ archived redo logs
see duplexed archive redo logs
Glossary-11
never-used blocks and compression
A never-used block is an Oracle block which has never contained any data. Annewly created datafile would contain many never-used blocks. When Oracle writesout backup sets, it only includes blocks which have been used (it does not write outnever used blocks) i.e. the datafiles are “compressed.”
offline tablespace
A tablespace which is not available to users when the database is open. Atablespace can only be taken offline by a DBA while the database is open. If atablespace is taken offline, all files that comprise the tablespace (that are not alreadyoffline) are taken offline.
A tablespace may be taken offline with three different priorities:
■ offline normal (or clean)
All the files in the tablespace are checkpointed, then made offline. If any filebelonging to the tablespace is not available, the tablespace cannot be takenoffline normal. Files in a tablespace taken offline cleanly do not need to berecovered before the tablespace is brought back online.
■ offline temporary
All files in the tablespace which are accessible to Oracle are checkpointed, thenmade offline. Files which were checkpointed by the offline-temporary com-mand do not need recovery, however files which were not checkpointed(because they were not accessible at the time of the offline immediate com-mand) must be recovered before the tablespace is brought back online.
■ offline immediate
All files in the tablespace are taken offline without any attempt to checkpointthe files first. All files in the tablespace must be recovered before the tablespaceis brought online. The database must be open to take a tablespace offline.
offline backup (see closed backup)
This term is no longer used to refer to a closed database backup, as it causes confu-sion with offline tablespaces and datafiles.
offline database (see database—closed)
This term is no longer used to refer to a closed database, as it causes confusion withoffline tablespaces and datafiles.
Glossary-12
offline datafile
A datafile which is not available to users when the database is open. A datafile canbe taken offline either as a part of a tablespace offline or a datafile can be takenoffline individually. In exceptional circumstances, Oracle will automatically take adatafile offline if it is required.
A datafile may be taken offline either:
■ as a consequence of the tablespace it belongs to being taken offline (see tooffline—tablespace) automatically by Oracle, if there is a failure which necessi-tates this. This file will need recovery before it can be brought online.
■ by issuing the command ALTER DATABASE DATAFILE <filename> OFFLINE.
A datafile taken offline by the alter database datafile command must be recoveredbefore being brought back online. The offline command can be executed while thedatabase is mounted or open.
online tablespace
A tablespace which is available to users if the database is open. A tablespace ismade available for access by users by issuing the command ALTER TABLESPACE<name> ONLINE. The database must be open to alter a tablespace online, and allfiles in the tablespace must be consistent with the rest of the database before thetablespace can be made online.
online backup (see open backup)
This term is no longer used to refer to an open-database backup, as it causes confu-sion with online tablespaces and datafiles.
online database (see database—open)
This term is no longer used to refer to an open database, as it causes confusion withonline tablespaces and datafiles.
online datafile
A datafile which is made available for access by users. The database can be open ormounted to issue the command ALTER DATABASE DATAFILE <filename>ONLINE. If the database is open, the file must be consistent with the remainingdatabase before the it can be made online. If the database is mounted, the file canbe made online without being consistent with the other datafiles (typically this isdone before initiating a database recovery).
Glossary-13
open backup (also known as open-database backup, or hot backup)
A backup of one or more datafiles taken while a database is open. This can be anoperating system backup (which requires the tablespaces to be in hot backupmode), or a Recovery Manager backup (which does not need the tablespaces to bein hot backup mode).
open database
see database—open
parallelization
Recovery Manager
To parallelize backup and restore using Recovery Manager multiple channels mustbe allocated.
Backup Set creation
Is parallelized by allocating multiple channels and also specifying filesperset.
File Copy creation
Is parallelized by allocating multiple channels, and by including multiple files to becopied within a single copy command.
Restore Parallelization
Recovery Manager parallelizes restore. The degree of parallelism depends on thenumber of channels allocated, and also the distinct number of backup sets or filecopies which are available to be read from.
Recovery Parallelization
Recovery Manager also parallelizes recovery when it is applying incremental back-ups. The degree of parallelism depends on the number of channels allocated, andalso the distinct number of backup sets which are available to read from.
Recovery Parallelism
Irrespective of whether you use Recovery Manager or O/S backups, it is possible touse recovery_parallelism to parallelize the application of redo logs.
partial resync
See resync—partial
password files
A file created by orapwd command.
Glossary-14
A database must use password files if you wish to connect internal over a network.For a more comprehensive explanation, see <Title>Oracle8 Server Administrator’sGuide
read-only tablespace
See tablespace— read only
recover
To make a restored file current.
or
To make a restored file current to a specific point in time. In ARCHIVELOG mode,you have the choice of complete or incomplete recovery (see recovery—complete,and recovery —incomplete).
For NOARCHIVELOG mode databases, the only option is to restore from the mostrecent backup. In exceptional circumstances, it may be possible to recover a datafileor database if the database is not in ARCHIVELOG mode. The only time it is possi-ble to recover a NOARCHIVELOG mode database, is if none of the online logshave been overwritten since the backup
For example:
1. The DBA makes a closed (consistent) backup of a database with 10 online loggroups
2. The DBA opens the database and 5 log switches occur (that is, less than orequal to 9 logs can be switched with 10 online logs)
3. Media failure occurs which damages one or more datafiles
In this case all redo generated since the backup is still available, which means thatrecovery is possible.
Note that this situation is not typical. If you must be able to recover the database—not just restore it—the database must be in ARCHIVELOG mode. Note that youshould not be backing up your online log, so this is *not* an option if you need tobe able to recover your database in case of media failure.
recover—Recovery Manager
A Recovery Manager command which will make a restored datafile newer by theapplication of incremental backups (if they exist) and then by the application ofredo (archived and online redo logs).
Glossary-15
RECOVER—SQL command
A SQL command issued to make a restored file newer by the application of redo(archived and online redo logs).
recovery—complete
To restore and recover a database and apply all redo generated (both in archivedand online redo logs) since the backup. This type of recovery is typically performedwhen media failure damages one or more datafiles, or control file s. The damagedfiles are fully recovered using all redo generated since the restored backup was firstmade.
recovery—incomplete
To restore a database from backup, and recover the database, but not apply all ofthe redo information generated since the backup.
Incomplete recovery is usually performed when:
■ The online logs are lost due to hardware failure
In this case the database is recovered until the last archived log generatedbefore the failure.
■ A user error necessitates recovery up until just before the error occurred
The requirement is to recover up until some point in time before an incorrectaction occurred in the database. For example, a user mistakenly deletes payrolltransactions before the transactions are sent to the payroll agency. In this exam-ple, the DBA will need to restore the whole database and then perform incom-plete recovery up until the point just before the user deleted the transactions.
■ An archived log required for recovery is missing
An archive log which is needed for complete recovery was not backed up, orthe archived log contents are corrupt (e.g. due to media failure). In this case,the only option is to recover up to the missing log.
In all cases above, the database must be opened with the RESETLOGS option.
recovery catalog
A recovery catalog is a set of Oracle tables and views which are used by RecoveryManager to store information about Oracle databases. This information is used byRecovery Manager to manage the backup, restoration and recovery of Oracle data-bases.
Glossary-16

recovery catalog database
An Oracle database which contains a recovery catalog schema.
Recovery Manager
A tool used by DBAs to backup, restore and recover Oracle databases (datafiles,control files and archived logs). It can be used with a Recovery Catalog, or without.If a recovery catalog is not used, Recovery Manager decides how to backup, restoreand recover the database using the database's control file.
recovery set
A subset of a database’s tablespaces that require point-in-time recovery to be per-formed on them. Also see auxiliary set.
recovery—point-in-time
database
A recovery of all datafiles and control file to a specific time which is not a full recov-ery.
tablespace
A recovery of all datafiles in a tablespace to a specific time which is not the fullrecovery. This recovery is done in a clone database. The tablespace is then re-inte-grated into the original database. This feature is new to Oracle8.
redo log
online redo log
The online redo log is a set of two or more files which record all changes made toOracle datafiles and control files. They are written to by LGWR. See also multi-plexed online redo log.
current online redo log
The online redo log file (or group, in the case of multiplexed logs) which is cur-rently being written to by LGWR.
archived redo log
This is also called the offline redo log. If the database is in ARCHIVELOG mode, aseach online redo log is filled, it is copied to one (or more) archive log destination(s).This copy is the archived redo log.
See also duplexed archived redo logs
Glossary-17
redo log groups
Each online redo log belongs to a group. A group must have at least one member,but may have more. If a redo log group has more than one member, it is said to bemultiplexed.
thread
Each Oracle instance has its own set of online redo log groups. These online redolog groups are called an instance's thread of online redo. In non-Oracle ParallelServer environments, one database has only one thread, belonging to the instanceaccessing it. In Oracle Parallel Server environments, each instance has a separatethread (i.e. each instance has it's own online redo log). Each thread has its own cur-rent log member.
redo record
A redo record is a group of change vectors describing a single, atomic change to thedatabase. Redo records are constructed for all data block changes, and saved ondisk in the online redo log. Redo records allow multiple database blocks to bechanged so that either all changes occur, or no changes occur, despite arbitrary fail-ures.
register database
A Recovery Manager command which registers a database with the recovery cata-log. Any resync catalog commands will result in the recovery catalog beingupdated with the database's current configuration.
RESETLOGS option
A method for opening a database which results in the database incarnation chang-ing, the log sequence number being reset to 1, and the online logs being reformat-ted (or created, if they do not already exist). Typically, a database is opened withthe RESETLOGS keyword:
■ after incomplete recovery (until time, log sequence, change, cancel)
■ after recovery using a backup control file
The reason for opening a database with this option is to prevent database corrup-tion by ensuring that any archived logs created by that database in the past cannoterroneously be applied to this incarnation of the database.
restore
To reconstruct or bring back an original copy of a file from backup.
Glossary-18
resync—full
A full catalog resync is a Recovery Manager operation which refreshes the Recov-ery Catalog with all changed information in the database's control file. Full resyncsshould be initiated by a DBA frequently, by issuing the Recovery Manager com-mand resync catalog. Full resyncs can also be initiated by Recovery Manager if itdetermines this action is necessary before executing certain commands.
resync—partial
Partial resyncs transfer information to the Recovery Catalog about archived redologs, backup sets and datafile copies. Partial resyncs will not transfer informationsuch as:
■ new datafiles
■ new or removed tablespaces
■ new or removed online log groups and members
Partial resyncs are initiated by Recovery Manager:
■ before: backup, copy, restore, recover, list and report, if
Recovery Manager determines that a resync is necessary
■ after: backup, copy, restore, switch, register, reset and catalog
roll forward
Application of redo logs to datafiles and control files in order to recover them (thatis, to recover changes to those files).
SBT
Acronym for System Backup to Tape
See Media Management Interface
shutdown clean
A database which has been shutdown with the immediate, transactional or normaloptions. A database shutdown cleanly does not require recovery; it is already in aconsistent state.
Glossary-19
snapshot control file
A copy of a database's control file taken by Recovery Manager. The snapshot con-trol file is used by Recovery Manager to read a consistent version of a control file(either to resync the recovery catalog, or if a recovery catalog is not used, to be readby Recovery Manager to decide what actions to perform). A snapshot control file iscreated by Recovery Manager using the same Oracle code which creates backupcontrol files (ALTER DATABASE BACKUP CONTROL FILE TO '<location>').
split block (see fractured block)
staging (of archived redo logs from tape to disk)
Staging of archived logs is a term used to describe restoring archived logs from ter-tiary storage (usually tape) to disk, in order to allow recovery to proceed.
switch
A Recovery Manager command which converts a datafile copy into a datafile usedby an Oracle database. It performs the equivalent function of the SQL commandALTER DATABASE RENAME DATAFILE FROM '<original name>' TO '<newname>', and also marks the datafile copy as no longer available.
tablespace
A database is divided into one or more logical storage units called tablespaces.Each tablespace has a number of datafiles exclusively associated with it.
tablespace—read only
A tablespace whose status has been changed to prevent it from being updated. It isput in read-only mode by executing the SQL statement ALTER TABLESPACE<tablespace> READ ONLY. Typically, the reason for putting a tablespace in read-only mode is to be able to reduce the frequency it is backed up. For example,instead of backing up the tablespace nightly, it may be feasible to reduce thebackup frequency, say to once a month, or less.
tablespace point-in-time recovery
See recovery—point-in-time tablespace
Note: The longer the duration between backing up anytablespace, the longer you will need to retain your backup mediaand the larger the risk of failed backup media (as you will havecopied it out fewer times).
Glossary-20

tape streaming
To write output to a tape drive fast enough to keep the tape constantly busy.
tape drive
A piece of hardware which reads and writes magnetic tapes.
tape volume
A term used by many vendors to mean one physical piece of tape media.
Glossary-21

Glossary-22

Index
AABORT optionSHUTDOWN command, 12-10, 12-22, 12-26,12-52
ACTIVATE STANDBY DATABASE optionALTER DATABASE command, 12-38
active online redo logloss of group, 12-50
ALERT file, 2-18, 12-3, 12-25, 12-29, 12-34allocate channel command, 8-10, 8-28, 8-36
type disk operand, 8-10allocate channel for delete command, 8-7, 9-8ALTER DATABASE command
ACTIVATE STANDBY DATABASEoption, 12-38
BACKUP CONTROLFILE option, 2-23BACKUP CONTROLFILE TO TRACE
option, 11-10, 12-53CLEAR LOGFILE GROUP option, 12-37CLEAR LOGFILE option, 12-48CREATE DATAFILE option, 12-13, 12-39CREATE STANDBY CONTROLFILE
option, 12-36DATAFILE ONLINE option, 12-28, 12-32MOUNT STANDBY DATABASE option, 12-37,
12-43NORESETLOGS option, 11-11, 12-25, 12-29,
12-34, 12-53OPEN NORESETLOGS option, 12-17OPEN option, 12-52OPEN RESETLOGS option, 8-4, 12-10, 12-25,
12-29, 12-34RECOVER AUTOMATIC LOGFILE
option, 12-7RECOVER clause, 12-4RECOVER LOGFILE option, 12-6RECOVER...FROM parameter, 12-5RESETLOGS option, 11-11, 12-3
ALTER SYSTEM commandARCHIVE LOG CURRENT option, 12-36, 12-38
ALTER TABLESPACE commandBEGIN BACKUP option
marking the beginning, 11-6minimizing time between begin and
end, 11-8BEGIN/END BACKUP option, 8-8END BACKUP option
marking the end, 11-6minimizing time between begin and
end, 11-8OFFLINE option, 11-9ONLINE option
bringing tablespaces back online, 11-9Apply Recovery Archives dialog box, 12-23
Enterprise Manager, 12-3ARCHIVE LOG CURRENT option
ALTER SYSTEM command, 12-36, 12-38archived logs
backing up, 9-3archived redo log, 1-7, 2-13 to 2-15
applying during recovery, 12-4, 12-6deleting after recovery, 12-14duplexing, 2-15errors during recovery, 12-8location during recovery, 12-4loss of, 12-51preserving log sequence number, 12-24, 12-28,
Index-23

12-33resetting log sequence number, 12-24, 12-28,
12-33restoring to disk, 12-14time-based recovery, 12-51tracking, 7-27
archivelogcopies, listing, 8-12deleting, 8-6deleting record of, 8-6marking as available, 8-7marking as unavailable, 8-7registering, 8-2
ARCHIVELOG modebackup options, 3-5datafile loss in, 12-46definition, 2-16distributed database backups, 3-6overview, 1-7strategies for backups in, 3-8
archiver process (ARCH), 2-17 to 2-18archiving online redo log files, 2-14
archivingautomatic, 2-17manual, 2-18modes
database, 2-16 to 2-19automatic archiving, 2-17auxiliary sets, 10-3
naming datafiles in tablespaces, 10-10available operand
change command, 8-7
Bbackup
after structural changes to database, 3-3after using RESETLOGS option, 3-5archived log, 9-3ARCHIVELOG mode in, 3-8backup sets, 7-10checking datafile backup status, 11-7choosing method, 5-1 to 5-7consistent whole database, 2-22constraints, 7-25
control file, 2-24, 9-3, 11-10creating a strategy, 3-7cumulative incremental, 7-13, 7-16database, 9-2datafile, 2-24DB_VERIFY utility, 11-4definition, 1-2, 4-4distributed databases, 3-6Enterprise Backup Utility used for, 5-3Export utility and, 2-28, 3-6Export utility used for, 5-3frequency, 3-2full, 7-12generating reports for, 8-12guidelines for, 3-2image copies, 7-10, 7-17importance of, 1-2inconsistent whole database, 2-23incremental, 7-12, 9-6
definition, 4-4Recovery Manager, 8-22
individual datafiles, 9-3keeping, 3-4, 9-7listing files needed, 11-2logical
definition, 2-28marking end, 11-6NOARCHIVELOG mode, in, 3-7, 9-2noncumulative incremental, 7-14of online redo logs, 3-9of recovery catalog, 6-6operating system, 5-2Parallel Server Environment, 9-5planning before database creation, 3-2privileges for control files, 11-10procedures for, 11-2 to 11-14
offline datafiles, 11-8offline tablespaces, 11-8online datafiles, 11-5online tablespaces, 11-5
Recovery Manager types, 7-10Recovery Manager, user tags for, 7-24restoring whole database backup, 12-9scenario, Recovery Manager, 8-27specification list, 8-24
Index-24
specifying device, 8-10tablespace, 3-3, 9-2, 9-3, 11-8test strategies, 3-7to disk, 5-4to disk, using Recovery Manager, 8-10to sequential media, 5-5types of, 2-21 to 2-25, 11-2 to 11-14using stored scripts, 8-19whole database, 2-21, 11-3 to 11-4
Recovery Manager, 8-22backup command, 8-21
format operand, 8-20setmaxcorrupt clause, 9-7skip inaccessible option, 9-7skip offline option, 9-2, 9-7skip read only option, 9-2tag operand, 8-23
backup constraints, 7-25backup control files
snapshot, 7-9BACKUP CONTROLFILE option
ALTER DATABASE command, 2-23BACKUP CONTROLFILE TO option
ALTER DATABASE command, 11-2BACKUP CONTROLFILE TO TRACE option
ALTER DATABASE command, 11-2, 11-10,12-53
backup fileuser-created
cataloging, 8-8backup methods, 5-1 to 5-7backup object list, 8-24backup piece
deleting, 8-6deleting record of, 8-6marking as available, 8-7marking as unavailable, 8-7naming, 8-20
backup pieces, 7-11backup sets, 7-10
backup pieces, 7-11compression, 7-11deleting multi-piece, 9-8full, 7-12incremental, 7-12
limiting number of files, 8-20listing, 8-12, 8-17, 8-18multiplexed, 7-22organizing, 8-21
backup specification list, 8-24Begin Online Tablespace Backup dialog, 11-6BEGIN/END option
ALTER TABLESPACE command, 8-8bitmap indexes
and TSPITR, 10-5, 13-5
Ccancel-based recovery, 4-7
procedures, 12-22catalog command, 8-2, 8-8catrman.sql script, 6-5catrman.sql script, 8-3CE CodeExInd, xviichange command, 8-6
available operand, 8-7delete operand, 8-7unavailable operand, 8-7uncatalog operand, 8-7
change-based recovery, 12-31 to 12-35coordinated in distributed database
system, 12-2changed-based recovery, 4-7change...delete command, 8-8channel control, 7-19, 8-9
allocating channel, 8-9channels
allocating, 7-19checkpoint, 2-5 to 2-9
after a time interval, 2-6at log switches, 2-6checkpoint process (CKPT), 2-8control files and, 2-20database, 2-6datafile, 2-6definnition, 4-4events during, 2-8fast, 2-8forcing, 2-6incremental, 2-7
Index-25

normal, 2-8online redo log files and, 2-5overview, 2-5performance effect of, 2-5shutting down an instance and, 2-6taking a tablespace offline and, 2-6types of, 2-6
CLEAR LOGFILE GROUP optionALTER DATABASE command, 12-37
CLEAR LOGFILE optionALTER DATABASE command, 12-48
clone databases, 10-3converted filenames, 10-13exporting, 13-15opening, 13-15preparing for TSPITR, 13-13preparing parameter files for, 13-12recovering, 13-14using datafile copy for TSPITR, 10-11
closed databaserecovery, 12-3
cold backupswhole database backups, 11-3
command file for Recovery Manager, 6-10commands
backup, 7-3categories of, 7-3LIST, 7-23recovery catelog maintenance, 7-3REPORT, 7-23REPORT DELETABLE, 7-23REPORT NEED BACKUP, 7-23REPORT UNRECOVERABLE, 7-23restore, 7-3stored script maintenance, 7-3
commands, Recovery Managerallocate channel, 8-10, 8-28, 8-36allocate channel for delete, 9-8backup, 8-21catalog, 8-2, 8-8change, 8-6, 8-7change...delete, 8-8copy, 2-27, 8-28delete script, 8-19execute script, 8-19
list, 8-12, 9-11list backupset, 8-18list copy, 8-18list incarnation of database, 8-4print script , 8-19register database, 8-3release channel, 8-11replace script, 8-19replicate, 8-31report , 9-12report deletable, 8-15report need backup, 8-13report need backup days, 8-14report schema, 8-16report unrecoverable, 8-14reset database, 8-4reset database to incarnation, 8-4restore, 9-10resync catalog from backup controlfile, 8-9set newname, 8-32, 8-35setlimit channel, 8-11switch, 8-35
committing transactionswriting redo log buffer and, 2-2
COMPATIBLE initialization parameter, 12-41complete export, 11-14complete recovery
procedures for, 12-15consistent whole database backups, 2-22constraints
backup, 7-25restore, 7-26
control file, 1-4, 2-19 to 2-20archived redo log information in, 2-15backing up, 9-3, 11-2, 11-10changes recorded, 2-20checkpoint information, 2-20contents, 1-4, 2-19CONTROL_FILES parameter
for primary and standby databases, 12-40definition, 1-4, 4-3during incomplete recovery, 12-22, 12-31during time-based recovery, 12-26finding filenames, 11-2inconsistency with data dictionary, 12-25, 12-30
Index-26

log sequence numbers and, 2-5loss of, 12-51, 12-52media recovery and, 2-15mirrored, loss of, 12-52multiplexed, 2-20privileges to backup, 11-10purpose, 1-4restore destination, 8-31standby database, 12-36
control file backupdefinition, 2-24
CONTROL_FILES initialization parameter, 8-31,12-52
coordinated, time-based, distributed databaserecovery, 12-2
copy command, 8-28corrupt datafile blocks
records in control file, 8-21setting maximum for backup, 9-7
corruption detection, 7-18CREATE CONTROLFILE command
DATAFILE clause, 12-53standby database, effect on, 12-40
CREATE DATAFILE optionALTER DATABASE command, 12-13, 12-39
CREATE STANDBY CONTROLFILE optionALTER DATABASE command, 12-36
creatingstandby database, 12-36
cumulative export, 11-14cumulative incremental backup, 7-13
Ddata dictionary
inconsistencies with control file, 12-25, 12-30views, 11-5
databasealtering physical structure
standby database, impact on, 12-39archiving modes, 2-16 to 2-19backing up, 9-2
using Recovery Manager, 8-20closed
recovery, 12-3
db identifier, 8-3disaster recovery planning, 12-35 to 12-44files
listing for backup, 11-2incarnations
listing, 8-13incremental backup
Recovery Manager, 8-22modes
NOARCHIVELOG, 2-16physical structure, 1-4 to 1-7, ?? to 4-5, ?? to 6-13point-in-time recovery, 9-10recovery
after control file damage, 12-52procedures, 12-1 to 12-54
recovery after using RESETLOGS option, 3-10registering in recovery catalog, 8-2, 8-3resynchronizing with recovery catalog, 8-4shutdown for backups, 9-2standby, 12-35 to 12-44
activating, 12-38creating, 12-35maintaining, 12-36
startuprecovery during, 12-4
whole database backup, 11-3 to 11-4Recovery Manager, 8-22
database bufferscheckpoints and, 2-5
database optionlist command, 8-17
DATABASE parameterRECOVER command, 12-3
database structuresarchived redo logs, 1-7control files, 1-4datafiles, 1-5online redo log, 1-5physical, 1-4 to 1-7, ?? to 4-5, ?? to 6-13redo log files, 1-5rollback segment, 1-6
database writer process (DBWR)checkpoints and, 2-5
datafile, 1-5adding to primary database
Index-27

effect on standby database, 12-39backing up, 2-24, 2-27, 9-3
offline, 11-8online, 11-5using Recovery Manager, 8-20
backup needed, listing, 8-14, 8-15backup sets
listing, 8-17backups, listing, 8-12checking backup status, 11-7converting name for standby use, 12-37copies to be deleted, listing, 8-15copies, listing, 8-12, 8-18copying, 2-27
advantages, 8-28to disk, 9-5
deleting copy of, 8-6deleting record of, 8-6listing, 8-16
for backup, 11-2loss of, 12-45marking copy as available, 8-7marking copy as unavailable, 8-7missing after recovery, 12-25, 12-30named in control files, 2-19overview, 1-5recovery
guidelines, 8-36without backup, 12-13
recovery creation, 12-13registering, 8-2renaming
effect on standby database, 12-39restore destination, 8-31restoring, 8-30
guidelines, 8-32when database is open, 9-8
switching, 8-35unrecoverable, listing, 8-14usage, 1-6viewing
backup status, 11-7files needing recovery, 12-12
DATAFILE clauseCREATE CONTROLFILE command, 12-53
DATAFILE ONLINE optionALTER DATABASE command, 12-28, 12-32
datafile optionlist command, 8-17
DATAFILE parameterRECOVER command, 12-4
days optionreport command, 8-15
db identifier, 8-3DB_BLOCK_MAX_DIRTY_TARGET, 2-7DB_FILE_STANDBY_NAME_CONVERT
initialization parameter, 12-37for primary and standby databases, 12-40
DB_NAME initialization parameter, 2-20DB_VERIFY utility, 11-4DBA_DATA_FILES view, 11-5delete operand
change command, 8-7delete script command, 8-19deleting
file records using Recovery Manager, 8-7files using Recovery Manager, 8-7recovery catalog record, 8-7stored scripts, 8-19
device_type_list optionlist backupset command, 8-18report command, 8-13
devicesbackup, finding, 9-2
disaster recoveryplanning for, 12-35 to 12-44
disk failure, 1-4distributed database
change-based recovery, 12-2coordinated time-based recovery, 12-2media recovery and snapshots, 12-3recovery in, 12-2taking backups, 3-6
distributed database systemrecovery, 12-2
duplexingarchived redo log, 2-15
duplexing archived redo log, 2-15
Index-28
EEnd Online Tablespace Backup dialog, 11-6Enterprise Backup Utility, 5-3Enterprise Manager
Apply Recovery Archives dialog box, 12-3,12-23
applying log files, 12-6RECOVER DATABASE UNTIL TIME
statement, 12-28SET AUTORECOVERY ON statement, 12-6Shutdown Database dialog box, 12-22, 12-26,
12-52Shutdown Abort mode, 12-10
STARTUP commandRECOVER option, 12-4
Startup Database dialog box, 12-27Enterprise Manager Startup dialog box, 12-23environment variables
NLS_DATE_FORMAT, 6-11NLS_LANG, 6-11
errorsarchiver process, 2-18
execute script command, 8-19Export utility, 2-28, 5-3
backups and, 2-28, 3-6exports, types of, 11-14read consistency and, 11-13using for backup, 11-13
exportscomplete, 11-14cumulative, 11-14incremental, 11-14modes, 11-13
Ffailure
archiving redo log files, 2-18disk, 1-4during checkpoints, 2-8hardware, 1-3instance, 1-3media, 1-4, 12-45
multiplexed online redo logs and, 2-9
process, 1-3statement, 1-3system, 1-3user error, 1-3
file recovery, 1-5file_name_pattern option
list command, 8-18filenames
listing for backup, 11-2files
marking as unavailable, 8-7format operand
backup command, 8-20fractured block detection, 7-26from backup operand
restore command, 8-33from copy operand
restore command, 8-33from/until time option
list command, 8-18full backup, 7-12
Ggroup, redo log
archived redo log, 12-47online redo log, 12-47
Hhardware failure, 1-3
II/O device
releasing in Recovery Manager, 8-11I/O errors
effect on backup, 8-20image copies, 7-17
cataloging, 7-27user created, 7-18
Import utility, 11-13database recovery and, 11-14procedure for using, 11-14
inactive online redo log
Index-29
loss of, 12-48incomplete recovery
change-based, 12-31 to 12-35procedures for, 12-21 to 12-35time-based, 12-26 to 12-30
inconsistent whole database backupsdefinition, 2-23
incremental backup, 7-12, 9-6Recovery Manager, 8-22
incremental export, 11-14incremental option
report command, 8-14initialization parameters
COMPATIBLE, 12-41CONTROL_FILES, 8-31, 12-52
for primary and standby databases, 12-40DB_FILE_STANDBY_NAME_CONVERT, 12-37
for primary and standby databases, 12-40DB_NAME, 2-20for primary and standby databases, 12-40LOG_ARCHIVE_DEST, 12-5, 12-23, 12-28LOG_ARCHIVE_FORMAT, 12-5LOG_ARCHIVE_START, 2-18LOG_CHECKPOINT_INTERVAL, 2-6LOG_CHECKPOINT_TIMEOUT, 2-6LOG_CHECKPOINTS_TO_ALERT, 2-9LOG_FILE_STANDBY_NAME_CONVERT, 12-
37PARALLEL_MAX_SERVERS, 12-11RECOVERY_PARALLELISM, 12-11
init.ora file, 8-35installing
recovery catalog, 8-2instance
failures in, 1-3recovery during startup, 12-4
integrity checking, 7-26interrupting media recovery, 12-9
Llist backupset command, 8-18
device_type_list option, 8-18LIST command, 7-23list command, 8-12, 9-11
database option, 8-17datafile option, 8-17file_name_pattern option, 8-18from/until time option, 8-18list_object_list option, 8-17list_operand option, 8-18list_qualifier option, 8-18redundancy option, 8-15, 8-16tablespace option, 8-17tag option, 8-18
list copy command, 8-18list incarnation of database command, 8-4list_object_list option
list command, 8-17list_operand option
list command, 8-17, 8-18list_qualifier option
list command, 8-18log files
converting name for standby use, 12-37log sequence number
control files and, 2-5multiplexed redo logs and, 2-10preserving after recovery, 12-24, 12-25, 12-28,
12-29, 12-33requested during recovery, 12-4resetting after recovery, 12-25, 12-29resetting to 1, 12-24, 12-28, 12-33
log switch recordrecovery catalog, 8-6
log switchesdescription, 2-5log sequence numbers, 2-5mirrored redo log files and, 2-10
log writer process (LGWR)archiver process (ARCH) and, 2-14manual archiving and, 2-18multiplexed redo log files and, 2-10online redo logs available for use, 2-3trace files and, 2-11writing to online redo log files, 2-2, 2-3
LOG_ARCHIVE_DEST initializationparameter, 12-5, 12-23, 12-28
LOG_ARCHIVE_FORMAT initializationparameter, 12-5
Index-30

LOG_ARCHIVE_START initializationparameter, 2-18
LOG_CHECKPOINT_INTERVAL parameter, 2-6LOG_CHECKPOINT_TIMEOUT parameter, 2-6LOG_CHECKPOINTS_TO_ALERT initialization
parameter, 2-9LOG_FILE_STANDBY_NAME_CONVERT
initialization parameter, 12-37logical backup
definition, 2-28LOGSOURCE parameter
SET command, 12-5loss of inactive log group, 12-48
Mmanual archiving, 2-18media failure, 1-4
archived redo log file loss, 12-51complete recovery procedures, 12-15 to 12-21control file loss, 12-51, 12-52datafile loss, 12-45description, 12-45NOARCHIVELOG mode, 12-9online redo log group loss, 12-47online redo log loss, 12-46recovery
distributed databases, 12-2recovery procedures
examples, 12-45 to 12-54Media Management Library (MML), 5-6media recovery, 4-7
applying archived redo logs, 12-4at instance startup, 12-4cancel-based, 12-21change-based, 12-21, 12-31 to 12-35commands, 12-11 to 12-12completion of, 12-17, 12-19, 12-21deciding which files need recovery, 12-12distributed database
coordinated time-based, 12-2error messages, 12-8errors with redo log files, 12-8from NOARCHIVELOG mode, 12-9interrupting, 12-9
lost fileslost archived redo log files, 12-51lost control files, 12-51lost datafiles, 12-45
lost mirrored control files, 12-52NOARCHIVELOG mode, 12-9online redo log files, 12-46open database-offline tablespace, 12-17preparing for, 12-11 to 12-15procedures for complete, 12-15 to 12-21procedures for incomplete, 12-21 to 12-35requirements of incomplete, 12-24, 12-28, 12-33restoring
archived redo log files, 12-14damaged files, 12-13whole database backups, 12-9
resuming after interruption, 12-9snapshots and, 12-3starting, 12-15successfully applied redo logs, 12-8SYSTEM tablespace, 12-17time-based, 12-21time-based incomplete, 12-26 to 12-30undamaged tablespaces online, 12-17using Recovery Manager, 8-35
mirrored control fileloss of, 12-52
mirrored online redo log, 2-10loss of, 12-47loss of member, 12-47
modeARCHIVELOG, 1-7, 2-16NOARCHIVELOG, 1-7, 2-16
recovery from failure, 12-9MOUNT option
STARTUP command, 12-23, 12-27MOUNT STANDBY DATABASE option
ALTER DATABASE command, 12-37, 12-43multiplexed
control files, 2-20redo log files, 2-9
multiplexed backup sets, 7-22
Index-31
NNLS_DATE_FORMAT environment
variable, 6-11, 9-4, 9-10NLS_LANG environment variable, 6-11, 9-4, 9-10NOARCHIVELOG mode
backing up, 9-2backup options, 3-5datafile loss in, 12-45definition, 2-16disadvantages, 12-9distributed database backups, 3-6overview, 1-7recovery from, 12-9strategies for backups in, 3-7
noncumulative incremental backup, 7-14nonpartitioned global indexes
and TSPITR, 10-5, 13-5NORESETLOGS option, 12-24 to 12-25, ?? to 12-26
ALTER DATABASE COMMANDbacking up control file, 11-11
ALTER DATABASE command, 12-53
Oobject list
recover command, 8-38objects owned by SYS
and TSPITR, 10-4, 13-4offline backups, 3-2OFFLINE option
ALTER TABLESPACE command, 11-9online backups, 3-2ONLINE option
ALTER TABLESPACE command, 11-9online redo log, 1-5, 2-2 to 2-13, 12-48
active group, 12-47applying during recovery, 12-4archived group, 12-47current group, 12-47inactive group, 12-47listing log files for backup, 11-2loss of
recovery, 12-46 to 12-50loss of active group, 12-50
loss of all members, 12-47loss of group, 12-47loss of mirrored members, 12-47multiple group loss, 12-50multiplexed, 1-5overview, 1-5preserving log sequence number, 12-24, 12-33resetting
effect of, 12-24 to 12-25procedures, 12-24 to 12-26
resetting log sequence number, 12-24, 12-33status of members, 12-47
online redo logsbacking up, 3-9clearing, 12-37
OPEN DATABASERESETLOGS option, 3-10
open database backupfractured block detection during, 7-26
OPEN optionALTER DATABASE command, 12-52
OPEN RESETLOGS optionALTER DATABASE command, 8-4, 12-10,
12-25, 12-29, 12-34operating system backup, 5-2ORA-01578 error message, 12-43Oracle Enterprise Manager, 5-3Oracle8 utilities
Recovery Manager, 7-2OS utilities, 9-7
PPARALLEL clause
RECOVER command, 12-11parallel recovery, 12-11Parallel Server
backups and, 9-5threads of online redo log, 2-13
PARALLEL_MAX_SERVERS initializationparameter, 12-11
parallelization, 7-20factors affecting degree of, 7-20
partitioned tablesand dropped partitions, 13-21
Index-32
and split partitions, 13-25and TSPITR, 10-5, 13-4performing partial TSPITR, 13-16
password fileconnecting to Recovery Manager with, 6-8connecting to Recovery Manager without, 6-7using with Recovery Manager, 6-6
performancecheckpoint effect, 2-5
physical database structures, 1-4 to 1-7, ?? to 4-5,?? to 6-13
point-in-time recoverydatabase, 4-6, 9-10tablespace, 4-6
prefaceSend Us Your Comments, xiii
primary databasepreparing for use, 13-16
primary databasespreparing for TSPITR, 13-12
print script command, 8-19privileges
backing upcontrol files, 11-10
process failure, 1-3
Qquerying
recovery catalog, 9-12
Rread consistency
Export utility and, 11-13read-only tablespaces
backing up, 9-2effect on recovery, 12-44recovering, 12-44
RECOVER AUTOMATIC LOGFILE optionALTER DATABASE command, 12-7
RECOVER clauseALTER DATABASE, 12-4
RECOVER commandDATABASE parameter, 12-3
DATAFILE parameter, 12-4PARALLEL clause, 12-11TABLESPACE parameter, 12-4unrecoverable objects and standby
databases, 12-43recover command, 8-35, 8-38
Recovery Manager, 4-2RECOVER DATABASE command, 12-52RECOVER DATABASE UNTIL CANCEL
statement, 12-23RECOVER DATABASE UNTIL CHANGE
statement, 12-32RECOVER DATABASE UNTIL TIME
statement, 12-28RECOVER FROM...STANDBY DATABASE
command, 12-37, 12-43RECOVER option
STARTUP command, 12-4recovered tablespaces
backing up, 13-16RECOVER...FROM parameter
ALTER DATABASE comman, 12-5recovery, 9-8
after control file damage, 12-52after using RESETLOGS option, 3-10applying redo logs during, 12-4cancel-based, 4-7
procedures, 12-22change-based, 4-7, 12-31 to 12-35closed database, 12-3commands, 12-11 to 12-12
Recovery Manager, 8-37database startup, during, 12-4datafile
guidelines for, 8-36without backup, 12-13
distributed database, 12-2with snapshots, 12-3
dropped table, 12-54from media failure
examples, 12-45 to 12-54Import utility, 11-14interrupting, 12-9lost control file, 12-51media, 4-7, 12-1
Index-33

complete, 4-7control files and, 2-15disabled, 2-16enabled, 2-16incomplete, 4-7
offline tablespaces in open database, 12-4parallel processes for, 12-11PARALLEL_MAX_SERVERS parameter, 12-11planning, 4-1 to 4-7point-in-time, 4-6
database, 9-10preparing for, 12-11 to 12-15privileges required, 12-15procedures for complete, 12-15 to 12-21procedures for incomplete, 12-21 to 12-35read-only tablespaces, 12-44recover command, 9-8restarting, 12-9roll forward phase, 12-4setting number of processes to use, 12-11SQL commands for, 12-4strategies, 4-1 to 4-7testing, 4-6time-based, 4-7, 12-26 to 12-30types
distributed database system and, 12-2unrecoverable objects and, 12-43 to 12-44using Import utility, 11-14when database is open, 9-8
recovery catalog, 6-2 to 6-6, 7-5, 8-2 to 8-9backup, 6-6complex queries using report , 9-12connecting to Recovery Manager with, 6-8connecting to Recovery Manager without, 6-7definition, 4-4deleting record, 8-7installing, 8-2log switch record, 8-6operating without, 7-7querying, 8-12, 9-11recovery of lost or damaged, 8-9registering databases, 8-2, 8-3resynchronizing, 6-6, 8-4schema, 6-2
setting up, 6-5
space requirements for, 6-3updating, 8-4
after schema changes, 8-5Recovery Manager, 5-2, 8-19
backupfractured block detection, 7-26scenario, 8-27
backup types, 7-10command file, 6-10commands
allocate channel, 8-10, 8-28, 8-36allocate channel for delete, 8-7, 9-8backup, 8-21, 9-7catalog, 8-2, 8-8change, 8-6, 8-7change...delete, 8-8copy, 8-28delete script, 8-19execute script, 8-19list, 8-12, 9-11list backupset, 8-18list copy, 8-18list incarnation of database, 8-4print script , 8-19recover, 8-35, 9-8register database, 8-3release channel, 8-11replace script, 8-19replicate, 8-31report deletable, 8-15report need backup, 8-13report need backup days, 8-14report schema, 8-16report unrecoverable, 8-14reset database, 8-4reset database to incarnation, 8-4restore, 9-8resync catalog from backup controlfile, 8-9set newname, 8-32, 8-35setlimit channel, 8-11switch, 8-35
connecting with password file, 6-8connecting with recovery catalog, 6-8connecting without password file, 6-7connecting without recovery catalog, 6-7
Index-34

connection options, 6-7copying datafiles with, 9-5deleting file records, 8-7deleting files, 8-7deleting recovery catalog record, 8-7fractured block detection in, 7-26general connect, 6-7interactive use of, 6-9introduction, 7-2recover command, 4-2recovery catalog, 4-4recovery catalog required, 8-2recovery commands, 8-37registering databases, 8-3resetting database information, 8-4running commands, 6-9 to 6-11sample scripts, 6-11scenarios, 9-1 to 9-12setting time parameters, 6-11stored scripts, 6-10, 7-9types of backups, 8-22user tags for backups, 7-24
recovery sets, 10-3containing whole tables, 10-4copying to primary database, 13-15importing into primary database, 13-15
RECOVERY_PARALLELISM initializationparameter, 12-11
redo entriescontent of, 2-2
redo logdefinition, 4-3listing log files for backup, 11-2
redo log bufferswriting of, 2-2
redo log files, 1-5”fuzzy” data in backups and, 3-9active (current), 2-4archived
advantages of, 2-13automatic, 2-17contents of, 2-15control files and, 2-15errors in archiving, 2-18log switches and, 2-5
manually, 2-18mechanics of archiving, 2-14
archived logs, 1-7available for use, 2-3contents of, 2-2distributed transaction information in, 2-3files named in control file, 2-19groups, 2-10inactive, 2-4log sequence numbers of, 2-5log switches, 2-5log writer process, 2-3manual archiving, 2-18members, 2-10mirrored
archiver process (ARCH) and, 2-14if all inaccessible, 2-11if some inaccessible, 2-10log switches and, 2-10
multiplexed, 2-9diagrammed, 2-10purpose of, 1-5
naming, 12-5online, 2-2
after checkpoint failure, 2-8recovery use of, 2-2requirement of two, 2-3threads of, 2-13
overview, 1-5redo entries, 2-2
redo recorddefinition, 4-3
redundancy optionlist command, 8-15, 8-16
register database command, 8-2, 8-3registering
archivelog, 8-2datafile, 8-2
release channel command, 8-11replace script command, 8-19replicate command, 8-31REPORT command, 7-23report command, 9-12
days option, 8-15device_type_list option, 8-13
Index-35
incremental option, 8-14report_object_list option, 8-13using for complex recovery catalog
queries, 9-12REPORT DELETABLE command, 7-23report deletable command, 8-15report generation, 7-23REPORT NEED BACKUP command, 7-23report need backup command, 8-13report need backup days command, 8-14report schema command, 8-16REPORT UNRECOVERABLE command, 7-23report unrecoverable command, 8-14report_object_list option
report command, 8-13reports
generating, 8-12reset database command, 8-4reset database to incarnation command, 8-4RESETLOGS option, 12-3, 12-24 to 12-26
ALTER DATABASE commandbacking up control file, 11-11
database backups after using, 3-5OPEN DATABASE, 3-10recovery of database after using, 3-10
restore command, 9-8, 9-10, ?? to 9-11, ?? to 9-11from backup operand, 8-33from copy operand, 8-33
restore constraints, 7-26restore destination
control file, 8-31datafile, 8-31
restore specification, 8-34list, 8-34
restoring, 9-8backup file selection, 8-30datafile
guidelines, 8-32when database is open, 9-8whole database backups, 12-9
restoring datafiles, 8-30resuming recovery after interruption, 12-9resync catalog from backup controlfile
command, 8-9resynchronizing recovery catalog, 6-6
rollback segment, 1-6definition, 4-3
rollback segmentsand TSPITR, 10-4
rolling forward, 1-5
Sscenarios
Recovery Manager, 9-1 to 9-12schema changes
updating recovery catalog, 8-5scripts
catrman.sql, 8-3scripts, stored
creating, 8-19deleting, 8-19printing, 8-19
Send Us Your Commentsboilerplate, xiii
sequence change number(SCN)format, 12-32
sequential mediabackups to, 5-5
SET AUTORECOVERY ON statement, 12-6SET command
LOGSOURCE parameter, 12-5set newname command, 8-30, 8-32, 8-35Set Tablespace Offline dialog, 11-9Set Tablespace Online dialog, 11-9set until limit
setlimit channel command, 8-30, 8-36setlimit channel command, 8-11
set until limit, 8-30, 8-36setmaxcorrupt clause
backup command, 9-7setsize parameter, 8-24shutdown
checkpoints and, 2-6SHUTDOWN command
ABORT option, 12-10, 12-22, 12-26, 12-52Shutdown Database dialog box
Abort mode, 12-22, 12-26Enterprise Manager, 12-52Shutdown Abort mode, 12-10
Index-36

skip inaccessible optionbackup command, 9-7
skip offline optionbackup command, 9-2, 9-7
skip read only optionbackup command, 9-2
skipping tablespaces during backup, 9-2snapshot control file, 7-9snapshot tables
and TSPITR, 10-5, 13-4snapshots
distributed database recovery and, 12-3media recovery and, 12-3
SQL commandsapplying log files, 12-6for recovering tablepace, 12-6recovery using, 4-2, 12-4
standby database, 12-35 to 12-44activating, 12-38control file for, 12-36creating, 12-35, 12-36effect of altering primary database, 12-39maintaining, 12-36mounting, 12-38
starting a databaserecovery during, 12-4
STARTUP commandMOUNT option, 12-23, 12-27RECOVER option, 12-4
Startup Database dialog box, 12-27statement failure, 1-3stored scripts, 7-9, 8-19
creating, 8-19deleting, 8-19printing, 8-19Recovery Manager, 6-10
switch command, 8-35system change number (SCN)
definition, 4-3use in distributed recovery, 12-3when determined, 2-2
system failure, 1-3SYSTEM tablespace
media failure in ARCHIVELOG mode, 12-46recovery of, 12-17
system time, changingeffect on recovery, 12-21
Ttable
droppedrecovery, 12-54
tablespace optionlist command, 8-17
TABLESPACE parameterRECOVER command, 12-4
tablespace point-in-time recoveryand recovery sets containing whole tables, 10-4introduction, 10-2, 13-2limitations, 10-4, 13-4performing, 10-9, 13-1 to ??, 13-7, ?? to 13-30planning for, 10-3, 10-7, 13-3requirements, 13-6restrictions, 10-6, 13-5tuning considerations, 10-10, 13-28
backup control files, 13-29recovery set location, 13-28
tablespacesbacking up, 9-2, 9-3backing up after TSPITR, 10-10backing up offline, 11-8backing up online, 11-5backing up several online, 11-8backups and checkpoints, 2-6frequency of backups, 3-3listing backup sets including datafiles
from, 8-17read-only
backing up, 9-2effect on recovery, 12-44
recovering offline in open database, 12-4restoring
when database is open, 9-8skipping during backup, 9-2
tag operandbackup command, 8-23list command, 8-18
threadsonline redo log, 2-13
Index-37

time formatRECOVER DATABASE UNTIL TIME
statement, 12-28time parameters, setting for Recovery Manager
use, 6-11time-based recovery, 4-7, 12-26 to 12-30
archived redo log, 12-51coordinated in distributed database, 12-2
trace fileARCH, 2-18control file backups to, 11-10log writer process and, 2-11
transactionscommitting
writing redo log buffers and, 2-2rollback, 1-6uncommitted, 1-6
TS_PITR_CHECK view, 10-4, 13-4TSPITR. See tablespace point-in-time recovery.type disk operand
allocate channel command, 8-10
Uunavailable operand
change command, 8-7uncatalog operand
change command, 8-7unrecoverable objects
and RECOVER operation, 12-43recovery and, 12-43 to 12-44
user errorsdatabase failure and, 1-3recovery from, 12-53
user tags, 7-24user-created backup file
cataloging, 8-8USING BACKUP CONTROLFILE
parameter, 12-23, 12-32utilities
OS, using to make copies, 9-7Recovery Manager, 7-2
VV$BACKUP, 11-7V$BACKUP_CORRUPTION, 8-21V$BACKUP_DEVICE, 9-2V$DATAFILE, 12-4, 12-28, 12-32
listing files for backup, 11-2V$DATAFILE_HEADER, 9-9V$LOGFILE, 12-47
listing files for backup, 11-2V$LONGOPS, 8-21V$RECOVER_FILE, 12-12views
data dictionary, 11-5DBA_DATA_FILES, 11-5V$BACKUP, 11-7V$BACKUP_CORRUPTION, 8-21V$DATAFILE, 11-2, 12-4, 12-28, 12-32V$LOGFILE, 11-2, 12-47V$LONGOPS, 8-21V$RECOVERFILE, 12-12
Wwarning
archiving mode for first backup, 3-8consistency and Export backups, 11-13
whole database backups, 11-3 to 11-4consistent, 2-22definition, 2-21inconsistent, 2-23restoring from, 12-9
Index-38