Embed Size (px)
Citation preview

Oracle Responsys
Mobile App Platform Cloud Service Configuration Guide
Responsys 19D
This document is for new Responsys Customers who have purchased and enabled Oracle Responsys
Mobile App Platform Cloud Service. (This product was previously known as Oracle Push Cloud Service –
Integrated with Responsys, or “Integrated Push”.)
It is also for existing customers who enabled Integrated Push prior to September 2016 and whose
accounts have been migrated to the Responsys v2 Integrated Push architecture available for Responsys
Release 6.29 and later. (The v2 Integrated Push architecture was formerly known as the “6.29 Integrated
Push architecture.” For more information, see the FAQ topic “What is the difference between v1 and v2
Integrated Push architecture” on page 74.)
The Responsys 19D functionality in this guide requires the Mobile App Platform Push SDK 6.43.0 or
later. Other functionality requires 6.33 or later OR an existing Responsys Integrated mobile app that
was migrated to the v2 architecture.
September 2019
Documentation for Oracle Responsys customers who integrate Responsys with a mobile app using the current Oracle
Responsys Mobile App Platform Cloud Service SDK. It is also for those whose accounts were migrated to the v2 Integrated Push
architecture
Oracle Responsys Mobile App Platform Cloud Service Configuration Guide
Responsys 19D document revision 01
You can always find the latest version of this document from the following Topliners page:
https://community.oracle.com/docs/DOC-1017159
Documentation for Oracle Responsys customers who integrate Responsys with a mobile app using the
current Oracle Responsys Mobile App Platform Cloud Service SDK. It is also for those whose accounts
were migrated to the v2 Integrated Push architecture.
Copyright © 2019 Oracle and/or its affiliates. All rights reserved.
Information in this document is subject to change without notice. Data used as examples in this
document is fictitious. No part of this document may be reproduced or transmitted in any form or by
any means, electronic or mechanical, without prior written permission of Oracle Responsys. Address
permission requests, comments, or suggestions about Oracle Responsys documentation by creating a
MOS Service Request at https://support.oracle.com.

ContentsOverview ....................................................................................................................................................... 3
Mobile App Channel Setup Checklist ........................................................................................................ 3
What’s new for the Mobile App Channel? ................................................................................................ 5
Changes and enhancements for 19D .................................................................................................... 5
Changes and enhancements for 19C .................................................................................................... 6
Changes and enhancements for 19B .................................................................................................... 6
Changes and enhancements for 19A .................................................................................................... 7
Changes and enhancements for 18D .................................................................................................... 8
Changes and enhancements for 18C .................................................................................................. 11
Changes and enhancements for 18B .................................................................................................. 12
What’s new for customers migrated to v2 Integrated Push? ................................................................. 13
Adding Mobile App Developer users to Responsys .................................................................................... 15
Setting up the App Channel List .................................................................................................................. 17
Before you begin ..................................................................................................................................... 17
Step 1 – Create the App Channel List...................................................................................................... 19
Step 2 – Associate the App Channel List to your app ............................................................................. 20
App Channel List – System Fields Reference .......................................................................................... 22
Setting up an App Channel Preferences PET (Optional) ............................................................................. 26
Before you begin ..................................................................................................................................... 28
Step 1 – Create the App Channel List PET ............................................................................................... 29
Step 2 – Associate the App Channel List PET .......................................................................................... 31
Using an App Channel List PET for mobile app behavioral targeting (Optional) ........................................ 32
Options available for importing external device data ............................................................................ 32
Importing an App Channel List PET ......................................................................................................... 33
Creating filters for App Channel List PETs ............................................................................................... 37
Setting up custom triggers for In-App messages (Optional) ....................................................................... 38
Adding a custom trigger for a mobile app .............................................................................................. 39
How custom triggers are used in campaigns .......................................................................................... 41
Step 1 – Select the custom trigger in the In-App Campaign Workbook ............................................. 41
Step 2 – Launch the In-App message campaign ................................................................................. 43

Mobile App Channel Configuration Guide Page 2
Using Interactive Notifications (Optional) .................................................................................................. 45
About Interactive Notifications ............................................................................................................... 45
Enabling Standard Interactive Notifications for your mobile app .......................................................... 45
How to add interactive notification buttons to your Push campaign..................................................... 46
Adding Custom Interactive Notification buttons .................................................................................... 49
Defining your Mobile App Message Center (Optional) ............................................................................... 49
Adding Mobile App Message Center to your mobile app ....................................................................... 49
Adding Message Centers for a mobile app ............................................................................................. 50
How Mobile App Message Center is used in campaigns ........................................................................ 52
Guidelines for Push Campaign Design and Message Center .................................................................. 54
Personalizing Push campaign settings (Optional) ....................................................................................... 55
How to personalize Push and Message Center settings ......................................................................... 56
Enabling mobile app reporting for mobile app campaigns ......................................................................... 58
Enabling engagement and conversion metrics in the mobile apps ........................................................ 58
Enabling a Responsys user for Interactive Dashboards .......................................................................... 58
Cross-channel conversion tracking ......................................................................................................... 58
Configuring the mobile app ................................................................................................................ 59
Setting up the Email campaign ........................................................................................................... 59
Viewing reporting for conversions and purchases attributed to Email Campaigns ........................... 60
Using Push campaign launch settings (Optional) ........................................................................................ 60
Setting Push Campaign launch defaults for your account ...................................................................... 60
Using Push Campaign launch settings for a campaign ........................................................................... 64
Managing launch settings for the Send Push Campaign activity in a Program ...................................... 65
Behavioral attributes for App Channel List Filters ...................................................................................... 67
Exporting App Channel List Filter results (Optional) ................................................................................... 68
Exporting Mobile App Event data (Optional) .............................................................................................. 68
Platform-specific Tasks ............................................................................................................................... 69
Implementing mobile app pre-permission messaging (iOS) (Optional) ................................................. 69
Handling PEM file expiration notices (iOS) ............................................................................................. 69
Next Steps ................................................................................................................................................... 70
Using the Responsys APIs ....................................................................................................................... 70
Learning about Responsys – More resources ......................................................................................... 72
Mobile App Channel Configuration Guide Page 3
Frequently Asked Questions (FAQs) ........................................................................................................... 74
Glossary ....................................................................................................................................................... 79
Overview
This document is for Responsys users who configure Responsys to interact with their organization’s
mobile apps. This document assumes that user to be the customer’s Responsys Account Admin or a user
with similar permissions. “Mobile App Platform” enables marketers to send interactions to mobile apps.
Responsys can send these as Push Notifications (including Rich Push), In-App Messages, and Message
Center messages. The Mobile App channel is different from the other Responsys channels like Email and
SMS, because it requires managing two lists for campaign setup and execution: the Contact Profile List
and the App Channel List.
Mobile App Channel Setup Checklist
Set up Responsys accounts for one or more Mobile App Developer, as described in “Adding Mobile App Developer users to Responsys” on page 15. Mobile App Developers use the Mobile App Developer Console to add their mobile apps to Responsys.
Set up the App Channel List, as described in “Setting up the App Channel List” on page 17. This is required before you can set up and launch Mobile App Channel campaigns.
OPTIONAL - Set up the App Channel List Preferences PET, as described in “Setting up an App Channel Preferences PET (Optional)” on page 26. This is required only if the mobile app will be sending a user’s notification preferences information to Responsys.
OPTIONAL - Set up the Connect job for importing an App Channel List PET, as described in “Using an App Channel List PET for mobile app behavioral targeting (Optional)” on page 32. This is required only if the marketer users plan to import additional device data from an external third-party source, such as device/audience segmentation data for performing mobile app behavioral targeting.
OPTIONAL - Configure custom trigger names, as described in “Setting up custom triggers for In-App messages (Optional)” on page 38. This is required if the mobile app supports custom triggers for In-App messaging.
OPTIONAL – Enhance your Push notifications with actionable buttons, as described in “Using Interactive Notifications (Optional)” on page 45. This optional feature provides a set of standard buttons that work for mobile apps built with the 18A or later SDK. Marketers can also work with Mobile App Developers to implement custom buttons.
OPTIONAL - Add a Mobile App Message Center to your app, as described in “Defining your Mobile App Message Center (Optional)” on page 49. This is an optional enhancement for mobile apps, which enables Push message recipients to view previously received Push messages.

Mobile App Channel Configuration Guide Page 4
Provide users with access to Interactive Dashboards for mobile app campaign reporting, as described in “Enabling mobile app reporting for mobile app campaigns” on page 58. This is required to use the interactive dashboards.

Mobile App Channel Configuration Guide Page 5
What’s new for the Mobile App Channel?
Refer to the Oracle Responsys Release Center page on Topliners to view upcoming release dates, feature
availability, release training videos with details about new features, and the “What’s New” (aka Release
Notes) documents.
Changes and enhancements for 19D
Xcode 11 Support
Before you build your iOS app with Xcode (or with iOS 13.x libraries), you are required to integrate your
iOS mobile app with Responsys SDK version 6.42.1 or later.
Why is this upgrade required?
If you build your app with Xcode 11 or iOS 13.x libraries, and do not integrate your iOS app with
Responsys SDK version 6.42.1 or later, your iOS mobile app users will not receive Push Notifications from
Responsys. Xcode 11 and iOS 13.x libraries break the method used by Push Notification SDKs like the
Responsys Push SDK to obtain a Push Notification token for apps.
By when do I need to upgrade my mobile app?
We recommend that you immediately upgrade your iOS app to use Responsys SDK version 6.42.1 or
later. In doing so, you can ensure your app will have the prerequisites required to build your app with
Xcode 11 or iOS 13.x libraries, and will avoid issues when upgrading to the latest Xcode versions.
iOS SDK and Change Log Links:
• iOS SDK Releases
• iOS SDK Change Log
As always, we recommend you use the latest version of our Push SDKs when managing your mobile
solution. For questions, contact Oracle Support.
Segmentation of Logged in Mobile App Users
We’ve added the ability for marketers to create segments to filter on logged in app users and logged out
app users. The USER_IDENTIFIER filter is available in the Filter Designer under App Channel. To
implement this feature, iOS apps must integrate with the 19D Responsys Push iOS SDK 6.43.0 or later.
Provisional Authorization Support
Added support for iOS Provisional Authorization. After an app has implemented the 19D/6.43.0 SDK,
marketers can make decisions based on whether or not certain users are Provisionally Authorized by
using the new PUSH_PERM_AUTH_STATUS_ column in the App Channel List. This enhancement enables
marketers to create segments of users that are opted-in to Provisional Authorization. For more
information on how to use the new column in an App Channel List, see the Responsys Help Center.

Mobile App Channel Configuration Guide Page 6
Using Provisional Authorization iOS apps, starting in iOS 12, upon install you can give users a “trial run”
or preview of notifications from your app. These notifications include a built-in prompt that asks users if
they want to continue receiving notifications from your app.
Segmentation of Mobile App Users based on App Icon Badging and Location Services
Oracle Responsys now tracks individual opt-in statuses for various mobile features so that marketers can
target only relevant devices with their campaigns. Marketers can use these permission fields as
attributes in a filter, and then target the filter with a campaign. To implement this feature, apps must
integrate with the 19D Responsys Push SDK 6.43.0 or later for Android or iOS.
The new permission fields are:
• APP_LOCATION_PERMISSION_: Segments users who have granted app access to App Location Services for iOS and Android on their device.
• PUSH_PERM_BADGES_: Segments users who have opted in to iOS App Icon Badging.
See the Oracle Responsys Help Center for more information on the new fields and possible values, as
well as how to create a filter.
Changes and enhancements for 19C
Android App Links
Added support for Android App Links. Android App Links enables Email Marketers to deep link their
Android end users in a standard, seamless and secure manner into their Android Apps. Similar to the
existing support for Oracle Responsys iOS Universal Links, some of the highlights of this feature include:
Link from a Responsys email campaign directly into an Android mobile app (if installed)
Achieve email-to-app deep linking on Android devices, while preserving click tracking and selective app
deep linking
See the Android App Links guide for more information.
Support for Multiple Push SDKs in one app
Integrate and use the Responsys Push SDK on your app even if your app already uses multiple other
Push SDKs. Release 19C onwards, we provide a solution that apps can implement to enable co-existence
of the Responsys Push SDK with multiple Push SDKs within the same app. For more information, see the
platform specific topics for Android and iOS.
Changes and enhancements for 19B
Authentication Key Support for iOS Apps
Responsys now supports Authentication Key Credentials for iOS apps. The key advantage of using
Authentication Key Credentials over .PEM files, is that unlike .PEM files, Authentication Keys do not
expire. Learn more

Mobile App Channel Configuration Guide Page 7
App Icon Badges for Message Center
App Icon Badges are supported through Message Center messaging Campaigns. Marketers can display a
Badge Count on the App Icon on an end user’s device to indicate to the app user the number of new
Message Center message available. Marketers can Increment the Badge Count for every message sent
to user’s device. App Icon Badging with Message Center Messages can drive increases app user
engagement rates. For more information, see the platform specific topics for Android and iOS.
Same App for Multiple Accounts
You can now use one Responsys app across multiple Responsys accounts. Previously, Responsys apps
were restricted to a single Responsys account.
Responsys accounts may use a single app across multiple Brands or Geographic regions. If you have
multiple accounts in Responsys (each corresponding to a separate brand, organization, or geographic
region) but have a single app that is used for each of these brands, organizations, or regions, you will
now be able to configure and use the same app in each of your Responsys accounts.
At any given time an app user will be associated with only one of your Responsys accounts. When an
app user switches the brand, organization, or region on the app, they will be disassociated from the
current Responsys account and associated with another of your Responsys accounts.
Note: This feature is available under our Controlled Availability program. To request access to this
feature, please contact your Customer Success manager or log in to My Oracle Support and create a
service request. For more information, see the platform specific topics for Android and iOS.
Support for AndroidX Libraries
The Responsys Android SDK (Release 19B / Version 6.41.0 onwards) supports AndroidX libraries. Apps
using AndroidX libraries instead of Android Support libraries, can use the PushIO SDK with Jetifier
enabled in the gradle.properties file.
Changes and enhancements for 19A
Geofence and Beacon Events API
Responsys now supports geofence and beacon events. The Responsys Push SDK has added a set of open
APIs that enable app developers to raise entry and exit events for geofences and beacons. You can
integrate with a geofence/beacon solution of your choice, or integrate with a native geofence/beacon
solution.
Once implemented, marketers will be able to use geofence and beacon events in their program
orchestrations in Responsys. These location-based events will be triggered when a mobile device user
enters or exits a geofence or beacon zone.
Learn more:
• For configuration and usage details, see the Geofence and Beacon Event Variables topic in the Oracle Responsys Help Center.
Mobile App Channel Configuration Guide Page 8
• For implementation details, see the Oracle Responsys Mobile App Platform Cloud Service SDK Developer's Guide.
mParticle Kit for Responsys SDK
The Oracle Responsys Push SDK now supports an integration with mParticle through iOS and Android
mParticle Kits, which serve as an integration layer between the Responsys and mParticle SDKs. If you use
mParticle as a Customer Data Platform (CDP), this integration will enable you to forward events to
mParticle for further analysis and processing.
Learn more: See the Oracle Responsys Mobile App Platform Cloud Service SDK Developer's Guide.
Support for titles in Push notifications
In the 19A update, we have made an enhancement that allows marketers to design and launch push
notification campaigns with titles. Marketers can use the title to compose more contextual push
notifications. Such notifications catch the mobile app user's attention more effectively and can lead to
better campaign performance.
Marketers can access the Title field by opening the Settings dialog located on the Responsys Push
Message Designer page. The Title field supports personalization and emojis.
Learn more:
• For usage details, see the Push – Designing a Campaign topic in the Oracle Responsys Help Center.
• For implementation details, see the Oracle Responsys Mobile App Platform Cloud Service SDK Developer's Guide.
Support for custom conversion window for Push conversions from mobile apps
Responsys already supports a Push Conversion event, which attributes conversions inside the app to the
push campaign that led the app user into the mobile app. In 19A, this has been enhanced to allow
mobile app developers and marketers to define the conversion window for push conversion events that
occur from within the mobile app.
Marketers and mobile app developers will be able to define the concept of a conversion window that is
applicable for their business. For example, they could define the conversion window to log a conversion
only if the mobile app user makes the conversion within a certain number of days of opening the push
notification. They could also define the conversion window such that a conversion is logged only once
for every push notification opened.
Learn more: See the Oracle Responsys Mobile App Platform Cloud Service SDK Developer's Guide.
Changes and enhancements for 18D
New Push Recency Filter Attribute

Mobile App Channel Configuration Guide Page 9
A new Push Recency filter attribute, “Last Push Button click date”, has been added to Filter Designer.
These interactions occur when a mobile app user clicks an Interactive Notification button in a Push
notification.
Learn more: See the filter attributes topic in the Oracle Responsys Help Center.
Redesigned In-app Backend feature
Oracle Responsys and the SDK have changed how in-app campaign messaging works for mobile apps
built with the 6.39.0 and later SDK. For mobile apps built with the 6.39.0 SDK, and for accounts enabled
to use the feature, the platform uses pull-based technology to fetch the messages, rather than “silent
push” technology. Mobile apps built with earlier versions still use the “silent push” and will be subject to
the restrictions of it.
Customers enabled for to use this feature can realize the following benefits:
• Size of the Rich HTML creative content used in In-app campaigns is no longer limited to 3.5 KB.
• In-app messages will be delivered to mobile apps on iOS devices, even if the mobile app has been "force quit” by the mobile app user. The SDK will fetch messages from Responsys every 5 minutes, store them on the device, and display them when triggered.
Implementation guidelines: If your organization has not yet integrated In-app Messaging and plans to
implement a new In-app Messaging integration in its mobile app OR if your organization has already
integrated In-app Messaging and are updating to SDK version 6.39.0 or later, you must use the
“Redesigned In-app Backend” feature.
• You must enable must enable the "Redesigned In-app Backend” feature for your Responsys account. Contact your CSM to have your account enabled. Note for customers updating their mobile apps: If you update your mobile app to SDK version 6.39.0 or later but do not enable the “Redesigned In-app Backend” feature in your app, then this will impact the ability to target all mobile app users immediately once you finally enable the “Redesigned In-app Backend” feature. Mobile app users will have to update their app to the app version that implements “Redesigned In-app Backend” feature before In-app Messages can be delivered to them.
• You must build your mobile app with the Mobile App SDK version 6.39.0 or later.
• You must enable the feature in your mobile app code, as described in the Oracle Responsys Mobile App Platform Cloud Service SDK Developer's Guide. See the platform-specific sections for In-app Messaging for more details.
Learn more: For usage details, see the In-App – Designing a Campaign topic in the Oracle Responsys Help
Center.
TIP: Marketers can tell if the redesigned In-app Message feature is enabled for their account by looking
in the In-app Message Designer page in Responsys. When the feature is enabled, they will see the

Mobile App Channel Configuration Guide Page 10
following text at the bottom of the page:
Message Center campaigns
Mobile App Marketers will now have access to a new Mobile App Campaigns format, Message Center.
The Message Center Campaign Designer will enable Marketers to send messages directly to their mobile
app users’ in-app Message Centers, without requiring an accompanying Push notification. This enables
Marketers to launch Message Center campaigns to mobile app users, even if users have opted-out of
receiving Push notifications. Currently, mobile apps fetch Message Center messages at 2-hour intervals,
so Marketers will find it best suited for communications that are not time-sensitive.
Implementation guidelines: For best results and performance of Message Center, we strongly
recommend upgrading to the 6.39 SDK. You will also need to make a code change to your mobile app to
enable Message Center.
Learn more:
• For usage details, see the Message Center Campaigns topic in the Oracle Responsys Help Center.
• For implementation details, see the Oracle Responsys Mobile App Platform Cloud Service SDK Developer's Guide.
Link tracking generation and external link tracking in In-app campaigns and for Push campaigns
containing rich content (HTML)
Link Tracking for Mobile App Campaigns (Push, In-app) has been enhanced to bring it on par with that
for Email Campaigns:
• Fully Functional Link Tracking UI on par with Email
• External Tracking and Additional Tracking for Mobile App Channel Campaigns (Push, In-app)
You can now also add External Tracking and Additional Tracking parameters to link tracked links in your
Rich Push / In-app messages.
Learn more: See the Push - Designing a Campaign topic and the In-App – Designing a Campaign topic in
the Oracle Responsys Help Center.
Mobile App Platform Push SDK captures Android Channel Permission Status
The SDK now captures Push Notification Permission Status for mobile app users on Android devices and
communicates it to Responsys. This ensures that for each app installation on an Android device, the

Mobile App Channel Configuration Guide Page 11
latest Push Notification Permission Status is reflected in the CHANNEL_PERMISSION_STATUS_ column of
the App Channel List.
Whenever a device registration is sent from SDK to Responsys, the latest Push Notification Status is
captured in the App Channel List for the device record.
Learn more: See the Channel Permission Status FAQ item on page 78.
Changes and enhancements for 18C
The Responsys 18C functionality in this guide requires the Mobile App Platform Push SDK 6.38 or
later.
Interactive Notification Enhancements
New Standard Interactive Notifications available: Marketers now have access to 17 new Standard
Interactive Notifications when they create Push campaigns. For the interaction buttons to be present in
a Push notification, the mobile app associated with the campaign must be built with the Mobile App SDK
version 6.38.0 greater. For more details, see “Using Interactive Notifications (Optional)” on page 45.
CED feeds now support Push “Button Clicked” events: When Marketers launch Push Campaigns that
use Interactive Notification buttons, Responsys captures the responses of their mobile app users as
"Push Button Clicked" Events. Marketers can now choose to export "Contact Interaction Events for
PUSH" of type "Button Clicked" using the "Export Feed Data" Connect Job Type. Once Marketers have
exported this Event data, they can import the data into their systems and conduct detailed, custom
analysis on app user responses to Interactive Notification buttons. Your account must have the
Interactive Notifications feature enabled to access this feature.
Campaign performance reports for Interactive Notifications: A new dashboard for Interactive
Notifications allows you to evaluate the engagement on Push Campaigns that include Interactive
Notification buttons. You must have Interactive Notifications enabled for your account to see this
feature.
Mobile App Channel Configuration Guide Page 12
“Send to Everyone in App Channel List” is now a Controlled Availability feature
For customers whose accounts were created prior to the 18C Update, you now have the option of
disabling the "Everyone in the App Channel List" Audience selection option in Push and In-app Campaign
Workbooks. For customers whose accounts are created after the 18C Update, the option to send to
everyone in the App Channel List is disabled by default.
When the “Everyone in the App Channel List” option is disabled, the Audience panel of Push and In-app
Campaign Workbooks will not have the "Everyone in the App Channel List" option. This benefits
Marketers by preventing accidental launches to all members of the App Channel List. To disable this
option, please contact your Customer Success Manager for assistance. Before you disable this option,
edit campaigns that have the “Everyone in App Channel List” option selected to use an audience or filter
instead. Otherwise, the campaign will have validation errors.
Support for real-time custom events
Real-time custom events are a special type of custom event that override how Responsys handles
enactments when the Enactment Batching feature is enabled. If your account has Enactment Batching
enabled and you need to send near-real-time messages, then we highly recommend having your
account enabled for the Real-time Events feature. This feature is intended for Responsys customers who
use the Mobile App channel. Part of this feature enables you to create real-time custom events. When a
real-time custom event is triggered, Responsys handles the enactments in near real-time instead of
batching them. This ensures that your customers receive the campaign messages (including Email, SMS,
Push, and In-app) without the delay imposed by enactment batching. For more information, see the
Defining Custom Event Types topic in the Oracle Responsys Help Center.
Changes and enhancements for 18B
The Responsys 18B functionality in this guide requires the Mobile App Platform Push SDK 6.37 or
later.
App Channel List attributes added to Filter Designer
New recency and interaction behavioral attributes are now available for use in Classic and Simple App
Channel filters.
• New recency attributes: Push bounce date, Last Push click date, Last App Uninstall date, Last Msg. Center sent date
• New interaction attributes: Push Skipped, Push Bounced, Push Clicked, App Uninstalled, Msg. Center Sent
These attributes enable you to retarget Mobile App users more effectively based on their behavioral
data. You can use these attributes with new or existing Classic and Simple filters. For more details, see
“Behavioral attributes for App Channel List Filters” on page 67.
Export App Channel List Filter results

Mobile App Channel Configuration Guide Page 13
Using the new Connect user interface in Responsys, you can now export App Channel List Filter results.
This enables Marketers to analyze mobile app audiences on their own systems. For more details, see
“Exporting App Channel List Filter results (Optional)” on page 68.
NOTE: This capability is only available with the new Connect user interface, which is currently under
measured deployment and will roll out over time.
Email conversions from Mobile Apps
When your email campaign has deep links to your mobile app, you can now track downstream mobile
app events such as Conversions and Purchases. These Conversions and Purchases will be attributed to
the email campaign that led users to the mobile app.
Whenever a user clicks a tracked link in their email and lands in your mobile app, the Responsys mobile
app platform initializes and maintains a “conversion context.” Your mobile app developers can use the
platform to decide whether to raise a Conversion / Purchase Event. Marketers can then track
Conversions and Purchases generated by their email campaigns.
For more information about how to set up your Email campaigns to track conversions and purchases
from your mobile app, see “Cross-channel conversion tracking” on page 58. Mobile App Developers can
find more setup details in the Oracle Responsys Mobile App Platform Cloud Service SDK Developer's
Guide.
Message Center enhancements
The Oracle Responsys Mobile App Cloud Platform SDK (Push SDK version 6.37.0 onwards) retrieves
“Message Center” messages from Responsys at fixed intervals every time a mobile app is launched. The
Push SDK stores retrieved messages locally, and they are served from the local storage on the device to
your mobile app on demand.
The new Message Center infrastructure imposes some limitations for designing and editing Push
campaigns. See “Guidelines for Push Campaign Design and Message Center” on page 54 for more
details.
What’s new for customers migrated to v2 Integrated Push?
If your mobile app was integrated with Responsys through the Oracle Push Cloud Service SDK before
September 2016 (that is, the v1 Integrated Push architecture), the following items are new after Oracle
Responsys migrates your account to the v2 Integrated Push architecture:
• App Channel List data is now populated in Responsys in near real time. You do not need to schedule a Connect job to import App Channel List data.
• New fields are available in the App Channel List. See “App Channel List – System Fields Reference” on page 22 for details.

Mobile App Channel Configuration Guide Page 14
• Responsys allows for multiple App Channel List PETs, however each mobile app can have only one Preferences PET. You can use the other PETs for various purposes, such as mobile app behavioral targeting. See “Using an App Channel List PET for mobile app behavioral targeting (Optional)” on page 32 for details.
• New App Channel List fields are exposed in Filter Designer in Responsys. See this FAQ item on page 76 for details.
• You can now create filters based on past push behavior. Refer to the Responsys online help for details.
• Mobile App Developers now have a Responsys interface for adding their apps to Responsys. You must create one or more Responsys users for each Mobile App Developer who will be responsible for this task.

Mobile App Channel Configuration Guide Page 15
Adding Mobile App Developer users to Responsys
The first step in setting up the Mobile App channel in Responsys is to add the mobile app to Responsys.
Mobile App Developers now have a Responsys interface, the Mobile App Developer Console, which is
only for adding their apps to Responsys and for obtaining the SDK files that they must incorporate into
the apps. You must create one or more Responsys users for each Mobile App Developer role responsible
for this task. We recommend creating at least one user per platform – for example, an Android
development team gets a user, and an iOS development team gets a different user.
1. Log in to the Responsys application.
2. From the navigation menu, choose Account, as shown on the next page.
3. On the Account Management page, locate the User Management section and click the Add User
link. The Add a User to this Account page is displayed.
4. Complete the following fields:
• Login name
• Email address
• User display name (displayed in the upper-right corner of the Responsys screen)
5. On the Role Assignment tab, choose one or more of the following roles:
NOTE: If you want to provide access only to the Mobile App Developer Console, choose only the
following roles. Choosing other roles in addition to the Mobile App Admin or Developer roles results
in the user getting access to the entire Responsys application.

Mobile App Channel Configuration Guide Page 16
• Mobile App Admin: Has all privileges of Mobile App Developer, plus the ability to delete apps and platforms.
• Mobile App Developer: Has full access to the Mobile App Developer Console, but cannot delete apps and platforms.
6. If the Organization Hierarchy tab is present, click it and choose Root.
7. Click Create. Responsys sends an email to the user’s email address, addressed to the username and
containing a temporary password and a link to the Responsys login page.
NOTES:
• When the new user clicks the link in the new user email, the login page displays in the web
browser. The cursor is placed in the Username field (above the Password field), but the field
itself does not show a label when the focus is on it. The user must enter the username (“Dear
username…”) from the email into the field.
• After the user enters the username and password and clicks the Sign In button, the system
prompts the user to create a new password.
• Users who have other Responsys roles in addition to the Mobile App Developer or Mobile App
Admin roles will see the Responsys home page when they log in, rather than the Mobile App
Developer Console.
To access the Mobile App Developer Console from the Responsys Home page: Click the
navigation menu ( ), and then select Mobile App Console.

Mobile App Channel Configuration Guide Page 17
• For more information about using the Mobile App Developer Console, refer to the “Mobile App
Config – Responsys” section of the Oracle Responsys Mobile App Platform Cloud Service SDK
Developer's Guide.
Setting up the App Channel List
Before you begin
A Marketer or an Account Admin should consider the following before setting up the App Channel List:
1. Contact Profile List – We recommend using the same list that is used to send Email and/or SMS campaigns. This enables the Marketer to include the Push messaging formats in their multi-channel campaign.
2. Match Key – This is the user identifier attribute that the system uses to associate a device record to a known profile record. A Marketer should pick one of Email Address or Mobile Number or Customer ID. We recommend choosing the dominant identifier in the Contacts Profile List, to maximize the conversion of unknown devices to known users. The project team should also consider data security. For example, Customer ID is more secure than an email address.
NOTES:
• Please use caution when choosing a match key. It cannot be reset to another value once set. For example, you cannot choose to change the match key to CUSTOMER_ID_ after you have set it to EMAIL_ADDRESS_.
• We do not recommend choosing EMAIL_SHA256_HASH_ or EMAIL_MD5_HASH_ as the match key for the user identifier. Doing so can cause confusion when an App Channel List record is created and a Profile List record does not currently exist for the email address. For more details, please see the FAQ item, “Should I use SHA256 or MD5HASH as the match key?” on page 75.
Setting a match key requires co-ordination between the Marketer and the Mobile App Developer.
A Marketer should be able to figure the best field for the match key. He or she should relay that
back to the Mobile App Developer so they set the right value for match key from within the mobile
app code. Within the mobile app code, this field is referred to as user_identifier.
3. Before “Step 2 – Associate the App Channel List to your app” (on page 20), ensure that the mobile app is set up in Responsys. Responsys Account Admins do this by logging onto the Mobile App Developer Console and verifying the mobile app that you are trying to set up is available on the Manage Apps page. For more details about the Mobile App Developer Console, please refer to the “Manage Apps and Platforms” topic of the Oracle Responsys Mobile App Platform Cloud Service SDK Developer's Guide on docs.oracle.com.
Mobile App Channel Configuration Guide Page 18
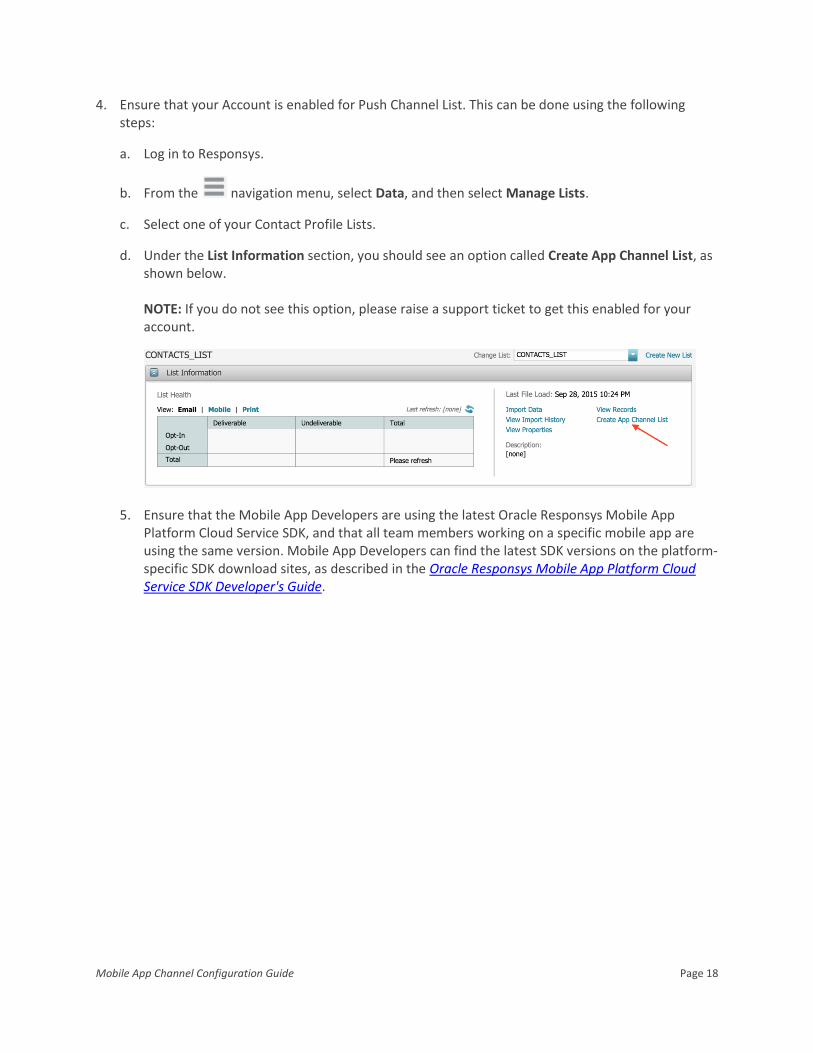
4. Ensure that your Account is enabled for Push Channel List. This can be done using the following steps:
a. Log in to Responsys.
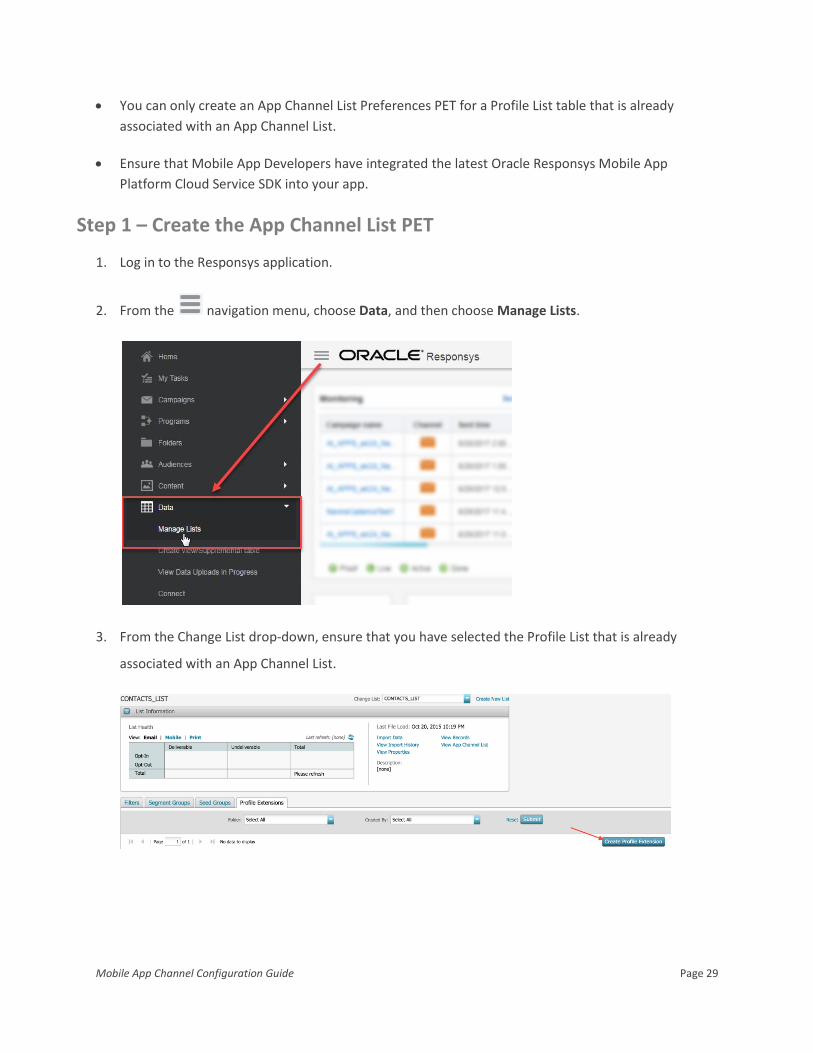
b. From the navigation menu, select Data, and then select Manage Lists.
c. Select one of your Contact Profile Lists.
d. Under the List Information section, you should see an option called Create App Channel List, as shown below. NOTE: If you do not see this option, please raise a support ticket to get this enabled for your account.
5. Ensure that the Mobile App Developers are using the latest Oracle Responsys Mobile App Platform Cloud Service SDK, and that all team members working on a specific mobile app are using the same version. Mobile App Developers can find the latest SDK versions on the platform-specific SDK download sites, as described in the Oracle Responsys Mobile App Platform Cloud Service SDK Developer's Guide.
Mobile App Channel Configuration Guide Page 19
Step 1 – Create the App Channel List
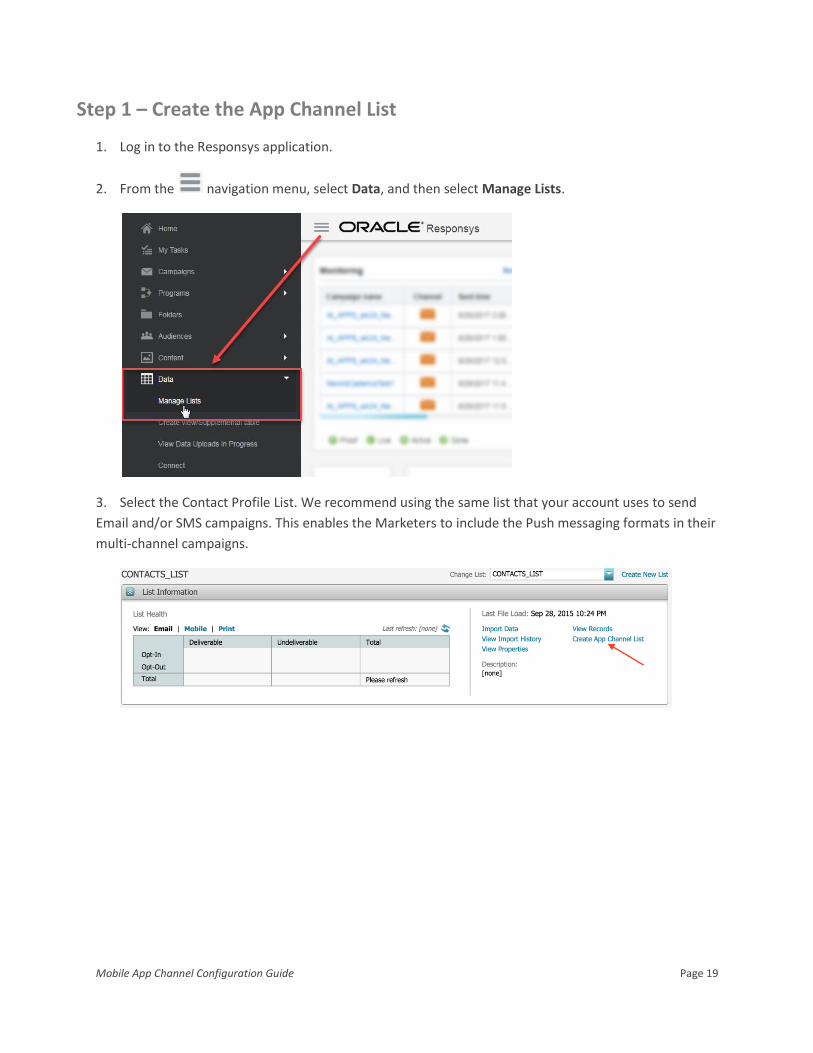
1. Log in to the Responsys application.
2. From the navigation menu, select Data, and then select Manage Lists.
3. Select the Contact Profile List. We recommend using the same list that your account uses to send
Email and/or SMS campaigns. This enables the Marketers to include the Push messaging formats in their
multi-channel campaigns.

Mobile App Channel Configuration Guide Page 20
4. Under the List Information section, click the Create App Channel List link.
The Create App Channel List dialog is displayed.
5. Enter a name for the App Channel List. By default, this is set to a concatenated string of your Profile
List name and the literal “_APP”.
6. Select a Folder Name. By default, the folder is set to the same folder as your Contact Profile List.
7. The third field, with the label “Map user identifier of the App Channel recipient to:”, is the match
key. As discussed in Item #2 in the “Before you begin” section (on page 17), select the match key that
corresponds to the user identifier used in the mobile app code:
• EMAIL_ADDRESS_
• MOBILE_NUMBER_
• CUSTOMER_ID_
• EMAIL_SHA256_HASH_
• EMAIL_MD5_HASH_
8. Click Save.
Step 2 – Associate the App Channel List to your app
1. From the navigation menu, select Account.
2. On the Account Management page, locate the Campaign Management section, and then select
Manage Mobile App Configurations.

Mobile App Channel Configuration Guide Page 21
3. On the Manage Mobile App Configurations page, select the App Name of the mobile app that you
want to configure.
4. Click on the “+” button to display the detailed view of the app. You should see the list of platforms.
5. Click Edit Profile List. This should open up a dialog that displays the Profile List and the App Channel
List. Select the Profile List, and the corresponding App Channel List will be automatically displayed.
6. If you have defined a Notification Preferences PET, then you should be able to select that as well.
Selecting a Notification Preferences PET is required only when the mobile app will be sending user
preferences data to Responsys.

Mobile App Channel Configuration Guide Page 22
App Channel List – System Fields Reference
App Channel List contains the following fields. All of these are system fields and cannot be updated
through the Data Viewer.
Column Name Description
RIID_ Numeric. A unique Recipient ID for the Device. This is the
key that is logged for all activities (Sent, Opens, and
Conversions).
NOTE: You can use RIID_ as a match key for an App Channel
List PET import in Responsys.
PROFILE_RIID_ Numeric. This is a foreign key reference to the Contact
Profile List. As described before, every App Channel List is
associated to a Contact Profile List. When this field has a
value, it corresponds to a Known contact in the Profile List.
Conversely, when this field is blank, it implies the user’s
profile is unknown. It implies that the user has not chosen to
sign in to the mobile app with their user identifier.
CHANNEL_PERMISSION_STATUS_ Text. Indicates whether the user has opted in to receive
push notification from this device. This could be set to either
“I” (Opted-In) or “O” (Opted-Out), to reflect the User
Preferences on the device. See the FAQ item about Channel
Permission Status (page 78) for more details.
CHANNEL_DELIVERABILITY_STATUS_ Text. Indicates whether messages can be sent to this device
or not. It is set to “D” (Deliverable) when the system creates
an App Channel List record (that is, a new user installs an
app on a specific mobile device for the first time). It is set to
“U” (Undeliverable) when the device can no longer be
reached, such as when the user has uninstalled the mobile
app. See the FAQ item about Channel Permission Status
(page 78) for more details.
CHANNEL_PERMISSION_REASON_ Text. For accounts using the v2 Integrated Push architecture,
this is set to “PU:MERGE” when the record is added to the
App Channel List. Accounts migrated from the v1 Integrated
Push architecture may have App Channel List records where
this value is set to “CO:MERGE,” meaning that the record
was added by a Connect job.

Mobile App Channel Configuration Guide Page 23
Column Name Description
CREATED_DATE_ DATETIME. Date and Time when the record is created in
Responsys.
MODIFIED_DATE_ DATETIME. Date and Time when the record is last updated in
Responsys.
API_KEY_ Text (to 100 characters). A unique key for a given mobile app
in Responsys.
DEVICE_ID_ Text (to 255 characters). A unique key for a mobile app on a
specific device, generated upon first run of the mobile app.
This means that different apps on the same device will have
different device IDs. This ID changes when a mobile app is
uninstalled and re-installed. Used internally by Responsys.
NOTE: Device ID + API Key combination can be used as a
match key for an App Channel List PET import in Responsys.
PLATFORM_TYPE_
Text. Indicates the platform of the device. Values are:
• APNS - Apple iOS platform
• SAPNS – Apple iOS Development platform
• GCM - Google Android platform
• WNS - Windows platform (not supported for v2)
UPDATED_AT_DATE_ DATETIME. This is the date when the mobile app last
communicated with the Responsys system; this may be due
to a user interaction or other cause (such as background
location update).
INSTALLED_AT_DATE_ DATETIME. This is the date when the mobile app is first run
on the device, which is when Responsys detects that the
mobile app was installed.
CARRIER_ Text (to 50 characters). A column that indicates the carrier
code, which is sent by the mobile platform.
MOBILE_COUNTRY_CODE_ Numeric. Country code of the device. Populated when
available.
APP_VERSION_ Text (to 25 characters). Version of the mobile app that is on
the device.
Mobile App Channel Configuration Guide Page 24
Column Name Description
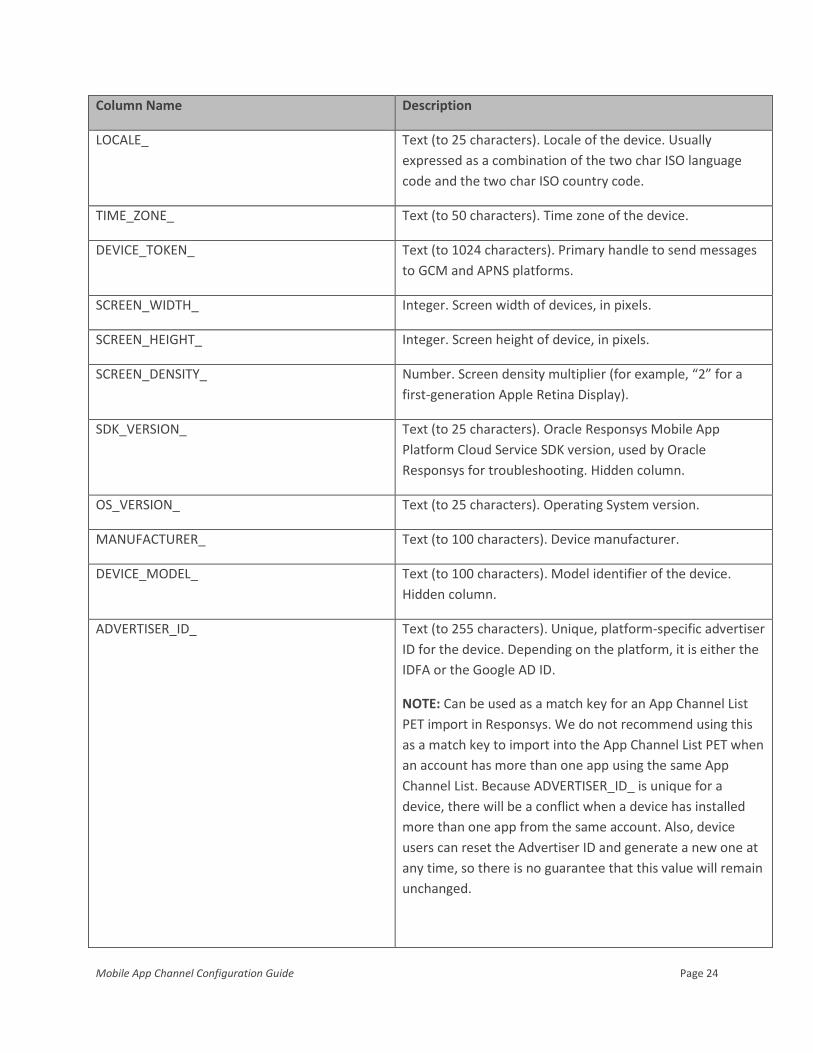
LOCALE_ Text (to 25 characters). Locale of the device. Usually
expressed as a combination of the two char ISO language
code and the two char ISO country code.
TIME_ZONE_ Text (to 50 characters). Time zone of the device.
DEVICE_TOKEN_ Text (to 1024 characters). Primary handle to send messages
to GCM and APNS platforms.
SCREEN_WIDTH_ Integer. Screen width of devices, in pixels.
SCREEN_HEIGHT_ Integer. Screen height of device, in pixels.
SCREEN_DENSITY_ Number. Screen density multiplier (for example, “2” for a
first-generation Apple Retina Display).
SDK_VERSION_ Text (to 25 characters). Oracle Responsys Mobile App
Platform Cloud Service SDK version, used by Oracle
Responsys for troubleshooting. Hidden column.
OS_VERSION_ Text (to 25 characters). Operating System version.
MANUFACTURER_ Text (to 100 characters). Device manufacturer.
DEVICE_MODEL_ Text (to 100 characters). Model identifier of the device.
Hidden column.
ADVERTISER_ID_ Text (to 255 characters). Unique, platform-specific advertiser
ID for the device. Depending on the platform, it is either the
IDFA or the Google AD ID.
NOTE: Can be used as a match key for an App Channel List
PET import in Responsys. We do not recommend using this
as a match key to import into the App Channel List PET when
an account has more than one app using the same App
Channel List. Because ADVERTISER_ID_ is unique for a
device, there will be a conflict when a device has installed
more than one app from the same account. Also, device
users can reset the Advertiser ID and generate a new one at
any time, so there is no guarantee that this value will remain
unchanged.

Mobile App Channel Configuration Guide Page 25
Column Name Description
EXT_DEVICE_TRACKING_ID_ Text (to 255 characters). Allows data captured by other
SDKs, such as external analytics data about a device.
NOTE: Can be used as a match key for an App Channel List
PET import in Responsys. This ID represents the unique
Device ID of an external system. Using the Oracle Responsys
Mobile App Platform Cloud Service SDK, a Mobile App
Developer can log this during the first device registration
and subsequent device registration updates.
VENDOR_ID_ Text (to 255 characters). IDFV, or Identifier for Vendors.
Shared by all apps from the same company. Hidden column.
DEVICE_COUNTRY_CODE_ Text (to 2 characters). Country; value is set based on the last
known location of the device.
DEVICE_CITY_ Text (to 100 characters). City; value is set based on the last
known location of the device.
DEVICE_POSTAL_CODE_ Text (to 25 characters). Zip code or postal code; value is set
based on the last known location of the device.
ADMIN_AREA1_ Text (to 50 characters). Refers to a geographic classification,
such as state, province, region, etc. Value is set based on the
last known location of the device.
ADMIN_AREA2_ Text (to 50 characters). Refers to a geographic sub-
classification, such as county, district, etc. Value is set based
on the last known location of the device.
REGISTRATION_UPDATED_DT_ Timestamp. To be used internally by the system. Hidden
column.
IP_ADDRESS_ Text (to 50 characters). IP of the device. Hidden column.
APP_ID_ Text (to 50 characters). Mobile application ID.
USER_IDENTIFIER_ Text (to 50 characters). For logged in users, it contains the
value of the USER_IDENTIFIER (match key) from the mobile
app. For logged out users, it contains null. Used when the
mobile app retrieves a logged in user’s Message Center
messages from Responsys.

Mobile App Channel Configuration Guide Page 26
Column Name Description
PUSH_PERM_AUTH_STATUS Text (to 50 characters). When an iOS app implements iOS
Provisional Authorization, this column indicates whether the
iOS user is still in the Provisional Authorization state (P) or
not. For more information, see the Responsys Help Center.
PUSH_PERM_BADGES Text (to 50 characters). This column indicates whether the
iOS user has opted in to App Icon Badging on this iOS device.
This could be set to either I (Opted-In) or O (Opted-Out), to
reflect the user preferences on the iOS device. For more
information, see the Responsys Help Center.
APP_LOCATION_PERMISSION Text (to 50 characters). This column indicates whether or not
the app user has granted the app access to location services
on the device. For more information, see the Responsys Help
Center.
Setting up an App Channel Preferences PET (Optional)
App Channel Preferences PETs store preferences in Responsys that are explicitly declared by the mobile
app user. Good examples of using an App Channel Preferences PET are:
• Allowing users to opt in to receiving notifications for specific types of promotions. For example, a mobile app user may opt in to receive a “Summer Deals” notification. Or, for a sports mobile app, users could select their favorite sports teams, and receive notifications specific to their teams.
• Allowing users to choose Language and Currency options
• Allowing user to set the maximum number of messages per week
App Channel Preferences PETs are not designed to store behavior data. For example, this is not the
place to store the user’s top 3 products, nor is it the place to store product categories that the user has
browsed in the last X days.
If the mobile app has user notification preferences data that will be sent to Responsys, you must create
a Preferences Profile Extension Table (PET) for the App Channel List, so that Responsys can store this
data. However, the following conditions must be met in order to bring in data into an App Channel PET:
• The App Channel List’s Preferences PET must be declared as a “Preferences PET” in the Account Mobile App Configuration View
• Preferences PET columns must be created with the “PR_” prefix in their names

Mobile App Channel Configuration Guide Page 27
• For each column in the Preferences PET, there must be a corresponding field with the same exact name that should be logged from within the mobile app code. This means that you must coordinate with the app development team to decide what notification preference columns will be set within the app before you start to create the App Channel List PET.
For example, let’s assume that app users of the Durham Denim App can select whether to receive
notifications for:
“Summer Deals”
“Deal of the Day”
Mobile App Developers use the following two fields to log these user preferences:
SUMMER_DEALS
DEAL_OF_THE_DAY
Mobile App Channel Configuration Guide Page 28
Therefore, the Responsys Account Admin or Marketer creating the Preferences PET must add the
following two columns to the PET to log these user preferences:
PR_SUMMER_DEALS
PR_DEAL_OF_THE_DAY
Any deviation would result in the preferences not being registered within Responsys.
NOTE: Preferences fields are case sensitive. For example, “SUMMER_DEALS” is not same as
“Summer_Deals”. To avoid confusion, the Mobile App Developer should always declare preferences
in upper case, for example, “SUMMER_DEALS”. This is a best practice, because the system always
creates column names in PETs in upper case.
You can associate multiple App Channel PETs with the same Profile List/App Channel List combination;
for example, you might have a PET with user segments from a third-party SDK for mobile app behavioral
targeting. (See “Using an App Channel List PET for mobile app behavioral targeting (Optional)” on
page 32.) However, please note that you can have only one Preferences PET per mobile app.
Before you begin
Before you get started on creating an App Channel Preferences PET, it is important to understand the
following:
• App Channel Preferences PETs are limited to only storing mobile app user preferences as of the
current release.
• Each mobile app may have only one App Channel List Preferences PET.
• You must prefix the column names for the App Channel List Preferences PET with “PR_”. For
example, if the Mobile App Developer has a preference with a key of PRICE_LIMIT, the column name
in the Preferences PET must be PR_PRICE_LIMIT.
• You can store a maximum of 30 preferences in a PET. In case, you need to store more than this limit,
you should get approval from Responsys Product Management. Please create a My Oracle Support
(MOS) ticket requesting approval and clearly state why you need more than 30 preferences.
• Marketer and the Mobile App Developer must coordinate on requirements. The Mobile App
Developer uses the Oracle Responsys Mobile App Platform Cloud Service SDK Preferences
Notifications feature to set the preferences within the app. As a Marketer (or Responsys Account
Admin), you should know the exact list of these preferences’ names and their data types. Use this
information to create columns in your App Channel List Preferences PET.
Mobile App Channel Configuration Guide Page 29
• You can only create an App Channel List Preferences PET for a Profile List table that is already
associated with an App Channel List.
• Ensure that Mobile App Developers have integrated the latest Oracle Responsys Mobile App
Platform Cloud Service SDK into your app.
Step 1 – Create the App Channel List PET
1. Log in to the Responsys application.
2. From the navigation menu, choose Data, and then choose Manage Lists.
3. From the Change List drop-down, ensure that you have selected the Profile List that is already
associated with an App Channel List.
Mobile App Channel Configuration Guide Page 30
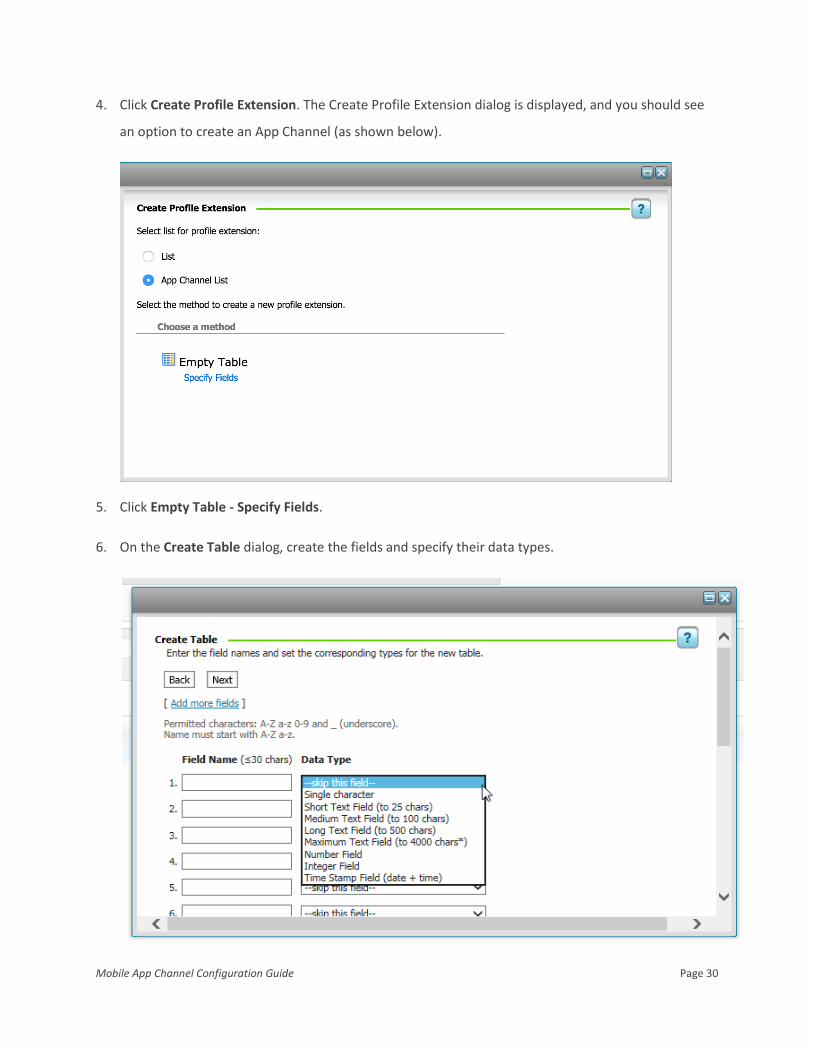
4. Click Create Profile Extension. The Create Profile Extension dialog is displayed, and you should see
an option to create an App Channel (as shown below).
5. Click Empty Table - Specify Fields.
6. On the Create Table dialog, create the fields and specify their data types.
Mobile App Channel Configuration Guide Page 31
The Mobile App Developer should provide a list of the preferences fields and their data types in the
mobile app.
• Remember to prefix the field names you receive from the Mobile App Developer with “PR_”.
• Use the following table to determine the data type to choose when you create the field:
For the following
Mobile App Data Type:
Use the following
Responsys Data Type:
Notes:
Boolean Short Text Field (to 25 characters) Use a short text field because Responsys does
not have a Boolean data type, and Boolean
values in the signal file are expressed as “true”
or “false”.
Number Number Field
String
Depending on the length, choose one of
the following:
Short Text Field (to 15 characters)
Medium Text Field (to 100 characters)
Long Text Field (to 500 characters)
Maximum Text Field (to 4000 characters)
Coordinate with the Mobile App Developer to
determine the length of data to expect from the
mobile app.
7. Click Next and provide a Name for the App Channel PET to complete the App Channel PET creation.
Step 2 – Associate the App Channel List PET
1. From the navigation menu, choose Account.
2. On the Account Management page, locate the Campaign Management section, and then select
Manage Mobile App Configurations.
3. On the Manage Mobile App Configurations page, select the App Name of the mobile app that you
want to configure.
4. Click the “+” button to display the detailed view of the app. You should see the list of platforms.

Mobile App Channel Configuration Guide Page 32
5. Click Edit Profile List. This should open up a dialog that displays the Profile List and the App Channel
List. Select the Profile List, and the corresponding App Channel List will be automatically displayed.
6. Click the “Preferences PET” dropdown. You should see the App Channel Preferences PET name that
was created during the previous step. If you see more than one PET in the list, ensure that you choose
the preferences PET name.
Using an App Channel List PET for mobile app behavioral targeting (Optional)
Significant percentages of mobile app users do not sign up and provide profile data. This makes it
difficult to create marketing campaigns that are of interest to the recipients. Responsys enables you to
enhance the information about unknown device users by importing device-based mobile analytics data.
Third-party analytics tools capture information about device users, based in their activity and location –
for example, one user who books travels often and who registers for conferences in various cities may
be identified as a “Business Traveler,” whereas another user who regularly purchases coffee at their
local coffee house may be identified as a “Coffee Drinker”. You may also have additional data about
mobile app users from an internal system of record that you may wish to import, such as the user’s
assumed age range or income range.
Once the analytics data is imported into an App Channel List PET, Marketers can create filters using the
data. Filters, in turn, enable marketers to send messages to the audience most likely to respond to
them.
Options available for importing external device data
There are two options available for importing external device data into Responsys:
1. Log the external device ID within the Responsys Push Cloud Service SDK
Every mobile-aware external SDK also has the concept of a Device ID. Mobile App Developers
should be able to log the external Device ID as “External Device Tracking ID” within their mobile
app code. This should be done as part of a new device registration and subsequent device
registration updates.
2. Log Responsys Device ID and API Key within the external SDK
A Mobile App Developer should be able to get the Oracle Responsys Mobile App Platform Cloud
Service SDK’s Device ID and API Key and log that with every user interaction. For example, when
the user views a product, adds a product to the wish list, and the like, the Mobile App Developer
should get the Responsys Device ID and API Key and log that as part of the interaction.

Mobile App Channel Configuration Guide Page 33
Importing an App Channel List PET
This section contains the basic instructions for setting up a Connect job to import an App Channel List
PET. For more details about the options in the import job wizard, click the blue online help button in the
upper right corner of the Responsys screen.
Before you begin:
• Determine the fields to be imported and their data types, which will help determine the fields and their data types when you create the App Channel List PET. Also, note the column containing the match key.
• Create an App Channel List Profile Extension Table, with columns for the imported data. (Automatically generating a new PET is not supported for this type of import job.) The steps are identical to those in “Step 1 – Create the App Channel List PET” on page 29, except that you are not restricted to the column-naming format that is required for a preferences PET.
To create the Connect Import Job:
1. From the navigation menu, choose Data, and then choose Connect.
Mobile App Channel Configuration Guide Page 34
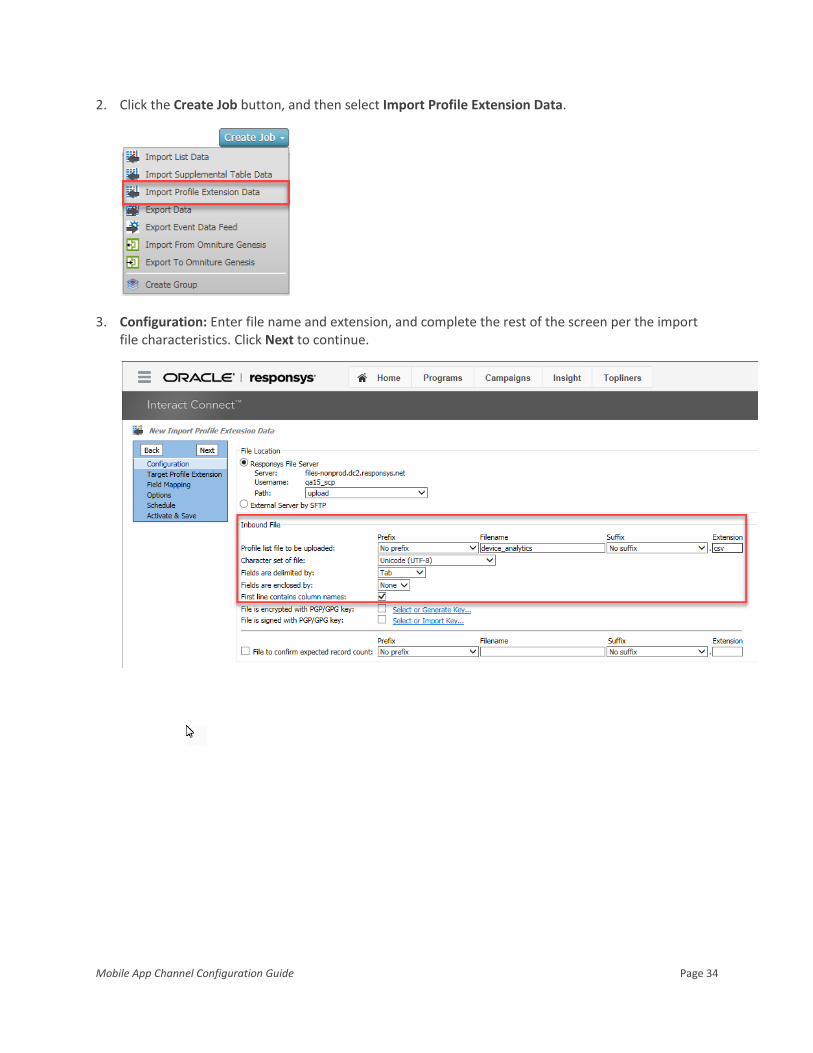
2. Click the Create Job button, and then select Import Profile Extension Data.
3. Configuration: Enter file name and extension, and complete the rest of the screen per the import file characteristics. Click Next to continue.
Mobile App Channel Configuration Guide Page 35
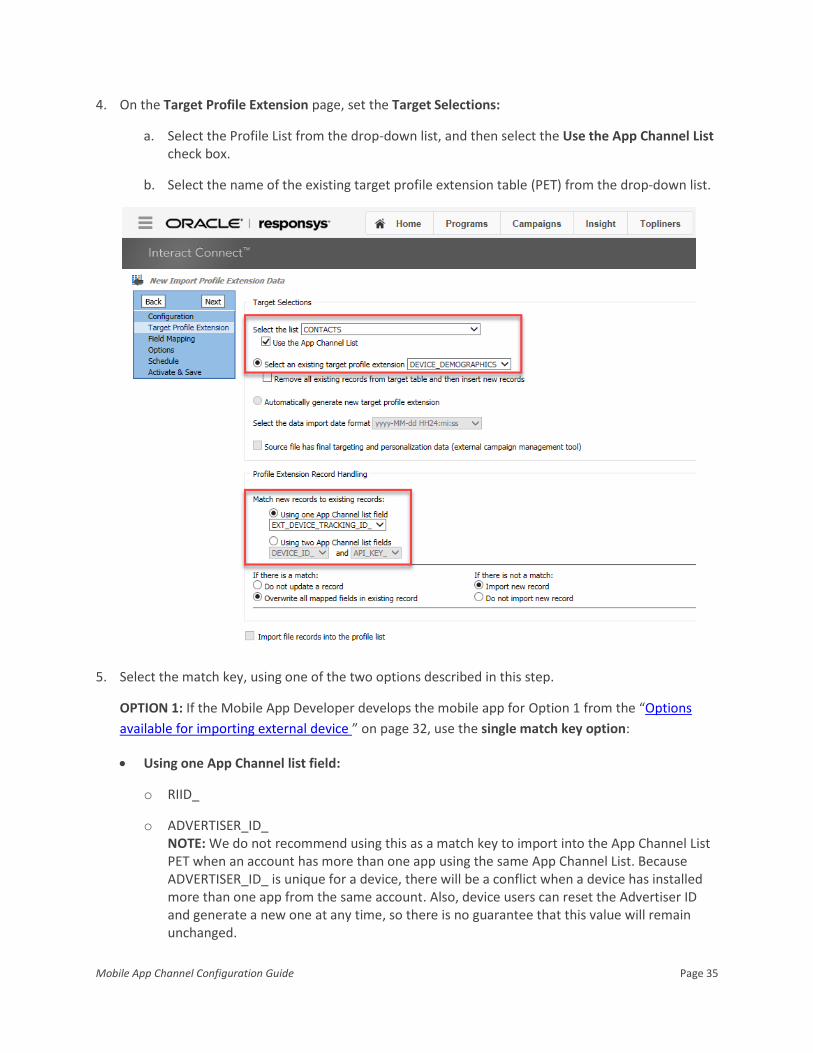
4. On the Target Profile Extension page, set the Target Selections:
a. Select the Profile List from the drop-down list, and then select the Use the App Channel List check box.
b. Select the name of the existing target profile extension table (PET) from the drop-down list.
5. Select the match key, using one of the two options described in this step.
OPTION 1: If the Mobile App Developer develops the mobile app for Option 1 from the “Options
available for importing external device ” on page 32, use the single match key option:
• Using one App Channel list field:
o RIID_
o ADVERTISER_ID_ NOTE: We do not recommend using this as a match key to import into the App Channel List PET when an account has more than one app using the same App Channel List. Because ADVERTISER_ID_ is unique for a device, there will be a conflict when a device has installed more than one app from the same account. Also, device users can reset the Advertiser ID and generate a new one at any time, so there is no guarantee that this value will remain unchanged.

Mobile App Channel Configuration Guide Page 36
o EXT_DEVICE_TRACKING_ID_ NOTE: This field is the unique device identifier assigned by the third-party SDK; this ID remains the same.
-OR-
OPTION 2: If the Mobile App Developer develops the mobile app for Option 2 from the “Options
available for importing external device ” on page 32, use the combination match key option:
• Using two app channel list fields: DEVICE_ID_ and API_KEY_
(For more details about these fields, see the “App Channel List – System Fields Reference” on
page 22.)
6. Accept the default values for the match/no match scenarios, and then click Next.
7. On the Field Mapping page, click the Upload the Mapping File link. In the Upload Mapping File dialog, browse to and upload the import file. Ensure that the field settings are correct for your file, and then click Done.
8. On the same Field Mapping page, set the field mappings between the import file and the App Channel PET. For the match key, map the correct field to the match key field shown in the List Fields section of the list. Click Next to continue.
9. On the Options page, enter an email address to be notified of failed jobs. Change the default settings, if desired. Click Next to continue.
10. On the Schedule page, set the schedule for the job, per your project requirements. Click Next to continue.
11. On the Activate & Save page:
a. Enter the job name in the field provided.
b. If you are ready for the job to be activated, select the Activate radio button. Once saved, the job will run per the Schedule settings.
c. Click Save to save the job settings.

Mobile App Channel Configuration Guide Page 37
Creating filters for App Channel List PETs
After the App Channel List PET import is completed, set up filters to target known users, based on the
third-party analytics data. Marketers creating campaigns and programs in Responsys can then send
campaigns only to known users who meet the filter criteria. (If you have an App Channel List Preferences
PET, the same steps are used to create filters based on the mobile app user’s notification preferences.)
1. Log in to the Responsys application.
2. From the navigation menu, select Data, and then select Manage Lists.
3. On the Manage Lists screen, if the screen does not show the correct Profile List, use the Change List field to change the Profile List to the one associated with the mobile app.
4. Click Create Filter, select Create App Channel List Filter, then select Profile data.

Mobile App Channel Configuration Guide Page 38
5. Construct your filter (refer to the Responsys online help for instructions, if needed). To locate your App Channel List PET attributes, expand the App Channel List Attributes, scroll to the name of your App Channel List PET, and then click the “+” (plus sign) to show the attributes.
Setting up custom triggers for In-App messages (Optional)
A “trigger,” within the context of mobile In-App messaging, means an end-user action within the mobile
app that a Marketer wants to respond to with a message. For example, this could be a user action of
adding products to a wish list. A Marketer could use that action and respond with an offer back to the
user in the form of an In-App message.
In-App messaging campaigns rely on triggers to display the message in the mobile app. Responsys and
the Oracle Responsys Mobile App Platform Cloud Service SDK support the standard trigger,
$ExplicitAppOpen, for all apps. The standard trigger opens the in-app message when the device user
opens the app.
Optionally, Marketers may want other mobile app actions to trigger an In-App message, such as when
an app user adds merchandise to a cart. Or, per our recommendation in the Oracle Responsys Mobile

Mobile App Channel Configuration Guide Page 39
App Platform Cloud Service SDK Developer's Guide, Android mobile app developers may need to add
custom triggers to their app if the app has a splash screen, tutorial or other activity that is displayed
before the home/main activity is displayed. Mobile App Developers can code the app to support custom
triggers. The Responsys Account Admin configures Responsys to use the app's custom triggers. To use
the custom triggers defined for and coded in a mobile app:
• Responsys Account Admin users must first add the custom trigger names for the app to the Manage Mobile App Configuration page.
• After the custom trigger names are added to Responsys, Marketers can select a custom trigger when they create their In-App Message campaigns.
Adding a custom trigger for a mobile app
Before you begin: Obtain a case-sensitive list of any added custom triggers from the Mobile App
Developers.
1. From the navigation menu, select Account.
2. On the Account Management page, locate the Campaign Management section, and then select
Manage Mobile App Configurations.

Mobile App Channel Configuration Guide Page 40
3. On the Manage Mobile App Configurations page, select the App Name of the mobile app that you
want to configure.
4. Click on the “+” button to display the detailed view of the app. You should see the list of platforms.
5. Click Add Custom Trigger. This opens up a dialog that enables you to enter the name of a custom
trigger for your app.
6. Type the custom trigger names in the fields provided. Click Add More if you want to add more custom triggers. When you have finished adding custom triggers, click Save.
Mobile App Channel Configuration Guide Page 41
How custom triggers are used in campaigns
Marketers can change the default trigger, $ExplicitAppOpen, to a custom trigger defined for the app.
Step 1 – Select the custom trigger in the In-App Campaign Workbook
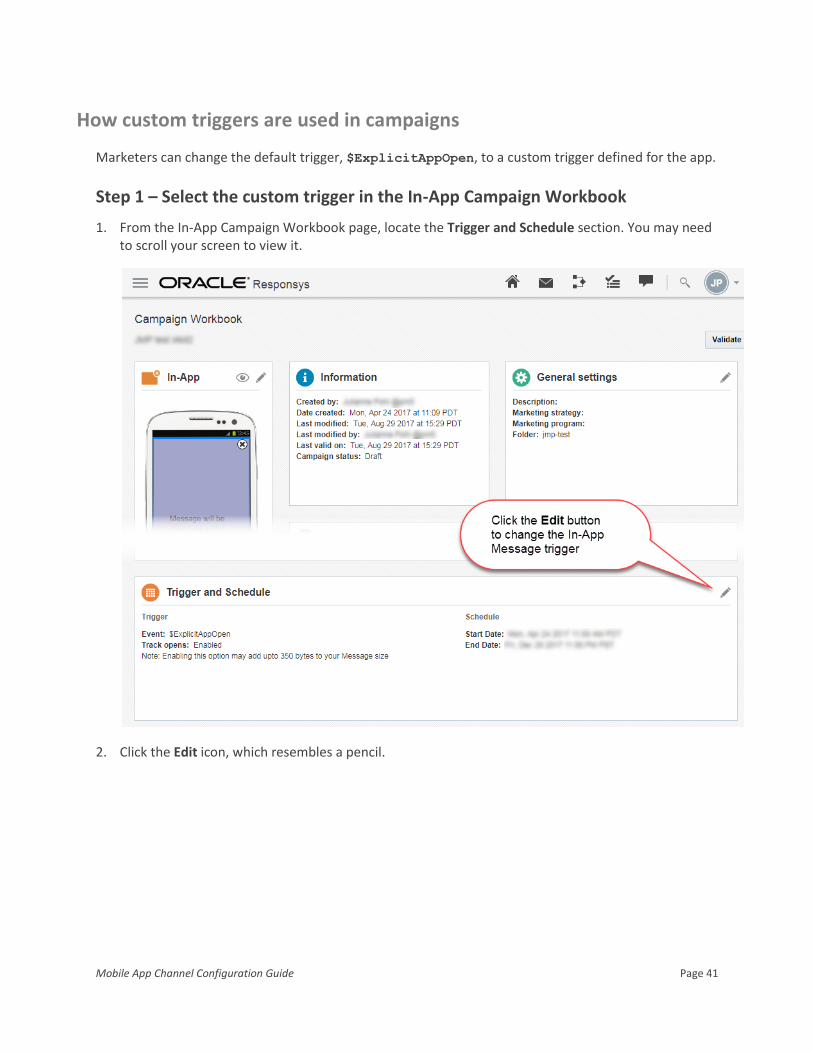
1. From the In-App Campaign Workbook page, locate the Trigger and Schedule section. You may need to scroll your screen to view it.
2. Click the Edit icon, which resembles a pencil.

Mobile App Channel Configuration Guide Page 42
The Trigger and Schedule dialog is displayed.
3. In the Trigger section:
a. Select the desired trigger.
b. Optionally, select the Track In-app Opens check box. This option enables you to track when the number of times the In-App message is displayed. NOTE: You must also enable Link Tracking in the In-App Message Designer section of the campaign workbook.
4. In the Schedule section, set the date range using the Start and End date and time fields.
This schedule defines how long the In-App message will be valid. For example, a Marketer might
decide to offer a promotion only for one week. Any user who took the action (activated the trigger)
outside the boundary of this pre-defined time limit will not see the In-App message. This should not
be confused with the Responsys Scheduled Filter concept.
5. Click Save.

Mobile App Channel Configuration Guide Page 43
Step 2 – Launch the In-App message campaign
After the In-App message campaign is defined, marketers must launch the campaign for it to be sent to
devices running your mobile app. They can do so in one of two ways:
• Launch directly from the Campaign Workbook. Use the Launch settings to schedule the launch timing and indicate how you want to receive progress and failure notifications.
• Include the campaign in a Responsys cross-channel marketing program by adding a Send in-app campaign activity to their program, as illustrated on the next page.

Mobile App Channel Configuration Guide Page 44
Whether you schedule the campaign from a campaign workbook or include it in a marketing program,
the SDK uses pull-based technology to fetch it from Responsys and the mobile app stores it until needed.
The mobile app displays the In-App message only if the custom trigger action occurs within the time
range scheduled in the campaign workbook.
Example: The “Holiday Deals” in-app campaign was defined as having $ExplicitAppOpen as the
custom trigger and it was scheduled to be visible between 11/23/2018 and 11/27/2018. It was included
in the “Holiday Deals – In App” program, which launched on 11/19/2018. The program’s starting event
was a scheduled filter that included all members of the app channel list, so all devices in the list received
the message before the scheduled date range for the campaign.
Customer Jane Smith’s device was in the app channel list and it received the in-app message. When she
opened the mobile app on 11/20/2018, the app did not display in-app message, even though it was
already present on her device. That is because the mobile app keeps track of when the in-app message
should be displayed and what action triggers it. When she opened the app during the scheduled time –
for example, on 11/26/2018 – the app displayed the in-app message as expected.
For More Information: Marketers can learn more about creating Mobile App Channel campaigns by
viewing the topic Mobile App Overview, which is available from the Oracle Responsys Help Center.
Mobile App Channel Configuration Guide Page 45
Using Interactive Notifications (Optional)
NOTE: This feature is a Controlled Availability feature. Please work with your Oracle Customer Success
Manager (CSM) to obtain approval for enablement
When Marketers design Push Campaigns in Responsys, they now have an option to add greater
interactivity to their Push Notifications through Interactive Notifications. Interactive Notifications enable
Marketers to add action buttons to their Push Notifications, and they allow mobile app users to interact
with Push notifications.
About Interactive Notifications
Marketers have the option to add Interactive Notification buttons to their Push campaigns. When a
mobile app user receives a Push notification that has Interactive Notification buttons, the user will see
the buttons below the message. When a mobile app user clicks an Interactive Notification button, the
resulting action depends the button’s definition:
• Launch a URL, which could go to a deep link within the mobile app or to a web page outside of the mobile app. The Marketer must specify the URL after selecting the interaction for the campaign.
• Dismiss the Push notification without taking further action.
Responsys supports a pre-defined set of 23 Standard Interactive Notifications that Marketers can add to
their Push campaigns. See the “Adding Interactive Notification buttons” section of the Push – Designing
a Campaign topic in the Oracle Responsys Help Center for more details about the Standard Interactive
Notification buttons.
If you need buttons other than those provided in the Standard Interactive Notifications, Responsys
supports adding Custom Interactive Notifications for mobile apps. Mobile app developers must define
Custom Interactive Notifications in their mobile app code using the Mobile App SDK and must configure
them for the app using the Mobile App Developer Console.
Enabling Standard Interactive Notifications for your mobile app
To enable Standard Interactive Notifications:
1. Contact the Responsys account's Oracle Customer Success Manager (CSM) to request enablement for the Responsys account. Interactive Notifications is a Controlled Availability feature.
2. The Mobile App Developers must obtain and build the mobile app with the Mobile App SDK for your supported platform. This feature requires the Mobile App SDK version 6.35 or greater, depending on the Standard Interactive Notifications that you want to use (see Notes on the following page). The Mobile App SDK supports several default Interactive Notification buttons and categories, and your mobile app requires no additional configuration to use the defaults.

Mobile App Channel Configuration Guide Page 46
NOTES:
• Standard Interactive Notifications added after Mobile App SDK version 6.35 will require you to build your mobile app with the supporting SDK version. Mobile app users must also have that version of your mobile app installed on their devices. For example, the Opt In OR Opt Out buttons are only visible to mobile app users if the mobile app they are using is built with the Mobile App SDK version 6.38 (when available) or greater.
• Interactive Notifications currently supported for only two Notification Actions: Launch App, Open URL.
• Interactive Notifications are not supported for the Rich Push format.
How to add interactive notification buttons to your Push campaign
To add interactive notification buttons to your Push campaign:
1. From the Push Campaign Workbook page, locate the Push tile and click the edit icon ( ) to open the Push Message Designer. (If this is a new campaign, you can also click the Create message button.)
2. On the Push Message Designer page, click the edit icon ( ) to change the Add push notification buttons indicator.
3. The Notification buttons dialog displays a prompt of “Do you want to add notification buttons to push message?” Select Yes.
The Notification buttons dialog changes to display your choices for notification buttons. Scroll the
dialog to see all of your options.

Mobile App Channel Configuration Guide Page 47
• Standard notification buttons are the buttons defined by Responsys. Recipients will only see the buttons if the version of your mobile app they are using was built with the supporting SDK version. These versions are displayed in the descriptions of the notification buttons. If you do not know which version of the Mobile App SDK your mobile app is using, ask your mobile app development team. TIP: To ensure that buttons are visible to Push campaign recipients, use filters to target recipients’ devices by SDK version.
• Custom notification buttons (below the standard set) are those defined by your mobile app development team. If your team has not defined custom buttons, you will not see this section in the dialog.
4. Click your desired button set to select it, and then click Next. For example, you could choose Accept OR Decline to give mobile app users the option to accept or decline an option.

Mobile App Channel Configuration Guide Page 48
5. Depending on the button set you choose, you must enter one or more web links (URLs) to open when the user clicks the button. You can enter a deep link for one of your mobile app screens (obtain these from your mobile app development team) or a web page. You can also personalize this link (as described in “Personalizing Push campaign settings (Optional)” on page 55).
6. Click Done to save your changes and close the dialog, or click Cancel to close the dialog without saving your changes.
The Push Message Designer page displays the notification button settings, and you can see the buttons
on the preview. Save your work, and then continue defining the Push campaign.

Mobile App Channel Configuration Guide Page 49
Adding Custom Interactive Notification buttons
If you need buttons other than the standard set, your Mobile App Developer team can add them to the
mobile app, and they will be available for Marketers to select from the Push Campaign Workbook as
described in the previous section. For more details, see the Oracle Responsys Mobile App Platform Cloud
Service SDK Developer's Guide.
Defining your Mobile App Message Center (Optional)
NOTE: The Message Center feature is currently released under our Controlled Availability program.
Please work with your Oracle Customer Success Manager (CSM) to obtain approval for enablement.
The Mobile App Message Center feature enables mobile apps to have a “message center” or “inbox” for
messages received by the mobile app on a user’s device. Marketers can use Message Center in one of
two ways:
• When designing Push campaigns, marketers can indicate that they want Responsys to retain the message in the Mobile App Message Center. After the Push campaign message is delivered to recipients, the recipients can use their mobile apps to access these messages later if the mobile app implements the Mobile App Message Center feature. Note that billing has changed for this method: when marketers send a Push that is stored in Message Center, your account is billed for only one message (interaction), even though two messages (Push and Message Center) are sent.
• Marketers can send messages directly to the Message Center, without a Push notification. The advantage to this method is method does not require the recipients to have opted in to receive Push notifications. The SDK fetches these messages from Responsys and stores them on the device. When a recipient opens the mobile app and goes to the Message Center on the mobile app, the messages are available. (Message Center direct messages are billed similarly to other campaign types.)
Adding Mobile App Message Center to your mobile app
Mobile app developers can learn more about how to implement this feature in the “Message Center”
topic of the Oracle Responsys Mobile App Platform Cloud Service SDK Developer's Guide.
For this feature to work as expected by marketers:
• The mobile app must use the Oracle Responsys Mobile App Platform Cloud Service SDK 6.39 (18D) or later. The 6.39 version of the SDK contains key bug fixes for this feature. Oracle recommends that your mobile app always use the latest SDK.

Mobile App Channel Configuration Guide Page 50
• Using the SDK, the mobile app developer must code their app to enable Message Center and to retrieve the Mobile App Message Center data. The SDK returns the 20 most recent messages for the Message Center specified in the request.
• Work with your development team to design a mobile app user experience that is appropriate for your brand and your customers. The SDK only supports retrieving messages from Responsys. It does not provide a mobile app user interface.
The following image illustrates an example of a possible Mobile App Message Center design. Mobile
apps receive the Subject, Message, Sent Date, Expiration Date, and a link to the Message Icon image
from Responsys as part of the Mobile App Message Center data. Marketers configure this data for
each Push message in the Push Campaign Workbook in Responsys, as described in the next section.
Adding Message Centers for a mobile app
Responsys supports five Message Centers per app, including Primary (the system default). You may add
up to four additional message centers.
1. Log in to Responsys as a user with access to the Mobile App Developer Console.
2. If the navigation menu is not displayed, click the navigation menu button ( ), and then select Mobile App Console. The Manage apps page is displayed.
3. From the Manage apps page, locate the mobile app that you will configure for multiple Message
Centers, and click its Edit icon ( ).
4. On the mobile app’s settings page, click Message Center. This displays the Message Center settings page, which shows the default Message Center, “Primary”.

Mobile App Channel Configuration Guide Page 51
5. Click Add Message Center.
6. In the Add Message Center dialog, enter the new Message Center name, and then click Add.
7. Repeat steps 5 and 6 for each Message Center that you want to add. You may add up to four Message Centers.

Mobile App Channel Configuration Guide Page 52
How Mobile App Message Center is used in campaigns
When defining a Push campaign in Responsys, marketers can indicate that the Push message should be
sent to the Mobile App Message Center. The following steps show how to do this.
Marketers can also send a Message Center campaign directly to the Mobile App Message Center on the
user’s device without sending a Push notification. Learn more about this new campaign type.
NOTE: Before performing these steps, marketers should ensure that the mobile app they choose in the
Push Message Designer supports Mobile App Message Center.
1. From the Push Campaign Workbook page, open the Push Message Designer.
2. On the Push Message Designer page, click the edit icon ( ) to change the Send to Message Center indicator.

Mobile App Channel Configuration Guide Page 53
3. On the Message Center dialog, select Yes. The dialog displays additional Message Center settings fields.
4. Complete the Message Center settings fields:
a. Subject: Enter a subject line for your message. This field is required.
b. Message Center: Choose the name of the message center for the message. “Primary” is the default, but there may be other choices if your mobile app supports multiple message centers.
c. Message icon: Optionally, enter the URL for the message center icon.
d. Message Center message will expire on: Select a date and time at which the message will expire. After the expiration date and time have passed, the message will no longer be available in the mobile app’s Message Center.
When completed, the dialog should look similar to the following:
5. Click Done to save your changes and close the dialog, or click Cancel to close the dialog without saving your changes. Continue defining the Push campaign.

Mobile App Channel Configuration Guide Page 54
Guidelines for Push Campaign Design and Message Center
If you have designed a Rich Push campaign that is also being sent to the Message Center, you must
consider the following:
• Personalization limitations: For compatibility with future releases, we recommend that you limit the number of personalization tokens in your Rich Push campaign messages. Oracle Responsys supports five or fewer average length personalization token-value pairs (25 characters long each).
• Dynamic Content Regions incompatible with Rich Push campaigns using Message Center: Use of Dynamic Content Region (DCR) in a Rich Push Message when a Rich Push campaign is also being sent to the Message Center is not permitted. Dynamic Content Region (DCR) usage for such campaigns will be disabled in a future update. When this takes effect, any launches you have scheduled for such campaigns will not work. If you do launch any campaigns with Dynamic Content Region (DCR), such campaigns will be disabled / “Closed” by Oracle.

Mobile App Channel Configuration Guide Page 55
Personalizing Push campaign settings (Optional)
A Marketer can design more flexible Push campaigns by personalizing various settings in the Push
Message Designer. These settings fields accept Responsys Personalization Language (RPL) values.
In the Settings dialog, you can personalize the following fields:
• Android Image URL
• iOS Image URL
• Title
• Values of custom key/value pairs
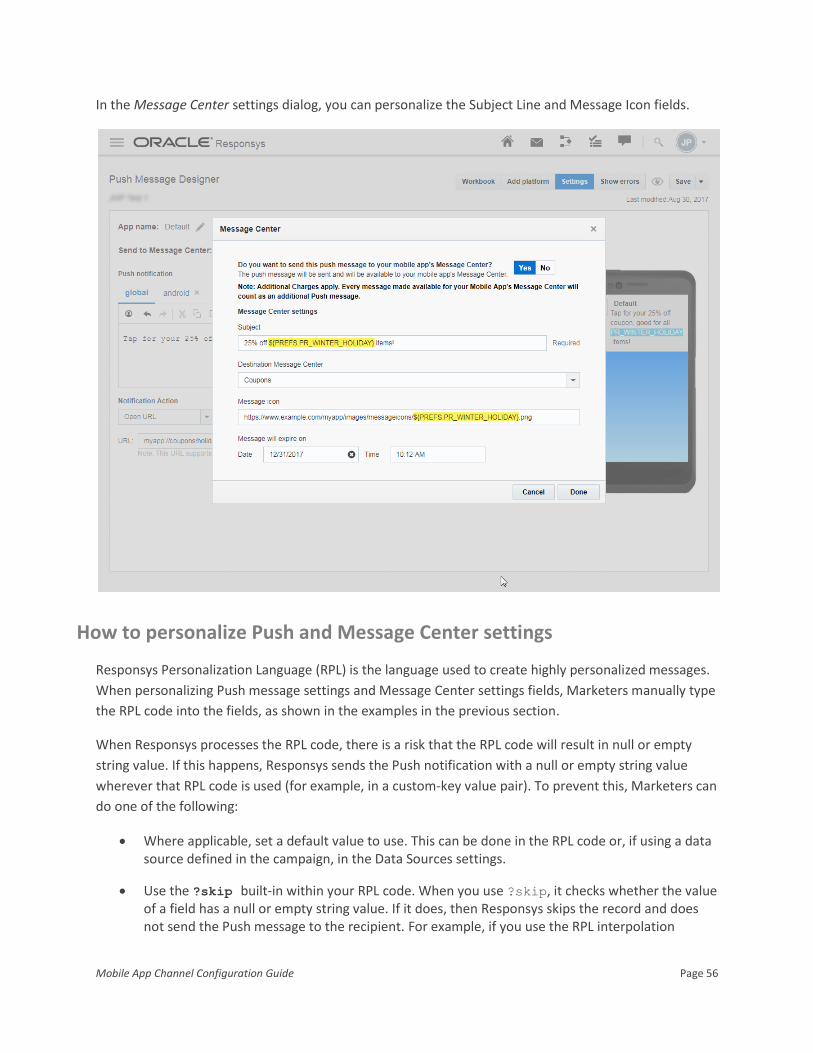
Mobile App Channel Configuration Guide Page 56
In the Message Center settings dialog, you can personalize the Subject Line and Message Icon fields.
How to personalize Push and Message Center settings
Responsys Personalization Language (RPL) is the language used to create highly personalized messages.
When personalizing Push message settings and Message Center settings fields, Marketers manually type
the RPL code into the fields, as shown in the examples in the previous section.
When Responsys processes the RPL code, there is a risk that the RPL code will result in null or empty
string value. If this happens, Responsys sends the Push notification with a null or empty string value
wherever that RPL code is used (for example, in a custom-key value pair). To prevent this, Marketers can
do one of the following:
• Where applicable, set a default value to use. This can be done in the RPL code or, if using a data source defined in the campaign, in the Data Sources settings.
• Use the ?skip built-in within your RPL code. When you use ?skip, it checks whether the value of a field has a null or empty string value. If it does, then Responsys skips the record and does not send the Push message to the recipient. For example, if you use the RPL interpolation
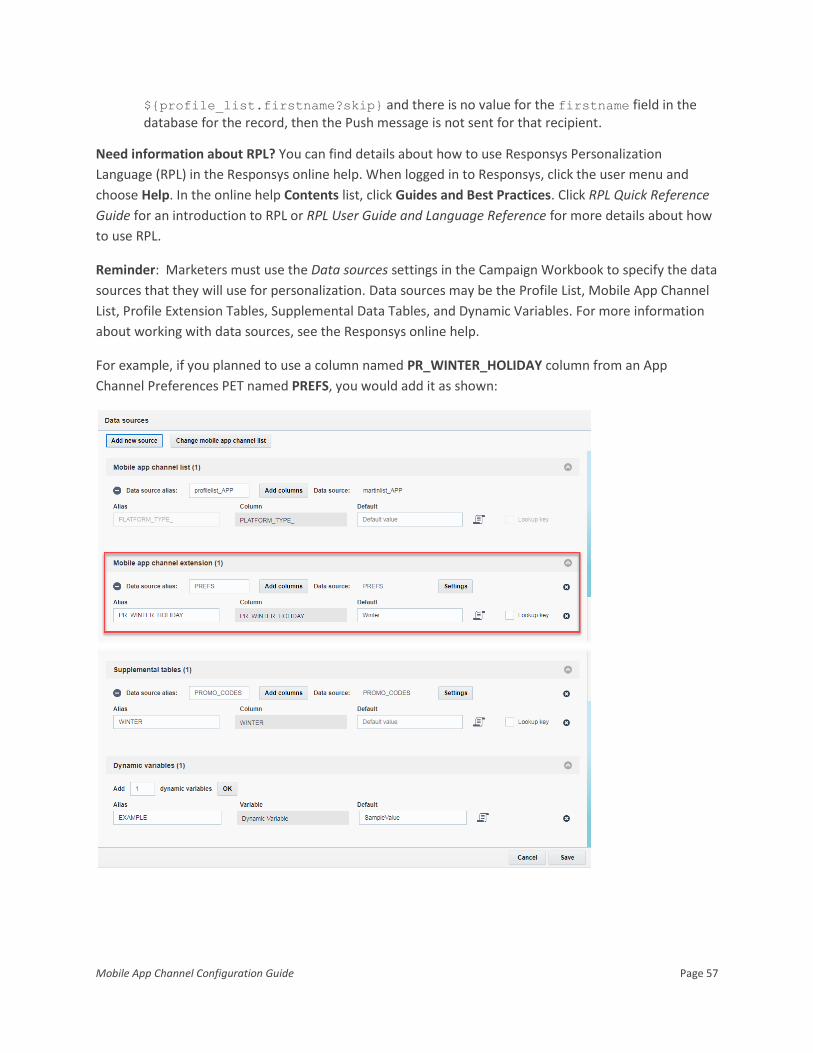
Mobile App Channel Configuration Guide Page 57
${profile_list.firstname?skip} and there is no value for the firstname field in the database for the record, then the Push message is not sent for that recipient.
Need information about RPL? You can find details about how to use Responsys Personalization
Language (RPL) in the Responsys online help. When logged in to Responsys, click the user menu and
choose Help. In the online help Contents list, click Guides and Best Practices. Click RPL Quick Reference
Guide for an introduction to RPL or RPL User Guide and Language Reference for more details about how
to use RPL.
Reminder: Marketers must use the Data sources settings in the Campaign Workbook to specify the data
sources that they will use for personalization. Data sources may be the Profile List, Mobile App Channel
List, Profile Extension Tables, Supplemental Data Tables, and Dynamic Variables. For more information
about working with data sources, see the Responsys online help.
For example, if you planned to use a column named PR_WINTER_HOLIDAY column from an App
Channel Preferences PET named PREFS, you would add it as shown:

Mobile App Channel Configuration Guide Page 58
Enabling mobile app reporting for mobile app campaigns
Mobile app reporting for Push and In-App message campaigns is available in Responsys through the
Interactive Dashboards. Responsys users with the “Mobile Apps Analytics Manager” role can view a
performance summary of Push notifications and In-app messages. Using the Mobile Apps Interactive
Dashboards, they can:
• Trend notification performance metrics over time and drill down on areas of interest, such as campaign conversions
• View notifications split by the device OS
• Analyze data for the past 48 hours broken down by the hour
• Conduct granular analysis with detailed tabular reports
For help getting started with Interactive Dashboards, see the following topics on the Responsys Insiders
community on Topliners:
• Next Generation Reporting with Oracle Responsys
• Getting Started with Interactive Dashboards
Responsys users can learn more about using this feature by accessing the online help while logged in to
Responsys, and then searching for the topic “About the Mobile Apps Interactive Dashboard.”
Enabling engagement and conversion metrics in the mobile apps
Mobile App Developers must add the code appropriate for the platforms supported by the mobile app.
The “Mobile App Reporting” topic in the Oracle Responsys Mobile App Platform Cloud Service SDK
Developer's Guide provides instruction for Mobile App Developers who will enable the mobile apps for
tracking conversion metrics.
Enabling a Responsys user for Interactive Dashboards
To view the Mobile Apps dashboards, users must have the Mobile Apps Analytics Manager role
assigned to their user profiles in Responsys.
Follow the instructions in the document Assigning Roles for Interactive Dashboards: Setup Guide on the
Responsys Insiders community on Topliners.
Cross-channel conversion tracking
When your email campaign has deep links to your mobile app, you can now track downstream mobile
app events such as Conversions and Purchases. With proper configuration of both the mobile app and

Mobile App Channel Configuration Guide Page 59
the Email campaign, these Conversions and Purchases will be attributed to the email campaign that led
users to the mobile app.
Whenever a user clicks a tracked link in their email and lands in your mobile app, the Responsys mobile
app platform initializes and maintains a “conversion context.” Your mobile app developers can use the
platform to decide whether or not to raise a Conversion / Purchase Event. Marketers can then track
Conversions and Purchases generated by their email campaigns.
Configuring the mobile app
Before Marketers can view cross-channel conversion data in Interactive Dashboards, Mobile App
Developers must refactor the mobile app to support tracking email conversions from mobile apps.
Mobile App Developers can find more setup details in the Oracle Responsys Mobile App Platform Cloud
Service SDK Developer's Guide.
Setting up the Email campaign
When editing your Email campaign using Email Message Designer, click the Link tracking button. Scroll
to the right to view the iOS link URL and Android link URL columns in your table. For each tracked link,
add the app link to the column(s) that your mobile app supports. (For more information about setting up
link tables, see the Responsys online help.) Mobile App Developers will be able to provide the app link in
the format that the mobile app understands. The app links will look something like this: example-
app://products/1234 .
Mobile App Channel Configuration Guide Page 60
After the campaign is launched and your mobile app users view the email message on their mobile
devices, if they click on a tracked link that has a mobile app link associated with it, the link opens in the
mobile app instead of in a web browser.
Viewing reporting for conversions and purchases attributed to Email Campaigns
After the Email campaign is launched, open Interactive Dashboards. The Browser Types report on the
Device dashboard for Email Campaigns will now help you compare conversions across mobile apps,
mobile browser, or web browser for your email campaigns. This information can help you determine
which conversion medium to best allocate your marketing budget to.
Using Push campaign launch settings (Optional)
Responsys 18A brings fully functional launch settings to Mobile App campaigns:
• Throttling Settings enable Marketers to set the throttling rate (messages per hour) for Push campaigns. Marketers can use the account defaults or override them as needed. Marketers can set the throttling rate in the Campaign Workbook launch settings or they can set the throttling rate in Program for Push campaigns launched from Program. Note that the throttling rate is only for batch-launched campaigns only.
• Notifications enable Marketers to specify who should receive notifications during a successful launch, and the types of notifications to send during the launch. If a launch failure occurs, Marketers can send notifications based on the type of failure. Marketers can use the account defaults or override them as needed. Responsys supported a minimal set of launch notifications in previous releases. For Responsys 18A, the launch notifications support three new notifications: “When launch starts”, “When there is an empty launch”, and “Send Skipped launch notification(s) to”.
This section provides instructions for setting the account defaults and for editing launch settings at the
campaign and program levels.
Setting Push Campaign launch defaults for your account
Responsys Account Administrators can set the default launch rate and the default notifications to send
during the launch. Values set here will be shown as the defaults in the Campaign Workbook and in the
Program, but Marketers can override those values as needed.
To set the default Push message launch throttle rate for your account:
1. Log in to the Responsys application.
2. From the navigation menu, choose Account.

Mobile App Channel Configuration Guide Page 61
3. On the Account Management page, locate the Account Customization section, and then locate the
Campaign Management sub-section. Click the Define launch throttle rate link.
4. From the Define launch throttle rate page, locate the Push section, and then type the default
maximum launch rate (messages per hour) in the field. The minimum value is 3601.
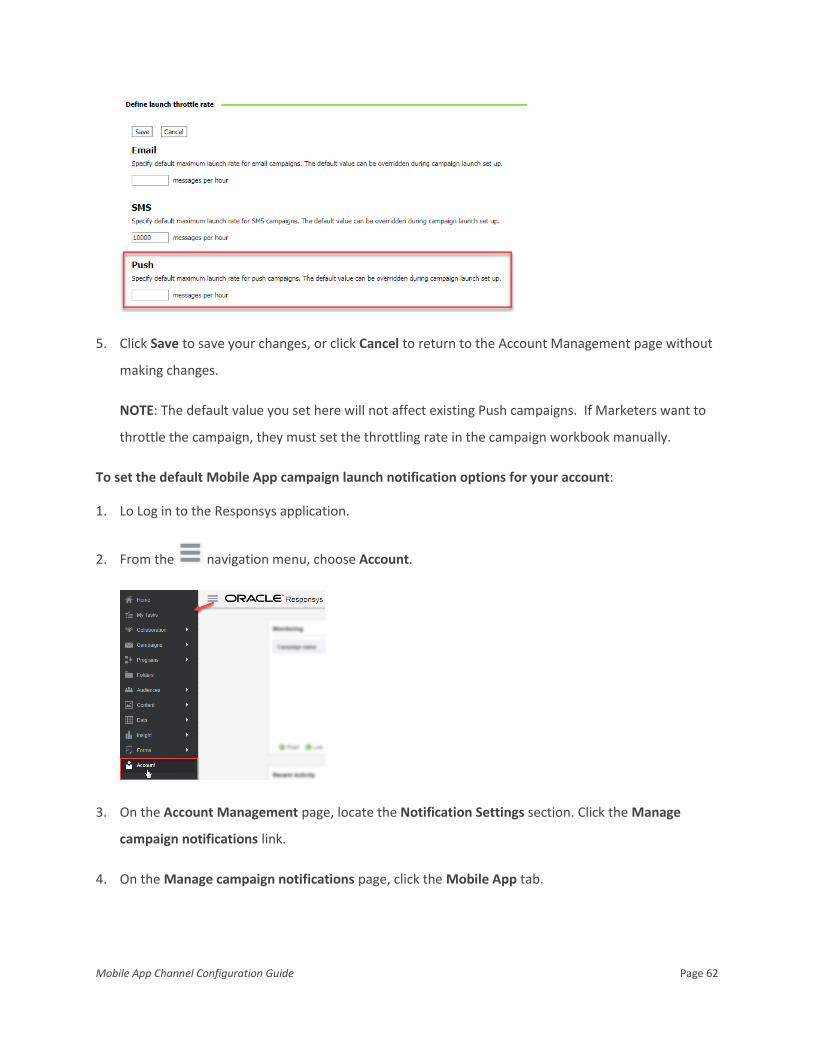
Mobile App Channel Configuration Guide Page 62
5. Click Save to save your changes, or click Cancel to return to the Account Management page without
making changes.
NOTE: The default value you set here will not affect existing Push campaigns. If Marketers want to
throttle the campaign, they must set the throttling rate in the campaign workbook manually.
To set the default Mobile App campaign launch notification options for your account:
1. Lo Log in to the Responsys application.
2. From the navigation menu, choose Account.
3. On the Account Management page, locate the Notification Settings section. Click the Manage
campaign notifications link.
4. On the Manage campaign notifications page, click the Mobile App tab.

Mobile App Channel Configuration Guide Page 63
5. Complete the fields to send the default desired notifications.
For Progress Notifications: In the field provided, enter the email addresses (separated by commas)
to receive progress notifications. Next, select and configure the types of notifications you want to
send.
• For “skipped messages exceed”, notifications are sent when the specified percentage of
messages is skipped.
• For “sent messages”, you can send the notification after the specified percentage of
messages is sent, or when the launch is complete.
• When the launch starts
• When there is an empty launch
For Failure Notifications: Enter email addresses (separated by commas) for the types of notifications
you want to send:
• Skipped launch notifications
• Launch failure notifications.
6. Click Save to save your changes, or click Cancel to return to the Account Management page without
making changes.
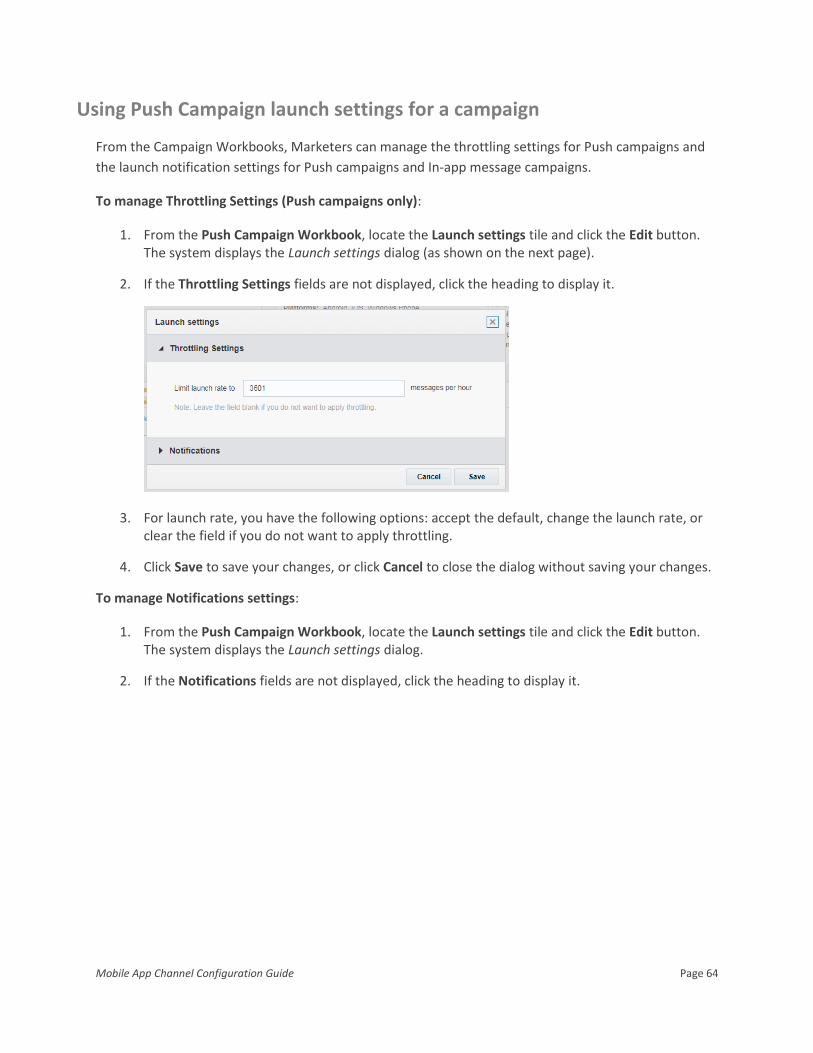
Mobile App Channel Configuration Guide Page 64
Using Push Campaign launch settings for a campaign
From the Campaign Workbooks, Marketers can manage the throttling settings for Push campaigns and
the launch notification settings for Push campaigns and In-app message campaigns.
To manage Throttling Settings (Push campaigns only):
1. From the Push Campaign Workbook, locate the Launch settings tile and click the Edit button. The system displays the Launch settings dialog (as shown on the next page).
2. If the Throttling Settings fields are not displayed, click the heading to display it.
3. For launch rate, you have the following options: accept the default, change the launch rate, or clear the field if you do not want to apply throttling.
4. Click Save to save your changes, or click Cancel to close the dialog without saving your changes.
To manage Notifications settings:
1. From the Push Campaign Workbook, locate the Launch settings tile and click the Edit button. The system displays the Launch settings dialog.
2. If the Notifications fields are not displayed, click the heading to display it.
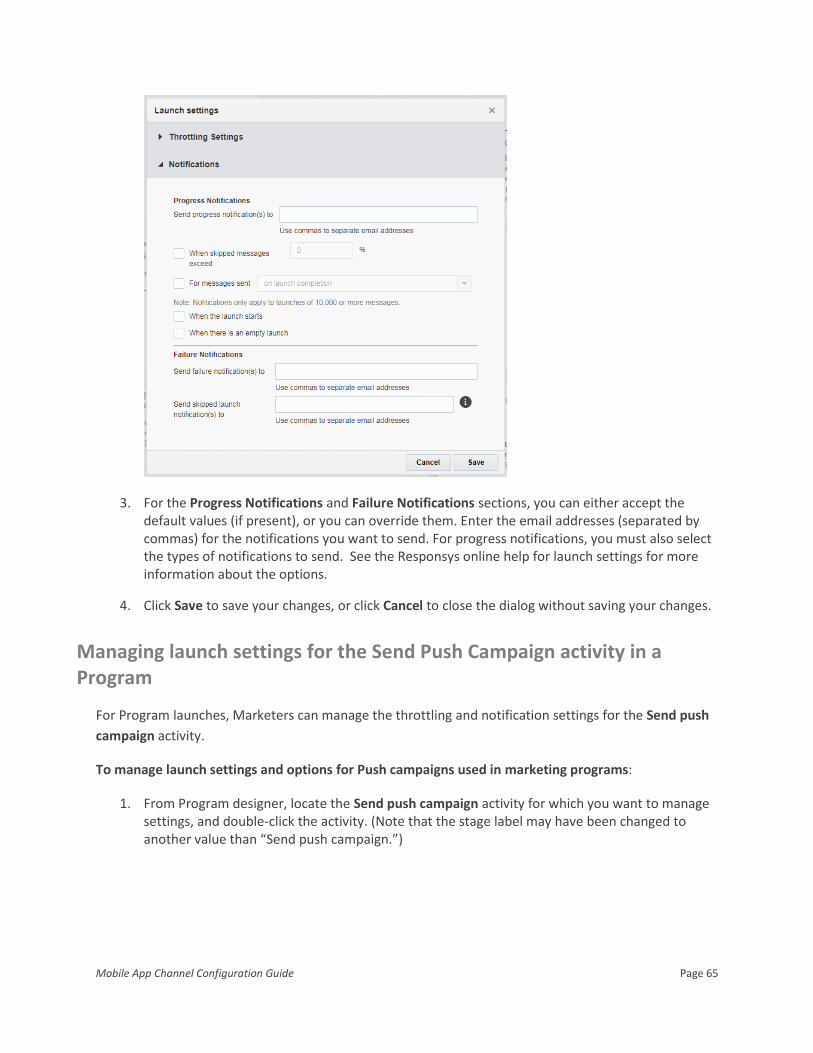
Mobile App Channel Configuration Guide Page 65
3. For the Progress Notifications and Failure Notifications sections, you can either accept the default values (if present), or you can override them. Enter the email addresses (separated by commas) for the notifications you want to send. For progress notifications, you must also select the types of notifications to send. See the Responsys online help for launch settings for more information about the options.
4. Click Save to save your changes, or click Cancel to close the dialog without saving your changes.
Managing launch settings for the Send Push Campaign activity in a Program
For Program launches, Marketers can manage the throttling and notification settings for the Send push
campaign activity.
To manage launch settings and options for Push campaigns used in marketing programs:
1. From Program designer, locate the Send push campaign activity for which you want to manage settings, and double-click the activity. (Note that the stage label may have been changed to another value than “Send push campaign.”)

Mobile App Channel Configuration Guide Page 66
2. From the Send push campaign activity dialog, click Settings & options. The system displays the options available for this activity.
3. To throttle the campaign launch, select the Apply launch throttling as defined in the campaign check box. If you do not want the campaign launch throttled, deselect the check box.
• If you add the activity to the Program Designer canvas after setting a launch throttling rate for the program, the check box will be selected.
• If you are applying throttling to an existing program for an existing campaign, you must set the throttling rate in the campaign, and then select this check box in the program. You could also unselect and then re-select the campaign to pick up the defaults set in the campaign workbook.
4. Modify the Progress Notifications and Failure Notifications as desired. You can accept the default values, or modify the fields to override the defaults.
• The notification types “When there is an empty launch” and “Send skipped launch notifications” do not apply for programs, so they are not shown on this dialog.
• If the values were set for the campaign before you added it to the program, the default values should be displayed.

Mobile App Channel Configuration Guide Page 67
• If the values from your campaign do not show here, that is because you added them after the activity was added to the program canvas. You can either modify the fields manually, or you can unselect and then re-select the campaign to pick up the defaults set in the campaign workbook.
5. Click Done to save your changes, or click Cancel to close the dialog without saving your changes.
Behavioral attributes for App Channel List Filters
With 18B, all recency and interaction behavioral attributes are now available for use in creating App
Channel Filters. Marketers now have the ability to create Audiences using all mobile app user
behavioral data that Responsys captures. This will enable Marketers to retarget mobile app users based
on their behavioral data. These attributes are backward compatible: you will be able to edit and to add
new attributes to existing Simple and Classic Filters
See the Responsys online help for more details about creating App Channel List Filters using Push
Recency and Push Interaction attributes. The online help also provides information about creating
Audiences that use these filters.
The table below lists the attributes. The 18D Update added a new attribute, Last Push button click date.
This allows marketers to filter recipients based on when they last clicked an Interactive Notification
button in a Push notification.
Push Recency Attributes Push Interaction Attributes
• Last Push sent date
• Last Push bounce date
• Last Push opened date
• Last Push Button click date
• Last Push click date
• Last Push conversion date
• Last App Uninstall date
• Last Msg. Center sent date
• Push Sent
• Push Opened
• Push Clicked
• Push Converted
• Push Skipped
• Push Bounced
• Msg. Center Sent
• App Uninstalled

Mobile App Channel Configuration Guide Page 68
Exporting App Channel List Filter results (Optional)
Using the new Connect user interface in Responsys, you can now export App Channel List Filter results.
This enables Marketers to analyze mobile app audiences on their own systems.
NOTE: This capability is only available with the new Connect user interface, which is currently under
measured deployment and will roll out over time.
To export App Channel List Filter results:
1. Log in to Responsys. From the navigation menu, choose Data, and then choose Connect.
If you see the classic Connect user interface, stop. Wait to configure this until your account has
been updated to use the new Connect user interface.
2. Click Create.
3. Select Export Data.
4. On the Select Object page, select the List filter option.
5. Select the User App Channel List check box. This includes App Channel List Filters in the list of filters. If it is not selected, then only the Profile List filters will be displayed.
6. Select the App Channel List Filter for which you want to export the results.
7. Continue setting up the Connect job with your desired settings, and then run the job.
Exporting Mobile App Event data (Optional)
Oracle Responsys Connect enables Marketers to transfer campaign event data (CED) feeds from
Responsys. You can set up an Export Feed Data job to export mobile app behavioral data represented
by Mobile App Event types. You can then import this data into your systems for additional analysis.
You can export event data for the following Mobile App Event types. As of 18C, Responsys supports Push
Button Clicked, which tracks Interactive Notification button clicks.
• Push Sent
• Push Failed
• Push Opened
• Push Converted
• Push Skipped
• Push Bounced
• Push Clicked
• App Uninstalled
• Message Center Sent
• Push Button Clicked
For instructions about how to create a Connect job for CED feeds, refer to the Responsys online help.

Mobile App Channel Configuration Guide Page 69
Platform-specific Tasks
Implementing mobile app pre-permission messaging (iOS) (Optional)
With 6.33, the Push SDK has separated the methods for registration and opt-ins. This means that Mobile
App Developers can ensure that the system registers mobile app users at installation, but can delay
prompting mobile app users to opt in to receive push notifications or to permit the app to receive the
user’s location information. Marketers should work with mobile app developers to design the opt-in
messaging and timing. For more details, see the “iOS Step-by Step Setup Instructions” in the Oracle
Responsys Mobile App Platform Cloud Service SDK Developer's Guide.
Impact on App Channel List records: When registration and opt-in occur separately, the system sets the
Channel Permission Status to “O” and the Channel Deliverability Status to “D” for the device at
registration time.
Later, when the mobile app prompts the user to opt-in for push notifications, the user’s response
determines the Channel Permission Status.
• If the user accepts, the permission status is set to “I”.
• If the user chooses not to opt in, the permission status stays “O”. If at some point later the user decides to opt-in, then the user must go to the device settings to change the push notification permission for the app.
Handling PEM file expiration notices (iOS)
Responsys sends email reminders before a PEM file used by an iOS app is about to expire. This allows
Mobile App Developers to update the PEM file in the system. The system:
• Sends an email to Account Primary Contacts and to the Responsys user who configured the mobile app using the Mobile App Developer Console. TIP: You can add others to this distribution list by request. Contact your CSM and provide a list of email addresses of people that should receive this notification.
• Sends the first reminder 30 days in advance, and if the file is not updated, the reminders repeat at 14 days and at 7 days before the expiration date.
To update your mobile app’s PEM file:
1. When you receive one of these emails, coordinate with the Mobile App Developers of the project as soon as possible to get the PEM file updated.
Mobile App Developers should follow the instructions in one of the following topics, depending
on the type of PEM file that they must generate:

Mobile App Channel Configuration Guide Page 70
• Generating a Development PEM
• Generating a Distribution PEM
2. Once you have the new PEM file, follow the instructions for logging into Responsys given in the email, and then access the Mobile App Developer Console.
3. From the Manage Apps page, click the Edit icon ( ) for your mobile app.
4. On the Platforms tab, choose Edit on the iOS Distribution Platform row.
5. From the iOS Distribution dialog, upload your PEM file. Note that you must delete the expired PEM before you can upload the new PEM file.
After a successful upload, you should see the Bundle ID and PEM file expiration date displayed.
Next Steps
After you and the mobile app development team complete the tasks needed to create the mobile app
and configure Responsys to work with it, the marketers using Responsys can create and manage Push
and In-App messaging campaigns and can create Programs in Responsys to orchestrate their mobile app
campaigns.
Using the Responsys APIs
The Responsys Web Services API enables Responsys customers to manage certain aspects of their
content, data, and campaigns through either the SOAP or the REST API.

Mobile App Channel Configuration Guide Page 71
NOTES:
• The SOAP API does not have an API call for triggering a Push campaign directly. You must use the REST API to when using API calls to trigger a Push campaign directly or to schedule a Push campaign launch. If you have a pre-existing implementation written for SOAP and cannot move to REST, the workaround is to write REST code for the desired Push tasks.
o Use the REST endpoint for Trigger Push Campaign if you want to send to particular recipients. You can include optional data for personalization.
o Use the REST endpoint for Schedule Push Campaign Launch to schedule a launch for a Push campaign, using the audience already defined in the Campaign Workbook.
o You can get a list of all Push campaigns for your account using the Fetch All Push Campaigns endpoint.
• Responsys requires the Enactment Batching feature to be enabled when using trigger custom event with mobile app campaigns in a marketing Program. Otherwise, the mobile app campaign events in the program will not be processed. However, there are some tradeoffs to consider before enabling the feature. Please review the “How Enactment Batching Affects Processing” section of the “Send Requests” topic in the Responsys REST API Guide, so that you can decide whether enactment batching is correct for your business needs.
• If your account has enactment batching and you need to send near real time mobile push messages, such as event reactions, then we highly recommend one of these two options:
o Use the Trigger Push Message REST API, or
o Have the Real-time Custom Events feature enabled for your account. This feature overrides enactment batching for custom events that you define with a type of “Real-time”. For more information about this feature, see the Defining Custom Event Types topic in the Oracle Responsys Help Center. To have this feature enabled for your account, please contact your Customer Success Manager for assistance.
When an account has Enactment Batching enabled, Responsys program orchestrations can only
use real-time custom events to perform near-real-time processing for any campaign type. That
is because for standard custom events, Responsys will batch enactments together into a single
enactment group before entering the enactments into a program. This results in an
approximately 20 minute delay between standard custom event triggering and entry into a
Responsys Program. Please note that the 20-minute delay applies to all channels—including
Email and SMS activities—that are part of the standard custom event processing.
• If your account has been enabled for Automatic Failover for Transactional Messaging (AFTM), you can use the HA Trigger Push Message REST API to ensure that the system continues to send push messages during planned or unplanned service disruptions in the primary environment. To

Mobile App Channel Configuration Guide Page 72
obtain the latest Oracle Responsys AFTM Developer’s Guide, or to learn more about the AFTM feature, see the AFTM documentation page in Responsys Insiders on Topliners.
For more information about Responsys APIs, refer to the following documents on docs.oracle.com:
• REST API Guide: HTML or PDF
• SOAP API Guide: PDF
Learning about Responsys – More resources
Responsys Insiders community: Responsys Insiders is a customer community where users can access
resources, ask questions, and learn about upcoming events, such as product release information and
training videos. To join the community, go here. To find documentation specific to mobile apps, choose
the Mobile category.
Responsys page on docs.oracle.com: The Oracle Responsys page on the Oracle Help Center provides
links to the Oracle Responsys Release Center and to Responsys documentation. Unlike the Responsys
Insiders community, you do not need to be a Responsys customer to access documents on
docs.oracle.com.
Online help for Oracle Responsys: The Responsys Help Center on docs.oracle.com provides access to
user documentation. You can also view it while logged in to Oracle Responsys. To access the online help
in Responsys, click the menu in the upper right corner of the page, and then choose Help.
Online help opens into its own web browser window. You can also search the online help for specific
topics, as illustrated below. From an open online help window, click Search on the Contents pane, enter
the search term in the Search screen, and click the Search button. Click the topic title to open it.

Mobile App Channel Configuration Guide Page 73

Mobile App Channel Configuration Guide Page 74
Frequently Asked Questions (FAQs)
Q: What is the difference between the “v1” and “v2” Integrated Push architecture?
A: The Responsys Integrated Push architecture enables Marketers to define Push and In-app Messages
in Responsys and deliver them through mobile apps that incorporate the Oracle Responsys Mobile App
Platform Cloud Service Software Development Kit (SDK). It also enables Responsys to receive data from
mobile apps.
v1 Integrated Push architecture v2 Integrated Push architecture
“v1” is the first version of this technology and “v2” is the second version. The v2 Integrated Push
architecture was introduced in Responsys Release 6.29, and it enables Responsys to receive data from
the mobile app in near real time. See “What’s new for customers migrated to v2 Integrated Push?” on
page 13 for specific details. To summarize:
• For Marketers, the most noticeable difference is that in v2, Responsys receives mobile app data from devices in near real time. Marketers create Push and In-app Message campaigns using the campaign workbooks in Responsys as they did in v1. They also have more filtering options.
• For Responsys Account Administrators, the main difference is simplified setup: you do not need to configure a Connect job to import the device data, because the mobile app recipients’ devices send the device data directly to Responsys.
• For Mobile App Developers, there are differences in how they code the mobile application to use the Oracle Responsys Mobile App Platform Cloud Service SDK. v2 also introduced a Mobile App Developer Console in Responsys for configuring mobile apps and their platform settings. NOTE: For v2, we support iOS and Android.

Mobile App Channel Configuration Guide Page 75
Q: I have more than one mobile app. Do I need to have more than one App Channel List?
A: No. More than one mobile app can use the same App Channel List. With one Contact Profile List, you
should be able to map all of your apps to the same App Channel List. Please note that all mobile apps for
a given App Channel List must use the same match key to associate the device to a known user.
—
Q: I have one Contact Profile List per region. How do I setup the App Channel List?
A: More than one mobile app can be mapped to the same Contact Profile List. However, it is not
possible to map a mobile app to more than one Contact Profile List.
—
Q: I have associated an App Channel List to my Contact Profile List. However, I want to remove this and
associate another App Channel List. Is this possible?
A: No, this is not possible through the UI. It is possible to do some backend changes to make this change.
However, this could take a significant amount of time. This also means that you cannot do any campaign
launches during this time. We recommend that you stay with one App Channel List unless you can
absolutely justify the need to change.
—
Q: I have created an App Channel List with EMAIL_ADDRESS_ as the match key. However, I want to
change this to CUSTOMER_ID_ now. Is this possible?
A: No, this is not possible. This is why you should spend some time before setting up the App Channel
List to decide on your match key. As stated before in this document, setting a match key requires co-
ordination between the Marketer and the Mobile App Developer. A Marketer should be able to figure
the best field for the match key. He or she should relay that back to the Mobile App Developer so they
set the right value for match key from within the mobile app code.
—
Q: Should I use SHA256 or MD5HASH as the match key?
A: No, we do not recommend using EMAIL_SHA256_HASH_ or EMAIL_MD5_HASH_ as the match key
(or as the user identifier in the mobile app). Using the SHA-256-hashed email address or the MD5-
hashed email address can cause confusion when an App Channel List record is created and a Profile List
record does not currently exist for the email address.
Example: A Responsys user has created the App Channel List using SHA256 or MD5HASH as the match
key. A new mobile app user registers from their device using the email address “[email protected]”.
(For simplicity's sake, assume that the SHA256/MD5HASH value of "[email protected]" is "ABC123".)
Responsys receives the device registration and one of the following occurs:
Mobile App Channel Configuration Guide Page 76
• Email address matches an existing Profile List record: If a Profile List record exists for "[email protected]", then the system is able to match the profile record in the Profile List and can associate the profile record to the App Channel List device record.
• Email address does not match an existing Profile List record: If "[email protected]" does not have an existing record in the Profile List, the system creates a new Profile List record with the SHA256/MD5HASH. The system also associates the profile record to the App Channel List device record. However, because MD5/SHA are one-way keys, the system cannot use the incoming USER_IDENTIFIER value of "ABC123" and convert that to "[email protected]". Therefore, in this example, the profile record has the hashed email address value but the EMAIL_ADDRESS_ field in the profile record would be blank. This can cause a lot of confusion for Responsys users, because users usually search for Profile List records using the plain text Email Address. However, if at a later time the user signs up with "[email protected]" using a web form or some other mechanism, then Responsys will correctly associate the same profile record and not create a new one.
—
Q: I already have a mobile app integrated with the Oracle Responsys Mobile App Platform Cloud Service
SDK. How do I figure what value is set for match key?
A: If you already have a mobile app integrated with the Oracle Responsys Mobile App Platform Cloud
Service SDK Developer's Guide SDK, then you should consult your Mobile App Development team.
Specifically, you should ask them for the value that is set for the field “USER_IDENTIFIER”. This should
help you determine the match key. If no value is set, then you can request them to set one of the fields
as discussed in Step 1 Point 7 of the “Step 1 – Create the App Channel List” section on page 20. Please
note that this change in the mobile app might mean that you have to roll out a new version of the
mobile app for your users. If you want to discover the declared match key in Responsys, please file a My
Oracle Support (MOS) request.
—
Q: Can I use all the fields in the App Channel List in Filter Designer?
A: No. Filter Designer uses a subset of the App Channel List fields.
Only the following fields (pages 71-72) are available through the Filter Designer as of the 19D Update:
ADMIN_AREA1_
ADMIN_AREA2_
API_KEY_
APP_ID_
APP_LOCATION_PERMISSION_
LOCALE_
MANUFACTURER_
MOBILE_COUNTRY_CODE_
OS_VERSION_
PLATFORM_TYPE_
Mobile App Channel Configuration Guide Page 77
APP_VERSION_
CARRIER_
CHANNEL_DELIVERABLITY_STATUS_
CHANNEL_PERMISSION_STATUS_
CREATED_DATE_
DEVICE_MODEL_
DEVICE_CITY_
DEVICE_COUNTRY_CODE_
DEVICE_POSTAL_CODE_
INSTALLED_AT_DATE_
PROFILE_RIID_
PUSH_PERM_AUTH_STATUS_
PUSH_PERM_BADGES_
RIID_
SCREEN_HEIGHT_
SCREEN_WIDTH_
SDK_VERSION_
TIME_ZONE_
UPDATED_AT_DATE_
USER_IDENTIFIER_
NOTES:
• If you have defined a Preferences PET, the attributes defined in that table are also available in the App Channel Attributes list in Filter Designer.
• If your mobile app was released before 6.29, its App Channel List will not have values for the new 6.29 fields until your account is migrated to the v2 Integrated Push architecture. Once it is migrated, when a user interacts with the app, then the App Channel List will capture data for the new fields.
—
Q: I have defined a campaign and launched it. However, I don’t see any Push notifications being sent.
Why?
A: There could be many possible reasons as to why the push notifications are not sent. One common
reason when it comes to the Mobile App channel is that the scheduled filter does not have any App
Channel attributes. It should have at least one App Channel attribute. This means that the filter query
behind the Scheduled filter should be defined as “App Channel List Filter”. To fix this, review the query
behind the Scheduled filter. If it does not have any App Channel attribute, define a new filter. When you
create a new filter on the Contact Profile List, ensure that you select the filter type as “App Channel List
Filter” so that App Channel attributes are available for your query criteria.

Mobile App Channel Configuration Guide Page 78
Q: On the Manage Mobile App Configuration page, why do I not see any Profile Lists when I click the Edit
Profile List button?
A: This list is populated with Profile List names that have a corresponding App Channel List. If there are
no Profile Lists with corresponding App Channel List, then this list will be empty. To correct this, locate
the Profile List that you want to use with the mobile app, and create an App Channel List for it:
1. From the Responsys navigation menu, choose Data Manage Lists.
2. On the Manage Lists page, use the Change List drop-down list to view the Profile List that you want to use.
3. In the List Information section, click the Create App Channel List link.
—
Q: Can I use a SQL View instead of a scheduled filter?
A: No, a SQL view is not supported as a starting point for programs with Mobile App channel.
—
Q: Can I create a PET for the App Channel List
A: Yes, you can create a PET table for the App Channel List. See the section “Setting up an App Channel
Preferences PET (Optional)” on page 26 for instructions and limitations.
—
Q: Can I associate multiple App Channel PETs to the same Profile List/App Channel List combination?
A: Yes, you can. However, please note that you can have only one Preferences PET per mobile app.
—
Q: How do users opt in or opt out of receiving push notifications? How are the Channel Permission
Status set in the App Channel List?
A: The GCM and APNs platform providers manage notification permissions differently. Responsys
handles notification permissions as follows:
• When a new user installs an app on a specific mobile device for the first time and agrees (implicitly or explicitly, per platform) to receive notifications, Responsys creates an App Channel List record and sets the Channel Deliverability Status to “D” (Deliverable) and the Channel Permission Status as follows:
o For iOS apps, the app must ask for the user’s permission to receive notifications. Responsys creates an App Channel List record for the user and marks the Channel Permission Status as “I” (Opted-In) or “O” (Opted-Out) depending on the user’s response to the iOS System Message or

Mobile App Channel Configuration Guide Page 79
from their choices in the System Settings. As of the 6.33 SDK release, mobile app developers can separate registration and the system prompt for push notification permission. When registration and opt-in occur separately, the system sets the Channel Permission Status to “O” and the Channel Deliverability Status to “D” for the device at registration time. Later, when the mobile app prompts the user to opt-in for push notifications, the user’s response determines the Channel Permission Status. If the user accepts, the permission status is set to “I”. If the user chooses not to opt in, the permission status stays “O”. If at some point later the user decides to opt-in, then the user must go to the device settings to change the push notification permission for the app.
o For Android, Channel Permission Status is set to “I” (Opted In) when a user installs the mobile app on their device. Users are opted in to receive notifications by platform default when they install the app, and the notifications permissions are shown at install time. Users have the ability to opt out or opt in through settings later. As of the 18D/6.39 SDK release, the SDK can capture when the users opt out or opt in to Push Notifications on their device, and it stores those values in the App Channel List. When a user chooses “Opt Out of Push Notifications for App” on their device, CHANNEL_PERMISSION_STATUS_ in App Channel List is set to “O” (Opted Out). When a user chooses “Opt In to Push Notifications for App” on their device, CHANNEL_PERMISSION_STATUS_ in App Channel List is set to “I” (Opted In). Before 18D/6.39, users could still opt out or opt in on their device, but the values were not captured in Responsys and the operating system suppressed notifications for opted out users.
• Responsys marks the Channel Deliverability Status “U” (Undeliverable) when the platform provider informs Responsys that a push notification cannot be sent to the user, which can happen when Responsys tries to send a push notification to the user. For example, the platform provider may send this message because the user has uninstalled the app.
Glossary
App Channel List: A list designed to store device information of all devices that have installed the mobile
app. It is always associated to a Contact Profile List. A Contact Profile List can have ONE App Channel List
associated with it. Once an App Channel List is associated, the association cannot be deleted. This is a
system restriction as of 6.25 release (Aug 2015).
App Channel List Filter: A special type of Filter available for Contact Profile Lists that have an App
Channel List associated with it. Marketers should use these filters for defining scheduled filters when
sending only to unknown devices. Marketers should also use App Channel List Filters when designing a
multi-channel program.
Custom trigger vs. custom event: Although they sound similar, these are two very different concepts in
Responsys:

Mobile App Channel Configuration Guide Page 80
• A “trigger,” in the context of mobile In-App messaging campaigns, means an end-user action within the mobile app that a Marketer wants to respond to with a message. A custom trigger refers to an end-user action that is not the standard one of opening a mobile app ($ExplicitAppOpen). For example, this could be a user action of adding products to a wish list. A Marketer could use that action and respond with an offer back to the user in the form of an In-App message. Custom triggers require additional coding in the mobile app and configuration by the account administrator.
• A custom event is a signal from an external source that alerts Responsys when notable customer activity occurs and should be recorded, or alternately when a notable activity occurs to a customer. Custom events can be triggered by loads (manual or automated), form submits, or through the Web Services API. Marketers can use custom events as starting events in a marketing program orchestration, but they require additional configuration by the account admin.
Known vs. unknown users: When a user installs a mobile app on a device, the only information
Responsys receives is the device information, which is stored in the App Channel List. These are
unknown users. In contrast, the Contact Profile List contains user information. These are known users.
These records can be linked through the match key.
Match key: A user identifier attribute that is used to associate a device record (unknown user) to a
known profile record (known user). A match key could be one of Email Address (in various formats),
Customer ID, or Mobile Number. When a user installs a mobile app on his or her device, Responsys gets
only the device information of that user. When a user signs-up (or signs-in) with one of the above
identifiers, the system can associate the device with a known profile record.
Mobile App Message Center: A Responsys feature that enables marketers to persist their sent Push
campaign messages, so that mobile app users can view them later in the mobile app. Developers
implement the feature in their mobile app using the Oracle Responsys Mobile App Platform Cloud
Service SDK Developer's Guide SDK. Developers can find more information in the “Message Center”
topic of the Oracle Responsys Mobile App Platform Cloud Service SDK Developer's Guide.

Mobile App Channel Configuration Guide Page 81
At runtime, the mobile app fetches the 20 most recent and unexpired messages from a Message Center
in Responsys and displays them to mobile app users. Depending on whether the user is logged in, the
messages received may vary as follows:
• If the mobile app user is logged in, and the mobile app has set the USER_IDENTIFIER, then the resulting messages are those meant for the logged-in (known) app user.
• If the mobile app user is not logged in, then the resulting messages are those meant for the device running the mobile app or for all logged out (unknown) users.
Notification Preferences PET: A Profile Extension Table that is associated to the App Channel List. It is
used for storing mobile app user preferences for a given mobile app. For example, a mobile app can
provide a set of options like “Lightning Deals”, “Monday Madness” etc. A user can subscribe to one or
more of these options. For each device where the mobile app is installed, the system maintains these
preferences in the Notification Preferences PET. Marketers can use preferences data to send relevant
messages to those users who have subscribed to a specific option. For Mobile App Developer details
about Notification Preferences, please refer to the platform-specific “Notification Preferences” topics in
the Oracle Responsys Mobile App Platform Cloud Service SDK Developer's Guide. (To find these topics,
click the platform name on the navigation list—for example, “iOS”—and then click “Notifications
Preferences”.)