Embed Size (px)
Citation preview
ORACLE JHEADSTART 11g for ADF RELEASE 11.1.2
TUTORIAL A step-by-step, end-to-end tutorial on how to be effective immediately with JEE application development using Oracle tools.
MAY 2012
JHeadstart Tutorial
Copyright © 2012, Oracle Corporation
All rights reserved.
Authors: Steve Muench, Steven Davelaar
The Programs (which include both the software and documentation) contain proprietary information; they
are provided under a license agreement containing restrictions on use and disclosure and are also protected by copyright, patent, and other intellectual and industrial property laws. Reverse engineering, disassembly,
or decompilation of the Programs, except to the extent required to obtain interoperability with other
independently created software or as specified by law, is prohibited. The information contained in this document is subject to change without notice. If you find any problems in
the documentation, please report them to us in writing. This document is not warranted to be error-free.
Except as may be expressly permitted in your license agreement for these Programs, no part of these Programs may be reproduced or transmitted in any form or by any means, electronic or mechanical, for any
purpose.
If the Programs are delivered to the United States Government or anyone licensing or using the Programs on behalf of the United States Government, the following notice is applicable:
U.S. GOVERNMENT RIGHTS Programs, software, databases, and related documentation and technical data
delivered to U.S. Government customers are "commercial computer software" or "commercial technical data" pursuant to the applicable Federal Acquisition Regulation and agency-specific supplemental regulations. As
such, use, duplication, disclosure, modification, and adaptation of the Programs, including documentation
and technical data, shall be subject to the licensing restrictions set forth in the applicable Oracle license agreement, and, to the extent applicable, the additional rights set forth in FAR 52.227-19, Commercial
Computer Software--Restricted Rights (June 1987). Oracle USA, Inc., 500 Oracle Parkway, Redwood City, CA
94065. The Programs are not intended for use in any nuclear, aviation, mass transit, medical, or other inherently
dangerous applications. It shall be the licensee's responsibility to take all appropriate fail-safe, backup,
redundancy and other measures to ensure the safe use of such applications if the Programs are used for such purposes, and we disclaim liability for any damages caused by such use of the Programs.
Oracle, JD Edwards, PeopleSoft, and Siebel are registered trademarks of Oracle Corporation and/or its
affiliates. Other names may be trademarks of their respective owners. The Programs may provide links to Web sites and access to content, products, and services from third
parties. Oracle is not responsible for the availability of, or any content provided on, third-party Web sites.
You bear all risks associated with the use of such content. If you choose to purchase any products or services from a third party, the relationship is directly between you and the third party. Oracle is not responsible for:
(a) the quality of third-party products or services; or (b) fulfilling any of the terms of the agreement with the
third party, including delivery of products or services and warranty obligations related to purchased products or services. Oracle is not responsible for any loss or damage of any sort that you may incur from
dealing with any third party.
Contents
1. Introduction ............................................................................................................................................. 4 2. Tutorial Setup ......................................................................................................................................... 5
2.1. Download the Tutorial Files ............................................................................................................ 5 2.2. Start with JDeveloper 11g, Release 11.1.2. ................................................................................... 5 2.3. Install Oracle JHeadstart 11g 11.1.2 Using "Check for Updates" ................................................... 5 2.4. Setup the Oracle HR Schema and Sample Data ............................................................................ 7 2.5. Define a JDeveloper Connection for the HR Schema .................................................................... 7
3. Creating a Default Web Application ....................................................................................................... 9 3.1. Create and Configure a New Application ........................................................................................ 9 3.2. Create Default ADF Business Components.................................................................................. 10 3.3. Generate Default Web Tier with JHeadstart ................................................................................. 17
4. Change Layout Styles and Query Behavior ......................................................................................... 27 4.1. Change How Employees Group Gets Generated ......................................................................... 27 4.2. Change How the Departments Group Gets Generated ................................................................ 33 4.3. Change How the Jobs Group Gets Generated ............................................................................. 34 4.4. Change How the Countries Group Gets Generated ..................................................................... 35 4.5. Change How the Regions Group Gets Generated ....................................................................... 36 4.6. Regenerate and Run the Application ............................................................................................ 41
5. Create Department Manager List of Values (LOV) .............................................................................. 47 5.1. Add Manager Name and Email to Departments Query ................................................................ 47 5.2. Create a Model List of Values (LOV) ............................................................................................ 50 5.3. Use the LOV on ManagerName and Hide the ManagerId ............................................................ 52 5.4. Regenerate and Run the Application ............................................................................................ 54
6. Creating a Wizard Including a Shuttle Control ..................................................................................... 57 6.1. Add View Object Instances to the Data Model to Support the Wizard and Shuttle ...................... 57 6.2. Create and Configure a New EmpWizard Group .......................................................................... 59 6.3. Create and Configure Three Item Regions for the EmpWizard Group ......................................... 60 6.4. Configure Subordinates Detail Group to Use Shuttle ................................................................... 62 6.5. Regenerate and Run the Application ............................................................................................ 64 6.6. Launching the Employee Wizard in a Popup Window .................................................................. 65
7. Adding a Conditionally Dependent Field .............................................................................................. 68 8. Adding a Graph and Summary Information.......................................................................................... 70
8.1. Configure the Employees4 Group ................................................................................................. 70 8.2. Add a Graph Using the JDeveloper Visual Page Editor ............................................................... 73 8.3. Preserving Customizations Using Generator Templates .............................................................. 77
9. Navigating Context-Sensitive to Another Group Taskflow ................................................................... 84 10. Reusing the Employees Group ......................................................................................................... 87
10.1. Make the EmployeesView Query Conditionally Restricted to one Department ........................ 87 10.2. Configure Employees Group for Reuse .................................................................................... 89 10.3. Reuse Employees Group as Child of Departments Group ....................................................... 90 10.4. Regenerate and Run the Application ........................................................................................ 92
11. Changing the Look and Feel ............................................................................................................ 95 12. Adding Validation Rules.................................................................................................................... 99
12.1. Defining Some Declarative Validation Rules ............................................................................. 99 12.2. Rerunning the Application to See Business Rules in Action ................................................... 104
13. Conclusion ...................................................................................................................................... 106 13.1. No Generated Java Code For Any Functionality in the Entire Tutorial! .................................. 107 13.2. Simplified Multi-Lingual Applications with Message Files ....................................................... 107 13.3. Now You Can Try On Your Own Schema ............................................................................... 108
14. Useful Links .................................................................................................................................... 109
1. Introduction On their own, the Oracle Application Development Framework (ADF) together with the Oracle JDeveloper 11g IDE give developers a productive, visual environment for building richly functional JEE applications without having to implement JEE design patterns and low-level plumbing code by hand. As its name implies, Oracle JHeadstart 11g offers a significant additional productivity advantage in creating sophisticated web-based, JEE business applications. Standing squarely on the shoulders of the base Oracle ADF framework, Oracle JHeadstart adds an additional capability for iteratively generating a fully-working web tier using Rich ADF Faces as View layer and ADF Task Flows as Controller layer. By following this tutorial, you'll experience first-hand how Oracle JHeadstart 11g can help you in building a best-practice ADF web application. You will built a transactional web application based on 6 tables of the Oracle HR schema, that includes rich functionality like quick and advanced search, a wizard in a popup window, a shuttle picker, a tree control, validation using list of values, conditionally dependent items, a graph, dynamic breadcrumbs, context-sensitive linking, validation rules and multi-language support. In addition, you will see how you can easily customize the generated artifacts and how you can preserve these customizations upon regeneration. Since no Java coding is required to implement the tutorial, even developers with minimal-to-no Java skills can follow along. If you are a more experienced ADF developer, it will be interesting to see how the JHeadstart-generated web tier auto-implements a host of ADF best practices that can be found on Oracle’s Technology Network and on various ADF-related blogs. If you are excited about ADF 11 features like facelets, (un)bounded task flows, page fragments, page templates, (dynamic) regions, XML Menu Model and model-driven LOV's, but struggle how they can be used best, then JHeadstart will make your life much easier. As we'll see in this step-by-step demo, the JHeadstart Application Generator does not generate any Java code. Instead, it generates web pages and page fragments, ADF metadata describing the data needed on those pages (“page definitions”), ADF metadata describing the page flow (“ADF Task Flow definitions”), and translatable message bundle files. We'll also see that all of the basic functionality provided by the underlying Oracle ADF framework components in the demo does not require any generated Java code either. We hope you'll walk away impressed by what you can do without writing a single line of Java code using this powerful combination of JEE tools and frameworks from Oracle. Any lines of code that you would eventually write in a real application would be squarely focused on enhancing all of the built-in functionality provided with your own custom business application logic.
Tip: The hr_schema.zip[2] contains the files to create the HR tables needed for this tutorial. A completed version of the tutorial application [3] is available for your reference.
Tip: Oracle JHeadstart 11g for ADF is a separate extension for Oracle JDeveloper 11g for which a fully-functional trial version is available for your evaluation purposes. Complete information on pricing, support, and additional services available for JHeadstart 11g is available in the JHeadstart Frequently Asked Questions document on the JHeadstart Product Center [5] on OTN.
Tip: After you've followed the demo steps yourself, the same steps work well as a scripted demo you can show to others to spread the good word about the many powerful features provided by the combination of Oracle JDeveloper 11g, Oracle ADF, and Oracle JHeadstart working together.
2. Tutorial Setup This section outlines the steps you'll need to follow to get your machine ready to go through this tutorial. We recommend not skipping any steps in this section without reading them!
2.1. Download the Tutorial Files If you are reading this tutorial online, download the hr_schema.zip [2] file that contains the database setup scripts. Extracting this zip file into the root directory of your C:\ drive will create a hr_schema directory with the database setup scripts (described more in detail below).
2.2. Start with JDeveloper 11g, Release 11.1.2. This tutorial requires Oracle JDeveloper 11g Studio Edition, release 11.1.2. Production. If you have a version of Oracle JDeveloper installed, you can verify what version it is by selecting the Help | About option from the main menu. NOTE: JHeadstart 11.1.2 will only work with JDeveloper release 11.1.2.0 or 11.1.2.1 Production. It will not work against earlier versions. If you need to download JDeveloper 11g Release 11.1.2 look for the latest version on this JDeveloper Downloads [6] page. Installation instructions can be found in the Oracle Fusion Middleware Guide for Oracle JDeveloper [21].
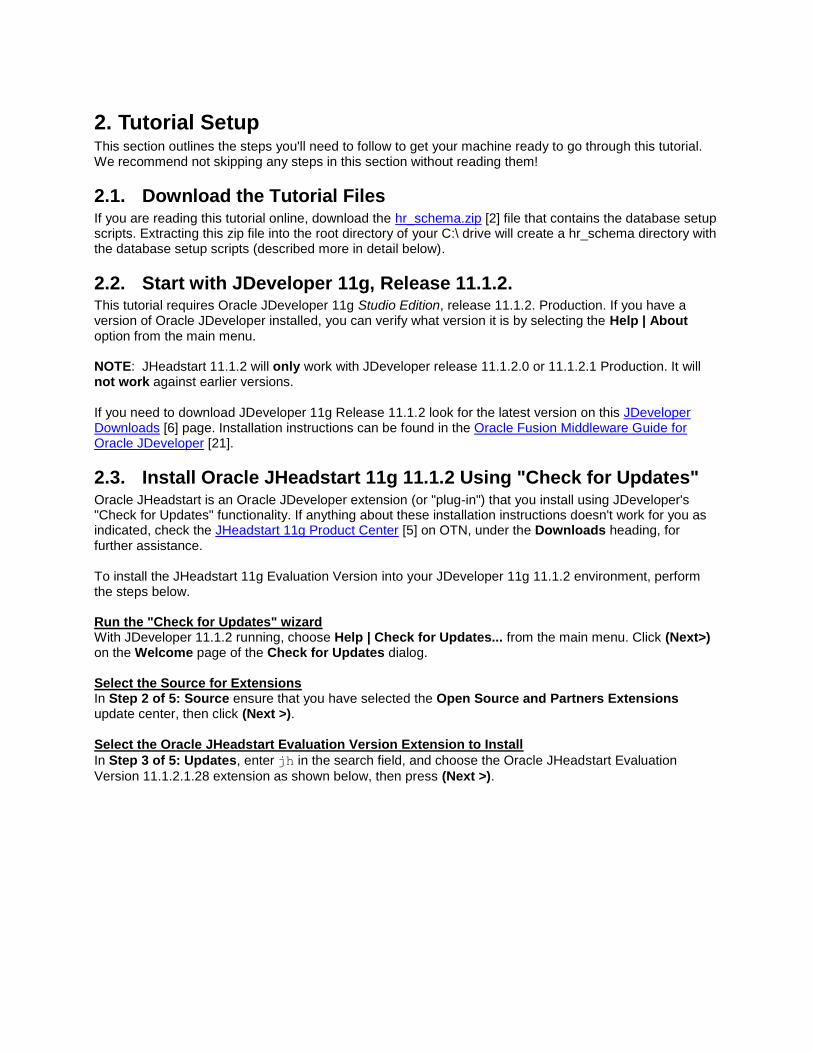
2.3. Install Oracle JHeadstart 11g 11.1.2 Using "Check for Updates" Oracle JHeadstart is an Oracle JDeveloper extension (or "plug-in") that you install using JDeveloper's "Check for Updates" functionality. If anything about these installation instructions doesn't work for you as indicated, check the JHeadstart 11g Product Center [5] on OTN, under the Downloads heading, for further assistance. To install the JHeadstart 11g Evaluation Version into your JDeveloper 11g 11.1.2 environment, perform the steps below. Run the "Check for Updates" wizard With JDeveloper 11.1.2 running, choose Help | Check for Updates... from the main menu. Click (Next>) on the Welcome page of the Check for Updates dialog. Select the Source for Extensions In Step 2 of 5: Source ensure that you have selected the Open Source and Partners Extensions update center, then click (Next >). Select the Oracle JHeadstart Evaluation Version Extension to Install
In Step 3 of 5: Updates, enter jh in the search field, and choose the Oracle JHeadstart Evaluation
Version 11.1.2.1.28 extension as shown below, then press (Next >).
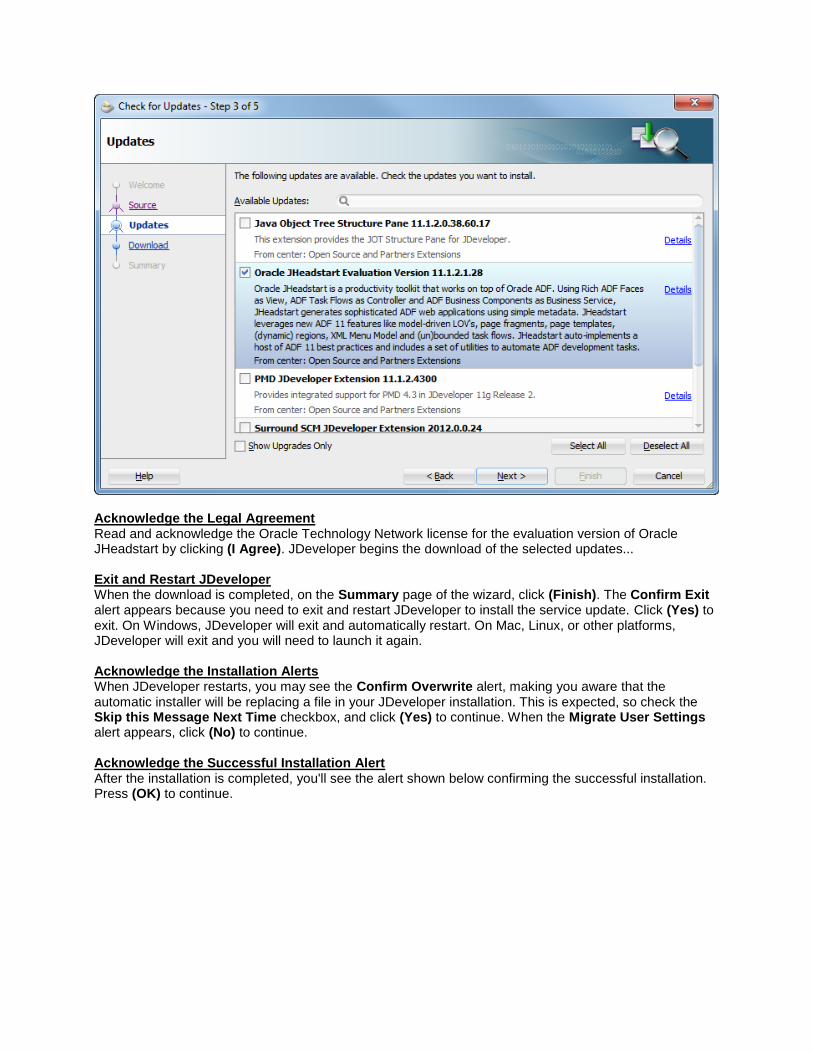
Acknowledge the Legal Agreement Read and acknowledge the Oracle Technology Network license for the evaluation version of Oracle JHeadstart by clicking (I Agree). JDeveloper begins the download of the selected updates... Exit and Restart JDeveloper When the download is completed, on the Summary page of the wizard, click (Finish). The Confirm Exit alert appears because you need to exit and restart JDeveloper to install the service update. Click (Yes) to exit. On Windows, JDeveloper will exit and automatically restart. On Mac, Linux, or other platforms, JDeveloper will exit and you will need to launch it again. Acknowledge the Installation Alerts When JDeveloper restarts, you may see the Confirm Overwrite alert, making you aware that the automatic installer will be replacing a file in your JDeveloper installation. This is expected, so check the Skip this Message Next Time checkbox, and click (Yes) to continue. When the Migrate User Settings alert appears, click (No) to continue. Acknowledge the Successful Installation Alert After the installation is completed, you'll see the alert shown below confirming the successful installation. Press (OK) to continue.
2.4. Setup the Oracle HR Schema and Sample Data This tutorial uses the sample HR schema that comes with the recent versions of the Oracle database. Create the HR Schema If Necessary If you don't already have an HR user account created in your database, you can follow these steps to create it. C:\hr_schema> sqlplus /nolog
SQL> connect sys as sysdba
SQL> create user hr identified by hr;
created.
SQL> alter user hr default tablespace users;
altered.
SQL> grant connect, resource to hr;
SQL> connect hr/hr
connected.
SQL> quit
Create the HR Schema Sample Tables In the hr_schema subdirectory of this tutorial, you'll find the hr.sql script. This script drops, recreates, and repopulates all the tables in the HR sample schema. Change directory to the hr_schema subdirectory, and run the script as the HR user, with the command: C:\hr_schema> sqlplus hr/hr @hr.sql Unlock the HR Schema If Necessary If you already have an HR schema in your database it might be locked for security reasons. To unlock the schema, follow these steps: C:\hr_schema> sqlplus /nolog
SQL> connect sys as sysdba
SQL> alter user hr identified by hr account unlock;
User altered.
SQL> quit
2.5. Define a JDeveloper Connection for the HR Schema Select View | Resouce Palette to show the Application Resources palet and follow these steps: Create a New Database Connection. Click on the Database folder, and select New Connection -> Database ... from the right-mouse menu.
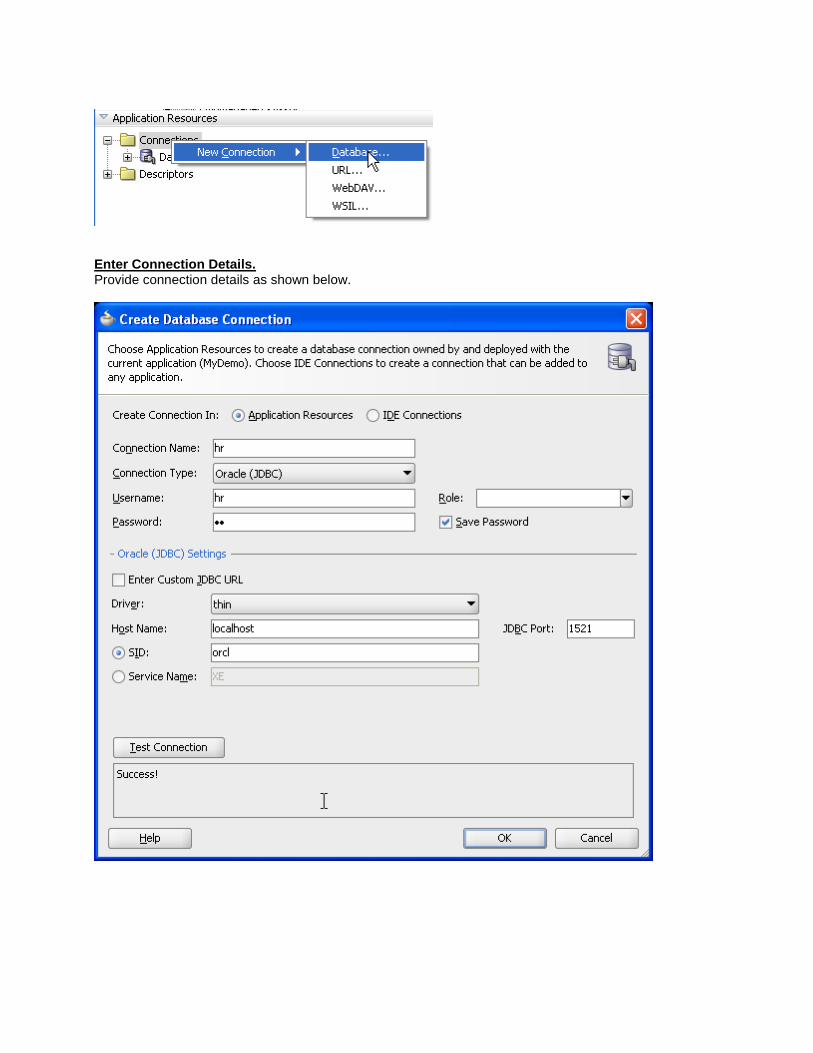
Enter Connection Details. Provide connection details as shown below.
3. Creating a Default Web Application In this section we will:
Create a new application,
Create the ADF Business Components to handle our backend database access, and
Generate a default set of web pages with JHeadstart Then, we'll run the application inside JDeveloper 11g to see what default behavior we get before starting to iteratively modify the application to further tailor it to work like our end users want.
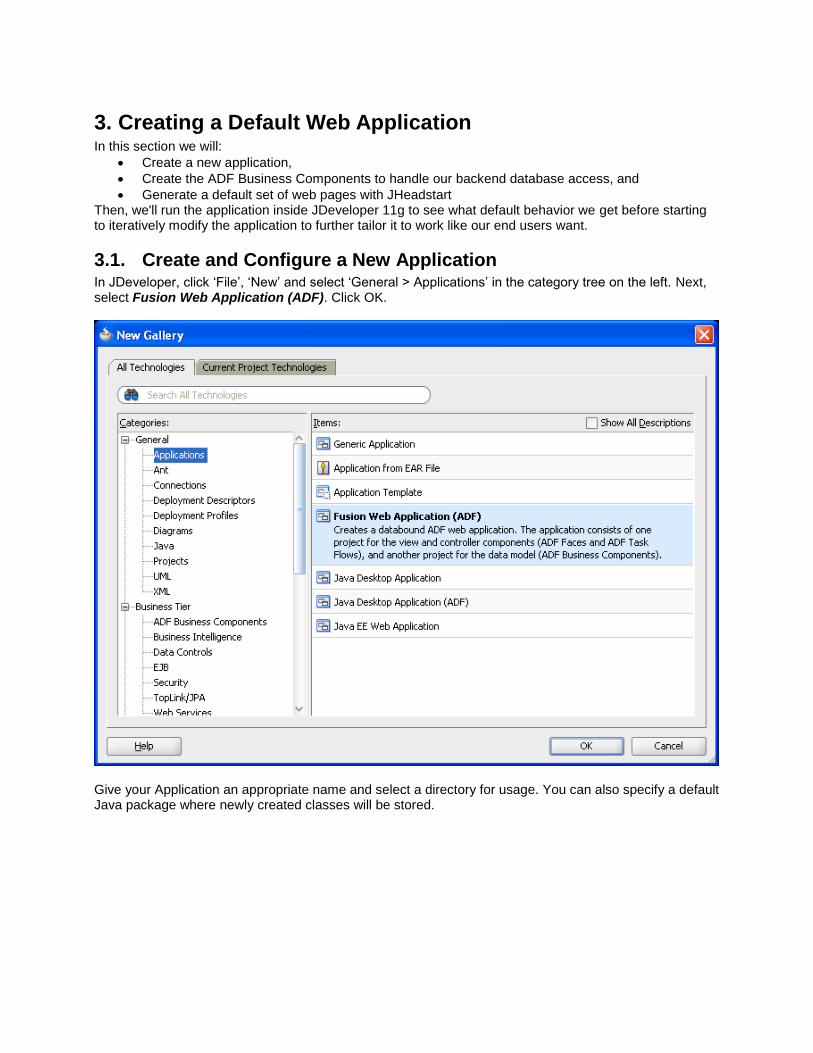
3.1. Create and Configure a New Application In JDeveloper, click ‘File’, ‘New’ and select ‘General > Applications’ in the category tree on the left. Next, select Fusion Web Application (ADF). Click OK.
Give your Application an appropriate name and select a directory for usage. You can also specify a default Java package where newly created classes will be stored.

You do not have to click Next, instead, click Finish to accept all defaults on the other pages of the wizard.
JDeveloper will now create a new application for you, with two projects: Model and ViewController.
3.2. Create Default ADF Business Components The ADF Business Components handle all of the database access for you in a way that is cleanly separated from the user interface. The application module provides the transactional component clients use to browse and modify view object data. The view object performs SQL queries and coordinates with entity objects to handle updates. The entity object encapsulates business domain data and validation for rows in a table. In this step we'll use wizards to create all three types of components based on existing tables in the database.
Tip: For additional background to ADF Business Components, including information on how their functionality maps to features of Oracle Forms, see the Fusion Developer's Guide for Oracle ADF [7] and ongoing columns in the Oracle Magazine DEVELOPER: Frameworks [8] series.
Run the Business Components from Tables Wizard Right click the Model project and select ‘New’.
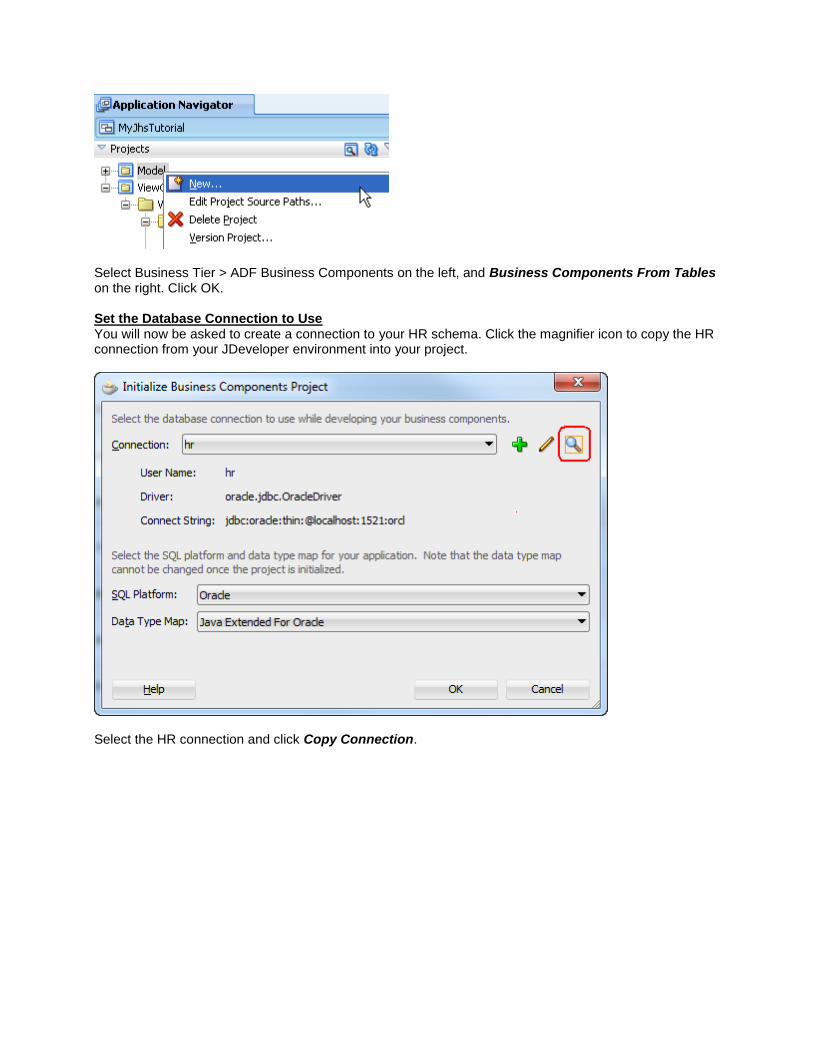
Select Business Tier > ADF Business Components on the left, and Business Components From Tables on the right. Click OK. Set the Database Connection to Use You will now be asked to create a connection to your HR schema. Click the magnifier icon to copy the HR connection from your JDeveloper environment into your project.
Select the HR connection and click Copy Connection.
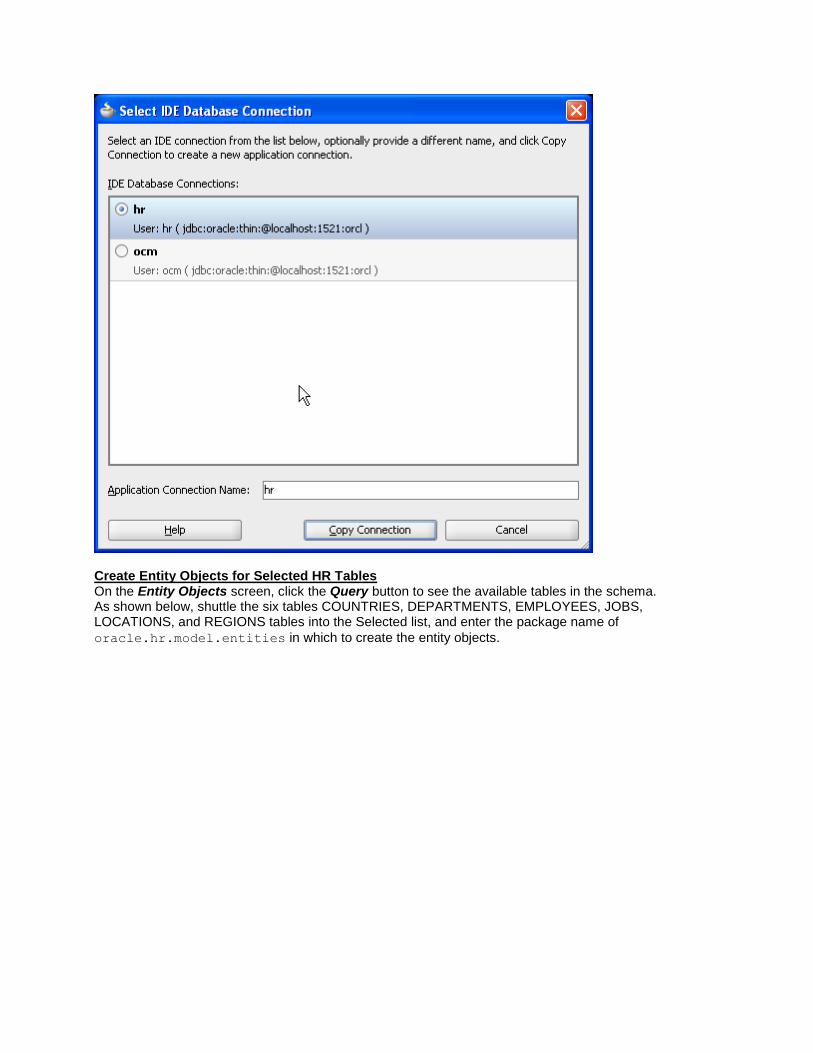
Create Entity Objects for Selected HR Tables On the Entity Objects screen, click the Query button to see the available tables in the schema. As shown below, shuttle the six tables COUNTRIES, DEPARTMENTS, EMPLOYEES, JOBS, LOCATIONS, and REGIONS tables into the Selected list, and enter the package name of
oracle.hr.model.entities in which to create the entity objects.
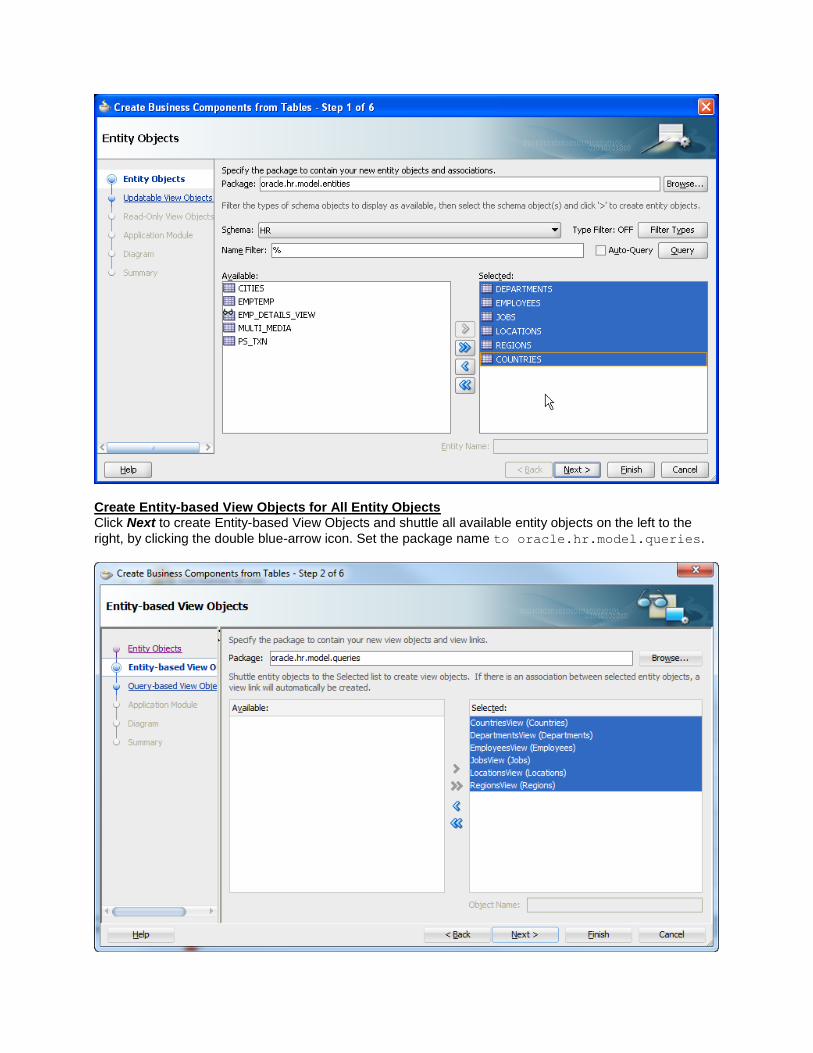
Create Entity-based View Objects for All Entity Objects Click Next to create Entity-based View Objects and shuttle all available entity objects on the left to the
right, by clicking the double blue-arrow icon. Set the package name to oracle.hr.model.queries.
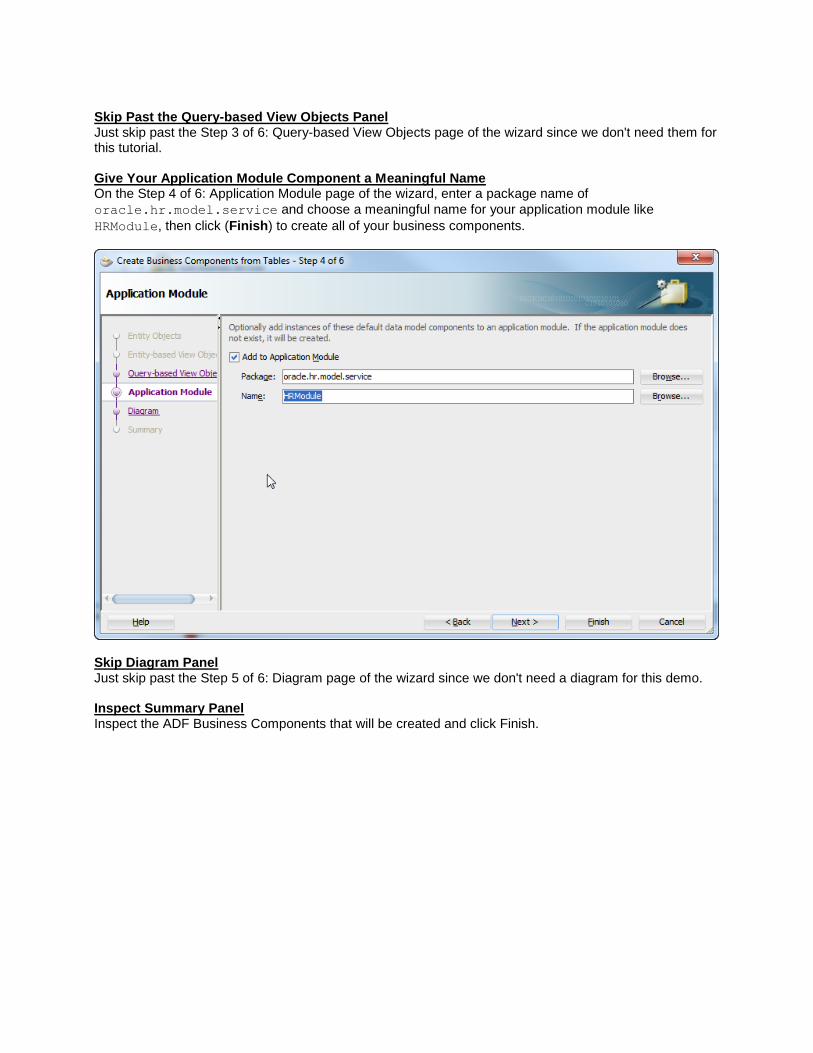
Skip Past the Query-based View Objects Panel Just skip past the Step 3 of 6: Query-based View Objects page of the wizard since we don't need them for this tutorial. Give Your Application Module Component a Meaningful Name On the Step 4 of 6: Application Module page of the wizard, enter a package name of
oracle.hr.model.service and choose a meaningful name for your application module like
HRModule, then click (Finish) to create all of your business components.
Skip Diagram Panel Just skip past the Step 5 of 6: Diagram page of the wizard since we don't need a diagram for this demo.
Inspect Summary Panel Inspect the ADF Business Components that will be created and click Finish.
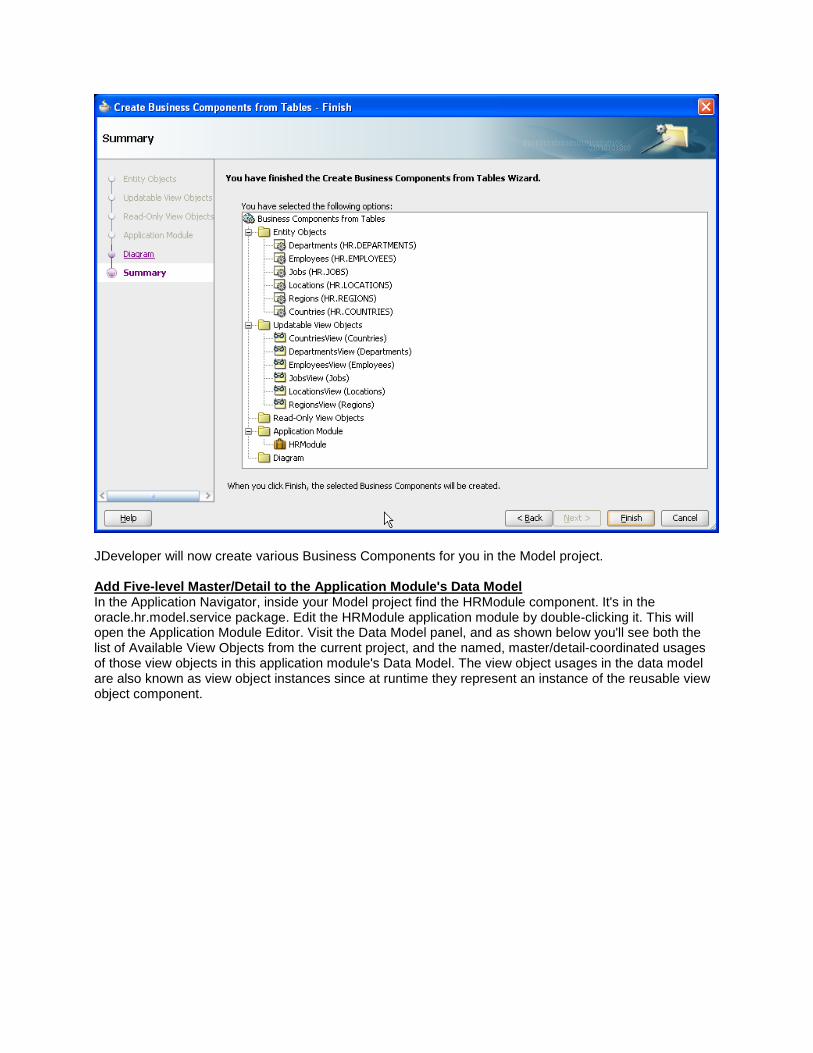
JDeveloper will now create various Business Components for you in the Model project. Add Five-level Master/Detail to the Application Module's Data Model In the Application Navigator, inside your Model project find the HRModule component. It's in the oracle.hr.model.service package. Edit the HRModule application module by double-clicking it. This will open the Application Module Editor. Visit the Data Model panel, and as shown below you'll see both the list of Available View Objects from the current project, and the named, master/detail-coordinated usages of those view objects in this application module's Data Model. The view object usages in the data model are also known as view object instances since at runtime they represent an instance of the reusable view object component.
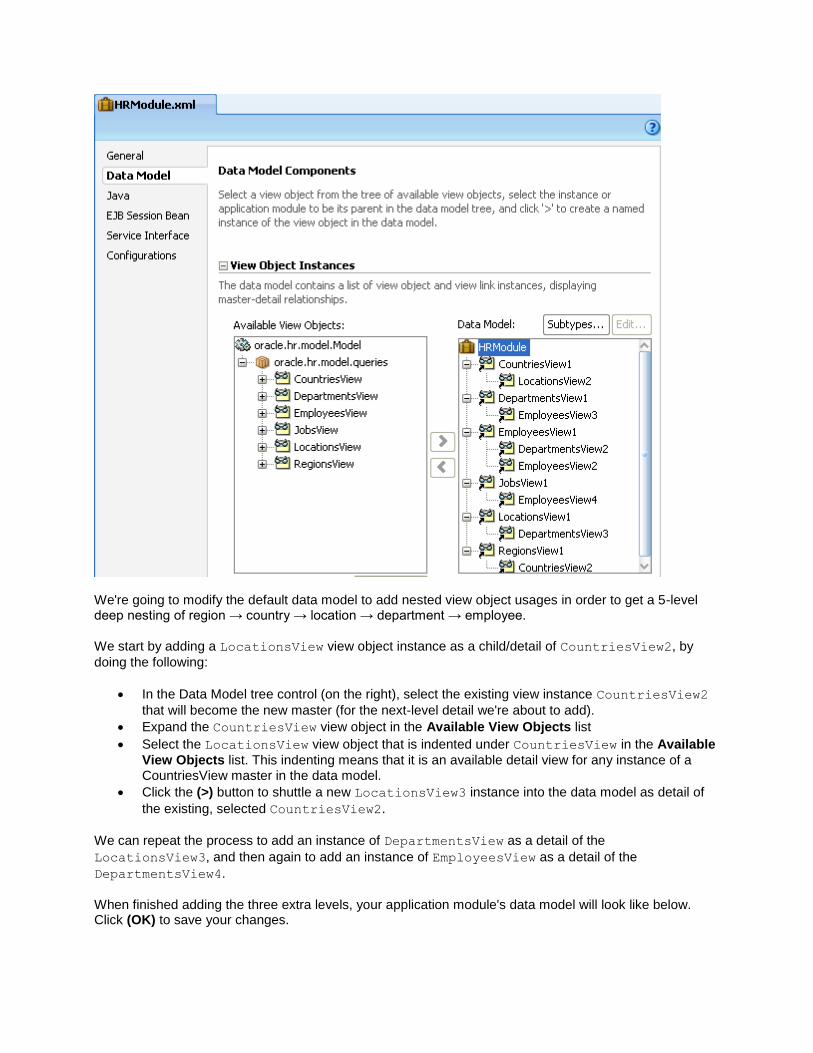
We're going to modify the default data model to add nested view object usages in order to get a 5-level deep nesting of region → country → location → department → employee.
We start by adding a LocationsView view object instance as a child/detail of CountriesView2, by
doing the following:
In the Data Model tree control (on the right), select the existing view instance CountriesView2
that will become the new master (for the next-level detail we're about to add).
Expand the CountriesView view object in the Available View Objects list
Select the LocationsView view object that is indented under CountriesView in the Available
View Objects list. This indenting means that it is an available detail view for any instance of a CountriesView master in the data model.
Click the (>) button to shuttle a new LocationsView3 instance into the data model as detail of
the existing, selected CountriesView2.
We can repeat the process to add an instance of DepartmentsView as a detail of the
LocationsView3, and then again to add an instance of EmployeesView as a detail of the
DepartmentsView4.
When finished adding the three extra levels, your application module's data model will look like below. Click (OK) to save your changes.
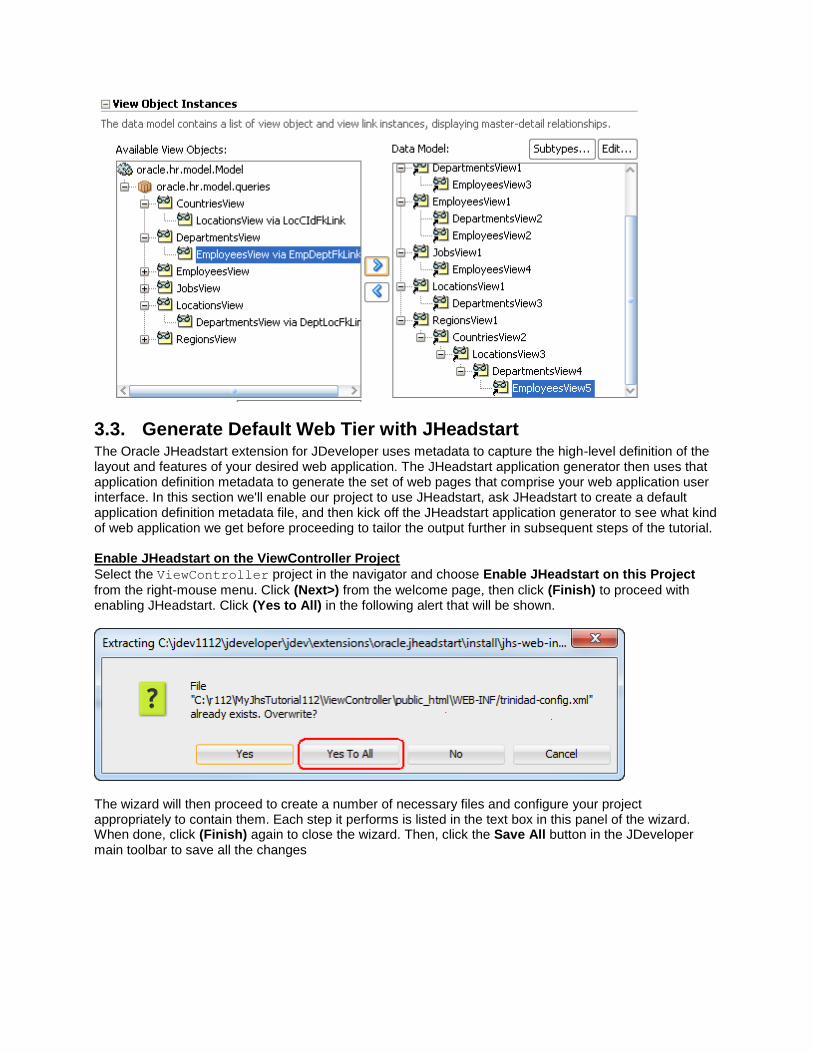
3.3. Generate Default Web Tier with JHeadstart The Oracle JHeadstart extension for JDeveloper uses metadata to capture the high-level definition of the layout and features of your desired web application. The JHeadstart application generator then uses that application definition metadata to generate the set of web pages that comprise your web application user interface. In this section we'll enable our project to use JHeadstart, ask JHeadstart to create a default application definition metadata file, and then kick off the JHeadstart application generator to see what kind of web application we get before proceeding to tailor the output further in subsequent steps of the tutorial. Enable JHeadstart on the ViewController Project
Select the ViewController project in the navigator and choose Enable JHeadstart on this Project
from the right-mouse menu. Click (Next>) from the welcome page, then click (Finish) to proceed with enabling JHeadstart. Click (Yes to All) in the following alert that will be shown.
The wizard will then proceed to create a number of necessary files and configure your project appropriately to contain them. Each step it performs is listed in the text box in this panel of the wizard. When done, click (Finish) again to close the wizard. Then, click the Save All button in the JDeveloper main toolbar to save all the changes
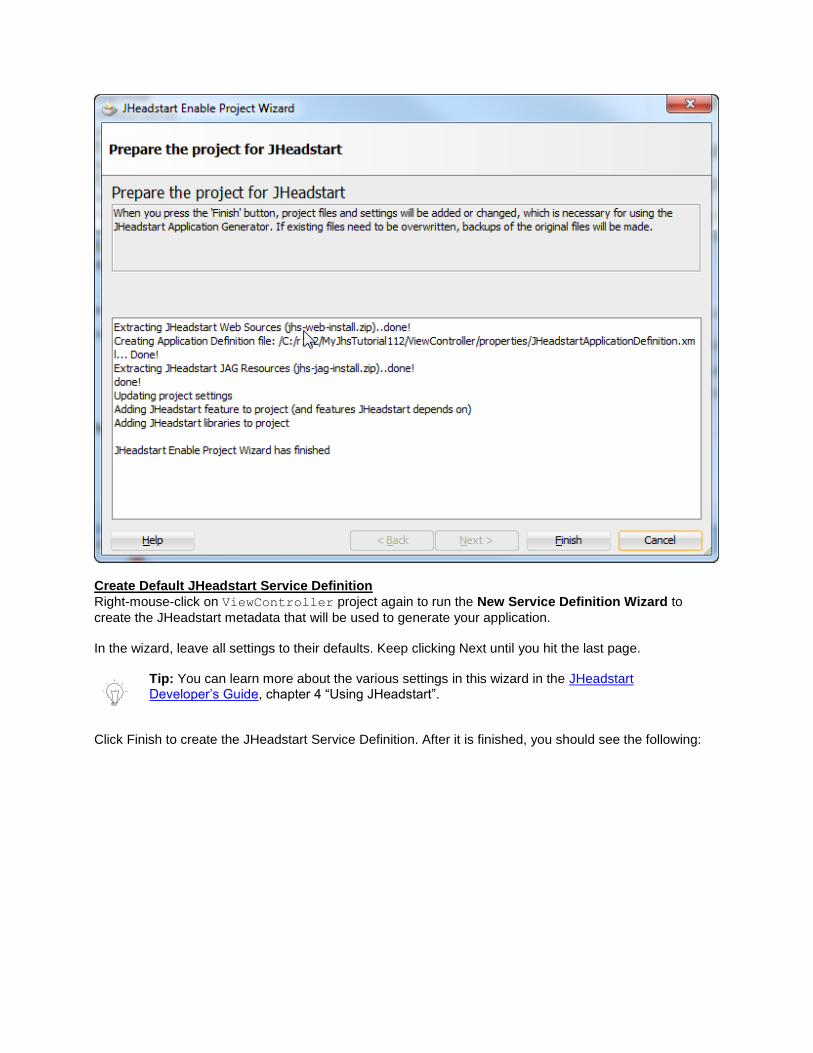
Create Default JHeadstart Service Definition
Right-mouse-click on ViewController project again to run the New Service Definition Wizard to
create the JHeadstart metadata that will be used to generate your application. In the wizard, leave all settings to their defaults. Keep clicking Next until you hit the last page.
Tip: You can learn more about the various settings in this wizard in the JHeadstart Developer’s Guide, chapter 4 “Using JHeadstart”.
Click Finish to create the JHeadstart Service Definition. After it is finished, you should see the following:
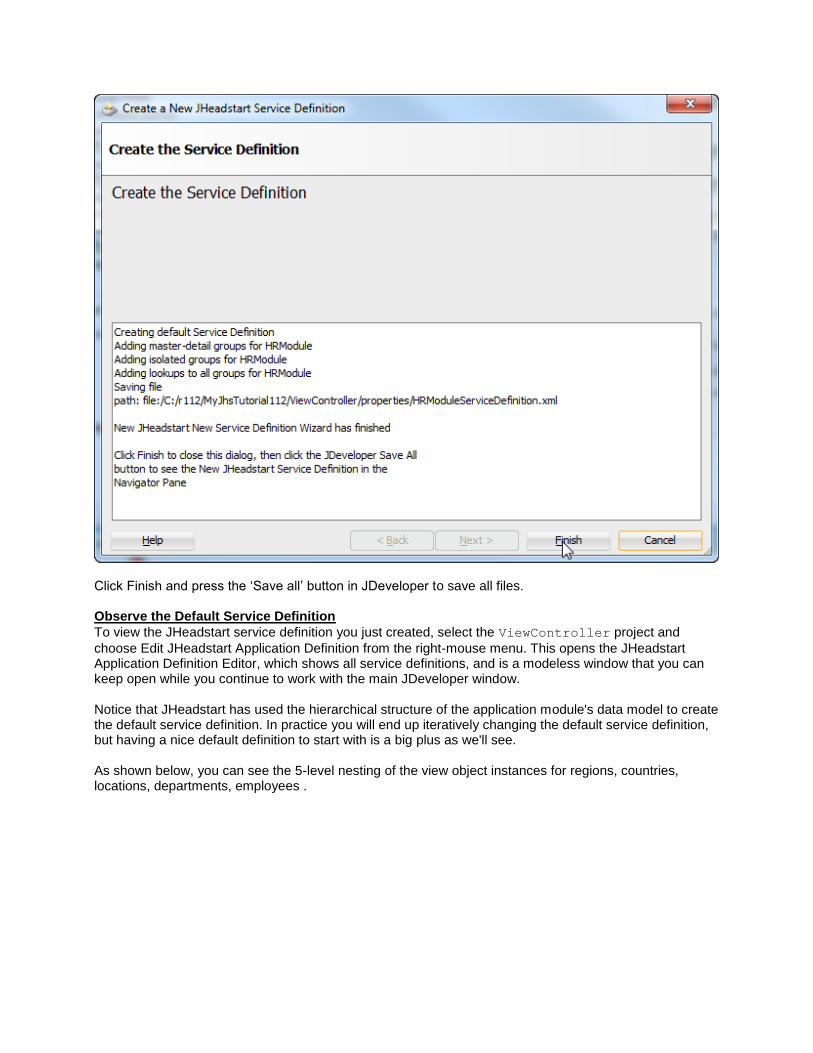
Click Finish and press the ‘Save all’ button in JDeveloper to save all files. Observe the Default Service Definition
To view the JHeadstart service definition you just created, select the ViewController project and
choose Edit JHeadstart Application Definition from the right-mouse menu. This opens the JHeadstart Application Definition Editor, which shows all service definitions, and is a modeless window that you can keep open while you continue to work with the main JDeveloper window. Notice that JHeadstart has used the hierarchical structure of the application module's data model to create the default service definition. In practice you will end up iteratively changing the default service definition, but having a nice default definition to start with is a big plus as we'll see. As shown below, you can see the 5-level nesting of the view object instances for regions, countries, locations, departments, employees .
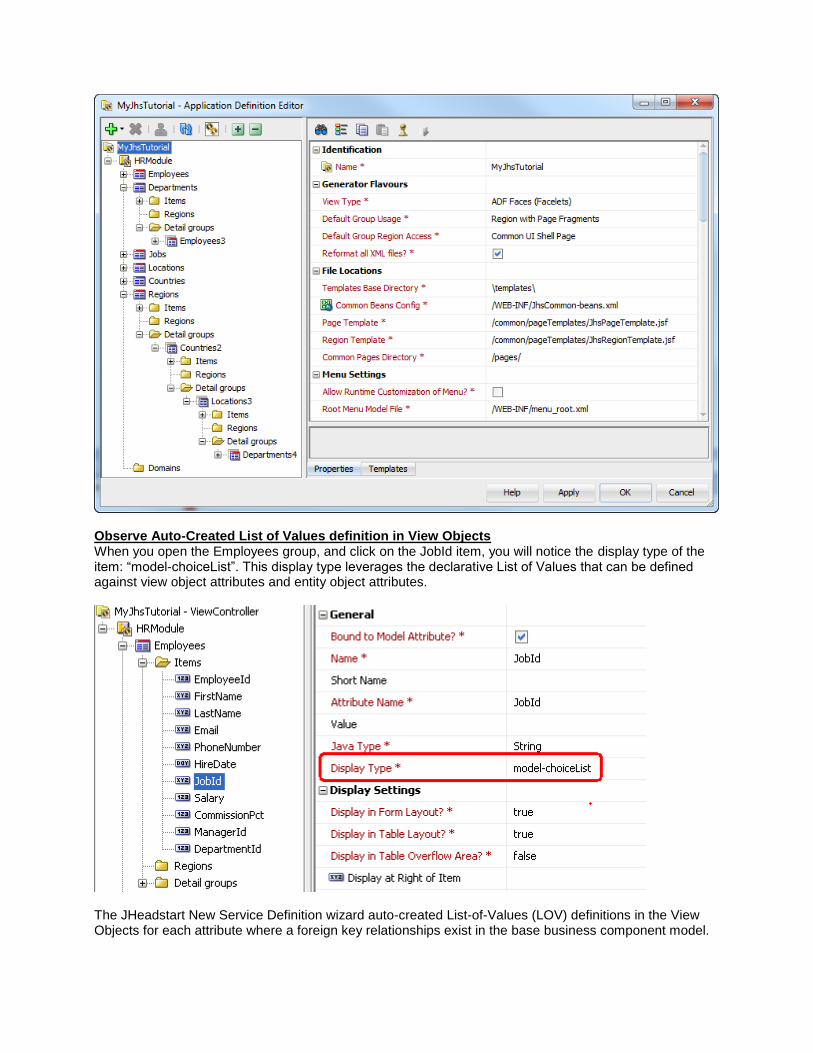
Observe Auto-Created List of Values definition in View Objects When you open the Employees group, and click on the JobId item, you will notice the display type of the item: “model-choiceList”. This display type leverages the declarative List of Values that can be defined against view object attributes and entity object attributes.
The JHeadstart New Service Definition wizard auto-created List-of-Values (LOV) definitions in the View Objects for each attribute where a foreign key relationships exist in the base business component model.
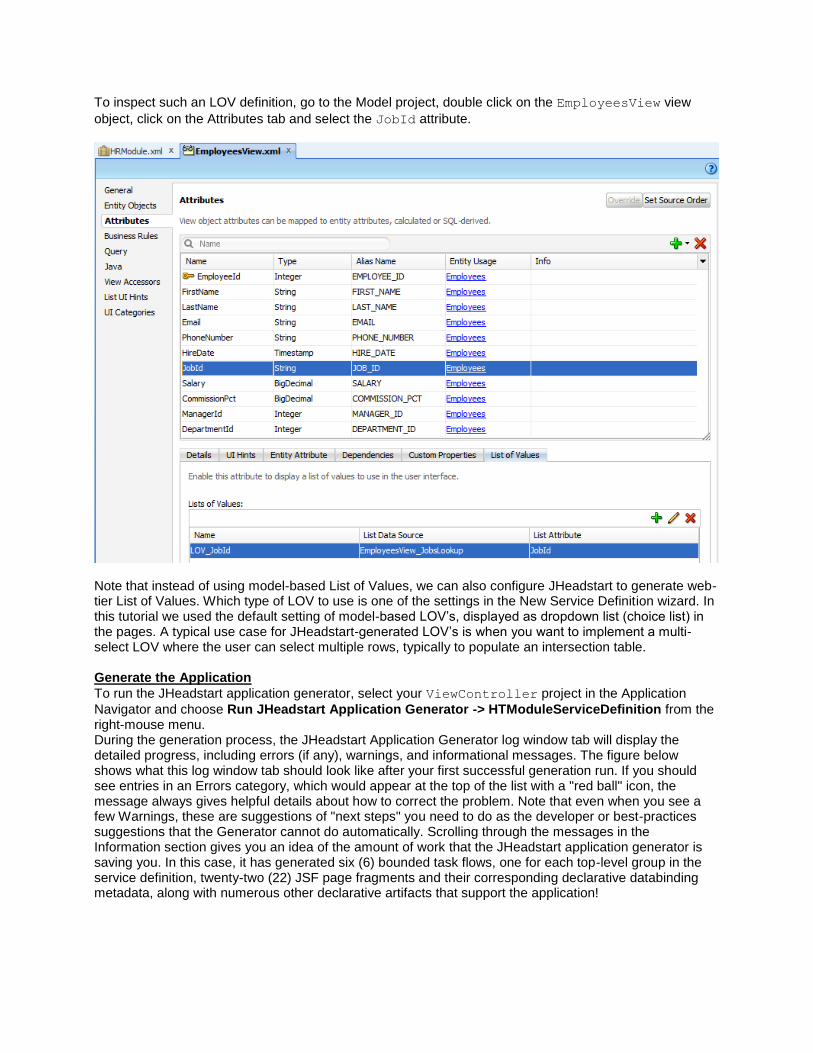
To inspect such an LOV definition, go to the Model project, double click on the EmployeesView view
object, click on the Attributes tab and select the JobId attribute.
Note that instead of using model-based List of Values, we can also configure JHeadstart to generate web-tier List of Values. Which type of LOV to use is one of the settings in the New Service Definition wizard. In this tutorial we used the default setting of model-based LOV’s, displayed as dropdown list (choice list) in the pages. A typical use case for JHeadstart-generated LOV’s is when you want to implement a multi-select LOV where the user can select multiple rows, typically to populate an intersection table. Generate the Application
To run the JHeadstart application generator, select your ViewController project in the Application
Navigator and choose Run JHeadstart Application Generator -> HTModuleServiceDefinition from the right-mouse menu. During the generation process, the JHeadstart Application Generator log window tab will display the detailed progress, including errors (if any), warnings, and informational messages. The figure below shows what this log window tab should look like after your first successful generation run. If you should see entries in an Errors category, which would appear at the top of the list with a "red ball" icon, the message always gives helpful details about how to correct the problem. Note that even when you see a few Warnings, these are suggestions of "next steps" you need to do as the developer or best-practices suggestions that the Generator cannot do automatically. Scrolling through the messages in the Information section gives you an idea of the amount of work that the JHeadstart application generator is saving you. In this case, it has generated six (6) bounded task flows, one for each top-level group in the service definition, twenty-two (22) JSF page fragments and their corresponding declarative databinding metadata, along with numerous other declarative artifacts that support the application!
For your convenience, on future runs of the JHeadstart application generator, in addition to the right-mouse menu option we picked here, you can also just click on the Run JHeadstart Application
Generator toolbar button ( ) at the top of the JHeadstart Application Definition Editor window. Both actions do the same thing. When generation has finished, you will be presented with an outcome message. Click OK and save all files in JDeveloper. Run the Application
Run the ViewController project by selecting it in the application navigator and then pressing F11 (or
clicking on the toolbar run icon ( ). A dialog pops up (after a while) where you can choose the default run activity for the unbounded task flow. Choose the UIShell activity and click OK. JDeveloper will then startup the embedded WebLogic server (this may take some time), deploy your web application to the WebLogic Server and start the application with yoyur default browser. You will be presented with the following screen in your browser:
You will get the default Home page, with a menu showing all services available (only one in this tutotial). Note that you can easily customize this home page, as well as the menu entries shown. Click on the HRModule tab, you should see a page like below.
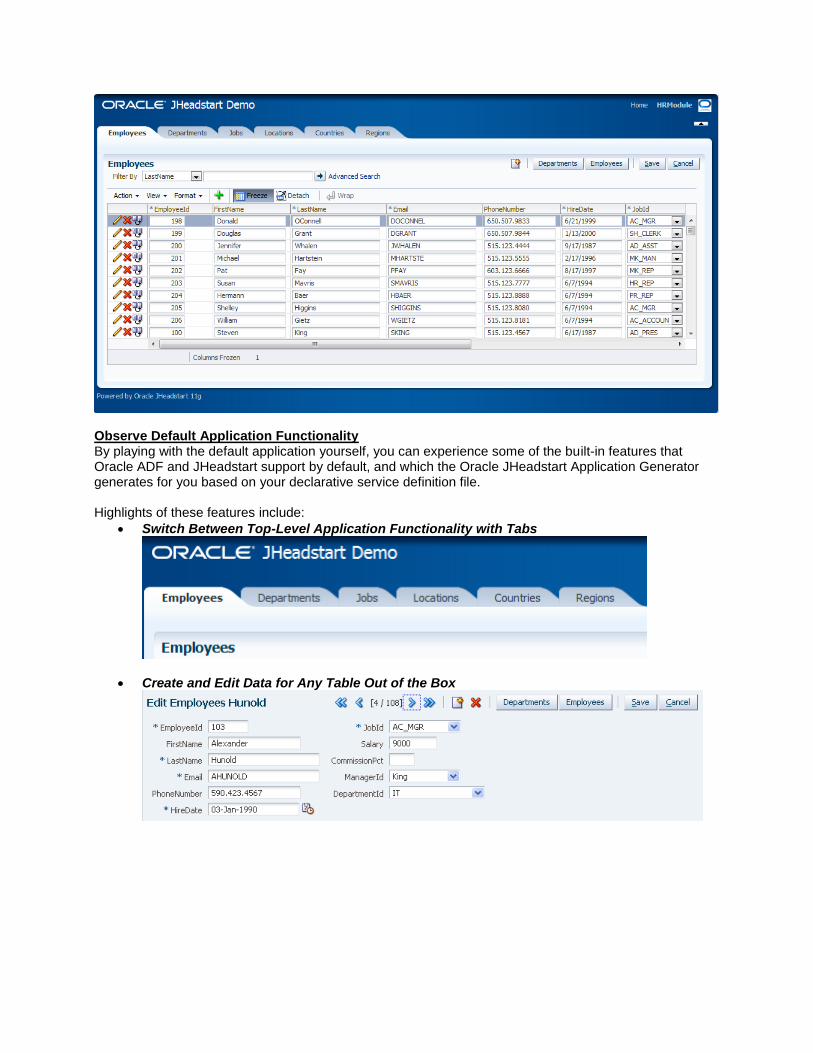
Observe Default Application Functionality By playing with the default application yourself, you can experience some of the built-in features that Oracle ADF and JHeadstart support by default, and which the Oracle JHeadstart Application Generator generates for you based on your declarative service definition file. Highlights of these features include:
Switch Between Top-Level Application Functionality with Tabs
Create and Edit Data for Any Table Out of the Box
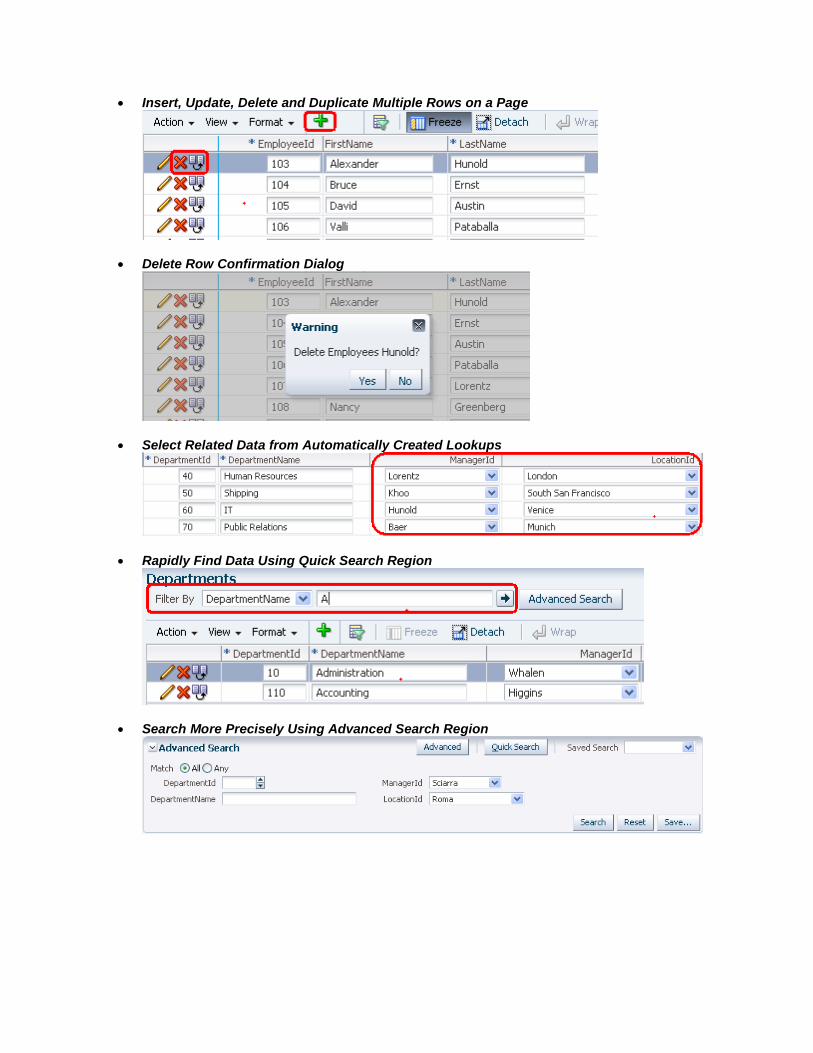
Insert, Update, Delete and Duplicate Multiple Rows on a Page
Delete Row Confirmation Dialog
Select Related Data from Automatically Created Lookups
Rapidly Find Data Using Quick Search Region
Search More Precisely Using Advanced Search Region
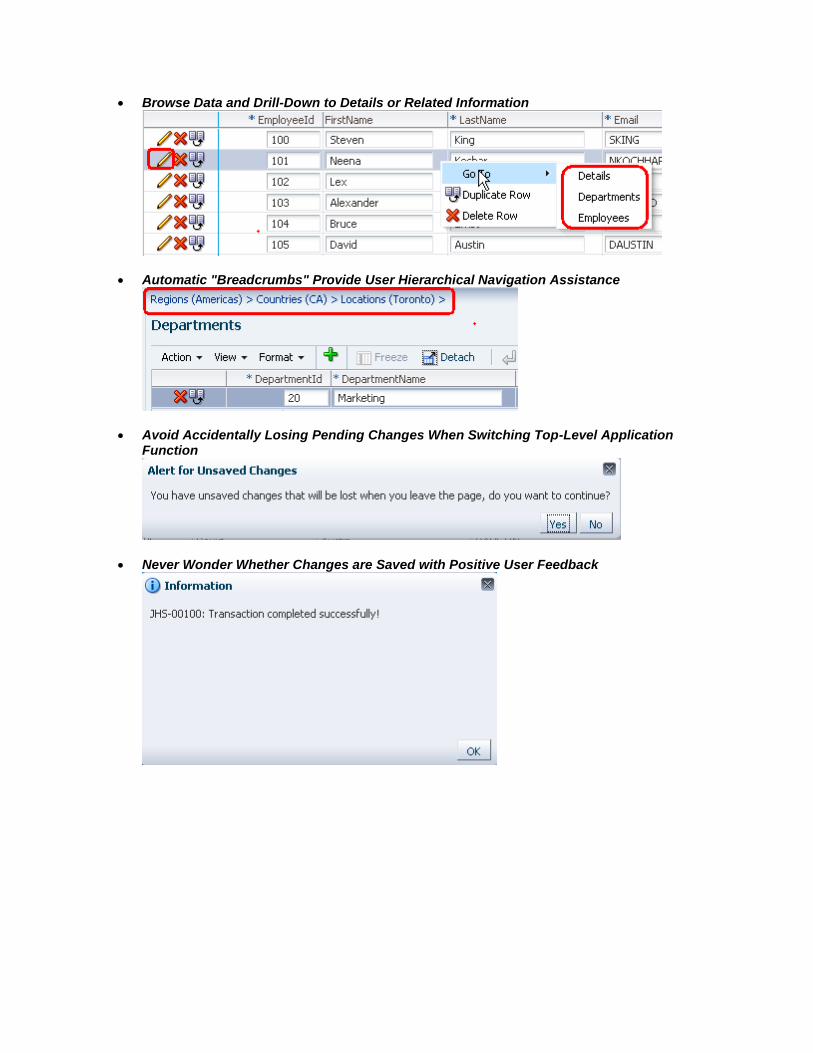
Browse Data and Drill-Down to Details or Related Information
Automatic "Breadcrumbs" Provide User Hierarchical Navigation Assistance
Avoid Accidentally Losing Pending Changes When Switching Top-Level Application Function
Never Wonder Whether Changes are Saved with Positive User Feedback
Under the covers: While running the generated web application, you might have noticed that the URL in the browser window does not change if you navigate between the various tabs within the HRModule service. This is because JHeadstart generates by default a so-
called one-page application. There is one UIShell page based on an ADF Faces page
template, and within this UIShell page an ADF Faces dynamic region is used to display
actual page content. When clicking on a menu tab, the current region displayed within the dynamic region switches. Each region displays a bounded taskflow with page fragments. The advantages of this structure include:
Optimal performance: only the dynamic region part of the page needs to be refreshed when clicking on another menu tab, and user actions within a region only update the region in the page, not the page as a whole.
Optimal reuse: Since bounded taskflow based on page fragments can be embedded in any page using an ADF faces (dynamic) region, it very easy to reuse JHeadstart groups acrross pages, as we will see later in this tutorial. Furthermore, using drag-and-drop, it is as easy to include a JHeadstart-generated taskflow as a region in a handbuilt page. In summary: JHeadstart generates a menu-driven application out of the box, but you can easily reuse the generated artifacts in other user interaction patterns, for example in a workflow-driven application where the transactions are launched from a personal task list.
4. Change Layout Styles and Query Behavior In this step of the demo, we'll change a number of declarative application definition properties about the
Employees, Departments, Jobs, and Regions groups to affect how the JHeadstart application
generator generates the web tier pages. We'll wait until making them all before re-running the application generator. To make the changes described here, make sure you have the JHeadstart Application Definition Editor
open. If you don't, just select your ViewController project and select Edit JHeadstart Application
Definition from the right-mouse menu.
Tip: Since the JHeadstart Application Definition Editor dialog is modeless, you can keep it open and Alt+Tab between it and the main JDeveloper IDE window.
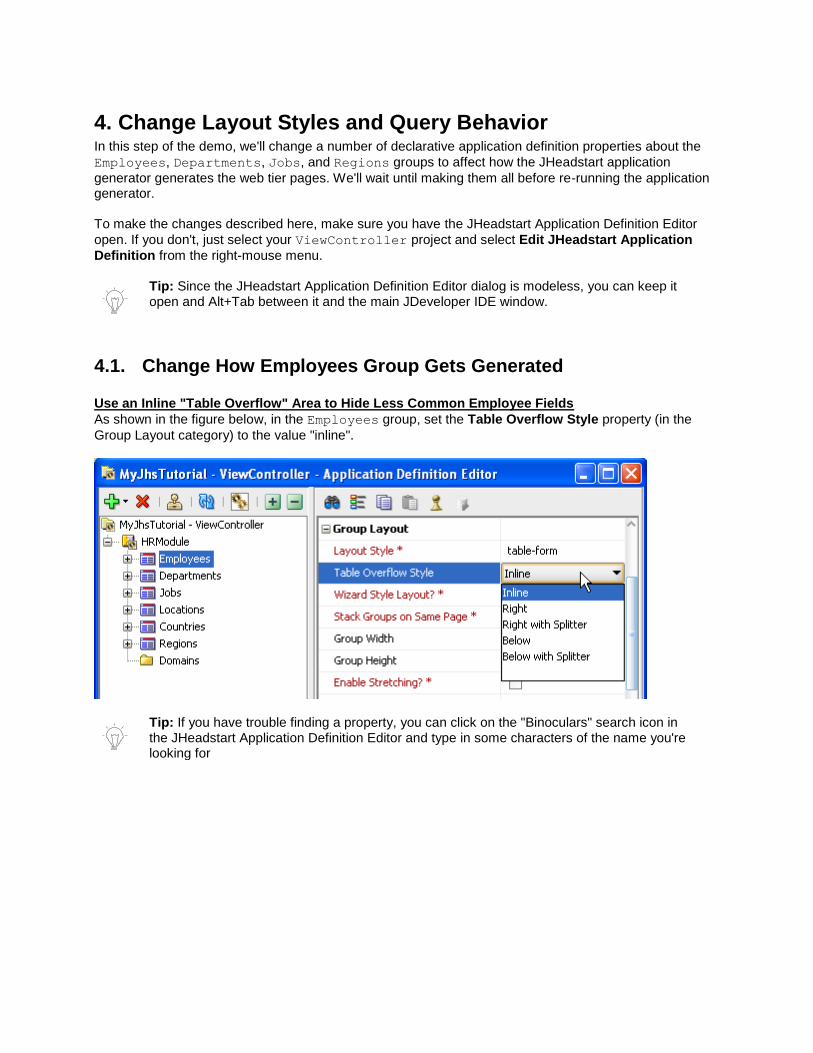
4.1. Change How Employees Group Gets Generated Use an Inline "Table Overflow" Area to Hide Less Common Employee Fields
As shown in the figure below, in the Employees group, set the Table Overflow Style property (in the
Group Layout category) to the value "inline".
Tip: If you have trouble finding a property, you can click on the "Binoculars" search icon in the JHeadstart Application Definition Editor and type in some characters of the name you're looking for

Tip: Every property in the JHeadstart editors is documented with a helpful usage message in the help zone below the property table as shown below.
Next, we need to indicate which attributes should be hidden by default when displayed in a table. To accomplish this, expand the Employees group and its Items folder to see the names of the items in that group. The default application definition includes an item for each attribute of each view object in the data model. Set the Display in Table Layout? property (in the Display Settings category) to false for
all attributes except: EmployeeId, FirstName, LastName,and JobId. As shown below, we can
multi-select attributes using the mouse in combination with the Shift or Control keys, then set the desired property.
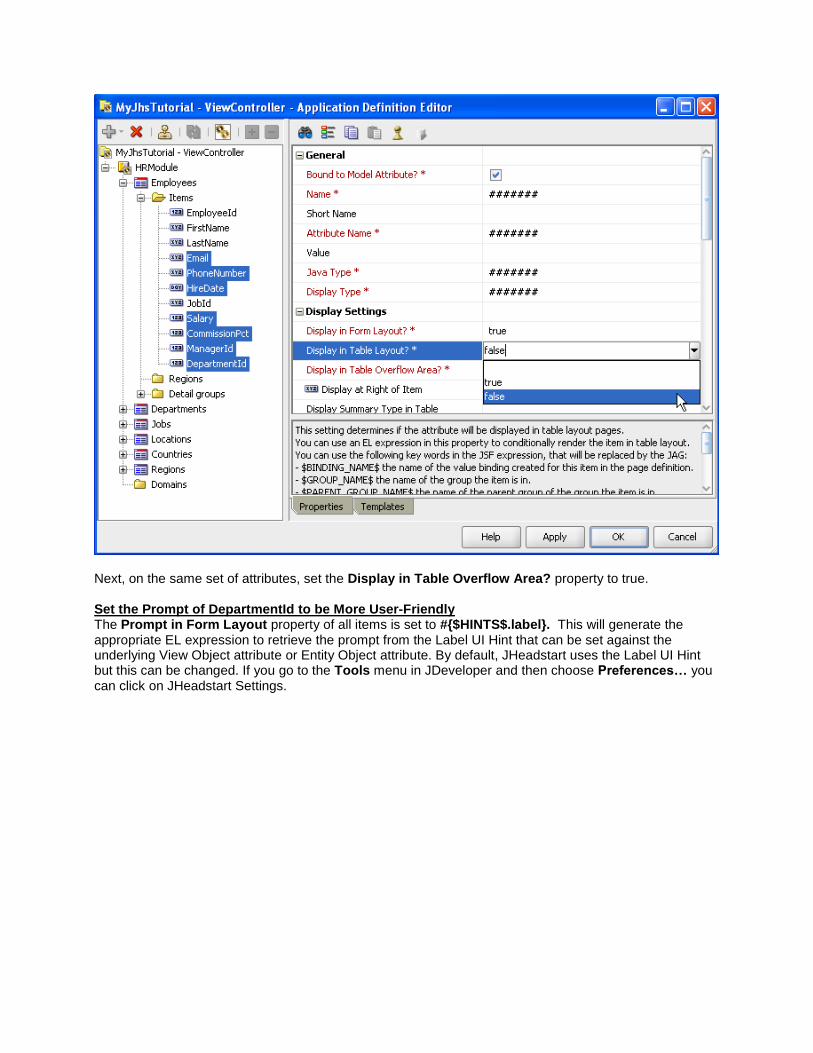
Next, on the same set of attributes, set the Display in Table Overflow Area? property to true. Set the Prompt of DepartmentId to be More User-Friendly The Prompt in Form Layout property of all items is set to #{$HINTS$.label}. This will generate the appropriate EL expression to retrieve the prompt from the Label UI Hint that can be set against the underlying View Object attribute or Entity Object attribute. By default, JHeadstart uses the Label UI Hint but this can be changed. If you go to the Tools menu in JDeveloper and then choose Preferences… you can click on JHeadstart Settings.

In this panel, the checkbox option Bind item prompt to ADF BC Control Hint “Label text”? determines this behavior. When you run the New Service Definition wizard with this checkbox checked, it will create the above EL expression that references the UI Hint. When unchecked, it will set the Prompt in Form Layout property to the name of the attribute (or current Label Hint of this attribute if already set). Now, you can easily switch this behavior later on for a group. If you change the setting of this JHeadstart
Preference, and then use the Synchronize ( )button in the JHeadstart Application Definition Editor, JHeadstart will update the Prompt in Form Layout property or Label Text UI Hint accordingly. We can also use this synchronize feature to quickly update the Label text UI Hint in the View Object attribute through the JHeadstart Application Definition Editor, which you are going to do now:
Change the Prompt in Form Layout property of DepartmentId item to “Department”.
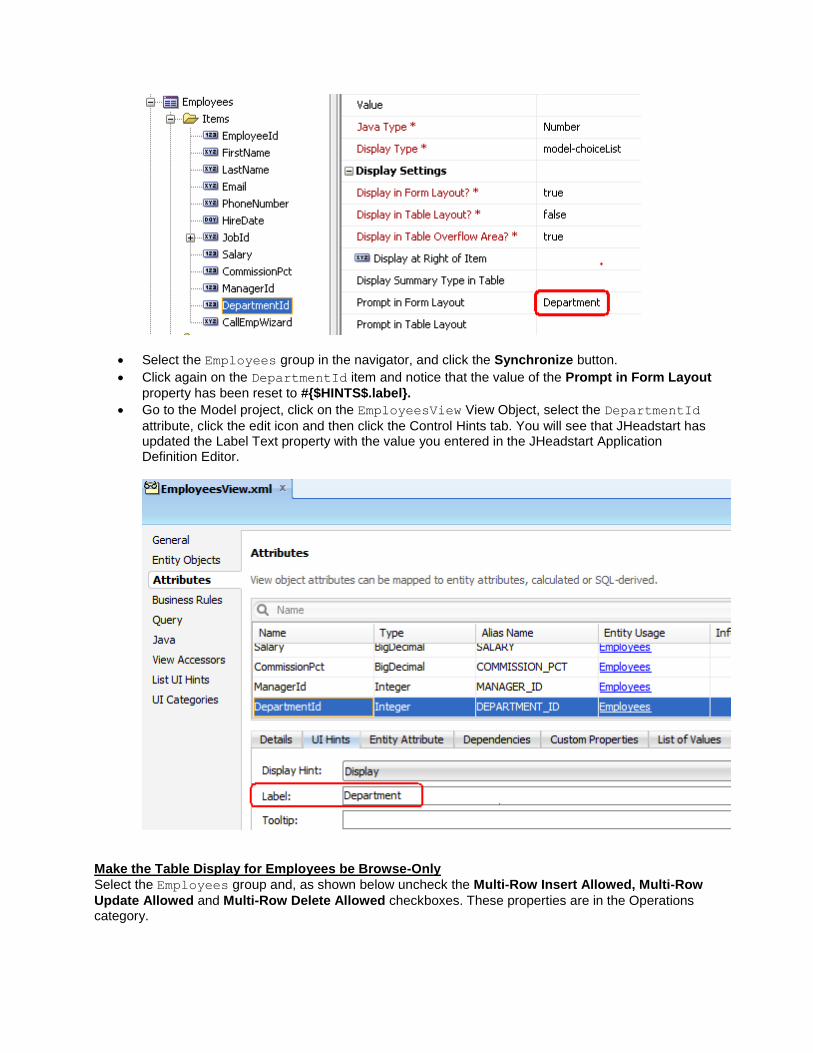
Select the Employees group in the navigator, and click the Synchronize button.
Click again on the DepartmentId item and notice that the value of the Prompt in Form Layout
property has been reset to #{$HINTS$.label}.
Go to the Model project, click on the EmployeesView View Object, select the DepartmentId
attribute, click the edit icon and then click the Control Hints tab. You will see that JHeadstart has updated the Label Text property with the value you entered in the JHeadstart Application Definition Editor.
Make the Table Display for Employees be Browse-Only
Select the Employees group and, as shown below uncheck the Multi-Row Insert Allowed, Multi-Row
Update Allowed and Multi-Row Delete Allowed checkboxes. These properties are in the Operations category.
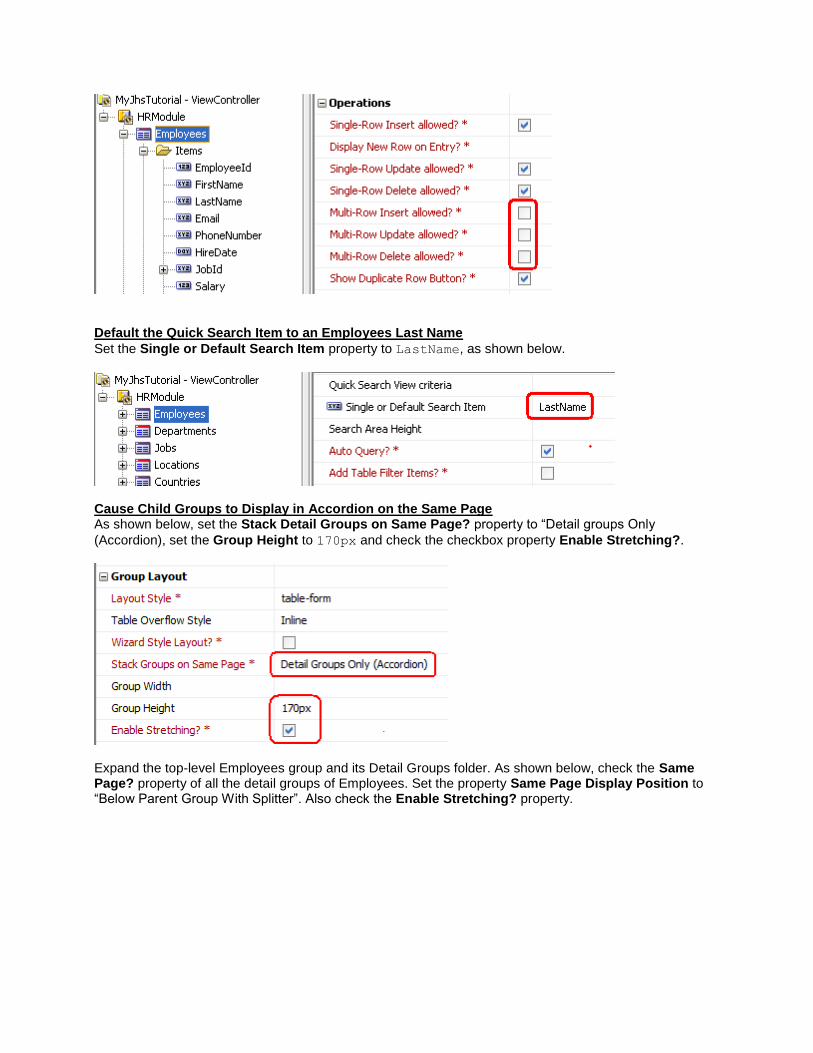
Default the Quick Search Item to an Employees Last Name
Set the Single or Default Search Item property to LastName, as shown below.
Cause Child Groups to Display in Accordion on the Same Page As shown below, set the Stack Detail Groups on Same Page? property to “Detail groups Only
(Accordion), set the Group Height to 170px and check the checkbox property Enable Stretching?.
Expand the top-level Employees group and its Detail Groups folder. As shown below, check the Same Page? property of all the detail groups of Employees. Set the property Same Page Display Position to “Below Parent Group With Splitter”. Also check the Enable Stretching? property.
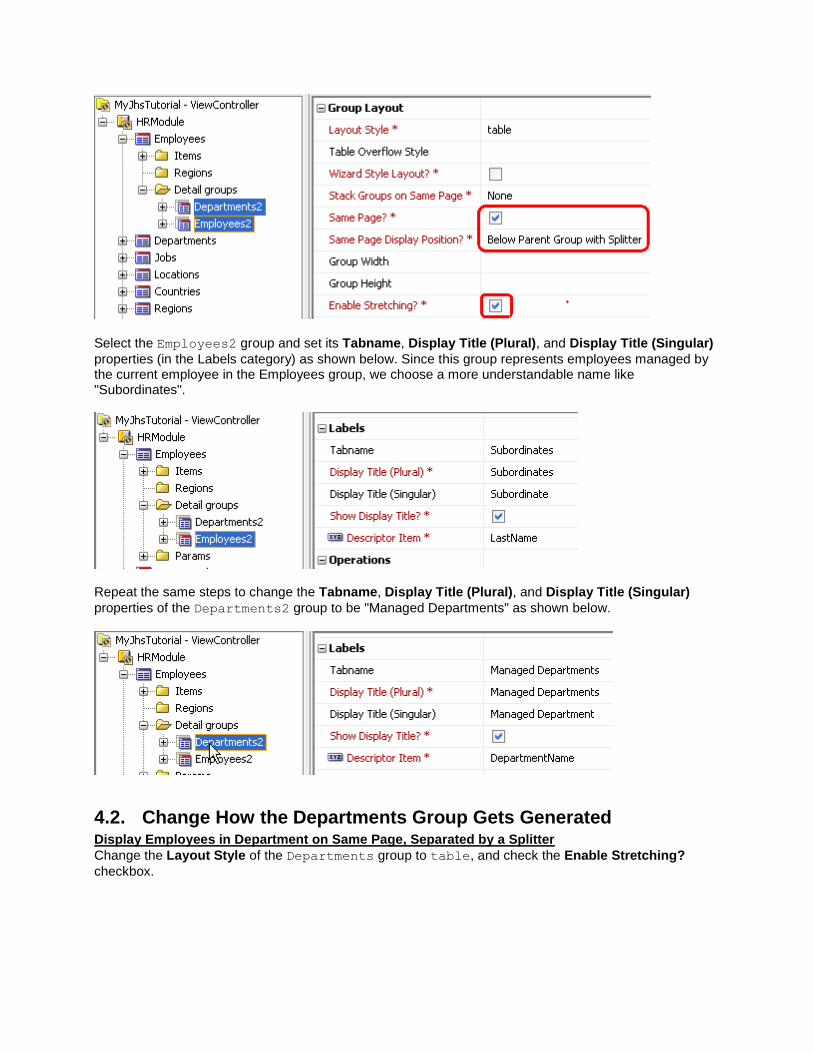
Select the Employees2 group and set its Tabname, Display Title (Plural), and Display Title (Singular)
properties (in the Labels category) as shown below. Since this group represents employees managed by the current employee in the Employees group, we choose a more understandable name like "Subordinates".
Repeat the same steps to change the Tabname, Display Title (Plural), and Display Title (Singular)
properties of the Departments2 group to be "Managed Departments" as shown below.
4.2. Change How the Departments Group Gets Generated Display Employees in Department on Same Page, Separated by a Splitter
Change the Layout Style of the Departments group to table, and check the Enable Stretching?
checkbox.
In child group Employees3 set the Same Page Display Position as shown below and check the Same
Page checkbox and Enable Stretching checkbox in the Group Layout category.
4.3. Change How the Jobs Group Gets Generated
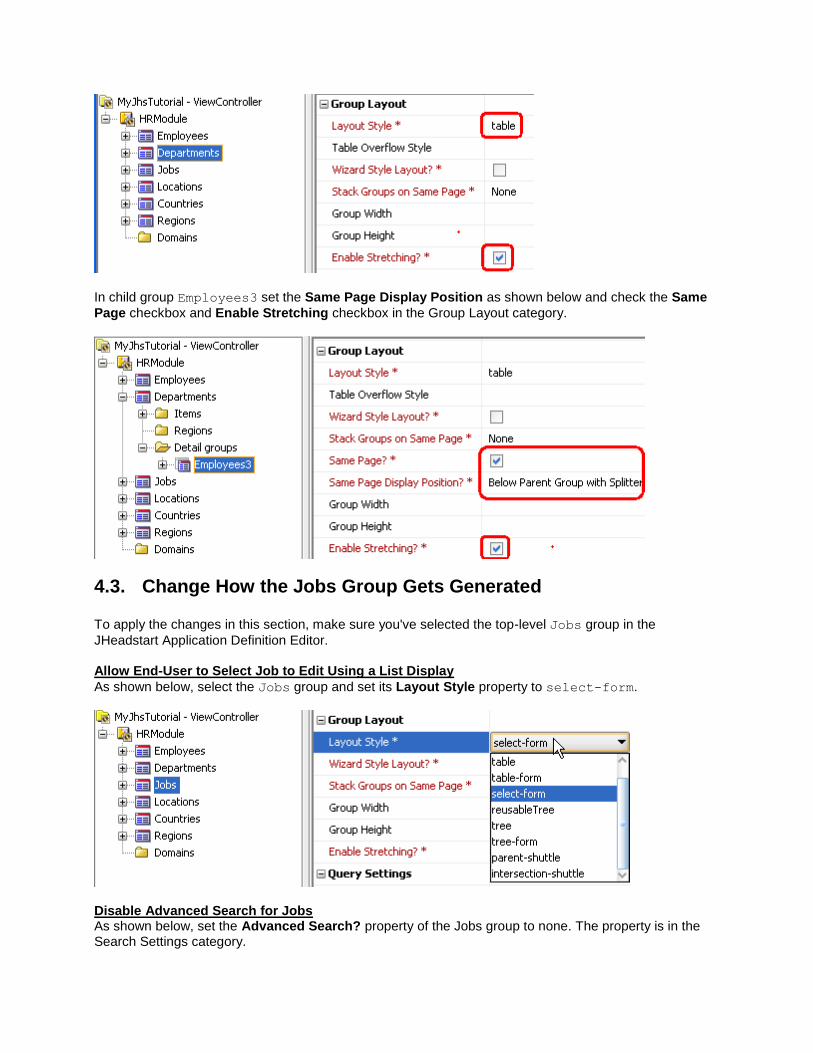
To apply the changes in this section, make sure you've selected the top-level Jobs group in the
JHeadstart Application Definition Editor. Allow End-User to Select Job to Edit Using a List Display
As shown below, select the Jobs group and set its Layout Style property to select-form.
Disable Advanced Search for Jobs As shown below, set the Advanced Search? property of the Jobs group to none. The property is in the Search Settings category.
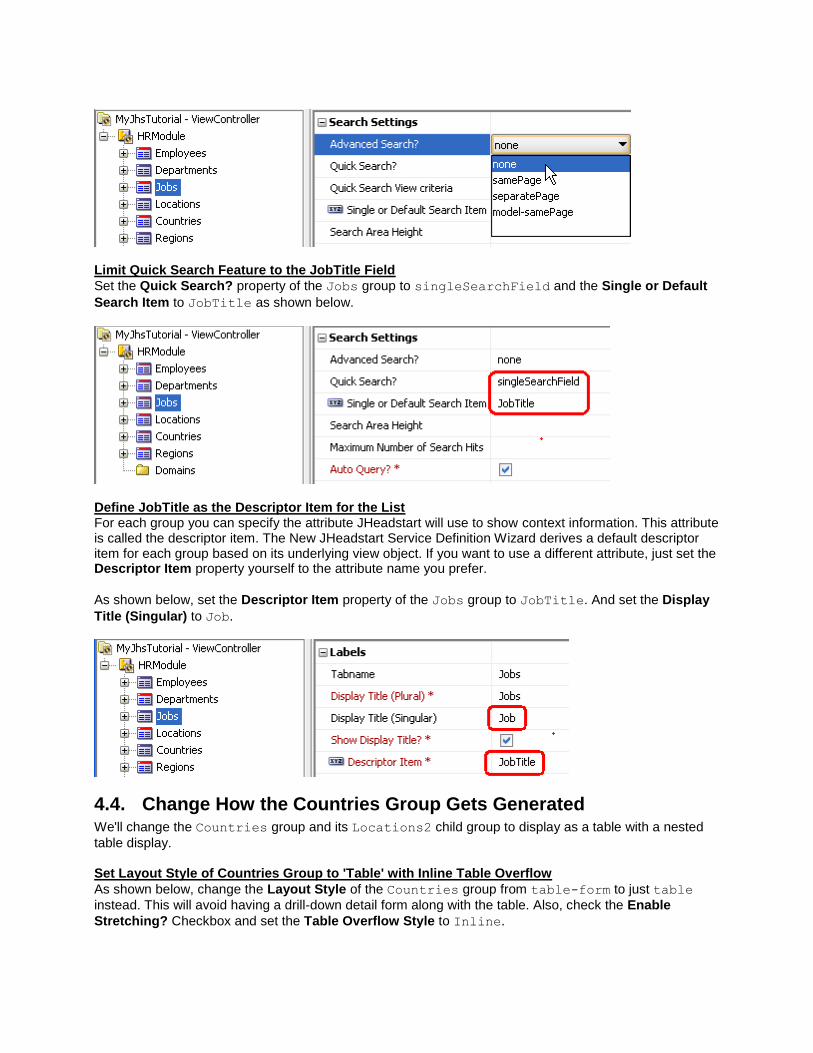
Limit Quick Search Feature to the JobTitle Field
Set the Quick Search? property of the Jobs group to singleSearchField and the Single or Default
Search Item to JobTitle as shown below.
Define JobTitle as the Descriptor Item for the List For each group you can specify the attribute JHeadstart will use to show context information. This attribute is called the descriptor item. The New JHeadstart Service Definition Wizard derives a default descriptor item for each group based on its underlying view object. If you want to use a different attribute, just set the Descriptor Item property yourself to the attribute name you prefer.
As shown below, set the Descriptor Item property of the Jobs group to JobTitle. And set the Display
Title (Singular) to Job.
4.4. Change How the Countries Group Gets Generated We'll change the Countries group and its Locations2 child group to display as a table with a nested
table display. Set Layout Style of Countries Group to 'Table' with Inline Table Overflow
As shown below, change the Layout Style of the Countries group from table-form to just table
instead. This will avoid having a drill-down detail form along with the table. Also, check the Enable
Stretching? Checkbox and set the Table Overflow Style to Inline.
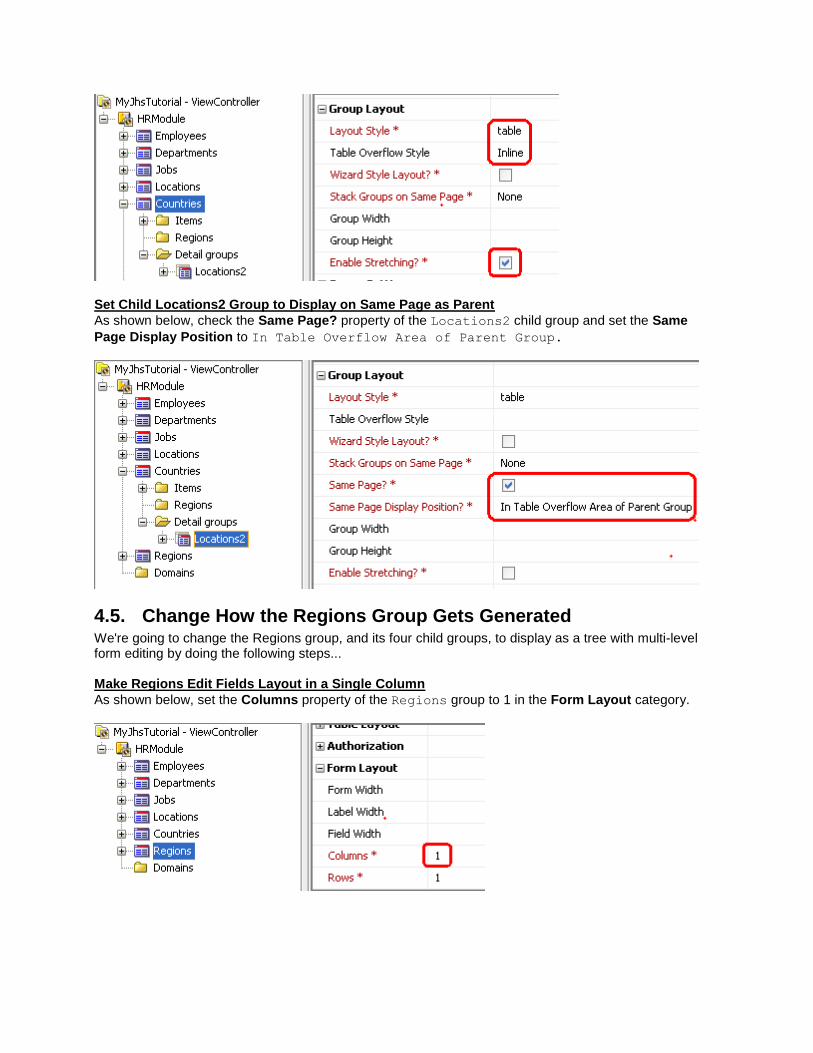
Set Child Locations2 Group to Display on Same Page as Parent
As shown below, check the Same Page? property of the Locations2 child group and set the Same
Page Display Position to In Table Overflow Area of Parent Group.
4.5. Change How the Regions Group Gets Generated We're going to change the Regions group, and its four child groups, to display as a tree with multi-level form editing by doing the following steps... Make Regions Edit Fields Layout in a Single Column
As shown below, set the Columns property of the Regions group to 1 in the Form Layout category.
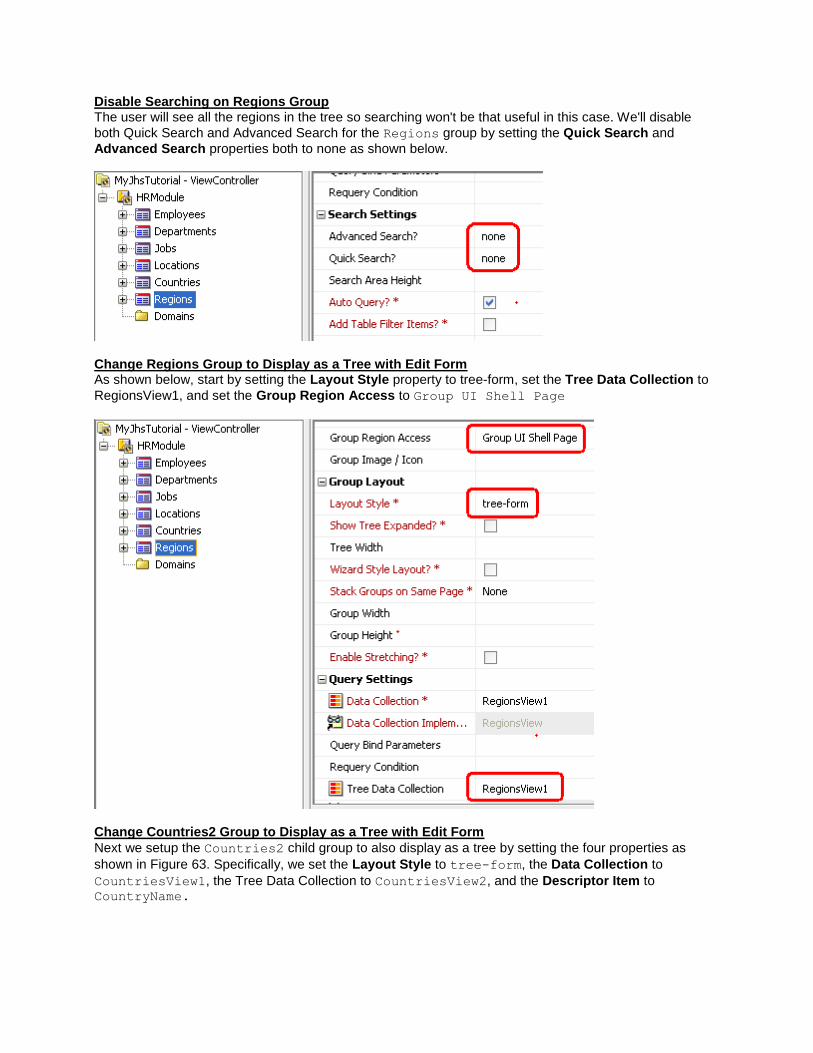
Disable Searching on Regions Group The user will see all the regions in the tree so searching won't be that useful in this case. We'll disable
both Quick Search and Advanced Search for the Regions group by setting the Quick Search and
Advanced Search properties both to none as shown below.
Change Regions Group to Display as a Tree with Edit Form As shown below, start by setting the Layout Style property to tree-form, set the Tree Data Collection to
RegionsView1, and set the Group Region Access to Group UI Shell Page
Change Countries2 Group to Display as a Tree with Edit Form
Next we setup the Countries2 child group to also display as a tree by setting the four properties as
shown in Figure 63. Specifically, we set the Layout Style to tree-form, the Data Collection to
CountriesView1, the Tree Data Collection to CountriesView2, and the Descriptor Item to CountryName.
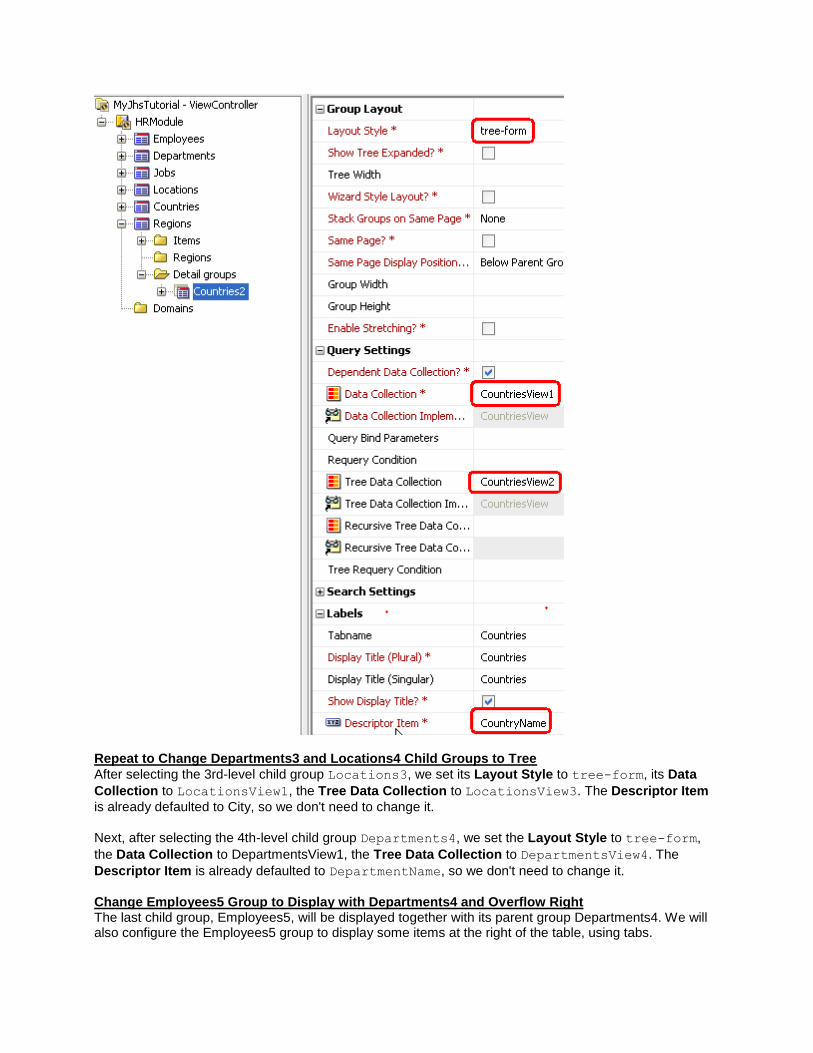
Repeat to Change Departments3 and Locations4 Child Groups to Tree
After selecting the 3rd-level child group Locations3, we set its Layout Style to tree-form, its Data
Collection to LocationsView1, the Tree Data Collection to LocationsView3. The Descriptor Item
is already defaulted to City, so we don't need to change it.
Next, after selecting the 4th-level child group Departments4, we set the Layout Style to tree-form,
the Data Collection to DepartmentsView1, the Tree Data Collection to DepartmentsView4. The
Descriptor Item is already defaulted to DepartmentName, so we don't need to change it.
Change Employees5 Group to Display with Departments4 and Overflow Right The last child group, Employees5, will be displayed together with its parent group Departments4. We will also configure the Employees5 group to display some items at the right of the table, using tabs.

Select the Employees5 group, and make the changes as shown below.
For all items except EmployeeId, FirstName, and LastName, as shown below set Display in Table Layout? to false and Display in Overflow Area? to true.
Show Employees5 Overflow Items Using Tabs We will group the overflow items in two tabbed regions. Right-mouse-click on the Regions node in the Employees5 group, and choose New -> Item Region.

Set the Name and Title of the new item region to Functional.
Now select all overflow items except Salary and CommissionPct, and drag and drop them into the
Functional item region, as shown below.
When you release the mouse, the Employees5 group should look like below.
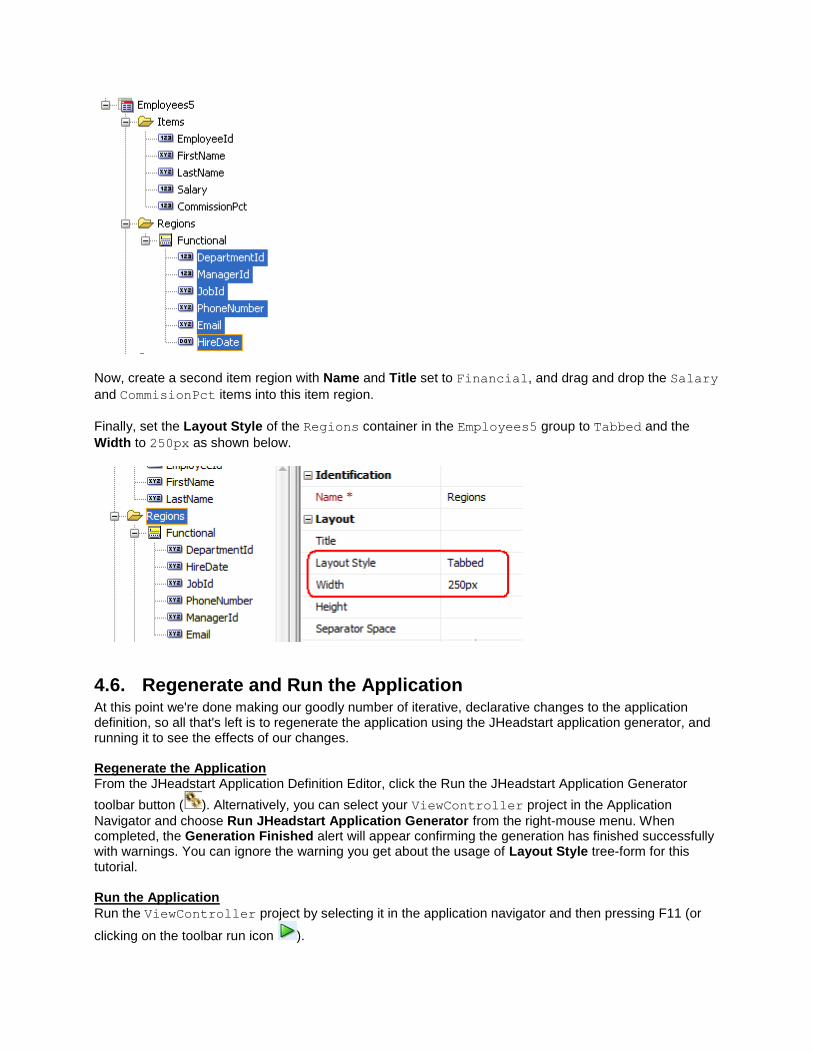
Now, create a second item region with Name and Title set to Financial, and drag and drop the Salary
and CommisionPct items into this item region.
Finally, set the Layout Style of the Regions container in the Employees5 group to Tabbed and the
Width to 250px as shown below.
4.6. Regenerate and Run the Application At this point we're done making our goodly number of iterative, declarative changes to the application definition, so all that's left is to regenerate the application using the JHeadstart application generator, and running it to see the effects of our changes. Regenerate the Application From the JHeadstart Application Definition Editor, click the Run the JHeadstart Application Generator
toolbar button ( ). Alternatively, you can select your ViewController project in the Application
Navigator and choose Run JHeadstart Application Generator from the right-mouse menu. When completed, the Generation Finished alert will appear confirming the generation has finished successfully with warnings. You can ignore the warning you get about the usage of Layout Style tree-form for this tutorial. Run the Application
Run the ViewController project by selecting it in the application navigator and then pressing F11 (or
clicking on the toolbar run icon ).
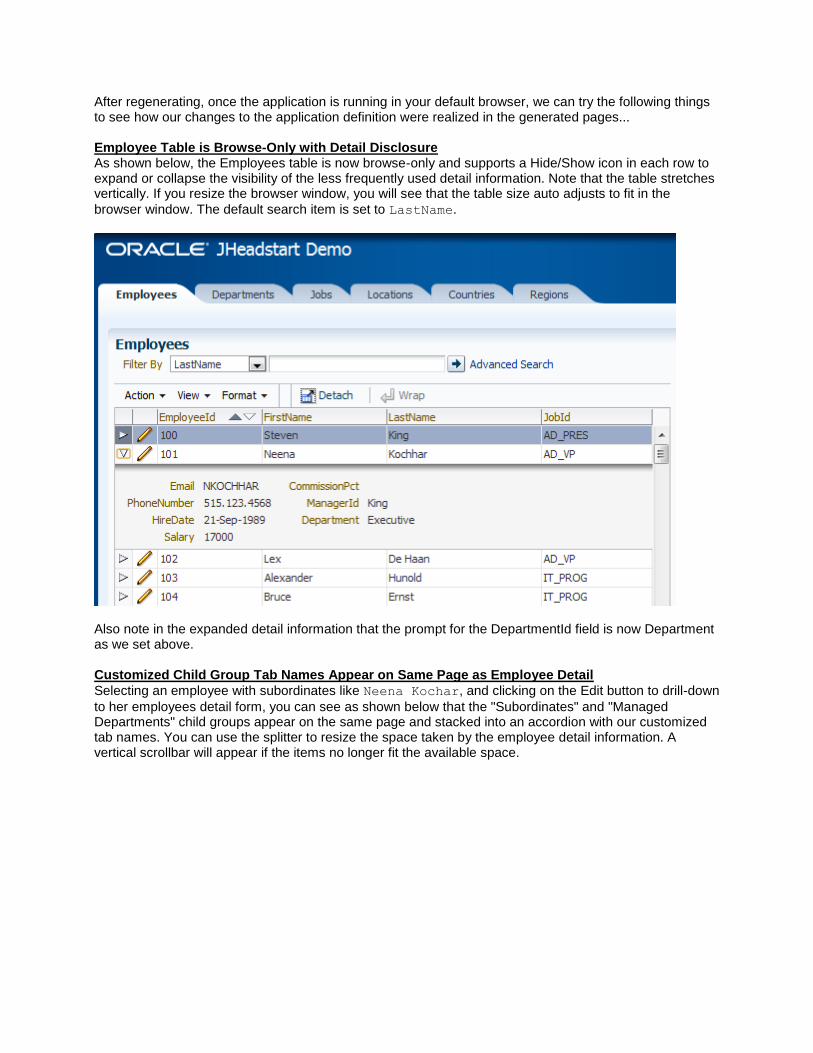
After regenerating, once the application is running in your default browser, we can try the following things to see how our changes to the application definition were realized in the generated pages... Employee Table is Browse-Only with Detail Disclosure As shown below, the Employees table is now browse-only and supports a Hide/Show icon in each row to expand or collapse the visibility of the less frequently used detail information. Note that the table stretches vertically. If you resize the browser window, you will see that the table size auto adjusts to fit in the
browser window. The default search item is set to LastName.
Also note in the expanded detail information that the prompt for the DepartmentId field is now Department as we set above. Customized Child Group Tab Names Appear on Same Page as Employee Detail
Selecting an employee with subordinates like Neena Kochar, and clicking on the Edit button to drill-down
to her employees detail form, you can see as shown below that the "Subordinates" and "Managed Departments" child groups appear on the same page and stacked into an accordion with our customized tab names. You can use the splitter to resize the space taken by the employee detail information. A vertical scrollbar will appear if the items no longer fit the available space.
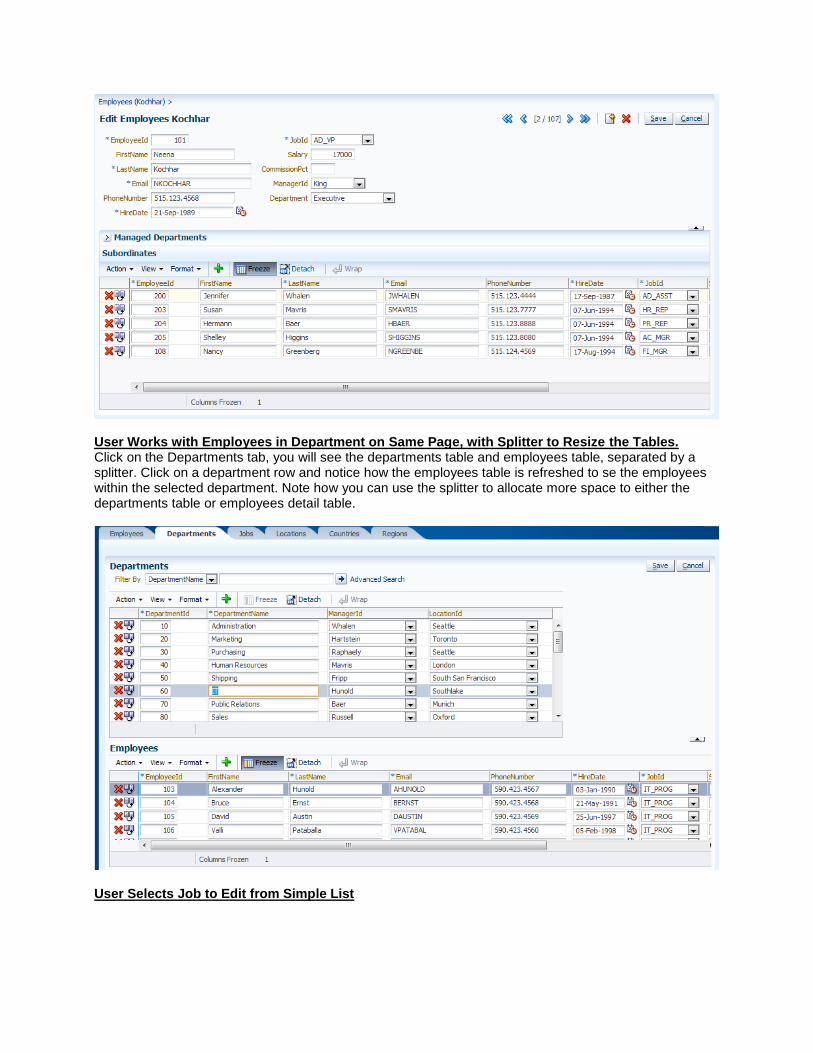
User Works with Employees in Department on Same Page, with Splitter to Resize the Tables. Click on the Departments tab, you will see the departments table and employees table, separated by a splitter. Click on a department row and notice how the employees table is refreshed to se the employees within the selected department. Note how you can use the splitter to allocate more space to either the departments table or employees detail table.
User Selects Job to Edit from Simple List
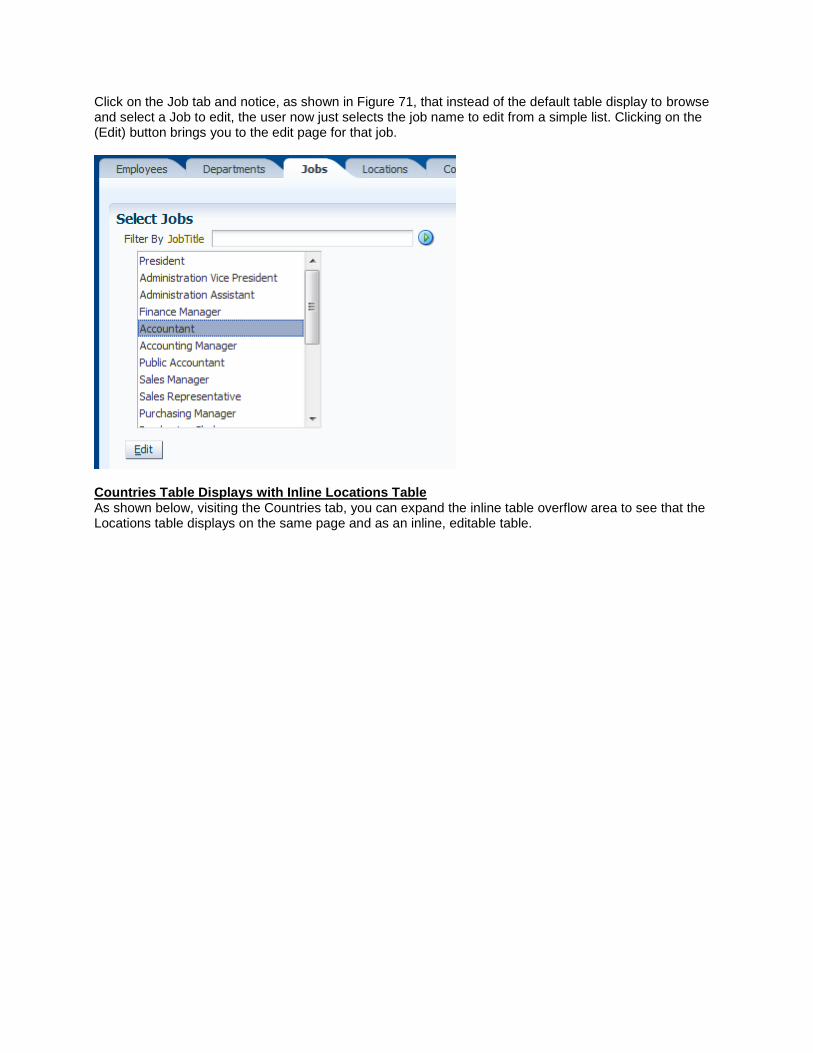
Click on the Job tab and notice, as shown in Figure 71, that instead of the default table display to browse and select a Job to edit, the user now just selects the job name to edit from a simple list. Clicking on the (Edit) button brings you to the edit page for that job.
Countries Table Displays with Inline Locations Table As shown below, visiting the Countries tab, you can expand the inline table overflow area to see that the Locations table displays on the same page and as an inline, editable table.
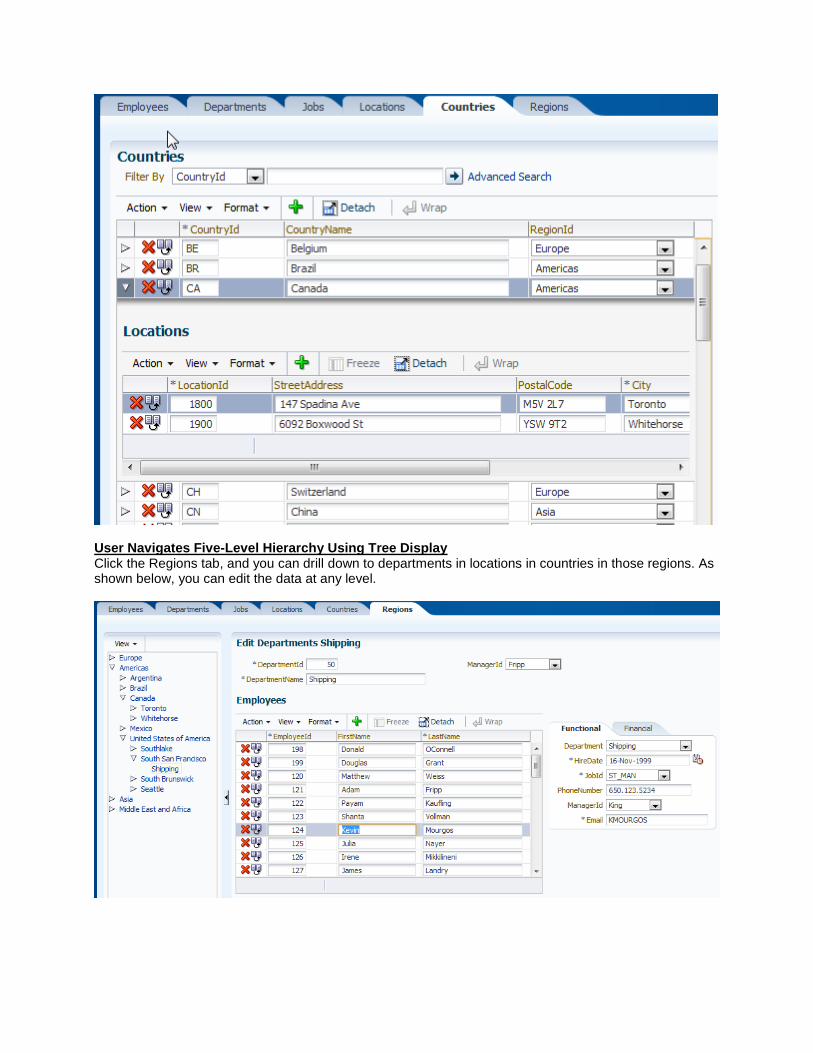
User Navigates Five-Level Hierarchy Using Tree Display Click the Regions tab, and you can drill down to departments in locations in countries in those regions. As shown below, you can edit the data at any level.

Notice, too, that the EmployeeId, FirstName, and LastName display in a table below the department selected in the tree, while the remainder of the details about the currently-selected employee row appear in a tabbed "overflow area" at the right the table. As you select different rows in the Employees table, the items in the overflow area below automatically update (without refreshing the entire page) to display the correct values for the currently selected employee.
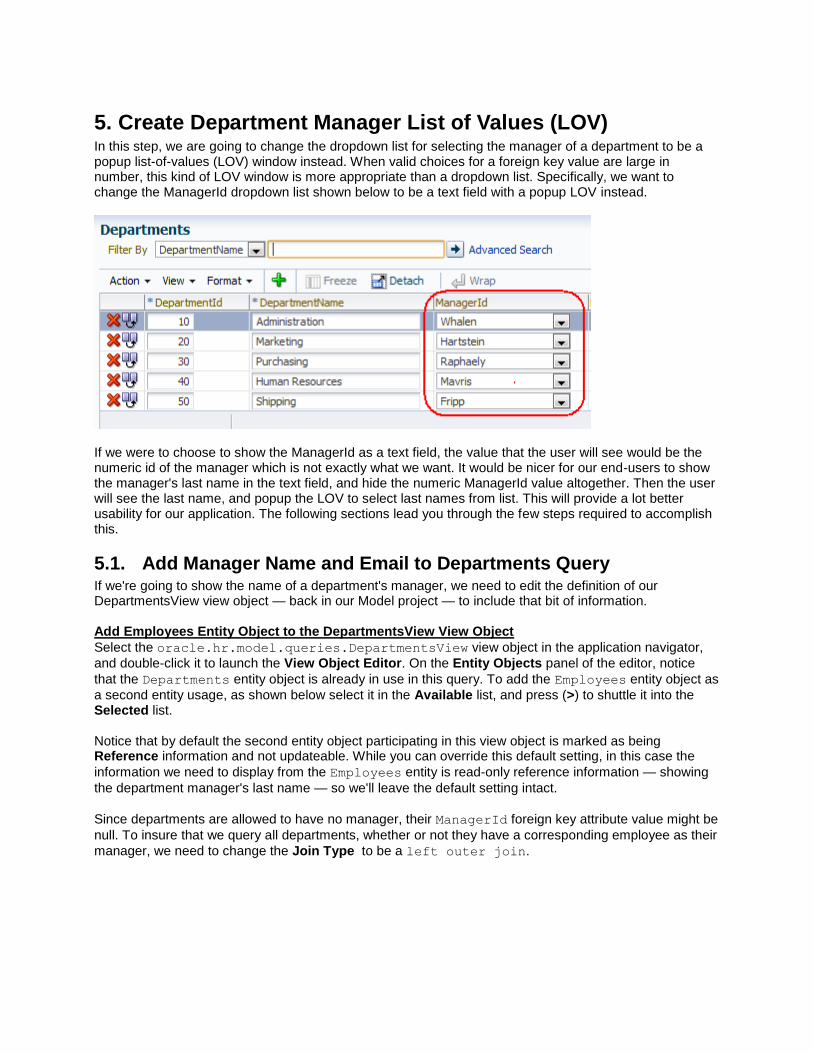
5. Create Department Manager List of Values (LOV) In this step, we are going to change the dropdown list for selecting the manager of a department to be a popup list-of-values (LOV) window instead. When valid choices for a foreign key value are large in number, this kind of LOV window is more appropriate than a dropdown list. Specifically, we want to change the ManagerId dropdown list shown below to be a text field with a popup LOV instead.
If we were to choose to show the ManagerId as a text field, the value that the user will see would be the numeric id of the manager which is not exactly what we want. It would be nicer for our end-users to show the manager's last name in the text field, and hide the numeric ManagerId value altogether. Then the user will see the last name, and popup the LOV to select last names from list. This will provide a lot better usability for our application. The following sections lead you through the few steps required to accomplish this.
5.1. Add Manager Name and Email to Departments Query If we're going to show the name of a department's manager, we need to edit the definition of our DepartmentsView view object — back in our Model project — to include that bit of information. Add Employees Entity Object to the DepartmentsView View Object
Select the oracle.hr.model.queries.DepartmentsView view object in the application navigator,
and double-click it to launch the View Object Editor. On the Entity Objects panel of the editor, notice
that the Departments entity object is already in use in this query. To add the Employees entity object as
a second entity usage, as shown below select it in the Available list, and press (>) to shuttle it into the Selected list. Notice that by default the second entity object participating in this view object is marked as being Reference information and not updateable. While you can override this default setting, in this case the
information we need to display from the Employees entity is read-only reference information — showing
the department manager's last name — so we'll leave the default setting intact.
Since departments are allowed to have no manager, their ManagerId foreign key attribute value might be
null. To insure that we query all departments, whether or not they have a corresponding employee as their
manager, we need to change the Join Type to be a left outer join.

Add LastName and Email Attribute to the Attributes List On the Attributes panel of the editor, click on the down arrow at the right of the green plus icon and choose Add Attribute from Entity….
In the Attributes dialog window select the Employees entity's LastName and Email attributes in the
Available list, and press (>) to shuttle it into the Selected list as shown below. Notice that the primary key
attribute (EmployeeId) is also automatically added by the wizard.
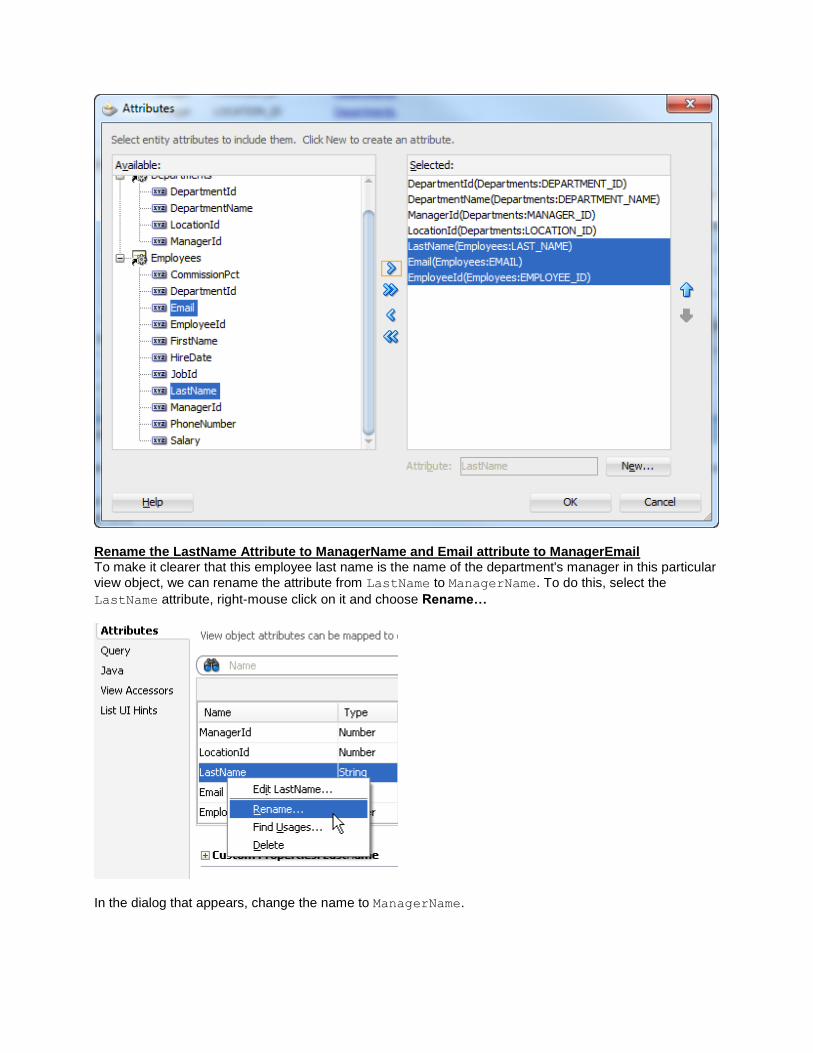
Rename the LastName Attribute to ManagerName and Email attribute to ManagerEmail To make it clearer that this employee last name is the name of the department's manager in this particular
view object, we can rename the attribute from LastName to ManagerName. To do this, select the
LastName attribute, right-mouse click on it and choose Rename…
In the dialog that appears, change the name to ManagerName.
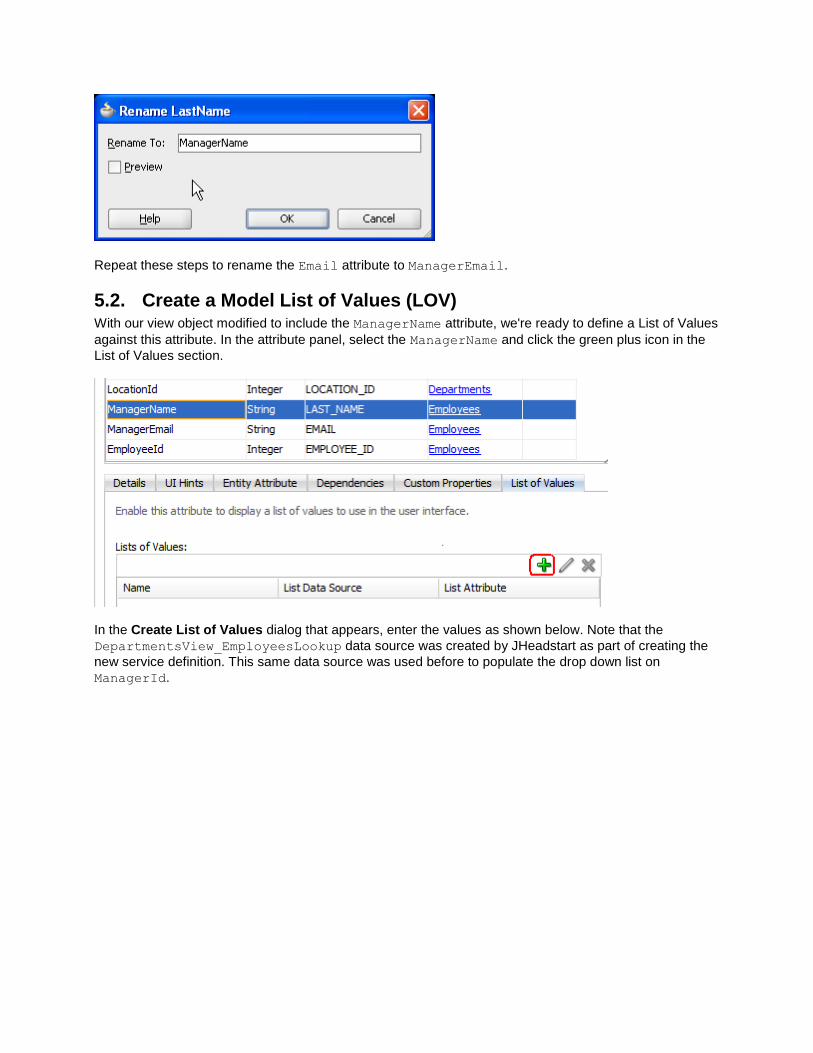
Repeat these steps to rename the Email attribute to ManagerEmail.
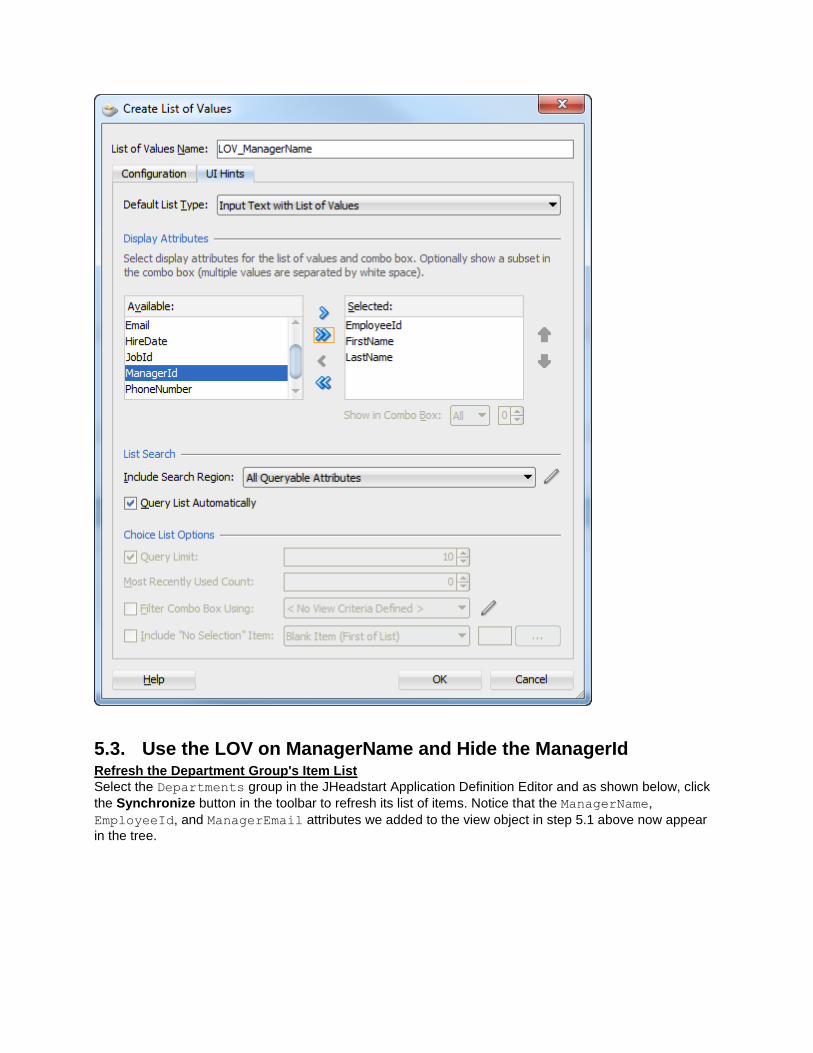
5.2. Create a Model List of Values (LOV) With our view object modified to include the ManagerName attribute, we're ready to define a List of Values
against this attribute. In the attribute panel, select the ManagerName and click the green plus icon in the
List of Values section.
In the Create List of Values dialog that appears, enter the values as shown below. Note that the
DepartmentsView_EmployeesLookup data source was created by JHeadstart as part of creating the
new service definition. This same data source was used before to populate the drop down list on
ManagerId.
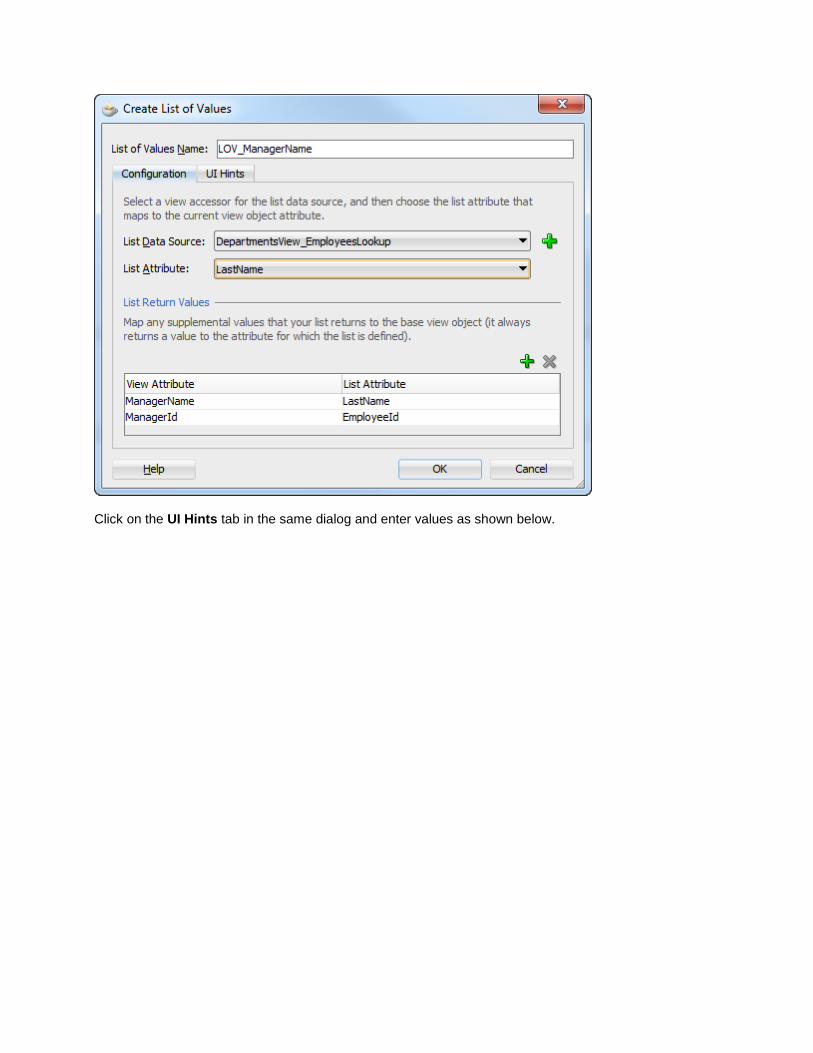
Click on the UI Hints tab in the same dialog and enter values as shown below.
5.3. Use the LOV on ManagerName and Hide the ManagerId Refresh the Department Group's Item List
Select the Departments group in the JHeadstart Application Definition Editor and as shown below, click
the Synchronize button in the toolbar to refresh its list of items. Notice that the ManagerName,
EmployeeId, and ManagerEmail attributes we added to the view object in step 5.1 above now appear
in the tree.
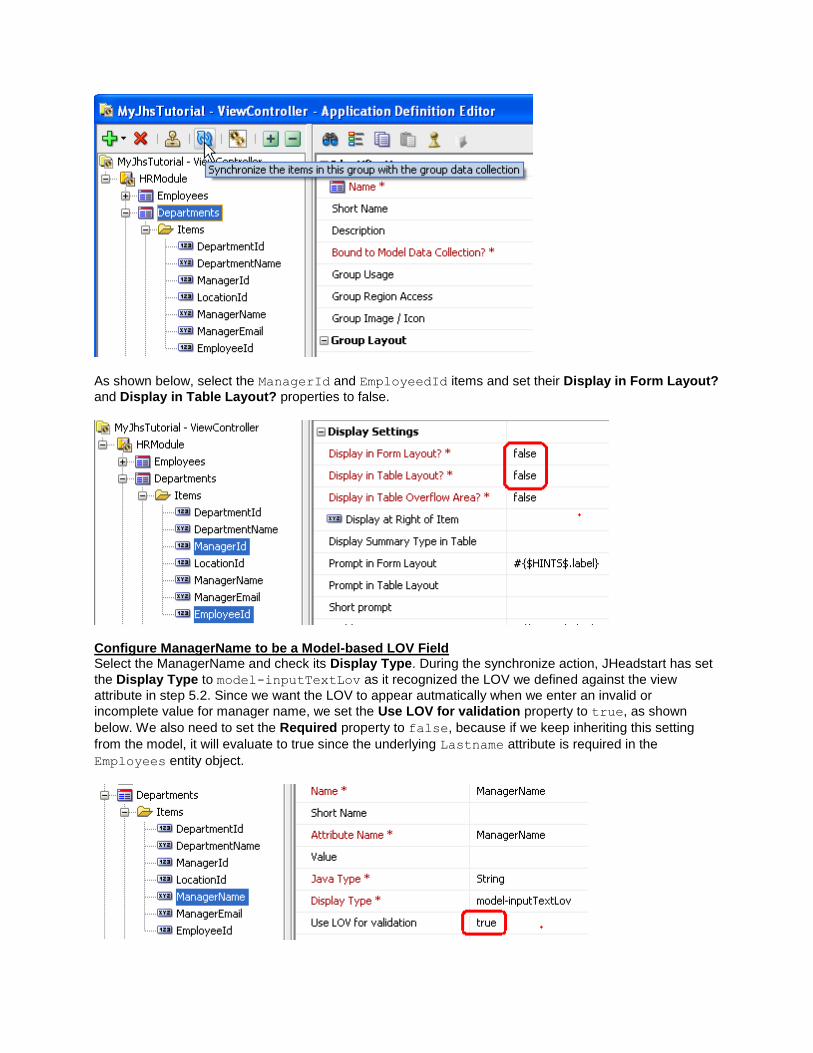
As shown below, select the ManagerId and EmployeedId items and set their Display in Form Layout?
and Display in Table Layout? properties to false.
Configure ManagerName to be a Model-based LOV Field Select the ManagerName and check its Display Type. During the synchronize action, JHeadstart has set
the Display Type to model-inputTextLov as it recognized the LOV we defined against the view
attribute in step 5.2. Since we want the LOV to appear autmatically when we enter an invalid or
incomplete value for manager name, we set the Use LOV for validation property to true, as shown
below. We also need to set the Required property to false, because if we keep inheriting this setting
from the model, it will evaluate to true since the underlying Lastname attribute is required in the
Employees entity object.
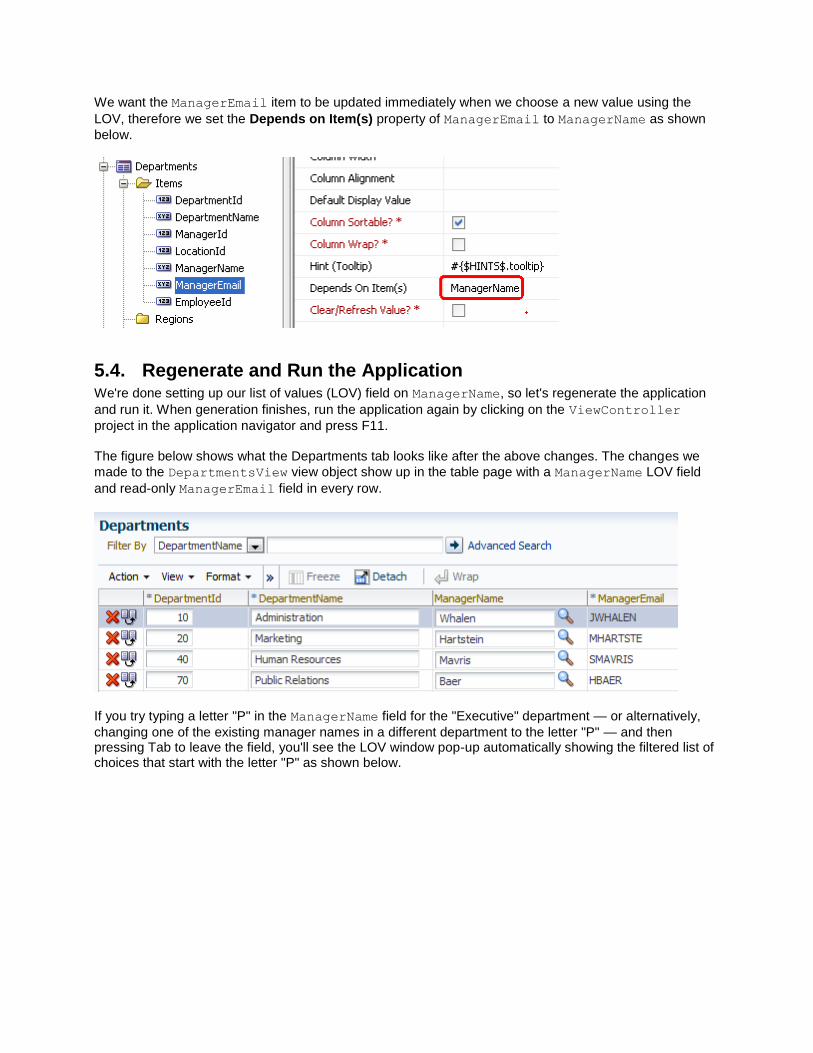
We want the ManagerEmail item to be updated immediately when we choose a new value using the
LOV, therefore we set the Depends on Item(s) property of ManagerEmail to ManagerName as shown
below.
5.4. Regenerate and Run the Application We're done setting up our list of values (LOV) field on ManagerName, so let's regenerate the application
and run it. When generation finishes, run the application again by clicking on the ViewController
project in the application navigator and press F11. The figure below shows what the Departments tab looks like after the above changes. The changes we
made to the DepartmentsView view object show up in the table page with a ManagerName LOV field
and read-only ManagerEmail field in every row.
If you try typing a letter "P" in the ManagerName field for the "Executive" department — or alternatively,
changing one of the existing manager names in a different department to the letter "P" — and then pressing Tab to leave the field, you'll see the LOV window pop-up automatically showing the filtered list of choices that start with the letter "P" as shown below.
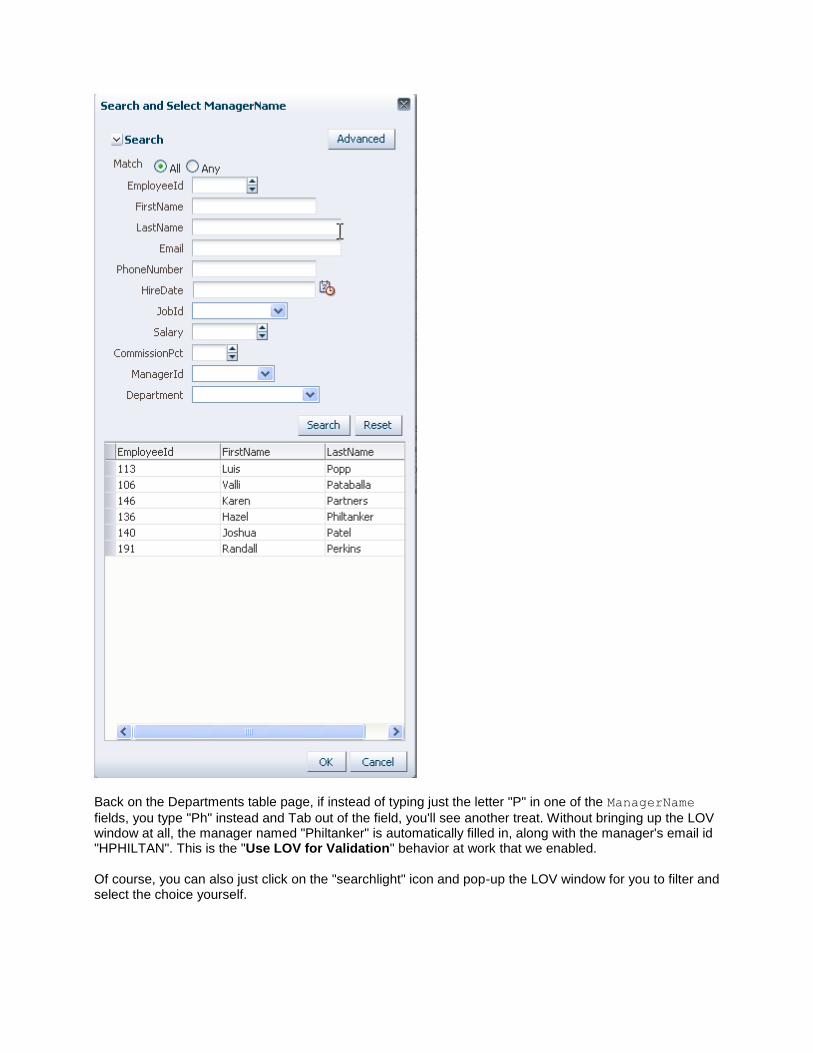
Back on the Departments table page, if instead of typing just the letter "P" in one of the ManagerName
fields, you type "Ph" instead and Tab out of the field, you'll see another treat. Without bringing up the LOV window at all, the manager named "Philtanker" is automatically filled in, along with the manager's email id "HPHILTAN". This is the "Use LOV for Validation" behavior at work that we enabled. Of course, you can also just click on the "searchlight" icon and pop-up the LOV window for you to filter and select the choice yourself.

Note: Although a roundtrip from the browser to the application server is made to check the number of matching rows, only the ManagerName and ManagerEmail fields in the current row are actually refreshed on the page. This is accomplished through an ADF Faces feature called Partial Page Rendering (PPR) that we will explain in more detail in the Adding a Conditionally Dependent Field section.
6. Creating a Wizard Including a Shuttle Control In this step we will generate a wizard consisting of four pages to enter a new employee. The fourth wizard page will contain a shuttle control to assign subordinates to the new employee if applicable.
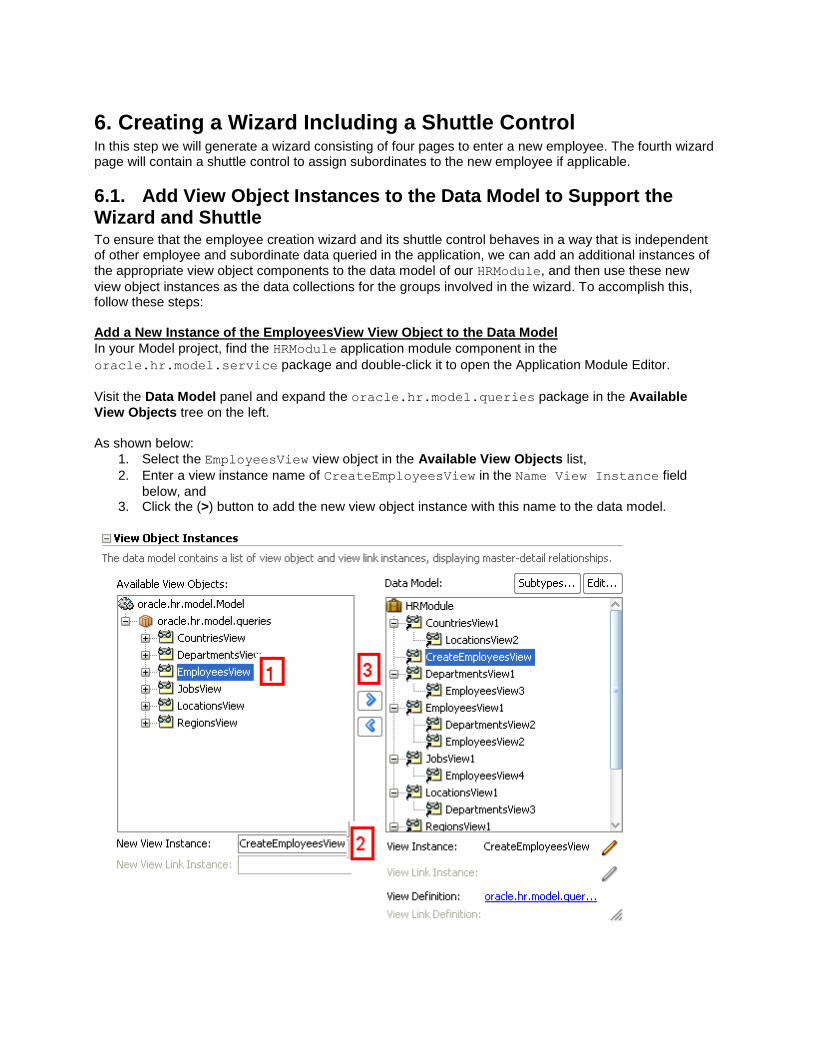
6.1. Add View Object Instances to the Data Model to Support the Wizard and Shuttle To ensure that the employee creation wizard and its shuttle control behaves in a way that is independent of other employee and subordinate data queried in the application, we can add an additional instances of
the appropriate view object components to the data model of our HRModule, and then use these new
view object instances as the data collections for the groups involved in the wizard. To accomplish this, follow these steps: Add a New Instance of the EmployeesView View Object to the Data Model
In your Model project, find the HRModule application module component in the
oracle.hr.model.service package and double-click it to open the Application Module Editor.
Visit the Data Model panel and expand the oracle.hr.model.queries package in the Available
View Objects tree on the left. As shown below:
1. Select the EmployeesView view object in the Available View Objects list,
2. Enter a view instance name of CreateEmployeesView in the Name View Instance field
below, and 3. Click the (>) button to add the new view object instance with this name to the data model.
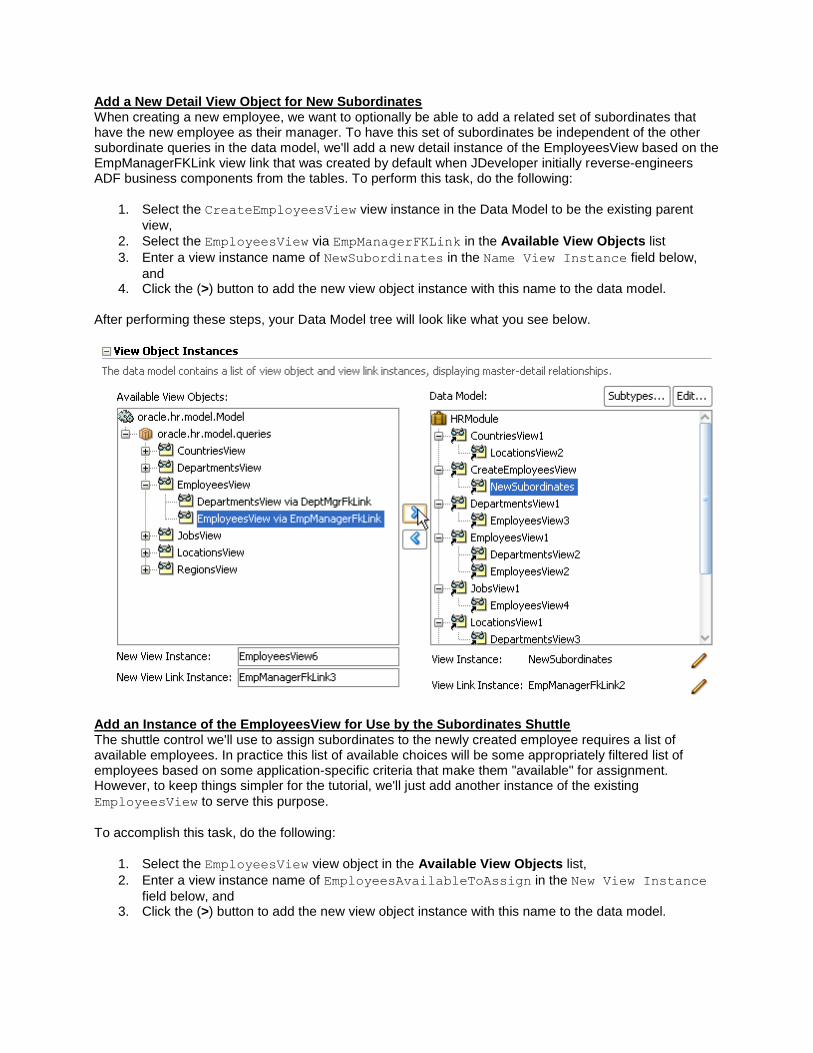
Add a New Detail View Object for New Subordinates When creating a new employee, we want to optionally be able to add a related set of subordinates that have the new employee as their manager. To have this set of subordinates be independent of the other subordinate queries in the data model, we'll add a new detail instance of the EmployeesView based on the EmpManagerFKLink view link that was created by default when JDeveloper initially reverse-engineers ADF business components from the tables. To perform this task, do the following:
1. Select the CreateEmployeesView view instance in the Data Model to be the existing parent
view,
2. Select the EmployeesView via EmpManagerFKLink in the Available View Objects list
3. Enter a view instance name of NewSubordinates in the Name View Instance field below,
and 4. Click the (>) button to add the new view object instance with this name to the data model.
After performing these steps, your Data Model tree will look like what you see below.
Add an Instance of the EmployeesView for Use by the Subordinates Shuttle The shuttle control we'll use to assign subordinates to the newly created employee requires a list of available employees. In practice this list of available choices will be some appropriately filtered list of employees based on some application-specific criteria that make them "available" for assignment. However, to keep things simpler for the tutorial, we'll just add another instance of the existing
EmployeesView to serve this purpose.
To accomplish this task, do the following:
1. Select the EmployeesView view object in the Available View Objects list,
2. Enter a view instance name of EmployeesAvailableToAssign in the New View Instance
field below, and 3. Click the (>) button to add the new view object instance with this name to the data model.
We're done making the required data model changes, so click the Save All button in the JDeveloper main toolbar to save them.
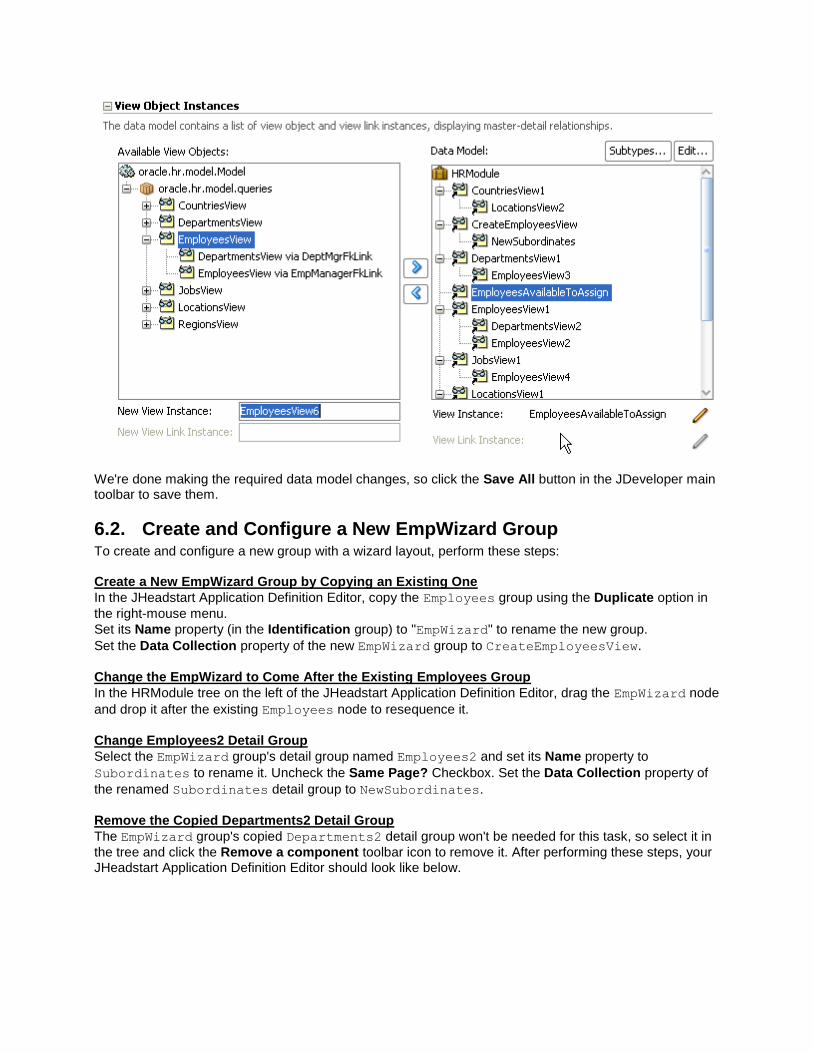
6.2. Create and Configure a New EmpWizard Group To create and configure a new group with a wizard layout, perform these steps: Create a New EmpWizard Group by Copying an Existing One
In the JHeadstart Application Definition Editor, copy the Employees group using the Duplicate option in
the right-mouse menu.
Set its Name property (in the Identification group) to "EmpWizard" to rename the new group.
Set the Data Collection property of the new EmpWizard group to CreateEmployeesView.
Change the EmpWizard to Come After the Existing Employees Group
In the HRModule tree on the left of the JHeadstart Application Definition Editor, drag the EmpWizard node
and drop it after the existing Employees node to resequence it.
Change Employees2 Detail Group
Select the EmpWizard group's detail group named Employees2 and set its Name property to
Subordinates to rename it. Uncheck the Same Page? Checkbox. Set the Data Collection property of
the renamed Subordinates detail group to NewSubordinates.
Remove the Copied Departments2 Detail Group
The EmpWizard group's copied Departments2 detail group won't be needed for this task, so select it in
the tree and click the Remove a component toolbar icon to remove it. After performing these steps, your JHeadstart Application Definition Editor should look like below.
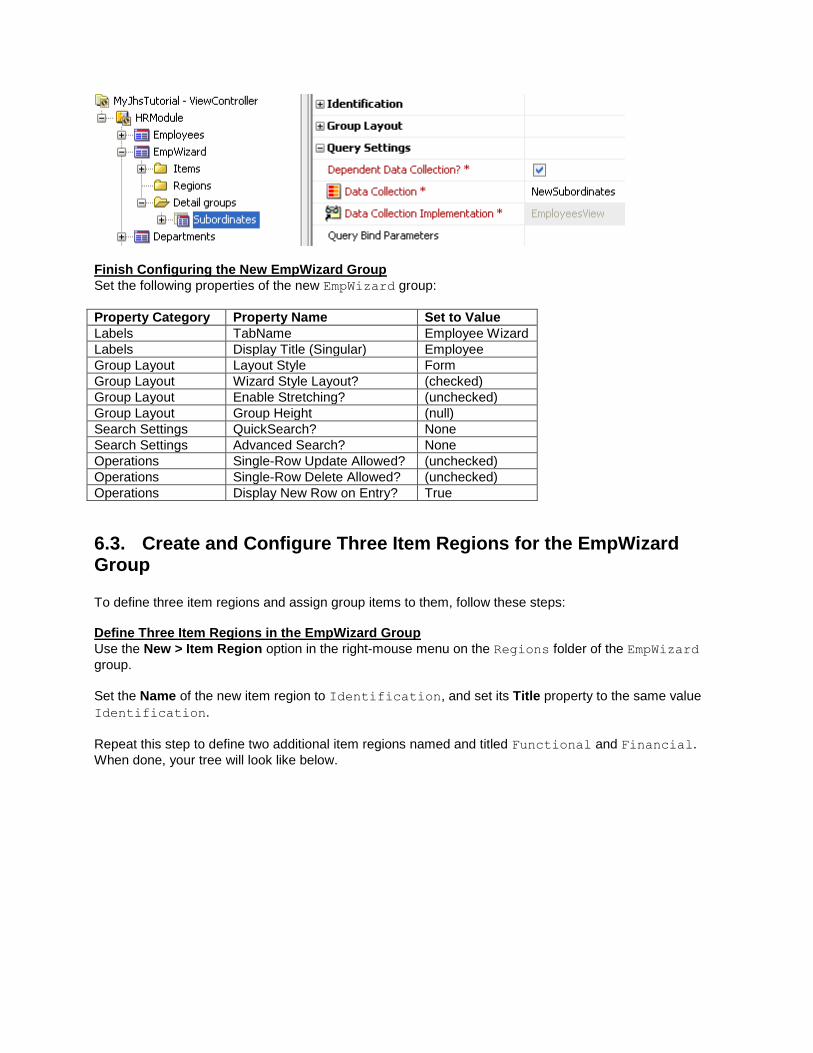
Finish Configuring the New EmpWizard Group
Set the following properties of the new EmpWizard group:
Property Category Property Name Set to Value
Labels TabName Employee Wizard
Labels Display Title (Singular) Employee
Group Layout Layout Style Form
Group Layout Wizard Style Layout? (checked)
Group Layout Enable Stretching? (unchecked)
Group Layout Group Height (null)
Search Settings QuickSearch? None
Search Settings Advanced Search? None
Operations Single-Row Update Allowed? (unchecked)
Operations Single-Row Delete Allowed? (unchecked)
Operations Display New Row on Entry? True
6.3. Create and Configure Three Item Regions for the EmpWizard Group To define three item regions and assign group items to them, follow these steps: Define Three Item Regions in the EmpWizard Group
Use the New > Item Region option in the right-mouse menu on the Regions folder of the EmpWizard
group.
Set the Name of the new item region to Identification, and set its Title property to the same value
Identification.
Repeat this step to define two additional item regions named and titled Functional and Financial.
When done, your tree will look like below.
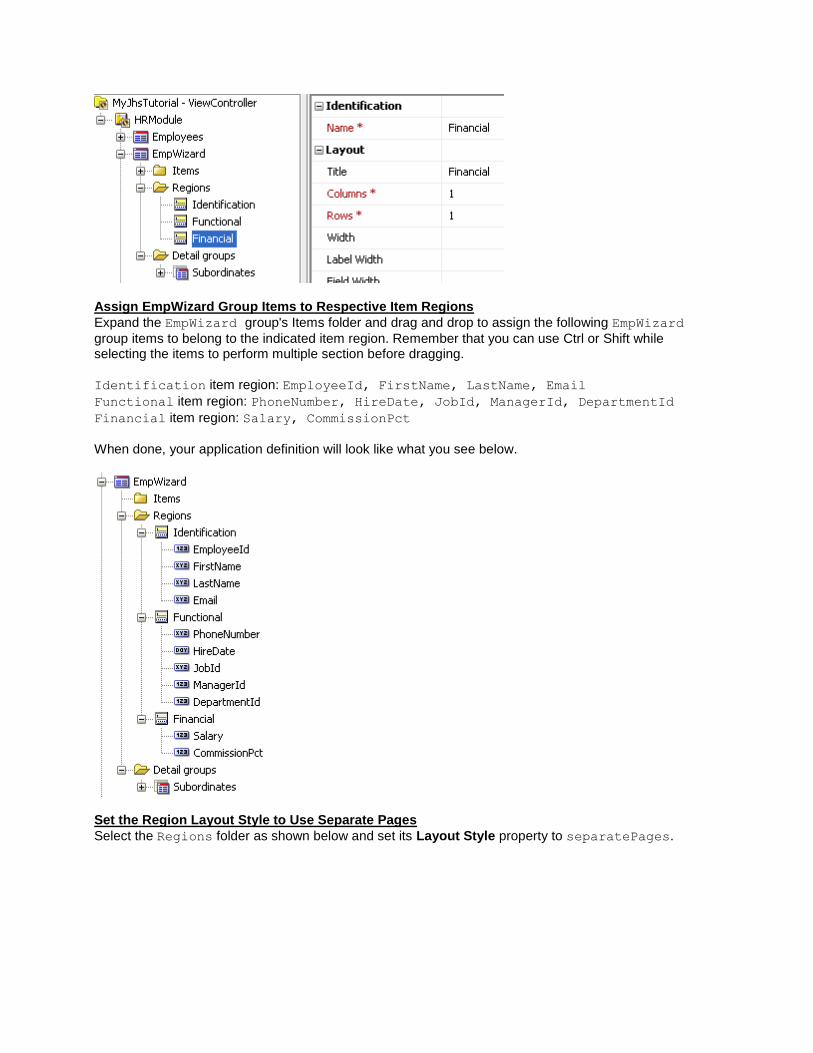
Assign EmpWizard Group Items to Respective Item Regions
Expand the EmpWizard group's Items folder and drag and drop to assign the following EmpWizard
group items to belong to the indicated item region. Remember that you can use Ctrl or Shift while selecting the items to perform multiple section before dragging.
Identification item region: EmployeeId, FirstName, LastName, Email
Functional item region: PhoneNumber, HireDate, JobId, ManagerId, DepartmentId
Financial item region: Salary, CommissionPct
When done, your application definition will look like what you see below.
Set the Region Layout Style to Use Separate Pages
Select the Regions folder as shown below and set its Layout Style property to separatePages.
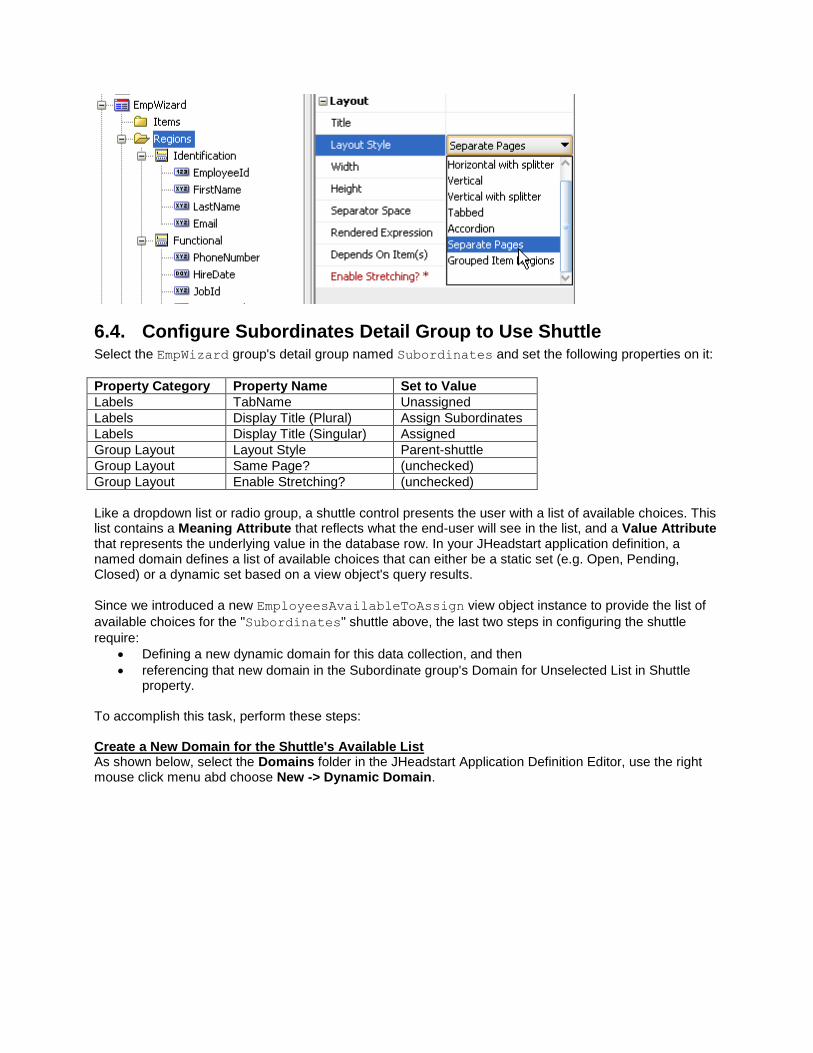
6.4. Configure Subordinates Detail Group to Use Shuttle Select the EmpWizard group's detail group named Subordinates and set the following properties on it:
Property Category Property Name Set to Value
Labels TabName Unassigned
Labels Display Title (Plural) Assign Subordinates
Labels Display Title (Singular) Assigned
Group Layout Layout Style Parent-shuttle
Group Layout Same Page? (unchecked)
Group Layout Enable Stretching? (unchecked)
Like a dropdown list or radio group, a shuttle control presents the user with a list of available choices. This list contains a Meaning Attribute that reflects what the end-user will see in the list, and a Value Attribute that represents the underlying value in the database row. In your JHeadstart application definition, a named domain defines a list of available choices that can either be a static set (e.g. Open, Pending, Closed) or a dynamic set based on a view object's query results.
Since we introduced a new EmployeesAvailableToAssign view object instance to provide the list of
available choices for the "Subordinates" shuttle above, the last two steps in configuring the shuttle
require:
Defining a new dynamic domain for this data collection, and then
referencing that new domain in the Subordinate group's Domain for Unselected List in Shuttle property.
To accomplish this task, perform these steps: Create a New Domain for the Shuttle's Available List As shown below, select the Domains folder in the JHeadstart Application Definition Editor, use the right mouse click menu abd choose New -> Dynamic Domain.
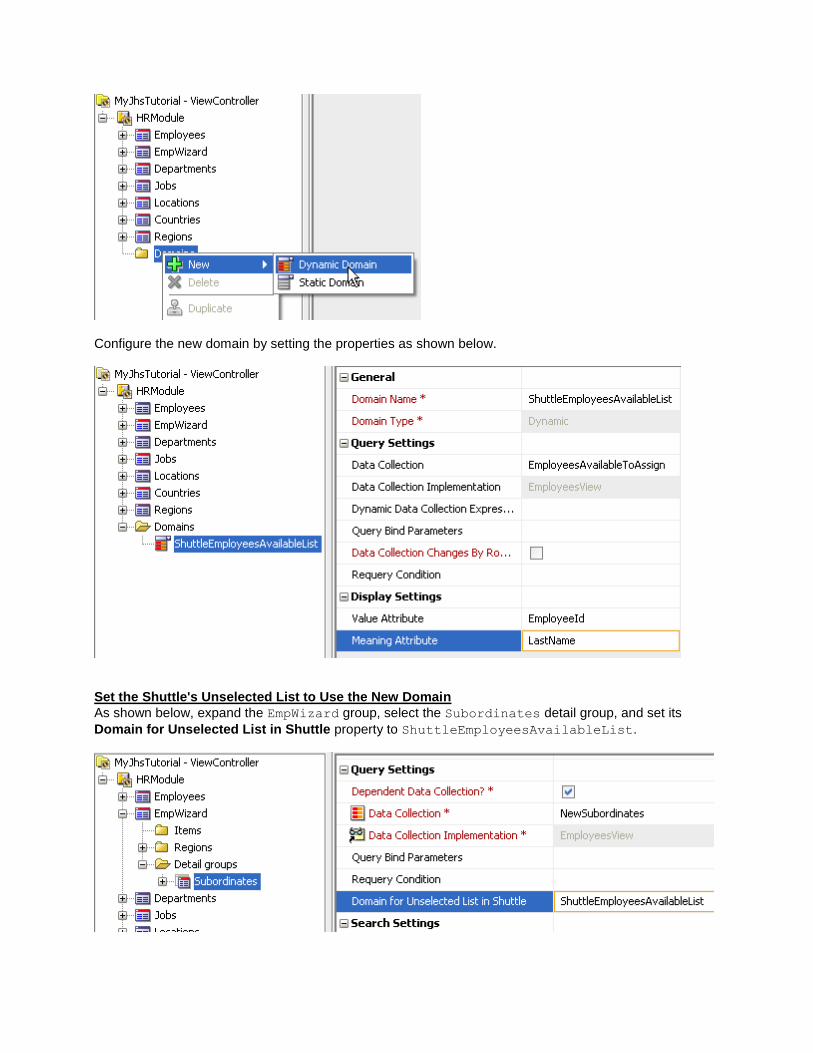
Configure the new domain by setting the properties as shown below.
Set the Shuttle's Unselected List to Use the New Domain
As shown below, expand the EmpWizard group, select the Subordinates detail group, and set its
Domain for Unselected List in Shuttle property to ShuttleEmployeesAvailableList.

6.5. Regenerate and Run the Application We're done defining the new employee wizard, so regenerate the application and run it. When generation
finishes successfully, run the application again by clicking on the ViewController project in the
application navigator and press F11.
Clicking on the Employee Wizard tab in the browser, you'll see the first page of the wizard as shown
below, ready to collect the information related to the Identification step of the process.
Clicking (Next) or the Functional link in the train component to proceed onto subsequent steps, you
can enter the information for the Functional step in the process as shown below.
Clicking (Next) to enter the Financial information in step 3, and clicking (Next) again, you can see that the
last step of the wizard is the Subordinates step that we configured to generate as a shuttle. As shown
in below, you can select a few subordinates, then click (Finish) to commit the transaction.
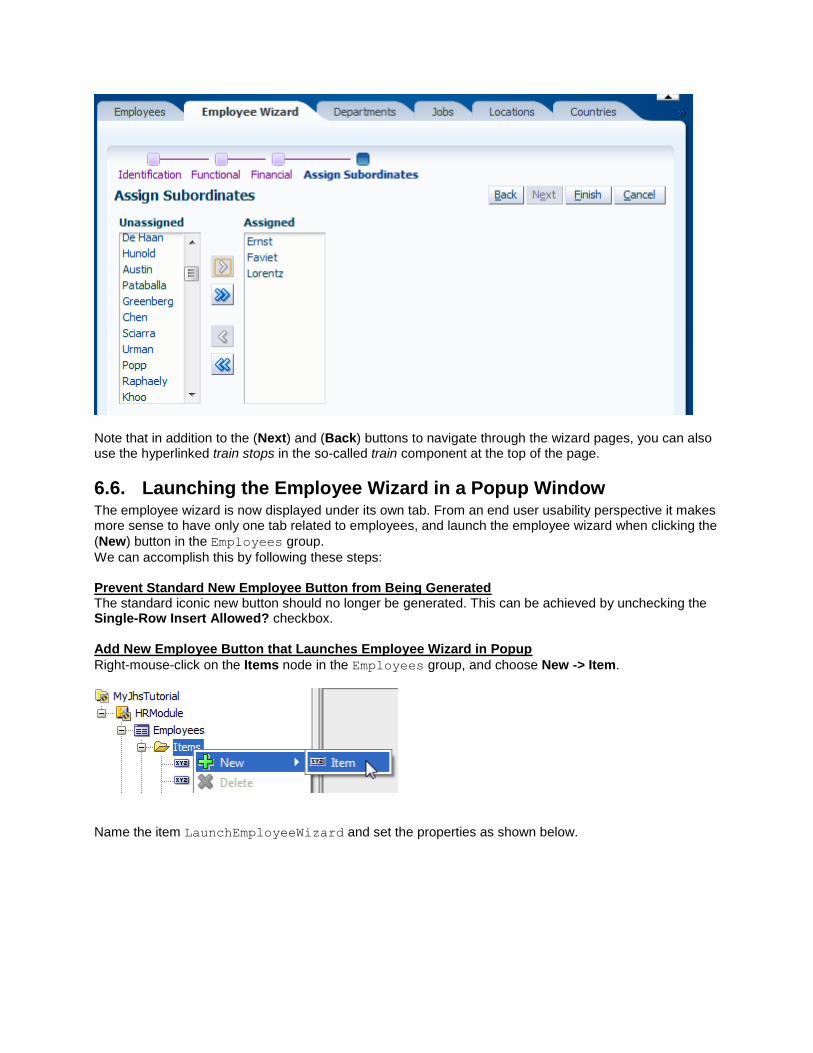
Note that in addition to the (Next) and (Back) buttons to navigate through the wizard pages, you can also use the hyperlinked train stops in the so-called train component at the top of the page.
6.6. Launching the Employee Wizard in a Popup Window The employee wizard is now displayed under its own tab. From an end user usability perspective it makes more sense to have only one tab related to employees, and launch the employee wizard when clicking the
(New) button in the Employees group.
We can accomplish this by following these steps: Prevent Standard New Employee Button from Being Generated The standard iconic new button should no longer be generated. This can be achieved by unchecking the Single-Row Insert Allowed? checkbox. Add New Employee Button that Launches Employee Wizard in Popup
Right-mouse-click on the Items node in the Employees group, and choose New -> Item.
Name the item LaunchEmployeeWizard and set the properties as shown below.
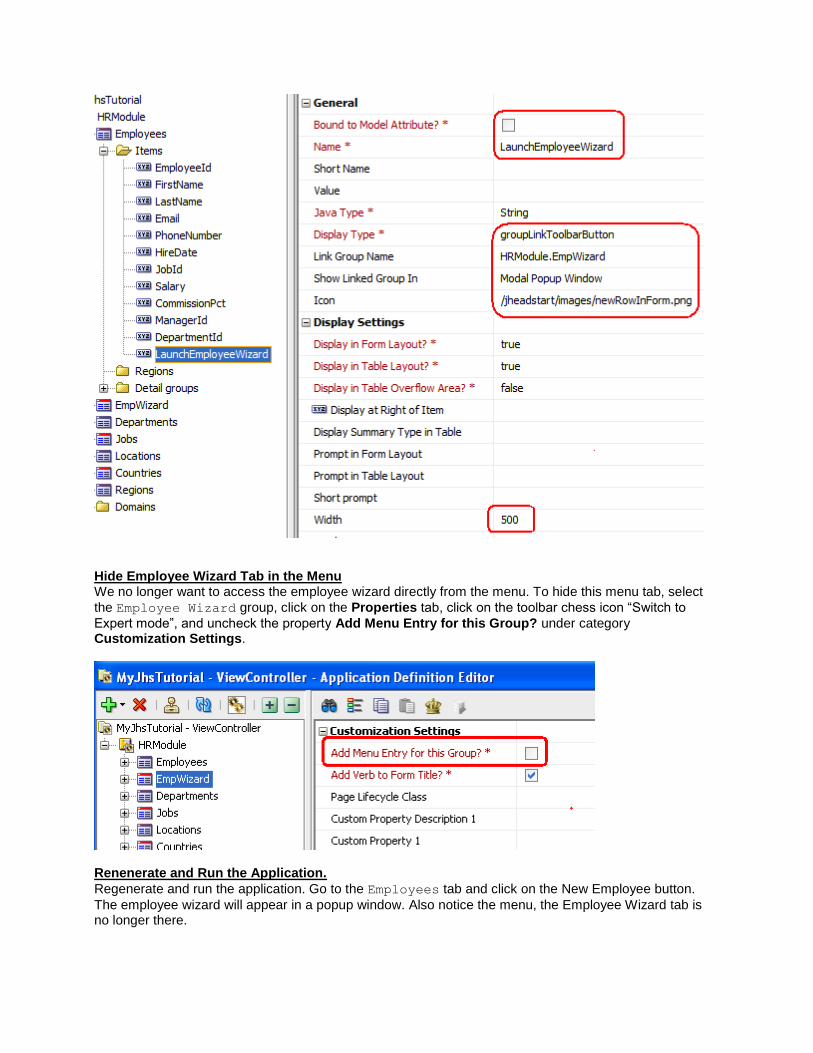
Hide Employee Wizard Tab in the Menu We no longer want to access the employee wizard directly from the menu. To hide this menu tab, select
the Employee Wizard group, click on the Properties tab, click on the toolbar chess icon “Switch to
Expert mode”, and uncheck the property Add Menu Entry for this Group? under category Customization Settings.
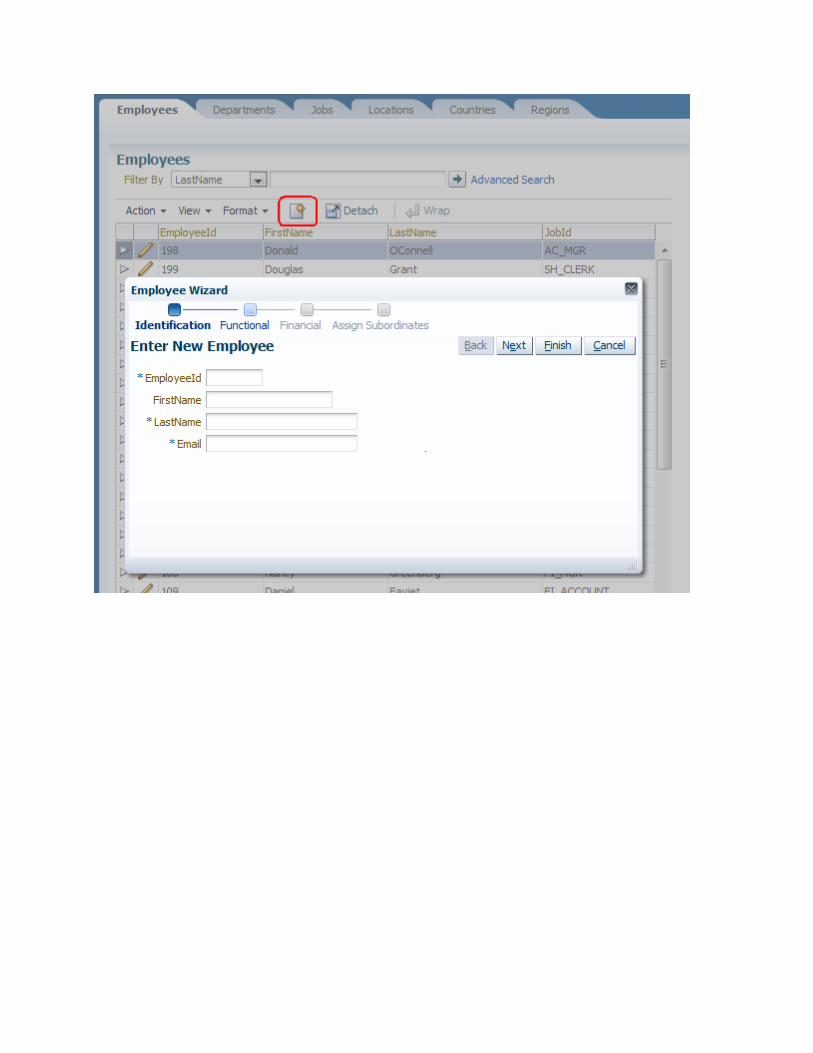
Renenerate and Run the Application.
Regenerate and run the application. Go to the Employees tab and click on the New Employee button.
The employee wizard will appear in a popup window. Also notice the menu, the Employee Wizard tab is no longer there.

7. Adding a Conditionally Dependent Field The ADF Faces components that JHeadstart application generator uses for your web tier pages cleverly combine Asynchronous JavaScript, XML, and Dynamic HTML to deliver a much more interactive web client interface for your business applications. In ADF Faces, the feature is known as partial page rendering because it allows selective parts of a page to be re-rendered to reflect server-side updates to data, without having to refresh and redraw the entire page. This combination of web technologies for delivering more interactive clients is known more popularly by the acronym AJAX [9]. ADF Faces supports this powerful feature for any Java Server Faces (JSF) page with no coding. JHeadstart automatically configures the necessary properties on the controls to enable a maximal use of this great feature. We've seen a few examples of this AJAX-style partial-page rendering in previous sections of the tutorial. Here we'll study a final example that involves using it to enable dynamically-changing, conditionally-dependent fields. Sometimes, one field value (or its enabled status) might depend on another field. JHeadstart makes it simple to generate pages that support this kind of conditionally-dependent field. For example, imagine that the commission percentage of an employee only is relevant if they are an Account Manager. In this
section we'll configure a simple example to implement the disabling of the CommissionPct item in the
Employees group unless the value of the JobId is equal to 'AC_MGR'. To accomplish this task, follow
these steps: Conditionalize the Value of the Disabled Property Using an Expression
In the JHeadstart Application Definition Editor, expand the top-level Employees group, its Items folder,
and select the CommissionPct item. Set its Disabled? property to the expression value:
#{$DEPENDS_ON_ITEM_VALUE$ != 'AC_MGR'}
As explained in the help text of this property, the token $DEPENDS_ON_ITEM_VALUE$ gets substituted
by the JHeadstart application generator so that the expression ends up referencing the correct value of the item on which the current item depends. We'll setup this item dependency next... Set the CommisionPct Item to Depend on the JobId Item
Set the Depends on Item property of the CommissionPct item to JobId. After doing this, your
application definition will look like below.
Also check the Clear/Refresh Value property. When an employee is no longer an Account Manager, the
value for CommissionPct will then automatically be cleared.
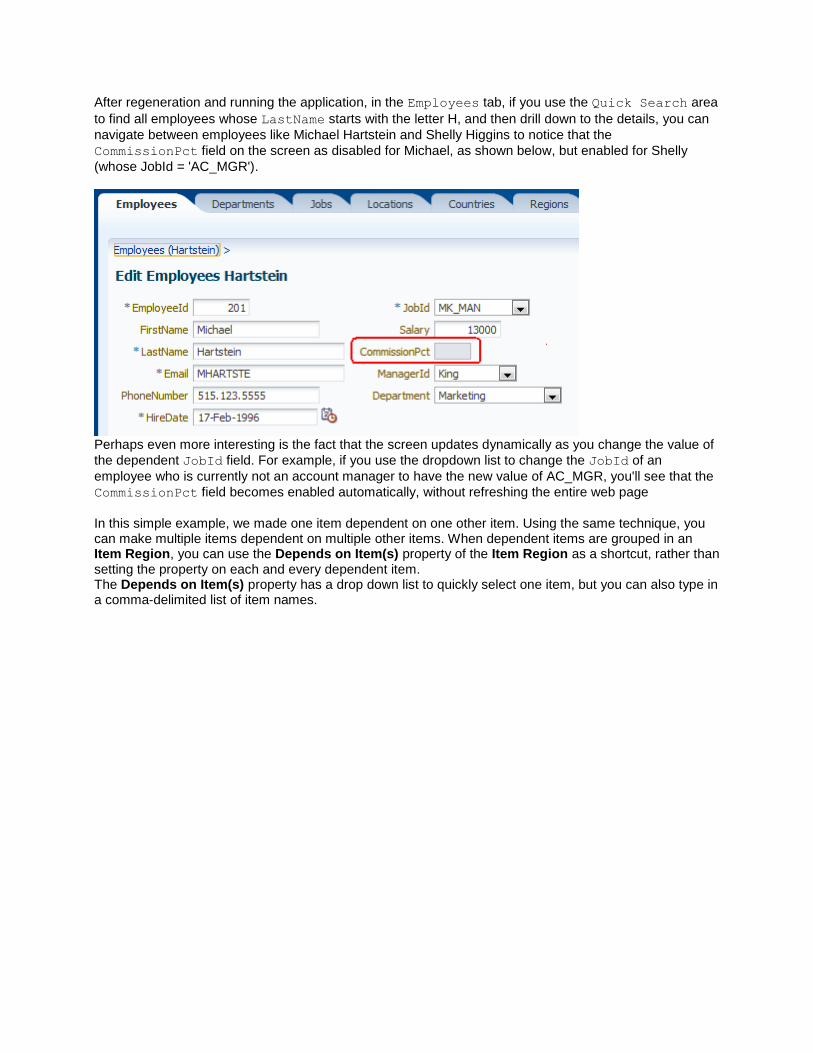
After regeneration and running the application, in the Employees tab, if you use the Quick Search area
to find all employees whose LastName starts with the letter H, and then drill down to the details, you can
navigate between employees like Michael Hartstein and Shelly Higgins to notice that the
CommissionPct field on the screen as disabled for Michael, as shown below, but enabled for Shelly
(whose JobId = 'AC_MGR').
Perhaps even more interesting is the fact that the screen updates dynamically as you change the value of
the dependent JobId field. For example, if you use the dropdown list to change the JobId of an
employee who is currently not an account manager to have the new value of AC_MGR, you'll see that the
CommissionPct field becomes enabled automatically, without refreshing the entire web page
In this simple example, we made one item dependent on one other item. Using the same technique, you can make multiple items dependent on multiple other items. When dependent items are grouped in an Item Region, you can use the Depends on Item(s) property of the Item Region as a shortcut, rather than setting the property on each and every dependent item. The Depends on Item(s) property has a drop down list to quickly select one item, but you can also type in a comma-delimited list of item names.

8. Adding a Graph and Summary Information In this section we will add some Business Intelligence functionality to the top-level Jobs group and its
Employees4 detail group. Assume an HR employee who needs to evaluate salary differences for
employees with the same job. For this task it is convenient to see the average salary for a job, as well as a graph visualizing the differences in salary within a job. To add this functionality to our application, follow these steps:
8.1. Configure the Employees4 Group Configure the Employees4 Detail Group to Display on the Same Page with Overflow Right
In the JHeadstart Application Definition Editor, expand the top-level Jobs group, and select its
Employees4 detail group. Check the Same Page? checkbox, and set the Table Overflow Style property
to Right.
Do not Allow Insert nor Delete in Employees4 Detail Group Uncheck the Multi-Row Insert allowed? and Multi-Row Delete allowed? Checkboxes.
Make Only Salary Updateable in Employees4 Detail Group
Select all items in the Employees4 group using Shift-Click, and unselect the Salary item using Ctrl-
Click. Set the Update Allowed? property for all selected items to false.
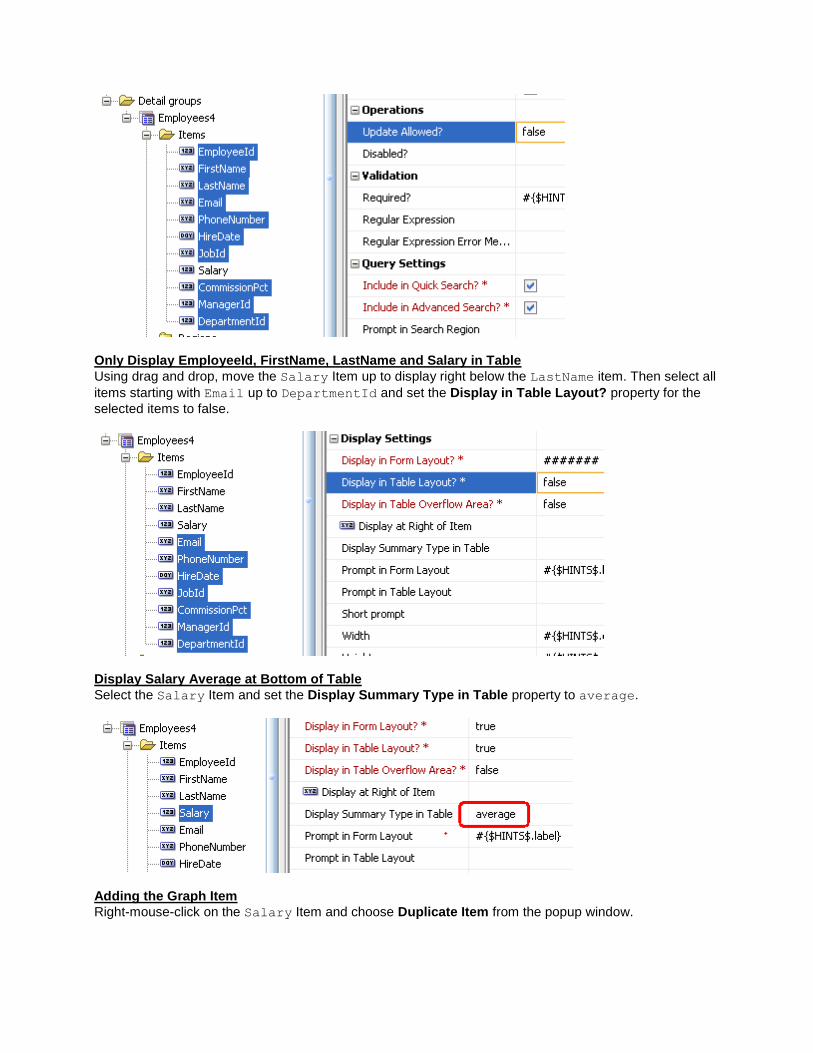
Only Display EmployeeId, FirstName, LastName and Salary in Table
Using drag and drop, move the Salary Item up to display right below the LastName item. Then select all
items starting with Email up to DepartmentId and set the Display in Table Layout? property for the
selected items to false.
Display Salary Average at Bottom of Table
Select the Salary Item and set the Display Summary Type in Table property to average.
Adding the Graph Item
Right-mouse-click on the Salary Item and choose Duplicate Item from the popup window.
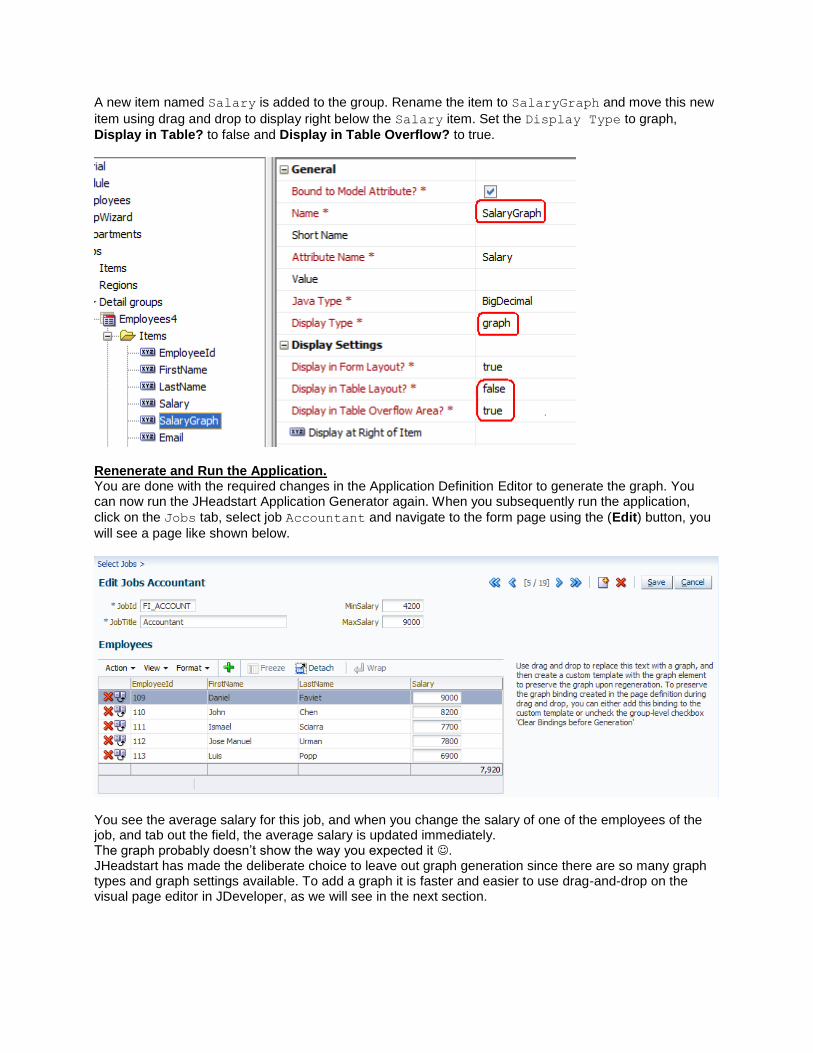
A new item named Salary is added to the group. Rename the item to SalaryGraph and move this new
item using drag and drop to display right below the Salary item. Set the Display Type to graph,
Display in Table? to false and Display in Table Overflow? to true.
Renenerate and Run the Application. You are done with the required changes in the Application Definition Editor to generate the graph. You can now run the JHeadstart Application Generator again. When you subsequently run the application,
click on the Jobs tab, select job Accountant and navigate to the form page using the (Edit) button, you
will see a page like shown below.
You see the average salary for this job, and when you change the salary of one of the employees of the job, and tab out the field, the average salary is updated immediately. The graph probably doesn’t show the way you expected it . JHeadstart has made the deliberate choice to leave out graph generation since there are so many graph types and graph settings available. To add a graph it is faster and easier to use drag-and-drop on the visual page editor in JDeveloper, as we will see in the next section.
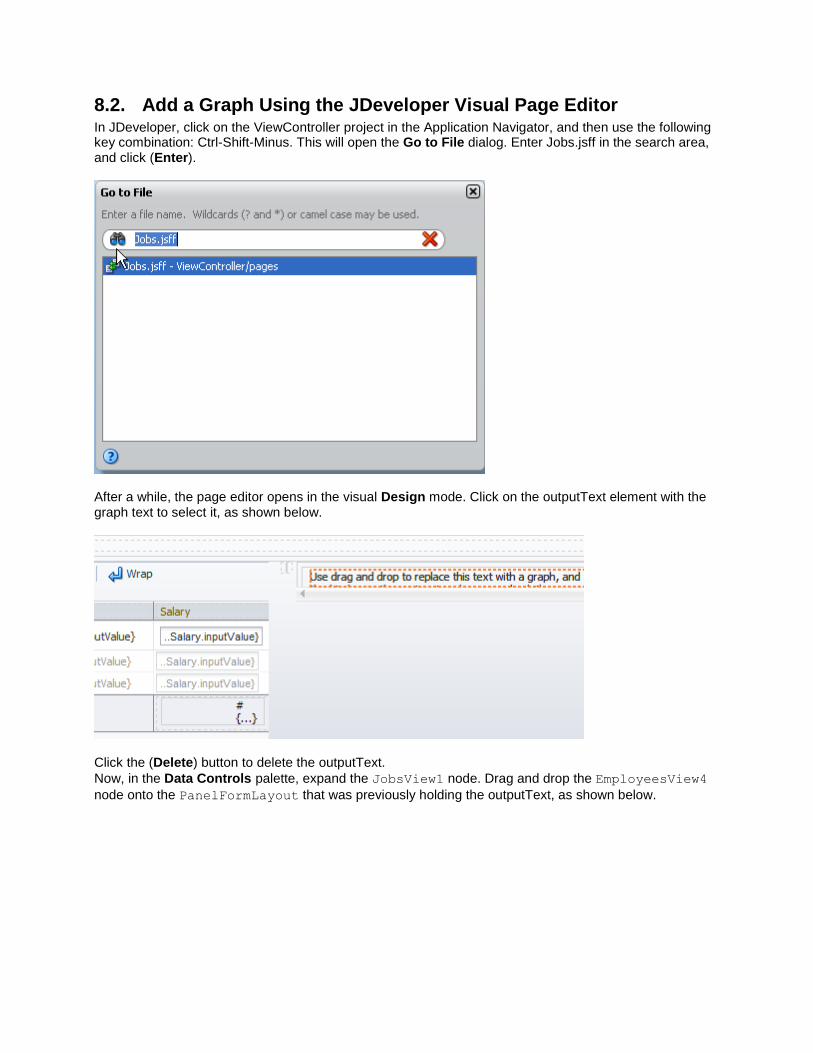
8.2. Add a Graph Using the JDeveloper Visual Page Editor In JDeveloper, click on the ViewController project in the Application Navigator, and then use the following key combination: Ctrl-Shift-Minus. This will open the Go to File dialog. Enter Jobs.jsff in the search area, and click (Enter).
After a while, the page editor opens in the visual Design mode. Click on the outputText element with the graph text to select it, as shown below.
Click the (Delete) button to delete the outputText.
Now, in the Data Controls palette, expand the JobsView1 node. Drag and drop the EmployeesView4
node onto the PanelFormLayout that was previously holding the outputText, as shown below.
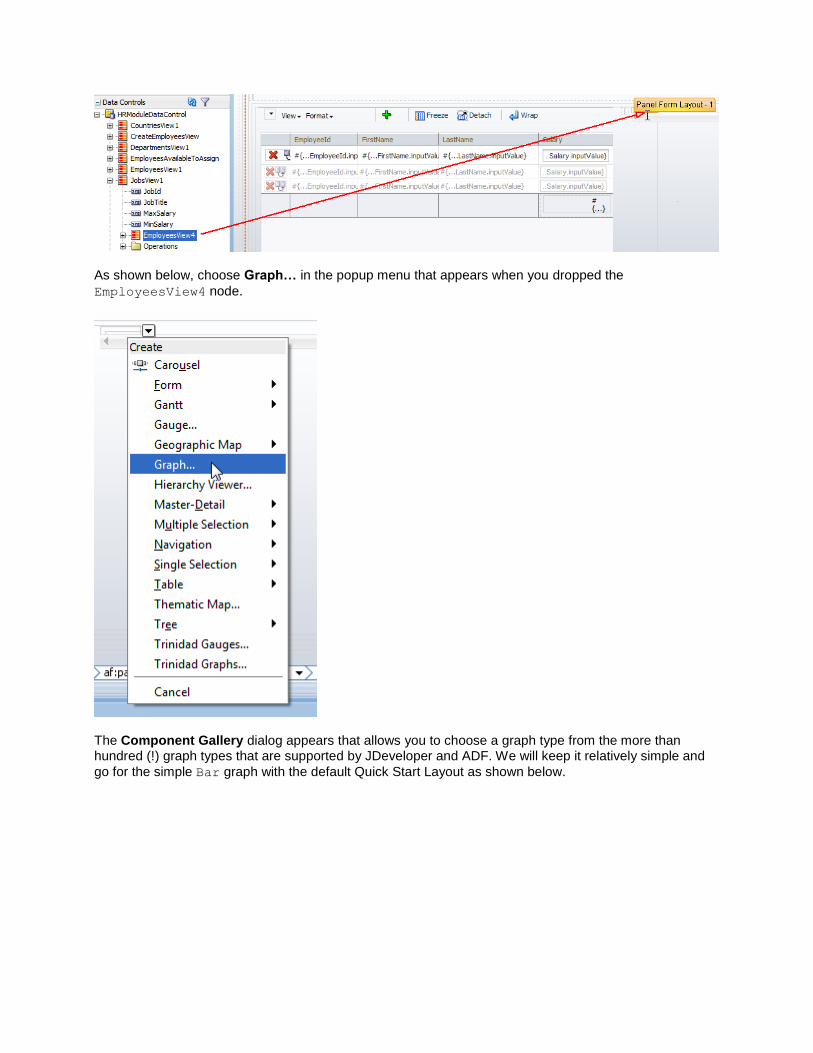
As shown below, choose Graph… in the popup menu that appears when you dropped the
EmployeesView4 node.
The Component Gallery dialog appears that allows you to choose a graph type from the more than hundred (!) graph types that are supported by JDeveloper and ADF. We will keep it relatively simple and
go for the simple Bar graph with the default Quick Start Layout as shown below.
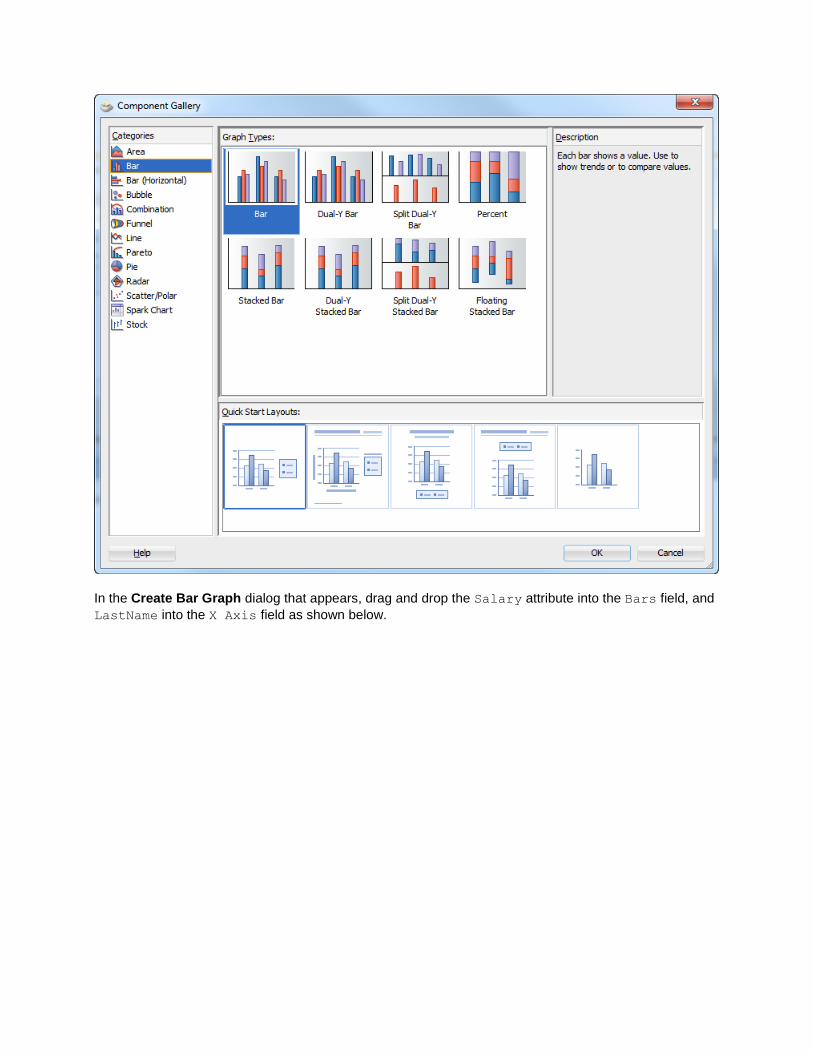
In the Create Bar Graph dialog that appears, drag and drop the Salary attribute into the Bars field, and
LastName into the X Axis field as shown below.
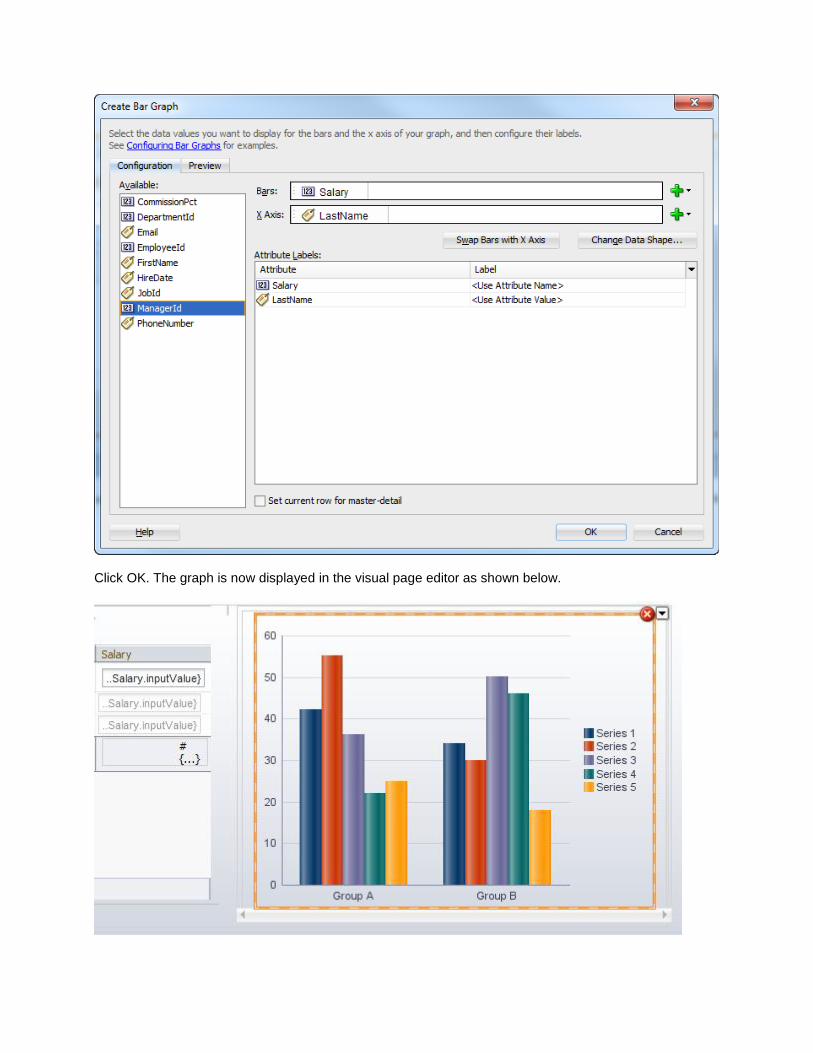
Click OK. The graph is now displayed in the visual page editor as shown below.
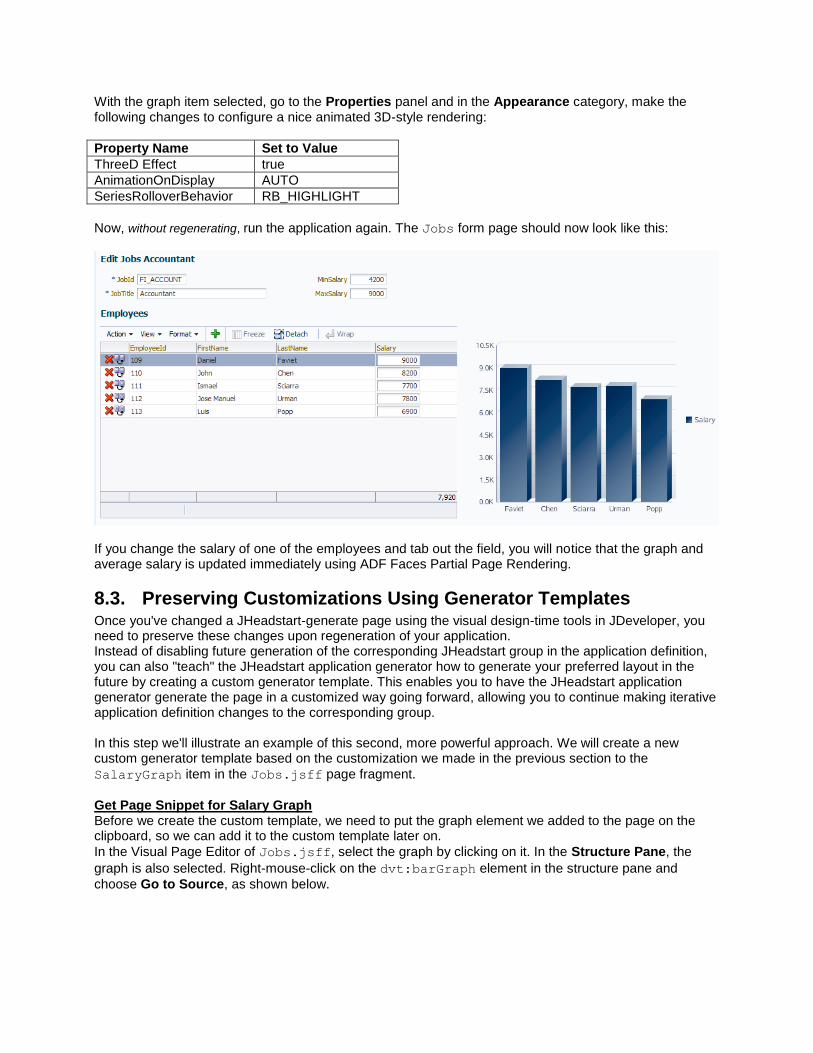
With the graph item selected, go to the Properties panel and in the Appearance category, make the following changes to configure a nice animated 3D-style rendering:
Property Name Set to Value
ThreeD Effect true
AnimationOnDisplay AUTO
SeriesRolloverBehavior RB_HIGHLIGHT
Now, without regenerating, run the application again. The Jobs form page should now look like this:
If you change the salary of one of the employees and tab out the field, you will notice that the graph and average salary is updated immediately using ADF Faces Partial Page Rendering.
8.3. Preserving Customizations Using Generator Templates Once you've changed a JHeadstart-generate page using the visual design-time tools in JDeveloper, you need to preserve these changes upon regeneration of your application. Instead of disabling future generation of the corresponding JHeadstart group in the application definition, you can also "teach" the JHeadstart application generator how to generate your preferred layout in the future by creating a custom generator template. This enables you to have the JHeadstart application generator generate the page in a customized way going forward, allowing you to continue making iterative application definition changes to the corresponding group. In this step we'll illustrate an example of this second, more powerful approach. We will create a new custom generator template based on the customization we made in the previous section to the
SalaryGraph item in the Jobs.jsff page fragment.
Get Page Snippet for Salary Graph Before we create the custom template, we need to put the graph element we added to the page on the clipboard, so we can add it to the custom template later on.
In the Visual Page Editor of Jobs.jsff, select the graph by clicking on it. In the Structure Pane, the
graph is also selected. Right-mouse-click on the dvt:barGraph element in the structure pane and
choose Go to Source, as shown below.
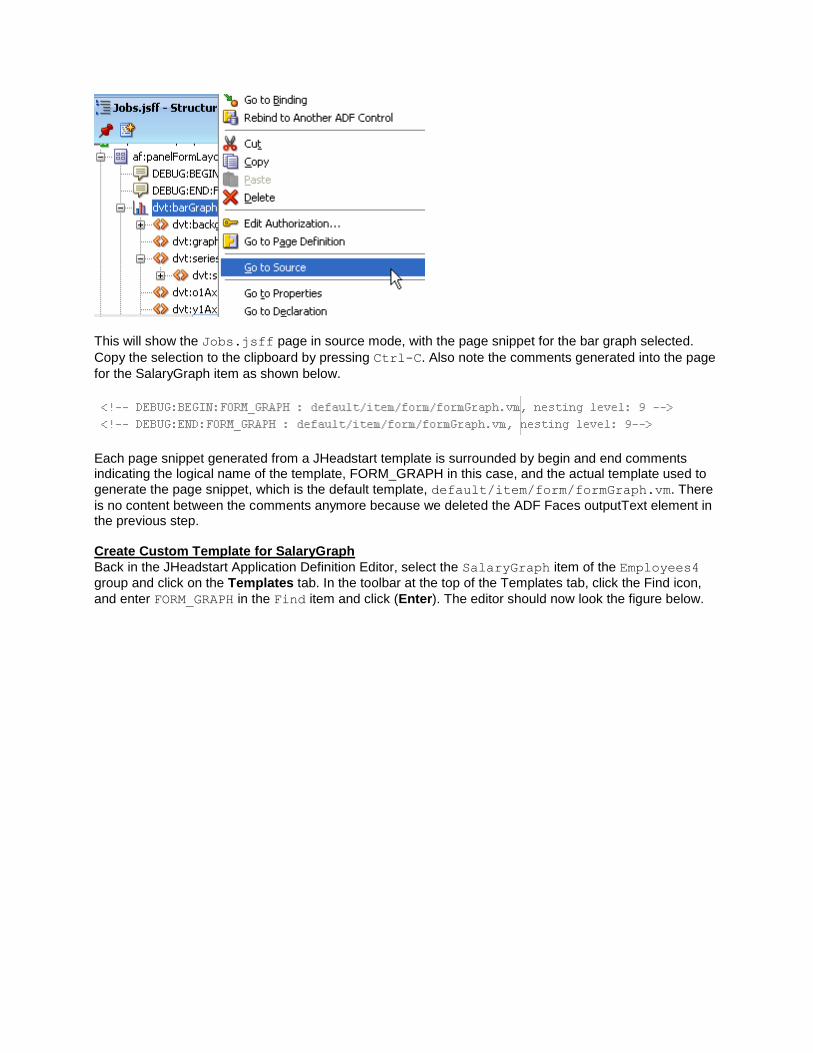
This will show the Jobs.jsff page in source mode, with the page snippet for the bar graph selected.
Copy the selection to the clipboard by pressing Ctrl-C. Also note the comments generated into the page
for the SalaryGraph item as shown below.
Each page snippet generated from a JHeadstart template is surrounded by begin and end comments indicating the logical name of the template, FORM_GRAPH in this case, and the actual template used to
generate the page snippet, which is the default template, default/item/form/formGraph.vm. There
is no content between the comments anymore because we deleted the ADF Faces outputText element in the previous step. Create Custom Template for SalaryGraph
Back in the JHeadstart Application Definition Editor, select the SalaryGraph item of the Employees4
group and click on the Templates tab. In the toolbar at the top of the Templates tab, click the Find icon,
and enter FORM_GRAPH in the Find item and click (Enter). The editor should now look the figure below.
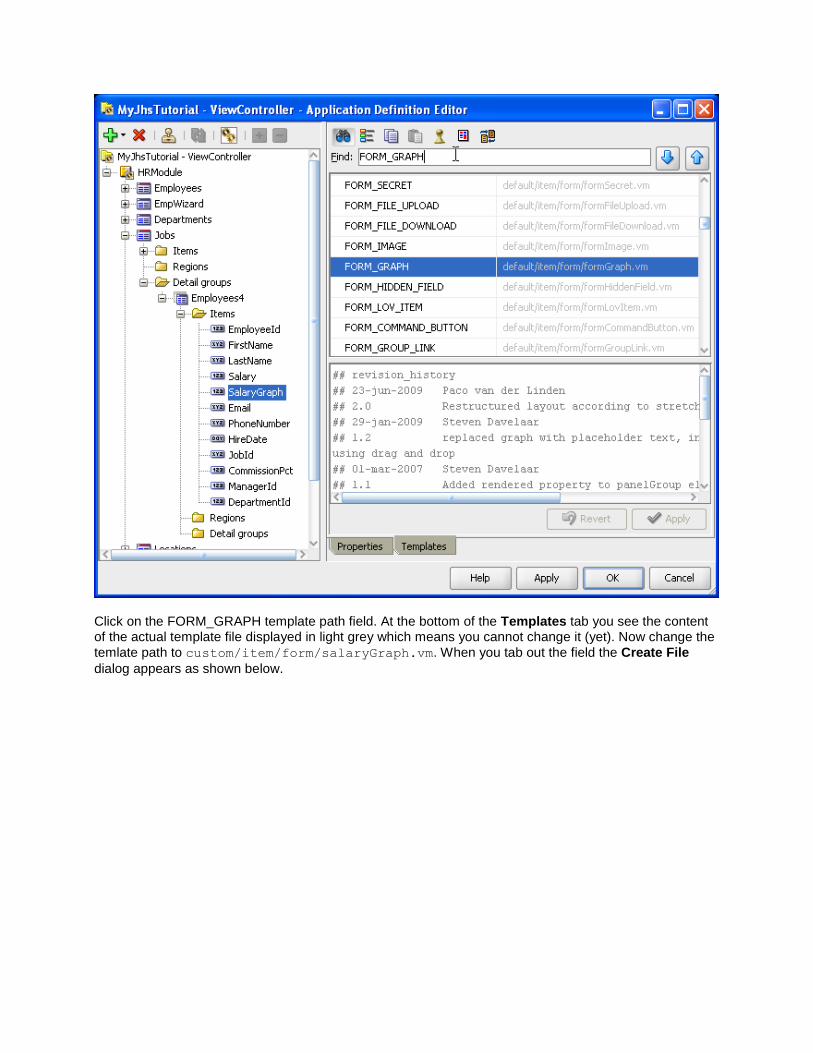
Click on the FORM_GRAPH template path field. At the bottom of the Templates tab you see the content of the actual template file displayed in light grey which means you cannot change it (yet). Now change the
temlate path to custom/item/form/salaryGraph.vm. When you tab out the field the Create File
dialog appears as shown below.

Click (Yes) to create a custom template that initially contains the same content as the default template. While in this example we don’t need any of the original content of the default template, it is in general a good idea to start with a copy of the default template. The template content is now displayed in black and
we can edit our custom template. Click in the template content pane and select all content using Ctrl-A.
Then paste the content of the clipboard using Ctrl-V and click (V Apply). The editor should look like this:
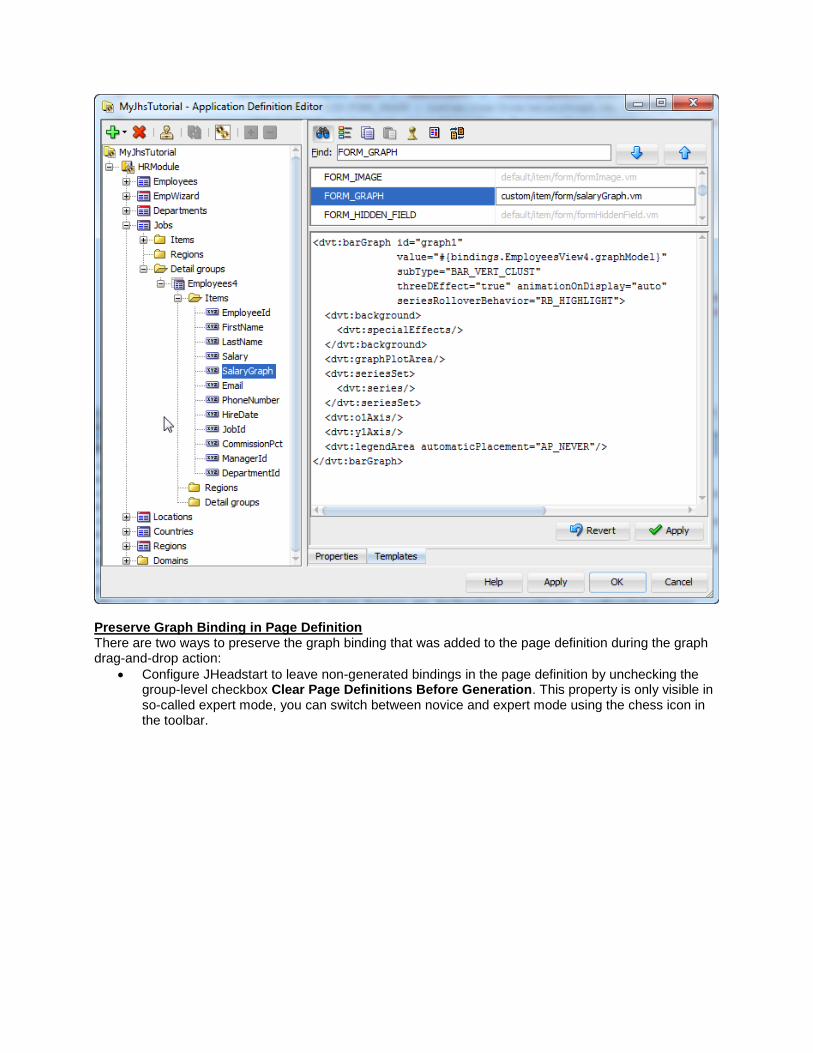
Preserve Graph Binding in Page Definition There are two ways to preserve the graph binding that was added to the page definition during the graph drag-and-drop action:
Configure JHeadstart to leave non-generated bindings in the page definition by unchecking the group-level checkbox Clear Page Definitions Before Generation. This property is only visible in so-called expert mode, you can switch between novice and expert mode using the chess icon in the toolbar.
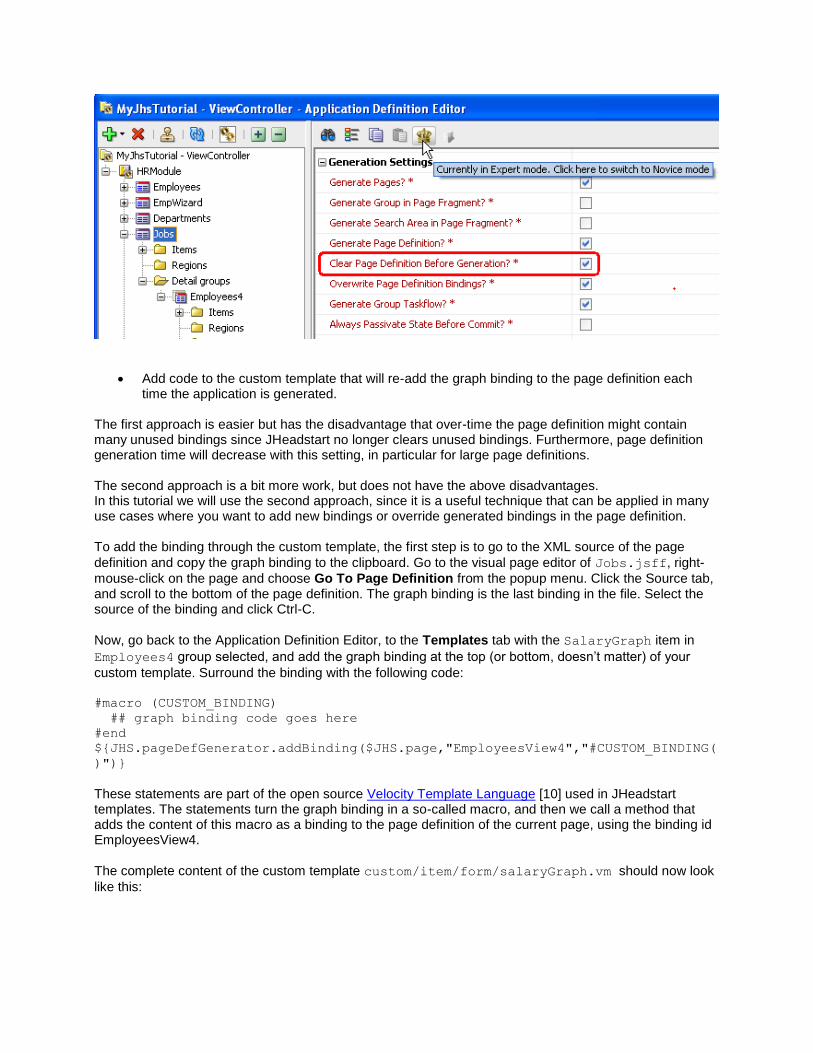
Add code to the custom template that will re-add the graph binding to the page definition each time the application is generated.
The first approach is easier but has the disadvantage that over-time the page definition might contain many unused bindings since JHeadstart no longer clears unused bindings. Furthermore, page definition generation time will decrease with this setting, in particular for large page definitions. The second approach is a bit more work, but does not have the above disadvantages. In this tutorial we will use the second approach, since it is a useful technique that can be applied in many use cases where you want to add new bindings or override generated bindings in the page definition. To add the binding through the custom template, the first step is to go to the XML source of the page
definition and copy the graph binding to the clipboard. Go to the visual page editor of Jobs.jsff, right-
mouse-click on the page and choose Go To Page Definition from the popup menu. Click the Source tab, and scroll to the bottom of the page definition. The graph binding is the last binding in the file. Select the source of the binding and click Ctrl-C.
Now, go back to the Application Definition Editor, to the Templates tab with the SalaryGraph item in
Employees4 group selected, and add the graph binding at the top (or bottom, doesn’t matter) of your
custom template. Surround the binding with the following code: #macro (CUSTOM_BINDING)
## graph binding code goes here
#end
${JHS.pageDefGenerator.addBinding($JHS.page,"EmployeesView4","#CUSTOM_BINDING(
)")}
These statements are part of the open source Velocity Template Language [10] used in JHeadstart templates. The statements turn the graph binding in a so-called macro, and then we call a method that adds the content of this macro as a binding to the page definition of the current page, using the binding id EmployeesView4.
The complete content of the custom template custom/item/form/salaryGraph.vm should now look
like this:
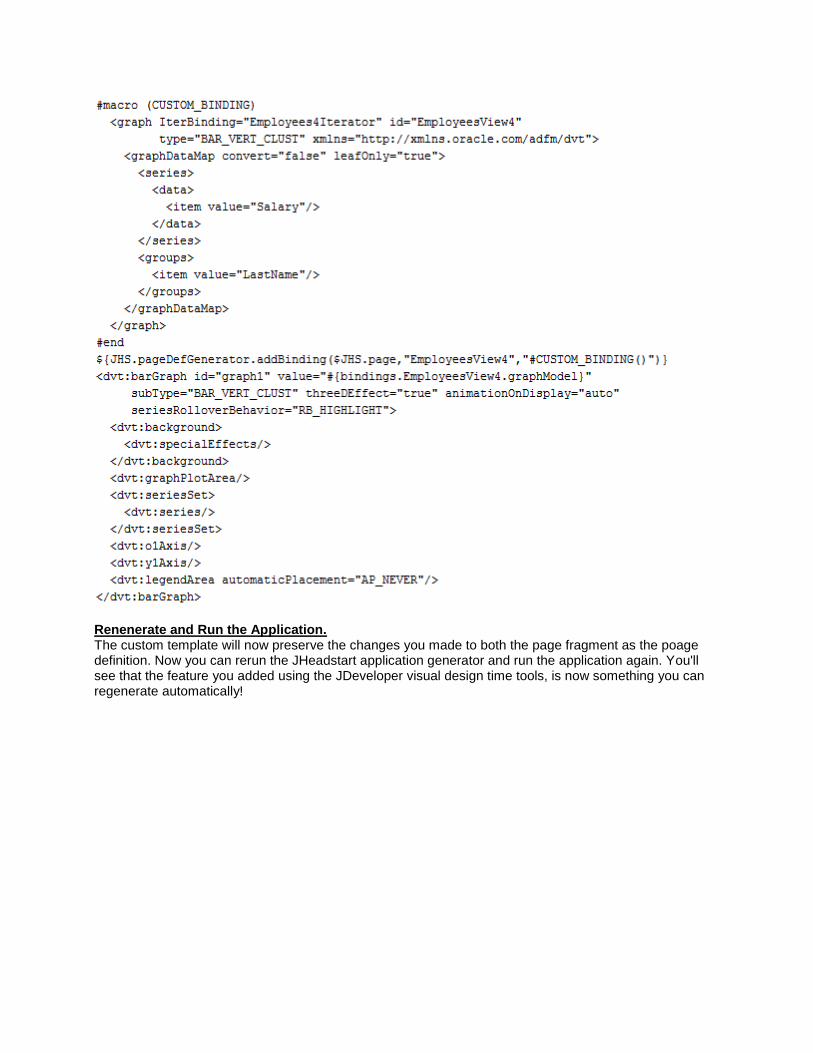
Renenerate and Run the Application. The custom template will now preserve the changes you made to both the page fragment as the poage definition. Now you can rerun the JHeadstart application generator and run the application again. You'll see that the feature you added using the JDeveloper visual design time tools, is now something you can regenerate automatically!
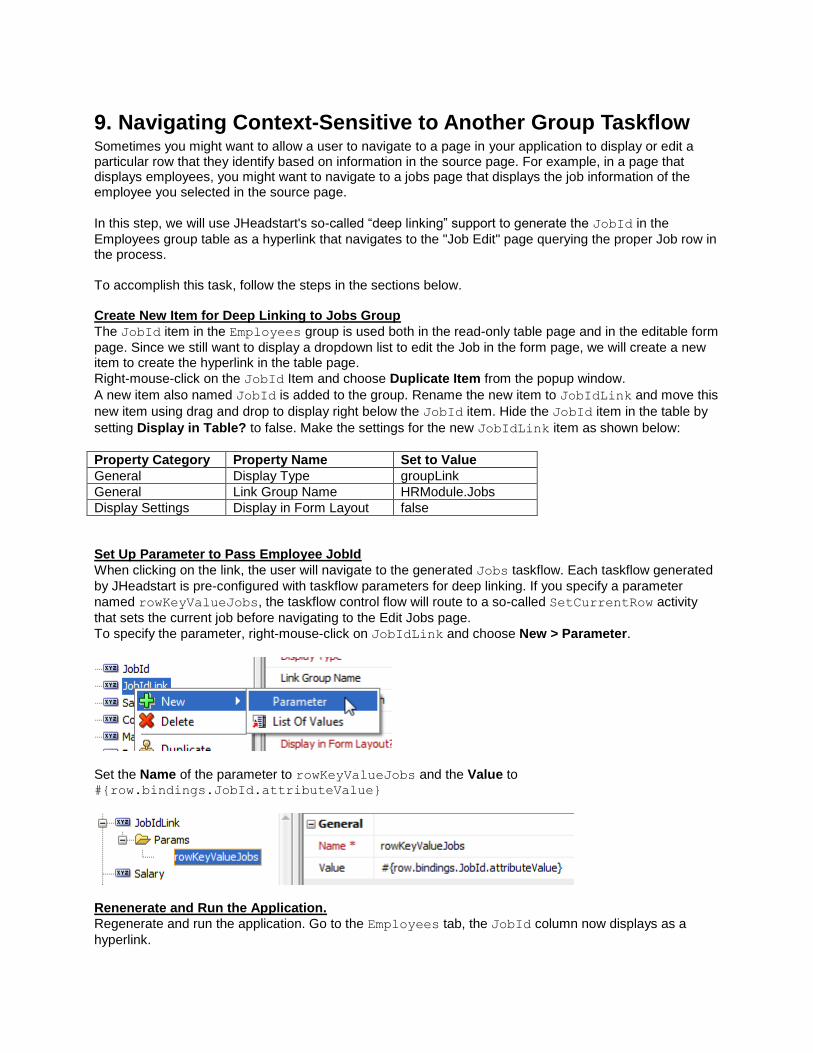
9. Navigating Context-Sensitive to Another Group Taskflow Sometimes you might want to allow a user to navigate to a page in your application to display or edit a particular row that they identify based on information in the source page. For example, in a page that displays employees, you might want to navigate to a jobs page that displays the job information of the employee you selected in the source page.
In this step, we will use JHeadstart's so-called “deep linking” support to generate the JobId in the
Employees group table as a hyperlink that navigates to the "Job Edit" page querying the proper Job row in the process. To accomplish this task, follow the steps in the sections below. Create New Item for Deep Linking to Jobs Group
The JobId item in the Employees group is used both in the read-only table page and in the editable form
page. Since we still want to display a dropdown list to edit the Job in the form page, we will create a new item to create the hyperlink in the table page.
Right-mouse-click on the JobId Item and choose Duplicate Item from the popup window.
A new item also named JobId is added to the group. Rename the new item to JobIdLink and move this
new item using drag and drop to display right below the JobId item. Hide the JobId item in the table by
setting Display in Table? to false. Make the settings for the new JobIdLink item as shown below:
Property Category Property Name Set to Value
General Display Type groupLink
General Link Group Name HRModule.Jobs
Display Settings Display in Form Layout false
Set Up Parameter to Pass Employee JobId
When clicking on the link, the user will navigate to the generated Jobs taskflow. Each taskflow generated
by JHeadstart is pre-configured with taskflow parameters for deep linking. If you specify a parameter
named rowKeyValueJobs, the taskflow control flow will route to a so-called SetCurrentRow activity
that sets the current job before navigating to the Edit Jobs page.
To specify the parameter, right-mouse-click on JobIdLink and choose New > Parameter.
Set the Name of the parameter to rowKeyValueJobs and the Value to #{row.bindings.JobId.attributeValue}
Renenerate and Run the Application.
Regenerate and run the application. Go to the Employees tab, the JobId column now displays as a
hyperlink.
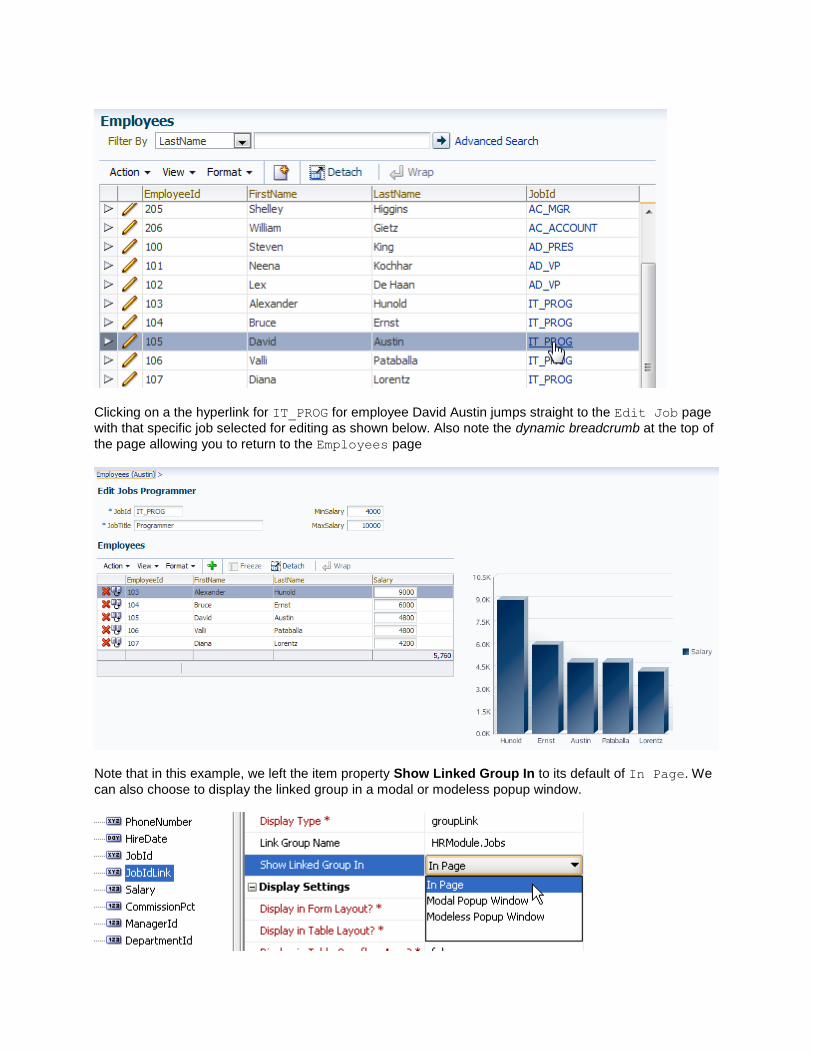
Clicking on a the hyperlink for IT_PROG for employee David Austin jumps straight to the Edit Job page
with that specific job selected for editing as shown below. Also note the dynamic breadcrumb at the top of
the page allowing you to return to the Employees page
Note that in this example, we left the item property Show Linked Group In to its default of In Page. We
can also choose to display the linked group in a modal or modeless popup window.

Using an additional parameter, we could even display the Jobs page in read-only mode in a popup,
supporting the “employee job details look up” use case rather than the “edit current job” use case. See the JHeadstart Developer’s Guide [4], section 6.14 “Navigating Context-Sensitive to Another Group Taskflow (Deep Linking)” for more information.
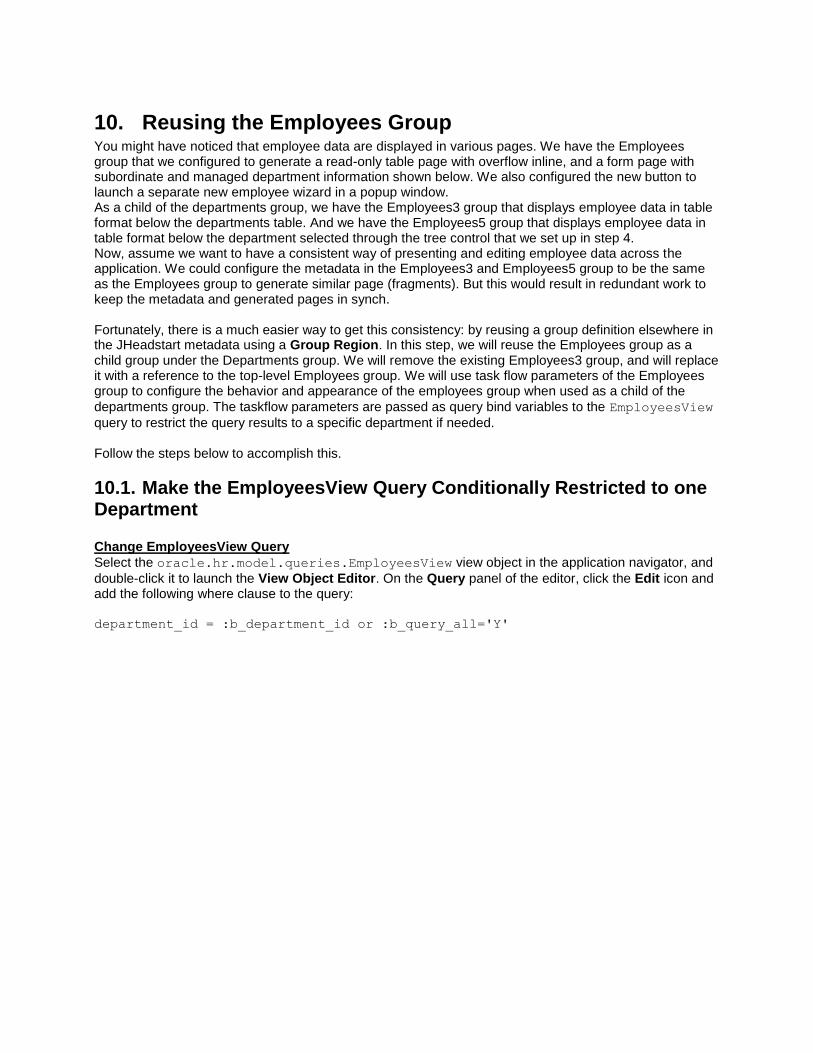
10. Reusing the Employees Group You might have noticed that employee data are displayed in various pages. We have the Employees group that we configured to generate a read-only table page with overflow inline, and a form page with subordinate and managed department information shown below. We also configured the new button to launch a separate new employee wizard in a popup window. As a child of the departments group, we have the Employees3 group that displays employee data in table format below the departments table. And we have the Employees5 group that displays employee data in table format below the department selected through the tree control that we set up in step 4. Now, assume we want to have a consistent way of presenting and editing employee data across the application. We could configure the metadata in the Employees3 and Employees5 group to be the same as the Employees group to generate similar page (fragments). But this would result in redundant work to keep the metadata and generated pages in synch. Fortunately, there is a much easier way to get this consistency: by reusing a group definition elsewhere in the JHeadstart metadata using a Group Region. In this step, we will reuse the Employees group as a child group under the Departments group. We will remove the existing Employees3 group, and will replace it with a reference to the top-level Employees group. We will use task flow parameters of the Employees group to configure the behavior and appearance of the employees group when used as a child of the
departments group. The taskflow parameters are passed as query bind variables to the EmployeesView
query to restrict the query results to a specific department if needed. Follow the steps below to accomplish this.
10.1. Make the EmployeesView Query Conditionally Restricted to one Department Change EmployeesView Query
Select the oracle.hr.model.queries.EmployeesView view object in the application navigator, and
double-click it to launch the View Object Editor. On the Query panel of the editor, click the Edit icon and add the following where clause to the query: department_id = :b_department_id or :b_query_all='Y'

Add Bind Parameters to EmployeesView Still in the Edit Query dialog, click on the Bind Variables node in the tree at the left side. Enter the two bind variables that you defined in the query:
Click on the New button and enter b_department_id in the Variable Name field.
Click on the Control Hints tab, and set the Display Hint field to Hide. This prevents the bind
variable to show up in the search region.
Click again on the New button and enter b_query_all in the Variable Name field. Enter ‘Y’ in
the Value field. This is the default value that will be used if the bind variable is not set.
Click on the Control Hints tab, and set the Display Hint field to Hide.
Click OK to close the Edit Query dialog. The query pane should look like this:
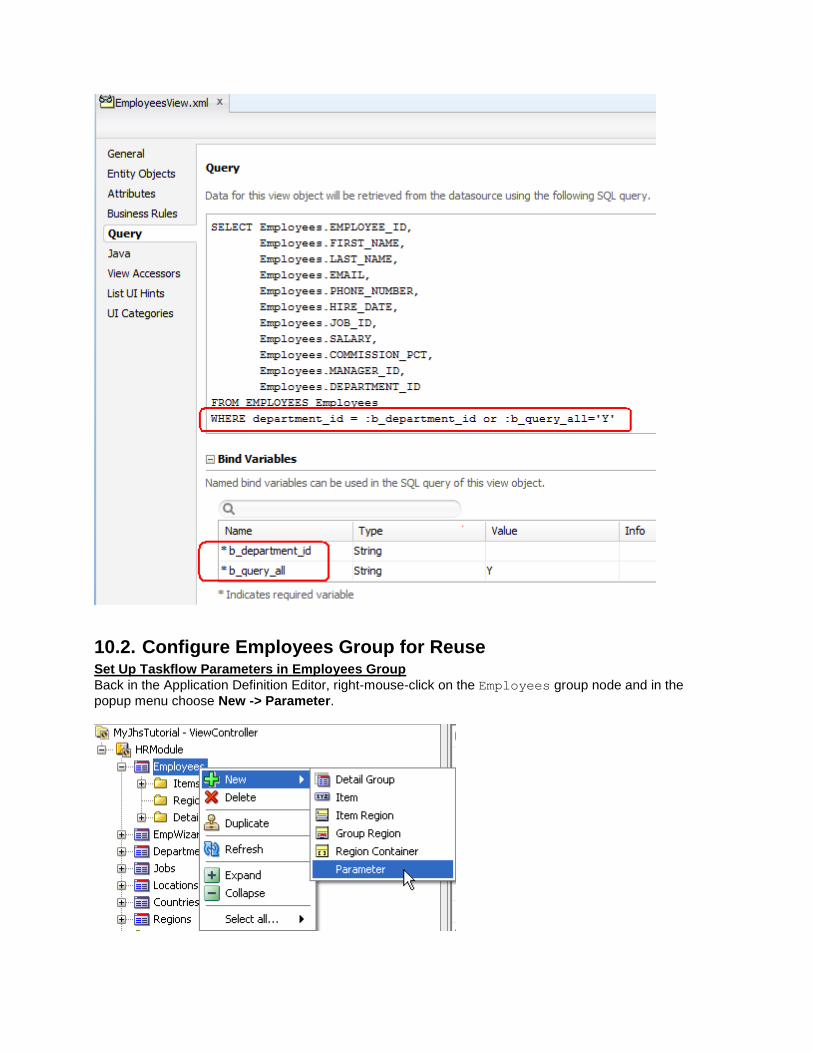
10.2. Configure Employees Group for Reuse Set Up Taskflow Parameters in Employees Group
Back in the Application Definition Editor, right-mouse-click on the Employees group node and in the
popup menu choose New -> Parameter.
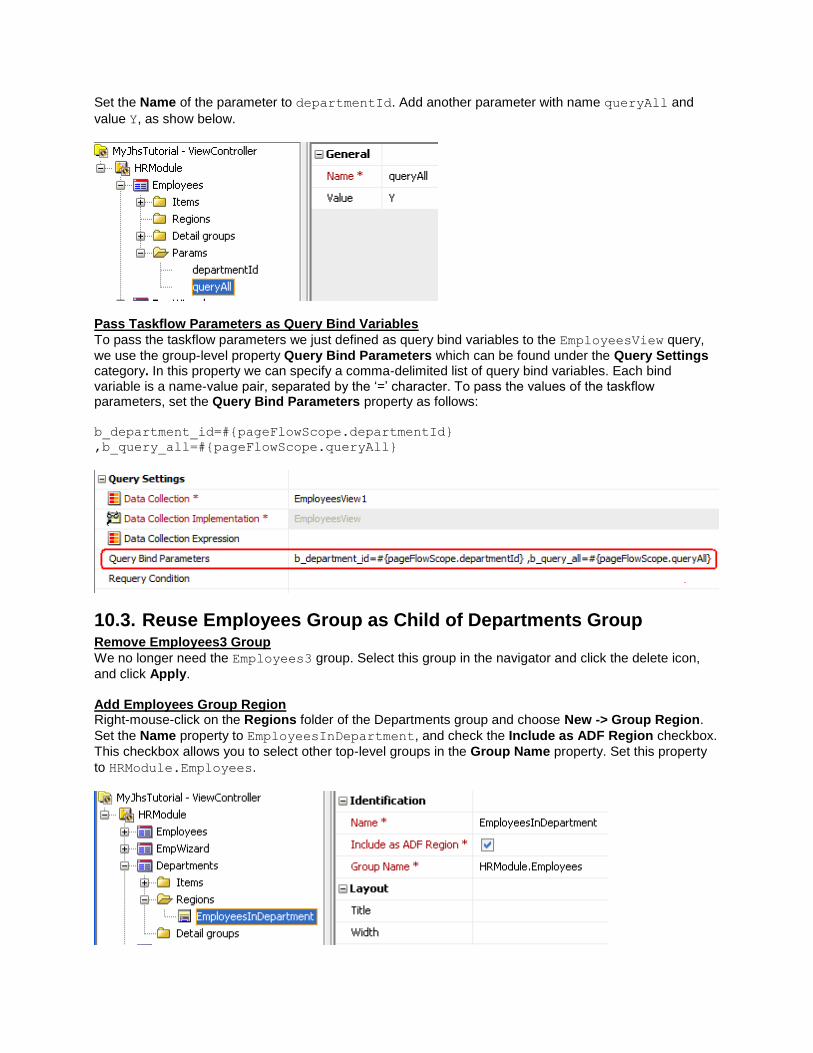
Set the Name of the parameter to departmentId. Add another parameter with name queryAll and
value Y, as show below.
Pass Taskflow Parameters as Query Bind Variables
To pass the taskflow parameters we just defined as query bind variables to the EmployeesView query,
we use the group-level property Query Bind Parameters which can be found under the Query Settings category. In this property we can specify a comma-delimited list of query bind variables. Each bind variable is a name-value pair, separated by the ‘=’ character. To pass the values of the taskflow parameters, set the Query Bind Parameters property as follows: b_department_id=#{pageFlowScope.departmentId}
,b_query_all=#{pageFlowScope.queryAll}
10.3. Reuse Employees Group as Child of Departments Group Remove Employees3 Group
We no longer need the Employees3 group. Select this group in the navigator and click the delete icon,
and click Apply. Add Employees Group Region Right-mouse-click on the Regions folder of the Departments group and choose New -> Group Region.
Set the Name property to EmployeesInDepartment, and check the Include as ADF Region checkbox.
This checkbox allows you to select other top-level groups in the Group Name property. Set this property
to HRModule.Employees.
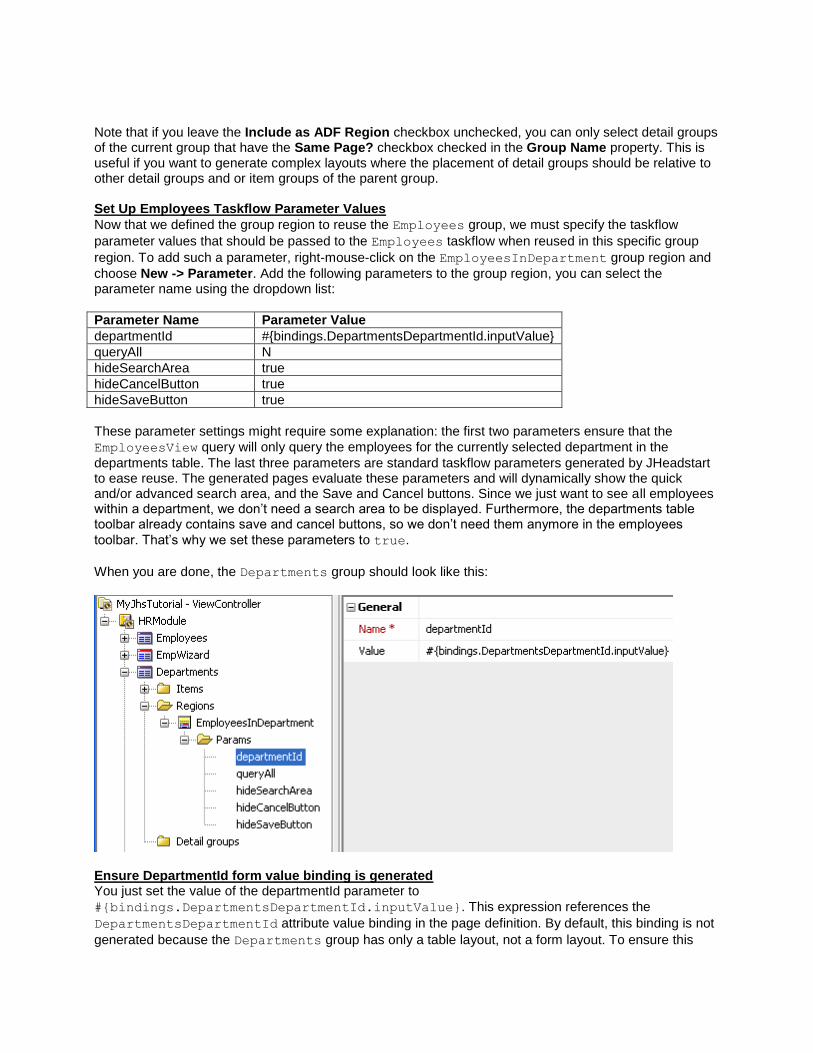
Note that if you leave the Include as ADF Region checkbox unchecked, you can only select detail groups of the current group that have the Same Page? checkbox checked in the Group Name property. This is useful if you want to generate complex layouts where the placement of detail groups should be relative to other detail groups and or item groups of the parent group. Set Up Employees Taskflow Parameter Values
Now that we defined the group region to reuse the Employees group, we must specify the taskflow
parameter values that should be passed to the Employees taskflow when reused in this specific group
region. To add such a parameter, right-mouse-click on the EmployeesInDepartment group region and
choose New -> Parameter. Add the following parameters to the group region, you can select the parameter name using the dropdown list:
Parameter Name Parameter Value
departmentId #{bindings.DepartmentsDepartmentId.inputValue}
queryAll N
hideSearchArea true
hideCancelButton true
hideSaveButton true
These parameter settings might require some explanation: the first two parameters ensure that the
EmployeesView query will only query the employees for the currently selected department in the
departments table. The last three parameters are standard taskflow parameters generated by JHeadstart to ease reuse. The generated pages evaluate these parameters and will dynamically show the quick and/or advanced search area, and the Save and Cancel buttons. Since we just want to see all employees within a department, we don’t need a search area to be displayed. Furthermore, the departments table toolbar already contains save and cancel buttons, so we don’t need them anymore in the employees
toolbar. That’s why we set these parameters to true.
When you are done, the Departments group should look like this:
Ensure DepartmentId form value binding is generated You just set the value of the departmentId parameter to
#{bindings.DepartmentsDepartmentId.inputValue}. This expression references the
DepartmentsDepartmentId attribute value binding in the page definition. By default, this binding is not
generated because the Departments group has only a table layout, not a form layout. To ensure this
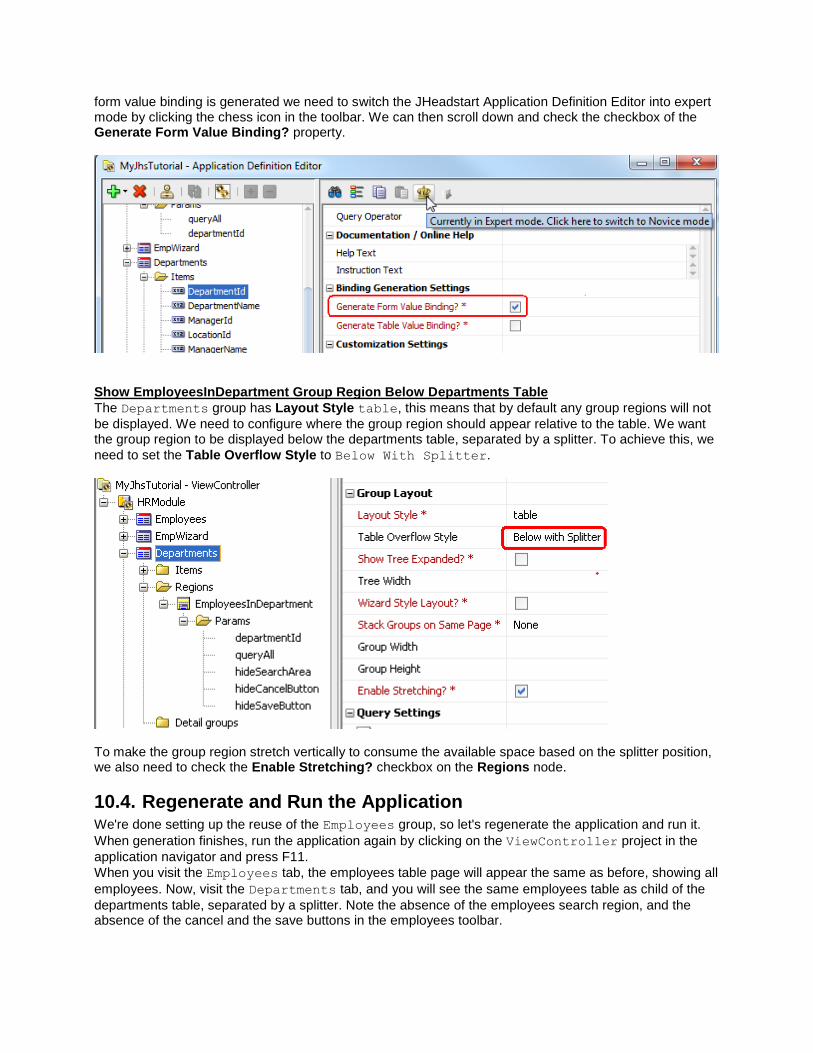
form value binding is generated we need to switch the JHeadstart Application Definition Editor into expert mode by clicking the chess icon in the toolbar. We can then scroll down and check the checkbox of the Generate Form Value Binding? property.
Show EmployeesInDepartment Group Region Below Departments Table
The Departments group has Layout Style table, this means that by default any group regions will not
be displayed. We need to configure where the group region should appear relative to the table. We want the group region to be displayed below the departments table, separated by a splitter. To achieve this, we
need to set the Table Overflow Style to Below With Splitter.
To make the group region stretch vertically to consume the available space based on the splitter position, we also need to check the Enable Stretching? checkbox on the Regions node.
10.4. Regenerate and Run the Application We're done setting up the reuse of the Employees group, so let's regenerate the application and run it.
When generation finishes, run the application again by clicking on the ViewController project in the
application navigator and press F11.
When you visit the Employees tab, the employees table page will appear the same as before, showing all
employees. Now, visit the Departments tab, and you will see the same employees table as child of the
departments table, separated by a splitter. Note the absence of the employees search region, and the absence of the cancel and the save buttons in the employees toolbar.
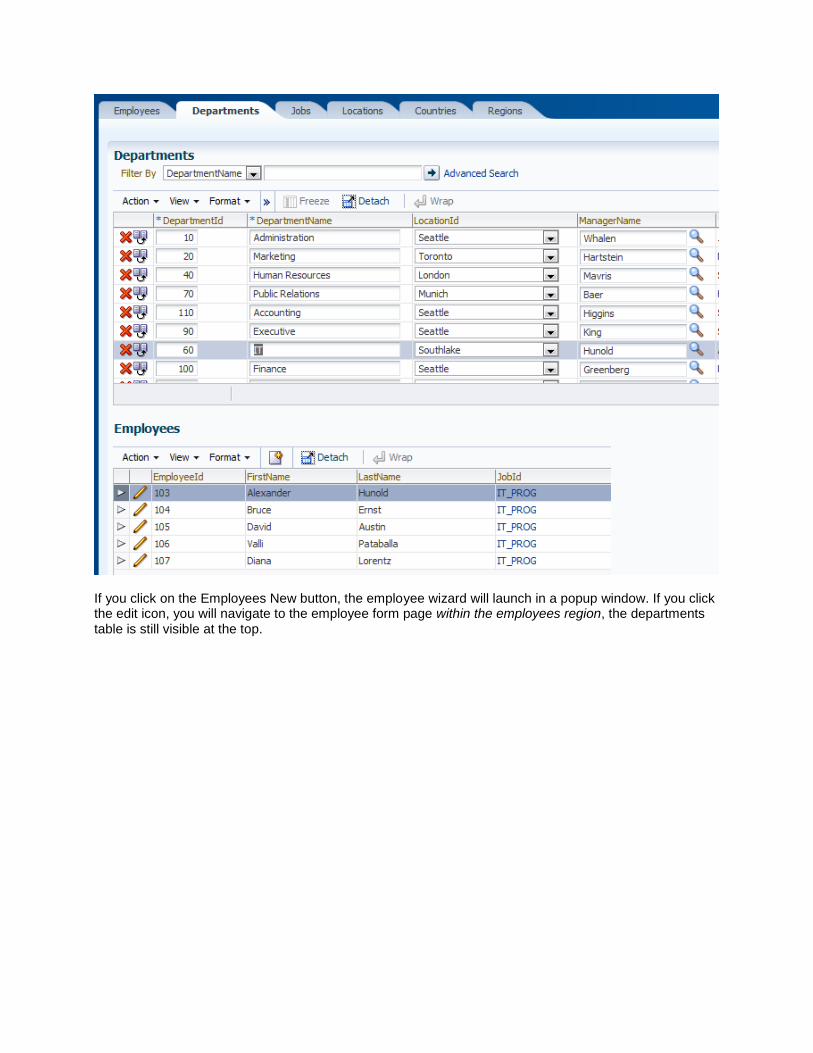
If you click on the Employees New button, the employee wizard will launch in a popup window. If you click the edit icon, you will navigate to the employee form page within the employees region, the departments table is still visible at the top.
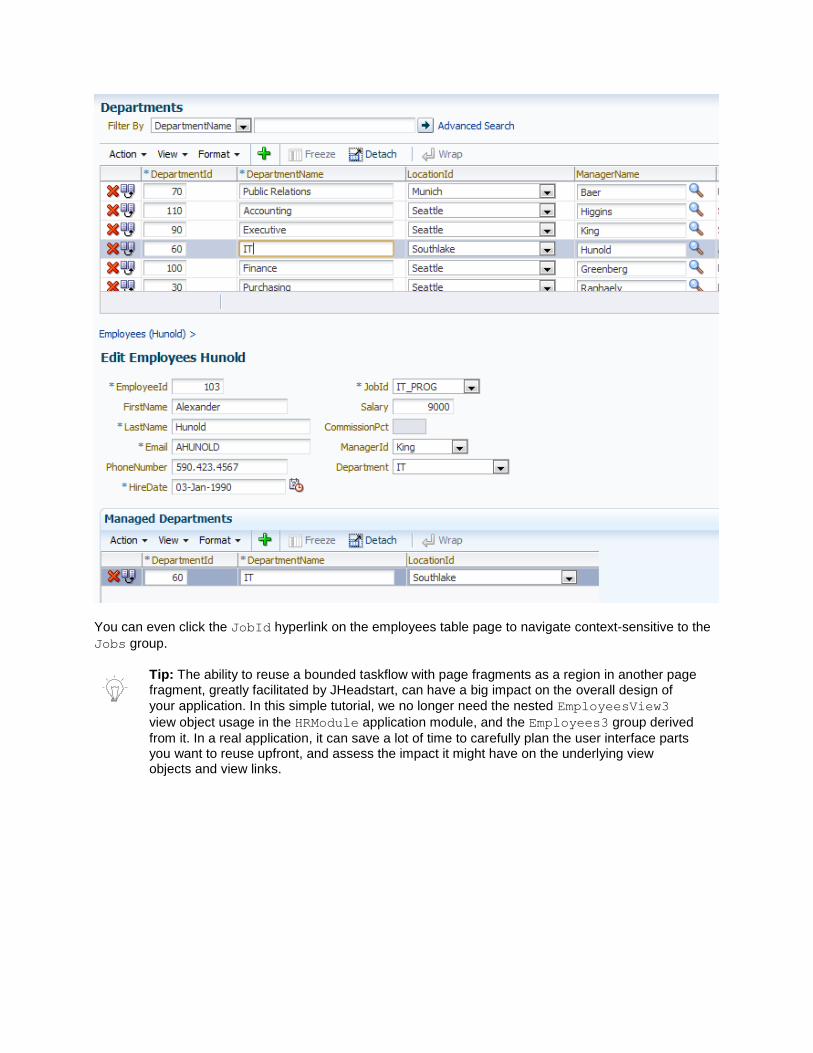
You can even click the JobId hyperlink on the employees table page to navigate context-sensitive to the
Jobs group.
Tip: The ability to reuse a bounded taskflow with page fragments as a region in another page fragment, greatly facilitated by JHeadstart, can have a big impact on the overall design of
your application. In this simple tutorial, we no longer need the nested EmployeesView3
view object usage in the HRModule application module, and the Employees3 group derived
from it. In a real application, it can save a lot of time to carefully plan the user interface parts you want to reuse upfront, and assess the impact it might have on the underlying view objects and view links.
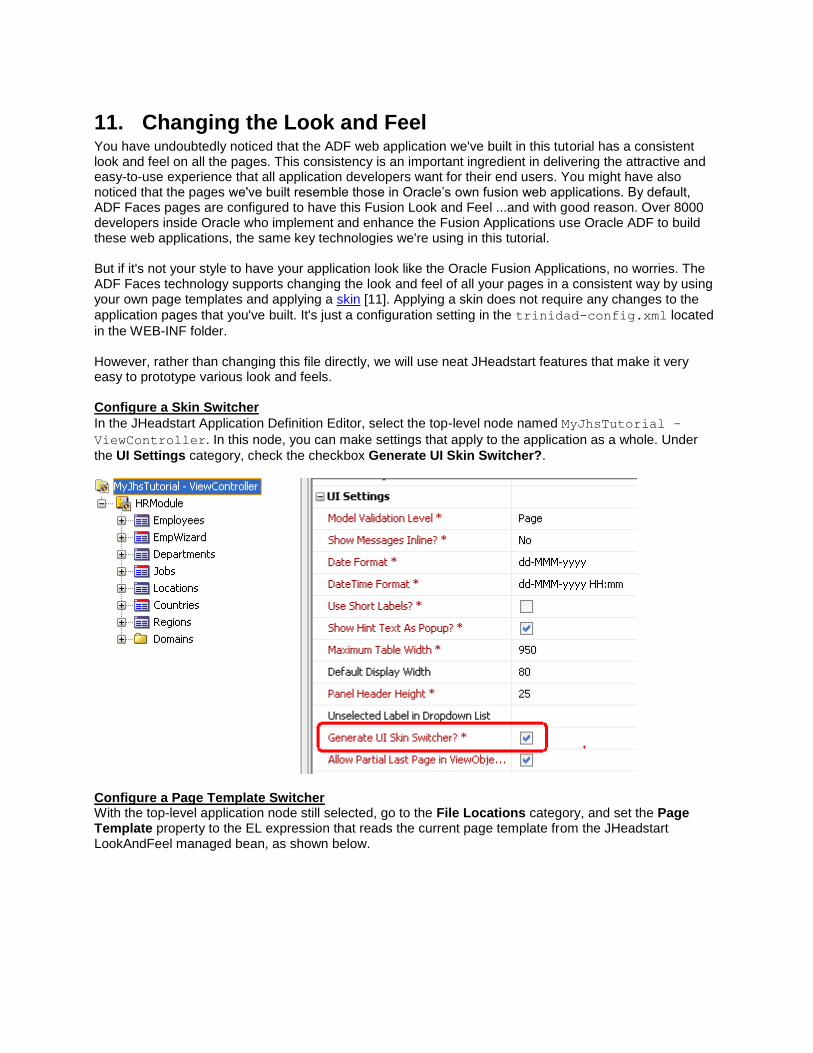
11. Changing the Look and Feel You have undoubtedly noticed that the ADF web application we've built in this tutorial has a consistent look and feel on all the pages. This consistency is an important ingredient in delivering the attractive and easy-to-use experience that all application developers want for their end users. You might have also noticed that the pages we've built resemble those in Oracle’s own fusion web applications. By default, ADF Faces pages are configured to have this Fusion Look and Feel ...and with good reason. Over 8000 developers inside Oracle who implement and enhance the Fusion Applications use Oracle ADF to build these web applications, the same key technologies we're using in this tutorial. But if it's not your style to have your application look like the Oracle Fusion Applications, no worries. The ADF Faces technology supports changing the look and feel of all your pages in a consistent way by using your own page templates and applying a skin [11]. Applying a skin does not require any changes to the
application pages that you've built. It's just a configuration setting in the trinidad-config.xml located
in the WEB-INF folder. However, rather than changing this file directly, we will use neat JHeadstart features that make it very easy to prototype various look and feels. Configure a Skin Switcher
In the JHeadstart Application Definition Editor, select the top-level node named MyJhsTutorial –
ViewController. In this node, you can make settings that apply to the application as a whole. Under
the UI Settings category, check the checkbox Generate UI Skin Switcher?.
Configure a Page Template Switcher With the top-level application node still selected, go to the File Locations category, and set the Page Template property to the EL expression that reads the current page template from the JHeadstart LookAndFeel managed bean, as shown below.
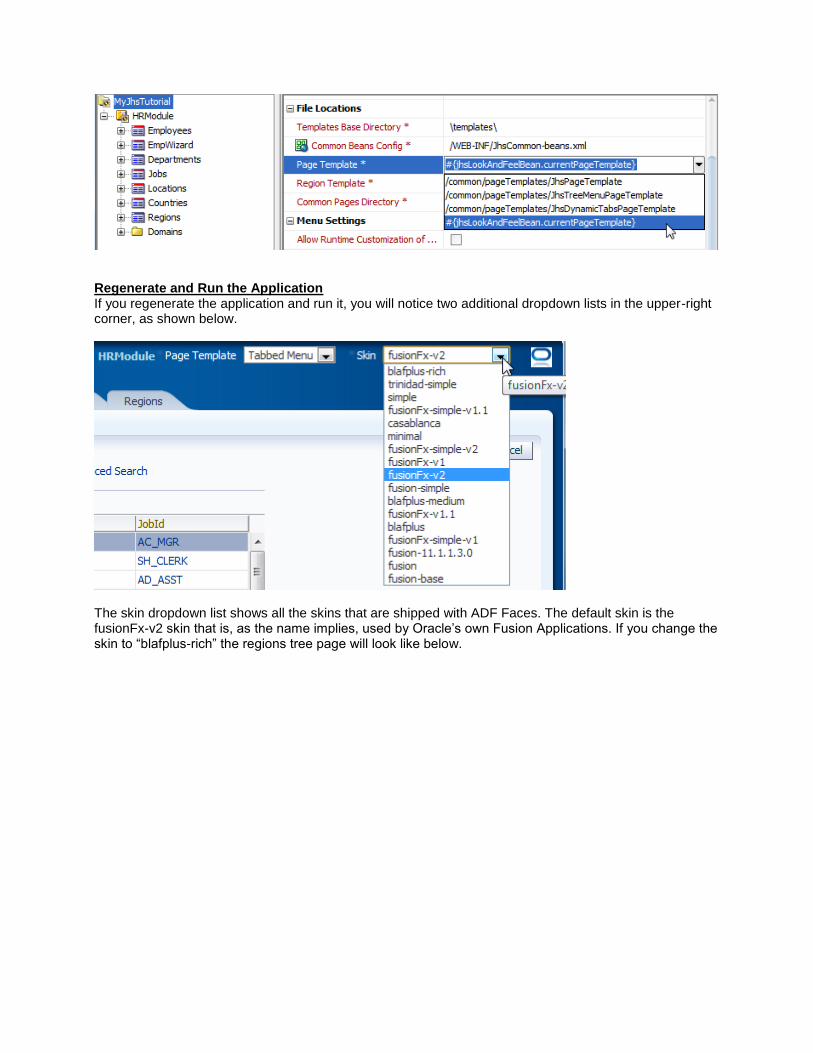
Regenerate and Run the Application If you regenerate the application and run it, you will notice two additional dropdown lists in the upper-right corner, as shown below.
The skin dropdown list shows all the skins that are shipped with ADF Faces. The default skin is the fusionFx-v2 skin that is, as the name implies, used by Oracle’s own Fusion Applications. If you change the skin to “blafplus-rich” the regions tree page will look like below.
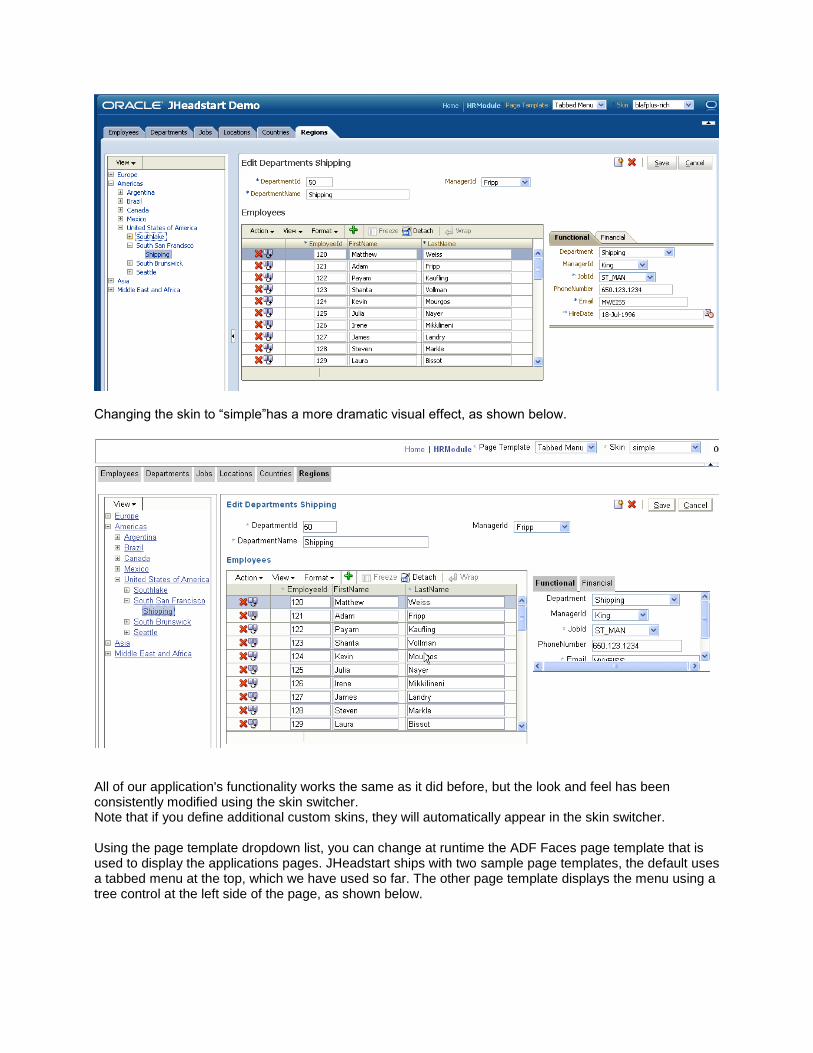
Changing the skin to “simple”has a more dramatic visual effect, as shown below.
All of our application's functionality works the same as it did before, but the look and feel has been consistently modified using the skin switcher. Note that if you define additional custom skins, they will automatically appear in the skin switcher. Using the page template dropdown list, you can change at runtime the ADF Faces page template that is used to display the applications pages. JHeadstart ships with two sample page templates, the default uses a tabbed menu at the top, which we have used so far. The other page template displays the menu using a tree control at the left side of the page, as shown below.
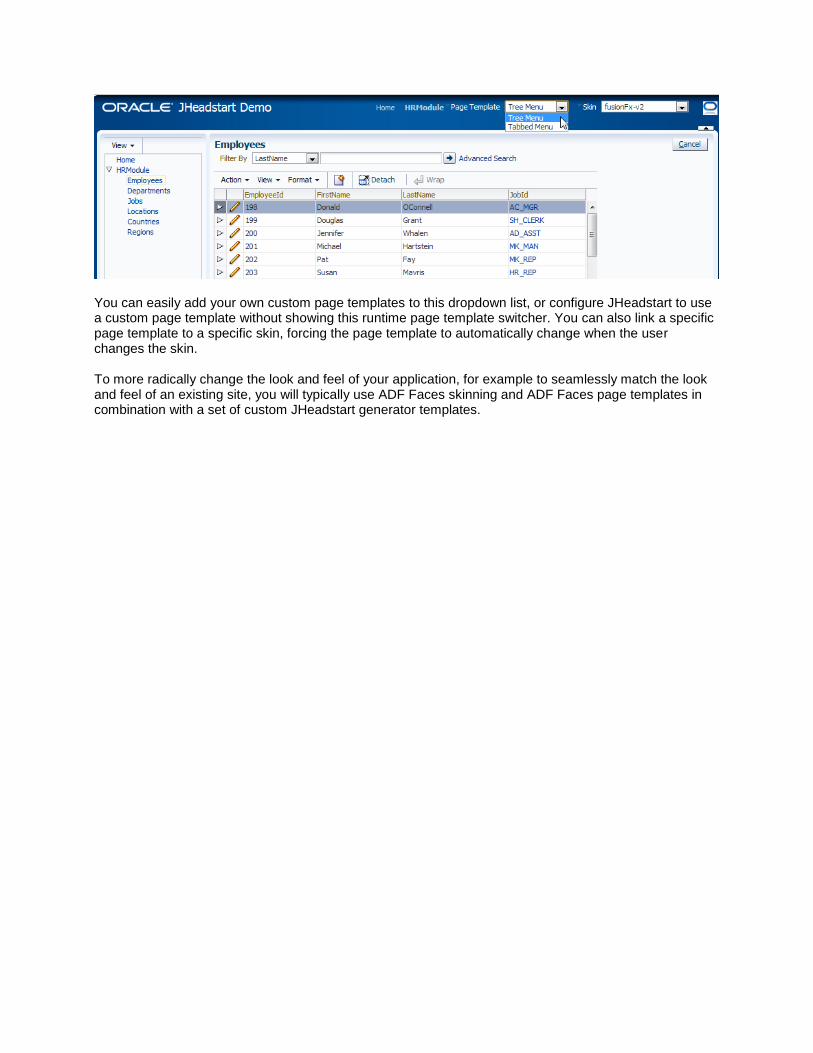
You can easily add your own custom page templates to this dropdown list, or configure JHeadstart to use a custom page template without showing this runtime page template switcher. You can also link a specific page template to a specific skin, forcing the page template to automatically change when the user changes the skin. To more radically change the look and feel of your application, for example to seamlessly match the look and feel of an existing site, you will typically use ADF Faces skinning and ADF Faces page templates in combination with a set of custom JHeadstart generator templates.
12. Adding Validation Rules In this section of the tutorial, we'll add some declarative validation logic to one of our business domain objects. This will illustrate how business logic and user interface are cleanly separated in an Oracle ADF application, as well as show how the errors are displayed to the end-user.
12.1. Defining Some Declarative Validation Rules Using Oracle ADF our business validation logic is nicely encapsulated inside the entity objects that represent our business domain objects. You can capture a number of aspects of business domain validation declaratively. Here we'll illustrate two examples of enforcing that an attribute is mandatory, and that its value lie within a certain numerical range. Make an Employee's Salary Mandatory
In your Model project, find the Employees entity object in the oracle.hr.model.entities package
and double-click it to edit it. Click on the Attributes tab, and click on the Salary attribute. In the Details tab shown below check the Mandatory checkbox.
Click Save. Validate that Salary is Between Minimum and Maximum Salary of Employee Job Click on the Business Rules tab, select the Entity Validators node, and click the plus icon to create a new entity-level validation rule.

In the Add Validation Rule for: Employees dialog, select Script Expression from the Rule Type
dropdown list. Enter the following expression: Salary >= Jobs.MinSalary && Salary <= Jobs.MaxSalary
This is a Groovy script expression. Groovy is a scripting language that nicely integrates with Java, and is supported by ADF Business Components to specify validation rules.
Using Groovy, we can easily traverse the object model created by ADF Business Components. In this
example, we use the expression Jobs to access the Jobs entity object instance for this employee. This
expression references a so-called Association Accessor attribute. If you want to know which assoications you can traverse using a Groovy expression, you can use the Structure pane and expand the Association Accessors node, as shown below.
Using the dot notation (like Jobs.MinSalary) we can then access all attributes in the Jobs entity
object. Now click on the Validation Execution tab and select the attributes that when modified should trigger this
rule: Salary and JobId. Also check the checkbox Execute only if one of the Selected Attributes has
been changed.
Click on the Failure Handling tab, Click the green plus icon to add a new message. Set the Message Id
to HRM-00001 and the Message Text to
Salary must be between {0} and {1} for this job.
When you tab out the Message Text field, two message tokens appear automatically at the bottom of the
dialog. Enter Jobs.MinSalary for the first token, and enter Jobs.MaxSalary for the second token.
When you are done, the dialog window should look like this:
Click OK to close the dialog, and click the Save All button in JDeveloper to save your changes. As shown below, any validation rules you've added to attributes or at the entity object level appear in the tree display on the Business Rules panel. Also note the business rules that were created based on database constraints. This rules are automatically created when running the ADF Business Components wizard in step 3 of this tutorial.
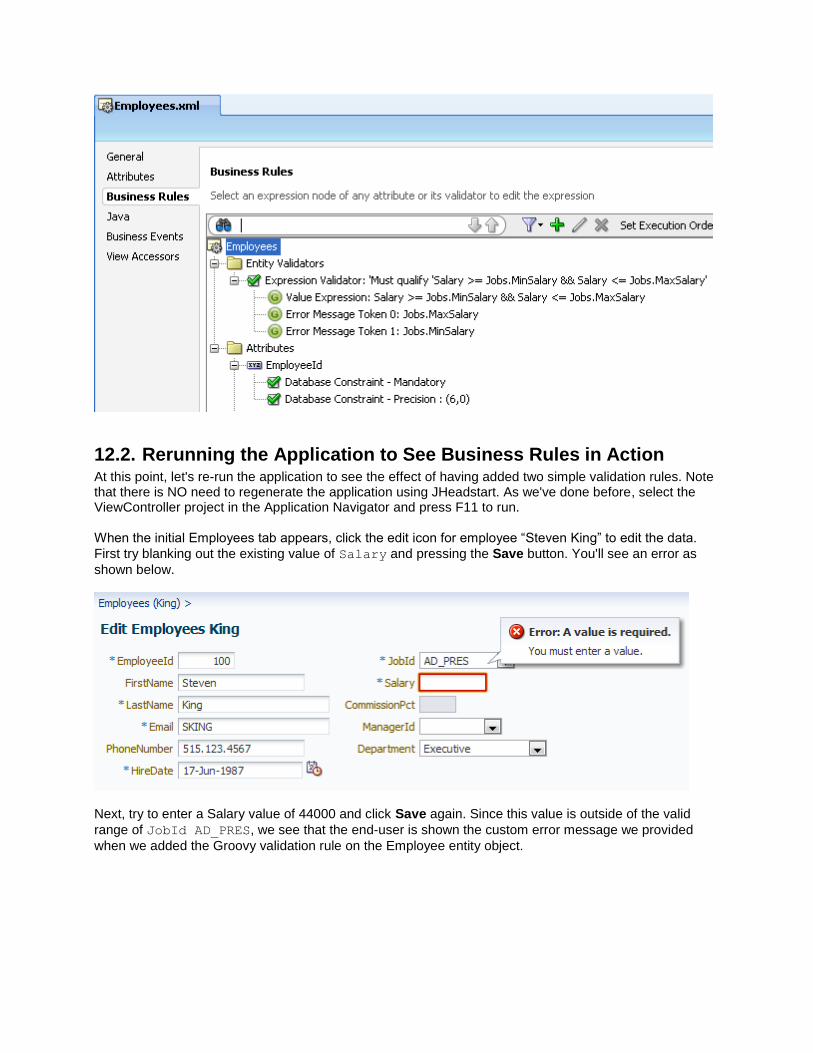
12.2. Rerunning the Application to See Business Rules in Action At this point, let's re-run the application to see the effect of having added two simple validation rules. Note that there is NO need to regenerate the application using JHeadstart. As we've done before, select the ViewController project in the Application Navigator and press F11 to run. When the initial Employees tab appears, click the edit icon for employee “Steven King” to edit the data.
First try blanking out the existing value of Salary and pressing the Save button. You'll see an error as
shown below.
Next, try to enter a Salary value of 44000 and click Save again. Since this value is outside of the valid
range of JobId AD_PRES, we see that the end-user is shown the custom error message we provided
when we added the Groovy validation rule on the Employee entity object.
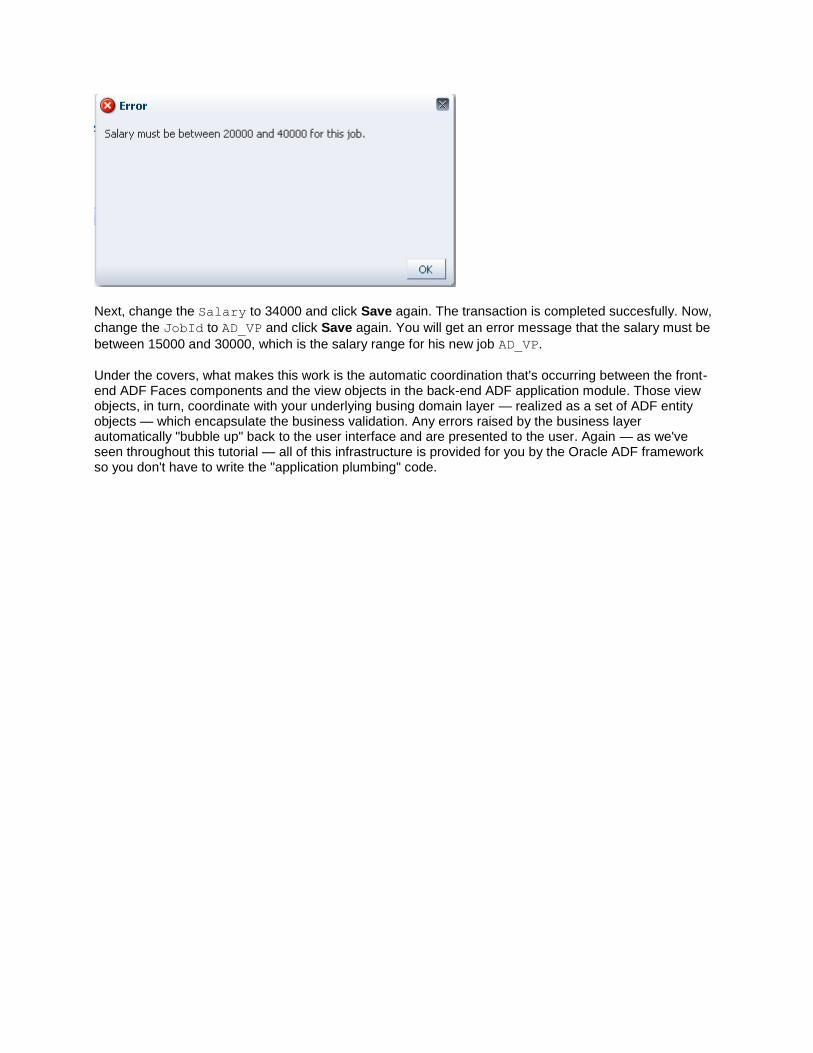
Next, change the Salary to 34000 and click Save again. The transaction is completed succesfully. Now,
change the JobId to AD_VP and click Save again. You will get an error message that the salary must be
between 15000 and 30000, which is the salary range for his new job AD_VP.
Under the covers, what makes this work is the automatic coordination that's occurring between the front-end ADF Faces components and the view objects in the back-end ADF application module. Those view objects, in turn, coordinate with your underlying busing domain layer — realized as a set of ADF entity objects — which encapsulate the business validation. Any errors raised by the business layer automatically "bubble up" back to the user interface and are presented to the user. Again — as we've seen throughout this tutorial — all of this infrastructure is provided for you by the Oracle ADF framework so you don't have to write the "application plumbing" code.
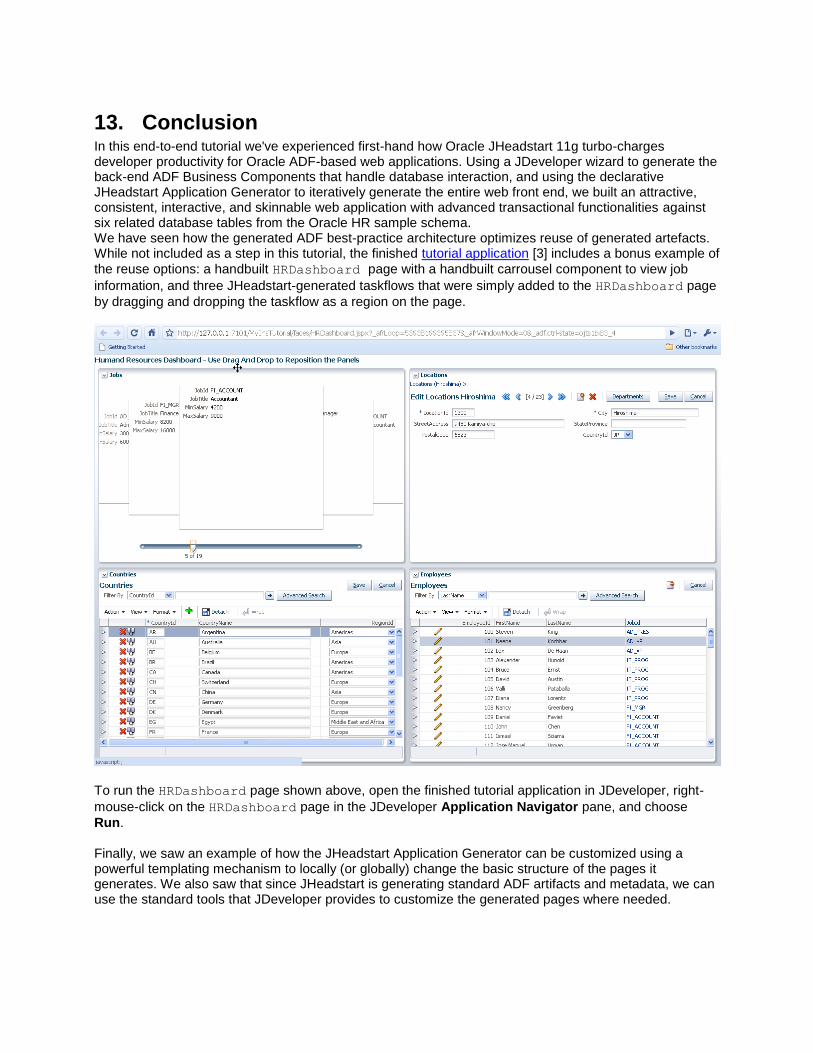
13. Conclusion In this end-to-end tutorial we've experienced first-hand how Oracle JHeadstart 11g turbo-charges developer productivity for Oracle ADF-based web applications. Using a JDeveloper wizard to generate the back-end ADF Business Components that handle database interaction, and using the declarative JHeadstart Application Generator to iteratively generate the entire web front end, we built an attractive, consistent, interactive, and skinnable web application with advanced transactional functionalities against six related database tables from the Oracle HR sample schema. We have seen how the generated ADF best-practice architecture optimizes reuse of generated artefacts. While not included as a step in this tutorial, the finished tutorial application [3] includes a bonus example of
the reuse options: a handbuilt HRDashboard page with a handbuilt carrousel component to view job
information, and three JHeadstart-generated taskflows that were simply added to the HRDashboard page
by dragging and dropping the taskflow as a region on the page.
To run the HRDashboard page shown above, open the finished tutorial application in JDeveloper, right-
mouse-click on the HRDashboard page in the JDeveloper Application Navigator pane, and choose
Run. Finally, we saw an example of how the JHeadstart Application Generator can be customized using a powerful templating mechanism to locally (or globally) change the basic structure of the pages it generates. We also saw that since JHeadstart is generating standard ADF artifacts and metadata, we can use the standard tools that JDeveloper provides to customize the generated pages where needed.
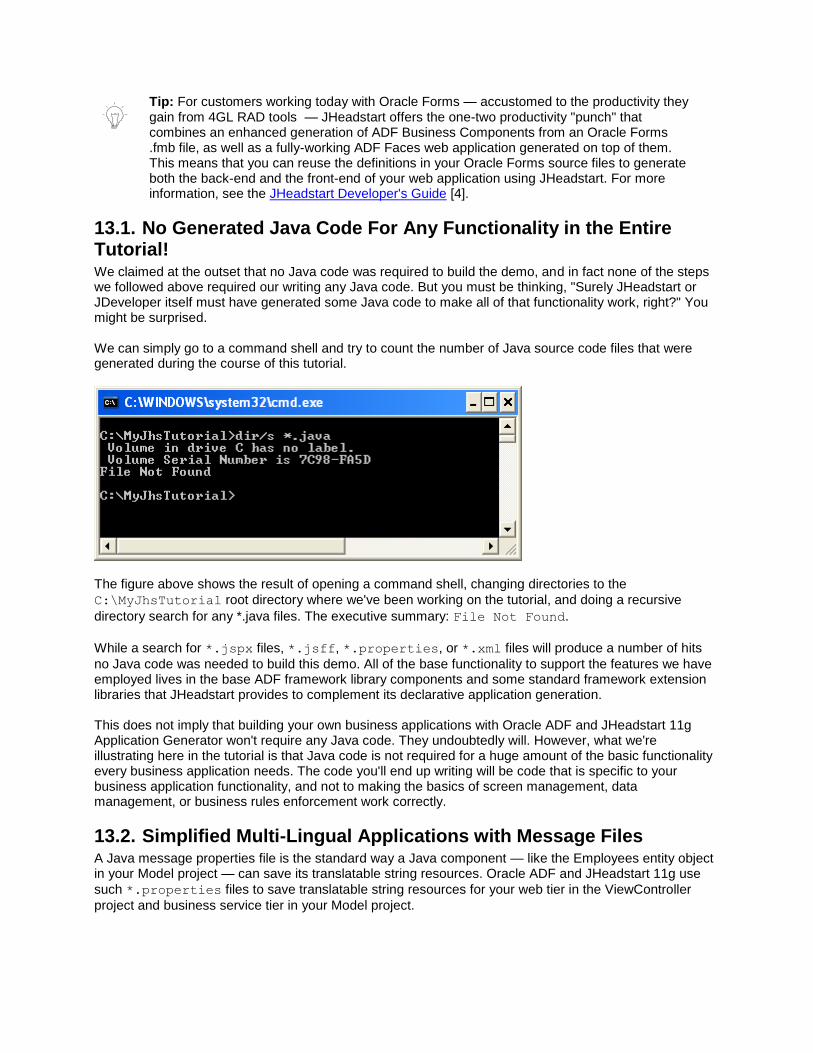
Tip: For customers working today with Oracle Forms — accustomed to the productivity they gain from 4GL RAD tools — JHeadstart offers the one-two productivity "punch" that combines an enhanced generation of ADF Business Components from an Oracle Forms .fmb file, as well as a fully-working ADF Faces web application generated on top of them. This means that you can reuse the definitions in your Oracle Forms source files to generate both the back-end and the front-end of your web application using JHeadstart. For more information, see the JHeadstart Developer's Guide [4].
13.1. No Generated Java Code For Any Functionality in the Entire Tutorial! We claimed at the outset that no Java code was required to build the demo, and in fact none of the steps we followed above required our writing any Java code. But you must be thinking, "Surely JHeadstart or JDeveloper itself must have generated some Java code to make all of that functionality work, right?" You might be surprised. We can simply go to a command shell and try to count the number of Java source code files that were generated during the course of this tutorial.
The figure above shows the result of opening a command shell, changing directories to the
C:\MyJhsTutorial root directory where we've been working on the tutorial, and doing a recursive
directory search for any *.java files. The executive summary: File Not Found.
While a search for *.jspx files, *.jsff, *.properties, or *.xml files will produce a number of hits
no Java code was needed to build this demo. All of the base functionality to support the features we have employed lives in the base ADF framework library components and some standard framework extension libraries that JHeadstart provides to complement its declarative application generation. This does not imply that building your own business applications with Oracle ADF and JHeadstart 11g Application Generator won't require any Java code. They undoubtedly will. However, what we're illustrating here in the tutorial is that Java code is not required for a huge amount of the basic functionality every business application needs. The code you'll end up writing will be code that is specific to your business application functionality, and not to making the basics of screen management, data management, or business rules enforcement work correctly.
13.2. Simplified Multi-Lingual Applications with Message Files A Java message properties file is the standard way a Java component — like the Employees entity object in your Model project — can save its translatable string resources. Oracle ADF and JHeadstart 11g use
such *.properties files to save translatable string resources for your web tier in the ViewController
project and business service tier in your Model project.

If we look a little more closely at the ModelBundle.properties file, you’l see the modified label for
DepartmentId and the error message for the Employees entity object's range validation rule that we
added above:
Liekwise, the ApplicationResources_en.properties file in the ViewController project contains
all the translatable strings generated into the various pages. Using a combination of *.properties files and Java message bundles like this, the applications you build with Oracle ADF and Oracle JHeadstart 11g for ADF are setup out of the box to use the best-practice techniques to make building even multi-lingual applications easy!
13.3. Now You Can Try On Your Own Schema At this point you are ready to try Oracle JHeadstart Evaluation Version on your own database schema. Keep in mind that the evaluation version of JHeadstart is fully-functional and has no time-limit, however it does limit you to working with a maximum of only ten (10) different view objects in your workspace. If you try to run the JHeadstart application generator in a workspace with more than ten view objects, you'll see the JAG error: JAG-00130 [ JHeadstart ] You can have only 10 ViewObjects in your workspace
when using the JHeadstart Evaluation Version.
This lets you experiment with every feature of the powerful JHeadstart product on a selected group of your real-world application tables to demonstrate to yourself, your colleagues, and your management the boost in development productivity it can provide you. In addition to the features showcased in this tutorial, you can add other powerful JHeadstart features like fine-grained security, and the ability to define so-called flex fields at runtime. You can find more information on these additional features in the JHeadstart Developer’s Guide [4]. If you like what you see, you can find information on getting the full JHeadstart product on the JHeadstart Product Center on OTN [5].
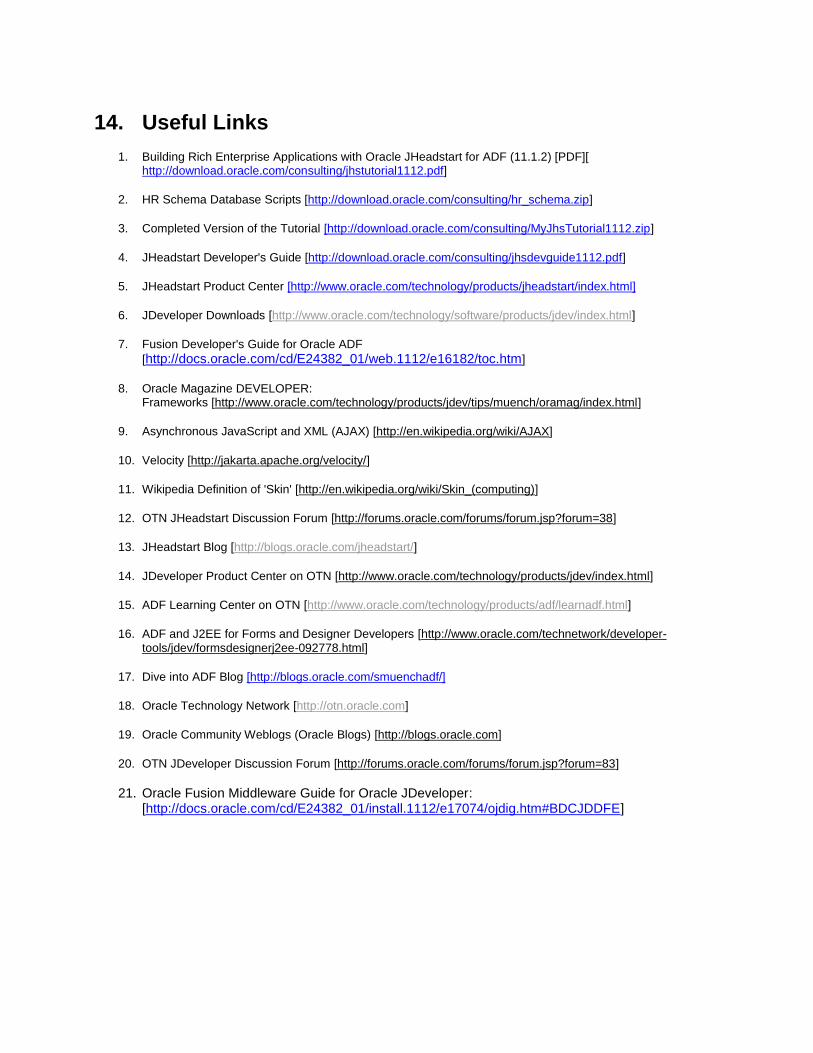
14. Useful Links
1. Building Rich Enterprise Applications with Oracle JHeadstart for ADF (11.1.2) [PDF][ http://download.oracle.com/consulting/jhstutorial1112.pdf]
2. HR Schema Database Scripts [http://download.oracle.com/consulting/hr_schema.zip]
3. Completed Version of the Tutorial [http://download.oracle.com/consulting/MyJhsTutorial1112.zip]
4. JHeadstart Developer's Guide [http://download.oracle.com/consulting/jhsdevguide1112.pdf]
5. JHeadstart Product Center [http://www.oracle.com/technology/products/jheadstart/index.html]
6. JDeveloper Downloads [http://www.oracle.com/technology/software/products/jdev/index.html]
7. Fusion Developer's Guide for Oracle ADF
[http://docs.oracle.com/cd/E24382_01/web.1112/e16182/toc.htm]
8. Oracle Magazine DEVELOPER: Frameworks [http://www.oracle.com/technology/products/jdev/tips/muench/oramag/index.html]
9. Asynchronous JavaScript and XML (AJAX) [http://en.wikipedia.org/wiki/AJAX]
10. Velocity [http://jakarta.apache.org/velocity/]
11. Wikipedia Definition of 'Skin' [http://en.wikipedia.org/wiki/Skin_(computing)]
12. OTN JHeadstart Discussion Forum [http://forums.oracle.com/forums/forum.jsp?forum=38]
13. JHeadstart Blog [http://blogs.oracle.com/jheadstart/]
14. JDeveloper Product Center on OTN [http://www.oracle.com/technology/products/jdev/index.html]
15. ADF Learning Center on OTN [http://www.oracle.com/technology/products/adf/learnadf.html]
16. ADF and J2EE for Forms and Designer Developers [http://www.oracle.com/technetwork/developer-
tools/jdev/formsdesignerj2ee-092778.html]
17. Dive into ADF Blog [http://blogs.oracle.com/smuenchadf/]
18. Oracle Technology Network [http://otn.oracle.com]
19. Oracle Community Weblogs (Oracle Blogs) [http://blogs.oracle.com]
20. OTN JDeveloper Discussion Forum [http://forums.oracle.com/forums/forum.jsp?forum=83]
21. Oracle Fusion Middleware Guide for Oracle JDeveloper: [http://docs.oracle.com/cd/E24382_01/install.1112/e17074/ojdig.htm#BDCJDDFE]