Embed Size (px)
Citation preview

Oracle® Hyperion Financial Management
User's Guide
Release 11.1.2.4.100
Updated: October 2015
Financial Management User's Guide, 11.1.2.4.100
Copyright © 2000, 2015, Oracle and/or its affiliates. All rights reserved.
Authors: EPM Information Development Team
This software and related documentation are provided under a license agreement containing restrictions on use anddisclosure and are protected by intellectual property laws. Except as expressly permitted in your license agreement orallowed by law, you may not use, copy, reproduce, translate, broadcast, modify, license, transmit, distribute, exhibit,perform, publish, or display any part, in any form, or by any means. Reverse engineering, disassembly, or decompilationof this software, unless required by law for interoperability, is prohibited.
The information contained herein is subject to change without notice and is not warranted to be error-free. If you findany errors, please report them to us in writing.
If this is software or related documentation that is delivered to the U.S. Government or anyone licensing it on behalf ofthe U.S. Government, then the following notice is applicable:
U.S. GOVERNMENT END USERS:
Oracle programs, including any operating system, integrated software, any programs installed on the hardware, and/ordocumentation, delivered to U.S. Government end users are "commercial computer software" pursuant to the applicableFederal Acquisition Regulation and agency-specific supplemental regulations. As such, use, duplication, disclosure,modification, and adaptation of the programs, including any operating system, integrated software, any programs installedon the hardware, and/or documentation, shall be subject to license terms and license restrictions applicable to the programs.No other rights are granted to the U.S. Government.
This software or hardware is developed for general use in a variety of information management applications. It is notdeveloped or intended for use in any inherently dangerous applications, including applications that may create a risk ofpersonal injury. If you use this software or hardware in dangerous applications, then you shall be responsible to take allappropriate fail-safe, backup, redundancy, and other measures to ensure its safe use. Oracle Corporation and its affiliatesdisclaim any liability for any damages caused by use of this software or hardware in dangerous applications.
Oracle and Java are registered trademarks of Oracle and/or its affiliates. Other names may be trademarks of their respectiveowners.
Intel and Intel Xeon are trademarks or registered trademarks of Intel Corporation. All SPARC trademarks are used underlicense and are trademarks or registered trademarks of SPARC International, Inc. AMD, Opteron, the AMD logo, and theAMD Opteron logo are trademarks or registered trademarks of Advanced Micro Devices. UNIX is a registered trademarkof The Open Group.
This software or hardware and documentation may provide access to or information about content, products, and servicesfrom third parties. Oracle Corporation and its affiliates are not responsible for and expressly disclaim all warranties of anykind with respect to third-party content, products, and services unless otherwise set forth in an applicable agreementbetween you and Oracle. Oracle Corporation and its affiliates will not be responsible for any loss, costs, or damages incurreddue to your access to or use of third-party content, products, or services, except as set forth in an applicable agreementbetween you and Oracle.
Contents
Documentation Accessibility . . . . . . . . . . . . . . . . . . . . . . . . . . . . . . . . . . . . . . . . . . . . . . . . . . . . . . . . . . 13
Documentation Feedback . . . . . . . . . . . . . . . . . . . . . . . . . . . . . . . . . . . . . . . . . . . . . . . . . . . . . . . . . . . . 15
Chapter 1. About Financial Management . . . . . . . . . . . . . . . . . . . . . . . . . . . . . . . . . . . . . . . . . . . . . . . . . 17
Financial Management Features . . . . . . . . . . . . . . . . . . . . . . . . . . . . . . . . . . . . . . . . . . . 17
Performance Management Architect . . . . . . . . . . . . . . . . . . . . . . . . . . . . . . . . . . . . . . . 18
EPM Workspace . . . . . . . . . . . . . . . . . . . . . . . . . . . . . . . . . . . . . . . . . . . . . . . . . . . . . . 18
Financial Management Dimensions . . . . . . . . . . . . . . . . . . . . . . . . . . . . . . . . . . . . . . . . 18
Scenario Dimension . . . . . . . . . . . . . . . . . . . . . . . . . . . . . . . . . . . . . . . . . . . . . . . . 19
Year Dimension . . . . . . . . . . . . . . . . . . . . . . . . . . . . . . . . . . . . . . . . . . . . . . . . . . . 19
Period Dimension . . . . . . . . . . . . . . . . . . . . . . . . . . . . . . . . . . . . . . . . . . . . . . . . . . 19
Entity Dimension . . . . . . . . . . . . . . . . . . . . . . . . . . . . . . . . . . . . . . . . . . . . . . . . . . 19
Value Dimension . . . . . . . . . . . . . . . . . . . . . . . . . . . . . . . . . . . . . . . . . . . . . . . . . . 20
Account Dimension . . . . . . . . . . . . . . . . . . . . . . . . . . . . . . . . . . . . . . . . . . . . . . . . 20
Intercompany Dimension . . . . . . . . . . . . . . . . . . . . . . . . . . . . . . . . . . . . . . . . . . . . 20
View Dimension . . . . . . . . . . . . . . . . . . . . . . . . . . . . . . . . . . . . . . . . . . . . . . . . . . . 20
Custom Dimensions . . . . . . . . . . . . . . . . . . . . . . . . . . . . . . . . . . . . . . . . . . . . . . . . 20
User-Defined Elements . . . . . . . . . . . . . . . . . . . . . . . . . . . . . . . . . . . . . . . . . . . . . . . . . 21
Chapter 2. Basic Financial Management Procedures . . . . . . . . . . . . . . . . . . . . . . . . . . . . . . . . . . . . . . . . . 25
Starting Financial Management . . . . . . . . . . . . . . . . . . . . . . . . . . . . . . . . . . . . . . . . . . . 25
Opening Applications . . . . . . . . . . . . . . . . . . . . . . . . . . . . . . . . . . . . . . . . . . . . . . . . . . 26
Closing Applications . . . . . . . . . . . . . . . . . . . . . . . . . . . . . . . . . . . . . . . . . . . . . . . . . . . 26
Setting User Preferences . . . . . . . . . . . . . . . . . . . . . . . . . . . . . . . . . . . . . . . . . . . . . . . . 26
Specifying a Cluster . . . . . . . . . . . . . . . . . . . . . . . . . . . . . . . . . . . . . . . . . . . . . . . . . 27
Specifying Default Language for Descriptions . . . . . . . . . . . . . . . . . . . . . . . . . . . . . . 27
Specifying Number Formatting . . . . . . . . . . . . . . . . . . . . . . . . . . . . . . . . . . . . . . . . 27
Specifying File Extract Options . . . . . . . . . . . . . . . . . . . . . . . . . . . . . . . . . . . . . . . . 27
Using Document Manager as the Default Page . . . . . . . . . . . . . . . . . . . . . . . . . . . . . 27
Setting User Preferences . . . . . . . . . . . . . . . . . . . . . . . . . . . . . . . . . . . . . . . . . . . . . 27
Enabling Multibyte Language Date and Time Formats . . . . . . . . . . . . . . . . . . . . . . . . . . . 28
Using Financial Management Help . . . . . . . . . . . . . . . . . . . . . . . . . . . . . . . . . . . . . . . . 29
iii
Exiting Financial Management . . . . . . . . . . . . . . . . . . . . . . . . . . . . . . . . . . . . . . . . . . . . 29
Using Financial Management . . . . . . . . . . . . . . . . . . . . . . . . . . . . . . . . . . . . . . . . . . . . 29
Setting Point of View Bar Options . . . . . . . . . . . . . . . . . . . . . . . . . . . . . . . . . . . . . . 29
Selecting Members for the Point of View . . . . . . . . . . . . . . . . . . . . . . . . . . . . . . . . . 30
Selecting Multiple Members . . . . . . . . . . . . . . . . . . . . . . . . . . . . . . . . . . . . . . . . . . 32
Finding Dimension Members . . . . . . . . . . . . . . . . . . . . . . . . . . . . . . . . . . . . . . . . . 33
Finding Selected Members . . . . . . . . . . . . . . . . . . . . . . . . . . . . . . . . . . . . . . . . . . . . 34
Saving Favorite Members . . . . . . . . . . . . . . . . . . . . . . . . . . . . . . . . . . . . . . . . . . . . 34
Selecting Favorite Members . . . . . . . . . . . . . . . . . . . . . . . . . . . . . . . . . . . . . . . . . . . 34
Selecting Members in Data Forms . . . . . . . . . . . . . . . . . . . . . . . . . . . . . . . . . . . . . . 35
Viewing Member Properties . . . . . . . . . . . . . . . . . . . . . . . . . . . . . . . . . . . . . . . . . . 35
Viewing Active Entities . . . . . . . . . . . . . . . . . . . . . . . . . . . . . . . . . . . . . . . . . . . . . . 35
Displaying Columns . . . . . . . . . . . . . . . . . . . . . . . . . . . . . . . . . . . . . . . . . . . . . . . . 36
Reordering Tabs . . . . . . . . . . . . . . . . . . . . . . . . . . . . . . . . . . . . . . . . . . . . . . . . . . . 37
Closing Tabs . . . . . . . . . . . . . . . . . . . . . . . . . . . . . . . . . . . . . . . . . . . . . . . . . . . . . . 37
Using Filters . . . . . . . . . . . . . . . . . . . . . . . . . . . . . . . . . . . . . . . . . . . . . . . . . . . . . . 37
Managing Documents . . . . . . . . . . . . . . . . . . . . . . . . . . . . . . . . . . . . . . . . . . . . . . . 38
Setting Up Links to Documents or Web Pages . . . . . . . . . . . . . . . . . . . . . . . . . . . . . . 42
Copying Document Links . . . . . . . . . . . . . . . . . . . . . . . . . . . . . . . . . . . . . . . . . . . . 42
Working with Custom Documents . . . . . . . . . . . . . . . . . . . . . . . . . . . . . . . . . . . . . . 42
Accessing Related Content . . . . . . . . . . . . . . . . . . . . . . . . . . . . . . . . . . . . . . . . . . . . 43
Managing Task Lists . . . . . . . . . . . . . . . . . . . . . . . . . . . . . . . . . . . . . . . . . . . . . . . . 44
Managing Favorites . . . . . . . . . . . . . . . . . . . . . . . . . . . . . . . . . . . . . . . . . . . . . . . . . 46
Chapter 3. Managing Data . . . . . . . . . . . . . . . . . . . . . . . . . . . . . . . . . . . . . . . . . . . . . . . . . . . . . . . . . . . 47
Working with Data Files . . . . . . . . . . . . . . . . . . . . . . . . . . . . . . . . . . . . . . . . . . . . . . . . 47
Data File Sections . . . . . . . . . . . . . . . . . . . . . . . . . . . . . . . . . . . . . . . . . . . . . . . . . . 48
Dimension Groupings . . . . . . . . . . . . . . . . . . . . . . . . . . . . . . . . . . . . . . . . . . . . . . . 49
Data File Example . . . . . . . . . . . . . . . . . . . . . . . . . . . . . . . . . . . . . . . . . . . . . . . . . . 50
Load Methods . . . . . . . . . . . . . . . . . . . . . . . . . . . . . . . . . . . . . . . . . . . . . . . . . . . . . . . 50
Merge . . . . . . . . . . . . . . . . . . . . . . . . . . . . . . . . . . . . . . . . . . . . . . . . . . . . . . . . . . 51
Replace . . . . . . . . . . . . . . . . . . . . . . . . . . . . . . . . . . . . . . . . . . . . . . . . . . . . . . . . . 51
Replace by Security . . . . . . . . . . . . . . . . . . . . . . . . . . . . . . . . . . . . . . . . . . . . . . . . . 52
Accumulate . . . . . . . . . . . . . . . . . . . . . . . . . . . . . . . . . . . . . . . . . . . . . . . . . . . . . . 52
Load Example . . . . . . . . . . . . . . . . . . . . . . . . . . . . . . . . . . . . . . . . . . . . . . . . . . . . . 52
Loading Data . . . . . . . . . . . . . . . . . . . . . . . . . . . . . . . . . . . . . . . . . . . . . . . . . . . . . . . . 53
Viewing Data Load Progress . . . . . . . . . . . . . . . . . . . . . . . . . . . . . . . . . . . . . . . . . . 55
Canceling Data Load Tasks . . . . . . . . . . . . . . . . . . . . . . . . . . . . . . . . . . . . . . . . . . . 55
Loading Submission Groups . . . . . . . . . . . . . . . . . . . . . . . . . . . . . . . . . . . . . . . . . . . . . 55
iv
Loading Drillable Region Definitions . . . . . . . . . . . . . . . . . . . . . . . . . . . . . . . . . . . . . . . 56
Extracting Data . . . . . . . . . . . . . . . . . . . . . . . . . . . . . . . . . . . . . . . . . . . . . . . . . . . . . . . 57
Flat File Extract Options . . . . . . . . . . . . . . . . . . . . . . . . . . . . . . . . . . . . . . . . . . . . . 57
Extracting Data to a Flat File . . . . . . . . . . . . . . . . . . . . . . . . . . . . . . . . . . . . . . . . . . 58
Managing Data . . . . . . . . . . . . . . . . . . . . . . . . . . . . . . . . . . . . . . . . . . . . . . . . . . . . . . . 59
Copying Data . . . . . . . . . . . . . . . . . . . . . . . . . . . . . . . . . . . . . . . . . . . . . . . . . . . . . . . . 60
Copying Line Item Detail . . . . . . . . . . . . . . . . . . . . . . . . . . . . . . . . . . . . . . . . . . . . 61
Copying Intercompany Transactions . . . . . . . . . . . . . . . . . . . . . . . . . . . . . . . . . . . . 62
Clearing Data . . . . . . . . . . . . . . . . . . . . . . . . . . . . . . . . . . . . . . . . . . . . . . . . . . . . . . . . 62
Chapter 4. Using Data Grids . . . . . . . . . . . . . . . . . . . . . . . . . . . . . . . . . . . . . . . . . . . . . . . . . . . . . . . . . . 65
Creating Data Grids . . . . . . . . . . . . . . . . . . . . . . . . . . . . . . . . . . . . . . . . . . . . . . . . . . . 65
Opening Data Grids . . . . . . . . . . . . . . . . . . . . . . . . . . . . . . . . . . . . . . . . . . . . . . . . . . . 66
Data Grid Tasks . . . . . . . . . . . . . . . . . . . . . . . . . . . . . . . . . . . . . . . . . . . . . . . . . . . . . . 66
Working with Data Grids . . . . . . . . . . . . . . . . . . . . . . . . . . . . . . . . . . . . . . . . . . . . . . . 67
Setting Data Grid Rows and Columns . . . . . . . . . . . . . . . . . . . . . . . . . . . . . . . . . . . 67
Setting Grid Display Options . . . . . . . . . . . . . . . . . . . . . . . . . . . . . . . . . . . . . . . . . . 68
Setting Grid Dimension Options . . . . . . . . . . . . . . . . . . . . . . . . . . . . . . . . . . . . . . . 69
Saving Data Grid Settings . . . . . . . . . . . . . . . . . . . . . . . . . . . . . . . . . . . . . . . . . . . . 70
Creating Data Grid Folders . . . . . . . . . . . . . . . . . . . . . . . . . . . . . . . . . . . . . . . . . . . 70
Extracting Data Grids . . . . . . . . . . . . . . . . . . . . . . . . . . . . . . . . . . . . . . . . . . . . . . . 71
Loading Data Grids . . . . . . . . . . . . . . . . . . . . . . . . . . . . . . . . . . . . . . . . . . . . . . . . . 71
Deleting Data Grids . . . . . . . . . . . . . . . . . . . . . . . . . . . . . . . . . . . . . . . . . . . . . . . . 72
Entering or Editing Data . . . . . . . . . . . . . . . . . . . . . . . . . . . . . . . . . . . . . . . . . . . . . . . . 72
Entering Data into Summary-Level Time Periods . . . . . . . . . . . . . . . . . . . . . . . . . . . 73
Copying and Pasting Cell Values . . . . . . . . . . . . . . . . . . . . . . . . . . . . . . . . . . . . . . . 73
Clearing Data . . . . . . . . . . . . . . . . . . . . . . . . . . . . . . . . . . . . . . . . . . . . . . . . . . . . . 74
Using Data Cell Colors to Determine Status . . . . . . . . . . . . . . . . . . . . . . . . . . . . . . . 74
Refreshing Data . . . . . . . . . . . . . . . . . . . . . . . . . . . . . . . . . . . . . . . . . . . . . . . . . . . 75
Viewing Data in Data Grids . . . . . . . . . . . . . . . . . . . . . . . . . . . . . . . . . . . . . . . . . . . . . . 75
Viewing Calculation Status . . . . . . . . . . . . . . . . . . . . . . . . . . . . . . . . . . . . . . . . . . . 75
Viewing Process Level . . . . . . . . . . . . . . . . . . . . . . . . . . . . . . . . . . . . . . . . . . . . . . . 77
Viewing Cell Information . . . . . . . . . . . . . . . . . . . . . . . . . . . . . . . . . . . . . . . . . . . . 77
Viewing Cell Adjustments . . . . . . . . . . . . . . . . . . . . . . . . . . . . . . . . . . . . . . . . . . . . 77
Adding Cell Text . . . . . . . . . . . . . . . . . . . . . . . . . . . . . . . . . . . . . . . . . . . . . . . . . . . 78
Viewing Cell Text . . . . . . . . . . . . . . . . . . . . . . . . . . . . . . . . . . . . . . . . . . . . . . . . . . 79
Attaching Documents to Data Grids . . . . . . . . . . . . . . . . . . . . . . . . . . . . . . . . . . . . . 79
Adding Line Item Detail . . . . . . . . . . . . . . . . . . . . . . . . . . . . . . . . . . . . . . . . . . . . . 80
Viewing Line Item Detail . . . . . . . . . . . . . . . . . . . . . . . . . . . . . . . . . . . . . . . . . . . . . 81
v
Line Item Detail Options . . . . . . . . . . . . . . . . . . . . . . . . . . . . . . . . . . . . . . . . . . . . . 81
Viewing Cell History . . . . . . . . . . . . . . . . . . . . . . . . . . . . . . . . . . . . . . . . . . . . . . . . 82
Running Data Allocations . . . . . . . . . . . . . . . . . . . . . . . . . . . . . . . . . . . . . . . . . . . . . . . 82
Running Equity Pickup Calculations from Data Grids . . . . . . . . . . . . . . . . . . . . . . . . . . . 83
Locking Data . . . . . . . . . . . . . . . . . . . . . . . . . . . . . . . . . . . . . . . . . . . . . . . . . . . . . . . . 83
Unlocking Data . . . . . . . . . . . . . . . . . . . . . . . . . . . . . . . . . . . . . . . . . . . . . . . . . . . . . . 83
Viewing Source and Destination Transactions . . . . . . . . . . . . . . . . . . . . . . . . . . . . . . . . 84
Running Entity Detail Reports . . . . . . . . . . . . . . . . . . . . . . . . . . . . . . . . . . . . . . . . . . . . 84
Starting the Entity Detail Report . . . . . . . . . . . . . . . . . . . . . . . . . . . . . . . . . . . . . . . 85
Accessing the Entity Detail Report using an External URL . . . . . . . . . . . . . . . . . . . . . 85
Report Point of View . . . . . . . . . . . . . . . . . . . . . . . . . . . . . . . . . . . . . . . . . . . . . . . . 86
Selecting Rows and Columns for the Report . . . . . . . . . . . . . . . . . . . . . . . . . . . . . . . 86
Displaying Line Item Detail . . . . . . . . . . . . . . . . . . . . . . . . . . . . . . . . . . . . . . . . . . . 87
Displaying Base Details . . . . . . . . . . . . . . . . . . . . . . . . . . . . . . . . . . . . . . . . . . . . . . 87
Displaying Source and Destination Transactions . . . . . . . . . . . . . . . . . . . . . . . . . . . . 88
Linking to Journal Detail . . . . . . . . . . . . . . . . . . . . . . . . . . . . . . . . . . . . . . . . . . . . . 88
Printing Entity Detail Reports . . . . . . . . . . . . . . . . . . . . . . . . . . . . . . . . . . . . . . . . . 88
Drilling Through to Intercompany Transactions . . . . . . . . . . . . . . . . . . . . . . . . . . . . . . . 88
Drilling Through to Source Data . . . . . . . . . . . . . . . . . . . . . . . . . . . . . . . . . . . . . . . . . . 89
Launching Oracle Financial Management Analytics . . . . . . . . . . . . . . . . . . . . . . . . . . . . . 89
Process Management Options . . . . . . . . . . . . . . . . . . . . . . . . . . . . . . . . . . . . . . . . . . . . 90
Chapter 5. Consolidating Data . . . . . . . . . . . . . . . . . . . . . . . . . . . . . . . . . . . . . . . . . . . . . . . . . . . . . . . . . 91
Consolidation Process . . . . . . . . . . . . . . . . . . . . . . . . . . . . . . . . . . . . . . . . . . . . . . . . . . 91
Translation Process . . . . . . . . . . . . . . . . . . . . . . . . . . . . . . . . . . . . . . . . . . . . . . . . . 94
Calculation Process . . . . . . . . . . . . . . . . . . . . . . . . . . . . . . . . . . . . . . . . . . . . . . . . . 95
Entering Currency Rates . . . . . . . . . . . . . . . . . . . . . . . . . . . . . . . . . . . . . . . . . . . . . . . . 95
Entering Percent Consolidations . . . . . . . . . . . . . . . . . . . . . . . . . . . . . . . . . . . . . . . . . . 96
Calculating Data . . . . . . . . . . . . . . . . . . . . . . . . . . . . . . . . . . . . . . . . . . . . . . . . . . . . . . 97
Translating Data . . . . . . . . . . . . . . . . . . . . . . . . . . . . . . . . . . . . . . . . . . . . . . . . . . . . . . 98
Consolidation Options . . . . . . . . . . . . . . . . . . . . . . . . . . . . . . . . . . . . . . . . . . . . . . . . . 99
Consolidate (Impacted Consolidation) . . . . . . . . . . . . . . . . . . . . . . . . . . . . . . . . . . . 99
Consolidate All with Data . . . . . . . . . . . . . . . . . . . . . . . . . . . . . . . . . . . . . . . . . . . . 99
Consolidate All . . . . . . . . . . . . . . . . . . . . . . . . . . . . . . . . . . . . . . . . . . . . . . . . . . . 100
Consolidating Data . . . . . . . . . . . . . . . . . . . . . . . . . . . . . . . . . . . . . . . . . . . . . . . . . . . 100
Viewing Consolidation Progress . . . . . . . . . . . . . . . . . . . . . . . . . . . . . . . . . . . . . . 101
Canceling Consolidation Tasks . . . . . . . . . . . . . . . . . . . . . . . . . . . . . . . . . . . . . . . 101
Consolidation Status . . . . . . . . . . . . . . . . . . . . . . . . . . . . . . . . . . . . . . . . . . . . . . . . . . 102
vi
Chapter 6. Using Data Forms . . . . . . . . . . . . . . . . . . . . . . . . . . . . . . . . . . . . . . . . . . . . . . . . . . . . . . . . . 103
Working with Data Forms . . . . . . . . . . . . . . . . . . . . . . . . . . . . . . . . . . . . . . . . . . . . . . 103
Opening Data Forms . . . . . . . . . . . . . . . . . . . . . . . . . . . . . . . . . . . . . . . . . . . . . . . . . . 104
Using the Data Form Toolbar . . . . . . . . . . . . . . . . . . . . . . . . . . . . . . . . . . . . . . . . . . . 104
Viewing Data Form Instructions . . . . . . . . . . . . . . . . . . . . . . . . . . . . . . . . . . . . . . . . . 105
Opening Data Forms in Smart View . . . . . . . . . . . . . . . . . . . . . . . . . . . . . . . . . . . . . . . 106
Entering Data in Data Forms . . . . . . . . . . . . . . . . . . . . . . . . . . . . . . . . . . . . . . . . . . . . 106
Shortcut Menu Commands . . . . . . . . . . . . . . . . . . . . . . . . . . . . . . . . . . . . . . . . . . . . . 107
Working with Cell Text . . . . . . . . . . . . . . . . . . . . . . . . . . . . . . . . . . . . . . . . . . . . . . . . 108
Entering Cell Text in Data Forms . . . . . . . . . . . . . . . . . . . . . . . . . . . . . . . . . . . . . . 108
Viewing Cell Text in Data Forms . . . . . . . . . . . . . . . . . . . . . . . . . . . . . . . . . . . . . . 109
Editing Cell Text in Data Forms . . . . . . . . . . . . . . . . . . . . . . . . . . . . . . . . . . . . . . . 110
Attaching Documents to Data Forms . . . . . . . . . . . . . . . . . . . . . . . . . . . . . . . . . . . . . . 111
Entering Line Item Detail in Data Forms . . . . . . . . . . . . . . . . . . . . . . . . . . . . . . . . . . . 112
Viewing Line Item Detail in Data Forms . . . . . . . . . . . . . . . . . . . . . . . . . . . . . . . . . . . . 112
Deleting Line Item Detail in Data Forms . . . . . . . . . . . . . . . . . . . . . . . . . . . . . . . . . . . 113
Using Linked Forms . . . . . . . . . . . . . . . . . . . . . . . . . . . . . . . . . . . . . . . . . . . . . . . . . . 113
Changing the Point of View in Data Forms . . . . . . . . . . . . . . . . . . . . . . . . . . . . . . . . . . 113
Calculating Data in Data Forms . . . . . . . . . . . . . . . . . . . . . . . . . . . . . . . . . . . . . . . . . . 114
Running On-Demand Rules in Data Forms . . . . . . . . . . . . . . . . . . . . . . . . . . . . . . 115
Suppressing Data in Data Forms . . . . . . . . . . . . . . . . . . . . . . . . . . . . . . . . . . . . . . 115
Adding Members to Data Forms . . . . . . . . . . . . . . . . . . . . . . . . . . . . . . . . . . . . . . 116
Printing Data Forms . . . . . . . . . . . . . . . . . . . . . . . . . . . . . . . . . . . . . . . . . . . . . . . 117
Drilling Through to Intercompany Transactions . . . . . . . . . . . . . . . . . . . . . . . . . . . . . . 117
Drilling Through to Source Data . . . . . . . . . . . . . . . . . . . . . . . . . . . . . . . . . . . . . . . . . 117
Chapter 7. Managing Ownership . . . . . . . . . . . . . . . . . . . . . . . . . . . . . . . . . . . . . . . . . . . . . . . . . . . . . . 119
Managing Ownership . . . . . . . . . . . . . . . . . . . . . . . . . . . . . . . . . . . . . . . . . . . . . . . . . 119
Changing the Point of View . . . . . . . . . . . . . . . . . . . . . . . . . . . . . . . . . . . . . . . . . . 120
Setting Display Options . . . . . . . . . . . . . . . . . . . . . . . . . . . . . . . . . . . . . . . . . . . . . 120
Entering Ownership Information . . . . . . . . . . . . . . . . . . . . . . . . . . . . . . . . . . . . . . . . . 121
Copying and Pasting Ownership Values . . . . . . . . . . . . . . . . . . . . . . . . . . . . . . . . . . . . 122
Ownership Calculation Process . . . . . . . . . . . . . . . . . . . . . . . . . . . . . . . . . . . . . . . . . . 123
Percent Ownership . . . . . . . . . . . . . . . . . . . . . . . . . . . . . . . . . . . . . . . . . . . . . . . . 123
Percent Control . . . . . . . . . . . . . . . . . . . . . . . . . . . . . . . . . . . . . . . . . . . . . . . . . . 123
Direct Percent Ownership . . . . . . . . . . . . . . . . . . . . . . . . . . . . . . . . . . . . . . . . . . . 123
Percent Consolidation . . . . . . . . . . . . . . . . . . . . . . . . . . . . . . . . . . . . . . . . . . . . . . 124
Consolidation Method . . . . . . . . . . . . . . . . . . . . . . . . . . . . . . . . . . . . . . . . . . . . . 124
Calculating Ownership . . . . . . . . . . . . . . . . . . . . . . . . . . . . . . . . . . . . . . . . . . . . . . . . 124
vii
Chapter 8. Managing Equity Pickup . . . . . . . . . . . . . . . . . . . . . . . . . . . . . . . . . . . . . . . . . . . . . . . . . . . . 127
About Equity Pickup . . . . . . . . . . . . . . . . . . . . . . . . . . . . . . . . . . . . . . . . . . . . . . . . . . 127
Examples of Equity Pickup Adjustments . . . . . . . . . . . . . . . . . . . . . . . . . . . . . . . . . . . . 128
Example 1: Direct Ownership . . . . . . . . . . . . . . . . . . . . . . . . . . . . . . . . . . . . . . . . 128
Example 2: Direct Ownership with Translation . . . . . . . . . . . . . . . . . . . . . . . . . . . . 129
Example 3: Cascading Ownership and Subholdings . . . . . . . . . . . . . . . . . . . . . . . . . 130
Example 4: Cross-Ownership . . . . . . . . . . . . . . . . . . . . . . . . . . . . . . . . . . . . . . . . . 133
Managing Equity Pickup . . . . . . . . . . . . . . . . . . . . . . . . . . . . . . . . . . . . . . . . . . . . . . . 135
Modifying the Display of the Manage Equity Pickup Table . . . . . . . . . . . . . . . . . . . . . . 136
Calculating Equity Pickup Adjustments . . . . . . . . . . . . . . . . . . . . . . . . . . . . . . . . . . . . 137
Printing Equity Pickup Reports . . . . . . . . . . . . . . . . . . . . . . . . . . . . . . . . . . . . . . . . . . 138
EPU Calculation Process . . . . . . . . . . . . . . . . . . . . . . . . . . . . . . . . . . . . . . . . . . . . . . . 138
Chapter 9. Reporting on Financial Management Data . . . . . . . . . . . . . . . . . . . . . . . . . . . . . . . . . . . . . . . . 141
Creating Reports . . . . . . . . . . . . . . . . . . . . . . . . . . . . . . . . . . . . . . . . . . . . . . . . . . . . . 141
Opening Reports . . . . . . . . . . . . . . . . . . . . . . . . . . . . . . . . . . . . . . . . . . . . . . . . . . . . . 142
Formatting System Reports . . . . . . . . . . . . . . . . . . . . . . . . . . . . . . . . . . . . . . . . . . . . . 142
Editing Reports . . . . . . . . . . . . . . . . . . . . . . . . . . . . . . . . . . . . . . . . . . . . . . . . . . . . . . 143
Saving Reports . . . . . . . . . . . . . . . . . . . . . . . . . . . . . . . . . . . . . . . . . . . . . . . . . . . . . . 144
Drilling Through to Intercompany Transactions . . . . . . . . . . . . . . . . . . . . . . . . . . . . . . 144
Printing Reports . . . . . . . . . . . . . . . . . . . . . . . . . . . . . . . . . . . . . . . . . . . . . . . . . . . . . 144
Deleting Reports . . . . . . . . . . . . . . . . . . . . . . . . . . . . . . . . . . . . . . . . . . . . . . . . . . . . . 145
Chapter 10. Processing Intercompany Transactions . . . . . . . . . . . . . . . . . . . . . . . . . . . . . . . . . . . . . . . . . 147
Intercompany Transaction Module Features . . . . . . . . . . . . . . . . . . . . . . . . . . . . . . . . . 147
Intercompany Transaction Security Roles . . . . . . . . . . . . . . . . . . . . . . . . . . . . . . . . . . . 148
Sample Intercompany Transactions Task Flow . . . . . . . . . . . . . . . . . . . . . . . . . . . . . . . 149
Intercompany Transaction Load Files . . . . . . . . . . . . . . . . . . . . . . . . . . . . . . . . . . . . . . 150
Section Headers in the Load File . . . . . . . . . . . . . . . . . . . . . . . . . . . . . . . . . . . . . . 151
Special Keywords in the Load File . . . . . . . . . . . . . . . . . . . . . . . . . . . . . . . . . . . . . 151
Intercompany Transaction File Example . . . . . . . . . . . . . . . . . . . . . . . . . . . . . . . . . 151
Load Methods . . . . . . . . . . . . . . . . . . . . . . . . . . . . . . . . . . . . . . . . . . . . . . . . . . . 152
Loading Intercompany Transactions . . . . . . . . . . . . . . . . . . . . . . . . . . . . . . . . . . . . . . 153
Extracting Intercompany Transaction Files . . . . . . . . . . . . . . . . . . . . . . . . . . . . . . . . . . 154
About Managing Intercompany Transactions . . . . . . . . . . . . . . . . . . . . . . . . . . . . . . . . 155
Creating Intercompany Transactions . . . . . . . . . . . . . . . . . . . . . . . . . . . . . . . . . . . . . . 155
Viewing Intercompany Transactions . . . . . . . . . . . . . . . . . . . . . . . . . . . . . . . . . . . . . . 158
Selecting an Entity and Partner . . . . . . . . . . . . . . . . . . . . . . . . . . . . . . . . . . . . . . . 159
Displaying Transaction Columns . . . . . . . . . . . . . . . . . . . . . . . . . . . . . . . . . . . . . . 159
Displaying Transaction Rows . . . . . . . . . . . . . . . . . . . . . . . . . . . . . . . . . . . . . . . . . 160
viii
Selecting Intercompany Transactions . . . . . . . . . . . . . . . . . . . . . . . . . . . . . . . . . . . . . . 161
Editing Intercompany Transactions . . . . . . . . . . . . . . . . . . . . . . . . . . . . . . . . . . . . . . . 161
Duplicating Intercompany Transactions . . . . . . . . . . . . . . . . . . . . . . . . . . . . . . . . . . . . 162
Assigning Reason Codes to Intercompany Transactions . . . . . . . . . . . . . . . . . . . . . . . . . 162
Matching Intercompany Transactions . . . . . . . . . . . . . . . . . . . . . . . . . . . . . . . . . . . . . 163
Auto-Match Process . . . . . . . . . . . . . . . . . . . . . . . . . . . . . . . . . . . . . . . . . . . . . . . 163
Auto-Matching Intercompany Transactions . . . . . . . . . . . . . . . . . . . . . . . . . . . . . . 166
Using Auto-Match Templates . . . . . . . . . . . . . . . . . . . . . . . . . . . . . . . . . . . . . . . . 167
Manually Matching Transactions with Tolerance Amount . . . . . . . . . . . . . . . . . . . 168
Manually Matching Transactions without Tolerance Amounts . . . . . . . . . . . . . . . . . 170
Generating Adjustments for Transaction Differences . . . . . . . . . . . . . . . . . . . . . . . . 170
Matching Status . . . . . . . . . . . . . . . . . . . . . . . . . . . . . . . . . . . . . . . . . . . . . . . . . . 171
Match Code . . . . . . . . . . . . . . . . . . . . . . . . . . . . . . . . . . . . . . . . . . . . . . . . . . . . . 172
Unmatching Intercompany Transactions . . . . . . . . . . . . . . . . . . . . . . . . . . . . . . . . . . . 172
Posting Intercompany Transactions . . . . . . . . . . . . . . . . . . . . . . . . . . . . . . . . . . . . . . . 173
Posting Process . . . . . . . . . . . . . . . . . . . . . . . . . . . . . . . . . . . . . . . . . . . . . . . . . . . 174
Posting to Flow Accounts . . . . . . . . . . . . . . . . . . . . . . . . . . . . . . . . . . . . . . . . . . . 174
Viewing Posted Status . . . . . . . . . . . . . . . . . . . . . . . . . . . . . . . . . . . . . . . . . . . . . . 175
Unposting Intercompany Transactions . . . . . . . . . . . . . . . . . . . . . . . . . . . . . . . . . . . . . 175
Viewing Intercompany Transaction Progress . . . . . . . . . . . . . . . . . . . . . . . . . . . . . . . . 176
Deleting Intercompany Transactions . . . . . . . . . . . . . . . . . . . . . . . . . . . . . . . . . . . . . . 176
Reporting on Intercompany Transactions . . . . . . . . . . . . . . . . . . . . . . . . . . . . . . . . . . . 177
Running Intercompany Transaction Reports . . . . . . . . . . . . . . . . . . . . . . . . . . . . . . . . 177
Displaying IC Transaction Report Columns . . . . . . . . . . . . . . . . . . . . . . . . . . . . . . 178
Displaying IC Transaction Report Rows . . . . . . . . . . . . . . . . . . . . . . . . . . . . . . . . . 180
Running Matching Reports . . . . . . . . . . . . . . . . . . . . . . . . . . . . . . . . . . . . . . . . . . . . . 180
Selecting Matching Report Options . . . . . . . . . . . . . . . . . . . . . . . . . . . . . . . . . . . . 180
Running a Matching Report by Account . . . . . . . . . . . . . . . . . . . . . . . . . . . . . . . . . 181
Running a Matching Report by Transaction ID . . . . . . . . . . . . . . . . . . . . . . . . . . . . 183
Drilling Through to Transaction Details . . . . . . . . . . . . . . . . . . . . . . . . . . . . . . . . . . . . 184
Email Alerts for Intercompany Transactions . . . . . . . . . . . . . . . . . . . . . . . . . . . . . . . . . 185
Chapter 11. Using Journals . . . . . . . . . . . . . . . . . . . . . . . . . . . . . . . . . . . . . . . . . . . . . . . . . . . . . . . . . . 187
About Journals . . . . . . . . . . . . . . . . . . . . . . . . . . . . . . . . . . . . . . . . . . . . . . . . . . . . . . 187
Journal Security Roles . . . . . . . . . . . . . . . . . . . . . . . . . . . . . . . . . . . . . . . . . . . . . . . . . 188
Using Journal Templates . . . . . . . . . . . . . . . . . . . . . . . . . . . . . . . . . . . . . . . . . . . . . . . 188
Creating Standard Journal Templates . . . . . . . . . . . . . . . . . . . . . . . . . . . . . . . . . . . 189
Creating Recurring Templates . . . . . . . . . . . . . . . . . . . . . . . . . . . . . . . . . . . . . . . . 190
Viewing Journal Template Lists . . . . . . . . . . . . . . . . . . . . . . . . . . . . . . . . . . . . . . . 191
ix
Filtering Journal Template Lists . . . . . . . . . . . . . . . . . . . . . . . . . . . . . . . . . . . . . . . 191
Displaying Columns in Journal Template Lists . . . . . . . . . . . . . . . . . . . . . . . . . . . . 192
Editing Journal Templates . . . . . . . . . . . . . . . . . . . . . . . . . . . . . . . . . . . . . . . . . . . 192
Printing Journal Templates . . . . . . . . . . . . . . . . . . . . . . . . . . . . . . . . . . . . . . . . . . 192
Deleting Journal Templates . . . . . . . . . . . . . . . . . . . . . . . . . . . . . . . . . . . . . . . . . . 193
Managing Journal Periods . . . . . . . . . . . . . . . . . . . . . . . . . . . . . . . . . . . . . . . . . . . . . . 193
Viewing Periods . . . . . . . . . . . . . . . . . . . . . . . . . . . . . . . . . . . . . . . . . . . . . . . . . . 193
Opening and Closing Periods . . . . . . . . . . . . . . . . . . . . . . . . . . . . . . . . . . . . . . . . . 194
Processing Journals . . . . . . . . . . . . . . . . . . . . . . . . . . . . . . . . . . . . . . . . . . . . . . . . . . . 194
Creating Journals . . . . . . . . . . . . . . . . . . . . . . . . . . . . . . . . . . . . . . . . . . . . . . . . . . . . 195
Creating Auto-reversing Journals . . . . . . . . . . . . . . . . . . . . . . . . . . . . . . . . . . . . . . 196
Creating Journals Using Recurring Templates . . . . . . . . . . . . . . . . . . . . . . . . . . . . . 197
Scanning Journals . . . . . . . . . . . . . . . . . . . . . . . . . . . . . . . . . . . . . . . . . . . . . . . . . . . . 198
Journal Status . . . . . . . . . . . . . . . . . . . . . . . . . . . . . . . . . . . . . . . . . . . . . . . . . . . . . . . 198
Managing Journal Groups . . . . . . . . . . . . . . . . . . . . . . . . . . . . . . . . . . . . . . . . . . . . . . 199
Creating Journal Groups . . . . . . . . . . . . . . . . . . . . . . . . . . . . . . . . . . . . . . . . . . . . 199
Deleting Journal Groups . . . . . . . . . . . . . . . . . . . . . . . . . . . . . . . . . . . . . . . . . . . . 199
Viewing Journal Lists . . . . . . . . . . . . . . . . . . . . . . . . . . . . . . . . . . . . . . . . . . . . . . . . . 200
Editing Journals . . . . . . . . . . . . . . . . . . . . . . . . . . . . . . . . . . . . . . . . . . . . . . . . . . . . . 200
Selecting Dimension Members for Journal Detail . . . . . . . . . . . . . . . . . . . . . . . . . . . . . 201
Copying and Pasting Journal Cells . . . . . . . . . . . . . . . . . . . . . . . . . . . . . . . . . . . . . . . . 202
Submitting Journals . . . . . . . . . . . . . . . . . . . . . . . . . . . . . . . . . . . . . . . . . . . . . . . . . . 202
Unsubmitting Journals . . . . . . . . . . . . . . . . . . . . . . . . . . . . . . . . . . . . . . . . . . . . . . . . 202
Approving Journals . . . . . . . . . . . . . . . . . . . . . . . . . . . . . . . . . . . . . . . . . . . . . . . . . . . 203
Rejecting Journals . . . . . . . . . . . . . . . . . . . . . . . . . . . . . . . . . . . . . . . . . . . . . . . . . . . . 203
Posting Journals . . . . . . . . . . . . . . . . . . . . . . . . . . . . . . . . . . . . . . . . . . . . . . . . . . . . . 203
Unposting Journals . . . . . . . . . . . . . . . . . . . . . . . . . . . . . . . . . . . . . . . . . . . . . . . . . . . 204
Reviewing Journals . . . . . . . . . . . . . . . . . . . . . . . . . . . . . . . . . . . . . . . . . . . . . . . . . . . 205
Journal Validation . . . . . . . . . . . . . . . . . . . . . . . . . . . . . . . . . . . . . . . . . . . . . . . . . . . 205
Viewing Automated Consolidation Journals . . . . . . . . . . . . . . . . . . . . . . . . . . . . . . . . . 206
Creating Journal Reports . . . . . . . . . . . . . . . . . . . . . . . . . . . . . . . . . . . . . . . . . . . . . . . 207
Displaying Columns for the Report . . . . . . . . . . . . . . . . . . . . . . . . . . . . . . . . . . . . 207
Filtering Journal Lists for Reports . . . . . . . . . . . . . . . . . . . . . . . . . . . . . . . . . . . . . 208
Saving Journal Reports . . . . . . . . . . . . . . . . . . . . . . . . . . . . . . . . . . . . . . . . . . . . . 209
Printing Journal Reports . . . . . . . . . . . . . . . . . . . . . . . . . . . . . . . . . . . . . . . . . . . . 209
Printing Reports for Individual Journals . . . . . . . . . . . . . . . . . . . . . . . . . . . . . . . . . 209
Deleting Journals . . . . . . . . . . . . . . . . . . . . . . . . . . . . . . . . . . . . . . . . . . . . . . . . . . . . 210
Working with Journals in Smart View . . . . . . . . . . . . . . . . . . . . . . . . . . . . . . . . . . . . . 210
x
Chapter 12. Using Process Management . . . . . . . . . . . . . . . . . . . . . . . . . . . . . . . . . . . . . . . . . . . . . . . . . 211
About Process Management . . . . . . . . . . . . . . . . . . . . . . . . . . . . . . . . . . . . . . . . . . . . 211
Enabling Process Management . . . . . . . . . . . . . . . . . . . . . . . . . . . . . . . . . . . . . . . . 211
Accessing Process Units . . . . . . . . . . . . . . . . . . . . . . . . . . . . . . . . . . . . . . . . . . . . . 212
Process Management Security Roles . . . . . . . . . . . . . . . . . . . . . . . . . . . . . . . . . . . . 212
Process Levels . . . . . . . . . . . . . . . . . . . . . . . . . . . . . . . . . . . . . . . . . . . . . . . . . . . . 213
Process Levels for Summary Time Periods . . . . . . . . . . . . . . . . . . . . . . . . . . . . . . . 214
Review Levels and Submission Phases . . . . . . . . . . . . . . . . . . . . . . . . . . . . . . . . . . 214
Starting Process Management . . . . . . . . . . . . . . . . . . . . . . . . . . . . . . . . . . . . . . . . . . . 214
Using Process Control . . . . . . . . . . . . . . . . . . . . . . . . . . . . . . . . . . . . . . . . . . . . . . . . . 215
Process Control Tasks . . . . . . . . . . . . . . . . . . . . . . . . . . . . . . . . . . . . . . . . . . . . . . 216
Selecting the Data View . . . . . . . . . . . . . . . . . . . . . . . . . . . . . . . . . . . . . . . . . . . . . 217
Selecting Entities for Process Control . . . . . . . . . . . . . . . . . . . . . . . . . . . . . . . . . . . 218
Selecting Multiple Rows for Process Control . . . . . . . . . . . . . . . . . . . . . . . . . . . . . . 218
Setting Process Control Display Options . . . . . . . . . . . . . . . . . . . . . . . . . . . . . . . . 219
Displaying Submission Phases in Process Control . . . . . . . . . . . . . . . . . . . . . . . . . . 221
Using the Process Control Toolbar . . . . . . . . . . . . . . . . . . . . . . . . . . . . . . . . . . . . . 221
Viewing the Process Control Summary . . . . . . . . . . . . . . . . . . . . . . . . . . . . . . . . . . 221
Viewing the Pass or Fail Status . . . . . . . . . . . . . . . . . . . . . . . . . . . . . . . . . . . . . . . . 222
Viewing Validation Account Detail . . . . . . . . . . . . . . . . . . . . . . . . . . . . . . . . . . . . 223
Viewing Calculation Status . . . . . . . . . . . . . . . . . . . . . . . . . . . . . . . . . . . . . . . . . . 224
Viewing Journal Status . . . . . . . . . . . . . . . . . . . . . . . . . . . . . . . . . . . . . . . . . . . . . 225
Viewing Rate Data . . . . . . . . . . . . . . . . . . . . . . . . . . . . . . . . . . . . . . . . . . . . . . . . 225
Viewing Manage Ownership Information . . . . . . . . . . . . . . . . . . . . . . . . . . . . . . . . 226
Attaching Documents to a Process Unit . . . . . . . . . . . . . . . . . . . . . . . . . . . . . . . . . 226
Calculating Data from Process Control . . . . . . . . . . . . . . . . . . . . . . . . . . . . . . . . . . 227
Translating Data from Process Control . . . . . . . . . . . . . . . . . . . . . . . . . . . . . . . . . . 227
Consolidating Data from Process Control . . . . . . . . . . . . . . . . . . . . . . . . . . . . . . . . 227
Running Equity Pickup Calculations from Process Control . . . . . . . . . . . . . . . . . . . 227
Promoting Process Units . . . . . . . . . . . . . . . . . . . . . . . . . . . . . . . . . . . . . . . . . . . . . . . 228
Submitting Process Units . . . . . . . . . . . . . . . . . . . . . . . . . . . . . . . . . . . . . . . . . . . . . . 229
Approving Process Units . . . . . . . . . . . . . . . . . . . . . . . . . . . . . . . . . . . . . . . . . . . . . . . 230
Rejecting Process Units . . . . . . . . . . . . . . . . . . . . . . . . . . . . . . . . . . . . . . . . . . . . . . . . 231
Signing Off on a Process Unit . . . . . . . . . . . . . . . . . . . . . . . . . . . . . . . . . . . . . . . . . . . 232
Publishing Process Units . . . . . . . . . . . . . . . . . . . . . . . . . . . . . . . . . . . . . . . . . . . . . . 232
Locking and Unlocking Process Units . . . . . . . . . . . . . . . . . . . . . . . . . . . . . . . . . . . . . 233
Viewing Process Management History . . . . . . . . . . . . . . . . . . . . . . . . . . . . . . . . . . . . . 234
Email Alerts for Process Control . . . . . . . . . . . . . . . . . . . . . . . . . . . . . . . . . . . . . . . . . 234
Process Management Validation . . . . . . . . . . . . . . . . . . . . . . . . . . . . . . . . . . . . . . . . . 235
xi
Validation for Promotion . . . . . . . . . . . . . . . . . . . . . . . . . . . . . . . . . . . . . . . . . . . 235
Validation for Rejection . . . . . . . . . . . . . . . . . . . . . . . . . . . . . . . . . . . . . . . . . . . . 236
Process Management and Consolidation . . . . . . . . . . . . . . . . . . . . . . . . . . . . . . . . . . . 236
Chapter 13. Using Email Alerts . . . . . . . . . . . . . . . . . . . . . . . . . . . . . . . . . . . . . . . . . . . . . . . . . . . . . . . 237
About Email Alerts . . . . . . . . . . . . . . . . . . . . . . . . . . . . . . . . . . . . . . . . . . . . . . . . . . . 237
Generating Alerts for Intercompany Transactions . . . . . . . . . . . . . . . . . . . . . . . . . . . . . 238
Sending Email Alerts for Intercompany Transactions . . . . . . . . . . . . . . . . . . . . . . . 238
Intercompany Transactions Email Content . . . . . . . . . . . . . . . . . . . . . . . . . . . . . . . 238
Receiving Intercompany Transaction Email Alerts . . . . . . . . . . . . . . . . . . . . . . . . . 239
Generating Alerts for Process Control . . . . . . . . . . . . . . . . . . . . . . . . . . . . . . . . . . . . . 239
Process Control Email Content . . . . . . . . . . . . . . . . . . . . . . . . . . . . . . . . . . . . . . . 240
Receiving Process Control Email Alerts . . . . . . . . . . . . . . . . . . . . . . . . . . . . . . . . . 241
Chapter 14. Automating Tasks . . . . . . . . . . . . . . . . . . . . . . . . . . . . . . . . . . . . . . . . . . . . . . . . . . . . . . . . 243
Overview . . . . . . . . . . . . . . . . . . . . . . . . . . . . . . . . . . . . . . . . . . . . . . . . . . . . . . . . . . 243
Financial Management Tasks Available for Automation . . . . . . . . . . . . . . . . . . . . . . . . . 243
Prerequisites for Task Automation . . . . . . . . . . . . . . . . . . . . . . . . . . . . . . . . . . . . . . . . 244
Managing Taskflows . . . . . . . . . . . . . . . . . . . . . . . . . . . . . . . . . . . . . . . . . . . . . . . . . . 244
Viewing Taskflows . . . . . . . . . . . . . . . . . . . . . . . . . . . . . . . . . . . . . . . . . . . . . . . . . . . 245
Creating Taskflows . . . . . . . . . . . . . . . . . . . . . . . . . . . . . . . . . . . . . . . . . . . . . . . . . . . 245
Adding Stages . . . . . . . . . . . . . . . . . . . . . . . . . . . . . . . . . . . . . . . . . . . . . . . . . . . . 246
Financial Management Stage Actions and Parameters . . . . . . . . . . . . . . . . . . . . . . . 248
Adding Links . . . . . . . . . . . . . . . . . . . . . . . . . . . . . . . . . . . . . . . . . . . . . . . . . . . . 253
Editing Taskflows . . . . . . . . . . . . . . . . . . . . . . . . . . . . . . . . . . . . . . . . . . . . . . . . . . . . 254
Deleting Taskflows . . . . . . . . . . . . . . . . . . . . . . . . . . . . . . . . . . . . . . . . . . . . . . . . . . . 254
Copying Taskflows . . . . . . . . . . . . . . . . . . . . . . . . . . . . . . . . . . . . . . . . . . . . . . . . . . . 254
Running Taskflows Manually for Testing . . . . . . . . . . . . . . . . . . . . . . . . . . . . . . . . . . . 255
Controlling Access to Taskflows . . . . . . . . . . . . . . . . . . . . . . . . . . . . . . . . . . . . . . . . . . 255
Scheduling Taskflows . . . . . . . . . . . . . . . . . . . . . . . . . . . . . . . . . . . . . . . . . . . . . . . . . 256
Viewing Taskflow Status . . . . . . . . . . . . . . . . . . . . . . . . . . . . . . . . . . . . . . . . . . . . . . . 256
Stopping Active Taskflows . . . . . . . . . . . . . . . . . . . . . . . . . . . . . . . . . . . . . . . . . . . 259
Viewing the Taskflow Participant Summary . . . . . . . . . . . . . . . . . . . . . . . . . . . . . . 259
Viewing the Taskflow Participant Details . . . . . . . . . . . . . . . . . . . . . . . . . . . . . . . . 260
xii
Documentation Accessibility
For information about Oracle's commitment to accessibility, visit the Oracle Accessibility Program website athttp://www.oracle.com/pls/topic/lookup?ctx=acc&id=docacc.
Access to Oracle SupportOracle customers that have purchased support have access to electronic support through My Oracle Support.For information, visit http://www.oracle.com/pls/topic/lookup?ctx=acc&id=info or visit http://www.oracle.com/pls/topic/lookup?ctx=acc&id=trs if you are hearing impaired.
13

14
Documentation Feedback
Send feedback on this documentation to: [email protected]
Follow EPM Information Development on these social media sites:
LinkedIn - http://www.linkedin.com/groups?gid=3127051&goback=.gmp_3127051
Twitter - http://twitter.com/hyperionepminfo
Facebook - http://www.facebook.com/pages/Hyperion-EPM-Info/102682103112642
Google+ - https://plus.google.com/106915048672979407731/#106915048672979407731/posts
YouTube - http://www.youtube.com/user/OracleEPMWebcasts
15

16
1About Financial Management
In This Chapter
Financial Management Features... . . . . . . . . . . . . . . . . . . . . . . . . . . . . . . . . . . . . . . . . . . . . . . . . . . . . . . . . . . . . . . . . . . . . . . .17
Performance Management Architect .. . . . . . . . . . . . . . . . . . . . . . . . . . . . . . . . . . . . . . . . . . . . . . . . . . . . . . . . . . . . . . . . . . . .18
EPM Workspace ... . . . . . . . . . . . . . . . . . . . . . . . . . . . . . . . . . . . . . . . . . . . . . . . . . . . . . . . . . . . . . . . . . . . . . . . . . . . . . . . . . . . . . . . . .18
Financial Management Dimensions ... . . . . . . . . . . . . . . . . . . . . . . . . . . . . . . . . . . . . . . . . . . . . . . . . . . . . . . . . . . . . . . . . . . .18
User-Defined Elements ... . . . . . . . . . . . . . . . . . . . . . . . . . . . . . . . . . . . . . . . . . . . . . . . . . . . . . . . . . . . . . . . . . . . . . . . . . . . . . . . . .21
Financial Management FeaturesOracle Hyperion Financial Management provides these features:
l A unified view of enterprise financial information consolidates key performance andoperating metrics from global sources in a scalable, Web-based application.
l “Fast virtual close” features trim days and weeks off your close cycle including using Web-based process management, Web-based intercompany reconciliations, journal adjustmentsand a consistent set of data and business measures.
l Powerful multidimensional analysis helps identify and report on key financial and businesstrends, new sources of profitability and cash flow at corporate, cost center, product, brand,customer, and channel levels.
l Flexible “what if” scenario management feature dynamically consolidates and reports actualresults, financial budgets, forecasts and plans, producing new statements as assumptionsand facts change.
l High-volume, preformatted reports deliver timely, accurate financial information forinternal management and external regulatory and government bodies from the sameapplication.
l Prepackaged features are deployed out-of-the-box, quickly and cost-effectively, includingfeatures such as world-class allocations, multicurrency translations, and robust dataintegration with legacy applications, ERP, and CRM systems.
l Customizable and extensible application solves your issues quickly and cost-effectively,using industry standard tools.
l Architected for the Web so users can easily and securely access global financial informationfrom any location, using a standard Web browser. Relational data storage ensures missioncritical data is available to users 24x7x365.
17
In addition, Financial Management provides:
l Pre-built starter kit applications for specific requirements such as Sustainability Reporting,IFRS, Japan Statutory Reporting
l Integration with Oracle Essbase for extended reporting and analysis
l Integration with other Oracle Hyperion Enterprise Performance Management Applications
Performance Management ArchitectOracle Hyperion EPM Architect is a component of Financial Management installation andconfiguration. You use it to create and work with applications and dimensions, and synchronizedata.
For help on tasks performed in Performance Management Architect, see the Oracle HyperionEnterprise Performance Management Architect Administrator's Guide.
EPM WorkspaceFinancial Management is available within Oracle Hyperion Enterprise PerformanceManagement Workspace. For information on tasks performed in EPM Workspace, such aspreferences or features in the Navigate, Favorites, Manage, or Tools menu, see the OracleHyperion Enterprise Performance Management Workspace User's Guide and online help.
Financial Management DimensionsDimensions describe an organization’s data and usually contain groups of related members.Examples of dimensions are Account, Entity, and Period. Financial Management provides eightsystem-defined dimensions and enables you to populate an unlimited number of customdimensions that you can apply to accounts.
The elements that comprise a dimension are called members. For example, GrossMargin andTotalRevenues are members of the Account dimension.
Dimension members are arranged in hierarchies. Upper-level members are called parentmembers, and a member immediately below a parent member is referred to as its child. Allmembers below a parent are referred to as descendants. The bottom-level hierarchy membersof the hierarchy are called base-level members.
Data is typically entered into base-level members of dimensions and not into parent members.Values for parent-level members are aggregated from the children of the parent-level members.In some cases, data for base-level members is calculated.
The following sections describe the system-defined dimensions. For information on settingdimension attributes, see the Oracle Hyperion Enterprise Performance Management ArchitectAdministrator's Guide if you are using Oracle Hyperion EPM Architect, or the Oracle HyperionFinancial Management Administrator's Guide if you are using Financial Management Classicapplication administration.
18
Scenario DimensionThe Scenario dimension represents a set of data, such as Actual, Budget, or Forecast. For example,the Actual scenario can contain data from a general ledger, reflecting past and current businessoperations. The Budget scenario can contain data that reflects the targeted business operations.The Forecast scenario typically contains data that corresponds to predictions for upcomingperiods. A Legal scenario can contain data calculated according to legal GAAP format and rules.
You can define any number of scenarios for an application and define attributes for Scenariodimension members, such as the default frequency, the default view, and zero data settings.
Year DimensionThe Year dimension represents the fiscal or calendar year for data. An application can containdata for more than one year. You specify a year range when you create the application and selecta year from the Year dimension to process data.
Period DimensionThe Period dimension represents time periods, such as quarters and months. It contains timeperiods and frequencies by displaying the time periods in a hierarchy. For example, if the Actualscenario maintains data on a monthly basis, generally 12 periods of data are available for thisscenario in a year. Financial Management supports years, months, and weeks for the perioddimension.
Entity DimensionThe Entity dimension represents the organizational structure of the company, such as themanagement and legal reporting structures. Entities can represent divisions, subsidiaries, plants,regions, countries, legal entities, business units, departments, or any organizational unit. Youcan define any number of entities.
The Entity dimension is the consolidation dimension of the system. Hierarchies in the Entitydimension reflect various consolidated views of the data. Various hierarchies can correspond togeographic consolidation, legal consolidation, or consolidation by activity. All relationshipsamong individual member components that exist in an organization are stored and maintainedin this dimension. Entities in an organization can be categorized as dependent, base, or parententities. Dependent entities are owned by other entities in the organization. Base entities are atthe bottom of the organization structure and do not own other entities. Parent entities containone or more dependents that report directly to them.
You define attributes for Entity dimension members, such as the default currency and securityclass, and to specify whether the entity allows adjustments and stores intercompany detail.
19
Value DimensionThe Value dimension represents the different types of values stored in your application, and caninclude the input currency, parent currency, adjustments, and consolidation detail such asproportion, elimination, and contribution detail. For example, the Entity Currency memberstores the value for an entity in its local currency. The Parent Currency member stores the valuefor an entity translated to the currency of the parent entity. The Value dimension is useful forproviding an audit trail of the transactions applied to data.
Account DimensionThe Account dimension represents a hierarchy of natural accounts. Accounts store financialdata for entities and scenarios in an application. Each account has a type, such as Revenue orExpense, that defines its accounting behavior.
You define attributes for Account dimension members, such as the account type, the numberof decimal places to display, and whether the account is a calculated, consolidated, orintercompany partner account.
Intercompany DimensionThe Intercompany dimension represents all intercompany balances that exist for an account.This is a reserved dimension that is used in combination with the Account dimension and anycustom dimension. Financial Management can track and eliminate intercompany transactiondetails across accounts and entities. You can also run Intercompany Matching reports to viewintercompany transactions.
View DimensionThe View dimension represents various modes of calendar intelligence; such as, Periodic, Year-to-Date, and Quarter-to-Date frequencies. If you set the view to Periodic, the values for eachmonth are displayed. If you set the view to Year-to-Date or Quarter-to-Date, the cumulativevalues for the year or quarter are displayed.
Custom DimensionsCustom dimensions are dimensions associated with accounts. These dimensions enable you tospecify additional details associated with accounts, such as products, markets, channels, balancesheet movement, or types of elimination. For example, custom dimensions could includeProduct Line, Region, Channel, or Customers. A Custom dimension for products associatedwith Sales and COGS accounts enables you to track sales and cost detail by product.
20
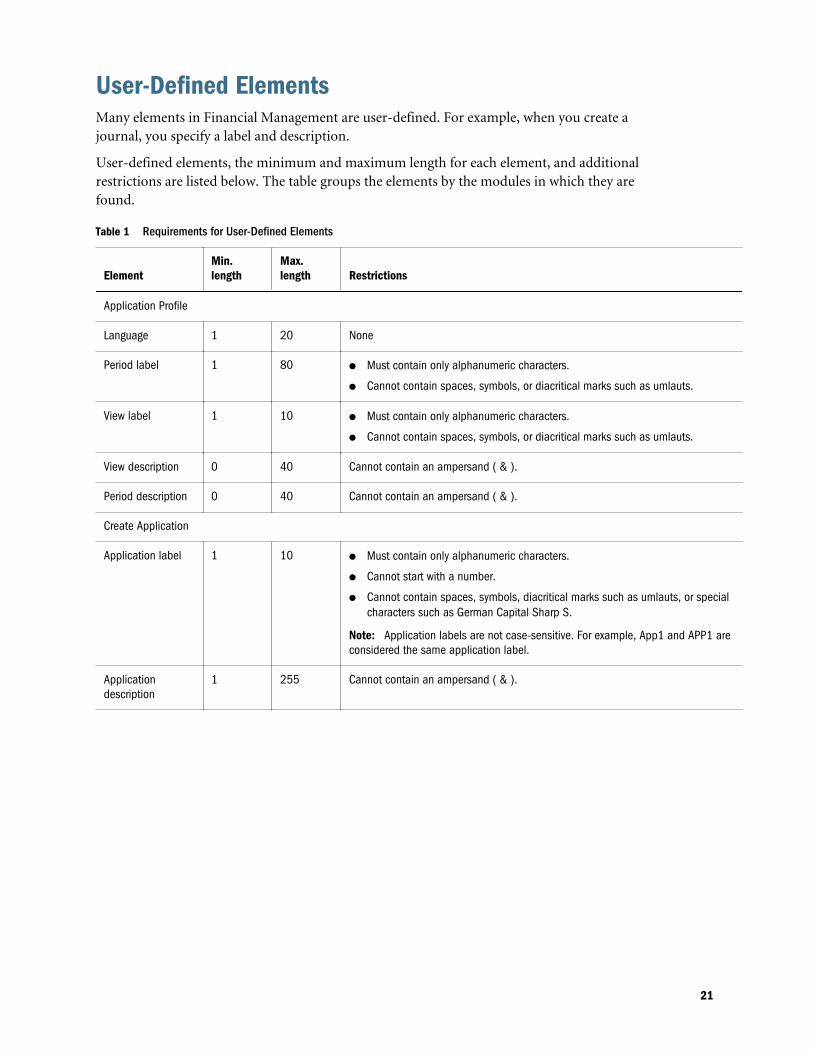
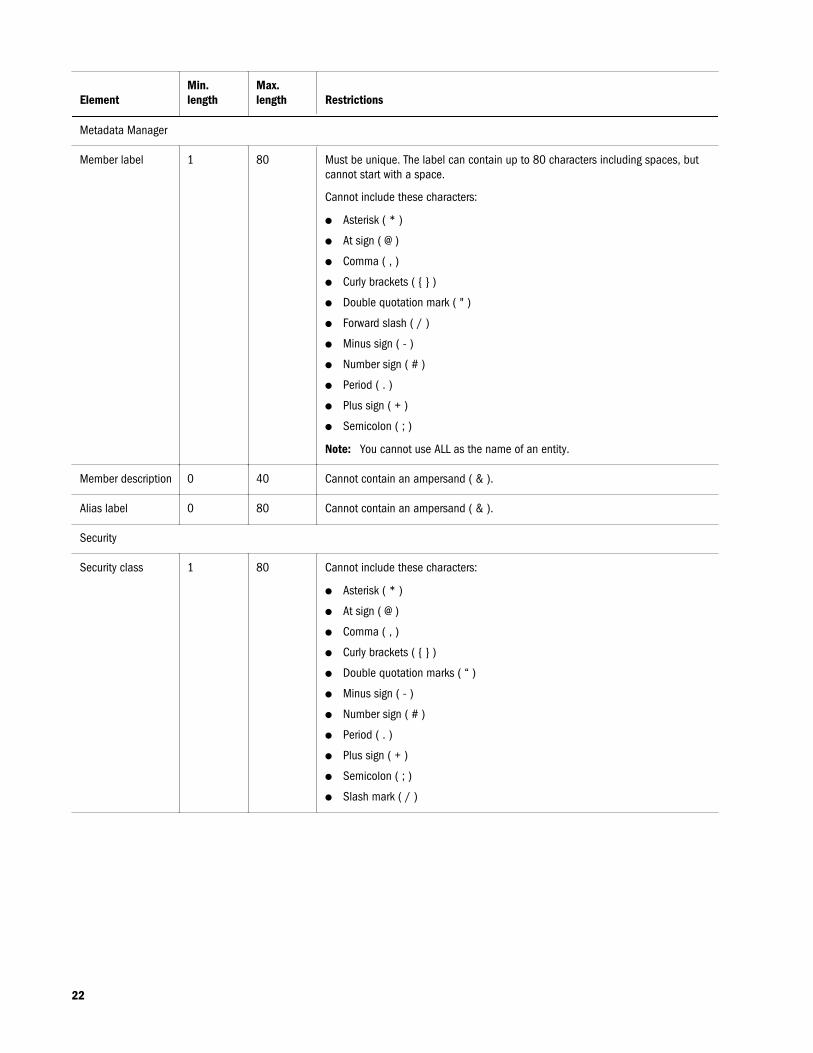
User-Defined ElementsMany elements in Financial Management are user-defined. For example, when you create ajournal, you specify a label and description.
User-defined elements, the minimum and maximum length for each element, and additionalrestrictions are listed below. The table groups the elements by the modules in which they arefound.
Table 1 Requirements for User-Defined Elements
ElementMin.length
Max.length Restrictions
Application Profile
Language 1 20 None
Period label 1 80l Must contain only alphanumeric characters.
l Cannot contain spaces, symbols, or diacritical marks such as umlauts.
View label 1 10l Must contain only alphanumeric characters.
l Cannot contain spaces, symbols, or diacritical marks such as umlauts.
View description 0 40 Cannot contain an ampersand ( & ).
Period description 0 40 Cannot contain an ampersand ( & ).
Create Application
Application label 1 10l Must contain only alphanumeric characters.
l Cannot start with a number.
l Cannot contain spaces, symbols, diacritical marks such as umlauts, or specialcharacters such as German Capital Sharp S.
Note: Application labels are not case-sensitive. For example, App1 and APP1 areconsidered the same application label.
Applicationdescription
1 255 Cannot contain an ampersand ( & ).
21
ElementMin.length
Max.length Restrictions
Metadata Manager
Member label 1 80 Must be unique. The label can contain up to 80 characters including spaces, butcannot start with a space.
Cannot include these characters:
l Asterisk ( * )
l At sign ( @ )
l Comma ( , )
l Curly brackets ( { } )
l Double quotation mark ( " )
l Forward slash ( / )
l Minus sign ( - )
l Number sign ( # )
l Period ( . )
l Plus sign ( + )
l Semicolon ( ; )
Note: You cannot use ALL as the name of an entity.
Member description 0 40 Cannot contain an ampersand ( & ).
Alias label 0 80 Cannot contain an ampersand ( & ).
Security
Security class 1 80 Cannot include these characters:
l Asterisk ( * )
l At sign ( @ )
l Comma ( , )
l Curly brackets ( { } )
l Double quotation marks ( “ )
l Minus sign ( - )
l Number sign ( # )
l Period ( . )
l Plus sign ( + )
l Semicolon ( ; )
l Slash mark ( / )
22

ElementMin.length
Max.length Restrictions
Journals
Journal label 1 20 Cannot include these characters:
l Asterisk ( * )
l At sign ( @ )
l Comma ( , )
l Curly brackets ( { } )
l Double quotation mark ( " )
l Forward slash ( / )
l Minus sign ( - )
l Number sign ( # )
l Period ( . )
l Plus sign ( + )
l Semicolon ( ; )
Journal description 0 255 None
Journal group 0 30 None
Journal line itemdescription
0 50 None
Load/Extract
Delimiter character 1 1 Must be one of these characters and cannot be used in the file or in the file name:
l Ampersand (&)
l At sign ( @ )
l Backslash (\)
l Carat ( ^ )
l Colon ( : )
l Comma ( , )
l Dollar sign ( $ )
l Line ( | )
l Percent sign ( % )
l Question mark ( ? )
l Semicolon ( ; )
l Tilde ( ~ )
Note: You must use the same delimiter character throughout the file. Using differentdelimiter characters within the same file causes an error when you load the file.
Data grids
Cell description 1 1900 None
Line item detail 1 80 None
23
ElementMin.length
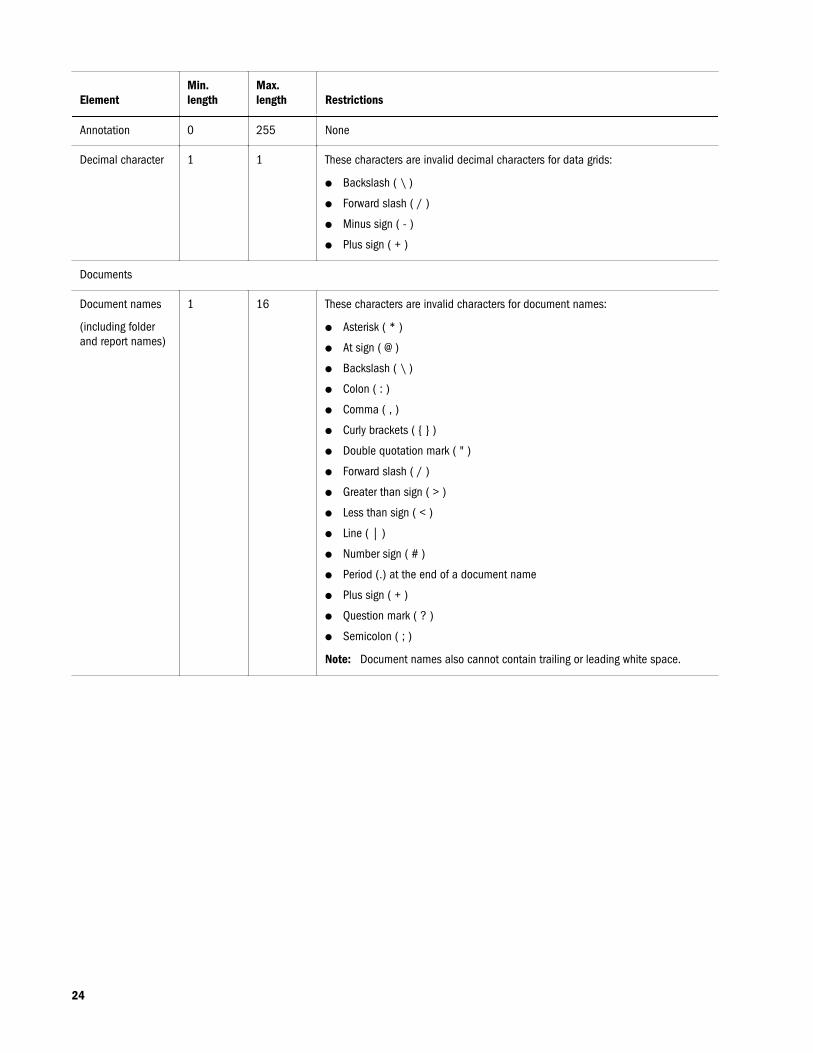
Max.length Restrictions
Annotation 0 255 None
Decimal character 1 1 These characters are invalid decimal characters for data grids:
l Backslash ( \ )
l Forward slash ( / )
l Minus sign ( - )
l Plus sign ( + )
Documents
Document names
(including folderand report names)
1 16 These characters are invalid characters for document names:
l Asterisk ( * )
l At sign ( @ )
l Backslash ( \ )
l Colon ( : )
l Comma ( , )
l Curly brackets ( { } )
l Double quotation mark ( " )
l Forward slash ( / )
l Greater than sign ( > )
l Less than sign ( < )
l Line ( | )
l Number sign ( # )
l Period (.) at the end of a document name
l Plus sign ( + )
l Question mark ( ? )
l Semicolon ( ; )
Note: Document names also cannot contain trailing or leading white space.
24
2Basic Financial Management
Procedures
In This Chapter
Starting Financial Management .. . . . . . . . . . . . . . . . . . . . . . . . . . . . . . . . . . . . . . . . . . . . . . . . . . . . . . . . . . . . . . . . . . . . . . . . .25
Opening Applications ... . . . . . . . . . . . . . . . . . . . . . . . . . . . . . . . . . . . . . . . . . . . . . . . . . . . . . . . . . . . . . . . . . . . . . . . . . . . . . . . . . . .26
Closing Applications ... . . . . . . . . . . . . . . . . . . . . . . . . . . . . . . . . . . . . . . . . . . . . . . . . . . . . . . . . . . . . . . . . . . . . . . . . . . . . . . . . . . . .26
Setting User Preferences ... . . . . . . . . . . . . . . . . . . . . . . . . . . . . . . . . . . . . . . . . . . . . . . . . . . . . . . . . . . . . . . . . . . . . . . . . . . . . . . .26
Enabling Multibyte Language Date and Time Formats ... . . . . . . . . . . . . . . . . . . . . . . . . . . . . . . . . . . . . . . . . . . . . . .28
Using Financial Management Help ... . . . . . . . . . . . . . . . . . . . . . . . . . . . . . . . . . . . . . . . . . . . . . . . . . . . . . . . . . . . . . . . . . . . .29
Exiting Financial Management .. . . . . . . . . . . . . . . . . . . . . . . . . . . . . . . . . . . . . . . . . . . . . . . . . . . . . . . . . . . . . . . . . . . . . . . . . . .29
Using Financial Management .. . . . . . . . . . . . . . . . . . . . . . . . . . . . . . . . . . . . . . . . . . . . . . . . . . . . . . . . . . . . . . . . . . . . . . . . . . . .29
Starting Financial ManagementYou can start Financial Management from a Web browser. You can also start FinancialManagement using Netegrity SiteMinder as a Web security agent.
The Financial Management Win32 client includes only the Metadata Manager, from which youcan edit metadata. It is only available offline. The Win32 component can be installed separatelyas a standalone tool to any computer without installing the Financial Management Servercomponent.
You work with Financial Management in the EPM Workspace environment.
For information on installing and configuring EPM Workspace, see the Oracle EnterprisePerformance Management System Installation and Configuration Guide.
ä To start Financial Management:
1 Ensure that the Web server is started and the Web application server is running in the Services panel.
2 In your browser, enter the URL for the EPM Workspace Log On page.
Note: The default EPM Workspace URL is http://host:port/workspace, wherehost is the name of the BI+ server and port is the Oracle HTTP server. The defaultport is 19000.
3 Enter your system user name.
4 Enter your system password.
5 Click Log On.
25
6 In EPM Workspace, select Navigate, then Applications, then Consolidation and select an application.
Opening ApplicationsAn application is a set of dimensions and dimension members that meet a set of analytical orreporting requirements. For example, you can have an application to report on tax data and aseparate application for sales analysis.
In Financial Management, all data is processed within applications. You can open and work withmultiple applications at one time.
Note: To access an application, you must be assigned as a user of the application.
ä To open an application:
1 Select Navigate, then Applications, and then Consolidation.
2 Select an application.
Closing ApplicationsYou can close the current application in which you are working, or if you have multipleapplications open, close them all simultaneously.
ä To close an application, take one of these actions:
l Select File, then Close, and then Current, or All.
l Click the X on the top of the tab in which the application is open.
Setting User PreferencesYou can specify user preferences for applications.
When you make any change in a user preference, you must log off and log back in for the changeto take effect.
See these procedures:
l “Specifying a Cluster” on page 27
l “Specifying Default Language for Descriptions” on page 27
l “Specifying Number Formatting” on page 27
l “Specifying File Extract Options” on page 27
l “Setting User Preferences” on page 27
26

Specifying a ClusterYou can specify an application as your startup application. From the General Preferences inEPM Workspace, you can select an application, and when you log off and log back into EPMWorkspace, the Financial Management application that you selected opens automatically.
The server cluster that is displayed is based on the cluster that was used at logon. You can selecta different cluster.
Specifying Default Language for DescriptionsYou can specify the default language in which to display descriptions for metadata. The languagesthat you can select are based on the languages that you defined when you set up the application.
Specifying Number FormattingYou can specify number formatting for the decimal and thousands separator characters. Youcan use any characters for delimiters except Arabic numerals (for example, 0 through 9), anampersand (&), back slash (\), less than sign (<), or question mark (?).
Specifying File Extract OptionsYou can specify whether to save all extracted files in Unicode format. The Unicode format forencoding text provides the ability to view multilingual characters. If you select this option,extracted files including reports, metadata files, member list files, journals, rules, and securityfiles are saved in Unicode format, using the UTF-16 character set.
Note: Data files are always extracted in Unicode format, regardless of this setting.
Select the Unicode file option if the extract files might contain multibyte (Japanese or other)characters and your code page on the Web server does not support them. For example, if yourdefault code page on the Web server is English, and you extract a file that contains Japanesecharacters, those characters are displayed correctly only if you select this option.
Using Document Manager as the Default PageYou can set the Document Manager as the default page when you open an application. If youselect this option, the application opens with the Document Manager page, from which you canview, create, edit, delete, load and extract documents.
Setting User PreferencesWhen you use Financial Management, you set user preferences through the EPM Workspace.
27
ä To set user preferences:
1 From the Workspace, select File, then Preferences, and then Consolidation.
2 From the list of applications, select an application.
Note: The system display your current settings. The system populates the list of applicationsand the cluster based on the Web Server and cluster that you used at logon.
3 Optional: To change the server cluster, from the drop-down list, select a cluster.
4 From Default Language for Descriptions, select the language to use for descriptions.
Note: The languages are listed in alphabetical order.
5 For Decimal Character, enter one character to use for a decimal.
6 For Thousands Separator Character, enter one character to use to separate thousands.
7 Optional: Select Save all files in Unicode format.
8 Optional: To set the application to open with Document Manager, select Use Document Manager asthe default page.
9 To save your preferences, click Save.
The preferences are saved to the database for the current application.
Tip: To reset the settings to the default values, click Reset.
10 Click OK.
11 Log off, and log on again for the changes to take effect.
Enabling Multibyte Language Date and Time FormatsFinancial Management date and time formatting is based on the browser’s language setting, noton the Regional Settings.
If you use multibyte or right-to-left languages, system files for those languages must be installed.If they are not installed, you may see an error message that “The specified LCID is not available”when you open an application.
Note: The system language files should be installed on both the browser machine and the Webserver, if they are different.
ä To check if the system files are installed:
1 From the Control Panel, select Regional and Language Options and select the Languages tab.
2 In the Supplemental Language support section, make sure these options are selected:
l Install files for complex script and right-to-left languages (including Thai)
l Install files for East Asian (multibyte) languages
28
3 If the required type is not checked, select it and click Apply. The system files will be installed. You maythen need to reboot your machine.
Using Financial Management HelpTo access help, click Help at the top of any Financial Management Web page.
Exiting Financial ManagementYou can exit Financial Management from any module.
To log off from a Financial Management Web page, select File, and then Log Off , or click LogOff from the top menu and click Yes to confirm that you want to log off. The system returns youto the Logon dialog box, so that you can log on again if necessary.
Using Financial ManagementYou can navigate to tasks and documents in a browser view and set up custom task lists forfrequently used tasks and documents.
Oracle recommends that you add Financial Management to the exceptions for your Web pop-up blocker. When you perform some tasks such as loading data, a status window pops up showingthe task status. If you have a pop-up blocker enabled on your computer, the status window isnot displayed.
Setting Point of View Bar OptionsThe point of view (POV) is a set of dimensions you define that determines the data accessed foran application. You select dimension members from the Point of View bar to display in datagrids or journals, for example.
Financial Management provides initial point of view settings. When you change dimensionselections, the point of view is updated with your changes. This user point of view is availablethroughout the application session. When you exit the application, the point of view is savedand can be used the next time that you open the application.
You set options for displaying dimensions in the POV bar. You can show dimension long names(such as Scenario or Year), show dimension short names (such as S for Scenario or Y for Year),or select not to display dimension names. You can show labels, descriptions, and icons, and wrapthe POV.
When you select these POV bar options in one module, they are saved and applied to othermodules. For example, if you select to show dimension long names in data grids, the POVdisplays dimension long names when you open a journal. If you close and reopen the application,the settings persist.
29
You can show, hide, or reorder dimensions. Show Hidden Dimensions, Show/Hide Dimensions,POV Details, and Reorder Dimensions settings are not automatically applied to other modules.
ä To set POV bar options:
1 Open an application.
2 From the Point of View bar, click the POV options icon at the right side of the bar and select options:
l Show Dimension long names
l Show Dimension short names
l Do not show Dimension names
l Show Label
l Show Description
l Show Dimension icons
l Wrap POV
l Show Hidden Dimensions
l Show/Hide Dimensions, select dimensions to hide, and click OK.
l POV Details, view the dimension member names and descriptions, and click OK.
l Reorder Dimensions, select dimensions, use the up and down arrows to change thedimension order, and click OK.
Selecting Members for the Point of ViewThe member selector displays the related members that belong to a dimension. The membersselected for the dimensions assigned to the point of view determine the context for the data inthe rows and columns of data grids and data forms. For example, if the Scenario dimension isset to Budget in the point of view of a data grid, then all rows and columns on the data griddisplay data for the Budget scenario.
The point of view can contain folders, which indicate that there are additional members for thedimension. You can expand the folders to show additional members in the hierarchy. TheHierarchy member list contains all members of a dimension.
30
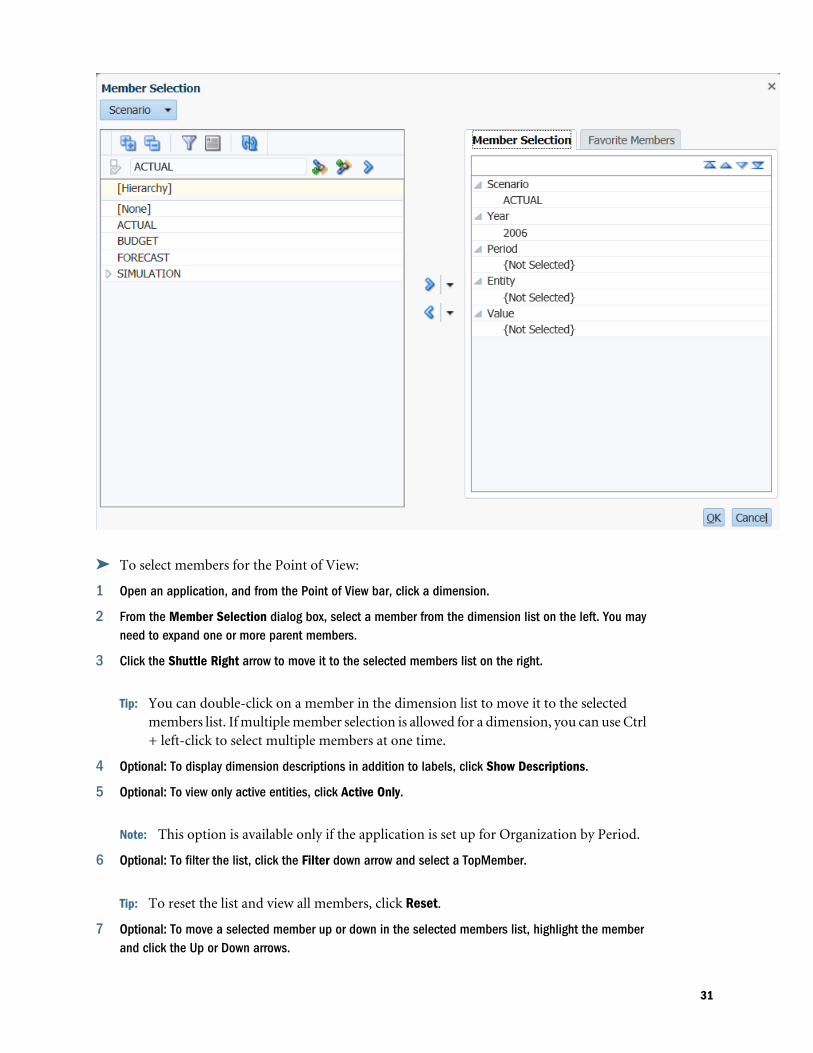
ä To select members for the Point of View:
1 Open an application, and from the Point of View bar, click a dimension.
2 From the Member Selection dialog box, select a member from the dimension list on the left. You mayneed to expand one or more parent members.
3 Click the Shuttle Right arrow to move it to the selected members list on the right.
Tip: You can double-click on a member in the dimension list to move it to the selectedmembers list. If multiple member selection is allowed for a dimension, you can use Ctrl+ left-click to select multiple members at one time.
4 Optional: To display dimension descriptions in addition to labels, click Show Descriptions.
5 Optional: To view only active entities, click Active Only.
Note: This option is available only if the application is set up for Organization by Period.
6 Optional: To filter the list, click the Filter down arrow and select a TopMember.
Tip: To reset the list and view all members, click Reset.
7 Optional: To move a selected member up or down in the selected members list, highlight the memberand click the Up or Down arrows.
31
Tip: To remove members from the selected members list, select one or more members andclick the Shuttle Left arrow, or select the Down arrow and Remove All.
8 Click OK to save your selections.
Selecting Multiple MembersIn several modules such as Manage Data and Extract Data to Database, you can select multipledimension members or use a member list to define the selection.
Member lists display subsets of related members that belong to a dimension. They can reducethe time that you spend browsing the hierarchy of members. For example, if Italy, France, andUK are used frequently in the POV for the Entity dimension, you can create a member list namedEuropean Region, and then select from the list instead of browsing through the hierarchy of theEntity dimension.
Financial Management provides system-defined member lists, such as [Descendants] and[Children]. System-defined member list names are enclosed in brackets ([ ]).
If you select multiple members for a dimension in certain modules, when you hover over thedimension in the Point of View bar, the system displays the number of selected members inparentheses. This is available for Manage Data, Extract Journals, and Extract Data to Database.For example, if you selected five entities, when you hover over the Entity dimension in the Pointof View, the tooltip displays the selected members and the number (5). The system displays amaximum of 20 members in the tooltip, followed by ellipses (...) if there are more than 20members.
ä To select multiple members from member lists:
1 From the Point of View bar, click a dimension.
2 Optional: To expand or collapse the dimension members, from the Selector Options down arrow, selectExpand All, or Collapse All.
3 From the Member Selection dialog box, use one of these methods:
l Select members and click the Shuttle Right arrow to move them to the selected memberslist.
l Click the Down arrow and select a list to move to the selected members list.
Tip: To remove members from the selected members list, select one or more members andclick the Shuttle Left arrow, or select the Down arrow and Remove All.
4 Optional: To display dimension descriptions in addition to labels, click Show Descriptions.
5 Optional: To view only active entities, click Active Only.
Note: This option is available only if the application is set up for Organization by Period.
6 Optional: To filter the list, click the Filter down arrow and select a TopMember.
Tip: To reset the list and view all members, click Reset.
32
7 Optional: To move a selected member up or down in the selected members list, highlight the memberand click the Up or Down arrows.
8 Click OK to save your selections.
Finding Dimension MembersYou can use the Point of View dialog box to quickly find a member within a large dimension.In addition to providing search capabilities, the Point of View dialog box displays your locationin the dimension hierarchy.
You can use wildcards before, after, or within the member name; for example, *con, con*, or*con*. To find the Massachusetts entity, for example, type ma*. The search defaults to the firstmember with a name that starts with “ma.” When you press Enter, the cursor moves to the nextmember that fits the criteria.
ä To find dimension members from the Member Selector:
1 From the Point of View bar, click a dimension.
2 Optional: From the Member Selection dialog box, click Enable/disable filter selection on the text forthe search criteria.
3 In the text box, type in the member name that you are looking for. The search only applies to the memberlabel, not the description.
Tip: Use an asterisk (*) as a wildcard, for example, Sales*.
4 Click Find Down. If a matching member is found, it is highlighted. If there are more matching members,click Find Down to display the next result.
Tip: Use Find Up and Find Down to navigate through the search result.
5 When you find and select a member, click the Shuttle Right arrow to move it to the selected memberslist.
6 Click OK.
ä To find dimension members from the Add Member text box:
1 From the Point of View bar, Ctrl + left-click on a dimension to display the Add Member text box.
2 Type the member name in the text box.
Note: You must enter the member label, not the description.
3 Click the green Arrow button next to the text box to find the member.
33
Finding Selected MembersFrom the Member Selection dialog, you can find the location of a dimension member in the lefttree panel.
ä To find selected members:
1 From the Point of View bar, click a dimension.
2 Double-click on the selected member on the right tree panel.
The system finds and highlights the same member on the left tree panel.
Note: This action only works when you select a dimension that is available in the MemberSelection list on the right.
Saving Favorite MembersWhen you are selecting members, you can use the Favorite Members tab to save frequently usedmembers for each dimension that is currently displayed in the Point of View. After you saveFavorite Members, they are available for selection from other modules in the application. Thelist of Favorite Members is also retained the next time that you log in to the application.
The Favorite Members tab is only enabled in the Point of View for dimensions that use a singlemember selection, for example Year.
ä To save favorite members:
1 From the Point of View bar, click a dimension.
2 Optional: To expand or collapse the dimension members, from the Selector Options down arrow, selectExpand All, or Collapse All.
3 From the Member Selection page, click the Favorite Members tab.
4 Select one or more members to save as favorites.
5 Click the Shuttle Right arrow to move the selected members to the Favorite Members tab and clickOK.
Tip: To remove members from the selected members list, select one or more members andclick the Shuttle Left arrow, or select the Down arrow and Remove All.
Selecting Favorite MembersOn some pages, you can quickly select members from the Favorite Members drop-down list.This function is only available if you saved dimension members to the Favorite Members list.
ä To select members:
1 From the Point of View bar, click the Down arrow next to the member name.
34
2 Select the desired member from the drop-down list.
Selecting Members in Data FormsIn Web Forms, you can quickly select members for selectable dimensions. The Favorite membersare displayed at the top of the list. The members matching the constraints are displayed next.
ä To select members in data forms:
1 From the Point of View bar, click the Down arrow next to the member name.
2 Select the desired member from the drop-down list.
Viewing Member PropertiesFrom the Member Selector, you can view dimension member properties for Scenario, Entity,Account, ICP, or Custom dimensions. You can also view member properties in a data form,data grid, journal, or Process Management page. When you select Member Properties, the systemdisplays the member name, description, default parent, and member properties. For example,for a Scenario dimension, the system displays the name, parent member, and metadata propertiessuch as the default frequency, default view, and security class.
Member Properties is not available for Year, Period, View, or Value dimension members.
If the dimension member is not a valid member, its properties are not displayed. When youselect multiple members in data forms and data grids, the first selected member properties aredisplayed. In journals, if the member field is empty, member properties are not displayed.
For information on setting metadata properties, see the Oracle Hyperion Financial ManagementAdministrator's Guide.
ä To view member properties, use one of these methods:
l From the Member Selector, right-click a member in the left pane, then select MemberProperties.
l From the Member Selector, right-click a member in the Selected Members tab, then selectMember Properties.
l From the Member Selector, right-click a member in the Favorite Members tab, then selectMember Properties.
l From a data form, data grid, journal, or Process Management page, right-click a member,then select Member Properties.
Viewing Active EntitiesIf your application is set up to support the Organization by Period setting, you can view the listof active children under a parent. Organization by Period enables you to preserve historical
35
organizational structures and have them co-exist in an application with the current organization.These organizational changes may be due to acquisitions, disposals, mergers, or reorganizations.
Organization by Period is determined through the use of the Organization by Period setting andthe Active system account. The Active account value controls whether the entity should beincluded in the consolidation.
The option to filter active entities is enabled only after you select a scenario, year, and period inthe point of view.
You can view or change the value for Active accounts through data grids. In the point of view,you must select Active as the account, and System as the Intercompany Partner dimension list.
ä To view active entities:
1 From the Point of View bar, click a dimension.
2 From the Member Selection dialog box, select a member list.
3 Select Active Only.
Note: This option is available only if the application is set up for Organization by Period.
4 Click OK.
Displaying ColumnsYou can specify which columns to display on Financial Management pages. You can expand,collapse, and reorder columns.
Selecting ColumnsYou can specify columns to display on a page, or display all available columns. For example, onthe Manage Journals page, you can select to display any or all of these columns: Label,Description, Short Description, Status, Group, Type, Balance Type, Created By, Created On,Approved By, Date Approved, Posted By, Date Posted, Entity, Parent, and Security.
ä To select columns:
1 From the menu at the top of the page, select View, and then Columns.
2 Select the columns to display, or to display all columns, click Show All.
Reordering ColumnsYou can reorder the columns on a page.
ä To reorder columns:
1 From the menu at the top of the page, select View, and then Reorder Columns.
36
2 From the Visible Columns list, select one or more columns and use the Up and Down arrows to movethem up or down in the display order.
3 Click OK.
Reordering TabsYou can reorder application tabs that you have open. For example, if you have Documents, LoadJournals, and Extract Journals tabs open, you can change their order.
ä To reorder tabs, use one of these methods:
l Drag and drop the tabs to the desired order.
l Right-click on the tab name, click Reorder Tabs, use the Up and Down arrows to reorder thetabs and then click OK.
Closing TabsWhen you are navigating among modules, you can easily close multiple tabs using the right-click option.
ä To close tabs, use one of these methods:
l To close the current tab, right-click on the tab name and click Close.
l To close all other tabs except the current one, right-click on the current tab name and selectClose others.
Note: If there are unsaved changes in multiple tabs, the Close others option is not alloweduntil the changes have been saved. If one of the tabs contains unsaved changes, thesystem displays a warning message for you to save the changes.
Using FiltersYou can use filters to define and view a subset of tasks or documents to which you have securityaccess. For example, on the Manage Journals page, you can filter the list of journals by Entity,Group, Label, Description, Journal Types, Balance Types, or Status.
You can expand, collapse, or resize the Filters pane to show or hide filter criteria.
ä To filter data:
1 From the Filters pane, click the Filter button, , next to a category.
2 From the list of available items, select items to display.
3 Click OK to refresh the list with the filtered criteria.
37
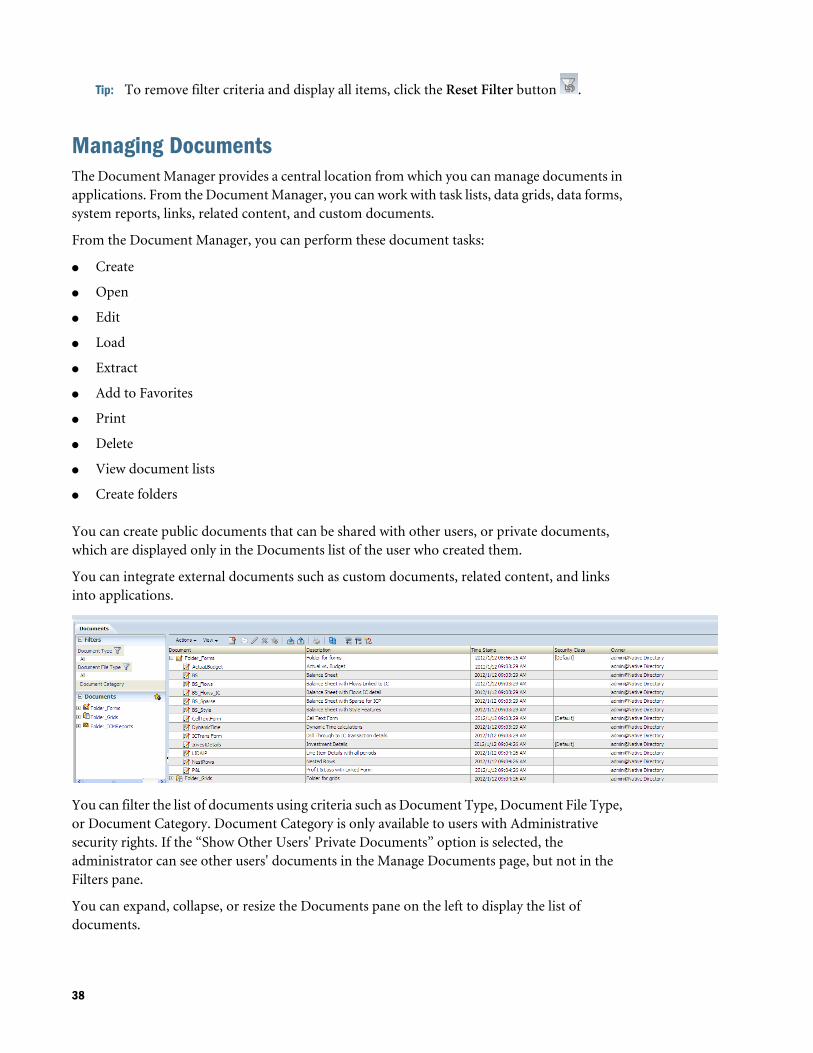
Tip: To remove filter criteria and display all items, click the Reset Filter button .
Managing DocumentsThe Document Manager provides a central location from which you can manage documents inapplications. From the Document Manager, you can work with task lists, data grids, data forms,system reports, links, related content, and custom documents.
From the Document Manager, you can perform these document tasks:
l Create
l Open
l Edit
l Load
l Extract
l Add to Favorites
l Print
l Delete
l View document lists
l Create folders
You can create public documents that can be shared with other users, or private documents,which are displayed only in the Documents list of the user who created them.
You can integrate external documents such as custom documents, related content, and linksinto applications.
You can filter the list of documents using criteria such as Document Type, Document File Type,or Document Category. Document Category is only available to users with Administrativesecurity rights. If the “Show Other Users' Private Documents” option is selected, theadministrator can see other users' documents in the Manage Documents page, but not in theFilters pane.
You can expand, collapse, or resize the Documents pane on the left to display the list ofdocuments.
38
ä To access the Document Manager:
1 Select Navigate, then Applications, and then Consolidation.
2 Open an application. If the Document Manager is not displayed by default, select Consolidation, andthen Documents.
Opening DocumentsYou can open one or multiple documents using several methods.
ä From the Manage Documents page, select a method:
l Select a document from the Manage Documents list and click Open Selected Document.
l Select a document from the Manage Documents list and select Actions, and then Open.
l From the Manage Documents list, double-click a document name to open it.
l From the Documents pane on the left, double-click a document name to open it.
l From the Documents pane on the left, select a document, right-click and select Open.
Saving DocumentsWhen you save a document, by default the system uses the Root folder. You can change thelocation in which to save the document, and specify whether it should be a private document.Private documents are only displayed in the Documents list of the user who created them.
ä To save a document:
1 From the Manage Documents page, create or edit a document.
2 Click Save, or select Actions, and then Save.
3 To change the destination folder, enter a location for the file.
4 For Name, enter a document name.
The name can have a maximum of 20 characters, including spaces.
5 Optional: Select a security class for the document or use the Default security class.
6 Optional: Enter a description.
The description can be a maximum of 255 characters, including spaces.
7 Optional: Select Private if you want the document to be private.
8 Optional: To overwrite a file, select Overwrite existing document.
9 Click Save.
Creating Document FoldersYou can create a folder hierarchy to organize documents. The Root folder is available by defaultand cannot be deleted. Any folders that you create are created under the Root folder.
39
Folder names cannot contain these characters: asterisk ( * ), at sign @ ), back or forward slash( / \ ), colon ( : ), comma ( , ), curly brackets ( { } ), double quotation marks ( " ), greater thanor less than signs (> <), number sign ( # ), period (.), pipe ( | ), plus sign ( + ), question mark( ? ), or semicolon ( ; . Folder names also cannot contain trailing or leading white space.
Note: To create folders, you must have the Advanced User security role.
ä To create document folders:
1 From the Document Manager, click New, and then Folder, or select Actions, then New, and thenFolder.
2 Enter a folder name.
The name can contain a maximum of 20 characters, including spaces.
3 Optional: Enter a folder description.
The description can contain a maximum of 80 characters, including spaces.
4 From Security Class, select the security class to assign to the folder.
5 For Content Type, select the type of documents for the folder.
Tip: If the folder will be used for all documents, select All.
6 Optional: Select Private if you want the folder to be private.
Note: Private folders cannot be shared or viewed by other users. This option is only availableif you have ALL access to at least one security class.
7 Click Create.
Viewing Document FoldersYou can view and expand or collapse document folders.
ä To view document folders:
1 Select Consolidation and then Documents.
2 To expand or collapse the Documents list, click the plus (+) or minus (-) signs next to folders, or right-click and select Expand All Below, Collapse, or Collapse All Below.
Loading DocumentsYou can load these types of documents:
l Data forms
l Data grids
l Task lists
40
l Reports
l Links
l Related Content
l Custom documents
When the Path is selected in the Default section of the Load Documents page, the system displaysa list of folders that exist in the system to which you can load documents. You can browse toselect a folder from which to load documents.
When you change the default load options, the options are updated for all the rows unless youhave a file selected. If you select the Override Security Class option for a specific row, the securityclass for that row is not updated when you change the default security class. You can change thecurrent document path in the default load section or each row independently.
Note: You cannot load a custom document in Override mode with the same name as an alreadyloaded document with a security access to which you do not have access.
When the load process is complete, a link displays for the log so that you can view any errors.
ä To load documents:
1 Select Consolidation, then Load, and then Documents, or from the Document Manager toolbar, clickLoad Documents.
2 From the Document Type list, select the type of documents to load.
3 For Security Class, select a document security class or use the Default security class.
4 Optional: To override the security class specified in the file being loaded, select Override SecurityClass, then select the security class from Security Class.
5 Optional: If the document is a private document, select Private.
6 Optional: Select Overwrite existing documents.
7 Optional: If you are using Firefox as the browser, you can load multiple files. Select Multipleselection if it is not already selected, and click Browse to locate the files.
You can select a maximum of 10 files at one time. The system then populates the detail rowswith the selected files.
You can also drag and drop files into the File Selection Content area.
8 To add more rows, click Add.
The system adds rows that you can use to load additional documents.
Tip: To delete rows, select the rows and click Delete.
9 Click Load.
If you reload existing files, the system displays a warning prompt asking if you want to usethem again. If you do, click Yes.
41
Tip: To reset the settings to the default values, click Reset.
Setting Up Links to Documents or Web PagesYou can create links to Web pages, and add them to Task lists and to the Favorites section. Whenyou create a link, you can specify whether it should be displayed within a Financial Managementapplication or in a separate browser window.
You can specify the option for the system to prompt you before opening the page. For example,you can specify this option when opening a link to a Web page that is time-consuming to open.
ä To link a Web page:
1 From the Document Manager, click New, then Link, or select Actions, then New, and then Link.
2 Enter the URL of the Web page.
3 To display the page within the current page, select Tasklist opens link within same page.
Note: If you do not select this option, the page opens in a separate browser window.
4 Optional: Select Prompt user before opening link so that the system prompts you with a confirmationdialog box before opening the page.
5 Optional: Select Include Single Sign On information in page request so that the single sign-oninformation is posted back to the page.
6 To save the link, click Save, enter the information, and click Save.
Copying Document LinksFrom a data grid or data form, you can copy a Financial Management document link and use itas a bookmark.
ä To copy a document link:
1 Open a data grid or data form.
2 From the toolbar, click Copy Document Link.
3 Copy the link text from the dialog and use it to create a bookmark in the browser.
4 Use this bookmark to open Oracle Hyperion Enterprise Performance Management Workspace and viewthe document. You will be prompted to log on before the document is opened.
Working with Custom DocumentsYou can attach one or more documents to cells in data grids, data forms, and Process Controlcells. You can attach any type of public document that you have stored in your task list. Forexample, you can attach a Microsoft Word document, Microsoft Excel spreadsheet, or XML file.
42
You must first upload the documents to the Financial Management database. The documentsare stored in the database, and you can apply security classes to them.
You can load, extract, organize, view, and delete custom documents in the same way that youwork with Financial Management documents.
To attach or extract any custom documents to or from the server, you must be assigned theManage Custom Documents security role.
You can specify a size limit for document attachments, and a maximum number of documentattachments by user when you create an application. You specify the limits in the AppSettingsattribute for the application metadata.
Accessing Related ContentYou can include content that is contained in the Workspace directly within a FinancialManagement task list. In Financial Management, when you create a related content document,it serves as a link to a resource in another product. For example, you can view a report fromOracle Hyperion Financial Reporting in HTML or as a PDF file. You can add the item to a tasklist or launch it separately from the Related Content menu. You must be assigned the appropriatesecurity rights to view the content.
Before you can use related content, you must perform these tasks:
l Set up a link to the related content resource server. There is one repository for all RelatedContent documents, which is accessed through one URL.
l Configure external authentication. If you are not using external authentication, the RelatedContent tab is not displayed in Manage Documents.
See the Oracle Enterprise Performance Management System Installation and ConfigurationGuide.
ä To access related content:
1 Make sure that your administrator has enabled external authentication and that a link is established tothe related content resource server.
2 From Documents, select New, then Related Content, or Actions, then New, then Related Content.
Note: If external authentication is not enabled, the Related Content tab is not displayed.
3 For Resource Document, enter the name of the document or click Browse to locate the file.
4 From Open As, select the format in which to open the document.
5 Optional: To preview the document, click Preview.
6 Click Save to save the document.
43
Managing Task ListsYou can create task lists for documents and tasks that you use frequently, for example, data grids,data forms, and reports. Task lists provide quick access to these items without navigating amongdifferent modules. For example, suppose you need to enter intercompany balances in data forms,review intercompany balances in reports, and translate parent entities in a data grid. Creating atask list enables you to complete your workflow without navigating among forms, grids, andreport modules.
See these procedures:
l “Creating Task Lists” on page 44
l “Editing Task Lists” on page 45
l “Deleting Task Lists” on page 45
Creating Task ListsYou can create private or public task lists. Public task lists can be shared with other users. Privatetask lists are not displayed to other users, and can be accessed only by the users who create them.To limit access to a list, you can assign a security class to the list.
You can add these items to task lists: tasks, data forms, data grids, intercompany reports, journalreports, links to Web sites or files, , related content, folders, and custom documents. You caninclude multiple instances of a task or document in a task list. For example, a task list may containthese items for a workflow: Input Grid, Load Data, Input Grid, Process Control.
You can also add a task list to another task list. For example, you can create a task list for journalactions and add it to a task list for monthly closing tasks. When you create a task list, you definewhether it can be added to other task lists. A task list that is attached to a major list cannot containanother task list.
To organize the documents of a task list, you can add document folders to task lists. Users canthen expand folders and select one or more documents. For example, you can add a folder ofdata forms. You can add a folder with subfolders, and you can modify a folder that is attachedto a task list to add a subfolder to it. You can add an unlimited number of folders to a task list.
ä To create a task list:
1 From Document Manager, click New, and then Task List, or select Actions, then New, and then TaskList.
2 Click Add, or select Actions, then Add, and select an item:
l Folder
l Task List
l Custom Documents
l Data Form
l Data Grid
l Link
44
l Related Content
l Reports
l Tasks
3 Select the items to add, and click Select.
4 Optional: To reorder items in a task list, highlight the item to move, and click the Move Task List Itemarrows to move the item up, down, to the top, or to the bottom.
Tip: To remove items from a task list, select the item and click Delete or Delete All.
5 Click Save, or select Actions, and then Save.
6 For Name, enter a task list name.
Note: These characters are not valid in a task list name: colon (:), semi-colon (;), less thanor greater than signs (< >), single or double quotation marks (', “),
7 From Security Class, select a security class, or use the Default security class.
8 Optional: For Description, enter a description.
9 Optional: Select Private if you do not want to display this task list to other users.
10 Optional: To overwrite a task list, select Overwrite existing document.
11 Click Save.
Editing Task ListsYou can add, reorder, and remove items from a task list.
Note: Removing items from a task list only removes them from the task list that you selected.It does not delete items from the system.
ä To edit a task list:
1 From Document Manager, open a task list and click Edit.
2 Add or remove items:
a. To add items, click Add, and select items.
b. To remove items, select items and click Delete or Delete All.
3 Optional: To reorder items, highlight the item to move, and click the Move Task List Item arrows to movethe item up, down, to the top, or to the bottom.
4 When you finish editing items, click Save.
Deleting Task ListsYou can delete a task list that you no longer need.
45
ä To delete a task list:
1 From the Document Manager, select the task list to delete.
2 Click Delete.
3 At the system prompt, click OK.
Managing FavoritesYou can add documents that you use frequently to your list of Favorites. You can view the listof documents marked as favorites, quickly access them from the Favorites section, or removeitems as favorites.
You can expand, collapse, or resize the Favorites pane to show or hide more Favorites.
Any changes that you make to the Favorites list are saved when you log out of the application.
See these procedures:
l “Adding Favorites” on page 46
l “Removing Favorites” on page 46
Adding FavoritesYou can add items that you use frequently, such as data forms, data grids, or reports, to theFavorites section.
After you add favorites, you can view and access them from the Favorites section.
ä To add favorites:
1 From Documents in the left pane, select the item to add.
2 Click Add to Favorites.
The newly added item automatically displays in the Favorites pane.
Removing FavoritesYou can remove items that you no longer need from your list of Favorites.
ä To remove items from your Favorites list:
1 From the Favorites list, select the item to remove.
2 Right-click and select Remove From Favorites.
46
3Managing Data
In This Chapter
Working with Data Files .. . . . . . . . . . . . . . . . . . . . . . . . . . . . . . . . . . . . . . . . . . . . . . . . . . . . . . . . . . . . . . . . . . . . . . . . . . . . . . . . . .47
Load Methods ... . . . . . . . . . . . . . . . . . . . . . . . . . . . . . . . . . . . . . . . . . . . . . . . . . . . . . . . . . . . . . . . . . . . . . . . . . . . . . . . . . . . . . . . . . . .50
Loading Data ... . . . . . . . . . . . . . . . . . . . . . . . . . . . . . . . . . . . . . . . . . . . . . . . . . . . . . . . . . . . . . . . . . . . . . . . . . . . . . . . . . . . . . . . . . . . .53
Loading Submission Groups ... . . . . . . . . . . . . . . . . . . . . . . . . . . . . . . . . . . . . . . . . . . . . . . . . . . . . . . . . . . . . . . . . . . . . . . . . . . .55
Loading Drillable Region Definitions ... . . . . . . . . . . . . . . . . . . . . . . . . . . . . . . . . . . . . . . . . . . . . . . . . . . . . . . . . . . . . . . . . . .56
Extracting Data ... . . . . . . . . . . . . . . . . . . . . . . . . . . . . . . . . . . . . . . . . . . . . . . . . . . . . . . . . . . . . . . . . . . . . . . . . . . . . . . . . . . . . . . . . . .57
Managing Data ... . . . . . . . . . . . . . . . . . . . . . . . . . . . . . . . . . . . . . . . . . . . . . . . . . . . . . . . . . . . . . . . . . . . . . . . . . . . . . . . . . . . . . . . . . .59
Copying Data ... . . . . . . . . . . . . . . . . . . . . . . . . . . . . . . . . . . . . . . . . . . . . . . . . . . . . . . . . . . . . . . . . . . . . . . . . . . . . . . . . . . . . . . . . . . . .60
Clearing Data ... . . . . . . . . . . . . . . . . . . . . . . . . . . . . . . . . . . . . . . . . . . . . . . . . . . . . . . . . . . . . . . . . . . . . . . . . . . . . . . . . . . . . . . . . . . . .62
Working with Data FilesThere are two ways to add data to a Financial Management application:
l Create a data file and load it into an application.
l Enter data in a data grid.
Creating and loading a data file is an alternative to manually entering data in a data grid. Youcreate data files in an ASCII format supporting multibyte character sets (MBCS) or a file encodedwith the Unicode format. By default, data files use the DAT file extension. A data file containssections that map the file data to dimensions, and can contain these sections:
l Column Order
l View
l Data
l Line Item Detail
l Description
Sample data files are installed with the HFM Client installation and are located in theFinancialManagement\SampleApps directory.
Note: Sample applications are only available if the HFM Client has been installed.
47
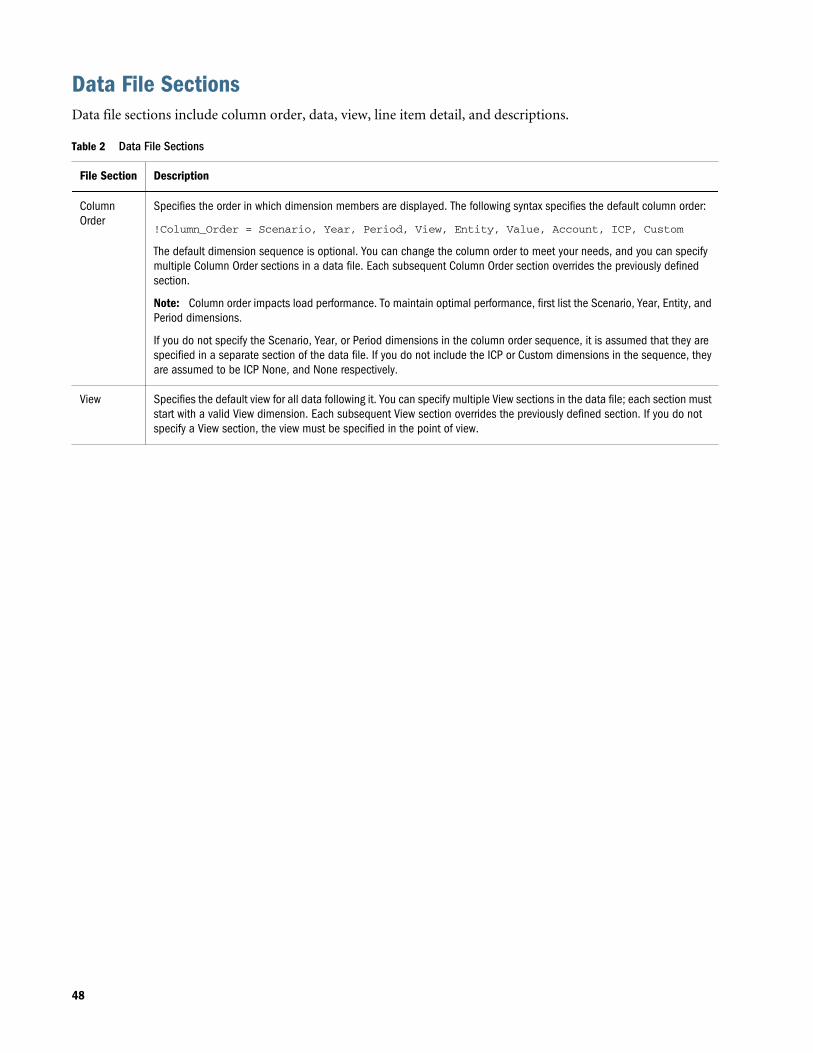
Data File SectionsData file sections include column order, data, view, line item detail, and descriptions.
Table 2 Data File Sections
File Section Description
ColumnOrder
Specifies the order in which dimension members are displayed. The following syntax specifies the default column order:
!Column_Order = Scenario, Year, Period, View, Entity, Value, Account, ICP, Custom
The default dimension sequence is optional. You can change the column order to meet your needs, and you can specifymultiple Column Order sections in a data file. Each subsequent Column Order section overrides the previously definedsection.
Note: Column order impacts load performance. To maintain optimal performance, first list the Scenario, Year, Entity, andPeriod dimensions.
If you do not specify the Scenario, Year, or Period dimensions in the column order sequence, it is assumed that they arespecified in a separate section of the data file. If you do not include the ICP or Custom dimensions in the sequence, theyare assumed to be ICP None, and None respectively.
View Specifies the default view for all data following it. You can specify multiple View sections in the data file; each section muststart with a valid View dimension. Each subsequent View section overrides the previously defined section. If you do notspecify a View section, the view must be specified in the point of view.
48
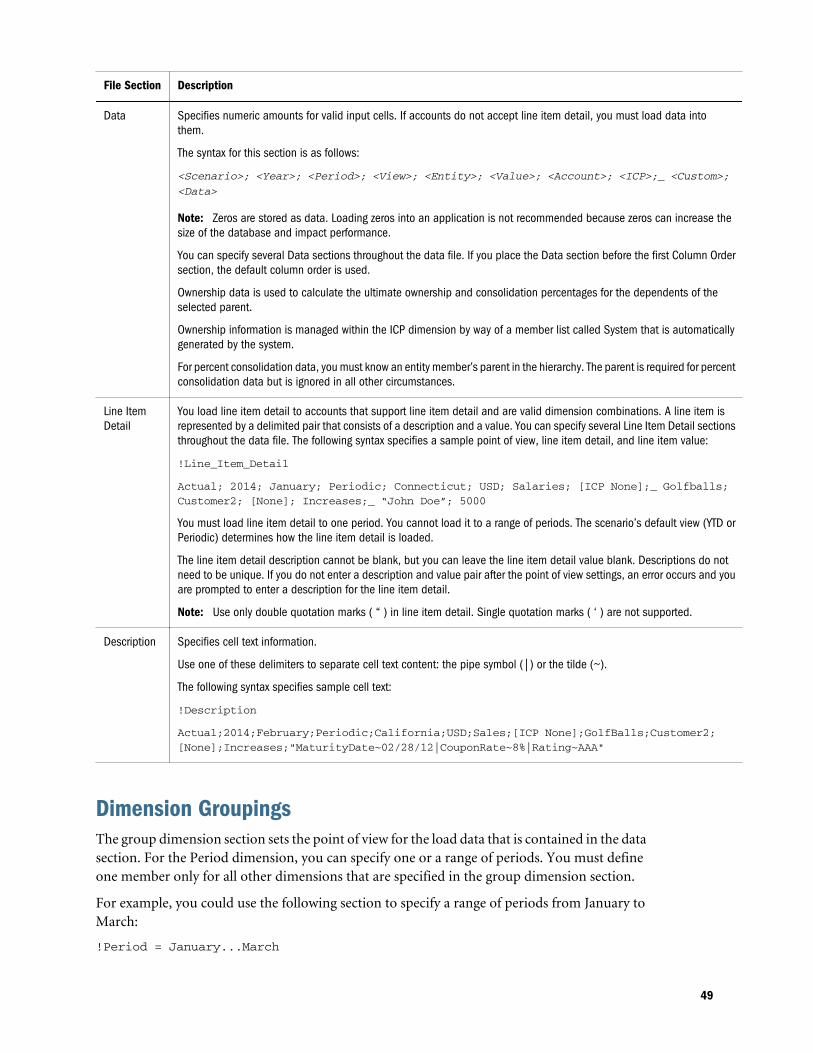
File Section Description
Data Specifies numeric amounts for valid input cells. If accounts do not accept line item detail, you must load data intothem.
The syntax for this section is as follows:
<Scenario>; <Year>; <Period>; <View>; <Entity>; <Value>; <Account>; <ICP>;_ <Custom>;
<Data>
Note: Zeros are stored as data. Loading zeros into an application is not recommended because zeros can increase thesize of the database and impact performance.
You can specify several Data sections throughout the data file. If you place the Data section before the first Column Ordersection, the default column order is used.
Ownership data is used to calculate the ultimate ownership and consolidation percentages for the dependents of theselected parent.
Ownership information is managed within the ICP dimension by way of a member list called System that is automaticallygenerated by the system.
For percent consolidation data, you must know an entity member’s parent in the hierarchy. The parent is required for percentconsolidation data but is ignored in all other circumstances.
Line ItemDetail
You load line item detail to accounts that support line item detail and are valid dimension combinations. A line item isrepresented by a delimited pair that consists of a description and a value. You can specify several Line Item Detail sectionsthroughout the data file. The following syntax specifies a sample point of view, line item detail, and line item value:
!Line_Item_Detail
Actual; 2014; January; Periodic; Connecticut; USD; Salaries; [ICP None];_ Golfballs;Customer2; [None]; Increases;_ “John Doe”; 5000
You must load line item detail to one period. You cannot load it to a range of periods. The scenario’s default view (YTD orPeriodic) determines how the line item detail is loaded.
The line item detail description cannot be blank, but you can leave the line item detail value blank. Descriptions do notneed to be unique. If you do not enter a description and value pair after the point of view settings, an error occurs and youare prompted to enter a description for the line item detail.
Note: Use only double quotation marks ( “ ) in line item detail. Single quotation marks ( ‘ ) are not supported.
Description Specifies cell text information.
Use one of these delimiters to separate cell text content: the pipe symbol (|) or the tilde (~).
The following syntax specifies sample cell text:
!Description
Actual;2014;February;Periodic;California;USD;Sales;[ICP None];GolfBalls;Customer2;[None];Increases;"MaturityDate~02/28/12|CouponRate~8%|Rating~AAA"
Dimension GroupingsThe group dimension section sets the point of view for the load data that is contained in the datasection. For the Period dimension, you can specify one or a range of periods. You must defineone member only for all other dimensions that are specified in the group dimension section.
For example, you could use the following section to specify a range of periods from January toMarch:
!Period = January...March
49
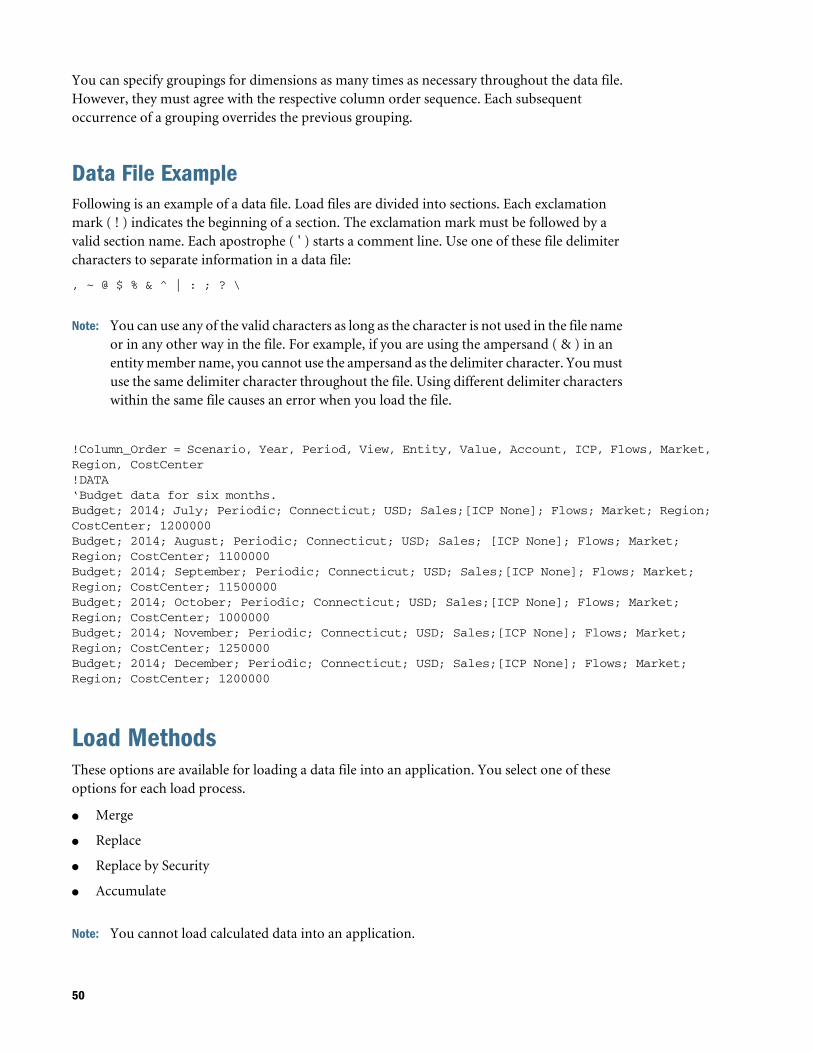
You can specify groupings for dimensions as many times as necessary throughout the data file.However, they must agree with the respective column order sequence. Each subsequentoccurrence of a grouping overrides the previous grouping.
Data File ExampleFollowing is an example of a data file. Load files are divided into sections. Each exclamationmark ( ! ) indicates the beginning of a section. The exclamation mark must be followed by avalid section name. Each apostrophe ( ' ) starts a comment line. Use one of these file delimitercharacters to separate information in a data file:
, ~ @ $ % & ^ | : ; ? \
Note: You can use any of the valid characters as long as the character is not used in the file nameor in any other way in the file. For example, if you are using the ampersand ( & ) in anentity member name, you cannot use the ampersand as the delimiter character. You mustuse the same delimiter character throughout the file. Using different delimiter characterswithin the same file causes an error when you load the file.
!Column_Order = Scenario, Year, Period, View, Entity, Value, Account, ICP, Flows, Market, Region, CostCenter!DATA‘Budget data for six months.Budget; 2014; July; Periodic; Connecticut; USD; Sales;[ICP None]; Flows; Market; Region; CostCenter; 1200000Budget; 2014; August; Periodic; Connecticut; USD; Sales; [ICP None]; Flows; Market; Region; CostCenter; 1100000Budget; 2014; September; Periodic; Connecticut; USD; Sales;[ICP None]; Flows; Market; Region; CostCenter; 11500000Budget; 2014; October; Periodic; Connecticut; USD; Sales;[ICP None]; Flows; Market; Region; CostCenter; 1000000Budget; 2014; November; Periodic; Connecticut; USD; Sales;[ICP None]; Flows; Market; Region; CostCenter; 1250000Budget; 2014; December; Periodic; Connecticut; USD; Sales;[ICP None]; Flows; Market; Region; CostCenter; 1200000
Load MethodsThese options are available for loading a data file into an application. You select one of theseoptions for each load process.
l Merge
l Replace
l Replace by Security
l Accumulate
Note: You cannot load calculated data into an application.
50
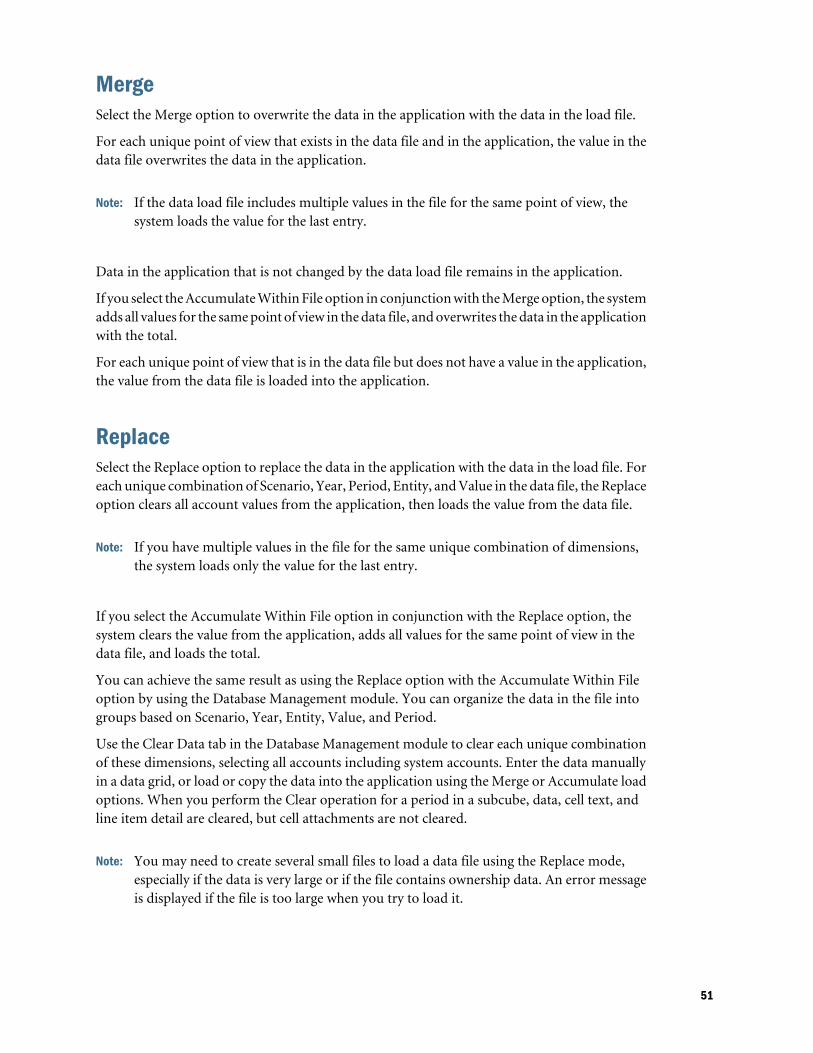
MergeSelect the Merge option to overwrite the data in the application with the data in the load file.
For each unique point of view that exists in the data file and in the application, the value in thedata file overwrites the data in the application.
Note: If the data load file includes multiple values in the file for the same point of view, thesystem loads the value for the last entry.
Data in the application that is not changed by the data load file remains in the application.
If you select the Accumulate Within File option in conjunction with the Merge option, the systemadds all values for the same point of view in the data file, and overwrites the data in the applicationwith the total.
For each unique point of view that is in the data file but does not have a value in the application,the value from the data file is loaded into the application.
ReplaceSelect the Replace option to replace the data in the application with the data in the load file. Foreach unique combination of Scenario, Year, Period, Entity, and Value in the data file, the Replaceoption clears all account values from the application, then loads the value from the data file.
Note: If you have multiple values in the file for the same unique combination of dimensions,the system loads only the value for the last entry.
If you select the Accumulate Within File option in conjunction with the Replace option, thesystem clears the value from the application, adds all values for the same point of view in thedata file, and loads the total.
You can achieve the same result as using the Replace option with the Accumulate Within Fileoption by using the Database Management module. You can organize the data in the file intogroups based on Scenario, Year, Entity, Value, and Period.
Use the Clear Data tab in the Database Management module to clear each unique combinationof these dimensions, selecting all accounts including system accounts. Enter the data manuallyin a data grid, or load or copy the data into the application using the Merge or Accumulate loadoptions. When you perform the Clear operation for a period in a subcube, data, cell text, andline item detail are cleared, but cell attachments are not cleared.
Note: You may need to create several small files to load a data file using the Replace mode,especially if the data is very large or if the file contains ownership data. An error messageis displayed if the file is too large when you try to load it.
51
If you load data using the Replace mode, and the system contains data for a subsequent period,the subsequent period's data may be accumulated in the file. If this occurs, reload the data usingthe same View in the data file as the default View of the Scenario. For example, if the Scenariodefault view is YTD, reload YTD data instead of Periodic data. When you load an interim period,also include and load all subsequent periods in the same data file.
Replace by SecuritySelect the Replace by Security option to perform a data load in Replace mode in which only themembers to which you have access are loaded. This option enables you to perform a data loadin Replace mode even if you do not have access to all accounts. When you perform the Clearoperation for a period in a subcube, only the cells to which you have access are cleared. Data,cell text, and line item detail are cleared, but cell attachments are not cleared.
AccumulateSelect the Accumulate option to accumulate the data in the application with the data in the loadfile. For each unique point of view in the data file, the value from the load file is added to thevalue in the application.
Note: Data for system accounts is not accumulated.
Accumulate Within File
You use the Accumulate Within File option in conjunction with the Merge and Replace options.When a data load file contains multiple lines of data for the same point of view, this option firstaccumulates the data in the file and then loads the totals into the application based on the selectedload option.
File Contains Ownership Data
If the file that you are loading contains ownership data, you must indicate this by selecting FileContains Ownership Data. If you do not select this option and the data file contains ownershipor shares data, an error occurs when you load the file.
File Contains Process Management Data
Select this option if the file that you are loading contains data for assignment of processmanagement submission groups to submission phases.
Load ExampleThe following example shows how the load options work. Suppose the following data exists inthe application for the Sales and Purchases accounts:
...Sales;... 15
...Purchases;... 10
52
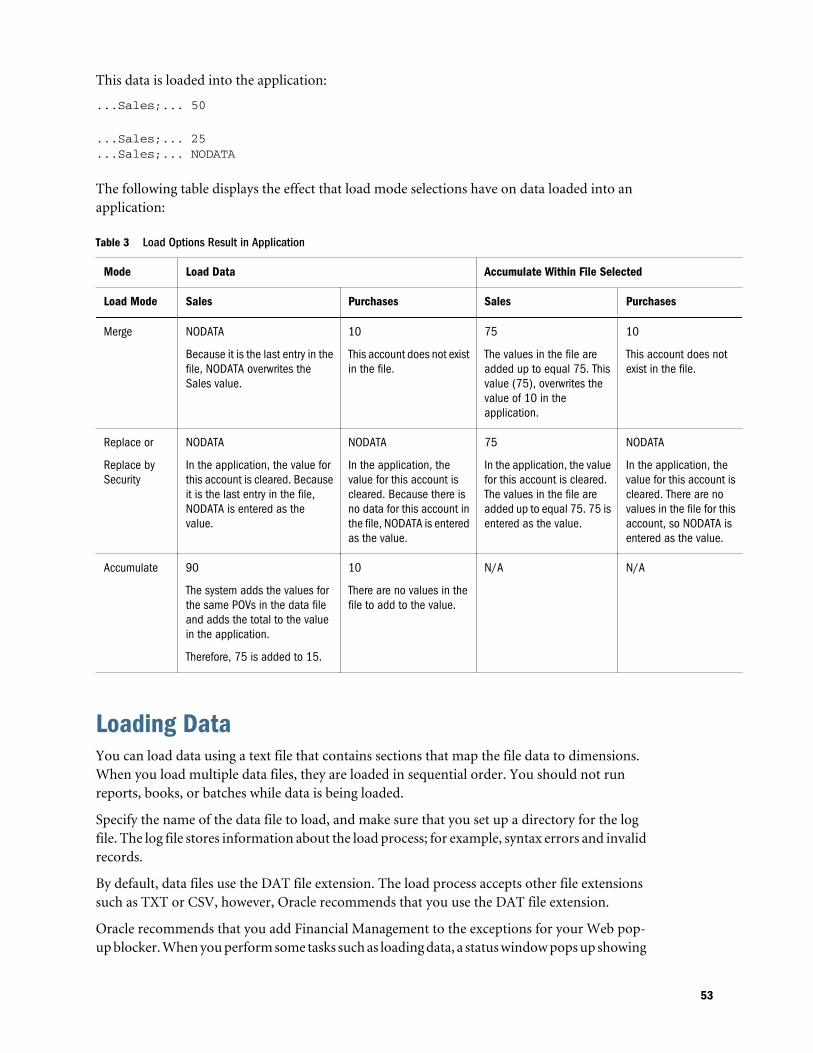
This data is loaded into the application:
...Sales;... 50
...Sales;... 25
...Sales;... NODATA
The following table displays the effect that load mode selections have on data loaded into anapplication:
Table 3 Load Options Result in Application
Mode Load Data Accumulate Within File Selected
Load Mode Sales Purchases Sales Purchases
Merge NODATA
Because it is the last entry in thefile, NODATA overwrites theSales value.
10
This account does not existin the file.
75
The values in the file areadded up to equal 75. Thisvalue (75), overwrites thevalue of 10 in theapplication.
10
This account does notexist in the file.
Replace or
Replace bySecurity
NODATA
In the application, the value forthis account is cleared. Becauseit is the last entry in the file,NODATA is entered as thevalue.
NODATA
In the application, thevalue for this account iscleared. Because there isno data for this account inthe file, NODATA is enteredas the value.
75
In the application, the valuefor this account is cleared.The values in the file areadded up to equal 75. 75 isentered as the value.
NODATA
In the application, thevalue for this account iscleared. There are novalues in the file for thisaccount, so NODATA isentered as the value.
Accumulate 90
The system adds the values forthe same POVs in the data fileand adds the total to the valuein the application.
Therefore, 75 is added to 15.
10
There are no values in thefile to add to the value.
N/A N/A
Loading DataYou can load data using a text file that contains sections that map the file data to dimensions.When you load multiple data files, they are loaded in sequential order. You should not runreports, books, or batches while data is being loaded.
Specify the name of the data file to load, and make sure that you set up a directory for the logfile. The log file stores information about the load process; for example, syntax errors and invalidrecords.
By default, data files use the DAT file extension. The load process accepts other file extensionssuch as TXT or CSV, however, Oracle recommends that you use the DAT file extension.
Oracle recommends that you add Financial Management to the exceptions for your Web pop-up blocker. When you perform some tasks such as loading data, a status window pops up showing
53
the task status. If you have a pop-up blocker enabled on your computer, the status window isnot displayed.
ä To load data:
1 Open the application into which to load data.
2 Select Consolidation, then Load, and then Data.
3 Optional: From Default Load Options, select File Contains Ownership Data if the load file containsownership data, such as shares owned.
Caution! If ownership data is included in the file, you must select this option, or an erroroccurs when you load the file.
4 Optional: Select File Contains Process Management Data if the load file contains data for assignmentof process management submission groups to submission phases.
5 Optional: Select Accumulate within File to add multiple values for the same cells in the load file beforeloading them into the application.
6 From Delimiter Character, select the default character used to separate the data in the file. Thesecharacters are valid delimiters: , ~ @ # $ % ^ & | : ; ? \
Note: You can use any of the valid characters if that character is not used in the file nameor in any other way in the file. For example, if you use the ampersand ( & ) in an entitymember name, you cannot use the ampersand as the delimiter character.
7 From Load Mode, select a mode:
l Merge to overwrite data in the application
l Replace to replace data in the application
l Replace by Security to replace data to which you have access, depending on your securityrights
l Accumulate to add data to data in the application
See “Load Methods” on page 50.
8 Optional: If you are using Firefox as the browser, you can load multiple files. Select Multipleselection if it is not already selected, and click Browse to locate the files.
You can drag and drop a maximum of 10 files at one time. The system then populates thedetail rows with the selected files.
You can also drag and drop files into the File Selection content area.
9 Optional: To override the default load options, select Override, and select different load options for thefile.
10 Optional: Click Scan to verify that the file format is correct.
11 Click Load.
If you reload existing files, the system displays a warning prompt asking if you want to usethem again. If you do, click Yes.
54
The system displays the load task progress, and a log file for each load file when the processis finished. Any data load information, including errors and invalid records, is located inthe log file.
Tip: To reset values, click Reset.
Viewing Data Load ProgressWhen you load data, you can monitor the data load progress. During the load process, a progressbar page is displayed in a separate browser window. This page displays the current progresspercentage, status, and last update time.
In addition, you can view the data load status from the Running Tasks module. In the RunningTasks module, you can view all tasks that are running, but you can cancel only tasks that youstarted.
ä To view data load progress:
1 Select Consolidation, then Load and then Data.
2 Select an action:
l From the Progress page, view the data load progress.
l Select Consolidation, then Maintenance, and then Running Tasks. From the RunningTasks page, select Data Load from the Tasks filter, and click OK to view the progress.
Canceling Data Load TasksWhen you load data, you can cancel a data load. If you are viewing the data load progress fromthe Running Tasks module, you can cancel only data loads that you started. Administrators cancancel running tasks by any users to free resources.
ä To cancel a data load, take one of these actions:
l From the Progress page, click Stop Task for the data load.
l From the Running Tasks page, select the Data Load task from the Tasks filter, and clickStop Tasks, or select Actions, and then Stop Tasks.
Loading Submission GroupsIn the Load Data task, you can load and extract Process Management Phased Submission groups.The load file cannot contain both submission phase records and data records. The submissionphase number must be between 1 and 9 (inclusive) and the group number must be between 0and 99 (inclusive).
No period can have a duplicate submission group assigned for phases 1-9. If duplicates areassigned, the entire load for that period is ignored and returned to the status before the load.
55
In Replace mode, all data for the period is cleared before new group/phase assignments areprocessed for that period, and new data replaces old data.
Example: Scenario=Actual; Period=January has these assignments: Phase=1, Groups=1,3,5, andPhase=2, Groups=2, 4, 6.
If you load the following data:
!SUBMISSION PHASEActual;January;1;”7,8,9”
All data for January (including Phase 2 assignments) is cleared, and the final result is as follows:
Scenario=Actual;Period=JanuaryActual;January;1;”7,8,9”
In Merge mode, the new group/phase assignments for the period override the assignments forthe same groups, but keep the assignments for other groups. If an error is detected for a period,all new assignments for that period are ignored.
After you load a submission group file to an application, users using the application are notifiedthat the system has changed and that they must log off from the application and log back on.
The load format is as follows:
!SUBMISSION PHASE<scenario>;<period>;<phase#>;<”group assignment”>
Load File Example
!SUBMISSION PHASEActual;January;1;”ALL”Actual;February;1;”1,3,5”Actual;February;2;”2,4,6-15”Actual;March;1;”1,2,3–5,7,9”Actual;March;2;”8,10-13,15”Actual;March;3;”14”
To load submission groups, see “Loading Data” on page 53.
Loading Drillable Region DefinitionsWhen you load data, you can load drillable region definitions. Drillable region definitions areused to define the data that is loaded from a general ledger source system and specify the datadrillable to Oracle Hyperion Financial Data Quality Management, Enterprise Edition.
You can load region definitions through FDMEE. For information on FDMEE, see the OracleHyperion Financial Data Quality Management, Enterprise Edition Administrator's Guide.
In data grids and data forms, after the regions have been loaded, cells that are drillable areindicated by a light blue icon at the top left corner of the cell. The cell context menu displays thedefined display name, which then opens the specified URL, such as the FDMEE page.
A region definition load file consists of the following information:
56
l Scenario, Year, Period, Entity, Account
l Display Name (for cell context menu) and URL (to drill to)
Extracting DataUse the procedure in this section to extract data as flat files.
Note: You can also extract data to a database. See the Extracting Data to a Database section inthe Oracle Hyperion Financial Management Administrator's Guide.
You can extract base-level input data and some types of calculated data from an application. Bydefault, data files use the .DAT file extension. After you extract data to a data file, you can viewand modify it in a text editor.
When you extract data, you must specify a member for the Scenario and Year dimensions. Youcan specify one or more members for the Period, Entity, and Account dimensions.
You can also extract these types of calculated data:
l Consolidated data for parent entities
l Base accounts and custom dimension members that are calculated by rules
l Parent accounts that intersect with their respective CustomTopMember andICPTopMember. If the CustomTop metadata attribute is blank or ALL, the [None] memberis used. Only valid data intersections are extracted. For each unique point of view, data ispresented in a data line in the file. Group headings are not created.
When you select options for extracting data, you can save the selections as a template. Thetemplate stores the current Type, Extract Format, Point of View, and selected options. Whenyou select a saved template, the extract options are populated with the default values.
Make sure that you set up a directory for log files and extracted files. The log file storesinformation about the process, such as the start and end time of the extract and the number ofextracted records.
Flat File Extract OptionsWhen you extract members in a flat file format, you can select whether to include a header forthe file.
Example: Flat File with Header
Scenario=Actual
Year=2014
Period=[Year]
View=YTD
57
Entity=CORP_OPS
Parent=GROUP
Value=[Parent Total]
Possible Duplicated Records=No
SalesIC;CHINA;[None];[None];[None];[None];100000
SalesIC;CHINA;[None];AllCustom2;[None];[None];100000
Scenario=Actual
Year=2014
Period=[Year]
View=Periodic
Entity=CORP_OPS
Parent=GROUP
Value=[Parent Total]
Possible Duplicated Records=No
SalesIC;CHINA;[None];[None];[None];[None];100000
SalesIC;CHINA;[None];AllCustom2;[None];[None];100000
Example: Flat File No Header
!Data
Actual;2014;[Year];YTD;GROUP.CORP_OPS;[Parent Total];SalesIC;CHINA;[None];[None];[None];[None];100000
Actual;2014;[Year];YTD;GROUP.CORP_OPS;[Parent Total];SalesIC;CHINA;[None];AllCustom2;[None];[None];100000
Actual;2014;[Year];Periodic;GROUP.CORP_OPS;[Parent Total];SalesIC;CHINA;[None];[None];[None];[None];100000
Actual;2014;[Year];Periodic;GROUP.CORP_OPS;[Parent Total];SalesIC;CHINA;[None];AllCustom2;[None];[None];100000
Extracting Data to a Flat File
ä To extract data to a flat file:
1 Open the application from which to extract data.
2 Select Consolidation, then Extract, and then Data.
3 Do one of these tasks:
58
l If you saved POV dimensions in a template, from Template, select the template. ThePoint of View and extract options are populated with the default values from thetemplate.
l If you are not using a template, select the POV dimension members to export.
4 For Extract Destination Type, select Flat File.
5 For Extract Format, select a format: Without Header or With Header.
6 Optional: From Options, select one or more extract options:
l Extract Dynamic Accounts
l Calculated Data
l Derived Data
l Cell Text
l Phased Submission Group Data
7 From Delimiter, select a delimiter.
8 From Line Item Details, select an extract option:
l Individual Line Items
l Total Summary for Cell
l None
9 Optional: For Extracted File Prefix, enter a prefix, or use the application name default prefix.
10 Click Extract.
11 From the download box, select Save.
12 Enter a name for the extracted file and make sure that the location for the file is in the directory thatyou set up.
Note: By default, data files use the DAT file extension.
13 Click Save.
Managing DataFrom the Manage Data page, you can perform these tasks:
l Copy Data
You can copy data from a specific scenario, year, period, or list of periods to a specificdestination (provided that the destination is not locked). The copy data process includesline item detail and intercompany transactions.
To copy data, you must have the Database Management security role.
See “Copying Data” on page 60.
l Clear Data
59

You can clear data from the database.
To clear data, you must have the Database Management security role.
See “Clearing Data” on page 62.
l Clear Invalid Records
You can find and clear invalid records from the database. To clear invalid records, you mustbe an Administrator. See the Oracle Hyperion Financial Management Administrator'sGuide.
ä To copy or clear data, or clear invalid records:
1 Open an application.
2 Select Consolidation, then Data, and then Manage.
3 From the Manage Data page, expand one or more of these sections:
l Copy Data
l Clear Data
l Clear Invalid Records
Copying DataYou can copy data from a specific scenario, year, period, or list of periods to a specific destination(provided that the destination is not locked). The frequency of the source periods must equalthe frequency of the destination periods. If you copy a list of periods, the number of sourceperiods must equal the number of destination periods. The source and destination scenariosmust also have the same default frequency. To update values, you must reconsolidate after youcopy the data.
For the Value dimension, you can copy values only from the Entity Currency member, or youcan include system and exchange rate accounts.
To copy data, you must have the Database Management security role.
You can define a factor by which copied data values are multiplied. Source amounts aremultiplied by the factor before data is copied to the destination. For example, you can increasedata values in one scenario before you copy them to another scenario, such as increasing allActual 2013 data values by 15% when you copy them to Forecast 2014. The multiplication factorthat you define is not applied to system accounts.
You must also consider any business rules you created and loaded that may affect the accountdata; for example, a rule that can be used to calculate an account in one period but not in anotherperiod.
You can specify how data is copied into an application. You can select to merge, replace, oraccumulate the data. For all Mode options, copy and load data options are the same. See “LoadMethods” on page 50.
60
You also specify a log file, which stores information about the copy process, for example, thestart and end times for the copy process and access violations.
ä To copy data:
1 Open the application from which to copy data.
2 Select Consolidation, then Data, and then Manage.
3 From the Manage Data page, expand Copy Data.
4 For Source, select a Scenario, Year, and a Period or range of Periods from which to copy data.
5 For Destination, select a Scenario, Year, and the same number of Periods to which to copy data.
6 For Copy Members, select the Account and Entity members from which to copy data.
7 In Options, from Mode, select an option:
l Accumulate to add data to data in the destination scenario
l Merge to overwrite data in the destination scenario
l Replace to replace data in the destination scenario
8 From View, select Periodic or YTD.
9 Select one or more options:
l Entity Currency Data to copy the data in the Entity Currency member of the Valuedimension
l Rates and System Data to copy data from system and exchange rate accounts
l Cell Text to copy cell text
l Copy Derived Data to copy derived data
10 Optional: To store the copy information in a log file, select Enable Detailed Logging.
11 Optional: For Multiplier, enter a factor by which to multiply the data that you are copying, such as 1.0.
Note: The factor that you specify is not applied to system accounts.
12 Click Copy.
13 Optional: To view a log of the copy process, click View Log.
Copying Line Item DetailWhen you copy data, line item detail is copied based on the source and destination scenarioviews and the ability of the source and destination scenarios to accept line item detail.
Note: You set up scenarios to use line item details by specifying this attribute in the Scenariometadata.
These rules apply to copying line item detail:
61
l If the source scenario has line item detail and the destination scenario can accept line itemdetail, all details and the corresponding total are copied to the destination scenario.
l If the source scenario has line item detail and the destination scenario cannot accept lineitem detail, only the total is copied from the source scenario to the destination scenario. Noline item detail is copied to the destination scenario.
l If the source scenario does not have line item detail and the destination scenario cannotaccept line item detail, no detail is copied.
l If the source scenario does not have line item detail and the destination scenario accepts lineitem detail, the total amount is copied from the source to the first line item detail data inthe destination scenario with the description equal to the label of the scenario.
l If the source and destination scenario views are the same, Periodic to Periodic or YTD toYTD, all details and the corresponding total are copied to the destination scenario. Theamount reflects the default view defined for the scenario.
l If the source and destination scenario views are not the same, Periodic to YTD or YTD toPeriodic, the line item detail in the destination scenario may not match the total after thecopy operation. Line item detail in the destination scenario only matches the total when youview the data in the nondefault view of the scenario.
Copying Intercompany TransactionsWhen you copy data, intercompany transactions are copied based on the source and destinationscenario views and the ability of the source and destination scenarios to accept transactions.
These rules apply to copying intercompany transactions:
l If both the source and destination support intercompany transactions, the system copiesthe source amount to the destination. It also copies the corresponding intercompanytransaction details to the destination cell.
l If the source supports intercompany transactions but the destination does not, the systemdoes not copy the transaction.
l If the source does not support intercompany transactions but the destination does, thesystem does not copy the transaction.
l If the destination contains intercompany details, the system does not copy the transaction.
Clearing DataYou can clear data for selected entities and accounts for a specific scenario, year, period, or listof periods. When you clear data, both base and parent entities are cleared. However, only base-level accounts are cleared. You cannot clear any cells that contain posted intercompanytransactions.
Note: You must select only unlocked cells when you clear data, or the clear process does notcomplete successfully.
62
To clear data, you must have the Database Management security role.
To clear invalid records from the database, you must be an administrator. See the Oracle HyperionFinancial Management Administrator's Guide.
ä To clear data:
1 Open the application from which to clear data.
2 Select Consolidation, then Data, and then Manage.
3 From the Manage Data page, expand Clear Data.
4 From Source, select a Scenario and Year, and select the Period, Account, and Entity dimension membersto clear.
5 From Options, select one or more options:
l Entity Currency Data to clear the data in the Entity Currency member of the Valuedimension
l Rates and System Data to clear data from system and exchange rate accounts
6 Optional: To store the clear information in a log file, select Enable Detailed Logging.
7 Click Clear.
8 At the confirmation prompt, click Yes to clear data.
63

64
4Using Data Grids
In This Chapter
Creating Data Grids ... . . . . . . . . . . . . . . . . . . . . . . . . . . . . . . . . . . . . . . . . . . . . . . . . . . . . . . . . . . . . . . . . . . . . . . . . . . . . . . . . . . . . .65
Opening Data Grids ... . . . . . . . . . . . . . . . . . . . . . . . . . . . . . . . . . . . . . . . . . . . . . . . . . . . . . . . . . . . . . . . . . . . . . . . . . . . . . . . . . . . . .66
Data Grid Tasks ... . . . . . . . . . . . . . . . . . . . . . . . . . . . . . . . . . . . . . . . . . . . . . . . . . . . . . . . . . . . . . . . . . . . . . . . . . . . . . . . . . . . . . . . . .66
Working with Data Grids... . . . . . . . . . . . . . . . . . . . . . . . . . . . . . . . . . . . . . . . . . . . . . . . . . . . . . . . . . . . . . . . . . . . . . . . . . . . . . . . .67
Entering or Editing Data ... . . . . . . . . . . . . . . . . . . . . . . . . . . . . . . . . . . . . . . . . . . . . . . . . . . . . . . . . . . . . . . . . . . . . . . . . . . . . . . . .72
Viewing Data in Data Grids... . . . . . . . . . . . . . . . . . . . . . . . . . . . . . . . . . . . . . . . . . . . . . . . . . . . . . . . . . . . . . . . . . . . . . . . . . . . . .75
Running Data Allocations ... . . . . . . . . . . . . . . . . . . . . . . . . . . . . . . . . . . . . . . . . . . . . . . . . . . . . . . . . . . . . . . . . . . . . . . . . . . . . . .82
Running Equity Pickup Calculations from Data Grids... . . . . . . . . . . . . . . . . . . . . . . . . . . . . . . . . . . . . . . . . . . . . . . . .83
Locking Data ... . . . . . . . . . . . . . . . . . . . . . . . . . . . . . . . . . . . . . . . . . . . . . . . . . . . . . . . . . . . . . . . . . . . . . . . . . . . . . . . . . . . . . . . . . . . .83
Unlocking Data ... . . . . . . . . . . . . . . . . . . . . . . . . . . . . . . . . . . . . . . . . . . . . . . . . . . . . . . . . . . . . . . . . . . . . . . . . . . . . . . . . . . . . . . . . . .83
Viewing Source and Destination Transactions... . . . . . . . . . . . . . . . . . . . . . . . . . . . . . . . . . . . . . . . . . . . . . . . . . . . . . . . .84
Running Entity Detail Reports.. . . . . . . . . . . . . . . . . . . . . . . . . . . . . . . . . . . . . . . . . . . . . . . . . . . . . . . . . . . . . . . . . . . . . . . . . . . .84
Drilling Through to Intercompany Transactions... . . . . . . . . . . . . . . . . . . . . . . . . . . . . . . . . . . . . . . . . . . . . . . . . . . . . . . .88
Drilling Through to Source Data ... . . . . . . . . . . . . . . . . . . . . . . . . . . . . . . . . . . . . . . . . . . . . . . . . . . . . . . . . . . . . . . . . . . . . . . .89
Launching Oracle Financial Management Analytics .. . . . . . . . . . . . . . . . . . . . . . . . . . . . . . . . . . . . . . . . . . . . . . . . . . .89
Process Management Options ... . . . . . . . . . . . . . . . . . . . . . . . . . . . . . . . . . . . . . . . . . . . . . . . . . . . . . . . . . . . . . . . . . . . . . . . . .90
Creating Data GridsYou use data grids to enter, view, or manually edit data in Financial Management applications.After you enter or edit the data, you can calculate the data, translate the data to other currencies,or consolidate the data. You can view data status, calculation status, process levels, line itemdetail, and destination and source transactions. In addition, you can lock and unlock data, runallocations, and run entity transaction detail reports.
You can display data, calculation status, or process level in data grids. If journals are posted tothe selected intersection in the grid, you can display all journal transactions against the cell. Youcan store text and line item detail for cells in the grid.
Dimensions are displayed in rows and columns on a data grid. You can save the grid settingsand reopen the grid later instead of resetting the rows and columns.
From a data grid, you can select menu commands to calculate, translate, and consolidate thedata. If a task is not applicable for a cell, the menu command is not available.
65
ä To create data grids:
1 From the Document Manager, click New, and then Data Grid, or select Actions, then New, and thenData Grid.
2 Set the grid rows and columns. See “Setting Data Grid Rows and Columns” on page 67.
3 Set the grid display options. See “Setting Grid Display Options” on page 68.
Opening Data GridsYou use data grids to view, enter, and edit data. To open a data grid, you must have access to itssecurity class.
ä To open data grids:
1 From the Document Manager, select a data grid
2 Click Open Selected Document, or select Actions, and then Open.
Data Grid TasksYou can perform these tasks from data grids:
l Setting Data Grid Rows and Columns
l Entering or Editing Data
l Selecting Members for the Point of View
l Viewing Cell Information
l Adding Cell Text
l Viewing Cell Adjustments
l Adding Line Item Detail
l Calculation Process
l Translating Data
l Consolidating Data
l Locking Data
l Viewing Cell History
l Viewing Source and Destination Transactions
l Running Entity Detail Reports
l Running Data Allocations
66
Working with Data GridsYou can select grid rows and columns, change them at any time, and save your grid settings forlater use. You can load, extract, and delete data grids, and you can organize them in folders.
These topics describe the tasks that you can perform for data grids:
l “Setting Data Grid Rows and Columns” on page 67
l “Setting Grid Display Options” on page 68
l “Setting Grid Dimension Options” on page 69
l “Saving Data Grid Settings” on page 70
l “Creating Data Grid Folders” on page 70
l “Loading Data Grids” on page 71
l “Extracting Data Grids” on page 71
l “Deleting Data Grids” on page 72
Setting Data Grid Rows and ColumnsBefore you enter data into a Financial Management application, you must select the dimensionsand dimension member lists to display on the POV, and rows and columns of the data grid. Youcan drag and drop dimensions to and from the POV bar and the grid rows and columns.
If your administrator has defined dynamic POV member lists, you can use them to quicklypopulate rows and columns with valid members for the selected dimension. In the MemberSelection dialog box, the valid dynamic POV member lists for the selected dimension aredisplayed with an @POV suffix at the bottom of the dialog box.
When you exit a grid, the user point of view is updated for all dimensions except the values inthe dimensions defined in the rows and columns. Although the values for rows and columns arestored in the grid settings, these values are not used to update the User Point of View when youexit the grid.
ä To set grid rows and columns:
1 From the Document Manager, click New, and then Data Grid, or select Actions, then New, and thenData Grid.
2 To select the row and column dimensions to display on the grid, drag the dimensions from the top POVto the rows and columns as needed.
3 Click the dimensions on the rows, columns, or POV to select members or a member list.
4 Optional: Select the POV options button to select and change POV options.
5 Optional: Select the Column options button next to a column, or Row options button next to a row toselect and change column or row options.
6 Optional: To change the order of row or column dimensions, select the Down arrow next to the Columnoptions or Row options button, and select Reorder Dimensions. Select the dimensions and use thearrow keys to change the order, and click OK.
67
7 Optional: To view the data grid, click Grid Viewer, or select Actions, and then Grid Viewer.
Tip: To return to the Grid Designer, click Grid Designer, or select Actions, and then GridDesigner.
8 Click Save to save the grid layout.
Setting Grid Display OptionsYou can select whether to display data, calculation status, or process review levels in data grids.The calculation status indicates, for example, whether data needs to be calculated, translated, orconsolidated. The review levels indicate the process management level for combinations of datacalled process units. You can easily toggle between the data and the calculation status and reviewlevel. The data grid automatically refreshes to reflect changes.
See “Viewing Calculation Status” on page 75 and “Viewing Process Level” on page 77.
You can also select whether to display metadata labels, descriptions, or both. When you enabledescriptions, they are displayed in the language that you specified in the User Preferences dialogbox. If you select to view both labels and descriptions, the dimension member is displayed as“Label - Description.” For entities, the member is displayed as “Parent.Entity - Description”, whereDescription is the description of the entity, not of the parent entity.
In addition, you can select a scale value to determine how data is displayed. For example, if theU.S. dollars currency (USD) is defined with a scale of 3, an amount of 300,000 USD is displayedas 300.
ä To set grid display options:
1 Open a data grid.
2 For Cell, select an option:
l To show calculation status, select Calculation Status.
l To show data, select Data.
l To show process review level, select Process Level.
3 For Row suppressions, select one or both options:
l To suppress cells that do not contain data, select Suppress No Data.
l To suppress cells that contain zero values, select Suppress Zeros.
4 For Metadata, select an option:
l To display metadata labels, select Label.
l To display metadata descriptions, select Description.
l To display both metadata labels and descriptions, select Both.
5 From Scale, select a scale value, or use the default scale defined for the currency assigned to the entity.
6 For Page Size, set these options:
l Enter a Columns Per Page value, or use the default value of 128.
68
l Enter a Rows Per Page value, or use the default value of 1024.
Setting Grid Dimension OptionsYou can set options for displaying dimensions in data grids. You can set the order in whichdimensions are displayed in the POV bar, hide POV dimensions that you do not use frequently,or use dimension members from the background POV that is saved and shared among modules.These options are saved when you save the data grid definition.
You can enter dimension names in a comma-separated list, or select available dimensions froma pop-up dialog box. You can enter the long dimension name (for example, Scenario), or shortdimension name (for example, S).
ä To set dimension options:
1 Open a data grid.
If the Grid Designer is not displayed, from the toolbar, click Grid Designer, or selectActions, and then Grid Designer.
2 From the right panel, expand Dimension Options.
3 For Dimension Order, use one of these methods to reorder dimensions:
l Enter dimension names in a comma-separated list in the order in which you want themto display on the POV bar.
Tip: To view more dimensions without scrolling, click the More... icon at the top leftof the text box.
l Alternatively, click the Arrows icon ( ) next to the text box. From the ReorderDimensions dialog box, select the dimensions to reorder, use the arrow keys to movethem up or down, and then click OK.
To return the dimensions to the default order, clear the content of the textbox. Clickthe Arrows icon next to the text box and from the Reorder Dimensions dialog box, clickOK.
4 For Do not display in POV, enter any dimension names that you do not want to display in the POV.
Tip: To view more dimensions without scrolling, click the More... icon at the top left of thetext box.
Alternatively, click the Edit icon ( ) next to the text box, select dimensions, and then clickOK.
5 For Retrieve from User POV, enter dimension names for which you want to use the members from thebackground POV.
69
Tip: To view more dimensions without scrolling, click the More... icon at the top left of thetext box.
Alternatively, click the Edit icon ( ) next to the text box, select dimensions, and then clickOK.
Saving Data Grid SettingsBy saving your grid settings, you can reduce the time that you spend selecting dimensions forrows and columns. After you save a grid, you can reopen it from the Document Manager. It isalso displayed in the Document List in the left pane.
When you save a grid, the member selection for all the dimensions in the top POV is merged tothe user background POV.
ä To save grid settings:
1 From a data grid, click Save.
2 Enter a name for the grid.
The name can have a maximum of 40 characters, including spaces.
3 From Security Class, select the security class for the folder or use the Default security class.
4 Optional: Enter a grid description.
The description can be a maximum of 255 characters, including spaces.
5 Optional: Select Private if you want the grid to be private.
6 Click Save to overwrite the current grid, or Save As to save the current grid as a new grid.
Creating Data Grid FoldersYou can create a folder hierarchy for data grids. Organizing grids into folders might help if yousave many grids. A Root folder is available by default and cannot be deleted. Any folders thatyou create are created under the Root folder.
To create a folder, you must have the Advanced User security role.
ä To create data grid folders:
1 Open the application in which to create folders.
2 From the Document Manager, click New, and then Folder, or select Actions, and then New, and thenFolder.
3 Enter a folder name.
Note: The folder name can contain a maximum of 40 characters, including spaces.
70
4 Optional: Enter a folder description.
Note: The folder description can contain a maximum of 255 characters, including spaces.
5 From Security Class, select the security class for the folder or use the Default security class.
Note: Users of this folder must have access rights to the specified security class.
6 From Content Type, select Data Grid.
Tip: If the folder will be used for all documents, select All.
7 Optional: Select Private if you want the folder to be private.
Note: Private folders cannot be shared or viewed by other users.
8 Click Create.
Extracting Data GridsYou can extract data grids from an application. Extracting the grid does not delete the grid fromthe folder or from the application. It only extracts the contents of the grid to a location youselect.
After you extract a data grid, you can modify it and reload it into the application. Make sure tooverwrite the old file when you reload the grid. You can also use the extracted grid as a modelfor a new grid.
ä To extract data grids:
1 Open the application from which to extract a grid.
2 From the Document Manager, select the data grid to extract, and click Extract Documents, or selectActions, and then Extract Documents.
3 From the download box, click Save, enter a file name, and click Save.
Loading Data GridsYou can load previously extracted data grids into your application.
ä To load data grids:
1 Open the application into which to load a data grid.
2 Select Consolidation, then Load, and then Documents, or from the Document Manager, click LoadDocuments.
3 Follow the instructions for loading documents. See “Loading Documents” on page 40
71

Deleting Data GridsYou can delete data grids that you no longer need.
ä To delete data grids:
1 From the Document Manager, select a data grid to delete.
2 Click Delete Selected Document, or select Actions, and then Delete.
Note: You can also delete a folder, but you must first delete any data grids that it contains.
3 At the system prompt, click Yes.
Entering or Editing DataYou use data grids to enter data manually into input accounts for base entities in FinancialManagement applications. Values for parent-level members are aggregrated from the childrenof the parent-level members. In some cases, data for base-level members is calculated. Forexample, the Salaries member might be a base-level member calculated based on headcount andsalary rate.
Calculated and consolidated accounts do not accept data entry, because the values they containcome from other sources. For example, if a company called USA East has three dependents, youenter values into the dependent entities. After you consolidate, the value in USA East is the totalof the values in its three dependents.
When you save data, Financial Management automatically calculates totals for the parentmembers of the dimension hierarchy.
You can enter “NODATA” in a cell to clear data from the database. For example, you mightenter data into an incorrect intersection and want to clear the data without entering zeros in thedatabase.
After you enter or edit data, you can submit the changes to the database, and refresh the gridwith the most recent data from the database.
ä To enter or edit data:
1 Open a data grid.
2 Double-click the cell in which to enter or edit data.
3 Enter a value in the cell and press Enter or Tab.
4 Repeat the steps until you have entered or edited all the necessary data.
5 Click Submit Data to save the data.
To discard the unsaved data, click Reset Data.
72
Entering Data into Summary-Level Time PeriodsIn data grids, you can enter data in parent-level members of the Period dimension and distributeit evenly among lower-level periods for Revenue, Expense, and Flow type accounts. For example,you could enter the amount 300 in the Quarter time period that contains the months of June,July, and August. The amount 100 could be distributed evenly among those three months. Asset,Liability, and Balance type accounts distribute the entire amount to the last base period of thesummary time period.
After entering the data in the parent-level members, you must submit the data to distribute itamong the base periods and to save it to the database.
For blank base periods, when you input data at the summary level, the data is distributed evenlyacross the periods. If the base periods contain data, the data is distributed proportionally. Forexample, if the months of January, February, and March list 3, 3, and 4 as the existing data, andyou enter 100 in the Quarter1 member, the system distributes 30, 30, and 40 to January, February,and March, respectively.
ä To enter data into summary-level time periods:
1 Open a data grid.
2 Double-click the cell in which to enter or edit data.
3 Enter a value in the cell and press Enter or Tab.
4 Repeat steps 1 through 3 until you have entered or edited all the data.
5 Click Submit Data to save the data, or click Reset Data.
Copying and Pasting Cell ValuesYou can use the copy and paste feature to change data for multiple cells simultaneously in a datagrid.
ä To copy and paste cell values:
1 From a data grid, select a cell or block of cells that contains the data to use for other cells.
2 Right-click and select Copy.
3 Select the cell or range of cells which to paste the data.
4 Right-click and select Paste.
Note: If the selected range does not contain any editable cells, the Paste option is notavailable. If only some of the selected cells in the range are editable, the system pastesthe values to those cells only.
73
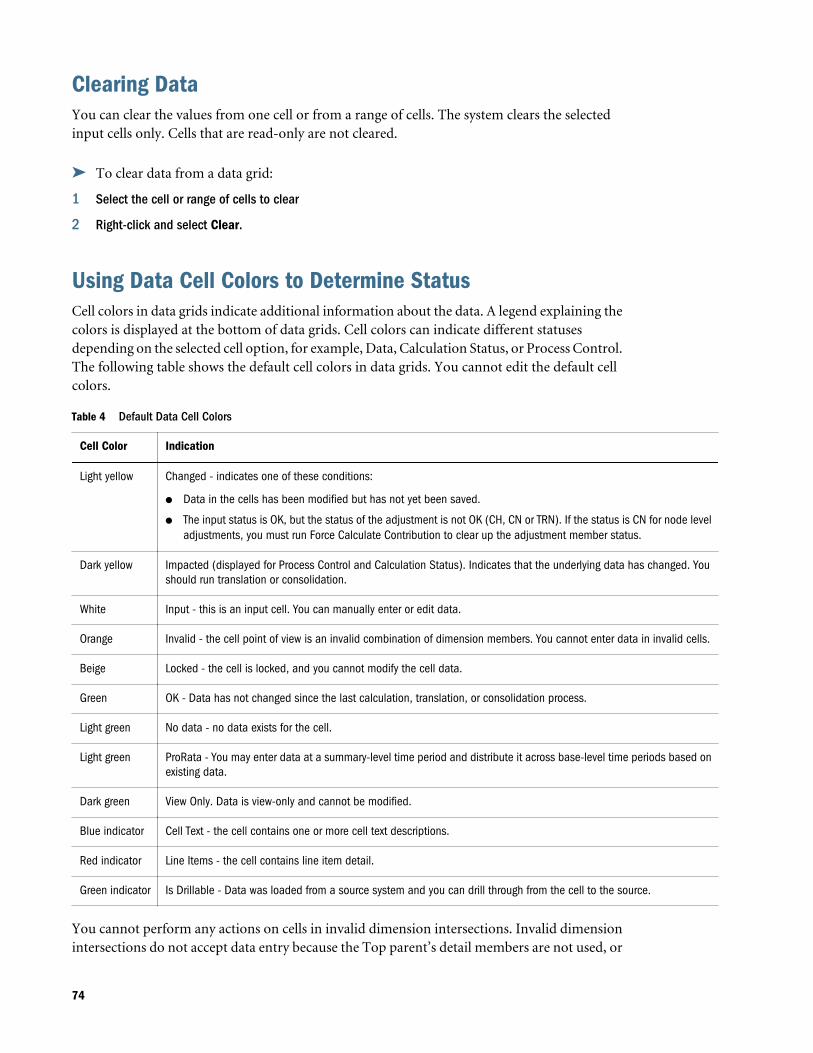
Clearing DataYou can clear the values from one cell or from a range of cells. The system clears the selectedinput cells only. Cells that are read-only are not cleared.
ä To clear data from a data grid:
1 Select the cell or range of cells to clear
2 Right-click and select Clear.
Using Data Cell Colors to Determine StatusCell colors in data grids indicate additional information about the data. A legend explaining thecolors is displayed at the bottom of data grids. Cell colors can indicate different statusesdepending on the selected cell option, for example, Data, Calculation Status, or Process Control.The following table shows the default cell colors in data grids. You cannot edit the default cellcolors.
Table 4 Default Data Cell Colors
Cell Color Indication
Light yellow Changed - indicates one of these conditions:
l Data in the cells has been modified but has not yet been saved.
l The input status is OK, but the status of the adjustment is not OK (CH, CN or TRN). If the status is CN for node leveladjustments, you must run Force Calculate Contribution to clear up the adjustment member status.
Dark yellow Impacted (displayed for Process Control and Calculation Status). Indicates that the underlying data has changed. Youshould run translation or consolidation.
White Input - this is an input cell. You can manually enter or edit data.
Orange Invalid - the cell point of view is an invalid combination of dimension members. You cannot enter data in invalid cells.
Beige Locked - the cell is locked, and you cannot modify the cell data.
Green OK - Data has not changed since the last calculation, translation, or consolidation process.
Light green No data - no data exists for the cell.
Light green ProRata - You may enter data at a summary-level time period and distribute it across base-level time periods based onexisting data.
Dark green View Only. Data is view-only and cannot be modified.
Blue indicator Cell Text - the cell contains one or more cell text descriptions.
Red indicator Line Items - the cell contains line item detail.
Green indicator Is Drillable - Data was loaded from a source system and you can drill through from the cell to the source.
You cannot perform any actions on cells in invalid dimension intersections. Invalid dimensionintersections do not accept data entry because the Top parent’s detail members are not used, or
74
restrictions are set for those dimensions. You can set up restrictions for dimensions when youset up members in the metadata file. For example, if you set up the Sales account in the metadatafile to accept data entry by customer, the intersection of Sales and None for the Customdimension is an invalid intersection for data entry.
To determine the data status, you must check both the calculation status and the process levelof the data. See “Viewing Calculation Status” on page 75 and “Viewing Process Level” on page77.
Refreshing DataYou can refresh the data that is displayed in data grids and display the data that is saved in thedatabase. This enables you to make changes to the data and restore the original data. When yourefresh data, you are prompted to save any changes that you made to the data. You can selectwhether to save the changes to the database or restore the data that is saved in the database.
Note: When multiple users are updating data values in the same cells, there is no indication tousers that cell data has been overwritten. If multiple users enter data in the same cellsimultaneously, the database stores the data from the last user who saved data.
To refresh the data in a data grid, click Reset Data.
Viewing Data in Data GridsIn addition to working with data, you can use data grids to view the calculation status and processlevel of the data. You can also view cell information, such as the point of view information, celladjustments, cell text, and line item detail.
Viewing Calculation StatusFinancial Management maintains the calculation status for each scenario, year, period, entity,parent, and value combination. The calculation status indicates whether data needs to becalculated, translated, or consolidated. You can view the calculation status in a data grid.
The calculation status can change as a result of several actions:
l Changing the organization structure
l Adding or deleting accounts
l Modifying entity attributes
l Entering data in data grids, or loading data from external sources
l Posting or unposting journals
l Posting or unposting intercompany transactions
l Reloading rules
75
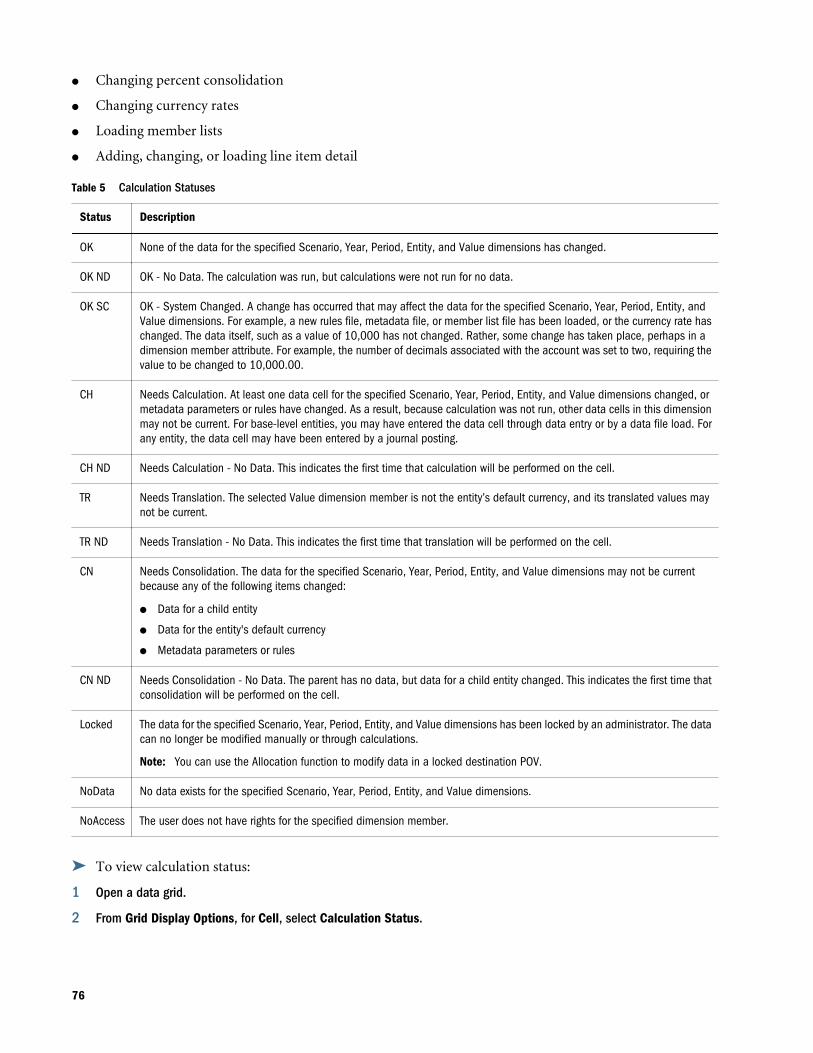
l Changing percent consolidation
l Changing currency rates
l Loading member lists
l Adding, changing, or loading line item detail
Table 5 Calculation Statuses
Status Description
OK None of the data for the specified Scenario, Year, Period, Entity, and Value dimensions has changed.
OK ND OK - No Data. The calculation was run, but calculations were not run for no data.
OK SC OK - System Changed. A change has occurred that may affect the data for the specified Scenario, Year, Period, Entity, andValue dimensions. For example, a new rules file, metadata file, or member list file has been loaded, or the currency rate haschanged. The data itself, such as a value of 10,000 has not changed. Rather, some change has taken place, perhaps in adimension member attribute. For example, the number of decimals associated with the account was set to two, requiring thevalue to be changed to 10,000.00.
CH Needs Calculation. At least one data cell for the specified Scenario, Year, Period, Entity, and Value dimensions changed, ormetadata parameters or rules have changed. As a result, because calculation was not run, other data cells in this dimensionmay not be current. For base-level entities, you may have entered the data cell through data entry or by a data file load. Forany entity, the data cell may have been entered by a journal posting.
CH ND Needs Calculation - No Data. This indicates the first time that calculation will be performed on the cell.
TR Needs Translation. The selected Value dimension member is not the entity’s default currency, and its translated values maynot be current.
TR ND Needs Translation - No Data. This indicates the first time that translation will be performed on the cell.
CN Needs Consolidation. The data for the specified Scenario, Year, Period, Entity, and Value dimensions may not be currentbecause any of the following items changed:
l Data for a child entity
l Data for the entity's default currency
l Metadata parameters or rules
CN ND Needs Consolidation - No Data. The parent has no data, but data for a child entity changed. This indicates the first time thatconsolidation will be performed on the cell.
Locked The data for the specified Scenario, Year, Period, Entity, and Value dimensions has been locked by an administrator. The datacan no longer be modified manually or through calculations.
Note: You can use the Allocation function to modify data in a locked destination POV.
NoData No data exists for the specified Scenario, Year, Period, Entity, and Value dimensions.
NoAccess The user does not have rights for the specified dimension member.
ä To view calculation status:
1 Open a data grid.
2 From Grid Display Options, for Cell, select Calculation Status.
76
Viewing Process LevelIf Process Control is enabled, Financial Management maintains process level information foreach scenario, year, period, and entity combination. The process review level indicates, forexample, whether data needs to be promoted to the next review level, submitted, or approved.See “Process Levels” on page 213.
ä To view process review level:
1 Open a data grid.
2 From Grid Display Options, for Cell, select Process Level.
Viewing Cell InformationYou can view information for any cell in data grids. Cell information includes information aboutthe point of view such as the process unit, point of view detail, and View. It also includes statusinformation, such as calculation status, process level, and security access. If the application usesprocess management submission phases, cell information includes the submission phase towhich the cell is assigned for the scenario and period.
The cell information displays the base input currency value. The stored data is the amount storedin the database, which is always in units. The full resolution data is the amount entered, withthe decimal and thousand separator defined in user preferences.
The displayed data is the amount displayed for the cell using the decimal places for the account.The displayed data might appear different than the data stored because of rounding, based onthe number of decimal places that you select to display.
For example, suppose you have an account that specifies 0 for the decimal place, the currencyof the entity has a scale of 3, and your user preferences specifies the comma (,) as the thousandsseparator and the period (.) as the decimal separator. If you enter the amount 12345.6789, thecell information is displayed as follows:
Displayed data = 12,346 (rounding to display 0 decimal places) Full resolution data =12,345.6789 Stored data=12345678.9 (stored in units)
ä To view cell information:
1 Open a data grid.
2 Select the cell for which to view information.
3 Right-click and select Cell Information.
4 View the cell information, and click OK.
Viewing Cell AdjustmentsUsing a data grid, you can view the adjustments made to accounts. An adjustment is a set ofdebit/credit changes posted through a journal entry to natural account balances for one scenarioand period.
77
The system displays the journal entry label and the amount. If the cell contains multipleadjustment entries, the system lists all of the entries and corresponding amounts.
ä To view adjustments:
1 Open a data grid.
2 Select the cell for the adjustment member for which to view the history.
3 Right-click and select Cell Adjustments.
4 View the cell's adjustment detail information, and click OK.
Adding Cell TextYou can add a text description for any valid cell in a data grid. For example, you might want toadd a description for a cell’s currency information, such as Entity Currency or Parent Currency.You can also edit existing cell text.
You can enter any characters for cell text values and you can use spaces. However, you cannotinclude the pipe (|) or tilde (~) character if you used it as a delimiter for the cell text value in theload format.
You can set a size limit for cell text in an application, using the MaxCellTextSize ApplicationSettings metadata attribute. MaxCellTextSize specifies the maximum number of characters thatcan be used for cell text. Specify 1900 or greater up to 2,147,483,646. Values between 0 and 1899are not valid. The default cell text setting is a maximum of 8,000 bytes.
At times, you may need multiple cell text entries to store different types of information for aPoint of View intersection. You can create multiple cell text entries and define cell text labels toeasily identify types of information when you view cell text. Before you can enter multiple celltext entries, the administrator must define cell text labels. See the Oracle Hyperion FinancialManagement Administrator's Guide.
For every application, there is a Cell Text Label system-generated member named [Default]. Ifyou want to enter only one cell text entry for a data cell, you can select the [Default] member toenter the cell text information. A cell can have either one entry using the [Default] cell text label,multiple cell text label entries, or a combination of cell text labels and [Default] entries.
After you add cell text, a blue triangle is displayed to indicate that there is text associated withthe cell.
ä To add cell text:
1 Open a data grid.
2 Select the cell for which to add text.
3 Right-click and select Cell Text.
The Cell Text dialog box includes the POV information and a grid for cell text. If no textexists for the cell, the system displays a blank grid.
4 Click Add Row.
78
The system adds a row with the first available cell text as the cell text label.
5 Either accept the label or select one of the other previously loaded labels from the drop-down list.
You cannot use the same label twice in the same grid.
Tip: The cell text labels in the drop-down list are displayed in alphabetical order. To quicklyfind a cell text label from a long list, enter one or more letters of the label. For example,if you enter R, the system quickly advances to the first cell text label starting with R (forexample, Rating).
6 On the row next to the [Default] system member label in the Cell Text column, enter the cell text.
Tip: You can resize the entire Cell Text dialog box by dragging any side, and you can alsoresize the Cell Text column by dragging the right bottom corner. Click the Edit buttonto edit cell text in a separate, larger popup window, which you can resize by draggingany side.
7 Optional: To add cell text rows, click Add, select a Cell Text Label, and enter text.
8 When you finish entering cell text, click OK.
9 Click Submit Data to save the data, or Reset Data to refresh the database.
Viewing Cell TextYou can view cell text from data grids. Cells that contain cell text are indicated by a blue triangleat the top of the cell.
ä To view cell text:
1 Select the input cell for which to view cell text.
2 Right-click and select Cell Text.
3 Optional: To display the entire cell text in read-only mode, click the Expand button. To return to theeditable cell text box, click the Collapse button.
4 Optional: To edit cell text in a separate, larger popup window, click the Edit button.
You can resize the Edit popup window by dragging any side.
5 Click OK.
Attaching Documents to Data GridsIn addition to or instead of entering cell text, you can attach one or more documents to cells foradditional detail. For example, you can attach a Microsoft Word document, Microsoft Excelspreadsheet, XSL, or RPT file. To attach or extract any custom documents to or from the server,you must be assigned the Manage Custom Documents security role. You must also havepreviously loaded custom documents in the Document Manager.
79
You can set a size limit for document attachments and a maximum number of documentattachments by user when you create an application. You set the limits in the AppSettingsattribute for the application metadata.
You can attach multiple documents, but Oracle recommends that you attach no more than threedocuments to a cell. Each document should be smaller than 100K to limit the performance effecton the database.
ä To attach a document to a cell:
1 From a data grid, select the cell to which to attach a document.
2 Right-click and select Cell Text.
3 Do one of these steps:
l To include one document attachment for the cell, click the cell with the [Default] celltext label.
l To include multiple document attachments for the cell text label entry, click the icon tothe right of each cell text row to open the Document Attachment dialog, then attach thedocument to that cell text row.
4 From your list of custom documents, select one or more documents to associate with the cell, and clickAttach.
5 Click OK.
The attachment is displayed in the Attachments section of the Cell Text dialog box.
Tip: To detach a document from a cell, select the document to detach, and click Detach.
Adding Line Item DetailLine item detail enables you to collect detailed information about accounts. For example, youmight have an account for travel expenses and want to show the amount details by type ofexpense, such as gas, tolls, or parking. To enter the information for the travel expense, you firstenter the amount for each line item detail. After you save the detail, the system calculates thetotal amount for the travel expense account.
In a data grid, you can add line item detail for valid intersections of base-level accounts andscenarios for which line item detail and the UsesLineItems member attribute are enabled. Afteryou enter the line item detail for the cell, a red triangle is displayed to indicate that there is lineitem detail associated with the cell.
You can enter line item detail only in the base frequency defined for the scenario. For example,if the scenario is Monthly, you cannot enter line item detail in “Quarter1.”
Line item detail applies only to the Entity Currency Value member, or to the default currency.
Note: Line item detail cannot contain single quotation marks ( ‘ ), and the maximum length forthe description is 80 characters.
80

ä To add line item detail:
1 Open a data grid.
2 Select the cell for which to add line item detail.
3 Right-click and select Cell Line Item Detail.
4 Click Add Row.
5 Enter a Description and Value for the line item detail.
6 Enter line items, and press Enter or select a different cell to see the change.
Tip: To clear line item detail, enter zero as the value to clear the amount.
7 Click OK to save the line items.
8 Click Close.
Viewing Line Item DetailYou can view line item detail in both YTD and Periodic views, but only in the base frequencydefined for the scenario. For example, if the scenario is Monthly and you are in the Quarterlyview, you can view the description of the line item detail but not the amounts. Cells that containline item detail are indicated by a red triangle at the top of the cell.
You can only verify that the Total amount matches the sum of the line item data when you viewline item detail in the default view of the scenario. If you view data in another view, the Totalamount and the line item detail will not match for any subsequent periods other than the firstperiod.
ä To view line item detail:
1 Open a data grid.
2 Select the cell for which to view line item detail.
3 Right-click and select Cell Line Item Detail.
4 View the cell’s line item detail.
5 Click OK.
Line Item Detail OptionsThe options for line item detail differ depending on whether you are using a data grid or DataForms.
Table 6 Line Item Detail Options
Task Data Grid Data Forms
View Multiple Periods No Yes
81
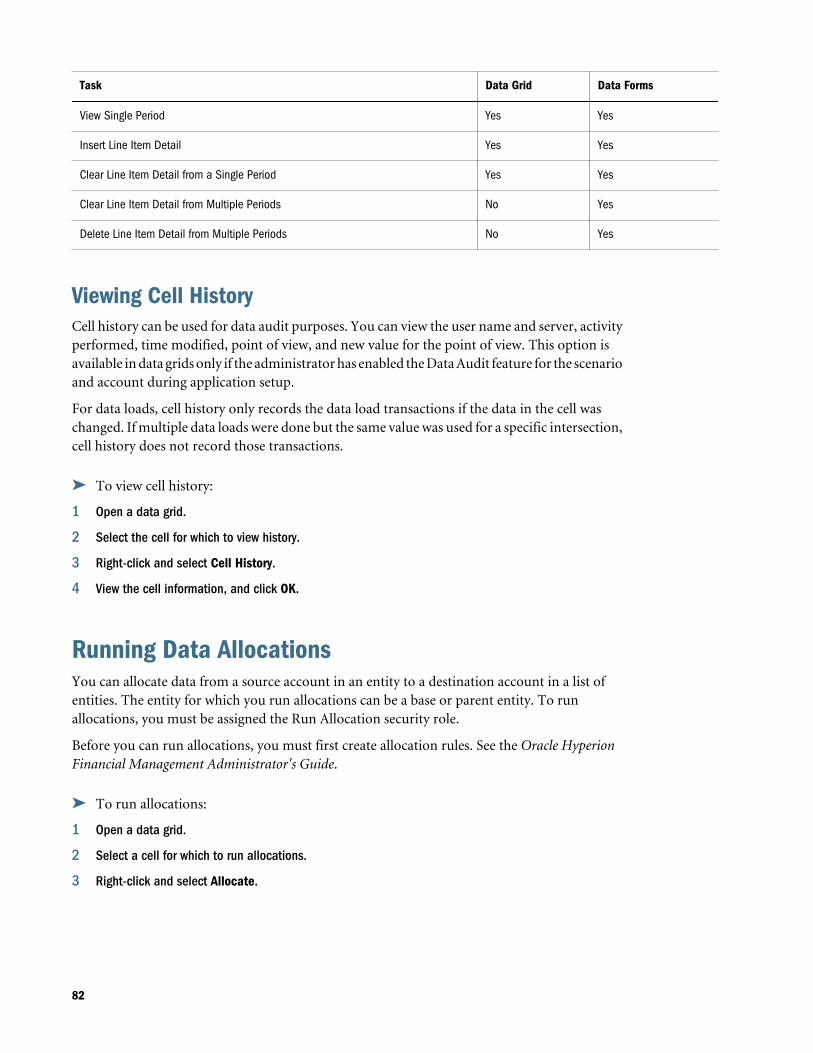
Task Data Grid Data Forms
View Single Period Yes Yes
Insert Line Item Detail Yes Yes
Clear Line Item Detail from a Single Period Yes Yes
Clear Line Item Detail from Multiple Periods No Yes
Delete Line Item Detail from Multiple Periods No Yes
Viewing Cell HistoryCell history can be used for data audit purposes. You can view the user name and server, activityperformed, time modified, point of view, and new value for the point of view. This option isavailable in data grids only if the administrator has enabled the Data Audit feature for the scenarioand account during application setup.
For data loads, cell history only records the data load transactions if the data in the cell waschanged. If multiple data loads were done but the same value was used for a specific intersection,cell history does not record those transactions.
ä To view cell history:
1 Open a data grid.
2 Select the cell for which to view history.
3 Right-click and select Cell History.
4 View the cell information, and click OK.
Running Data AllocationsYou can allocate data from a source account in an entity to a destination account in a list ofentities. The entity for which you run allocations can be a base or parent entity. To runallocations, you must be assigned the Run Allocation security role.
Before you can run allocations, you must first create allocation rules. See the Oracle HyperionFinancial Management Administrator's Guide.
ä To run allocations:
1 Open a data grid.
2 Select a cell for which to run allocations.
3 Right-click and select Allocate.
82
Running Equity Pickup Calculations from Data GridsYou can run the Equity Pickup process or force it to run directly from a data grid if you havethe appropriate security access to the cell. See “Calculating Equity Pickup Adjustments” on page137. To run EPU calculations, you must be assigned the Manage Ownership security role.
ä To run or force Equity Pickup calculations:
1 From a data grid, select the cell for which to run or force equity pickup calculations.
2 Right-click and select Run EPU or Force EPU.
Locking DataYou can lock an entity for a period or periods if you do not want users to be able to modify thatdata. When data is locked, you cannot change the data for that scenario, year, entity, parent,value, and period. To lock data, you must be assigned the Lock Data security role.
When you lock data, you only need to select the Top parent entity, because the system locksrecursively across the Entity and Value dimensions starting at the base entities. For each entity,Value members are locked in this order: Entity Currency, None, Parent Currency, ContributionTotal.
You can lock data for a period only if these conditions are met:
l The entity’s calculation status must be OK. See “Viewing Calculation Status” on page 75.
l If process management is enabled for the scenario, the entity must have a process level ofPublished. If Process Management is enabled and the cell status is NODATA, you mustpromote the process unit before it can be locked. See “Process Levels” on page 213.
l If the entity is a parent, all of its children must also be locked. If you select the Top parentmember, the system locks all of its children.
l The Validation account for the entity currency and entity currency adjustments must bezero.
ä To lock data:
1 From a data grid, select a cell for which to lock data.
2 Right-click and select Lock.
Unlocking DataTo unlock data, you must be assigned the Unlock Data security role.
ä To unlock data:
1 From a data grid, select the cell for which to unlock data.
2 Right-click and select Unlock.
83
When you unlock data, you only need to select the Top parent entity, because the system unlocksrecursively across the Entity and Value dimensions.
Viewing Source and Destination TransactionsAfter you run a consolidation, you can view the source and destination transactions generatedby the consolidation process to provide an audit trail. To view consolidation transactions, youmust have set up your consolidation rules file to store these transactions. The Nature parameterof the HS.Con function determines whether consolidation transactions are stored. See the OracleHyperion Financial Management Administrator's Guide.
In addition, you must have View or All security access to the destination point of view. Thedestination point of view corresponds to the destination cell impacted by the transaction. Thesource point of view corresponds to the cell from which the consolidation was run. If you selecta parent member of the Custom dimension or ICP dimension, the system generates all of thecorresponding audit transaction details for all base members of the selected parent.
When you select to view transactions, they open in a new Web browser window.
ä To view consolidation transactions:
1 From a data grid, select a cell for which to view consolidation transactions.
2 Right-click and select an option:
l To view the destination data impacted by the consolidation, select DestinationTransactions. The system displays all of the destination transactions generated from oraffected by the selected cell.
l To view the source data from which the consolidation was run, select SourceTransactions. The system displays all the source transactions that have affected theselected cell.
3 Optional: To print the transactions, click Printable Page. A separate window opens from which you canprint the transactions.
4 When you finish viewing destination or source transactions, click OK.
Running Entity Detail ReportsThe Entity Detail Report provides a full audit detail of the entire consolidation path for a specificdata cell of a specified entity. The report starts with the source amount entered in the EntityCurrency Value dimension and shows all of its related details in each Value dimension, includingthe journal entries generated in the journal posting process and the audit transaction detailsgenerated as part of the consolidation process. If the account contains line item detail, the reportalso shows the related line item details entered for the account.
This report provides the capability of viewing transactions, showing the detail of the amountsgenerated from each step of the consolidation process, including currency translations and
84
intercompany eliminations. It also displays the transaction records for derived data from priorperiods.
See these procedures:
l “Starting the Entity Detail Report” on page 85
l “Accessing the Entity Detail Report using an External URL” on page 85
l “Selecting Rows and Columns for the Report” on page 86
l “Displaying Line Item Detail” on page 87
l “Displaying Base Details” on page 87
l “Displaying Source and Destination Transactions” on page 88
l “Linking to Journal Detail” on page 88
l “Printing Entity Detail Reports” on page 88
Starting the Entity Detail ReportYou access the Entity Detail Report from a data grid or form.
ä To start the Entity Detail Report:
1 From a data grid or form, select the cell for which to view entity transaction detail.
2 Right-click and select Entity Details.
The report is displayed in a separate browser window.
Accessing the Entity Detail Report using an External URLYou can access the Entity Detail Report from an external link that you set up. You specify a URLthat includes the application name and POV information. From the URL, you can access theEntity Detail Report and also drill down into the corresponding journals.
ä To access the Entity Detail Report from an external URL:
1 Create an application, and then load application elements, data, and journals.
2 Create a data form.
3 Right-click and select Entity Details, and then expand the dialog box to view the journal ID.
4 Click the Journal ID link and ensure that it opens the Journals page.
5 Form the encoded external URL based on the POV.
Note that you must manually create the URL. It must include the module, extcaller, uitask,app_instance_id, and povstring.
6 Log off from the current session.
7 To test the link, enter the URL that you created, enter the password, and from the Entity Detail page,click the journal ID link. The Journals page should display.
85
Report Point of ViewThe Entity Detail report uses the point of view from the data grid that you are using. The Pointof View information used for the report includes the Scenario, Year, Period, Entity, View,Account, ICP, and Custom dimensions. The Value dimension information is ignored, and allValue members are displayed on the report.
You can only select one account when you run the report. If the account selected is a parentaccount, the system does not display line item details, journal details, or audit transaction detailsfor the account. The system does not enumerate the details for the base members of the parentaccount. The support of base members applies only to the custom dimensions. For example, ifthe Intercompany Partner, Custom1 is a Parent member, all entries that are posted to all basemembers of the Parent member are displayed.
Selecting Rows and Columns for the ReportYou can select the rows and columns to display on the report. You can change these selectionsat any time.
The rows can display Entity Currency, Entity Curr Adjs, Entity Curr Total, Parent Currency,Parent Curr Adjs, Parent Curr Total, Parent Adjs, Parent Total, Proportion, Elimination,Contribution, Contribution Adjs, and Contribution Total.
The columns display the amount, Custom accounts, ICP, debits, credits, ID, or remarks.
You can suppress the display of some transaction details or dimensions by deselecting theapplicable options. For example, if you want the report to show only the journal details, you candeselect all other row display options, leaving only the journals option selected. If you want toalso suppress the Custom columns because they are not used for the account, you can deselectthese options from the column display.
The Value column contains all of the Value members. If the currency of the parent member isthe same as the currency of the entity, the system skips the display of the Parent Currency relatedValue members because it is duplicate information. The Amount column contains the amountfrom the data subcube. The amounts for each transaction detail are stored in the Debit or Creditcolumn, depending on the sign of the data cell.
The Remarks column contains additional information about the amount. Depending on theValue dimension, you can have several possible remark comments such as whether the amountis Input, Calculated, or Derived, or uses the Nature parameter for auditing transactions. It canalso contain information about prior records. One of the main purposes of the Entity DetailTransaction Report is to show all of the transaction records that made up the amount stored inthe database. Prior LID, Journals, and Transactions remarks indicate that the amount stored inthe database could be from line item details, journal adjustments, consolidation eliminations,as well as derived data from prior periods.
86
Table 7 Possible Values for the Remark Column
Value Dimension Remark
Entity Currencyl Input
l Calculated
l Prior LID
l Derived
Adjustmentsl Calculated
l Group Label
l Prior Journals
l Derived
Proportion/Eliminationl Nature
l Prior Transactions
l Derived
ä To select report rows and columns:
1 From a data grid, select the cell for which to view entity transaction detail.
2 Right-click and select Entity Details.
The report is displayed in a separate browser window.
3 Select View, then Rows, and then select rows to display, or select Show All.
4 Select View, then Columns, and then select columns to display, or select Show All.
5 Optional: To show or hide columns, select View, then Columns, then Manage Columns, and use thearrow keys to move columns to the Hidden or Visible column lists.
6 Optional: To reorder columns, select View, then Reorder Columns, use the Up and Down arrows toreorder the columns and click OK.
Displaying Line Item DetailIn the Entity Detail Report, the option to display line item detail is only applicable for the scenarioand account defined to use line item detail. Line item detail information is available only for theEntity Currency Value dimension.
Displaying Base DetailsIn the Entity Detail Report, the option to display base details applies only to a data cell that is aparent member cell. If the option to display base details is not selected, the aggregated amountfor the parent cell is displayed as one entry in the report. If you select to display base details, allthe information from the base records of the parent cell is displayed.
For example, suppose AllCustom1 is a parent member of the Custom 1 dimension. The basemembers include Opening, Appropriation, Variances, Increases, Decreases, and Closing. When
87
you select to display base details in the report, the system generates the report with all applicablebase records for AllCustom1. If you do not select to display base details, the only the amountfor the selected parent cell is displayed; for example, the parent cell AllCustom1 is displayedwithout any base details.
Displaying Source and Destination TransactionsFrom the Entity Detail report, you can view the audit transaction detail information generatedfrom the consolidation process. To view the transaction detail, you can display DestinationTransactions. If you also want to view the Source transactions that generated the amount, youcan also display Source Transactions.
You can view these transactions only if you have set up your consolidation rules file to storethese transactions. You must use the HS.CON function with the Nature parameter in the rulesfile. If the HS.CON function is not used or if the Nature parameter is not specified in the function,the system will not generate any audit transaction detail during the consolidation process. Seethe Oracle Hyperion Financial Management Administrator's Guide.
Linking to Journal DetailWhen the Entity Detail Report contains the journal detail for any of the adjustment Valuemembers, the debit or credit amount is displayed with the journal ID. You can click the journalID link in the ID column to display the Journals Detail page containing all of the informationfor that journal entry.
ä To link to journal detail:
1 Start an Entity Detail Report.
2 Click on a Journal ID in the ID column of the report.
Printing Entity Detail ReportsWhen you print an Entity Detail Report, the system processes the report for all entities at once.It generates one report that contains all pages for all entities.
ä To print reports:
1 From an Entity Detail report, click Printable Page.
2 The report opens in a separate window, from which you can print the report.
Drilling Through to Intercompany TransactionsAfter transactions are posted to an account, you can view the account balance reflecting theposted amounts in the data grid. Account cells in the grid that contain posted transactions are
88
indicated with a green icon. The corresponding transaction details for the account cell aredisplayed in a separate window.
To drill through to intercompany transactions, you must be assigned the IntercompanyTransaction User security role. You can only view intercompany transactions from the data grid;you cannot make changes to the transactions using this view.
ä To view Intercompany transactions from a data grid:
1 From a data grid, select a cell that contains intercompany transactions.
2 Right-click and select Intercompany Transactions to view the transaction detail.
Drilling Through to Source DataIf you use FDMEE to load data, you can drill from data grids to FDMEE to view the source data.You can view additional information about the data load, including POV information and loaddate and time.
A cell has a drillable status if it has data loaded through an outside source and its Point of Viewis within a specified region that has been defined and loaded to Financial Management. Cellsthat are drillable are indicated by an icon on the bottom left corner of the cell.
For information on FDMEE, see the Oracle Hyperion Financial Data Quality Management,Enterprise Edition Administrator's Guide.
ä To drill through to source data:
1 From a data grid, select an input cell that has a drillable indicator.
2 Right-click and select Drill Through to launch a new page with the Point of View for the selected cell,from which you can drill through to the source data.
Note: If you drill through to FDMEE, the information opens in a new browser window. Ifyou drill through to ERPI, the information opens in a new tab in Workspace.
Launching Oracle Financial Management AnalyticsFrom Financial Management, you can seamlessly access Oracle Financial Management Analyticsand work with Financial Management dashboards. You must first complete these requirements:
l Make sure that you have the Dashboard Viewer security role. If you do not have this role,see your administrator.
l Install Oracle Financial Management Analytics on your Financial Management machine oron any other machine.
l Run the OFMA Configuration Utility to configure the Financial Management dashboard.From the utility, follow the steps to configure the Financial Management application.
l Select the option Enable OMFA within the HFM Workspace.
89
For more information, see the Oracle Financial Management Analytics Administrator's Guide.
ä To launch Oracle Financial Management Analytics:
1 Log on to Financial Management.
2 Select Consolidation, and then Analytics, or from the Application Tasks menu in the left pane, selectAnalytics.
Note: This menu option is displayed only if you have the Dashboard Viewer security roleand you have installed and configured Oracle Financial Management Analytics.
3 From the Oracle Financial Management Analytics Home page, open the dashboard page that you setup in the OFMA Configuration.
Process Management OptionsYou can work with these Process Management options from data grids.
l Information
l Start
l Promote
l Reject
l Sign Off
l Submit
l Approve
l Publish
These options are also available from the Process Control module. See Chapter 12, “UsingProcess Management”.
You can access Process Management options using these methods:
l From a data grid, select a cell in a data grid that is set up for Process Management, right-click and select Manage Process.
l To use the Process Control module, select Consolidation, then Data, and then ProcessControl.
90
5Consolidating Data
In This Chapter
Consolidation Process ... . . . . . . . . . . . . . . . . . . . . . . . . . . . . . . . . . . . . . . . . . . . . . . . . . . . . . . . . . . . . . . . . . . . . . . . . . . . . . . . . . .91
Entering Currency Rates ... . . . . . . . . . . . . . . . . . . . . . . . . . . . . . . . . . . . . . . . . . . . . . . . . . . . . . . . . . . . . . . . . . . . . . . . . . . . . . . . .95
Entering Percent Consolidations... . . . . . . . . . . . . . . . . . . . . . . . . . . . . . . . . . . . . . . . . . . . . . . . . . . . . . . . . . . . . . . . . . . . . . . .96
Calculating Data ... . . . . . . . . . . . . . . . . . . . . . . . . . . . . . . . . . . . . . . . . . . . . . . . . . . . . . . . . . . . . . . . . . . . . . . . . . . . . . . . . . . . . . . . .97
Translating Data... . . . . . . . . . . . . . . . . . . . . . . . . . . . . . . . . . . . . . . . . . . . . . . . . . . . . . . . . . . . . . . . . . . . . . . . . . . . . . . . . . . . . . . . . .98
Consolidation Options ... . . . . . . . . . . . . . . . . . . . . . . . . . . . . . . . . . . . . . . . . . . . . . . . . . . . . . . . . . . . . . . . . . . . . . . . . . . . . . . . . . .99
Consolidating Data ... . . . . . . . . . . . . . . . . . . . . . . . . . . . . . . . . . . . . . . . . . . . . . . . . . . . . . . . . . . . . . . . . . . . . . . . . . . . . . . . . . . . 100
Consolidation Status ... . . . . . . . . . . . . . . . . . . . . . . . . . . . . . . . . . . . . . . . . . . . . . . . . . . . . . . . . . . . . . . . . . . . . . . . . . . . . . . . . . 102
Consolidation ProcessConsolidation is the process of gathering data from dependent entities and aggregating the datato parent entities. After you enter or load data into base-level entities, calculate and adjust data,you run a consolidation for a selected Scenario and Period to aggregate the data throughout theorganization. As data consolidates, the system performs the necessary currency translation andintercompany eliminations, and equity adjustments or minority ownership calculations ifneeded.
Financial Management provides a default consolidation method. To enable statutoryconsolidations, you can customize the consolidation process. When you create an application,you can set the Consolidation Rules attribute. By default, when this setting is not enabled, thesystem performs the default consolidation and eliminations. When this setting is enabled, thesystem performs consolidation according to the rules written in the Sub Consolidate() routine,as defined by the administrator. See the Oracle Hyperion Financial Management Administrator'sGuide.
You launch the consolidation process from data grids. Launching consolidation runs theconsolidation rules for the specified scenario, year, period, entity, and value. As part of thatprocess, consolidation is run for all descendent entities and all prior time periods within thesame year. The consolidation process runs all Calculate functions for each affected entity andvalue. The translation process is run as required to convert data from the child entity currencyto the parent entity currency. If the child and parent entity use the same currency, the translationprocess is not run.
After you select the parent entity into which the dependent entities consolidate, processes thatare required run automatically.
91
l The system runs calculation rules for all descendants of the entity.
l If the data for the child entity and the data for the parent entity are in different currencies,the system translates data based on the exchange rate. For the child entity, the translatedvalue is stored in the Parent Currency member of the Value dimension. The translated valuein Parent Currency is rolled up to the parent.
l You can enter adjustments to data through journals.
l The consolidation process begins. If the parent's ownership of the child is less than 100%,the ownership percentage is applied. The system generates proportion and eliminationdetail, and creates contribution data. You can make further adjustments to contributiondata through journals.
At the entity level of the consolidation process, you enter data in input accounts and enteradjustments through journals in the entity currency. The system runs calculation rules at theentity level, resulting in adjusted data for the entity.
Financial Management stores values as double precision floating point numbers which translatesto the equivalent of 15 significant digits. Depending on how applications are configured,currencies and overall values, it is possible for the system to “round” values when it reaches theprecision limits. If you encounter this situation, Oracle recommends that you work with a trustedconsultant who can recommend several different approaches for the issue. Please note that thedifference in numbers is originating from the precision limitation and this is not a software bug.Oracle has no plans of increasing the precision to more than 15 digits in the near future.
Example:
Assume you have these 3 numbers:
A: 0.000000000000003
B: 0.000000000000003
C: 1
If you add A+B = 0.000000000000006
Then adding C will makes it 16 significant digits, so the system would round the last digit 6 up.The result is:
1.00000000000001
If you add B+C first, and then A, each of the 0.000000000000003 will be dropped as soon as it’sadded to the 1, since the result is more than 15 significant digits. The result would be 1.
Following are examples of the consolidation process.
The first example shows the process when the entity currency and the parent currency aredifferent.
92
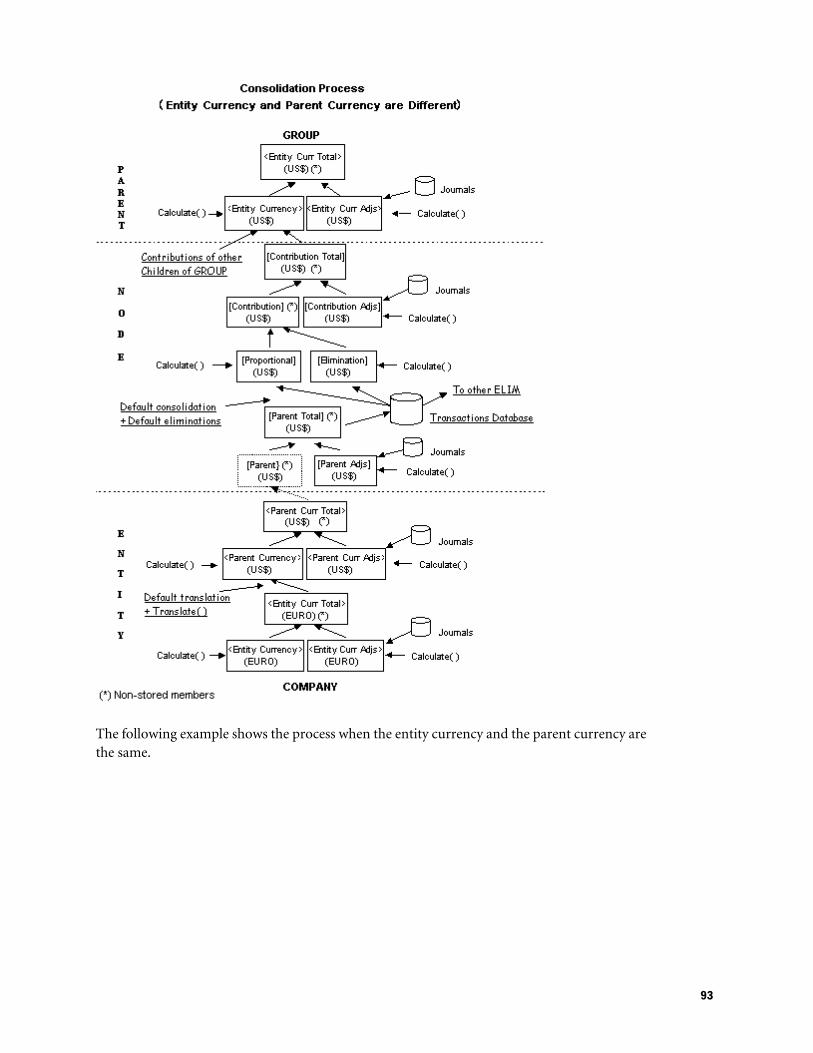
The following example shows the process when the entity currency and the parent currency arethe same.
93
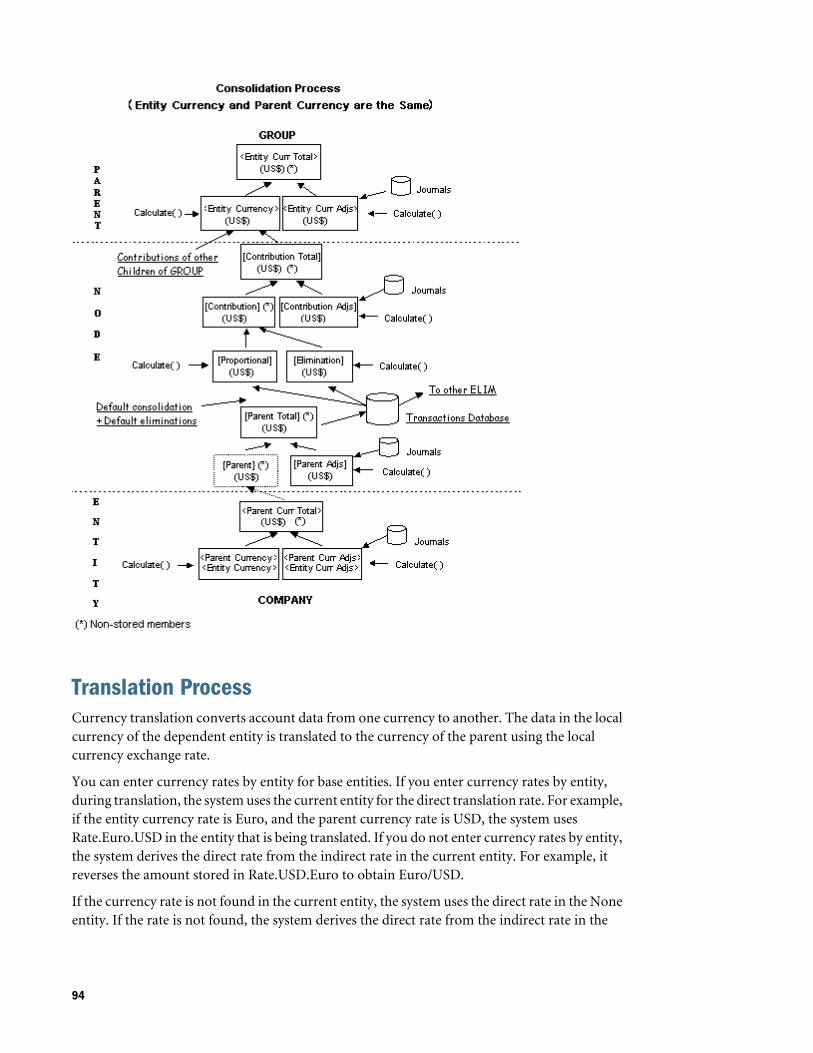
Translation ProcessCurrency translation converts account data from one currency to another. The data in the localcurrency of the dependent entity is translated to the currency of the parent using the localcurrency exchange rate.
You can enter currency rates by entity for base entities. If you enter currency rates by entity,during translation, the system uses the current entity for the direct translation rate. For example,if the entity currency rate is Euro, and the parent currency rate is USD, the system usesRate.Euro.USD in the entity that is being translated. If you do not enter currency rates by entity,the system derives the direct rate from the indirect rate in the current entity. For example, itreverses the amount stored in Rate.USD.Euro to obtain Euro/USD.
If the currency rate is not found in the current entity, the system uses the direct rate in the Noneentity. If the rate is not found, the system derives the direct rate from the indirect rate in the
94
None entity. For example, the system reverses the amount stored in Rate.USD.Euro to obtainEuro/USD. See the Oracle Hyperion Financial Management Administrator's Guide.
After the translation rule is run, the translated currency dimension is stored. You can makeadjustments to the translated amounts in each currency through journals.
The total of these two levels (Translated and Adjusted data) represents the starting point of theconsolidation process. The translation process does not take place if the entity and the parenthave the same default currency. In this case, the system moves directly to the consolidationprocess.
As a dependent entity's values roll up into its parent during consolidation, the system can storeconsolidation detail, such as Proportion and Elimination detail. Proportion detail contains thebalances resulting from the execution of consolidation rules. It also reflects the results of thepercent consolidation on the base values. Elimination detail contains any eliminating balancesthat result during consolidation based on elimination rules.
The system derives as aggregation the contribution (before adjustment) values. It is still possibleto adjust this data through journals. The system runs calculation rules for adjustments tocontribution after you post the journals.
The total of the contribution data (before adjustments) plus the adjustments represents thecontribution of the base entity to its parent. The system adds the contribution to thecontributions of the other immediate dependents of the parent to obtain the parent consolidateddata. The intermediate contribution level aggregations are not stored during calculation.However, the parent consolidated data is stored by the system.
Calculation ProcessWhen you calculate data, the system runs calculation rules for the scenario, year, period, entity,and value that you specify. For example, you can calculate the current month’s opening balancesby using the prior month’s closing balances.
Calculation rules for all prior time periods within the same year are also run if they have notbeen run previously. Because calculation rules do not consolidate source entities or runtranslation, the status (for example, needs translation or consolidation) is not removed fromthe cell. Even if the input accounts are not current, calculation uses that data to derive calculatedaccounts.
Entering Currency RatesCurrency rates are used during translation and consolidation. You maintain currency rates foreach application by entering the data to the currency members manually in the data grid or byloading the rates from an ASCII file. See “Loading Data” on page 53.
For each application currency, the From Currency and To Currency dimensions contain system-defined currency members. You must input currency rates to accounts that have theCurrencyrate account type.
95
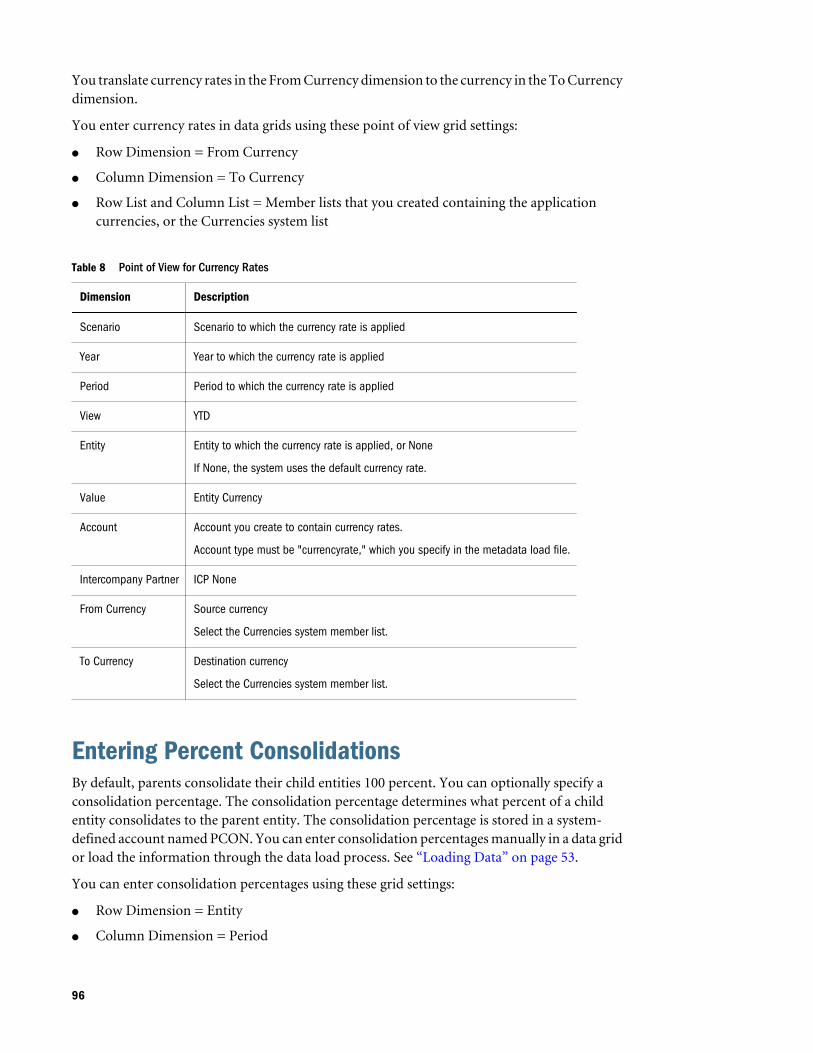
You translate currency rates in the From Currency dimension to the currency in the To Currencydimension.
You enter currency rates in data grids using these point of view grid settings:
l Row Dimension = From Currency
l Column Dimension = To Currency
l Row List and Column List = Member lists that you created containing the applicationcurrencies, or the Currencies system list
Table 8 Point of View for Currency Rates
Dimension Description
Scenario Scenario to which the currency rate is applied
Year Year to which the currency rate is applied
Period Period to which the currency rate is applied
View YTD
Entity Entity to which the currency rate is applied, or None
If None, the system uses the default currency rate.
Value Entity Currency
Account Account you create to contain currency rates.
Account type must be "currencyrate," which you specify in the metadata load file.
Intercompany Partner ICP None
From Currency Source currency
Select the Currencies system member list.
To Currency Destination currency
Select the Currencies system member list.
Entering Percent ConsolidationsBy default, parents consolidate their child entities 100 percent. You can optionally specify aconsolidation percentage. The consolidation percentage determines what percent of a childentity consolidates to the parent entity. The consolidation percentage is stored in a system-defined account named PCON. You can enter consolidation percentages manually in a data gridor load the information through the data load process. See “Loading Data” on page 53.
You can enter consolidation percentages using these grid settings:
l Row Dimension = Entity
l Column Dimension = Period
96
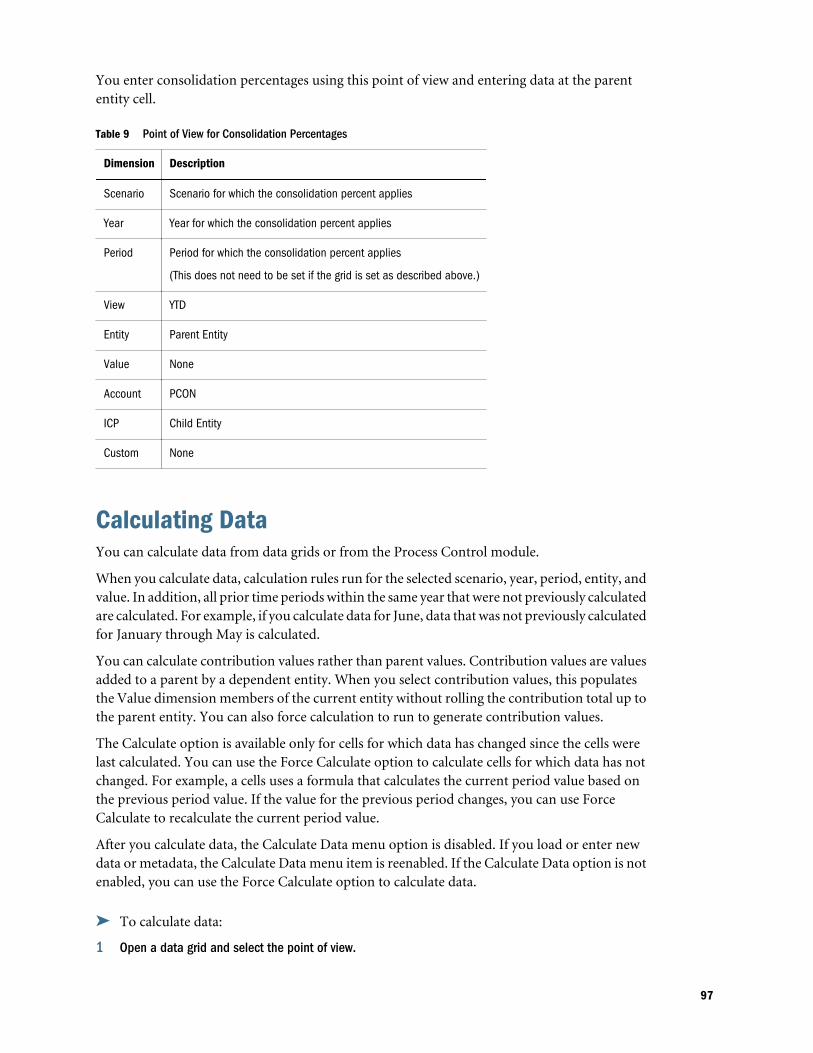
You enter consolidation percentages using this point of view and entering data at the parententity cell.
Table 9 Point of View for Consolidation Percentages
Dimension Description
Scenario Scenario for which the consolidation percent applies
Year Year for which the consolidation percent applies
Period Period for which the consolidation percent applies
(This does not need to be set if the grid is set as described above.)
View YTD
Entity Parent Entity
Value None
Account PCON
ICP Child Entity
Custom None
Calculating DataYou can calculate data from data grids or from the Process Control module.
When you calculate data, calculation rules run for the selected scenario, year, period, entity, andvalue. In addition, all prior time periods within the same year that were not previously calculatedare calculated. For example, if you calculate data for June, data that was not previously calculatedfor January through May is calculated.
You can calculate contribution values rather than parent values. Contribution values are valuesadded to a parent by a dependent entity. When you select contribution values, this populatesthe Value dimension members of the current entity without rolling the contribution total up tothe parent entity. You can also force calculation to run to generate contribution values.
The Calculate option is available only for cells for which data has changed since the cells werelast calculated. You can use the Force Calculate option to calculate cells for which data has notchanged. For example, a cells uses a formula that calculates the current period value based onthe previous period value. If the value for the previous period changes, you can use ForceCalculate to recalculate the current period value.
After you calculate data, the Calculate Data menu option is disabled. If you load or enter newdata or metadata, the Calculate Data menu item is reenabled. If the Calculate Data option is notenabled, you can use the Force Calculate option to calculate data.
ä To calculate data:
1 Open a data grid and select the point of view.
97
2 Select the cell for which to calculate data.
3 Right-click and take one of these actions:
l To calculate the selected cells, select Calculate.
l To force calculation to run for all selected cells, select Force Calculate.
l To calculate contribution values, select Calculate Contribution.
l To force calculation to run for all selected contribution values, select Force CalculateContribution.
Translating DataCurrency translation converts account data from one currency to another. You can translatedata from the entity's input currency to any other currency that has been defined in theapplication, either during the consolidation process or separately. When you consolidate data,currency translation occurs if the parent entity has a different default currency than the childentities. Data in the Entity Currency Total member of the child is translated to the parent'scurrency, and the result is stored in the child currency member. You may need to translate tocurrencies other than the parent currency. The Value dimension contains members for allapplication currencies.
Launching translation runs the default translation rules for the specified scenario, year, period,entity, and value. As a part of the process, translation rules for all prior time periods within thesame year are also run, if translation for those periods is required (TR status). Because translationrules do not cause dependent entities to be consolidated, they do not remove the status thatindicates that a cell needs consolidation (CN status). Even if the data for the entity's defaultcurrency is not current, translation uses that data to derive the input accounts for the specifiedcurrency (Value dimension). Subsequently, the translation rules automatically launch thecalculation process so that the calculated accounts are populated for the specified currency.
After you have entered currency rates for the application, you can translate the currency for anentity to any application currency in the Value dimension.
You translate data and view translation status from data grids or from the Process Control panel.See “Viewing Calculation Status” on page 75.
After you translate data, the Translate Data menu command is disabled. If you load new data,the Translate Data menu option is reenabled. If the Translate Data menu option is not enabledbut you need to run the translation process, you can use the Force Translate menu command.
ä To translate data:
1 Open a data grid and select the point of view.
2 Select a cell for which to run translation rules.
3 Right-click and take one of these actions:
l To translate the selected cells, select Translate.
98
Note: Translation is run for all cells in the current scenario, year, period, entity, andvalue.
l To force translation to run for all selected cells, select Force Translate.
Consolidation OptionsConsolidation is the process of gathering data from dependent entities and aggregating the datato parent entities. Launching consolidation runs the consolidation process for the specifiedscenario, year, period, entity, and value. As a part of that process, consolidation for all descendantentities and all prior time periods within the same year is run, if it has not been run previously.The consolidation process runs all calculation rules functions for each affected entity and value,and the translation process runs as necessary to convert from child entities to parent entities.The consolidation process does not run translation rules for currencies that are not used in theprocess of deriving parent entity data from its children.
These options are available for consolidating data: Consolidate (Impacted), Consolidate All withData, and Consolidate All.
Consolidate (Impacted Consolidation)The Consolidate (Impacted Consolidation) option is available for any parent entity with acalculation status of CN or CN ND. When you select this option for a parent entity, the systemperforms calculations (Calculate, Translate, Consolidate) for any dependent entity within theconsolidation path of the selected parent that has a calculation status of CN, CN ND, CH, TR,or TR ND, on the current period or on any prior period in the current year. Consolidate is themost efficient option because only entities that require consolidation are updated.
Process units with a status of NODATA on the current period and all prior periods are skipped.
Process units with a status of OK or OK SC on the current period are not recalculated,retranslated, or reconsolidated.
If the selected parent has a status of CN or CN ND in the prior period, consolidation runs forall periods from the first period in the current year where the parent is impacted until the currentperiod.
Consolidate All with DataThe Consolidate All with Data option is available for any parent entity, regardless of its status.When you select this option for a parent entity, the system consolidates every dependent entitywithin the consolidation path of the selected parent that contains data, regardless of its status,in the current period or in any of the prior periods. This option is useful for updating systemstatus from OK SC to OK after metadata changes.
Process units with a status of NODATA on the current period and all prior periods are skipped.
Process units with a status of OK or OK SC on the current period are recalculated, retranslated,and reconsolidated.
99
If the selected parent has a status of CN or CN ND in the prior period, consolidation runs forall periods from the first period in the current year where the parent is impacted until the currentperiod.
Consolidate AllThe Consolidate All option is available for any parent entity, regardless of its status. When youselect this option for a parent entity, the system performs calculations for every process unitwithin the consolidation path of the selected parent, regardless of its status. It consolidates allentities whether they contain data or not. This option is useful when an update from prior periodsis required, or when an entity with no data needs to be populated using allocations. This optionshould be used sparingly because the system does not omit entities with no data, which can havea significant impact on consolidation performance.
Process units with a status of NODATA on the current period are calculated, translated, andconsolidated.
Process units with a status of OK or OK SC on the current period are recalculated, translated,and reconsolidated.
If the selected parent has a status of CN or CN ND in the prior period, consolidation runs forall periods from the first period in the current year where the parent is impacted until the currentperiod.
Consolidating DataYou can run consolidation from data grids or the Process Control pane, or you can use the TaskAutomation functionality to automate the process. You can access the consolidation optionsfrom the shortcut menu of any parent entity in a data grid. When you select a parent toconsolidate, all descendants of the parent are also consolidated. If you consolidate data for aperiod and the data for prior periods has not been consolidated, the data for the prior period isalso consolidated.
To use the Consolidate option, you must be assigned the Consolidate security role. To useConsolidate All, you must be assigned the Consolidate All security role. To use Consolidate Allwith Data, you must be assigned the Consolidate All with Data security role.
When the consolidation process is complete, the status of each successfully consolidated entitychanges to OK.
Note: If the consolidation process is running for the selected entity, the system displays a warningmessage when an overlapping consolidation is launched.
ä To consolidate data:
1 Open a data grid and select the point of view.
2 Select a cell for which to run consolidation.
100
3 Right-click and take one of these actions:
l To consolidate the selected entity, select Consolidate.
l To consolidate all selected entities, regardless of whether they contain data, selectConsolidate All.
Note: Consolidation is run for all cells in the current scenario, year, period, entity, andvalue.
l To consolidate all selected entities that contain data, select Consolidate All with Data.
Viewing Consolidation ProgressWhen you consolidate data, you can monitor the progress of one or more consolidations thatyou started in a particular session.
When a consolidation starts, a progress bar is automatically displayed in a separate window. Youcan view information about the completion status of the consolidation, the point of view, andlast update time. If you start a series of tasks, you can see the progress of the task that is running.
When the progress bar is displayed, you cannot perform any other tasks Financial Managementusing the same Web page. You can start another session by starting another user interfaceinstance. If you close the instance from which you started the task, the task continues to run inthe server on its own.
In addition, you can view the status of the task from the Running Tasks module. In the RunningTasks module, you can view all of the tasks that are running, but you can cancel only tasks thatyou started.
ä To view consolidation progress:
1 Open a data grid and select a cell for which to run consolidation.
2 Right-click and select Consolidate, Consolidate All, or Consolidate All with Data.
3 Take one of these actions:
l From the Consolidation Progress page, view the progress for the task that is running.
l From the Running Tasks page, select the Consolidation task from the Tasks filter andclick View to view the progress.
Canceling Consolidation TasksWhen you consolidate data, you can cancel a consolidation task or series of consolidations. Ifyou are viewing consolidation progress from the Running Tasks module, you can only cancelany tasks that you started. Administrators can cancel running tasks by any user to free resources.See the Oracle Hyperion Financial Management Administrator's Guide.
ä To cancel a consolidation task, take one of these actions:
l From the Consolidation Progress page, click Cancel for the consolidation to cancel.
101
l From the Running Tasks page, select the Consolidation task from the Tasks filter, and clickStop Task.
Consolidation StatusYou can view the consolidation status from data grids. The consolidation status of a base levelor parent entity can change as a result of several actions:
l Changing the organization structure
l Adding or deleting accounts
l Modifying entity attributes
l Entering data in data grids, or loading data from external sources
l Posting or unposting journals
l Posting or unposting intercompany transactions
l Reloading rules
l Changing percent consolidation
l Changing currency rates
102
6Using Data Forms
In This Chapter
Working with Data Forms... . . . . . . . . . . . . . . . . . . . . . . . . . . . . . . . . . . . . . . . . . . . . . . . . . . . . . . . . . . . . . . . . . . . . . . . . . . . . . 103
Opening Data Forms... . . . . . . . . . . . . . . . . . . . . . . . . . . . . . . . . . . . . . . . . . . . . . . . . . . . . . . . . . . . . . . . . . . . . . . . . . . . . . . . . . . 104
Using the Data Form Toolbar.. . . . . . . . . . . . . . . . . . . . . . . . . . . . . . . . . . . . . . . . . . . . . . . . . . . . . . . . . . . . . . . . . . . . . . . . . . . 104
Viewing Data Form Instructions... . . . . . . . . . . . . . . . . . . . . . . . . . . . . . . . . . . . . . . . . . . . . . . . . . . . . . . . . . . . . . . . . . . . . . . 105
Opening Data Forms in Smart View ... . . . . . . . . . . . . . . . . . . . . . . . . . . . . . . . . . . . . . . . . . . . . . . . . . . . . . . . . . . . . . . . . . 106
Entering Data in Data Forms ... . . . . . . . . . . . . . . . . . . . . . . . . . . . . . . . . . . . . . . . . . . . . . . . . . . . . . . . . . . . . . . . . . . . . . . . . . 106
Shortcut Menu Commands... . . . . . . . . . . . . . . . . . . . . . . . . . . . . . . . . . . . . . . . . . . . . . . . . . . . . . . . . . . . . . . . . . . . . . . . . . . . 107
Working with Cell Text . . . . . . . . . . . . . . . . . . . . . . . . . . . . . . . . . . . . . . . . . . . . . . . . . . . . . . . . . . . . . . . . . . . . . . . . . . . . . . . . . . . 108
Attaching Documents to Data Forms... . . . . . . . . . . . . . . . . . . . . . . . . . . . . . . . . . . . . . . . . . . . . . . . . . . . . . . . . . . . . . . . . 111
Entering Line Item Detail in Data Forms ... . . . . . . . . . . . . . . . . . . . . . . . . . . . . . . . . . . . . . . . . . . . . . . . . . . . . . . . . . . . . 112
Viewing Line Item Detail in Data Forms... . . . . . . . . . . . . . . . . . . . . . . . . . . . . . . . . . . . . . . . . . . . . . . . . . . . . . . . . . . . . . 112
Deleting Line Item Detail in Data Forms ... . . . . . . . . . . . . . . . . . . . . . . . . . . . . . . . . . . . . . . . . . . . . . . . . . . . . . . . . . . . . 113
Using Linked Forms ... . . . . . . . . . . . . . . . . . . . . . . . . . . . . . . . . . . . . . . . . . . . . . . . . . . . . . . . . . . . . . . . . . . . . . . . . . . . . . . . . . . . 113
Changing the Point of View in Data Forms... . . . . . . . . . . . . . . . . . . . . . . . . . . . . . . . . . . . . . . . . . . . . . . . . . . . . . . . . . . 113
Calculating Data in Data Forms ... . . . . . . . . . . . . . . . . . . . . . . . . . . . . . . . . . . . . . . . . . . . . . . . . . . . . . . . . . . . . . . . . . . . . . 114
Drilling Through to Intercompany Transactions... . . . . . . . . . . . . . . . . . . . . . . . . . . . . . . . . . . . . . . . . . . . . . . . . . . . . . 117
Drilling Through to Source Data ... . . . . . . . . . . . . . . . . . . . . . . . . . . . . . . . . . . . . . . . . . . . . . . . . . . . . . . . . . . . . . . . . . . . . . 117
Working with Data FormsYou can enter data in an application using forms that your administrator created. Data Formsenable you to enter data for predefined views, such as specific periods and accounts. The formssupport nested columns and rows for multidimensional analysis, and enable you to drill intofurther detail.
Sample Data Form scripts are included when you select the Sample Applications during theHFM Client installation, and are located in the FinancialManagement\SampleAppsdirectory.
You can view a list of available data forms. The list displays the name, description, and last-modified date. If you have the Manage Data Forms security role, you can also view the securityclass for each form.
103
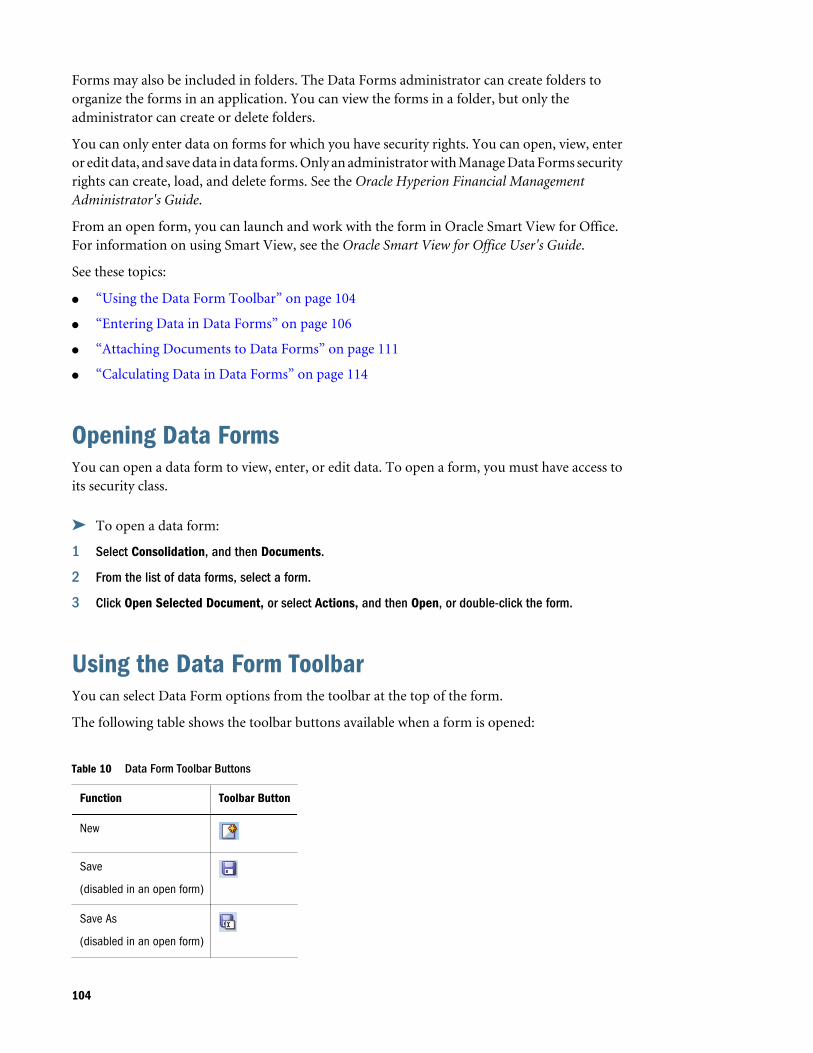
Forms may also be included in folders. The Data Forms administrator can create folders toorganize the forms in an application. You can view the forms in a folder, but only theadministrator can create or delete folders.
You can only enter data on forms for which you have security rights. You can open, view, enteror edit data, and save data in data forms. Only an administrator with Manage Data Forms securityrights can create, load, and delete forms. See the Oracle Hyperion Financial ManagementAdministrator's Guide.
From an open form, you can launch and work with the form in Oracle Smart View for Office.For information on using Smart View, see the Oracle Smart View for Office User's Guide.
See these topics:
l “Using the Data Form Toolbar” on page 104
l “Entering Data in Data Forms” on page 106
l “Attaching Documents to Data Forms” on page 111
l “Calculating Data in Data Forms” on page 114
Opening Data FormsYou can open a data form to view, enter, or edit data. To open a form, you must have access toits security class.
ä To open a data form:
1 Select Consolidation, and then Documents.
2 From the list of data forms, select a form.
3 Click Open Selected Document, or select Actions, and then Open, or double-click the form.
Using the Data Form ToolbarYou can select Data Form options from the toolbar at the top of the form.
The following table shows the toolbar buttons available when a form is opened:
Table 10 Data Form Toolbar Buttons
Function Toolbar Button
New
Save
(disabled in an open form)
Save As
(disabled in an open form)
104
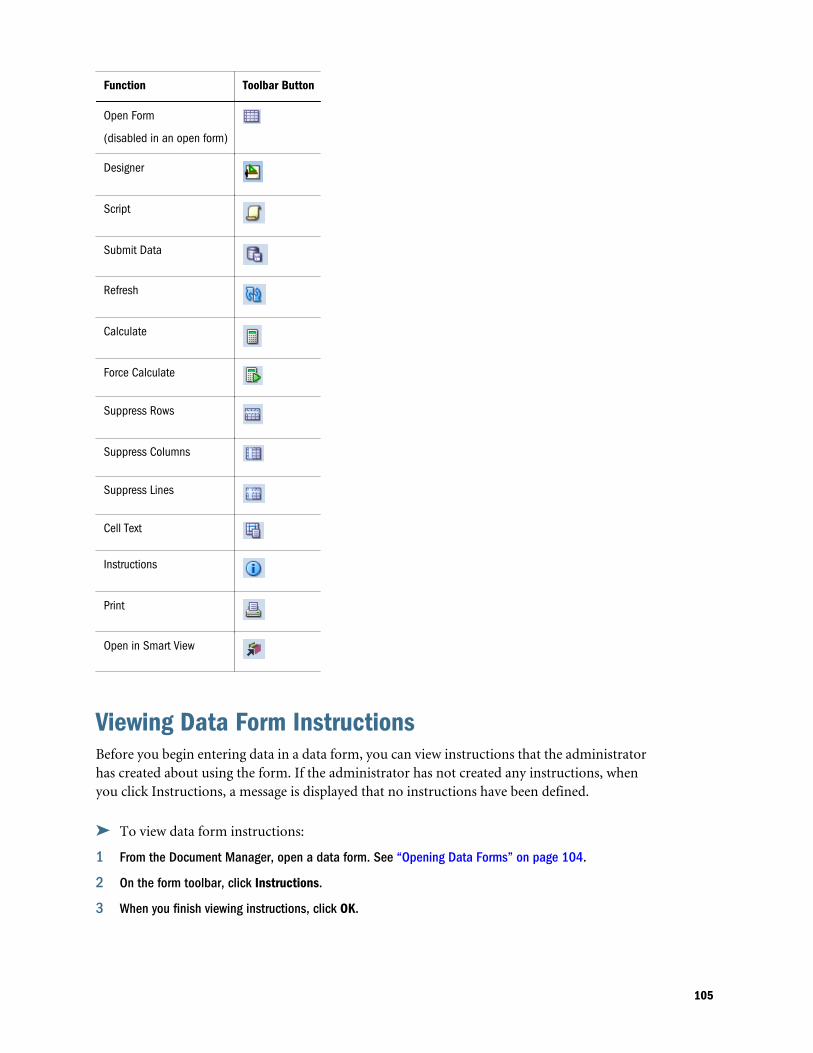
Function Toolbar Button
Open Form
(disabled in an open form)
Designer
Script
Submit Data
Refresh
Calculate
Force Calculate
Suppress Rows
Suppress Columns
Suppress Lines
Cell Text
Instructions
Open in Smart View
Viewing Data Form InstructionsBefore you begin entering data in a data form, you can view instructions that the administratorhas created about using the form. If the administrator has not created any instructions, whenyou click Instructions, a message is displayed that no instructions have been defined.
ä To view data form instructions:
1 From the Document Manager, open a data form. See “Opening Data Forms” on page 104.
2 On the form toolbar, click Instructions.
3 When you finish viewing instructions, click OK.
105
Opening Data Forms in Smart ViewFrom a data form, you can open and work with the form in Smart View. To open Smart View,you must have it installed. See the Oracle Smart View for Office User's Guide.
When you open a form through Smart View, the form opens in a new tab. If Smart View is notalready open, the system launches it before opening the form.
Note: The form is loaded in Smart View with the POV defined in the form definition. If youmade changes to the user POV, they are not reflected in Smart View.
You can work with the form in Microsoft Excel, save the form, and make changes offline whilenot connected to Financial Management. When you connect to Financial Management, you cansend the modified values to Financial Management.
ä To open a data form in Smart View:
1 Open a data form.
2 Click Open in Smart View, or select Actions, and then Smart View.
Entering Data in Data FormsYou can enter or edit data in predefined data forms that your administrator has created. Youcan enter data in input cells, or enter an amount directly in a summary-level time period andhave it distributed across base-level periods. You cannot enter data into calculated or cells atinvalid intersections, which are indicated in red.
To enter data in a data form, you must have access to the security class for the form and securityrights for the data in the cells on the form.
You can use the scroll bars for rows and columns to view various parts of the form.
To add cell text to a form, if the cell is ReadOnly, you cannot enter cell text directly into the cells.You must use the Cell Text editor. See “Entering Cell Text in Data Forms” on page 108.
ä To enter data in data forms:
1 From the Document Manager, open a data form.
See “Opening Data Forms” on page 104.
2 Double-click an input cell to enter data. Input cells are displayed as white cells.
Note: To clear a cell, you can delete its contents, enter NODATA, or right-click and selectClear.
3 When you finish entering data, click Submit Data.
4 To refresh the data, click Refresh.
106

Shortcut Menu CommandsFrom data forms, you can use shortcut menu commands, which are displayed when you right-click in a form. Data forms provide the same right-click menu commands as data grids, howeverthe availability of the menu commands depends on the cell status and your security rights.
Note: When you perform any consolidation actions on data forms, the forms are notautomatically refreshed after the consolidation process. When the consolidation processis complete, from the data form, click Refresh to refresh the data in the form. If you chooseto refresh the data in a data form while consolidation is running, you must manually closethe Running Task page.
Table 11 Data Form Right-Click Menu Commands
Menu Command Description
Cell Text View cell text. See “Viewing Cell Text in Data Forms” on page 109.
IntercompanyTransactions
View intercompany transactions. See “Drilling Through to Intercompany Transactions” on page 117.
Linked Form Navigate to linked forms. See “Using Linked Forms” on page 113.
Cell Information View form properties. See “Viewing Cell Information” on page 77.
Force Calculate For base entity, force calculation to run. See “Calculating Data” on page 97.
Force CalculateContribution
For base entity, force calculate contribution to run. See “Calculating Data” on page 97.
Consolidate For parent entity, consolidate entities. See “Consolidate (Impacted Consolidation)” on page 99.
CalculateContribution
For parent entity, calculate contribution. See “Calculating Data” on page 97.
Consolidate All withData
For parent entity, consolidate every dependent entity within the consolidation path of the selected parent thatcontains data, regardless of its status. See “Consolidate All with Data” on page 99.
Consolidate All For parent entity, perform calculations for every process unit within the consolidation path of the selected parent,regardless of its status. See “Consolidate All” on page 100.
Translate Translate selected cells. See “Translating Data” on page 98. (only available if translation is available).
Force Translate Force translation to run. See “Translating Data” on page 98. (only available if translation is available).
Lock Lock data for a period. See “Locking Data” on page 83.
Unlock Unlock data for a period. See “Unlocking Data” on page 83.
Manage Process View process unit status. See “Viewing the Process Control Summary” on page 221.
Allocate For base entity, allocate data from a source account to a destination account. See “Running Data Allocations” onpage 82.
107
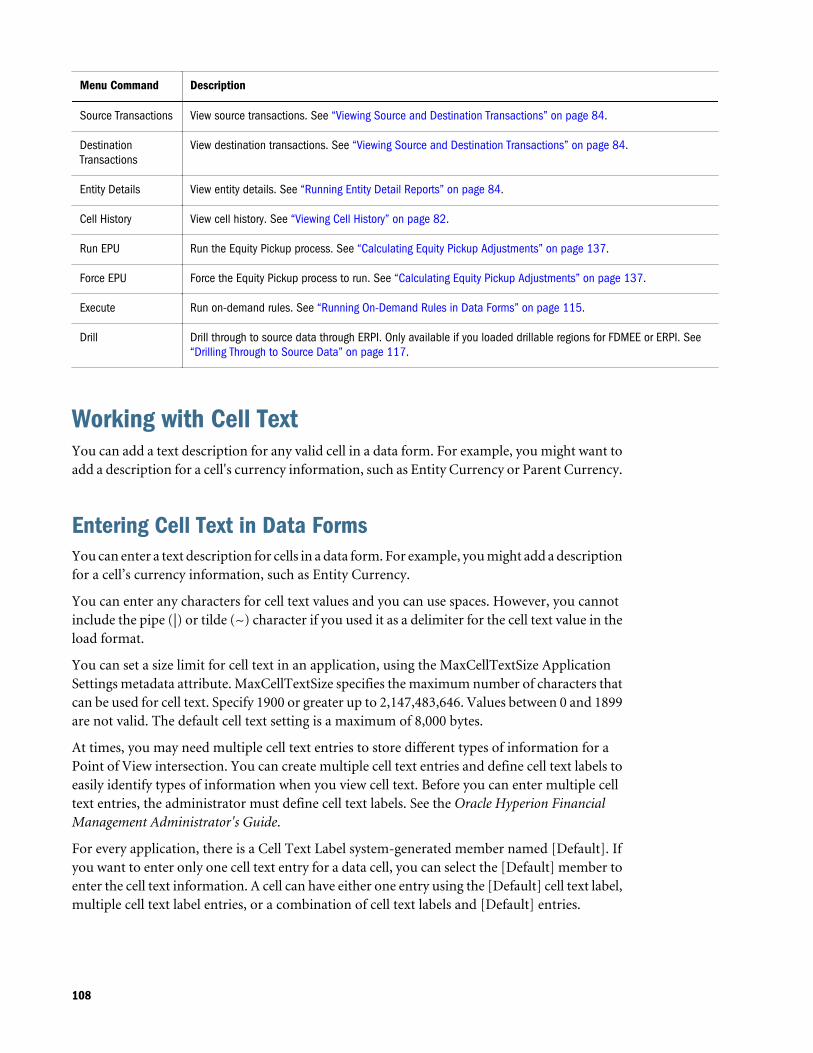
Menu Command Description
Source Transactions View source transactions. See “Viewing Source and Destination Transactions” on page 84.
DestinationTransactions
View destination transactions. See “Viewing Source and Destination Transactions” on page 84.
Entity Details View entity details. See “Running Entity Detail Reports” on page 84.
Cell History View cell history. See “Viewing Cell History” on page 82.
Run EPU Run the Equity Pickup process. See “Calculating Equity Pickup Adjustments” on page 137.
Force EPU Force the Equity Pickup process to run. See “Calculating Equity Pickup Adjustments” on page 137.
Execute Run on-demand rules. See “Running On-Demand Rules in Data Forms” on page 115.
Drill Drill through to source data through ERPI. Only available if you loaded drillable regions for FDMEE or ERPI. See“Drilling Through to Source Data” on page 117.
Working with Cell TextYou can add a text description for any valid cell in a data form. For example, you might want toadd a description for a cell's currency information, such as Entity Currency or Parent Currency.
Entering Cell Text in Data FormsYou can enter a text description for cells in a data form. For example, you might add a descriptionfor a cell’s currency information, such as Entity Currency.
You can enter any characters for cell text values and you can use spaces. However, you cannotinclude the pipe (|) or tilde (~) character if you used it as a delimiter for the cell text value in theload format.
You can set a size limit for cell text in an application, using the MaxCellTextSize ApplicationSettings metadata attribute. MaxCellTextSize specifies the maximum number of characters thatcan be used for cell text. Specify 1900 or greater up to 2,147,483,646. Values between 0 and 1899are not valid. The default cell text setting is a maximum of 8,000 bytes.
At times, you may need multiple cell text entries to store different types of information for aPoint of View intersection. You can create multiple cell text entries and define cell text labels toeasily identify types of information when you view cell text. Before you can enter multiple celltext entries, the administrator must define cell text labels. See the Oracle Hyperion FinancialManagement Administrator's Guide.
For every application, there is a Cell Text Label system-generated member named [Default]. Ifyou want to enter only one cell text entry for a data cell, you can select the [Default] member toenter the cell text information. A cell can have either one entry using the [Default] cell text label,multiple cell text label entries, or a combination of cell text labels and [Default] entries.
108
After you add cell text, a blue triangle is displayed to indicate that there is text associated withthe cell.
Note: You cannot enter text for a cell that is calculated by the form.
ä To enter cell text in data forms:
1 From the Document Manager, open a data form.
2 Select the cell for which to add text.
3 Take one of these actions:
l Select a cell, right-click, and select Cell Text.
l Select a cell, and in the form toolbar, click Cell Text.
l If the administrator has set up the form with a cell text column, enter the cell text in thecolumn.
4 Right-click and select Cell Text.
The Cell Text dialog box includes the POV information and a grid for cell text. If no textexists for the cell, the system displays a blank grid.
5 Click Add Row.
The system adds a row with the [Default] system member as the cell text label.
6 Either accept the [Default] label or select one of the other previously loaded labels from the drop-downlist.
You cannot use the same label twice in the same grid.
Tip: The cell text labels in the drop-down list are displayed in alphabetical order. To quicklyfind a cell text label from a long list, enter one or more letters of the label. For example,if you enter R, the system quickly advances to the first cell text label starting with R (forexample, Rating).
7 On the row next to the [Default] system member label in the Cell Text column, enter the cell text.
Tip: You can resize the entire Cell Text dialog box by dragging any side, and you can alsoresize the Cell Text column by dragging the right bottom corner. Click the Edit buttonto edit cell text in a separate, larger popup window, which you can resize by draggingany side.
8 Optional: To add cell text rows, click Add Row, select a Cell Text Label, and enter text.
9 When you finish entering cell text, click OK.
Viewing Cell Text in Data FormsYou can view cell text from data forms. Cells that contain text are indicated by a blue triangle atthe top of the cell.
109
ä To view cell text in data forms:
1 From the Document Manager, open a data form.
2 Select the input cell for which to view cell text.
3 Use one of these methods:
l Select a cell, right-click, and select Cell Text.
l Select a cell, and in the form toolbar, click Cell Text.
l If the administrator has set up the form with a cell text column, view the cell text in thecolumn.
Note: The cell point of view is displayed for informational purpose only.
4 Optional: To display the entire cell text in read-only mode, click the Expand button. To return to theeditable cell text box, click the Collapse button.
5 Optional: To edit cell text in a separate, larger text box, click the Edit button.
You can resize the Edit popup window by dragging any side.
6 Click OK.
Editing Cell Text in Data FormsWhen a cell contains cell text, you can edit the cell text title from the column next to the cellinstead of the Cell Text dialog box. The cell text title is one line of 69 characters maximum.Additional text that you enter for the cell is considered body text.
Cells that have only cell text titles display the cell text title in the column, and are not indicatedby a blue triangular mark in the top left corner of the cell. Cell text that is more than 69 charactersis indicated by a blue triangular mark in the cell, and can be edited only in the Cell Text dialogbox.
ä To edit cell text:
1 From the Document Manager, open a data form.
2 Select the cell for which to edit text.
3 Take one of these actions:
l Select a cell, right-click, and select Cell Text.
l Select a cell, and in the form toolbar, click Cell Text.
l If the administrator has set up the form with a cell text column, edit the cell text in thecolumn, or click Cell Text to add more text.
The Cell Text dialog box includes the POV information and a grid for cell text. If no textalready exists for the cell, the system displays a blank grid.
4 Click Add Row.
The system adds a row with the [Default] system member as the cell text label.
110
5 Either accept the [Default] label or select one of the other previously loaded labels from the drop-downlist.
You cannot use the same label twice in the same grid.
Tip: The cell text labels in the drop-down list are displayed in alphabetical order. To quicklyfind a cell text label from a long list, enter one or more letters of the label. For example,if you enter R, the system quickly advances to the first cell text label starting with R (forexample, Rating).
6 On the row next to the [Default] system member label in the Cell Text column, enter the cell text.
Tip: You can resize the entire Cell Text dialog box by dragging any side, and you can alsoresize the Cell Text column by dragging the right bottom corner. Click the Edit buttonto edit cell text in a separate, larger popup window, which you can resize by draggingany side.
7 Optional: To add cell text rows, click Add Row, select a Cell Text Label, and enter text.
Tip: To delete a row, click Delete Row.
8 When you finish entering cell text, click OK.
Attaching Documents to Data FormsIn addition to or instead of entering cell text, you can attach one or more documents to cells foradditional detail. For example, you can attach a Microsoft Word document, Microsoft Excelspreadsheet, XSL, or RPT file. To attach or extract any custom documents to or from the server,you must be assigned the Manage Custom Documents security role.
You can set a size limit for document attachments and a maximum number of documentattachments by user in an application. You set the limits in the AppSettings attribute for theapplication metadata.
You can attach multiple documents, however Oracle recommends that you attach no more thantwo or three documents to a cell. Each document should be smaller than 100K to limit theperformance effect on the database.
ä To attach a document to a cell:
1 From a data form, select the cell to which to attach a document.
2 Right-click and select Cell Text.
3 Click Attach.
4 Do one of these steps:
l To include one document attachment for the cell, click the cell with the [Default] celltext label.
111
l To include multiple document attachments for the cell text label entry, click the icon tothe right of each cell text row to open the Document Attachment dialog, then attach thedocument to that cell text row.
5 From your list of custom documents, select one or more documents to associate with the cell, and clickAttach.
6 Click OK.
Tip: To detach a document from a cell, select the document to detach, and click Detach.
Entering Line Item Detail in Data FormsYou can enter line item detail for cells in a data form. If a cell does not support line item detail,this menu option is not displayed.
The maximum description length is 80 characters. You cannot change detail descriptions.
ä To add line item detail in data forms:
1 From the Document Manager, open a data form.
2 Select the cell for which to add detail.
3 Right-click and select Cell Line Item Detail.
Note: The cell point of view is displayed for informational purpose only.
4 Enter the cell line item detail, and click Save.
5 To add a row, click New Entry.
Note: If the form was set up for multiple period line item detail, you can click Delete Rowto delete a row of line item detail. You can also click Clear Row to clear the line itemdetail from a row.
6 To refresh the data, click Refresh.
7 When you finish entering line item detail, click OK.
Note: After you save your entries, cells that contain line item detail are indicated by a redtriangle at the top of the cell. Cells that contain both cell text and line item detail areindicated by blue and red triangles at the top of the cell.
Viewing Line Item Detail in Data FormsYou can view line item detail for cells in data forms. Cells that contain line item detail areindicated by a red triangle at the top of the cell. You can view line item detail by one period orby all periods. The system administrator specifies how line item detail is viewed when creatingthe data form.
112
ä To view line item detail in data forms:
1 From the Document Manager, open a data form.
2 Select the cell for which to view line item detail.
3 Right-click and select Cell Line Item Detail.
Deleting Line Item Detail in Data FormsYou can delete line item detail from cells in a data form. Cells that contain line item detail areindicated by a red triangle at the top of the cell.
ä To delete line item detail:
1 From the Document Manager, open a data form and make sure the administrator has set it to displayline item detail for all input periods.
2 Select the cell for which to delete line item detail.
3 Right-click and select Cell Line Item Detail.
4 Select the row to delete and select Delete Row.
5 Click Save, close the line item detail page and click Refresh to refresh the data.
Using Linked FormsWhen administrators create data forms, they can define links from one form to another to enabledrill-through to a more specific data entry view. For example, a form that contains summaryaccount balances can link to a corresponding form with the account details. The link from oneform to another applies to an entire row. A data form can contain up to 64 linked forms.
Linked forms are indicated by this icon: .
ä To use linked forms:
1 From a data form, select a row that contains linked forms.
2 Right-click on a cell and select Linked Form.
3 When you finish using the linked form, click OK.
Changing the Point of View in Data FormsAn administrator creates a data form by defining the rows and columns for the form and thepoint of view. However, the administrator can also allow users to change some elements in thepoint of view on the form by selecting members from a specified list. This enables you to use thesame form for different dimension members.
113
The point of view is displayed on the top of the form. Elements that can be changed are displayedas links in the point of view. For example, if the Entity dimension is displayed as a link, you canchange the entity but not the other dimensions in the point of view.
If Favorite Members have been set up for the selectable dimensions in the form POV bar, youcan select those members. This enables you to quickly and easily select members in the listwithout opening and selecting them from the Member Selector dialog. A list of Favorite Membersis indicated by a drop-down arrow next to the dimension. When you click the drop-down arrow,the system displays a list of your favorite members for that dimension in the order in which youset them up. For example, if you set up EastRegion.EastSales, EastRegion.EastProduction,EastRegion.Admin for the Entity dimension Favorite Members in the Member Selection dialogbox, when you click the drop-down arrow next to the Entity dimension in the data form POVbar, the system displays the list of those members.
If your administrator has defined dynamic POV member lists, you can select them to quicklypopulate rows and columns with valid members. From the Member Selection dialog box, thevalid dynamic POV member lists for the current dimension are displayed with an @POV suffixat the bottom of the dialog box.
ä To change a point of view element on data forms:
1 From the Document Manager, open a data form.
2 From the Point of View, click the element to change.
3 From Member Selection, select the dimension member to change and click OK.
The system returns you to the data form.
Calculating Data in Data FormsAfter you enter data in data forms, you can calculate the data to see the results. When you selectto calculate data, the system calculates data for the scenario, year, period, value, parent, andentities defined in the grid.
ä To calculate data in data forms:
1 From the Document Manager, open a data form.
2 Select the cell for which to calculate data and save the data.
3 Take one of these actions:
l Click Calculate.
l Click Force Calculate to force calculation to run for each scenario, year, period, value,parent, entity defined in the grid, regardless of status.
Note: You must submit the data before you calculate.
114

Running On-Demand Rules in Data FormsIf your administrator has created on-demand rules for a data form, you can run the rules whenyou are working in the form. On-demand rules enable you to quickly see the results ofcalculations. For example, when you are working in a data form that has been set up to run aspecific on-demand rule, you can enter data and then run the on-demand rule to see thecalculation result.
When you run on-demand rules, the system runs the rule on all subcubes that have a valid POVin one of the cells in the currently displayed form, and that are not locked. The rules are onlyavailable when the cell has a Calculate or Force Calculate option available.
ä To run on-demand rules:
1 From the Document Manager, open a data form.
2 Select the cell for which to calculate data.
3 Use one of these methods:
l From the toolbar, click the Execute button and select the rule to run.
Note: This process runs the rule on all valid POVs on the form that are not locked.
l Right-click on a cell and from the context menu, select Execute, and then select the ruleto run.
Note: This process runs the rule for only the POVs of the selected cells.
The Execute toolbar button and right-click menu option are not available if theadministrator has not specified any on-demand rules for the form.
4 Right-click on the cell and select Cell Information to verify the calculation status.
Suppressing Data in Data FormsYou can set row and column suppression options individually using the Suppress Rows andSuppress Columns options, or together, using the Suppress Lines option. For example, settingSuppress Lines to NoData has the same effect as setting both Suppress Rows and SuppressColumns to NoData. When the row and column suppression options differ, the selected optionis displayed with a check mark that indicates the current setting. For example, if NoData issuppressed on rows and Zero is suppressed on columns, the Suppress Lines setting is NoData& Zero. Clicking NoData & Zero sets both row and column suppression to NoData & Zero.
Note: To use all of the suppression options, you must be assigned the Manage Data Entry Formsecurity role. If you are not assigned this role, only the Invalid cells suppression option isavailable.
115
ä To suppress data:
1 From the Document Manager, open a data form.
2 Take one or more of these actions:
l To suppress rows, on the toolbar, click Suppress Rows, and select None, or one or moreof these options: NoData, Zero, or Invalid.
l To suppress columns, on the toolbar, click Suppress Columns and select None, or oneor more of these options: NoData, Zero, or Invalid.
l To suppress rows and columns, on the toolbar, click Suppress Lines and select None,or one or more of these options: NoData, Zero, or Invalid.
Tip: Another method of selecting suppression options is to place your cursor over a rowor column header, and right-click to change the row or column. To change bothrow and column options, place your cursor in the space at the top left of the formwhere the rows and columns intersect, right-click and select an option.
Adding Members to Data FormsWhen administrators define data forms, they can choose to allow form users to insert additional
lines of data. If additions are allowed, an Add Member button ( ) is displayed in the left headercell of the form. You can select additional members, and enter and save data for those members.The new entries are inserted into the form, and the totals are updated.
For example, a form may have been defined for an account with intercompany transactions forIC1, IC2, and IC4. You can select members IC3 and IC5, enter data for those members, and savethe data. The form is refreshed with the newly saved data and the new lines are displayed in theappropriate hierarchical order.
After you select members to add from a row, the form displays the selected members with a redplus sign (+) at the left side of the row, and the other Add Member icons are unavailable. Whenyou refresh the form, all of the Add Member icons display, and you can select another line forwhich to add members.
ä To add members to data forms:
1 From the Document Manager, open the form into which to enter data.
2 To add dimension members to the form, in the leftmost header cell of the form, click Add Member,
.
3 Select the members for which to enter data and click Add.
Tip: To select multiple members, hold Ctrl and select members. Use Add All and RemoveAll to add or remove all members.
4 Click OK.
5 Enter data for the additional members.
6 Optional: Enter cell text by taking one of these actions:
116

l Highlight a cell, right-click, and select Cell Text.
l Select a cell and click Cell Text.
l If the administrator has set up the form with a cell text column, enter the cell text in thecolumn.
7 Optional: To calculate or force calculate the selected cells, click Calculate and Force Calculate,respectively.
Note: You must submit the data before you calculate.
8 To save your changes, click Save.
The form is automatically refreshed and updated with the newly added entries.
Printing Data FormsYou can preview and print data forms.
ä To print data forms:
1 From the Document Manager, select the form to open.
2 From the form, click Print.
3 Open or save the form, select a printer, and click Print.
Drilling Through to Intercompany TransactionsAfter transactions are posted to an account, you can view the account balance reflecting theposted amounts in the data form. Account cells in the form that contain posted transactions areindicated with a green triangle at the top of the cell. The corresponding transaction details forthe account cell are displayed in a separate window.
To drill through to intercompany transactions, you must be assigned the IntercompanyTransaction User security role. You can view intercompany transactions from the data form,but you cannot make changes to the transactions using this view.
ä To view Intercompany transactions from data forms:
1 From a data form, select a cell that contains intercompany transactions.
2 Right-click and select Intercompany Transactions to view the transaction details.
Drilling Through to Source DataIf you use FDMEE to load data, you can drill down from data forms to FDMEE to view thesource data. For information on Oracle Hyperion Financial Data Quality Management,Enterprise Edition, see the Oracle Hyperion Financial Data Quality Management, EnterpriseEdition Administrator's Guide.
117
A cell has a drillable status if it has data loaded through an outside source and its Point of Viewis within a specified region that has been defined and loaded to Financial Management. Cellsthat are drillable are indicated by a light blue icon at the top left corner of the cell.
ä To drill through to source data:
1 From a data form, select an input cell that has a drillable indicator.
2 Right-click and select Drill Through to launch a new page with the Point of View for the selected cell,from which you can drill through to the source data.
Note: If you drill through to FDMEE, the information opens in a new browser window. Ifyou drill through to ERPI, the information opens in a new tab in Workspace.
118
7Managing Ownership
In This Chapter
Managing Ownership ... . . . . . . . . . . . . . . . . . . . . . . . . . . . . . . . . . . . . . . . . . . . . . . . . . . . . . . . . . . . . . . . . . . . . . . . . . . . . . . . . . 119
Entering Ownership Information ... . . . . . . . . . . . . . . . . . . . . . . . . . . . . . . . . . . . . . . . . . . . . . . . . . . . . . . . . . . . . . . . . . . . . . 121
Copying and Pasting Ownership Values ... . . . . . . . . . . . . . . . . . . . . . . . . . . . . . . . . . . . . . . . . . . . . . . . . . . . . . . . . . . . . 122
Ownership Calculation Process ... . . . . . . . . . . . . . . . . . . . . . . . . . . . . . . . . . . . . . . . . . . . . . . . . . . . . . . . . . . . . . . . . . . . . . . 123
Calculating Ownership... . . . . . . . . . . . . . . . . . . . . . . . . . . . . . . . . . . . . . . . . . . . . . . . . . . . . . . . . . . . . . . . . . . . . . . . . . . . . . . . . 124
Managing OwnershipYou can manage ownership and control of an organization by recording the shares of stock thatthe entities in the organization own in one another. You can record two types of shares for anorganization: regular shares and voting shares. The system uses regular shares to calculateownership, and voting shares to calculate control.
The Manage Ownership grid displays a list of entities according to hierarchy. You can define theownership of a parent entity in child entities by assigning system accounts for partial entityownership, such as Percent Ownership (POWN system account) and Percent Consolidation(PCON system account). You can enter share values and specify consolidation methods for theentities. See “Entering Ownership Information” on page 121.
You can calculate ownership percentages based on share ownership. See “CalculatingOwnership” on page 124.
If you assign a holding company to a parent entity, the system first uses the share values tocalculate the ownership and control percentages. It then uses those percentages to propose theconsolidation percentage and method for the entities below that parent.
The following figure shows a sample ownership grid. The rows display the list of child entitiesbased on the entity that you are using as the parent entity in the point of view. The columnsdisplay system accounts for which you can enter values.
119
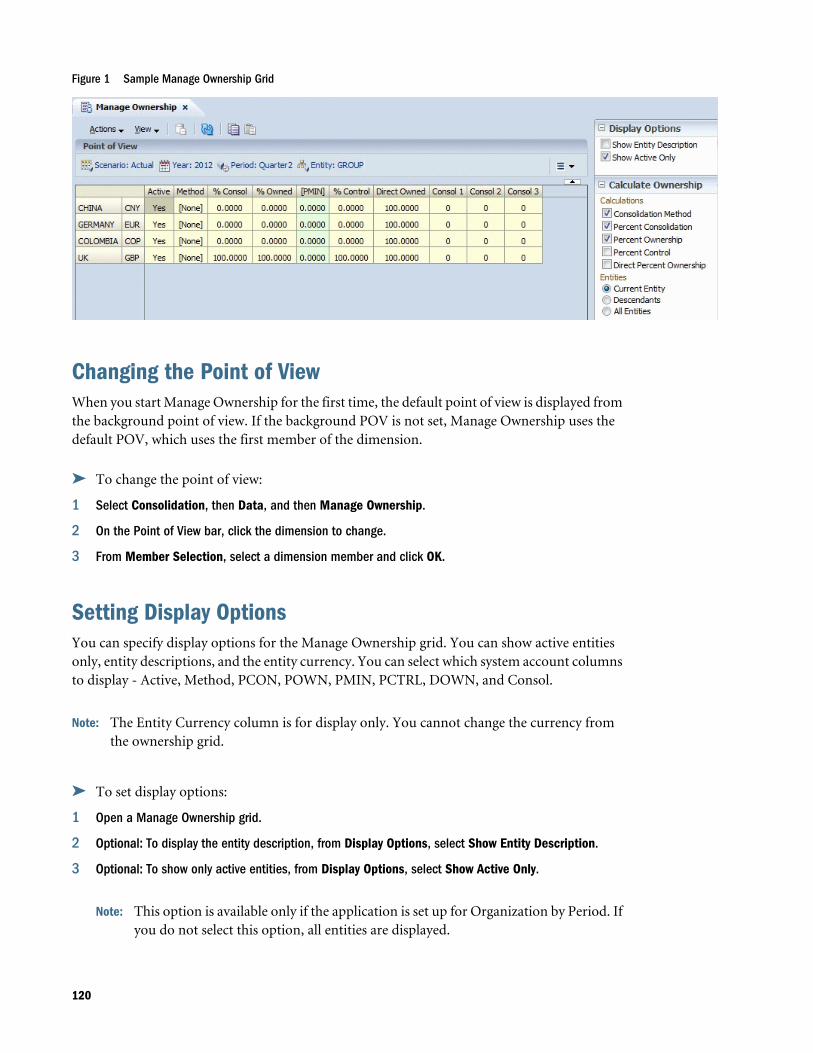
Figure 1 Sample Manage Ownership Grid
Changing the Point of ViewWhen you start Manage Ownership for the first time, the default point of view is displayed fromthe background point of view. If the background POV is not set, Manage Ownership uses thedefault POV, which uses the first member of the dimension.
ä To change the point of view:
1 Select Consolidation, then Data, and then Manage Ownership.
2 On the Point of View bar, click the dimension to change.
3 From Member Selection, select a dimension member and click OK.
Setting Display OptionsYou can specify display options for the Manage Ownership grid. You can show active entitiesonly, entity descriptions, and the entity currency. You can select which system account columnsto display - Active, Method, PCON, POWN, PMIN, PCTRL, DOWN, and Consol.
Note: The Entity Currency column is for display only. You cannot change the currency fromthe ownership grid.
ä To set display options:
1 Open a Manage Ownership grid.
2 Optional: To display the entity description, from Display Options, select Show Entity Description.
3 Optional: To show only active entities, from Display Options, select Show Active Only.
Note: This option is available only if the application is set up for Organization by Period. Ifyou do not select this option, all entities are displayed.
120
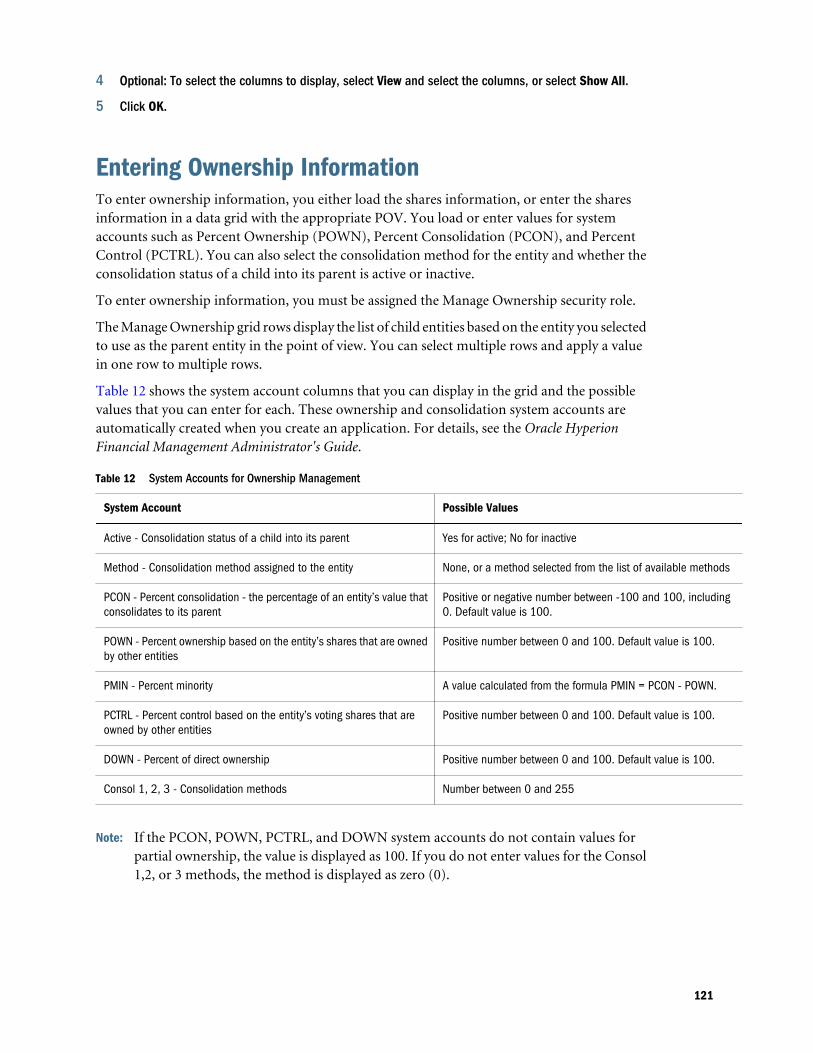
4 Optional: To select the columns to display, select View and select the columns, or select Show All.
5 Click OK.
Entering Ownership InformationTo enter ownership information, you either load the shares information, or enter the sharesinformation in a data grid with the appropriate POV. You load or enter values for systemaccounts such as Percent Ownership (POWN), Percent Consolidation (PCON), and PercentControl (PCTRL). You can also select the consolidation method for the entity and whether theconsolidation status of a child into its parent is active or inactive.
To enter ownership information, you must be assigned the Manage Ownership security role.
The Manage Ownership grid rows display the list of child entities based on the entity you selectedto use as the parent entity in the point of view. You can select multiple rows and apply a valuein one row to multiple rows.
Table 12 shows the system account columns that you can display in the grid and the possiblevalues that you can enter for each. These ownership and consolidation system accounts areautomatically created when you create an application. For details, see the Oracle HyperionFinancial Management Administrator's Guide.
Table 12 System Accounts for Ownership Management
System Account Possible Values
Active - Consolidation status of a child into its parent Yes for active; No for inactive
Method - Consolidation method assigned to the entity None, or a method selected from the list of available methods
PCON - Percent consolidation - the percentage of an entity’s value thatconsolidates to its parent
Positive or negative number between -100 and 100, including0. Default value is 100.
POWN - Percent ownership based on the entity’s shares that are ownedby other entities
Positive number between 0 and 100. Default value is 100.
PMIN - Percent minority A value calculated from the formula PMIN = PCON - POWN.
PCTRL - Percent control based on the entity’s voting shares that areowned by other entities
Positive number between 0 and 100. Default value is 100.
DOWN - Percent of direct ownership Positive number between 0 and 100. Default value is 100.
Consol 1, 2, 3 - Consolidation methods Number between 0 and 255
Note: If the PCON, POWN, PCTRL, and DOWN system accounts do not contain values forpartial ownership, the value is displayed as 100. If you do not enter values for the Consol1,2, or 3 methods, the method is displayed as zero (0).
121
ä To enter ownership information:
1 Select Consolidation, then Data, and then Manage Ownership.
2 Select the scenario, year, period, and entity dimension members from the Point of View for which toenter ownership information.
3 Optional: To display the entity currency, select View, then Columns, and select Entity Currency.
4 From the grid, select entities for which to enter values and take one or more of these actions:
l For Active, select Yes or No to specify whether the consolidation status of the child intoits parent is active.
l For Method, select a consolidation method for the entity.
l For PCON, enter a value for percent consolidation.
l For POWN, enter a value for percent ownership.
l For PCTRL, enter a value for percent control.
l For DOWN, enter a value for direct ownership.
l For Consol1, Consol2, and Consol3, enter a consolidation method.
5 To save the changes to the database and refresh the grid, click Submit, or select Actions, and thenSubmit.
Tip: To reset the data to the values in the database without saving changes, click Reset, orselect Actions, and then Reset.
Copying and Pasting Ownership ValuesIn the Manage Ownership grid, you can copy and paste the values from one cell to another. Youcan select a specific cell and enter data in that cell, then select other cells and paste the value tothem.
The value is not pasted to the destination cells if these conditions occur:
l If the data type of the source and destination cells does not match (for example, Yes or Noversus a number).
l If the value of the source cell is out of valid range for the value of the destination cell (forexample, the source value is -100, and the destination cell is a Consol1 value which has arange of 0 to 255).
ä To copy and paste ownership values:
1 From the Manage Ownership grid, select the cell that contains the value that you want to apply, andclick Copy , or select Actions, then Copy, or right-click and select Copy.
2 Select the cells to which you want to apply the value, and click Paste, or select Actions, and thenPaste, or right-click and select Paste.
The system applies the current value to all the selected entities.
122
3 To save the current values to the database and refresh the data, click Submit, or select Actions, andthen Submit.
Tip: To reset the data to the values that were last saved in the database, click Reset, or selectActions, and then Reset.
Ownership Calculation ProcessThe Ownership calculation process use the shares stored in the Shares%Owned system accountto calculate ownership and the shares stored in the Voting%Owned system account to calculatecontrol percentages. The process calculates the dependents of the selected parent in these systemaccounts: Percent Ownership (POWN), Percent Consolidation (PCON), Percent Control(PCTRL), Direct Percent Ownership (DOWN), and consolidation method (METHOD).
The system also calculates the Percent Minority (PMIN) amount using this formula:
Percent Consolidation (PCON) - Percent Ownership (POWN) = PMIN
For details on these system-generated Ownership and Consolidation accounts, andconsolidation methods including POWN and POWNMIN, see the Oracle Hyperion FinancialManagement Administrator's Guide.
Percent OwnershipPercent ownership (POWN) represents the percentage of an entity’s non-voting shares that otherentities own, directly or indirectly. The system calculates the percentage owned based on theshare values stored in the Shares%Owned account. The calculation result is stored in the parentin the POWN system account using the ICP dimension. For example, if the calculation returns90% for Entity A, the system stores 90 in the parent entity’s POWN account, ICP=A.
Percent ControlPercent control (PCTRL) represents the percentage of an entity based on voting shares that otherentities own, directly or indirectly. The system calculates the percentage that the selected parent’sholding company controls of each dependent, based on the share values stored in the Voting%Owned account. The calculation result is stored in the parent in the PCTRL system accountusing the ICP dimension. For example, if the calculation returns 80% for Entity A, the systemstores 80 in the parent entity’s PCTRL account, ICP=A.
Direct Percent OwnershipDirect percent ownership (DOWN) is the percentage of regular non-voting shares of stockowned by each entity. The system calculates the percentage based on the share values in theShares%Owned account. The calculation result is stored in the DOWN system account usingthe ICP dimension.
123
For example, if Entity 002 has a value of 80 in the Shares%Owned account, ICP=holding (theholding company owns 80% of Entity 002), the system stores 80 in the DOWN account , ICP=Afor Entity=Group1.
Percent ConsolidationPercent consolidation (PCON) is the percentage of an entity’s values that consolidate to itsparent. The system uses the methods defined in the Consolidation Method metadata table todetermine the percent consolidation to apply for each entity. If there is no consolidation methodassigned to the entity, or the method assigned to the entity does not match a method markedUsedByCalcRoutine, the system uses the percent consolidation corresponding to the percentcontrol.
For example, if the Method account Custom1=Global, ICP=001 has a value of 1, and the percentconsolidation in the consolidation method table corresponding to the Global method is 100%,the system stores 100 in the PCON account, ICP=001.
Consolidation MethodConsolidation method is the set of rules that determine how to consolidate data from an entityto its parent. The system proposes this method based on the percent control and theconsolidation methods in the Consolidation Method metadata table that have the“UsedbyCalcRoutine” attribute. For each entity for which percent control is calculated, thesystem assigns the consolidation method corresponding to the percent control for theconsolidation method specified in the table. For example, if the percent control calculated forEntity A is 75%, and the consolidation method assigns the GLOBAL method when percentcontrol is from 50% to 100%, the system stores 1 in the parent entity’s Method account,Custom1=GLOBAL, ICP=A.
The exception to this rule is the holding company for the parent. For the holding company, thesystem does not use percent control to determine the consolidation method. Instead, it assignsthe consolidation method that has the IsHoldingMethod attribute.
Calculating OwnershipYou use the Calculate Ownership option to calculate values for ownership percentages based onentity shares. You can calculate ownership for multiple parent entities and for multiple periodsfor a specific scenario and year. You can run calculation procedures together or separately.
For the Calculate Ownership option to be available, you must assign a holding company to theparent entity. When you define entity members for the application, you specify theHoldingCompany attribute for the entity. See the Oracle Hyperion Financial ManagementAdministrator's Guide.
ä To calculate ownership:
1 From the POV, select the parent entity for which to calculate ownership.
124

Note: The parent entity that the calculation process uses is the Entity on the point of view.For example, if the POV entity is Region.Europe, the calculation runs for Europe, notRegion.
2 From the right pane, select one or more Calculate Ownership options:
l To select a consolidation method for percent control, select Consolidation Method.
l To calculate ultimate percent consolidation, select Percent Consolidation.
l To calculate ultimate percent ownership, select Percent Ownership.
l To calculate ultimate percent control, select Percent Control.
l To calculate direct percent ownership, select Direct Percent Ownership.
3 Select an Entities option:
l To calculate ownership for the current entity only, select Current Entity.
l To calculate ownership for the current entity and all parent entities below it, selectDescendants.
l To calculate ownership for all entities, select All Entities.
4 From Periods, select the periods for which to calculate ownership, or select All.
5 Click Calculate.
125

126
8Managing Equity Pickup
In This Chapter
About Equity Pickup ... . . . . . . . . . . . . . . . . . . . . . . . . . . . . . . . . . . . . . . . . . . . . . . . . . . . . . . . . . . . . . . . . . . . . . . . . . . . . . . . . . . 127
Examples of Equity Pickup Adjustments ... . . . . . . . . . . . . . . . . . . . . . . . . . . . . . . . . . . . . . . . . . . . . . . . . . . . . . . . . . . . . 128
Managing Equity Pickup... . . . . . . . . . . . . . . . . . . . . . . . . . . . . . . . . . . . . . . . . . . . . . . . . . . . . . . . . . . . . . . . . . . . . . . . . . . . . . . 135
Modifying the Display of the Manage Equity Pickup Table... . . . . . . . . . . . . . . . . . . . . . . . . . . . . . . . . . . . . . . . . 136
Calculating Equity Pickup Adjustments ... . . . . . . . . . . . . . . . . . . . . . . . . . . . . . . . . . . . . . . . . . . . . . . . . . . . . . . . . . . . . . 137
Printing Equity Pickup Reports .. . . . . . . . . . . . . . . . . . . . . . . . . . . . . . . . . . . . . . . . . . . . . . . . . . . . . . . . . . . . . . . . . . . . . . . . . 138
EPU Calculation Process ... . . . . . . . . . . . . . . . . . . . . . . . . . . . . . . . . . . . . . . . . . . . . . . . . . . . . . . . . . . . . . . . . . . . . . . . . . . . . . 138
About Equity PickupEquity pickup (EPU) functionality enables you to revaluate the investments owned by a holdingcompany. The purpose of the reevaluation is to adjust the investments in the Balance Sheet ofthe holding company to reflect the current value of the corresponding share in the equity of thesubsidiary. The underlying principle of the equity pickup adjustment is to provide a fair pictureof the value of the portfolio owned by the holding company.
Like most assets, investments are presented in the Balance Sheet at their historical cost.Investment amounts reflect acquisition prices. However, due to profit or loss incurred in thesubsidiary since the acquisition, historical cost may differ from the actual value of the investmentowned. In the case of a subsidiary in a foreign country, exchange currency fluctuations may alsoaffect the value of the investment when translated into the holding company's currency. Equitypickup adjustments account for this difference.
An equity pickup adjustment replaces the historical cost with the actual value of the equityowned. In this respect, equity pickup is similar to the equity method in statutory consolidation.
Equity pickup adjustments are made in the local currency of the holding company, before anyconsolidation of this holding into the group. These adjustments belong to the holding company,independently from any ultimate parent entity.
For each company owned, the adjustment is expressed as follows:
Direct Ownership Percentage * Equity of Owned Entity
= Current Equity Value
- Investment
= Equity Pickup Adjustment
127
Examples of Equity Pickup Adjustmentsl “Example 1: Direct Ownership” on page 128
l “Example 2: Direct Ownership with Translation” on page 129
l “Example 3: Cascading Ownership and Subholdings” on page 130
l “Example 4: Cross-Ownership” on page 133
Example 1: Direct Ownershipl H owns 80% of A.
l Investment in A at historical cost: 100
l Actual Equity of A: 1000
l Adjustment amount in H related to investment in A =
(80% * 1000) = 800 – 100 = 700
The EPU adjustment impacts both assets and equity in the holding company.
Investments in A: 700 (Debit)
Equity: 700 (Credit)
128
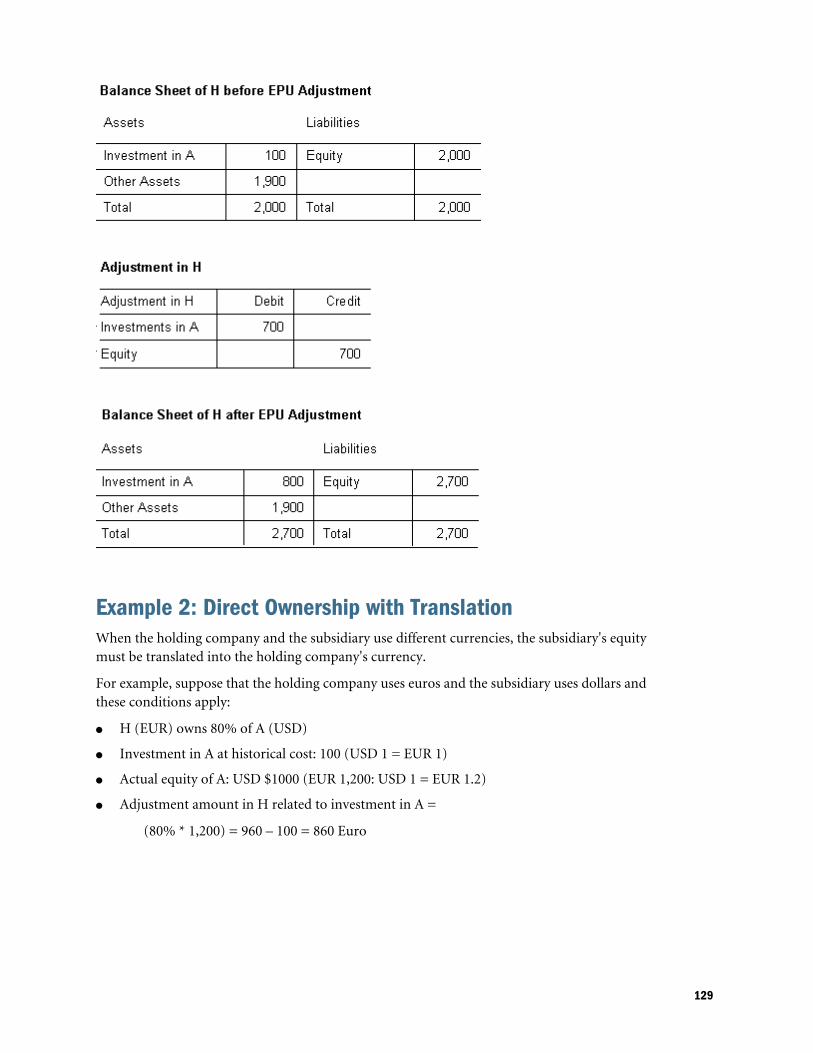
Example 2: Direct Ownership with TranslationWhen the holding company and the subsidiary use different currencies, the subsidiary's equitymust be translated into the holding company's currency.
For example, suppose that the holding company uses euros and the subsidiary uses dollars andthese conditions apply:
l H (EUR) owns 80% of A (USD)
l Investment in A at historical cost: 100 (USD 1 = EUR 1)
l Actual equity of A: USD $1000 (EUR 1,200: USD 1 = EUR 1.2)
l Adjustment amount in H related to investment in A =
(80% * 1,200) = 960 – 100 = 860 Euro
129
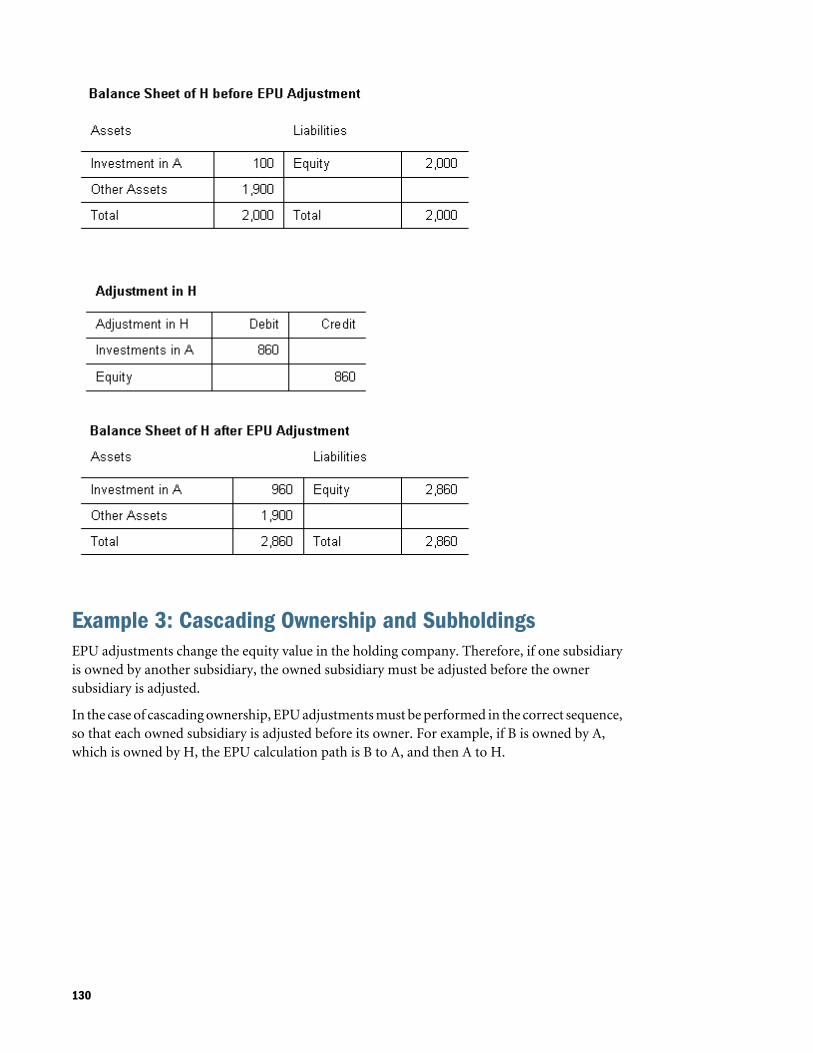
Example 3: Cascading Ownership and SubholdingsEPU adjustments change the equity value in the holding company. Therefore, if one subsidiaryis owned by another subsidiary, the owned subsidiary must be adjusted before the ownersubsidiary is adjusted.
In the case of cascading ownership, EPU adjustments must be performed in the correct sequence,so that each owned subsidiary is adjusted before its owner. For example, if B is owned by A,which is owned by H, the EPU calculation path is B to A, and then A to H.
130

l H owns 80% of A.
l Investment of H in A at historical cost: 400
l Actual equity of A before any adjustment: 1000
l A owns 30% of B
l Investment of A in B at historical cost: 70
l Actual equity of B: 500
Adjustment in A
The EPU calculation path starts with EPU adjustment in A:
l A owns 30% of B
l Investment of A in B at historical cost: 70
l Actual Equity of B: 500
l Direct ownership percentage * Equity of entity owned - Investment = EPU Adjustmentamount
l Adjustment amount in A related to investment in B =
30% * 500 = 150 — 70 = 80
Investments in A: 80 (Debit)
Equity: 80 (Credit)
131
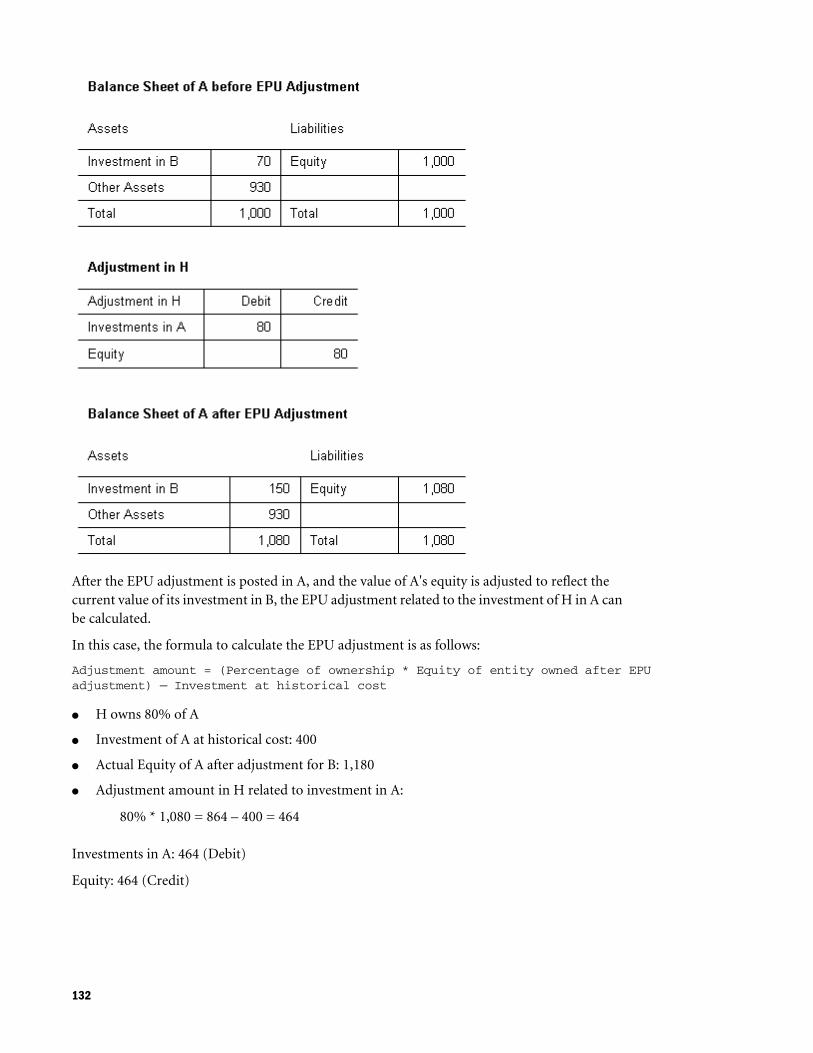
After the EPU adjustment is posted in A, and the value of A's equity is adjusted to reflect thecurrent value of its investment in B, the EPU adjustment related to the investment of H in A canbe calculated.
In this case, the formula to calculate the EPU adjustment is as follows:
Adjustment amount = (Percentage of ownership * Equity of entity owned after EPU adjustment) — Investment at historical cost
l H owns 80% of A
l Investment of A at historical cost: 400
l Actual Equity of A after adjustment for B: 1,180
l Adjustment amount in H related to investment in A:
80% * 1,080 = 864 – 400 = 464
Investments in A: 464 (Debit)
Equity: 464 (Credit)
132
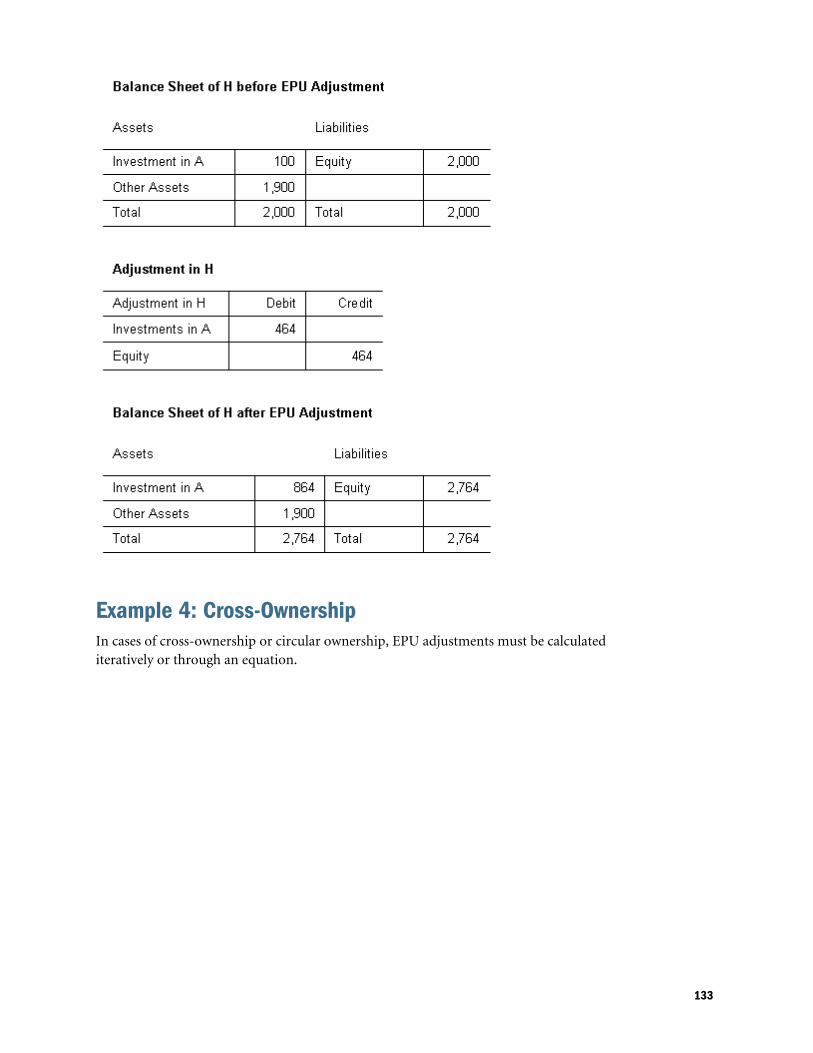
Example 4: Cross-OwnershipIn cases of cross-ownership or circular ownership, EPU adjustments must be calculatediteratively or through an equation.
133
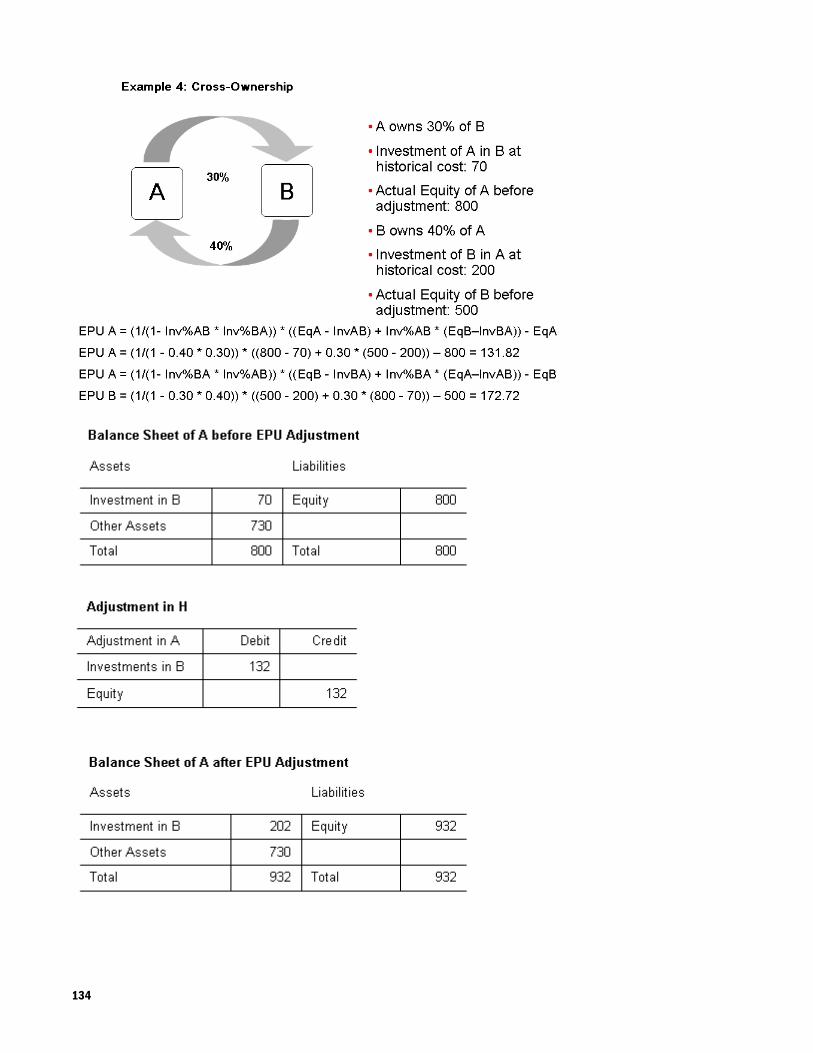
134
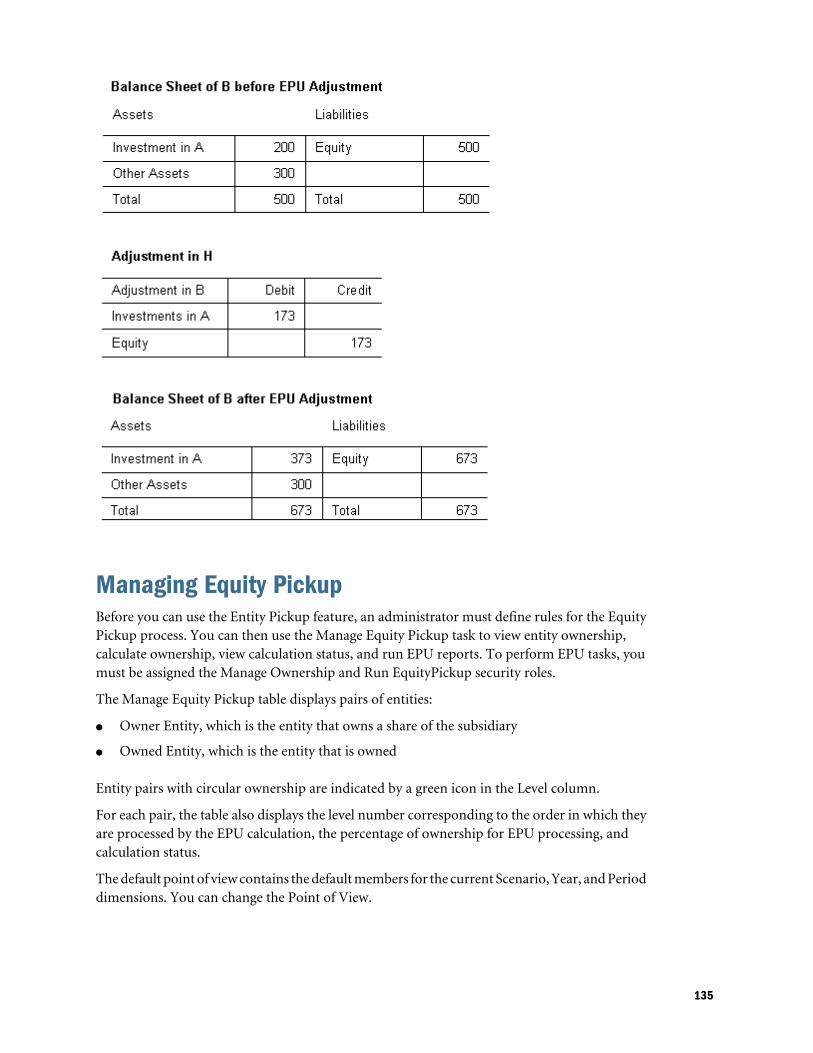
Managing Equity PickupBefore you can use the Entity Pickup feature, an administrator must define rules for the EquityPickup process. You can then use the Manage Equity Pickup task to view entity ownership,calculate ownership, view calculation status, and run EPU reports. To perform EPU tasks, youmust be assigned the Manage Ownership and Run EquityPickup security roles.
The Manage Equity Pickup table displays pairs of entities:
l Owner Entity, which is the entity that owns a share of the subsidiary
l Owned Entity, which is the entity that is owned
Entity pairs with circular ownership are indicated by a green icon in the Level column.
For each pair, the table also displays the level number corresponding to the order in which theyare processed by the EPU calculation, the percentage of ownership for EPU processing, andcalculation status.
The default point of view contains the default members for the current Scenario, Year, and Perioddimensions. You can change the Point of View.
135
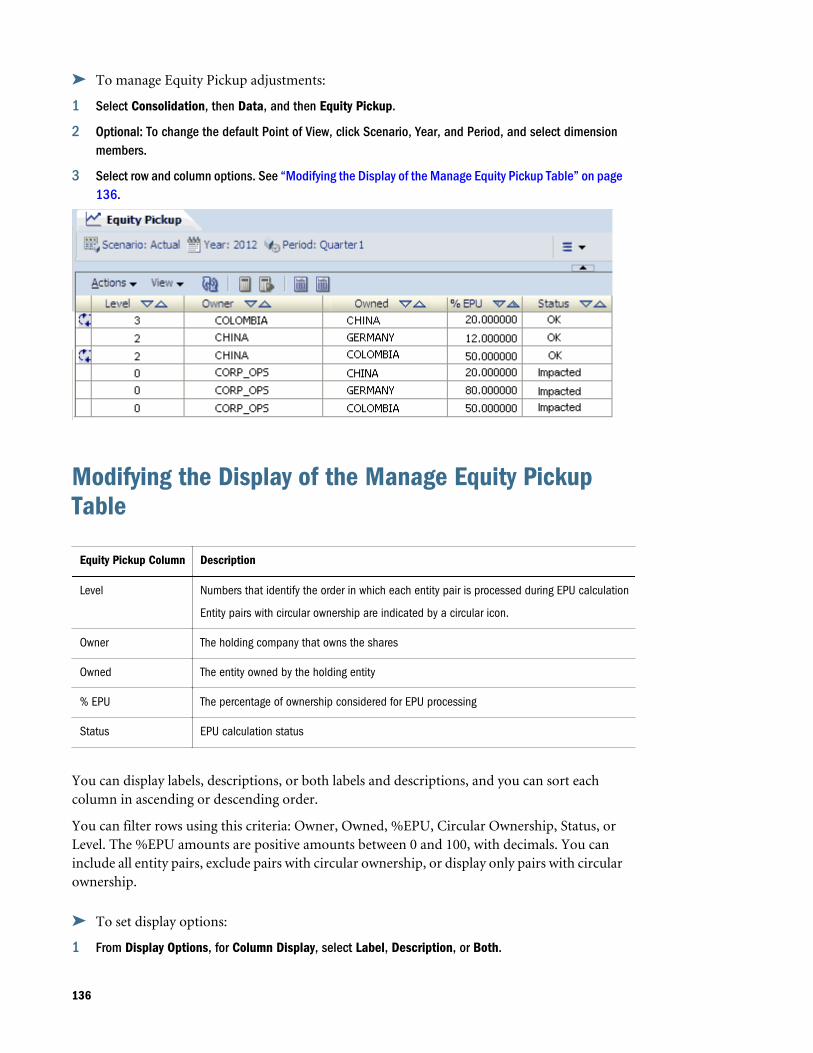
ä To manage Equity Pickup adjustments:
1 Select Consolidation, then Data, and then Equity Pickup.
2 Optional: To change the default Point of View, click Scenario, Year, and Period, and select dimensionmembers.
3 Select row and column options. See “Modifying the Display of the Manage Equity Pickup Table” on page136.
Modifying the Display of the Manage Equity PickupTable
Equity Pickup Column Description
Level Numbers that identify the order in which each entity pair is processed during EPU calculation
Entity pairs with circular ownership are indicated by a circular icon.
Owner The holding company that owns the shares
Owned The entity owned by the holding entity
% EPU The percentage of ownership considered for EPU processing
Status EPU calculation status
You can display labels, descriptions, or both labels and descriptions, and you can sort eachcolumn in ascending or descending order.
You can filter rows using this criteria: Owner, Owned, %EPU, Circular Ownership, Status, orLevel. The %EPU amounts are positive amounts between 0 and 100, with decimals. You caninclude all entity pairs, exclude pairs with circular ownership, or display only pairs with circularownership.
ä To set display options:
1 From Display Options, for Column Display, select Label, Description, or Both.
136

2 For Num Decimals, select a value between 0 and 9.
3 From Row Filter:
a. For Owner, enter or click Browse to find an entity.
b. For Owned, enter or click Browse to find an entity.
c. If you select Show Combination, the system displays the rows for all possiblecombinations for the Owner and Owned entities that you selected.
d. For % EPU, select greater than (>), less than (<), or equal to (=), and enter a percentage.
e. For Circular Ownership, select an option:
l Include to display all entity pairs
l Exclude to suppress pairs with circular ownership
l Display Only to display only pairs with circular ownership
f. For Status, select to display calculations with a status of OK, Impacted, or Both.
g. For Level, select the level range that you want to display.
Calculating Equity Pickup AdjustmentsTo enable calculation of Equity Pickup (EPU) adjustments, the application administrator mustcreate a section in the Rules file named SUB EquityPickUp, where EPU calculations are defined.For information on equity pickup rules, see the Oracle Hyperion Financial ManagementAdministrator's Guide.
To calculate EPU adjustments, you can use the Run Equity Pickup option or the Force EquityPickup option. After EPU calculation is run for one or multiple pairs of entities, the EPU statusfor the pair changes to OK, unless an additional change occurs due to another process.
The Run option runs EPU calculations only on pairs (Owner, Owned), with an EPU calculationstatus of Impacted. EPU pairs are impacted if the calculation status of the Owner, Owned, orany EPU descendant of the Owned entity has changed. After EPU calculation, EPU status changesto OK, unless an additional change occurs due to another process.
The Force Equity Pickup option runs EPU calculations on all pairs for the selected Scenario,Year, and Period, regardless of status.
You can calculate EPU adjustments from the Manage Equity Pickup task, data grids, data forms,or Process Control. To calculate EPU adjustments, you must be assigned the Manage Ownershipand Run EquityPickup security roles.
ä To calculate EPU:
1 Select Consolidation, then Data, and then Equity Pickup.
2 Use one of these methods:
l From the Manage Equity Pickup page, click Run EPU or Force EPU, or select Actions, andthen Run EPU, or Actions, and then Force EPU.
137
l From a data grid, data form, or Process Control, right-click and select Run EPU or ForceEPU.
3 Click Refresh.
Printing Equity Pickup ReportsYou can print an Equity Pickup report that contains the records in the Manage Equity Pickuptable. The report header displays the date, time, user ID of the user launching the report,application name, POV, and filter options. The body of the report displays the table with thecolumns and criteria that you selected.
Note: You can format and print the report using HFM-Format, PDF, RTF, HTML, XLS, orXLSX. See “Formatting System Reports” on page 142.
ä To print EPU reports:
1 Select Consolidation, then Data, and then Equity Pickup.
2 Select the criteria that you want to display in the report.
3 Click Full Report or Filtered Report, or select Actions, and then Full Report, or Actions, and thenFiltered Report.
4 For Report Format, select an option: HFM-Format, PDF, RTF, HTML, XLS, or XLSX.
5 For Report Template, select a template.
6 Click OK.
7 From the report preview, click Print.
EPU Calculation ProcessThe EPU calculation process may require you to run calculations or consolidations on Ownerand Owned entities, and may include translation, if the Owned and Owner entities use differentcurrencies.
The calculation process follows these steps:
1. For each pair of entities, the system calculates the owner and owned entities in the defaultcurrency. If the Calculation Status for Value Entity Curr Total is not OK or ND, the Calculateor Consolidate (if parent entity) process is run.
2. The system translates the Owned entity into the default currency of the Owner entity (if thevalue is not OK - already translated), and runs the Calculate process for Parent Curr Adjs ifnecessary (if Calculation status is not OK or ND).
3. The system runs the Sub EquityPickup() routine in the Rule file.
4. The system calculates the Owner entity. If the Calculation status for Owner in EntityCurrency is not ND, Calculate runs to set the entity to OK status. This final calculation
138

occurs only if the Owner entity does not own the next pair and if new data was posted tothe Owner entity.
At the end of the calculation process, both the calculation and Equity Pickup status of the entitiesshould be OK, unless another process changed the entities in the meantime.
139

140

9Reporting on Financial
Management Data
In This Chapter
Creating Reports .. . . . . . . . . . . . . . . . . . . . . . . . . . . . . . . . . . . . . . . . . . . . . . . . . . . . . . . . . . . . . . . . . . . . . . . . . . . . . . . . . . . . . . . . 141
Opening Reports .. . . . . . . . . . . . . . . . . . . . . . . . . . . . . . . . . . . . . . . . . . . . . . . . . . . . . . . . . . . . . . . . . . . . . . . . . . . . . . . . . . . . . . . . 142
Formatting System Reports .. . . . . . . . . . . . . . . . . . . . . . . . . . . . . . . . . . . . . . . . . . . . . . . . . . . . . . . . . . . . . . . . . . . . . . . . . . . . 142
Editing Reports .. . . . . . . . . . . . . . . . . . . . . . . . . . . . . . . . . . . . . . . . . . . . . . . . . . . . . . . . . . . . . . . . . . . . . . . . . . . . . . . . . . . . . . . . . . 143
Saving Reports .. . . . . . . . . . . . . . . . . . . . . . . . . . . . . . . . . . . . . . . . . . . . . . . . . . . . . . . . . . . . . . . . . . . . . . . . . . . . . . . . . . . . . . . . . . 144
Drilling Through to Intercompany Transactions... . . . . . . . . . . . . . . . . . . . . . . . . . . . . . . . . . . . . . . . . . . . . . . . . . . . . . 144
Printing Reports .. . . . . . . . . . . . . . . . . . . . . . . . . . . . . . . . . . . . . . . . . . . . . . . . . . . . . . . . . . . . . . . . . . . . . . . . . . . . . . . . . . . . . . . . . 144
Deleting Reports .. . . . . . . . . . . . . . . . . . . . . . . . . . . . . . . . . . . . . . . . . . . . . . . . . . . . . . . . . . . . . . . . . . . . . . . . . . . . . . . . . . . . . . . . 145
You can generate these types of Financial Management system reports:
l Data grid reports, which display information from data grids
l Journal reports, which display information for a journal or list of journals based on criteriathat you select in the Journals module
l Intercompany Partner (ICP) Matching reports, which display the intercompanytransactions that are to be eliminated during consolidation
l Intercompany Transaction reports, which display a list of intercompany transactions
l Intercompany Match by Account reports, which display intercompany transactions basedon selected accounts
l Intercompany Match by ID reports, which display intercompany transactions by transactionID
Creating ReportsYou create a report using one of these methods:
l Specifying values using the Report page options.
l Using a text editor to specify report options in scripts. See the Oracle Hyperion FinancialManagement Administrator's Guide.
ä To create reports from the Reports page:
1 Select Consolidation, and then Documents.
141
2 Click New, or select Actions, and then New.
3 Select Reports, and then select a type of report.
4 Specify the report information and options for the report.
For details on each report option, see the Defining Reports chapter in the Oracle HyperionFinancial Management Administrator's Guide.
Opening ReportsYou can view the list of available reports by report type or file type, and sort the list by reportname or the date and time last modified. You can open reports from the Manage Documentslist, task lists, or Favorites.
ä To open reports:
1 Select Consolidation, and then Documents.
2 From the Filters pane, click the Filter button next to Document Type, and select the report type to open.
Formatting System ReportsFinancial Management provides sample system report templates, including HFM-Format andOracle Business Intelligence Publisher templates.
HFM-Format report templates are used for Financial Management system reports. When yougenerate the reports, the data is exported to XML, and you can then apply a style sheet and viewthe report in HTML.
During the installation process, HFM-Format report templates are installed on the applicationserver in this directory: FinancialManagement\Server Working Folder\Report StyleSheets.
You can use BI Publisher report templates to format reports. BI Publisher report templates areused for these types of reports: Intercompany, Journals, Intercompany Transactions,Intercompany Matching by Account, Intercompany Matching by Transaction ID, EquityPickup, and Security Reports.
Note: BI Publisher templates for data grid system reports are not included at this time.
BI Publisher report templates offer these report print options: PDF, RTF, HTML, XML, andXSLX. You can customize these templates in Microsoft Word. For example, by default, the reportdisplays up to 30 columns. You can customize the template to display more columns. Tocustomize the templates, you must install and configure Microsoft Office Word and Oracle BIPublisher Desktop. You can then use BI Publisher to customize templates and update reports.
142
Note: If you want to retain a customized template when you upgrade or uninstall FinancialManagement, back up the template in a separate directory before you uninstall.
During the installation process, Oracle Business Intelligence Publisher report templates areinstalled on the application server in this directory: FinancialManagement\Server WorkingFolder\Report Style Sheets\Templates.
ä To format system reports:
1 Open a report.
2 From Report format, select an option:
l HFM-Format
l PDF
l RTF
l HTML
l XLS
l XLSX
3 From Style Sheet, select a style sheet.
Note: The list displays the style sheets, including sample templates, that are stored in theReport Style Sheets directory.
4 If necessary for the report, select Override POV, and click OK.
Note: To print reports, see “Printing Reports” on page 144.
Editing ReportsYou can edit reports that you previously created.
ä To edit reports:
1 Select Consolidation, and then Documents.
2 Select a report to edit.
3 Click Edit, or select Actions, and then Edit.
4 Edit the report.
5 When you finish editing, save the report.
143

Saving ReportsWhen you save a report, you can specify a destination folder and security and privacy options.If you previously saved the report, from the Save As dialog box, you can specify a differentlocation, security, or privacy options.
The report name can contain a maximum of 20 characters. Do not use double quotation marks(““) or an equal sign (=) in the report name.
ä To save a report:
1 Open the report to save.
2 Click Save or Save As, and enter the information for the report.
3 Click Save.
Drilling Through to Intercompany TransactionsIntercompany Matching Reports help you track intercompany transactions for analysis andauditing purposes. After you consolidate data, you can run intercompany matching reports toprovide detail on intercompany account balances that were eliminated.
When you run an Intercompany Matching Report at the account balance level, a link is displayedon the report if the administrator set up the report to display intercompany transactions detailfor the matching group. When you click the link, you can view the matching report at thetransaction detail level.
To drill down to intercompany transactions, you must be assigned the IntercompanyTransaction User security role. You can only view intercompany transactions in the report; youcannot change the transactions in the report.
ä To view intercompany transactions from an Intercompany report:
1 Select Consolidation, then Intercompany, and then Reports.
2 From the list of reports, open an Intercompany report.
Note: To override the report options, click Edit to edit the report and print without havingto save the changes.
3 From the report, double-click the link to the transactions detail.
Printing ReportsYou can print reports that you created and saved on the local client computer or the server.When you select Print, the report is generated based on the report selections.
When you print a report, you can choose to override some or all options available to the reporttype. For example, for an Intercompany Matching report, you could select a different partner
144
entity for the report. If you do not select to override any options, the system uses the optionsetting from the report definition. The last overridden option is preserved in a session, so if yourerun the same or another report, the system displays one or more overridden options from thetime you last printed the report.
ä To print reports:
1 From the list of reports, select a report.
2 Optional: To override the POV, select Override POV.
3 Click OK.
4 Click Print.
Deleting ReportsYou can delete reports that you no longer need. To delete a report from the server, you musthave All access to the report’s security class. Before you delete a report folder, you must firstdelete any reports that it contains.
ä To delete reports on the server:
1 Select Consolidation, and then Documents.
2 Select the report to delete and click Delete.
3 At the system prompt, click OK.
145

146
10Processing Intercompany
Transactions
In This Chapter
Intercompany Transaction Module Features... . . . . . . . . . . . . . . . . . . . . . . . . . . . . . . . . . . . . . . . . . . . . . . . . . . . . . . . . 147
Intercompany Transaction Security Roles... . . . . . . . . . . . . . . . . . . . . . . . . . . . . . . . . . . . . . . . . . . . . . . . . . . . . . . . . . . . 148
Sample Intercompany Transactions Task Flow ... . . . . . . . . . . . . . . . . . . . . . . . . . . . . . . . . . . . . . . . . . . . . . . . . . . . . . 149
Intercompany Transaction Load Files .. . . . . . . . . . . . . . . . . . . . . . . . . . . . . . . . . . . . . . . . . . . . . . . . . . . . . . . . . . . . . . . . . 150
Loading Intercompany Transactions... . . . . . . . . . . . . . . . . . . . . . . . . . . . . . . . . . . . . . . . . . . . . . . . . . . . . . . . . . . . . . . . . . 153
Extracting Intercompany Transaction Files.. . . . . . . . . . . . . . . . . . . . . . . . . . . . . . . . . . . . . . . . . . . . . . . . . . . . . . . . . . . . 154
About Managing Intercompany Transactions... . . . . . . . . . . . . . . . . . . . . . . . . . . . . . . . . . . . . . . . . . . . . . . . . . . . . . . . 155
Creating Intercompany Transactions ... . . . . . . . . . . . . . . . . . . . . . . . . . . . . . . . . . . . . . . . . . . . . . . . . . . . . . . . . . . . . . . . . 155
Viewing Intercompany Transactions ... . . . . . . . . . . . . . . . . . . . . . . . . . . . . . . . . . . . . . . . . . . . . . . . . . . . . . . . . . . . . . . . . . 158
Selecting Intercompany Transactions ... . . . . . . . . . . . . . . . . . . . . . . . . . . . . . . . . . . . . . . . . . . . . . . . . . . . . . . . . . . . . . . . 161
Editing Intercompany Transactions ... . . . . . . . . . . . . . . . . . . . . . . . . . . . . . . . . . . . . . . . . . . . . . . . . . . . . . . . . . . . . . . . . . . 161
Duplicating Intercompany Transactions... . . . . . . . . . . . . . . . . . . . . . . . . . . . . . . . . . . . . . . . . . . . . . . . . . . . . . . . . . . . . . 162
Assigning Reason Codes to Intercompany Transactions ... . . . . . . . . . . . . . . . . . . . . . . . . . . . . . . . . . . . . . . . . . . 162
Matching Intercompany Transactions ... . . . . . . . . . . . . . . . . . . . . . . . . . . . . . . . . . . . . . . . . . . . . . . . . . . . . . . . . . . . . . . . 163
Unmatching Intercompany Transactions ... . . . . . . . . . . . . . . . . . . . . . . . . . . . . . . . . . . . . . . . . . . . . . . . . . . . . . . . . . . . . 172
Posting Intercompany Transactions ... . . . . . . . . . . . . . . . . . . . . . . . . . . . . . . . . . . . . . . . . . . . . . . . . . . . . . . . . . . . . . . . . . 173
Unposting Intercompany Transactions ... . . . . . . . . . . . . . . . . . . . . . . . . . . . . . . . . . . . . . . . . . . . . . . . . . . . . . . . . . . . . . . 175
Viewing Intercompany Transaction Progress... . . . . . . . . . . . . . . . . . . . . . . . . . . . . . . . . . . . . . . . . . . . . . . . . . . . . . . . . 176
Deleting Intercompany Transactions ... . . . . . . . . . . . . . . . . . . . . . . . . . . . . . . . . . . . . . . . . . . . . . . . . . . . . . . . . . . . . . . . . 176
Reporting on Intercompany Transactions ... . . . . . . . . . . . . . . . . . . . . . . . . . . . . . . . . . . . . . . . . . . . . . . . . . . . . . . . . . . . 177
Running Intercompany Transaction Reports .. . . . . . . . . . . . . . . . . . . . . . . . . . . . . . . . . . . . . . . . . . . . . . . . . . . . . . . . . . 177
Running Matching Reports .. . . . . . . . . . . . . . . . . . . . . . . . . . . . . . . . . . . . . . . . . . . . . . . . . . . . . . . . . . . . . . . . . . . . . . . . . . . . . 180
Drilling Through to Transaction Details .. . . . . . . . . . . . . . . . . . . . . . . . . . . . . . . . . . . . . . . . . . . . . . . . . . . . . . . . . . . . . . . . 184
Email Alerts for Intercompany Transactions ... . . . . . . . . . . . . . . . . . . . . . . . . . . . . . . . . . . . . . . . . . . . . . . . . . . . . . . . . 185
Intercompany Transaction Module FeaturesAn intercompany transaction is a transaction between two entities in an organization. FinancialManagement enables you to track and reconcile intercompany transaction details acrossaccounts and custom dimensions. Common intercompany transaction types include these types:
l Intercompany Sales/Purchases
l Intercompany Receivables/Payables
147
l Sales/Transfer of Fixed Assets to related parties
l Intercompany Loans/Bonds
The Intercompany Transactions module provides an efficient way to identify, report, andreconcile intercompany account differences. You can enter, match, post, and verifyintercompany transactions. With the ability to view transaction detail at any time, you canreconcile intercompany account differences frequently, and thus minimize their impact on theclosing cycle. You can also analyze differences due to real errors in transaction currency ordifferences due to exchange rates.
With the Intercompany Transactions module, you can perform these business processes:
l Open periods for intercompany transactions
l Create intercompany transaction details at the invoice level.
l Match transactions at the invoice level.
l Match transactions in the transaction currency, and in the reporting or parent currency.
l Post transactions.
l Create intercompany matching reports.
l Drill through an account balance to transactional details from intercompany matchingreports, data grids, or data forms.
l View an entity partner’s intercompany transaction details with the entity at any time.
l Enter text comments to help resolve mismatched entries.
l Analyze differences due to real errors in transaction currency or differences due to exchangerates.
l Lock entities and close periods to prevent unauthorized input.
For intercompany administrative tasks, see the Oracle Hyperion Financial ManagementAdministrator's Guide.
Intercompany Transaction Security RolesAn administrator with intercompany security rights can create a custom workspace for handlingintercompany matching tasks and perform all intercompany tasks. Users who have been assignedthe Intercompany Transaction User role can perform Intercompany Transaction andIntercompany Reporting functions.
If you are assigned the Intercompany Transaction User role, you can perform these tasks:
l Create transactions.
l Edit transactions.
l View list of transactions.
l Delete transactions.
l Load and extract transactions.
148
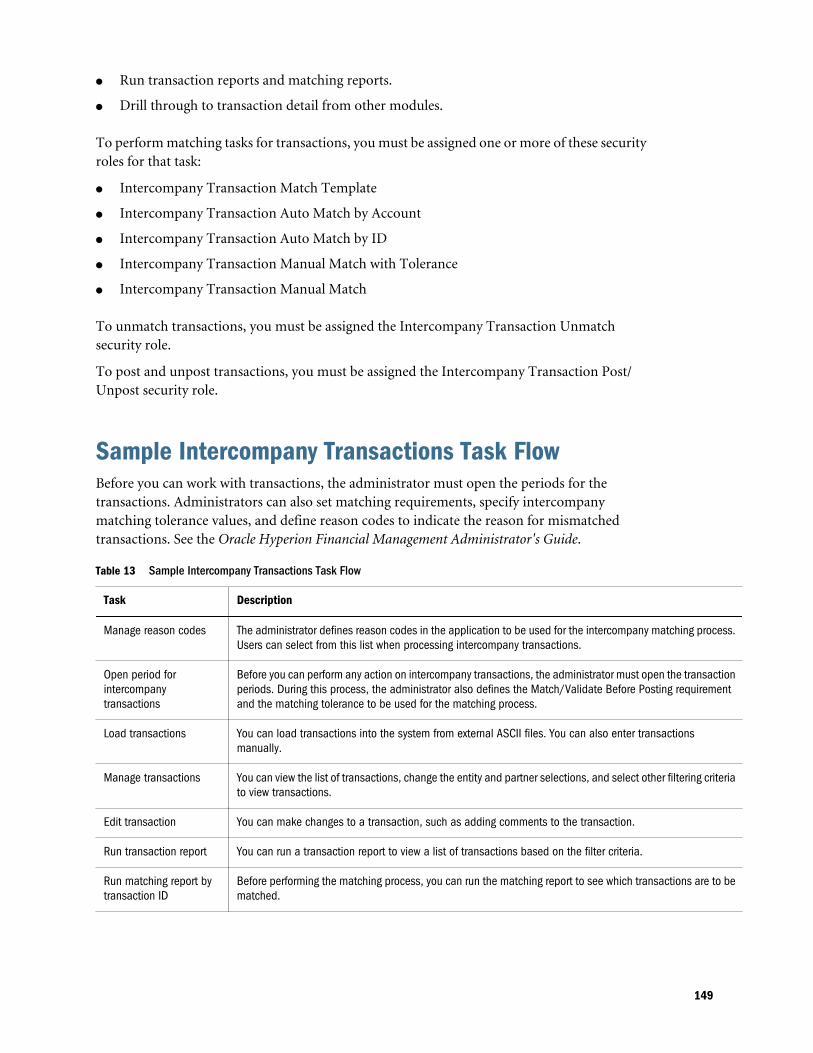
l Run transaction reports and matching reports.
l Drill through to transaction detail from other modules.
To perform matching tasks for transactions, you must be assigned one or more of these securityroles for that task:
l Intercompany Transaction Match Template
l Intercompany Transaction Auto Match by Account
l Intercompany Transaction Auto Match by ID
l Intercompany Transaction Manual Match with Tolerance
l Intercompany Transaction Manual Match
To unmatch transactions, you must be assigned the Intercompany Transaction Unmatchsecurity role.
To post and unpost transactions, you must be assigned the Intercompany Transaction Post/Unpost security role.
Sample Intercompany Transactions Task FlowBefore you can work with transactions, the administrator must open the periods for thetransactions. Administrators can also set matching requirements, specify intercompanymatching tolerance values, and define reason codes to indicate the reason for mismatchedtransactions. See the Oracle Hyperion Financial Management Administrator's Guide.
Table 13 Sample Intercompany Transactions Task Flow
Task Description
Manage reason codes The administrator defines reason codes in the application to be used for the intercompany matching process.Users can select from this list when processing intercompany transactions.
Open period forintercompanytransactions
Before you can perform any action on intercompany transactions, the administrator must open the transactionperiods. During this process, the administrator also defines the Match/Validate Before Posting requirementand the matching tolerance to be used for the matching process.
Load transactions You can load transactions into the system from external ASCII files. You can also enter transactionsmanually.
Manage transactions You can view the list of transactions, change the entity and partner selections, and select other filtering criteriato view transactions.
Edit transaction You can make changes to a transaction, such as adding comments to the transaction.
Run transaction report You can run a transaction report to view a list of transactions based on the filter criteria.
Run matching report bytransaction ID
Before performing the matching process, you can run the matching report to see which transactions are to bematched.
149

Task Description
Auto-match bytransaction ID
You can match transactions using the transaction ID or the reference ID. The system updates the transactionswith a matched status and matched code. You can also save the matching settings to a matching templateto be used later.
Run matching report byaccount
This is another option to view the matching transactions report where the transactions are matched based onthe accounts instead of a transaction or invoice.
Auto-match by account This option is useful to match transactions when the application does not have an exact match of transactionID and detail. To avoid a possible mismatch, you can perform auto-matching by ID first, then auto-matchingby account.
Perform manual match oftransactions
After you perform the auto-match process, you might find some transactions that should be matched eventhough they do not fit the matching criteria for the process. You can select certain transactions and manuallymatch the transactions. The matching process updates the matched status and assigns a matched code.
Perform unmatch oftransactions
During the matching process, you might need to unmatch certain groups of transactions manually. When youselect a transaction, the system displays the group of transactions that have the same matched code. Youcan then unmatch all transactions within the same matched group.
Post transactions After all transactions have been matched and you are ready to post the transactions to the system, you canselect the transactions to post.
Run transaction report After you post transactions, you can create a transaction report to view the status of each transaction. Thisreport contains information on the posting status, and posting user, date and time. This can be used as asummary report so that you can quickly view the posting information.
Lock entities The administrator can lock entities to prevent users from adding new transactions or making changes to specificentities. When the entity is locked, no more matching can done for that entity, and no additional transactionscan be posted for the entity.
Drill down to transactiondetails from theIntercompany MatchingSystem Report
After you post transactions and the intercompany accounts reflect the account balance of these transactions,you can run the Intercompany Matching System Report to view the matching at the account level for individualtransactions.
Drill through totransaction details fromdata grids or data forms
When you are in a data grid or data form, you can view the corresponding intercompany transactions. Youcannot modify transactions from data grids or forms.
Close period At the end of the closing cycle after you finish processing intercompany transactions, the IntercompanyAdministrator closes the period to prevent additional modifications to the transactions for the period. If theMatch/Validate Before Post option is selected for the period, all matched transactions or mismatchedtransactions with a reason code must be posted before the period can be closed. When you close a period,the period is locked for future transactions, however, you can continue to view transactions or run reports ontransactions from the period.
Intercompany Transaction Load FilesIn addition to manually entering intercompany transactions, you can load transaction detailsfrom an external ASCII file. You can select multiple external files in one load process and selectwhether to merge or replace the transactions.
150
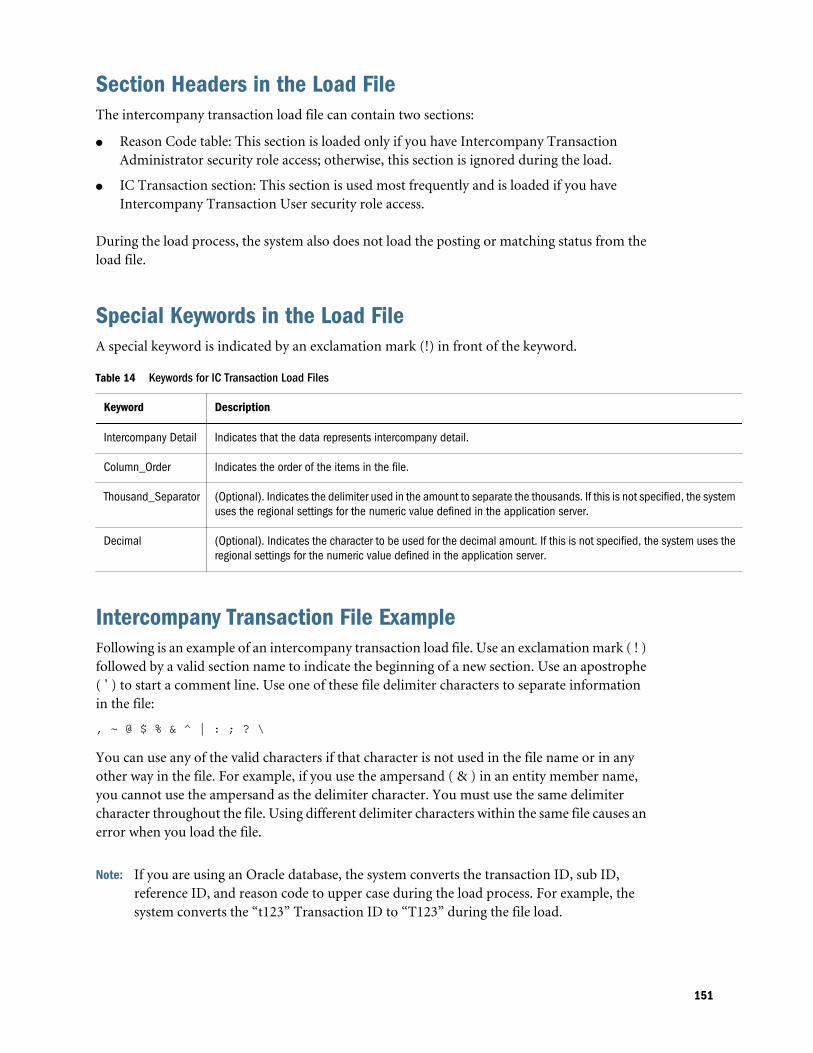
Section Headers in the Load FileThe intercompany transaction load file can contain two sections:
l Reason Code table: This section is loaded only if you have Intercompany TransactionAdministrator security role access; otherwise, this section is ignored during the load.
l IC Transaction section: This section is used most frequently and is loaded if you haveIntercompany Transaction User security role access.
During the load process, the system also does not load the posting or matching status from theload file.
Special Keywords in the Load FileA special keyword is indicated by an exclamation mark (!) in front of the keyword.
Table 14 Keywords for IC Transaction Load Files
Keyword Description
Intercompany Detail Indicates that the data represents intercompany detail.
Column_Order Indicates the order of the items in the file.
Thousand_Separator (Optional). Indicates the delimiter used in the amount to separate the thousands. If this is not specified, the systemuses the regional settings for the numeric value defined in the application server.
Decimal (Optional). Indicates the character to be used for the decimal amount. If this is not specified, the system uses theregional settings for the numeric value defined in the application server.
Intercompany Transaction File ExampleFollowing is an example of an intercompany transaction load file. Use an exclamation mark ( ! )followed by a valid section name to indicate the beginning of a new section. Use an apostrophe( ' ) to start a comment line. Use one of these file delimiter characters to separate informationin the file:
, ~ @ $ % & ^ | : ; ? \
You can use any of the valid characters if that character is not used in the file name or in anyother way in the file. For example, if you use the ampersand ( & ) in an entity member name,you cannot use the ampersand as the delimiter character. You must use the same delimitercharacter throughout the file. Using different delimiter characters within the same file causes anerror when you load the file.
Note: If you are using an Oracle database, the system converts the transaction ID, sub ID,reference ID, and reason code to upper case during the load process. For example, thesystem converts the “t123” Transaction ID to “T123” during the file load.
151
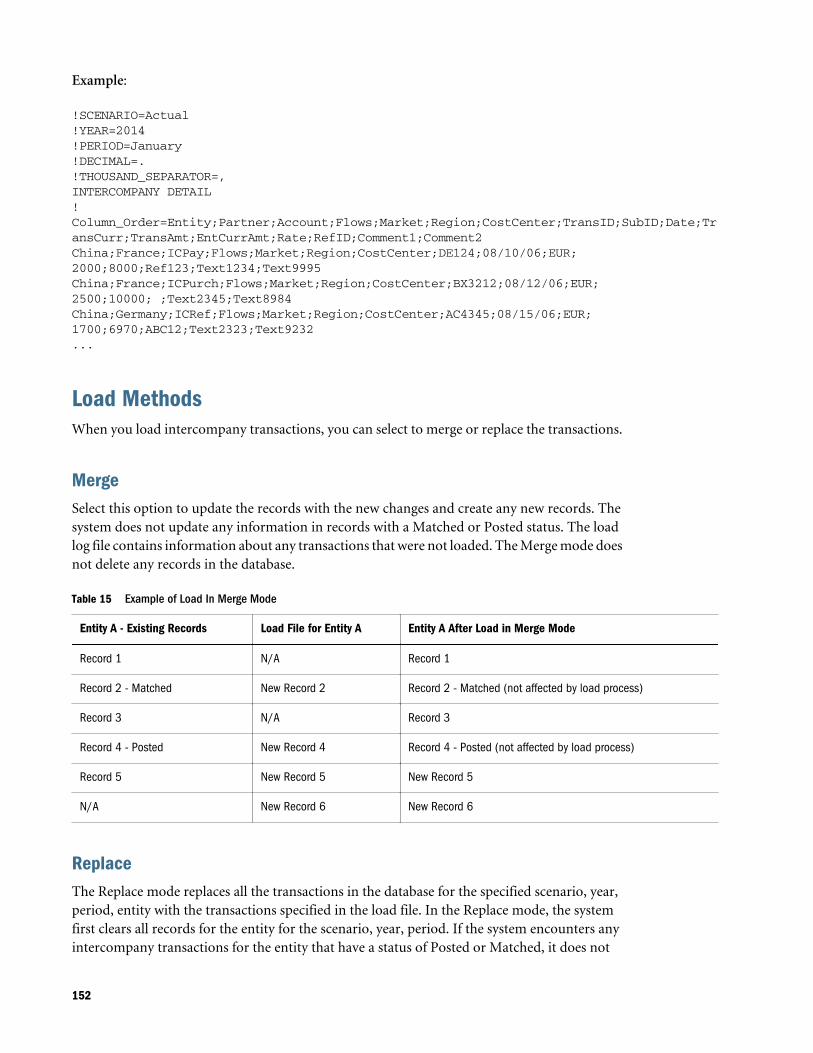
Example:
!SCENARIO=Actual!YEAR=2014!PERIOD=January!DECIMAL=.!THOUSAND_SEPARATOR=,INTERCOMPANY DETAIL!Column_Order=Entity;Partner;Account;Flows;Market;Region;CostCenter;TransID;SubID;Date;TransCurr;TransAmt;EntCurrAmt;Rate;RefID;Comment1;Comment2China;France;ICPay;Flows;Market;Region;CostCenter;DE124;08/10/06;EUR;2000;8000;Ref123;Text1234;Text9995China;France;ICPurch;Flows;Market;Region;CostCenter;BX3212;08/12/06;EUR;2500;10000; ;Text2345;Text8984China;Germany;ICRef;Flows;Market;Region;CostCenter;AC4345;08/15/06;EUR;1700;6970;ABC12;Text2323;Text9232...
Load MethodsWhen you load intercompany transactions, you can select to merge or replace the transactions.
MergeSelect this option to update the records with the new changes and create any new records. Thesystem does not update any information in records with a Matched or Posted status. The loadlog file contains information about any transactions that were not loaded. The Merge mode doesnot delete any records in the database.
Table 15 Example of Load In Merge Mode
Entity A - Existing Records Load File for Entity A Entity A After Load in Merge Mode
Record 1 N/A Record 1
Record 2 - Matched New Record 2 Record 2 - Matched (not affected by load process)
Record 3 N/A Record 3
Record 4 - Posted New Record 4 Record 4 - Posted (not affected by load process)
Record 5 New Record 5 New Record 5
N/A New Record 6 New Record 6
ReplaceThe Replace mode replaces all the transactions in the database for the specified scenario, year,period, entity with the transactions specified in the load file. In the Replace mode, the systemfirst clears all records for the entity for the scenario, year, period. If the system encounters anyintercompany transactions for the entity that have a status of Posted or Matched, it does not
152
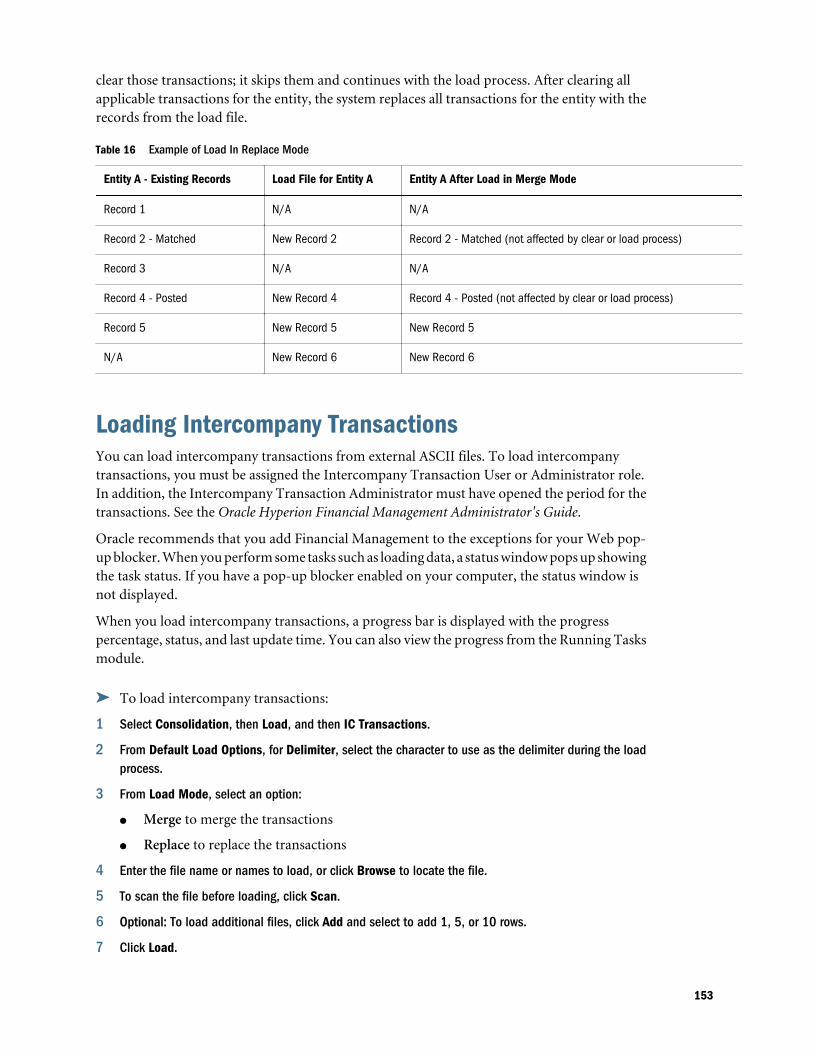
clear those transactions; it skips them and continues with the load process. After clearing allapplicable transactions for the entity, the system replaces all transactions for the entity with therecords from the load file.
Table 16 Example of Load In Replace Mode
Entity A - Existing Records Load File for Entity A Entity A After Load in Merge Mode
Record 1 N/A N/A
Record 2 - Matched New Record 2 Record 2 - Matched (not affected by clear or load process)
Record 3 N/A N/A
Record 4 - Posted New Record 4 Record 4 - Posted (not affected by clear or load process)
Record 5 New Record 5 New Record 5
N/A New Record 6 New Record 6
Loading Intercompany TransactionsYou can load intercompany transactions from external ASCII files. To load intercompanytransactions, you must be assigned the Intercompany Transaction User or Administrator role.In addition, the Intercompany Transaction Administrator must have opened the period for thetransactions. See the Oracle Hyperion Financial Management Administrator's Guide.
Oracle recommends that you add Financial Management to the exceptions for your Web pop-up blocker. When you perform some tasks such as loading data, a status window pops up showingthe task status. If you have a pop-up blocker enabled on your computer, the status window isnot displayed.
When you load intercompany transactions, a progress bar is displayed with the progresspercentage, status, and last update time. You can also view the progress from the Running Tasksmodule.
ä To load intercompany transactions:
1 Select Consolidation, then Load, and then IC Transactions.
2 From Default Load Options, for Delimiter, select the character to use as the delimiter during the loadprocess.
3 From Load Mode, select an option:
l Merge to merge the transactions
l Replace to replace the transactions
4 Enter the file name or names to load, or click Browse to locate the file.
5 To scan the file before loading, click Scan.
6 Optional: To load additional files, click Add and select to add 1, 5, or 10 rows.
7 Click Load.
153
If you reload existing files, the system displays a warning prompt asking if you want to usethem again. If you do, click Yes.
The scan and load status for each file is displayed in a new page.
Extracting Intercompany Transaction FilesYou can extract intercompany transaction files if you have the Intercompany Transaction Useror Administrator security role. You can specify whether to extract matched, unmatched,mismatched, posted, or unposted transactions, and transactions with a specific transactioncurrency, match code, or reason code. You can also extract the list of reason codes defined inthe application.
ä To extract intercompany transactions:
1 Select Consolidation, then Extract, and then IC Transactions.
2 From the Point of View bar, select the scenario, year, and period.
3 Enter the names of the Entity and Partner dimension members, or click Browse to find the Entity andPartner members.
4 Select one or more types of transactions to include in the extract process:
l Matched
l Unmatched
l Mismatched
l Posted
l Unposted
5 From Reason codes, select a reason code, or leave the default option of All.
6 From Transaction Currency, select a transaction currency for which to extract transactions, or leave thedefault option of All.
7 For Transaction Match Code, enter a match code value, or use the percent sign (%) as a wildcard.
8 Optional: To extract a list of reason codes defined in your application, select Include list of ReasonCodes.
9 Click Extract.
10 From the confirmation prompt that the extract was successful, click OK.
11 Click the Download link and select Save.
12 Enter a name for the extracted file and make sure that the location for the file is in the directory thatyou set up.
Note: By default, transaction files use the TRN file extension.
13 Click Save.
154
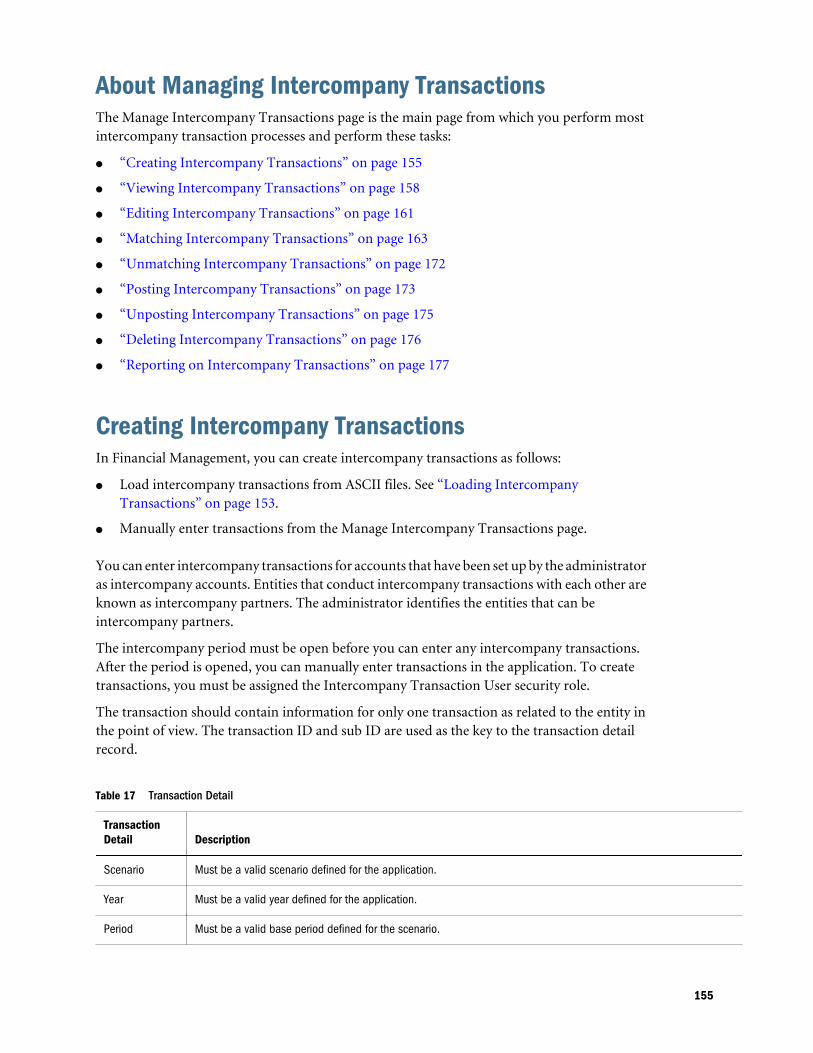
About Managing Intercompany TransactionsThe Manage Intercompany Transactions page is the main page from which you perform mostintercompany transaction processes and perform these tasks:
l “Creating Intercompany Transactions” on page 155
l “Viewing Intercompany Transactions” on page 158
l “Editing Intercompany Transactions” on page 161
l “Matching Intercompany Transactions” on page 163
l “Unmatching Intercompany Transactions” on page 172
l “Posting Intercompany Transactions” on page 173
l “Unposting Intercompany Transactions” on page 175
l “Deleting Intercompany Transactions” on page 176
l “Reporting on Intercompany Transactions” on page 177
Creating Intercompany TransactionsIn Financial Management, you can create intercompany transactions as follows:
l Load intercompany transactions from ASCII files. See “Loading IntercompanyTransactions” on page 153.
l Manually enter transactions from the Manage Intercompany Transactions page.
You can enter intercompany transactions for accounts that have been set up by the administratoras intercompany accounts. Entities that conduct intercompany transactions with each other areknown as intercompany partners. The administrator identifies the entities that can beintercompany partners.
The intercompany period must be open before you can enter any intercompany transactions.After the period is opened, you can manually enter transactions in the application. To createtransactions, you must be assigned the Intercompany Transaction User security role.
The transaction should contain information for only one transaction as related to the entity inthe point of view. The transaction ID and sub ID are used as the key to the transaction detailrecord.
Table 17 Transaction Detail
TransactionDetail Description
Scenario Must be a valid scenario defined for the application.
Year Must be a valid year defined for the application.
Period Must be a valid base period defined for the scenario.
155
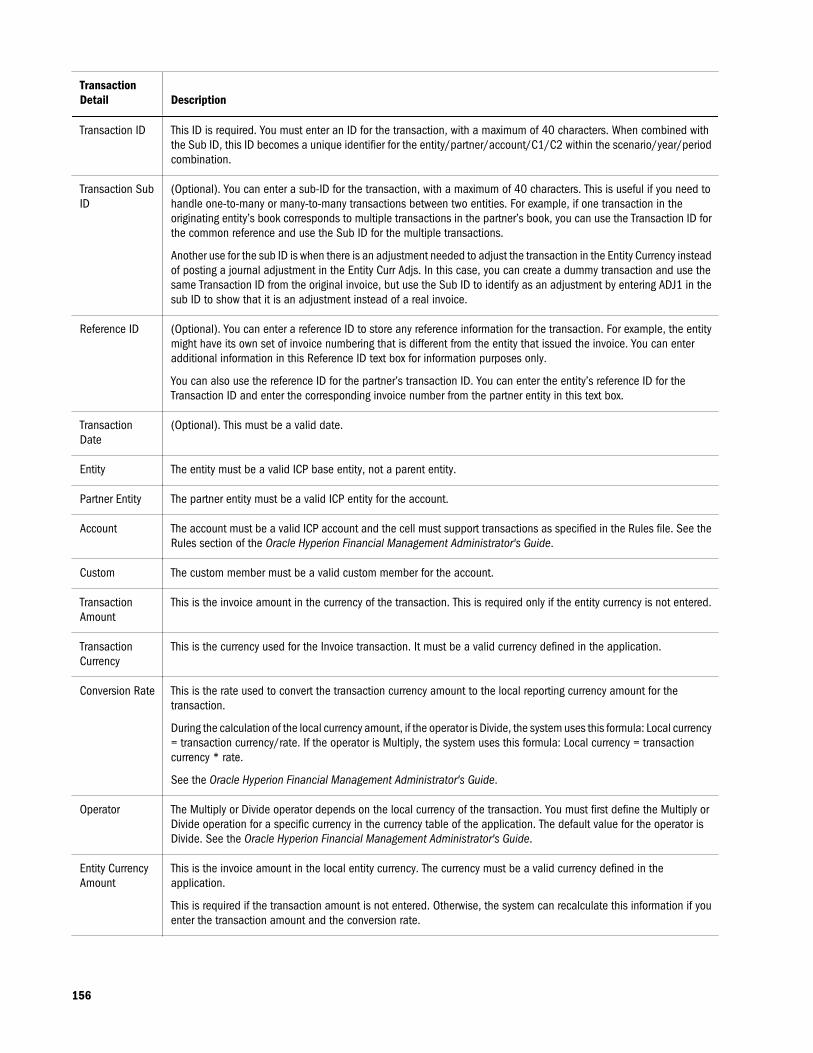
TransactionDetail Description
Transaction ID This ID is required. You must enter an ID for the transaction, with a maximum of 40 characters. When combined withthe Sub ID, this ID becomes a unique identifier for the entity/partner/account/C1/C2 within the scenario/year/periodcombination.
Transaction SubID
(Optional). You can enter a sub-ID for the transaction, with a maximum of 40 characters. This is useful if you need tohandle one-to-many or many-to-many transactions between two entities. For example, if one transaction in theoriginating entity’s book corresponds to multiple transactions in the partner’s book, you can use the Transaction ID forthe common reference and use the Sub ID for the multiple transactions.
Another use for the sub ID is when there is an adjustment needed to adjust the transaction in the Entity Currency insteadof posting a journal adjustment in the Entity Curr Adjs. In this case, you can create a dummy transaction and use thesame Transaction ID from the original invoice, but use the Sub ID to identify as an adjustment by entering ADJ1 in thesub ID to show that it is an adjustment instead of a real invoice.
Reference ID (Optional). You can enter a reference ID to store any reference information for the transaction. For example, the entitymight have its own set of invoice numbering that is different from the entity that issued the invoice. You can enteradditional information in this Reference ID text box for information purposes only.
You can also use the reference ID for the partner’s transaction ID. You can enter the entity’s reference ID for theTransaction ID and enter the corresponding invoice number from the partner entity in this text box.
TransactionDate
(Optional). This must be a valid date.
Entity The entity must be a valid ICP base entity, not a parent entity.
Partner Entity The partner entity must be a valid ICP entity for the account.
Account The account must be a valid ICP account and the cell must support transactions as specified in the Rules file. See theRules section of the Oracle Hyperion Financial Management Administrator's Guide.
Custom The custom member must be a valid custom member for the account.
TransactionAmount
This is the invoice amount in the currency of the transaction. This is required only if the entity currency is not entered.
TransactionCurrency
This is the currency used for the Invoice transaction. It must be a valid currency defined in the application.
Conversion Rate This is the rate used to convert the transaction currency amount to the local reporting currency amount for thetransaction.
During the calculation of the local currency amount, if the operator is Divide, the system uses this formula: Local currency= transaction currency/rate. If the operator is Multiply, the system uses this formula: Local currency = transactioncurrency * rate.
See the Oracle Hyperion Financial Management Administrator's Guide.
Operator The Multiply or Divide operator depends on the local currency of the transaction. You must first define the Multiply orDivide operation for a specific currency in the currency table of the application. The default value for the operator isDivide. See the Oracle Hyperion Financial Management Administrator's Guide.
Entity CurrencyAmount
This is the invoice amount in the local entity currency. The currency must be a valid currency defined in theapplication.
This is required if the transaction amount is not entered. Otherwise, the system can recalculate this information if youenter the transaction amount and the conversion rate.
156
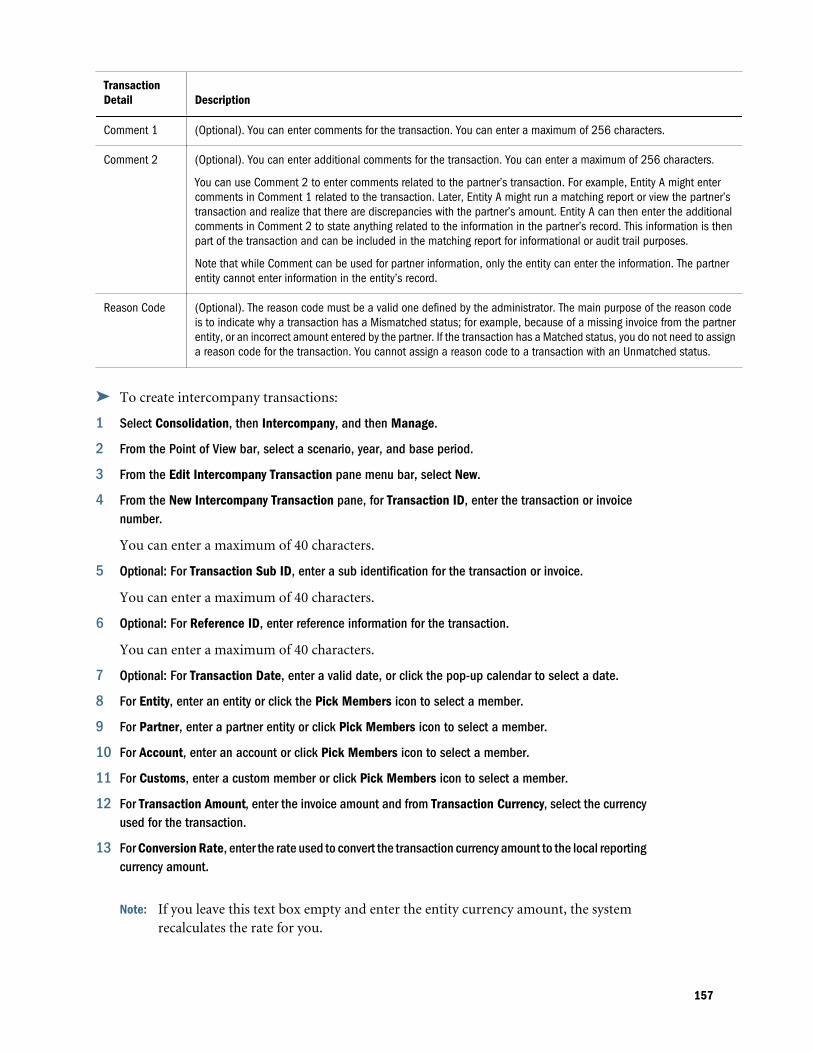
TransactionDetail Description
Comment 1 (Optional). You can enter comments for the transaction. You can enter a maximum of 256 characters.
Comment 2 (Optional). You can enter additional comments for the transaction. You can enter a maximum of 256 characters.
You can use Comment 2 to enter comments related to the partner’s transaction. For example, Entity A might entercomments in Comment 1 related to the transaction. Later, Entity A might run a matching report or view the partner’stransaction and realize that there are discrepancies with the partner’s amount. Entity A can then enter the additionalcomments in Comment 2 to state anything related to the information in the partner’s record. This information is thenpart of the transaction and can be included in the matching report for informational or audit trail purposes.
Note that while Comment can be used for partner information, only the entity can enter the information. The partnerentity cannot enter information in the entity’s record.
Reason Code (Optional). The reason code must be a valid one defined by the administrator. The main purpose of the reason codeis to indicate why a transaction has a Mismatched status; for example, because of a missing invoice from the partnerentity, or an incorrect amount entered by the partner. If the transaction has a Matched status, you do not need to assigna reason code for the transaction. You cannot assign a reason code to a transaction with an Unmatched status.
ä To create intercompany transactions:
1 Select Consolidation, then Intercompany, and then Manage.
2 From the Point of View bar, select a scenario, year, and base period.
3 From the Edit Intercompany Transaction pane menu bar, select New.
4 From the New Intercompany Transaction pane, for Transaction ID, enter the transaction or invoicenumber.
You can enter a maximum of 40 characters.
5 Optional: For Transaction Sub ID, enter a sub identification for the transaction or invoice.
You can enter a maximum of 40 characters.
6 Optional: For Reference ID, enter reference information for the transaction.
You can enter a maximum of 40 characters.
7 Optional: For Transaction Date, enter a valid date, or click the pop-up calendar to select a date.
8 For Entity, enter an entity or click the Pick Members icon to select a member.
9 For Partner, enter a partner entity or click Pick Members icon to select a member.
10 For Account, enter an account or click Pick Members icon to select a member.
11 For Customs, enter a custom member or click Pick Members icon to select a member.
12 For Transaction Amount, enter the invoice amount and from Transaction Currency, select the currencyused for the transaction.
13 For Conversion Rate, enter the rate used to convert the transaction currency amount to the local reportingcurrency amount.
Note: If you leave this text box empty and enter the entity currency amount, the systemrecalculates the rate for you.
157
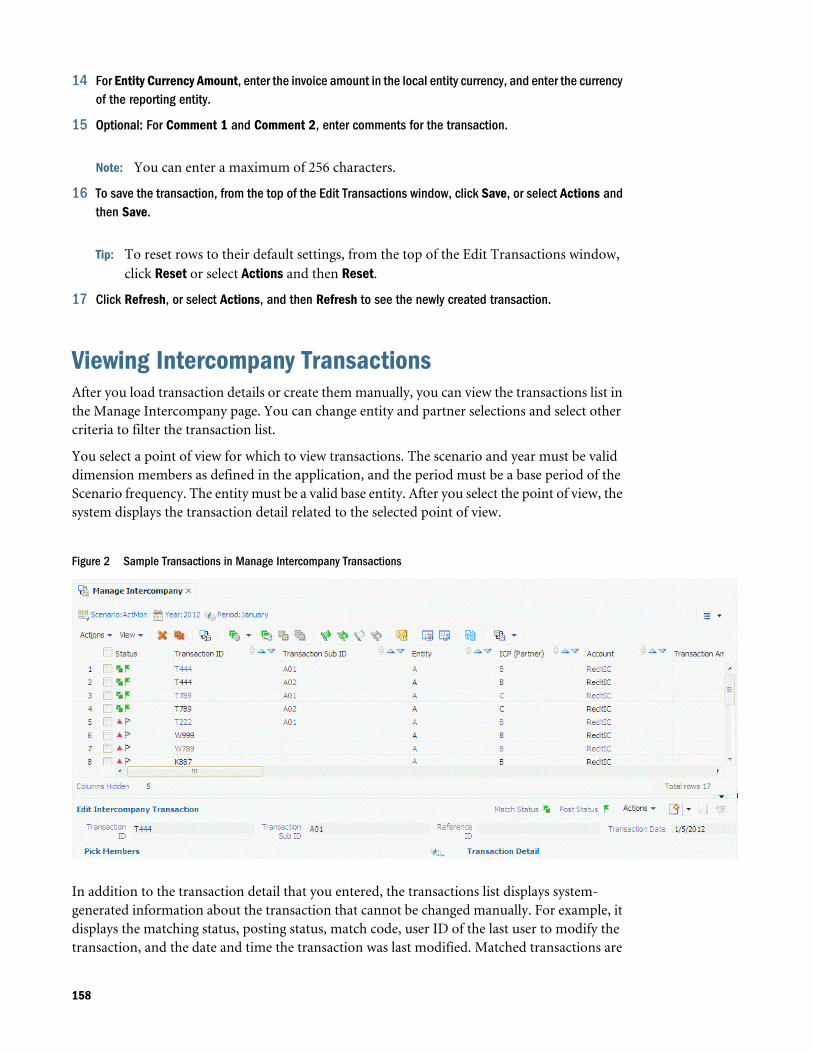
14 For Entity Currency Amount, enter the invoice amount in the local entity currency, and enter the currencyof the reporting entity.
15 Optional: For Comment 1 and Comment 2, enter comments for the transaction.
Note: You can enter a maximum of 256 characters.
16 To save the transaction, from the top of the Edit Transactions window, click Save, or select Actions andthen Save.
Tip: To reset rows to their default settings, from the top of the Edit Transactions window,click Reset or select Actions and then Reset.
17 Click Refresh, or select Actions, and then Refresh to see the newly created transaction.
Viewing Intercompany TransactionsAfter you load transaction details or create them manually, you can view the transactions list inthe Manage Intercompany page. You can change entity and partner selections and select othercriteria to filter the transaction list.
You select a point of view for which to view transactions. The scenario and year must be validdimension members as defined in the application, and the period must be a base period of theScenario frequency. The entity must be a valid base entity. After you select the point of view, thesystem displays the transaction detail related to the selected point of view.
Figure 2 Sample Transactions in Manage Intercompany Transactions
In addition to the transaction detail that you entered, the transactions list displays system-generated information about the transaction that cannot be changed manually. For example, itdisplays the matching status, posting status, match code, user ID of the last user to modify thetransaction, and the date and time the transaction was last modified. Matched transactions are
158
indicated by double green boxes, and posted transactions are indicated by a green flag in theStatus column. Mismatched transactions are indicated by a red triangle.
ä To view intercompany transactions:
1 Select Consolidation, then Intercompany, and then Manage.
2 In the Point of View bar, select a scenario, year, and period.
3 Optional: To filter the list of transactions, select columns and rows.
Selecting an Entity and PartnerAn application can have many transactions for a scenario/year/period combination. You canfilter the list of transactions to display by selecting only the entity and partner transactions toview.
You can use the Entity and Partner text boxes to manually enter the member names to view, orbrowse to select members from the Member Selection dialog box. You can select multiplemembers if you separate them with a semicolon (;). You can also select member lists.
If you do not select any members for the entity and partner, the system displays transactions forall entities and partners.
Displaying Transaction ColumnsYou can select the columns to display in the transactions list. You can sort the columns byascending or descending order, or select no sorting. For example, if you want to see all of yourposted transactions at the top of the list, you can sort the posting status in descending order.
ä To select the transaction columns to display:
1 Select Consolidation, then Intercompany, and then Manage.
2 Select View, then Columns, and select the columns, or select Show All.
3 Optional: To show or hide columns, select View, then Columns, then Manage Columns, and use thearrow keys to move columns to the Hidden or Visible column lists, and then click OK.
4 Optional: To reorder columns, select View, then Reorder Columns, and use the arrow keys to reorderthe columns.
5 Optional: To change the column sort order, click the header icons and select an option:
l Ascending
l Descending
l No Sort
6 To display the dimension label, corresponding description, or both, expand Display Options in the rightpane, then from Dimension Options, select a dimension, and select Label, Description, or Both.
7 To save the column settings, click Save Current Settings.
159

Tip: To reset the settings to the last saved state, click Reset Settings.
Displaying Transaction RowsYou can select the rows to display on the transaction list and filter the list of transactions. Youcan display Entity transactions, Partner transactions, or both.
You can display only intercompany transactions for a specific entity and partner, or you can alsodisplay the corresponding transactions from the partner with the entity. For example, if youselect only the transactions for Entity A with Partner B in the Entity and Partner selections, thesystem displays only the transactions that Entity A has with Partner B. However, to see thecorresponding transactions for Entity B with Partner A, you can select to include both the Entitytransactions and the Partner transactions.
You can use the percent sign (%) as a wildcard in these fields marked with an asterisk (*):Transaction ID, Transaction Sub ID, Reference ID, Match Code, or leave a text box blank toavoid filtering. The row settings are saved when you exit the session.
If you do not specify row filters, the system displays all transaction rows.
Note: Depending on the setup of your database, text boxes might be case-sensitive. For example,filtering with “testgroup” might return different results than filtering with “TestGroup.”
ä To select transaction rows to display:
1 Select Consolidation, then Intercompany, and then Manage.
2 From Row Filter, select filter options for rows:
a. For Entity, either use the default entity, enter an entity, or click Browse and select amember.
b. For Partner, either use the default partner entity, enter a partner entity, or clickBrowse and select a member.
c. If you select to display Entity Transactions, for Entity Account and Customs, enter anaccount, or click Browse and select an account.
d. If you select to display Partner Transactions, for Partner Account and Customs, enter apartner account, or click Browse and select an account.
e. Optional: Filter rows by ID, or leave blank to display all:
l Transaction ID
l Transaction Sub ID
l Reference ID
f. Optional: Filter rows by Transaction criteria, or leave blank to display all:
l Amount From and To
l Start Date and End Date
l Reason Code
160
l Match Code
l Transaction Currency
3 For Display, select Entity Transactions, Partner Transactions, or both.
4 From Include, select one or more options: Matched, Unmatched, Mismatched, Posted, or Unposted.
5 Expand Display Options, and from Scale Factor, select a value or use the Default value.
6 From Decimal Override, select a value between 0 and 6, or use the Default value.
7 From Common Currency, select a currency.
8 For Dimension Options, for the dimensions, select to display Label, Description, or Both.
Selecting Intercompany TransactionsFrom the Manage Intercompany Transactions page, you can select multiple transactions andthen post, unpost, match, unmatch, or delete them.
ä To select intercompany transactions:
1 Select Consolidation, then Intercompany, and then Manage.
2 In the Point of View bar, select a scenario, year, and period.
3 Use one of these methods:
l Click the checkbox next to the transactions row or rows that you want to process.
l To Select All, or Deselect All transactions, click the checkbox in the column header.
When you use Select All, the system selects 5000 transactions from the current page.You can scroll to select transactions from other pages.
Editing Intercompany TransactionsYou can edit a transaction to change information or add comments to a transaction. You canmake changes as long as the transaction has not been matched or posted. To make changes to atransaction that has been posted, you must first unpost the transaction. If you want to makechanges to a transaction that has a Matched status, you must first unmatch the transaction,which also unmatches all of the related transactions in the same matching process with the samematch code. If the transaction has a Mismatched status, any changes will change the status fromMismatched to Unmatched, with the exception of assigning a reason code to a Mismatchedtransaction, or entering comments for a Mismatched transaction.
After the transaction is saved, you can edit the Transaction ID, Sub ID, Entity, Partner, Account,or Custom dimensions for the original transaction. When you save the edited transaction, thesystem replaces the original transaction with the new information.
ä To edit intercompany transactions:
1 Select Consolidation, then Intercompany, and then Manage.
161
2 From the list of intercompany transactions, select the transaction to edit.
3 From the Point of View bar, select a scenario, year, and base period.
4 Edit the transaction.
5 To save the changes, from the top of the Edit Intercompany Transactions pane, click Save, or selectActions and then Save.
Duplicating Intercompany TransactionsYou can duplicate an intercompany transaction to create a new transaction that copies theinformation from another transaction.
ä To duplicate intercompany transactions:
1 Select Consolidation, then Intercompany, and then Manage.
2 From the list of intercompany transactions, select the transaction to duplicate.
3 From the New Intercompany Transaction pane menu bar, click Duplicate.
4 To save the changes, from the top of the New Intercompany Transactions pane, click Save, or selectActions and then Save.
Assigning Reason Codes to Intercompany TransactionsYou can assign a reason code to an intercompany transaction to indicate why it has a Mismatchedstatus. For example, it could be mismatched because of a missing invoice from the partner entity,or an incorrect amount was entered for the transaction. Reason codes are defined by theadministrator for the application, and you can select one from the list to apply to a transaction.
You can assign reason codes to individual intercompany transactions, or assign the same reasoncode to multiple transactions.
In addition to the intercompany transactions to which you have access, you can assign a reasoncode to the partner’s transaction even if you do not have All access to the entity assigned as thepartner in the transaction. You can also enter comments in the Comment 2 text box to add anexplanation of the reason code assignment.
ä To assign reason codes:
1 Select Consolidation, then Intercompany, and then Manage.
2 From the list of intercompany transactions, select the transaction or transactions to which to assign areason code.
Note: You can assign a reason code only to transactions with the Mismatched status.
3 Click Set Reason Code, or select Actions, and then Set Reason Code.
4 From the Reason Code list, select a reason code, and then click OK.
162
Matching Intercompany TransactionsBefore you post intercompany transactions to an intercompany account, you can perform amatching process to ensure that both the entity and its partner entered the transaction. Forexample, for an intercompany sales transaction from Entity A to Entity B, an Accounts Receivableentry in Entity A should have a corresponding Accounts Payable entry in Entity B.
If your administrator set up the period to require matching before posting, you must match thetransactions before you can post them. The matching process ensures that all entries are enteredand reconciles differences between the intercompany account balances. For transactions thathave a Mismatched status, you can assign a valid reason code to the transactions and post them.
You can match transactions by several methods. You can allow the system to automatically matchtransactions based on criteria that you specify. If the transactions are not matched by theautomatic matching process, you can also manually match specific transactions, with toleranceor without a tolerance.
See these procedures:
l “Auto-Matching Intercompany Transactions” on page 166
l “Manually Matching Transactions with Tolerance Amount ” on page 168
l “Manually Matching Transactions without Tolerance Amounts” on page 170
Auto-Match ProcessThe auto-match process performs the matching only on transactions with a status of Unmatchedor Mismatched. These transactions must also be unposted transactions. When you select theauto-match process, you can select whether to match transactions by account, or by ID.
You can filter the list to match only transactions with a specific transaction currency.Transactions that have been previously matched are excluded from the matching process becausea match code has been assigned to those transactions.
After you include transactions in the matching process, the match status of the transactionsbecomes Matched or Mismatched. Any mismatched transactions can be included again in theauto-match process.
When you auto-match intercompany transactions, a progress bar is displayed with the progresspercentage, status, and last update time. You can also view the progress from the Running Tasksmodule.
Auto-MatchPerforming the auto-match process using the Transaction ID is the most common and accuratemethod of matching intercompany transactions. The system performs the auto-match processby Transaction ID using the current filter selected for Entity/Partner/Transaction ID/Transaction Currency. If you filter for Reference ID and perform an auto-match, transactionsare matched based on Entity/Partner/Reference ID/ Transaction Currency in the current filter.
163
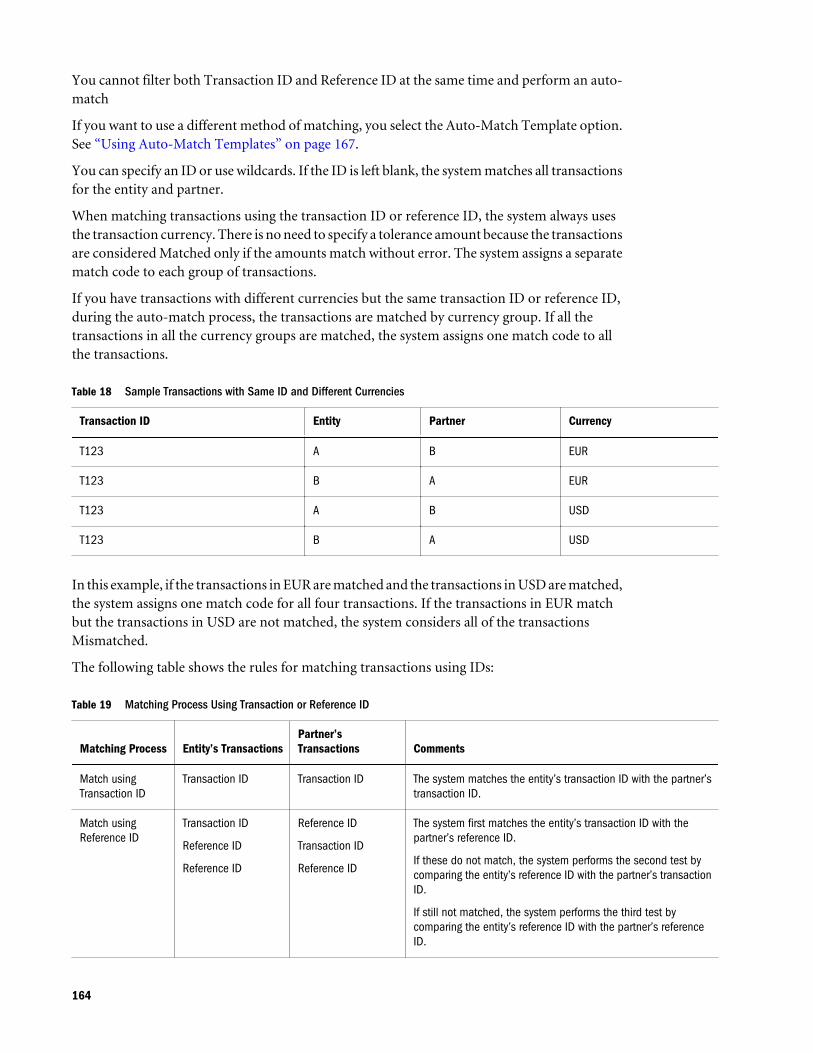
You cannot filter both Transaction ID and Reference ID at the same time and perform an auto-match
If you want to use a different method of matching, you select the Auto-Match Template option.See “Using Auto-Match Templates” on page 167.
You can specify an ID or use wildcards. If the ID is left blank, the system matches all transactionsfor the entity and partner.
When matching transactions using the transaction ID or reference ID, the system always usesthe transaction currency. There is no need to specify a tolerance amount because the transactionsare considered Matched only if the amounts match without error. The system assigns a separatematch code to each group of transactions.
If you have transactions with different currencies but the same transaction ID or reference ID,during the auto-match process, the transactions are matched by currency group. If all thetransactions in all the currency groups are matched, the system assigns one match code to allthe transactions.
Table 18 Sample Transactions with Same ID and Different Currencies
Transaction ID Entity Partner Currency
T123 A B EUR
T123 B A EUR
T123 A B USD
T123 B A USD
In this example, if the transactions in EUR are matched and the transactions in USD are matched,the system assigns one match code for all four transactions. If the transactions in EUR matchbut the transactions in USD are not matched, the system considers all of the transactionsMismatched.
The following table shows the rules for matching transactions using IDs:
Table 19 Matching Process Using Transaction or Reference ID
Matching Process Entity’s TransactionsPartner’sTransactions Comments
Match usingTransaction ID
Transaction ID Transaction ID The system matches the entity’s transaction ID with the partner’stransaction ID.
Match usingReference ID
Transaction ID
Reference ID
Reference ID
Reference ID
Transaction ID
Reference ID
The system first matches the entity’s transaction ID with thepartner’s reference ID.
If these do not match, the system performs the second test bycomparing the entity’s reference ID with the partner’s transactionID.
If still not matched, the system performs the third test bycomparing the entity’s reference ID with the partner’s referenceID.
164
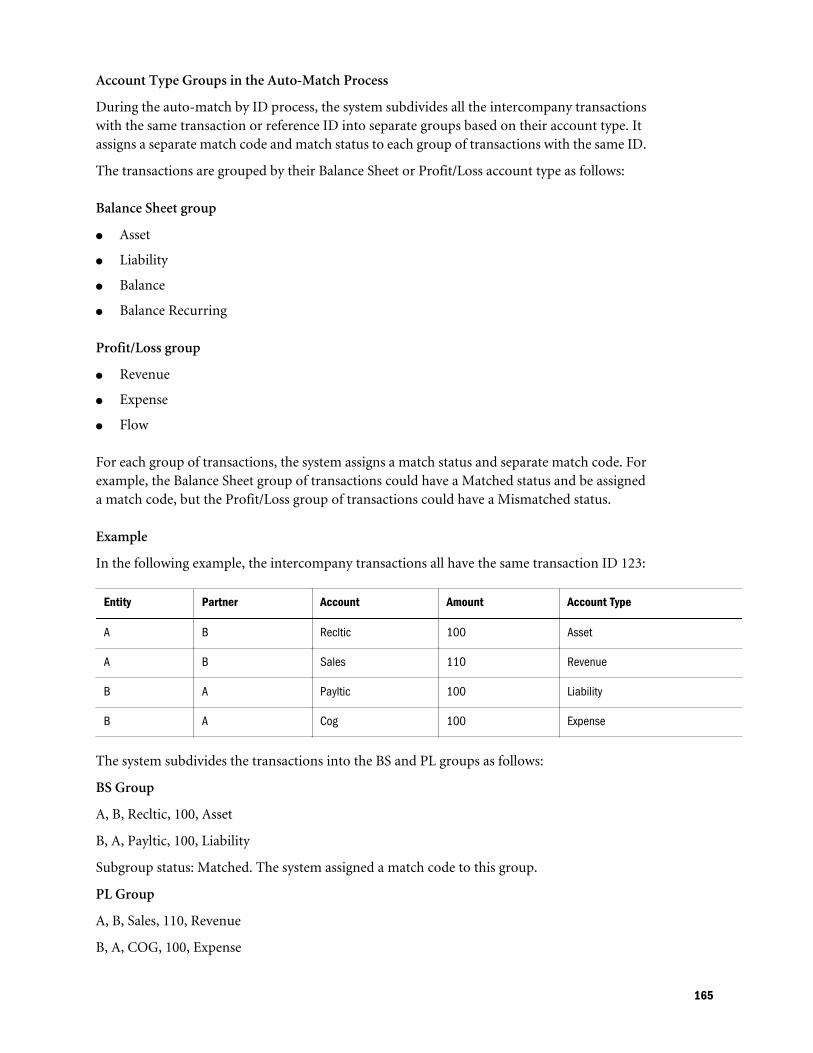
Account Type Groups in the Auto-Match Process
During the auto-match by ID process, the system subdivides all the intercompany transactionswith the same transaction or reference ID into separate groups based on their account type. Itassigns a separate match code and match status to each group of transactions with the same ID.
The transactions are grouped by their Balance Sheet or Profit/Loss account type as follows:
Balance Sheet group
l Asset
l Liability
l Balance
l Balance Recurring
Profit/Loss group
l Revenue
l Expense
l Flow
For each group of transactions, the system assigns a match status and separate match code. Forexample, the Balance Sheet group of transactions could have a Matched status and be assigneda match code, but the Profit/Loss group of transactions could have a Mismatched status.
Example
In the following example, the intercompany transactions all have the same transaction ID 123:
Entity Partner Account Amount Account Type
A B Recltic 100 Asset
A B Sales 110 Revenue
B A Payltic 100 Liability
B A Cog 100 Expense
The system subdivides the transactions into the BS and PL groups as follows:
BS Group
A, B, Recltic, 100, Asset
B, A, Payltic, 100, Liability
Subgroup status: Matched. The system assigned a match code to this group.
PL Group
A, B, Sales, 110, Revenue
B, A, COG, 100, Expense
165
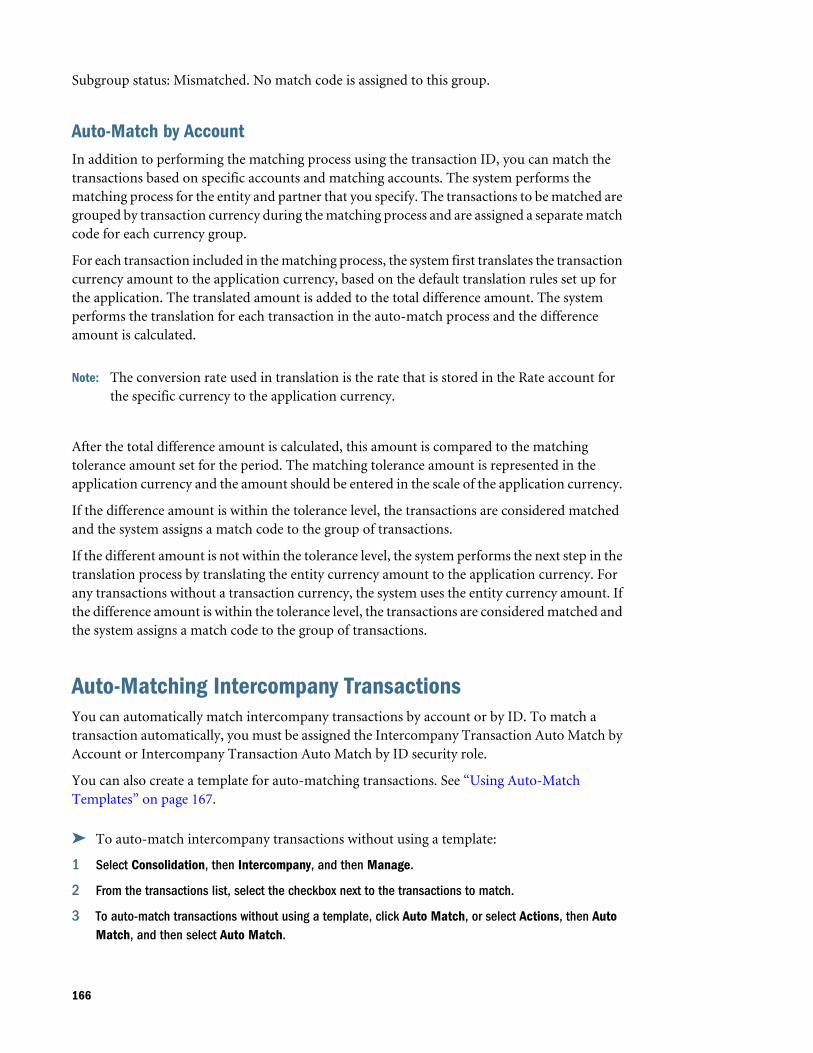
Subgroup status: Mismatched. No match code is assigned to this group.
Auto-Match by AccountIn addition to performing the matching process using the transaction ID, you can match thetransactions based on specific accounts and matching accounts. The system performs thematching process for the entity and partner that you specify. The transactions to be matched aregrouped by transaction currency during the matching process and are assigned a separate matchcode for each currency group.
For each transaction included in the matching process, the system first translates the transactioncurrency amount to the application currency, based on the default translation rules set up forthe application. The translated amount is added to the total difference amount. The systemperforms the translation for each transaction in the auto-match process and the differenceamount is calculated.
Note: The conversion rate used in translation is the rate that is stored in the Rate account forthe specific currency to the application currency.
After the total difference amount is calculated, this amount is compared to the matchingtolerance amount set for the period. The matching tolerance amount is represented in theapplication currency and the amount should be entered in the scale of the application currency.
If the difference amount is within the tolerance level, the transactions are considered matchedand the system assigns a match code to the group of transactions.
If the different amount is not within the tolerance level, the system performs the next step in thetranslation process by translating the entity currency amount to the application currency. Forany transactions without a transaction currency, the system uses the entity currency amount. Ifthe difference amount is within the tolerance level, the transactions are considered matched andthe system assigns a match code to the group of transactions.
Auto-Matching Intercompany TransactionsYou can automatically match intercompany transactions by account or by ID. To match atransaction automatically, you must be assigned the Intercompany Transaction Auto Match byAccount or Intercompany Transaction Auto Match by ID security role.
You can also create a template for auto-matching transactions. See “Using Auto-MatchTemplates” on page 167.
ä To auto-match intercompany transactions without using a template:
1 Select Consolidation, then Intercompany, and then Manage.
2 From the transactions list, select the checkbox next to the transactions to match.
3 To auto-match transactions without using a template, click Auto Match, or select Actions, then AutoMatch, and then select Auto Match.
166
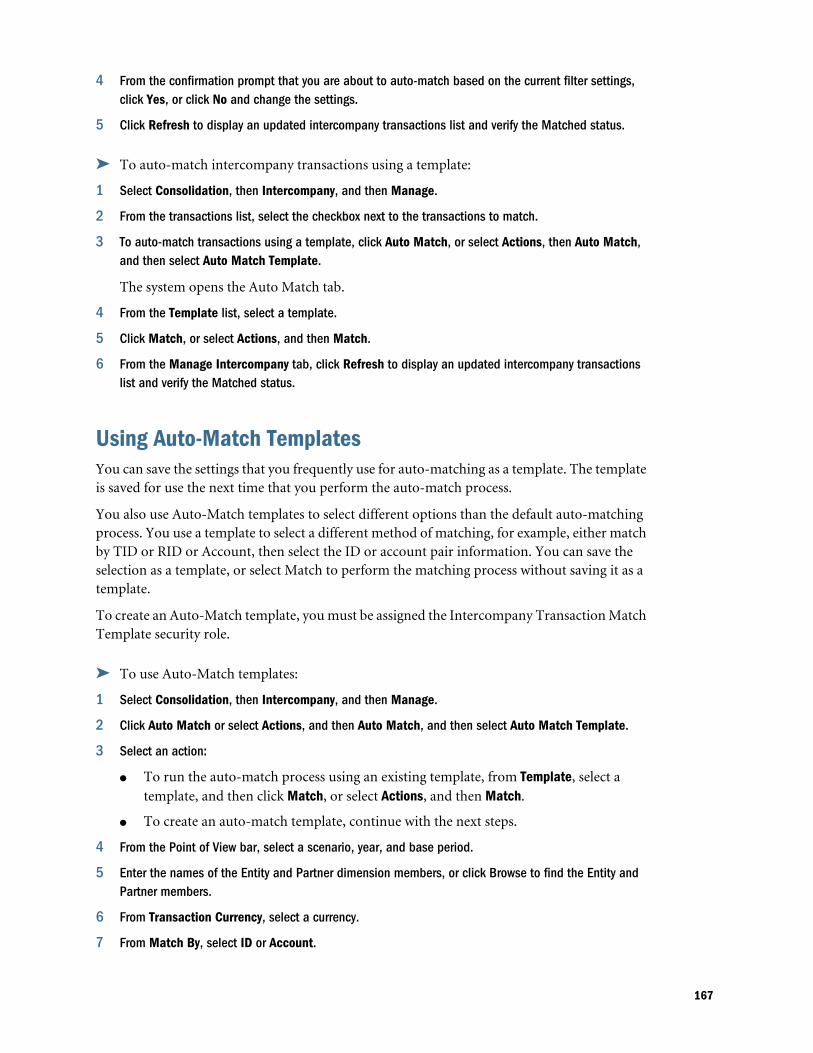
4 From the confirmation prompt that you are about to auto-match based on the current filter settings,click Yes, or click No and change the settings.
5 Click Refresh to display an updated intercompany transactions list and verify the Matched status.
ä To auto-match intercompany transactions using a template:
1 Select Consolidation, then Intercompany, and then Manage.
2 From the transactions list, select the checkbox next to the transactions to match.
3 To auto-match transactions using a template, click Auto Match, or select Actions, then Auto Match,and then select Auto Match Template.
The system opens the Auto Match tab.
4 From the Template list, select a template.
5 Click Match, or select Actions, and then Match.
6 From the Manage Intercompany tab, click Refresh to display an updated intercompany transactionslist and verify the Matched status.
Using Auto-Match TemplatesYou can save the settings that you frequently use for auto-matching as a template. The templateis saved for use the next time that you perform the auto-match process.
You also use Auto-Match templates to select different options than the default auto-matchingprocess. You use a template to select a different method of matching, for example, either matchby TID or RID or Account, then select the ID or account pair information. You can save theselection as a template, or select Match to perform the matching process without saving it as atemplate.
To create an Auto-Match template, you must be assigned the Intercompany Transaction MatchTemplate security role.
ä To use Auto-Match templates:
1 Select Consolidation, then Intercompany, and then Manage.
2 Click Auto Match or select Actions, and then Auto Match, and then select Auto Match Template.
3 Select an action:
l To run the auto-match process using an existing template, from Template, select atemplate, and then click Match, or select Actions, and then Match.
l To create an auto-match template, continue with the next steps.
4 From the Point of View bar, select a scenario, year, and base period.
5 Enter the names of the Entity and Partner dimension members, or click Browse to find the Entity andPartner members.
6 From Transaction Currency, select a currency.
7 From Match By, select ID or Account.
167
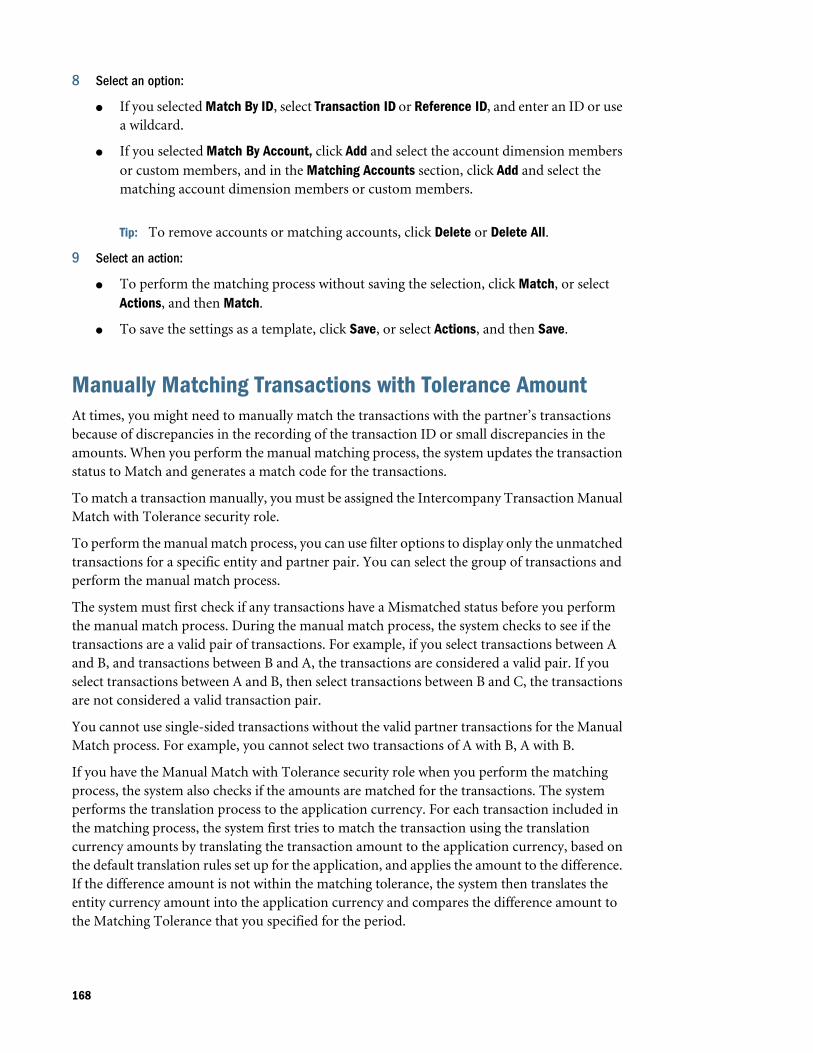
8 Select an option:
l If you selected Match By ID, select Transaction ID or Reference ID, and enter an ID or usea wildcard.
l If you selected Match By Account, click Add and select the account dimension membersor custom members, and in the Matching Accounts section, click Add and select thematching account dimension members or custom members.
Tip: To remove accounts or matching accounts, click Delete or Delete All.
9 Select an action:
l To perform the matching process without saving the selection, click Match, or selectActions, and then Match.
l To save the settings as a template, click Save, or select Actions, and then Save.
Manually Matching Transactions with Tolerance Amount At times, you might need to manually match the transactions with the partner’s transactionsbecause of discrepancies in the recording of the transaction ID or small discrepancies in theamounts. When you perform the manual matching process, the system updates the transactionstatus to Match and generates a match code for the transactions.
To match a transaction manually, you must be assigned the Intercompany Transaction ManualMatch with Tolerance security role.
To perform the manual match process, you can use filter options to display only the unmatchedtransactions for a specific entity and partner pair. You can select the group of transactions andperform the manual match process.
The system must first check if any transactions have a Mismatched status before you performthe manual match process. During the manual match process, the system checks to see if thetransactions are a valid pair of transactions. For example, if you select transactions between Aand B, and transactions between B and A, the transactions are considered a valid pair. If youselect transactions between A and B, then select transactions between B and C, the transactionsare not considered a valid transaction pair.
You cannot use single-sided transactions without the valid partner transactions for the ManualMatch process. For example, you cannot select two transactions of A with B, A with B.
If you have the Manual Match with Tolerance security role when you perform the matchingprocess, the system also checks if the amounts are matched for the transactions. The systemperforms the translation process to the application currency. For each transaction included inthe matching process, the system first tries to match the transaction using the translationcurrency amounts by translating the transaction amount to the application currency, based onthe default translation rules set up for the application, and applies the amount to the difference.If the difference amount is not within the matching tolerance, the system then translates theentity currency amount into the application currency and compares the difference amount tothe Matching Tolerance that you specified for the period.
168

If the amount is within the tolerance level, the transactions are considered Matched and thesystem assigns a match code to the group of transactions. See “Matching Status” on page 171and “Match Code” on page 172.
If you have the Manual Match security role, the system does not check the tolerance amount.See “Manually Matching Transactions without Tolerance Amounts” on page 170.
During the manual match process, transactions are not grouped by transaction currency.Therefore, you can select transactions in different transaction currencies and the systemtranslates each transaction separately.
Account Type Groups in the Manual Match Process
During the manual match process, the system subdivides all the intercompany transactions withthe same transaction or reference ID into separate groups based on their account type. The entiregroup of transactions within the manual match process must be matched before the transactionscan be assigned a Matched status and a match code.
If both subgroups are matched, the system assigns all of the transactions the Matched status andassigns them one match code. If only one subgroup is matched, but the other is not, all of thetransactions are considered mismatched.
The transactions are grouped by their Balance Sheet or Profit/Loss account type as follows:
Balance Sheet group
l Asset
l Liability
l Balance
l Balance Recurring
Profit/Loss group
l Revenue
l Expense
l Flow
Example
In the following example, the intercompany transactions all have the same transaction ID 123:
Entity Partner Account Amount Account Type
A B Recltic 100 Asset
A B Sales 110 Revenue
B A Payltic 100 Liability
B A Cog 100 Expense
The system subdivides the transactions into the BS and PL groups as follows:
169
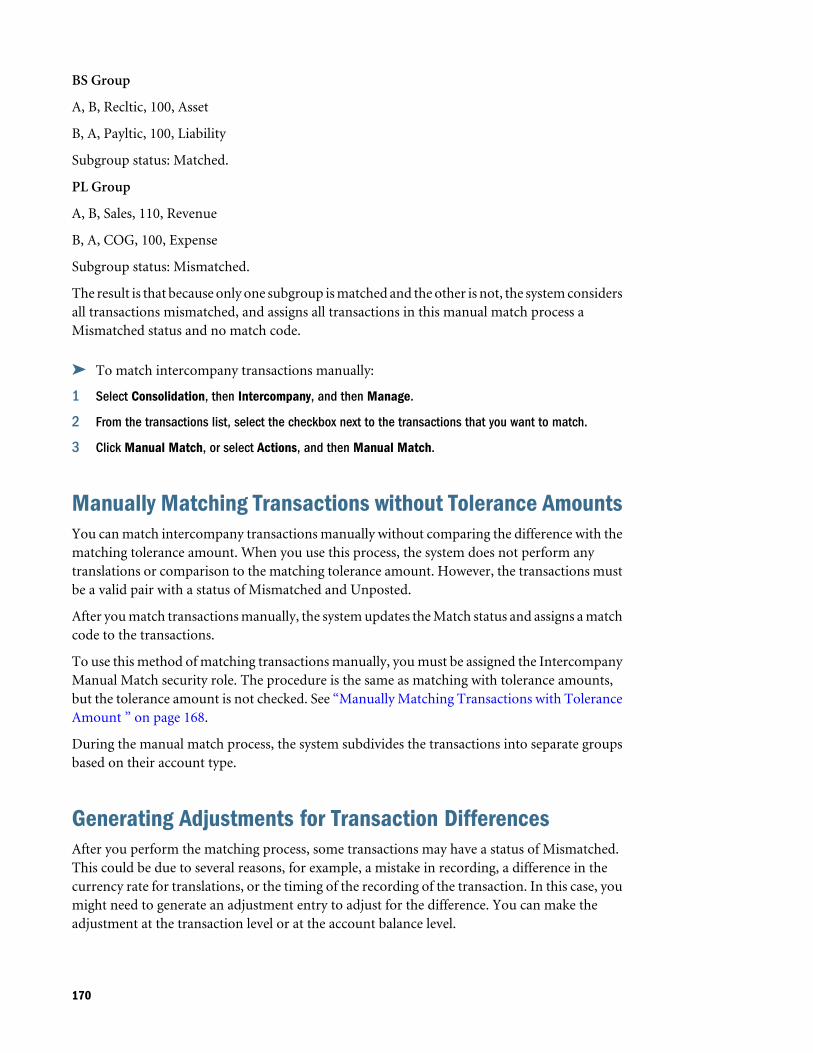
BS Group
A, B, Recltic, 100, Asset
B, A, Payltic, 100, Liability
Subgroup status: Matched.
PL Group
A, B, Sales, 110, Revenue
B, A, COG, 100, Expense
Subgroup status: Mismatched.
The result is that because only one subgroup is matched and the other is not, the system considersall transactions mismatched, and assigns all transactions in this manual match process aMismatched status and no match code.
ä To match intercompany transactions manually:
1 Select Consolidation, then Intercompany, and then Manage.
2 From the transactions list, select the checkbox next to the transactions that you want to match.
3 Click Manual Match, or select Actions, and then Manual Match.
Manually Matching Transactions without Tolerance AmountsYou can match intercompany transactions manually without comparing the difference with thematching tolerance amount. When you use this process, the system does not perform anytranslations or comparison to the matching tolerance amount. However, the transactions mustbe a valid pair with a status of Mismatched and Unposted.
After you match transactions manually, the system updates the Match status and assigns a matchcode to the transactions.
To use this method of matching transactions manually, you must be assigned the IntercompanyManual Match security role. The procedure is the same as matching with tolerance amounts,but the tolerance amount is not checked. See “Manually Matching Transactions with ToleranceAmount ” on page 168.
During the manual match process, the system subdivides the transactions into separate groupsbased on their account type.
Generating Adjustments for Transaction DifferencesAfter you perform the matching process, some transactions may have a status of Mismatched.This could be due to several reasons, for example, a mistake in recording, a difference in thecurrency rate for translations, or the timing of the recording of the transaction. In this case, youmight need to generate an adjustment entry to adjust for the difference. You can make theadjustment at the transaction level or at the account balance level.
170
Adjusting Data at the Transaction LevelTo adjust an intercompany transaction at the transaction level before it is posted to the database,you can enter a new transaction with the same transaction ID but with a different transactionsub ID to identify it (for example, SubID=Adjustment 1). During the posting process, the systemaccumulates all of the transactions with the same transaction ID and uses the total amount topost to the account. Using this method, the adjustment is included in the posting to the accountbalance in the entity currency.
Adjusting Data at the Account Balance LevelTo make adjustments at the account balance level, you can make the adjustment as a journalentry and post the adjustment amount to the Entity Currency Adjs Value dimension. The systemprocesses the adjustment similar to other journal adjustments and is reflected in the accountbalance in Entity Currency Total.
Matching StatusIntercompany transactions can have one of these matching statuses: Unmatched, Matched, orMismatched. The matching status is updated by the system and cannot be changed manually.
When you create or load a transaction, it has a default status of Unmatched. If the transactionis included in the auto-match process, the transaction is updated to Matched or Mismatchedstatus. The Mismatched status means that the matching process has been done for the transactionbut it was not matched, or was not within the matching tolerance level as defined for theapplication. You can resolve this by rerunning the auto-match process or by manually matching.See “Auto-Matching Intercompany Transactions” on page 166 and “Manually MatchingTransactions with Tolerance Amount ” on page 168.
Changes from Unmatched to Matched or Mismatched
During the auto-match or manual process, unmatched transactions can be changed to Matchedor Mismatched status.
Changes from Mismatched to Unmatched
If a transaction has gone through the auto-match process and has a status of Mismatched, anychanges to the transaction (with the exception of the comments and reason code) change thestatus to Unmatched. This applies to both manual entry and loading transactions.
Changes from Matched to Unmatched
Since the system does not allow changes to matched transactions except for comments andreason code, you cannot change the matched status by manual entry or loading transactions.However, you can perform the Unmatch process manually, and the Matched status can bechanged to Unmatched status.
171
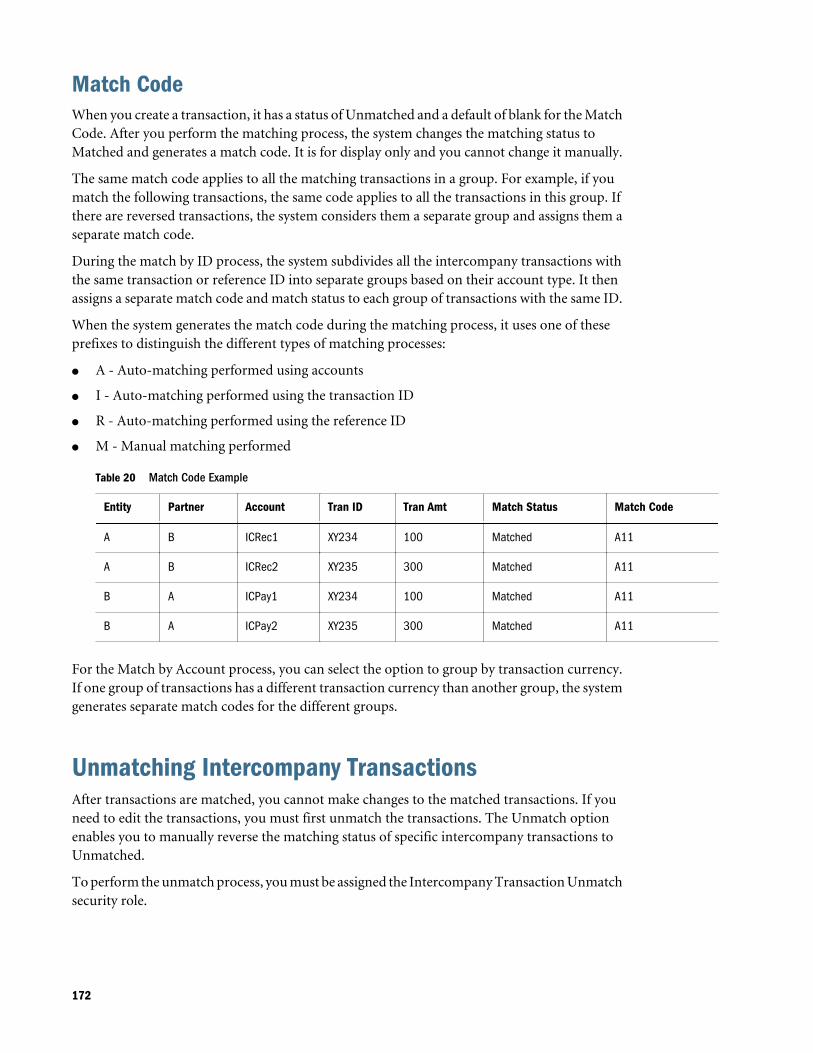
Match CodeWhen you create a transaction, it has a status of Unmatched and a default of blank for the MatchCode. After you perform the matching process, the system changes the matching status toMatched and generates a match code. It is for display only and you cannot change it manually.
The same match code applies to all the matching transactions in a group. For example, if youmatch the following transactions, the same code applies to all the transactions in this group. Ifthere are reversed transactions, the system considers them a separate group and assigns them aseparate match code.
During the match by ID process, the system subdivides all the intercompany transactions withthe same transaction or reference ID into separate groups based on their account type. It thenassigns a separate match code and match status to each group of transactions with the same ID.
When the system generates the match code during the matching process, it uses one of theseprefixes to distinguish the different types of matching processes:
l A - Auto-matching performed using accounts
l I - Auto-matching performed using the transaction ID
l R - Auto-matching performed using the reference ID
l M - Manual matching performed
Table 20 Match Code Example
Entity Partner Account Tran ID Tran Amt Match Status Match Code
A B ICRec1 XY234 100 Matched A11
A B ICRec2 XY235 300 Matched A11
B A ICPay1 XY234 100 Matched A11
B A ICPay2 XY235 300 Matched A11
For the Match by Account process, you can select the option to group by transaction currency.If one group of transactions has a different transaction currency than another group, the systemgenerates separate match codes for the different groups.
Unmatching Intercompany TransactionsAfter transactions are matched, you cannot make changes to the matched transactions. If youneed to edit the transactions, you must first unmatch the transactions. The Unmatch optionenables you to manually reverse the matching status of specific intercompany transactions toUnmatched.
To perform the unmatch process, you must be assigned the Intercompany Transaction Unmatchsecurity role.
172
When you perform the unmatch process, it applies to all transactions with the same match code.This ensures that all transactions related to that one match process are reversed to the originalstatus.
When you unmatch a transaction, the system displays a list of transactions that have beenmatched. These transactions should all have a status of Matched and the same match code. Thesystem does not unmatch posted transactions or transactions for locked entities. To unmatchposted transactions, you must first unpost the transactions and then unmatch them.
When you select Unmatch All to unmatch all transactions, a progress bar is displayed with theprogress percentage, status, and last update time. You can also view the progress from theRunning Tasks module. See “Viewing Intercompany Transaction Progress” on page 176.
When the unmatch process is complete, the matching status for the transactions changes toUnmatched and the match code becomes blank.
For example, suppose a group of transactions that include T123, T124, T125, T126 were matchedand assigned the same Match Code of A122. If you want to make changes to transaction T125,you need to select T125 to unmatch. When you select T125, the system displays all thetransactions within the Match group for your review. After you confirm the selection, theunmatch process unmatches all the transactions in this match group.
ä To unmatch intercompany transactions:
1 Select Consolidation, then Intercompany, and then Manage.
2 From the list of intercompany transactions, select the checkbox next to the transactions to unmatch, orfrom the column header, click Select All.
3 Click Unmatch Selected or Unmatch All, or select Actions, and then Unmatch Selected, or UnmatchAll.
4 From the Unmatch tab, review the transactions to be unmatched and click Unmatch.
When the unmatch process is completed, the match status for these transactions isUnmatched and the match code changes to blank.
Posting Intercompany TransactionsYou post intercompany transactions to include them in an account balance. When you createor load an intercompany transaction, by default it has a status of Unposted and no amount isshown in the account balance. For example, you might input an intercompany transaction forEntity A with Entity B for the amount of USD $100. However, the amount was not recorded inthe ICRec account. The ICRec account balance remains at zero until the transaction is posted.
When you post the selected intercompany transactions to the account, the system updates thestatus of the transactions to Posted, and the total transaction amount is reflected in the accountbalance.
To post a transaction, you must be assigned the Intercompany Transaction Post/Unpost securityrole.
173
If the period is set up with the Match/Validate requirement before posting, the system checksthe transactions before posting to ensure that only transactions with the Matched status, orMismatched status with a reason code, are posted to the account balance. If this requirement isnot set for the period, no validation is needed. See the Oracle Hyperion Financial ManagementAdministrator's Guide.
When you select Post All, the system posts all transactions that meet the filter criteria. It doesnot post all of the transactions for the POV. A progress bar is displayed with the progresspercentage, status, and last update time. You can also view the progress from the Running Tasksmodule. See “Viewing Intercompany Transaction Progress” on page 176.
After an intercompany transaction is Posted, you cannot change it. If you need to make changesto a posted transaction, you must unpost it, make the changes, then match and post thetransaction again. See “Unposting Intercompany Transactions” on page 175.
ä To post intercompany transactions:
1 Select Consolidation, then Intercompany, and then Manage.
2 From the list of intercompany transactions, select the checkbox next to the transactions to post, or fromthe column header, click Select All.
3 Select an action:
l Click Post, or select Actions, and then Post.
l To post the transactions that meet the filter criteria, click Post All, or select Actions, andthen Post All.
4 From the Result tab, verify the posting result and click OK.
On the Manage Intercompany transactions list, posted transactions are indicated by a greenflag in the Status column.
Posting ProcessDuring the posting process, the system accumulates the transactions related to a particularaccount cell and accumulates the amount to the account balance. For example, if you have twotransactions with a total of 100 for the ICRec account, the system applies the total amount of100 to the ICRec account balance. If this is the first transaction, the ICRec account has a balanceof 100. If you later post four transactions to this account for a total amount of 300, after posting,the ICRec account has a balance of 400, because the system adds the amount to the accountbalance.
The system posts transactions to the Entity Currency Value dimension. If the account is a Balancetype, the system posts the amount as YTD view regardless of the default view of the scenario.
Posting to Flow AccountsFor Flow accounts, the system posts according to the rules specified for the scenario. Whenadministrators define rules for the application, they define the cells that are available for enteringintercompany transactions. Administrators can define the period frequency in each scenario to
174
determine which periods support transactions, based on the valid frequencies defined in thePER file. Valid frequencies for a monthly scenario are MTD, QTD, HYTD, and YTD and canalso be used to specify the period frequency for supporting transactions. See the Oracle HyperionFinancial Management Administrator's Guide.
For example, if the scenario is set up to accept intercompany transactions on a Quarterlyfrequency, the system only allows intercompany transactions to be entered for March, June,September, and December. For the other nonquarterly months, the system only allows users toenter the cell amounts manually without entering any transactions. However, for thetransactions being entered for the quarterly months, you should enter all transactions for theentire quarter, not just the quarterly months. For example, in March, you should entertransactions for January, February, and March, so that the drill-down to the transactions matchesthe YTD amount.
Viewing Posted StatusPosted transactions are indicated by a green flag in the Status column on the Process ICTransactions page. You can use the column sorting capability to sort transactions by theMatching Status or Posting status. Therefore, to see all of your posted transactions at the top ofthe list, you can sort the Posting status in descending order.
You can also confirm the amounts posted to the account balance in a data grid or data form.
ä To view transactions with a Posted status, take one of these actions:
l From Manage Intercompany Transactions, select the point of view, and review the Statuscolumn for posted transactions.
l From Manage Intercompany Transactions, select the point of view, and sort by Post status.See “Displaying Transaction Columns” on page 159.
l From a data grid, drill down to view the transactions. See “Drilling Through to IntercompanyTransactions” on page 88.
l From a data form, drill down to view the transactions. See “Drilling Through toIntercompany Transactions” on page 117.
Unposting Intercompany TransactionsAfter an intercompany transaction has a status of Posted, no more changes can be made to it.You cannot edit or delete the transaction. If you need to make changes to the Posted transaction,you must unpost the transaction, make the necessary changes, then match and post thetransaction again.
To unpost a transaction, you must be assigned the Intercompany Transaction Post /Unpostsecurity role.
During the unpost process, the system reverses the amount out of the account balance andchanges the status from Posted to Unposted. Unposting the transaction does not affect thematching status.
175
When you select Unpost All, the system unposts all transactions that meet the filter criteria. Itdoes not unpost all of the transactions for the POV. A progress bar is displayed with the progresspercentage, status, and last update time. You can also view the progress from the Running Tasksmodule. See “Viewing Intercompany Transaction Progress” on page 176.
ä To unpost intercompany transactions:
1 Select Consolidation, then Intercompany, and then Manage.
2 From the list of intercompany transactions, select the checkbox next to the transactions to unpost, orfrom the column header, click Select All.
3 Select an action:
l Click Unpost, or select Actions, and then Unpost.
l To unpost the transactions that meet the filter criteria, click Unpost All, or selectActions, and then Unpost All.
4 From the Result tab, verify the posting result and click OK.
Viewing Intercompany Transaction ProgressYou can view the progress of intercompany transactions processes for these options: LoadTransactions, AutoMatch, Post All, Unpost All, Unmatch All, Delete All, Matching Report byTransaction ID, Matching Report by Account, and Transaction Report. When you select theseoptions, a progress bar page is displayed in a separate browser window with the current progresspercentage, the status, and last update time.
In addition, you can view the task status from the Running Tasks module. In the Running Tasksmodule, you can stop the task if you are an administrator or have the appropriate security rightsfor the task. You can also select to view the log from the Running Tasks module to view the statusinformation after the process is completed. See the Oracle Hyperion Financial ManagementAdministrator's Guide.
ä To view the progress of intercompany transactions:
1 From the list of transactions, select the transaction, and select a task.
2 Take one of these actions:
l From the Manage Intercompany Transactions page, view the progress bar for the taskthat is running.
l From the Running Tasks page, select the task to view the progress.
Deleting Intercompany TransactionsYou can delete intercompany transactions that you no longer need. However, you can deleteonly transactions with the posting status of Unposted and the matching status of Unmatchedor Mismatched. You cannot delete posted or matched transactions. Any posted transactions
176
must be unposted first, and any matched transactions must be unmatched before you can deletethem.
You must be assigned the Intercompany Transaction User security role to delete transactions.
When you select Delete All, the system deletes all transactions that meet the filter criteria. It doesnot delete all of the transactions for the POV. A progress bar is displayed with the progresspercentage, status, and last update time. You can also view the progress from the Running Tasksmodule. See “Viewing Intercompany Transaction Progress” on page 176.
ä To delete intercompany transactions:
1 Select the checkbox next to the transactions to delete, or from the column header, click Select All.
2 Select an action:
l Click Delete, or select Actions, and then Delete.
l To delete the transactions that meet the filter criteria, click Delete All, or select Actions,and then Delete All.
Note: When you select Delete All, some transactions might not be deleted, based on theirstatus. For example, posted or matched transactions are not deleted.
3 At the confirmation message, click OK.
Reporting on Intercompany TransactionsAfter loading transactions into the application, you may want to run a matching report to checkpotential matching transactions and mismatched transactions. You can run these types ofreports:
l Intercompany Transactions report, that displays a list of transactions. See “RunningIntercompany Transaction Reports” on page 177.
l Matching Report by Account, a matching report based on selected accounts. See “Runninga Matching Report by Account” on page 181.
l Matching Report by Transaction ID, a matching report based on transaction ID. See“Running a Matching Report by Transaction ID” on page 183.
When you run a report, a progress bar is displayed with the progress percentage, status, and lastupdate time. You can also view the progress from the Running Tasks module. See “ViewingIntercompany Transaction Progress” on page 176.
Running Intercompany Transaction ReportsYou can run an Intercompany Transaction report to view a list of the transactions in the system.You can select columns and rows to display on the report, and you can change the column sortorder.
177
Note: You can format and print the report using HFM-Format, PDF, RTF, HTML, XLS, orXLSX. See “Formatting System Reports” on page 142.
You can create a report by these methods:
l Running the report from the Intercompany Transaction Report page.
l Writing a script in a text file. See the Oracle Hyperion Financial Management Administrator'sGuide.
Note: The output of this report is a list of selected transactions with various sorting andgrouping capability. This is not the matching report for reconciliation purposes. See“Running Matching Reports” on page 180.
ä To run Intercompany Transaction reports:
1 Use one of these methods:
l Select Consolidation, then Intercompany, then Reports. Click New, Reports, then ICTransactions.
l Select Consolidation, then Intercompany, then Manage. From the Reports menu, select ICTransactions.
l Select Consolidation, then Documents. Click New, then Reports, then IC Transactions.
2 Select the rows and columns to display on the report.
See “Displaying IC Transaction Report Columns” on page 178 and “Displaying ICTransaction Report Rows” on page 180.
Note: If a tooltip hides any action, such as deleting a row, you can dismiss the tooltip bytabbing out of or using a mouse click to move the focus outside of the component.
3 To print or preview the report, click Print/Preview, or select Actions and then Print/Preview.
The report opens in a new tab.
4 To save the report, click Save, or select Actions, and then Save.
Tip: To reset the selected options back to default values without saving your changes, clickReset or select Actions, and then Reset.
5 From the confirmation prompt that the report was saved successfully, click OK.
Displaying IC Transaction Report ColumnsYou can select the items to display in the report columns, and the order in which you would liketo see them. You can sort the columns by ascending or descending order, or select no sorting.If you select the Totals option, a subtotal is displayed for the amounts in the column.
178
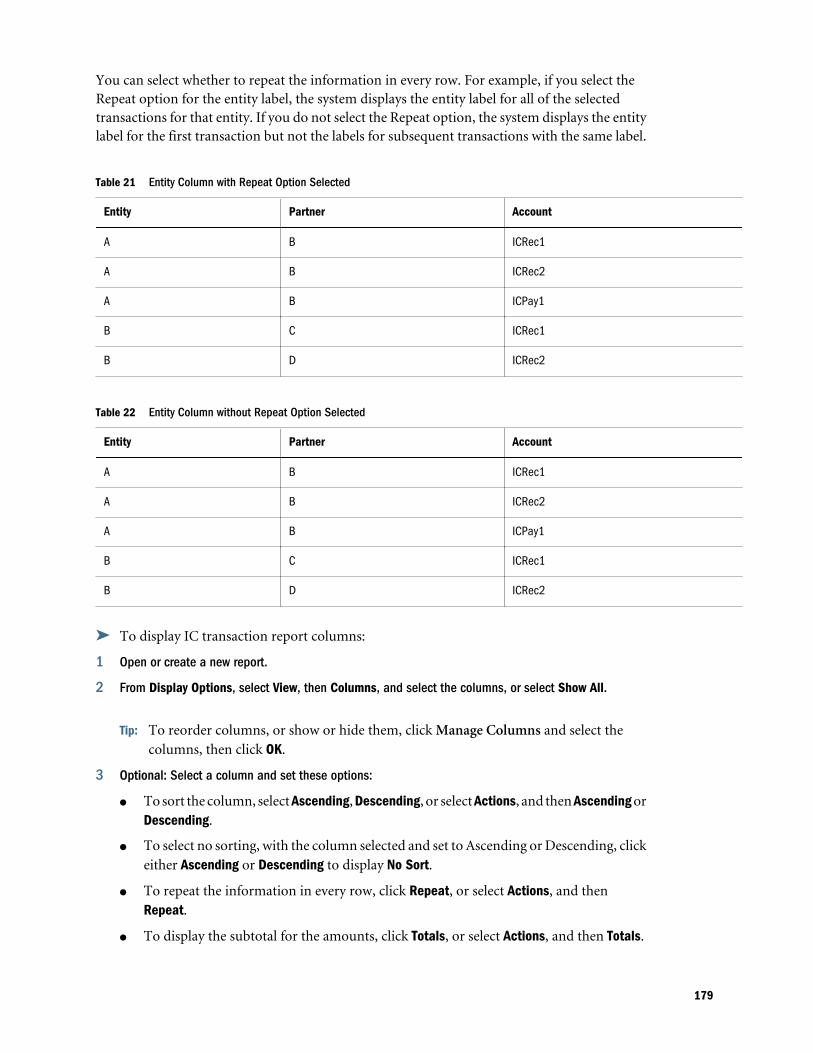
You can select whether to repeat the information in every row. For example, if you select theRepeat option for the entity label, the system displays the entity label for all of the selectedtransactions for that entity. If you do not select the Repeat option, the system displays the entitylabel for the first transaction but not the labels for subsequent transactions with the same label.
Table 21 Entity Column with Repeat Option Selected
Entity Partner Account
A B ICRec1
A B ICRec2
A B ICPay1
B C ICRec1
B D ICRec2
Table 22 Entity Column without Repeat Option Selected
Entity Partner Account
A B ICRec1
A B ICRec2
A B ICPay1
B C ICRec1
B D ICRec2
ä To display IC transaction report columns:
1 Open or create a new report.
2 From Display Options, select View, then Columns, and select the columns, or select Show All.
Tip: To reorder columns, or show or hide them, click Manage Columns and select thecolumns, then click OK.
3 Optional: Select a column and set these options:
l To sort the column, select Ascending, Descending, or select Actions, and then Ascending orDescending.
l To select no sorting, with the column selected and set to Ascending or Descending, clickeither Ascending or Descending to display No Sort.
l To repeat the information in every row, click Repeat, or select Actions, and thenRepeat.
l To display the subtotal for the amounts, click Totals, or select Actions, and then Totals.
179
Displaying IC Transaction Report RowsYou can select specific rows to restrict the report to certain types of transactions. After you specifycriteria for the report, only the transactions that meet the filter criteria are processed for thereport. For example, you can display only the transactions that are matched and posted, or selecttransactions from a specific range of dates.
ä To display IC transaction report rows:
1 Open or create a new report.
2 From Row Filter, enter an ID, or leave blank to display all.
l Transaction ID
l Transaction Sub ID
l Reference ID
3 Optional: Filter rows by Transaction criteria, or leave blank to display all:
l Amount From and To
l Start Date and End Date
l Reason Code
l Match Code
l Transaction Currency
4 From Include, select one or more options: Matched, Unmatched, Mismatched, Posted, or Unposted.
5 For Display, select Entity Transactions, Partner Transactions, or both.
6 Optional: To display only the subtotal row instead of all transaction details, select Suppress Details.
Running Matching ReportsAfter you load transactions into the application, you can run a Matching Report to see thepotential matching transactions and mismatched transactions. You can run a Matching Reportby account, by transaction ID, or by reference ID.
You can select columns and rows to display on the report, and change the column sort order.
You can create a Matching Report by these methods:
l Running the report from the Intercompany Matching Report page.
l Writing a script in a text file. See the Oracle Hyperion Financial Management Administrator'sGuide.
Selecting Matching Report OptionsWhen you run a Matching Report, you can display or suppress various types of transaction detail.For example, you can suppress details and matched transactions.
180

You can select single or multiple members and a list for the entity and partner selection. If youdo not select any members for the entity and partner, the system displays transactions for allentities and partners.
In addition to the entity and partner selection, you must specify the matching currency to usefor the report.
Suppressing DetailsIf you want the Matching Report to display only the subtotal amount, you can select to suppressthe intercompany details. When you select this option, the report displays only the totaldifference for each entity/partner section. If there is a discrepancy and you need to view eachintercompany transaction, you can regenerate the report and show intercompany details.
Suppressing Matched TransactionsYou can select these options for suppressing matched transactions:
l Matched using Transaction Currency Amount
l Matched using Matching Currency Amount
Note: If both options are selected, the system suppresses the transaction only if bothconditions are met.
Since the matching tolerance amount is always entered in the matching report currency and isin the scale of the matching report, the system must first translate the transaction currencyamount or the entity currency amount, and the total difference is then compared to the matchingtolerance amount.
If you select to suppress matched transactions using the transaction or matching currency, thesystem suppresses the transactions if the entity and partner amounts are within the matchingtolerance amount that you specify. For example, if an entity has an amount of 299 and the partnerhas 200, the difference is 99. If the matching tolerance amount is 100 and the difference betweenthe entity and partner is less than 100 as in this example, the system suppresses the transactionsbecause it is within the matching tolerance.
Running a Matching Report by AccountYou can run a Matching Report by account to match intercompany transactions at thetransaction level. If no match is found, the problem could be incorrect entry of the transaction,or no recording of the transaction entry on the partner’s side.
The Matching Currency could be a specific currency or the common parent’s currency. Thesystem translates both the transaction currency amount and the entity currency amount to theMatching Currency that you select. If you leave the Matching Currency blank, the system doesnot perform any translation, and the report does not display these columns: Entity Amount inMatching Currency, Partner Amount in Matching Currency, Matching Currency difference,Transaction Error, and Conversion Error.
181
See “Selecting Matching Report Options” on page 180.
ä To run a Matching Report by Account:
1 Use one of these methods:
l Select Consolidation, then Intercompany, then Reports. Click New, Reports, thenIntercompany Match by Account.
l Select Consolidation, then Intercompany, then Manage. From the Reports menu, selectIntercompany Match by Account.
l Select Consolidation, then Documents. Click New, then Reports, then Intercompany Matchby Account.
2 For Name, enter a report name.
3 Optional: For Description, enter a report description.
4 From Security Class, select a security class for the report, or use the Default security class.
5 From Report Format, select a format.
6 Optional: From Style Sheet, select a report style sheet.
7 From the Point of View, select a scenario, year, and base period.
8 For Entity, enter an entity or click Browse to select an entity.
9 For Partner, enter a partner entity or click Browse to select a partner entity.
10 From Member Name, select an option:
l To display the dimension member label, select Label.
l To display the dimension member description, select Description.
l To display the label and description, select Both.
11 Optional: From Scale Factor and Decimal Override, select values for the amounts displayed for thetransactions.
12 From the Report Columns section, select columns to display on the report.
13 From Accounts, click Add and select the account dimension members or custom members, and in theMatching Accounts section, click Add and select the matching account dimension members or custommembers.
14 Optional: From the Row Filter Suppress section, select to suppress:
l Details
l Matched using Transaction Currency Amount, then enter a tolerance if required
l Matched using Matching Currency Amount, then enter a tolerance if required
15 From Include During Processing, select one or more Match or Post statuses:
l Matched
l Unmatched
l Mismatched
182
l Posted
l Unposted
16 Optional: To filter by transaction currency, from Transaction Currency, select a currency.
17 To print or preview the report, click Print/Preview, or select Actions and then Print/Preview.
The report opens in a new tab.
18 To save the report, click Save, or select Actions, and then Save.
Tip: To reset the selected options back to default values without saving your changes, clickReset or select Actions, and then Reset.
19 From the confirmation prompt that the report was saved successfully, click OK.
Running a Matching Report by Transaction IDYou can run a Matching Report by transaction ID to match intercompany transactions at thetransaction level. The Matching Currency could be a specific currency or the common parent’scurrency. The system translates both the transaction currency amount and the entity currencyamount to the Matching Currency that you select. If you leave the Matching Currency blank,the system does not perform any translation, and the report does not display these columns:Entity Amount in Matching Currency, Partner Amount in Matching Currency, MatchingCurrency difference, Transaction Error, and Conversion Error.
See “Selecting Matching Report Options” on page 180.
ä To run a Matching Report by transaction ID:
1 Use one of these methods:
l Select Consolidation, then Intercompany, then Reports. Click New, Reports, thenIntercompany Match by ID.
l Select Consolidation, then Intercompany, then Manage. From the Reports menu, selectIntercompany Match by ID.
l Select Consolidation, then Documents. Click New, then Reports, then Intercompany Matchby ID.
2 For Name, enter a report name.
3 Optional: For Description, enter a report description.
4 From Security Class, select a security class for the report, or use the Default security class.
5 From Report Format, select a format.
6 Optional: From Style Sheet, select a report style sheet.
7 From the Point of View, select a scenario, year, and base period.
8 For Entity, enter an entity or click Browse to select an entity.
9 For Partner, enter a partner entity or click Browse to select a partner entity.
183
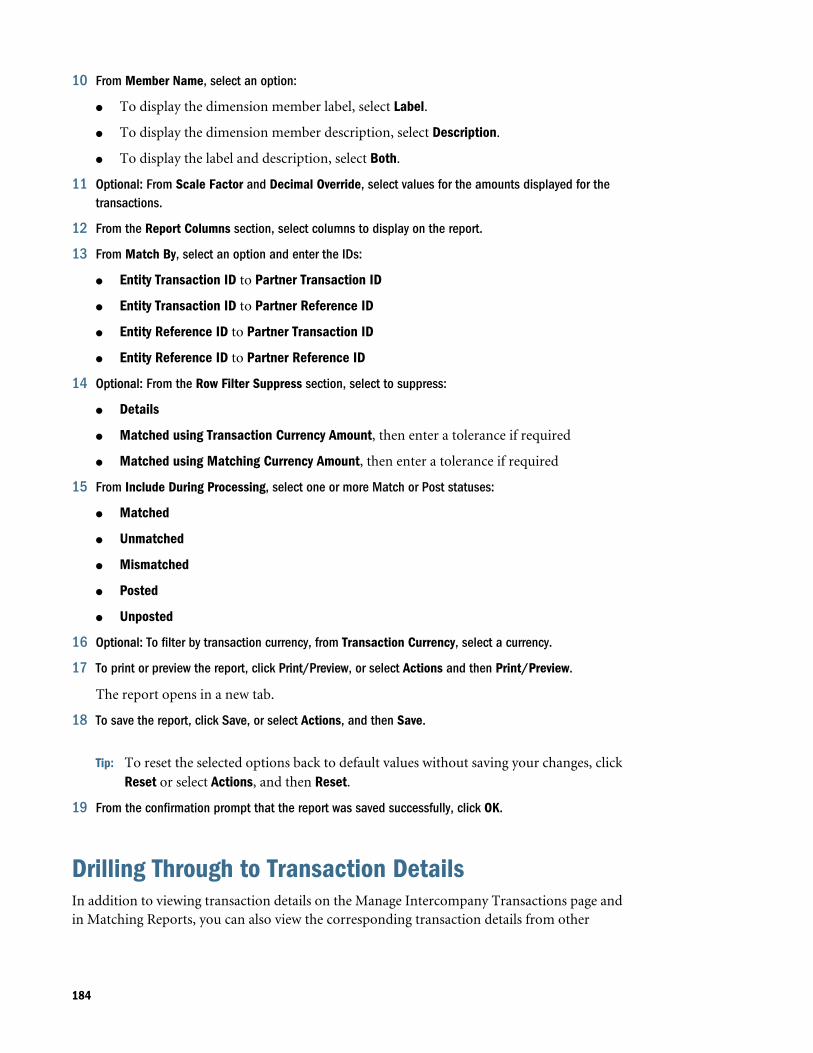
10 From Member Name, select an option:
l To display the dimension member label, select Label.
l To display the dimension member description, select Description.
l To display the label and description, select Both.
11 Optional: From Scale Factor and Decimal Override, select values for the amounts displayed for thetransactions.
12 From the Report Columns section, select columns to display on the report.
13 From Match By, select an option and enter the IDs:
l Entity Transaction ID to Partner Transaction ID
l Entity Transaction ID to Partner Reference ID
l Entity Reference ID to Partner Transaction ID
l Entity Reference ID to Partner Reference ID
14 Optional: From the Row Filter Suppress section, select to suppress:
l Details
l Matched using Transaction Currency Amount, then enter a tolerance if required
l Matched using Matching Currency Amount, then enter a tolerance if required
15 From Include During Processing, select one or more Match or Post statuses:
l Matched
l Unmatched
l Mismatched
l Posted
l Unposted
16 Optional: To filter by transaction currency, from Transaction Currency, select a currency.
17 To print or preview the report, click Print/Preview, or select Actions and then Print/Preview.
The report opens in a new tab.
18 To save the report, click Save, or select Actions, and then Save.
Tip: To reset the selected options back to default values without saving your changes, clickReset or select Actions, and then Reset.
19 From the confirmation prompt that the report was saved successfully, click OK.
Drilling Through to Transaction DetailsIn addition to viewing transaction details on the Manage Intercompany Transactions page andin Matching Reports, you can also view the corresponding transaction details from other
184
modules after the transactions have been posted to the account cells. There are three areas whereyou can drill through to the transaction details:
l Drill through from an Intercompany Matching Report (account balance level). See “DrillingThrough to Intercompany Transactions” on page 144.
l Drill through from data grids. See “Drilling Through to Intercompany Transactions” onpage 88.
l Drill through from Data Forms. See “Drilling Through to Intercompany Transactions” onpage 117.
Email Alerts for Intercompany TransactionsYou can generate email alerts for intercompany transactions. For example, you might noticethat transaction M865 between Entity A and Partner C has a mismatched status. You can sendan email to Entity A to alert the user of the status, and ask for additional information. Beforeyou send an alert to a user, you must ensure that the user has security rights to receiveintercompany transaction alerts.
You can generate email alerts from the Intercompany Transactions Monitor page andIntercompany Transactions Manage page.
To use email alerts, see Chapter 13, “Using Email Alerts”.
185

186
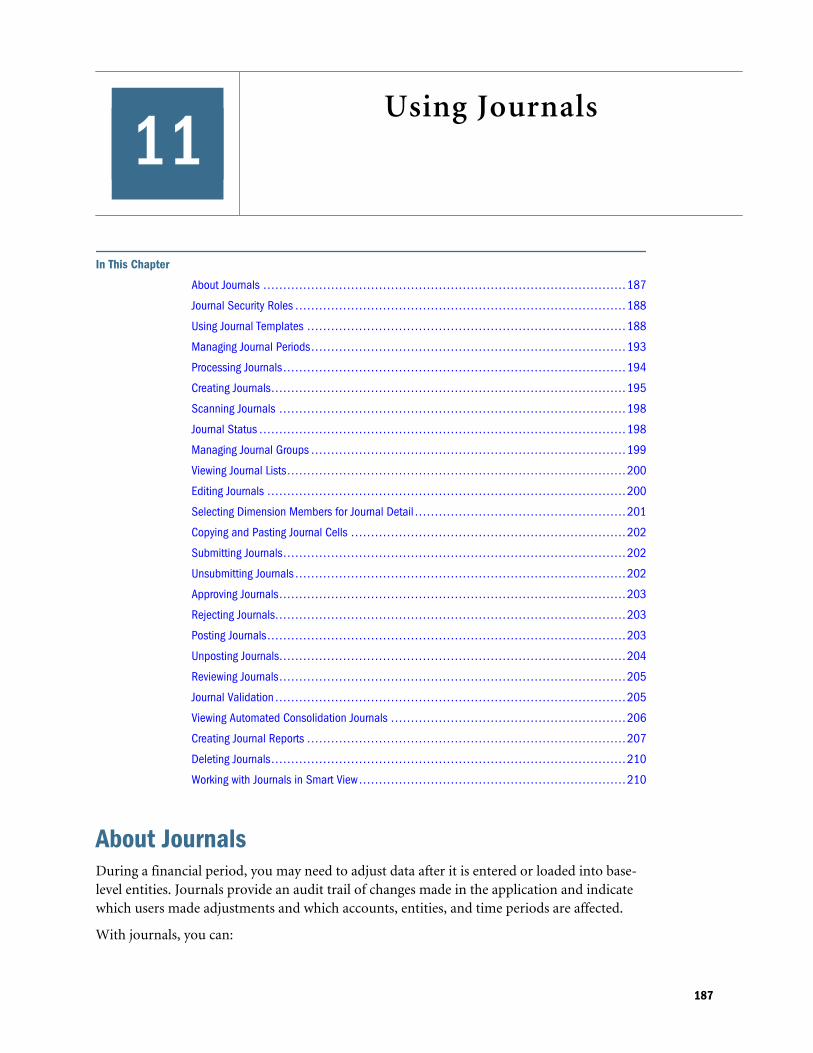
11Using Journals
In This Chapter
About Journals .. . . . . . . . . . . . . . . . . . . . . . . . . . . . . . . . . . . . . . . . . . . . . . . . . . . . . . . . . . . . . . . . . . . . . . . . . . . . . . . . . . . . . . . . . . 187
Journal Security Roles ... . . . . . . . . . . . . . . . . . . . . . . . . . . . . . . . . . . . . . . . . . . . . . . . . . . . . . . . . . . . . . . . . . . . . . . . . . . . . . . . . 188
Using Journal Templates ... . . . . . . . . . . . . . . . . . . . . . . . . . . . . . . . . . . . . . . . . . . . . . . . . . . . . . . . . . . . . . . . . . . . . . . . . . . . . . 188
Managing Journal Periods... . . . . . . . . . . . . . . . . . . . . . . . . . . . . . . . . . . . . . . . . . . . . . . . . . . . . . . . . . . . . . . . . . . . . . . . . . . . . 193
Processing Journals .. . . . . . . . . . . . . . . . . . . . . . . . . . . . . . . . . . . . . . . . . . . . . . . . . . . . . . . . . . . . . . . . . . . . . . . . . . . . . . . . . . . . . 194
Creating Journals.. . . . . . . . . . . . . . . . . . . . . . . . . . . . . . . . . . . . . . . . . . . . . . . . . . . . . . . . . . . . . . . . . . . . . . . . . . . . . . . . . . . . . . . . 195
Scanning Journals .. . . . . . . . . . . . . . . . . . . . . . . . . . . . . . . . . . . . . . . . . . . . . . . . . . . . . . . . . . . . . . . . . . . . . . . . . . . . . . . . . . . . . . 198
Journal Status ... . . . . . . . . . . . . . . . . . . . . . . . . . . . . . . . . . . . . . . . . . . . . . . . . . . . . . . . . . . . . . . . . . . . . . . . . . . . . . . . . . . . . . . . . . 198
Managing Journal Groups ... . . . . . . . . . . . . . . . . . . . . . . . . . . . . . . . . . . . . . . . . . . . . . . . . . . . . . . . . . . . . . . . . . . . . . . . . . . . . 199
Viewing Journal Lists.. . . . . . . . . . . . . . . . . . . . . . . . . . . . . . . . . . . . . . . . . . . . . . . . . . . . . . . . . . . . . . . . . . . . . . . . . . . . . . . . . . . . 200
Editing Journals .. . . . . . . . . . . . . . . . . . . . . . . . . . . . . . . . . . . . . . . . . . . . . . . . . . . . . . . . . . . . . . . . . . . . . . . . . . . . . . . . . . . . . . . . . 200
Selecting Dimension Members for Journal Detail . . . . . . . . . . . . . . . . . . . . . . . . . . . . . . . . . . . . . . . . . . . . . . . . . . . . . 201
Copying and Pasting Journal Cells .. . . . . . . . . . . . . . . . . . . . . . . . . . . . . . . . . . . . . . . . . . . . . . . . . . . . . . . . . . . . . . . . . . . . 202
Submitting Journals.. . . . . . . . . . . . . . . . . . . . . . . . . . . . . . . . . . . . . . . . . . . . . . . . . . . . . . . . . . . . . . . . . . . . . . . . . . . . . . . . . . . . . 202
Unsubmitting Journals .. . . . . . . . . . . . . . . . . . . . . . . . . . . . . . . . . . . . . . . . . . . . . . . . . . . . . . . . . . . . . . . . . . . . . . . . . . . . . . . . . . 202
Approving Journals.. . . . . . . . . . . . . . . . . . . . . . . . . . . . . . . . . . . . . . . . . . . . . . . . . . . . . . . . . . . . . . . . . . . . . . . . . . . . . . . . . . . . . . 203
Rejecting Journals.. . . . . . . . . . . . . . . . . . . . . . . . . . . . . . . . . . . . . . . . . . . . . . . . . . . . . . . . . . . . . . . . . . . . . . . . . . . . . . . . . . . . . . . 203
Posting Journals.. . . . . . . . . . . . . . . . . . . . . . . . . . . . . . . . . . . . . . . . . . . . . . . . . . . . . . . . . . . . . . . . . . . . . . . . . . . . . . . . . . . . . . . . . 203
Unposting Journals.. . . . . . . . . . . . . . . . . . . . . . . . . . . . . . . . . . . . . . . . . . . . . . . . . . . . . . . . . . . . . . . . . . . . . . . . . . . . . . . . . . . . . . 204
Reviewing Journals.. . . . . . . . . . . . . . . . . . . . . . . . . . . . . . . . . . . . . . . . . . . . . . . . . . . . . . . . . . . . . . . . . . . . . . . . . . . . . . . . . . . . . . 205
Journal Validation ... . . . . . . . . . . . . . . . . . . . . . . . . . . . . . . . . . . . . . . . . . . . . . . . . . . . . . . . . . . . . . . . . . . . . . . . . . . . . . . . . . . . . . 205
Viewing Automated Consolidation Journals .. . . . . . . . . . . . . . . . . . . . . . . . . . . . . . . . . . . . . . . . . . . . . . . . . . . . . . . . . . 206
Creating Journal Reports .. . . . . . . . . . . . . . . . . . . . . . . . . . . . . . . . . . . . . . . . . . . . . . . . . . . . . . . . . . . . . . . . . . . . . . . . . . . . . . . 207
Deleting Journals.. . . . . . . . . . . . . . . . . . . . . . . . . . . . . . . . . . . . . . . . . . . . . . . . . . . . . . . . . . . . . . . . . . . . . . . . . . . . . . . . . . . . . . . . 210
Working with Journals in Smart View ... . . . . . . . . . . . . . . . . . . . . . . . . . . . . . . . . . . . . . . . . . . . . . . . . . . . . . . . . . . . . . . . . 210
About JournalsDuring a financial period, you may need to adjust data after it is entered or loaded into base-level entities. Journals provide an audit trail of changes made in the application and indicatewhich users made adjustments and which accounts, entities, and time periods are affected.
With journals, you can:
187
l Create double-sided journal entries by using debits and credits
l Balance entries, or permit single-sided, out-of-balance entries
l Create recurring journals that are repeated for a number of future periods
l Create auto-reversing journals that generate reversing entries in the next time period
l Use the journal approval process to provide accountability
After creating a journal, you submit it to your supervisor for approval before posting it to thedatabase.
Journal Security RolesThe journal tasks that you can perform depend on the role assigned to you by the administrator.If a journal task is not available to you, either it is disabled, or it is displayed with a messagealerting you that you do not have the rights to perform the action.
To open a journal, you must have Read access to one or more of the cells referenced in the lineitems. If you do not have Read access to the cells, journal reports display NOACCESS status forthese cells.
To edit a journal, you must have All access to the security class for the journal. To post a journal,you must have All access to the security classes of every dimension in the detail lines that usesecurity classes.
These default security roles pertain to journals:
l Journals Administrator (unrestricted journals access)
l Manage Templates
l Create Journals
l Create Unbalanced Journals
l Generate Recurring
l Read Journals
l Approve Journals
l Post Journals
Using Journal TemplatesYou can create a journal template to post adjustments that have common information, such asentities or accounts. Then you can use the template to create journals with similar information.
You can create two types of journal templates:
l Standard templates, which contain accounts and entities for adjustments that you enterfrequently. See “Creating Standard Journal Templates” on page 189.
188
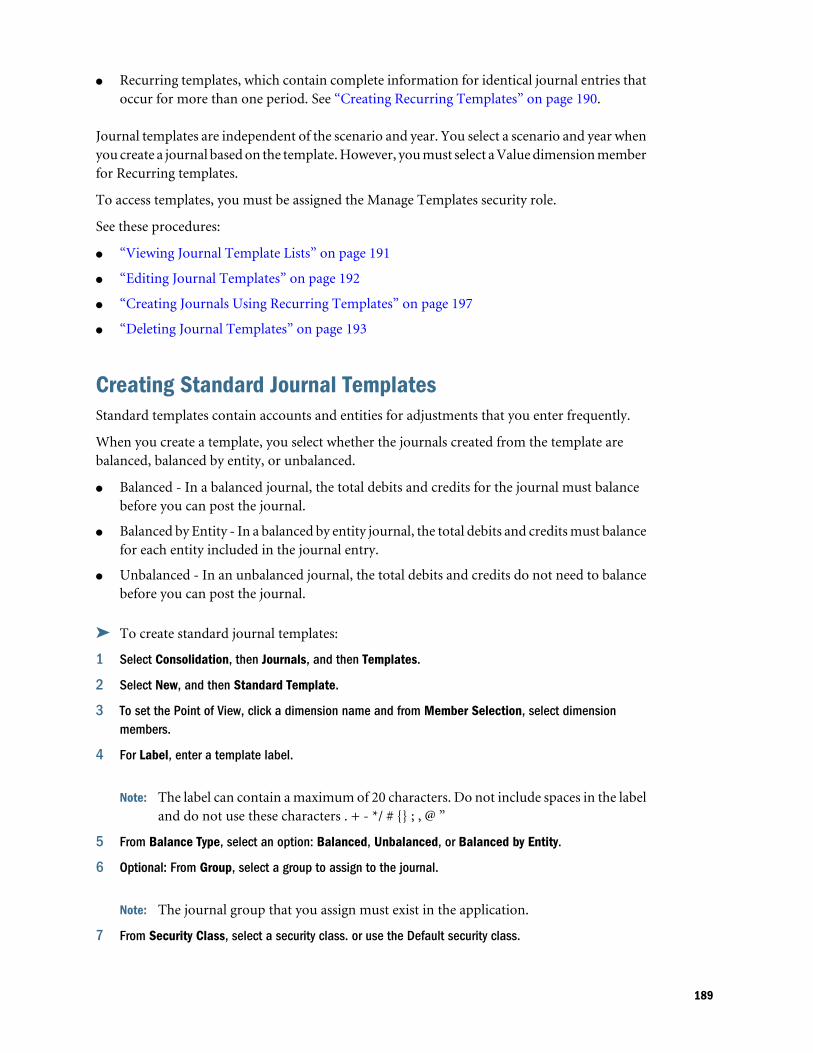
l Recurring templates, which contain complete information for identical journal entries thatoccur for more than one period. See “Creating Recurring Templates” on page 190.
Journal templates are independent of the scenario and year. You select a scenario and year whenyou create a journal based on the template. However, you must select a Value dimension memberfor Recurring templates.
To access templates, you must be assigned the Manage Templates security role.
See these procedures:
l “Viewing Journal Template Lists” on page 191
l “Editing Journal Templates” on page 192
l “Creating Journals Using Recurring Templates” on page 197
l “Deleting Journal Templates” on page 193
Creating Standard Journal TemplatesStandard templates contain accounts and entities for adjustments that you enter frequently.
When you create a template, you select whether the journals created from the template arebalanced, balanced by entity, or unbalanced.
l Balanced - In a balanced journal, the total debits and credits for the journal must balancebefore you can post the journal.
l Balanced by Entity - In a balanced by entity journal, the total debits and credits must balancefor each entity included in the journal entry.
l Unbalanced - In an unbalanced journal, the total debits and credits do not need to balancebefore you can post the journal.
ä To create standard journal templates:
1 Select Consolidation, then Journals, and then Templates.
2 Select New, and then Standard Template.
3 To set the Point of View, click a dimension name and from Member Selection, select dimensionmembers.
4 For Label, enter a template label.
Note: The label can contain a maximum of 20 characters. Do not include spaces in the labeland do not use these characters . + - */ # {} ; , @ ”
5 From Balance Type, select an option: Balanced, Unbalanced, or Balanced by Entity.
6 Optional: From Group, select a group to assign to the journal.
Note: The journal group that you assign must exist in the application.
7 From Security Class, select a security class. or use the Default security class.
189
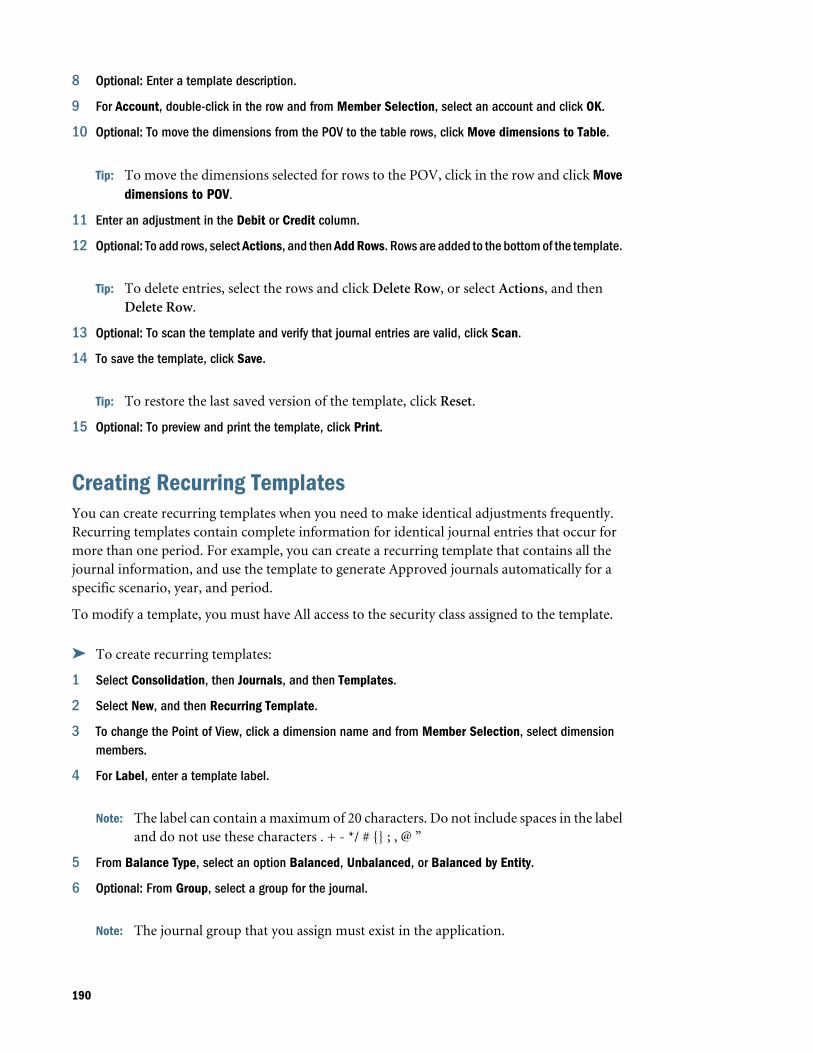
8 Optional: Enter a template description.
9 For Account, double-click in the row and from Member Selection, select an account and click OK.
10 Optional: To move the dimensions from the POV to the table rows, click Move dimensions to Table.
Tip: To move the dimensions selected for rows to the POV, click in the row and click Movedimensions to POV.
11 Enter an adjustment in the Debit or Credit column.
12 Optional: To add rows, select Actions, and then Add Rows. Rows are added to the bottom of the template.
Tip: To delete entries, select the rows and click Delete Row, or select Actions, and thenDelete Row.
13 Optional: To scan the template and verify that journal entries are valid, click Scan.
14 To save the template, click Save.
Tip: To restore the last saved version of the template, click Reset.
15 Optional: To preview and print the template, click Print.
Creating Recurring TemplatesYou can create recurring templates when you need to make identical adjustments frequently.Recurring templates contain complete information for identical journal entries that occur formore than one period. For example, you can create a recurring template that contains all thejournal information, and use the template to generate Approved journals automatically for aspecific scenario, year, and period.
To modify a template, you must have All access to the security class assigned to the template.
ä To create recurring templates:
1 Select Consolidation, then Journals, and then Templates.
2 Select New, and then Recurring Template.
3 To change the Point of View, click a dimension name and from Member Selection, select dimensionmembers.
4 For Label, enter a template label.
Note: The label can contain a maximum of 20 characters. Do not include spaces in the labeland do not use these characters . + - */ # {} ; , @ ”
5 From Balance Type, select an option Balanced, Unbalanced, or Balanced by Entity.
6 Optional: From Group, select a group for the journal.
Note: The journal group that you assign must exist in the application.
190
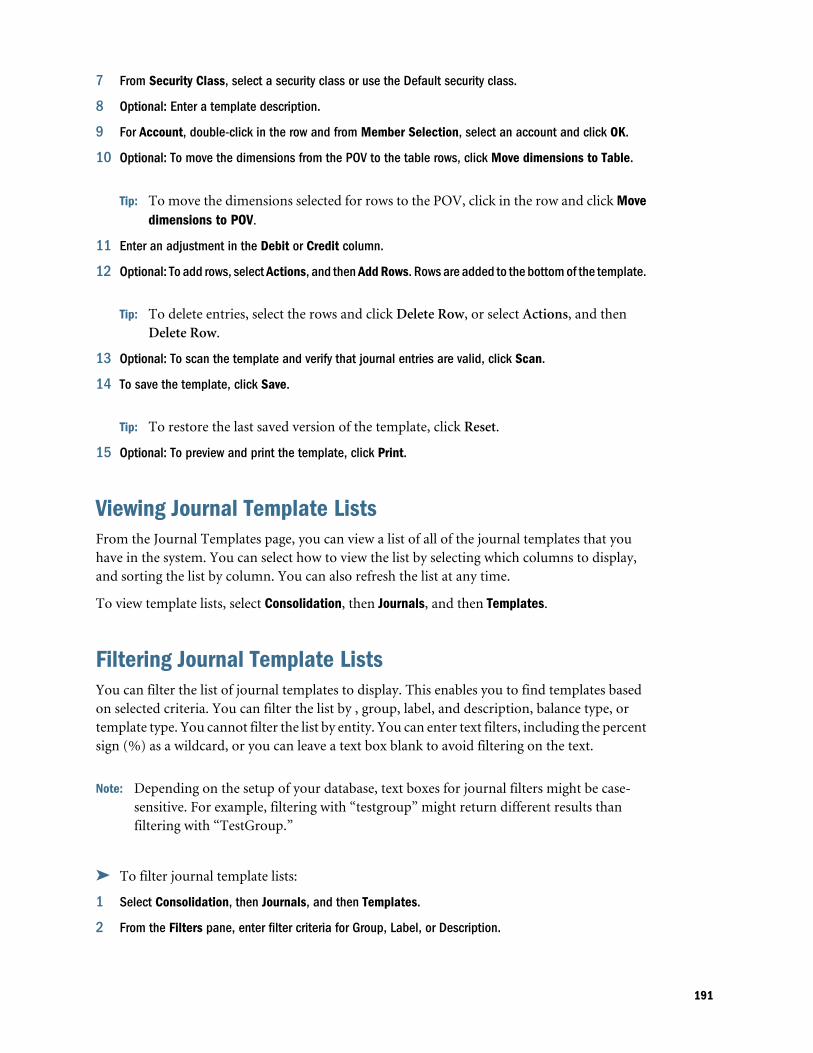
7 From Security Class, select a security class or use the Default security class.
8 Optional: Enter a template description.
9 For Account, double-click in the row and from Member Selection, select an account and click OK.
10 Optional: To move the dimensions from the POV to the table rows, click Move dimensions to Table.
Tip: To move the dimensions selected for rows to the POV, click in the row and click Movedimensions to POV.
11 Enter an adjustment in the Debit or Credit column.
12 Optional: To add rows, select Actions, and then Add Rows. Rows are added to the bottom of the template.
Tip: To delete entries, select the rows and click Delete Row, or select Actions, and thenDelete Row.
13 Optional: To scan the template and verify that journal entries are valid, click Scan.
14 To save the template, click Save.
Tip: To restore the last saved version of the template, click Reset.
15 Optional: To preview and print the template, click Print.
Viewing Journal Template ListsFrom the Journal Templates page, you can view a list of all of the journal templates that youhave in the system. You can select how to view the list by selecting which columns to display,and sorting the list by column. You can also refresh the list at any time.
To view template lists, select Consolidation, then Journals, and then Templates.
Filtering Journal Template ListsYou can filter the list of journal templates to display. This enables you to find templates basedon selected criteria. You can filter the list by , group, label, and description, balance type, ortemplate type. You cannot filter the list by entity. You can enter text filters, including the percentsign (%) as a wildcard, or you can leave a text box blank to avoid filtering on the text.
Note: Depending on the setup of your database, text boxes for journal filters might be case-sensitive. For example, filtering with “testgroup” might return different results thanfiltering with “TestGroup.”
ä To filter journal template lists:
1 Select Consolidation, then Journals, and then Templates.
2 From the Filters pane, enter filter criteria for Group, Label, or Description.
191
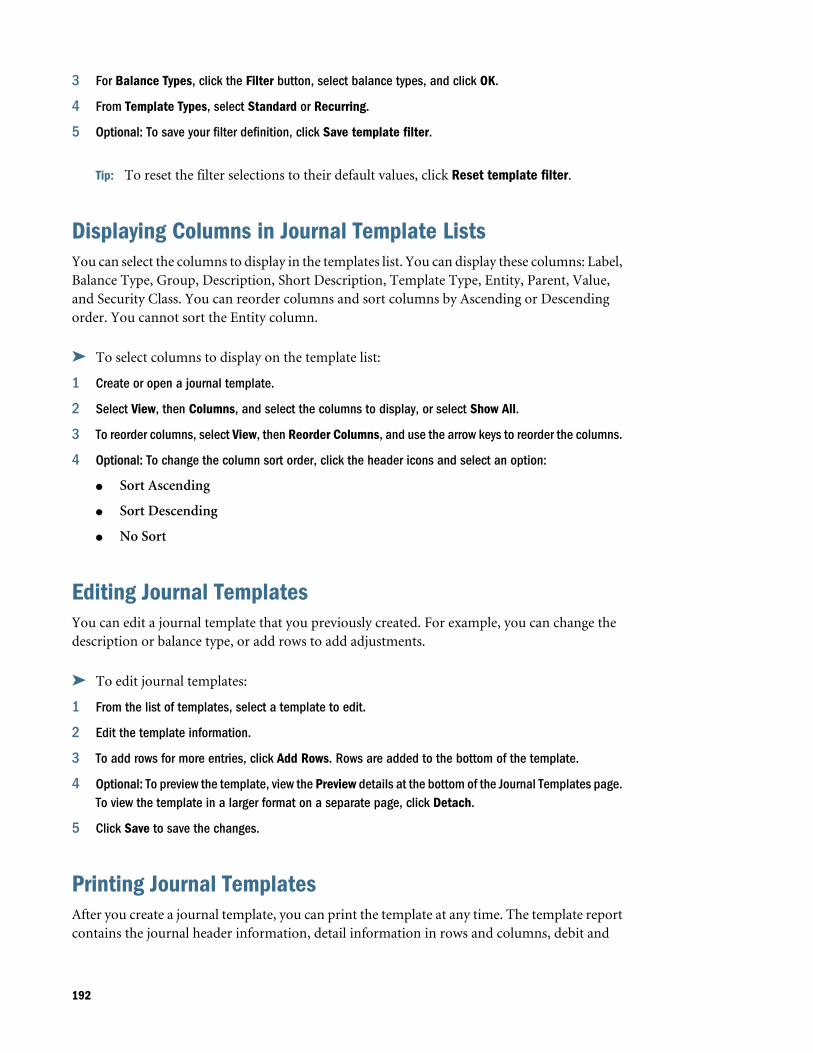
3 For Balance Types, click the Filter button, select balance types, and click OK.
4 From Template Types, select Standard or Recurring.
5 Optional: To save your filter definition, click Save template filter.
Tip: To reset the filter selections to their default values, click Reset template filter.
Displaying Columns in Journal Template ListsYou can select the columns to display in the templates list. You can display these columns: Label,Balance Type, Group, Description, Short Description, Template Type, Entity, Parent, Value,and Security Class. You can reorder columns and sort columns by Ascending or Descendingorder. You cannot sort the Entity column.
ä To select columns to display on the template list:
1 Create or open a journal template.
2 Select View, then Columns, and select the columns to display, or select Show All.
3 To reorder columns, select View, then Reorder Columns, and use the arrow keys to reorder the columns.
4 Optional: To change the column sort order, click the header icons and select an option:
l Sort Ascending
l Sort Descending
l No Sort
Editing Journal TemplatesYou can edit a journal template that you previously created. For example, you can change thedescription or balance type, or add rows to add adjustments.
ä To edit journal templates:
1 From the list of templates, select a template to edit.
2 Edit the template information.
3 To add rows for more entries, click Add Rows. Rows are added to the bottom of the template.
4 Optional: To preview the template, view the Preview details at the bottom of the Journal Templates page.To view the template in a larger format on a separate page, click Detach.
5 Click Save to save the changes.
Printing Journal TemplatesAfter you create a journal template, you can print the template at any time. The template reportcontains the journal header information, detail information in rows and columns, debit and
192
credit information, variance, and line descriptions as they appear on the screen. The commentsat the bottom of the report correspond to the line detail in the journal template.
ä To print journal templates:
1 From the list of templates, open the template to print.
2 Click Print.
The template opens in a new browser window.
3 Click File, and then Print.
Deleting Journal TemplatesYou can delete journal templates that you no longer need. For example, if you have a journaltemplate for adjustments to an account, and you remove that account from your chart ofaccounts, you can delete the template for those adjustments.
ä To delete journal templates:
1 From the list of templates, select the template to delete and click Delete, or select Actions, and thenDelete.
2 At the system prompt, click Yes.
Managing Journal PeriodsBefore you can work with journals, you must open the time periods for the journals. By default,all periods have an initial status of Unopened. You can open and close periods at any time, butyou cannot change an opened period to unopened.
See “Viewing Periods” on page 193 and “Opening and Closing Periods” on page 194.
Note: To manage journal periods, you must have the Administrator or Journals Administratorsecurity role.
Viewing PeriodsYou can filter the list of journal periods by selecting a scenario and year and by selecting theperiod status; for example, Opened, Closed, or Unopened.
ä To view periods:
1 Select Consolidation, then Journals, and then Periods.
2 From Scenario and Year, select a scenario and year for which to view periods.
193

Opening and Closing PeriodsBefore you can post journals, you must open the time periods for each scenario to which youwant to post. You cannot post journals to an unopened or closed period.
By default, all periods have an initial status of Unopened. You can open and close periods at anytime, but you cannot change an opened period to unopened.
You cannot close a period if there are unposted auto-reversals in the period. If you close a periodthat contains approved journals, a warning message is displayed.
ä To open or close periods:
1 Select Consolidation, then Journals, and then Periods.
2 For Scenario and Year, select members of the periods that you want to open.
3 Select the periods to open or close.
4 Take one of these actions:
l To open the selected periods, click Open, or select Actions, and then Open.
l To close the selected periods, click Close, or select Actions, and then Close.
Processing JournalsAfter you set up journals, you can enter journal information and process journals. See theseprocedures:
l “Creating Journals” on page 195
l “Scanning Journals” on page 198
l “Viewing Journal Lists” on page 200
l “Editing Journals” on page 200
l “Submitting Journals” on page 202
l “Unsubmitting Journals” on page 202
l “Approving Journals” on page 203
l “Rejecting Journals” on page 203
l “Posting Journals” on page 203
l “Unposting Journals” on page 204
l “Reviewing Journals” on page 205
l “Creating Journal Reports” on page 207
l “Deleting Journals” on page 210
194
Creating JournalsYou use journals to enter adjustments to account balances and maintain an audit trail of changesto your data. You create journals by entering a journal label and description, balance type, pointof view, and adjustment amounts. You can also enter a security class for the journals, and ajournal group that you can use to filter and sort journals. After you create a journal, its status isWorking.
Before you create a journal, check the point of view to be sure that the scenario, year, period,and value are the ones to which you want to enter adjustments. See “Opening and ClosingPeriods” on page 194.
You can drag and drop the Entity, ICP, and all Custom dimensions between the journal gridand the POV. If all dimensions in the journal detail lines are the same, the dimension is movedto the POV header information. If they are not the same, they remain in the journal details. TheAccount dimension remains on the detail line, and all other dimensions remain in the header.If you are creating a journal for a single entity, you can use the entity dimension from the POVheader without dragging it to the journal rows.
When you enter journal data, you can scan the journal and verify that the entries are valid. Inthis way, you can make any necessary changes before you post the journal. See “ScanningJournals” on page 198.
ä To create regular journals:
1 Select Consolidation, then Journals, and then Manage.
2 Select New, and then one of these options:
l To create a new journal, select Journal.
l To use a journal template, select Journal From Template, select the template, and clickOK.
3 To change the Point of View, click a dimension name and from Member Selection, select dimensionmembers.
4 For Label, enter a journal label.
Note: The label can contain a maximum of 20 characters. Do not use these characters: . +- */ # {} ; , @ ”
5 From Balance Type, select a type: Balanced, Unbalanced, or Balanced by Entity.
6 From Type, select Regular.
7 Optional: From Group, select a group for the journal.
Note: The journal group that you assign must exist in the application. See “Creating JournalGroups” on page 199.
8 From Security Class, select a security class or use the Default security class.
9 Optional: Enter a journal description.
10 For Account, select an account by using one of these methods and then click OK:
195

l Double-click in an Account row
l Click Pick Members
l Select Actions and then Pick Members
11 Optional: To move the dimensions from the POV to the table rows, click Move dimensions to Table.
Tip: To move the dimensions selected for rows to the POV, click in the row and click Movedimensions to POV.
12 Enter an adjustment in the Debit or Credit column.
13 Optional: To add rows, select Actions, and then Add Rows. Rows are added to the bottom of the journal.
Tip: To delete entries, select the rows and click Delete Row, or select Actions, and thenDelete Row.
14 Optional: Scan the journal and verify that the entries are valid. Save the journal and click Scan. See“Scanning Journals” on page 198.
15 To save the journal, click Save.
Creating Auto-reversing JournalsYou create auto-reversing journals to enter adjustments that you want to reverse in the nextperiod, for example, sales or expenses that are collected and paid in the next period. Auto-reversing journals affect two periods of data. You post an auto-reversing journal to adjust valuesin one period. When you post the auto-reversing journal, the system automatically creates ajournal (called an auto-reversal journal) to reverse those adjustments for the next period, andassigns it Approved status. You post this Approved journal for the reversal to take effect.
For example, you can create and post an auto-reversing journal that adjusts accounts in January.The system creates an auto-reversal journal that reverses those adjustments for February.
Because the auto-reversal journal is generated automatically by the system, it can only be postedor unposted. If you unpost an auto-reversal journal, its status changes from Posted back toApproved.
If you unpost the original auto-reversing journal that you created, the system deletes theautomatically-generated auto-reversal journal for the next period. You cannot unpost an auto-reversing journal after its auto-reversal journal has been posted.
ä To create auto-reversing journals:
1 Select Consolidation, then Journals, and then Manage.
2 Select New, and then one of these options:
l To create a new journal, select Journal.
l To use a journal template, select Journal From Template, select the template, and clickOK.
196
3 To change the Point of View, click a dimension name and from Member Selection, select dimensionmembers.
4 For Label, enter a journal label.
Note: The label can contain a maximum of 20 characters. Do not use these characters: . +- */ # {} ; , @ ”
5 From Balance Type, select a type: Balanced, Unbalanced, or Balanced by Entity.
6 From Type, select Auto-reversing.
7 Optional: From Group, select a group for the journal.
Note: The journal group that you assign must exist in the application. See “Creating JournalGroups” on page 199.
8 From Security Class, select a security class or use the Default security class.
9 Optional: Enter a journal description.
10 For Account, select an account by using one of these methods and then click OK:
l Double-click in an Account row
l Click Pick Members
l Select Actions and then Pick Members
11 Optional: To move the dimensions from the POV to the table rows, click Move dimensions to Table.
Tip: To move the dimensions selected for rows to the POV, click in the row and click Movedimensions to POV.
12 Enter an adjustment in the Debit or Credit column.
13 Optional: To add rows to the journal, select Actions, and then Add Rows. Rows are added to the bottomof the journal.
Tip: To delete entries, select the rows and click Delete Row, or select Actions, and thenDelete Row.
14 Optional: Scan the journal and verify that the entries are valid. Save the journal and click Scan. See“Scanning Journals” on page 198.
15 To save the journal, click Save.
Creating Journals Using Recurring TemplatesYou can use a recurring template to create journals automatically. When you generate a journalfrom a recurring template, you receive a confirmation message that the journal has beengenerated. The status of the journal is Approved.
To create a journal using a recurring template, you must be assigned the Generate Recurringsecurity role. You must also have All access to the security class assigned to the template.
197
The system uses the security class assigned to the template as the security class for the journal.If you need to modify the security class assignment for the journal, you must reject the journaland then resubmit it. To edit a journal, you must have All access to the security class assignedto the journal. To modify the template, you must have All access to the security class assignedto the template.
ä To create journals using recurring templates:
1 Select Consolidation, then Journals, and then Templates.
2 Open a recurring template from which to create a journal.
3 Click Generate.
4 Select a scenario, year, and period for which to generate the journal, and click OK.
Scanning JournalsAfter you enter journal data, you can scan the journal to verify that all entries are valid. The scanprocess enables you to identify errors and make any necessary changes before you post thejournal.
When you run a scan, if the journal contains errors, a separate window displays the scan resultsby row number. If all of the entries are valid, no message is displayed.
ä To scan journals:
1 Create or open a journal.
2 Click Scan.
Journal StatusThe journal status indicates the current state of the journal. The status of a journal changes whenyou create, submit, approve, reject, or post the journal.
Table 23 Journal Statuses
Status Description
Working Journal is created. It has been saved, but it can be incomplete. For example, it might need to have a label or single entityassigned.
Submitted Journal is submitted for approval.
Approved Journal is approved for posting.
Rejected Journal is rejected or unposted.
Posted Journal adjustments are posted to the database.
198
The journal actions that are available depend on the journal status. For example, if the journalhas a status of Approved, the only actions available are Reject or Post.
Managing Journal GroupsYou can create journal groups to help classify journals by type, and use the groups to filter journallists. To create a journal group, you must be the application owner or be assigned theAdministrator or Journals Administrator security role.
You can also load journals group during a journals load. When you create a journal and specifya journal group, the system validates the group against the list of groups and displays an errormessage if the group that you specify is invalid.
See these procedures:
l “Creating Journal Groups” on page 199
l “Deleting Journal Groups” on page 199
Creating Journal GroupsYou can create a journal group if you are the application owner or are assigned the Administratoror Journals Administrator security role.
When you create journal groups, the list of groups is displayed in alphabetical order.
ä To create journal groups:
1 Select Consolidation, then Journals, and then Groups.
2 Click Create, or select Actions, and then Create.
3 For Name, enter a group name.
Note: Group labels can contain up to 30 alphanumeric characters and spaces and cannotuse these special characters: # * @ + - / . , ; " { }
4 Optional: For Description, enter a group description.
Note: Group descriptions can contain up to 255 alphanumeric characters and spaces.
5 Click Create.
Deleting Journal GroupsYou can delete a journal group if you are the application owner or are assigned the Administratoror Journals Administrator security role, and if the group is not being used by other users.
ä To remove journal groups:
1 Select Consolidation, then Journals, and then Groups.
199

2 Take one of these actions:
l Select one or more journal groups to delete and click Delete Selected, or select Actions,and then Delete Selected.
l To delete all journal groups, click Delete All, or select Actions, and then Delete All.
Viewing Journal ListsThe journals list displays the label, status, entity, short description, and group of all of the journalsin the system. You can sort the list of journals. You can select which columns to display, sort thelist by column, or sort it by alphabetical ascending or descending order. If you select to sort byentity, the journals display multiple times for multiple-entity journals. You can also refresh thelist at any time.
ä To select journal columns to display on the list:
1 Select Consolidation, then Journals, and then Manage.
2 From the journal list, click View, then Columns, and then select the columns to display, or select ShowAll.
3 Optional: To show or hide columns, select View, then Columns, then Manage Columns, and use thearrow keys to move columns to the Hidden or Visible column lists.
4 Optional: To change the column sort order, click the header icons and select an option:
l Sort Ascending
l Sort Descending
l No Sort
Editing JournalsYou can edit a journal that you previously created. For example, you can change the descriptionof a journal, add adjustments, or change the balance type.
You can edit only Working, Submitted, and Rejected journals. You cannot edit Approved orPosted journals. You must have All security access to the security class for a journal to edit thejournal. See the Oracle Hyperion Financial Management Administrator's Guide.
ä To edit journals:
1 Select Consolidation, then Journals, and then Manage.
2 To change the Point of View, click a dimension name and from Member Selection, select dimensionmembers.
3 From the list of journals, select a journal with a status of Working, Submitted, or Rejected.
4 Click Edit, or select Actions and then Edit, or double-click a journal row.
5 Edit the journal as needed.
200
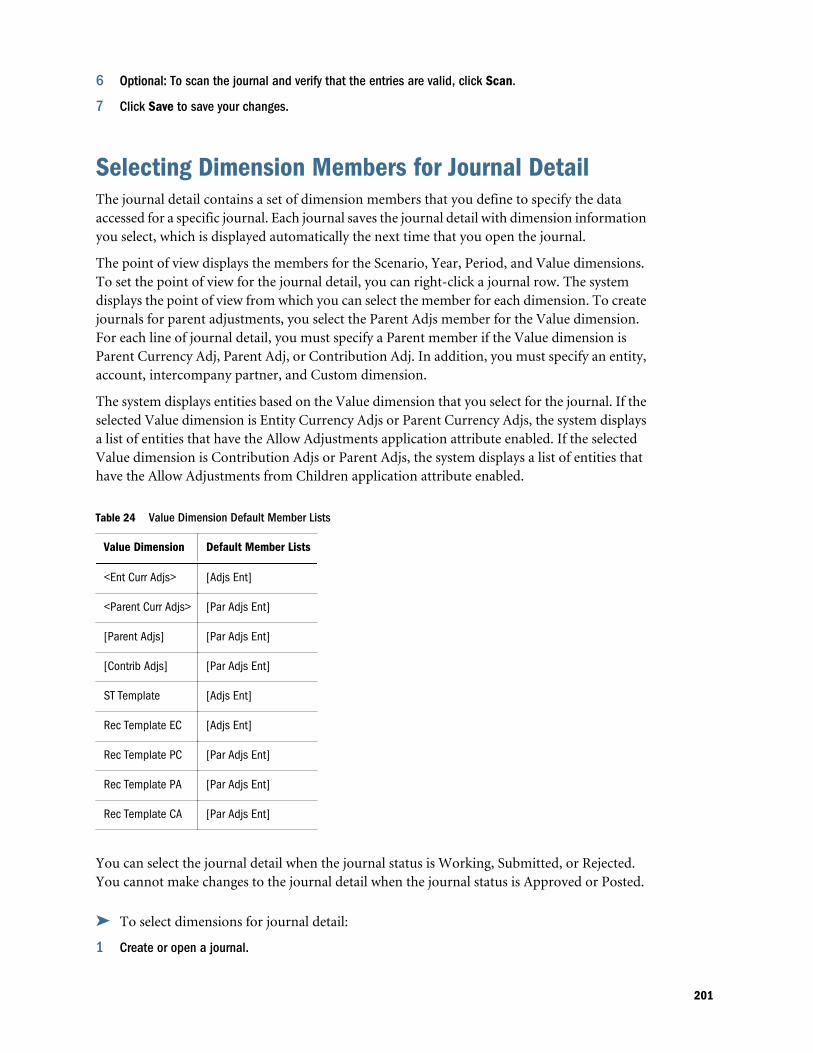
6 Optional: To scan the journal and verify that the entries are valid, click Scan.
7 Click Save to save your changes.
Selecting Dimension Members for Journal DetailThe journal detail contains a set of dimension members that you define to specify the dataaccessed for a specific journal. Each journal saves the journal detail with dimension informationyou select, which is displayed automatically the next time that you open the journal.
The point of view displays the members for the Scenario, Year, Period, and Value dimensions.To set the point of view for the journal detail, you can right-click a journal row. The systemdisplays the point of view from which you can select the member for each dimension. To createjournals for parent adjustments, you select the Parent Adjs member for the Value dimension.For each line of journal detail, you must specify a Parent member if the Value dimension isParent Currency Adj, Parent Adj, or Contribution Adj. In addition, you must specify an entity,account, intercompany partner, and Custom dimension.
The system displays entities based on the Value dimension that you select for the journal. If theselected Value dimension is Entity Currency Adjs or Parent Currency Adjs, the system displaysa list of entities that have the Allow Adjustments application attribute enabled. If the selectedValue dimension is Contribution Adjs or Parent Adjs, the system displays a list of entities thathave the Allow Adjustments from Children application attribute enabled.
Table 24 Value Dimension Default Member Lists
Value Dimension Default Member Lists
<Ent Curr Adjs> [Adjs Ent]
<Parent Curr Adjs> [Par Adjs Ent]
[Parent Adjs] [Par Adjs Ent]
[Contrib Adjs] [Par Adjs Ent]
ST Template [Adjs Ent]
Rec Template EC [Adjs Ent]
Rec Template PC [Par Adjs Ent]
Rec Template PA [Par Adjs Ent]
Rec Template CA [Par Adjs Ent]
You can select the journal detail when the journal status is Working, Submitted, or Rejected.You cannot make changes to the journal detail when the journal status is Approved or Posted.
ä To select dimensions for journal detail:
1 Create or open a journal.
201
2 To change the Point of View, click a dimension name and from Member Selection, select a member forthe scenario, year, period, and value.
3 Click OK.
Tip: To select dimension members from an open journal, click Pick Members, or from ajournal row, right-click and select Pick Members, select the members, and click OK.
Copying and Pasting Journal CellsYou can copy and paste the information in the journals grid from one cell to another to createjournal entries.
ä To copy or paste journal rows:
1 Create or open a journal.
2 Select a row in the journals grid.
3 To copy the information in a row and store it on the clipboard, click Copy Row, or select Actions, andthen Copy Row.
4 Select the row to which to paste the values.
5 To paste the information from the clipboard to the selected row, click Paste Row, or select Actions, andthen Paste Row.
Submitting JournalsAfter creating journals and entering journal data, you must submit them to your supervisor forapproval before posting them to the database. You can submit a journal when you create it, orsubmit it later by selecting it from the list of available journals.
You can submit journals one at a time or in batches. After you submit a journal, the statuschanges to Submitted. A reviewer then approves or rejects the journal, and if it is approved, youcan post it.
ä To submit journals:
1 On the Manage Journals page, set the journal point of view.
2 From the list of journals, select the Working or Rejected journal to submit.
3 Click Submit, or select Actions, and then Submit.
Unsubmitting JournalsYou can unsubmit a journal that you previously submitted. When you unsubmit a journal, thestatus reverts from Submitted to Working.
202
ä To unsubmit journals:
1 On the Manage Journals page, set the journal point of view.
2 Select the submitted journal to unsubmit.
3 Click Unsubmit, or select Actions, and then Unsubmit.
Approving JournalsAfter you submit a journal, you can approve it for posting. You can approve a journal from theEdit Journal tab after you create and submit it, or you can approve it later by selecting it fromthe journals list.
You can approve journals one at a time or in batches. After you approve a journal, the statuschanges to Approved and the journal cannot be edited.
ä To approve journals:
1 On the Manage Journals page, set the journal point of view.
2 Select the submitted journal to approve.
3 Click Approve, or select Actions, and then Approve.
Rejecting JournalsAfter a journal is submitted for approval, or approved, you can reject it. You can reject journalsone at a time or in batches. After you reject a journal, the status changes to Rejected.
ä To reject journals:
1 On the Manage Journals page, set the journal point of view.
2 Select the submitted or approved journal to reject.
3 Click Reject, or select Actions, and then Reject.
Posting JournalsYou can post a journal after it is approved. You can post a journal after you submit and approveit, or you can post it later by selecting it from the list of available journals.
The scenario view to which a journal is posted depends on the setting for the Scenario attribute“ZeroViewForAdj.” If this attribute is set to Periodic, the journal is posted to the Periodic value.If this attribute is set to YTD, the journal is posted to the YTD value.
You can post journals one at a time or in batches. You must have the journal period open beforeyou can post, and you must have All access to the security classes of every entity for the detaillines.
203
Your ability to post a journal also depends on the process level of the data in the journal. Forexample, if you have a process management security role of Reviewer 2 and the data that thejournal affects is at Process Level 6, you cannot post the journal. See “Process Levels” on page213.
When you post adjustments from a journal, the adjustment values are stored in the specifiedadjustment member. These four Value dimension members are valid for posting journals: EntityCurrency Adjustments, Parent Currency Adjustments, Parent Adjustments, and ContributionAdjustments.
You can post a journal to a specific parent and child combination (node) by using one of theseValue dimensions:
l Parent Adjs - Applied to the node before consolidation.
l Contribution Adjs - Applied to the contribution when determining the contribution total.
Note: Node adjustments are posted in the currency of the parent.
If more than one journal is posted to the Entity Currency Adjs member for the same account,the results are cumulative. The total from the current journal is added to or subtracted to fromthe existing total in Entity Currency Adjs.
When you post a journal, the system recalculates the account balances so that the database reflectsthe adjustments. The journal status changes to Posted, and you can view the adjustment in adata grid.
Note: Do not delete or rename a posted journal, as this will result in unresolved data for theadjustment values that the journal had created.
ä To post journals:
1 On the Manage Journals page, set the journal point of view.
2 Select the journals to post.
You cannot post previously posted journals.
3 Click Post, or select Actions, and then Post.
Unposting JournalsYou can unpost a journal after it is posted. For example, suppose you post several journals withadjustments to an entity, and you receive new data for that entity. You can unpost the journals,load the new data, and post the journals again.
When you unpost a journal, the journal status changes to Rejected. When you unpost an auto-reversal journal, the journal status changes back to Approved.
204
ä To unpost journals:
1 On the Manage Journals page, set the journal point of view.
2 Select the posted journal to unpost.
3 Click Unpost, or select Actions, and then Unpost.
Reviewing JournalsYou can review journals that have been created, edited, submitted, unsubmitted, approved,rejected, or posted. You can review journals before they are posted, or after they are posted andbefore you run a journal report.
ä To review journals:
1 From the Manage Journals page, view the list of journals.
2 Click a journal to open and review it.
Journal ValidationWhen you submit, approve, or post a journal, the system validates the journal. The system checksfor these conditions:
l The period must be a base period for the scenario’s base frequency.
l When you post or unpost a journal, the period must be opened.
l The Value dimension must be an adjustment dimension.
l The journal must have the appropriate status for the action to be performed.
l Line items must exist for the journal.
l The entity and the parent must be valid dimensions. For regular journals, the entity mustallow adjustments. If you are posting a journal to Parent Currency Adjs, you must enter avalid parent. The entity must be a child of the specified parent for the journal entity.
l If you are posting a journal to a node, the parent must allow adjustments for child entities.The entity must be a child of the specified parent.
l Node journals must have valid parent-entity combinations. The system also checks for theOrganization by Period application setting when you attempt to post node journals. Theentity must be active for the parent for the period in which you are posting.
l The account must be valid. It must be an Asset, Liability, Revenue, Expense, Balance, Flow,or Balance Recurring account. The account must be a base account and cannot be designatedas calculated in metadata. It cannot be calculated through a roll-up process; the accountcannot have children.
l All other dimensions must be valid. The ICP dimension cannot be ICP Top, ICP Entities,or blank, but you can select ICP None. If an ICP is specified, the account must be set up asan ICP account.
205
l The Custom dimensions cannot be designated as calculated in metadata and cannot becalculated through a roll-up process; the Custom dimensions cannot have children.
l For a balanced journal, the total debits must equal the total credits. For a balanced- by-entityregular journal, the total debits must equal the total credits for each entity. For a balanced-by-entity node journal, the total debits must equal the total credits for each node and theparent and children entities must have the same currency. If the Value dimension is EntityCurrency, the parent entities in the journal can have different currencies, but they must havethe same currency as their children entities.
l All dimension intersections must be valid.
l The subcube of dimensions containing the line item cell cannot be locked.
l The cell cannot be designated as a NoInput cell in rules.
Viewing Automated Consolidation JournalsAutomated consolidation transactions are automatically created as part of the consolidationprocess. You can view the transactions as automated consolidation journals, extract the journalsto external files, and print them through journal reports.
To generate automated consolidation journals, the administrator must specify the Nature valuein the rule file for the consolidation process. See the Oracle Hyperion Financial ManagementAdministrator's Guide.
Automated consolidation journals generated from the consolidation process are displayed inthe [Elimination] or [Proportion] Value dimension and provide a way to report the amount inthe child entity that is rolled up to the parent entity during consolidation. The list ofconsolidation journals is sorted by Parent Entity and Entity and grouped by Parent Entity,Current Entity, and Nature value.
Note: You cannot edit, scan, submit, approve, reject, post, unpost, or delete automatedconsolidation journals. You can only open and view journals, run reports, and extractjournals.
To run a journal report on automated consolidation journals, see “Creating Journal Reports”on page 207. To print a report, see “Printing Journal Reports” on page 209.
ä To view automated consolidation journals:
1 From Manage Journals, select the Point of View as follows:
l Select the Scenario, Year, and Period for the consolidation data that you want to view.
l For the Value member, select [Proportion] or [Elimination], and then click OK.
The system displays a list of journals generated during the consolidation process.
2 Click on a journal to view the transactions.
206
Note: You can view transactions based on your security rights to the members in the Pointof View and to the journal security class. You must also have the Read Journals orJournals Administrator security role.
Creating Journal ReportsYou can create journal reports to check the status of journals and to review journal adjustments.You can set journal report properties, select columns to display, preview, save, and print thereports.
See “Saving Journal Reports” on page 209, “Printing Journal Reports” on page 209, and“Printing Reports for Individual Journals” on page 209.
Note: You can format and print the report using HFM-Format, PDF, RTF, HTML, or XLS. See“Formatting System Reports” on page 142.
When you run journal reports using elimination or proportional values, eliminationjournals or proportional journals are created automatically, which may result in errormessages due to the large volume of journals. To avoid this problem, you should filter thelist of journals to display on the reports using the Journals Group as the filter.
ä To create journal reports:
1 Select Consolidation, then Journals, and then Reports.
2 Click New, then Reports, and then Journal, or select Actions, then New, then Reports, and thenJournal.
3 From the Point of View, select a Scenario, Year, Period, and Value for the report.
Note: To run a journal report for automated consolidation journals, you must select[Elimination] or [Proportion] as the Value member.
4 Select columns and display options for the report.
See “Displaying Columns for the Report” on page 207.
Displaying Columns for the ReportYou can select the columns to display on a journal report, and sort them by Ascending orDescending order.
You can specify whether to display the total for the column. If you select the Totals option, asubtotal is displayed for the amounts in the column.
You can select whether to repeat the field information in every row. For example, if you selectthe Repeat option for the entity label, the system displays the entity label for all of the selectedjournals for that entity. If you do not select the Repeat option, the system displays the entitylabel for the first journal but not the labels for subsequent journals with the same label.
207
ä To select columns to display on the report:
1 From the journal report, click View, then Columns, and then select the columns to display, or selectShow All.
2 Optional: To show or hide columns, select View, then Columns, then Manage Columns, and use thearrow keys to move columns to the Hidden or Visible column lists.
3 Optional: To reorder columns, select View, then Reorder Columns, use the Up and Down arrows toreorder the columns and click OK.
4 Optional: To change the column sort order, click the header icons and select an option:
l Ascending
l Descending
l No Sort
5 Optional: To repeat the information in every row, click Repeat or select Actions, and then Repeat.
6 Optional: To display the subtotal for the amounts, click Totals, or select Actions, and then Totals.
Tip: To restore the columns to their default settings, click Restore Defaults.
Filtering Journal Lists for ReportsYou can filter the list of journals to display on the report. You can enter text filters, and use thepercent sign (%) as a wildcard, or you can leave a text box blank to avoid filtering.
Note: Depending on the setup of your database, text boxes for journal filters might be case-sensitive. For example, filtering with “testgroup” might return different results thanfiltering with “TestGroup.”
ä To filter journal lists:
1 From a journal report, expand the Row Filter list.
2 To filter by entity, enter an entity name or click Browse and select an entity.
3 To filter by group, label, or description, enter text or use the percent sign (%) as a wildcard.
4 To filter by status, select one or more options: Working, Submitted, Approved, Rejected, or Posted, orselect Show All.
5 To filter by type, select one or more options: Regular, Auto-reversing, Auto-reversed, or select ShowAll.
6 To filter by balance type, select one or more options: Balanced, Unbalanced, or Balanced by Entity,or select Show All.
Tip: To restore the list to its default status, click Restore Defaults.
7 Optional: To save your filter definition, click Save current filter.
208
Saving Journal ReportsAfter you select the options for a journal report, you can save the report.
ä To save a journal report:
1 Create or open a journal report.
2 Click Save or Save As, enter the report information and click Save.
Printing Journal ReportsYou can preview and print reports that you created and saved on the local client computer orthe server.
ä To print journal reports:
1 From the list of journal reports, select the report to print.
2 Select the columns to display on the report.
3 Click Print/Preview.
The report is displayed in a separate browser window.
4 To print the journal report, select File, then Print.
Printing Reports for Individual JournalsIn addition to printing reports on multiple journals, you can print a report on an individualjournal. This can be useful for auditing purposes. The report contains the journal headerinformation, detail information in rows and columns, debit and credit information, variance,and line descriptions as they are displayed on the screen. The comments at the bottom of thereport correspond to the line detail in the journal.
Note: When you print a report on a selected journal from within the journal, you cannot selectthe columns or format. For instructions on selecting options for reports, see “PrintingJournal Reports” on page 209.
ä To print reports for individual journals:
1 Select Consolidation, then Journals, and then Manage.
2 Open the journal for which to print a report.
3 Click Print.
The Journal report opens in a new browser window.
4 Click File, and then Print.
209

Deleting JournalsYou can delete unposted journals that you no longer need. You cannot delete Approved or Postedjournals, because that would result in unresolved data for the adjustment values that the journalhad created.
ä To delete journals:
1 From the journals list, select the journal to delete, and click Delete, or select Actions, and thenDelete.
2 At the system prompt, click Yes.
Working with Journals in Smart ViewYou can open and work with journals in Smart View. To use Smart View, you must have itinstalled. See the Oracle Enterprise Performance Management System Installation andConfiguration Guide
For detailed procedures on using journals in Smart View, see the Oracle Smart View for OfficeUser's Guide.
You can perform these journal tasks in Oracle Smart View for Office:
l Open a journal and view its properties, such as Status, Type, Balance Type, Group, andSecurity Class
l Create a new blank journal or create a journal using a standard or recurring template
l Create a journal using the right-click option from data grids or data forms
l Edit and save journals
l Submit, Approve, Post, Unpost, and Delete journals
l Open an Entity Detail Report from data grids or data forms, and from an Entity Detail report,click on a journal to drill down for further details
210
12Using Process Management
In This Chapter
About Process Management .. . . . . . . . . . . . . . . . . . . . . . . . . . . . . . . . . . . . . . . . . . . . . . . . . . . . . . . . . . . . . . . . . . . . . . . . . . . 211
Starting Process Management .. . . . . . . . . . . . . . . . . . . . . . . . . . . . . . . . . . . . . . . . . . . . . . . . . . . . . . . . . . . . . . . . . . . . . . . . . 214
Using Process Control . . . . . . . . . . . . . . . . . . . . . . . . . . . . . . . . . . . . . . . . . . . . . . . . . . . . . . . . . . . . . . . . . . . . . . . . . . . . . . . . . . . 215
Promoting Process Units .. . . . . . . . . . . . . . . . . . . . . . . . . . . . . . . . . . . . . . . . . . . . . . . . . . . . . . . . . . . . . . . . . . . . . . . . . . . . . . . 228
Submitting Process Units.. . . . . . . . . . . . . . . . . . . . . . . . . . . . . . . . . . . . . . . . . . . . . . . . . . . . . . . . . . . . . . . . . . . . . . . . . . . . . . . 229
Approving Process Units.. . . . . . . . . . . . . . . . . . . . . . . . . . . . . . . . . . . . . . . . . . . . . . . . . . . . . . . . . . . . . . . . . . . . . . . . . . . . . . . . 230
Rejecting Process Units .. . . . . . . . . . . . . . . . . . . . . . . . . . . . . . . . . . . . . . . . . . . . . . . . . . . . . . . . . . . . . . . . . . . . . . . . . . . . . . . . 231
Signing Off on a Process Unit . . . . . . . . . . . . . . . . . . . . . . . . . . . . . . . . . . . . . . . . . . . . . . . . . . . . . . . . . . . . . . . . . . . . . . . . . . 232
Publishing Process Units . . . . . . . . . . . . . . . . . . . . . . . . . . . . . . . . . . . . . . . . . . . . . . . . . . . . . . . . . . . . . . . . . . . . . . . . . . . . . . . 232
Locking and Unlocking Process Units .. . . . . . . . . . . . . . . . . . . . . . . . . . . . . . . . . . . . . . . . . . . . . . . . . . . . . . . . . . . . . . . . . 233
Viewing Process Management History .. . . . . . . . . . . . . . . . . . . . . . . . . . . . . . . . . . . . . . . . . . . . . . . . . . . . . . . . . . . . . . . . 234
Email Alerts for Process Control . . . . . . . . . . . . . . . . . . . . . . . . . . . . . . . . . . . . . . . . . . . . . . . . . . . . . . . . . . . . . . . . . . . . . . . . 234
Process Management Validation ... . . . . . . . . . . . . . . . . . . . . . . . . . . . . . . . . . . . . . . . . . . . . . . . . . . . . . . . . . . . . . . . . . . . . 235
Process Management and Consolidation... . . . . . . . . . . . . . . . . . . . . . . . . . . . . . . . . . . . . . . . . . . . . . . . . . . . . . . . . . . . 236
About Process ManagementProcess management is the management of the review and approval process of financial data.You can use process management to submit budget plans and have them approved efficiently,and to transfer ownership of data. In a centralized environment, you can also use processmanagement to provide review control and to ensure data privacy.
For the purpose of review, data is organized into process units. A process unit is the combinationof data for a specific Scenario, Year, Period, Entity, and Value dimension. In the Valuedimension, you can select Local, Translated, or Contribution data. For example, a process unitcould be a combination of data for Actual, 2014, January, WestSales, and USD. During the reviewcycle, you use process management to submit, promote, approve, reject, and publish processunits.
Enabling Process ManagementBefore you can use Process Management, the administrator must enable process managementusing the SupportSubmissionPhase attribute for the Scenario dimension in the metadata file.When this attribute is enabled, Process Management is available for the specified scenarios.
211
When you select a cell, Process Management is available only for the input frequency of thescenario. For example, if the input frequency is months, Process Management is available whenyou select January, but is not available when you select a quarter, such as Q1. If you select multiplecells and your selection includes a data cell in which Process Management is not supported, theProcess Management option is not available.
If Process Management is enabled for a scenario, the system performs validation checks for eachprocess unit as the data moves from one level to the next. Validation checks are defined by theadministrator to ensure that accounts are in balance. See “Process Management Validation” onpage 235.
Accessing Process UnitsYou can access data in a process unit based on a combination of these items:
l Your assigned security role.
See “Process Management Security Roles” on page 212.
l The current review level of the process unit.
See “Process Levels” on page 213.
l Your access rights to the process unit.
Access rights can be None, Read, Promote, or All.
m None - you have no access to the process unit.
m Read - you can only view data for the process unit.
m Promote - you can view data and also promote an entity even if you do not have Allaccess.
m All - you have complete access to the process unit, including the ability to view and tomodify data.
Process Management Security RolesIf Process Management is enabled for any scenario in the application, the applicationadministrator must assign specific security roles to each user. An administrator can assign oneor more security roles to users. See the Oracle Hyperion Financial Management Administrator'sGuide.
To start Process Management, you must be assigned the Review Supervisor security role. Afterthe Review Supervisor starts a process unit and promotes it to First Pass status, other users canreview it, enter or change data, and promote it to the next level. If you have the Submitter securityrole, you can also skip review levels and promote the data to the Submitted status.
You can have up to 12 security roles in an application.
212
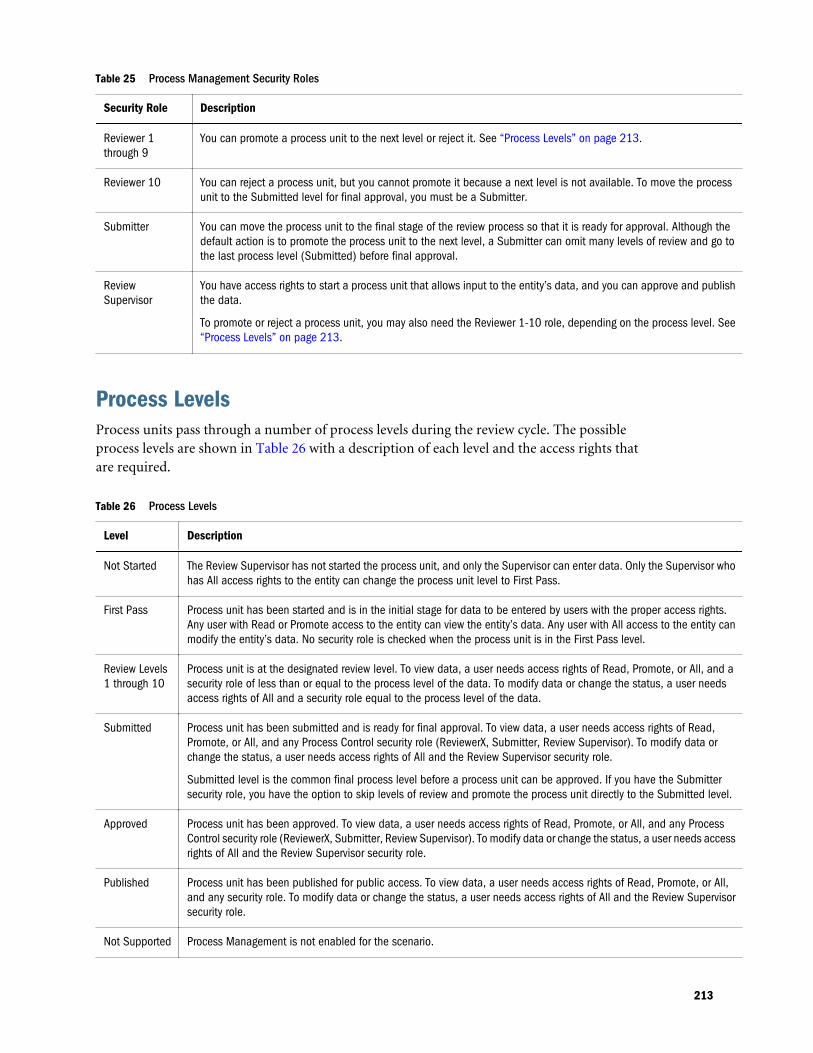
Table 25 Process Management Security Roles
Security Role Description
Reviewer 1through 9
You can promote a process unit to the next level or reject it. See “Process Levels” on page 213.
Reviewer 10 You can reject a process unit, but you cannot promote it because a next level is not available. To move the processunit to the Submitted level for final approval, you must be a Submitter.
Submitter You can move the process unit to the final stage of the review process so that it is ready for approval. Although thedefault action is to promote the process unit to the next level, a Submitter can omit many levels of review and go tothe last process level (Submitted) before final approval.
ReviewSupervisor
You have access rights to start a process unit that allows input to the entity’s data, and you can approve and publishthe data.
To promote or reject a process unit, you may also need the Reviewer 1-10 role, depending on the process level. See“Process Levels” on page 213.
Process LevelsProcess units pass through a number of process levels during the review cycle. The possibleprocess levels are shown in Table 26 with a description of each level and the access rights thatare required.
Table 26 Process Levels
Level Description
Not Started The Review Supervisor has not started the process unit, and only the Supervisor can enter data. Only the Supervisor whohas All access rights to the entity can change the process unit level to First Pass.
First Pass Process unit has been started and is in the initial stage for data to be entered by users with the proper access rights.Any user with Read or Promote access to the entity can view the entity’s data. Any user with All access to the entity canmodify the entity’s data. No security role is checked when the process unit is in the First Pass level.
Review Levels1 through 10
Process unit is at the designated review level. To view data, a user needs access rights of Read, Promote, or All, and asecurity role of less than or equal to the process level of the data. To modify data or change the status, a user needsaccess rights of All and a security role equal to the process level of the data.
Submitted Process unit has been submitted and is ready for final approval. To view data, a user needs access rights of Read,Promote, or All, and any Process Control security role (ReviewerX, Submitter, Review Supervisor). To modify data orchange the status, a user needs access rights of All and the Review Supervisor security role.
Submitted level is the common final process level before a process unit can be approved. If you have the Submittersecurity role, you have the option to skip levels of review and promote the process unit directly to the Submitted level.
Approved Process unit has been approved. To view data, a user needs access rights of Read, Promote, or All, and any ProcessControl security role (ReviewerX, Submitter, Review Supervisor). To modify data or change the status, a user needs accessrights of All and the Review Supervisor security role.
Published Process unit has been published for public access. To view data, a user needs access rights of Read, Promote, or All,and any security role. To modify data or change the status, a user needs access rights of All and the Review Supervisorsecurity role.
Not Supported Process Management is not enabled for the scenario.
213
Note: The ability to modify data also includes the ability to post journals.
Process Levels for Summary Time PeriodsThe process level that is displayed for summary time periods corresponds to the process levelfor the last period in that interval. For example, if your fiscal year begins in July, the systemdisplays the process level for September as the process level for Quarter 1. If you select multiplecells for Quarter 1 – for example, July, August, and September - and update the process level,the system displays an error message when it attempts to process Q1, because Q1 is not an inputperiod. If you update the process level for the last period in the interval, September, the level isreflected for Q1.
The security access of upper level periods (Quarter 1 in this example) depends on the mostrestrictive security right of the lower periods (July, August and September). If, for example, aReview Level 1 user does not have access to all child periods, (in this case, July and August), thesystem does not display the information of the parent period (Quarter 1).
If the process management status for July and August is Published before the September processstarts, the Review Level 1 user would have read-only access rights to July and August, andtherefore read-only access rights to Quarter 1.
Review Levels and Submission PhasesIf you are using Submission Phases in process management, the review level for each processunit is stored by submission phase. You must promote each submission phase independently.The rules for promotion to each review level still apply, and in addition, there is the followingdependency based on the submission phase number:
The review level of a submission phase must be less than or equal to the review level of all thelower numbered phases in that subcube.
For example, if an account is in Submission Phase 1 and the Review Level for Submission Phase1 is Review Level 4, you cannot promote accounts in Submission Phase 2 to a review level greaterthan 4. If Balance Sheet and Profit/Loss accounts are Submission Phase 1 accounts, andSubmission Phase 1 has Review Level 4 status, you cannot promote Supplemental accounts,which are Submission Phase 2 accounts, to a review level greater than 4. In the same way, youcannot reject a process unit if it violates the submission phase rule.
For information on defining submission phases, see the Oracle Hyperion Financial ManagementAdministrator's Guide.
Starting Process ManagementThe Review Supervisor must start a process unit before other users can enter data or performany process management actions. The Review Supervisor or an administrative user are the onlyusers who can access a process unit when the status is Not Started. See “Process ManagementSecurity Roles” on page 212.
214
After a Review Supervisor starts a process unit, its process level changes to First Pass.
You can start Process Management from a data grid or from the Process Control module. Whenyou start a process unit from the Process Control module, you can select a data view and filterand sorting options. See “Using Process Control” on page 215.
ä To start Process Management from Process Control:
1 Select Consolidation, then Data, and then Process Control.
2 From the POV bar, click a dimension name and from Member Selection, select dimension members forthe Scenario, Year, and Period.
3 Optional: To change the TopMember for the entity list, from Member Selection, select an entity.
4 From Display Options, Grid Settings, select a Data View:
l Local
l Translation
l Contribution
See “Selecting the Data View” on page 217.
5 Optional: Select the options for the grid, views, and columns.
See “Setting Process Control Display Options” on page 219.
6 Select the process unit to start.
7 Click Manage Process and select Start.
8 Optional: Enter a comment in Comments, or attach a document for more detail.
See “Attaching Documents to a Process Unit” on page 226.
9 Optional: If you are using the Tree view, select Apply Action to Selected Entity Only or Apply Action toSelected Entity and Descendants.
10 Click OK.
ä To start Process Management from a data grid:
1 From a data grid, select the cell for which to start Process Management.
2 Right-click and select Manage Process, and then select Start.
3 Optional: Enter a comment in Comments, or attach a document for more detail.
4 Click OK.
Using Process ControlYou can use Process Control to perform Process Management tasks as an alternative to usingdata grids. The Process Control module provides a centralized place for review and consolidationprocesses, and enables you to easily view process validation. It also provides calculation andjournal status, and the ability to drill down into details for journals, consolidation status, and
215
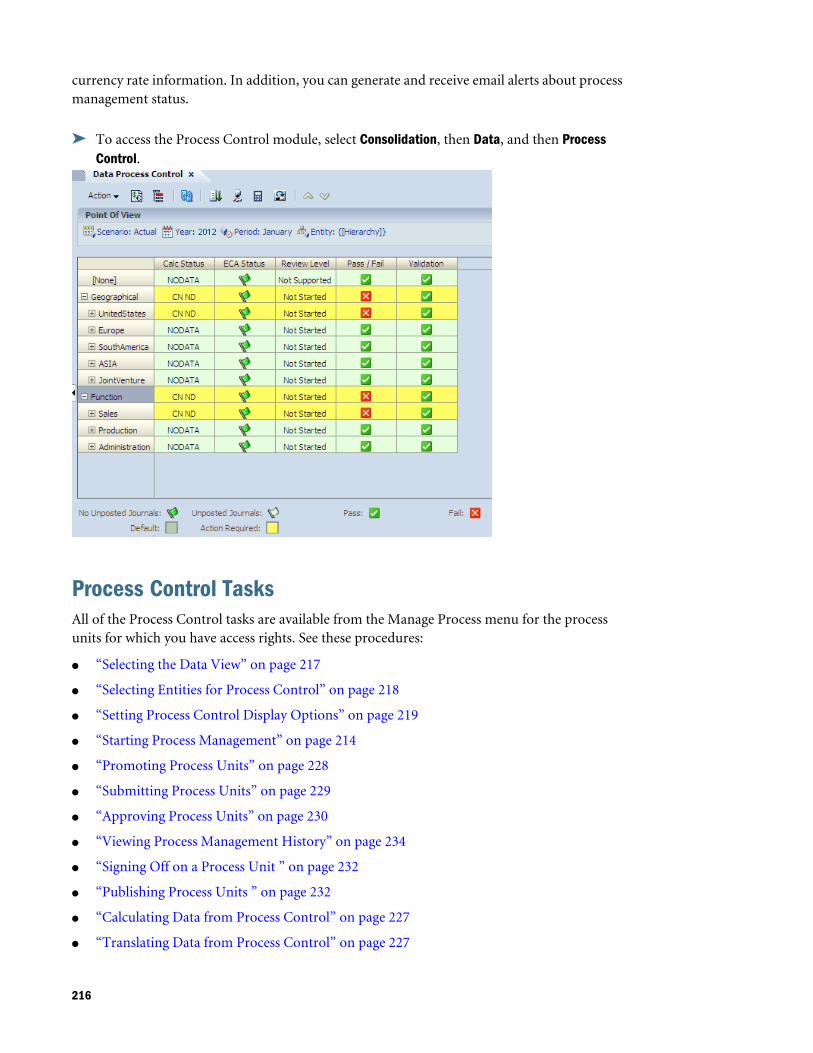
currency rate information. In addition, you can generate and receive email alerts about processmanagement status.
ä To access the Process Control module, select Consolidation, then Data, and then ProcessControl.
Process Control TasksAll of the Process Control tasks are available from the Manage Process menu for the processunits for which you have access rights. See these procedures:
l “Selecting the Data View” on page 217
l “Selecting Entities for Process Control” on page 218
l “Setting Process Control Display Options” on page 219
l “Starting Process Management” on page 214
l “Promoting Process Units” on page 228
l “Submitting Process Units” on page 229
l “Approving Process Units” on page 230
l “Viewing Process Management History” on page 234
l “Signing Off on a Process Unit ” on page 232
l “Publishing Process Units ” on page 232
l “Calculating Data from Process Control” on page 227
l “Translating Data from Process Control” on page 227
216
l “Consolidating Data from Process Control” on page 227
l “Viewing the Process Control Summary” on page 221
l “Viewing the Pass or Fail Status” on page 222
l “Viewing Validation Account Detail” on page 223
l “Viewing Calculation Status” on page 224
l “Viewing Journal Status” on page 225
l “Viewing Rate Data” on page 225
l “Viewing Manage Ownership Information” on page 226
l “Attaching Documents to a Process Unit” on page 226
Selecting the Data ViewThe Process Control page displays a point of view with these dimensions: Scenario, Year, andPeriod. You can change any of these dimensions.
You can select these data views for Process Control: Local, Translation, or Consolidation. Thesystem uses the corresponding Value dimension in the point of view and displays the calculationstatus and journal status based on the data view that you select. In addition, the system uses thecorresponding Value dimension for the process unit validation. See “Viewing CalculationStatus” on page 224, “Viewing Journal Status” on page 225, and “Viewing Validation AccountDetail” on page 223.
Local ViewWhen the Local Data View is selected, the Calculation Status (Calc Status) column is based onthe Entity Currency Total member (Entity Curr Total) of the Value dimension. The JournalStatus column (ECA Status) is based on the Entity Currency Adjustment member (Entity CurrAdjs) of the Value dimension.
Translation ViewWhen the Translation Data View is selected, the Calculation Status (Calc Status) column is basedon the Parent Currency Total member (Parent Curr Total) of the Value dimension. The JournalStatus column (PCA Status) is based on the Parent Currency Adjustment member (Parent CurrAdjs) of the Value dimension.
Consolidation ViewWhen the Consolidation Data View is selected, the Calculation Status (Calc Status) column isbased on the Contribution Total member (Contribution Total) of the Value dimension. TheJournal Status columns (PA and CA Status) are based on the Parent Adjustment (Parent Adjs)and Contribution Adjustment (Contribution Adjs) members of the Value dimension.
217
Selecting Entities for Process ControlThe Process Control rows display the list of entities based on the selected TopMember of theentity. The entity list can be a user-defined list, or a system list such as Hierarchy, Descendant,Ancestors, Children, or Base. The TopMember text box is populated based on the entity thatyou are using in your point of view for the data grid. You can change the TopMember to filterthe list of entities.
If you select a Hierarchy entity list, you can display the entities in a Tree view or a list view. Ifthe entities are displayed in a Tree view, you can expand and collapse the hierarchy using theplus (+) and minus (-) signs next to the entity. When you use a Tree view, sorting and filteringare not available for rows. When you use a list view, sorting and filtering are available.
ä To select entities for Process Control:
1 Select Consolidation, then Data, and then Process Control.
2 From the POV bar, click a dimension name and from Member Selection, select dimension members forthe Scenario, Year, and Period.
3 Optional: To change the TopMember for the entity list, from Member Selection, select an entity.
4 From Display Options, Grid Settings, select a Data View:
l Local
l Translation
l Contribution
See “Selecting the Data View” on page 217.
5 Optional: Select the options for the grid, views, and columns.
See “Setting Process Control Display Options” on page 219.
Selecting Multiple Rows for Process ControlYou can select multiple rows on which to perform process management actions. You can selectcontiguous or noncontiguous rows, or all rows. When you perform a process managementaction, the action applies to all selected items.
ä To select multiple rows, from the Process Control page, use these options:
l To select contiguous rows, highlight a row and drag to select additional rows.
l To select noncontiguous rows, highlight a row, press and hold Ctrl, and select additionalrows.
l To select all rows, click the top left cell corner of the grid.
218
Setting Process Control Display OptionsYou can select options to display the list of entities and review levels. You can display thisinformation:
l Review Level, for example, Started, First Pass, Review Level 1, Approved. See “Process Levels”on page 213.
l Pass/Fail status, which displays whether the process unit is ready for promotion to the nextlevel. See “Viewing the Pass or Fail Status” on page 222.
l Validation status, which displays the validation status for the entity based on the amountstored in the Validation account for the entity. See “Viewing Validation Account Detail” onpage 223.
l Calculation status, for example, OK, NODATA, CH. See “Viewing Calculation Status” onpage 224.
l Journal status, which displays a red or green flag for the status of journals for the entity, suchas Entity Currency Adjustments, Parent Currency Adjustments, Parent Adjustments, orContribution Adjustments. See “Viewing Journal Status” on page 225.
The Process Control page also uses cell colors to indicate additional information about the data.See “Using Data Cell Colors to Determine Status” on page 74.
StyleYou can display entities in a flat list or as a Tree hierarchy format. You can only use a Tree viewif you select the Hierarchy system member list. All other member lists are displayed as a flat list.
When the entities are displayed in a Tree view, you can expand and collapse the hierarchy usingthe plus (+) and minus (-) signs next to the entity. When changing the process level in a Treeview, you can choose to apply the action to the current selected entity only or to the selectedentity and its descendants. Using the entity and descendants option allows you to perform anaction without having to manually expand the entire organization.
When the list is displayed in a Tree view, row sorting or filtering is unavailable.
Entity ViewYou can view entity information using the entity label, description, or both. The default settingis to display the label.
Show Active OnlyIf you are using an application set up for Organization by Period, you can display only the activedescendants for a parent entity.
219
FiltersWhen you use a list view, row sorting and filtering are available. For example, you can filter rowsbased on the review level and display all rows above or below a specific review level, such as alllevels above First Pass. You can sort rows by review levels in descending or ascending order.
You can filter rows by validation status, such as Pass Only or Fail Only. You can also filter rowsby calculation status, such as OK, CN, or TR. See “Viewing Calculation Status” on page 75.
After you set sorting and filtering options, the settings are displayed in tool tips for the columnson the Process Control page.
Period ViewYou can view one period or all periods. When you choose all periods, you can view status foronly one submission phase at a time, and you must choose to view either the Process ReviewLevel or Calculation Status. The selected information is displayed across the columns for all theperiods in the scenario.
Submission PhasesIf your application contains submission phases, you can select the submission phases for whichyou want to view status. You can also select the review and status information for which youwant to include columns.
Page SizeDepending on the entity list selection, it is possible to display many entities for Process Control.To minimize the performance issue with a large number of entities, you can select the numberof entities to display on the page.
ä To set process control display options:
1 From the Process Control page, Display Options, Grid Settings, select a Data View:
l Local
l Translation
l Contribution
See “Selecting the Data View” on page 217.
2 For Style, select Tree or List.
3 For Rows Per Page, enter the number of rows or use the default value of 1024.
4 For Entity View, select Label, Description, or Both.
5 For Period View, select Single or All.
6 For Review Level Columns, select one or more options: Review Level, Pass/Fail, or Validation.
7 For Status Columns, select one or more options: Calc Status or Journal Status.
220
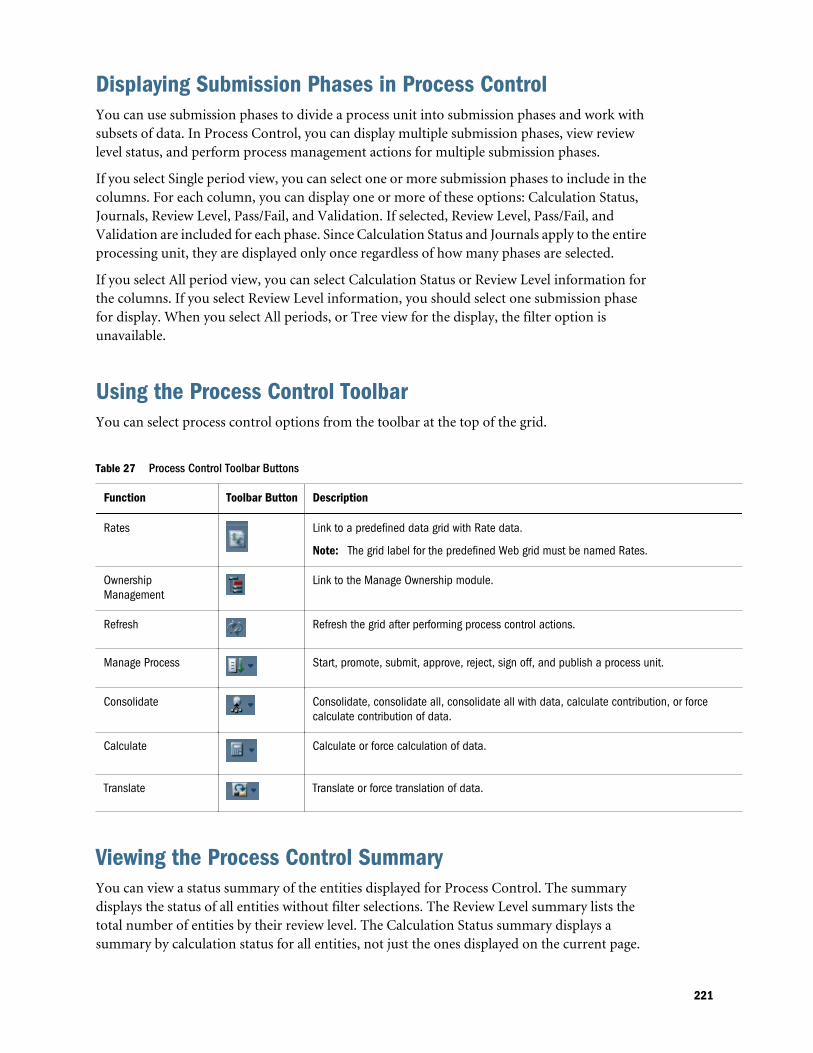
Displaying Submission Phases in Process ControlYou can use submission phases to divide a process unit into submission phases and work withsubsets of data. In Process Control, you can display multiple submission phases, view reviewlevel status, and perform process management actions for multiple submission phases.
If you select Single period view, you can select one or more submission phases to include in thecolumns. For each column, you can display one or more of these options: Calculation Status,Journals, Review Level, Pass/Fail, and Validation. If selected, Review Level, Pass/Fail, andValidation are included for each phase. Since Calculation Status and Journals apply to the entireprocessing unit, they are displayed only once regardless of how many phases are selected.
If you select All period view, you can select Calculation Status or Review Level information forthe columns. If you select Review Level information, you should select one submission phasefor display. When you select All periods, or Tree view for the display, the filter option isunavailable.
Using the Process Control ToolbarYou can select process control options from the toolbar at the top of the grid.
Table 27 Process Control Toolbar Buttons
Function Toolbar Button Description
Rates Link to a predefined data grid with Rate data.
Note: The grid label for the predefined Web grid must be named Rates.
OwnershipManagement
Link to the Manage Ownership module.
Refresh Refresh the grid after performing process control actions.
Manage Process Start, promote, submit, approve, reject, sign off, and publish a process unit.
Consolidate Consolidate, consolidate all, consolidate all with data, calculate contribution, or forcecalculate contribution of data.
Calculate Calculate or force calculation of data.
Translate Translate or force translation of data.
Viewing the Process Control SummaryYou can view a status summary of the entities displayed for Process Control. The summarydisplays the status of all entities without filter selections. The Review Level summary lists thetotal number of entities by their review level. The Calculation Status summary displays asummary by calculation status for all entities, not just the ones displayed on the current page.
221
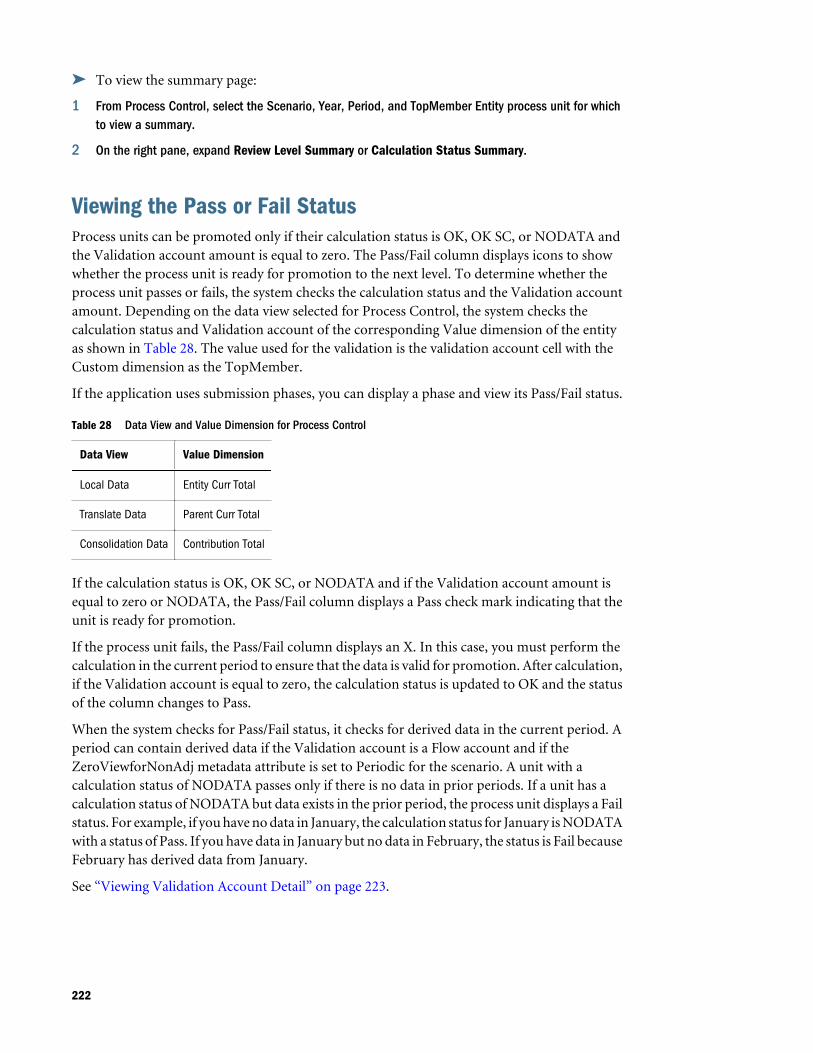
ä To view the summary page:
1 From Process Control, select the Scenario, Year, Period, and TopMember Entity process unit for whichto view a summary.
2 On the right pane, expand Review Level Summary or Calculation Status Summary.
Viewing the Pass or Fail StatusProcess units can be promoted only if their calculation status is OK, OK SC, or NODATA andthe Validation account amount is equal to zero. The Pass/Fail column displays icons to showwhether the process unit is ready for promotion to the next level. To determine whether theprocess unit passes or fails, the system checks the calculation status and the Validation accountamount. Depending on the data view selected for Process Control, the system checks thecalculation status and Validation account of the corresponding Value dimension of the entityas shown in Table 28. The value used for the validation is the validation account cell with theCustom dimension as the TopMember.
If the application uses submission phases, you can display a phase and view its Pass/Fail status.
Table 28 Data View and Value Dimension for Process Control
Data View Value Dimension
Local Data Entity Curr Total
Translate Data Parent Curr Total
Consolidation Data Contribution Total
If the calculation status is OK, OK SC, or NODATA and if the Validation account amount isequal to zero or NODATA, the Pass/Fail column displays a Pass check mark indicating that theunit is ready for promotion.
If the process unit fails, the Pass/Fail column displays an X. In this case, you must perform thecalculation in the current period to ensure that the data is valid for promotion. After calculation,if the Validation account is equal to zero, the calculation status is updated to OK and the statusof the column changes to Pass.
When the system checks for Pass/Fail status, it checks for derived data in the current period. Aperiod can contain derived data if the Validation account is a Flow account and if theZeroViewforNonAdj metadata attribute is set to Periodic for the scenario. A unit with acalculation status of NODATA passes only if there is no data in prior periods. If a unit has acalculation status of NODATA but data exists in the prior period, the process unit displays a Failstatus. For example, if you have no data in January, the calculation status for January is NODATAwith a status of Pass. If you have data in January but no data in February, the status is Fail becauseFebruary has derived data from January.
See “Viewing Validation Account Detail” on page 223.
222
ä To view the Pass/Fail status:
1 Open Process Control.
2 Select the entities for which to show status.
The Pass/Fail status is displayed in the Pass/Fail column.
Viewing Validation Account DetailThe Pass/Fail column is linked to the Validation Account Detail page, which enables you to viewthe supporting detail for the process unit, such as calculation status and Validation accountinformation. This page displays all children associated with the Validation account and anybalances in those accounts.
If the application uses submission phases, you can display a phase and view its validation detail.
When you drill down to the detail screen, this information is displayed:
l Calculation status
l Validation account amount
Depending on the Data View option that you selected for the process unit, the system displaysdifferent data values.
l If the Data View is Local Data, the system displays Entity Curr Total, Entity Curr Adjs andEntity Currency
l If the Data View is Translate Data, the system displays Parent Curr Total, Parent Curr Adjsand Parent Currency.
l If the Data View is Consolidation Data, the system displays Proportion, Elimination,Contribution Adjs and Contribution Total.
The Raw Data option displays the data in units. The Formatted Data option displays data in thescaled value based on the scale of the currency assigned to the entity.
For example, suppose the Entity dimension member, WestSales, displays an X in the Validationcolumn. To view more information, you can click the X in the column. The following figureshows the Validation account detail for the WestSales account.
223
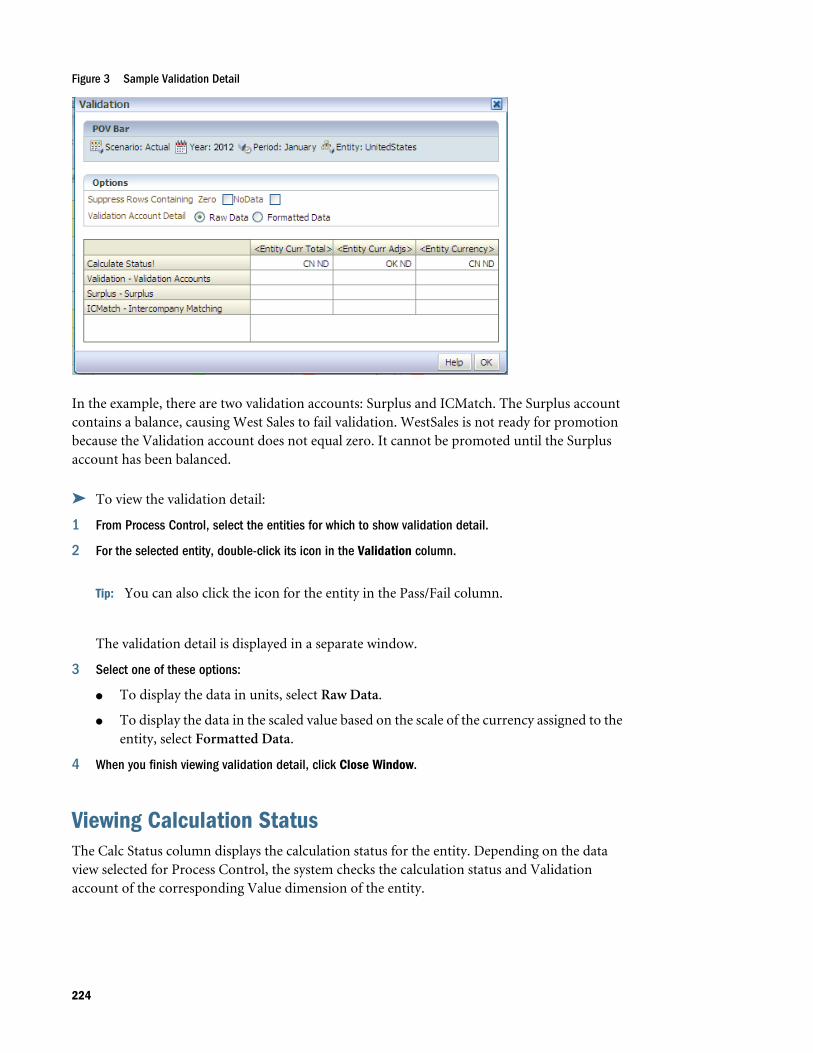
Figure 3 Sample Validation Detail
In the example, there are two validation accounts: Surplus and ICMatch. The Surplus accountcontains a balance, causing West Sales to fail validation. WestSales is not ready for promotionbecause the Validation account does not equal zero. It cannot be promoted until the Surplusaccount has been balanced.
ä To view the validation detail:
1 From Process Control, select the entities for which to show validation detail.
2 For the selected entity, double-click its icon in the Validation column.
Tip: You can also click the icon for the entity in the Pass/Fail column.
The validation detail is displayed in a separate window.
3 Select one of these options:
l To display the data in units, select Raw Data.
l To display the data in the scaled value based on the scale of the currency assigned to theentity, select Formatted Data.
4 When you finish viewing validation detail, click Close Window.
Viewing Calculation StatusThe Calc Status column displays the calculation status for the entity. Depending on the dataview selected for Process Control, the system checks the calculation status and Validationaccount of the corresponding Value dimension of the entity.
224
ä To view calculation status:
1 Open Process Control.
2 Select the entity TopMember for which to show calculation status.
The calculation status is displayed in the Calc Status column.
Viewing Journal StatusThe journal status column (ECA, PCA, PA, or CA) displays the status of journals for the entitiesin the selected entity list. The column title varies based on the member selected for data view:Local, Translation, or Contribution.
For Local data view, the column displays the status of the Entity Currency Adjustments (ECA).
For Translation data view, the column displays the status of the Parent Currency Adjustments(PCA).
For Consolidation data view, the system displays one column for the status of the ParentAdjustments (PA) and one column for the Contribution Adjustments (CA).
In the journal status column, a green flag indicates that there are no unposted journals. A redflag indicates that unposted journals must be posted for the entity.
When you hover over the cursor over the journal status flag, the system displays the number ofunposted journals to which the entity has security access. When you click the flag, the systemopens the Journals module so that you can view the unposted journals for the selected processunit. You can then post the journals that need posting.
Note: Only the list of unposted journals to which you have security access is displayed.
ä To view the journal status:
1 From Process Control, select the entity TopMember for which to show journal status.
The journal status is displayed in the ECA, PCA, PA, or CA Status column.
2 Optional: If the column displays a red flag indicating unposted journals for a process unit, click the flagto open the Journals module and view the unposted journals.
Viewing Rate DataFrom Process Control, you can link to a data grid to view rate data. You can then make anychanges to the rate directly from the data grid.
To use this link, you must have previously created a data grid named “Rates” that contains rateinformation. See Chapter 4, “Using Data Grids”.
ä To view rates:
1 From Process Control, select the process control unit for which to view rates.
225
2 From the toolbar, click Rates .
The system opens the Rates data grid that you previously defined. If you do not have a Ratesdata grid, an error message is displayed.
Viewing Manage Ownership InformationFrom Process Control, you can link to a manage ownership grid to view ownership information.See Chapter 7, “Managing Ownership”.
ä To view ownership information:
1 From Process Control, select the process control unit for which to view ownership managementinformation.
2 From the toolbar, click Ownership Management .
The system opens the Ownership Management grid that you previously defined. If you do nothave an Ownership Management grid, an error message is displayed.
Attaching Documents to a Process UnitFrom Process Control, you can attach one or more documents to cells for additional detail. Forexample, you can attach a Microsoft Word document, Excel spreadsheet, XSL, or RPT file. Toattach or extract any custom documents to or from the server, you must be assigned the ManageCustom Documents security role.
You can set a size limit for document attachments and a maximum number of documentattachments by user when you create an application. You set the limits in the AppSettingsattribute for the application metadata.
You can attach multiple documents; however, Oracle recommends that you do not attach morethan three documents to a cell. Each document should be smaller than 100K to limit theperformance effect on the database.
After you attach a document to a process unit, you can download the document, but you cannotdetach it from the process unit.
ä To attach a document to a cell:
1 From Process Control, select the process unit for which to attach a document.
2 Select a process unit action.
3 Click Add Row.
4 From the Attachments column, click Attach.
5 From your list of custom documents, select one or more documents to associate with the process unit,and click Attach.
226
Note: You cannot attach private documents.
The document is associated with the scenario, year, period, and entity combination and theprocess level.
Calculating Data from Process ControlIf you need to promote a process unit that does not have the correct status, you can calculate orforce calculation directly from Process Control if you have the appropriate security access to theprocess unit. See “Calculating Data” on page 97.
ä To calculate or force calculation:
1 From Process Control, select the process unit for which to calculate data.
2 Click Calculate , or right-click and select Calculate or Force Calculate.
Translating Data from Process ControlIf you need to promote a process unit that does not have the correct status, you can translate orforce translation directly from Process Control if you have the appropriate security access rightsfor the process unit. See “Translating Data” on page 98.
ä To translate or force translation:
1 From Process Control, select the process unit for which to translate data.
2 Click the Translate , or right-click and select Translate or Force Translate.
Consolidating Data from Process ControlIf you need to promote a process unit that does not have the correct status, you can consolidate,calculate contribution, or force a contribution calculation directly from Process Control if youhave the appropriate security access to the process unit. See “Consolidating Data” on page 100.
ä To consolidate data, calculate contribution or force a contribution calculation:
1 From Process Control, select the process unit for which to consolidate or calculate contribution.
2 Click Consolidate , or right-click and select Consolidate, Consolidate All, Consolidate All withData, Calculate Contribution, or Force Calculate Contribution.
Running Equity Pickup Calculations from Process ControlYou can run the Equity Pickup process or force it to run directly from Process Control if youhave the appropriate security access to the process unit. See “Calculating Equity Pickup
227
Adjustments” on page 137. To run EPU calculations, you must be assigned the ManageOwnership security role.
ä To run or force Equity Pickup calculations:
1 From Process Control, select the process unit for which to run or force equity pickup calculations.
2 Right-click and select Run EPU or Force EPU.
Promoting Process UnitsThe Process Management page displays the current level of the selected process unit, availableactions, and the promotion levels available depending on the current status and your securityrole.
To promote a process unit to the next process level, you must be assigned the appropriate securityrole and access rights for the process unit. For example, if the process unit is at Review Level 2,you must have the access right of All or Promote for the entity’s data, and you must be assignedthe role of Reviewer 2 to promote it. See “Process Management Security Roles” on page 212.
Note: When a process unit has a First Pass status, the system does not perform a check forsecurity roles. Any user who has All access to the entity can modify the data.
The process unit must have a calculation status of OK, OK SC, or NODATA, and a zero balancein the validation account before you can promote it.
When you promote the parent entity data to the next process level, validation checks areperformed to verify that the child entities are at the level to which you are trying to promote theparent. A parent can be promoted only to a level that is less than or equal to the lowest level ofits immediate children.
If your application uses phased submissions, when you select a cell, the system determines thesubmission phase that applies to the cell. There can only be one review status for each submissionphase, so when you promote the cell, you promote all the cells for that submission phase. Whenyou promote multiple cells in the data grid, the system determines all submission phases thatapply to those cells and promotes the phases at the same time, depending on the review leveldependency rules.
After you promote a process unit, its process level changes to the next process level. You canpromote a process unit up through Review Level 10, which is the last process level. When aprocess unit has a status of Review Level 10, you can submit it for approval. See “SubmittingProcess Units” on page 229.
Note: If you receive javascript errors during the promotion process, you might need to increasethe timeout setting for the Oracle Hyperion Reporting and Analysis proxy server. See theOracle Enterprise Performance Management System Installation and Configuration Guide.
228
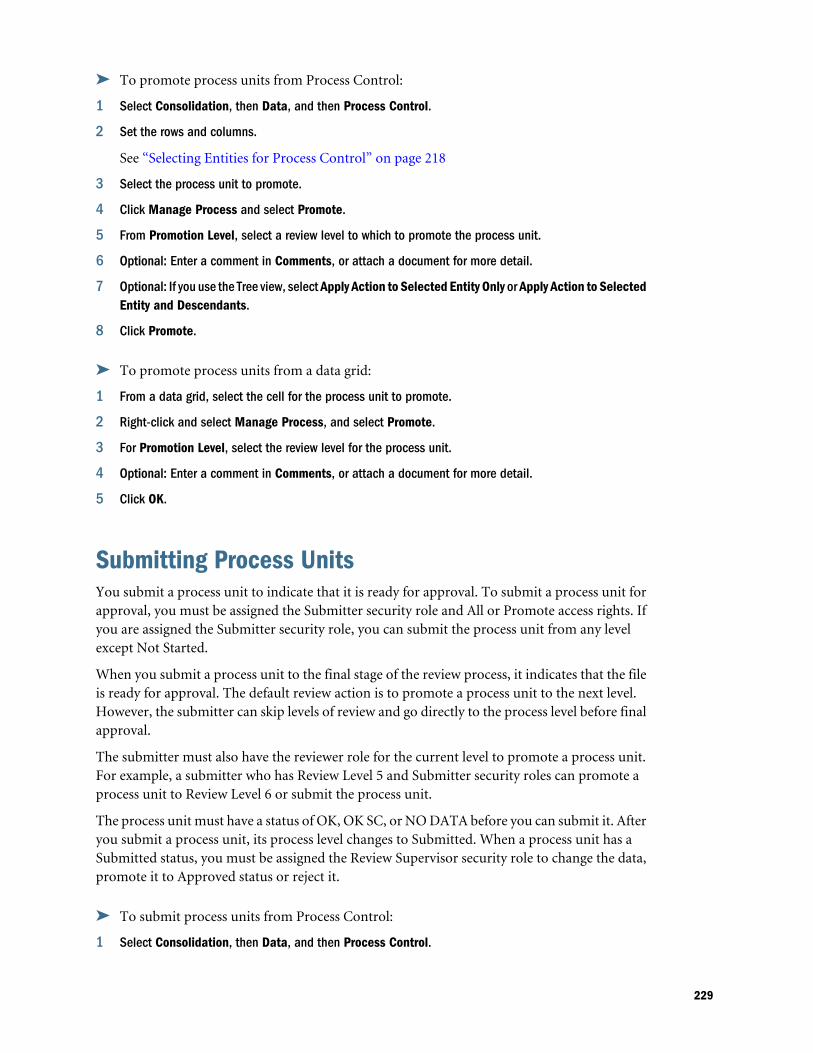
ä To promote process units from Process Control:
1 Select Consolidation, then Data, and then Process Control.
2 Set the rows and columns.
See “Selecting Entities for Process Control” on page 218
3 Select the process unit to promote.
4 Click Manage Process and select Promote.
5 From Promotion Level, select a review level to which to promote the process unit.
6 Optional: Enter a comment in Comments, or attach a document for more detail.
7 Optional: If you use the Tree view, select Apply Action to Selected Entity Only or Apply Action to SelectedEntity and Descendants.
8 Click Promote.
ä To promote process units from a data grid:
1 From a data grid, select the cell for the process unit to promote.
2 Right-click and select Manage Process, and select Promote.
3 For Promotion Level, select the review level for the process unit.
4 Optional: Enter a comment in Comments, or attach a document for more detail.
5 Click OK.
Submitting Process UnitsYou submit a process unit to indicate that it is ready for approval. To submit a process unit forapproval, you must be assigned the Submitter security role and All or Promote access rights. Ifyou are assigned the Submitter security role, you can submit the process unit from any levelexcept Not Started.
When you submit a process unit to the final stage of the review process, it indicates that the fileis ready for approval. The default review action is to promote a process unit to the next level.However, the submitter can skip levels of review and go directly to the process level before finalapproval.
The submitter must also have the reviewer role for the current level to promote a process unit.For example, a submitter who has Review Level 5 and Submitter security roles can promote aprocess unit to Review Level 6 or submit the process unit.
The process unit must have a status of OK, OK SC, or NO DATA before you can submit it. Afteryou submit a process unit, its process level changes to Submitted. When a process unit has aSubmitted status, you must be assigned the Review Supervisor security role to change the data,promote it to Approved status or reject it.
ä To submit process units from Process Control:
1 Select Consolidation, then Data, and then Process Control.
229
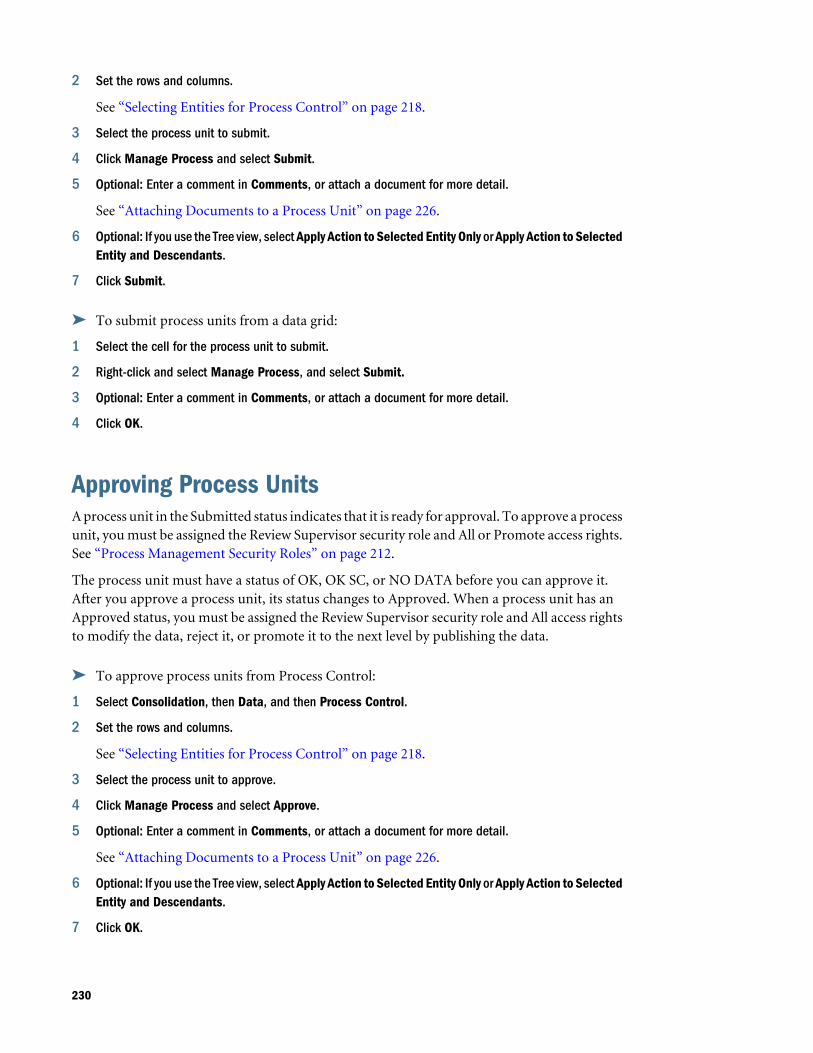
2 Set the rows and columns.
See “Selecting Entities for Process Control” on page 218.
3 Select the process unit to submit.
4 Click Manage Process and select Submit.
5 Optional: Enter a comment in Comments, or attach a document for more detail.
See “Attaching Documents to a Process Unit” on page 226.
6 Optional: If you use the Tree view, select Apply Action to Selected Entity Only or Apply Action to SelectedEntity and Descendants.
7 Click Submit.
ä To submit process units from a data grid:
1 Select the cell for the process unit to submit.
2 Right-click and select Manage Process, and select Submit.
3 Optional: Enter a comment in Comments, or attach a document for more detail.
4 Click OK.
Approving Process UnitsA process unit in the Submitted status indicates that it is ready for approval. To approve a processunit, you must be assigned the Review Supervisor security role and All or Promote access rights.See “Process Management Security Roles” on page 212.
The process unit must have a status of OK, OK SC, or NO DATA before you can approve it.After you approve a process unit, its status changes to Approved. When a process unit has anApproved status, you must be assigned the Review Supervisor security role and All access rightsto modify the data, reject it, or promote it to the next level by publishing the data.
ä To approve process units from Process Control:
1 Select Consolidation, then Data, and then Process Control.
2 Set the rows and columns.
See “Selecting Entities for Process Control” on page 218.
3 Select the process unit to approve.
4 Click Manage Process and select Approve.
5 Optional: Enter a comment in Comments, or attach a document for more detail.
See “Attaching Documents to a Process Unit” on page 226.
6 Optional: If you use the Tree view, select Apply Action to Selected Entity Only or Apply Action to SelectedEntity and Descendants.
7 Click OK.
230

ä To approve process units from a data grid:
1 Select the cell for the process unit to approve.
2 Right-click and select Manage Process and select Approve.
3 Optional: Enter a comment in Comments, or attach a document for more detail.
4 Click Approve.
Rejecting Process UnitsTo reject a process unit to its previous state, you must be assigned the appropriate security rolesand access rights for the process unit; for example, Read or Promote access rights. If the processunit has a status of Published, you must have All access rights to reject it. See “ProcessManagement Security Roles” on page 212.
When you reject a process unit, the system automatically returns the process unit to its previousstate. For example, when you reject a process unit that is at Review Level 2, it returns to ReviewLevel 1. If a process unit that was at Review Level 5 has been Submitted by skipping severalprocess levels, when you reject it, it returns to Review Level 5, which is the previous state, notReview Level 10, which is the process level before Submitted.
When a process unit has a First Pass status, only the Review Supervisor can reject it and returnit to Not Started status. If a user rejects a process unit with an Approved status, its status returnsto Submitted.
ä To reject process units from Process Control:
1 Select Consolidation, then Data, and then Process Control.
2 Set the rows and columns.
See “Selecting Entities for Process Control” on page 218.
3 Select the process unit to reject.
4 Click Manage Process and select Reject.
5 Optional: Enter a comment in Comments, or attach a document for more detail.
6 Click Reject.
ä To reject process units from a data grid:
1 Select the cell for the process unit to reject.
2 Right-click and select Manage Process and select Reject.
3 Optional: Enter a comment in Comments, or attach a document for more detail.
4 Optional: If you use the Tree view, select Selected Entity Only or Selected Entity and Descendants.
5 Click OK.
231
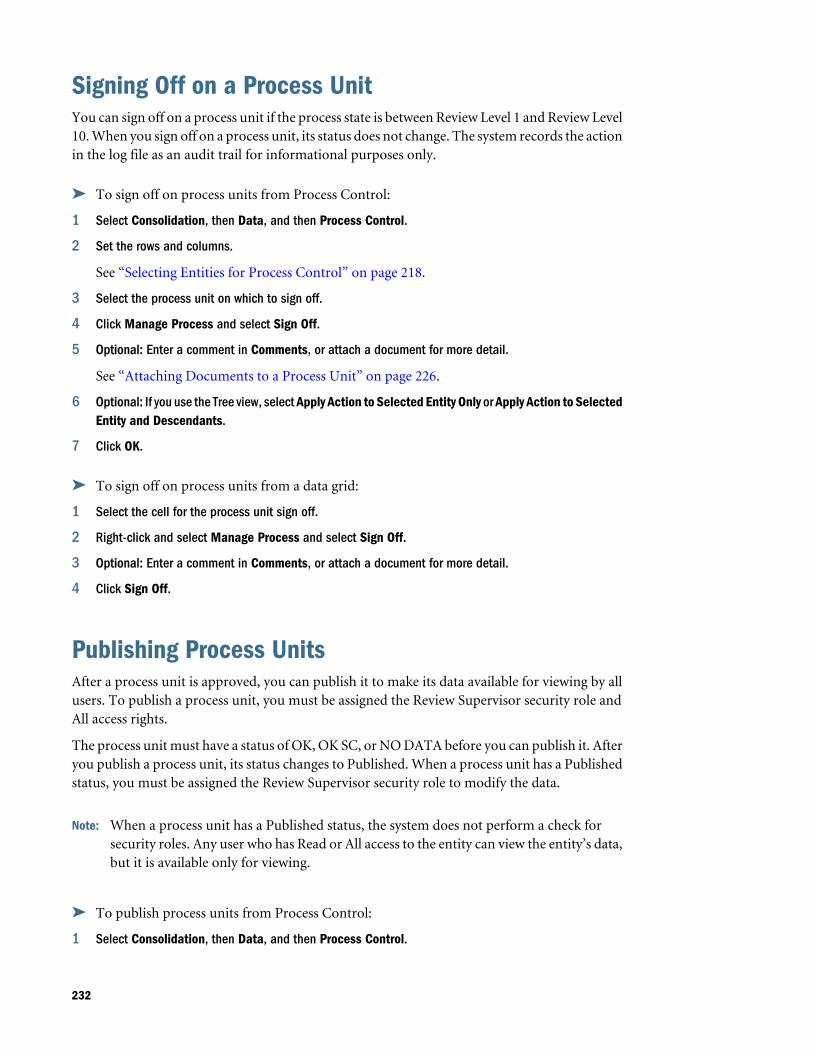
Signing Off on a Process Unit You can sign off on a process unit if the process state is between Review Level 1 and Review Level10. When you sign off on a process unit, its status does not change. The system records the actionin the log file as an audit trail for informational purposes only.
ä To sign off on process units from Process Control:
1 Select Consolidation, then Data, and then Process Control.
2 Set the rows and columns.
See “Selecting Entities for Process Control” on page 218.
3 Select the process unit on which to sign off.
4 Click Manage Process and select Sign Off.
5 Optional: Enter a comment in Comments, or attach a document for more detail.
See “Attaching Documents to a Process Unit” on page 226.
6 Optional: If you use the Tree view, select Apply Action to Selected Entity Only or Apply Action to SelectedEntity and Descendants.
7 Click OK.
ä To sign off on process units from a data grid:
1 Select the cell for the process unit sign off.
2 Right-click and select Manage Process and select Sign Off.
3 Optional: Enter a comment in Comments, or attach a document for more detail.
4 Click Sign Off.
Publishing Process Units After a process unit is approved, you can publish it to make its data available for viewing by allusers. To publish a process unit, you must be assigned the Review Supervisor security role andAll access rights.
The process unit must have a status of OK, OK SC, or NO DATA before you can publish it. Afteryou publish a process unit, its status changes to Published. When a process unit has a Publishedstatus, you must be assigned the Review Supervisor security role to modify the data.
Note: When a process unit has a Published status, the system does not perform a check forsecurity roles. Any user who has Read or All access to the entity can view the entity’s data,but it is available only for viewing.
ä To publish process units from Process Control:
1 Select Consolidation, then Data, and then Process Control.
232
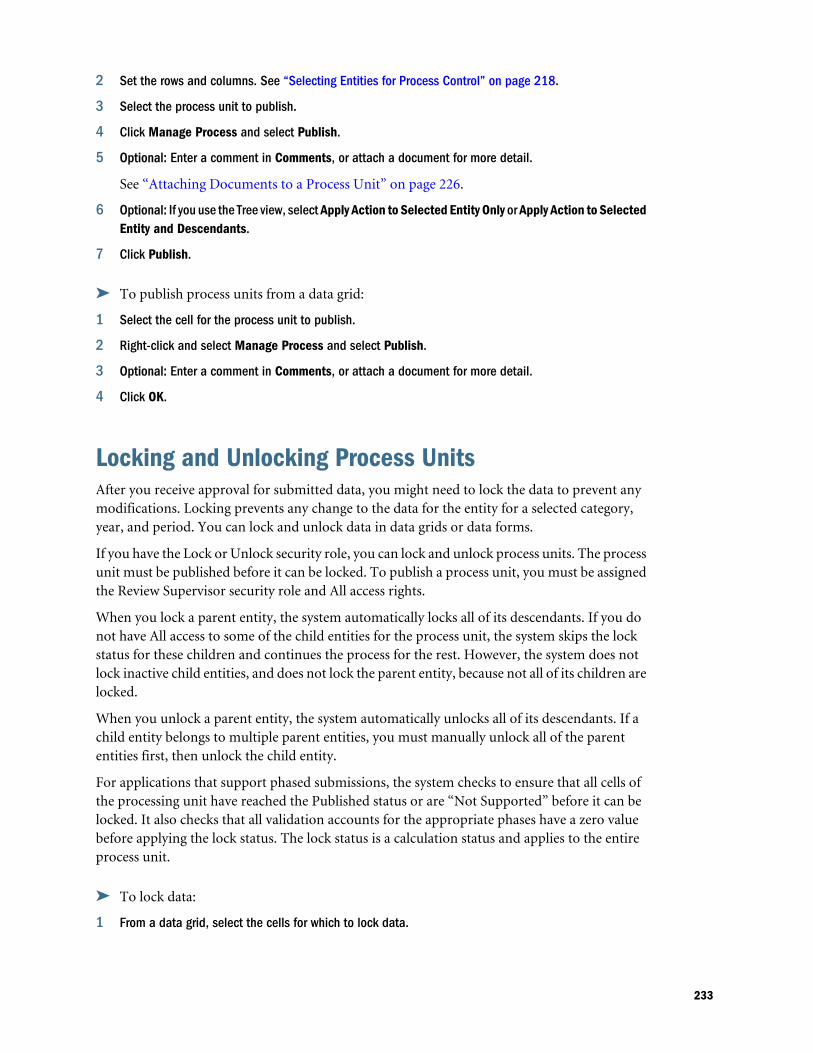
2 Set the rows and columns. See “Selecting Entities for Process Control” on page 218.
3 Select the process unit to publish.
4 Click Manage Process and select Publish.
5 Optional: Enter a comment in Comments, or attach a document for more detail.
See “Attaching Documents to a Process Unit” on page 226.
6 Optional: If you use the Tree view, select Apply Action to Selected Entity Only or Apply Action to SelectedEntity and Descendants.
7 Click Publish.
ä To publish process units from a data grid:
1 Select the cell for the process unit to publish.
2 Right-click and select Manage Process and select Publish.
3 Optional: Enter a comment in Comments, or attach a document for more detail.
4 Click OK.
Locking and Unlocking Process UnitsAfter you receive approval for submitted data, you might need to lock the data to prevent anymodifications. Locking prevents any change to the data for the entity for a selected category,year, and period. You can lock and unlock data in data grids or data forms.
If you have the Lock or Unlock security role, you can lock and unlock process units. The processunit must be published before it can be locked. To publish a process unit, you must be assignedthe Review Supervisor security role and All access rights.
When you lock a parent entity, the system automatically locks all of its descendants. If you donot have All access to some of the child entities for the process unit, the system skips the lockstatus for these children and continues the process for the rest. However, the system does notlock inactive child entities, and does not lock the parent entity, because not all of its children arelocked.
When you unlock a parent entity, the system automatically unlocks all of its descendants. If achild entity belongs to multiple parent entities, you must manually unlock all of the parententities first, then unlock the child entity.
For applications that support phased submissions, the system checks to ensure that all cells ofthe processing unit have reached the Published status or are “Not Supported” before it can belocked. It also checks that all validation accounts for the appropriate phases have a zero valuebefore applying the lock status. The lock status is a calculation status and applies to the entireprocess unit.
ä To lock data:
1 From a data grid, select the cells for which to lock data.
233
2 Right-click and select Lock.
ä To unlock data:
1 From a data grid, select the cells for which to unlock data.
2 Right-click and select Unlock.
Viewing Process Management HistoryThe Process Management History page displays process history by date and time, user, actiontaken, process level, and comments. You cannot change or delete this information; it isautomatically updated as units are processed by individual users. For example, if USER1promotes a process unit to Review Level 2, the process history displays this line:
01/05/2014 2:18:36PM USER1 Promote Review Level 2
Note: The timestamp displayed for a process unit on a local machine or server may be differentif the local machine and server time are different.
ä To view process history from Process Control:
1 Select Consolidation, then Data, and then Process Control.
2 Set the rows and columns.
See “Selecting Entities for Process Control” on page 218.
3 Select the process unit for which to view history.
4 Right-click and select Process History.
5 When you finish viewing the process history, click OK.
ä To view process history from data grids:
1 From a data grid, select the process unit for which to view information.
2 Right-click and select Manage Process and select Process History.
3 When you finish viewing the process history, click OK.
Email Alerts for Process ControlYou can set up the Process Control module to trigger email alerts based on a change of status inprocess control. For example, you can send an email alert that a process unit is ready for the nextlevel of promotion. You can generate alerts for these actions: First Pass, Review Levels 1 through10, Submitted, Approved, and Published. You cannot generate alerts when the process unit isat the Not Started level or for the Sign Off action.
234
To use email alerts for Process Control, the administrator must enable a Process Managementmetadata setting for the process unit scenario. For information on alerts, see Chapter 13, “UsingEmail Alerts.”
When a process review action is performed in the Process Control module or a data grid, thesystem automatically generates email alerts to the appropriate users for the action, according tothe review level assignments. The system sends alerts to the users at the level before the processcontrol action and to the users at the current level after the action. When the alert is generated,the user who performed the action receives a confirmation email that contains the actionperformed, the process units affected as part of the action, the names of users receiving the emailalerts for each process unit, and any comments entered about the action.
Process Management ValidationWhen you create an application, you can select a validation account. During the Review process,when you try to promote, submit, approve, sign off, or publish the process unit, the systemchecks whether the account value in the Validation account equals zero or NODATA. If it doesnot, the system displays a message that it cannot perform the action.
If the application is set up to use phased submissions, you can set validation accounts for eachsubmission phase.
When you promote, submit, approve, sign off, or publish a process unit, the system also checksthe data to ensure that it has an OK, OK SC, or NO DATA status. If the process unit does nothave one of these statuses, you must recalculate, translate, or consolidate the data before youcan perform any process management action.
The system also checks the process unit to see if the data is locked. You cannot perform anyprocess management actions until the data is unlocked. You can only lock data when it ispublished. See “Locking Data” on page 83.
The process level of the parent entity must always be lower than or equal to all of its immediatechildren. The process level of the child entity must always be greater than or equal to all of itsimmediate parents.
Validation for PromotionWhen you promote a process unit, the system also performs these additional validation checks:
l It checks the process level of direct descendants to ensure that you are not promoting anentity to a level that is higher than the lowest level of all of the entity’s dependents.
l If you are using a different currency for the entity, the system checks the process level forthe entity’s input currency to ensure that a current translation is being used.
l If you are using a node component, the system checks the currency process unit that appliesto the parent’s input currency to ensure that the node values are correct.
235
The system also performs validation checks for child entities with 0% consolidation (unownedentities). Before you can promote the parent entity, you must promote the unowned entities toa specific level; for example, the lowest level of all of the child entities.
Validation for RejectionWhen you reject a process unit, the system performs these additional validation checks:
l It checks the process level of the immediate parents to ensure that you are not rejecting anentity to a level that is lower than all of the entity’s parents.
l If the Value dimension equals the input currency for an entity, the system checks the inputcurrency for all of the parents. If the parent’s input currency is the same as the entity’s inputcurrency, the system checks the node process unit. If the parent’s input currency is different,the system checks the process level of the parent’s currency at the entity level.
l If the Value dimension uses a currency other than the input currency for an entity, the systemchecks the level of the node process unit.
l If the Value dimension indicates that you are using a node process unit, the system checksthe process level for the parent’s input currency process unit.
Process Management and ConsolidationYou can consolidate data at any time regardless of the process level of the dependents. The firsttime that you consolidate data for a process unit, the parent data status is NODATA and theinitial process level is Not Started. After consolidation, the parent data status changes to OK,but the process level is still Not Started. The Review Supervisor can then start the process unit.
If any of the children contain NODATA, the consolidation process can still occur. When youattempt to promote the parent data to the next process level, the system performs validationchecks. The initial process level is Not Started. After you consolidate, the parent process level isstill Not Started. You can manually change the process level of the NODATA process unit. Afterthe NODATA process unit has been changed, the parent can then be promoted to a level that isless than or equal to the lowest of all of its immediate children.
236
13Using Email Alerts
In This Chapter
About Email Alerts .. . . . . . . . . . . . . . . . . . . . . . . . . . . . . . . . . . . . . . . . . . . . . . . . . . . . . . . . . . . . . . . . . . . . . . . . . . . . . . . . . . . . . . 237
Generating Alerts for Intercompany Transactions ... . . . . . . . . . . . . . . . . . . . . . . . . . . . . . . . . . . . . . . . . . . . . . . . . . . 238
Generating Alerts for Process Control . . . . . . . . . . . . . . . . . . . . . . . . . . . . . . . . . . . . . . . . . . . . . . . . . . . . . . . . . . . . . . . . . . 239
About Email AlertsYou can use email alerts for intercompany transactions and in the process control review process.Email alerts help highlight a key event or data change in the system. For example, you can sendan email alert that an intercompany transaction is mismatched and needs to be matched, or thata process unit is ready for the next level of promotion.
Email alerts are sent using standard Simple Mail Transfer Protocol (SMTP), so you can use alertswith any email system that works with Internet email. To use alerts, you must specify the SMTPserver name when you run the Financial Management configuration utility. See the OracleEnterprise Performance Management System Installation and Configuration Guide.
The alert process uses the email addresses that are stored in your authentication files, such asLDAP, MSAD, or Native Directory.
Before you can send or receive email alerts, you must complete these steps:
l The security class assigned to the scenario and entity for the alert must support email alerts.See the Oracle Hyperion Financial Management Administrator's Guide.
l Users must be assigned a security role to receive email alerts. See the Oracle EnterprisePerformance Management System User Security Administration Guide
l The SMTP mail server must be configured. See the Oracle Enterprise PerformanceManagement System Installation and Configuration Guide.
See these procedures:
l “Generating Alerts for Intercompany Transactions” on page 238
l “Generating Alerts for Process Control” on page 239
237
Generating Alerts for Intercompany TransactionsYou can generate email alerts for intercompany transactions. For example, you might noticethat transaction M865 between Entity A and Partner C has a mismatched status. You can sendan email to Entity A to alert the user of the status and ask for additional information. Before yousend an alert to a user, you must ensure that the user has security rights to receive intercompanytransaction alerts.
Sending Email Alerts for Intercompany TransactionsThe Intercompany Transactions Monitor page displays a list of intercompany entities with theirProcess status and Lock status so that you can monitor the transaction status. You can select anyentities from the list of transactions for which to generate email alerts. For example, during themonitoring process, you may notice that certain entities have not yet begun their intercompanytransaction process. You may want to send email alerts to the users responsible for the entities.
The system generates email only to the users who are responsible for the entities. If multipleentities are selected to which the same user has security access, the system sends one alert to theuser that contains information from all of the selected entities. See “Receiving IntercompanyTransaction Email Alerts” on page 239.
You can include comments in the email content in addition to the transaction informationincluded by the system.
When you generate an email alert, you receive a confirmation log that includes the informationfor the emails sent to various users.
ä To send email alerts from the Intercompany Transactions Monitor page:
1 From the list of entities, select the entities for which to send an alert.
2 Click Email Alert, or select Actions, and then Email Alert.
3 Optional: In Comment for all alerts, enter a comment.
The comment is used for all the alerts that are generated.
4 Click Send.
Intercompany Transactions Email ContentThe Subject line of the alert displays the application name and the module name from whichthe email was generated. The content contains the following information regarding the actionperformed and the transaction detail:
Comment: additional comments entered by the user
Scenario, Year, Period
Entity, Partner, TID, SID, Account, Customers, Flows
Entity, Partner, TID, SID, Account, Customers, Flows
238
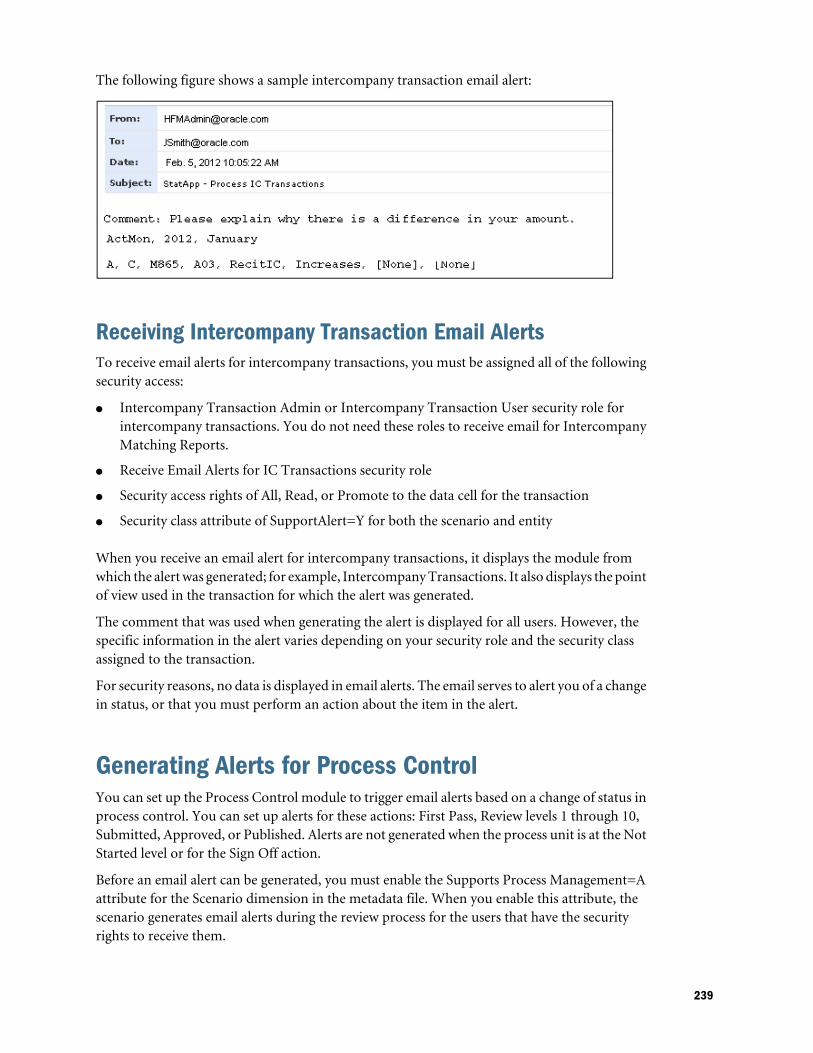
The following figure shows a sample intercompany transaction email alert:
Receiving Intercompany Transaction Email AlertsTo receive email alerts for intercompany transactions, you must be assigned all of the followingsecurity access:
l Intercompany Transaction Admin or Intercompany Transaction User security role forintercompany transactions. You do not need these roles to receive email for IntercompanyMatching Reports.
l Receive Email Alerts for IC Transactions security role
l Security access rights of All, Read, or Promote to the data cell for the transaction
l Security class attribute of SupportAlert=Y for both the scenario and entity
When you receive an email alert for intercompany transactions, it displays the module fromwhich the alert was generated; for example, Intercompany Transactions. It also displays the pointof view used in the transaction for which the alert was generated.
The comment that was used when generating the alert is displayed for all users. However, thespecific information in the alert varies depending on your security role and the security classassigned to the transaction.
For security reasons, no data is displayed in email alerts. The email serves to alert you of a changein status, or that you must perform an action about the item in the alert.
Generating Alerts for Process ControlYou can set up the Process Control module to trigger email alerts based on a change of status inprocess control. You can set up alerts for these actions: First Pass, Review levels 1 through 10,Submitted, Approved, or Published. Alerts are not generated when the process unit is at the NotStarted level or for the Sign Off action.
Before an email alert can be generated, you must enable the Supports Process Management=Aattribute for the Scenario dimension in the metadata file. When you enable this attribute, thescenario generates email alerts during the review process for the users that have the securityrights to receive them.
239
When a process review action is performed in a data grid or the Process Control module, thesystem automatically generates email alerts to the appropriate users for the action, according tothe scenario setting and security rights set up by the administrator. For example, when a processunit is promoted to the next level, only the users with appropriate access rights to the processunit at that review level can receive the alerts.
The system sends email alerts to the users at the prior level before the process control action,and to the users at the current level after the action. For example, User 1 and User 2 both haveReviewer 4 role access, and User 3 and 4 have Reviewer 5 role access. When the process unit isat Level 4 and is promoted to Level 5, User 1 and 2 receive email alerts because they are at Level4 before the promote action. Users 3 and 4 receive email alerts because they are at Level 5, whichis the current level after the promote action.
When the alert is generated, the user who performed the action receives a confirmation email.The confirmation email contains the action performed, the process units affected by the action,and the names of the users receiving the email alerts for each process unit.
ä To generate email alerts from Process Control:
1 Enable security access for email alerts for the process unit and for the appropriate users for the action.
See the Oracle Hyperion Financial Management Administrator's Guide.
2 Optional: To add a comment, from Process Control, select a process unit and enter a comment inComments.
As a result of the review action, an alert is generated to the appropriate users. The commentis used for all the alerts that are generated.
Process Control Email ContentThe Subject line of the email alert displays the process review action, the review level after theaction, and the entity, period, year, and scenario information.
For example, the email subject line for the following review action notifies users that the processunit for the France entity for the Actual scenario in January has been rejected and returned toReview Level 3:
Subject: Reject RL3 - France, January, 2012, Actual
The email content contains the following information regarding the action performed and theprocess unit:
Action: review action performed
Comment: additional comments to be included in the email
Process unit information: list of entities in the review action
Entity label - Entity description, Period, Year, Scenario, Review Level
prior to action, Review Level after the action
The following figure shows a sample process control email alert:
240
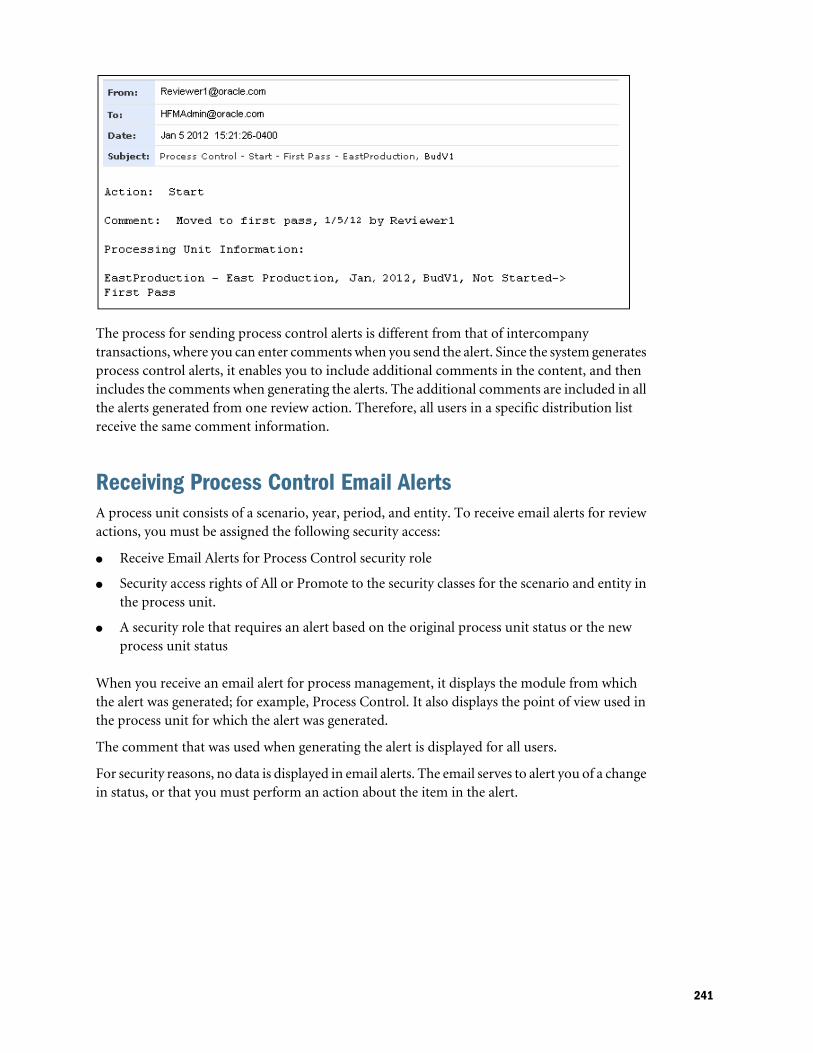
The process for sending process control alerts is different from that of intercompanytransactions, where you can enter comments when you send the alert. Since the system generatesprocess control alerts, it enables you to include additional comments in the content, and thenincludes the comments when generating the alerts. The additional comments are included in allthe alerts generated from one review action. Therefore, all users in a specific distribution listreceive the same comment information.
Receiving Process Control Email AlertsA process unit consists of a scenario, year, period, and entity. To receive email alerts for reviewactions, you must be assigned the following security access:
l Receive Email Alerts for Process Control security role
l Security access rights of All or Promote to the security classes for the scenario and entity inthe process unit.
l A security role that requires an alert based on the original process unit status or the newprocess unit status
When you receive an email alert for process management, it displays the module from whichthe alert was generated; for example, Process Control. It also displays the point of view used inthe process unit for which the alert was generated.
The comment that was used when generating the alert is displayed for all users.
For security reasons, no data is displayed in email alerts. The email serves to alert you of a changein status, or that you must perform an action about the item in the alert.
241

242
14Automating Tasks
In This Chapter
Overview ... . . . . . . . . . . . . . . . . . . . . . . . . . . . . . . . . . . . . . . . . . . . . . . . . . . . . . . . . . . . . . . . . . . . . . . . . . . . . . . . . . . . . . . . . . . . . . . . 243
Financial Management Tasks Available for Automation... . . . . . . . . . . . . . . . . . . . . . . . . . . . . . . . . . . . . . . . . . . . 243
Prerequisites for Task Automation... . . . . . . . . . . . . . . . . . . . . . . . . . . . . . . . . . . . . . . . . . . . . . . . . . . . . . . . . . . . . . . . . . . . 244
Managing Taskflows ... . . . . . . . . . . . . . . . . . . . . . . . . . . . . . . . . . . . . . . . . . . . . . . . . . . . . . . . . . . . . . . . . . . . . . . . . . . . . . . . . . . 244
Viewing Taskflows ... . . . . . . . . . . . . . . . . . . . . . . . . . . . . . . . . . . . . . . . . . . . . . . . . . . . . . . . . . . . . . . . . . . . . . . . . . . . . . . . . . . . . . 245
Creating Taskflows ... . . . . . . . . . . . . . . . . . . . . . . . . . . . . . . . . . . . . . . . . . . . . . . . . . . . . . . . . . . . . . . . . . . . . . . . . . . . . . . . . . . . . 245
Editing Taskflows ... . . . . . . . . . . . . . . . . . . . . . . . . . . . . . . . . . . . . . . . . . . . . . . . . . . . . . . . . . . . . . . . . . . . . . . . . . . . . . . . . . . . . . . 254
Deleting Taskflows ... . . . . . . . . . . . . . . . . . . . . . . . . . . . . . . . . . . . . . . . . . . . . . . . . . . . . . . . . . . . . . . . . . . . . . . . . . . . . . . . . . . . . 254
Copying Taskflows ... . . . . . . . . . . . . . . . . . . . . . . . . . . . . . . . . . . . . . . . . . . . . . . . . . . . . . . . . . . . . . . . . . . . . . . . . . . . . . . . . . . . . 254
Running Taskflows Manually for Testing ... . . . . . . . . . . . . . . . . . . . . . . . . . . . . . . . . . . . . . . . . . . . . . . . . . . . . . . . . . . . . 255
Controlling Access to Taskflows ... . . . . . . . . . . . . . . . . . . . . . . . . . . . . . . . . . . . . . . . . . . . . . . . . . . . . . . . . . . . . . . . . . . . . . 255
Scheduling Taskflows ... . . . . . . . . . . . . . . . . . . . . . . . . . . . . . . . . . . . . . . . . . . . . . . . . . . . . . . . . . . . . . . . . . . . . . . . . . . . . . . . . . 256
Viewing Taskflow Status ... . . . . . . . . . . . . . . . . . . . . . . . . . . . . . . . . . . . . . . . . . . . . . . . . . . . . . . . . . . . . . . . . . . . . . . . . . . . . . . 256
OverviewTask Automation provides a method for linking a series of tasks into a taskflow. You can usetask automation to automate tasks that you commonly perform using Financial Management.
When you work with Financial Management, you routinely perform tasks such as loading data,running calculations and translations, consolidating parent entities, and extracting data. Youcan create, manage, and maintain taskflows to schedule critical tasks to be run as required.
See these procedures:
l “Managing Taskflows” on page 244
l “Viewing Taskflow Status” on page 256
Financial Management Tasks Available for AutomationThese activities are available for task automation:
l Allocate
l Calculate
243
l Calculate Contribution
l Translate
l Consolidate
l Load Journals
l Extract Journals
l Load Data
l Extract Data (Deprecated)
l Extract Data to Database
l Extract Data to File
l Process Journals
l Use Process Management
Prerequisites for Task AutomationYou must be assigned one of these Oracle Hyperion Shared Services roles to perform taskflowoperations:
l Manage Taskflows - Permits users to create and edit taskflows.
l Run Taskflows - Permits users to only run and view taskflows. Users with this role cannotcreate new taskflows or edit existing taskflows.
Note: Both of these roles are global user roles. Users assigned these roles can either modify orrun taskflows for any application and product. See the Oracle Enterprise PerformanceManagement System User Security Administration Guide.
Managing TaskflowsA taskflow is a sequence of tasks that you can create in task automation. For example, you cancreate a taskflow to load, calculate, and consolidate data. You can create, edit, save, copy, anddelete a taskflow, view a list of available taskflows, assign access to a taskflow, run a taskflowmanually for testing, and schedule a taskflow to run automatically.
You can enable logging capability for taskflows. See the Oracle Enterprise PerformanceManagement System Installation and Configuration Troubleshooting Guide.
See these procedures:
l “Viewing Taskflows” on page 245
l “Creating Taskflows” on page 245
l “Editing Taskflows” on page 254
l “Deleting Taskflows” on page 254
l “Copying Taskflows” on page 254
244

l “Running Taskflows Manually for Testing” on page 255
l “Controlling Access to Taskflows” on page 255
l “Scheduling Taskflows” on page 256
Viewing TaskflowsYou store and manage taskflows in Shared Services. The Taskflow Listing Summary shows theavailable taskflows by application, the user who created the taskflow, and a description.
ä To view taskflows:
1 Select Navigate, then Administer, and then Consolidation Administration.
2 Select Administration, and then Taskflows, and then Manage, or expand Taskflows from the left sidenavigation pane and select Manage.
Note: When viewing tasks in a taskflow, users can only view those tasks to which they haveaccess.
Creating TaskflowsYou create a taskflow to link a series of tasks and specify the time to run them. When you createa taskflow, you assign it a name and description. Then you add task stages and links betweentasks. Stages define specific tasks, such as data loads. Links specify how the system should proceedafter completion of the step.
ä To create taskflows:
1 Select Navigate, then Administer, and then Consolidation Administration.
2 Select Administration, and then Taskflows, and then Manage, or expand Taskflows from the left sidenavigation pane and select Manage.
3 From the Taskflow page, click New.
4 For Name, enter a taskflow name.
The name can contain up to 40 characters.
5 For Application, enter a name for which to create taskflows.
6 Optional: For Description, enter a taskflow description.
7 Click Submit.
The taskflow editor is displayed, where you can add stages and links.
245
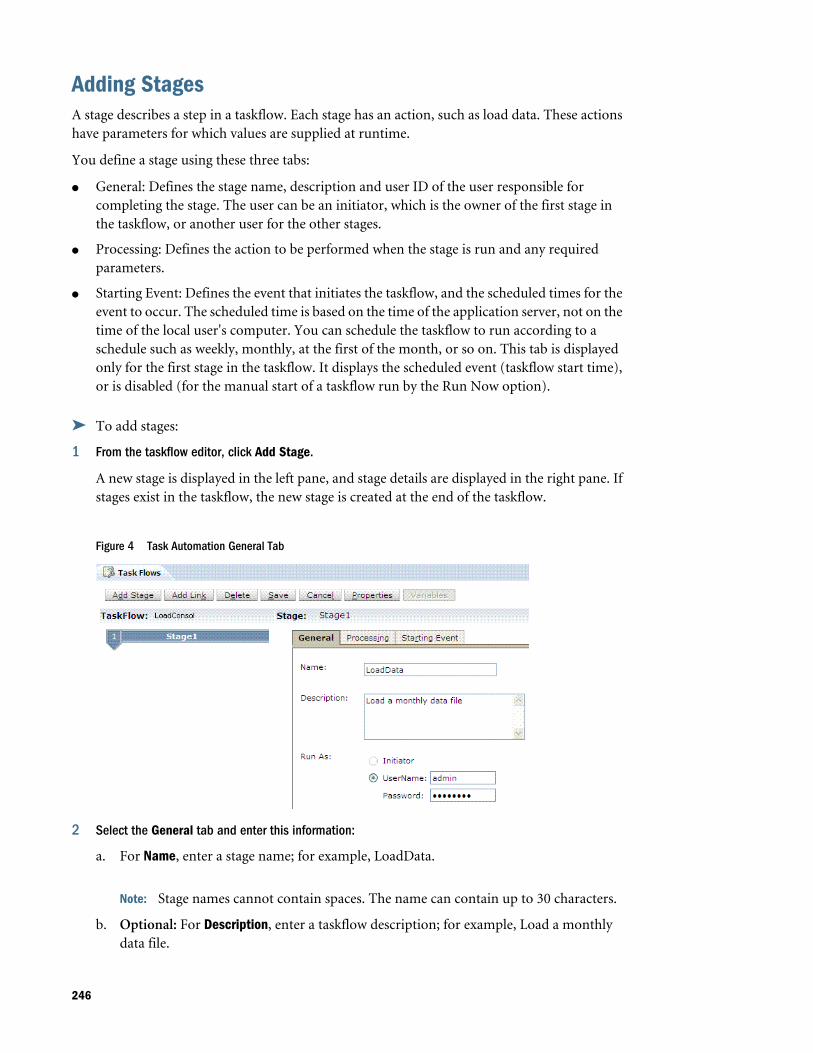
Adding StagesA stage describes a step in a taskflow. Each stage has an action, such as load data. These actionshave parameters for which values are supplied at runtime.
You define a stage using these three tabs:
l General: Defines the stage name, description and user ID of the user responsible forcompleting the stage. The user can be an initiator, which is the owner of the first stage inthe taskflow, or another user for the other stages.
l Processing: Defines the action to be performed when the stage is run and any requiredparameters.
l Starting Event: Defines the event that initiates the taskflow, and the scheduled times for theevent to occur. The scheduled time is based on the time of the application server, not on thetime of the local user's computer. You can schedule the taskflow to run according to aschedule such as weekly, monthly, at the first of the month, or so on. This tab is displayedonly for the first stage in the taskflow. It displays the scheduled event (taskflow start time),or is disabled (for the manual start of a taskflow run by the Run Now option).
ä To add stages:
1 From the taskflow editor, click Add Stage.
A new stage is displayed in the left pane, and stage details are displayed in the right pane. Ifstages exist in the taskflow, the new stage is created at the end of the taskflow.
Figure 4 Task Automation General Tab
2 Select the General tab and enter this information:
a. For Name, enter a stage name; for example, LoadData.
Note: Stage names cannot contain spaces. The name can contain up to 30 characters.
b. Optional: For Description, enter a taskflow description; for example, Load a monthlydata file.
246
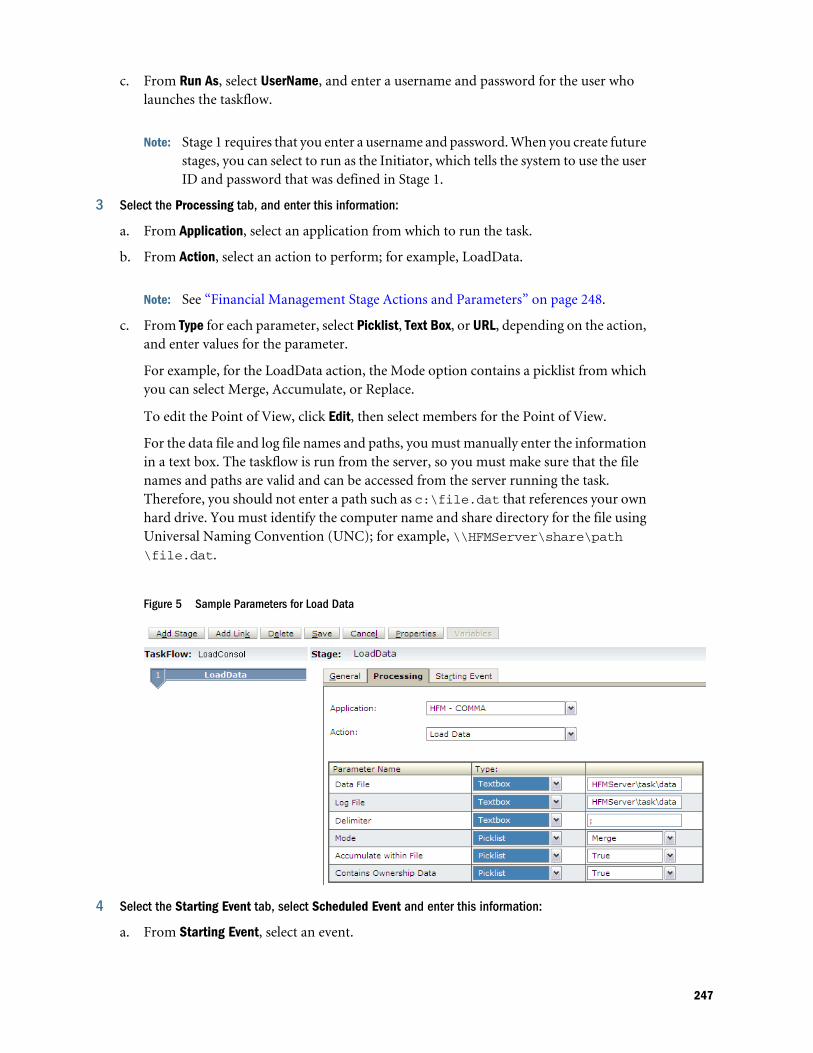
c. From Run As, select UserName, and enter a username and password for the user wholaunches the taskflow.
Note: Stage 1 requires that you enter a username and password. When you create futurestages, you can select to run as the Initiator, which tells the system to use the userID and password that was defined in Stage 1.
3 Select the Processing tab, and enter this information:
a. From Application, select an application from which to run the task.
b. From Action, select an action to perform; for example, LoadData.
Note: See “Financial Management Stage Actions and Parameters” on page 248.
c. From Type for each parameter, select Picklist, Text Box, or URL, depending on the action,and enter values for the parameter.
For example, for the LoadData action, the Mode option contains a picklist from whichyou can select Merge, Accumulate, or Replace.
To edit the Point of View, click Edit, then select members for the Point of View.
For the data file and log file names and paths, you must manually enter the informationin a text box. The taskflow is run from the server, so you must make sure that the filenames and paths are valid and can be accessed from the server running the task.Therefore, you should not enter a path such as c:\file.dat that references your ownhard drive. You must identify the computer name and share directory for the file usingUniversal Naming Convention (UNC); for example, \\HFMServer\share\path\file.dat.
Figure 5 Sample Parameters for Load Data
4 Select the Starting Event tab, select Scheduled Event and enter this information:
a. From Starting Event, select an event.
247
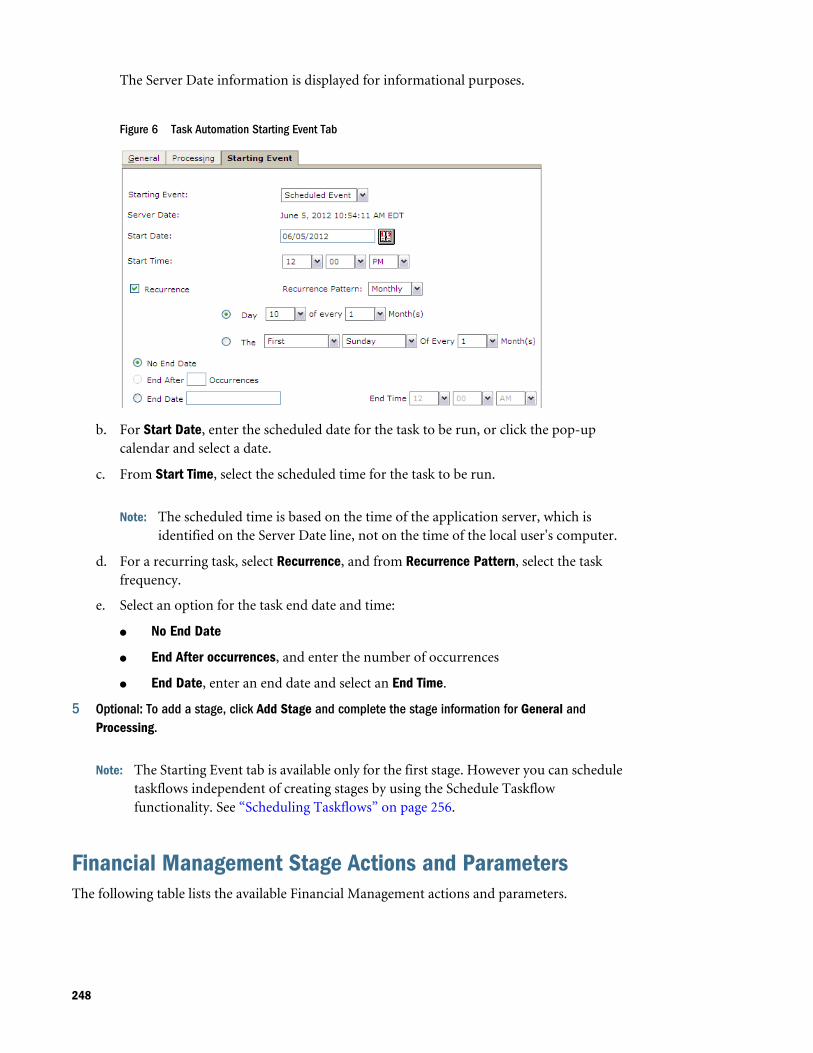
The Server Date information is displayed for informational purposes.
Figure 6 Task Automation Starting Event Tab
b. For Start Date, enter the scheduled date for the task to be run, or click the pop-upcalendar and select a date.
c. From Start Time, select the scheduled time for the task to be run.
Note: The scheduled time is based on the time of the application server, which isidentified on the Server Date line, not on the time of the local user's computer.
d. For a recurring task, select Recurrence, and from Recurrence Pattern, select the taskfrequency.
e. Select an option for the task end date and time:
l No End Date
l End After occurrences, and enter the number of occurrences
l End Date, enter an end date and select an End Time.
5 Optional: To add a stage, click Add Stage and complete the stage information for General andProcessing.
Note: The Starting Event tab is available only for the first stage. However you can scheduletaskflows independent of creating stages by using the Schedule Taskflowfunctionality. See “Scheduling Taskflows” on page 256.
Financial Management Stage Actions and ParametersThe following table lists the available Financial Management actions and parameters.
248
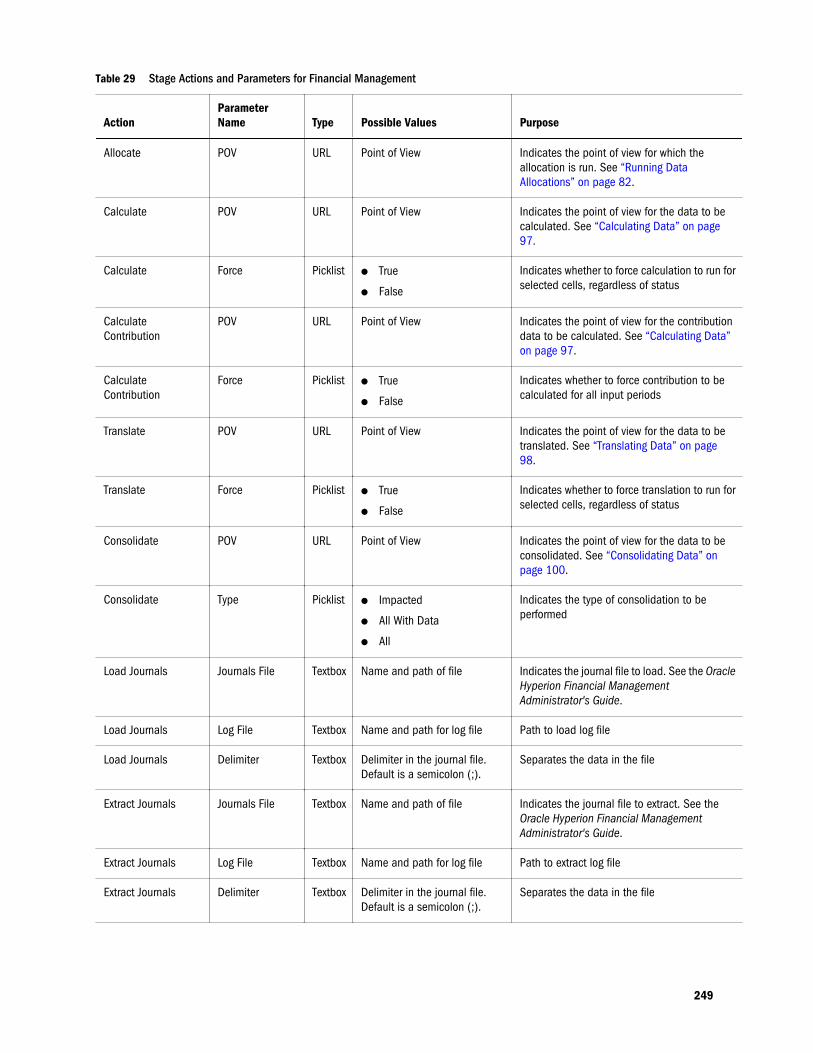
Table 29 Stage Actions and Parameters for Financial Management
ActionParameterName Type Possible Values Purpose
Allocate POV URL Point of View Indicates the point of view for which theallocation is run. See “Running DataAllocations” on page 82.
Calculate POV URL Point of View Indicates the point of view for the data to becalculated. See “Calculating Data” on page97.
Calculate Force Picklistl True
l False
Indicates whether to force calculation to run forselected cells, regardless of status
CalculateContribution
POV URL Point of View Indicates the point of view for the contributiondata to be calculated. See “Calculating Data”on page 97.
CalculateContribution
Force Picklistl True
l False
Indicates whether to force contribution to becalculated for all input periods
Translate POV URL Point of View Indicates the point of view for the data to betranslated. See “Translating Data” on page98.
Translate Force Picklistl True
l False
Indicates whether to force translation to run forselected cells, regardless of status
Consolidate POV URL Point of View Indicates the point of view for the data to beconsolidated. See “Consolidating Data” onpage 100.
Consolidate Type Picklistl Impacted
l All With Data
l All
Indicates the type of consolidation to beperformed
Load Journals Journals File Textbox Name and path of file Indicates the journal file to load. See the OracleHyperion Financial ManagementAdministrator's Guide.
Load Journals Log File Textbox Name and path for log file Path to load log file
Load Journals Delimiter Textbox Delimiter in the journal file.Default is a semicolon (;).
Separates the data in the file
Extract Journals Journals File Textbox Name and path of file Indicates the journal file to extract. See theOracle Hyperion Financial ManagementAdministrator's Guide.
Extract Journals Log File Textbox Name and path for log file Path to extract log file
Extract Journals Delimiter Textbox Delimiter in the journal file.Default is a semicolon (;).
Separates the data in the file
249
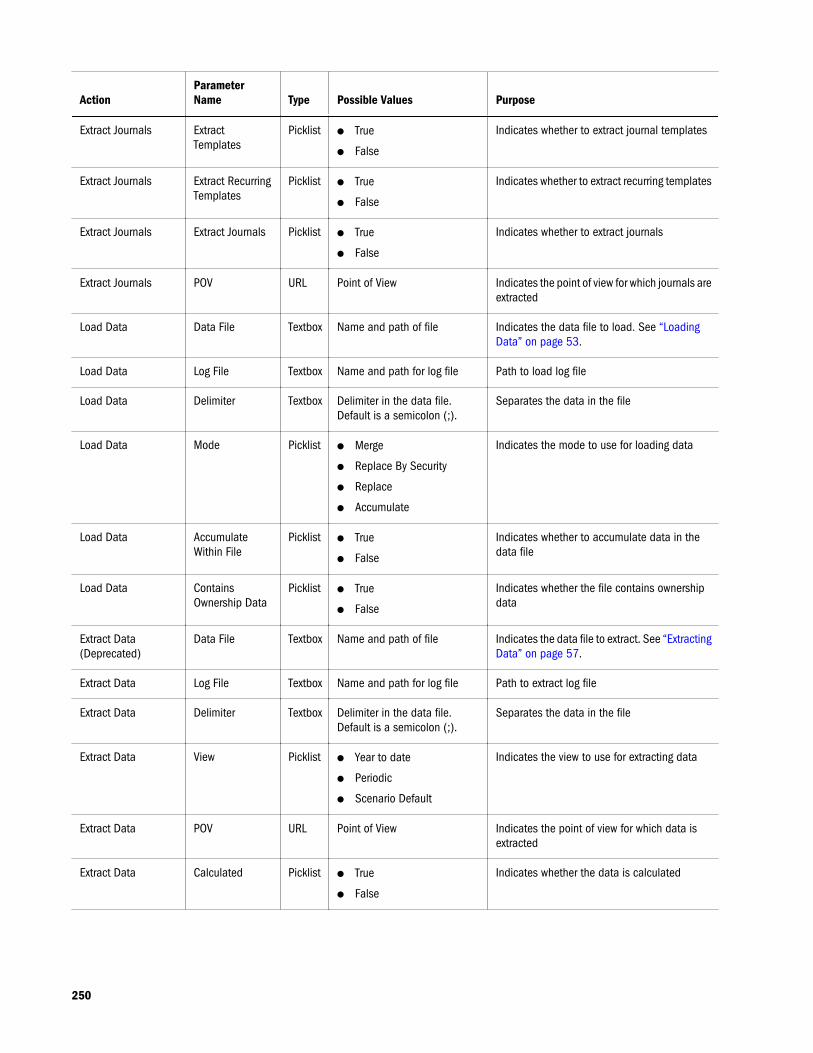
ActionParameterName Type Possible Values Purpose
Extract Journals ExtractTemplates
Picklistl True
l False
Indicates whether to extract journal templates
Extract Journals Extract RecurringTemplates
Picklistl True
l False
Indicates whether to extract recurring templates
Extract Journals Extract Journals Picklistl True
l False
Indicates whether to extract journals
Extract Journals POV URL Point of View Indicates the point of view for which journals areextracted
Load Data Data File Textbox Name and path of file Indicates the data file to load. See “LoadingData” on page 53.
Load Data Log File Textbox Name and path for log file Path to load log file
Load Data Delimiter Textbox Delimiter in the data file.Default is a semicolon (;).
Separates the data in the file
Load Data Mode Picklistl Merge
l Replace By Security
l Replace
l Accumulate
Indicates the mode to use for loading data
Load Data AccumulateWithin File
Picklistl True
l False
Indicates whether to accumulate data in thedata file
Load Data ContainsOwnership Data
Picklistl True
l False
Indicates whether the file contains ownershipdata
Extract Data(Deprecated)
Data File Textbox Name and path of file Indicates the data file to extract. See “ExtractingData” on page 57.
Extract Data Log File Textbox Name and path for log file Path to extract log file
Extract Data Delimiter Textbox Delimiter in the data file.Default is a semicolon (;).
Separates the data in the file
Extract Data View Picklistl Year to date
l Periodic
l Scenario Default
Indicates the view to use for extracting data
Extract Data POV URL Point of View Indicates the point of view for which data isextracted
Extract Data Calculated Picklistl True
l False
Indicates whether the data is calculated
250
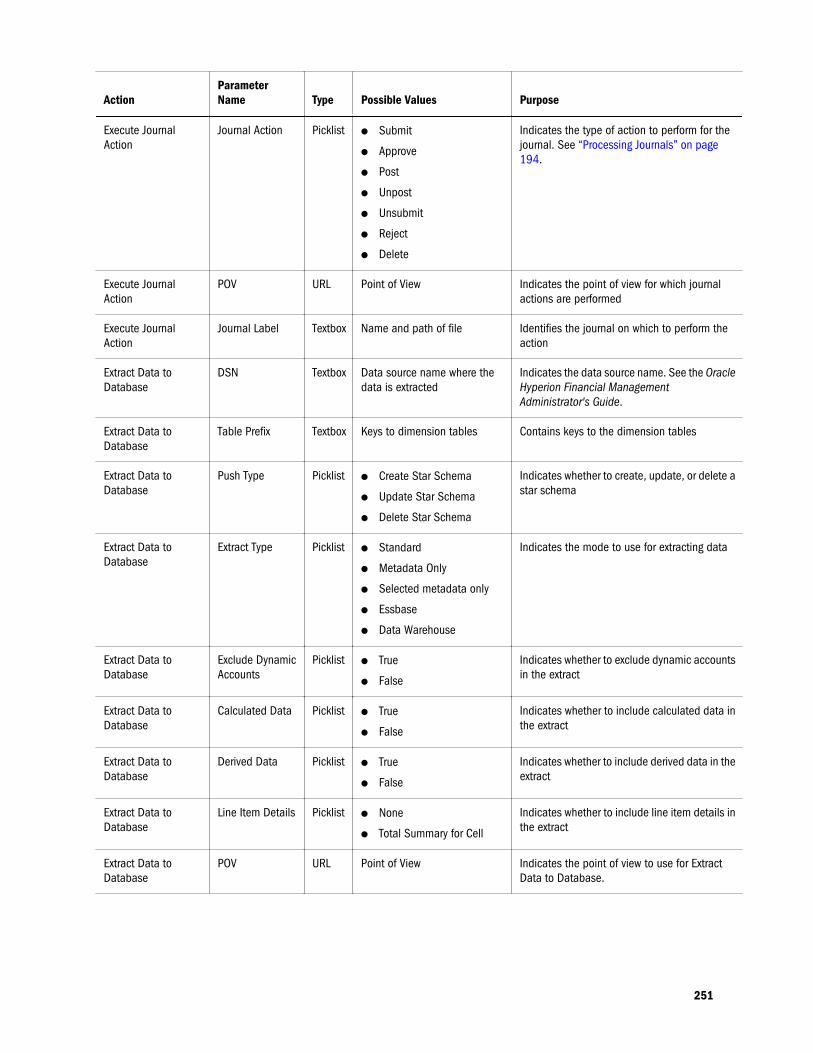
ActionParameterName Type Possible Values Purpose
Execute JournalAction
Journal Action Picklistl Submit
l Approve
l Post
l Unpost
l Unsubmit
l Reject
l Delete
Indicates the type of action to perform for thejournal. See “Processing Journals” on page194.
Execute JournalAction
POV URL Point of View Indicates the point of view for which journalactions are performed
Execute JournalAction
Journal Label Textbox Name and path of file Identifies the journal on which to perform theaction
Extract Data toDatabase
DSN Textbox Data source name where thedata is extracted
Indicates the data source name. See the OracleHyperion Financial ManagementAdministrator's Guide.
Extract Data toDatabase
Table Prefix Textbox Keys to dimension tables Contains keys to the dimension tables
Extract Data toDatabase
Push Type Picklistl Create Star Schema
l Update Star Schema
l Delete Star Schema
Indicates whether to create, update, or delete astar schema
Extract Data toDatabase
Extract Type Picklistl Standard
l Metadata Only
l Selected metadata only
l Essbase
l Data Warehouse
Indicates the mode to use for extracting data
Extract Data toDatabase
Exclude DynamicAccounts
Picklistl True
l False
Indicates whether to exclude dynamic accountsin the extract
Extract Data toDatabase
Calculated Data Picklistl True
l False
Indicates whether to include calculated data inthe extract
Extract Data toDatabase
Derived Data Picklistl True
l False
Indicates whether to include derived data in theextract
Extract Data toDatabase
Line Item Details Picklistl None
l Total Summary for Cell
Indicates whether to include line item details inthe extract
Extract Data toDatabase
POV URL Point of View Indicates the point of view to use for ExtractData to Database.
251
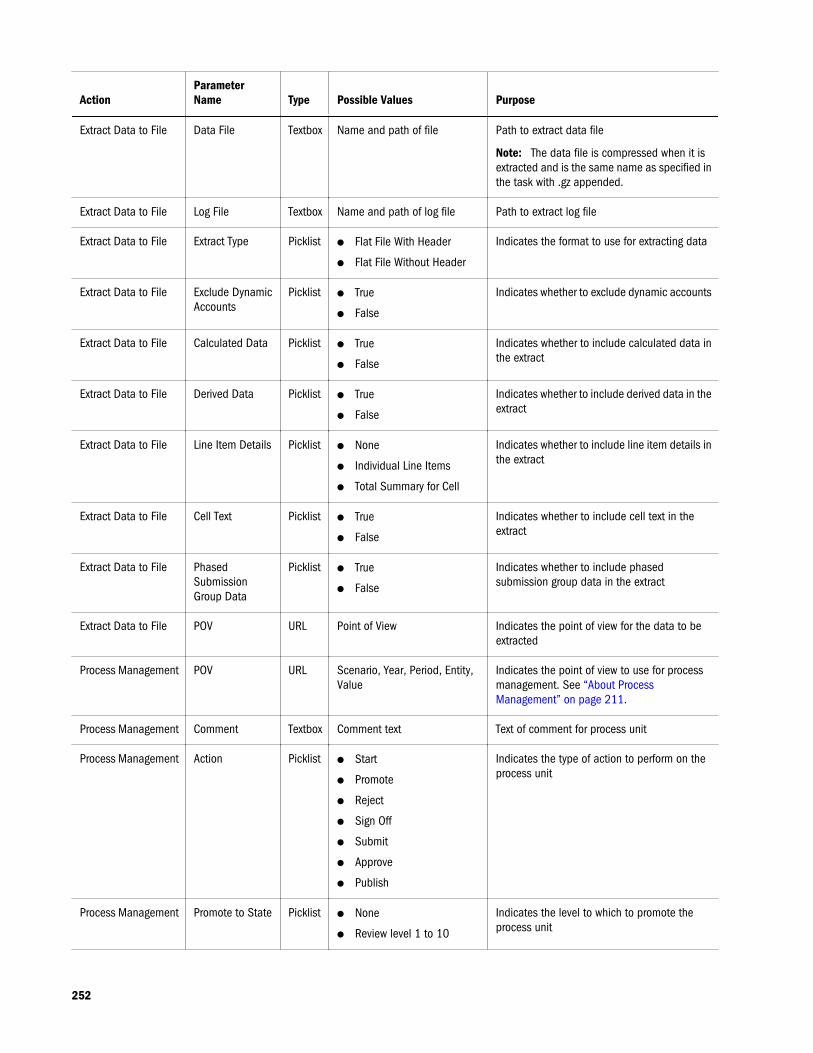
ActionParameterName Type Possible Values Purpose
Extract Data to File Data File Textbox Name and path of file Path to extract data file
Note: The data file is compressed when it isextracted and is the same name as specified inthe task with .gz appended.
Extract Data to File Log File Textbox Name and path of log file Path to extract log file
Extract Data to File Extract Type Picklistl Flat File With Header
l Flat File Without Header
Indicates the format to use for extracting data
Extract Data to File Exclude DynamicAccounts
Picklistl True
l False
Indicates whether to exclude dynamic accounts
Extract Data to File Calculated Data Picklistl True
l False
Indicates whether to include calculated data inthe extract
Extract Data to File Derived Data Picklistl True
l False
Indicates whether to include derived data in theextract
Extract Data to File Line Item Details Picklistl None
l Individual Line Items
l Total Summary for Cell
Indicates whether to include line item details inthe extract
Extract Data to File Cell Text Picklistl True
l False
Indicates whether to include cell text in theextract
Extract Data to File PhasedSubmissionGroup Data
Picklistl True
l False
Indicates whether to include phasedsubmission group data in the extract
Extract Data to File POV URL Point of View Indicates the point of view for the data to beextracted
Process Management POV URL Scenario, Year, Period, Entity,Value
Indicates the point of view to use for processmanagement. See “About ProcessManagement” on page 211.
Process Management Comment Textbox Comment text Text of comment for process unit
Process Management Action Picklistl Start
l Promote
l Reject
l Sign Off
l Submit
l Approve
l Publish
Indicates the type of action to perform on theprocess unit
Process Management Promote to State Picklistl None
l Review level 1 to 10
Indicates the level to which to promote theprocess unit
252
Adding Links A link is the point during the execution of the taskflow at which the activity in one stage iscompleted, and the taskflow ends or control passes to another stage, which starts. A link can beunconditional, where the completion of one stage always leads to the start of another, orconditional, where the sequence of operation depends on one or more link conditions.
A link specifies the action for the system to take next. Every stage needs a link. In general, moststages have two links: success and failure. You can specify that, if the first stage is successful, thesystem should proceed to the second stage (Receiving stage). You can also specify the action tobe performed if problems occur in the first stage and it does not successfully complete.
For example, you can set a success link so that if the first stage of LoadData is successful, thesystem should proceed to the Receiving stage of Consolidation. You can set a failure link so thatif failure occurs or any problems are encountered in the LoadData stage, the system shouldproceed to the Receiving stage of End, which ends the process and terminates the taskflow.
The last stage in the taskflow must have a final link with “End” as the target to complete thetaskflow.
You can specify conditions for a link. For example, you can add a condition for a load data tasksuch as LoadData_Result= =Success.
You must enter two equal signs (= =) after the variable, and place single quotation marks (')around the condition that you are evaluating. The value can be True or False.
ä To add links:
1 From a task flow, click Add Link.
2 From the General tab, for Name, enter a link name.
The name can contain up to 30 characters.
3 For Description, enter a link description.
The Sending Stage is displayed for informational purposes.
4 From Receiving Stage select a stage.
5 Select Condition tab if applicable, and from Variable, select a variable, for example, LoadData_Result.
Tip: To delete a condition, click Delete.
6 From Relational Operators, select Equal to or Not equal to.
7 From Value, select Success or Failure.
8 Click Add.
Note: Ensure that the last stage in the taskflow has a link with an End target.
Tip: To delete a condition, click Delete.
253
Editing TaskflowsAfter you create a taskflow, you can edit the taskflow description, and create, edit, or deletetaskflow variables. You can also add or delete a stage or a link.
ä To edit taskflows:
1 Select Navigate, then Administer, and then Consolidation Administration.
2 Select Administration, and then Taskflows, and then Manage, or expand Taskflows from the left sidenavigation pane and select Manage.
3 From the Taskflow Listing Summary page, select the taskflow to edit and click Edit.
4 In the taskflow editor, select an option:
l To add a stage, click Add Stage. See “Adding Stages” on page 246.
l To add a link, click Add Link. See “Adding Links ” on page 253.
l To delete a stage, you must first delete all conditions from the link of the stage to bedeleted. Save the taskflow, and then click Delete.
Note: If you delete a stage, all links associated with it are also deleted.
l To edit the taskflow description, click Properties.
5 Edit the taskflow and take one of these actions:
l To save the edits, click Save.
l To cancel the edits, click Cancel. The system returns you to the Taskflow ListingSummary without saving your changes.
Deleting TaskflowsYou can delete a taskflow that you no longer need.
ä To delete taskflows:
1 Select Navigate, then Administer, and then Consolidation Administration.
2 Select Administration, and then Taskflows, and then Manage, or expand Taskflows from the left sidenavigation pane and select Manage.
3 From the Taskflow Listing Summary page, select the taskflow to delete, and click Delete.
Copying TaskflowsAfter you define a taskflow for an application, you can copy it to a different application.
ä To copy taskflows:
1 Select Navigate, then Administer, and then Consolidation Administration.
254
2 Select Administration, and then Taskflows, and then Manage, or expand Taskflows from the left sidenavigation pane and select Manage.
3 From the Taskflow Listing Summary page, select the taskflow to copy and click Save As.
4 Enter a new name and description for the taskflow.
5 Click Submit.
Shared Services adds a copy of the taskflow with a new name to the Taskflow ListingSummary.
Running Taskflows Manually for TestingYou can run a taskflow manually instead of waiting for it to start automatically. You might wantto test a taskflow before it is scheduled to run, which enables you to make adjustments to thetaskflow before it actually runs.
ä To run taskflows manually:
1 Select Navigate, then Administer, and then Consolidation Administration.
2 Select Administration, and then Taskflows, and then Manage, or expand Taskflows from the left sidenavigation pane and select Manage.
3 From the Taskflow Listing Summary page, select the taskflow to run and click Run Now.
Controlling Access to TaskflowsIn addition to role-based authorization using Oracle Hyperion Shared Services Console, youcan manage access permissions at the more granular taskflow level by using Access Control Lists(ACLs). Before you can assign permissions to taskflows, you must first ensure that theappropriate roles are created using Shared Services Console. For example, create a OracleHyperion Financial Management role with a descriptive name like “Manage Financials TF”(which provides the ability to manage all Financials taskflows), then choose the ManageTaskflows base role. Once the role is created using Oracle Hyperion Shared Services Console,you can assign access permissions to individual taskflows.
Shared Services provides these types of permissions for each taskflow:
l Manage
l Execute
ä To assign permissions to individual taskflows:
1 Select Navigate, then Administer, and then Consolidation Administration.
2 Select Administration, and then Taskflows, and then Manage, or expand Taskflows from the left sidenavigation pane and select Manage.
3 From the list of taskflows, select a taskflow and click Access Control.
255

4 Select the appropriate base roles for Manage Permission Role and Execute Permission Role.
For example, select the “Manage Financials TF” role for the Manage Permission Role and“Execute Financials TF” for the Execute Permission Role.
5 Click Save.
Scheduling TaskflowsYou can schedule a taskflow to run automatically without creating or editing a taskflow. ScheduleTaskflow enables you to define the taskflow start time and the scheduled times for the event tooccur, based on the application server time, not the local user’s computer.
ä To schedule a taskflow:
1 Select Navigate, then Administer, and then Consolidation Administration.
2 Select Administration, and then Taskflows, and then Manage, or expand Taskflows from the left sidenavigation pane and select Manage.
3 From the list of taskflows, select a taskflow and click Schedule Taskflow.
4 Enter this information:
a. From Starting Event, select Scheduled Event.
The Server Date information is displayed for informational purposes.
b. For Start Date, enter the date for the task to be run, or click the pop-up calendar andselect a date.
c. From Start Time, select a time for the task to be run.
Note: This time is based on the application server, which is identified on the Server Dateline.
d. For a recurring task, select Recurrence, and from Recurrence Pattern, select the taskfrequency.
e. Select an option for the task end date and time:
l No End Date
l End After Occurrences, and enter the number of occurrences
l End Date, enter an end date and select an End Time.
5 Click Save.
Viewing Taskflow StatusThe Taskflow Status Summary enables you to check the status of taskflows, including taskflowsthat are active, completed, or stopped. You can view all taskflows, or you can filter the list of
256
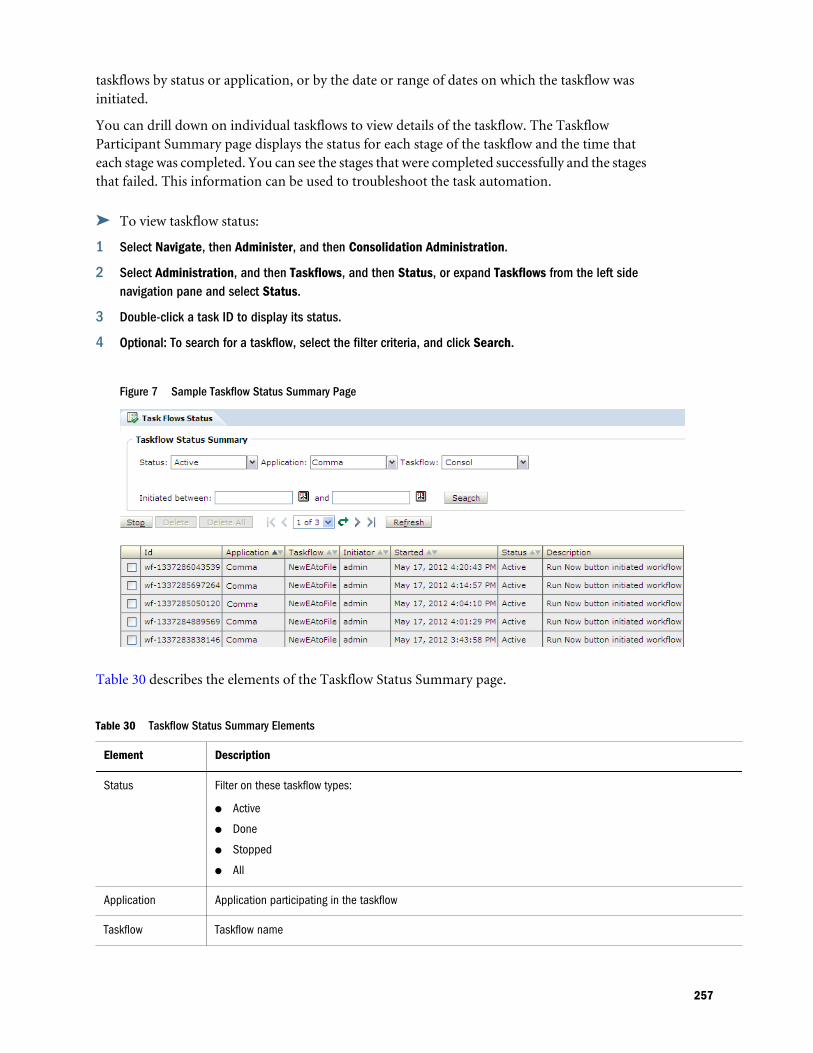
taskflows by status or application, or by the date or range of dates on which the taskflow wasinitiated.
You can drill down on individual taskflows to view details of the taskflow. The TaskflowParticipant Summary page displays the status for each stage of the taskflow and the time thateach stage was completed. You can see the stages that were completed successfully and the stagesthat failed. This information can be used to troubleshoot the task automation.
ä To view taskflow status:
1 Select Navigate, then Administer, and then Consolidation Administration.
2 Select Administration, and then Taskflows, and then Status, or expand Taskflows from the left sidenavigation pane and select Status.
3 Double-click a task ID to display its status.
4 Optional: To search for a taskflow, select the filter criteria, and click Search.
Figure 7 Sample Taskflow Status Summary Page
Table 30 describes the elements of the Taskflow Status Summary page.
Table 30 Taskflow Status Summary Elements
Element Description
Status Filter on these taskflow types:
l Active
l Done
l Stopped
l All
Application Application participating in the taskflow
Taskflow Taskflow name
257
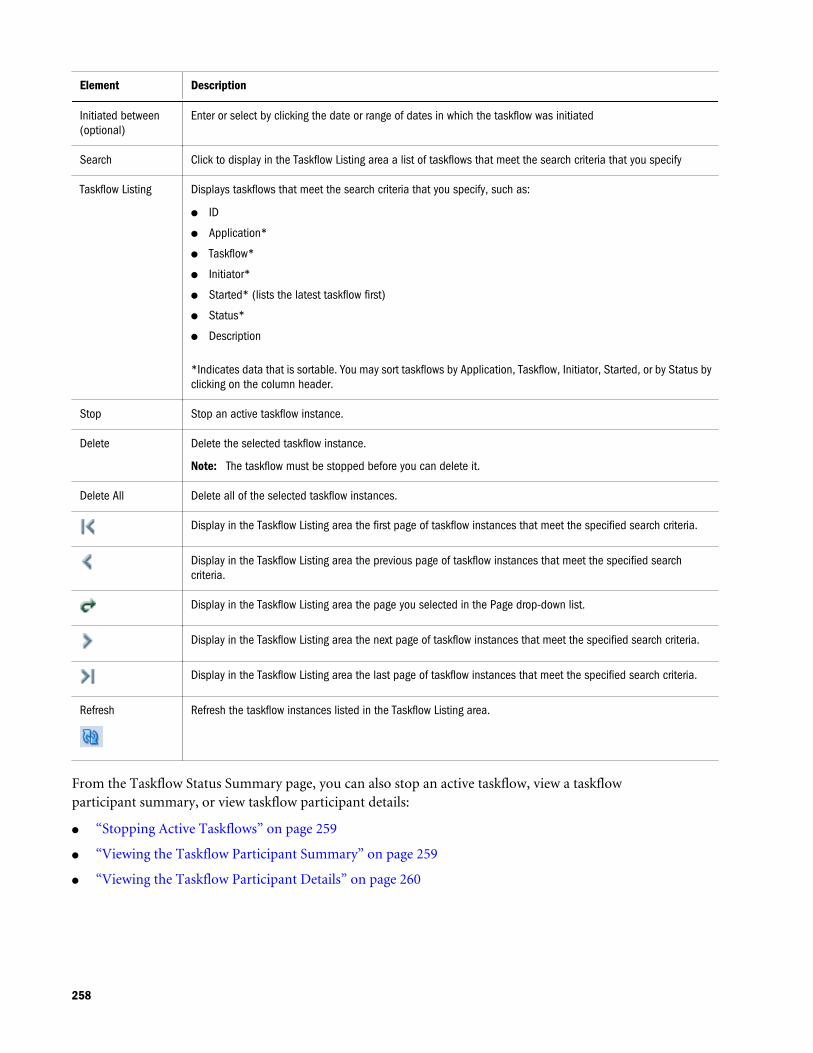
Element Description
Initiated between(optional)
Enter or select by clicking the date or range of dates in which the taskflow was initiated
Search Click to display in the Taskflow Listing area a list of taskflows that meet the search criteria that you specify
Taskflow Listing Displays taskflows that meet the search criteria that you specify, such as:
l ID
l Application*
l Taskflow*
l Initiator*
l Started* (lists the latest taskflow first)
l Status*
l Description
*Indicates data that is sortable. You may sort taskflows by Application, Taskflow, Initiator, Started, or by Status byclicking on the column header.
Stop Stop an active taskflow instance.
Delete Delete the selected taskflow instance.
Note: The taskflow must be stopped before you can delete it.
Delete All Delete all of the selected taskflow instances.
Display in the Taskflow Listing area the first page of taskflow instances that meet the specified search criteria.
Display in the Taskflow Listing area the previous page of taskflow instances that meet the specified searchcriteria.
Display in the Taskflow Listing area the page you selected in the Page drop-down list.
Display in the Taskflow Listing area the next page of taskflow instances that meet the specified search criteria.
Display in the Taskflow Listing area the last page of taskflow instances that meet the specified search criteria.
Refresh Refresh the taskflow instances listed in the Taskflow Listing area.
From the Taskflow Status Summary page, you can also stop an active taskflow, view a taskflowparticipant summary, or view taskflow participant details:
l “Stopping Active Taskflows” on page 259
l “Viewing the Taskflow Participant Summary” on page 259
l “Viewing the Taskflow Participant Details” on page 260
258

Stopping Active TaskflowsActive taskflows are taskflows that are in progress. You can stop taskflows that are not in progress.For example, you can stop a taskflow that has errors and make adjustments to it.
ä To stop active taskflows:
1 Select Navigate, then Administer, and then Consolidation Administration.
2 Select Administration, and then Taskflows, and then Manage, or expand Taskflows from the left sidenavigation pane and select Manage.
3 From Status, select Active.
4 Optional: To filter the list, select search criteria for the taskflow, and click Search.
5 Select the taskflow to stop and click Stop.
Viewing the Taskflow Participant SummaryThe Taskflow Participant Summary page lists the participants in a taskflow and provides statusinformation for each participant instance.
ä To view taskflow participant status:
1 Select Navigate, then Administer, and then Consolidation Administration.
2 Select Administration, and then Taskflows, and then Status, or expand Taskflows from the left sidenavigation pane and select Status.
3 Select the search criteria for the taskflows, and click Search.
To view all of the taskflows in theShared Services taskflow management system, select(Status) All and click Search.
4 In the Taskflow Listing area, find the taskflow for which to view the participant summary and click thetaskflow ID.
The Taskflow Participant Summary page is displayed.
5 Click Cancel to return to the Taskflow Status Summary page.
Table 31 Taskflow Participant Summary Page Elements
Element Description
Taskflow Summary Summary information for the selected taskflow (items appear in the order of completion):
l ID
l Application
l Taskflow
l Initiator
l Started
l Status
l Description
259
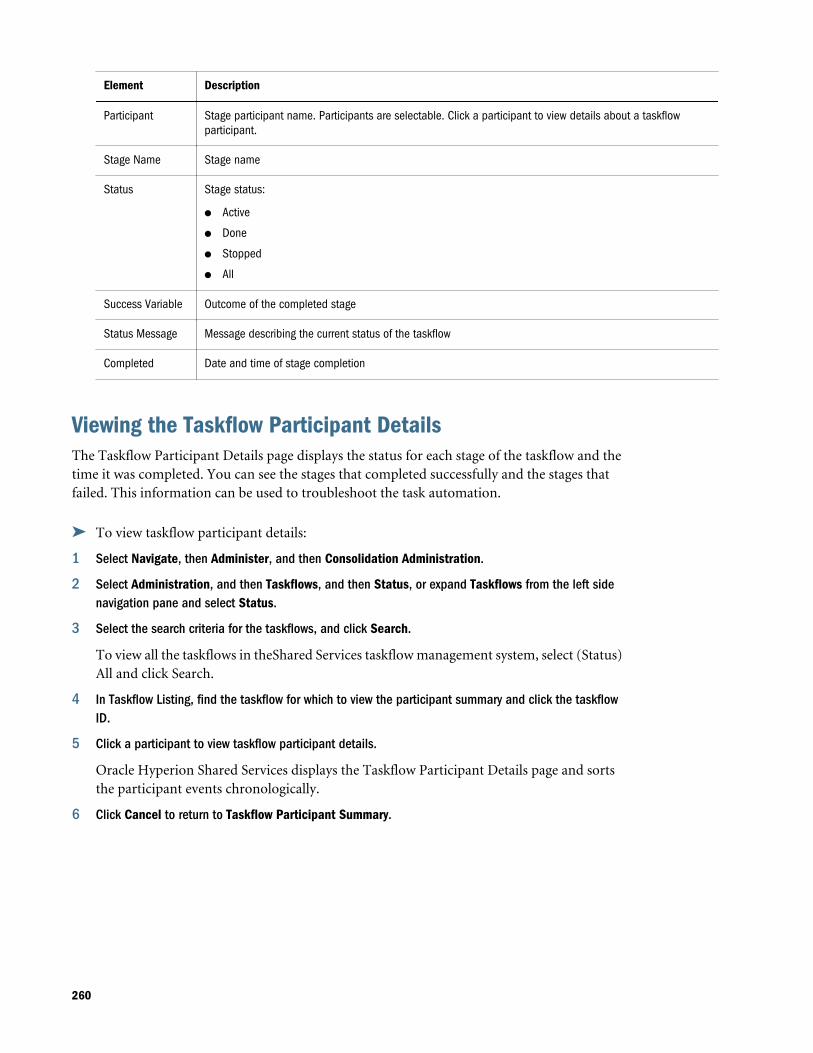
Element Description
Participant Stage participant name. Participants are selectable. Click a participant to view details about a taskflowparticipant.
Stage Name Stage name
Status Stage status:
l Active
l Done
l Stopped
l All
Success Variable Outcome of the completed stage
Status Message Message describing the current status of the taskflow
Completed Date and time of stage completion
Viewing the Taskflow Participant DetailsThe Taskflow Participant Details page displays the status for each stage of the taskflow and thetime it was completed. You can see the stages that completed successfully and the stages thatfailed. This information can be used to troubleshoot the task automation.
ä To view taskflow participant details:
1 Select Navigate, then Administer, and then Consolidation Administration.
2 Select Administration, and then Taskflows, and then Status, or expand Taskflows from the left sidenavigation pane and select Status.
3 Select the search criteria for the taskflows, and click Search.
To view all the taskflows in theShared Services taskflow management system, select (Status)All and click Search.
4 In Taskflow Listing, find the taskflow for which to view the participant summary and click the taskflowID.
5 Click a participant to view taskflow participant details.
Oracle Hyperion Shared Services displays the Taskflow Participant Details page and sortsthe participant events chronologically.
6 Click Cancel to return to Taskflow Participant Summary.
260