Embed Size (px)
Citation preview
Oracle® Hyperion Financial Management
Administrator's Guide
Release 11.1.2.4.100
Updated: October 2015
Financial Management Administrator's Guide, 11.1.2.4.100
Copyright © 2000, 2015, Oracle and/or its affiliates. All rights reserved.
Authors: EPM Information Development Team
This software and related documentation are provided under a license agreement containing restrictions on use anddisclosure and are protected by intellectual property laws. Except as expressly permitted in your license agreement orallowed by law, you may not use, copy, reproduce, translate, broadcast, modify, license, transmit, distribute, exhibit,perform, publish, or display any part, in any form, or by any means. Reverse engineering, disassembly, or decompilationof this software, unless required by law for interoperability, is prohibited.
The information contained herein is subject to change without notice and is not warranted to be error-free. If you findany errors, please report them to us in writing.
If this is software or related documentation that is delivered to the U.S. Government or anyone licensing it on behalf ofthe U.S. Government, then the following notice is applicable:
U.S. GOVERNMENT END USERS:
Oracle programs, including any operating system, integrated software, any programs installed on the hardware, and/ordocumentation, delivered to U.S. Government end users are "commercial computer software" pursuant to the applicableFederal Acquisition Regulation and agency-specific supplemental regulations. As such, use, duplication, disclosure,modification, and adaptation of the programs, including any operating system, integrated software, any programs installedon the hardware, and/or documentation, shall be subject to license terms and license restrictions applicable to the programs.No other rights are granted to the U.S. Government.
This software or hardware is developed for general use in a variety of information management applications. It is notdeveloped or intended for use in any inherently dangerous applications, including applications that may create a risk ofpersonal injury. If you use this software or hardware in dangerous applications, then you shall be responsible to take allappropriate fail-safe, backup, redundancy, and other measures to ensure its safe use. Oracle Corporation and its affiliatesdisclaim any liability for any damages caused by use of this software or hardware in dangerous applications.
Oracle and Java are registered trademarks of Oracle and/or its affiliates. Other names may be trademarks of their respectiveowners.
Intel and Intel Xeon are trademarks or registered trademarks of Intel Corporation. All SPARC trademarks are used underlicense and are trademarks or registered trademarks of SPARC International, Inc. AMD, Opteron, the AMD logo, and theAMD Opteron logo are trademarks or registered trademarks of Advanced Micro Devices. UNIX is a registered trademarkof The Open Group.
This software or hardware and documentation may provide access to or information about content, products, and servicesfrom third parties. Oracle Corporation and its affiliates are not responsible for and expressly disclaim all warranties of anykind with respect to third-party content, products, and services unless otherwise set forth in an applicable agreementbetween you and Oracle. Oracle Corporation and its affiliates will not be responsible for any loss, costs, or damages incurreddue to your access to or use of third-party content, products, or services, except as set forth in an applicable agreementbetween you and Oracle.
Contents
Documentation Accessibility . . . . . . . . . . . . . . . . . . . . . . . . . . . . . . . . . . . . . . . . . . . . . . . . . . . . . . . . . . 17
Documentation Feedback . . . . . . . . . . . . . . . . . . . . . . . . . . . . . . . . . . . . . . . . . . . . . . . . . . . . . . . . . . . . 19
Chapter 1. About Financial Management . . . . . . . . . . . . . . . . . . . . . . . . . . . . . . . . . . . . . . . . . . . . . . . . . 21
Financial Management Features . . . . . . . . . . . . . . . . . . . . . . . . . . . . . . . . . . . . . . . . . . . 21
Performance Management Architect . . . . . . . . . . . . . . . . . . . . . . . . . . . . . . . . . . . . . . . 22
EPM Workspace . . . . . . . . . . . . . . . . . . . . . . . . . . . . . . . . . . . . . . . . . . . . . . . . . . . . . . 22
Financial Management Dimensions . . . . . . . . . . . . . . . . . . . . . . . . . . . . . . . . . . . . . . . . 22
Scenario Dimension . . . . . . . . . . . . . . . . . . . . . . . . . . . . . . . . . . . . . . . . . . . . . . . . 23
Year Dimension . . . . . . . . . . . . . . . . . . . . . . . . . . . . . . . . . . . . . . . . . . . . . . . . . . . 23
Period Dimension . . . . . . . . . . . . . . . . . . . . . . . . . . . . . . . . . . . . . . . . . . . . . . . . . . 23
Entity Dimension . . . . . . . . . . . . . . . . . . . . . . . . . . . . . . . . . . . . . . . . . . . . . . . . . . 23
Value Dimension . . . . . . . . . . . . . . . . . . . . . . . . . . . . . . . . . . . . . . . . . . . . . . . . . . 24
Account Dimension . . . . . . . . . . . . . . . . . . . . . . . . . . . . . . . . . . . . . . . . . . . . . . . . 24
Intercompany Dimension . . . . . . . . . . . . . . . . . . . . . . . . . . . . . . . . . . . . . . . . . . . . 24
View Dimension . . . . . . . . . . . . . . . . . . . . . . . . . . . . . . . . . . . . . . . . . . . . . . . . . . . 24
Custom Dimensions . . . . . . . . . . . . . . . . . . . . . . . . . . . . . . . . . . . . . . . . . . . . . . . . 24
User-Defined Elements . . . . . . . . . . . . . . . . . . . . . . . . . . . . . . . . . . . . . . . . . . . . . . . . . 25
Chapter 2. Managing Applications . . . . . . . . . . . . . . . . . . . . . . . . . . . . . . . . . . . . . . . . . . . . . . . . . . . . . . 29
Application Administration . . . . . . . . . . . . . . . . . . . . . . . . . . . . . . . . . . . . . . . . . . . . . . 30
Creating Applications . . . . . . . . . . . . . . . . . . . . . . . . . . . . . . . . . . . . . . . . . . . . . . . . . . 31
Creating a New Application . . . . . . . . . . . . . . . . . . . . . . . . . . . . . . . . . . . . . . . . . . . . . . 31
Defining Frequencies . . . . . . . . . . . . . . . . . . . . . . . . . . . . . . . . . . . . . . . . . . . . . . . 33
Editing Periods . . . . . . . . . . . . . . . . . . . . . . . . . . . . . . . . . . . . . . . . . . . . . . . . . . . . 34
Defining Features . . . . . . . . . . . . . . . . . . . . . . . . . . . . . . . . . . . . . . . . . . . . . . . . . . 36
Creating Custom Dimensions . . . . . . . . . . . . . . . . . . . . . . . . . . . . . . . . . . . . . . . . . 37
Saving Application Profiles . . . . . . . . . . . . . . . . . . . . . . . . . . . . . . . . . . . . . . . . . . . 39
Creating an Application from a Profile File . . . . . . . . . . . . . . . . . . . . . . . . . . . . . . . . . . . 39
Copying from an Application . . . . . . . . . . . . . . . . . . . . . . . . . . . . . . . . . . . . . . . . . . . . 40
Modifying Applications . . . . . . . . . . . . . . . . . . . . . . . . . . . . . . . . . . . . . . . . . . . . . . . . . 40
Modifying the Number of Years in the Application . . . . . . . . . . . . . . . . . . . . . . . . . . 40
iii
Enabling or Disabling Application Modules . . . . . . . . . . . . . . . . . . . . . . . . . . . . . . . 41
Registering Applications . . . . . . . . . . . . . . . . . . . . . . . . . . . . . . . . . . . . . . . . . . . . . . . . 42
Opening Applications . . . . . . . . . . . . . . . . . . . . . . . . . . . . . . . . . . . . . . . . . . . . . . . . . . 42
Closing Applications . . . . . . . . . . . . . . . . . . . . . . . . . . . . . . . . . . . . . . . . . . . . . . . . . . . 42
Changing Application Server Clusters . . . . . . . . . . . . . . . . . . . . . . . . . . . . . . . . . . . . . . 43
Viewing the Application List . . . . . . . . . . . . . . . . . . . . . . . . . . . . . . . . . . . . . . . . . . . . . 43
Deleting Applications . . . . . . . . . . . . . . . . . . . . . . . . . . . . . . . . . . . . . . . . . . . . . . . . . . 43
Loading Application Elements . . . . . . . . . . . . . . . . . . . . . . . . . . . . . . . . . . . . . . . . . . . . 44
Extracting Application Elements . . . . . . . . . . . . . . . . . . . . . . . . . . . . . . . . . . . . . . . . . . 45
Using Sample Applications . . . . . . . . . . . . . . . . . . . . . . . . . . . . . . . . . . . . . . . . . . . . . . 45
Working with System Messages . . . . . . . . . . . . . . . . . . . . . . . . . . . . . . . . . . . . . . . . . . . 46
Viewing System Messages . . . . . . . . . . . . . . . . . . . . . . . . . . . . . . . . . . . . . . . . . . . . 46
Deleting System Messages . . . . . . . . . . . . . . . . . . . . . . . . . . . . . . . . . . . . . . . . . . . . 47
System Message Detail Strings . . . . . . . . . . . . . . . . . . . . . . . . . . . . . . . . . . . . . . . . . 47
Managing Application Access . . . . . . . . . . . . . . . . . . . . . . . . . . . . . . . . . . . . . . . . . . . . 48
Logging Out Users . . . . . . . . . . . . . . . . . . . . . . . . . . . . . . . . . . . . . . . . . . . . . . . . . 48
Disabling and Enabling Connections . . . . . . . . . . . . . . . . . . . . . . . . . . . . . . . . . . . . 49
Viewing Application Connection Status . . . . . . . . . . . . . . . . . . . . . . . . . . . . . . . . . . 49
Managing System Users . . . . . . . . . . . . . . . . . . . . . . . . . . . . . . . . . . . . . . . . . . . . . . . . . 50
Viewing Users . . . . . . . . . . . . . . . . . . . . . . . . . . . . . . . . . . . . . . . . . . . . . . . . . . . . . 50
Logging Out Selected or All Users . . . . . . . . . . . . . . . . . . . . . . . . . . . . . . . . . . . . . . 51
Managing Servers and Applications . . . . . . . . . . . . . . . . . . . . . . . . . . . . . . . . . . . . . . . . 51
Enabling and Disabling Admin Mode . . . . . . . . . . . . . . . . . . . . . . . . . . . . . . . . . . . . 51
Synchronizing Servers . . . . . . . . . . . . . . . . . . . . . . . . . . . . . . . . . . . . . . . . . . . . . . . 52
Auditing Tasks . . . . . . . . . . . . . . . . . . . . . . . . . . . . . . . . . . . . . . . . . . . . . . . . . . . . . . . 52
Auditing Data . . . . . . . . . . . . . . . . . . . . . . . . . . . . . . . . . . . . . . . . . . . . . . . . . . . . . . . . 55
Monitoring Running Tasks . . . . . . . . . . . . . . . . . . . . . . . . . . . . . . . . . . . . . . . . . . . . . . 56
Viewing Running Tasks . . . . . . . . . . . . . . . . . . . . . . . . . . . . . . . . . . . . . . . . . . . . . . 57
Stopping Running Tasks . . . . . . . . . . . . . . . . . . . . . . . . . . . . . . . . . . . . . . . . . . . . . 58
Refreshing Running Tasks . . . . . . . . . . . . . . . . . . . . . . . . . . . . . . . . . . . . . . . . . . . . 58
Scanning For and Clearing Invalid Records . . . . . . . . . . . . . . . . . . . . . . . . . . . . . . . . . . . 59
Monitoring System Status Using HFM Insights (Exalytics Only) . . . . . . . . . . . . . . . . . . . 59
Accessing HFM Insights . . . . . . . . . . . . . . . . . . . . . . . . . . . . . . . . . . . . . . . . . . . . . 59
HFM Insights Main Dashboard . . . . . . . . . . . . . . . . . . . . . . . . . . . . . . . . . . . . . . . . 60
Filtering Applications . . . . . . . . . . . . . . . . . . . . . . . . . . . . . . . . . . . . . . . . . . . . . . . 61
Application Details . . . . . . . . . . . . . . . . . . . . . . . . . . . . . . . . . . . . . . . . . . . . . . . . . 61
Chapter 3. Managing Application Security . . . . . . . . . . . . . . . . . . . . . . . . . . . . . . . . . . . . . . . . . . . . . . . . . 65
Application Security Considerations . . . . . . . . . . . . . . . . . . . . . . . . . . . . . . . . . . . . . . . 66
iv
Launching the Shared Services Console from Financial Management . . . . . . . . . . . . . . . . 66
Selecting Users and Groups for Assigning Security Classes . . . . . . . . . . . . . . . . . . . . . 67
Setting Up Security Classes . . . . . . . . . . . . . . . . . . . . . . . . . . . . . . . . . . . . . . . . . . . 67
Assigning User Access to Security Classes . . . . . . . . . . . . . . . . . . . . . . . . . . . . . . . . . 69
Setting Up Email Alerting . . . . . . . . . . . . . . . . . . . . . . . . . . . . . . . . . . . . . . . . . . . . 70
Running Security Reports . . . . . . . . . . . . . . . . . . . . . . . . . . . . . . . . . . . . . . . . . . . . 71
Loading Application Security . . . . . . . . . . . . . . . . . . . . . . . . . . . . . . . . . . . . . . . . . . . . . 71
Clearing and Loading Security Information . . . . . . . . . . . . . . . . . . . . . . . . . . . . . . . 73
Before Clearing Security Information . . . . . . . . . . . . . . . . . . . . . . . . . . . . . . . . . . . . 73
After Clearing Security Information . . . . . . . . . . . . . . . . . . . . . . . . . . . . . . . . . . . . . 74
Extracting Application Security . . . . . . . . . . . . . . . . . . . . . . . . . . . . . . . . . . . . . . . . . . . 75
Chapter 4. Managing Metadata . . . . . . . . . . . . . . . . . . . . . . . . . . . . . . . . . . . . . . . . . . . . . . . . . . . . . . . . 77
Defining Accounts . . . . . . . . . . . . . . . . . . . . . . . . . . . . . . . . . . . . . . . . . . . . . . . . . . . . 78
Account Type Behavior . . . . . . . . . . . . . . . . . . . . . . . . . . . . . . . . . . . . . . . . . . . . . . 80
Defining Dynamic Accounts . . . . . . . . . . . . . . . . . . . . . . . . . . . . . . . . . . . . . . . . . . 82
Defining Custom Members . . . . . . . . . . . . . . . . . . . . . . . . . . . . . . . . . . . . . . . . . . . . . . 82
Adding Custom Dimension Information . . . . . . . . . . . . . . . . . . . . . . . . . . . . . . . . . . . . 84
Importing Custom Dimension Information . . . . . . . . . . . . . . . . . . . . . . . . . . . . . . . 84
Manually Editing Custom Dimension Information . . . . . . . . . . . . . . . . . . . . . . . . . . 85
Defining Entity Members . . . . . . . . . . . . . . . . . . . . . . . . . . . . . . . . . . . . . . . . . . . . . . . 86
Defining Scenario Members . . . . . . . . . . . . . . . . . . . . . . . . . . . . . . . . . . . . . . . . . . . . . . 87
Defining Application Settings . . . . . . . . . . . . . . . . . . . . . . . . . . . . . . . . . . . . . . . . . . . . 89
Organization by Period . . . . . . . . . . . . . . . . . . . . . . . . . . . . . . . . . . . . . . . . . . . . . . . . . 91
Defining Consolidation Methods . . . . . . . . . . . . . . . . . . . . . . . . . . . . . . . . . . . . . . . . . . 92
Using Consolidation Methods . . . . . . . . . . . . . . . . . . . . . . . . . . . . . . . . . . . . . . . . . 93
Assigning Consolidation Methods Manually . . . . . . . . . . . . . . . . . . . . . . . . . . . . . . . 93
Using POWN or POWNMIN Consolidation Methods . . . . . . . . . . . . . . . . . . . . . . . 94
Defining Currencies . . . . . . . . . . . . . . . . . . . . . . . . . . . . . . . . . . . . . . . . . . . . . . . . . . . 95
Defining Cell Text Labels . . . . . . . . . . . . . . . . . . . . . . . . . . . . . . . . . . . . . . . . . . . . . . . . 97
System-Generated Accounts . . . . . . . . . . . . . . . . . . . . . . . . . . . . . . . . . . . . . . . . . . . . . 98
Consolidation Accounts . . . . . . . . . . . . . . . . . . . . . . . . . . . . . . . . . . . . . . . . . . . . . 98
Ownership Accounts . . . . . . . . . . . . . . . . . . . . . . . . . . . . . . . . . . . . . . . . . . . . . . . . 99
Editing System-Generated Accounts . . . . . . . . . . . . . . . . . . . . . . . . . . . . . . . . . . . . 100
Setting Up Intercompany Partners . . . . . . . . . . . . . . . . . . . . . . . . . . . . . . . . . . . . . . . . 100
Editing System-Generated ICP Members . . . . . . . . . . . . . . . . . . . . . . . . . . . . . . . . 101
Editing System-Generated Value Members . . . . . . . . . . . . . . . . . . . . . . . . . . . . . . . 101
Metadata Filtering Based on Security . . . . . . . . . . . . . . . . . . . . . . . . . . . . . . . . . . . . . . 102
Creating Metadata Files of the APP Format . . . . . . . . . . . . . . . . . . . . . . . . . . . . . . . . . . 103
v
File Format . . . . . . . . . . . . . . . . . . . . . . . . . . . . . . . . . . . . . . . . . . . . . . . . . . . . . . 104
Version . . . . . . . . . . . . . . . . . . . . . . . . . . . . . . . . . . . . . . . . . . . . . . . . . . . . . . . . 104
Application Settings . . . . . . . . . . . . . . . . . . . . . . . . . . . . . . . . . . . . . . . . . . . . . . . 104
Currencies . . . . . . . . . . . . . . . . . . . . . . . . . . . . . . . . . . . . . . . . . . . . . . . . . . . . . . 105
Members . . . . . . . . . . . . . . . . . . . . . . . . . . . . . . . . . . . . . . . . . . . . . . . . . . . . . . . 105
Consolidation Methods . . . . . . . . . . . . . . . . . . . . . . . . . . . . . . . . . . . . . . . . . . . . . 108
Hierarchies . . . . . . . . . . . . . . . . . . . . . . . . . . . . . . . . . . . . . . . . . . . . . . . . . . . . . . 109
Dimensions Not Included in Metadata Files . . . . . . . . . . . . . . . . . . . . . . . . . . . . . . 111
Using Metadata Manager Views . . . . . . . . . . . . . . . . . . . . . . . . . . . . . . . . . . . . . . . . . . 111
Changing the Metadata File Format . . . . . . . . . . . . . . . . . . . . . . . . . . . . . . . . . . . . 112
Tree View Tasks . . . . . . . . . . . . . . . . . . . . . . . . . . . . . . . . . . . . . . . . . . . . . . . . . . 113
List View Tasks . . . . . . . . . . . . . . . . . . . . . . . . . . . . . . . . . . . . . . . . . . . . . . . . . . . 117
Sorting Metadata in List View . . . . . . . . . . . . . . . . . . . . . . . . . . . . . . . . . . . . . . . . 119
Creating Metadata Reports in File Properties . . . . . . . . . . . . . . . . . . . . . . . . . . . . . 120
Metadata Referential Integrity . . . . . . . . . . . . . . . . . . . . . . . . . . . . . . . . . . . . . . . . . . . 120
Metadata Referential Integrity Checks . . . . . . . . . . . . . . . . . . . . . . . . . . . . . . . . . . 120
Metadata Log File Referential Integrity Errors . . . . . . . . . . . . . . . . . . . . . . . . . . . . . 121
Using the Metadata Merge Utility . . . . . . . . . . . . . . . . . . . . . . . . . . . . . . . . . . . . . . . . 121
Loading Metadata . . . . . . . . . . . . . . . . . . . . . . . . . . . . . . . . . . . . . . . . . . . . . . . . . . . . 122
Viewing Metadata Load Changes . . . . . . . . . . . . . . . . . . . . . . . . . . . . . . . . . . . . . . . . . 124
Extracting Metadata . . . . . . . . . . . . . . . . . . . . . . . . . . . . . . . . . . . . . . . . . . . . . . . . . . 125
Chapter 5. Managing Member Lists . . . . . . . . . . . . . . . . . . . . . . . . . . . . . . . . . . . . . . . . . . . . . . . . . . . . 127
Creating Member List Files . . . . . . . . . . . . . . . . . . . . . . . . . . . . . . . . . . . . . . . . . . . . . 128
EnumMemberLists . . . . . . . . . . . . . . . . . . . . . . . . . . . . . . . . . . . . . . . . . . . . . . . . 128
EnumMembersInList . . . . . . . . . . . . . . . . . . . . . . . . . . . . . . . . . . . . . . . . . . . . . . 129
Dynamic Member Lists . . . . . . . . . . . . . . . . . . . . . . . . . . . . . . . . . . . . . . . . . . . . . 131
Dynamic POV Member List . . . . . . . . . . . . . . . . . . . . . . . . . . . . . . . . . . . . . . . . . 131
Loading Member Lists . . . . . . . . . . . . . . . . . . . . . . . . . . . . . . . . . . . . . . . . . . . . . . . . . 132
Extracting Member Lists . . . . . . . . . . . . . . . . . . . . . . . . . . . . . . . . . . . . . . . . . . . . . . . 133
System Lists by Dimension . . . . . . . . . . . . . . . . . . . . . . . . . . . . . . . . . . . . . . . . . . . . . 134
Chapter 6. Managing Journals . . . . . . . . . . . . . . . . . . . . . . . . . . . . . . . . . . . . . . . . . . . . . . . . . . . . . . . . 135
Creating Journal Files . . . . . . . . . . . . . . . . . . . . . . . . . . . . . . . . . . . . . . . . . . . . . . . . . 135
File Format Section . . . . . . . . . . . . . . . . . . . . . . . . . . . . . . . . . . . . . . . . . . . . . . . . 136
Version Section . . . . . . . . . . . . . . . . . . . . . . . . . . . . . . . . . . . . . . . . . . . . . . . . . . 136
Journal Group Section . . . . . . . . . . . . . . . . . . . . . . . . . . . . . . . . . . . . . . . . . . . . . 137
Standard Section . . . . . . . . . . . . . . . . . . . . . . . . . . . . . . . . . . . . . . . . . . . . . . . . . . 137
Recurring Section . . . . . . . . . . . . . . . . . . . . . . . . . . . . . . . . . . . . . . . . . . . . . . . . . 137
Header Section . . . . . . . . . . . . . . . . . . . . . . . . . . . . . . . . . . . . . . . . . . . . . . . . . . . 137
vi
Loading Journals . . . . . . . . . . . . . . . . . . . . . . . . . . . . . . . . . . . . . . . . . . . . . . . . . . . . . 139
Extracting Journals . . . . . . . . . . . . . . . . . . . . . . . . . . . . . . . . . . . . . . . . . . . . . . . . . . . 140
Chapter 7. Managing Data Forms . . . . . . . . . . . . . . . . . . . . . . . . . . . . . . . . . . . . . . . . . . . . . . . . . . . . . . 143
Creating Data Forms in the Form Designer . . . . . . . . . . . . . . . . . . . . . . . . . . . . . . . . . . 143
Setting the Point of View . . . . . . . . . . . . . . . . . . . . . . . . . . . . . . . . . . . . . . . . . . . . 144
Specifying Form Details . . . . . . . . . . . . . . . . . . . . . . . . . . . . . . . . . . . . . . . . . . . . . 145
Specifying On-Demand Rules for Data Forms . . . . . . . . . . . . . . . . . . . . . . . . . . . . . 146
Specifying Form Row and Column Options . . . . . . . . . . . . . . . . . . . . . . . . . . . . . . 146
Specifying Form Headers . . . . . . . . . . . . . . . . . . . . . . . . . . . . . . . . . . . . . . . . . . . . 147
Using Data Form Scripts . . . . . . . . . . . . . . . . . . . . . . . . . . . . . . . . . . . . . . . . . . . . . . . 147
AddMember . . . . . . . . . . . . . . . . . . . . . . . . . . . . . . . . . . . . . . . . . . . . . . . . . . . . . 150
BackgroundPOV . . . . . . . . . . . . . . . . . . . . . . . . . . . . . . . . . . . . . . . . . . . . . . . . . . 151
Blank . . . . . . . . . . . . . . . . . . . . . . . . . . . . . . . . . . . . . . . . . . . . . . . . . . . . . . . . . . 152
Cn . . . . . . . . . . . . . . . . . . . . . . . . . . . . . . . . . . . . . . . . . . . . . . . . . . . . . . . . . . . . 152
Calc1 . . . . . . . . . . . . . . . . . . . . . . . . . . . . . . . . . . . . . . . . . . . . . . . . . . . . . . . . . . 153
CalcByRow . . . . . . . . . . . . . . . . . . . . . . . . . . . . . . . . . . . . . . . . . . . . . . . . . . . . . . 153
Cell_Link . . . . . . . . . . . . . . . . . . . . . . . . . . . . . . . . . . . . . . . . . . . . . . . . . . . . . . . 154
CellText . . . . . . . . . . . . . . . . . . . . . . . . . . . . . . . . . . . . . . . . . . . . . . . . . . . . . . . . 154
CustomHeader . . . . . . . . . . . . . . . . . . . . . . . . . . . . . . . . . . . . . . . . . . . . . . . . . . . 155
CustomHeaderStyle . . . . . . . . . . . . . . . . . . . . . . . . . . . . . . . . . . . . . . . . . . . . . . . 155
DynamicPOV . . . . . . . . . . . . . . . . . . . . . . . . . . . . . . . . . . . . . . . . . . . . . . . . . . . . 156
FormInputBoxLength . . . . . . . . . . . . . . . . . . . . . . . . . . . . . . . . . . . . . . . . . . . . . . 156
FormNumDecimals . . . . . . . . . . . . . . . . . . . . . . . . . . . . . . . . . . . . . . . . . . . . . . . 156
FormRowHeight . . . . . . . . . . . . . . . . . . . . . . . . . . . . . . . . . . . . . . . . . . . . . . . . . . 157
FormScale . . . . . . . . . . . . . . . . . . . . . . . . . . . . . . . . . . . . . . . . . . . . . . . . . . . . . . 157
HeaderOption . . . . . . . . . . . . . . . . . . . . . . . . . . . . . . . . . . . . . . . . . . . . . . . . . . . 157
HideInPov . . . . . . . . . . . . . . . . . . . . . . . . . . . . . . . . . . . . . . . . . . . . . . . . . . . . . . 158
Instructions . . . . . . . . . . . . . . . . . . . . . . . . . . . . . . . . . . . . . . . . . . . . . . . . . . . . . 158
LineItemDetailSinglePeriod . . . . . . . . . . . . . . . . . . . . . . . . . . . . . . . . . . . . . . . . . . 159
Link . . . . . . . . . . . . . . . . . . . . . . . . . . . . . . . . . . . . . . . . . . . . . . . . . . . . . . . . . . . 159
MaxCells . . . . . . . . . . . . . . . . . . . . . . . . . . . . . . . . . . . . . . . . . . . . . . . . . . . . . . . 160
MaxColsForSparseRetrievalMethod . . . . . . . . . . . . . . . . . . . . . . . . . . . . . . . . . . . . 160
NoSuppress . . . . . . . . . . . . . . . . . . . . . . . . . . . . . . . . . . . . . . . . . . . . . . . . . . . . . 160
NumDecimals . . . . . . . . . . . . . . . . . . . . . . . . . . . . . . . . . . . . . . . . . . . . . . . . . . . 161
OnDemandRules . . . . . . . . . . . . . . . . . . . . . . . . . . . . . . . . . . . . . . . . . . . . . . . . . 161
Override . . . . . . . . . . . . . . . . . . . . . . . . . . . . . . . . . . . . . . . . . . . . . . . . . . . . . . . . 161
POVOrder . . . . . . . . . . . . . . . . . . . . . . . . . . . . . . . . . . . . . . . . . . . . . . . . . . . . . . 162
PrintNumDataColsPerPage . . . . . . . . . . . . . . . . . . . . . . . . . . . . . . . . . . . . . . . . . . 163
vii
PrintNumRowsPerPage . . . . . . . . . . . . . . . . . . . . . . . . . . . . . . . . . . . . . . . . . . . . . 163
PrintRepeatHeadersonAllPages . . . . . . . . . . . . . . . . . . . . . . . . . . . . . . . . . . . . . . . 164
Rn . . . . . . . . . . . . . . . . . . . . . . . . . . . . . . . . . . . . . . . . . . . . . . . . . . . . . . . . . . . . 164
ReadOnly . . . . . . . . . . . . . . . . . . . . . . . . . . . . . . . . . . . . . . . . . . . . . . . . . . . . . . . 165
ReportDescription . . . . . . . . . . . . . . . . . . . . . . . . . . . . . . . . . . . . . . . . . . . . . . . . 165
ReportLabel . . . . . . . . . . . . . . . . . . . . . . . . . . . . . . . . . . . . . . . . . . . . . . . . . . . . . 166
ReportSecurityClass . . . . . . . . . . . . . . . . . . . . . . . . . . . . . . . . . . . . . . . . . . . . . . . 166
ReportType . . . . . . . . . . . . . . . . . . . . . . . . . . . . . . . . . . . . . . . . . . . . . . . . . . . . . 167
RowHeaderPct . . . . . . . . . . . . . . . . . . . . . . . . . . . . . . . . . . . . . . . . . . . . . . . . . . . 167
SCalc . . . . . . . . . . . . . . . . . . . . . . . . . . . . . . . . . . . . . . . . . . . . . . . . . . . . . . . . . . 167
Scale . . . . . . . . . . . . . . . . . . . . . . . . . . . . . . . . . . . . . . . . . . . . . . . . . . . . . . . . . . 169
SelectablePOVList . . . . . . . . . . . . . . . . . . . . . . . . . . . . . . . . . . . . . . . . . . . . . . . . . 169
ShowDescriptions . . . . . . . . . . . . . . . . . . . . . . . . . . . . . . . . . . . . . . . . . . . . . . . . . 170
ShowLabels . . . . . . . . . . . . . . . . . . . . . . . . . . . . . . . . . . . . . . . . . . . . . . . . . . . . . 170
String . . . . . . . . . . . . . . . . . . . . . . . . . . . . . . . . . . . . . . . . . . . . . . . . . . . . . . . . . . 170
Style . . . . . . . . . . . . . . . . . . . . . . . . . . . . . . . . . . . . . . . . . . . . . . . . . . . . . . . . . . . 171
SuppressColHeaderRepeats . . . . . . . . . . . . . . . . . . . . . . . . . . . . . . . . . . . . . . . . . . 173
SuppressInvalidCols . . . . . . . . . . . . . . . . . . . . . . . . . . . . . . . . . . . . . . . . . . . . . . . 173
SuppressInvalidRows . . . . . . . . . . . . . . . . . . . . . . . . . . . . . . . . . . . . . . . . . . . . . . 174
SuppressNoDataCols . . . . . . . . . . . . . . . . . . . . . . . . . . . . . . . . . . . . . . . . . . . . . . 174
SuppressNoDataRows . . . . . . . . . . . . . . . . . . . . . . . . . . . . . . . . . . . . . . . . . . . . . . 174
SuppressRowHeaderRepeats . . . . . . . . . . . . . . . . . . . . . . . . . . . . . . . . . . . . . . . . . 175
SuppressZeroCols . . . . . . . . . . . . . . . . . . . . . . . . . . . . . . . . . . . . . . . . . . . . . . . . . 175
SuppressZeroRows . . . . . . . . . . . . . . . . . . . . . . . . . . . . . . . . . . . . . . . . . . . . . . . . 175
Using Relative Time Periods . . . . . . . . . . . . . . . . . . . . . . . . . . . . . . . . . . . . . . . . . . . . 176
Order of Precedence for Conflicting Attributes . . . . . . . . . . . . . . . . . . . . . . . . . . . . . . . 176
Editing Data Forms . . . . . . . . . . . . . . . . . . . . . . . . . . . . . . . . . . . . . . . . . . . . . . . . . . . 177
Loading Data Forms . . . . . . . . . . . . . . . . . . . . . . . . . . . . . . . . . . . . . . . . . . . . . . . . . . 178
Extracting Data Forms . . . . . . . . . . . . . . . . . . . . . . . . . . . . . . . . . . . . . . . . . . . . . . . . 178
Deleting Data Forms . . . . . . . . . . . . . . . . . . . . . . . . . . . . . . . . . . . . . . . . . . . . . . . . . . 179
Chapter 8. Extracting Data to a Database . . . . . . . . . . . . . . . . . . . . . . . . . . . . . . . . . . . . . . . . . . . . . . . . 181
Configuring a Data Source Name (DSN) . . . . . . . . . . . . . . . . . . . . . . . . . . . . . . . . . . . 182
Star Schemas . . . . . . . . . . . . . . . . . . . . . . . . . . . . . . . . . . . . . . . . . . . . . . . . . . . . . . . 182
Star Schema Formats . . . . . . . . . . . . . . . . . . . . . . . . . . . . . . . . . . . . . . . . . . . . . . . 184
Prefix Tables . . . . . . . . . . . . . . . . . . . . . . . . . . . . . . . . . . . . . . . . . . . . . . . . . . . . . 184
Creating and Exporting Data to a Star Schema . . . . . . . . . . . . . . . . . . . . . . . . . . . . . . . 185
Updating a Star Schema . . . . . . . . . . . . . . . . . . . . . . . . . . . . . . . . . . . . . . . . . . . . . . . 187
Deleting a Star Schema . . . . . . . . . . . . . . . . . . . . . . . . . . . . . . . . . . . . . . . . . . . . . . . . 188
viii

Creating a Star Schema Template . . . . . . . . . . . . . . . . . . . . . . . . . . . . . . . . . . . . . . . . . 188
Deleting a Star Schema Template . . . . . . . . . . . . . . . . . . . . . . . . . . . . . . . . . . . . . . . . . 189
Chapter 9. Defining Reports . . . . . . . . . . . . . . . . . . . . . . . . . . . . . . . . . . . . . . . . . . . . . . . . . . . . . . . . . 191
Defining Journal Report Scripts . . . . . . . . . . . . . . . . . . . . . . . . . . . . . . . . . . . . . . . . . . 191
Defining Intercompany Matching Report Scripts . . . . . . . . . . . . . . . . . . . . . . . . . . . . . 192
Selecting Member Lists for Intercompany Matching Reports . . . . . . . . . . . . . . . . . . 192
Selecting Accounts for Intercompany Matching Reports . . . . . . . . . . . . . . . . . . . . . 193
Specifying Decimal Places in Intercompany Matching Reports . . . . . . . . . . . . . . . . . 193
Selecting Style Sheets for Intercompany Matching Reports . . . . . . . . . . . . . . . . . . . . 193
Specifying Currencies in Intercompany Matching Reports . . . . . . . . . . . . . . . . . . . . 193
Suppression Options for Intercompany Matching Reports . . . . . . . . . . . . . . . . . . . . 194
Intercompany Matching Report Script Keywords . . . . . . . . . . . . . . . . . . . . . . . . . . 195
Defining Intercompany Transaction Report Scripts . . . . . . . . . . . . . . . . . . . . . . . . . . . . 201
Chapter 10. Managing Rules . . . . . . . . . . . . . . . . . . . . . . . . . . . . . . . . . . . . . . . . . . . . . . . . . . . . . . . . . 205
Rule Types . . . . . . . . . . . . . . . . . . . . . . . . . . . . . . . . . . . . . . . . . . . . . . . . . . . . . . . . . 206
Rule Considerations . . . . . . . . . . . . . . . . . . . . . . . . . . . . . . . . . . . . . . . . . . . . . . . . . . 207
Calculation Commands . . . . . . . . . . . . . . . . . . . . . . . . . . . . . . . . . . . . . . . . . . . . . 208
Current Dimension Members . . . . . . . . . . . . . . . . . . . . . . . . . . . . . . . . . . . . . . . . 212
Account Expressions . . . . . . . . . . . . . . . . . . . . . . . . . . . . . . . . . . . . . . . . . . . . . . . 213
Functions Automatically Clear Data . . . . . . . . . . . . . . . . . . . . . . . . . . . . . . . . . . . . 214
Error Messages . . . . . . . . . . . . . . . . . . . . . . . . . . . . . . . . . . . . . . . . . . . . . . . . . . . 215
Rule Execution During Consolidation . . . . . . . . . . . . . . . . . . . . . . . . . . . . . . . . . . . . . 215
Default Translation . . . . . . . . . . . . . . . . . . . . . . . . . . . . . . . . . . . . . . . . . . . . . . . . . . . 216
Financial Management Objects . . . . . . . . . . . . . . . . . . . . . . . . . . . . . . . . . . . . . . . . . . 216
Using VBScript in Rules . . . . . . . . . . . . . . . . . . . . . . . . . . . . . . . . . . . . . . . . . . . . . . . 217
VBScript Operators . . . . . . . . . . . . . . . . . . . . . . . . . . . . . . . . . . . . . . . . . . . . . . . . 217
VBScript Statements . . . . . . . . . . . . . . . . . . . . . . . . . . . . . . . . . . . . . . . . . . . . . . . 218
VBScript Keywords . . . . . . . . . . . . . . . . . . . . . . . . . . . . . . . . . . . . . . . . . . . . . . . . 219
VBScript Functions . . . . . . . . . . . . . . . . . . . . . . . . . . . . . . . . . . . . . . . . . . . . . . . . 219
VBScript Objects . . . . . . . . . . . . . . . . . . . . . . . . . . . . . . . . . . . . . . . . . . . . . . . . . 222
Commonly Used Rules . . . . . . . . . . . . . . . . . . . . . . . . . . . . . . . . . . . . . . . . . . . . . . . . 223
Reusing Data . . . . . . . . . . . . . . . . . . . . . . . . . . . . . . . . . . . . . . . . . . . . . . . . . . . . 223
Setting Accounts by Calculating Amounts . . . . . . . . . . . . . . . . . . . . . . . . . . . . . . . 224
Conditional Rules . . . . . . . . . . . . . . . . . . . . . . . . . . . . . . . . . . . . . . . . . . . . . . . . . 224
Setting Opening Balances of All Accounts . . . . . . . . . . . . . . . . . . . . . . . . . . . . . . . . 226
Creating Rules Files . . . . . . . . . . . . . . . . . . . . . . . . . . . . . . . . . . . . . . . . . . . . . . . . . . . 227
Loading Rules . . . . . . . . . . . . . . . . . . . . . . . . . . . . . . . . . . . . . . . . . . . . . . . . . . . . . . . 229
Extracting Rules . . . . . . . . . . . . . . . . . . . . . . . . . . . . . . . . . . . . . . . . . . . . . . . . . . . . . 230
ix

Chapter 11. Rule Functions . . . . . . . . . . . . . . . . . . . . . . . . . . . . . . . . . . . . . . . . . . . . . . . . . . . . . . . . . . 231
Functions Overview . . . . . . . . . . . . . . . . . . . . . . . . . . . . . . . . . . . . . . . . . . . . . . . . . . 234
ABSExp . . . . . . . . . . . . . . . . . . . . . . . . . . . . . . . . . . . . . . . . . . . . . . . . . . . . . . . . . . . 240
AccountType . . . . . . . . . . . . . . . . . . . . . . . . . . . . . . . . . . . . . . . . . . . . . . . . . . . . . . . 241
AccountTypeID . . . . . . . . . . . . . . . . . . . . . . . . . . . . . . . . . . . . . . . . . . . . . . . . . . . . . 242
AddEntityToList . . . . . . . . . . . . . . . . . . . . . . . . . . . . . . . . . . . . . . . . . . . . . . . . . . . . . 243
AddEntityToListUsingIDs . . . . . . . . . . . . . . . . . . . . . . . . . . . . . . . . . . . . . . . . . . . . . . 243
AddMemberToList . . . . . . . . . . . . . . . . . . . . . . . . . . . . . . . . . . . . . . . . . . . . . . . . . . . 244
AddMemberToListUsingIDs . . . . . . . . . . . . . . . . . . . . . . . . . . . . . . . . . . . . . . . . . . . . 244
Alloc . . . . . . . . . . . . . . . . . . . . . . . . . . . . . . . . . . . . . . . . . . . . . . . . . . . . . . . . . . . . . 245
AllowAdjFromChildren . . . . . . . . . . . . . . . . . . . . . . . . . . . . . . . . . . . . . . . . . . . . . . . . 246
AllowAdjs . . . . . . . . . . . . . . . . . . . . . . . . . . . . . . . . . . . . . . . . . . . . . . . . . . . . . . . . . . 246
ApplicationName . . . . . . . . . . . . . . . . . . . . . . . . . . . . . . . . . . . . . . . . . . . . . . . . . . . . 247
CalculateExchangeRate . . . . . . . . . . . . . . . . . . . . . . . . . . . . . . . . . . . . . . . . . . . . . . . . 248
CalculateRate . . . . . . . . . . . . . . . . . . . . . . . . . . . . . . . . . . . . . . . . . . . . . . . . . . . . . . . 248
CalcStatus . . . . . . . . . . . . . . . . . . . . . . . . . . . . . . . . . . . . . . . . . . . . . . . . . . . . . . . . . 249
CellTextUnitItem . . . . . . . . . . . . . . . . . . . . . . . . . . . . . . . . . . . . . . . . . . . . . . . . . . . . 250
Clear . . . . . . . . . . . . . . . . . . . . . . . . . . . . . . . . . . . . . . . . . . . . . . . . . . . . . . . . . . . . . 251
Con . . . . . . . . . . . . . . . . . . . . . . . . . . . . . . . . . . . . . . . . . . . . . . . . . . . . . . . . . . . . . . 252
Consol1, Consol2, Consol3 . . . . . . . . . . . . . . . . . . . . . . . . . . . . . . . . . . . . . . . . . . . . . 253
ConsolidateYTD . . . . . . . . . . . . . . . . . . . . . . . . . . . . . . . . . . . . . . . . . . . . . . . . . . . . . 254
ContainsCellText . . . . . . . . . . . . . . . . . . . . . . . . . . . . . . . . . . . . . . . . . . . . . . . . . . . . 255
ContainsCellTextWithLabel . . . . . . . . . . . . . . . . . . . . . . . . . . . . . . . . . . . . . . . . . . . . 256
Currency . . . . . . . . . . . . . . . . . . . . . . . . . . . . . . . . . . . . . . . . . . . . . . . . . . . . . . . . . . 257
CustomTop . . . . . . . . . . . . . . . . . . . . . . . . . . . . . . . . . . . . . . . . . . . . . . . . . . . . . . . . 257
DataUnitItem . . . . . . . . . . . . . . . . . . . . . . . . . . . . . . . . . . . . . . . . . . . . . . . . . . . . . . . 258
Decimal . . . . . . . . . . . . . . . . . . . . . . . . . . . . . . . . . . . . . . . . . . . . . . . . . . . . . . . . . . . 259
DefaultFreq . . . . . . . . . . . . . . . . . . . . . . . . . . . . . . . . . . . . . . . . . . . . . . . . . . . . . . . . 260
DefaultParent . . . . . . . . . . . . . . . . . . . . . . . . . . . . . . . . . . . . . . . . . . . . . . . . . . . . . . . 260
DefaultTranslate . . . . . . . . . . . . . . . . . . . . . . . . . . . . . . . . . . . . . . . . . . . . . . . . . . . . . 261
DefaultView . . . . . . . . . . . . . . . . . . . . . . . . . . . . . . . . . . . . . . . . . . . . . . . . . . . . . . . . 262
DefCurrency . . . . . . . . . . . . . . . . . . . . . . . . . . . . . . . . . . . . . . . . . . . . . . . . . . . . . . . . 263
DOwn . . . . . . . . . . . . . . . . . . . . . . . . . . . . . . . . . . . . . . . . . . . . . . . . . . . . . . . . . . . . 263
Dynamic . . . . . . . . . . . . . . . . . . . . . . . . . . . . . . . . . . . . . . . . . . . . . . . . . . . . . . . . . . 264
Exp . . . . . . . . . . . . . . . . . . . . . . . . . . . . . . . . . . . . . . . . . . . . . . . . . . . . . . . . . . . . . . 265
Dimension Intersection Considerations . . . . . . . . . . . . . . . . . . . . . . . . . . . . . . . . . 266
Period and Year Keywords . . . . . . . . . . . . . . . . . . . . . . . . . . . . . . . . . . . . . . . . . . . 267
Mathematical Calculations . . . . . . . . . . . . . . . . . . . . . . . . . . . . . . . . . . . . . . . . . . 268
Placing Other Functions Within Exp . . . . . . . . . . . . . . . . . . . . . . . . . . . . . . . . . . . 268
x

Simultaneously Setting Several Accounts . . . . . . . . . . . . . . . . . . . . . . . . . . . . . . . . 268
Exp and Dimension Intersection Considerations . . . . . . . . . . . . . . . . . . . . . . . . . . . 269
GetCell . . . . . . . . . . . . . . . . . . . . . . . . . . . . . . . . . . . . . . . . . . . . . . . . . . . . . . . . . . . . 272
GetCellNoData . . . . . . . . . . . . . . . . . . . . . . . . . . . . . . . . . . . . . . . . . . . . . . . . . . . . . . 272
GetCellRealData . . . . . . . . . . . . . . . . . . . . . . . . . . . . . . . . . . . . . . . . . . . . . . . . . . . . . 273
GetCellText . . . . . . . . . . . . . . . . . . . . . . . . . . . . . . . . . . . . . . . . . . . . . . . . . . . . . . . . 274
GetCellTextWithLabel . . . . . . . . . . . . . . . . . . . . . . . . . . . . . . . . . . . . . . . . . . . . . . . . . 275
GetCellType . . . . . . . . . . . . . . . . . . . . . . . . . . . . . . . . . . . . . . . . . . . . . . . . . . . . . . . . 276
GetCustomLabelArray . . . . . . . . . . . . . . . . . . . . . . . . . . . . . . . . . . . . . . . . . . . . . . . . 276
GetItem . . . . . . . . . . . . . . . . . . . . . . . . . . . . . . . . . . . . . . . . . . . . . . . . . . . . . . . . . . . 277
GetItemIDs2 . . . . . . . . . . . . . . . . . . . . . . . . . . . . . . . . . . . . . . . . . . . . . . . . . . . . . . . . 278
GetItemIDs2ExtDim . . . . . . . . . . . . . . . . . . . . . . . . . . . . . . . . . . . . . . . . . . . . . . . . . . 279
GetNumItems . . . . . . . . . . . . . . . . . . . . . . . . . . . . . . . . . . . . . . . . . . . . . . . . . . . . . . 279
GetNumLID . . . . . . . . . . . . . . . . . . . . . . . . . . . . . . . . . . . . . . . . . . . . . . . . . . . . . . . . 280
GetRate . . . . . . . . . . . . . . . . . . . . . . . . . . . . . . . . . . . . . . . . . . . . . . . . . . . . . . . . . . . 281
GetSubmissionGroup . . . . . . . . . . . . . . . . . . . . . . . . . . . . . . . . . . . . . . . . . . . . . . . . . 281
GetSubmissionPhase . . . . . . . . . . . . . . . . . . . . . . . . . . . . . . . . . . . . . . . . . . . . . . . . . . 282
Holding . . . . . . . . . . . . . . . . . . . . . . . . . . . . . . . . . . . . . . . . . . . . . . . . . . . . . . . . . . . 282
ICPTopMember . . . . . . . . . . . . . . . . . . . . . . . . . . . . . . . . . . . . . . . . . . . . . . . . . . . . . 283
ICPWeight . . . . . . . . . . . . . . . . . . . . . . . . . . . . . . . . . . . . . . . . . . . . . . . . . . . . . . . . . 283
IDFromMember . . . . . . . . . . . . . . . . . . . . . . . . . . . . . . . . . . . . . . . . . . . . . . . . . . . . . 284
ImpactStatus . . . . . . . . . . . . . . . . . . . . . . . . . . . . . . . . . . . . . . . . . . . . . . . . . . . . . . . 285
Input . . . . . . . . . . . . . . . . . . . . . . . . . . . . . . . . . . . . . . . . . . . . . . . . . . . . . . . . . . . . . 286
IsAlmostEqual . . . . . . . . . . . . . . . . . . . . . . . . . . . . . . . . . . . . . . . . . . . . . . . . . . . . . . 287
IsBase . . . . . . . . . . . . . . . . . . . . . . . . . . . . . . . . . . . . . . . . . . . . . . . . . . . . . . . . . . . . . 287
IsCalculated . . . . . . . . . . . . . . . . . . . . . . . . . . . . . . . . . . . . . . . . . . . . . . . . . . . . . . . . 289
IsChild . . . . . . . . . . . . . . . . . . . . . . . . . . . . . . . . . . . . . . . . . . . . . . . . . . . . . . . . . . . . 290
IsConsolidated . . . . . . . . . . . . . . . . . . . . . . . . . . . . . . . . . . . . . . . . . . . . . . . . . . . . . . 291
IsDescendant . . . . . . . . . . . . . . . . . . . . . . . . . . . . . . . . . . . . . . . . . . . . . . . . . . . . . . . 292
IsFirst . . . . . . . . . . . . . . . . . . . . . . . . . . . . . . . . . . . . . . . . . . . . . . . . . . . . . . . . . . . . 294
IsICP . . . . . . . . . . . . . . . . . . . . . . . . . . . . . . . . . . . . . . . . . . . . . . . . . . . . . . . . . . . . . 294
IsLast . . . . . . . . . . . . . . . . . . . . . . . . . . . . . . . . . . . . . . . . . . . . . . . . . . . . . . . . . . . . . 295
IsTransCur . . . . . . . . . . . . . . . . . . . . . . . . . . . . . . . . . . . . . . . . . . . . . . . . . . . . . . . . . 296
IsTransCurAdj . . . . . . . . . . . . . . . . . . . . . . . . . . . . . . . . . . . . . . . . . . . . . . . . . . . . . . 296
IsValidDest . . . . . . . . . . . . . . . . . . . . . . . . . . . . . . . . . . . . . . . . . . . . . . . . . . . . . . . . . 297
IsZero . . . . . . . . . . . . . . . . . . . . . . . . . . . . . . . . . . . . . . . . . . . . . . . . . . . . . . . . . . . . 298
List . . . . . . . . . . . . . . . . . . . . . . . . . . . . . . . . . . . . . . . . . . . . . . . . . . . . . . . . . . . . . . 299
Member . . . . . . . . . . . . . . . . . . . . . . . . . . . . . . . . . . . . . . . . . . . . . . . . . . . . . . . . . . . 300
MemberFromID . . . . . . . . . . . . . . . . . . . . . . . . . . . . . . . . . . . . . . . . . . . . . . . . . . . . . 301
xi
Method . . . . . . . . . . . . . . . . . . . . . . . . . . . . . . . . . . . . . . . . . . . . . . . . . . . . . . . . . . . 302
NoInput . . . . . . . . . . . . . . . . . . . . . . . . . . . . . . . . . . . . . . . . . . . . . . . . . . . . . . . . . . . 302
NoRound . . . . . . . . . . . . . . . . . . . . . . . . . . . . . . . . . . . . . . . . . . . . . . . . . . . . . . . . . . 303
NumBase . . . . . . . . . . . . . . . . . . . . . . . . . . . . . . . . . . . . . . . . . . . . . . . . . . . . . . . . . . 304
Number . . . . . . . . . . . . . . . . . . . . . . . . . . . . . . . . . . . . . . . . . . . . . . . . . . . . . . . . . . . 305
NumChild . . . . . . . . . . . . . . . . . . . . . . . . . . . . . . . . . . . . . . . . . . . . . . . . . . . . . . . . . 306
NumCustom . . . . . . . . . . . . . . . . . . . . . . . . . . . . . . . . . . . . . . . . . . . . . . . . . . . . . . . 307
NumDescendant . . . . . . . . . . . . . . . . . . . . . . . . . . . . . . . . . . . . . . . . . . . . . . . . . . . . . 308
NumPerInGen . . . . . . . . . . . . . . . . . . . . . . . . . . . . . . . . . . . . . . . . . . . . . . . . . . . . . . 310
NumPeriods . . . . . . . . . . . . . . . . . . . . . . . . . . . . . . . . . . . . . . . . . . . . . . . . . . . . . . . . 310
OpenCellTextUnit . . . . . . . . . . . . . . . . . . . . . . . . . . . . . . . . . . . . . . . . . . . . . . . . . . . 311
OpenDataUnit . . . . . . . . . . . . . . . . . . . . . . . . . . . . . . . . . . . . . . . . . . . . . . . . . . . . . . 312
OpenDataUnitSorted . . . . . . . . . . . . . . . . . . . . . . . . . . . . . . . . . . . . . . . . . . . . . . . . . 313
Owned . . . . . . . . . . . . . . . . . . . . . . . . . . . . . . . . . . . . . . . . . . . . . . . . . . . . . . . . . . . . 313
Owner . . . . . . . . . . . . . . . . . . . . . . . . . . . . . . . . . . . . . . . . . . . . . . . . . . . . . . . . . . . . 313
PCon . . . . . . . . . . . . . . . . . . . . . . . . . . . . . . . . . . . . . . . . . . . . . . . . . . . . . . . . . . . . . 314
PEPU . . . . . . . . . . . . . . . . . . . . . . . . . . . . . . . . . . . . . . . . . . . . . . . . . . . . . . . . . . . . . 315
PeriodNumber . . . . . . . . . . . . . . . . . . . . . . . . . . . . . . . . . . . . . . . . . . . . . . . . . . . . . . 315
PlugAcct . . . . . . . . . . . . . . . . . . . . . . . . . . . . . . . . . . . . . . . . . . . . . . . . . . . . . . . . . . 316
POwn . . . . . . . . . . . . . . . . . . . . . . . . . . . . . . . . . . . . . . . . . . . . . . . . . . . . . . . . . . . . 317
PVAForBalance . . . . . . . . . . . . . . . . . . . . . . . . . . . . . . . . . . . . . . . . . . . . . . . . . . . . . 318
PVAForFlow . . . . . . . . . . . . . . . . . . . . . . . . . . . . . . . . . . . . . . . . . . . . . . . . . . . . . . . 318
RateForBalance . . . . . . . . . . . . . . . . . . . . . . . . . . . . . . . . . . . . . . . . . . . . . . . . . . . . . . 319
RateForFlow . . . . . . . . . . . . . . . . . . . . . . . . . . . . . . . . . . . . . . . . . . . . . . . . . . . . . . . . 319
ReviewStatus . . . . . . . . . . . . . . . . . . . . . . . . . . . . . . . . . . . . . . . . . . . . . . . . . . . . . . . 320
ReviewStatusUsingPhaseID . . . . . . . . . . . . . . . . . . . . . . . . . . . . . . . . . . . . . . . . . . . . . 321
Round . . . . . . . . . . . . . . . . . . . . . . . . . . . . . . . . . . . . . . . . . . . . . . . . . . . . . . . . . . . . 322
Scale . . . . . . . . . . . . . . . . . . . . . . . . . . . . . . . . . . . . . . . . . . . . . . . . . . . . . . . . . . . . . 323
SecurityAsPartner . . . . . . . . . . . . . . . . . . . . . . . . . . . . . . . . . . . . . . . . . . . . . . . . . . . . 324
SecurityClass . . . . . . . . . . . . . . . . . . . . . . . . . . . . . . . . . . . . . . . . . . . . . . . . . . . . . . . 325
SetCellTextWithLabel . . . . . . . . . . . . . . . . . . . . . . . . . . . . . . . . . . . . . . . . . . . . . . . . . 326
SetData . . . . . . . . . . . . . . . . . . . . . . . . . . . . . . . . . . . . . . . . . . . . . . . . . . . . . . . . . . . 326
SetDataWithPOV . . . . . . . . . . . . . . . . . . . . . . . . . . . . . . . . . . . . . . . . . . . . . . . . . . . . 327
SubmissionGroup . . . . . . . . . . . . . . . . . . . . . . . . . . . . . . . . . . . . . . . . . . . . . . . . . . . . 328
SupportsProcessManagement . . . . . . . . . . . . . . . . . . . . . . . . . . . . . . . . . . . . . . . . . . . 328
SupportsTran . . . . . . . . . . . . . . . . . . . . . . . . . . . . . . . . . . . . . . . . . . . . . . . . . . . . . . . 329
SwitchSign . . . . . . . . . . . . . . . . . . . . . . . . . . . . . . . . . . . . . . . . . . . . . . . . . . . . . . . . . 329
SwitchType . . . . . . . . . . . . . . . . . . . . . . . . . . . . . . . . . . . . . . . . . . . . . . . . . . . . . . . . 331
Trans . . . . . . . . . . . . . . . . . . . . . . . . . . . . . . . . . . . . . . . . . . . . . . . . . . . . . . . . . . . . . 332
xii
TransPeriodic . . . . . . . . . . . . . . . . . . . . . . . . . . . . . . . . . . . . . . . . . . . . . . . . . . . . . . . 332
UD1...3 . . . . . . . . . . . . . . . . . . . . . . . . . . . . . . . . . . . . . . . . . . . . . . . . . . . . . . . . . . . 333
ValidationAccount . . . . . . . . . . . . . . . . . . . . . . . . . . . . . . . . . . . . . . . . . . . . . . . . . . . 334
ValidationAccountEx . . . . . . . . . . . . . . . . . . . . . . . . . . . . . . . . . . . . . . . . . . . . . . . . . 335
XBRLTags . . . . . . . . . . . . . . . . . . . . . . . . . . . . . . . . . . . . . . . . . . . . . . . . . . . . . . . . . 335
Chapter 12. Custom Functions . . . . . . . . . . . . . . . . . . . . . . . . . . . . . . . . . . . . . . . . . . . . . . . . . . . . . . . . 337
Management Reporting Functions . . . . . . . . . . . . . . . . . . . . . . . . . . . . . . . . . . . . . . . . 338
Average . . . . . . . . . . . . . . . . . . . . . . . . . . . . . . . . . . . . . . . . . . . . . . . . . . . . . . . . 338
Cumulative . . . . . . . . . . . . . . . . . . . . . . . . . . . . . . . . . . . . . . . . . . . . . . . . . . . . . 340
Difference . . . . . . . . . . . . . . . . . . . . . . . . . . . . . . . . . . . . . . . . . . . . . . . . . . . . . . 342
DSO - Days Sales Outstanding . . . . . . . . . . . . . . . . . . . . . . . . . . . . . . . . . . . . . . . . 343
Opening . . . . . . . . . . . . . . . . . . . . . . . . . . . . . . . . . . . . . . . . . . . . . . . . . . . . . . . . 346
Rate . . . . . . . . . . . . . . . . . . . . . . . . . . . . . . . . . . . . . . . . . . . . . . . . . . . . . . . . . . . 347
Business Rules Functions . . . . . . . . . . . . . . . . . . . . . . . . . . . . . . . . . . . . . . . . . . . . . . . 351
Custom_Alloc . . . . . . . . . . . . . . . . . . . . . . . . . . . . . . . . . . . . . . . . . . . . . . . . . . . 351
Increase_Decrease . . . . . . . . . . . . . . . . . . . . . . . . . . . . . . . . . . . . . . . . . . . . . . . . . 354
Pro_Rata_Ratio . . . . . . . . . . . . . . . . . . . . . . . . . . . . . . . . . . . . . . . . . . . . . . . . . . 356
Spread . . . . . . . . . . . . . . . . . . . . . . . . . . . . . . . . . . . . . . . . . . . . . . . . . . . . . . . . . 357
Units_Rates . . . . . . . . . . . . . . . . . . . . . . . . . . . . . . . . . . . . . . . . . . . . . . . . . . . . . 359
Chapter 13. Creating Rules Using Calculation Manager . . . . . . . . . . . . . . . . . . . . . . . . . . . . . . . . . . . . . . 361
Calculation Manager Security Roles . . . . . . . . . . . . . . . . . . . . . . . . . . . . . . . . . . . . . . . 361
Working with Applications in Calculation Manager . . . . . . . . . . . . . . . . . . . . . . . . . . . 362
Migrating Rules to Calculation Manager . . . . . . . . . . . . . . . . . . . . . . . . . . . . . . . . . . . . 362
VB Function Support in Function Selector . . . . . . . . . . . . . . . . . . . . . . . . . . . . . . . . . . 362
Special VB Script Functions for Financial Management . . . . . . . . . . . . . . . . . . . . . . . . . 364
Chapter 14. Managing Intercompany Transactions . . . . . . . . . . . . . . . . . . . . . . . . . . . . . . . . . . . . . . . . . . 367
Setting Up Intercompany Transactions . . . . . . . . . . . . . . . . . . . . . . . . . . . . . . . . . . . . . 367
Opening Intercompany Periods . . . . . . . . . . . . . . . . . . . . . . . . . . . . . . . . . . . . . . . 367
Setting Matching Tolerances . . . . . . . . . . . . . . . . . . . . . . . . . . . . . . . . . . . . . . . . . 368
Setting Match/Validate Before Post Option . . . . . . . . . . . . . . . . . . . . . . . . . . . . . . . 369
Closing Intercompany Periods . . . . . . . . . . . . . . . . . . . . . . . . . . . . . . . . . . . . . . . . 370
Managing Reason Codes . . . . . . . . . . . . . . . . . . . . . . . . . . . . . . . . . . . . . . . . . . . . . . . 370
Adding Reason Codes . . . . . . . . . . . . . . . . . . . . . . . . . . . . . . . . . . . . . . . . . . . . . . 371
Editing Reason Codes . . . . . . . . . . . . . . . . . . . . . . . . . . . . . . . . . . . . . . . . . . . . . . 371
Deleting Reason Codes . . . . . . . . . . . . . . . . . . . . . . . . . . . . . . . . . . . . . . . . . . . . . 371
Monitoring Intercompany Transactions . . . . . . . . . . . . . . . . . . . . . . . . . . . . . . . . . . . . 372
Locking and Unlocking Entities . . . . . . . . . . . . . . . . . . . . . . . . . . . . . . . . . . . . . . . . . . 373
xiii
Viewing the Intercompany Transactions Summary . . . . . . . . . . . . . . . . . . . . . . . . . . . . 374
Chapter 15. Managing Process Management Submission Phases . . . . . . . . . . . . . . . . . . . . . . . . . . . . . . . . 375
Defining Submission Phases . . . . . . . . . . . . . . . . . . . . . . . . . . . . . . . . . . . . . . . . . . . . 375
Setting Up Submission Groups . . . . . . . . . . . . . . . . . . . . . . . . . . . . . . . . . . . . . . . . . . 376
Submission Group and Phase Examples . . . . . . . . . . . . . . . . . . . . . . . . . . . . . . . . . . . . 377
Assigning Submission Groups to Phases . . . . . . . . . . . . . . . . . . . . . . . . . . . . . . . . . . . . 379
Viewing Unassigned Submission Groups . . . . . . . . . . . . . . . . . . . . . . . . . . . . . . . . . . . 380
Chapter 16. Managing Email Alerting . . . . . . . . . . . . . . . . . . . . . . . . . . . . . . . . . . . . . . . . . . . . . . . . . . . 383
Setting Up Process Management Alerting . . . . . . . . . . . . . . . . . . . . . . . . . . . . . . . . . . . 383
Setting Up Intercompany Alerting . . . . . . . . . . . . . . . . . . . . . . . . . . . . . . . . . . . . . . . . 384
Appendix A. Configuration Settings . . . . . . . . . . . . . . . . . . . . . . . . . . . . . . . . . . . . . . . . . . . . . . . . . . . . . 387
Available Configuration Settings . . . . . . . . . . . . . . . . . . . . . . . . . . . . . . . . . . . . . . . . . 388
Changing Configuration Settings . . . . . . . . . . . . . . . . . . . . . . . . . . . . . . . . . . . . . . . . . 393
Overriding Values . . . . . . . . . . . . . . . . . . . . . . . . . . . . . . . . . . . . . . . . . . . . . . . . . . . . 394
Changing the Settings Table Display . . . . . . . . . . . . . . . . . . . . . . . . . . . . . . . . . . . . . . . 394
Searching for Settings . . . . . . . . . . . . . . . . . . . . . . . . . . . . . . . . . . . . . . . . . . . . . . . . . 394
Viewing Effective Settings . . . . . . . . . . . . . . . . . . . . . . . . . . . . . . . . . . . . . . . . . . . . . . 395
Exporting Settings . . . . . . . . . . . . . . . . . . . . . . . . . . . . . . . . . . . . . . . . . . . . . . . . . . . . 395
Deleting Settings . . . . . . . . . . . . . . . . . . . . . . . . . . . . . . . . . . . . . . . . . . . . . . . . . . . . . 395
Appendix B. Optimizing Performance . . . . . . . . . . . . . . . . . . . . . . . . . . . . . . . . . . . . . . . . . . . . . . . . . . . 397
Performance Overview . . . . . . . . . . . . . . . . . . . . . . . . . . . . . . . . . . . . . . . . . . . . . . . . 398
Introduction to Oracle Hyperion EPM System Performance . . . . . . . . . . . . . . . . . . 398
Common EPM Installation Directory References . . . . . . . . . . . . . . . . . . . . . . . . . . . . . 398
Financial Management Records and Subcubes . . . . . . . . . . . . . . . . . . . . . . . . . . . . . . . 398
Tuning Recommendations for Financial Management . . . . . . . . . . . . . . . . . . . . . . . . . . 398
Diagnosing Performance Problems . . . . . . . . . . . . . . . . . . . . . . . . . . . . . . . . . . . . . . . 399
Using Monitoring Tools . . . . . . . . . . . . . . . . . . . . . . . . . . . . . . . . . . . . . . . . . . . . 399
Using Remote Diagnostic Agent (RDA) . . . . . . . . . . . . . . . . . . . . . . . . . . . . . . . . . 401
Using a Reference Application . . . . . . . . . . . . . . . . . . . . . . . . . . . . . . . . . . . . . . . . 401
Tuning Operating Systems Parameters . . . . . . . . . . . . . . . . . . . . . . . . . . . . . . . . . . . . . 402
Tuning Windows Parameters . . . . . . . . . . . . . . . . . . . . . . . . . . . . . . . . . . . . . . . . . 402
Tuning the Web Server . . . . . . . . . . . . . . . . . . . . . . . . . . . . . . . . . . . . . . . . . . . . . . . . 402
Tuning HFM Web . . . . . . . . . . . . . . . . . . . . . . . . . . . . . . . . . . . . . . . . . . . . . . . . 403
HFM Web Tuning Parameters . . . . . . . . . . . . . . . . . . . . . . . . . . . . . . . . . . . . . . . . 404
Web Browser Optimizations . . . . . . . . . . . . . . . . . . . . . . . . . . . . . . . . . . . . . . . . . 405
Tuning Financial Management Applications . . . . . . . . . . . . . . . . . . . . . . . . . . . . . . . . . 405
Commonly Tuned Financial Management Settings . . . . . . . . . . . . . . . . . . . . . . . . . 405
xiv
Financial Management Memory Settings for Larger Applications . . . . . . . . . . . . . . . 409
Application-Specific Settings . . . . . . . . . . . . . . . . . . . . . . . . . . . . . . . . . . . . . . . . . 409
Tuning Financial Management Application Servers . . . . . . . . . . . . . . . . . . . . . . . . . 410
Application Database Maintenance . . . . . . . . . . . . . . . . . . . . . . . . . . . . . . . . . . . . 411
Basic Design Considerations . . . . . . . . . . . . . . . . . . . . . . . . . . . . . . . . . . . . . . . . . 412
Tuning Oracle 11g Databases for Financial Management . . . . . . . . . . . . . . . . . . . . . . . . 413
Introduction . . . . . . . . . . . . . . . . . . . . . . . . . . . . . . . . . . . . . . . . . . . . . . . . . . . . . 413
Common Performance Issues . . . . . . . . . . . . . . . . . . . . . . . . . . . . . . . . . . . . . . . . 413
Tuning Guidelines for Oracle 11g Databases . . . . . . . . . . . . . . . . . . . . . . . . . . . . . . 414
How to Determine Memory Settings for Oracle Database Release 11g . . . . . . . . . . . . 418
How to Calculate the Number of Processes for Oracle Database Release 11g . . . . . . . 420
Other Considerations . . . . . . . . . . . . . . . . . . . . . . . . . . . . . . . . . . . . . . . . . . . . . . 421
Frequently Asked Questions . . . . . . . . . . . . . . . . . . . . . . . . . . . . . . . . . . . . . . . . . . . . 423
xv

xvi
Documentation Accessibility
For information about Oracle's commitment to accessibility, visit the Oracle Accessibility Program website athttp://www.oracle.com/pls/topic/lookup?ctx=acc&id=docacc.
Access to Oracle SupportOracle customers that have purchased support have access to electronic support through My Oracle Support.For information, visit http://www.oracle.com/pls/topic/lookup?ctx=acc&id=info or visit http://www.oracle.com/pls/topic/lookup?ctx=acc&id=trs if you are hearing impaired.
17

18
Documentation Feedback
Send feedback on this documentation to: [email protected]
Follow EPM Information Development on these social media sites:
LinkedIn - http://www.linkedin.com/groups?gid=3127051&goback=.gmp_3127051
Twitter - http://twitter.com/hyperionepminfo
Facebook - http://www.facebook.com/pages/Hyperion-EPM-Info/102682103112642
Google+ - https://plus.google.com/106915048672979407731/#106915048672979407731/posts
YouTube - http://www.youtube.com/user/OracleEPMWebcasts
19

20

1About Financial Management
In This Chapter
Financial Management Features... . . . . . . . . . . . . . . . . . . . . . . . . . . . . . . . . . . . . . . . . . . . . . . . . . . . . . . . . . . . . . . . . . . . . . . .21
Performance Management Architect .. . . . . . . . . . . . . . . . . . . . . . . . . . . . . . . . . . . . . . . . . . . . . . . . . . . . . . . . . . . . . . . . . . . .22
EPM Workspace ... . . . . . . . . . . . . . . . . . . . . . . . . . . . . . . . . . . . . . . . . . . . . . . . . . . . . . . . . . . . . . . . . . . . . . . . . . . . . . . . . . . . . . . . . .22
Financial Management Dimensions ... . . . . . . . . . . . . . . . . . . . . . . . . . . . . . . . . . . . . . . . . . . . . . . . . . . . . . . . . . . . . . . . . . . .22
User-Defined Elements ... . . . . . . . . . . . . . . . . . . . . . . . . . . . . . . . . . . . . . . . . . . . . . . . . . . . . . . . . . . . . . . . . . . . . . . . . . . . . . . . . .25
Financial Management FeaturesOracle Hyperion Financial Management provides these features:
l A unified view of enterprise financial information consolidates key performance andoperating metrics from global sources in a scalable, Web-based application.
l “Fast virtual close” features trim days and weeks off your close cycle including using Web-based process management, Web-based intercompany reconciliations, journal adjustmentsand a consistent set of data and business measures.
l Powerful multidimensional analysis helps identify and report on key financial and businesstrends, new sources of profitability and cash flow at corporate, cost center, product, brand,customer, and channel levels.
l Flexible “what if” scenario management feature dynamically consolidates and reports actualresults, financial budgets, forecasts and plans, producing new statements as assumptionsand facts change.
l High-volume, preformatted reports deliver timely, accurate financial information forinternal management and external regulatory and government bodies from the sameapplication.
l Prepackaged features are deployed out-of-the-box, quickly and cost-effectively, includingfeatures such as world-class allocations, multicurrency translations, and robust dataintegration with legacy applications, ERP, and CRM systems.
l Customizable and extensible application solves your issues quickly and cost-effectively,using industry standard tools.
l Architected for the Web so users can easily and securely access global financial informationfrom any location, using a standard Web browser. Relational data storage ensures missioncritical data is available to users 24x7x365.
21
In addition, Financial Management provides:
l Pre-built starter kit applications for specific requirements such as Sustainability Reporting,IFRS, Japan Statutory Reporting
l Integration with Oracle Essbase for extended reporting and analysis
l Integration with other Oracle Hyperion Enterprise Performance Management applications
Performance Management ArchitectOracle Hyperion EPM Architect is an optional component of Financial Management installationand configuration. You use it to create and work with applications and dimensions, andsynchronize data.
For help on tasks performed in Performance Management Architect, see the Oracle HyperionEnterprise Performance Management Architect Administrator's Guide.
EPM WorkspaceFinancial Management is available within Oracle Hyperion Enterprise PerformanceManagement Workspace. For information on tasks performed in EPM Workspace, such aspreferences or features in the Navigate, Favorites, Manage, or Tools menu, see the OracleHyperion Enterprise Performance Management Workspace User's Guide and online help.
Financial Management DimensionsDimensions describe an organization’s data and usually contain groups of related members.Examples of dimensions are Account, Entity, and Period. Financial Management provides eightsystem-defined dimensions and enables you to populate an unlimited number of customdimensions that you can apply to accounts.
The elements that comprise a dimension are called members. For example, GrossMargin andTotalRevenues are members of the Account dimension.
Dimension members are arranged in hierarchies. Upper-level members are called parentmembers, and a member immediately below a parent member is referred to as its child. Allmembers below a parent are referred to as descendants. The bottom-level hierarchy membersare called base-level members.
Data is typically entered into base-level members of dimensions and not into parent members.Values for parent-level members are aggregated from the children of the parent-level members.In some cases, data for base-level members is calculated.
The following sections describe the system-defined dimensions. For information on settingdimension attributes, see the Oracle Hyperion Enterprise Performance Management ArchitectAdministrator's Guide if you are using Performance Management Architect, or Chapter 4,“Managing Metadata” if you are using Financial Management Classic applicationadministration.
22
Scenario DimensionThe Scenario dimension represents a set of data, such as Actual, Budget, or Forecast. For example,the Actual scenario can contain data from a general ledger, reflecting past and current businessoperations. The Budget scenario can contain data that reflects the targeted business operations.The Forecast scenario typically contains data that corresponds to predictions for upcomingperiods. A Legal scenario can contain data calculated according to legal GAAP format and rules.
You can define any number of scenarios for an application and define attributes for Scenariodimension members, such as the default frequency, the default view, and zero data settings.
Year DimensionThe Year dimension represents the fiscal or calendar year for data. An application can containdata for more than one year. You specify a year range when you create the application and selecta year from the Year dimension to process data.
Period DimensionThe Period dimension represents time periods, such as quarters and months. It contains timeperiods and frequencies by displaying the time periods in a hierarchy. For example, if the Actualscenario maintains data on a monthly basis, generally 12 periods of data are available for thisscenario in a year. Financial Management supports years, months, and weeks for the Perioddimension.
Entity DimensionThe Entity dimension represents the organizational structure of the company, such as themanagement and legal reporting structures. Entities can represent divisions, subsidiaries, plants,regions, countries, legal entities, business units, departments, or any organizational unit. Youcan define any number of entities.
The Entity dimension is the consolidation dimension of the system. Hierarchies in the Entitydimension reflect various consolidated views of the data. Various hierarchies can correspond togeographic consolidation, legal consolidation, or consolidation by activity. All relationshipsamong individual member components that exist in an organization are stored and maintainedin this dimension. Entities in an organization can be categorized as base, dependent, or parententities. Base entities are at the bottom of the organization structure and do not own otherentities. Dependent entities are owned by other entities in the organization. Parent entitiescontain one or more dependents that report directly to them.
You define attributes for Entity dimension members, such as the default currency and securityclass, and to specify whether the entity allows adjustments and stores intercompany detail.
23

Value DimensionThe Value dimension represents the types of values stored in your application, and can includethe input currency, parent currency, adjustments, and consolidation detail such as proportion,elimination, and contribution detail. For example, the Entity Currency member stores the valuefor an entity in its local currency. The Parent Currency member stores the value for an entitytranslated to the currency of the parent entity. The Value dimension is useful for providing anaudit trail of the transactions applied to data.
Account DimensionThe Account dimension represents a hierarchy of natural accounts. Accounts store financialdata for entities and scenarios in an application. Each account has a type, such as Revenue orExpense, that defines its accounting behavior.
You define attributes for Account dimension members, such as the account type, the numberof decimal places to display, and whether the account is a calculated, consolidated, orintercompany partner account.
Intercompany DimensionThe Intercompany dimension represents all intercompany balances that exist for an account.This is a reserved dimension that is used in combination with the Account dimension and anycustom dimension. Financial Management can track and eliminate intercompany transactiondetails across accounts and entities. You can also run Intercompany Matching reports to viewintercompany transactions.
View DimensionThe View dimension represents various modes of calendar intelligence such as, Periodic, Year-to-Date, and Quarter-to-Date frequencies. If you set the view to Periodic, the values for eachmonth are displayed. If you set the view to Year-to-Date or Quarter-to-Date, the cumulativevalues for the year or quarter are displayed.
Custom DimensionsCustom dimensions are dimensions associated with accounts. These dimensions enable you tospecify additional details associated with accounts, such as products, markets, channels, balancesheet movement, or types of elimination. For example, Custom dimensions could includeProduct Line, Region, Channel, or Customers. A Custom dimension for products associatedwith Sales and COGS accounts enables you to track sales and cost detail by product.
24
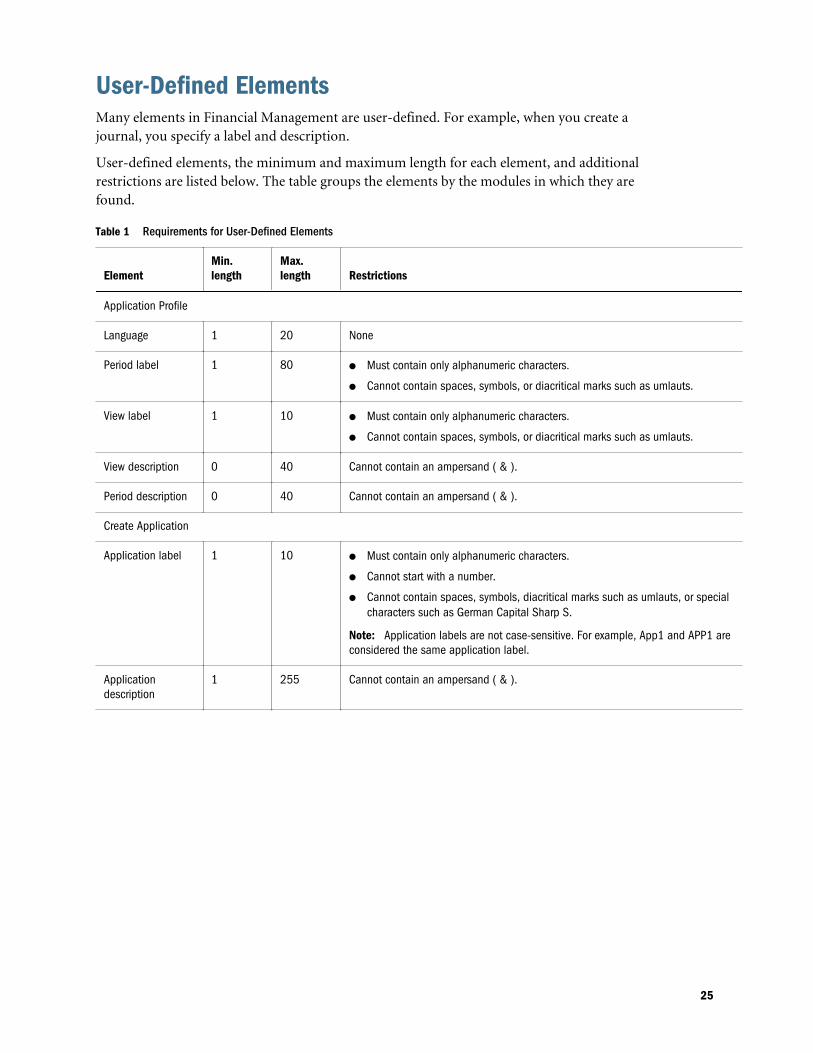
User-Defined ElementsMany elements in Financial Management are user-defined. For example, when you create ajournal, you specify a label and description.
User-defined elements, the minimum and maximum length for each element, and additionalrestrictions are listed below. The table groups the elements by the modules in which they arefound.
Table 1 Requirements for User-Defined Elements
ElementMin.length
Max.length Restrictions
Application Profile
Language 1 20 None
Period label 1 80l Must contain only alphanumeric characters.
l Cannot contain spaces, symbols, or diacritical marks such as umlauts.
View label 1 10l Must contain only alphanumeric characters.
l Cannot contain spaces, symbols, or diacritical marks such as umlauts.
View description 0 40 Cannot contain an ampersand ( & ).
Period description 0 40 Cannot contain an ampersand ( & ).
Create Application
Application label 1 10l Must contain only alphanumeric characters.
l Cannot start with a number.
l Cannot contain spaces, symbols, diacritical marks such as umlauts, or specialcharacters such as German Capital Sharp S.
Note: Application labels are not case-sensitive. For example, App1 and APP1 areconsidered the same application label.
Applicationdescription
1 255 Cannot contain an ampersand ( & ).
25

ElementMin.length
Max.length Restrictions
Metadata Manager
Member label 1 80 Must be unique. The label can contain up to 80 characters including spaces, butcannot start with a space.
Cannot include these characters:
l Asterisk ( * )
l At sign ( @ )
l Comma ( , )
l Curly brackets ( { } )
l Double quotation mark ( " )
l Forward slash ( / )
l Minus sign ( - )
l Number sign ( # )
l Period ( . )
l Plus sign ( + )
l Semicolon ( ; )
Note: You cannot use ALL as the name of an entity.
Member description 0 40 Cannot contain an ampersand ( & ).
Alias label 0 80 Cannot contain an ampersand ( & ).
Security
Security class 1 80 Cannot include these characters:
l Asterisk ( * )
l At sign ( @ )
l Comma ( , )
l Curly brackets ( { } )
l Double quotation marks ( “ )
l Minus sign ( - )
l Number sign ( # )
l Period ( . )
l Plus sign ( + )
l Semicolon ( ; )
l Slash mark ( / )
26
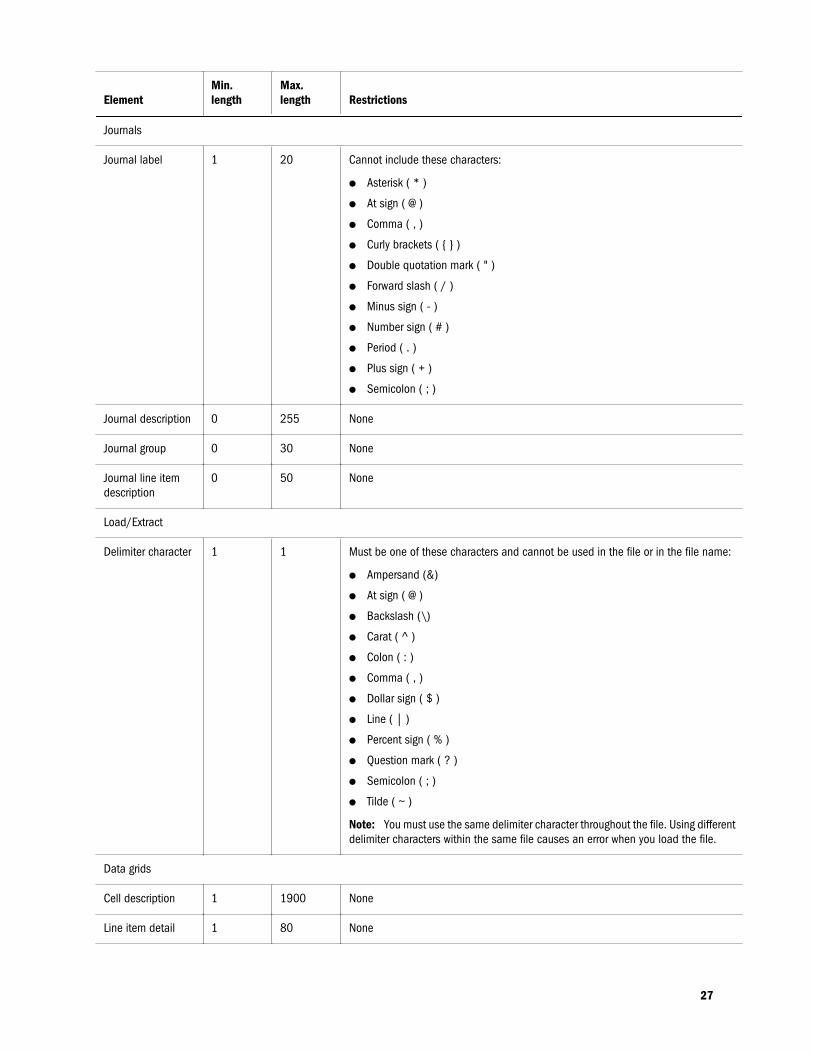
ElementMin.length
Max.length Restrictions
Journals
Journal label 1 20 Cannot include these characters:
l Asterisk ( * )
l At sign ( @ )
l Comma ( , )
l Curly brackets ( { } )
l Double quotation mark ( " )
l Forward slash ( / )
l Minus sign ( - )
l Number sign ( # )
l Period ( . )
l Plus sign ( + )
l Semicolon ( ; )
Journal description 0 255 None
Journal group 0 30 None
Journal line itemdescription
0 50 None
Load/Extract
Delimiter character 1 1 Must be one of these characters and cannot be used in the file or in the file name:
l Ampersand (&)
l At sign ( @ )
l Backslash (\)
l Carat ( ^ )
l Colon ( : )
l Comma ( , )
l Dollar sign ( $ )
l Line ( | )
l Percent sign ( % )
l Question mark ( ? )
l Semicolon ( ; )
l Tilde ( ~ )
Note: You must use the same delimiter character throughout the file. Using differentdelimiter characters within the same file causes an error when you load the file.
Data grids
Cell description 1 1900 None
Line item detail 1 80 None
27
ElementMin.length
Max.length Restrictions
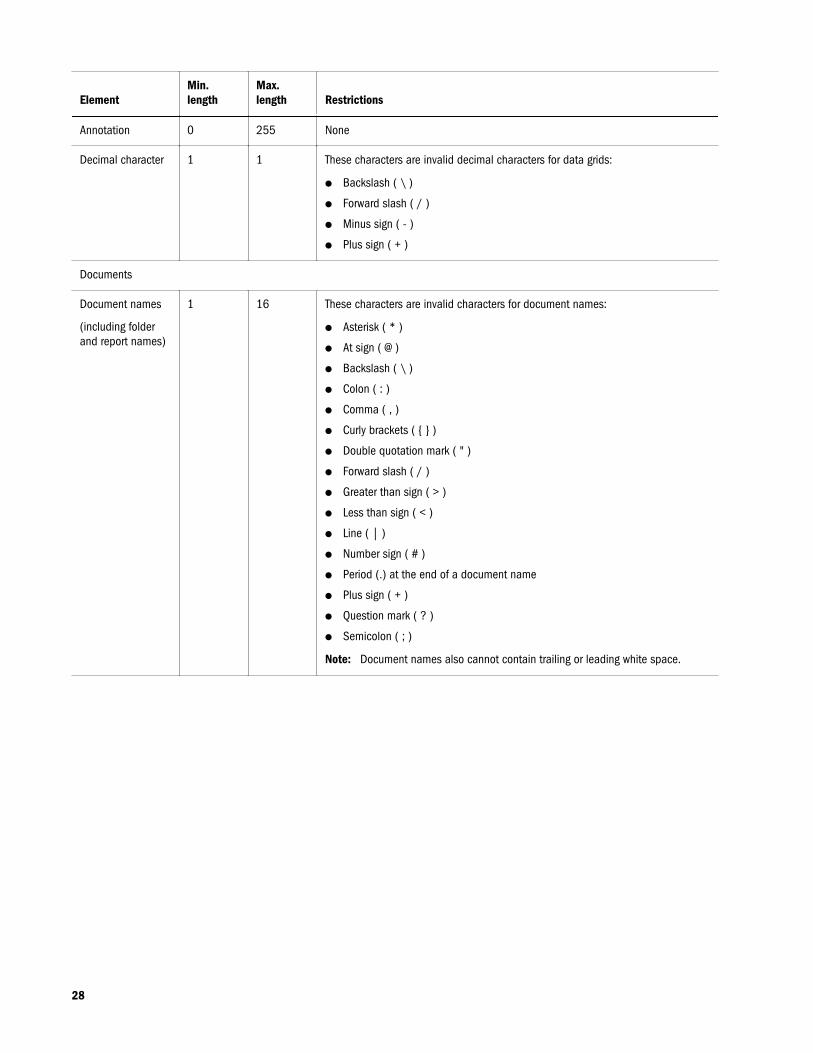
Annotation 0 255 None
Decimal character 1 1 These characters are invalid decimal characters for data grids:
l Backslash ( \ )
l Forward slash ( / )
l Minus sign ( - )
l Plus sign ( + )
Documents
Document names
(including folderand report names)
1 16 These characters are invalid characters for document names:
l Asterisk ( * )
l At sign ( @ )
l Backslash ( \ )
l Colon ( : )
l Comma ( , )
l Curly brackets ( { } )
l Double quotation mark ( " )
l Forward slash ( / )
l Greater than sign ( > )
l Less than sign ( < )
l Line ( | )
l Number sign ( # )
l Period (.) at the end of a document name
l Plus sign ( + )
l Question mark ( ? )
l Semicolon ( ; )
Note: Document names also cannot contain trailing or leading white space.
28
2Managing Applications
In This Chapter
Application Administration ... . . . . . . . . . . . . . . . . . . . . . . . . . . . . . . . . . . . . . . . . . . . . . . . . . . . . . . . . . . . . . . . . . . . . . . . . . . . . .30
Creating Applications ... . . . . . . . . . . . . . . . . . . . . . . . . . . . . . . . . . . . . . . . . . . . . . . . . . . . . . . . . . . . . . . . . . . . . . . . . . . . . . . . . . . .31
Creating a New Application ... . . . . . . . . . . . . . . . . . . . . . . . . . . . . . . . . . . . . . . . . . . . . . . . . . . . . . . . . . . . . . . . . . . . . . . . . . . . .31
Creating an Application from a Profile File .. . . . . . . . . . . . . . . . . . . . . . . . . . . . . . . . . . . . . . . . . . . . . . . . . . . . . . . . . . . . .39
Copying from an Application... . . . . . . . . . . . . . . . . . . . . . . . . . . . . . . . . . . . . . . . . . . . . . . . . . . . . . . . . . . . . . . . . . . . . . . . . . . .40
Modifying Applications ... . . . . . . . . . . . . . . . . . . . . . . . . . . . . . . . . . . . . . . . . . . . . . . . . . . . . . . . . . . . . . . . . . . . . . . . . . . . . . . . . .40
Registering Applications... . . . . . . . . . . . . . . . . . . . . . . . . . . . . . . . . . . . . . . . . . . . . . . . . . . . . . . . . . . . . . . . . . . . . . . . . . . . . . . . .42
Opening Applications ... . . . . . . . . . . . . . . . . . . . . . . . . . . . . . . . . . . . . . . . . . . . . . . . . . . . . . . . . . . . . . . . . . . . . . . . . . . . . . . . . . . .42
Closing Applications ... . . . . . . . . . . . . . . . . . . . . . . . . . . . . . . . . . . . . . . . . . . . . . . . . . . . . . . . . . . . . . . . . . . . . . . . . . . . . . . . . . . . .42
Changing Application Server Clusters .. . . . . . . . . . . . . . . . . . . . . . . . . . . . . . . . . . . . . . . . . . . . . . . . . . . . . . . . . . . . . . . . . . .43
Viewing the Application List . . . . . . . . . . . . . . . . . . . . . . . . . . . . . . . . . . . . . . . . . . . . . . . . . . . . . . . . . . . . . . . . . . . . . . . . . . . . . . .43
Deleting Applications ... . . . . . . . . . . . . . . . . . . . . . . . . . . . . . . . . . . . . . . . . . . . . . . . . . . . . . . . . . . . . . . . . . . . . . . . . . . . . . . . . . . .43
Loading Application Elements ... . . . . . . . . . . . . . . . . . . . . . . . . . . . . . . . . . . . . . . . . . . . . . . . . . . . . . . . . . . . . . . . . . . . . . . . . .44
Extracting Application Elements ... . . . . . . . . . . . . . . . . . . . . . . . . . . . . . . . . . . . . . . . . . . . . . . . . . . . . . . . . . . . . . . . . . . . . . . .45
Using Sample Applications ... . . . . . . . . . . . . . . . . . . . . . . . . . . . . . . . . . . . . . . . . . . . . . . . . . . . . . . . . . . . . . . . . . . . . . . . . . . . .45
Working with System Messages ... . . . . . . . . . . . . . . . . . . . . . . . . . . . . . . . . . . . . . . . . . . . . . . . . . . . . . . . . . . . . . . . . . . . . . . .46
Managing Application Access... . . . . . . . . . . . . . . . . . . . . . . . . . . . . . . . . . . . . . . . . . . . . . . . . . . . . . . . . . . . . . . . . . . . . . . . . . .48
Managing System Users.. . . . . . . . . . . . . . . . . . . . . . . . . . . . . . . . . . . . . . . . . . . . . . . . . . . . . . . . . . . . . . . . . . . . . . . . . . . . . . . . . .50
Managing Servers and Applications... . . . . . . . . . . . . . . . . . . . . . . . . . . . . . . . . . . . . . . . . . . . . . . . . . . . . . . . . . . . . . . . . . . .51
Auditing Tasks ... . . . . . . . . . . . . . . . . . . . . . . . . . . . . . . . . . . . . . . . . . . . . . . . . . . . . . . . . . . . . . . . . . . . . . . . . . . . . . . . . . . . . . . . . . . .52
Auditing Data... . . . . . . . . . . . . . . . . . . . . . . . . . . . . . . . . . . . . . . . . . . . . . . . . . . . . . . . . . . . . . . . . . . . . . . . . . . . . . . . . . . . . . . . . . . . .55
Monitoring Running Tasks ... . . . . . . . . . . . . . . . . . . . . . . . . . . . . . . . . . . . . . . . . . . . . . . . . . . . . . . . . . . . . . . . . . . . . . . . . . . . . . .56
Scanning For and Clearing Invalid Records... . . . . . . . . . . . . . . . . . . . . . . . . . . . . . . . . . . . . . . . . . . . . . . . . . . . . . . . . . . .59
Monitoring System Status Using HFM Insights (Exalytics Only).. . . . . . . . . . . . . . . . . . . . . . . . . . . . . . . . . . . . . . .59
Caution! The information in this chapter about application administration is provided for usewith Classic Financial Management applications only. If you transform anapplication created in Classic application administration to PerformanceManagement Architect, you then cannot work with that application in ClassicFinancial Management administration. For information on applicationadministration using Performance Management Architect, see the Oracle HyperionEnterprise Performance Management Architect Administrator's Guide.
29
An application consists of a set of entities, accounts, scenarios, and other dimensions that youuse together. You can create as many applications as you need. For example, you can set up oneapplication to report on tax data for several organizations and another application to report onSecurity and Exchange Commission data for other organizations.
For application administration, these security roles are required: Dimension Editor andFinancial Management Application Creator/Financial Management Manager. For informationon roles, see the Oracle Enterprise Performance Management System User Security AdministrationGuide.
Applications run on application servers. You can set up clusters of application servers to balancethe load on multiple servers. For instructions, see the Oracle Enterprise Performance ManagementSystem Installation and Configuration Guide.
Only members of the Administrator group that you specify when you configure the applicationserver can perform these administrative tasks:
Users on System
l List users
l Log out users
Manage Servers and Applications
l View disabled components
l Enable or disable connections
l Log out users
System Messages
l View - must be member of Administrator group
l Delete - must be member of Administrator group
To assign users to the Administrator Group, see the Oracle Enterprise Performance ManagementSystem User Security Administration Guide.
Application AdministrationYou define an application using these steps:
1. Create an application shell, in which you specify the application server where the applicationresides, an application label and description, calendar, language, and frequency properties.See “Creating Applications” on page 31.
2. Define security for the application, including which users have access to the application andwhat type of access each user has. See Chapter 3, “Managing Application Security”.
3. Define metadata for the application, including accounts, entities, scenarios, and customdimensions, application settings, consolidation methods, and currencies. See Chapter 4,“Managing Metadata.”
30
4. Load data, data forms, member lists, rules, and journals to the application.
Creating Applications
Caution! This information is provided for use with Classic Financial Management applicationsonly. For information on application administration using PerformanceManagement Architect, see the Oracle Hyperion Enterprise Performance ManagementArchitect Administrator's Guide.
An application is a set of dimensions and dimension members that meet a set of analytical orreporting requirements. For example, you can have an application to report on tax data and aseparate application for sales analysis.
For detailed information on Oracle Hyperion Tax Provision applications, see the OracleHyperion Tax Provision documentation.
There are several methods for creating applications:
l Create a new application. This option launches the Create Application wizard. You candefine the application calendar, module configuration, and custom dimensions. See“Creating a New Application” on page 31.
l Copy from an application. View the application calendar, module configuration and customdimensions from an application and modify using the Application Creation wizard to createa new application. See “Copying from an Application” on page 40.
l Create an application from a profile file. You can also view and modify the calendar. See“Creating an Application from a Profile File” on page 39.
Creating a New ApplicationTo create a new application, you must have the Application Administrator security role.
ä To create an application:
1 Select Navigate, then Administer, and then Consolidation Administration.
2 From the Applications tab, select Actions, and then New.
3 From Application options, select New application, and then click Next.
The system launches the Application Creation wizard.
4 In the Application Properties section, for Name, enter a name for the new application.
The application label can have a maximum of either 10 alphanumeric characters or 12 bytes.It cannot start with a number or contain spaces, an ampersand (&) symbol, specialcharacters, or more than five international characters. It also cannot contain these characters:German capital (Unicode U+1E9E) and lowercase ß (Unicode U+00DF), or Turkish dotlesslower case: ı (Unicode U+0131).
31
Application labels are not case-sensitive. For example, App1 and APP1 are considered thesame application. HFM, HSV, and HSX are reserved names and cannot be used forapplication labels or descriptions.
Caution! Do not create applications with the same name even if they are on differentFinancial Management application servers. Applications of the same name butfrom different Financial Management application servers cannot coexist on oneOracle Hyperion Shared Services server.
5 For Description, enter a description for the application.
The application description can have a maximum of 255 characters, and can include spaces.HFM, HSV, and HSX are reserved names and cannot be used for application descriptions.
6 From the Application Type list, select a type:
l Consolidation
l Tax Provisioning
7 From the Cluster list, select the application server cluster on which to run the new application.
If the server cluster is not listed, you may need to register it. See the Oracle EnterprisePerformance Management System Installation and Configuration Guide.
8 From the User Management Project list, select the Shared Services project to which to add theapplication.
Note: Each application must belong to a project. See the Oracle Enterprise PerformanceManagement System User Security Administration Guide.
9 For Languages, you can specify up to 10 languages for descriptions that are used throughout anapplication. Use a comma to separate the language names. Each language name can contain amaximum of 80 characters. Note that a space is counted as a character.
Caution! After you create an application, you cannot change the languages in theapplication.
10 Define a calendar.
When you select the type of calendar and the time periods for the application profile, thesystem creates default frequencies for the application. For example, if you include half-years,quarters, and months as the time periods, the system creates these frequencies: yearly, half-yearly, quarterly, and monthly.
Caution! After you create an application, you cannot change the start year, perioddescriptions or labels in the application.
l In the Years section, for Start Year, enter the start year for the calendar.
l For Number of Years, enter the total number of years to include in the application.
32
Note: The number of years in an application is the only profile definition that can bemodified for existing applications. See “Modifying the Number of Years in theApplication” on page 40.
11 In the Time Periods section, select the time periods to include:
l Months
Select the time periods to include (Half-Years, Quarters, or Trimesters)
From the Start Month drop-down list, select the first month in the calendar.
l Quarters
Optional: Select to include Half-Years.
l Custom. If you choose to define a Custom calendar, you must define the period labelprefix and number of base periods. A flat list is created and you can modify the hierarchylater.
l For Period Label Prefix, enter a prefix for the periods to include.
The label can contain a maximum of 10 characters and can include spaces.
l For Number of Base Periods, enter the number of periods in the year.
For example, If you enter 10 for the number of periods and NewPeriod as the labelprefix, these periods are added to the hierarchy: NewPeriod1 through NewPeriod10.
Note: If you choose to define a Manual calendar, leave the period label prefix and numberof base periods blank. You can then enter the frequencies and periods that you need.
12 Click Next.
Defining FrequenciesThe frequency specifies the time period level at which you can input data, for example, monthsor quarters. Frequencies and their corresponding views are created based on the time periodsthat you selected when defining the calendar. You can add, modify, and delete frequencies. Youcan also enter a descriptive label for each frequency and view in each language that you previouslydefined.
The year-to-date (YTD) frequency is provided by default in the first row of the Frequencycolumn. You cannot delete the YTD frequency, or change the label. However, you can enter adescription of the YTD frequency for each language that you define.
Note: In addition to the frequencies that you can define, each application contains two system-defined frequencies and corresponding views, Scenario View and Periodic.
If you selected to define a calendar manually, the Frequencies grid is empty, and you must enterthe necessary frequency views and their descriptions. You should enter one frequency for eachlevel of the Period dimension.
33

Caution! After you create an application, you cannot change the frequency descriptions orlabels in the application.
ä To define frequencies:
1 From the Frequencies screen, click the (+) Add Frequency button, or select Actions, and then AddFrequency.
2 Enter one or more frequencies and descriptions.
By default, YTD is the first frequency. The number of frequencies that you define should beequal to the number of generations in the Period tree.
Note: The label can contain a maximum of 40 characters. The description can contain amaximum of 80 characters.
Labels cannot include these characters: + - * / # { } ; , @ "
Tip: Because you cannot modify frequencies after an application is created, make sure toinclude a description for each frequency in each language.
3 Click Next.
Editing PeriodsThe period hierarchy is a combination of the time period and frequencies that you define. Youcan make changes to this hierarchy by adding or deleting periods. For example, you may wantto add another month to the fourth quarter to display a 13-month year.
Note: The number of base periods should be greater than 0.
When you select a period, you can change the period label or description. You cannot edit thelabel or description for the [Year] period.
Note: You cannot edit period labels based on language. If you change a period label in onelanguage, the change is carried over into all other languages defined in the applicationprofile. However, you can have a unique period description for each language.
To add sibling and child periods to the hierarchy, see “Adding Sibling and Child Periods” onpage 35.
ä To enter and edit periods:
1 From the period hierarchy, select a period, and enter or edit the period label or description.
The period label can contain a maximum of 40 characters. The period description cancontain a maximum of 80 characters. Note that a space is counted as a character.
34
2 Make sure to include a description for each period.
If you do not include a description and choose to add one later, you must modify theapplication profile and recreate all applications that use the profile.
Adding Sibling and Child PeriodsYou can add one or multiple sibling and child periods to the period hierarchy.
ä To add one child or sibling period:
1 Highlight the period to which to add a child or sibling period.
2 Select an option:
l Click the Insert Child button, , or select Actions, and then Insert Child.
l Click the Insert Sibling button, , or select Actions, and then Insert Sibling.
3 Enter a name for the new sibling or child period.
ä To add multiple child or sibling periods:
1 Highlight the period to which to add multiple child or sibling periods.
2 Click the Insert Many button, , or select Actions, and then Insert Many.
3 Enter the number of periods to add to the hierarchy.
4 Enter a label prefix for the new periods, and click OK.
Tip: If you enter 10 for the number of periods and NewPeriod as the label prefix, theseperiods are added to the hierarchy: NewPeriod1 through NewPeriod10.
5 When you finish adding periods, click Next.
Deleting PeriodsWhen you delete periods from the hierarchy, all descendants of the period are also deleted.
Note: You cannot delete the [Year] period.
ä To delete a period:
1 Select a period to delete.
2 Click Delete Period or select Actions, and then Delete Period.
Click Next.
35
Defining FeaturesThe Feature screen lists the Application Settings and default values based on the applicationmodules that are enabled. You can change any of the default values.
Application Settings
You can specify these settings:
l Application Currency - The currency to use in the application. See “Defining Currencies” onpage 95.
l Rate Account for Balanced Accounts - The rate account for BALANCE accounts. See“Defining Accounts” on page 78.
l Rate Account for Flow Accounts - The rate account for FLOW accounts. See “DefiningAccounts” on page 78.
l Translate Method for Balanced Accounts - The translation method for BALANCE accounts.See “Defining Accounts” on page 78.
l Translate Method for Flow Accounts - The translation method for FLOW accounts. See“Defining Accounts” on page 78.
Enabling or Disabling Application Modules
When you create an application, all application modules are enabled by default. Users can viewmodules for which they have the appropriate security role.
Depending on the application type, you might not require all modules. If you are the ApplicationAdministrator, you can select to disable specific application modules. For example, you coulddisable the Journals or Intercompany Transactions modules for certain applications. When youdisable a module, it is not displayed for any application user.
Note: If you have documents associated with a module that you want to disable, such as journalor intercompany transaction reports, make sure to also remove them from the system.
After you make changes to modules, close and reopen the application to see the changes.
The application module configuration information is saved as an XML file named applicationname_Moduleconfig.xml. You can load and extract module configuration information fromthe Load Application Elements and Extract Application Elements pages.
ä To define application features:
1 From the Features screen, specify values for these Application Settings, or use the default values:
l Application Currency - Enter a currency for the application. All currencies are listed andavailable to select. For example, if you type US, the USD - US Dollar currency is displayedand available to select.
l Rate Account for Balanced Accounts - Enter the rate account to use for BALANCEaccounts.
36
l Rate Account for Flow Accounts - Enter the rate account to use for FLOW accounts.
l Translate Method for Balanced Accounts - From the dropdown list, select the translationmethod for BALANCE accounts: PVA for the periodic value translation method, or VALto use the value at exchange rate translation method.
l Translate Method for Flow Accounts - From the dropdown list, select the translationmethod for FLOW accounts: PVA for the periodic value translation method, or VAL touse the value at exchange rate translation method.
2 Select Yes to enable or No to disable application modules, or use the default values:
l Enable Process Control
l Enable Submission Phase
l Enable Manage Ownership
l Enable Journals
l Enable Data Management
l Enable Audit Tasks
l Enable Intercompany Transactions
l Enable Equity Pickup
3 Click Next.
Creating Custom DimensionsYou use the Dimensions screen to configure dimensions and security properties for dimensions.You can add or delete Custom dimensions, and specify a Custom Dimension name and Alias.
In the Dimensions table, the first two Custom dimensions for the application are automaticallydisplayed. These Custom dimensions are used for currency rate and consolidation methodinformation, and the size for these dimensions must be Large. The first dimension is used for“From Currency” and consolidation method information, and the second dimension is used for“To Currency” information. You can specify the dimension name (short label) and dimensionalias (long label) for the Custom dimension for these two entries. You cannot change the size,and you cannot delete these dimensions.
In addition to the default dimensions, you can create additional Custom dimensions with theseguidelines:
l You must enter a unique Custom dimension name and dimension alias for the application.Both the name and alias must be unique. For example, if you have a dimension name ofPROD, the dimension alias cannot be PROD. The Custom dimension name also cannot bethe same as a Currency name.
l The dimension name can be a maximum of 10 characters.
l The dimension alias can be a maximum of 20 characters.
l The dimension name and alias cannot contain spaces, and cannot be blank.
l You must select a size for the Custom dimension: Small, Medium, or Large.
37
The maximum number of Custom dimensions depends on the database type and the size ofeach Custom dimension.
l The Large Custom dimension supports 2 billion members, and requires 4 bytes of space ina database column for storage.
l Medium supports 32,000 members and requires 2 bytes.
l Small supports up to 128 and requires 1 byte.
The calculation method of the maximum number of Custom dimensions is the same regardlessof the database type, but the database type determines the amount of total space available.
The total number of physical Custom columns dictates the total number of bytes available forCustom dimension storage in Oracle, Microsoft SQL Server, or IBM DB2 databases.
l Oracle supports up to 21 physical Custom columns; 21 x 8 = 168 bytes total available space.
l SQL Server supports 5 physical Custom columns; 5 x 8 bytes = 40 bytes total available space
l IBM DB2 supports primary keys up to 900 bytes, = 800 bytes total available space
At least two Custom dimensions are required. Below are the formulae for calculating more thantwo Custom dimensions:
Migrating applications: 4xLD + 2xMD + SD <= MAXBYTES - 8
New applications: 4xLD + 2xMD + SD <= MAXBYTES
LD = number of large dimensions, MD = number of medium dimensions, and SD = numberof small dimensions.
MAXBYTES = 40 for Microsoft SQL Server, 168 for Oracle, 800 for IBM DB2
Oracle recommends that you use Medium for Custom dimensions for all practical purposes.
The Small size for Custom dimensions is not recommended if you anticipate having more than128 members over the lifetime of the application.
Oracle recommends that you use the Large size for Custom dimensions only if you plan to havemore than 32,536 members in that dimension over the lifetime of the application.
The following example shows sample Custom dimensions.
Custom Dimension Name Custom Dimension Alias Custom Dimension Size Use for Currency
Prod Products Large From Currency
Mkt Markets Large To Currency
Flows BSFlows Small N/A
Cust Customers Large N/A
ä To create Custom dimensions:
1 From the Dimensions table, click the (+) Create Custom Dimension button, or select Actions, and thenCreate Custom Dimension.
38
2 For Short Name, enter a unique dimension name.
3 For Alias Name, enter a unique dimension alias.
4 For Dimension Size, select an option: Small, Medium, or Large.
5 To create additional dimensions, repeat these steps.
6 Optional: If you have completed all the steps to create an application, click Create Application.
When the application is successfully created, a confirmation message displays that theapplication has been created and that the metadata has been loaded successfully. From theconfirmation message, click OK.
Saving Application ProfilesAfter you complete all the steps in the Application Creation Wizard and click Create Application,the system generates a binary application Profile (.PER) file using the options that you selectedduring the wizard navigation. The application is then created using the Profile file. Metadata isupdated and loaded with your selected settings.
After a Profile file is created for an application, you can create a new application using the Profilefile. See “Creating an Application from a Profile File” on page 39.
Creating an Application from a Profile FileWhen you create a new application, the system generates a binary application Profile (.PER) fileusing the options that you selected during the wizard navigation. The application is then createdusing the Profile file. You can create a new application using the Profile file from an existingapplication.
When you use a Profile file, the system uses the default values for application settings.
ä To create an application from a Profile file:
1 Select Navigate, then Administer, and then Consolidation Administration.
2 From the Applications tab, select Actions, and then New.
3 From Application options, select Application from Profile File, and then click Next.
The system launches the Application Creation wizard.
4 From the Browse Profile File screen, click Browse, and select an application Profile (.PER) file, andthen click Next.
5 Modify the Application Properties if needed, and then click Create Application.
39
Copying from an ApplicationTo create an application, you can copy an application profile from an existing application. Youcan view the application calendar, module configuration and custom dimensions from anapplication and modify using the Application Creation wizard to create a new application.
ä To create an application:
1 Select Navigate, then Administer, and then Consolidation Administration.
2 From the Applications tab, select Actions, and then New.
3 From Application options, select Copy from an application, and then click Next.
The system launches the Application Creation wizard.
4 From the Select Application screen, select an application to copy.
The wizard is populated with the information from the selected application, includingapplication settings and module configuration. You can change the current values.
l To create an application from the Application Properties screen, click CreateApplication.
l To modify application information, click Next to navigate through the wizard.
Modifying ApplicationsAfter you create an application, modifications to the Application Profile are generally notallowed. However, an administrator can change these settings:
l Increase the number of years used in the application. See “Modifying the Number of Yearsin the Application” on page 40.
l Enable or disable application modules. See “Enabling or Disabling Application Modules”on page 41.
Modifying the Number of Years in the ApplicationYou can modify the number of years the application supports, with these limitations:
l The new profile end year should exceed the current end year. You can only increase thenumber of years; decreasing the number is not supported.
l The new end year must be less than 2100.
l You cannot modify the application profile Start Year.
Example
Current start year: 2005
Current number of years: 10 (End year 2015)
Request for modification: 15 (End year 2020)
40
Before the application profile end year can be processed, the system sets the application intoAdmin Mode. The current application process is stopped and all users logged into the applicationare forcefully logged out.
ä To modify an application:
1 Select Navigate, then Administer, and then Consolidation Administration.
2 From the Applications tab, select an application to modify.
3 Click Modify Application, or select Actions, and then Modify Application, or right-click on an applicationand select Modify Application.
Note that most of the Application Properties are grayed out.
4 To change the Number of Years, enter the number of years for the application.
5 Click Modify Application.
The system displays a warning message before processing the modified application. If you clickYes, it sets the application to Admin Mode, and validates the number of years. If there are novalidation errors, it updates the Year dimension, and then disables the Admin Mode.
Enabling or Disabling Application ModulesWhen you create an application, all application modules are enabled by default. Users must havethe security roles associated with the modules. Modules are not displayed for users without theassociated security role.
Depending on the application type, you might not require all modules. If you are the ApplicationAdministrator, you can select to disable specific application modules. For example, you coulddisable the Journals or Intercompany Transactions modules for certain applications. When youdisable a module, it is not displayed for any application user.
After you make changes to modules, you must close and reopen the application to see thechanges.
ä To modify an application:
1 Select Navigate, then Administer, and then Consolidation Administration.
2 From the Applications tab, select an application to modify.
3 Right-click and select Modify Application.
4 Click Modify Application, or select Actions, and then Modify Application, or right-click on an applicationand select Modify Application.
5 In the Create Application wizard, click Next to navigate to the Features tab.
6 From the module list, select Yes to enable or No to disable application modules:
l Enable Process Control
l Enable Manage Ownership
l Enable Journals
41
l Enable Data Management
l Enable Audit Tasks
l Enable Intercompany Transactions
l Enable Equity Pickup
7 Click Modify Application
8 To view the changes, close and then reopen the application.
Registering ApplicationsDuring the installation process, you configure and register server clusters. After you create anapplication, you can register the application against the preferred server cluster.
ä To register applications:
1 Select Navigate, then Administer, and then Consolidation Administration.
2 Select Administration, and then Applications.
3 From the application list, select an application.
4 Click Register, or select Actions, and then Register.
5 From the Cluster list, select a server cluster.
6 From the User Management Project list, select the Oracle Hyperion Shared Services project.
7 Click Register.
Opening ApplicationsIn Financial Management, all data is processed within applications. You can open and work withmultiple applications at one time.
To access an application, you must be assigned as a user of the application.
ä To open an application:
1 Select Navigate, then Applications, then Consolidation.
2 Select an application.
Note: If the application is not listed, click Refresh.
Closing ApplicationsYou can close the current application in which you are working, or if you have multipleapplications open, close them all simultaneously.
42
ä To close an application, take one of these actions:
l Select File, then Close, and then Current, or All.
l Click the X on the top of the tab in which the application is open.
Changing Application Server ClustersYou use the Administration module to manage applications. By default, the Administrationmodule uses the first available cluster/server. You can change the connected server using thisoption, which reloads the Administration module.
ä To change the server cluster:
1 Select Navigate, then Administer, then Consolidation Administration.
2 Select Administration, and then Change Cluster.
3 From the Cluster Server list, select a cluster.
4 Click OK.
Viewing the Application ListThe Applications table contains a list of all of the available Financial Management applicationsin the system. The table displays application names and descriptions.
ä To view the application list:
1 Select Navigate, then Administer, and then Consolidation Administration.
2 Select Administration, and then Applications.
Deleting Applications
Caution! This information is provided for use with Financial Management applicationAdministration only. For information on application administration usingPerformance Management Architect, see the Oracle Hyperion Enterprise PerformanceManagement Architect Administrator's Guide.
Before you delete an application, ensure that no other user is currently using the application.
To delete an application, you must have these security roles:
l Shared Services: Financial Management Manager, or Shared Services: FinancialManagement Administrator and Shared Services: Financial Management ApplicationCreator
l Application: Application Administrator
43

l Application: Provisioning Manager
ä To delete an application:
1 Select Navigate, then Administer, and then Consolidation Administration.
2 Select Administration, and then Applications.
3 Select the application to delete.
4 Click Delete, or select Actions, and then Delete.
5 If the application is open, a warning message displays. Select an option:
l To delete the application forcefully, click Force Delete.
Users who are logged in receive error messages after the application is deleted.
l To view the application users, click See Users. From the System Users page, you can logout users.
l To cancel application deletion, click Cancel.
6 If the application is not open by you or other users, a confirmation prompt displays. Click Yes to deletethe application.
Loading Application ElementsAfter you create an application, you load metadata, member lists, rules, and security files. Youcan load individual files, select multiple files to load, or load all files at once. When you loadmultiple files, the system loads them in the proper sequence. You can also scan the files to verifythem before loading.
Each load process generates a log file so you can review each process individually. When the loadprocess is complete, a link displays for the log so that you can view any errors. If one of the loadfiles does not complete successfully, you can correct any errors and reload it.
Application element files must use a specific file format, and several options are available for theload process. See these sections:
l “Loading Application Security” on page 71
l “Loading Metadata” on page 122
l “Loading Member Lists” on page 132
l “Loading Rules” on page 229
ä To load application elements:
1 Open an application.
2 Select Consolidation, then Load, and then Application Elements.
3 Enter the file name to load, or click Browse to locate the file that you want to load.
4 Specify options for the load process.
5 Optional: Click Scan to verify that the file format is correct.
44
6 Click Load to load individual files or click Load All.
If you reload existing files, the system displays a warning prompt asking if you want to usethem again. If you do, click Yes.
Tip: To reset the file options to the default values, click Reset or Reset All.
7 Optional: To download the log file, click Download Log. Click Open to display the log file, or Save andselect a location to save the file locally.
Extracting Application ElementsYou can extract application elements, view and modify the information in a text editor, and thenreload the elements into the application. This can be useful if you need to make updates tomultiple files simultaneously. You can extract individual files, select multiple files to extract, orextract all files at once.
Application element files must use a specific file format, and several options are available for theextract process. See these sections:
l “Extracting Application Security” on page 75
l “Extracting Metadata” on page 125
l “Extracting Member Lists” on page 133
l “Extracting Rules” on page 230
When the extract process is complete, a link displays for the log so that you can view any errors.
ä To extract application elements:
1 Open an application.
2 Select Consolidation, then Extract, and then Application Elements.
3 Specify options for the extract process.
4 Click Extract to extract individual files or click Extract All.
5 Click Download to download the extracted file.
6 Optional: To download the log file, click Download Log. Click Open to display the log file, or Save andselect a location to save the file locally.
Using Sample ApplicationsFinancial Management provides sample application files that you can use to populate a testapplication.
When you create a test application, you can load files from sample applications, includingsecurity, metadata, data, rules, and journal files; report definitions, data grids, and data formscripts.
45
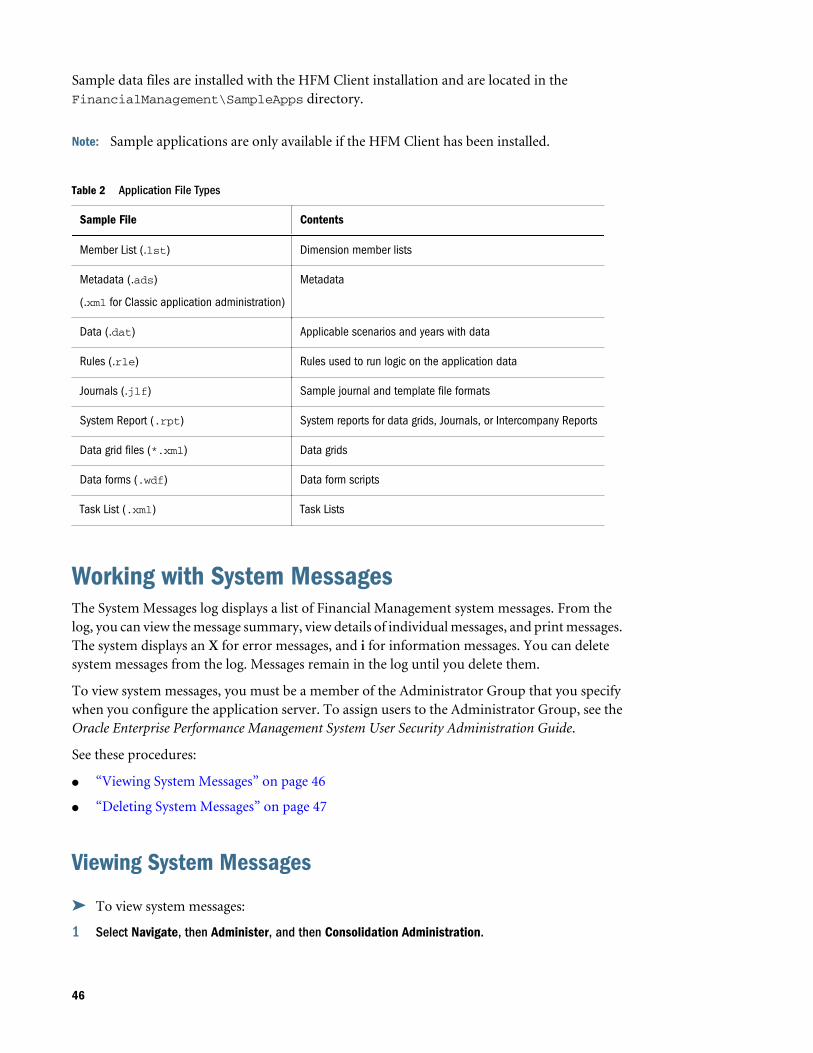
Sample data files are installed with the HFM Client installation and are located in theFinancialManagement\SampleApps directory.
Note: Sample applications are only available if the HFM Client has been installed.
Table 2 Application File Types
Sample File Contents
Member List (.lst) Dimension member lists
Metadata (.ads)
(.xml for Classic application administration)
Metadata
Data (.dat) Applicable scenarios and years with data
Rules (.rle) Rules used to run logic on the application data
Journals (.jlf) Sample journal and template file formats
System Report (.rpt) System reports for data grids, Journals, or Intercompany Reports
Data grid files (*.xml) Data grids
Data forms (.wdf) Data form scripts
Task List (.xml) Task Lists
Working with System MessagesThe System Messages log displays a list of Financial Management system messages. From thelog, you can view the message summary, view details of individual messages, and print messages.The system displays an X for error messages, and i for information messages. You can deletesystem messages from the log. Messages remain in the log until you delete them.
To view system messages, you must be a member of the Administrator Group that you specifywhen you configure the application server. To assign users to the Administrator Group, see theOracle Enterprise Performance Management System User Security Administration Guide.
See these procedures:
l “Viewing System Messages” on page 46
l “Deleting System Messages” on page 47
Viewing System Messages
ä To view system messages:
1 Select Navigate, then Administer, and then Consolidation Administration.
46

2 Select Administration, then System, and then Messages.
3 Optional: From the Filters panel, select filter criteria:
l Application
l Server
l Date Range
m To view all dates, select Include All.
m To specify a date range, select Range, and then specify Minutes, Hours, Days, orMonths.
m To specify specific dates, select Custom, and then enter a Start and End date, orclick the calendar icon to select dates.
4 From the list of system messages, select a message for which to view detail.
5 Double-click the message to open it, or click View, or select Actions, and then View.
6 When you finish viewing system message details, click OK.
Deleting System MessagesYou can delete system messages from the System Messages log if you are assigned to theAdministrator group.
ä To delete system messages:
1 Select Navigate, then Administer, and then Consolidation Administration.
2 Select Administration, then System, and then Messages.
3 From the list of system messages, select one or more messages to delete.
4 Take one of these actions:
l To delete selected messages, click Delete Selected or select Actions, and then DeleteSelected.
l To delete messages based on the current filter settings, click Delete based on the currentfilter settings, or select Actions, and then Delete Filtered.
l To delete all system messages, click Delete All or select Actions, and then Delete All.
Tip: To refresh the list of messages, click Refresh or select Actions, and then Refresh.
System Message Detail StringsSome processes return strings of technical information for system messages such as errors. Thestrings contain a uniquely identifying error reference number, followed by various fields ofinformation. The fields are delimited by semicolons, and each field has a label that is followedby a colon, as in this example:
Error Reference Number: {219EB33B-BF50-11D6-A43E-0000863DCCF1}
47
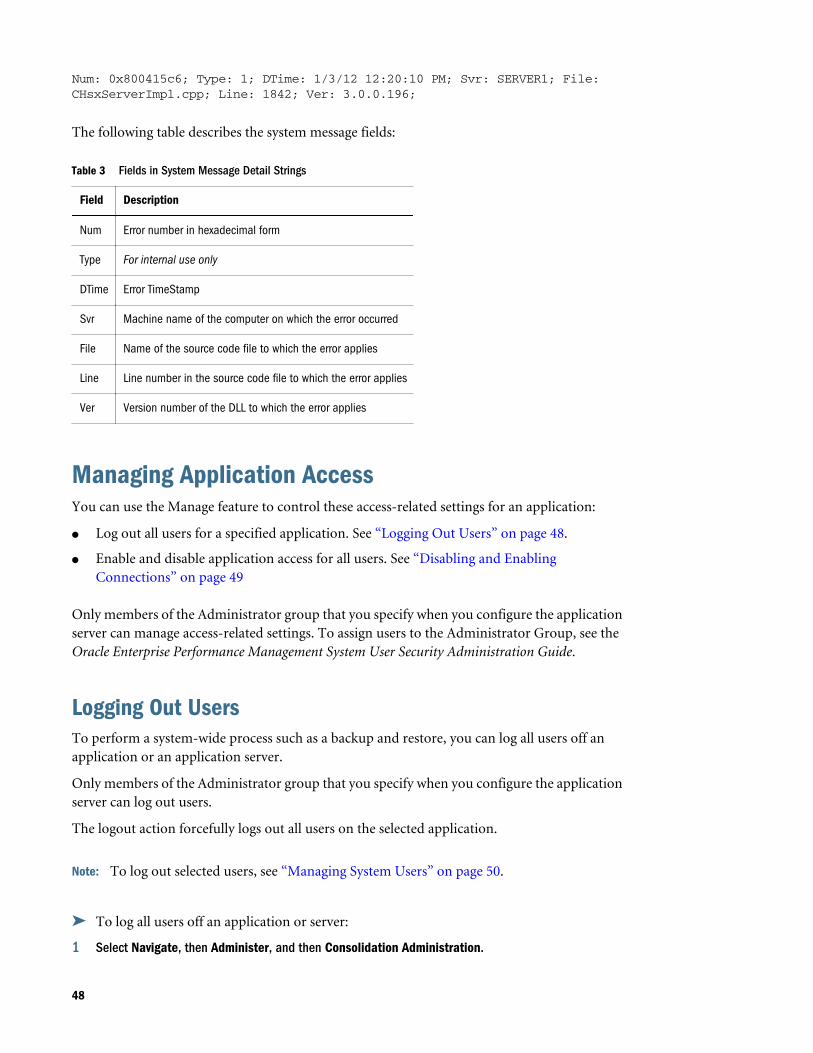
Num: 0x800415c6; Type: 1; DTime: 1/3/12 12:20:10 PM; Svr: SERVER1; File: CHsxServerImpl.cpp; Line: 1842; Ver: 3.0.0.196;
The following table describes the system message fields:
Table 3 Fields in System Message Detail Strings
Field Description
Num Error number in hexadecimal form
Type For internal use only
DTime Error TimeStamp
Svr Machine name of the computer on which the error occurred
File Name of the source code file to which the error applies
Line Line number in the source code file to which the error applies
Ver Version number of the DLL to which the error applies
Managing Application AccessYou can use the Manage feature to control these access-related settings for an application:
l Log out all users for a specified application. See “Logging Out Users” on page 48.
l Enable and disable application access for all users. See “Disabling and EnablingConnections” on page 49
Only members of the Administrator group that you specify when you configure the applicationserver can manage access-related settings. To assign users to the Administrator Group, see theOracle Enterprise Performance Management System User Security Administration Guide.
Logging Out UsersTo perform a system-wide process such as a backup and restore, you can log all users off anapplication or an application server.
Only members of the Administrator group that you specify when you configure the applicationserver can log out users.
The logout action forcefully logs out all users on the selected application.
Note: To log out selected users, see “Managing System Users” on page 50.
ä To log all users off an application or server:
1 Select Navigate, then Administer, and then Consolidation Administration.
48
2 Select Administration, then System, and then Manage.
3 Click Logout All Users, or select Actions, then Logout All Users, and then click Yes from the confirmationprompt.
4 From the Logout Result dialog box, click OK.
Disabling and Enabling ConnectionsWhen you disable connections, the system prevents new users from logging on to the specifiedserver or application. You can use the disable connections feature with the log out users feature.For example, you can disable logging on to an application, log out users logged on to theapplication, load metadata, and then enable connections to the application.
These options are available for user access:
l Disable Connections - This option disables connections for all users, including theAdministrator. No users are allowed to access the selected application.
l Enable Connections for Admin Only - Application access is only allowed for the Administrator.
l Enable Connections for All Users - Application access is allowed for all users.
ä To disable or enable user connections to an application or server:
1 Select Navigate, then Administer, and then Consolidation Administration.
2 Select Administration, then System, and then Manage.
3 Take one of these actions:
l Click Disable Connections, or select Actions, and then Disable Connections.
l Click Enable Connections for Admin Only, or select Actions, and then Enable Connectionsfor Admin Only.
l Click Enable Connections for All Users, or select Actions, and then Enable Connections forAll Users.
4 To refresh the list of connections, click Refresh, or select Actions, and then Refresh.
Viewing Application Connection StatusYou can view connection status by a list of servers, or by a list of applications.
When you view by server, the system displays the server name and a list of the applicationsapplicable for that server with their status: Enabled or Disabled.
When you view by applications, the system displays the application names, the server on whichthey reside, and their status: Enabled or Disabled.
ä To view application connection status:
1 Select Navigate, then Administer, and then Consolidation Administration.
2 Select Administration, then System, and then Manage.
49
3 Use the menu icon to toggle between display types:
l If the list is displayed by Server, select Click to view by applications.
l If the list is displayed by Applications, select Click to view by servers.
Managing System UsersThe System Users feature enables you to view the users on the system and log off users of anapplication or server. You can view which modules are being used by users and what activitiesare being performed. See “Viewing Users” on page 50 and “Logging Out Users” on page 48.
Note: To view users on system, you must be assigned the Financial Management Administratorsecurity role.
Only members of the Administrator group that you specify when you configure the applicationserver can log out users. To assign users to the Administrator Group, see the Oracle EnterprisePerformance Management System User Security Administration Guide.
Viewing UsersYou can view logged-on users for all application and servers, or filter the list to view users ofspecific servers and applications.
Note: To view users on system, you must be assigned the Financial Management Administratorsecurity role.
This information is available for each logged-on user:
l User name
l Current module in which the user is working
l Current activity of user
l Time the activity was started
l Server name
l Application name
l Status
ä To view logged-on users:
1 Select Navigate, then Administer, and then Consolidation Administration.
2 Select Administration, then System, and then Users.
3 Optional: From the Filters panel, filter users by Application, or by Server.
50
Logging Out Selected or All UsersTo perform a system-wide process such as a backup and restore, you can log users off anapplication or an application server. For example, you can log off users logged on to the serverand disable future logging on to the server. See “Disabling and Enabling Connections” on page49.
Only members of the Administrator group that you specify when you configure the applicationserver can log out users.
When you log out users, the system does not disconnect them immediately - there can potentiallybe a five-minute delay before the user is logged out while the processes that the user is performingare completed.
You can control the user session timeout by changing the timeout setting in Microsoft InternetInformation Services (IIS), or by changing the Web Session Timeout setting using the EPMConfigurator. The default timeout setting is 20 minutes.
When you log a user off the system, the system displays a Stopped status for the user. In addition,the system notifies the user who has been logged off immediately following the first user actionafter logout.
ä To log users off an application or server:
1 Select Navigate, then Administer, and then Consolidation Administration.
2 Select Administration, then System, and then Users.
3 From the list of users, select one or more users to log out.
4 Take one of these actions:
l Click Logout Selected User(s) or select Actions, and then Logout Selected User(s).
l Click Logout All Users, or select Actions, and then Logout All Users.
Tip: To refresh the list of users, click Refresh or select Actions, and then Refresh.
Managing Servers and ApplicationsTo manage servers and applications, you must be an Administrator.
Enabling and Disabling Admin ModeIf you are an administrator, you can enable Admin Mode to prevent users from logging intoapplications while you perform administrative maintenance tasks, such as backup and restoreoperations.
When you change an application to Admin Mode, all users will be logged out of the system. Ifthere are any pending tasks (for example, consolidation, data load, or metadata load), theapplication will not be changed to Admin Mode and waits until the pending tasks are completed
51
before shutting down. After the tasks are completed, you can enable Admin Mode for theapplication.
Users are not allowed to log into the application until you disable the Admin Mode.
ä To enable or disable Admin Mode:
1 Select Navigate, then Administer, and then Consolidation Administration.
2 Select System, and then Applications.
3 Select an application.
4 Take one of these actions:
l From the toolbar, click the Admin Mode button.
l Select Actions, and then Admin Mode.
l Right-click on the application name and select Admin Mode.
5 When you are done working on the application, select the application and disable Admin Mode.
Synchronizing ServersThe synchronization between Financial Management application servers is based on systemtime. Changing the clock can affect this synchronization. For the time change to and fromDaylight Saving Time (DST), Oracle recommends that you stop the servers before the timechange and restart them afterward.
Auditing TasksYou can use the Task Audit feature to view the tasks performed by users. You can filter auditedtasks by date range, application server, user, and task performed.
If you are assigned the Application Administrator role, you can view, export, and delete taskaudit information. If you are not an administrator, but have the View Task Audit role, you canview and export task audit information.
These user activities are logged in the task audit:
l Idle
l Rules Load
l Rules Scan
l Rules Extract
l Consolidation
l Chart Logic (Calculate)
l Translation
l Custom Logic
l Allocate
52
l Data Load
l Data Extract
l Data Entry
l Data Retrieval
l Data Clear
l Data Copy
l Journal Entry
l Journal Retrieval
l Journal Posting
l Journal Unposting
l Journal Template Entry
l Metadata Load
l Metadata Extract
l Member List Load
l Member List Scan
l Member List Extract
l Security Load
l Security Scan
l Security Extract
l Logon
l Logon Failure
l Logoff
l Metadata Scan
l Data Scan
l Extract Data to Database Export
l Extract Data to Database Schema Delete
l Transactions Load
l Transactions Extract
l Document Attachments
l Document Detachments
l Create Transactions
l Edit Transactions
l Delete Transactions
l Post Transactions
l Unpost Transactions
53
l Delete Invalid Records
l Data Audit Purged
l Task Audit Purged
l Post All Transactions
l Unpost All Transactions
l Delete All Transactions
l Unmatch All Transactions
l AutoMatch by ID
l AutoMatch by Account
l IC Matching Report by ID
l IC Matching Report by Acct
l IC Transaction Report
The task audit log includes this information:
l Username
l Activity performed
l Activity start time
l Activity end time
l Server name
l Description
l Current module
The task audit log information is stored in the (APPNAME_TASK_AUDIT) table. You can backup or extract the information in the table to a file, then clear the table. You should monitor thesize of the log and clear it on a regular basis.
ä To perform a task audit:
1 Select Navigate, then Administer, and then Consolidation Administration.
2 Select Administration, then Audit, and then Tasks.
3 Optional: From the Filters panel, select filter criteria:
l Application
l Server
l Date Range
m To view all dates, select Include All.
m To specify a date range, select Range, and then specify Minutes, Hours, Days, orMonths.
54
m To specify specific dates, select Custom, and then enter a Start and End date, orclick the calendar icon to select dates.
l Users
l Tasks
4 Optional: To export the audit information to a CSV file, click Export, or select Actions, and thenExport and follow the download instructions.
5 Optional: To delete entries based on the current filter settings, click Delete based on the current filtersettings, or select Actions, and then Delete Filtered.
6 Optional: To delete all entries from the log, click Delete All, or select Actions, and then Delete All.
Note: When you clear the log, a record of the clear process remains in the log and cannotbe erased.
Auditing DataYou can use the Data Audit feature to view data changes performed by users. You can filter thedata changes by date range, application server, user, and dimension members.
In the Metadata Manager, you can enable the EnableDataAudit metadata attribute for theaccounts and scenarios for which you want to audit data changes. The audit settings for thescenario override the audit settings for the account. If the EnableDataAudit attribute is set toYes for a scenario, all accounts in the scenario are audited, even accounts for whichEnableDataAudit is set to False. If EnableDataAudit is set to Override for a scenario, all accountsfor which EnableDataAudit is set to True are audited. To disable auditing of Scenario andAccount members, change the EnableDataAudit attribute to No.
If you are assigned the Application Administrator role, you can view, export, and delete dataaudit information. If you are not an administrator, but have the View Data Audit role, you canview and export data audit information.
These user activities are logged in the data audit:
l Data Entry
l Data Clear
l Data Copy
l Data Load
l Journal Entry
The data audit log includes this information:
l User name
l Activity performed
l Time modified
l Server name
55
l Point of view
l Value entered for the point of view
The data audit log information is stored in the APPNAME_DATA_AUDIT table. You can backup or extract the information in the table. You should monitor the size of the log and clear it ona regular basis.
ä To perform a data audit:
1 Select Navigate, then Administer, and then Consolidation Administration.
2 Select Administration, then Audit, and then Data.
3 Optional: From the Point of View, click a dimension to select dimension members.
4 Optional: From the Filters panel, select filter criteria:
l Application
l Server
l Date Range
m To view all dates, select Include All.
m To specify a date range, select Range, and then specify Minutes, Hours, Days, orMonths.
m To specify specific dates, select Custom, and then enter a Start and End date, orclick the calendar icon to select dates.
l Users
5 Optional: To export the audit information to a CSV file, click Export, or select Actions, and thenExport and follow the download instructions.
6 Optional: To delete entries based on the current filter settings, click Delete based on the current filtersettings, or select Actions, and then Delete Filtered.
7 Optional: To delete all entries from the log, click Delete All, or select Actions, and then Delete All.
Note: When you clear the log, a record of the clear process remains in the task audit log andcannot be erased.
Monitoring Running TasksYou can use the Running Tasks module to view and terminate running tasks. You can filterrunning tasks by application, server, user, task performed, and task status.
By default, running tasks remain in the database for 900 seconds (15 minutes). You can changethe default time by modifying the AutoClearDeadTasksAfterSeconds setting. See Appendix A,“Configuration Settings”.
l “Viewing Running Tasks” on page 57
l “Stopping Running Tasks” on page 58
56
l “Refreshing Running Tasks” on page 58
Viewing Running Tasks
ä To view running tasks:
1 Take one of these actions:
l From an application, select Consolidation, then Maintenance, and then Running Tasks.
l Select Navigate, then Administer, then Consolidation Administration, then Administration,then System, and then Running Tasks.
2 Optional: From the Filters panel, select filter criteria:
l Application
l Server
l Users
l Tasks
l Status
You can view and terminate these tasks:
l Consolidation
l Data Load
l Data Extract
l Extract Data to Database Export
l Post All Transactions
l Unpost All Transactions
l Delete All Transactions
l UnMatch All Transactions
l AutoMatch by ID
l AutoMatch by Account
l IC Matching Report
l IC Matching Report by ID
l IC Matching Report by Acct
l IC Transaction Report
l Journals Report
You can filter the running tasks by these status types:
l Initializing
l Running
57
l Paused
l Uninitializing
l Stopped
l Aborted
l Completed
l Not Responding
l Scheduled Stop
l Scheduled Start
Stopping Running TasksOnly the user who starts a task or a user assigned to the Administrator role can terminate a taskthat is running.
ä To stop a task:
1 From the Running Tasks module, select a task that you want to stop.
2 Click Stop Tasks, or select Actions, and then Stop Tasks.
Refreshing Running TasksWhen you load multiple or large data or intercompany transaction files, the task may not bedisplayed immediately in the Running Tasks module. When you open Running Tasks, if a delayoccurs in the file transfer for a data or intercompany load, the system displays a message to wait,and the screen automatically refreshes and displays the task. By default, the system automaticallyrefreshes the Running Tasks screen in 5-second intervals and performs the automatic refreshprocess a maximum of 120 times. If no running task is found after 120 times, the refresh cyclestops, and you must do a manual refresh. The refresh cycle continues until all of the runningtasks are completed.
Note: If you are the Financial Management System Administrator, you can configure DefaultRefresh Count and Default Refresh Interval See “Changing Configuration Settings” onpage 393.
ä To refresh the Running Task list:
1 From the task list, click Refresh, or select Actions, and then Refresh.
2 From the drop-down list, select a refresh mode:
l Default
l Manual
l 5 seconds
58
l 10 seconds
l 15 seconds
l 30 seconds
l 60 seconds
Note: The refresh mode setting is retained the next time that you log on to the application.
Scanning For and Clearing Invalid RecordsYou can use the Clear Invalid Records feature to scan an application for invalid records and toremove them. You must have Administrator security access to clear invalid records.
Running the Clear Invalid Records process impacts the database, network, and FinancialManagement environment and can cause performance issues. This process must be run in amaintenance window where users are not accessing the Financial Management environment.
ä To scan for and delete invalid records:
1 Open the application from which to delete invalid records.
2 Select Consolidation, then Data, and then Manage.
3 From the Manage Data page, expand Clear Invalid Records.
Note: This feature is available only to users with Administrator security access.
4 Select an action:
l Click Scan to scan for invalid records.
l Click Clear Invalid Records to clear the records.
Monitoring System Status Using HFM Insights(Exalytics Only)HFM Insights provides a dashboard for system administrators to monitor the status of theFinancial Management system. It displays data collected from system components over a periodof time and enables administrators to take corrective action if necessary.
Note: This feature is available only for Exalytics installations.
Accessing HFM InsightsTo access HFM Insights, you must have the Financial Management Application Administratorrole.
59
Note: The application processes are not required to be up and running for monitoring purposes.
ä To access HFM Insights:
1 Select Navigate, then Administer, and then Consolidation Administration.
2 Select System, and then Insights.
HFM Insights Main DashboardWhen you open HFM Insights, the main page displays a table in which each row representsapplications running on each server and their status. In a multi-server environment, you canfilter the applications by server.
The table contains rows for each application and server combination as selected in the filter. Forexample, if you selected three applications and two servers, the table displays six rows:Application 1 on Server 1, Application 2 on Server 2, and so on. For each row, the followinginformation is displayed:
l Application icon, application name, and server name
l Chart based on the following Key Performance Indicators (KPI). The data is limited to thelast two weeks:
m Users - number of users during the past two weeks
m Errors - number of errors during the past two weeks
m Tasks - number of tasks during the past two weeks
m Memory - Physical memory in MB
m CPU - CPU usage
l Status Overview:
m Status icon displaying one of the following statuses:
o Admin Mode
o Crash
o Down (process is not loaded)
o Unresponsive
o Up (process is up and running)
m Start Time - the last time the XFMDatasource process was started
m Up Time - Uptime calculation, which is the difference between the Start Time and thelast ping time
m Last Health Check - Timestamp of last successful ping to XMFDatasource process fromHsxServer log
60
By default, all metrics are displayed. You can deselect any of the metrics from an individualgraph. For example, you can select only CPU and deselect the other metrics. The graph will scaleaccording to your selections.
The screen automatically refreshes at 5 minute intervals, or you can manually refresh it.
Filtering ApplicationsApplication filter - lists all the applications for which you are an Application Administrator. Youcan select one or more applications. By default, the first five applications in the list are selectedand the table displays the status of those applications.
Server filter - lists all the available servers. You can select one or more servers. If there is onlyone server in the system, the server filter is not displayed. If the server filter is displayed, by defaultthe first server is selected and the table lists the application status on that server.
Show filter - enables you to select the metrics to be displayed in the graph. It is a multi-selectionlist. By default, all the metrics are selected and the graph displays all the metrics: Users, Errors,Tasks, Memory, and CPU.
Application DetailsWhen you click an application icon, a new tab opens, which displays additional detailed metricsfor the application running on that server.
The tab title is <Application Name>@<ServerName>.
The Application page displays the following sections:
Application Summaryl Application icon, application name, and server name
l Status Overview, as shown on the main page
l Application Dimensions - Application Dimensions and total members in each dimension
l Restart - Restarts the XFMDatasource process
Performance OverviewThis section displays a chart based on the same KPI as on the main screen.
l Show - Filter for time periods to display. By default, data is displayed for the last 14 days.
l Refresh- Select Manual or Auto Refresh. The default value is Manual.
UserFrequent users - Bar graph displaying the top 10 users with the maximum number of sessionsover the last 14 days, based on the Task Audit data
61
Session Details - Details of user sessions, including User name, Time Started, Time Ended, andDuration of user session. You can sort any of the columns.
You can filter by User. In the User Search box, type a full or partial user name, or use the percentsign ( % ) as a wildcard.
In the Duration Search box, to view only users logged in for a specific duration, enter a timevalue. For example, to view users logged in for 1 hour, enter 1h. To view users with a durationless than one hour, in the Search box, enter %h.
MemoryThe Memory section displays a graph of system memory parameters, based on System Messagesdata. It includes:
l Total Memory
l Used Memory
l NumCubesInRAM
l NumDataRecordsInRAM
l NumRecordsInLargestCube
l MinDataCacheSizeInMB
l MaxDataCacheSizeInMB
l MaxNumCubesInRAM
For details on memory parameters, see “Available Configuration Settings” on page 388.
TasksThis section contains four tabs that display Task information.
Tasks View
The Tasks view displays the top 10 frequently executed tasks in the selected time span, based onTask Audit data. For example, you can quickly view the number of Logons, or Consolidationsthat occurred during the last two weeks.
l Metric - filter for frequency time metric:
m Frequency - Count of tasks that occurred in the selected time span
m Total Time - Total time taken by the tasks that occurred in the selected time span
m Average Time - Average time taken by the tasks that occurred in the selected time span
l User - filter by User who performed the task. In the User Search box, type a full or partialuser name, or use the percent sign ( % ) as a wildcard.
62
Users View
The Users View tab contains a bar chart showing the top 10 users who performed a particulartask.
l Metric - filter for task times:
m Frequency - Count of tasks performed by the users in the selected time span
m Total Time - Total time taken by the tasks performed in the selected time span
m Average Time - Average time taken by the tasks performed in the selected time span
l Tasks - filter by Task. By default, Consolidation is selected.
Months View
The Months View displays a bar chart showing a particular task on a monthly basis. You cancompare task activity by month.
l Metric - filter for task times:
m Frequency - Count of tasks performed for a selected month or months
m Total Time - Total time taken by the tasks for the selected month or months
m Average Time - Average time taken by the tasks for the selected month or months
l Tasks - filter by Task. By default, Consolidation is selected.
Task Details
This tab displays detailed information about each task, based on Task Audit data. It includes theUser name, Activity name, Time Started, Time Ended, Duration, and Description. You can sortany of the columns.
You can filter by User, Activity, Duration, and Description.
ErrorsThe Errors section displays the top 10 frequent errors, based on System Messages data.
l Error Frequency - Displays the Error Code. You can hover over the error code to view itsdescription.
l Error Details - Displays the Error Code, System Message Summary, Date and Time of theerror for the selected application on the selected server for a particular span of time. Youcan sort on Error Code and Date-Time. You can filter by Error Code and System MessageSummary.
63

64
3Managing Application Security
In This Chapter
Application Security Considerations ... . . . . . . . . . . . . . . . . . . . . . . . . . . . . . . . . . . . . . . . . . . . . . . . . . . . . . . . . . . . . . . . . . .66
Launching the Shared Services Console from Financial Management.. . . . . . . . . . . . . . . . . . . . . . . . . . . . . . .66
Loading Application Security.. . . . . . . . . . . . . . . . . . . . . . . . . . . . . . . . . . . . . . . . . . . . . . . . . . . . . . . . . . . . . . . . . . . . . . . . . . . . .71
Extracting Application Security.. . . . . . . . . . . . . . . . . . . . . . . . . . . . . . . . . . . . . . . . . . . . . . . . . . . . . . . . . . . . . . . . . . . . . . . . . . .75
Security and access rights enable you to control access to Financial Management applicationsand application elements. Setting up security enables you to protect data and preventunauthorized users from changing data. For example, you can restrict access to certain dataelements or forms within an application.
Security exists at two levels:
l Authentication by an external provider
l Financial Management security, in which users and groups are assigned to applications andapplication elements are assigned to security classes
There are two ways to set up security for Financial Management applications:
l Load a security file into an application. See “Loading Application Security” on page 71 .
l Use the Oracle Hyperion Shared Services Console to set up security information. See“Launching the Shared Services Console from Financial Management” on page 66.
These security roles are required for application administration. For information on assigningroles, see the Oracle Enterprise Performance Management System User Security AdministrationGuide.
Security Role Description
Financial ManagementAdministrator
Required for accessing administration functionality.
Dimension Editor Creates and manages import profiles for dimension creation, as well as creating and managing dimensionsmanually.
Required to access Classic application administration options.
65
Security Role Description
Financial ManagementApplication Creator/Financial ManagementManager
Creates applications. Users with this role can create applications, but can change only the dimensions to whichthey have access permissions.
When a user with Application Creator role deploys an application from Performance Management Architect,that user automatically becomes the application administrator and provisioning manager for that application.The Application Creator can create all applications.
The Financial Management Application Creator can create Consolidation applications and Generic applications.To create applications, the user must also be a member of the Application Creators group specified in theConfiguration Utility.
Application Security ConsiderationsFinancial Management security offers flexibility in securing application elements and tasks.Because security classes are assigned to application elements as they are created, you shoulddesign your security system before you set up your applications.
After you design a security system for one application, you can extract the security elements forbackup or loading into another application. See “Loading Application Security” on page 71and “Extracting Application Security” on page 75.
Before setting up security in Financial Management, you should consider these questions:
l How do you want to group and classify Financial Management tasks and applicationelements?
l How do you want to group users?
l What level of access right should be assigned for your users and groups?
l What security classes do you want to assign to application elements as they are created?
Launching the Shared Services Console from FinancialManagementBefore you can set up security for Financial Management applications, you must do these tasks:
1. Create Financial Management applications. For Classic Financial Management applications,see “Creating Applications” on page 31. For Performance Management Architectapplications, see the Oracle Hyperion Enterprise Performance Management ArchitectAdministrator's Guide
2. Provision users by assigning users and groups to applications and assigning user roles. Seethe Oracle Enterprise Performance Management System User Security Administration Guide.
You can then use the Shared Services Console to set up security for Financial Managementapplications. In the console, you can do these application tasks:
l Assign users and groups
l Assign user permissions to security classes
66
l Run security reports
ä To launch the Shared Services Console:
1 From Financial Management, select Navigate, then Administer.
2 Select Shared Services Console.
Selecting Users and Groups for Assigning Security ClassesOnly a user assigned to the Provisioning Manager role can define users and groups. See theOracle Enterprise Performance Management System User Security Administration Guide.
By default, the Access Control page displays the first 100 provisioned groups and users. Groupsare displayed first, followed by users in the table. Users and Groups can be distinguished by theiricons in the table.
ä To select users and groups for an application:
1 From the Shared Services Console, expand Application Groups, right-click the application name, andselect Assign Access Control.
2 Select Users/Groups, or select Actions, and then Users/Groups.
3 Select an option: Users or Groups.
4 From Available Users, or Available Groups, select users and groups to assign to the application. anduse the arrow keys to move them to the Selected Users or Selected Groups column.
5 Click OK.
Setting Up Security ClassesSecurity classes determine user and group access rights to application elements.
Caution! The information in this section is provided for use with Classic FinancialManagement applications only. For information on setting up security usingPerformance Management Architect, see the Oracle Hyperion Enterprise PerformanceManagement Architect Administrator's Guide.
You can perform these procedures:
l “Creating Security Classes” on page 68
l “Deleting Security Classes” on page 68
l “Selecting Security Classes” on page 69
Note: Only users assigned to the Provisioning Manager role can define security classes forapplications.
67
After you define security classes for an application, you can assign the security classes toapplication elements such as accounts and entities.
A user's or group's ability to access application elements depends on the security classes to whichthe user or group belongs and on the security class associated with the application elements.
A system-generated security class called [Default] is created as part of an application. It cannotbe deleted or modified by users. Access rights can be assigned to the [Default] security class. Anymember that is not assigned a security class is treated as if it has the Default security class.
Creating Security Classes
ä To create security classes:
1 From the Shared Services Console, expand Application Groups, right-click the application name, andselect Assign Access Control.
2 Select Add Security Class, or select Actions, and then Add Security Class.
3 For Name, enter a name for the security class.
The name must be unique and can contain a maximum of 80 characters. It can includespaces, but it cannot start with a space. These characters are not allowed:
l Asterisk ( * )
l At sign ( @ )
l Comma ( , )
l Curly brackets ( { } )
l Double quotation marks ( “ )
l Minus sign ( - )
l Number sign ( # )
l Period ( . )
l Plus sign ( + )
l Semicolon ( ; )
l Slash mark ( / )
4 Click OK.
Deleting Security ClassesWhen you no longer need a security class, you can delete it from the security class dimension.Before you delete a security class from an application, you must disassociate it from theapplication elements to which it is assigned.
You can disassociate an entity, account, or scenario from a security class by modifying thesecurity class in the metadata file. You can disassociate a journal from a security class bymodifying the journal file or by updating the security class for the journal in the Process Journalsmodule.
68
ä To delete security classes:
1 From the Shared Services Console, expand Application Groups, right-click the application name, andselect Assign Access Control.
2 From the list of security classes, select the security class row/column header based on its view in thetable.
Tip: To delete multiple security classes, use the Ctrl key and select row/ column headers.
3 Select Delete Security Class, or select Actions, and then Delete Security Class.
4 Click Yes to confirm deletion.
Selecting Security ClassesBy default, the Security Classes page displays the available security classes, and the system displaysthe first 100 security classes.
ä To select security classes for an application:
1 From the Shared Services Console, expand Application Groups, right-click the application name, andselect Assign Access Control.
2 Select Security Classes, or select Actions, and then Security Classes.
3 From Available Security Classes, select the security classes to assign to the application, and use thearrow key to move them to the Selected Security Classes column.
4 Click OK.
Assigning User Access to Security ClassesAfter you define users and groups and create security classes, you can specify the type of accessthat each user and group has to each security class in the application.
You can assign users one of five access types: None, Metadata, Read, Promote, or All. You canuse the Pivot feature to toggle between two views for the assign access table. For example, if usersand groups are on the rows and security classes are on the columns and you click Pivot, the usersand groups move to the columns and security classes move to the rows.
When you grant users access to a security class, you can enable email alerts, which can be usedfor intercompany reporting, and also to inform users of process unit status changes for entitiesand scenarios that use the security class. To receive email alerts for process control, a user musthave All or Promote access to the security class.
Note: A user assigned to the Application Administrator role for an application has access to allinformation in the application.
69
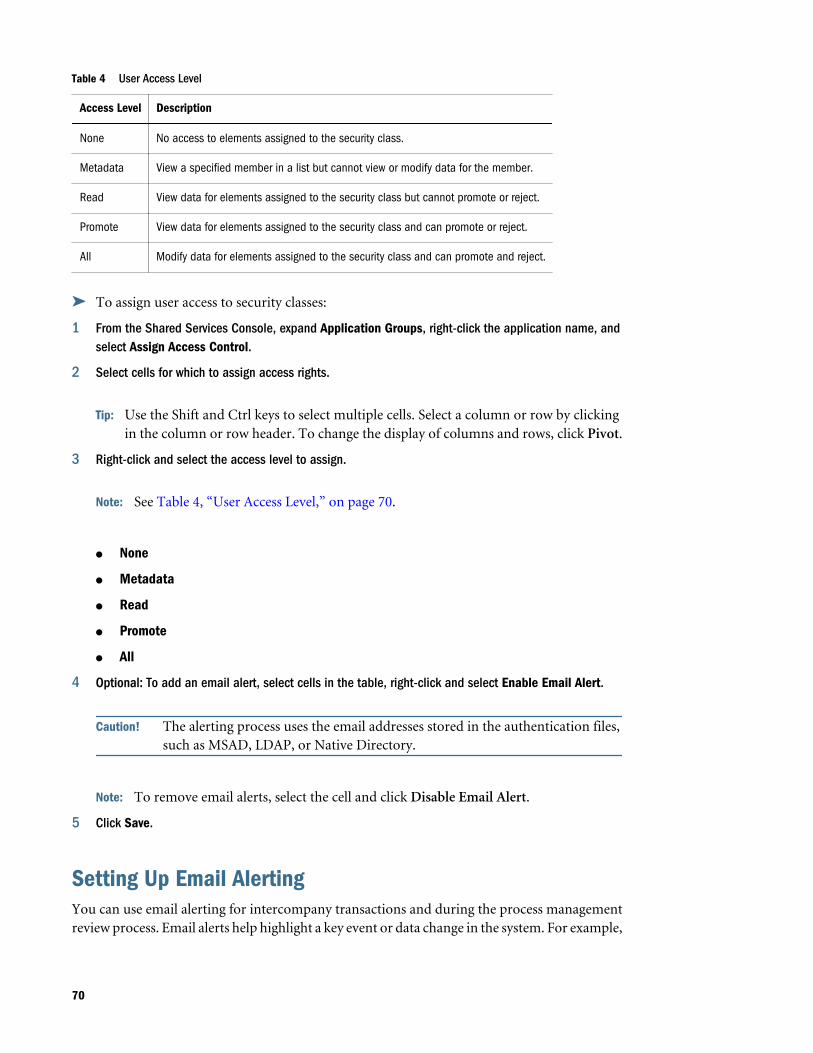
Table 4 User Access Level
Access Level Description
None No access to elements assigned to the security class.
Metadata View a specified member in a list but cannot view or modify data for the member.
Read View data for elements assigned to the security class but cannot promote or reject.
Promote View data for elements assigned to the security class and can promote or reject.
All Modify data for elements assigned to the security class and can promote and reject.
ä To assign user access to security classes:
1 From the Shared Services Console, expand Application Groups, right-click the application name, andselect Assign Access Control.
2 Select cells for which to assign access rights.
Tip: Use the Shift and Ctrl keys to select multiple cells. Select a column or row by clickingin the column or row header. To change the display of columns and rows, click Pivot.
3 Right-click and select the access level to assign.
Note: See Table 4, “User Access Level,” on page 70.
l None
l Metadata
l Read
l Promote
l All
4 Optional: To add an email alert, select cells in the table, right-click and select Enable Email Alert.
Caution! The alerting process uses the email addresses stored in the authentication files,such as MSAD, LDAP, or Native Directory.
Note: To remove email alerts, select the cell and click Disable Email Alert.
5 Click Save.
Setting Up Email AlertingYou can use email alerting for intercompany transactions and during the process managementreview process. Email alerts help highlight a key event or data change in the system. For example,
70
you can send an email alert that an intercompany transaction is mismatched and needs to bematched, or that a process unit is ready for the next promotion level.
Note: The alerting process uses the email addresses that are stored in your externalauthentication provider, such as LDAP, MSAD, or Native Directory.
Users with the Application Administration role do not automatically receive email alerts. For auser with the Application Administrator role to receive email alerts, set up the user as a separateuser and assign the security role to receive alerts.
Running Security ReportsYou can run security reports on the information that you selected while setting up security forthe application. You can run reports for classes by user, roles by user, classes and roles by user,and users by group. You can view the report online or you can export it to a file.
ä To create a security report:
1 From the Oracle Hyperion Shared Services Console, expand Application Groups, right-click theapplication name, and select Assign Access Control.
2 Select Security Reports, or select Actions, and then Security Reports.
3 Select a report option:
l Access Rights and select options:
m Classes by User
m Roles by User
l Users by Group
4 Select a Report Format: PDF, RTF, HTML, XLS, XLSX.
5 Optional: Select a Template.
6 Select an option:
l Launch Report to open the report in a new page.
l Export to File to save the report in the selected report file format.
Loading Application Security
Caution! You can only load security classes for Classic Financial Management applications.
You must load application security before you can load other information to an application. Ifyou are loading several application elements at once, the system loads the security files first.
71
Security information load files can be in an ASCII or Unicode format. The default file nameextension for security information load files is SEC.
You can load users, security classes, role access, and security class access.
To remove a role from a user or group, you must modify the role in the Shared Services Console.See the Oracle Enterprise Performance Management System User Security Administration Guide.
Note: Oracle recommends that you add Financial Management to the exceptions for your Webpop-up blocker. When you perform some tasks such as loading data, a status windowpops up showing the task status. If you have a pop-up blocker enabled on your computer,the status window is not displayed.
ä To load application security:
1 Open the application.
2 Select Consolidation, then Load, and then Application Elements.
3 In the Security section, enter the file name to load, or click Browse to find the file.
Note: By default, application security information files use the SEC file extension. The loadprocess accepts other file extensions such as TXT or CSV, however, Oraclerecommends that you use the SEC file extension.
4 Optional: Select Clear All to clear security information for the application before loading the new securityinformation.
Caution! You can use the Clear All option only if you have been assigned the ApplicationAdministrator and Provisioning Manager roles. Also, if you use this option, youwill have to reprovision users, as all users (including the user doing the clear)will be removed in this process. For information on provisioning users, see theOracle Enterprise Performance Management System User Security AdministrationGuide. Before selecting the clear option, review “Clearing and Loading SecurityInformation” on page 73.
5 From Delimiter, select the character used to separate information in the file. These characters are valid:
, ~ @ $ % ^ & | : ; ? \
Note: You must use a character that is not used in the file name or in any other way in thefile. For example, if you use the comma in an entity description, you cannot use thecomma as the delimiter.
6 From the Filters section, select the types of security information to load.
Tip: To reset the filter selections, click Reset.
7 Click Load.
8 Optional: To download the log file, click Download Log. Click Open to display the log file, or Save andselect a location to save the file locally.
72

Clearing and Loading Security InformationBefore you begin a security file load, you can clear security information from an application andthen load the new security information. For example, if you plan to change security class Class1to Class2 during the security load, you must make the change to all application elements thatreference the Class1 security class.
Because the system generates new security references for application elements that use securityclass information, you must perform prerequisite steps before you load the new securityinformation, and perform follow-up steps after you load it.
ä To clear security information and load a new security file:
1 Extract application elements from the application. See “Before Clearing Security Information” on page73.
2 Select to clear existing security information and load a new security file.
3 Load application elements to the application. See “After Clearing Security Information” on page 74.
Note: You must be assigned to the Application Administrator security role to be able toperform these procedures.
Before Clearing Security InformationBefore you clear security information and load a security file, you must perform these tasks forthe specified application elements that utilize security class information.
Metadata
ä To update metadata before clearing and loading security information:
1 Extract all application metadata elements in the application.
2 Make changes to the security class information of the metadata elements as necessary.
Journals
ä To update journals before clearing and loading security information:
1 Unpost posted journals in the application.
2 Reject approved journals so that the journal status reverts to Working.
3 Extract all journals.
4 Make changes to the journal security class information as necessary.
73
Grids
ä To update grids before clearing and loading security information:
1 Extract all grids that have a security class assigned.
2 Make changes to the grid security class information as necessary.
Data Forms
ä To update data forms before clearing and loading security information:
1 Extract all data forms that have a security class assigned.
2 Make changes to the data forms security class information as necessary.
After Clearing Security InformationAfter you clear security information and load a security file, you must perform these tasks forthe specified application elements that utilize security class information.
Metadata
ä To update metadata:
1 Make sure the metadata information is cleared.
2 Load the updated metadata file to the application.
Journals
ä To update journals after clearing and loading security information:
1 Load the updated journal file.
2 Post journals that you unposted before clearing and loading security information.
3 Approve journals that you rejected before clearing and loading security information.
Grids
ä To update grids after clearing and loading security information:
1 Load the updated grid files.
2 Select the option to overwrite existing documents.
74
Data Forms
ä To update data forms after clearing and loading security information:
1 Load the updated data form file.
2 Select the option to overwrite existing documents.
Folders
ä To update folders after clearing and loading security information:
1 Delete folders that may have an incorrect security class assigned.
2 Add new folders to the application.
Reports
ä To update reports after clearing and loading security information:
1 Reload all reports with an assigned security class.
2 Provide the new security class assignment if applicable.
Task Lists
ä To update task lists after clearing and loading security information:
1 Reload all task lists with an assigned security class.
2 Provide the new security class assignment if applicable.
Extracting Application SecurityYou can extract application security to view or modify it in a text editor. When you extractapplication security from an application, save the file in a format that supports multibytecharacter sets (MBCS). By default, application security files use the SEC file extension.
You can extract these types of security information:
l Users and groups
l Security classes
l Role access
l Security class access
Note: Oracle recommends that you periodically extract security to a backup file. Forinformation on backing up security information, see the Oracle EnterprisePerformance Management System Installation and Configuration Guide.
75
ä To extract application security:
1 Open the application.
2 Select Consolidation, then Extract, and then Application Elements.
3 In the Security section, from Delimiter, select the character used to separate information in the file.
These characters are valid:
, ~ @ $ % ^ & | : ; ? \
Note: You must use a character that is not used in the file name or in any other way in thefile. For example, if you use the comma in an entity description, you cannot use thecomma as the delimiter.
4 From Filters, select the types of security to extract.
Tip: To reset the selections, click Reset.
5 Click Extract.
6 Follow the download instructions displayed in the browser to download the extracted file.
The instructions vary depending on the Web browser that you are using. Make sure to savethe file in the Web directory that you set up.
7 Optional: To download the log file, click Download Log. Click Open to display the log file, or Save andselect a location to save the file locally.
76
4Managing Metadata
In This Chapter
Defining Accounts.. . . . . . . . . . . . . . . . . . . . . . . . . . . . . . . . . . . . . . . . . . . . . . . . . . . . . . . . . . . . . . . . . . . . . . . . . . . . . . . . . . . . . . . . .78
Defining Custom Members ... . . . . . . . . . . . . . . . . . . . . . . . . . . . . . . . . . . . . . . . . . . . . . . . . . . . . . . . . . . . . . . . . . . . . . . . . . . . . .82
Adding Custom Dimension Information... . . . . . . . . . . . . . . . . . . . . . . . . . . . . . . . . . . . . . . . . . . . . . . . . . . . . . . . . . . . . . . .84
Defining Entity Members ... . . . . . . . . . . . . . . . . . . . . . . . . . . . . . . . . . . . . . . . . . . . . . . . . . . . . . . . . . . . . . . . . . . . . . . . . . . . . . . .86
Defining Scenario Members... . . . . . . . . . . . . . . . . . . . . . . . . . . . . . . . . . . . . . . . . . . . . . . . . . . . . . . . . . . . . . . . . . . . . . . . . . . . .87
Defining Application Settings ... . . . . . . . . . . . . . . . . . . . . . . . . . . . . . . . . . . . . . . . . . . . . . . . . . . . . . . . . . . . . . . . . . . . . . . . . . .89
Organization by Period... . . . . . . . . . . . . . . . . . . . . . . . . . . . . . . . . . . . . . . . . . . . . . . . . . . . . . . . . . . . . . . . . . . . . . . . . . . . . . . . . . .91
Defining Consolidation Methods... . . . . . . . . . . . . . . . . . . . . . . . . . . . . . . . . . . . . . . . . . . . . . . . . . . . . . . . . . . . . . . . . . . . . . . .92
Defining Currencies ... . . . . . . . . . . . . . . . . . . . . . . . . . . . . . . . . . . . . . . . . . . . . . . . . . . . . . . . . . . . . . . . . . . . . . . . . . . . . . . . . . . . . .95
Defining Cell Text Labels .. . . . . . . . . . . . . . . . . . . . . . . . . . . . . . . . . . . . . . . . . . . . . . . . . . . . . . . . . . . . . . . . . . . . . . . . . . . . . . . . .97
System-Generated Accounts.. . . . . . . . . . . . . . . . . . . . . . . . . . . . . . . . . . . . . . . . . . . . . . . . . . . . . . . . . . . . . . . . . . . . . . . . . . . . .98
Setting Up Intercompany Partners.. . . . . . . . . . . . . . . . . . . . . . . . . . . . . . . . . . . . . . . . . . . . . . . . . . . . . . . . . . . . . . . . . . . . . 100
Metadata Filtering Based on Security .. . . . . . . . . . . . . . . . . . . . . . . . . . . . . . . . . . . . . . . . . . . . . . . . . . . . . . . . . . . . . . . . . 102
Creating Metadata Files of the APP Format .. . . . . . . . . . . . . . . . . . . . . . . . . . . . . . . . . . . . . . . . . . . . . . . . . . . . . . . . . . 103
Using Metadata Manager Views ... . . . . . . . . . . . . . . . . . . . . . . . . . . . . . . . . . . . . . . . . . . . . . . . . . . . . . . . . . . . . . . . . . . . . . 111
Metadata Referential Integrity .. . . . . . . . . . . . . . . . . . . . . . . . . . . . . . . . . . . . . . . . . . . . . . . . . . . . . . . . . . . . . . . . . . . . . . . . . 120
Using the Metadata Merge Utility. . . . . . . . . . . . . . . . . . . . . . . . . . . . . . . . . . . . . . . . . . . . . . . . . . . . . . . . . . . . . . . . . . . . . . . 121
Loading Metadata... . . . . . . . . . . . . . . . . . . . . . . . . . . . . . . . . . . . . . . . . . . . . . . . . . . . . . . . . . . . . . . . . . . . . . . . . . . . . . . . . . . . . . 122
Viewing Metadata Load Changes... . . . . . . . . . . . . . . . . . . . . . . . . . . . . . . . . . . . . . . . . . . . . . . . . . . . . . . . . . . . . . . . . . . . . 124
Extracting Metadata ... . . . . . . . . . . . . . . . . . . . . . . . . . . . . . . . . . . . . . . . . . . . . . . . . . . . . . . . . . . . . . . . . . . . . . . . . . . . . . . . . . . 125
Caution! The information in this chapter is provided for use with Classic FinancialManagement applications only. For information on managing metadata forapplications created using Performance Management Architect, see the OracleHyperion Enterprise Performance Management Architect Administrator's Guide.
Metadata is defined as the structural elements of an application that describe and store data, forexample, dimension names, member names, properties, exchange rates, and security. You candefine metadata for Classic Financial Management applications in two ways:
l Create an XML or APP metadata file and load it to an application.
l Use Metadata Manager to create an XML or APP metadata file and load it to an application.
77
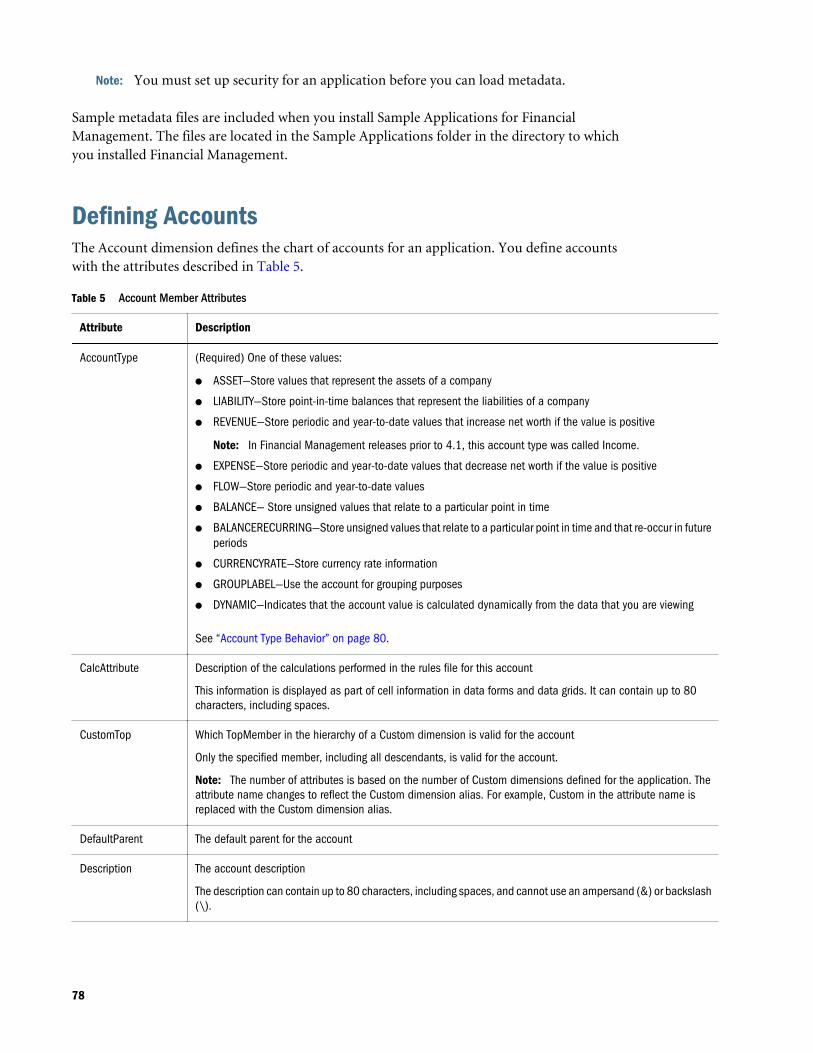
Note: You must set up security for an application before you can load metadata.
Sample metadata files are included when you install Sample Applications for FinancialManagement. The files are located in the Sample Applications folder in the directory to whichyou installed Financial Management.
Defining AccountsThe Account dimension defines the chart of accounts for an application. You define accountswith the attributes described in Table 5.
Table 5 Account Member Attributes
Attribute Description
AccountType (Required) One of these values:
l ASSET—Store values that represent the assets of a company
l LIABILITY—Store point-in-time balances that represent the liabilities of a company
l REVENUE—Store periodic and year-to-date values that increase net worth if the value is positive
Note: In Financial Management releases prior to 4.1, this account type was called Income.
l EXPENSE—Store periodic and year-to-date values that decrease net worth if the value is positive
l FLOW—Store periodic and year-to-date values
l BALANCE— Store unsigned values that relate to a particular point in time
l BALANCERECURRING—Store unsigned values that relate to a particular point in time and that re-occur in futureperiods
l CURRENCYRATE—Store currency rate information
l GROUPLABEL—Use the account for grouping purposes
l DYNAMIC—Indicates that the account value is calculated dynamically from the data that you are viewing
See “Account Type Behavior” on page 80.
CalcAttribute Description of the calculations performed in the rules file for this account
This information is displayed as part of cell information in data forms and data grids. It can contain up to 80characters, including spaces.
CustomTop Which TopMember in the hierarchy of a Custom dimension is valid for the account
Only the specified member, including all descendants, is valid for the account.
Note: The number of attributes is based on the number of Custom dimensions defined for the application. Theattribute name changes to reflect the Custom dimension alias. For example, Custom in the attribute name isreplaced with the Custom dimension alias.
DefaultParent The default parent for the account
Description The account description
The description can contain up to 80 characters, including spaces, and cannot use an ampersand (&) or backslash(\).
78
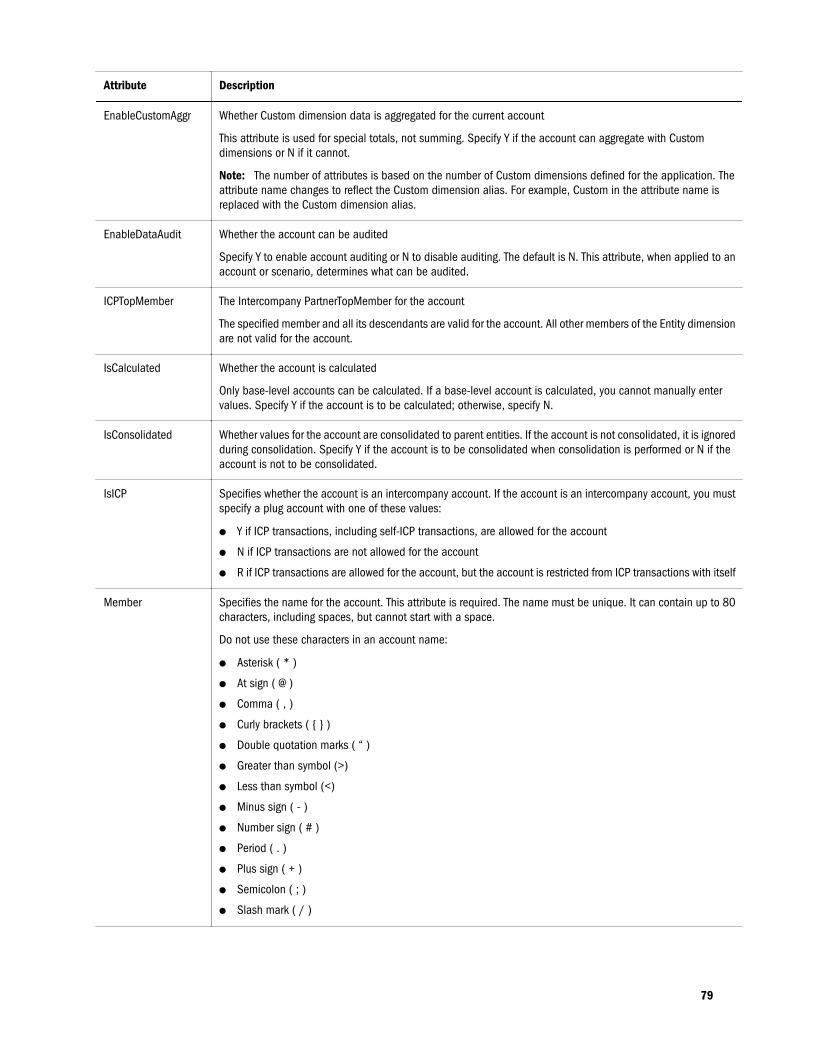
Attribute Description
EnableCustomAggr Whether Custom dimension data is aggregated for the current account
This attribute is used for special totals, not summing. Specify Y if the account can aggregate with Customdimensions or N if it cannot.
Note: The number of attributes is based on the number of Custom dimensions defined for the application. Theattribute name changes to reflect the Custom dimension alias. For example, Custom in the attribute name isreplaced with the Custom dimension alias.
EnableDataAudit Whether the account can be audited
Specify Y to enable account auditing or N to disable auditing. The default is N. This attribute, when applied to anaccount or scenario, determines what can be audited.
ICPTopMember The Intercompany PartnerTopMember for the account
The specified member and all its descendants are valid for the account. All other members of the Entity dimensionare not valid for the account.
IsCalculated Whether the account is calculated
Only base-level accounts can be calculated. If a base-level account is calculated, you cannot manually entervalues. Specify Y if the account is to be calculated; otherwise, specify N.
IsConsolidated Whether values for the account are consolidated to parent entities. If the account is not consolidated, it is ignoredduring consolidation. Specify Y if the account is to be consolidated when consolidation is performed or N if theaccount is not to be consolidated.
IsICP Specifies whether the account is an intercompany account. If the account is an intercompany account, you mustspecify a plug account with one of these values:
l Y if ICP transactions, including self-ICP transactions, are allowed for the account
l N if ICP transactions are not allowed for the account
l R if ICP transactions are allowed for the account, but the account is restricted from ICP transactions with itself
Member Specifies the name for the account. This attribute is required. The name must be unique. It can contain up to 80characters, including spaces, but cannot start with a space.
Do not use these characters in an account name:
l Asterisk ( * )
l At sign ( @ )
l Comma ( , )
l Curly brackets ( { } )
l Double quotation marks ( “ )
l Greater than symbol (>)
l Less than symbol (<)
l Minus sign ( - )
l Number sign ( # )
l Period ( . )
l Plus sign ( + )
l Semicolon ( ; )
l Slash mark ( / )
79
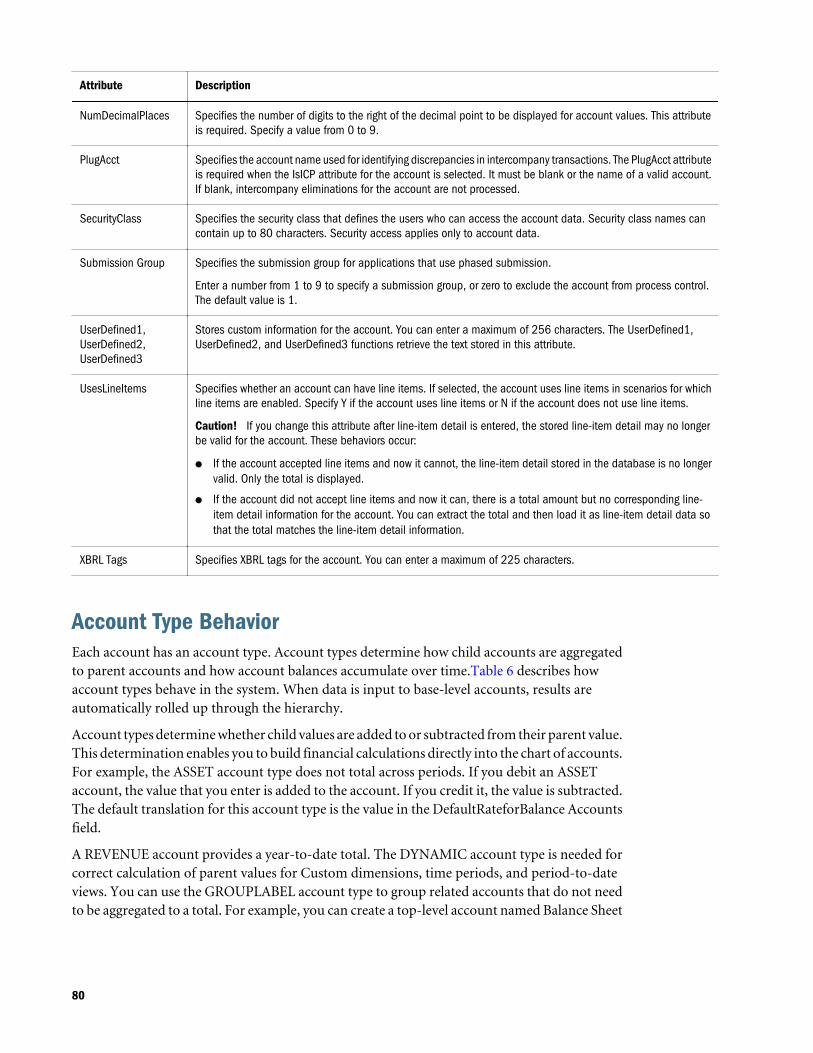
Attribute Description
NumDecimalPlaces Specifies the number of digits to the right of the decimal point to be displayed for account values. This attributeis required. Specify a value from 0 to 9.
PlugAcct Specifies the account name used for identifying discrepancies in intercompany transactions. The PlugAcct attributeis required when the IsICP attribute for the account is selected. It must be blank or the name of a valid account.If blank, intercompany eliminations for the account are not processed.
SecurityClass Specifies the security class that defines the users who can access the account data. Security class names cancontain up to 80 characters. Security access applies only to account data.
Submission Group Specifies the submission group for applications that use phased submission.
Enter a number from 1 to 9 to specify a submission group, or zero to exclude the account from process control.The default value is 1.
UserDefined1,UserDefined2,UserDefined3
Stores custom information for the account. You can enter a maximum of 256 characters. The UserDefined1,UserDefined2, and UserDefined3 functions retrieve the text stored in this attribute.
UsesLineItems Specifies whether an account can have line items. If selected, the account uses line items in scenarios for whichline items are enabled. Specify Y if the account uses line items or N if the account does not use line items.
Caution! If you change this attribute after line-item detail is entered, the stored line-item detail may no longerbe valid for the account. These behaviors occur:
l If the account accepted line items and now it cannot, the line-item detail stored in the database is no longervalid. Only the total is displayed.
l If the account did not accept line items and now it can, there is a total amount but no corresponding line-item detail information for the account. You can extract the total and then load it as line-item detail data sothat the total matches the line-item detail information.
XBRL Tags Specifies XBRL tags for the account. You can enter a maximum of 225 characters.
Account Type BehaviorEach account has an account type. Account types determine how child accounts are aggregatedto parent accounts and how account balances accumulate over time.Table 6 describes howaccount types behave in the system. When data is input to base-level accounts, results areautomatically rolled up through the hierarchy.
Account types determine whether child values are added to or subtracted from their parent value.This determination enables you to build financial calculations directly into the chart of accounts.For example, the ASSET account type does not total across periods. If you debit an ASSETaccount, the value that you enter is added to the account. If you credit it, the value is subtracted.The default translation for this account type is the value in the DefaultRateforBalance Accountsfield.
A REVENUE account provides a year-to-date total. The DYNAMIC account type is needed forcorrect calculation of parent values for Custom dimensions, time periods, and period-to-dateviews. You can use the GROUPLABEL account type to group related accounts that do not needto be aggregated to a total. For example, you can create a top-level account named Balance Sheet
80
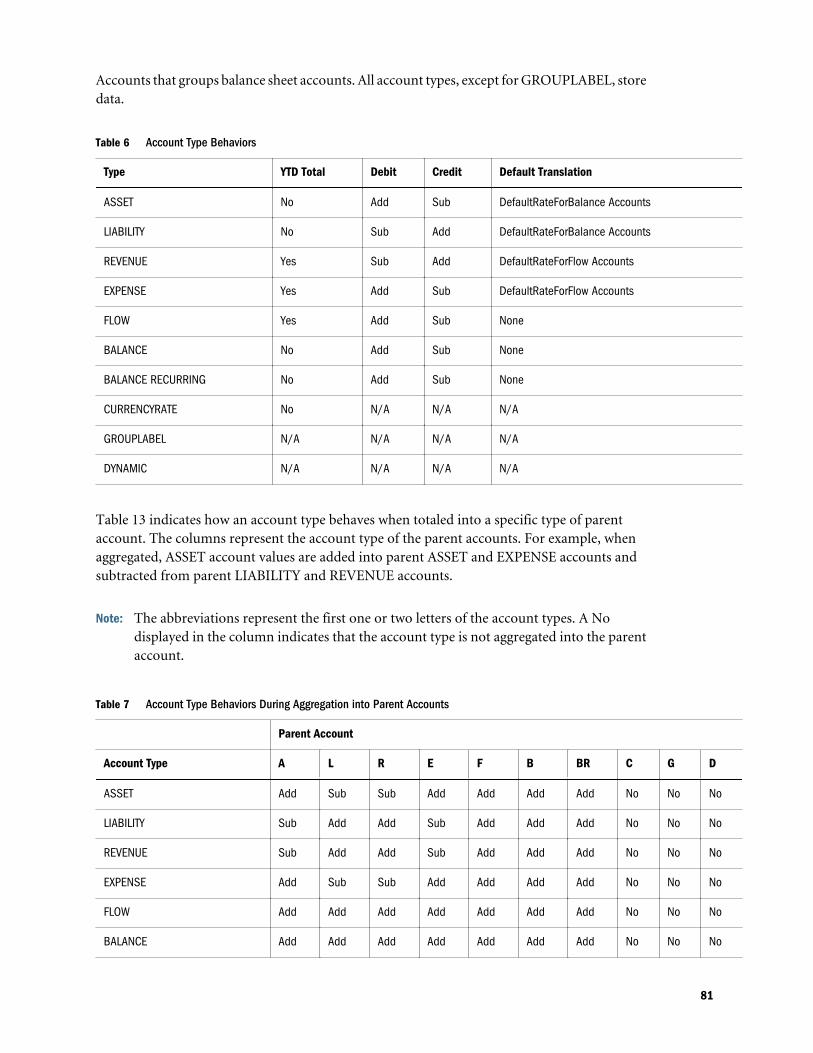
Accounts that groups balance sheet accounts. All account types, except for GROUPLABEL, storedata.
Table 6 Account Type Behaviors
Type YTD Total Debit Credit Default Translation
ASSET No Add Sub DefaultRateForBalance Accounts
LIABILITY No Sub Add DefaultRateForBalance Accounts
REVENUE Yes Sub Add DefaultRateForFlow Accounts
EXPENSE Yes Add Sub DefaultRateForFlow Accounts
FLOW Yes Add Sub None
BALANCE No Add Sub None
BALANCE RECURRING No Add Sub None
CURRENCYRATE No N/A N/A N/A
GROUPLABEL N/A N/A N/A N/A
DYNAMIC N/A N/A N/A N/A
Table 13 indicates how an account type behaves when totaled into a specific type of parentaccount. The columns represent the account type of the parent accounts. For example, whenaggregated, ASSET account values are added into parent ASSET and EXPENSE accounts andsubtracted from parent LIABILITY and REVENUE accounts.
Note: The abbreviations represent the first one or two letters of the account types. A Nodisplayed in the column indicates that the account type is not aggregated into the parentaccount.
Table 7 Account Type Behaviors During Aggregation into Parent Accounts
Parent Account
Account Type A L R E F B BR C G D
ASSET Add Sub Sub Add Add Add Add No No No
LIABILITY Sub Add Add Sub Add Add Add No No No
REVENUE Sub Add Add Sub Add Add Add No No No
EXPENSE Add Sub Sub Add Add Add Add No No No
FLOW Add Add Add Add Add Add Add No No No
BALANCE Add Add Add Add Add Add Add No No No
81
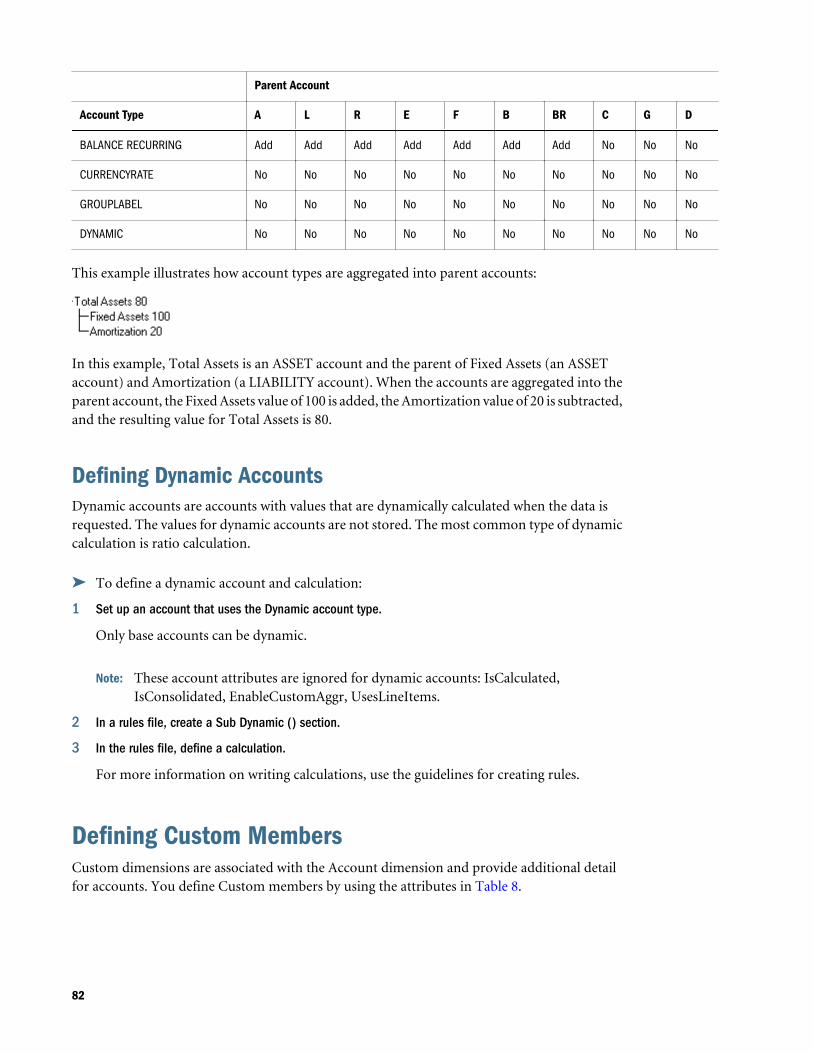
Parent Account
Account Type A L R E F B BR C G D
BALANCE RECURRING Add Add Add Add Add Add Add No No No
CURRENCYRATE No No No No No No No No No No
GROUPLABEL No No No No No No No No No No
DYNAMIC No No No No No No No No No No
This example illustrates how account types are aggregated into parent accounts:
In this example, Total Assets is an ASSET account and the parent of Fixed Assets (an ASSETaccount) and Amortization (a LIABILITY account). When the accounts are aggregated into theparent account, the Fixed Assets value of 100 is added, the Amortization value of 20 is subtracted,and the resulting value for Total Assets is 80.
Defining Dynamic AccountsDynamic accounts are accounts with values that are dynamically calculated when the data isrequested. The values for dynamic accounts are not stored. The most common type of dynamiccalculation is ratio calculation.
ä To define a dynamic account and calculation:
1 Set up an account that uses the Dynamic account type.
Only base accounts can be dynamic.
Note: These account attributes are ignored for dynamic accounts: IsCalculated,IsConsolidated, EnableCustomAggr, UsesLineItems.
2 In a rules file, create a Sub Dynamic () section.
3 In the rules file, define a calculation.
For more information on writing calculations, use the guidelines for creating rules.
Defining Custom MembersCustom dimensions are associated with the Account dimension and provide additional detailfor accounts. You define Custom members by using the attributes in Table 8.
82
Table 8 Custom Member Attributes
Attribute Description
DefaultParent Specifies the default parent for the Custom dimension member.
Description Specifies the description for the Custom member. The description can contain up to 80 characters, includingspaces.
IsCalculated Specifies whether the base-level Custom account is calculated. If a base-level Custom account is calculated, youcannot manually enter values. Specify Y if the Custom account is to be calculated or N if the Custom account isnot to be calculated.
Member Specifies the name for the Custom member. This attribute is required. The name must be unique and can containup to 80 characters, including spaces, but cannot start with a space.
Note: The name of a Custom dimension member cannot duplicate the name of a consolidation method.
Do not use these characters in the Custom member name:
l Asterisk ( * )
l At sign ( @ )
l Comma ( , )
l Curly brackets ( { } )
l Double quotation marks ( “ )
l Minus sign ( - )
l Number sign ( # )
l Period ( . )
l Plus sign ( + )
l Semicolon ( ; )
l Slash mark ( / )
SecurityClass Specifies the security class name that defines the users who can access the Custom dimension data. Securityclass names can contain up to 80 characters. Security access applies only to data.
Submission Group Specifies the submission group. The value can be a number from 0 to 99.
The default is blank. A blank value defaults to the value of 1.
If you set the submission group to zero (0), the account is not included in the review process.
SwitchSignForFlow Specifies sign change (Debit or Credit) for FLOW accounts that use these rules:
l ASSET to LIABILITY
l LIABILITY to ASSET
l EXPENSE to REVENUE
l REVENUE to EXPENSE
l BALANCE to FLOW
l FLOW to BALANCE
Specify Y if the sign for the account is switched or N if the sign for the account is not switched.
83
Attribute Description
SwitchTypeForFlow Specifies the account type change for FLOW accounts that use these rules:
l ASSET to EXPENSE
l EXPENSE to ASSET
l LIABILITY to REVENUE
l REVENUE to LIABILITY
l BALANCE to FLOW
l FLOW to BALANCE
Specify Y if the account type for the account is switched or N if the account type for the account is notswitched.
UserDefined1,UserDefined2,UserDefined3
Stores custom information for the dimension member. You can enter a maximum of 256 characters. TheUserDefined1, UserDefined2, and UserDefined3 functions retrieve the text stored in this attribute.
Adding Custom Dimension InformationWhen you create an application metadata file, you can add Custom dimension information.You can include this information using one of these methods:
l Import the Custom dimension information from the application profile
l Edit the Custom dimension information manually in Metadata Manager
When you load the metadata file to an application, the system validates the information in themetadata file against the Custom dimension information in the application previously createdby the application profile. If errors exist, the system displays an error message and does notproceed with the metadata load process.
Importing Custom Dimension InformationWhen you create an application metadata file, you can import the application profileinformation so the Metadata Manager can reference the Custom dimension information thatyou specified in the profile. After you import the profile, the Custom dimensions are availablefor selection in the Metadata Manager. The metadata dimension list displays the DimensionAlias (long label) for the Custom dimensions.
The system imports profile information using a Replace action. Importing application profileinformation, therefore, may result in adding, removing, or reordering Custom dimensions inthe metadata list.
Before you import Custom dimension information, you may want to modify existingdimensions in the metadata file. You can rename a Custom dimension alias to a different uniquename. For example, you can rename “Markets” to “GlobalMkt”.
84
You can also remove Custom dimensions in the metadata file. When you remove a Customdimension from the grid, the system also removes any corresponding member hierarchyinformation.
Note: You cannot delete the first two entries of the Custom dimension table. To remove theexisting entries, you must rename them. You must have at least two Custom entries.
You can add Custom dimensions in the metadata file. The new dimensions are added to the endof the metadata list. To insert dimensions in the middle of the list, you must add and then reorderthem.
ä To edit Custom dimensions:
1 From Manage Metadata, click Edit Customs.
2 Optional: To rename, remove, or add Custom dimensions, click Rename, Remove, or Add.
ä To import Custom dimension information from an application profile:
1 From Manage Metadata, click Import.
2 Enter the name of the application profile to import, and then click OK.
Manually Editing Custom Dimension InformationFor a new metadata file, you can add the Custom dimension manually instead of importing itfrom an application profile. You can also use the Edit option to make changes to the Customdimension information stored for a metadata file.
When you open the Edit Custom page, if you have not previously entered Custom dimensioninformation, the system displays a blank grid for entering the Custom Dimension Alias, whichis the only information required in Metadata Manager. If you previously imported the Customdimension information from an application profile or manually entered information, theinformation is displayed in the table.
You can enter the Custom dimension alias information in any order, because the actual orderis determined by the application during application creation using the profile information.
ä To manually edit Custom dimension:
1 From Manage Metadata, click Edit Customs.
2 Enter Custom Dimension aliases as needed.
3 Click OK.
85
Defining Entity MembersEntities represent the organizational structure of the company, such as divisions, subsidiaries,plants, regions, countries, legal entities, business units, departments, or any organizational unit.They define the consolidation path for data. When you run a consolidation for the Entitydimension, data rolls up from children to parents as defined in the dimension hierarchy. Youcan create multiple consolidation paths by placing an entity child member under more than oneparent. You define entity members by using the attributes in Table 9.
Table 9 Entity Member Attributes
Attribute Description
AllowAdjFromChildren Specifies whether journal postings from children are permitted for the parent entity. For entities that roll up tomore than one parent, you can enable this attribute for the parent entity. Specify Y if journal postings fromchildren are permitted or N if journal postings from children are not permitted.
AllowAdjs Specifies whether journal postings are permitted for this entity. Specify Y if journal postings are permitted forthe entity or N if journal postings are not permitted for the entity.
DefaultParent Specifies the default parent for the entity.
DefCurrency Specifies the default currency for the entity. This attribute is required.
Description Specifies the description for the entity. The description can contain up to 80 characters, including spaces.
HoldingCompany Specifies the holding company for the entity, which identifies the owner of an entity member. Can be the nameof an entity or blank.
IsICP Specifies whether entities can be partners in intercompany transactions. Specify Y if the entity is anintercompany entity or N if the entity is not an intercompany entity. A member for which you select ICP isautomatically displayed as a member in the ICP dimension.
Member Specifies the name for the entity. This attribute is required. The name must be unique and can contain up to80 characters including spaces but cannot start with a space.
Do not use these characters in the entity name:
l Asterisk ( * )
l At sign ( @ )
l Comma ( , )
l Curly brackets ( { } )
l Double quotation marks ( “ )
l Minus sign ( - )
l Number sign ( # )
l Period ( . )
l Plus sign ( + )
l Semicolon ( ; )
l Slash mark ( / )
Note: You cannot use ALL as the name of an entity.
SecurityAsPartner This attribute enables you to specify a security class for an entity acting as an intercompany partner. Specifiesthe name of a valid security class for the ICP entity.
86
Attribute Description
SecurityClass Specifies the name of a valid security class of users who can access the data of the entity. Security classnames can contain up to 80 characters.
UserDefined1,UserDefined2,UserDefined3
Stores custom information for the entity. You can enter a maximum of 256 characters. The UserDefined1,UserDefined2, and UserDefined3 functions retrieve the text stored in this attribute.
Defining Scenario MembersThe Scenario dimension represents a set of related data, such as budget, actual, or forecast. Youdefine scenario members by using the attributes in Table 10.
The frequency of a scenario specifies the time period level at which data can be input. You caninput and view either periodic or year-to-date data values. For example, if you input data asyear-to-date values, when you select Periodic as the data view, the system automatically derivesthe periodic values from the year-to-date values.
For each scenario, you can specify how to display missing data. Financial Management interpretsmissing data as zero for display on reports and for calculating summary periods. You can specifywhether a zero for missing data is interpreted as zero for the current period (Periodic) or as zerofor year-to-date (YTD).
You also enable process management options by scenario. You can select whether to enableprocess management, select the maximum level of reviews for process units, and select the startyear for phased submissions.
Table 10 Scenario Member Attributes
Attribute Description
ConsolidateYTD Specifies the data view for consolidation - Year-to-Date or Periodic. This attribute is required. SpecifyY for YTD or N for Periodic.
Note: If you set ConsolidateYTD to N, you must also set both ZeroViewForAdj and ZeroViewForNonadjoptions to Periodic.
DefaultFreq Specifies the types of periods for which data input is valid for the scenario. This attribute is required.
For example, a value of Monthly indicates that you can extract input data only in month-based periods,not in quarter-based or year-based periods. The frequency must be defined in the application profile.
DefaultParent Specifies the default parent for the scenario.
DefaultView Specifies the data view (Year-to-Date or Periodic) to use when Scenario View is selected in the point-of-view bar. This attribute is required. Specify YTD or Periodic.
If you change the default view for a scenario and line-item detail has been entered, you should firstextract the line-item detail and save it. Then delete the line-item detail from the scenario before changingthe view. You must change the extracted line-item detail to match the new default view before reloadingit.
DefFreqForICTrans Specifies the default frequency for intercompany transaction data. This attribute must be a validfrequency and can contain a maximum of 80 characters. The default for this attribute is blank.
87
Attribute Description
Description Specifies the description for the scenario. The description can contain up to 80 characters, includingspaces.
EnableDataAudit Specifies whether changes to data for the scenario should be tracked in the data audit log. This attributefor an account or a scenario determines what can be audited. Specify one of these values:
l Y to automatically audit all accounts. Even accounts that have EnableDataAudit set to False willbe audited.
l O to audit only those accounts that have EnableDataAudit set to True.
l N to disable auditing for all accounts.
MaximumReviewLevel Specifies the maximum level of reviews for process units for the scenario. Each process unit can haveup to 10 levels of review. Specify a review level from 1 to 10. This attribute is required.
Member Specifies the name for the scenario. This attribute is required. The name must be unique and cancontain up to 80 characters, including spaces, but cannot start with a space.
Do not use these characters in the scenario name:
l Asterisk ( * )
l At sign ( @ )
l Comma ( , )
l Curly brackets ( { } )
l Double quotation marks ( “ )
l Minus sign ( - )
l Number sign ( # )
l Period ( . )
l Plus sign ( + )
l Semicolon ( ; )
l Slash mark ( / )
PhasedSubmissionStartYear In applications for which process management phased submissions is enabled, specifies the start yearfor phased submissions.
SecurityClass Specifies the name of a valid security class that defines users who can access the data for the scenario.Security class names can contain up to 80 characters. For example, a user with None access rights toa scenario can open journal periods for the scenario.
SupportsProcessManagement Specifies whether the scenario supports Process Management. Specify one of these values:
l Y to enable the Process Management without email alerts
l N to disable the Process Management option
l A to enable Process Management and email alerts
UserDefined1, UserDefined2,UserDefined3
Stores custom information for the scenario. You can enter a maximum of 256 characters. TheUserDefined1, UserDefined2, and UserDefined3 functions retrieve the text stored in this attribute.
88
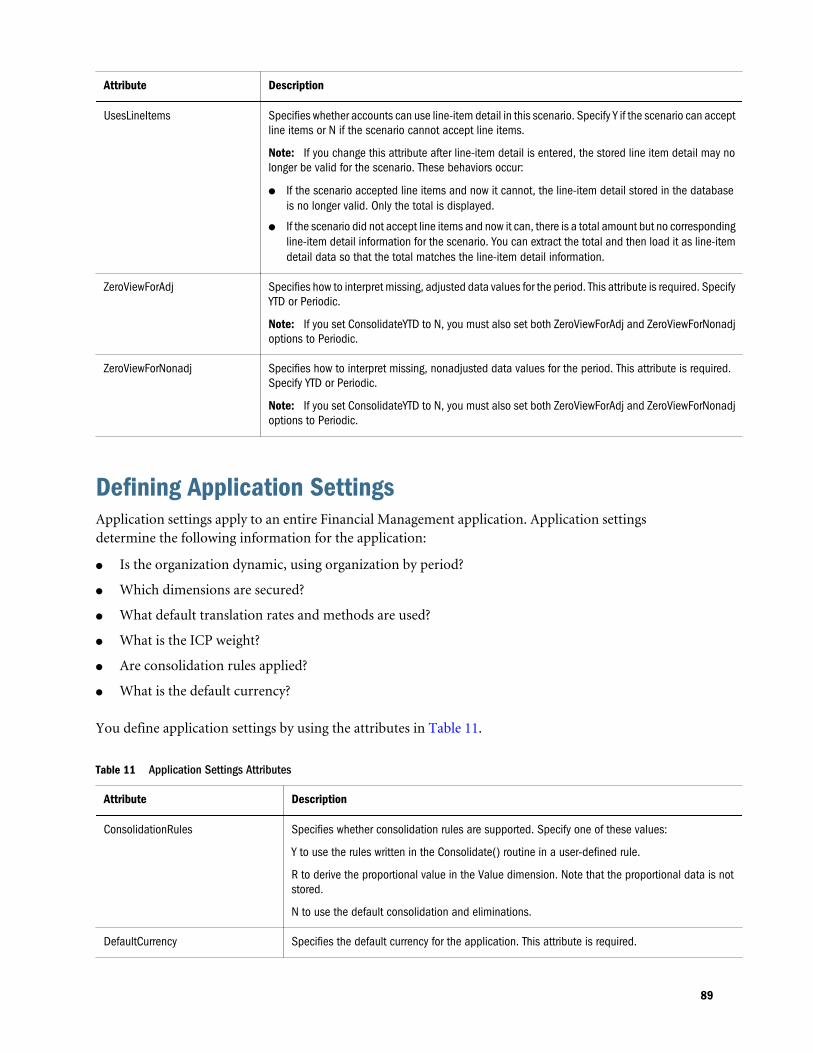
Attribute Description
UsesLineItems Specifies whether accounts can use line-item detail in this scenario. Specify Y if the scenario can acceptline items or N if the scenario cannot accept line items.
Note: If you change this attribute after line-item detail is entered, the stored line item detail may nolonger be valid for the scenario. These behaviors occur:
l If the scenario accepted line items and now it cannot, the line-item detail stored in the databaseis no longer valid. Only the total is displayed.
l If the scenario did not accept line items and now it can, there is a total amount but no correspondingline-item detail information for the scenario. You can extract the total and then load it as line-itemdetail data so that the total matches the line-item detail information.
ZeroViewForAdj Specifies how to interpret missing, adjusted data values for the period. This attribute is required. SpecifyYTD or Periodic.
Note: If you set ConsolidateYTD to N, you must also set both ZeroViewForAdj and ZeroViewForNonadjoptions to Periodic.
ZeroViewForNonadj Specifies how to interpret missing, nonadjusted data values for the period. This attribute is required.Specify YTD or Periodic.
Note: If you set ConsolidateYTD to N, you must also set both ZeroViewForAdj and ZeroViewForNonadjoptions to Periodic.
Defining Application SettingsApplication settings apply to an entire Financial Management application. Application settingsdetermine the following information for the application:
l Is the organization dynamic, using organization by period?
l Which dimensions are secured?
l What default translation rates and methods are used?
l What is the ICP weight?
l Are consolidation rules applied?
l What is the default currency?
You define application settings by using the attributes in Table 11.
Table 11 Application Settings Attributes
Attribute Description
ConsolidationRules Specifies whether consolidation rules are supported. Specify one of these values:
Y to use the rules written in the Consolidate() routine in a user-defined rule.
R to derive the proportional value in the Value dimension. Note that the proportional data is notstored.
N to use the default consolidation and eliminations.
DefaultCurrency Specifies the default currency for the application. This attribute is required.
89
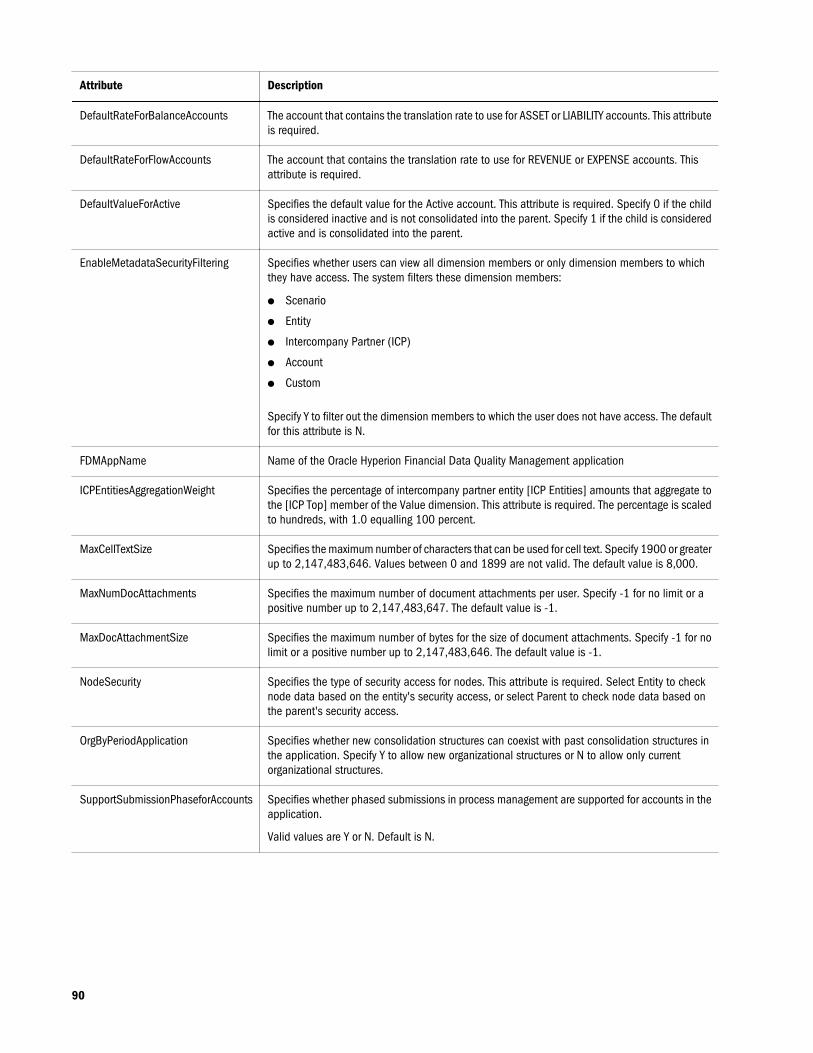
Attribute Description
DefaultRateForBalanceAccounts The account that contains the translation rate to use for ASSET or LIABILITY accounts. This attributeis required.
DefaultRateForFlowAccounts The account that contains the translation rate to use for REVENUE or EXPENSE accounts. Thisattribute is required.
DefaultValueForActive Specifies the default value for the Active account. This attribute is required. Specify 0 if the childis considered inactive and is not consolidated into the parent. Specify 1 if the child is consideredactive and is consolidated into the parent.
EnableMetadataSecurityFiltering Specifies whether users can view all dimension members or only dimension members to whichthey have access. The system filters these dimension members:
l Scenario
l Entity
l Intercompany Partner (ICP)
l Account
l Custom
Specify Y to filter out the dimension members to which the user does not have access. The defaultfor this attribute is N.
FDMAppName Name of the Oracle Hyperion Financial Data Quality Management application
ICPEntitiesAggregationWeight Specifies the percentage of intercompany partner entity [ICP Entities] amounts that aggregate tothe [ICP Top] member of the Value dimension. This attribute is required. The percentage is scaledto hundreds, with 1.0 equalling 100 percent.
MaxCellTextSize Specifies the maximum number of characters that can be used for cell text. Specify 1900 or greaterup to 2,147,483,646. Values between 0 and 1899 are not valid. The default value is 8,000.
MaxNumDocAttachments Specifies the maximum number of document attachments per user. Specify -1 for no limit or apositive number up to 2,147,483,647. The default value is -1.
MaxDocAttachmentSize Specifies the maximum number of bytes for the size of document attachments. Specify -1 for nolimit or a positive number up to 2,147,483,646. The default value is -1.
NodeSecurity Specifies the type of security access for nodes. This attribute is required. Select Entity to checknode data based on the entity's security access, or select Parent to check node data based onthe parent's security access.
OrgByPeriodApplication Specifies whether new consolidation structures can coexist with past consolidation structures inthe application. Specify Y to allow new organizational structures or N to allow only currentorganizational structures.
SupportSubmissionPhaseforAccounts Specifies whether phased submissions in process management are supported for accounts in theapplication.
Valid values are Y or N. Default is N.
90
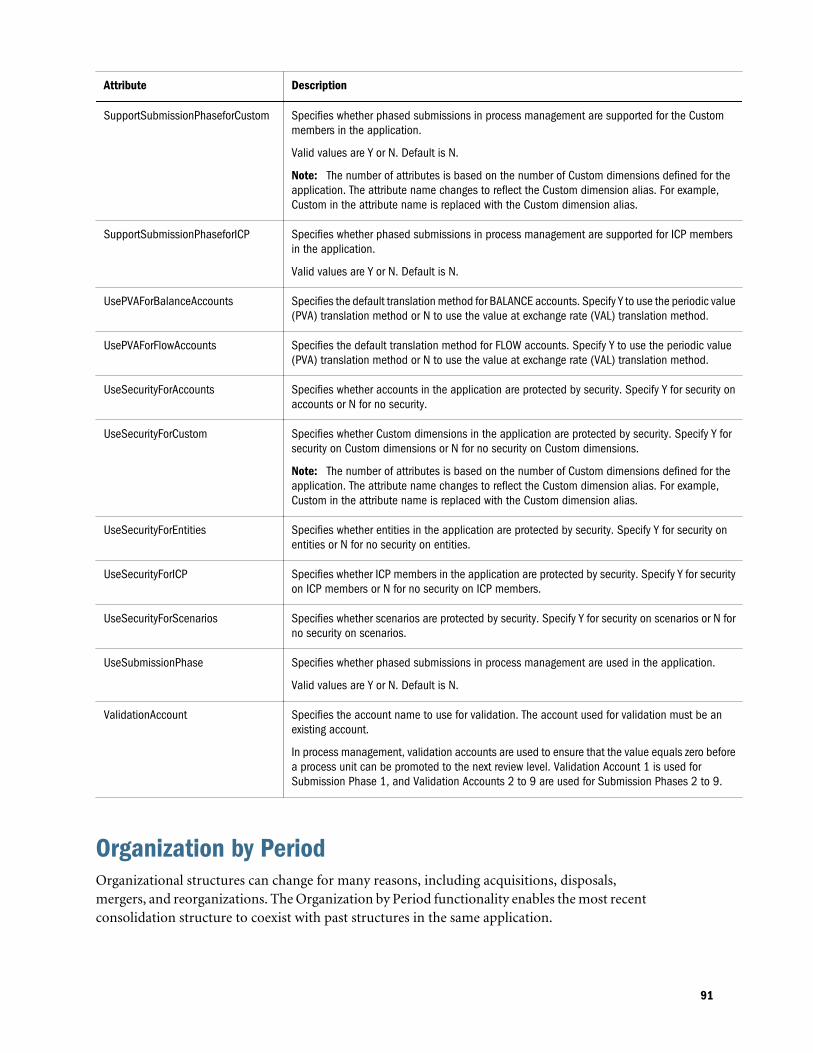
Attribute Description
SupportSubmissionPhaseforCustom Specifies whether phased submissions in process management are supported for the Custommembers in the application.
Valid values are Y or N. Default is N.
Note: The number of attributes is based on the number of Custom dimensions defined for theapplication. The attribute name changes to reflect the Custom dimension alias. For example,Custom in the attribute name is replaced with the Custom dimension alias.
SupportSubmissionPhaseforICP Specifies whether phased submissions in process management are supported for ICP membersin the application.
Valid values are Y or N. Default is N.
UsePVAForBalanceAccounts Specifies the default translation method for BALANCE accounts. Specify Y to use the periodic value(PVA) translation method or N to use the value at exchange rate (VAL) translation method.
UsePVAForFlowAccounts Specifies the default translation method for FLOW accounts. Specify Y to use the periodic value(PVA) translation method or N to use the value at exchange rate (VAL) translation method.
UseSecurityForAccounts Specifies whether accounts in the application are protected by security. Specify Y for security onaccounts or N for no security.
UseSecurityForCustom Specifies whether Custom dimensions in the application are protected by security. Specify Y forsecurity on Custom dimensions or N for no security on Custom dimensions.
Note: The number of attributes is based on the number of Custom dimensions defined for theapplication. The attribute name changes to reflect the Custom dimension alias. For example,Custom in the attribute name is replaced with the Custom dimension alias.
UseSecurityForEntities Specifies whether entities in the application are protected by security. Specify Y for security onentities or N for no security on entities.
UseSecurityForICP Specifies whether ICP members in the application are protected by security. Specify Y for securityon ICP members or N for no security on ICP members.
UseSecurityForScenarios Specifies whether scenarios are protected by security. Specify Y for security on scenarios or N forno security on scenarios.
UseSubmissionPhase Specifies whether phased submissions in process management are used in the application.
Valid values are Y or N. Default is N.
ValidationAccount Specifies the account name to use for validation. The account used for validation must be anexisting account.
In process management, validation accounts are used to ensure that the value equals zero beforea process unit can be promoted to the next review level. Validation Account 1 is used forSubmission Phase 1, and Validation Accounts 2 to 9 are used for Submission Phases 2 to 9.
Organization by PeriodOrganizational structures can change for many reasons, including acquisitions, disposals,mergers, and reorganizations. The Organization by Period functionality enables the most recentconsolidation structure to coexist with past structures in the same application.
91
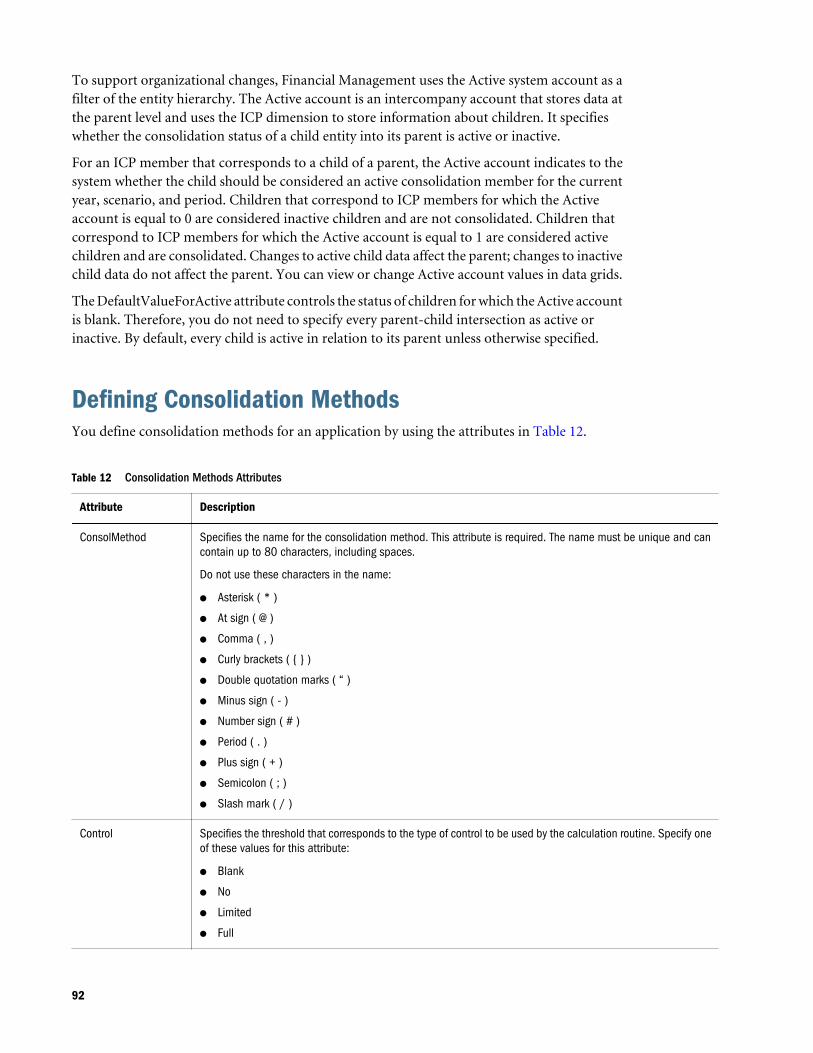
To support organizational changes, Financial Management uses the Active system account as afilter of the entity hierarchy. The Active account is an intercompany account that stores data atthe parent level and uses the ICP dimension to store information about children. It specifieswhether the consolidation status of a child entity into its parent is active or inactive.
For an ICP member that corresponds to a child of a parent, the Active account indicates to thesystem whether the child should be considered an active consolidation member for the currentyear, scenario, and period. Children that correspond to ICP members for which the Activeaccount is equal to 0 are considered inactive children and are not consolidated. Children thatcorrespond to ICP members for which the Active account is equal to 1 are considered activechildren and are consolidated. Changes to active child data affect the parent; changes to inactivechild data do not affect the parent. You can view or change Active account values in data grids.
The DefaultValueForActive attribute controls the status of children for which the Active accountis blank. Therefore, you do not need to specify every parent-child intersection as active orinactive. By default, every child is active in relation to its parent unless otherwise specified.
Defining Consolidation MethodsYou define consolidation methods for an application by using the attributes in Table 12.
Table 12 Consolidation Methods Attributes
Attribute Description
ConsolMethod Specifies the name for the consolidation method. This attribute is required. The name must be unique and cancontain up to 80 characters, including spaces.
Do not use these characters in the name:
l Asterisk ( * )
l At sign ( @ )
l Comma ( , )
l Curly brackets ( { } )
l Double quotation marks ( “ )
l Minus sign ( - )
l Number sign ( # )
l Period ( . )
l Plus sign ( + )
l Semicolon ( ; )
l Slash mark ( / )
Control Specifies the threshold that corresponds to the type of control to be used by the calculation routine. Specify oneof these values for this attribute:
l Blank
l No
l Limited
l Full
92
Attribute Description
Description Specifies the description for the consolidation method. The description can contain up to 80 characters, includingspaces.
IsHoldingMethod Specifies whether the consolidation method is used for the holding company. This attribute is optional. SpecifyY to use the method for the holding company, or N to use a different method for the holding company.
PercentConsol Specifies the consolidation percentage applied by the ownership calculation process. Specify a value for thepercent (such as 100) or one of these keywords:
l POWN
l POWNMIN
Note: For information on POWN and POWNMIN, see “Using POWN or POWNMIN Consolidation Methods” onpage 94.
ToPercentControl Specifies the upper boundary of the range for PercentControl. Used for the ownership calculation routine. Specifya value between 0 and 100.
Note: One of the method records must have a value of 100.
ToPercentControlComp Specifies whether the upper boundary of the range of percent control is included in the range. Used for theownership calculation routine together with the ToPercentControl attribute. This attribute is optional if theUsedByCalcRoutine attribute is N. Specify < or <= for this attribute.
UsedByCalcRoutine Specifies whether the method is used for the automatic ownership calculation routine. Specify Y to use themethod for ownership calculations, or N if you do not want to use the method for ownership calculations.
Using Consolidation MethodsConsolidation methods are used during the consolidation and calculate ownership processes.
When you define consolidation methods in metadata, the system automatically generates the[ConsolMethod] system list for the From Currency dimension, which consists of all methodsdefined in the consolidation methods section.
There are two ways to assign the consolidation method to an entity for use during consolidation:
l You can manually assign the method through data load or data entry.
l You can automatically assign the method in the Calculate Ownership process, which is basedon the ultimate percent control assigned to the entity. For details on calculating ownership,see the Oracle Hyperion Financial Management User's Guide.
Assigning Consolidation Methods ManuallyTo enter consolidation method information manually, you can create a data grid with thisinformation:
POV: Scenario, Year, Period, View, Entity, Value, Account, CustomScenario: Applicable scenarioYear: Applicable yearPeriod: Applicable periodEntity: A parent entity
93
Value: [None]Account: [Method] system-generated accountCustom: ToCurrencyRow: ICP entities. For parent entities, you use the ICP Entities system list, or a user-defined list of selected ICP entities.Column: FromCurrency. You should use the ConsolMethods system-generated list.
Method assignment information is stored in the account method of the data file of the parententity. For each child of a parent, the system stores the consolidation method assignment in theICP dimension. The assigned method is used when the children are consolidated to the parent.
For an intersection of the grid, use 1 to indicate the method assignment to the ICP entity. Forexample, if a parent group has two children, A and B, and you assign the Global method to Aand the Equity method to B, enter 1 in the intersection for the Global method and entity A and1 in the intersection for the Equity method and entity B.
Using POWN or POWNMIN Consolidation MethodsThe Calculate Ownership process uses settings in the consolidation method table to calculatethe percentage of control and ultimate percentage of ownership, automatically assign thepercentage of consolidation, and assign the methods for consolidation.
For the consolidation method corresponding to the EQUITY process, you use the POWNMINkeyword in the consolidation method table. When you use POWNMIN, the percentage ofconsolidation that is assigned for the EQUITY company corresponds to the percentage used ina consolidation process that is performed in stages.
POWNMIN Calculation
POWNMIN = POWN + Sum of (Percent Minority of Entity Owners * Direct Percentage of Ownership in the Entity)
Where:
l Percent Minority = Percent Consolidation – Percent Ownership
l Entity Owners are any entities within the descendants of the current parent that own sharesof the entity being processed
l Direct Percentage of Ownership in the entity is retrieved from the Shares%Owned systemaccount
Example:
l B is owned by A: 80%
l C is owned by A: 70%
l D is owned by B: 20%
l D is owned by C: 20%
The Parent entity GROUP has entities A, B, C, and D as dependents (A is the holding company).The system calculates percent ownership as follows:
l A: 100%
94
l B: 80%
l C: 70%
l D: 30%
Suppose the Percent Consolidation of D (from the consolidation method table) is POWNMIN.
If the consolidation process is done in stages, the POWNMIN process would be:
1. Consolidation of D into B using direct ownership percentage: 20%
2. Consolidation of D into C using direct ownership percentage: 20%
3. Consolidation of B and C into A using their respective percentages: (80% and 70%)
It is calculated as follows:
Entity D’s Percent consolidation = 30% + (100% - 80%) * 20% + (100% - 70%) * 20% = 40%
Using this staged consolidation process, Entity D is consolidated using a total percentage of 40%.
When the subholdings B and C are consolidated into A, some minority interests correspondingto 10% are calculated on the Equity from Entity D.
POWN Calculation
However, if the consolidation is done using a flat hierarchy, the process typically uses the ultimatepercentage of ownership (POWN) as percentage of consolidation for the Equity company. Inthis case, the percentage of consolidation for D into the Group would be 30%. No minorityinterests would be calculated on the Equity from Entity D.
In summary:
l Using POWN, the percentage of consolidation assigned to Entity D would be 30% (ultimatepercentage of ownership).
l Using POWNMIN, the percentage of consolidation assigned to Entity D would be 40%(using a staged consolidation process).
Defining CurrenciesCurrencies store translated values for entities. Every application must include a Currencydimension. The Currency dimension must include a currency for each default currency assignedto an entity in the Entity dimension. Each currency added to the Currency dimension is displayedas a system-generated member in the Value dimension. You can select a currency from the Valuedimension to view data values translated to the currency.
You define currencies for an application by creating a dimension with the Currency dimensiontype, and by using the attributes in Table 13. You create members in the Currency dimensionfor each currency needed in your application.
95
Table 13 Currency Attributes
Attribute Description
Currency Specifies the name for the currency. This attribute is required. The name must be unique and can contain up to 80characters, including spaces.
Do not use these characters in the currency name:
l Asterisk ( * )
l At sign ( @ )
l Comma ( , )
l Curly brackets ( { } )
l Double quotation marks ( “ )
l Minus sign ( - )
l Number sign ( # )
l Period ( . )
l Plus sign ( + )
l Semicolon ( ; )
l Slash mark ( / )
Description Specifies the currency description. The description can contain up to 80 characters, including spaces.
DisplayInICT Specifies whether currencies display in the drop-down list in the Intercompany Transactions module. Specify Y todisplay currencies or N to not display currencies. The default is Y.
Scale Specifies the unit in which amounts are displayed and stored for the currency by identifying where the decimal pointis placed. This attribute is required.
Also determines how the exchange rate must be entered. For example, if data is scaled to thousands, a value of 1entered on a data form is stored as 1,000 in the database. Scale is a currency attribute, not an entity attribute.Specify one of these values for this attribute:
l Blank = None
l 0 = Units
l 1 = Tens
l 2 = Hundreds
l 3 = Thousands
l 4 = Ten thousands
l 5 = Hundred thousands
l 6 = Millions
l 7 = Ten millions
l 8 = Hundred millions
l 9 = Billions
TranslationOperator If you are using intercompany transactions, specifies whether to multiply or divide the local currency by the exchangerate. The default is blank. Specify one of these values:
l D to calculate the local currency by dividing the transaction currency by the rate
l M to calculate the local currency by multiplying the transaction currency by the rate
l Blank to default the value to D
96
The [Currencies] system member list is available for the From Currency and To Currencydimensions. Currencies that you add to the application are added to the [Currencies] memberlist. The [Currencies] list enables you to enter currency translation rates for pairs of currenciesand filter out non-currency members.
Defining Cell Text LabelsYou can add cell text for any valid cell in a data grid or form. At times, you may need multiplecell text entries to store different types of information for a Point of View intersection. You cancreate multiple cell text entries and define cell text labels to easily identify types of information.
Before users can enter multiple cell text entries, the administrator must define cell text labels.The labels are loaded as metadata. They apply to all account cells in the application, and areavailable for selection when users enter cell text information. See the Oracle Hyperion FinancialManagement User's Guide.
These are the guidelines for defining cell text labels:
l The label name can be a maximum 80 characters. It must be unique within a data cell.
l It can contain spaces but cannot start with a space. If you are using an Oracle database, labelscannot contain spaces.
l The label name cannot contain these characters:
m Ampersand (&)
m Asterisk ( * )
m At symbol ( @ )
m Comma ( , )
m Curly brackets ( { } )
m Double quotation mark ( " )
m Forward slash (/)
m Less than symbol (<)
m Minus sign (-)
m Number sign ( # )
m Period (.)
m Pipe character (|)
m Plus sign (+)
m Semicolon ( ; )
m tilde character (~)
You can load cell text labels as part of a metadata load in a Cell Text Labels section in the loadfile. The following example shows a sample load file section for cell text labels:
<MISC Name="CellTextLabel">
97

<MISCENTRY>
<LABEL>MaturityDate</LABEL>
</MISCENTRY>
<MISCENTRY>
<LABEL>CouponRate</LABEL>
</MISCENTRY>
<MISCENTRY>
<LABEL>ExchangeRate</LABEL>
</MISCENTRY>
<MISCENTRY>
<LABEL>Rating</LABEL>
</MISCENTRY>
<MISCENTRY>
<LABEL>InterestRate</LABEL>
</MISCENTRY>
</MISC>
System-Generated AccountsWhen you create an application, system accounts for consolidation and ownership areautomatically created for the application.
Note: You can change only the description, security class, and decimal location for systemaccounts. All other attributes for system accounts are predefined and cannot be modified.
Consolidation AccountsThe system accounts described in Table 14 are required for each parent in the Entity dimensionand are used in the consolidation process.
Note: All system accounts that are used for consolidation, except for the Active account, areBALANCE accounts. The Active account is a BALANCERECURRING account.
98
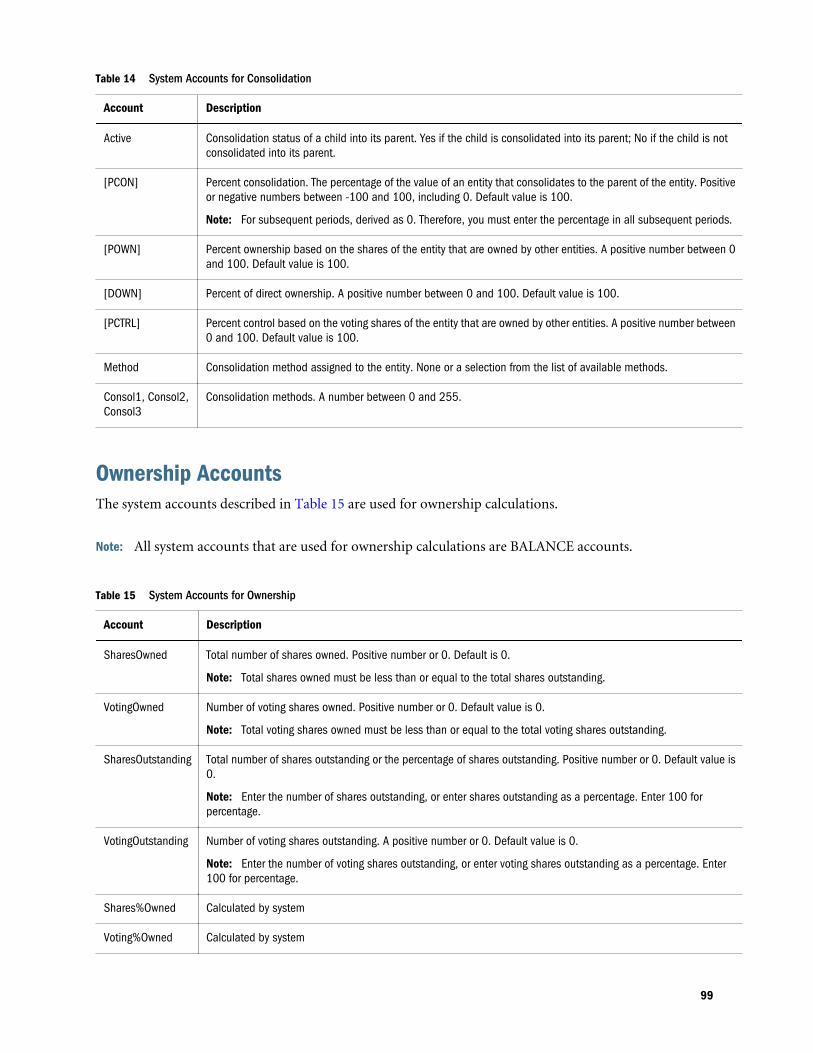
Table 14 System Accounts for Consolidation
Account Description
Active Consolidation status of a child into its parent. Yes if the child is consolidated into its parent; No if the child is notconsolidated into its parent.
[PCON] Percent consolidation. The percentage of the value of an entity that consolidates to the parent of the entity. Positiveor negative numbers between -100 and 100, including 0. Default value is 100.
Note: For subsequent periods, derived as 0. Therefore, you must enter the percentage in all subsequent periods.
[POWN] Percent ownership based on the shares of the entity that are owned by other entities. A positive number between 0and 100. Default value is 100.
[DOWN] Percent of direct ownership. A positive number between 0 and 100. Default value is 100.
[PCTRL] Percent control based on the voting shares of the entity that are owned by other entities. A positive number between0 and 100. Default value is 100.
Method Consolidation method assigned to the entity. None or a selection from the list of available methods.
Consol1, Consol2,Consol3
Consolidation methods. A number between 0 and 255.
Ownership AccountsThe system accounts described in Table 15 are used for ownership calculations.
Note: All system accounts that are used for ownership calculations are BALANCE accounts.
Table 15 System Accounts for Ownership
Account Description
SharesOwned Total number of shares owned. Positive number or 0. Default is 0.
Note: Total shares owned must be less than or equal to the total shares outstanding.
VotingOwned Number of voting shares owned. Positive number or 0. Default value is 0.
Note: Total voting shares owned must be less than or equal to the total voting shares outstanding.
SharesOutstanding Total number of shares outstanding or the percentage of shares outstanding. Positive number or 0. Default value is0.
Note: Enter the number of shares outstanding, or enter shares outstanding as a percentage. Enter 100 forpercentage.
VotingOutstanding Number of voting shares outstanding. A positive number or 0. Default value is 0.
Note: Enter the number of voting shares outstanding, or enter voting shares outstanding as a percentage. Enter100 for percentage.
Shares%Owned Calculated by system
Voting%Owned Calculated by system
99
Editing System-Generated AccountsWhen you create an application, system account members are automatically created for theapplication.
Note: You can edit only the description, security class, and the decimal location for systemaccount members. All other attributes are predefined and cannot be modified.
ä To edit system accounts:
1 In Metadata Manager, open the file that contains the system-generated account members.
2 Select the List View tab.
3 From the list, select a system account, and modify the description, security class, or decimal locationas needed.
4 Repeat step 3 as needed to modify other system account members.
5 Click Save File.
Note: You must load the updated metadata file into your application for your changes totake effect.
Setting Up Intercompany PartnersIntercompany transactions are managed across the Intercompany Partner (ICP) dimension. TheICP dimension contains all intercompany balances that exist for an account. ICP is a reserveddimension used with the Account dimension and Custom dimensions to track and eliminateintercompany transaction details.
To set up an application for intercompany transactions, you must perform these actions:
l Indicate the accounts that perform intercompany transactions and indicate a plug accountfor each intercompany account (IsICP and PlugAcct attributes in account metadata)
l Indicate the entities that perform intercompany transactions (IsICP attribute in entitymetadata)
When you create intercompany transactions, each group must have at least one intercompanyaccount and one plug account. You designate an account as intercompany by selecting the IsICPattribute for the account in Metadata Manager. When an account is designated as intercompanyand intercompany transactions are entered, eliminating or reversing entries are generated in the[Elimination] Value dimension member through the consolidation process.
A plug account is an account that, when eliminations are completed, stores the differencebetween two intercompany accounts in the Elimination Value dimension. A plug account canbe set up as an ICP account. For a plug account to be detailed by ICP, set the IsICP metadataattribute to Y or R so the system writes eliminations to the corresponding ICP member. If you
100
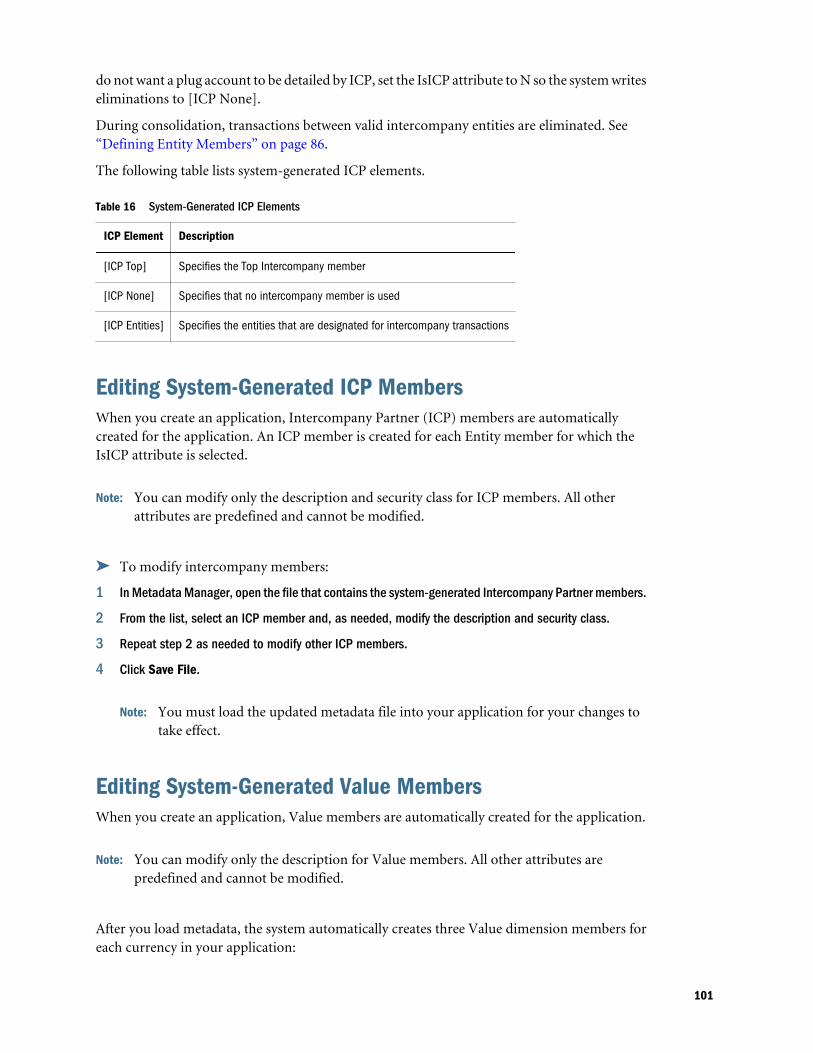
do not want a plug account to be detailed by ICP, set the IsICP attribute to N so the system writeseliminations to [ICP None].
During consolidation, transactions between valid intercompany entities are eliminated. See“Defining Entity Members” on page 86.
The following table lists system-generated ICP elements.
Table 16 System-Generated ICP Elements
ICP Element Description
[ICP Top] Specifies the Top Intercompany member
[ICP None] Specifies that no intercompany member is used
[ICP Entities] Specifies the entities that are designated for intercompany transactions
Editing System-Generated ICP MembersWhen you create an application, Intercompany Partner (ICP) members are automaticallycreated for the application. An ICP member is created for each Entity member for which theIsICP attribute is selected.
Note: You can modify only the description and security class for ICP members. All otherattributes are predefined and cannot be modified.
ä To modify intercompany members:
1 In Metadata Manager, open the file that contains the system-generated Intercompany Partner members.
2 From the list, select an ICP member and, as needed, modify the description and security class.
3 Repeat step 2 as needed to modify other ICP members.
4 Click Save File.
Note: You must load the updated metadata file into your application for your changes totake effect.
Editing System-Generated Value MembersWhen you create an application, Value members are automatically created for the application.
Note: You can modify only the description for Value members. All other attributes arepredefined and cannot be modified.
After you load metadata, the system automatically creates three Value dimension members foreach currency in your application:
101
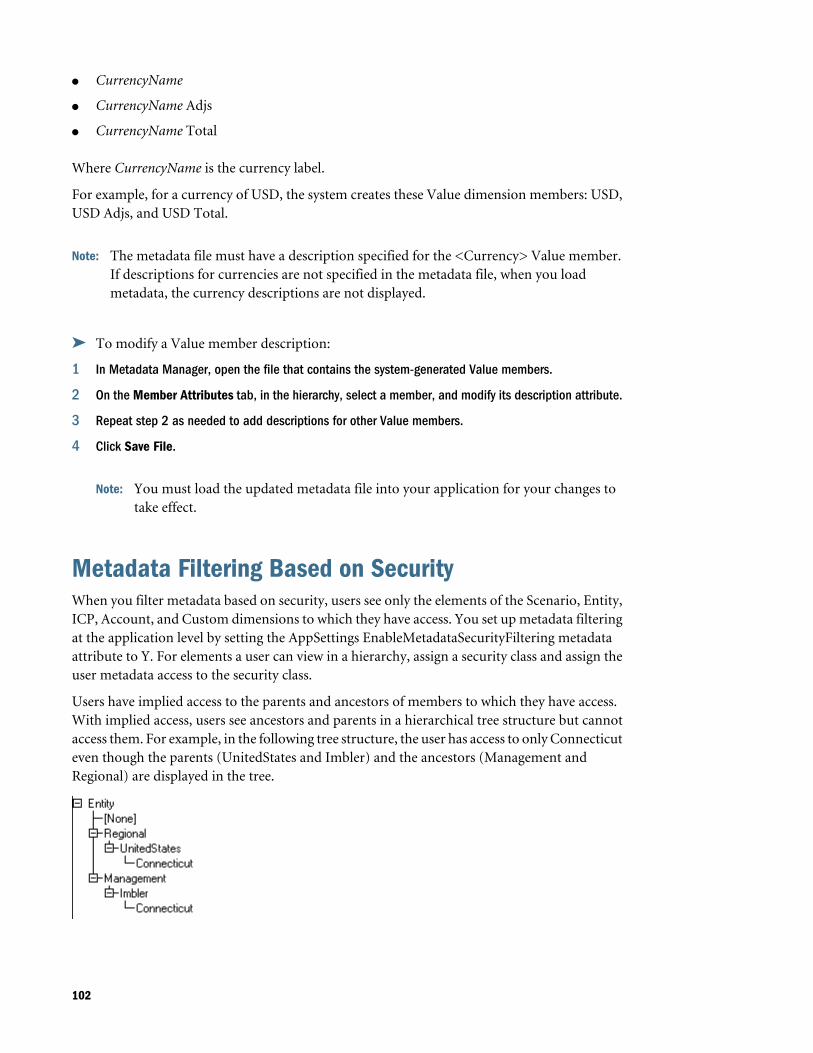
l CurrencyName
l CurrencyName Adjs
l CurrencyName Total
Where CurrencyName is the currency label.
For example, for a currency of USD, the system creates these Value dimension members: USD,USD Adjs, and USD Total.
Note: The metadata file must have a description specified for the <Currency> Value member.If descriptions for currencies are not specified in the metadata file, when you loadmetadata, the currency descriptions are not displayed.
ä To modify a Value member description:
1 In Metadata Manager, open the file that contains the system-generated Value members.
2 On the Member Attributes tab, in the hierarchy, select a member, and modify its description attribute.
3 Repeat step 2 as needed to add descriptions for other Value members.
4 Click Save File.
Note: You must load the updated metadata file into your application for your changes totake effect.
Metadata Filtering Based on SecurityWhen you filter metadata based on security, users see only the elements of the Scenario, Entity,ICP, Account, and Custom dimensions to which they have access. You set up metadata filteringat the application level by setting the AppSettings EnableMetadataSecurityFiltering metadataattribute to Y. For elements a user can view in a hierarchy, assign a security class and assign theuser metadata access to the security class.
Users have implied access to the parents and ancestors of members to which they have access.With implied access, users see ancestors and parents in a hierarchical tree structure but cannotaccess them. For example, in the following tree structure, the user has access to only Connecticuteven though the parents (UnitedStates and Imbler) and the ancestors (Management andRegional) are displayed in the tree.
102
Creating Metadata Files of the APP FormatYou can use an APP-format metadata file to add metadata to an application. The metadata filesections can be arranged in any order; however, the system automatically processes sections inthis order:
l Currencies
l Entity dimension
l Scenario dimension
l Custom dimensions
l Account dimension
l Value dimension
l Intercompany Partner dimension
l Application settings
l Consolidation methods
For each type of dimension-related metadata, sections are processed in this order:
l Members
l Hierarchies
Note: For Custom dimensions, these sections must use the Custom dimension alias name.
Metadata for the Entity, Scenario, Account, and Custom dimensions is placed in the membersand hierarchies sections. Custom dimensions may include the dimension section. The sectionsfor each type of metadata can exist only once in a metadata file.
You can use these characters as a delimiter:
, ~ @ $ % ^ | : ; ? \
Note: You must use a character that is not used in the file name or in any other way in the file.Delimiters are necessary only for ASCII files with the APP file extension. Delimiters arenot necessary for extensible markup language (XML) files.
A line starting with an exclamation point ( ! ) indicates the beginning of a new section in themetadata file and must be followed by a valid section name; for example, currencies, members,or hierarchies. True or false values are represented as Y for true or N for false. A line startingwith an apostrophe ( ' ) is considered a comment line and is ignored by the system.
You can use these sections in a metadata file:
l File format
l Version
l Application settings
103
l Currencies
l Dimension
l Members
l Hierarchies
l Consolidation methods
File FormatThis section of a metadata file indicates the file version number. The version number changesonly when changes are made to the file format. The file format is automatically generated whenyou extract metadata; if you are defining a file to load, you must include a valid file format. Thissyntax specifies the file format:
!FILE_FORMAT = majorNumber.minorNumber
majorNumber and minorNumber consist of one or two digits. majorNumber can contain aleading zero, and minorNumber can contain a trailing zero. You must include majorNumberand minorNumber and use only a period ( . ) as the decimal separator. These examples representvalid file format values:
!FILE_FORMAT = 11.12!FILE_FORMAT = 11.120!FILE_FORMAT = 011.120!FILE_FORMAT = 011.12
VersionThis section of a metadata file indicates the version of Financial Management that was used toextract metadata. The version number is automatically generated when you extract metadata; ifyou are creating a metadata file for loading, you do not need to specify a version. This syntaxrepresents the version:
!VERSION = major version.minor version.build version
This example represents a valid version value:
!VERSION = 11.1.4749
Application SettingsThis section of a metadata file defines settings that apply to the entire Financial Managementapplication. For information on application settings attributes, see “Defining ApplicationSettings” on page 89.
This example specifies application settings attributes:
!APPLICATION_SETTINGSDefaultCurrency=USDDefaultRateForBalanceAccounts=Rate1
104

DefaultRateForFlowAccounts=Rate2UsePVAForBalanceAccounts=YUsePVAForFlowAccounts=YICPEntitiesAggregationWeight=1DefaultValueForActive=1ConsolidationRules=NOrgByPeriodApplication=NNodeSecurity=EntityUseSecurityForAccounts=NUseSecurityForEntities=YUseSecurityForScenarios=YUseSecurityForFlows=YUseSecurityForMarket=YUseSecurityForRegion=NUseSecurityForCostCenter=NUseSecurityForICP=NEnableMetadataSecurityFiltering=NSupportSubmissionPHaseForFlows=YSupportSubmissionPhaseForMarket=YSupportSubmissionPHaseForRegion=NSupportSubmissionPhaseForCostCenter=N
CurrenciesThis section of a metadata file defines currencies. This syntax specifies a currency:
Label; Scale; Descriptions
See “Defining Currencies” on page 95.
This example specifies currency attributes:
!CURRENCIESEURO;0;English=European EuroGBR;0;English=Great Britain PoundsUSD;0;English=United Stated Dollars
MembersThis section of a metadata file defines the members of a dimension. You can use delimiters torepresent missing values as empty. Enter dimension members by using this syntax:
!MEMBERS=Customers'Label;IsCalculated;SwitchSignForFlow;SwitchTypeForFlow;UserDefined1;UserDefined2;UserDefined3;SecurityClass;DefaultParent;Descriptions[None];N;N;N;;;;;DefaultParent=#rootAllCustomers;Y;N;N;;;;;DefaultParent=#rootCustomer2;N;N;N;;;;;DefaultParent=AllCustomersCustomer3;N;N;N;;;;;DefaultParent=AllCustomersCustomer4;N;N;N;;;;;DefaultParent=AllCustomersCustomer5;N;N;N;;;;;DefaultParent=AllCustomers
Note: For Custom dimensions, this section must use the Custom dimension alias name.
105
These topics list the formats for the members sections of the Account, Scenario, Entity, Custom,Value, and ICP dimensions.
AccountSyntax for Account dimension members:
'Label, AccountType, IsCalculated, IsConsolidated, IsICP, PlugAcct, CustomTop, NumDecimalPlaces, UsesLineItems, EnableCustomAggr, UserDefined1, UserDefined2, UserDefined3, XBRLTags, SecurityClass, ICPTopMember, EnableDataAudit, DefaultParent, Descriptions
See “Defining Accounts” on page 78.
The Custom_Order keyword is required for all new metadata files to define the columns forCustom dimensions. This section must match the Custom Order of the application profile (.per)file.
For example:
!Custom_Order=Product;Customers;Channel;UnitsFlows
The following example specifies attributes for two accounts, AdminExpenses and CapitalStock:
!MEMBERS=AccountAdminExpenses;EXPENSE;N;Y;Y; ;AllCustom3;AllCustom1;AllMarket;AllFlows;2;N;Y;Y;Y;Y; ;; ; ; ; ;N;DefaultParent=NetIncomeCapitalStock;LIABILITY;N;Y;N; AllCustom3;[None];AllMarket;AllFlows;6;N;Y;Y;Y;Y;; ; ; ; ; ;N;DefaultParent=TotalEquity;English=Capital Stock
ScenarioSyntax for Scenario dimension members:
'Label, DefaultFreq, DefaultView, ZeroViewForNonadj, ZeroViewForAdj, ConsolidateYTD, UserDefined1, UserDefined2, UserDefined3, SupportsProcessManagement, SecurityClass, MaximumReviewLevel, UsesLineItems, EnableDataAudit, EnableJournalsAutoLabel, DefFreqForPostingFlowTrans, DefaultParent, Descriptions
See “Defining Scenario Members” on page 87.
The following example specifies attributes for two scenarios, Actual and Budget:
!MEMBERS=ScenarioActual;MTD;Periodic;Periodic;Periodic;N; ; ; ;N; ;10;Y;N;N;MTD ;DefaultParent=#rootBudget;MTD;Periodic;Periodic;Periodic;N; ; ; ;Y; ;10;Y;N;N;MTD ;DefaultParent=#root
EntitySyntax for Entity dimension members:
'Label, DefCurrency, AllowAdjs, IsICP, AllowAdjFromChildren, SecurityClass, UserDefined1, UserDefined2, UserDefined3, HoldingCompany, SecurityAsPartner, DefaultParent, Descriptions
See “Defining Entity Members” on page 86.
106
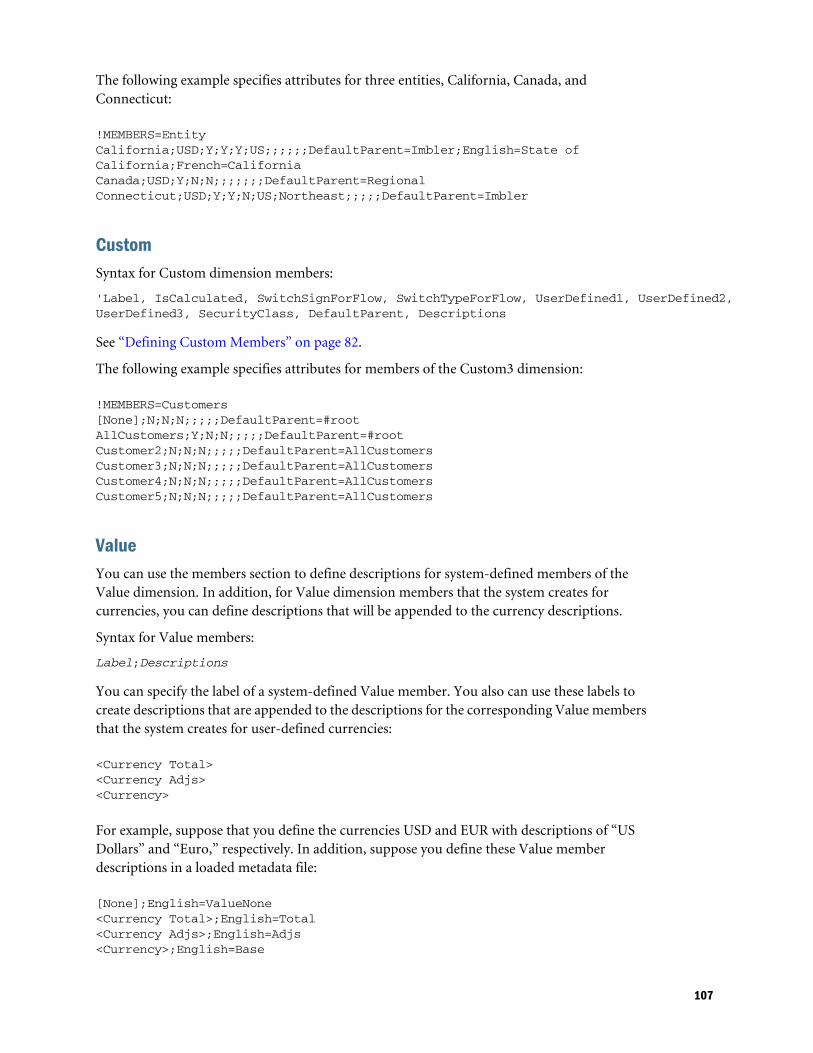
The following example specifies attributes for three entities, California, Canada, andConnecticut:
!MEMBERS=EntityCalifornia;USD;Y;Y;Y;US;;;;;;DefaultParent=Imbler;English=State of California;French=CaliforniaCanada;USD;Y;N;N;;;;;;;DefaultParent=RegionalConnecticut;USD;Y;Y;N;US;Northeast;;;;;DefaultParent=Imbler
CustomSyntax for Custom dimension members:
'Label, IsCalculated, SwitchSignForFlow, SwitchTypeForFlow, UserDefined1, UserDefined2, UserDefined3, SecurityClass, DefaultParent, Descriptions
See “Defining Custom Members” on page 82.
The following example specifies attributes for members of the Custom3 dimension:
!MEMBERS=Customers[None];N;N;N;;;;;DefaultParent=#rootAllCustomers;Y;N;N;;;;;DefaultParent=#rootCustomer2;N;N;N;;;;;DefaultParent=AllCustomersCustomer3;N;N;N;;;;;DefaultParent=AllCustomersCustomer4;N;N;N;;;;;DefaultParent=AllCustomersCustomer5;N;N;N;;;;;DefaultParent=AllCustomers
ValueYou can use the members section to define descriptions for system-defined members of theValue dimension. In addition, for Value dimension members that the system creates forcurrencies, you can define descriptions that will be appended to the currency descriptions.
Syntax for Value members:
Label;Descriptions
You can specify the label of a system-defined Value member. You also can use these labels tocreate descriptions that are appended to the descriptions for the corresponding Value membersthat the system creates for user-defined currencies:
<Currency Total><Currency Adjs><Currency>
For example, suppose that you define the currencies USD and EUR with descriptions of “USDollars” and “Euro,” respectively. In addition, suppose you define these Value memberdescriptions in a loaded metadata file:
[None];English=ValueNone<Currency Total>;English=Total<Currency Adjs>;English=Adjs<Currency>;English=Base
107
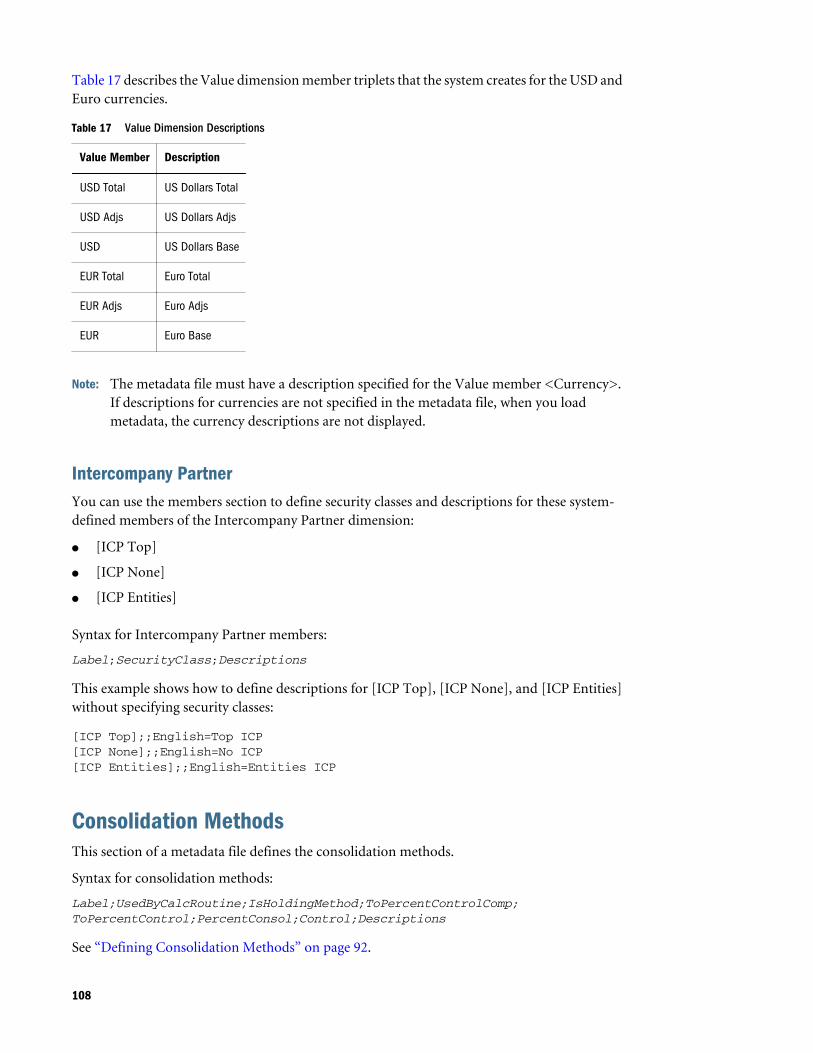
Table 17 describes the Value dimension member triplets that the system creates for the USD andEuro currencies.
Table 17 Value Dimension Descriptions
Value Member Description
USD Total US Dollars Total
USD Adjs US Dollars Adjs
USD US Dollars Base
EUR Total Euro Total
EUR Adjs Euro Adjs
EUR Euro Base
Note: The metadata file must have a description specified for the Value member <Currency>.If descriptions for currencies are not specified in the metadata file, when you loadmetadata, the currency descriptions are not displayed.
Intercompany PartnerYou can use the members section to define security classes and descriptions for these system-defined members of the Intercompany Partner dimension:
l [ICP Top]
l [ICP None]
l [ICP Entities]
Syntax for Intercompany Partner members:
Label;SecurityClass;Descriptions
This example shows how to define descriptions for [ICP Top], [ICP None], and [ICP Entities]without specifying security classes:
[ICP Top];;English=Top ICP[ICP None];;English=No ICP[ICP Entities];;English=Entities ICP
Consolidation MethodsThis section of a metadata file defines the consolidation methods.
Syntax for consolidation methods:
Label;UsedByCalcRoutine;IsHoldingMethod;ToPercentControlComp;ToPercentControl;PercentConsol;Control;Descriptions
See “Defining Consolidation Methods” on page 92.
108

This example specifies attributes for consolidation methods:
!CONSOLIDATION_METHODSM2;Y;N;<=;20;0;NoM3;Y;N;<;50;POWN;LimitedM4;Y;N;<=;50;50;LimitedM1;Y;Y;<=;100;100;FullM5;Y;N;<=;100;100;Full
HierarchiesThis metadata file section defines parent-child relationships. A parent-child relationship isreferred to as a node. A node can have its own set of attribute values.
A node record is a delimited list. The first two items of each line of the list identify a parent andchild. You can use delimiters to represent missing attribute values as empty. All top-levelmembers in a hierarchy should be represented as children of an empty parent.
Tip: Node records for Custom dimensions contain a third attribute. See “Custom Hierarchies”on page 110.
To begin a hierarchies section, enter this line, replacing the <> characters with the dimensionname:
!HIERARCHIES=<>
Do not include spaces when starting sections for Custom dimensions. For example, begin theHierarchies section for the FLOW dimension with this line:
!HIERARCHIES=Customers;[None];1;AllCustomers;0AllCustomers;Customer2;1AllCustomers;Customer3;1AllCustomers;Customer4;1AllCustomers;Customer5;1
Note: For Custom dimensions, this section must use the Custom dimension alias name.
These topics list the formats for the Hierarchies sections of the Account, Scenario, Entity, andCustom dimensions.
Account HierarchiesSyntax for Account dimension hierarchies:
parentmemberlabel;childmemberlabel
This example specifies Account dimension hierarchies:
!HIERARCHIES=Account
109
;[None];ExchangeRatesExchangeRates;Rate1ExchangeRates;Rate2;Plug;NetProfitNetProfit;NetIncomeNetIncome;GrossMarginGrossMargin;SalesGrossMargin;TotalCostsTotalCosts;PurchasesTotalCosts;SalariesTotalCosts;OtherCostsNetIncome;AdminExpensesNetIncome;InterestChargesNetProfit;Taxes
Scenario HierarchiesSyntax for Scenario dimension hierarchies:
parentmemberlabel;childmemberlabel
This example specifies Scenario dimension hierarchies:
!HIERARCHIES=Scenario;Actual;Budget
Entity HierarchiesSyntax for Entity dimension hierarchies:
parentmemberlabel;childmemberlabel
This example specifies Entity dimension hierarchies:
!HIERARCHIES=Entity;[None];RegionalRegional;UnitedStatesUnitedStates;CaliforniaCalifornia;SunnyvaleCalifornia;FosterCity
Custom HierarchiesSyntax for Custom dimension hierarchies:
parentmemberlabel;childmemberlabel;AggregationWeight
This example specifies a Custom dimension hierarchy:
!HIERARCHIES=Products;[None];1;AllProducts;0
110
AllProducts;Golf;1Golf;GolfBalls;1Golf;GolfShoes;1Golf;GolfTees;1Golf;GolfClubs;1
Dimensions Not Included in Metadata FilesThe Year, Period, and View dimensions are not included in metadata files. You define thesedimensions in the application profile that you specify when you define an application.
Value and Intercompany Partner dimension members are mostly system-defined. However, youcan define descriptions for Value members, and security classes and descriptions for somemembers of the Intercompany Partner dimension.
l Value — Standard members are automatically generated. In addition, after you loadmetadata, the system automatically creates a triplet of Value dimension members for eachcurrency that you loaded: CurrencyName, CurrencyName Adjs, and CurrencyName Total,where CurrencyName is the currency label. For example, for a currency of USD, FinancialManagement creates these Value dimension members: USD, USD Adjs, and USD Total.You can define descriptions of the system-generated members, as well as descriptionsappended to the Value members that the system creates for user-defined currencies.
l Intercompany Partner — This dimension is automatically generated. An IntercompanyPartner dimension member is generated for each Entity dimension member in which theIsICP attribute is set to TRUE. You can define security classes and descriptions for someIntercompany Partner members as described in “Intercompany Partner” on page 108.
Using Metadata Manager ViewsYou use Metadata Manager to edit and create metadata files. Metadata includes informationrelating to dimension member attributes and currencies. For example, you can use MetadataManager to add accounts to an application.
Note: Metadata Manager is available only in the Financial Management Windows client.
Metadata Manager can open files in extensible mark-up language (XML) and APP file formats.You can use Metadata Manager to create an XML or APP file or to edit an XML or APP file thatwas extracted from a Financial Management application. Metadata files created in MetadataManager are automatically encoded with the Unicode format, using Little Endian byte ordering.After you create or edit a metadata file, you can load the metadata contained in the file into anapplication.
You cannot edit metadata directly in an application. When you make changes to metadata inMetadata Manager, you are making changes only to the file, not to the metadata in theapplication. After you extract and modify the metadata in the file, you must reload the modifiedfile into the application for your changes to take effect.
111
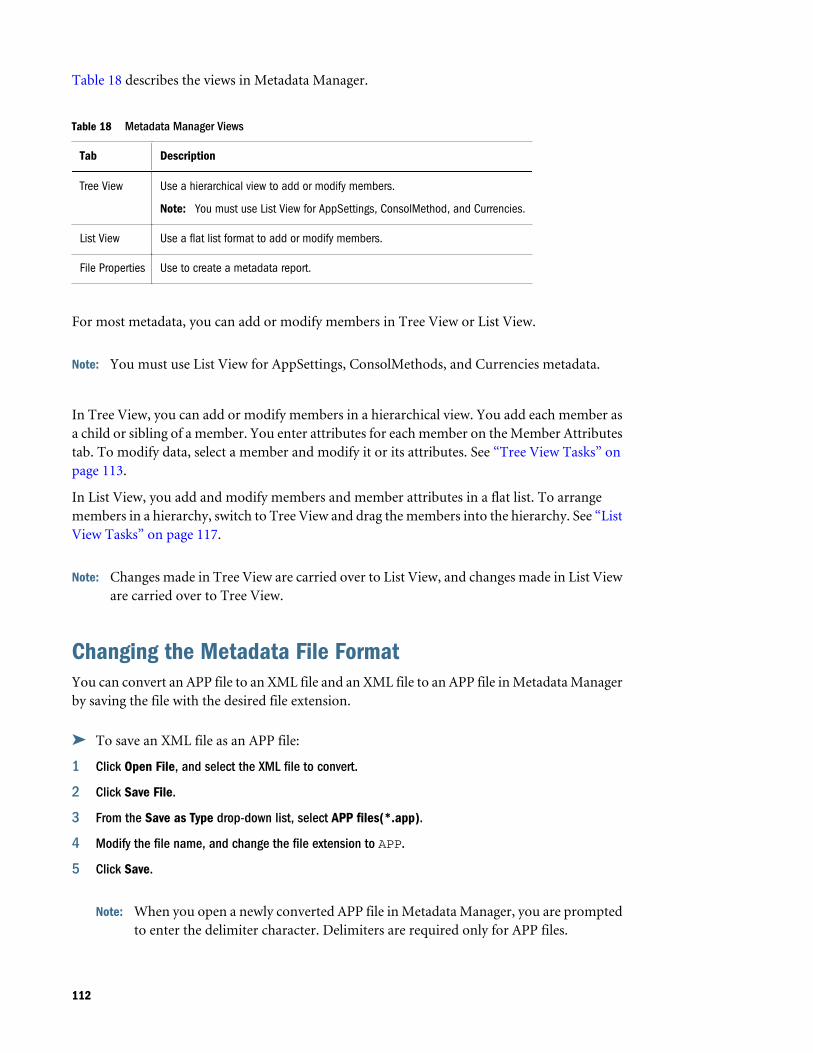
Table 18 describes the views in Metadata Manager.
Table 18 Metadata Manager Views
Tab Description
Tree View Use a hierarchical view to add or modify members.
Note: You must use List View for AppSettings, ConsolMethod, and Currencies.
List View Use a flat list format to add or modify members.
File Properties Use to create a metadata report.
For most metadata, you can add or modify members in Tree View or List View.
Note: You must use List View for AppSettings, ConsolMethods, and Currencies metadata.
In Tree View, you can add or modify members in a hierarchical view. You add each member asa child or sibling of a member. You enter attributes for each member on the Member Attributestab. To modify data, select a member and modify it or its attributes. See “Tree View Tasks” onpage 113.
In List View, you add and modify members and member attributes in a flat list. To arrangemembers in a hierarchy, switch to Tree View and drag the members into the hierarchy. See “ListView Tasks” on page 117.
Note: Changes made in Tree View are carried over to List View, and changes made in List Vieware carried over to Tree View.
Changing the Metadata File FormatYou can convert an APP file to an XML file and an XML file to an APP file in Metadata Managerby saving the file with the desired file extension.
ä To save an XML file as an APP file:
1 Click Open File, and select the XML file to convert.
2 Click Save File.
3 From the Save as Type drop-down list, select APP files(*.app).
4 Modify the file name, and change the file extension to APP.
5 Click Save.
Note: When you open a newly converted APP file in Metadata Manager, you are promptedto enter the delimiter character. Delimiters are required only for APP files.
112
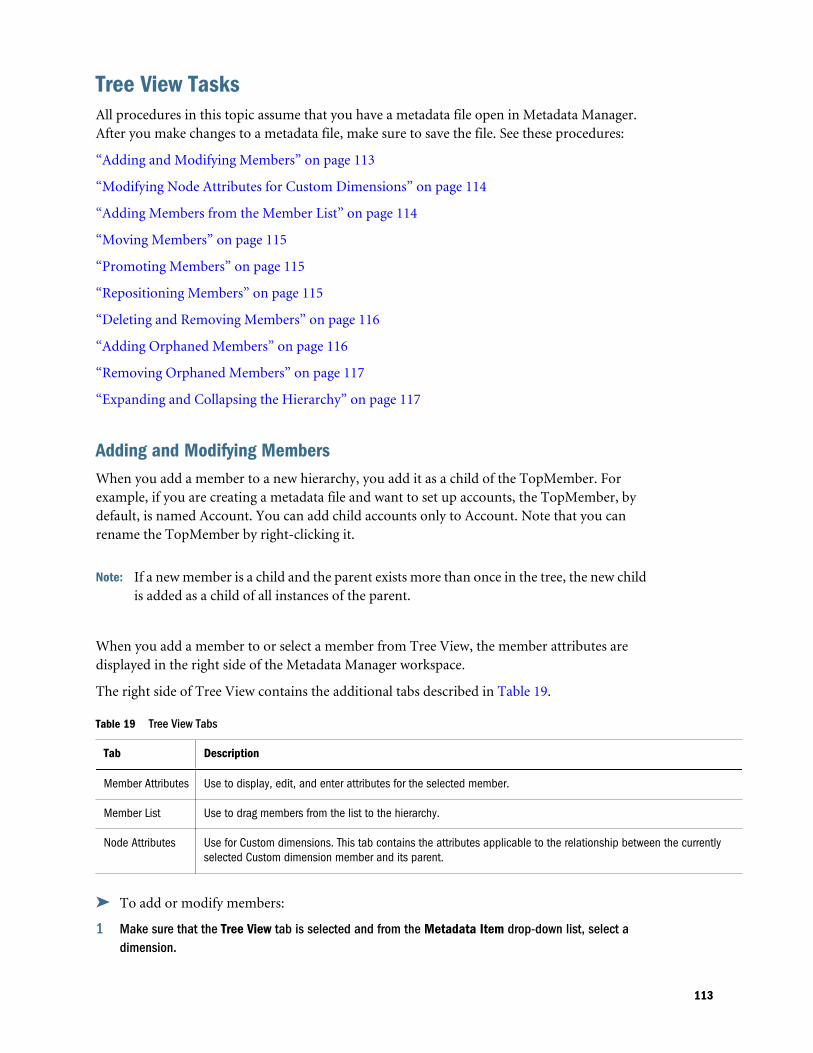
Tree View TasksAll procedures in this topic assume that you have a metadata file open in Metadata Manager.After you make changes to a metadata file, make sure to save the file. See these procedures:
“Adding and Modifying Members” on page 113
“Modifying Node Attributes for Custom Dimensions” on page 114
“Adding Members from the Member List” on page 114
“Moving Members” on page 115
“Promoting Members” on page 115
“Repositioning Members” on page 115
“Deleting and Removing Members” on page 116
“Adding Orphaned Members” on page 116
“Removing Orphaned Members” on page 117
“Expanding and Collapsing the Hierarchy” on page 117
Adding and Modifying MembersWhen you add a member to a new hierarchy, you add it as a child of the TopMember. Forexample, if you are creating a metadata file and want to set up accounts, the TopMember, bydefault, is named Account. You can add child accounts only to Account. Note that you canrename the TopMember by right-clicking it.
Note: If a new member is a child and the parent exists more than once in the tree, the new childis added as a child of all instances of the parent.
When you add a member to or select a member from Tree View, the member attributes aredisplayed in the right side of the Metadata Manager workspace.
The right side of Tree View contains the additional tabs described in Table 19.
Table 19 Tree View Tabs
Tab Description
Member Attributes Use to display, edit, and enter attributes for the selected member.
Member List Use to drag members from the list to the hierarchy.
Node Attributes Use for Custom dimensions. This tab contains the attributes applicable to the relationship between the currentlyselected Custom dimension member and its parent.
ä To add or modify members:
1 Make sure that the Tree View tab is selected and from the Metadata Item drop-down list, select adimension.
113
2 Do one of these tasks:
l To add a child member to a specific member, select a member, and then click
l To add a sibling member to a specific member, select a member, and then click
l To modify members, select a member.
Note: You can add children only to the TopMember in the hierarchy.
3 On the Member Attributes tab, enter or modify attributes for the member.
4 Press the Tab key to confirm the new entry.
5 Repeat these steps until you have added or updated all members.
Modifying Node Attributes for Custom DimensionsThe aggregation weight property specifies the percentage of the custom member to be aggregatedto the parent, with 1 representing 100%. By changing the aggregation weight attribute on theNode Attributes tab, you can modify the relationship between the selected Custom member andits parent. For example, if you set the aggregation weight to .5, only 50 percent of the value forthe member is aggregated to the parent. See “Defining Custom Members” on page 82.
The aggregation weight for the Custom dimension can be any value (positive or negative), andfractions are allowed (for example, 1.5 is valid). The default values are 0 (no aggregation) and 1(to aggregate). If the value is not 0 or 1, then the child member is aggregated to the parent usingthat multiplier.
ä To modify node attributes:
1 Make sure that the Tree View tab is selected and, from the Metadata Item drop-down list, select aCustom dimension.
2 In the hierarchy, highlight a Custom member.
3 On the right side of the Metadata Manager workspace, select the Node Attributes tab.
4 Modify the AggrWeight attribute.
Adding Members from the Member ListYou can add members to the hierarchy by dragging members from the Member List tab and tothe hierarchy structure. If you add a child member to a parent member and the parent existsmore than once in the hierarchy, the child member is added as a child member for all instancesof the parent member. You can add multiple members simultaneously.
ä To add members from the Member List tab:
1 Ensure that the Tree View tab is selected, and from the Metadata Item drop-down list, select a dimension.
2 From the Member List tab, select the members to add.
114
Note: You can select multiple members by holding down the Ctrl key as you select eachmember.
3 Drag the selected members to the hierarchy.
Note: The members are not removed from the Member List tab; they are only copied intothe hierarchy.
Moving MembersYou can move members in the hierarchy by dragging the members. You can move multiplemembers simultaneously.
ä To move members:
1 Ensure that the Tree View tab is selected, and from the Metadata Item drop-down list, select adimension.
2 In the hierarchy, select a member.
Note: You can select multiple members by holding down the Ctrl key as you select eachmember.
3 Drag the selected members to the new location.
Promoting Members
You can promote members in the hierarchy by using the Promote toolbar button . Whenyou promote a member, it moves it up one level in the hierarchy.
ä To promote members:
1 Ensure that the Tree View tab is selected, and from the Metadata Item drop-down list, select adimension.
2 In the hierarchy, select a member to promote.
3 Click .
Repositioning Members
You can reposition members in the hierarchy by using the Move Up and Move Down toolbar buttons. Repositioning does not promote members to a new level but moves them upor down within their current level in the hierarchy.
115
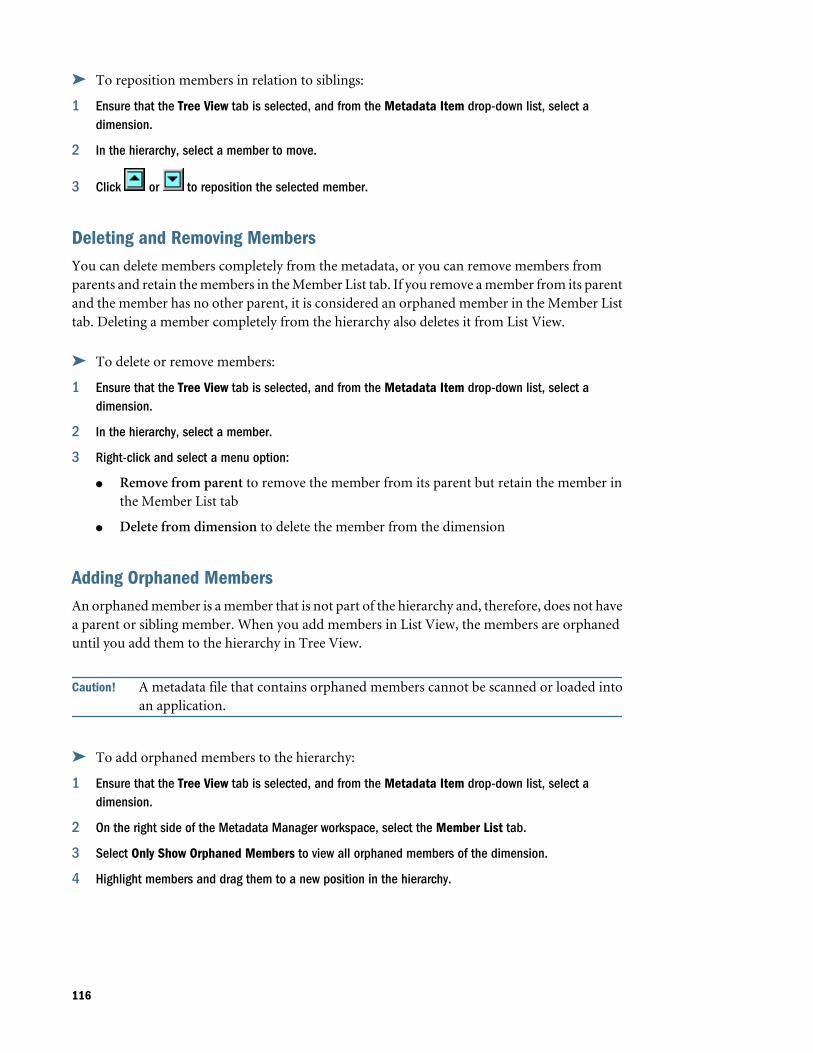
ä To reposition members in relation to siblings:
1 Ensure that the Tree View tab is selected, and from the Metadata Item drop-down list, select adimension.
2 In the hierarchy, select a member to move.
3 Click or to reposition the selected member.
Deleting and Removing MembersYou can delete members completely from the metadata, or you can remove members fromparents and retain the members in the Member List tab. If you remove a member from its parentand the member has no other parent, it is considered an orphaned member in the Member Listtab. Deleting a member completely from the hierarchy also deletes it from List View.
ä To delete or remove members:
1 Ensure that the Tree View tab is selected, and from the Metadata Item drop-down list, select adimension.
2 In the hierarchy, select a member.
3 Right-click and select a menu option:
l Remove from parent to remove the member from its parent but retain the member inthe Member List tab
l Delete from dimension to delete the member from the dimension
Adding Orphaned MembersAn orphaned member is a member that is not part of the hierarchy and, therefore, does not havea parent or sibling member. When you add members in List View, the members are orphaneduntil you add them to the hierarchy in Tree View.
Caution! A metadata file that contains orphaned members cannot be scanned or loaded intoan application.
ä To add orphaned members to the hierarchy:
1 Ensure that the Tree View tab is selected, and from the Metadata Item drop-down list, select adimension.
2 On the right side of the Metadata Manager workspace, select the Member List tab.
3 Select Only Show Orphaned Members to view all orphaned members of the dimension.
4 Highlight members and drag them to a new position in the hierarchy.
116
Removing Orphaned MembersIf you select to show only orphaned members, you can easily remove orphaned members fromthe member list.
Caution! A metadata file that contains orphaned members cannot be scanned or loaded intoan application.
ä To remove orphaned members:
1 Ensure that the Tree View tab is selected, and from the Metadata Item drop-down list, select adimension.
2 On the right side of the Metadata Manager workspace, select the Member List tab.
3 Select Only Show Orphaned Members to display the orphaned members of the selected dimension.
4 Highlight members, right-click, and select Remove Highlighted Members.
Note: To remove all orphaned members, right-click, and select Select All.
Expanding and Collapsing the HierarchyYou can expand or collapse the hierarchy by using the expand and collapse toolbar buttons. Youcan expand or collapse the entire hierarchy, or you can expand or collapse individual parentmembers.
ä To expand or collapse the tree:
1 Make sure that the Tree View tab is selected, and, from the Metadata Item drop-down list, select adimension.
2 To expand the hierarchy, select a member and click to expand the current member and all membersbelow it in the hierarchy.
3 To collapse the hierarchy, select a member and Click to collapse the current member and allmembers below it in the hierarchy.
List View TasksAll procedures in this topic assume that you have a metadata file open in Metadata Manager.After you make a change to a metadata file, make sure to save the file.
Note: After you use List View to add members, use Tree View to add the members to thehierarchy.
See these procedures:
117
“Adding and Modifying Members” on page 118
“Copying, Cutting, and Pasting Members” on page 118
“Deleting Members” on page 119
“Validating Metadata” on page 119
“Showing or Hiding Columns” on page 119
Adding and Modifying MembersWhen you use List View to add members, you can enter the member and its attributes in a flatlist. The information that you add or modify is not validated until you change to a different view(for example, Tree View) or manually validate the data.
ä To add or modify members:
1 Ensure that the List View tab is selected, and from the Metadata Item drop-down list, select a dimension.
2 To add a member, click and, in the new line, enter the member name and attributes.
3 To modify a member, select the member and modify it or its attributes.
4 Repeat these steps until you have completed all member additions and modifications.
Copying, Cutting, and Pasting MembersYou can cut, copy, and paste members from one cell to another cell or from multiple cells tomultiple cells. You can also disable drop-down list cells. Disabling drop-down list cells makes iteasier to copy, cut, and paste multiple cells. Changes made in List View are reflected in TreeView.
ä To copy, cut, or paste members, application settings, or currencies:
1 Ensure that the List View tab is selected, and from the Metadata Item drop-down list, select a dimension.
2 Optional: Select Disable Combo Boxes.
3 Select a cell or multiple, contiguous cells.
Note: To select an entire row or column, select the row number or the column header.
4 Perform an action:
l Click to cut the information in a cell and store it on the clipboard.
l Click to copy the information in a cell and store it on the clipboard.
l Click to paste information from the clipboard to the selected cell.
118
Deleting MembersWhen you delete a member you must also delete all attributes associated with the member.Therefore, to delete a member, you must select the entire member row. Changes made in ListView are reflected in Tree View.
ä To delete members:
1 Ensure that the List View tab is selected, and from the Metadata Item drop-down list, select a dimension.
2 Highlight rows by clicking the row numbers.
3 Click .
Validating MetadataChanges that you make to members are not validated until you change to a different view (forexample, Tree View) or until you select the validate toolbar button. If an error is found duringthe validation process, the system displays the row number where the error occurred.
Showing or Hiding ColumnsYou can specify the columns of information to be displayed by showing or hiding columns.
ä To hide a single column:
1 Make sure that the List View tab is selected, and, from the Metadata Item drop-down list, select adimension.
2 Right-click a column, and select Hide Current Column.
ä To show or hide multiple columns:
1 Make sure that the List View tab is selected, and, from the Metadata Item drop-down list, select adimension.
2 Right-click in the grid, and select Show/Hide Columns.
3 Select the columns to view.
4 Click OK.
Sorting Metadata in List ViewYou can sort metadata in List View by column. You can sort column information in ascendingor descending order.
ä To sort a column:
1 Make sure that the List View tab is selected, and, from the Metadata Item drop-down list, select adimension.
119
2 Double-click a column header to sort the column information.
Tip: To sort the column in reverse order, double-click a column header again.
Creating Metadata Reports in File PropertiesYou can apply an XSL style sheet to transform metadata into HTML format for easier viewing.
Financial Management provides two default report XSL style sheets for metadata reports. Forexample, for the report to display metadata in hierarchies, use theHFM_MetadataWithHierarchy.XSL style sheet.
The style sheets are installed during the installation process. They are located by default in theReport Style Sheets\Metadata folder in the directory to which you installed FinancialManagement. To create your own style sheets instead of using the ones provided, contact yourIT administrator for support with XSL.
ä To create a metadata report:
1 In Metadata Manager, select the File Properties tab, and then open a metadata file.
Note: By default, metadata files use the XML or APP file extension.
2 Optional: Click View XML to view the metadata before generating the report.
3 In the XSL Style Sheet Filename text box, enter the style sheet name to apply to the metadata file; or
click to locate a file.
Note: By default, metadata report style sheets use the XSL file extension.
4 Click View Metadata to view the formatted report.
Metadata Referential IntegrityTo prevent a referential integrity problem from occurring in the application, FinancialManagement verifies that metadata changes are valid to the application in its current state beforeaccepting the changes.
When you load metadata, the system compares the metadata load file with the metadata elementsin the application. All changes are recorded, and some changes are checked against existing data.Modifications that cause referential integrity problems are not allowed.
Metadata Referential Integrity ChecksThe log file provides information about specific changes in metadata attributes that require thesystem to check existing data with regard to the metadata file that you are loading.
120
The system also checks for invalid points of view between the load file and the metadata in theapplication. If a dimension member is not in the load file but exists in a journal in the application,the metadata load is prevented.
Metadata Log File Referential Integrity ErrorsIn the metadata log file, referential integrity errors are displayed under this section:
Metadata referential integrity check started at
Each line in the referential integrity check section refers to a metadata integrity error in the loadfile. Errors found during the integrity check are displayed in this format:
Journals::SINGLECA1 Scenario::Actual Year::2014 Value::[Contribution Adjs] Period::January has 1 occurrences of Changed::[SCENARIO::Actual::ZeroViewForAdj: Periodic to YTD]
This example shows that the metadata integrity error occurs in the SINGLECA1 journal withthis point of view: Scenario Actual, Year 2014, Value [Contribution Adjs], Period January. Theerror is that the ZeroViewForAdj attribute for the Actual scenario was changed from Periodicto YTD. This change is not allowed because a journal exists for the Actual scenario.
Using the Metadata Merge UtilityIf you are upgrading to a new release from an existing release, you can use the Metadata Mergeutility to merge your existing metadata files with the files in the latest version. This enables youto retain modifications that you made in your existing metadata file. The utility is located in theFinancial Management\Utilities folder.
Note: The Metadata Merge utility works only with metadata in XML format; it does not workfor APP format.
Usage
MetadataMerge.bat -b<Base File>[i<Ignore descriptions>]-l <Latest file>-m <Modified file>[-o <Output File>]
where:
-b,-base <Base File> = Base version of metadata file full path including the file name withextension
-l,-latest <Latest File> = Release version of metadata file full path including the file name withextension
-m,-modified <Modified File>= Modified metadata file full path including the file name withextension
-o,-output <Output File> = Output metadata file path, to which the updated metadata andMetadata Difference report will be saved
121
-i,-ignoredesc <Ignore Descriptions> = Ignore member description changes
Example
-b c:\temp\MetadataMerge\Comma_V1_B.xml
-l c:\temp\MetadataMerge\Comma_V2_R.xml
-m c:\temp\MetadataMerge\Comma_Customer_M.xml (User-modified metadata
based on Comma_V1_B.xml file)
-i true
Command: MetadataMerge.bat -b c:\temp\MetadataMerge\Comma_Metadata_B.xml -l c:\temp\MetadataMerge\Comma_Metadata_R.xml -m
c:\temp\MetadataMerge\Comma_Metadata_M.xml -i true
ä To use the Metadata Merge utility:
1 Run MetadataMerge.bat from either File Explorer or the command line.
2 During the merge process, if there are any metadata conflicts, the system displays a warning message.Select one of these options:
l Y - Yes. The system will apply changes from the latest release file and merge them intothe existing file.
l N - No. The system will not apply changes from the latest release file.
l MA - Merge All. All changes will be applied from the latest release file. The system willnot prompt you for further conflicts.
l MN - Merge None. No changes will be applied. The system will not prompt you forfurther conflicts.
3 Copy the two images under the Images folder to the path where the Metadata Differences Report.htmlfile is generated. These images are the Expand and Collapse icons for the tree in the MetadataDifferences report.
Loading MetadataWhen you load a metadata file, Financial Management replaces metadata with new metadatafrom the load file. Replacement is useful for making minor changes to the metadata, such asadding an account. For example, if your application includes a North America entity, and youload entities from a metadata file, the attributes for the North America entity in the file replacethe attributes for the North America entity in the application.
Note: Do not use the ampersand character ( & ) in a metadata file. If you do, an error occurs.
When you load metadata files, the system waits for other tasks such as consolidation, data entryor other load processes to finish before proceeding to load the files. Oracle recommends thatyou load metadata during periods of light activity across the server cluster instead of, for example,
122
during a long-running consolidation. You can check the Running Tasks page to see whichconsolidations or data loads, for example, are in progress.
Loading large metadata files can result in a proxy timeout error. If this error occurs, increase theWeb proxy timeout setting.
After you load a metadata file to an application, users using the application are notified that thesystem has changed and that they must log off from the application and log back on.
Caution! You must delete orphaned members before loading; if orphaned members are notdeleted, metadata is not updated.
You must select either the Merge or Replace load option. You can clear all metadata beforeloading the new metadata and also check the data integrity. Table 20 describes the load options.
Table 20 Metadata Load Options
Load Option Description
Merge If a dimension member exists in the load file and in the application database, then the member in the database isreplaced with the member from the load file. If the database has other dimension members that are not referenced inthe load file, the members in the database are unchanged.
For example, a database contains entities CT, MA, and CA. You use the merge method to load a metadata file containingnew information for CA only. In the database, CA is updated with the new information and MA and CT remain in thedatabase and remain unchanged.
Replace All dimension members in the application database are deleted and the members from the load file are put into thedatabase.
For example, a database contains entities CT, MA, and CA. You use the replace method to load a metadata file containingnew information for CA only. In the database, CT and MA are deleted, and the only entity is CA with the new informationfrom the load file.
Clear AllMetadataBefore Loading
All dimension members and corresponding data, journals, and intercompany transactions in the application databaseare deleted.
Note: If this option is selected, it overrides the function of the merge and replace methods.
Check Integrity Checks the metadata against the data to ensure integrity. See “Metadata Referential Integrity” on page 120.
Note: Oracle recommends that you add Financial Management to the exceptions for your Webpop-up blocker. When you perform some tasks such as loading data, a status windowpops up showing the task status. If you have a pop-up blocker enabled on your computer,the status window is not displayed.
ä To load metadata:
1 Open the application.
2 Select Consolidation, then Load, and then Application Elements.
3 In the Metadata section, enter the file name to load or click Browse to locate the file.
123
Note: By default, metadata files use the XML or APP file extension. The load process acceptsother file extensions such as TXT or CSV, however, Oracle recommends that you usethe XML or APP file extension.
4 Optional: Select Clear metadata and data.
Note: If you select this option, you cannot select elements in the Metadata Options section.
5 Optional: Select Check Integrity to check the metadata file against the data in the current application.
It is highly recommended that you select this option, because it ensures that the applicationis not adversely affected by the metadata in the load file.
Note: If integrity errors occur, they are written to the metadata log file, and no portion ofthe file is loaded into the application.
You must fix the errors before you can continue with this procedure. See “Metadata LogFile Referential Integrity Errors” on page 121.
6 In the Load Options section, select a load method:
l Merge
l Replace
7 From Delimiter, select the character to be used to separate the metadata in the file.
Delimiter characters are required only for ASCII files with the APP file extension. Delimitercharacters are not required for XML files. These characters are valid:
, ~ @ $ % ^ | : ; ? \
Note: Use a character that is not used in the file name or in any other way in the file. Forexample, if you use the comma in an entity description, you cannot use the commaas the delimiter.
8 From the Filters section, select the types of metadata to load.
Tip: To reset the filter selections, click Reset.
9 Optional: Click Scan to verify that the file format is correct.
10 Click Load.
11 Optional: To download the log file, click Download Log. Click Open to display the log file, or Save andselect a location to save the file locally.
Viewing Metadata Load ChangesAfter a metadata file has been successfully loaded, you can view detailed information about themetadata changes made during the load process. For example, if an attribute was changed in the
124

Account dimension, the system displays the old attribute and the new attribute values. You canview a report of this information from the Task Audit module.
The metadata load changes report includes these details:
l Members added
l Members deleted
l Members renamed through Performance Management Architect
l Member attribute changes (does not include description changes)
l New parent/child relationships
l Deleted parent/child relationships
l Changes in aggregation weight for Parent-Child relationships in Custom dimensions
Sample Metadata Load Report Output** Entity **Added member WestRegion.Changed IsICP for China from Y to N.Added Parent/Child Regional/Asia.Removed Parent/Child Europe/Bulgaria.** Account **Renamed member SalesIC to SalesInterco.Deleted member EastSales.** Scenario **Added member Forecast.
ä To view metadata load changes:
1 Select Navigate, then Administer, and then Consolidation Administration.
2 Select Administration, then Audit, and then Tasks.
3 From the Task Audit Activity column, click the Link icon next to the Metadata Load process thatyou want to view.
4 Click Open and view the report with any text editor.
Extracting MetadataYou can extract metadata to view or modify it in Metadata Manager. When you extract metadata,you save the file as an XML or APP file and specify the file name and location. After you modifymetadata, you must reload the modified file into the application for the changes to take effect.
You cannot extract members of system-defined dimensions, such as the Value dimension. Inaddition, you cannot extract members of dimensions that are defined in application profiles,such as Year and Period.
ä To extract metadata:
1 Open the application.
125
2 Select Consolidation, then Extract, and then Application Elements.
3 In the Metadata section, from Delimiter, select the character to be used to separate the metadata inthe file.
Delimiter characters are necessary only for ASCII files with the .app file extension. Delimitercharacters are not necessary for XML files. These characters are valid:
, ~ @ $ % ^ | : ; ? \
Note: Use a character that is not used in the file name or in any other way in the file. Forexample, if you use the comma in an entity description, do not use the comma as thedelimiter.
4 Select a File Format:
l Financial Management (.app)
l Financial Management (.xml)
l EPM Architect (.ads)
5 From Filters, select the types of metadata to extract.
6 Click Extract.
7 Follow the download instructions displayed in the browser to download the extracted file.
The instructions vary depending on the Web browser that you are using. Make sure to savethe file in the Web directory that you set up.
8 Optional: To download the log file, click Download Log. Click Open to display the log file, or Save andselect a location to save the file locally.
126
5Managing Member Lists
In This Chapter
Creating Member List Files .. . . . . . . . . . . . . . . . . . . . . . . . . . . . . . . . . . . . . . . . . . . . . . . . . . . . . . . . . . . . . . . . . . . . . . . . . . . . . 128
Loading Member Lists .. . . . . . . . . . . . . . . . . . . . . . . . . . . . . . . . . . . . . . . . . . . . . . . . . . . . . . . . . . . . . . . . . . . . . . . . . . . . . . . . . . 132
Extracting Member Lists .. . . . . . . . . . . . . . . . . . . . . . . . . . . . . . . . . . . . . . . . . . . . . . . . . . . . . . . . . . . . . . . . . . . . . . . . . . . . . . . . 133
System Lists by Dimension ... . . . . . . . . . . . . . . . . . . . . . . . . . . . . . . . . . . . . . . . . . . . . . . . . . . . . . . . . . . . . . . . . . . . . . . . . . . 134
Member lists enable you to specify a subset of members within a dimension, and can reduce thetime that you spend browsing member hierarchies in data grids and data forms. For example,if Italy, France, and UK are used frequently in the point of view for the Entity dimension, youcan create a member list named European region that includes the frequently used members.You can then select members from the list, instead of browsing through the hierarchy of theEntity dimension.
You can also use member lists in rules. For example, you can write a rule that calculates allmembers of a member list.
Two types of member lists are used in Financial Management:
l System-defined member lists
l User-defined member lists
After an application is created and metadata is loaded, the system generates system-definedmember lists. These member lists group members according to common properties, such as allchildren of a specified parent, or all base members of a specified dimension. System-definedmember lists are enclosed in brackets, for example [Descendants].
You can create user-defined member lists that contain user-specified dimension members. Forexample, you can select member lists when setting the point of view in data grids or in journals,or when copying or clearing data in Database Management. You can create member lists for allFinancial Management dimensions.
You can create static and dynamic member lists. Static member lists contain user-specifieddimension members. For example, you can create a static Account member list calledProfitAndLoss that includes only these accounts: Sales, Purchases, Salaries, OtherCosts, andTotalCosts. To add members to static lists, you must add the members manually.
Dynamic member lists contain members that, at runtime, meet specified criteria. Because thelists are built dynamically, they are updated when they are retrieved. For the Scenario, Year,
127
Period, and Entity dimensions, you can use the current member in the POV as the starting pointfor the list.
Note: You can combine static and dynamic member lists in the same file.
Sample member list files are included when you install Sample Applications for FinancialManagement. The files are located in the Sample Applications folder in the directory to whichyou installed Financial Management.
Creating Member List FilesYou can use a text editor such as Notepad ++ to create member list files and then load the filesinto your application.
You can use Microsoft Visual Basic script syntax to add members to each static and dynamiclist.
Note: The member list name cannot contain quotation marks ( “ ) or an ampersand (&).
By default, member list files use the LST file extension.
You use these subroutines to create member list files:
l Sub EnumMemberLists (): Specifies which dimensions have member lists, and defines themember lists for each dimension. You define the number of lists for each dimension andthe name of each member list within that dimension.
l Sub EnumMembersInList (): Defines the members within each member list.
Note: The HS.Dimension function returns the dimension alias of the dimension. For Customdimensions, in which you can specify a dimension name and dimension alias (long name),the HS.Dimension function returns the dimension alias (long name).
For information on adding dynamic member lists to the script, see “Dynamic Member Lists”on page 131.
EnumMemberListsEach member list file must include an EnumMemberLists subroutine to specify whichdimensions have member lists, the number of lists for each dimension, and the name of eachmember list. Within the EnumMemberLists () subroutine, you use the syntax and functions inthis table to define member lists:
128
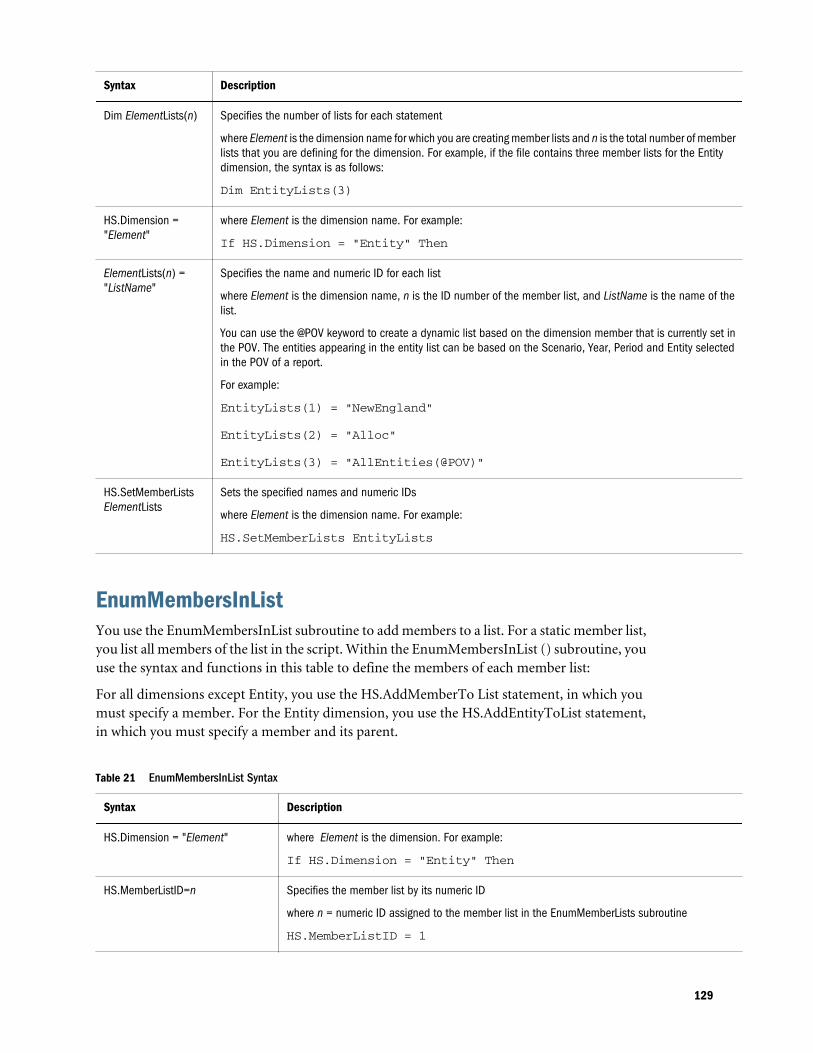
Syntax Description
Dim ElementLists(n) Specifies the number of lists for each statement
where Element is the dimension name for which you are creating member lists and n is the total number of memberlists that you are defining for the dimension. For example, if the file contains three member lists for the Entitydimension, the syntax is as follows:
Dim EntityLists(3)
HS.Dimension ="Element"
where Element is the dimension name. For example:
If HS.Dimension = "Entity" Then
ElementLists(n) ="ListName"
Specifies the name and numeric ID for each list
where Element is the dimension name, n is the ID number of the member list, and ListName is the name of thelist.
You can use the @POV keyword to create a dynamic list based on the dimension member that is currently set inthe POV. The entities appearing in the entity list can be based on the Scenario, Year, Period and Entity selectedin the POV of a report.
For example:
EntityLists(1) = "NewEngland"
EntityLists(2) = "Alloc"
EntityLists(3) = "AllEntities(@POV)"
HS.SetMemberListsElementLists
Sets the specified names and numeric IDs
where Element is the dimension name. For example:
HS.SetMemberLists EntityLists
EnumMembersInListYou use the EnumMembersInList subroutine to add members to a list. For a static member list,you list all members of the list in the script. Within the EnumMembersInList () subroutine, youuse the syntax and functions in this table to define the members of each member list:
For all dimensions except Entity, you use the HS.AddMemberTo List statement, in which youmust specify a member. For the Entity dimension, you use the HS.AddEntityToList statement,in which you must specify a member and its parent.
Table 21 EnumMembersInList Syntax
Syntax Description
HS.Dimension = "Element" where Element is the dimension. For example:
If HS.Dimension = "Entity" Then
HS.MemberListID=n Specifies the member list by its numeric ID
where n = numeric ID assigned to the member list in the EnumMemberLists subroutine
HS.MemberListID = 1
129
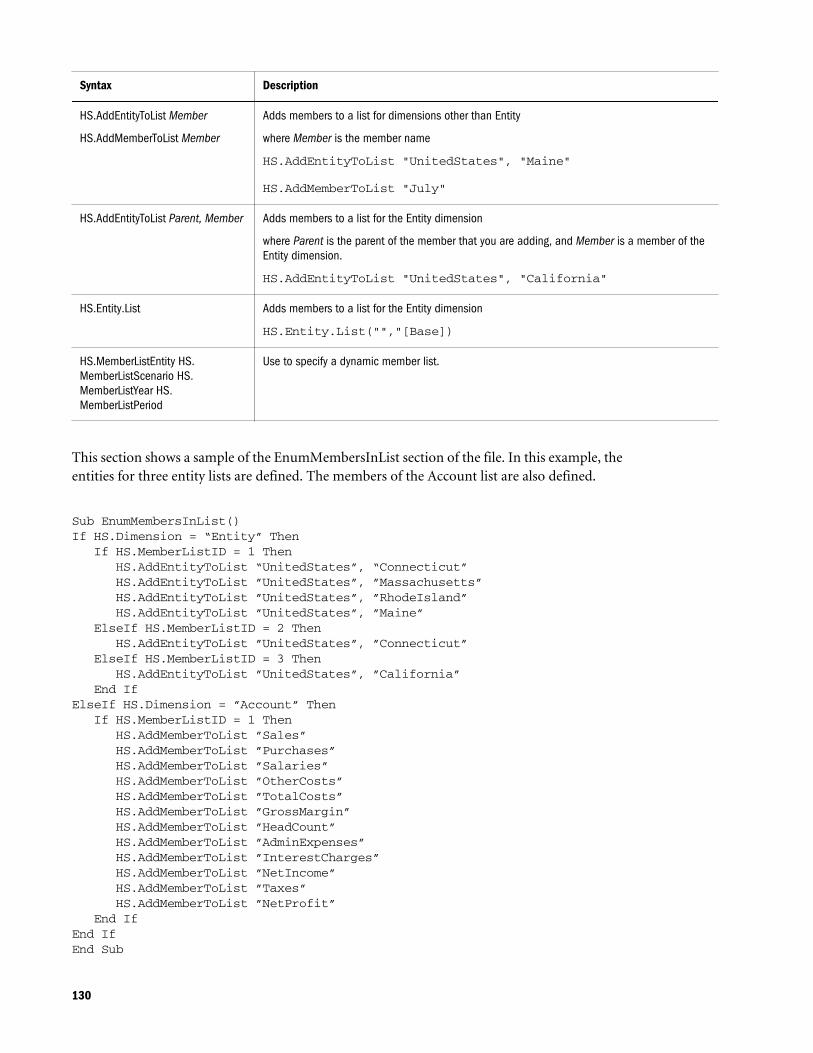
Syntax Description
HS.AddEntityToList Member
HS.AddMemberToList Member
Adds members to a list for dimensions other than Entity
where Member is the member name
HS.AddEntityToList "UnitedStates", "Maine"
HS.AddMemberToList "July"
HS.AddEntityToList Parent, Member Adds members to a list for the Entity dimension
where Parent is the parent of the member that you are adding, and Member is a member of theEntity dimension.
HS.AddEntityToList "UnitedStates", "California"
HS.Entity.List Adds members to a list for the Entity dimension
HS.Entity.List("","[Base])
HS.MemberListEntity HS.MemberListScenario HS.MemberListYear HS.MemberListPeriod
Use to specify a dynamic member list.
This section shows a sample of the EnumMembersInList section of the file. In this example, theentities for three entity lists are defined. The members of the Account list are also defined.
Sub EnumMembersInList()If HS.Dimension = “Entity” Then If HS.MemberListID = 1 Then HS.AddEntityToList “UnitedStates”, “Connecticut” HS.AddEntityToList ”UnitedStates”, ”Massachusetts” HS.AddEntityToList ”UnitedStates”, ”RhodeIsland” HS.AddEntityToList ”UnitedStates”, ”Maine” ElseIf HS.MemberListID = 2 Then HS.AddEntityToList ”UnitedStates”, ”Connecticut” ElseIf HS.MemberListID = 3 Then HS.AddEntityToList ”UnitedStates”, ”California” End IfElseIf HS.Dimension = ”Account” Then If HS.MemberListID = 1 Then HS.AddMemberToList ”Sales” HS.AddMemberToList ”Purchases” HS.AddMemberToList ”Salaries” HS.AddMemberToList ”OtherCosts” HS.AddMemberToList ”TotalCosts” HS.AddMemberToList ”GrossMargin” HS.AddMemberToList ”HeadCount” HS.AddMemberToList ”AdminExpenses” HS.AddMemberToList ”InterestCharges” HS.AddMemberToList ”NetIncome” HS.AddMemberToList ”Taxes” HS.AddMemberToList ”NetProfit” End IfEnd IfEnd Sub
130
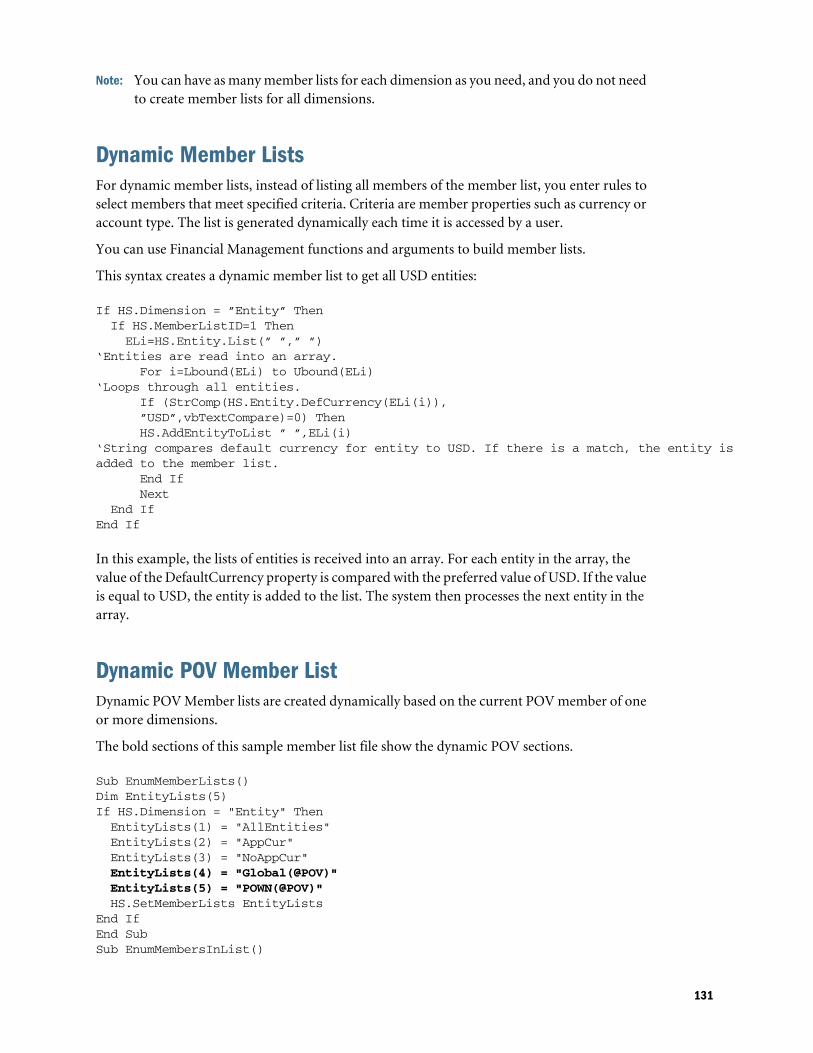
Note: You can have as many member lists for each dimension as you need, and you do not needto create member lists for all dimensions.
Dynamic Member ListsFor dynamic member lists, instead of listing all members of the member list, you enter rules toselect members that meet specified criteria. Criteria are member properties such as currency oraccount type. The list is generated dynamically each time it is accessed by a user.
You can use Financial Management functions and arguments to build member lists.
This syntax creates a dynamic member list to get all USD entities:
If HS.Dimension = ”Entity” Then If HS.MemberListID=1 Then ELi=HS.Entity.List(” ”,” ”)‘Entities are read into an array. For i=Lbound(ELi) to Ubound(ELi)‘Loops through all entities. If (StrComp(HS.Entity.DefCurrency(ELi(i)), ”USD”,vbTextCompare)=0) Then HS.AddEntityToList ” ”,ELi(i)‘String compares default currency for entity to USD. If there is a match, the entity is added to the member list. End If Next End IfEnd If
In this example, the lists of entities is received into an array. For each entity in the array, thevalue of the DefaultCurrency property is compared with the preferred value of USD. If the valueis equal to USD, the entity is added to the list. The system then processes the next entity in thearray.
Dynamic POV Member ListDynamic POV Member lists are created dynamically based on the current POV member of oneor more dimensions.
The bold sections of this sample member list file show the dynamic POV sections.
Sub EnumMemberLists()Dim EntityLists(5)If HS.Dimension = "Entity" Then EntityLists(1) = "AllEntities" EntityLists(2) = "AppCur" EntityLists(3) = "NoAppCur" EntityLists(4) = "Global(@POV)" EntityLists(5) = "POWN(@POV)" HS.SetMemberLists EntityListsEnd IfEnd SubSub EnumMembersInList()
131
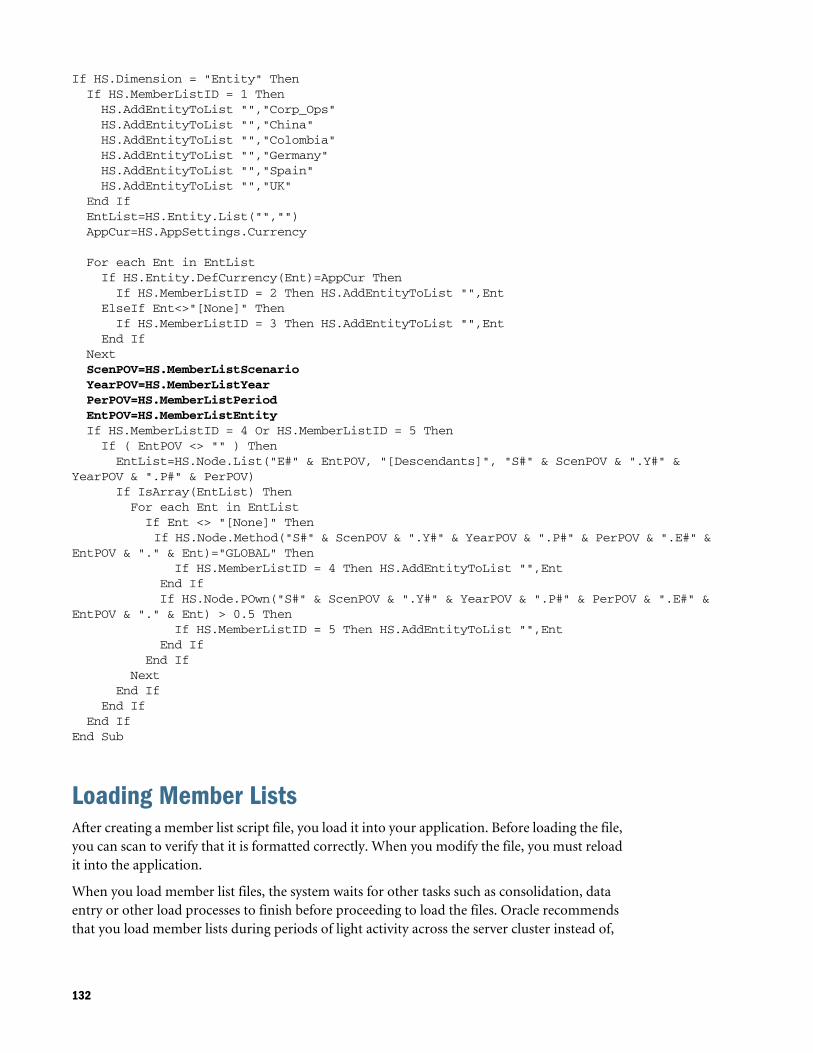
If HS.Dimension = "Entity" Then If HS.MemberListID = 1 Then HS.AddEntityToList "","Corp_Ops" HS.AddEntityToList "","China" HS.AddEntityToList "","Colombia" HS.AddEntityToList "","Germany" HS.AddEntityToList "","Spain" HS.AddEntityToList "","UK" End If EntList=HS.Entity.List("","") AppCur=HS.AppSettings.Currency For each Ent in EntList If HS.Entity.DefCurrency(Ent)=AppCur Then If HS.MemberListID = 2 Then HS.AddEntityToList "",Ent ElseIf Ent<>"[None]" Then If HS.MemberListID = 3 Then HS.AddEntityToList "",Ent End If Next ScenPOV=HS.MemberListScenario YearPOV=HS.MemberListYear PerPOV=HS.MemberListPeriod EntPOV=HS.MemberListEntity If HS.MemberListID = 4 Or HS.MemberListID = 5 Then If ( EntPOV <> "" ) Then EntList=HS.Node.List("E#" & EntPOV, "[Descendants]", "S#" & ScenPOV & ".Y#" & YearPOV & ".P#" & PerPOV) If IsArray(EntList) Then For each Ent in EntList If Ent <> "[None]" Then If HS.Node.Method("S#" & ScenPOV & ".Y#" & YearPOV & ".P#" & PerPOV & ".E#" & EntPOV & "." & Ent)="GLOBAL" Then If HS.MemberListID = 4 Then HS.AddEntityToList "",Ent End If If HS.Node.POwn("S#" & ScenPOV & ".Y#" & YearPOV & ".P#" & PerPOV & ".E#" & EntPOV & "." & Ent) > 0.5 Then If HS.MemberListID = 5 Then HS.AddEntityToList "",Ent End If End If Next End If End If End IfEnd Sub
Loading Member ListsAfter creating a member list script file, you load it into your application. Before loading the file,you can scan to verify that it is formatted correctly. When you modify the file, you must reloadit into the application.
When you load member list files, the system waits for other tasks such as consolidation, dataentry or other load processes to finish before proceeding to load the files. Oracle recommendsthat you load member lists during periods of light activity across the server cluster instead of,
132

for example, during a long-running consolidation. You can check the Running Tasks page tosee which consolidations or data loads, for example, are in progress.
After you load a member list file into an application, users using that application are notifiedthat the system has changed and that they must log off from the application and log back on.The calculation status also changes to OK SC (system changed).
Note: Oracle recommends that you add Financial Management to the exceptions for your Webpop-up blocker. When you perform some tasks such as loading data, a status windowpops up showing the task status. If you have a pop-up blocker enabled on your computer,the status window is not displayed.
ä To load member lists:
1 Open the application.
2 Select Consolidation, then Load, and then Application Elements.
3 In the Member Lists section, enter the file name to load, or click Browse to locate the file.
Note: By default, member list files use the LST file extension. The load process accepts otherfile extensions such as TXT or CSV, however, Oracle recommends that you use theLST file extension.
4 Optional: Click Scan to verify that the file format is correct.
5 Click Load.
Note: If an invalid member list is loaded, Web users may not be able to access the data grid.If the following error message is displayed, you may need to correct the member listand load the file:
”Type Mismatch /hfm/Data/ExploreData.asp. Error Number 13. Error Source: Microsoft VBScript runtime error.”
6 Optional: To download the log file, click Download Log. Click Open to display the log file, or Save andselect a location to save the file locally.
Extracting Member ListsYou can extract member lists from an application. Extracted member lists are saved as ASCIIfiles. By default, member list files use the LST file extension. After you extract member lists, youcan view and modify the member list information in a text editor.
ä To extract member lists:
1 Open the application.
2 Select Consolidation, then Extract, and then Application Elements.
133
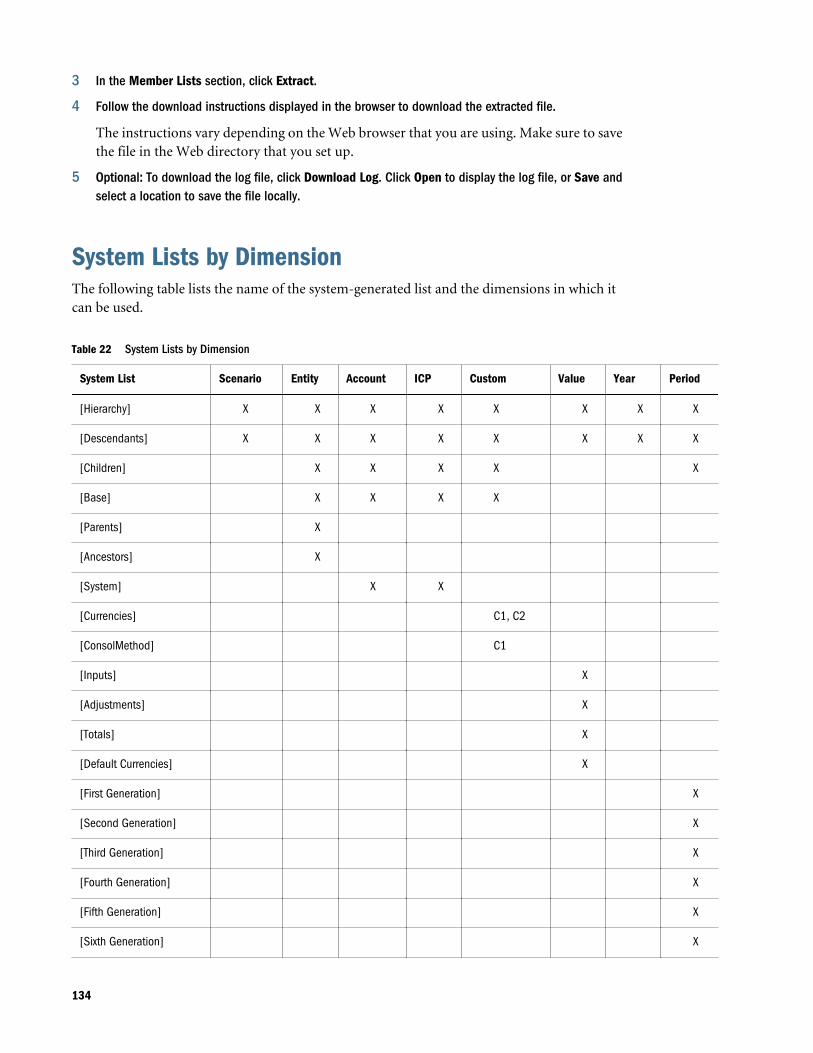
3 In the Member Lists section, click Extract.
4 Follow the download instructions displayed in the browser to download the extracted file.
The instructions vary depending on the Web browser that you are using. Make sure to savethe file in the Web directory that you set up.
5 Optional: To download the log file, click Download Log. Click Open to display the log file, or Save andselect a location to save the file locally.
System Lists by DimensionThe following table lists the name of the system-generated list and the dimensions in which itcan be used.
Table 22 System Lists by Dimension
System List Scenario Entity Account ICP Custom Value Year Period
[Hierarchy] X X X X X X X X
[Descendants] X X X X X X X X
[Children] X X X X X
[Base] X X X X
[Parents] X
[Ancestors] X
[System] X X
[Currencies] C1, C2
[ConsolMethod] C1
[Inputs] X
[Adjustments] X
[Totals] X
[Default Currencies] X
[First Generation] X
[Second Generation] X
[Third Generation] X
[Fourth Generation] X
[Fifth Generation] X
[Sixth Generation] X
134
6Managing Journals
In This Chapter
Creating Journal Files .. . . . . . . . . . . . . . . . . . . . . . . . . . . . . . . . . . . . . . . . . . . . . . . . . . . . . . . . . . . . . . . . . . . . . . . . . . . . . . . . . . . 135
Loading Journals .. . . . . . . . . . . . . . . . . . . . . . . . . . . . . . . . . . . . . . . . . . . . . . . . . . . . . . . . . . . . . . . . . . . . . . . . . . . . . . . . . . . . . . . . 139
Extracting Journals .. . . . . . . . . . . . . . . . . . . . . . . . . . . . . . . . . . . . . . . . . . . . . . . . . . . . . . . . . . . . . . . . . . . . . . . . . . . . . . . . . . . . . . 140
Many external general ledger systems can generate ASCII text files containing journalinformation that you can load into a Financial Management application. If necessary, you canedit the ASCII file using a text editor before loading it.
Sample journal files are included when you install Sample Applications for FinancialManagement. The files are located in the Sample Applications folder in the directory to whichyou installed Financial Management.
Creating Journal FilesYou can create journal files using an ASCII format supporting multibyte character sets (MBCS)or a file encoded with the Unicode format, using Little Endian byte ordering. By default, journalfiles use the JLF file extension.
A security information file can contain these sections:
l File Format
l Version
l Journal Group
l Standard
l Recurring
l Header - Scenario, Year, Period
A line starting with an exclamation point ( ! ) indicates the beginning of a new section in thejournal file, and must be followed by a valid section name (for example, Year). A line startingwith an apostrophe ( ' ) is considered a comment line and is ignored by the system.
You can use these special characters to separate information within the file as long as the characteris not used in the file in another way:
135
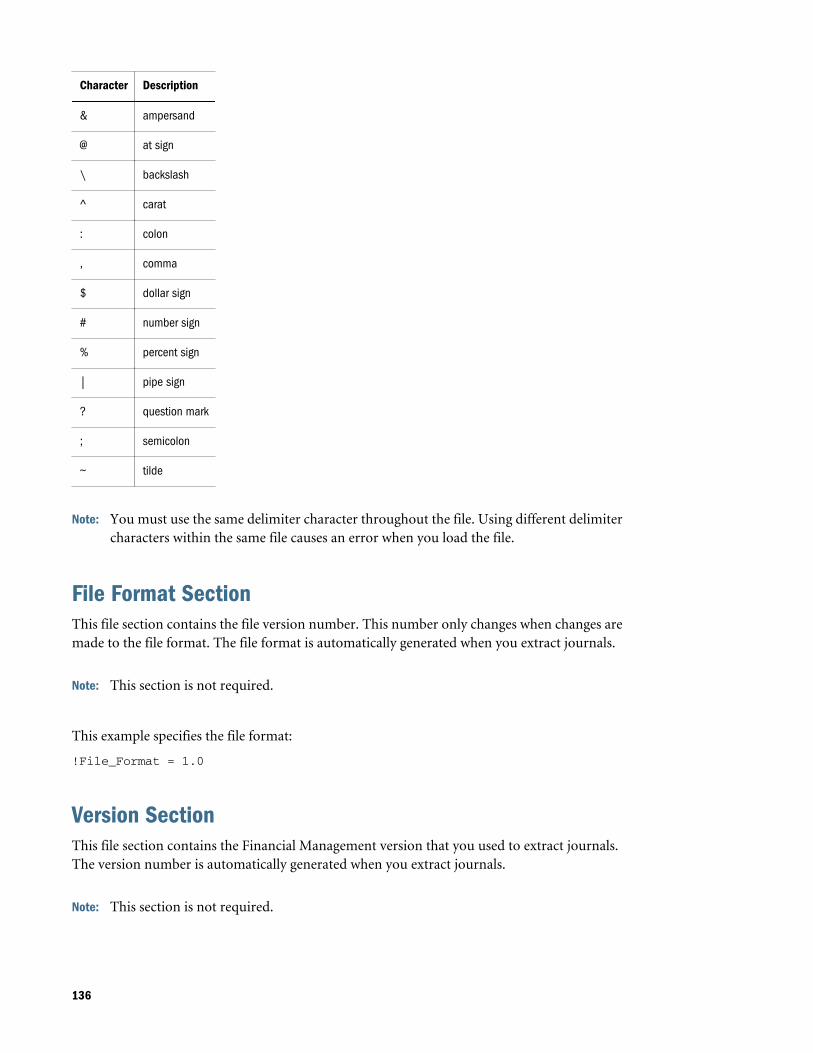
Character Description
& ampersand
@ at sign
\ backslash
^ carat
: colon
, comma
$ dollar sign
# number sign
% percent sign
| pipe sign
? question mark
; semicolon
~ tilde
Note: You must use the same delimiter character throughout the file. Using different delimitercharacters within the same file causes an error when you load the file.
File Format SectionThis file section contains the file version number. This number only changes when changes aremade to the file format. The file format is automatically generated when you extract journals.
Note: This section is not required.
This example specifies the file format:
!File_Format = 1.0
Version SectionThis file section contains the Financial Management version that you used to extract journals.The version number is automatically generated when you extract journals.
Note: This section is not required.
136
This example specifies the version:
!Version = 11.1
Journal Group SectionThis file section uses this syntax to define journal groups.
!GROUP=<journal group>;<journal group description>
For example, this example defines two journal groups:
!GROUP=Allocations;Allocations Journals Group!GROUP=Tax;Tax Journals Group
Standard SectionStandard templates apply to all scenarios, years, and periods in an application. They are notdependent on a specific combination of scenario, period, and year.
This syntax specifies a standard template:
!STANDARD = <label>, <balancing attribute>, <type>, <journal group>, <securityclass>, <SingleParent.SingleEntity>!DESC=<journal description><parent.entity>, <account>, <ICP>, <CustomDimensionName>, <amount type>, <amount>, <line item desc>
Recurring SectionRecurring templates apply to all scenarios, years, and periods in an application. They are notdependent on a specific combination of scenario, period, and year, but are dependent on ValueAdjs.
Note: You cannot create a recurring template for an auto reversing template. For the typeattribute, the value must be R for regular.
This syntax specifies a recurring template:
!RECURRING = <label>, <balancing attribute>, <type>, <value>, <journal group>, <securityclass>, <SingleParent.SingleEntity>!DESC=<journal description><parent.entity>, <account>, <ICP>, <CustomDimensionName>, <amount type>, <amount>, <line item desc>
Header SectionThis file section contains the scenario, year, and period information. The journal type headerinformation and corresponding detail lines follow the Header section. This organizes journal
137

information according to a specific scenario, year, and period. You can specify multiple Headersections in the journal file.
This syntax specifies the scenario, year, and period:
!SCENARIO= Actual!YEAR = 2014!PERIOD = January
The Header section is followed by journal detail information for Actual, January, 2014.
The Journal subsection of the Header section provides journal detail information for thespecified Scenario, Period, and Year.
Table 23 describes the attributes that are used in the Journal subsection. These attributes areused for regular journals and recurring and standard templates.
Table 23 Journal Attribute Descriptions
Attribute Value
<label> User-defined label for journal, 20 characters maximum
<balancing attribute>l U = unbalanced
l B = balanced in total
l E = balanced by entity
<type>l R = regular journals
l A = auto-reversing journals
l V = auto-reversal journal
Note: You cannot load system-generated auto reversals, but you can extract them.
<status>l W = Working
l S = Submitted
l A = Approved
l P = Posted
l R = Rejected
<value dimension>l [Contribution Adjs]
l [Parent Adjs]
l <Entity Curr Adjs>
l <Parent Curr Adjs>
<journal group> Optional: User-defined parameter, 30 characters maximum
Note: Groups must be preloaded.
<security class> Optional: Valid security class that is associated with the journal
Note: If you do not assign a security class, the journal assumes the Default security class. Only users who haveaccess rights to this security class can access the journal.
<singleparent.singleentity>
Optional: Valid parent/entity pair that is used by all the line items in the journal. When you specify a single parent/entity pair for the entire journal, the parent.entity attribute is not used.
138
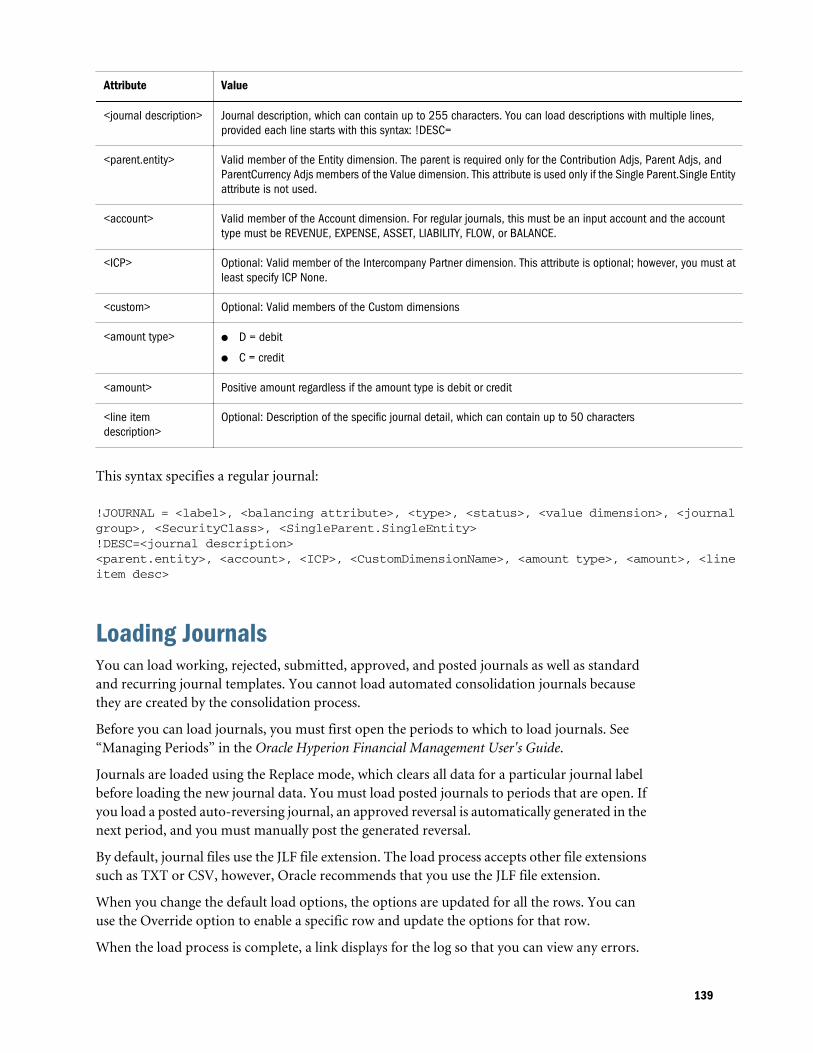
Attribute Value
<journal description> Journal description, which can contain up to 255 characters. You can load descriptions with multiple lines,provided each line starts with this syntax: !DESC=
<parent.entity> Valid member of the Entity dimension. The parent is required only for the Contribution Adjs, Parent Adjs, andParentCurrency Adjs members of the Value dimension. This attribute is used only if the Single Parent.Single Entityattribute is not used.
<account> Valid member of the Account dimension. For regular journals, this must be an input account and the accounttype must be REVENUE, EXPENSE, ASSET, LIABILITY, FLOW, or BALANCE.
<ICP> Optional: Valid member of the Intercompany Partner dimension. This attribute is optional; however, you must atleast specify ICP None.
<custom> Optional: Valid members of the Custom dimensions
<amount type>l D = debit
l C = credit
<amount> Positive amount regardless if the amount type is debit or credit
<line itemdescription>
Optional: Description of the specific journal detail, which can contain up to 50 characters
This syntax specifies a regular journal:
!JOURNAL = <label>, <balancing attribute>, <type>, <status>, <value dimension>, <journal group>, <SecurityClass>, <SingleParent.SingleEntity>!DESC=<journal description><parent.entity>, <account>, <ICP>, <CustomDimensionName>, <amount type>, <amount>, <line item desc>
Loading JournalsYou can load working, rejected, submitted, approved, and posted journals as well as standardand recurring journal templates. You cannot load automated consolidation journals becausethey are created by the consolidation process.
Before you can load journals, you must first open the periods to which to load journals. See“Managing Periods” in the Oracle Hyperion Financial Management User's Guide.
Journals are loaded using the Replace mode, which clears all data for a particular journal labelbefore loading the new journal data. You must load posted journals to periods that are open. Ifyou load a posted auto-reversing journal, an approved reversal is automatically generated in thenext period, and you must manually post the generated reversal.
By default, journal files use the JLF file extension. The load process accepts other file extensionssuch as TXT or CSV, however, Oracle recommends that you use the JLF file extension.
When you change the default load options, the options are updated for all the rows. You canuse the Override option to enable a specific row and update the options for that row.
When the load process is complete, a link displays for the log so that you can view any errors.
139
Note: Oracle recommends that you add Financial Management to the exceptions for your Webpop-up blocker. When you perform some tasks such as loading data, a status windowpops up showing the task status. If you have a pop-up blocker enabled on your computer,the status window is not displayed.
ä To load journals:
1 Select Consolidation, then Load, and then Journals.
2 For Delimiter, enter the delimiter used to separate the journals data in the file. These characters arevalid:
, ~ @ $ % & ^ | : ; ? \
Note: Use a character that is not used in the file name or in any other way in the file. Forexample, if you use the comma in an entity description, you cannot use the commaas the delimiter.
3 Optional: If you are using Firefox as the browser, you can load multiple files. Select Multipleselection if it is not already selected, and click Browse to locate the files.
You can select a maximum of 10 files at one time. The system then populates the detail rowswith the selected files.
You can also drag and drop files into the File Selection Content area.
4 Optional: Click Add to add more rows for loading journals.
Tip: To delete a row, select a row and click Delete.
5 Optional: To override the default file settings for a row, click Override.
Tip: To reset the load options to the default values, click Reset.
6 Click Load.
Note: If you reload existing files, the system displays a warning prompt asking if you wantto use them again. If you do, click Yes.
Extracting JournalsYou can extract journals, recurring journals, and journal templates from an application. Youcan select the Scenario, Year, Period, Entity, and Value dimensions for which to extract journals.You can select the journal status, journal type, and journal balance type to extract.
When you extract journals, they are saved to an ASCII file that supports multibyte character sets(MBCS). By default, journal files use the JLF file extension. After you extract journals, you canview and modify the journal information in a text editor.
140
You can extract automated consolidation journals to external systems, however you cannot re-import them into Financial Management. When you extract these journals, the Balance type isblank for automated consolidation journals.
When the extract process is complete, a link displays for the log so that you can view any errors.
ä To extract journals:
1 Select Consolidation, then Extract, and then Journals.
2 Specify a Scenario and Year from which to extract journals.
3 Optional: Select a Period from which to extract journals.
4 Optional: Select one or more Entity and Value dimensions to extract.
To extract automated consolidation journals, you must select [Proportion] and/or[Elimination] as the Value member.
Note: For the Period, Entity, and Value dimensions, if you do not select specific members,the system assumes that you want to extract all members for the dimension. However,if you specifically select members, the system displays a plus sign ( + ) next to thedimension to indicate multiple selections.
5 For Delimiter, enter the delimiter used to separate the journals data in the file. These characters arevalid:
, ~ @ $ % & ^ | : ; ? \
Note: Use a character that is not used in the file name or in any other way in the file. Forexample, if you use the comma in an entity description, you cannot use the commaas the delimiter.
6 Select Journal Types to extract:
l Templates
l Recurring Templates
l Journals
7 Optional: Enter the Label and Group for the journals to extract.
You can use the percent sign ( % ) as a wildcard.
For automated consolidation journals, in the Label field, you can query on the Nature valueof the audit transaction that you specified in the consolidation rule. You cannot use a numberfor the label.
8 Select the journal Status, Type, and Balance Type to extract, or select All.
9 Click Extract.
10 Follow the download instructions displayed in the browser.
The instructions vary depending on the Web browser that you are using. Make sure to save thefile in the Web directory that you set up.
141

142
7Managing Data Forms
In This Chapter
Creating Data Forms in the Form Designer .. . . . . . . . . . . . . . . . . . . . . . . . . . . . . . . . . . . . . . . . . . . . . . . . . . . . . . . . . . . 143
Using Data Form Scripts.. . . . . . . . . . . . . . . . . . . . . . . . . . . . . . . . . . . . . . . . . . . . . . . . . . . . . . . . . . . . . . . . . . . . . . . . . . . . . . . . 147
Using Relative Time Periods... . . . . . . . . . . . . . . . . . . . . . . . . . . . . . . . . . . . . . . . . . . . . . . . . . . . . . . . . . . . . . . . . . . . . . . . . . . 176
Order of Precedence for Conflicting Attributes ... . . . . . . . . . . . . . . . . . . . . . . . . . . . . . . . . . . . . . . . . . . . . . . . . . . . . . 176
Editing Data Forms... . . . . . . . . . . . . . . . . . . . . . . . . . . . . . . . . . . . . . . . . . . . . . . . . . . . . . . . . . . . . . . . . . . . . . . . . . . . . . . . . . . . . 177
Loading Data Forms ... . . . . . . . . . . . . . . . . . . . . . . . . . . . . . . . . . . . . . . . . . . . . . . . . . . . . . . . . . . . . . . . . . . . . . . . . . . . . . . . . . . 178
Extracting Data Forms ... . . . . . . . . . . . . . . . . . . . . . . . . . . . . . . . . . . . . . . . . . . . . . . . . . . . . . . . . . . . . . . . . . . . . . . . . . . . . . . . . 178
Deleting Data Forms ... . . . . . . . . . . . . . . . . . . . . . . . . . . . . . . . . . . . . . . . . . . . . . . . . . . . . . . . . . . . . . . . . . . . . . . . . . . . . . . . . . . 179
Data forms are templates with predefined rows and columns that you set up for users to viewand enter specific data. Users cannot add rows and columns to or remove rows and columnsfrom data forms. They can change point of view selections only for the dimensions that youspecify when you set up the form. You can define links from one form to another to enable usersto drill through to view data in the linked form.
To create data forms, you must be assigned to the Administrator or Manage Data Entry Formssecurity role. To load, extract, and delete data forms, you must be assigned to the Manage DataEntry Forms role.
You can create data forms in two ways:
l Using the Data Form options in the Form Designer
l Writing a script in the Script view
By default, data forms use the WDF file extension.
You can easily switch between the Designer and Script view. If the script contains any errors,they are displayed in the Script view. From the Script view, you can also print data forms.
You can switch from the Designer view of a data form to Open Form. The system prompts youto save the form, then displays the data form.
Creating Data Forms in the Form DesignerYou use the Form Designer to set the Point of View, and specify form details, row, column, andheader options.
143
After you create a data form, you can scan it to check the validity. The system generates the formscript and validates it. If there are errors, they are displayed in the Script view. See “Using DataForm Scripts” on page 147.
For information on setting form details:
l “Setting the Point of View” on page 144
l “Specifying Form Details” on page 145
l “Specifying Form Row and Column Options” on page 146
l “Specifying Form Headers” on page 147
ä To create a data form:
1 Select Consolidation, and then Documents.
2 Click New, and then Data Form, or select Actions, then New, and then Data Form.
The Forms Designer is displayed by default.
Tip: If the Designer page is not automatically displayed, click Designer, or select Actions,and then Designer.
3 Set the Point of View for the data form.
4 Specify the Form Details.
5 Specify the Row and Column options.
6 Optional: To add rows or columns, click Add New Row, Add New Column, or select Actions, and thenAdd New Row or Add New Column.
Tip: To delete a row or column, click Delete Column/Row, or select Actions, and thenDelete Column/Row.
7 Specify the Header options.
Tip: To reset the form to the default values or the last saved definition, click Reset.
8 Optional: Click Scan to verify the validity of the form.
9 Click Save to save the form, enter the information for the form, and then click Save.
Setting the Point of ViewYou can define the Background POV and selectable POV using the POV bar. A BackgroundPOV for the form specifies for each dimension the initial value that is displayed on the data form.A Selectable POV for the form consists of the dimensions for which users can select members.
For any dimension in the POV bar, you specify the Background POV members by selecting amember. If you select a member list, it is used as a selectable POV, from which data form userscan select members. You cannot select more than two items and more than one member ormember list.
144
If you have defined dynamic POV member lists, you can use them to quickly select valid membersfor the selected dimension. In the Member Selection dialog box, the valid dynamic POV memberlists for the selected dimension are displayed with an @POV suffix at the bottom of the dialogbox.
These rules apply to using the POV:
l If you do not select a member or member list and the dimension is not used in a row orcolumn, the system uses the member from the user POV for the initial value for thedimension.
l If you specify values in a Background and Selectable POV for a dimension, and the memberfor the Background POV is not in the member list for the Selectable POV, the system usesthe first member in the member list of the Selectable POV as the Background POV member.
l Users need full access to the member hierarchy to be able to work with all the members inthe hierarchy. For example, if you want users to access all Custom 4 members, you mustenable access to the parent entity, in this case, CustomTop.
The Form Designer grid contains rows and columns. In a new form, by default the Scenariodimension is used for the grid column, and the Period dimension is used for the grid row. Youcan add a column or row to the form, and then drag and drop dimensions from the POV bar tothe grid rows and columns to define the data form layout. If you drag and drop more than onedimension in the same row or column, you can reorder the dimensions. When you click adimension, you can select members from the Member Selection page to include in the grid orPOV.
When you select a row or column in the grid, the corresponding row and column options aredisplayed in the Form Details property pane. You can include calc expression in a row or column.In this case, you cannot drag and drop dimensions in the row or column, instead you must enterthe calc expression in the row or column using the property pane. Dimensions that are used forrows are not available for columns and vice-versa.
Specifying Form DetailsThe Form Details section specifies form properties such as grid, print, display, and suppressionoptions for the data form. You can include Instructions for users of the data form, and specifyany on-demand rules that are available for the data form.
Note: The items in the Form Details section are only updated in the script if you change thedefault settings. If you leave the default settings unchanged, the keywords for these itemsdo not display in the script.
For valid values for each option, see “Using Data Form Scripts” on page 147.
145
Specifying On-Demand Rules for Data FormsYou can create on-demand rules that can be run from data forms. On-demand rules are usefulwhen you want to run only a subset of calculations to quickly see the results in the data form.For example, when you are working in a data form that has been set up to run a specific on-demand rule, you can enter data and then run the on-demand rule to quickly see the results ofthe calculation.
You create on-demand rules in the application rule file. The rules are created in a new subroutineand are identified by the OnDemand prefix, for example, OnDemand_Calculation. See“Creating Rules Files” on page 227.
ä To specify on-demand rules for a data form:
1 Select Consolidation, and then Documents.
2 Click New, and then Data Form, or select Actions, then New, and then Data Form.
The Forms Designer is displayed by default.
Tip: If the Designer page is not automatically displayed, click Designer, or select Actions,and then Designer.
3 In the Form Details panel, for On Demand Rules, use one of these methods:
l If you know the rule names, enter them in the text box in a comma-separated list.
l To search for available rules, click the Edit button next to the text box, then from theAvailable Rules pop-up dialog box, select one or more rules to use in the form and clickOK.
4 Click OK.
5 Save the data form.
Specifying Form Row and Column OptionsThe dimension elements that you specify for rows and columns override elements that are setin the Background POV or Selectable POV. You can specify only one member list per row orcolumn.
For valid values for each option, see “Using Data Form Scripts” on page 147.
If a form requires more than 100 rows, you can use the Scripts tab to specify the additional rows.For information on the syntax to use, see “Rn” on page 164.
If a form requires more than 24 columns, you can use the Scripts tab to specify the additionalcolumns. For information on the syntax to use, see “Cn” on page 152.
In addition, you can specify Calculated Row or Column, and Calc Expressions for rows andcolumns. When you select the Calculated Row option, the selected row or column becomes acalculated row and column, and you must enter a calc expression.
146
Note: You can use Other to specify syntax for row or column keywords not displayed in theOptions section, such as Blank and ReadOnly. In addition, if the definition of a row orcolumn in the script contains deprecated or invalid syntax, that syntax is displayed inOther.
Specifying Form HeadersThe Headers section enables you to specify header properties for each dimension, such as ShowLabel, Description, or Both, specify a Style, specify the maximum length of the labels ordescriptions for members and member lists, and whether the lengths are fixed. You can specifydifferent lengths for different dimensions.
The Headers section also contains the Other text box, which has two uses:
l If syntax is added for the HeaderOption keyword, you can specify that syntax in Other.
l If the form contains invalid syntax for the HeaderOption keyword for a dimension, theOther text box displays that syntax.
For valid values for each option, see “Using Data Form Scripts” on page 147.
Using Data Form ScriptsThe Script feature enables you to view, modify, and print the script. You enter the syntax in thetext box on the Script page.
You can use three types of syntax elements when creating data form scripts: keywords, values,and options. Keywords are on individual lines in the script and are placed to the left of the equalsign. Values are placed immediately after the equal sign to complete the line. Options can beadded to a line of script where each is delimited by a comma.
Note: When a value is required, it must be specified before options. Options are never requiredand can be in any order.
Sample data form scripts are installed with Sample Applications for Financial Management. Thefiles are located in the Sample Applications folder in the directory to which you installed FinancialManagement.
Note: Data entry form script elements are not case-sensitive.
Table 24 Data Form Script Syntax
Script Syntax Description
AddMember Use in a row definition to allow the user to add data for a member that previously had no data orcontained zeros and was suppressed from the form. The option adds an icon to the form that, whenclicked, enables the user to select members to add to the form.
147
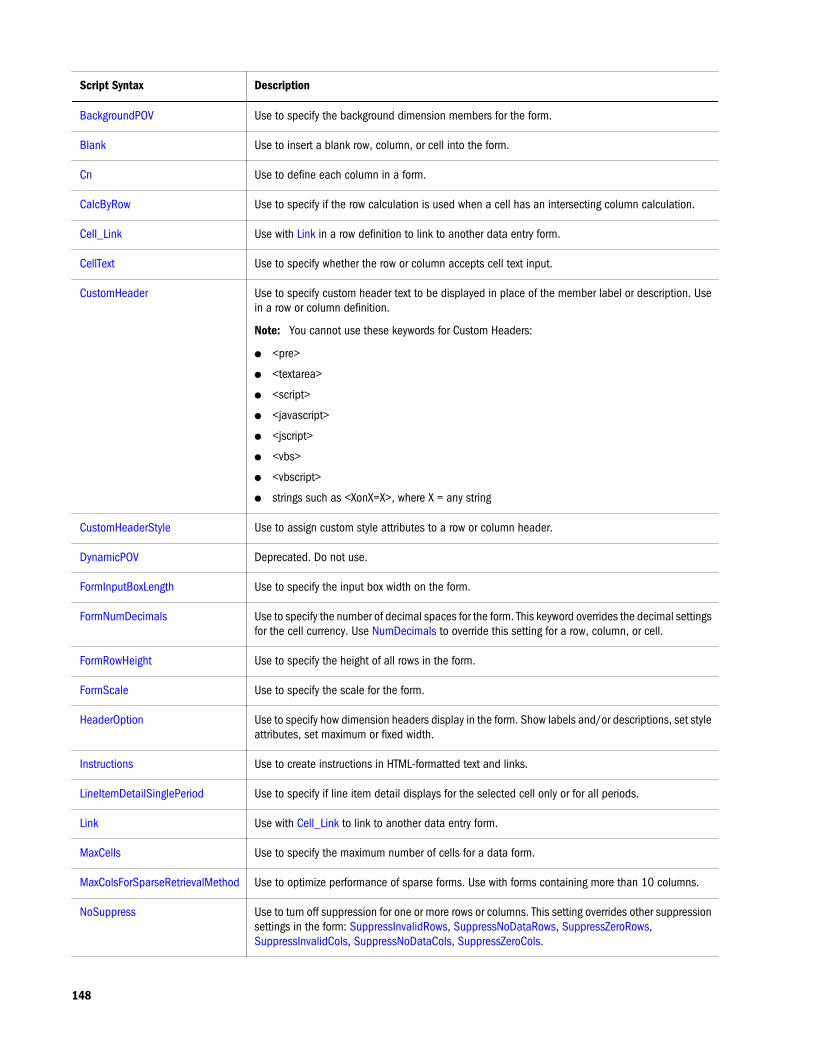
Script Syntax Description
BackgroundPOV Use to specify the background dimension members for the form.
Blank Use to insert a blank row, column, or cell into the form.
Cn Use to define each column in a form.
CalcByRow Use to specify if the row calculation is used when a cell has an intersecting column calculation.
Cell_Link Use with Link in a row definition to link to another data entry form.
CellText Use to specify whether the row or column accepts cell text input.
CustomHeader Use to specify custom header text to be displayed in place of the member label or description. Usein a row or column definition.
Note: You cannot use these keywords for Custom Headers:
l <pre>
l <textarea>
l <script>
l <javascript>
l <jscript>
l <vbs>
l <vbscript>
l strings such as <XonX=X>, where X = any string
CustomHeaderStyle Use to assign custom style attributes to a row or column header.
DynamicPOV Deprecated. Do not use.
FormInputBoxLength Use to specify the input box width on the form.
FormNumDecimals Use to specify the number of decimal spaces for the form. This keyword overrides the decimal settingsfor the cell currency. Use NumDecimals to override this setting for a row, column, or cell.
FormRowHeight Use to specify the height of all rows in the form.
FormScale Use to specify the scale for the form.
HeaderOption Use to specify how dimension headers display in the form. Show labels and/or descriptions, set styleattributes, set maximum or fixed width.
Instructions Use to create instructions in HTML-formatted text and links.
LineItemDetailSinglePeriod Use to specify if line item detail displays for the selected cell only or for all periods.
Link Use with Cell_Link to link to another data entry form.
MaxCells Use to specify the maximum number of cells for a data form.
MaxColsForSparseRetrievalMethod Use to optimize performance of sparse forms. Use with forms containing more than 10 columns.
NoSuppress Use to turn off suppression for one or more rows or columns. This setting overrides other suppressionsettings in the form: SuppressInvalidRows, SuppressNoDataRows, SuppressZeroRows,SuppressInvalidCols, SuppressNoDataCols, SuppressZeroCols.
148
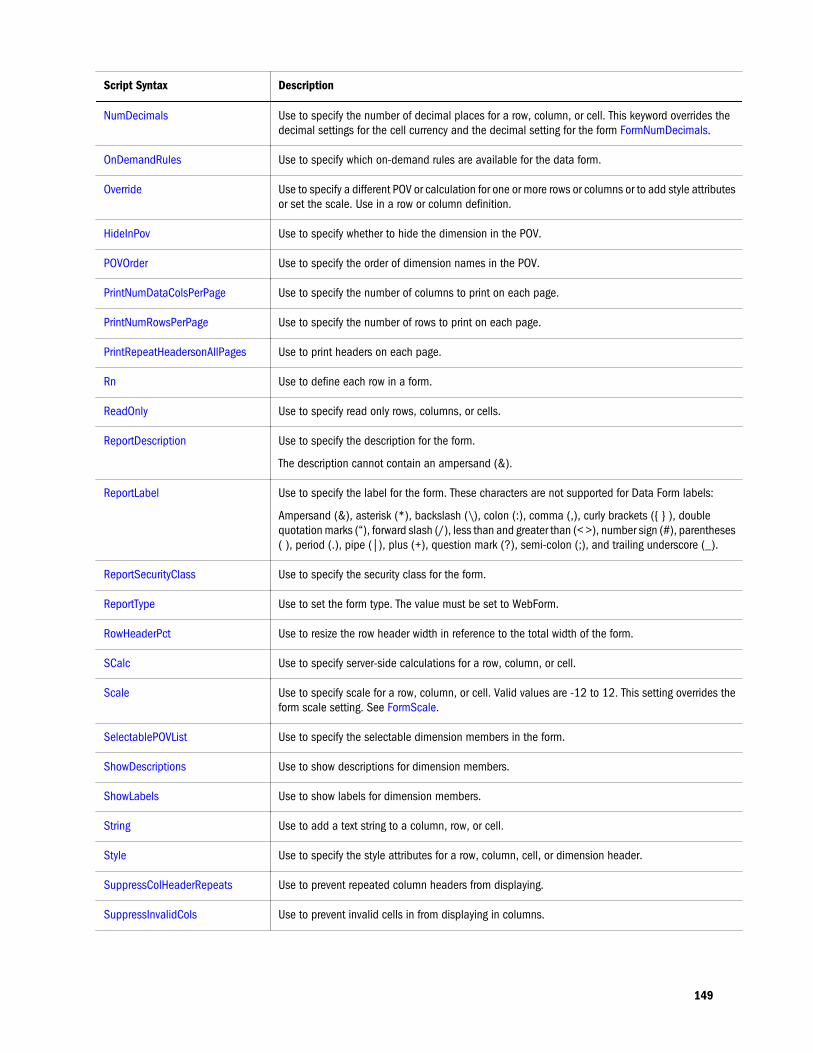
Script Syntax Description
NumDecimals Use to specify the number of decimal places for a row, column, or cell. This keyword overrides thedecimal settings for the cell currency and the decimal setting for the form FormNumDecimals.
OnDemandRules Use to specify which on-demand rules are available for the data form.
Override Use to specify a different POV or calculation for one or more rows or columns or to add style attributesor set the scale. Use in a row or column definition.
HideInPov Use to specify whether to hide the dimension in the POV.
POVOrder Use to specify the order of dimension names in the POV.
PrintNumDataColsPerPage Use to specify the number of columns to print on each page.
PrintNumRowsPerPage Use to specify the number of rows to print on each page.
PrintRepeatHeadersonAllPages Use to print headers on each page.
Rn Use to define each row in a form.
ReadOnly Use to specify read only rows, columns, or cells.
ReportDescription Use to specify the description for the form.
The description cannot contain an ampersand (&).
ReportLabel Use to specify the label for the form. These characters are not supported for Data Form labels:
Ampersand (&), asterisk (*), backslash (\), colon (:), comma (,), curly brackets ({ } ), doublequotation marks (“), forward slash (/), less than and greater than (< >), number sign (#), parentheses( ), period (.), pipe (|), plus (+), question mark (?), semi-colon (;), and trailing underscore (_).
ReportSecurityClass Use to specify the security class for the form.
ReportType Use to set the form type. The value must be set to WebForm.
RowHeaderPct Use to resize the row header width in reference to the total width of the form.
SCalc Use to specify server-side calculations for a row, column, or cell.
Scale Use to specify scale for a row, column, or cell. Valid values are -12 to 12. This setting overrides theform scale setting. See FormScale.
SelectablePOVList Use to specify the selectable dimension members in the form.
ShowDescriptions Use to show descriptions for dimension members.
ShowLabels Use to show labels for dimension members.
String Use to add a text string to a column, row, or cell.
Style Use to specify the style attributes for a row, column, cell, or dimension header.
SuppressColHeaderRepeats Use to prevent repeated column headers from displaying.
SuppressInvalidCols Use to prevent invalid cells in from displaying in columns.
149
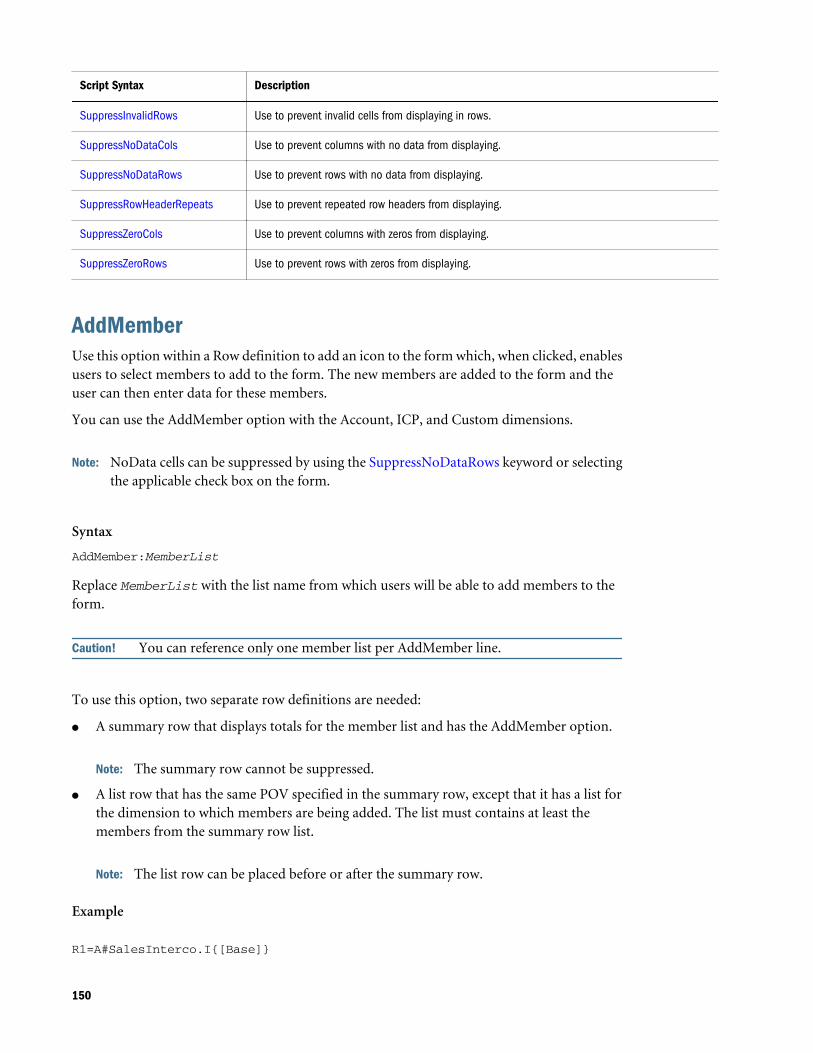
Script Syntax Description
SuppressInvalidRows Use to prevent invalid cells from displaying in rows.
SuppressNoDataCols Use to prevent columns with no data from displaying.
SuppressNoDataRows Use to prevent rows with no data from displaying.
SuppressRowHeaderRepeats Use to prevent repeated row headers from displaying.
SuppressZeroCols Use to prevent columns with zeros from displaying.
SuppressZeroRows Use to prevent rows with zeros from displaying.
AddMemberUse this option within a Row definition to add an icon to the form which, when clicked, enablesusers to select members to add to the form. The new members are added to the form and theuser can then enter data for these members.
You can use the AddMember option with the Account, ICP, and Custom dimensions.
Note: NoData cells can be suppressed by using the SuppressNoDataRows keyword or selectingthe applicable check box on the form.
Syntax
AddMember:MemberList
Replace MemberList with the list name from which users will be able to add members to theform.
Caution! You can reference only one member list per AddMember line.
To use this option, two separate row definitions are needed:
l A summary row that displays totals for the member list and has the AddMember option.
Note: The summary row cannot be suppressed.
l A list row that has the same POV specified in the summary row, except that it has a list forthe dimension to which members are being added. The list must contains at least themembers from the summary row list.
Note: The list row can be placed before or after the summary row.
Example
R1=A#SalesInterco.I{[Base]}
150

R2=A#SalesInterco.I#[ICP Entities],AddMember:I{[Base]}
In this example, Row 1 specifies the [Base] member list for the Intercompany Partner dimension.Row 2 specifies the total for the member list and the member list to be used with the AddMembericon.
Note: You can use the AddMember option in multiple rows in a form, but each summary rowneeds its own list row.
BackgroundPOVUse this keyword to specify the background dimension members for the form. Dimensions notspecified in the Background POV are considered dynamic and are taken from the user’s pointof view when the form is opened.
Users need full security access to the member hierarchy to be able to work with all the membersin the hierarchy. For example, if you want users to access all Custom 4 members, you must enableaccess to the parent entity, in this case, CustomTop.
Note: If a member in the Background POV is not valid based on the SelectablePOVList forthe dimension, the system defaults to the first member of the list.
Syntax
BackgroundPOV=S#Scenario.W#View.E#Parent.Entity.V#Value.A#Account.I#ICP.C1#Custom1.C2#Custom2.C3#Custom3.C4#Custom4
Table 25 Syntax for BackgroundPOV Keyword
Parameter Description
Scenario Name of a valid Scenario member.
View A valid view.
Parent Name of a valid Parent member. This parameter is optional.
Entity Name of a valid Entity member.
Value Name of a valid Value member.
Account Name of a valid Account member.
ICP Name of a valid ICP member.
Custom Name of valid Custom members.
151
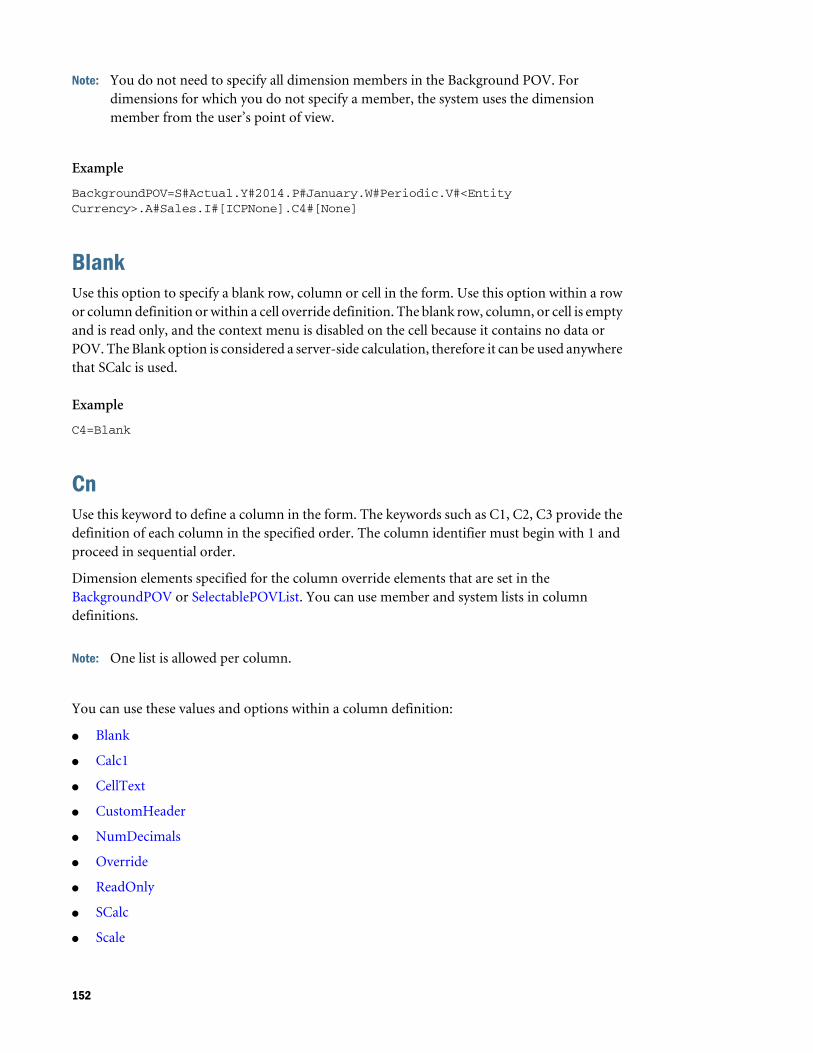
Note: You do not need to specify all dimension members in the Background POV. Fordimensions for which you do not specify a member, the system uses the dimensionmember from the user’s point of view.
Example
BackgroundPOV=S#Actual.Y#2014.P#January.W#Periodic.V#<Entity Currency>.A#Sales.I#[ICPNone].C4#[None]
BlankUse this option to specify a blank row, column or cell in the form. Use this option within a rowor column definition or within a cell override definition. The blank row, column, or cell is emptyand is read only, and the context menu is disabled on the cell because it contains no data orPOV. The Blank option is considered a server-side calculation, therefore it can be used anywherethat SCalc is used.
Example
C4=Blank
CnUse this keyword to define a column in the form. The keywords such as C1, C2, C3 provide thedefinition of each column in the specified order. The column identifier must begin with 1 andproceed in sequential order.
Dimension elements specified for the column override elements that are set in theBackgroundPOV or SelectablePOVList. You can use member and system lists in columndefinitions.
Note: One list is allowed per column.
You can use these values and options within a column definition:
l Blank
l Calc1
l CellText
l CustomHeader
l NumDecimals
l Override
l ReadOnly
l SCalc
l Scale
152

l String
l Style
Syntax
Cn=CalcExpressionCn=POVExpression
Table 26 Syntax for Columns Keyword
Parameter Description
n The column number.
CalcExpression Use SCalc, Blank, or String. See “SCalc” on page 167, “Blank” on page 152, and “String” on page 170.
POVExpression A valid dimension intersection or member list.
Example
C1=S#Actual.P#July,CustomHeader:Actual_JulyC2=S#Actual.P#August,(Override 2,3, P#July)C3=S#Budget.P#SeptemberC4=SCalc(col(1)+col(3)),numdecimals:4,scale:1,readonlyC5=BlankC6=S#Budget.P#October,Style:font-style:boldC7=C1{TotalProducts.[Hierarchy]}
Calc1This value is Deprecated. If you have forms that use this keyword, you must manually edit themto use SCalc.
CalcByRowA keyword used to change the default calculation order (columns first) to rows first. Thiskeyword applies to the entire form.
Syntax
CalcByRow=Boolean
Where Boolean is True if row calculations are used; False if column calculations are used.
Example
ReportType=WebFormReportLabel=CalcByColReportDescription=Demonstrate CalcByRowBackgroundPOV=S#Actual.Y#2014.P#January.w#<Scenario View>.E#UnitedStates.Connecticut.V#USD.A#Sales.I#[ICP NONE].C1#Golfballs.C2#Customer2.C3#[None].C4#[None]
153
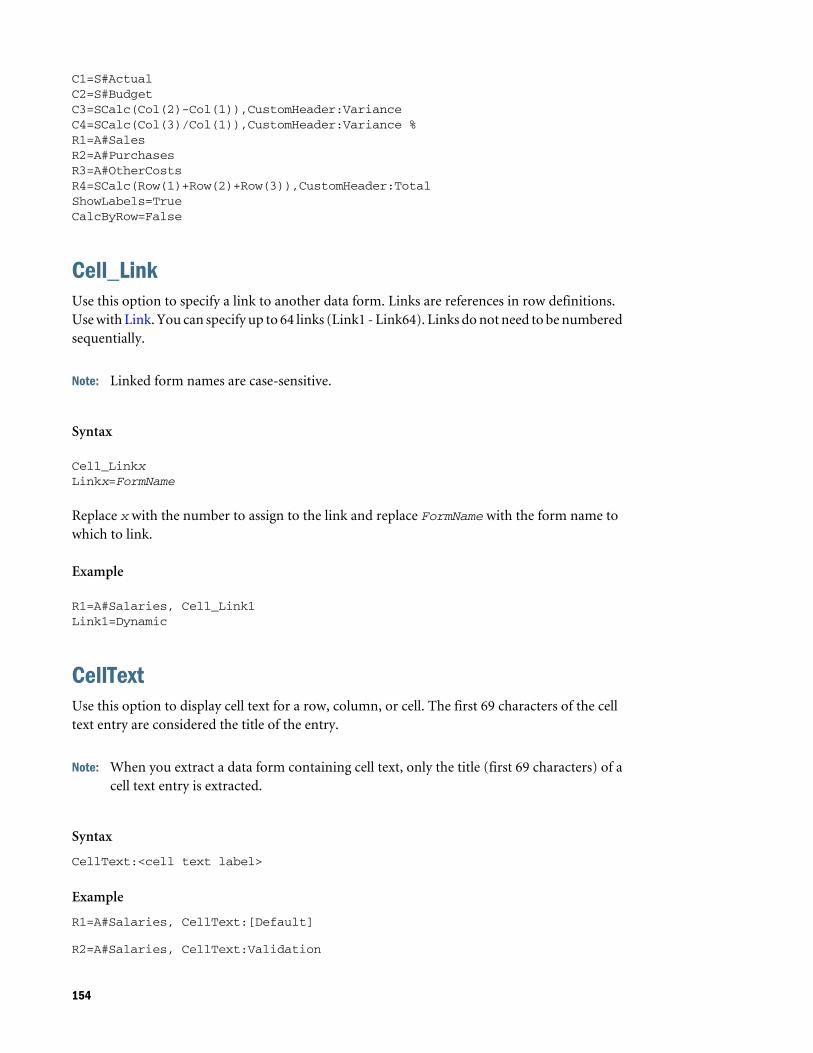
C1=S#ActualC2=S#BudgetC3=SCalc(Col(2)-Col(1)),CustomHeader:VarianceC4=SCalc(Col(3)/Col(1)),CustomHeader:Variance %R1=A#SalesR2=A#PurchasesR3=A#OtherCostsR4=SCalc(Row(1)+Row(2)+Row(3)),CustomHeader:TotalShowLabels=TrueCalcByRow=False
Cell_LinkUse this option to specify a link to another data form. Links are references in row definitions.Use with Link. You can specify up to 64 links (Link1 - Link64). Links do not need to be numberedsequentially.
Note: Linked form names are case-sensitive.
Syntax
Cell_LinkxLinkx=FormName
Replace x with the number to assign to the link and replace FormName with the form name towhich to link.
Example
R1=A#Salaries, Cell_Link1Link1=Dynamic
CellTextUse this option to display cell text for a row, column, or cell. The first 69 characters of the celltext entry are considered the title of the entry.
Note: When you extract a data form containing cell text, only the title (first 69 characters) of acell text entry is extracted.
Syntax
CellText:<cell text label>
Example
R1=A#Salaries, CellText:[Default]
R2=A#Salaries, CellText:Validation
154
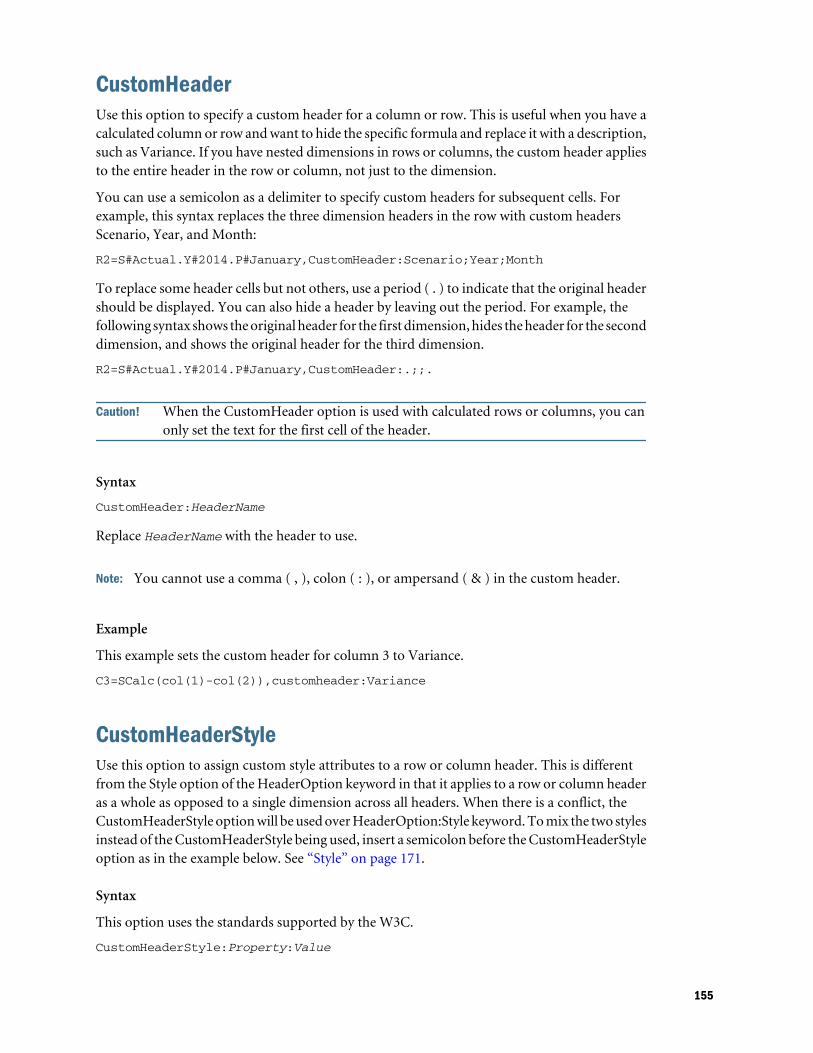
CustomHeaderUse this option to specify a custom header for a column or row. This is useful when you have acalculated column or row and want to hide the specific formula and replace it with a description,such as Variance. If you have nested dimensions in rows or columns, the custom header appliesto the entire header in the row or column, not just to the dimension.
You can use a semicolon as a delimiter to specify custom headers for subsequent cells. Forexample, this syntax replaces the three dimension headers in the row with custom headersScenario, Year, and Month:
R2=S#Actual.Y#2014.P#January,CustomHeader:Scenario;Year;Month
To replace some header cells but not others, use a period ( . ) to indicate that the original headershould be displayed. You can also hide a header by leaving out the period. For example, thefollowing syntax shows the original header for the first dimension, hides the header for the seconddimension, and shows the original header for the third dimension.
R2=S#Actual.Y#2014.P#January,CustomHeader:.;;.
Caution! When the CustomHeader option is used with calculated rows or columns, you canonly set the text for the first cell of the header.
Syntax
CustomHeader:HeaderName
Replace HeaderName with the header to use.
Note: You cannot use a comma ( , ), colon ( : ), or ampersand ( & ) in the custom header.
Example
This example sets the custom header for column 3 to Variance.
C3=SCalc(col(1)-col(2)),customheader:Variance
CustomHeaderStyleUse this option to assign custom style attributes to a row or column header. This is differentfrom the Style option of the HeaderOption keyword in that it applies to a row or column headeras a whole as opposed to a single dimension across all headers. When there is a conflict, theCustomHeaderStyle option will be used over HeaderOption:Style keyword. To mix the two stylesinstead of the CustomHeaderStyle being used, insert a semicolon before the CustomHeaderStyleoption as in the example below. See “Style” on page 171.
Syntax
This option uses the standards supported by the W3C.
CustomHeaderStyle:Property:Value
155
Example
C1=S#Actual,CustomHeaderStyle:font-style:italic;font-family:arial;font-size:12px;font-color:red
DynamicPOVThis keyword is deprecated.
If you have a form that contains the DynamicPOV keyword, use these steps to account for thisdeprecation:
1. Remove all dimensions specified with the DynamicPOV keyword from the BackgroundPOVkeyword.
2. Delete the DynamicPOV keyword.
FormInputBoxLengthUse this keyword to specify the input box width. The default is 20 characters wide.
Note: This keyword does not determine the number of characters that can be entered into theinput box.
Syntax
FormInputBoxLength=InputLength
Replace InputLength with the number of characters for the input box width.
Example
FormInputBoxLength=20
FormNumDecimalsUse this keyword to specify the number of decimals for the entire form. If this keyword isspecified, it overrides the number of decimals set for the cell. If this keyword is not specified, thenumber of decimals for the cell is used.
You can override a column, row, or cell decimal setting by using NumDecimals.
Syntax
FormNumDecimals=Decimals
Replace Decimals with a value from 0 to 9.
Note: When you use a value of 9, maximum precision is used and therefore, up to 14 digits areactually included after the decimal.
156
Example
FormNumDecimals=0
FormRowHeightUse this keyword to specify the height of all rows in the form. The default is 16px.
Syntax
FormRowHeight=Pixels px
Replace Pixels with the number of pixels for the row height.
Caution! You must include px after Pixels. If you omit px, rows and columns may not aligncorrectly when the form is printed.
Example
FormRowHeight=16 px
FormScaleUse this keyword to specify the default scaling for the form.
If specified in a form, this keyword overrides the scale in the entity currency, otherwise the systemuses the scaling defined for the currencies assigned to entities.
You can override the form scale setting by using the Scale option within row or columndefinitions or within a cell override.
Syntax
FormScale=n
Replace n with a value from -12 to 12.
Example
FormScale=0
HeaderOptionUse this keyword to specify heading defaults for each dimension. The options currentlysupported are:
l Length - the maximum length for row headers. This can be a number or can be the word“Fixed” if you want the maximum and minimum length to be the same.
Note: Row headers are truncated with ellipses if they are longer than the specified length.
157
l ShowDescription to display member descriptions
l ShowLabel to display member labels
l Style
Syntax
HeaderOptionDimension=Length:nHeaderOptionDimension=ShowDescriptionHeaderOptionDimension=ShowLabelHeaderOptionDimension=Style:Property:Value;Property:Value...
Replace Dimension with the row dimension name, n with the length for the header or “Fixed”,Property with the style property and Value with the property value. See Style.
Example
HeaderOptionPeriod=Length:4HeaderOptionScenario=ShowDescriptionHeaderOptionsAccount=ShowLabel,Style:font-style:italic
HideInPovUse this keyword to specify the HideInPOV option for each dimension. If this value is present,the dimension is not shown in the POV Bar of the data form. If this value is not found, thedimension is displayed in the POV Bar.
Syntax
HideinPOV=Dimension
Dimension names can be either the short name or the long name, and are listed in a comma-separated list.
Note: The dimension is ignored if it is already part of the selectable POV, since all selectabledimensions are shown in the POV bar.
Example
In the following example, Scenario, Year, and Period are hidden in the POV bar when the dataform is opened.
HideinPov=S,Y,P
InstructionsUse this keyword to specify the instructions for form users. If you do not specify this keyword,the instructions window opens with this message: "There are no detailed instructions definedfor this form".
158
Syntax
Instructions=HTMLInstructions
Replace HTMLInstructions with HTML-formatted text and links.
Example
Instructions=Please enter your cost center budgets for the year.Any questions, please contact the Budget Administrator.
LineItemDetailSinglePeriodUse this keyword to specify whether line item details are displayed for just the selected cell orfor all input periods. The default is True, which displays details for only the selected cell.
Syntax
LineItemDetailSinglePeriod=Boolean
Replace Boolean with True to display line item detail for the selected cell or False to show lineitem detail for all input periods.
Example
LineItemDetailSinglePeriod=True
LinkUse this keyword to specify a link to another data form. Links are references in row definitions.Use with Cell_Link. You can specify up to 64 links (Link1 - Link64). Links do not need to benumbered sequentially.
Note: Linked form names are case-sensitive.
Syntax
Cell_LinkxLinkx=FormName
Replace x with the number to assign to the link and replace FormName with the form name towhich to link.
Example
R1=A#Salaries, Cell_Link1Link1=Dynamic
159
MaxCellsThis keyword specifies the maximum number of cells allowed in the data form. If the form resultsin more than the MaxCells value, an error occurs. The default is 25000.
Syntax
MaxCells=n
Replace n with the number of cells for the form.
Note: The value is for the number of visible cells on the form including calculated cells. It doesnot include suppressed cells.
Example
MaxCells=500
MaxColsForSparseRetrievalMethod
Note: This keyword is Deprecated. If you have a script that uses this keyword, the form loadscorrectly, however you cannot edit the value.
Use this keyword to specify the number of columns in the form to optimize performance ofsparse data forms. You specify this keyword for forms that have more than 10 columns. If yourform has 10 or fewer columns, the optimization occurs automatically.
Syntax
MaxColsForSparseRetrievalMethod=n
Replace n with the number of columns in the form.
Example
MaxColsForSparseRetrievalMethod=11
NoSuppressUse this option to turn off suppression for one or more rows or columns. Thus, regardless ofthe form suppression options, the row or column is displayed. Use this option within a row orcolumn definition.
Example
R4=A#Inventory,NoSuppress
160
NumDecimalsUse this option to specify the number of decimal places to show for calculated or uncalculatedrows or columns or in a cell override. If this keyword is specified, it overrides the number ofdecimals set for the cell or set by FormNumDecimals.
Syntax
NumDecimals:n
Replace n with a value from 0 to 9.
Note: When you use a value of 9, maximum precision is used and therefore, up to 14 digits areactually included after the decimal.
Example
C4=A#Inventory,NumDecimals:1
OnDemandRulesUse this option to specify which on-demand rules are available for the data form. Use a comma-separated list of rule names. See “Specifying On-Demand Rules for Data Forms” on page 146.
Example
OnDemandRules=Calculation,Tax,Tax2
OverrideUse this option to specify different POV dimension members, formula calculations, or text forone or more consecutive columns or rows or to change a style. Use this option within a row orcolumn definition.
Note: To override cells that are not consecutive, you can enter the override in the Other field ofthe form options. You can enter multiple overrides by separating each override by acomma. The following example overrides three individual cells:
Override(1,1,string("455")),Override(3,3,string("23")),Override(5,5,string("2234"))
You cannot use member lists with the Override option. You can apply multiple overrides to acell, with the last value being used when there is a conflict. In most cases, you can also mix theoverrides on a cell. For example, if an override on a row specifies a value for NumDecimals whilean override on a column specifies a value for Scale, there is no conflict except if the samedimension is used. If you use a leading semicolon, you can mix values for Style.
161
You can also mix overrides where they intersect by including a semicolon after the Overridekeyword. Note that without the semicolon, the style defined for the row is used because rowvalues supersede column values when they conflict in the form. To mix the overrides from therow and column definitions, you must include the semicolon on the row keyword.
Syntax
Override(StartCell,EndCell,Override)
Parameter Description
StartCell An integer value representing the override starting point. If the override is defined for a row, this parameter indicates thestarting column where the override is applied. In this example, the override starts with column 2:
R2=A#Sales, Override(2,3,A#SalesTP)
EndCell An integer value representing the override ending point. In the example above, the override ends with column 3.
Override A POV. For example, to override with a different account, you specify A#newacct. To override with a different scenario andaccount, you specify A#newacct.S#newscenario.
You can also use these values or options with a POV override or by themselves:
l Blank
l CellText
l NumDecimals
l ReadOnly
l SCalc
l Scale
l String
l Style
Example
In the following override example, the system overrides columns 2 and 3 for row 2 with Januaryas the period and the PriorSales amount instead of the sales amount for the month:
R2=A#Sales, Override(2,3,Y#2014.P#January.A#PriorSales)
In the following override example, the system overrides columns 2 and 3 for row 2 with a formulacalculation of the average of Sales1, Sales2, and Sales3:
R2=A#Sales, Override(2,3,SCalc((A#Sales1+A#Sales2+A#Sales3)/3)
In the following override example, the system overrides columns 2 and 3 for row 2 with the readonly option.
R2=A#Sales, Override(2,3,readonly)
POVOrderUse this keyword to specify the order of dimension names in the POV. Dimension names canbe either the short name or the long name and are listed in a comma-separated list in the order
162
in which they should display. Any dimension not specified on the list is appended in order bydimension number to the end of the list.
Example
In the following example, the dimension order on the POV bar is Account, Period, Year,Scenario.
Note: If the Account dimension was specified as hidden, Period would display first on the POVbar.
POVOrder=A,P,Y,S
PrintNumDataColsPerPageUse this keyword to specify the number of columns to print on each page. The default is 6.
Users can override this setting in the printer-friendly display of the form.
Note: When setting the value for this keyword, you should also take into account the specificsof the form, such as the row height, and the printer and printer settings used, includingresolution and orientation.
Syntax
PrintNumDataColsPerPage=n
Replace n with the number of columns to print per page.
Example
PrintNumColsPerPage=6
PrintNumRowsPerPageUse this keyword to specify the number of rows to print on each page. The default is 20.
Users can override this setting in the printer-friendly display of the form.
Note: When setting the value for this keyword, you should also take into account the specificsof the form, such as the row height, and the printer and printer settings used, includingresolution and orientation.
Syntax
PrintNumRowsPerPage=n
Replace n with the number of rows to print per page.
163
Example
PrintNumRowsPerPage=20
PrintRepeatHeadersonAllPagesUse this keyword to specify whether to print headers on all pages. The default is True.
Users can override this setting in the printer-friendly display of the form.
Syntax
PrintRepeatHeadersonAllPages=Boolean
Replace Boolean with True or False.
Example
PrintRepeatHeadersonAllPages=True
RnUse this keyword to define a row in the form. The keywords such as R1, R2, R3 provide thedefinition of each row in the specified order. The row identifier must begin with 1 and proceedin sequential order. You can use member and system lists in row definitions.
Note: You can use multiple lists in a row.
Dimension elements specified for the row override elements that are set in theBackgroundPOV or SelectablePOVList.
You can use these values and options within a row definition:
l AddMember
l Blank
l Cell_Link
l CellText
l CustomHeader
l NoSuppress
l NumDecimals
l Override
l ReadOnly
l SCalc
l Scale
l String
164

l Style
Syntax
Rn=CalcExpressionRn=POVExpression
Table 27 Syntax for Rows Keyword
Parameter Description
n The row number.
CalcExpression Use SCalc, Blank, or String. See “SCalc” on page 167, “Blank” on page 152, and “String” on page 170.
POVExpression A valid dimension intersection or member list.
Example
R1=A#Sales.I#[ICP Entities],AddMember:I{[Base]}R2=A#Sales.I{[Base]}R3=A#HeadCount.I#[ICP None],NoSuppressR4=A#Purchases.I#[ICP None],CustomHeader:ABCR5=SCalc(Row(2)*100),numdecimals:1,scale:0R6=A{OperatingIncome.[Descendants]}
ReadOnlyUse this option to specify a read-only row, column, or cell in the form. Use this option withina row or column definition or within a cell override definition. The read-only cell is similar toall other cells but you cannot edit its contents. You can modify the style of a read-only row,column, or cell to differentiate it from editable rows, columns, and cells. See Style.
Note: When you export to Excel, the read-only formatting is maintained.
Example
C4=S#Actual.Y#2014,ReadOnly
ReportDescriptionUse this keyword to specify the form description.
Syntax
ReportDescription=Description
Replace Description with a description for the form. The description can contain a maximumof 255 characters.
165
Example
ReportDescription=Intercompany Detail
ReportLabelUse this keyword specify the form name. This keyword is required.
Syntax
ReportLabel=Label
Replace Label with the form name. The name can contain a maximum of 40 characters. Youcannot use these characters in the name:
l Asterisk ( * )
l At sign ( @ )
l Backslash ( \ )
l Colon ( : )
l Comma ( , )
l Curly brackets ( { } )
l Forward slash ( / )
l Less-than and greater-than signs ( < > )
l Number sign ( # )
l Parentheses ( ( ) )
l Period ( . )
l Pipe ( | )
l Plus sign ( + )
l Question mark ( ? )
l Quotation marks ( “ )
l Semicolon ( ; )
Note: You can use an underscore ( _ ) in the report label but it must be used between twocharacters. It cannot be used alone as the label name and it cannot be used at the endof a label name.
Example
ReportLabel=ICP Detail
ReportSecurityClassUse this keyword to specify the security class assigned to the form. The default is [Default].
166
Syntax
ReportSecurityClass=SecurityClass
Replace SecurityClass with the name of a valid security class.
Example
ReportSecurityClass=Corporate
ReportTypeUse this keyword to specify the report type. This keyword is required and the value must be setto WebForm for the file to be loaded as a data form script.
Syntax
ReportType=WebForm
RowHeaderPctUse this option to resize the row header width in reference with the total width of the form. Thisis applicable only when the actual width of the row header exceeds the specified percentage.
For example, if the actual row header width is 25% of the total form's width, and the specifiedvalue is 40%, the row header would not increase to 40%, as it could display the content in 25%.However, if the specified value is 10%, the row header width would decrease from the actualwidth of 25% to fit in the specified 10% width with a scroll bar. If a row header has multiplecolumns, the system adds the width of all the columns, and compares it with the total width ofthe form.
Syntax
RowHeaderPct:n
Replace n with a value from 1 to 100.
Example
RowHeaderPct=30
SCalcYou can use the Scalc function to create, in columns and rows, custom formulas that use standardmathematical operators. Use this value within a row or column definition or within a celloverride definition. The specified calculations are performed on the application server. Thefollowing example subtracts column 2 from column 1:
Scalc(col(1)-col(2))
You can also use this value to create text within the form.
167
Syntax
SCalc(<expression> [<operator> <expression>])
Note: You can include multiple pairs of [<operator> <expression>] in an SCalccalculation.
Parameter Description
operator The mathematical operator for the calculation. These operators are supported:
+ - * /
expression The values in the calculation. In addition to numeric values, you can include cell references, row references, columnreferences, and various other types of items.
You can use these types of items in SCalc calculations:
l References to dimension members. This example references the Account dimensionmembers Purchases and OtherCosts: R6=SCalc(((A#Purchases)-(A#OtherCosts))*100)
l Cell references, using the syntax Cell(rowIndex,columnIndex). This example refers tothe cell in the fourth row of the second column in the form: R1=SCalc(Cell(4,2))
l Row references, using the syntax Row(rowIndex). This example divides row 4 by row 2:R3=SCalc(Row(4)/Row(2))
Note: For rows or columns that contain member lists, the calculation occurs on the totalfor the members of the list.
l Column references, using the syntax Col(columnIndex). This example adds column 1 andcolumn 3: C4=SCalc(Col(1)+Col(3))
l Nested formulas, using parentheses to nest.
l Forward references to cells with SCalc calculations
Note: SCalc calculations are not performed until the data is saved and the calculated resultsare not displayed on the form until the form is refreshed.
An SCalc row or column can reference another SCalc row or column in its calculation, howeveryou cannot forward reference in a SCalc row or column for another Scalc row or column. Forexample, this SCalc forward reference is allowed:
C1=A#SalesC2=A#COGSC3=SCalc(Col(1)-Col(2))C4=SCalc(Col(3)/Col(1)*100)
168
ScaleUse this option to specify the scale for uncalculated columns, rows, or cells.
Syntax
Scale:n
Replace n with a value from -12 to 12.
Example
C4=A#Inventory,Scale:2
SelectablePOVListUse this keyword to specify the members of a dimension that can be selected by users.
The initial value for a selectable dimension comes from the Background POV if one is specifiedfor the dimension; otherwise, the initial value comes from the user’s point of view. If the initialvalue is invalid for the list, the system defaults to the first member of the list.
When the user selects a new member, the selected member becomes part of the user’s point ofview.
Syntax
SelectablePOVList=Dimension{MemberList}SelectablePOVList=Dimension{[SystemList]}SelectablePOVList=Dimension{Parent.[SystemList]}
Table 28 Syntax for SelectablePOVList Keyword
Parameter Description
Dimension One of these characters to represent the dimension that is selectable:
l S for Scenario
l W for View
l E for Entity
l V for Value
l P for Period
l A for Account
l I for ICP
l C for Custom
Parent A valid parent for the dimension.
MemberList Name of a valid member list.
SystemList Name of a valid system list.
169
Example
SelectablePOVList=S{ActualBudget}.Y{Years}.P{Months}.E{[Hierarchy]}.C1{ProductsAllocate}.C2{Customers}.C3{AllChannels}
ShowDescriptionsUse this keyword to specify whether descriptions are displayed for the dimension elements inthe form. The default is False.
Note: If no description exists, the label is displayed. If there is no description for an entity, onlythe entity label is displayed; the parent label is not included.
Syntax
ShowDescriptions=Boolean
Replace Boolean with True or False.
Example
ShowDescriptions=True
ShowLabelsUse this keyword to specify whether labels are displayed for the dimension elements in the form.The default is True.
If ShowLabels and ShowDescriptions are set to True, then labels and descriptions areseparated by hyphens. If both are set to False, the system displays labels.
Syntax
ShowLabels=Boolean
Replace Boolean with True or False.
Example
ShowLabels=False
StringUse this option to specify a text string in a column, row, or cell. Use this option within a row orcolumn definition or within a cell override definition. The String option is considered a server-side calculation, therefore it can be used anywhere that SCalc is used.
Example
C4=String("Show this read-only string")
170
StyleUse this option to specify the style attributes for a row, column, cell, custom header, or dimensionheader. Use this option within a row, column, cell override, custom header or header optiondefinition.
Caution! Use care when applying style attributes to a form. The Style option is a powerfulfeature and, if used incorrectly, can significantly change the appearance of a form.
Note: When you export to Excel, the style formatting is maintained.
Syntax
Each style property consists of a property name, colon, and value. The value may be one or morewords, separated by spaces, for example:
Style:color:red;text-align:right
The Style option is interpreted by the browser, not by Financial Management, so it is limitedonly by what the browser supports. The Style option uses the standards supported by the WorldWide Web Consortium (W3C).
Note: You can use the Style option keyword one time on a line and add multiple Property:Valuepairs. For example:
C3=S#Actual.Y#@CUR(-1),Style:font-color:blue;background-color:red;font-weight:bold
The Style Example table lists some of the properties and potential values that can be used. Fora full list, see the Property Index from the W3C.
Table 29 Style Examples
Property Value
Color (foreground)Background-color
The color name or the standard hexadecimal RGB notation. For example:
Style: color: red
Style: color: rgb(255,0,0)
Style: background-color: #ff0000
Style: background-color: yellow
Font-family The font name. For example:
Style: font-family: Arial
171
Property Value
Font The font style. For example:
Style: font-style: italic
Note: You can combine up to six font properties in a Style value. For example:
Style: font-style:italic;font-family:Arial;font-size:12px
Font-weight The font weight. Values include demi-bold, demi-light, extra-bold, light, extra-light, demi-light. For example:
Style: font-weight: extra-bold
Font-size The font point size. For example:
Style: font-size: 12px
Alignment The text alignment. Values include left, right, center, and justify. For example:
Style: text-align: center
You can combine styles at row and column intersections by including, for a row, a semicolonas the first character in the Style text box or Cust Header Style text box. Note that without thesemicolon after the Style keyword, the style defined for the row is used because row valuessupersede column values when they conflict in the form.
Each cell in the grid displays only its right and bottom borders, so that a single pixel separatesadjoining cells. You can use Style to change the color or set the line to dashed for the right orbottom borders. However, if you enable the top or left border, it will be in addition to the bottomborder of the above cell and the right border of the cell to the left, respectively. This means youwill have two borders. You can avoid double borders by turning off the adjacent border.
You must also set the CustomHeaderStyle of an axis to keep the headers aligned with the grid.
Example
In the following example, the styles from Row 1 (pink background) and Column 1 (pinkbackground and bold, green text) are combined by adding a semicolon after the Style keywordin the row definition. The example for SuppressColHeaderRepeats shows a sample data entryform if this syntax is used.
R1=Blank, CustomheaderStyle: font-weight: bold, CustomHeader: Balance sheet accounts, Style:; Background-color: pinkC1=S#Actual.Y#@CUR, Style: Background-color: pink; color: green; font-weight: bold
172
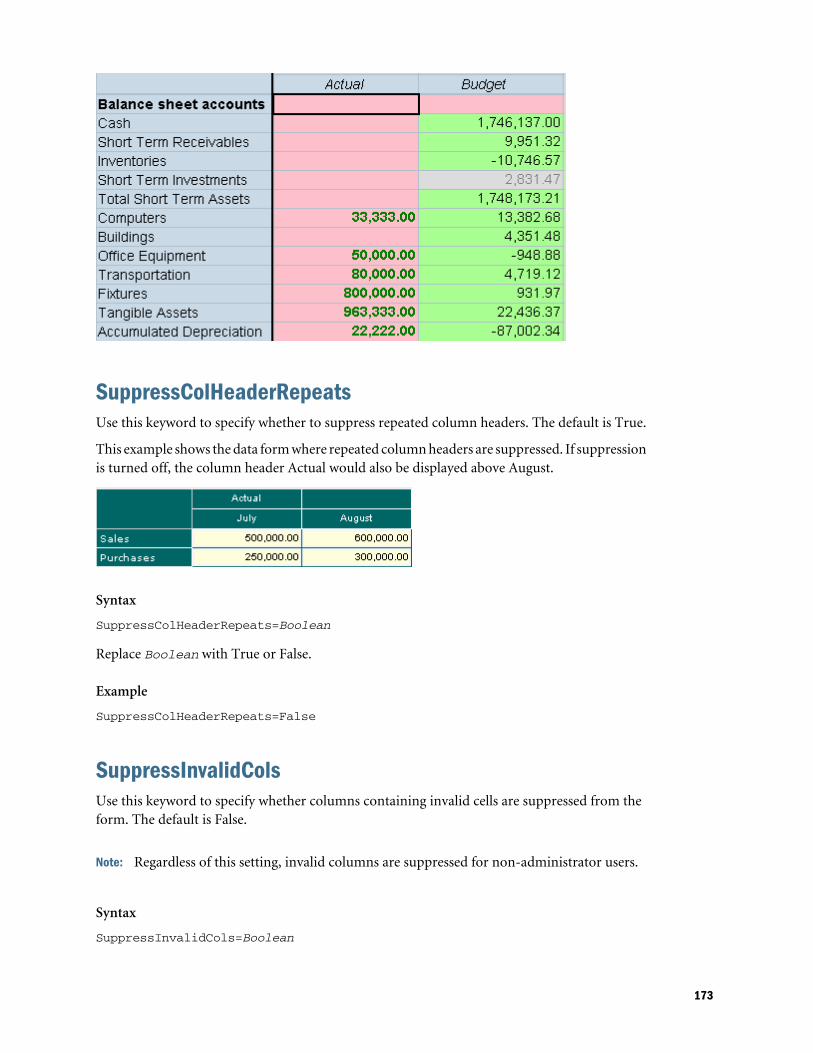
SuppressColHeaderRepeatsUse this keyword to specify whether to suppress repeated column headers. The default is True.
This example shows the data form where repeated column headers are suppressed. If suppressionis turned off, the column header Actual would also be displayed above August.
Syntax
SuppressColHeaderRepeats=Boolean
Replace Boolean with True or False.
Example
SuppressColHeaderRepeats=False
SuppressInvalidColsUse this keyword to specify whether columns containing invalid cells are suppressed from theform. The default is False.
Note: Regardless of this setting, invalid columns are suppressed for non-administrator users.
Syntax
SuppressInvalidCols=Boolean
173

Replace Boolean with True to suppress invalid columns or False to display invalid columns.
Example
SuppressInvalidCols=False
SuppressInvalidRowsUse this keyword to specify whether rows containing invalid cells are suppressed from the form.The default is False.
Note: Regardless of this setting, invalid rows are suppressed for non-administrator users.
Syntax
SuppressInvalidRows=Boolean
Replace Boolean with True to suppress invalid rows or False to display invalid rows.
Example
SuppressInvalidRows=False
SuppressNoDataColsUse this keyword to specify whether columns containing nodata cells are suppressed from theform. The default is False.
Syntax
SuppressNoDataCols=Boolean
Replace Boolean with True to suppress columns with no data or False to display columns withno data.
Example
SuppressNoDataCols=False
SuppressNoDataRowsUse this keyword to specify whether rows containing nodata cells are suppressed from the form.The default is False.
Syntax
SuppressNoDataRows=Boolean
Replace Boolean with True to suppress rows with no data or False to display rows with no data.
174
Example
SuppressNoDataRows=False
SuppressRowHeaderRepeatsUse this keyword to specify whether to suppress repeated row headers. The default is True.
Syntax
SuppressRowHeaderRepeats=Boolean
Replace Boolean with True or False.
Example
SuppressRowHeaderRepeats=False
SuppressZeroColsUse this keyword to specify whether columns containing zeros are suppressed from the form.The default is False.
Syntax
SuppressZeroCols=Boolean
Replace Boolean with True to suppress columns with zeros or False to display columns withzeros.
Example
SuppressZeroCols=False
SuppressZeroRowsUse this keyword to specify whether rows containing zeros are suppressed from the form. Thedefault is False.
Syntax
SuppressZeroRows=Boolean
Replace Boolean with True to suppress rows with zeros or False to display rows with zeros.
Example
SuppressZeroRows=False
175
Using Relative Time PeriodsFor rows and columns, you can use these keywords to select a period relative to the current POV:
l @Cur
l @First
l @Last
l @Next
l @Prev
Note: Year and period values are not case sensitive.
For example, if the period selected in the POV is January, the column or row that is created usingthis formula displays data for February:
P#CUR+1
For the system to apply the relative year when the period extends past the current year, or if youneed to refer to a prior year, you must specify Y#@Cur as part of the row or column definition.
For example, you need to specify C1=Y#@Cur.P#@Cur(+1) to return the correct year if thecurrent period is the last period. If the current Point of View is 2013 December:C1=Y#@Cur.P#@Cur(+1) returns 2014 January.
If the current Point of View is 2013December: C2=P#@Cur(+1) returns 2014 January (if Januaryis the first period in the year, and December is the last). Therefore, for the system to correctlyreflect the year information, you specify the year in the column definition. For example,C2=Y#@Cur.P#@Cur(+1)
The @CUR function can be used for other dimensions to retrieve the current POV. However,@CUR for the other dimensions does not support using an offset, for example, +2, since theother dimensions are not chronological. For example, if the current POV had the Actual scenario,a valid example for a column would be to use C1=S#@CUR to return “Actual”. If you changedthe POV scenario to Budget, this same column definition would return “Budget”.
Order of Precedence for Conflicting AttributesThere are multiple ways to set the number of decimals, scale, and POV for data forms. Forexample, you can set the number of decimals:
l For the form - FormNumDecimals=3
l For a column - C4=A#Inventory,NumDecimals:1
l For a row - R4=A#Sales,NumDecimals:2
l For a cell override - R2=S#Actual.P#August, Override(2,7,P#July,NumDecimals:4)
176
In some instances, the setting for one of these attributes may intersect with a conflicting settingfor the same attribute. For example, a column may have a scale setting of 1, while an intersectingrow may have a scale setting of 2. It is important to understand that the value that is applied forthe number of decimals and scale attributes is based on this order of precedence:
l Cell Override
l Row
l Column
l Form
l Default - For number of decimals, the default comes from the account. For scale, the defaultis taken from the entity currency.
Note: In the POV, the value for each dimension is independently resolved. For example,the Account dimension might be set at the form level and the Scenario dimension atthe row level.
The system resolves conflicting attributes according to the order of precedence. For example, ifthe number of decimals attribute is defined on a cell override, this value is used instead of theform, row, column or default.
Similarly, if a cell has conflicting data and calculations specified, this order of precedence isapplied:
l SCalc
l Data
Note: SCalc formulas in a form are evaluated in a left to right, top to bottom order. Forexample, all of the columns in row 1 are evaluated sequentially, then all of the columnsfor row 2 are evaluated. An SCalc formula can refer to another SCalc cell that precedesit in the evaluation order.
Editing Data FormsYou can edit a data form using the Form Designer. You can only edit one data form at a time.
Note: After you edit a data form, you must reload the updated script to the application to seethe changes that you made.
ä To edit data forms:
1 Select Consolidation, and then Documents.
2 Open a data form.
3 Click Edit, or select Actions, and then Edit.
4 Edit the form as needed.
177
5 Click Save.
Loading Data FormsAfter you create data form scripts, you load them into an application.
Note: Oracle recommends that you add Financial Management to the exceptions for your Webpop-up blocker. When you perform some tasks such as loading data, a status windowpops up showing the task status. If you have a pop-up blocker enabled on your computer,the status window is not displayed.
ä To load data forms:
1 Select Consolidation, then Load, and then Documents.
2 From Document Type, select Data Form.
3 Enter the file name or click Browse to locate the file.
Note: By default, data form scripts use the WDF file extension. The load process acceptsother file extensions such as TXT or CSV, however, Oracle recommends that you usethe WDF file extension.
4 Optional: Perform one of these steps:
l To override the security class specified in the file being loaded, select Override SecurityClass, then select the security class from Security Class.
l To make this form available only to you, select Private. If you select this option, theOverride option and Security Class list are not available.
5 Repeat these steps until you have added the forms to load.
6 Optional: Select Overwrite Existing Documents if you are updating data forms.
7 Click Load.
Note: All data forms that you load must include a valid ReportLabel. If you selected to loadmultiple forms and one of the forms has an invalid ReportLabel, none of the selectedforms are loaded.
Extracting Data FormsYou can extract data form scripts from an application. Extracting the script does not delete thescript from the folder or from the application. It only extracts the contents of the script to alocation you select.
After you extract a data form script, you can modify it and reload it to the application. You canalso use the model for a new script.
178
Note: If you are reloading a script into an application, you must select the Overwrite ExistingDocuments option to replace the old file in the application.
ä To extract data forms:
1 Open the application.
2 Select Consolidation, then Documents.
3 Click Extract Documents, or select Actions, and then Extract Documents.
4 Enter the file name or click Browse to locate the file.
5 Click Extract.
6 Click Save and specify the location to which to save the file.
Deleting Data FormsTo delete data forms, you must be an administrator with the security role of Manage Data EntryForms. If you want to delete a folder, you must first delete any data forms that it contains.
ä To delete data forms:
1 Open the application.
2 Select Consolidation, then Documents, and then Data Forms.
3 Select a data form, then click Delete, or select Actions, and then Delete.
179

180
8Extracting Data to a Database
In This Chapter
Configuring a Data Source Name (DSN)... . . . . . . . . . . . . . . . . . . . . . . . . . . . . . . . . . . . . . . . . . . . . . . . . . . . . . . . . . . . . 182
Star Schemas ... . . . . . . . . . . . . . . . . . . . . . . . . . . . . . . . . . . . . . . . . . . . . . . . . . . . . . . . . . . . . . . . . . . . . . . . . . . . . . . . . . . . . . . . . . 182
Creating and Exporting Data to a Star Schema .... . . . . . . . . . . . . . . . . . . . . . . . . . . . . . . . . . . . . . . . . . . . . . . . . . . . 185
Updating a Star Schema .... . . . . . . . . . . . . . . . . . . . . . . . . . . . . . . . . . . . . . . . . . . . . . . . . . . . . . . . . . . . . . . . . . . . . . . . . . . . . 187
Deleting a Star Schema .... . . . . . . . . . . . . . . . . . . . . . . . . . . . . . . . . . . . . . . . . . . . . . . . . . . . . . . . . . . . . . . . . . . . . . . . . . . . . . 188
Creating a Star Schema Template... . . . . . . . . . . . . . . . . . . . . . . . . . . . . . . . . . . . . . . . . . . . . . . . . . . . . . . . . . . . . . . . . . . . 188
Deleting a Star Schema Template... . . . . . . . . . . . . . . . . . . . . . . . . . . . . . . . . . . . . . . . . . . . . . . . . . . . . . . . . . . . . . . . . . . . 189
Use the procedures in this chapter to extract data to a database.
Note: To extract data as flat files, see the Extracting Data section in the Oracle Hyperion FinancialManagement User's Guide.
You can extract data and use an Essbase database to analyze the data and produce reports. Youuse a star schema to send data to an Essbase database. You can also use a star schema with third-party products.
Note: You create the database after you export data to the star schema. To create a database, seethe database documentation for your release.
Before you extract data to a database, you must set up a data source name (DSN) for the databaseto store star schemas. To store star schemas in multiple databases, you can create a DSN for eachdatabase. For instructions, see the Oracle Enterprise Performance Management System Installationand Configuration Guide.
To extract data to a database, you must be assigned the Administrator or Extended Analyticssecurity role.
If you are not assigned the Extended Analytics security role, these restrictions apply for extractingdata:
l You can extract only base level data for ICP and all Custom dimensions.
l You can select only one Scenario and one Year dimension.
l You can select only the Periods that are in the Scenario's default frequency.
181
Configuring a Data Source Name (DSN)To use the Extract Data to Database feature, you must configure a data source name (DSN) toprovide a connection between the database server and application server. The DSN specifies thedatabase server name and other database-related information, such as the username andpassword of a user with full access rights to the database server.
ä To create a DSN:
1 Select Navigate, then Administer, and then Consolidation Administration.
2 From Admin Tasks, double-click Configure DSN.
3 Click Create Data Source.
4 Enter a Data Source Name for the destination database.
5 From the Database Type drop-down list, select a database type: Oracle, SQL Server, or DB2.
6 Enter a username and password.
Note: Ensure that the user is granted privileges to create, update, and delete tables.
7 Enter the server Host name.
8 Enter the Port number.
9 Optional: Enter a default tablespace or filegroup name.
10 Optional: Enter an index tablespace or filegroup name.
11 Click Test Connection.
12 When the system displays the “Successful” confirmation, click Save to save the DSN.
13 Click Refresh to display the updated DSN information.
After you have created and saved a connection, it is displayed on the Configure DSN page. Ifyou need to edit it at a later time, you can edit it by clicking Edit DSN, or you can delete it whenit is no longer needed.
Star SchemasYou can create multiple star schemas per application. The table names in each star schema beginwith a prefix that you specify. You can select multiple members in all dimensions to create thestar schema that best reflects the information to export.
Note: Cell text and line item detail are not exported to the star schema.
The data combinations in the star schema are created based on the dimension members thatyou select to export. The more dimension members selected, the more possible datacombinations that need to be created in the star schema, and the more time needed to complete
182
the export process. You can calculate the number of data combinations by multiplying thenumber of members selected for each dimension.
Caution! Do not select to export all members from every dimension; select segments of datato export. Depending on the application size, the number of data combinations, andthe amount of time to complete the export time could be excessive.
For example, you can export this data:
l Scenario - Actual
l Year - 2014
l Period - January
l View - Periodic
l Entity - Regional, United States, Florida, Connecticut
l Value - USD
l Account - Gross Margin, Sales, Total Costs
l ICP - [None]
l C1 - Balls, Tennis Balls, Golf Balls
l C2 - All Customers, Customer2, Customer3, Customer4, Customer5
l C3 - [None]
l C4 - [None]
The star schema that is created can then be used by Oracle Essbase Integration Services to createone or many data cubes to reflect the audience that needs to see and use the information. Thestar schema contains 180 data combinations for these members (1 * 1 * 1 * 1 * 4 * 1 * 3 * 1 * 3* 5 * 1 * 1 = 180).
Note: When you export metadata to Oracle Essbase through Oracle Essbase Integration Services,the Extract Data to a Database feature uses metadata in a different order than it displaysin the Financial Management application.
You can extract only local currency data if you prefer. To extract only local currency data, usethe Entity Currency member from the Value dimension in the Point of View. Entity Currencyacts as placeholder for the currency and extracts the default currency for each entity that isselected.
If the selected Scenario is YTD, the data extract extracts periodic derived data. For example,suppose the Scenario is ZeroView=YTD. There is a value of 100 in an expense account in thefirst period. In the second period, no data is reported for that account. The derived periodicvalue for the second period is –100, forcing the YTD amount to 0. If Extract Data to Databaseis run for this Point of View on a periodic basis, for the first three periods, the values are 100, –100, and 0, respectively.
183
Star Schema FormatsYou select one of these extract format options when you create a star schema:
l Standard
l Metadata Only
l Selected Metadata Only
l Essbase
l Data Warehouse
The extract format option that you select determines the schema format used. Each schemaformat generates a different set of tables. These schema formats are available:
l Standard Essbase Schema - this schema is used for the Standard, Metadata Only, and SelectedMetadata Only extract format types.
l SQL and Essbase Schema - this schema is used for the Essbase extract format type.
l Warehouse Normalized Hierarchy Schema - this schema is used for the Data Warehouseextract format type.
Prefix TablesFor each schema format, the system creates a PREFIX_FACT table that contains keys to thedimension tables and one data field. The system also creates PREFIX_DIMENSION tables,HFM_EA_EXTRACT table to track extract timestamps for metadata, and aPREFIX_LOCK_ACCESS table to track writer and reader locks. A writer lock is used whenmetadata is being changed, for example, when the create or replace process is being used. Areader lock is used when metadata is not being changed and the system is updating data in theFACT table, for example when an update process is being used. These rules are used for the lockprocess:
l Only one writer at a time can execute against the same prefix on the same DBMS instance.
l If a writer is executing or is in the queue, no readers can execute until the writer hascompleted.
l Multiple readers can execute simultaneously regardless of the point of view.
Note: The system creates two tables for the Entity dimension: PREFIX_ENTITY andPREFIX_PARENT.
For the SQL and Essbase Aggregation Schema format, the system also createsPREFIX_DIMENSION_BASE tables.
For the Warehouse Normalized Hierarchy Schema format, the system createsPREFIX_DIMENSION_PARENT tables.
Note: Base and Parent tables are not created for the View, Year, and Parent dimensions.
184
For example, if the Relational Table Prefix is DEMO, the system creates these tables for theEssbase format:
l HFM_EA_EXTRACT1
l HFM_LOCK_ACCESS1
l DEMO_FACT
l DEMO_YEAR
l DEMO_VIEW
l DEMO_PARENT
l DEMO_SCENARIO and DEMO_SCENARIO_BASE
l DEMO_PERIOD and DEMO_PERIOD_BASE
l DEMO_VALUE and DEMO_VALUE_BASE
l DEMO_ENTITY and DEMO_ENTITY_BASE
l DEMO_ICP and DEMO_ICP_BASE
l DEMO_ACCOUNT and DEMO_ACCOUNT_BASE
l DEMO_CUSTOM and DEMO_CUSTOM_BASE
Creating and Exporting Data to a Star SchemaYou can create a star schema by specifying the prefix that identifies the tables for the schemaand the dimension members of the cells to be exported. Before you export the data, make surethat the application data is consolidated.
Caution! Do not use the Financial Management database as the destination database for thedata export.
Note: For Oracle database users: The extracted text data is stored in NVARCHAR(Unicode)format. Use the Oracle “translate” command in SELECT statements to convert the textfrom Unicode to ANSI format. For example, SELECT translate (LABEL using CHAR_CS)as LABEL FROM DEMO_ACCOUNT.
Note: If you are extracting a large amount of data, make sure that you have adequate disk spacefor the extract.
Oracle recommends that you add Financial Management to the exceptions for your Web pop-up blocker. When you perform some tasks such as loading data, a status window pops up showingthe task status. If you have a pop-up blocker enabled on your computer, the status window isnot displayed.
185
ä To create a star schema and extract Financial Management data:
1 Select Consolidation, then Extract, and then Data.
2 Do one of these tasks:
l If you saved POV dimensions in a template, from Template, select the template.
l If you are not using a template, select the POV dimension members to export.
3 From the Extract Destination section, for the Type option, select Database.
Note: This option is only available if you are assigned the Administrator or ExtendedAnalytics security role.
4 From Extract Format, select an option:
l Standard
l Metadata Only - extracts metadata only
l Selected Metadata Only - extracts only the metadata for the selected dimensionmembers.
l Essbase
l Data Warehouse
5 From Options, select one or more options:
l Extract Dynamic Accounts
l Calculated Data
l Derived Data
6 From Line Item Details, select an option:
l Total Summary for Cell
l None
7 From Schema Actions, select Create Star Schema.
8 From Destination Database (DSN), select the database to which you are exporting the star schema.
Note: Do not use the same Financial Management database from which you are exportingdata as the destination database.
9 For Relational Table Prefix, enter a prefix to identify the tables for the star schema, or use the defaultapplication name prefix.
Note: The prefix can contain up to 10 alphanumeric characters and must start with a letter.It cannot contain an underscore. The default prefix is the application name.
10 Click Extract.
186
Updating a Star SchemaYou can export data to a previously defined star schema. When you update a star schema, youcan specify different dimension members.
Note: When you update a star schema, the system updates the Fact table.
Oracle recommends that you add Financial Management to the exceptions for your Web pop-up blocker. When you perform some tasks such as loading data, a status window pops up showingthe task status. If you have a pop-up blocker enabled on your computer, the status window isnot displayed.
ä To update a star schema:
1 Select Consolidation, then Extract, and then Data.
2 Do one of these tasks:
l If you saved POV dimensions in a template, from Template, select the template.
l If you are not using a template, select the POV dimension members to export.
3 From Extract Destination Type, select Database.
Note: This option is only available if you are assigned the Administrator or ExtendedAnalytics security role.
4 From Extract Format, select an option:
l Standard
l Metadata Only - extracts metadata only
l Selected Metadata Only - extracts only the metadata for the selected dimensionmembers.
l Essbase
l Data Warehouse
5 From Options, select one or more options:
l Extract Dynamic Accounts
l Calculated Data
l Derived Data
6 From Line Item Details, select an option:
l Total Summary for Cell
l None
7 From Schema Actions, select Update Star Schema.
8 From Destination Database (DSN), select the database to which you are exporting the star schema.
187
Note: Do not use the same Financial Management database from which you are exportingdata as the destination database.
9 For Relational Table Prefix, enter a prefix that to identify the tables for the star schema, or use thedefault application name prefix.
Note: The prefix can contain up to 10 alphanumeric characters and must start with a letter.It cannot contain an underscore. The default prefix is the application name.
10 Click Extract.
Deleting a Star SchemaYou can delete a star schema that you no longer need. Deleting a star schema deletes all of thestar schema data, metadata, and tables.
ä To delete a star schema:
1 Select Consolidation, then Extract, and then Data.
2 From Extract Destination Type, select Database.
3 From Destination Database (DSN), select the database that contains the star schema.
4 For Relational Table Prefix, enter the prefix that identifies the star schema’s tables.
Note: The prefix can contain up to 10 alphanumeric characters and must start with a letter.The default prefix is the application name.
5 From Schema Actions, select Delete Star Schema.
Creating a Star Schema TemplateYou can create a star schema template, which enables you to name and save POVs so that youcan use them again.
ä To create a star schema template:
1 Select Consolidation, then Extract, and then Data.
2 Select the POV dimension members.
3 From Destination Database (DSN), select the database to which you are exporting the star schema.
4 For Relational Table Prefix, type the prefix that identifies the star schema’s tables.
Note: The prefix can contain up to 10 alphanumeric characters and must start with a letter.The default prefix is the application name.
5 Click Save Template.
6 Enter a template name and click OK.
188
Deleting a Star Schema Template
ä To delete a star schema template:
1 Select Consolidation, then Extract, and then Data.
2 From Template, select the template to delete.
3 Click Delete Template.
4 At the system prompt, click OK.
189

190
9Defining Reports
In This Chapter
Defining Journal Report Scripts .. . . . . . . . . . . . . . . . . . . . . . . . . . . . . . . . . . . . . . . . . . . . . . . . . . . . . . . . . . . . . . . . . . . . . . . . 191
Defining Intercompany Matching Report Scripts .. . . . . . . . . . . . . . . . . . . . . . . . . . . . . . . . . . . . . . . . . . . . . . . . . . . . . 192
Defining Intercompany Transaction Report Scripts .. . . . . . . . . . . . . . . . . . . . . . . . . . . . . . . . . . . . . . . . . . . . . . . . . . 201
You can define these report types in Financial Management:
l Journal reports, which display information for a specific journal or list of journals based oncriteria that you select in the Journals module
l Intercompany Partner (ICP) Matching reports, which display the intercompanytransactions that are to be eliminated during consolidation
You can create a new report definition for each report, or you can open and modify a reportdefinition.
You define a report using one of these methods:
l Specifying values using the Report page options. See the Oracle Hyperion FinancialManagement User's Guide.
l Using a text editor to specify report options in scripts
The date, time, and user fields are automatically displayed as header information on all reports.The Point of View definitions differ for each report. For detailed examples of reports, see“Defining Journal Report Scripts” on page 191, and “Defining Intercompany Matching ReportScripts” on page 192.
Sample Intercompany Partner Matching report scripts are included when you install SampleApplications for Financial Management. The files are located in the Sample Applications folderin the directory to which you installed Financial Management.
Defining Journal Report ScriptsYou create journal reports to check the status of journals and review journal adjustments. Youcan create a journal report to display information for a specific journal, or list of journals. Forexample, you can select to display only journals with a specific status, balance type, entity, oraccount. You can also select the columns that display on the report and change their sort order.
191
You can set entity and account filters for journal reports in the report definition. The syntax forEntity filtering is EntityFilter=ParentName.ChildName (for example, UnitedStates.Maryland).The syntax for Account filtering is AccountFilter=MemberName (for example, Sales).
This example shows a sample Journal report definition:
ReportType=Journal ReportDescription=Tax Journals POV=S#Actual.Y#2014.P#January.V#<Entity Curr Adjs> DisplayColumn_0=Account,Ascending,NoRepeat,Yes,Label DisplayColumn_1=ICP,,NoRepeat,No,Label DisplayColumn_2=Products,,NoRepeat,No,Label DisplayColumn_3=Markets,,NoRepeat,No,Label StatusFilter=Working,Submitted,Rejected,Approved,Posted TypeFilter=Regular BalanceTypeFilter=Balanced,Unbalanced EntityFilter=UnitedStates.Maryland AccountFilter=Sales
Defining Intercompany Matching Report ScriptsIntercompany Matching reports help you track intercompany transactions for analysis andauditing purposes. The Intercompany Matching report shows matches for entities andintercompany partner dimensions that have been set up with the Intercompany Partner (IsICP)attribute enabled.
Intercompany Partner (ICP) Matching reports list the intercompany transactions that areeliminated during consolidation. Intercompany transactions are managed across theIntercompany Partner dimension. The Intercompany dimension contains all intercompanybalances that might exist for an account. You can enter intercompany transactions through datagrids, data loads, journals, or data forms. Financial Management can track and eliminateintercompany transaction details across accounts and custom dimensions. Intercompanytransactions are eliminated as of the first common parent of two intercompany entities. Theyare eliminated through the [Elimination] member of the Value dimension.
You can create Intercompany Matching reports by using the user interface
You can select accounts for the report, or use the plug account option, in which the systemgenerates the account and matching account based on the plug account. You can select tosuppress reversed transactions, custom dimensions or intercompany details. When you print areport, you can override report settings to customize the report for your needs.
Selecting Member Lists for Intercompany Matching ReportsYou specify dimension members that comprise the Point of View for the generated report. Youcan select member lists for the report Entity and Partner. For example, you could select theRegional member list for the Entity field. If you select a member list for Entity and Partner, thesystem processes the ICP transactions for all entities in the Entity list against all entities in thePartner list. The system only processes transactions for entities that have the ICP attributeenabled.
192

Selecting Accounts for Intercompany Matching ReportsYou must define the account and matching accounts for which you want to match transactions.If you want the system to generate the account and matching account based on the plug account,you can specify the plug account option and the system automatically generates the account andmatching account.
Specifying Decimal Places in Intercompany MatchingReportsYou can add the Decimal keyword to an Intercompany Matching report definition to specifythe number of decimal places to display in the report. The possible values for the decimal aredefault, 0-9. If you do not specify a decimal value, the system uses the default decimal setting asdefined in the account.
Selecting Style Sheets for Intercompany Matching ReportsYou can select a style sheet from a drop-down list when you are creating a report. You can alsoadd the StyleSheet keyword to the report definition to specify the style sheet to use for the report;for example, StyleSheet=HFM_IntercompanyDefault.xsl. If you do not specify a style sheetin the report definition, the system uses the default style sheet.
Specifying Currencies in Intercompany Matching ReportsYou can generate an Intercompany Matching report in a currency that you specify. This enablesyou to run the report and validate intercompany transactions in a common currency before theamounts are consolidated. For example, to check the values in the EUR currency, you couldchange the Value in the Point of View from USD to EUR and generate the report.
If you define a report using a currency that has not been translated, the system performs thetranslation process using the translation rules defined in the Sub Translate section of your rulefile. The system also stores the translated amounts in the corresponding currency Valuedimension member. However, if the reporting currency has previously been translated and thetranslation status of the entity is OK, the system does not need to re-translate and uses the storedtranslated amounts for processing the Intercompany Matching report.
For example, if you run an Intercompany Match report for the currency EUR, the system firstchecks if the translated data has been created for the EUR currency (V#EUR). The system alsochecks to ensure that translation status is OK. If the translation status of the entity is TR (requirestranslation), the system re-translates to ensure that the translated data is valid. Otherwise, thesystem uses the stored translated amounts for processing. However, if the data has not yet beentranslated to EUR, the system performs the translation process as defined in Sub Translate andstores the translated amounts in the EUR value member. The EUR translated amounts are alsoused for the Intercompany Matching report.
193
Suppression Options for Intercompany Matching ReportsWhen you create an Intercompany Matching report, you can suppress several types ofintercompany transactions and detail from the report. You can also select these suppressionoptions when you print the report.
Suppressing MatchesWhen you create an Intercompany Matching report, you can show or suppress matching Entity/Partner transactions. If you select to suppress them, the system suppresses the transactions if theEntity and Partner amounts are within the matching tolerance amount or percentage. Forexample, if an Entity has an amount of 299 and the Partner has 200, the difference is 99. If thematching tolerance amount is 100 and the difference between the Entity and Partner is less than100 as in this example, the system suppresses the transactions because it is within the matchingtolerance.
If you select not to suppress the Entity/Partner transactions, the system does not suppress themeven if the Entity and Partner amounts are within the matching tolerance amount or percentage.Using the previous example, even if the difference amount is 99 and if it is within the matchingtolerance, the system does not suppress the transactions. The matching tolerance specified isdisplayed in units.
Suppressing Reversed TransactionsBy default, the system displays the reversed transactions from an Intercompany Partner everytime a transaction is displayed for the Entity. You can select to suppress these reversedtransactions when you generate a report.
This option is very useful when you have one matching account for the report. For example, youmight have a “Cash” account used to store intercompany transactions for Revenue and Expense.In this case, you must use the Suppress Reversed Transaction option to avoid a double entrybecause there is only one matching account for the report.
Suppressing DetailsIf you want to display only the different amount in the report, you can suppress the intercompanydetails. When you select this option, the report does not display the intercompany transactionsand prints only the total difference for each Entity/Partner section. If there is a discrepancy andyou need to view each intercompany transaction, you can regenerate the report and showintercompany details.
Suppressing Custom DimensionsYou can select to suppress the columns for any of the Custom dimensions.
194

Member Display OptionYou can display the label, description, or both for the dimension member in the report.
Group By OptionYou can group your intercompany partner transactions by Custom dimension. The system sortsthe details based on this option and provides a subtotal for the group.
Intercompany Matching Report Script KeywordsYou use the keywords in this section to define Intercompany Partner Matching report scripts.After you create a script, save it with the RPT file name extension.
Note: Intercompany Partner Matching report script keywords are not case-sensitive.
ReportTypeThis keyword specifies the report type. This keyword is required in the script.
Syntax
ReportType=Intercompany
ReportDescriptionThis keyword specifies the description for the report. The report description can contain amaximum of 40 characters. This keyword is required in the script.
Syntax
ReportDescription=ReportDescription
Replace ReportDescription with the description for the report. For example:
ReportDescription=Intercompany Elimination Report
StyleSheetThis keyword specifies the style sheet to use for the report.
Syntax
StyleSheet=StyleSheetFileName
Replace StyleSheetFileName with the style sheet for the report. For example:
ReportDescription=HFM_IntercompanyDefault.xsl
If you do not specify a style sheet in the report definition, the system uses the default style sheet.
195
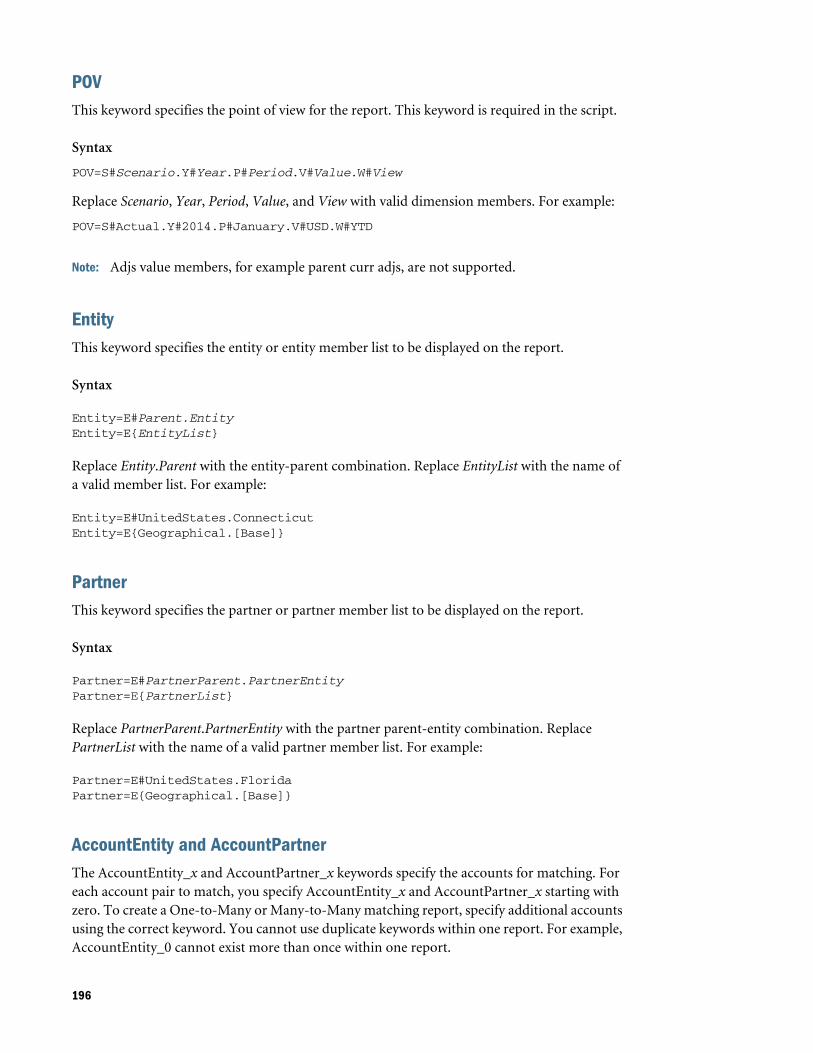
POVThis keyword specifies the point of view for the report. This keyword is required in the script.
Syntax
POV=S#Scenario.Y#Year.P#Period.V#Value.W#View
Replace Scenario, Year, Period, Value, and View with valid dimension members. For example:
POV=S#Actual.Y#2014.P#January.V#USD.W#YTD
Note: Adjs value members, for example parent curr adjs, are not supported.
EntityThis keyword specifies the entity or entity member list to be displayed on the report.
Syntax
Entity=E#Parent.EntityEntity=E{EntityList}
Replace Entity.Parent with the entity-parent combination. Replace EntityList with the name ofa valid member list. For example:
Entity=E#UnitedStates.ConnecticutEntity=E{Geographical.[Base]}
PartnerThis keyword specifies the partner or partner member list to be displayed on the report.
Syntax
Partner=E#PartnerParent.PartnerEntityPartner=E{PartnerList}
Replace PartnerParent.PartnerEntity with the partner parent-entity combination. ReplacePartnerList with the name of a valid partner member list. For example:
Partner=E#UnitedStates.FloridaPartner=E{Geographical.[Base]}
AccountEntity and AccountPartnerThe AccountEntity_x and AccountPartner_x keywords specify the accounts for matching. Foreach account pair to match, you specify AccountEntity_x and AccountPartner_x starting withzero. To create a One-to-Many or Many-to-Many matching report, specify additional accountsusing the correct keyword. You cannot use duplicate keywords within one report. For example,AccountEntity_0 cannot exist more than once within one report.
196
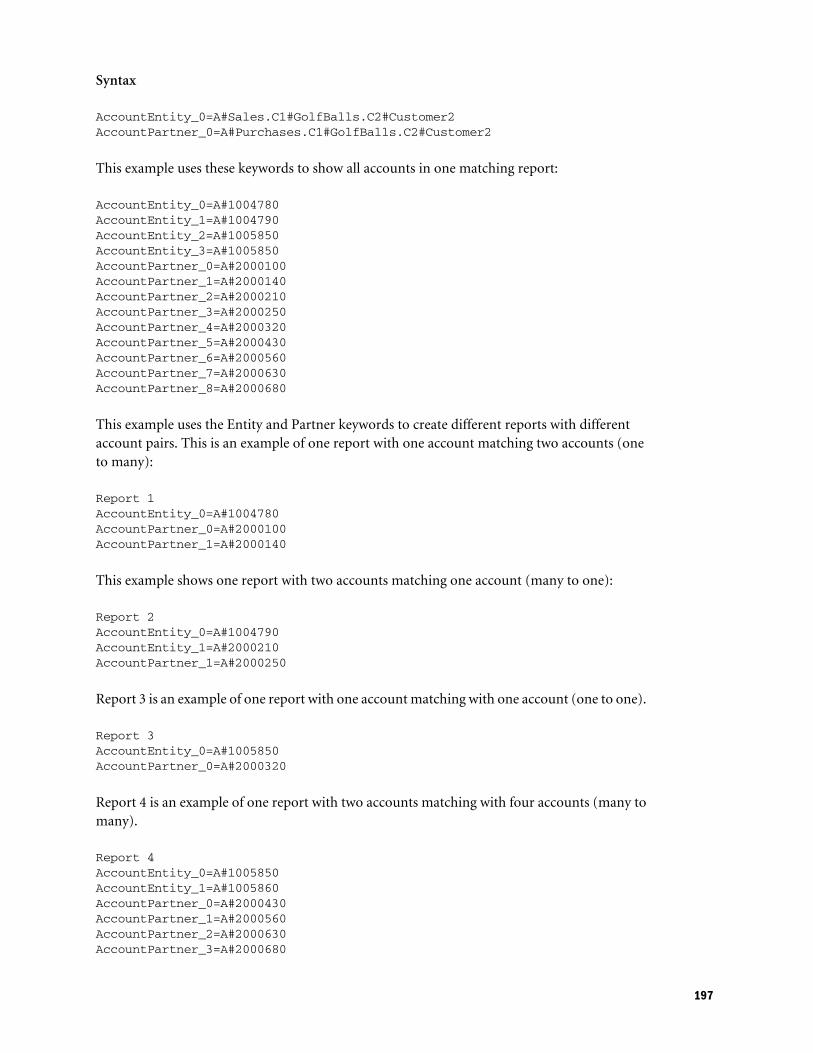
Syntax
AccountEntity_0=A#Sales.C1#GolfBalls.C2#Customer2AccountPartner_0=A#Purchases.C1#GolfBalls.C2#Customer2
This example uses these keywords to show all accounts in one matching report:
AccountEntity_0=A#1004780AccountEntity_1=A#1004790AccountEntity_2=A#1005850AccountEntity_3=A#1005850AccountPartner_0=A#2000100AccountPartner_1=A#2000140AccountPartner_2=A#2000210AccountPartner_3=A#2000250AccountPartner_4=A#2000320AccountPartner_5=A#2000430AccountPartner_6=A#2000560AccountPartner_7=A#2000630AccountPartner_8=A#2000680
This example uses the Entity and Partner keywords to create different reports with differentaccount pairs. This is an example of one report with one account matching two accounts (oneto many):
Report 1AccountEntity_0=A#1004780AccountPartner_0=A#2000100AccountPartner_1=A#2000140
This example shows one report with two accounts matching one account (many to one):
Report 2AccountEntity_0=A#1004790AccountEntity_1=A#2000210AccountPartner_1=A#2000250
Report 3 is an example of one report with one account matching with one account (one to one).
Report 3AccountEntity_0=A#1005850AccountPartner_0=A#2000320
Report 4 is an example of one report with two accounts matching with four accounts (many tomany).
Report 4AccountEntity_0=A#1005850AccountEntity_1=A#1005860AccountPartner_0=A#2000430AccountPartner_1=A#2000560AccountPartner_2=A#2000630AccountPartner_3=A#2000680
197
SuppressIfMatchThis keyword suppresses transactions if the entity and partner amounts are within the matchingtolerance amount.
Syntax
SuppressIfMatch=Boolean
Replace Boolean with Yes or No. For example:
SuppressIfMatch=Yes
For example, if an Entity has an amount of 299 and the Partner has 200, the difference is 99. Ifthe matching tolerance amount is 100 and the difference between the Entity and Partner is lessthan 100, as in this example, the system suppresses the transactions because it is within thematching tolerance.
If you select not to suppress the Entity/Partner transactions, the system does not suppress theseeven if the Entity and Partner amounts are within the matching tolerance amount. Using theprevious example, even if the difference amount is 99 and if it is within the matching tolerance,the system does not suppress the transactions.
Note: Matching tolerance is specified in units.
SuppressReversedTransactionsThis keyword suppresses reversed transactions from partners for each corresponding entitytransaction.
Syntax
SuppressReversedTransactions=Boolean
Replace Boolean with Yes or No. For example:
SuppressReversedTransactions=Yes
By default, the system displays the reversed transactions from an Intercompany Partner everytime a transaction is displayed for the Entity. You can select to suppress these reversedtransactions when you create a report.
This option is useful when you have one matching account for the report, for example, if youhave one “wash” account to store intercompany transactions for Revenue and Expense. In thiscase, you must use the suppress reversed transactions option to avoid a double entry becausethere is only one matching account for the report.
SuppressDetailsThis keyword suppresses intercompany detail and prints only the Total difference for eachEntity/Partner section.
198
Syntax
SuppressDetails=Boolean
Replace Boolean with Yes or No. For example:
SuppressDetails=Yes
To create an Intercompany Matching report that displays only the difference amount, you cansuppress the intercompany details when you create it. When you select this option, the reportdoes not display the intercompany transactions and only prints the Total difference for eachEntity/Partner section. If there is a discrepancy and you need to view each intercompanytransaction, you can regenerate the report and show intercompany details.
MatchingToleranceThis keyword enables you to specify a value to view only out-of-balance transactions over acertain amount, or use the default value of 0.
Note: Matching tolerance is specified in units.
Syntax
MatchingTolerance=ToleranceValue
Replace ToleranceValue with a number that is less than 1 billion. The limit for this keyword is999999999. For example:
MatchingTolerance=100
For example, if an Entity has an amount of 299 and the Partner has 200, the difference is 99. Ifthe matching tolerance amount is 100 and the difference between the Entity and Partner is lessthan 100 as in this example, you can use the SuppressIfMatch keyword to have the systemsuppress the transaction because it is within the matching tolerance.
SuppressCustomsThis keyword suppresses Custom dimensions.
Syntax
SuppressCustomAlias=Boolean
Replace Boolean with Yes or No. The default is Yes. For example:
SuppressCustomFlows=Yes
ScaleFactorThis keyword specifies the unit in which amounts are displayed by identifying where the decimalpoint is placed. For example, if you enter a scale factor of 3, the report amount is displayed inthousands. If the scale factor is 0, the report amount is displayed in units.
199
Syntax
ScaleFactor=Scale
Replace Scale with one of these numbers:
l 0 = Units
l 1 = Tens
l 2 = Hundreds
l 3 = Thousands
l 4 = Ten Thousands
l 5 = Hundred Thousands
l 6 = Millions
l 7 = Ten Millions
l 8 = Hundred Millions
l 9 = Billions
For example:
ScaleFactor=3
In this example, the number 12345.78 is displayed as 12.345678 on the report.
DecimalThis keyword specifies the number of decimal places to display in the report and can overridethe number of decimal places defined in the account.
Syntax
Decimal=NumberDecimalPlaces
Replace NumberDecimalPlaces with a number 0-6. If you do not specify a decimal value, thesystem uses the default decimal setting as defined in the account. For example:
Decimal=3
In this example, the number 123.4567 is displayed as 123.457.
DisplayLabelsThis keyword specifies if member labels are displayed on the report.
Syntax
DisplayLabels=Boolean
Replace Boolean with Yes or No. The default is Yes. For example:
DisplayLabels=Yes
200
DisplayDescriptionsThis keyword specifies if member descriptions are displayed on the report.
Syntax
DisplayDescriptions=Boolean
Replace Boolean with Yes or No. The default is No. For example:
DisplayDescriptions=Yes
DisplayPlugElimAcctsThis keyword specifies if a summary of plug accounts affected by the intercompany transactionsis displayed.
Syntax
DisplayPlugElimAccts=Boolean
Replace Boolean with Yes or No. For example:
DisplayPlugElimAccts=Yes
GroupByCustomThis keyword groups Custom dimension transactions by dimension. This keyword is optional.
Syntax
GroupByCustom=Custom
Replace Custom with the Custom dimension alias by which to group the Custom dimensions inthe report. For example:
GroupByCustom=Flows
Defining Intercompany Transaction Report ScriptsYou can define these types of intercompany transaction reports:
l IC Transactions - create a list of transactions.
l Intercompany Match By Account- create matching reports based on accounts selected.
l Intercompany Match By ID- create matching reports based on transaction ID.
Table 30 Keywords for Intercompany Transaction Report Scripts
Keyword Description
ReportType Specify the report type. For example, ReportType=ICTransactions
ReportLabel Specify the report name. For example, ReportLabel=Transaction Report
201
Keyword Description
ReportDescription Specify a report description. For example, ReportDescription=Intercompany Transaction Detail Report
ReportSecurityClass Specify the security class for the report. The default is [Default].
POV Specify a valid point of view for the report. For example, POV=S#ActMon.Y#2014.P#January
ScaleFactor Specify a scale factor for the report. The scale can be a value from 0 to 9.
Decimal Specify the number of decimals to display in the report. The number of decimals can be a value from 0 to9.
FromAmt and ToAmt Specify a range of transaction amounts.
IncludeMatched Specify True to include matched transactions in the report, otherwise False.
IncludeUnMatched Specify True to include unmatched transactions in the report, otherwise False.
IncludeMisMatched Specify True to include mismatched transactions in the report, otherwise False.
IncludePosted Specify True to include posted transactions in the report, otherwise False.
IncludeUnPosted Specify True to include unposted transactions in the report, otherwise False.
Entity The entity must be a valid ICP base entity, not a parent entity.
Partner The partner entity must be a valid ICP entity for the account.
Entity Account If you are displaying Entity transactions, specify an entity account.
Partner Account If you are displaying Partner transactions, specify a partner account.
TransactionID This ID is required. You must enter an ID for the transaction, with a maximum of 40 characters. When combinedwith the Sub ID, this ID becomes a unique identifier for the Entity/Partner/Account/C1/C2 within theScenario/Year/Period.
TransactionSubID Specify a transaction Sub ID.
TransactionCurrency This is the currency used for the Invoice transaction. It must be a valid currency defined in the application.
ReferenceID This is optional. You can enter a Reference ID to store reference information for the transaction. For example,the entity might have its own set of invoice numbering that is different from the entity that issued the invoice.You can enter additional information in this Reference ID for information purposes only.
You can enter the entity reference ID in the Transaction ID and enter the corresponding invoice number fromthe partner entity.
MatchCode This is optional. The match code must be one of these prefixes to distinguish the different types of matchingprocesses:
l A - Auto-matching performed using Accounts
l I - Auto-matching performed using the Transaction ID
l R - Auto-matching performed using the Reference ID
l M - Manual matching performed
202
Keyword Description
ReasonCode This is optional. The reason code must be a valid reason code defined by the administrator. The main purposeof the reason code is to indicate why a transaction has a MisMatched status - for example, because of amissing invoice from the partner entity, or an incorrect amount entered by the partner. If the transaction hasa Matched status, you do not need to assign a reason code for the transaction. You cannot assign a reasoncode to transactions with an UnMatched status.
FromDate Optional. This must be a valid date.
ToDate Optional. This must be a valid date.
DisplayColumns Section Specifies the columns that are displayed in the report and how they are displayed. Syntax is:<DisplayColumns>, <Sort>,<Label>, <Repeat>, <Totals> where <DisplayedColumns> is a valid column, <Sort> is Sort or No Sort, <Label> is a label, description, or both,<Repeat> is Repeat or NoRepeat, and <Total> is Total or NoTotal.
For Custom dimensions, the alias is used for the column, for example:
Customers,NoSort,Label,Repeat,NoTotal
DisplayEntityTransactions Specify True to display entity transactions in the report, otherwise False.
You can select to display only intercompany transactions for a specific entity and partner, or also display thecorresponding transactions from the partner with the entity. For example, if you select only the transactionsfor Entity A with Partner B in the Entity and Partner selections, the system displays only the transactions thatEntity A has with Partner B. However, if you want to see the corresponding transactions for Entity B withPartner A, you can select to include Entity transactions and Partner transactions.
DisplayPartnerTransactions Specify True to display partner transactions in the report, otherwise False.
SuppressDetails Specify True to suppress transaction detail and display only the subtotal row.
203

204
10Managing Rules
In This Chapter
Rule Types ... . . . . . . . . . . . . . . . . . . . . . . . . . . . . . . . . . . . . . . . . . . . . . . . . . . . . . . . . . . . . . . . . . . . . . . . . . . . . . . . . . . . . . . . . . . . . . 206
Rule Considerations ... . . . . . . . . . . . . . . . . . . . . . . . . . . . . . . . . . . . . . . . . . . . . . . . . . . . . . . . . . . . . . . . . . . . . . . . . . . . . . . . . . . 207
Rule Execution During Consolidation... . . . . . . . . . . . . . . . . . . . . . . . . . . . . . . . . . . . . . . . . . . . . . . . . . . . . . . . . . . . . . . . . 215
Default Translation ... . . . . . . . . . . . . . . . . . . . . . . . . . . . . . . . . . . . . . . . . . . . . . . . . . . . . . . . . . . . . . . . . . . . . . . . . . . . . . . . . . . . . 216
Financial Management Objects.. . . . . . . . . . . . . . . . . . . . . . . . . . . . . . . . . . . . . . . . . . . . . . . . . . . . . . . . . . . . . . . . . . . . . . . . 216
Using VBScript in Rules ... . . . . . . . . . . . . . . . . . . . . . . . . . . . . . . . . . . . . . . . . . . . . . . . . . . . . . . . . . . . . . . . . . . . . . . . . . . . . . . 217
Commonly Used Rules ... . . . . . . . . . . . . . . . . . . . . . . . . . . . . . . . . . . . . . . . . . . . . . . . . . . . . . . . . . . . . . . . . . . . . . . . . . . . . . . . 223
Creating Rules Files.. . . . . . . . . . . . . . . . . . . . . . . . . . . . . . . . . . . . . . . . . . . . . . . . . . . . . . . . . . . . . . . . . . . . . . . . . . . . . . . . . . . . . 227
Loading Rules ... . . . . . . . . . . . . . . . . . . . . . . . . . . . . . . . . . . . . . . . . . . . . . . . . . . . . . . . . . . . . . . . . . . . . . . . . . . . . . . . . . . . . . . . . . 229
Extracting Rules ... . . . . . . . . . . . . . . . . . . . . . . . . . . . . . . . . . . . . . . . . . . . . . . . . . . . . . . . . . . . . . . . . . . . . . . . . . . . . . . . . . . . . . . . 230
You use Financial Management rules to automate the calculations of data within an application.You can use rules for these purposes:
l Calculate data entry level amounts for a specific entity, scenario, and period.
l Prevent data entry for a specific cell in a specific entity, scenario, and period.
l Allow input at the Parent entity level.
l Calculate data that cannot be calculated through a hierarchical aggregation, such as ratiosor variance analysis.
l Perform allocations from a parent entity to a list of base entities.
l Perform complex currency conversions, calculate exchange rate differences, or performother calculations necessary for your consolidation.
l Define formulas to dynamically calculate accounts.
l Specify the accounts in the application that support intercompany transactions.
You can write rules in a text editor, such as Notepad ++.
Note: To work with rules in Oracle Hyperion Calculation Manager, see Chapter 13, “CreatingRules Using Calculation Manager”.
205
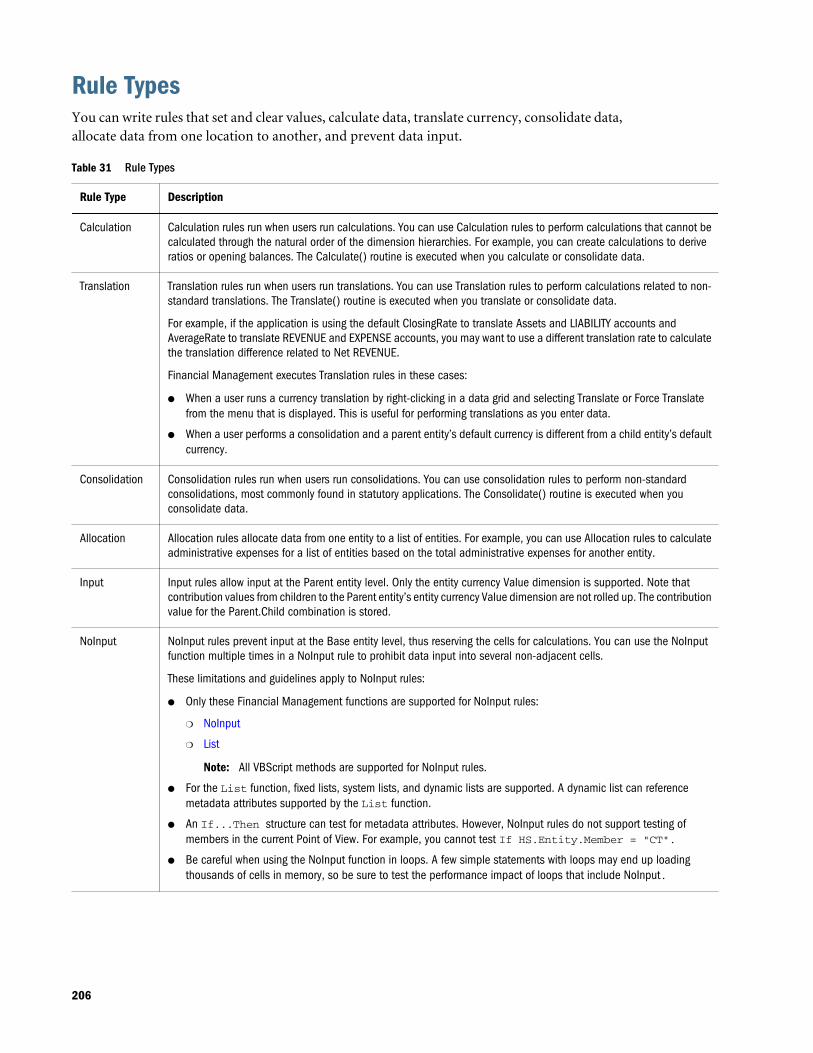
Rule TypesYou can write rules that set and clear values, calculate data, translate currency, consolidate data,allocate data from one location to another, and prevent data input.
Table 31 Rule Types
Rule Type Description
Calculation Calculation rules run when users run calculations. You can use Calculation rules to perform calculations that cannot becalculated through the natural order of the dimension hierarchies. For example, you can create calculations to deriveratios or opening balances. The Calculate() routine is executed when you calculate or consolidate data.
Translation Translation rules run when users run translations. You can use Translation rules to perform calculations related to non-standard translations. The Translate() routine is executed when you translate or consolidate data.
For example, if the application is using the default ClosingRate to translate Assets and LIABILITY accounts andAverageRate to translate REVENUE and EXPENSE accounts, you may want to use a different translation rate to calculatethe translation difference related to Net REVENUE.
Financial Management executes Translation rules in these cases:
l When a user runs a currency translation by right-clicking in a data grid and selecting Translate or Force Translatefrom the menu that is displayed. This is useful for performing translations as you enter data.
l When a user performs a consolidation and a parent entity’s default currency is different from a child entity’s defaultcurrency.
Consolidation Consolidation rules run when users run consolidations. You can use consolidation rules to perform non-standardconsolidations, most commonly found in statutory applications. The Consolidate() routine is executed when youconsolidate data.
Allocation Allocation rules allocate data from one entity to a list of entities. For example, you can use Allocation rules to calculateadministrative expenses for a list of entities based on the total administrative expenses for another entity.
Input Input rules allow input at the Parent entity level. Only the entity currency Value dimension is supported. Note thatcontribution values from children to the Parent entity’s entity currency Value dimension are not rolled up. The contributionvalue for the Parent.Child combination is stored.
NoInput NoInput rules prevent input at the Base entity level, thus reserving the cells for calculations. You can use the NoInputfunction multiple times in a NoInput rule to prohibit data input into several non-adjacent cells.
These limitations and guidelines apply to NoInput rules:
l Only these Financial Management functions are supported for NoInput rules:
m NoInput
m List
Note: All VBScript methods are supported for NoInput rules.
l For the List function, fixed lists, system lists, and dynamic lists are supported. A dynamic list can referencemetadata attributes supported by the List function.
l An If...Then structure can test for metadata attributes. However, NoInput rules do not support testing ofmembers in the current Point of View. For example, you cannot test If HS.Entity.Member = "CT".
l Be careful when using the NoInput function in loops. A few simple statements with loops may end up loadingthousands of cells in memory, so be sure to test the performance impact of loops that include NoInput.
206

Rule Type Description
DynamicCalculation
Dynamic rules enable you to define formulas to dynamically calculate accounts. You can dynamically calculate Baseaccounts only. You cannot use Dynamic rules on Parent accounts.
Use these guidelines for writing dynamic calculation rules:
l The right side of the equation must reference the same Scenario/Year/Entity combination. This means you cannotreference prior year amounts in your calculations.
l Only dynamic accounts are valid on the left side of the equation.
l Dynamic accounts cannot be used on the right side of the equation.
l Only Account and View are valid on the left side of the equation.
l If View is not specified, the calculation executes for YTD and Periodic. If View is specified, the calculation is executedonly for the specified view.
l HS.View.PeriodNumber is the only HS statement that can be used in a HS.Dynamic calculation.
l All statements in the Sub Dynamic section are executed sequentially.
Transactions Transactions rules specify the accounts in the application that support intercompany transactions. Cells supportingtransactions are read-only in data grids and forms.
Equity Pickup Equity pickup rules specify the owned entity, owner entity, and percentage of ownership
This is the default point of view when the Sub EquityPickup section is run:
l Current scenario, year, and period
l Entity: owner of the pair processed
l Value: <Entity Currency>
OnDemand On-demand rules are used in Data Forms, and enable you to run a subset of calculations to quickly see the results inthe data form. All HS functions that can be used in Sub Calculate (but no others) can also be used in OnDemandrules.
You create rules for Financial Management in a unique script, which is based on the MicrosoftVBScript language. Rules are constructed through the combination of functions, objects, andother arguments to generate the scripting syntax. Within each routine, you use two types offunctions to write rules:
l Financial Management functions that define calculations
l VBScript functions that are used to write conditional statements
Rule ConsiderationsFollowing are considerations for writing rules for applications:
l Rules are executed when users perform calculations, translations, consolidations, andallocations. Calculation rules execute one time for each Entity/Value dimension intersectionto which the calculation or consolidation applies. See “Calculation Rules with CalculationCommands” on page 209.
l The dimension members to which Financial Management applies calculations depend onthe data grid cell where the user’s cursor is placed and the members specified in the Pointof View bar. See “Current Dimension Members” on page 212.
207
l When a function puts data into a currency-related Value member, Financial Managementmight delete the current value in the Value member. See “Functions Automatically ClearData” on page 214.
l Rules execute in sequential order within a routine and there is a set order in which routinesrun before other routines. See “Rule Execution During Consolidation” on page 215.
Calculation CommandsCalculate routines are executed for a specified intersection of scenario, year, period, entity, andvalue. Executing Calculate routines results in writing or clearing data in the current data table,which corresponds to the current intersection of scenario, year, period, entity, and value. Whenusers execute Calculate routines, the system can read data from anywhere in the application.However, data is only written to the current data table.
Note: The calculate routine will fail if the [None] entity exists in a hierarchy when youconsolidate.
You run these processes in data grids by selecting one of these commands:
l Calculate
l Force Calculate
l Calculate Contribution
l Force Calculate Contribution
l Consolidate
l Consolidate All With Data
l Consolidate All
l Translate
l Force Translate
When you select a calculation command, Financial Management executes the Sub Calculate()routine in the RLE file. The Calculate() routine calculates accounts and custom dimensionmembers for a specified Entity-Value combination within a specified Scenario, Year, and Period.
Force CalculateThe Force Calculate option forces rules to run only on the Value member selected, and any Valuemember on which it depends. For example, Force Calculate on entity currency runs rules on theentity currency member only. Force Calculate on the entity currency total runs rules on entitycurrency, entity currency adj, and entity currency total. Force Calculate is the only commandfor which it is possible to affect only a single member of a value triplet.
208
Calculation Rules with Calculation CommandsThe number of times that a Calculation rule is executed depends upon the calculate commandselected by the user and by other factors.
Caution! Carefully read these sections before writing rules. You might want an operation tooccur only for certain members of the Value dimension, and if this is the case youmust test for the current member with VBScript’s If structure and the Memberfunction before executing the operation. For steps and examples on using Ifstructures and the Member function, see “Conditional Rules” on page 224.
When a user selects the Calculate or Force Calculate command, Financial Management runs theapplication’s Calculation rule for the intersection of the current entity member and the Valuemember for the entity’s default currency, Entity Currency. If the entity’s AllowAdjs attribute isenabled in the metadata, Financial Management also runs the rule a second time, applying therule to the intersection of the entity and the member of the Value dimension that storesadjustments to the entity’s default currency, Entity Curr Adjs.
Example
For example, if an entity named California has a default currency of USD and its AllowAdjsattribute is enabled in the metadata, the calculation rule runs twice, once for the intersection ofCalifornia with USD and once for the intersection of California with USD Adjs.
Calculation Rules with Consolidation CommandsWhen a user selects one of the Consolidate commands, Financial Management runs theCalculation rule for several of the Value dimensions that intersect each previouslyunconsolidated child entity. After executing for the children, Financial Management runs therule for the intersection of the parent entity and the member of the Value dimension for theparent’s default currency.
1. The rule is run for the intersection of the child entity and the Value member that stores thechild entity’s default currency (Entity Currency).
2. If the child entity’s AllowAdjs attribute is set to Y, the rule is run for the intersection of thechild entity and the Value member that stores adjustments in the child entity’s defaultcurrency (Entity Curr Adjs).
3. If the child’s currency differs from the parent’s currency, the rule is run for the intersectionof the child entity and the Value member that stores amounts translated to the parent’s homecurrency (Parent Currency).
4. If a child’s currency differs from the parent’s currency and the rules file contains aTranslation rule, Financial Management executes the Translation rule before step 3.
5. If the child’s currency differs from the parent’s currency, and the child entity’s AllowAdjsattribute is set to Y, the rule is run for the intersection of the child entity and the Valuemember that stores adjustments translated to the parent’s home currency (Parent CurrAdjs).
209
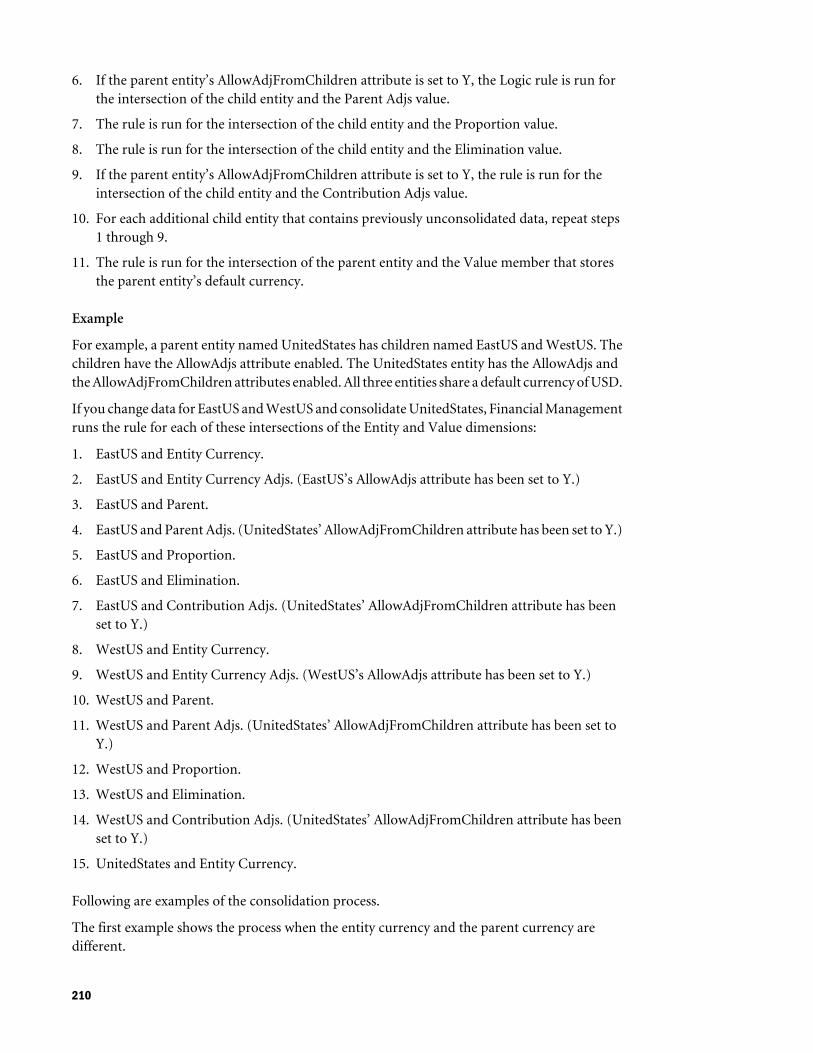
6. If the parent entity’s AllowAdjFromChildren attribute is set to Y, the Logic rule is run forthe intersection of the child entity and the Parent Adjs value.
7. The rule is run for the intersection of the child entity and the Proportion value.
8. The rule is run for the intersection of the child entity and the Elimination value.
9. If the parent entity’s AllowAdjFromChildren attribute is set to Y, the rule is run for theintersection of the child entity and the Contribution Adjs value.
10. For each additional child entity that contains previously unconsolidated data, repeat steps1 through 9.
11. The rule is run for the intersection of the parent entity and the Value member that storesthe parent entity’s default currency.
Example
For example, a parent entity named UnitedStates has children named EastUS and WestUS. Thechildren have the AllowAdjs attribute enabled. The UnitedStates entity has the AllowAdjs andthe AllowAdjFromChildren attributes enabled. All three entities share a default currency of USD.
If you change data for EastUS and WestUS and consolidate UnitedStates, Financial Managementruns the rule for each of these intersections of the Entity and Value dimensions:
1. EastUS and Entity Currency.
2. EastUS and Entity Currency Adjs. (EastUS’s AllowAdjs attribute has been set to Y.)
3. EastUS and Parent.
4. EastUS and Parent Adjs. (UnitedStates’ AllowAdjFromChildren attribute has been set to Y.)
5. EastUS and Proportion.
6. EastUS and Elimination.
7. EastUS and Contribution Adjs. (UnitedStates’ AllowAdjFromChildren attribute has beenset to Y.)
8. WestUS and Entity Currency.
9. WestUS and Entity Currency Adjs. (WestUS’s AllowAdjs attribute has been set to Y.)
10. WestUS and Parent.
11. WestUS and Parent Adjs. (UnitedStates’ AllowAdjFromChildren attribute has been set toY.)
12. WestUS and Proportion.
13. WestUS and Elimination.
14. WestUS and Contribution Adjs. (UnitedStates’ AllowAdjFromChildren attribute has beenset to Y.)
15. UnitedStates and Entity Currency.
Following are examples of the consolidation process.
The first example shows the process when the entity currency and the parent currency aredifferent.
210
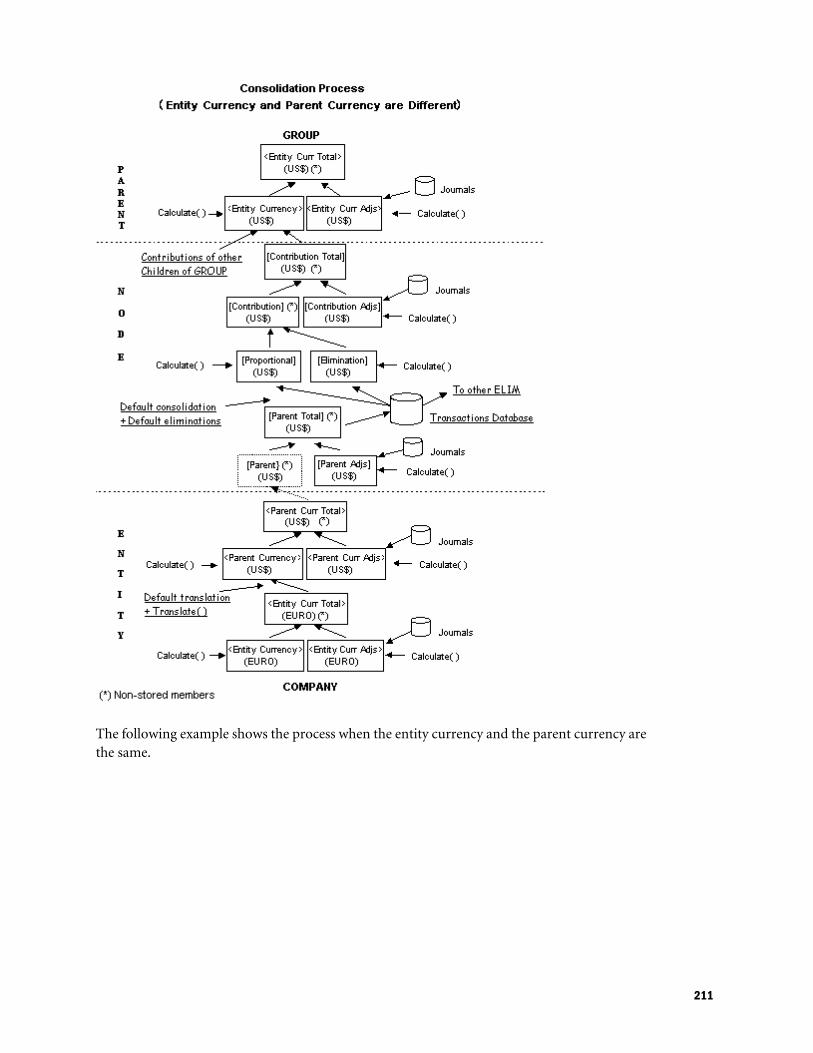
The following example shows the process when the entity currency and the parent currency arethe same.
211
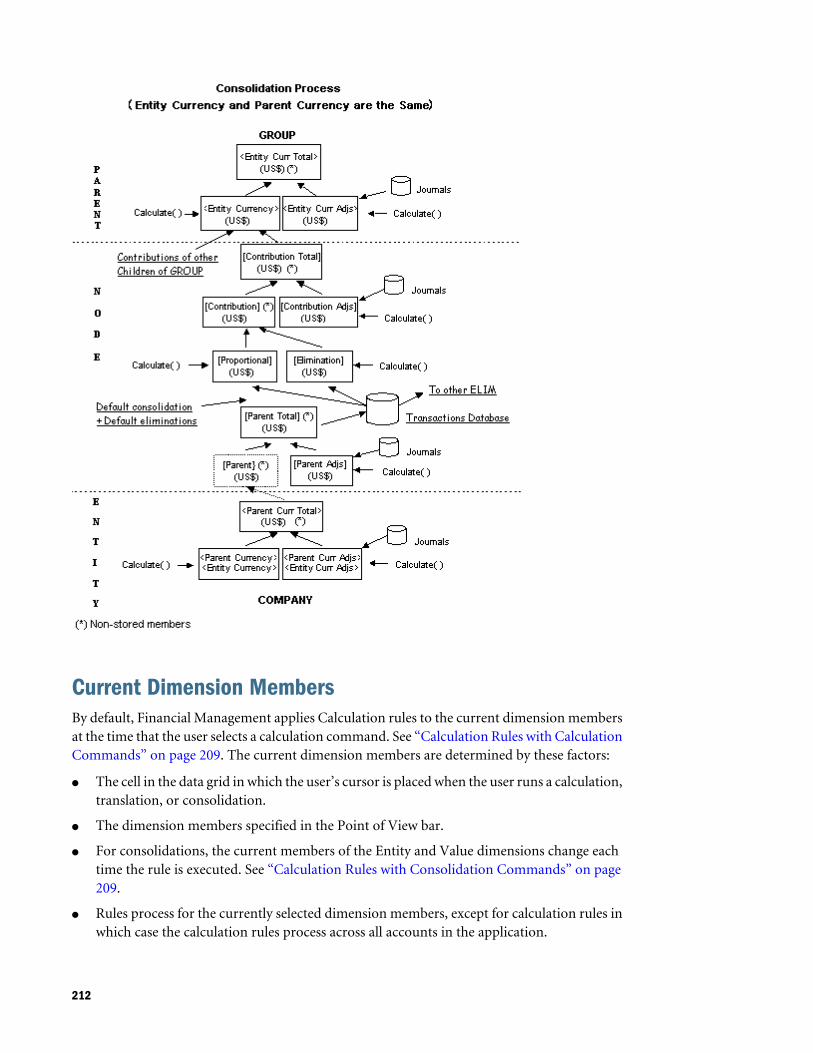
Current Dimension MembersBy default, Financial Management applies Calculation rules to the current dimension membersat the time that the user selects a calculation command. See “Calculation Rules with CalculationCommands” on page 209. The current dimension members are determined by these factors:
l The cell in the data grid in which the user’s cursor is placed when the user runs a calculation,translation, or consolidation.
l The dimension members specified in the Point of View bar.
l For consolidations, the current members of the Entity and Value dimensions change eachtime the rule is executed. See “Calculation Rules with Consolidation Commands” on page209.
l Rules process for the currently selected dimension members, except for calculation rules inwhich case the calculation rules process across all accounts in the application.
212
If a dimension member of the cell in which the cursor is placed differs from the correspondingmember of the corresponding dimension in the Point of View bar, the cell’s dimension memberoverrides the Point of View bar’s dimension member. For example, if a user has specified anentity named Europe in the Point of View bar and runs a translation with the cursor placed ina cell for an entity named Germany, Germany is the current entity.
By specifying a dimension member as an argument, you can use some functions to work with aspecific dimension member regardless of the current dimension. For example, you can use theNumBase function with the Entity object to get the number of base entities for the entity thatyou specify in the argument.
For more complex functions, you can create Account Expressions to specify the dimensionmembers.
Account ExpressionsSome functions require an Account Expression as an argument. In its simplest form, an AccountExpression is a string that specifies the account to which Financial Management applies thefunction.
The Account Expression characters are listed in the following table.
Table 32 Characters Used to Specify Dimensions in Account Expressions
Character Dimension
A# Account
I# Intercompany Partner
C# Custom
S# Scenario
Y# Year
P# Period
W# View
E# Entity
V# Value
To understand Account Expressions, consider the Clear function, which removes values fromthe dimension members specified in the function’s argument. In this example, the argument"A#Sales" is an Account Expression:
HS.Clear"A#Sales"
The A# characters represent the Account dimension, and the word Sales is the member nameof the Account dimension to which Financial Management applies the Clear function. ThisAccount Expression tells Financial Management to clear the data stored in the Sales account.
213
When you use an Account Expression, Financial Management applies the function to theintersection of the account that you specify in the Account Expression and the current membersof these dimensions:
l Entity
l Period
l Scenario
l Value
l View
l Year
l Custom - Uses the CustomTopMember that was set for the account in the metadata. Forexample, if the Account Expression does not specify a member of the Custom 3 dimension,Financial Management uses all valid Custom 3 members as defined by theCustomTopMember specified for the account.
l Intercompany Partner - All valid ICP members.
You can override the Intercompany and Custom dimension defaults by specifying members inthe Account Expression. Each dimension is represented by certain characters. When you includemore than one dimension in an Account Expression, you must separate the dimensions withperiods.
When you create an Account Expression, you do not have to specify all of these dimensionmembers; you can specify the members to which to apply the function. For example, this lineclears the intersection of the Sales account and the Hardware ICP:
HS.Clear "A#Sales.I#Hardware"
Functions Automatically Clear DataWhen a function puts data into a Value member that relates to currencies, Financial Managementautomatically clears data from the member if either of these conditions apply:
l The intersecting Entity member is a parent.
l The intersecting Account member is a calculated account.
Tip: The currency-related Value members are the system-generated Entity Currencymember and the user-defined currency members such as USD, EURO, LIRA.
In addition, if a function puts data into a Value member for adjustments, Financial Managementautomatically clears data from the member if the intersecting Account member is a calculatedaccount.
Tip: The adjustment-related Value members are those that include the code “Adjs” in theirname, for example, USD Adjs, EURO Adjs, LIRA Adjs.
214
Error MessagesWhen Financial Management detects a syntax error, it displays an error message that containsthis information:
l The line number in the RLE file that is causing the error.
l The applicable Financial Management object and function.
l An error description.
Rule Execution During ConsolidationDuring the consolidation process, rules are executed in a pre-defined sequence. For each basechild of a specific parent, the calculation sequence for the various elements in the Valuedimension takes place in this order:
1. Accounts defined as IsCalculated in the metadata are cleared in EntityCurrency.
2. Accounts defined as IsCalculated in the metadata are cleared in EntityCurrAdjs.
3. The Sub Calculate() routine is executed on EntityCurrency.
4. The Sub Calculate() routine is executed on EntityCurrAdjs.
5. The ParentCurrency data is cleared.
6. Default translation is applied to all accounts defined as Revenue, Expense, Asset, Liabilityfor the total amount of EntityCurrency and EntityCurrAdjs. For accounts with the Flow orBalance attribute, translation is not applied by default, the total amount of EntityCurrencyand EntityCurrAdjs is rolled up into Parent Currency.
7. The Sub Translate() routine is executed.
8. The Sub Calculate() routine is executed on ParentCurrency.
9. Accounts defined as “IsCalculated” in the metadata are cleared in ParentCurrAdjs.
10. The Sub Calculate() routine is executed on ParentCurrAdjs.
11. Accounts defined as “IsCalculated” in the metadata are cleared in ParentAdjs
12. The Sub Calculate() routine is executed on ParentAdjs.
13. Proportion and Elimination data are cleared.
14. Default consolidation and eliminations are performed for the total amount of Parent andParentAdjs.
15. The Sub Calculate() routine is executed on Proportion and Elimination.
16. Accounts defined as “IsCalculated” in the metadata are cleared in ContributionAdjs.
17. The Sub Calculate() routine is executed on ContributionAdjs.
After the previous steps have been repeated for each base child, this sequence takes place for theparent entity:
1. The EntityCurrency data is cleared.
215
2. The sum of the total of Proportion, Elimination, and ContributionAdjs for every child iswritten into EntityCurrency of the parent entity.
3. The Sub Calculate() routine is executed on EntityCurrency.
4. Accounts defined as “IsCalculated” in the metadata are cleared in EntityCurrAdjs.
5. The Sub Calculate() routine is executed on EntityCurrAdjs.
Note: If a parent is further consolidated into another parent, this sequence continues withstep 5 from the child consolidation sequence.
Default TranslationFollowing is the sequence in which default translation takes place.
1. The system checks the current entity for the direct translation rate and uses that rate fortranslation.
2. If the translation rate is not found, the system derives the direct rate from the indirect ratein the current entity.
3. If neither the direct rate nor the indirect rate is found in the current entity, the system looksat the [None] entity and uses the direct rate.
4. If the direct rate is not found in the [None] entity, the system derives the direct rate fromthe indirect rate in the [None] entity.
5. If the indirect rate for the [None] entity does not exist, the system derives the rate bytriangulation using the application currency in the [None] entity.
6. If triangulation fails, the entity is not translated.
Note: The system first looks for a translation rate within the current entity. If not found inthe current entity, the system looks for a translation rate within the [None] entity. Ifthe system cannot find a translation rate in the [None] entity, the system translatesusing triangulation. Triangulation is a way to convert balances from one currency toanother using a third, common currency.
For example, if you want to convert EURO to YEN, but the system cannot find a direct or indirectrate to perform the translation, if EURO and YEN can both translate into USD then, usingtriangulation, the system can convert the EURO balance to USD and then convert the USDbalance to YEN.
Financial Management ObjectsThis section explains the syntax you must use to represent Financial Management objects whenusing functions.
216

The top-level object in Financial Management is the HS object. This means that when you usea Financial Management function, the first three characters must be the letters HS followed bya period:
HS.
This example demonstrates how to write the Clear function:
HS.Clear
If you do not precede Clear with the HS. characters, an error occurs.
Caution! You cannot use the HS. characters before a standard VBScript function. If you do,an error occurs. Use the HS. characters only before a Financial Managementfunction.
Some Financial Management functions apply only to objects that are children of the HS object.These functions require you to put the applicable object’s name between the HS characters andthe function name. These objects are children of the HS object and are used in FinancialManagement:
l Account
l AppSettings
l Custom
l DataUnit
l Entity
l ICP
l Node
l Parent
l Period
l Scenario
l Value
l Year
Using VBScript in RulesVBScript functions are used to write conditional statements in rules.
VBScript OperatorsThese VBScript operators are supported in Financial Management rules:
l And
217
l Eqv
l Imp
l Is
l Mod
l Not
l Or
l Xor
l =
l <
l >
l <=
l >=
l <>
l +
l &
l -
l /
l \
l *
l ^
VBScript StatementsThese VBScript statements are supported in Financial Management rules:
l Call
l Const
l Dim
l Do...Loop
l Erase
l Exit
l For...Next
l ForEach...Next
l Function...End Function
l If...Then...Else If...Else...End If
l On Error Go to 0
218
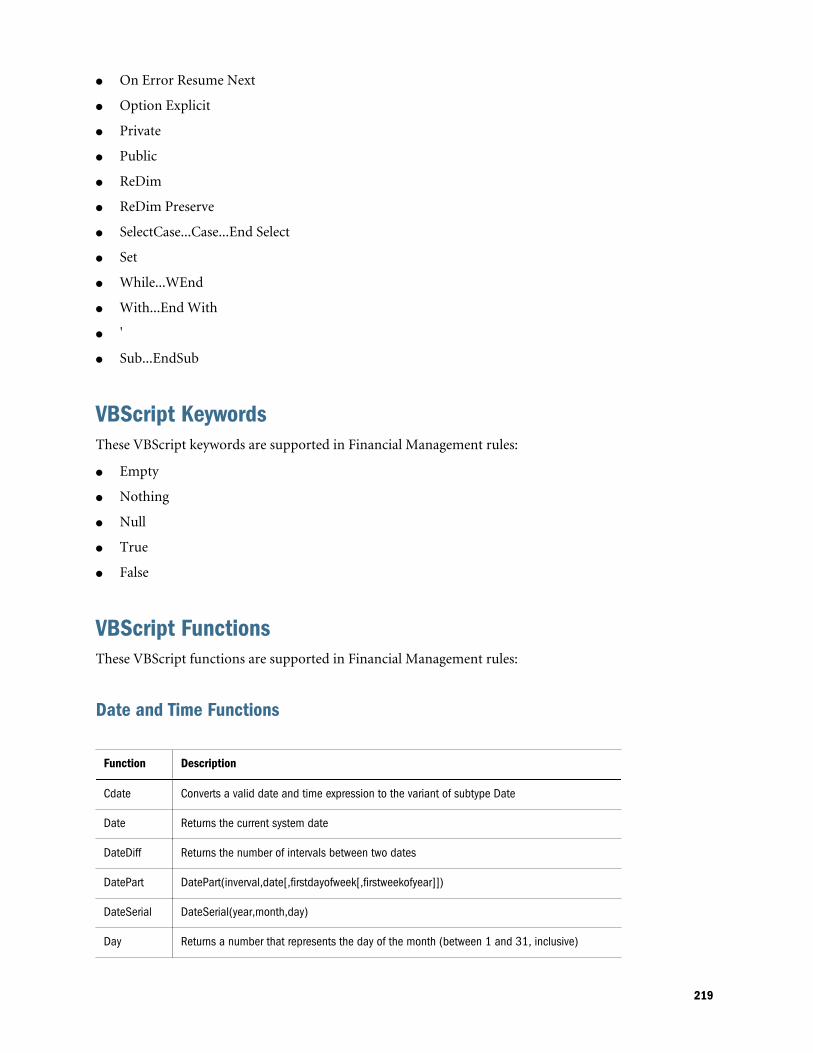
l On Error Resume Next
l Option Explicit
l Private
l Public
l ReDim
l ReDim Preserve
l SelectCase...Case...End Select
l Set
l While...WEnd
l With...End With
l '
l Sub...EndSub
VBScript KeywordsThese VBScript keywords are supported in Financial Management rules:
l Empty
l Nothing
l Null
l True
l False
VBScript FunctionsThese VBScript functions are supported in Financial Management rules:
Date and Time Functions
Function Description
Cdate Converts a valid date and time expression to the variant of subtype Date
Date Returns the current system date
DateDiff Returns the number of intervals between two dates
DatePart DatePart(inverval,date[,firstdayofweek[,firstweekofyear]])
DateSerial DateSerial(year,month,day)
Day Returns a number that represents the day of the month (between 1 and 31, inclusive)
219
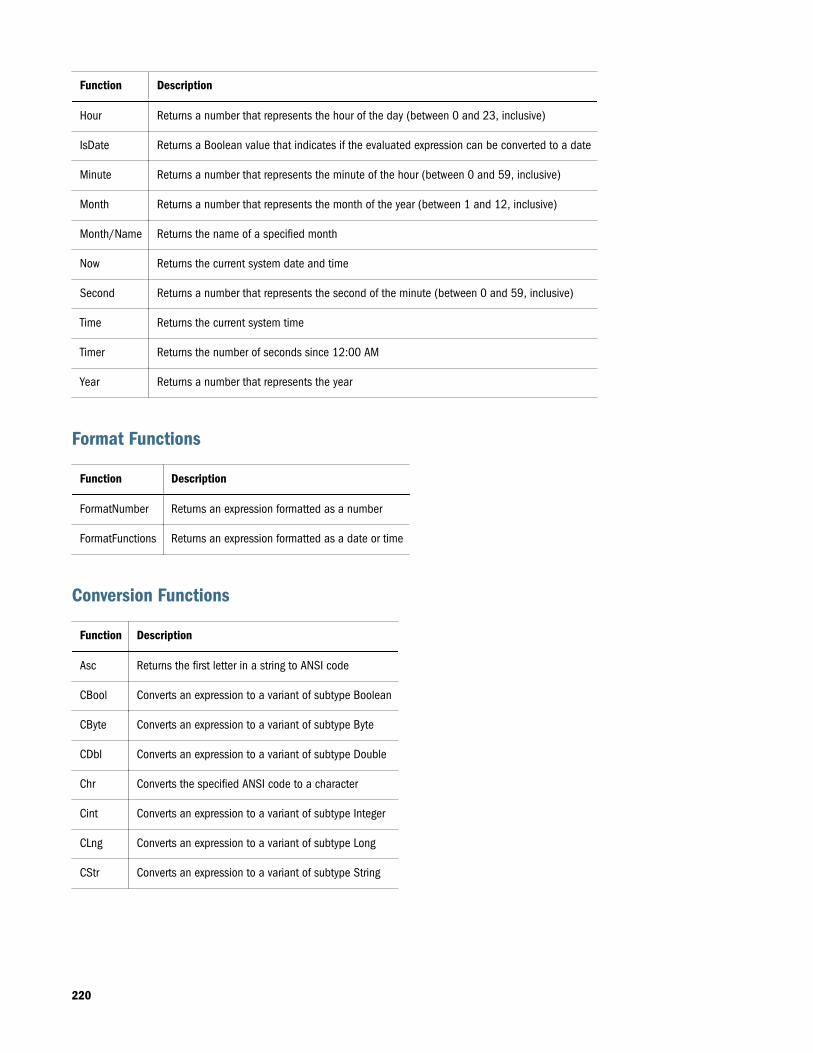
Function Description
Hour Returns a number that represents the hour of the day (between 0 and 23, inclusive)
IsDate Returns a Boolean value that indicates if the evaluated expression can be converted to a date
Minute Returns a number that represents the minute of the hour (between 0 and 59, inclusive)
Month Returns a number that represents the month of the year (between 1 and 12, inclusive)
Month/Name Returns the name of a specified month
Now Returns the current system date and time
Second Returns a number that represents the second of the minute (between 0 and 59, inclusive)
Time Returns the current system time
Timer Returns the number of seconds since 12:00 AM
Year Returns a number that represents the year
Format Functions
Function Description
FormatNumber Returns an expression formatted as a number
FormatFunctions Returns an expression formatted as a date or time
Conversion Functions
Function Description
Asc Returns the first letter in a string to ANSI code
CBool Converts an expression to a variant of subtype Boolean
CByte Converts an expression to a variant of subtype Byte
CDbl Converts an expression to a variant of subtype Double
Chr Converts the specified ANSI code to a character
Cint Converts an expression to a variant of subtype Integer
CLng Converts an expression to a variant of subtype Long
CStr Converts an expression to a variant of subtype String
220
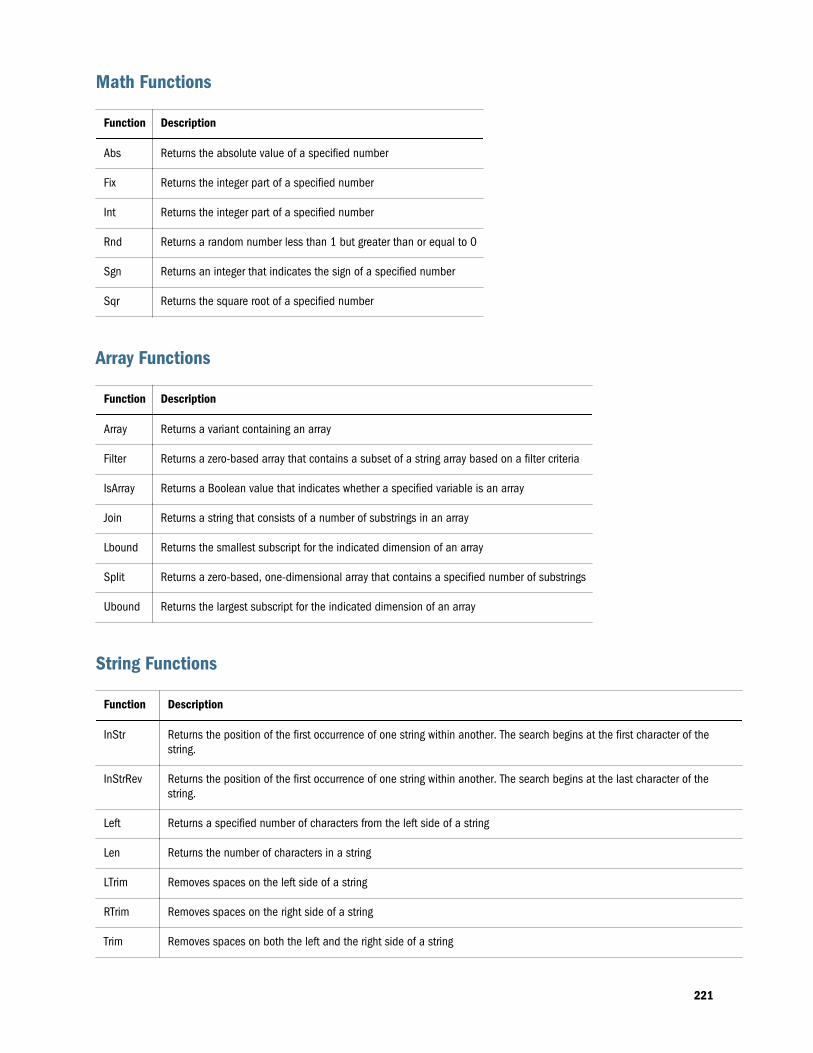
Math Functions
Function Description
Abs Returns the absolute value of a specified number
Fix Returns the integer part of a specified number
Int Returns the integer part of a specified number
Rnd Returns a random number less than 1 but greater than or equal to 0
Sgn Returns an integer that indicates the sign of a specified number
Sqr Returns the square root of a specified number
Array Functions
Function Description
Array Returns a variant containing an array
Filter Returns a zero-based array that contains a subset of a string array based on a filter criteria
IsArray Returns a Boolean value that indicates whether a specified variable is an array
Join Returns a string that consists of a number of substrings in an array
Lbound Returns the smallest subscript for the indicated dimension of an array
Split Returns a zero-based, one-dimensional array that contains a specified number of substrings
Ubound Returns the largest subscript for the indicated dimension of an array
String Functions
Function Description
InStr Returns the position of the first occurrence of one string within another. The search begins at the first character of thestring.
InStrRev Returns the position of the first occurrence of one string within another. The search begins at the last character of thestring.
Left Returns a specified number of characters from the left side of a string
Len Returns the number of characters in a string
LTrim Removes spaces on the left side of a string
RTrim Removes spaces on the right side of a string
Trim Removes spaces on both the left and the right side of a string
221
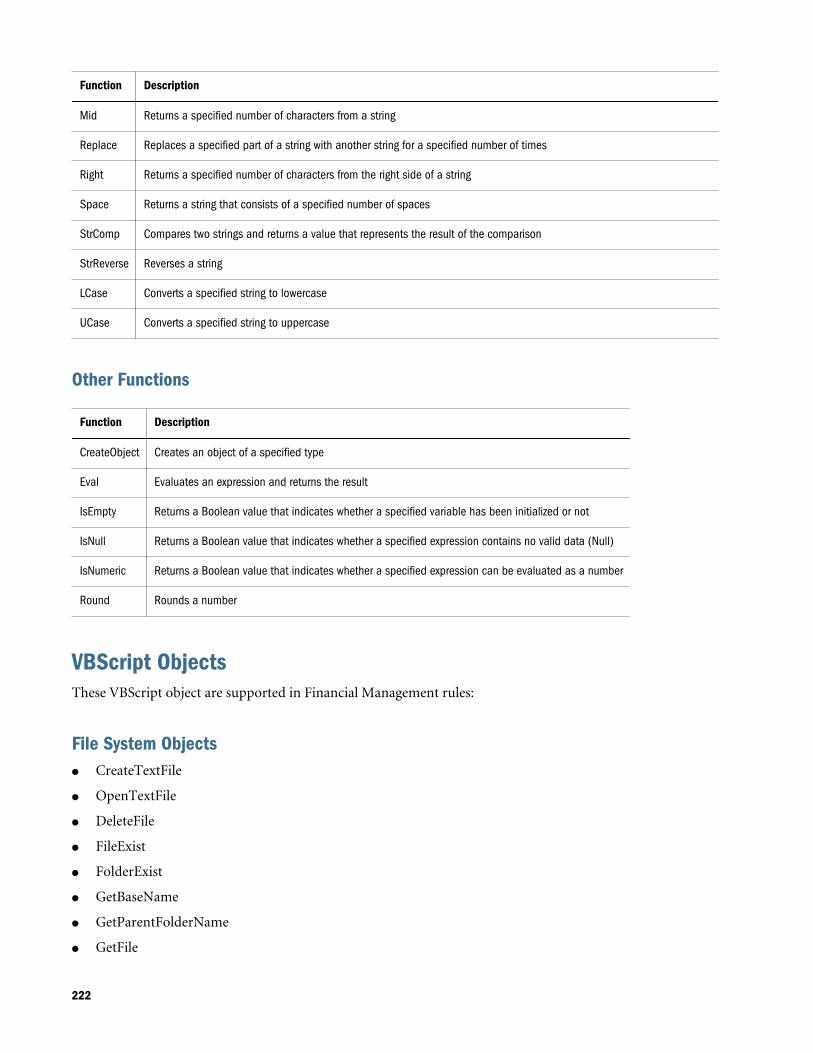
Function Description
Mid Returns a specified number of characters from a string
Replace Replaces a specified part of a string with another string for a specified number of times
Right Returns a specified number of characters from the right side of a string
Space Returns a string that consists of a specified number of spaces
StrComp Compares two strings and returns a value that represents the result of the comparison
StrReverse Reverses a string
LCase Converts a specified string to lowercase
UCase Converts a specified string to uppercase
Other Functions
Function Description
CreateObject Creates an object of a specified type
Eval Evaluates an expression and returns the result
IsEmpty Returns a Boolean value that indicates whether a specified variable has been initialized or not
IsNull Returns a Boolean value that indicates whether a specified expression contains no valid data (Null)
IsNumeric Returns a Boolean value that indicates whether a specified expression can be evaluated as a number
Round Rounds a number
VBScript ObjectsThese VBScript object are supported in Financial Management rules:
File System Objectsl CreateTextFile
l OpenTextFile
l DeleteFile
l FileExist
l FolderExist
l GetBaseName
l GetParentFolderName
l GetFile
222
l CopyFile
File Objectsl OpenAsTextStream
l Size
Text Stream Objectsl AtEndOfStream
l Close
l WriteLine
l ReadLine
Err Objectsl Description
l HelpContext
l HelpFile
l Number
l Source
l Raise
l Clear
Commonly Used RulesThese sections show you how to write some simple and commonly used rules. The descriptionsof these rules contain step-by-step procedures for readers who are not comfortable withVBScript. These procedures are followed by examples. If you have experience with VBScript,you might prefer to skip the procedures and instead focus on the examples.
Tip: These procedures assume that you have a rules file and code you write is placed in theCalculate() subroutine. See “Creating Rules Files” on page 227.
Reusing DataUse the EXP function to insert data from one account into another account. EXP’s argumentcontains the account to be set and the account from which the value is retrieved. The argumentis in the form of an equation, with the target account on the left side of the equal sign and thesource account on the right side.
223
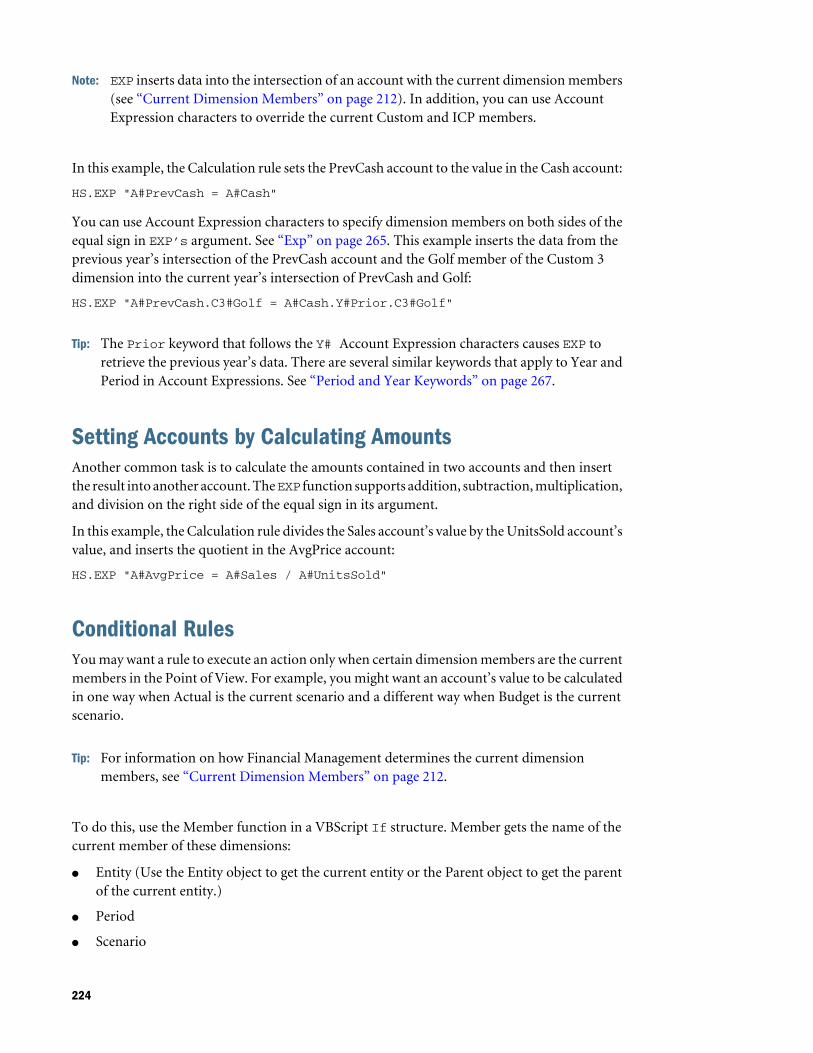
Note: EXP inserts data into the intersection of an account with the current dimension members(see “Current Dimension Members” on page 212). In addition, you can use AccountExpression characters to override the current Custom and ICP members.
In this example, the Calculation rule sets the PrevCash account to the value in the Cash account:
HS.EXP "A#PrevCash = A#Cash"
You can use Account Expression characters to specify dimension members on both sides of theequal sign in EXP’s argument. See “Exp” on page 265. This example inserts the data from theprevious year’s intersection of the PrevCash account and the Golf member of the Custom 3dimension into the current year’s intersection of PrevCash and Golf:
HS.EXP "A#PrevCash.C3#Golf = A#Cash.Y#Prior.C3#Golf"
Tip: The Prior keyword that follows the Y# Account Expression characters causes EXP toretrieve the previous year’s data. There are several similar keywords that apply to Year andPeriod in Account Expressions. See “Period and Year Keywords” on page 267.
Setting Accounts by Calculating AmountsAnother common task is to calculate the amounts contained in two accounts and then insertthe result into another account. The EXP function supports addition, subtraction, multiplication,and division on the right side of the equal sign in its argument.
In this example, the Calculation rule divides the Sales account’s value by the UnitsSold account’svalue, and inserts the quotient in the AvgPrice account:
HS.EXP "A#AvgPrice = A#Sales / A#UnitsSold"
Conditional RulesYou may want a rule to execute an action only when certain dimension members are the currentmembers in the Point of View. For example, you might want an account’s value to be calculatedin one way when Actual is the current scenario and a different way when Budget is the currentscenario.
Tip: For information on how Financial Management determines the current dimensionmembers, see “Current Dimension Members” on page 212.
To do this, use the Member function in a VBScript If structure. Member gets the name of thecurrent member of these dimensions:
l Entity (Use the Entity object to get the current entity or the Parent object to get the parentof the current entity.)
l Period
l Scenario
224
l Value
l Year
If structures enable you to execute statements only if certain conditions are true. The followingsections show a few different ways of using Member with If structures to test for dimensionmembers.
Tip: These sections cover only a few of the If structure aspects. For more details on If structures,consult Microsoft’s VBScript documentation. (You can download VBScriptdocumentation from Microsoft’s Web site.)
Testing for a Dimension MemberTo have Financial Management execute an action only if a particular dimension member is thecurrent member, use an If structure that tests the return value of the Member function.
In this example, if the current scenario is Budget,Financial Management multiplies the amountsin the UnitsSold and Price accounts and inserts the product in the Sales account.
If HS.Scenario.Member = “Budget” Then HS.EXP "A#Sales = A#UnitsSold * A#Price"End If
Tip: All If structures must begin with an If...Then statement and end with an End Ifstatement. The actions to be executed if the condition is met are sandwiched between theIf...Then and End If statements as shown above.
Testing for More Than One MemberYou can test for more than one member in an If...Then statement. In other words, you canexecute an action for two or more members of a dimension. Consider the example in the Testingfor a Dimension Member section. You might want the Sales account’s value to be calculated ifthe current scenario is Budget or Forecast.
To test for more than one member, use two Member functions and VBScript’s Or keyword inthe If...Then statement. Place Or after the first Member function, then place the secondMember function between Or and Then.
Tip: You can use this technique to test for more than two members. For each member to betested, include an additional combination of the Member function and the Or keyword.
In this example, if the current scenario is Budget or Forecast,Financial Management multipliesthe amounts in the UnitsSold and Price accounts and inserts the product in the Sales account:
If HS.Scenario.Member = "Budget" Or HS.Scenario.Member = "Forecast" Then HS.EXP "A#Sales = A#UnitsSold * A#Price"End If
225
Performing Different Actions for Different MembersYou can have a rule perform different actions for different members of a dimension. For example,you might want one calculation to occur if the current scenario is Budget and a differentcalculation to occur if the current scenario is Actual.
To conditionally perform different actions, include one or more ElseIf statements in an Ifstructure. Have each ElseIf statement test for a different member; place the actions to beperformed for a member beneath its ElseIf statement.
In this example, different accounts will be updated depending upon whether the current scenariois Budget or Actual:
l If the current scenario is Budget,Financial Management multiplies the amounts in theUnitsSold and Price accounts and inserts the product in the Sales account.
l If the current scenario is Actual,Financial Management divides the Sales account’s amountby the UnitsSold account’s amount and inserts the quotient in the Price account.
If HS.Scenario.Member = "Budget" Then HS.EXP "A#Sales = A#UnitsSold * A#Price" ElseIf HS.Scenario.Member = "Actual" Then HS.EXP "A#Price = A#Sales / A#UnitsSold"End If
Tip: To have an action occur if none of the specified conditions in the If...Then andElseIf statements are met, VBScript enables you to add an Else statement to an Ifstructure. See Microsoft’s VBScript documentation for details.
Setting Opening Balances of All AccountsTo set the opening balances of accounts, use the Exp and IsFirst functions in an If structure.Exp and If structures are introduced in the previous sections; IsFirst determines whether thecurrent period is the first period in the default frequency of the current scenario. For example,if a scenario has a default frequency of Monthly, IsFirst determines whether the current periodis the first month in the year.
To set opening balances, place IsFirst in an If structure’s If...Then statement, then placeExp between this statement and the End If statement. While you can include a specific accountin Exp’s argument, you probably will want to set the opening balances of all the accounts.
This example shows you how to set the opening balances of all accounts. You can just retype orcopy this example into a Calculation rule without modifications:
HS.EXP "A#ALL = A#ALL.P#Prior"
Note: In this example, A# is followed by the keyword ALL; this means that the rule applies to allaccounts. In addition, the P# characters are followed by the keyword Prior; this meansthat EXP gets the account data from the period prior to the current period.
226
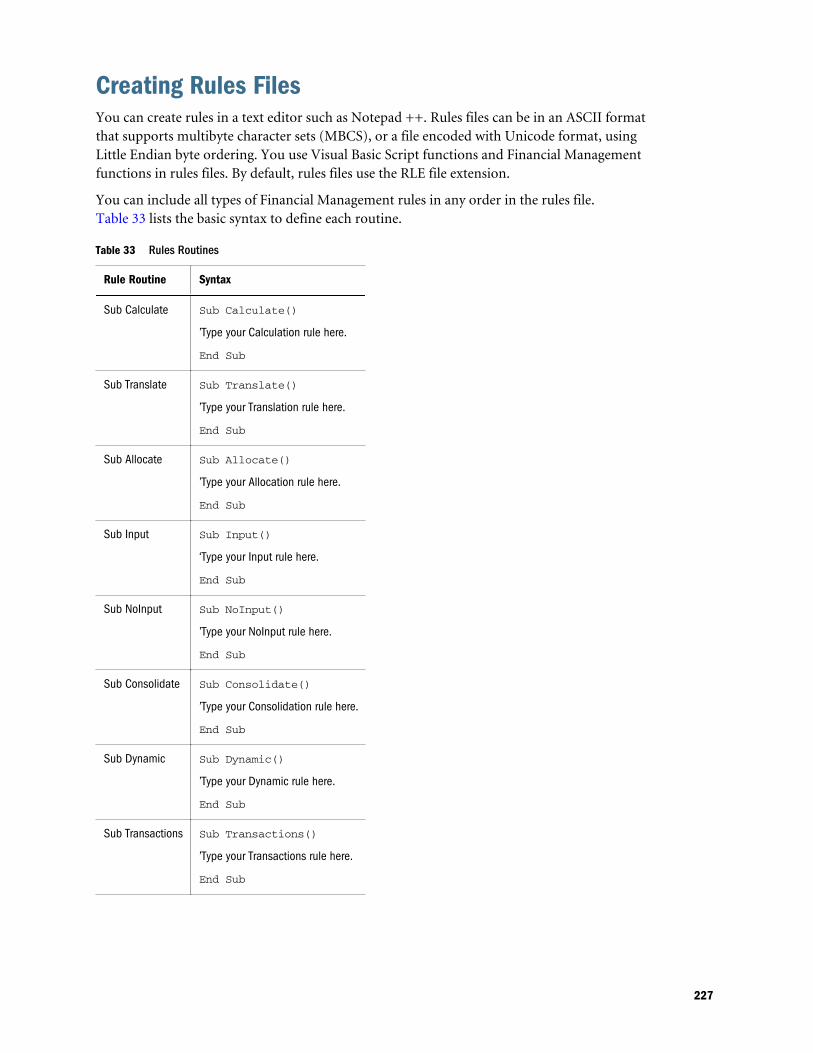
Creating Rules FilesYou can create rules in a text editor such as Notepad ++. Rules files can be in an ASCII formatthat supports multibyte character sets (MBCS), or a file encoded with Unicode format, usingLittle Endian byte ordering. You use Visual Basic Script functions and Financial Managementfunctions in rules files. By default, rules files use the RLE file extension.
You can include all types of Financial Management rules in any order in the rules file.Table 33 lists the basic syntax to define each routine.
Table 33 Rules Routines
Rule Routine Syntax
Sub Calculate Sub Calculate()
’Type your Calculation rule here.
End Sub
Sub Translate Sub Translate()
’Type your Translation rule here.
End Sub
Sub Allocate Sub Allocate()
’Type your Allocation rule here.
End Sub
Sub Input Sub Input()
‘Type your Input rule here.
End Sub
Sub NoInput Sub NoInput()
’Type your NoInput rule here.
End Sub
Sub Consolidate Sub Consolidate()
’Type your Consolidation rule here.
End Sub
Sub Dynamic Sub Dynamic()
’Type your Dynamic rule here.
End Sub
Sub Transactions Sub Transactions()
’Type your Transactions rule here.
End Sub
227
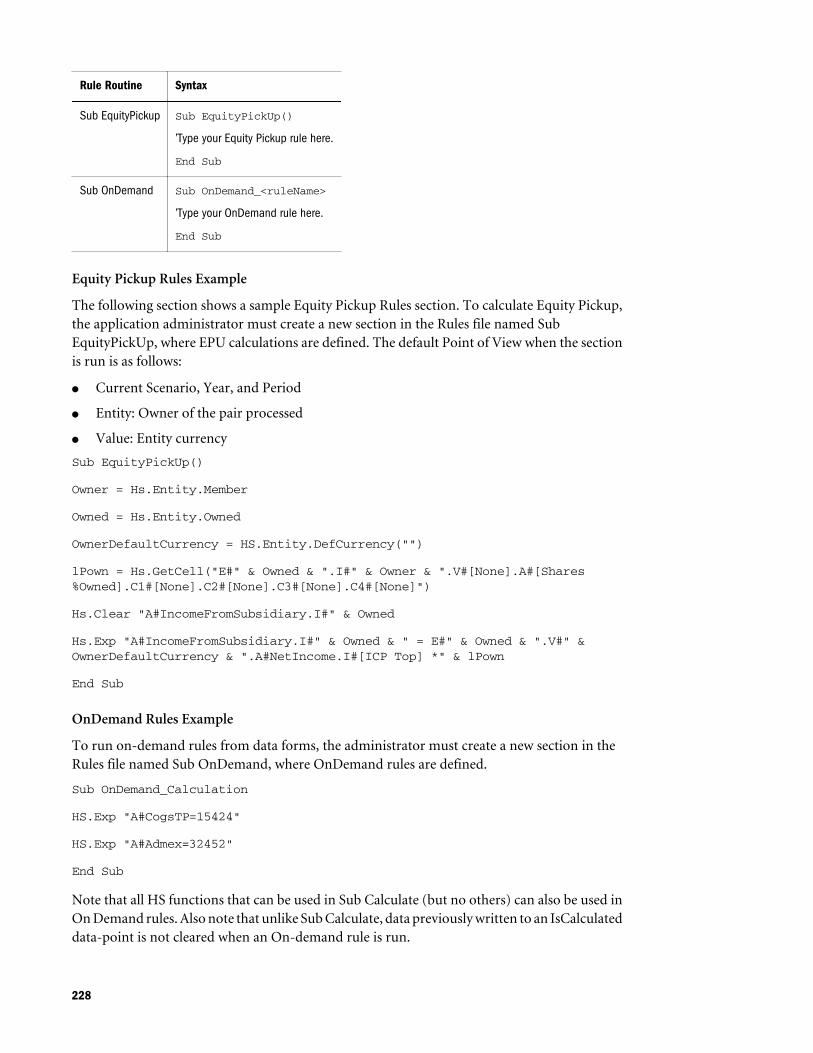
Rule Routine Syntax
Sub EquityPickup Sub EquityPickUp()
’Type your Equity Pickup rule here.
End Sub
Sub OnDemand Sub OnDemand_<ruleName>
’Type your OnDemand rule here.
End Sub
Equity Pickup Rules Example
The following section shows a sample Equity Pickup Rules section. To calculate Equity Pickup,the application administrator must create a new section in the Rules file named SubEquityPickUp, where EPU calculations are defined. The default Point of View when the sectionis run is as follows:
l Current Scenario, Year, and Period
l Entity: Owner of the pair processed
l Value: Entity currency
Sub EquityPickUp()
Owner = Hs.Entity.Member
Owned = Hs.Entity.Owned
OwnerDefaultCurrency = HS.Entity.DefCurrency("")
lPown = Hs.GetCell("E#" & Owned & ".I#" & Owner & ".V#[None].A#[Shares%Owned].C1#[None].C2#[None].C3#[None].C4#[None]")
Hs.Clear "A#IncomeFromSubsidiary.I#" & Owned
Hs.Exp "A#IncomeFromSubsidiary.I#" & Owned & " = E#" & Owned & ".V#" & OwnerDefaultCurrency & ".A#NetIncome.I#[ICP Top] *" & lPown
End Sub
OnDemand Rules Example
To run on-demand rules from data forms, the administrator must create a new section in theRules file named Sub OnDemand, where OnDemand rules are defined.
Sub OnDemand_Calculation
HS.Exp "A#CogsTP=15424"
HS.Exp "A#Admex=32452"
End Sub
Note that all HS functions that can be used in Sub Calculate (but no others) can also be used inOn Demand rules. Also note that unlike Sub Calculate, data previously written to an IsCalculateddata-point is not cleared when an On-demand rule is run.
228
Loading RulesRules changes can affect data and are dependent on metadata. As a result, the rules load processapplies a global lock on the Financial Management server cluster. The rules load cannot proceeduntil any previously started operations of these types have finished:
l Consolidation
l Data entry
l Data, Journal or Security load
l Extract Data to Database
l Member list load
l Metadata load
The rules scan process has the same restrictions as the load process to enable the system to validatedimension members and other parameters. Rules scan and load processes are queued and startedautomatically after any blocking tasks are finished. Oracle recommends that you load rulesduring periods of light activity across the server cluster instead of, for example, during a long-running consolidation. You can check the Running Tasks page to see which processes, such asconsolidation or data loads, are in progress.
After you load a rules file to an application, users using that application are notified that thesystem has changed and that they must log off from the application and log back on.
If the rules files contains intercompany transactions, you can verify the posted transactions inthe application against new transactions in the rules file. The Sub Transactions section of therules file defines the accounts that support intercompany transaction detail.
Note: Oracle recommends that you add Financial Management to the exceptions for your Webpop-up blocker. When you perform some tasks such as loading data, a status windowpops up showing the task status. If you have a pop-up blocker enabled on your computer,the status window is not displayed.
ä To load rules:
1 Select Consolidation, then Load, and then Application Elements.
2 In the Rules section, enter the file name to load, or click Browse to locate the file.
Note: By default, rules files use the RLE file extension. The load process accepts other fileextensions such as TXT or CSV, however, Oracle recommends that you use the RLEfile extension.
3 Optional: Select Check Integrity to verify that posted intercompany transactions are valid with thestatements in the Sub Transactions section of the rule file that you are loading.
4 Optional: Click Scan to verify that the file format is correct.
5 Click Load.
229
Tip: To reset the options to the default values, click Reset.
6 Optional: To download the log file, click Download Log. Click Open to display the log file, or Save andselect a location to save the file locally.
Extracting RulesWhen you extract rules, they are saved to an ASCII file that supports multibyte character sets(MBCS). By default, rules files use the RLE file extension. After you extract rules, you can viewand modify them in a text editor.
ä To extract rules:
1 Select Consolidation, then Extract, and then Application Elements.
2 In the Rules section, click Extract.
3 Follow the download instructions displayed in the browser to download the extracted file.
The instructions vary depending on the Web browser that you are using. Make sure to savethe file in the Web directory that you set up.
4 Optional: To download the log file, click Download Log. Click Open to display the log file, or Save andselect a location to save the file locally.
230
11Rule Functions
In This Chapter
Functions Overview ... . . . . . . . . . . . . . . . . . . . . . . . . . . . . . . . . . . . . . . . . . . . . . . . . . . . . . . . . . . . . . . . . . . . . . . . . . . . . . . . . . . . 234
ABSExp... . . . . . . . . . . . . . . . . . . . . . . . . . . . . . . . . . . . . . . . . . . . . . . . . . . . . . . . . . . . . . . . . . . . . . . . . . . . . . . . . . . . . . . . . . . . . . . . . . 240
AccountType ... . . . . . . . . . . . . . . . . . . . . . . . . . . . . . . . . . . . . . . . . . . . . . . . . . . . . . . . . . . . . . . . . . . . . . . . . . . . . . . . . . . . . . . . . . . . 241
AccountTypeID ... . . . . . . . . . . . . . . . . . . . . . . . . . . . . . . . . . . . . . . . . . . . . . . . . . . . . . . . . . . . . . . . . . . . . . . . . . . . . . . . . . . . . . . . . 242
AddEntityToList . . . . . . . . . . . . . . . . . . . . . . . . . . . . . . . . . . . . . . . . . . . . . . . . . . . . . . . . . . . . . . . . . . . . . . . . . . . . . . . . . . . . . . . . . . . 243
AddEntityToListUsingIDs ... . . . . . . . . . . . . . . . . . . . . . . . . . . . . . . . . . . . . . . . . . . . . . . . . . . . . . . . . . . . . . . . . . . . . . . . . . . . . . . 243
AddMemberToList . . . . . . . . . . . . . . . . . . . . . . . . . . . . . . . . . . . . . . . . . . . . . . . . . . . . . . . . . . . . . . . . . . . . . . . . . . . . . . . . . . . . . . . . 244
AddMemberToListUsingIDs... . . . . . . . . . . . . . . . . . . . . . . . . . . . . . . . . . . . . . . . . . . . . . . . . . . . . . . . . . . . . . . . . . . . . . . . . . . . 244
Alloc ... . . . . . . . . . . . . . . . . . . . . . . . . . . . . . . . . . . . . . . . . . . . . . . . . . . . . . . . . . . . . . . . . . . . . . . . . . . . . . . . . . . . . . . . . . . . . . . . . . . . . 245
AllowAdjFromChildren ... . . . . . . . . . . . . . . . . . . . . . . . . . . . . . . . . . . . . . . . . . . . . . . . . . . . . . . . . . . . . . . . . . . . . . . . . . . . . . . . . 246
AllowAdjs .. . . . . . . . . . . . . . . . . . . . . . . . . . . . . . . . . . . . . . . . . . . . . . . . . . . . . . . . . . . . . . . . . . . . . . . . . . . . . . . . . . . . . . . . . . . . . . . . 246
ApplicationName.... . . . . . . . . . . . . . . . . . . . . . . . . . . . . . . . . . . . . . . . . . . . . . . . . . . . . . . . . . . . . . . . . . . . . . . . . . . . . . . . . . . . . . 247
CalculateExchangeRate ... . . . . . . . . . . . . . . . . . . . . . . . . . . . . . . . . . . . . . . . . . . . . . . . . . . . . . . . . . . . . . . . . . . . . . . . . . . . . . . 248
CalculateRate ... . . . . . . . . . . . . . . . . . . . . . . . . . . . . . . . . . . . . . . . . . . . . . . . . . . . . . . . . . . . . . . . . . . . . . . . . . . . . . . . . . . . . . . . . . 248
CalcStatus ... . . . . . . . . . . . . . . . . . . . . . . . . . . . . . . . . . . . . . . . . . . . . . . . . . . . . . . . . . . . . . . . . . . . . . . . . . . . . . . . . . . . . . . . . . . . . . 249
CellTextUnitItem .... . . . . . . . . . . . . . . . . . . . . . . . . . . . . . . . . . . . . . . . . . . . . . . . . . . . . . . . . . . . . . . . . . . . . . . . . . . . . . . . . . . . . . . 250
Clear.. . . . . . . . . . . . . . . . . . . . . . . . . . . . . . . . . . . . . . . . . . . . . . . . . . . . . . . . . . . . . . . . . . . . . . . . . . . . . . . . . . . . . . . . . . . . . . . . . . . . . . 251
Con ... . . . . . . . . . . . . . . . . . . . . . . . . . . . . . . . . . . . . . . . . . . . . . . . . . . . . . . . . . . . . . . . . . . . . . . . . . . . . . . . . . . . . . . . . . . . . . . . . . . . . . 252
Consol1, Consol2, Consol3 ... . . . . . . . . . . . . . . . . . . . . . . . . . . . . . . . . . . . . . . . . . . . . . . . . . . . . . . . . . . . . . . . . . . . . . . . . . . 253
ConsolidateYTD... . . . . . . . . . . . . . . . . . . . . . . . . . . . . . . . . . . . . . . . . . . . . . . . . . . . . . . . . . . . . . . . . . . . . . . . . . . . . . . . . . . . . . . . . 254
ContainsCellText.. . . . . . . . . . . . . . . . . . . . . . . . . . . . . . . . . . . . . . . . . . . . . . . . . . . . . . . . . . . . . . . . . . . . . . . . . . . . . . . . . . . . . . . . . 255
ContainsCellTextWithLabel .. . . . . . . . . . . . . . . . . . . . . . . . . . . . . . . . . . . . . . . . . . . . . . . . . . . . . . . . . . . . . . . . . . . . . . . . . . . . . 256
Currency ... . . . . . . . . . . . . . . . . . . . . . . . . . . . . . . . . . . . . . . . . . . . . . . . . . . . . . . . . . . . . . . . . . . . . . . . . . . . . . . . . . . . . . . . . . . . . . . . 257
CustomTop... . . . . . . . . . . . . . . . . . . . . . . . . . . . . . . . . . . . . . . . . . . . . . . . . . . . . . . . . . . . . . . . . . . . . . . . . . . . . . . . . . . . . . . . . . . . . . 257
DataUnitItem .... . . . . . . . . . . . . . . . . . . . . . . . . . . . . . . . . . . . . . . . . . . . . . . . . . . . . . . . . . . . . . . . . . . . . . . . . . . . . . . . . . . . . . . . . . 258
Decimal .. . . . . . . . . . . . . . . . . . . . . . . . . . . . . . . . . . . . . . . . . . . . . . . . . . . . . . . . . . . . . . . . . . . . . . . . . . . . . . . . . . . . . . . . . . . . . . . . . . 259
DefaultFreq ... . . . . . . . . . . . . . . . . . . . . . . . . . . . . . . . . . . . . . . . . . . . . . . . . . . . . . . . . . . . . . . . . . . . . . . . . . . . . . . . . . . . . . . . . . . . . 260
DefaultParent.. . . . . . . . . . . . . . . . . . . . . . . . . . . . . . . . . . . . . . . . . . . . . . . . . . . . . . . . . . . . . . . . . . . . . . . . . . . . . . . . . . . . . . . . . . . . 260
DefaultTranslate... . . . . . . . . . . . . . . . . . . . . . . . . . . . . . . . . . . . . . . . . . . . . . . . . . . . . . . . . . . . . . . . . . . . . . . . . . . . . . . . . . . . . . . . 261
DefaultView ... . . . . . . . . . . . . . . . . . . . . . . . . . . . . . . . . . . . . . . . . . . . . . . . . . . . . . . . . . . . . . . . . . . . . . . . . . . . . . . . . . . . . . . . . . . . . 262
DefCurrency... . . . . . . . . . . . . . . . . . . . . . . . . . . . . . . . . . . . . . . . . . . . . . . . . . . . . . . . . . . . . . . . . . . . . . . . . . . . . . . . . . . . . . . . . . . . . 263
DOwn... . . . . . . . . . . . . . . . . . . . . . . . . . . . . . . . . . . . . . . . . . . . . . . . . . . . . . . . . . . . . . . . . . . . . . . . . . . . . . . . . . . . . . . . . . . . . . . . . . . . 263
Dynamic ... . . . . . . . . . . . . . . . . . . . . . . . . . . . . . . . . . . . . . . . . . . . . . . . . . . . . . . . . . . . . . . . . . . . . . . . . . . . . . . . . . . . . . . . . . . . . . . . 264
231
Exp ... . . . . . . . . . . . . . . . . . . . . . . . . . . . . . . . . . . . . . . . . . . . . . . . . . . . . . . . . . . . . . . . . . . . . . . . . . . . . . . . . . . . . . . . . . . . . . . . . . . . . . 265
GetCell . . . . . . . . . . . . . . . . . . . . . . . . . . . . . . . . . . . . . . . . . . . . . . . . . . . . . . . . . . . . . . . . . . . . . . . . . . . . . . . . . . . . . . . . . . . . . . . . . . . . 272
GetCellNoData ... . . . . . . . . . . . . . . . . . . . . . . . . . . . . . . . . . . . . . . . . . . . . . . . . . . . . . . . . . . . . . . . . . . . . . . . . . . . . . . . . . . . . . . . . 272
GetCellRealData... . . . . . . . . . . . . . . . . . . . . . . . . . . . . . . . . . . . . . . . . . . . . . . . . . . . . . . . . . . . . . . . . . . . . . . . . . . . . . . . . . . . . . . . 273
GetCellText .. . . . . . . . . . . . . . . . . . . . . . . . . . . . . . . . . . . . . . . . . . . . . . . . . . . . . . . . . . . . . . . . . . . . . . . . . . . . . . . . . . . . . . . . . . . . . . . 274
GetCellTextWithLabel .. . . . . . . . . . . . . . . . . . . . . . . . . . . . . . . . . . . . . . . . . . . . . . . . . . . . . . . . . . . . . . . . . . . . . . . . . . . . . . . . . . . 275
GetCellType ... . . . . . . . . . . . . . . . . . . . . . . . . . . . . . . . . . . . . . . . . . . . . . . . . . . . . . . . . . . . . . . . . . . . . . . . . . . . . . . . . . . . . . . . . . . . . 276
GetCustomLabelArray... . . . . . . . . . . . . . . . . . . . . . . . . . . . . . . . . . . . . . . . . . . . . . . . . . . . . . . . . . . . . . . . . . . . . . . . . . . . . . . . . . 276
GetItem .... . . . . . . . . . . . . . . . . . . . . . . . . . . . . . . . . . . . . . . . . . . . . . . . . . . . . . . . . . . . . . . . . . . . . . . . . . . . . . . . . . . . . . . . . . . . . . . . 277
GetItemIDs2 ... . . . . . . . . . . . . . . . . . . . . . . . . . . . . . . . . . . . . . . . . . . . . . . . . . . . . . . . . . . . . . . . . . . . . . . . . . . . . . . . . . . . . . . . . . . . 278
GetItemIDs2ExtDim .... . . . . . . . . . . . . . . . . . . . . . . . . . . . . . . . . . . . . . . . . . . . . . . . . . . . . . . . . . . . . . . . . . . . . . . . . . . . . . . . . . . 279
GetNumItems... . . . . . . . . . . . . . . . . . . . . . . . . . . . . . . . . . . . . . . . . . . . . . . . . . . . . . . . . . . . . . . . . . . . . . . . . . . . . . . . . . . . . . . . . . . 279
GetNumLID ... . . . . . . . . . . . . . . . . . . . . . . . . . . . . . . . . . . . . . . . . . . . . . . . . . . . . . . . . . . . . . . . . . . . . . . . . . . . . . . . . . . . . . . . . . . . . 280
GetRate ... . . . . . . . . . . . . . . . . . . . . . . . . . . . . . . . . . . . . . . . . . . . . . . . . . . . . . . . . . . . . . . . . . . . . . . . . . . . . . . . . . . . . . . . . . . . . . . . . 281
GetSubmissionGroup ... . . . . . . . . . . . . . . . . . . . . . . . . . . . . . . . . . . . . . . . . . . . . . . . . . . . . . . . . . . . . . . . . . . . . . . . . . . . . . . . . . 281
GetSubmissionPhase ... . . . . . . . . . . . . . . . . . . . . . . . . . . . . . . . . . . . . . . . . . . . . . . . . . . . . . . . . . . . . . . . . . . . . . . . . . . . . . . . . . 282
Holding... . . . . . . . . . . . . . . . . . . . . . . . . . . . . . . . . . . . . . . . . . . . . . . . . . . . . . . . . . . . . . . . . . . . . . . . . . . . . . . . . . . . . . . . . . . . . . . . . . 282
ICPTopMember .. . . . . . . . . . . . . . . . . . . . . . . . . . . . . . . . . . . . . . . . . . . . . . . . . . . . . . . . . . . . . . . . . . . . . . . . . . . . . . . . . . . . . . . . . . 283
ICPWeight .. . . . . . . . . . . . . . . . . . . . . . . . . . . . . . . . . . . . . . . . . . . . . . . . . . . . . . . . . . . . . . . . . . . . . . . . . . . . . . . . . . . . . . . . . . . . . . . . 283
IDFromMember.. . . . . . . . . . . . . . . . . . . . . . . . . . . . . . . . . . . . . . . . . . . . . . . . . . . . . . . . . . . . . . . . . . . . . . . . . . . . . . . . . . . . . . . . . . 284
ImpactStatus ... . . . . . . . . . . . . . . . . . . . . . . . . . . . . . . . . . . . . . . . . . . . . . . . . . . . . . . . . . . . . . . . . . . . . . . . . . . . . . . . . . . . . . . . . . . 285
Input.. . . . . . . . . . . . . . . . . . . . . . . . . . . . . . . . . . . . . . . . . . . . . . . . . . . . . . . . . . . . . . . . . . . . . . . . . . . . . . . . . . . . . . . . . . . . . . . . . . . . . . 286
IsAlmostEqual .. . . . . . . . . . . . . . . . . . . . . . . . . . . . . . . . . . . . . . . . . . . . . . . . . . . . . . . . . . . . . . . . . . . . . . . . . . . . . . . . . . . . . . . . . . . 287
IsBase... . . . . . . . . . . . . . . . . . . . . . . . . . . . . . . . . . . . . . . . . . . . . . . . . . . . . . . . . . . . . . . . . . . . . . . . . . . . . . . . . . . . . . . . . . . . . . . . . . . 287
IsCalculated ... . . . . . . . . . . . . . . . . . . . . . . . . . . . . . . . . . . . . . . . . . . . . . . . . . . . . . . . . . . . . . . . . . . . . . . . . . . . . . . . . . . . . . . . . . . . 289
IsChild.. . . . . . . . . . . . . . . . . . . . . . . . . . . . . . . . . . . . . . . . . . . . . . . . . . . . . . . . . . . . . . . . . . . . . . . . . . . . . . . . . . . . . . . . . . . . . . . . . . . . 290
IsConsolidated ... . . . . . . . . . . . . . . . . . . . . . . . . . . . . . . . . . . . . . . . . . . . . . . . . . . . . . . . . . . . . . . . . . . . . . . . . . . . . . . . . . . . . . . . . 291
IsDescendant.. . . . . . . . . . . . . . . . . . . . . . . . . . . . . . . . . . . . . . . . . . . . . . . . . . . . . . . . . . . . . . . . . . . . . . . . . . . . . . . . . . . . . . . . . . . . 292
IsFirst . . . . . . . . . . . . . . . . . . . . . . . . . . . . . . . . . . . . . . . . . . . . . . . . . . . . . . . . . . . . . . . . . . . . . . . . . . . . . . . . . . . . . . . . . . . . . . . . . . . . . . 294
IsICP... . . . . . . . . . . . . . . . . . . . . . . . . . . . . . . . . . . . . . . . . . . . . . . . . . . . . . . . . . . . . . . . . . . . . . . . . . . . . . . . . . . . . . . . . . . . . . . . . . . . . 294
IsLast .. . . . . . . . . . . . . . . . . . . . . . . . . . . . . . . . . . . . . . . . . . . . . . . . . . . . . . . . . . . . . . . . . . . . . . . . . . . . . . . . . . . . . . . . . . . . . . . . . . . . . 295
IsTransCur.. . . . . . . . . . . . . . . . . . . . . . . . . . . . . . . . . . . . . . . . . . . . . . . . . . . . . . . . . . . . . . . . . . . . . . . . . . . . . . . . . . . . . . . . . . . . . . . . 296
IsTransCurAdj .. . . . . . . . . . . . . . . . . . . . . . . . . . . . . . . . . . . . . . . . . . . . . . . . . . . . . . . . . . . . . . . . . . . . . . . . . . . . . . . . . . . . . . . . . . . . 296
IsValidDest.. . . . . . . . . . . . . . . . . . . . . . . . . . . . . . . . . . . . . . . . . . . . . . . . . . . . . . . . . . . . . . . . . . . . . . . . . . . . . . . . . . . . . . . . . . . . . . . 297
IsZero... . . . . . . . . . . . . . . . . . . . . . . . . . . . . . . . . . . . . . . . . . . . . . . . . . . . . . . . . . . . . . . . . . . . . . . . . . . . . . . . . . . . . . . . . . . . . . . . . . . . 298
List. . . . . . . . . . . . . . . . . . . . . . . . . . . . . . . . . . . . . . . . . . . . . . . . . . . . . . . . . . . . . . . . . . . . . . . . . . . . . . . . . . . . . . . . . . . . . . . . . . . . . . . . . 299
Member .. . . . . . . . . . . . . . . . . . . . . . . . . . . . . . . . . . . . . . . . . . . . . . . . . . . . . . . . . . . . . . . . . . . . . . . . . . . . . . . . . . . . . . . . . . . . . . . . . . 300
MemberFromID... . . . . . . . . . . . . . . . . . . . . . . . . . . . . . . . . . . . . . . . . . . . . . . . . . . . . . . . . . . . . . . . . . . . . . . . . . . . . . . . . . . . . . . . . 301
Method... . . . . . . . . . . . . . . . . . . . . . . . . . . . . . . . . . . . . . . . . . . . . . . . . . . . . . . . . . . . . . . . . . . . . . . . . . . . . . . . . . . . . . . . . . . . . . . . . . 302
NoInput .. . . . . . . . . . . . . . . . . . . . . . . . . . . . . . . . . . . . . . . . . . . . . . . . . . . . . . . . . . . . . . . . . . . . . . . . . . . . . . . . . . . . . . . . . . . . . . . . . . 302
NoRound... . . . . . . . . . . . . . . . . . . . . . . . . . . . . . . . . . . . . . . . . . . . . . . . . . . . . . . . . . . . . . . . . . . . . . . . . . . . . . . . . . . . . . . . . . . . . . . . 303
NumBase ... . . . . . . . . . . . . . . . . . . . . . . . . . . . . . . . . . . . . . . . . . . . . . . . . . . . . . . . . . . . . . . . . . . . . . . . . . . . . . . . . . . . . . . . . . . . . . . 304
Number .. . . . . . . . . . . . . . . . . . . . . . . . . . . . . . . . . . . . . . . . . . . . . . . . . . . . . . . . . . . . . . . . . . . . . . . . . . . . . . . . . . . . . . . . . . . . . . . . . . 305
232
NumChild ... . . . . . . . . . . . . . . . . . . . . . . . . . . . . . . . . . . . . . . . . . . . . . . . . . . . . . . . . . . . . . . . . . . . . . . . . . . . . . . . . . . . . . . . . . . . . . . 306
NumCustom .... . . . . . . . . . . . . . . . . . . . . . . . . . . . . . . . . . . . . . . . . . . . . . . . . . . . . . . . . . . . . . . . . . . . . . . . . . . . . . . . . . . . . . . . . . . 307
NumDescendant .. . . . . . . . . . . . . . . . . . . . . . . . . . . . . . . . . . . . . . . . . . . . . . . . . . . . . . . . . . . . . . . . . . . . . . . . . . . . . . . . . . . . . . . . 308
NumPerInGen... . . . . . . . . . . . . . . . . . . . . . . . . . . . . . . . . . . . . . . . . . . . . . . . . . . . . . . . . . . . . . . . . . . . . . . . . . . . . . . . . . . . . . . . . . . 310
NumPeriods ... . . . . . . . . . . . . . . . . . . . . . . . . . . . . . . . . . . . . . . . . . . . . . . . . . . . . . . . . . . . . . . . . . . . . . . . . . . . . . . . . . . . . . . . . . . . 310
OpenCellTextUnit . . . . . . . . . . . . . . . . . . . . . . . . . . . . . . . . . . . . . . . . . . . . . . . . . . . . . . . . . . . . . . . . . . . . . . . . . . . . . . . . . . . . . . . . . 311
OpenDataUnit . . . . . . . . . . . . . . . . . . . . . . . . . . . . . . . . . . . . . . . . . . . . . . . . . . . . . . . . . . . . . . . . . . . . . . . . . . . . . . . . . . . . . . . . . . . . 312
OpenDataUnitSorted... . . . . . . . . . . . . . . . . . . . . . . . . . . . . . . . . . . . . . . . . . . . . . . . . . . . . . . . . . . . . . . . . . . . . . . . . . . . . . . . . . . 313
Owned... . . . . . . . . . . . . . . . . . . . . . . . . . . . . . . . . . . . . . . . . . . . . . . . . . . . . . . . . . . . . . . . . . . . . . . . . . . . . . . . . . . . . . . . . . . . . . . . . . . 313
Owner .. . . . . . . . . . . . . . . . . . . . . . . . . . . . . . . . . . . . . . . . . . . . . . . . . . . . . . . . . . . . . . . . . . . . . . . . . . . . . . . . . . . . . . . . . . . . . . . . . . . . 313
PCon ... . . . . . . . . . . . . . . . . . . . . . . . . . . . . . . . . . . . . . . . . . . . . . . . . . . . . . . . . . . . . . . . . . . . . . . . . . . . . . . . . . . . . . . . . . . . . . . . . . . . 314
PEPU ... . . . . . . . . . . . . . . . . . . . . . . . . . . . . . . . . . . . . . . . . . . . . . . . . . . . . . . . . . . . . . . . . . . . . . . . . . . . . . . . . . . . . . . . . . . . . . . . . . . . 315
PeriodNumber .. . . . . . . . . . . . . . . . . . . . . . . . . . . . . . . . . . . . . . . . . . . . . . . . . . . . . . . . . . . . . . . . . . . . . . . . . . . . . . . . . . . . . . . . . . . 315
PlugAcct.. . . . . . . . . . . . . . . . . . . . . . . . . . . . . . . . . . . . . . . . . . . . . . . . . . . . . . . . . . . . . . . . . . . . . . . . . . . . . . . . . . . . . . . . . . . . . . . . . . 316
POwn ... . . . . . . . . . . . . . . . . . . . . . . . . . . . . . . . . . . . . . . . . . . . . . . . . . . . . . . . . . . . . . . . . . . . . . . . . . . . . . . . . . . . . . . . . . . . . . . . . . . . 317
PVAForBalance ... . . . . . . . . . . . . . . . . . . . . . . . . . . . . . . . . . . . . . . . . . . . . . . . . . . . . . . . . . . . . . . . . . . . . . . . . . . . . . . . . . . . . . . . . 318
PVAForFlow ... . . . . . . . . . . . . . . . . . . . . . . . . . . . . . . . . . . . . . . . . . . . . . . . . . . . . . . . . . . . . . . . . . . . . . . . . . . . . . . . . . . . . . . . . . . . . 318
RateForBalance ... . . . . . . . . . . . . . . . . . . . . . . . . . . . . . . . . . . . . . . . . . . . . . . . . . . . . . . . . . . . . . . . . . . . . . . . . . . . . . . . . . . . . . . . 319
RateForFlow ... . . . . . . . . . . . . . . . . . . . . . . . . . . . . . . . . . . . . . . . . . . . . . . . . . . . . . . . . . . . . . . . . . . . . . . . . . . . . . . . . . . . . . . . . . . . 319
ReviewStatus ... . . . . . . . . . . . . . . . . . . . . . . . . . . . . . . . . . . . . . . . . . . . . . . . . . . . . . . . . . . . . . . . . . . . . . . . . . . . . . . . . . . . . . . . . . . 320
ReviewStatusUsingPhaseID ... . . . . . . . . . . . . . . . . . . . . . . . . . . . . . . . . . . . . . . . . . . . . . . . . . . . . . . . . . . . . . . . . . . . . . . . . . . 321
Round ... . . . . . . . . . . . . . . . . . . . . . . . . . . . . . . . . . . . . . . . . . . . . . . . . . . . . . . . . . . . . . . . . . . . . . . . . . . . . . . . . . . . . . . . . . . . . . . . . . . 322
Scale ... . . . . . . . . . . . . . . . . . . . . . . . . . . . . . . . . . . . . . . . . . . . . . . . . . . . . . . . . . . . . . . . . . . . . . . . . . . . . . . . . . . . . . . . . . . . . . . . . . . . 323
SecurityAsPartner .. . . . . . . . . . . . . . . . . . . . . . . . . . . . . . . . . . . . . . . . . . . . . . . . . . . . . . . . . . . . . . . . . . . . . . . . . . . . . . . . . . . . . . . 324
SecurityClass ... . . . . . . . . . . . . . . . . . . . . . . . . . . . . . . . . . . . . . . . . . . . . . . . . . . . . . . . . . . . . . . . . . . . . . . . . . . . . . . . . . . . . . . . . . . 325
SetCellTextWithLabel.. . . . . . . . . . . . . . . . . . . . . . . . . . . . . . . . . . . . . . . . . . . . . . . . . . . . . . . . . . . . . . . . . . . . . . . . . . . . . . . . . . . . 326
SetData ... . . . . . . . . . . . . . . . . . . . . . . . . . . . . . . . . . . . . . . . . . . . . . . . . . . . . . . . . . . . . . . . . . . . . . . . . . . . . . . . . . . . . . . . . . . . . . . . . 326
SetDataWithPOV ... . . . . . . . . . . . . . . . . . . . . . . . . . . . . . . . . . . . . . . . . . . . . . . . . . . . . . . . . . . . . . . . . . . . . . . . . . . . . . . . . . . . . . . 327
SubmissionGroup ... . . . . . . . . . . . . . . . . . . . . . . . . . . . . . . . . . . . . . . . . . . . . . . . . . . . . . . . . . . . . . . . . . . . . . . . . . . . . . . . . . . . . . 328
SupportsProcessManagement .. . . . . . . . . . . . . . . . . . . . . . . . . . . . . . . . . . . . . . . . . . . . . . . . . . . . . . . . . . . . . . . . . . . . . . . . . 328
SupportsTran ... . . . . . . . . . . . . . . . . . . . . . . . . . . . . . . . . . . . . . . . . . . . . . . . . . . . . . . . . . . . . . . . . . . . . . . . . . . . . . . . . . . . . . . . . . . 329
SwitchSign ... . . . . . . . . . . . . . . . . . . . . . . . . . . . . . . . . . . . . . . . . . . . . . . . . . . . . . . . . . . . . . . . . . . . . . . . . . . . . . . . . . . . . . . . . . . . . . 329
SwitchType... . . . . . . . . . . . . . . . . . . . . . . . . . . . . . . . . . . . . . . . . . . . . . . . . . . . . . . . . . . . . . . . . . . . . . . . . . . . . . . . . . . . . . . . . . . . . . 331
Trans ... . . . . . . . . . . . . . . . . . . . . . . . . . . . . . . . . . . . . . . . . . . . . . . . . . . . . . . . . . . . . . . . . . . . . . . . . . . . . . . . . . . . . . . . . . . . . . . . . . . . 332
TransPeriodic .. . . . . . . . . . . . . . . . . . . . . . . . . . . . . . . . . . . . . . . . . . . . . . . . . . . . . . . . . . . . . . . . . . . . . . . . . . . . . . . . . . . . . . . . . . . . 332
UD1...3 ... . . . . . . . . . . . . . . . . . . . . . . . . . . . . . . . . . . . . . . . . . . . . . . . . . . . . . . . . . . . . . . . . . . . . . . . . . . . . . . . . . . . . . . . . . . . . . . . . 333
ValidationAccount.. . . . . . . . . . . . . . . . . . . . . . . . . . . . . . . . . . . . . . . . . . . . . . . . . . . . . . . . . . . . . . . . . . . . . . . . . . . . . . . . . . . . . . . 334
ValidationAccountEx .. . . . . . . . . . . . . . . . . . . . . . . . . . . . . . . . . . . . . . . . . . . . . . . . . . . . . . . . . . . . . . . . . . . . . . . . . . . . . . . . . . . . 335
XBRLTags ... . . . . . . . . . . . . . . . . . . . . . . . . . . . . . . . . . . . . . . . . . . . . . . . . . . . . . . . . . . . . . . . . . . . . . . . . . . . . . . . . . . . . . . . . . . . . . . 335
You can write these rule types using these functions:
l Allocation rules
233
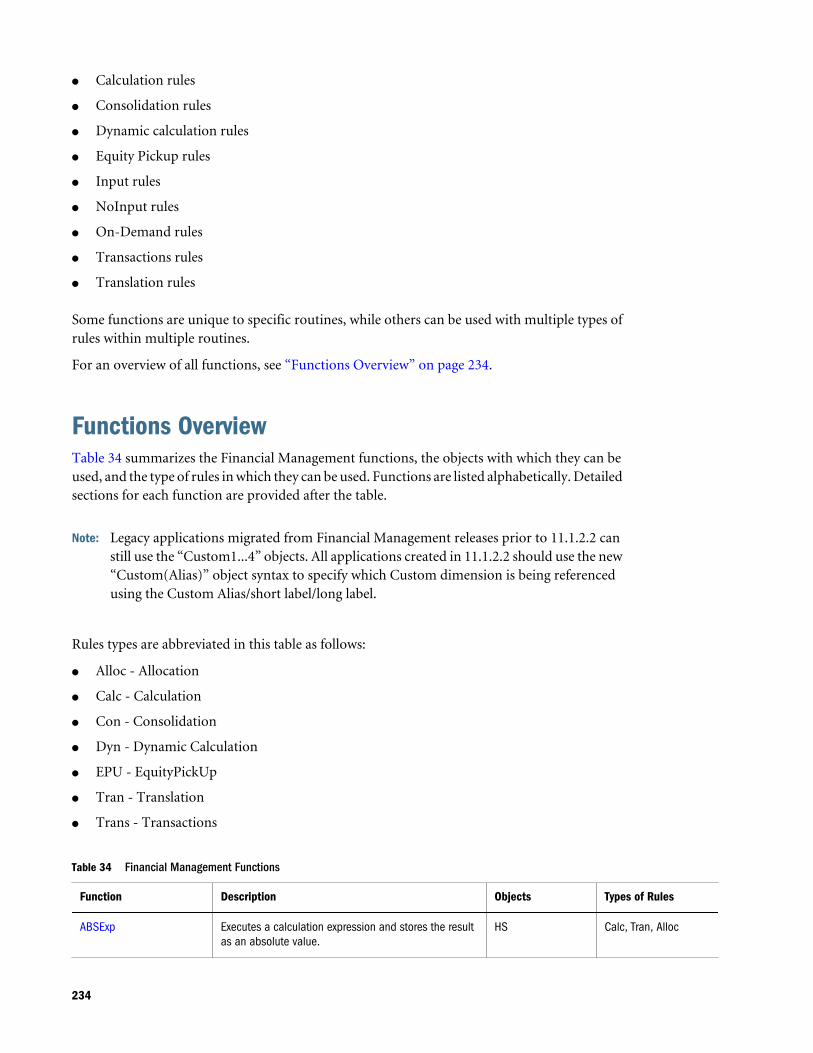
l Calculation rules
l Consolidation rules
l Dynamic calculation rules
l Equity Pickup rules
l Input rules
l NoInput rules
l On-Demand rules
l Transactions rules
l Translation rules
Some functions are unique to specific routines, while others can be used with multiple types ofrules within multiple routines.
For an overview of all functions, see “Functions Overview” on page 234.
Functions OverviewTable 34 summarizes the Financial Management functions, the objects with which they can beused, and the type of rules in which they can be used. Functions are listed alphabetically. Detailedsections for each function are provided after the table.
Note: Legacy applications migrated from Financial Management releases prior to 11.1.2.2 canstill use the “Custom1...4” objects. All applications created in 11.1.2.2 should use the new“Custom(Alias)” object syntax to specify which Custom dimension is being referencedusing the Custom Alias/short label/long label.
Rules types are abbreviated in this table as follows:
l Alloc - Allocation
l Calc - Calculation
l Con - Consolidation
l Dyn - Dynamic Calculation
l EPU - EquityPickUp
l Tran - Translation
l Trans - Transactions
Table 34 Financial Management Functions
Function Description Objects Types of Rules
ABSExp Executes a calculation expression and stores the resultas an absolute value.
HS Calc, Tran, Alloc
234
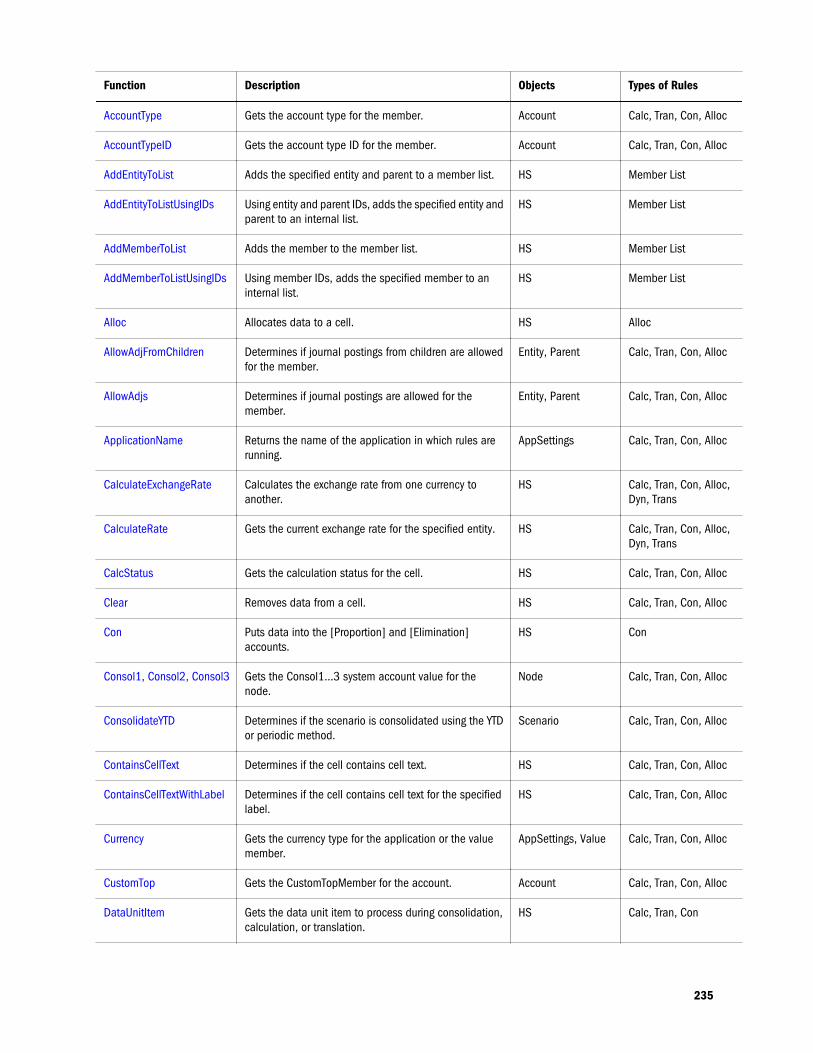
Function Description Objects Types of Rules
AccountType Gets the account type for the member. Account Calc, Tran, Con, Alloc
AccountTypeID Gets the account type ID for the member. Account Calc, Tran, Con, Alloc
AddEntityToList Adds the specified entity and parent to a member list. HS Member List
AddEntityToListUsingIDs Using entity and parent IDs, adds the specified entity andparent to an internal list.
HS Member List
AddMemberToList Adds the member to the member list. HS Member List
AddMemberToListUsingIDs Using member IDs, adds the specified member to aninternal list.
HS Member List
Alloc Allocates data to a cell. HS Alloc
AllowAdjFromChildren Determines if journal postings from children are allowedfor the member.
Entity, Parent Calc, Tran, Con, Alloc
AllowAdjs Determines if journal postings are allowed for themember.
Entity, Parent Calc, Tran, Con, Alloc
ApplicationName Returns the name of the application in which rules arerunning.
AppSettings Calc, Tran, Con, Alloc
CalculateExchangeRate Calculates the exchange rate from one currency toanother.
HS Calc, Tran, Con, Alloc,Dyn, Trans
CalculateRate Gets the current exchange rate for the specified entity. HS Calc, Tran, Con, Alloc,Dyn, Trans
CalcStatus Gets the calculation status for the cell. HS Calc, Tran, Con, Alloc
Clear Removes data from a cell. HS Calc, Tran, Con, Alloc
Con Puts data into the [Proportion] and [Elimination]accounts.
HS Con
Consol1, Consol2, Consol3 Gets the Consol1...3 system account value for thenode.
Node Calc, Tran, Con, Alloc
ConsolidateYTD Determines if the scenario is consolidated using the YTDor periodic method.
Scenario Calc, Tran, Con, Alloc
ContainsCellText Determines if the cell contains cell text. HS Calc, Tran, Con, Alloc
ContainsCellTextWithLabel Determines if the cell contains cell text for the specifiedlabel.
HS Calc, Tran, Con, Alloc
Currency Gets the currency type for the application or the valuemember.
AppSettings, Value Calc, Tran, Con, Alloc
CustomTop Gets the CustomTopMember for the account. Account Calc, Tran, Con, Alloc
DataUnitItem Gets the data unit item to process during consolidation,calculation, or translation.
HS Calc, Tran, Con
235

Function Description Objects Types of Rules
Decimal Gets the number of decimal places for the specifiedaccount.
Account Calc, Tran, Con, Alloc
DefaultFreq Gets the default scenario frequency. Scenario Calc, Tran, Con, Alloc
DefaultParent Gets the default parent for the member. Account Calc, Tran, Con, Alloc
DefaultTranslate Calculates translation by bypassing rules. HS Tran
DefaultView Gets the default scenario view. Scenario Calc, Tran, Con, Alloc
DefCurrency Gets the default currency for the entity or parent. Entity, Parent Calc, Tran, Con, Alloc
DOwn Gets the percentage of Direct Ownership (DOwn) for thenode.
Node Calc, Tran, Con, Alloc
Dynamic Specifies the formula for the dynamic accounts that needcalculations.
HS Dyn
Exp Executes a calculation expression and puts data into aspecified point of view.
HS Calc, Tran, Alloc
GetCell Gets the data contained in a cell. HS Calc, Tran, Con, Alloc
GetCellNoData Gets the data contained in a cell and indicates if the cellcontains no data.
HS Calc, Tran, Con, Alloc
GetCellRealData Gets the data contained in a cell and indicates if the cellcontains real data.
HS Calc, Tran, Con, Alloc
GetCellText Gets the default cell text for a specified Point of View. HS Calc, Tran, Con, Alloc
GetCellTextWithLabel Gets the cell text from the Point of View for the specifiedcell text label.
HS Calc, Tran, Con, Alloc
GetCellType Gets the cell type. HS Calc, Tran, Con, Alloc
GetCustomLabelArray Returns a list of Custom dimension names and aliases. HS Calc, Tran, Con, Alloc
GetItem Gets an individual record to process for consolidation. DataUnit Calc, Tran, Con
GetItemIDs2 Gets an individual record to process for consolidationusing dimension ID numbers.
DataUnit Calc, Tran, Con
GetNumItems Gets the number of records to process forconsolidation.
DataUnit Calc, Tran, Con
GetNumLID Gets the number of line-item details for the specifiedPOV.
HS Calc, Tran, Con, Alloc
GetRate Gets the currency rate for a cell. HS Calc, Tran, Con, Alloc
GetSubmissionGroup Gets the submission group for a cell. HS Calc, Tran, Con, Alloc
GetSubmissionPhase Gets the submission phase for a cell. HS Calc, Tran, Con, Alloc
236
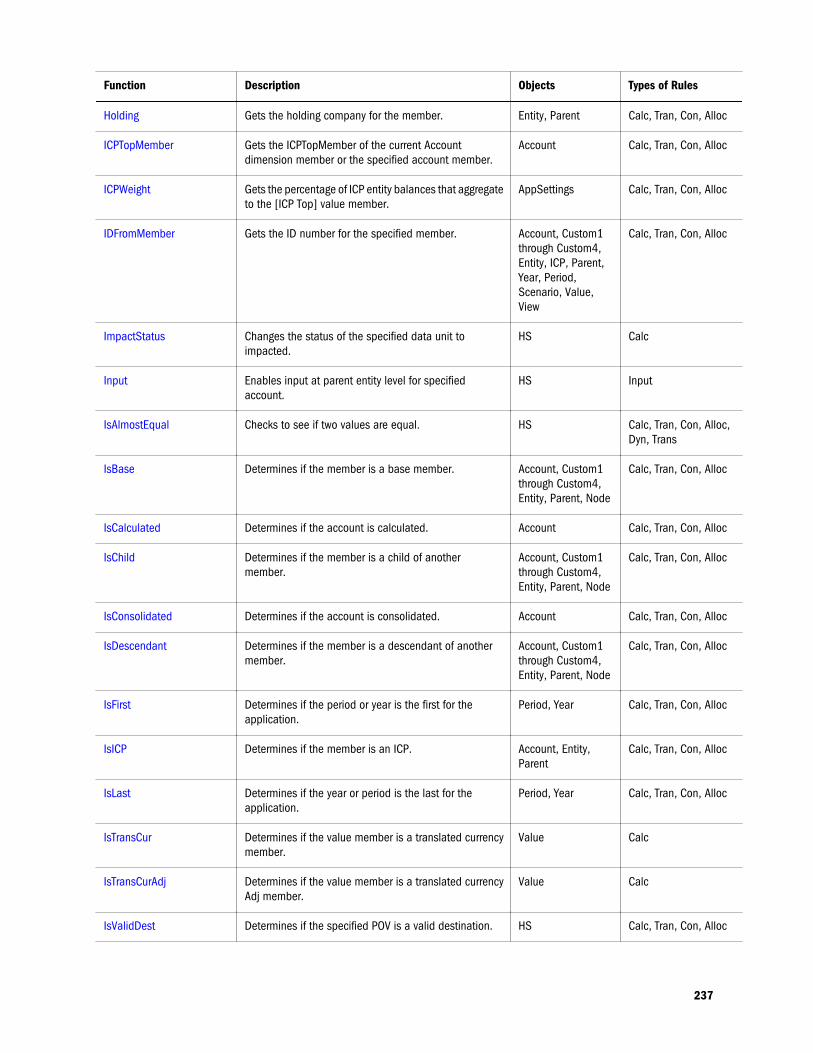
Function Description Objects Types of Rules
Holding Gets the holding company for the member. Entity, Parent Calc, Tran, Con, Alloc
ICPTopMember Gets the ICPTopMember of the current Accountdimension member or the specified account member.
Account Calc, Tran, Con, Alloc
ICPWeight Gets the percentage of ICP entity balances that aggregateto the [ICP Top] value member.
AppSettings Calc, Tran, Con, Alloc
IDFromMember Gets the ID number for the specified member. Account, Custom1through Custom4,Entity, ICP, Parent,Year, Period,Scenario, Value,View
Calc, Tran, Con, Alloc
ImpactStatus Changes the status of the specified data unit toimpacted.
HS Calc
Input Enables input at parent entity level for specifiedaccount.
HS Input
IsAlmostEqual Checks to see if two values are equal. HS Calc, Tran, Con, Alloc,Dyn, Trans
IsBase Determines if the member is a base member. Account, Custom1through Custom4,Entity, Parent, Node
Calc, Tran, Con, Alloc
IsCalculated Determines if the account is calculated. Account Calc, Tran, Con, Alloc
IsChild Determines if the member is a child of anothermember.
Account, Custom1through Custom4,Entity, Parent, Node
Calc, Tran, Con, Alloc
IsConsolidated Determines if the account is consolidated. Account Calc, Tran, Con, Alloc
IsDescendant Determines if the member is a descendant of anothermember.
Account, Custom1through Custom4,Entity, Parent, Node
Calc, Tran, Con, Alloc
IsFirst Determines if the period or year is the first for theapplication.
Period, Year Calc, Tran, Con, Alloc
IsICP Determines if the member is an ICP. Account, Entity,Parent
Calc, Tran, Con, Alloc
IsLast Determines if the year or period is the last for theapplication.
Period, Year Calc, Tran, Con, Alloc
IsTransCur Determines if the value member is a translated currencymember.
Value Calc
IsTransCurAdj Determines if the value member is a translated currencyAdj member.
Value Calc
IsValidDest Determines if the specified POV is a valid destination. HS Calc, Tran, Con, Alloc
237
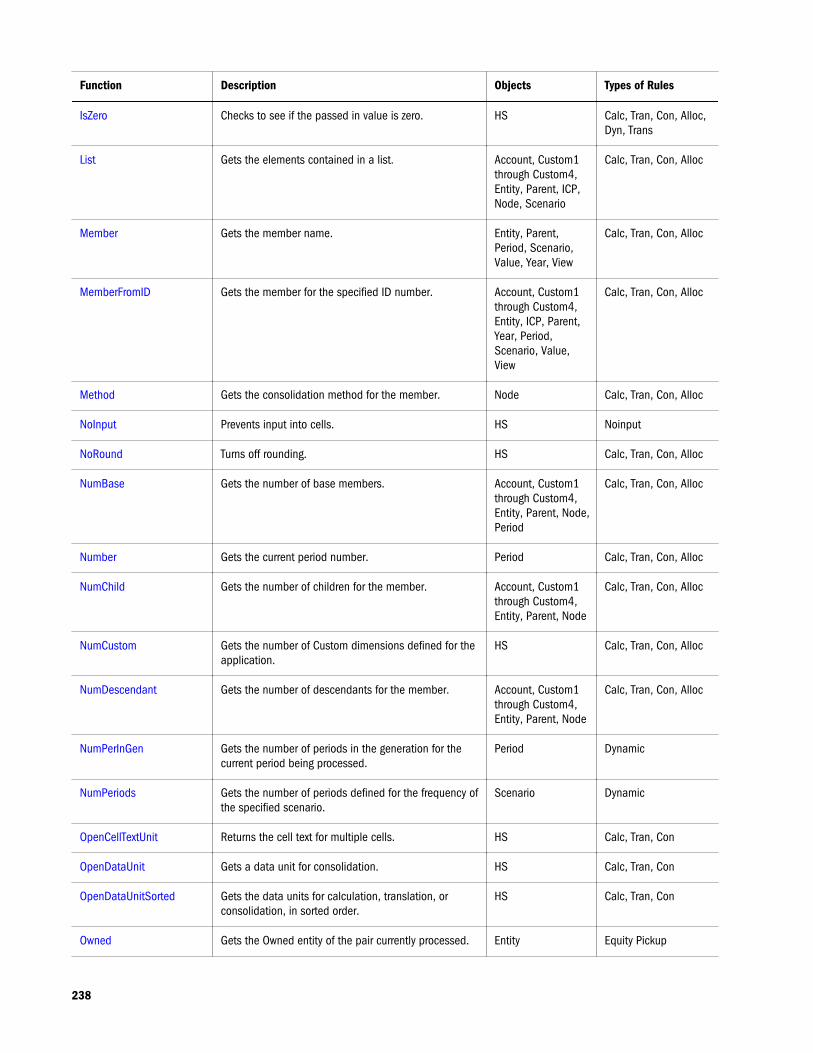
Function Description Objects Types of Rules
IsZero Checks to see if the passed in value is zero. HS Calc, Tran, Con, Alloc,Dyn, Trans
List Gets the elements contained in a list. Account, Custom1through Custom4,Entity, Parent, ICP,Node, Scenario
Calc, Tran, Con, Alloc
Member Gets the member name. Entity, Parent,Period, Scenario,Value, Year, View
Calc, Tran, Con, Alloc
MemberFromID Gets the member for the specified ID number. Account, Custom1through Custom4,Entity, ICP, Parent,Year, Period,Scenario, Value,View
Calc, Tran, Con, Alloc
Method Gets the consolidation method for the member. Node Calc, Tran, Con, Alloc
NoInput Prevents input into cells. HS Noinput
NoRound Turns off rounding. HS Calc, Tran, Con, Alloc
NumBase Gets the number of base members. Account, Custom1through Custom4,Entity, Parent, Node,Period
Calc, Tran, Con, Alloc
Number Gets the current period number. Period Calc, Tran, Con, Alloc
NumChild Gets the number of children for the member. Account, Custom1through Custom4,Entity, Parent, Node
Calc, Tran, Con, Alloc
NumCustom Gets the number of Custom dimensions defined for theapplication.
HS Calc, Tran, Con, Alloc
NumDescendant Gets the number of descendants for the member. Account, Custom1through Custom4,Entity, Parent, Node
Calc, Tran, Con, Alloc
NumPerInGen Gets the number of periods in the generation for thecurrent period being processed.
Period Dynamic
NumPeriods Gets the number of periods defined for the frequency ofthe specified scenario.
Scenario Dynamic
OpenCellTextUnit Returns the cell text for multiple cells. HS Calc, Tran, Con
OpenDataUnit Gets a data unit for consolidation. HS Calc, Tran, Con
OpenDataUnitSorted Gets the data units for calculation, translation, orconsolidation, in sorted order.
HS Calc, Tran, Con
Owned Gets the Owned entity of the pair currently processed. Entity Equity Pickup
238
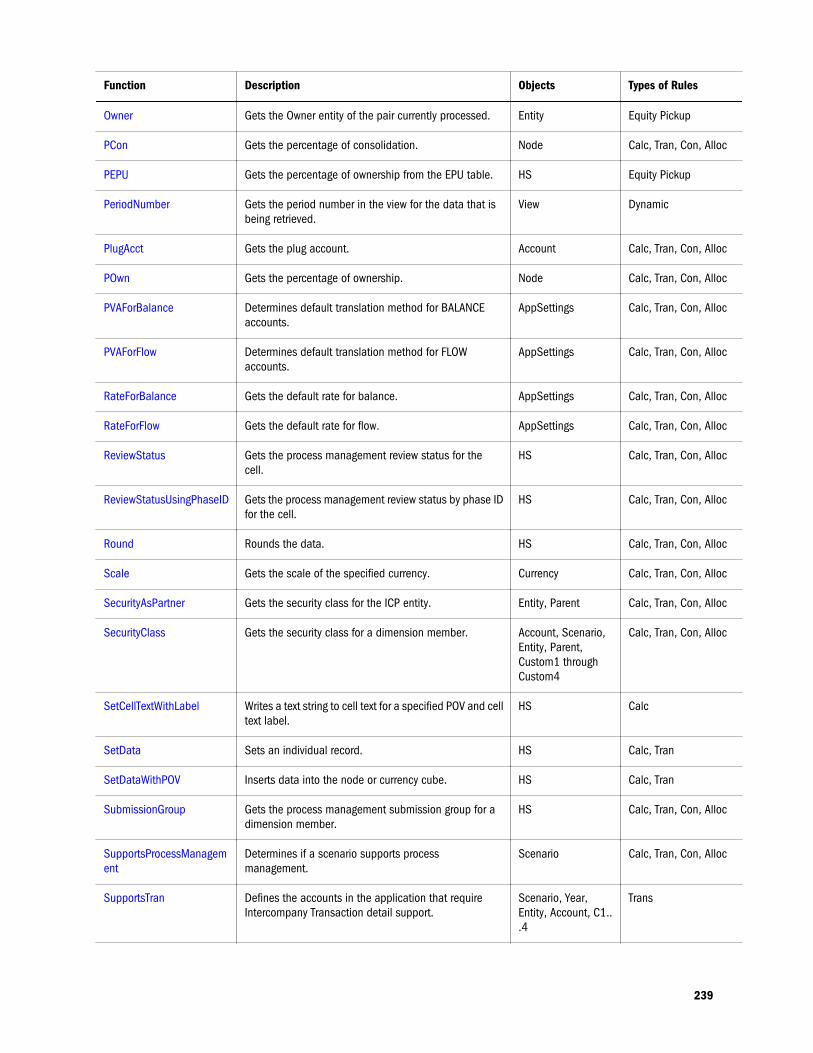
Function Description Objects Types of Rules
Owner Gets the Owner entity of the pair currently processed. Entity Equity Pickup
PCon Gets the percentage of consolidation. Node Calc, Tran, Con, Alloc
PEPU Gets the percentage of ownership from the EPU table. HS Equity Pickup
PeriodNumber Gets the period number in the view for the data that isbeing retrieved.
View Dynamic
PlugAcct Gets the plug account. Account Calc, Tran, Con, Alloc
POwn Gets the percentage of ownership. Node Calc, Tran, Con, Alloc
PVAForBalance Determines default translation method for BALANCEaccounts.
AppSettings Calc, Tran, Con, Alloc
PVAForFlow Determines default translation method for FLOWaccounts.
AppSettings Calc, Tran, Con, Alloc
RateForBalance Gets the default rate for balance. AppSettings Calc, Tran, Con, Alloc
RateForFlow Gets the default rate for flow. AppSettings Calc, Tran, Con, Alloc
ReviewStatus Gets the process management review status for thecell.
HS Calc, Tran, Con, Alloc
ReviewStatusUsingPhaseID Gets the process management review status by phase IDfor the cell.
HS Calc, Tran, Con, Alloc
Round Rounds the data. HS Calc, Tran, Con, Alloc
Scale Gets the scale of the specified currency. Currency Calc, Tran, Con, Alloc
SecurityAsPartner Gets the security class for the ICP entity. Entity, Parent Calc, Tran, Con, Alloc
SecurityClass Gets the security class for a dimension member. Account, Scenario,Entity, Parent,Custom1 throughCustom4
Calc, Tran, Con, Alloc
SetCellTextWithLabel Writes a text string to cell text for a specified POV and celltext label.
HS Calc
SetData Sets an individual record. HS Calc, Tran
SetDataWithPOV Inserts data into the node or currency cube. HS Calc, Tran
SubmissionGroup Gets the process management submission group for adimension member.
HS Calc, Tran, Con, Alloc
SupportsProcessManagement
Determines if a scenario supports processmanagement.
Scenario Calc, Tran, Con, Alloc
SupportsTran Defines the accounts in the application that requireIntercompany Transaction detail support.
Scenario, Year,Entity, Account, C1...4
Trans
239
Function Description Objects Types of Rules
SwitchSign Determines if credits are switched to debits for themember.
Custom1 throughCustom4
Calc, Tran, Con, Alloc
SwitchType Determines if account types are switched for themember.
Custom1 throughCustom4
Calc, Tran, Con, Alloc
Trans Translates using YTD method. HS Tran
TransPeriodic Translates using periodic method. HS Tran
UD1...3 Gets the user-defined attribute for the member. Account, Entity,Parent, Scenario,Custom1 throughCustom4
Calc, Tran, Con, Alloc
ValidationAccount Gets the validation account. AppSettings Calc, Tran, Con, Alloc
ValidationAccountEx Gets the validation account for the process managementsubmission phase.
AppSettings Calc, Tran, Con, Alloc
XBRLTags Gets the XBRL tag for the account. Account Calc, Tran, Con, Alloc
ABSExpExecutes a calculation expression and stores the result as an absolute value. This function is thesame as the Exp function except that it stores the resulting value as an absolute value. Thisfunction can be used in these types of rules:
l Calculation
l Translation
l Allocation
Syntax
HS.ABSExp "DestPOV = Expression"
Table 35 Syntax for ABSExp Function
Parameter Description
DestPOV A destination point of view that identifies where to put the data
You must specify an Account member, and you can optionally specify ICP and Custom members. Note these usage rules:
l If you do not specify an ICP member, the default is [ICP None].
l To avoid populating the database with unwanted values, rules should be as explicit as possible in terms of defining wheredata should reside. A good practice is to include clearly defined Custom dimension intersections for the Accountdimension. Such clearly defined intersections utilize Financial Management validation checks to avoid writing data toinvalid intersections. See “Dimension Intersection Considerations” on page 266.
Expression A calculation expression
240
Return Value
None.
Example
This example sets the amount in the StateTax account. The example calculates the absoluteamount by multiplying the amount in the Sales account for 2014 by the rate in the StateRateaccount for 2014.
HS.ABSExp "A#StateTax = A#Sales.Y#2014 * A#StateRate.Y#2014"
AccountTypeGets the account type for the current Account member or for a specified account. This functioncan be used in these types of rules:
l Calculation
l Translation
l Consolidation
l Allocation
Syntax
HS.Account.AccountType("Account")
HS.Account.AccountType("")
where, Account is the name of a valid Account member.
You can use a blank string (" ") to apply this function to the current member only if you areusing the function in the Sub Consolidate subroutine. Otherwise, specify an account when usingthis function.
Return Value
The account type for the specified account.
Note: Account types use all capital letters.
Valid account types are:
l ASSET
l LIABILITY
l REVENUE
l EXPENSE
l DYNAMIC
l FLOW
241

l BALANCE
l BALANCERECURRING
l CURRENCYRATE
l GROUPLABEL
Example
In this example, if the account type for the Sales account is REVENUE, then statements betweenthe If...Then and End If statements are executed.
If HS.Account.AccountType("Sales") = "REVENUE" Then...End If
AccountTypeIDGets the account type ID for the current account member or for a specified account. Thisfunction can be used in these types of rules:
l Calculation
l Translation
l Consolidation
l Allocation
l Dynamic Calculation
l Transactions
Syntax
HS.Account.AccountTypeID("Account")
HS.Account.AccountTypeID("")
where Account is the name of a valid Account member
You can use a blank string (" ") to apply this function to the current member only if you areusing the function in the Sub Consolidate subroutine. Otherwise, you must specify an accountwhen using this function.
Return Value
The ID for the specified account. Table 36 lists valid account types with corresponding IDs.
Table 36 Account Type IDs
Account Type ID
REVENUE (INCOME in previous releases) 0
EXPENSE 1
242
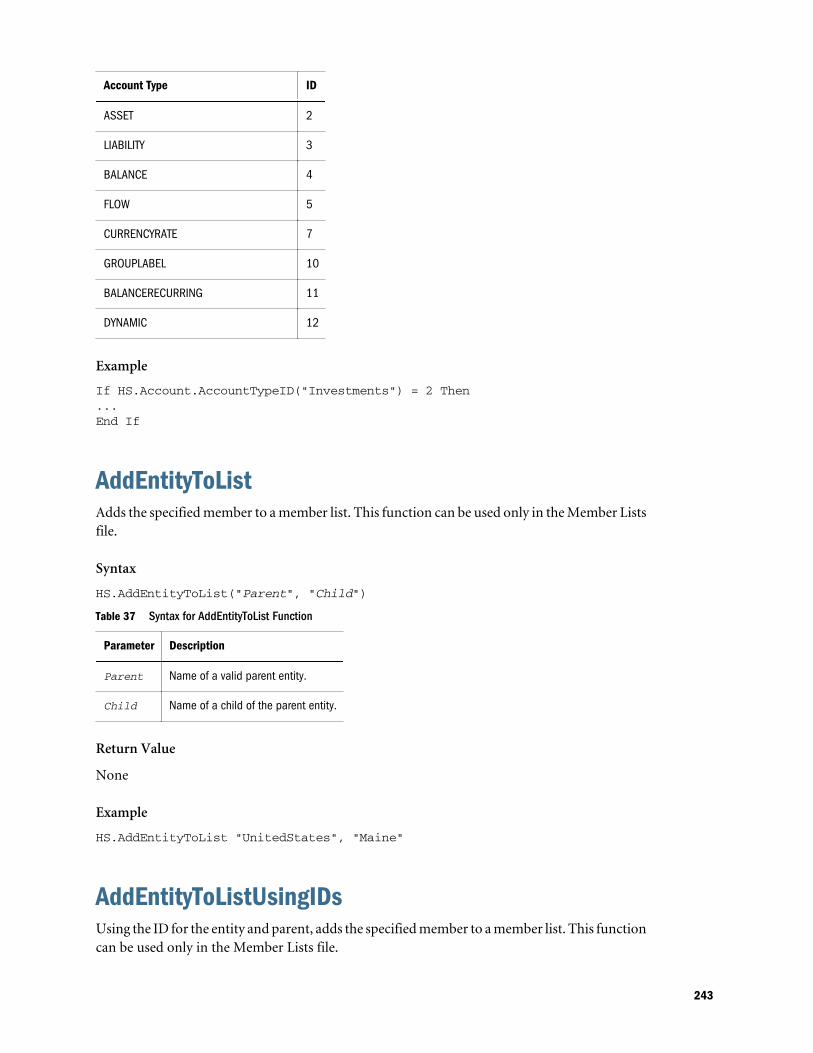
Account Type ID
ASSET 2
LIABILITY 3
BALANCE 4
FLOW 5
CURRENCYRATE 7
GROUPLABEL 10
BALANCERECURRING 11
DYNAMIC 12
Example
If HS.Account.AccountTypeID("Investments") = 2 Then...End If
AddEntityToListAdds the specified member to a member list. This function can be used only in the Member Listsfile.
Syntax
HS.AddEntityToList("Parent", "Child")
Table 37 Syntax for AddEntityToList Function
Parameter Description
Parent Name of a valid parent entity.
Child Name of a child of the parent entity.
Return Value
None
Example
HS.AddEntityToList "UnitedStates", "Maine"
AddEntityToListUsingIDsUsing the ID for the entity and parent, adds the specified member to a member list. This functioncan be used only in the Member Lists file.
243
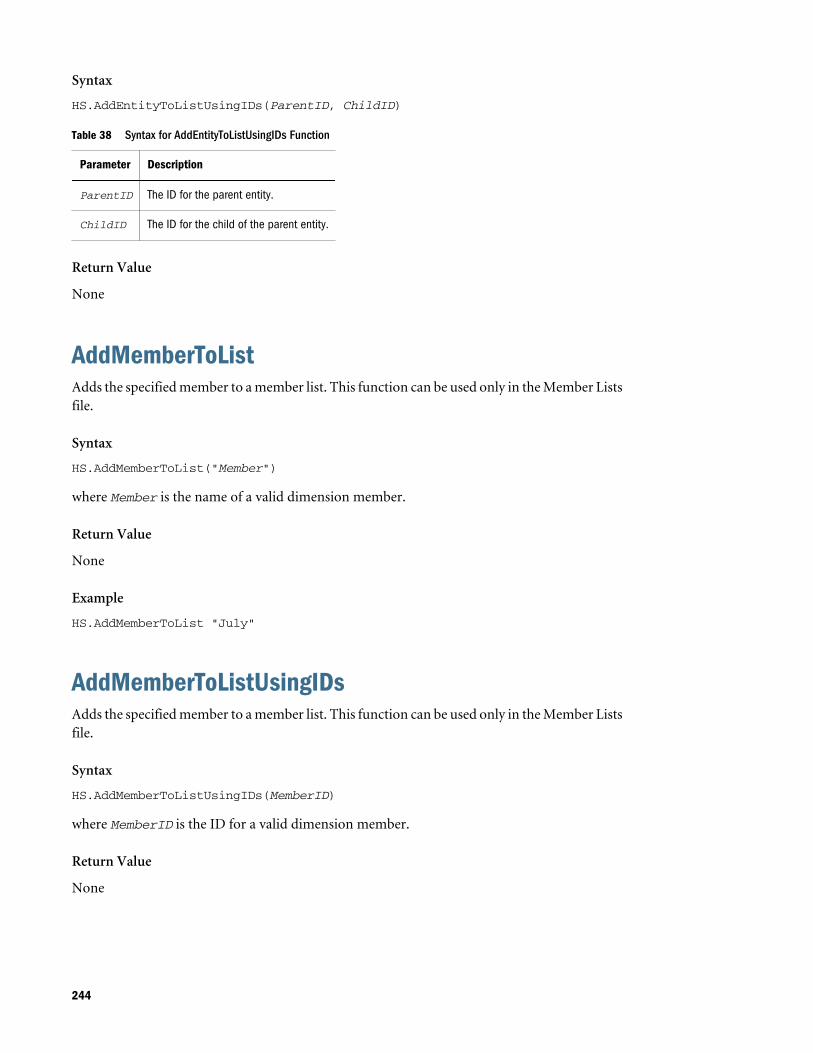
Syntax
HS.AddEntityToListUsingIDs(ParentID, ChildID)
Table 38 Syntax for AddEntityToListUsingIDs Function
Parameter Description
ParentID The ID for the parent entity.
ChildID The ID for the child of the parent entity.
Return Value
None
AddMemberToListAdds the specified member to a member list. This function can be used only in the Member Listsfile.
Syntax
HS.AddMemberToList("Member")
where Member is the name of a valid dimension member.
Return Value
None
Example
HS.AddMemberToList "July"
AddMemberToListUsingIDsAdds the specified member to a member list. This function can be used only in the Member Listsfile.
Syntax
HS.AddMemberToListUsingIDs(MemberID)
where MemberID is the ID for a valid dimension member.
Return Value
None
244
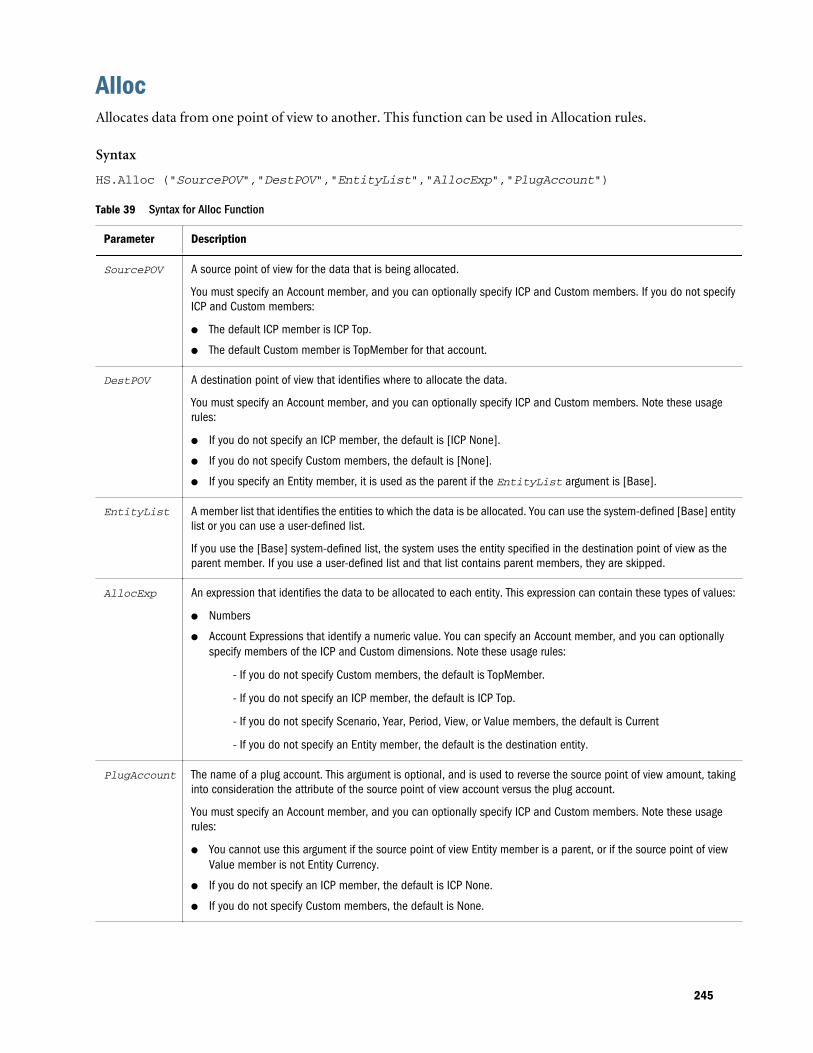
AllocAllocates data from one point of view to another. This function can be used in Allocation rules.
Syntax
HS.Alloc ("SourcePOV","DestPOV","EntityList","AllocExp","PlugAccount")
Table 39 Syntax for Alloc Function
Parameter Description
SourcePOV A source point of view for the data that is being allocated.
You must specify an Account member, and you can optionally specify ICP and Custom members. If you do not specifyICP and Custom members:
l The default ICP member is ICP Top.
l The default Custom member is TopMember for that account.
DestPOV A destination point of view that identifies where to allocate the data.
You must specify an Account member, and you can optionally specify ICP and Custom members. Note these usagerules:
l If you do not specify an ICP member, the default is [ICP None].
l If you do not specify Custom members, the default is [None].
l If you specify an Entity member, it is used as the parent if the EntityList argument is [Base].
EntityList A member list that identifies the entities to which the data is be allocated. You can use the system-defined [Base] entitylist or you can use a user-defined list.
If you use the [Base] system-defined list, the system uses the entity specified in the destination point of view as theparent member. If you use a user-defined list and that list contains parent members, they are skipped.
AllocExp An expression that identifies the data to be allocated to each entity. This expression can contain these types of values:
l Numbers
l Account Expressions that identify a numeric value. You can specify an Account member, and you can optionallyspecify members of the ICP and Custom dimensions. Note these usage rules:
- If you do not specify Custom members, the default is TopMember.
- If you do not specify an ICP member, the default is ICP Top.
- If you do not specify Scenario, Year, Period, View, or Value members, the default is Current
- If you do not specify an Entity member, the default is the destination entity.
PlugAccount The name of a plug account. This argument is optional, and is used to reverse the source point of view amount, takinginto consideration the attribute of the source point of view account versus the plug account.
You must specify an Account member, and you can optionally specify ICP and Custom members. Note these usagerules:
l You cannot use this argument if the source point of view Entity member is a parent, or if the source point of viewValue member is not Entity Currency.
l If you do not specify an ICP member, the default is ICP None.
l If you do not specify Custom members, the default is None.
245
Return Value
None.
Example
In this example, data from the TangibleAssets account is allocated to the Cash account.
Call HS.ALLOC ("A#TangibleAssets","A#Cash","NewEngland","A#TangibleAssets","A#Plug")
AllowAdjFromChildrenSpecifies if journal postings from children are allowed for the specified entity or parent member.This function can be used in these types of rules:
l Calculation
l Translation
l Consolidation
l Allocation
Note: A member is a child if it is one level directly below a member in a tree hierarchy.
Syntax
HS.Entity.AllowAdjFromChildren("Entity")HS.Entity.AllowAdjFromChildren(" ")HS.Parent.AllowAdjFromChildren("Entity")HS.Parent.AllowAdjFromChildren(" ")
where Entity is the name of a valid Entity or Parent member.
Use a blank string (" ") to apply this function to the current entity or parent.
Return Value
A Boolean expression that is True if journal postings from children are permitted for the specifiedentity, False if journal postings from children are not permitted.
Example
In this example, if journal postings from children of France are allowed, then statements betweenthe If…Then and End If statements are executed.
If HS.Entity.AllowAdjFromChildren("France") = TRUE then ...End If
AllowAdjsSpecifies if journal postings are allowed for the specified entity or parent member. This functioncan be used in these types of rules:
246
l Calculation
l Translation
l Consolidation
l Allocation
Syntax
HS.Entity.AllowAdjs("Entity")HS.Entity.AllowAdjs(" ")HS.Parent.AllowAdjs("Entity")HS.Parent.AllowAdjs(" ")
where Entity is the name of a valid Entity or Parent member.
Use a blank string (" ") to apply this function to the current entity or parent.
Return Value
A Boolean expression that is True if journal postings are permitted for the specified entity, Falseif journal postings are not permitted.
Example
In this example, if journal postings for France are allowed, then statements between the If…Then and End If statements are executed.
If HS.Entity.AllowAdjs("France") = TRUE then ...End If
ApplicationNameReturns the name of the application in which rules are running. This function can be used inthese types of rules:
l Calculation
l Translation
l Consolidation
l Allocation
Syntax
HS.ApplicationName
Return Value
Name of the application in which rules are running.
247
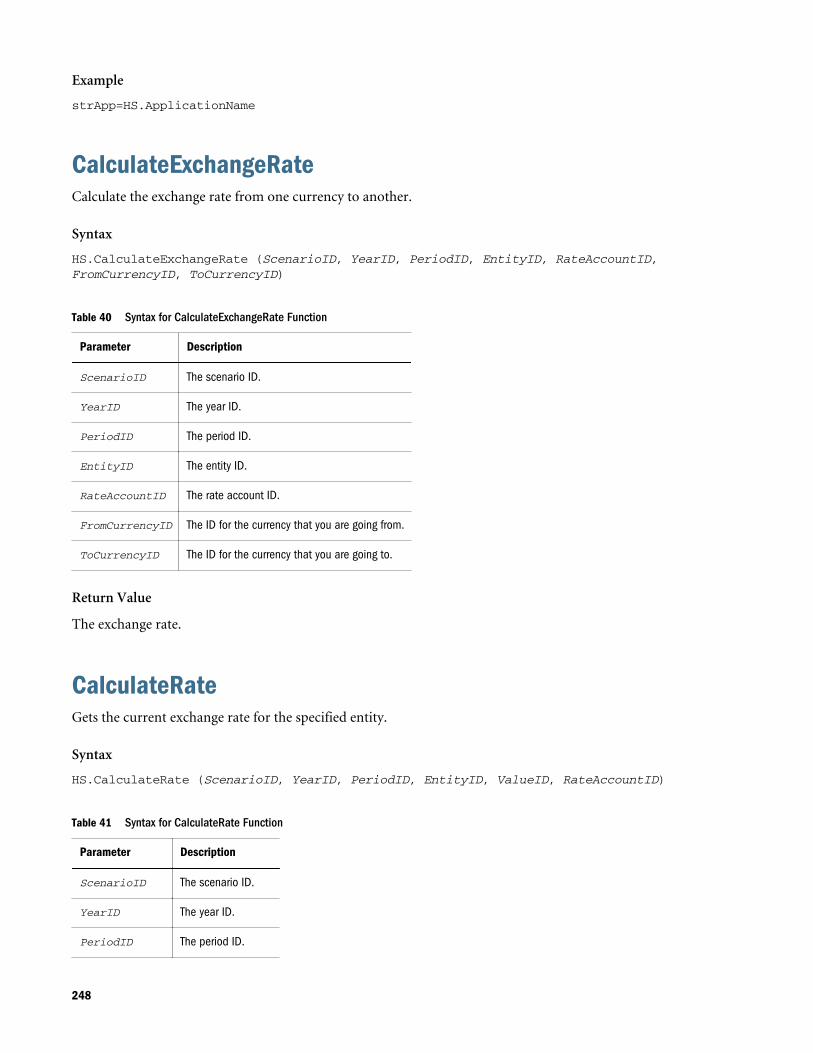
Example
strApp=HS.ApplicationName
CalculateExchangeRateCalculate the exchange rate from one currency to another.
Syntax
HS.CalculateExchangeRate (ScenarioID, YearID, PeriodID, EntityID, RateAccountID, FromCurrencyID, ToCurrencyID)
Table 40 Syntax for CalculateExchangeRate Function
Parameter Description
ScenarioID The scenario ID.
YearID The year ID.
PeriodID The period ID.
EntityID The entity ID.
RateAccountID The rate account ID.
FromCurrencyID The ID for the currency that you are going from.
ToCurrencyID The ID for the currency that you are going to.
Return Value
The exchange rate.
CalculateRateGets the current exchange rate for the specified entity.
Syntax
HS.CalculateRate (ScenarioID, YearID, PeriodID, EntityID, ValueID, RateAccountID)
Table 41 Syntax for CalculateRate Function
Parameter Description
ScenarioID The scenario ID.
YearID The year ID.
PeriodID The period ID.
248
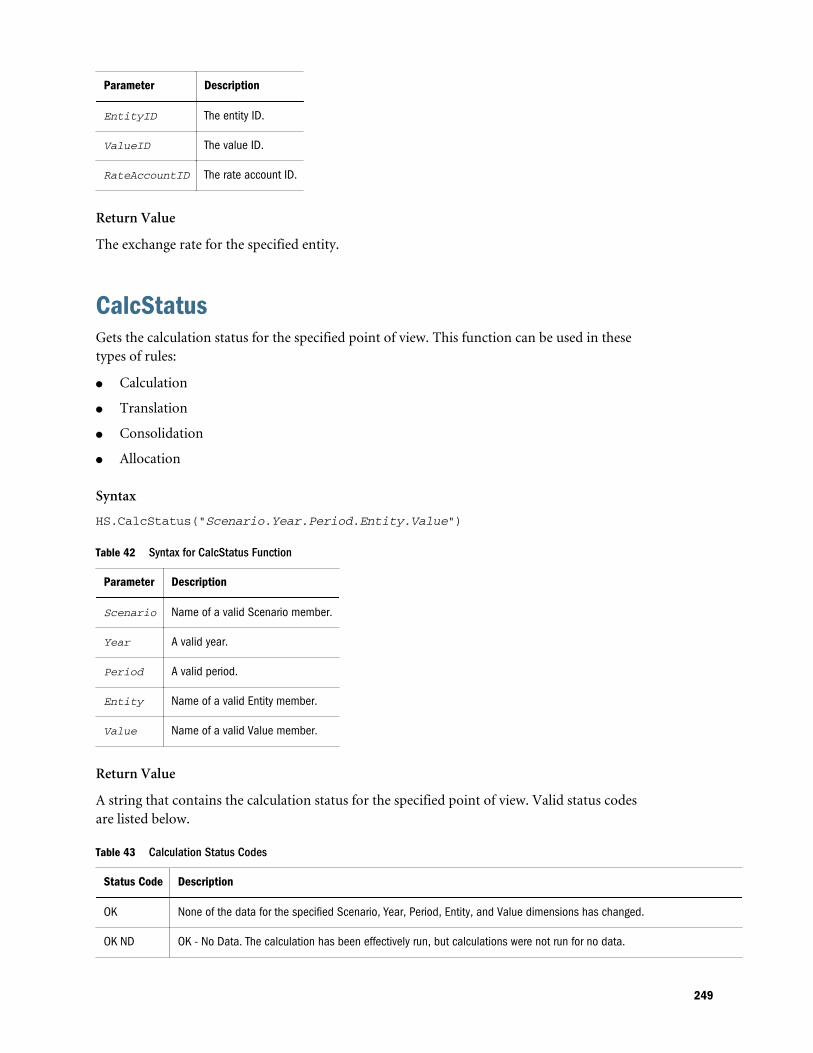
Parameter Description
EntityID The entity ID.
ValueID The value ID.
RateAccountID The rate account ID.
Return Value
The exchange rate for the specified entity.
CalcStatusGets the calculation status for the specified point of view. This function can be used in thesetypes of rules:
l Calculation
l Translation
l Consolidation
l Allocation
Syntax
HS.CalcStatus("Scenario.Year.Period.Entity.Value")
Table 42 Syntax for CalcStatus Function
Parameter Description
Scenario Name of a valid Scenario member.
Year A valid year.
Period A valid period.
Entity Name of a valid Entity member.
Value Name of a valid Value member.
Return Value
A string that contains the calculation status for the specified point of view. Valid status codesare listed below.
Table 43 Calculation Status Codes
Status Code Description
OK None of the data for the specified Scenario, Year, Period, Entity, and Value dimensions has changed.
OK ND OK - No Data. The calculation has been effectively run, but calculations were not run for no data.
249
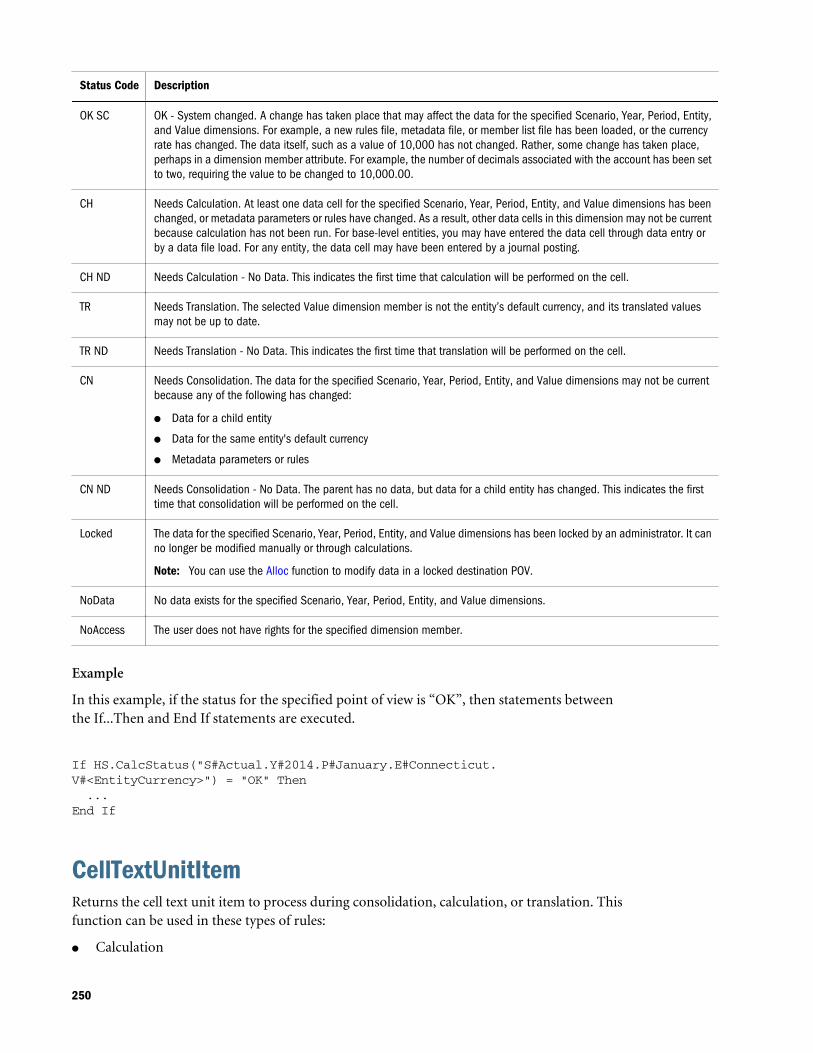
Status Code Description
OK SC OK - System changed. A change has taken place that may affect the data for the specified Scenario, Year, Period, Entity,and Value dimensions. For example, a new rules file, metadata file, or member list file has been loaded, or the currencyrate has changed. The data itself, such as a value of 10,000 has not changed. Rather, some change has taken place,perhaps in a dimension member attribute. For example, the number of decimals associated with the account has been setto two, requiring the value to be changed to 10,000.00.
CH Needs Calculation. At least one data cell for the specified Scenario, Year, Period, Entity, and Value dimensions has beenchanged, or metadata parameters or rules have changed. As a result, other data cells in this dimension may not be currentbecause calculation has not been run. For base-level entities, you may have entered the data cell through data entry orby a data file load. For any entity, the data cell may have been entered by a journal posting.
CH ND Needs Calculation - No Data. This indicates the first time that calculation will be performed on the cell.
TR Needs Translation. The selected Value dimension member is not the entity’s default currency, and its translated valuesmay not be up to date.
TR ND Needs Translation - No Data. This indicates the first time that translation will be performed on the cell.
CN Needs Consolidation. The data for the specified Scenario, Year, Period, Entity, and Value dimensions may not be currentbecause any of the following has changed:
l Data for a child entity
l Data for the same entity's default currency
l Metadata parameters or rules
CN ND Needs Consolidation - No Data. The parent has no data, but data for a child entity has changed. This indicates the firsttime that consolidation will be performed on the cell.
Locked The data for the specified Scenario, Year, Period, Entity, and Value dimensions has been locked by an administrator. It canno longer be modified manually or through calculations.
Note: You can use the Alloc function to modify data in a locked destination POV.
NoData No data exists for the specified Scenario, Year, Period, Entity, and Value dimensions.
NoAccess The user does not have rights for the specified dimension member.
Example
In this example, if the status for the specified point of view is “OK”, then statements betweenthe If...Then and End If statements are executed.
If HS.CalcStatus("S#Actual.Y#2014.P#January.E#Connecticut.V#<EntityCurrency>") = "OK" Then ...End If
CellTextUnitItemReturns the cell text unit item to process during consolidation, calculation, or translation. Thisfunction can be used in these types of rules:
l Calculation
250
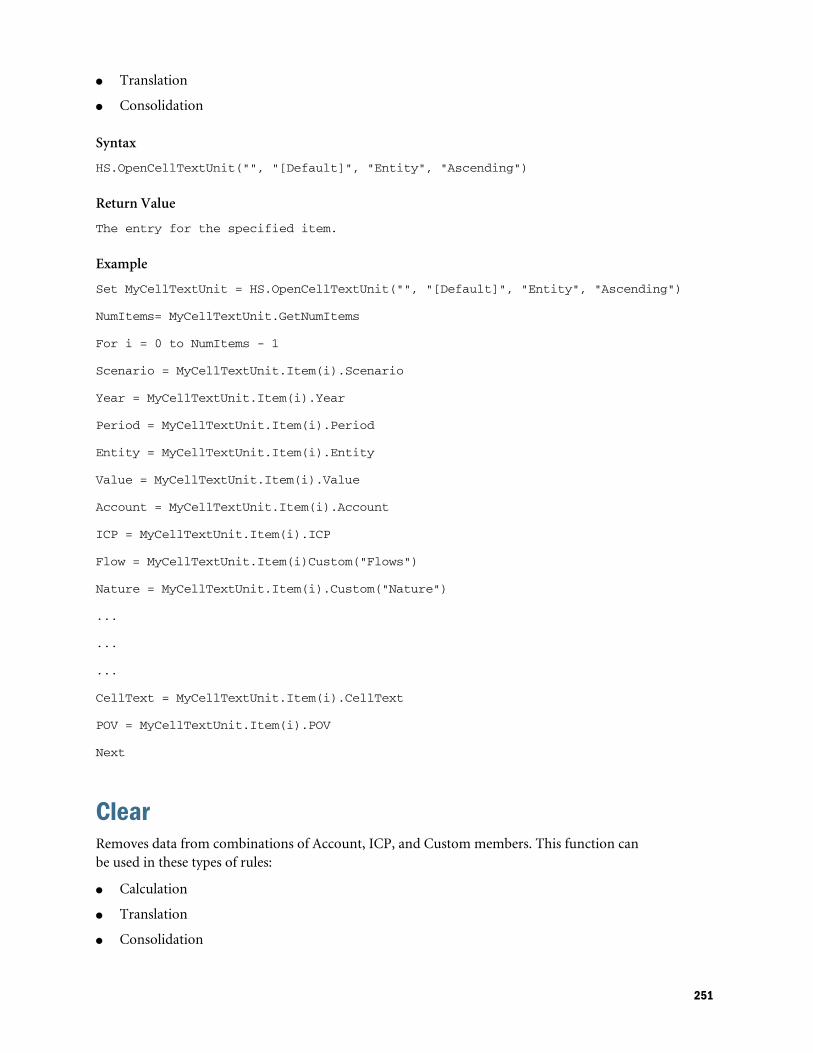
l Translation
l Consolidation
Syntax
HS.OpenCellTextUnit("", "[Default]", "Entity", "Ascending")
Return Value
The entry for the specified item.
Example
Set MyCellTextUnit = HS.OpenCellTextUnit("", "[Default]", "Entity", "Ascending")
NumItems= MyCellTextUnit.GetNumItems
For i = 0 to NumItems - 1
Scenario = MyCellTextUnit.Item(i).Scenario
Year = MyCellTextUnit.Item(i).Year
Period = MyCellTextUnit.Item(i).Period
Entity = MyCellTextUnit.Item(i).Entity
Value = MyCellTextUnit.Item(i).Value
Account = MyCellTextUnit.Item(i).Account
ICP = MyCellTextUnit.Item(i).ICP
Flow = MyCellTextUnit.Item(i)Custom("Flows")
Nature = MyCellTextUnit.Item(i).Custom("Nature")
...
...
...
CellText = MyCellTextUnit.Item(i).CellText
POV = MyCellTextUnit.Item(i).POV
Next
ClearRemoves data from combinations of Account, ICP, and Custom members. This function canbe used in these types of rules:
l Calculation
l Translation
l Consolidation
251
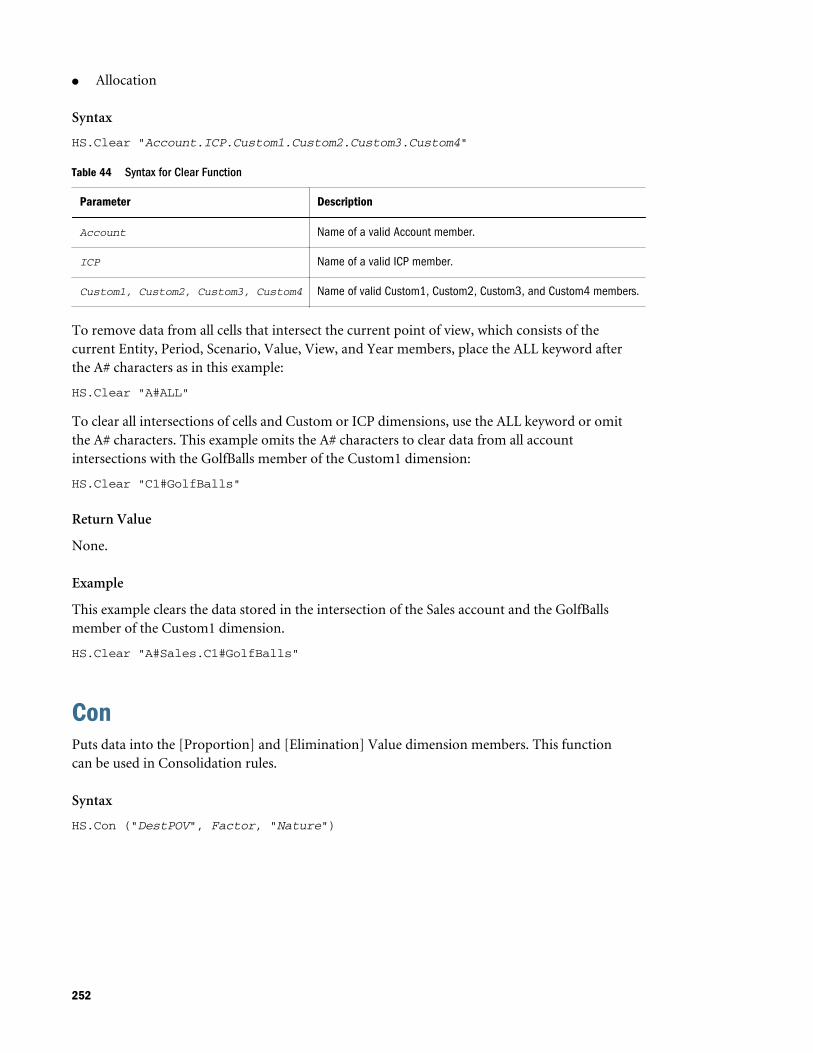
l Allocation
Syntax
HS.Clear "Account.ICP.Custom1.Custom2.Custom3.Custom4"
Table 44 Syntax for Clear Function
Parameter Description
Account Name of a valid Account member.
ICP Name of a valid ICP member.
Custom1, Custom2, Custom3, Custom4 Name of valid Custom1, Custom2, Custom3, and Custom4 members.
To remove data from all cells that intersect the current point of view, which consists of thecurrent Entity, Period, Scenario, Value, View, and Year members, place the ALL keyword afterthe A# characters as in this example:
HS.Clear "A#ALL"
To clear all intersections of cells and Custom or ICP dimensions, use the ALL keyword or omitthe A# characters. This example omits the A# characters to clear data from all accountintersections with the GolfBalls member of the Custom1 dimension:
HS.Clear "C1#GolfBalls"
Return Value
None.
Example
This example clears the data stored in the intersection of the Sales account and the GolfBallsmember of the Custom1 dimension.
HS.Clear "A#Sales.C1#GolfBalls"
ConPuts data into the [Proportion] and [Elimination] Value dimension members. This functioncan be used in Consolidation rules.
Syntax
HS.Con ("DestPOV", Factor, "Nature")
252
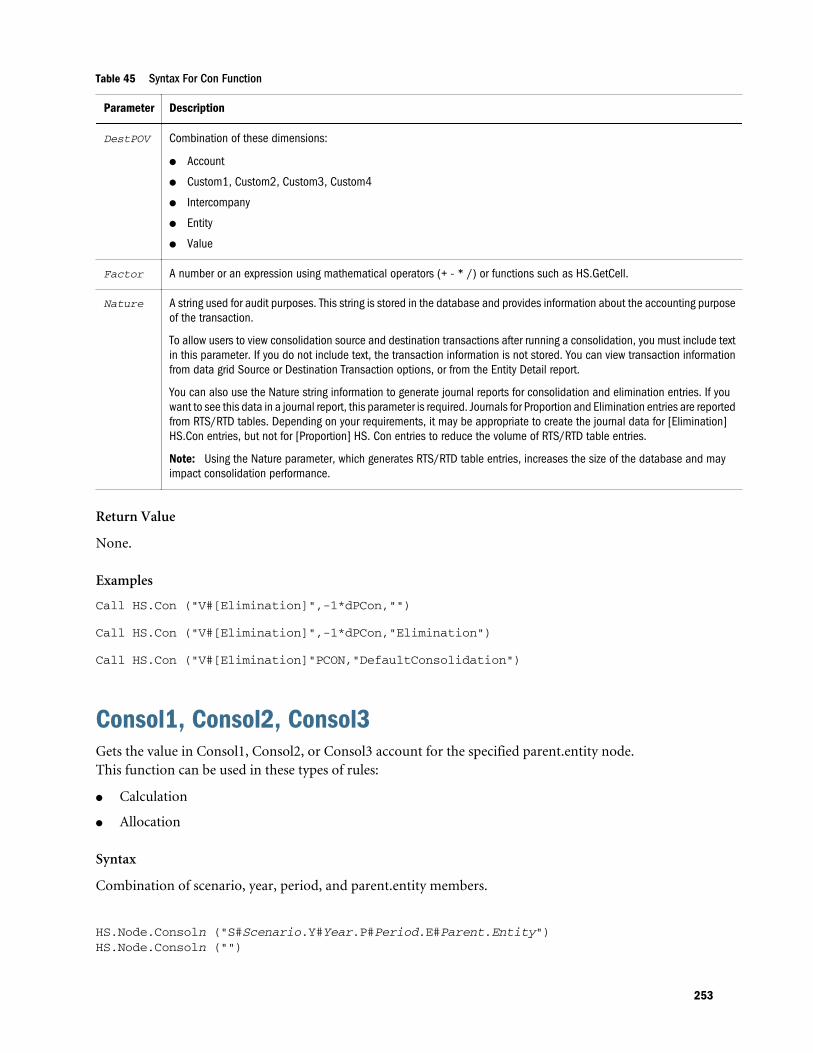
Table 45 Syntax For Con Function
Parameter Description
DestPOV Combination of these dimensions:
l Account
l Custom1, Custom2, Custom3, Custom4
l Intercompany
l Entity
l Value
Factor A number or an expression using mathematical operators (+ - * /) or functions such as HS.GetCell.
Nature A string used for audit purposes. This string is stored in the database and provides information about the accounting purposeof the transaction.
To allow users to view consolidation source and destination transactions after running a consolidation, you must include textin this parameter. If you do not include text, the transaction information is not stored. You can view transaction informationfrom data grid Source or Destination Transaction options, or from the Entity Detail report.
You can also use the Nature string information to generate journal reports for consolidation and elimination entries. If youwant to see this data in a journal report, this parameter is required. Journals for Proportion and Elimination entries are reportedfrom RTS/RTD tables. Depending on your requirements, it may be appropriate to create the journal data for [Elimination]HS.Con entries, but not for [Proportion] HS. Con entries to reduce the volume of RTS/RTD table entries.
Note: Using the Nature parameter, which generates RTS/RTD table entries, increases the size of the database and mayimpact consolidation performance.
Return Value
None.
Examples
Call HS.Con ("V#[Elimination]",-1*dPCon,"")
Call HS.Con ("V#[Elimination]",-1*dPCon,"Elimination")
Call HS.Con ("V#[Elimination]"PCON,"DefaultConsolidation")
Consol1, Consol2, Consol3Gets the value in Consol1, Consol2, or Consol3 account for the specified parent.entity node.This function can be used in these types of rules:
l Calculation
l Allocation
Syntax
Combination of scenario, year, period, and parent.entity members.
HS.Node.Consoln ("S#Scenario.Y#Year.P#Period.E#Parent.Entity")HS.Node.Consoln ("")
253
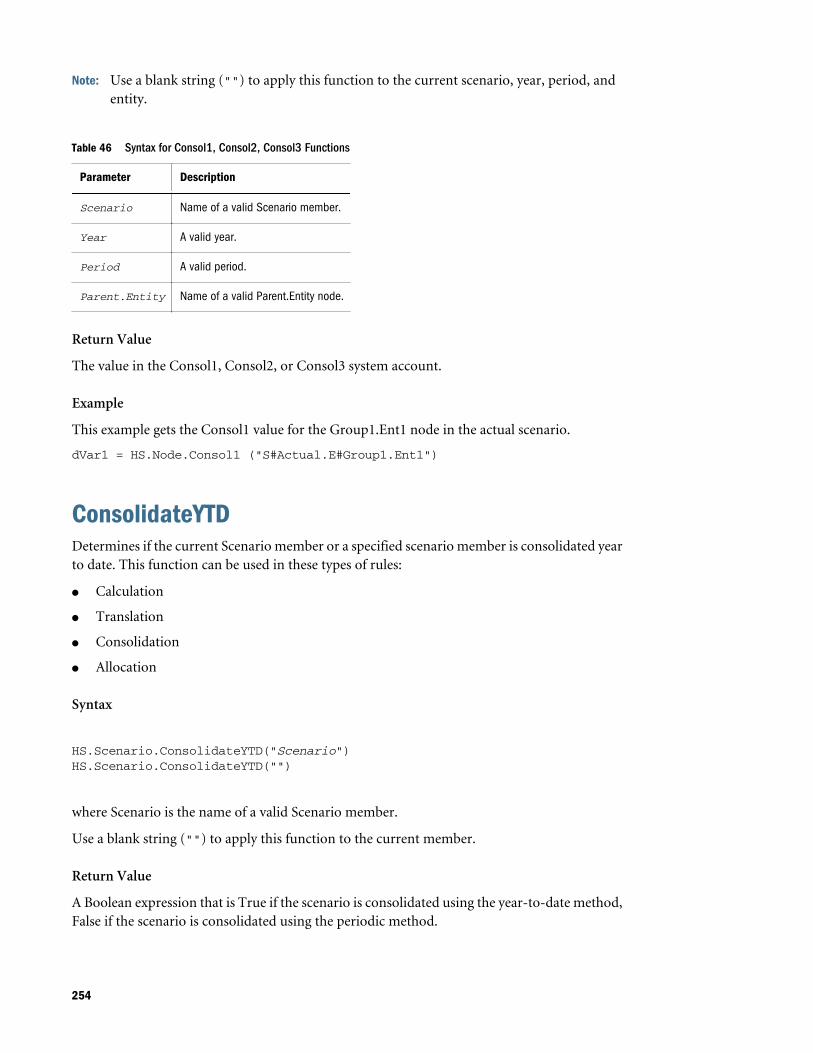
Note: Use a blank string ("") to apply this function to the current scenario, year, period, andentity.
Table 46 Syntax for Consol1, Consol2, Consol3 Functions
Parameter Description
Scenario Name of a valid Scenario member.
Year A valid year.
Period A valid period.
Parent.Entity Name of a valid Parent.Entity node.
Return Value
The value in the Consol1, Consol2, or Consol3 system account.
Example
This example gets the Consol1 value for the Group1.Ent1 node in the actual scenario.
dVar1 = HS.Node.Consol1 ("S#Actual.E#Group1.Ent1")
ConsolidateYTDDetermines if the current Scenario member or a specified scenario member is consolidated yearto date. This function can be used in these types of rules:
l Calculation
l Translation
l Consolidation
l Allocation
Syntax
HS.Scenario.ConsolidateYTD("Scenario")HS.Scenario.ConsolidateYTD("")
where Scenario is the name of a valid Scenario member.
Use a blank string ("") to apply this function to the current member.
Return Value
A Boolean expression that is True if the scenario is consolidated using the year-to-date method,False if the scenario is consolidated using the periodic method.
254
Example
In this example, if the Actual scenario is set up to be consolidated using the year-to-date method,then statements between the If...Then and End If statements are executed.
If HS.Scenario.ConsolidateYTD("Actual") = TRUE Then ...End If
ContainsCellTextDetermines if the specified cell contains cell text. This function can be used in these types ofrules:
l Calculation
l Translation
l Consolidation
l Allocation
Syntax
HS.ContainsCellText("POVExpression")
where POVExpression is a combination of members. If you do not specify a dimension, thesedefault values are used.
l Account - [none]
l ICP - [ICP None]
l Custom1...4 - [None]
l Scenario - Current Scenario member
l Entity - Current Entity member
l Value - Current Value member
l Year and Period - Current member
Note: The default entries apply when you use this function in Calculation rules. When used inAllocation, Translation, or Consolidation rules, you must specify the full sub-cubeAccount/ICP/Customs POV. The Scenario, Year, Period, View, Entity, and Valuedimensions default to the current members.
Return Value
A Boolean expression that is True if the specified data cell contains cell text for any cell text label;False otherwise.
255
Example
In this example, if the specified cell does not contain cell text for any cell text label, thenstatements between the If...Then and End If lines are executed.
If HS.ContainsCellText("A#Sales.C1#Prod1.C2#Region1") = "False" then ...End If
Note: If you are using cell text labels, this function returns a “True” value if any of the existingcell text labels (including “[Default]”) contain a cell text entry.
ContainsCellTextWithLabelDetermines if the cell contains cell text for the specified label and updates the cell textinformation. This function can be used in these types of rules:
l Calculation
l Translation
l Consolidation
l Allocation
Syntax
HS.ContainsCellTextWithLabel("POVExpression", “CellTextLabel”)
where POVExpression is a combination of members. If you do not specify a dimension, thesedefault values are used:
l Account - [none
l ICP - [ICP None]
l Custom1...4 - [None]
l Scenario - Current Scenario member
l Entity - Current Entity member
l Value - Current Value member
l Year and Period - Current member
CellTextLabel is either the default cell text label (“[Default]”) or one of the valid loaded cell textlabels.
Note: The default entries apply when you use this function in Calculation rules. When used inAllocation, Translation, or Consolidation rules, you must specify the full sub-cubeAccount/ICP/Customs POV. The Scenario, Year, Period, View, Entity, and Valuedimensions default to the current members.
Return Value
256
A Boolean expression that is True if the specified data cell contains cell text for the cell text labelspecified; False otherwise.
Example
In this example, if the specified cell does not contain cell text for the cell text label specified, thenstatements between the If...Then and End If lines are executed.
If HS.ContainsCellTextWithLabel ("A#Sales.C1#Prod1.C2#Region1", “Rating”) = "False" then ... End If
CurrencyGets the currency for the application or for the current Value dimension member. This functioncan be used in these types of rules:
l Calculation
l Translation
l Consolidation
l Allocation
Syntax
HS.AppSettings.CurrencyHS.Value.Currency
Return Value
A string that contains the currency name for the application or for the Value member.
Example
In this example, if Euro is the currency of the application then statements between the If...Thenand End If statements are executed.
If HS.AppSettings.Currency = "Euro" Then ...End If
CustomTopReturns the CustomTopMember for the current or specified Account member. This functioncan be used in these types of rules:
l Calculation
l Translation
l Consolidation
l Allocation
257
Syntax
HS.Account.CustomTop("Member","CustomDimName")HS.Account.CustomTop("","CustomDimName")
where CustomDimName is a Custom dimension, and Member is an Account dimension member.The member not being specified is only appropriate in the Sub Consolidate subroutine.
Note: Use a blank string (" ") to apply this function to the current member.
Return Value
The CustomTopMember for the specified Account member.
Example
HS.Account.CustomTop("Prod","Sales")
DataUnitItemReturns the data unit item to process during consolidation, calculation, or translation. Thisfunction can be used in these types of rules:
l Calculation
l Translation
l Consolidation
Syntax
HS.OpenDataUnit("")
Return Value
The member label for the specified item.
Example
Set MyDataUnit = HS.OpenDataUnit("")
NumItems= MyDataUnit.GetNumItems
For i = 0 to NumItems - 1
Account = MyDataUnit.Item(i)Account.
ICP = MyDataUnit.Item(i).ICP
Flow = MyDataUnit.Item(i)Custom("Flows")
Nature = MyDataUnit.Item(i).Custom("Nature")
...
...
258

...
Data = MyDataUnit.Item(i).Data
POV = MyDataUnit.Item(i).POV
Next
DecimalGets the number of decimal places for the specified account. This function can be used in thesetypes of rules:
l Calculation
l Translation
l Consolidation
l Allocation
Syntax
HS.Account.Decimal("AccountName")HS.Account.Decimal("")
Note: Use a blank string ("") to apply this function to the current account when using the SubConsolidate subroutine.
HS.Account.Decimal(Var1)
Table 47 Syntax for Decimal Function
Parameter Description
AccountName Name of a valid Account member
Var1 VBScript variable representing an Account member
Return Value
An integer representing the decimal value assigned to the account. Valid values are 0 to 9.
Example
In this example, if the number of decimal places assigned to the Sales account is 2, then statementsbetween the If...Then and End If statements are executed.
If HS.Account.Decimal("Sales") = 2 Then ...End If
259
DefaultFreqGets the default frequency for the current Scenario member or for a specified scenario member.This function can be used in these types of rules:
l Calculation
l Translation
l Consolidation
l Allocation
Syntax
HS.Scenario.DefaultFreq("Scenario")HS.Scenario.DefaultFreq("")
Note: Use a blank string ("") to apply this function to the current member.
where Scenario is the name of a valid Scenario member.
Return Value
A string that contains the default frequency for the scenario.
Example
In this example, if the default frequency for the Actual scenario is YTD, then statements betweenthe If...Then and End If statements are executed.
If HS.Scenario.DefaultFreq("Actual") = "YTD" Then ...End If
DefaultParentGets the default parent for the current member or a specified member. This function can beused in these types of rules:
l Calculation
l Translation
l Consolidation
l Allocation
Syntax
HS.<Object>.DefaultParent("Member")
HS.<Object>.DefaultParent("")
HS.Custom("Label").DefaultParent("Member")
260
HS.Custom("Label").DefaultParent("")
where Member is a valid dimension member.
Note: Use a blank string (" ") to apply this function to the current member.
Table 48 Syntax for DefaultParent Function
Parameter Description
<Object> One of these object keywords:
l Account
l Custom1...4
l Custom(Custom Dimension Label)
l Entity
l Scenario
Member Depending on the object selected, the name of a valid member of one of these dimensions:.
l Account
l Custom1...4
l Custom
l Entity
l Scenario
Return Value
A string that contains the default parent for the member.
DefaultTranslateCalculates translation by bypassing rules. This function overrides the Application settings andcan be used in SubTranslate rules only.
Syntax
HS.DefaultTranslate(dRateForBalanceAccounts, dRateForFlowAccounts, bUsePVAForFlowAccounts, bUsePVAForBalanceAccounts)
Table 49 Syntax for DefaultTranslate Function
Parameter Description
dRateForBalanceAccounts Number for rate
dRateForFlowAccounts Number for rate
bUserPVAForFlowAccounts True or False
bUsePVAForBalanceAccounts True or False
261
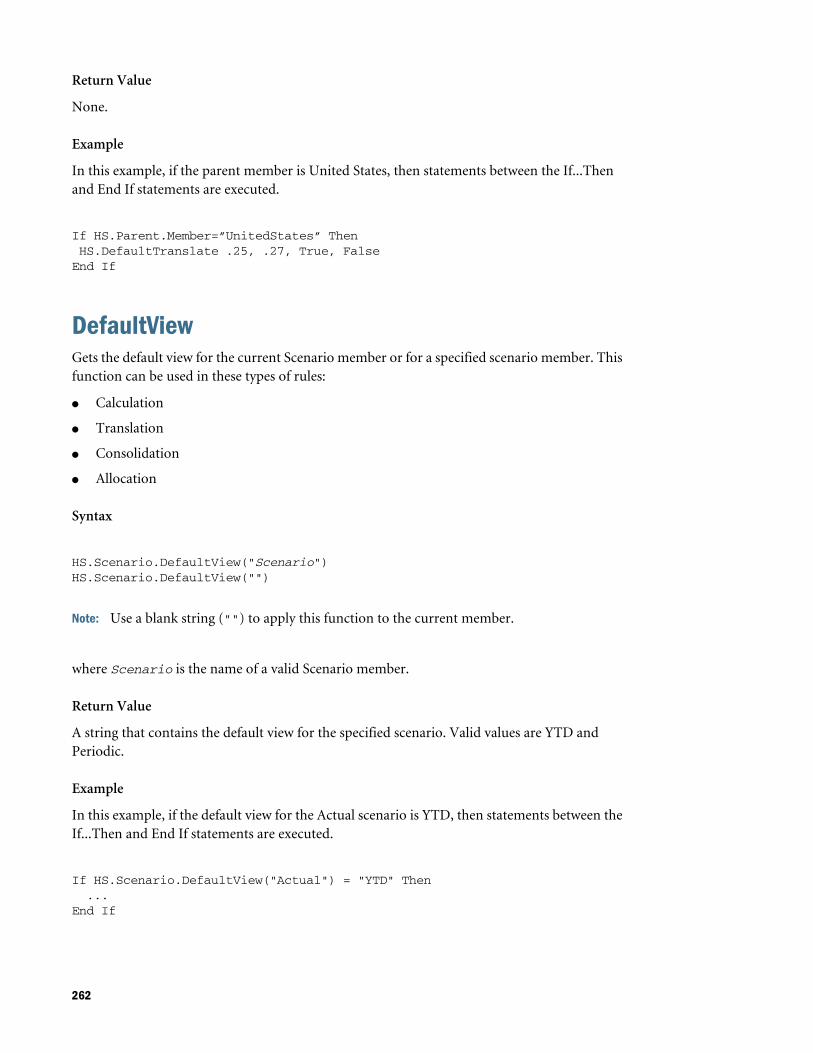
Return Value
None.
Example
In this example, if the parent member is United States, then statements between the If...Thenand End If statements are executed.
If HS.Parent.Member=”UnitedStates” Then HS.DefaultTranslate .25, .27, True, FalseEnd If
DefaultViewGets the default view for the current Scenario member or for a specified scenario member. Thisfunction can be used in these types of rules:
l Calculation
l Translation
l Consolidation
l Allocation
Syntax
HS.Scenario.DefaultView("Scenario")HS.Scenario.DefaultView("")
Note: Use a blank string ("") to apply this function to the current member.
where Scenario is the name of a valid Scenario member.
Return Value
A string that contains the default view for the specified scenario. Valid values are YTD andPeriodic.
Example
In this example, if the default view for the Actual scenario is YTD, then statements between theIf...Then and End If statements are executed.
If HS.Scenario.DefaultView("Actual") = "YTD" Then ...End If
262
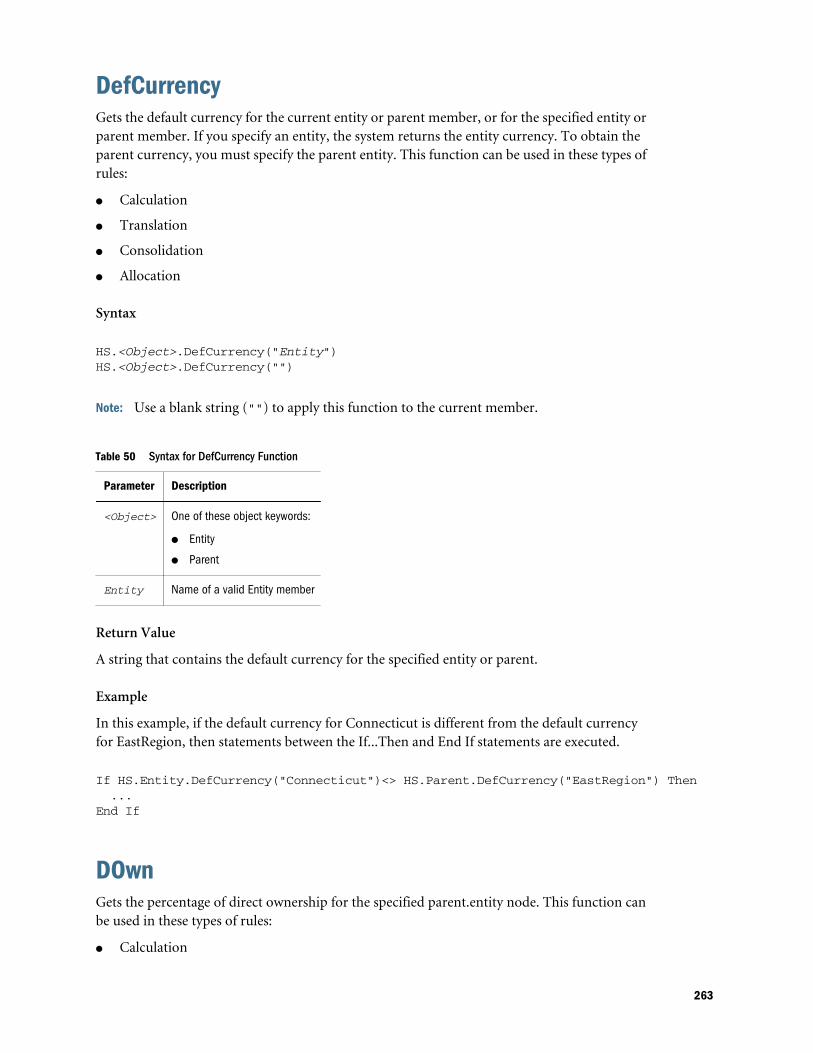
DefCurrencyGets the default currency for the current entity or parent member, or for the specified entity orparent member. If you specify an entity, the system returns the entity currency. To obtain theparent currency, you must specify the parent entity. This function can be used in these types ofrules:
l Calculation
l Translation
l Consolidation
l Allocation
Syntax
HS.<Object>.DefCurrency("Entity")HS.<Object>.DefCurrency("")
Note: Use a blank string ("") to apply this function to the current member.
Table 50 Syntax for DefCurrency Function
Parameter Description
<Object> One of these object keywords:
l Entity
l Parent
Entity Name of a valid Entity member
Return Value
A string that contains the default currency for the specified entity or parent.
Example
In this example, if the default currency for Connecticut is different from the default currencyfor EastRegion, then statements between the If...Then and End If statements are executed.
If HS.Entity.DefCurrency("Connecticut")<> HS.Parent.DefCurrency("EastRegion") Then ...End If
DOwnGets the percentage of direct ownership for the specified parent.entity node. This function canbe used in these types of rules:
l Calculation
263
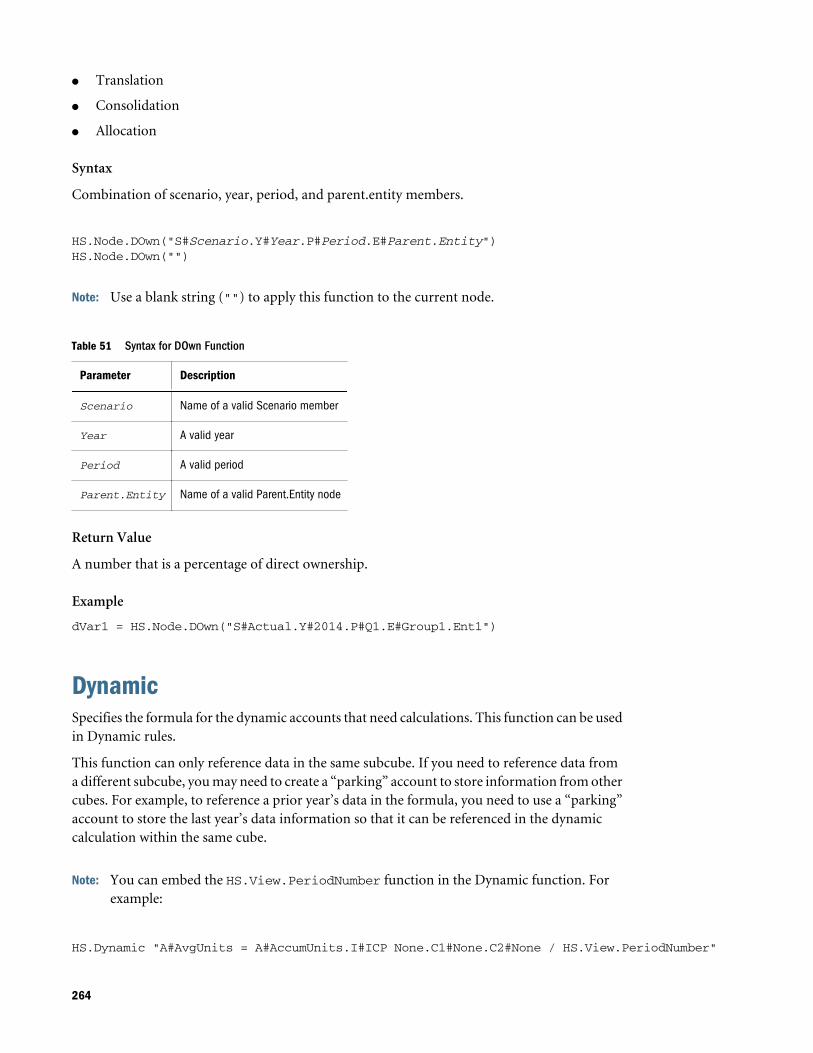
l Translation
l Consolidation
l Allocation
Syntax
Combination of scenario, year, period, and parent.entity members.
HS.Node.DOwn("S#Scenario.Y#Year.P#Period.E#Parent.Entity")HS.Node.DOwn("")
Note: Use a blank string ("") to apply this function to the current node.
Table 51 Syntax for DOwn Function
Parameter Description
Scenario Name of a valid Scenario member
Year A valid year
Period A valid period
Parent.Entity Name of a valid Parent.Entity node
Return Value
A number that is a percentage of direct ownership.
Example
dVar1 = HS.Node.DOwn("S#Actual.Y#2014.P#Q1.E#Group1.Ent1")
DynamicSpecifies the formula for the dynamic accounts that need calculations. This function can be usedin Dynamic rules.
This function can only reference data in the same subcube. If you need to reference data froma different subcube, you may need to create a “parking” account to store information from othercubes. For example, to reference a prior year’s data in the formula, you need to use a “parking”account to store the last year’s data information so that it can be referenced in the dynamiccalculation within the same cube.
Note: You can embed the HS.View.PeriodNumber function in the Dynamic function. Forexample:
HS.Dynamic "A#AvgUnits = A#AccumUnits.I#ICP None.C1#None.C2#None / HS.View.PeriodNumber"
264
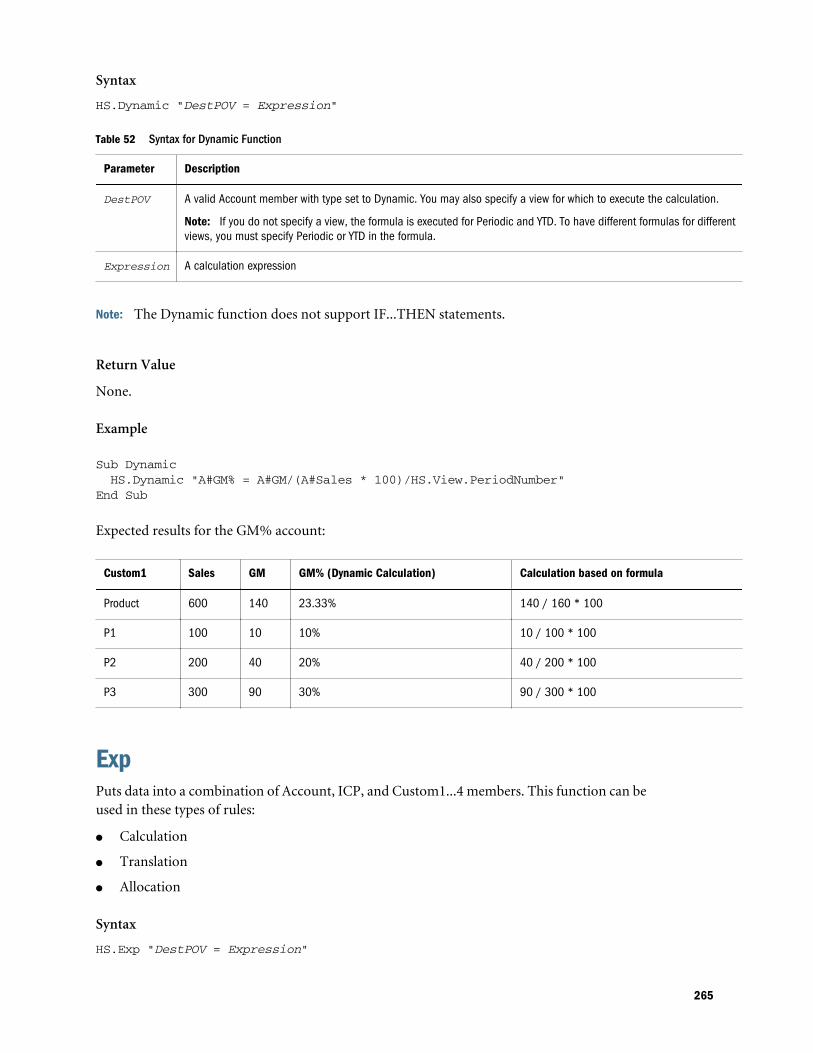
Syntax
HS.Dynamic "DestPOV = Expression"
Table 52 Syntax for Dynamic Function
Parameter Description
DestPOV A valid Account member with type set to Dynamic. You may also specify a view for which to execute the calculation.
Note: If you do not specify a view, the formula is executed for Periodic and YTD. To have different formulas for differentviews, you must specify Periodic or YTD in the formula.
Expression A calculation expression
Note: The Dynamic function does not support IF...THEN statements.
Return Value
None.
Example
Sub Dynamic HS.Dynamic "A#GM% = A#GM/(A#Sales * 100)/HS.View.PeriodNumber"End Sub
Expected results for the GM% account:
Custom1 Sales GM GM% (Dynamic Calculation) Calculation based on formula
Product 600 140 23.33% 140 / 160 * 100
P1 100 10 10% 10 / 100 * 100
P2 200 40 20% 40 / 200 * 100
P3 300 90 30% 90 / 300 * 100
ExpPuts data into a combination of Account, ICP, and Custom1...4 members. This function can beused in these types of rules:
l Calculation
l Translation
l Allocation
Syntax
HS.Exp "DestPOV = Expression"
265
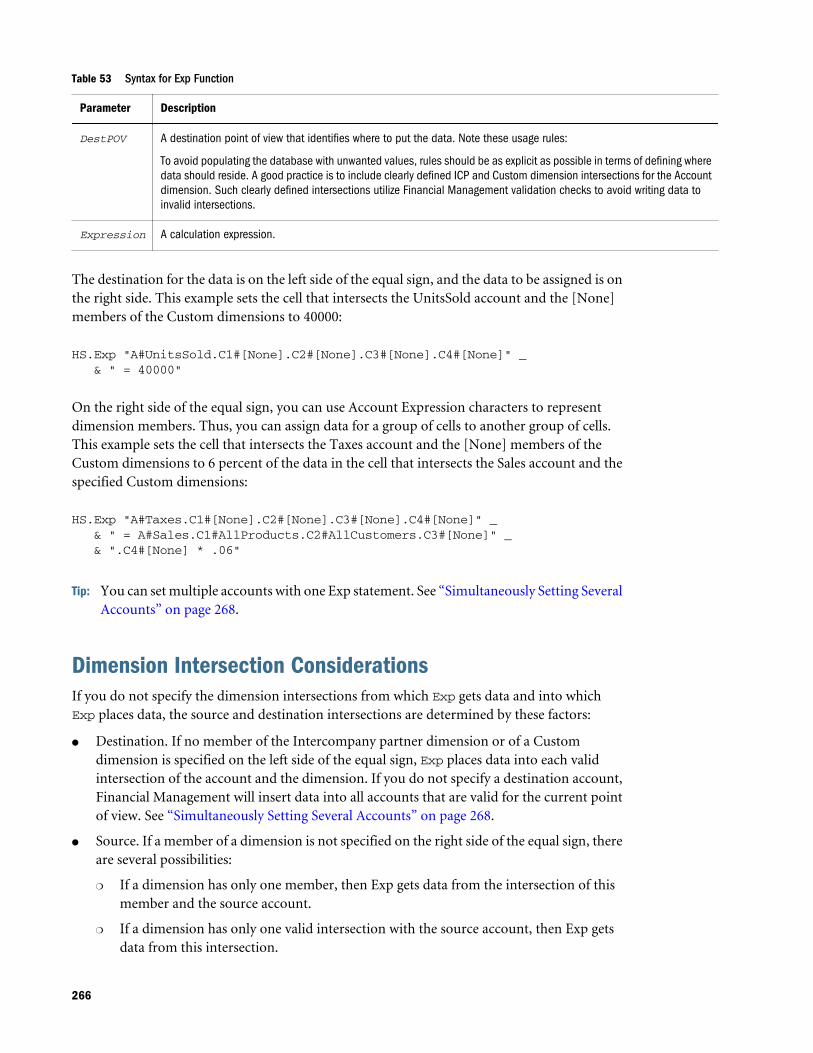
Table 53 Syntax for Exp Function
Parameter Description
DestPOV A destination point of view that identifies where to put the data. Note these usage rules:
To avoid populating the database with unwanted values, rules should be as explicit as possible in terms of defining wheredata should reside. A good practice is to include clearly defined ICP and Custom dimension intersections for the Accountdimension. Such clearly defined intersections utilize Financial Management validation checks to avoid writing data toinvalid intersections.
Expression A calculation expression.
The destination for the data is on the left side of the equal sign, and the data to be assigned is onthe right side. This example sets the cell that intersects the UnitsSold account and the [None]members of the Custom dimensions to 40000:
HS.Exp "A#UnitsSold.C1#[None].C2#[None].C3#[None].C4#[None]" _ & " = 40000"
On the right side of the equal sign, you can use Account Expression characters to representdimension members. Thus, you can assign data for a group of cells to another group of cells.This example sets the cell that intersects the Taxes account and the [None] members of theCustom dimensions to 6 percent of the data in the cell that intersects the Sales account and thespecified Custom dimensions:
HS.Exp "A#Taxes.C1#[None].C2#[None].C3#[None].C4#[None]" _ & " = A#Sales.C1#AllProducts.C2#AllCustomers.C3#[None]" _ & ".C4#[None] * .06"
Tip: You can set multiple accounts with one Exp statement. See “Simultaneously Setting SeveralAccounts” on page 268.
Dimension Intersection ConsiderationsIf you do not specify the dimension intersections from which Exp gets data and into whichExp places data, the source and destination intersections are determined by these factors:
l Destination. If no member of the Intercompany partner dimension or of a Customdimension is specified on the left side of the equal sign, Exp places data into each validintersection of the account and the dimension. If you do not specify a destination account,Financial Management will insert data into all accounts that are valid for the current pointof view. See “Simultaneously Setting Several Accounts” on page 268.
l Source. If a member of a dimension is not specified on the right side of the equal sign, thereare several possibilities:
m If a dimension has only one member, then Exp gets data from the intersection of thismember and the source account.
m If a dimension has only one valid intersection with the source account, then Exp getsdata from this intersection.
266
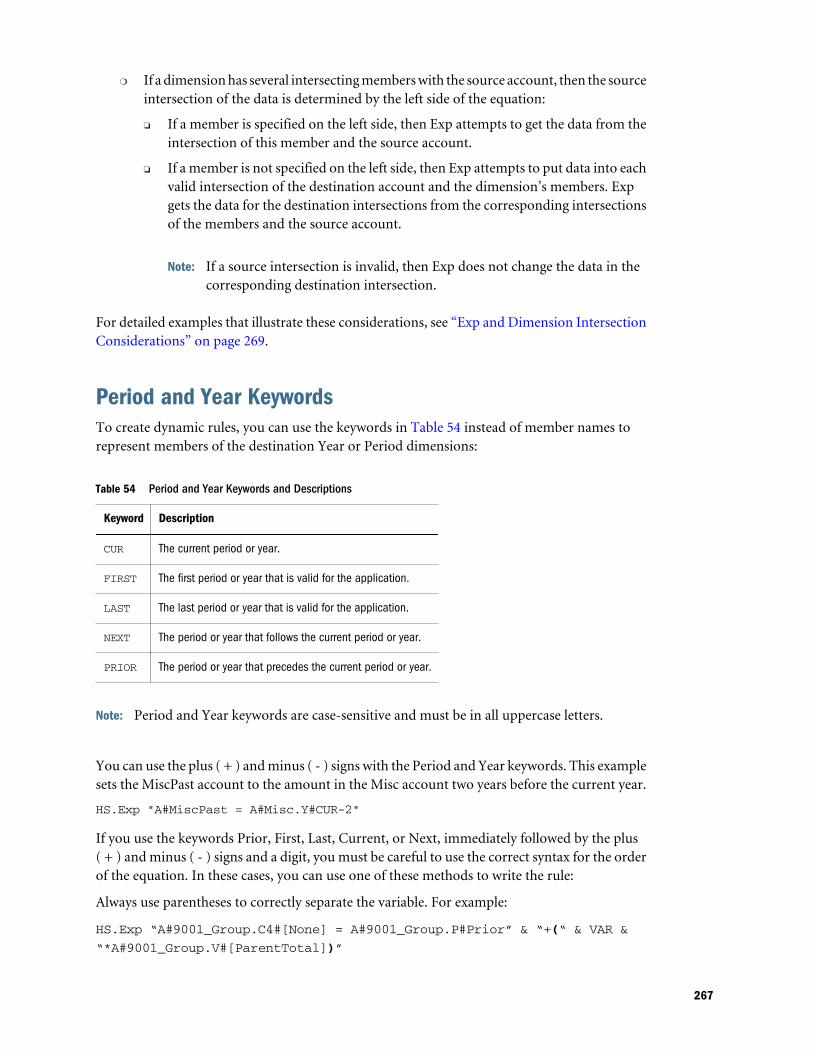
m If a dimension has several intersecting members with the source account, then the sourceintersection of the data is determined by the left side of the equation:
o If a member is specified on the left side, then Exp attempts to get the data from theintersection of this member and the source account.
o If a member is not specified on the left side, then Exp attempts to put data into eachvalid intersection of the destination account and the dimension’s members. Expgets the data for the destination intersections from the corresponding intersectionsof the members and the source account.
Note: If a source intersection is invalid, then Exp does not change the data in thecorresponding destination intersection.
For detailed examples that illustrate these considerations, see “Exp and Dimension IntersectionConsiderations” on page 269.
Period and Year KeywordsTo create dynamic rules, you can use the keywords in Table 54 instead of member names torepresent members of the destination Year or Period dimensions:
Table 54 Period and Year Keywords and Descriptions
Keyword Description
CUR The current period or year.
FIRST The first period or year that is valid for the application.
LAST The last period or year that is valid for the application.
NEXT The period or year that follows the current period or year.
PRIOR The period or year that precedes the current period or year.
Note: Period and Year keywords are case-sensitive and must be in all uppercase letters.
You can use the plus ( + ) and minus ( - ) signs with the Period and Year keywords. This examplesets the MiscPast account to the amount in the Misc account two years before the current year.
HS.Exp "A#MiscPast = A#Misc.Y#CUR-2"
If you use the keywords Prior, First, Last, Current, or Next, immediately followed by the plus( + ) and minus ( - ) signs and a digit, you must be careful to use the correct syntax for the orderof the equation. In these cases, you can use one of these methods to write the rule:
Always use parentheses to correctly separate the variable. For example:
HS.Exp “A#9001_Group.C4#[None] = A#9001_Group.P#Prior” & “+(“ & VAR &
“*A#9001_Group.V#[ParentTotal])”
267
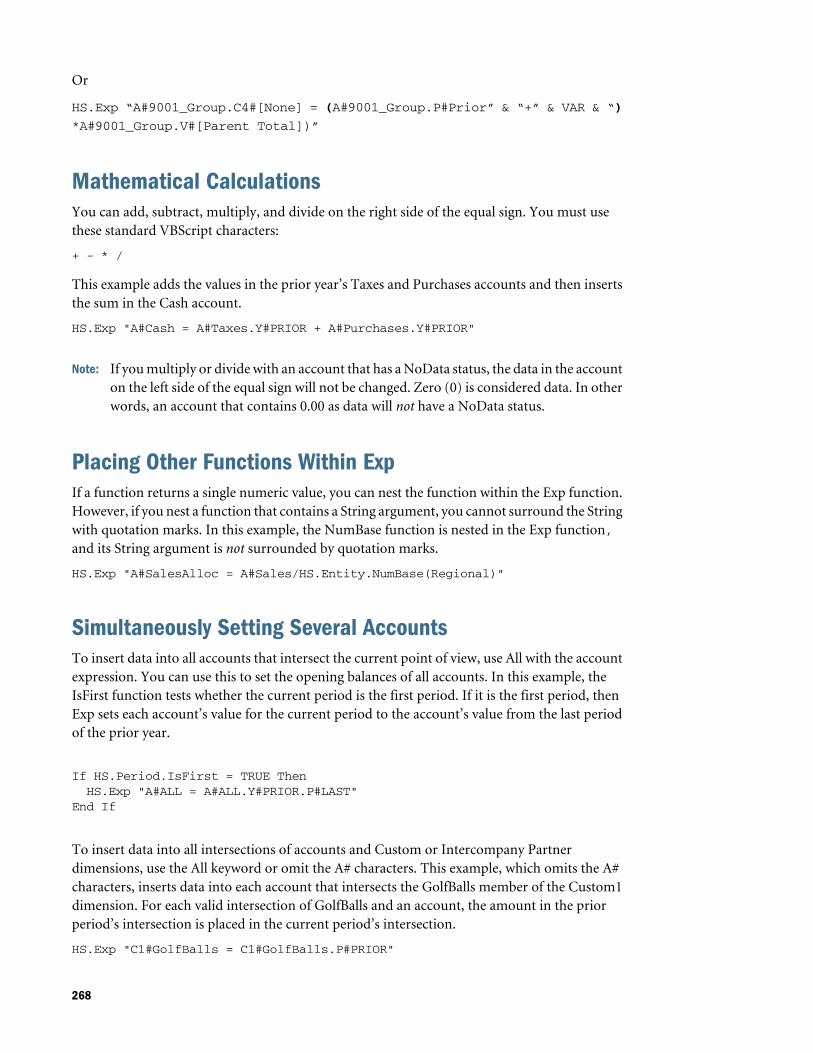
Or
HS.Exp “A#9001_Group.C4#[None] = (A#9001_Group.P#Prior” & “+” & VAR & “)
*A#9001_Group.V#[Parent Total])”
Mathematical CalculationsYou can add, subtract, multiply, and divide on the right side of the equal sign. You must usethese standard VBScript characters:
+ - * /
This example adds the values in the prior year’s Taxes and Purchases accounts and then insertsthe sum in the Cash account.
HS.Exp "A#Cash = A#Taxes.Y#PRIOR + A#Purchases.Y#PRIOR"
Note: If you multiply or divide with an account that has a NoData status, the data in the accounton the left side of the equal sign will not be changed. Zero (0) is considered data. In otherwords, an account that contains 0.00 as data will not have a NoData status.
Placing Other Functions Within ExpIf a function returns a single numeric value, you can nest the function within the Exp function.However, if you nest a function that contains a String argument, you cannot surround the Stringwith quotation marks. In this example, the NumBase function is nested in the Exp function,and its String argument is not surrounded by quotation marks.
HS.Exp "A#SalesAlloc = A#Sales/HS.Entity.NumBase(Regional)"
Simultaneously Setting Several AccountsTo insert data into all accounts that intersect the current point of view, use All with the accountexpression. You can use this to set the opening balances of all accounts. In this example, theIsFirst function tests whether the current period is the first period. If it is the first period, thenExp sets each account’s value for the current period to the account’s value from the last periodof the prior year.
If HS.Period.IsFirst = TRUE Then HS.Exp "A#ALL = A#ALL.Y#PRIOR.P#LAST"End If
To insert data into all intersections of accounts and Custom or Intercompany Partnerdimensions, use the All keyword or omit the A# characters. This example, which omits the A#characters, inserts data into each account that intersects the GolfBalls member of the Custom1dimension. For each valid intersection of GolfBalls and an account, the amount in the priorperiod’s intersection is placed in the current period’s intersection.
HS.Exp "C1#GolfBalls = C1#GolfBalls.P#PRIOR"
268
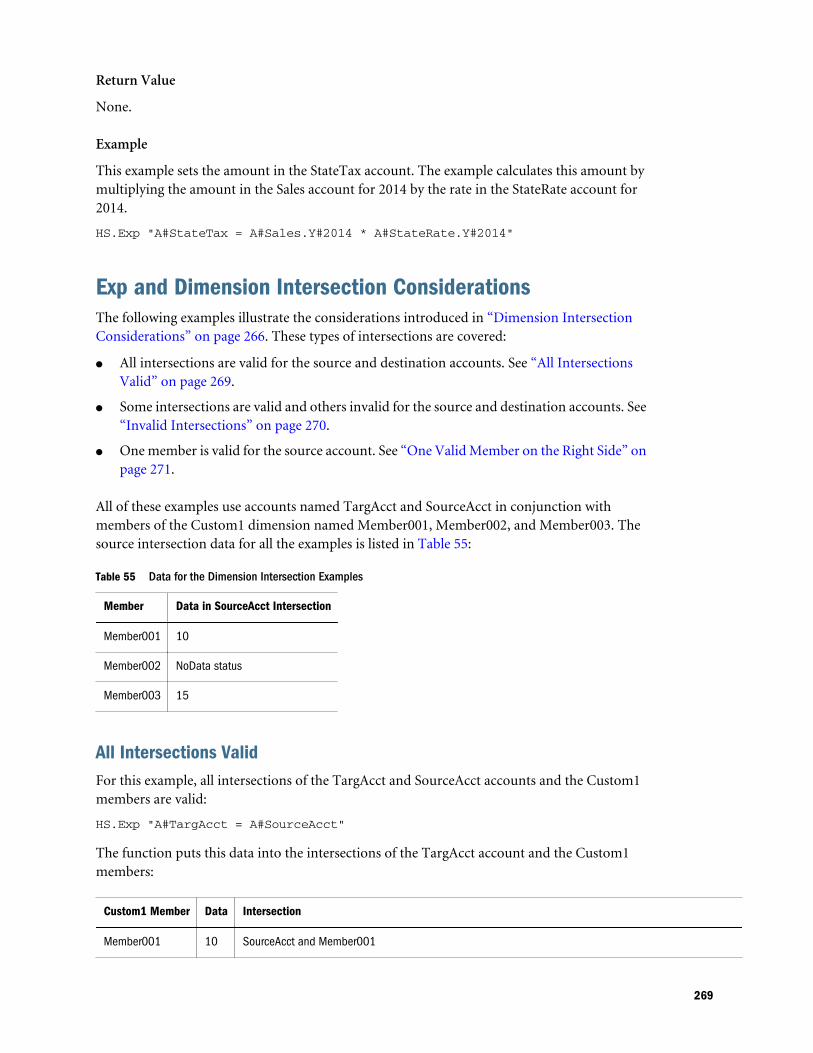
Return Value
None.
Example
This example sets the amount in the StateTax account. The example calculates this amount bymultiplying the amount in the Sales account for 2014 by the rate in the StateRate account for2014.
HS.Exp "A#StateTax = A#Sales.Y#2014 * A#StateRate.Y#2014"
Exp and Dimension Intersection ConsiderationsThe following examples illustrate the considerations introduced in “Dimension IntersectionConsiderations” on page 266. These types of intersections are covered:
l All intersections are valid for the source and destination accounts. See “All IntersectionsValid” on page 269.
l Some intersections are valid and others invalid for the source and destination accounts. See“Invalid Intersections” on page 270.
l One member is valid for the source account. See “One Valid Member on the Right Side” onpage 271.
All of these examples use accounts named TargAcct and SourceAcct in conjunction withmembers of the Custom1 dimension named Member001, Member002, and Member003. Thesource intersection data for all the examples is listed in Table 55:
Table 55 Data for the Dimension Intersection Examples
Member Data in SourceAcct Intersection
Member001 10
Member002 NoData status
Member003 15
All Intersections ValidFor this example, all intersections of the TargAcct and SourceAcct accounts and the Custom1members are valid:
HS.Exp "A#TargAcct = A#SourceAcct"
The function puts this data into the intersections of the TargAcct account and the Custom1members:
Custom1 Member Data Intersection
Member001 10 SourceAcct and Member001
269
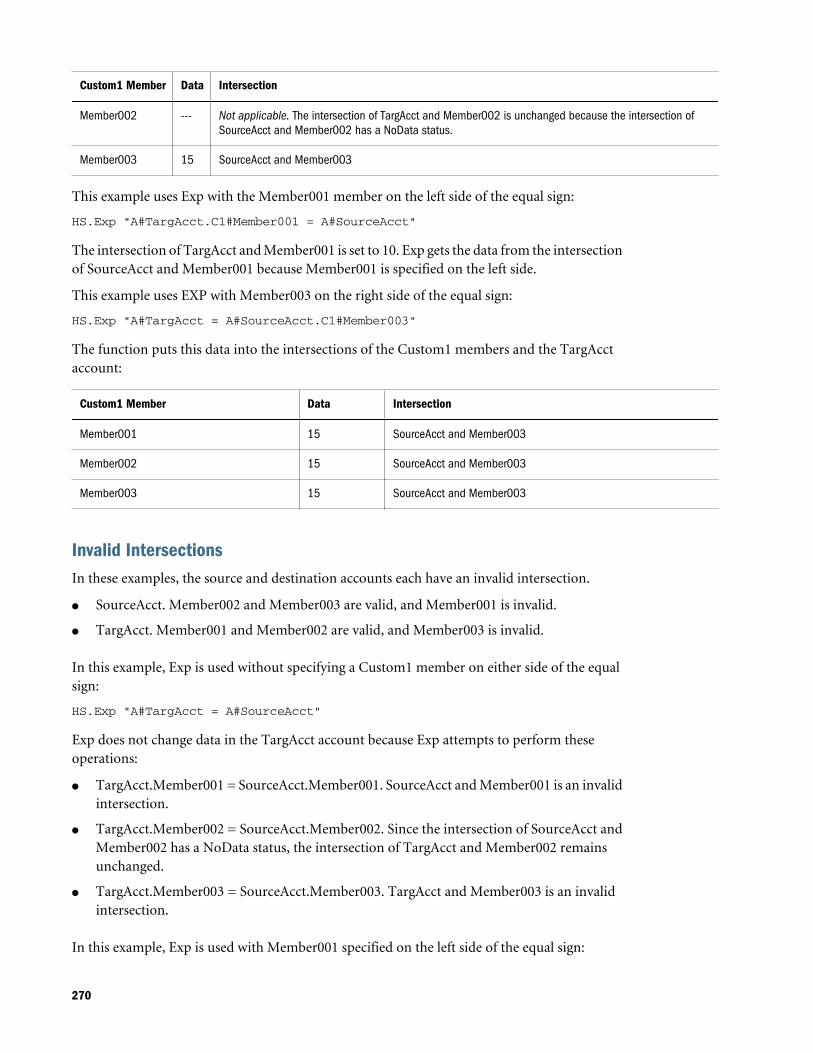
Custom1 Member Data Intersection
Member002 --- Not applicable. The intersection of TargAcct and Member002 is unchanged because the intersection ofSourceAcct and Member002 has a NoData status.
Member003 15 SourceAcct and Member003
This example uses Exp with the Member001 member on the left side of the equal sign:
HS.Exp "A#TargAcct.C1#Member001 = A#SourceAcct"
The intersection of TargAcct and Member001 is set to 10. Exp gets the data from the intersectionof SourceAcct and Member001 because Member001 is specified on the left side.
This example uses EXP with Member003 on the right side of the equal sign:
HS.Exp "A#TargAcct = A#SourceAcct.C1#Member003"
The function puts this data into the intersections of the Custom1 members and the TargAcctaccount:
Custom1 Member Data Intersection
Member001 15 SourceAcct and Member003
Member002 15 SourceAcct and Member003
Member003 15 SourceAcct and Member003
Invalid IntersectionsIn these examples, the source and destination accounts each have an invalid intersection.
l SourceAcct. Member002 and Member003 are valid, and Member001 is invalid.
l TargAcct. Member001 and Member002 are valid, and Member003 is invalid.
In this example, Exp is used without specifying a Custom1 member on either side of the equalsign:
HS.Exp "A#TargAcct = A#SourceAcct"
Exp does not change data in the TargAcct account because Exp attempts to perform theseoperations:
l TargAcct.Member001 = SourceAcct.Member001. SourceAcct and Member001 is an invalidintersection.
l TargAcct.Member002 = SourceAcct.Member002. Since the intersection of SourceAcct andMember002 has a NoData status, the intersection of TargAcct and Member002 remainsunchanged.
l TargAcct.Member003 = SourceAcct.Member003. TargAcct and Member003 is an invalidintersection.
In this example, Exp is used with Member001 specified on the left side of the equal sign:
270
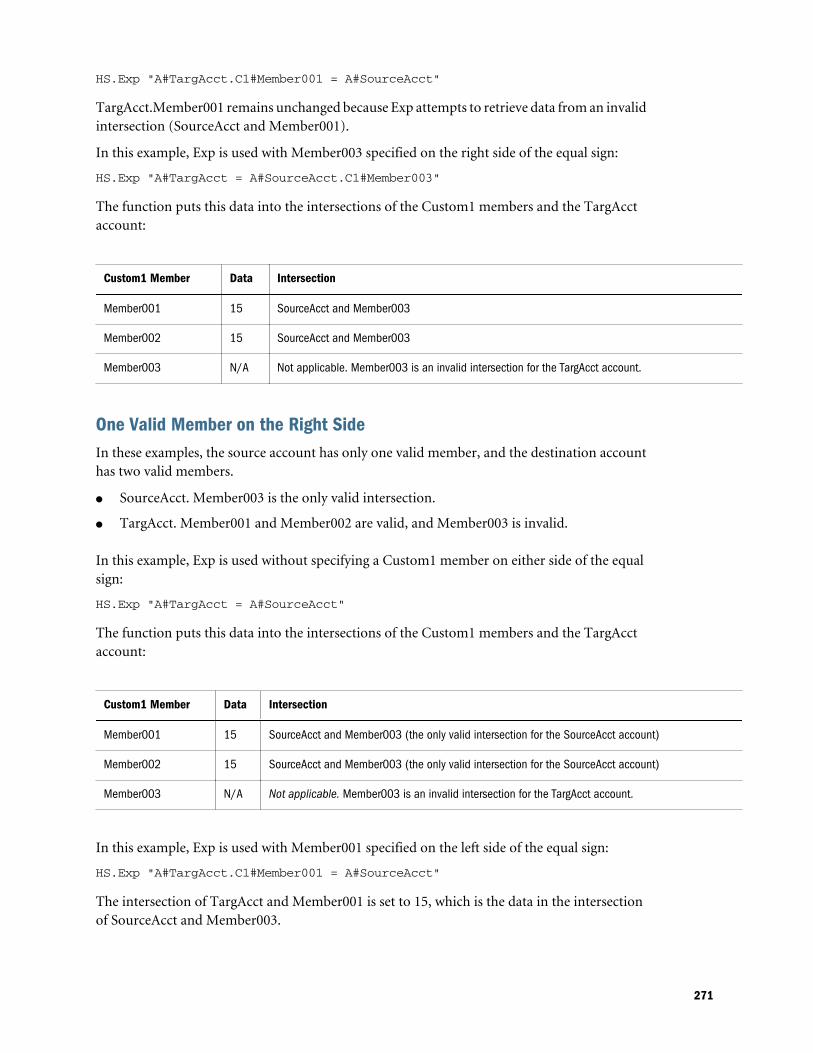
HS.Exp "A#TargAcct.C1#Member001 = A#SourceAcct"
TargAcct.Member001 remains unchanged because Exp attempts to retrieve data from an invalidintersection (SourceAcct and Member001).
In this example, Exp is used with Member003 specified on the right side of the equal sign:
HS.Exp "A#TargAcct = A#SourceAcct.C1#Member003"
The function puts this data into the intersections of the Custom1 members and the TargAcctaccount:
Custom1 Member Data Intersection
Member001 15 SourceAcct and Member003
Member002 15 SourceAcct and Member003
Member003 N/A Not applicable. Member003 is an invalid intersection for the TargAcct account.
One Valid Member on the Right SideIn these examples, the source account has only one valid member, and the destination accounthas two valid members.
l SourceAcct. Member003 is the only valid intersection.
l TargAcct. Member001 and Member002 are valid, and Member003 is invalid.
In this example, Exp is used without specifying a Custom1 member on either side of the equalsign:
HS.Exp "A#TargAcct = A#SourceAcct"
The function puts this data into the intersections of the Custom1 members and the TargAcctaccount:
Custom1 Member Data Intersection
Member001 15 SourceAcct and Member003 (the only valid intersection for the SourceAcct account)
Member002 15 SourceAcct and Member003 (the only valid intersection for the SourceAcct account)
Member003 N/A Not applicable. Member003 is an invalid intersection for the TargAcct account.
In this example, Exp is used with Member001 specified on the left side of the equal sign:
HS.Exp "A#TargAcct.C1#Member001 = A#SourceAcct"
The intersection of TargAcct and Member001 is set to 15, which is the data in the intersectionof SourceAcct and Member003.
271
Tip: If there were more than one valid intersection for the SourceAcct account and the Custom1dimension, Exp would attempt to get data from the intersection of SourceAcct andMember001. If this were an invalid intersection, then Exp would leave the destinationaccount unchanged.
GetCellGets the data contained in a cell. This function can be used in these types of rules:
l Calculation
l Translation
l Consolidation
l Allocation
Syntax
HS.GetCell("POVExpression")
where POVExpression is a valid point of view.
Return Value
The data stored in the specified cell.
Note: If the function returns more than one value, an error occurs.
Example
This example assigns to the dData variable the amount stored in the intersection of the Salesaccount and the Golfballs member of the Custom1 dimension:
Dim dDatadData = HS.GetCell("A#Sales.I#[ICP None].C1#Golfballs.C2#Customer2.C3#Increases.C4#[None]")
GetCellNoDataGets the data contained in a cell and also indicates whether the cell contains data. This functioncan be used in these types of rules:
l Calculation
l Translation
l Consolidation
l Allocation
272
Syntax
HS.GetCellNoData("POV",Var1)
Table 56 Syntax for GetCellNoData Function
Parameter Description
POV A valid point of view.
Var1 A variable that specifies if there is data in the cell.
Return Value
The possible return values depend on what is found in the cell:
l If the cell contains real data, the data value is returned and the boolean value returned forVar1 is False.
l If the cell contains no data, 0 is returned for the data value and the boolean value returnedfor Var1 is True.
l If the cell contains derived data, the derived value is returned and the boolean value returnedfor Var1 is False.
Caution! If the argument causes GetCellNoData to return more than one value, an erroroccurs.
Example
In this example, the amount in the Sales account is assigned to the dSalesAmt variable. If theSales account has no data, the statements between the If Then and End If statements are executed.
dSalesAmt = HS.GetCellNoData("A#Sales.I#[ICP None].C1#[None].C2#[None].C3#[None].C4#[None]",bIsNoData)If bIsNoData = TRUE then ...End If
GetCellRealDataGets the data contained in a cell and also indicates whether the cell contains real data. Thisfunction can be used in these types of rules:
l Calculation
l Translation
l Consolidation
l Allocation
Syntax
HS.GetCellRealData("POV",Var1)
273

Table 57 Syntax for GetCellRealData Function
Parameter Description
POV A valid point of view.
Var1 A variable that specifies if there is real data in the cell.
Return Value
The possible return values depend on what is found in the cell:
l If the cell contains real data, the data value is returned and the boolean value returned forVar1 is True.
l If the cell contains no data, 0 is returned for the data value and the boolean value returnedfor Var1 is False.
l If the cell contains derived data, the derived value is returned and the boolean value returnedfor Var1 is False.
Example
dData = HS.GetCellRealData("A#Sales.C1#Prod1",bIsRealData)If bIsRealData = TRUE then ...End If
GetCellTextGets the default cell text from the point of view. This function can be used in these types of rules:
l Calculation
l Translation
l Consolidation
l Allocation
Syntax
HS.GetCellText("POVExpression")
where POVExpression is a valid point of view.
Return Value
The [Default] label cell text for the POV.
Example
HS.GetCellText("S#Actual.Y#2014.P#January.E#Connecticut.V#<Entity Currency>.A#Sales.I#[ICP None].C1#[None].C2#[None].C3#[None].C4#[None]")
274

Note: If you are using cell text labels, this function retrieves the cell text for the cell text label“[Default]”.
GetCellTextWithLabelGets the cell text from the Point of View for the specified cell text label. This function can beused in these types of rules:
l Calculation
l Translation
l Consolidation
l Allocation
Syntax
HS.GetCellTextWithLabel("POVExpression", "CellTextLabel")
where POVExpression is a combination of members. If you do not specify a dimension, thesedefault values are used.
l Account - [none]
l ICP - [ICP None]
l Custom1...4 - [None]
l Scenario - Current Scenario member
l Entity - Current Entity member
l Value - Current Value member
l Year and Period - Current member
CellTextLabel is either the default cell text label (“[Default]”) or one of the valid loaded cell textlabels.
Note: The default dimension member values apply when you use this function in Calculationrules. When used in Allocation, Translation, or Consolidation rules, you must specify theAccount, ICP, and Custom1…4 members. The Scenario, Year, Period, View, Entity, andValue default to the current members.
Return Value
The cell text for the POV and cell text label specified.
Example
HS.GetCellTextWithLabel("A#Sales.I#[ICP None].C1#[None].C2#[None].C3#[None].C4#[None]","Rating")
275
GetCellTypeGets the cell type. This function can be used in these types of rules:
l Calculation
l Translation
l Consolidation
l Allocation
Note: Account types use all capital letters.
Syntax
HS.GetCellType("POVExpression")
where POVExpression is a valid point of view.
Return Value
The type for the specified cell.
Valid types are:
l ASSET
l LIABILITY
l REVENUE
l EXPENSE
l FLOW
l BALANCE
l BALANCERECURRING
l CURRENCYRATE
l GROUPLABEL
Example
This example checks to see if the cell type is EXPENSE. If it is, then statements between theIf...Then and End If statements are executed.
If HS.GetCellType("S#Actual.C4#[None]") = "EXPENSE" Then ...End If
GetCustomLabelArrayReturns a list of Custom dimension labels in an array. This function can be used in these typesof rules:
276

l Calculation
l Translation
l Consolidation
l Allocation
Syntax
HS.GetCustomLabelArray(Names,Aliases)
Return Value
Returns two arrays, one with Custom short names and one with Custom long names.
Example
HS.GetCustomLabelArray(Custom1,Products)
GetItemGets an individual record to process for consolidation. This function can be used inConsolidation rules.
Note: This function can only be used for 4 or fewer Custom dimensions. For more than fourCustom dimensions, use DataUnitItem.
Syntax
DataUnit.GetItem (lItem, strAccount, strICP, strCustom1, strCustom2, strCustom3, strCustom4, dData)
Table 58 Syntax for GetItem Function
Parameter Description
lItem A record number.
strAccount Name of a valid Account dimension member.
strICP Name of a valid ICP dimension member.
strCustom1 Name of a valid Custom1 dimension member.
strCustom2 Name of a valid Custom2 dimension member.
strCustom3 Name of a valid Custom3 dimension member.
strCustom4 Name of a valid Custom4 dimension member.
dData The data in the specified cell.
277
Return Value
An array containing the account, ICP, Custom1...4, data.
Example
Call DataUnit.GetItem(lItem, strAccount, strICP, strCustom1, strCustom2, strCustom3, strCustom4, dData)If dData = 0 Then ...End If
GetItemIDs2Using dimension IDs, gets an individual record to process for consolidation. This function canbe used in Consolidation rules.
Note: This function can only be used for 4 or fewer Custom dimensions. For more than fourCustom dimensions, use GetItemIDs2ExtDim.
Syntax
DataUnit.GetItemIDs2(lItem, lAccountID, lICPID, lCustom1ID, lCustom2ID, lCustom3ID, lCustom4ID, dData)
Table 59 Syntax for GetItemIDs2Function
Parameter Description
lItem A record number.
lAccountID ID number of a valid Account dimension member.
lICPID ID number of a valid ICP dimension member.
lCustom1ID ID number of a valid Custom1 dimension member.
lCustom2ID ID number of a valid Custom2 dimension member.
lCustom3ID ID number of a valid Custom3 dimension member.
lCustom4ID ID number of a valid Custom4 dimension member.
dData The data in the specified cell.
Return Value
Variables containing the account, ICP, Custom1...4, data.
Example
Call DataUnit.GetItemIDs2(lItem, lAccount, lICP, lCustom1, lCustom2, lCustom3, lCustom4, dData)
278
If dData = 0 Then ...End If
GetItemIDs2ExtDimUsing dimension IDs, gets an individual record to process for consolidation. This function canbe used in Consolidation rules.
Note: This function is used when you have more than four Custom dimensions.
Syntax
DataUnit.GetItemIDs2ExtDim(1Item, lAccountID, lICPID, lCustomID, dData)
Table 60 Syntax for GetItemIDs2Function
Parameter Description
lItem A record number.
lAccountID ID number of a valid Account dimension member.
lICPID ID number of a valid ICP dimension member.
lCustomID ID number of a valid Custom dimension member.
dData The data in the specified cell.
Return Value
A two-column array containing the IDs for both the dimension and member.
Example
Call DataUnit.GetItemIDs2(lItem, lAccount, lICP, lCustom5, dData)If dData = 0 Then ...End If
GetNumItemsGets the number of records to process for consolidation. This function can be used inConsolidation rules.
Syntax
NumItems = DataUnit.GetNumItems
279
Return Value
The number of records in the data unit.
Example
Set dataUnit = HS.OpenDataUnit("")lNumItems = dataUnit.GetNumItemsfor lItem = 0 to lNumItems - 1' Get the next item from the Data UnitCall dataUnit.GetItem(lItem, strAccount, strICP, strCustom1, strCustom2, strCustom3, strCustom4, dData)
GetNumLIDGets the number of line item details for the specified point of view. This function can be usedin these types of rules:
l Calculation
l Translation
l Consolidation
l Allocation
Syntax
HS.GetNumLID("POVExpression")
where POVExpression is a valid POV combination. If you do not specify a dimension, thesevalues are used:
l Account - [none]
l ICP - [ICP None]
l Custom1...4 - [None]
l Scenario - Current Scenario member
l Entity - Current Entity member
l Value - <entity currency>
l Year and Period - Current member
Note: If an invalid intersection is specified, the return value is 0.
Return Value
The number of line item details entered for the specified cell.
Example
In this example, if no line item details have been entered for the specified cell, then statementsbetween the If...Then and End If lines are executed.
280
If HS.GetNumLID("A#Sales.C1#Prod1.C2#Region1") = 0 then ...End If
GetRateGets the currency rate for the current point of view or for a specified point of view. This functioncan be used in the these types of rules:
l Calculation
l Translation
l Consolidation
l Allocation
Syntax
HS.GetRate("POVExpression")
where POVExpression is a valid point of view.
Note: You must specify a rate account.
Return Value
The currency rate for the specified point of view.
Example
dVar1 = HS.GetRate("S#Actual.Y#2014.P#March.V#Euro.E#Connecticut.A#AvgRate")
GetSubmissionGroupGets the process management submission group for the cell.
Syntax
HS.GetSubmissionGroup(“A#Account.C1#Custom1.C2#Custom2.C3#Custom3.C4#Custom4.I#ICP”)
Return Value
An integer representing the process management submission group. Valid values are 1–99.
Example
dVar1=HS.GetSubmissionGroup(“A#Sales.C1#Golfballs.C2#Tennisballs.C3#Soccerballs.C4#Basketballs.I#EastSales”)
281

GetSubmissionPhaseGets the process management submission phase for the cell.
Syntax
HS.GetSubmissionPhase("S#Scenario.P#Period.A#Account.C1#Custom1.C2#Custom2.C3#Custom3.C4#Custom4.I#ICP")
Return Value
An integer representing the process management submission phase. Valid values are 1–9.
Example
dVar1=HS.GetSubmissionPhase(“S#Actual.P#January.A#Sales.C1#Golfballs.C2#Tennisballs.C3#Soccerballs.C4#Basketballs.I#EastSales”)
HoldingGets the holding company for the current or specified Entity or parent dimension member. Thisfunction can be used in these types of rules:
l Calculation
l Translation
l Consolidation
l Allocation
Syntax
HS.Entity.Holding("Entity")HS.Entity.Holding("")HS.Parent.Holding("Entity")HS.Parent.Holding("")
where Entity is the name of a valid Entity dimension or parent member. You can use a blankstring (“ “) to apply this function to the current member.
Return Value
A string that contains the name of the holding company for the specified entity member orparent.
Example
In this example, if Europe is the holding company for the entity France, then statements betweenthe If...Then and End If lines are executed.
If HS.Entity.Holding("France") = "Europe" Then ...End If
282
ICPTopMemberGets the ICPTopMember of the current Account dimension member or the specified accountmember. This function can be used in the these types of rules:
l Calculation
l Translation
l Consolidation
l Allocation
Syntax
HS.Account.ICPTopMember("AccountName")HS.Account.ICPTopMember("")HS.Account.ICPTopMember(Var1)
Note: You can use a blank string (“ “) to apply this function to the current account only if youare using it in the Sub Consolidate subroutine.
Table 61 Syntax for ICPTopMember Function
Parameter Description
AccountName Name of a valid Account dimension member.
Var1 A VisualBasic variable.
Return Value
A string with the name of the ICPTopMember for the account.
Example
In this example, if the ICPTopMember of the Sales account is TotalProd, then statementsbetween the If...Then and End If statements are executed.
If HS.Account.ICPTopMember("Sales") = "TotalProd" Then...End If
ICPWeightGets the ICP weight for the application. The percentage of intercompany partner entity [ICPEntities] amounts that aggregate to the [ICP Top] member of the Value dimension. This functioncan be used in these types of rules:
l Calculation
l Translation
283
l Consolidation
l Allocation
Syntax
HS.AppSettings.ICPWeight
Return Value
The percentage of ICP entities that are aggregated into the ICPTopMember. The value is apercentage scaled to hundreds, with 1.0 equalling 100 percent.
Example
In this example, if the ICPWeight of the current application is 1, then statements between theIf...Then and End If lines are executed.
If HS.AppSettings.ICPWeight = 1 Then ...End If
IDFromMemberGets the ID number for the specified member. This function can be used in these types of rules:
l Calculation
l Translation
l Consolidation
l Allocation
Syntax
HS.<Object>.IDFromMember("Element")
284
Table 62 Syntax for IDFromMember Function
Parameter Description
<Object> One of these object keywords:
l Account
l Custom1...4
l Custom (Custom Dimension Label)
l Entity
l ICP
l Parent
l Period
l Scenario
l Value
l Year
l View
Element Depending on the object selected, the name of a valid member of one of these dimensions:
l Account
l Custom1...4
l Custom
l Entity
l ICP
l Parent
l Period
l Scenario
l Value
l Year
Return Value
The ID number of the specified member. If the member entry is not a valid member, the returnvalue will be -1.
Example
This example gets the ID number for Connecticut:
1EntityID = HS.Entity.IDFromMember("Connecticut")
1CustomID=HS.Custom("Prod").IDFromMember("P3000-Phones")
ImpactStatusChanges the status of the specified data unit to impacted. This function can be used in Calculationrules.
285
Syntax
Combination of Scenario, Year, Period, Entity, and Value members. If the scenario is the same,the year and period combination must be a future period. If no value member is specified, it isassumed to be current.
HS.ImpactStatus"S#Scenario.Y#Year.P#Period.E#Entity.V#Value"
Table 63 Syntax for ImpactStatus Function
Parameter Description
Scenario Name of a valid Scenario dimension member.
Year A valid year.
Period A valid period.
Entity Name of a valid Entity dimension member.
Value Name of a valid Value dimension member.
Note: If the specified POV is the same scenario, year, period, and entity as the data unit beingprocessed, an error occurs and there is no impact to the data unit. If the target Period islocked when the rule is run, the system returns a VBScript error and there is no impactto the data unit.
Return Value
None.
Example
HS.ImpactStatus "S#Actual.Y#2014.P#January"
InputEnables data input into <Entity Currency> of parent entities for data-points that can enteredto at a base entity level. This does not include data-points flagged as IsCalculated and data-pointsset as NoInput. Only the entity currency Value dimension is supported. When you use thisfunction, the value at the Parent Entity level is not equal to the sum of its children’s contributions.
Because this function enables input at the Parent entity level, the children contributions do notroll up to the Parent entity’s entity currency Value dimension. However, the parent-childcontribution value is stored, and you can still post journals to the Contribution AdjustmentsValue dimension. This function can be used in Input rules.
Caution! For accounts where you allow input at the parent entity level, it is important toremember that the value at the Parent entity’s entity currency Value member willnot be equal to the sum of all the children’s contributions.
286
Syntax
HS.Input"POVExpression"
where POVExpression is a point of view.
Return Value
None.
Example
This example enables input into the cells that intersect the Sales account and the Budget scenario:
Sub Input HS.Input"A#Sales.S#Budget"End Sub
IsAlmostEqualChecks to see if the passed in values are equal based on a predefined Financial Managementepsilon. This function can be used in all types of rules.
A difference of -0.0000000000001 to 0.0000000000001 is considered zero difference.
Syntax
BooleanValue = HS.IsAlmostEqual(Value1, Value2)
Return Value
A Boolean expression that is True if the passed in values are equal ; False if they are not equal.
Example
Dim BoolVal Dim Value1 Dim Value2 Value1 = 10.1299999999 Value2 = 10.13 BoolVal = HS.IsAlmostEqual(Value1, Value2) If BoolVal = true Then // do processing Else // do Processing End If
IsBaseDetermines if the current member or a specified member is a base member of the applicationor of the specified parent. This function can be used in these types of rules:
l Calculation
287
l Translation
l Consolidation
l Allocation
Note: A member is a base member if it has no children (that is, it is at the end of branch ina tree hierarchy).
Syntax
HS.<Object>.IsBase("Parent","Element")HS.Node.IsBase("Parent"."Entity"."S#Scenario.Y#Year.P#Period")HS.<Object>.IsBase("","")HS.Custom(Dimension).IsBase(Member)
Note: Use a blank string (“ “) to apply this function to the current member.
Table 64 Syntax for IsBase Function
Parameter Description
<Object> One of these object keywords:
l Account
l Custom1...4
l Custom (Custom Dimension Label)
l Entity
l Parent
Parent A valid Parent member.
Note: Parent is mandatory only when used with Node.
Element Depending on the object selected, the name of a valid member of one of these dimensions:
l Account
l Custom1...4
l Custom
l Entity
l Parent
Entity Name of a valid Entity dimension member.
Scenario Name of a valid Scenario dimension member.
Year A valid year.
Period A valid period.
Note: For Node, determines if the element is an active base member of the specified parent.
288
Return Value
A Boolean expression that is True if the element is a base member below the specified parent or,when no parent is specified, is a base member in the application. False if the element is not abase member.
For Node, True if the element is an active base entity below the parent in the specified point ofview. False if the element is not an active base entity.
Example
In this example, if Connecticut is a base entity under EastRegion, then statements between theIf...Then and End If lines are executed.
If HS.Entity.IsBase("EastRegion","Connecticut") = TRUE Then ...End IfIf HS.Custom("Prod").IsBase("P3000-Phones") = TRUE Then...End If
IsCalculatedDetermines if the current Account dimension member or a specified account member is acalculated account. This function can be used in these types of rules:
l Calculation
l Translation
l Consolidation
l Allocation
Syntax
HS.Account.IsCalculated("Account")
where Account is the name of a valid Account member.
HS.Account.IsConsolidated("")
Note: You can use a blank string ("") to apply this function to the current member only if youare using it in the Sub Consolidate subroutine.
Return Value
A Boolean expression that is True if the account is a calculated account; False if the account isnot a calculated account.
Example
In this example, if the Sales account is calculated, then statements between the If...Then and EndIf statements are executed.
289
If HS.Account.IsCalculated("Sales") = TRUE Then ...End If
IsChildDetermines if the current member or a specified member is a child of the specified parent. Thisfunction can be used in these types of rules:
l Calculation
l Translation
l Consolidation
l Allocation
Note: A member is a child if it is one level directly below a member in a tree hierarchy.
Syntax
HS.<Object>.IsChild("Parent","Element")HS.Node.IsChild("Parent"."Entity"."S#Scenario.Y#Year.P#Period")HS.<Object>.IsChild("Parent","")HS.Custom(Dimension).IsChild("P3000-Phones")
Note: Use a blank string ("") to apply this function to the current member.
Table 65 Syntax for IsChild Function
Parameter Description
<Object> One of these object keywords:
l Account
l Custom1...4
l Custom (Custom Dimension Label)
l Entity
l Parent
Parent Name of a Parent member. (Parent is mandatory.)
Element Depending on the object selected, the name of a valid member of one of these dimensions:
l Account
l Custom1...4
l Custom
l Entity
l Parent
Entity Name of a valid Entity dimension member.
290
Parameter Description
Scenario Name of a valid Scenario dimension member.
Year A valid year
Period A valid period
Note: For Node, determines if the member is an active child of the specified parent.
Return Value
A Boolean expression that is True if the element is a child of the specified parent; False if theelement is not a child of the specified parent.
For Node, True if the element is an active child of the specified parent; False if the element isnot an active child of the specified parent.
Example
In this example, if Connecticut is a child of EastRegion, then statements between the If...Thenand End If lines are executed.
If HS.Entity.IsChild("EastRegion","Connecticut") = TRUE Then ...End IfIf HS.Custom("Prod").IsChild("P3000-Phones") = TRUE Then...End If
IsConsolidatedDetermines if the current Account dimension member or a specified account member is aconsolidated account. This function can be used in these types of rules:
l Calculation
l Translation
l Consolidation
l Allocation
Syntax
HS.Account.IsConsolidated("Account")
where Account is the name of a valid Account member.
HS.Account.IsConsolidated("")
Note: You can use a blank string ("") to apply this function to the current member only if youare using it in the Sub Consolidate subroutine.
291
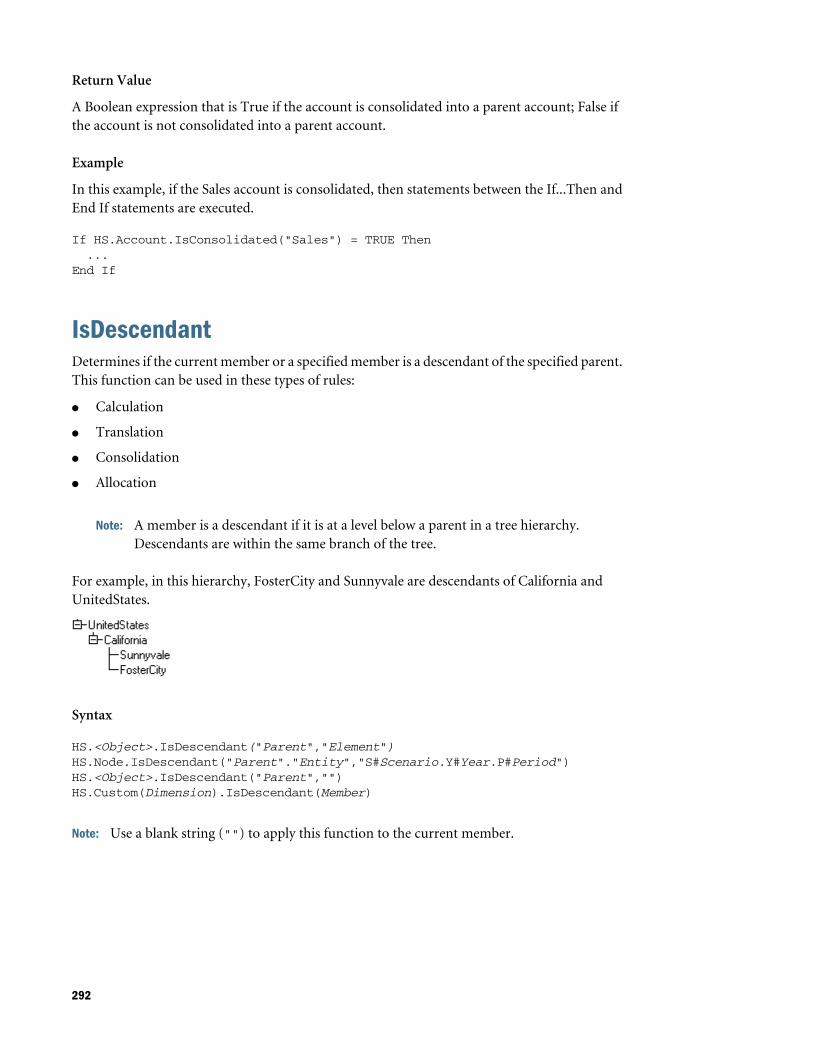
Return Value
A Boolean expression that is True if the account is consolidated into a parent account; False ifthe account is not consolidated into a parent account.
Example
In this example, if the Sales account is consolidated, then statements between the If...Then andEnd If statements are executed.
If HS.Account.IsConsolidated("Sales") = TRUE Then ...End If
IsDescendantDetermines if the current member or a specified member is a descendant of the specified parent.This function can be used in these types of rules:
l Calculation
l Translation
l Consolidation
l Allocation
Note: A member is a descendant if it is at a level below a parent in a tree hierarchy.Descendants are within the same branch of the tree.
For example, in this hierarchy, FosterCity and Sunnyvale are descendants of California andUnitedStates.
Syntax
HS.<Object>.IsDescendant("Parent","Element")HS.Node.IsDescendant("Parent"."Entity","S#Scenario.Y#Year.P#Period")HS.<Object>.IsDescendant("Parent","")HS.Custom(Dimension).IsDescendant(Member)
Note: Use a blank string ("") to apply this function to the current member.
292
Table 66 Syntax for IsDescendant Function
Parameter Description
<Object> One of these object keywords:
l Account
l Custom1...4
l Custom (Custom Dimension Label)
l Entity
l Parent
Parent Name of a valid Parent member. Parent is required.
Element Depending on the object selected, name of a valid member of one of these dimensions:
l Account
l Custom1...4
l Custom
l Entity
l Parent
Entity Name of a valid Entity dimension member.
Scenario Name of a valid Scenario dimension member.
Year A valid year.
Period A valid period.
Note: When you use node as the object, the function determines if the member is an activedescendant of the specified parent.
Return Value
A Boolean expression that is True if the element is a descendant of the specified parent; False ifthe element is not a descendant of the specified parent.
For Node, True if the element is an active descendant of the specified parent; False if the elementis not an active descendant of the specified parent.
Example
In this example, if Connecticut is a descendant of Regional, then statements between the If...Thenand End If lines are executed.
If HS.Entity.IsDescendant("Regional","Connecticut") = TRUE Then ...End IfIf HS.Custom("Prod").IsDescendant("All_Phones", P3000_Phones")...End If
293
IsFirstDetermines if the current period or year is the first period or year of the application. The defaultfrequency of the current scenario is used to determine if the current period or year is the firstperiod or year of the application. This function can be used in these types of rules:
l Calculation
l Translation
l Consolidation
l Allocation
Syntax
HS.<Object>.IsFirst
where <Object> is one of these keywords:
l Period
l Year
Return Value
A Boolean expression that is True if the current period or year is the first period or year; Falseif the current period or year is not the first period or year.
Example
In this example, if the current period is the first period then statements between the If...Thenand End If statements are executed:
If HS.Period.IsFirst = TRUE Then ...End If
IsICPDetermines if the current Account or Entity dimension member or a specified account or entitymember is an intercompany partner (ICP). This function can be used in these types of rules:
l Calculation
l Translation
l Consolidation
l Allocation
Syntax
HS.<Object>.IsICP("Element")HS.<Object>.IsICP("")
294

Note: Use a blank string ("") to apply this function to the current member.
Table 67 Syntax for IsICP Function
Parameter Description
<Object> One of these object keywords:
l Account
l Entity
Element Depending on the object selected, name of a valid member of the Account or Entity dimension.
l Account
l Entity
Return Value
A Boolean expression that is True if the account or entity member is an intercompany partner;False if the account or entity member is not an intercompany partner.
Example
In this example, if the Sales account is an intercompany partner, then statements between theIf...Then and End If lines are executed.
If HS.Account.IsICP("Sales") = TRUE Then ...End If
IsLastDetermines if the current period or year is the last period or year of the application. The defaultfrequency of the current scenario is used to determine if the current period or year is the lastperiod or year of the application. This function can be used in these types of rules:
l Calculation
l Translation
l Consolidation
l Allocation
Syntax
HS.<Object>.IsLast
where <Object> is one of these keywords:
l Period
l Year
295
Return Value
A Boolean expression that is True if the current period or year is the last period or year; False ifthe current period or year is not the last period or year.
Example
In this example, if the current period is the last period, then statements between the If...Thenand End If statements are executed:
If HS.Period.IsLast = TRUE Then ...End If
IsTransCurDetermines if the current Value dimension member is a translated currency member. Thisfunction can be used in Calculation rules.
Syntax
HS.Value.IsTransCur
Return Value
A Boolean expression that is True if the current Value member is a translated currency member;False if the current Value member is not a translated currency member.
Example
In this example, if the Value member is a translated currency member, then all statementsbetween the If...Then and End If statements are executed.
If HS.Value.IsTransCur = TRUE Then ...End If
IsTransCurAdjDetermines if the current Value dimension member is a translated currency Adj member. Thisfunction can be used in Calculation rules.
Syntax
HS.Value.IsTransCurAdj
Return Value
A Boolean that is True if the current Value member is a translated currency Adj member; Falseif the current Value member is not a translated currency Adj member.
296
Example
In this example, if the Value member is a translated currency Adj member, then all statementsbetween the If...Then and End If statements are executed.
If HS.Value.IsTransCurAdj = TRUE Then ...End If
IsValidDestDetermines if the specified point of view is a valid destination. This function can be used in thesetypes of rules:
l Calculation
l Translation
l Consolidation
l Allocation
Note: This function does not check to see whether the cell is a calculated cell.
Syntax
HS.IsValidDest("POVExpression")
where POVExpression is a point of view. If you do not specify a dimension, these default valuesare used:
l Account - Current Account member if used in Sub Consolidate subroutine. Otherwise,account is required.
l Custom and ICP - Current member is used in Sub Consolidate subroutine. Otherwise, theTopMember for the account is used.
l Scenario - Current Scenario member
l Entity - Current Entity member
l Value - Current Value member
l Year and Period - Current member
Return Value
A Boolean that is True if the specified point of view is a valid destination; False otherwise.
Example
In this example, if the specified destination is valid, then all statements between the If...Thenand End If statements are executed.
If HS.IsValidDest("A#Sales.I#CT.C1#P1.C2#R1.C3#[None].C4#[None]") = TRUE Then ...
297
End If
IsZeroChecks to see if the passed in value is close to zero based on a predefined Financial Managementepsilon. This function can be used in all types of rules.
This function is recommended instead of an exact comparison to zero where floating pointarithmetic introduces errors of less than 1 x 10 E-10 that can be ignored.
Instead of:
Difference = Value1 – Value2
If Difference = 0 Then
‘process where Difference = 0
Else
‘process where Difference <> 0
End If
Use:
Difference = Value1 – Value2
If HS.IsZero(Difference) Then
‘process where Difference = 0
Else
‘process where Difference <> 0
End If
Syntax
BooleanValue = HS.IsZero(Value)
Return Value
A Boolean that is True if the passed in value is close to zero. False otherwise.
Example
Dim BoolVal Dim Value Value = 0.000000001 BoolVal = HS.IsZero(Value) If BoolVal = true Then // do processing Else // do Processing End If
298
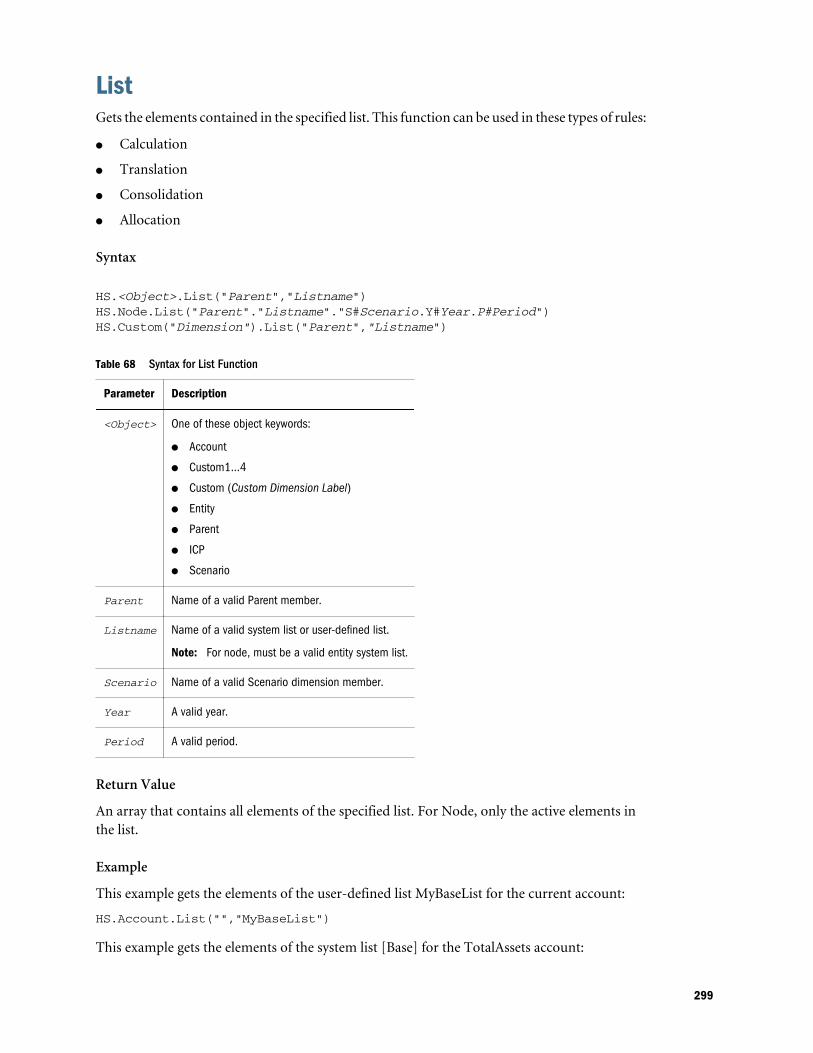
ListGets the elements contained in the specified list. This function can be used in these types of rules:
l Calculation
l Translation
l Consolidation
l Allocation
Syntax
HS.<Object>.List("Parent","Listname")HS.Node.List("Parent"."Listname"."S#Scenario.Y#Year.P#Period")HS.Custom("Dimension").List("Parent","Listname")
Table 68 Syntax for List Function
Parameter Description
<Object> One of these object keywords:
l Account
l Custom1...4
l Custom (Custom Dimension Label)
l Entity
l Parent
l ICP
l Scenario
Parent Name of a valid Parent member.
Listname Name of a valid system list or user-defined list.
Note: For node, must be a valid entity system list.
Scenario Name of a valid Scenario dimension member.
Year A valid year.
Period A valid period.
Return Value
An array that contains all elements of the specified list. For Node, only the active elements inthe list.
Example
This example gets the elements of the user-defined list MyBaseList for the current account:
HS.Account.List("","MyBaseList")
This example gets the elements of the system list [Base] for the TotalAssets account:
299
HS.Account.List("TotalAssets","[Base]")
Hs.Custom("Prod").List("Products","[Base]")
MemberGets the name of the current member. This function can be used in these types of rules:
l Calculation
l Translation
l Consolidation
l Allocation
Syntax
HS.<Object>.Member
where <Object> is one of these keywords:
l Entity
l Parent
l Period
l Scenario
l Value
l Year
l View
Return Value
A string that contains the current member name.
For the Value object, Member returns the name of the current Value member, not the currencyassociated with the value. For example, if the current Value member is Entity Currency and thevalue is associated with the USD currency, HS.Parent.Member returns Entity Currency, notUSD.
Tip: To get the currency of the current Value member, use the DefCurrency function.
Example
In this example, if the current entity is California then statements between the If...Then and EndIf statements are executed:
If HS.Entity.Member = "California" Then ...End If
300
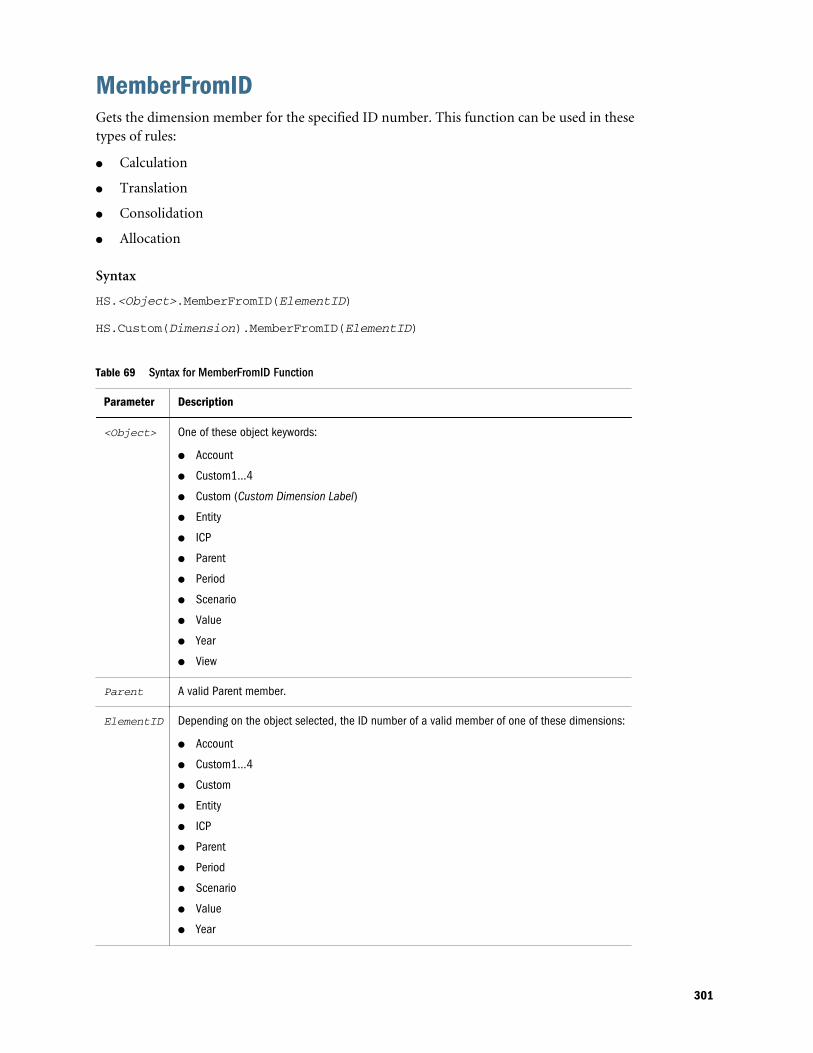
MemberFromIDGets the dimension member for the specified ID number. This function can be used in thesetypes of rules:
l Calculation
l Translation
l Consolidation
l Allocation
Syntax
HS.<Object>.MemberFromID(ElementID)
HS.Custom(Dimension).MemberFromID(ElementID)
Table 69 Syntax for MemberFromID Function
Parameter Description
<Object> One of these object keywords:
l Account
l Custom1...4
l Custom (Custom Dimension Label)
l Entity
l ICP
l Parent
l Period
l Scenario
l Value
l Year
l View
Parent A valid Parent member.
ElementID Depending on the object selected, the ID number of a valid member of one of these dimensions:
l Account
l Custom1...4
l Custom
l Entity
l ICP
l Parent
l Period
l Scenario
l Value
l Year
301
Return Value
The dimension member name.
Example
This example gets the member for the ID number 001:
strEntity = HS.Entity.MemberFromID(001)
strCustom = HS.Custom("Prod").MemberFromID(001)
MethodGets the consolidation method for the specified member. If there is more than one non-zerovalue, the system returns the first one found. This function can be used in these types of rules:
l Calculation
l Translation
l Consolidation
l Allocation
Syntax
HS.Node.Method("POVExpression")
where POVExpression is a combination of Scenario. Year, Period, and Entity members.
Return Value
A string that specifies the consolidation method for the specified point of view.
Example
In this example, if the method for the point of view is GLOBAL, then statements between theIf...Then and End If statements are executed.
If HS.Node.Method("S#Actual.Y#2014.P#January.E#Regional.Connecticut") = "GLOBAL" Then ...End If
NoInputPrevents users from entering data into specific cells or slices of cells. This is useful when thereare accounts that are not input or calculated.
When you set up a calculated account, you in effect, are preventing users from being able toinput to that account. However, if you have accounts in which data input is enabled for somedimension intersections but not for others, you can use NoInput. This function can be used inNoInput rules.
302
Syntax
HS.NoInput "POVExpression"
where POVExpression is a point of view.
Return Value
None.
Example
This example prohibits input into the cells that intersect the Sales account and the Budgetscenario for 2014:
Sub NoInput HS.NoInput "S#Budget.Y#2014.A#Sales"End Sub
NoRoundTurns off rounding for all following Exp statements. This function can be used in these types ofrules:
l Calculation
l Translation
l Allocation
Tip: You can also turn off rounding by entering 0 as the argument for the Round function.For example, HS.Round(0) turns off rounding.
Syntax
HS.NoRound
Return Value
None.
Example
This example rounds the amount inserted into the SalesRound account’s cells to the nearesttenth, then uses NoRound to turn off rounding for the amount inserted into the SalesNoRoundaccount’s cells:
HS.Round 0.1HS.Exp "A#SalesRound" = "A#Sales"HS.NoRoundHS.Exp "A#SalesNoRound" = "A#Sales"
303
NumBaseGets the number of base members for the current member or for a specified member. Thisfunction can be used in these types of rules:
l Calculation
l Translation
l Consolidation
l Allocation
Note: A member is a base member if it has no children (that is, it is at the end of branch ina tree hierarchy).
Syntax
HS.<Object>.NumBase("Element")HS.Node.NumBase("S#Scenario.Y#Year.P#Period.E#Entity")HS.<Object>.NumBase("")HS.Custom(Dimension).NumBase(Member)
Note: Use a blank string ("") to apply this function to the current member.
Table 70 Syntax for NumBase Function
Parameter Description
<Object> One of these object keywords:
l Account
l Custom1...4
l Custom (Custom Dimension Label)
l Entity
l Parent
l Node
Element Depending on the object selected, name of a valid member for one of these dimensions:
l Account
l Custom1...4
l Custom
l Entity
l Parent
l Node
For Account and Custom objects, you must specify the member - you cannot use a blank string.
To get the number of base members in the entire dimension, specify ALL within quotation marks, as in this example:
iAcctBase = HS.Account.NumBase("ALL")
304
Parameter Description
Scenario Name of a valid Scenario dimension member.
Year A valid year.
Period A valid period.
Entity Name of a valid Entity dimension member.
You can also embed the NumBase function in the Exp function. If you embed the NumBasefunction, do not surround NumBase’s argument with quotation marks, as in this example:
HS.Exp "A#AverageSales = A#Sales/HS.Entity.NumBase(Regional)"
Return Value
A Long that identifies the number of base members. For Node, gets the number of active baseelements of the specified member.
Note: If a base entity appears twice in a branch, the entity is counted twice.
Example
In this example, the application contains an account named SalesAlloc that stores the averagesales amount for the base entities under the Regional entity. To calculate the SalesAlloc amount,the example divides the Sales account's amount by the number of base entities under Regional.
If HS.Exp"A#SalesAlloc = A#Sales/HS.Entity.NumBase(Regional)" then ...End IfIf HS.Exp"ASalesAlloc = A#Sales/HS.Custom("Prod").NumBase("TotalProducts")...End If
NumberGets the current period number. This function can be used in these types of rules:
l Calculation
l Translation
l Consolidation
l Allocation
Syntax
HS.View.PeriodNumber
Return Value
The current period number.
305
Example
In this example, if the current period is the first period then statements between the If...Thenand End If statements are executed.
If HS.View.PeriodNumber = 1 Then ...End If
NumChildGets the number of child members for the current dimension member or for a specified member.This function can be used in these types of rules:
l Calculation
l Translation
l Consolidation
l Allocation
Note: A member is a child if it is one level directly below a member in a tree hierarchy. Onlymembers one level below the specified object are counted.
Syntax
HS.<Object>.NumChild("Element")HS.Node.NumChild("S#Scenario.Y#Year.P#Period.E#Entity")HS.<Object>.NumChild("")HS.Custom(Dimension).NumChild(Member)
Note: Use a blank string ("") to apply this function to the current member.
Table 71 Syntax for NumChild Function
Parameter Description
<Object> One of these object keywords:
l Account
l Custom1-4
l Custom (Custom Dimension Label)
l Entity
l Node
l Parent
306
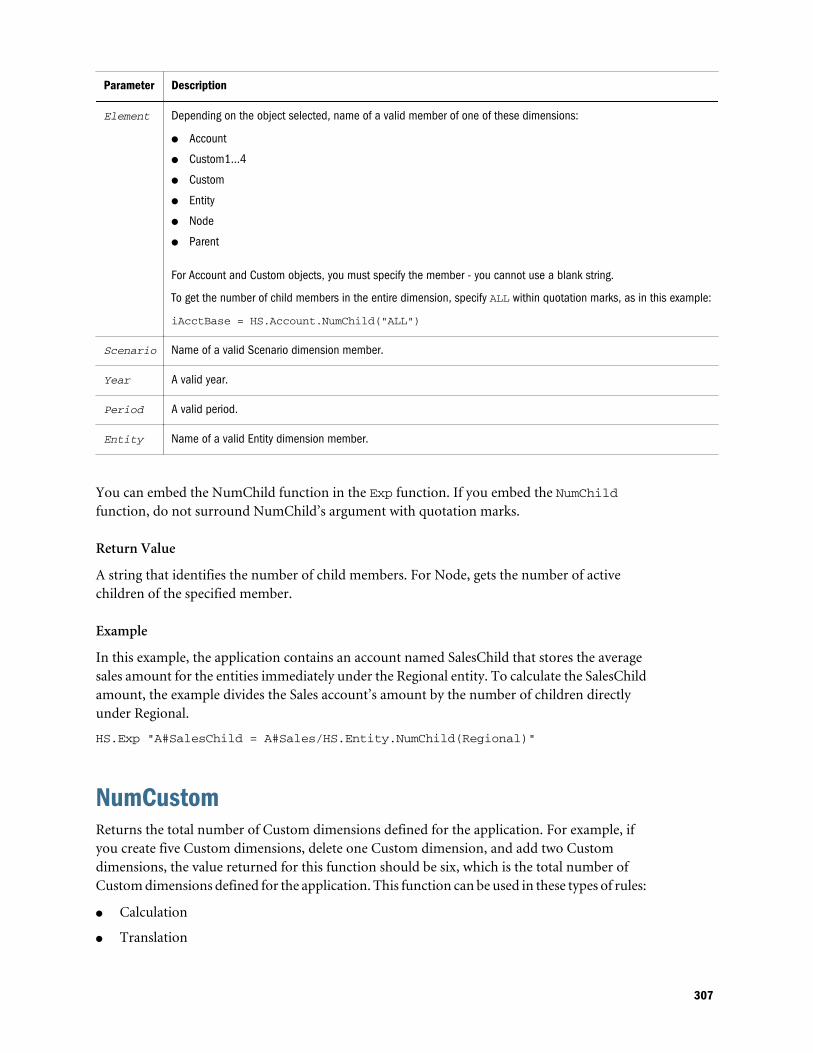
Parameter Description
Element Depending on the object selected, name of a valid member of one of these dimensions:
l Account
l Custom1...4
l Custom
l Entity
l Node
l Parent
For Account and Custom objects, you must specify the member - you cannot use a blank string.
To get the number of child members in the entire dimension, specify ALL within quotation marks, as in this example:
iAcctBase = HS.Account.NumChild("ALL")
Scenario Name of a valid Scenario dimension member.
Year A valid year.
Period A valid period.
Entity Name of a valid Entity dimension member.
You can embed the NumChild function in the Exp function. If you embed the NumChildfunction, do not surround NumChild’s argument with quotation marks.
Return Value
A string that identifies the number of child members. For Node, gets the number of activechildren of the specified member.
Example
In this example, the application contains an account named SalesChild that stores the averagesales amount for the entities immediately under the Regional entity. To calculate the SalesChildamount, the example divides the Sales account’s amount by the number of children directlyunder Regional.
HS.Exp "A#SalesChild = A#Sales/HS.Entity.NumChild(Regional)"
NumCustomReturns the total number of Custom dimensions defined for the application. For example, ifyou create five Custom dimensions, delete one Custom dimension, and add two Customdimensions, the value returned for this function should be six, which is the total number ofCustom dimensions defined for the application. This function can be used in these types of rules:
l Calculation
l Translation
307

l Consolidation
l Allocation
Syntax
HS.NumCustom
Return Value
The number of Custom dimensions for the application.
Example
nCustoms = HS.NumCustom
NumDescendantGets the number of descendants of the current dimension member or a specified member. Thisfunction can be used in these types of rules:
l Calculation
l Translation
l Consolidation
l Allocation
Note: A member is a descendant if it is at a level below a parent in a tree hierarchy.Descendants are within the same branch of the tree.
For example, in this hierarchy, FosterCity and Sunnyvale are descendants of California andUnitedStates.
Syntax
HS.<Object>.NumDescendant("Element")HS.Node.NumDescendant("S#Scenario.Y#Year.P#Period.E#Entity")HS.<Object>.NumDescendant("")HS.Custom(Dimension).NumDescendant(Member)
Note: Use a blank string ("") to apply this function to the current member.
308
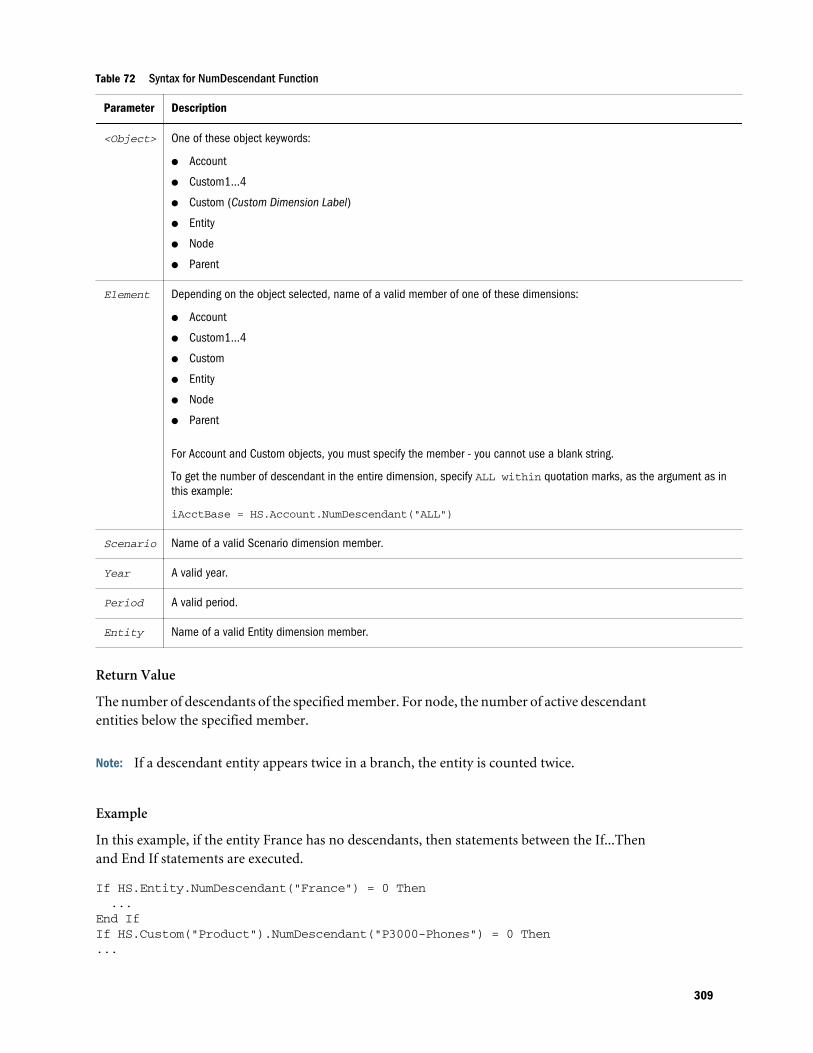
Table 72 Syntax for NumDescendant Function
Parameter Description
<Object> One of these object keywords:
l Account
l Custom1...4
l Custom (Custom Dimension Label)
l Entity
l Node
l Parent
Element Depending on the object selected, name of a valid member of one of these dimensions:
l Account
l Custom1...4
l Custom
l Entity
l Node
l Parent
For Account and Custom objects, you must specify the member - you cannot use a blank string.
To get the number of descendant in the entire dimension, specify ALL within quotation marks, as the argument as inthis example:
iAcctBase = HS.Account.NumDescendant("ALL")
Scenario Name of a valid Scenario dimension member.
Year A valid year.
Period A valid period.
Entity Name of a valid Entity dimension member.
Return Value
The number of descendants of the specified member. For node, the number of active descendantentities below the specified member.
Note: If a descendant entity appears twice in a branch, the entity is counted twice.
Example
In this example, if the entity France has no descendants, then statements between the If...Thenand End If statements are executed.
If HS.Entity.NumDescendant("France") = 0 Then ...End IfIf HS.Custom("Product").NumDescendant("P3000-Phones") = 0 Then...
309
End If
NumPerInGenGets the number of periods in the generation for the current period being processed. Thisfunction can be used in Dynamic SUB functions.
Syntax
HS.Period.NumPerInGen
Return Value
One value for the number of periods of the view.
Example
HS.Dynamic "A#MarginPct=A#GrossMargin/HS.Period.NumPerInGen"
For example, if the current period is April, and April is in the fourth generation in the calendarfile (monthly generation), the number of periods for the monthly generation is 12. If the currentperiod is Q2, which is in the third generation of the calendar file (quarterly generation), thenumber of periods is 4.
Monthly generation (4th generation):
January, February, March, April, May, June, July, August, September, October, November,December
System returns 12 for the number of periods in this generation.
Quarterly generation (3rd generation):
Q1, Q2, Q3, Q4
System returns 4 for the number of periods in this generation.
Half-yearly generation (2nd generation):
HY1, HY2
System returns 2 for the number of periods in this generation.
Yearly generation (first generation):
Year
System returns 1 for the number of periods in this generation.
NumPeriodsGets the number of periods defined for the frequency of the specified scenario. This functioncan be used in these types of rules:
l Calculation
310
l Translation
l Consolidation
l Allocation
Syntax
HS.Scenario.NumPeriods("ScenarioName")
or
HS.Scenario.NumPeriods(””)
or
HS.Scenario.NumPeriods(Var1)
Return Value
Numeric value for the number of periods for the frequency. For example, if the scenario ismonthly, the system returns 12 for the number of periods. If the scenario is quarterly, the systemreturns 4 for the number of periods.
Example
This example returns the number of periods defined for the frequency of the Actual scenario.
HS.Scenario.NumPeriods(“Actual”)
OpenCellTextUnitRetrieves the cell text for multiple cells. This function can be used in these types of rules:
l Calculation
l Translation
l Consolidation
You can specify part of the POV for which to retrieve cell text, for example, Scenario and Year,instead of the entire POV. If you do not specify a page dimension member, (Scenario, Year,Period, Value, Entity), then cell text is returned only for the current member. If you do notspecify a sub-cube dimension (Account, ICP, Custom), then the system returns cell text for allbase and parent members. You can specify the Scenario and Year member to retrieve cell textfor a sub-cube that is not the current sub-cube. You can also specify a member list for Period,Value, and/or Entity to retrieve cell text for more than one sub-cube. You can specify to retrievecell text labels, and also whether to sort the cell text by Ascending or Descending order ofdimension member or cell text label. If you do not specify a value for sorting, then no sorting isperformed on the cell text unit, and results are returned based on their order in the database.
Syntax
Set CTU = HS.OpenCellTextUnit(POVExpression,Label(s),Sort_Dimension,Sort_Order)
311
Where POVExpression is a POV, Label is none, one, or more cell text labels, andSort_Order is Ascending or Descending.
Return Value
Returns information on all the cell text and labels for the specified POV.
Example
Set CTU = HS.OpenCellTextUnit("S#Actual.Y#2014","","","")
Set CTU = HS.OpenCellTextUnit("S#Actual.Y#2014.P{.[Base]}.A{.[Base]}","","Period","Ascending")
Set CTU = HS.OpenCellTextUnit("S#Actual.Y#2014.E{.[Base]}.P{.[Base]}","CouponRate","LABEL","Ascending")
Set CTU = HS.OpenCellTextUnit("S#Actual.Y#2014.E{.[Base]}.P{.[Base]}.A#Purchases","","Brands","Descending")
If you want to retrieve cell text for multiple labels, you can enter the labels as comma-separatedvalues. If you do not specify any value for Label(s), all labels are retrieved.
Example
Set CTU = HS.OpenCellTextUnit("A#Sales","Label-1,Label-2","Label","Descending")
OpenDataUnitGets the data unit to process during consolidation, calculation, or translation. This function canbe used in these types of rules:
l Calculation
l Translation
l Consolidation
Syntax
HS.OpenDataUnit(POVExpression)
where POVExpression is a POV. As part of the POV Expression, the function supports user-defined and system lists for Account, ICP, C1, C2, C3, and C4.
Return Value
When used in the Sub Consolidate subroutine, returns all records with data but returns onlyaccounts that are flagged as consolidated.
When used in the Sub Calculate or Sub Translate subroutine, returns all records containing data,including accounts that are flagged as consolidated.
Note: An account is consolidated if its IsConsolidated attribute = True.
312
Example
Set DataUnit=HS.OpenDataUnit{“A{TotalRev.[Base]}.C1{C1Top.[Base]}.C2{MyC2List}.C3#[None]”)
OpenDataUnitSortedGets the data units to process during calculation, translation, or consolidation, with data sortedin the order specified. This function can be used in these types of rules:
l Calculation
l Translation
l Consolidation
Syntax
HS.OpenDataUnitSorted(POVExpression, <dimension to be sorted>, Ascending or Descending)
where POVExpression is a POV string, <dimension to be sorted> is a dimension name string,and can only be one of these six dimensions: “Account” or “A”, “ICP” or “I”, “Custom1” or“C1”, “Custom2” or “C2”, “Custom3” or “C3”, “Custom4” or “C4”. You must specify one ofthe following: Account, ICP, Custom1, Custom2, Custom3, Custom4. The third parameter is astring value (“Ascending” or “A”, or “Descending” or “D”).
Examples
Set DataUnit= HS.OpenDataUnitSorted(“S#Actual.E#Group1”,”C1”,”Ascending”)
OwnedGets the owned entity of the entity pair currently processed. This function is used in EquityPickUp rules.
Syntax
HS.Entity.Owned
Return Value
The owned entity.
Example
Owned=HS.Entity.Owned
OwnerGets the owner of the entity pair currently processed. This function is used in Equity PickUprules.
313
Syntax
HS.Entity.Owner
Return Value
The owner entity.
Example
Owner=HS.Entity.Owner
PConGets the percentage of consolidation for the current member or a specified member. Thisfunction can be used in these types of rules:
l Calculation
l Translation
l Consolidation
l Allocation
Syntax
HS.Node.PCon("S#Scenario.Y#Year.P#Period.E#Entity")HS.Node.PCon("")
Note: Use a blank string ("") to apply this function to the current member.
Table 73 Syntax for PCon Function
Parameter Description
Scenario Name of a valid Scenario dimension member.
Year A valid year.
Period A valid period.
Entity Name of a valid Entity dimension member.
Return Value
The percentage of consolidation for the member.
Example
This example gets the percent consolidation for the specified point of view:
Pcon = HS.Node.PCon("S#Actual.Y#2014.P#January.E#Regional.Connecticut")
314

PEPUGets the percentage of ownership from the Equity Pickup (EPU) table. This function is used inEquity PickUp rules.
Syntax
HS.PEPU(“S#.Y#.P#”,Owner,Owned)
Return Value
The ownership percentage from the EPU table.
Example
HS.PEPU(S#Actual.Y#2014.P#Jan, Group, CT)
or
HS.PEPU(“”,””,””)
Default parameters: if the values are blank, the function returns the percentage of ownership forthe entity pair in the current Scenario, Year, and Period.
Example
Sub EquityPickUp()Owned=Hs.Entity.OwnedOwnerCurrencyTotl=Hs.Entity.DefCurrency & “Total”Hs.Clear “A#Inv.C4#EPU.I#” & OwnedHs.Exp “A#Inv.C4#EPU.I#” & Owned & “=A#EQ.C4#C3Tot.I#[ICPTot].E#” &Owned & “.V#” & OwnerCurrencyTotl & “*” & Hs.PEPU (,,,)End Sub
PeriodNumberGets the period number in the view for the data that is being retrieved. This function can be usedin Dynamic SUB functions.
Syntax
HS.View.PeriodNumber
Return Value
One value for the number of periods of the view.
Example
Hs.Dynamic "A#MarginPct=A#GrossMargin/HS.View.PeriodNumber"
315
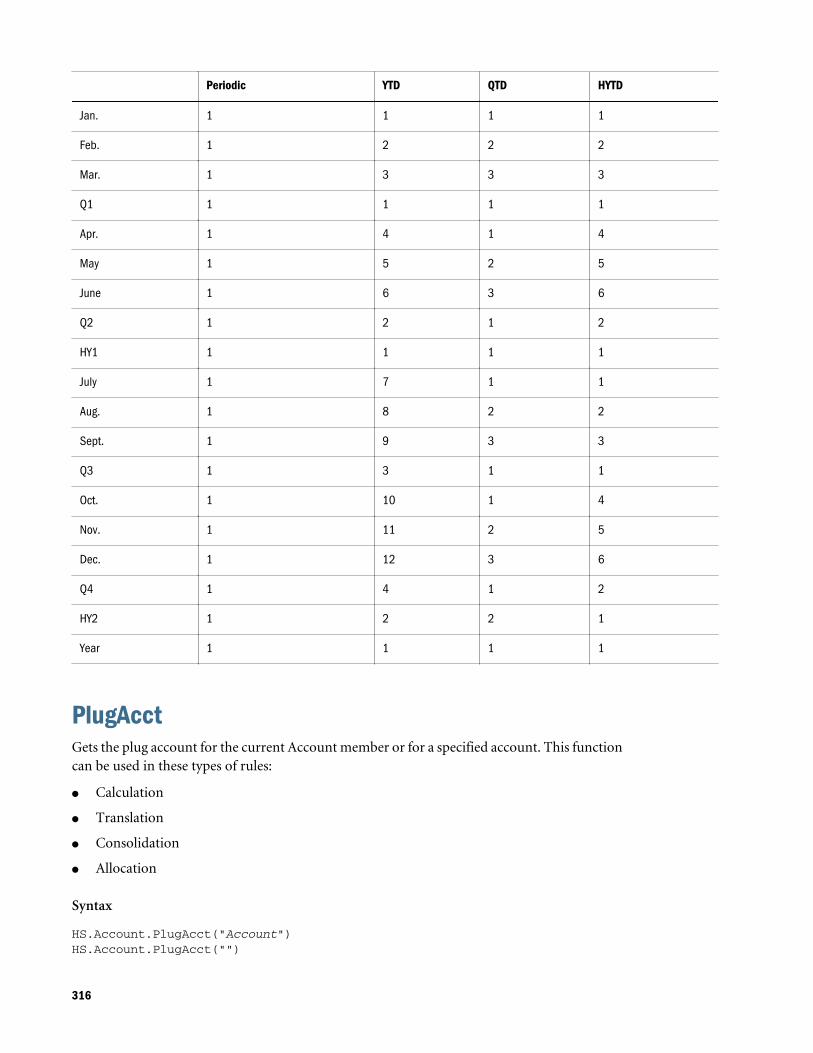
Periodic YTD QTD HYTD
Jan. 1 1 1 1
Feb. 1 2 2 2
Mar. 1 3 3 3
Q1 1 1 1 1
Apr. 1 4 1 4
May 1 5 2 5
June 1 6 3 6
Q2 1 2 1 2
HY1 1 1 1 1
July 1 7 1 1
Aug. 1 8 2 2
Sept. 1 9 3 3
Q3 1 3 1 1
Oct. 1 10 1 4
Nov. 1 11 2 5
Dec. 1 12 3 6
Q4 1 4 1 2
HY2 1 2 2 1
Year 1 1 1 1
PlugAcctGets the plug account for the current Account member or for a specified account. This functioncan be used in these types of rules:
l Calculation
l Translation
l Consolidation
l Allocation
Syntax
HS.Account.PlugAcct("Account")HS.Account.PlugAcct("")
316
where Account is the name of a valid Account dimension member.
Note: You can use a blank string ("") to apply this function to the current member only if youare using it in the Sub Consolidate subroutine.
Return Value
A string that specifies the name of the plug account for the member.
Example
In this example, if the plug account for the Sales account is Plug1 then statements between theIf...Then and End If statements are executed:
If HS.Account.PlugAcct("Sales") = "Plug1" Then ...End If
POwnGets the ultimate percentage of ownership for the current member or for a specified member.This function can be used in these types of rules:
l Calculation
l Translation
l Consolidation
l Allocation
Syntax
HS.Node.POwn("S#Scenario.Y#Year.P#Period.E#Entity")HS.Node.POwn("")
Note: Use a blank string ("") to apply this function to the current member.
Table 74 Syntax for POwn Function
Parameter Description
Scenario Name of a valid Scenario dimension member.
Year A valid year.
Period A valid period.
Entity Name of a valid Entity dimension member.
317
Return Value
The percentage of ownership for the member.
Example
This example gets the percent ownership for the specified point of view:
POwn = HS.Node.POwn("S#Actual.Y#2014.P#January. E#Regional.Connecticut")
PVAForBalanceDetermines the default translation method for BALANCE accounts (ASSET and LIABILITYaccounts). This function overrides the application defaults for currency conversions duringtranslation. This function can be used in these types of rules:
l Calculation
l Translation
l Consolidation
l Allocation
Syntax
HS.AppSettings.PVAForBalance
Return Value
A Boolean expression that is True if BALANCE accounts use the periodic value (PVA) translationmethod; False if BALANCE accounts use the value at exchange rate (VAL) translation method.
Example
In this example, if BALANCE accounts in the application use the periodic value translationmethod, then statements between the If...Then and End If statements are executed:
If HS.AppSettings.PVAForBalance = TRUE Then ...End If
PVAForFlowDetermines the default translation method for FLOW accounts (REVENUE and EXPENSEaccounts). This function overrides the application defaults for currency conversions duringtranslation. This function can be used in these types of rules:
l Calculation
l Translation
l Consolidation
l Allocation
318
Syntax
HS.AppSettings.PVAForFlow
Return Value
A Boolean expression that is True if FLOW accounts use the periodic value (PVA) translationmethod; False if FLOW accounts use the value at exchange rate (VAL) translation method.
Example
In this example, if FLOW accounts in the application use the value at exchange rate translationmethod, then statements between the If...Then and End If statements are executed:
If HS.AppSettings.PVAForFlow = FALSE Then ...End If
RateForBalanceGets the default translation rate account to use for BALANCE accounts (ASSET and LIABILITYaccounts). This function can be used in these types of rules:
l Calculation
l Translation
l Consolidation
l Allocation
Syntax
HS.AppSettings.RateForBalance
Return Value
A string that specifies the rate account containing the default translation rate to use forBALANCE accounts.
Example
In this example, if the default translation rate account for BALANCE accounts is Rate1, thenstatements between the If...Then and End If statements are executed:
If HS.AppSettings.RateForBalance = "Rate1" Then ...End If
RateForFlowGets the default translation rate account to use for FLOW accounts (REVENUE and EXPENSEaccounts). This function can be used in these types of rules:
319
l Calculation
l Translation
l Consolidation
l Allocation
Syntax
HS.AppSettings.RateForFlow
Return Value
A string that specifies the rate account containing the default translation rate to use for FLOWaccounts.
Example
In this example, if the default translation rate account for FLOW accounts is Rate2, thenstatements between the If and End If statements are executed:
If HS.AppSettings.RateForFlow = "Rate2" Then ...End If
ReviewStatusGets the review status for the specified point of view. This function can be used in these typesof rules:
l Calculation
l Translation
l Consolidation
l Allocation
Syntax
HS.ReviewStatus("S#Scenario.Y#Year.P#Period.E#Entity.V#Value")HS.ReviewStatus("")
Note: Use a blank string ("") to apply this function to the current member.
Table 75 Syntax for ReviewStatus Function
Parameter Description
Scenario Name of a valid Scenario dimension member.
Year A valid year
320
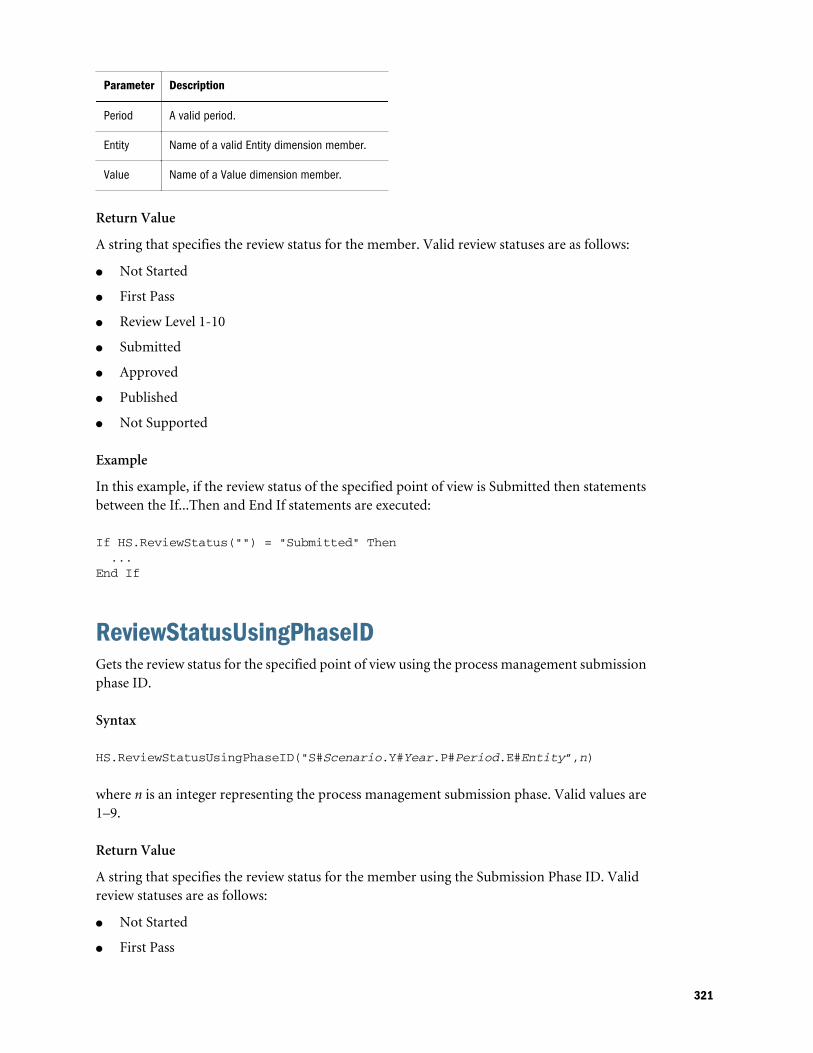
Parameter Description
Period A valid period.
Entity Name of a valid Entity dimension member.
Value Name of a Value dimension member.
Return Value
A string that specifies the review status for the member. Valid review statuses are as follows:
l Not Started
l First Pass
l Review Level 1-10
l Submitted
l Approved
l Published
l Not Supported
Example
In this example, if the review status of the specified point of view is Submitted then statementsbetween the If...Then and End If statements are executed:
If HS.ReviewStatus("") = "Submitted" Then ...End If
ReviewStatusUsingPhaseIDGets the review status for the specified point of view using the process management submissionphase ID.
Syntax
HS.ReviewStatusUsingPhaseID("S#Scenario.Y#Year.P#Period.E#Entity”,n)
where n is an integer representing the process management submission phase. Valid values are1–9.
Return Value
A string that specifies the review status for the member using the Submission Phase ID. Validreview statuses are as follows:
l Not Started
l First Pass
321
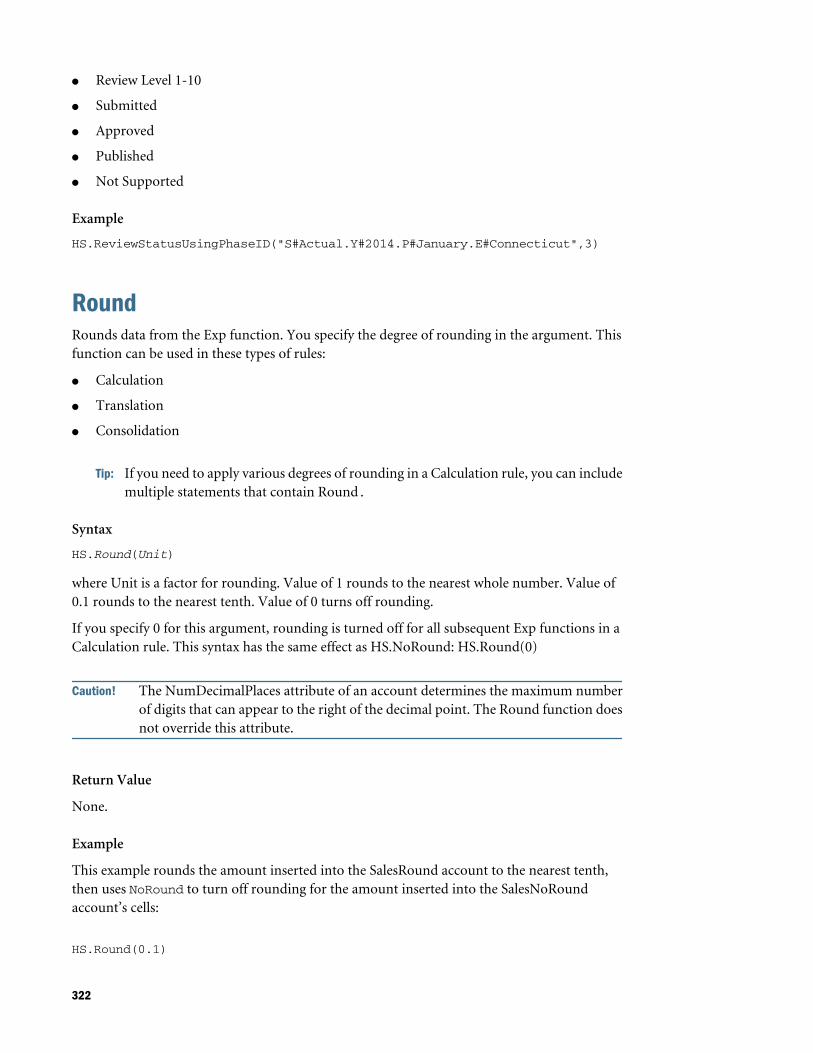
l Review Level 1-10
l Submitted
l Approved
l Published
l Not Supported
Example
HS.ReviewStatusUsingPhaseID("S#Actual.Y#2014.P#January.E#Connecticut",3)
RoundRounds data from the Exp function. You specify the degree of rounding in the argument. Thisfunction can be used in these types of rules:
l Calculation
l Translation
l Consolidation
Tip: If you need to apply various degrees of rounding in a Calculation rule, you can includemultiple statements that contain Round.
Syntax
HS.Round(Unit)
where Unit is a factor for rounding. Value of 1 rounds to the nearest whole number. Value of0.1 rounds to the nearest tenth. Value of 0 turns off rounding.
If you specify 0 for this argument, rounding is turned off for all subsequent Exp functions in aCalculation rule. This syntax has the same effect as HS.NoRound: HS.Round(0)
Caution! The NumDecimalPlaces attribute of an account determines the maximum numberof digits that can appear to the right of the decimal point. The Round function doesnot override this attribute.
Return Value
None.
Example
This example rounds the amount inserted into the SalesRound account to the nearest tenth,then uses NoRound to turn off rounding for the amount inserted into the SalesNoRoundaccount’s cells:
HS.Round(0.1)
322
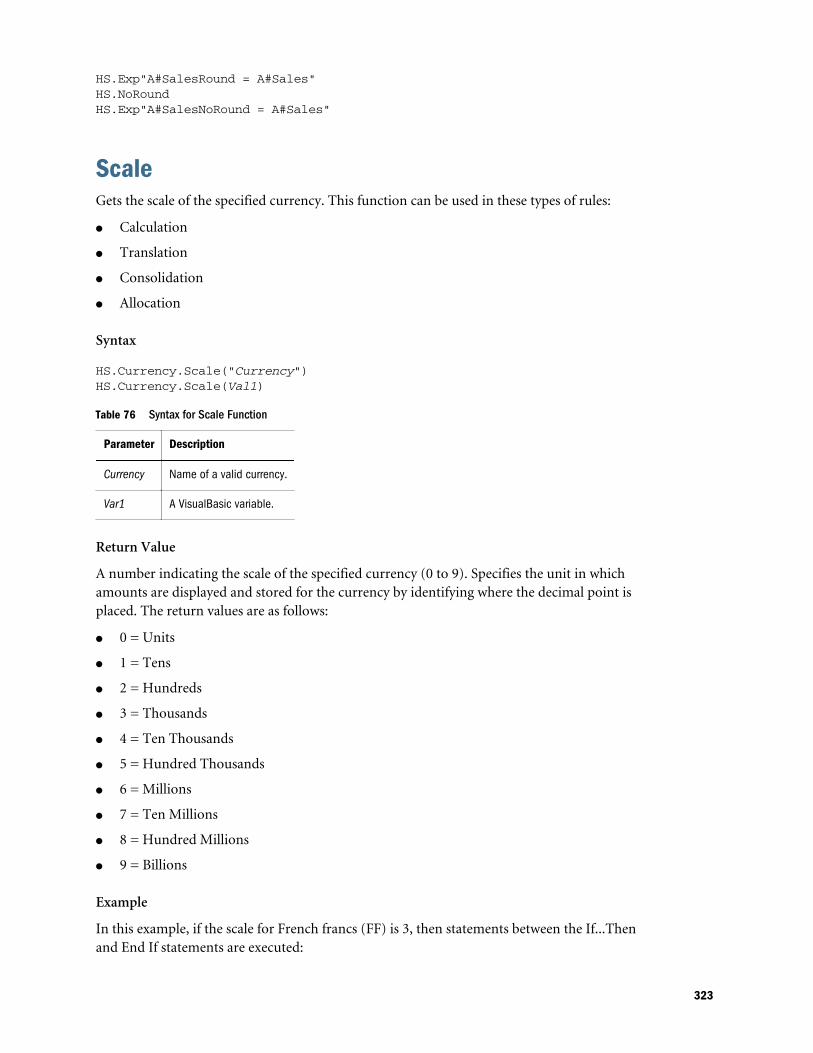
HS.Exp"A#SalesRound = A#Sales"HS.NoRoundHS.Exp"A#SalesNoRound = A#Sales"
ScaleGets the scale of the specified currency. This function can be used in these types of rules:
l Calculation
l Translation
l Consolidation
l Allocation
Syntax
HS.Currency.Scale("Currency")HS.Currency.Scale(Val1)
Table 76 Syntax for Scale Function
Parameter Description
Currency Name of a valid currency.
Var1 A VisualBasic variable.
Return Value
A number indicating the scale of the specified currency (0 to 9). Specifies the unit in whichamounts are displayed and stored for the currency by identifying where the decimal point isplaced. The return values are as follows:
l 0 = Units
l 1 = Tens
l 2 = Hundreds
l 3 = Thousands
l 4 = Ten Thousands
l 5 = Hundred Thousands
l 6 = Millions
l 7 = Ten Millions
l 8 = Hundred Millions
l 9 = Billions
Example
In this example, if the scale for French francs (FF) is 3, then statements between the If...Thenand End If statements are executed:
323
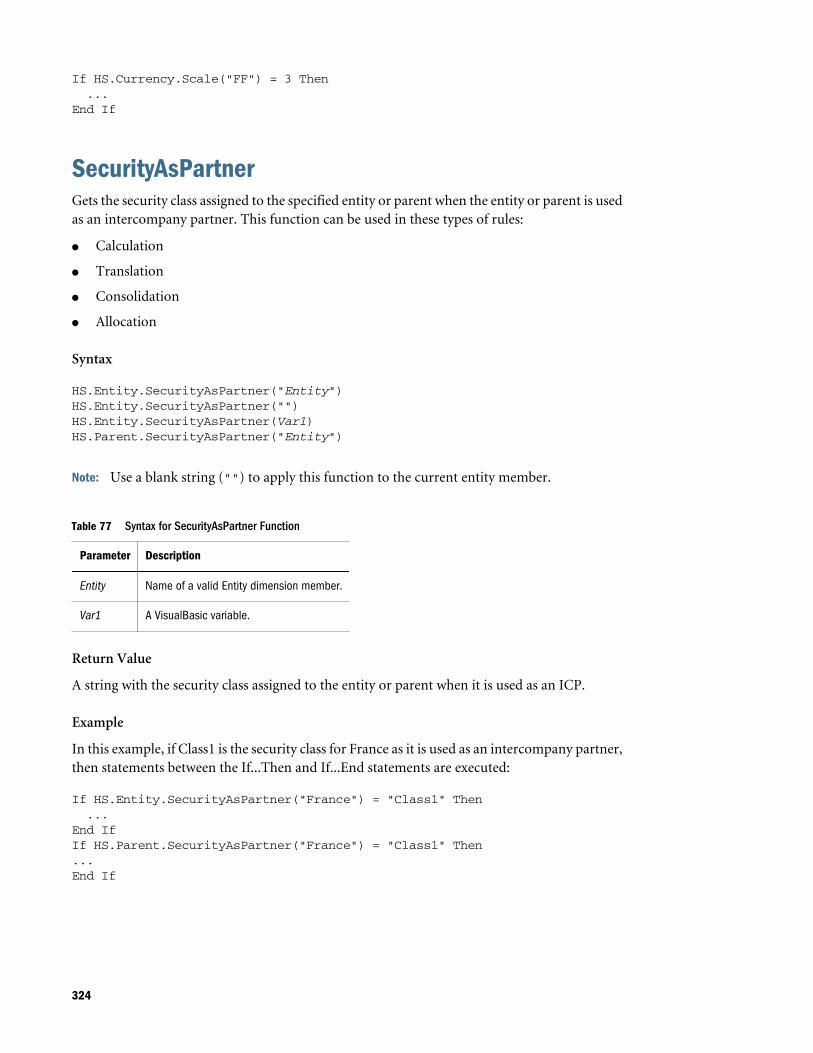
If HS.Currency.Scale("FF") = 3 Then ...End If
SecurityAsPartnerGets the security class assigned to the specified entity or parent when the entity or parent is usedas an intercompany partner. This function can be used in these types of rules:
l Calculation
l Translation
l Consolidation
l Allocation
Syntax
HS.Entity.SecurityAsPartner("Entity")HS.Entity.SecurityAsPartner("")HS.Entity.SecurityAsPartner(Var1)HS.Parent.SecurityAsPartner("Entity")
Note: Use a blank string ("") to apply this function to the current entity member.
Table 77 Syntax for SecurityAsPartner Function
Parameter Description
Entity Name of a valid Entity dimension member.
Var1 A VisualBasic variable.
Return Value
A string with the security class assigned to the entity or parent when it is used as an ICP.
Example
In this example, if Class1 is the security class for France as it is used as an intercompany partner,then statements between the If...Then and If...End statements are executed:
If HS.Entity.SecurityAsPartner("France") = "Class1" Then ...End IfIf HS.Parent.SecurityAsPartner("France") = "Class1" Then...End If
324
SecurityClassGets the security class for the specified member. This function can be used in these types of rules:
l Calculation
l Translation
l Consolidation
l Allocation
Syntax
HS.<Object>.SecurityClass("Element")HS.<Object>.SecurityClass("")HS.<Object>.SecurityClass(Var1)HS.Custom(Dimension).SecurityClass("Element")
Note: Use a blank string ("") to apply this function to the current member.
Table 78 Syntax for SecurityClass Function
Parameter Description
<Object> One of these object keywords:
l Account
l Scenario
l Entity
l Parent
l Custom1...4
l Custom (Custom Dimension Label)
Element Depending on the object selected, name of a valid member of one of these dimensions:
l Account
l Scenario
l Entity
l Custom1...4
l Custom
Var1 A VisualBasic variable.
Return Value
The name of the security class assigned to the specified member.
Example
In this example, if Class1 is the security class assigned to the Cash account, then statementsbetween the If...Then and End If statements are executed:
If HS.Account.SecurityClass("Cash") = "Class1" Then
325
...End IfIf HS.Custom(Dimension).SecurityClass(Member) Then...End If
SetCellTextWithLabelUpdates the cell text information for a specified POV and cell text label. This function can beused in these types of rules:
Calculation
Syntax
HS.SetCellTextWithLabel("POVExpression", "CellTextLabel", "CellTextString")
where POVExpression is a combination of members and CellTextLabel is either the default celltext label (“[Default]”) or one of the valid loaded cell text labels. CellTextString is the text stringto be written. You must specify the Account, ICP, and Custom POV members. The Scenario,Year, Period, View, Entity, and Value default to the current members.
Return Value
None
Example
HS.SetCellTextWithLabel "A#Asset.I#[ICP None].C1#[None].C2#[None].C3#[None].C4#[None]”, “Rating”, “AAA”
SetDataSets an individual record. This function can be used in these types of rules:
l Calculation
l Translation
Syntax
HS.SetData lView, lAccount, lICP, lCustom1, lCustom2, lCustom3,lCustom4, dData, bAddToExistingData
Table 79 Syntax for SetData Function
Parameter Description
lView 0 = Scenario View
1 = Periodic
2 = YTD
lAccount ID number of the account to which you are setting data.
326
Parameter Description
lICP ID number of the ICP to which you are setting data.
lCustom1...4 ID number of the Custom dimension to which you are setting data.
dData The data value to set.
bAddToExistingData True = To accumulate the data
False = To replace the data
Return Value
None.
Example
HS.SetData 2, 002, , , , , , 25000, TRUE
SetDataWithPOVInserts data into the node or currency cube. This function can be used in these following typesof rules:
l Calculation
l Translation
Syntax
HS.SetDataWithPOV POV, dData, bAddToExistingDataInCache
Table 80 Syntax for SetData Function
Parameter Description
POV Valid POV
dData The data value to set.
bAddToExistingData True = To accumulate the data
False = To replace the data
Return Value
None.
Example
HS.SetDataWithPOV "W#YTD.A#Asset.I#[ICP None].C1#None.C2#None.C3#None.C4#None”,25000,TRUE
327
SubmissionGroupGets the process management submission group for a dimension member.
Syntax
HS.<Dimension>.SubmissionGroup(Dimension member)
where Dimension is one of these dimensions: Account, Custom1...4, or Custom
HS.Account.SubmissionGroup(Account)
HS.Custom1.SubmissionGroup(Custom1)
HS.Custom2.SubmissionGroup(Custom2)
HS.Custom3.SubmissionGroup(Custom3)
HS.Custom4.SubmissionGroup(Custom4)
HS.Custom(Custom Dimension Label).SubmissionGroup((CustomDimensionLabel))
Return Value
An integer representing the submission group for the dimension member. Valid values are 1–99.
Example
HS.Account.SubmissionGroup(“Sales”)
HS.Custom("Product").SubmissionGroup("P3000-Phones")
SupportsProcessManagementDetermines if a scenario supports process management. This function can be used in these typesof rules:
l Calculation
l Translation
l Consolidation
l Allocation
Syntax
HS.Scenario.SupportsProcessManagement("Scenario")HS.Scenario.SupportsProcessManagement("")
Note: Use a blank string ("") to apply this function to the current scenario.
HS.Scenario.SupportsProcessManagement(Var1)
328
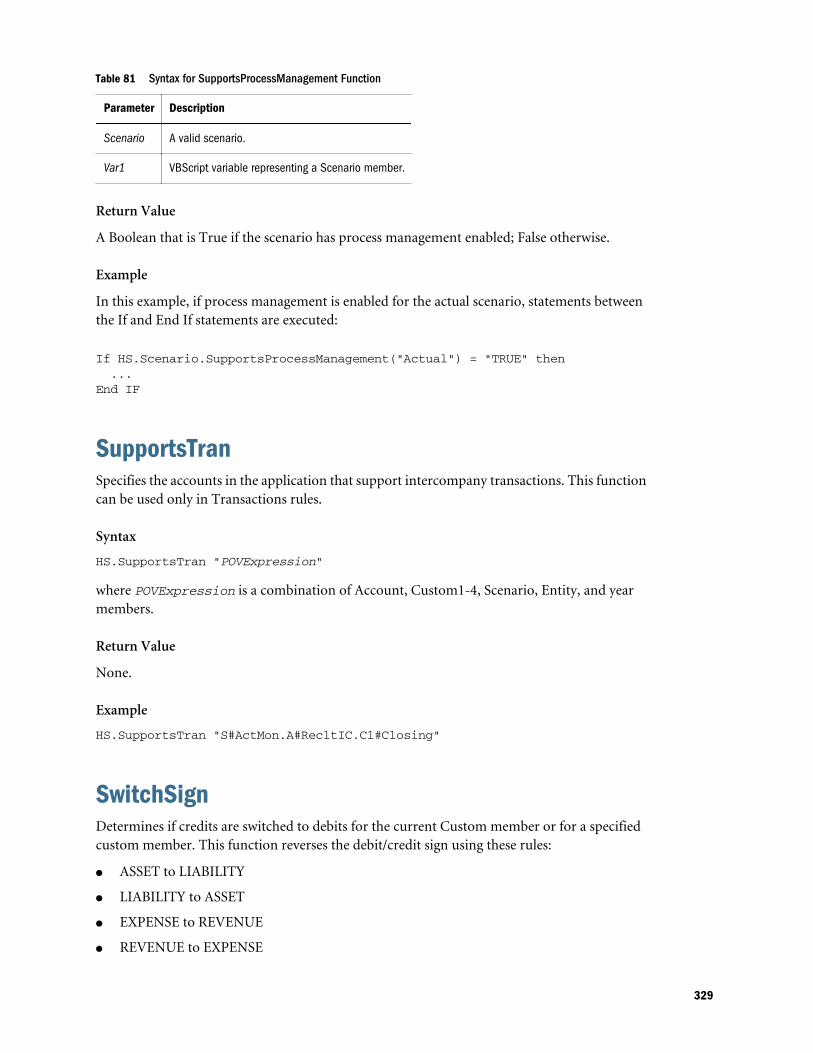
Table 81 Syntax for SupportsProcessManagement Function
Parameter Description
Scenario A valid scenario.
Var1 VBScript variable representing a Scenario member.
Return Value
A Boolean that is True if the scenario has process management enabled; False otherwise.
Example
In this example, if process management is enabled for the actual scenario, statements betweenthe If and End If statements are executed:
If HS.Scenario.SupportsProcessManagement("Actual") = "TRUE" then ...End IF
SupportsTranSpecifies the accounts in the application that support intercompany transactions. This functioncan be used only in Transactions rules.
Syntax
HS.SupportsTran "POVExpression"
where POVExpression is a combination of Account, Custom1-4, Scenario, Entity, and yearmembers.
Return Value
None.
Example
HS.SupportsTran "S#ActMon.A#RecltIC.C1#Closing"
SwitchSignDetermines if credits are switched to debits for the current Custom member or for a specifiedcustom member. This function reverses the debit/credit sign using these rules:
l ASSET to LIABILITY
l LIABILITY to ASSET
l EXPENSE to REVENUE
l REVENUE to EXPENSE
329
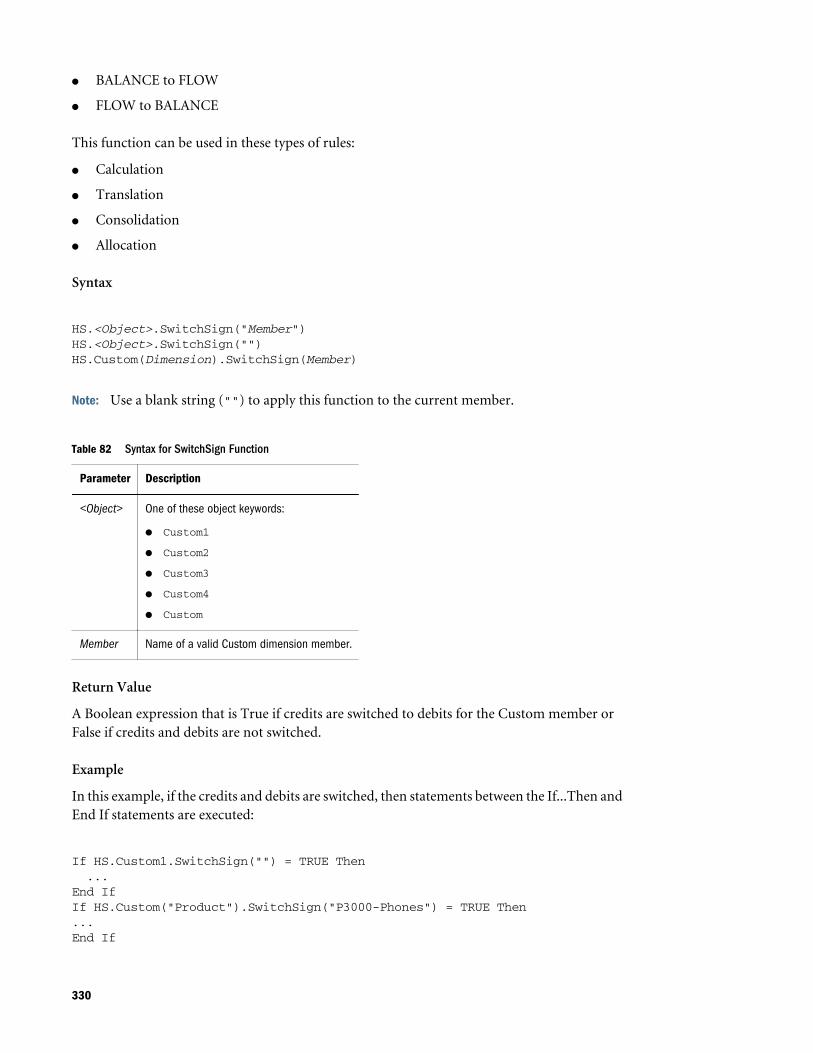
l BALANCE to FLOW
l FLOW to BALANCE
This function can be used in these types of rules:
l Calculation
l Translation
l Consolidation
l Allocation
Syntax
HS.<Object>.SwitchSign("Member")HS.<Object>.SwitchSign("")HS.Custom(Dimension).SwitchSign(Member)
Note: Use a blank string ("") to apply this function to the current member.
Table 82 Syntax for SwitchSign Function
Parameter Description
<Object> One of these object keywords:
l Custom1
l Custom2
l Custom3
l Custom4
l Custom
Member Name of a valid Custom dimension member.
Return Value
A Boolean expression that is True if credits are switched to debits for the Custom member orFalse if credits and debits are not switched.
Example
In this example, if the credits and debits are switched, then statements between the If...Then andEnd If statements are executed:
If HS.Custom1.SwitchSign("") = TRUE Then ...End IfIf HS.Custom("Product").SwitchSign("P3000-Phones") = TRUE Then...End If
330
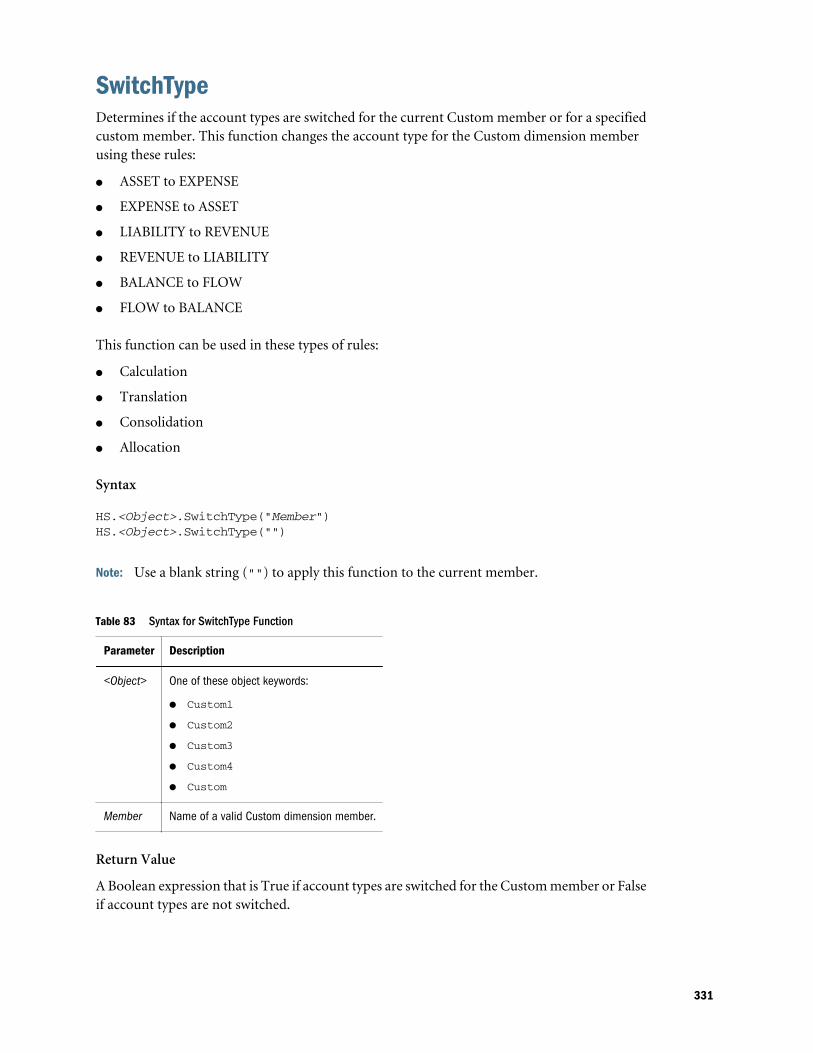
SwitchTypeDetermines if the account types are switched for the current Custom member or for a specifiedcustom member. This function changes the account type for the Custom dimension memberusing these rules:
l ASSET to EXPENSE
l EXPENSE to ASSET
l LIABILITY to REVENUE
l REVENUE to LIABILITY
l BALANCE to FLOW
l FLOW to BALANCE
This function can be used in these types of rules:
l Calculation
l Translation
l Consolidation
l Allocation
Syntax
HS.<Object>.SwitchType("Member")HS.<Object>.SwitchType("")
Note: Use a blank string ("") to apply this function to the current member.
Table 83 Syntax for SwitchType Function
Parameter Description
<Object> One of these object keywords:
l Custom1
l Custom2
l Custom3
l Custom4
l Custom
Member Name of a valid Custom dimension member.
Return Value
A Boolean expression that is True if account types are switched for the Custom member or Falseif account types are not switched.
331
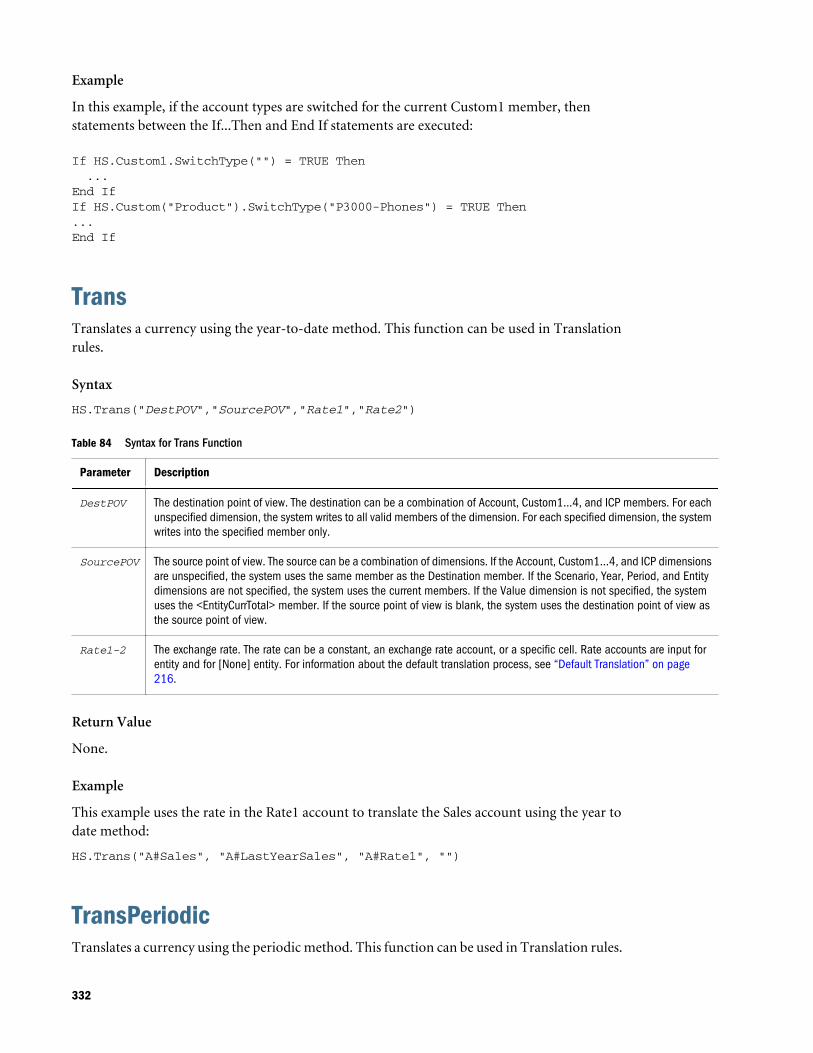
Example
In this example, if the account types are switched for the current Custom1 member, thenstatements between the If...Then and End If statements are executed:
If HS.Custom1.SwitchType("") = TRUE Then ...End IfIf HS.Custom("Product").SwitchType("P3000-Phones") = TRUE Then...End If
TransTranslates a currency using the year-to-date method. This function can be used in Translationrules.
Syntax
HS.Trans("DestPOV","SourcePOV","Rate1","Rate2")
Table 84 Syntax for Trans Function
Parameter Description
DestPOV The destination point of view. The destination can be a combination of Account, Custom1...4, and ICP members. For eachunspecified dimension, the system writes to all valid members of the dimension. For each specified dimension, the systemwrites into the specified member only.
SourcePOV The source point of view. The source can be a combination of dimensions. If the Account, Custom1...4, and ICP dimensionsare unspecified, the system uses the same member as the Destination member. If the Scenario, Year, Period, and Entitydimensions are not specified, the system uses the current members. If the Value dimension is not specified, the systemuses the <EntityCurrTotal> member. If the source point of view is blank, the system uses the destination point of view asthe source point of view.
Rate1-2 The exchange rate. The rate can be a constant, an exchange rate account, or a specific cell. Rate accounts are input forentity and for [None] entity. For information about the default translation process, see “Default Translation” on page216.
Return Value
None.
Example
This example uses the rate in the Rate1 account to translate the Sales account using the year todate method:
HS.Trans("A#Sales", "A#LastYearSales", "A#Rate1", "")
TransPeriodicTranslates a currency using the periodic method. This function can be used in Translation rules.
332
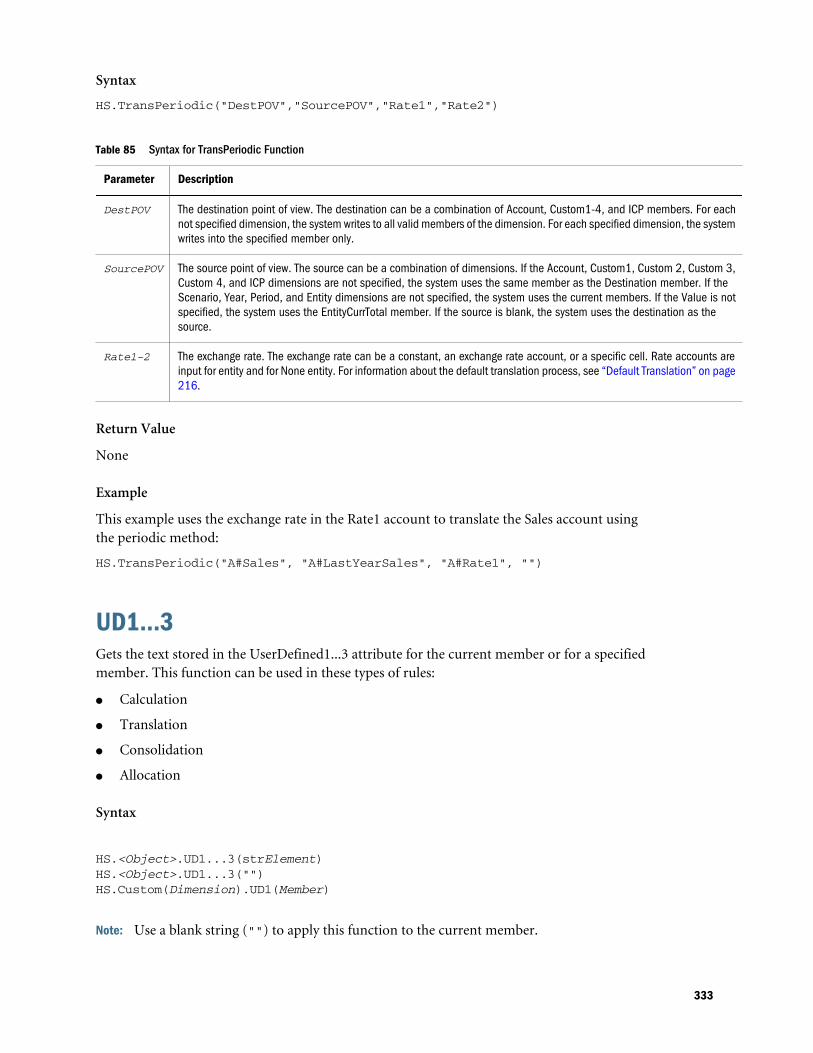
Syntax
HS.TransPeriodic("DestPOV","SourcePOV","Rate1","Rate2")
Table 85 Syntax for TransPeriodic Function
Parameter Description
DestPOV The destination point of view. The destination can be a combination of Account, Custom1-4, and ICP members. For eachnot specified dimension, the system writes to all valid members of the dimension. For each specified dimension, the systemwrites into the specified member only.
SourcePOV The source point of view. The source can be a combination of dimensions. If the Account, Custom1, Custom 2, Custom 3,Custom 4, and ICP dimensions are not specified, the system uses the same member as the Destination member. If theScenario, Year, Period, and Entity dimensions are not specified, the system uses the current members. If the Value is notspecified, the system uses the EntityCurrTotal member. If the source is blank, the system uses the destination as thesource.
Rate1-2 The exchange rate. The exchange rate can be a constant, an exchange rate account, or a specific cell. Rate accounts areinput for entity and for None entity. For information about the default translation process, see “Default Translation” on page216.
Return Value
None
Example
This example uses the exchange rate in the Rate1 account to translate the Sales account usingthe periodic method:
HS.TransPeriodic("A#Sales", "A#LastYearSales", "A#Rate1", "")
UD1...3Gets the text stored in the UserDefined1...3 attribute for the current member or for a specifiedmember. This function can be used in these types of rules:
l Calculation
l Translation
l Consolidation
l Allocation
Syntax
HS.<Object>.UD1...3(strElement)HS.<Object>.UD1...3("")HS.Custom(Dimension).UD1(Member)
Note: Use a blank string ("") to apply this function to the current member.
333

Table 86 Syntax for UD1...3 Functions
Parameter Description
<Object> One of these object keywords:
l Account
l Entity
l Parent
l Scenario
l Custom1...4
l Custom
Element Depending on the object selected, name of a valid member of one of these dimensions:
l Account
l Entity
l Parent
l Scenario
l Custom1...4
l Custom
Return Value
A string that contains the user-defined text stored for the member.
Example
In this example, if the user-defined text for the UD1 account is History, then statements betweenthe If...Then and End If statements are executed.
If HS.Account.UD1(strAccount) = "History" Then ...End IfIf HS.Custom("Product").UD1("P3000-Phones") = "History" Then...End If
ValidationAccountGets the validation account for an application. This function can be used in these types of rules:
l Calculation
l Translation
l Consolidation
l Allocation
Syntax
HS.AppSettings.ValidationAccount
334
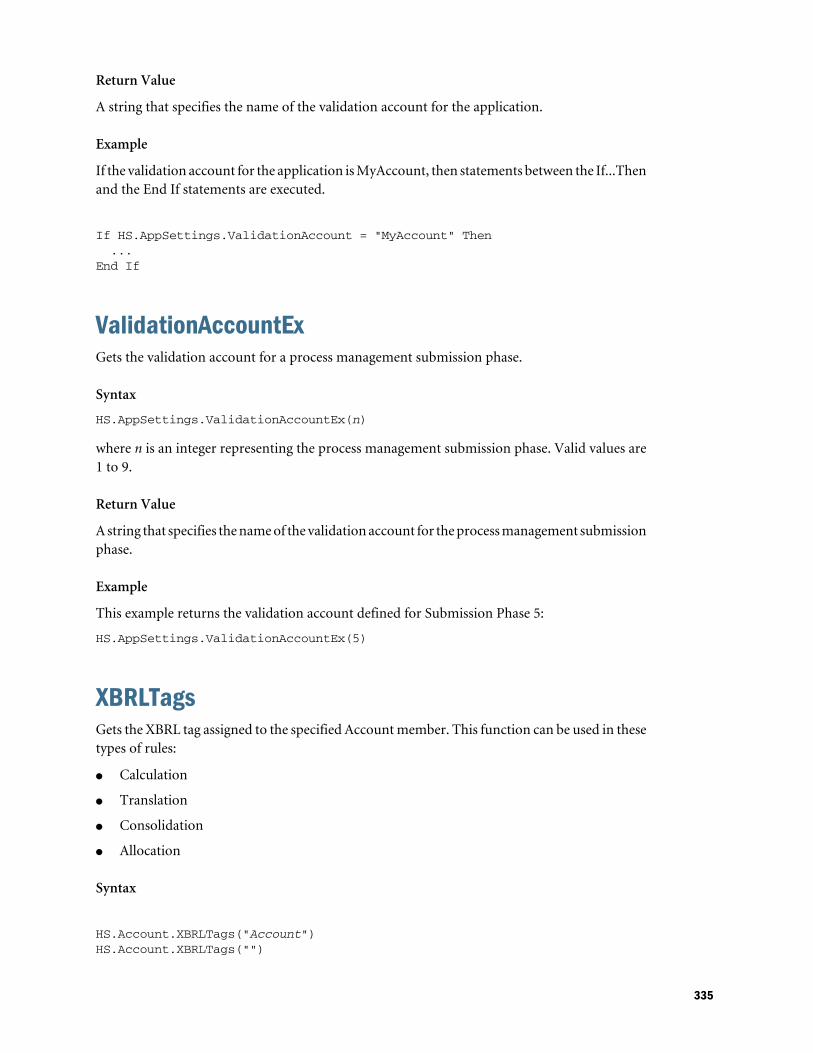
Return Value
A string that specifies the name of the validation account for the application.
Example
If the validation account for the application is MyAccount, then statements between the If...Thenand the End If statements are executed.
If HS.AppSettings.ValidationAccount = "MyAccount" Then ...End If
ValidationAccountExGets the validation account for a process management submission phase.
Syntax
HS.AppSettings.ValidationAccountEx(n)
where n is an integer representing the process management submission phase. Valid values are1 to 9.
Return Value
A string that specifies the name of the validation account for the process management submissionphase.
Example
This example returns the validation account defined for Submission Phase 5:
HS.AppSettings.ValidationAccountEx(5)
XBRLTagsGets the XBRL tag assigned to the specified Account member. This function can be used in thesetypes of rules:
l Calculation
l Translation
l Consolidation
l Allocation
Syntax
HS.Account.XBRLTags("Account")HS.Account.XBRLTags("")
335
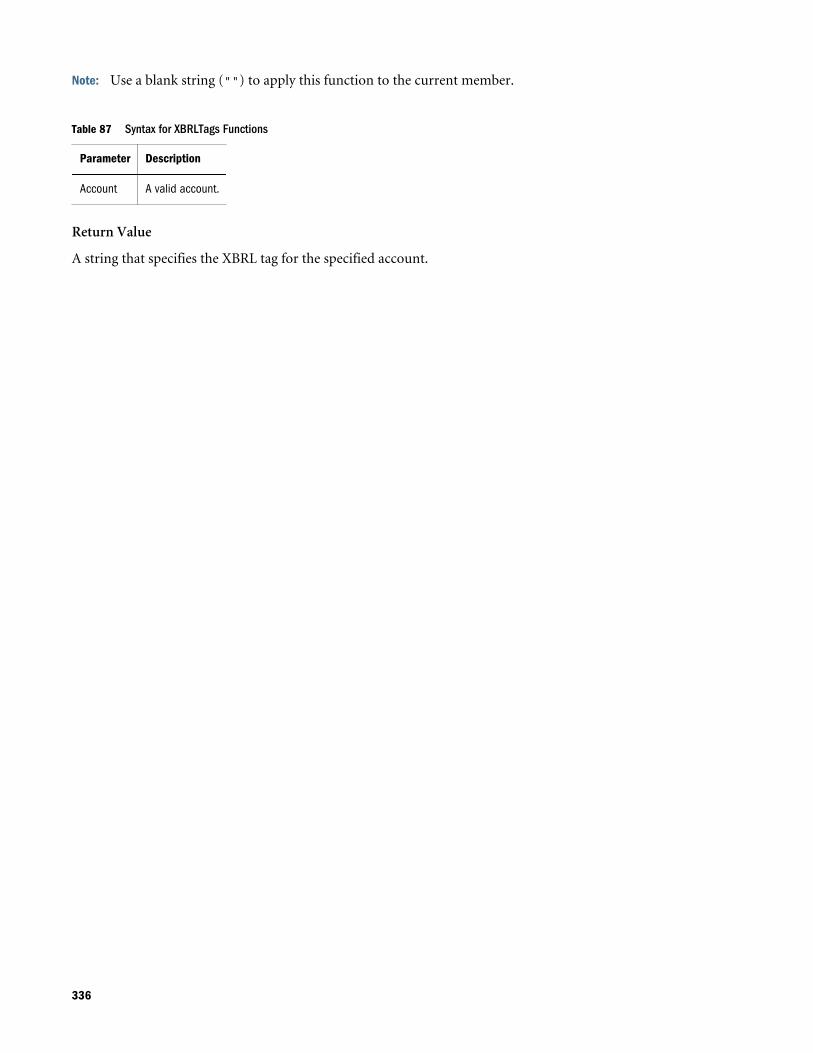
Note: Use a blank string ("") to apply this function to the current member.
Table 87 Syntax for XBRLTags Functions
Parameter Description
Account A valid account.
Return Value
A string that specifies the XBRL tag for the specified account.
336
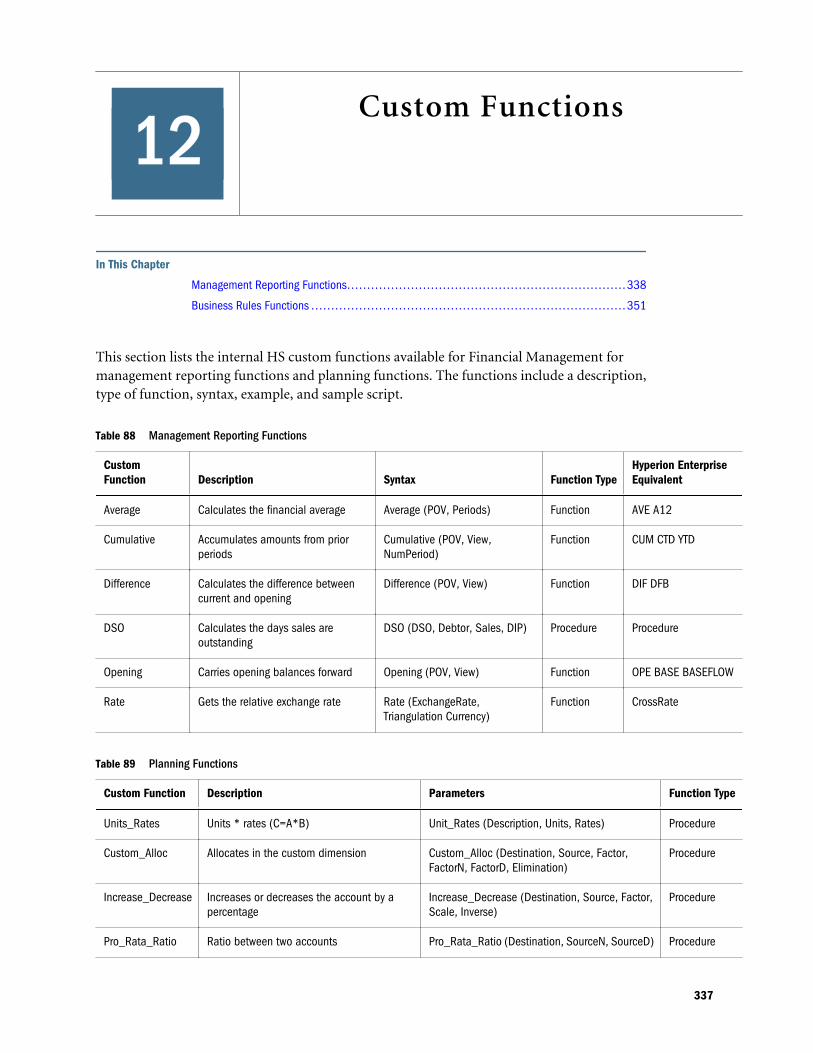
12Custom Functions
In This Chapter
Management Reporting Functions... . . . . . . . . . . . . . . . . . . . . . . . . . . . . . . . . . . . . . . . . . . . . . . . . . . . . . . . . . . . . . . . . . . . 338
Business Rules Functions ... . . . . . . . . . . . . . . . . . . . . . . . . . . . . . . . . . . . . . . . . . . . . . . . . . . . . . . . . . . . . . . . . . . . . . . . . . . . . 351
This section lists the internal HS custom functions available for Financial Management formanagement reporting functions and planning functions. The functions include a description,type of function, syntax, example, and sample script.
Table 88 Management Reporting Functions
CustomFunction Description Syntax Function Type
Hyperion EnterpriseEquivalent
Average Calculates the financial average Average (POV, Periods) Function AVE A12
Cumulative Accumulates amounts from priorperiods
Cumulative (POV, View,NumPeriod)
Function CUM CTD YTD
Difference Calculates the difference betweencurrent and opening
Difference (POV, View) Function DIF DFB
DSO Calculates the days sales areoutstanding
DSO (DSO, Debtor, Sales, DIP) Procedure Procedure
Opening Carries opening balances forward Opening (POV, View) Function OPE BASE BASEFLOW
Rate Gets the relative exchange rate Rate (ExchangeRate,Triangulation Currency)
Function CrossRate
Table 89 Planning Functions
Custom Function Description Parameters Function Type
Units_Rates Units * rates (C=A*B) Unit_Rates (Description, Units, Rates) Procedure
Custom_Alloc Allocates in the custom dimension Custom_Alloc (Destination, Source, Factor,FactorN, FactorD, Elimination)
Procedure
Increase_Decrease Increases or decreases the account by apercentage
Increase_Decrease (Destination, Source, Factor,Scale, Inverse)
Procedure
Pro_Rata_Ratio Ratio between two accounts Pro_Rata_Ratio (Destination, SourceN, SourceD) Procedure
337
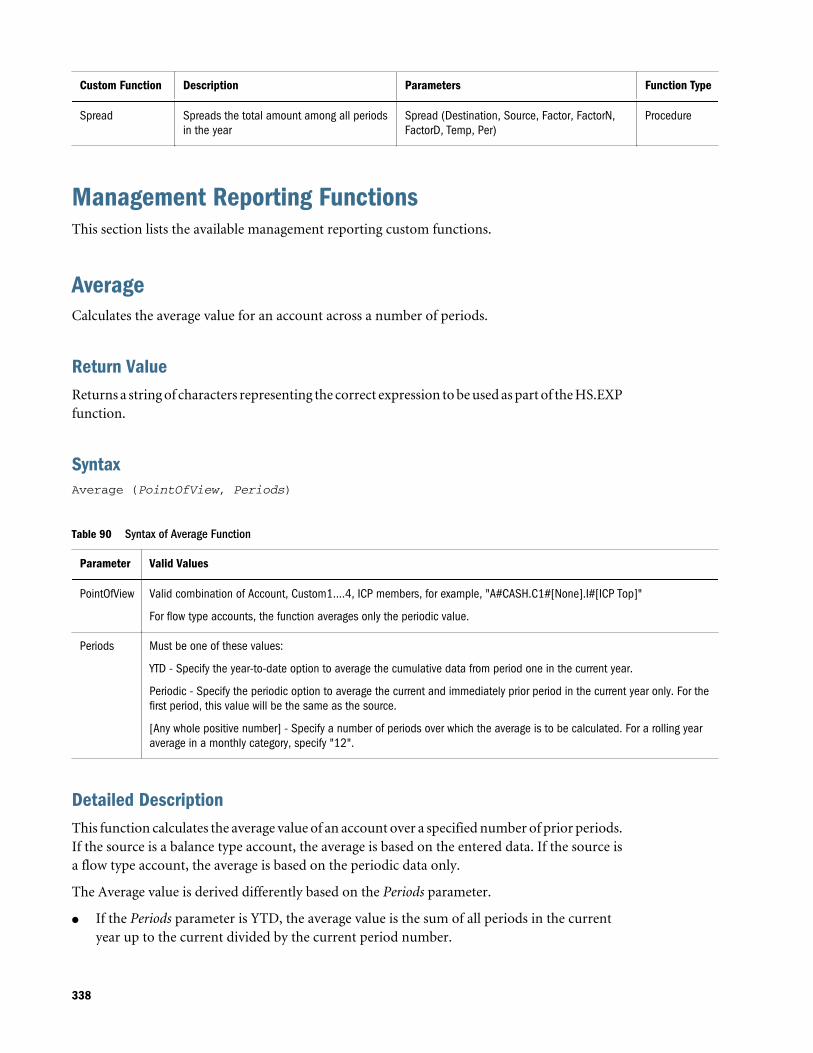
Custom Function Description Parameters Function Type
Spread Spreads the total amount among all periodsin the year
Spread (Destination, Source, Factor, FactorN,FactorD, Temp, Per)
Procedure
Management Reporting FunctionsThis section lists the available management reporting custom functions.
AverageCalculates the average value for an account across a number of periods.
Return ValueReturns a string of characters representing the correct expression to be used as part of the HS.EXPfunction.
SyntaxAverage (PointOfView, Periods)
Table 90 Syntax of Average Function
Parameter Valid Values
PointOfView Valid combination of Account, Custom1….4, ICP members, for example, "A#CASH.C1#[None].I#[ICP Top]"
For flow type accounts, the function averages only the periodic value.
Periods Must be one of these values:
YTD - Specify the year-to-date option to average the cumulative data from period one in the current year.
Periodic - Specify the periodic option to average the current and immediately prior period in the current year only. For thefirst period, this value will be the same as the source.
[Any whole positive number] - Specify a number of periods over which the average is to be calculated. For a rolling yearaverage in a monthly category, specify "12".
Detailed DescriptionThis function calculates the average value of an account over a specified number of prior periods.If the source is a balance type account, the average is based on the entered data. If the source isa flow type account, the average is based on the periodic data only.
The Average value is derived differently based on the Periods parameter.
l If the Periods parameter is YTD, the average value is the sum of all periods in the currentyear up to the current divided by the current period number.
338

l If the Periods parameter is Periodic, the average value is the sum of the current andimmediately prior periods divided by two. If the current period is the first period of the year,the average value is the same value as the source.
l If the Periods parameter is a number, the average value is the sum of the current and eachpreceding period for the specified number of periods, divided by the specified number.
ExampleThe SALES account will return these values for January, February, and March 2014 dependingon the Periods parameter used in the Average custom function. The default view set for thescenario being processed is YTD.
Table 91 Example of Average Function
Account Oct2013 Nov2013 Dec2013 Jan2014 Feb2014 Mar2014
A#Sales 9,000 10,500 11,700 800 1,900 3,200
Average(“A#Sales”, “YTD”) N/A N/A N/A 800 950 1,067
Average(“A#Sales”, “Periodic”) N/A N/A N/A 800 950 1,200
Average(“A#Sales, “3”) N/A N/A N/A 1,167 1,033 1,067
Sample Script
' sample statement written in the calling routineSub Calculate()Hs.Exp "A#AVG_SALES = " & Average("A#Sales", "12")End Sub' programming of the AVERAGE functionFUNCTION Average(strPOV,strPERIOD)DIM nPERIODDIM strCUMDIM istrPOV = UCASE(strPOV)strPERIOD = UCASE(strPERIOD)IF strPERIOD = "PERIODIC" THENIF HS.PERIOD.ISFIRST = TRUE THENnPERIOD = 1ELSE nPERIOD = 2END IFELSEIF strPERIOD = "YTD" THENnPERIOD = HS.PERIOD.NUMBER()ELSEIF CINT(strPERIOD) > 0 THENnPERIOD = CINT(strPERIOD)ELSEEXIT FUNCTIONEND IFFOR i = 0 TO nPERIOD-1IF i = 0 THENstrCUM = strPOV &".W#PERIODIC"
339
ELSEstrCUM = strCUM &"+"& strPOV &".W#PERIODIC.P#CUR-"&iEND IFNEXTAverage = "(("& strCUM &")/"& nPERIOD &")"END FUNCTION
CumulativeCalculates the total of the preceding period’s values for a specified account.
Return ValueReturns a string of characters representing the correct expression to be used as part of the HS.EXPfunction.
SyntaxCumulative (PointOfView, View, NumPeriod)
Table 92 Syntax of Cumulative Function
Parameter Valid Values
PointOfView Valid combination of Account, Custom1….4, ICP members, for example, "A#CASH.C1#[None].I#[ICP Top]"
View Must be one of these values:
" " (double quote) - Based on the default view defined for the scenario being processed (either YTD or Periodic).
YTD - User specifies the Year-to-date option, which overrides the default view set for the scenario.
Periodic - Specify the periodic option, which overrides the default view set for the scenario.
NumPeriod A whole number representing the number of periods in the current scenario to accumulate, starting with the currentperiod.
If NumPeriod is 0 or negative, the function aggregates from the beginning of the current year.
Detailed DescriptionThis function calculates the sum of either the periods specified or the sum year to date for thespecified account. By default, the view of the accumulated data is the scenario default; however,you can override this for flow type accounts.
l If the View parameter is YTD, the function accumulates the year-to-date values.
l If the View parameter is Periodic, the function accumulates the periodic values.
l If the View parameter is blank ( " " ), the function accumulates the data using the scenariodefault view.
340
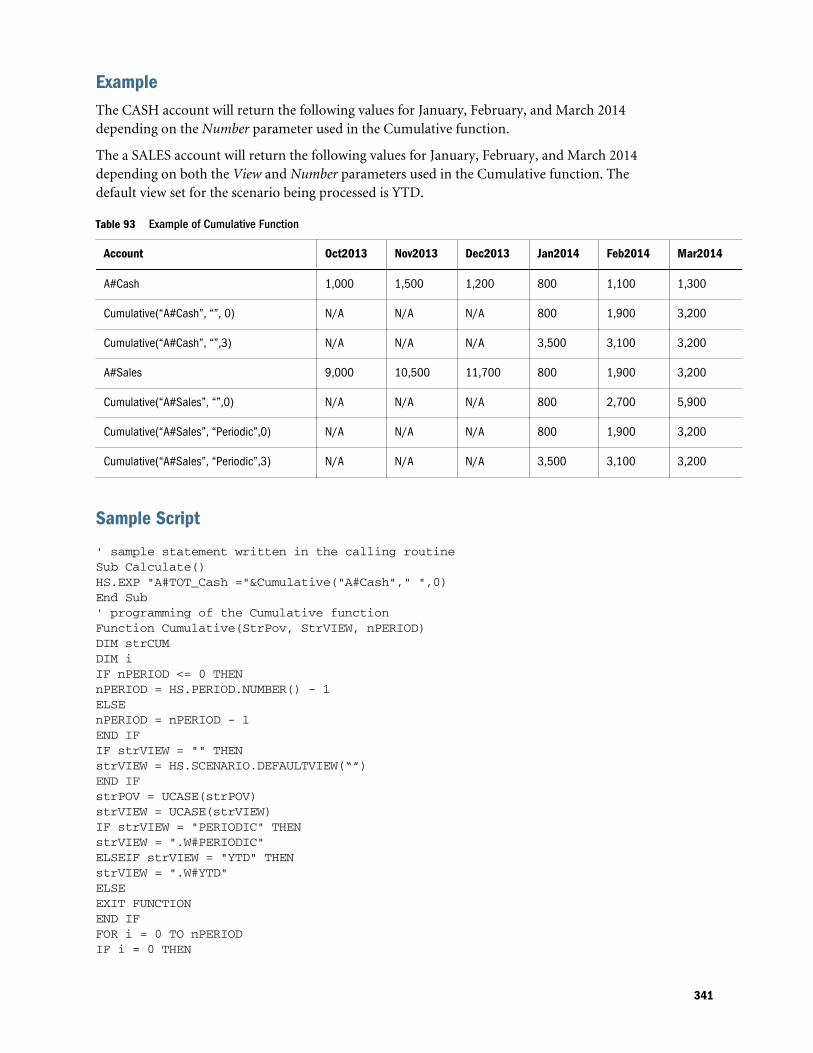
ExampleThe CASH account will return the following values for January, February, and March 2014depending on the Number parameter used in the Cumulative function.
The a SALES account will return the following values for January, February, and March 2014depending on both the View and Number parameters used in the Cumulative function. Thedefault view set for the scenario being processed is YTD.
Table 93 Example of Cumulative Function
Account Oct2013 Nov2013 Dec2013 Jan2014 Feb2014 Mar2014
A#Cash 1,000 1,500 1,200 800 1,100 1,300
Cumulative(“A#Cash”, “”, 0) N/A N/A N/A 800 1,900 3,200
Cumulative(“A#Cash”, “”,3) N/A N/A N/A 3,500 3,100 3,200
A#Sales 9,000 10,500 11,700 800 1,900 3,200
Cumulative(“A#Sales”, “”,0) N/A N/A N/A 800 2,700 5,900
Cumulative(“A#Sales”, “Periodic”,0) N/A N/A N/A 800 1,900 3,200
Cumulative(“A#Sales”, “Periodic”,3) N/A N/A N/A 3,500 3,100 3,200
Sample Script
' sample statement written in the calling routineSub Calculate()HS.EXP "A#TOT_Cash ="&Cumulative("A#Cash"," ",0)End Sub' programming of the Cumulative functionFunction Cumulative(StrPov, StrVIEW, nPERIOD)DIM strCUMDIM iIF nPERIOD <= 0 THENnPERIOD = HS.PERIOD.NUMBER() - 1ELSEnPERIOD = nPERIOD - 1END IFIF strVIEW = "" THEN strVIEW = HS.SCENARIO.DEFAULTVIEW(“”) END IFstrPOV = UCASE(strPOV)strVIEW = UCASE(strVIEW)IF strVIEW = "PERIODIC" THENstrVIEW = ".W#PERIODIC"ELSEIF strVIEW = "YTD" THENstrVIEW = ".W#YTD"ELSEEXIT FUNCTIONEND IFFOR i = 0 TO nPERIODIF i = 0 THEN
341
strCUM = strPOV & strVIEWELSEstrCUM = strCUM &"+"& strPOV & strVIEW &".P#CUR-"&iEND IFNEXT Cumulative = "("& strCUM &")"END FUNCTION
DifferenceCalculates the difference between the current period value and the opening value.
Return ValueReturns a string of characters representing the correct expression to be used as part of the HS.EXPfunction.
SyntaxDifference (PointOfView, View)
Table 94 Syntax of Difference Function
Parameter Valid Values
PointOfView Valid combination of Account, Custom1….4, ICP members, for example, "A#CASH.C1#[None].I#[ICP Top]"
View Must be one of these values:
" " (double quote) - Based on the default view defined for the scenario being processed (either YTD or Periodic).
YTD - Specify the Year-to-date option, which overrides the default view set for the scenario.
Periodic - Specify the periodic option, which overrides the default view set for the scenario.
Detailed DescriptionThis function calculates the difference between the value of the current period and the openingvalue. (Current - Opening)
The opening value is derived differently based on the View parameter passed to the function.
l If the View parameter is YTD, the opening value is retrieved from the last period of the prioryear.
l If the View parameter is Periodic, the opening value is retrieved from the prior period of thecurrent year. If the current period is the first period of the year, the opening value is retrievedfrom the last period of the prior year.
l If the View parameter is blank ( " " ), the opening value is based upon the default data viewof the scenario.
342
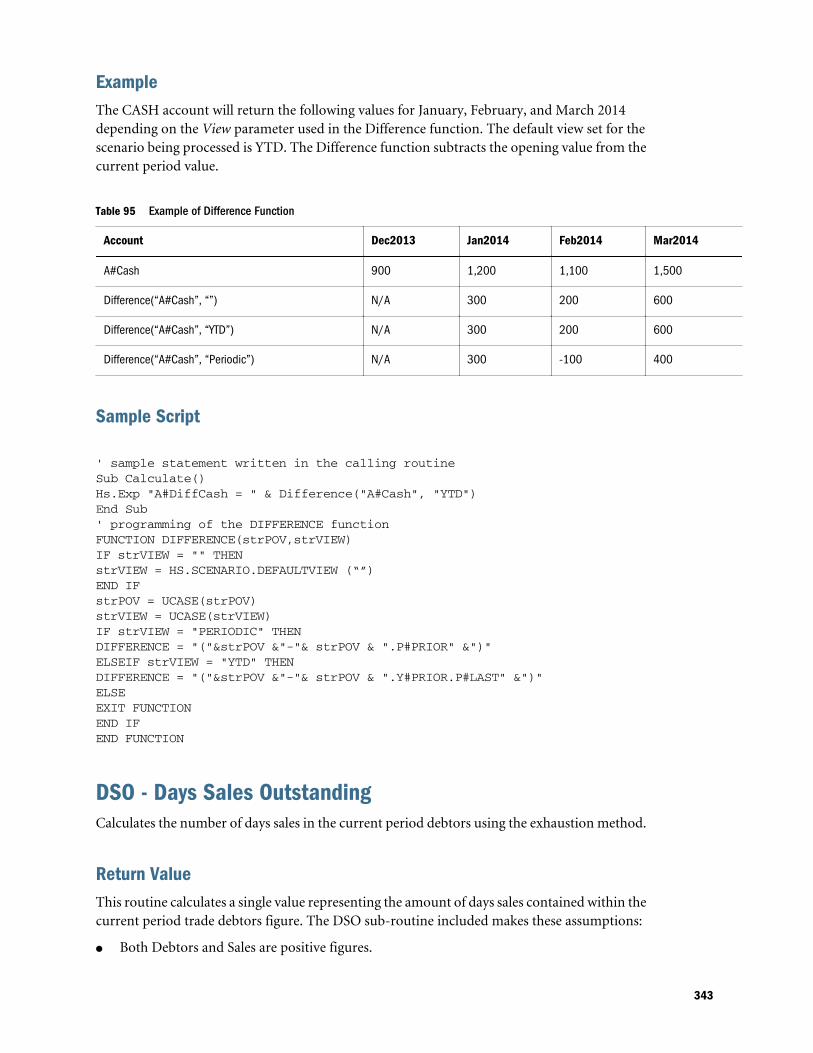
ExampleThe CASH account will return the following values for January, February, and March 2014depending on the View parameter used in the Difference function. The default view set for thescenario being processed is YTD. The Difference function subtracts the opening value from thecurrent period value.
Table 95 Example of Difference Function
Account Dec2013 Jan2014 Feb2014 Mar2014
A#Cash 900 1,200 1,100 1,500
Difference(“A#Cash”, “”) N/A 300 200 600
Difference(“A#Cash”, “YTD”) N/A 300 200 600
Difference(“A#Cash”, “Periodic”) N/A 300 -100 400
Sample Script
' sample statement written in the calling routineSub Calculate()Hs.Exp "A#DiffCash = " & Difference("A#Cash", "YTD")End Sub' programming of the DIFFERENCE functionFUNCTION DIFFERENCE(strPOV,strVIEW)IF strVIEW = "" THEN strVIEW = HS.SCENARIO.DEFAULTVIEW (“”) END IFstrPOV = UCASE(strPOV)strVIEW = UCASE(strVIEW)IF strVIEW = "PERIODIC" THENDIFFERENCE = "("&strPOV &"-"& strPOV & ".P#PRIOR" &")"ELSEIF strVIEW = "YTD" THENDIFFERENCE = "("&strPOV &"-"& strPOV & ".Y#PRIOR.P#LAST" &")" ELSEEXIT FUNCTIONEND IFEND FUNCTION
DSO - Days Sales OutstandingCalculates the number of days sales in the current period debtors using the exhaustion method.
Return ValueThis routine calculates a single value representing the amount of days sales contained within thecurrent period trade debtors figure. The DSO sub-routine included makes these assumptions:
l Both Debtors and Sales are positive figures.
343
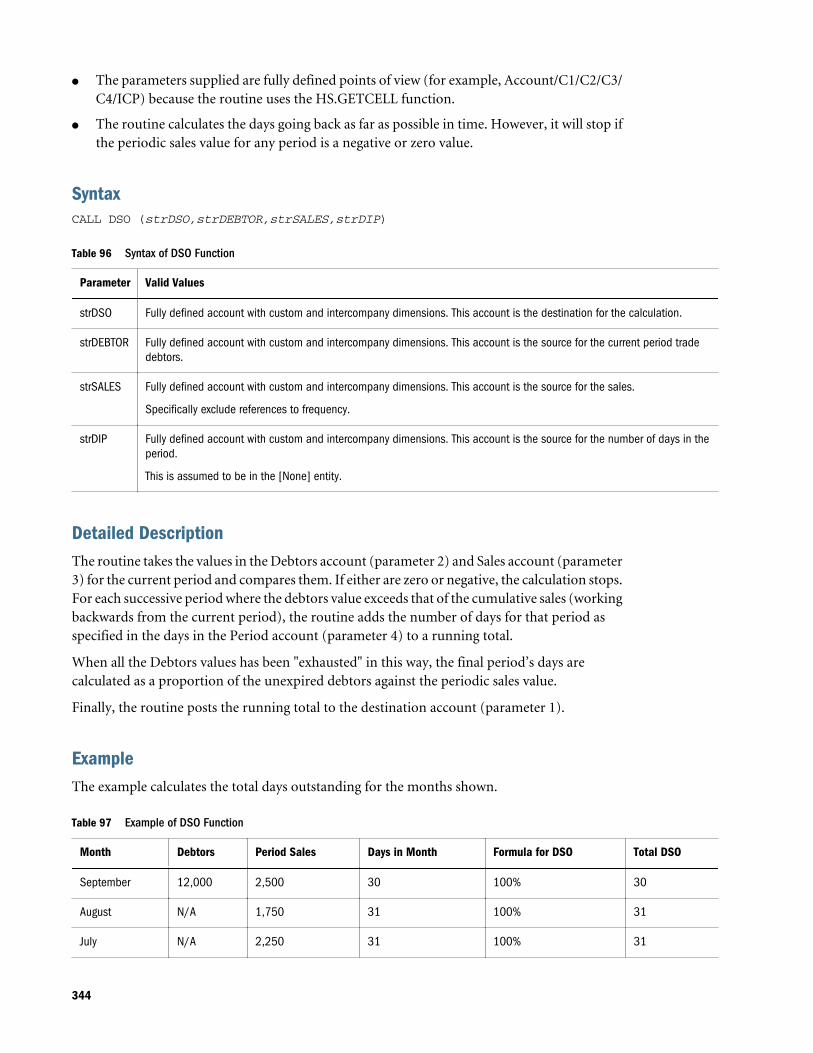
l The parameters supplied are fully defined points of view (for example, Account/C1/C2/C3/C4/ICP) because the routine uses the HS.GETCELL function.
l The routine calculates the days going back as far as possible in time. However, it will stop ifthe periodic sales value for any period is a negative or zero value.
SyntaxCALL DSO (strDSO,strDEBTOR,strSALES,strDIP)
Table 96 Syntax of DSO Function
Parameter Valid Values
strDSO Fully defined account with custom and intercompany dimensions. This account is the destination for the calculation.
strDEBTOR Fully defined account with custom and intercompany dimensions. This account is the source for the current period tradedebtors.
strSALES Fully defined account with custom and intercompany dimensions. This account is the source for the sales.
Specifically exclude references to frequency.
strDIP Fully defined account with custom and intercompany dimensions. This account is the source for the number of days in theperiod.
This is assumed to be in the [None] entity.
Detailed DescriptionThe routine takes the values in the Debtors account (parameter 2) and Sales account (parameter3) for the current period and compares them. If either are zero or negative, the calculation stops.For each successive period where the debtors value exceeds that of the cumulative sales (workingbackwards from the current period), the routine adds the number of days for that period asspecified in the days in the Period account (parameter 4) to a running total.
When all the Debtors values has been "exhausted" in this way, the final period’s days arecalculated as a proportion of the unexpired debtors against the periodic sales value.
Finally, the routine posts the running total to the destination account (parameter 1).
ExampleThe example calculates the total days outstanding for the months shown.
Table 97 Example of DSO Function
Month Debtors Period Sales Days in Month Formula for DSO Total DSO
September 12,000 2,500 30 100% 30
August N/A 1,750 31 100% 31
July N/A 2,250 31 100% 31
344
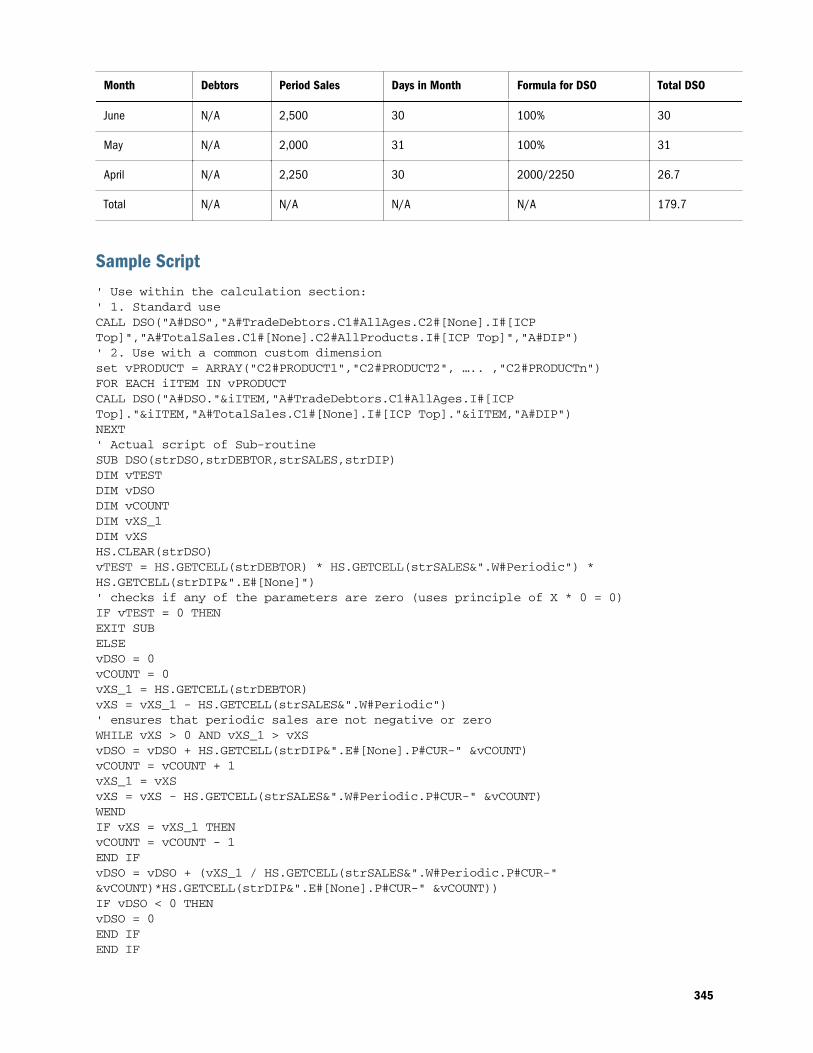
Month Debtors Period Sales Days in Month Formula for DSO Total DSO
June N/A 2,500 30 100% 30
May N/A 2,000 31 100% 31
April N/A 2,250 30 2000/2250 26.7
Total N/A N/A N/A N/A 179.7
Sample Script
' Use within the calculation section:' 1. Standard useCALL DSO("A#DSO","A#TradeDebtors.C1#AllAges.C2#[None].I#[ICP Top]","A#TotalSales.C1#[None].C2#AllProducts.I#[ICP Top]","A#DIP")' 2. Use with a common custom dimensionset vPRODUCT = ARRAY("C2#PRODUCT1","C2#PRODUCT2", ….. ,"C2#PRODUCTn")FOR EACH iITEM IN vPRODUCTCALL DSO("A#DSO."&iITEM,"A#TradeDebtors.C1#AllAges.I#[ICP Top]."&iITEM,"A#TotalSales.C1#[None].I#[ICP Top]."&iITEM,"A#DIP")NEXT' Actual script of Sub-routineSUB DSO(strDSO,strDEBTOR,strSALES,strDIP)DIM vTESTDIM vDSODIM vCOUNTDIM vXS_1DIM vXSHS.CLEAR(strDSO)vTEST = HS.GETCELL(strDEBTOR) * HS.GETCELL(strSALES&".W#Periodic") * HS.GETCELL(strDIP&".E#[None]")' checks if any of the parameters are zero (uses principle of X * 0 = 0)IF vTEST = 0 THENEXIT SUBELSEvDSO = 0vCOUNT = 0vXS_1 = HS.GETCELL(strDEBTOR)vXS = vXS_1 - HS.GETCELL(strSALES&".W#Periodic")' ensures that periodic sales are not negative or zeroWHILE vXS > 0 AND vXS_1 > vXSvDSO = vDSO + HS.GETCELL(strDIP&".E#[None].P#CUR-" &vCOUNT)vCOUNT = vCOUNT + 1vXS_1 = vXSvXS = vXS - HS.GETCELL(strSALES&".W#Periodic.P#CUR-" &vCOUNT)WENDIF vXS = vXS_1 THENvCOUNT = vCOUNT - 1END IFvDSO = vDSO + (vXS_1 / HS.GETCELL(strSALES&".W#Periodic.P#CUR-" &vCOUNT)*HS.GETCELL(strDIP&".E#[None].P#CUR-" &vCOUNT))IF vDSO < 0 THENvDSO = 0END IFEND IF
345
HS.EXP strDSO &"="& vDSOEND SUB
OpeningRetrieves the opening value for a specified, fully defined account (Account/C1/C2/C3/C4/ICP).
Return ValueThis function returns a string of characters representing the correct expression to be used as partof the HS.EXP function.
SyntaxOpening (PointOfView, View)
Table 98 Syntax of Opening Function
Parameter Valid Values
PointOfView Valid combination of Account, Custom1….4, ICP members, for example, "A#CLOSE.C1#[None].I#[ICP Top]"
View Must be one of these values:
" " (double quote) - Based on the default view defined for the scenario being processed (either YTD or Periodic).
YTD - Specify the Year-to-date option, which overrides the default view set for the scenario.
Periodic- Specify the Periodic option, which overrides the default view set for the scenario.
Detailed DescriptionThis function calculates the opening value of a specified account. The opening value is deriveddifferently based on the View parameter.
l If the View parameter is YTD, the opening value is retrieved from the last period of the prioryear.
l If the View parameter is Periodic, the opening value is retrieved from the prior period of thecurrent year. If the current period is the first period of the year, the opening value is retrievedfrom the last period of the prior year.
l If the View parameter is blank ( " " ), the opening value is based on the default data view ofthe scenario.
ExampleThe FA_COST account will return the following values for January, February, and March 2014depending on the View parameters used in the Opening function. The default view set for thescenario being processed is YTD.
346
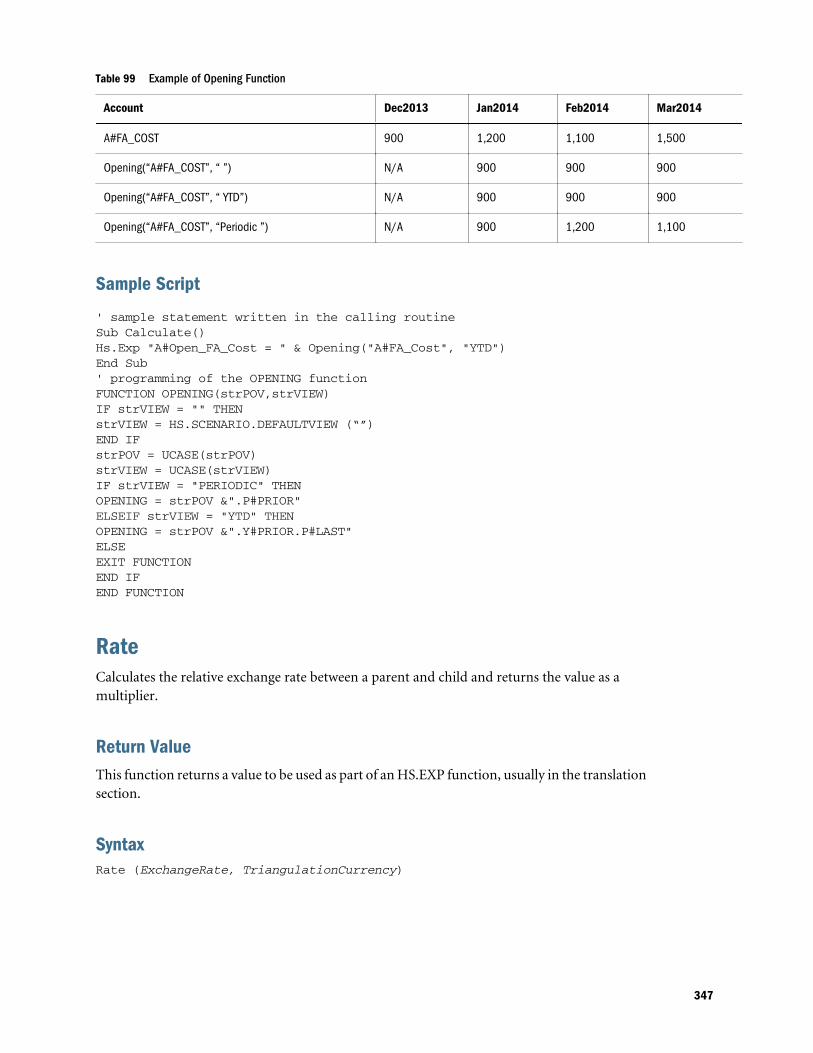
Table 99 Example of Opening Function
Account Dec2013 Jan2014 Feb2014 Mar2014
A#FA_COST 900 1,200 1,100 1,500
Opening(“A#FA_COST”, “ ”) N/A 900 900 900
Opening(“A#FA_COST”, “ YTD”) N/A 900 900 900
Opening(“A#FA_COST”, “Periodic ”) N/A 900 1,200 1,100
Sample Script
' sample statement written in the calling routineSub Calculate()Hs.Exp "A#Open_FA_Cost = " & Opening("A#FA_Cost", "YTD")End Sub' programming of the OPENING functionFUNCTION OPENING(strPOV,strVIEW)IF strVIEW = "" THEN strVIEW = HS.SCENARIO.DEFAULTVIEW (“”) END IFstrPOV = UCASE(strPOV)strVIEW = UCASE(strVIEW)IF strVIEW = "PERIODIC" THENOPENING = strPOV &".P#PRIOR"ELSEIF strVIEW = "YTD" THENOPENING = strPOV &".Y#PRIOR.P#LAST"ELSEEXIT FUNCTIONEND IFEND FUNCTION
RateCalculates the relative exchange rate between a parent and child and returns the value as amultiplier.
Return ValueThis function returns a value to be used as part of an HS.EXP function, usually in the translationsection.
SyntaxRate (ExchangeRate, TriangulationCurrency)
347
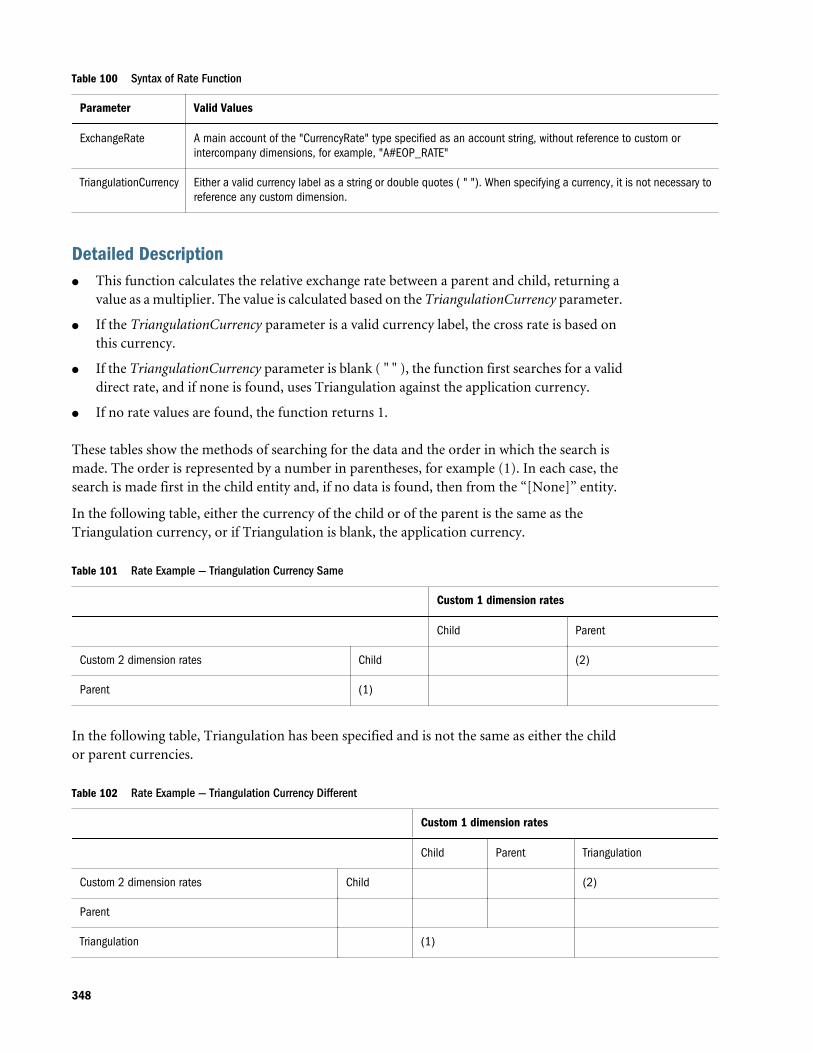
Table 100 Syntax of Rate Function
Parameter Valid Values
ExchangeRate A main account of the "CurrencyRate" type specified as an account string, without reference to custom orintercompany dimensions, for example, "A#EOP_RATE"
TriangulationCurrency Either a valid currency label as a string or double quotes ( " "). When specifying a currency, it is not necessary toreference any custom dimension.
Detailed Descriptionl This function calculates the relative exchange rate between a parent and child, returning a
value as a multiplier. The value is calculated based on the TriangulationCurrency parameter.
l If the TriangulationCurrency parameter is a valid currency label, the cross rate is based onthis currency.
l If the TriangulationCurrency parameter is blank ( " " ), the function first searches for a validdirect rate, and if none is found, uses Triangulation against the application currency.
l If no rate values are found, the function returns 1.
These tables show the methods of searching for the data and the order in which the search ismade. The order is represented by a number in parentheses, for example (1). In each case, thesearch is made first in the child entity and, if no data is found, then from the “[None]” entity.
In the following table, either the currency of the child or of the parent is the same as theTriangulation currency, or if Triangulation is blank, the application currency.
Table 101 Rate Example — Triangulation Currency Same
Custom 1 dimension rates
Child Parent
Custom 2 dimension rates Child (2)
Parent (1)
In the following table, Triangulation has been specified and is not the same as either the childor parent currencies.
Table 102 Rate Example — Triangulation Currency Different
Custom 1 dimension rates
Child Parent Triangulation
Custom 2 dimension rates Child (2)
Parent
Triangulation (1)
348
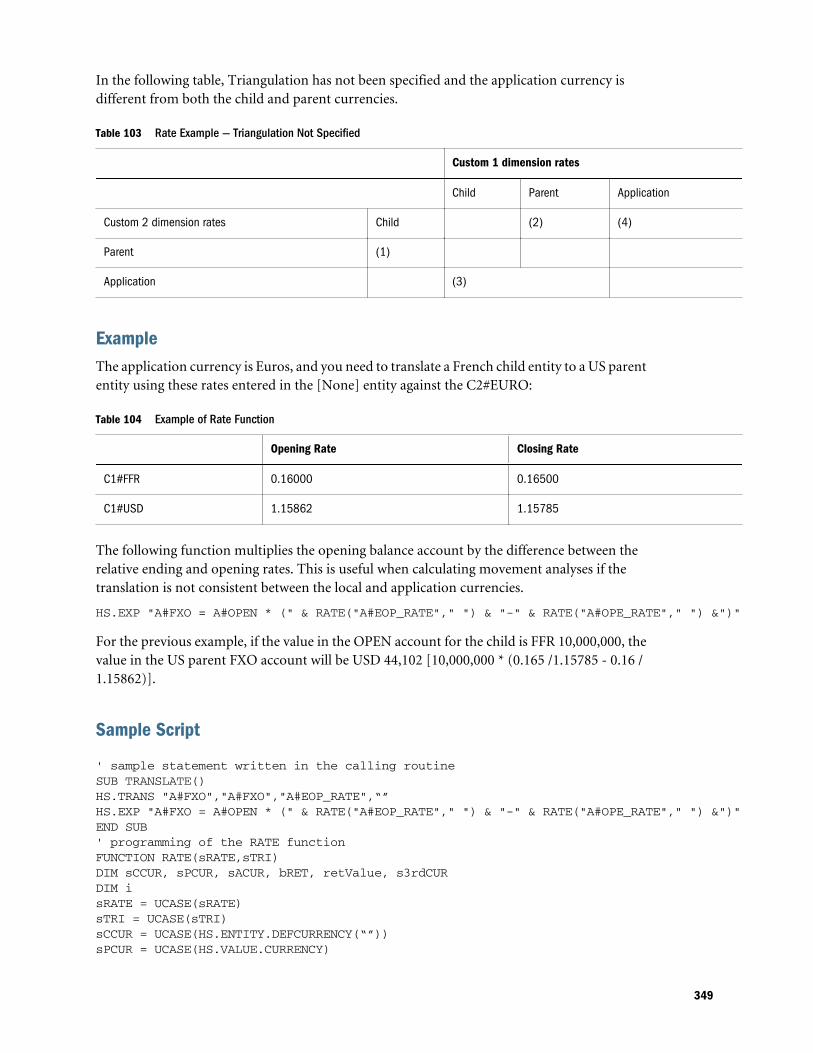
In the following table, Triangulation has not been specified and the application currency isdifferent from both the child and parent currencies.
Table 103 Rate Example — Triangulation Not Specified
Custom 1 dimension rates
Child Parent Application
Custom 2 dimension rates Child (2) (4)
Parent (1)
Application (3)
ExampleThe application currency is Euros, and you need to translate a French child entity to a US parententity using these rates entered in the [None] entity against the C2#EURO:
Table 104 Example of Rate Function
Opening Rate Closing Rate
C1#FFR 0.16000 0.16500
C1#USD 1.15862 1.15785
The following function multiplies the opening balance account by the difference between therelative ending and opening rates. This is useful when calculating movement analyses if thetranslation is not consistent between the local and application currencies.
HS.EXP "A#FXO = A#OPEN * (" & RATE("A#EOP_RATE"," ") & "-" & RATE("A#OPE_RATE"," ") &")"
For the previous example, if the value in the OPEN account for the child is FFR 10,000,000, thevalue in the US parent FXO account will be USD 44,102 [10,000,000 * (0.165 /1.15785 - 0.16 /1.15862)].
Sample Script
' sample statement written in the calling routineSUB TRANSLATE()HS.TRANS "A#FXO","A#FXO","A#EOP_RATE",“”HS.EXP "A#FXO = A#OPEN * (" & RATE("A#EOP_RATE"," ") & "-" & RATE("A#OPE_RATE"," ") &")"END SUB' programming of the RATE functionFUNCTION RATE(sRATE,sTRI)DIM sCCUR, sPCUR, sACUR, bRET, retValue, s3rdCURDIM isRATE = UCASE(sRATE)sTRI = UCASE(sTRI)sCCUR = UCASE(HS.ENTITY.DEFCURRENCY(“”))sPCUR = UCASE(HS.VALUE.CURRENCY)
349
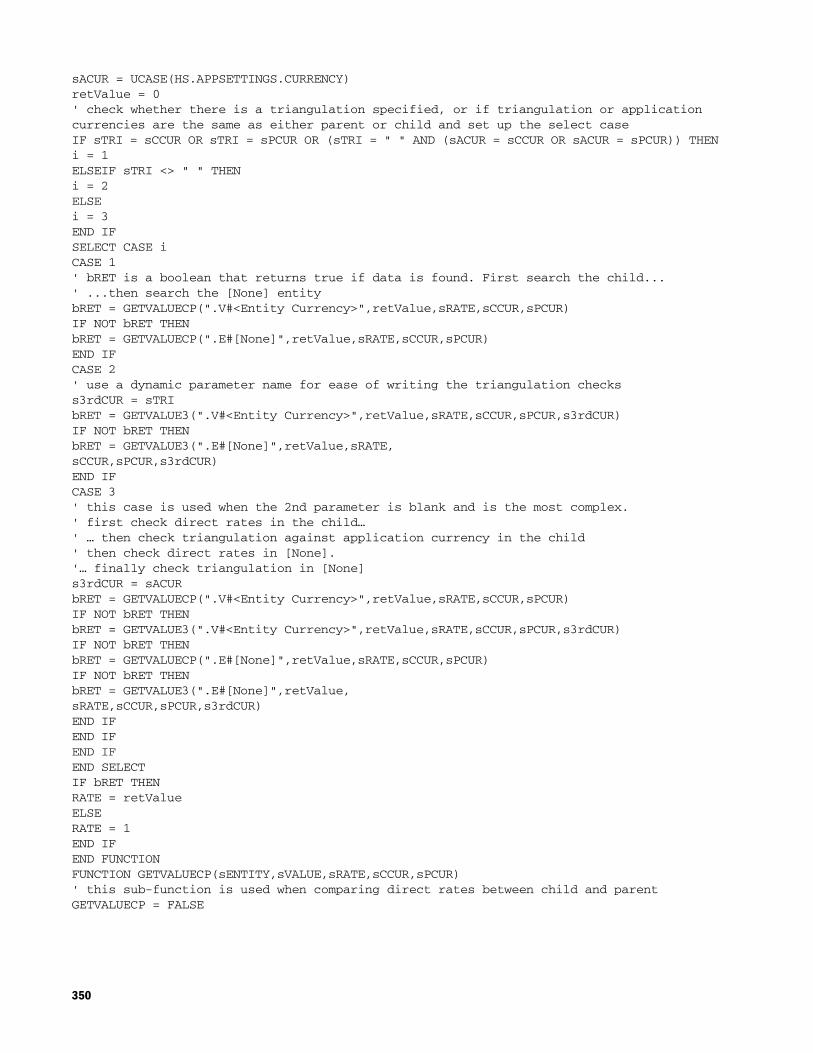
sACUR = UCASE(HS.APPSETTINGS.CURRENCY)retValue = 0' check whether there is a triangulation specified, or if triangulation or application currencies are the same as either parent or child and set up the select caseIF sTRI = sCCUR OR sTRI = sPCUR OR (sTRI = " " AND (sACUR = sCCUR OR sACUR = sPCUR)) THENi = 1ELSEIF sTRI <> " " THENi = 2ELSEi = 3END IFSELECT CASE iCASE 1' bRET is a boolean that returns true if data is found. First search the child...' ...then search the [None] entitybRET = GETVALUECP(".V#<Entity Currency>",retValue,sRATE,sCCUR,sPCUR)IF NOT bRET THENbRET = GETVALUECP(".E#[None]",retValue,sRATE,sCCUR,sPCUR)END IFCASE 2' use a dynamic parameter name for ease of writing the triangulation checkss3rdCUR = sTRIbRET = GETVALUE3(".V#<Entity Currency>",retValue,sRATE,sCCUR,sPCUR,s3rdCUR)IF NOT bRET THENbRET = GETVALUE3(".E#[None]",retValue,sRATE,sCCUR,sPCUR,s3rdCUR)END IFCASE 3' this case is used when the 2nd parameter is blank and is the most complex. ' first check direct rates in the child…' … then check triangulation against application currency in the child' then check direct rates in [None].'… finally check triangulation in [None]s3rdCUR = sACURbRET = GETVALUECP(".V#<Entity Currency>",retValue,sRATE,sCCUR,sPCUR)IF NOT bRET THENbRET = GETVALUE3(".V#<Entity Currency>",retValue,sRATE,sCCUR,sPCUR,s3rdCUR)IF NOT bRET THENbRET = GETVALUECP(".E#[None]",retValue,sRATE,sCCUR,sPCUR)IF NOT bRET THENbRET = GETVALUE3(".E#[None]",retValue,sRATE,sCCUR,sPCUR,s3rdCUR)END IFEND IFEND IFEND SELECTIF bRET THENRATE = retValueELSERATE = 1END IFEND FUNCTIONFUNCTION GETVALUECP(sENTITY,sVALUE,sRATE,sCCUR,sPCUR)' this sub-function is used when comparing direct rates between child and parentGETVALUECP = FALSE
350
' check if data exists for direct rate child to parent. If it does return it.' if no direct child to parent rate check for indirect parent to child rate...' return the inverse of the indirect rate.IF HS.GETCELL(sRATE & ".C1#" & sCCUR & ".C2#" & sPCUR & sENTITY) <> 0 THENsVALUE = CDBL(HS.GETCELL(sRATE & ".C1#" & sCCUR & ".C2#" & sPCUR & sENTITY))GETVALUECP = TRUEELSEIF HS.GETCELL(sRATE & ".C1#" & sPCUR & ".C2#" & sCCUR & sENTITY) <> 0 THENsVALUE = CDBL(1 / HS.GETCELL(sRATE & ".C1#" & sPCUR & ".C2#" & sCCUR & sENTITY))GETVALUECP = TRUEEND IFEND FUNCTIONFUNCTION GETVALUE3(sENTITY,sVALUE,sRATE,sCCUR,sPCUR,s3rdCUR)' this sub-function is used when triangulating' check if data exists for direct rate child to triangulation…' … if it does return the direct relative rate child to parent…' if no direct child to triangulation rate check for indirect triangulation to child rate…' … return the inverse of the indirect relative rates.GETVALUE3 = FALSEIF HS.GETCELL(sRATE & ".C1#" & sCCUR & ".C2#" & s3rdCUR & sENTITY) <> 0 THENsVALUE = CDBL(HS.GETCELL(sRATE & ".C1#" & sCCUR & ".C2#" & s3rdCUR & sENTITY) / HS.GETCELL(sRATE & ".C1#" & sPCUR & ".C2#" & s3rdCUR & sENTITY))GETVALUE3 = TRUEELSEIF HS.GETCELL(sRATE & ".C1#" & s3rdCUR & ".C2#" & sCCUR & sENTITY) <> 0 THENsVALUE = CDBL(HS.GETCELL(sRATE & ".C1#" & s3rdCUR & ".C2#" & sPCUR & sENTITY) / HS.GETCELL(sRATE & ".C1#" & s3rdCUR & ".C2#" & sCCUR & sENTITY))GETVALUE3 = TRUEEND IFEND FUNCTION
Business Rules FunctionsThis section lists business rules custom functions.
Custom_AllocThis function allocates a Source point of view (POV) to a Destination POV using a Factor POVas the basis of Allocation, with the option to reverse post the total allocated amount to anElimination POV. This function is designed for custom dimension allocations.
Return ValueNo return value.
SyntaxCustom_Alloc(Destination,Source,Factor,FactorN,FactorD,Elimination)
351

Table 105 Syntax of Custom_Alloc Function
Parameter Valid Values
Destination A valid destination POV that is a valid combination of Account, ICP and Custom 1-4 members.
Source A valid source POV that is a valid combination of dimension members. Source is the amount that is to be allocated.
Factor A valid source POV. Factor is the Account used to store the allocation factor.
FactorN A valid source POV. FactorN is the numerator factor used as the basis for allocation.
FactorD A valid source POV. FactorD is the denominator factor used as the basis for allocation.
Elimination A valid source POV. Elimination can be an empty string (""), in which case this parameter is ignored. If the Eliminationparameter is set, the amount posted to the Destination POV is multiplied by -1 and posted to the Elimination POV.
Detailed DescriptionThis function allocates a Source POV to a Destination POV using a Factor POV as the basis ofallocation, with the option to reverse post the total allocated amount to an Elimination POV.This function is designed for custom dimension allocations.
The Factor parameter stores the result of FactorN divided by FactorD. This is required to enablethe factor to refer to entities other than the current entity.
If the entity in the Source POV is a parent, that parent must be consolidated before executingthe calculation at the child level. If the parent currency is different from the child currency, thena translation of all relevant currencies must also be run before executing the calculation at thechild level.
It is recommended that variables are set in the calling routine and passed to the Custom_Allocfunction, which define the Destination, Source, Factor, FactorN, FactorD and EliminationPOVs. It is also recommended that the variable names in the calling routine be set to be the sameas the Custom_Alloc function.
The Elimination parameter can be an empty string (""), in which case this parameter is ignored.If the Elimination parameter is set, the amount posted to the Destination POV will be multipliedby -1 and posted to the Elimination POV.
ExampleThe Telephone account is allocated to Products based on a ratio of Products Sales to Total Sales.The inverse of the allocated amount is posted to Allocations account.
Table 106 Example of Custom_Alloc Function
Account Jan2014 Feb2014 Mar2014
A#Telephone.C1#[None] 100 300 400
A#Sales”.C1#Product1 1000 1000 1000
352
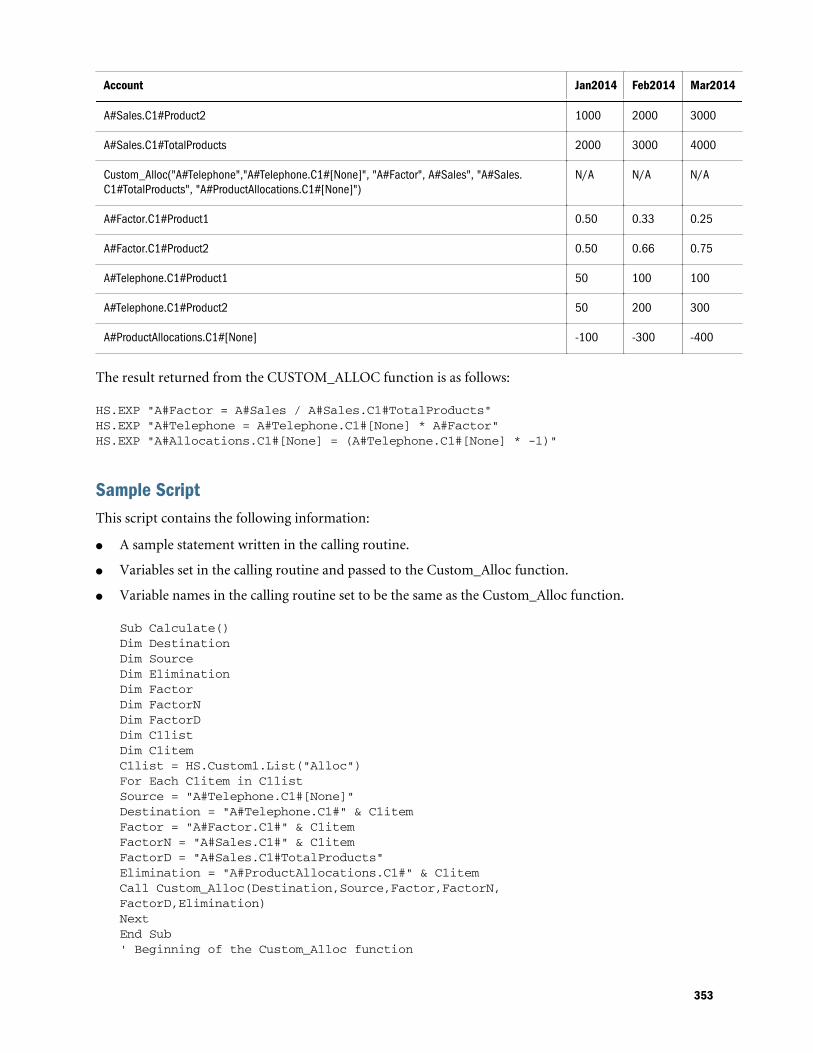
Account Jan2014 Feb2014 Mar2014
A#Sales.C1#Product2 1000 2000 3000
A#Sales.C1#TotalProducts 2000 3000 4000
Custom_Alloc("A#Telephone","A#Telephone.C1#[None]", "A#Factor", A#Sales", "A#Sales.C1#TotalProducts", "A#ProductAllocations.C1#[None]")
N/A N/A N/A
A#Factor.C1#Product1 0.50 0.33 0.25
A#Factor.C1#Product2 0.50 0.66 0.75
A#Telephone.C1#Product1 50 100 100
A#Telephone.C1#Product2 50 200 300
A#ProductAllocations.C1#[None] -100 -300 -400
The result returned from the CUSTOM_ALLOC function is as follows:
HS.EXP "A#Factor = A#Sales / A#Sales.C1#TotalProducts"HS.EXP "A#Telephone = A#Telephone.C1#[None] * A#Factor"HS.EXP "A#Allocations.C1#[None] = (A#Telephone.C1#[None] * -1)"
Sample ScriptThis script contains the following information:
l A sample statement written in the calling routine.
l Variables set in the calling routine and passed to the Custom_Alloc function.
l Variable names in the calling routine set to be the same as the Custom_Alloc function.
Sub Calculate()Dim DestinationDim SourceDim EliminationDim FactorDim FactorNDim FactorDDim C1listDim C1itemC1list = HS.Custom1.List("Alloc")For Each C1item in C1list Source = "A#Telephone.C1#[None]"Destination = "A#Telephone.C1#" & C1itemFactor = "A#Factor.C1#" & C1itemFactorN = "A#Sales.C1#" & C1itemFactorD = "A#Sales.C1#TotalProducts"Elimination = "A#ProductAllocations.C1#" & C1item Call Custom_Alloc(Destination,Source,Factor,FactorN,FactorD,Elimination)Next End Sub' Beginning of the Custom_Alloc function
353
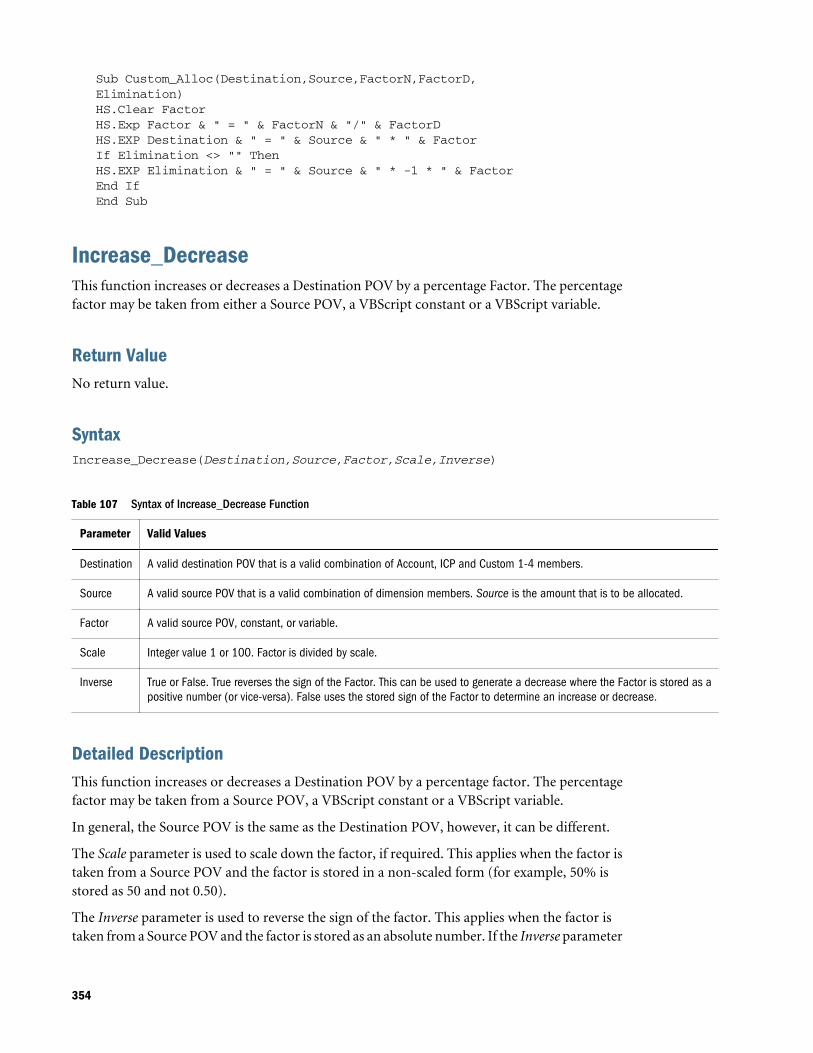
Sub Custom_Alloc(Destination,Source,FactorN,FactorD,Elimination)HS.Clear FactorHS.Exp Factor & " = " & FactorN & "/" & FactorDHS.EXP Destination & " = " & Source & " * " & Factor If Elimination <> "" ThenHS.EXP Elimination & " = " & Source & " * -1 * " & FactorEnd IfEnd Sub
Increase_DecreaseThis function increases or decreases a Destination POV by a percentage Factor. The percentagefactor may be taken from either a Source POV, a VBScript constant or a VBScript variable.
Return ValueNo return value.
SyntaxIncrease_Decrease(Destination,Source,Factor,Scale,Inverse)
Table 107 Syntax of Increase_Decrease Function
Parameter Valid Values
Destination A valid destination POV that is a valid combination of Account, ICP and Custom 1-4 members.
Source A valid source POV that is a valid combination of dimension members. Source is the amount that is to be allocated.
Factor A valid source POV, constant, or variable.
Scale Integer value 1 or 100. Factor is divided by scale.
Inverse True or False. True reverses the sign of the Factor. This can be used to generate a decrease where the Factor is stored as apositive number (or vice-versa). False uses the stored sign of the Factor to determine an increase or decrease.
Detailed DescriptionThis function increases or decreases a Destination POV by a percentage factor. The percentagefactor may be taken from a Source POV, a VBScript constant or a VBScript variable.
In general, the Source POV is the same as the Destination POV, however, it can be different.
The Scale parameter is used to scale down the factor, if required. This applies when the factor istaken from a Source POV and the factor is stored in a non-scaled form (for example, 50% isstored as 50 and not 0.50).
The Inverse parameter is used to reverse the sign of the factor. This applies when the factor istaken from a Source POV and the factor is stored as an absolute number. If the Inverse parameter
354
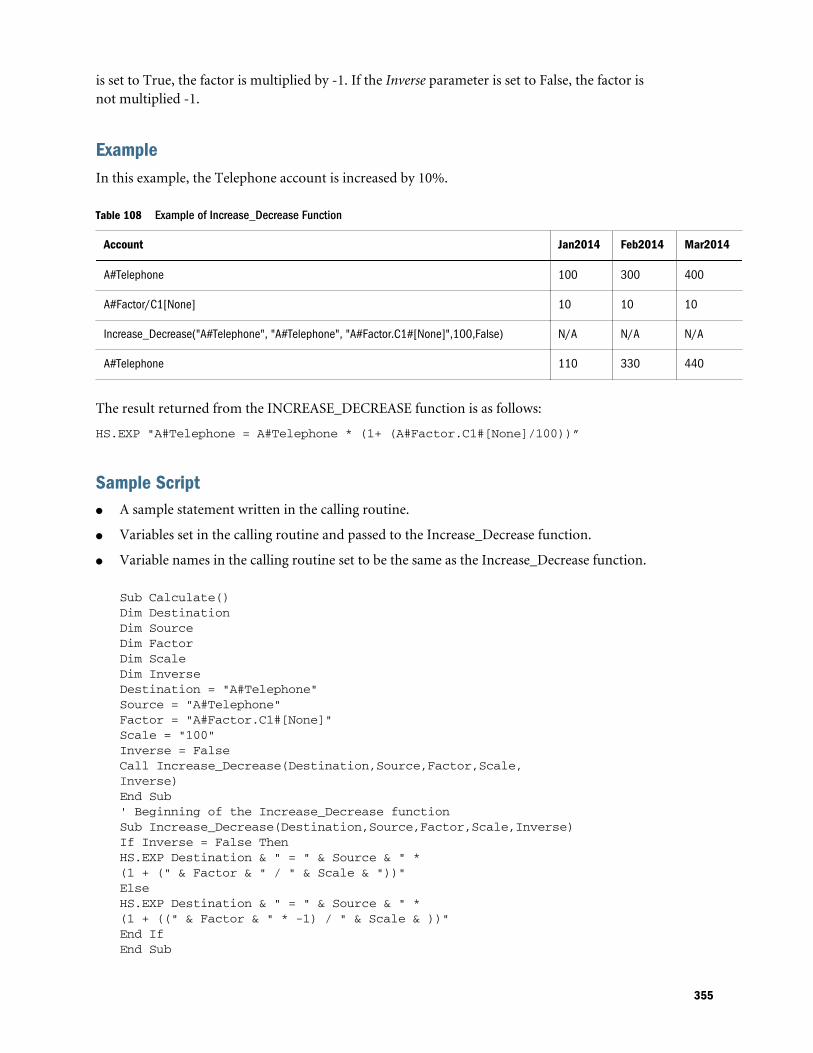
is set to True, the factor is multiplied by -1. If the Inverse parameter is set to False, the factor isnot multiplied -1.
ExampleIn this example, the Telephone account is increased by 10%.
Table 108 Example of Increase_Decrease Function
Account Jan2014 Feb2014 Mar2014
A#Telephone 100 300 400
A#Factor/C1[None] 10 10 10
Increase_Decrease("A#Telephone", "A#Telephone", "A#Factor.C1#[None]",100,False) N/A N/A N/A
A#Telephone 110 330 440
The result returned from the INCREASE_DECREASE function is as follows:
HS.EXP "A#Telephone = A#Telephone * (1+ (A#Factor.C1#[None]/100))”
Sample Scriptl A sample statement written in the calling routine.
l Variables set in the calling routine and passed to the Increase_Decrease function.
l Variable names in the calling routine set to be the same as the Increase_Decrease function.
Sub Calculate()Dim DestinationDim SourceDim FactorDim ScaleDim Inverse Destination = "A#Telephone"Source = "A#Telephone"Factor = "A#Factor.C1#[None]"Scale = "100"Inverse = FalseCall Increase_Decrease(Destination,Source,Factor,Scale,Inverse)End Sub' Beginning of the Increase_Decrease function Sub Increase_Decrease(Destination,Source,Factor,Scale,Inverse)If Inverse = False ThenHS.EXP Destination & " = " & Source & " * (1 + (" & Factor & " / " & Scale & "))"ElseHS.EXP Destination & " = " & Source & " * (1 + ((" & Factor & " * -1) / " & Scale & ))"End IfEnd Sub
355
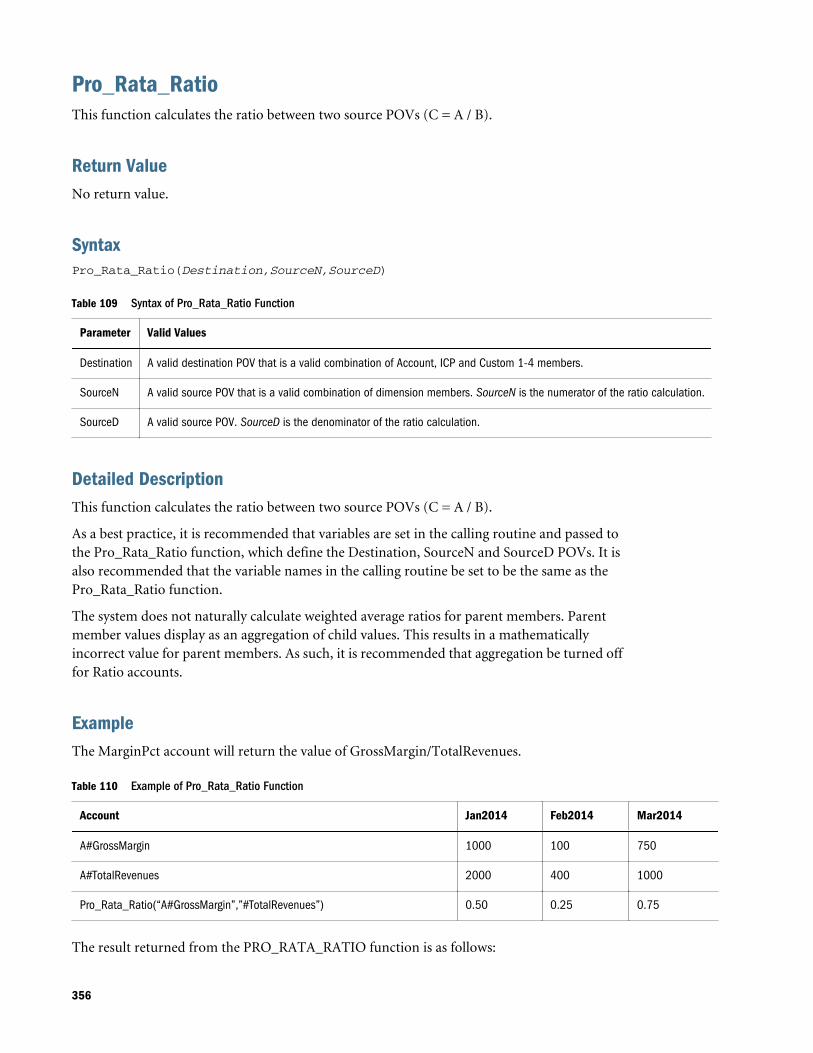
Pro_Rata_RatioThis function calculates the ratio between two source POVs (C = A / B).
Return ValueNo return value.
SyntaxPro_Rata_Ratio(Destination,SourceN,SourceD)
Table 109 Syntax of Pro_Rata_Ratio Function
Parameter Valid Values
Destination A valid destination POV that is a valid combination of Account, ICP and Custom 1-4 members.
SourceN A valid source POV that is a valid combination of dimension members. SourceN is the numerator of the ratio calculation.
SourceD A valid source POV. SourceD is the denominator of the ratio calculation.
Detailed DescriptionThis function calculates the ratio between two source POVs (C = A / B).
As a best practice, it is recommended that variables are set in the calling routine and passed tothe Pro_Rata_Ratio function, which define the Destination, SourceN and SourceD POVs. It isalso recommended that the variable names in the calling routine be set to be the same as thePro_Rata_Ratio function.
The system does not naturally calculate weighted average ratios for parent members. Parentmember values display as an aggregation of child values. This results in a mathematicallyincorrect value for parent members. As such, it is recommended that aggregation be turned offfor Ratio accounts.
ExampleThe MarginPct account will return the value of GrossMargin/TotalRevenues.
Table 110 Example of Pro_Rata_Ratio Function
Account Jan2014 Feb2014 Mar2014
A#GrossMargin 1000 100 750
A#TotalRevenues 2000 400 1000
Pro_Rata_Ratio(“A#GrossMargin”,”#TotalRevenues”) 0.50 0.25 0.75
The result returned from the PRO_RATA_RATIO function is as follows:
356
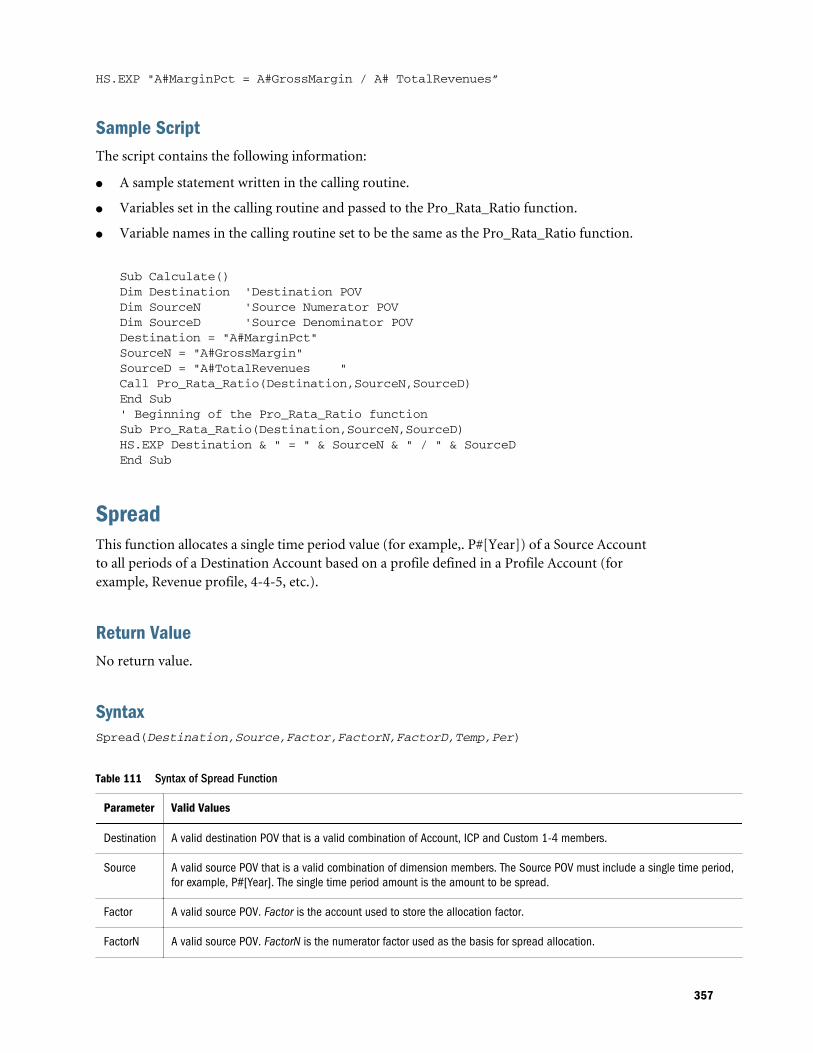
HS.EXP "A#MarginPct = A#GrossMargin / A# TotalRevenues”
Sample ScriptThe script contains the following information:
l A sample statement written in the calling routine.
l Variables set in the calling routine and passed to the Pro_Rata_Ratio function.
l Variable names in the calling routine set to be the same as the Pro_Rata_Ratio function.
Sub Calculate()Dim Destination 'Destination POVDim SourceN 'Source Numerator POV Dim SourceD 'Source Denominator POV Destination = "A#MarginPct"SourceN = "A#GrossMargin"SourceD = "A#TotalRevenues "Call Pro_Rata_Ratio(Destination,SourceN,SourceD)End Sub' Beginning of the Pro_Rata_Ratio functionSub Pro_Rata_Ratio(Destination,SourceN,SourceD)HS.EXP Destination & " = " & SourceN & " / " & SourceDEnd Sub
SpreadThis function allocates a single time period value (for example,. P#[Year]) of a Source Accountto all periods of a Destination Account based on a profile defined in a Profile Account (forexample, Revenue profile, 4-4-5, etc.).
Return ValueNo return value.
SyntaxSpread(Destination,Source,Factor,FactorN,FactorD,Temp,Per)
Table 111 Syntax of Spread Function
Parameter Valid Values
Destination A valid destination POV that is a valid combination of Account, ICP and Custom 1-4 members.
Source A valid source POV that is a valid combination of dimension members. The Source POV must include a single time period,for example, P#[Year]. The single time period amount is the amount to be spread.
Factor A valid source POV. Factor is the account used to store the allocation factor.
FactorN A valid source POV. FactorN is the numerator factor used as the basis for spread allocation.
357

Parameter Valid Values
FactorD A valid source POV. FactorD is the denominator factor used as the basis for spread allocation.
Temp A valid destination Account. Temp is the account that temporarily stores the Source value.
Per A period string that defines the name of the first period in the timeframe, for example, "January". The Temp value is storedin the first period and the parameter is required to refer to this in the calculation.
Detailed DescriptionThis function allocates a single time period value (for example, P#[Year]) of a Source POV toall periods of a Destination POV based on a profile defined in a Profile POV (for example,Revenue profile, 4-4-5, and so on).
Time-based allocations are particularly suited to budgeting applications where amounts are firstentered for the total year, and then later allocated across time periods based on a suitable profile.
The Source POV must contain a single time period. The time period will generally be P#[Year],but could be any single period, such as P#January.
The value in the Source POV is stored by the calculation in a temporary account. This is requiredbecause the source and destination accounts are typically the same account. Where this is thecase, the value in P#[Year] changes as the calculation proceeds from 1 period to the next.Therefore, you must store the value first to be able to refer to it for all time periods.
It is recommended that variables are set in the calling routine and passed to the Spread function,which define the Destination, Source, Profile, Temp, and Period1 parameters. It is alsorecommended that the variable names in the calling routine be set to be the same as the Spreadfunction.
ExampleThe Year value in the Telephone account are allocated across Time Periods using a 4-4-5quarterly ratio.
The result returned from the SPREAD function is as follows:
HS.EXP "A#TempTelephone.C1#[None] = A#Telephone.C1#[None].P#[Year]" (Where Period.Number = 1)HS.EXP "A#Telephone.C1#[None] = A#TempTelephone P#January * E.Globals.A#Profile445.C1#[None].P#Cur / E.Globals.A#Profile445.C1#[None].P#[Year]
Sample ScriptThe script contains the following information:
l A sample statement written in the calling routine.
l Variables set in the calling routine and passed to the Spread function.
l Variable names in the calling routine set to be the same as the Spread function.
358
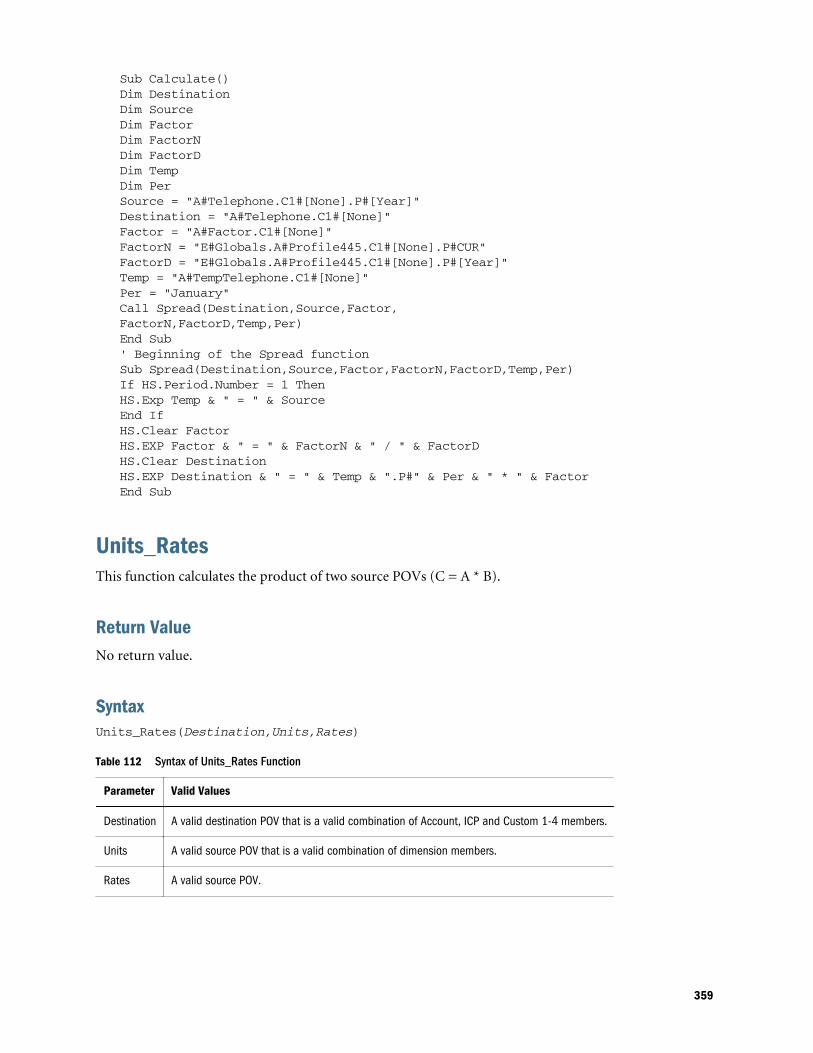
Sub Calculate()Dim DestinationDim SourceDim FactorDim FactorNDim FactorDDim TempDim Per Source = "A#Telephone.C1#[None].P#[Year]"Destination = "A#Telephone.C1#[None]"Factor = "A#Factor.C1#[None]"FactorN = "E#Globals.A#Profile445.C1#[None].P#CUR"FactorD = "E#Globals.A#Profile445.C1#[None].P#[Year]"Temp = "A#TempTelephone.C1#[None]"Per = "January"Call Spread(Destination,Source,Factor,FactorN,FactorD,Temp,Per) End Sub' Beginning of the Spread function Sub Spread(Destination,Source,Factor,FactorN,FactorD,Temp,Per)If HS.Period.Number = 1 Then HS.Exp Temp & " = " & SourceEnd IfHS.Clear FactorHS.EXP Factor & " = " & FactorN & " / " & FactorD HS.Clear DestinationHS.EXP Destination & " = " & Temp & ".P#" & Per & " * " & Factor End Sub
Units_RatesThis function calculates the product of two source POVs (C = A * B).
Return ValueNo return value.
SyntaxUnits_Rates(Destination,Units,Rates)
Table 112 Syntax of Units_Rates Function
Parameter Valid Values
Destination A valid destination POV that is a valid combination of Account, ICP and Custom 1-4 members.
Units A valid source POV that is a valid combination of dimension members.
Rates A valid source POV.
359
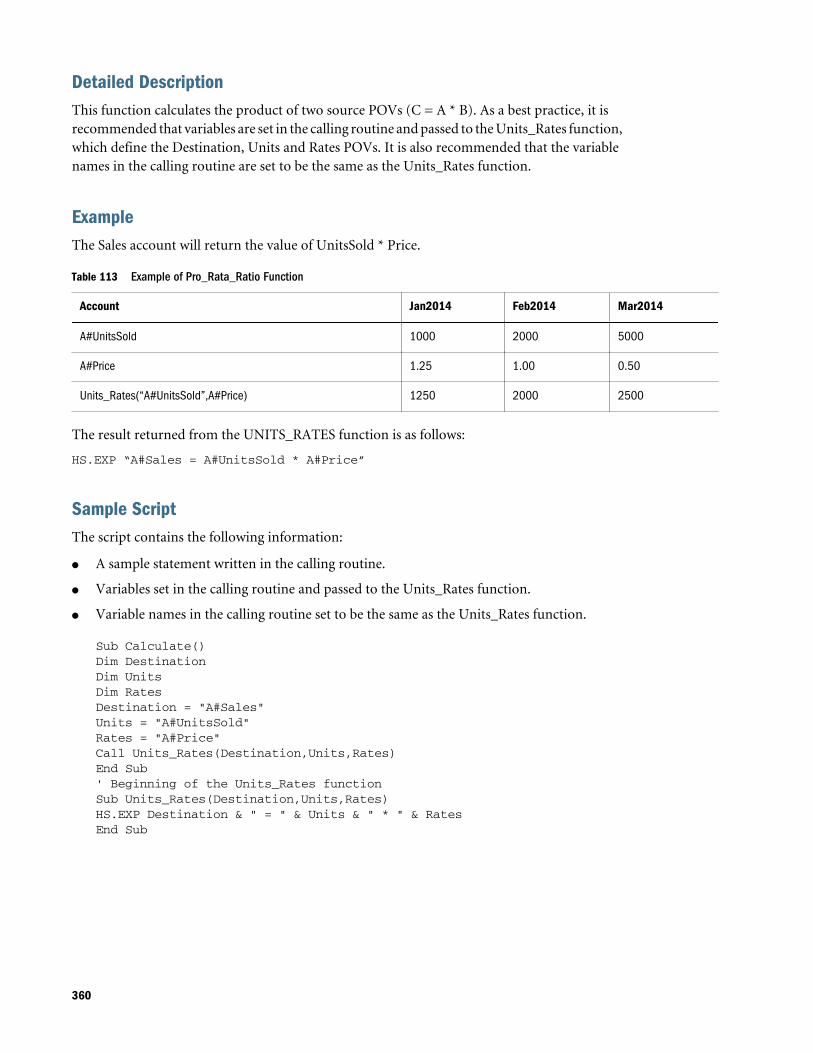
Detailed DescriptionThis function calculates the product of two source POVs (C = A * B). As a best practice, it isrecommended that variables are set in the calling routine and passed to the Units_Rates function,which define the Destination, Units and Rates POVs. It is also recommended that the variablenames in the calling routine are set to be the same as the Units_Rates function.
ExampleThe Sales account will return the value of UnitsSold * Price.
Table 113 Example of Pro_Rata_Ratio Function
Account Jan2014 Feb2014 Mar2014
A#UnitsSold 1000 2000 5000
A#Price 1.25 1.00 0.50
Units_Rates(“A#UnitsSold”,A#Price) 1250 2000 2500
The result returned from the UNITS_RATES function is as follows:
HS.EXP “A#Sales = A#UnitsSold * A#Price”
Sample ScriptThe script contains the following information:
l A sample statement written in the calling routine.
l Variables set in the calling routine and passed to the Units_Rates function.
l Variable names in the calling routine set to be the same as the Units_Rates function.
Sub Calculate()Dim DestinationDim Units Dim Rates Destination = "A#Sales"Units = "A#UnitsSold"Rates = "A#Price"Call Units_Rates(Destination,Units,Rates)End Sub' Beginning of the Units_Rates functionSub Units_Rates(Destination,Units,Rates)HS.EXP Destination & " = " & Units & " * " & RatesEnd Sub
360
13Creating Rules UsingCalculation Manager
In This Chapter
Calculation Manager Security Roles... . . . . . . . . . . . . . . . . . . . . . . . . . . . . . . . . . . . . . . . . . . . . . . . . . . . . . . . . . . . . . . . . . 361
Working with Applications in Calculation Manager .. . . . . . . . . . . . . . . . . . . . . . . . . . . . . . . . . . . . . . . . . . . . . . . . . . 362
Migrating Rules to Calculation Manager .. . . . . . . . . . . . . . . . . . . . . . . . . . . . . . . . . . . . . . . . . . . . . . . . . . . . . . . . . . . . . . 362
VB Function Support in Function Selector .. . . . . . . . . . . . . . . . . . . . . . . . . . . . . . . . . . . . . . . . . . . . . . . . . . . . . . . . . . . . 362
Special VB Script Functions for Financial Management.. . . . . . . . . . . . . . . . . . . . . . . . . . . . . . . . . . . . . . . . . . . . . 364
The Calculation Manager module provides a common user interface to create calculation rulesfor Financial Management. The graphical flow provides a better understanding of the calculationprocess and enables you to switch between the graphical view and the VB Script view. CalculationManager provides a central repository to maintain all calculation rules, and share rules amongapplications. You can import, export, and print calculation rules, and create custom folders foreasy navigation.
Calculation Manager Security RolesThese roles are available for Calculation Manager access for Financial Management:
l Rules Administrator - can perform any tasks in Calculation Manager for the specifiedapplication, such as create, modify and delete rule objects, templates and variables, andvalidate and deploy any rule sets
l Rules Designer - can create rules objects and modify or delete those objects
l Rules Viewer - can view and validate rules objects
To access Calculation Manager from EPM Workspace, you must have the Rules Administrator,Rules Designer, or Rules Viewer security role.
To deploy rules, you must have the Rules Administrator security role.
For more information on security roles, see the Oracle Enterprise Performance ManagementSystem User Security Administration Guide.
361
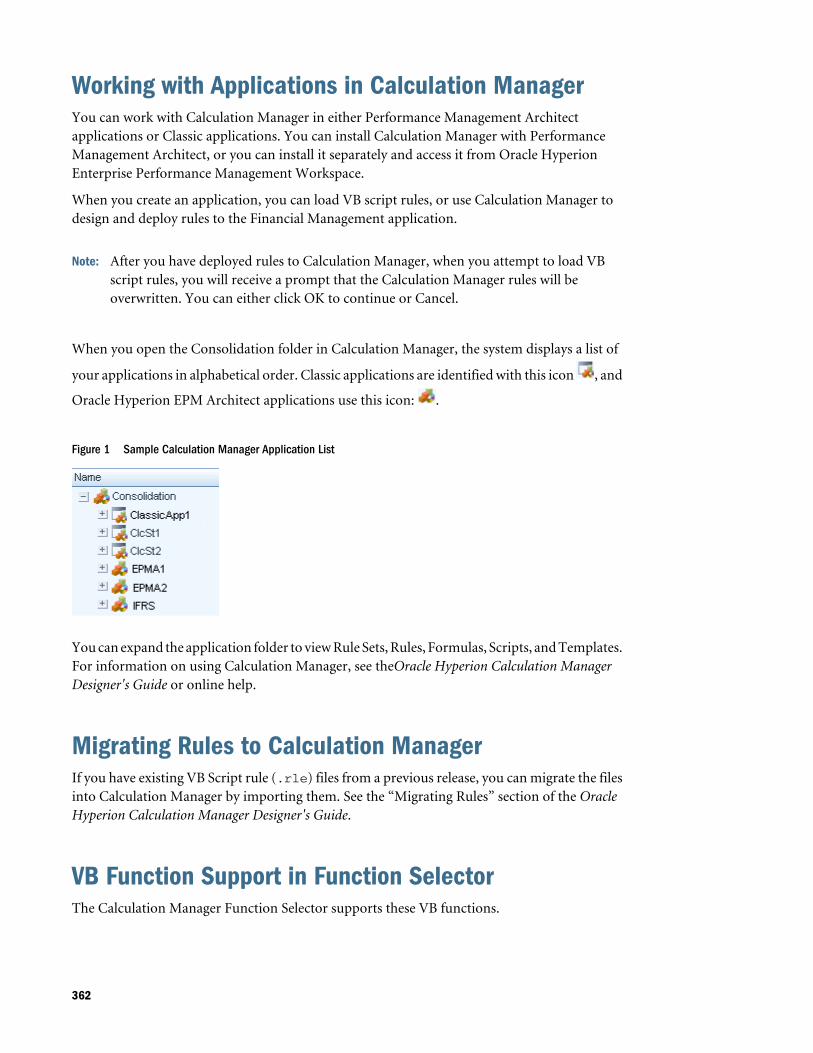
Working with Applications in Calculation ManagerYou can work with Calculation Manager in either Performance Management Architectapplications or Classic applications. You can install Calculation Manager with PerformanceManagement Architect, or you can install it separately and access it from Oracle HyperionEnterprise Performance Management Workspace.
When you create an application, you can load VB script rules, or use Calculation Manager todesign and deploy rules to the Financial Management application.
Note: After you have deployed rules to Calculation Manager, when you attempt to load VBscript rules, you will receive a prompt that the Calculation Manager rules will beoverwritten. You can either click OK to continue or Cancel.
When you open the Consolidation folder in Calculation Manager, the system displays a list of
your applications in alphabetical order. Classic applications are identified with this icon , and
Oracle Hyperion EPM Architect applications use this icon: .
Figure 1 Sample Calculation Manager Application List
You can expand the application folder to view Rule Sets, Rules, Formulas, Scripts, and Templates.For information on using Calculation Manager, see theOracle Hyperion Calculation ManagerDesigner's Guide or online help.
Migrating Rules to Calculation ManagerIf you have existing VB Script rule (.rle) files from a previous release, you can migrate the filesinto Calculation Manager by importing them. See the “Migrating Rules” section of the OracleHyperion Calculation Manager Designer's Guide.
VB Function Support in Function SelectorThe Calculation Manager Function Selector supports these VB functions.
362
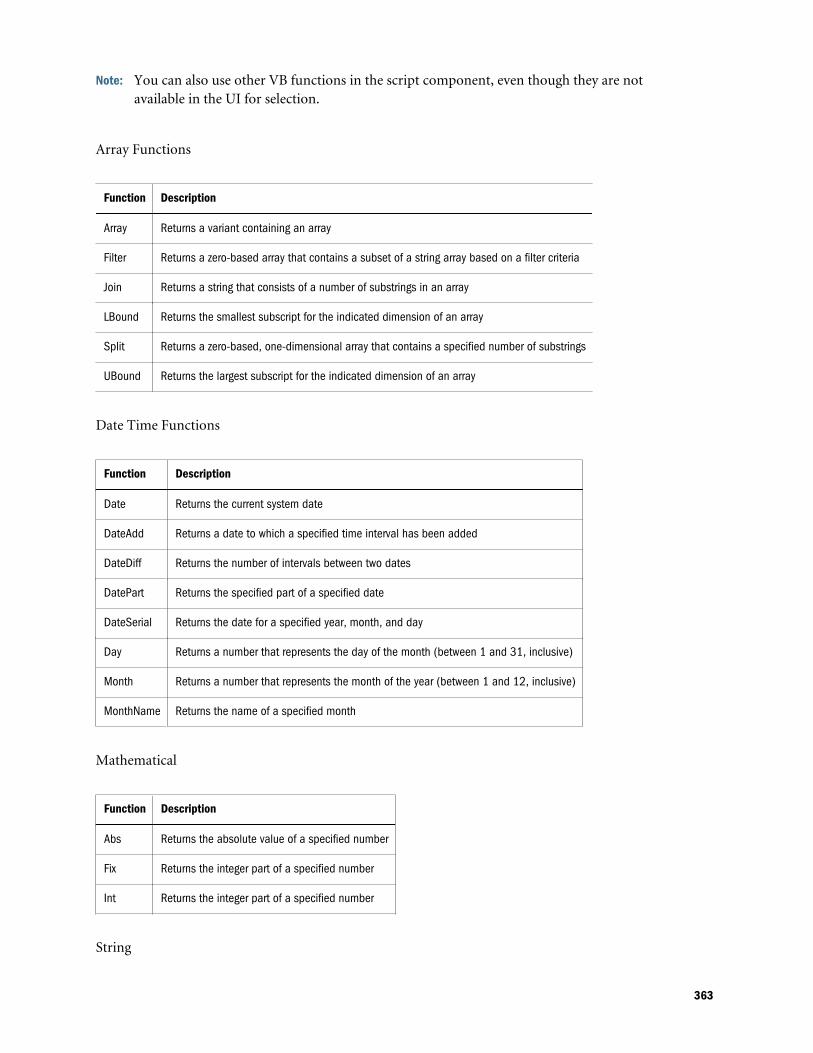
Note: You can also use other VB functions in the script component, even though they are notavailable in the UI for selection.
Array Functions
Function Description
Array Returns a variant containing an array
Filter Returns a zero-based array that contains a subset of a string array based on a filter criteria
Join Returns a string that consists of a number of substrings in an array
LBound Returns the smallest subscript for the indicated dimension of an array
Split Returns a zero-based, one-dimensional array that contains a specified number of substrings
UBound Returns the largest subscript for the indicated dimension of an array
Date Time Functions
Function Description
Date Returns the current system date
DateAdd Returns a date to which a specified time interval has been added
DateDiff Returns the number of intervals between two dates
DatePart Returns the specified part of a specified date
DateSerial Returns the date for a specified year, month, and day
Day Returns a number that represents the day of the month (between 1 and 31, inclusive)
Month Returns a number that represents the month of the year (between 1 and 12, inclusive)
MonthName Returns the name of a specified month
Mathematical
Function Description
Abs Returns the absolute value of a specified number
Fix Returns the integer part of a specified number
Int Returns the integer part of a specified number
String
363
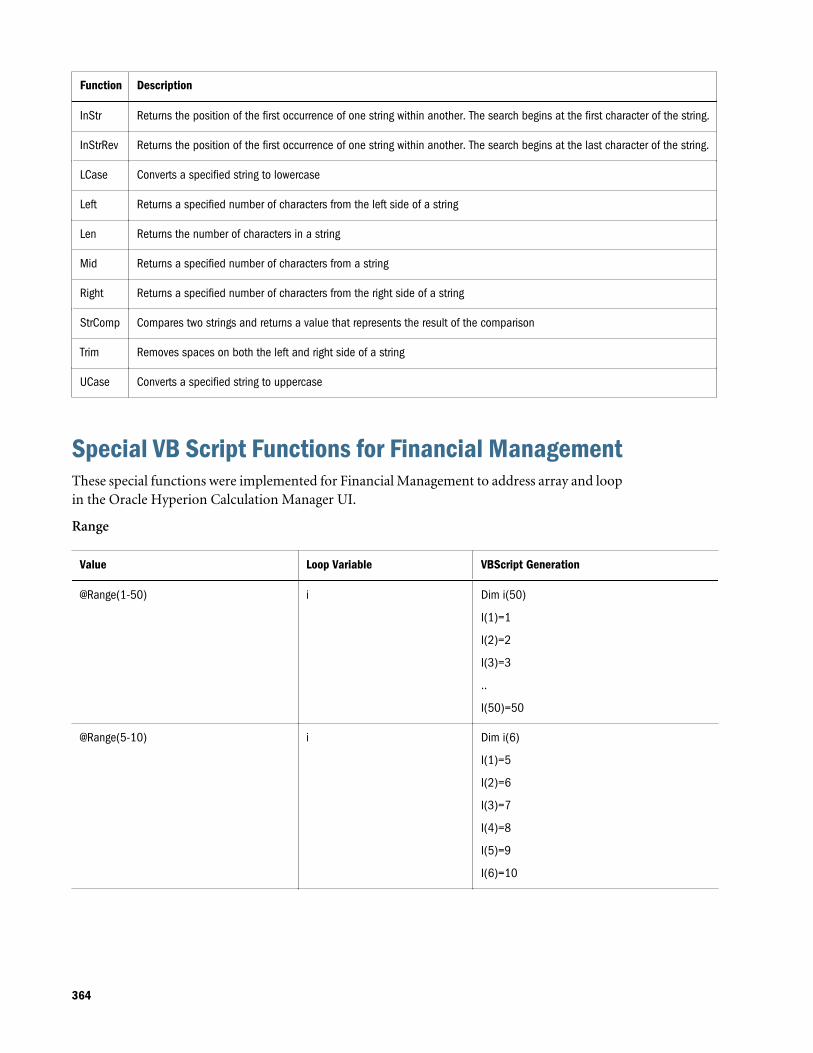
Function Description
InStr Returns the position of the first occurrence of one string within another. The search begins at the first character of the string.
InStrRev Returns the position of the first occurrence of one string within another. The search begins at the last character of the string.
LCase Converts a specified string to lowercase
Left Returns a specified number of characters from the left side of a string
Len Returns the number of characters in a string
Mid Returns a specified number of characters from a string
Right Returns a specified number of characters from the right side of a string
StrComp Compares two strings and returns a value that represents the result of the comparison
Trim Removes spaces on both the left and right side of a string
UCase Converts a specified string to uppercase
Special VB Script Functions for Financial ManagementThese special functions were implemented for Financial Management to address array and loopin the Oracle Hyperion Calculation Manager UI.
Range
Value Loop Variable VBScript Generation
@Range(1-50) i Dim i(50)
I(1)=1
I(2)=2
I(3)=3
..
I(50)=50
@Range(5-10) i Dim i(6)
I(1)=5
I(2)=6
I(3)=7
I(4)=8
I(5)=9
I(6)=10
364
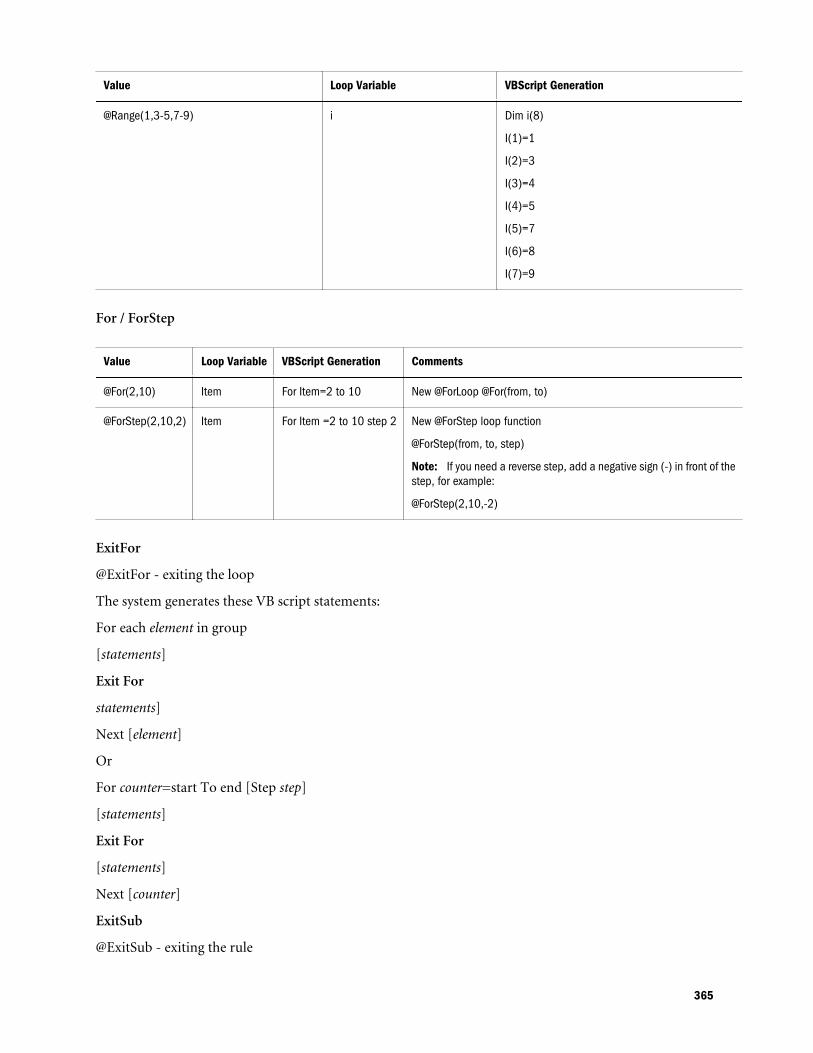
Value Loop Variable VBScript Generation
@Range(1,3-5,7-9) i Dim i(8)
I(1)=1
I(2)=3
I(3)=4
I(4)=5
I(5)=7
I(6)=8
I(7)=9
For / ForStep
Value Loop Variable VBScript Generation Comments
@For(2,10) Item For Item=2 to 10 New @ForLoop @For(from, to)
@ForStep(2,10,2) Item For Item =2 to 10 step 2 New @ForStep loop function
@ForStep(from, to, step)
Note: If you need a reverse step, add a negative sign (-) in front of thestep, for example:
@ForStep(2,10,-2)
ExitFor
@ExitFor - exiting the loop
The system generates these VB script statements:
For each element in group
[statements]
Exit For
statements]
Next [element]
Or
For counter=start To end [Step step]
[statements]
Exit For
[statements]
Next [counter]
ExitSub
@ExitSub - exiting the rule
365
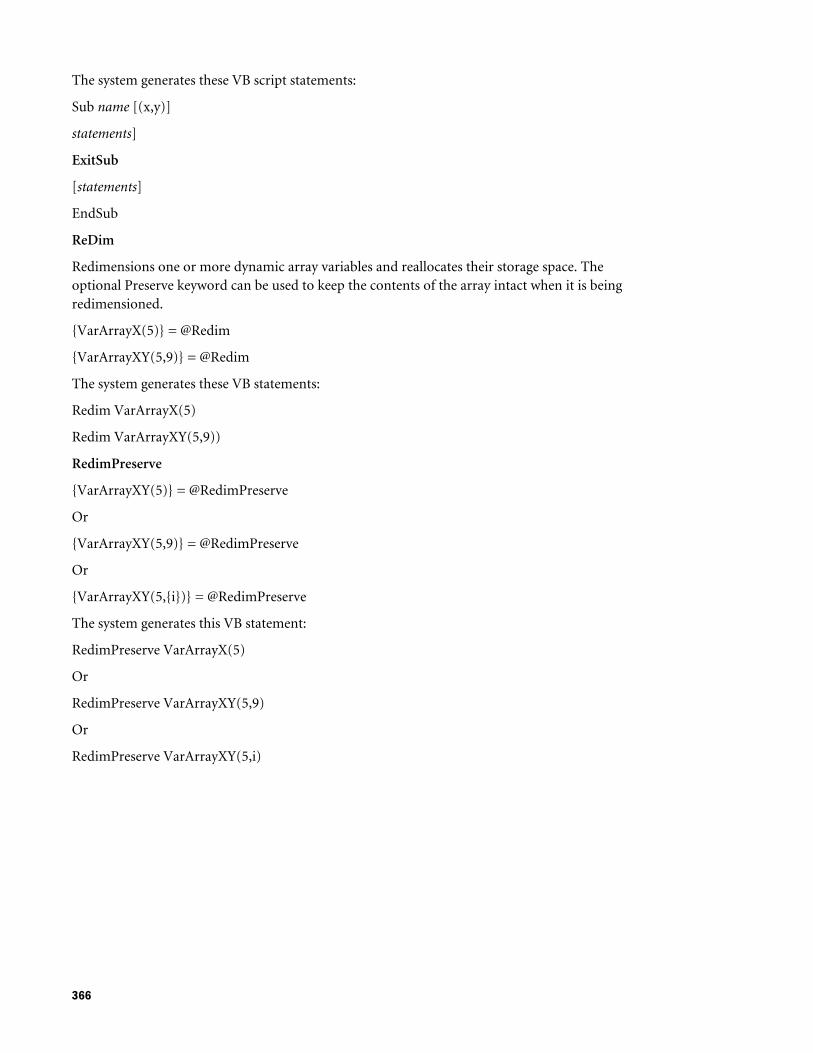
The system generates these VB script statements:
Sub name [(x,y)]
statements]
ExitSub
[statements]
EndSub
ReDim
Redimensions one or more dynamic array variables and reallocates their storage space. Theoptional Preserve keyword can be used to keep the contents of the array intact when it is beingredimensioned.
{VarArrayX(5)} = @Redim
{VarArrayXY(5,9)} = @Redim
The system generates these VB statements:
Redim VarArrayX(5)
Redim VarArrayXY(5,9))
RedimPreserve
{VarArrayXY(5)} = @RedimPreserve
Or
{VarArrayXY(5,9)} = @RedimPreserve
Or
{VarArrayXY(5,{i})} = @RedimPreserve
The system generates this VB statement:
RedimPreserve VarArrayX(5)
Or
RedimPreserve VarArrayXY(5,9)
Or
RedimPreserve VarArrayXY(5,i)
366
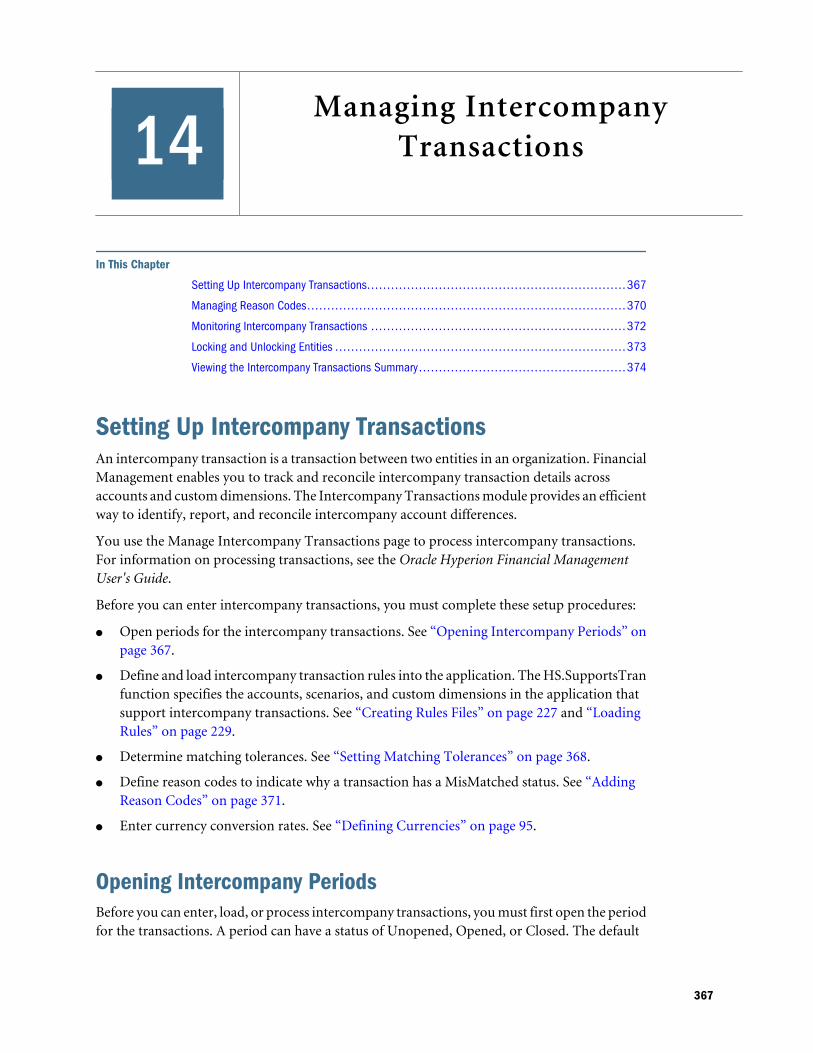
14Managing Intercompany
Transactions
In This Chapter
Setting Up Intercompany Transactions... . . . . . . . . . . . . . . . . . . . . . . . . . . . . . . . . . . . . . . . . . . . . . . . . . . . . . . . . . . . . . . 367
Managing Reason Codes... . . . . . . . . . . . . . . . . . . . . . . . . . . . . . . . . . . . . . . . . . . . . . . . . . . . . . . . . . . . . . . . . . . . . . . . . . . . . . 370
Monitoring Intercompany Transactions ... . . . . . . . . . . . . . . . . . . . . . . . . . . . . . . . . . . . . . . . . . . . . . . . . . . . . . . . . . . . . . 372
Locking and Unlocking Entities .. . . . . . . . . . . . . . . . . . . . . . . . . . . . . . . . . . . . . . . . . . . . . . . . . . . . . . . . . . . . . . . . . . . . . . . . 373
Viewing the Intercompany Transactions Summary... . . . . . . . . . . . . . . . . . . . . . . . . . . . . . . . . . . . . . . . . . . . . . . . . . 374
Setting Up Intercompany TransactionsAn intercompany transaction is a transaction between two entities in an organization. FinancialManagement enables you to track and reconcile intercompany transaction details acrossaccounts and custom dimensions. The Intercompany Transactions module provides an efficientway to identify, report, and reconcile intercompany account differences.
You use the Manage Intercompany Transactions page to process intercompany transactions.For information on processing transactions, see the Oracle Hyperion Financial ManagementUser's Guide.
Before you can enter intercompany transactions, you must complete these setup procedures:
l Open periods for the intercompany transactions. See “Opening Intercompany Periods” onpage 367.
l Define and load intercompany transaction rules into the application. The HS.SupportsTranfunction specifies the accounts, scenarios, and custom dimensions in the application thatsupport intercompany transactions. See “Creating Rules Files” on page 227 and “LoadingRules” on page 229.
l Determine matching tolerances. See “Setting Matching Tolerances” on page 368.
l Define reason codes to indicate why a transaction has a MisMatched status. See “AddingReason Codes” on page 371.
l Enter currency conversion rates. See “Defining Currencies” on page 95.
Opening Intercompany PeriodsBefore you can enter, load, or process intercompany transactions, you must first open the periodfor the transactions. A period can have a status of Unopened, Opened, or Closed. The default
367
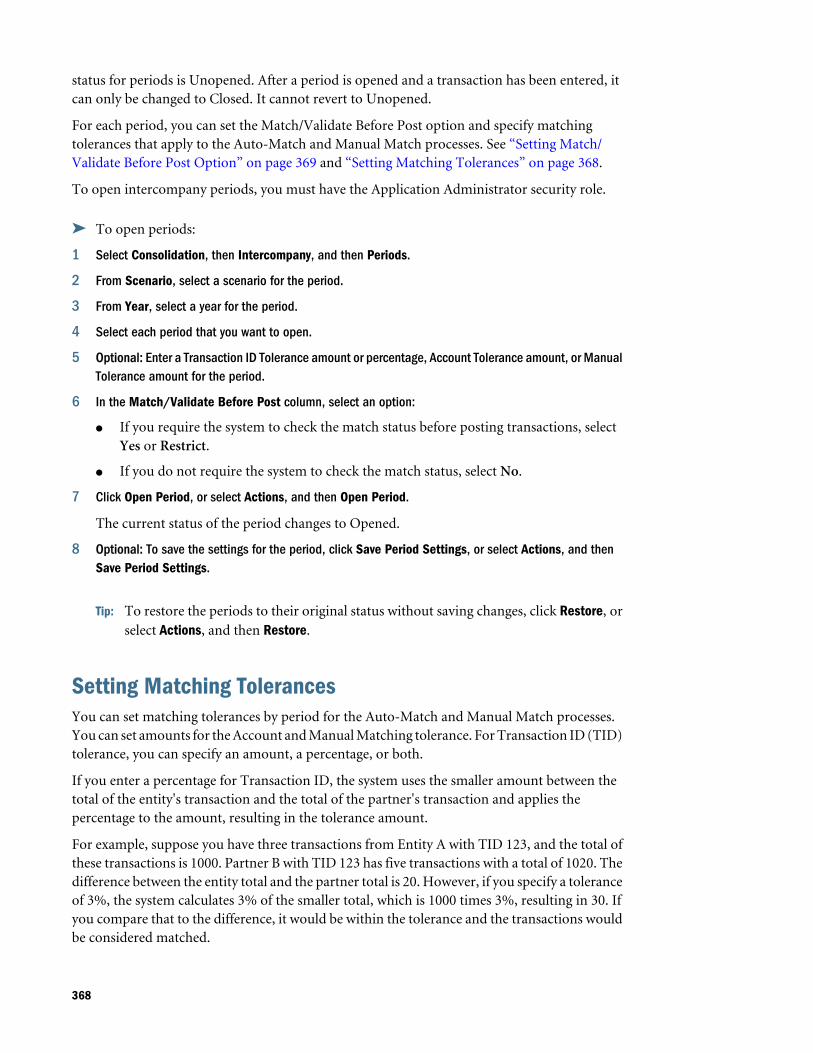
status for periods is Unopened. After a period is opened and a transaction has been entered, itcan only be changed to Closed. It cannot revert to Unopened.
For each period, you can set the Match/Validate Before Post option and specify matchingtolerances that apply to the Auto-Match and Manual Match processes. See “Setting Match/Validate Before Post Option” on page 369 and “Setting Matching Tolerances” on page 368.
To open intercompany periods, you must have the Application Administrator security role.
ä To open periods:
1 Select Consolidation, then Intercompany, and then Periods.
2 From Scenario, select a scenario for the period.
3 From Year, select a year for the period.
4 Select each period that you want to open.
5 Optional: Enter a Transaction ID Tolerance amount or percentage, Account Tolerance amount, or ManualTolerance amount for the period.
6 In the Match/Validate Before Post column, select an option:
l If you require the system to check the match status before posting transactions, selectYes or Restrict.
l If you do not require the system to check the match status, select No.
7 Click Open Period, or select Actions, and then Open Period.
The current status of the period changes to Opened.
8 Optional: To save the settings for the period, click Save Period Settings, or select Actions, and thenSave Period Settings.
Tip: To restore the periods to their original status without saving changes, click Restore, orselect Actions, and then Restore.
Setting Matching TolerancesYou can set matching tolerances by period for the Auto-Match and Manual Match processes.You can set amounts for the Account and Manual Matching tolerance. For Transaction ID (TID)tolerance, you can specify an amount, a percentage, or both.
If you enter a percentage for Transaction ID, the system uses the smaller amount between thetotal of the entity's transaction and the total of the partner's transaction and applies thepercentage to the amount, resulting in the tolerance amount.
For example, suppose you have three transactions from Entity A with TID 123, and the total ofthese transactions is 1000. Partner B with TID 123 has five transactions with a total of 1020. Thedifference between the entity total and the partner total is 20. However, if you specify a toleranceof 3%, the system calculates 3% of the smaller total, which is 1000 times 3%, resulting in 30. Ifyou compare that to the difference, it would be within the tolerance and the transactions wouldbe considered matched.
368
If in addition to the percentage, you enter an amount, for example, 15, the system compares thepercentage amount with the amount entered and uses the smallest amount as comparison. Inthis example, the difference between the entity total and the partner total is 20 and the percentagetolerance is 30, but the amount tolerance is 15. This would not be considered within the toleranceand the transactions are not matched.
You can also leave the TID amount and percentage blank. If either has a zero value, or if bothare blank, the system matches only transactions that have zero transaction difference.
For Account tolerance and Manual Match tolerance, the matching tolerance is represented inthe application currency and the amount entered is represented in the scale factor of theapplication currency. During the matching process, the system converts each transaction intothe application currency and compares the total difference amount to the matching toleranceset for the period. The comparison is done in units.
During the TID/RID matching process, the system does not translate the transaction to theapplication currency when comparing it to the TID tolerance value.
Setting Match/Validate Before Post OptionFor each period, you can set the Match/Validate Before Post option. The Match/Validate optiondefines whether the system needs to check the match status of the transactions before thetransactions can be posted and defines the types of validation that need to be done before anentity can be locked or a period can be closed.
If you select the Match/Validate Before Post option, you must match transactions or assign areason code before they can be posted. Before you can close a period or lock an entity, you mustpost all matched transactions or mismatched transactions with reason codes.
If you select the Restrict option, you must match transactions before you can post them, but youcan close periods or lock entities that have unposted transactions.
Table 114 Match/Validate Before Post Option Value Descriptions
Match/ValidateOption Value Description
No All transactions can be posted
Yes The system allows transactions to be posted if either of these conditions are met:
l Transactions have the Matched status.
l Transactions with a MisMatched status contain a valid Reason Code.
Note: Unmatched transactions or mismatched transactions without a reason code cannot be posted.
The system also checks that all matched transactions or mismatched transactions with reason codes are posted beforethe period can be closed or the entity can be locked.
369
Match/ValidateOption Value Description
Restrict If you set the Match/Validate Before Post option to Restrict, the system allows transactions to be posted if either of theseconditions are met:
l Transactions have the Matched status.
l Transactions with a MisMatched status contain a valid Reason Code.
Note: Unmatched transactions or mismatched transactions without a reason code cannot be posted.
You can close periods or lock entities that have unposted transactions.
Closing Intercompany PeriodsAfter processing intercompany transactions, you can close the period to prevent modificationsto the transactions. If you select the Match/Validate Before Post option, you must post allmatched transactions and all mismatched transactions with a reason code. Although the periodis locked for future transactions, you can view transactions and run reports for the period.
To close intercompany periods, you must have the Application Administrator security role.
ä To close a period:
1 Select Consolidation, then Intercompany, and then Periods.
2 From the Scenario list, select a scenario for which to close periods.
3 From the Year list, select a year in which to close periods.
4 Select the period or periods to close.
5 Click Close Period, or select Actions, and then Close Period.
Managing Reason CodesWhen intercompany transactions are created in the application, they have a default match statusof UnMatched. During the Auto-Match process, the match status is updated to Matched orMisMatched.
You can define reason codes to indicate why a transaction has a MisMatched status. For example,this might be due to a missing invoice from the partner entity, or an incorrect amount enteredby the partner. After you define the list of valid reason codes for the application, users can selectfrom the list and assign one of the codes when they enter intercompany transactions.
If the Match/Validate Before Post option is selected for the period, you can post transactionswith a Matched status, or transactions with a MisMatched status that contain a valid reasoncode.
You can add, edit, or delete reason codes for an application.
See these procedures:
370
l “Adding Reason Codes” on page 371
l “Editing Reason Codes” on page 371
l “Deleting Reason Codes” on page 371
Adding Reason CodesYou can create a list of reason codes for mismatched transactions for an application. Users canthen assign one of the reason codes for transactions.
You can manually add reason codes or you can load reason codes during the transaction loadprocess. For information on loading transactions, see the Oracle Hyperion Financial ManagementUser's Guide.
ä To add reason codes:
1 Select Consolidation, then Intercompany, and then Reason Codes.
2 Click Add Row or select Actions, and then Add Row.
3 For Name, enter a label for the reason code.
Note: The label can contain a maximum of 20 characters. Note that a space is counted as acharacter. These characters are invalid: ampersand (&), asterisk (*), backslash (\,comma (,), curly brackets ({} ), forward slash (/), hyphen (-), number sign (#), period(.), plus sign (+), and semi-colon (;).
4 Optional: For Description, enter a description for the reason code.
Note: The description can contain a maximum of 40 characters.
5 Click Save, or select Actions, and then Save.
Editing Reason CodesAfter you create a reason code, you can edit the code description. You cannot edit the reasoncode label.
ä To edit reason codes:
1 Select Consolidation, then Intercompany, and then Reason Codes.
2 From the list of reason codes, select the reason code to edit.
3 From the Description column, edit the description, and click OK.
Deleting Reason CodesYou can delete reason codes that you no longer need in the list of reason codes for an application.
371
ä To delete reason codes:
1 Select Consolidation, then Intercompany, and then Reason Codes.
2 From the list of reason codes, select the reason code or codes to delete.
3 Click Delete Row or Delete All, or select Actions, and then Delete Row or Delete All.
4 Click Yes to delete the reason code.
Monitoring Intercompany TransactionsYou use the Monitor Intercompany Transactions feature to monitor the intercompanytransaction matching process. When a large number of intercompany transactions are enteredto the system in a period, the matching process can be time-consuming to ensure that alltransactions are entered and matched successfully. Since not all transactions are entered at thesame time, administrators need to monitor the matching process. The Monitor IntercompanyTransactions feature enables you to easily find out which intercompany partners have startedtheir intercompany transactions process.
To monitor Intercompany transactions, you must be assigned the Intercompany TransactionAdministrator security role, which enables you to view Process status, Lock status, entity details,intercompany transactions summary, and perform email alerts.
The Intercompany Transactions Monitor page displays a list of intercompany entities with theirProcess status and Lock status. You can filter the display by Entity, Process status or Lock status.The entities are links to Intercompany Transactions Monitor Detail information. When youclick an entity, the system displays the number of posted and unposted transactions by status,such as Matched, Mismatched, or Unmatched.
Table 115 Entity Status for Intercompany Transactions
Status Description
Not Started The entity has no intercompany transactions for the scenario, year, and period in the point of view.
Started The entity has at least one intercompany transaction for the scenario, year and period in the point of view.
Not Lockable An entity has a status of Not Lockable if you selected Match/Validate Before Post for the period, but you did not postmatched transactions or mismatched transactions with a reason code.
You can click an entity in the list to view the total number of posted and unposted transactionsfor the entity, categorized by matching status.
For example, if you click the plus (+) sign next to an Entity A to expand it, the page displays thenumber of posted and unposted transactions by status for Entity A. If you click the value forunposted transactions in the Unmatched column, the system links to the Manage IntercompanyTransactions page, with the filtering selected to display the unposted transactions with anUnmatched status for Entity A. You can expand multiple entities simultaneously to view theirdetails.
You can send email alerts for any of the entities in the Intercompany Transactions Monitor page.See the Oracle Hyperion Financial Management User's Guide.
372
ä To monitor intercompany transactions:
1 Select Consolidation, then Intercompany, and then Monitor.
2 In the Point of View bar, select a scenario, year, and period.
3 From the Display Options list, select an option:
l To view the entity information using the label, select Label.
l To view the entity information using the description, select Description.
l To view the entity information using the label and description, select Both.
4 From the Filters list, for Entity, enter or browse for the entity for which to monitor status.
Note: If you leave Entity blank, the system returns all entities in the list.
5 Optional: To display only active entities, select Show Active Only.
6 Optional: To filter the transactions list by Process Status, select one or more of these transaction types:
l Not Started
l Started
7 Optional: To filter the transactions list by Lock Status, select one or more of these transaction types:
l Lockable
l Not Lockable
l Locked
8 Optional: To sort the transactions list by Process or Lock status, click the column heading and selectAscending or Descending.
9 Click the plus sign (+) next to an entity or select Show Details from the context menu to display theIntercompany Transactions Monitor detail.
10 From the Intercompany Transactions Monitor Detail box, click a value from one of the status columns.
The Manage Intercompany Transactions page is displayed with the selected filter criteria.
11 Optional: To send an email alert for an entity, from the Intercompany Transactions Monitor page, selectan entity and click Email Alert, or select Email Alert from the context menu, or select Actions, and thenEmail Alert.
Locking and Unlocking EntitiesYou can apply a lock to an entity for a scenario, year, and period to prevent future changes tointercompany transactions for the entity. If the Match/Validate Before Post option is selectedfor the period, you must post all matched transactions and all mismatched transactions with areason code before you can lock the entity.
Note: The transaction lock status is different from the data lock status. For information on datalock status, see the Oracle Hyperion Financial Management User's Guide.
373
If you are assigned the Intercompany Transaction Administrator security role, you can viewProcess status, Lock status, entity details, intercompany transactions summary, and performemail alerts.
When the entity is locked, you cannot enter new intercompany transactions. You also cannotdelete or change existing transactions. You cannot post or unpost transactions to a locked entity,or update the match status of a transaction that involves a locked entity. Therefore, even if thepartner entity is not locked, the partner cannot match transactions because the match statuscannot be updated for the entity.
For example, suppose Entity A is locked. You cannot enter any more transactions for Entity A,and no posting or matching can be done to the entity. You can still have intercompanytransactions for Entity B with its partner Entity A if Entity B is not locked. However, if you tryto match Entity B with Entity A, the process fails because the system cannot update the matchstatus for Entity A.
If you are using submission phases, an entity should not be locked until all phases have Publishedstatus.
ä To lock an entity:
1 Select Consolidation, then Intercompany, and then Monitor.
2 From Scenario, select a scenario for the entity.
3 From Year, select a year for the entity.
4 From Period, select a period for the entity.
5 Select the entity or entities to lock.
6 Click Lock, or select Lock from the context menu, or select Actions, and then Lock.
Tip: To unlock entities, select the entity to unlock, then click Unlock, or select Unlock fromthe context menu, or select Actions, and then Unlock.
Viewing the Intercompany Transactions SummaryYou can view a summary of the status for all intercompany transactions, and if necessary, filterentities to display specific entity
ä To view the intercompany transactions summary:
1 Select Consolidation, then Intercompany, and then Monitor.
2 Select a Scenario, Year, and Period for the entity.
3 Using the Entity filter, select one or more entities for which to view a summary of transactions.
4 Click Summary, or select Summary from the context menu, or select Actions, and then Summary.
5 When you finish viewing the summary, click OK.
374
15Managing Process Management
Submission Phases
In This Chapter
Defining Submission Phases... . . . . . . . . . . . . . . . . . . . . . . . . . . . . . . . . . . . . . . . . . . . . . . . . . . . . . . . . . . . . . . . . . . . . . . . . . 375
Setting Up Submission Groups ... . . . . . . . . . . . . . . . . . . . . . . . . . . . . . . . . . . . . . . . . . . . . . . . . . . . . . . . . . . . . . . . . . . . . . . 376
Submission Group and Phase Examples ... . . . . . . . . . . . . . . . . . . . . . . . . . . . . . . . . . . . . . . . . . . . . . . . . . . . . . . . . . . . 377
Assigning Submission Groups to Phases ... . . . . . . . . . . . . . . . . . . . . . . . . . . . . . . . . . . . . . . . . . . . . . . . . . . . . . . . . . . . 379
Viewing Unassigned Submission Groups ... . . . . . . . . . . . . . . . . . . . . . . . . . . . . . . . . . . . . . . . . . . . . . . . . . . . . . . . . . . . 380
Process management is the management of the review and approval of financial data. For thepurpose of review, data is organized into process units, which are the combination of data for aspecific Scenario, Year, Period, Entity, and Value dimension. During the review cycle, youperform actions on process units, such as promote, submit, approve, reject, and publish.
In Process Management, you can divide a data process unit into different submission phases towork with subsets of data. During the review process, you can promote each phase of the processunit rather than the entire process unit. This eliminates the need for additional scenarios toenforce the review process.
To manage Process Management Submission Phases, the UseSubmissionPhase applicationattribute must be enabled, and you must be an Application Administrator or Review Supervisor.
Defining Submission PhasesYour review process requirements may vary by period. For example, the monthly close cyclemight require a single-phase review process for Balance Sheet and Profit/Loss data in Januaryand February. For a quarterly month such as March, the quarterly closing review process mayrequire multiple phased submission cycles for Balance Sheet and Profit/Loss data andsupplemental data.
Your review process requirements may also vary by scenario. For example, the Actual scenariomight require only Balance Sheet and Profit/Loss accounts to be submitted for review. For theBudget scenario, all accounts might be required, and for the Forecast scenario, only Profit/Lossaccounts and supplemental data might be required.
You can use a maximum of nine submission phases in the review process. For example, in theActual scenario, you might submit Balance Sheet and Profit/Loss accounts for review in Phase1, and supplemental data in Phase 2. In the Budget scenario, you might submit Intercompany
375
data in Phase 1, Balance Sheet and Profit/Loss accounts in Phase 2, and supplemental data inPhase 3.
You perform these tasks to set up submission phases:
l Set the application and dimension metadata attributes to use submission phases. See“Defining Application Settings” on page 89.
m Set the UseSubmissionPhase application attribute to Y. By default, the setting forsubmission phases is disabled, and you must set this attribute to enable phasedsubmissions in the application.
m Set SupportSubmissionPhaseForAccounts, SupportSubmissionPhaseForCustom, orSupportSubmissionPhaseForICP attributes as required. You must define whichdimensions (Account, Custom, and ICP members) are enabled for processmanagement. For example, if the application needs submission by accounts and not forCustom or Intercompany (ICP) dimensions, you can select theSupportSubmissionPhaseForAccounts attribute. You must enable at least onedimension.
l Assign validation accounts. See “Defining Application Settings” on page 89.
The validation account is used in Process Control and for data locking. The validationaccount amount must be zero before data can be promoted, approved, or locked.
If you do not want to use validation in Process Control or for data locking, leave thevalidation account blank.
If you are using phased submissions, you can specify a separate validation account for eachsubmission phase. An application can have up to nine submission phases. For applicationsthat use phased submissions, the Validation Account setting identifies the validation accountfor phase 1. Validation accounts 2 through 9 identify the remaining phases.
l Define submission groups and assign submission groups to dimension members. See“Setting Up Submission Groups” on page 376.
l Assign submission groups to submission phases. See “Assigning Submission Groups toPhases” on page 379.
Setting Up Submission GroupsFor each application, you must decide which dimension members to include in a submissiongroup. For example, you can define Cash accounts and Investment accounts for SubmissionGroup 1.
In the metadata file, you set this attribute for submission groups: SubmissionGroup=0 to 99 or<blank>.
The default is blank. A <blank> value defaults to the value of 1.
If you set the submission group to zero, the account is not included in the review process.
When multiple dimensions are used for phased submissions, the system determines the cellsubmission group assignment by the maximum of the group assignments of its dimension
376
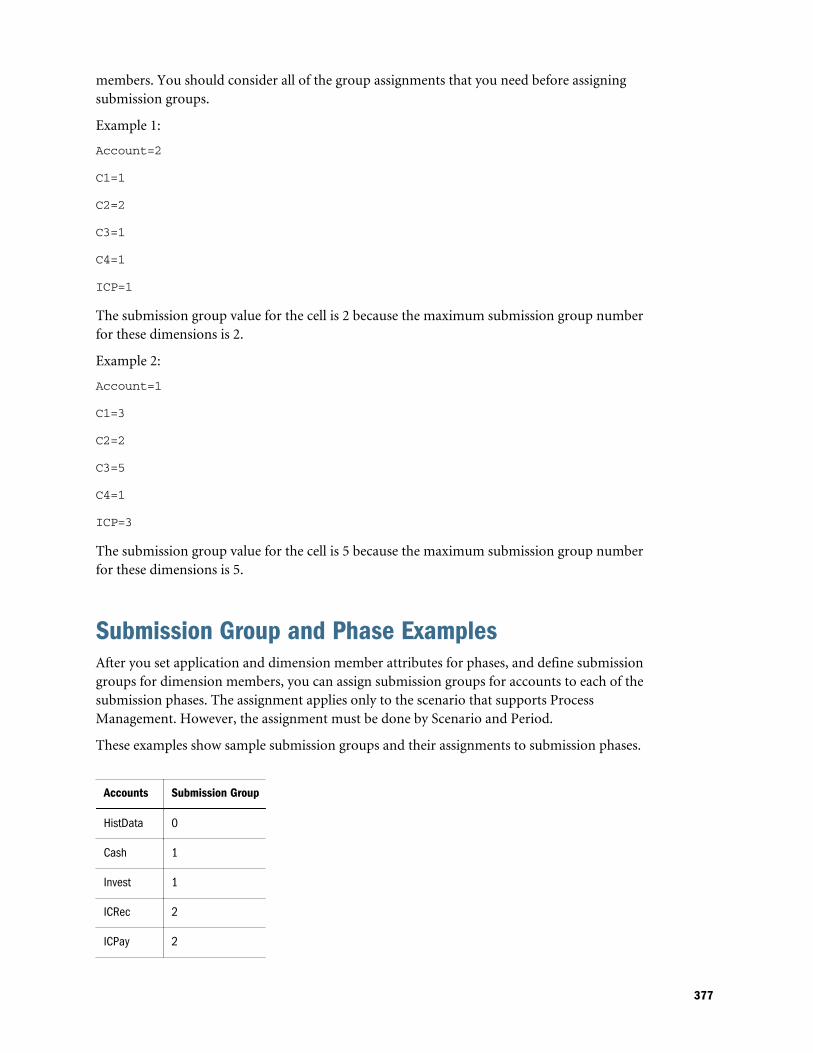
members. You should consider all of the group assignments that you need before assigningsubmission groups.
Example 1:
Account=2
C1=1
C2=2
C3=1
C4=1
ICP=1
The submission group value for the cell is 2 because the maximum submission group numberfor these dimensions is 2.
Example 2:
Account=1
C1=3
C2=2
C3=5
C4=1
ICP=3
The submission group value for the cell is 5 because the maximum submission group numberfor these dimensions is 5.
Submission Group and Phase ExamplesAfter you set application and dimension member attributes for phases, and define submissiongroups for dimension members, you can assign submission groups for accounts to each of thesubmission phases. The assignment applies only to the scenario that supports ProcessManagement. However, the assignment must be done by Scenario and Period.
These examples show sample submission groups and their assignments to submission phases.
Accounts Submission Group
HistData 0
Cash 1
Invest 1
ICRec 2
ICPay 2
377
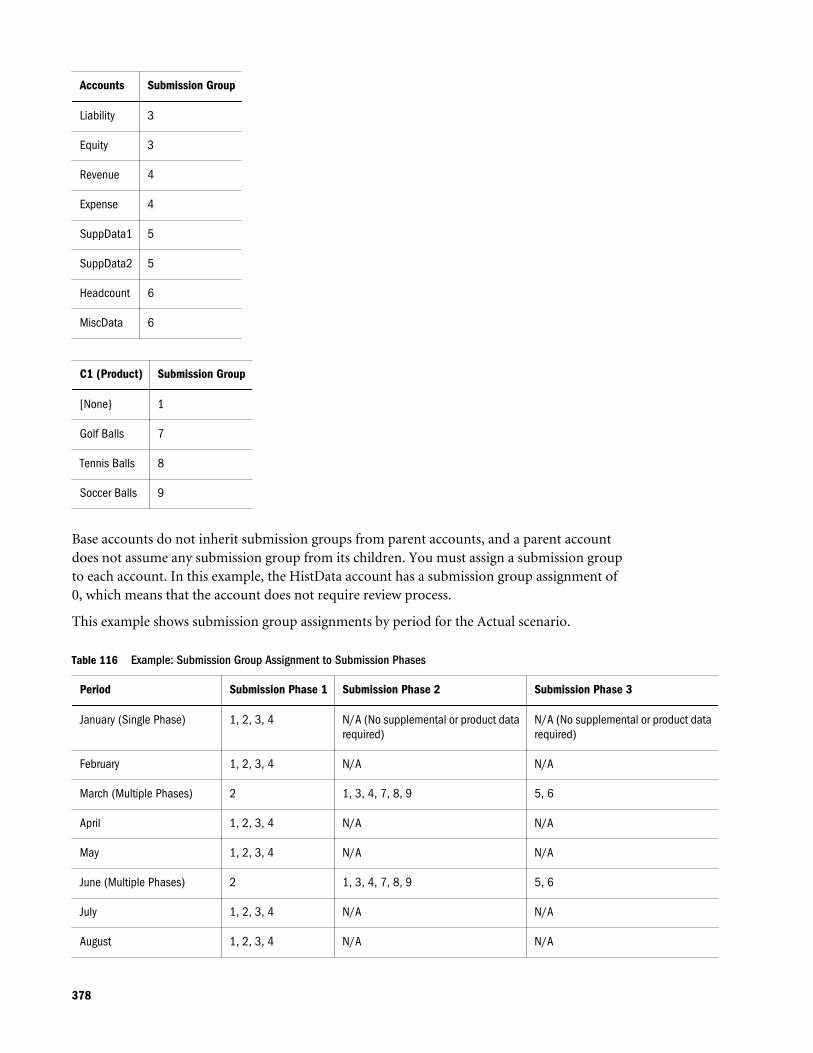
Accounts Submission Group
Liability 3
Equity 3
Revenue 4
Expense 4
SuppData1 5
SuppData2 5
Headcount 6
MiscData 6
C1 (Product) Submission Group
[None} 1
Golf Balls 7
Tennis Balls 8
Soccer Balls 9
Base accounts do not inherit submission groups from parent accounts, and a parent accountdoes not assume any submission group from its children. You must assign a submission groupto each account. In this example, the HistData account has a submission group assignment of0, which means that the account does not require review process.
This example shows submission group assignments by period for the Actual scenario.
Table 116 Example: Submission Group Assignment to Submission Phases
Period Submission Phase 1 Submission Phase 2 Submission Phase 3
January (Single Phase) 1, 2, 3, 4 N/A (No supplemental or product datarequired)
N/A (No supplemental or product datarequired)
February 1, 2, 3, 4 N/A N/A
March (Multiple Phases) 2 1, 3, 4, 7, 8, 9 5, 6
April 1, 2, 3, 4 N/A N/A
May 1, 2, 3, 4 N/A N/A
June (Multiple Phases) 2 1, 3, 4, 7, 8, 9 5, 6
July 1, 2, 3, 4 N/A N/A
August 1, 2, 3, 4 N/A N/A
378
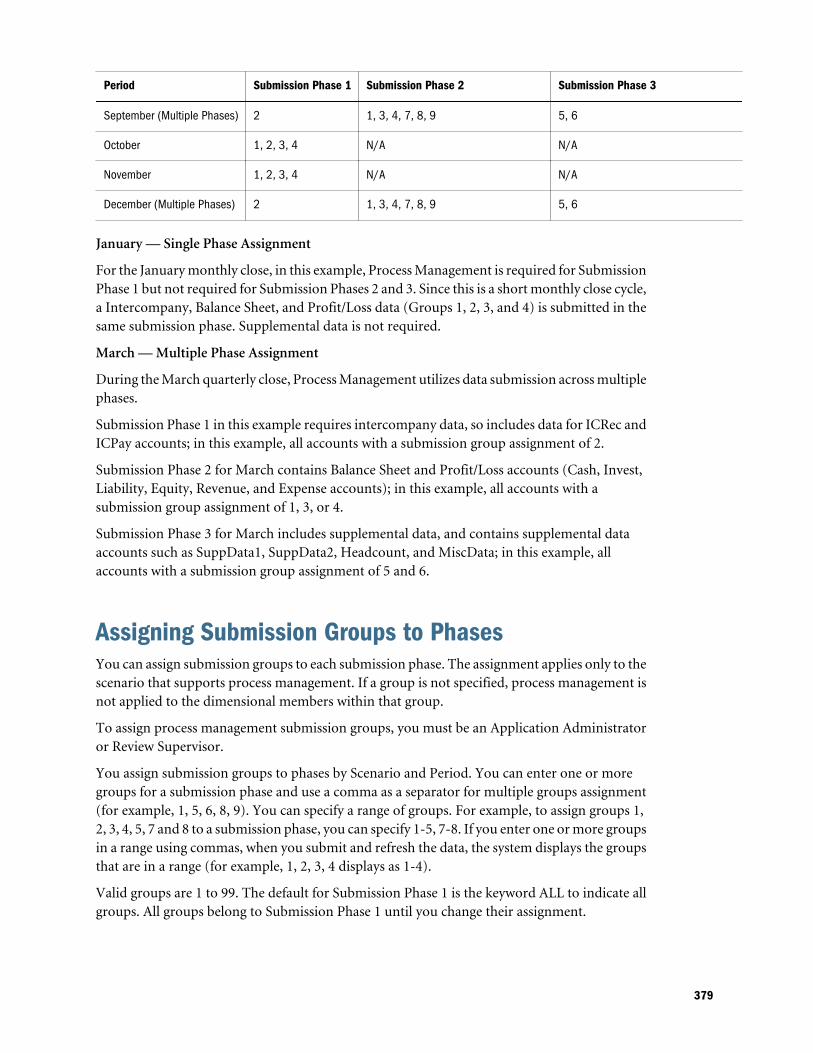
Period Submission Phase 1 Submission Phase 2 Submission Phase 3
September (Multiple Phases) 2 1, 3, 4, 7, 8, 9 5, 6
October 1, 2, 3, 4 N/A N/A
November 1, 2, 3, 4 N/A N/A
December (Multiple Phases) 2 1, 3, 4, 7, 8, 9 5, 6
January — Single Phase Assignment
For the January monthly close, in this example, Process Management is required for SubmissionPhase 1 but not required for Submission Phases 2 and 3. Since this is a short monthly close cycle,a Intercompany, Balance Sheet, and Profit/Loss data (Groups 1, 2, 3, and 4) is submitted in thesame submission phase. Supplemental data is not required.
March — Multiple Phase Assignment
During the March quarterly close, Process Management utilizes data submission across multiplephases.
Submission Phase 1 in this example requires intercompany data, so includes data for ICRec andICPay accounts; in this example, all accounts with a submission group assignment of 2.
Submission Phase 2 for March contains Balance Sheet and Profit/Loss accounts (Cash, Invest,Liability, Equity, Revenue, and Expense accounts); in this example, all accounts with asubmission group assignment of 1, 3, or 4.
Submission Phase 3 for March includes supplemental data, and contains supplemental dataaccounts such as SuppData1, SuppData2, Headcount, and MiscData; in this example, allaccounts with a submission group assignment of 5 and 6.
Assigning Submission Groups to PhasesYou can assign submission groups to each submission phase. The assignment applies only to thescenario that supports process management. If a group is not specified, process management isnot applied to the dimensional members within that group.
To assign process management submission groups, you must be an Application Administratoror Review Supervisor.
You assign submission groups to phases by Scenario and Period. You can enter one or moregroups for a submission phase and use a comma as a separator for multiple groups assignment(for example, 1, 5, 6, 8, 9). You can specify a range of groups. For example, to assign groups 1,2, 3, 4, 5, 7 and 8 to a submission phase, you can specify 1-5, 7-8. If you enter one or more groupsin a range using commas, when you submit and refresh the data, the system displays the groupsthat are in a range (for example, 1, 2, 3, 4 displays as 1-4).
Valid groups are 1 to 99. The default for Submission Phase 1 is the keyword ALL to indicate allgroups. All groups belong to Submission Phase 1 until you change their assignment.
379
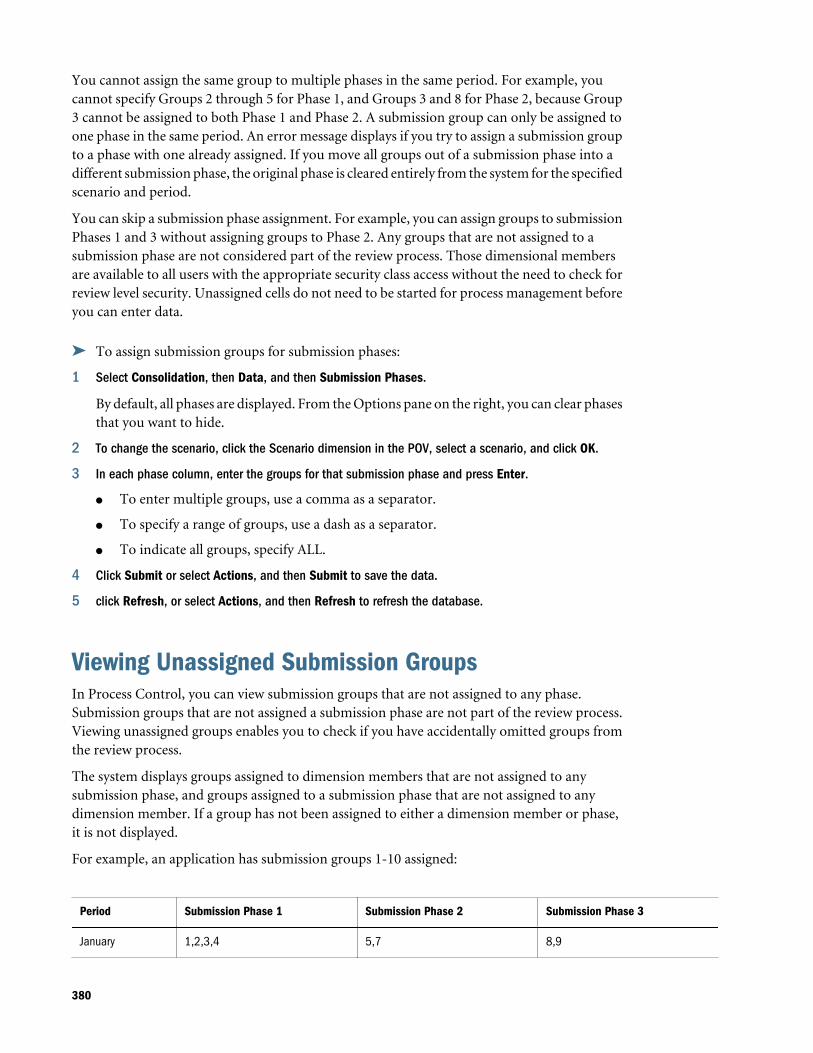
You cannot assign the same group to multiple phases in the same period. For example, youcannot specify Groups 2 through 5 for Phase 1, and Groups 3 and 8 for Phase 2, because Group3 cannot be assigned to both Phase 1 and Phase 2. A submission group can only be assigned toone phase in the same period. An error message displays if you try to assign a submission groupto a phase with one already assigned. If you move all groups out of a submission phase into adifferent submission phase, the original phase is cleared entirely from the system for the specifiedscenario and period.
You can skip a submission phase assignment. For example, you can assign groups to submissionPhases 1 and 3 without assigning groups to Phase 2. Any groups that are not assigned to asubmission phase are not considered part of the review process. Those dimensional membersare available to all users with the appropriate security class access without the need to check forreview level security. Unassigned cells do not need to be started for process management beforeyou can enter data.
ä To assign submission groups for submission phases:
1 Select Consolidation, then Data, and then Submission Phases.
By default, all phases are displayed. From the Options pane on the right, you can clear phasesthat you want to hide.
2 To change the scenario, click the Scenario dimension in the POV, select a scenario, and click OK.
3 In each phase column, enter the groups for that submission phase and press Enter.
l To enter multiple groups, use a comma as a separator.
l To specify a range of groups, use a dash as a separator.
l To indicate all groups, specify ALL.
4 Click Submit or select Actions, and then Submit to save the data.
5 click Refresh, or select Actions, and then Refresh to refresh the database.
Viewing Unassigned Submission GroupsIn Process Control, you can view submission groups that are not assigned to any phase.Submission groups that are not assigned a submission phase are not part of the review process.Viewing unassigned groups enables you to check if you have accidentally omitted groups fromthe review process.
The system displays groups assigned to dimension members that are not assigned to anysubmission phase, and groups assigned to a submission phase that are not assigned to anydimension member. If a group has not been assigned to either a dimension member or phase,it is not displayed.
For example, an application has submission groups 1-10 assigned:
Period Submission Phase 1 Submission Phase 2 Submission Phase 3
January 1,2,3,4 5,7 8,9
380
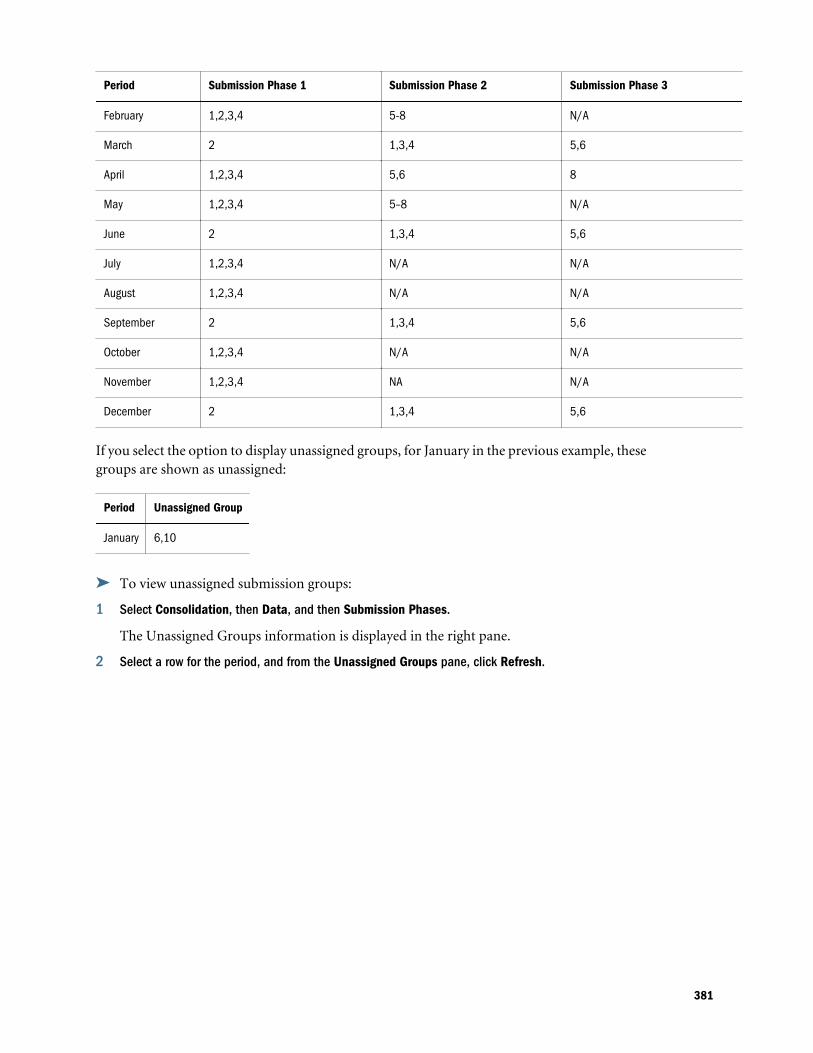
Period Submission Phase 1 Submission Phase 2 Submission Phase 3
February 1,2,3,4 5-8 N/A
March 2 1,3,4 5,6
April 1,2,3,4 5,6 8
May 1,2,3,4 5–8 N/A
June 2 1,3,4 5,6
July 1,2,3,4 N/A N/A
August 1,2,3,4 N/A N/A
September 2 1,3,4 5,6
October 1,2,3,4 N/A N/A
November 1,2,3,4 NA N/A
December 2 1,3,4 5,6
If you select the option to display unassigned groups, for January in the previous example, thesegroups are shown as unassigned:
Period Unassigned Group
January 6,10
ä To view unassigned submission groups:
1 Select Consolidation, then Data, and then Submission Phases.
The Unassigned Groups information is displayed in the right pane.
2 Select a row for the period, and from the Unassigned Groups pane, click Refresh.
381

382
16Managing Email Alerting
In This Chapter
Setting Up Process Management Alerting ... . . . . . . . . . . . . . . . . . . . . . . . . . . . . . . . . . . . . . . . . . . . . . . . . . . . . . . . . . . 383
Setting Up Intercompany Alerting ... . . . . . . . . . . . . . . . . . . . . . . . . . . . . . . . . . . . . . . . . . . . . . . . . . . . . . . . . . . . . . . . . . . . 384
You can use email alerting for intercompany transactions and during the process managementreview process. Email alerts help highlight a key event or data change in the system. For example,you can send an email alert that an intercompany transaction is mismatched and needs to bematched, or that a process unit is ready for the next promotion level.
Email alerts are sent using standard Simple Mail Transfer Protocol (SMTP), so you can use alertswith any email system that works with Internet email. To use alerts, you must configure emailsettings and specify the SMTP server name when you run the Financial Managementconfiguration utility. See the Oracle Enterprise Performance Management System Installation andConfiguration Guide.
The alert process uses the email addresses that are stored in your authentication files, such asLDAP, MSAD, or Native Directory.
Before you can send or receive email alerts, you must have set up user and data security rightsin the application. The security class assigned to the scenario and entity for the alert must supportemail alerts, and users must be assigned a security role to receive email alerts. For informationon setting security roles, see the Oracle Enterprise Performance Management System User SecurityAdministration Guide.
Setting Up Process Management AlertingYou can set up the Process Control module to generate email alerts based on a change of statusin process control. You can set up alerts for these actions: First Pass, Review levels 1 through 10,Submitted, Approved, or Published.
Email alerts are not generated when the process unit is at the Not Started level or for the SignOff action.
ä To set up process management email alerts:
1 From Metadata Manager, for the scenario in the process unit, set the SupportsProcessManagementmetadata attribute to “A” to allow alerts.
383
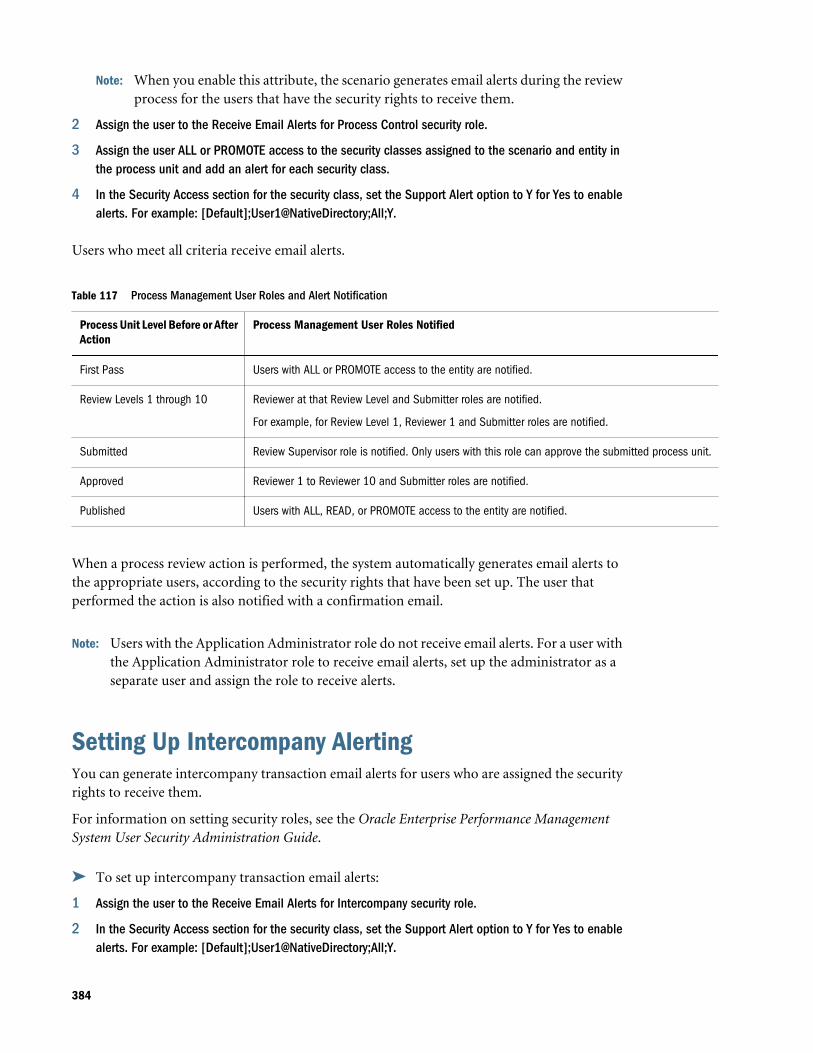
Note: When you enable this attribute, the scenario generates email alerts during the reviewprocess for the users that have the security rights to receive them.
2 Assign the user to the Receive Email Alerts for Process Control security role.
3 Assign the user ALL or PROMOTE access to the security classes assigned to the scenario and entity inthe process unit and add an alert for each security class.
4 In the Security Access section for the security class, set the Support Alert option to Y for Yes to enablealerts. For example: [Default];User1@NativeDirectory;All;Y.
Users who meet all criteria receive email alerts.
Table 117 Process Management User Roles and Alert Notification
Process Unit Level Before or AfterAction
Process Management User Roles Notified
First Pass Users with ALL or PROMOTE access to the entity are notified.
Review Levels 1 through 10 Reviewer at that Review Level and Submitter roles are notified.
For example, for Review Level 1, Reviewer 1 and Submitter roles are notified.
Submitted Review Supervisor role is notified. Only users with this role can approve the submitted process unit.
Approved Reviewer 1 to Reviewer 10 and Submitter roles are notified.
Published Users with ALL, READ, or PROMOTE access to the entity are notified.
When a process review action is performed, the system automatically generates email alerts tothe appropriate users, according to the security rights that have been set up. The user thatperformed the action is also notified with a confirmation email.
Note: Users with the Application Administrator role do not receive email alerts. For a user withthe Application Administrator role to receive email alerts, set up the administrator as aseparate user and assign the role to receive alerts.
Setting Up Intercompany AlertingYou can generate intercompany transaction email alerts for users who are assigned the securityrights to receive them.
For information on setting security roles, see the Oracle Enterprise Performance ManagementSystem User Security Administration Guide.
ä To set up intercompany transaction email alerts:
1 Assign the user to the Receive Email Alerts for Intercompany security role.
2 In the Security Access section for the security class, set the Support Alert option to Y for Yes to enablealerts. For example: [Default];User1@NativeDirectory;All;Y.
384

Users who meet all criteria receive email alerts from the Intercompany Transactions orIntercompany Partner Matching Report modules.
For information on generating email alerts in intercompany transactions, see the OracleHyperion Financial Management User's Guide.
385

386
AConfiguration Settings
In This Appendix
Available Configuration Settings... . . . . . . . . . . . . . . . . . . . . . . . . . . . . . . . . . . . . . . . . . . . . . . . . . . . . . . . . . . . . . . . . . . . . . 388
Changing Configuration Settings ... . . . . . . . . . . . . . . . . . . . . . . . . . . . . . . . . . . . . . . . . . . . . . . . . . . . . . . . . . . . . . . . . . . . . 393
Overriding Values ... . . . . . . . . . . . . . . . . . . . . . . . . . . . . . . . . . . . . . . . . . . . . . . . . . . . . . . . . . . . . . . . . . . . . . . . . . . . . . . . . . . . . . 394
Changing the Settings Table Display ... . . . . . . . . . . . . . . . . . . . . . . . . . . . . . . . . . . . . . . . . . . . . . . . . . . . . . . . . . . . . . . . . 394
Searching for Settings ... . . . . . . . . . . . . . . . . . . . . . . . . . . . . . . . . . . . . . . . . . . . . . . . . . . . . . . . . . . . . . . . . . . . . . . . . . . . . . . . . 394
Viewing Effective Settings ... . . . . . . . . . . . . . . . . . . . . . . . . . . . . . . . . . . . . . . . . . . . . . . . . . . . . . . . . . . . . . . . . . . . . . . . . . . . . 395
Exporting Settings ... . . . . . . . . . . . . . . . . . . . . . . . . . . . . . . . . . . . . . . . . . . . . . . . . . . . . . . . . . . . . . . . . . . . . . . . . . . . . . . . . . . . . . 395
Deleting Settings ... . . . . . . . . . . . . . . . . . . . . . . . . . . . . . . . . . . . . . . . . . . . . . . . . . . . . . . . . . . . . . . . . . . . . . . . . . . . . . . . . . . . . . . 395
The Settings module enables you to view and modify Financial Management configurationsettings. By default, the Settings table is populated with the recommended settings at the timeof installation.
You can change setting values if required. For example, you might need to change values basedon memory usage or to improve performance. For considerations on updating these values, seeAppendix B, “Optimizing Performance”.
You can override settings for a specific application. To change a system-level value, you musthave the Financial Management Administrator security role. To change an application levelvalue, you must have both the Financial Management Administrator and the ApplicationAdministrator security roles.
You can sort the settings list, search for settings, and export them to an Excel worksheet. Youcan delete setting overrides, but you cannot delete settings created by the system.
You can also view runtime values for specific application settings. See “Viewing EffectiveSettings” on page 395.
See these topics:
l “Available Configuration Settings” on page 388
l “Changing Configuration Settings” on page 393
l “Overriding Values” on page 394
l “Changing the Settings Table Display” on page 394
l “Searching for Settings” on page 394
l “Viewing Effective Settings” on page 395
387
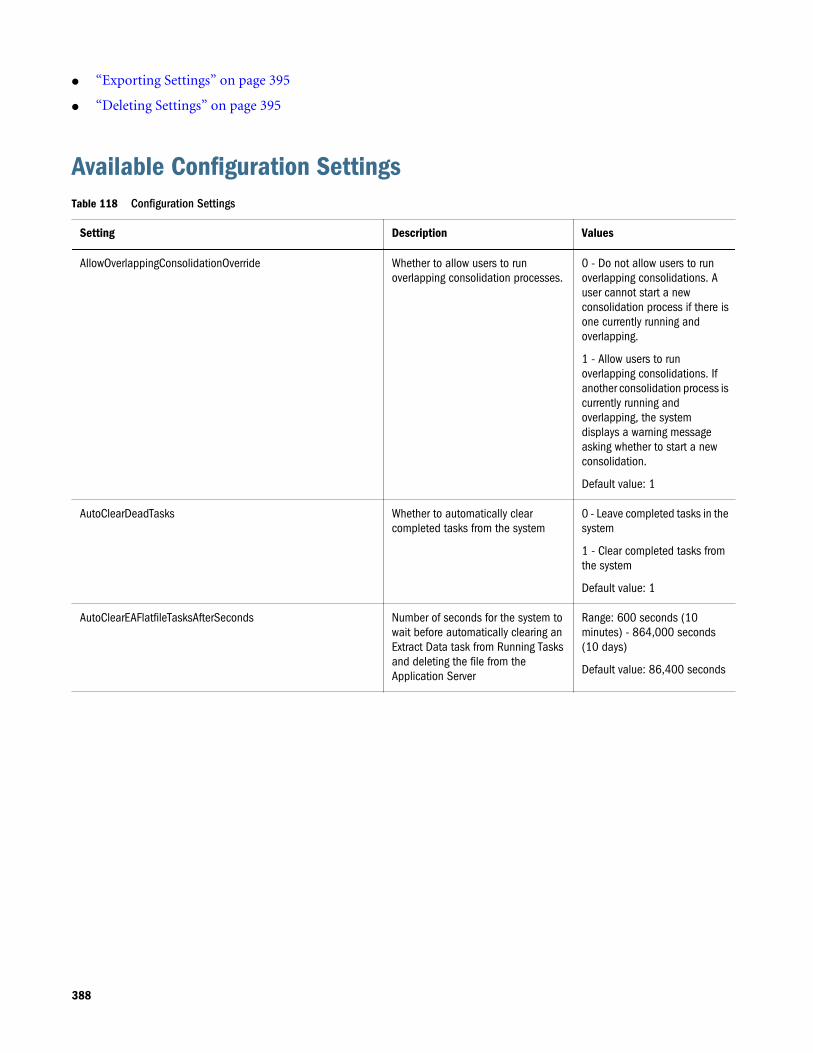
l “Exporting Settings” on page 395
l “Deleting Settings” on page 395
Available Configuration SettingsTable 118 Configuration Settings
Setting Description Values
AllowOverlappingConsolidationOverride Whether to allow users to runoverlapping consolidation processes.
0 - Do not allow users to runoverlapping consolidations. Auser cannot start a newconsolidation process if there isone currently running andoverlapping.
1 - Allow users to runoverlapping consolidations. Ifanother consolidation process iscurrently running andoverlapping, the systemdisplays a warning messageasking whether to start a newconsolidation.
Default value: 1
AutoClearDeadTasks Whether to automatically clearcompleted tasks from the system
0 - Leave completed tasks in thesystem
1 - Clear completed tasks fromthe system
Default value: 1
AutoClearEAFlatfileTasksAfterSeconds Number of seconds for the system towait before automatically clearing anExtract Data task from Running Tasksand deleting the file from theApplication Server
Range: 600 seconds (10minutes) - 864,000 seconds(10 days)
Default value: 86,400 seconds
388
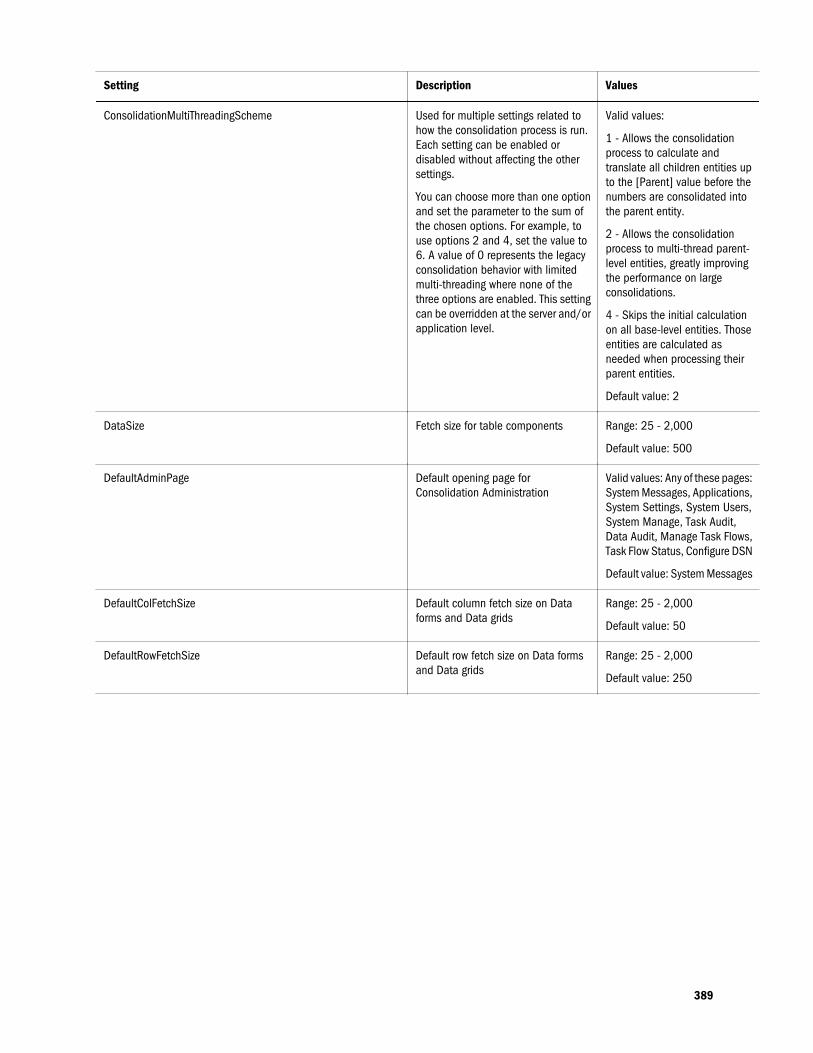
Setting Description Values
ConsolidationMultiThreadingScheme Used for multiple settings related tohow the consolidation process is run.Each setting can be enabled ordisabled without affecting the othersettings.
You can choose more than one optionand set the parameter to the sum ofthe chosen options. For example, touse options 2 and 4, set the value to6. A value of 0 represents the legacyconsolidation behavior with limitedmulti-threading where none of thethree options are enabled. This settingcan be overridden at the server and/orapplication level.
Valid values:
1 - Allows the consolidationprocess to calculate andtranslate all children entities upto the [Parent] value before thenumbers are consolidated intothe parent entity.
2 - Allows the consolidationprocess to multi-thread parent-level entities, greatly improvingthe performance on largeconsolidations.
4 - Skips the initial calculationon all base-level entities. Thoseentities are calculated asneeded when processing theirparent entities.
Default value: 2
DataSize Fetch size for table components Range: 25 - 2,000
Default value: 500
DefaultAdminPage Default opening page forConsolidation Administration
Valid values: Any of these pages:System Messages, Applications,System Settings, System Users,System Manage, Task Audit,Data Audit, Manage Task Flows,Task Flow Status, Configure DSN
Default value: System Messages
DefaultColFetchSize Default column fetch size on Dataforms and Data grids
Range: 25 - 2,000
Default value: 50
DefaultRowFetchSize Default row fetch size on Data formsand Data grids
Range: 25 - 2,000
Default value: 250
389
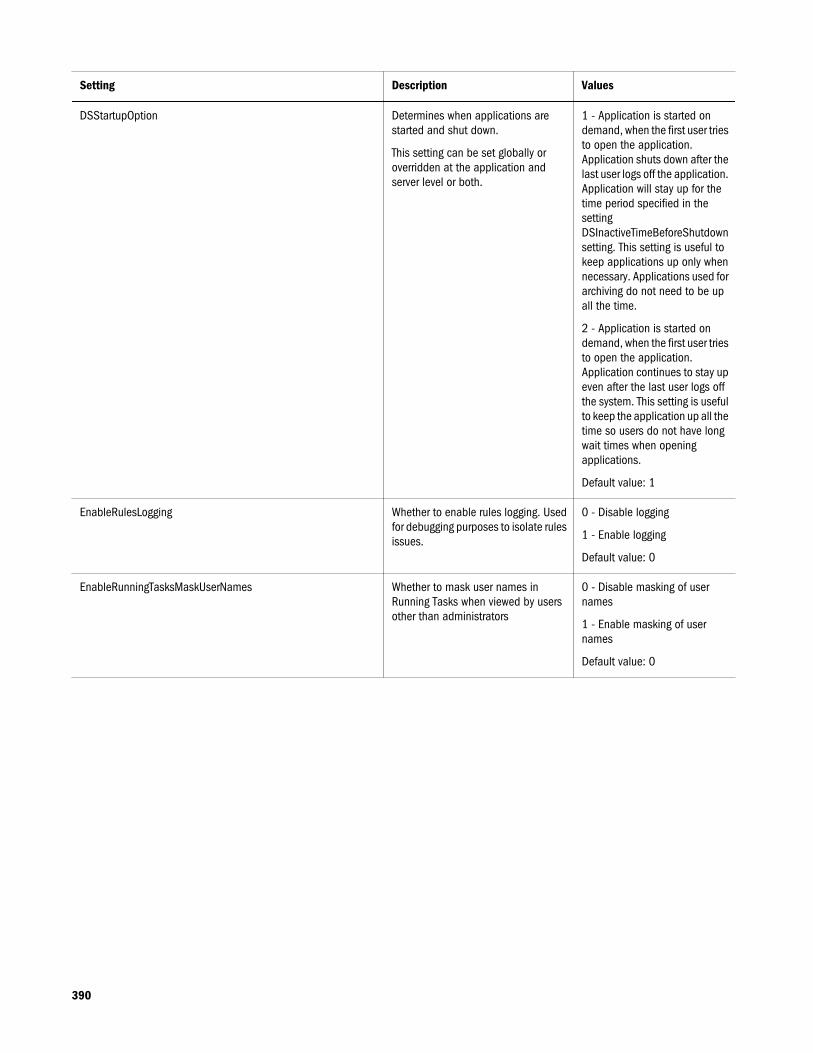
Setting Description Values
DSStartupOption Determines when applications arestarted and shut down.
This setting can be set globally oroverridden at the application andserver level or both.
1 - Application is started ondemand, when the first user triesto open the application.Application shuts down after thelast user logs off the application.Application will stay up for thetime period specified in thesettingDSInactiveTimeBeforeShutdownsetting. This setting is useful tokeep applications up only whennecessary. Applications used forarchiving do not need to be upall the time.
2 - Application is started ondemand, when the first user triesto open the application.Application continues to stay upeven after the last user logs offthe system. This setting is usefulto keep the application up all thetime so users do not have longwait times when openingapplications.
Default value: 1
EnableRulesLogging Whether to enable rules logging. Usedfor debugging purposes to isolate rulesissues.
0 - Disable logging
1 - Enable logging
Default value: 0
EnableRunningTasksMaskUserNames Whether to mask user names inRunning Tasks when viewed by usersother than administrators
0 - Disable masking of usernames
1 - Enable masking of usernames
Default value: 0
390
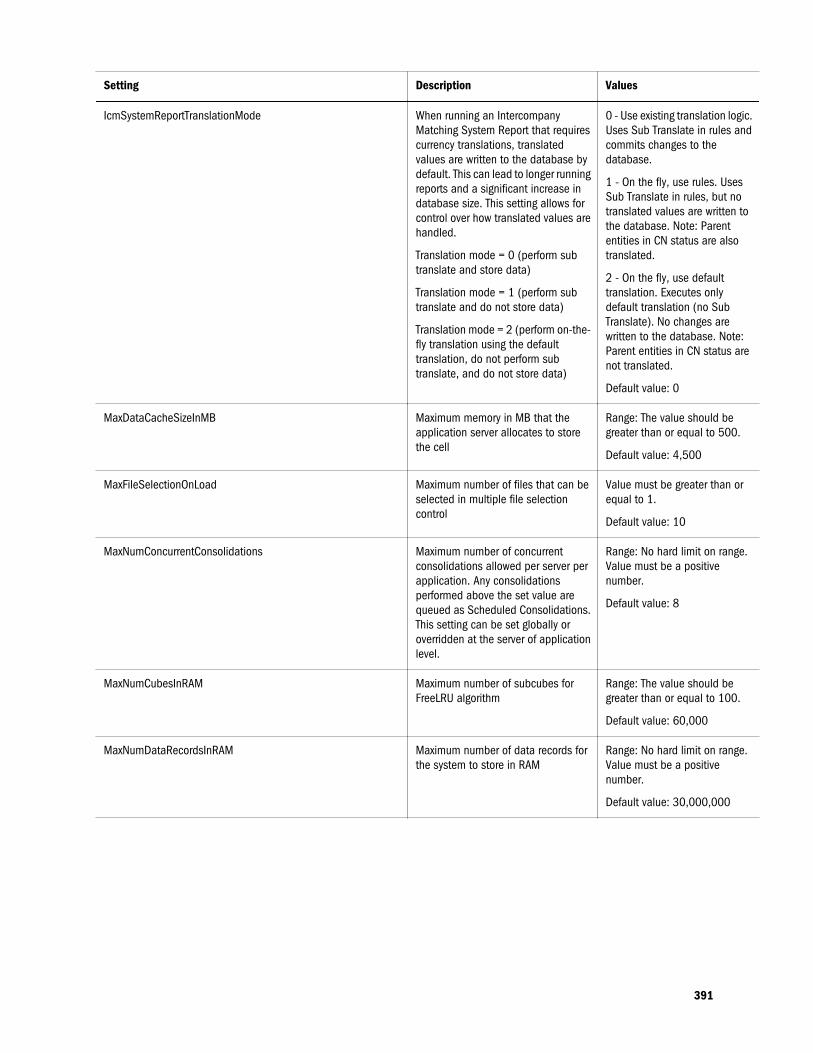
Setting Description Values
IcmSystemReportTranslationMode When running an IntercompanyMatching System Report that requirescurrency translations, translatedvalues are written to the database bydefault. This can lead to longer runningreports and a significant increase indatabase size. This setting allows forcontrol over how translated values arehandled.
Translation mode = 0 (perform subtranslate and store data)
Translation mode = 1 (perform subtranslate and do not store data)
Translation mode = 2 (perform on-the-fly translation using the defaulttranslation, do not perform subtranslate, and do not store data)
0 - Use existing translation logic.Uses Sub Translate in rules andcommits changes to thedatabase.
1 - On the fly, use rules. UsesSub Translate in rules, but notranslated values are written tothe database. Note: Parententities in CN status are alsotranslated.
2 - On the fly, use defaulttranslation. Executes onlydefault translation (no SubTranslate). No changes arewritten to the database. Note:Parent entities in CN status arenot translated.
Default value: 0
MaxDataCacheSizeInMB Maximum memory in MB that theapplication server allocates to storethe cell
Range: The value should begreater than or equal to 500.
Default value: 4,500
MaxFileSelectionOnLoad Maximum number of files that can beselected in multiple file selectioncontrol
Value must be greater than orequal to 1.
Default value: 10
MaxNumConcurrentConsolidations Maximum number of concurrentconsolidations allowed per server perapplication. Any consolidationsperformed above the set value arequeued as Scheduled Consolidations.This setting can be set globally oroverridden at the server of applicationlevel.
Range: No hard limit on range.Value must be a positivenumber.
Default value: 8
MaxNumCubesInRAM Maximum number of subcubes forFreeLRU algorithm
Range: The value should begreater than or equal to 100.
Default value: 60,000
MaxNumDataRecordsInRAM Maximum number of data records forthe system to store in RAM
Range: No hard limit on range.Value must be a positivenumber.
Default value: 30,000,000
391
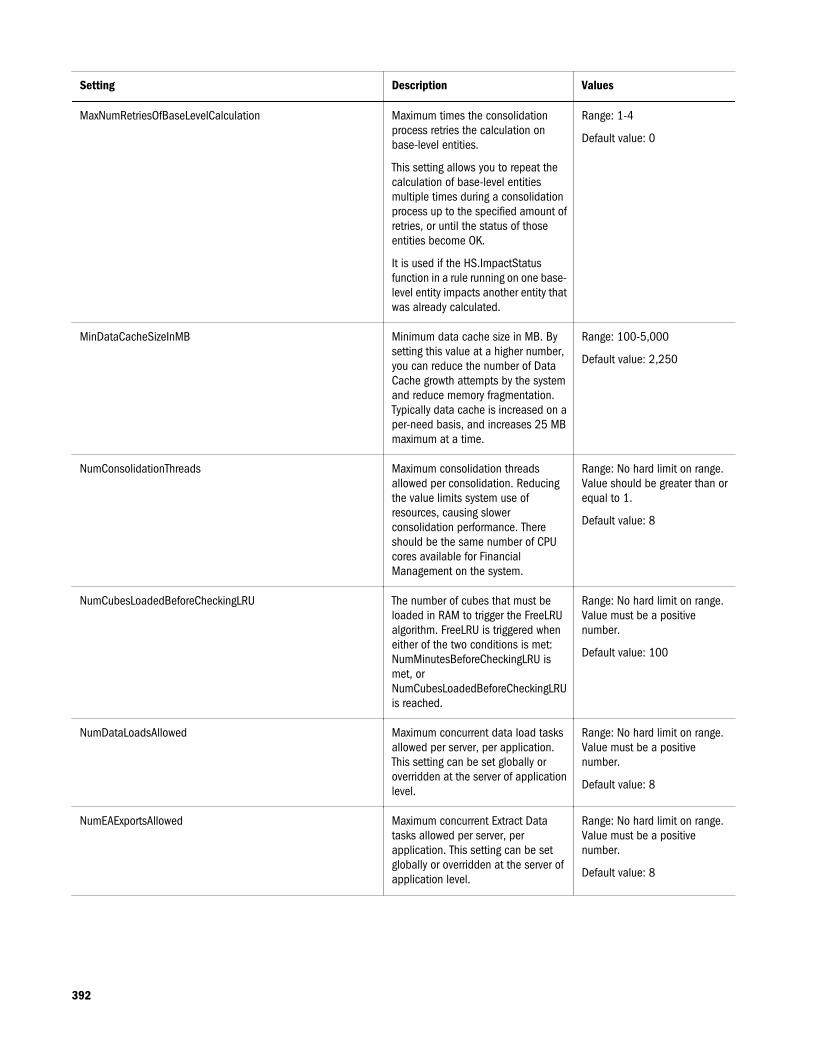
Setting Description Values
MaxNumRetriesOfBaseLevelCalculation Maximum times the consolidationprocess retries the calculation onbase-level entities.
This setting allows you to repeat thecalculation of base-level entitiesmultiple times during a consolidationprocess up to the specified amount ofretries, or until the status of thoseentities become OK.
It is used if the HS.ImpactStatusfunction in a rule running on one base-level entity impacts another entity thatwas already calculated.
Range: 1-4
Default value: 0
MinDataCacheSizeInMB Minimum data cache size in MB. Bysetting this value at a higher number,you can reduce the number of DataCache growth attempts by the systemand reduce memory fragmentation.Typically data cache is increased on aper-need basis, and increases 25 MBmaximum at a time.
Range: 100-5,000
Default value: 2,250
NumConsolidationThreads Maximum consolidation threadsallowed per consolidation. Reducingthe value limits system use ofresources, causing slowerconsolidation performance. Thereshould be the same number of CPUcores available for FinancialManagement on the system.
Range: No hard limit on range.Value should be greater than orequal to 1.
Default value: 8
NumCubesLoadedBeforeCheckingLRU The number of cubes that must beloaded in RAM to trigger the FreeLRUalgorithm. FreeLRU is triggered wheneither of the two conditions is met:NumMinutesBeforeCheckingLRU ismet, orNumCubesLoadedBeforeCheckingLRUis reached.
Range: No hard limit on range.Value must be a positivenumber.
Default value: 100
NumDataLoadsAllowed Maximum concurrent data load tasksallowed per server, per application.This setting can be set globally oroverridden at the server of applicationlevel.
Range: No hard limit on range.Value must be a positivenumber.
Default value: 8
NumEAExportsAllowed Maximum concurrent Extract Datatasks allowed per server, perapplication. This setting can be setglobally or overridden at the server ofapplication level.
Range: No hard limit on range.Value must be a positivenumber.
Default value: 8
392
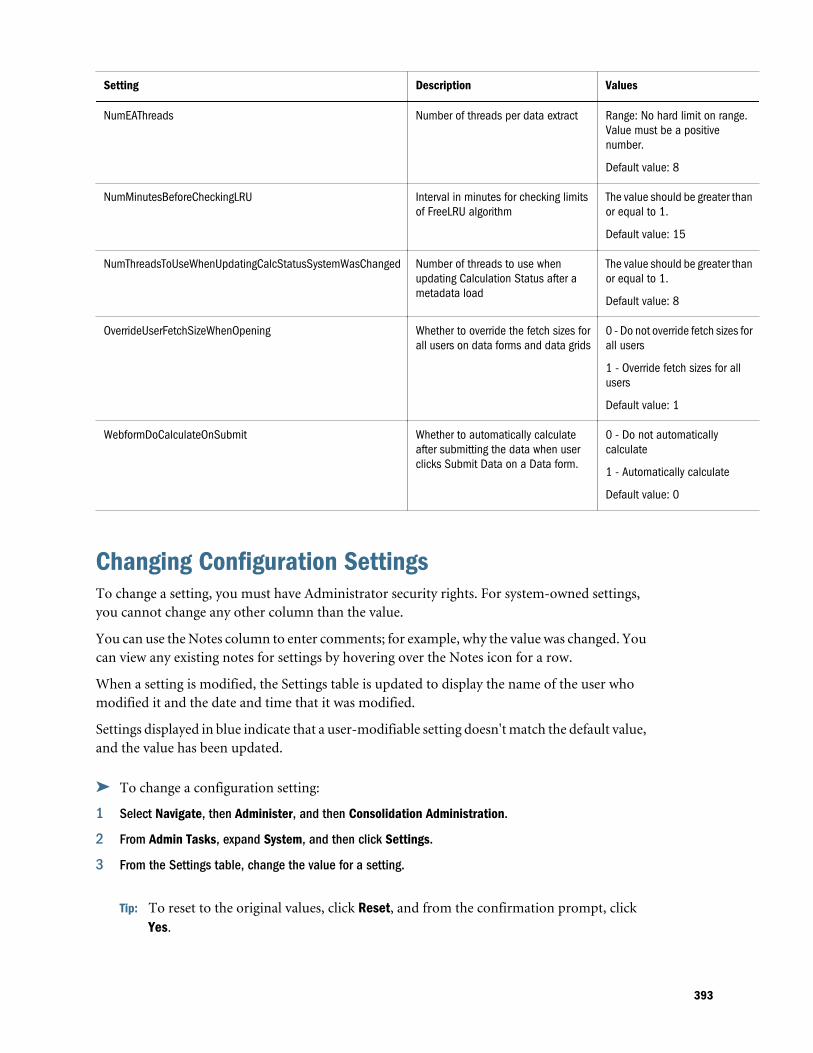
Setting Description Values
NumEAThreads Number of threads per data extract Range: No hard limit on range.Value must be a positivenumber.
Default value: 8
NumMinutesBeforeCheckingLRU Interval in minutes for checking limitsof FreeLRU algorithm
The value should be greater thanor equal to 1.
Default value: 15
NumThreadsToUseWhenUpdatingCalcStatusSystemWasChanged Number of threads to use whenupdating Calculation Status after ametadata load
The value should be greater thanor equal to 1.
Default value: 8
OverrideUserFetchSizeWhenOpening Whether to override the fetch sizes forall users on data forms and data grids
0 - Do not override fetch sizes forall users
1 - Override fetch sizes for allusers
Default value: 1
WebformDoCalculateOnSubmit Whether to automatically calculateafter submitting the data when userclicks Submit Data on a Data form.
0 - Do not automaticallycalculate
1 - Automatically calculate
Default value: 0
Changing Configuration SettingsTo change a setting, you must have Administrator security rights. For system-owned settings,you cannot change any other column than the value.
You can use the Notes column to enter comments; for example, why the value was changed. Youcan view any existing notes for settings by hovering over the Notes icon for a row.
When a setting is modified, the Settings table is updated to display the name of the user whomodified it and the date and time that it was modified.
Settings displayed in blue indicate that a user-modifiable setting doesn't match the default value,and the value has been updated.
ä To change a configuration setting:
1 Select Navigate, then Administer, and then Consolidation Administration.
2 From Admin Tasks, expand System, and then click Settings.
3 From the Settings table, change the value for a setting.
Tip: To reset to the original values, click Reset, and from the confirmation prompt, clickYes.
393
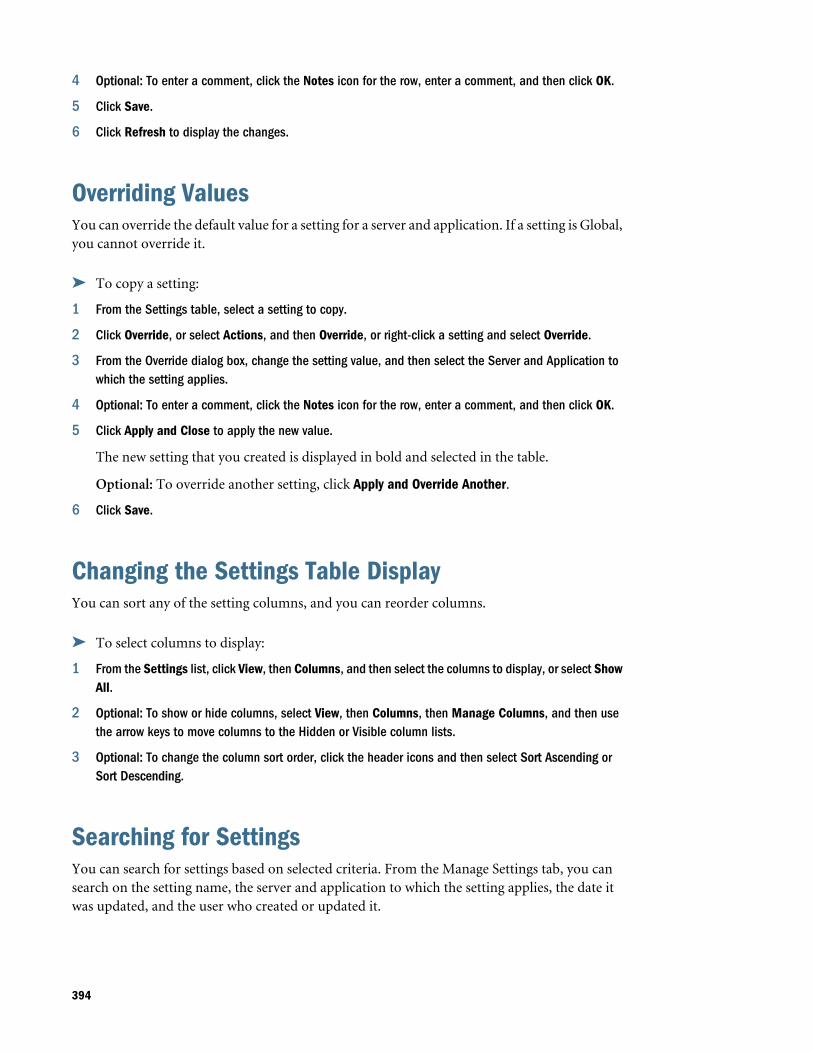
4 Optional: To enter a comment, click the Notes icon for the row, enter a comment, and then click OK.
5 Click Save.
6 Click Refresh to display the changes.
Overriding ValuesYou can override the default value for a setting for a server and application. If a setting is Global,you cannot override it.
ä To copy a setting:
1 From the Settings table, select a setting to copy.
2 Click Override, or select Actions, and then Override, or right-click a setting and select Override.
3 From the Override dialog box, change the setting value, and then select the Server and Application towhich the setting applies.
4 Optional: To enter a comment, click the Notes icon for the row, enter a comment, and then click OK.
5 Click Apply and Close to apply the new value.
The new setting that you created is displayed in bold and selected in the table.
Optional: To override another setting, click Apply and Override Another.
6 Click Save.
Changing the Settings Table DisplayYou can sort any of the setting columns, and you can reorder columns.
ä To select columns to display:
1 From the Settings list, click View, then Columns, and then select the columns to display, or select ShowAll.
2 Optional: To show or hide columns, select View, then Columns, then Manage Columns, and then usethe arrow keys to move columns to the Hidden or Visible column lists.
3 Optional: To change the column sort order, click the header icons and then select Sort Ascending orSort Descending.
Searching for SettingsYou can search for settings based on selected criteria. From the Manage Settings tab, you cansearch on the setting name, the server and application to which the setting applies, the date itwas updated, and the user who created or updated it.
394
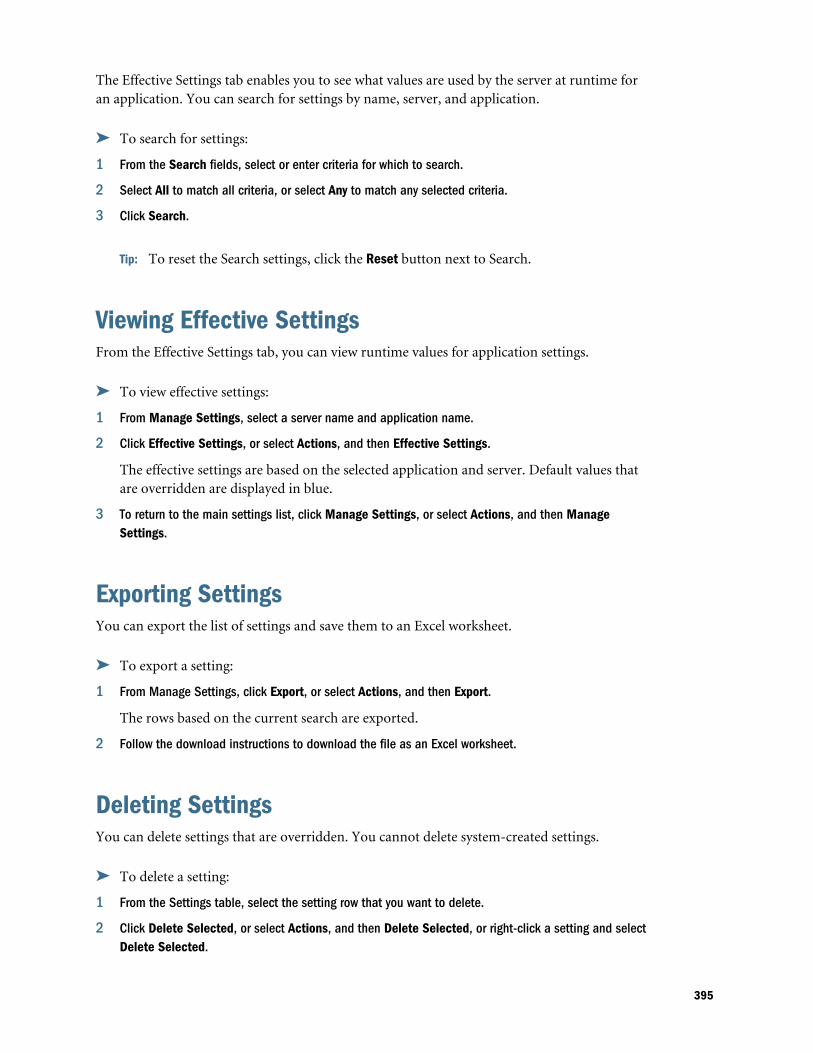
The Effective Settings tab enables you to see what values are used by the server at runtime foran application. You can search for settings by name, server, and application.
ä To search for settings:
1 From the Search fields, select or enter criteria for which to search.
2 Select All to match all criteria, or select Any to match any selected criteria.
3 Click Search.
Tip: To reset the Search settings, click the Reset button next to Search.
Viewing Effective SettingsFrom the Effective Settings tab, you can view runtime values for application settings.
ä To view effective settings:
1 From Manage Settings, select a server name and application name.
2 Click Effective Settings, or select Actions, and then Effective Settings.
The effective settings are based on the selected application and server. Default values thatare overridden are displayed in blue.
3 To return to the main settings list, click Manage Settings, or select Actions, and then ManageSettings.
Exporting SettingsYou can export the list of settings and save them to an Excel worksheet.
ä To export a setting:
1 From Manage Settings, click Export, or select Actions, and then Export.
The rows based on the current search are exported.
2 Follow the download instructions to download the file as an Excel worksheet.
Deleting SettingsYou can delete settings that are overridden. You cannot delete system-created settings.
ä To delete a setting:
1 From the Settings table, select the setting row that you want to delete.
2 Click Delete Selected, or select Actions, and then Delete Selected, or right-click a setting and selectDelete Selected.
395

3 From the confirmation prompt, click Yes.
396
BOptimizing Performance
In This Appendix
Performance Overview ... . . . . . . . . . . . . . . . . . . . . . . . . . . . . . . . . . . . . . . . . . . . . . . . . . . . . . . . . . . . . . . . . . . . . . . . . . . . . . . . . 398
Common EPM Installation Directory References ... . . . . . . . . . . . . . . . . . . . . . . . . . . . . . . . . . . . . . . . . . . . . . . . . . . . 398
Financial Management Records and Subcubes... . . . . . . . . . . . . . . . . . . . . . . . . . . . . . . . . . . . . . . . . . . . . . . . . . . . . 398
Tuning Recommendations for Financial Management.. . . . . . . . . . . . . . . . . . . . . . . . . . . . . . . . . . . . . . . . . . . . . . . 398
Diagnosing Performance Problems... . . . . . . . . . . . . . . . . . . . . . . . . . . . . . . . . . . . . . . . . . . . . . . . . . . . . . . . . . . . . . . . . . . 399
Tuning Operating Systems Parameters.. . . . . . . . . . . . . . . . . . . . . . . . . . . . . . . . . . . . . . . . . . . . . . . . . . . . . . . . . . . . . . . . 402
Tuning the Web Server.. . . . . . . . . . . . . . . . . . . . . . . . . . . . . . . . . . . . . . . . . . . . . . . . . . . . . . . . . . . . . . . . . . . . . . . . . . . . . . . . . . 402
Tuning Financial Management Applications ... . . . . . . . . . . . . . . . . . . . . . . . . . . . . . . . . . . . . . . . . . . . . . . . . . . . . . . . . 405
Tuning Oracle 11g Databases for Financial Management .. . . . . . . . . . . . . . . . . . . . . . . . . . . . . . . . . . . . . . . . . . 413
Frequently Asked Questions ... . . . . . . . . . . . . . . . . . . . . . . . . . . . . . . . . . . . . . . . . . . . . . . . . . . . . . . . . . . . . . . . . . . . . . . . . . 423
This chapter assumes familiarity with the Financial Management application, databaseadministration, and general operating system concepts. Actual implementations andenvironments will vary widely based on business requirements, Financial Management data set,network topology, and hardware usage. Therefore, you must consider how to adapt theseguidelines to your own implementations. All test results and performance numbers are onlyintended as examples to illustrate tuning concepts.
Caution! Improper settings and configurations may prevent Financial Management fromworking.
Before implementing any of the tuning settings, it is recommended to carry out end-to-endperformance testing to obtain baseline performance data for the default configurations, makeincremental changes to the tuning settings and then collect performance data. It should beverified that configuration changes improve, not impair, system performance.
For supported platforms and components, refer to the Oracle Enterprise PerformanceManagement System Supported Platform Matrix: http://www.oracle.com/technetwork/middleware/ias/downloads/fusion-certification-100350.html.
397
Performance Overview
Introduction to Oracle Hyperion EPM System PerformanceTo maximize Oracle Hyperion EPM System performance, you need to monitor, analyze, andtune all the components. This section describes the tools that you can use to monitorperformance and the techniques for optimizing the performance of Financial Management.
Common EPM Installation Directory ReferencesThis chapter uses the following directory references:
l Middleware Home— A Middleware home consists of the Oracle WebLogic Server home,and, optionally, one or more Oracle homes, including EPM Oracle home. The defaultinstallation directory is Oracle\Middleware. The Middleware home location is referred toas MIDDLEWARE_HOME throughout this chapter.
l EPM Oracle Home— An Oracle home contains installed files necessary to host a specificproduct, and resides within the directory structure of the Middleware home. The defaultEPM Oracle home location is MIDDLEWARE_HOME\EPMSystem11R1. The EPM Oraclehome location is referred to as EPM_ORACLE_HOME throughout this chapter.
l EPM Oracle Instance— Additionally, during configuration, some products deploycomponents to the EPM Oracle Instance defined during configuration. The default locationfor the EPM Oracle instance is MIDDLEWARE_HOME\user_projects\epmsystem1. TheEPM Oracle instance location is referred to as EPM_ORACLE_INSTANCE throughout thischapter.
Financial Management Records and SubcubesA record in Financial Management holds the data for all base periods for a given intersection ofdimension members. A subcube is a collection of records that all belong to the same Entity,Scenario, Year, and Value (currency). Within a subcube there are a minimum of 4 dimensions:Account, ICP and Customs. An FM application needs a minimum of two custom dimensions.There is no upper limit on the number of custom dimensions. Because the subcube is a naturalunit of data for the purposes of consolidation, data movement and processing are carried outon a subcube basis in many places in Financial Management.
Tuning Recommendations for Financial ManagementPerformance tuning Financial Management is an iterative process.
398
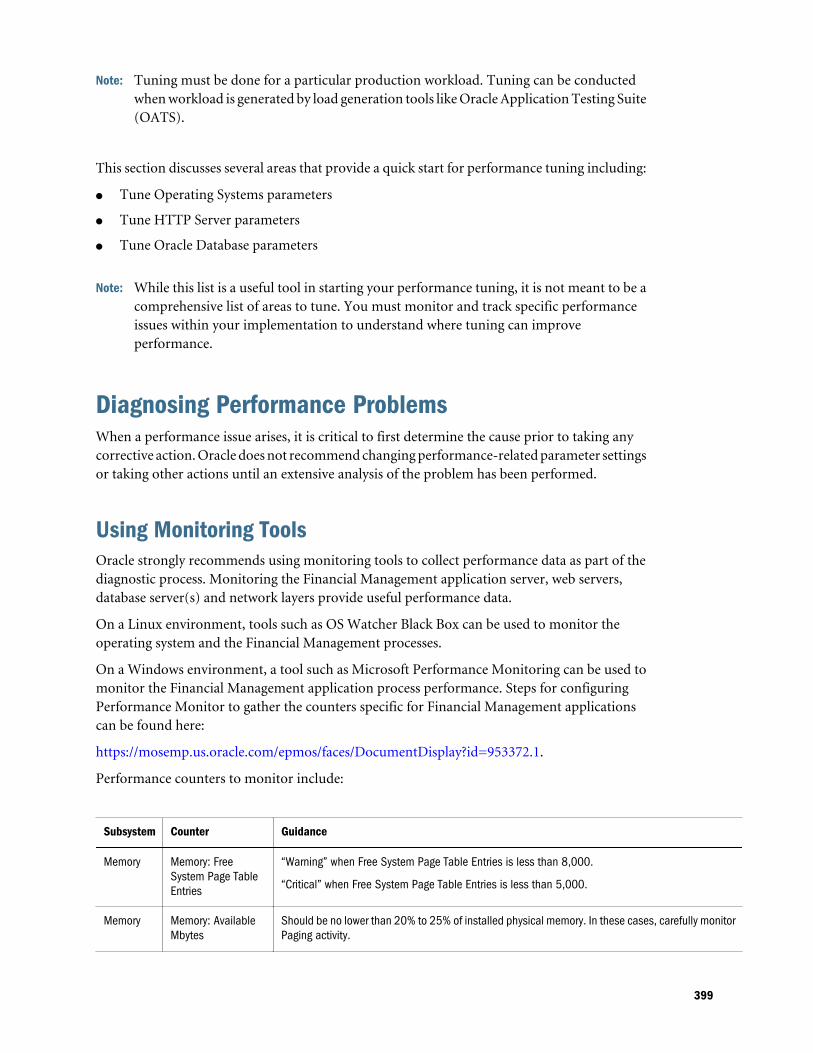
Note: Tuning must be done for a particular production workload. Tuning can be conductedwhen workload is generated by load generation tools like Oracle Application Testing Suite(OATS).
This section discusses several areas that provide a quick start for performance tuning including:
l Tune Operating Systems parameters
l Tune HTTP Server parameters
l Tune Oracle Database parameters
Note: While this list is a useful tool in starting your performance tuning, it is not meant to be acomprehensive list of areas to tune. You must monitor and track specific performanceissues within your implementation to understand where tuning can improveperformance.
Diagnosing Performance ProblemsWhen a performance issue arises, it is critical to first determine the cause prior to taking anycorrective action. Oracle does not recommend changing performance-related parameter settingsor taking other actions until an extensive analysis of the problem has been performed.
Using Monitoring ToolsOracle strongly recommends using monitoring tools to collect performance data as part of thediagnostic process. Monitoring the Financial Management application server, web servers,database server(s) and network layers provide useful performance data.
On a Linux environment, tools such as OS Watcher Black Box can be used to monitor theoperating system and the Financial Management processes.
On a Windows environment, a tool such as Microsoft Performance Monitoring can be used tomonitor the Financial Management application process performance. Steps for configuringPerformance Monitor to gather the counters specific for Financial Management applicationscan be found here:
https://mosemp.us.oracle.com/epmos/faces/DocumentDisplay?id=953372.1.
Performance counters to monitor include:
Subsystem Counter Guidance
Memory Memory: FreeSystem Page TableEntries
“Warning” when Free System Page Table Entries is less than 8,000.
“Critical” when Free System Page Table Entries is less than 5,000.
Memory Memory: AvailableMbytes
Should be no lower than 20% to 25% of installed physical memory. In these cases, carefully monitorPaging activity.
399
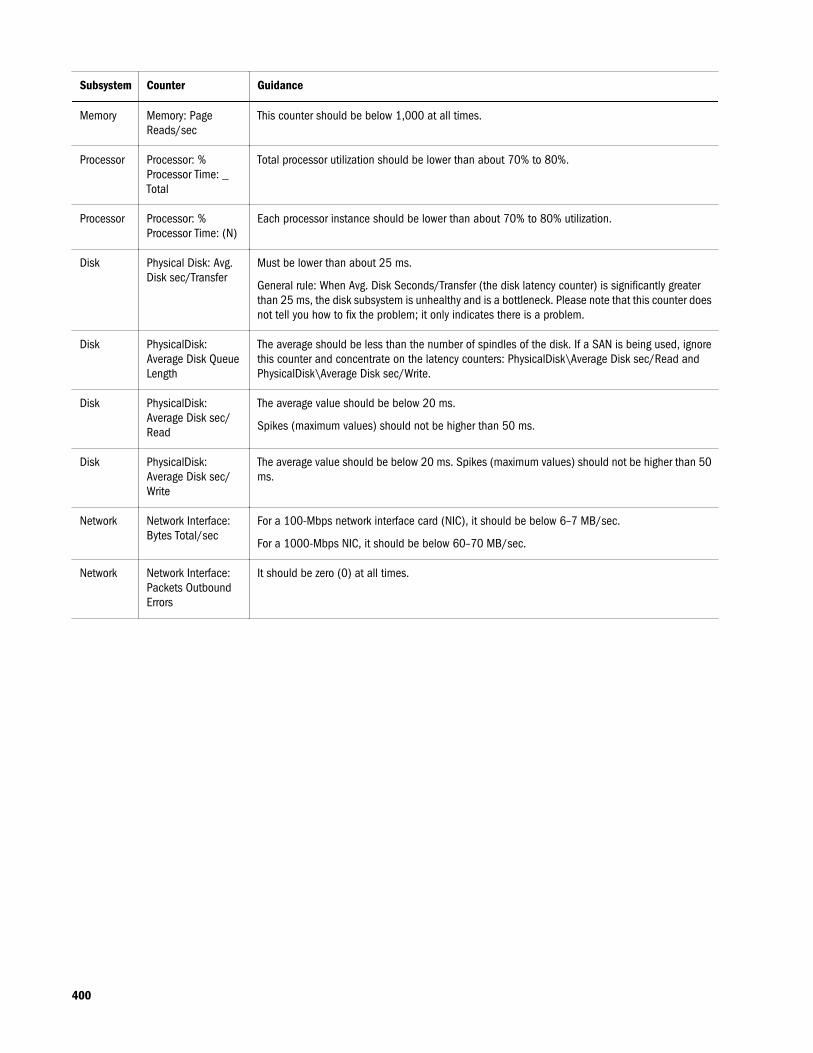
Subsystem Counter Guidance
Memory Memory: PageReads/sec
This counter should be below 1,000 at all times.
Processor Processor: %Processor Time: _Total
Total processor utilization should be lower than about 70% to 80%.
Processor Processor: %Processor Time: (N)
Each processor instance should be lower than about 70% to 80% utilization.
Disk Physical Disk: Avg.Disk sec/Transfer
Must be lower than about 25 ms.
General rule: When Avg. Disk Seconds/Transfer (the disk latency counter) is significantly greaterthan 25 ms, the disk subsystem is unhealthy and is a bottleneck. Please note that this counter doesnot tell you how to fix the problem; it only indicates there is a problem.
Disk PhysicalDisk:Average Disk QueueLength
The average should be less than the number of spindles of the disk. If a SAN is being used, ignorethis counter and concentrate on the latency counters: PhysicalDisk\Average Disk sec/Read andPhysicalDisk\Average Disk sec/Write.
Disk PhysicalDisk:Average Disk sec/Read
The average value should be below 20 ms.
Spikes (maximum values) should not be higher than 50 ms.
Disk PhysicalDisk:Average Disk sec/Write
The average value should be below 20 ms. Spikes (maximum values) should not be higher than 50ms.
Network Network Interface:Bytes Total/sec
For a 100-Mbps network interface card (NIC), it should be below 6–7 MB/sec.
For a 1000-Mbps NIC, it should be below 60–70 MB/sec.
Network Network Interface:Packets OutboundErrors
It should be zero (0) at all times.
400
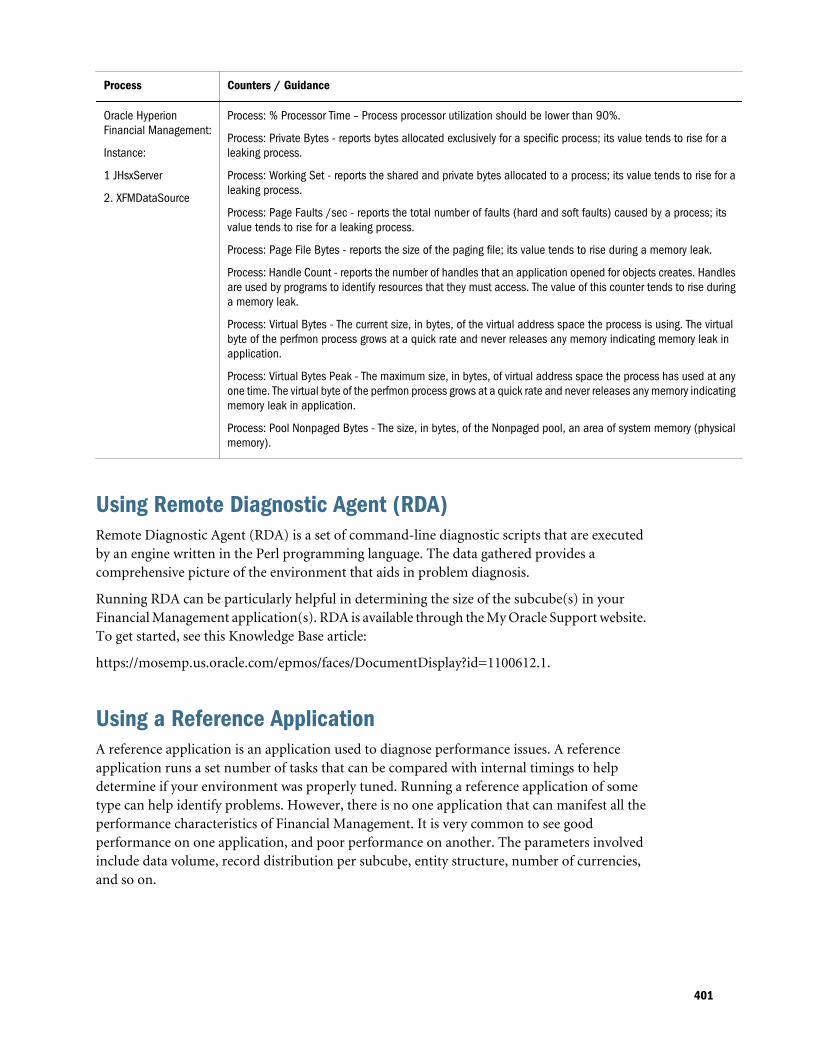
Process Counters / Guidance
Oracle HyperionFinancial Management:
Instance:
1 JHsxServer
2. XFMDataSource
Process: % Processor Time – Process processor utilization should be lower than 90%.
Process: Private Bytes - reports bytes allocated exclusively for a specific process; its value tends to rise for aleaking process.
Process: Working Set - reports the shared and private bytes allocated to a process; its value tends to rise for aleaking process.
Process: Page Faults /sec - reports the total number of faults (hard and soft faults) caused by a process; itsvalue tends to rise for a leaking process.
Process: Page File Bytes - reports the size of the paging file; its value tends to rise during a memory leak.
Process: Handle Count - reports the number of handles that an application opened for objects creates. Handlesare used by programs to identify resources that they must access. The value of this counter tends to rise duringa memory leak.
Process: Virtual Bytes - The current size, in bytes, of the virtual address space the process is using. The virtualbyte of the perfmon process grows at a quick rate and never releases any memory indicating memory leak inapplication.
Process: Virtual Bytes Peak - The maximum size, in bytes, of virtual address space the process has used at anyone time. The virtual byte of the perfmon process grows at a quick rate and never releases any memory indicatingmemory leak in application.
Process: Pool Nonpaged Bytes - The size, in bytes, of the Nonpaged pool, an area of system memory (physicalmemory).
Using Remote Diagnostic Agent (RDA)Remote Diagnostic Agent (RDA) is a set of command-line diagnostic scripts that are executedby an engine written in the Perl programming language. The data gathered provides acomprehensive picture of the environment that aids in problem diagnosis.
Running RDA can be particularly helpful in determining the size of the subcube(s) in yourFinancial Management application(s). RDA is available through the My Oracle Support website.To get started, see this Knowledge Base article:
https://mosemp.us.oracle.com/epmos/faces/DocumentDisplay?id=1100612.1.
Using a Reference ApplicationA reference application is an application used to diagnose performance issues. A referenceapplication runs a set number of tasks that can be compared with internal timings to helpdetermine if your environment was properly tuned. Running a reference application of sometype can help identify problems. However, there is no one application that can manifest all theperformance characteristics of Financial Management. It is very common to see goodperformance on one application, and poor performance on another. The parameters involvedinclude data volume, record distribution per subcube, entity structure, number of currencies,and so on.
401
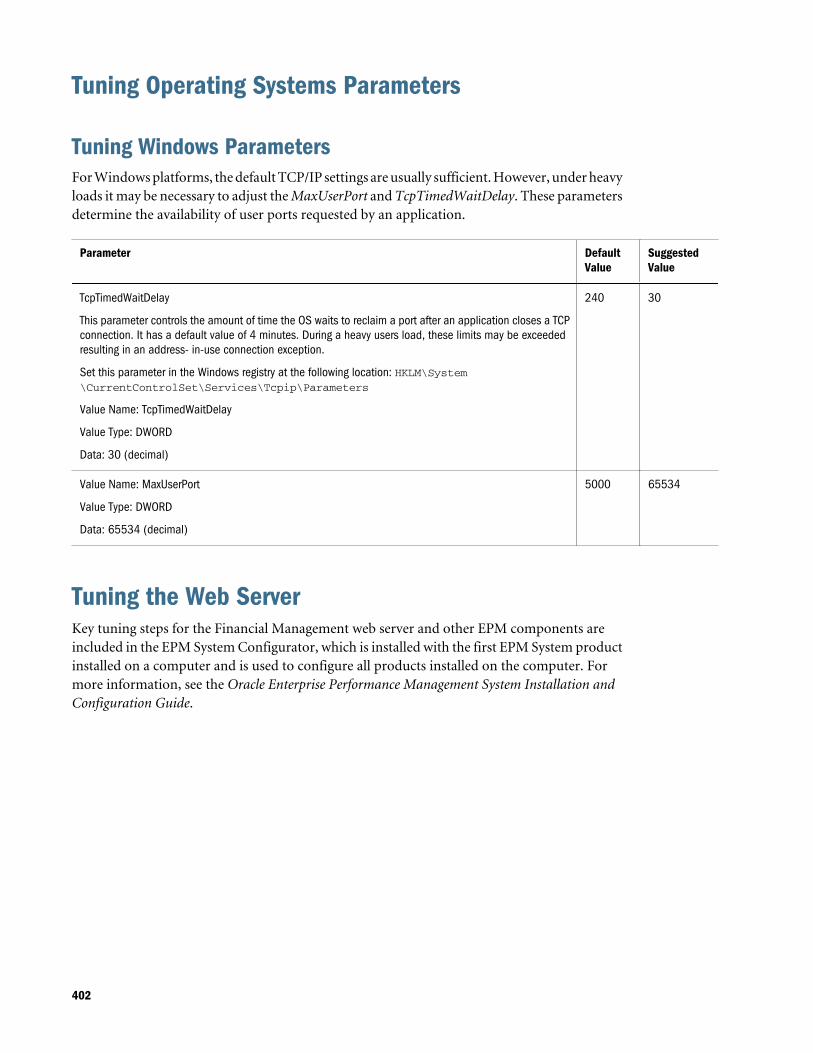
Tuning Operating Systems Parameters
Tuning Windows ParametersFor Windows platforms, the default TCP/IP settings are usually sufficient. However, under heavyloads it may be necessary to adjust the MaxUserPort and TcpTimedWaitDelay. These parametersdetermine the availability of user ports requested by an application.
Parameter DefaultValue
SuggestedValue
TcpTimedWaitDelay
This parameter controls the amount of time the OS waits to reclaim a port after an application closes a TCPconnection. It has a default value of 4 minutes. During a heavy users load, these limits may be exceededresulting in an address- in-use connection exception.
Set this parameter in the Windows registry at the following location: HKLM\System\CurrentControlSet\Services\Tcpip\Parameters
Value Name: TcpTimedWaitDelay
Value Type: DWORD
Data: 30 (decimal)
240 30
Value Name: MaxUserPort
Value Type: DWORD
Data: 65534 (decimal)
5000 65534
Tuning the Web ServerKey tuning steps for the Financial Management web server and other EPM components areincluded in the EPM System Configurator, which is installed with the first EPM System productinstalled on a computer and is used to configure all products installed on the computer. Formore information, see the Oracle Enterprise Performance Management System Installation andConfiguration Guide.
402
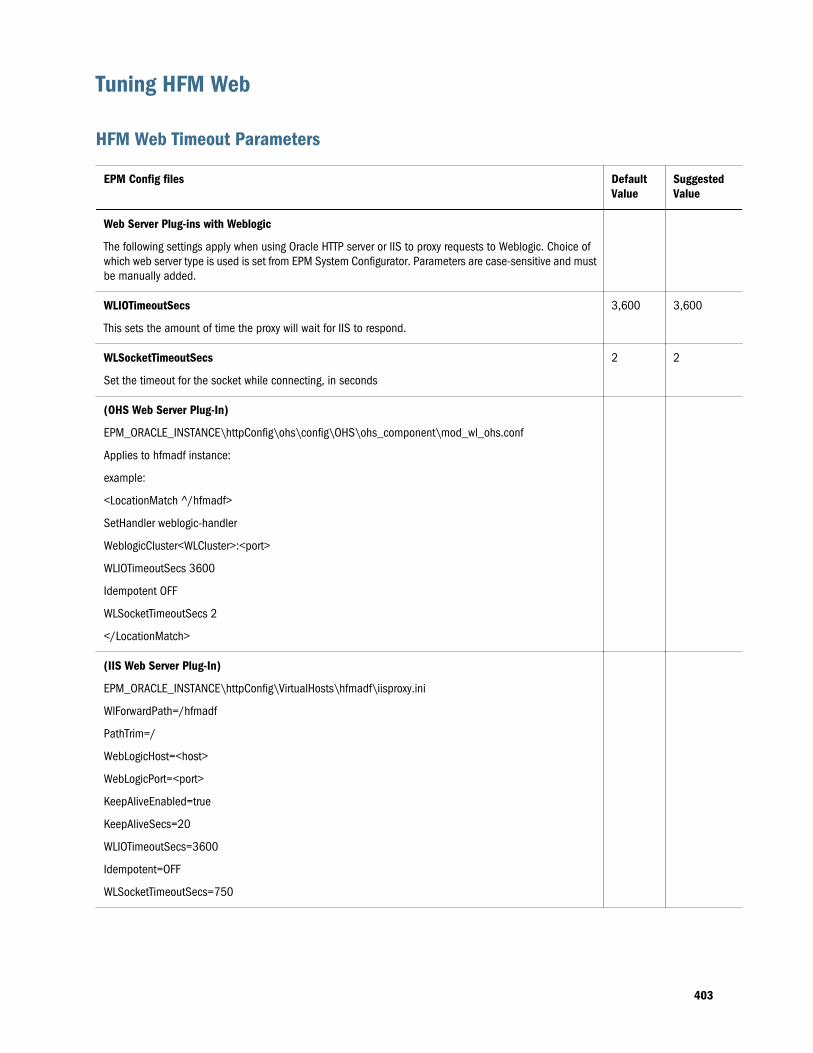
Tuning HFM Web
HFM Web Timeout Parameters
EPM Config files DefaultValue
SuggestedValue
Web Server Plug-ins with Weblogic
The following settings apply when using Oracle HTTP server or IIS to proxy requests to Weblogic. Choice ofwhich web server type is used is set from EPM System Configurator. Parameters are case-sensitive and mustbe manually added.
WLIOTimeoutSecs
This sets the amount of time the proxy will wait for IIS to respond.
3,600 3,600
WLSocketTimeoutSecs
Set the timeout for the socket while connecting, in seconds
2 2
(OHS Web Server Plug-In)
EPM_ORACLE_INSTANCE\httpConfig\ohs\config\OHS\ohs_component\mod_wl_ohs.conf
Applies to hfmadf instance:
example:
<LocationMatch ^/hfmadf>
SetHandler weblogic-handler
WeblogicCluster<WLCluster>:<port>
WLIOTimeoutSecs 3600
Idempotent OFF
WLSocketTimeoutSecs 2
</LocationMatch>
(IIS Web Server Plug-In)
EPM_ORACLE_INSTANCE\httpConfig\VirtualHosts\hfmadf\iisproxy.ini
WlForwardPath=/hfmadf
PathTrim=/
WebLogicHost=<host>
WebLogicPort=<port>
KeepAliveEnabled=true
KeepAliveSecs=20
WLIOTimeoutSecs=3600
Idempotent=OFF
WLSocketTimeoutSecs=750
403

EPM Config files DefaultValue
SuggestedValue
Weblogic
Stuck Threads (Weblogic Admin consol)
Long-running tasks like Metadata loads can appear to be stuck when HFM application process is busyprocessing the load file. Increase the Stuck Thread Time when these issues occur.
Change the following setting from the Weblogic console.
Select "Lock and Edit".
Select Servers and click on HFMWeb(N).
Select the Tuning tab.
Change "Stuck Thread Max Time" to 1200.
Change "Stuck Thread Timer Interval" to 1200.
Select "Activate Changes".
The HFMWeb0 server will need to be restarted.
Where HFMWeb(N) is HFMWeb0, HFMWeb1, etc., depending on how many HFM web servers are deployedand which server you are updating.
Stuck Thread Max Time 600 1200
Stuck Thread Timer Interval 60 1200
HFM Web Tuning ParametersThis section covers other HFM Web UI tuning parameters.
Tuning Parameter and Locations
Parameter DefaultValue
SuggestedValue
WebLogic
HFM ADF Web App Java Heap Size(Xms and Xmx)
The amount of heap available to each managed instance of the HFM ADF Web Application can be tunedby editing the JVMOptionXX options.
Where HFMWeb(N) is HFMWeb0, HFMWeb1, etc. depending on how many HFM Web servers are deployedand which server instance you are updating.
Xms sets the initial heap size and should be set to the same size as Xmx. 128m 2048m
Xmx sets the maximum size of the heap. It is recommended not to set the maximum heap size to higherthan 75% of the available physical memory.
Note that on a compact deployment, it is not possible to tune HFM ADF Web separately as there will be asingle EPMSystem(N) Web application for all EPM products.
512m 2048m
404
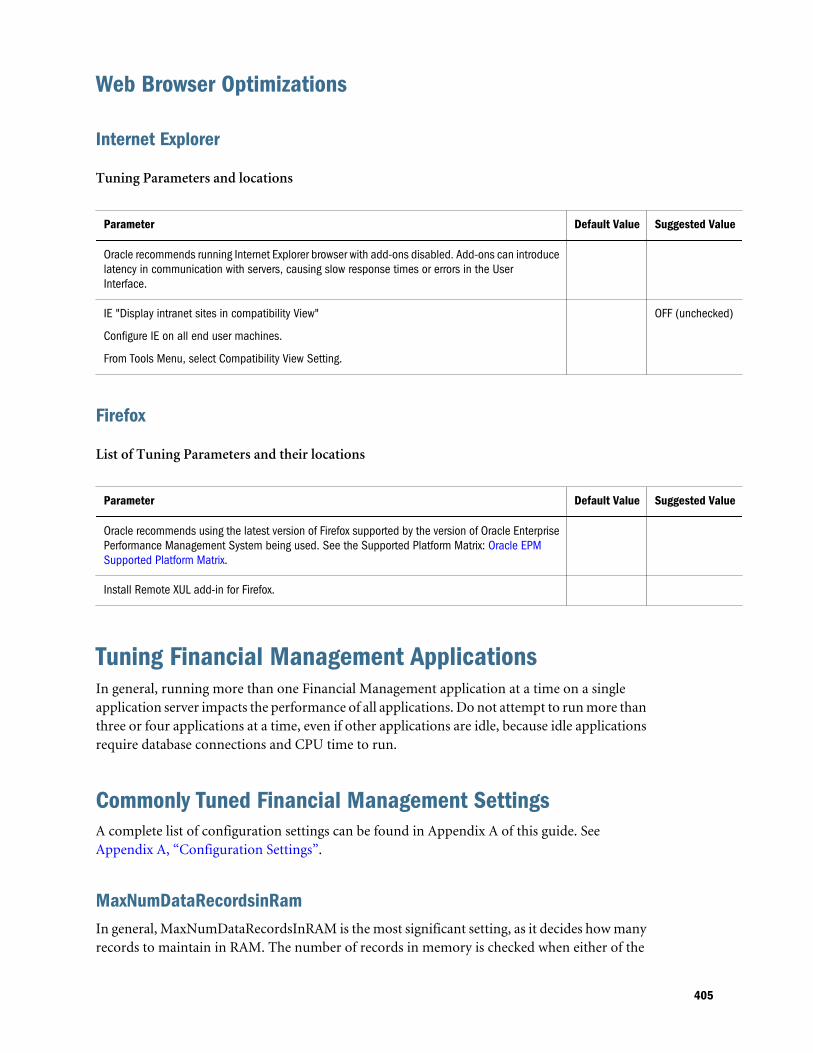
Web Browser Optimizations
Internet Explorer
Tuning Parameters and locations
Parameter Default Value Suggested Value
Oracle recommends running Internet Explorer browser with add-ons disabled. Add-ons can introducelatency in communication with servers, causing slow response times or errors in the UserInterface.
IE "Display intranet sites in compatibility View"
Configure IE on all end user machines.
From Tools Menu, select Compatibility View Setting.
OFF (unchecked)
Firefox
List of Tuning Parameters and their locations
Parameter Default Value Suggested Value
Oracle recommends using the latest version of Firefox supported by the version of Oracle EnterprisePerformance Management System being used. See the Supported Platform Matrix: Oracle EPMSupported Platform Matrix.
Install Remote XUL add-in for Firefox.
Tuning Financial Management ApplicationsIn general, running more than one Financial Management application at a time on a singleapplication server impacts the performance of all applications. Do not attempt to run more thanthree or four applications at a time, even if other applications are idle, because idle applicationsrequire database connections and CPU time to run.
Commonly Tuned Financial Management SettingsA complete list of configuration settings can be found in Appendix A of this guide. SeeAppendix A, “Configuration Settings”.
MaxNumDataRecordsinRamIn general, MaxNumDataRecordsInRAM is the most significant setting, as it decides how manyrecords to maintain in RAM. The number of records in memory is checked when either of the
405
two conditions NumMinutesBeforeCheckingLRU or NumCubesLoadedBeforeCheckingLRU isreached. See “Available Configuration Settings” on page 388.
Range: No hard limit on range.
Default value: 30,000,000
Note: When total number of records in RAM goes above this value, the FreeLRU is called torelease records from memory to free up some memory for the Financial Managementserver. The informational message “FreeLRUCachesIfMoreRAMIsNeeded released datacubes” is recorded in the log.
MinDataCacheSizeInMBBy setting this value at a higher number, you can reduce the number of DataCache growthattempts and thus reduce memory fragmentation. Typically DataCache is grown on a per-needbasis, and grows 25 MB maximum at a time.
Range: No hard limit on range.
Default value: 2,000
MaxDataCacheSizeInMBThis setting controls the maximum amount of memory that the Financial Managementapplication server allocates to store the cell values and cell status. If more memory is requiredby the system, then the cell value and cell status are paged out to disk based on the LRU logic.The workaround is to increase the cache size.
Range: The value should be greater than or equal to 500.
Default value: 4,500
Note: If performance of a consolidation operation decreases because of paging, you can increaseMaxDataCacheSizeInMB to minimize paging. This value should be more than the totalmemory usage allowed by “MaxNumDataRecordsInRAM”, so that the system does notpage out the cells unnecessarily to disk. A too low MaxDataCacheSizeInMB setting meansthat you will run out of memory to store data records and begin paging, which reducessystem performance.
MaxNumCubesInRAMThis setting controls the number of cubes that are held in memory at any given time. The numberof cubes in memory is checked when either of the two conditionsNumMinutesBeforeCheckingLRU or NumCubesLoadedBeforeCheckingLRU is reached.Lowering this setting can alleviate high memory usage for sparse applications (applications withmany entities, but relatively few records per entity). This setting affects all data operationsincluding consolidations and data retrievals.
Range: 100-500,000
406
Default value: 60,000
IcmSystemReportTranslationModeWhen running an Intercompany Matching System Report that requires currency translations,translated values are written to the database by default. This can lead to longer running reportsand a significant increase in database size. This setting allows for control over how translatedvalues are handled.
Range: 0,1,2
Default value: 0
Valid Data options:
l 0 - Default behavior; translated values are written to the database.
l 1 - On-the-fly calculations use Sub Translate in rules, but no translated values are writtento the database. Note: Parent Entities in CN status will also be translated.
l 2 - On-the-fly calculations only execute default translation (no Sub Translate rule). Nochanges are written to the database. Note: Parent Entities in CN status will NOT betranslated.
NumConsolidationThreadsThis setting controls the multi-threading of consolidations per application server.
Range: No hard limit on range. Value must be a positive number.
Default value: 8
Note: Lowering the value limits the system's utilization of system resources, resulting in slowerconsolidation performance. Raising the value results in higher CPU utilization and mayaffect other components’ performance.
Tip: Tests were conducted to evaluate the impact of increasing NumConsolidationThreads from4 to 8. Results below show that one month consolidation times became faster.
Transactions 92 users
NumConsolidationThreads = 4
Average Response Time (seconds)
92 users
NumConsolidationThreads = 8
Average Response Time (seconds)
01_Run_Consolidation_ A_1105 10.11 3.22
02_Run_Consolidation_A_0005 16.15 9.47
03_Run_Consolidation_ A_2205 7.75 3.19
04_Run_Consolidation_A_3305 18.67 9.17
407
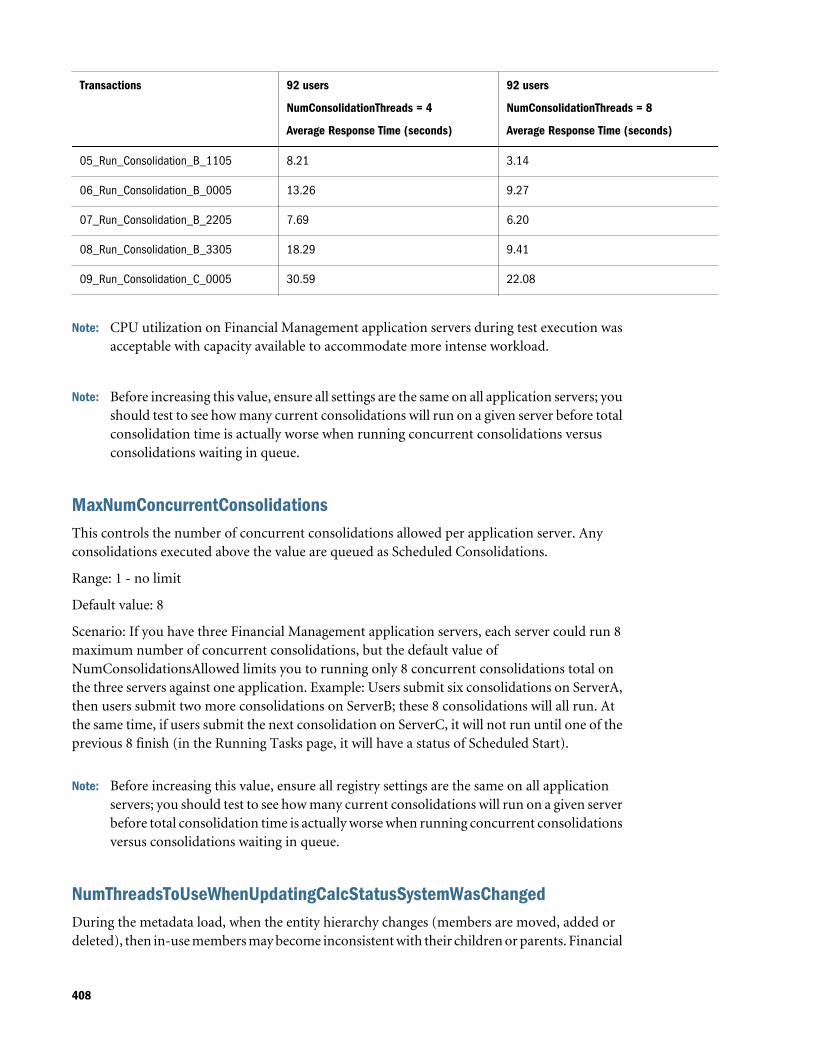
Transactions 92 users
NumConsolidationThreads = 4
Average Response Time (seconds)
92 users
NumConsolidationThreads = 8
Average Response Time (seconds)
05_Run_Consolidation_B_1105 8.21 3.14
06_Run_Consolidation_B_0005 13.26 9.27
07_Run_Consolidation_B_2205 7.69 6.20
08_Run_Consolidation_B_3305 18.29 9.41
09_Run_Consolidation_C_0005 30.59 22.08
Note: CPU utilization on Financial Management application servers during test execution wasacceptable with capacity available to accommodate more intense workload.
Note: Before increasing this value, ensure all settings are the same on all application servers; youshould test to see how many current consolidations will run on a given server before totalconsolidation time is actually worse when running concurrent consolidations versusconsolidations waiting in queue.
MaxNumConcurrentConsolidationsThis controls the number of concurrent consolidations allowed per application server. Anyconsolidations executed above the value are queued as Scheduled Consolidations.
Range: 1 - no limit
Default value: 8
Scenario: If you have three Financial Management application servers, each server could run 8maximum number of concurrent consolidations, but the default value ofNumConsolidationsAllowed limits you to running only 8 concurrent consolidations total onthe three servers against one application. Example: Users submit six consolidations on ServerA,then users submit two more consolidations on ServerB; these 8 consolidations will all run. Atthe same time, if users submit the next consolidation on ServerC, it will not run until one of theprevious 8 finish (in the Running Tasks page, it will have a status of Scheduled Start).
Note: Before increasing this value, ensure all registry settings are the same on all applicationservers; you should test to see how many current consolidations will run on a given serverbefore total consolidation time is actually worse when running concurrent consolidationsversus consolidations waiting in queue.
NumThreadsToUseWhenUpdatingCalcStatusSystemWasChangedDuring the metadata load, when the entity hierarchy changes (members are moved, added ordeleted), then in-use members may become inconsistent with their children or parents. Financial
408
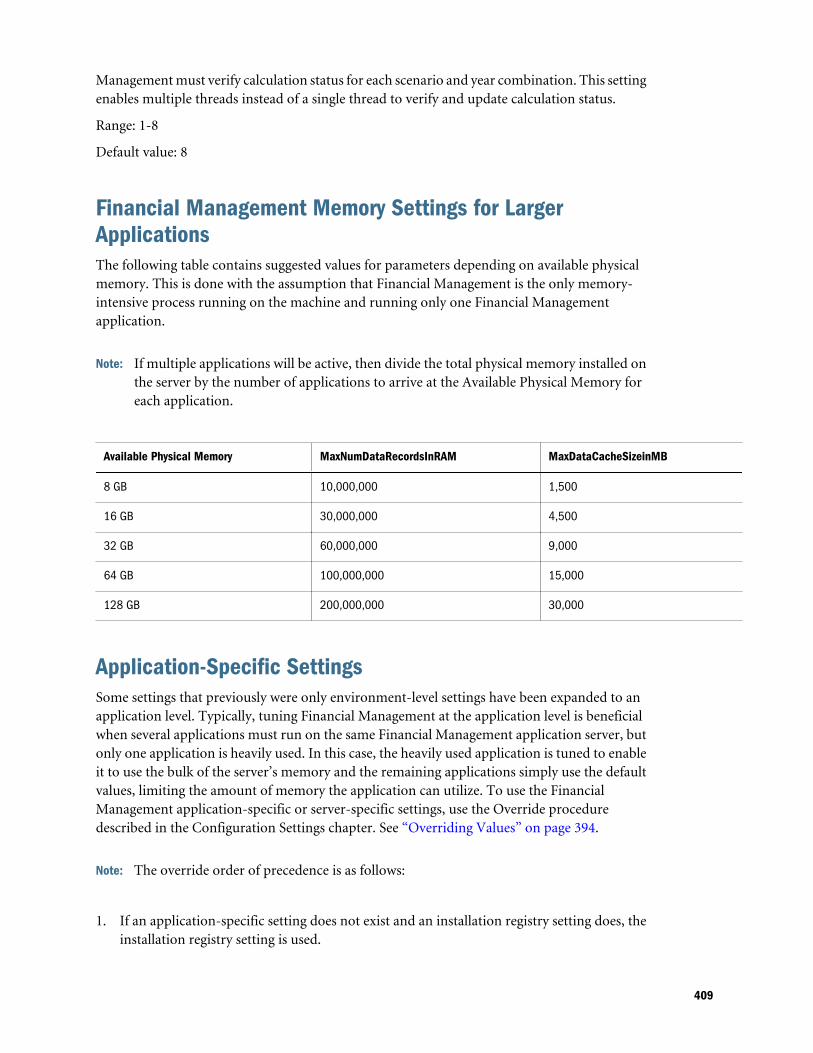
Management must verify calculation status for each scenario and year combination. This settingenables multiple threads instead of a single thread to verify and update calculation status.
Range: 1-8
Default value: 8
Financial Management Memory Settings for LargerApplicationsThe following table contains suggested values for parameters depending on available physicalmemory. This is done with the assumption that Financial Management is the only memory-intensive process running on the machine and running only one Financial Managementapplication.
Note: If multiple applications will be active, then divide the total physical memory installed onthe server by the number of applications to arrive at the Available Physical Memory foreach application.
Available Physical Memory MaxNumDataRecordsInRAM MaxDataCacheSizeinMB
8 GB 10,000,000 1,500
16 GB 30,000,000 4,500
32 GB 60,000,000 9,000
64 GB 100,000,000 15,000
128 GB 200,000,000 30,000
Application-Specific SettingsSome settings that previously were only environment-level settings have been expanded to anapplication level. Typically, tuning Financial Management at the application level is beneficialwhen several applications must run on the same Financial Management application server, butonly one application is heavily used. In this case, the heavily used application is tuned to enableit to use the bulk of the server’s memory and the remaining applications simply use the defaultvalues, limiting the amount of memory the application can utilize. To use the FinancialManagement application-specific or server-specific settings, use the Override proceduredescribed in the Configuration Settings chapter. See “Overriding Values” on page 394.
Note: The override order of precedence is as follows:
1. If an application-specific setting does not exist and an installation registry setting does, theinstallation registry setting is used.
409
2. If an application-specific setting does not exist, the setting defined in the Server key is used.
3. If no application-specific or server setting is defined, the default value is used. For settingsand default values, see Appendix A, “Configuration Settings”.
These settings can be overridden with application-specific settings:
l AllowOverlappingConsolidationOverride
l AutoClearDeadTasks
l AutoClearEAFlatfileTasksAfterSeconds
l EnableRulesLogging
l EnableRunningTasksMaskUserNames
l DSStartupOption
l MaxDataCacheSizeInMB
l MaxNumConcurrentConsolidations
l MaxNumCubesInRAM
l MaxNumDataRecordsInRAM
l MaxNumRetriesOfBaseLevelCalculation
l MinDataCacheSizeInMB
l NumConsolidationThreads
l NumCubesLoadedBeforeCheckingLRU
l NumDataLoadsAllowed
l NumEAExportsAllowed
l NumEAThreads
l NumMinutesBeforeCheckingLRU
l NumThreadsToUseWhenUpdatingCalcStatusSystemWasChanged
Tuning Financial Management Application ServersWhen tuning Financial Management application servers, you should start with baseline tests tomeasure key user activities with representative user concurrency. When using multiple FinancialManagement clusters, often to separate reporting and Oracle Smart View for Office user activityfrom consolidation activity, it is likely to see different tuning changes affect each server differentlybased on the user task being measured. For example, an Financial Management applicationserver primarily used for reporting will see no benefit by increasing NumConsolidationThreads,while a server running many consolidations should see improvements in consolidation times.Likewise, an application server primarily used for reporting would likely see better responsetimes for repeated reports when MaxNumDataRecordsInRAM is set high enough to keep allrecords in memory, while a server running many consolidations is unlikely to see consolidationtimes improve. Another point to consider when deciding what role an application server willhave is CPU speed, CPU core count, RAM amount and RAM speed. An application server
410
primarily dedicated to running consolidations, running one Financial Management applicationthat has intensive rules, will typically see the best performance with faster CPU clock speeds,with at least 8 cores, rather than using more CPUs/cores, but slower clock speed.
FM Tuning ExampleConsider the simple case of tuning an HFM application server with 8 CPUs, 64 Gb of RAM andhosting three HFM applications with only one of the three being used heavily; call this applicationCORP. The Financial Management application server will be used for both consolidation andreporting activity, and the database will be Oracle.
Referring to the table provided in the Financial Management Memory Settings for LargerApplications section, we need to keep the totals of MaxNumDataRecordsinRAM andMaxDataCacheSizeinMB to 60,000,000 and 9,000 respectively. Since two of the threeapplications are not heavily used, we will allow those two application to use default values, andtune the CORP application to take full advantage of the server resources.
MaxNumDataRecordsinRAM is 30,000,000, with two applications using defaults - that meansCORP can have MaxNumDataRecordsinRAM set to 40,000,000.
Default value for MaxDataCacheSizeinMB is 4,500, with two applications using defaults - thatmeans CORP can have MaxDataCacheSizeinMB set to 6,000.
Other values we would consider tuning specifically for CORP in this example would be:
MinDataCacheSizeInMB – setting to half the value of MaxDataCacheSizeinMB (3,000).
Since we are tuning at the application level for CORP and allowing the other two application touse default values, we create overrides for CORP to use values different than the defaults. Thesewould be the updates to the settings:
MaxNumDataRecordsinRAM (40,000,000)
MaxDataCacheSizeinMB (6,000)
MinDataCacheSizeinMB (4,000)
Application Database MaintenanceThe following best practices are recommended when using Oracle / SQL Server databases withFinancial Management:
For Financial Management tables <appname>_DATA_AUDIT, <appname>_TASK_AUDIT,and HFM_ERRORLOG, it is recommended to implement the following best practices:
Quarterly - Business to review the Audit logs, archive and delete.
Half-Yearly - Archive System Messages and truncate table.
Tip: Set up alerts so that action can be taken if these tables grow beyond the recommendednumber of records (> 500,000). Note that large audit tables can have severe impact onFinancial Management performance.
411
Basic Design Considerationsl If Data Audit feature is not part of business requirements, then it is recommended to turn
off data auditing. Degradation in performance has been observed for applications with aData Audit table more than 10GB.
Tip: To turn off auditing of members, change the EnableDataAudit attribute to N for allmembers in your metadata file.
l Rules must always be tested prior to loading in a production environment to avoid anypitfalls of poorly designed rules (for example, data explosion from rules). Efficient rules arecritical for acceptable system performance.
l Financial Management does all processing through subcubes while they are stored in RAM,so the larger the subcube, the larger the impact on performance. Try to minimize subcubesize as much as possible, for example, no subcube should exceed the 200,000 base recordlimits in order to ensure optimal system performance.
l Loading to or calculating zeros in a Financial Management application is not recommended.Zeros are stored as data, which increases the database size and can affect performance. It isrecommended that only numeric information, such as 1000, be stored in FinancialManagement. See the Data File section in the Oracle Hyperion Financial Management User'sGuide.
l If Financial Management is not properly shut down, temporary files may remain uponreboot. To ensure optimal performance, it is recommended that you delete all *.db.* filenames from the Financial Management Server Working folder before launching FinancialManagement.
l For attaching multiple documents to a data grid or process unit, Oracle recommends thatyou attach no more than three documents to a cell. Each document should be smaller than100K to limit the performance effect on the database.
Tip: You can set a size limit for document attachments and a maximum number ofdocument attachments by user when you create an application. You can set the limitsin the AppSettings attribute for the application metadata.
l Use the Consolidate All option only under appropriate circumstances. If this option is used,the system does not skip entities with NODATA, which can have a significant impact onconsolidation performance.
Tip: The Consolidate (Impacted Consolidation) is the most efficient option, because onlyentities that require logic or consolidation are updated by the system. The ConsolidateAll with Data option is useful for updating system status from OK SC to OK aftermetadata changes. For additional information, see the Consolidation Options sectionof the Oracle Hyperion Financial Management User's Guide.
412
Tuning Oracle 11g Databases for FinancialManagement
IntroductionFinancial Management requires a relational database to store application data. Each FinancialManagement application contains a set of tables, indexes, stored procedures, and other objects.Because the number and sizes of these objects vary according to the user’s data set, applicationdesign, and reporting requirements, it is difficult to specify a concrete set of rules for setting upthe database. This section addresses the two most common issues that arise during deploymentto Oracle databases:
l Oracle DB running out of memory to support the required number of database connections
l Poor performance during reporting and consolidation
Both of these issues can be traced to improper Oracle parameter settings and configurations.Creating a System Global Area (SGA) that is too large limits the amount of free physical memoryto support user connections and activities. Conversely, creating an SGA that is too small causesadditional disk access, and slows down performance.
This section guides you through the process of monitoring a typical database and determiningthe proper initialization settings to maximize performance. You should repeat this processperiodically to keep up with changes to your data set, workload, and application design.
Oracle 11g has made the process of monitoring and tuning the database much easier thanprevious versions. We strongly recommend using Oracle Enterprise Manager (both DataControl and Grid Control) to monitor, diagnose, and tune database performance. To obtainaccurate instance statistics, Oracle recommends that you enable Oracle database AutomaticMaintenance Tasks.
It is very important that tuning not be done immediately after database startup. At that point,the buffer caches are empty and no statistics have been collected. Always test and tune yourdatabase after a period of activity on Financial Management applications.
Common Performance IssuesThe most common cause of poor performance is stale or missing table statistics. FinancialManagement applications create new tables or can clear existing tables and reload or replaceentire data sets on the fly. By default, Oracle 10g and 11g run nightly jobs to check for tables thatneed statistics to be updated. This may not be sufficient in some cases. The following activitiesare common end user activities where the DBA should be informed that schema statistics shouldbe updated:
l New HFM application created and loaded
l Data in an existing Scenario is cleared and reloaded
413

l New Scenario/Year is opened and loaded with data. This includes scenarios populated byFinancial Management rules.
l Financial Management application is copied using the Financial Management applicationCopy utility. More information on the Copy utility can be found here: https://mosemp.us.oracle.com/epmos/faces/DocumentDisplay?id=968956.1.
After a Scenario/Year has been loaded with the first month’s data, data loads to subsequentperiods do not affect table statistics.
Tuning Guidelines for Oracle 11g Databases
Oracle Initialization ParametersMany initialization parameters can be fine-tuned to improve database performance. This sectionfocuses on the parameters that are known to greatly influence Financial Managementperformance with an Oracle database.
CURSOR_SHARINGCURSOR_SHARING determines what type of SQL statements can share the same cursors. Ifthis parameter is set to EXACT, only statements with identical text can share the same cursor.If this parameter is set to FORCE, statements that differ in some literals but are otherwiseidentical can share and reuse SQL cursors, unless the literals affect the meaning of the statement.Tests show that setting this parameter to a value of FORCE may improve consolidation andreporting performance significantly. This is because with this parameter set to FORCE, theOracle database spends less time parsing SQL statements, and requires less memory.
Suggested setting for all releases prior to 11.1.2.2.300: FORCE
Suggested setting for releases 11.1.2.2.300 and later: EXACT
MEMORY_TARGETMEMORY_TARGET and MEMORY_MAX_TARGET are two new parameters in Oracledatabase release 11g. These two parameters determine the use of Automatic MemoryManagement for an Oracle database. Oracle strongly recommends the use of Automatic MemoryManagement to manage the memory on your system. By setting these two parameters to non-zero values, Oracle enables Automatic Memory Management, and tunes to the target memorysize, redistributing memory as needed between system global area (SGA) and the instanceprogram global area (PGA). As a result, the following parameters are automatically sized:
SGA_TARGET
SGA_MAX_SIZE
DB_CACHE_SIZE
SHARED_POOL_SIZE
414
LARGE_POOL_SIZE
JAVA_POOL_SIZE
STREAMS_POOL_SIZE
PGA_AGGREGATE_TARGET
However, LOG_BUFFER is not affected by Automatic Memory Management, and still needs tobe manually sized. Tuning LOG_BUFFER is discussed later in this section.
Since MEMORY_TARGET specifies the total memory size of SGA and PGA, it should be set toa relatively high value to achieve better performance. Financial Management consolidation andreporting are memory-intensive tasks, and require abundant memory. Considering that 32-bitoperating systems have limits on available address space (typically 2 GB or 3 GB), Oraclerecommends this parameter to be set to at least 1.2 GB. Generally, higher values are associatedwith better Oracle database performance, so we would like to set this parameter as high as possiblewithout running out of virtual address space.
Suggested setting: minimum 1.2GB, generally higher than 1.2GB (depending on theenvironment).
When determining the amount of memory to allocate to the Oracle 11g instance, review thissection: “How to Calculate the Number of Processes for Oracle Database Release 11g” on page420.
MEMORY_MAX_TARGETMEMORY_MAX_TARGET specifies the maximum value to which a DBA can set theMEMORY_TARGET parameter. It serves as an upper limit so MEMORY_TARGET cannot beset too high accidentally. It also reserves memory for the Oracle database instance, in case youwant to increase MEMORY_TARGET at runtime without a restart. Therefore,MEMORY_MAX_TARGET should be no lower than MEMORY_TARGET.
Suggested setting: No lower than MEMORY_TARGET
SGA_TARGETSGA_TARGET specifies the total size of all SGA components. If Automatic MemoryManagement is enabled, and SGA_TARGET is set to a non-zero value, then this value serves asthe minimum size of SGA.
Suggested setting: 0 if Automatic Memory Management is enabled; otherwise refer to “How toDetermine Memory Settings for Oracle Database Release 11g” on page 418.
SGA_MAX_SIZESGA_MAX_SIZE specifies the maximum size of the SGA for the lifetime of the instance. Thisparameter sets the upper limit for SGA_TARGET. If Automatic Memory Management isenabled, the Oracle database cannot increase the total size of SGA components beyondSGA_MAX_SIZE.
415
Suggested setting: Use the default setting if Automatic Memory Management is enabled;otherwise refer to “How to Determine Memory Settings for Oracle Database Release 11g” onpage 418.
PGA_AGGREGATE_TARGETPGA_AGGREGATE_TARGET specifies the total PGA memory available to all server processesattached to the instance. If Automatic Memory Management is enabled, andPGA_AGGREGATE_TARGET is set to a non-zero value, then this value serves as the minimumsize of PGA.
Suggested setting: 0 if Automatic Memory Management is enabled; otherwise refer to “How toDetermine Memory Settings for Oracle Database Release 11g” on page 418.
LOG_BUFFERLOG_BUFFER specifies the amount of memory (in bytes) that Oracle uses when buffering redoentries to a redo log file. Redo log entries contain a record of the changes that have been madeto the database block buffers. Financial Management is a high-update transactional system, andthe database constantly uses log buffer. Properly sizing the log buffer can improve the databaseperformance. In general, larger values for LOG_BUFFER reduce redo log file I/O, particularlyif transactions are long or numerous. If the buffer is too small, the system waits until the bufferis clear before adding new updates, so it is important to set this buffer correctly to improvedatabase performance.
Suggested setting: Start with 8 MB. Refer to “How to Determine Memory Settings for OracleDatabase Release 11g” on page 418.
OPTIMIZER_MODEOPTIMIZER_MODE establishes the default behavior for choosing an optimization approachfor the instance. You can set the optimizer mode to FIRST_ROWS for optimal online applicationresponse, or to ALL_ROWS to minimize total execution time for batch operations. BecauseFinancial Management deals only with the total returned data set, minimizing the total executiontime is more appropriate.
Suggested setting: ALL_ROWS
OPTIMIZER_INDEX_COST_ADJOPTIMIZER_INDEX_COST_ADJ allows you to tune optimizer behavior for access pathselection to be more or less index friendly; that is, to make the optimizer more or less prone toselecting an index access path over a full table scan. The default for this parameter is 100 percent,at which the optimizer evaluates index access paths at the regular cost. But FinancialManagement transactions generally favor index access paths more than full table scan paths, soOracle recommends a lower value for this parameter.
Suggested setting: 50
416
PROCESSESPROCESSES specifies the maximum number of operating system user processes that cansimultaneously connect to an Oracle database. Because Financial Management only works withdedicated servers, each connection requires a process. Each Financial Management applicationrequires a minimum of 20 database connections in addition to the number specified by theFinancial Management database connection pool setting. For example, if the FinancialManagement database connection pool setting is 40, then each Financial Managementapplication on each application server requires at least 60 Oracle database connections.
Suggested setting: Refer to “How to Calculate the Number of Processes for Oracle DatabaseRelease 11g” on page 420.
SESSIONSThis parameter specifies the maximum number of sessions that can be created on the databasesystem. Because every login requires a session, this parameter effectively determines themaximum number of concurrent users on the Oracle database. The default value is 1.1 *PROCESSES + 5. Oracle does not recommend setting this parameter below its default value.
TRANSACTIONSTRANSACTIONS specifies the maximum number of concurrent transactions. Because sometransactions may be recursive, this parameter should be greater than SESSIONS, and in turn,PROCESSES, to allow for recursive transactions. The default value is 1.1 * SESSIONS. Oracledoes not recommend setting this parameter below its default value.
OPEN_CURSORSOPEN_CURSORS specifies the maximum number of open cursors (handles to private SQLareas) that a session can have at once. It is important to set the value of OPEN_CURSORS highenough to prevent your application from running out of open cursors. Assuming that a sessiondoes not open the number of cursors specified by OPEN_CURSORS, there is no added overheadto setting this value higher than actually needed.
Suggested setting: 5000
SESSION_CACHED_CURSORSSESSION_CACHED_CURSORS specifies the number of session cursors to cache. Repeatedparse calls of the same SQL statement cause the session cursor for that statement to be movedinto the session cursor cache. Subsequent parse calls will find the cursor in the cache, and donot need to reopen the cursor. Performance of Financial Management applications will benefitfrom this cache because Financial Management connections are also cached.
Suggested setting: 50
417

TRACE_ENABLEDTRACE_ENABLED controls tracing of the execution history, or code path, of Oracle database.Enabling this option by setting the parameter to TRUE adds additional overhead on the databaseand is not recommended for a normal Financial Management application environment.
Suggested setting: FALSE
STATISTICS_LEVELSTATISTICS_LEVEL specifies the level of statistics collection for database and operating system.The Oracle database collects these statistics for a variety of purposes, including making self-management decisions. The default setting of TYPICAL ensures collection of all major statisticsrequired for database self-management functionality, and provides the best overall performance.
Suggested setting: TYPICAL
TIMED_STATISTICSTIMED_STATISTICS specifies whether statistics related to time are collected. Starting withOracle database release 11.1.0.7.0, the value of the TIMED_STATISTICS parameter cannot beset to FALSE if the value of STATISTICS_LEVEL is set to TYPICAL or ALL.
Suggested setting: TRUE
TIMED_OS_STATISTICSTIMED_OS_STATISTICS specifies (in seconds) the interval at which Oracle collects operatingsystem statistics when a request is made from the client to the server or when a request completes.Enabling this option by setting the parameter to a number greater than 0 severely degrades theperformance of applications.
Suggested setting: 0
How to Determine Memory Settings for Oracle DatabaseRelease 11gThis section outlines how to monitor and view Oracle system-related statistics, and tune Oracledatabase memory parameters. There are many ways to determine optimal memory settings, butthe preferred way is to use memory advisors, including Memory Advisor, SGA Advisor, SharedPool Advisor, Buffer Cache Advisor, and PGA Advisor. You must have an Oracle login with DBAprivileges to use these advisors and to perform the following tasks. Note that most of the queriesbelow have equivalent graphical interfaces through Oracle Enterprise Manager.
Total Memory Sizing (MEMORY_TARGET)MEMORY_TARGET specifies the Oracle system-wide usable memory, including both SGA andPGA. Prior to Oracle database release 11g, SGA and PGA had to be tuned separately.
418
If a database is upgraded from Oracle 10g to 11g, MEMORY_TARGET can be determined bysimply adding SGA_TARGET and PGA_AGGREGATE_TARGET from the Oracle 10g database.
If a database is upgraded from Oracle 9i to 11g, MEMORY_TARGET can be determined byadding PGA_AGGREGATE_TARGET and all SGA components, including DB_CACHE_SIZE,SHARED_POOL_SIZE, LARGE_POOL_SIZE, JAVA_POOL_SIZE, etc.
If a database has not been upgraded from an earlier version, and has no history references, Oraclerecommends this parameter to be initially set to 1 to 3 GB, depending on system resources andsystem limits. After the database has been in use for some time, this parameter can be tuned asfollows. (This tuning also applies to the above two upgrade scenarios).
SQL> select * from v$memory_target_advice order by memory_size;
MEMORY_SIZE MEMORY_SIZE_FACTOR ESTD_DB_TIME ESTD_DB_TIME_FACTOR VERSION
180 .5 458 1.344 0
270 .75 367 1.0761 0
360 1 341 1 0
450 1.25 335 .9817 0
540 1.5 335 .9817 0
630 1.75 335 .9817 0
720 2 335 .9817 0
The row with the MEMORY_SIZE_FACTOR of 1 shows the current size of memory, as set bythe MEMORY_TARGET initialization parameter, and the amount of DB time required tocomplete the current workload. In previous and subsequent rows, the results show a number ofalternative MEMORY_TARGET sizes. For each alternative size, the database shows the sizefactor (the multiple of the current size), and the estimated DB time to complete the currentworkload if the MEMORY_TARGET parameter were changed to the alternative size. Notice thatfor a total memory size smaller than the current MEMORY_TARGET size (360 in this example),estimated DB time (ESTD_DB_TIME) increases. Notice also that in this example, there isnothing to be gained by increasing total memory size beyond 450MB, because theESTD_DB_TIME value is not decreasing. Therefore, in this example, the suggestedMEMORY_TARGET size is 450 MB.
SGA Sizing (SGA_TARGET)Normally, SGA is tuned automatically by the Oracle database if Automatic MemoryManagement is enabled. But a DBA can still monitor the size of SGA and find out if it is at theoptimal size.
SQL> select * from v$sga_target_advice order by sga_size;
SGA_SIZE SGA_SIZE_FACTOR ESTD_DB_TIME ESTD_DB_TIME_FACTOR ESTD_PHYSICAL_READS
290 .5 448176 1.6578 1636103
435 .75 339336 1.2552 1636103
419
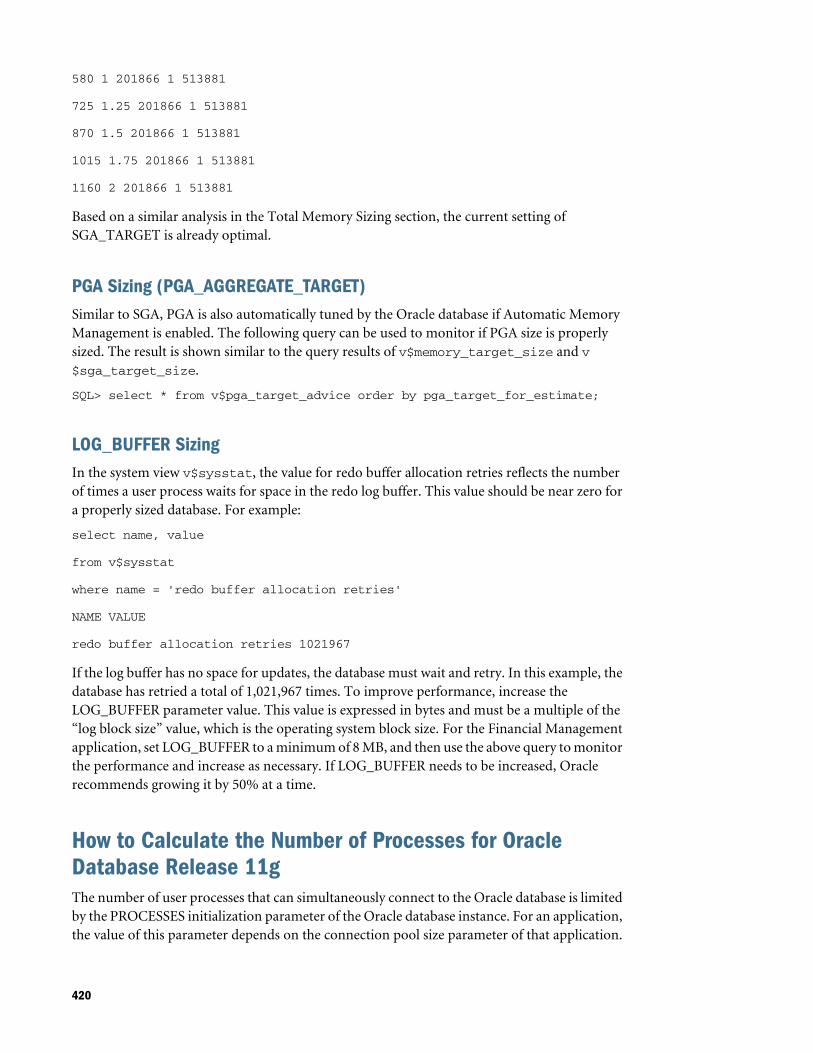
580 1 201866 1 513881
725 1.25 201866 1 513881
870 1.5 201866 1 513881
1015 1.75 201866 1 513881
1160 2 201866 1 513881
Based on a similar analysis in the Total Memory Sizing section, the current setting ofSGA_TARGET is already optimal.
PGA Sizing (PGA_AGGREGATE_TARGET)Similar to SGA, PGA is also automatically tuned by the Oracle database if Automatic MemoryManagement is enabled. The following query can be used to monitor if PGA size is properlysized. The result is shown similar to the query results of v$memory_target_size and v$sga_target_size.
SQL> select * from v$pga_target_advice order by pga_target_for_estimate;
LOG_BUFFER SizingIn the system view v$sysstat, the value for redo buffer allocation retries reflects the numberof times a user process waits for space in the redo log buffer. This value should be near zero fora properly sized database. For example:
select name, value
from v$sysstat
where name = 'redo buffer allocation retries'
NAME VALUE
redo buffer allocation retries 1021967
If the log buffer has no space for updates, the database must wait and retry. In this example, thedatabase has retried a total of 1,021,967 times. To improve performance, increase theLOG_BUFFER parameter value. This value is expressed in bytes and must be a multiple of the“log block size” value, which is the operating system block size. For the Financial Managementapplication, set LOG_BUFFER to a minimum of 8 MB, and then use the above query to monitorthe performance and increase as necessary. If LOG_BUFFER needs to be increased, Oraclerecommends growing it by 50% at a time.
How to Calculate the Number of Processes for OracleDatabase Release 11gThe number of user processes that can simultaneously connect to the Oracle database is limitedby the PROCESSES initialization parameter of the Oracle database instance. For an application,the value of this parameter depends on the connection pool size parameter of that application.
420
Each Financial Management application requires a minimum of 20 database connections, plusthe Financial Management database connection pool setting value. For example, if the FinancialManagement database connection pool setting is 40, then each Financial Managementapplication requires at least 60 Oracle database connections. As a result, the value of PROCESSESshould be set higher than 60.
Note: The total number of servers in a cluster, and the total number of applications, affect thenumber of required database connections.
This example illustrates how to calculate the number of processes that connect to the Oracledatabase. Suppose a cluster of two Financial Management application servers has twoapplications on each server. The Financial Management database connection pool setting is 40.The minimum number of Oracle database connections is calculated as the sum of the connectionpool setting plus 20, times the number of applications, times the number of application servers:(40 + 20) * 2 * 2 = 240. For additional safety, multiply this number by a factor of 1.1 to allowfor ancillary connections and general usage of the database. Considering that the Oracle databasealso has some background processes, add 20 to this number to arrive at the value of PROCESSES.So, in this case, PROCESSES should be set to 260.
In general,
PROCESSES = (Financial Management connection pool setting + 20) * (Number of FinancialManagement applications) * (Number of Financial Management application servers) * 1.1 + 20.
Other Considerations
Shared Server versus Dedicated ServerFinancial Management requires all connections to the Oracle database to be served by dedicatedserver processes. In other words, Financial Management does not work with shared serverprocesses. Dedicated server processes consume more CPU and memory resources but achievebetter performance. To use a dedicated server, the net service name value should include theSERVER=DEDICATED clause in the connect descriptor. This is an example of a net serviceconfigured for dedicated server processes:
HFMDB = (DESCRIPTION = (ADDRESS = (PROTOCOL = TCP)(HOST = hfm.oracle.com)(PORT = 1521))(CONNECT_DATA =(SERVER = DEDICATED)(SERVICE_NAME = HFMDB1) ) )
Online Redo Log Files SizeThe size of the redo log files can influence performance, because the behaviors of the databasewriter and archiver processes depend on the redo log sizes. Generally, larger redo log files providebetter performance. Undersized log files increase checkpoint activity and reduce performance.However, small log files and frequent checkpoints reduce recovery time. So, if daily operationalefficiency is more important than minimizing recovery time, then set online redo log files to arelatively large value. Hundreds of MB is a normal size for Financial Management databases.
421
But the preferred way to determine the size of redo log files is to enableFAST_START_MTTR_TARGET, and run a typical database workload for a while. Then run thefollowing query to obtain the optimal size of redo logs.
SQL> select optimal_logfile_size from v$instance_recovery;
For more details about how to tune MTTR target and the size of online redo files, please referto the Oracle Database Performance Tuning Guide.
Tablespaces and Segments FragmentationsOver time, updates and deletes on objects within a tablespace can create pockets of empty spacethat individually are not large enough to be reused for new data. This type of empty space isreferred to as fragmented free space. Objects with fragmented free space can result in muchwasted space, and can impact database performance. Financial Management consolidationperforms extensive updates, inserts, and deletes, so it is very important to monitor thefragmentation of tablespaces and defragment them regularly. The preferred way to defragmentand reclaim this space is to perform an online segment shrink. For more information about howto use online segments, please refer to the Oracle Database Administrator’s Guide or consultOracle database support services
Index FragmentationFinancial Management applications usually create hundreds or even thousands of indexes. Asapplication data changes over time, indexes could become fragmented. Regular monitoring anddefragmentation of these indexes can improve performance. However, index rebuild is a time-consuming and resource-intensive operation. Oracle does not recommend any index rebuildwhile applications are in operation. Enterprise Manager provides user-friendly interfaces tomonitor the statistics of indexes. For more details about how to monitor and defragment indexesthrough Oracle Enterprise Manager, refer to Oracle database documentation.
Disable the feature DEFERRED_SEGMENT_CREATIONOracle introduced the DEFERRED_SEGMENT_CREATION feature in Release 11.2. The defaultsetting is ON in all installations. The feature ensures that a TABLE create statement does notactually create a table. The table is only created after a row of data is inserted.
Disable the feature DEFERRED_SEGMENT_CREATIONOracle introduced the DEFERRED_SEGMENT_CREATION feature in Release 11.2. The defaultsettings is ON in all installations. With this feature, a TABLE create statement does not actuallycreate a table. The table is only created after a row of data is inserted. This feature can causeissues when exporting and importing Financial Management schemas, as some tables may notbe created during the import. It is recommended that this feature be disabled; tables must thencreated automatically. To disable this feature, log in to your instance using SYSTEM or SYS andissue the command:
alter system set deferred_segment_creation=false;
422
Any table created after issuing this statement is created automatically. If you already have aninstance with empty tables and want to export the application, you can alter each tableindividually to force creation and allow the table to be used by the EXP (export) command.
To determine if a schema has empty tables, run either of the two following commands:
select segment_name, segment_type, extents from dba_segments where extents < 1 and segment_type='TABLE' and owner='<hfm db schema>'
select table_name from all_tables where owner='<hfm db schema>' and table_name not in (select segment_name from dba_segments where owner='<hfm db schema>' and segment_type='TABLE' and extents>0)
Issue the following command for each empty table:
alter table <table_name> allocate extent
Regular Maintenance and Tuning PlansThe preceding sections outline the typical process to correctly size the Oracle memoryparameters. Performance tuning, by its nature, is iterative. Removing one performance blockmight not lead to immediate performance improvement because another block might berevealed. Therefore, this process should be repeated until the performance is acceptable. BecauseFinancial Management application data changes constantly from period to period, regulardatabase maintenance and tuning plans will help users proactively monitor and tune Oracledatabase performance, and prevent potential performance issues in the future. For moreinformation and additional tuning options, consult Oracle database support.
Frequently Asked Questions
Which Operating Systems are supported?
See the Oracle Enterprise Performance Management System Supported Platform Matrix: OracleEPM Supported Platform Matrix.
Must the relational database be 64-bit?
The database can be either 32-bit or 64-bit, as long as it is a supported DBMS type and version.
Considerations must be made for third-party and extending software. By default, the FinancialManagement installation only installs 64-bit software on a 64-bit operating system. This meansthat only the 64-bit client components are installed on the Financial Management applicationserver. When 32-bit connectivity is required, components may not function unless the 32-bitclient software is installed on the 64-bit application server. For more information, refer to theOracle Enterprise Performance Management System Installation and Configuration Guide.
What are the memory limitations of 64-bit Financial Management?
In practical terms, 64-bit Financial Management is limited by physical memory, rather thanvirtual memory. It can take advantage of all available physical memory after the proper memoryparameter adjustments are made.
423
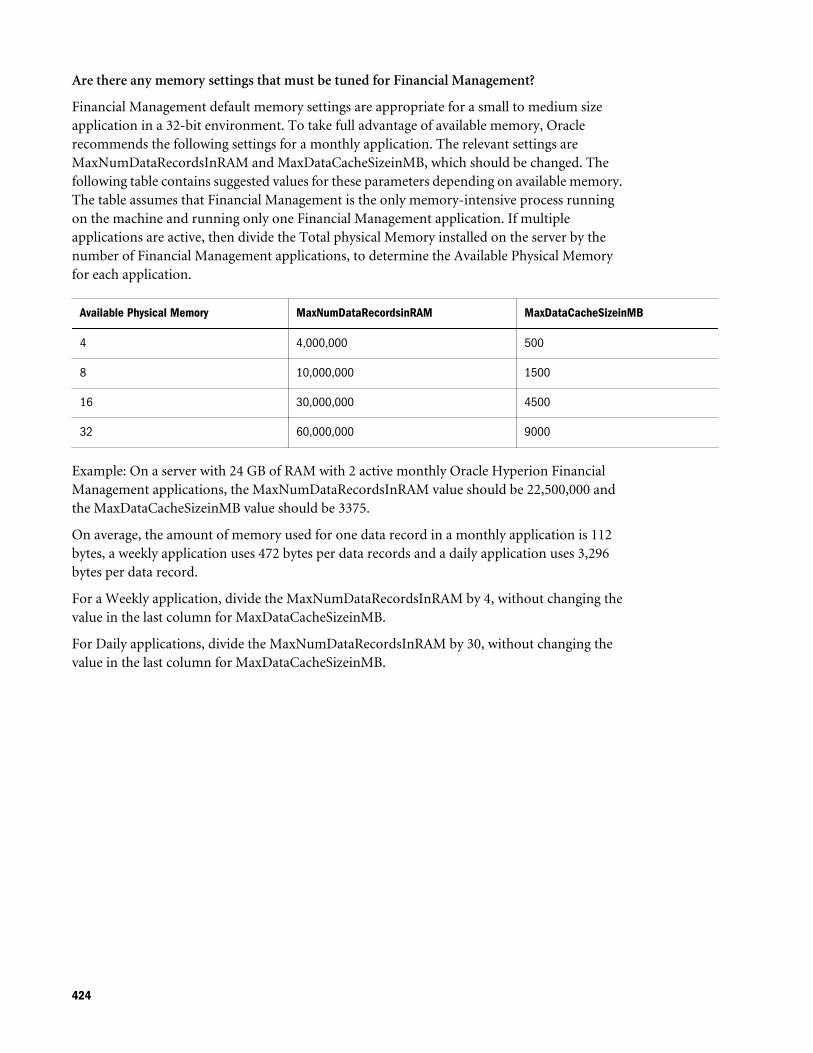
Are there any memory settings that must be tuned for Financial Management?
Financial Management default memory settings are appropriate for a small to medium sizeapplication in a 32-bit environment. To take full advantage of available memory, Oraclerecommends the following settings for a monthly application. The relevant settings areMaxNumDataRecordsInRAM and MaxDataCacheSizeinMB, which should be changed. Thefollowing table contains suggested values for these parameters depending on available memory.The table assumes that Financial Management is the only memory-intensive process runningon the machine and running only one Financial Management application. If multipleapplications are active, then divide the Total physical Memory installed on the server by thenumber of Financial Management applications, to determine the Available Physical Memoryfor each application.
Available Physical Memory MaxNumDataRecordsinRAM MaxDataCacheSizeinMB
4 4,000,000 500
8 10,000,000 1500
16 30,000,000 4500
32 60,000,000 9000
Example: On a server with 24 GB of RAM with 2 active monthly Oracle Hyperion FinancialManagement applications, the MaxNumDataRecordsInRAM value should be 22,500,000 andthe MaxDataCacheSizeinMB value should be 3375.
On average, the amount of memory used for one data record in a monthly application is 112bytes, a weekly application uses 472 bytes per data records and a daily application uses 3,296bytes per data record.
For a Weekly application, divide the MaxNumDataRecordsInRAM by 4, without changing thevalue in the last column for MaxDataCacheSizeinMB.
For Daily applications, divide the MaxNumDataRecordsInRAM by 30, without changing thevalue in the last column for MaxDataCacheSizeinMB.
424