Embed Size (px)
Citation preview
Oracle Banking Digital
Experience Retail Customer Services User Manual
Release 18.2.0.0.0
Part No. E97823-01
June 2018
User Manual Oracle Banking Digital Experience Retail Customer Services ii
Retail Customer Services User Manual
June 2018
Oracle Financial Services Software Limited
Oracle Park
Off Western Express Highway
Goregaon (East)
Mumbai, Maharashtra 400 063
India
Worldwide Inquiries:
Phone: +91 22 6718 3000
Fax:+91 22 6718 3001 www.oracle.com/financialservices/
Copyright © 2018, Oracle and/or its affiliates. All rights reserved.
Oracle and Java are registered trademarks of Oracle and/or its affiliates. Other names may be trademarks of their respective owners.
U.S. GOVERNMENT END USERS: Oracle programs, including any operating system, integrated software, any programs installed on the hardware, and/or documentation, delivered to U.S. Government end users are “commercial computer software” pursuant to the applicable Federal Acquisition Regulation and agency-specific supplemental regulations. As such, use, duplication, disclosure, modification, and adaptation of the programs, including any operating system, integrated software, any programs installed on the hardware, and/or documentation, shall be subject to license terms and license restrictions applicable to the programs. No other rights are granted to the U.S. Government.
This software or hardware is developed for general use in a variety of information management applications. It is not developed or intended for use in any inherently dangerous applications, including applications that may create a risk of personal injury. If you use this software or hardware in dangerous applications, then you shall be responsible to take all appropriate failsafe, backup, redundancy, and other measures to ensure its safe use. Oracle Corporation and its affiliates disclaim any liability for any damages caused by use of this software or hardware in dangerous applications.
This software and related documentation are provided under a license agreement containing restrictions on use and disclosure and are protected by intellectual property laws. Except as expressly permitted in your license agreement or allowed by law, you may not use, copy, reproduce, translate, broadcast, modify, license, transmit, distribute, exhibit, perform, publish or display any part, in any form, or by any means. Reverse engineering, disassembly, or decompilation of this software, unless required by law for interoperability, is prohibited.
The information contained herein is subject to change without notice and is not warranted to be error-free. If you find any errors, please report them to us in writing.
This software or hardware and documentation may provide access to or information on content, products and services from third parties. Oracle Corporation and its affiliates are not responsible for and expressly disclaim all warranties of any kind with respect to third-party content, products, and services. Oracle Corporation and its affiliates will not be responsible for any loss, costs, or damages incurred due to your access to or use of third-party content, products, or services.
User Manual Oracle Banking Digital Experience Retail Customer Services iii
Table of Contents
1. Preface ................................................................................................................................................. 6
1.1 Intended Audience ........................................................................................................................ 6
1.2 Documentation Accessibility ......................................................................................................... 6
1.3 Access to Oracle Support ............................................................................................................. 6
1.4 Structure ........................................................................................................................................ 6
1.5 Related Information Sources......................................................................................................... 6
2. Transaction Host Matrix ..................................................................................................................... 7
3. Portal Page .......................................................................................................................................... 9
4. Channel On-boarding ....................................................................................................................... 13
4.1 Self-Register................................................................................................................................ 13
5. Log-In & Log-Out of Oracle Banking Digital Experience .............................................................. 19
5.1 Log-in to the application .............................................................................................................. 19
5.2 Log-out of the application ............................................................................................................ 22
6. Calculators ........................................................................................................................................ 23
6.1 Loans Calculator ......................................................................................................................... 24
6.2 Eligibility Calculator ..................................................................................................................... 25
6.3 Term Deposit Calculator ............................................................................................................. 27
6.4 Foreign Exchange Calculator ...................................................................................................... 29
6.5 Goal Calculator............................................................................................................................ 31
7. First Time Login ................................................................................................................................ 35
8. Dashboard ......................................................................................................................................... 42
8.1 Retail Dashboard ........................................................................................................................ 42
9. Forgot Password .............................................................................................................................. 48
10. Forgot Username .......................................................................................................................... 51
11. FATCA & CRS Form ...................................................................................................................... 53
11.1 FATCA & CRS Self - Certification Form for Individuals .............................................................. 54
11.1.2 Customer Identification ....................................................................................................... 54
11.1.3 Additional KYC Information ................................................................................................. 58
11.1.4 Tax Residency Information ................................................................................................. 60
11.1.5 Declaration .......................................................................................................................... 65
11.1.6 Review ................................................................................................................................. 66
11.1.7 Confirm ................................................................................................................................ 68
11.2 FATCA and CRS Self - Certification Form for Entities ................................................................ 69
User Manual Oracle Banking Digital Experience Retail Customer Services iv
11.2.2 Identification of the Entity .................................................................................................... 69
11.2.3 Tax Residency ..................................................................................................................... 72
11.2.4 Entity Certification ............................................................................................................... 75
11.2.5 Declaration .......................................................................................................................... 81
11.2.6 Review ................................................................................................................................. 83
11.2.7 Confirm ................................................................................................................................ 85
12. Mailbox ........................................................................................................................................... 87
12.1 Mails ............................................................................................................................................ 87
12.1.2 Compose Mail ..................................................................................................................... 89
12.1.3 Inbox .................................................................................................................................... 90
12.1.4 Sent Mail ............................................................................................................................. 93
12.1.5 Sent Mails – Details............................................................................................................. 94
12.1.6 Deleted Mail ........................................................................................................................ 96
12.2 Alerts ........................................................................................................................................... 99
12.3 Notifications ............................................................................................................................... 101
13. Interest Certificates ..................................................................................................................... 104
14. TDS ............................................................................................................................................... 108
15. Service Request .......................................................................................................................... 110
15.1 Raise New Request .................................................................................................................. 110
15.1.1 Raise New Request - Summary ........................................................................................ 110
15.1.2 Service Request Form ...................................................................................................... 112
15.2 Track Request ........................................................................................................................... 113
15.2.1 Track Request - Search .................................................................................................... 114
15.2.2 Service Request Details - Request Status ........................................................................ 115
16. Feedback Capture ....................................................................................................................... 118
17. Session Summary ....................................................................................................................... 121
18. ATM / Branch Locator ................................................................................................................. 124
19. Limits ............................................................................................................................................ 128
19.1 Limits – View ............................................................................................................................. 128
19.2 Daily and Monthly Limits - Edit .................................................................................................. 131
20. My Preference .............................................................................................................................. 134
20.1 Profile ........................................................................................................................................ 134
20.2 Primary Account Number .......................................................................................................... 136
20.3 Alerts Subscription .................................................................................................................... 138
20.4 Third Party Apps ....................................................................................................................... 141
20.5 Security and Login .................................................................................................................... 146
User Manual Oracle Banking Digital Experience Retail Customer Services v
20.5.1 Set Security Question ....................................................................................................... 146
20.5.2 SMS and Missed Call Banking .......................................................................................... 151
20.6 Settings ..................................................................................................................................... 153
21. Security Question Authentication ............................................................................................. 156
22. Change Password ....................................................................................................................... 158
23. Nominations................................................................................................................................. 160
23.1 Add Nominee............................................................................................................................. 162
23.1.1 Add Nominee – Add New .................................................................................................. 162
23.1.2 Add Nominee - Replicate Existing Nominee ..................................................................... 165
23.2 View Nominee ........................................................................................................................... 167
23.3 Edit Nominee ............................................................................................................................. 168
23.4 Delete Nominee ........................................................................................................................ 171
24. One Time Password .................................................................................................................... 173
Preface
User Manual Oracle Banking Digital Experience Retail Customer Services 6
1. Preface
1.1 Intended Audience
This document is intended for the following audience:
Customers
Partners
1.2 Documentation Accessibility
For information about Oracle's commitment to accessibility, visit the Oracle Accessibility Program website at http://www.oracle.com/pls/topic/lookup?ctx=acc&id=docacc.
1.3 Access to Oracle Support
Oracle customers have access to electronic support through My Oracle Support. For information, visit
http://www.oracle.com/pls/topic/lookup?ctx=acc&id=info or visit
http://www.oracle.com/pls/topic/lookup?ctx=acc&id=trs if you are hearing impaired.
1.4 Structure
This manual is organized into the following categories:
Preface gives information on the intended audience. It also describes the overall structure of the User Manual.
Introduction provides brief information on the overall functionality covered in the User Manual.
The subsequent chapters provide information on transactions covered in the User Manual.
Each transaction is explained in the following manner:
Introduction to the transaction
Pre-requisite for the transaction
Screenshots of the transaction
The images of screens used in this user manual are for illustrative purpose only, to provide improved understanding of the functionality; actual screens that appear in the application may vary based on selected browser, theme, and mobile devices.
Procedure containing steps to complete the transaction- The mandatory and conditional fields of the transaction are explained in the procedure.
If a transaction contains multiple procedures, each procedure is explained. If some functionality is present in many transactions, this functionality is explained separately.
1.5 Related Information Sources
For more information on Oracle Banking Digital Experience Release 18.2.0.0.0, refer to the following documents:
Oracle Banking Digital Experience Licensing Guide
Oracle Banking Digital Experience Installation Manuals
Transaction Host Matrix
User Manual Oracle Banking Digital Experience Retail Customer Services 7
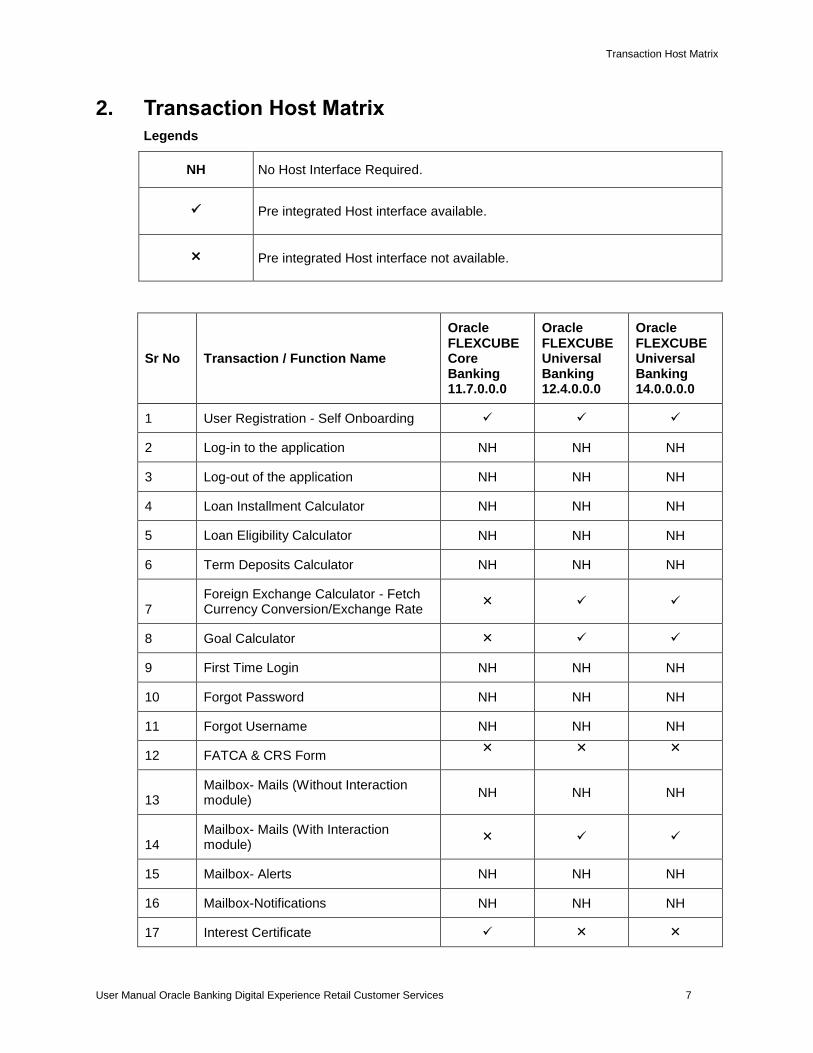
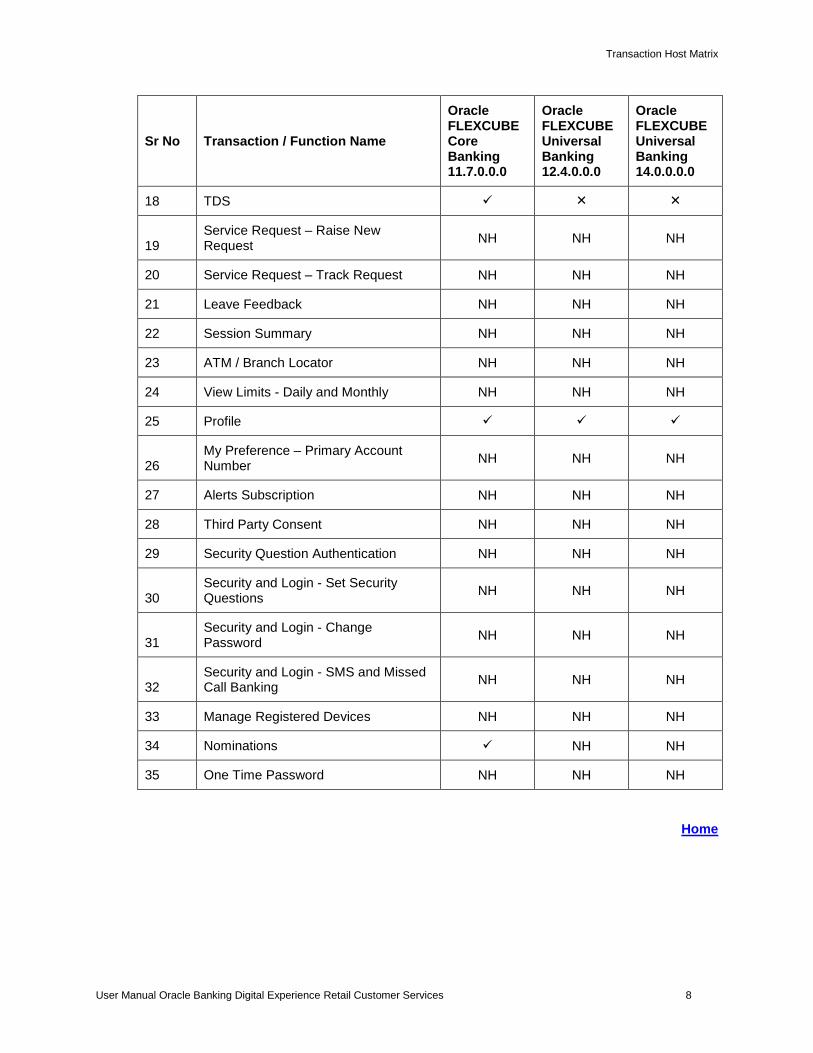
2. Transaction Host Matrix
Legends
NH No Host Interface Required.
Pre integrated Host interface available.
Pre integrated Host interface not available.
Sr No Transaction / Function Name
Oracle FLEXCUBE Core Banking 11.7.0.0.0
Oracle FLEXCUBE Universal Banking 12.4.0.0.0
Oracle FLEXCUBE Universal Banking 14.0.0.0.0
1 User Registration - Self Onboarding
2 Log-in to the application NH NH NH
3 Log-out of the application NH NH NH
4 Loan Installment Calculator NH NH NH
5 Loan Eligibility Calculator NH NH NH
6 Term Deposits Calculator NH NH NH
7 Foreign Exchange Calculator - Fetch Currency Conversion/Exchange Rate
8 Goal Calculator
9 First Time Login NH NH NH
10 Forgot Password NH NH NH
11 Forgot Username NH NH NH
12 FATCA & CRS Form
13 Mailbox- Mails (Without Interaction module)
NH NH NH
14 Mailbox- Mails (With Interaction module)
15 Mailbox- Alerts NH NH NH
16 Mailbox-Notifications NH NH NH
17 Interest Certificate
Transaction Host Matrix
User Manual Oracle Banking Digital Experience Retail Customer Services 8
Sr No Transaction / Function Name
Oracle FLEXCUBE Core Banking 11.7.0.0.0
Oracle FLEXCUBE Universal Banking 12.4.0.0.0
Oracle FLEXCUBE Universal Banking 14.0.0.0.0
18 TDS
19 Service Request – Raise New Request
NH NH NH
20 Service Request – Track Request NH NH NH
21 Leave Feedback NH NH NH
22 Session Summary NH NH NH
23 ATM / Branch Locator NH NH NH
24 View Limits - Daily and Monthly NH NH NH
25 Profile
26 My Preference – Primary Account Number
NH NH NH
27 Alerts Subscription NH NH NH
28 Third Party Consent NH NH NH
29 Security Question Authentication NH NH NH
30 Security and Login - Set Security Questions
NH NH NH
31 Security and Login - Change Password
NH NH NH
32 Security and Login - SMS and Missed Call Banking
NH NH NH
33 Manage Registered Devices NH NH NH
34 Nominations NH NH
35 One Time Password NH NH NH
Home
Portal Page
User Manual Oracle Banking Digital Experience Retail Customer Services 9
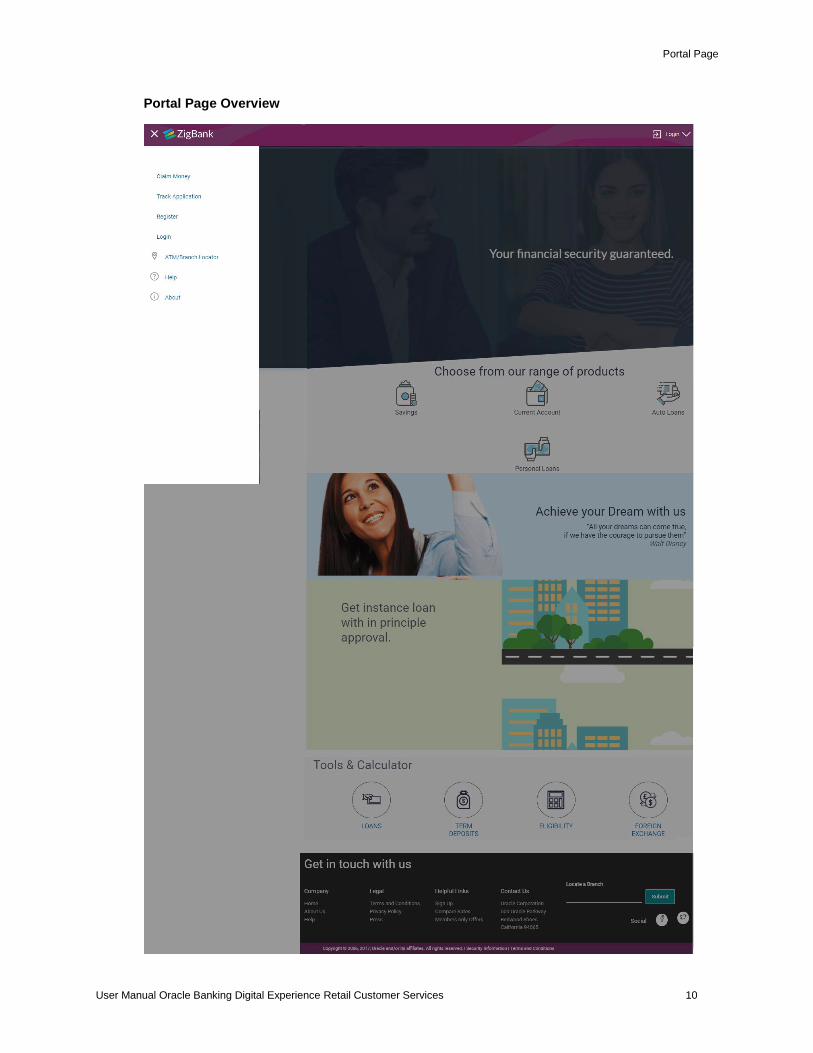
3. Portal Page
A bank’s landing page should be designed in a manner that connects with its customers and also leads to quick conversions of prospects into customers of the bank. The portal page should enable existing customers to easily login to the system and should also provide users to perform tasks such as to view and apply for the bank’s product offerings, register for online banking access, track existing product applications, search for the bank’s ATMs and branches etc.
The Oracle Banking Digital Experience portal page displays various options that enable users to undertake required tasks and gain information about the bank and its products. The different sections and features provided on the portal page are documented as follows:
Portal Page
User Manual Oracle Banking Digital Experience Retail Customer Services 10
Portal Page Overview
Portal Page
User Manual Oracle Banking Digital Experience Retail Customer Services 11
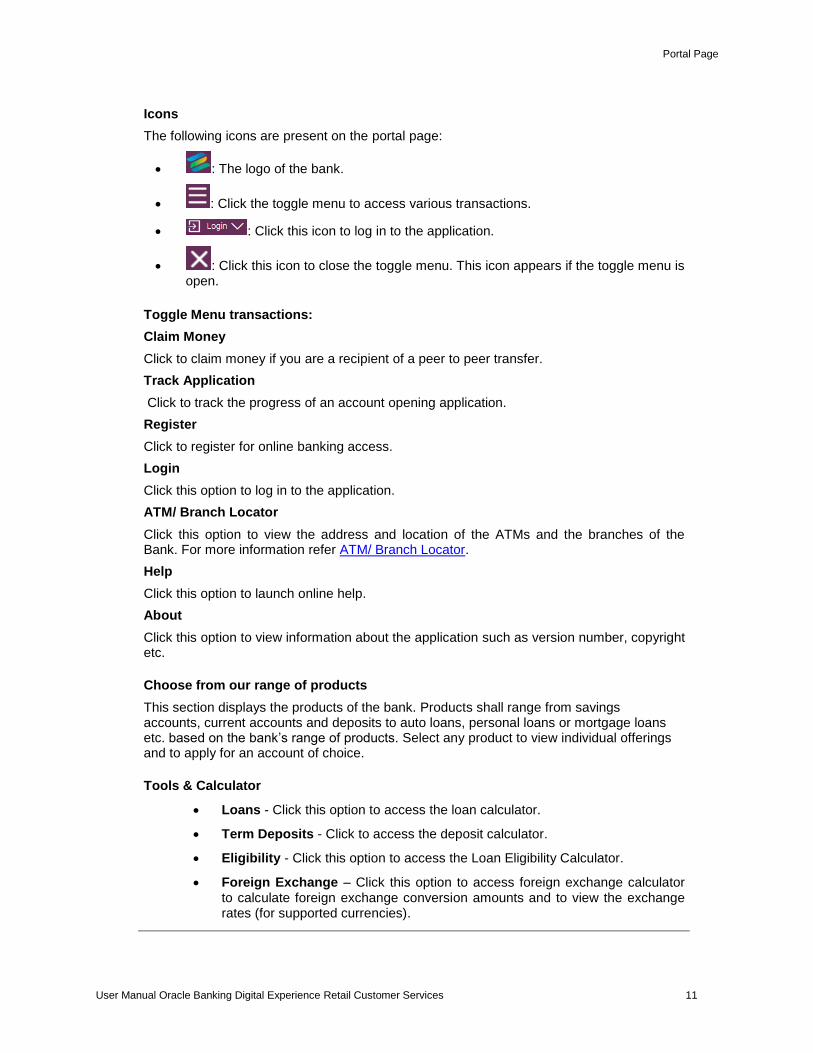
Icons
The following icons are present on the portal page:
: The logo of the bank.
: Click the toggle menu to access various transactions.
: Click this icon to log in to the application.
: Click this icon to close the toggle menu. This icon appears if the toggle menu is open.
Toggle Menu transactions:
Claim Money
Click to claim money if you are a recipient of a peer to peer transfer.
Track Application
Click to track the progress of an account opening application.
Register
Click to register for online banking access.
Login
Click this option to log in to the application.
ATM/ Branch Locator
Click this option to view the address and location of the ATMs and the branches of the Bank. For more information refer ATM/ Branch Locator.
Help
Click this option to launch online help.
About
Click this option to view information about the application such as version number, copyright etc.
Choose from our range of products
This section displays the products of the bank. Products shall range from savings accounts, current accounts and deposits to auto loans, personal loans or mortgage loans etc. based on the bank’s range of products. Select any product to view individual offerings and to apply for an account of choice.
Tools & Calculator
Loans - Click this option to access the loan calculator.
Term Deposits - Click to access the deposit calculator.
Eligibility - Click this option to access the Loan Eligibility Calculator.
Foreign Exchange – Click this option to access foreign exchange calculator to calculate foreign exchange conversion amounts and to view the exchange rates (for supported currencies).
Portal Page
User Manual Oracle Banking Digital Experience Retail Customer Services 12
Get in touch with us
Company
Home: Click to go to the bank’s home page
About Us: Click to view the information about the bank
Help: Click to navigate to the Help page.
Legal
This section displays the following links:
Terms and Conditions: Click to view the bank’s terms and conditions
Privacy Policy: Click to view the bank’s privacy policy.
Press: Click to view the bank’s press related information.
Helpful Links
Sign Up : Click to sign up to the application
Compare Rates : Click to compare rates
Members only Offers: Click to view offers available only to customers of the bank.
Contact US
The physical address, email ID and phone numbers of the bank are displayed here.
Locate a Branch
Enter a location to search for branches in that area.
Social
Click the social networking site icons to connect to Facebook / twitter.
Home
Channel On-boarding
User Manual Oracle Banking Digital Experience Retail Customer Services 13
4. Channel On-boarding
In the current scenario, bank customers are comfortable and adept at using digital channels, which have increasingly become the primary mode of banking. Customers prefer self-service channels for their basic banking needs as it makes transactions and inquiries accessible anywhere anytime.
In order to access online banking channel, users need to have login credentials. This feature enables users to register themselves for channel access.
4.1 Self-Register
This feature enables customers to register themselves for channel access. Customers who do not have access to online channels can onboard themselves without having to approach the bank physically. Bank customers who have existing savings accounts, term deposits and or Loans can onboard themselves by authenticating their relationship with the bank. Customer authentication is done on the basis of primary details registered with the bank.
Pre-requisites
In order to be able to register oneself, a user must have any of the following existing relationships with the Bank:
Demand Deposit
Loan
Term Deposit
Credit Card
Features Supported In the Application
Registration for online banking access by:
Validating relationship with the bank, and
Creation of Login credentials – User ID and Password
How to reach here:
Bank’s Portal Page > Toggle Menu > Register
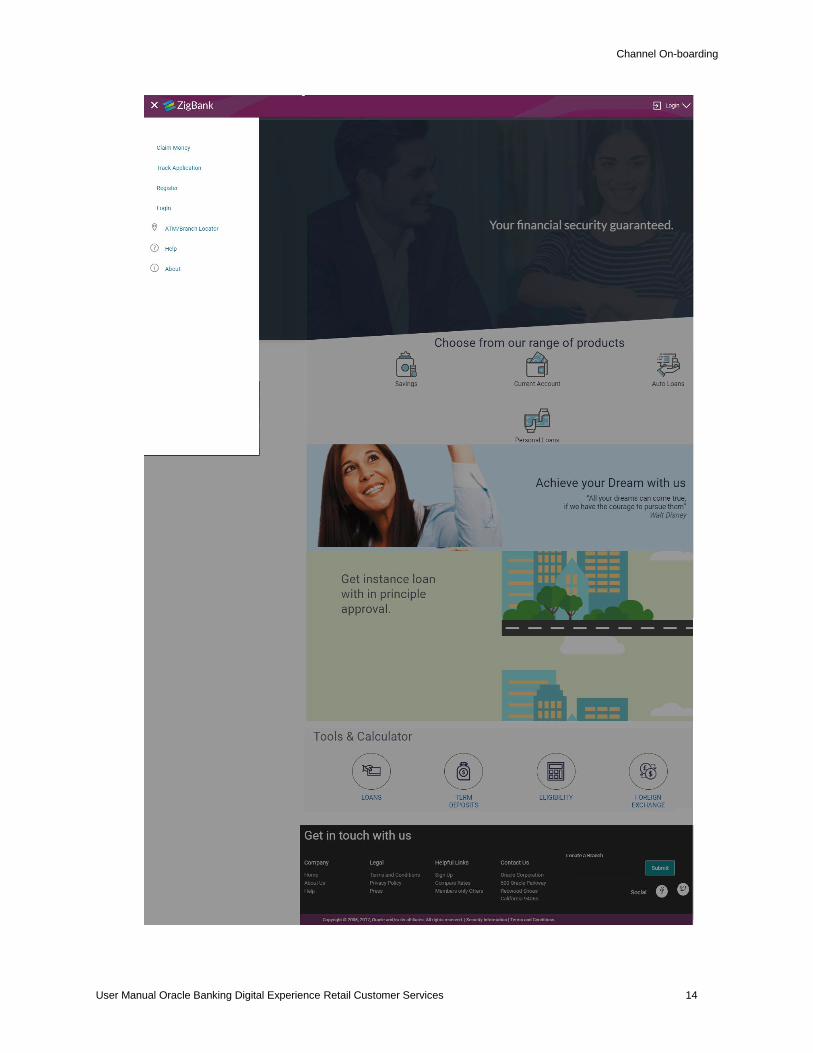
To register for access to banking channels:
1. Access the bank’s portal page, click to expand the toggle menu and click on Register.
Channel On-boarding
User Manual Oracle Banking Digital Experience Retail Customer Services 14
Channel On-boarding
User Manual Oracle Banking Digital Experience Retail Customer Services 15
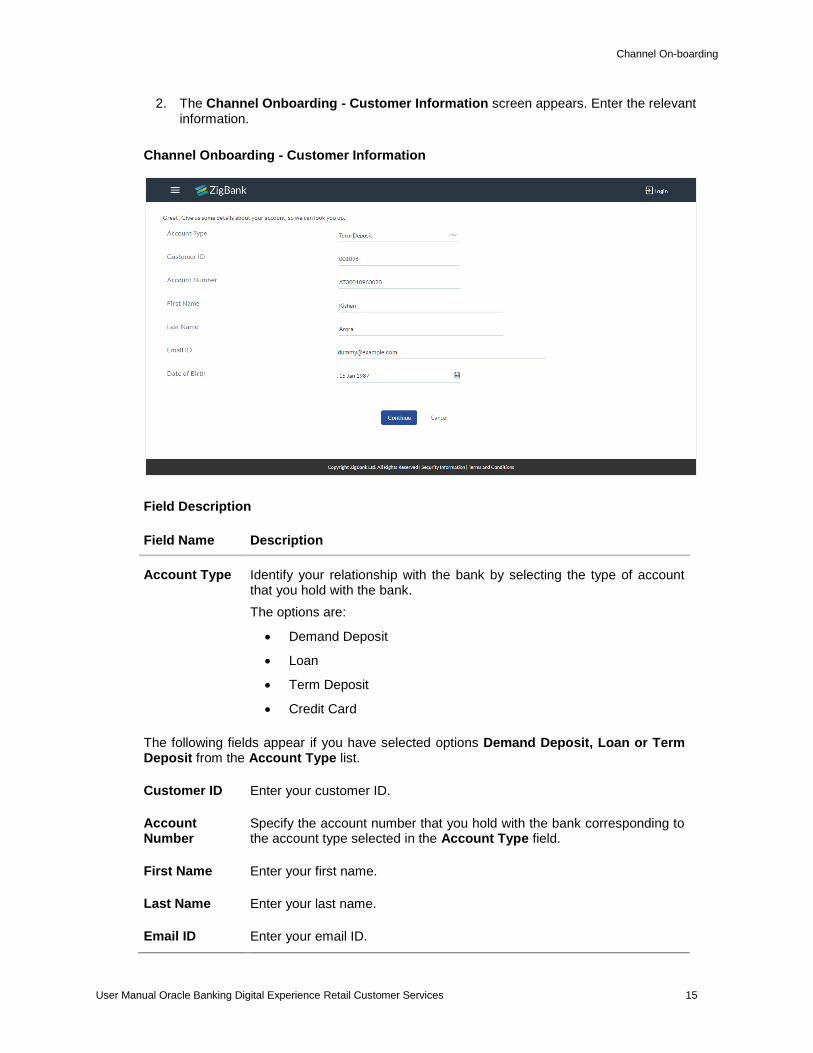
2. The Channel Onboarding - Customer Information screen appears. Enter the relevant information.
Channel Onboarding - Customer Information
Field Description
Field Name Description
Account Type Identify your relationship with the bank by selecting the type of account that you hold with the bank.
The options are:
Demand Deposit
Loan
Term Deposit
Credit Card
The following fields appear if you have selected options Demand Deposit, Loan or Term Deposit from the Account Type list.
Customer ID Enter your customer ID.
Account Number
Specify the account number that you hold with the bank corresponding to the account type selected in the Account Type field.
First Name Enter your first name.
Last Name Enter your last name.
Email ID Enter your email ID.
Channel On-boarding
User Manual Oracle Banking Digital Experience Retail Customer Services 16
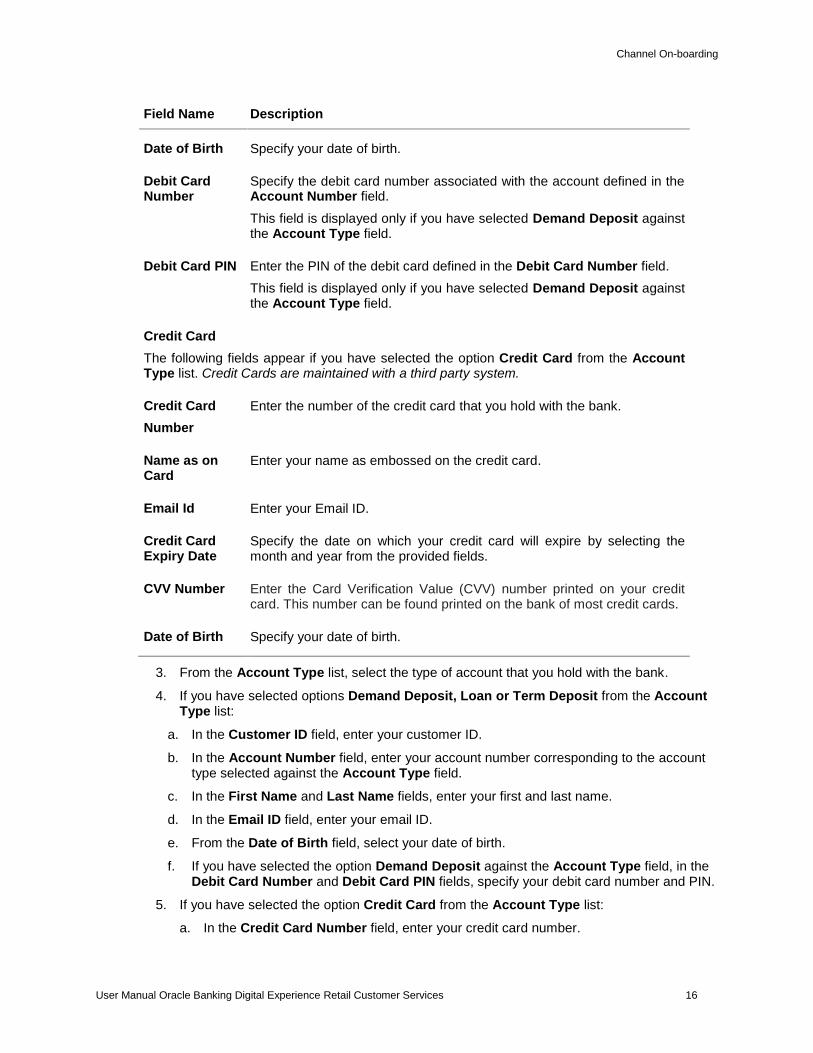
Field Name Description
Date of Birth Specify your date of birth.
Debit Card Number
Specify the debit card number associated with the account defined in the Account Number field.
This field is displayed only if you have selected Demand Deposit against the Account Type field.
Debit Card PIN Enter the PIN of the debit card defined in the Debit Card Number field.
This field is displayed only if you have selected Demand Deposit against the Account Type field.
Credit Card
The following fields appear if you have selected the option Credit Card from the Account Type list. Credit Cards are maintained with a third party system.
Credit Card
Number
Enter the number of the credit card that you hold with the bank.
Name as on Card
Enter your name as embossed on the credit card.
Email Id Enter your Email ID.
Credit Card Expiry Date
Specify the date on which your credit card will expire by selecting the month and year from the provided fields.
CVV Number Enter the Card Verification Value (CVV) number printed on your credit card. This number can be found printed on the bank of most credit cards.
Date of Birth Specify your date of birth.
3. From the Account Type list, select the type of account that you hold with the bank.
4. If you have selected options Demand Deposit, Loan or Term Deposit from the Account Type list:
a. In the Customer ID field, enter your customer ID.
b. In the Account Number field, enter your account number corresponding to the account type selected against the Account Type field.
c. In the First Name and Last Name fields, enter your first and last name.
d. In the Email ID field, enter your email ID.
e. From the Date of Birth field, select your date of birth.
f. If you have selected the option Demand Deposit against the Account Type field, in the Debit Card Number and Debit Card PIN fields, specify your debit card number and PIN.
5. If you have selected the option Credit Card from the Account Type list:
a. In the Credit Card Number field, enter your credit card number.

Channel On-boarding
User Manual Oracle Banking Digital Experience Retail Customer Services 17
b. In the Name as on Card field, enter your name as embossed on the card.
c. In the Email ID field, enter your email address.
d. In the Credit Card Expiry Date fields, select the month and year in which your credit card will expire.
e. In the CVV Number field, enter your CVV number.
f. From the Date of Birth field, select your date of birth.
6. Click Continue.
7. The Verification screen appears. For more information click here.
8. The Get Online - Create your log in details screen appears. Enter a user name and password that you want to set as your log in credentials.
Create your log in details
Field Description
Field Name Description
Create your login details
User Name Enter a value that you want to set as your user name.
Password Enter a password to be considered as your login password.
Re-Enter Password Re-enter the password entered in the Password field to confirm the same.
I agree to Terms and Conditions
Select the checkbox to acknowledge acceptance of registration terms and conditions.
Channel On-boarding
User Manual Oracle Banking Digital Experience Retail Customer Services 18
Field Name Description
Terms and Conditions The link to view the terms and conditions.
9. In the User Name field, enter a value to be considered as your user name.
10. In the Password field, enter a password to be set as your login password. OR
Click icon to enter the password using the virtual keyboard.
11. In the Re-enter Password field, re-enter the password. OR
Click icon to re-enter the password using the virtual keyboard.
12. To accept the terms and conditions, select the check box.
13. Click Sign Up. OR Click Cancel to end the registration process.
14. The success message appears. A mail is sent to the user’s email ID containing his login user name and password.
Click Login to start using online banking.
Home
Log-In & Log-Out of Oracle Banking Digital Experience
User Manual Oracle Banking Digital Experience Retail Customer Services 19
5. Log-In & Log-Out of Oracle Banking Digital Experience
A user can access online banking services by logging in to the system from the login page. By enabling user login through entry of user name and password, the bank can ensure that its customers’ financial information is always accessed in a safe and secure manner.
Once a user is done accessing the online banking system, he/she can log out by selecting the Log Out option provided. Logging out enables users to exit from the system in a secure manner, thus ensuring that no one else can gain access to the user’s online banking services (without supplying valid credentials).
Pre-requisites
The user must be registered for online banking access and must have valid login credentials.
The user must have a valid account with bank that is enabled for online banking access.
Other features related to accounts must be supported by the host system.
Features Supported In the Application
Log-in to the application
Log-out of the application
5.1 Log-in to the application
The user can log in to the Oracle Banking Digital Experience application by entering his/her login username and password in the provided fields.
To log in to the application:
1. Access the bank’s portal page.
2. Select the Login option. The Login page appears.
Log-In & Log-Out of Oracle Banking Digital Experience
User Manual Oracle Banking Digital Experience Retail Customer Services 20
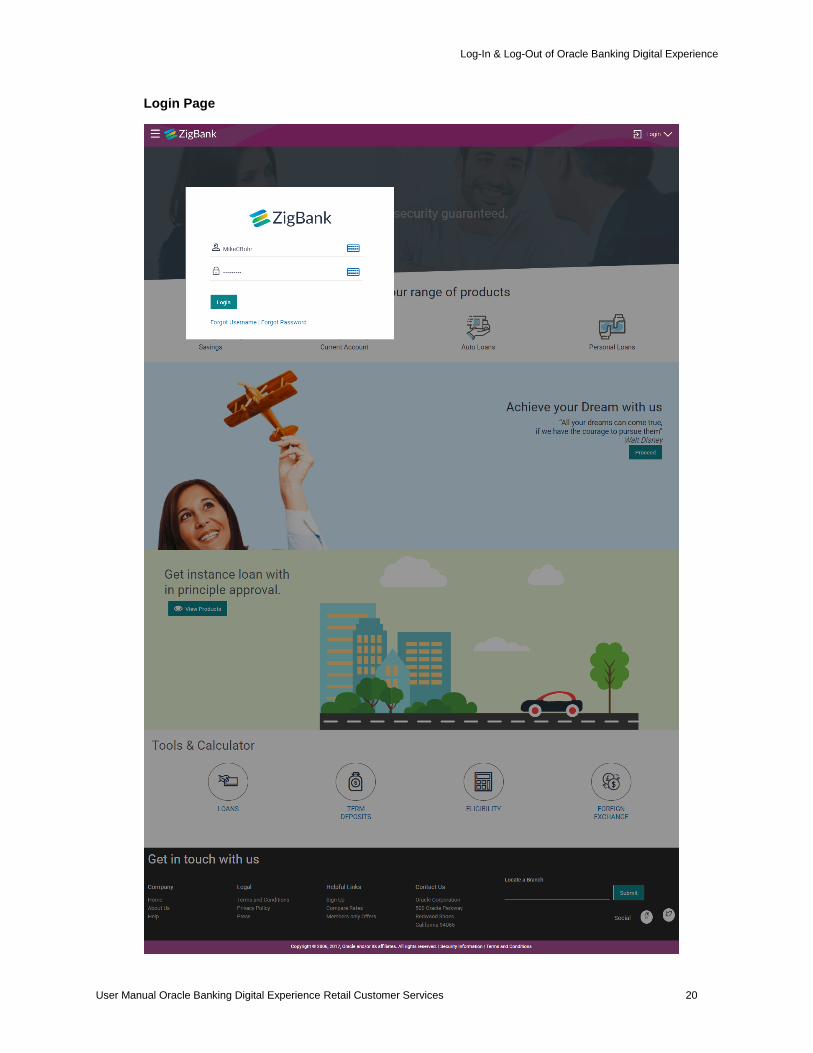
Login Page
Log-In & Log-Out of Oracle Banking Digital Experience
User Manual Oracle Banking Digital Experience Retail Customer Services 21
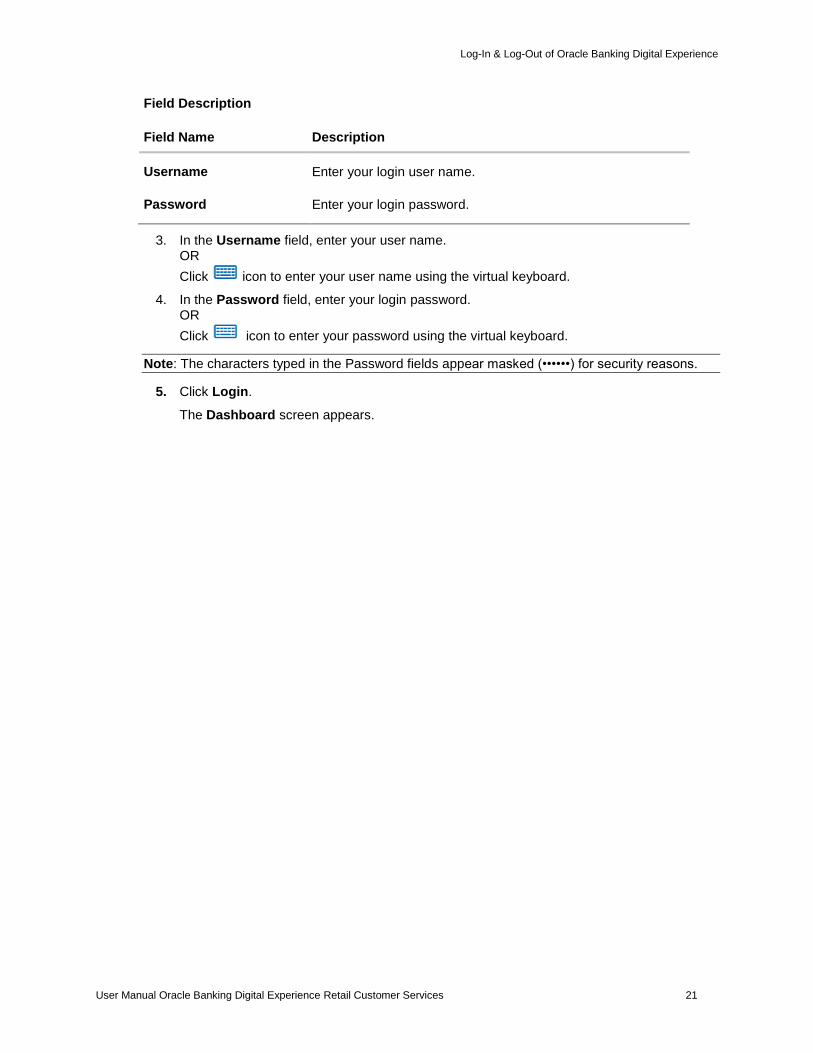
Field Description
Field Name Description
Username Enter your login user name.
Password Enter your login password.
3. In the Username field, enter your user name. OR
Click icon to enter your user name using the virtual keyboard.
4. In the Password field, enter your login password. OR
Click icon to enter your password using the virtual keyboard.
Note: The characters typed in the Password fields appear masked (••••••) for security reasons.
5. Click Login.
The Dashboard screen appears.
Log-In & Log-Out of Oracle Banking Digital Experience
User Manual Oracle Banking Digital Experience Retail Customer Services 22
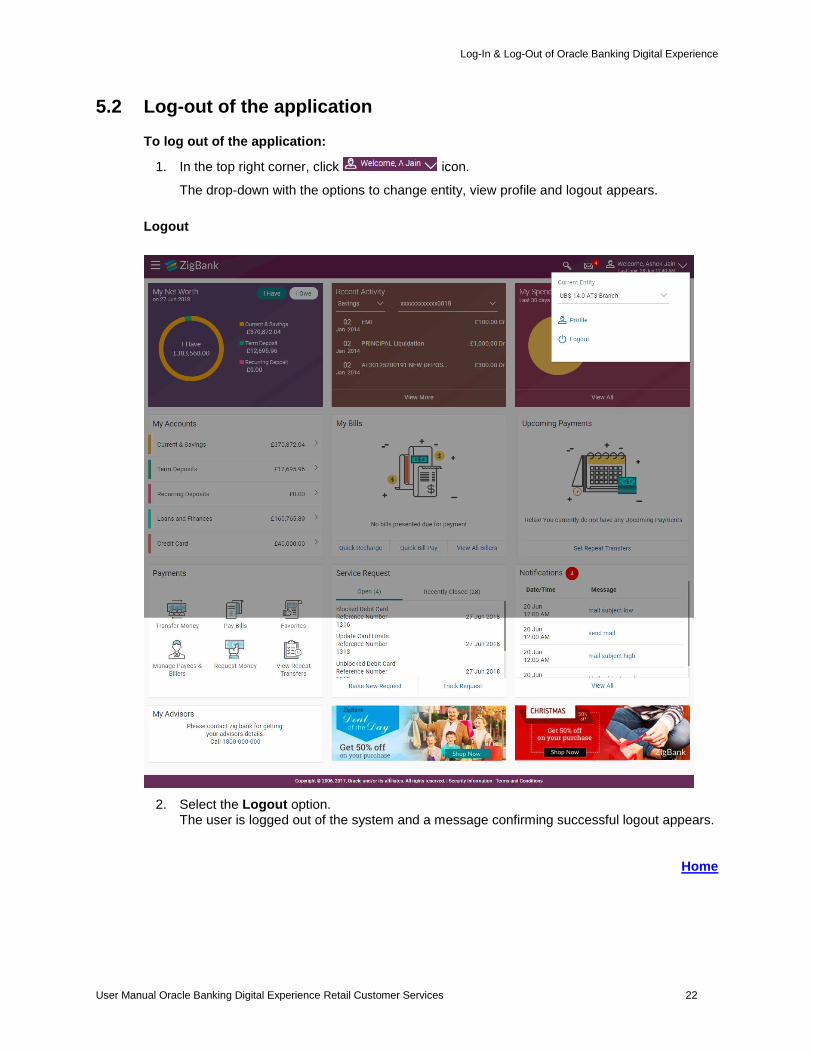
5.2 Log-out of the application
To log out of the application:
1. In the top right corner, click icon.
The drop-down with the options to change entity, view profile and logout appears.
Logout
2. Select the Logout option. The user is logged out of the system and a message confirming successful logout appears.
Home
Calculators
User Manual Oracle Banking Digital Experience Retail Customer Services 23
6. Calculators
Financial calculators are tools used to arrive at a certain calculation helping to take a decision with some predefined criteria. Banks can provide details of their products and offers such as loan interest rates, fixed deposit interest rates, loan tenure etc. through calculators. Users can also use these calculators to compare different offers and products offered by the bank.
Oracle Banking Digital Experience provides calculators which banks can offer to their users on their digital channel. Calculators can be used by customers as well as prospects.
Features Supported In the Application
The different calculators are:
Loan Eligibility Calculator
Loan Calculator
Term Deposits Calculator
Foreign Exchange Calculator
Goal Calculator
Calculators
User Manual Oracle Banking Digital Experience Retail Customer Services 24
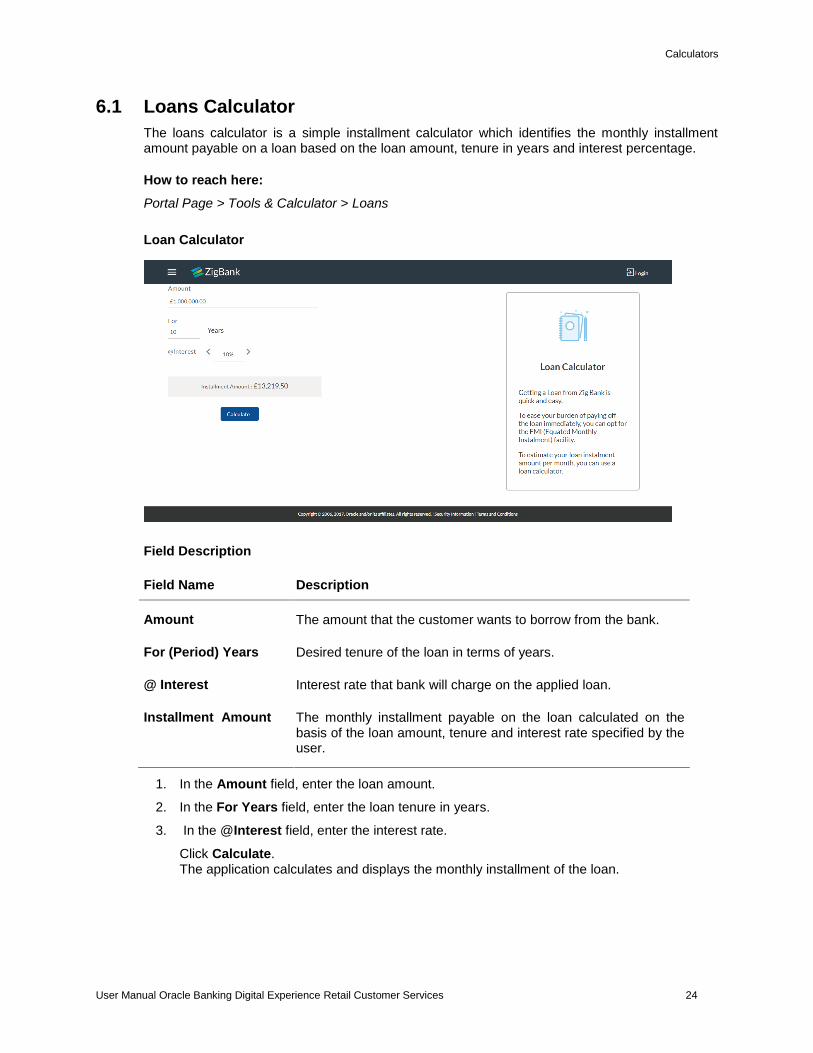
6.1 Loans Calculator
The loans calculator is a simple installment calculator which identifies the monthly installment amount payable on a loan based on the loan amount, tenure in years and interest percentage.
How to reach here:
Portal Page > Tools & Calculator > Loans
Loan Calculator
Field Description
Field Name Description
Amount The amount that the customer wants to borrow from the bank.
For (Period) Years Desired tenure of the loan in terms of years.
@ Interest Interest rate that bank will charge on the applied loan.
Installment Amount The monthly installment payable on the loan calculated on the basis of the loan amount, tenure and interest rate specified by the user.
1. In the Amount field, enter the loan amount.
2. In the For Years field, enter the loan tenure in years.
3. In the @Interest field, enter the interest rate.
Click Calculate. The application calculates and displays the monthly installment of the loan.
Calculators
User Manual Oracle Banking Digital Experience Retail Customer Services 25
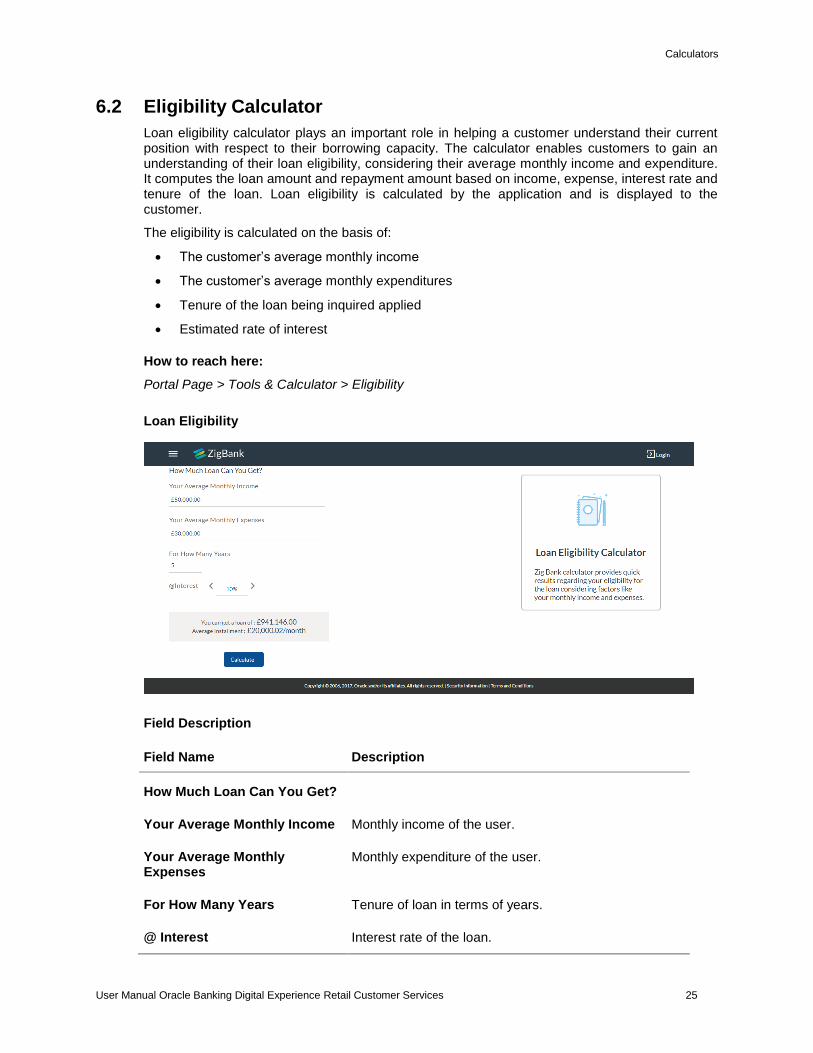
6.2 Eligibility Calculator
Loan eligibility calculator plays an important role in helping a customer understand their current position with respect to their borrowing capacity. The calculator enables customers to gain an understanding of their loan eligibility, considering their average monthly income and expenditure. It computes the loan amount and repayment amount based on income, expense, interest rate and tenure of the loan. Loan eligibility is calculated by the application and is displayed to the customer.
The eligibility is calculated on the basis of:
The customer’s average monthly income
The customer’s average monthly expenditures
Tenure of the loan being inquired applied
Estimated rate of interest
How to reach here:
Portal Page > Tools & Calculator > Eligibility
Loan Eligibility
Field Description
Field Name Description
How Much Loan Can You Get?
Your Average Monthly Income Monthly income of the user.
Your Average Monthly Expenses
Monthly expenditure of the user.
For How Many Years Tenure of loan in terms of years.
@ Interest Interest rate of the loan.
Calculators
User Manual Oracle Banking Digital Experience Retail Customer Services 26
Field Name Description
You can get a loan of The amount of loan that the customer is eligible to borrow.
Average Installment Display the estimated monthly installment amount.
1. In the Your Average Monthly Income field, enter your monthly income.
2. In the Your Average Monthly Expenses field, enter your monthly expenses.
3. In the For How Many Years field, enter the tenure of loan.
4. In the Interest field, enter the rate of interest.
5. Click Calculate. The application calculates and displays the eligible loan amount and the average installment amount.
Calculators
User Manual Oracle Banking Digital Experience Retail Customer Services 27
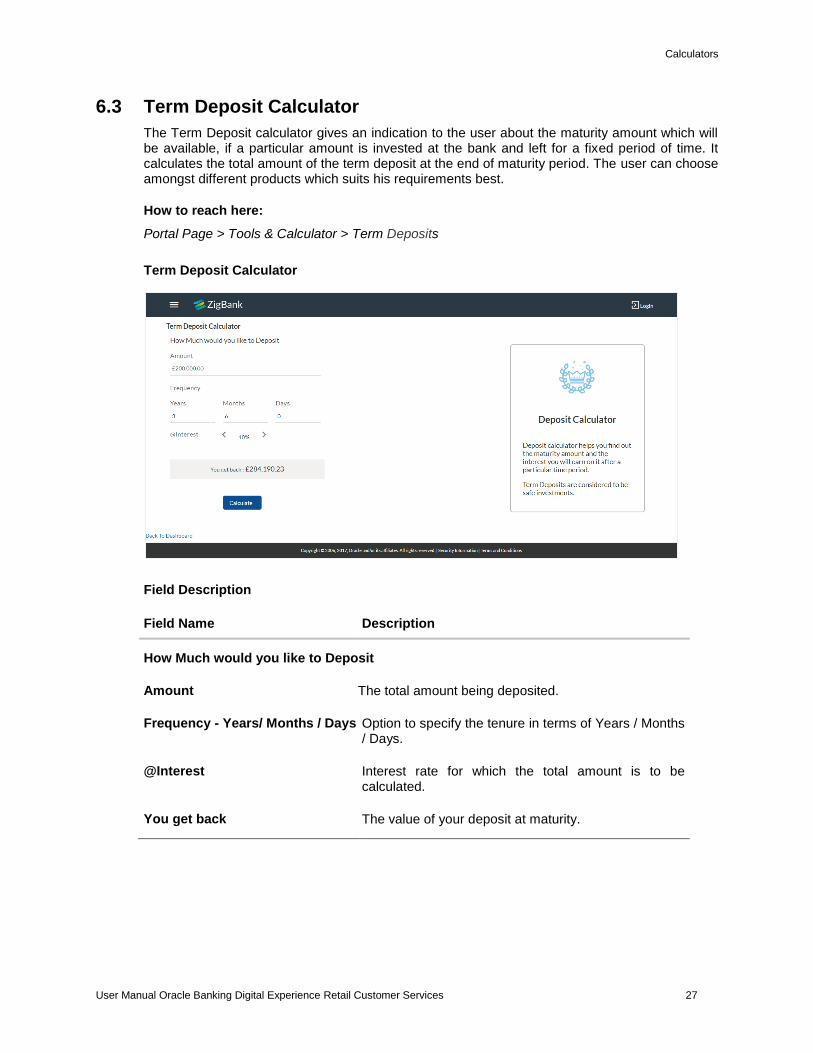
6.3 Term Deposit Calculator
The Term Deposit calculator gives an indication to the user about the maturity amount which will be available, if a particular amount is invested at the bank and left for a fixed period of time. It calculates the total amount of the term deposit at the end of maturity period. The user can choose amongst different products which suits his requirements best.
How to reach here:
Portal Page > Tools & Calculator > Term Deposits
Term Deposit Calculator
Field Description
Field Name Description
How Much would you like to Deposit
Amount The total amount being deposited.
Frequency - Years/ Months / Days Option to specify the tenure in terms of Years / Months / Days.
@Interest Interest rate for which the total amount is to be calculated.
You get back The value of your deposit at maturity.
Calculators
User Manual Oracle Banking Digital Experience Retail Customer Services 28
To calculate deposit value at maturity:
1. In the Amount field, enter the deposit amount.
2. In the Frequency - Years/ Months / Days fields, enter the relevant information.
3. In the Interest field, enter the rate of interest.
4. Click Calculate. The Deposit Value at maturity appears.
Calculators
User Manual Oracle Banking Digital Experience Retail Customer Services 29
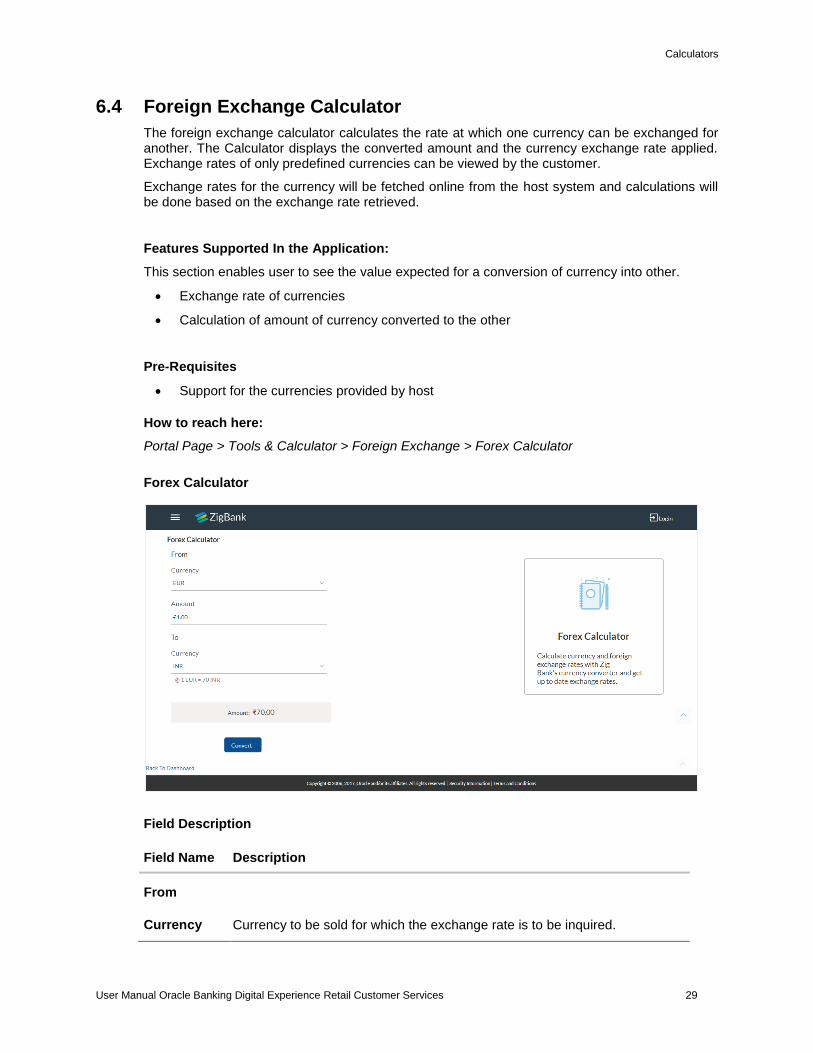
6.4 Foreign Exchange Calculator
The foreign exchange calculator calculates the rate at which one currency can be exchanged for another. The Calculator displays the converted amount and the currency exchange rate applied. Exchange rates of only predefined currencies can be viewed by the customer.
Exchange rates for the currency will be fetched online from the host system and calculations will be done based on the exchange rate retrieved.
Features Supported In the Application:
This section enables user to see the value expected for a conversion of currency into other.
Exchange rate of currencies
Calculation of amount of currency converted to the other
Pre-Requisites
Support for the currencies provided by host
How to reach here:
Portal Page > Tools & Calculator > Foreign Exchange > Forex Calculator
Forex Calculator
Field Description
Field Name Description
From
Currency Currency to be sold for which the exchange rate is to be inquired.
Calculators
User Manual Oracle Banking Digital Experience Retail Customer Services 30
Field Name Description
Amount Amount for which conversion is required.
To
Currency Buy currency
Amount Amount (in the To Currency) which you will get post conversion.
To calculate currency exchange rate:
1. From the From – Currency list, select the appropriate currency.
2. In the Amount field, enter the amount to be converted.
3. From the To - Currency list, select the currency
4. To calculate the currency exchange rate, click Convert. The exchange rate for the currency pair appears.
Calculators
User Manual Oracle Banking Digital Experience Retail Customer Services 31
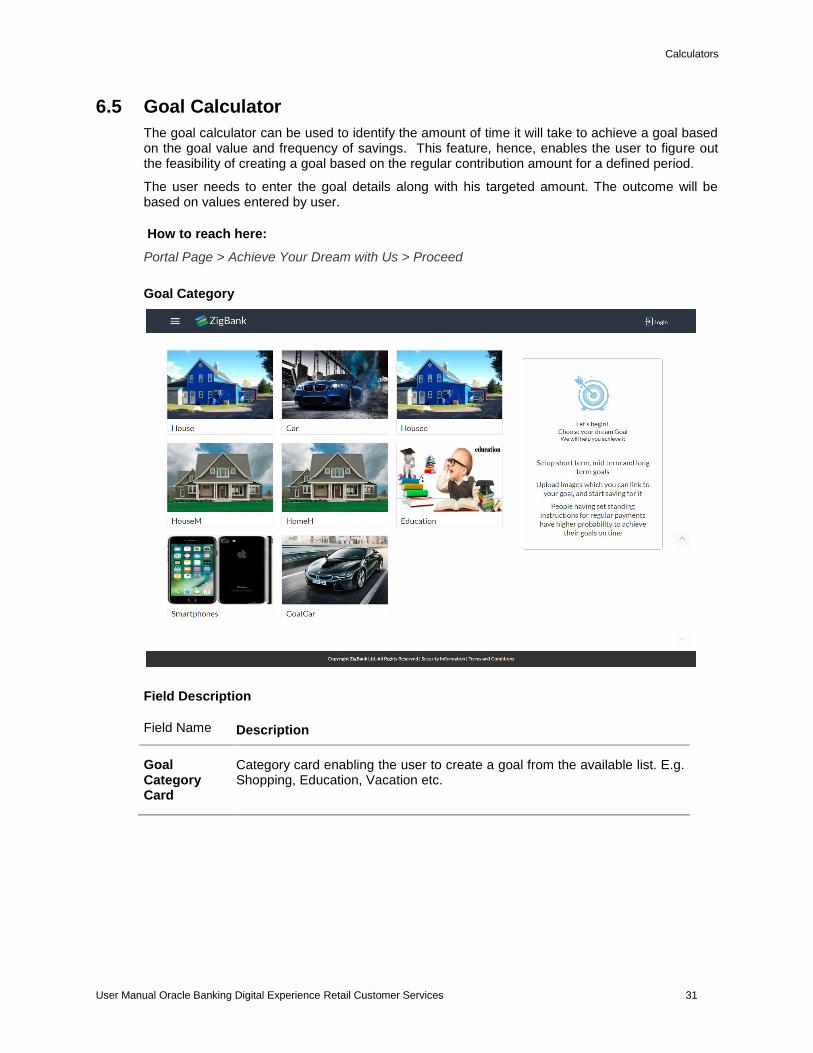
6.5 Goal Calculator
The goal calculator can be used to identify the amount of time it will take to achieve a goal based on the goal value and frequency of savings. This feature, hence, enables the user to figure out the feasibility of creating a goal based on the regular contribution amount for a defined period.
The user needs to enter the goal details along with his targeted amount. The outcome will be based on values entered by user.
How to reach here:
Portal Page > Achieve Your Dream with Us > Proceed
Goal Category
Field Description
Field Name Description
Goal Category Card
Category card enabling the user to create a goal from the available list. E.g. Shopping, Education, Vacation etc.
Calculators
User Manual Oracle Banking Digital Experience Retail Customer Services 32
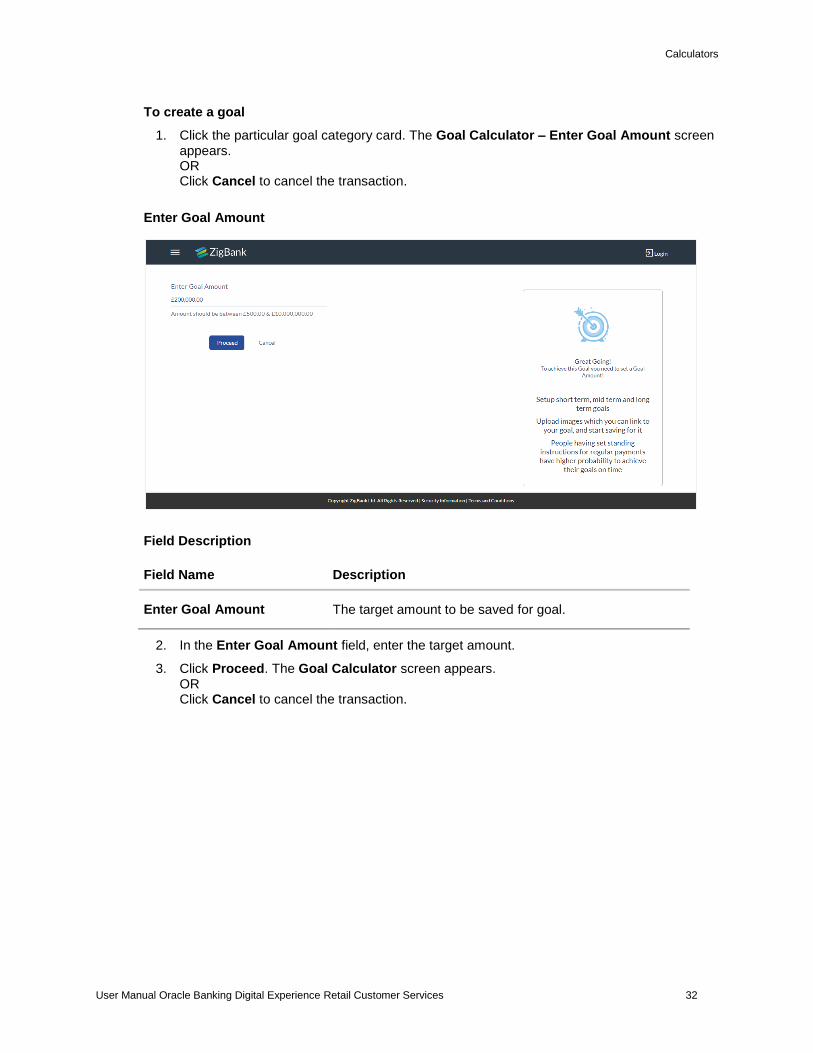
To create a goal
1. Click the particular goal category card. The Goal Calculator – Enter Goal Amount screen appears. OR Click Cancel to cancel the transaction.
Enter Goal Amount
Field Description
Field Name Description
Enter Goal Amount The target amount to be saved for goal.
2. In the Enter Goal Amount field, enter the target amount.
3. Click Proceed. The Goal Calculator screen appears. OR Click Cancel to cancel the transaction.
Calculators
User Manual Oracle Banking Digital Experience Retail Customer Services 33
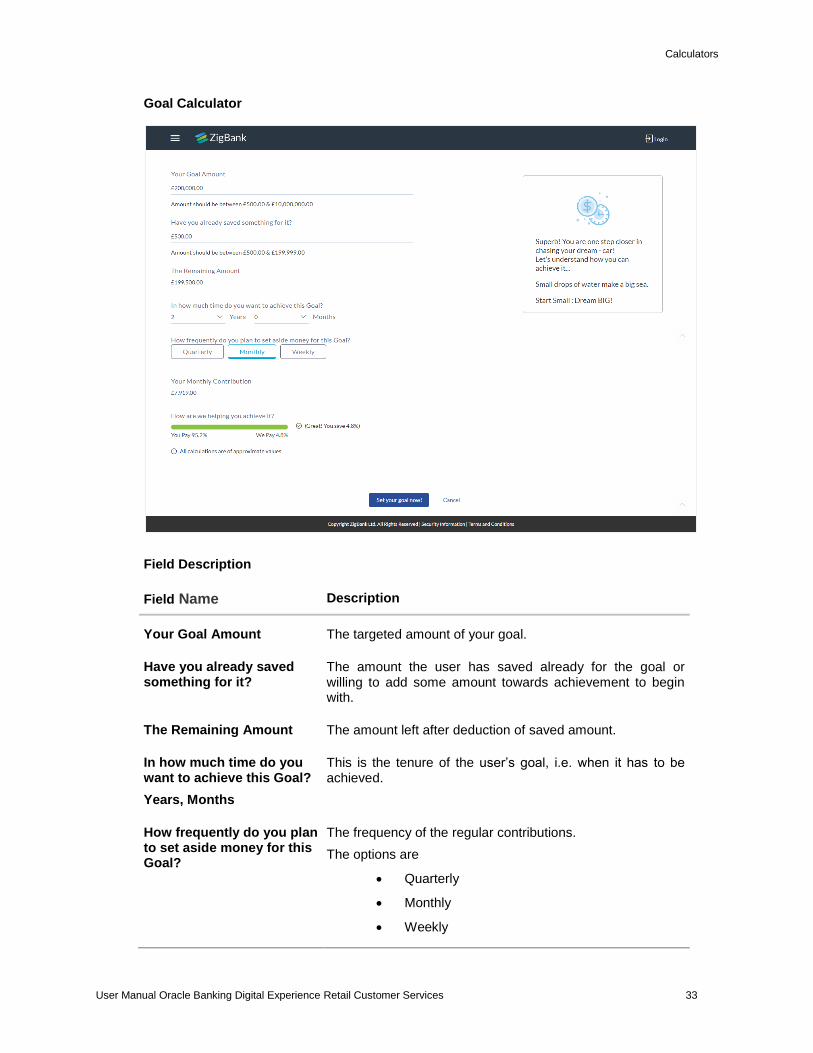
Goal Calculator
Field Description
Field Name Description
Your Goal Amount The targeted amount of your goal.
Have you already saved something for it?
The amount the user has saved already for the goal or willing to add some amount towards achievement to begin with.
The Remaining Amount The amount left after deduction of saved amount.
In how much time do you want to achieve this Goal?
Years, Months
This is the tenure of the user’s goal, i.e. when it has to be achieved.
How frequently do you plan to set aside money for this Goal?
The frequency of the regular contributions.
The options are
Quarterly
Monthly
Weekly
Calculators
User Manual Oracle Banking Digital Experience Retail Customer Services 34
4. In the Have you already saved something for it? field; enter the amount which you have already saved for the goal.
5. From the In how much time do you want to achieve this Goal? list, select the appropriate years and months i.e. time frame user plans to achieve his goal.
In the How frequently do you plan to set aside money for this Goal? field, select the appropriate option. The screen section displaying Your Monthly Contribution based on the data entered and graph displaying your contribution and bank's contribution appears.
The screen displays a bar chart showing How are we helping you achieve it? This displays the amount paid by user and the interest component provided by Bank and hence the total savings percentage.
6. Click Set your goal Now! to create the goal. The user is directed to the Login Page of the application. OR Click Cancel to abort the goal creation process.
FAQs
What do the “you pay”, “We pay” fields suggest?
You pay is the amount, the customer contributes towards his goal, while the We pay component is interest accrued by the bank towards fulfillment of the goal.
Can the customer calculate how much time he will need to achieve a Goal, if he pays x amount every month for 2 years?
The goal calculator helps the customer to identify the amount he needs to contribute frequently so that he can achieve his goal within the desired time frame. Reverse calculation is not possible.
Home
First Time Login
User Manual Oracle Banking Digital Experience Retail Customer Services 35
7. First Time Login
When a new user logs into the application for the first time with the user name and password provided by bank, there are certain tasks that he/she needs to fulfill before being able to access the online services of the bank. The tasks include accepting the terms and conditions of the bank, change of system generated password and setting up security questions (only if the bank administrator has set up security questions as a second factor authentication for any of the transactions).
Prerequisites:
The bank administrator has enabled the First time login steps for Retail users.
How to reach here:
Portal Page > Login
To log in to the application:
1. Open an internet browser to access the application.
2. Type the Oracle Banking Digital Experience URL in the Address bar, and press Enter. The Portal page appears.
3. Click Login. The Login screen appears.
First Time Login
User Manual Oracle Banking Digital Experience Retail Customer Services 36
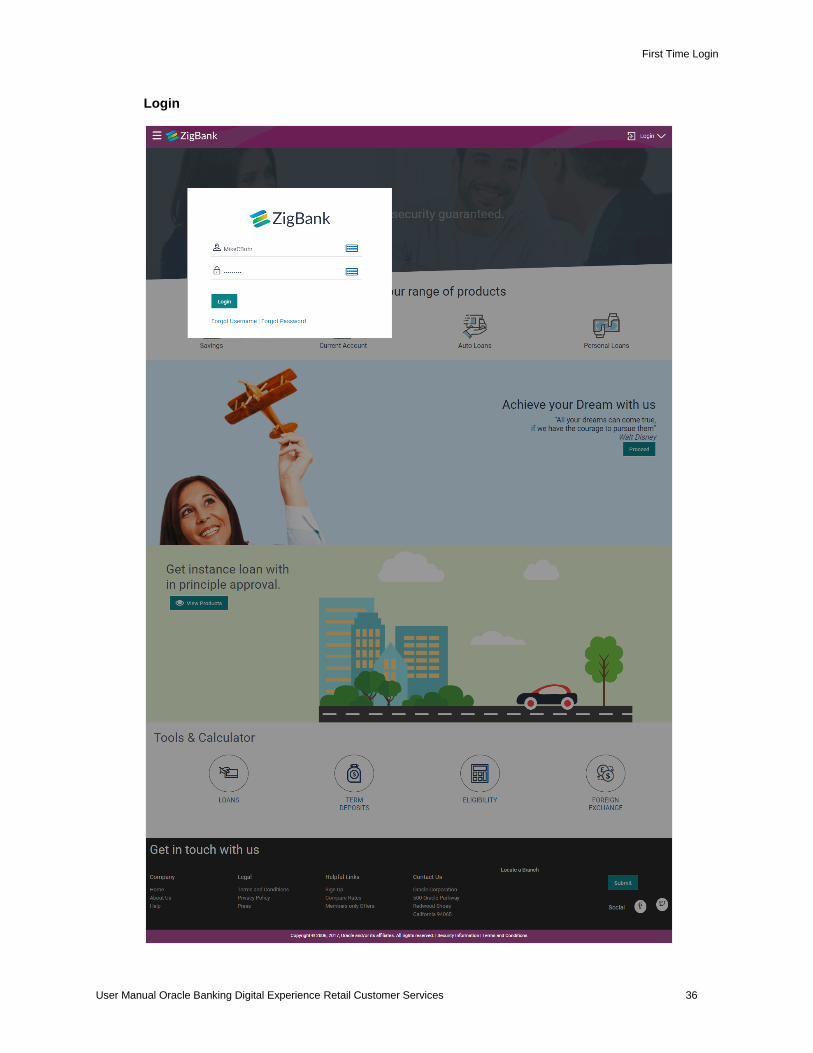
Login
First Time Login
User Manual Oracle Banking Digital Experience Retail Customer Services 37
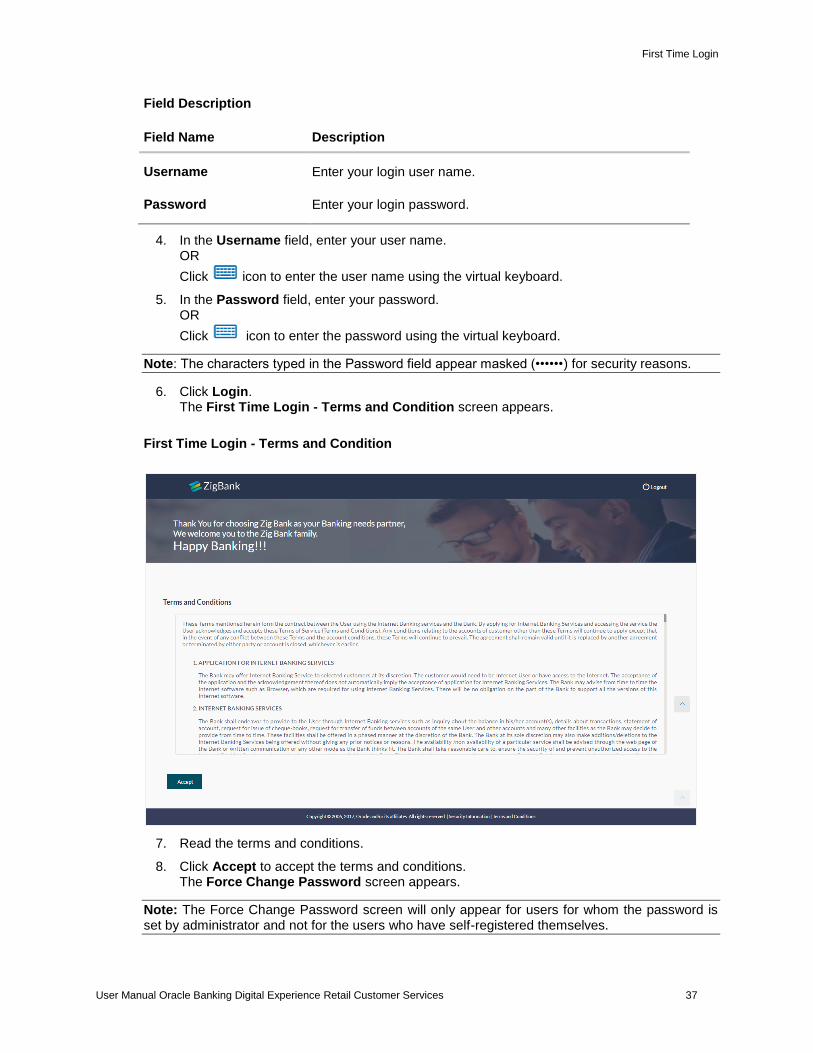
Field Description
Field Name Description
Username Enter your login user name.
Password Enter your login password.
4. In the Username field, enter your user name. OR
Click icon to enter the user name using the virtual keyboard.
5. In the Password field, enter your password. OR
Click icon to enter the password using the virtual keyboard.
Note: The characters typed in the Password field appear masked (••••••) for security reasons.
6. Click Login. The First Time Login - Terms and Condition screen appears.
First Time Login - Terms and Condition
7. Read the terms and conditions.
8. Click Accept to accept the terms and conditions. The Force Change Password screen appears.
Note: The Force Change Password screen will only appear for users for whom the password is set by administrator and not for the users who have self-registered themselves.

First Time Login
User Manual Oracle Banking Digital Experience Retail Customer Services 38
Force Change Password
Field Description
Field Name Description
Current Password Enter your current password as received on your email address.
New Password Enter a new password.
Re-enter Password Re-enter the new password to confirm the same.
9. In the Current Password field, enter your current password as set by the bank. OR
Click icon to enter the current password using the virtual keyboard.
10. In the New Password field, enter a new password. OR
Click icon to enter a new password using the virtual keyboard.
11. In the Re-enter Password field, re-enter the new password. OR
Click icon to re-enter the new password using the virtual keyboard.
12. Click Confirm. The success message appears. The User is directed to the User Security Question Setup screen.
First Time Login
User Manual Oracle Banking Digital Experience Retail Customer Services 39
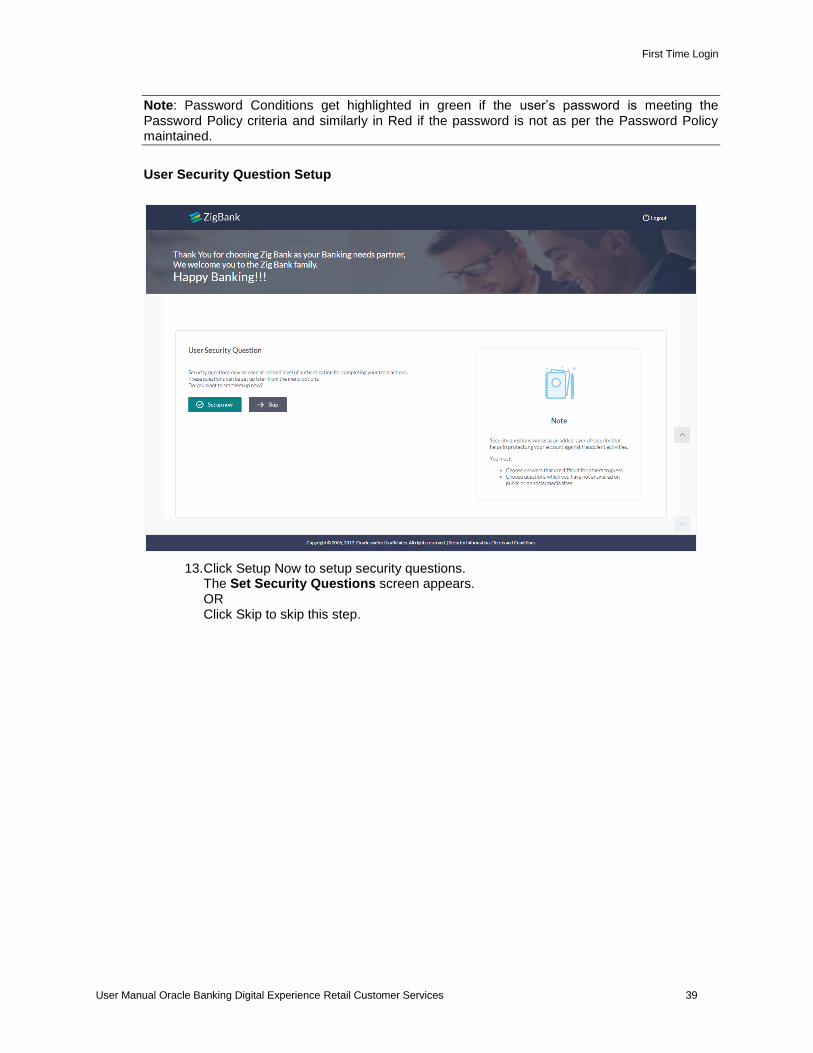
Note: Password Conditions get highlighted in green if the user’s password is meeting the Password Policy criteria and similarly in Red if the password is not as per the Password Policy maintained.
User Security Question Setup
13. Click Setup Now to setup security questions. The Set Security Questions screen appears. OR Click Skip to skip this step.
First Time Login
User Manual Oracle Banking Digital Experience Retail Customer Services 40
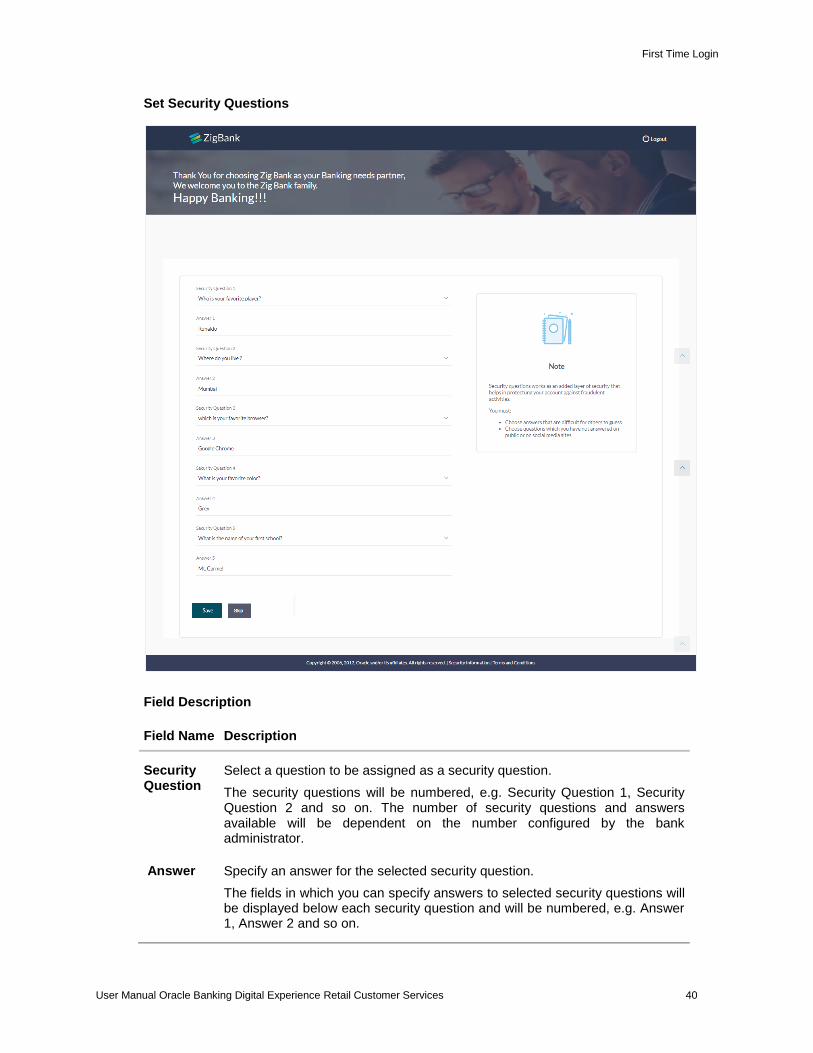
Set Security Questions
Field Description
Field Name Description
Security Question
Select a question to be assigned as a security question.
The security questions will be numbered, e.g. Security Question 1, Security Question 2 and so on. The number of security questions and answers available will be dependent on the number configured by the bank administrator.
Answer Specify an answer for the selected security question.
The fields in which you can specify answers to selected security questions will be displayed below each security question and will be numbered, e.g. Answer 1, Answer 2 and so on.
First Time Login
User Manual Oracle Banking Digital Experience Retail Customer Services 41
14. From the Security Question list, select the appropriate security question to be added in your security question set.
15. In the Answer field, enter an answer for the corresponding security question.
16. Click Save to save the security questions. The user is directed to the Dashboard screen. OR Click Skip to skip this step.
Home
Dashboard
User Manual Oracle Banking Digital Experience Retail Customer Services 42
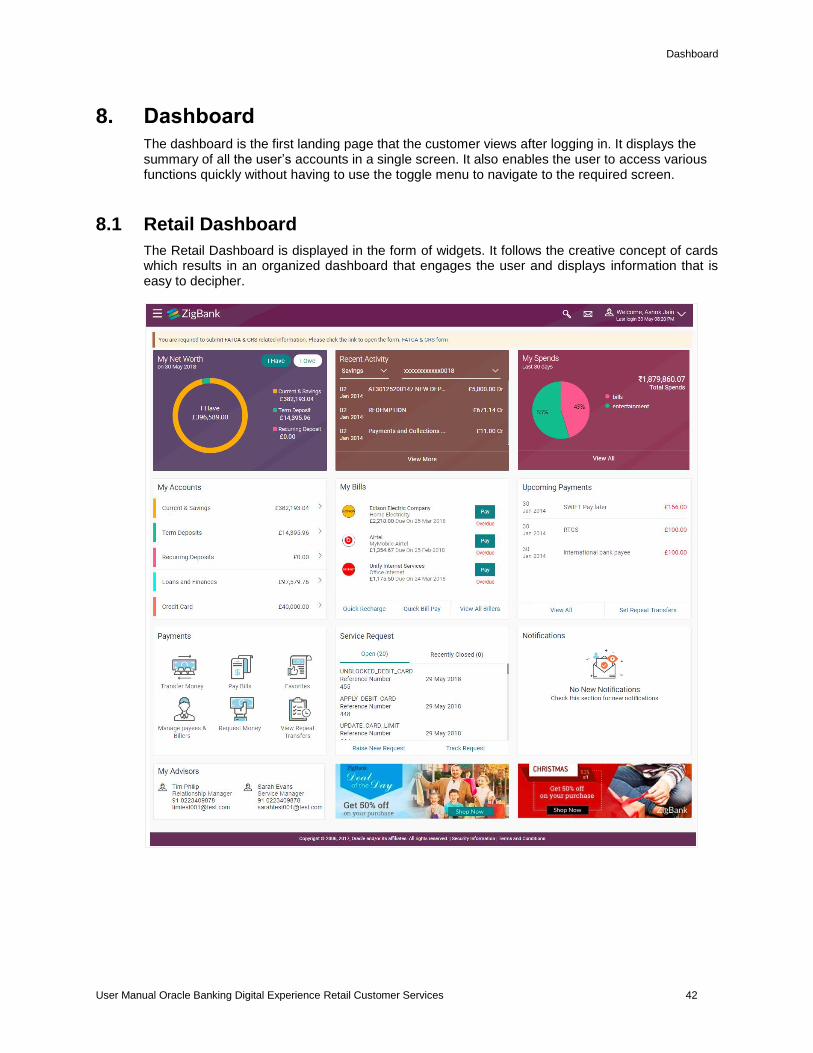
8. Dashboard
The dashboard is the first landing page that the customer views after logging in. It displays the summary of all the user’s accounts in a single screen. It also enables the user to access various functions quickly without having to use the toggle menu to navigate to the required screen.
8.1 Retail Dashboard
The Retail Dashboard is displayed in the form of widgets. It follows the creative concept of cards which results in an organized dashboard that engages the user and displays information that is easy to decipher.
Dashboard
User Manual Oracle Banking Digital Experience Retail Customer Services 43
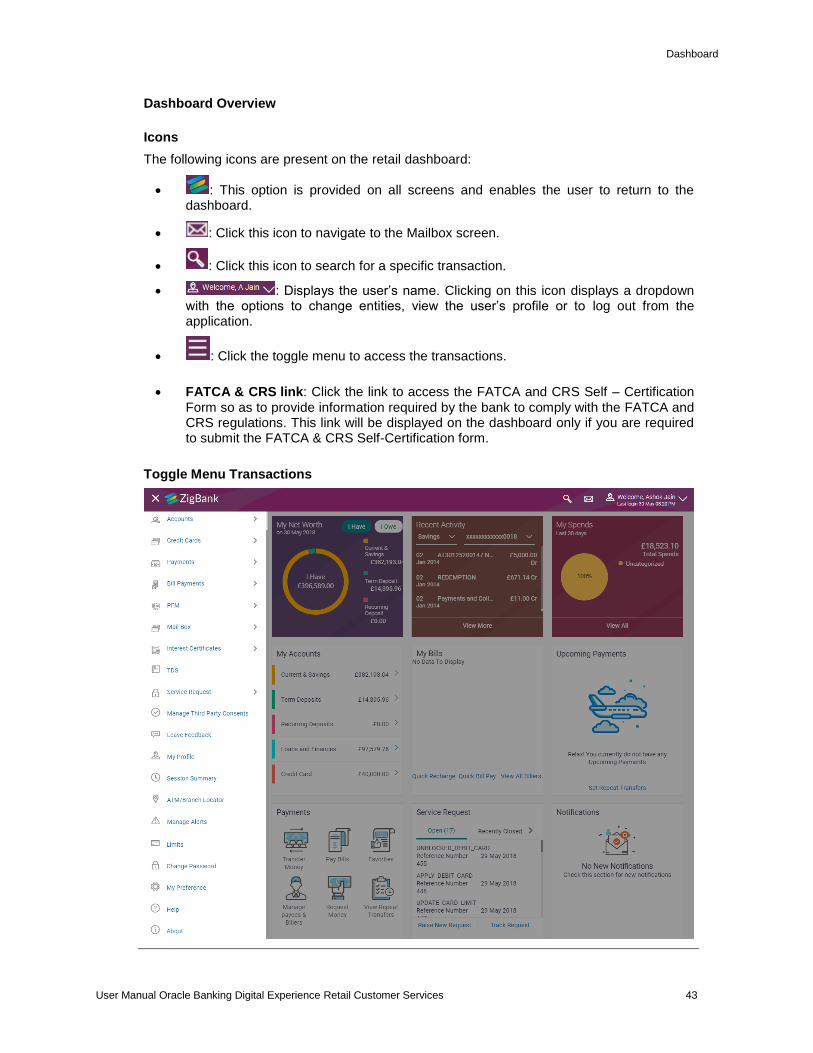
Dashboard Overview
Icons
The following icons are present on the retail dashboard:
: This option is provided on all screens and enables the user to return to the dashboard.
: Click this icon to navigate to the Mailbox screen.
: Click this icon to search for a specific transaction.
: Displays the user’s name. Clicking on this icon displays a dropdown with the options to change entities, view the user’s profile or to log out from the application.
: Click the toggle menu to access the transactions.
FATCA & CRS link: Click the link to access the FATCA and CRS Self – Certification
Form so as to provide information required by the bank to comply with the FATCA and CRS regulations. This link will be displayed on the dashboard only if you are required to submit the FATCA & CRS Self-Certification form.
Toggle Menu Transactions
Dashboard
User Manual Oracle Banking Digital Experience Retail Customer Services 44
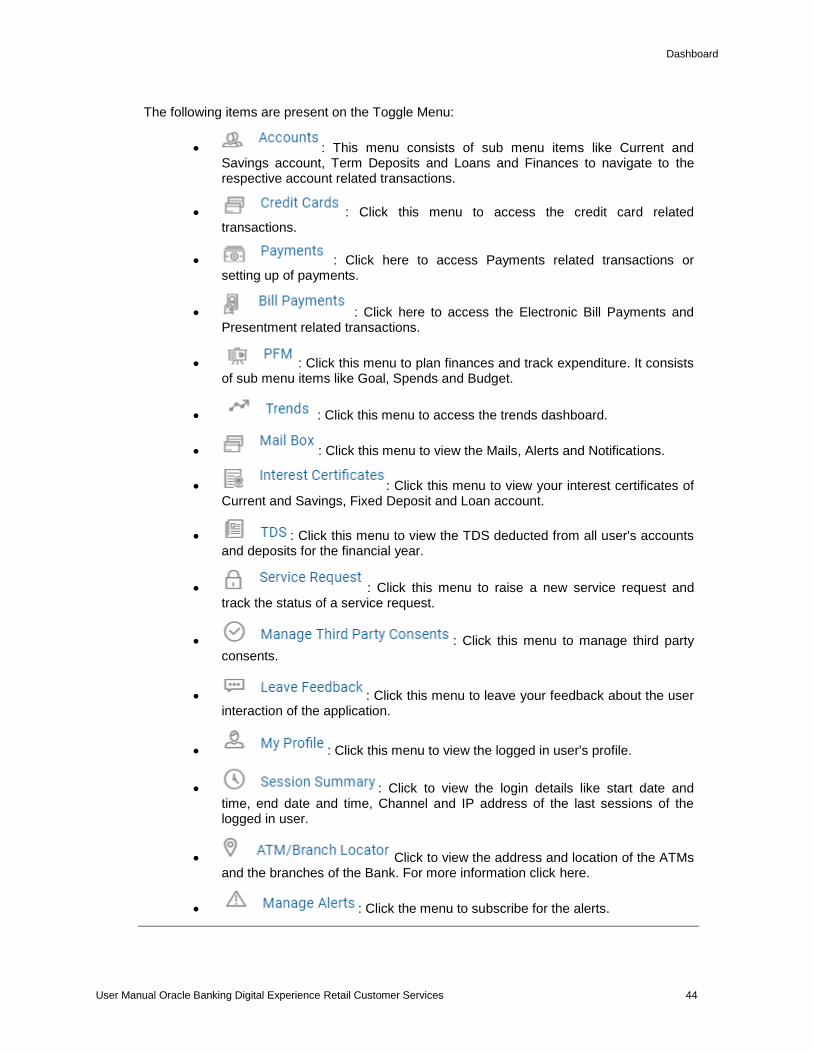
The following items are present on the Toggle Menu:
: This menu consists of sub menu items like Current and Savings account, Term Deposits and Loans and Finances to navigate to the respective account related transactions.
: Click this menu to access the credit card related transactions.
: Click here to access Payments related transactions or setting up of payments.
: Click here to access the Electronic Bill Payments and Presentment related transactions.
: Click this menu to plan finances and track expenditure. It consists of sub menu items like Goal, Spends and Budget.
: Click this menu to access the trends dashboard.
: Click this menu to view the Mails, Alerts and Notifications.
: Click this menu to view your interest certificates of Current and Savings, Fixed Deposit and Loan account.
: Click this menu to view the TDS deducted from all user's accounts and deposits for the financial year.
: Click this menu to raise a new service request and track the status of a service request.
: Click this menu to manage third party consents.
: Click this menu to leave your feedback about the user interaction of the application.
: Click this menu to view the logged in user's profile.
: Click to view the login details like start date and time, end date and time, Channel and IP address of the last sessions of the logged in user.
Click to view the address and location of the ATMs and the branches of the Bank. For more information click here.
: Click the menu to subscribe for the alerts.
Dashboard
User Manual Oracle Banking Digital Experience Retail Customer Services 45
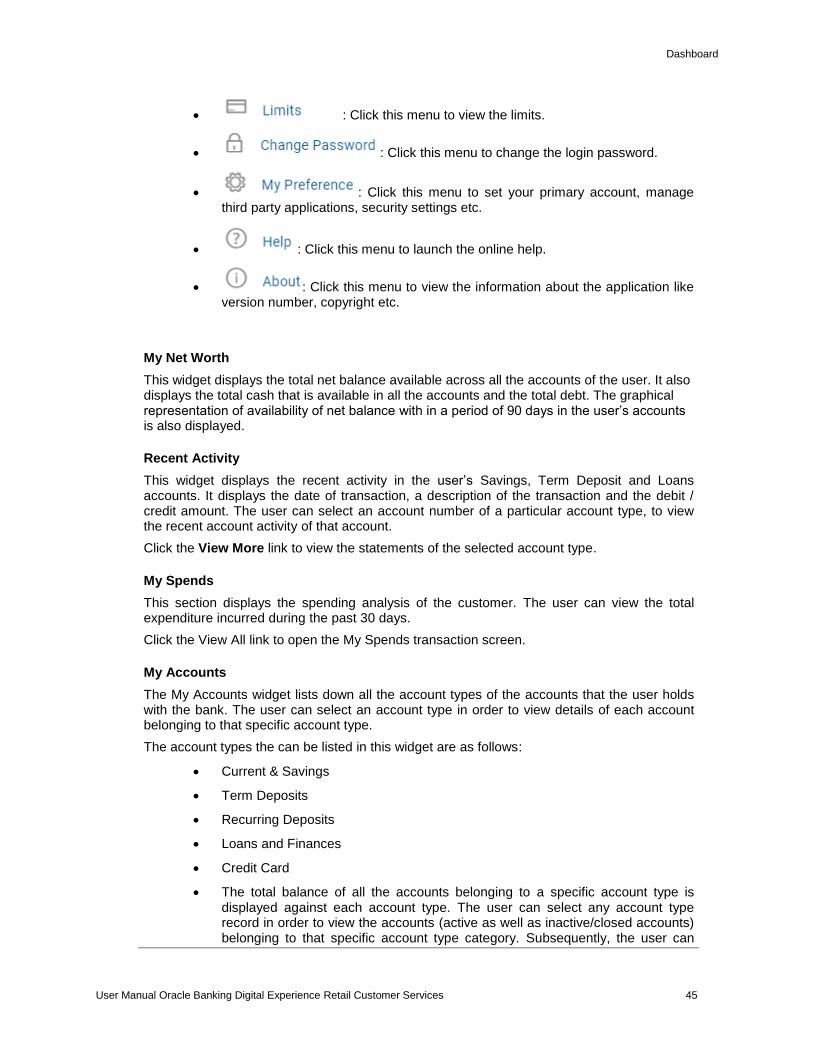
: Click this menu to view the limits.
: Click this menu to change the login password.
: Click this menu to set your primary account, manage third party applications, security settings etc.
: Click this menu to launch the online help.
: Click this menu to view the information about the application like version number, copyright etc.
My Net Worth
This widget displays the total net balance available across all the accounts of the user. It also displays the total cash that is available in all the accounts and the total debt. The graphical representation of availability of net balance with in a period of 90 days in the user’s accounts is also displayed.
Recent Activity
This widget displays the recent activity in the user’s Savings, Term Deposit and Loans accounts. It displays the date of transaction, a description of the transaction and the debit / credit amount. The user can select an account number of a particular account type, to view the recent account activity of that account.
Click the View More link to view the statements of the selected account type.
My Spends
This section displays the spending analysis of the customer. The user can view the total expenditure incurred during the past 30 days.
Click the View All link to open the My Spends transaction screen.
My Accounts
The My Accounts widget lists down all the account types of the accounts that the user holds with the bank. The user can select an account type in order to view details of each account belonging to that specific account type.
The account types the can be listed in this widget are as follows:
Current & Savings
Term Deposits
Recurring Deposits
Loans and Finances
Credit Card
The total balance of all the accounts belonging to a specific account type is displayed against each account type. The user can select any account type record in order to view the accounts (active as well as inactive/closed accounts) belonging to that specific account type category. Subsequently, the user can
Dashboard
User Manual Oracle Banking Digital Experience Retail Customer Services 46
also select an individual account to view details of the account or to perform transactions using that account.
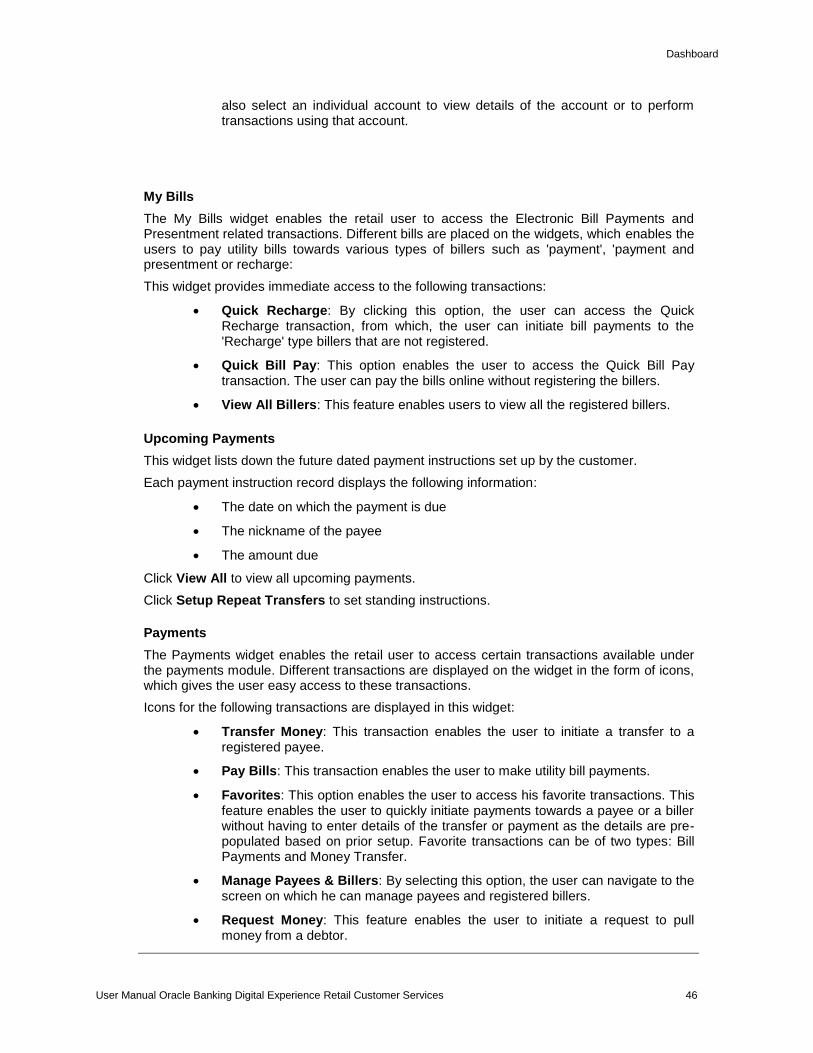
My Bills
The My Bills widget enables the retail user to access the Electronic Bill Payments and Presentment related transactions. Different bills are placed on the widgets, which enables the users to pay utility bills towards various types of billers such as 'payment', 'payment and presentment or recharge:
This widget provides immediate access to the following transactions:
Quick Recharge: By clicking this option, the user can access the Quick Recharge transaction, from which, the user can initiate bill payments to the 'Recharge' type billers that are not registered.
Quick Bill Pay: This option enables the user to access the Quick Bill Pay transaction. The user can pay the bills online without registering the billers.
View All Billers: This feature enables users to view all the registered billers.
Upcoming Payments
This widget lists down the future dated payment instructions set up by the customer.
Each payment instruction record displays the following information:
The date on which the payment is due
The nickname of the payee
The amount due
Click View All to view all upcoming payments.
Click Setup Repeat Transfers to set standing instructions.
Payments
The Payments widget enables the retail user to access certain transactions available under the payments module. Different transactions are displayed on the widget in the form of icons, which gives the user easy access to these transactions.
Icons for the following transactions are displayed in this widget:
Transfer Money: This transaction enables the user to initiate a transfer to a registered payee.
Pay Bills: This transaction enables the user to make utility bill payments.
Favorites: This option enables the user to access his favorite transactions. This feature enables the user to quickly initiate payments towards a payee or a biller without having to enter details of the transfer or payment as the details are pre-populated based on prior setup. Favorite transactions can be of two types: Bill Payments and Money Transfer.
Manage Payees & Billers: By selecting this option, the user can navigate to the screen on which he can manage payees and registered billers.
Request Money: This feature enables the user to initiate a request to pull money from a debtor.
Dashboard
User Manual Oracle Banking Digital Experience Retail Customer Services 47
View Repeat Transfers: This transaction enables the user to view and setup repeat transfers. All customer payments, that are periodic in nature, can be set-up and managed here.
Service Requests
The service requests widget displays the number of open service requests initiated by the customer as well as the service requests that are recently closed. The customer can raise a new request and track the status of open service requests.
Notifications
The notification widget enables the user to view the notifications sent by the bank. Click View All to view all the notifications sent by the bank.
My Advisors
This widget displays the names and contact details of the user’s relationship managers.
Offers
Any offers and rewards as hosted by the bank will be shown in this section of the dashboard.
Promotions
This section of the dashboard displays promotional messages of any bank offerings applicable to the customer.
Home
Forgot Password
User Manual Oracle Banking Digital Experience Retail Customer Services 48
9. Forgot Password
The login password is the password using which the user can log into the internet banking platform. The user cannot access his bank accounts without this password. The Forgot Password feature enables users to reset their login password.
The user is required to enter his User ID and Date of Birth. His identity is validated through the 2factor authentication process, post which, the user can setup a new login password for channel access.
Pre-requisites
The user must have valid login credentials to access the digital banking platform.
The system administrator must have setup 2 factor authentication for Forgot Password.
Features Supported In the Application
User Verification
New Password Creation
How to reach here:
Portal > Forgot Password
To reset the password:
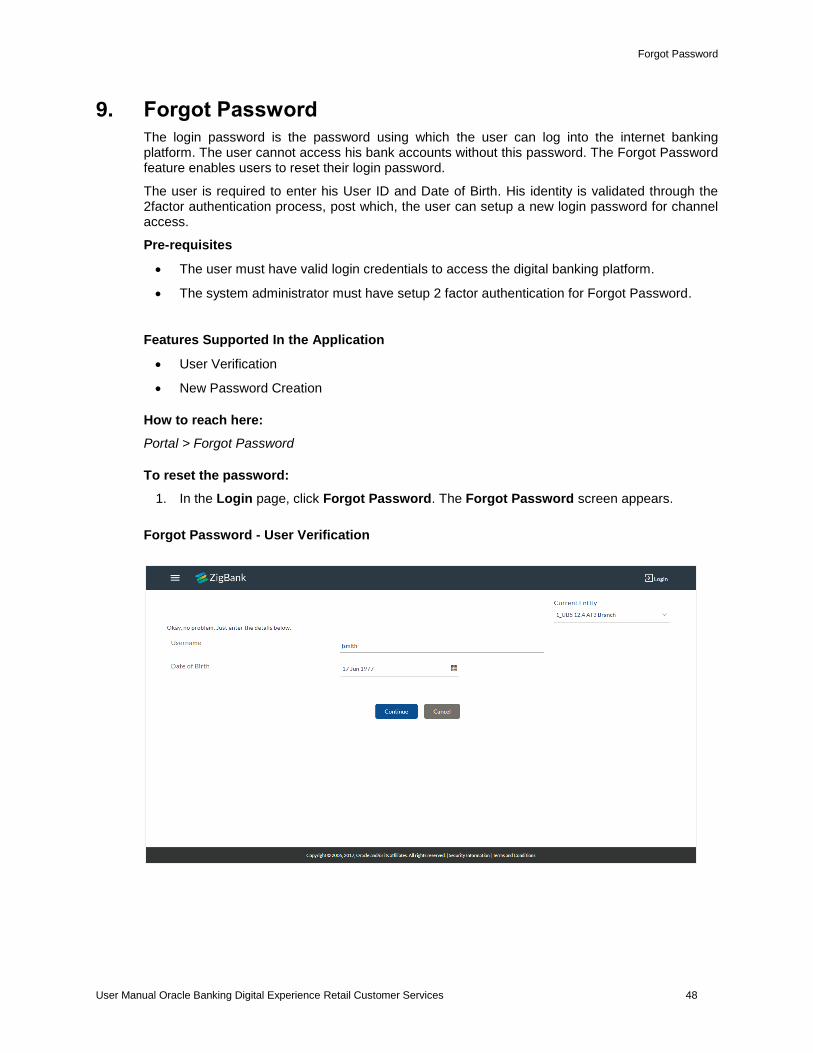
1. In the Login page, click Forgot Password. The Forgot Password screen appears.
Forgot Password - User Verification
Forgot Password
User Manual Oracle Banking Digital Experience Retail Customer Services 49
Field Description
Field Name Description
Username Enter your login username.
Date of birth Enter your date of birth.
2. In the Username field, enter your login username.
3. In Date of birth field, enter your date of birth.
4. Click Continue. OR Click Cancel to cancel the transaction.
5. The Verification screen appears. The user has to pass the 2factor authentication, before he can proceed. 2 factor authentication (OTP/Security question/Soft Token) will be as per the setup done by the system administrator.
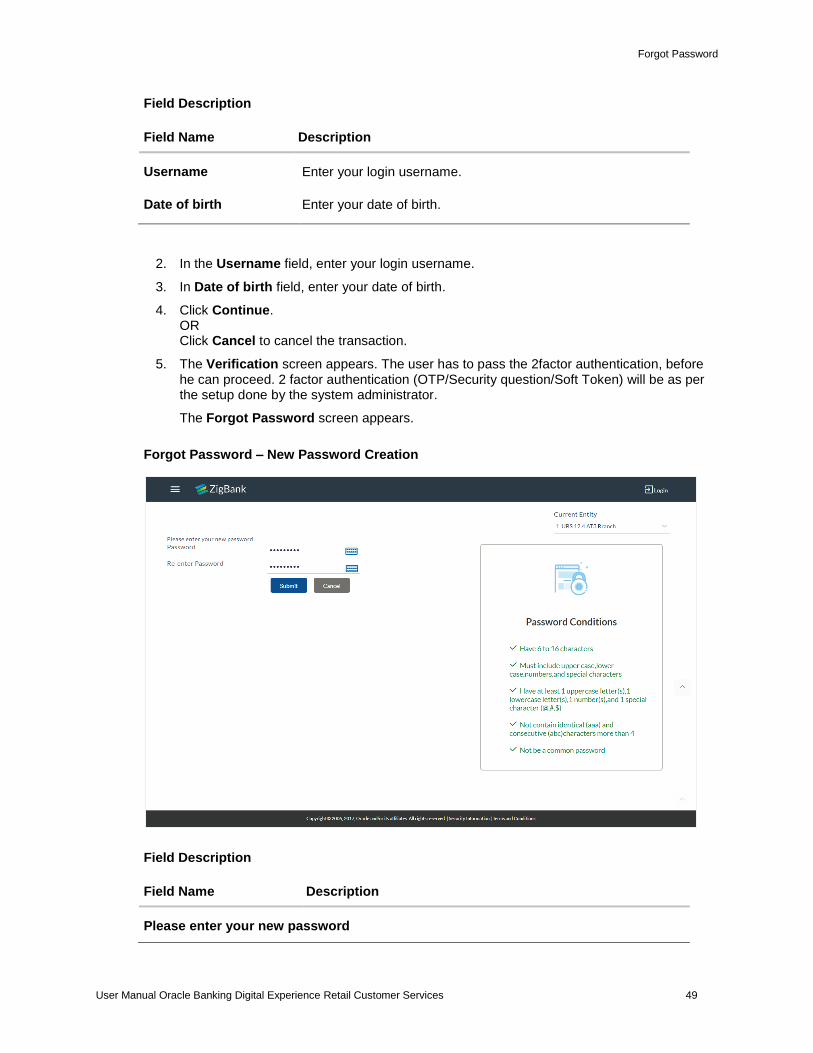
The Forgot Password screen appears.
Forgot Password – New Password Creation
Field Description
Field Name Description
Please enter your new password
Forgot Password
User Manual Oracle Banking Digital Experience Retail Customer Services 50
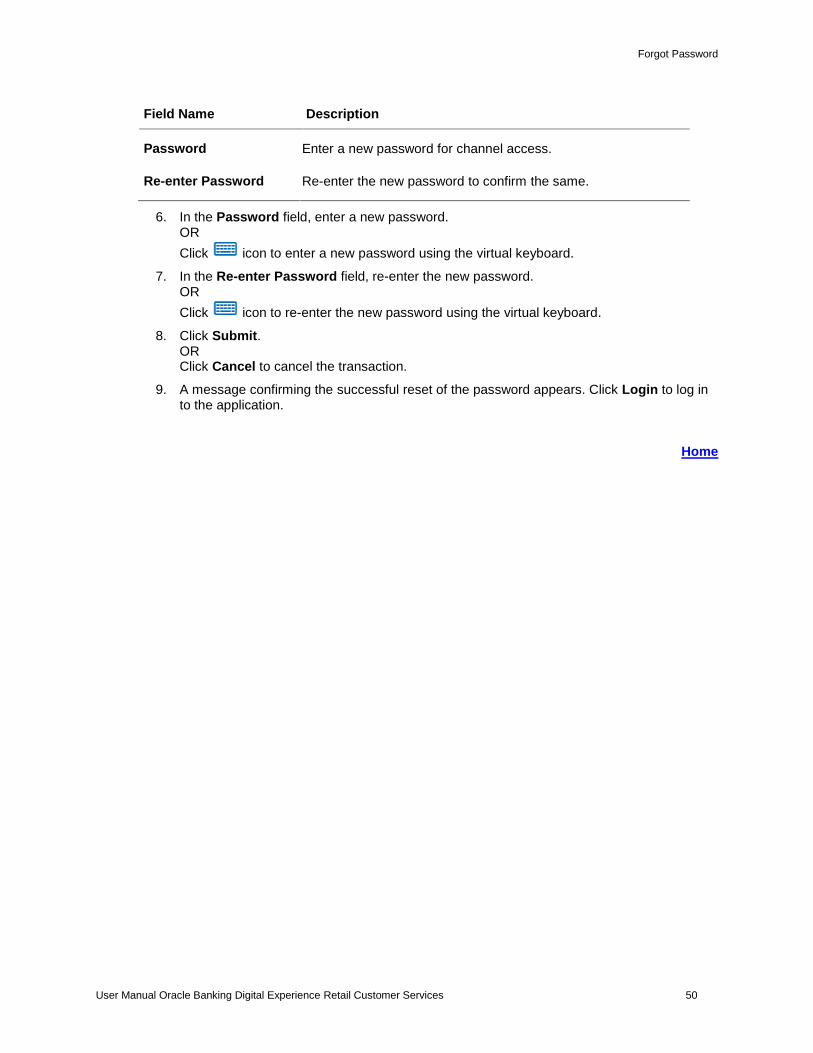
Field Name Description
Password Enter a new password for channel access.
Re-enter Password Re-enter the new password to confirm the same.
6. In the Password field, enter a new password. OR
Click icon to enter a new password using the virtual keyboard.
7. In the Re-enter Password field, re-enter the new password. OR
Click icon to re-enter the new password using the virtual keyboard.
8. Click Submit. OR Click Cancel to cancel the transaction.
9. A message confirming the successful reset of the password appears. Click Login to log in to the application.
Home
Forgot Username
User Manual Oracle Banking Digital Experience Retail Customer Services 51
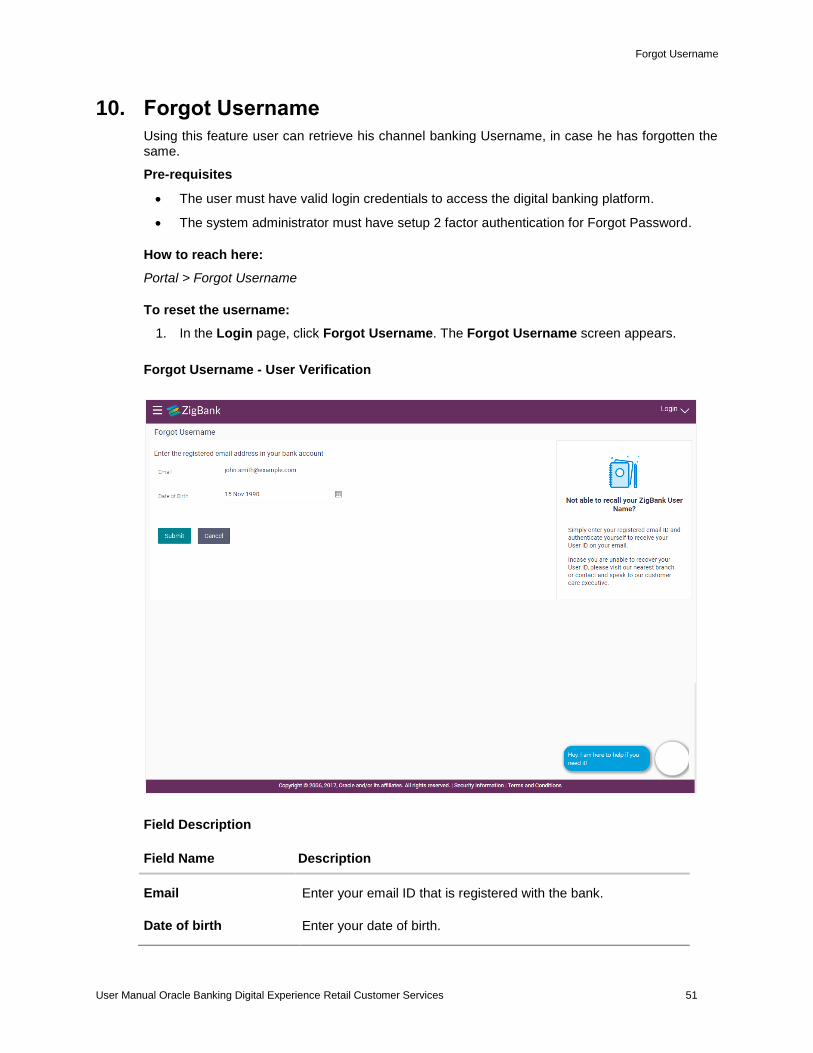
10. Forgot Username
Using this feature user can retrieve his channel banking Username, in case he has forgotten the same.
Pre-requisites
The user must have valid login credentials to access the digital banking platform.
The system administrator must have setup 2 factor authentication for Forgot Password.
How to reach here:
Portal > Forgot Username
To reset the username:
1. In the Login page, click Forgot Username. The Forgot Username screen appears.
Forgot Username - User Verification
Field Description
Field Name Description
Email Enter your email ID that is registered with the bank.
Date of birth Enter your date of birth.
Forgot Username
User Manual Oracle Banking Digital Experience Retail Customer Services 52
2. In the Email field, enter your email ID that is registered with the bank.
3. In Date of birth field, enter your date of birth.
4. Click Submit. OR Click Cancel to cancel the transaction.
5. The Verification screen appears if the transaction is configured for 2 Factor Authentication.
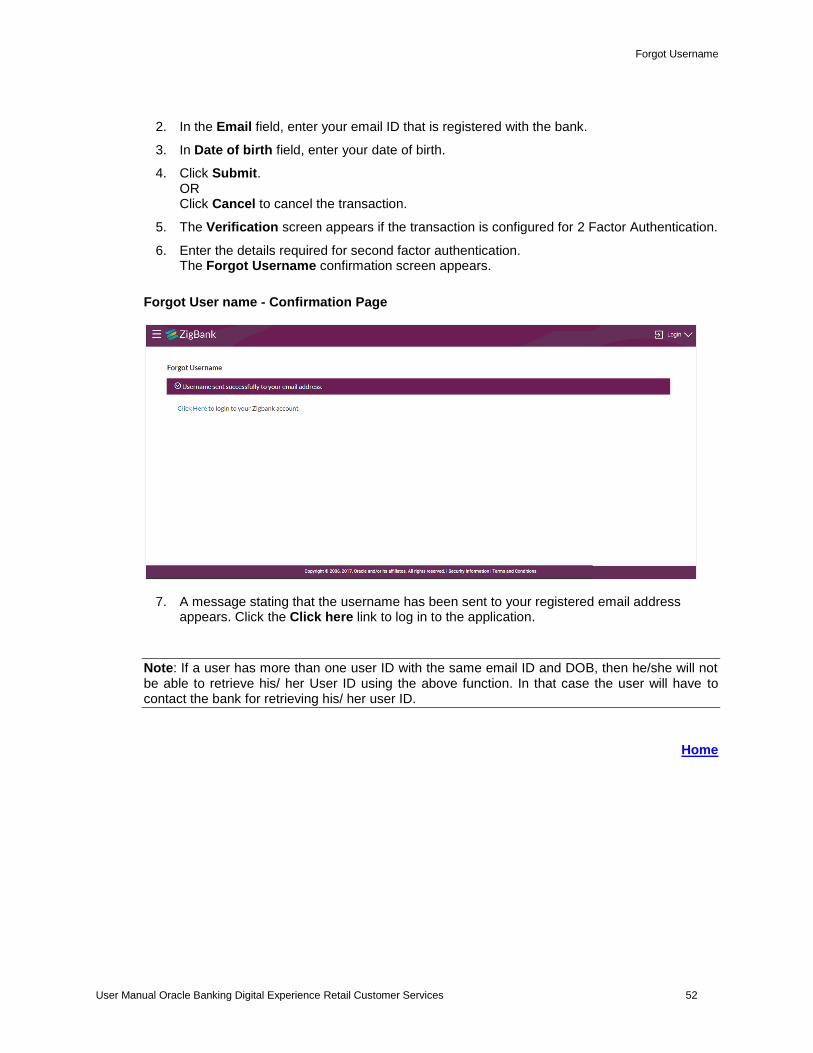
6. Enter the details required for second factor authentication. The Forgot Username confirmation screen appears.
Forgot User name - Confirmation Page
7. A message stating that the username has been sent to your registered email address appears. Click the Click here link to log in to the application.
Note: If a user has more than one user ID with the same email ID and DOB, then he/she will not be able to retrieve his/ her User ID using the above function. In that case the user will have to contact the bank for retrieving his/ her user ID.
Home
FATCA & CRS Form
User Manual Oracle Banking Digital Experience Retail Customer Services 53
11. FATCA & CRS Form
The Foreign Account Tax Compliance Act (FATCA) is a United States federal law that was introduced to enable the Internal Revenue Service (IRS) to obtain detailed account information of US tax payers that invest and earn income through non U.S. institutions.
The Common Reporting Standard (CRS), is a global reporting standard developed by the Organization for Economic Cooperation and Development (OECD). This information standard was brought into effect for the purpose of combatting tax evasion at a global level.
The goal of both FATCA and CRS is to enable tax authorities to obtain information pertaining to the financial assets held by their citizens in foreign or overseas financial institutions, thereby greatly strengthening global tax compliance.
The FATCA and CRS Self – Certification Forms for Individuals and Entities has been created so as to capture required information for the purposes of complying with both FATCA and CRS.
A FATCA & CRS check is maintained under system configurations by the system administrator to identify if FATCA & CRS is to be enabled or not. If enabled, every time a business user logs into the banking application, the system will identify whether the user is required to fill out the form or not and further identify the type of form to be provided to the user based on the type of user. Individuals and sole proprietors will be displayed the FATCA & CRS Self – Certification form for Individuals and Corporates and other business entities will be displayed the FATCA & CRS Self – Certification form for Entities. Moreover, the FATCA & CRS Self – Certification from for Entities will be made available only to users that are accessing the online banking services of the entities in the capacity of trustees, sole owners or authorized signatories.
This section documents the information captured in the FATCA & CRS Self – Certification forms for both Individuals and Entities.
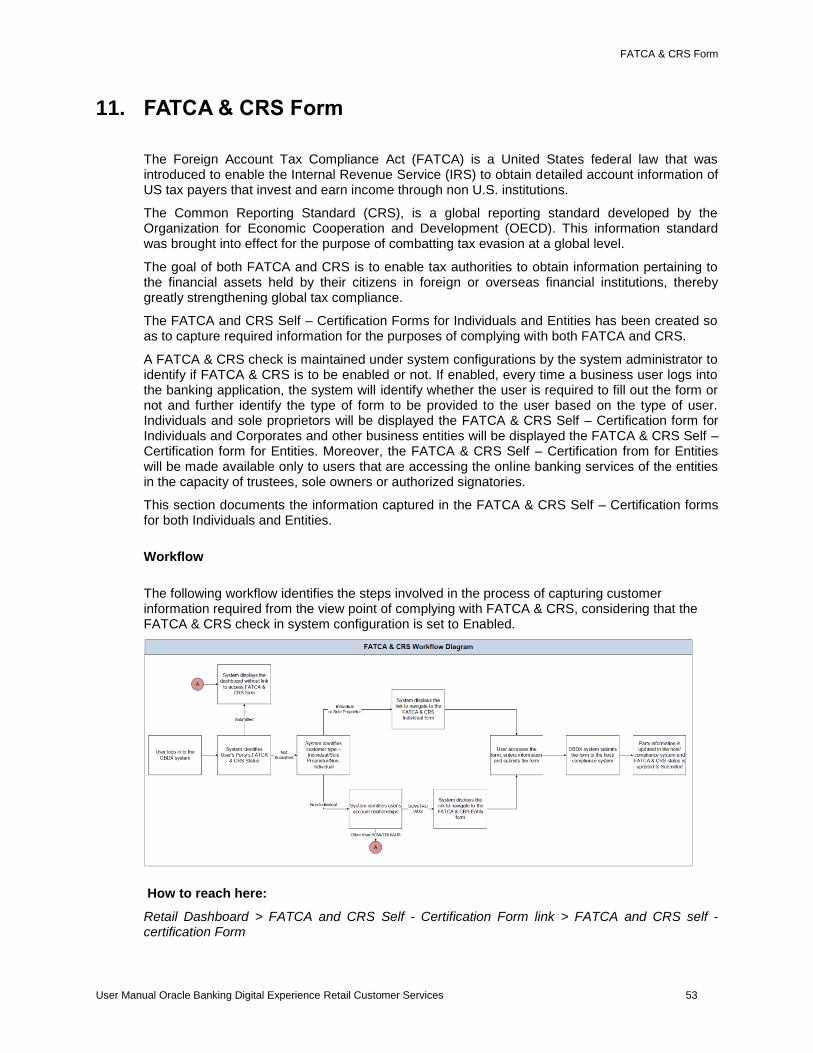
Workflow
The following workflow identifies the steps involved in the process of capturing customer information required from the view point of complying with FATCA & CRS, considering that the FATCA & CRS check in system configuration is set to Enabled.
How to reach here:
Retail Dashboard > FATCA and CRS Self - Certification Form link > FATCA and CRS self - certification Form
FATCA & CRS Form
User Manual Oracle Banking Digital Experience Retail Customer Services 54
11.1 FATCA & CRS Self - Certification Form for Individuals
The FATCA and CRS – Self Certification form for Individuals is displayed to those users that are required to fill out the FATCA and CRS form and are either individuals or sole proprietors. The sections that consist of this form are documented as follows:
To fill the FATCA & CRS Self - Certification Form for individuals:
1. Select the FATCA & CRS link displayed as part of a message on the dashboard. The FATCA & CRS Self - Certification Form for Individuals appears.
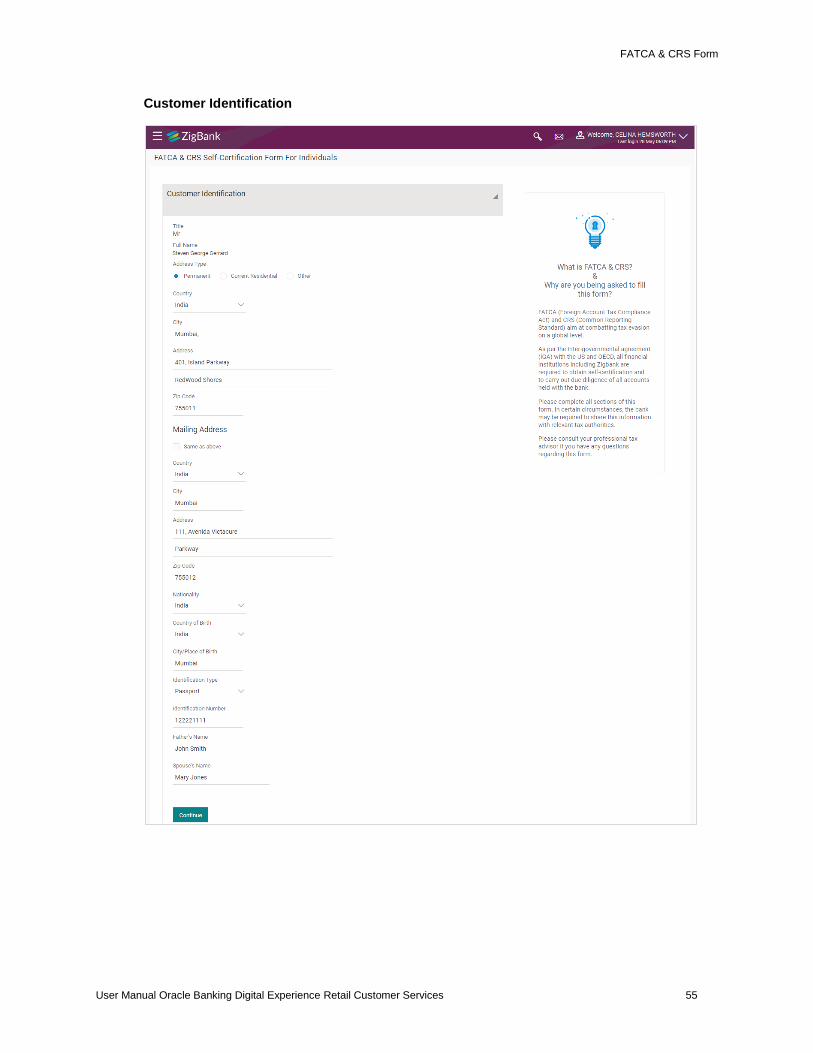
11.1.2 Customer Identification
In this section, enter basic personal details that includes your name, primary address, identification information, etc.
FATCA & CRS Form
User Manual Oracle Banking Digital Experience Retail Customer Services 55
Customer Identification
FATCA & CRS Form
User Manual Oracle Banking Digital Experience Retail Customer Services 56
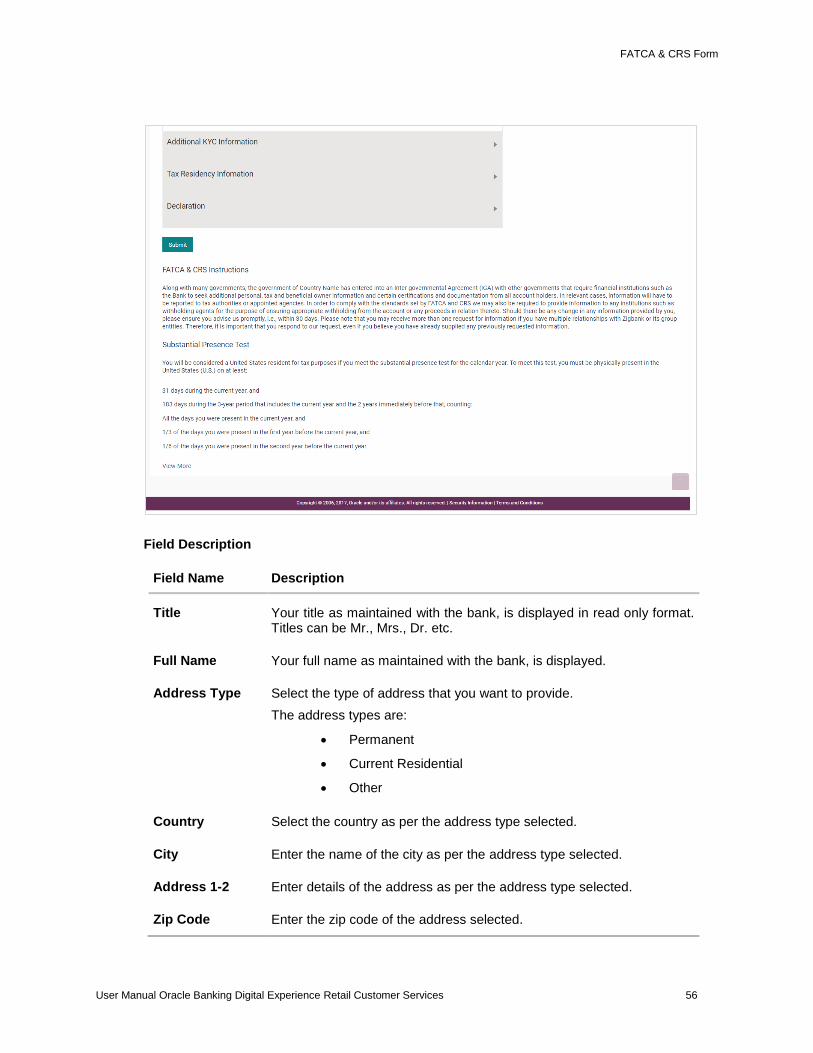
Field Description
Field Name Description
Title Your title as maintained with the bank, is displayed in read only format. Titles can be Mr., Mrs., Dr. etc.
Full Name Your full name as maintained with the bank, is displayed.
Address Type Select the type of address that you want to provide.
The address types are:
Permanent
Current Residential
Other
Country Select the country as per the address type selected.
City Enter the name of the city as per the address type selected.
Address 1-2 Enter details of the address as per the address type selected.
Zip Code Enter the zip code of the address selected.
FATCA & CRS Form
User Manual Oracle Banking Digital Experience Retail Customer Services 57
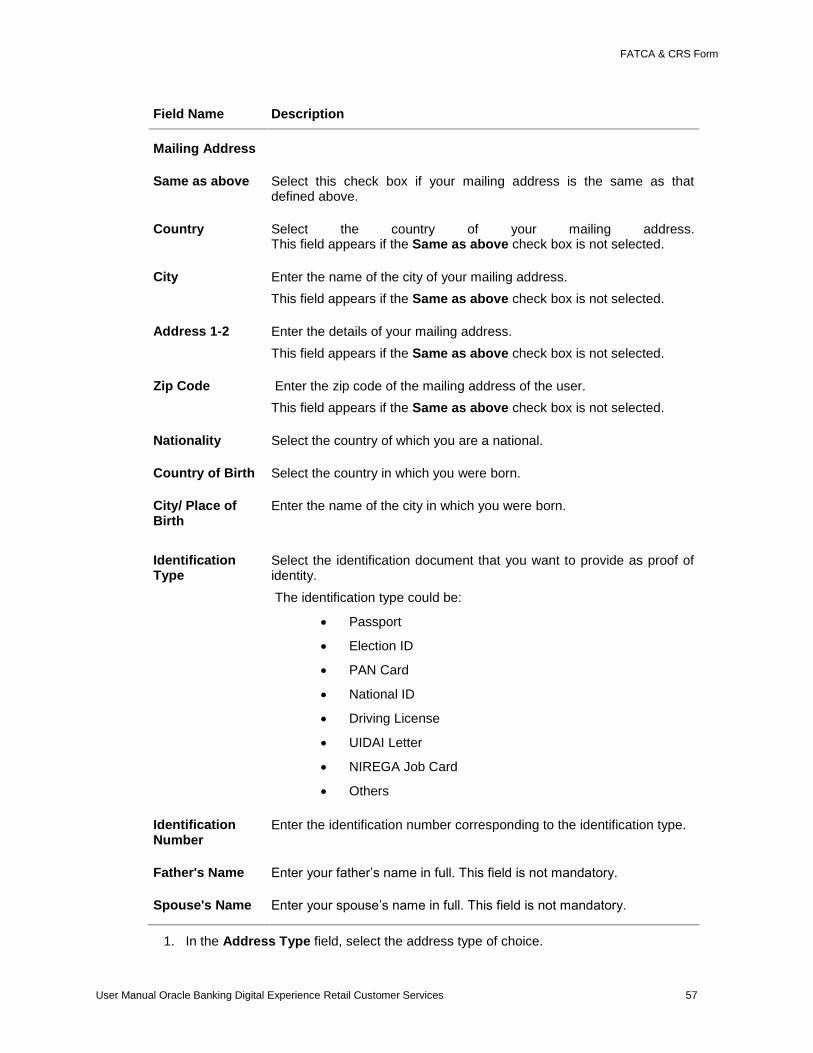
Field Name Description
Mailing Address
Same as above Select this check box if your mailing address is the same as that defined above.
Country Select the country of your mailing address. This field appears if the Same as above check box is not selected.
City Enter the name of the city of your mailing address.
This field appears if the Same as above check box is not selected.
Address 1-2 Enter the details of your mailing address.
This field appears if the Same as above check box is not selected.
Zip Code Enter the zip code of the mailing address of the user.
This field appears if the Same as above check box is not selected.
Nationality Select the country of which you are a national.
Country of Birth Select the country in which you were born.
City/ Place of Birth
Enter the name of the city in which you were born.
Identification Type
Select the identification document that you want to provide as proof of identity.
The identification type could be:
Passport
Election ID
PAN Card
National ID
Driving License
UIDAI Letter
NIREGA Job Card
Others
Identification Number
Enter the identification number corresponding to the identification type.
Father's Name Enter your father’s name in full. This field is not mandatory.
Spouse's Name Enter your spouse’s name in full. This field is not mandatory.
1. In the Address Type field, select the address type of choice.
FATCA & CRS Form
User Manual Oracle Banking Digital Experience Retail Customer Services 58
2. If you select the option Other, enter the type of address being defined in the Other Address field.
3. From the Country and City lists, select the country and city as per the Address Type specified.
4. In the Address and ZIP Code fields, enter the address and zip code as per the Address Type specified.
5. Select the Same as Above check box, if your mailing address is the same as the address specified as primary address , else specify details of your mailing address.
6. From the Nationality list, select the country in which you are a national.
7. From the Country of Birth and City/ Place of Birth lists, select the country and city in which you were born.
8. From the Identification Type list, select the identification document that you want to provide as proof of identification.
9. In the Identification Number field, enter the identification number as per the identification type selected.
10. In the Father’s Name field, enter the name of your father in full.
11. In the Spouse’s Name field, enter the name of your Spouse in full.
12. Click Continue. The Additional KYC Information section appears.
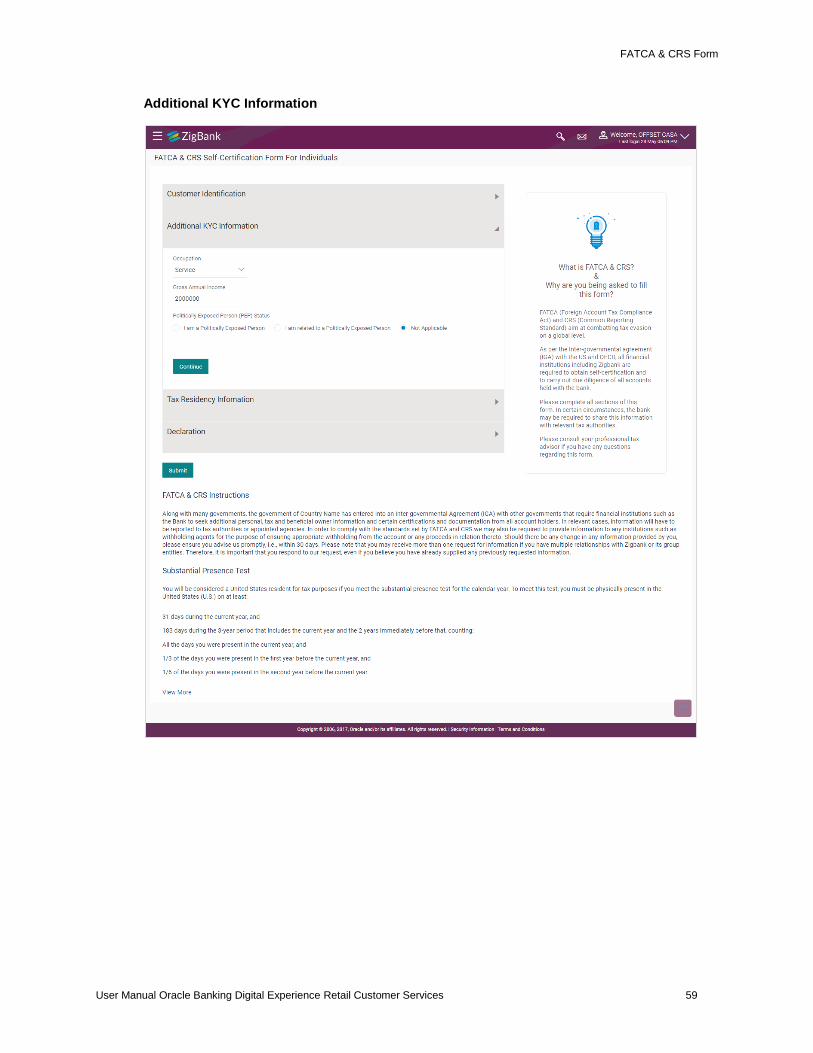
11.1.3 Additional KYC Information
In this section, specify information pertaining to your occupation and income. You are also required to specify whether you are a politically exposed person or are related to a politically exposed person.
FATCA & CRS Form
User Manual Oracle Banking Digital Experience Retail Customer Services 59
Additional KYC Information
FATCA & CRS Form
User Manual Oracle Banking Digital Experience Retail Customer Services 60
Field Description
Field Name Description
Occupation Select the type of occupation that best describes your current or most recent job.
The types are:
Service
Business
Others
Gross Annual Income Enter your gross annual income that you earn from all sources, in this field.
Politically Exposed Person(PEP) Status
Specify your status with regards to being a politically exposed person or being related to a politically exposed person.
The options are:
I am a Politically Exposed Person
I am related to a Politically Exposed Person
Not Applicable – Select this option if you are neither a PEP nor related to a PEP
1. From the Occupation list, select the type of occupation that best describes your current or most recent job.
2. In the Gross Annual Income field, enter the amount you earn as gross annual income.
3. In the Politically Exposed Person (PEP) Status field, select the option applicable to you.
4. Click Continue. The Tax Residency Information section appears.
11.1.4 Tax Residency Information
This section enables you to specify information about your tax residency. You are required to identify the countries in which you are considered a tax resident and also specify information pertaining to your relationship with the United States of America.

FATCA & CRS Form
User Manual Oracle Banking Digital Experience Retail Customer Services 61
Tax Residency Information
FATCA & CRS Form
User Manual Oracle Banking Digital Experience Retail Customer Services 62
Field Description
Field Name Description
Was the Entity established in a country other than <Name of Country>? (Applicable to Sole Proprietors only)
This field is applicable to sole proprietors only. Specify whether the entity was established in the country or in another country.
The options are:
Yes – Select this option to identify that the entity was established in a country other than the country in which your accounts are held.
No – Select this option to identify that the entity was established in the country in which your accounts are held.
Are you a tax resident of any country other than <Name of Country>?
Specify whether you are a tax resident of country other than the country in which your accounts are held.
The options are:
Yes – Select this option to identify that you are a tax resident of a country/countries other than the one in which your accounts are held.
No – Select this option to identify that you are not a tax resident of any country other than the country in which your accounts are held.
The following fields are enabled if you have selected the option Yes in either of the two fields above.
Country of Tax Residence Select the country in which you are considered a tax resident.
TIN Available Specify whether your Taxpayer Identification Number (TIN) of the country in which you are a tax resident, is available or not.
The options are:
Yes – Select this option if your TIN for the country selected in the Country of Tax Residence field is available.
No – Select this option if you do not have a TIN for the country selected in the Country of Tax Residence field.
Tax Identification Type Select your TIN type from the list. The values in this list are populated based on the Identification documents that are accepted as TINs in the country that you have selected as Country of Tax Residence.
This field appears if you have selected the option Yes against the TIN Available field.
FATCA & CRS Form
User Manual Oracle Banking Digital Experience Retail Customer Services 63
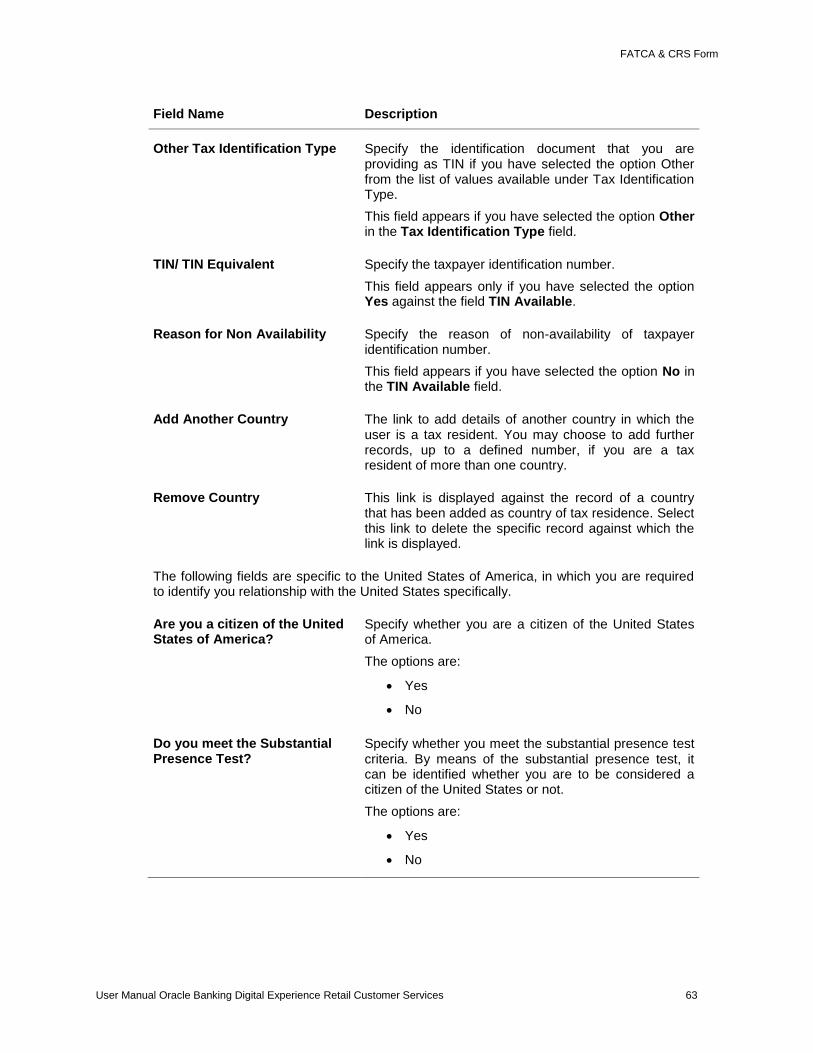
Field Name Description
Other Tax Identification Type Specify the identification document that you are providing as TIN if you have selected the option Other from the list of values available under Tax Identification Type.
This field appears if you have selected the option Other in the Tax Identification Type field.
TIN/ TIN Equivalent Specify the taxpayer identification number.
This field appears only if you have selected the option Yes against the field TIN Available.
Reason for Non Availability Specify the reason of non-availability of taxpayer identification number.
This field appears if you have selected the option No in the TIN Available field.
Add Another Country The link to add details of another country in which the user is a tax resident. You may choose to add further records, up to a defined number, if you are a tax resident of more than one country.
Remove Country This link is displayed against the record of a country that has been added as country of tax residence. Select this link to delete the specific record against which the link is displayed.
The following fields are specific to the United States of America, in which you are required to identify you relationship with the United States specifically.
Are you a citizen of the United States of America?
Specify whether you are a citizen of the United States of America.
The options are:
Yes
No
Do you meet the Substantial Presence Test?
Specify whether you meet the substantial presence test criteria. By means of the substantial presence test, it can be identified whether you are to be considered a citizen of the United States or not.
The options are:
Yes
No
FATCA & CRS Form
User Manual Oracle Banking Digital Experience Retail Customer Services 64
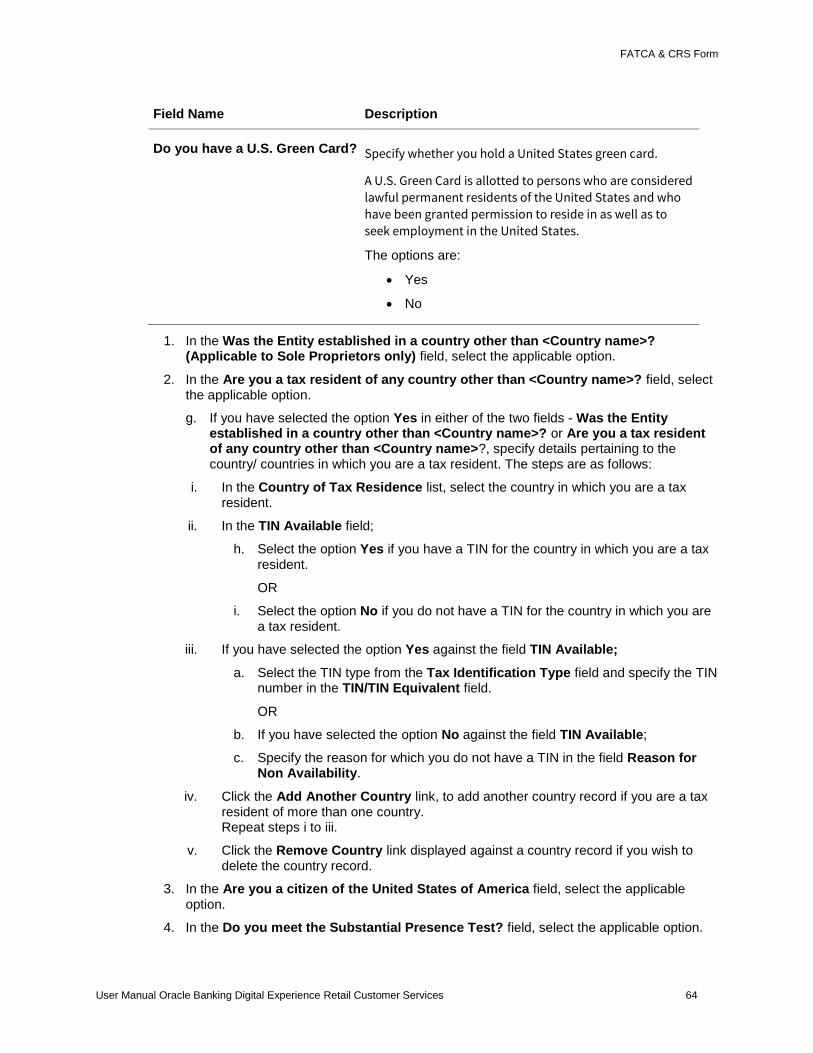
Field Name Description
Do you have a U.S. Green Card? Specify whether you hold a United States green card.
A U.S. Green Card is allotted to persons who are considered
lawful permanent residents of the United States and who
have been granted permission to reside in as well as to
seek employment in the United States.
The options are:
Yes
No
1. In the Was the Entity established in a country other than <Country name>? (Applicable to Sole Proprietors only) field, select the applicable option.
2. In the Are you a tax resident of any country other than <Country name>? field, select the applicable option.
g. If you have selected the option Yes in either of the two fields - Was the Entity established in a country other than <Country name>? or Are you a tax resident of any country other than <Country name>?, specify details pertaining to the country/ countries in which you are a tax resident. The steps are as follows:
i. In the Country of Tax Residence list, select the country in which you are a tax resident.
ii. In the TIN Available field;
h. Select the option Yes if you have a TIN for the country in which you are a tax resident.
OR
i. Select the option No if you do not have a TIN for the country in which you are a tax resident.
iii. If you have selected the option Yes against the field TIN Available;
a. Select the TIN type from the Tax Identification Type field and specify the TIN number in the TIN/TIN Equivalent field.
OR
b. If you have selected the option No against the field TIN Available;
c. Specify the reason for which you do not have a TIN in the field Reason for Non Availability.
iv. Click the Add Another Country link, to add another country record if you are a tax resident of more than one country. Repeat steps i to iii.
v. Click the Remove Country link displayed against a country record if you wish to delete the country record.
3. In the Are you a citizen of the United States of America field, select the applicable option.
4. In the Do you meet the Substantial Presence Test? field, select the applicable option.
FATCA & CRS Form
User Manual Oracle Banking Digital Experience Retail Customer Services 65
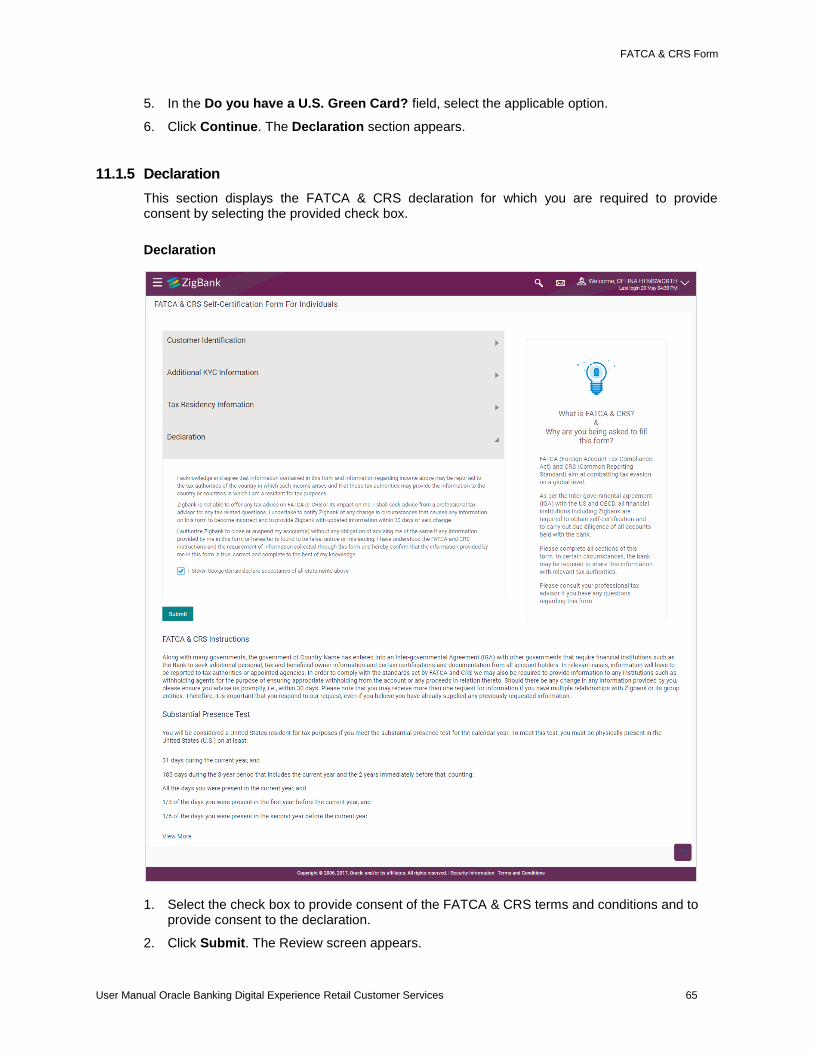
5. In the Do you have a U.S. Green Card? field, select the applicable option.
6. Click Continue. The Declaration section appears.
11.1.5 Declaration
This section displays the FATCA & CRS declaration for which you are required to provide consent by selecting the provided check box.
Declaration
1. Select the check box to provide consent of the FATCA & CRS terms and conditions and to provide consent to the declaration.
2. Click Submit. The Review screen appears.
FATCA & CRS Form
User Manual Oracle Banking Digital Experience Retail Customer Services 66
11.1.6 Review
The review screen displays all the information that you have entered in the form. You can review this information and if required, select the option to edit the information of any section. Once you have verified all the information defined in the form, you can click on the option provided to submit the form, after which the form will be submitted and the confirmation page will be displayed.
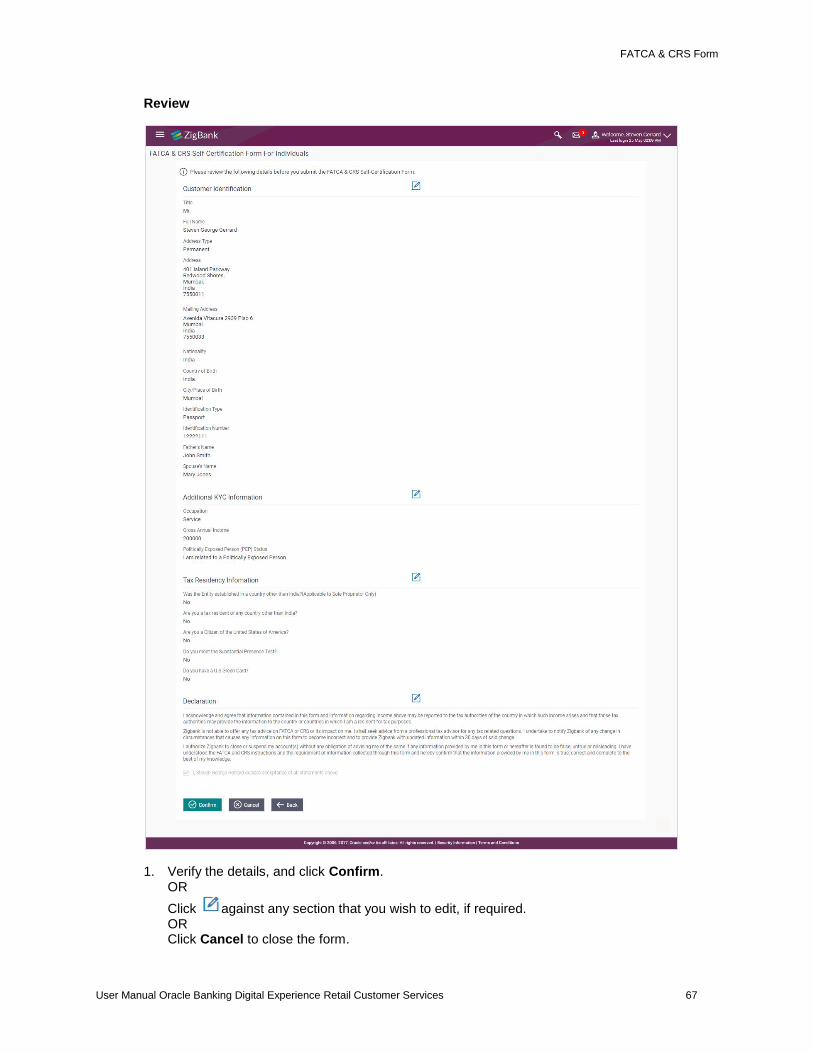
FATCA & CRS Form
User Manual Oracle Banking Digital Experience Retail Customer Services 67
Review
1. Verify the details, and click Confirm. OR
Click against any section that you wish to edit, if required. OR Click Cancel to close the form.
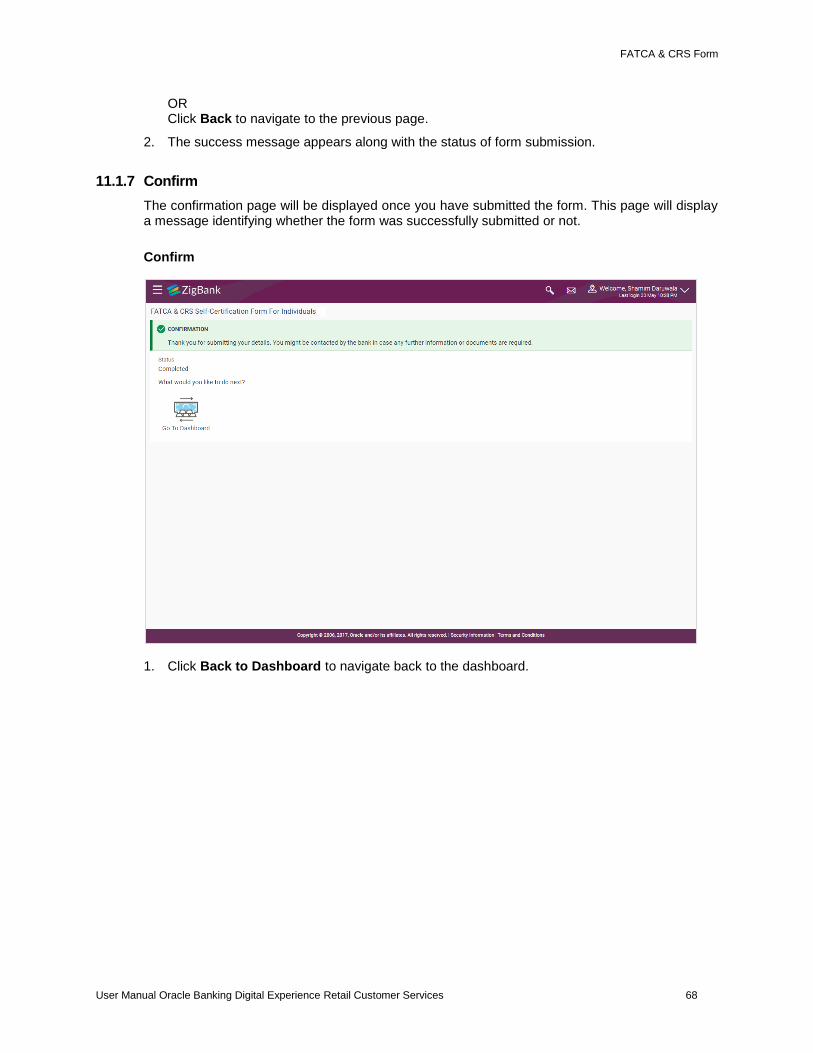
FATCA & CRS Form
User Manual Oracle Banking Digital Experience Retail Customer Services 68
OR Click Back to navigate to the previous page.
2. The success message appears along with the status of form submission.
11.1.7 Confirm
The confirmation page will be displayed once you have submitted the form. This page will display a message identifying whether the form was successfully submitted or not.
Confirm
1. Click Back to Dashboard to navigate back to the dashboard.
FATCA & CRS Form
User Manual Oracle Banking Digital Experience Retail Customer Services 69
11.2 FATCA and CRS Self - Certification Form for Entities
The FATCA & CRS Self – Certification from for Entities is made available to users that are accessing the online banking services of the entities or companies in the capacity of trustees, sole owners or authorized signatories.
The sections that consist of this form are documented as follows:
To fill the FATCA & CRS Self - Certification Form for Entities:
1. Select the FATCA & CRS link displayed as part of a message on the dashboard.
2. The FATCA & CRS Self - Certification Form for Entities appears.
11.2.2 Identification of the Entity
In this section, basic details of the entity are captured such as the name and address details of the entity.
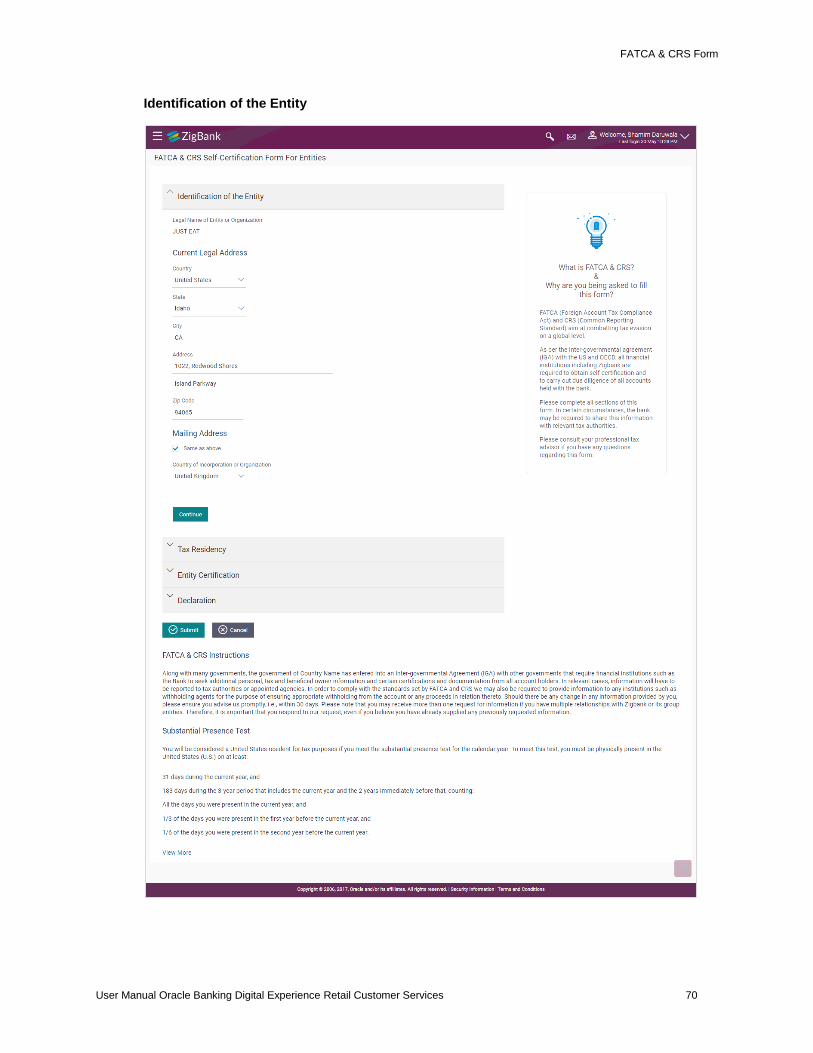
FATCA & CRS Form
User Manual Oracle Banking Digital Experience Retail Customer Services 70
Identification of the Entity
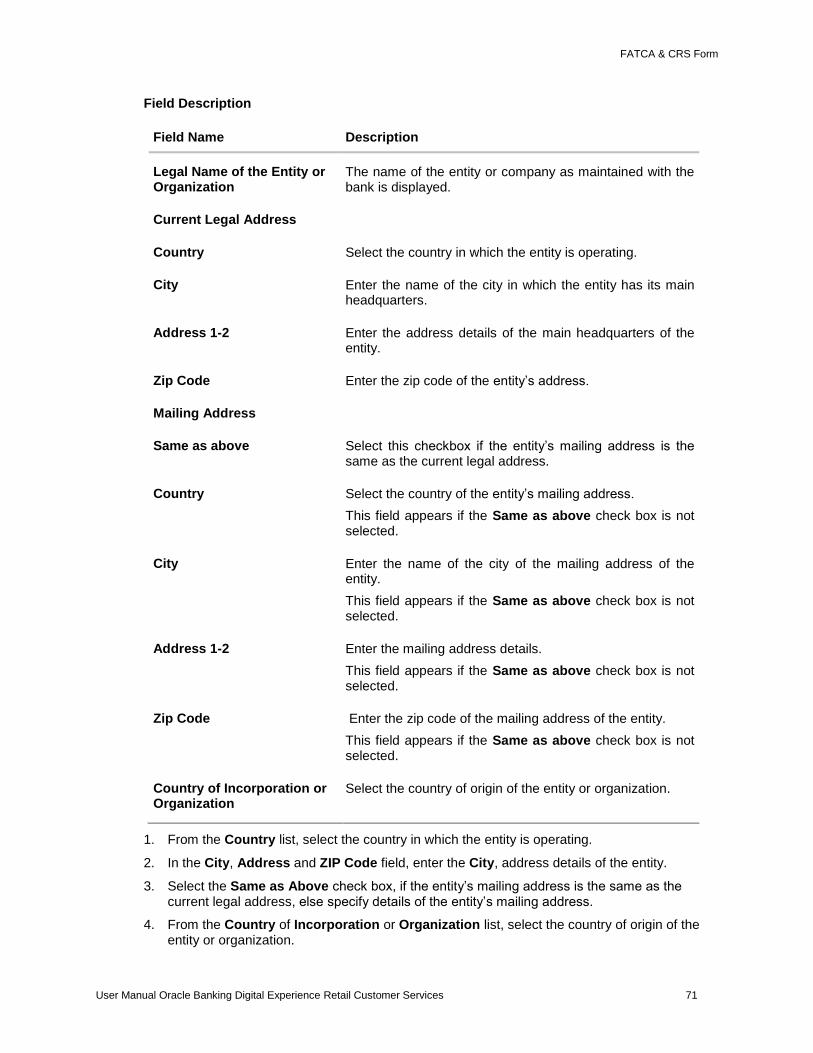
FATCA & CRS Form
User Manual Oracle Banking Digital Experience Retail Customer Services 71
Field Description
Field Name Description
Legal Name of the Entity or Organization
The name of the entity or company as maintained with the bank is displayed.
Current Legal Address
Country Select the country in which the entity is operating.
City Enter the name of the city in which the entity has its main headquarters.
Address 1-2 Enter the address details of the main headquarters of the entity.
Zip Code Enter the zip code of the entity’s address.
Mailing Address
Same as above Select this checkbox if the entity’s mailing address is the same as the current legal address.
Country Select the country of the entity’s mailing address.
This field appears if the Same as above check box is not selected.
City Enter the name of the city of the mailing address of the entity.
This field appears if the Same as above check box is not selected.
Address 1-2 Enter the mailing address details.
This field appears if the Same as above check box is not selected.
Zip Code Enter the zip code of the mailing address of the entity.
This field appears if the Same as above check box is not selected.
Country of Incorporation or Organization
Select the country of origin of the entity or organization.
1. From the Country list, select the country in which the entity is operating.
2. In the City, Address and ZIP Code field, enter the City, address details of the entity.
3. Select the Same as Above check box, if the entity’s mailing address is the same as the current legal address, else specify details of the entity’s mailing address.
4. From the Country of Incorporation or Organization list, select the country of origin of the entity or organization.

FATCA & CRS Form
User Manual Oracle Banking Digital Experience Retail Customer Services 72
5. Click Continue. The Tax Residency section appears.
11.2.3 Tax Residency
This section captures information pertaining to the tax residency of the entity. You are required to specify whether the entity can be considered as a tax resident of any country other than the country in which its accounts are held and subsequently specify details pertaining to the countries in which the entity is a tax resident. Information specific to the entity’s operations in the United States is also captured in this section.
Tax Residency
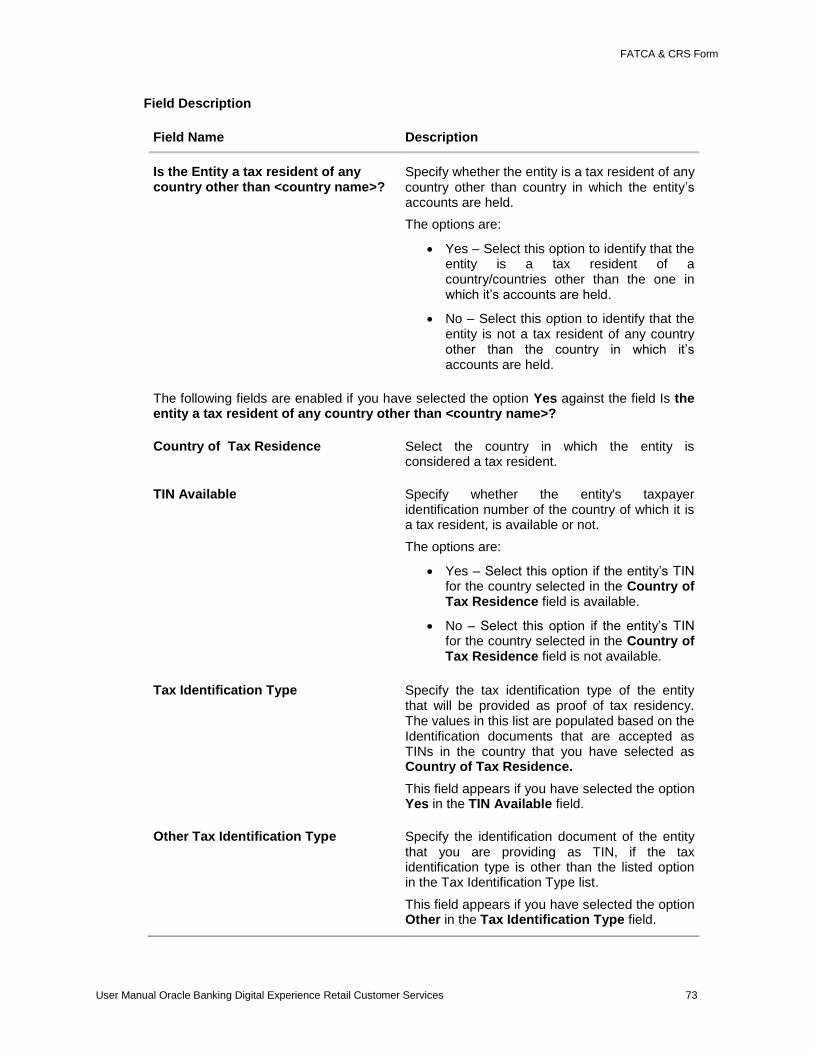
FATCA & CRS Form
User Manual Oracle Banking Digital Experience Retail Customer Services 73
Field Description
Field Name Description
Is the Entity a tax resident of any country other than <country name>?
Specify whether the entity is a tax resident of any country other than country in which the entity’s accounts are held.
The options are:
Yes – Select this option to identify that the entity is a tax resident of a country/countries other than the one in which it’s accounts are held.
No – Select this option to identify that the entity is not a tax resident of any country other than the country in which it’s accounts are held.
The following fields are enabled if you have selected the option Yes against the field Is the entity a tax resident of any country other than <country name>?
Country of Tax Residence Select the country in which the entity is considered a tax resident.
TIN Available Specify whether the entity's taxpayer identification number of the country of which it is a tax resident, is available or not.
The options are:
Yes – Select this option if the entity’s TIN for the country selected in the Country of Tax Residence field is available.
No – Select this option if the entity’s TIN for the country selected in the Country of Tax Residence field is not available.
Tax Identification Type Specify the tax identification type of the entity that will be provided as proof of tax residency. The values in this list are populated based on the Identification documents that are accepted as TINs in the country that you have selected as Country of Tax Residence.
This field appears if you have selected the option Yes in the TIN Available field.
Other Tax Identification Type Specify the identification document of the entity that you are providing as TIN, if the tax identification type is other than the listed option in the Tax Identification Type list.
This field appears if you have selected the option Other in the Tax Identification Type field.
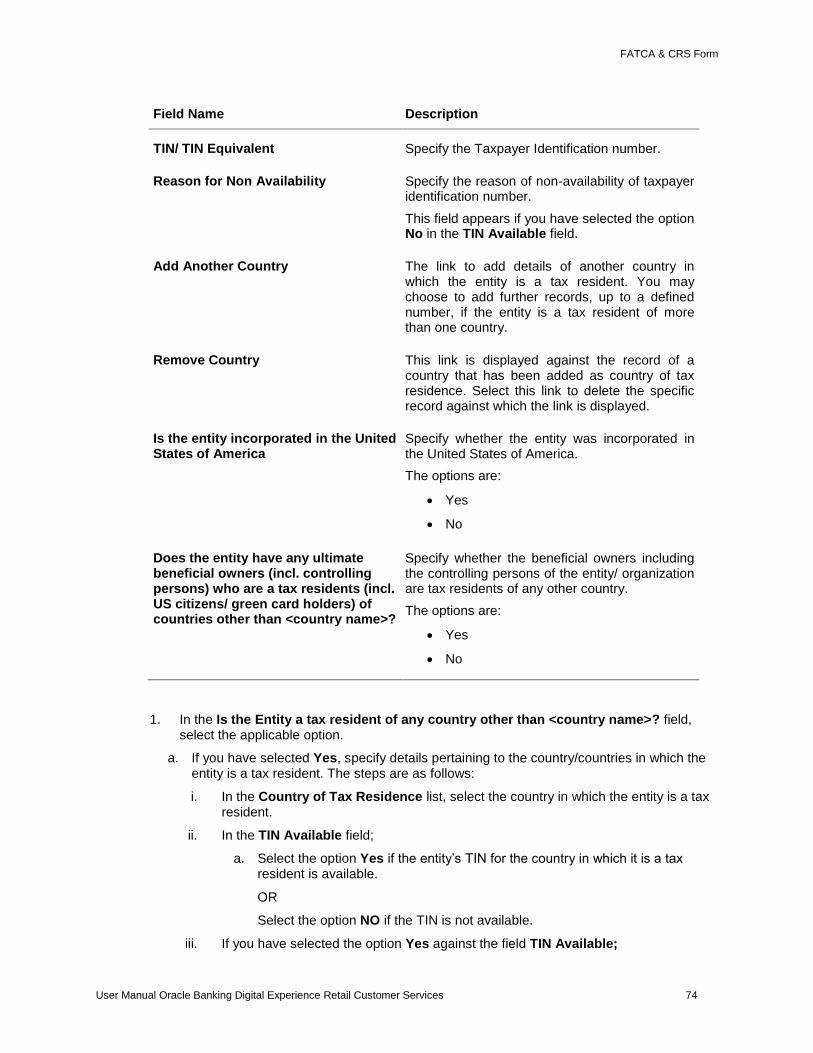
FATCA & CRS Form
User Manual Oracle Banking Digital Experience Retail Customer Services 74
Field Name Description
TIN/ TIN Equivalent Specify the Taxpayer Identification number.
Reason for Non Availability Specify the reason of non-availability of taxpayer identification number.
This field appears if you have selected the option No in the TIN Available field.
Add Another Country The link to add details of another country in which the entity is a tax resident. You may choose to add further records, up to a defined number, if the entity is a tax resident of more than one country.
Remove Country This link is displayed against the record of a country that has been added as country of tax residence. Select this link to delete the specific record against which the link is displayed.
Is the entity incorporated in the United States of America
Specify whether the entity was incorporated in the United States of America.
The options are:
Yes
No
Does the entity have any ultimate beneficial owners (incl. controlling persons) who are a tax residents (incl. US citizens/ green card holders) of countries other than <country name>?
Specify whether the beneficial owners including the controlling persons of the entity/ organization are tax residents of any other country.
The options are:
Yes
No
1. In the Is the Entity a tax resident of any country other than <country name>? field, select the applicable option.
a. If you have selected Yes, specify details pertaining to the country/countries in which the entity is a tax resident. The steps are as follows:
i. In the Country of Tax Residence list, select the country in which the entity is a tax resident.
ii. In the TIN Available field;
a. Select the option Yes if the entity’s TIN for the country in which it is a tax resident is available.
OR
Select the option NO if the TIN is not available.
iii. If you have selected the option Yes against the field TIN Available;
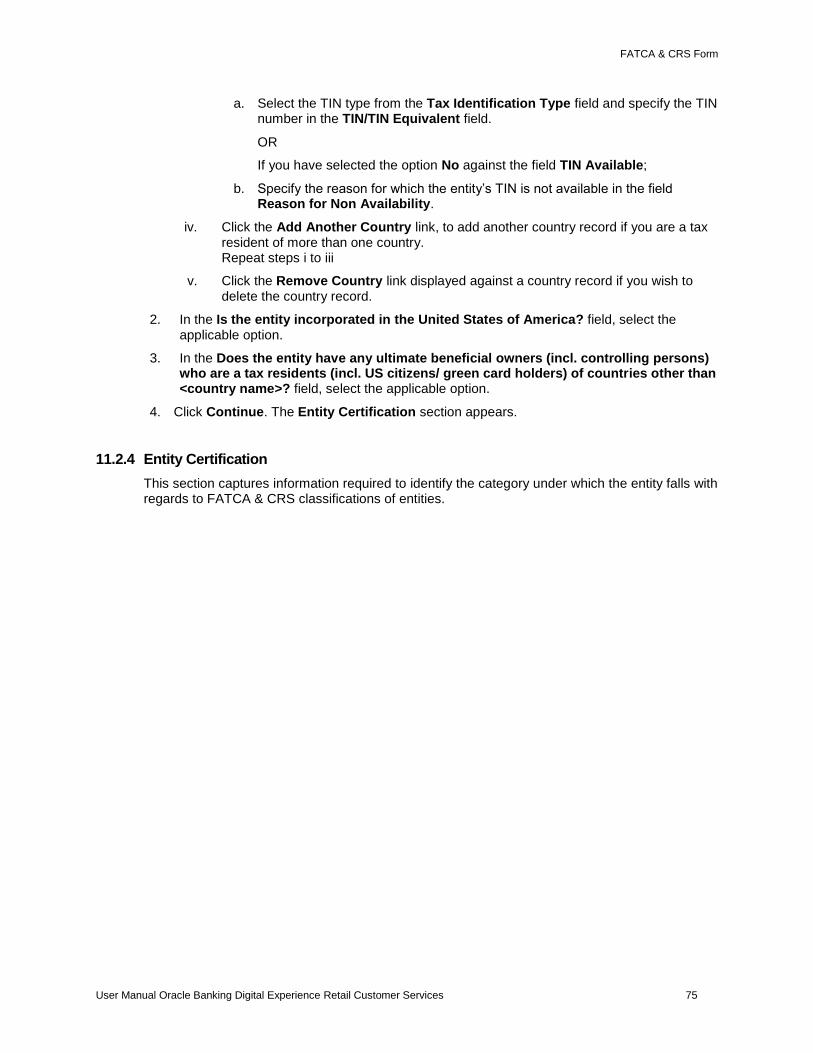
FATCA & CRS Form
User Manual Oracle Banking Digital Experience Retail Customer Services 75
a. Select the TIN type from the Tax Identification Type field and specify the TIN number in the TIN/TIN Equivalent field.
OR
If you have selected the option No against the field TIN Available;
b. Specify the reason for which the entity’s TIN is not available in the field Reason for Non Availability.
iv. Click the Add Another Country link, to add another country record if you are a tax resident of more than one country. Repeat steps i to iii
v. Click the Remove Country link displayed against a country record if you wish to delete the country record.
2. In the Is the entity incorporated in the United States of America? field, select the applicable option.
3. In the Does the entity have any ultimate beneficial owners (incl. controlling persons) who are a tax residents (incl. US citizens/ green card holders) of countries other than <country name>? field, select the applicable option.
4. Click Continue. The Entity Certification section appears.
11.2.4 Entity Certification
This section captures information required to identify the category under which the entity falls with regards to FATCA & CRS classifications of entities.
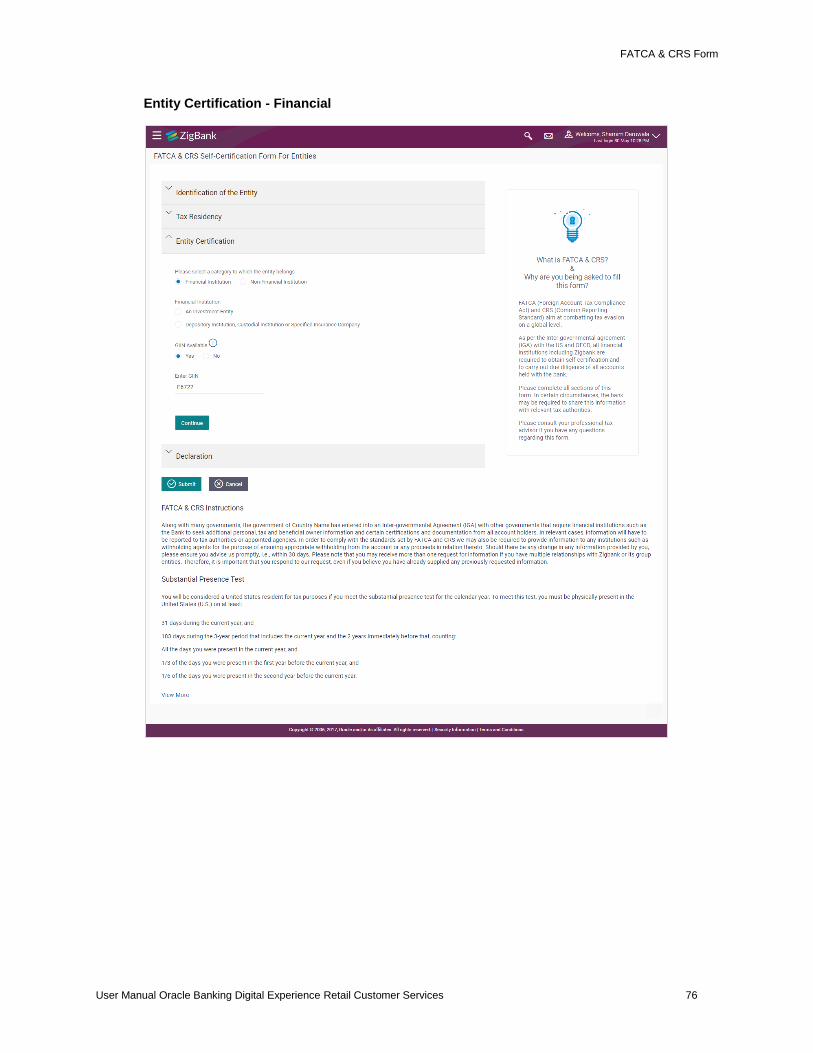
FATCA & CRS Form
User Manual Oracle Banking Digital Experience Retail Customer Services 76
Entity Certification - Financial
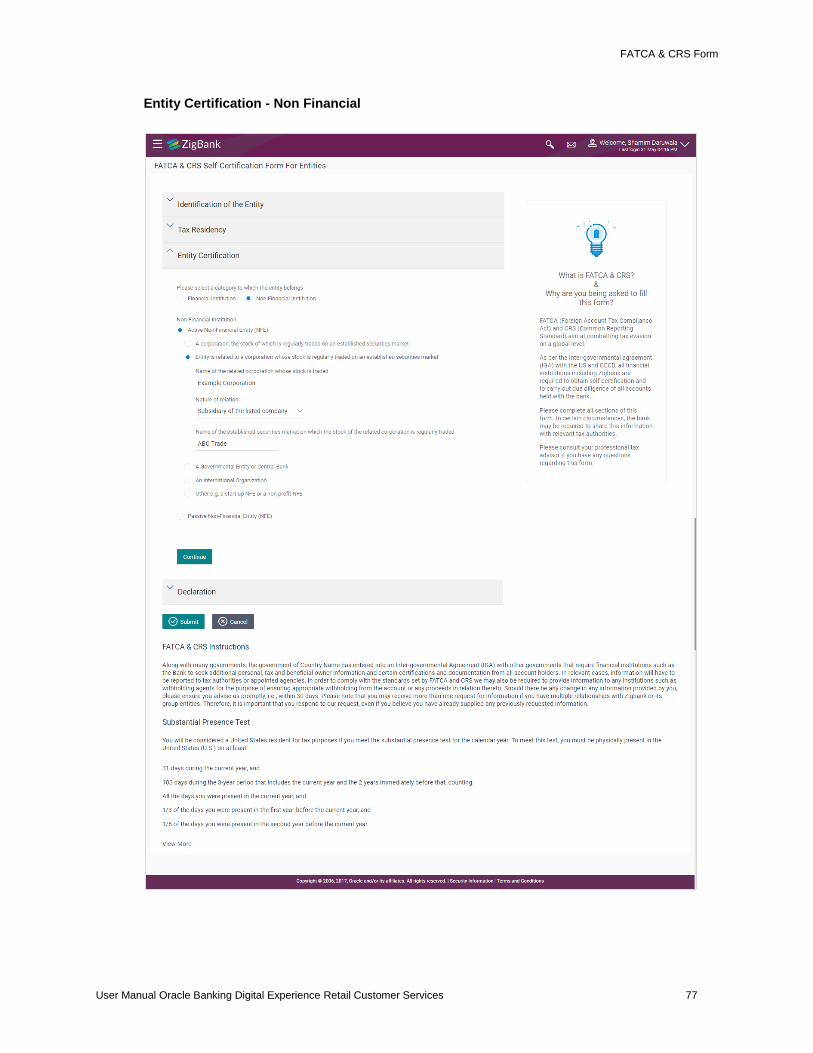
FATCA & CRS Form
User Manual Oracle Banking Digital Experience Retail Customer Services 77
Entity Certification - Non Financial
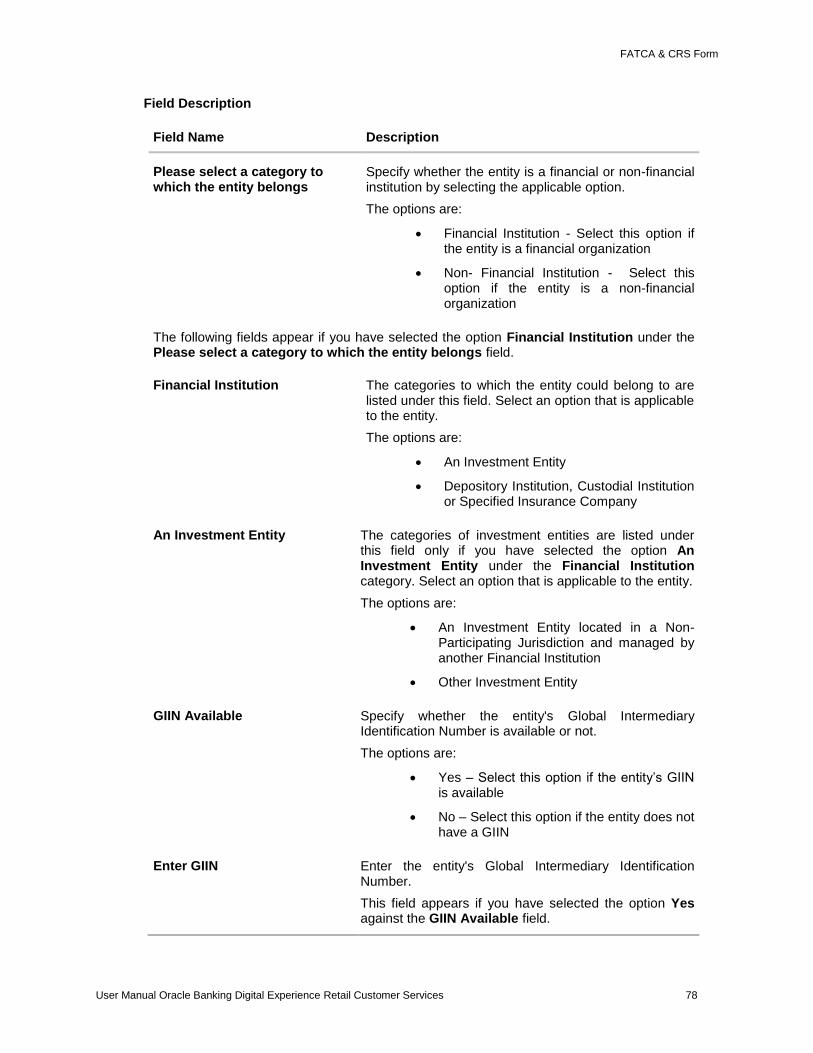
FATCA & CRS Form
User Manual Oracle Banking Digital Experience Retail Customer Services 78
Field Description
Field Name Description
Please select a category to which the entity belongs
Specify whether the entity is a financial or non-financial institution by selecting the applicable option.
The options are:
Financial Institution - Select this option if the entity is a financial organization
Non- Financial Institution - Select this option if the entity is a non-financial organization
The following fields appear if you have selected the option Financial Institution under the Please select a category to which the entity belongs field.
Financial Institution The categories to which the entity could belong to are listed under this field. Select an option that is applicable to the entity.
The options are:
An Investment Entity
Depository Institution, Custodial Institution or Specified Insurance Company
An Investment Entity The categories of investment entities are listed under this field only if you have selected the option An Investment Entity under the Financial Institution category. Select an option that is applicable to the entity.
The options are:
An Investment Entity located in a Non-Participating Jurisdiction and managed by another Financial Institution
Other Investment Entity
GIIN Available Specify whether the entity's Global Intermediary Identification Number is available or not.
The options are:
Yes – Select this option if the entity’s GIIN is available
No – Select this option if the entity does not have a GIIN
Enter GIIN Enter the entity's Global Intermediary Identification Number.
This field appears if you have selected the option Yes against the GIIN Available field.
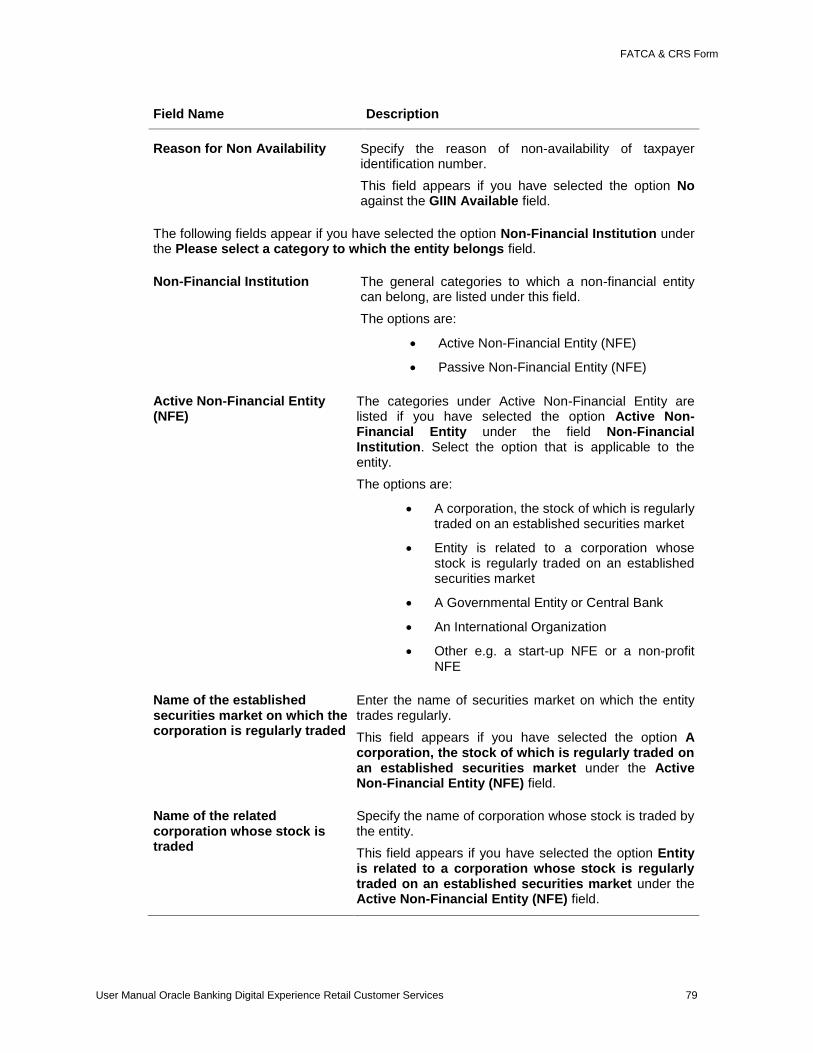
FATCA & CRS Form
User Manual Oracle Banking Digital Experience Retail Customer Services 79
Field Name Description
Reason for Non Availability Specify the reason of non-availability of taxpayer identification number.
This field appears if you have selected the option No against the GIIN Available field.
The following fields appear if you have selected the option Non-Financial Institution under the Please select a category to which the entity belongs field.
Non-Financial Institution The general categories to which a non-financial entity can belong, are listed under this field.
The options are:
Active Non-Financial Entity (NFE)
Passive Non-Financial Entity (NFE)
Active Non-Financial Entity (NFE)
The categories under Active Non-Financial Entity are listed if you have selected the option Active Non-Financial Entity under the field Non-Financial Institution. Select the option that is applicable to the entity.
The options are:
A corporation, the stock of which is regularly traded on an established securities market
Entity is related to a corporation whose stock is regularly traded on an established securities market
A Governmental Entity or Central Bank
An International Organization
Other e.g. a start-up NFE or a non-profit NFE
Name of the established securities market on which the corporation is regularly traded
Enter the name of securities market on which the entity trades regularly.
This field appears if you have selected the option A corporation, the stock of which is regularly traded on an established securities market under the Active Non-Financial Entity (NFE) field.
Name of the related corporation whose stock is traded
Specify the name of corporation whose stock is traded by the entity.
This field appears if you have selected the option Entity is related to a corporation whose stock is regularly traded on an established securities market under the Active Non-Financial Entity (NFE) field.
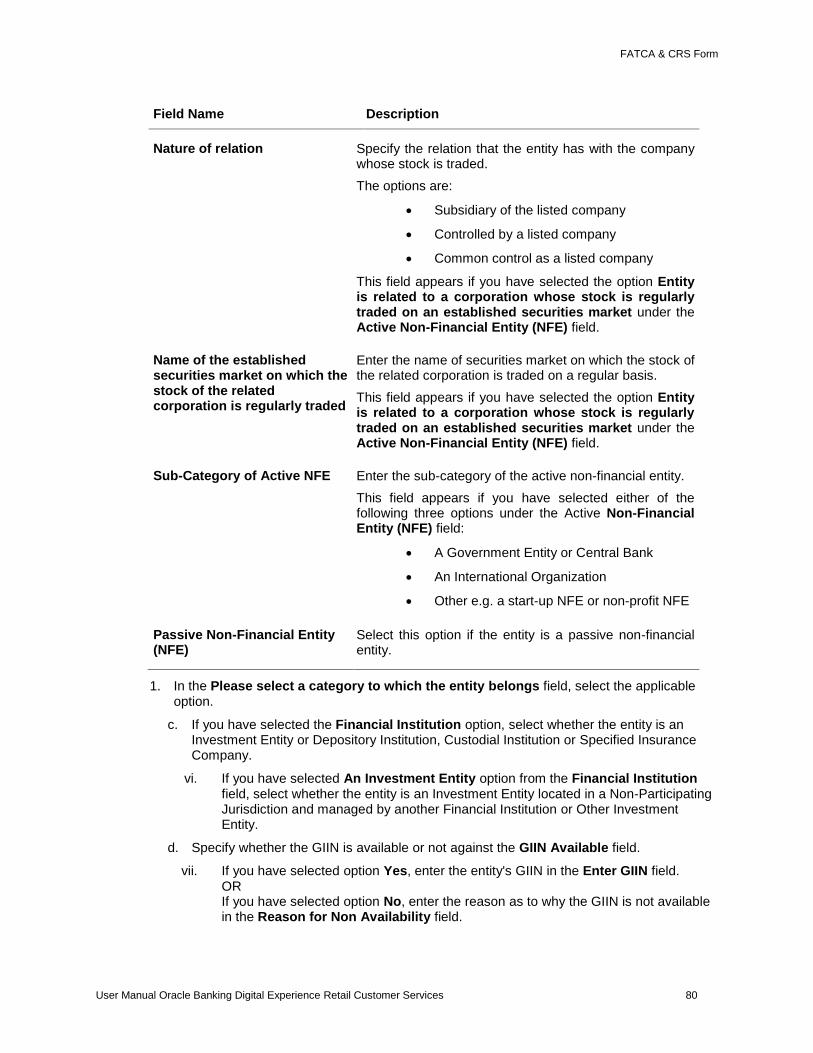
FATCA & CRS Form
User Manual Oracle Banking Digital Experience Retail Customer Services 80
Field Name Description
Nature of relation Specify the relation that the entity has with the company whose stock is traded.
The options are:
Subsidiary of the listed company
Controlled by a listed company
Common control as a listed company
This field appears if you have selected the option Entity is related to a corporation whose stock is regularly traded on an established securities market under the Active Non-Financial Entity (NFE) field.
Name of the established securities market on which the stock of the related corporation is regularly traded
Enter the name of securities market on which the stock of the related corporation is traded on a regular basis.
This field appears if you have selected the option Entity is related to a corporation whose stock is regularly traded on an established securities market under the Active Non-Financial Entity (NFE) field.
Sub-Category of Active NFE Enter the sub-category of the active non-financial entity.
This field appears if you have selected either of the following three options under the Active Non-Financial Entity (NFE) field:
A Government Entity or Central Bank
An International Organization
Other e.g. a start-up NFE or non-profit NFE
Passive Non-Financial Entity (NFE)
Select this option if the entity is a passive non-financial entity.
1. In the Please select a category to which the entity belongs field, select the applicable option.
c. If you have selected the Financial Institution option, select whether the entity is an Investment Entity or Depository Institution, Custodial Institution or Specified Insurance Company.
vi. If you have selected An Investment Entity option from the Financial Institution field, select whether the entity is an Investment Entity located in a Non-Participating Jurisdiction and managed by another Financial Institution or Other Investment Entity.
d. Specify whether the GIIN is available or not against the GIIN Available field.
vii. If you have selected option Yes, enter the entity's GIIN in the Enter GIIN field. OR If you have selected option No, enter the reason as to why the GIIN is not available in the Reason for Non Availability field.
FATCA & CRS Form
User Manual Oracle Banking Digital Experience Retail Customer Services 81
OR
2. If you have selected the Non-Financial Institution option, select the applicable option.
3. If you have selected the category Active Non-Financial Entity (NFE), select the applicable sub-category options and enter the relevant information displayed against the selected options.
4. Click Continue. The Declaration section appears.
11.2.5 Declaration
This section displays the FATCA & CRS declaration for which you are required to provide consent on behalf of the entity, by selecting the provided checkbox. You are also required to enter your name in full and also specify your designation in the provided fields.
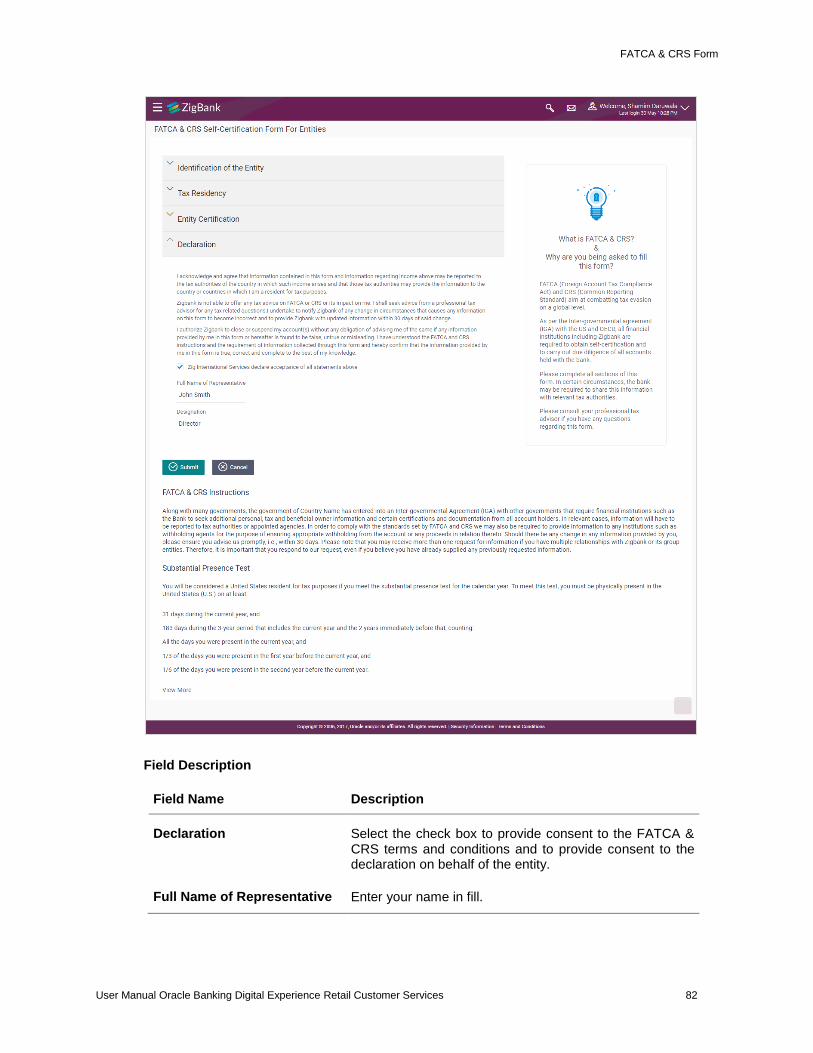
FATCA & CRS Form
User Manual Oracle Banking Digital Experience Retail Customer Services 82
Field Description
Field Name Description
Declaration Select the check box to provide consent to the FATCA & CRS terms and conditions and to provide consent to the declaration on behalf of the entity.
Full Name of Representative Enter your name in fill.
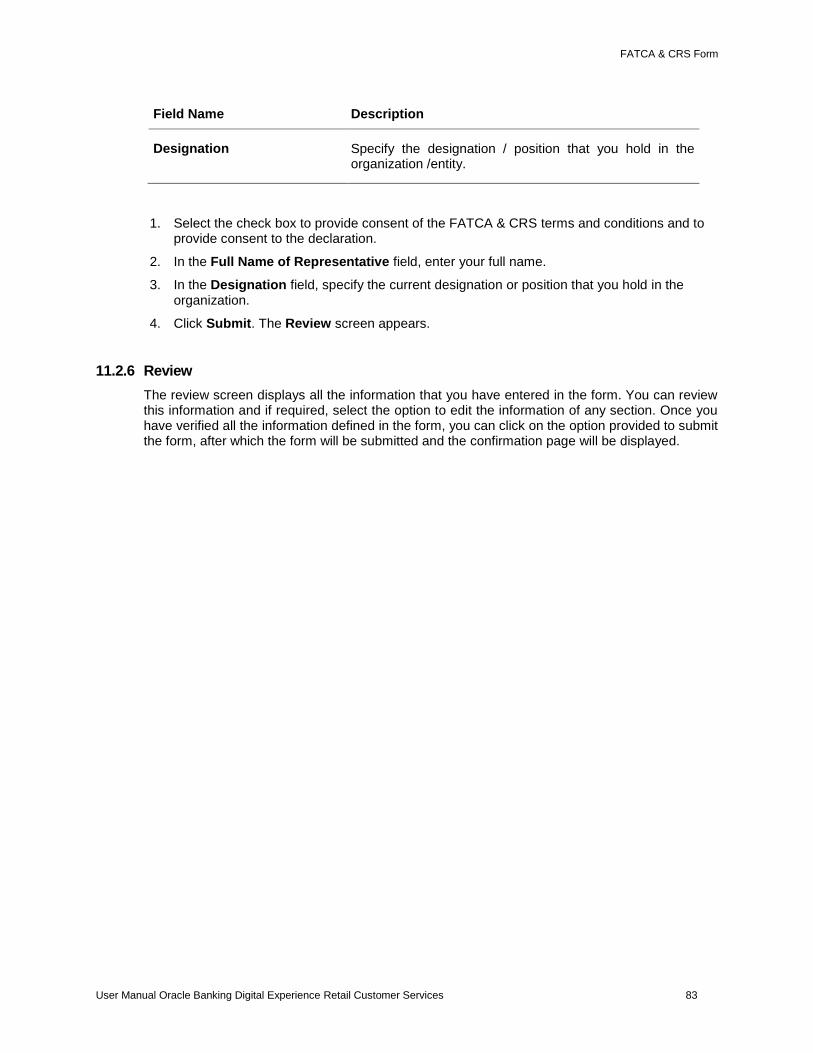
FATCA & CRS Form
User Manual Oracle Banking Digital Experience Retail Customer Services 83
Field Name Description
Designation Specify the designation / position that you hold in the organization /entity.
1. Select the check box to provide consent of the FATCA & CRS terms and conditions and to provide consent to the declaration.
2. In the Full Name of Representative field, enter your full name.
3. In the Designation field, specify the current designation or position that you hold in the organization.
4. Click Submit. The Review screen appears.
11.2.6 Review
The review screen displays all the information that you have entered in the form. You can review this information and if required, select the option to edit the information of any section. Once you have verified all the information defined in the form, you can click on the option provided to submit the form, after which the form will be submitted and the confirmation page will be displayed.
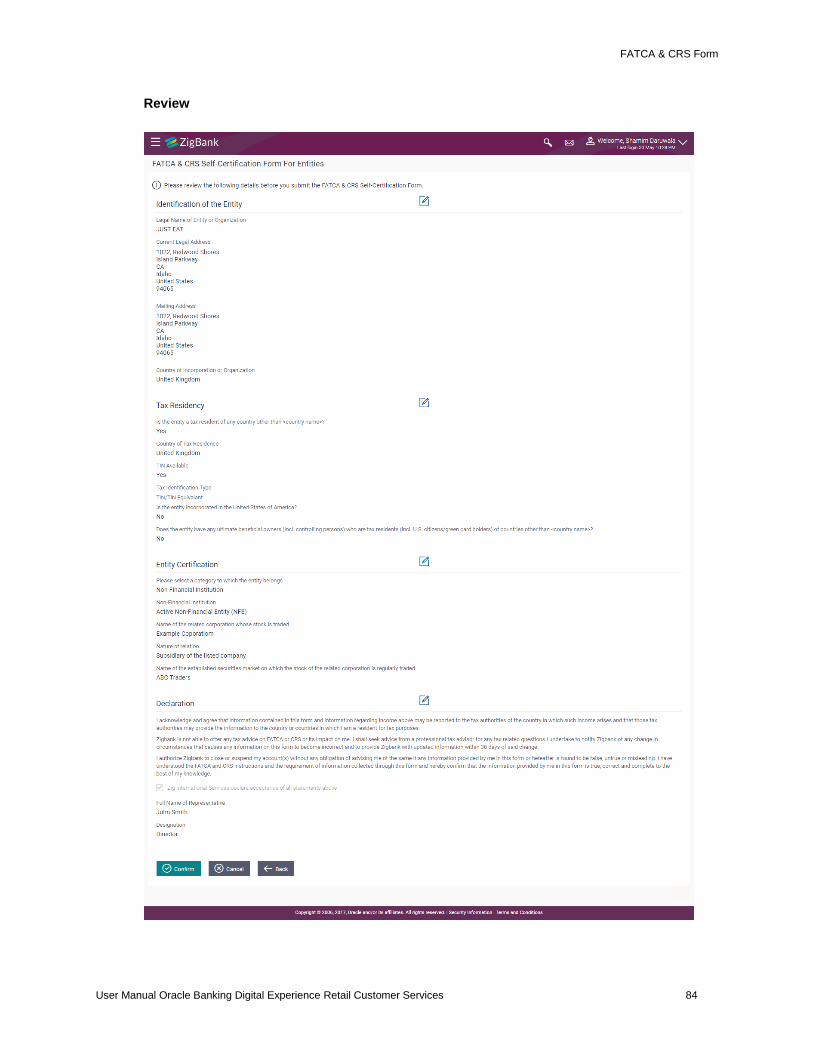
FATCA & CRS Form
User Manual Oracle Banking Digital Experience Retail Customer Services 84
Review
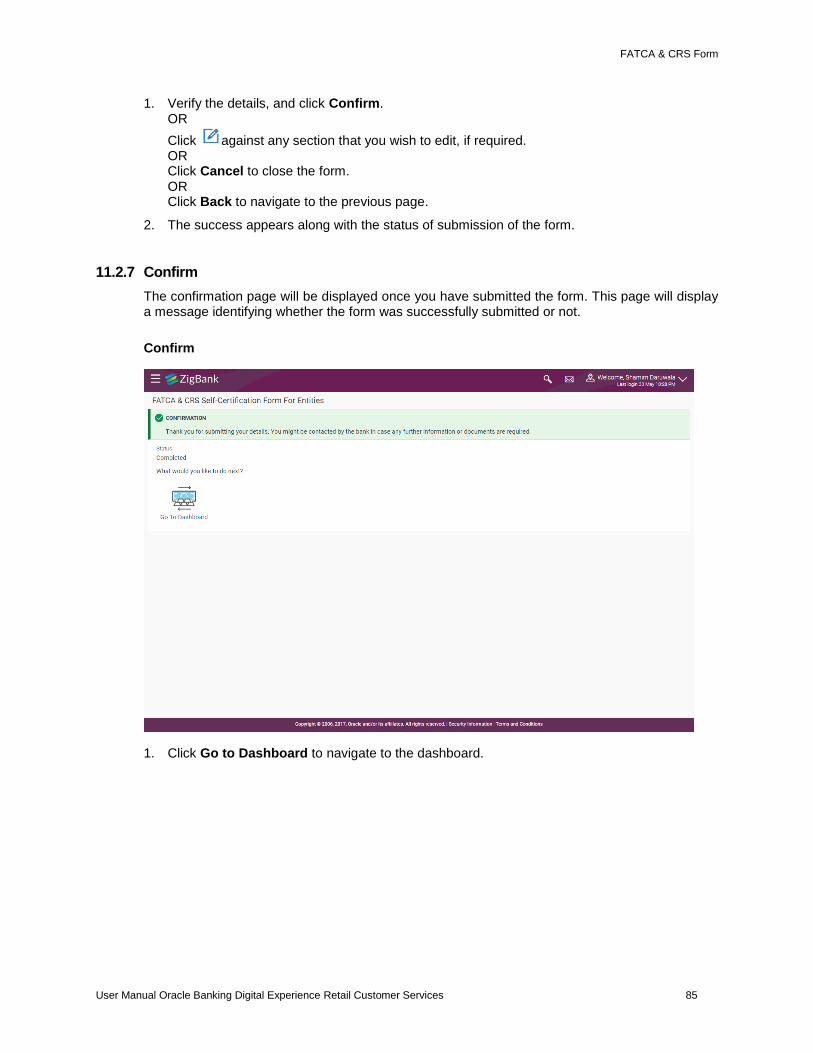
FATCA & CRS Form
User Manual Oracle Banking Digital Experience Retail Customer Services 85
1. Verify the details, and click Confirm. OR
Click against any section that you wish to edit, if required. OR Click Cancel to close the form. OR Click Back to navigate to the previous page.
2. The success appears along with the status of submission of the form.
11.2.7 Confirm
The confirmation page will be displayed once you have submitted the form. This page will display a message identifying whether the form was successfully submitted or not.
Confirm
1. Click Go to Dashboard to navigate to the dashboard.
FATCA & CRS Form
User Manual Oracle Banking Digital Experience Retail Customer Services 86
FAQs
What is FATCA, why I have to fill the FATCA & CRS form?
FATCA stands for 'Foreign Account Tax Compliance Act' and is a legislation designed to prevent tax evasion.
Introduced by the United States Department of Treasury and the US Internal Revenue Service (IRS), the purpose of FATCA is to encourage better tax compliance by preventing US Persons from using foreign banks and other financial organizations in order to avoid US taxation on their income and assets.
What is a tax identification number (TIN)?
This is your unique number issued in your jurisdiction to you as a tax payer. However we are aware that some jurisdictions do not issue a specific tax numbers. UK residents can use their National Insurance number.
Does the Co-Applicant also need to login for the system to populate the information if he/she is an existing channel user?
No. The co-applicant’s customer ID needs to be entered by the primary applicant if he/she is an existing user. A verification code will be sent to the co-applicants email ID and/or mobile number. Once the verification process is successful, the co-applicant’s details will be populated.
Why am I asked to capture previous residential address details?
The bank has a resident stability policy in place wherein if the applicant is staying at the current address for less than a defined term then he/she needs to define the previous residential address.
My co-applicant and I live in the same house, do I need to enter address details again while defining co-applicant information?
No. There is an option in the co-applicant contact information section to default the primary applicant’s address in that of the co-applicant’s residential address fields.
Why am I being asked to capture previous employment details?
The bank has a employment stability policy in place wherein if the applicant has not completed a defined term in the current organization then he/she needs to define previous employment details.
I have saved the application. Can my co-applicant resume the application from the application tracker?
Yes. The co-applicant needs to be a registered channel user to login to the application tracker and resume the application.
Can the co-applicant perform all the pending tasks (if applicable) in the application tracker?
Yes, the co-applicant has all the rights as that of the primary applicant.
Home
Mailbox
User Manual Oracle Banking Digital Experience Retail Customer Services 87
12. Mailbox
Mailbox helps in two way communication between the bank administrator and the business user. Mailbox displays the list of messages to the user with date and time and message subject. Users can send mail messages to bank administrators with specific pre-defined subjects for their queries/complaints/feedback.
Prerequisites:
The user must have a relationship with Bank.
User must have login credentials.
Features Supported in the Application:
Compose – This enables the user to select a predefined subject and to initiate a mail with a query/ complaint/ feedback.
Inbox – This folder displays all the messages sent by bank administrators to the user. The
user can reply to any of these mail messages or can delete any message.
Sent Mail – This folder lists down the mails sent by the user. An option is provided to delete any or all sent mails.
Deleted Mail – This folder displays the mails deleted from the user’s Inbox and Sent Mail folders. The user can opt to permanently delete any or all of these mail messages.
Alerts – This folder lists down the alerts sent by the bank to the user. The user can opt to delete any or all of these alerts.
Notifications - This section enables the user to view all the notifications sent by the bank.
How to reach here:
Toggle Menu > Mail Box OR
Dashboard > Click >View All
12.1 Mails
The Mails functionality is subdivided into the following sub-sections:
Compose: This option enables the user to create and send a new mail message.
Inbox: This folder displays all the mail messages received by the user.
Sent mail: This folder displays the list of mail messages sent by the user to the bank.
Deleted Mail: This folder contains the list of mail messages deleted by the user from the inbox and the sent mail folders.
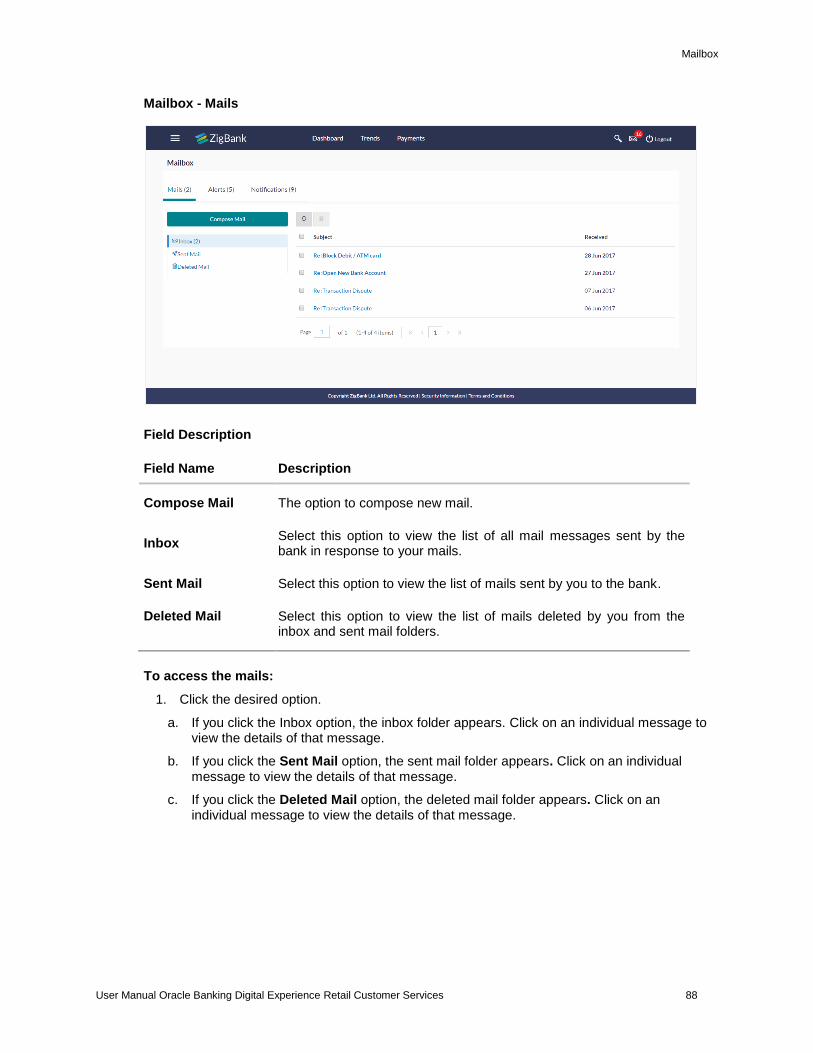
Mailbox
User Manual Oracle Banking Digital Experience Retail Customer Services 88
Mailbox - Mails
Field Description
Field Name Description
Compose Mail The option to compose new mail.
Inbox Select this option to view the list of all mail messages sent by the bank in response to your mails.
Sent Mail Select this option to view the list of mails sent by you to the bank.
Deleted Mail Select this option to view the list of mails deleted by you from the inbox and sent mail folders.
To access the mails:
1. Click the desired option.
a. If you click the Inbox option, the inbox folder appears. Click on an individual message to view the details of that message.
b. If you click the Sent Mail option, the sent mail folder appears. Click on an individual message to view the details of that message.
c. If you click the Deleted Mail option, the deleted mail folder appears. Click on an individual message to view the details of that message.
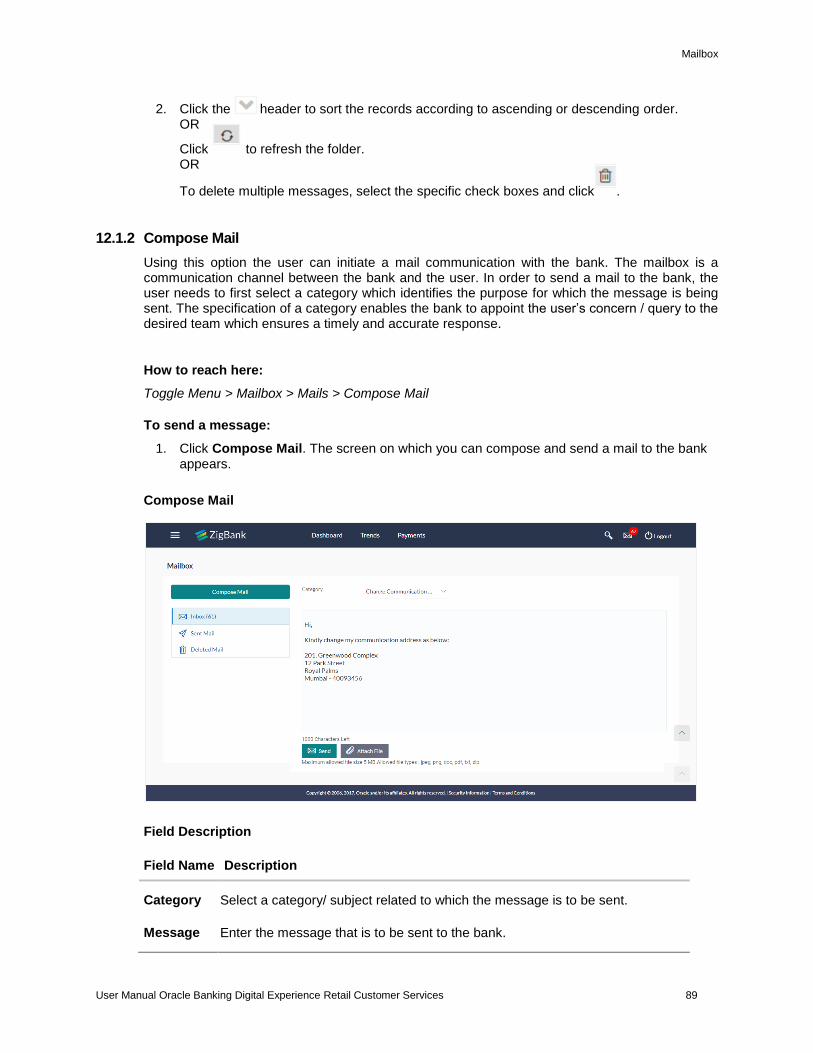
Mailbox
User Manual Oracle Banking Digital Experience Retail Customer Services 89
2. Click the header to sort the records according to ascending or descending order. OR
Click to refresh the folder. OR
To delete multiple messages, select the specific check boxes and click .
12.1.2 Compose Mail
Using this option the user can initiate a mail communication with the bank. The mailbox is a communication channel between the bank and the user. In order to send a mail to the bank, the user needs to first select a category which identifies the purpose for which the message is being sent. The specification of a category enables the bank to appoint the user’s concern / query to the desired team which ensures a timely and accurate response.
How to reach here:
Toggle Menu > Mailbox > Mails > Compose Mail
To send a message:
1. Click Compose Mail. The screen on which you can compose and send a mail to the bank appears.
Compose Mail
Field Description
Field Name Description
Category Select a category/ subject related to which the message is to be sent.
Message Enter the message that is to be sent to the bank.
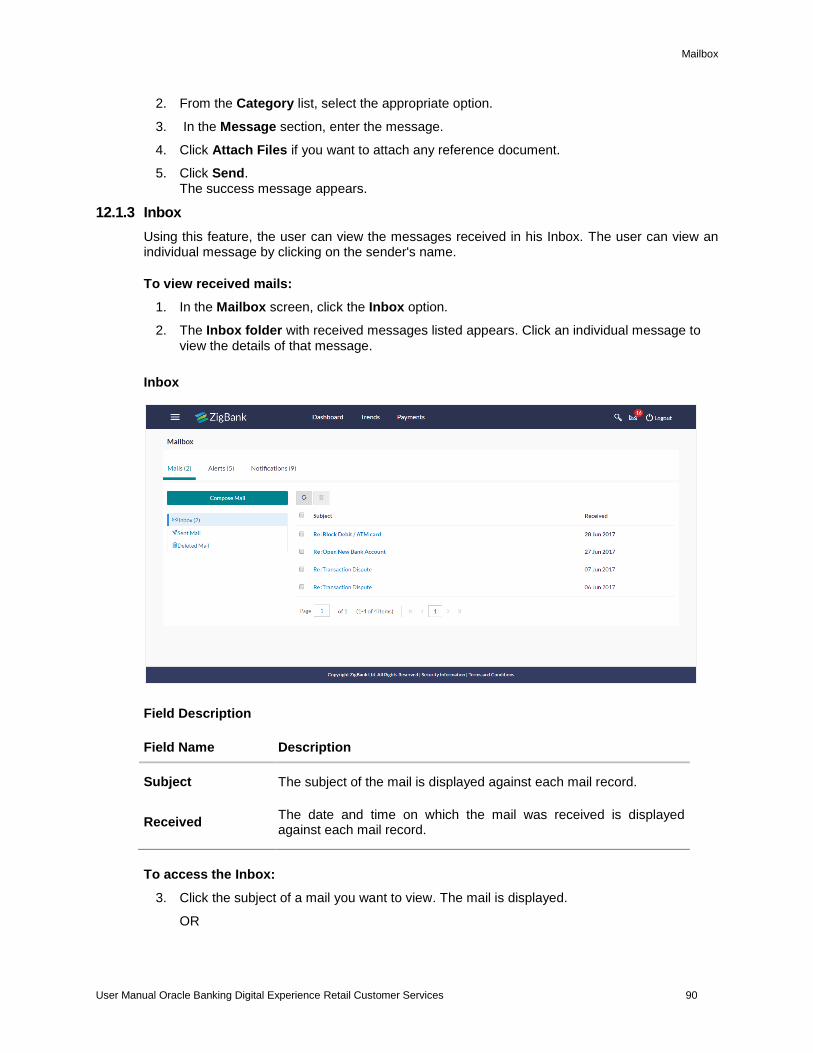
Mailbox
User Manual Oracle Banking Digital Experience Retail Customer Services 90
2. From the Category list, select the appropriate option.
3. In the Message section, enter the message.
4. Click Attach Files if you want to attach any reference document.
5. Click Send. The success message appears.
12.1.3 Inbox
Using this feature, the user can view the messages received in his Inbox. The user can view an individual message by clicking on the sender's name.
To view received mails:
1. In the Mailbox screen, click the Inbox option.
2. The Inbox folder with received messages listed appears. Click an individual message to view the details of that message.
Inbox
Field Description
Field Name Description
Subject The subject of the mail is displayed against each mail record.
Received The date and time on which the mail was received is displayed against each mail record.
To access the Inbox:
3. Click the subject of a mail you want to view. The mail is displayed.
OR
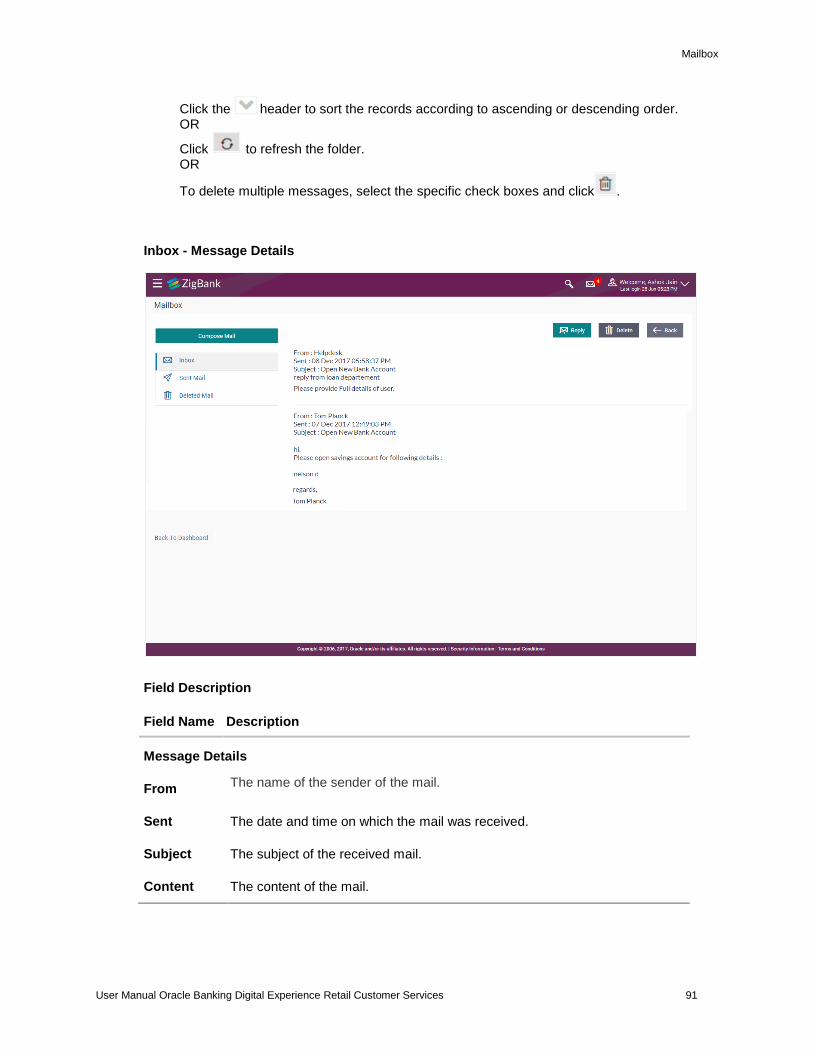
Mailbox
User Manual Oracle Banking Digital Experience Retail Customer Services 91
Click the header to sort the records according to ascending or descending order. OR
Click to refresh the folder. OR
To delete multiple messages, select the specific check boxes and click .
Inbox - Message Details
Field Description
Field Name Description
Message Details
From The name of the sender of the mail.
Sent The date and time on which the mail was received.
Subject The subject of the received mail.
Content The content of the mail.
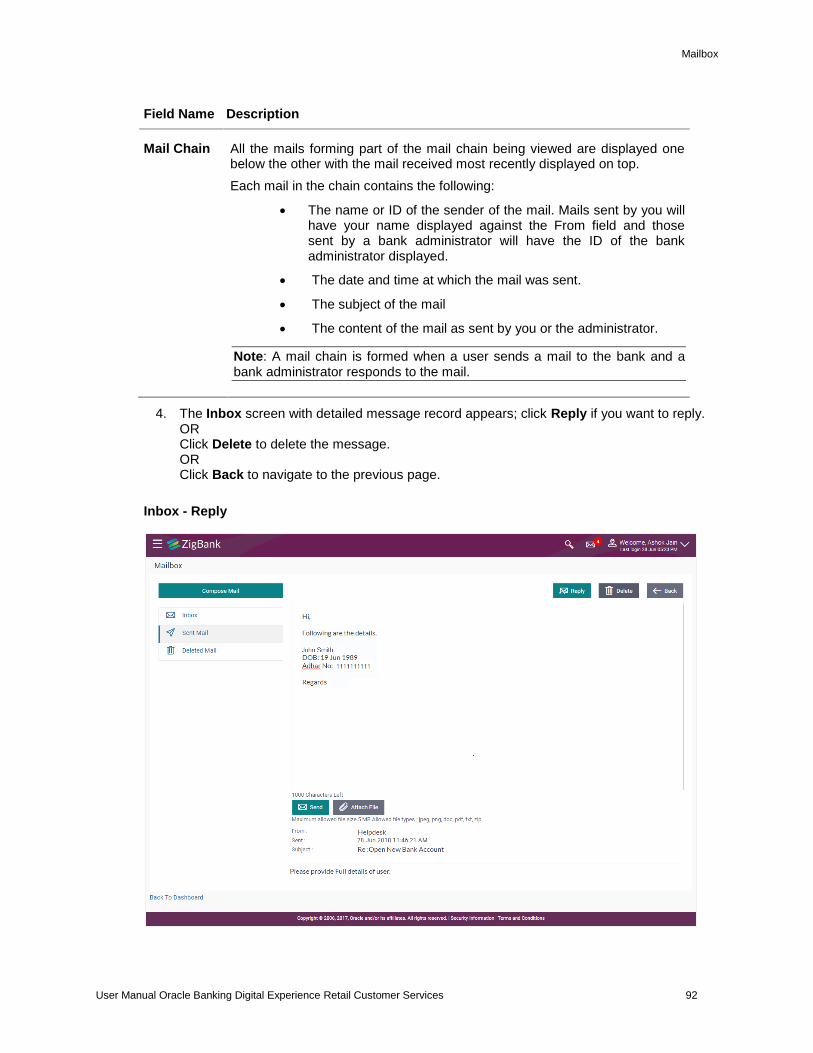
Mailbox
User Manual Oracle Banking Digital Experience Retail Customer Services 92
Field Name Description
Mail Chain All the mails forming part of the mail chain being viewed are displayed one below the other with the mail received most recently displayed on top.
Each mail in the chain contains the following:
The name or ID of the sender of the mail. Mails sent by you will have your name displayed against the From field and those sent by a bank administrator will have the ID of the bank administrator displayed.
The date and time at which the mail was sent.
The subject of the mail
The content of the mail as sent by you or the administrator.
Note: A mail chain is formed when a user sends a mail to the bank and a bank administrator responds to the mail.
4. The Inbox screen with detailed message record appears; click Reply if you want to reply. OR Click Delete to delete the message. OR Click Back to navigate to the previous page.
Inbox - Reply
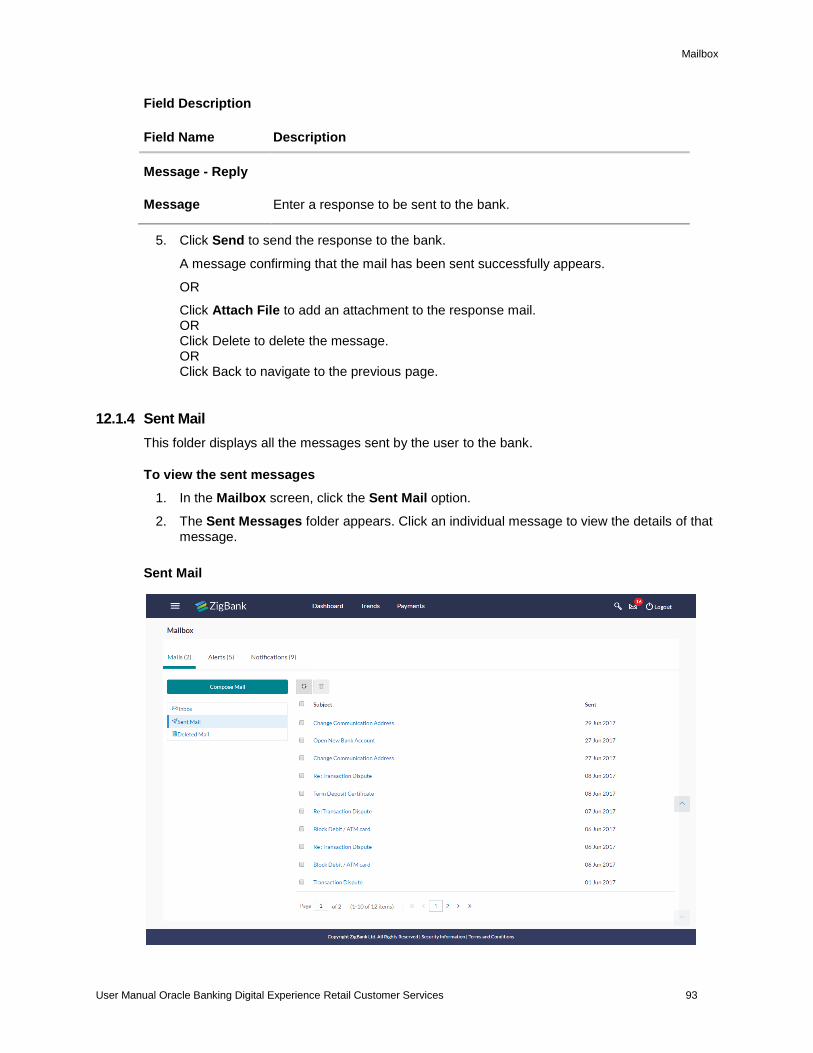
Mailbox
User Manual Oracle Banking Digital Experience Retail Customer Services 93
Field Description
Field Name Description
Message - Reply
Message Enter a response to be sent to the bank.
5. Click Send to send the response to the bank.
A message confirming that the mail has been sent successfully appears.
OR
Click Attach File to add an attachment to the response mail. OR Click Delete to delete the message. OR Click Back to navigate to the previous page.
12.1.4 Sent Mail
This folder displays all the messages sent by the user to the bank.
To view the sent messages
1. In the Mailbox screen, click the Sent Mail option.
2. The Sent Messages folder appears. Click an individual message to view the details of that message.
Sent Mail
Mailbox
User Manual Oracle Banking Digital Experience Retail Customer Services 94
Field Description
Field Name
Description
Subject The subject of the mail is displayed against each mail record.
Sent The date and time on which the mail was sent is displayed against each mail record.
3. Click the subject of the specific sent message that you want to view. OR
Click the header to sort the records according to ascending or descending date. OR
Click to refresh the mailbox. OR
To delete multiple mails, select the check box (s) against the mail, and click to delete the message.
4. The Sent Mail screen with the detailed sent message appears. Click Reply if you want to reply. Type the reply and Click Send. The success message appears. OR Click Delete to delete the message. OR Click Back to navigate to the previous page.
12.1.5 Sent Mails – Details
Sent Mail - Details
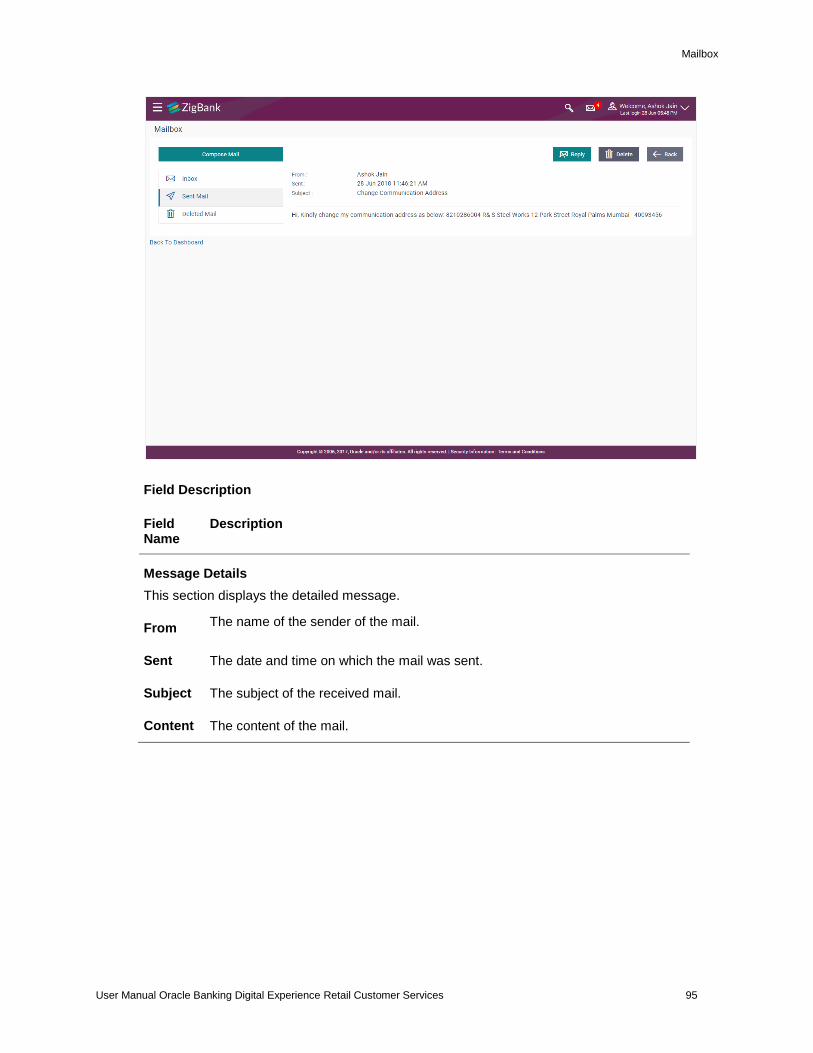
Mailbox
User Manual Oracle Banking Digital Experience Retail Customer Services 95
Field Description
Field Name
Description
Message Details
This section displays the detailed message.
From The name of the sender of the mail.
Sent The date and time on which the mail was sent.
Subject The subject of the received mail.
Content The content of the mail.
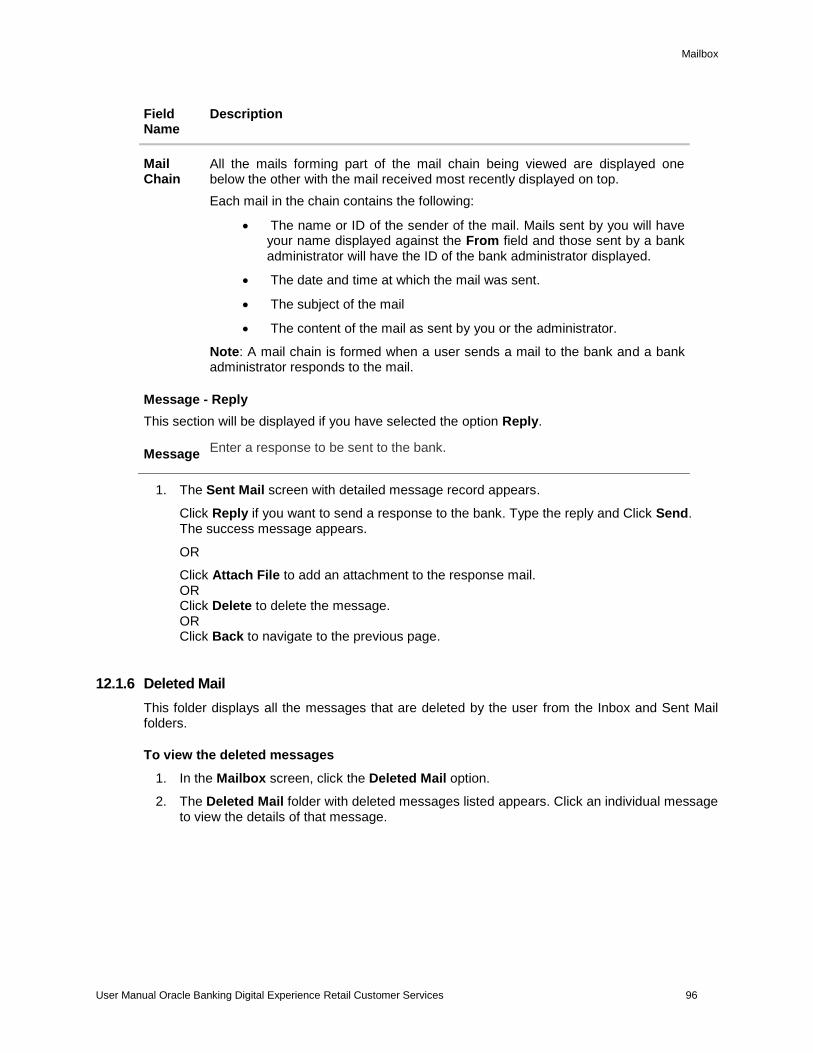
Mailbox
User Manual Oracle Banking Digital Experience Retail Customer Services 96
Field Name
Description
Mail Chain
All the mails forming part of the mail chain being viewed are displayed one below the other with the mail received most recently displayed on top.
Each mail in the chain contains the following:
The name or ID of the sender of the mail. Mails sent by you will have your name displayed against the From field and those sent by a bank administrator will have the ID of the bank administrator displayed.
The date and time at which the mail was sent.
The subject of the mail
The content of the mail as sent by you or the administrator.
Note: A mail chain is formed when a user sends a mail to the bank and a bank administrator responds to the mail.
Message - Reply
This section will be displayed if you have selected the option Reply.
Message Enter a response to be sent to the bank.
1. The Sent Mail screen with detailed message record appears.
Click Reply if you want to send a response to the bank. Type the reply and Click Send. The success message appears.
OR
Click Attach File to add an attachment to the response mail. OR Click Delete to delete the message. OR Click Back to navigate to the previous page.
12.1.6 Deleted Mail
This folder displays all the messages that are deleted by the user from the Inbox and Sent Mail folders.
To view the deleted messages
1. In the Mailbox screen, click the Deleted Mail option.
2. The Deleted Mail folder with deleted messages listed appears. Click an individual message to view the details of that message.
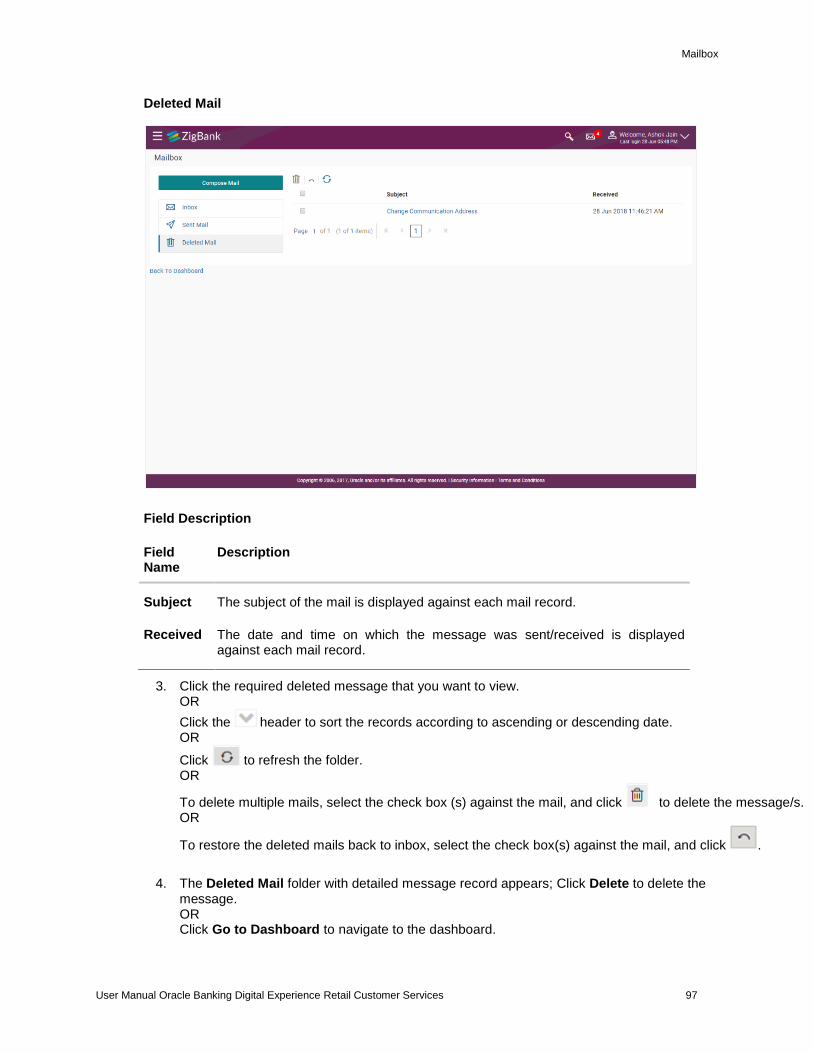
Mailbox
User Manual Oracle Banking Digital Experience Retail Customer Services 97
Deleted Mail
Field Description
Field Name
Description
Subject The subject of the mail is displayed against each mail record.
Received The date and time on which the message was sent/received is displayed against each mail record.
3. Click the required deleted message that you want to view. OR
Click the header to sort the records according to ascending or descending date. OR
Click to refresh the folder. OR
To delete multiple mails, select the check box (s) against the mail, and click to delete the message/s. OR
To restore the deleted mails back to inbox, select the check box(s) against the mail, and click .
4. The Deleted Mail folder with detailed message record appears; Click Delete to delete the message. OR Click Go to Dashboard to navigate to the dashboard.
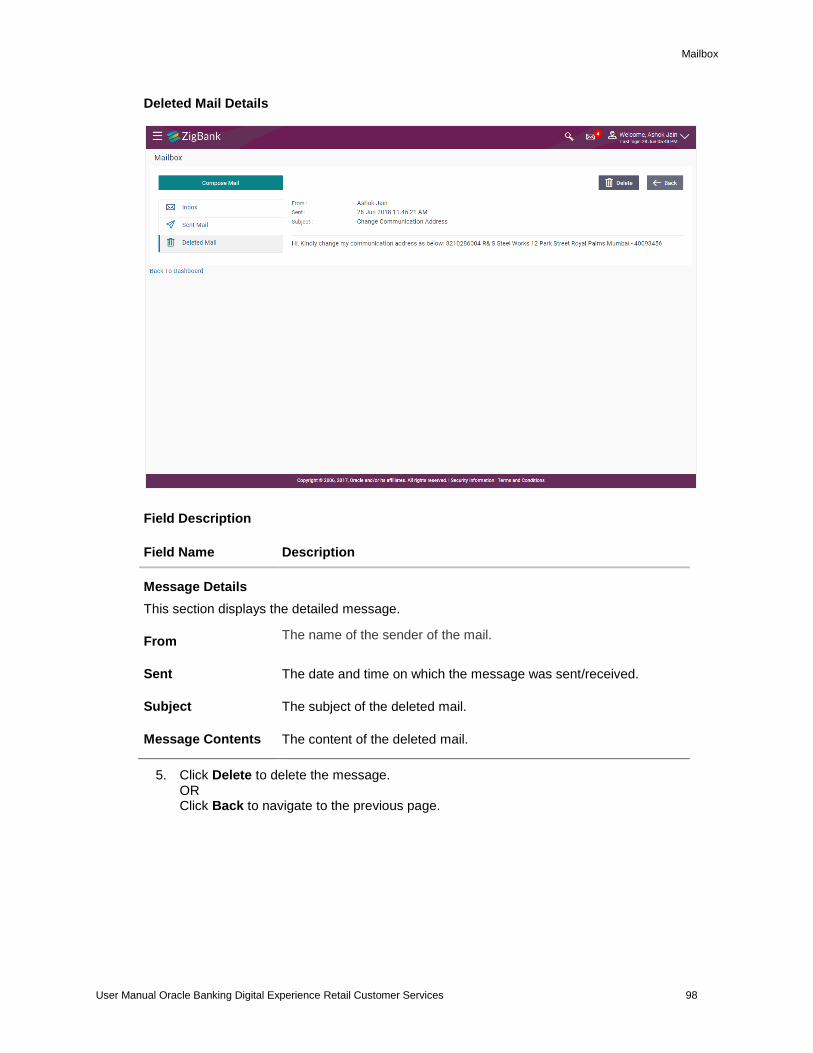
Mailbox
User Manual Oracle Banking Digital Experience Retail Customer Services 98
Deleted Mail Details
Field Description
Field Name Description
Message Details
This section displays the detailed message.
From The name of the sender of the mail.
Sent The date and time on which the message was sent/received.
Subject The subject of the deleted mail.
Message Contents The content of the deleted mail.
5. Click Delete to delete the message. OR Click Back to navigate to the previous page.
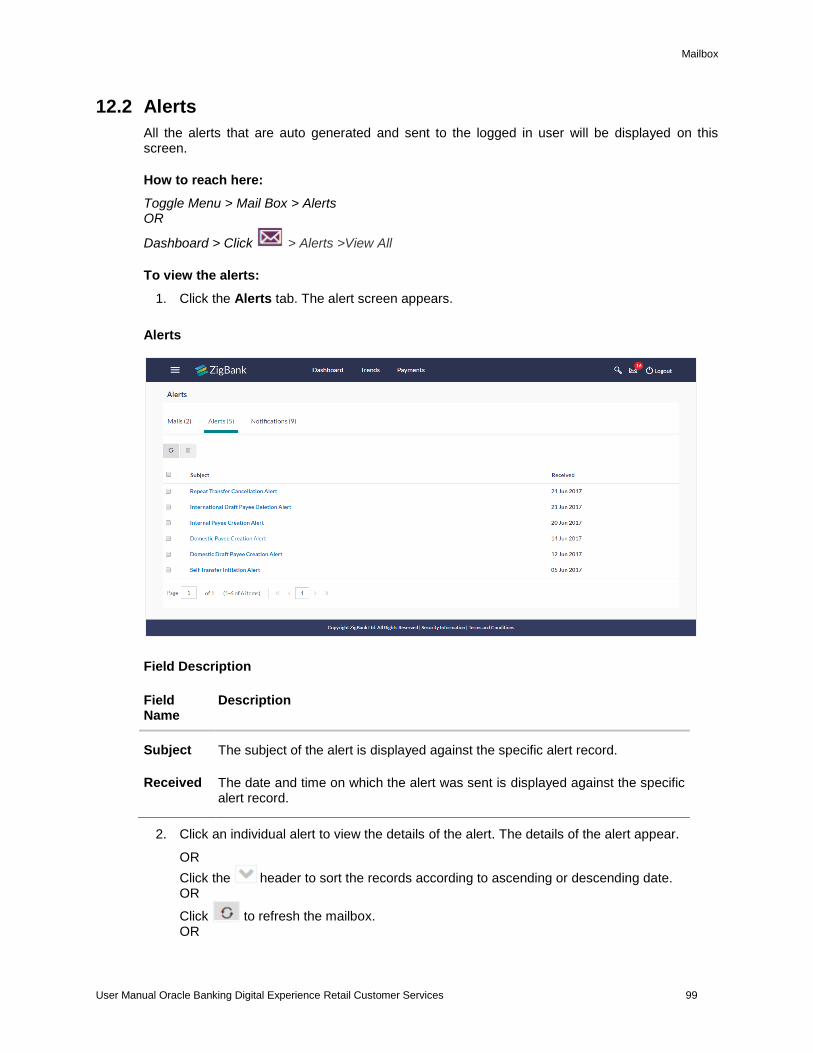
Mailbox
User Manual Oracle Banking Digital Experience Retail Customer Services 99
12.2 Alerts
All the alerts that are auto generated and sent to the logged in user will be displayed on this screen.
How to reach here:
Toggle Menu > Mail Box > Alerts OR
Dashboard > Click > Alerts >View All
To view the alerts:
1. Click the Alerts tab. The alert screen appears.
Alerts
Field Description
Field Name
Description
Subject The subject of the alert is displayed against the specific alert record.
Received The date and time on which the alert was sent is displayed against the specific alert record.
2. Click an individual alert to view the details of the alert. The details of the alert appear.
OR
Click the header to sort the records according to ascending or descending date. OR
Click to refresh the mailbox. OR
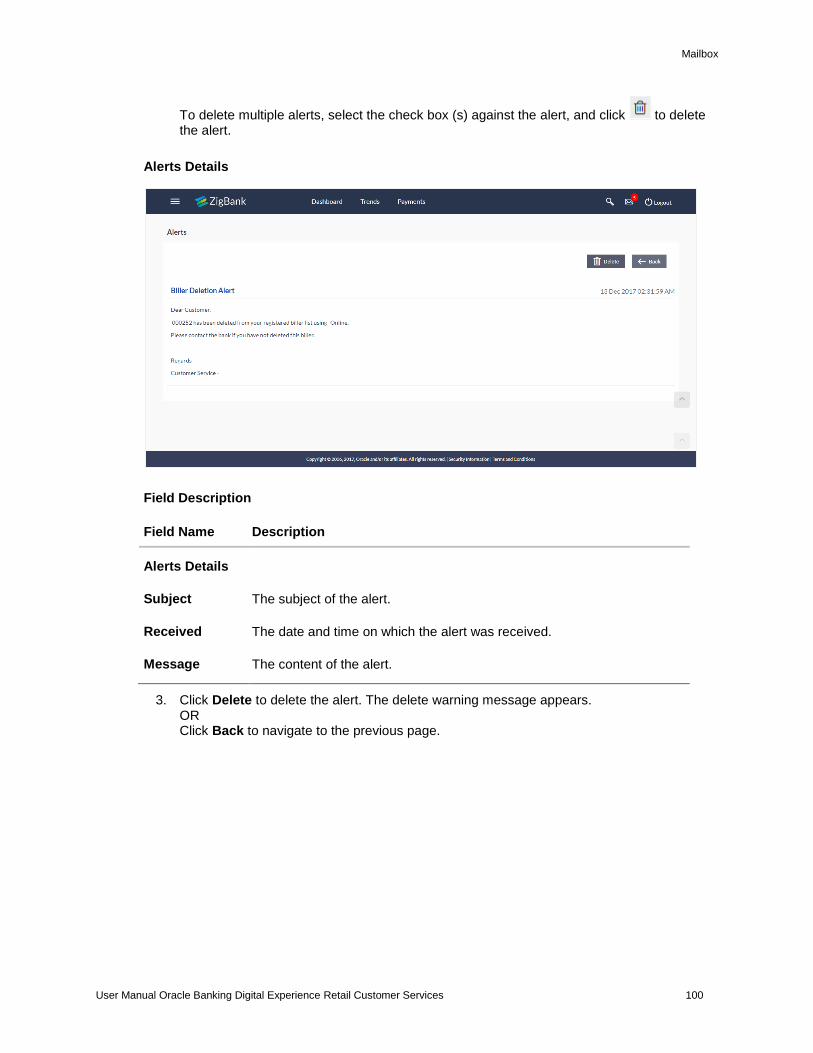
Mailbox
User Manual Oracle Banking Digital Experience Retail Customer Services 100
To delete multiple alerts, select the check box (s) against the alert, and click to delete the alert.
Alerts Details
Field Description
Field Name Description
Alerts Details
Subject The subject of the alert.
Received The date and time on which the alert was received.
Message The content of the alert.
3. Click Delete to delete the alert. The delete warning message appears. OR Click Back to navigate to the previous page.
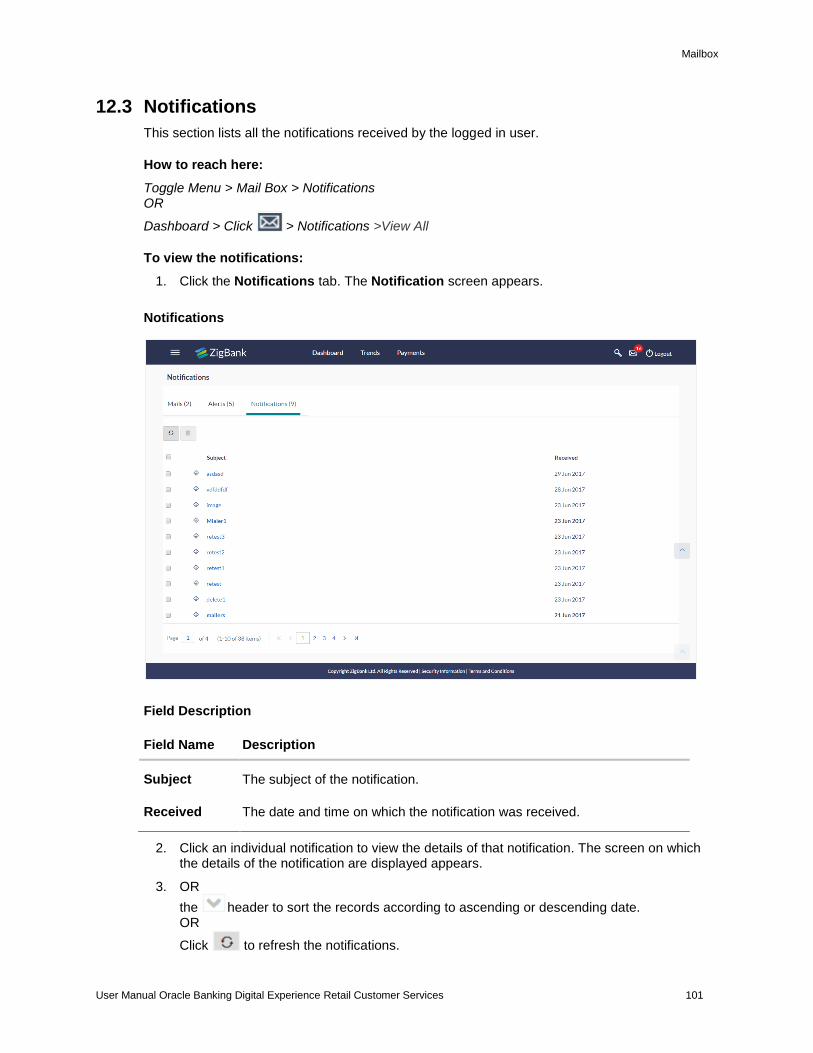
Mailbox
User Manual Oracle Banking Digital Experience Retail Customer Services 101
12.3 Notifications
This section lists all the notifications received by the logged in user.
How to reach here:
Toggle Menu > Mail Box > Notifications OR
Dashboard > Click > Notifications >View All
To view the notifications:
1. Click the Notifications tab. The Notification screen appears.
Notifications
Field Description
Field Name Description
Subject The subject of the notification.
Received The date and time on which the notification was received.
2. Click an individual notification to view the details of that notification. The screen on which the details of the notification are displayed appears.
3. OR
the header to sort the records according to ascending or descending date. OR
Click to refresh the notifications.
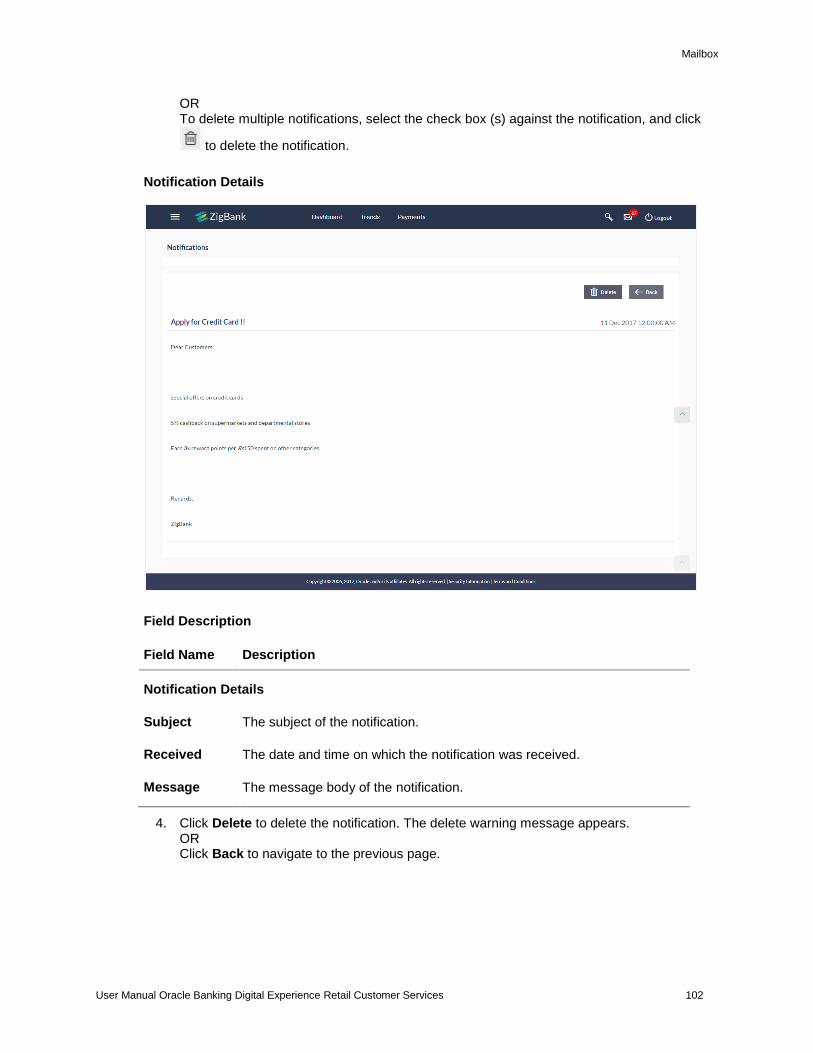
Mailbox
User Manual Oracle Banking Digital Experience Retail Customer Services 102
OR To delete multiple notifications, select the check box (s) against the notification, and click
to delete the notification.
Notification Details
Field Description
Field Name Description
Notification Details
Subject The subject of the notification.
Received The date and time on which the notification was received.
Message The message body of the notification.
4. Click Delete to delete the notification. The delete warning message appears. OR Click Back to navigate to the previous page.
Mailbox
User Manual Oracle Banking Digital Experience Retail Customer Services 103
FAQs
Can customers initiate fresh mails?
Yes, customers of the bank can initiate fresh mails by accessing compose mail option through secure mailbox. Customers can only send mails to bank administrators using this feature.
Can customer delete multiple mails?
Yes, users can select multiple mails and delete the same.
Can customers restore the deleted mails?
Yes, deleted mails can be restored from the deleted folder. User can go to the Deleted folder, select the mails and click on restore button to move those mails back to respective folder.
Can Customer send a reply to the alerts/ notifications sent by the Bank?
No, customer cannot reply to the alerts/ notifications.
What are notifications generally about?
Notifications inform customers of the bank about any new offers, promotional rates, and launch of new products or services.
Home
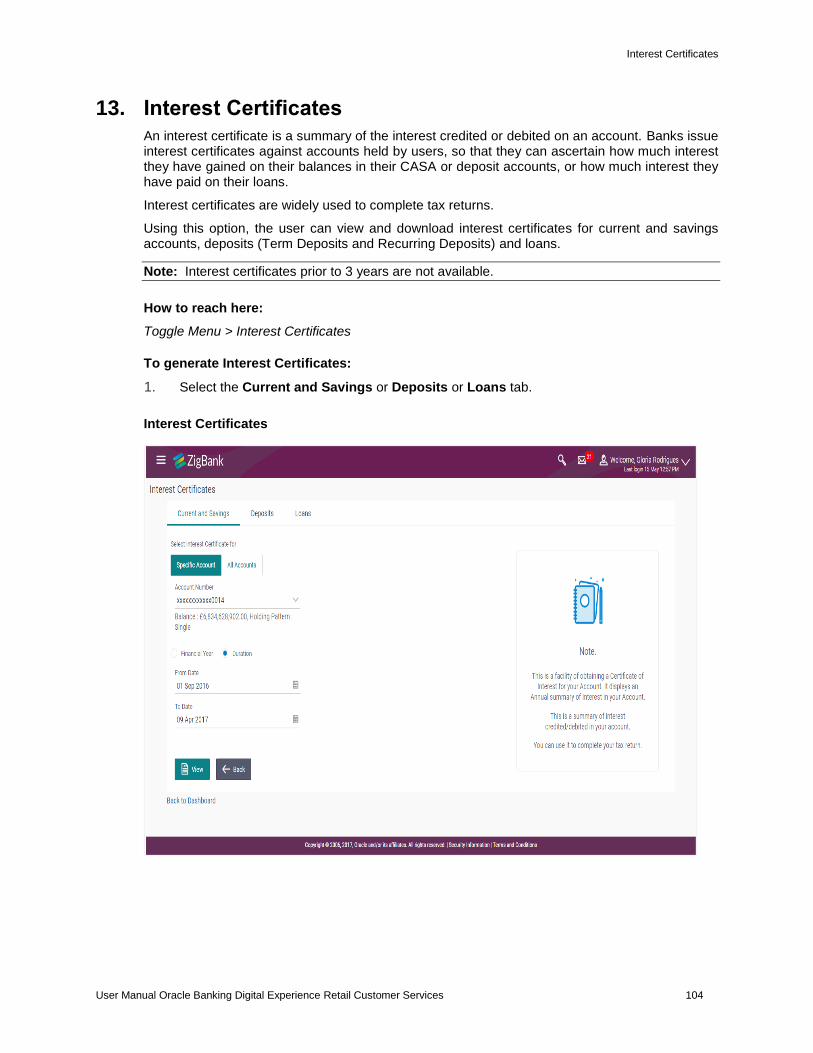
Interest Certificates
User Manual Oracle Banking Digital Experience Retail Customer Services 104
13. Interest Certificates
An interest certificate is a summary of the interest credited or debited on an account. Banks issue interest certificates against accounts held by users, so that they can ascertain how much interest they have gained on their balances in their CASA or deposit accounts, or how much interest they have paid on their loans.
Interest certificates are widely used to complete tax returns.
Using this option, the user can view and download interest certificates for current and savings accounts, deposits (Term Deposits and Recurring Deposits) and loans.
Note: Interest certificates prior to 3 years are not available.
How to reach here:
Toggle Menu > Interest Certificates
To generate Interest Certificates:
1. Select the Current and Savings or Deposits or Loans tab.
Interest Certificates
Interest Certificates
User Manual Oracle Banking Digital Experience Retail Customer Services 105
Field Description
Field Name Description
Select Interest Certificate for
The option to specify whether the interest certificate is to be generated for a specific account or for all accounts of the specific account type.
The options are:
Specific Account
All Accounts
Account Number Select the account number for which the interest certificate to be generated.
This field is enabled if you have selected the Specific Account option in the Select Interest Certificate for field.
Balance The net balance in the selected account. This value is displayed below the Account Number field once an account number is selected.
Period Define a period for which the interest certificate to be generated.
The options are:
Financial Year
Duration
Financial Year The financial year for which the interest certificate for the account/s is to be generated.
This field is enabled if you have selected the Financial Year option in the Period field.
Note: Interest certificates prior to 3 years are not available.
From Date The start date of the date range from which interest certificate to be generated.
This field is enabled if you have selected the Duration option in the Choose a period for generating Interest Certificate field.
To Date The end date of the date range till which interest certificate is to be generated.
This field is enabled if you have selected the Duration option in the Choose a period for generating Interest Certificate field.
2. In Select Interest Certificate for field, select appropriate option for which the interest certificate to be generated.
3. If you have selected Specific Account;
a. From the Account Number list, select the account for which interest certificate is required. The Net Balance of selected account gets displayed.
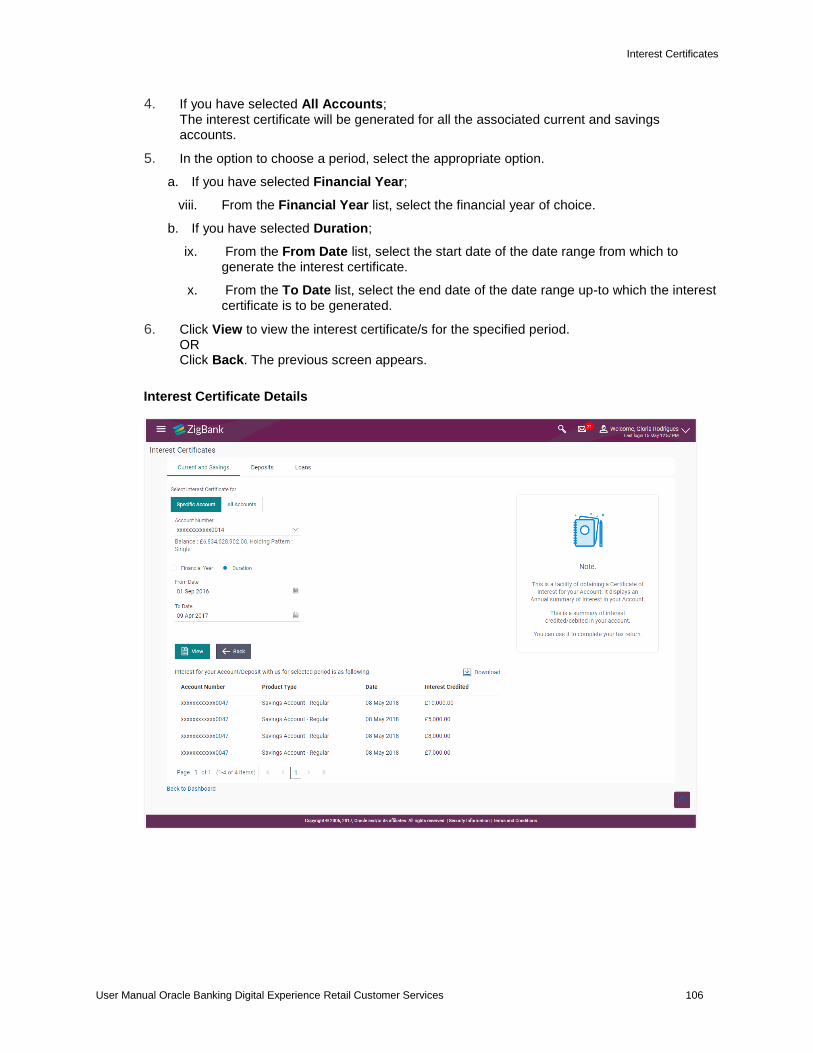
Interest Certificates
User Manual Oracle Banking Digital Experience Retail Customer Services 106
4. If you have selected All Accounts; The interest certificate will be generated for all the associated current and savings accounts.
5. In the option to choose a period, select the appropriate option.
a. If you have selected Financial Year;
viii. From the Financial Year list, select the financial year of choice.
b. If you have selected Duration;
ix. From the From Date list, select the start date of the date range from which to generate the interest certificate.
x. From the To Date list, select the end date of the date range up-to which the interest certificate is to be generated.
6. Click View to view the interest certificate/s for the specified period. OR Click Back. The previous screen appears.
Interest Certificate Details
Interest Certificates
User Manual Oracle Banking Digital Experience Retail Customer Services 107
Field Description
Field Name Description
The following fields are displayed as records for interest certificates generated for the account/s:
Account Number The account number of the customer for which the interest certificate has been generated.
Product Type The product type of the account for which interest was credited/ debited.
Date The date on which interest was credited/ debited in the account.
Interest Credited The amount of interest which was credited in the account.
This field is displayed for Current and Savings and Deposits accounts.
Interest Paid The amount of interest which was debited from the account.
This field is displayed only for Loan accounts.
7. Click to download the interest certificate for accounts in .pdf format. The Interest Certificate generated is password protected.
8. Click the Back to Dashboard link to navigate back to the dashboard.
Home
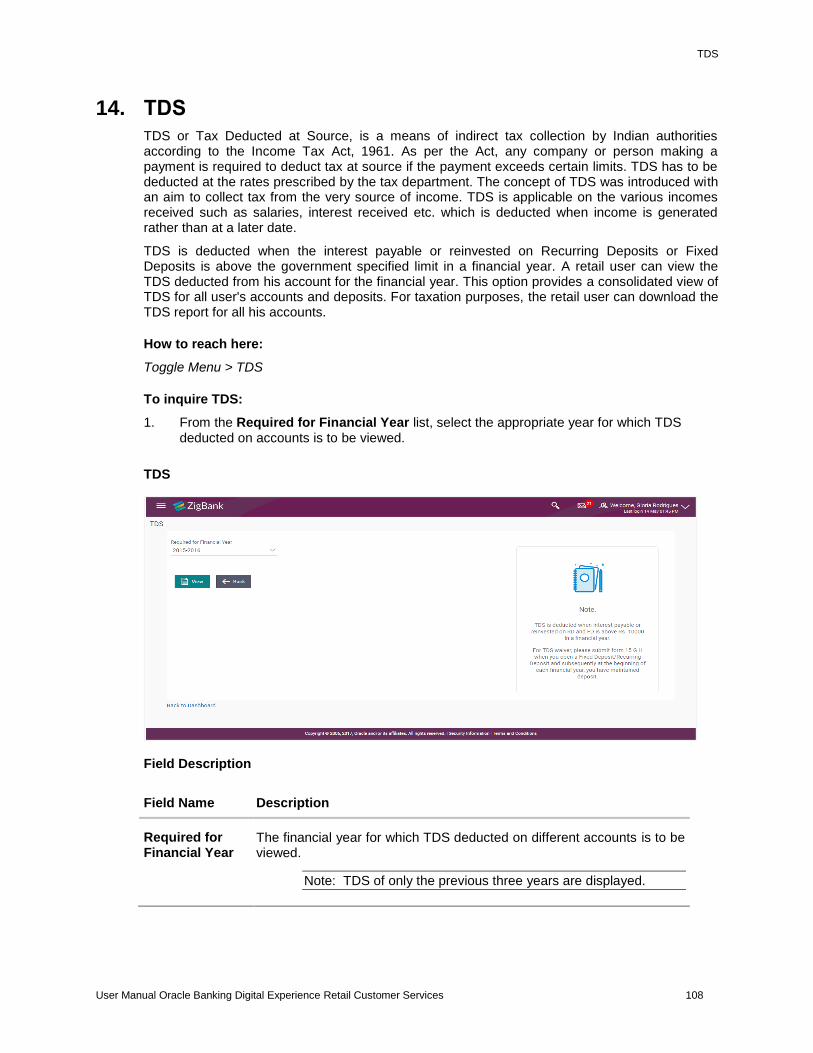
TDS
User Manual Oracle Banking Digital Experience Retail Customer Services 108
14. TDS
TDS or Tax Deducted at Source, is a means of indirect tax collection by Indian authorities according to the Income Tax Act, 1961. As per the Act, any company or person making a payment is required to deduct tax at source if the payment exceeds certain limits. TDS has to be deducted at the rates prescribed by the tax department. The concept of TDS was introduced with an aim to collect tax from the very source of income. TDS is applicable on the various incomes received such as salaries, interest received etc. which is deducted when income is generated rather than at a later date.
TDS is deducted when the interest payable or reinvested on Recurring Deposits or Fixed Deposits is above the government specified limit in a financial year. A retail user can view the TDS deducted from his account for the financial year. This option provides a consolidated view of TDS for all user's accounts and deposits. For taxation purposes, the retail user can download the TDS report for all his accounts.
How to reach here:
Toggle Menu > TDS
To inquire TDS:
1. From the Required for Financial Year list, select the appropriate year for which TDS deducted on accounts is to be viewed.
TDS
Field Description
Field Name Description
Required for Financial Year
The financial year for which TDS deducted on different accounts is to be viewed.
Note: TDS of only the previous three years are displayed.
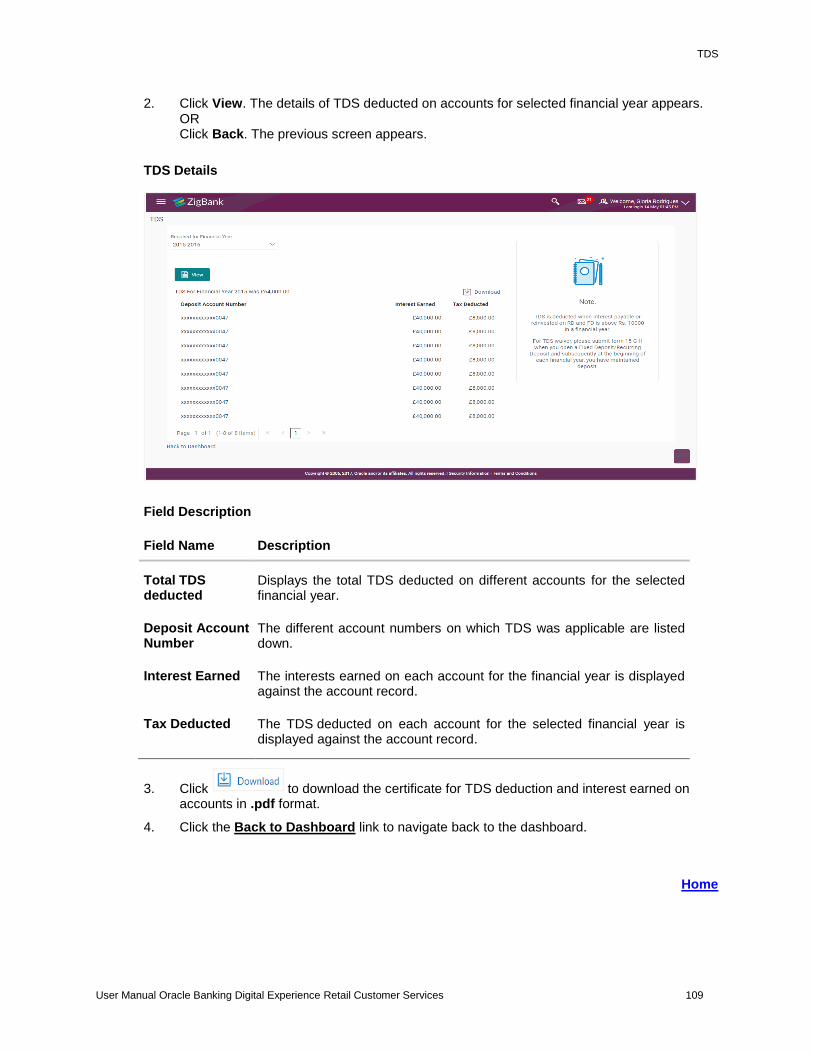
TDS
User Manual Oracle Banking Digital Experience Retail Customer Services 109
2. Click View. The details of TDS deducted on accounts for selected financial year appears. OR Click Back. The previous screen appears.
TDS Details
Field Description
Field Name Description
Total TDS deducted
Displays the total TDS deducted on different accounts for the selected financial year.
Deposit Account Number
The different account numbers on which TDS was applicable are listed down.
Interest Earned The interests earned on each account for the financial year is displayed against the account record.
Tax Deducted The TDS deducted on each account for the selected financial year is displayed against the account record.
3. Click to download the certificate for TDS deduction and interest earned on accounts in .pdf format.
4. Click the Back to Dashboard link to navigate back to the dashboard.
Home
Service Request
User Manual Oracle Banking Digital Experience Retail Customer Services 110
15. Service Request
This feature enables users to initiate service requests as well as to view all the service requests initiated by them along with the updated status of each service request.
15.1 Raise New Request
The user can view all the service requests defined by the System/ Bank administrator on this screen. These service requests are grouped under Product and Request Category so that the user can easily locate and raise a service request according to their requirement. A free search is also provided on the screen that enables the user to search for a specific service request on the basis of the service request name.
Using this screen the users can raise a new service request by inputting the data in the fields (fields chosen by the System/ Bank administrator while creating Service Request Definition).
Pre-Requisites
Transaction access is provided to the Retail User.
Features Supported In Application
The module supports the following features:
Raise New Request – Summary
Raise New Request
How to reach here:
Dashboard > Service Request Widget > Raise New Request OR Toggle menu > Service Request > Raise New Request
15.1.1 Raise New Request - Summary
To raise a service request:
1. The initial (summary) page of the service request appears.
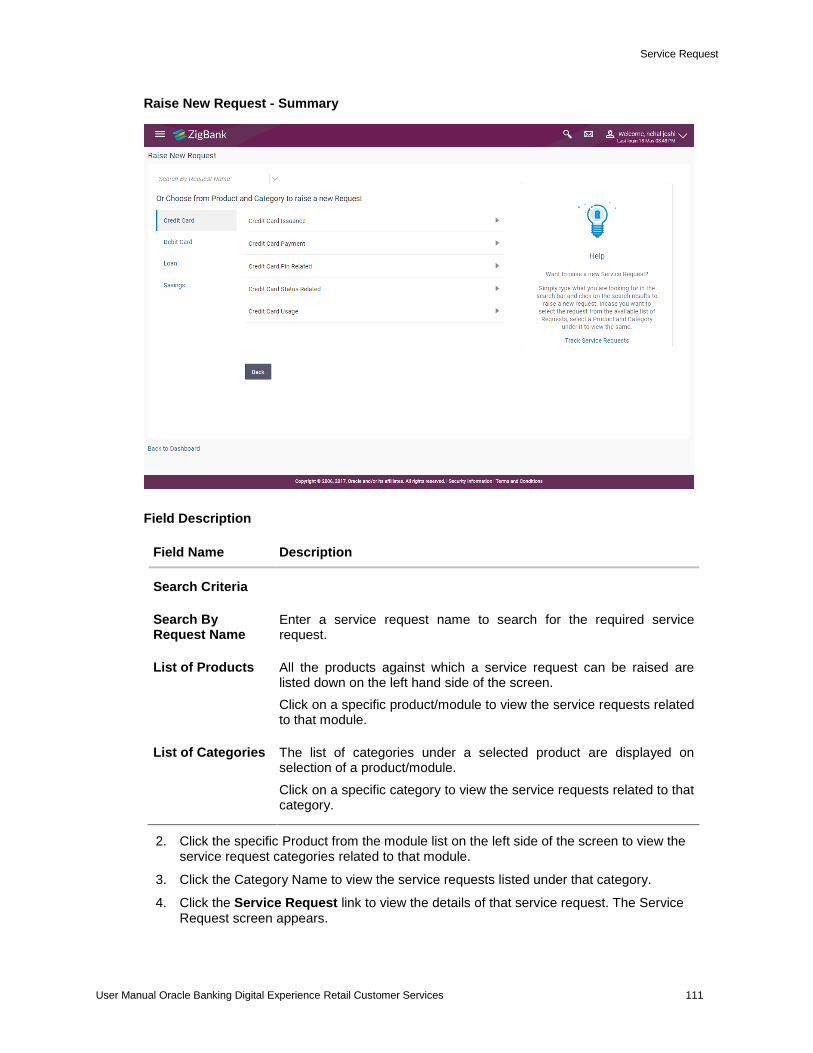
Service Request
User Manual Oracle Banking Digital Experience Retail Customer Services 111
Raise New Request - Summary
Field Description
Field Name Description
Search Criteria
Search By Request Name
Enter a service request name to search for the required service request.
List of Products All the products against which a service request can be raised are listed down on the left hand side of the screen.
Click on a specific product/module to view the service requests related to that module.
List of Categories The list of categories under a selected product are displayed on selection of a product/module.
Click on a specific category to view the service requests related to that category.
2. Click the specific Product from the module list on the left side of the screen to view the service request categories related to that module.
3. Click the Category Name to view the service requests listed under that category.
4. Click the Service Request link to view the details of that service request. The Service Request screen appears.
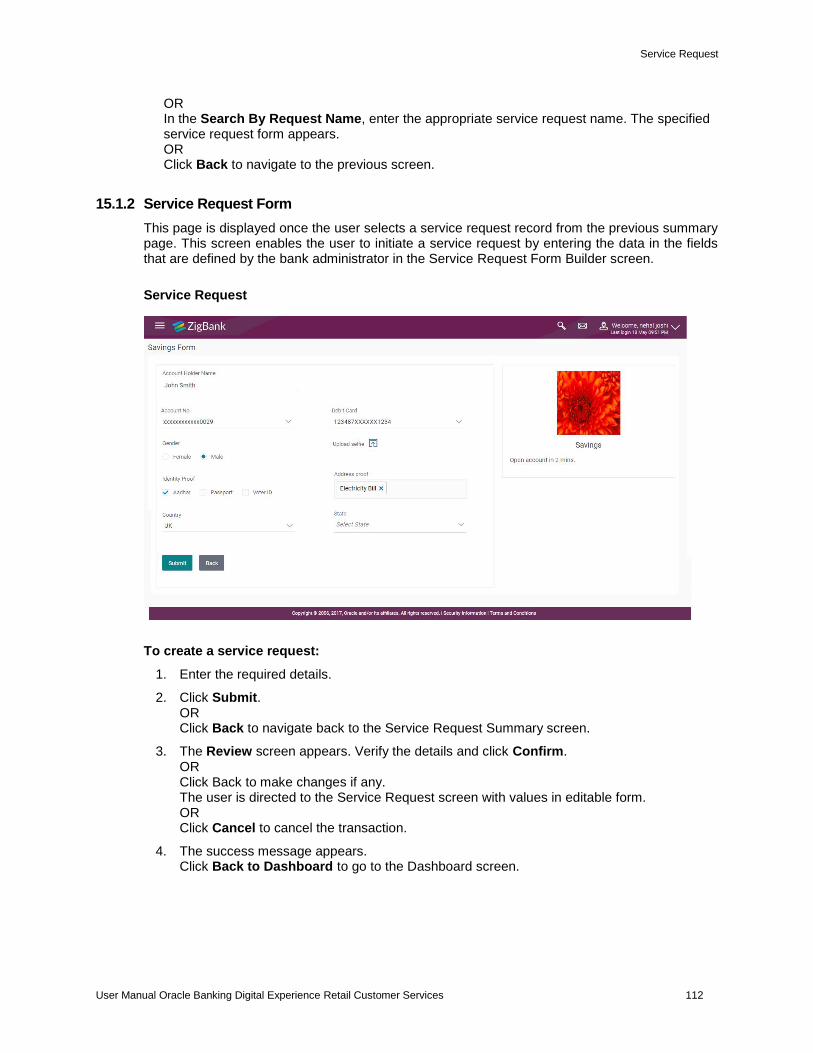
Service Request
User Manual Oracle Banking Digital Experience Retail Customer Services 112
OR In the Search By Request Name, enter the appropriate service request name. The specified service request form appears. OR Click Back to navigate to the previous screen.
15.1.2 Service Request Form
This page is displayed once the user selects a service request record from the previous summary page. This screen enables the user to initiate a service request by entering the data in the fields that are defined by the bank administrator in the Service Request Form Builder screen.
Service Request
To create a service request:
1. Enter the required details.
2. Click Submit. OR Click Back to navigate back to the Service Request Summary screen.
3. The Review screen appears. Verify the details and click Confirm. OR Click Back to make changes if any. The user is directed to the Service Request screen with values in editable form. OR Click Cancel to cancel the transaction.
4. The success message appears. Click Back to Dashboard to go to the Dashboard screen.
Service Request
User Manual Oracle Banking Digital Experience Retail Customer Services 113
15.2 Track Request
The user can view all the service requests along with the updated status of each service request initiated by them. This feature enables the user to view the details of each service request and hence, enables the user to keep track of all the service request initiated by him. The search criteria provided enables the user to filter service requests based on various criteria such as request type, status, reference number, date range etc.
Below are the Service Requests that are available out of the box in the system:
Credit Card Supplementary
Credit Card PIN Request
Replace Credit Card
Update Card Limits
Update Credit Card Auto Payment
Register Credit Card Auto Payment
Deregister Credit Card Auto Payment
Activate Credit Card
Hotlist Debit Card
Cancel Debit Card
Debit Card PIN Request
Apply Debit Card
Replace Debit Card
Block Debit Card (temporary block)
Unblock Debit Card (remove temporary block)
Upgrade Debit Card
The bank can define new service requests in addition to the above mentioned Service Requests.
Pre-Requisites
Transaction access is provided to the Retail User.
Features Supported In Application
The module supports following features:
Search Service Request
View Service Request details
How to reach here:
Dashboard > Service Request Widget > Track Request OR Toggle menu > Service Request > Track Request
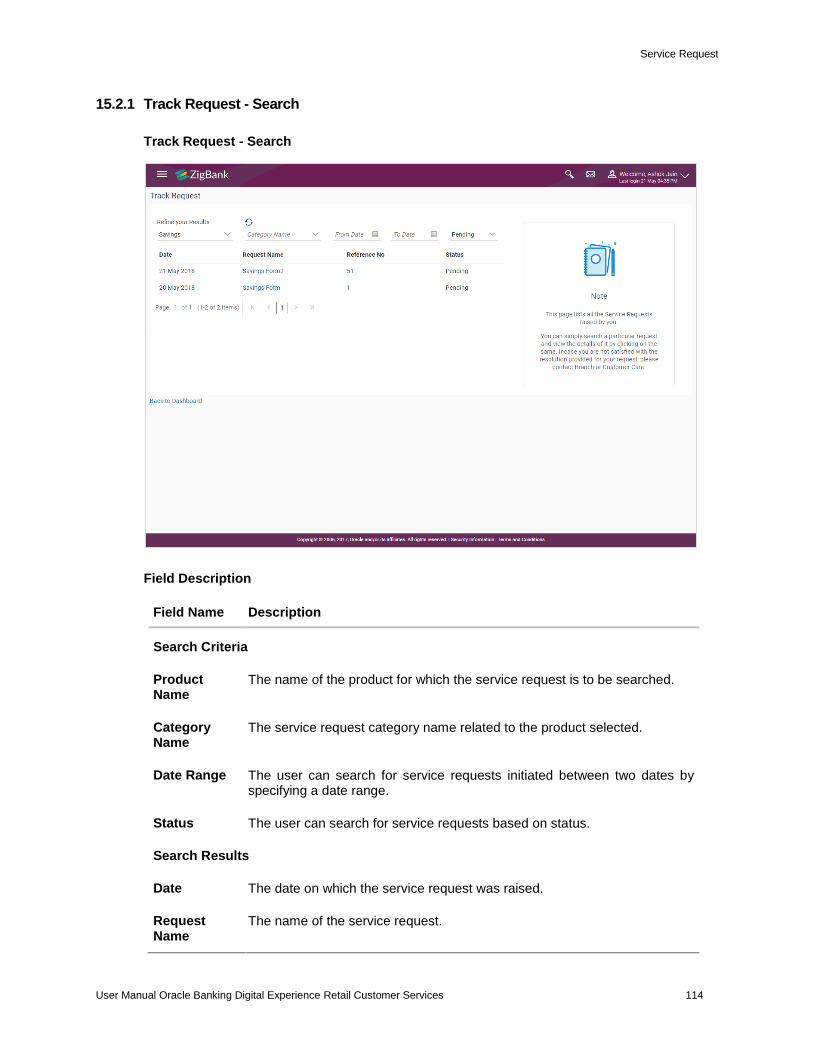
Service Request
User Manual Oracle Banking Digital Experience Retail Customer Services 114
15.2.1 Track Request - Search
Track Request - Search
Field Description
Field Name Description
Search Criteria
Product Name
The name of the product for which the service request is to be searched.
Category Name
The service request category name related to the product selected.
Date Range The user can search for service requests initiated between two dates by specifying a date range.
Status The user can search for service requests based on status.
Search Results
Date The date on which the service request was raised.
Request Name
The name of the service request.
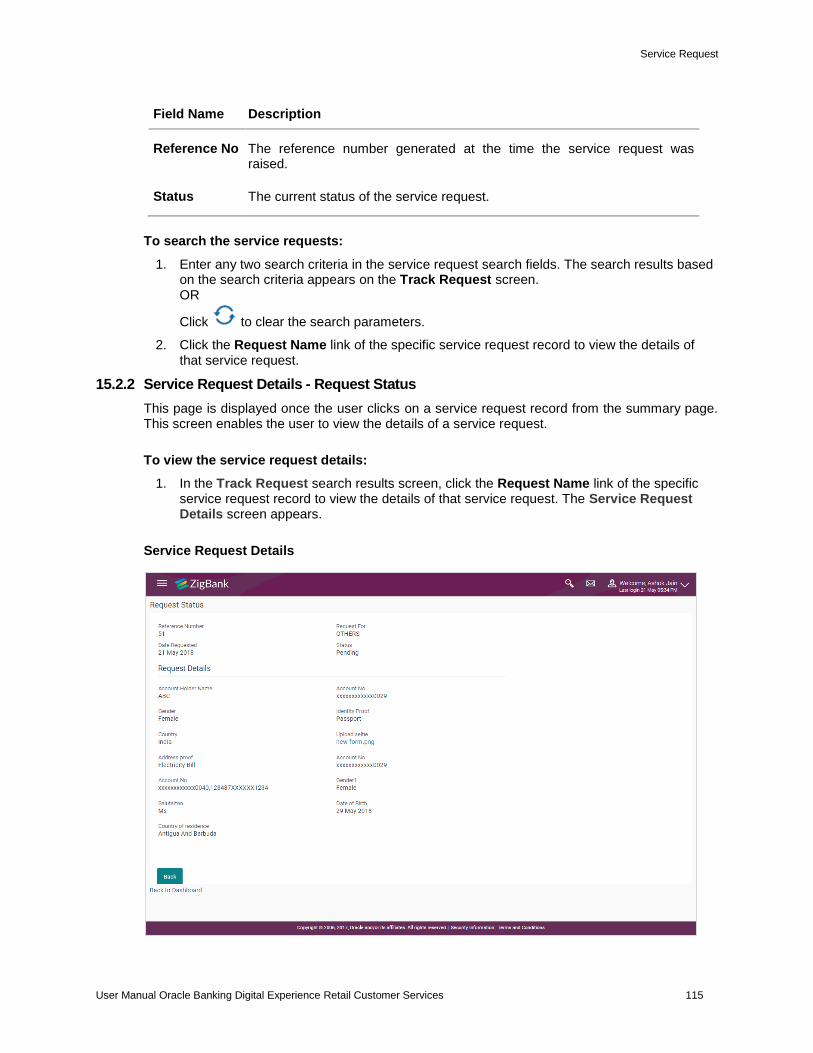
Service Request
User Manual Oracle Banking Digital Experience Retail Customer Services 115
Field Name Description
Reference No The reference number generated at the time the service request was raised.
Status The current status of the service request.
To search the service requests:
1. Enter any two search criteria in the service request search fields. The search results based on the search criteria appears on the Track Request screen. OR
Click to clear the search parameters.
2. Click the Request Name link of the specific service request record to view the details of that service request.
15.2.2 Service Request Details - Request Status
This page is displayed once the user clicks on a service request record from the summary page. This screen enables the user to view the details of a service request.
To view the service request details:
1. In the Track Request search results screen, click the Request Name link of the specific service request record to view the details of that service request. The Service Request Details screen appears.
Service Request Details
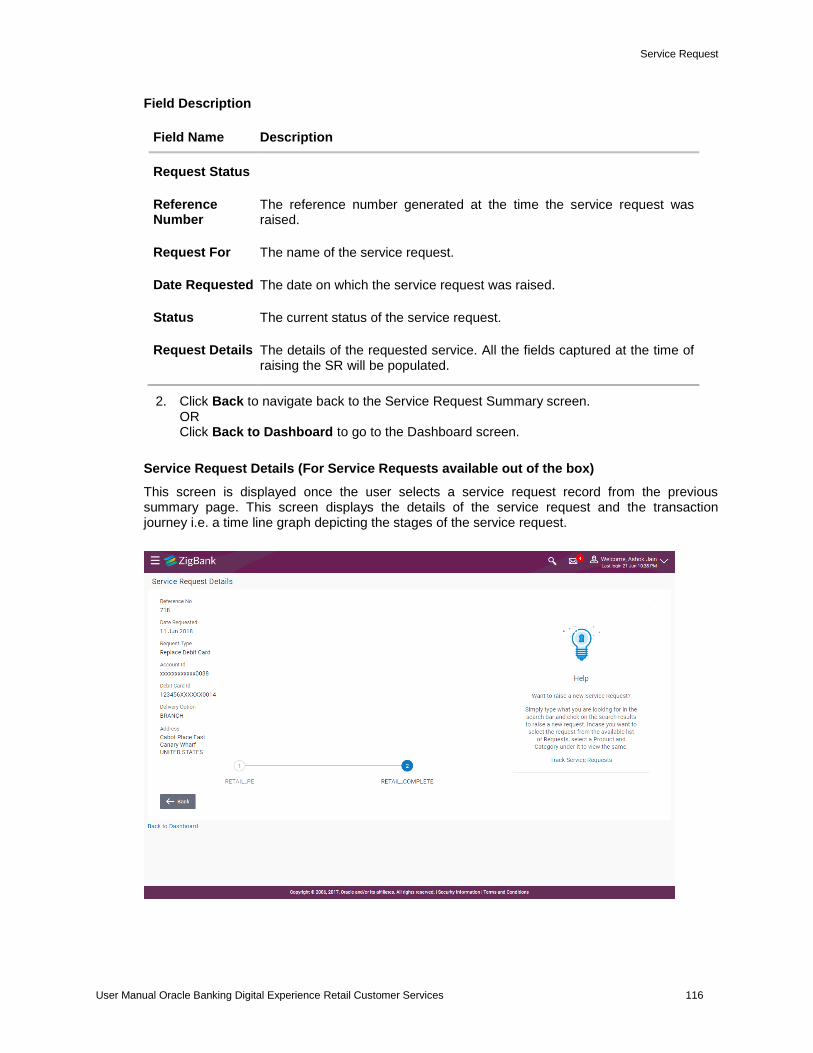
Service Request
User Manual Oracle Banking Digital Experience Retail Customer Services 116
Field Description
Field Name Description
Request Status
Reference Number
The reference number generated at the time the service request was raised.
Request For The name of the service request.
Date Requested The date on which the service request was raised.
Status The current status of the service request.
Request Details The details of the requested service. All the fields captured at the time of raising the SR will be populated.
2. Click Back to navigate back to the Service Request Summary screen. OR Click Back to Dashboard to go to the Dashboard screen.
Service Request Details (For Service Requests available out of the box)
This screen is displayed once the user selects a service request record from the previous summary page. This screen displays the details of the service request and the transaction journey i.e. a time line graph depicting the stages of the service request.
Service Request
User Manual Oracle Banking Digital Experience Retail Customer Services 117
Field Description
Field Name Description
Reference No The reference number generated at the time the service request was raised.
Date Requested The date on which the service request was raised.
Request Type The type of service request initiated.
Service Request Details
This section displays the fields depending on type of service request initiated.
Transaction Journey
This section displays the stages of the service request in the form of a timeline graph. Details pertaining to when the service request was initiated along with when the service request was approved or rejected are displayed with the help of this timeline.
3. Click Back to navigate back to the Service Request Summary screen. OR Click Back to Dashboard to go to the Dashboard screen.
Home
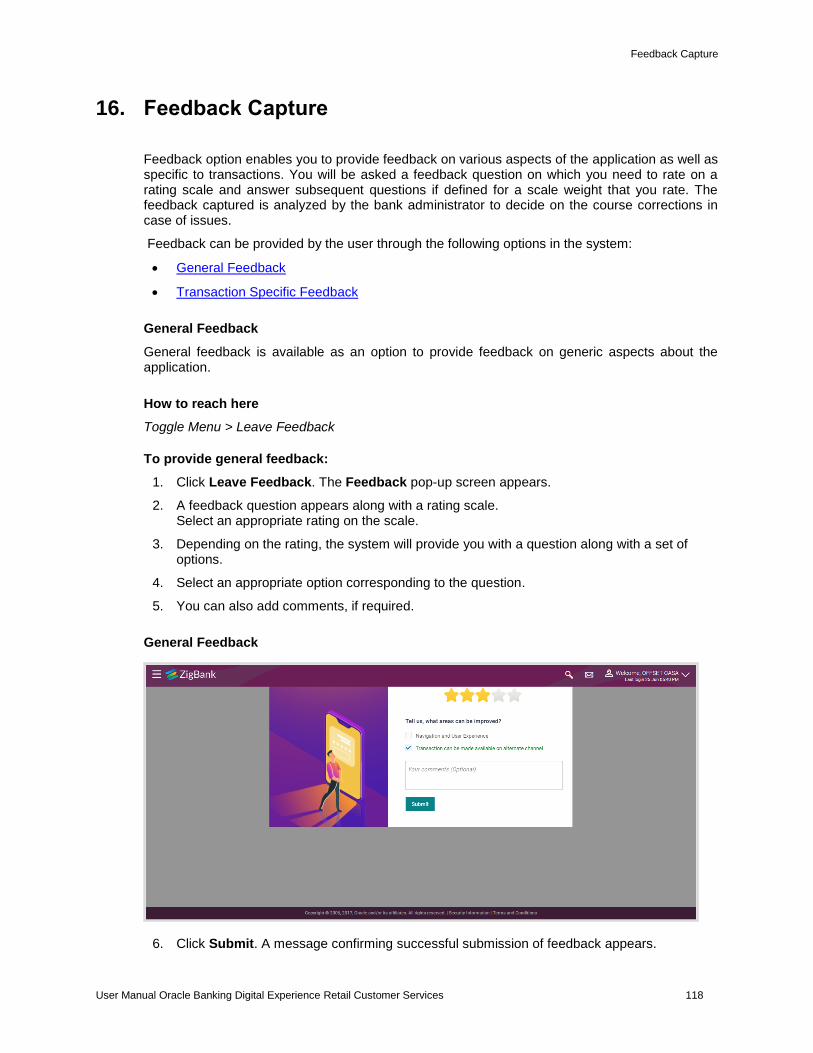
Feedback Capture
User Manual Oracle Banking Digital Experience Retail Customer Services 118
16. Feedback Capture
Feedback option enables you to provide feedback on various aspects of the application as well as specific to transactions. You will be asked a feedback question on which you need to rate on a rating scale and answer subsequent questions if defined for a scale weight that you rate. The feedback captured is analyzed by the bank administrator to decide on the course corrections in case of issues.
Feedback can be provided by the user through the following options in the system:
General Feedback
Transaction Specific Feedback
General Feedback
General feedback is available as an option to provide feedback on generic aspects about the application.
How to reach here
Toggle Menu > Leave Feedback
To provide general feedback:
1. Click Leave Feedback. The Feedback pop-up screen appears.
2. A feedback question appears along with a rating scale. Select an appropriate rating on the scale.
3. Depending on the rating, the system will provide you with a question along with a set of options.
4. Select an appropriate option corresponding to the question.
5. You can also add comments, if required.
General Feedback
6. Click Submit. A message confirming successful submission of feedback appears.
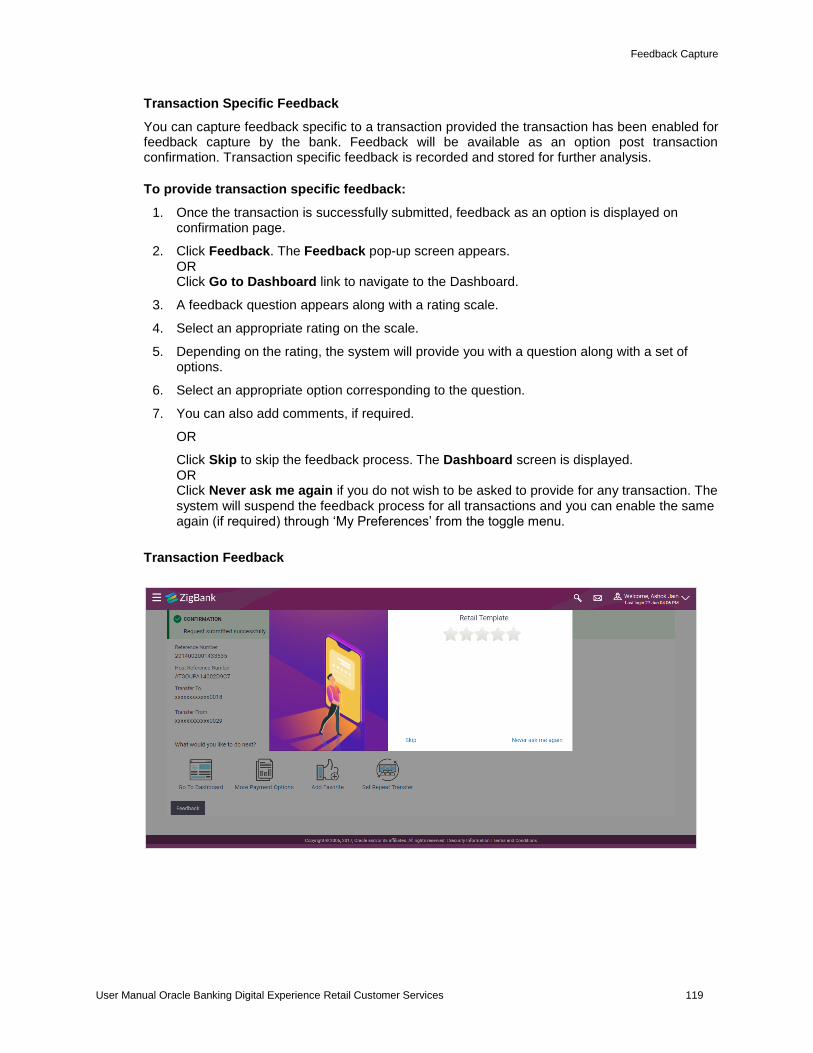
Feedback Capture
User Manual Oracle Banking Digital Experience Retail Customer Services 119
Transaction Specific Feedback
You can capture feedback specific to a transaction provided the transaction has been enabled for feedback capture by the bank. Feedback will be available as an option post transaction confirmation. Transaction specific feedback is recorded and stored for further analysis.
To provide transaction specific feedback:
1. Once the transaction is successfully submitted, feedback as an option is displayed on confirmation page.
2. Click Feedback. The Feedback pop-up screen appears. OR Click Go to Dashboard link to navigate to the Dashboard.
3. A feedback question appears along with a rating scale.
4. Select an appropriate rating on the scale.
5. Depending on the rating, the system will provide you with a question along with a set of options.
6. Select an appropriate option corresponding to the question.
7. You can also add comments, if required.
OR
Click Skip to skip the feedback process. The Dashboard screen is displayed. OR Click Never ask me again if you do not wish to be asked to provide for any transaction. The system will suspend the feedback process for all transactions and you can enable the same again (if required) through ‘My Preferences’ from the toggle menu.
Transaction Feedback

Feedback Capture
User Manual Oracle Banking Digital Experience Retail Customer Services 120
8. Click Submit. A message confirming successful submission of feedback appears.
Home
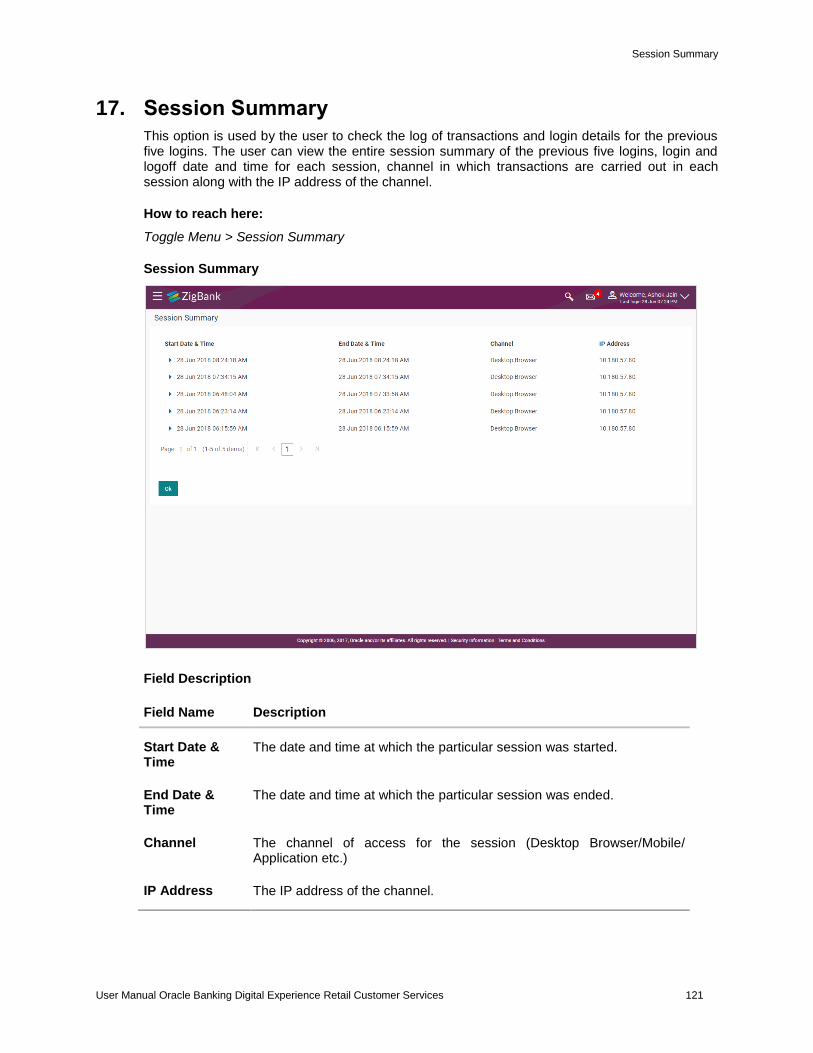
Session Summary
User Manual Oracle Banking Digital Experience Retail Customer Services 121
17. Session Summary
This option is used by the user to check the log of transactions and login details for the previous five logins. The user can view the entire session summary of the previous five logins, login and logoff date and time for each session, channel in which transactions are carried out in each session along with the IP address of the channel.
How to reach here:
Toggle Menu > Session Summary
Session Summary
Field Description
Field Name Description
Start Date & Time
The date and time at which the particular session was started.
End Date & Time
The date and time at which the particular session was ended.
Channel The channel of access for the session (Desktop Browser/Mobile/ Application etc.)
IP Address The IP address of the channel.
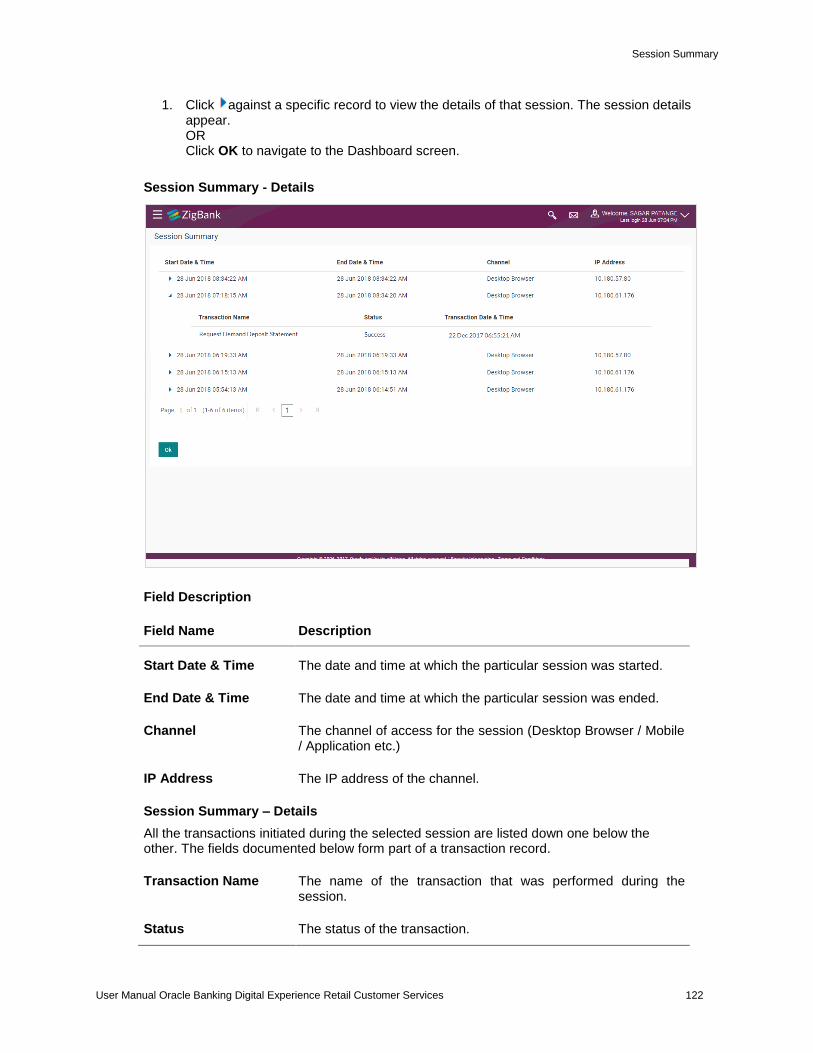
Session Summary
User Manual Oracle Banking Digital Experience Retail Customer Services 122
1. Click against a specific record to view the details of that session. The session details appear. OR Click OK to navigate to the Dashboard screen.
Session Summary - Details
Field Description
Field Name Description
Start Date & Time The date and time at which the particular session was started.
End Date & Time The date and time at which the particular session was ended.
Channel The channel of access for the session (Desktop Browser / Mobile / Application etc.)
IP Address The IP address of the channel.
Session Summary – Details
All the transactions initiated during the selected session are listed down one below the other. The fields documented below form part of a transaction record.
Transaction Name The name of the transaction that was performed during the session.
Status The status of the transaction.
Session Summary
User Manual Oracle Banking Digital Experience Retail Customer Services 123
Field Name Description
Transaction Date & Time
The date and time at which the transaction was performed.
2. Click OK to navigate to the Dashboard screen.
Home
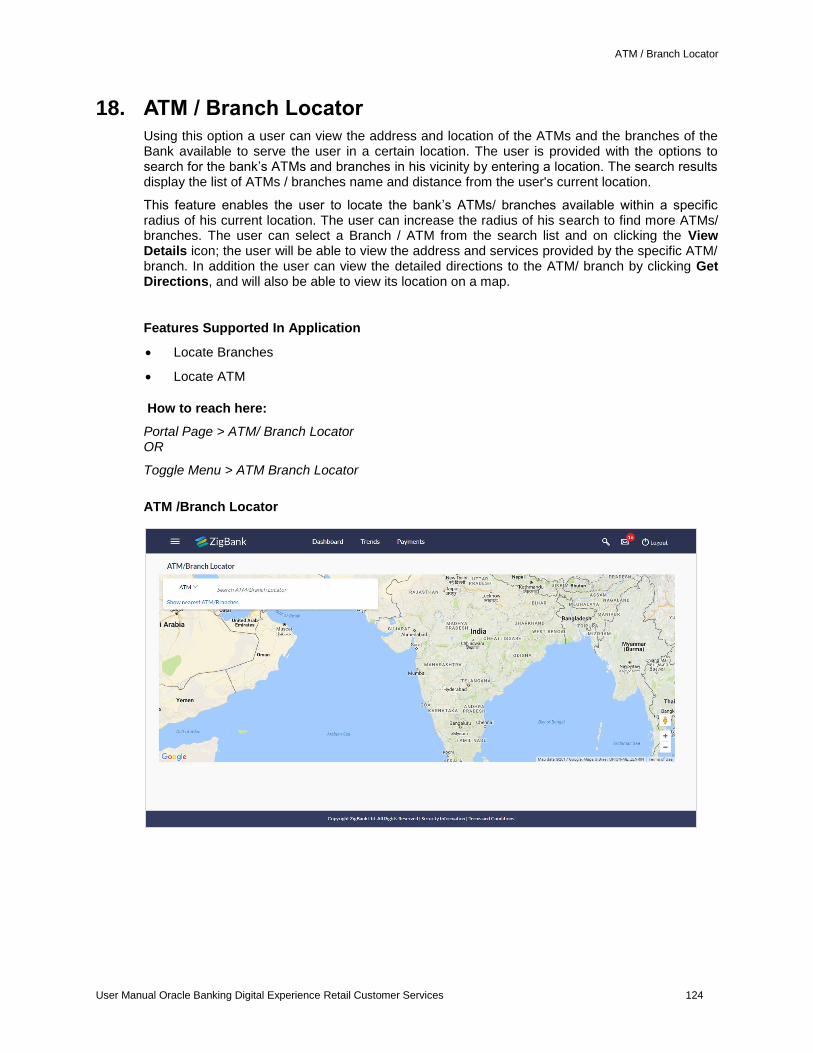
ATM / Branch Locator
User Manual Oracle Banking Digital Experience Retail Customer Services 124
18. ATM / Branch Locator
Using this option a user can view the address and location of the ATMs and the branches of the Bank available to serve the user in a certain location. The user is provided with the options to search for the bank’s ATMs and branches in his vicinity by entering a location. The search results display the list of ATMs / branches name and distance from the user's current location.
This feature enables the user to locate the bank’s ATMs/ branches available within a specific radius of his current location. The user can increase the radius of his search to find more ATMs/ branches. The user can select a Branch / ATM from the search list and on clicking the View Details icon; the user will be able to view the address and services provided by the specific ATM/ branch. In addition the user can view the detailed directions to the ATM/ branch by clicking Get Directions, and will also be able to view its location on a map.
Features Supported In Application
Locate Branches
Locate ATM
How to reach here:
Portal Page > ATM/ Branch Locator OR
Toggle Menu > ATM Branch Locator
ATM /Branch Locator
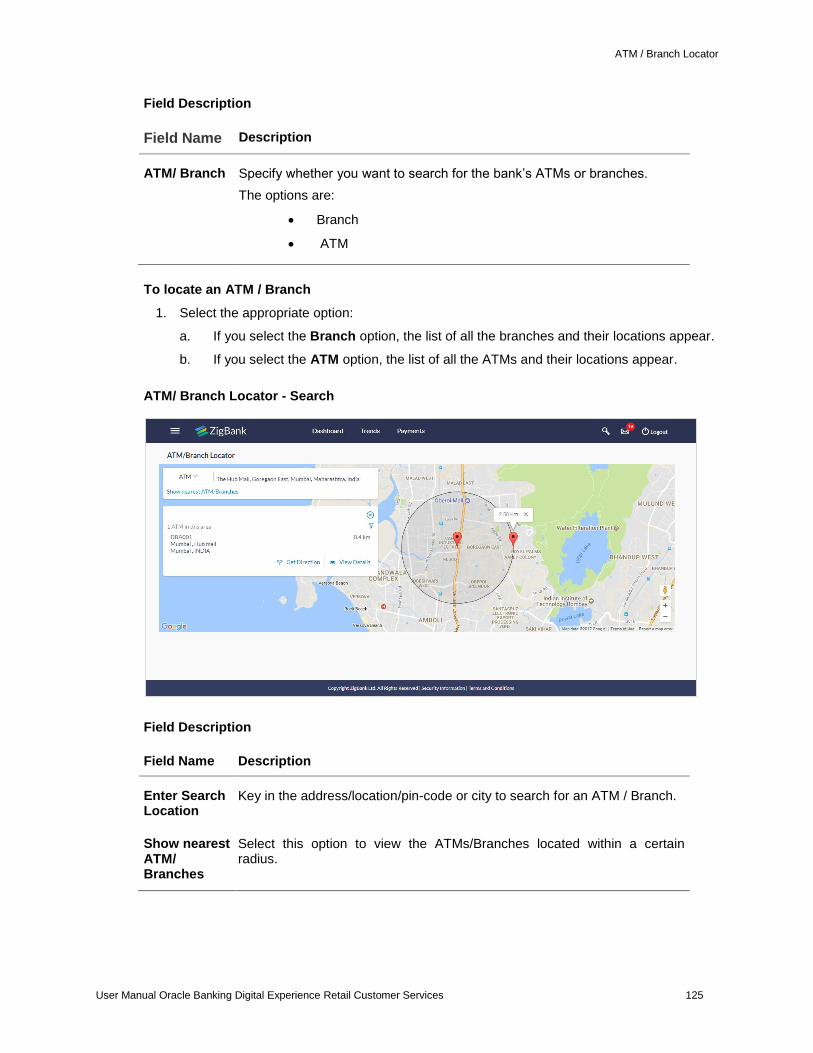
ATM / Branch Locator
User Manual Oracle Banking Digital Experience Retail Customer Services 125
Field Description
Field Name Description
ATM/ Branch Specify whether you want to search for the bank’s ATMs or branches.
The options are:
Branch
ATM
To locate an ATM / Branch
1. Select the appropriate option:
a. If you select the Branch option, the list of all the branches and their locations appear.
b. If you select the ATM option, the list of all the ATMs and their locations appear.
ATM/ Branch Locator - Search
Field Description
Field Name Description
Enter Search Location
Key in the address/location/pin-code or city to search for an ATM / Branch.
Show nearest ATM/ Branches
Select this option to view the ATMs/Branches located within a certain radius.
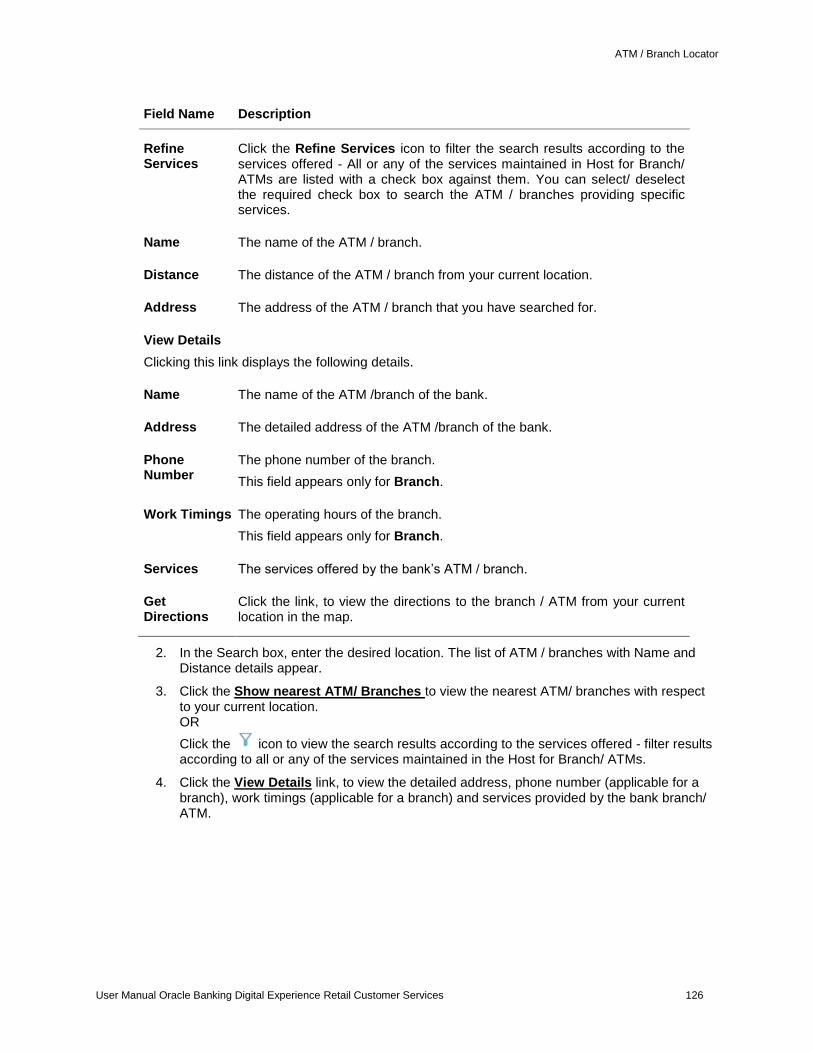
ATM / Branch Locator
User Manual Oracle Banking Digital Experience Retail Customer Services 126
Field Name Description
Refine Services
Click the Refine Services icon to filter the search results according to the services offered - All or any of the services maintained in Host for Branch/ ATMs are listed with a check box against them. You can select/ deselect the required check box to search the ATM / branches providing specific services.
Name The name of the ATM / branch.
Distance The distance of the ATM / branch from your current location.
Address The address of the ATM / branch that you have searched for.
View Details
Clicking this link displays the following details.
Name The name of the ATM /branch of the bank.
Address The detailed address of the ATM /branch of the bank.
Phone Number
The phone number of the branch.
This field appears only for Branch.
Work Timings The operating hours of the branch.
This field appears only for Branch.
Services The services offered by the bank’s ATM / branch.
Get Directions
Click the link, to view the directions to the branch / ATM from your current location in the map.
2. In the Search box, enter the desired location. The list of ATM / branches with Name and Distance details appear.
3. Click the Show nearest ATM/ Branches to view the nearest ATM/ branches with respect to your current location. OR
Click the icon to view the search results according to the services offered - filter results according to all or any of the services maintained in the Host for Branch/ ATMs.
4. Click the View Details link, to view the detailed address, phone number (applicable for a branch), work timings (applicable for a branch) and services provided by the bank branch/ ATM.
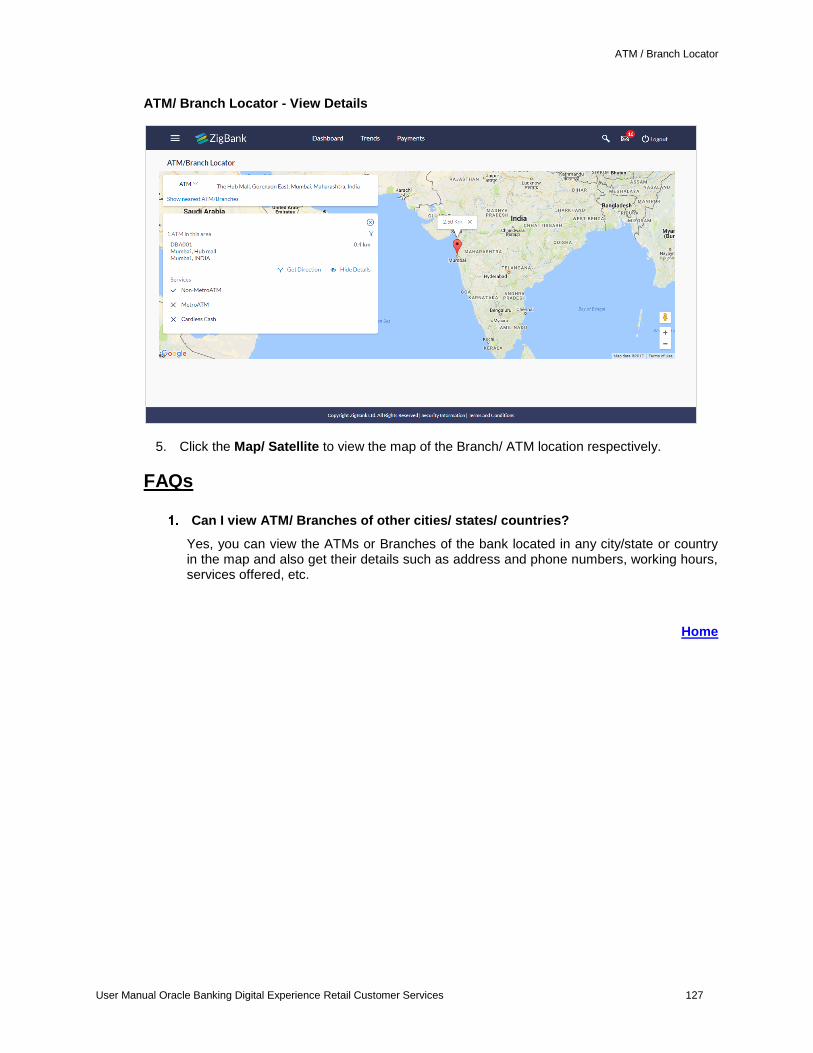
ATM / Branch Locator
User Manual Oracle Banking Digital Experience Retail Customer Services 127
ATM/ Branch Locator - View Details
5. Click the Map/ Satellite to view the map of the Branch/ ATM location respectively.
FAQs
Can I view ATM/ Branches of other cities/ states/ countries?
Yes, you can view the ATMs or Branches of the bank located in any city/state or country in the map and also get their details such as address and phone numbers, working hours, services offered, etc.
Home
Limits
User Manual Oracle Banking Digital Experience Retail Customer Services 128
19. Limits
The bank can put restrictions on the transactions initiated by customers from the online banking
channels. The bank applies different types of limits on different transactions. These limits may
vary depending on the user / customer type.
The different types of limits are as follows:
Permitted number of transactions in a day
Cumulative amount of transactions in a day
Minimum amount for a transaction
Maximum amount for a transaction
The limits function enables a retail user to view the daily limits (applicable at specific transaction level and at transaction group level) assigned by the bank for a specific channel or for a group of channels. The user can edit and reduce the cumulative transaction amount limit offered by the bank for individual transactions. The user can also reduce the maximum transaction count limit offered by the bank for individual transactions.
Further modification of limits will be enabled up to the limits offered by the bank for each transaction. Updated limits will be applicable from the next calendar day.
Pre-requisites
The user must have an active Current and Savings Account relationship with Bank.
Features supported in the Application
View Transaction Limits: Daily and monthly
Reduce cumulative daily amount limit for each transaction
Reduce cumulative daily count limit for each transaction
How to reach here:
Toggle Menu > Limits
19.1 Limits – View
The logged in Retail user can view the transaction limits offered by the bank for each transaction using this option.
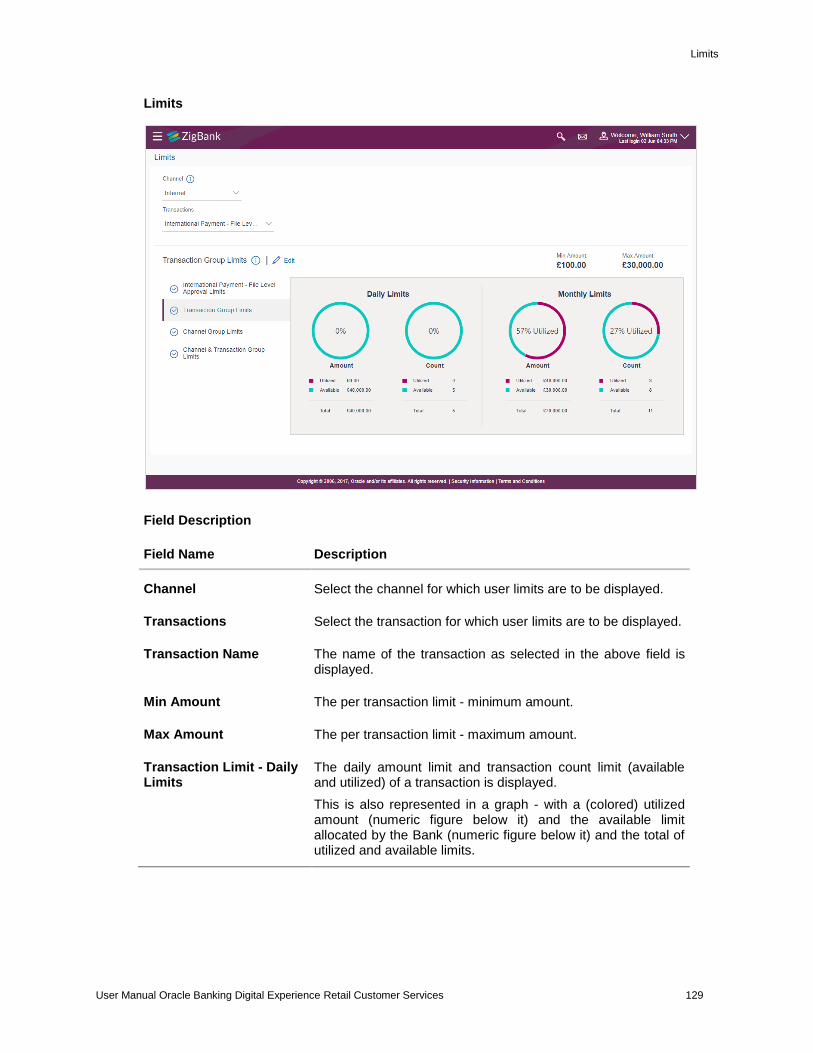
Limits
User Manual Oracle Banking Digital Experience Retail Customer Services 129
Limits
Field Description
Field Name Description
Channel Select the channel for which user limits are to be displayed.
Transactions Select the transaction for which user limits are to be displayed.
Transaction Name The name of the transaction as selected in the above field is displayed.
Min Amount The per transaction limit - minimum amount.
Max Amount The per transaction limit - maximum amount.
Transaction Limit - Daily Limits
The daily amount limit and transaction count limit (available and utilized) of a transaction is displayed.
This is also represented in a graph - with a (colored) utilized amount (numeric figure below it) and the available limit allocated by the Bank (numeric figure below it) and the total of utilized and available limits.
Limits
User Manual Oracle Banking Digital Experience Retail Customer Services 130
Field Name Description
Transaction Limit - Monthly Limits
The monthly amount limit and transaction count limit (available and utilized) of a transaction is displayed.
This is also represented in a graph - with a (colored) utilized amount (numeric figure below it) and the available limit allocated by the Bank (numeric figure below it) and the total of utilized and available limits.
Transaction Group Limit - Daily Limits
The daily amount limit and transaction count limit (available and utilized) of a transaction group is displayed.
This is also represented in a graph - with a (colored) utilized amount (numeric figure below it) and the available limit allocated by the Bank (numeric figure below it) and the total of utilized and available limits.
Transaction Group Limit - Monthly Limits
The monthly amount limit and transaction count limit (available and utilized) of a transaction group is displayed.
This is also represented in a graph - with a (colored) utilized amount (numeric figure below it) and the available limit allocated by the Bank (numeric figure below it) and the total of utilized and available limits.
Channel Group Limit - Daily Limits
The daily amount limit and transaction count limit (available and utilized) of a channel group is displayed.
This is also represented in a graph - with a (colored) utilized amount (numeric figure below it) and the available limit allocated by the Bank (numeric figure below it) and the total of utilized and available limits.
Channel Group Limit - Monthly Limits
The monthly amount limit and transaction count limit (available and utilized) of a channel group is displayed.
This is also represented in a graph - with a (colored) utilized amount (numeric figure below it) and the available limit allocated by the Bank (numeric figure below it) and the total of utilized and available limits.
Channel & Transaction Group Limit - Daily Limits
The daily amount limit and transaction count limit (available and utilized) of a channel and transaction group is displayed.
This is also represented in a graph - with a (colored) utilized amount (numeric figure below it) and the available limit allocated by the Bank (numeric figure below it) and the total of utilized and available limits.
Channel & Transaction Group Limit - Monthly Limits
The monthly amount limit and transaction count limit (available and utilized) of a channel and transaction group is displayed.
This is also represented in a graph - with a (colored) utilized amount (numeric figure below it) and the available limit allocated by the Bank (numeric figure below it) and the total of utilized and available limits.
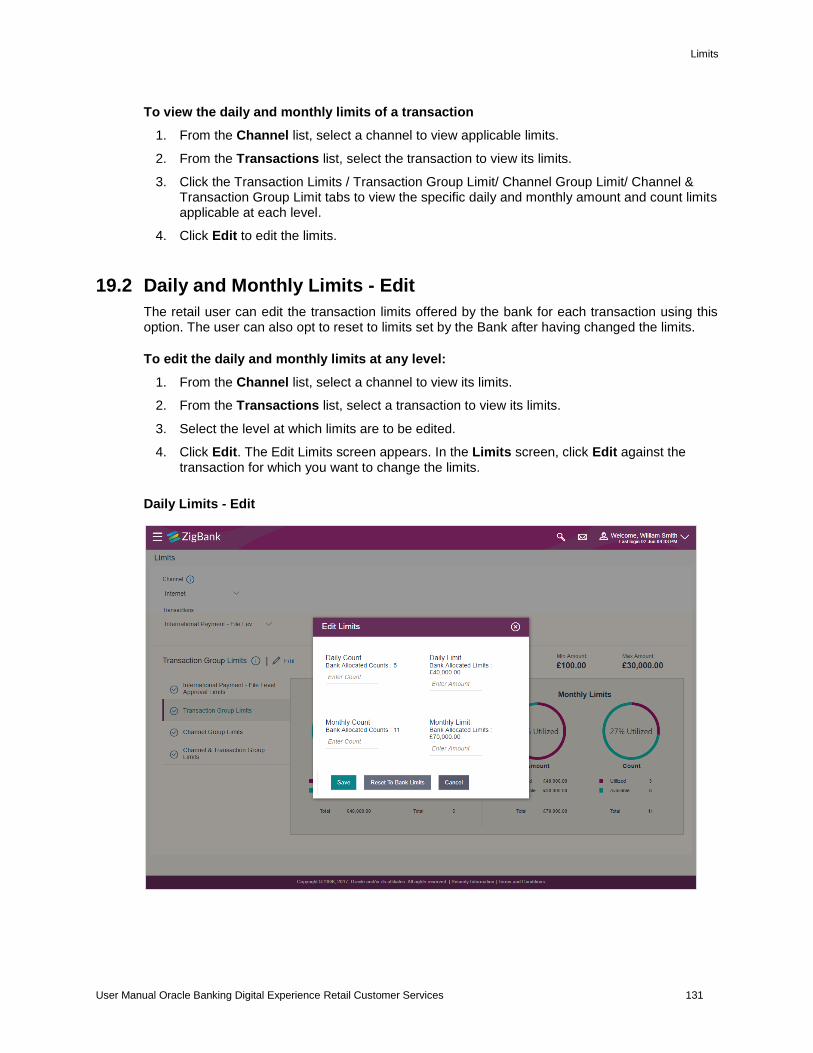
Limits
User Manual Oracle Banking Digital Experience Retail Customer Services 131
To view the daily and monthly limits of a transaction
1. From the Channel list, select a channel to view applicable limits.
2. From the Transactions list, select the transaction to view its limits.
3. Click the Transaction Limits / Transaction Group Limit/ Channel Group Limit/ Channel & Transaction Group Limit tabs to view the specific daily and monthly amount and count limits applicable at each level.
4. Click Edit to edit the limits.
19.2 Daily and Monthly Limits - Edit
The retail user can edit the transaction limits offered by the bank for each transaction using this option. The user can also opt to reset to limits set by the Bank after having changed the limits.
To edit the daily and monthly limits at any level:
1. From the Channel list, select a channel to view its limits.
2. From the Transactions list, select a transaction to view its limits.
3. Select the level at which limits are to be edited.
4. Click Edit. The Edit Limits screen appears. In the Limits screen, click Edit against the transaction for which you want to change the limits.
Daily Limits - Edit
Limits
User Manual Oracle Banking Digital Experience Retail Customer Services 132
Field Description
Field Name Description
Daily Count
Bank Allocated Counts Transaction initiation limits allocated to you by the bank for the particular Transaction/ Transaction Group/ Channel Group / Transaction & Channel Group.
Enter Count Enter an amount to specify the new daily transaction count to be applicable to you for the particular Transaction/ Transaction Group/ Channel Group / Transaction & Channel Group.
Monthly Count
Bank Allocated Counts The cumulative transaction initiation limits allocated to you by the bank for the particular Transaction/ Transaction Group/ Channel Group / Transaction & Channel Group.
Enter Count Enter an amount to specify the new cumulative transaction count to be applicable to you for the Transaction/ Transaction Group/ Channel Group / Transaction & Channel Group.
Daily Limit
Bank Allocated Limits The daily transaction amount allocated to you by the bank for the particular Transaction/ Transaction Group/ Channel Group / Transaction & Channel Group.
Enter Amount Enter an amount to specify the new daily transaction amount to be applicable to you for the Transaction/ Transaction Group/ Channel Group / Transaction & Channel Group.
Monthly Limit
Bank Allocated Amount The monthly transaction amount, allocated to you by the bank for the particular Transaction/ Transaction Group/ Channel Group / Transaction & Channel Group.
Enter Amount Enter an amount to specify the new monthly transaction amount to be applicable to you for a Transaction/ Transaction Group/ Channel Group / Transaction & Channel Group.
5. Under the Daily Count section, enter a value in the Enter Count field to modify the daily count limit, if required.
6. Under the Monthly Count section, enter a value in the Enter Count field to modify the monthly count limit, if required.
7. Under the Daily Limit section, enter a value in the Enter Amount field to modify the daily amount limit, if required.
Limits
User Manual Oracle Banking Digital Experience Retail Customer Services 133
8. Under the Monthly Limit section, enter a value in the Enter Amount field to modify the monthly amount limit, if required.
9. Click Save to save the changes. OR Click Reset to Bank Limits, if you want to change the limits back to the limits offered by the Bank. The limits assigned by the bank for the transaction will be auto populated. OR
Click Cancel to cancel the operation and to navigate back to the Dashboard.
10. A message confirming successful limit updation, appears.
FAQs
Can the customer change the daily and monthly limits pre-set by bank?
Yes, the customer can modify the limits set i.e. the range of amount or the count etc. However any change has to be within the prescribed upper limit set by the bank.
Home
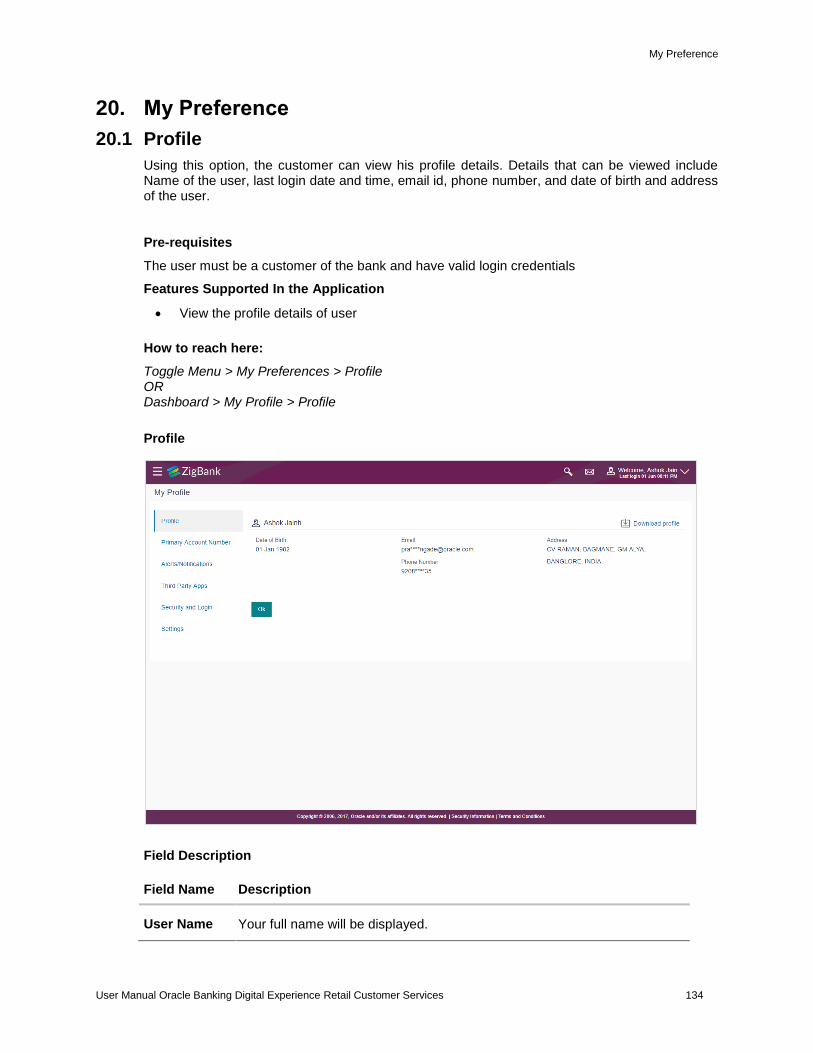
My Preference
User Manual Oracle Banking Digital Experience Retail Customer Services 134
20. My Preference
20.1 Profile
Using this option, the customer can view his profile details. Details that can be viewed include Name of the user, last login date and time, email id, phone number, and date of birth and address of the user.
Pre-requisites
The user must be a customer of the bank and have valid login credentials
Features Supported In the Application
View the profile details of user
How to reach here:
Toggle Menu > My Preferences > Profile OR Dashboard > My Profile > Profile
Profile
Field Description
Field Name Description
User Name Your full name will be displayed.
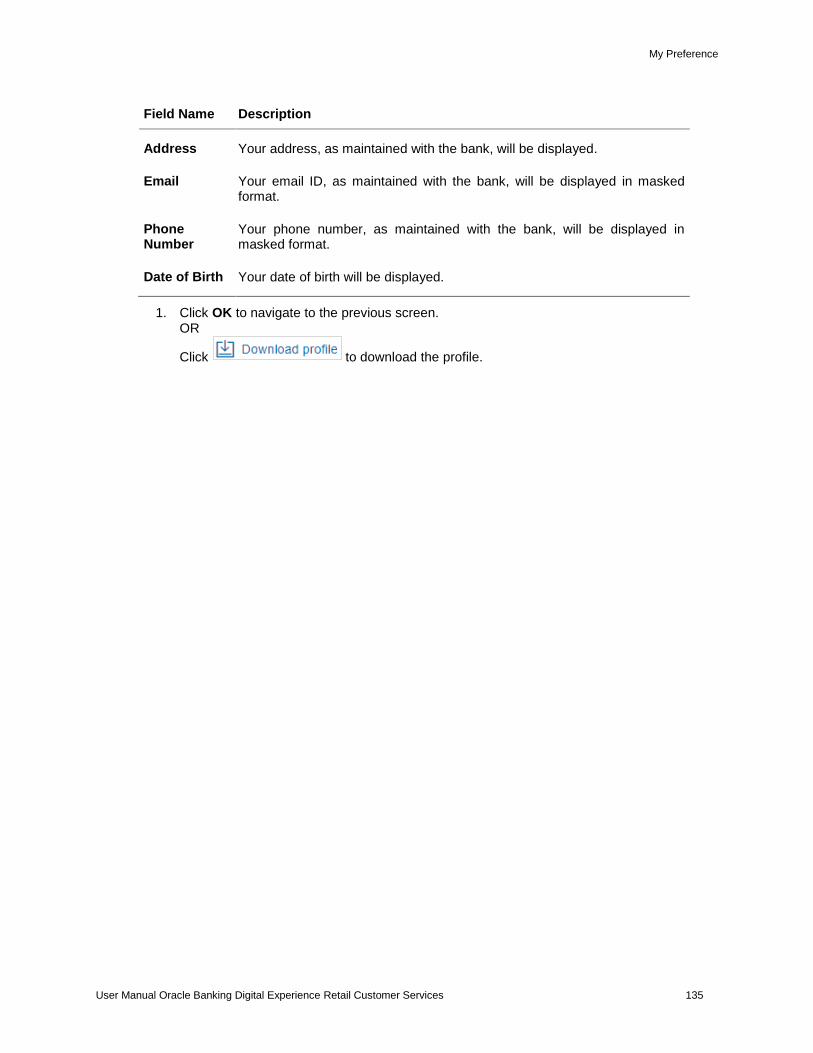
My Preference
User Manual Oracle Banking Digital Experience Retail Customer Services 135
Field Name Description
Address Your address, as maintained with the bank, will be displayed.
Email Your email ID, as maintained with the bank, will be displayed in masked format.
Phone Number
Your phone number, as maintained with the bank, will be displayed in masked format.
Date of Birth Your date of birth will be displayed.
1. Click OK to navigate to the previous screen. OR
Click to download the profile.
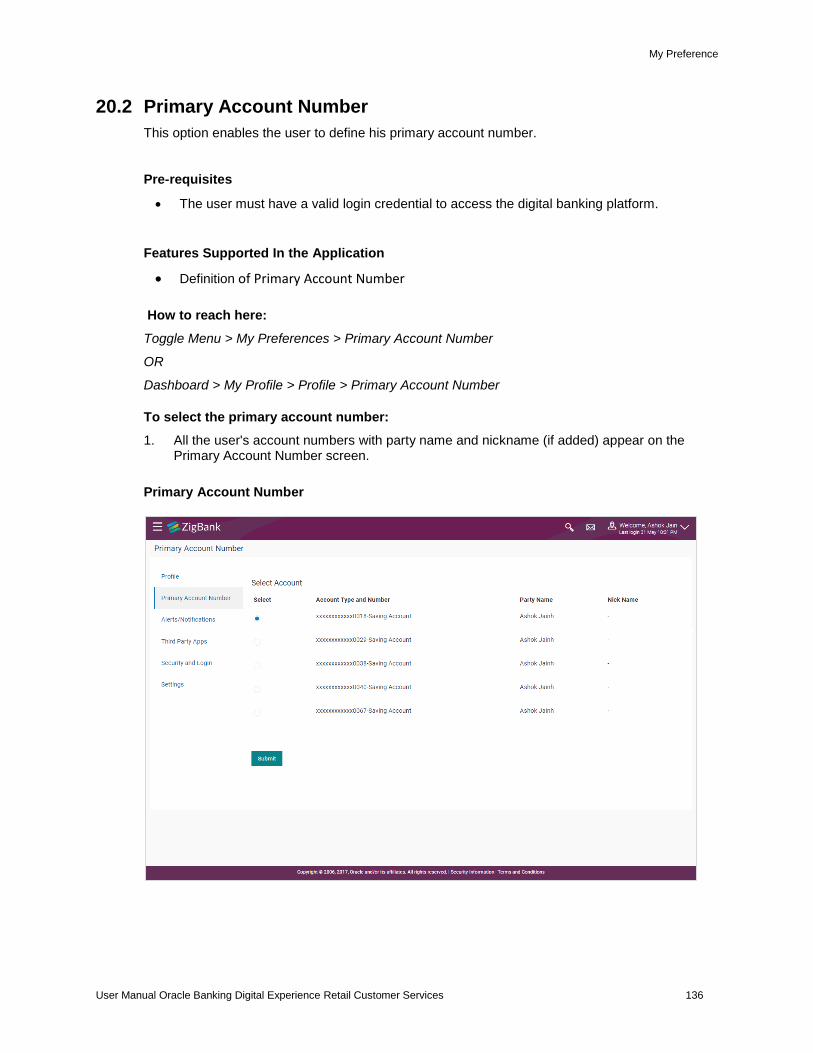
My Preference
User Manual Oracle Banking Digital Experience Retail Customer Services 136
20.2 Primary Account Number
This option enables the user to define his primary account number.
Pre-requisites
The user must have a valid login credential to access the digital banking platform.
Features Supported In the Application
Definition of Primary Account Number
How to reach here:
Toggle Menu > My Preferences > Primary Account Number
OR
Dashboard > My Profile > Profile > Primary Account Number
To select the primary account number:
1. All the user's account numbers with party name and nickname (if added) appear on the Primary Account Number screen.
Primary Account Number
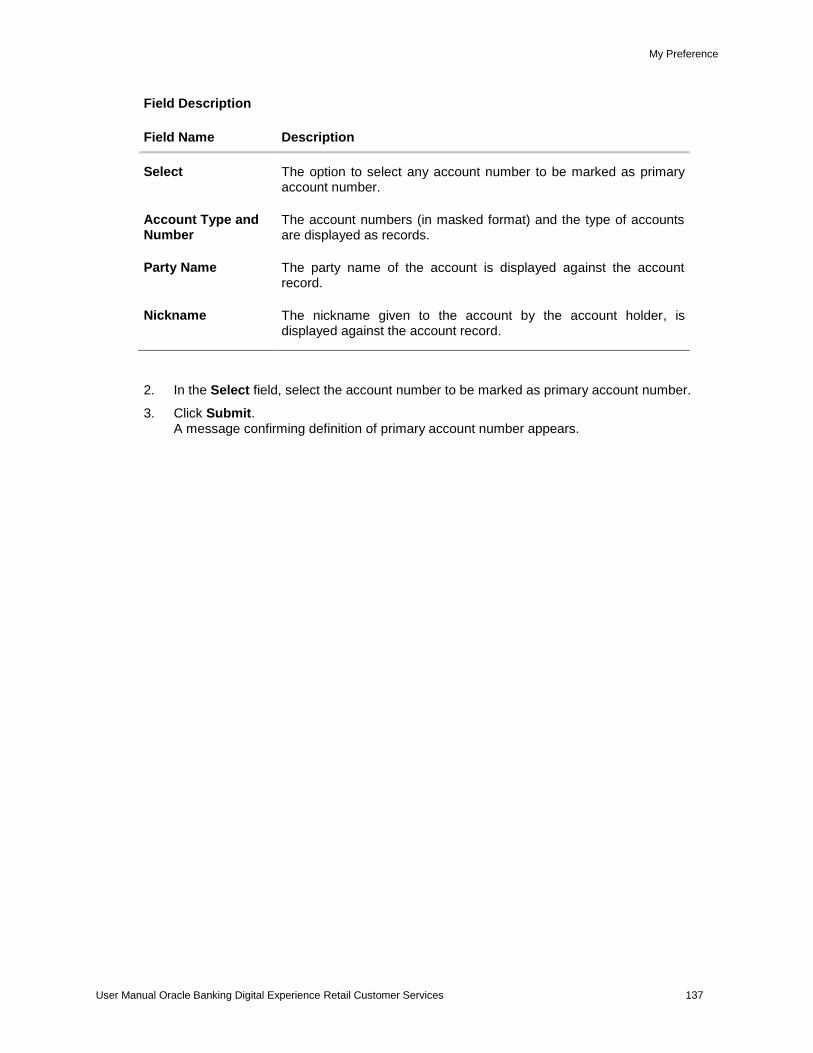
My Preference
User Manual Oracle Banking Digital Experience Retail Customer Services 137
Field Description
Field Name Description
Select The option to select any account number to be marked as primary account number.
Account Type and Number
The account numbers (in masked format) and the type of accounts are displayed as records.
Party Name The party name of the account is displayed against the account record.
Nickname The nickname given to the account by the account holder, is displayed against the account record.
2. In the Select field, select the account number to be marked as primary account number.
3. Click Submit. A message confirming definition of primary account number appears.
My Preference
User Manual Oracle Banking Digital Experience Retail Customer Services 138
20.3 Alerts Subscription
Using this option, the user can subscribe for alerts. These alerts are triggered by events that are configured in the system.
The users can subscribe for alerts and define the mode through which each subscribed alert is to be delivered, i.e. through Email, SMS, on screen mailbox or through push notifications.
Pre-requisites
The user has registered his contact details such as email ID and Mobile number with the bank.
Features Supported In the Application
Alert Subscription
Alert Un-subscription
How to reach here:
Toggle Menu > My Preferences > Alerts Subscription OR
Toggle Menu > Manage Alerts > Alerts Subscription
OR
Dashboard > My Profile > Profile > Alerts Subscription
To subscribe for an alert:
1. Select the desired module. The screen displaying all the alerts available under the selected module appears.
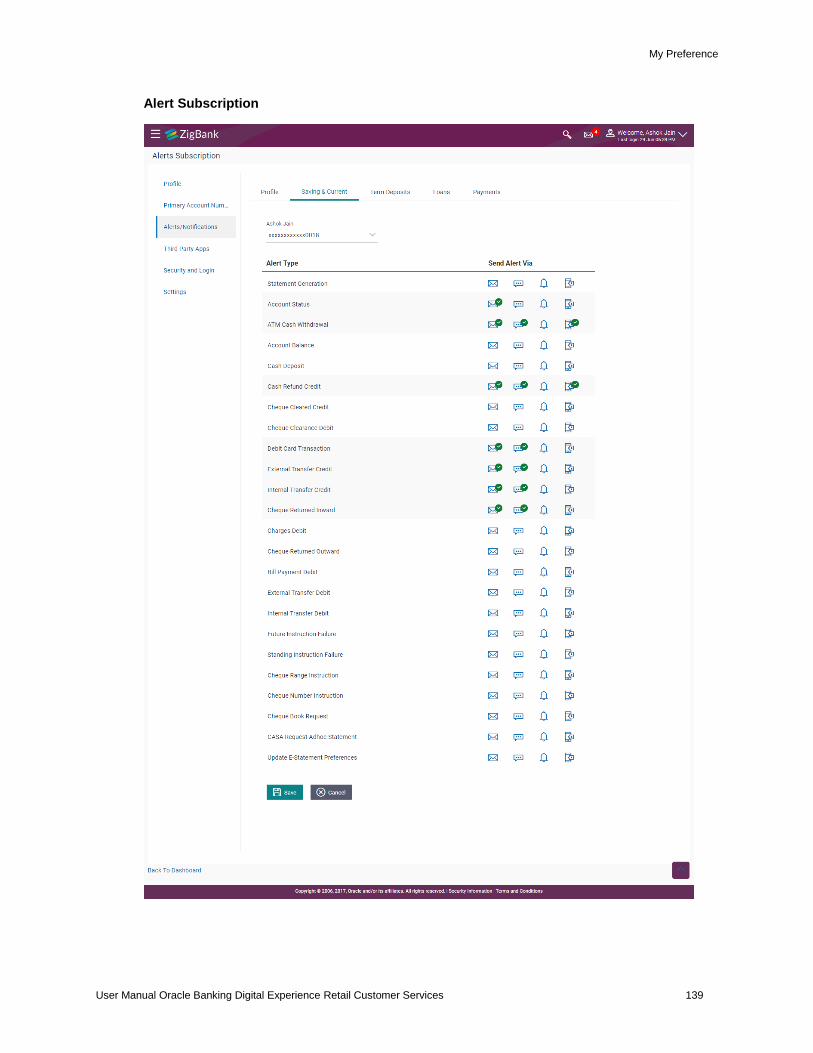
My Preference
User Manual Oracle Banking Digital Experience Retail Customer Services 139
Alert Subscription
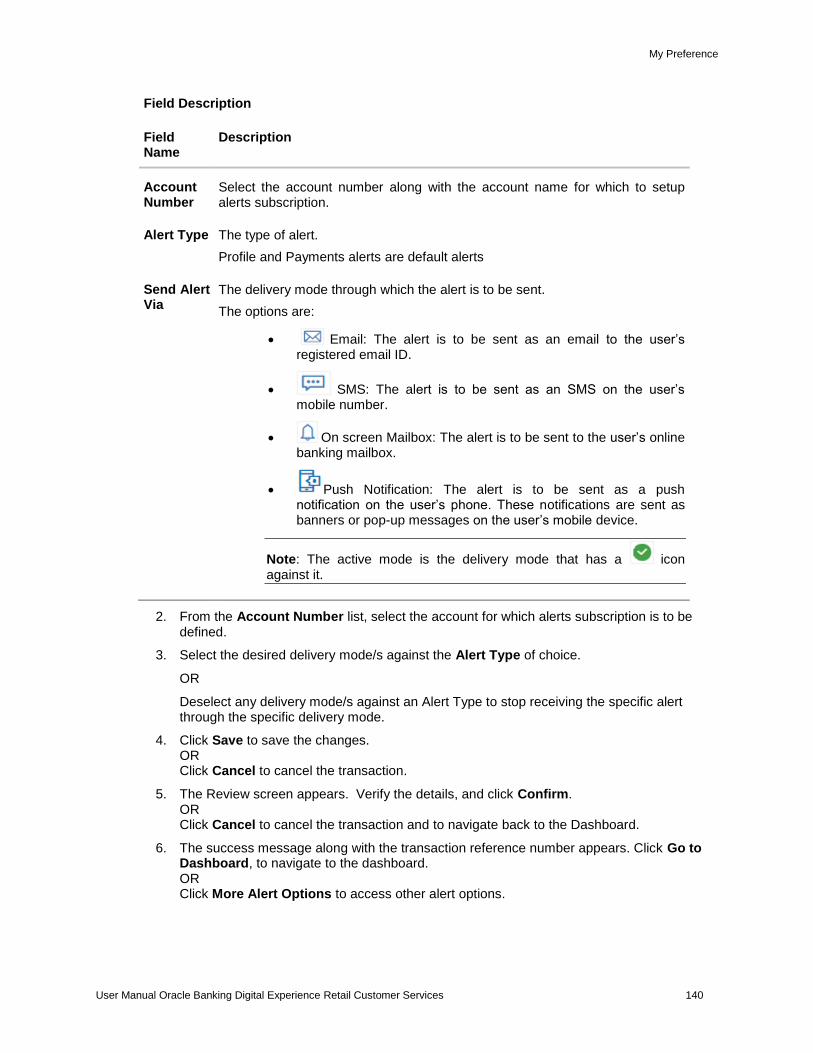
My Preference
User Manual Oracle Banking Digital Experience Retail Customer Services 140
Field Description
Field Name
Description
Account Number
Select the account number along with the account name for which to setup alerts subscription.
Alert Type The type of alert.
Profile and Payments alerts are default alerts
Send Alert Via
The delivery mode through which the alert is to be sent.
The options are:
Email: The alert is to be sent as an email to the user’s registered email ID.
SMS: The alert is to be sent as an SMS on the user’s mobile number.
On screen Mailbox: The alert is to be sent to the user’s online banking mailbox.
Push Notification: The alert is to be sent as a push notification on the user’s phone. These notifications are sent as banners or pop-up messages on the user’s mobile device.
Note: The active mode is the delivery mode that has a icon against it.
2. From the Account Number list, select the account for which alerts subscription is to be defined.
3. Select the desired delivery mode/s against the Alert Type of choice.
OR
Deselect any delivery mode/s against an Alert Type to stop receiving the specific alert through the specific delivery mode.
4. Click Save to save the changes. OR Click Cancel to cancel the transaction.
5. The Review screen appears. Verify the details, and click Confirm. OR Click Cancel to cancel the transaction and to navigate back to the Dashboard.
6. The success message along with the transaction reference number appears. Click Go to Dashboard, to navigate to the dashboard. OR Click More Alert Options to access other alert options.
My Preference
User Manual Oracle Banking Digital Experience Retail Customer Services 141
20.4 Third Party Apps
This option enables the user to manage the access provided to third party application(s). The user can define the fine-grained entitlements i.e. account level access along with a set of transactions for the third party. The user can disable the access for a specific third party application whenever required.
Note: Only those third party applications for which the user has registered and given rights to access his/her accounts for inquiries and transactions, will appear on this page.
How to reach here:
Toggle Menu > My Preferences > Third Party Apps
OR Dashboard > My Profile > Profile > Third Party Apps
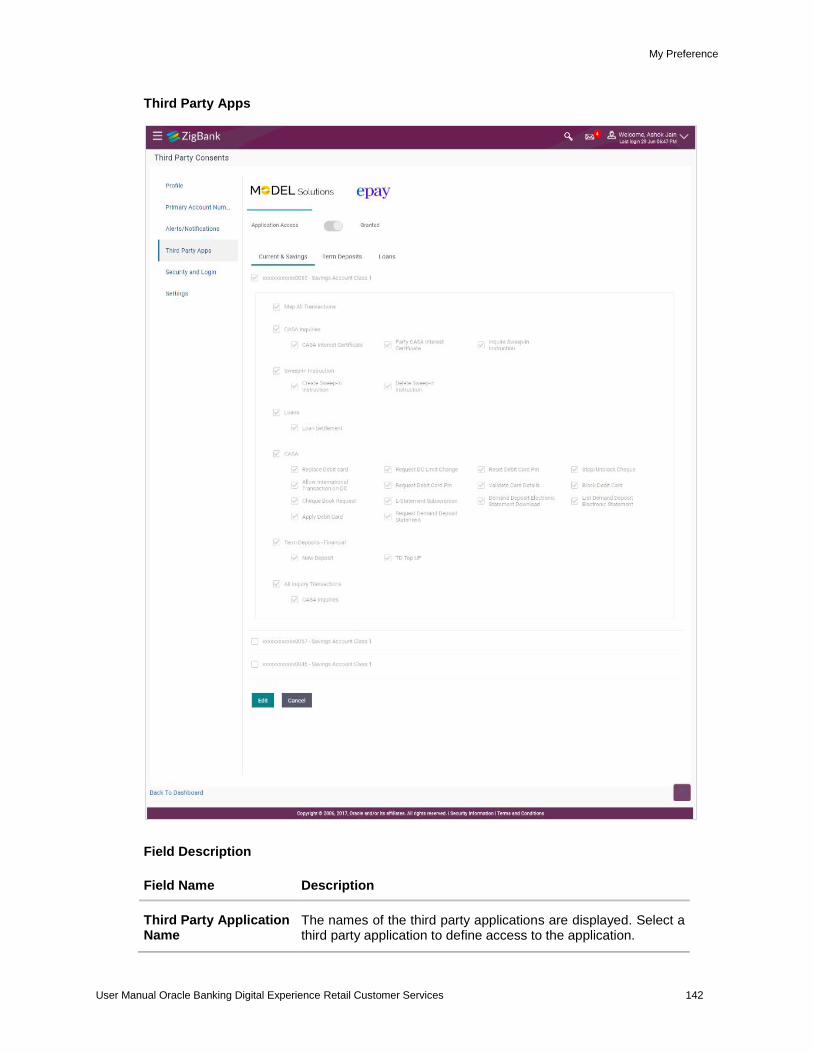
My Preference
User Manual Oracle Banking Digital Experience Retail Customer Services 142
Third Party Apps
Field Description
Field Name Description
Third Party Application Name
The names of the third party applications are displayed. Select a third party application to define access to the application.

My Preference
User Manual Oracle Banking Digital Experience Retail Customer Services 143
Field Name Description
Application Access The option to define whether access for the application is to be provided or not. If access is granted, then the user can revoke access and if it was revoked, then the user can grant access whenever required.
Current and Savings/ Term Deposits/ Loans and Finances
Select a product to define account and transaction level access to the third party.
1. Select the third party application for which you wish to define fine grained access.
2. The system will display the list of accounts under each of the account types along with the transactions
3. Click Edit to modify account and transaction access. The Third Party Consents – Edit screen with values in editable form appears. OR Click Cancel to cancel the operation and to navigate back to the Dashboard. OR Click Back to Dashboard to go to the Dashboard.
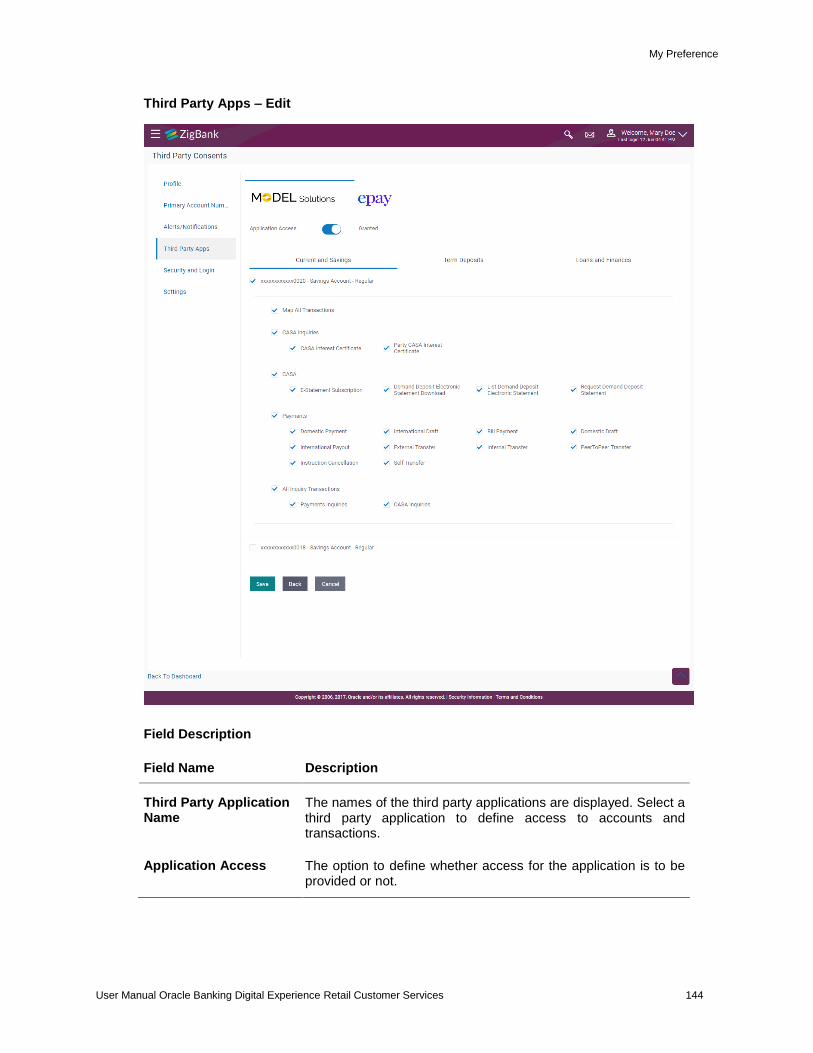
My Preference
User Manual Oracle Banking Digital Experience Retail Customer Services 144
Third Party Apps – Edit
Field Description
Field Name Description
Third Party Application Name
The names of the third party applications are displayed. Select a third party application to define access to accounts and transactions.
Application Access The option to define whether access for the application is to be provided or not.
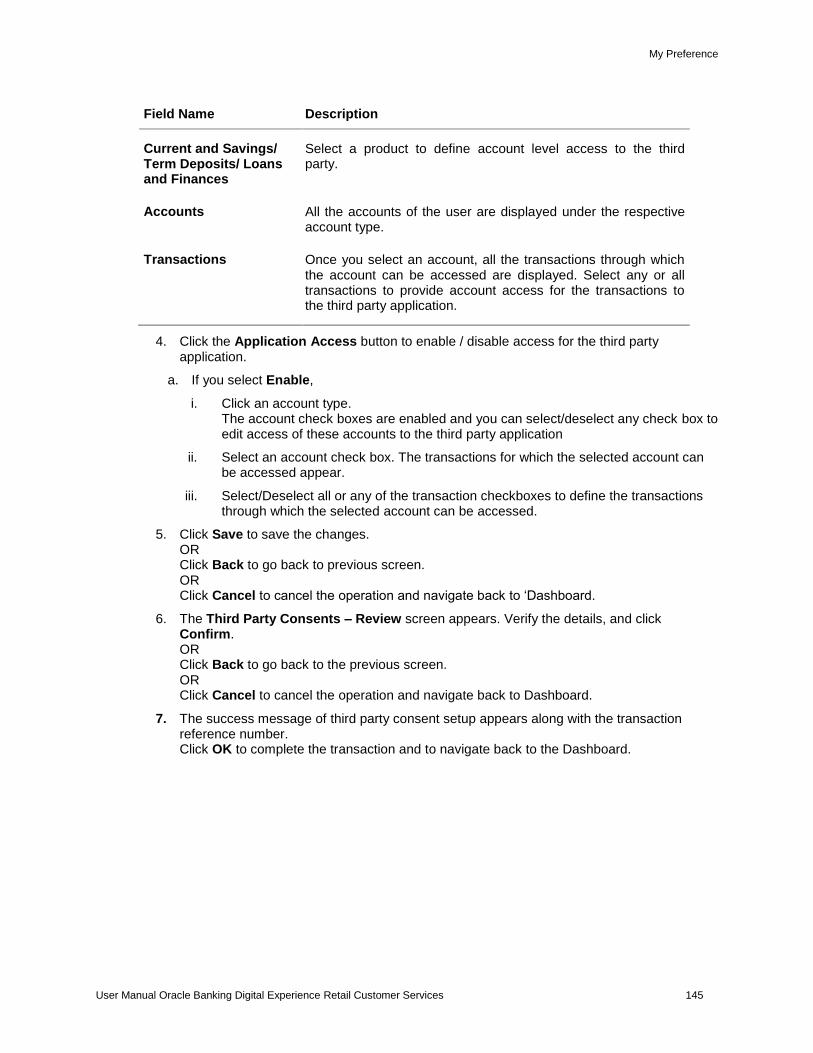
My Preference
User Manual Oracle Banking Digital Experience Retail Customer Services 145
Field Name Description
Current and Savings/ Term Deposits/ Loans and Finances
Select a product to define account level access to the third party.
Accounts All the accounts of the user are displayed under the respective account type.
Transactions Once you select an account, all the transactions through which the account can be accessed are displayed. Select any or all transactions to provide account access for the transactions to the third party application.
4. Click the Application Access button to enable / disable access for the third party application.
a. If you select Enable,
i. Click an account type. The account check boxes are enabled and you can select/deselect any check box to edit access of these accounts to the third party application
ii. Select an account check box. The transactions for which the selected account can be accessed appear.
iii. Select/Deselect all or any of the transaction checkboxes to define the transactions through which the selected account can be accessed.
5. Click Save to save the changes. OR Click Back to go back to previous screen. OR Click Cancel to cancel the operation and navigate back to ‘Dashboard.
6. The Third Party Consents – Review screen appears. Verify the details, and click Confirm. OR Click Back to go back to the previous screen. OR Click Cancel to cancel the operation and navigate back to Dashboard.
7. The success message of third party consent setup appears along with the transaction reference number. Click OK to complete the transaction and to navigate back to the Dashboard.
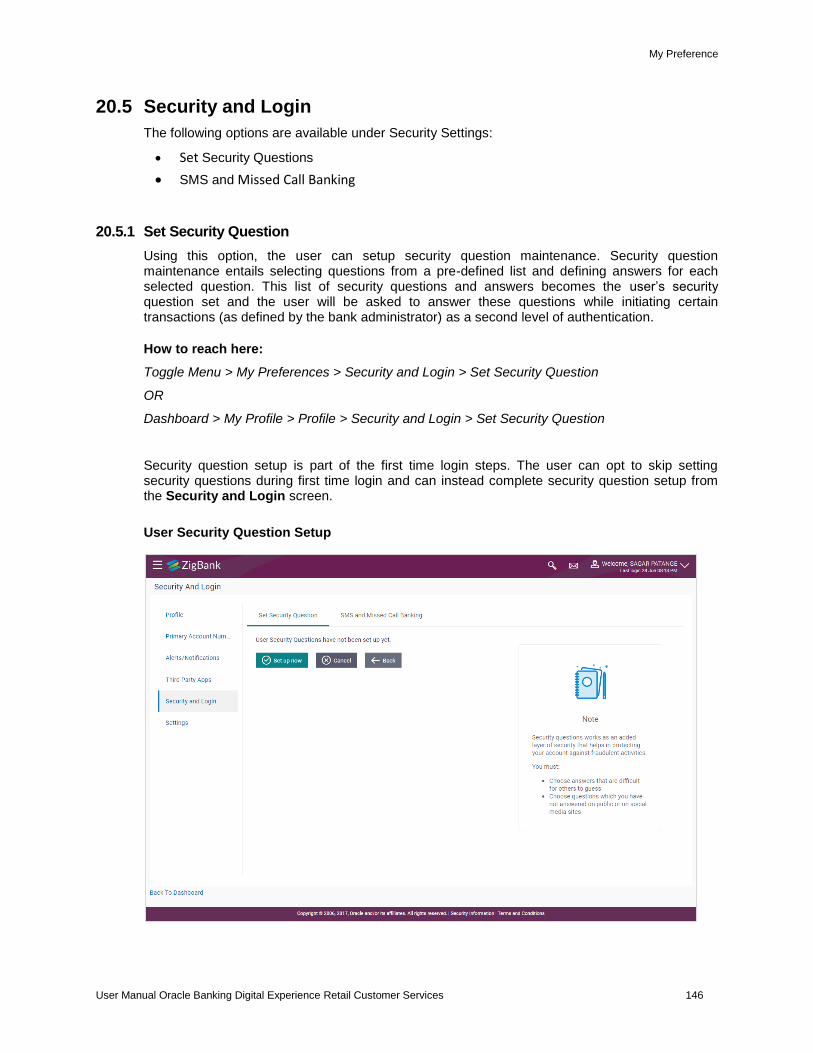
My Preference
User Manual Oracle Banking Digital Experience Retail Customer Services 146
20.5 Security and Login
The following options are available under Security Settings:
Set Security Questions
SMS and Missed Call Banking
20.5.1 Set Security Question
Using this option, the user can setup security question maintenance. Security question maintenance entails selecting questions from a pre-defined list and defining answers for each selected question. This list of security questions and answers becomes the user’s security question set and the user will be asked to answer these questions while initiating certain transactions (as defined by the bank administrator) as a second level of authentication.
How to reach here:
Toggle Menu > My Preferences > Security and Login > Set Security Question
OR
Dashboard > My Profile > Profile > Security and Login > Set Security Question
Security question setup is part of the first time login steps. The user can opt to skip setting security questions during first time login and can instead complete security question setup from the Security and Login screen.
User Security Question Setup
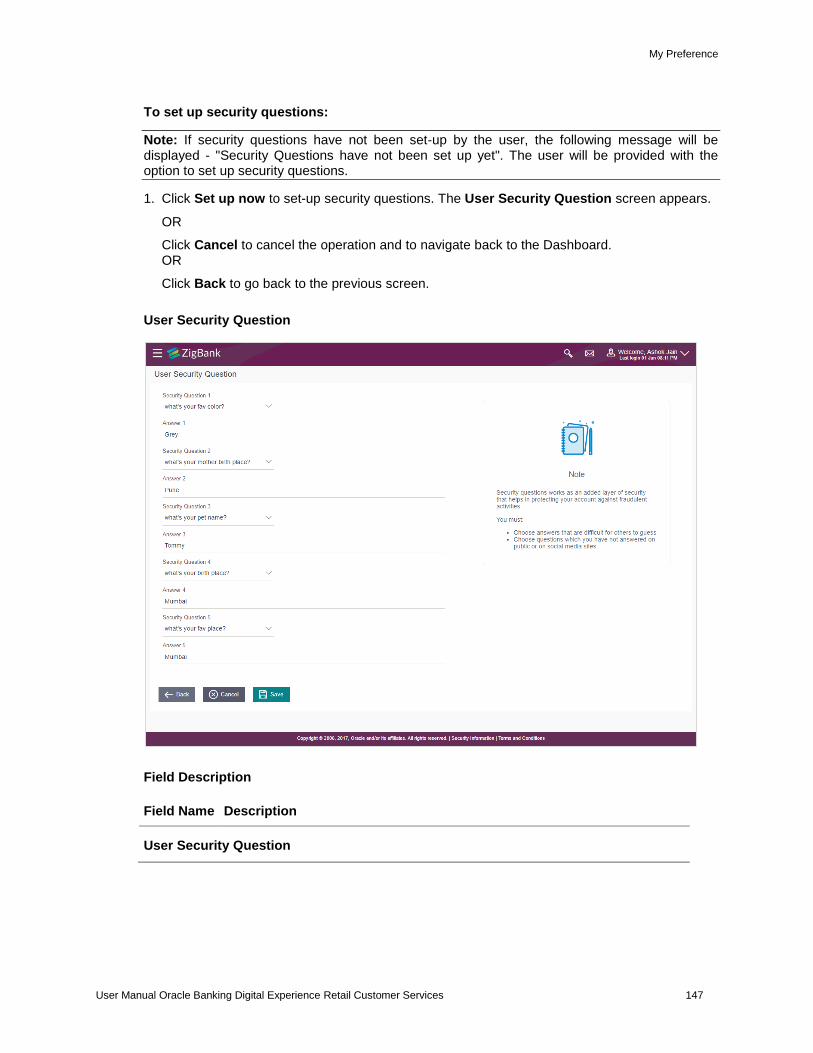
My Preference
User Manual Oracle Banking Digital Experience Retail Customer Services 147
To set up security questions:
Note: If security questions have not been set-up by the user, the following message will be displayed - "Security Questions have not been set up yet". The user will be provided with the option to set up security questions.
1. Click Set up now to set-up security questions. The User Security Question screen appears.
OR
Click Cancel to cancel the operation and to navigate back to the Dashboard. OR
Click Back to go back to the previous screen.
User Security Question
Field Description
Field Name Description
User Security Question
My Preference
User Manual Oracle Banking Digital Experience Retail Customer Services 148
Field Name Description
Security Question
Select a question to be assigned as a security question.
The security questions will be numbered, e.g. Security Question1, Security Question 2 and so on. The number of security questions and answers available will be dependent on the number configured by the bank administrator.
Answer Specify an answer for the selected security question.
The fields in which you can specify answers to selected security questions will be displayed below each security question and will be numbered, e.g. Answer 1, Answer 2 and so on.
2. From the Security Question list, select the appropriate security question to be added in the security question set.
3. In the Answer field, enter an answer for the corresponding security question.
4. Click Save to save the security questions. OR Click Back to go back to the previous screen. OR Click Cancel to cancel the operation and to navigate back to the Dashboard.
5. The User Security Question – Review screen appears. Verify the details, and click Confirm. OR Click Back to edit the security question setup. The User Security Question – Edit screen with values in editable form appears. OR Click Cancel to cancel the operation and navigate back to ‘Dashboard’.
6. The success message of submitting the request appears. Click OK to complete the transaction and navigate back to ‘Dashboard’.0
User Security Question – View and Edit
If the user has already set-up of Security Questions, the application displays the list of security questions. It also enables the user to modify the set of security questions.
To edit the set of security questions:
1. Navigate to Set Security Questions screen, the Set Security Question - View screen appears.
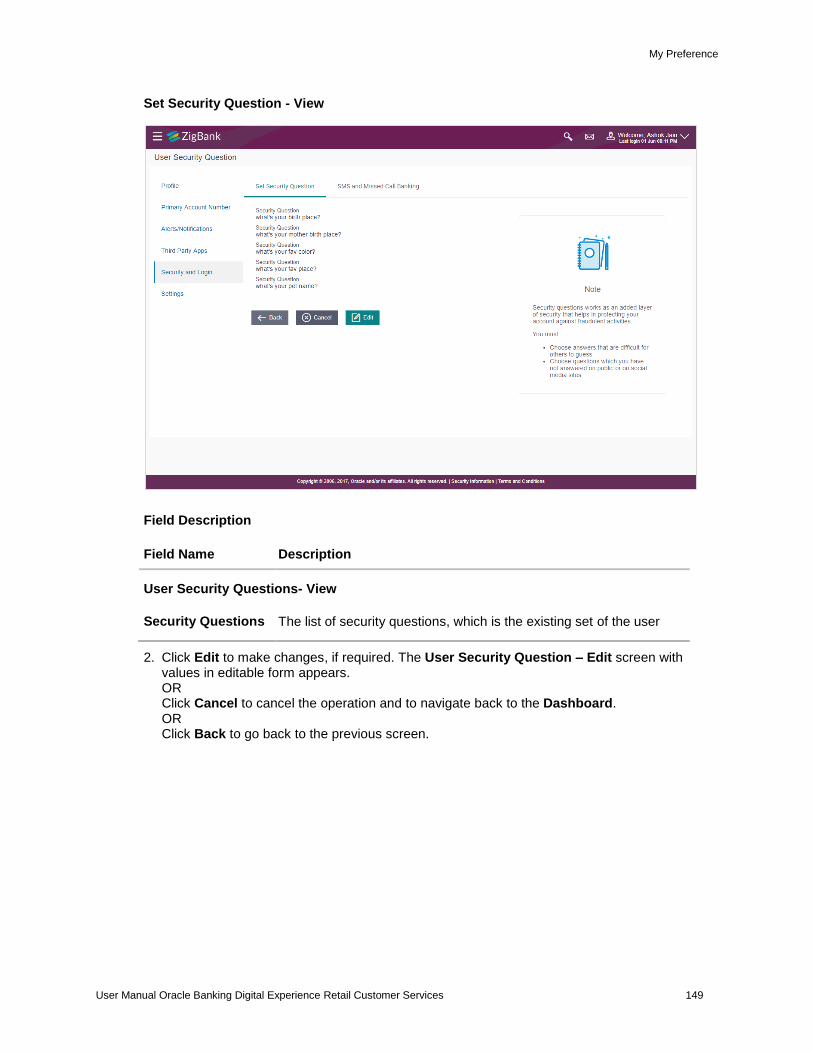
My Preference
User Manual Oracle Banking Digital Experience Retail Customer Services 149
Set Security Question - View
Field Description
Field Name Description
User Security Questions- View
Security Questions The list of security questions, which is the existing set of the user
2. Click Edit to make changes, if required. The User Security Question – Edit screen with values in editable form appears. OR Click Cancel to cancel the operation and to navigate back to the Dashboard. OR Click Back to go back to the previous screen.
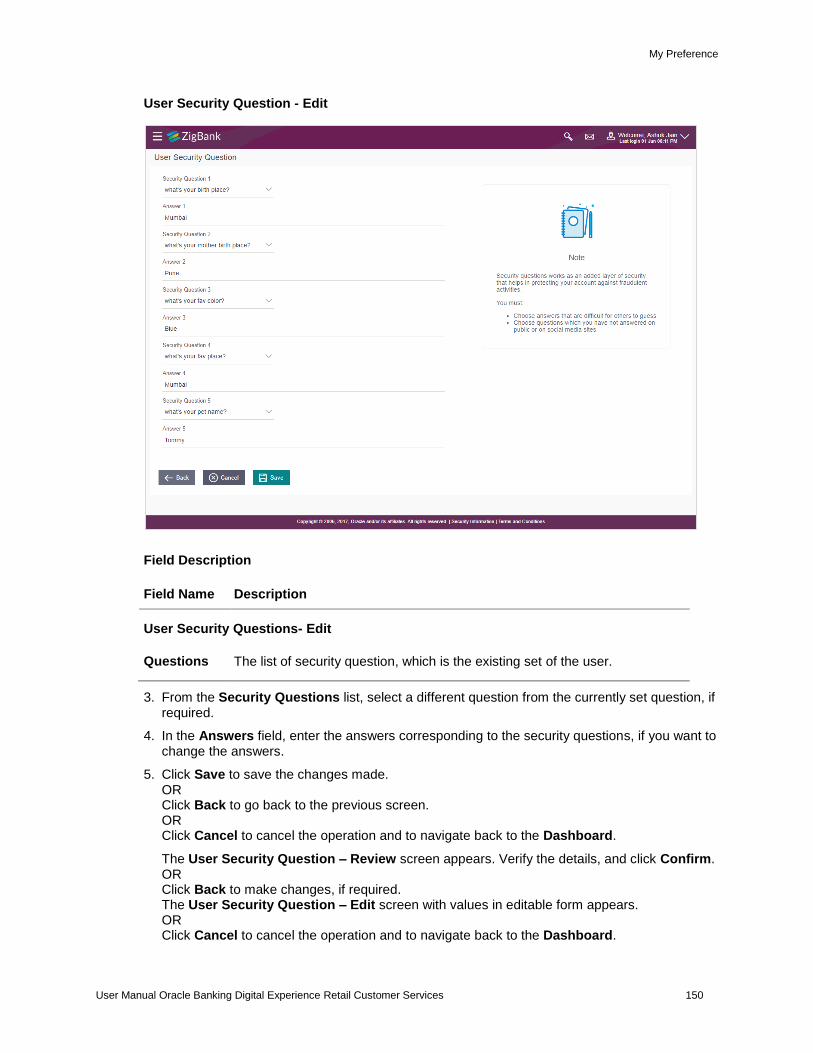
My Preference
User Manual Oracle Banking Digital Experience Retail Customer Services 150
User Security Question - Edit
Field Description
Field Name Description
User Security Questions- Edit
Questions The list of security question, which is the existing set of the user.
3. From the Security Questions list, select a different question from the currently set question, if required.
4. In the Answers field, enter the answers corresponding to the security questions, if you want to change the answers.
5. Click Save to save the changes made. OR Click Back to go back to the previous screen. OR Click Cancel to cancel the operation and to navigate back to the Dashboard.
The User Security Question – Review screen appears. Verify the details, and click Confirm. OR Click Back to make changes, if required. The User Security Question – Edit screen with values in editable form appears. OR Click Cancel to cancel the operation and to navigate back to the Dashboard.
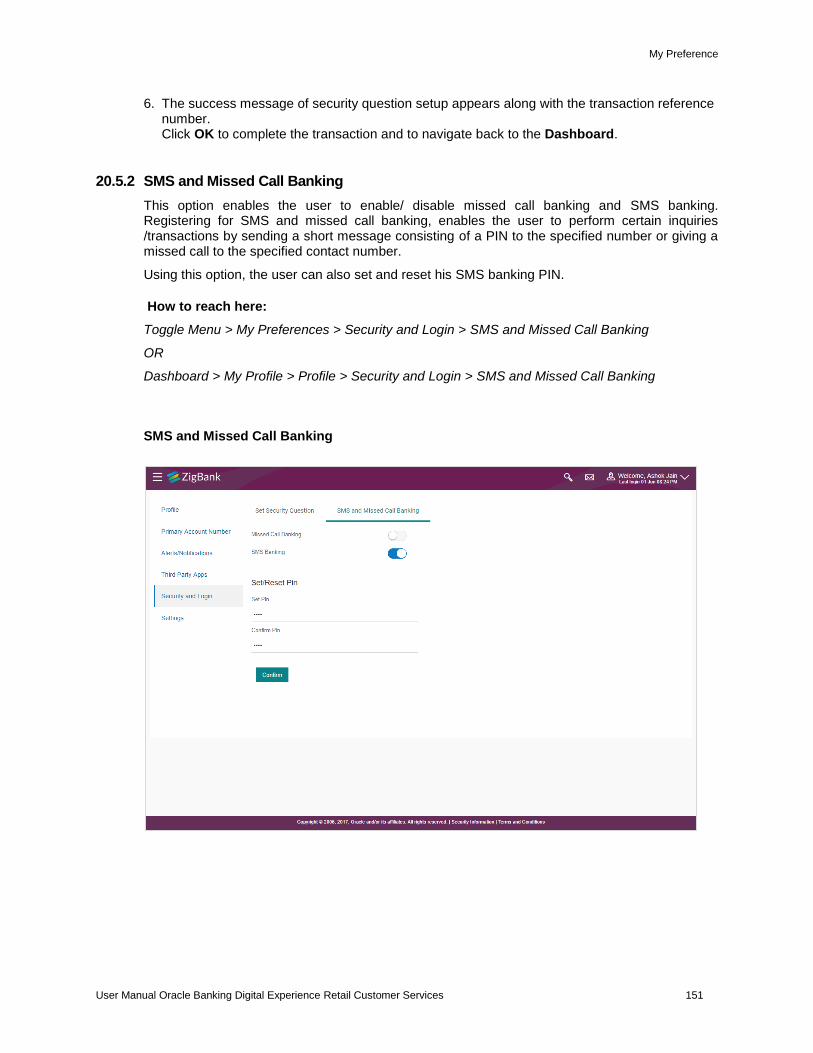
My Preference
User Manual Oracle Banking Digital Experience Retail Customer Services 151
6. The success message of security question setup appears along with the transaction reference number. Click OK to complete the transaction and to navigate back to the Dashboard.
20.5.2 SMS and Missed Call Banking
This option enables the user to enable/ disable missed call banking and SMS banking. Registering for SMS and missed call banking, enables the user to perform certain inquiries /transactions by sending a short message consisting of a PIN to the specified number or giving a missed call to the specified contact number.
Using this option, the user can also set and reset his SMS banking PIN.
How to reach here:
Toggle Menu > My Preferences > Security and Login > SMS and Missed Call Banking
OR
Dashboard > My Profile > Profile > Security and Login > SMS and Missed Call Banking
SMS and Missed Call Banking
My Preference
User Manual Oracle Banking Digital Experience Retail Customer Services 152
Field Description
Field Name Description
Missed Call Banking The option to register / deregister the user's device for missed call banking.
SMS Banking The option to register / deregister the user's device for SMS banking.
Set/ Reset PIN
Set PIN Enter a PIN to access SMS banking.
Reset PIN Re-enter the PIN to confirm the same.
1. Click the Missed Call Banking toggle button to register / deregister. OR Click the SMS Banking toggle button to register / deregister.
2. If you have registered for SMS Banking:
a. In the Set PIN field, enter a PIN to be used to access SMS banking.
b. In the Reset PIN field, re-enter the PIN so as to confirm the same.
c. Click Confirm. The success message appears.
Note: The Confirm option appears only if SMS Banking is enabled and if a PIN is to be set.
d. Click Ok to navigate to the dashboard.
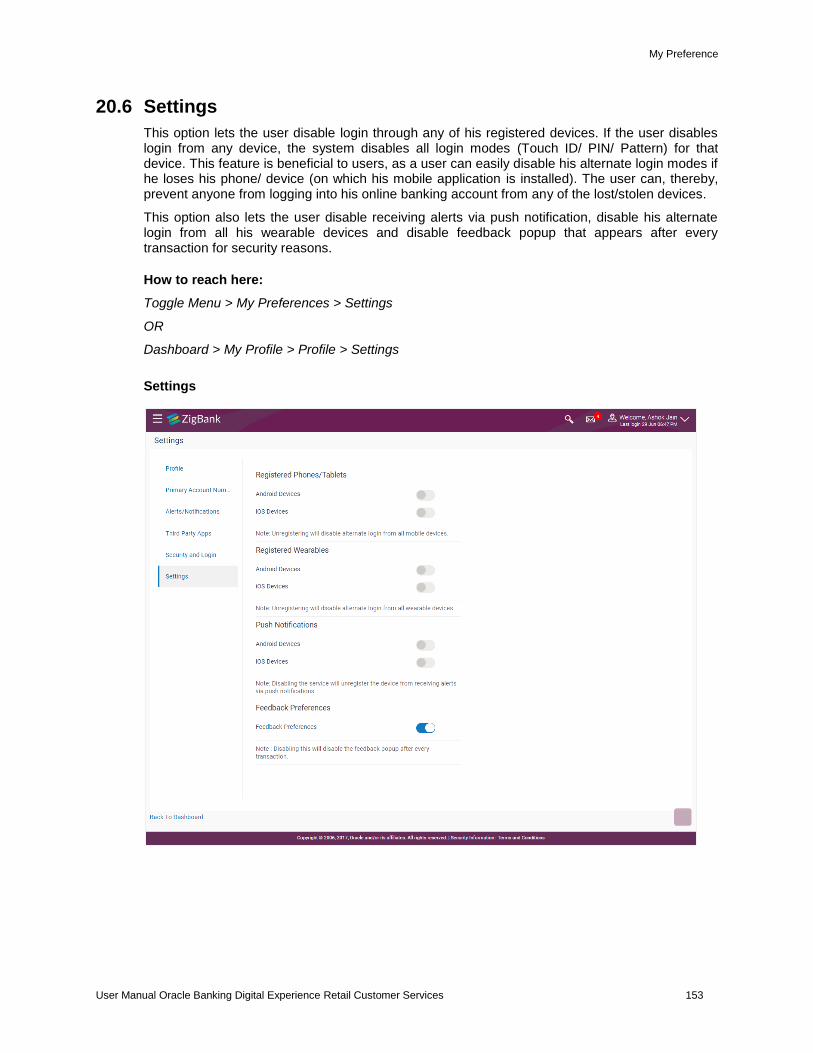
My Preference
User Manual Oracle Banking Digital Experience Retail Customer Services 153
20.6 Settings
This option lets the user disable login through any of his registered devices. If the user disables login from any device, the system disables all login modes (Touch ID/ PIN/ Pattern) for that device. This feature is beneficial to users, as a user can easily disable his alternate login modes if he loses his phone/ device (on which his mobile application is installed). The user can, thereby, prevent anyone from logging into his online banking account from any of the lost/stolen devices.
This option also lets the user disable receiving alerts via push notification, disable his alternate login from all his wearable devices and disable feedback popup that appears after every transaction for security reasons.
How to reach here:
Toggle Menu > My Preferences > Settings
OR
Dashboard > My Profile > Profile > Settings
Settings
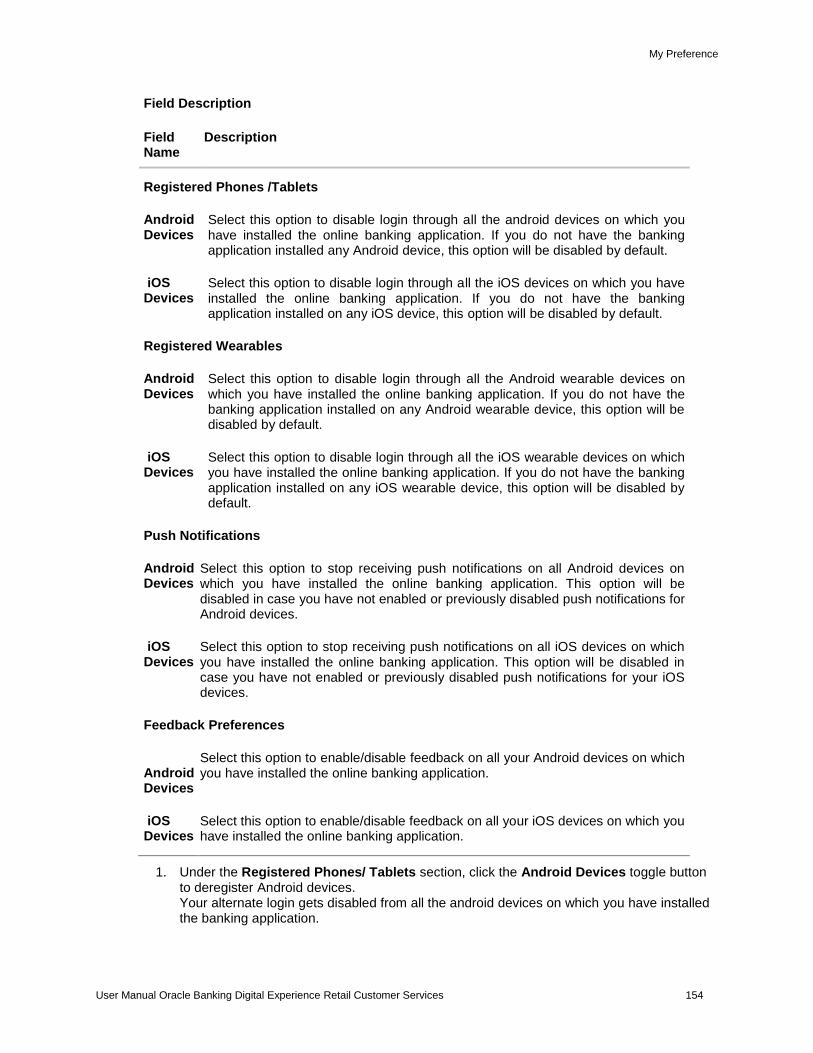
My Preference
User Manual Oracle Banking Digital Experience Retail Customer Services 154
Field Description
Field Name
Description
Registered Phones /Tablets
Android Devices
Select this option to disable login through all the android devices on which you have installed the online banking application. If you do not have the banking application installed any Android device, this option will be disabled by default.
iOS Devices
Select this option to disable login through all the iOS devices on which you have installed the online banking application. If you do not have the banking application installed on any iOS device, this option will be disabled by default.
Registered Wearables
Android Devices
Select this option to disable login through all the Android wearable devices on which you have installed the online banking application. If you do not have the banking application installed on any Android wearable device, this option will be disabled by default.
iOS Devices
Select this option to disable login through all the iOS wearable devices on which you have installed the online banking application. If you do not have the banking application installed on any iOS wearable device, this option will be disabled by default.
Push Notifications
Android Devices
Select this option to stop receiving push notifications on all Android devices on which you have installed the online banking application. This option will be disabled in case you have not enabled or previously disabled push notifications for Android devices.
iOS Devices
Select this option to stop receiving push notifications on all iOS devices on which you have installed the online banking application. This option will be disabled in case you have not enabled or previously disabled push notifications for your iOS devices.
Feedback Preferences
Android Devices
Select this option to enable/disable feedback on all your Android devices on which you have installed the online banking application.
iOS Devices
Select this option to enable/disable feedback on all your iOS devices on which you have installed the online banking application.
1. Under the Registered Phones/ Tablets section, click the Android Devices toggle button to deregister Android devices. Your alternate login gets disabled from all the android devices on which you have installed the banking application.
My Preference
User Manual Oracle Banking Digital Experience Retail Customer Services 155
2. Under Registered Phones/Tablets, click the iOS Devices toggle button to deregister iOS devices. Your alternate login gets disabled from all the iOS devices on which you have installed the banking application.
3. Under Push Notifications, section, click the Android Devices toggle button to deregister push notifications on android devices. Your push notification alerts gets disabled from all the android devices on which you have installed the banking application.
4. Under Push Notifications, Click the iOS Devices toggle button to deregister push notifications on iOS devices. Your push notification alerts gets disabled from all the iOS devices on which you have installed the banking application.
5. Under Registered Wearables, click the Android Devices toggle button to deregister your Android wearable devices. Your alternate login gets disabled from all the android wearable devices on which you have installed the banking application.
6. Under Registered Wearables, click the iOS Devices toggle button to deregister your iOS wearable devices. Your alternate login gets disabled from all the iOS wearable devices on which you have installed the banking application.
7. Under the Feedback Preferences section, click the Android Devices toggle button to deregister feedback on your Android devices. You will no longer get the option to provide feedback on all the android devices on which you have installed the application.
8. Under the Feedback Preferences section, click the iOS Devices toggle button to deregister feedback on your iOS devices. You will no longer the option to provide feedback on all the iOS devices on which you have installed the application.
FAQs
If I have more than one iOS devices and I need to deregister one of my devices from the Zigbank application, can I do so using the 'Registered Device' option?
If you disable 'iOS Devices' in the 'Register Device' option, it will disable your alternate login from all the devices. You need to re-install the application if you want to use it again on that device.
Why would I need to unregister a device?
The unregistering of devices is done in case you have lost your device and you want to disable your alternate login from that device to prevent any misuse of your Bank account.
Home
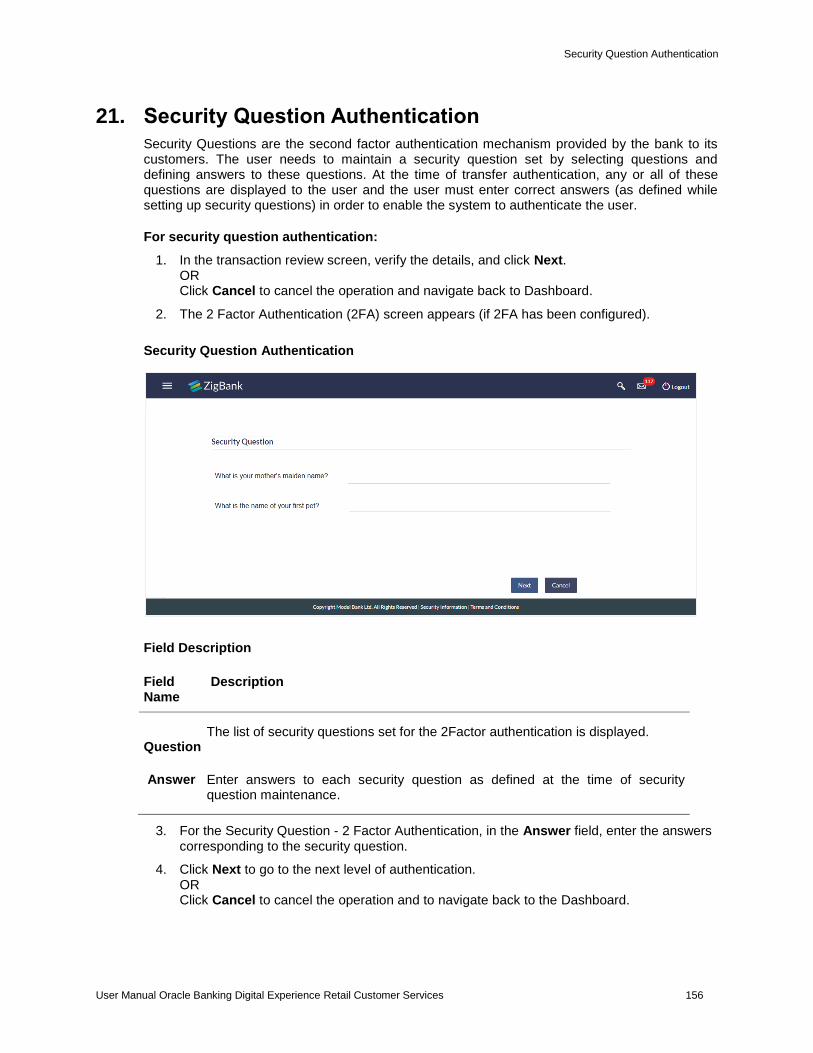
Security Question Authentication
User Manual Oracle Banking Digital Experience Retail Customer Services 156
21. Security Question Authentication
Security Questions are the second factor authentication mechanism provided by the bank to its customers. The user needs to maintain a security question set by selecting questions and defining answers to these questions. At the time of transfer authentication, any or all of these questions are displayed to the user and the user must enter correct answers (as defined while setting up security questions) in order to enable the system to authenticate the user.
For security question authentication:
1. In the transaction review screen, verify the details, and click Next. OR Click Cancel to cancel the operation and navigate back to Dashboard.
2. The 2 Factor Authentication (2FA) screen appears (if 2FA has been configured).
Security Question Authentication
Field Description
Field Name
Description
Question
The list of security questions set for the 2Factor authentication is displayed.
Answer Enter answers to each security question as defined at the time of security question maintenance.
3. For the Security Question - 2 Factor Authentication, in the Answer field, enter the answers corresponding to the security question.
4. Click Next to go to the next level of authentication. OR Click Cancel to cancel the operation and to navigate back to the Dashboard.

Security Question Authentication
User Manual Oracle Banking Digital Experience Retail Customer Services 157
5. Complete the 2 Factor Authentication, and click Confirm. OR Click Cancel to cancel the operation and to navigate back to the Dashboard.
6. The success message of appears along with the transaction reference number. Click Back to Dashboard to navigate to the dashboard.
Home
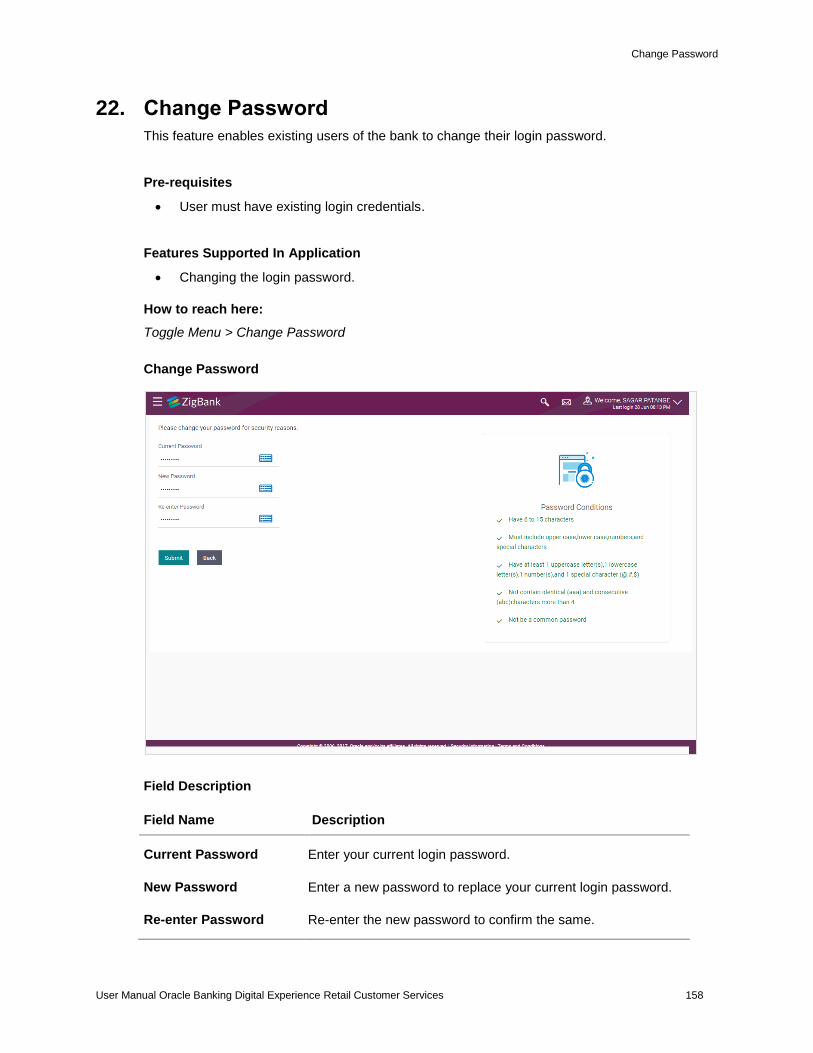
Change Password
User Manual Oracle Banking Digital Experience Retail Customer Services 158
22. Change Password
This feature enables existing users of the bank to change their login password.
Pre-requisites
User must have existing login credentials.
Features Supported In Application
Changing the login password.
How to reach here:
Toggle Menu > Change Password
Change Password
Field Description
Field Name Description
Current Password Enter your current login password.
New Password Enter a new password to replace your current login password.
Re-enter Password Re-enter the new password to confirm the same.
Change Password
User Manual Oracle Banking Digital Experience Retail Customer Services 159
To reset the password:
1. In the Current Password field, enter your current login password. OR
Click icon to enter the current login password using the virtual keyboard.
2. In the New Password field, enter a new password. OR
Click icon to enter a new password using the virtual keyboard. (Read the conditions defined under the Password Conditions section on the application screen to view the password policy.)
3. In the Re-enter Password field, re-enter the new password. OR
Click icon to re-enter the new password using the virtual keyboard.
4. Click Submit. OR Click Cancel to cancel the transaction.
5. A message confirming successful change of login password appears. Click Login on confirmation screen to log in to the application.
Note: Password Conditions gets highlighted in green if the user’s password is meeting the Password Policy criteria and similarly in Red if the password is not as per the Password Policy maintained.
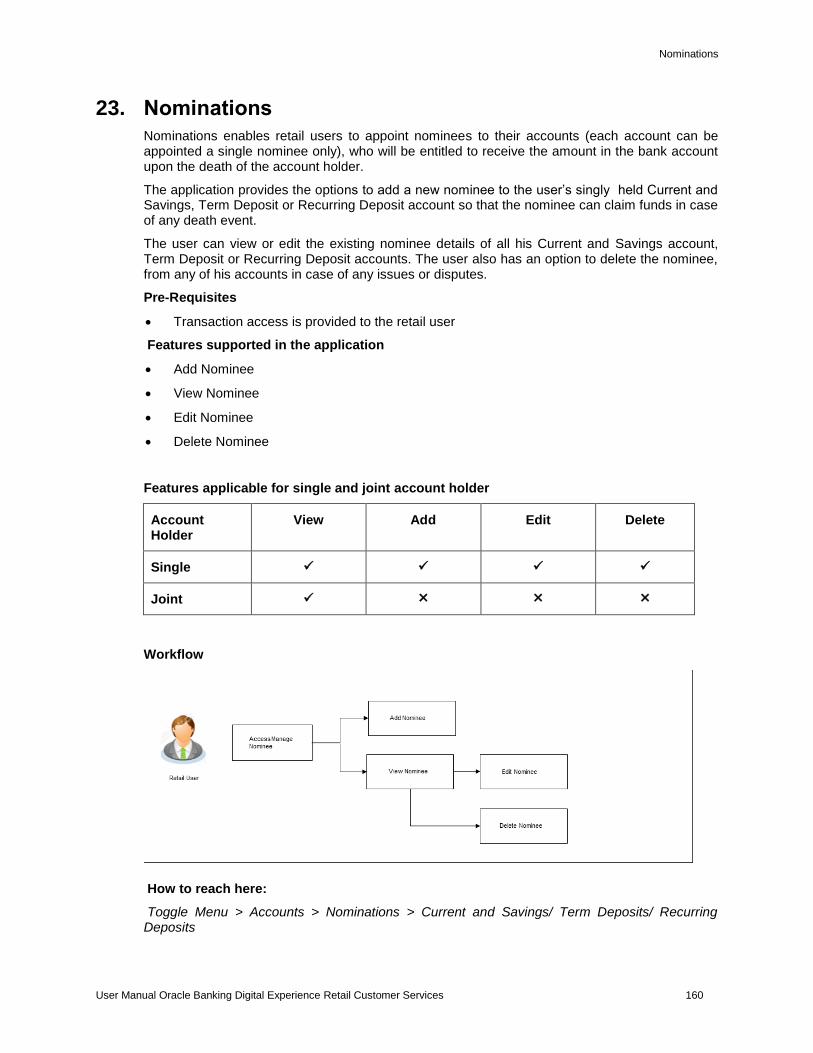
Nominations
User Manual Oracle Banking Digital Experience Retail Customer Services 160
23. Nominations
Nominations enables retail users to appoint nominees to their accounts (each account can be appointed a single nominee only), who will be entitled to receive the amount in the bank account upon the death of the account holder.
The application provides the options to add a new nominee to the user’s singly held Current and Savings, Term Deposit or Recurring Deposit account so that the nominee can claim funds in case of any death event.
The user can view or edit the existing nominee details of all his Current and Savings account, Term Deposit or Recurring Deposit accounts. The user also has an option to delete the nominee, from any of his accounts in case of any issues or disputes.
Pre-Requisites
Transaction access is provided to the retail user
Features supported in the application
Add Nominee
View Nominee
Edit Nominee
Delete Nominee
Features applicable for single and joint account holder
Account Holder
View Add Edit Delete
Single
Joint
Workflow
How to reach here:
Toggle Menu > Accounts > Nominations > Current and Savings/ Term Deposits/ Recurring Deposits
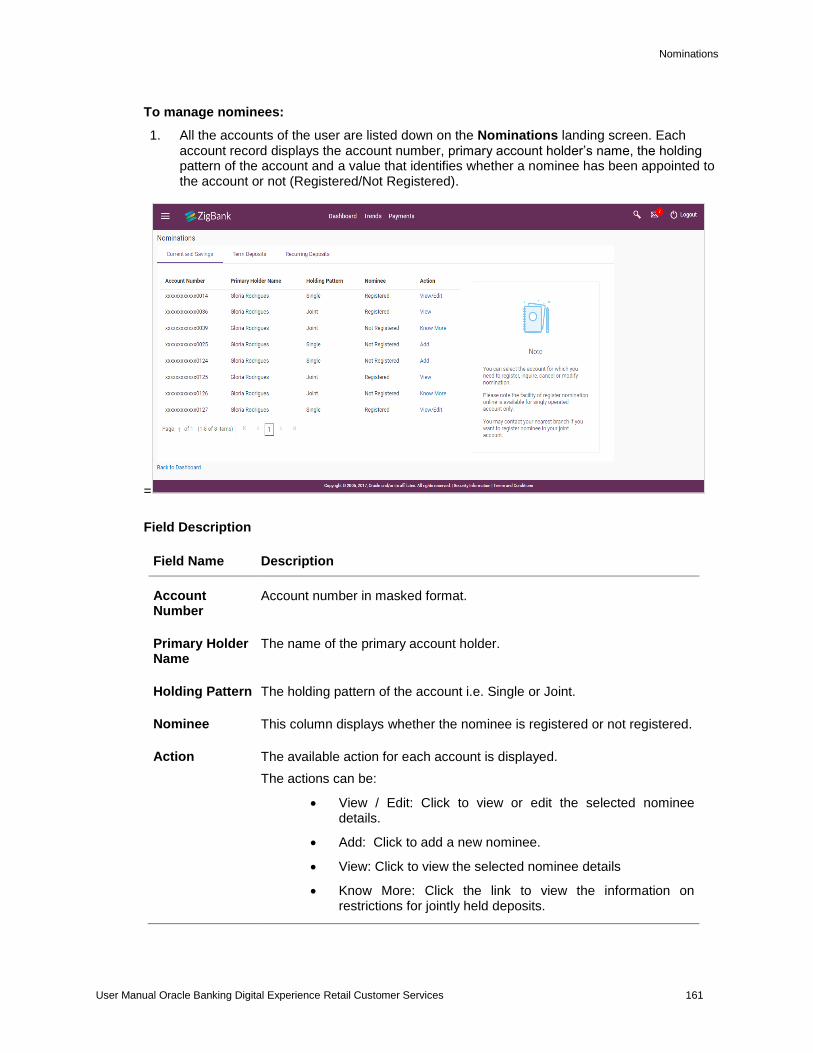
Nominations
User Manual Oracle Banking Digital Experience Retail Customer Services 161
To manage nominees:
1. All the accounts of the user are listed down on the Nominations landing screen. Each account record displays the account number, primary account holder’s name, the holding pattern of the account and a value that identifies whether a nominee has been appointed to the account or not (Registered/Not Registered).
=
Field Description
Field Name Description
Account Number
Account number in masked format.
Primary Holder Name
The name of the primary account holder.
Holding Pattern The holding pattern of the account i.e. Single or Joint.
Nominee This column displays whether the nominee is registered or not registered.
Action The available action for each account is displayed.
The actions can be:
View / Edit: Click to view or edit the selected nominee details.
Add: Click to add a new nominee.
View: Click to view the selected nominee details
Know More: Click the link to view the information on restrictions for jointly held deposits.
Nominations
User Manual Oracle Banking Digital Experience Retail Customer Services 162
Field Name Description
Term Deposits
The fields and options displayed under the Term Deposits tab will be the same as those described in Current and Savings Account section.
Recurring Deposits
The fields and options displayed under the Recurring Deposits tab will be the same as those described in Current and Savings Account section.
2. Under the Action column, select and click the Add link against the account for which you want to add a nominee. OR Select and click the View link against the account whose nominee details you want to view. OR Select and click the View/ Edit link against the account whose nominee details you want to view edit and delete. OR Select and click the Know More link against the account to view the information to add nominees for joint account.
Note: The Add link appears against those accounts for which no nominee has been added. The View and View/ Edit links appear against the accounts for which nominees have already been added.
23.1 Add Nominee
Using this option, you can add a nominee. Following two options are present to add a nominee.
Add New Nominee: This option enables the user to add a new nominee by entering –nominee’s name and other details like date of birth, relationship, country state and address.
Replicate existing nominee: This option enables the user to replicate a nominee by selecting an already added nominee from his existing CASA, FD or RD, so that the nominee details are pre-populated, and the user need not have to enter the entire nominee details.
23.1.1 Add Nominee – Add New
To add a new nominee:
1. In the Nominations screen, click the Add link against the account for which you want to add a new nominee. The Add Nominee screen with the options, Add New Nominee and Replicate Existing Nominee appears.
2. If you select Add New option, the Add Nominee - Add New screen appears.
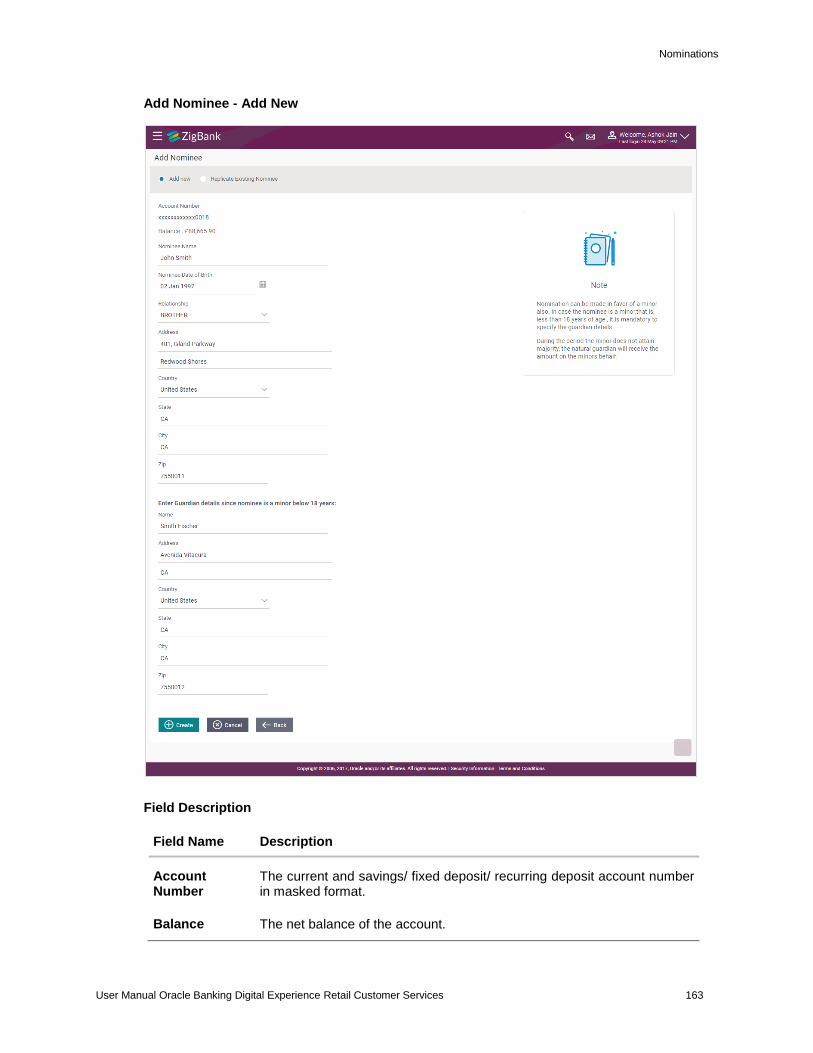
Nominations
User Manual Oracle Banking Digital Experience Retail Customer Services 163
Add Nominee - Add New
Field Description
Field Name Description
Account Number
The current and savings/ fixed deposit/ recurring deposit account number in masked format.
Balance The net balance of the account.
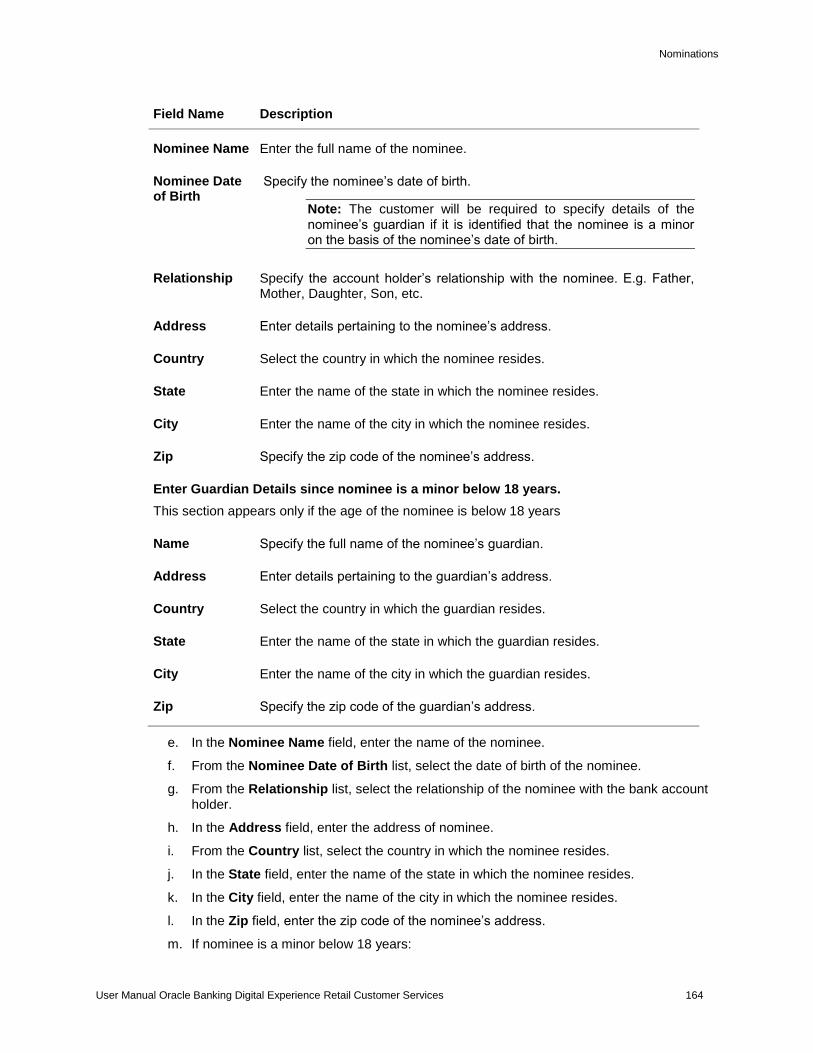
Nominations
User Manual Oracle Banking Digital Experience Retail Customer Services 164
Field Name Description
Nominee Name Enter the full name of the nominee.
Nominee Date of Birth
Specify the nominee’s date of birth.
Note: The customer will be required to specify details of the nominee’s guardian if it is identified that the nominee is a minor on the basis of the nominee’s date of birth.
Relationship Specify the account holder’s relationship with the nominee. E.g. Father, Mother, Daughter, Son, etc.
Address Enter details pertaining to the nominee’s address.
Country Select the country in which the nominee resides.
State Enter the name of the state in which the nominee resides.
City Enter the name of the city in which the nominee resides.
Zip Specify the zip code of the nominee’s address.
Enter Guardian Details since nominee is a minor below 18 years.
This section appears only if the age of the nominee is below 18 years
Name Specify the full name of the nominee’s guardian.
Address Enter details pertaining to the guardian’s address.
Country Select the country in which the guardian resides.
State Enter the name of the state in which the guardian resides.
City Enter the name of the city in which the guardian resides.
Zip Specify the zip code of the guardian’s address.
e. In the Nominee Name field, enter the name of the nominee.
f. From the Nominee Date of Birth list, select the date of birth of the nominee.
g. From the Relationship list, select the relationship of the nominee with the bank account holder.
h. In the Address field, enter the address of nominee.
i. From the Country list, select the country in which the nominee resides.
j. In the State field, enter the name of the state in which the nominee resides.
k. In the City field, enter the name of the city in which the nominee resides.
l. In the Zip field, enter the zip code of the nominee’s address.
m. If nominee is a minor below 18 years:
Nominations
User Manual Oracle Banking Digital Experience Retail Customer Services 165
iv. In the Name field, enter the name of the guardian.
v. In the Address field, enter the address of the guardian.
vi. From the Country list, select the country in which the guardian resides.
vii. In the State field, enter the name of the state in which the guardian resides.
viii. In the City field, enter the name of the city in which the guardian resides.
ix. In the Zip field, enter the zip code of the guardian’s address.
n. Click Create. OR Click Cancel to cancel the transaction. OR Click Back to navigate to the previous page.
o. The Review screen appears. Verify the details, and click Confirm. OR Click Cancel to cancel the transaction. OR Click Back to navigate to the previous page.
p. The Verification screen appears. The user has to pass the 2factor authentication, before he can proceed. 2 factor authentication (OTP/Security question/Soft Token) will be as per the setup done by system administrator.
q. The success message appears. Click Go to Dashboard, to navigate to the dashboard. OR Click Add another nominee to add another nominee.
23.1.2 Add Nominee - Replicate Existing Nominee
To add a nominee from the existing nominee list:
1. In the Nominations screen, click the Add link against the account for which you want to add a new nominee. The Add Nominee screen with options, Add New Nominee and Replicate Existing Nominee appears.
2. If you select Replicate Existing Nominee option, the Add Nominee - Replicate Existing Nominee screen appears.
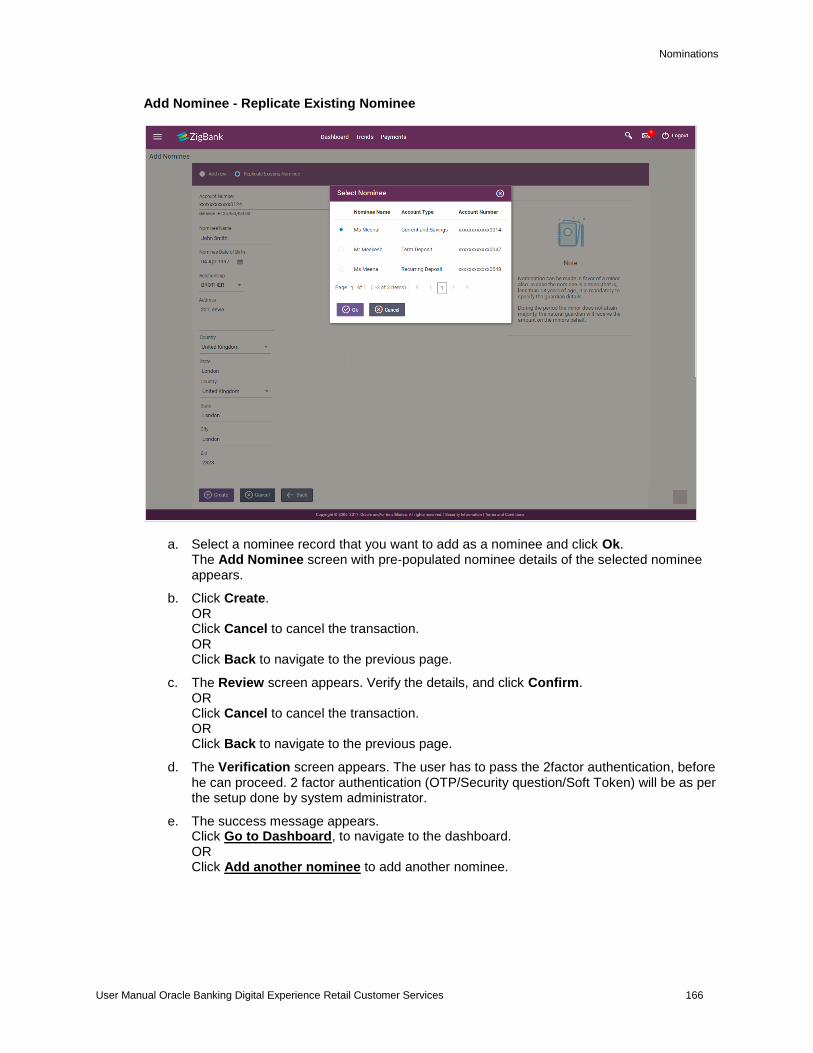
Nominations
User Manual Oracle Banking Digital Experience Retail Customer Services 166
Add Nominee - Replicate Existing Nominee
a. Select a nominee record that you want to add as a nominee and click Ok. The Add Nominee screen with pre-populated nominee details of the selected nominee appears.
b. Click Create. OR Click Cancel to cancel the transaction. OR Click Back to navigate to the previous page.
c. The Review screen appears. Verify the details, and click Confirm. OR Click Cancel to cancel the transaction. OR Click Back to navigate to the previous page.
d. The Verification screen appears. The user has to pass the 2factor authentication, before he can proceed. 2 factor authentication (OTP/Security question/Soft Token) will be as per the setup done by system administrator.
e. The success message appears. Click Go to Dashboard, to navigate to the dashboard. OR Click Add another nominee to add another nominee.
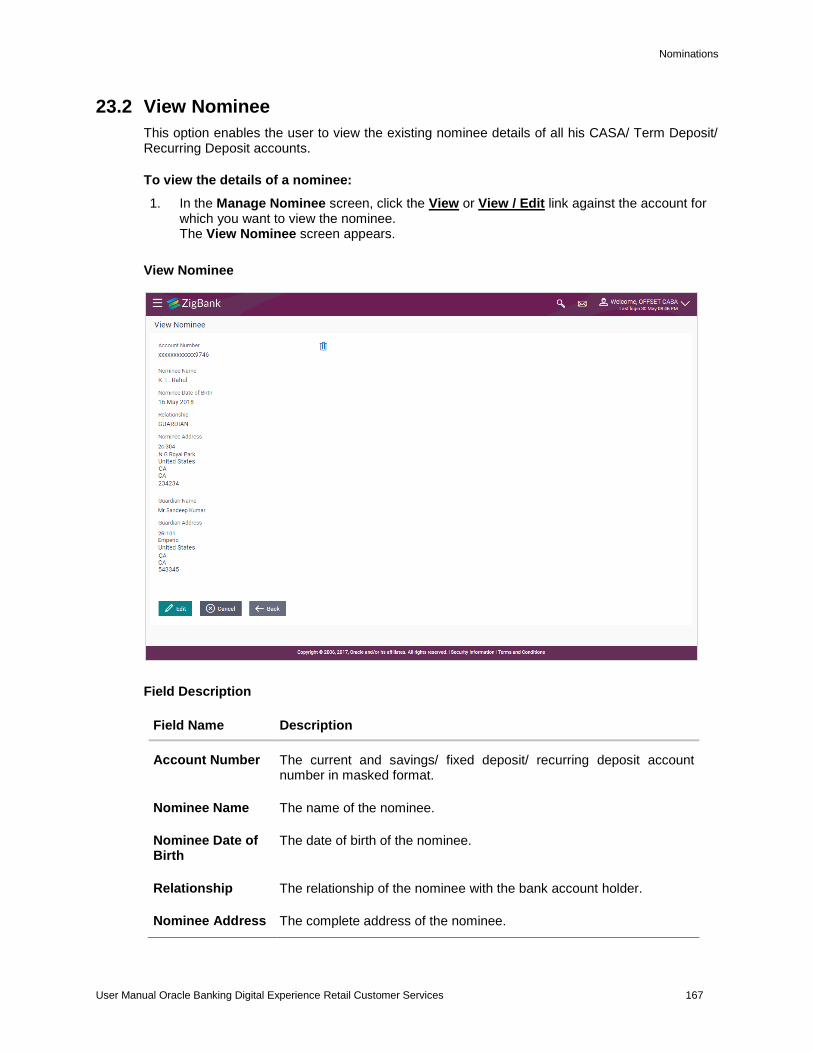
Nominations
User Manual Oracle Banking Digital Experience Retail Customer Services 167
23.2 View Nominee
This option enables the user to view the existing nominee details of all his CASA/ Term Deposit/ Recurring Deposit accounts.
To view the details of a nominee:
1. In the Manage Nominee screen, click the View or View / Edit link against the account for which you want to view the nominee. The View Nominee screen appears.
View Nominee
Field Description
Field Name Description
Account Number The current and savings/ fixed deposit/ recurring deposit account number in masked format.
Nominee Name The name of the nominee.
Nominee Date of Birth
The date of birth of the nominee.
Relationship The relationship of the nominee with the bank account holder.
Nominee Address The complete address of the nominee.
Nominations
User Manual Oracle Banking Digital Experience Retail Customer Services 168
Field Name Description
Guardian Name The name of the nominee's guardian.
This field appears if the nominee is a minor.
Guardian Address The complete address of the guardian of the nominee if age of the nominee is less than 18 years.
This field appears if nominee is a minor.
2. Click Edit to update the nominee details. The Edit Nominee screen appears. OR
Click to delete the nominee. OR Click Cancel to cancel the transaction and to navigate to the dashboard. OR Click Back to go back to previous screen.
Note: The Edit option is displayed only if the action selected was View/Edit. This option will not be provided if the action selected was View.
23.3 Edit Nominee
The user can edit the details of a nominee assigned to any of his CASA / Term Deposit/ Recurring Deposit accounts.
To edit the nominee details:
1. In the Manage Nominee screen, click the View / Edit link against the account for which you want to edit the nominee. The View Nominee screen appears.
2. Click Edit to update the details. The Edit Nominee screen appears. OR Click Cancel to cancel the transaction and to navigate to the dashboard. OR Click Back to go back to previous screen.
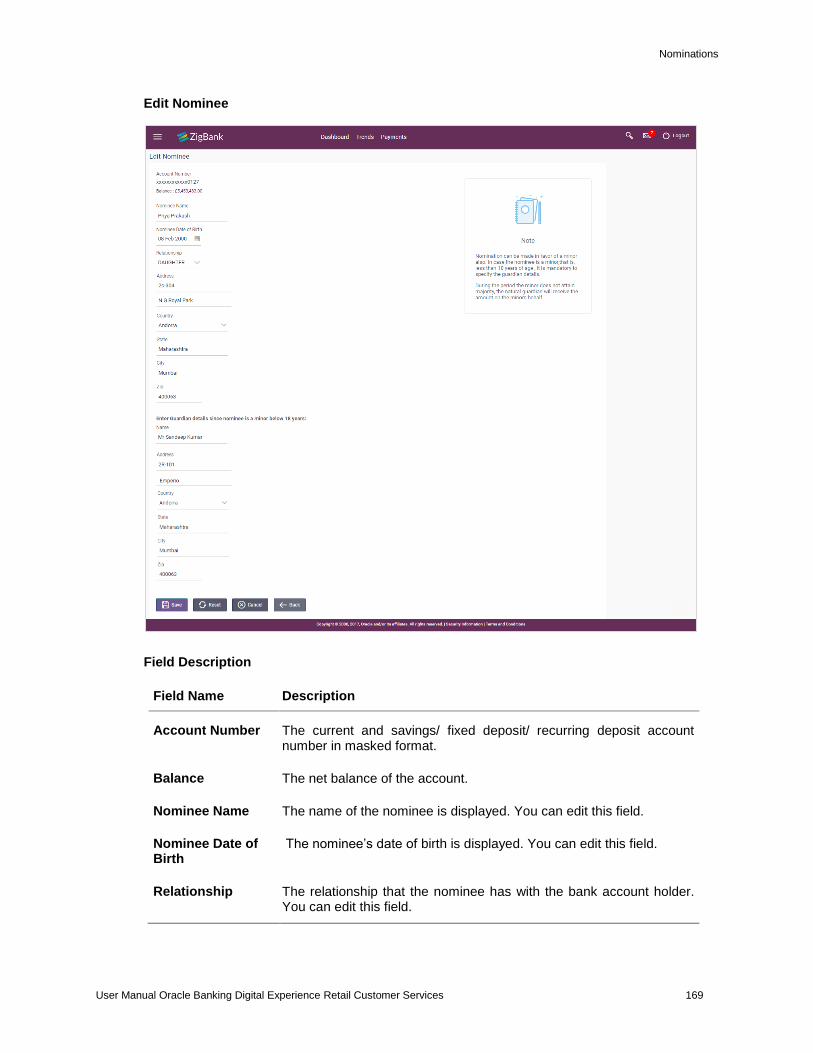
Nominations
User Manual Oracle Banking Digital Experience Retail Customer Services 169
Edit Nominee
Field Description
Field Name Description
Account Number The current and savings/ fixed deposit/ recurring deposit account number in masked format.
Balance The net balance of the account.
Nominee Name The name of the nominee is displayed. You can edit this field.
Nominee Date of Birth
The nominee’s date of birth is displayed. You can edit this field.
Relationship The relationship that the nominee has with the bank account holder. You can edit this field.
Nominations
User Manual Oracle Banking Digital Experience Retail Customer Services 170
Field Name Description
Address The address of the nominee is displayed. You can edit this field.
Country The country in which the nominee resides. You can edit this field.
State The state in which the nominee resides. You can edit this field.
City The name of the city in which the nominee resides. You can edit this field.
Zip The postal code of the nominee. You can edit this field.
Enter Guardian Details since nominee is a minor below 18 years.
This section appears if the age of the nominee is below 18 years.
Name The name of the guardian of the nominee. You can edit this field.
Address The address of the guardian. You can edit this field.
Country The country in which the guardian of the nominee resides. You can edit this field.
State The state in which the guardian of the nominee resides. You can edit this field.
City The city in which the guardian of the nominee resides. You can edit this field.
Zip The postal code of the nominee's guardian. You can edit this field.
3. In the Nominee Name field, edit the name of the nominee, if required.
4. From the Nominee Date of Birth list, edit the date of birth of the nominee, if required.
5. From the Relationship list, edit the relationship of the nominee with the bank account holder, if required.
6. In the Address field, edit the address of the nominee, if required.
7. From the Country list, edit the country of the nominee, if required.
8. In the State, City and Zip fields, edit the required details.
9. If the nominee is a minor below 18 years:
f. In the Name field, edit the name of the nominee's guardian, if required.
g. In the Address field, edit the address details of the nominee's guardian, if required.
h. From the Country list, edit the country of the nominee's guardian, if required.
i. In the State, City and Zip field, edit the details, if required.
10. Click Save to save the changes made. OR Click Reset to clear the nominee’s details and to enter the new details. OR
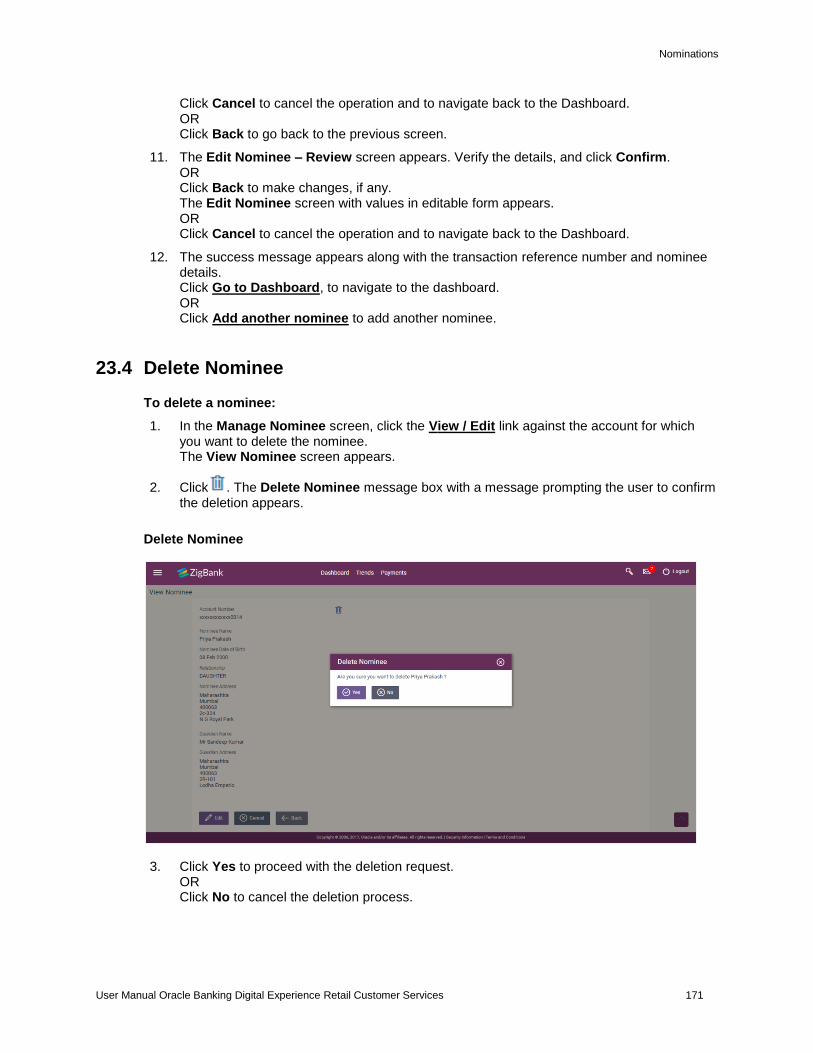
Nominations
User Manual Oracle Banking Digital Experience Retail Customer Services 171
Click Cancel to cancel the operation and to navigate back to the Dashboard. OR Click Back to go back to the previous screen.
11. The Edit Nominee – Review screen appears. Verify the details, and click Confirm. OR Click Back to make changes, if any. The Edit Nominee screen with values in editable form appears. OR Click Cancel to cancel the operation and to navigate back to the Dashboard.
12. The success message appears along with the transaction reference number and nominee details. Click Go to Dashboard, to navigate to the dashboard. OR Click Add another nominee to add another nominee.
23.4 Delete Nominee
To delete a nominee:
1. In the Manage Nominee screen, click the View / Edit link against the account for which you want to delete the nominee. The View Nominee screen appears.
2. Click . The Delete Nominee message box with a message prompting the user to confirm the deletion appears.
Delete Nominee
3. Click Yes to proceed with the deletion request. OR Click No to cancel the deletion process.
Nominations
User Manual Oracle Banking Digital Experience Retail Customer Services 172
4. The Verification screen appears. The user has to pass the 2factor authentication, before he can proceed. 2 factor authentication (OTP/Security question/Soft Token) will be as per the setup done by system administrator.
5. The success message of deletion appears along with the transaction reference number and nominee details. Click Go to Dashboard, to navigate to the dashboard. OR Click Go to Manage Nominee to navigate back to the Nominations page.
Home
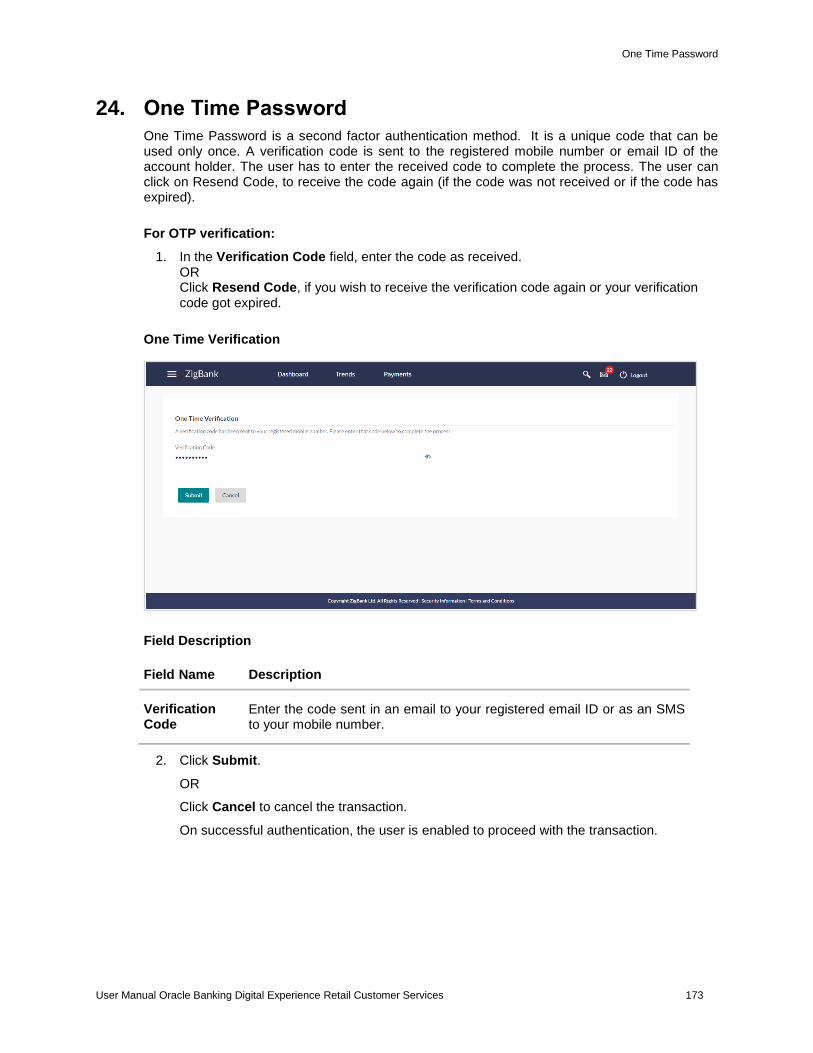
One Time Password
User Manual Oracle Banking Digital Experience Retail Customer Services 173
24. One Time Password
One Time Password is a second factor authentication method. It is a unique code that can be used only once. A verification code is sent to the registered mobile number or email ID of the account holder. The user has to enter the received code to complete the process. The user can click on Resend Code, to receive the code again (if the code was not received or if the code has expired).
For OTP verification:
1. In the Verification Code field, enter the code as received. OR Click Resend Code, if you wish to receive the verification code again or your verification code got expired.
One Time Verification
Field Description
Field Name Description
Verification Code
Enter the code sent in an email to your registered email ID or as an SMS to your mobile number.
2. Click Submit.
OR
Click Cancel to cancel the transaction.
On successful authentication, the user is enabled to proceed with the transaction.
One Time Password
User Manual Oracle Banking Digital Experience Retail Customer Services 174
FAQs
Why is there a need for a One-Time Password (OTP)?
An OTP helps to protect against online fraud. It is a secure way to authenticate whether a customer who is making an online transaction is the rightful owner of the credit / debit card being used.
When do I key in the OTP and how do I receive the OTP?
When you make an online transaction using your credit/debit card, OTP is set up will be required. OTP will be sent to your mobile phone via SMS or email.
Home


![Millionaire Certificate Oracle FLEXCUBE Universal Banking ... · Millionaire Certificate . Oracle FLEXCUBE Universal Banking . Release 11.3.83.02.0 [April] [2014] Oracle Part Number](https://img.dokumen.tips/doc/110x75/5b93734609d3f2d9098d521d/millionaire-certificate-oracle-flexcube-universal-banking-millionaire-certificate.jpg)