Embed Size (px)
Citation preview
Oracle Banking Digital
Experience Installer Pre-Requisite Setup Manual Release 17.1.0.0.0
March 2017
Part No. E83887-01

Oracle Banking Digital Experience Installer Pre-Requisite Setup Manual ii
Oracle Banking Digital Experience Installer Pre-Requisite Setup Manual
March 2017
Oracle Financial Services Software Limited
Oracle Park
Off Western Express Highway
Goregaon (East)
Mumbai, Maharashtra 400 063
India
Worldwide Inquiries:
Phone: +91 22 6718 3000
Fax:+91 22 6718 3001
www.oracle.com/financialservices/
Copyright © 2017, Oracle and/or its affiliates. All rights reserved.
Oracle and Java are registered trademarks of Oracle and/or its affiliates. Other names may be trademarks of their respective owners.
U.S. GOVERNMENT END USERS: Oracle programs, including any operating system, integrated software, any programs installed on the hardware, and/or documentation, delivered to U.S. Government end users are “commercial computer software” pursuant to the applicable Federal Acquisition Regulation and agency-specific supplemental regulations. As such, use, duplication, disclosure, modification, and adaptation of the programs, including any operating system, integrated software, any programs installed on the hardware, and/or documentation, shall be subject to license terms and license restrictions applicable to the programs. No other rights are granted to the U.S. Government.
This software or hardware is developed for general use in a variety of information management applications. It is not developed or intended for use in any inherently dangerous applications, including applications that may create a risk of personal injury. If you use this software or hardware in dangerous applications, then you shall be responsible to take all appropriate failsafe, backup, redundancy, and other measures to ensure its safe use. Oracle Corporation and its affiliates disclaim any liability for any damages caused by use of this software or hardware in dangerous applications.
This software and related documentation are provided under a license agreement containing restrictions on use and disclosure and are protected by intellectual property laws. Except as expressly permitted in your license agreement or allowed by law, you may not use, copy, reproduce, translate, broadcast, modify, license, transmit, distribute, exhibit, perform, publish or display any part, in any form, or by any means. Reverse engineering, disassembly, or decompilation of this software, unless required by law for interoperability, is prohibited.
The information contained herein is subject to change without notice and is not warranted to be error-free. If you find any errors, please report them to us in writing.
This software or hardware and documentation may provide access to or information on content, products and services from third parties. Oracle Corporation and its affiliates are not responsible for and expressly disclaim all warranties of any kind with respect to third-party content, products, and services. Oracle Corporation and its affiliates will not be responsible for any loss, costs, or damages incurred due to your access to or use of third-party content, products, or services.
Oracle Banking Digital Experience Installer Pre-Requisite Setup Manual iii
Table of Contents 1. Preface ................................................................................................................................................. 4 2. Introduction ......................................................................................................................................... 5 3. Installing and Configuring Weblogic 12c with JRF ......................................................................... 7 4. Oracle Webtier Installation .............................................................................................................. 28 5. Oracle HTTP Server Webgate Installation and Configuration ...................................................... 45 6. Oracle Identity and Access Management Installation and Configuration .................................. 56 7. Oracle Access Management Configuration ................................................................................... 77 8. LDAP Installation and Configuration ............................................................................................ 113 9. Oracle Business Intelligence Publisher Installation ................................................................... 150
Preface
Oracle Banking Digital Experience Installer Pre-Requisite Setup Manual 4
1. Preface
1.1 Intended Audience
This document is intended for the following audience:
Customers
Partners
1.2 Documentation Accessibility For information about Oracle's commitment to accessibility, visit the Oracle Accessibility
Program website at http://www.oracle.com/pls/topic/lookup?ctx=acc&id=docacc.
1.3 Access to OFSS Support
https://support.us.oracle.com
1.4 Structure
This manual is organized into the following categories:
Preface gives information on the intended audience. It also describes the overall structure of the User Manual.
The subsequent chapters describes following details:
Introduction
Configuration / Installation.
1.5 Related Information Sources
For more information on Oracle Banking Digital Experience Release 17.1.0.0.0, refer to the following documents:
Oracle Banking Digital Experience Licensing Guide

Introduction
Oracle Banking Digital Experience Installer Pre-Requisite Setup Manual 5
2. Introduction
This guide helps you to do the pre-requisite setup required before the execution of OBDX 17.1.0.0.0 Installer.
More details about each task are explained in detail in following sections.
2.1 Software List
Software Name Version Links/Location/eDelivery File Mandatory Software
Oracle Database
12c http://www.oracle.com/technetwork/database/enterprise-edition/downloads/index.html
Y
Oracle Java Development Kit
1.8.0_101 http://www.oracle.com/technetwork/java/javase/downloads/jdk8-downloads-2133151.html
Y
Oracle WebLogic 12.2.1.0.0 http://www.oracle.com/technetwork/middleware/weblogic/downloads/wls-main-097127.html
Y
Oracle Weblogic Infrastructure
12.2.1.0.0 Y
Oracle Web Tier Suite
11.1.1.9.0 http://www.oracle.com/technetwork/java/webtier/downloads/index2-303202.html
Y
Oracle Webgates Suite
11.1.2.3.0 http://www.oracle.com/technetwork/middleware/id-mgmt/downloads/oam-webgates-2147084.html
Y
Oracle Installer – WebLogic
10.3.6.0 http://www.oracle.com/technetwork/middleware/weblogic/downloads/wls-main-097127.html
N
Oracle Java Development Kit
1.7 http://www.oracle.com/technetwork/java/javase/downloads/java-archive-downloads-javase7-521261.html#jdk-7u80-oth-JPR
Y
Oracle Identity and Access Management Suite (IAM)
11.1.2.3.0 http://www.oracle.com/technetwork/middleware/id-mgmt/downloads/oid-11gr2-2104316.html
N
LDAP
(OUD/OpenLDAP)
11.1.2.3.0 http://www.oracle.com/technetwork/middleware/id-mgmt/downloads/oid-11gr2-2104316.html
N

Introduction
Oracle Banking Digital Experience Installer Pre-Requisite Setup Manual 6
Software Name Version Links/Location/eDelivery File Mandatory Software
Oracle Business Intelligence Publisher
12.2.1.0.0 http://www.oracle.com/technetwork/middleware/bi-publisher/downloads/index.html
N
Installing and Configuring Weblogic 12c with JRF
Oracle Banking Digital Experience Installer Pre-Requisite Setup Manual 7
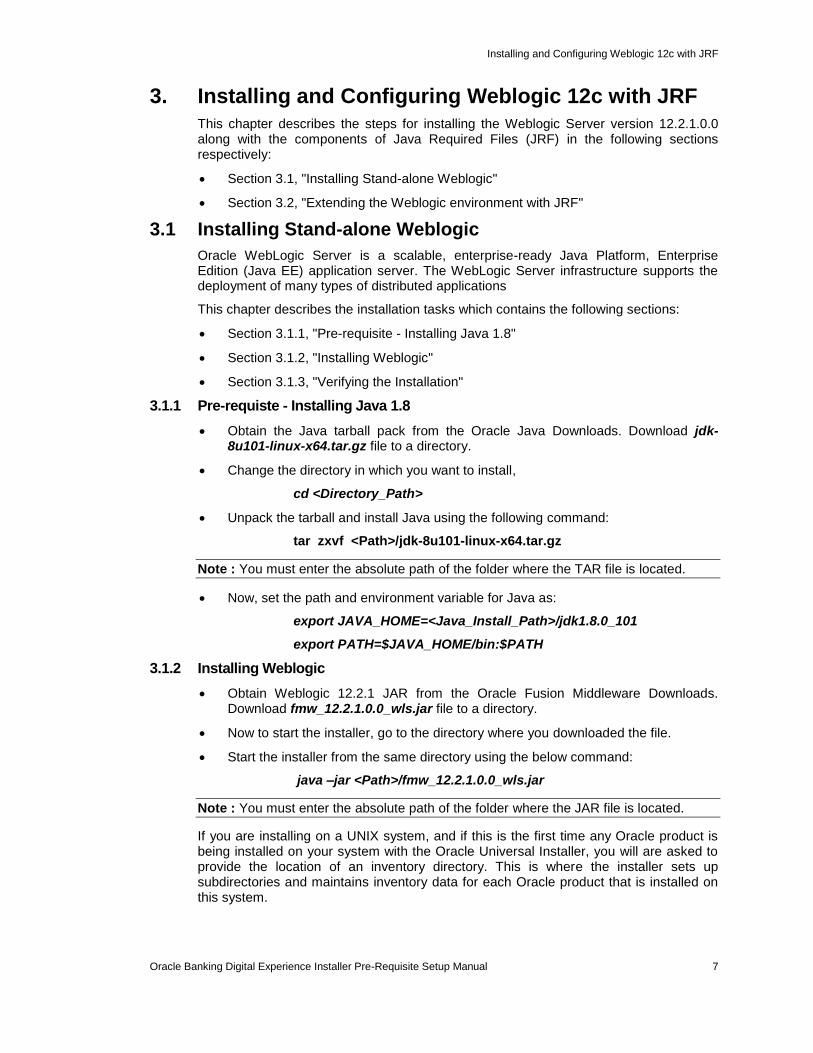
3. Installing and Configuring Weblogic 12c with JRF
This chapter describes the steps for installing the Weblogic Server version 12.2.1.0.0 along with the components of Java Required Files (JRF) in the following sections respectively:
Section 3.1, "Installing Stand-alone Weblogic"
Section 3.2, "Extending the Weblogic environment with JRF"
3.1 Installing Stand-alone Weblogic
Oracle WebLogic Server is a scalable, enterprise-ready Java Platform, Enterprise Edition (Java EE) application server. The WebLogic Server infrastructure supports the deployment of many types of distributed applications
This chapter describes the installation tasks which contains the following sections:
Section 3.1.1, "Pre-requisite - Installing Java 1.8"
Section 3.1.2, "Installing Weblogic"
Section 3.1.3, "Verifying the Installation"
3.1.1 Pre-requiste - Installing Java 1.8
Obtain the Java tarball pack from the Oracle Java Downloads. Download jdk-8u101-linux-x64.tar.gz file to a directory.
Change the directory in which you want to install,
cd <Directory_Path>
Unpack the tarball and install Java using the following command:
tar zxvf <Path>/jdk-8u101-linux-x64.tar.gz
Note : You must enter the absolute path of the folder where the TAR file is located.
Now, set the path and environment variable for Java as:
export JAVA_HOME=<Java_Install_Path>/jdk1.8.0_101
export PATH=$JAVA_HOME/bin:$PATH
3.1.2 Installing Weblogic
Obtain Weblogic 12.2.1 JAR from the Oracle Fusion Middleware Downloads. Download fmw_12.2.1.0.0_wls.jar file to a directory.
Now to start the installer, go to the directory where you downloaded the file.
Start the installer from the same directory using the below command:
java –jar <Path>/fmw_12.2.1.0.0_wls.jar
Note : You must enter the absolute path of the folder where the JAR file is located.
If you are installing on a UNIX system, and if this is the first time any Oracle product is being installed on your system with the Oracle Universal Installer, you will are asked to provide the location of an inventory directory. This is where the installer sets up subdirectories and maintains inventory data for each Oracle product that is installed on this system.
Installing and Configuring Weblogic 12c with JRF
Oracle Banking Digital Experience Installer Pre-Requisite Setup Manual 8
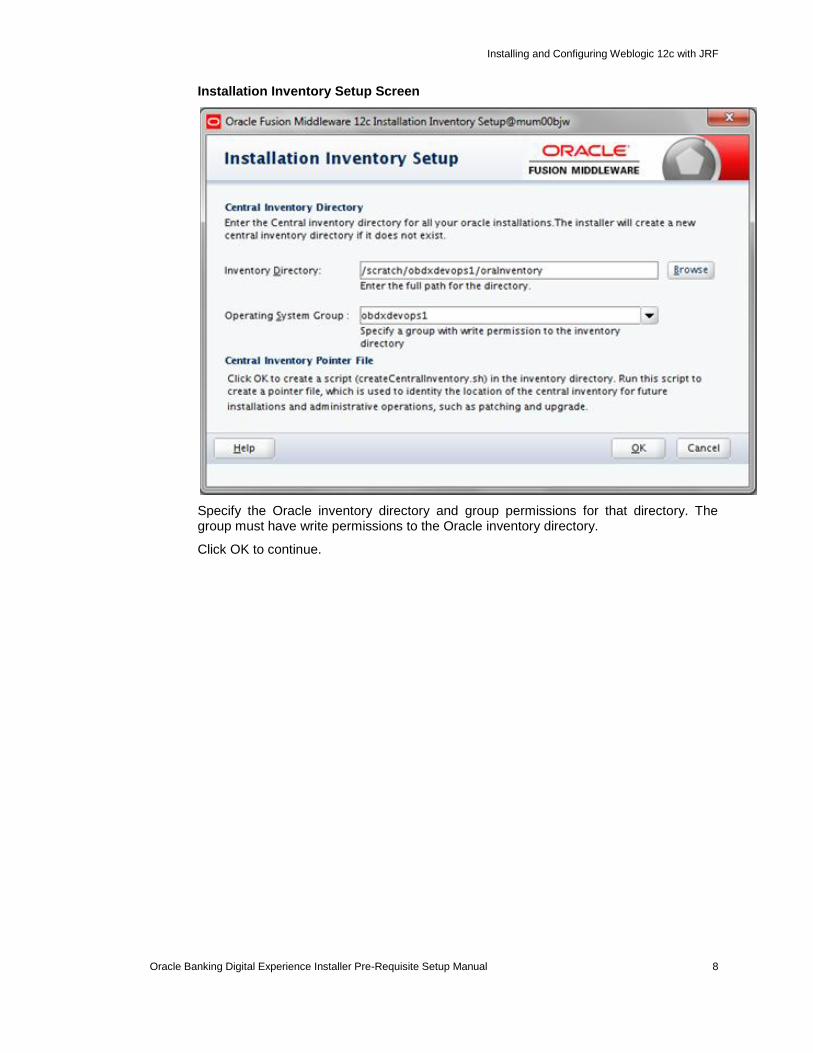
Installation Inventory Setup Screen
Specify the Oracle inventory directory and group permissions for that directory. The group must have write permissions to the Oracle inventory directory.
Click OK to continue.
Installing and Configuring Weblogic 12c with JRF
Oracle Banking Digital Experience Installer Pre-Requisite Setup Manual 9
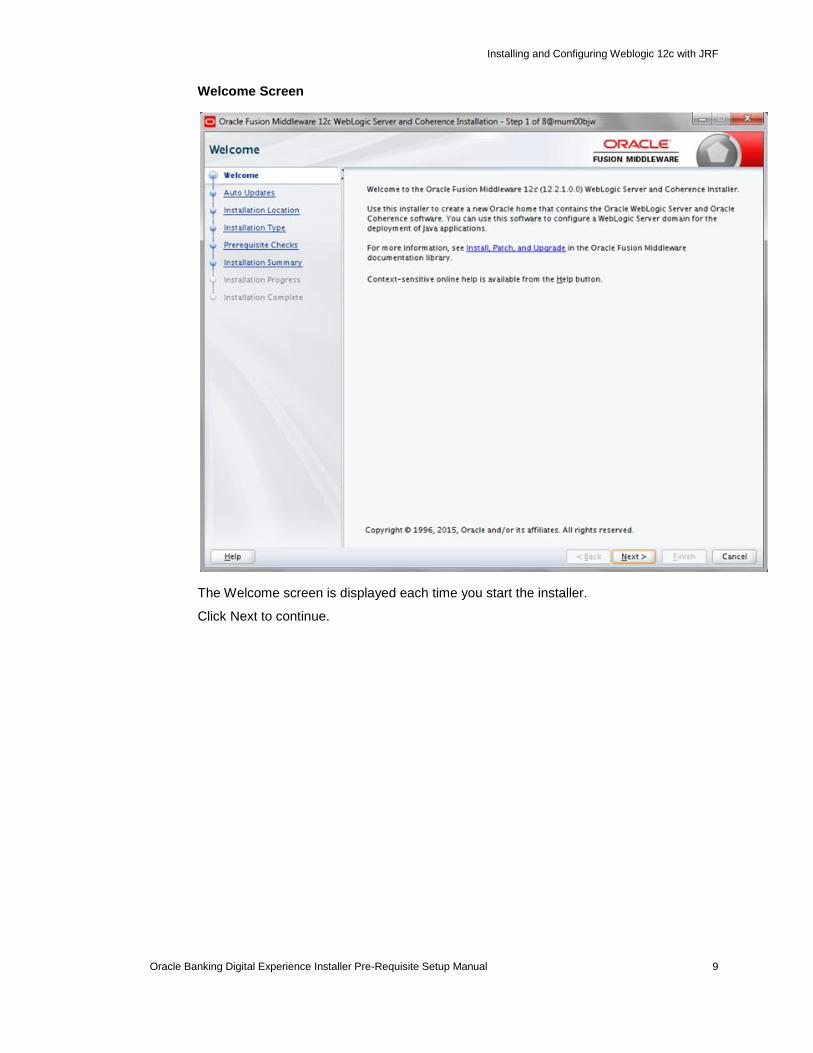
Welcome Screen
The Welcome screen is displayed each time you start the installer.
Click Next to continue.
Installing and Configuring Weblogic 12c with JRF
Oracle Banking Digital Experience Installer Pre-Requisite Setup Manual 10
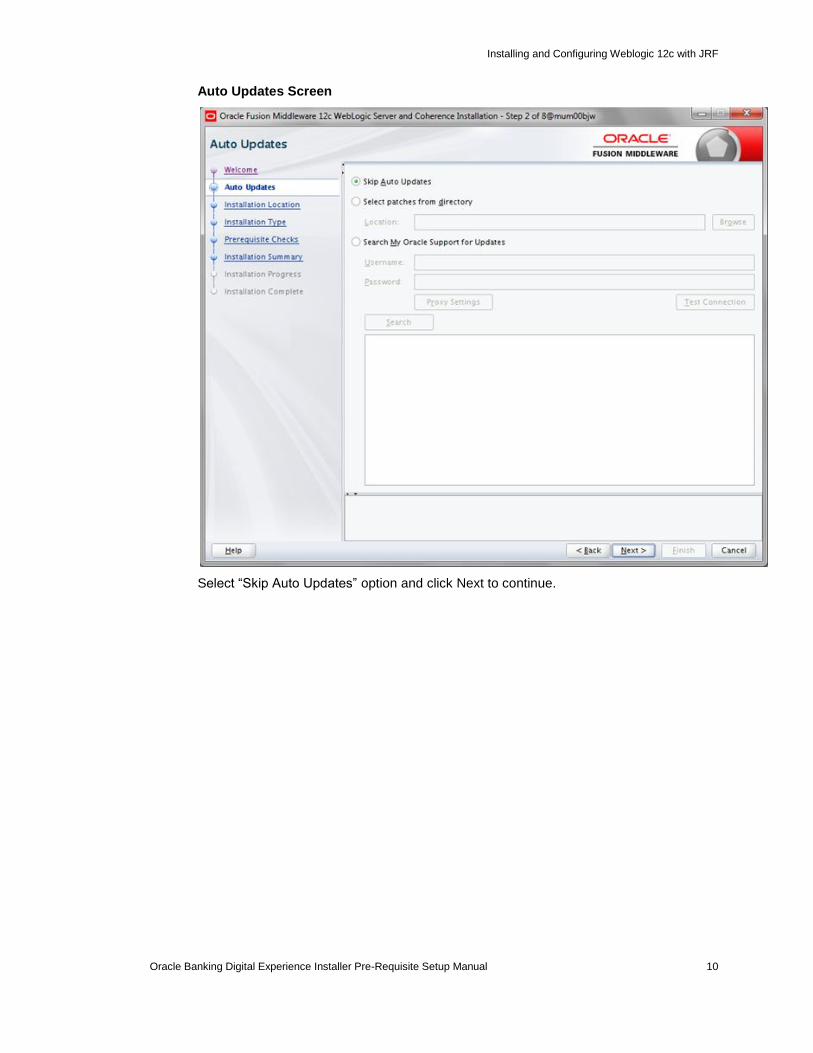
Auto Updates Screen
Select “Skip Auto Updates” option and click Next to continue.
Installing and Configuring Weblogic 12c with JRF
Oracle Banking Digital Experience Installer Pre-Requisite Setup Manual 11
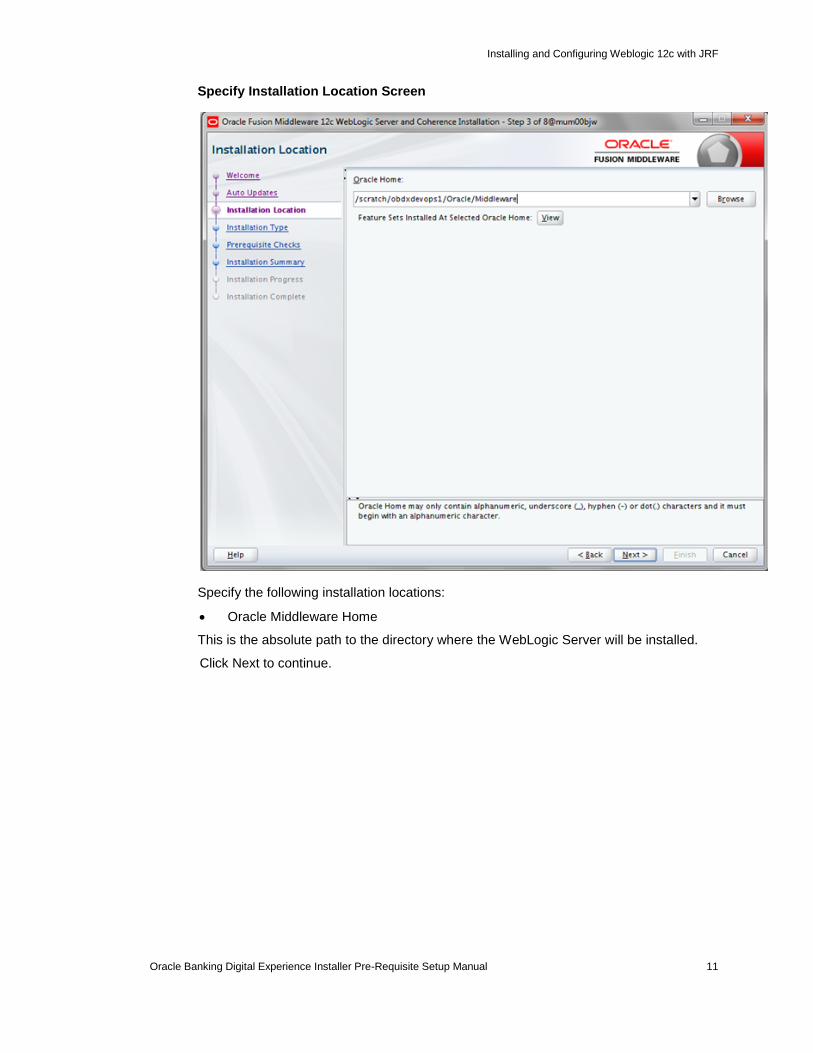
Specify Installation Location Screen
Specify the following installation locations:
Oracle Middleware Home
This is the absolute path to the directory where the WebLogic Server will be installed.
Click Next to continue.
Installing and Configuring Weblogic 12c with JRF
Oracle Banking Digital Experience Installer Pre-Requisite Setup Manual 12
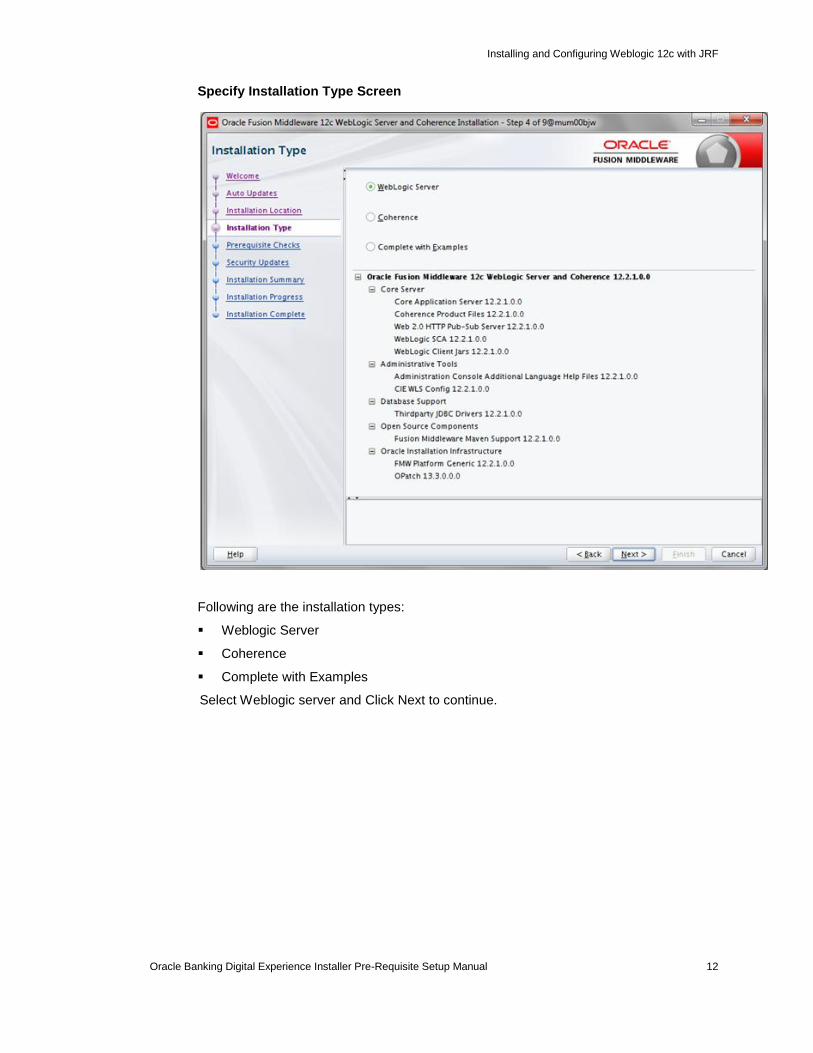
Specify Installation Type Screen
Following are the installation types:
Weblogic Server
Coherence
Complete with Examples
Select Weblogic server and Click Next to continue.

Installing and Configuring Weblogic 12c with JRF
Oracle Banking Digital Experience Installer Pre-Requisite Setup Manual 13
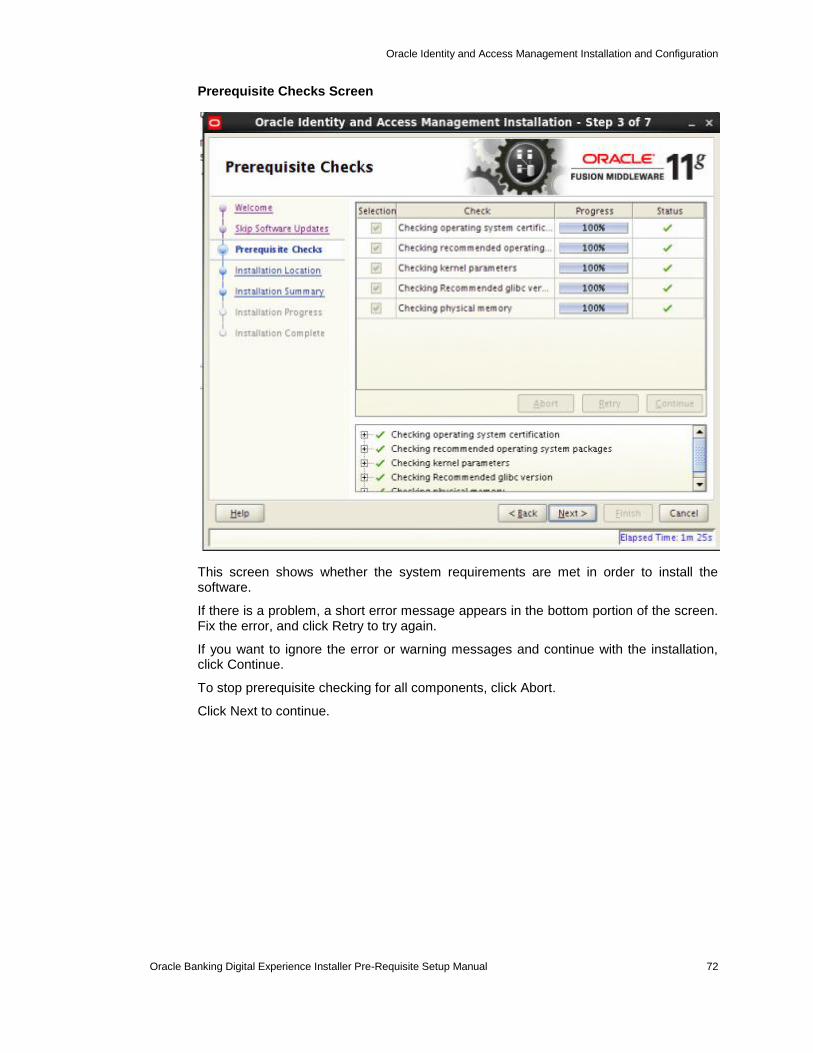
Prerequisite Checks Screen
This screen shows whether the system requirements are met in order to install the software.
If there is a problem, a short error message appears in the bottom portion of the screen. Fix the error, and click Retry to try again.
If you want to ignore the error or warning messages and continue with the installation, click Continue.
To stop prerequisite checking for all components, click Abort.
Click Next to continue.

Installing and Configuring Weblogic 12c with JRF
Oracle Banking Digital Experience Installer Pre-Requisite Setup Manual 14
Specify Security Updates Screen
Uncheck the box stating “I wish to receive security updates via My Oracle Support”
Click on Next.
Installing and Configuring Weblogic 12c with JRF
Oracle Banking Digital Experience Installer Pre-Requisite Setup Manual 15
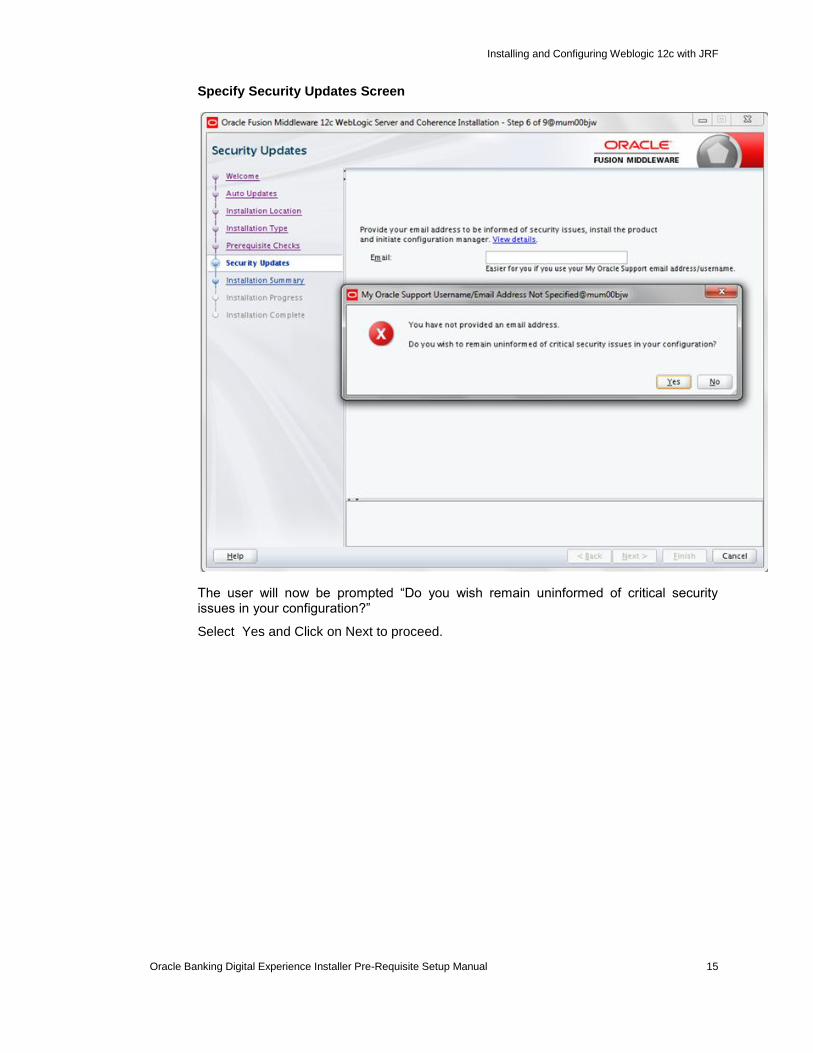
Specify Security Updates Screen
The user will now be prompted “Do you wish remain uninformed of critical security issues in your configuration?”
Select Yes and Click on Next to proceed.
Installing and Configuring Weblogic 12c with JRF
Oracle Banking Digital Experience Installer Pre-Requisite Setup Manual 16
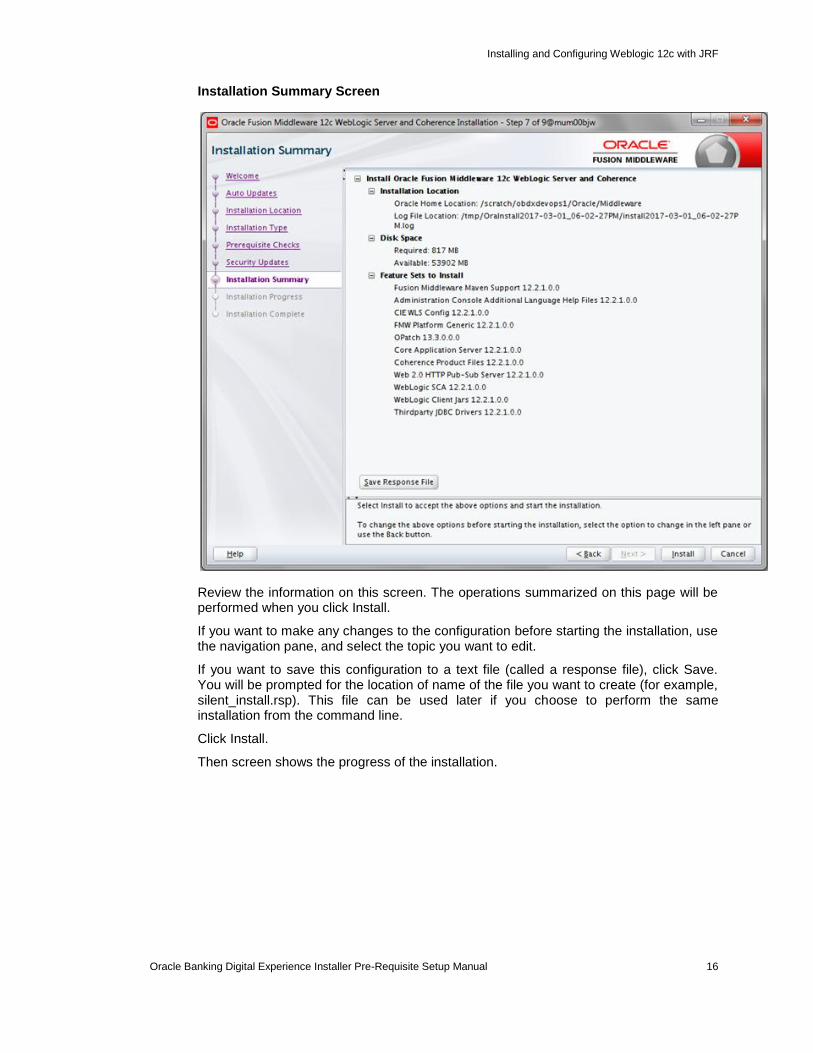
Installation Summary Screen
Review the information on this screen. The operations summarized on this page will be performed when you click Install.
If you want to make any changes to the configuration before starting the installation, use the navigation pane, and select the topic you want to edit.
If you want to save this configuration to a text file (called a response file), click Save. You will be prompted for the location of name of the file you want to create (for example, silent_install.rsp). This file can be used later if you choose to perform the same installation from the command line.
Click Install.
Then screen shows the progress of the installation.
Installing and Configuring Weblogic 12c with JRF
Oracle Banking Digital Experience Installer Pre-Requisite Setup Manual 17
Installation Progress Screen
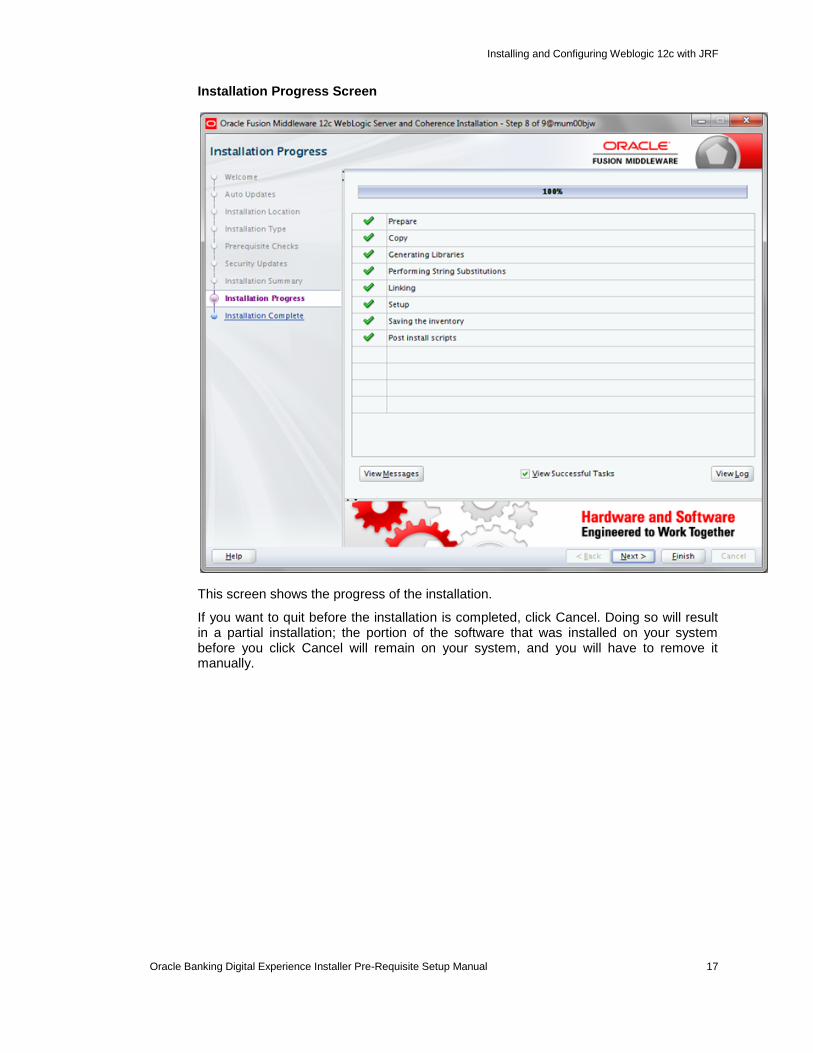
This screen shows the progress of the installation.
If you want to quit before the installation is completed, click Cancel. Doing so will result in a partial installation; the portion of the software that was installed on your system before you click Cancel will remain on your system, and you will have to remove it manually.
Installing and Configuring Weblogic 12c with JRF
Oracle Banking Digital Experience Installer Pre-Requisite Setup Manual 18
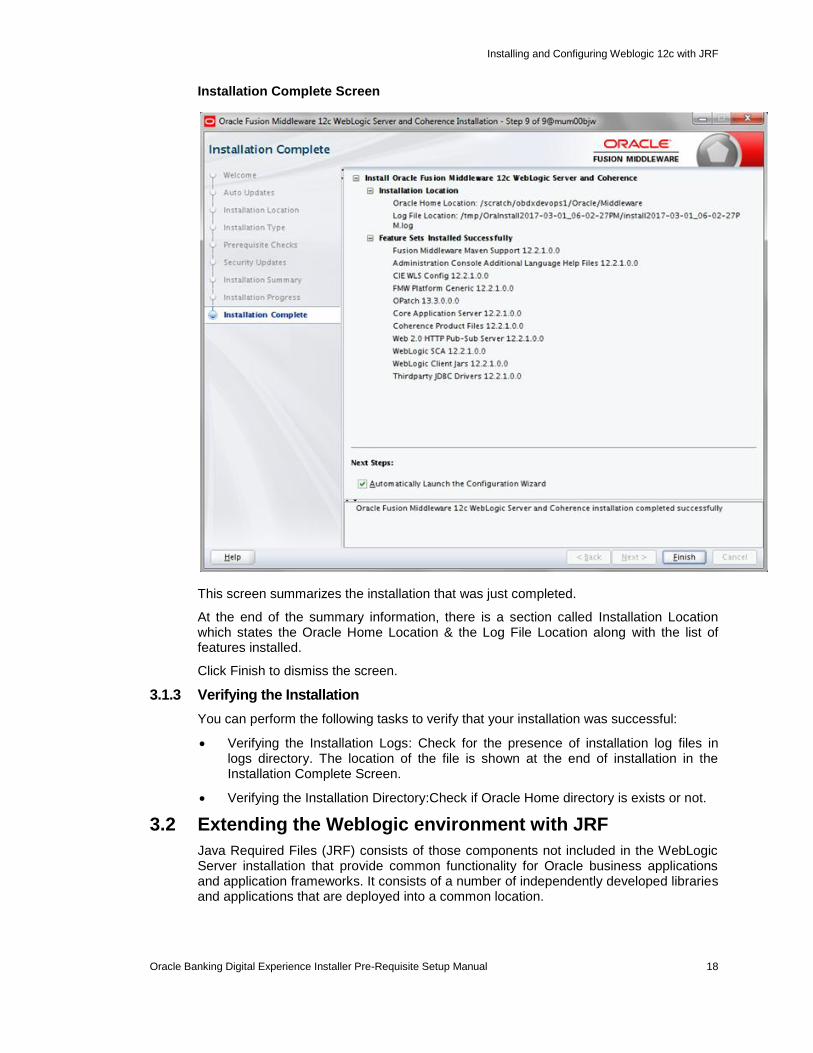
Installation Complete Screen
This screen summarizes the installation that was just completed.
At the end of the summary information, there is a section called Installation Location which states the Oracle Home Location & the Log File Location along with the list of features installed.
Click Finish to dismiss the screen.
3.1.3 Verifying the Installation
You can perform the following tasks to verify that your installation was successful:
Verifying the Installation Logs: Check for the presence of installation log files in logs directory. The location of the file is shown at the end of installation in the Installation Complete Screen.
Verifying the Installation Directory:Check if Oracle Home directory is exists or not.
3.2 Extending the Weblogic environment with JRF
Java Required Files (JRF) consists of those components not included in the WebLogic Server installation that provide common functionality for Oracle business applications and application frameworks. It consists of a number of independently developed libraries and applications that are deployed into a common location.
Installing and Configuring Weblogic 12c with JRF
Oracle Banking Digital Experience Installer Pre-Requisite Setup Manual 19
This chapter describes the installation tasks which contains the following sections:
Section 3.2.1, "Installing JRF components"
Section 3.2.2, "Verifying the Installation"
3.2.1 Installing JRF Components
Obtain FMW 12.2.1 Infrastructure JAR from the Oracle Fusion Middleware Downloads. Download fmw_12.2.1.0.0_infrastructure.jar file to a directory.
Now to start the installer, go to the directory where you downloaded the file and execute the below command:
java –jar <Path>/fmw_12.2.1.0.0_infrastructure.jar
Note : You must enter the absolute path of the folder where the JAR file is located.
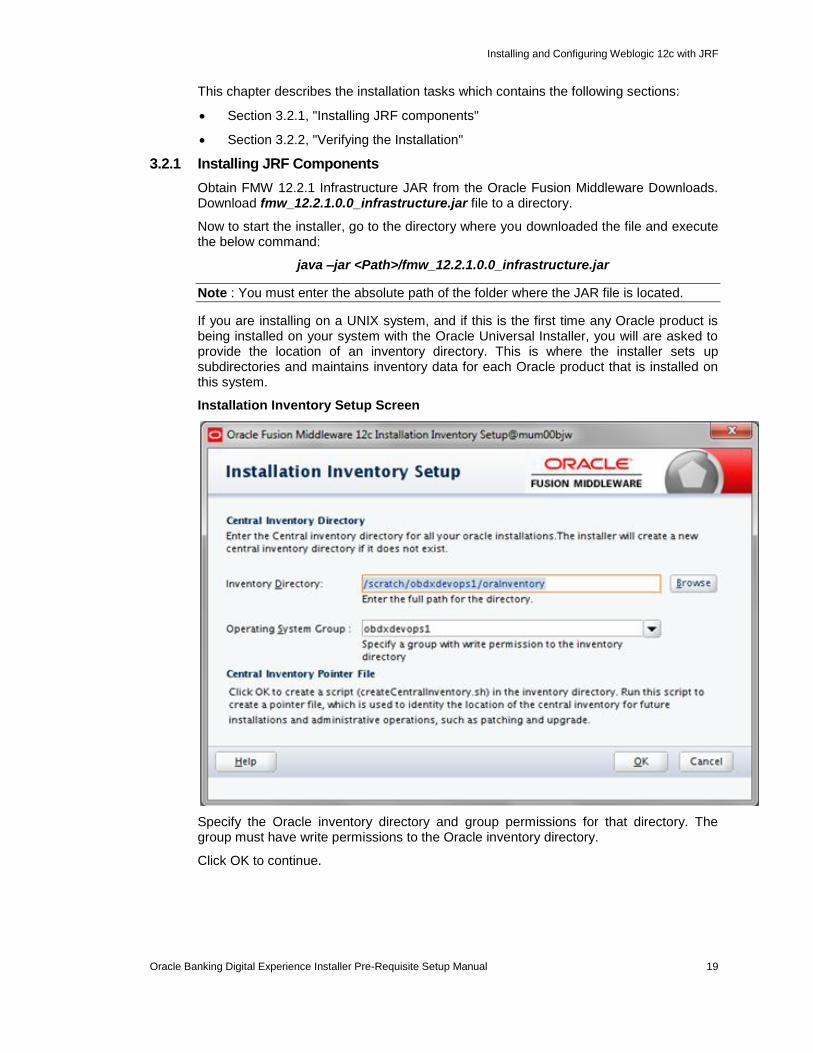
If you are installing on a UNIX system, and if this is the first time any Oracle product is being installed on your system with the Oracle Universal Installer, you will are asked to provide the location of an inventory directory. This is where the installer sets up subdirectories and maintains inventory data for each Oracle product that is installed on this system.
Installation Inventory Setup Screen
Specify the Oracle inventory directory and group permissions for that directory. The group must have write permissions to the Oracle inventory directory.
Click OK to continue.
Installing and Configuring Weblogic 12c with JRF
Oracle Banking Digital Experience Installer Pre-Requisite Setup Manual 20
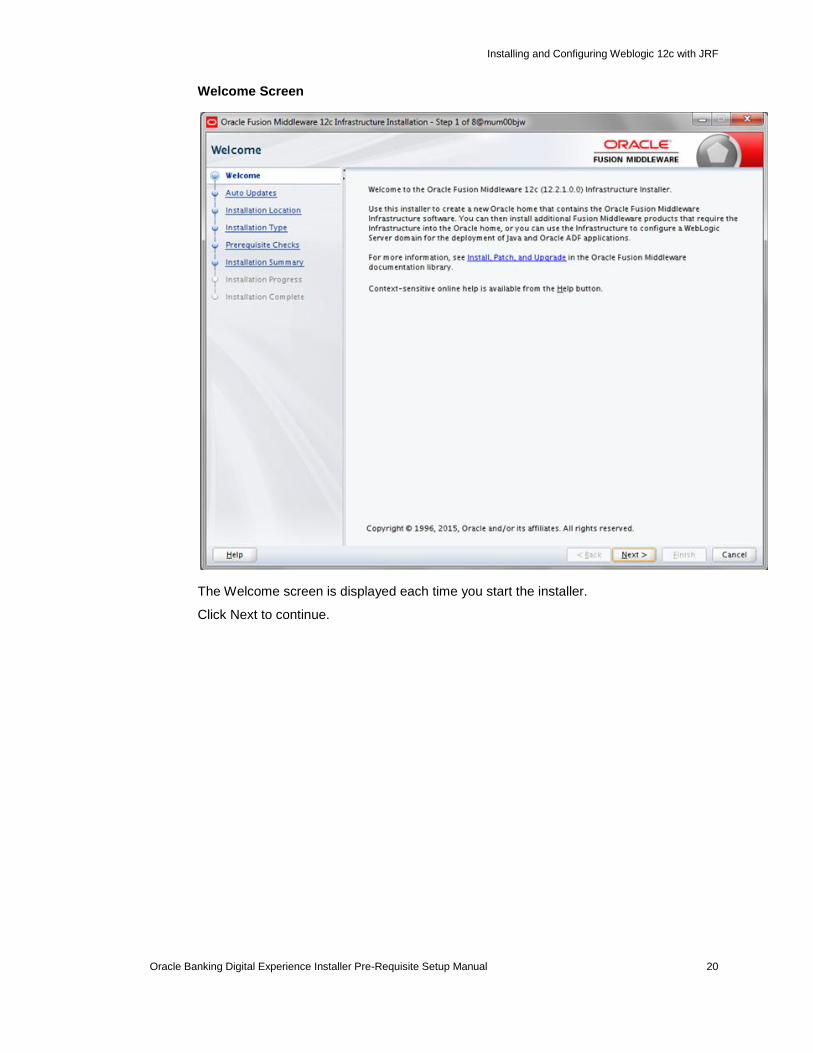
Welcome Screen
The Welcome screen is displayed each time you start the installer.
Click Next to continue.
Installing and Configuring Weblogic 12c with JRF
Oracle Banking Digital Experience Installer Pre-Requisite Setup Manual 21
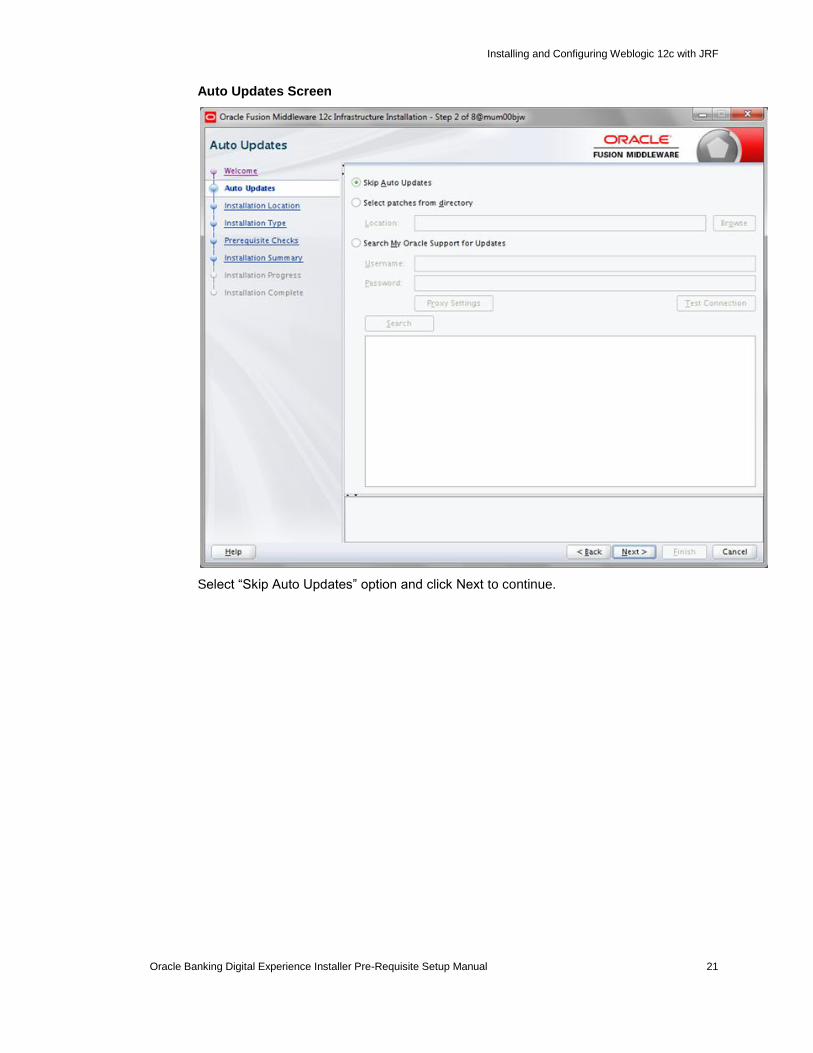
Auto Updates Screen
Select “Skip Auto Updates” option and click Next to continue.
Installing and Configuring Weblogic 12c with JRF
Oracle Banking Digital Experience Installer Pre-Requisite Setup Manual 22
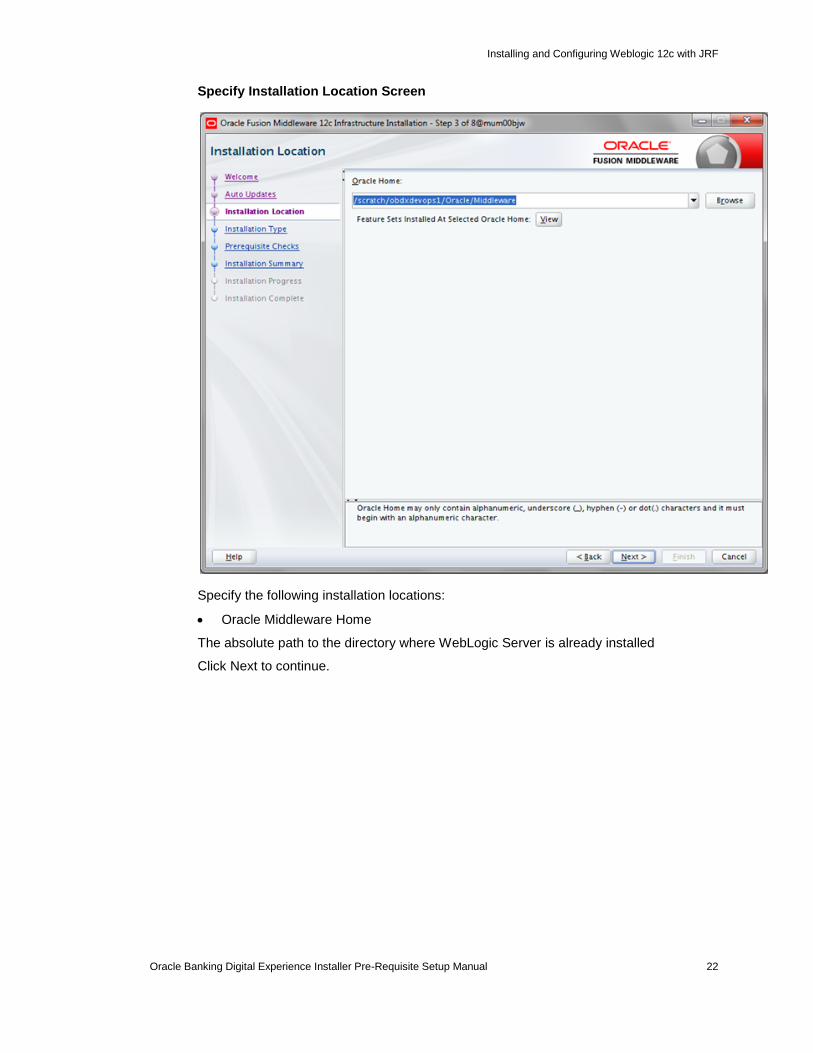
Specify Installation Location Screen
Specify the following installation locations:
Oracle Middleware Home
The absolute path to the directory where WebLogic Server is already installed
Click Next to continue.
Installing and Configuring Weblogic 12c with JRF
Oracle Banking Digital Experience Installer Pre-Requisite Setup Manual 23
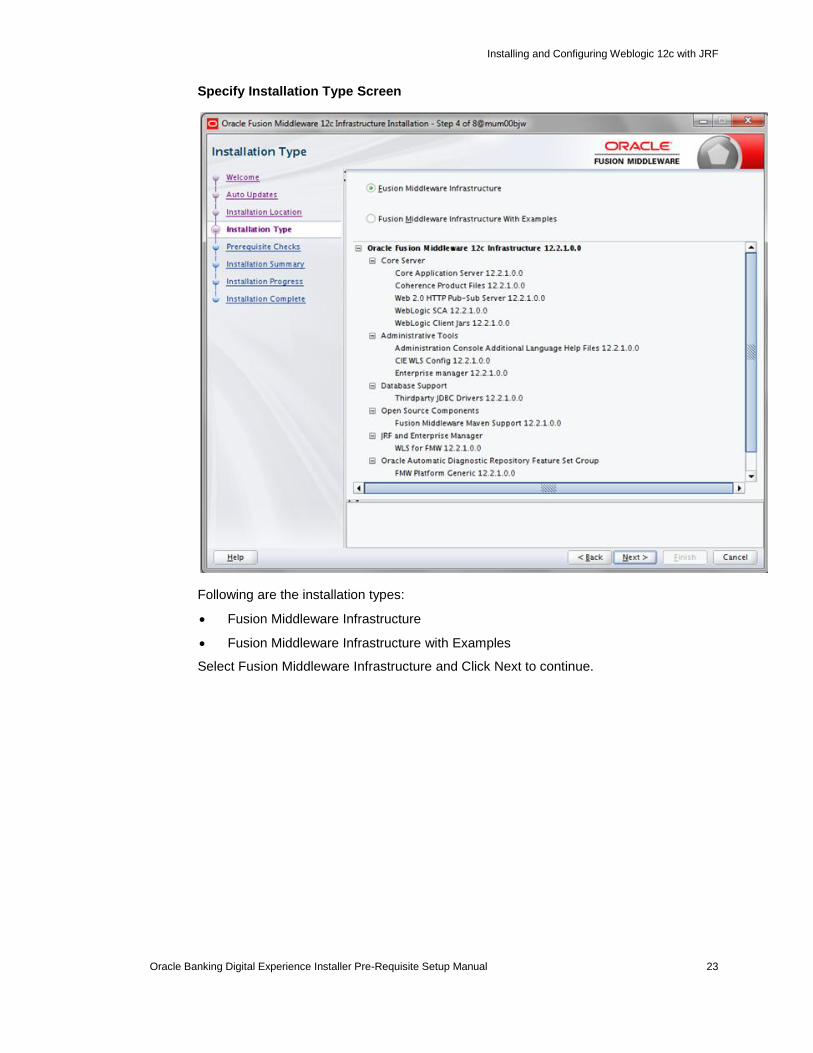
Specify Installation Type Screen
Following are the installation types:
Fusion Middleware Infrastructure
Fusion Middleware Infrastructure with Examples
Select Fusion Middleware Infrastructure and Click Next to continue.
Installing and Configuring Weblogic 12c with JRF
Oracle Banking Digital Experience Installer Pre-Requisite Setup Manual 24
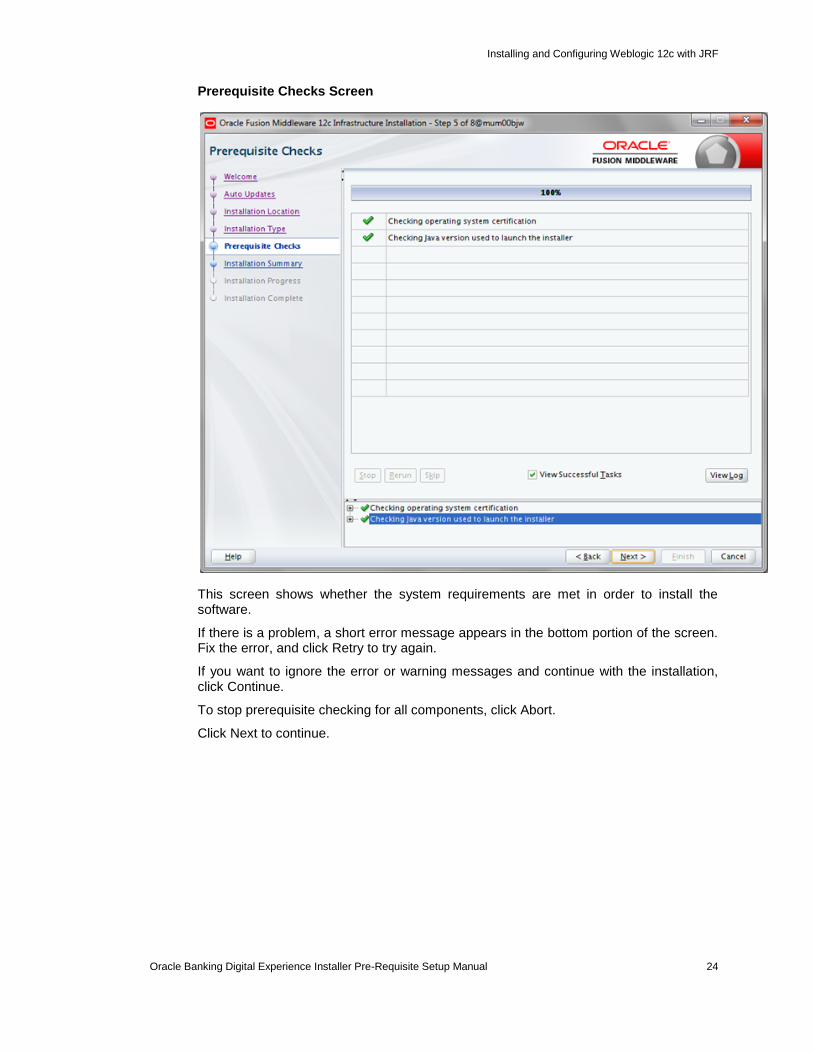
Prerequisite Checks Screen
This screen shows whether the system requirements are met in order to install the software.
If there is a problem, a short error message appears in the bottom portion of the screen. Fix the error, and click Retry to try again.
If you want to ignore the error or warning messages and continue with the installation, click Continue.
To stop prerequisite checking for all components, click Abort.
Click Next to continue.
Installing and Configuring Weblogic 12c with JRF
Oracle Banking Digital Experience Installer Pre-Requisite Setup Manual 25
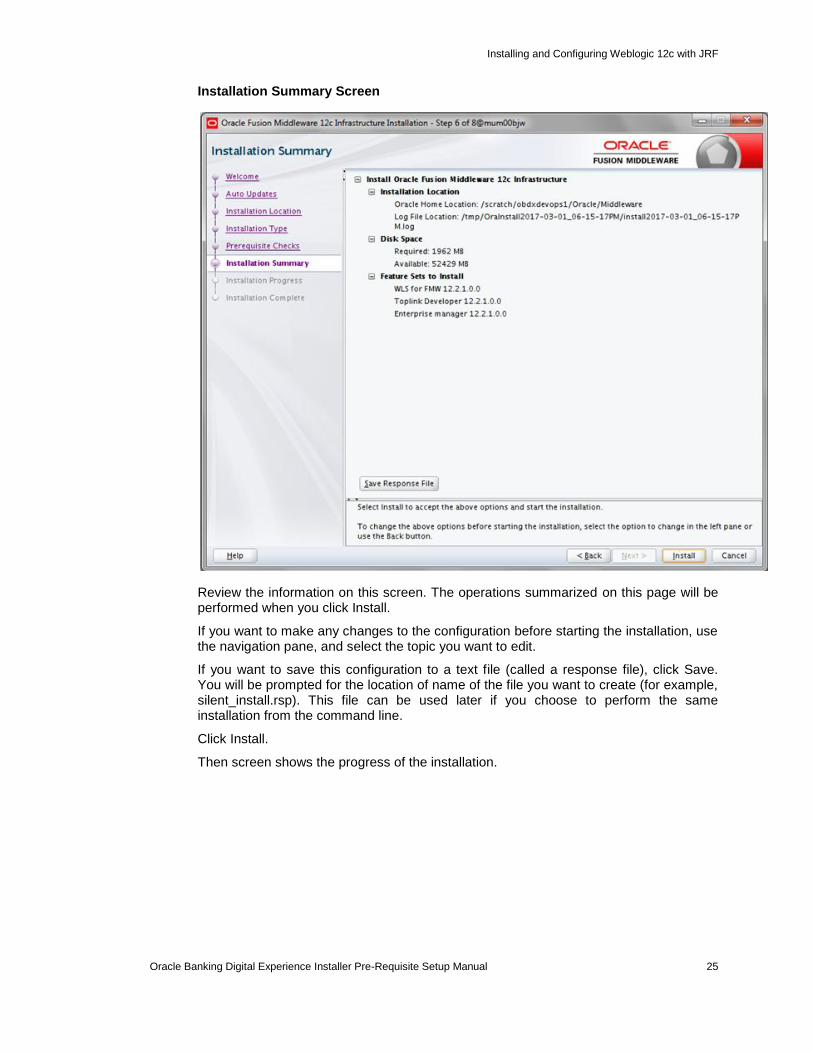
Installation Summary Screen
Review the information on this screen. The operations summarized on this page will be performed when you click Install.
If you want to make any changes to the configuration before starting the installation, use the navigation pane, and select the topic you want to edit.
If you want to save this configuration to a text file (called a response file), click Save. You will be prompted for the location of name of the file you want to create (for example, silent_install.rsp). This file can be used later if you choose to perform the same installation from the command line.
Click Install.
Then screen shows the progress of the installation.
Installing and Configuring Weblogic 12c with JRF
Oracle Banking Digital Experience Installer Pre-Requisite Setup Manual 26
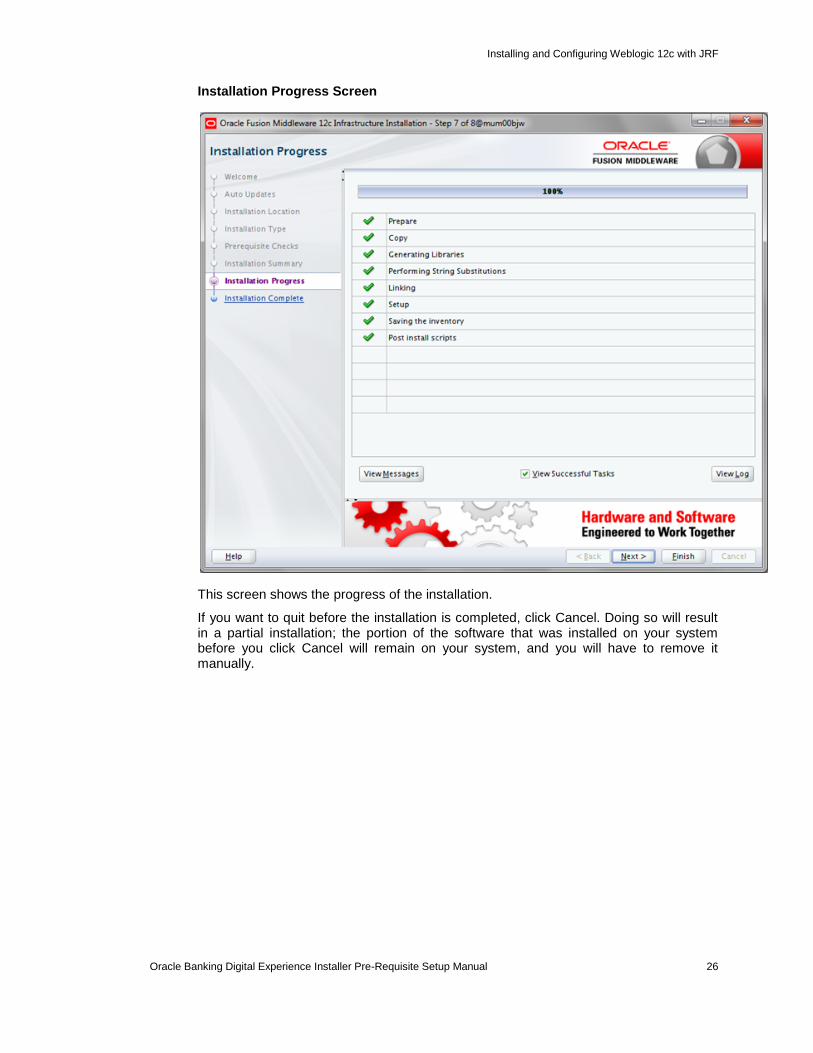
Installation Progress Screen
This screen shows the progress of the installation.
If you want to quit before the installation is completed, click Cancel. Doing so will result in a partial installation; the portion of the software that was installed on your system before you click Cancel will remain on your system, and you will have to remove it manually.

Installing and Configuring Weblogic 12c with JRF
Oracle Banking Digital Experience Installer Pre-Requisite Setup Manual 27
Installation Complete Screen
This screen summarizes the installation that was just completed.
At the end of the summary information, there is a section called Installation Location which states the Oracle Home Location & the Log File Location along with the list of features installed.
Click Finish to dismiss the screen.
3.2.2 Verifying the Installation
You can perform the following tasks to verify that your installation was successful:
Verifying the Installation Logs: Check for the presence of installation log files in logs directory. The location of the file is shown at the end of installation in the Installation Complete Screen.
Verifying the Installation Directory: Check if Oracle Home directory exists or not.
Oracle Webtier Installation
Oracle Banking Digital Experience Installer Pre-Requisite Setup Manual 28
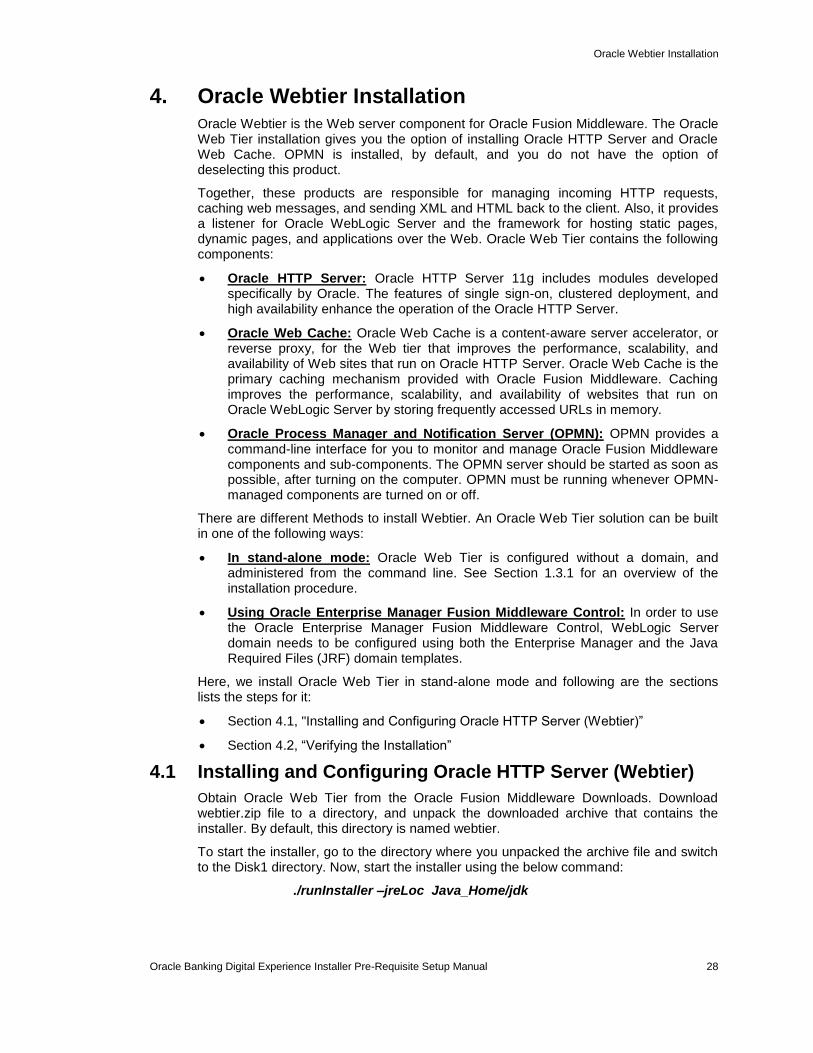
4. Oracle Webtier Installation
Oracle Webtier is the Web server component for Oracle Fusion Middleware. The Oracle Web Tier installation gives you the option of installing Oracle HTTP Server and Oracle Web Cache. OPMN is installed, by default, and you do not have the option of deselecting this product.
Together, these products are responsible for managing incoming HTTP requests, caching web messages, and sending XML and HTML back to the client. Also, it provides a listener for Oracle WebLogic Server and the framework for hosting static pages, dynamic pages, and applications over the Web. Oracle Web Tier contains the following components:
Oracle HTTP Server: Oracle HTTP Server 11g includes modules developed specifically by Oracle. The features of single sign-on, clustered deployment, and high availability enhance the operation of the Oracle HTTP Server.
Oracle Web Cache: Oracle Web Cache is a content-aware server accelerator, or reverse proxy, for the Web tier that improves the performance, scalability, and availability of Web sites that run on Oracle HTTP Server. Oracle Web Cache is the primary caching mechanism provided with Oracle Fusion Middleware. Caching improves the performance, scalability, and availability of websites that run on Oracle WebLogic Server by storing frequently accessed URLs in memory.
Oracle Process Manager and Notification Server (OPMN): OPMN provides a command-line interface for you to monitor and manage Oracle Fusion Middleware components and sub-components. The OPMN server should be started as soon as possible, after turning on the computer. OPMN must be running whenever OPMN-managed components are turned on or off.
There are different Methods to install Webtier. An Oracle Web Tier solution can be built in one of the following ways:
In stand-alone mode: Oracle Web Tier is configured without a domain, and administered from the command line. See Section 1.3.1 for an overview of the installation procedure.
Using Oracle Enterprise Manager Fusion Middleware Control: In order to use the Oracle Enterprise Manager Fusion Middleware Control, WebLogic Server domain needs to be configured using both the Enterprise Manager and the Java Required Files (JRF) domain templates.
Here, we install Oracle Web Tier in stand-alone mode and following are the sections lists the steps for it:
Section 4.1, "Installing and Configuring Oracle HTTP Server (Webtier)”
Section 4.2, “Verifying the Installation”
4.1 Installing and Configuring Oracle HTTP Server (Webtier)
Obtain Oracle Web Tier from the Oracle Fusion Middleware Downloads. Download webtier.zip file to a directory, and unpack the downloaded archive that contains the installer. By default, this directory is named webtier.
To start the installer, go to the directory where you unpacked the archive file and switch to the Disk1 directory. Now, start the installer using the below command:
./runInstaller –jreLoc Java_Home/jdk
Oracle Webtier Installation
Oracle Banking Digital Experience Installer Pre-Requisite Setup Manual 29
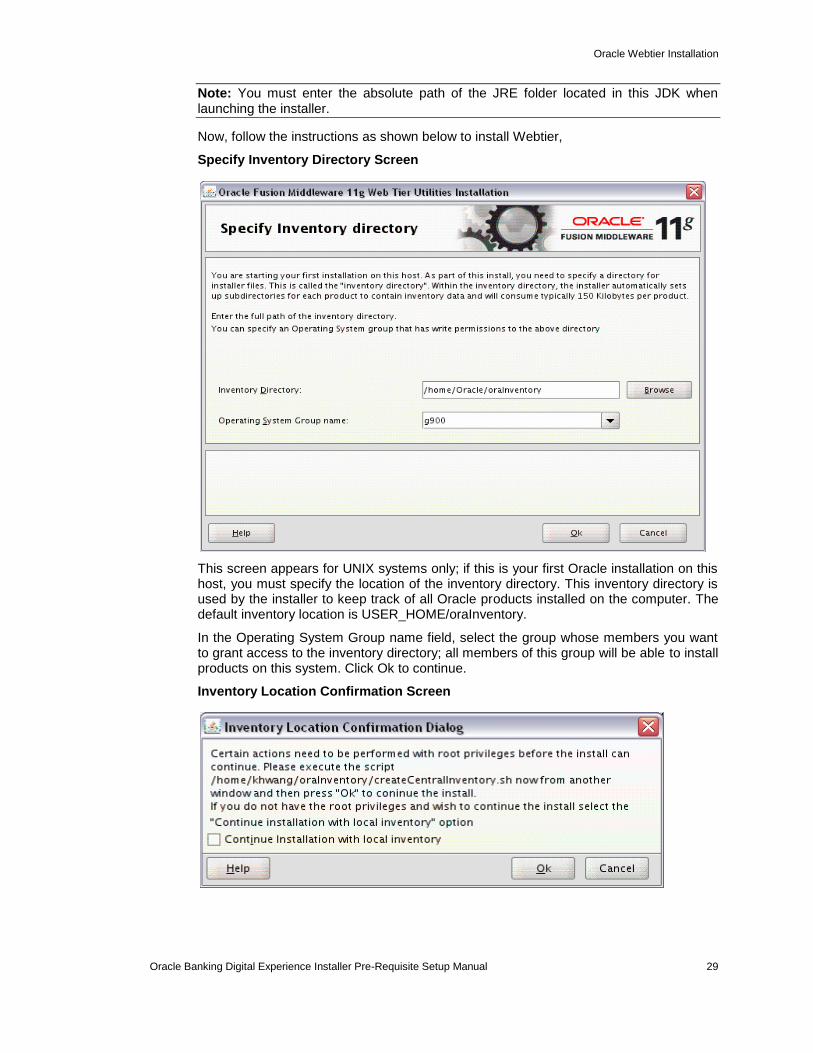
Note: You must enter the absolute path of the JRE folder located in this JDK when launching the installer.
Now, follow the instructions as shown below to install Webtier,
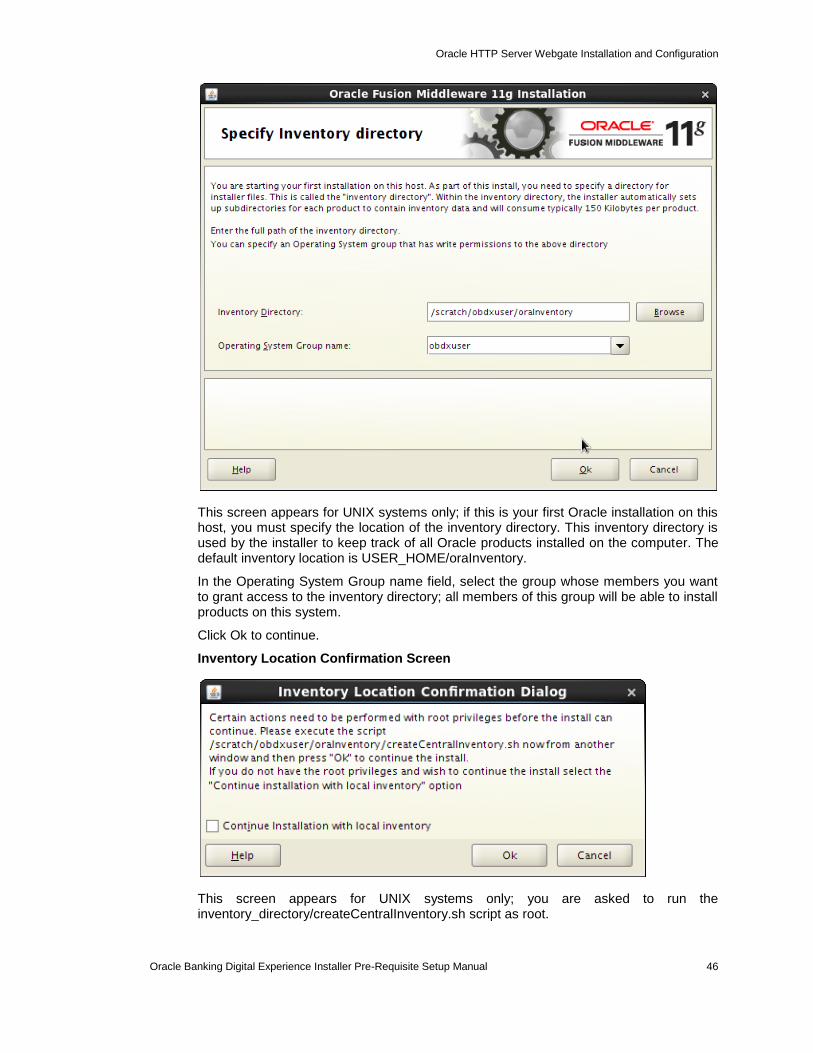
Specify Inventory Directory Screen
This screen appears for UNIX systems only; if this is your first Oracle installation on this host, you must specify the location of the inventory directory. This inventory directory is used by the installer to keep track of all Oracle products installed on the computer. The default inventory location is USER_HOME/oraInventory.
In the Operating System Group name field, select the group whose members you want to grant access to the inventory directory; all members of this group will be able to install products on this system. Click Ok to continue.
Inventory Location Confirmation Screen

Oracle Webtier Installation
Oracle Banking Digital Experience Installer Pre-Requisite Setup Manual 30
This screen appears for UNIX systems only; you are asked to run the inventory_directory/createCentralInventory.sh script as root.
If you do not have root access on this system but want to continue with the installation, select Continue installation with local inventory.
Click Ok to continue.
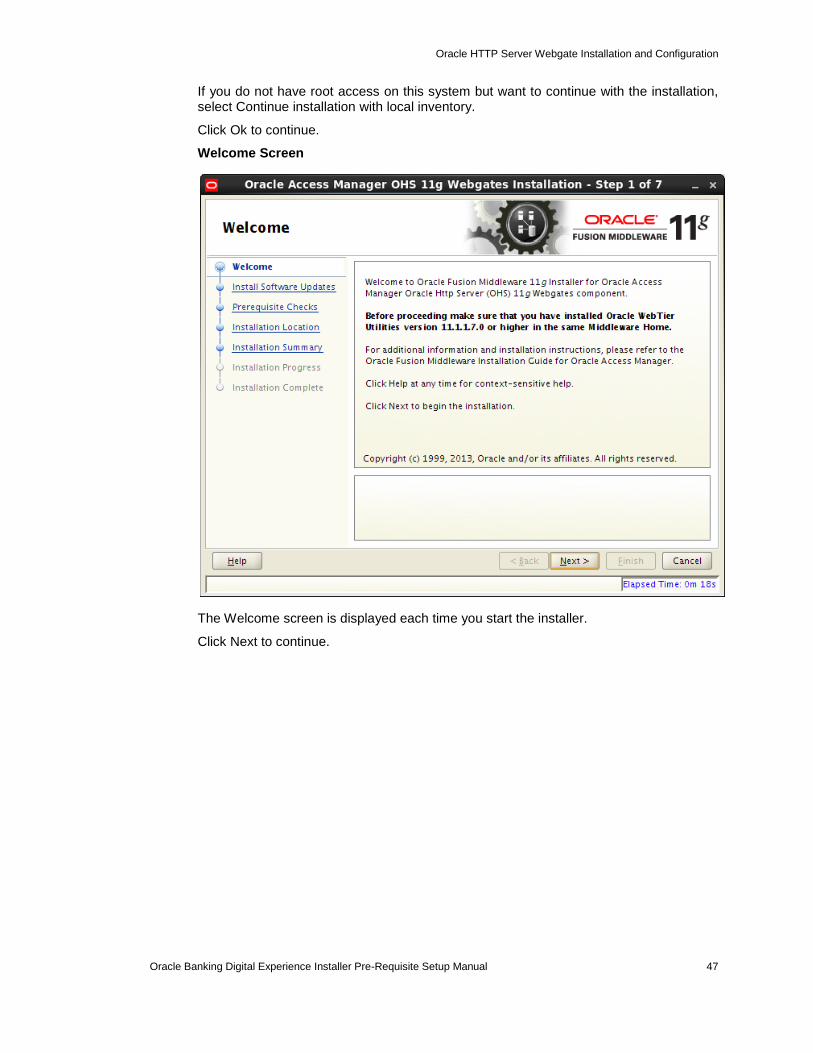
Welcome Screen
The Welcome screen is displayed each time you start the installer.
Click Next to continue.
Oracle Webtier Installation
Oracle Banking Digital Experience Installer Pre-Requisite Setup Manual 31
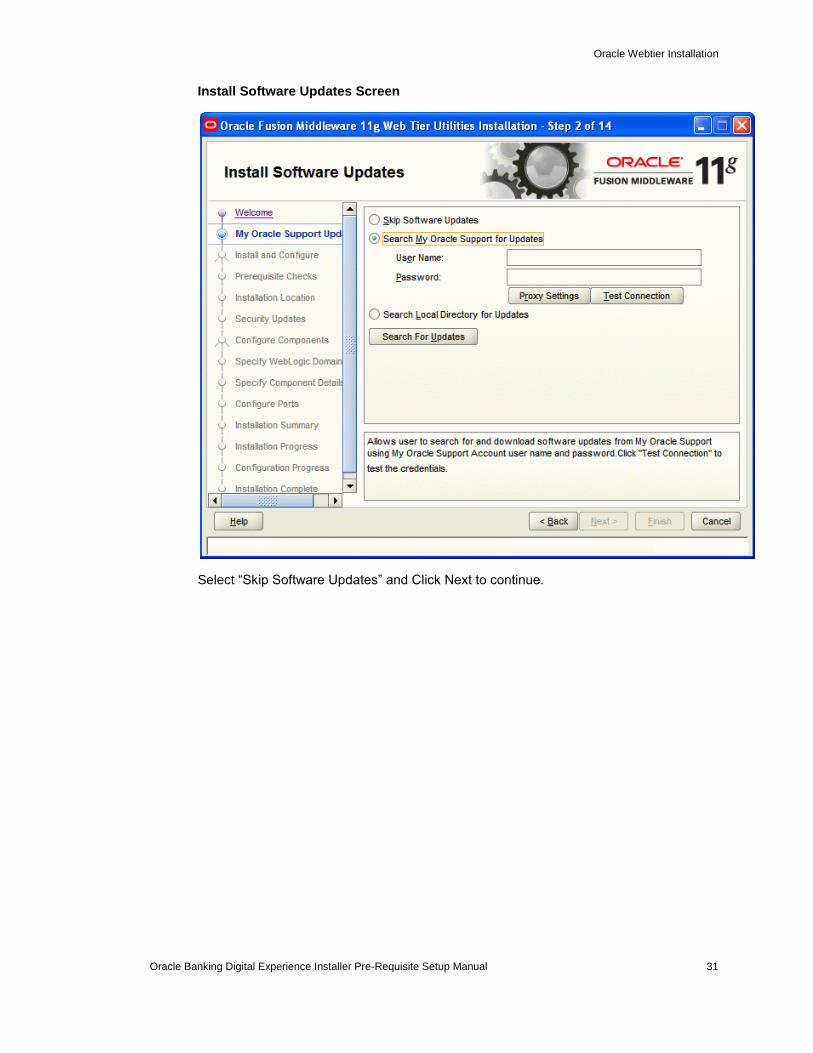
Install Software Updates Screen
Select “Skip Software Updates” and Click Next to continue.
Oracle Webtier Installation
Oracle Banking Digital Experience Installer Pre-Requisite Setup Manual 32
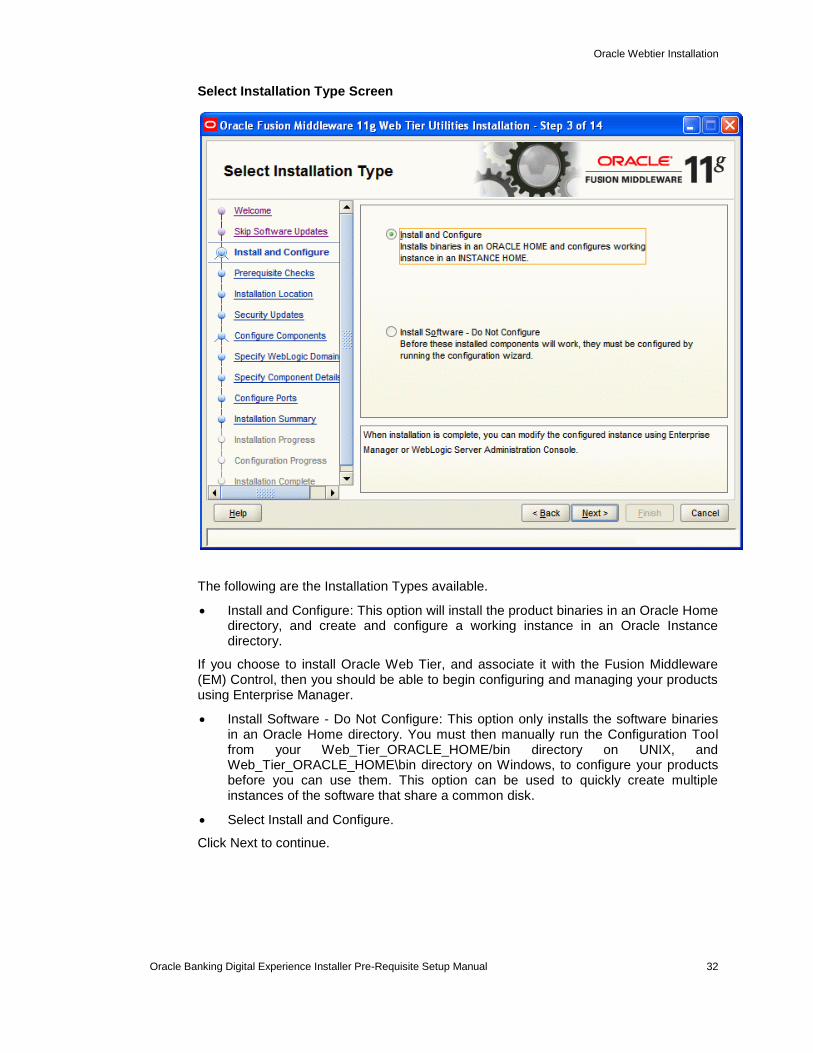
Select Installation Type Screen
The following are the Installation Types available.
Install and Configure: This option will install the product binaries in an Oracle Home directory, and create and configure a working instance in an Oracle Instance directory.
If you choose to install Oracle Web Tier, and associate it with the Fusion Middleware (EM) Control, then you should be able to begin configuring and managing your products using Enterprise Manager.
Install Software - Do Not Configure: This option only installs the software binaries in an Oracle Home directory. You must then manually run the Configuration Tool from your Web_Tier_ORACLE_HOME/bin directory on UNIX, and Web_Tier_ORACLE_HOME\bin directory on Windows, to configure your products before you can use them. This option can be used to quickly create multiple instances of the software that share a common disk.
Select Install and Configure.
Click Next to continue.
Oracle Webtier Installation
Oracle Banking Digital Experience Installer Pre-Requisite Setup Manual 33
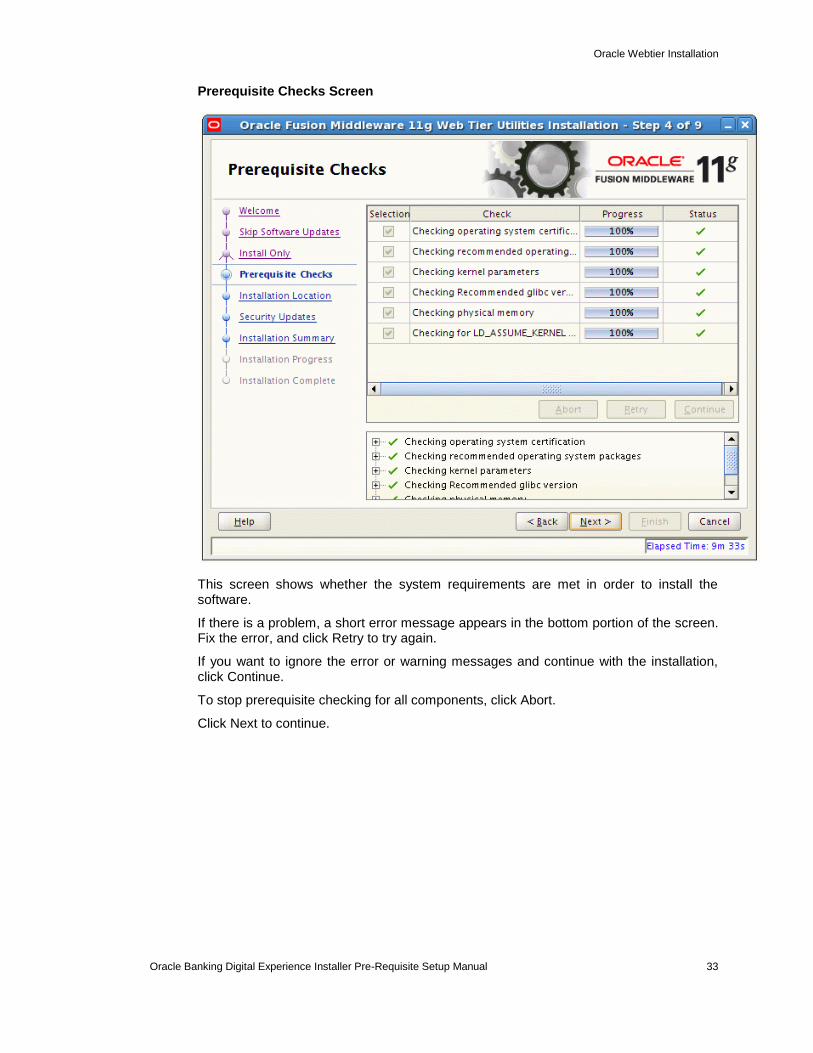
Prerequisite Checks Screen
This screen shows whether the system requirements are met in order to install the software.
If there is a problem, a short error message appears in the bottom portion of the screen. Fix the error, and click Retry to try again.
If you want to ignore the error or warning messages and continue with the installation, click Continue.
To stop prerequisite checking for all components, click Abort.
Click Next to continue.
Oracle Webtier Installation
Oracle Banking Digital Experience Installer Pre-Requisite Setup Manual 34
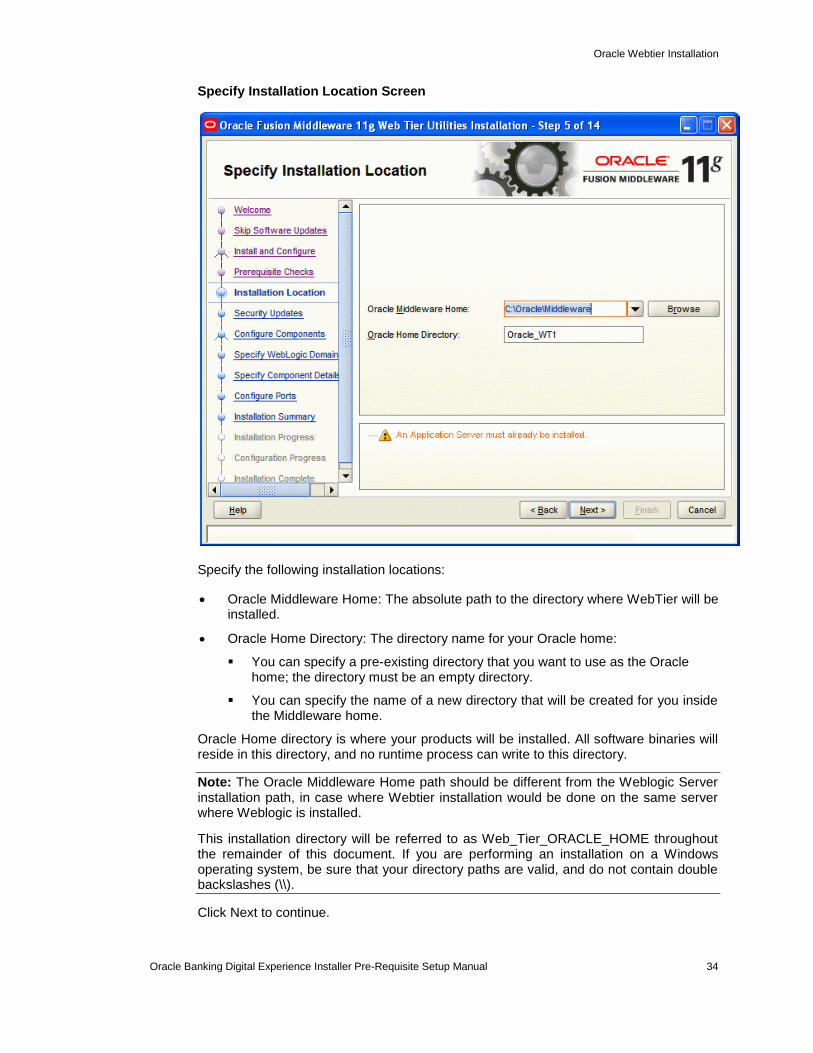
Specify Installation Location Screen
Specify the following installation locations:
Oracle Middleware Home: The absolute path to the directory where WebTier will be installed.
Oracle Home Directory: The directory name for your Oracle home:
You can specify a pre-existing directory that you want to use as the Oracle home; the directory must be an empty directory.
You can specify the name of a new directory that will be created for you inside the Middleware home.
Oracle Home directory is where your products will be installed. All software binaries will reside in this directory, and no runtime process can write to this directory.
Note: The Oracle Middleware Home path should be different from the Weblogic Server installation path, in case where Webtier installation would be done on the same server where Weblogic is installed.
This installation directory will be referred to as Web_Tier_ORACLE_HOME throughout the remainder of this document. If you are performing an installation on a Windows operating system, be sure that your directory paths are valid, and do not contain double backslashes (\\).
Click Next to continue.
Oracle Webtier Installation
Oracle Banking Digital Experience Installer Pre-Requisite Setup Manual 35
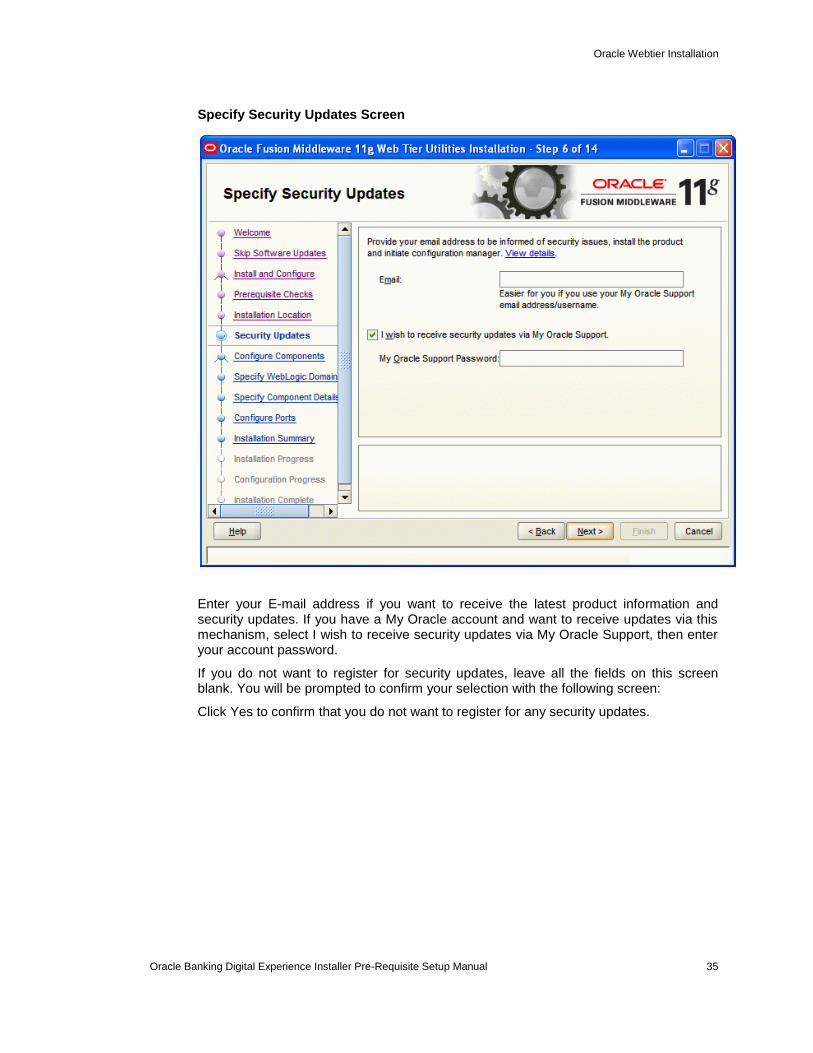
Specify Security Updates Screen
Enter your E-mail address if you want to receive the latest product information and security updates. If you have a My Oracle account and want to receive updates via this mechanism, select I wish to receive security updates via My Oracle Support, then enter your account password.
If you do not want to register for security updates, leave all the fields on this screen blank. You will be prompted to confirm your selection with the following screen:
Click Yes to confirm that you do not want to register for any security updates.
Oracle Webtier Installation
Oracle Banking Digital Experience Installer Pre-Requisite Setup Manual 36
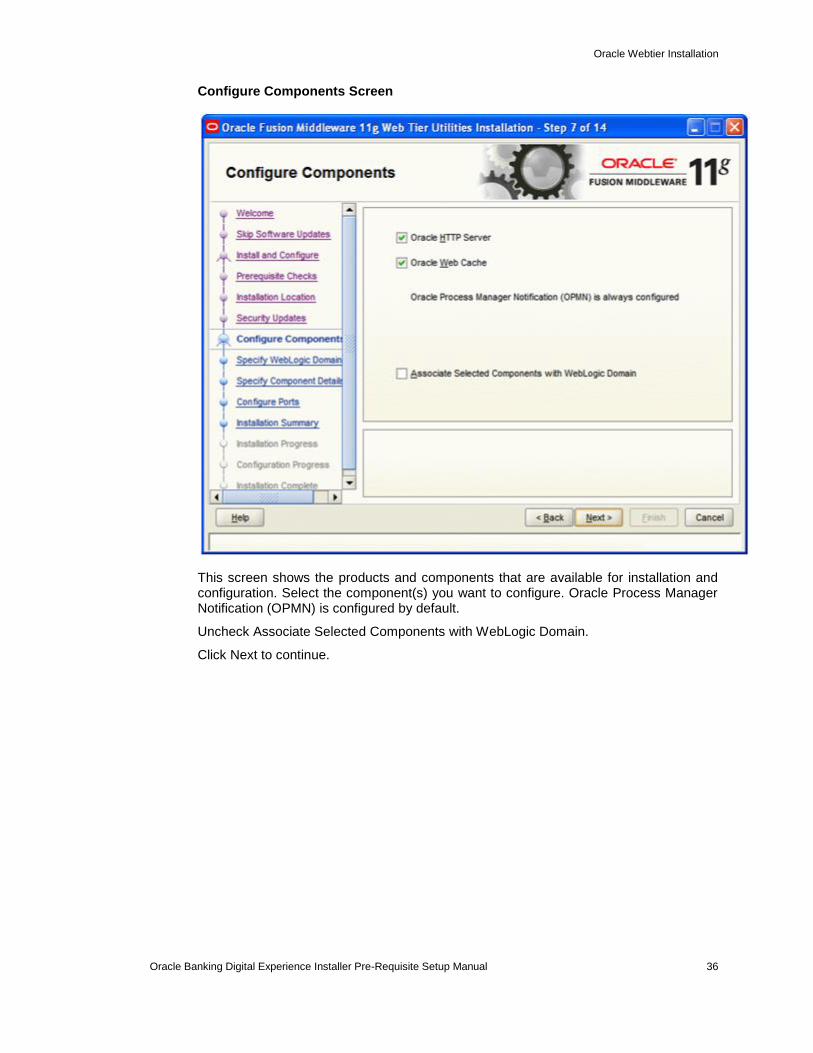
Configure Components Screen
This screen shows the products and components that are available for installation and configuration. Select the component(s) you want to configure. Oracle Process Manager Notification (OPMN) is configured by default.
Uncheck Associate Selected Components with WebLogic Domain.
Click Next to continue.
Oracle Webtier Installation
Oracle Banking Digital Experience Installer Pre-Requisite Setup Manual 37
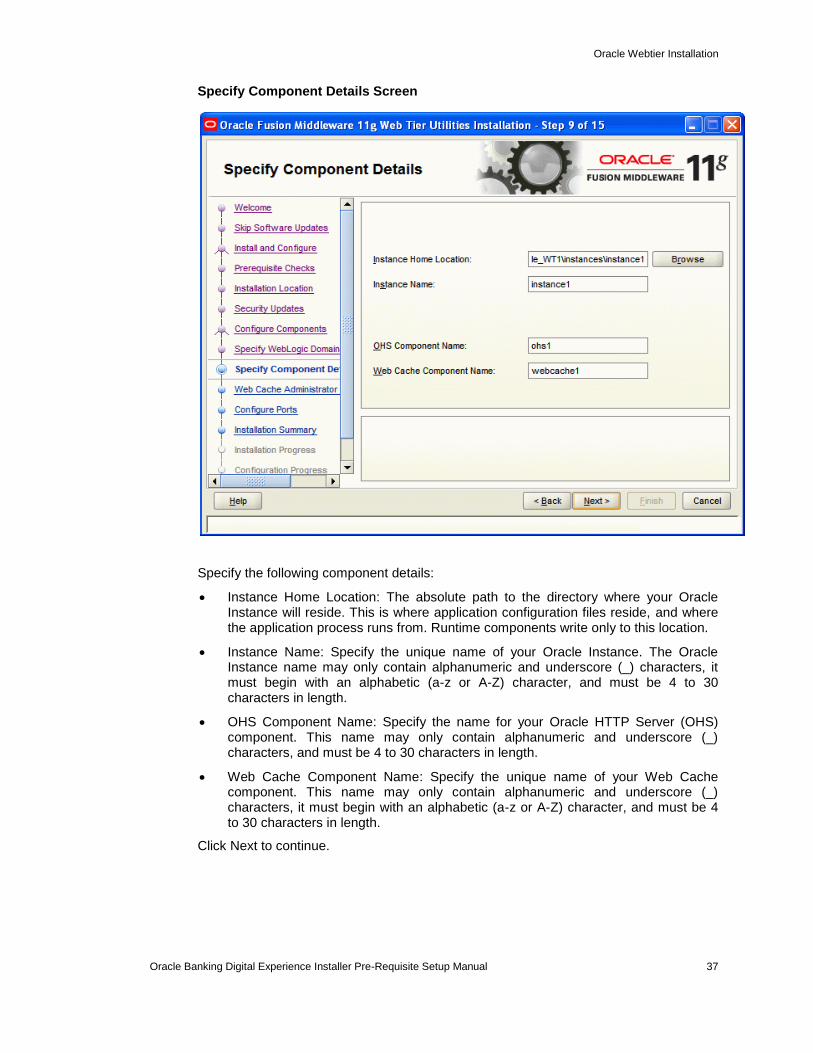
Specify Component Details Screen
Specify the following component details:
Instance Home Location: The absolute path to the directory where your Oracle Instance will reside. This is where application configuration files reside, and where the application process runs from. Runtime components write only to this location.
Instance Name: Specify the unique name of your Oracle Instance. The Oracle Instance name may only contain alphanumeric and underscore (_) characters, it must begin with an alphabetic (a-z or A-Z) character, and must be 4 to 30 characters in length.
OHS Component Name: Specify the name for your Oracle HTTP Server (OHS) component. This name may only contain alphanumeric and underscore (_) characters, and must be 4 to 30 characters in length.
Web Cache Component Name: Specify the unique name of your Web Cache component. This name may only contain alphanumeric and underscore (_) characters, it must begin with an alphabetic (a-z or A-Z) character, and must be 4 to 30 characters in length.
Click Next to continue.
Oracle Webtier Installation
Oracle Banking Digital Experience Installer Pre-Requisite Setup Manual 38
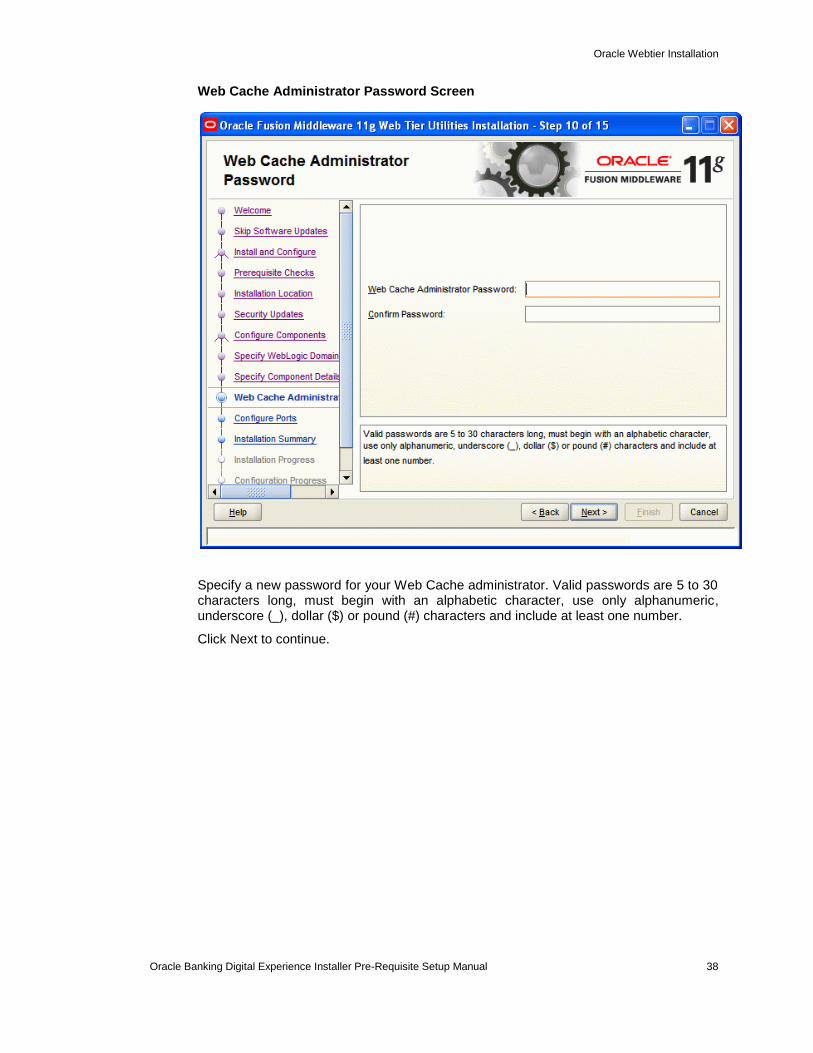
Web Cache Administrator Password Screen
Specify a new password for your Web Cache administrator. Valid passwords are 5 to 30 characters long, must begin with an alphabetic character, use only alphanumeric, underscore (_), dollar ($) or pound (#) characters and include at least one number.
Click Next to continue.

Oracle Webtier Installation
Oracle Banking Digital Experience Installer Pre-Requisite Setup Manual 39
Configure Ports Screen
Select Auto Port Configuration if you want the installer to automatically assign the default ports to the components.
Click Next to continue.

Oracle Webtier Installation
Oracle Banking Digital Experience Installer Pre-Requisite Setup Manual 40
Installation Summary Screen
Review the information on this screen. The operations summarized on this page will be performed when you click Install.
If you want to make any changes to the configuration before starting the installation, use the navigation pane, and select the topic you want to edit.
If you want to save this configuration to a text file (called a response file), click Save. You will be prompted for the location of name of the file you want to create (for example, silent_install.rsp). This file can be used later if you choose to perform the same installation from the command line.
Click Install.
Oracle Webtier Installation
Oracle Banking Digital Experience Installer Pre-Requisite Setup Manual 41
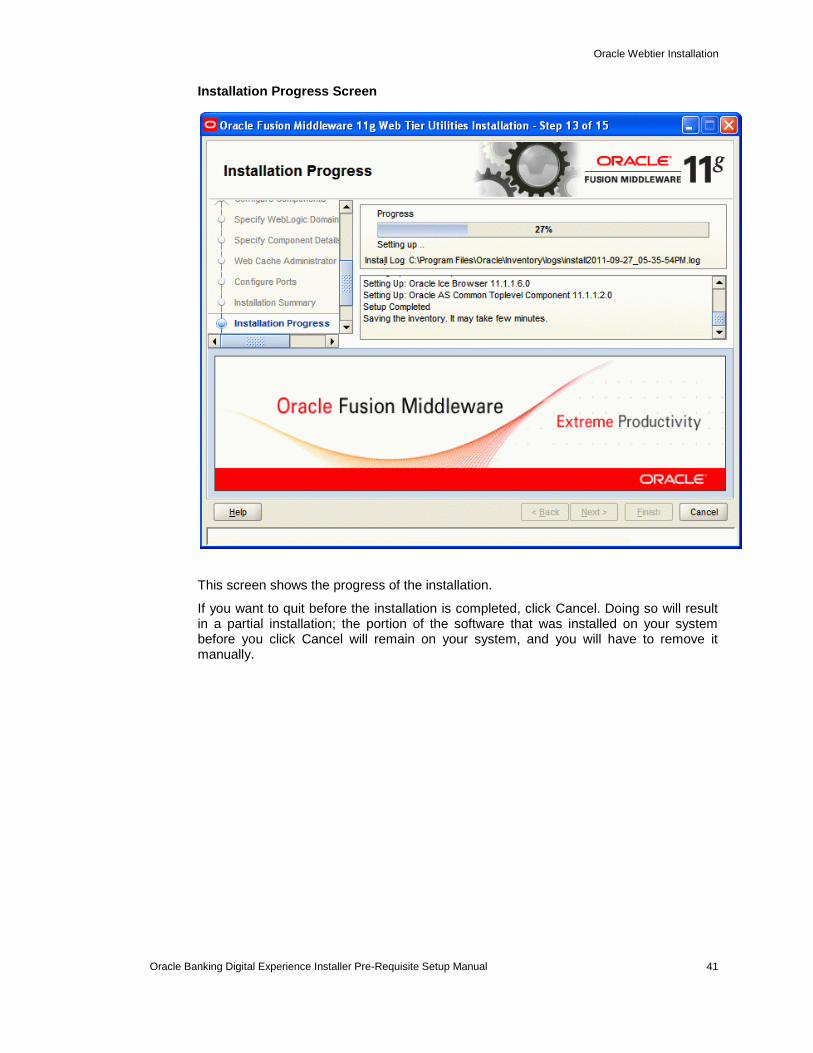
Installation Progress Screen
This screen shows the progress of the installation.
If you want to quit before the installation is completed, click Cancel. Doing so will result in a partial installation; the portion of the software that was installed on your system before you click Cancel will remain on your system, and you will have to remove it manually.
Oracle Webtier Installation
Oracle Banking Digital Experience Installer Pre-Requisite Setup Manual 42
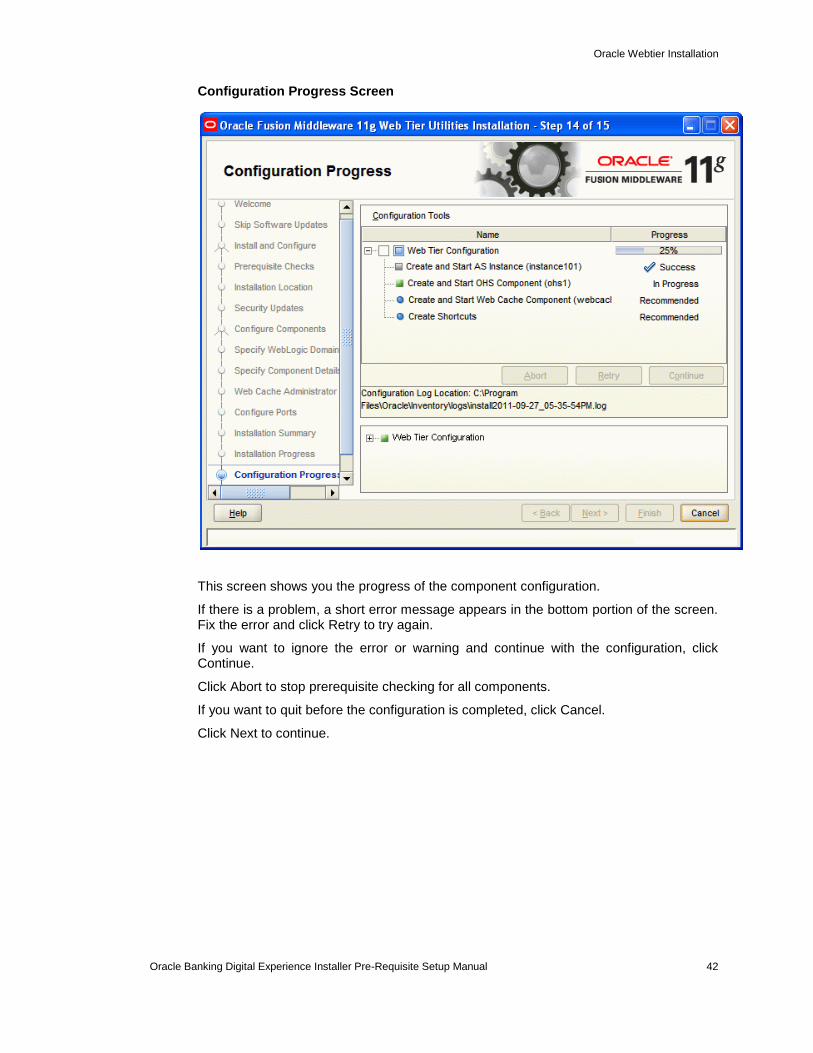
Configuration Progress Screen
This screen shows you the progress of the component configuration.
If there is a problem, a short error message appears in the bottom portion of the screen. Fix the error and click Retry to try again.
If you want to ignore the error or warning and continue with the configuration, click Continue.
Click Abort to stop prerequisite checking for all components.
If you want to quit before the configuration is completed, click Cancel.
Click Next to continue.
Oracle Webtier Installation
Oracle Banking Digital Experience Installer Pre-Requisite Setup Manual 43
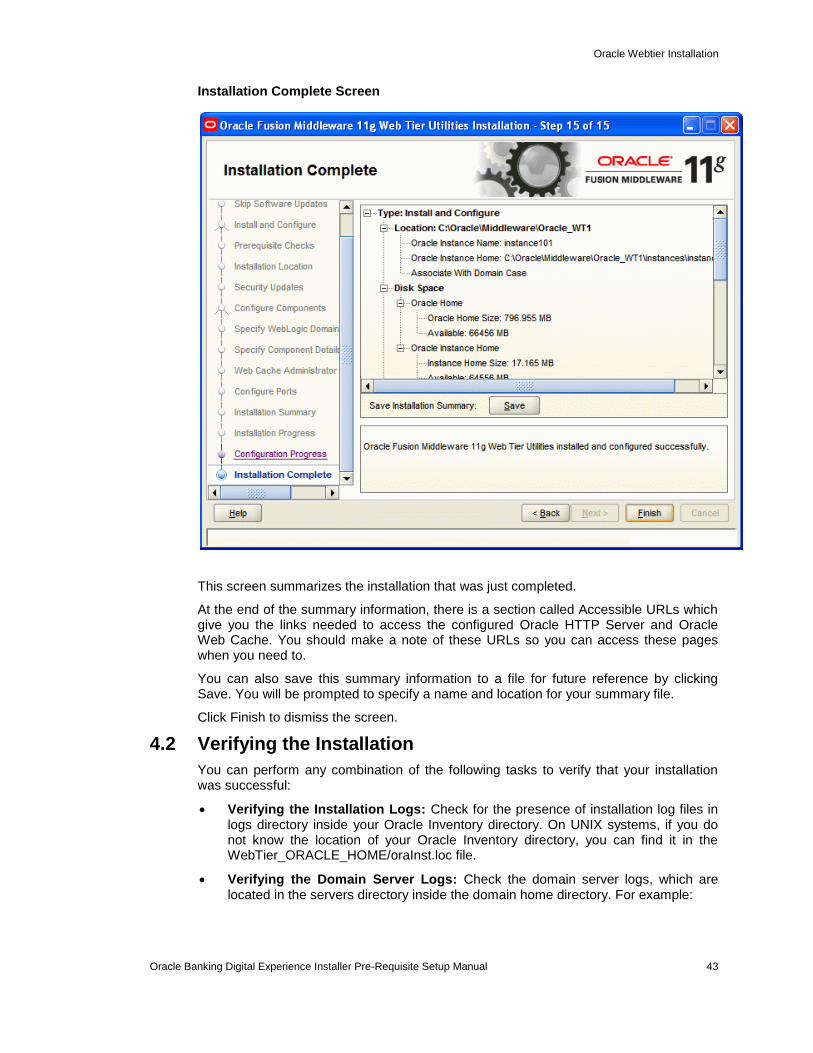
Installation Complete Screen
This screen summarizes the installation that was just completed.
At the end of the summary information, there is a section called Accessible URLs which give you the links needed to access the configured Oracle HTTP Server and Oracle Web Cache. You should make a note of these URLs so you can access these pages when you need to.
You can also save this summary information to a file for future reference by clicking Save. You will be prompted to specify a name and location for your summary file.
Click Finish to dismiss the screen.
4.2 Verifying the Installation
You can perform any combination of the following tasks to verify that your installation was successful:
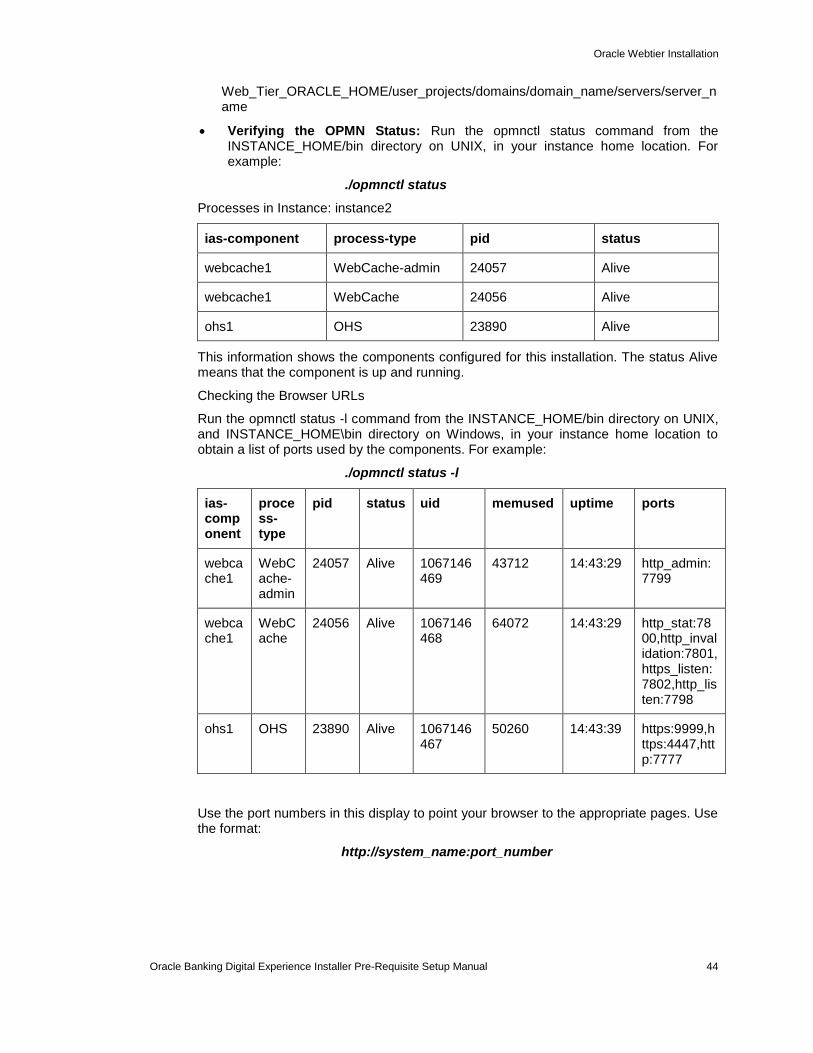
Verifying the Installation Logs: Check for the presence of installation log files in logs directory inside your Oracle Inventory directory. On UNIX systems, if you do not know the location of your Oracle Inventory directory, you can find it in the WebTier_ORACLE_HOME/oraInst.loc file.
Verifying the Domain Server Logs: Check the domain server logs, which are located in the servers directory inside the domain home directory. For example:
Oracle Webtier Installation
Oracle Banking Digital Experience Installer Pre-Requisite Setup Manual 44
Web_Tier_ORACLE_HOME/user_projects/domains/domain_name/servers/server_name
Verifying the OPMN Status: Run the opmnctl status command from the INSTANCE_HOME/bin directory on UNIX, in your instance home location. For example:
./opmnctl status
Processes in Instance: instance2
ias-component process-type pid status
webcache1 WebCache-admin 24057 Alive
webcache1 WebCache 24056 Alive
ohs1 OHS 23890 Alive
This information shows the components configured for this installation. The status Alive means that the component is up and running.
Checking the Browser URLs
Run the opmnctl status -l command from the INSTANCE_HOME/bin directory on UNIX, and INSTANCE_HOME\bin directory on Windows, in your instance home location to obtain a list of ports used by the components. For example:
./opmnctl status -l
ias-component
process-type
pid status uid memused uptime ports
webcache1
WebCache-admin
24057 Alive 1067146469
43712 14:43:29 http_admin:7799
webcache1
WebCache
24056 Alive 1067146468
64072 14:43:29 http_stat:7800,http_invalidation:7801,https_listen:7802,http_listen:7798
ohs1 OHS 23890 Alive 1067146467
50260 14:43:39 https:9999,https:4447,http:7777
Use the port numbers in this display to point your browser to the appropriate pages. Use the format:
http://system_name:port_number
Oracle HTTP Server Webgate Installation and Configuration
Oracle Banking Digital Experience Installer Pre-Requisite Setup Manual 45
5. Oracle HTTP Server Webgate Installation and Configuration
A WebGate is a web-server plug-in for Oracle Access Manager (OAM) that intercepts HTTP requests and forwards them to the Access Server for authentication and authorization.
Installing a WebGate for Oracle Access Manager involves the following steps:
Section 5.1, "Installing and Configuring Oracle Webgate"
Section 5.2, "Post-Installation Steps for Oracle HTTP Server WebGate"
Section 5.3, "Verifying the Installation and Configuration of Oracle HTTP Server WebGate"
Section 5.4, "Registering the New Oracle HTTP Server 11g WebGate”
5.1 Installing and Configuring Oracle HTTP Server WebGate
Obtain Oracle HTTP Server Webgate software from the Oracle Fusion Middleware Downloads. Download webgate.zip file (version 11.1.2.3.0) to a directory, and unpack the downloaded archive that contains the installer. By default, this directory is named webgate.
To start the installation wizard, perform the following steps:
Extract the contents of the WebGate.zip file to a directory. By default, this directory is named WebGate.
Go to the Disk1 directory under the WebGate folder.
Run the following command:
./runInstaller -jreLoc Java_Home/jdk
Note : You must enter the absolute path of the JRE folder located in this JDK when launching the installer.
After the Installer starts, the Welcome screen is displayed. Proceed with the installation by referring to the section "Installation Flow and Procedure of Oracle HTTP Server 11g WebGate" for installing Oracle HTTP Server 11g WebGate for Oracle Access Manager.
To install Oracle HTTP Server 11g WebGate for Oracle Access Manager, follow the instructions as shown below:
Specify Inventory Directory Screen
Oracle HTTP Server Webgate Installation and Configuration
Oracle Banking Digital Experience Installer Pre-Requisite Setup Manual 46
This screen appears for UNIX systems only; if this is your first Oracle installation on this host, you must specify the location of the inventory directory. This inventory directory is used by the installer to keep track of all Oracle products installed on the computer. The default inventory location is USER_HOME/oraInventory.
In the Operating System Group name field, select the group whose members you want to grant access to the inventory directory; all members of this group will be able to install products on this system.
Click Ok to continue.
Inventory Location Confirmation Screen
This screen appears for UNIX systems only; you are asked to run the inventory_directory/createCentralInventory.sh script as root.
Oracle HTTP Server Webgate Installation and Configuration
Oracle Banking Digital Experience Installer Pre-Requisite Setup Manual 47
If you do not have root access on this system but want to continue with the installation, select Continue installation with local inventory.
Click Ok to continue.
Welcome Screen
The Welcome screen is displayed each time you start the installer.
Click Next to continue.
Oracle HTTP Server Webgate Installation and Configuration
Oracle Banking Digital Experience Installer Pre-Requisite Setup Manual 48
Install Software Updates Screen
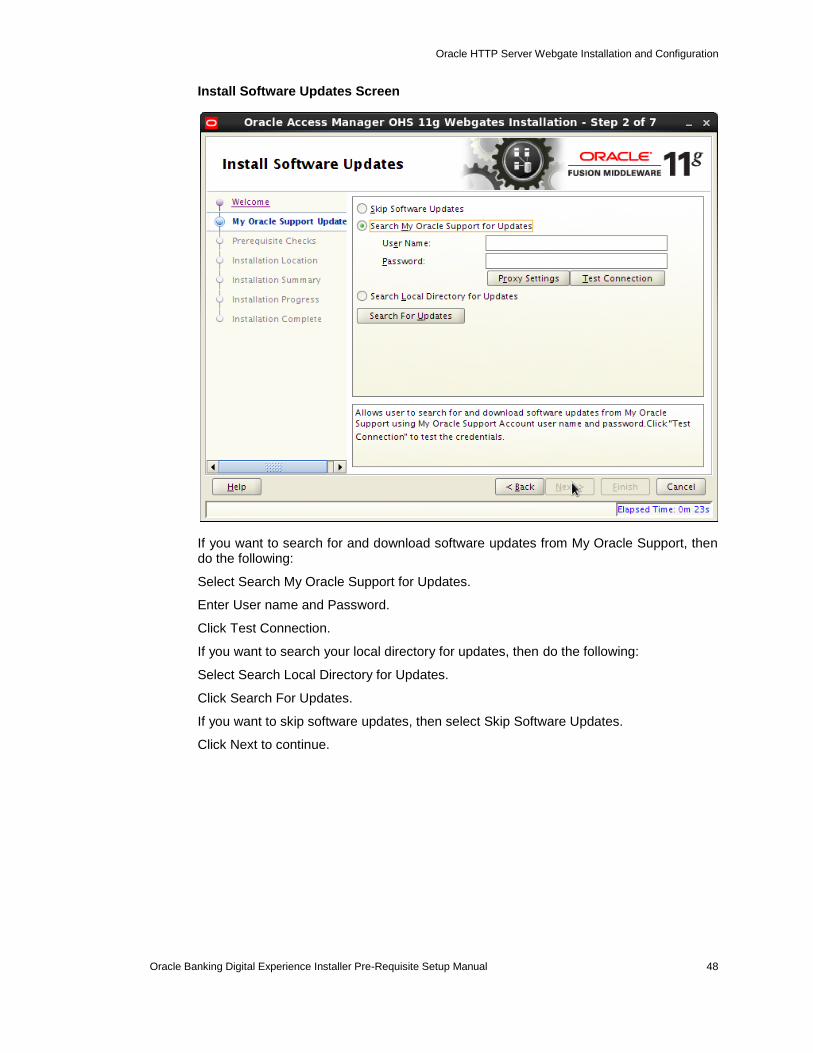
If you want to search for and download software updates from My Oracle Support, then do the following:
Select Search My Oracle Support for Updates.
Enter User name and Password.
Click Test Connection.
If you want to search your local directory for updates, then do the following:
Select Search Local Directory for Updates.
Click Search For Updates.
If you want to skip software updates, then select Skip Software Updates.
Click Next to continue.
Oracle HTTP Server Webgate Installation and Configuration
Oracle Banking Digital Experience Installer Pre-Requisite Setup Manual 49
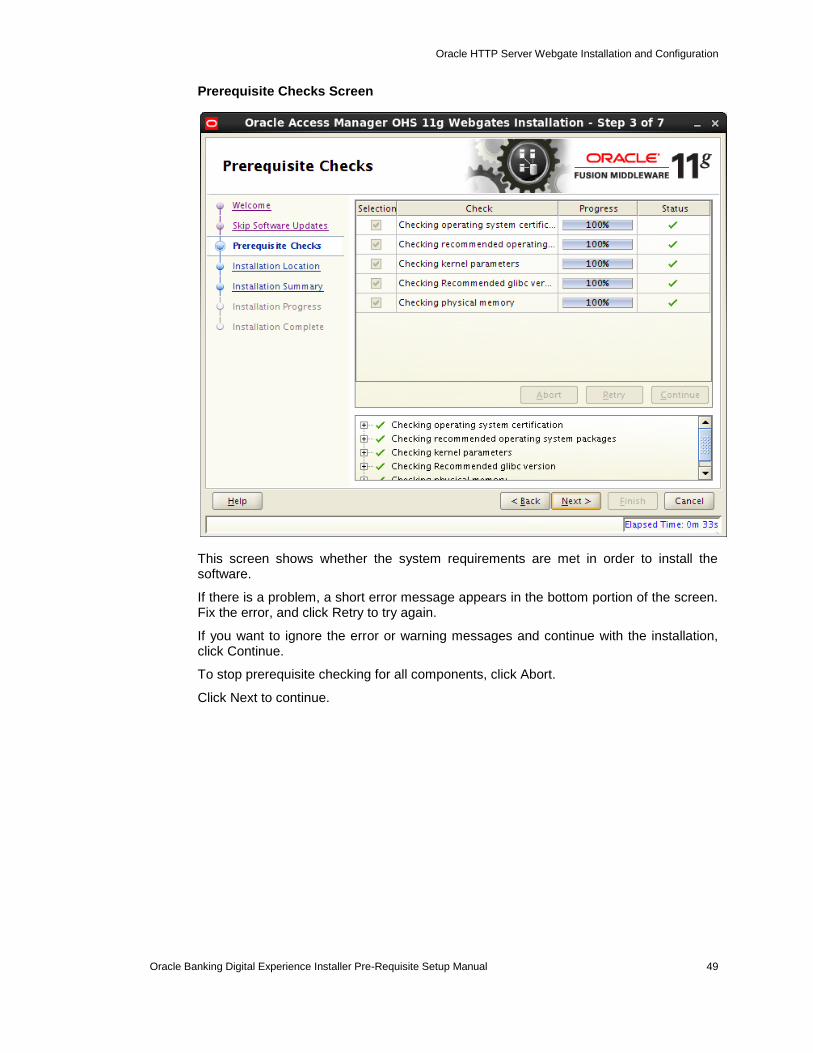
Prerequisite Checks Screen
This screen shows whether the system requirements are met in order to install the software.
If there is a problem, a short error message appears in the bottom portion of the screen. Fix the error, and click Retry to try again.
If you want to ignore the error or warning messages and continue with the installation, click Continue.
To stop prerequisite checking for all components, click Abort.
Click Next to continue.
Oracle HTTP Server Webgate Installation and Configuration
Oracle Banking Digital Experience Installer Pre-Requisite Setup Manual 50
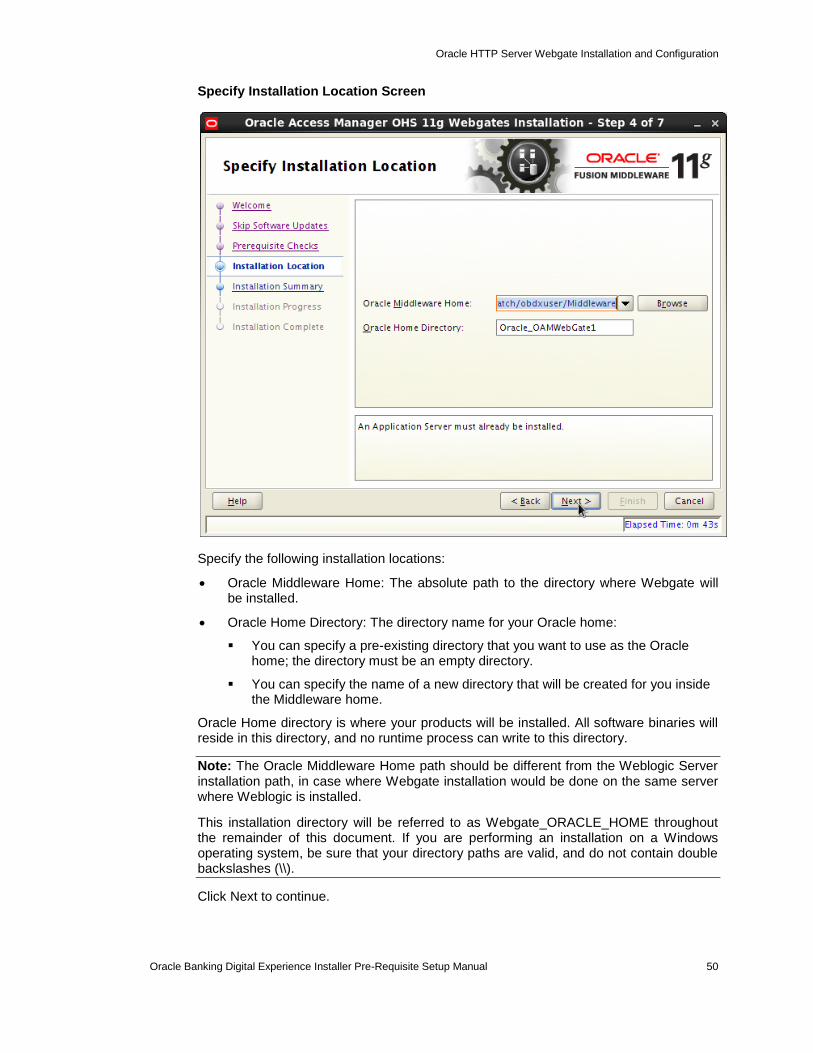
Specify Installation Location Screen
Specify the following installation locations:
Oracle Middleware Home: The absolute path to the directory where Webgate will be installed.
Oracle Home Directory: The directory name for your Oracle home:
You can specify a pre-existing directory that you want to use as the Oracle home; the directory must be an empty directory.
You can specify the name of a new directory that will be created for you inside the Middleware home.
Oracle Home directory is where your products will be installed. All software binaries will reside in this directory, and no runtime process can write to this directory.
Note: The Oracle Middleware Home path should be different from the Weblogic Server installation path, in case where Webgate installation would be done on the same server where Weblogic is installed.
This installation directory will be referred to as Webgate_ORACLE_HOME throughout the remainder of this document. If you are performing an installation on a Windows operating system, be sure that your directory paths are valid, and do not contain double backslashes (\\).
Click Next to continue.
Oracle HTTP Server Webgate Installation and Configuration
Oracle Banking Digital Experience Installer Pre-Requisite Setup Manual 51
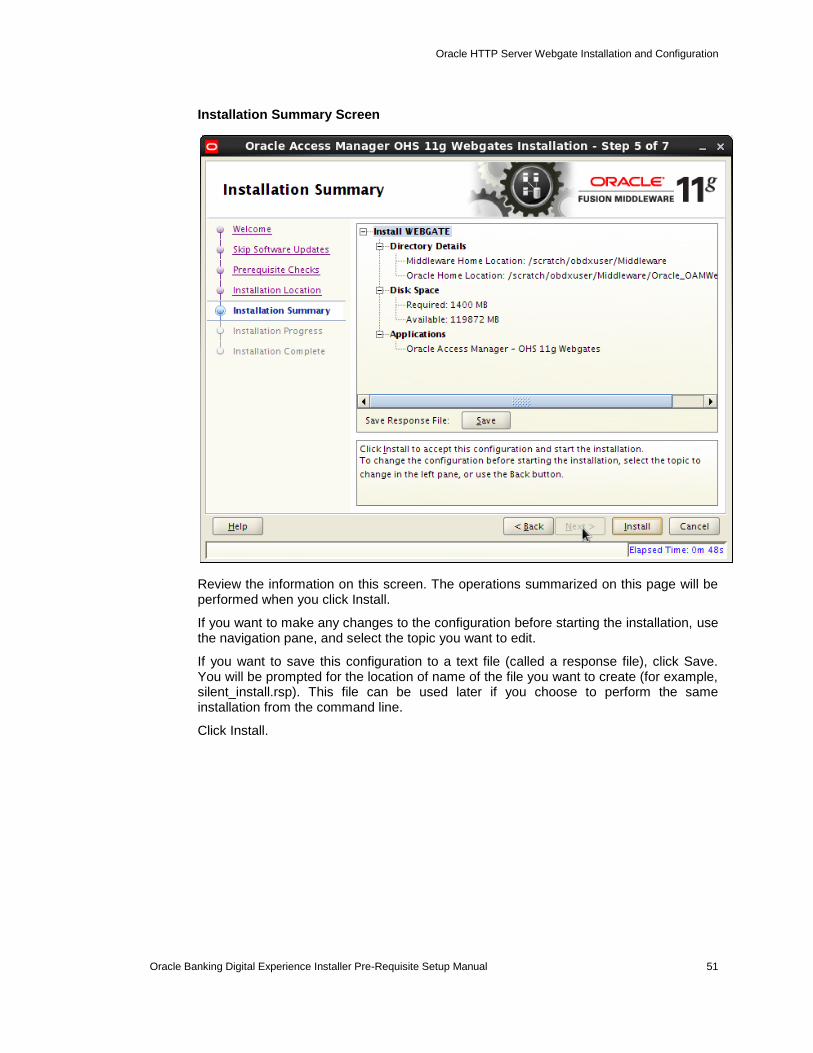
Installation Summary Screen
Review the information on this screen. The operations summarized on this page will be performed when you click Install.
If you want to make any changes to the configuration before starting the installation, use the navigation pane, and select the topic you want to edit.
If you want to save this configuration to a text file (called a response file), click Save. You will be prompted for the location of name of the file you want to create (for example, silent_install.rsp). This file can be used later if you choose to perform the same installation from the command line.
Click Install.
Oracle HTTP Server Webgate Installation and Configuration
Oracle Banking Digital Experience Installer Pre-Requisite Setup Manual 52
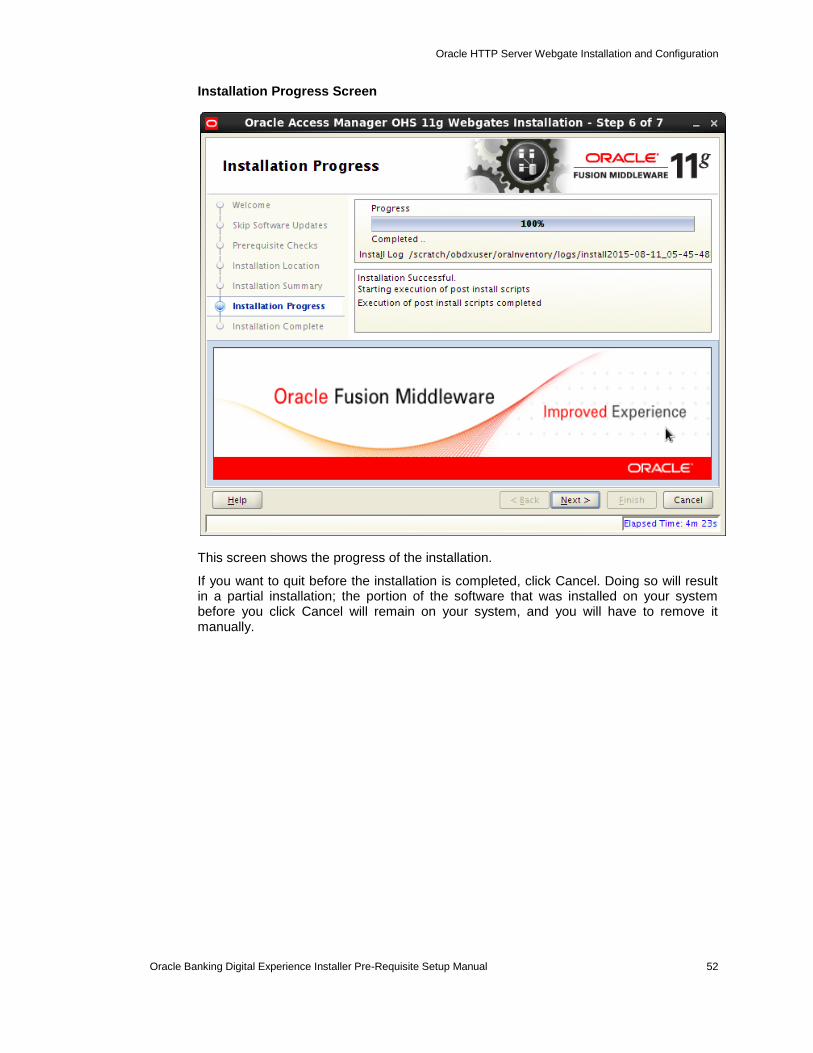
Installation Progress Screen
This screen shows the progress of the installation.
If you want to quit before the installation is completed, click Cancel. Doing so will result in a partial installation; the portion of the software that was installed on your system before you click Cancel will remain on your system, and you will have to remove it manually.
Oracle HTTP Server Webgate Installation and Configuration
Oracle Banking Digital Experience Installer Pre-Requisite Setup Manual 53
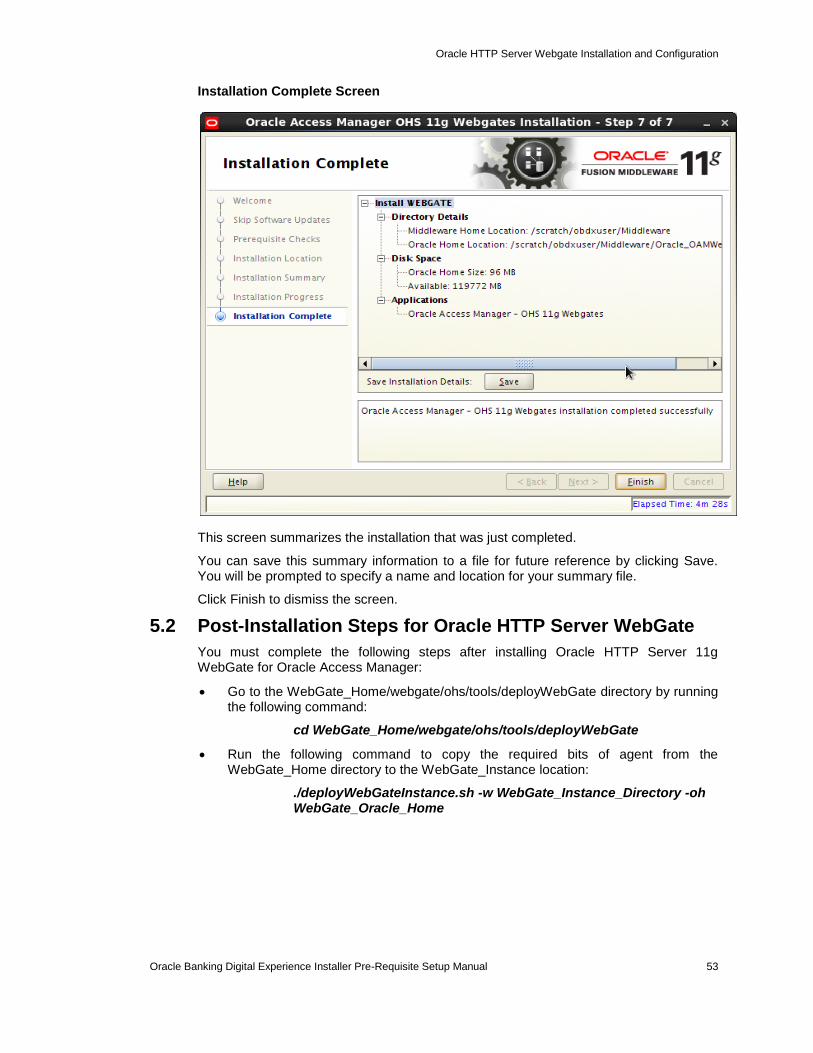
Installation Complete Screen
This screen summarizes the installation that was just completed.
You can save this summary information to a file for future reference by clicking Save. You will be prompted to specify a name and location for your summary file.
Click Finish to dismiss the screen.
5.2 Post-Installation Steps for Oracle HTTP Server WebGate
You must complete the following steps after installing Oracle HTTP Server 11g WebGate for Oracle Access Manager:
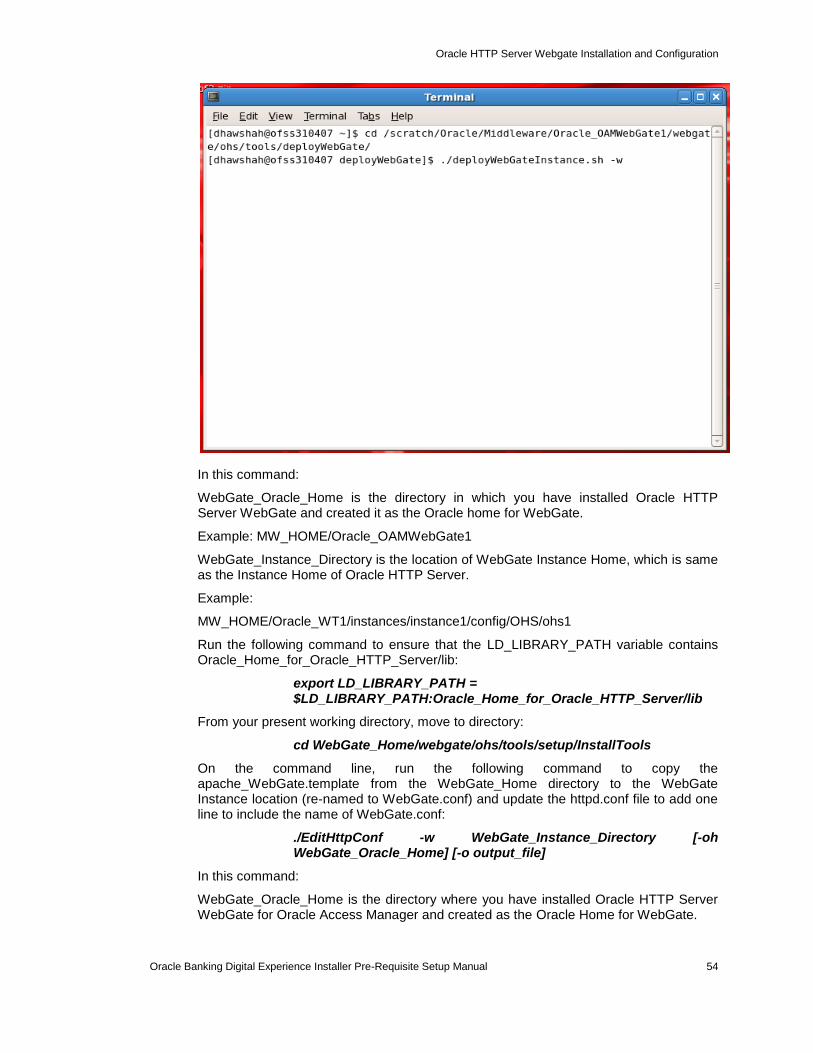
Go to the WebGate_Home/webgate/ohs/tools/deployWebGate directory by running the following command:
cd WebGate_Home/webgate/ohs/tools/deployWebGate
Run the following command to copy the required bits of agent from the WebGate_Home directory to the WebGate_Instance location:
./deployWebGateInstance.sh -w WebGate_Instance_Directory -oh WebGate_Oracle_Home
Oracle HTTP Server Webgate Installation and Configuration
Oracle Banking Digital Experience Installer Pre-Requisite Setup Manual 54
In this command:
WebGate_Oracle_Home is the directory in which you have installed Oracle HTTP Server WebGate and created it as the Oracle home for WebGate.
Example: MW_HOME/Oracle_OAMWebGate1
WebGate_Instance_Directory is the location of WebGate Instance Home, which is same as the Instance Home of Oracle HTTP Server.
Example:
MW_HOME/Oracle_WT1/instances/instance1/config/OHS/ohs1
Run the following command to ensure that the LD_LIBRARY_PATH variable contains Oracle_Home_for_Oracle_HTTP_Server/lib:
export LD_LIBRARY_PATH = $LD_LIBRARY_PATH:Oracle_Home_for_Oracle_HTTP_Server/lib
From your present working directory, move to directory:
cd WebGate_Home/webgate/ohs/tools/setup/InstallTools
On the command line, run the following command to copy the apache_WebGate.template from the WebGate_Home directory to the WebGate Instance location (re-named to WebGate.conf) and update the httpd.conf file to add one line to include the name of WebGate.conf:
./EditHttpConf -w WebGate_Instance_Directory [-oh WebGate_Oracle_Home] [-o output_file]
In this command:
WebGate_Oracle_Home is the directory where you have installed Oracle HTTP Server WebGate for Oracle Access Manager and created as the Oracle Home for WebGate.

Oracle HTTP Server Webgate Installation and Configuration
Oracle Banking Digital Experience Installer Pre-Requisite Setup Manual 55
Example: MW_HOME/Oracle_OAMWebGate1
WebGate_Instance_Directory is the location of WebGate Instance Home, which is same as the Instance Home of Oracle HTTP Server.
Example: MW_HOME/Oracle_WT1/instances/instance1/config/OHS/ohs1
output_file is the name of the temporary output file used by the tool.
Example: Edithttpconf.log
Note: The -oh WebGate_Oracle_Home and -o output_file parameters are optional.
5.3 Verifying the Installation of Oracle HTTP Server WebGate
After installing Oracle HTTP Server 11g WebGate for Oracle Access Manager, including the post-installation steps, you can examine the install DATE-TIME_STAMP.out log file to verify the installation.
The default location of the log is : WebGate_Home/oraInst.loc
5.4 Registering the New Oracle HTTP Server 11g WebGate
Before you can use the new Oracle HTTP Server 11g WebGate agent for Oracle Access Manager, you must register the new WebGate agent with Oracle Access Manager by using the Oracle Access Manager Administration Console.
Refer to the Section 7.1.2 “Post-Installation Tasks” under Oracle Access Management Configuration chapter.
Oracle Identity and Access Management Installation and Configuration
Oracle Banking Digital Experience Installer Pre-Requisite Setup Manual 56
6. Oracle Identity and Access Management Installation and Configuration
Oracle Identity and Access Management (IAM) components enable enterprises to manage the end-to-end lifecycle of user identities across all enterprise resources - both within and beyond the firewall. With IAM, you can deploy applications faster, apply the most granular protection to enterprise resources, automatically eliminate latent access privileges, and much more. Following components are included in IAM:
Oracle Identity Manager
Oracle Access Management
Oracle Adaptive Access Manager
Oracle Entitlements Server
Oracle Privileged Account Manager
Oracle Access Management Mobile and Social
Oracle Mobile Security Suite
This chapter provides information for installing IAM and includes the following topics:
Section 6.1, "Pre-requisite - Installing Java 1.7"
Section 6.2, "Pre-requisite - Installing Weblogic 11g"
Section 6.3, "Installing Oracle Identity and Access Management (IAM)"
6.1 Pre-requiste - Installing Java 1.7
Obtain the Java tarball pack from the Oracle Java Downloads. Download jdk-7u80-linux-x64.tar.gz file to a directory.
Change the directory in which you want to install,
cd <Directory_Path>
Unpack the tarball and install Java using the following command:
tar zxvf <Path>/jdk-7u80-linux-x64.tar.gz
Note : You must enter the absolute path of the folder where the TAR file is located.
Now, set the path and environment variable for Java as:
export JAVA_HOME=<Java_Install_Path>/jdk1.7.0_80
export PATH=$JAVA_HOME/bin:$PATH
6.2 Pre-requisite - Installing Weblogic 11g
Oracle WebLogic Server is a scalable, enterprise-ready Java Platform, Enterprise Edition (Java EE) application server. The WebLogic Server infrastructure supports the deployment of many types of distributed applications.
This chapter describes the installation tasks which contains the following sections:
Section 6.2.1, "Installing Weblogic"
Section 6.2.2, "Verifying the Installation"
Oracle Identity and Access Management Installation and Configuration
Oracle Banking Digital Experience Installer Pre-Requisite Setup Manual 57
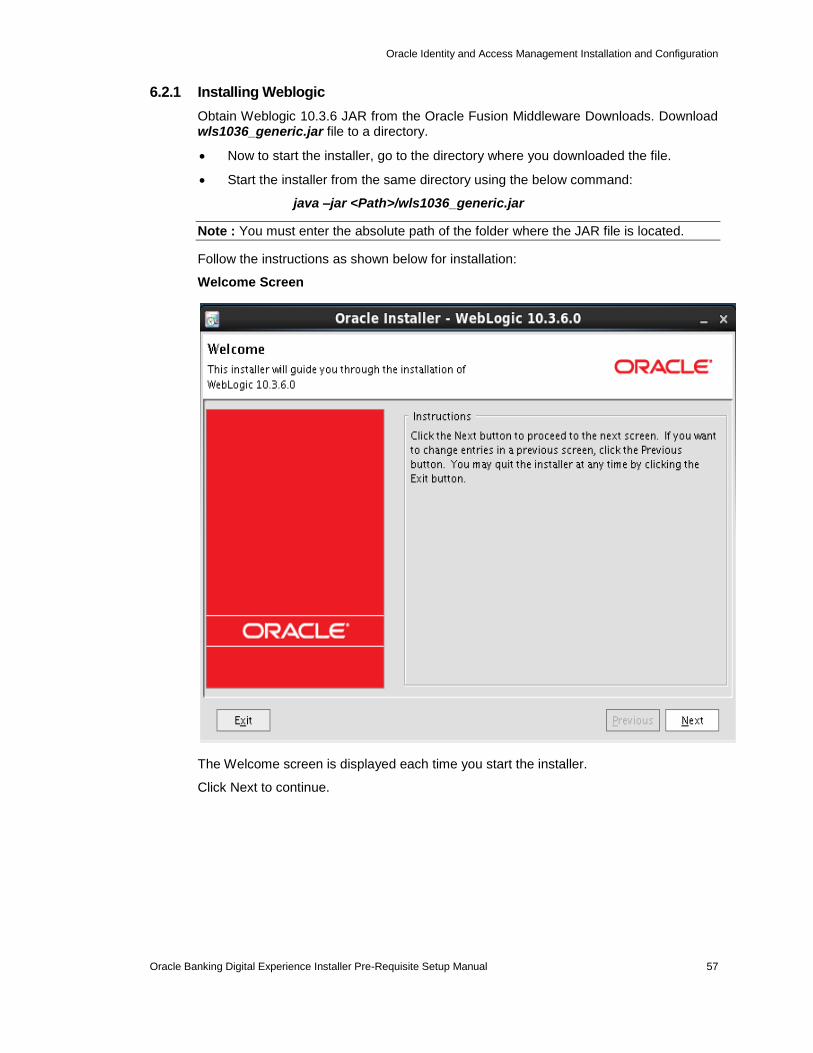
6.2.1 Installing Weblogic
Obtain Weblogic 10.3.6 JAR from the Oracle Fusion Middleware Downloads. Download wls1036_generic.jar file to a directory.
Now to start the installer, go to the directory where you downloaded the file.
Start the installer from the same directory using the below command:
java –jar <Path>/wls1036_generic.jar
Note : You must enter the absolute path of the folder where the JAR file is located.
Follow the instructions as shown below for installation:
Welcome Screen
The Welcome screen is displayed each time you start the installer.
Click Next to continue.
Oracle Identity and Access Management Installation and Configuration
Oracle Banking Digital Experience Installer Pre-Requisite Setup Manual 58
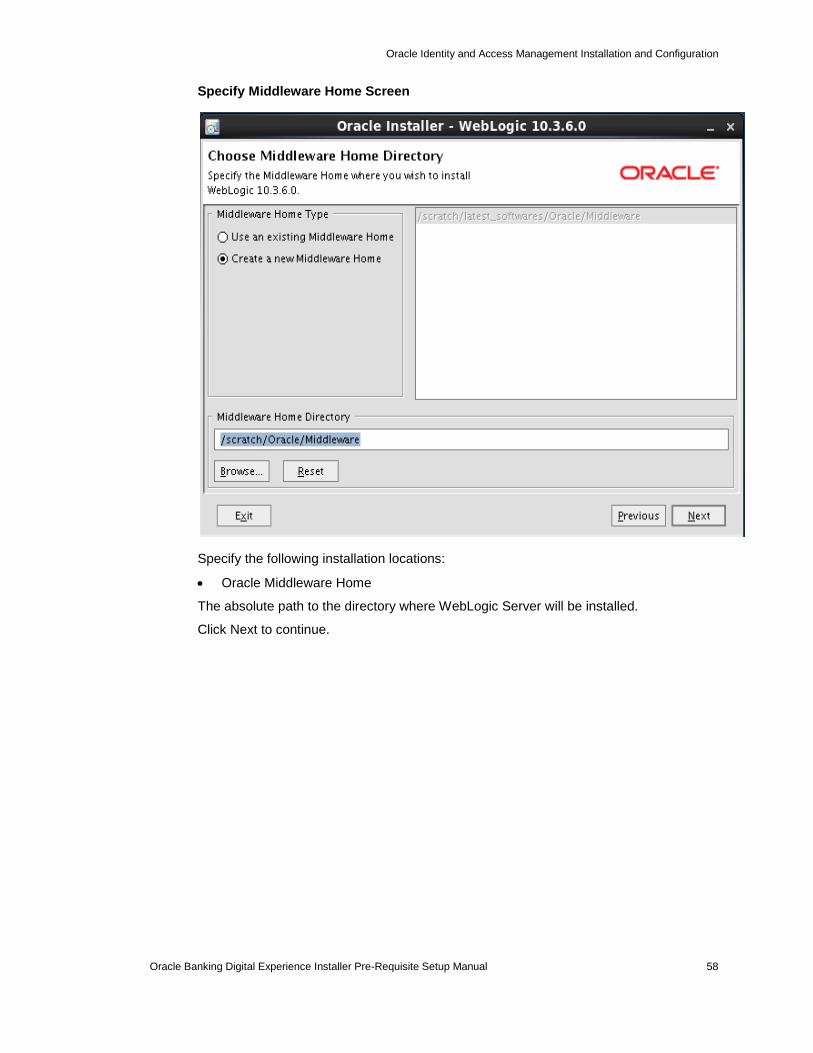
Specify Middleware Home Screen
Specify the following installation locations:
Oracle Middleware Home
The absolute path to the directory where WebLogic Server will be installed.
Click Next to continue.
Oracle Identity and Access Management Installation and Configuration
Oracle Banking Digital Experience Installer Pre-Requisite Setup Manual 59
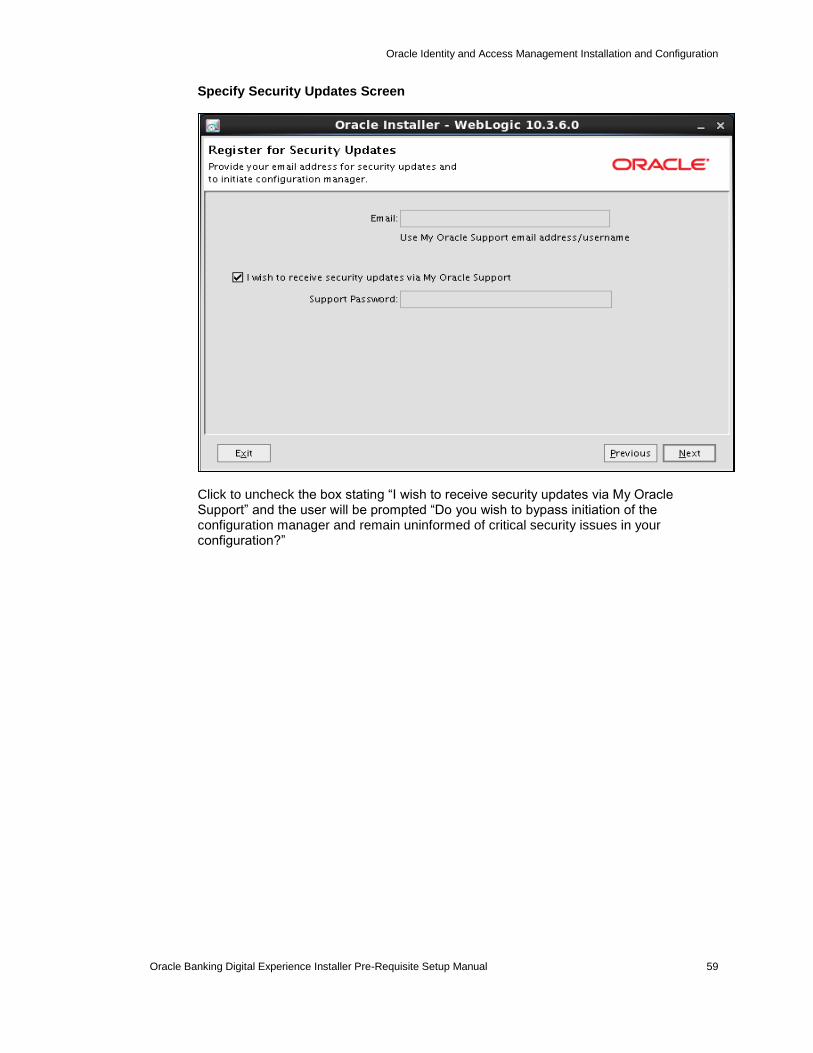
Specify Security Updates Screen
Click to uncheck the box stating “I wish to receive security updates via My Oracle Support” and the user will be prompted “Do you wish to bypass initiation of the configuration manager and remain uninformed of critical security issues in your configuration?”
Oracle Identity and Access Management Installation and Configuration
Oracle Banking Digital Experience Installer Pre-Requisite Setup Manual 60
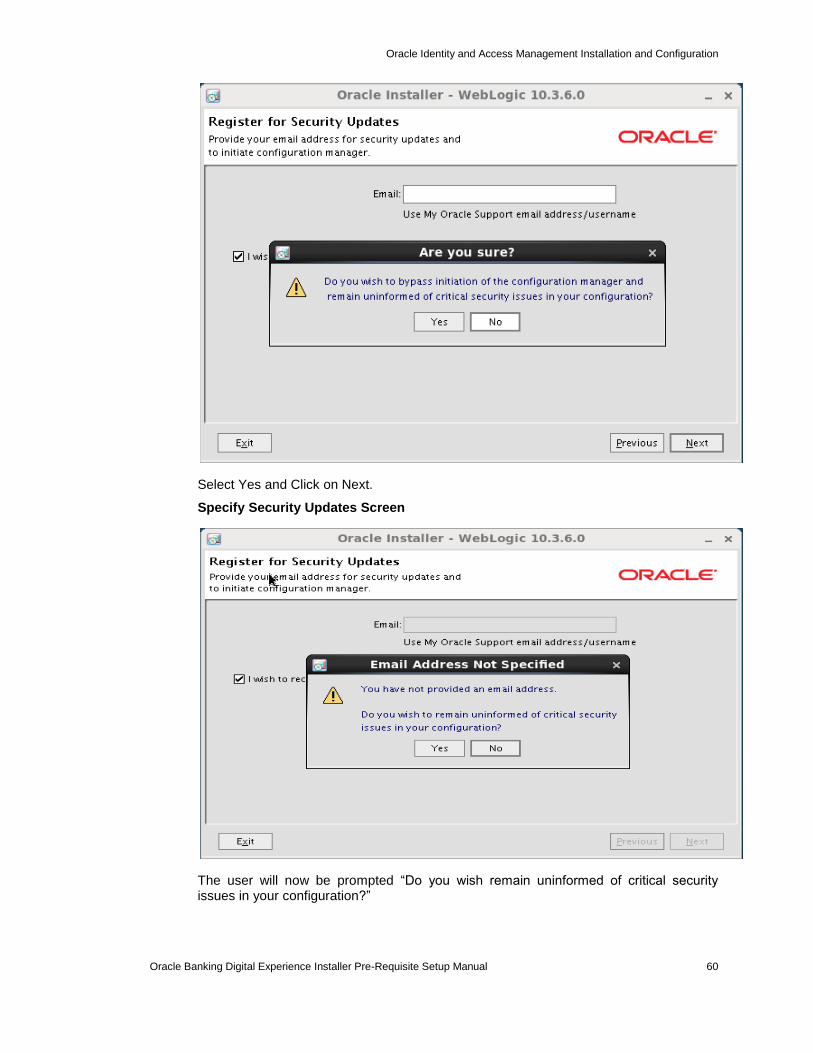
Select Yes and Click on Next.
Specify Security Updates Screen
The user will now be prompted “Do you wish remain uninformed of critical security issues in your configuration?”
Oracle Identity and Access Management Installation and Configuration
Oracle Banking Digital Experience Installer Pre-Requisite Setup Manual 61
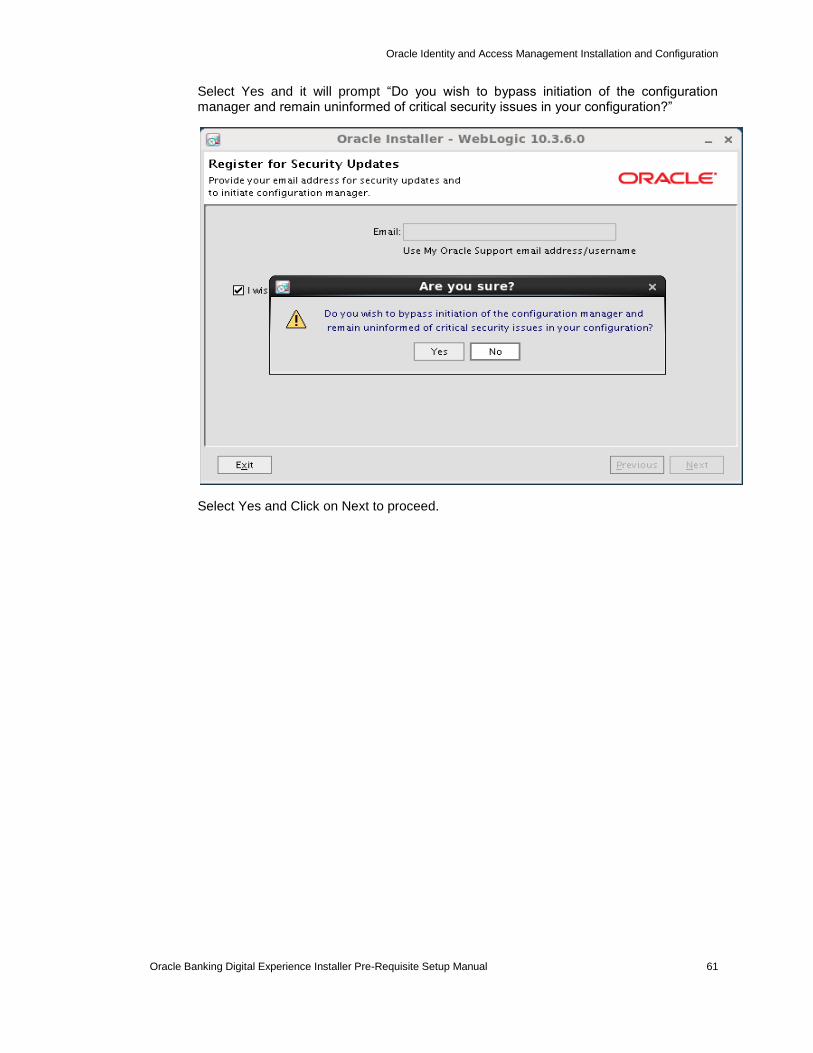
Select Yes and it will prompt “Do you wish to bypass initiation of the configuration manager and remain uninformed of critical security issues in your configuration?”
Select Yes and Click on Next to proceed.
Oracle Identity and Access Management Installation and Configuration
Oracle Banking Digital Experience Installer Pre-Requisite Setup Manual 62
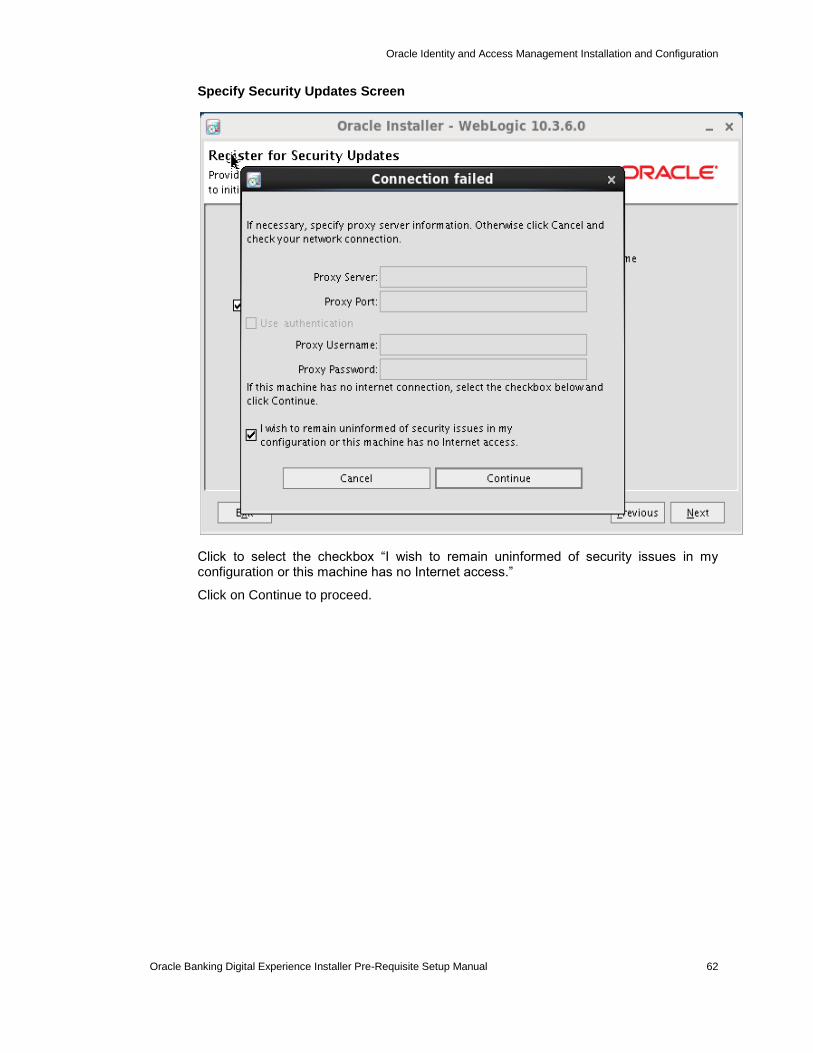
Specify Security Updates Screen
Click to select the checkbox “I wish to remain uninformed of security issues in my configuration or this machine has no Internet access.”
Click on Continue to proceed.
Oracle Identity and Access Management Installation and Configuration
Oracle Banking Digital Experience Installer Pre-Requisite Setup Manual 63
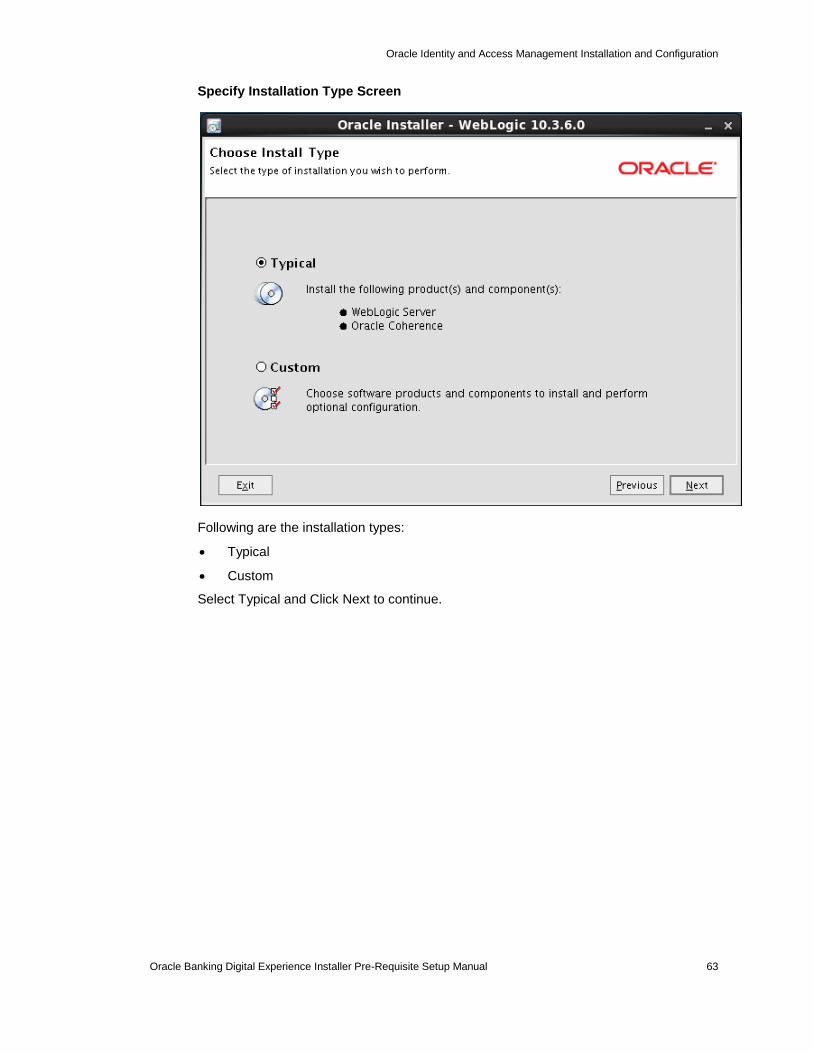
Specify Installation Type Screen
Following are the installation types:
Typical
Custom
Select Typical and Click Next to continue.
Oracle Identity and Access Management Installation and Configuration
Oracle Banking Digital Experience Installer Pre-Requisite Setup Manual 64
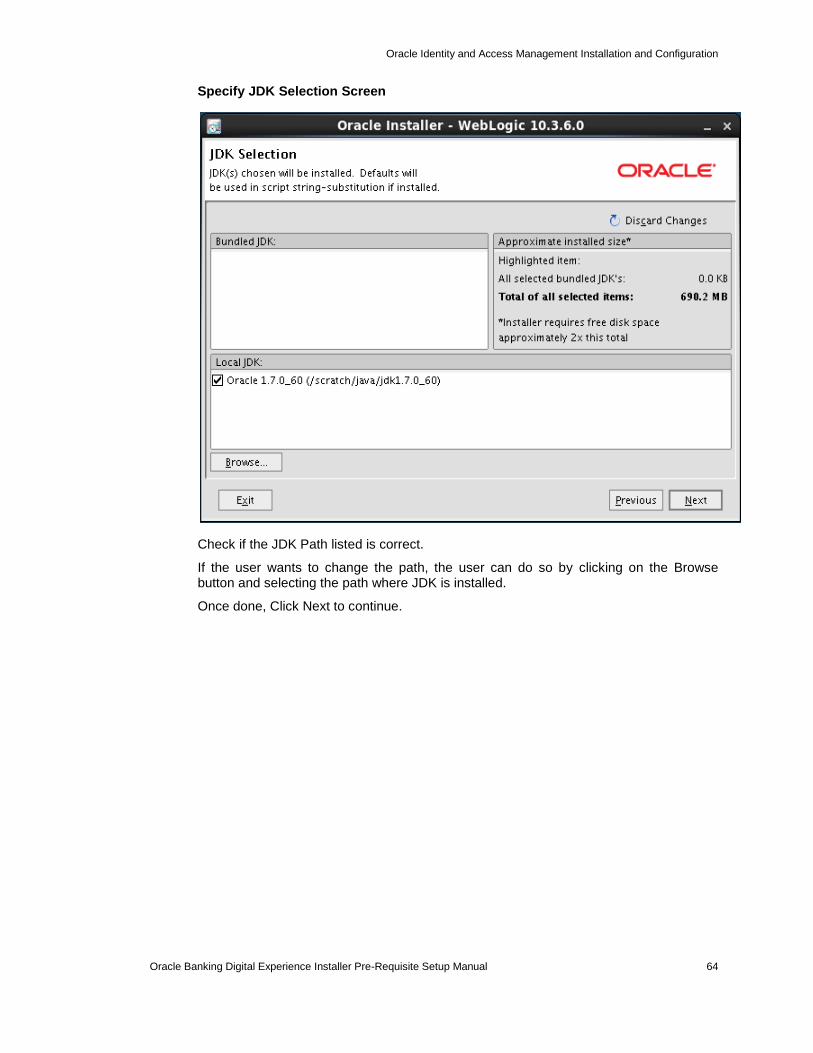
Specify JDK Selection Screen
Check if the JDK Path listed is correct.
If the user wants to change the path, the user can do so by clicking on the Browse button and selecting the path where JDK is installed.
Once done, Click Next to continue.

Oracle Identity and Access Management Installation and Configuration
Oracle Banking Digital Experience Installer Pre-Requisite Setup Manual 65
Choose Product Installation Directories Screen
This screen shows the Middleware Home location and the Weblogic Server and Oracle Coherence Product home directories.
The user should verify the path and Click Next to continue.
Oracle Identity and Access Management Installation and Configuration
Oracle Banking Digital Experience Installer Pre-Requisite Setup Manual 66
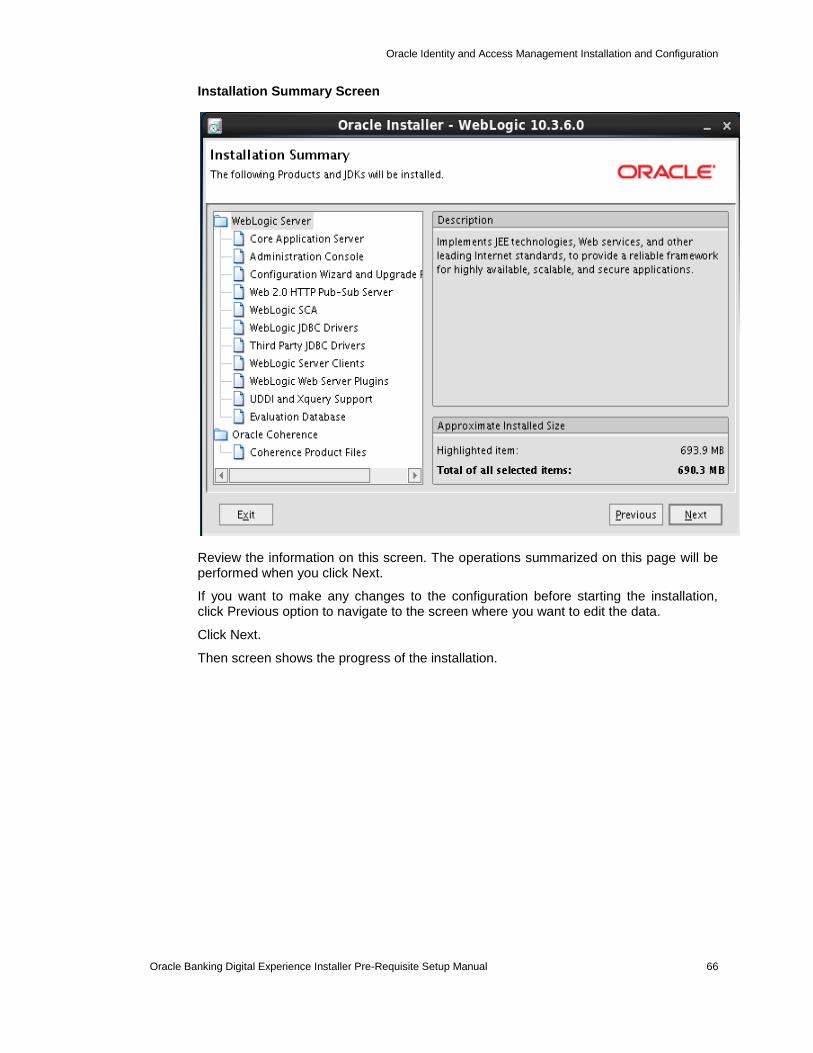
Installation Summary Screen
Review the information on this screen. The operations summarized on this page will be performed when you click Next.
If you want to make any changes to the configuration before starting the installation, click Previous option to navigate to the screen where you want to edit the data.
Click Next.
Then screen shows the progress of the installation.
Oracle Identity and Access Management Installation and Configuration
Oracle Banking Digital Experience Installer Pre-Requisite Setup Manual 67
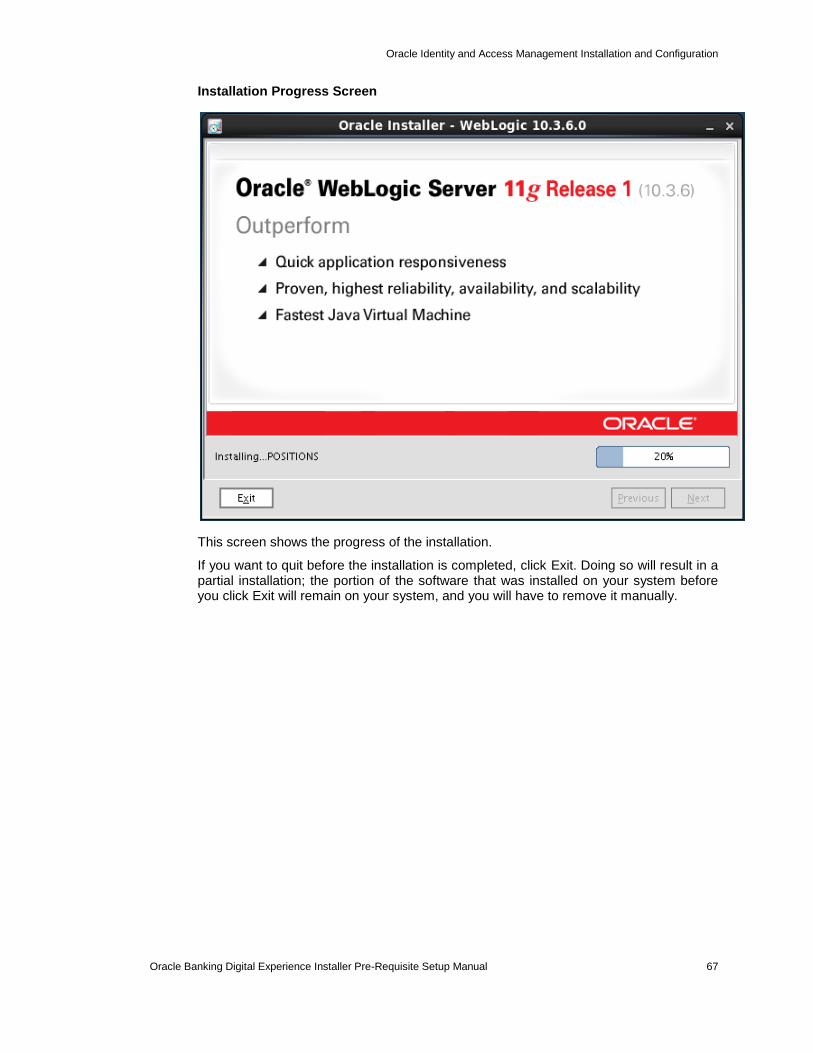
Installation Progress Screen
This screen shows the progress of the installation.
If you want to quit before the installation is completed, click Exit. Doing so will result in a partial installation; the portion of the software that was installed on your system before you click Exit will remain on your system, and you will have to remove it manually.
Oracle Identity and Access Management Installation and Configuration
Oracle Banking Digital Experience Installer Pre-Requisite Setup Manual 68
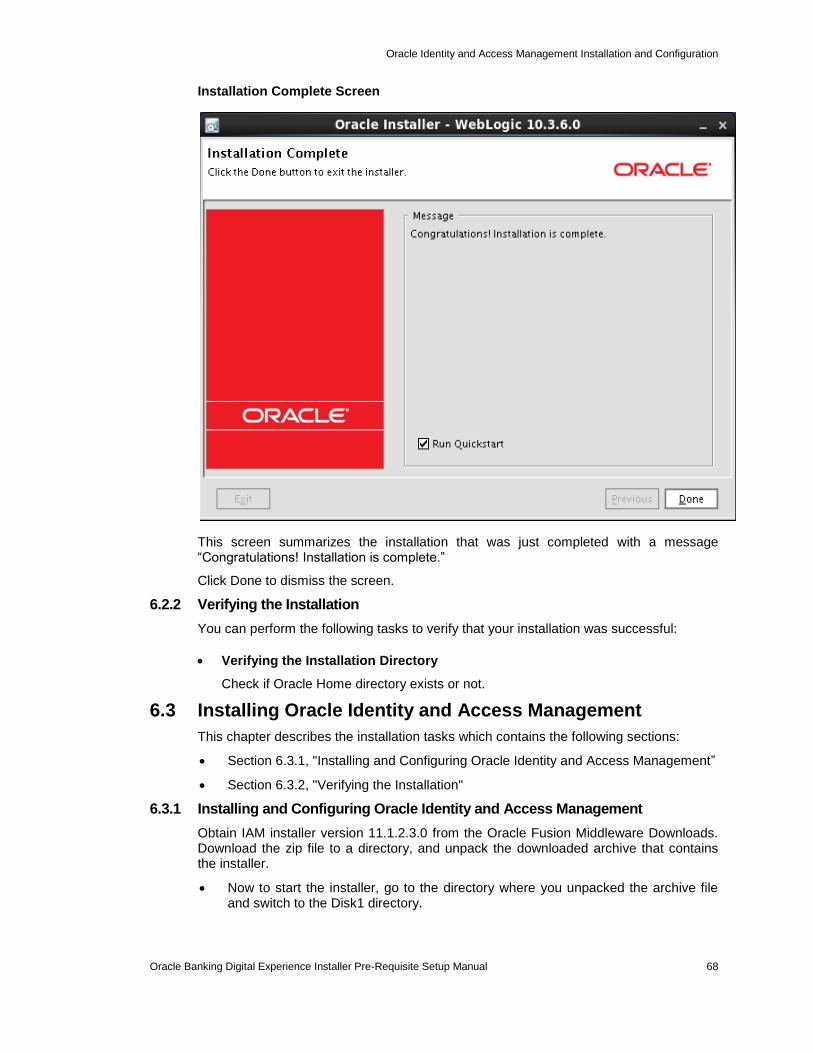
Installation Complete Screen
This screen summarizes the installation that was just completed with a message “Congratulations! Installation is complete.”
Click Done to dismiss the screen.
6.2.2 Verifying the Installation
You can perform the following tasks to verify that your installation was successful:
Verifying the Installation Directory
Check if Oracle Home directory exists or not.
6.3 Installing Oracle Identity and Access Management
This chapter describes the installation tasks which contains the following sections:
Section 6.3.1, "Installing and Configuring Oracle Identity and Access Management”
Section 6.3.2, "Verifying the Installation"
6.3.1 Installing and Configuring Oracle Identity and Access Management
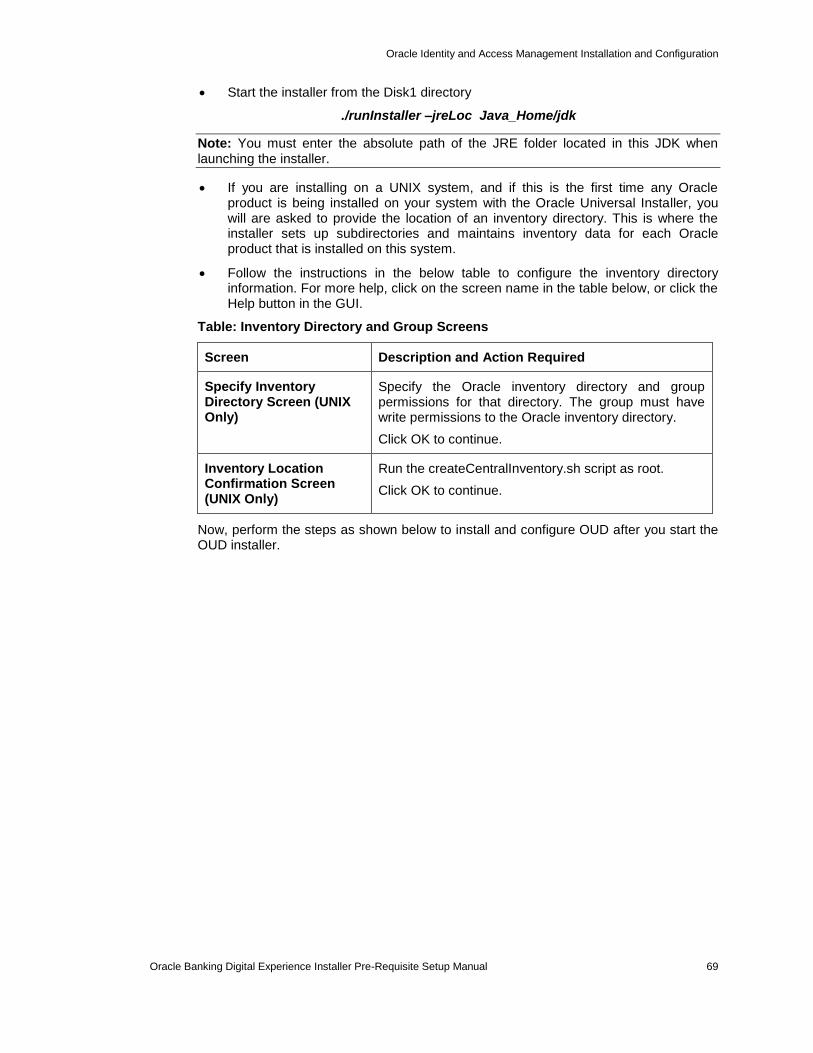
Obtain IAM installer version 11.1.2.3.0 from the Oracle Fusion Middleware Downloads. Download the zip file to a directory, and unpack the downloaded archive that contains the installer.
Now to start the installer, go to the directory where you unpacked the archive file and switch to the Disk1 directory.
Oracle Identity and Access Management Installation and Configuration
Oracle Banking Digital Experience Installer Pre-Requisite Setup Manual 69
Start the installer from the Disk1 directory
./runInstaller –jreLoc Java_Home/jdk
Note: You must enter the absolute path of the JRE folder located in this JDK when launching the installer.
If you are installing on a UNIX system, and if this is the first time any Oracle product is being installed on your system with the Oracle Universal Installer, you will are asked to provide the location of an inventory directory. This is where the installer sets up subdirectories and maintains inventory data for each Oracle product that is installed on this system.
Follow the instructions in the below table to configure the inventory directory information. For more help, click on the screen name in the table below, or click the Help button in the GUI.
Table: Inventory Directory and Group Screens
Screen Description and Action Required
Specify Inventory Directory Screen (UNIX Only)
Specify the Oracle inventory directory and group permissions for that directory. The group must have write permissions to the Oracle inventory directory.
Click OK to continue.
Inventory Location Confirmation Screen (UNIX Only)
Run the createCentralInventory.sh script as root.
Click OK to continue.
Now, perform the steps as shown below to install and configure OUD after you start the OUD installer.
Oracle Identity and Access Management Installation and Configuration
Oracle Banking Digital Experience Installer Pre-Requisite Setup Manual 70
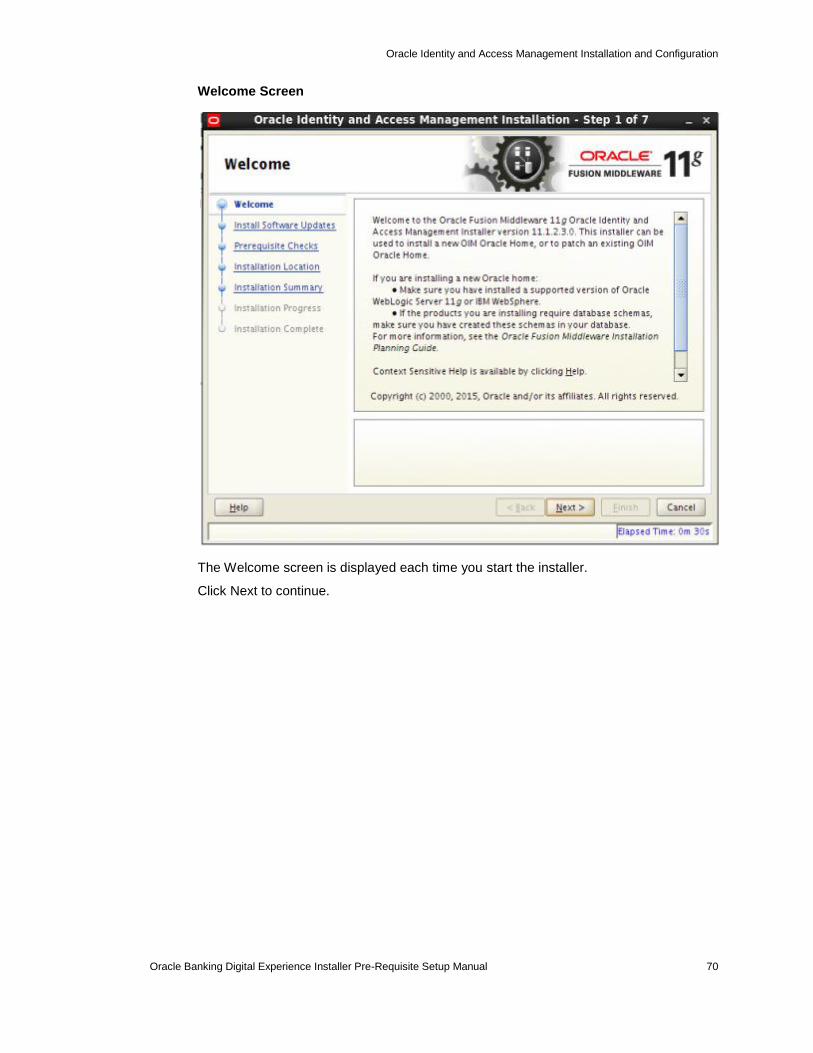
Welcome Screen
The Welcome screen is displayed each time you start the installer.
Click Next to continue.
Oracle Identity and Access Management Installation and Configuration
Oracle Banking Digital Experience Installer Pre-Requisite Setup Manual 71
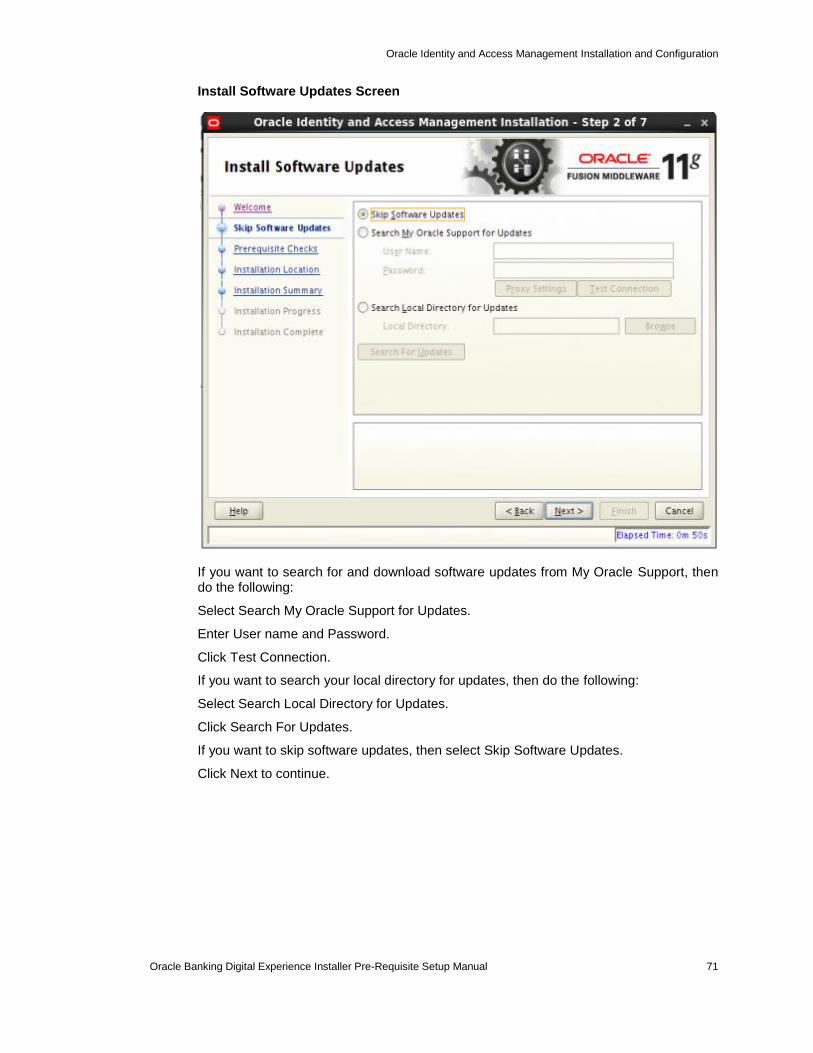
Install Software Updates Screen
If you want to search for and download software updates from My Oracle Support, then do the following:
Select Search My Oracle Support for Updates.
Enter User name and Password.
Click Test Connection.
If you want to search your local directory for updates, then do the following:
Select Search Local Directory for Updates.
Click Search For Updates.
If you want to skip software updates, then select Skip Software Updates.
Click Next to continue.
Oracle Identity and Access Management Installation and Configuration
Oracle Banking Digital Experience Installer Pre-Requisite Setup Manual 72
Prerequisite Checks Screen
This screen shows whether the system requirements are met in order to install the software.
If there is a problem, a short error message appears in the bottom portion of the screen. Fix the error, and click Retry to try again.
If you want to ignore the error or warning messages and continue with the installation, click Continue.
To stop prerequisite checking for all components, click Abort.
Click Next to continue.
Oracle Identity and Access Management Installation and Configuration
Oracle Banking Digital Experience Installer Pre-Requisite Setup Manual 73
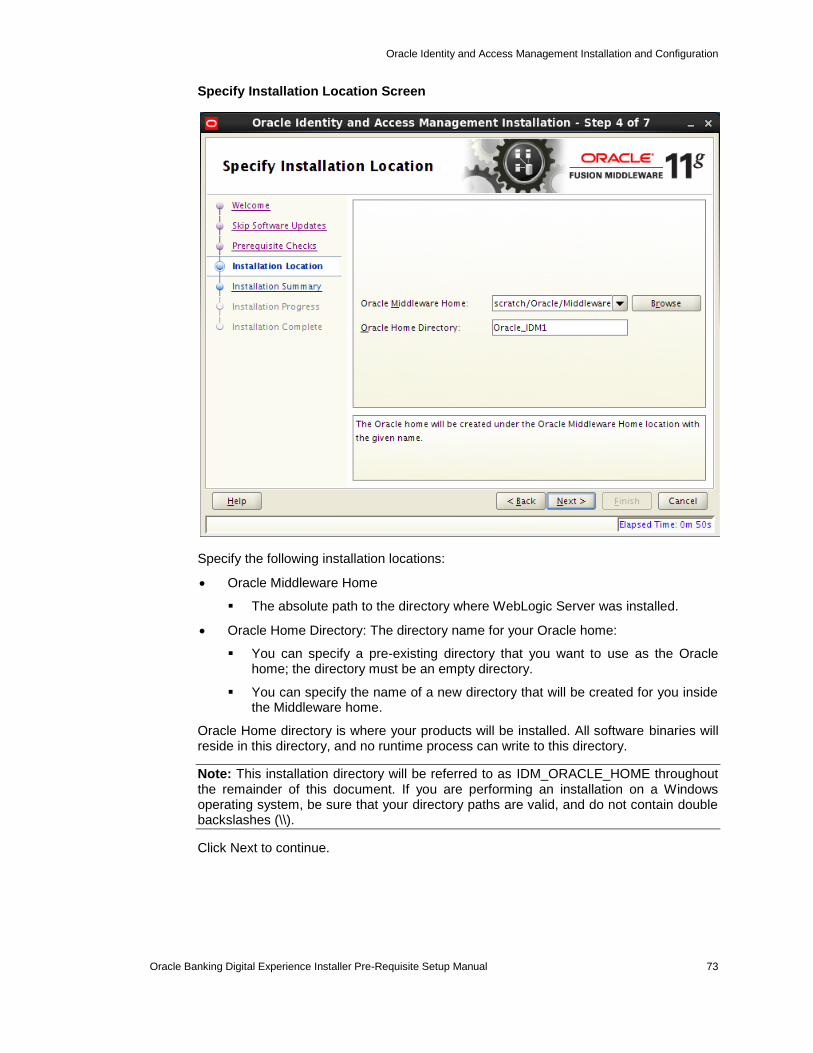
Specify Installation Location Screen
Specify the following installation locations:
Oracle Middleware Home
The absolute path to the directory where WebLogic Server was installed.
Oracle Home Directory: The directory name for your Oracle home:
You can specify a pre-existing directory that you want to use as the Oracle home; the directory must be an empty directory.
You can specify the name of a new directory that will be created for you inside the Middleware home.
Oracle Home directory is where your products will be installed. All software binaries will reside in this directory, and no runtime process can write to this directory.
Note: This installation directory will be referred to as IDM_ORACLE_HOME throughout the remainder of this document. If you are performing an installation on a Windows operating system, be sure that your directory paths are valid, and do not contain double backslashes (\\).
Click Next to continue.
Oracle Identity and Access Management Installation and Configuration
Oracle Banking Digital Experience Installer Pre-Requisite Setup Manual 74
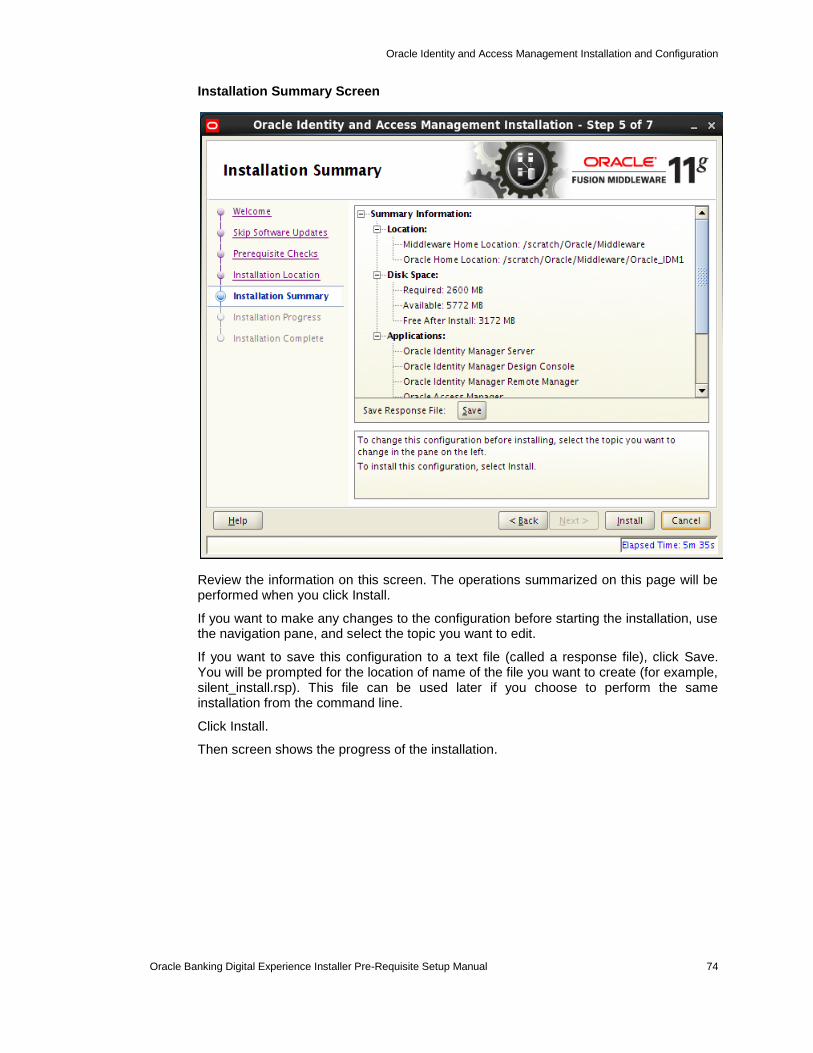
Installation Summary Screen
Review the information on this screen. The operations summarized on this page will be performed when you click Install.
If you want to make any changes to the configuration before starting the installation, use the navigation pane, and select the topic you want to edit.
If you want to save this configuration to a text file (called a response file), click Save. You will be prompted for the location of name of the file you want to create (for example, silent_install.rsp). This file can be used later if you choose to perform the same installation from the command line.
Click Install.
Then screen shows the progress of the installation.

Oracle Identity and Access Management Installation and Configuration
Oracle Banking Digital Experience Installer Pre-Requisite Setup Manual 75
Installation Progress Screen
This screen shows the progress of the installation.
If you want to quit before the installation is completed, click Cancel. Doing so will result in a partial installation; the portion of the software that was installed on your system before you click Cancel will remain on your system, and you will have to remove it manually.

Oracle Identity and Access Management Installation and Configuration
Oracle Banking Digital Experience Installer Pre-Requisite Setup Manual 76
Installation Complete Screen
This screen summarizes the installation that was just completed.
You can also save this summary information to a file for future reference by clicking Save. You will be prompted to specify a name and location for your summary file.
Click Finish to dismiss the screen.
6.3.2 Verifying the Installation
You can perform any combination of the following tasks to verify that your installation was successful:
Verifying the Installation Logs: Check for the presence of installation log files in logs directory inside your Oracle Inventory directory.
Verifying the IDM Home Directory: Check for the presence of IDM Home directory. For example, <Oracle_Home>/Oracle_IDM1
Oracle Access Management Configuration
Oracle Banking Digital Experience Security Setup Configuration Manual 77
7. Oracle Access Management Configuration
Oracle Access Management includes components like Oracle Access Manager, Oracle Access Management Security Token Service, Oracle Access Management Identity Federation, Oracle Access Management Mobile and Social.
Following topics in this chapter provides detailed information on configuring Oracle Access Management:
Section 7.1, "Configuring Oracle Access Management"
Section 7.2, "Register Oracle HTTP 11g Webgate for Oracle Access Manager"
7.1 Configuring Oracle Access Management
After installing Oracle Identity and Access Management, configuring Oracle Access Management includes the following sections:
Section 7.1.1, "Creating Weblogic Domain for Oracle Access Manager"
Section 7.1.2, "Post-Installation Tasks"
Section 7.1.3, "Verifying the Installation"
7.1.1 Creating Weblogic Domain for Oracle Access Manager
Before you start configuring Oracle Access Management, note that the IDM HOME is the path provided during IDM installation and is used to refer to the Oracle home directory.
Execute the below command, to launch the Weblogic Configuration Wizard:
<Oracle_Home>/wlserver_10.3/common/bin/config.sh
Note: Oracle_Home is the Middleware Home, which is the absolute path where Weblogic Server is installed.
Follow the instructions as shown below for installation:
Oracle Access Management Configuration
Oracle Banking Digital Experience Security Setup Configuration Manual 78
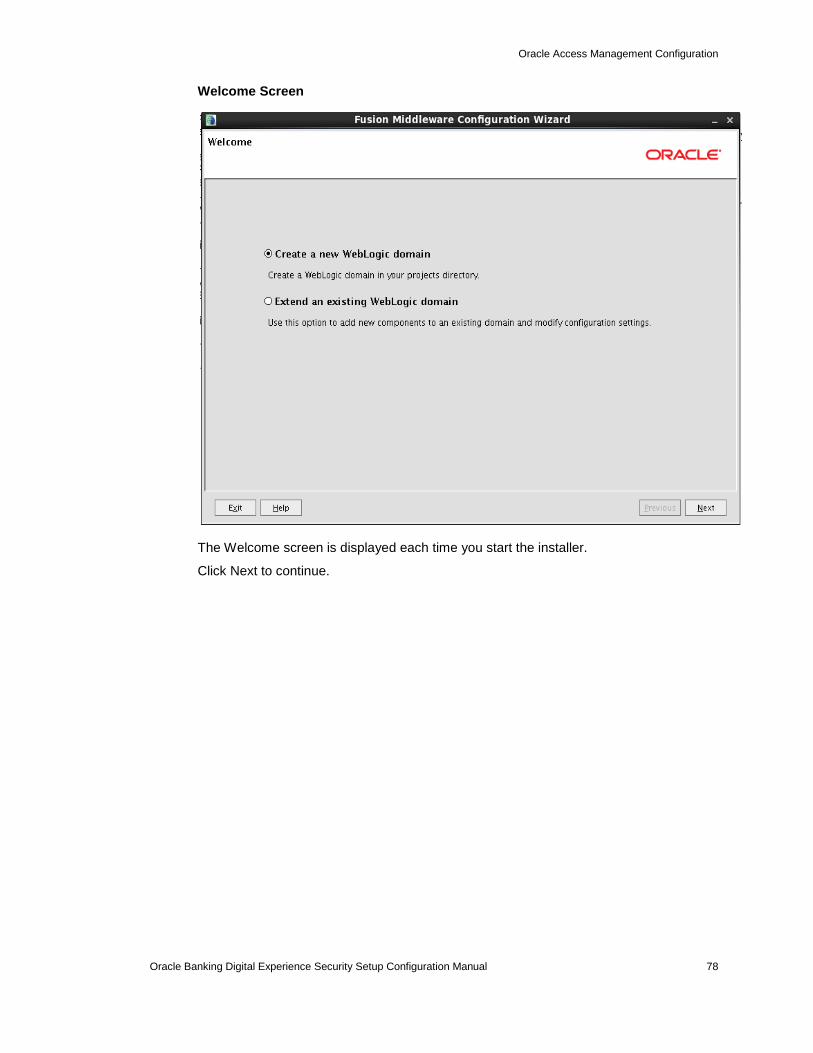
Welcome Screen
The Welcome screen is displayed each time you start the installer.
Click Next to continue.

Oracle Access Management Configuration
Oracle Banking Digital Experience Security Setup Configuration Manual 79
Select Domain Source Screen
Use this screen to select the components that you want to configure.
For Oracle Access Manager, select the Oracle Access Management And Mobile Security Suite - 11.1.2.3.0 [IDM_HOME]
Click Next to continue.
Note: On selecting Oracle Access Management and Mobile Security Suite option, few options like Oracle Enterprise Manager, Oracle WSM Policy Manager, Oracle JRF, Oracle Platform Security Service and Oracle OPSS Metadata for JRF gets selected by-default.
Oracle Access Management Configuration
Oracle Banking Digital Experience Security Setup Configuration Manual 80
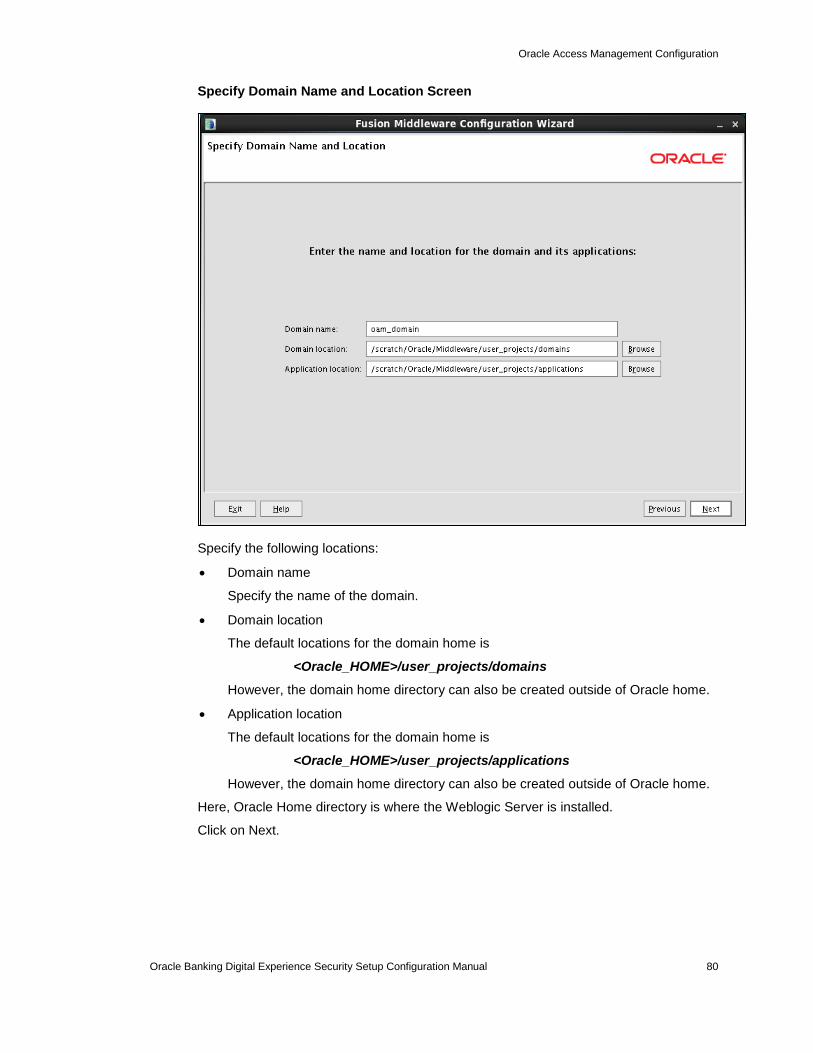
Specify Domain Name and Location Screen
Specify the following locations:
Domain name
Specify the name of the domain.
Domain location
The default locations for the domain home is
<Oracle_HOME>/user_projects/domains
However, the domain home directory can also be created outside of Oracle home.
Application location
The default locations for the domain home is
<Oracle_HOME>/user_projects/applications
However, the domain home directory can also be created outside of Oracle home.
Here, Oracle Home directory is where the Weblogic Server is installed.
Click on Next.
Oracle Access Management Configuration
Oracle Banking Digital Experience Security Setup Configuration Manual 81
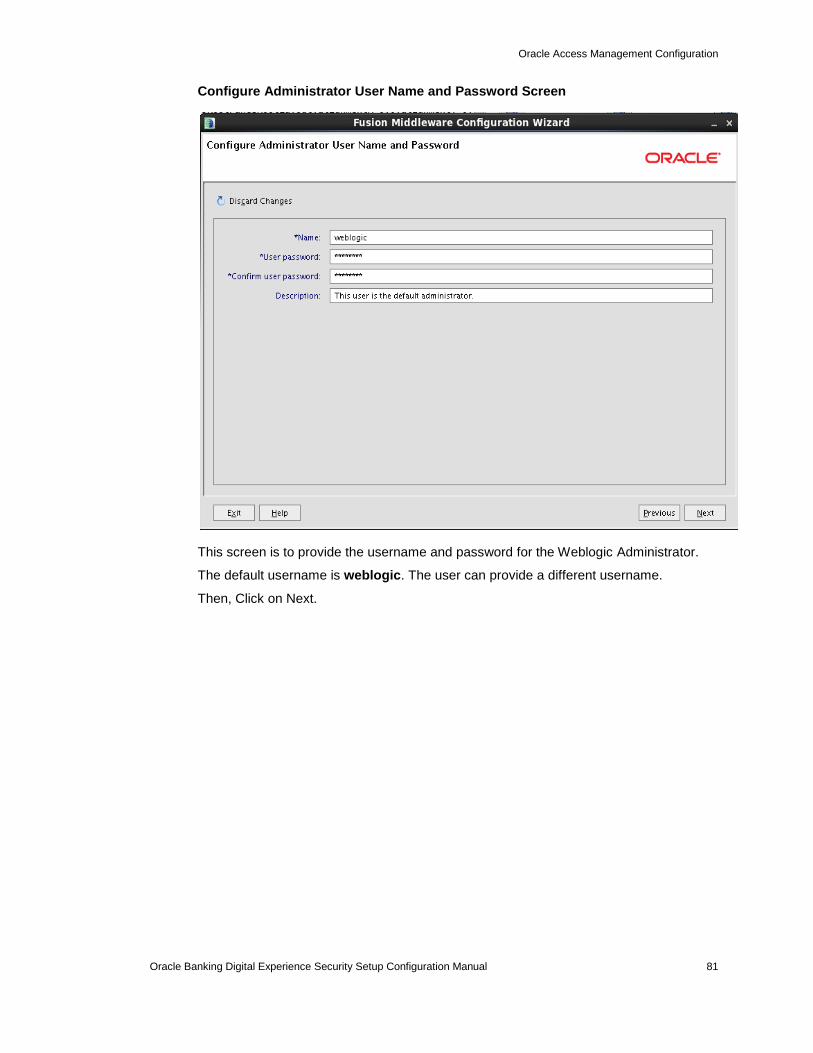
Configure Administrator User Name and Password Screen
This screen is to provide the username and password for the Weblogic Administrator.
The default username is weblogic. The user can provide a different username.
Then, Click on Next.
Oracle Access Management Configuration
Oracle Banking Digital Experience Security Setup Configuration Manual 82
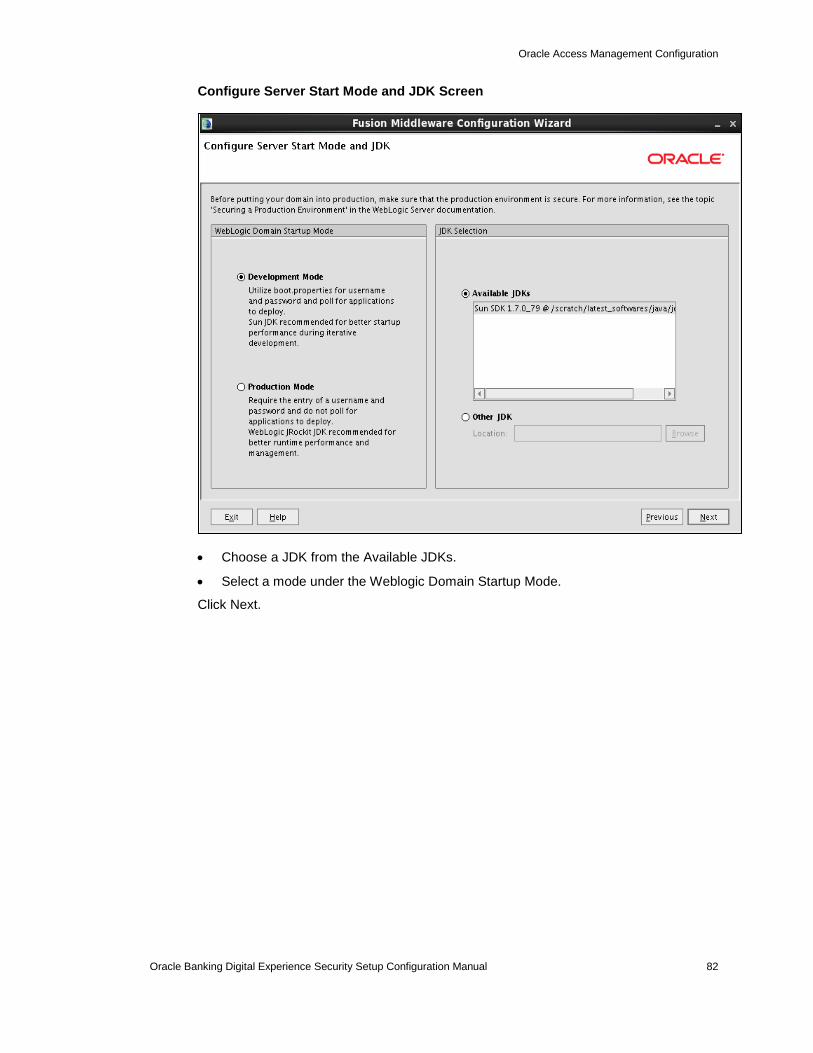
Configure Server Start Mode and JDK Screen
Choose a JDK from the Available JDKs.
Select a mode under the Weblogic Domain Startup Mode.
Click Next.
Oracle Access Management Configuration
Oracle Banking Digital Experience Security Setup Configuration Manual 83
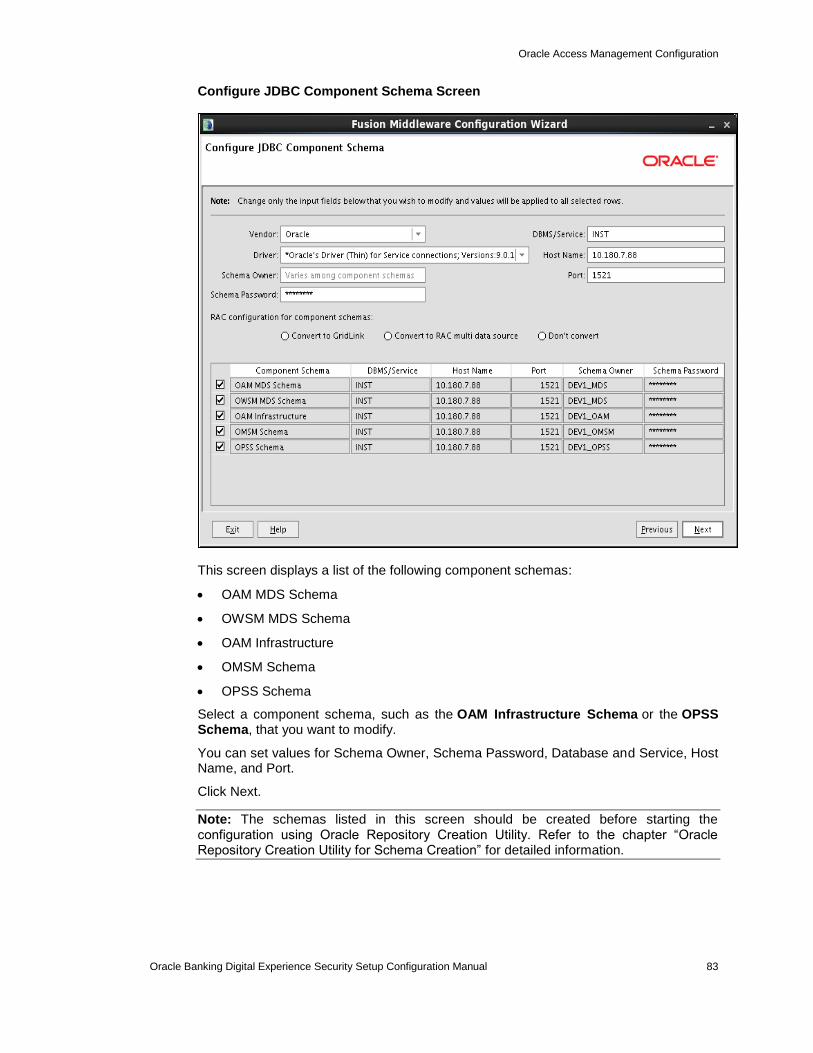
Configure JDBC Component Schema Screen
This screen displays a list of the following component schemas:
OAM MDS Schema
OWSM MDS Schema
OAM Infrastructure
OMSM Schema
OPSS Schema
Select a component schema, such as the OAM Infrastructure Schema or the OPSS Schema, that you want to modify.
You can set values for Schema Owner, Schema Password, Database and Service, Host Name, and Port.
Click Next.
Note: The schemas listed in this screen should be created before starting the configuration using Oracle Repository Creation Utility. Refer to the chapter “Oracle Repository Creation Utility for Schema Creation” for detailed information.
Oracle Access Management Configuration
Oracle Banking Digital Experience Security Setup Configuration Manual 84
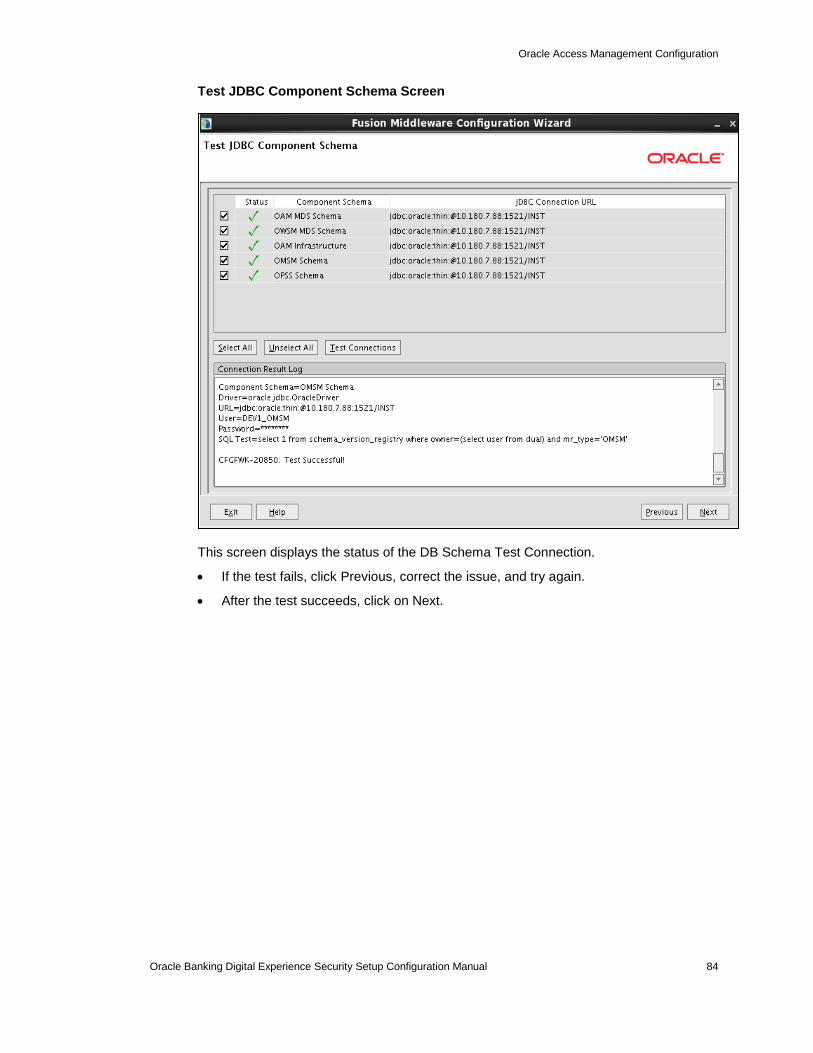
Test JDBC Component Schema Screen
This screen displays the status of the DB Schema Test Connection.
If the test fails, click Previous, correct the issue, and try again.
After the test succeeds, click on Next.
Oracle Access Management Configuration
Oracle Banking Digital Experience Security Setup Configuration Manual 85
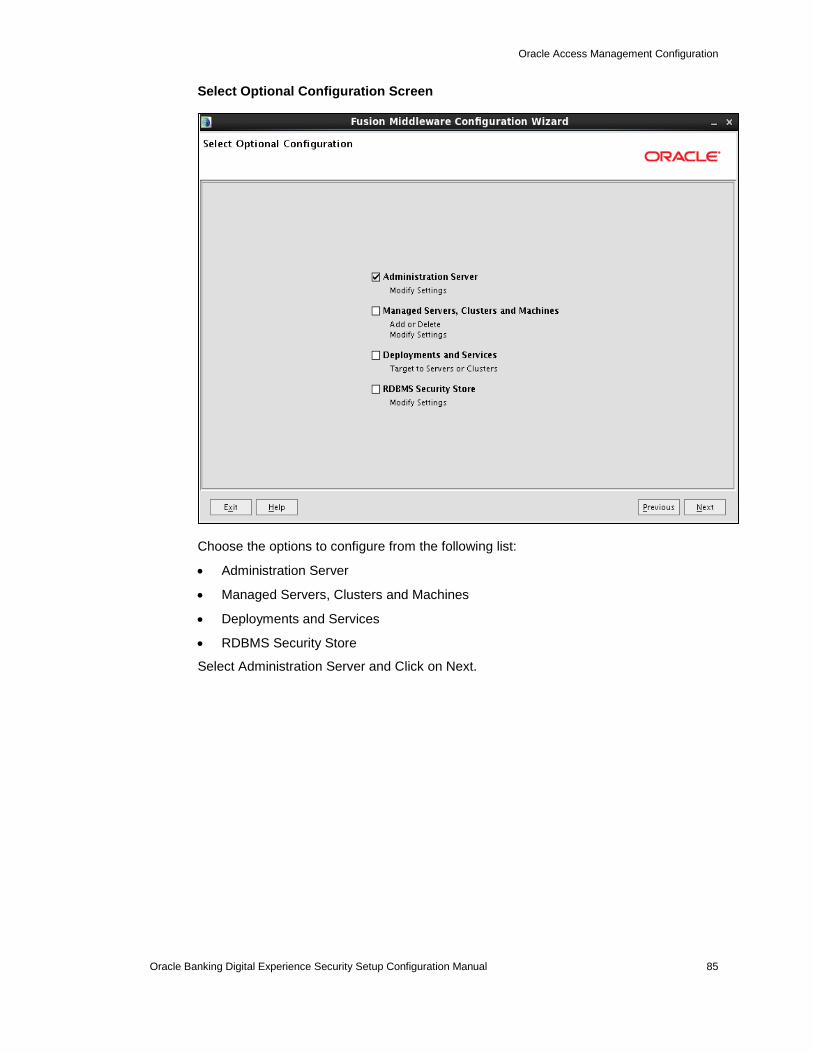
Select Optional Configuration Screen
Choose the options to configure from the following list:
Administration Server
Managed Servers, Clusters and Machines
Deployments and Services
RDBMS Security Store
Select Administration Server and Click on Next.
Oracle Access Management Configuration
Oracle Banking Digital Experience Security Setup Configuration Manual 86
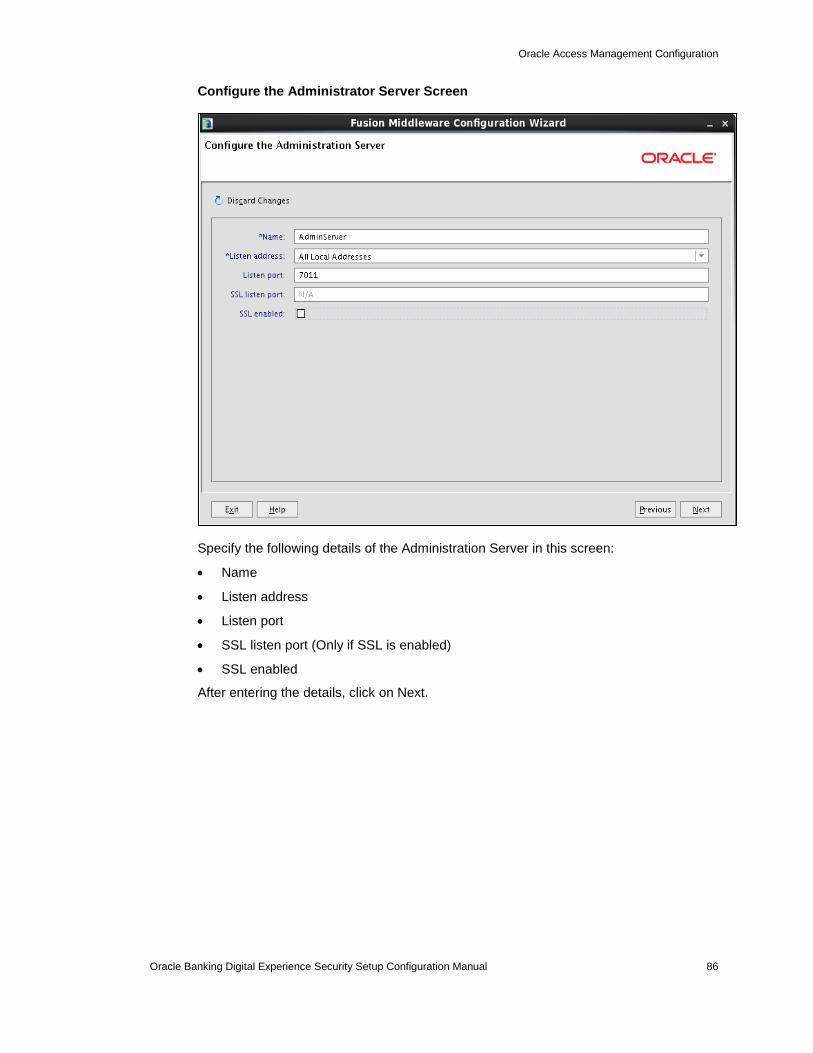
Configure the Administrator Server Screen
Specify the following details of the Administration Server in this screen:
Name
Listen address
Listen port
SSL listen port (Only if SSL is enabled)
SSL enabled
After entering the details, click on Next.
Oracle Access Management Configuration
Oracle Banking Digital Experience Security Setup Configuration Manual 87
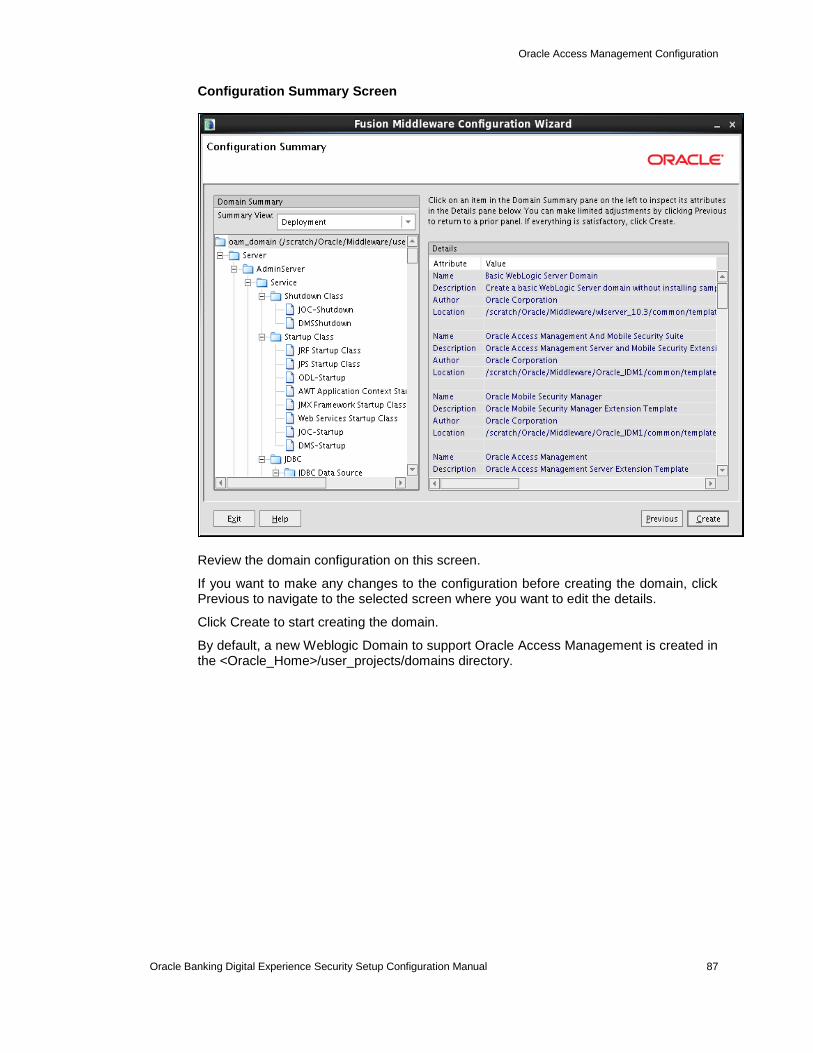
Configuration Summary Screen
Review the domain configuration on this screen.
If you want to make any changes to the configuration before creating the domain, click Previous to navigate to the selected screen where you want to edit the details.
Click Create to start creating the domain.
By default, a new Weblogic Domain to support Oracle Access Management is created in the <Oracle_Home>/user_projects/domains directory.
Oracle Access Management Configuration
Oracle Banking Digital Experience Security Setup Configuration Manual 88
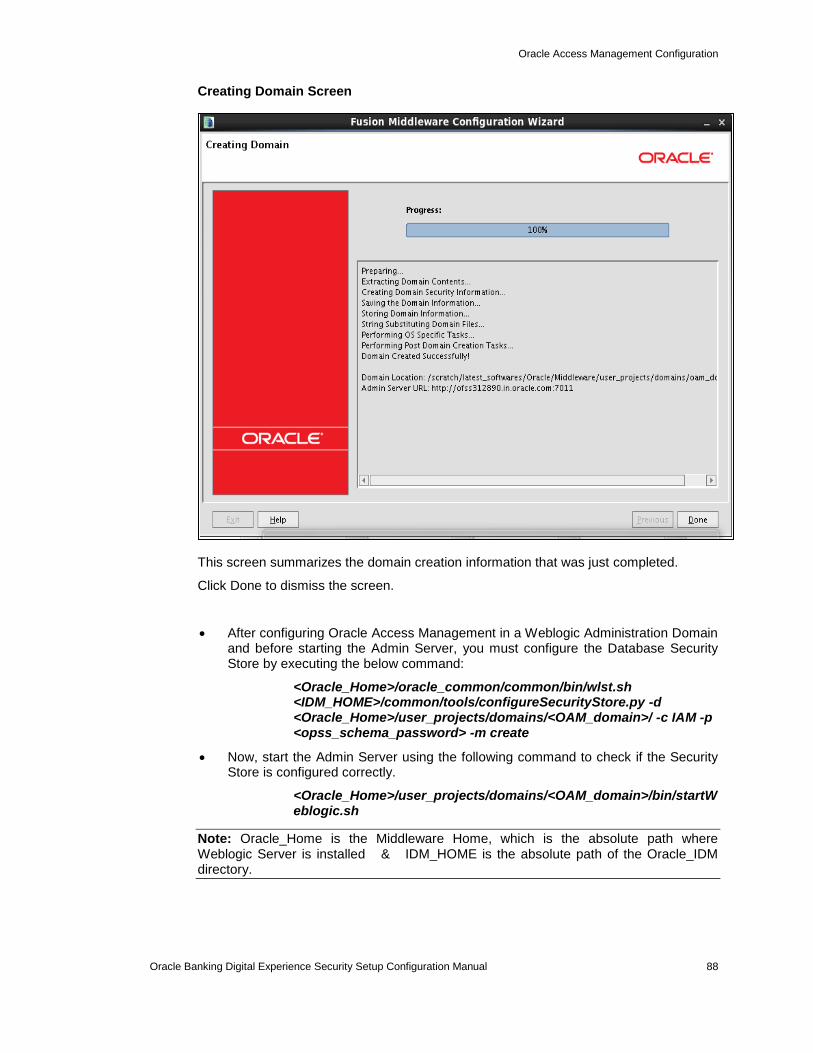
Creating Domain Screen
This screen summarizes the domain creation information that was just completed.
Click Done to dismiss the screen.
After configuring Oracle Access Management in a Weblogic Administration Domain and before starting the Admin Server, you must configure the Database Security Store by executing the below command:
<Oracle_Home>/oracle_common/common/bin/wlst.sh <IDM_HOME>/common/tools/configureSecurityStore.py -d <Oracle_Home>/user_projects/domains/<OAM_domain>/ -c IAM -p <opss_schema_password> -m create
Now, start the Admin Server using the following command to check if the Security Store is configured correctly.
<Oracle_Home>/user_projects/domains/<OAM_domain>/bin/startWeblogic.sh
Note: Oracle_Home is the Middleware Home, which is the absolute path where Weblogic Server is installed & IDM_HOME is the absolute path of the Oracle_IDM directory.
Oracle Access Management Configuration
Oracle Banking Digital Experience Security Setup Configuration Manual 89
7.1.2 Post-Installation Tasks
After installing and configuring Oracle Access Management, the user can perform the following steps:
Configure your own LDAP to use instead of the default embedded LDAP, which comes with Oracle Weblogic Server.
To do this, ensure that the Admin Server is running. Login to the Weblogic Console using the following URL:
http://<hostname>:<oam_admin_port>/console
Now, go to Security Realms > myrealm > Providers
Click on ‘DefaultAuthenticator” provider and change the Control Flag to SUFFICIENT and Save the changes.
Now, click on New and enter the below details and click Save.
Name : OUDAuthenticator
Type : IPlanetAuthenticator
Control Flag : SUFFICIENT
Click on the new OUDAuthenticator Provider and under Provider Specific tab and set the details of LDAP where the server should point. Refer to the following table for more information:
Property Value
Host This is the LDAP Server (OUD/Open LDAP) Hostname
Port This is the LDAP Server (OUD/Open LDAP) Port. E.g. 1389
Principal This is the Administrator Account name. E.g. cn=orcladmin
Credential This is the Administrator Account password.
UserBase DN
This is the OUD/ OpenLDAP user search base
cn=Users, dc=in,dc=oracle,dc=com
GroupBase DN
This is the OUD/ OpenLDAP group search base
cn=Groups, dc=in,dc=oracle,dc=com
Click on Save to update the changes.
Click on Save and reorder the providers so that LDAP Provider gets highest priority followed by OAMIdentityAsserter and DefaultAuthenticator.
Click Save to apply the changes and shutdown the Admin Server for restart.
Now, again start the Admin Server using the command,
<Oracle_Home>/user_projects/domains/<OAM_domain>/bin/startWeblogic.sh
Oracle Access Management Configuration
Oracle Banking Digital Experience Security Setup Configuration Manual 90
Also, start the OAM Managed Server (by default it is ‘oam_server1’) as mentioned below:
<Oracle_Home>/user_projects/domains/<OAM_domain>/bin/startManagedWeblogic.sh oam_server1
(Only if Managed Server Start Fails)
In-case Managed Server startup fails with the below error
<Error> <Security> <BEA-090783> <Server is Running in Development Mode and Native Library(terminalio) to read the password securely from commandline is not found.>
Set the JAVA_OPTIONS, WLS_USER and WLS_PASSWORD as follows:
export JAVA_OPTIONS=-Dweblogic.management.allowPasswordEcho=true
export WLS_USER=<oam_weblogic_username>
export WLS_PASSWORD=<oam_weblgoic_password>
After setting the values for the above variables, try starting the Managed Server once again.
7.1.3 Verifying the Installation
You can perform any combination of the following tasks to verify that your installation was successful:
Ensure that the Administration Server and Managed Servers are up and running.
Verifying the installation for Oracle Access Management
Log in to the Administration Console for Oracle Access Management using the following URL:
http://<hostname>:<oam_admin_port>/oamconsole
You will be redirected to:
http://<hostname>:<oamserver_port>/oam/server
When you access this Administration Console running on the Administration Server, you are prompted to enter a user name and password. Note that you must have Administrator's role and privileges.
Verifying the installation for Weblogic Server Administration Console
If the installation and configuration of Oracle Access Management are successful, this console shows the Administration Server in running mode.
7.2 Register Oracle HTTP 11g Webgate for Oracle Access Manager
Before you can use the new Oracle HTTP Server 11g WebGate agent for Oracle Access Manager, you must register the new WebGate agent with Oracle Access Manager by using the Oracle Access Manager Administration Console.
Follow the instructions as shown below to Create Webgate SSO Agent, Manage Application Domain & Resources for Oracle Access Manager.
Create Webgate Agent
Oracle Access Management Configuration
Oracle Banking Digital Experience Security Setup Configuration Manual 91
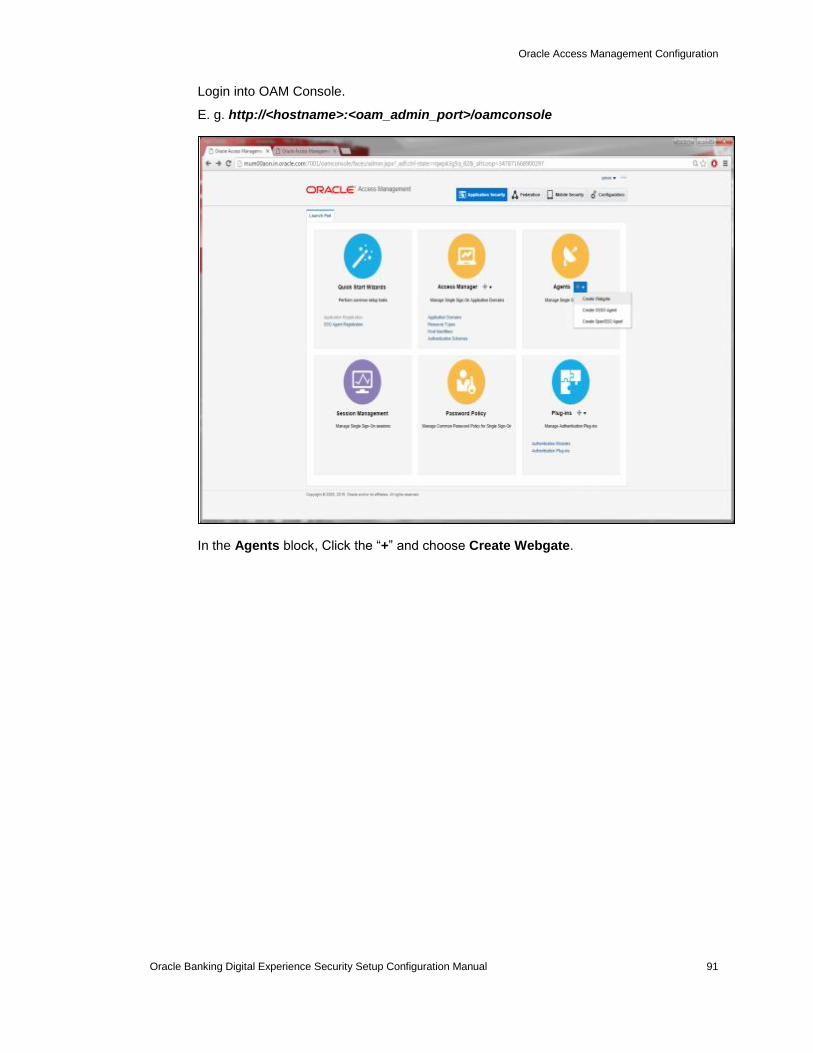
Login into OAM Console.
E. g. http://<hostname>:<oam_admin_port>/oamconsole
In the Agents block, Click the “+” and choose Create Webgate.
Oracle Access Management Configuration
Oracle Banking Digital Experience Security Setup Configuration Manual 92
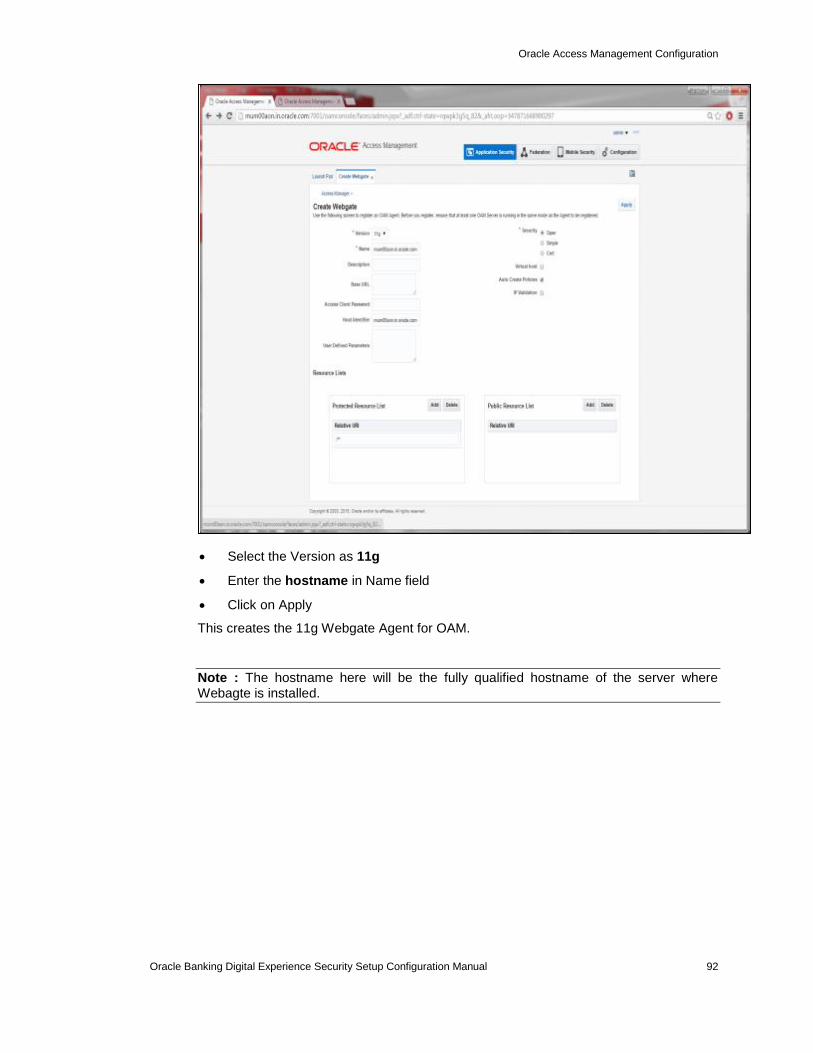
Select the Version as 11g
Enter the hostname in Name field
Click on Apply
This creates the 11g Webgate Agent for OAM.
Note : The hostname here will be the fully qualified hostname of the server where Webagte is installed.
Oracle Access Management Configuration
Oracle Banking Digital Experience Security Setup Configuration Manual 93
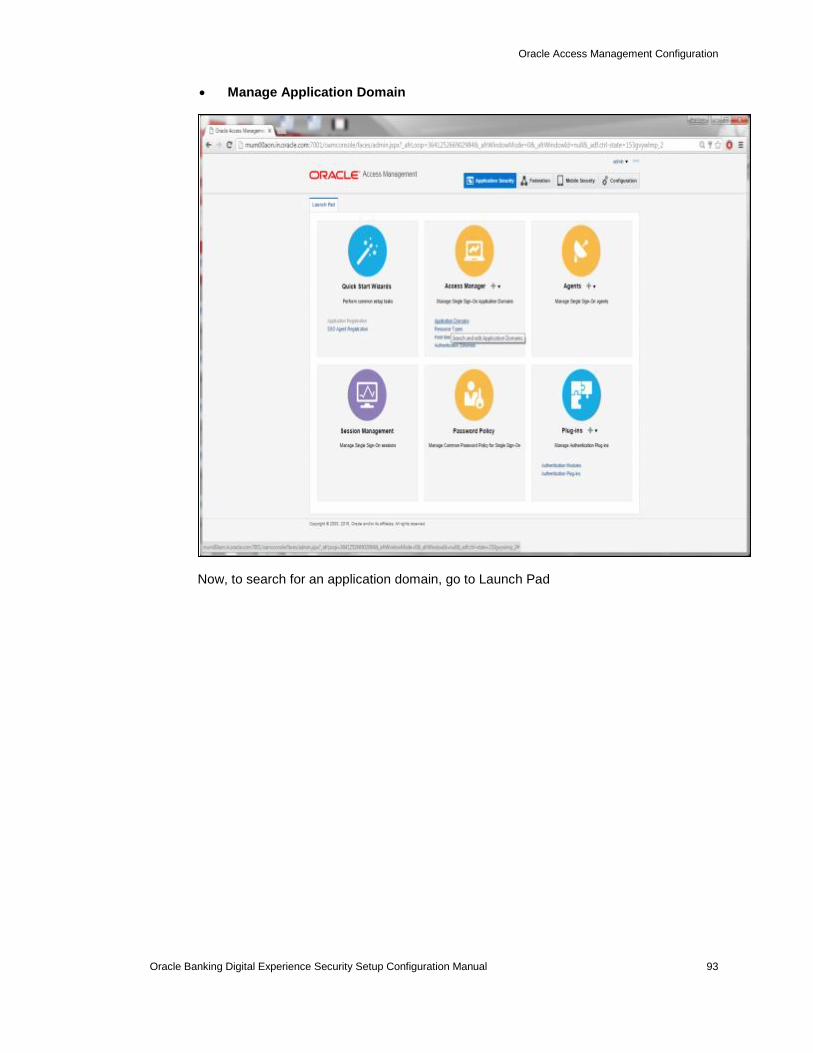
Manage Application Domain
Now, to search for an application domain, go to Launch Pad
Oracle Access Management Configuration
Oracle Banking Digital Experience Security Setup Configuration Manual 94
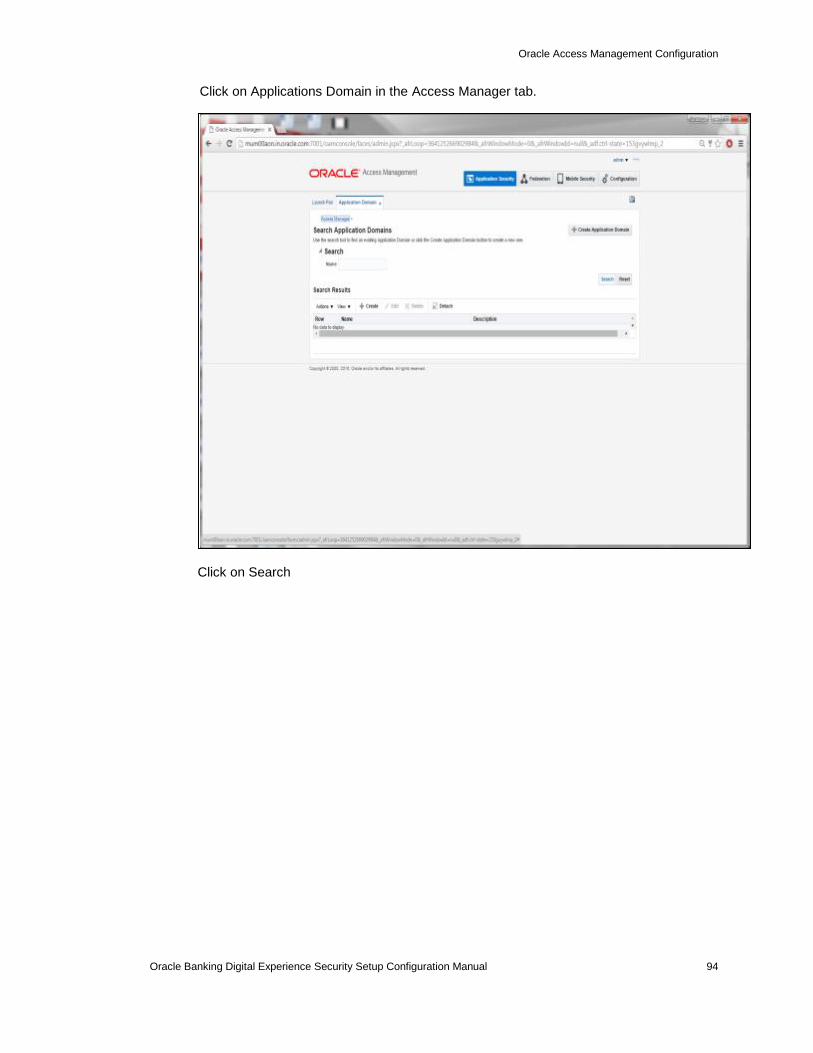
Click on Applications Domain in the Access Manager tab.
Click on Search
Oracle Access Management Configuration
Oracle Banking Digital Experience Security Setup Configuration Manual 95
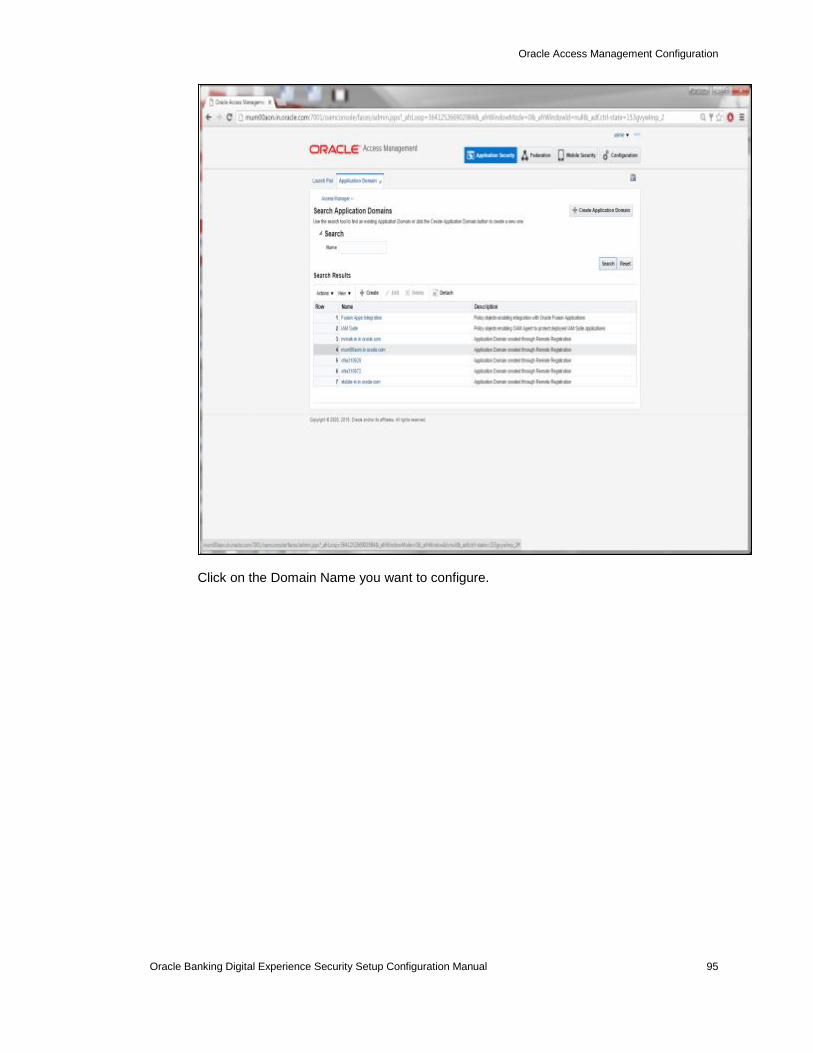
Click on the Domain Name you want to configure.

Oracle Access Management Configuration
Oracle Banking Digital Experience Security Setup Configuration Manual 96
Click on the Resources Tab
Oracle Access Management Configuration
Oracle Banking Digital Experience Security Setup Configuration Manual 97
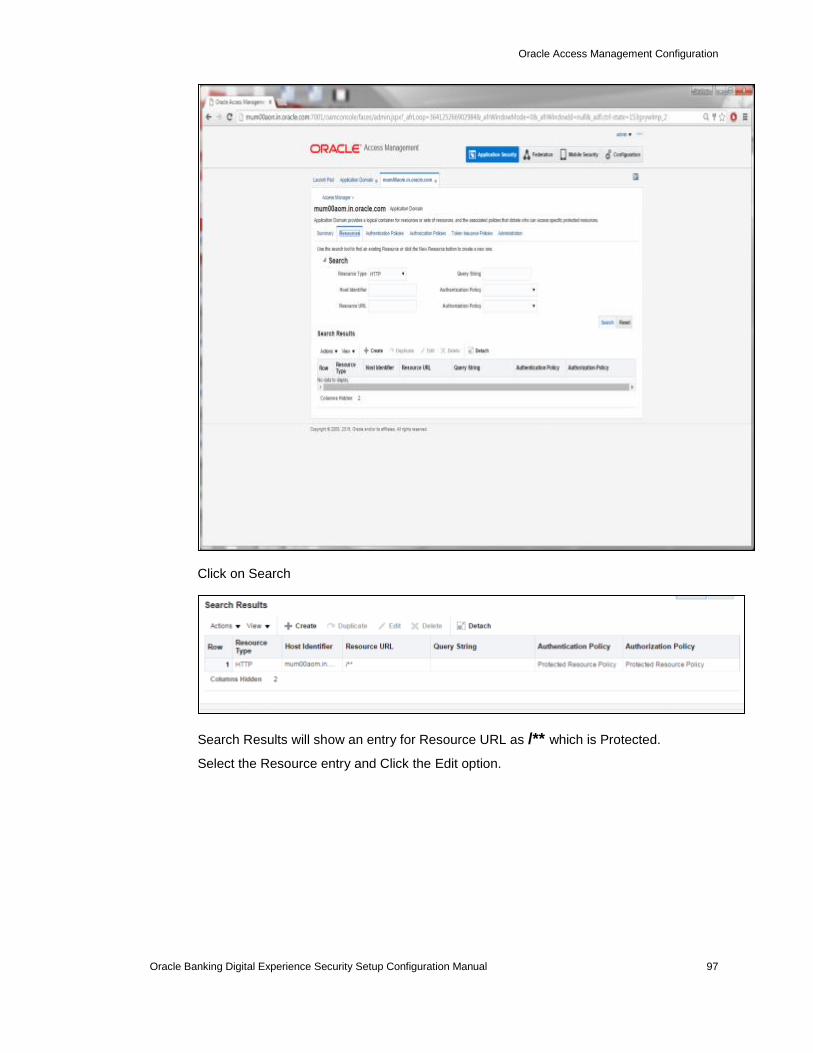
Click on Search
Search Results will show an entry for Resource URL as /** which is Protected.
Select the Resource entry and Click the Edit option.
Oracle Access Management Configuration
Oracle Banking Digital Experience Security Setup Configuration Manual 98
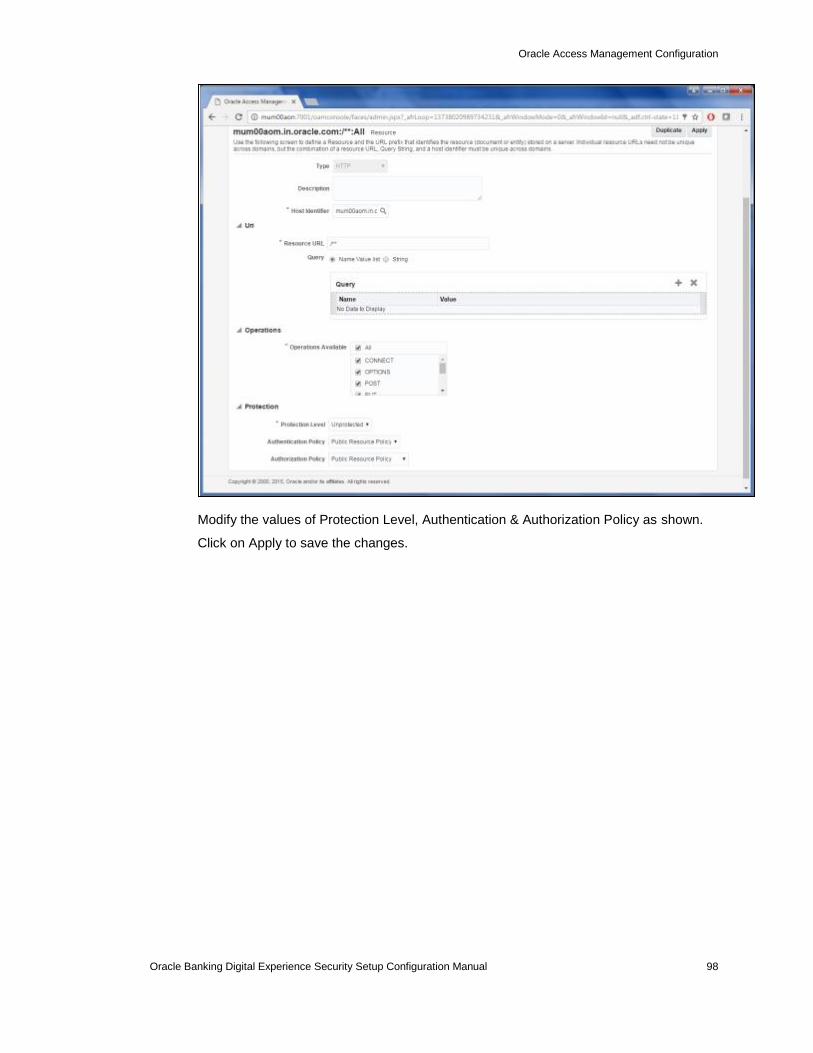
Modify the values of Protection Level, Authentication & Authorization Policy as shown.
Click on Apply to save the changes.
Oracle Access Management Configuration
Oracle Banking Digital Experience Security Setup Configuration Manual 99
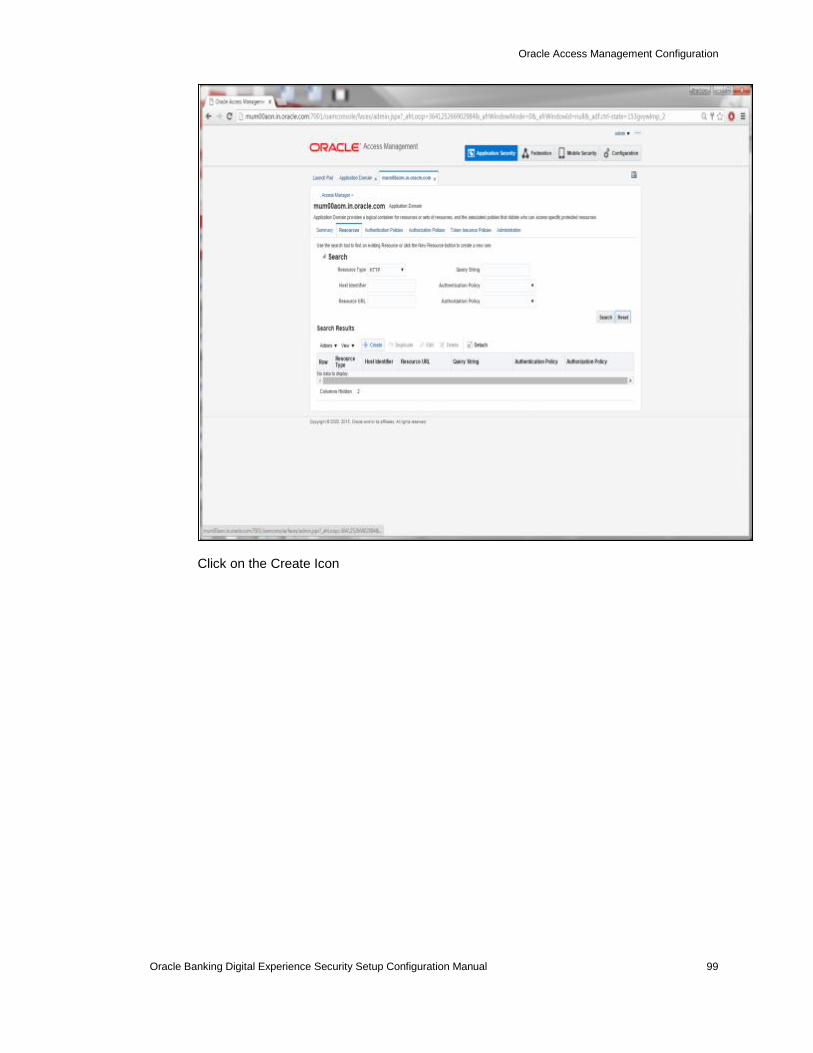
Click on the Create Icon
Oracle Access Management Configuration
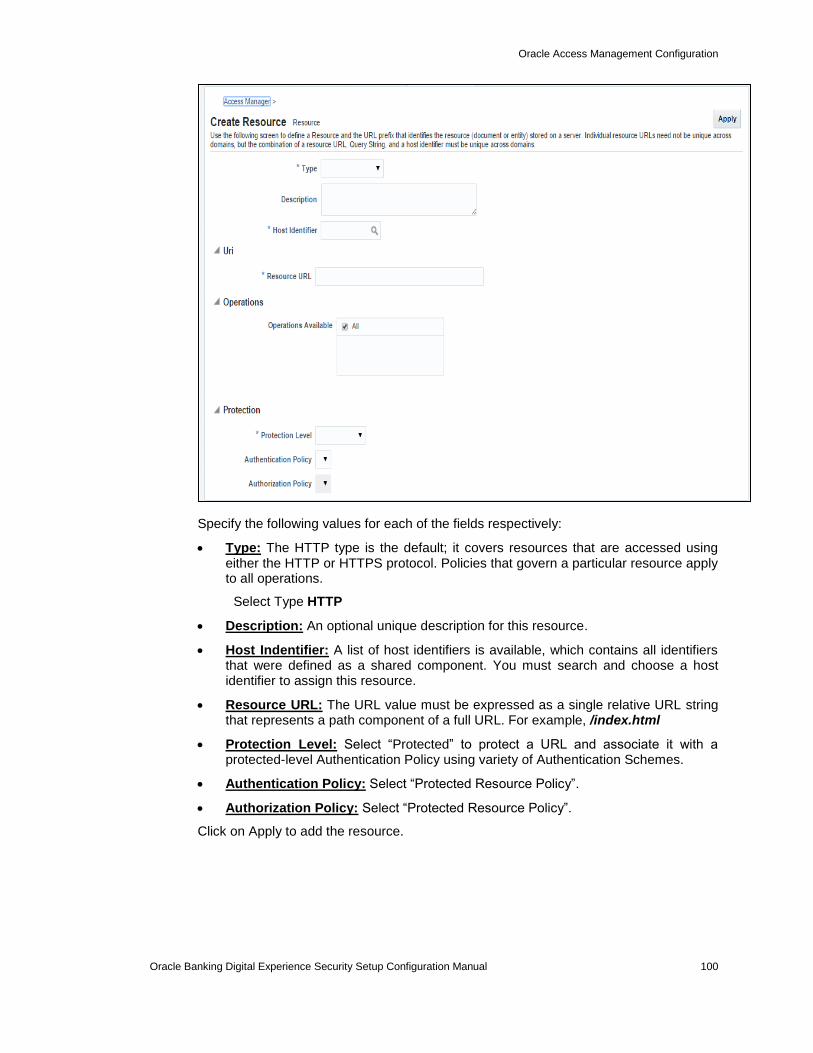
Oracle Banking Digital Experience Security Setup Configuration Manual 100
Specify the following values for each of the fields respectively:
Type: The HTTP type is the default; it covers resources that are accessed using either the HTTP or HTTPS protocol. Policies that govern a particular resource apply to all operations.
Select Type HTTP
Description: An optional unique description for this resource.
Host Indentifier: A list of host identifiers is available, which contains all identifiers that were defined as a shared component. You must search and choose a host identifier to assign this resource.
Resource URL: The URL value must be expressed as a single relative URL string that represents a path component of a full URL. For example, /index.html
Protection Level: Select “Protected” to protect a URL and associate it with a protected-level Authentication Policy using variety of Authentication Schemes.
Authentication Policy: Select “Protected Resource Policy”.
Authorization Policy: Select “Protected Resource Policy”.
Click on Apply to add the resource.
Oracle Access Management Configuration
Oracle Banking Digital Experience Security Setup Configuration Manual 101
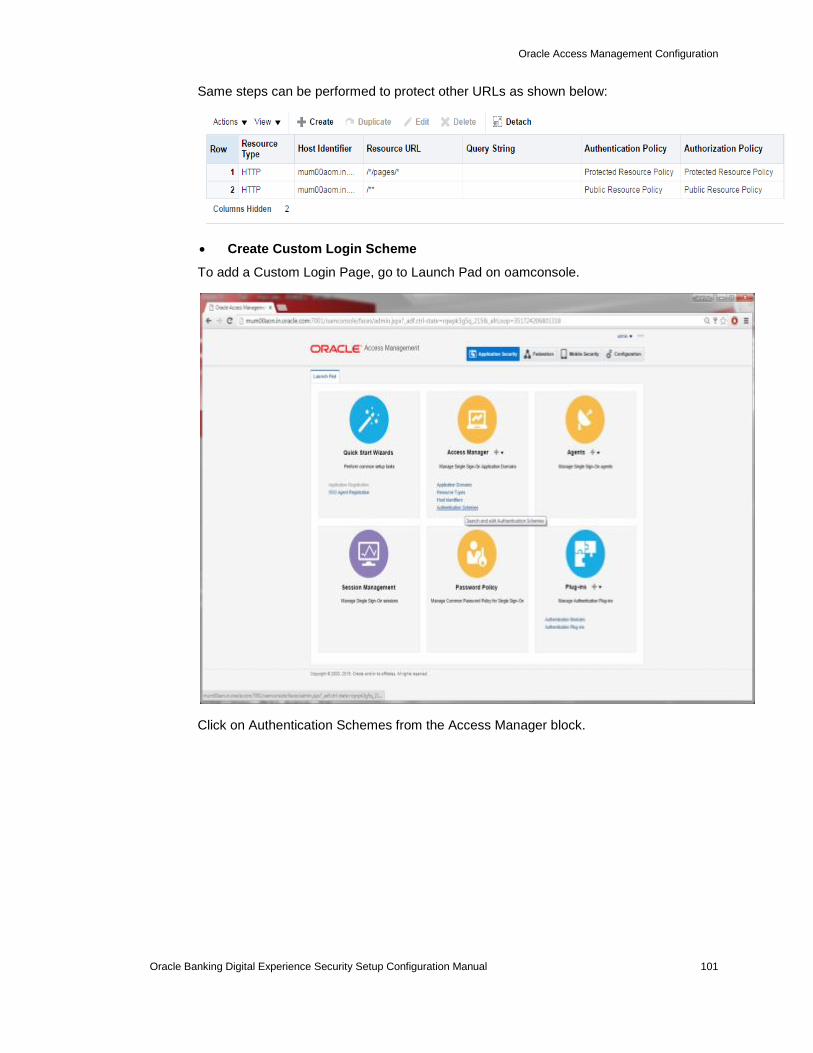
Same steps can be performed to protect other URLs as shown below:
Create Custom Login Scheme
To add a Custom Login Page, go to Launch Pad on oamconsole.
Click on Authentication Schemes from the Access Manager block.

Oracle Access Management Configuration
Oracle Banking Digital Experience Security Setup Configuration Manual 102
Click on Create Authentication Scheme

Oracle Access Management Configuration
Oracle Banking Digital Experience Security Setup Configuration Manual 103
Specify the following details:
Provide a name for the Scheme. E.g. OBDXLoginScheme
Select the authentication level as 2.
Choose the Challenge Method as FORM
Enter the Challenge Re-direct URL. E.g. /oam/server
Select the Authentication Module as LDAP
Enter the Challenge URL which is the actual URL of the login page.
Select the Context Type as External
Click on Apply to save the Scheme.
Oracle Access Management Configuration
Oracle Banking Digital Experience Security Setup Configuration Manual 104
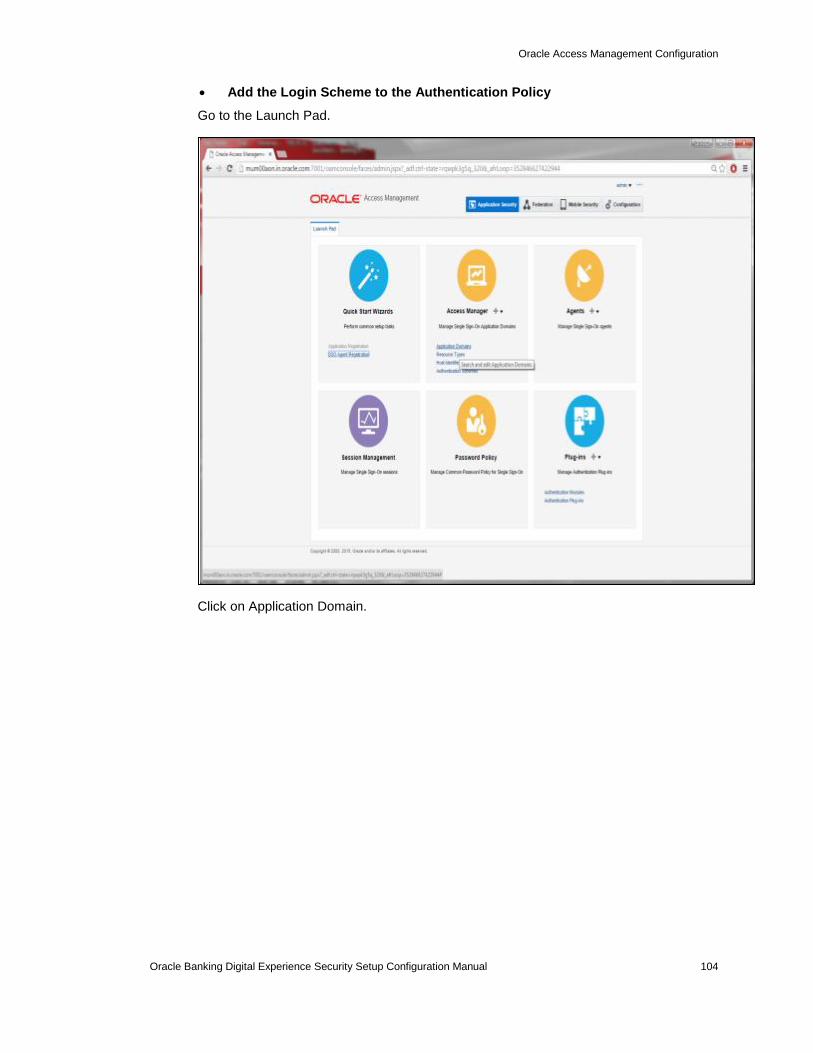
Add the Login Scheme to the Authentication Policy
Go to the Launch Pad.
Click on Application Domain.

Oracle Access Management Configuration
Oracle Banking Digital Experience Security Setup Configuration Manual 105
Click on Search and Select the Domain Name.

Oracle Access Management Configuration
Oracle Banking Digital Experience Security Setup Configuration Manual 106
Click on Authentication Policies Tab
Oracle Access Management Configuration
Oracle Banking Digital Experience Security Setup Configuration Manual 107
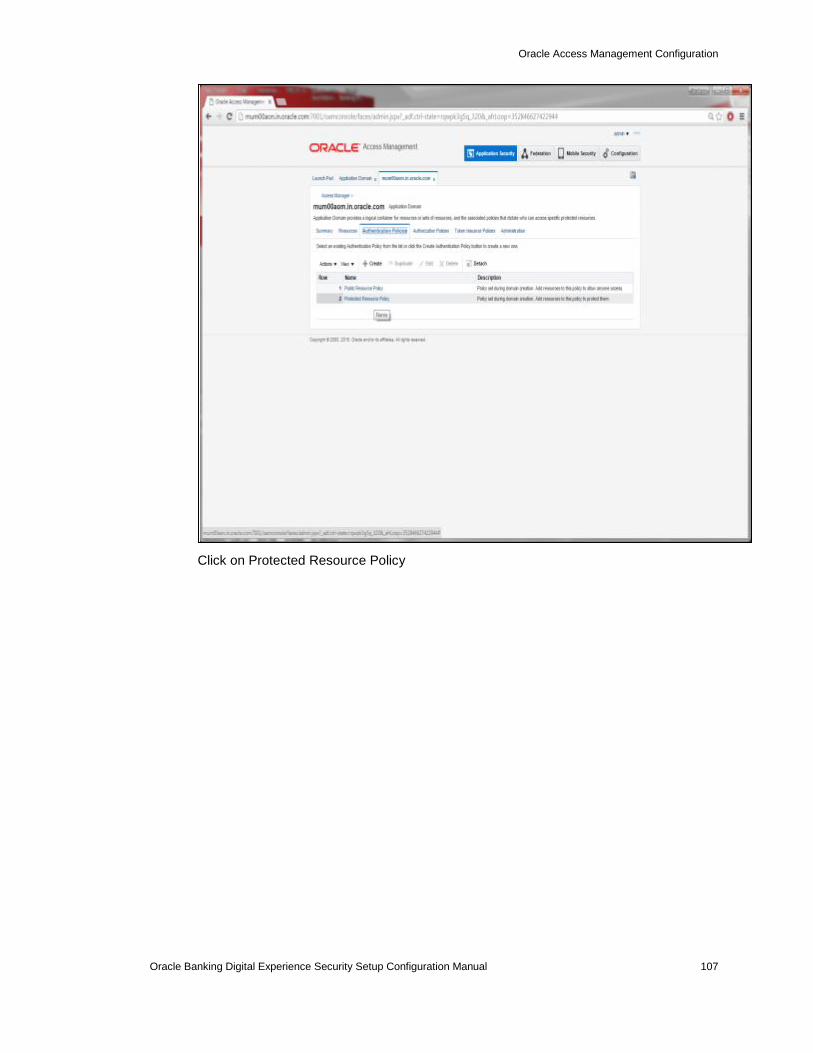
Click on Protected Resource Policy
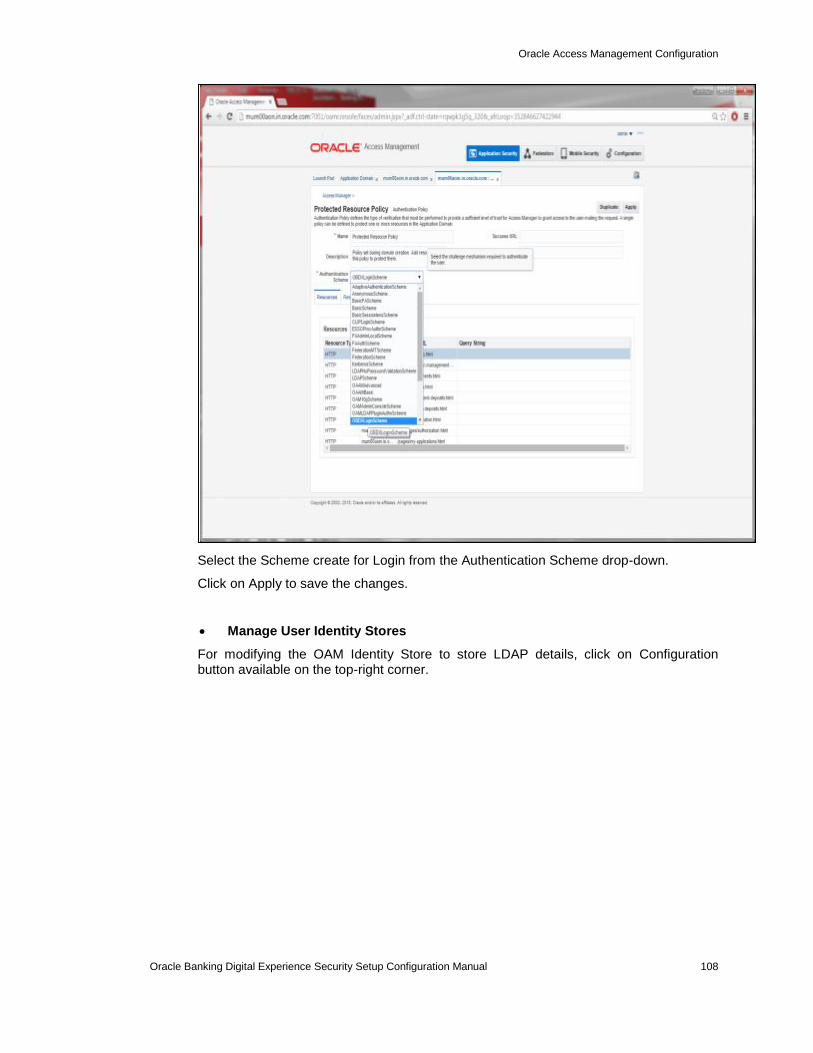
Oracle Access Management Configuration
Oracle Banking Digital Experience Security Setup Configuration Manual 108
Select the Scheme create for Login from the Authentication Scheme drop-down.
Click on Apply to save the changes.
Manage User Identity Stores
For modifying the OAM Identity Store to store LDAP details, click on Configuration button available on the top-right corner.
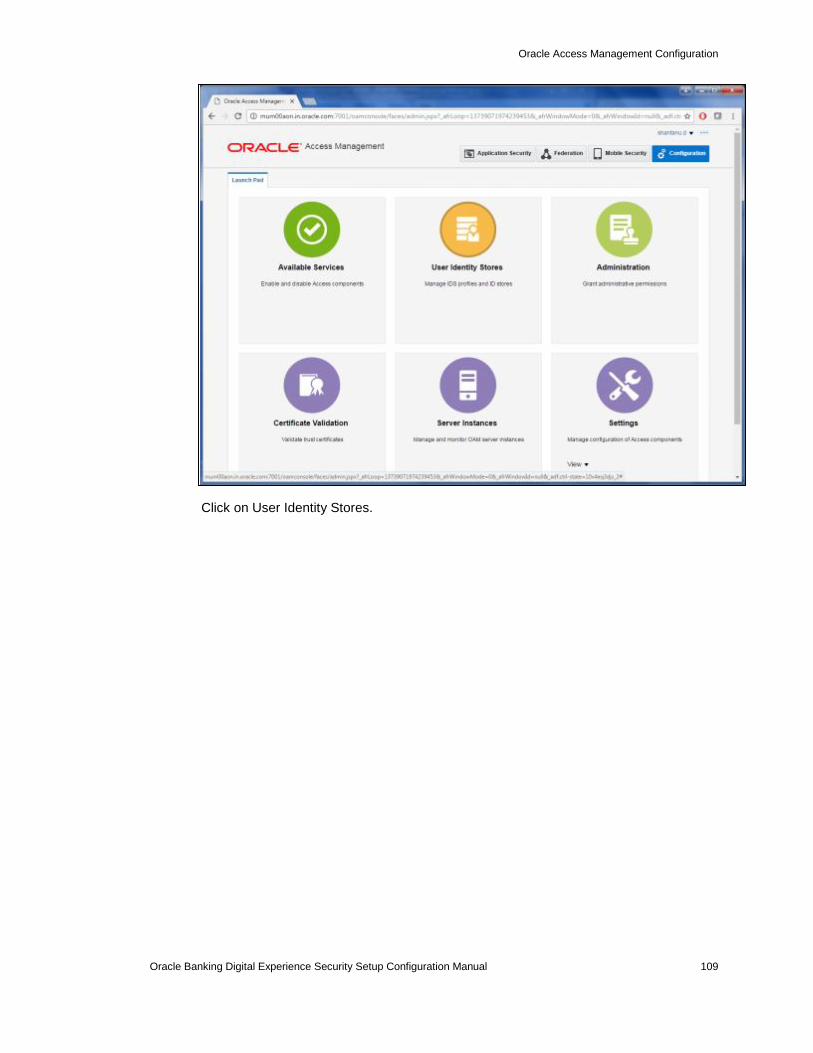
Oracle Access Management Configuration
Oracle Banking Digital Experience Security Setup Configuration Manual 109
Click on User Identity Stores.
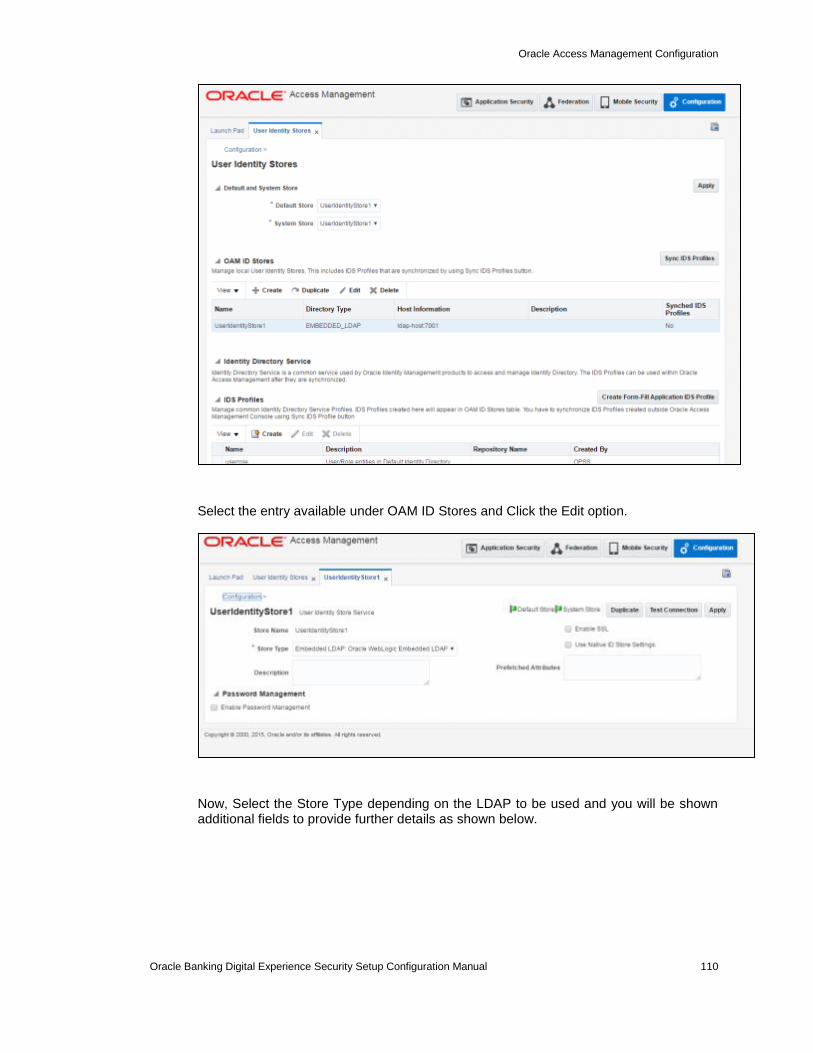
Oracle Access Management Configuration
Oracle Banking Digital Experience Security Setup Configuration Manual 110
Select the entry available under OAM ID Stores and Click the Edit option.
Now, Select the Store Type depending on the LDAP to be used and you will be shown additional fields to provide further details as shown below.
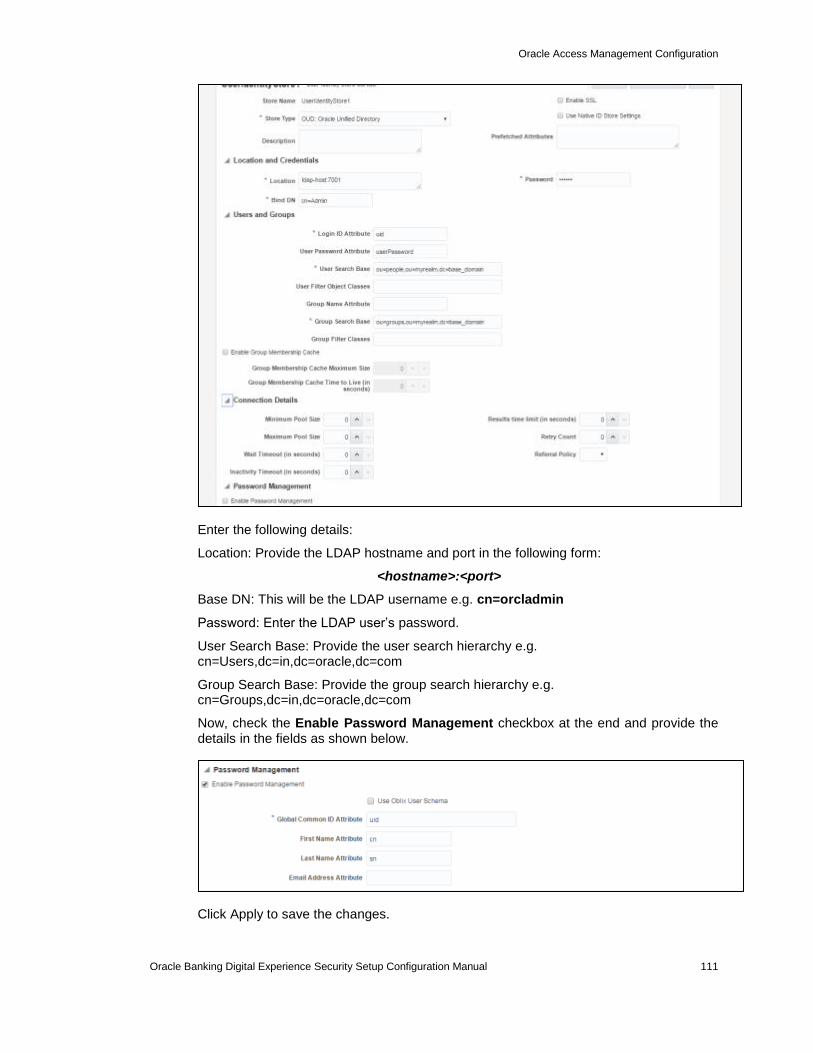
Oracle Access Management Configuration
Oracle Banking Digital Experience Security Setup Configuration Manual 111
Enter the following details:
Location: Provide the LDAP hostname and port in the following form:
<hostname>:<port>
Base DN: This will be the LDAP username e.g. cn=orcladmin
Password: Enter the LDAP user’s password.
User Search Base: Provide the user search hierarchy e.g. cn=Users,dc=in,dc=oracle,dc=com
Group Search Base: Provide the group search hierarchy e.g. cn=Groups,dc=in,dc=oracle,dc=com
Now, check the Enable Password Management checkbox at the end and provide the details in the fields as shown below.
Click Apply to save the changes.
Oracle Access Management Configuration
Oracle Banking Digital Experience Security Setup Configuration Manual 112
Note : After mapping the LDAP server details in OAM ID Store, login to the oamconsole will be only allowed using the LDAP admin user credentials. The user details can be found in the usergroup.ldif file attached in the Section 7.1.4 “Creating the Attribute, Object Schema, User and Groups on LDAP Server” of this document.
Copying the artifacts generated after registering Webgate
Registering the new WebGate agent will generate the following files and artifacts either in <IDM_HOME>/oam/server/rreg/client/rreg/output/Agent_ID directory or else in <Oracle_Home>/user_projects/domains/<oam_domain>/output/Agent_ID directory:
cwallet.sso
ObAccessClient.xml
The user should copy the files from the above mentioned location to the <WebTier_Instance_Home>/config/OHS/ohs1/webgate/config directory and restart OHS server instance.
LDAP Installation and Configuration
Oracle Banking Digital Experience Security Setup Configuration Manual 113
8. LDAP Installation and Configuration
This chapter describes the different ways of installing the Lightweight Directory Access Protocol (LDAP) server in the following sections respectively:
Section 8.1, "Using Oracle Unified Directory"
Section 8.2, "Using Open LDAP"
Section 8.3, “Creating Weblogic Domain for Oracle Unified Directory”
Section 8.4, “Creating the Attribute, Object Schema, User and Groups on LDAP Server”
8.1 Using Oracle Unified Directory
Oracle Unified Directory is a comprehensive next generation directory service. It is designed to address large deployments and to provide high performance, and is highly extensive. Oracle Unified Directory is easy to deploy, manage, and monitor.
This chapter describes the installation tasks which contains the following sections:
Section 8.1.1, "Installing and Configuring Oracle Unified Directory"
Section 8.1.2, "Verifying the Installation"
8.1.1 Installing and Configuring Oracle Unified Directory
Obtain OUD from the Oracle Fusion Middleware Downloads. Download OUD.zip file to a directory, and unpack the downloaded archive that contains the installer. By default, this directory is named OUD.
Now to start the installer, go to the directory where you unpacked the archive file and switch to the Disk1 directory.
Start the installer from the Disk1 directory (On UNIX)
./runInstaller –jreLoc Java_Home/jdk
Note : You must enter the absolute path of the JRE folder located in this JDK when launching the installer.
If you are installing on a UNIX system, and if this is the first time any Oracle product is being installed on your system with the Oracle Universal Installer, you will are asked to provide the location of an inventory directory. This is where the installer sets up subdirectories and maintains inventory data for each Oracle product that is installed on this system.
Follow the instructions in the below table to configure the inventory directory information. For more help, click on the screen name in the table below, or click the Help button in the GUI.
Table: Inventory Directory and Group Screens
Screen Description and Action Required
Specify Inventory Directory Screen (UNIX Only)
Specify the Oracle inventory directory and group permissions for that directory. The group must have write permissions to the Oracle inventory directory.
Click OK to continue.
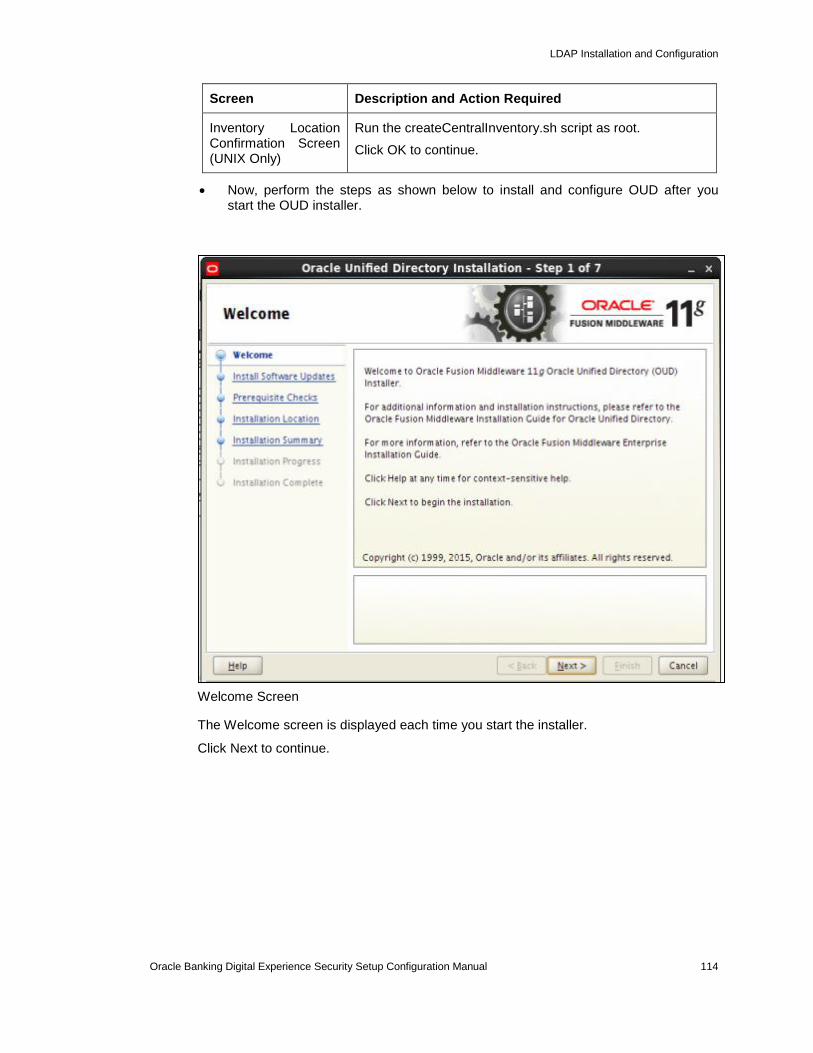
LDAP Installation and Configuration
Oracle Banking Digital Experience Security Setup Configuration Manual 114
Screen Description and Action Required
Inventory Location Confirmation Screen (UNIX Only)
Run the createCentralInventory.sh script as root.
Click OK to continue.
Now, perform the steps as shown below to install and configure OUD after you start the OUD installer.
Welcome Screen
The Welcome screen is displayed each time you start the installer.
Click Next to continue.
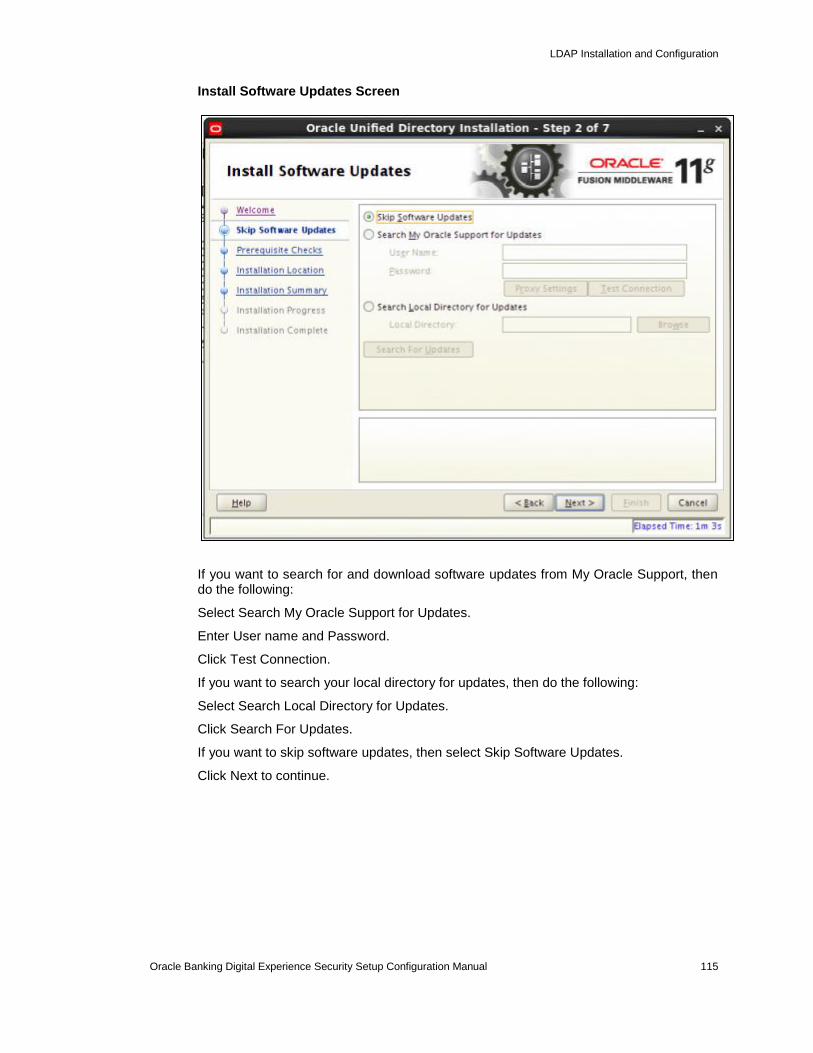
LDAP Installation and Configuration
Oracle Banking Digital Experience Security Setup Configuration Manual 115
Install Software Updates Screen
If you want to search for and download software updates from My Oracle Support, then do the following:
Select Search My Oracle Support for Updates.
Enter User name and Password.
Click Test Connection.
If you want to search your local directory for updates, then do the following:
Select Search Local Directory for Updates.
Click Search For Updates.
If you want to skip software updates, then select Skip Software Updates.
Click Next to continue.

LDAP Installation and Configuration
Oracle Banking Digital Experience Security Setup Configuration Manual 116
Prerequisite Checks Screen
This screen shows whether the system requirements are met in order to install the software.
If there is a problem, a short error message appears in the bottom portion of the screen. Fix the error, and click Retry to try again.
If you want to ignore the error or warning messages and continue with the installation, click Continue.
To stop prerequisite checking for all components, click Abort.
Click Next to continue.
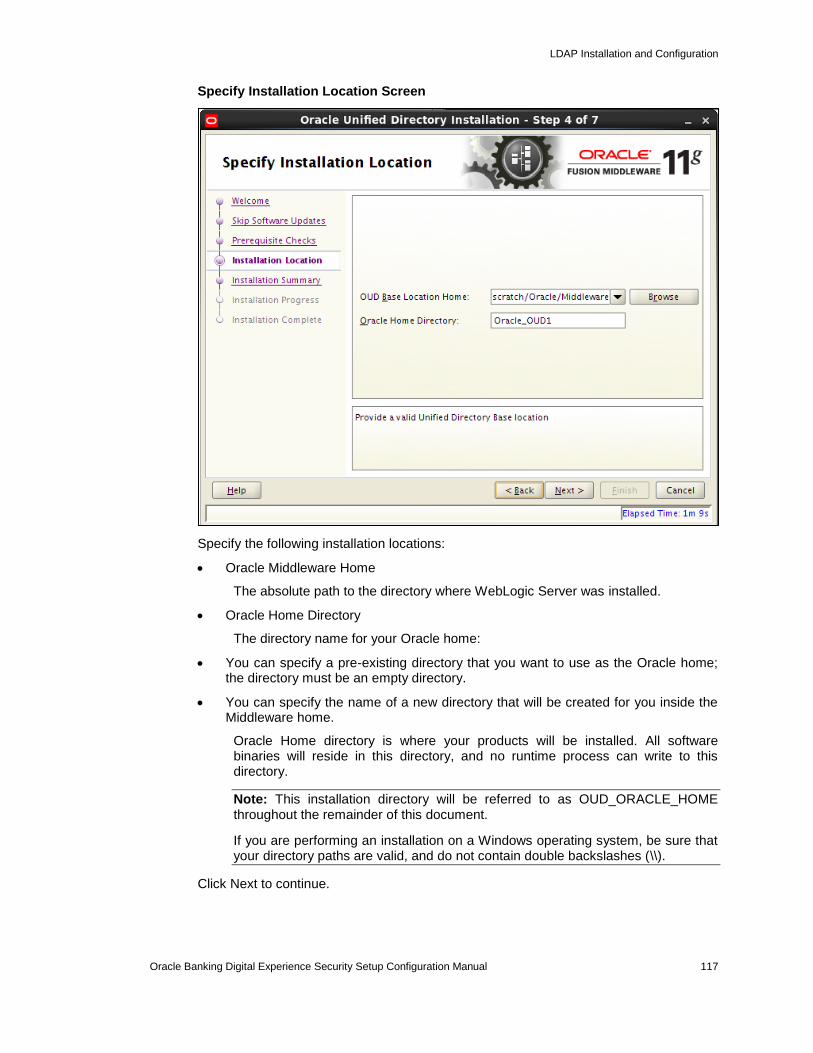
LDAP Installation and Configuration
Oracle Banking Digital Experience Security Setup Configuration Manual 117
Specify Installation Location Screen
Specify the following installation locations:
Oracle Middleware Home
The absolute path to the directory where WebLogic Server was installed.
Oracle Home Directory
The directory name for your Oracle home:
You can specify a pre-existing directory that you want to use as the Oracle home; the directory must be an empty directory.
You can specify the name of a new directory that will be created for you inside the Middleware home.
Oracle Home directory is where your products will be installed. All software binaries will reside in this directory, and no runtime process can write to this directory.
Note: This installation directory will be referred to as OUD_ORACLE_HOME throughout the remainder of this document.
If you are performing an installation on a Windows operating system, be sure that your directory paths are valid, and do not contain double backslashes (\\).
Click Next to continue.

LDAP Installation and Configuration
Oracle Banking Digital Experience Security Setup Configuration Manual 118
Installation Summary Screen
Review the information on this screen. The operations summarized on this page will be performed when you click Install.
If you want to make any changes to the configuration before starting the installation, use the navigation pane, and select the topic you want to edit.
If you want to save this configuration to a text file (called a response file), click Save. You will be prompted for the location of name of the file you want to create (for example, silent_install.rsp). This file can be used later if you choose to perform the same installation from the command line.
Click Install.
Then screen shows the progress of the installation.
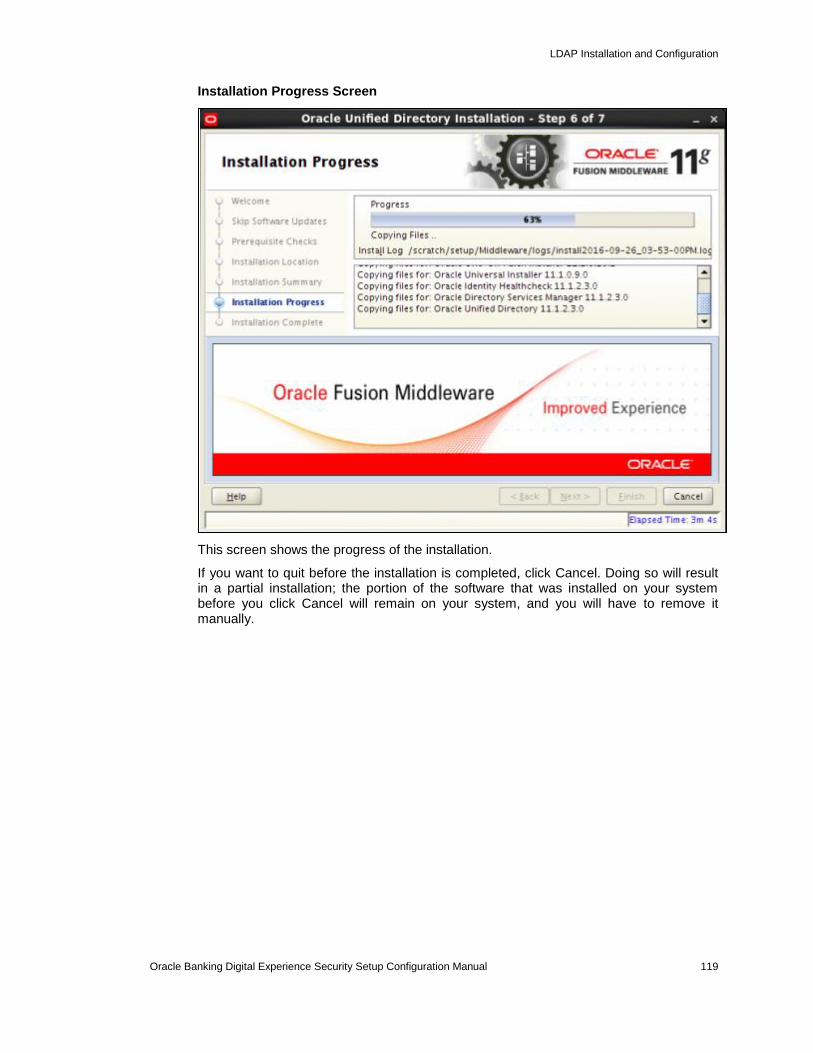
LDAP Installation and Configuration
Oracle Banking Digital Experience Security Setup Configuration Manual 119
Installation Progress Screen
This screen shows the progress of the installation.
If you want to quit before the installation is completed, click Cancel. Doing so will result in a partial installation; the portion of the software that was installed on your system before you click Cancel will remain on your system, and you will have to remove it manually.
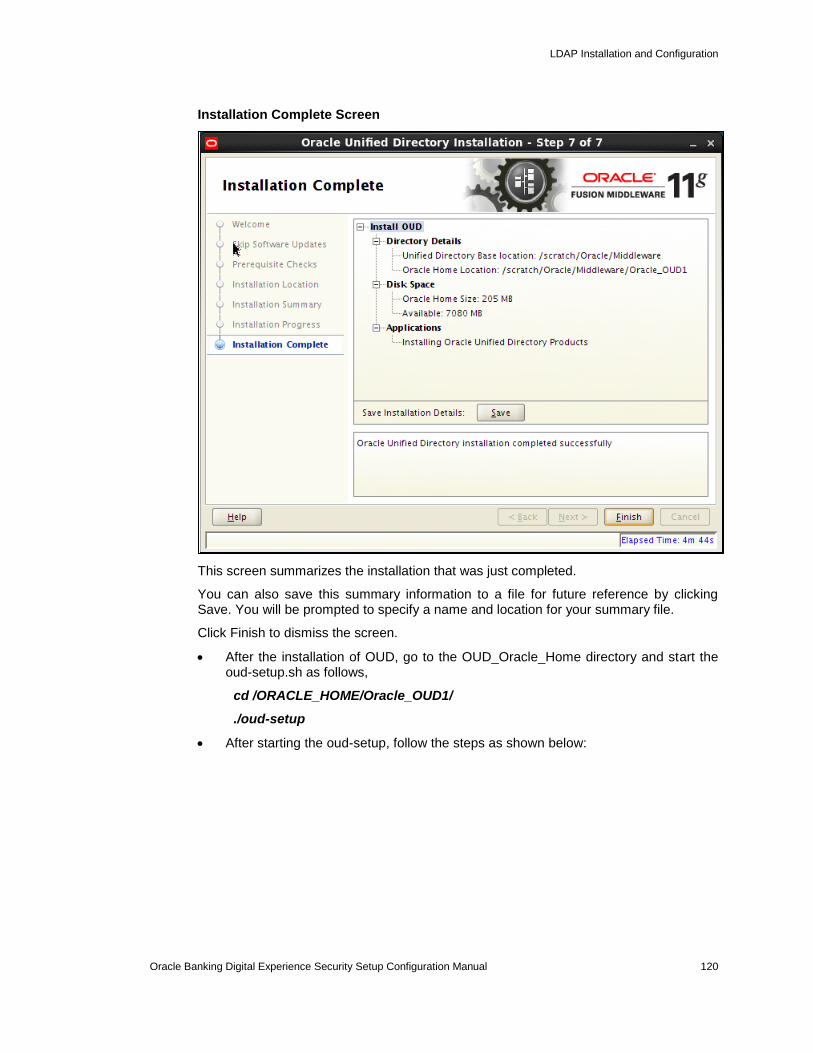
LDAP Installation and Configuration
Oracle Banking Digital Experience Security Setup Configuration Manual 120
Installation Complete Screen
This screen summarizes the installation that was just completed.
You can also save this summary information to a file for future reference by clicking Save. You will be prompted to specify a name and location for your summary file.
Click Finish to dismiss the screen.
After the installation of OUD, go to the OUD_Oracle_Home directory and start the oud-setup.sh as follows,
cd /ORACLE_HOME/Oracle_OUD1/
./oud-setup
After starting the oud-setup, follow the steps as shown below:

LDAP Installation and Configuration
Oracle Banking Digital Experience Security Setup Configuration Manual 121
Welcome Screen
The Welcome screen is displayed each time you start the installer.
Server Settings Screen
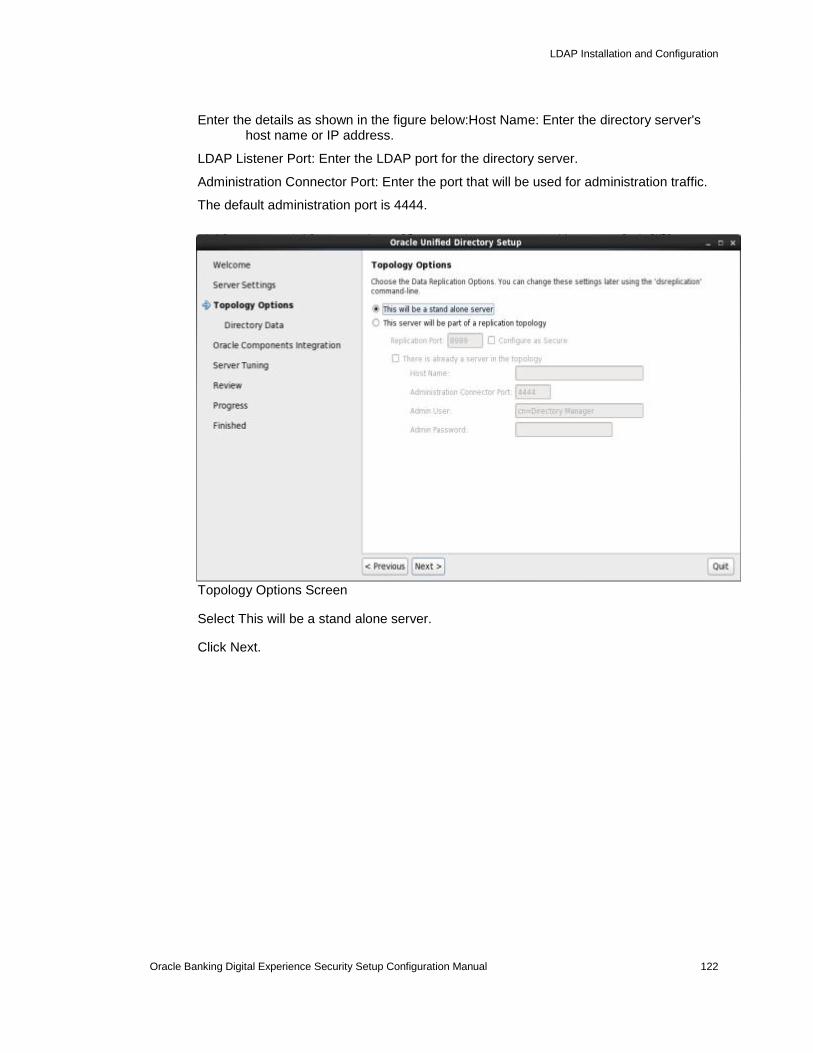
LDAP Installation and Configuration
Oracle Banking Digital Experience Security Setup Configuration Manual 122
Enter the details as shown in the figure below:Host Name: Enter the directory server's host name or IP address.
LDAP Listener Port: Enter the LDAP port for the directory server.
Administration Connector Port: Enter the port that will be used for administration traffic.
The default administration port is 4444.
Topology Options Screen
Select This will be a stand alone server.
Click Next.

LDAP Installation and Configuration
Oracle Banking Digital Experience Security Setup Configuration Manual 123
Directory Data Screen
Specify how to load data into your directory
Directory Base DN: Enter the base DN for your directory.
dc=in,dc=oracle,dc=com
Directory Data: Select the following data option: Only Create Base Entry: Creates an entry with the base DN specified previously.
Click Next.
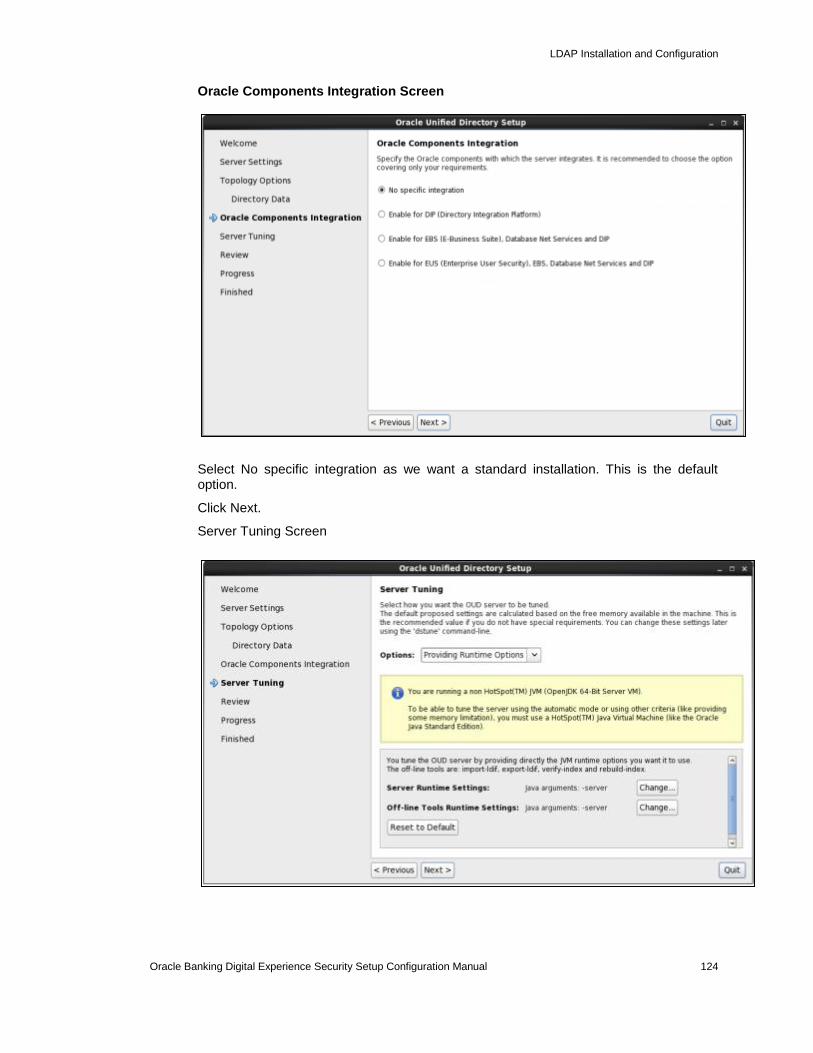
LDAP Installation and Configuration
Oracle Banking Digital Experience Security Setup Configuration Manual 124
Oracle Components Integration Screen
Select No specific integration as we want a standard installation. This is the default option.
Click Next.
Server Tuning Screen
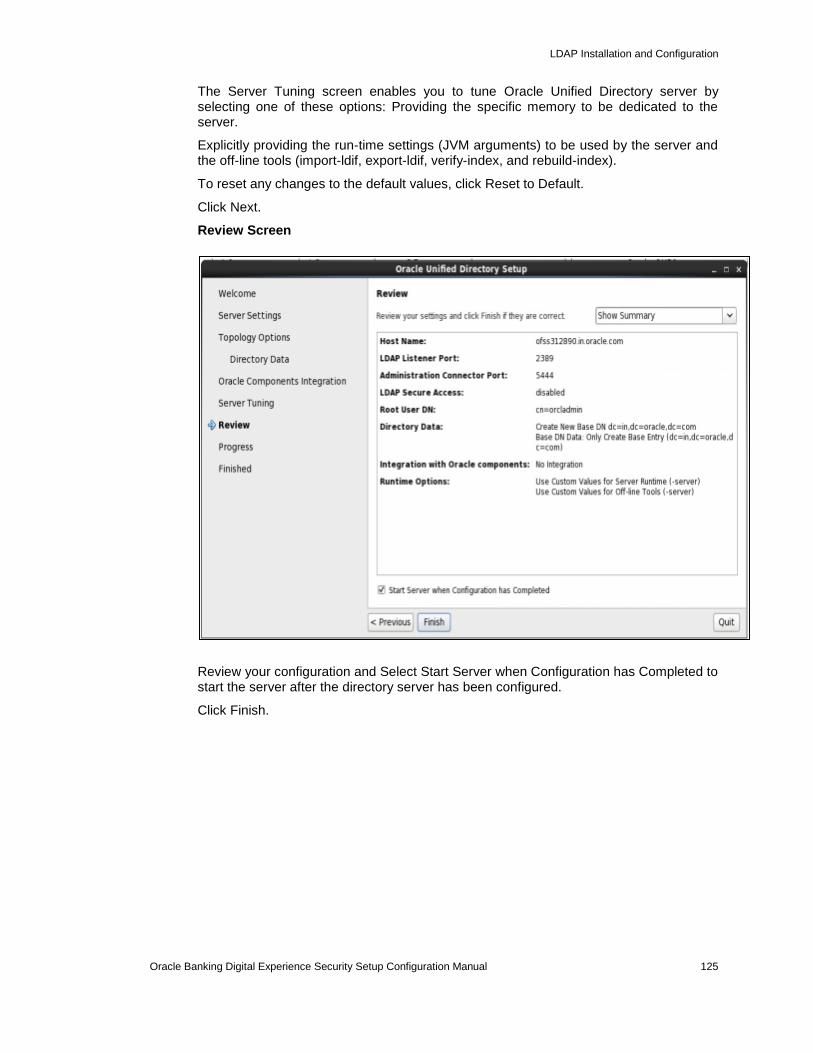
LDAP Installation and Configuration
Oracle Banking Digital Experience Security Setup Configuration Manual 125
The Server Tuning screen enables you to tune Oracle Unified Directory server by selecting one of these options: Providing the specific memory to be dedicated to the server.
Explicitly providing the run-time settings (JVM arguments) to be used by the server and the off-line tools (import-ldif, export-ldif, verify-index, and rebuild-index).
To reset any changes to the default values, click Reset to Default.
Click Next.
Review Screen
Review your configuration and Select Start Server when Configuration has Completed to start the server after the directory server has been configured.
Click Finish.

LDAP Installation and Configuration
Oracle Banking Digital Experience Security Setup Configuration Manual 126
Configuration Done Screen
After the processing is done i.e.,after creating directory server is done and starting directory Is done click close.
8.1.2 Verifying the Installation
You can perform any combination of the following tasks to verify that your installation was successful:
Verifying the Installation Logs
Check for the presence of installation log files in logs directory inside your Oracle Inventory directory. On UNIX systems, if you do not know the location of your Oracle Inventory directory, you can find it in the OUD_ORACLE_HOME/oraInst.loc file.
Checking the Browser URLs
Use the port numbers of OUD provided during configuration, by default UserDN port is 1389 and Admin Connector Port is 4444. Check if there is any process running on the port. Use the following command:
netstat –tulpn | grep <port_number>
To check the URLs, use the format:
http://system_name:port_number/odsm
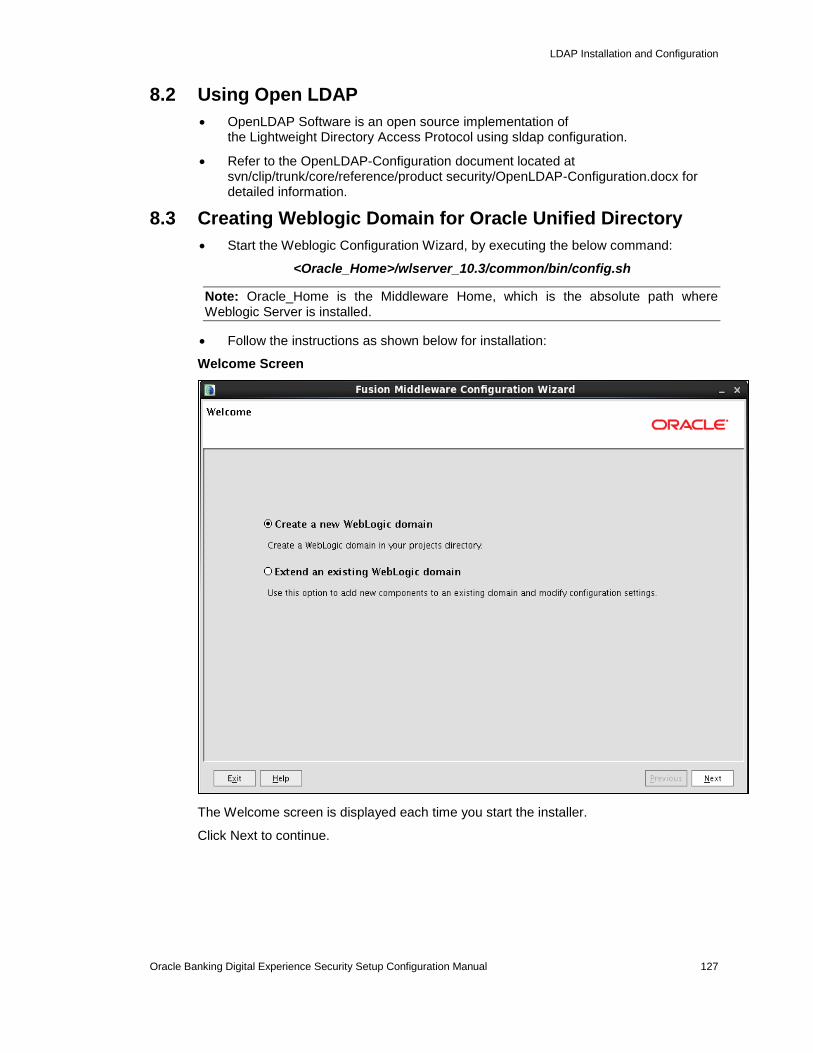
LDAP Installation and Configuration
Oracle Banking Digital Experience Security Setup Configuration Manual 127
8.2 Using Open LDAP
OpenLDAP Software is an open source implementation of the Lightweight Directory Access Protocol using sldap configuration.
Refer to the OpenLDAP-Configuration document located at svn/clip/trunk/core/reference/product security/OpenLDAP-Configuration.docx for detailed information.
8.3 Creating Weblogic Domain for Oracle Unified Directory
Start the Weblogic Configuration Wizard, by executing the below command:
<Oracle_Home>/wlserver_10.3/common/bin/config.sh
Note: Oracle_Home is the Middleware Home, which is the absolute path where Weblogic Server is installed.
Follow the instructions as shown below for installation:
Welcome Screen
The Welcome screen is displayed each time you start the installer.
Click Next to continue.
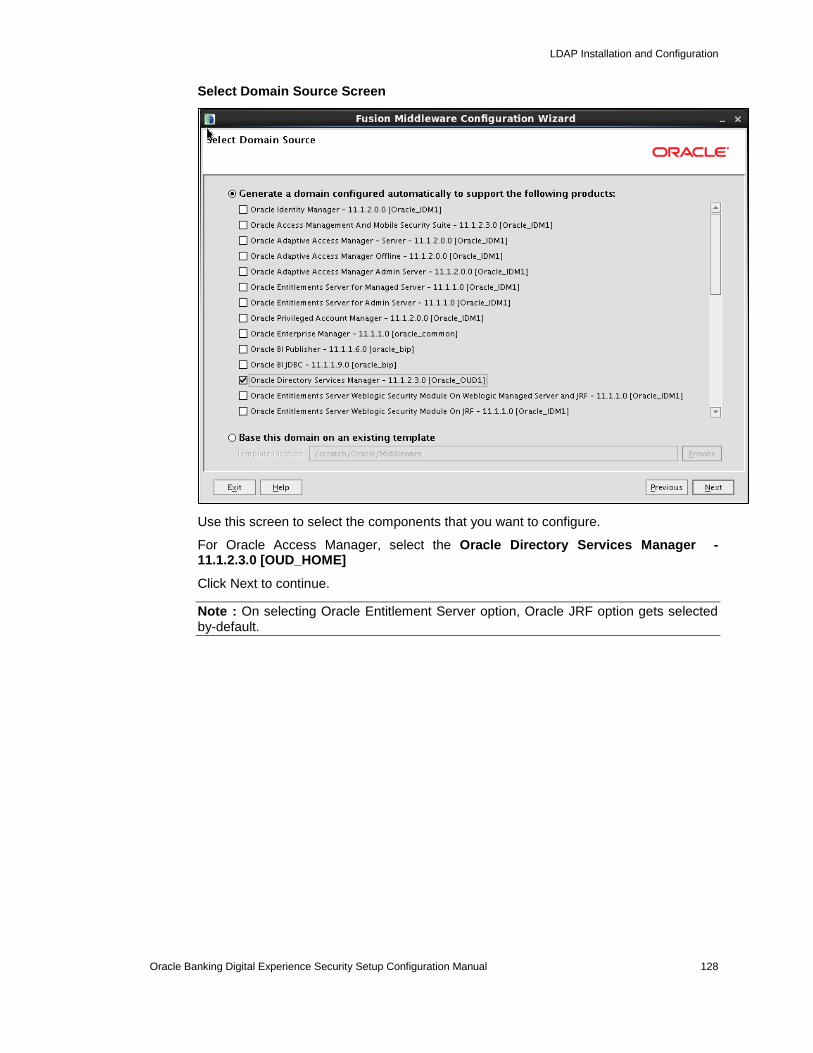
LDAP Installation and Configuration
Oracle Banking Digital Experience Security Setup Configuration Manual 128
Select Domain Source Screen
Use this screen to select the components that you want to configure.
For Oracle Access Manager, select the Oracle Directory Services Manager - 11.1.2.3.0 [OUD_HOME]
Click Next to continue.
Note : On selecting Oracle Entitlement Server option, Oracle JRF option gets selected by-default.
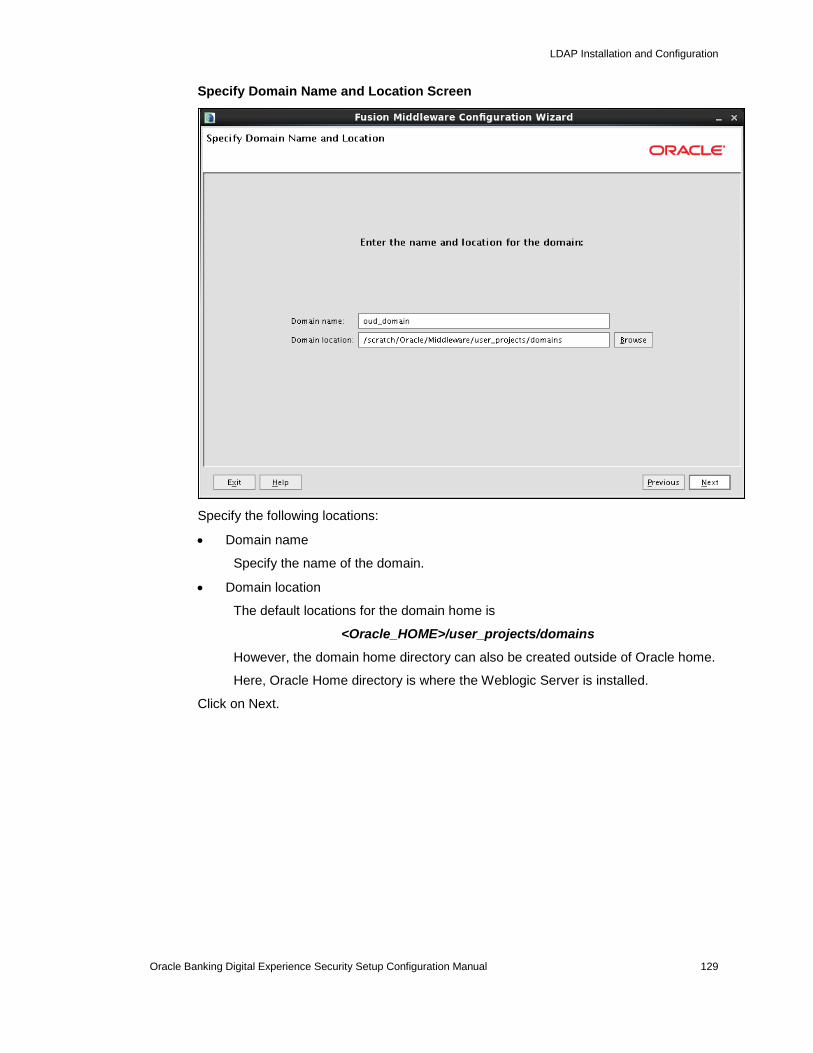
LDAP Installation and Configuration
Oracle Banking Digital Experience Security Setup Configuration Manual 129
Specify Domain Name and Location Screen
Specify the following locations:
Domain name
Specify the name of the domain.
Domain location
The default locations for the domain home is
<Oracle_HOME>/user_projects/domains
However, the domain home directory can also be created outside of Oracle home.
Here, Oracle Home directory is where the Weblogic Server is installed.
Click on Next.
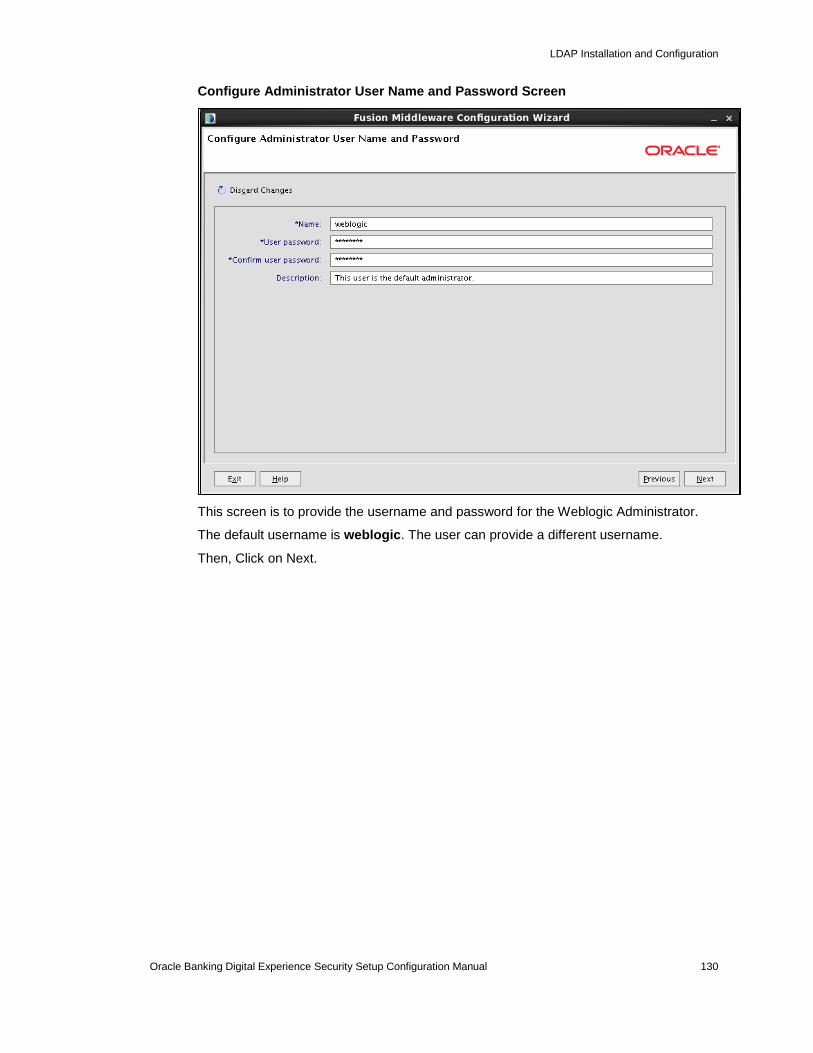
LDAP Installation and Configuration
Oracle Banking Digital Experience Security Setup Configuration Manual 130
Configure Administrator User Name and Password Screen
This screen is to provide the username and password for the Weblogic Administrator.
The default username is weblogic. The user can provide a different username.
Then, Click on Next.
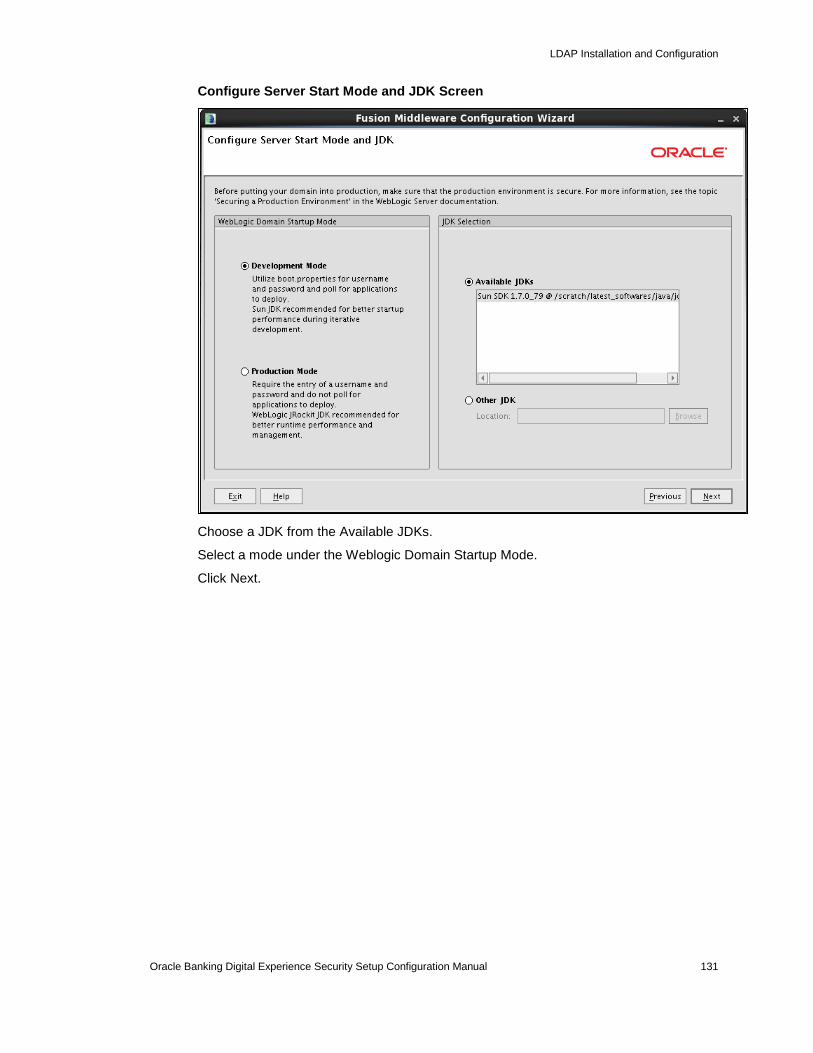
LDAP Installation and Configuration
Oracle Banking Digital Experience Security Setup Configuration Manual 131
Configure Server Start Mode and JDK Screen
Choose a JDK from the Available JDKs.
Select a mode under the Weblogic Domain Startup Mode.
Click Next.
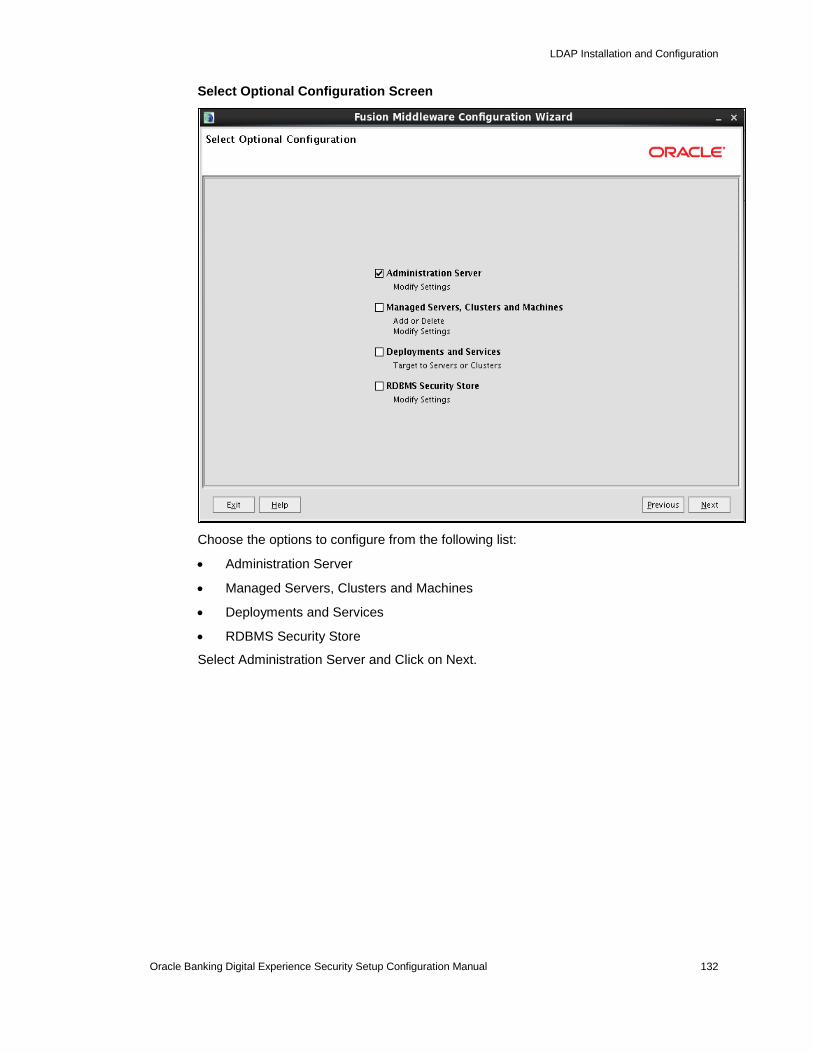
LDAP Installation and Configuration
Oracle Banking Digital Experience Security Setup Configuration Manual 132
Select Optional Configuration Screen
Choose the options to configure from the following list:
Administration Server
Managed Servers, Clusters and Machines
Deployments and Services
RDBMS Security Store
Select Administration Server and Click on Next.
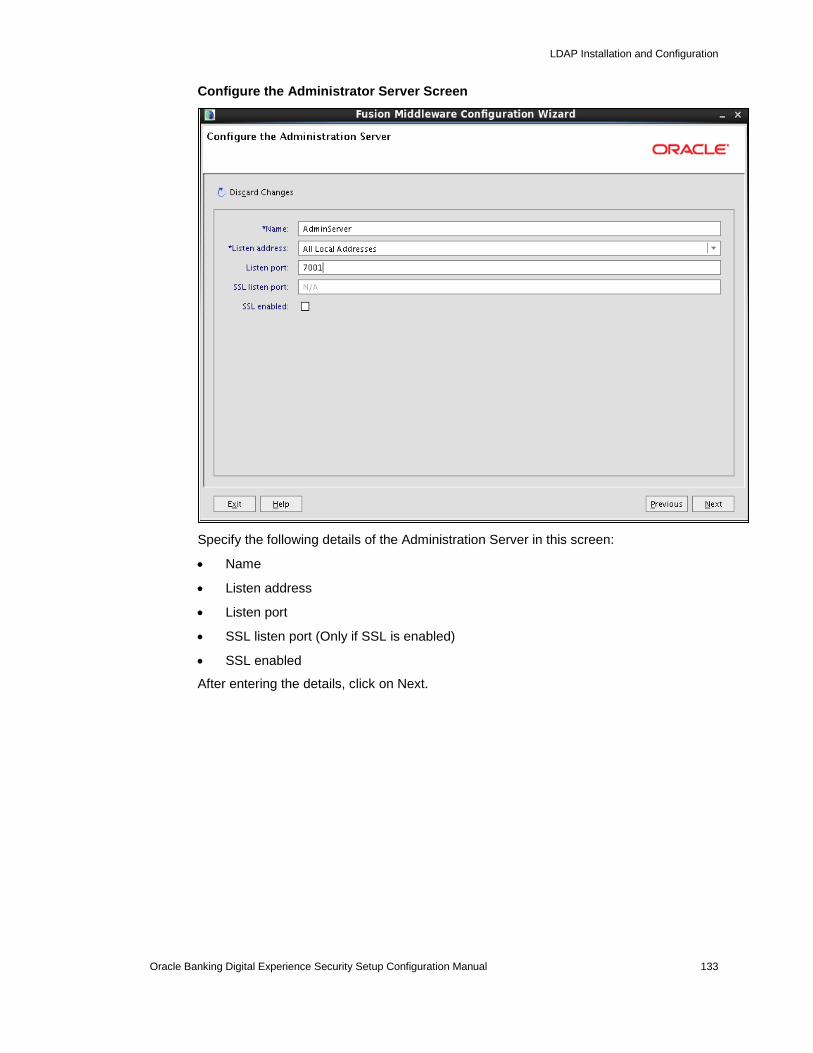
LDAP Installation and Configuration
Oracle Banking Digital Experience Security Setup Configuration Manual 133
Configure the Administrator Server Screen
Specify the following details of the Administration Server in this screen:
Name
Listen address
Listen port
SSL listen port (Only if SSL is enabled)
SSL enabled
After entering the details, click on Next.

LDAP Installation and Configuration
Oracle Banking Digital Experience Security Setup Configuration Manual 134
Configuration Summary Screen
Review the domain configuration on this screen.
If you want to make any changes to the configuration before creating the domain, click Previous to navigate to the selected screen where you want to edit the details.
Click Create to start creating the domain.
By default, a new Weblogic Domain to support Oracle Unified Directory is created in the <Oracle_Home>/user_projects/domains directory.
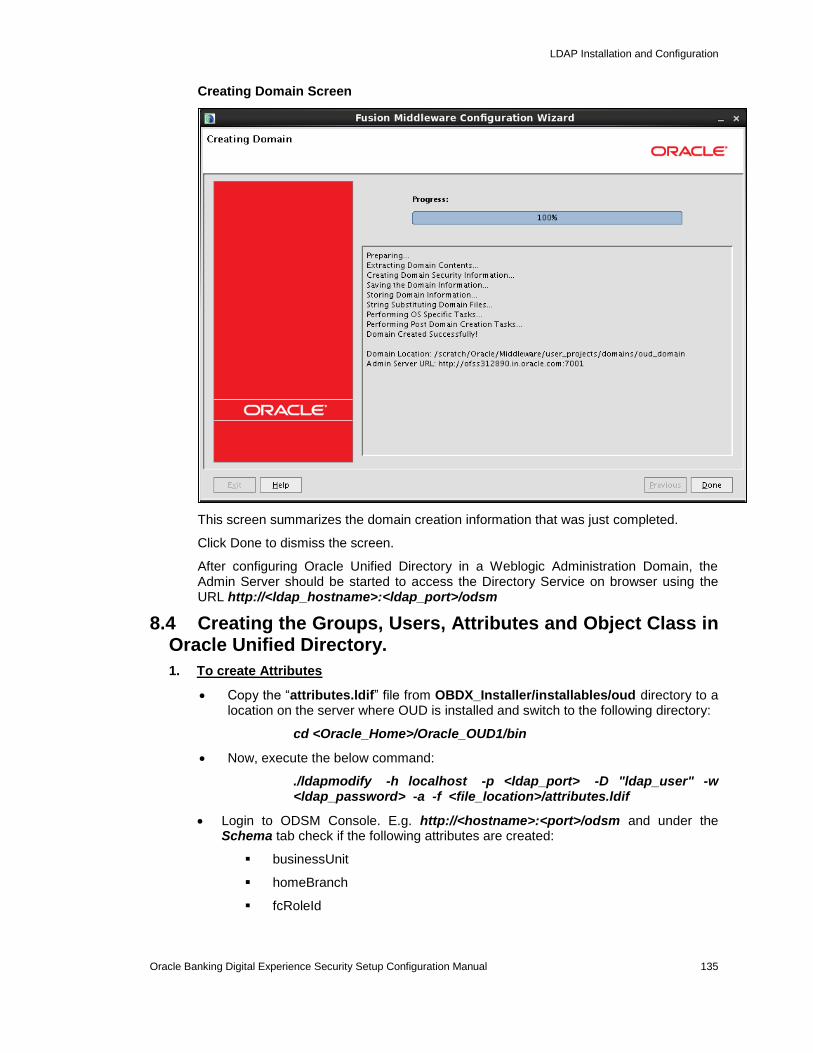
LDAP Installation and Configuration
Oracle Banking Digital Experience Security Setup Configuration Manual 135
Creating Domain Screen
This screen summarizes the domain creation information that was just completed.
Click Done to dismiss the screen.
After configuring Oracle Unified Directory in a Weblogic Administration Domain, the Admin Server should be started to access the Directory Service on browser using the URL http://<ldap_hostname>:<ldap_port>/odsm
8.4 Creating the Groups, Users, Attributes and Object Class in Oracle Unified Directory.
1. To create Attributes
Copy the “attributes.ldif” file from OBDX_Installer/installables/oud directory to a location on the server where OUD is installed and switch to the following directory:
cd <Oracle_Home>/Oracle_OUD1/bin
Now, execute the below command:
./ldapmodify -h localhost -p <ldap_port> -D "ldap_user" -w <ldap_password> -a -f <file_location>/attributes.ldif
Login to ODSM Console. E.g. http://<hostname>:<port>/odsm and under the Schema tab check if the following attributes are created:
businessUnit
homeBranch
fcRoleId

LDAP Installation and Configuration
Oracle Banking Digital Experience Security Setup Configuration Manual 136
fcUserType
partyId
partyName
targetUnit
2. To create a Object Class
Copy the “objectclass.ldif” file from <Installer_Home>/installables/oud directory to a location on the server where OUD is installed and switch to the following directory:
cd <Oracle_Home>/Oracle_OUD1/bin
Now, execute the below command:
./ldapmodify -h localhost -p <ldap_port> -D "ldap_user" -w <ldap_password> -a -f <file_location>/objectclass.ldif
Login to ODSM Console. E.g. http://<hostname>:<port>/odsm and under the Schema tab check if the ‘fcPerson’ and ‘fcRole’ object class is created.
3. To create Groups
Copy the “group.ldif” file from <Installer_Home>/installables/oud directory to a location on the server where OUD is installed and switch to the following directory:
cd <Oracle_Home>/Oracle_OUD1/bin
Now, execute the below command:
./ldapmodify -h localhost -p <ldap_port> -D "ldap_user" -w <ldap_password> -a -f <file_location>/group.ldif
Login to ODSM Console. E.g. http://<hostname>:<port>/odsm and under the Data Browser tab check if the groups are created.
4. To create User and mapping it to the Group
Login to ODSM Console. E.g. http://<hostname>:<port>/odsm.
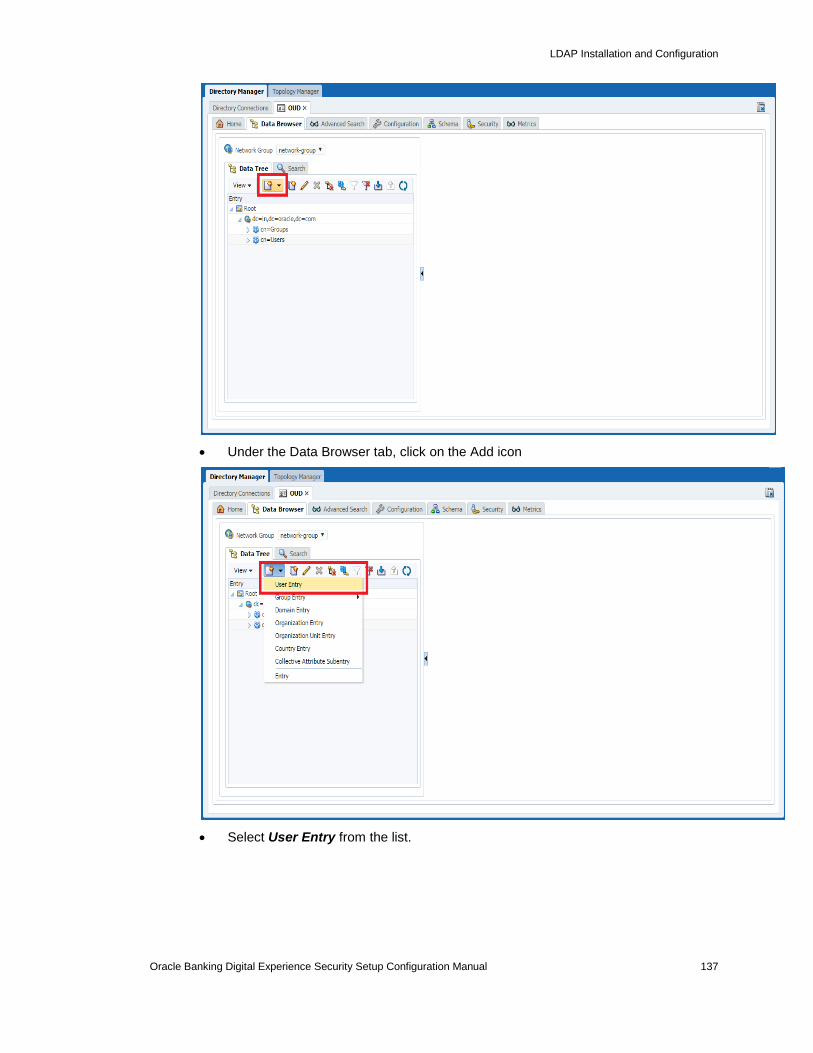
LDAP Installation and Configuration
Oracle Banking Digital Experience Security Setup Configuration Manual 137
Under the Data Browser tab, click on the Add icon
Select User Entry from the list.
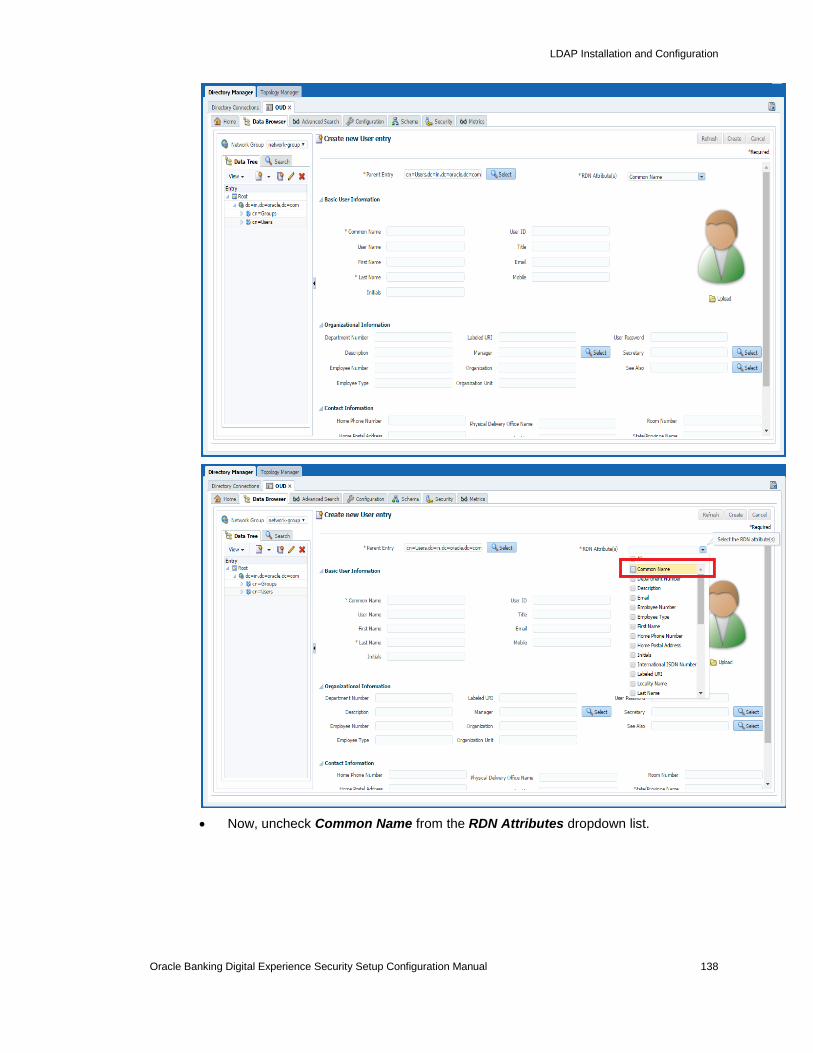
LDAP Installation and Configuration
Oracle Banking Digital Experience Security Setup Configuration Manual 138
Now, uncheck Common Name from the RDN Attributes dropdown list.
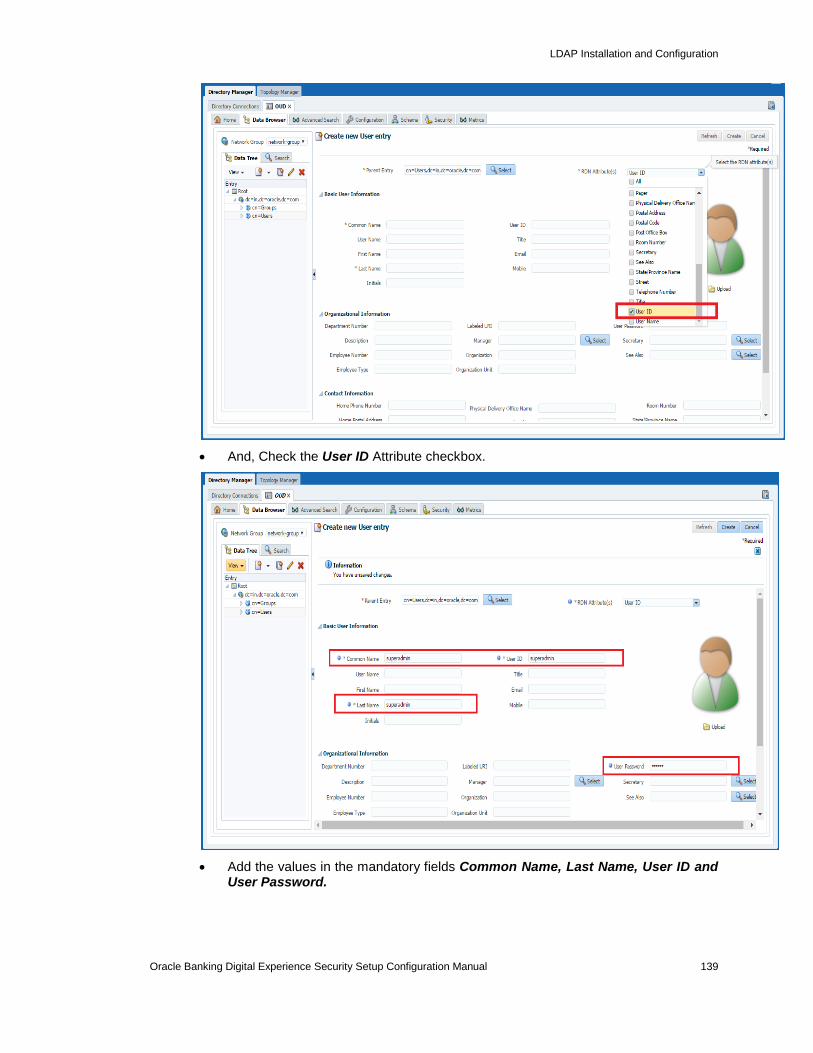
LDAP Installation and Configuration
Oracle Banking Digital Experience Security Setup Configuration Manual 139
And, Check the User ID Attribute checkbox.
Add the values in the mandatory fields Common Name, Last Name, User ID and User Password.
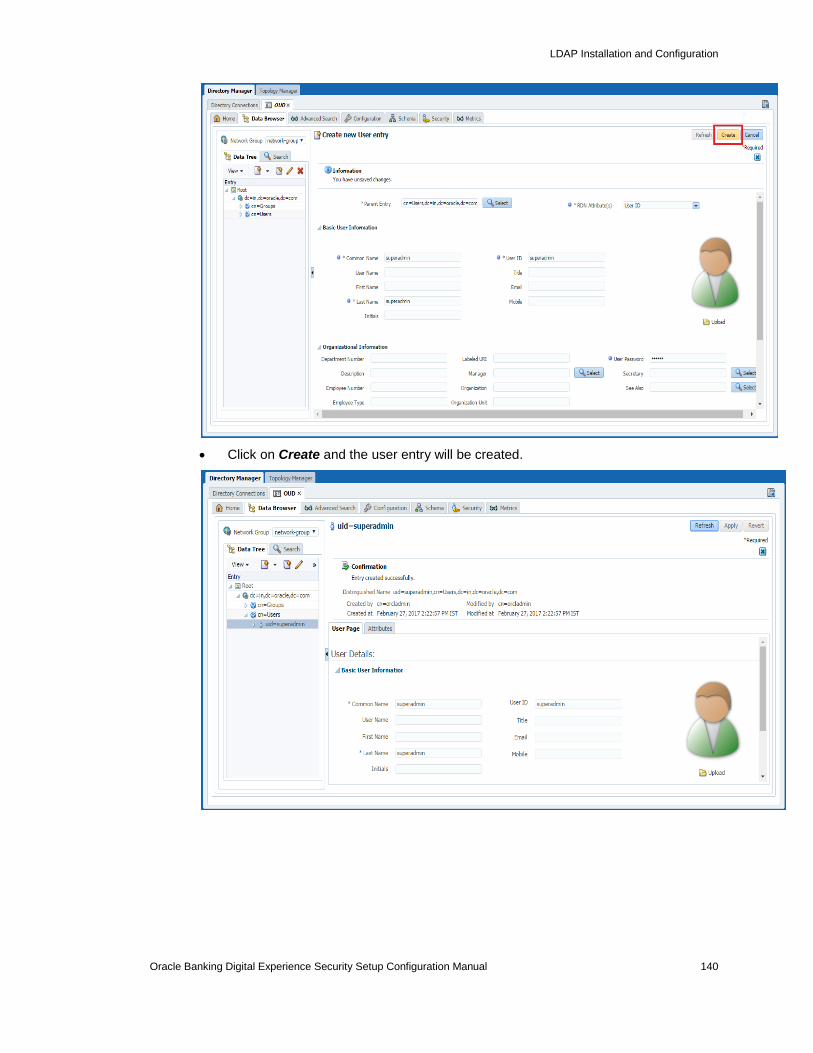
LDAP Installation and Configuration
Oracle Banking Digital Experience Security Setup Configuration Manual 140
Click on Create and the user entry will be created.
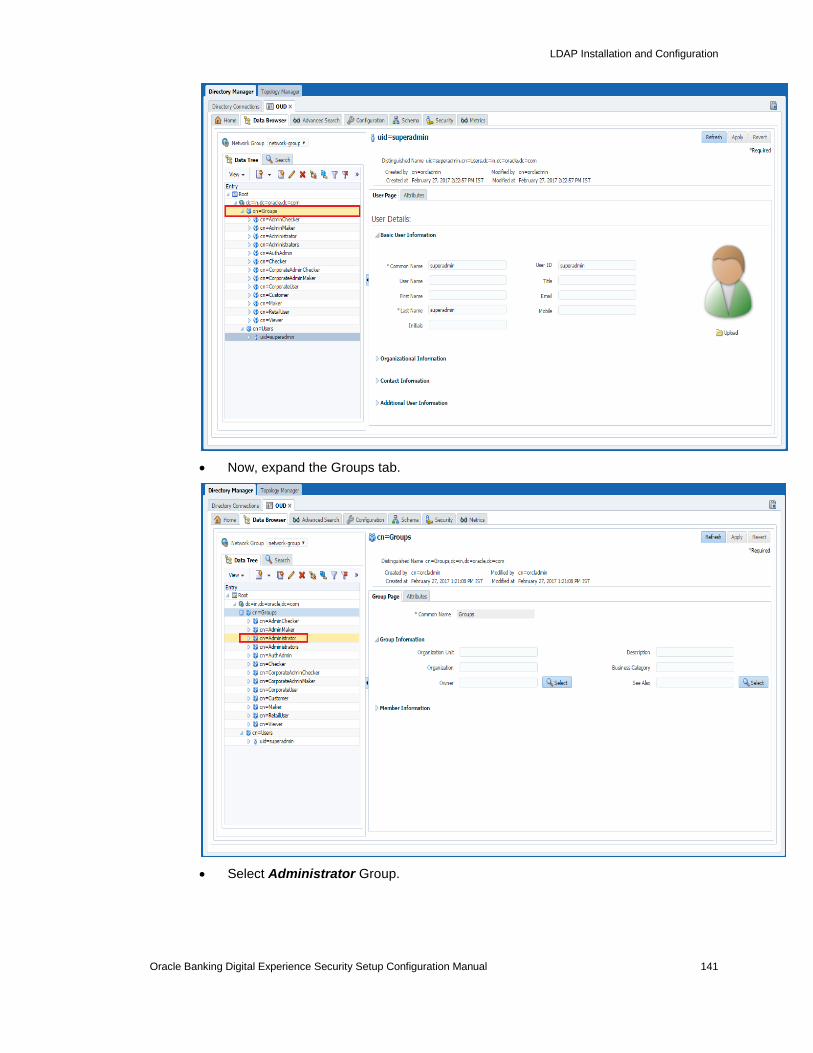
LDAP Installation and Configuration
Oracle Banking Digital Experience Security Setup Configuration Manual 141
Now, expand the Groups tab.
Select Administrator Group.
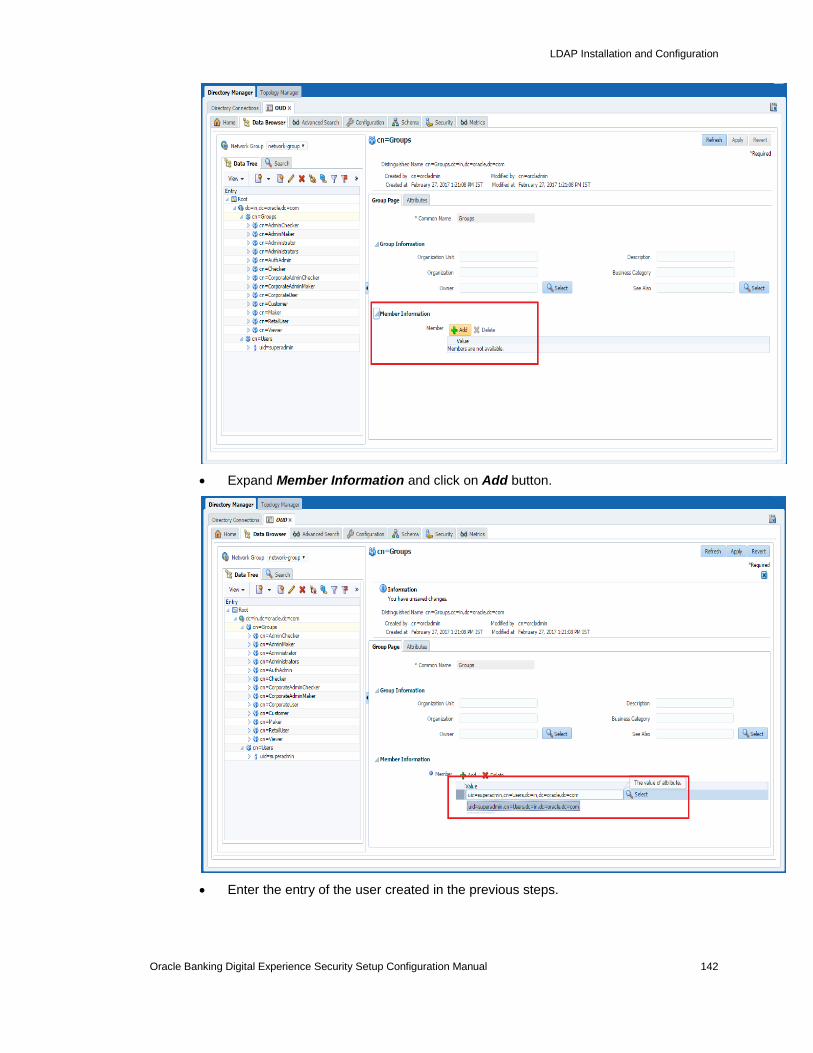
LDAP Installation and Configuration
Oracle Banking Digital Experience Security Setup Configuration Manual 142
Expand Member Information and click on Add button.
Enter the entry of the user created in the previous steps.
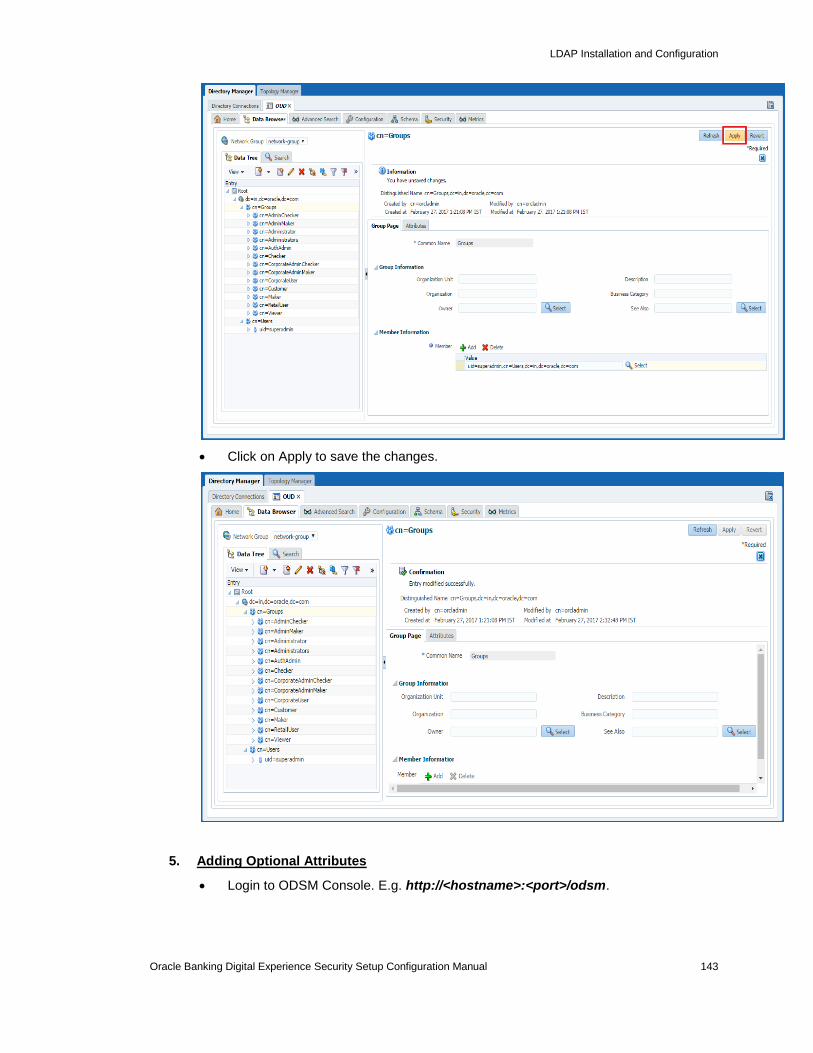
LDAP Installation and Configuration
Oracle Banking Digital Experience Security Setup Configuration Manual 143
Click on Apply to save the changes.
5. Adding Optional Attributes
Login to ODSM Console. E.g. http://<hostname>:<port>/odsm.
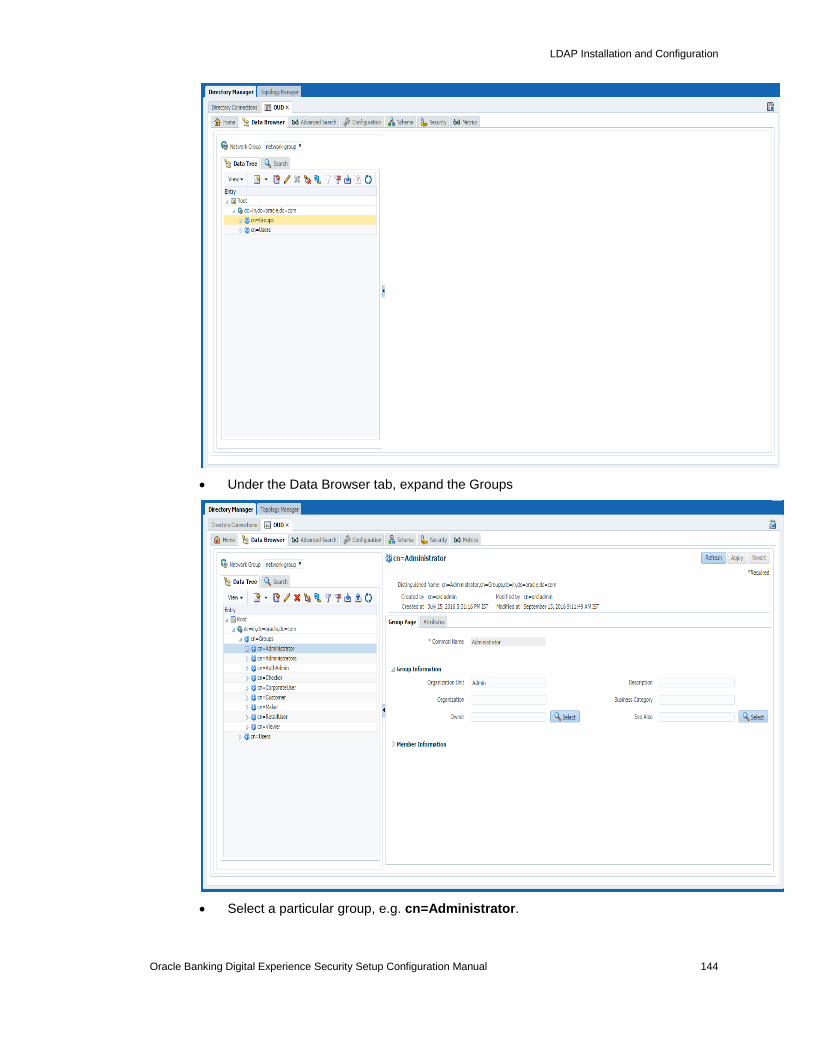
LDAP Installation and Configuration
Oracle Banking Digital Experience Security Setup Configuration Manual 144
Under the Data Browser tab, expand the Groups
Select a particular group, e.g. cn=Administrator.
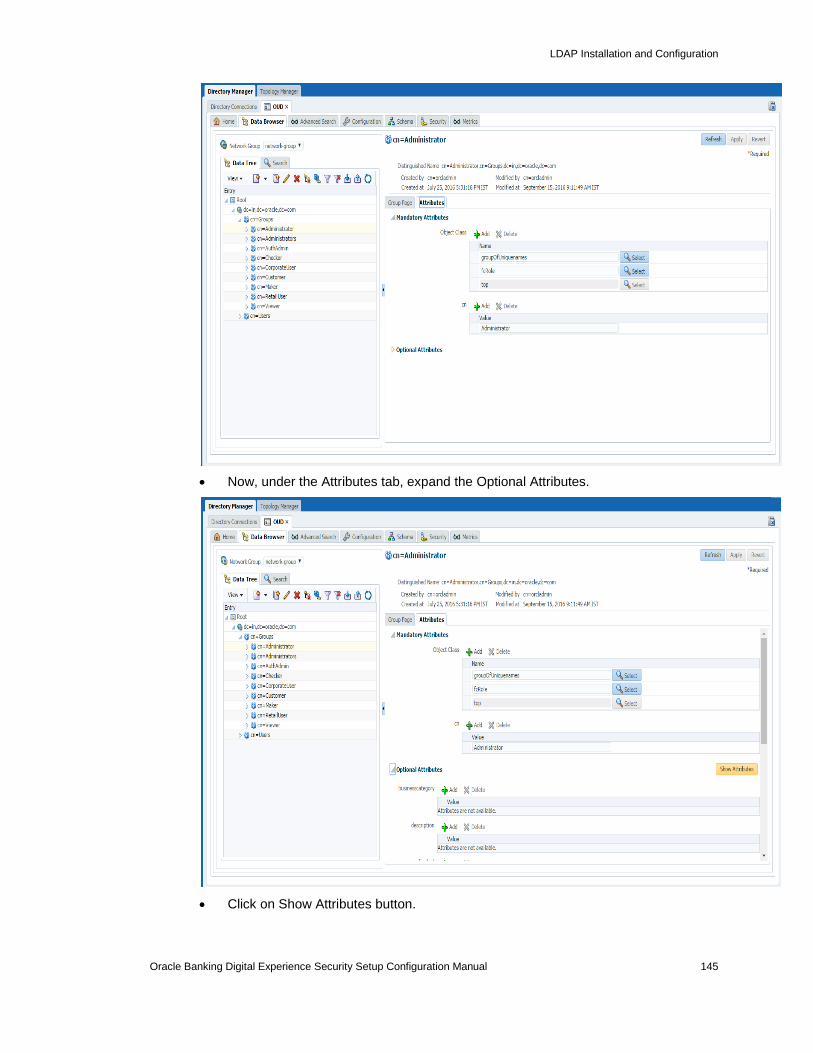
LDAP Installation and Configuration
Oracle Banking Digital Experience Security Setup Configuration Manual 145
Now, under the Attributes tab, expand the Optional Attributes.
Click on Show Attributes button.

LDAP Installation and Configuration
Oracle Banking Digital Experience Security Setup Configuration Manual 146
In the Filter type “fc” and click on Search button. It will show a entry for “fcroleid”.
Select the entry “fcroleid”.
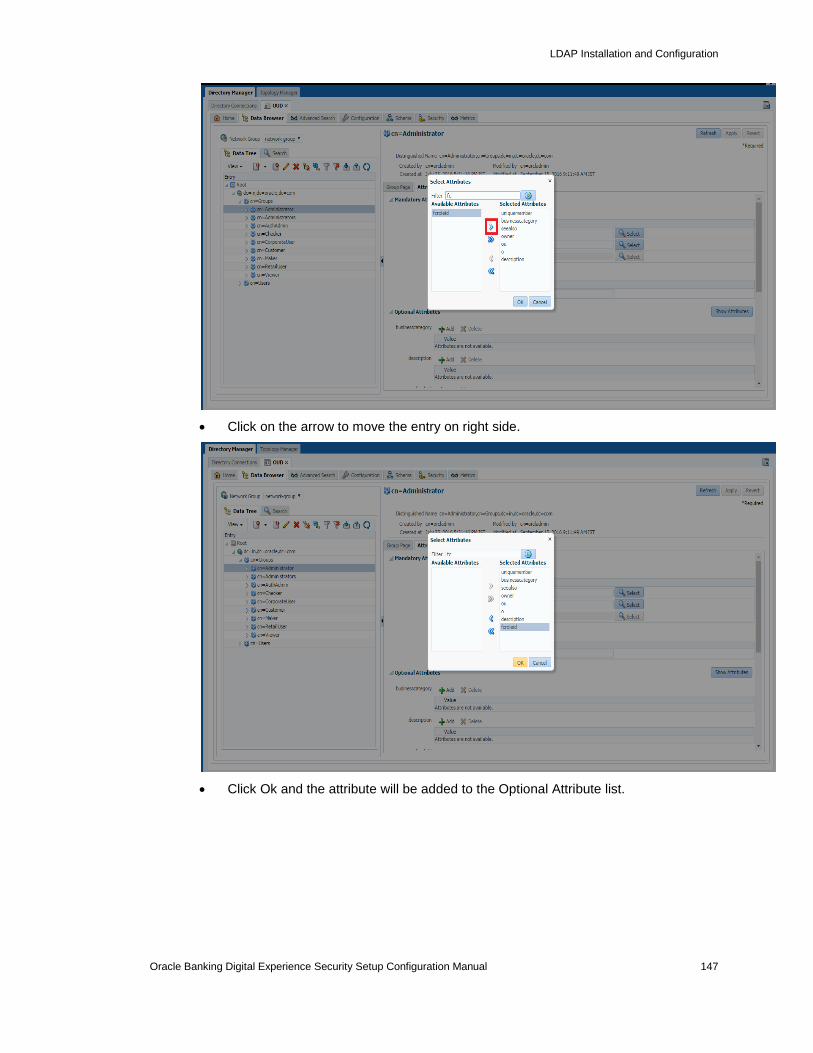
LDAP Installation and Configuration
Oracle Banking Digital Experience Security Setup Configuration Manual 147
Click on the arrow to move the entry on right side.
Click Ok and the attribute will be added to the Optional Attribute list.
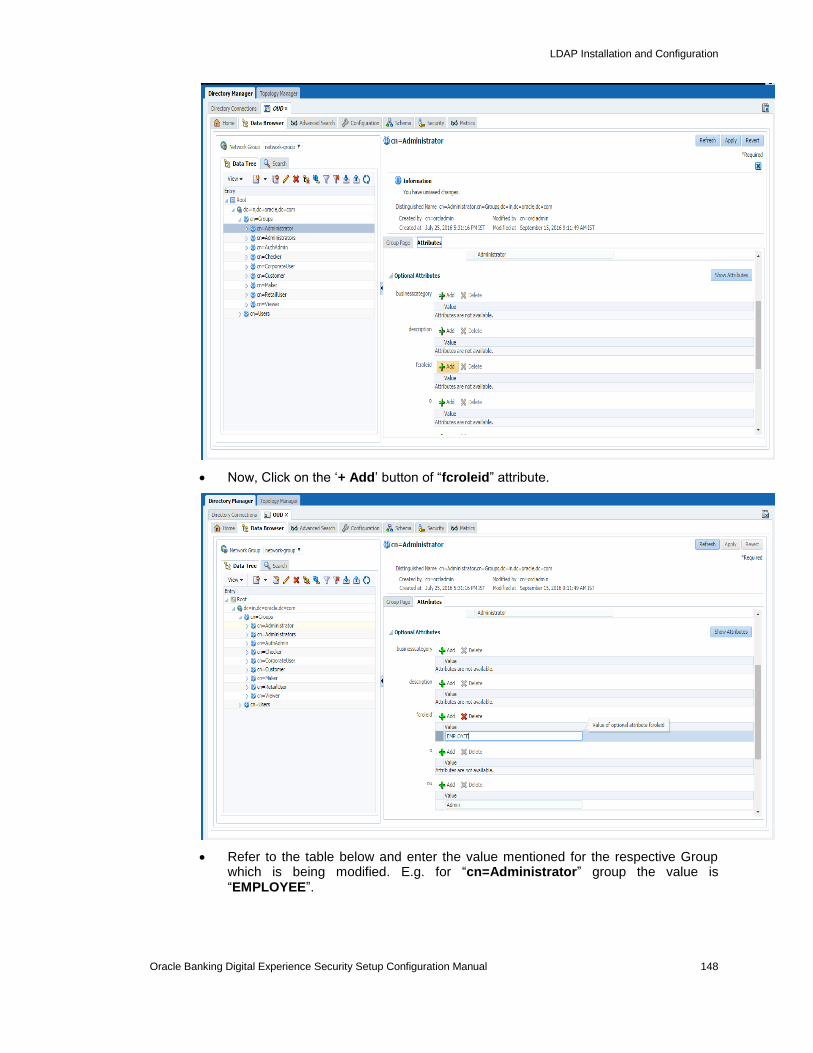
LDAP Installation and Configuration
Oracle Banking Digital Experience Security Setup Configuration Manual 148
Now, Click on the ‘+ Add’ button of “fcroleid” attribute.
Refer to the table below and enter the value mentioned for the respective Group which is being modified. E.g. for “cn=Administrator” group the value is “EMPLOYEE”.
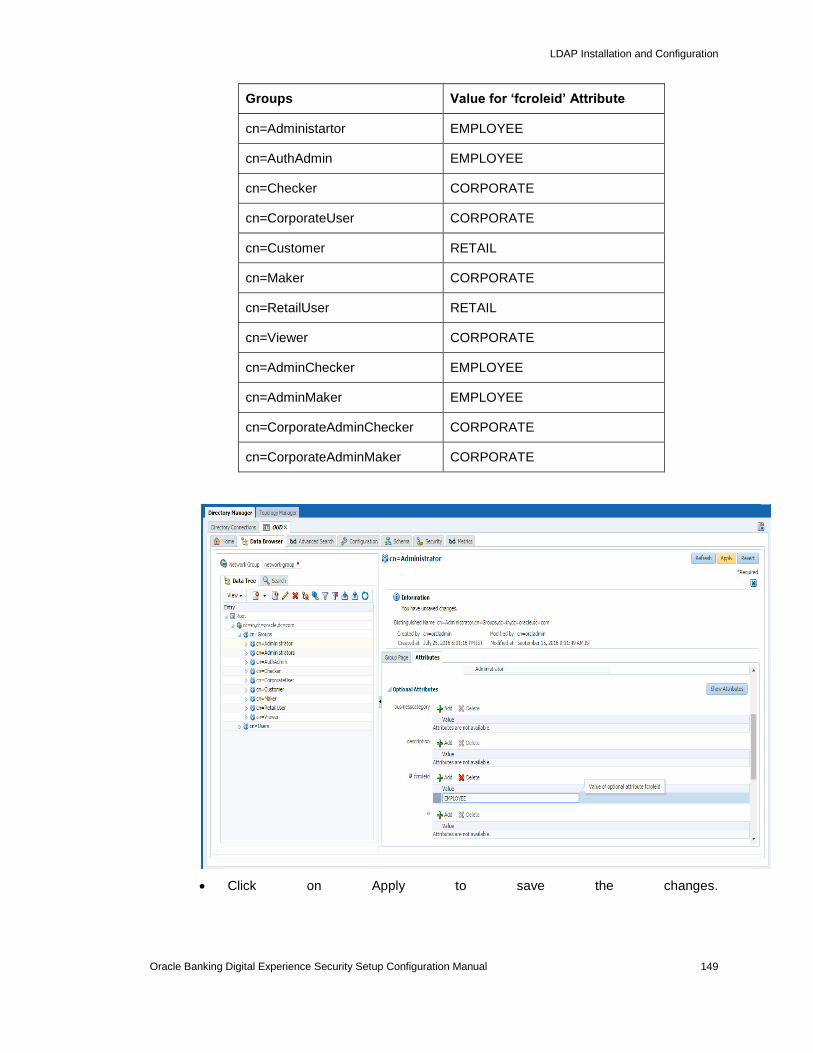
LDAP Installation and Configuration
Oracle Banking Digital Experience Security Setup Configuration Manual 149
Groups Value for ‘fcroleid’ Attribute
cn=Administartor EMPLOYEE
cn=AuthAdmin EMPLOYEE
cn=Checker CORPORATE
cn=CorporateUser CORPORATE
cn=Customer RETAIL
cn=Maker CORPORATE
cn=RetailUser RETAIL
cn=Viewer CORPORATE
cn=AdminChecker EMPLOYEE
cn=AdminMaker EMPLOYEE
cn=CorporateAdminChecker CORPORATE
cn=CorporateAdminMaker CORPORATE
Click on Apply to save the changes.

Oracle Business Intelligence Publisher Installation
Oracle Banking Digital Experience Security Setup Configuration Manual 150
9. Oracle Business Intelligence Publisher Installation
To install Oracle Business Intelligence Installation click here.