Embed Size (px)
Citation preview
Operation Manual
Sartorius Docu-pHMeter, Docu-pH+Meter
Docu-pH, Docu-pH+, pH/mV Meter

Français – page xx
Español – page xx
Italiano – page xx
2
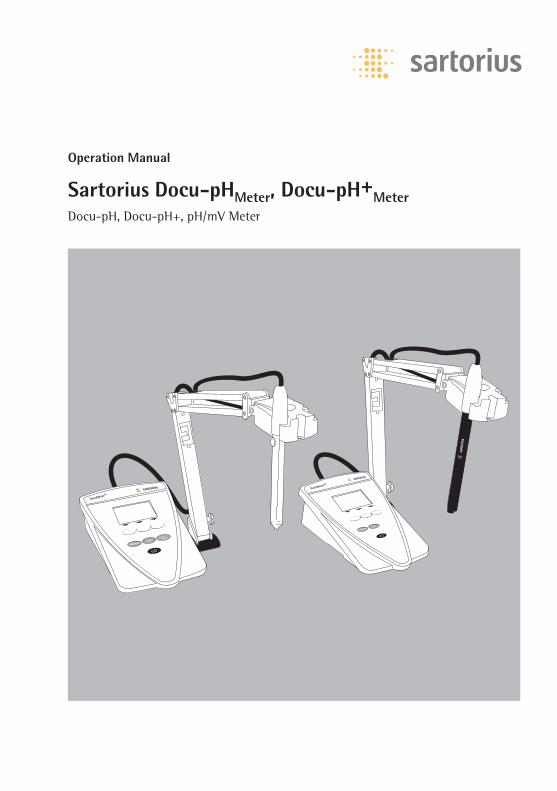
Contents
3 Contents4 Intended Use5 Warning and Safety Information6 General View of the pH Meter
7 Getting Started7 Equipment Supplied7 Connecting the Equipment to AC Power9 Installing Electrodes
12 Default Settings (Setup Menu)12 Example: Selecting the Language13 Parameter Settings (Overview)
15 Calibration (Adjustment)15 Calibration for pH Measurement18 Checking the Relative Millivolt Mode19 Deleting Calibration Data 20 Docu-pH+
Meter Model: Calibration with Cal Reminder
21 Operating the Meter: Measurement21 ATC Probe21 Lock Function21 Fast Mode (Shorter Measurement Time)22 Measuring the pH22 Measuring Redox Potential 23 Docu-pH+
Meter Model: Saving Measured Data 26 Electrode with DocuClip®
28 Interpreting Calibration Curves 29 Temperature Compensation30 Docu-pH+
Meter Model: Data Output 31 Docu-pH+
Meter Model: Data Interface
32 Error Messages33 Care and Maintenance33 Recycling Instructions
34 Overview34 Meter Specifications35 Accessories36 Declaration of Conformity
3
Intended Use
The Docu-pHMeter is a meter for measur-ing pH/mV and temperature. The fol-lowing measuring ranges are covered:
– pH range: -2.000 to 20.000 – mV measuring range: -2,000 to +2,000 – Temperature range: –5 to +105C°
The pH meters simplify and speed up routine procedures thanks to their:
– Automatic electrode recognition
– Simple operation
– Rugged and sturdy construction
– Easy to calibrate with 1, 2 or 3 calibra-tion points
– Automatic buffer recognition
– Automatic electrode test during calibra-tion
– Automatic temperature compensation
– Clear readout with easy-to-understandsymbols and LCD
– Intuitive menu controls with plain-lan-guage instructions via LCD and softkeys
– Electrode operation with DocuClip®: Previous calibrations are traceable
– Docu-pH+Meter: Serial interface for data
transfer to PC or printer
– Docu-pH+Meter:
Data storage capacity: 500 datasets
SymbolsThe following symbols are used inthese instructions:
§ indicates required steps
$ indicates required steps, but only under certain conditions
> describes what happens after youperform a certain step
– indicates an item in a list
! indicates a hazard
Conventions Used in This OperationManual
– The pictures in this Operation Manualare based on the “Docu-pHMeter”model. On the other models, somedisplay readouts and printouts maydiffer slightly from the ones shown. Any differences that impact opera-tion of the meter will be explained.
Hotline for Technical ApplicationsAdvice Phone: +49.551.308.4440Fax: +49.551.308.4449
4
Warning and Safety Information
Your pH/mV meter complies with theEuropean Council Directives as well asinternational regulations and standardsfor electrical equipment, electromagneticcompatibility, and the stipulated safetyrequirements. Improper use or handling,however, can result in damage and/orinjury.
§ To prevent damage to the equipment,read this Operation Manual thoroughlybefore using your pH/mV meter. Keep these instructions in a safe place.Please observe the following instructionsto ensure safe and reliable operation ofyour pH/mV meter.
Designated Use– Designated use of the pH/mV meter is
exclusively for measuring pH and milli-volt values in a laboratory environment.Any use above and beyond this is considered non-intended use.
Operational Safety!Do not use this equipment in potentially
explosive atmospheres.
! If you use electrical equipment in instal-lations and under ambient conditionsrequiring higher safety standards, youmust comply with the provisions asspecified in the applicable regulationsfor installation in your country.
! If you use an AC adapter, make sure the voltage rating printed on the ACadapter is identical to your local linevoltage.
– If you transport your pH/mV meter from a cold to a warm environment,condensation may occur and yourpH/mV meter may malfunction. In caseslike this, allow the meter’s temperatureto reach the room temperature prior to using it again.
– Use Sartorius accessories, as these areoptimally designed for use with yourpH/mV meter.
– Calibration:The temperature dependency for somebuffer solutions and DIN/NIST is savedin your pH/mV meter. Automatic tem-perature compensation is only accurateif the stored buffers are used.
– Installation instructions: The operator shall be responsible forany modifications to Sartorius equip-ment and must check and, if necessary,correct these modifications. On request,Sartorius will provide information onthe minimum operating specifications(in accordance with the standards listedabove for defined immunity to interfer-ence).
Protection ratings for the housing:– This meter complies with IP43– AC adapter complies with IP20
– Only clean the meter as described in thecleaning instructions: see the chapterentitled “Care and Maintenance.”
$ If you have any problems with yourpH/mV meter: contact your local Sartorius office, dealer or service center.
5
General View of the pH Meter
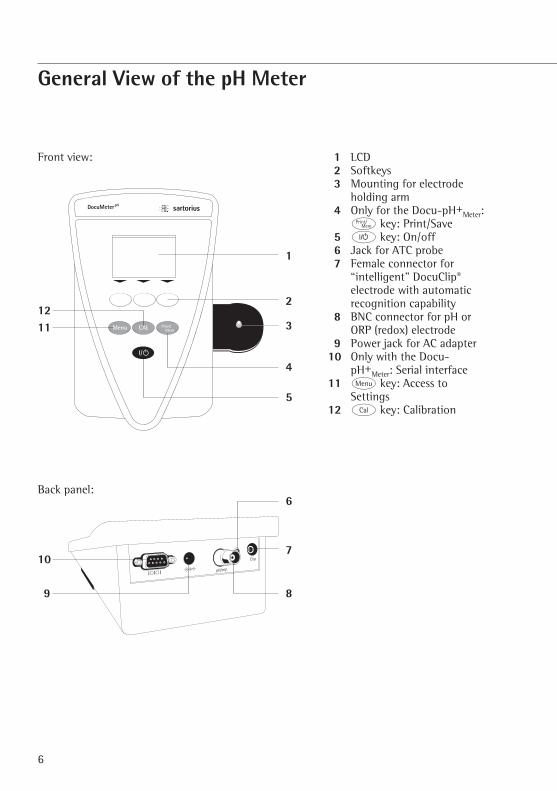
Front view:
Back panel:
6
2
3
4
1
7
5
6
89
10
1112
1 LCD2 Softkeys 3 Mounting for electrode
holding arm4 Only for the Docu-pH+
Meter:z key: Print/Save
5 e key: On/off6 Jack for ATC probe7 Female connector for
“intelligent” DocuClip®
electrode with automaticrecognition capability
8 BNC connector for pH orORP (redox) electrode
9 Power jack for AC adapter10 Only with the Docu-
pH+Meter: Serial interface
11 m key: Access to Settings
12 Q key: Calibration
7
Getting Started
Storage and Shipping ConditionsDo not expose the pH/mV meter unnecessarily to extreme temperatures, moisture, shocks, blows or vibration.
Unpacking the pH/mV Meter§ After unpacking the pH meter, please check
it immediately for any visible damage.$ If any sign of damage is visible, proceed as directed
in the chapter entitled “Care and Maintenance,”under the section on “Safety Inspection.”It is a good idea to save the box and all parts of thepackaging until you have successfully installed yourportable meter. Only the original packaging providesthe best protection for shipment. Before packingyour portable meter, unplug all connected cables to prevent damage.
Equipment SuppliedThe equipment supplied includes the componentslisted below:
– pH meter– AC adapter– Electrode holding arm– Technical buffers; pH = 4.00 and 7.00 at 25°C:
One capsule each for producing 100 ml of buffersolution; pH = 4.00 ml and pH= 7.00
$ The pH/mV meter is also available in sets (includingelectrode/DocuClip®). For more information, pleasecontact your local dealer or Sartorius directly.
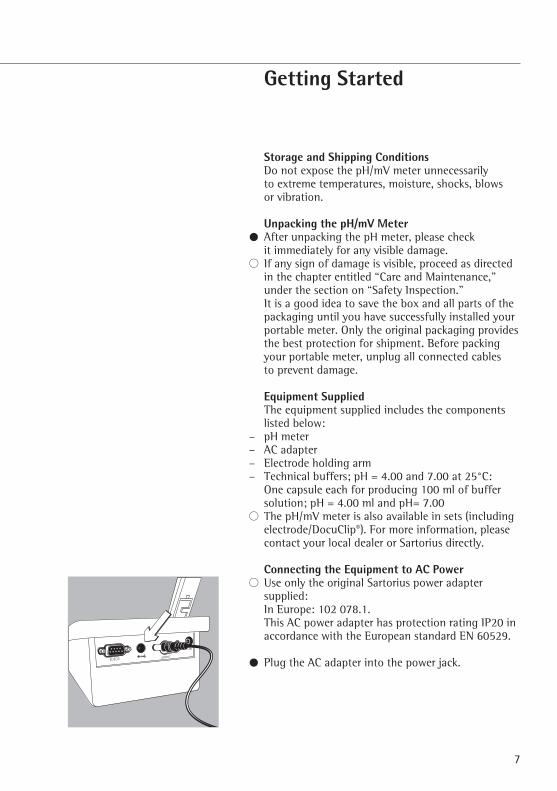
Connecting the Equipment to AC Power$ Use only the original Sartorius power adapter
supplied: In Europe: 102 078.1. This AC power adapter has protection rating IP20 inaccordance with the European standard EN 60529.
§ Plug the AC adapter into the power jack.
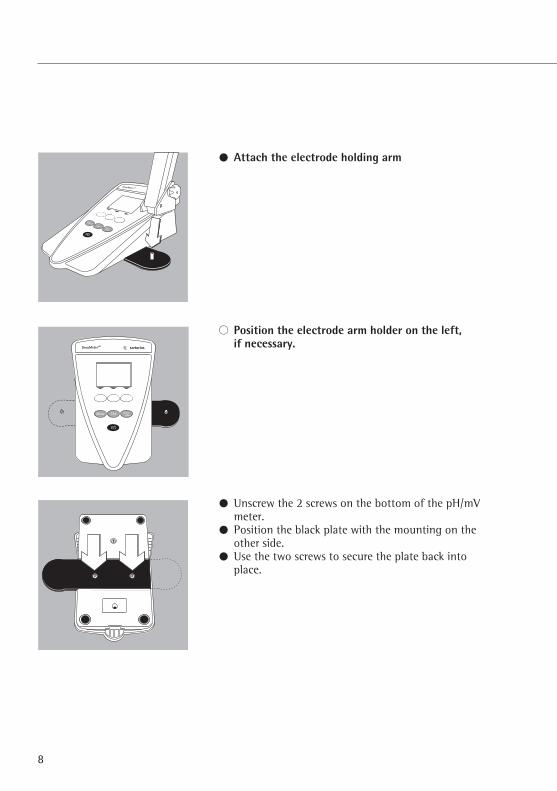
§ Attach the electrode holding arm
$ Position the electrode arm holder on the left, if necessary.
§ Unscrew the 2 screws on the bottom of the pH/mVmeter.
§ Position the black plate with the mounting on theother side.
§ Use the two screws to secure the plate back intoplace.
8
Installing Electrodes
You can use the following electrodes with the meter:– pH combination electrode with BNC connector– Separate 2.5 mm phone plug for ATC probe– Ion-selective electrode or ORP (redox) electrode with
BNC connector– Sartorius electrodes with DocuClip®
– The Docu-pHMeter automatically recognizes the typesof the ACT probes at the temperatures listed below:– NCT10 kohm: +14°C to 76°C– NCT30 kohm: –5°C to 40°C– PT1000: 4°C to 105°C
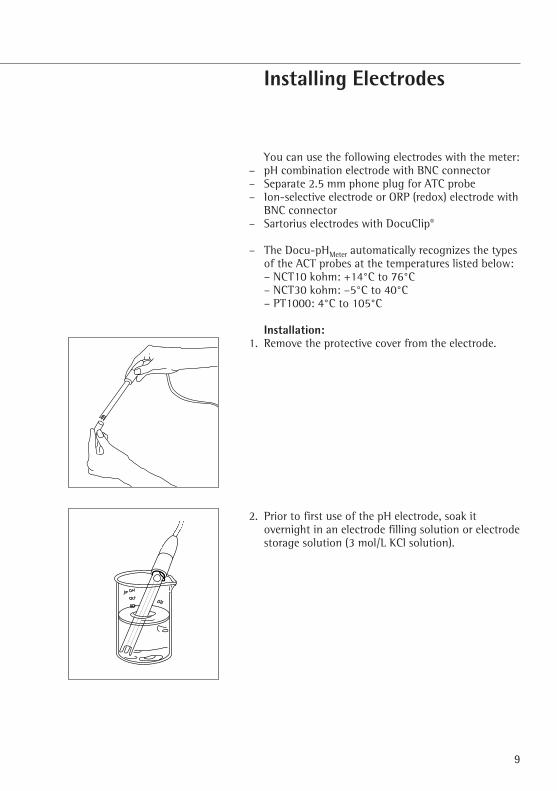
Installation:1. Remove the protective cover from the electrode.
2. Prior to first use of the pH electrode, soak itovernight in an electrode filling solution or electrodestorage solution (3 mol/L KCl solution).
9
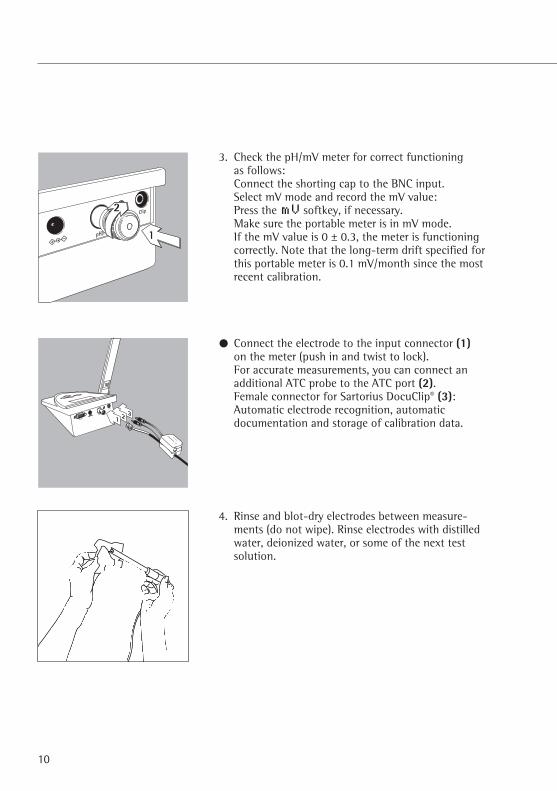
3. Check the pH/mV meter for correct functioning as follows:Connect the shorting cap to the BNC input. Select mV mode and record the mV value:Press the mV softkey, if necessary.Make sure the portable meter is in mV mode. If the mV value is 0 ± 0.3, the meter is functioningcorrectly. Note that the long-term drift specified forthis portable meter is 0.1 mV/month since the mostrecent calibration.
§ Connect the electrode to the input connector (1)on the meter (push in and twist to lock). For accurate measurements, you can connect anadditional ATC probe to the ATC port (2).Female connector for Sartorius DocuClip® (3): Automatic electrode recognition, automatic documentation and storage of calibration data.
4. Rinse and blot-dry electrodes between measure-ments (do not wipe). Rinse electrodes with distilledwater, deionized water, or some of the next testsolution.
10
11
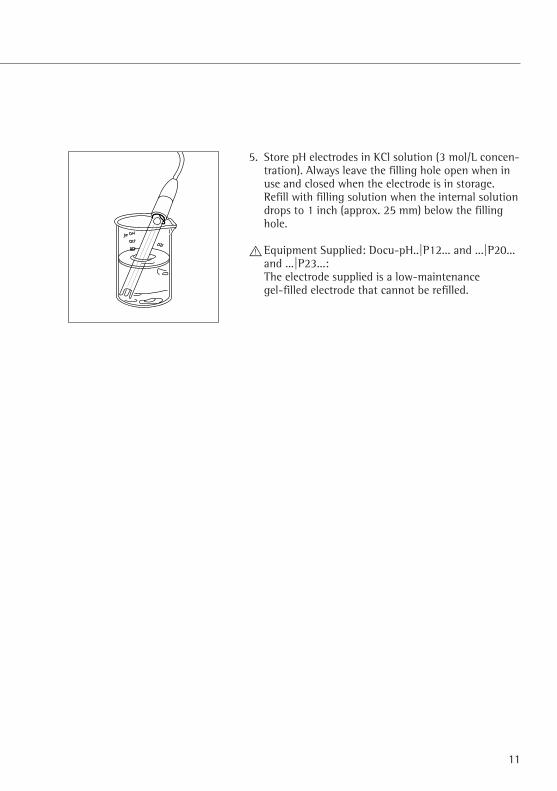
5. Store pH electrodes in KCl solution (3 mol/L concen-tration). Always leave the filling hole open when inuse and closed when the electrode is in storage.Refill with filling solution when the internal solutiondrops to 1 inch (approx. 25 mm) below the fillinghole.
!Equipment Supplied: Docu-pH..|P12... and ...|P20...and ...|P23...:The electrode supplied is a low-maintenance gel-filled electrode that cannot be refilled.
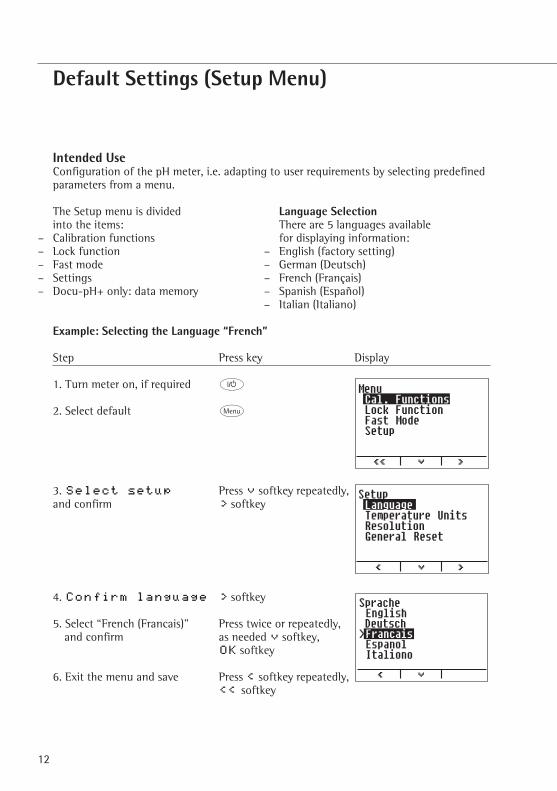
Default Settings (Setup Menu)
Intended UseConfiguration of the pH meter, i.e. adapting to user requirements by selecting predefinedparameters from a menu.
The Setup menu is divided Language Selectioninto the items: There are 5 languages available
– Calibration functions for displaying information:– Lock function – English (factory setting)– Fast mode – German (Deutsch)– Settings – French (Français)– Docu-pH+ only: data memory – Spanish (Español)
– Italian (Italiano)
Example: Selecting the Language “French”
Step Press key Display
1. Turn meter on, if required e
2. Select default m
3. Select setup Press q softkey repeatedly,and confirm O softkey
4. Confirm language O softkey
5. Select “French (Francais)” Press twice or repeatedly,and confirm as needed q softkey,
OK softkey
6. Exit the menu and save Press o softkey repeatedly,oo softkey
12
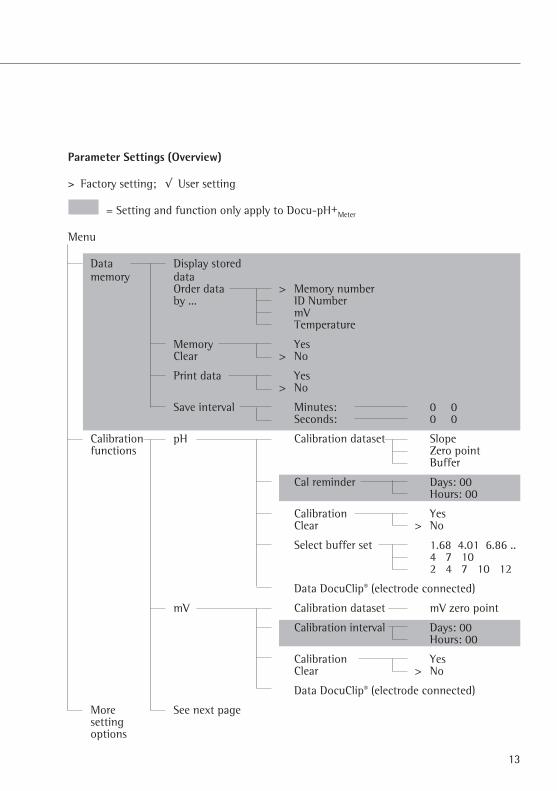
Parameter Settings (Overview)
> Factory setting; √ User setting
= Setting and function only apply to Docu-pH+Meter
Menu
Data Display stored memory data
Order data > Memory numberby ... ID Number
mVTemperature
Memory YesClear > No
Print data Yes> No
Save interval Minutes: 0 0Seconds: 0 0
Calibration pH Calibration dataset Slope functions Zero point
Buffer
Cal reminder Days: 00Hours: 00
Calibration YesClear > No
Select buffer set 1.68 4.01 6.86 ..4 7 102 4 7 10 12
Data DocuClip® (electrode connected)
mV Calibration dataset mV zero point
Calibration interval Days: 00Hours: 00
Calibration YesClear > No
Data DocuClip® (electrode connected)
More See next pagesettingoptions
13
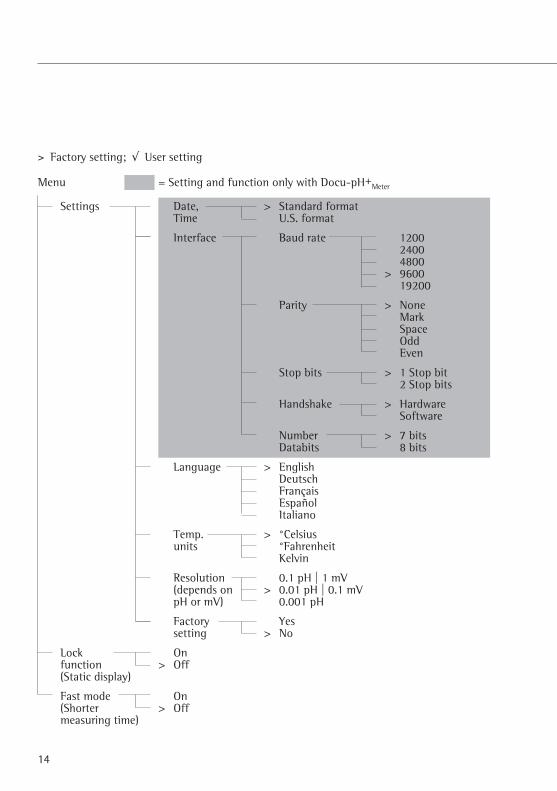
> Factory setting; √ User setting
Menu = Setting and function only with Docu-pH+Meter
Settings Date, > Standard formatTime U.S. format
Interface Baud rate 120024004800
> 960019200
Parity > NoneMarkSpaceOddEven
Stop bits > 1 Stop bit2 Stop bits
Handshake > HardwareSoftware
Number > 7 bitsDatabits 8 bits
Language > EnglishDeutschFrançaisEspañolItaliano
Temp. > °Celsiusunits °Fahrenheit
Kelvin
Resolution 0.1 pH | 1 mV(depends on > 0.01 pH | 0.1 mVpH or mV) 0.001 pH
Factory Yessetting > No
Lock Onfunction > Off(Static display)
Fast mode On(Shorter > Offmeasuring time)
14
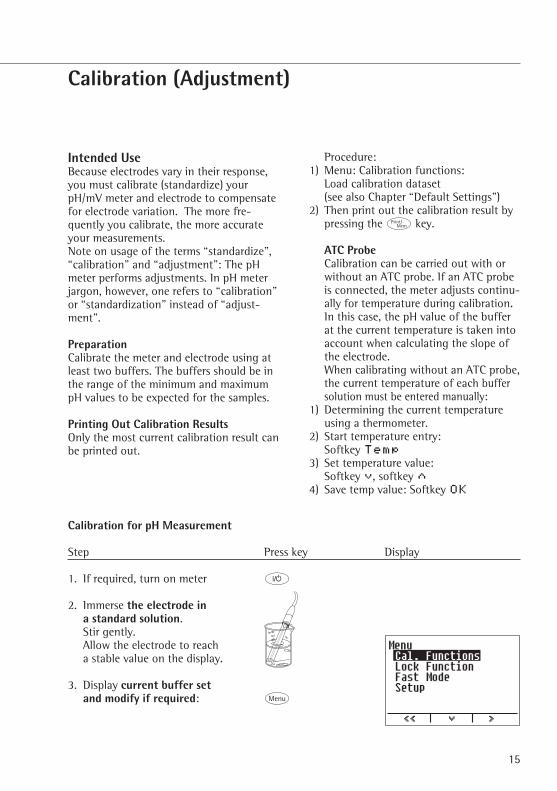
Calibration (Adjustment)
Intended UseBecause electrodes vary in their response,you must calibrate (standardize) yourpH/mV meter and electrode to compensatefor electrode variation. The more fre-quently you calibrate, the more accurateyour measurements. Note on usage of the terms “standardize”,“calibration” and “adjustment”: The pHmeter performs adjustments. In pH meterjargon, however, one refers to “calibration”or “standardization” instead of “adjust-ment”.
PreparationCalibrate the meter and electrode using atleast two buffers. The buffers should be inthe range of the minimum and maximumpH values to be expected for the samples.
Printing Out Calibration ResultsOnly the most current calibration result canbe printed out.
Procedure:1) Menu: Calibration functions:
Load calibration dataset (see also Chapter “Default Settings”)
2) Then print out the calibration result bypressing the z key.
ATC ProbeCalibration can be carried out with orwithout an ATC probe. If an ATC probeis connected, the meter adjusts continu-ally for temperature during calibration.In this case, the pH value of the bufferat the current temperature is taken intoaccount when calculating the slope ofthe electrode. When calibrating without an ATC probe,the current temperature of each buffersolution must be entered manually:
1) Determining the current temperatureusing a thermometer.
2) Start temperature entry: Softkey Temp
3) Set temperature value: Softkey q, softkey Q
4) Save temp value: Softkey OK
15
Calibration for pH Measurement
Step Press key Display
1. If required, turn on meter e
2. Immerse the electrode ina standard solution. Stir gently. Allow the electrode to reach a stable value on the display.
3. Display current buffer setand modify if required: m
16
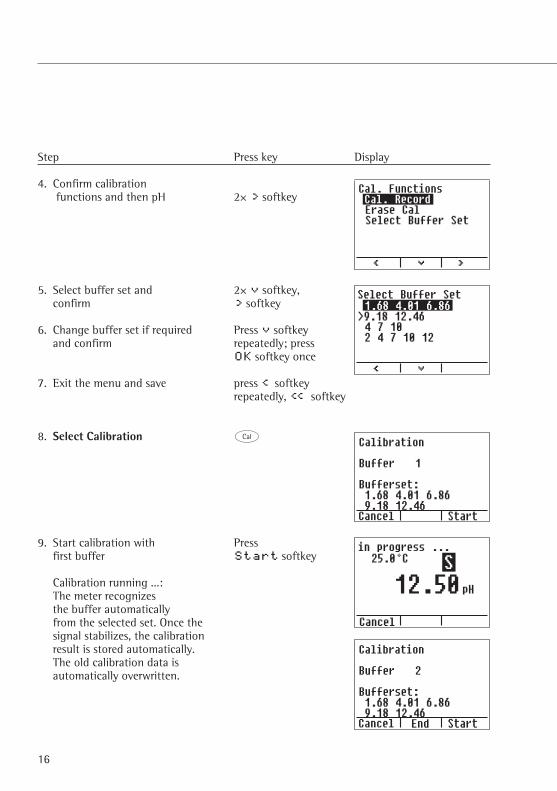
Step Press key Display
4. Confirm calibration functions and then pH 2+ O softkey
5. Select buffer set and 2+ q softkey,confirm O softkey
6. Change buffer set if required Press q softkey and confirm repeatedly; press
OK softkey once
7. Exit the menu and save press o softkey repeatedly, oo softkey
8. Select Calibration Q
9. Start calibration with Press first buffer Start softkey
Calibration running ...: The meter recognizes the buffer automatically from the selected set. Once the signal stabilizes, the calibration result is stored automatically. The old calibration data is automatically overwritten.
Cal. Functions Cal. Record Erase Cal Select Buffer Set
Select Buffer Set
Calibration Buffer 1
Bufferset:
Cancel
in progress ...
Cancel
Calibration Buffer 2
Bufferset:
Cancel End
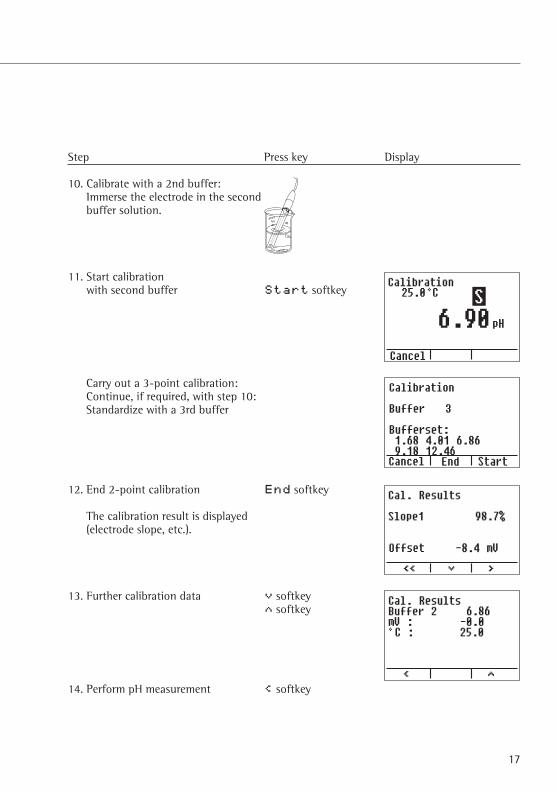
Step Press key Display
10. Calibrate with a 2nd buffer:Immerse the electrode in the second buffer solution.
11. Start calibration with second buffer Start softkey
Carry out a 3-point calibration: Continue, if required, with step 10: Standardize with a 3rd buffer
12. End 2-point calibration End softkey
The calibration result is displayed(electrode slope, etc.).
13. Further calibration data q softkey Q softkey
14. Perform pH measurement o softkey
17
Calibration
Cancel
Cal. Results
Slope1
Offset
Cal. Results Buffer 2
Calibration Buffer 3
Bufferset:
Cancel End
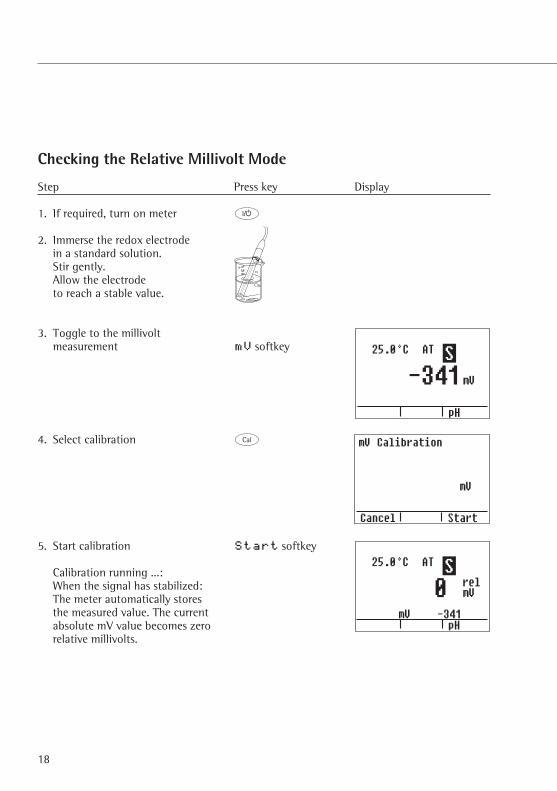
Checking the Relative Millivolt Mode
Step Press key Display
1. If required, turn on meter e
2. Immerse the redox electrode in a standard solution. Stir gently. Allow the electrode to reach a stable value.
3. Toggle to the millivolt measurement mV softkey
4. Select calibration Q
5. Start calibration Start softkey
Calibration running ...: When the signal has stabilized:The meter automatically stores the measured value. The current absolute mV value becomes zero relative millivolts.
18
Cancel
mV Calibration
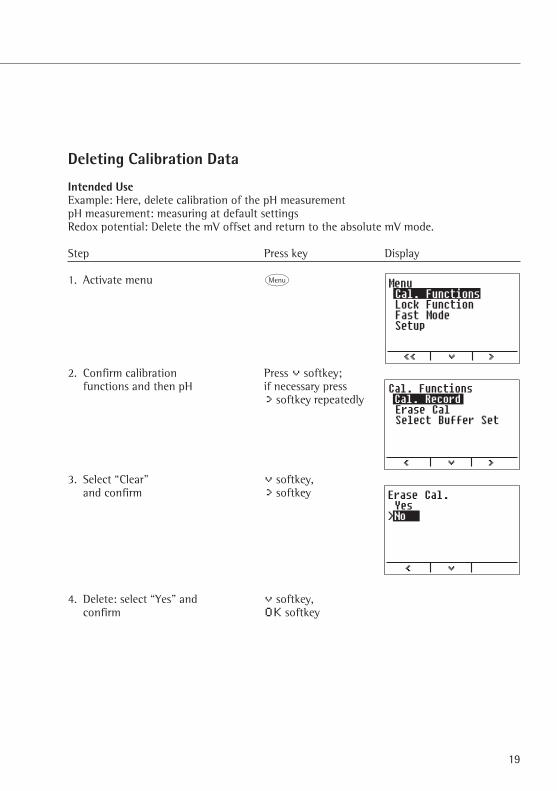
Deleting Calibration Data
Intended UseExample: Here, delete calibration of the pH measurement pH measurement: measuring at default settingsRedox potential: Delete the mV offset and return to the absolute mV mode.
Step Press key Display
1. Activate menu m
2. Confirm calibration Press q softkey; functions and then pH if necessary press
O softkey repeatedly
3. Select “Clear” q softkey,and confirm O softkey
4. Delete: select “Yes” and q softkey,confirm OK softkey
19
Cal. Functions Cal. Record Erase Cal Select Buffer Set
Erase Cal. Yes >No
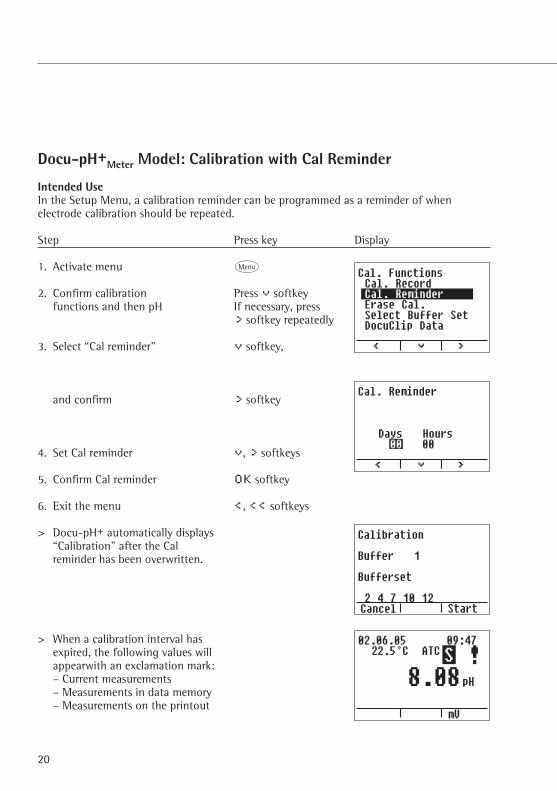
Docu-pH+Meter Model: Calibration with Cal Reminder
Intended UseIn the Setup Menu, a calibration reminder can be programmed as a reminder of when electrode calibration should be repeated.
Step Press key Display
1. Activate menu m
2. Confirm calibration Press q softkey functions and then pH If necessary, press
O softkey repeatedly
3. Select “Cal reminder” q softkey,
and confirm O softkey
4. Set Cal reminder q, O softkeys
5. Confirm Cal reminder OK softkey
6. Exit the menu o, oo softkeys
> Docu-pH+ automatically displays“Calibration” after the Cal reminder has been overwritten.
> When a calibration interval has expired, the following values will appearwith an exclamation mark:– Current measurements– Measurements in data memory– Measurements on the printout
20
Cal. Functions Cal. Record Cal. Reminder Erase Cal. Select Buffer Set DocuClip Data
Cal. Reminder
Days Hours
Calibration
Buffer 1
Bufferset
Cancel
21
Operating the Meter: Measurement
Preparation§ To select measuring mode: Press softkey
pH or mV.
! Improperly standardized electrodes yield inaccurate measurements. Perform calibration regularly prior tomeasurement.
$ Temper buffer or buffer solutions ormeasure current temperature, if themeasurement is performed without anATC probe.
ATC Probe– Measurements can be performed with
and without an ATC probe.
– The Docu-pHMeter detects the followingtype of ATC probes automatically:– NCT10 kohm: +14°C to 76°C– NCT30 kohm: –5°C to 40°C– PT1000: 4°C to 105°C
! It is imperative that you measure thetemperature to achieve accurate pHmeasurements. When measuring with-out an ATC probe, enter the currenttemperature manually:
1) Determine the current temperatureusing a thermometer.
2) Start temperature entry: Softkey Temp
3) Set temperature value: Softkey q, softkey Q
3) Save temperature value: Softkey OK
Lock Function– The lock function freezes the value
in the display. Once the stability conditions have been met, the value is displayed statically (Symbol: “ “) Deactivate lock function: Press Softkey Unlock
Activate function: see chapter entitled“Default Settings.”
Fast Mode (Shorter MeasurementTime)
– The fast mode reduces the measuringtime by using a lower stability criterion. Activate function: see chapter entitled“Default Settings.”
22
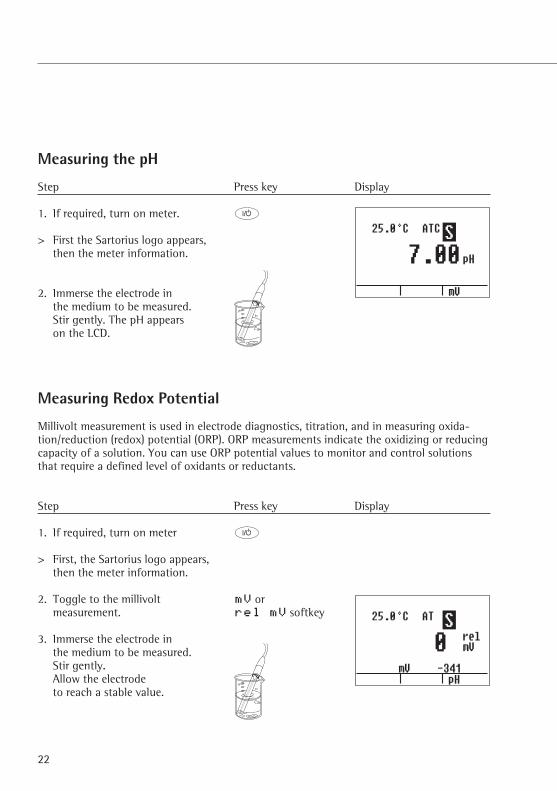
Measuring the pH
Step Press key Display
1. If required, turn on meter. e
> First the Sartorius logo appears, then the meter information.
2. Immerse the electrode in the medium to be measured. Stir gently. The pH appearson the LCD.
Measuring Redox Potential
Millivolt measurement is used in electrode diagnostics, titration, and in measuring oxida-tion/reduction (redox) potential (ORP). ORP measurements indicate the oxidizing or reducingcapacity of a solution. You can use ORP potential values to monitor and control solutionsthat require a defined level of oxidants or reductants.
Step Press key Display
1. If required, turn on meter e
> First, the Sartorius logo appears, then the meter information.
2. Toggle to the millivolt mV or measurement. rel mV softkey
3. Immerse the electrode in the medium to be measured. Stir gently.Allow the electrode to reach a stable value.
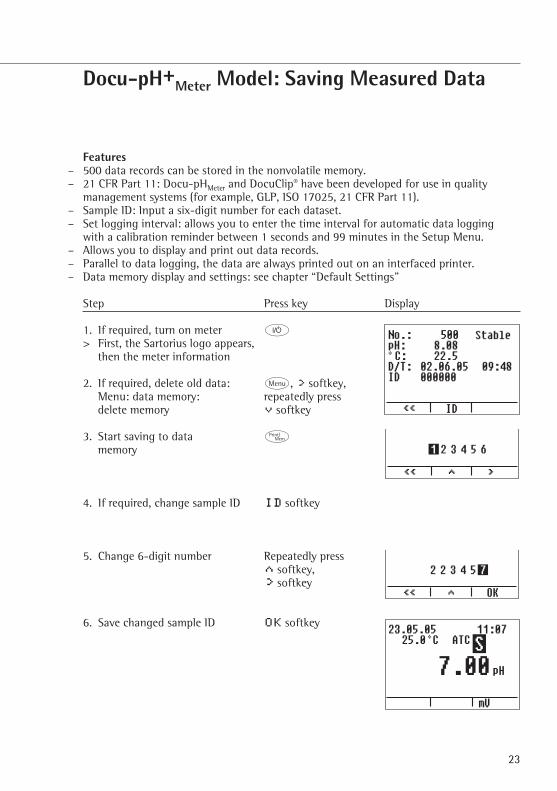
Docu-pH+Meter Model: Saving Measured Data
Features– 500 data records can be stored in the nonvolatile memory.– 21 CFR Part 11: Docu-pHMeter and DocuClip® have been developed for use in quality
management systems (for example, GLP, ISO 17025, 21 CFR Part 11). – Sample ID: Input a six-digit number for each dataset.– Set logging interval: allows you to enter the time interval for automatic data logging
with a calibration reminder between 1 seconds and 99 minutes in the Setup Menu.– Allows you to display and print out data records.– Parallel to data logging, the data are always printed out on an interfaced printer.– Data memory display and settings: see chapter “Default Settings”
Step Press key Display
1. If required, turn on meter e> First, the Sartorius logo appears,
then the meter information
2. If required, delete old data: m, O softkey,Menu: data memory: repeatedly pressdelete memory q softkey
3. Start saving to data zmemory
4. If required, change sample ID ID softkey
5. Change 6-digit number Repeatedly pressQ softkey,O softkey
6. Save changed sample ID OK softkey
23
Stable
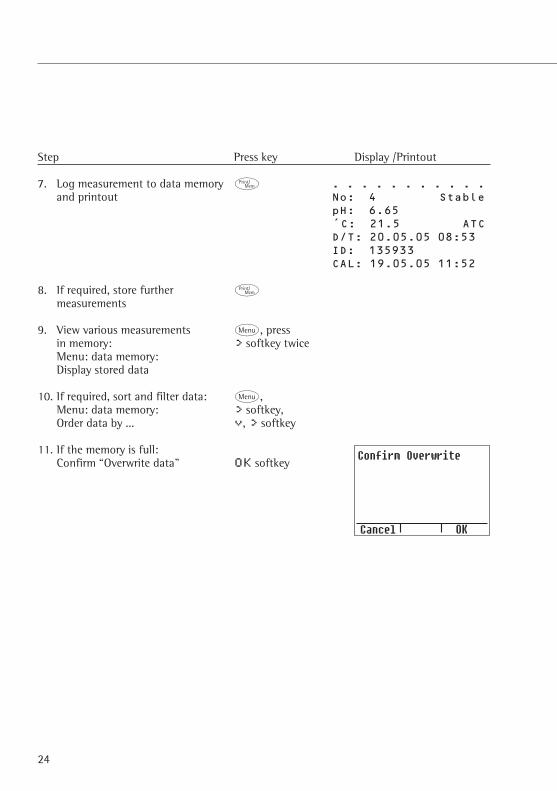
Step Press key Display /Printout
7. Log measurement to data memory z . . . . . . . . . . .and printout No: 4 Stable
pH: 6.65´C: 21.5 ATCD/T: 20.05.05 08:53 ID: 135933CAL: 19.05.05 11:52
8. If required, store further zmeasurements
9. View various measurements m, pressin memory: O softkey twiceMenu: data memory: Display stored data
10. If required, sort and filter data: m,Menu: data memory: O softkey,Order data by ... q, O softkey
11. If the memory is full:Confirm “Overwrite data” OK softkey
24
Confirm Overwrite
Cancel
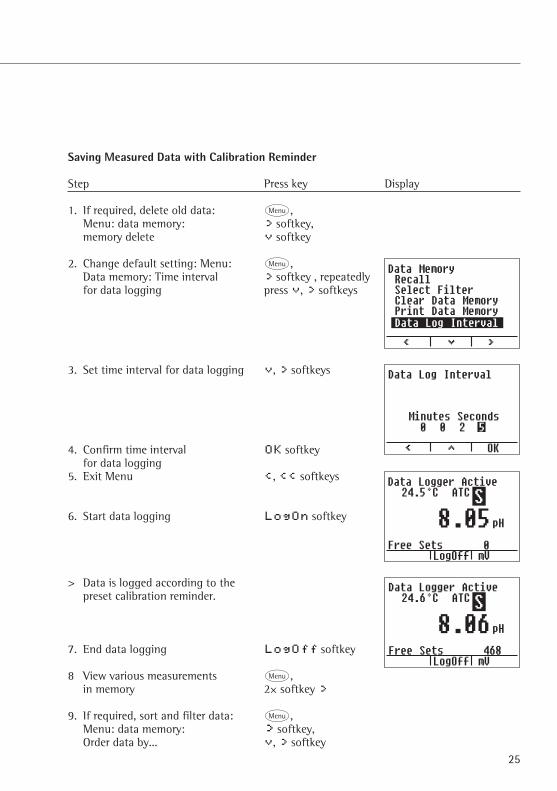
Saving Measured Data with Calibration Reminder
Step Press key Display
1. If required, delete old data: m,Menu: data memory: O softkey,memory delete q softkey
2. Change default setting: Menu: m,Data memory: Time interval O softkey , repeatedly for data logging press q, O softkeys
3. Set time interval for data logging q, O softkeys
4. Confirm time interval OK softkey for data logging
5. Exit Menu o, oo softkeys
6. Start data logging LogOn softkey
> Data is logged according to thepreset calibration reminder.
7. End data logging LogOff softkey
8 View various measurements m,in memory 2+ softkey O
9. If required, sort and filter data: m,Menu: data memory: O softkey,Order data by... q, O softkey
25
Data Memory Recall Select Filter Clear Data Memory Print Data Memory Data Log Interval
Data Log Interval
Minutes Seconds
Data Logger Active
Free Sets
Data Logger Active
Free Sets
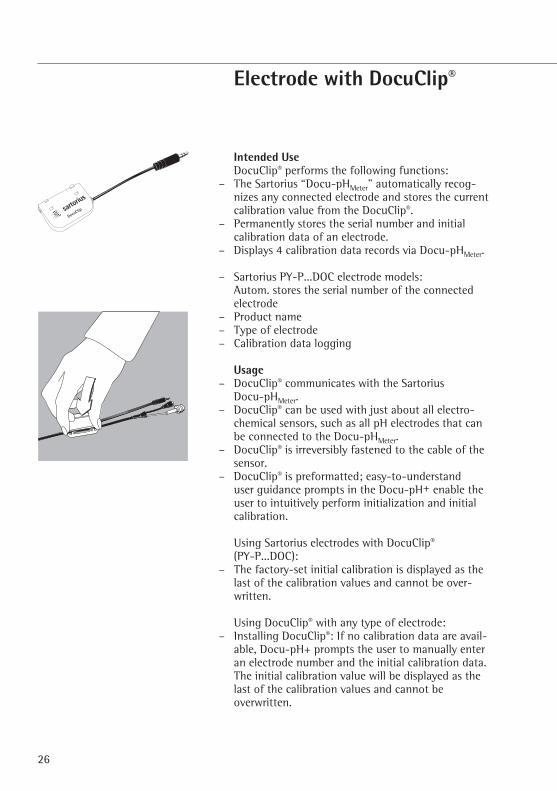
Electrode with DocuClip®
Intended UseDocuClip® performs the following functions:
– The Sartorius “Docu-pHMeter” automatically recog-nizes any connected electrode and stores the current calibration value from the DocuClip®.
– Permanently stores the serial number and initial calibration data of an electrode.
– Displays 4 calibration data records via Docu-pHMeter.
– Sartorius PY-P...DOC electrode models: Autom. stores the serial number of the connectedelectrode
– Product name – Type of electrode– Calibration data logging
Usage– DocuClip® communicates with the Sartorius
Docu-pHMeter.– DocuClip® can be used with just about all electro-
chemical sensors, such as all pH electrodes that canbe connected to the Docu-pHMeter.
– DocuClip® is irreversibly fastened to the cable of thesensor.
– DocuClip® is preformatted; easy-to-understand user guidance prompts in the Docu-pH+ enable theuser to intuitively perform initialization and initialcalibration.
Using Sartorius electrodes with DocuClip®
(PY-P...DOC):– The factory-set initial calibration is displayed as the
last of the calibration values and cannot be over-written.
Using DocuClip® with any type of electrode: – Installing DocuClip®: If no calibration data are avail-
able, Docu-pH+ prompts the user to manually enteran electrode number and the initial calibration data.The initial calibration value will be displayed as thelast of the calibration values and cannot be overwritten.
26
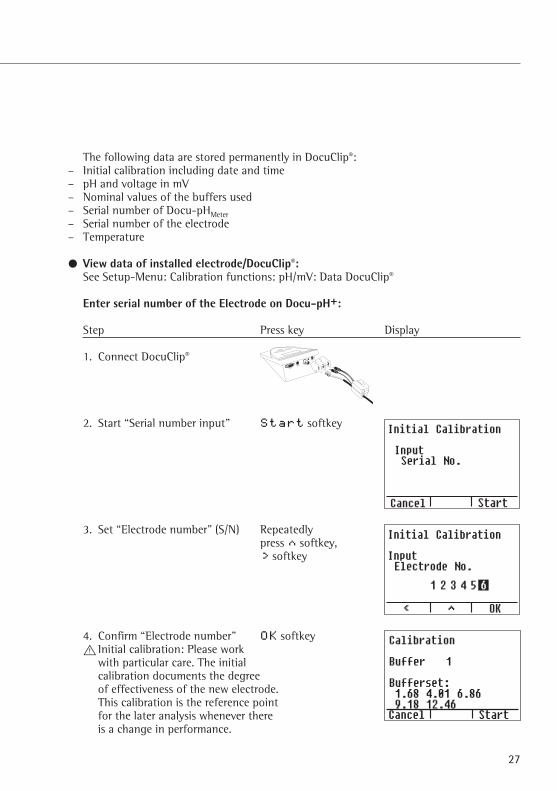
The following data are stored permanently in DocuClip®:– Initial calibration including date and time – pH and voltage in mV– Nominal values of the buffers used– Serial number of Docu-pHMeter
– Serial number of the electrode– Temperature
§ View data of installed electrode/DocuClip®:See Setup-Menu: Calibration functions: pH/mV: Data DocuClip®
Enter serial number of the Electrode on Docu-pH+:
Step Press key Display
1. Connect DocuClip®
2. Start “Serial number input” Start softkey
3. Set “Electrode number” (S/N) Repeatedly press Q softkey,O softkey
4. Confirm “Electrode number” OK softkey ! Initial calibration: Please work
with particular care. The initial calibration documents the degree of effectiveness of the new electrode. This calibration is the reference point for the later analysis whenever there is a change in performance.
27
Initial Calibration
Input Serial No.
Cancel
Initial Calibration
Input Electrode No.
Calibration Buffer 1
Bufferset:
Cancel
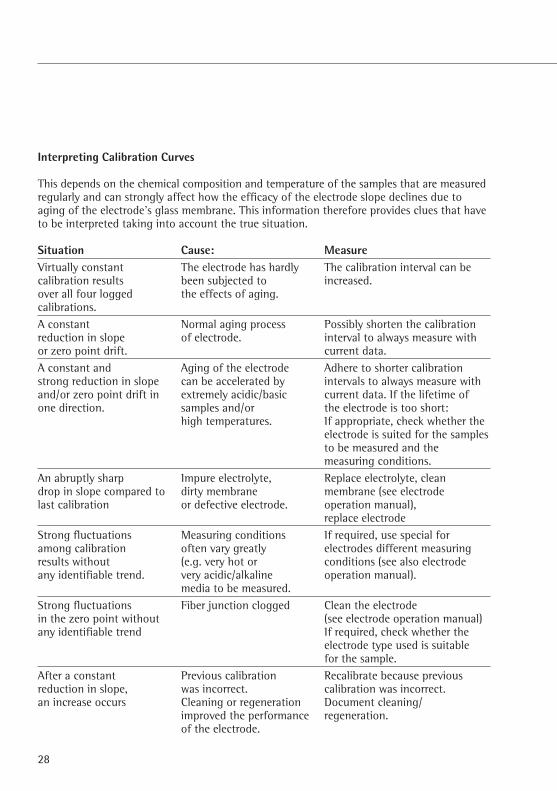
Interpreting Calibration Curves
This depends on the chemical composition and temperature of the samples that are measuredregularly and can strongly affect how the efficacy of the electrode slope declines due toaging of the electrode’s glass membrane. This information therefore provides clues that haveto be interpreted taking into account the true situation.
Situation Cause: MeasureVirtually constant The electrode has hardly The calibration interval can be calibration results been subjected to increased.over all four logged the effects of aging.calibrations.
A constant Normal aging process Possibly shorten the calibration reduction in slope of electrode. interval to always measure with or zero point drift. current data.
A constant and Aging of the electrode Adhere to shorter calibration strong reduction in slope can be accelerated by intervals to always measure with and/or zero point drift in extremely acidic/basic current data. If the lifetime of one direction. samples and/or the electrode is too short:
high temperatures. If appropriate, check whether the electrode is suited for the samplesto be measured and the measuring conditions.
An abruptly sharp Impure electrolyte, Replace electrolyte, clean drop in slope compared to dirty membrane membrane (see electrodelast calibration or defective electrode. operation manual),
replace electrode
Strong fluctuations Measuring conditions If required, use special for among calibration often vary greatly electrodes different measuring results without (e.g. very hot or conditions (see also electrode any identifiable trend. very acidic/alkaline operation manual).
media to be measured.
Strong fluctuations Fiber junction clogged Clean the electrode in the zero point without (see electrode operation manual)any identifiable trend If required, check whether the
electrode type used is suitable for the sample.
After a constant Previous calibration Recalibrate because previous reduction in slope, was incorrect. calibration was incorrect.an increase occurs Cleaning or regeneration Document cleaning/
improved the performance regeneration.of the electrode.
28
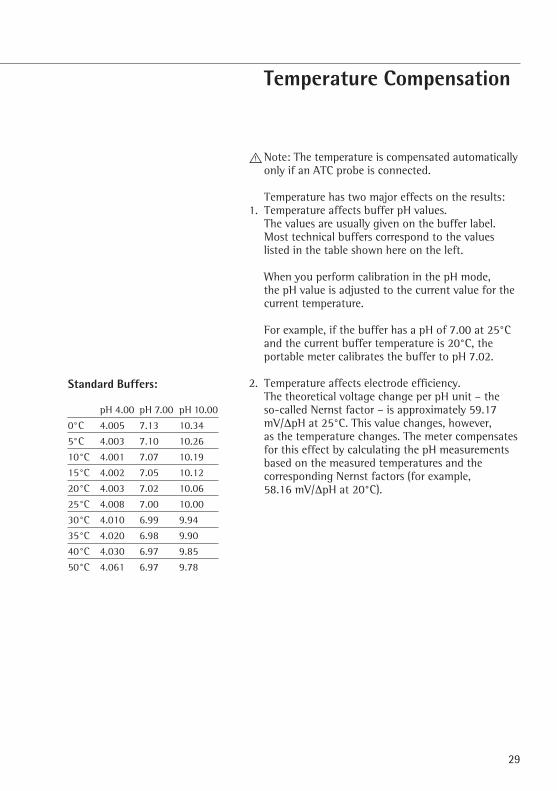
Temperature Compensation
!Note: The temperature is compensated automaticallyonly if an ATC probe is connected.
Temperature has two major effects on the results:1. Temperature affects buffer pH values.
The values are usually given on the buffer label.Most technical buffers correspond to the values listed in the table shown here on the left.
When you perform calibration in the pH mode, the pH value is adjusted to the current value for thecurrent temperature.
For example, if the buffer has a pH of 7.00 at 25°Cand the current buffer temperature is 20°C, theportable meter calibrates the buffer to pH 7.02.
2. Temperature affects electrode efficiency.The theoretical voltage change per pH unit – the so-called Nernst factor – is approximately 59.17mV/∆pH at 25°C. This value changes, however, as the temperature changes. The meter compensatesfor this effect by calculating the pH measurementsbased on the measured temperatures and the corresponding Nernst factors (for example, 58.16 mV/∆pH at 20°C).
29
Standard Buffers:
pH 4.00 pH 7.00 pH 10.00
0°C 4.005 7.13 10.34
5°C 4.003 7.10 10.26
10°C 4.001 7.07 10.19
15°C 4.002 7.05 10.12
20°C 4.003 7.02 10.06
25°C 4.008 7.00 10.00
30°C 4.010 6.99 9.94
35°C 4.020 6.98 9.90
40°C 4.030 6.97 9.85
50°C 4.061 6.97 9.78
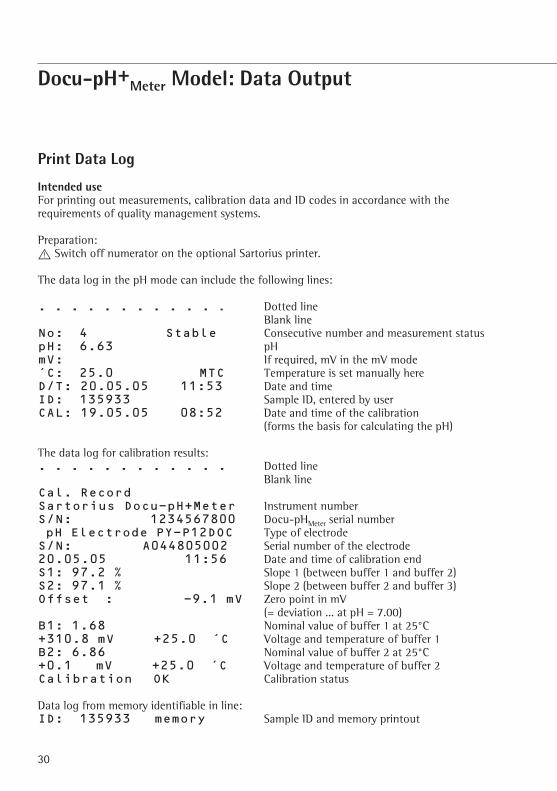
Docu-pH+Meter Model: Data Output
Print Data Log
Intended useFor printing out measurements, calibration data and ID codes in accordance with therequirements of quality management systems.
Preparation:! Switch off numerator on the optional Sartorius printer.
The data log in the pH mode can include the following lines:
. . . . . . . . . . . . Dotted lineBlank line
No: 4 Stable Consecutive number and measurement status pH: 6.63 pH mV: If required, mV in the mV mode ´C: 25.0 MTC Temperature is set manually here D/T: 20.05.05 11:53 Date and timeID: 135933 Sample ID, entered by user CAL: 19.05.05 08:52 Date and time of the calibration
(forms the basis for calculating the pH)
The data log for calibration results:. . . . . . . . . . . . Dotted line
Blank lineCal. RecordSartorius Docu-pH+Meter Instrument numberS/N: 1234567800 Docu-pHMeter serial numberpH Electrode PY-P12DOC Type of electrodeS/N: A044805002 Serial number of the electrode20.05.05 11:56 Date and time of calibration endS1: 97.2 % Slope 1 (between buffer 1 and buffer 2)S2: 97.1 % Slope 2 (between buffer 2 and buffer 3)Offset : -9.1 mV Zero point in mV
(= deviation ... at pH = 7.00) B1: 1.68 Nominal value of buffer 1 at 25°C+310.8 mV +25.0 ´C Voltage and temperature of buffer 1B2: 6.86 Nominal value of buffer 2 at 25°C+0.1 mV +25.0 ´C Voltage and temperature of buffer 2Calibration OK Calibration status
Data log from memory identifiable in line:ID: 135933 memory Sample ID and memory printout
30
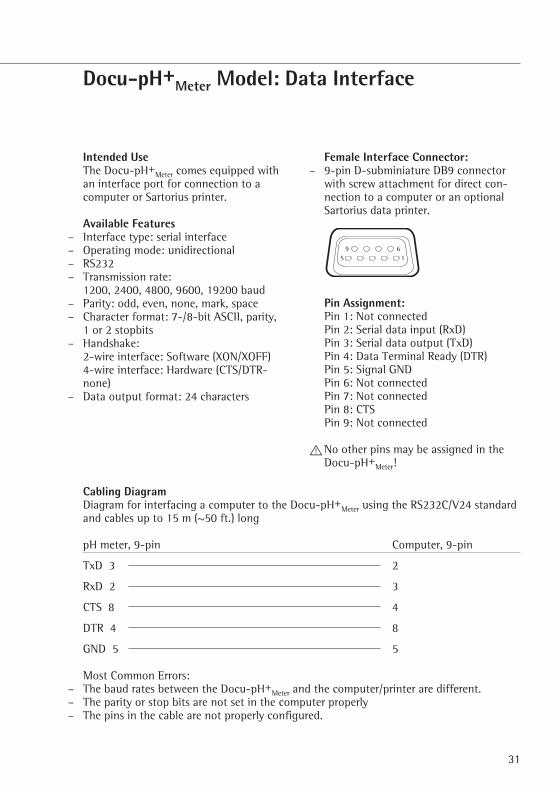
Docu-pH+Meter Model: Data Interface
Intended UseThe Docu-pH+
Meter comes equipped withan interface port for connection to acomputer or Sartorius printer.
Available Features– Interface type: serial interface – Operating mode: unidirectional – RS232– Transmission rate:
1200, 2400, 4800, 9600, 19200 baud– Parity: odd, even, none, mark, space– Character format: 7-/8-bit ASCII, parity,
1 or 2 stopbits– Handshake:
2-wire interface: Software (XON/XOFF)4-wire interface: Hardware (CTS/DTR-none)
– Data output format: 24 characters
Female Interface Connector:– 9-pin D-subminiature DB9 connector
with screw attachment for direct con-nection to a computer or an optionalSartorius data printer.
Pin Assignment:Pin 1: Not connectedPin 2: Serial data input (RxD)Pin 3: Serial data output (TxD)Pin 4: Data Terminal Ready (DTR)Pin 5: Signal GND Pin 6: Not connectedPin 7: Not connectedPin 8: CTSPin 9: Not connected
!No other pins may be assigned in theDocu-pH+
Meter!
6
5 1
9
31
Cabling DiagramDiagram for interfacing a computer to the Docu-pH+
Meter using the RS232C/V24 standardand cables up to 15 m (~50 ft.) long
pH meter, 9-pin Computer, 9-pin
TxD 3 2
RxD 2 3
CTS 8 4
DTR 4 8
GND 5 5
Most Common Errors:– The baud rates between the Docu-pH+
Meter and the computer/printer are different. – The parity or stop bits are not set in the computer properly – The pins in the cable are not properly configured.
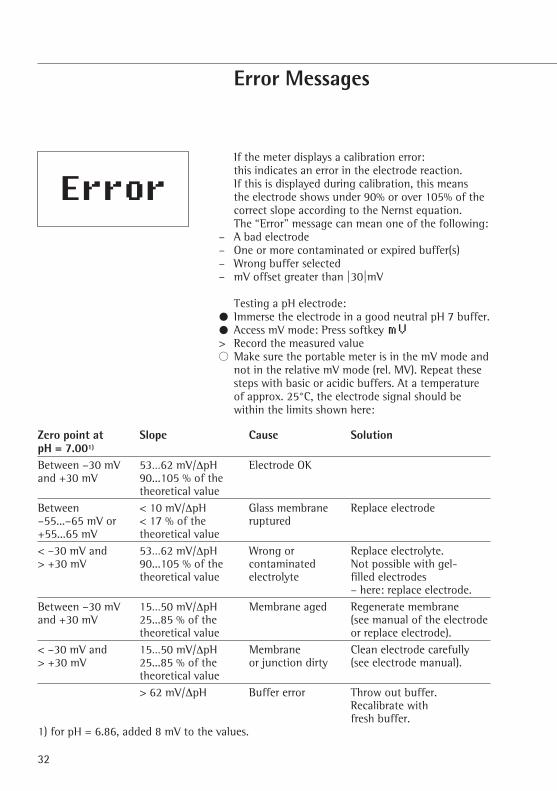
Error Messages
If the meter displays a calibration error:this indicates an error in the electrode reaction. If this is displayed during calibration, this means the electrode shows under 90% or over 105% of thecorrect slope according to the Nernst equation. The “Error” message can mean one of the following:
– A bad electrode– One or more contaminated or expired buffer(s)– Wrong buffer selected– mV offset greater than |30|mV
Testing a pH electrode:§ Immerse the electrode in a good neutral pH 7 buffer.§ Access mV mode: Press softkey mV> Record the measured value $ Make sure the portable meter is in the mV mode and
not in the relative mV mode (rel. MV). Repeat thesesteps with basic or acidic buffers. At a temperatureof approx. 25°C, the electrode signal should bewithin the limits shown here:
32
Zero point at Slope Cause SolutionpH = 7.001)
Between –30 mV 53…62 mV/∆pH Electrode OK and +30 mV 90...105 % of the
theoretical value
Between < 10 mV/∆pH Glass membrane Replace electrode–55...–65 mV or < 17 % of the ruptured+55...65 mV theoretical value
< –30 mV and 53…62 mV/∆pH Wrong or Replace electrolyte.> +30 mV 90...105 % of the contaminated Not possible with gel-
theoretical value electrolyte filled electrodes– here: replace electrode.
Between –30 mV 15…50 mV/∆pH Membrane aged Regenerate membrane and +30 mV 25...85 % of the (see manual of the electrode
theoretical value or replace electrode).
< –30 mV and 15…50 mV/∆pH Membrane Clean electrode carefully> +30 mV 25...85 % of the or junction dirty (see electrode manual).
theoretical value
> 62 mV/∆pH Buffer error Throw out buffer.Recalibrate withfresh buffer.
1) for pH = 6.86, added 8 mV to the values.
Error
Care and Maintenance
Cleaning§ Unplug the AC adapter from the wall outlet. § Clean the pH meter using a piece of cloth which has
been wet with a mild detergent § Wipe down the pH meter with a soft cloth.$ Cleaning the electrode: refer to the Instructions for
Use of the particular electrode.
! Make sure that no liquid enters the instrument.!Do not use any aggressive cleaning agents
(solvents or similar agents)
Safety InspectionIf there is any indication that safe operation of theequipment is no longer guaranteed:
§ Disconnect the power cord from the outlet> Ensure that the equipment cannot be used during
this time. Notify your nearest Sartorius Service Center.Maintenance and repair work may only be performed by specialized service technicians.
Recycling InstructionsTo ensure adequate protection for safe shipment,your instrument has been packaged to the extentnecessary using environmentally friendly materials.After successful installation of the instrument, youshould return this packaging for recycling because it is a valuable source of secondary raw material. For information on recycling options, includingrecycling of old weighing equipment, contact yourmunicipal waste disposal center or local recyclingdepot.
33

34
Overview
Meter Specifications
Docu-pHMeter Docu-pH+Meter
pH measurementMeasuring range -2.000 … 20.000
Readability 0.001 | 0.01 | 0.1, adjustable
Accuracy ± 0.005
mV measurementMeasuring range in mV –2000.0 … +2000.0
Readability in mV 0.1 | 1 adjustable
Accuracy in mV ± 0.2 < | 1000 | ± 1 > | 1000 |
Temperature measurementMeasuring range in °C –5 … 105
Readability in °C 0.1
Accuracy in °C ± 0.2
Temperature compensation Automatic or manual from -5°C … 105°C
Buffer recognition Automatic: technical buffers, DIN/NIST buffers
Calibration points, max. number 3
Date|Time battery-supplied - +
Sample IDs - +
Calibration reminder - +
Complete GLP-compliant record - +
Memory for measurement data - +
Communication with DocuClip® + +
Input for pH combination electrodes BNC BNC
Input for temperature probes
NTC 10 kO, NTC 30 kO, Pt1000 2.5 mm phone plug 2.5 mm phone plug
Interface RS232C – +
Dimensions in mm 89 + 229 + 145
Weight in kg 1
35
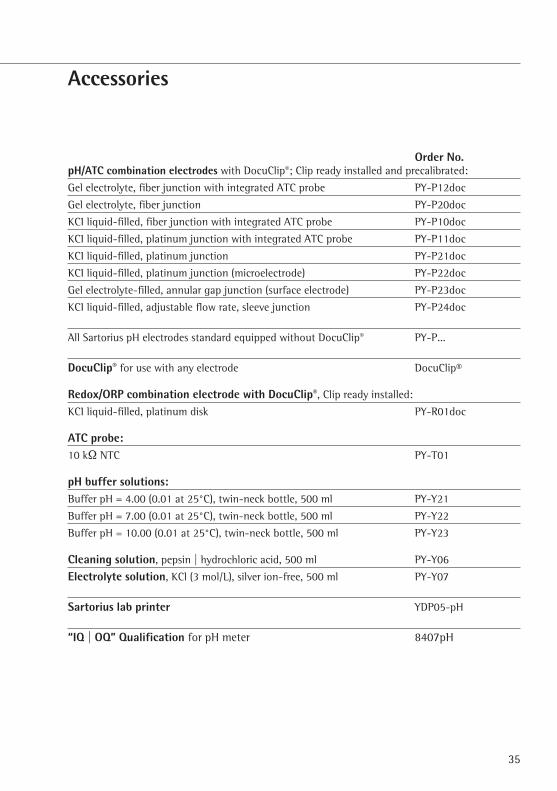
Accessories
Order No.pH/ATC combination electrodes with DocuClip®; Clip ready installed and precalibrated:
Gel electrolyte, fiber junction with integrated ATC probe PY-P12doc
Gel electrolyte, fiber junction PY-P20doc
KCI liquid-filled, fiber junction with integrated ATC probe PY-P10doc
KCI liquid-filled, platinum junction with integrated ATC probe PY-P11doc
KCI liquid-filled, platinum junction PY-P21doc
KCI liquid-filled, platinum junction (microelectrode) PY-P22doc
Gel electrolyte-filled, annular gap junction (surface electrode) PY-P23doc
KCI liquid-filled, adjustable flow rate, sleeve junction PY-P24doc
All Sartorius pH electrodes standard equipped without DocuClip® PY-P...
DocuClip® for use with any electrode DocuClip®
Redox/ORP combination electrode with DocuClip®, Clip ready installed:
KCI liquid-filled, platinum disk PY-R01doc
ATC probe:10 kO NTC PY-T01
pH buffer solutions:Buffer pH = 4.00 (0.01 at 25°C), twin-neck bottle, 500 ml PY-Y21
Buffer pH = 7.00 (0.01 at 25°C), twin-neck bottle, 500 ml PY-Y22
Buffer pH = 10.00 (0.01 at 25°C), twin-neck bottle, 500 ml PY-Y23
Cleaning solution, pepsin | hydrochloric acid, 500 ml PY-Y06
Electrolyte solution, KCl (3 mol/L), silver ion-free, 500 ml PY-Y07
Sartorius lab printer YDP05-pH
“IQ | OQ” Qualification for pH meter 8407pH
36
C

Sartorius AGWeender Landstrasse 94–10837075 Goettingen, Germany
Phone +49.551.308.0Fax +49.551.308.3289www.sartorius.com
Copyright by Sartorius AG, Goettingen, Germany. All rights reserved. No part of this publication may be reprinted or translated in any form or by any means without the prior writtenpermission of Sartorius AG.The status of the information,specifications and illustrations in this manual is indicated by the date given below. Sartorius AG reserves the right to make changes to thetechnology, features,specifications and design of theequipment without notice.
Status: November 2006, Sartorius AG, Goettingen, Germany
Printed in Germany on paper that has
been bleached without any use of chlorine
W1A000 · KT
Publication No.: WDO6003-e06112