Embed Size (px)
Citation preview

TABLE OF CONTENTS PAGE
OPERATING INSTRUCTIONS MANUAL
WARNING: 1. Read and follow instructions carefully. Proper training and periodic review
regarding the use of this equipment is essential to prevent possible serious injury and/or property damage. The instructions contained herein were developed for using this equipment on fittings manufactured by Mueller Co. only, and may not be applicable for any other use.
2. DO NOT exceed the pressure ratings of any components or equipment. Exceeding the rated pressure may result in serious injury and/or property damage.
3. Safety goggles and other appropriate protective gear should be used. Failure to do so could result in serious injury.
Modern Centurion® Fire Hydrant
Inspection and Maintenance 2
Changing Shoe 3
To Replace Nozzles 4
Parts 5
Filling Oil Reservoir 6
Removing Main Valve From Lower Barrel Flange 7 - 8
Removing Main Vlave From Top of Upper Barrel 9 - 10
Facing of Hose Nozzles 11
Inserting Extension Section 12 - 13
Replacing Traffic Flange and Stem Coupling 14 - 15
F 10642 8/19
!

2
MODERN CENTURION® FIRE HYDRANTInspection and Maintenance
from the Barrel. If the water fails to drain from the Barrel, it may be caused by one or more of the following conditions:
1. Water table in ground higher than drains.
2. When hydrant was installed no coarse gravel was put around the Drains and the ground is of such nature that it will not readily absorb water.
3. Drains stopped up by some foreign substance.
4. Failure to leave the Cap off the hydrant to allow air to enter so Barrel will drain.
Replace Nozzle Caps and Oil Filler Plug.
NOTE: The following procedure can be used to open most blocked drain valves.
1. If the water level does not drain and remains in the Barrel at a level just below the nozzles, recap the nozzles hand tight and then back them off 1/4 turn.
2. Open the Main Valve and fill the Barrel as completely as possible.
3. Tighten the Nozzle Caps and close the Hydrant to within two or three turns of full closure for several seconds.
4. Close the Main Valve completely and recheck hydrant drainage. Repeat this procedure if necessary.
To ensure their readiness for instantaneous use, all fire hydrants should be inspected and tested at six-month intervals.
Inspect visually for damaged or missing parts.
Unscrew one Nozzle Cap slightly and tighten the others. Open hydrant fully. Tighten the loose Nozzle Cap when water starts flowing. Remove Oil Filler Plug to check oil level and make sure Stem O-rings are in good condition. (If oil level is low, fill as shown on page 3.) Check all Gaskets for leaks. Turn Operating Nut to fully CLOSED position.
If water was coming from Oil Filler Hole, remove Housing and replace the two O-rings. Inspect and clean Stem and replace it if it is corroded or pitted. Check oil level. Replace Housing and retest for leaks.
Use A-367 Brass Sleeve when removing or replacing Housing or Hydrant Barrel to protect O-rings.
Remove one Nozzle Cap and open hydrant fully and flush the Barrel and the hydrant lateral. Turn Operating Nut to fully CLOSED position.
Remove all Nozzle Caps. Clean and lubricate the threads.
Examine the inside of the Barrel to make certain the Drain Valves have completely drained the water
The above procedure introduces full line pressure to the Drain Valves and provides the best method to clean the Drain Valves with water pressure.
IMPORTANT –– Initial installation of the hydrant MUST BE MADE PROPERLY so the Traffic Flange will function in the ground properly. It should be blocked at ground line and around shoe by concrete or some similar substance to prevent the ground from giving away when the Hydrant is struck.
For additional information on Hydrant anchorage, blocking, and drainage see AWWA Standard C600.
The lower and upper barrels of the Mueller Modern Centurion Hydrant can be removed from the shoe (with the shoe under pressure) keeping the Main Valve intact with the shoe by leaving the two-drain ring housing bolts in place.

3
MODERN CENTURION® FIRE HYDRANTChanging Shoe
1.
4.
7.
2.
5.
3.
6.
Remove all 6 Shoe Bolt Nuts and 2 drain ring housing Bolt Nuts.
Position Shoe to slip in place.
Slip off Hydrant Shoe.
Slip new Shoe in place being careful not to damage Bottom Seat Ring O-ring.
Tighten Operating Nut to be sure Main Valve is in the fully CLOSED position.
Lubricate new Shoe and Bottom Seat Ring O-ring.
Replace Shoe Bolt Nuts. Tighten to approximately 1800 in-lbs. Then tighten Drain Ring Housing Bolt Nuts to approximately 600 in-lbs.

4
To Replace NozzlesMODERN CENTURION® FIRE HYDRANT
Unscrew and remove the Nozzle Cap. Using a pointed tool or awl, remove the Nozzle Lock. If Nozzle is retained with retaining screw, use screwdriver to remove screw.
Lubricate O-ring on new Nozzle. Screw new Nozzle in place hand tight and place Nozzle Wrench behind threaded section of Nozzle so that Wrench gaps engage Nozzle drive lugs. Screw on Nozzle Cap to hold the Wrench in place. Attach a length of pipe to handle of Nozzle Wrench and tighten.
Place Nozzle Wrench behind threaded section of Nozzle so that Wrench gaps engage Nozzle drive lugs. Replace Nozzle Cap and tighten until Cap rests loosely against Wrench.
Remove Nozzle Cap and drive the Nozzle Lock into position between the Nozzle and Hydrant Barrel using the Nozzle Lock Installation Tool and Brass Hammer. Replace the Nozzle Cap.NOTE: Wear safety glasses when using a striking tool.
Attach a length of pipe over handle end of Wrench and unscrew the Nozzle.
2.
5.
1.
4.
3.

5
Bury - 1'6" (0.46m minimum; longer by 6' (152 mm) intervals
PartsMODERN CENTURION® FIRE HYDRANT
A-52
A-53
A-3
A-5
A-6
A-7
A-13
A-17
A-18
A-12
A-23
A-20
A-27
A-29
A-25
A-31
A-36
A-39
A-41
A-37
A-45
A-49
A-35
A-40
A-16
A-54
A-55
A-57
A-56
A-14
A-15
A-19
A-58
A-59
A-22
A-26
A-28
A-32
A-30
A-33
A-34
A-38
A-44
A-47
A-51
A-46
A-50
A-43
A-42
A-21
Operating NutWeather CapHold Down Nut O-Ring – Inside Hold Down NutHold Down Nut O-Ring – Outside HousingAnti-Friction WasherHousing BoltsHousing Top O-RingNozzle LockPumper NozzlePumper Nozzle CapPumper Nozzle Cap Gasket Pumper Nozzle O-RingOil Filler PlugChain Connector HookChainStem O-RingUpper StemUpper BarrelHose Nozzle CapHose NozzleHose Nozzle Cap GasketHose Nozzle O-RingTraffic Flange Bolt & NutTraffic Flange GasketTraffic FlangeStem CouplingClevis PinReusable ClipLower BarrelLower StemStem Pin 8"Upper Valve PlateDrain Valve FacingDrain Valve Facing ScrewSeat RingSeat Ring Top O-RingDrain Ring Housing Gasket Drain RingHousingDrain Ring
Ring Bottom O-RingMain ValveLower Valve PlateCap Nut WasherCap Nut SealCap NutShoeShoe Bolt & NutHydrant Lubricating Oil
Drain Ring Housing Bolt & Nut Seat
A-48
6
Filling Oil ReservoirMODERN CENTURION® FIRE HYDRANT
CAUTION: Always fill the oil reservoir with the Bonnet installed, the hydrant in its normal upright position, and the main valve fully closed. If the hydrant is filled with lubricant under any other circumstances, excess lubricant can overfill the reservoir and create a pressure lock. This could result in damage to the seals or Bonnet, or prevent proper hydrant operation.
!
1.
4.
3.
Remove the Weather Cap from the Hydrant.
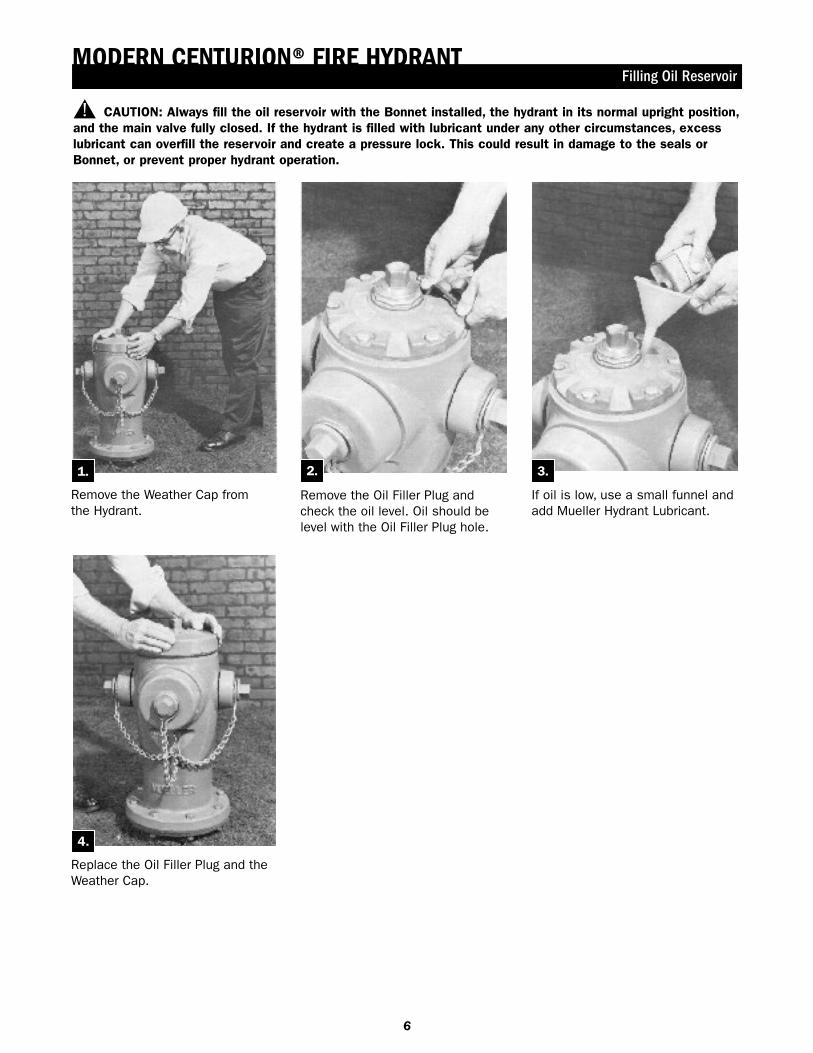
Replace the Oil Filler Plug and the Weather Cap.
If oil is low, use a small funnel and add Mueller Hydrant Lubricant.
2.
Remove the Oil Filler Plug and check the oil level. Oil should be level with the Oil Filler Plug hole.

7
Removing Main Valve From Lower Barrel FlangeMODERN CENTURION® FIRE HYDRANT
CAUTION: Always fill the oil reservoir with the Bonnet installed, the hydrant in its normal upright position, and the main valve fully closed. If the hydrant is filled with lubricant under any other circumstances, excess lubricant can overfill the reservoir and create a pressure lock. This could result in damage to the seals or Bonnet, or prevent proper hydrant operation.
!
1.
4.
2.
5.
3.
6.
Remove Upper Barrel. Remove Upper Stem and Stem Coupling from Lower Stem. Slide slotted end of Wrench over Lower Stem. Align holes in Wrench and Stem and attach Wrench to Stem with a Clevis Pin. Lower Support Arm onto the flange of Lower Barrel and tighten Thumb Screw to hold Main Valve in the closed position. Shut off water at the Gate Valve.
Lower Main Valve assembly and carefully thread Seat Ring into the base of the Hydrant hand tight. Raise the Main Valve leaving about 1/2" of play between the Main Valve and Seat. Lower Support Arm onto flange of Lower Barrel and tighten Thumb Screw.
Remove Main Valve assembly by turning Wrench counter-clockwise and lift out Wrench, Lower Stem, Main Valve Assembly and Seat Ring from Hydrant Barrel as a unit.
Tighten Main Valve to 200 ft-lbs. Turn on water at the Gate Valve and remove Wrench from Stem by removing Clevis Pin.
Remove Weather Cap, Hold Down Nut, Anti-Friction Washer, and Operating Nut. Lubricate Brass Sleeve and slide over threaded stem end to prevent O-ring damage. Unbolt and remove Housing. Remove Traffic Flange Bolts and Traffic Flange.
Straighten Stainless Steel Lock Washer, unscrew Cap Nut and remove Washer, Stem Seal, Lower Valve Plate, Main Valve and Seat Ring. (On hydrants 1997 and newer, Main Valve can be reversed to provide new seal.) Clean, inspect and replace any damaged parts. Replace Drain Valve Facings. Inspect and lubricate Top and Bottom Seat O-rings (replace if necessary). Lubricate all threaded surfaces and reassemble. With Cap Nut tightened, bend edges of Stainless Steel Lock Washer over one flat on the Lower Valve Plate and one flat on the Cap Nut.

8
Removing Main Valve From Lower Barrel FlangeMODERN CENTURION® FIRE HYDRANT
Turn Operating Nut in the closing direction to assure
Main Valve is closed tightly, then turn in opening direction 1/4 turn to relieve tension on operating mechanism.
7. 8. 9.
10.
Attach the Brass Sleeve to Upper Stem and lubricate outside to protect O-ring Seals from thread damage. Bolt the Housing to Upper Barrel. Remove Brass Sleeve; reassemble Operating Nut, Anti-Friction Washer, and Hold Down Nut.* Be sure O-ring Seals are in good condition at thread shoulder on outside of Hold Down Nut and on inside where contact is made with Operating Nut. Remove Oil Filler Plug in Housing. Pour Mueller Hydrant Lubricant into Oil Reservoir until it is level with Oil Filler Plug hole. Replace Oil Filler Plug and attach Weather Cap.
Unscrew one Hose Nozzle Cap slightly to bleed air. Open Hydrant fully. Tighten Hose Nozzle Cap when water starts flowing and check all gaskets for leaks. Turn Operating Nut to fully closed position and remove Hose Nozzle Cap to allow Barrel to drain. Replace Hose Nozzle Cap.
Reassemble Upper Stem to Lower Stem. Place Upper Barrel in place and reassemble Traffic Flange.
*Tighten Hold Down Nut to 200 - 300 ft-lbs of torque. If torque wrench is not available, use a 3 lb. hammer to strike the end of the A-311 wrench firmly two times to assure the nut is properly tightened.

9
Removing Main Valve From Top of Upper BarrelMODERN CENTURION® FIRE HYDRANT
1.
4.
2.
5.
3.
6.
Slide slotted end of Wrench over top of Stem and engage the slot with Pin welded to Upper Stem. Tighten “T” handle of Wrench firmly. Lower support arm onto top of Upper Barrel and tighten Thumb Screw to hold the Main Valve in the closed position. Shut off water at the Gate Valve. Remove Main Valve assembly by turning Seat Wrench counter-clockwise.
With Cap Nut tightened to 100 ft-lbs on 5-1/4" Hydrant or 50 ft-lbs on 4-1/2" Hydrant, bend edges of Stainless Steel Lock Washer over one flat on the Lower Valve Plate and one flat on the Cap Nut.
Lift out Wrench, Upper and Lower Stem, Main Valve Assembly and Seat Ring from Hydrant Barrel as a unit.
Lower Main Valve into the Barrel, turn Seat Wrench clockwise, and carefully thread Main Valve and Seat Ring into the base of the Hydrant hand tight. Raise the Main Valve leaving about 1/2" of play between the Main Valve and Seat. Lower Support Arm and tighten Thumb Screw.
Remove Weather Cap, Hold Down Nut, Operating Nut and Anti-Friction Washer. Lubricate Brass Sleeve and slide over threaded stem end to prevent O-ring damage. Unbolt and remove Housing. Remove Brass Sleeve.
Straighten Stainless Steel Lock Washer, unscrew Cap Nut and remove Washer, Stem Seal, Lower Valve Plate, Main Valve and Seat Ring. Clean, inspect and replace any damaged parts. (On hydrants 1997 and newer, Main Valve can be reversed to provide new seal.) Replace Drain Valve Facings.Inspect and lubricate Top and Bottom Seat O-rings (replace if necessary). Lubricate all threaded surfaces and reassemble.
CAUTION: Always fill the oil reservoir with the Bonnet installed, the hydrant in its normal upright position, and the main valve fully closed. If the hydrant is filled with lubricant under any other circumstances, excess lubricant can overfill the reservoir and create a pressure lock. This could result in damage to the seals or Bonnet, or prevent proper hydrant operation.
!

10
Removing Main Valve From Top of Upper BarrelMODERN CENTURION® FIRE HYDRANT
7. 8. 9.
Attach the Brass Sleeve to Upper Stem and lubricate outside to protect O-ring Seals from thread damage. Place Housing onto Upper Barrel and tighten Bolts. Remove Brass Sleeve. Reassemble Operating Nut, Anti-Friction Washer, and Hold Down Nut.* Be sure O-ring Seals are in good condition at thread shoulder on outside of Hold Down Nut and on inside where contact is made with Operating Nut. Remove Oil Filler Plug in Housing. Pour Mueller Hydrant Lubricant into Oil Reservoir until it is level with Oil Filler Plug hole. Replace Oil Filler Plug. Screw on Weather Cap.
Unscrew one Hose Nozzle Cap slightly to bleed air. Open Hydrant fully. Tighten Hose Nozzle Cap when water starts flowing and check all Gaskets for leaks. Turn Operating Nut to fully closed position and remove Hose Nozzle Cap to allow Barrel to drain. Replace Hose Nozzle Cap.
Turn Seat Wrench clockwise to tighten Main Valve to 200 ft-lbs. Turn on water at the Gate Valve and remove Seat Wrench by loosening “T” Handle.
Turn Operating Nut in the closing direction to assure
Main Valve is closed tightly, then turn in opening direction 1/4 turn to relieve tension on operating mechanism.
10.
*Tighten Hold Down Nut to 200 - 300 ft-lbs of torque. If torque wrench is not available, use a 3 lb. hammer to strike the end of the A-311 wrench firmly two times to assure the nut is properly tightened.

11
Turn Operating Nut in the closing direction to assure Main Valve
is closed tightly, then turn in opening direction 1/4 turn to relieve tension on operating mechanism.
Facing of Hose NozzlesMODERN CENTURION® FIRE HYDRANT
§
1.
4. 5.
6.
3.
Loosen Nuts on Traffic Flange Bolts.
Tighten Operating Nut, turning in closing direction.
Tighten Traffic Flange Bolts.
Rotate upper barrel section as desired.
2.
Turn Operating Nut slightly in the opening direction to relieve compression between barrel sections.

12
Inserting Extension SectionMODERN CENTURION® FIRE HYDRANT
1.
4.
2.
5.
3.
6.
Unbolt and remove Traffic Flange.
Attach Extension Barrel to Lower Barrel with solid Flange halves (without groove) and Bolts, being sure Flange Gasket is in place.
Remove the Upper Barrel and remove Stem and Stem Coupling by removing the lower Stainless Steel Reusable Clip and Clevis Pin.
Assemble Upper Stem and Stem Coupling onto Extension Stem and retain it with Stainless Steel Clevis Pin and Reusable Clip. Make sure stem coupling is installed with notches towards the lower stem. Words “this end up” towards the upper stem.
Remove the Weather Cap, Hold Down Nut, Anti-Friction Washer and Operating Nut from the Hydrant. Lubricate outside of Brass Sleeve and slide over threaded stem to prevent O-ring damage. Unbolt and remove the Housing. Remove Brass Sleeve.
Place Extension Stem and Extension Coupling on Lower Stem and retain it with Stainless Steel Clevis Pin and Reusable Clip.
CAUTION: Always fill the oil reservoir with the Bonnet installed, the hydrant in its normal upright position, and the main valve fully closed. If the hydrant is filled with lubricant under any other circumstances, excess lubricant can overfill the reservoir and create a pressure lock. This could result in damage to the seals or Bonnet, or prevent proper hydrant operation.
!

13
Turn Operating Nut in the closing direction to assure Main
Valve is closed tightly, then turn in opening direction 1/4 turn to relieve tension on operating mechanism.
7. 8. 9.
10.
Attach Brass Sleeve to Upper Stem and lubricate outside to protect O-ring seals from thread damage. Bolt Housing onto Upper Barrel and remove the Brass Sleeve. Reassemble Operating Nut, Anti-Friction Washer and Hold Down Nut* Be Sure O-ring seals are in good condition at thread shoulder on outside of Hold Down Nut and on inside where contact is made with Operating Nut. Remove Oil Filler Plug and pour Mueller Hydrant Lubricant into Oil Reservoir until it is level with Oil Filler Plug hole. Replace Oil Filler Plug and Weather Cap.
Unscrew one Hose Nozzle Cap slightly to bleed air. Open Hydrant fully. Tighten the Hose Nozzle Cap when water starts flowing and check all gaskets for leaks. Turn Operating Nut to fully CLOSED position and remove Hose Nozzle Cap to allow Barrel to drain. Replace Hose Nozzle Cap.
Attach Upper Barrel to Extension Barrel with Traffic Flange halves (with bevel on outer edge downward) and Bolts, being sure Traffic Flange Gasket is in place.
Inserting Extension SectionMODERN CENTURION® FIRE HYDRANT
*Tighten Hold Down Nut to 200 - 300 ft-lbs of torque. If torque wrench is not available, use a 3 lb. hammer to strike the end of the A-311 wrench firmly two times to assure the nut is properly tightened.

14
Replacing Traffic Flange and Stem CouplingMODERN CENTURION® FIRE HYDRANT
1.
4.
2.
5.
3.
6.
Remove Stainless Steel Reusable Clip from Stainless Steel Clevis Pin. Remove the Clevis Pin and damaged Stem Coupling from Upper Stem. Unbolt and remove broken Traffic Flange from Upper Barrel. Remove Weather Cap, Hold Down Nut, Anti-Friction Washer and Operating Nut from Upper Barrel. Lubricate Brass Sleeve and slide over threaded Stem end to prevent O-ring damage. Unbolt and remove Housing. Remove Upper Stem from Housing.
Assemble Upper Stem and new Stem Coupling onto Lower Stem and retain with new Stainless Steel Clevis Pin and new Reusable Clip furnished withStem Coupling.
Remove Stainless Steel Cotter Pin from Stainless Steel Clevis Pin in Lower Stem and throw these pieces away.
Place Flange Gasket on exposed Flange of Lower Barrel. Place Upper Barrel carefully in position on Lower Barrel. Be sure that it is concentric with Lower Barrel and that Gasket is centered. Bolt into place the two halves of Traffic Flange (with bevel on outer edge downward) and with Traffic Flange snugly fitting around Lower Barrel.
Mueller Hydrant with Upper Barrel knocked over by vehicle. Note: broken pieces of Traffic Flange lying on ground.
Place Extension Stem and Extension Coupling on Lower Stem and retain it with Stainless Steel Clevis Pin and Reusable Clip.
CAUTION: Always fill the oil reservoir with the Bonnet installed, the hydrant in its normal upright position, and the main valve fully closed. If the hydrant is filled with lubricant under any other circumstances, excess lubricant can overfill the reservoir and create a pressure lock. This could result in damage to the seals or Bonnet, or prevent proper hydrant operation.
!

15
Replacing Traffic Flange and Stem CouplingMODERN CENTURION® FIRE HYDRANT
Unscrew one Hose Nozzle Cap slightly to bleed air.
Open Hydrant fully. Tighten the Hose Nozzle Cap when water starts flowing and check all gaskets for leaks. Turn Operating Nut to fully closed position and remove Hose Nozzle Cap to allow Barrel to drain. Replace Hose Nozzle Cap.
7. 8.
9.
Remove the Oil Filler Plug in Housing. Pour Mueller Hydrant Lubricating Oil into oil reservoir until it is level with Oil Filler Plug hole. Replace Oil Filler Plug and Weather Cap.
Attach the Brass Sleeve to Upper Stem and lubricate outside to protect O-rings from thread damage. Place Housing onto Upper Barrel and tighten Bolts. Remove Brass Sleeve, reassemble Operating Nut, Anti-Friction Washer and Hold Down Nut.* Be sure O-ring Seals are in good condition at thread shoulder on outside of Hold Down Nut and on inside where contact is made with Operating Nut.
Turn Operating Nut in the closing direction to assure Main
Valve is closed tightly, then turn in opening direction 1/4 turn to relieve tension on operating mechanism.
10.
*Tighten Hold Down Nut to 200 - 300 ft-lbs of torque. If torque wrench is not available, use a 3 lb. hammer to strike the end of the A-311 wrench firmly two times to assure the nut is properly tightened.

16
MUELLER® | ECHOLOGICS® | HYDRO GATE® | HYDRO-GUARD® | HYMAX® | JONES® | KRAUSZ® | MI.NET® | MILLIKEN® | PRATT® | SINGER® | U.S. PIPE VALVE AND HYDRANT
1.800.423.1323 – www.muellerwp.com – [email protected] – 1.423.490.9555 – www.mueller-international.com – [email protected]
Mueller refers to one or more of Mueller Water Products, Inc. a Delaware corporation (“MWP”), and its subsidiaries. MWP and each of its subsidiaries are legally separate and independent entities when providing products and services. MWP does not provide products or services to third parties. MWP and each of its subsidiaries are liable only for their own acts and omissions and not those of each other. MWP brands include Mueller®, Echologics®, Hydro Gate®, Hydro-Guard®, HYMAX®, Jones®, Krausz®, Mi.Net®, Milliken®, Pratt®, Singer®, and U.S. Pipe Valve & Hydrant. Please see muellerwp.com/brands and krauszusa.com to learn more.
Copyright © 2019 Mueller Water Products, Inc. All Rights Reserved. The trademarks, logos and service marks displayed in this document are the property of Mueller Water Products, Inc., its affiliates or other third parties. Products marked with a section symbol (§) are subject to patents or patent applications. For details, visit www.mwppat.com. These products are intended for use in potable water applications. Please contact your Mueller Sales or Customer Service Representative concerning any other application(s).