Embed Size (px)
Citation preview
iu
User Guide
Online Payment Approver (WebGUI version)
Online Payment Approver–User Guide Page 2 of 30
Table of Contents
1 ABOUT THIS DOCUMENT ............................................................................................................. 3
1.1 HOW TO USE THIS GUIDE ........................................................................................................... 3
1.2 COURSE OBJECTIVES ................................................................................................................ 3
2 REVIEWING, APPROVING, AND REJECTING ............................................................................. 4
2.1 PURCHASE ORDER EXCEPTION LIST ........................................................................................... 4
2.2 REVIEWING ONLINE PAYMENT REQUESTS ................................................................................... 4
2.3 SAP SECURITY ROLES .............................................................................................................. 4
3 LOGGING IN TO SAP ..................................................................................................................... 5
3.1 LOGGING IN TO THE SAP ........................................................................................................... 5
3.2 WEBGUI VS. WINGUI ................................................................................................................ 5
3.3 DETERMINE YOUR INTERFACE .................................................................................................... 7
3.4 WELCOME PAGE ........................................................................................................................ 7
4 SAP BUSINESS WORKPLACE (SBWP) ........................................................................................ 9
4.1 ACCESSING THE SBWP ............................................................................................................. 9
4.2 ONLINE PAYMENT REQUEST DOCUMENTS ................................................................................. 10
4.3 BASIC DATA ............................................................................................................................. 11
4.4 VENDOR INFORMATION ............................................................................................................. 12
4.5 COST DISTRIBUTION ................................................................................................................ 13
4.6 PAYMENT ................................................................................................................................ 14
4.7 NOTES .................................................................................................................................... 15
4.8 VERIFYING THE INFORMATION ................................................................................................... 17
4.9 APPROVING A REQUEST ........................................................................................................... 17
4.10 REJECTING A REQUEST ............................................................................................................ 18
4.11 ADDITIONAL FEATURES ............................................................................................................ 21
4.12 STATUS COLUMN ..................................................................................................................... 23
5 ESTABLISHING A SUBSTITUTE APPROVER ............................................................................ 24
5.1 SUBSTITUTE APPROVER POLICY ............................................................................................... 24
5.2 TWO TYPES OF SUBSTITUTE APPROVER ................................................................................... 24
5.3 SETTING UP A SUBSTITUTE APPROVER ..................................................................................... 25
6 APPENDIX A–RESOURCES ........................................................................................................ 30
Online Payment Approver–User Guide Page 3 of 30
1 About This Document
This document is designed as a resource for Online Payment approvers who access SAP
through WebGUI. Throughout this document, WebGUI screens are displayed.
1.1 How to Use This Guide
As a Reference
This user manual was organized in a linear format that corresponds with the sequence of steps
necessary to review and process an online payment request.
1.2 Course Objectives
Online Payment approvers are responsible for reviewing online payment request documents and
either approving or rejecting them.
After completing this course, you should be able to:
Describe the policies associated with approving online payment.
Access online payment request documents in SAP.
Review the information contained in online payment request documents.
And approve and reject online payment requests.
Online Payment Approver–User Guide Page 4 of 30
2 Reviewing, Approving, and Rejecting
At Hopkins, certain types of transactions can be paid through an online payment request.
Employees can log onto SAP and submit a payment request for things like catering, express
shipping, and software licensing. After the payment is approved, a payment is made to the
vendor
2.1 Purchase Order Exception List
A complete list of the transactions that can be paid through an online payment request is
available on the Shared Services website @ http://ssc.jhu.edu/supplychain/exceptions.html.
2.2 Reviewing Online Payment Requests
As an Online Payment approver, it’s your job to review online payment request documents, and
either approve or reject them.
Online payment request documents are available for review in SAP.
You’re responsible for reviewing the online payment request for:
Availability of funds
Completeness and accuracy
Supporting documentation (invoices)
Compliance with funding-agency regulations and the Purchase Order Exception list
Please contact Accounts Payable Shared Services if you have questions regarding online
payment policies and procedures.
2.3 SAP Security Roles
As an approver, you’ll need the following SAP security role: Online Payment Approver.
Once you have this role, you’ll be able to review online payment request documents, and
make decisions about these payments.
If you don’t have access to this security role, work with your departmental HR administrator
to process an ISR Position Maintain and add the role.
Online Payment Approver–User Guide Page 5 of 30
3 Logging In to SAP
You should be familiar with the SAP login process, but this will serve as a review.
3.1 Logging In to the SAP
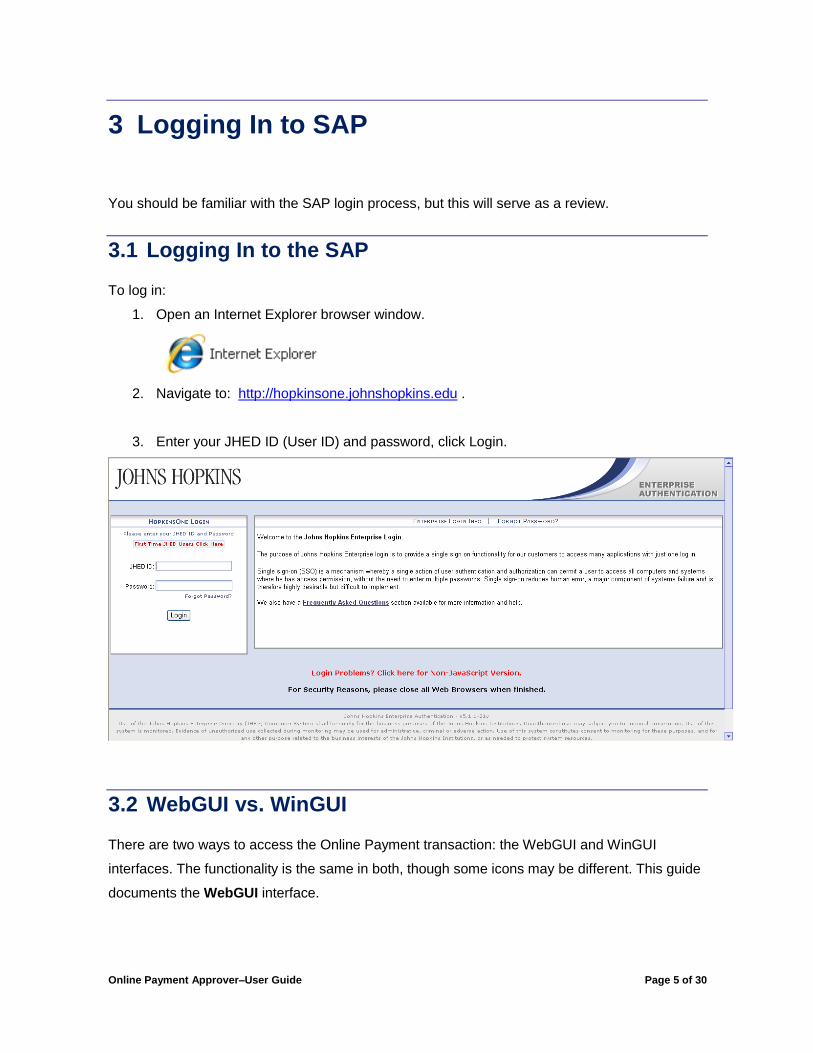
To log in:
1. Open an Internet Explorer browser window.
2. Navigate to: http://hopkinsone.johnshopkins.edu .
3. Enter your JHED ID (User ID) and password, click Login.
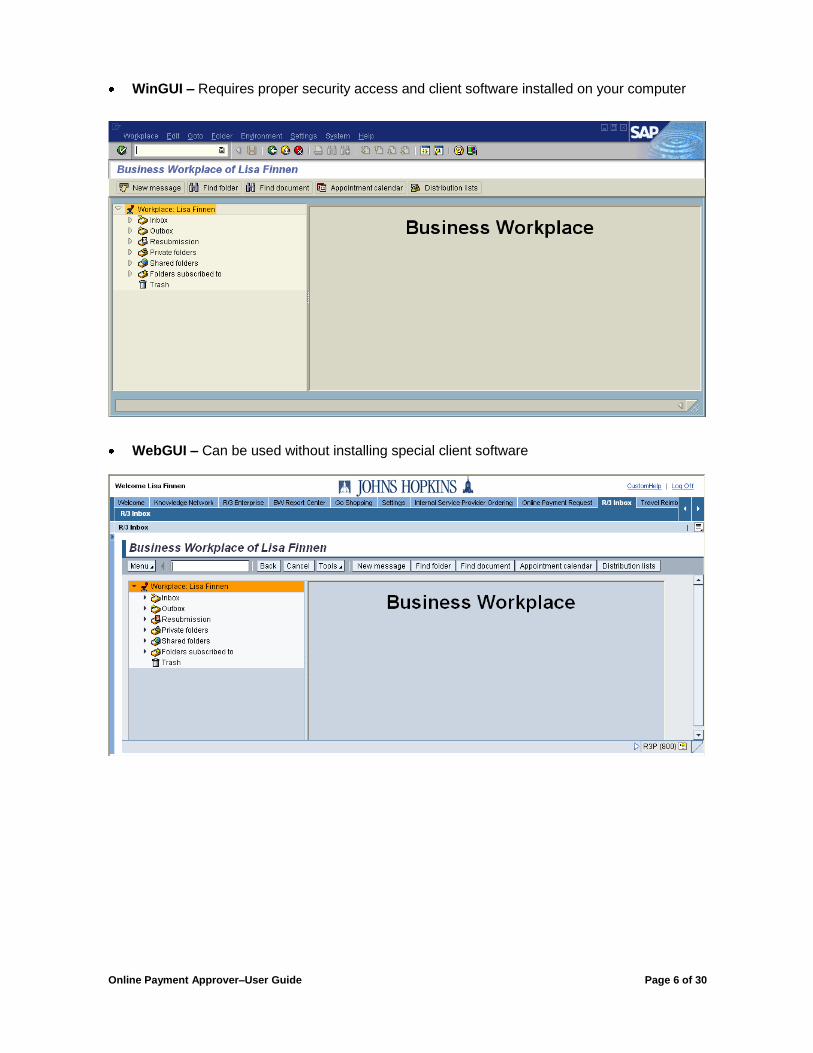
3.2 WebGUI vs. WinGUI
There are two ways to access the Online Payment transaction: the WebGUI and WinGUI
interfaces. The functionality is the same in both, though some icons may be different. This guide
documents the WebGUI interface.
Online Payment Approver–User Guide Page 6 of 30
WinGUI – Requires proper security access and client software installed on your computer
WebGUI – Can be used without installing special client software
Online Payment Approver–User Guide Page 7 of 30
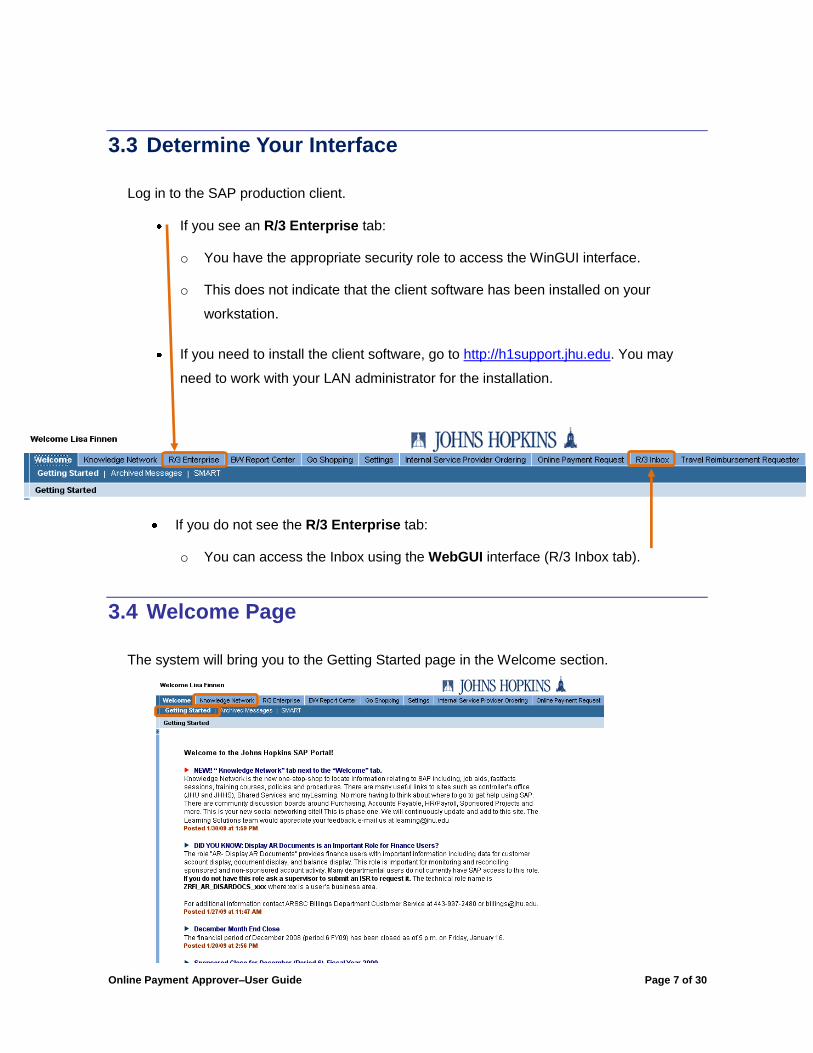
3.3 Determine Your Interface
Log in to the SAP production client.
If you see an R/3 Enterprise tab:
o You have the appropriate security role to access the WinGUI interface.
o This does not indicate that the client software has been installed on your
workstation.
If you need to install the client software, go to http://h1support.jhu.edu. You may
need to work with your LAN administrator for the installation.
If you do not see the R/3 Enterprise tab:
o You can access the Inbox using the WebGUI interface (R/3 Inbox tab).
3.4 Welcome Page
The system will bring you to the Getting Started page in the Welcome section.
Online Payment Approver–User Guide Page 8 of 30
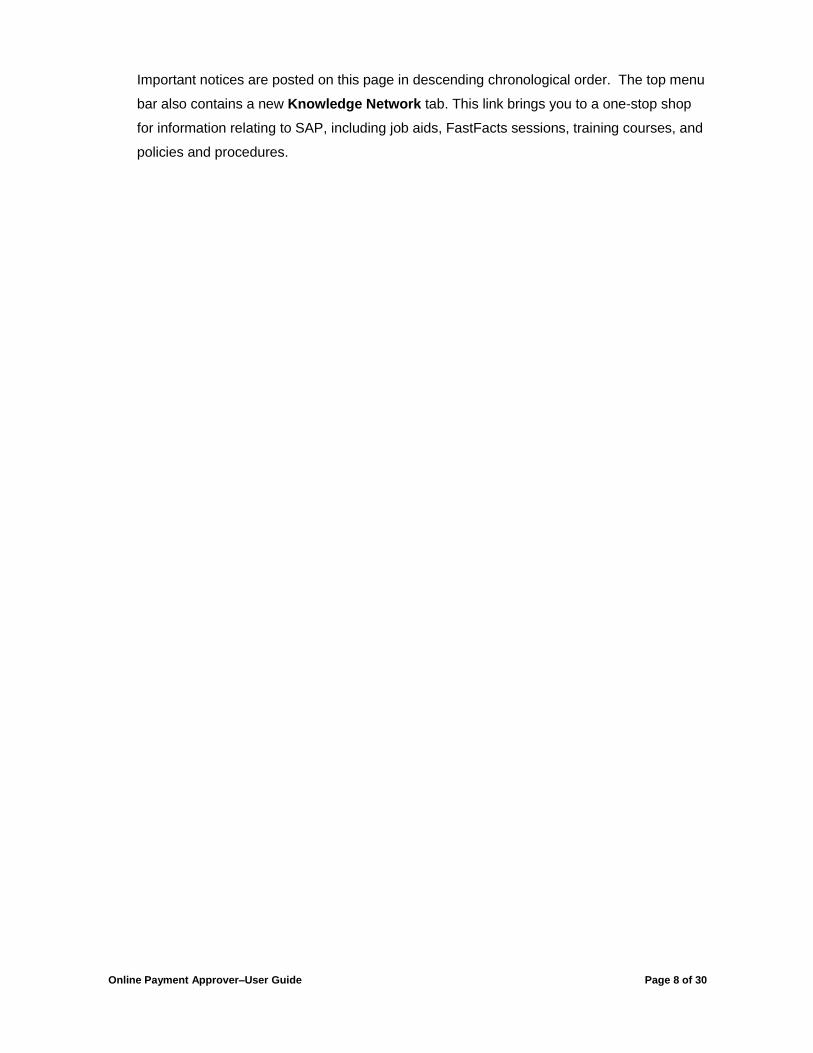
Important notices are posted on this page in descending chronological order. The top menu
bar also contains a new Knowledge Network tab. This link brings you to a one-stop shop
for information relating to SAP, including job aids, FastFacts sessions, training courses, and
policies and procedures.

Online Payment Approver–User Guide Page 9 of 30
4 SAP Business Workplace (SBWP)
Within SAP, online payment request documents can be accessed from the SAP Business Workplace (SBWP).
The SAP Business Workplace:
o Allows you to monitor, review, and approve or reject electronic travel and business ex-pense documents.
o Speeds up the approval and payment remittance processes.
o Reduces paper documentation.
4.1 Accessing the SBWP
You can access the SAP Business Workplace by clicking the R/3 Inbox tab. Then, to access
pending online payment request documents, you need to begin by clicking open your inbox.
If you are a substitute or “backup” approver, and you need to access documents
that are in the regular approver’s inbox, please see the Resources section of this
document to get instructions on how to open and close the regular approver’s
inbox.
Online Payment Approver–User Guide Page 10 of 30
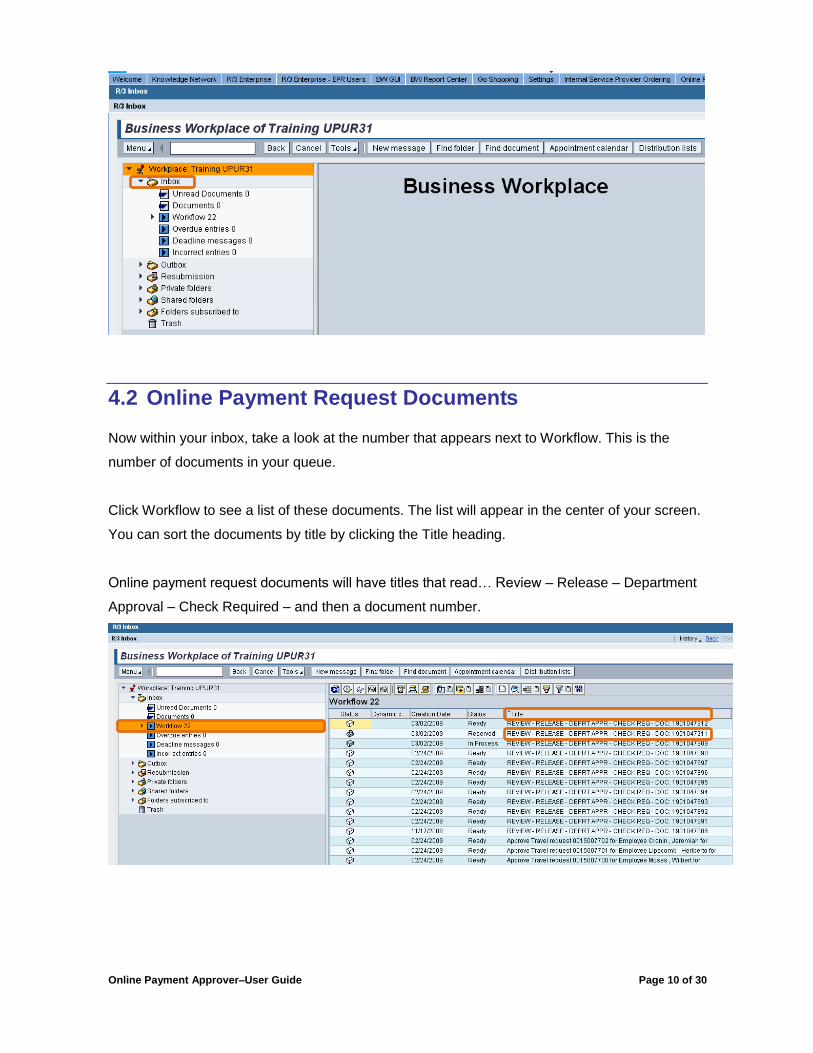
4.2 Online Payment Request Documents
Now within your inbox, take a look at the number that appears next to Workflow. This is the
number of documents in your queue.
Click Workflow to see a list of these documents. The list will appear in the center of your screen.
You can sort the documents by title by clicking the Title heading.
Online payment request documents will have titles that read… Review – Release – Department
Approval – Check Required – and then a document number.
Online Payment Approver–User Guide Page 11 of 30
4.3 Basic Data
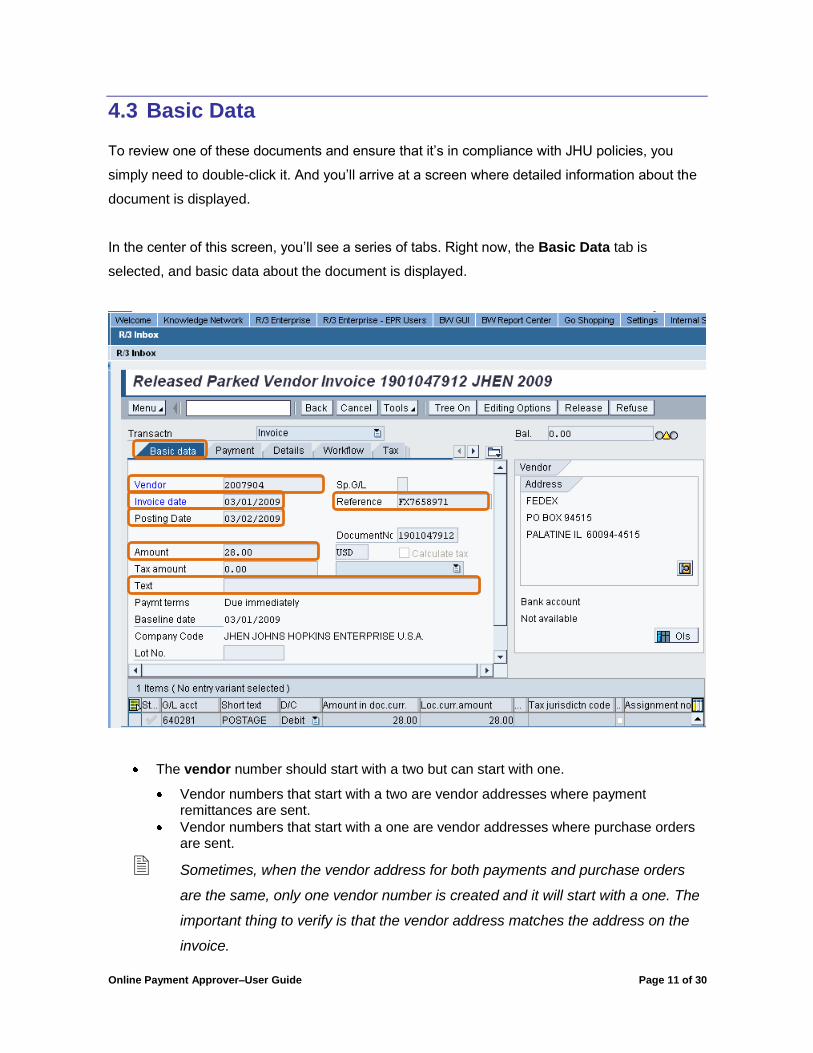
To review one of these documents and ensure that it’s in compliance with JHU policies, you
simply need to double-click it. And you’ll arrive at a screen where detailed information about the
document is displayed.
In the center of this screen, you’ll see a series of tabs. Right now, the Basic Data tab is
selected, and basic data about the document is displayed.
The vendor number should start with a two but can start with one.
Vendor numbers that start with a two are vendor addresses where payment remittances are sent.
Vendor numbers that start with a one are vendor addresses where purchase orders are sent.
Sometimes, when the vendor address for both payments and purchase orders
are the same, only one vendor number is created and it will start with a one. The
important thing to verify is that the vendor address matches the address on the
invoice.
Online Payment Approver–User Guide Page 12 of 30
The invoice date is the date that the invoice was created by the vendor.
The reference field is the invoice number. It should match the number that is on the
actual invoice. It’s important to make sure that these numbers match in order to avoid a
possible duplicate payment and also to make it easy to search for this invoice at a later
date.
The posting date is the date that the online payment request document was created in
SAP. This date must be within the current accounting period. If the date reflects the
previous month (and the accounting period is closed for that month), then it cannot be
processed. The originator will have to change the posting date to reflect the current
accounting period.
The amount is the total amount to be paid on the invoice.
The text field is optional. If the text in this area is preceded by an asterisk (*), this means
that the information should be included on the documentation sent to the vendor. If the
text is not preceded by an asterisk, this means that it is a note to Accounts Payable
Shared Services.
4.4 Vendor Information
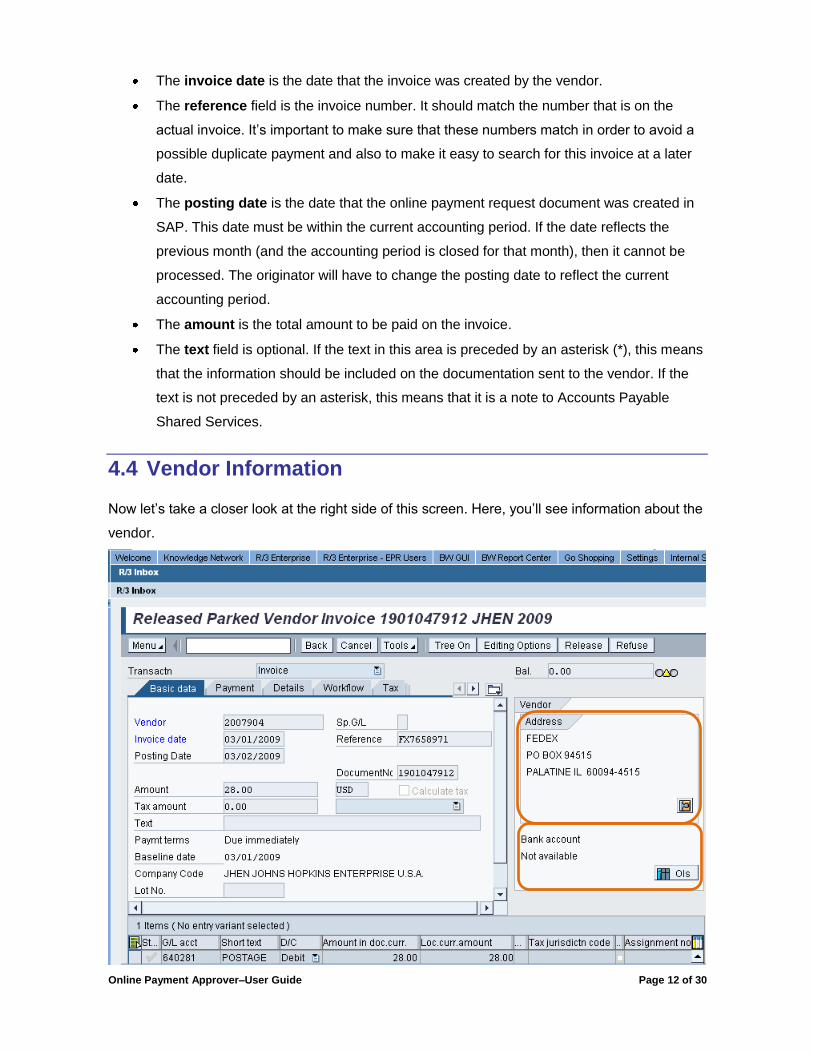
Now let’s take a closer look at the right side of this screen. Here, you’ll see information about the
vendor.
Online Payment Approver–User Guide Page 13 of 30
The vendor’s address is pulled from the vendor master record. You must make sure that
this address matches the one on the actual invoice to ensure that the payment is sent to
the correct location.
You may see the vendor’s banking information displayed here. It’s pulled from the
vendor master record.
o If banking information is displayed, this generally means that an ACH
(Automated Clearning House) payment will be issued to the vendor.
o If no banking information is available, this generally means that a check will be
issued to the vendor.
4.5 Cost Distribution
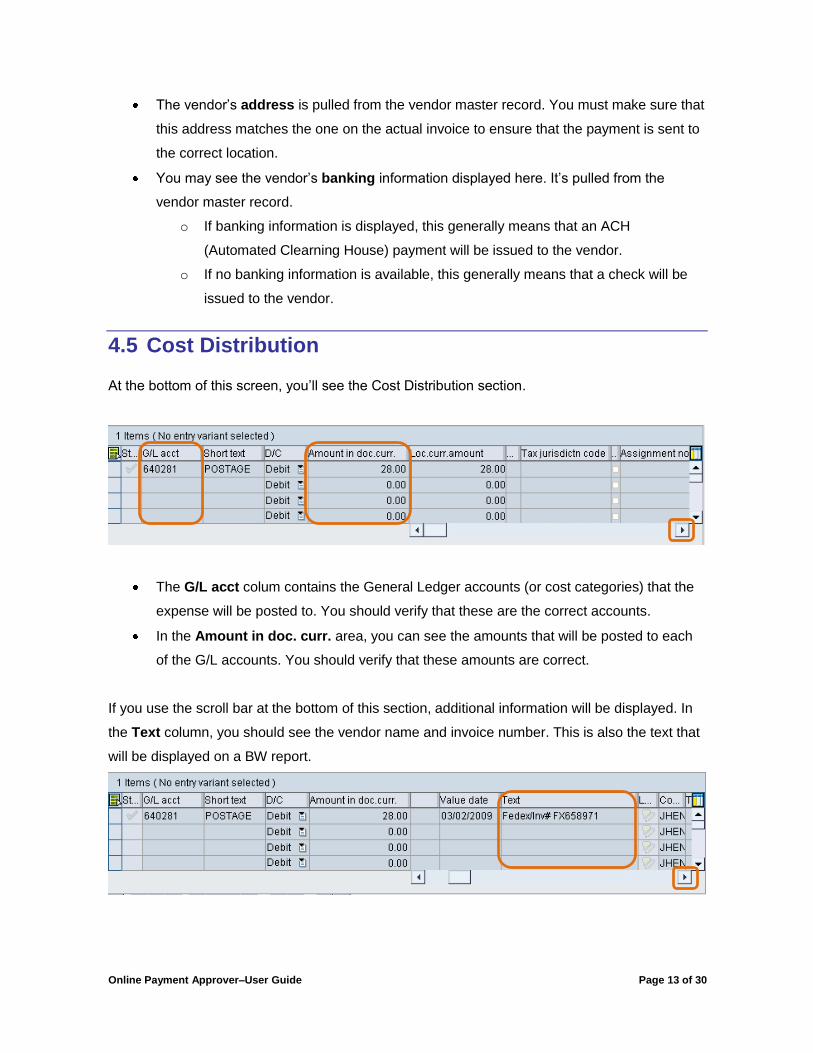
At the bottom of this screen, you’ll see the Cost Distribution section.
The G/L acct colum contains the General Ledger accounts (or cost categories) that the
expense will be posted to. You should verify that these are the correct accounts.
In the Amount in doc. curr. area, you can see the amounts that will be posted to each
of the G/L accounts. You should verify that these amounts are correct.
If you use the scroll bar at the bottom of this section, additional information will be displayed. In
the Text column, you should see the vendor name and invoice number. This is also the text that
will be displayed on a BW report.
Online Payment Approver–User Guide Page 14 of 30
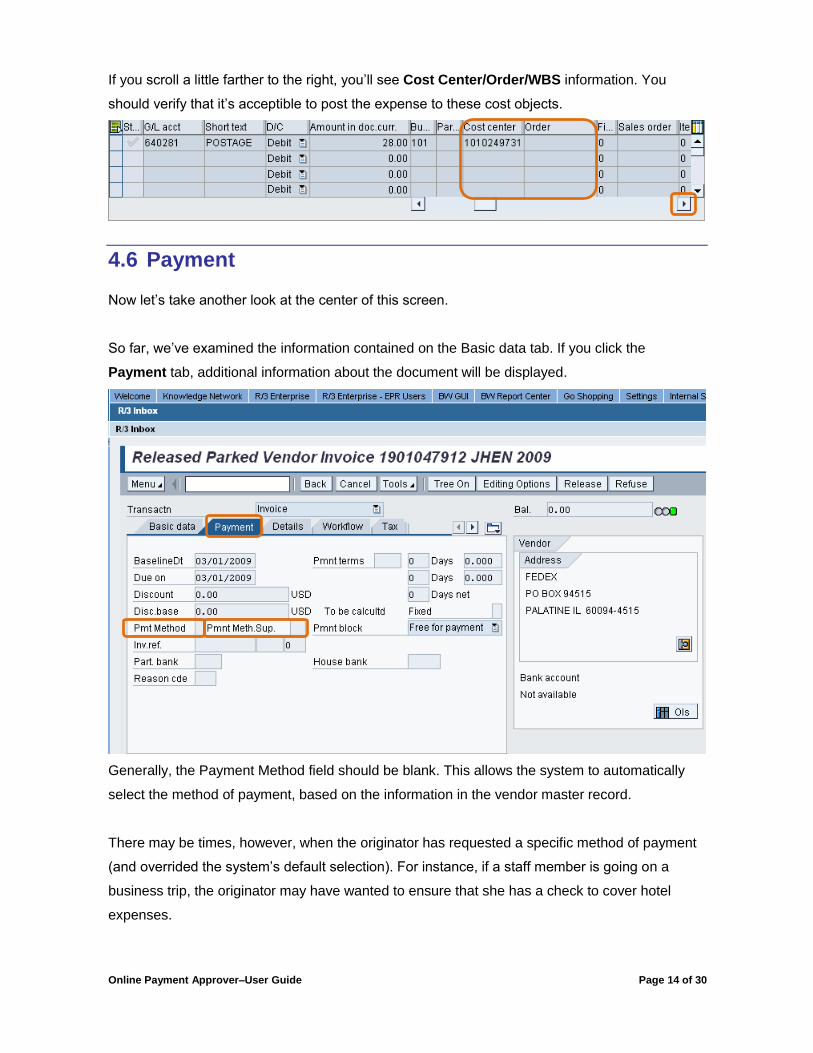
If you scroll a little farther to the right, you’ll see Cost Center/Order/WBS information. You
should verify that it’s acceptible to post the expense to these cost objects.
4.6 Payment
Now let’s take another look at the center of this screen.
So far, we’ve examined the information contained on the Basic data tab. If you click the
Payment tab, additional information about the document will be displayed.
Generally, the Payment Method field should be blank. This allows the system to automatically
select the method of payment, based on the information in the vendor master record.
There may be times, however, when the originator has requested a specific method of payment
(and overrided the system’s default selection). For instance, if a staff member is going on a
business trip, the originator may have wanted to ensure that she has a check to cover hotel
expenses.
Online Payment Approver–User Guide Page 15 of 30
The payment option codes are as follows:
1 – Check JHU
2 – Wires JHU
3 – Vendor Automated Clearing House (ACH) JHU
4 – Check JHHS
5 – Wires JHHS
6 – ACH JHHS
7 – Emply ACH JHU
8 – JHU single check
9 – JHHS single check
Generally, the Payment Method Supplied field should be blank. This allows the system to
automatically select the method of payment delivery, based on the information in the vendor
master record.
There may be times, however, when the originator has requested a specific form of delivery. For
instance, let’s say that the originator wants to provide a staff member with a check to cover
business trip hotel expenses. Unless the originator manually enters a code in this field, the
check will automatically be mailed to the vendor (rather than the staff member).
The payment delivery codes are as follows:
01 – Departmental pick-up (at Accounts Payable Shared Services, Eastern)
02 – Attachment required
03 – Airmail
04 – Returned interdepartmental mail
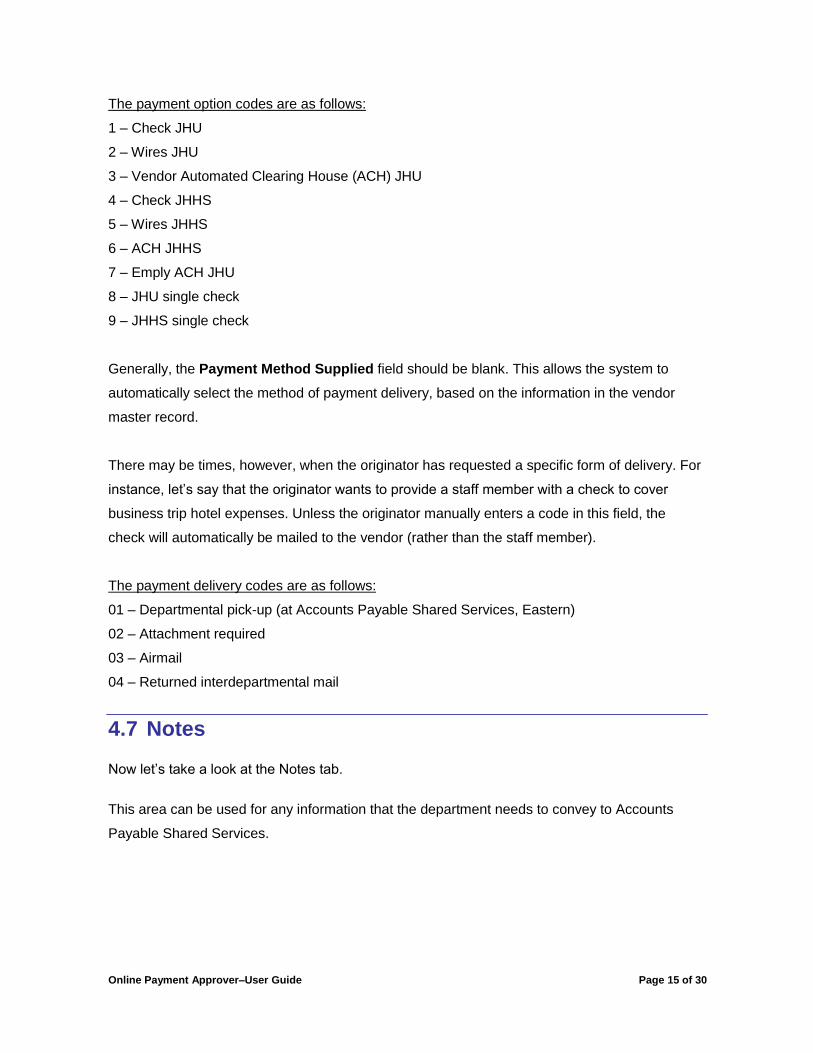
4.7 Notes
Now let’s take a look at the Notes tab.
This area can be used for any information that the department needs to convey to Accounts
Payable Shared Services.
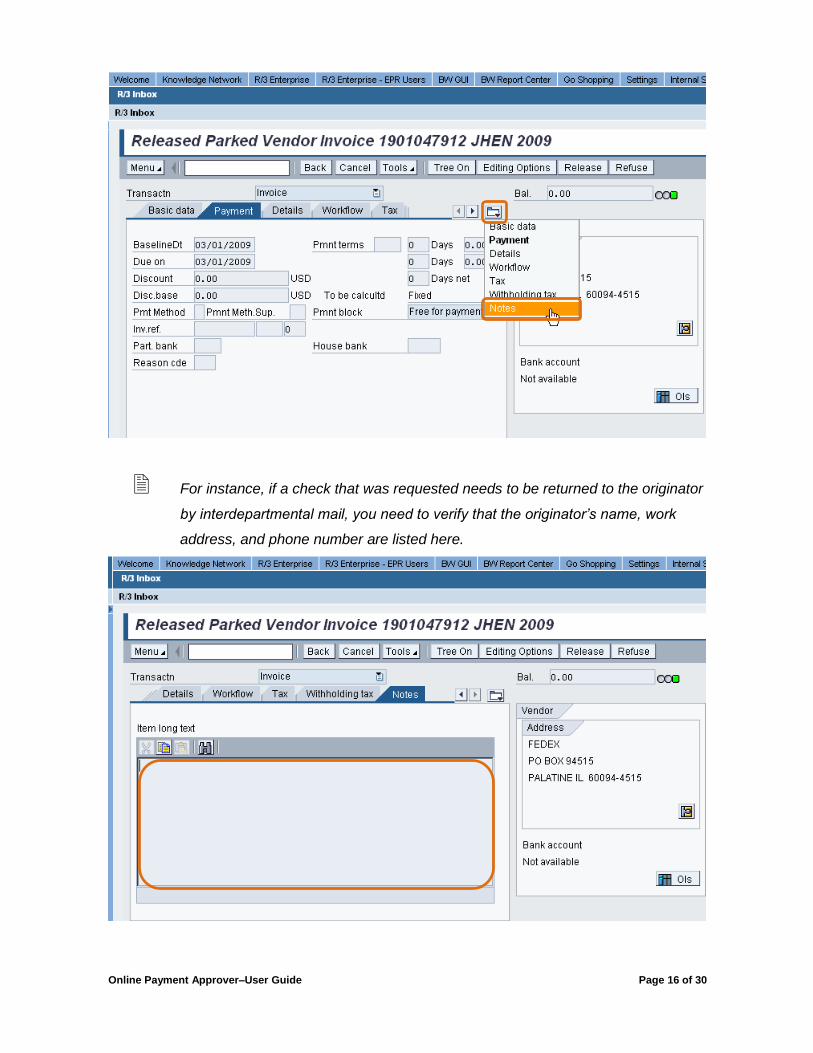
Online Payment Approver–User Guide Page 16 of 30
For instance, if a check that was requested needs to be returned to the originator
by interdepartmental mail, you need to verify that the originator’s name, work
address, and phone number are listed here.
Online Payment Approver–User Guide Page 17 of 30
4.8 Verifying the Information
As an approver, you will need to verify that the information recorded in the online payment
request document matches the actual invoice. You will either be presented with a hard copy of
the invoice, or it will be scanned and attached to the online payment request.
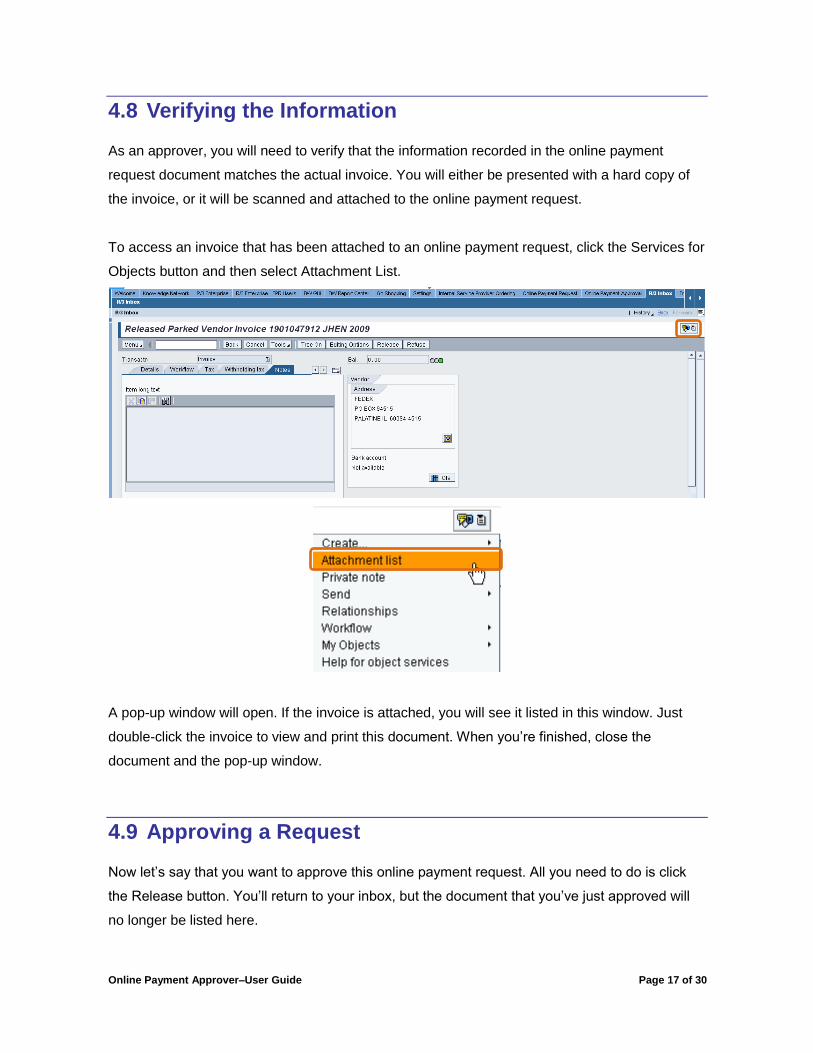
To access an invoice that has been attached to an online payment request, click the Services for
Objects button and then select Attachment List.
A pop-up window will open. If the invoice is attached, you will see it listed in this window. Just
double-click the invoice to view and print this document. When you’re finished, close the
document and the pop-up window.
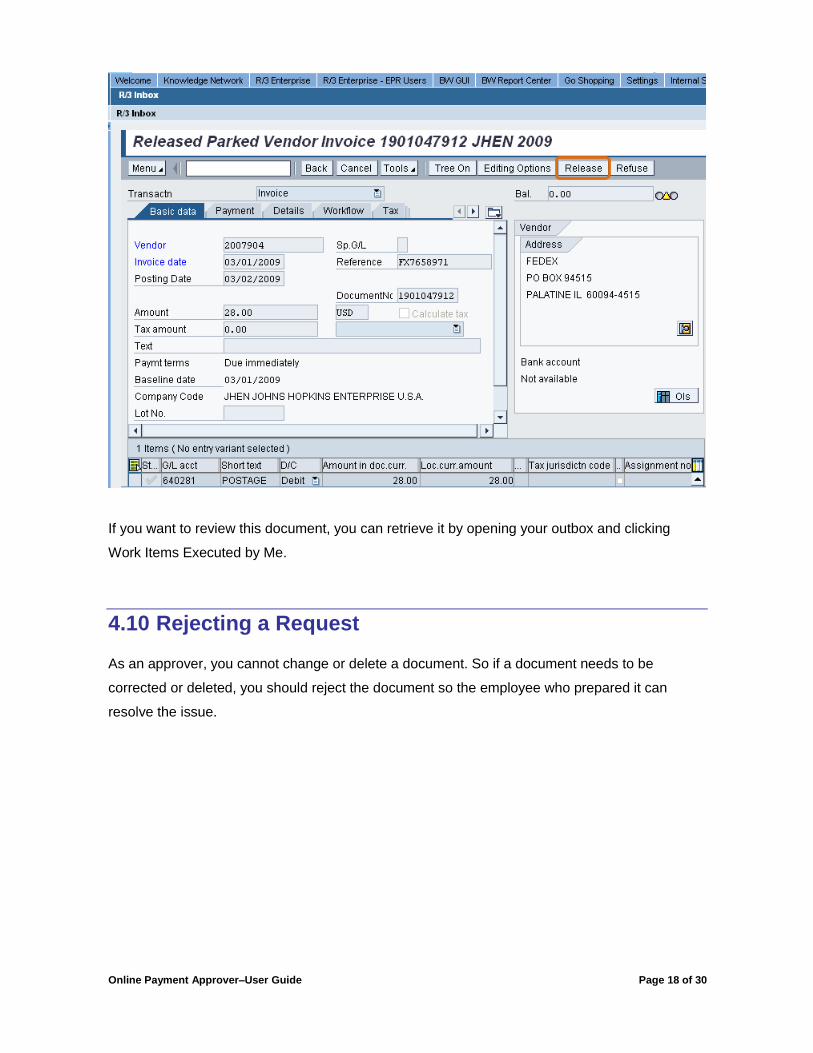
4.9 Approving a Request
Now let’s say that you want to approve this online payment request. All you need to do is click
the Release button. You’ll return to your inbox, but the document that you’ve just approved will
no longer be listed here.
Online Payment Approver–User Guide Page 18 of 30
If you want to review this document, you can retrieve it by opening your outbox and clicking
Work Items Executed by Me.
4.10 Rejecting a Request
As an approver, you cannot change or delete a document. So if a document needs to be
corrected or deleted, you should reject the document so the employee who prepared it can
resolve the issue.
Online Payment Approver–User Guide Page 19 of 30
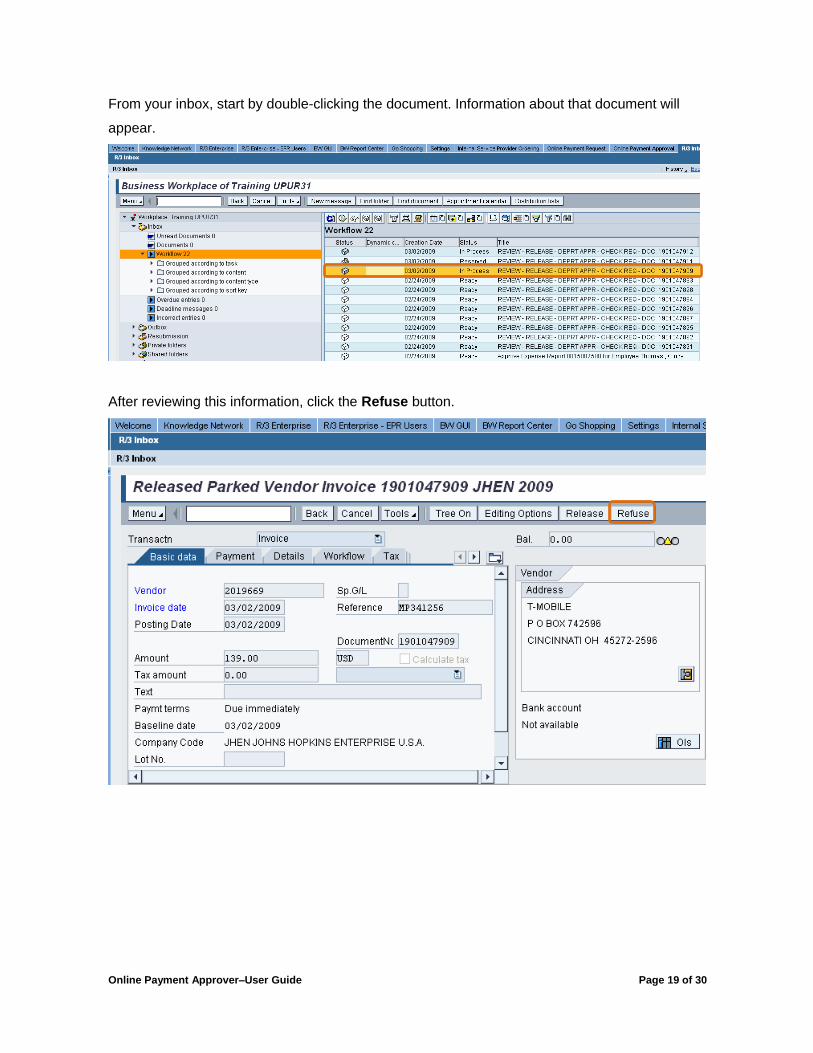
From your inbox, start by double-clicking the document. Information about that document will
appear.
After reviewing this information, click the Refuse button.
Online Payment Approver–User Guide Page 20 of 30
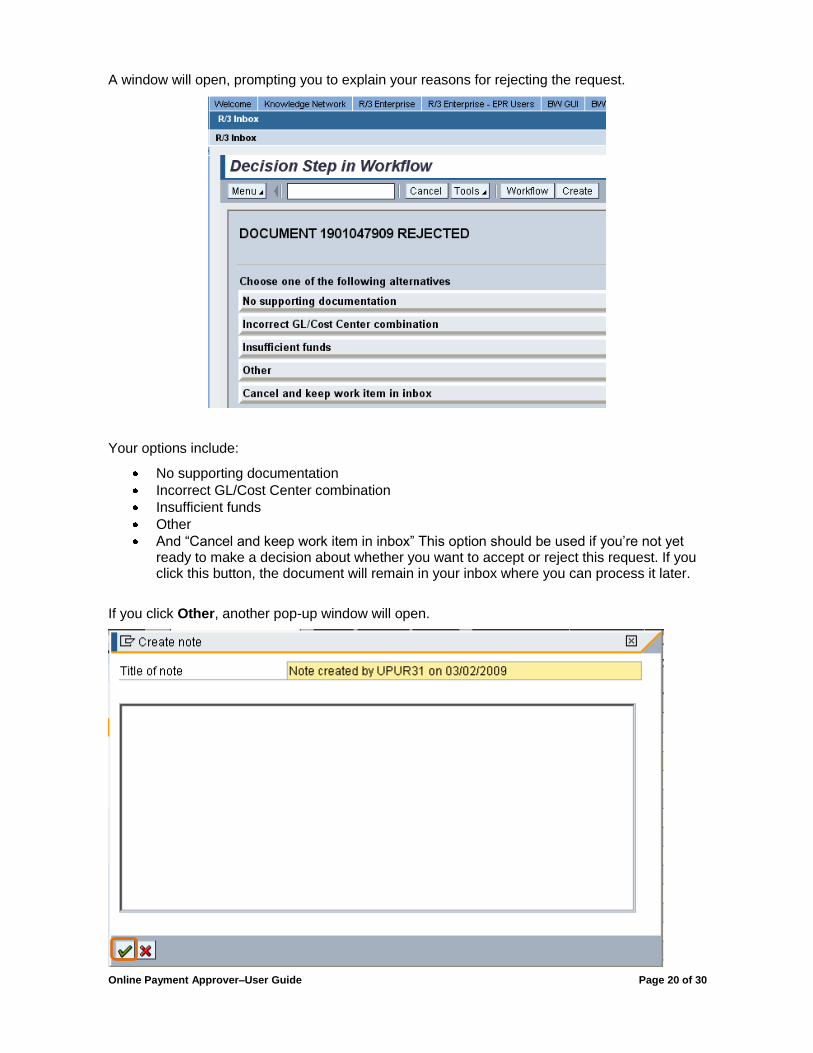
A window will open, prompting you to explain your reasons for rejecting the request.
Your options include:
No supporting documentation
Incorrect GL/Cost Center combination
Insufficient funds
Other
And “Cancel and keep work item in inbox” This option should be used if you’re not yet ready to make a decision about whether you want to accept or reject this request. If you click this button, the document will remain in your inbox where you can process it later.
If you click Other, another pop-up window will open.
Online Payment Approver–User Guide Page 21 of 30
Within this window, you can type the reason why you’re rejecting the document. Please be
precise to eliminate confusion, as the originator will be able to view this information. Click the
Continue button to complete the process. And once again, you’ll return to your inbox.
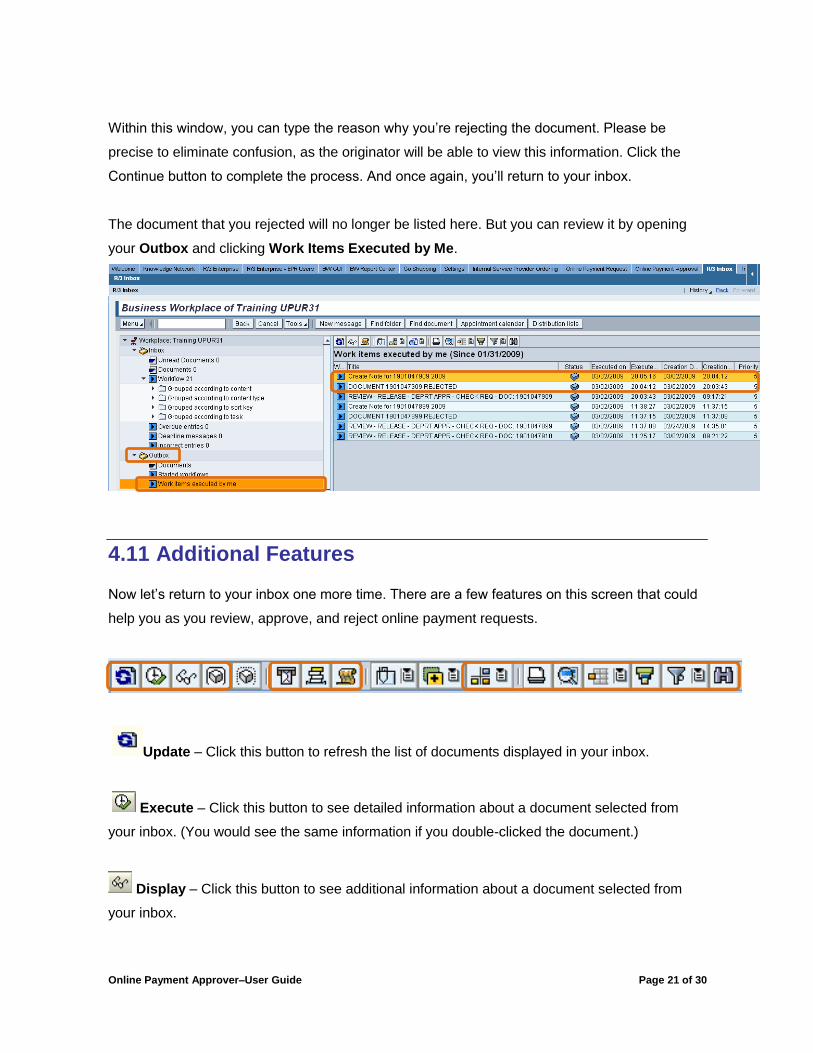
The document that you rejected will no longer be listed here. But you can review it by opening
your Outbox and clicking Work Items Executed by Me.
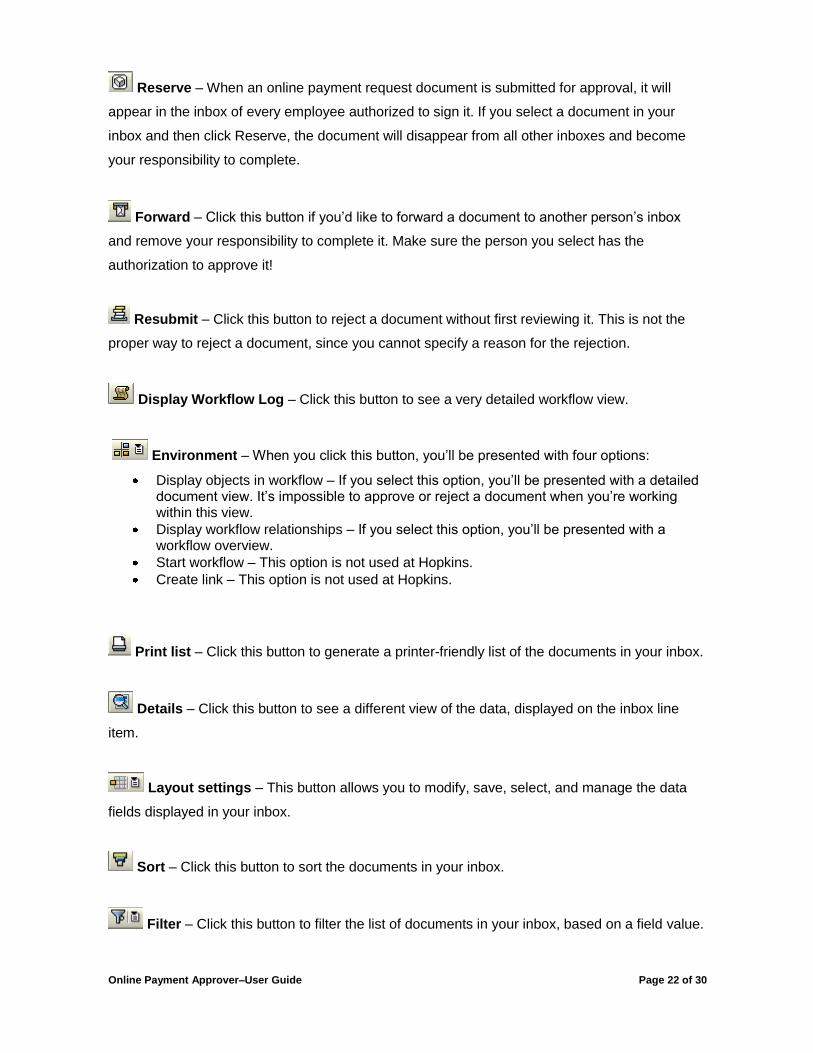
4.11 Additional Features
Now let’s return to your inbox one more time. There are a few features on this screen that could
help you as you review, approve, and reject online payment requests.
Update – Click this button to refresh the list of documents displayed in your inbox.
Execute – Click this button to see detailed information about a document selected from
your inbox. (You would see the same information if you double-clicked the document.)
Display – Click this button to see additional information about a document selected from
your inbox.
Online Payment Approver–User Guide Page 22 of 30
Reserve – When an online payment request document is submitted for approval, it will
appear in the inbox of every employee authorized to sign it. If you select a document in your
inbox and then click Reserve, the document will disappear from all other inboxes and become
your responsibility to complete.
Forward – Click this button if you’d like to forward a document to another person’s inbox
and remove your responsibility to complete it. Make sure the person you select has the
authorization to approve it!
Resubmit – Click this button to reject a document without first reviewing it. This is not the
proper way to reject a document, since you cannot specify a reason for the rejection.
Display Workflow Log – Click this button to see a very detailed workflow view.
Environment – When you click this button, you’ll be presented with four options:
Display objects in workflow – If you select this option, you’ll be presented with a detailed document view. It’s impossible to approve or reject a document when you’re working within this view.
Display workflow relationships – If you select this option, you’ll be presented with a workflow overview.
Start workflow – This option is not used at Hopkins.
Create link – This option is not used at Hopkins.
Print list – Click this button to generate a printer-friendly list of the documents in your inbox.
Details – Click this button to see a different view of the data, displayed on the inbox line
item.
Layout settings – This button allows you to modify, save, select, and manage the data
fields displayed in your inbox.
Sort – Click this button to sort the documents in your inbox.
Filter – Click this button to filter the list of documents in your inbox, based on a field value.

Online Payment Approver–User Guide Page 23 of 30
Find in list – Click this button to search for a document in your inbox using a value.
4.12 Status Column
And finally, let’s take a closer look at the Status column in your inbox. There are three different
icons that might be displayed in the Status column. Each icon has a different meaning.
Ready – When you see this icon, it means that this document is new and has not yet been
opened. The document may also appear in other approvers’ inboxes.
In Process – When you see this icon, it means that the document has been opened, but it
hasn’t been approved or rejected. The document is your responsibility and has been removed
from all other inboxes.
Reserve – When you see this icon, it means that you’ve applied the Reserve function to
the document. The document is now your responsibility and has been removed from all other
inboxes.

Online Payment Approver–User Guide Page 24 of 30
5 Establishing a Substitute Approver
As an approver, it’s your responsibility to appoint a substitute approver in case you’re ever
unavailable to process requests. If you have a substitute approver in place, documents will never
be delayed because of your absence.
In this section, we’ll step through the process of setting up a substitute approver in SAP. After
you complete this section, you’ll be able to:
Explain the difference between active and passive substitute approvers.
And set up a substitute approver.
5.1 Substitute Approver Policy
A substitute approver is a departmentally authorized employee with appropriate security roles
assigned to his or her position. More than one person can be established as a substitute
approver.
5.2 Two Types of Substitute Approver
There are two types of substitute approvers.
Active substitute approvers
Passive substitute approvers
Active substitute approvers have documents that require approval automatically routed to their
SAP Business Workplace inbox. This feature is turned on whenever the approver is expected to
be absent.
Passive substitute approvers have to access the approver’s inbox to retrieve documents
requiring approval. This is generally done when the approver is unexpectedly absent.
Online Payment Approver–User Guide Page 25 of 30
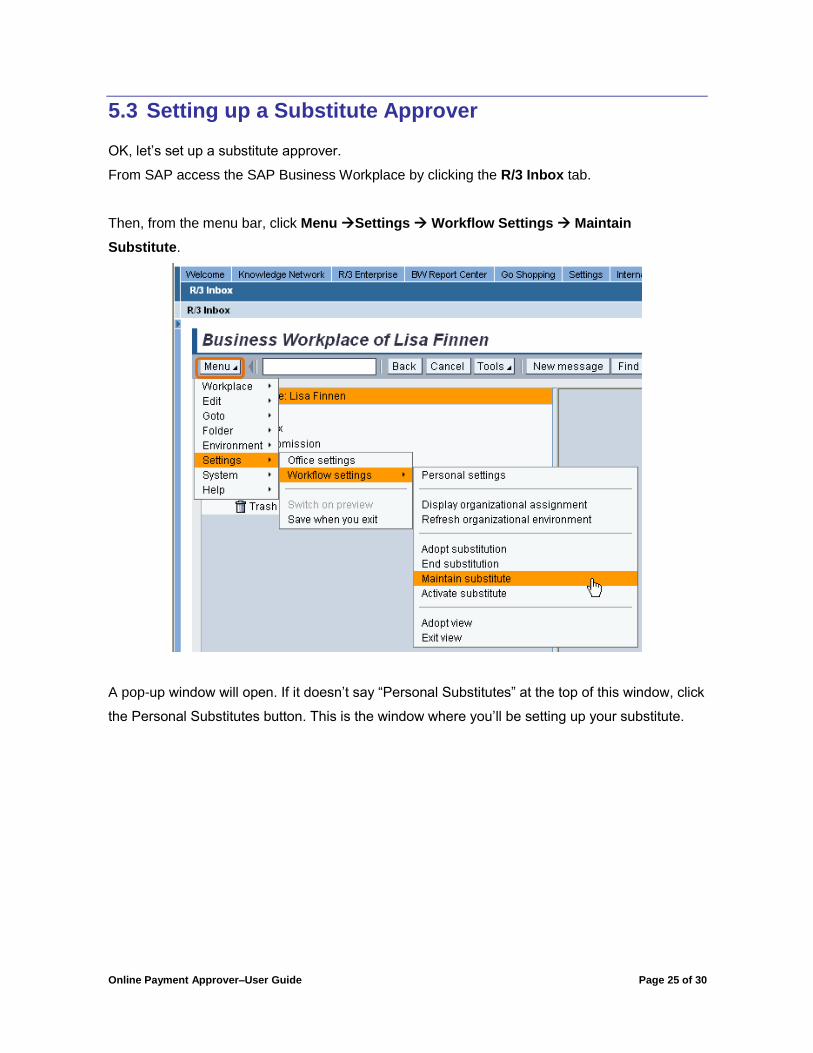
5.3 Setting up a Substitute Approver
OK, let’s set up a substitute approver.
From SAP access the SAP Business Workplace by clicking the R/3 Inbox tab.
Then, from the menu bar, click Menu Settings Workflow Settings Maintain
Substitute.
A pop-up window will open. If it doesn’t say “Personal Substitutes” at the top of this window, click
the Personal Substitutes button. This is the window where you’ll be setting up your substitute.
Online Payment Approver–User Guide Page 26 of 30
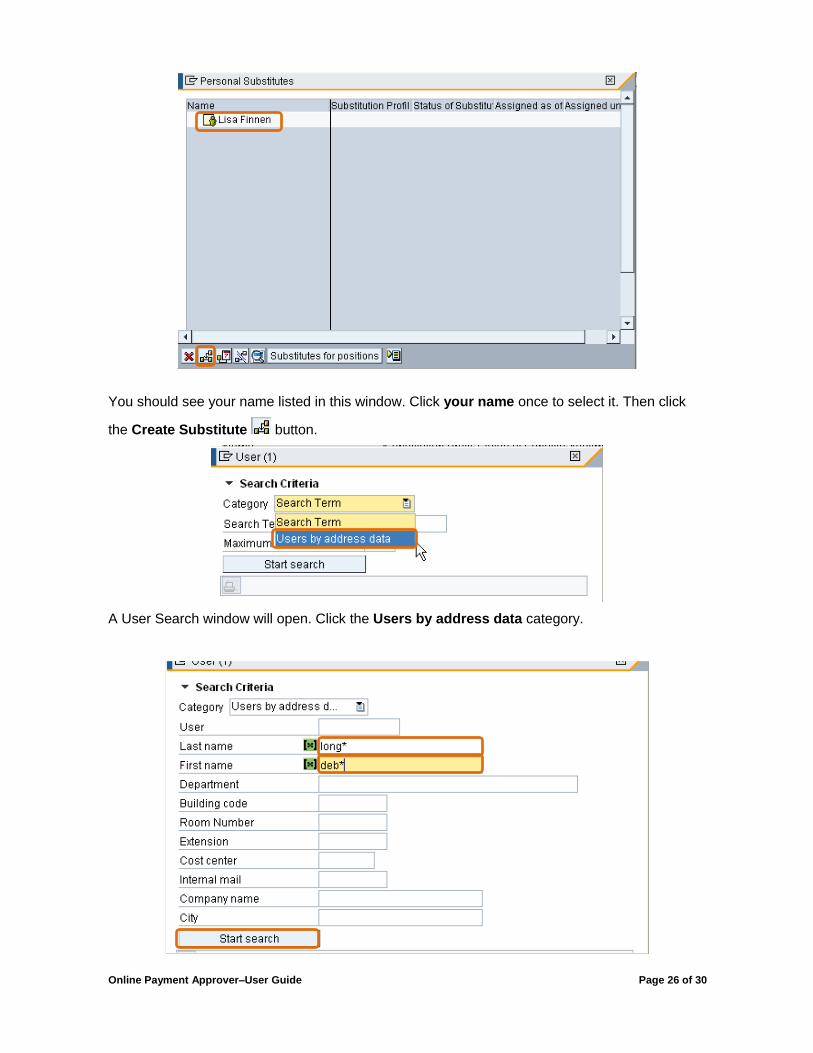
You should see your name listed in this window. Click your name once to select it. Then click
the Create Substitute button.
A User Search window will open. Click the Users by address data category.
Online Payment Approver–User Guide Page 27 of 30
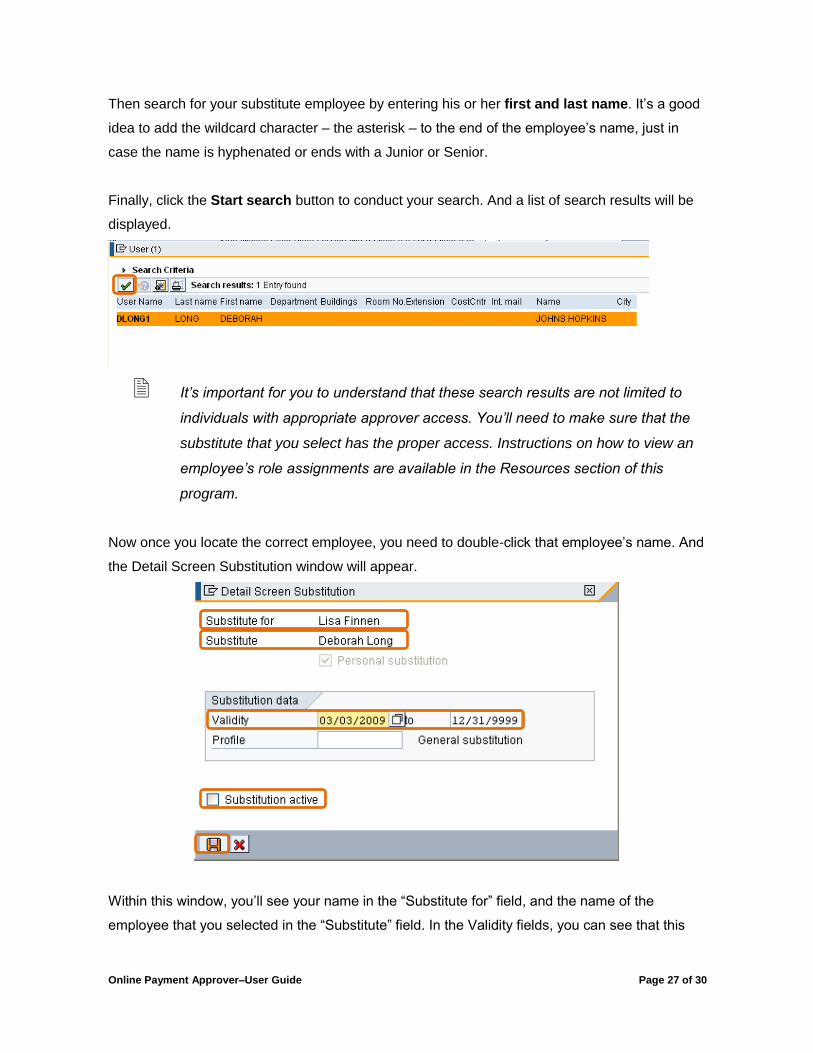
Then search for your substitute employee by entering his or her first and last name. It’s a good
idea to add the wildcard character – the asterisk – to the end of the employee’s name, just in
case the name is hyphenated or ends with a Junior or Senior.
Finally, click the Start search button to conduct your search. And a list of search results will be
displayed.
It’s important for you to understand that these search results are not limited to
individuals with appropriate approver access. You’ll need to make sure that the
substitute that you select has the proper access. Instructions on how to view an
employee’s role assignments are available in the Resources section of this
program.
Now once you locate the correct employee, you need to double-click that employee’s name. And
the Detail Screen Substitution window will appear.
Within this window, you’ll see your name in the “Substitute for” field, and the name of the
employee that you selected in the “Substitute” field. In the Validity fields, you can see that this
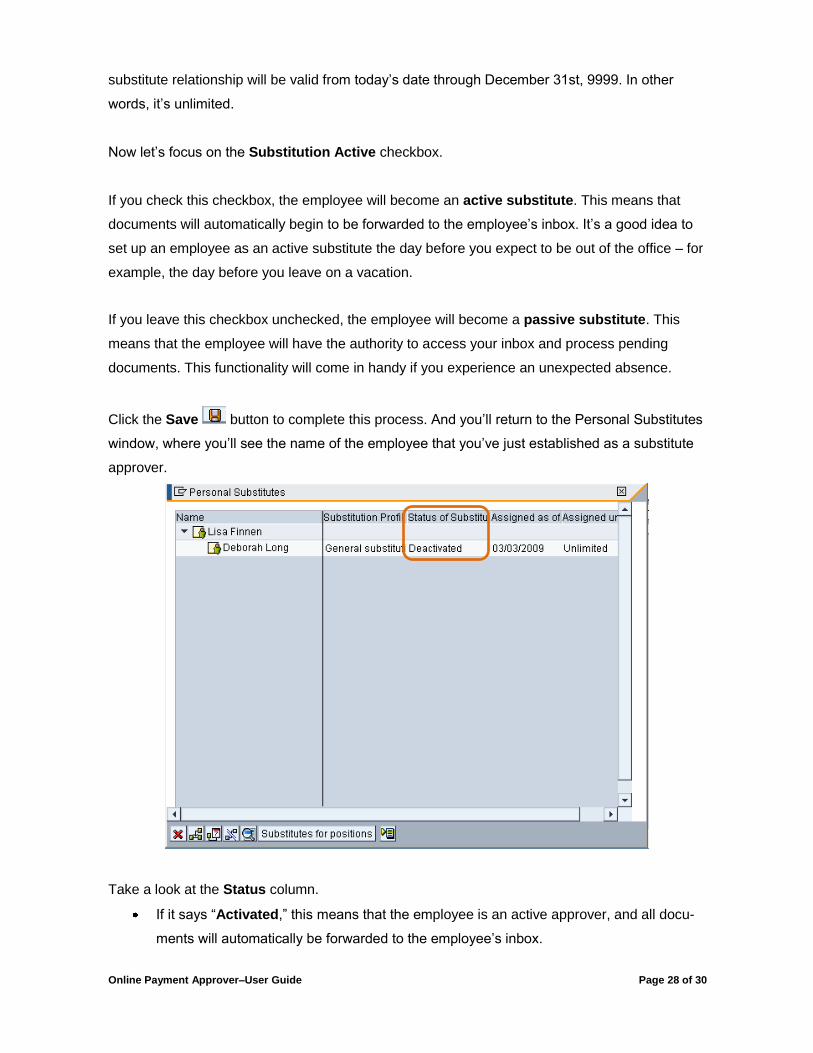
Online Payment Approver–User Guide Page 28 of 30
substitute relationship will be valid from today’s date through December 31st, 9999. In other
words, it’s unlimited.
Now let’s focus on the Substitution Active checkbox.
If you check this checkbox, the employee will become an active substitute. This means that
documents will automatically begin to be forwarded to the employee’s inbox. It’s a good idea to
set up an employee as an active substitute the day before you expect to be out of the office – for
example, the day before you leave on a vacation.
If you leave this checkbox unchecked, the employee will become a passive substitute. This
means that the employee will have the authority to access your inbox and process pending
documents. This functionality will come in handy if you experience an unexpected absence.
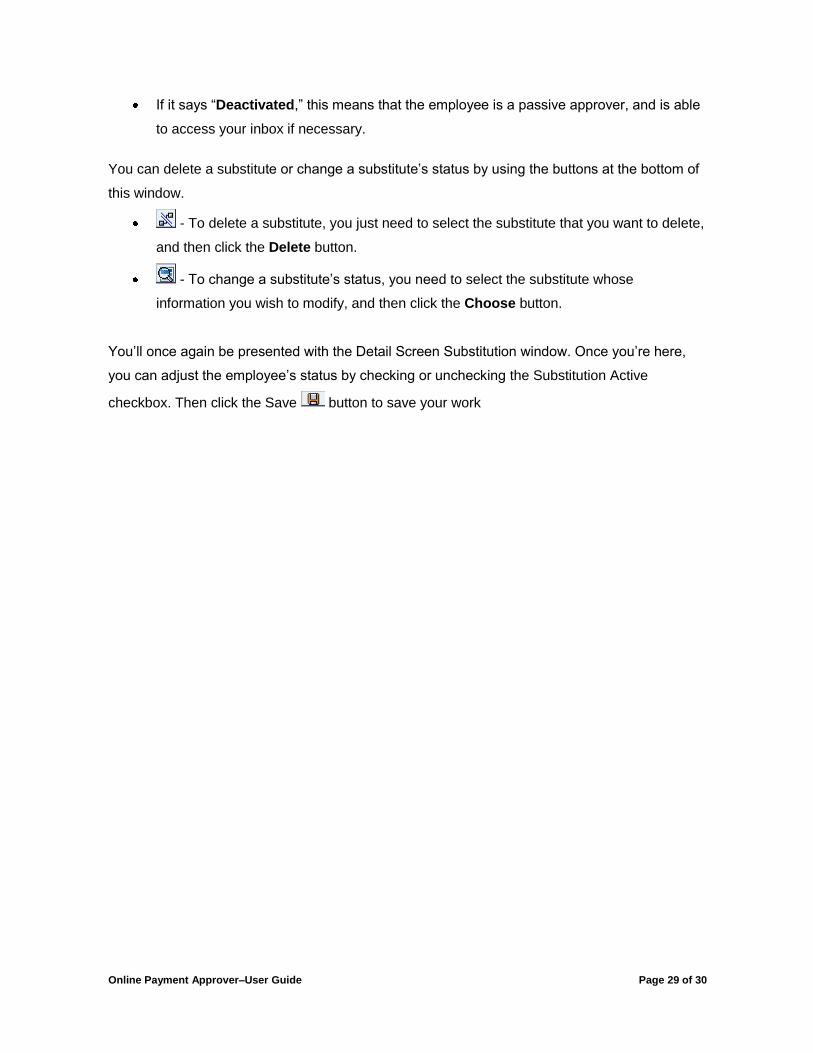
Click the Save button to complete this process. And you’ll return to the Personal Substitutes
window, where you’ll see the name of the employee that you’ve just established as a substitute
approver.
Take a look at the Status column.
If it says “Activated,” this means that the employee is an active approver, and all docu-
ments will automatically be forwarded to the employee’s inbox.
Online Payment Approver–User Guide Page 29 of 30
If it says “Deactivated,” this means that the employee is a passive approver, and is able
to access your inbox if necessary.
You can delete a substitute or change a substitute’s status by using the buttons at the bottom of
this window.
- To delete a substitute, you just need to select the substitute that you want to delete,
and then click the Delete button.
- To change a substitute’s status, you need to select the substitute whose
information you wish to modify, and then click the Choose button.
You’ll once again be presented with the Detail Screen Substitution window. Once you’re here,
you can adjust the employee’s status by checking or unchecking the Substitution Active
checkbox. Then click the Save button to save your work
Online Payment Approver–User Guide Page 30 of 30
6 Appendix A–Resources
For more information, consult the following resources.
General Web sites
o Shared Services http://ssc.jhu.edu/
o Controller’s Office http://www.controller.jhu.edu/
o Knowledge Network
https://collaborate.johnshopkins.edu/sites/SAP/knownet/Pages/default.aspx
Contact Information for Accounts Payable Shared Services
o http://ssc.jhu.edu/accountspayable/contact.html
Purchase order exception list
o http://ssc.jhu.edu/supplychain/exceptions.html
How to open an approver’s inbox (instructions for passive substitute approvers)
o http://training.jhu.edu/html/Financial/SAP/Resources/OpeningApproverInbox_V4.pdf
How to view employee role assignments
o http://training.jhu.edu/html/Financial/SAP/Resources/ViewingRoleAssignments_V2.pdf