Embed Size (px)
Citation preview

Page 1
CONTENTS
1 INTRODUCTION
1.1 WHO WE ARE 3
1.2 WHAT IS NOVA MIDDLEWARE? 3
2 INSTALLATION
2.1 PREPARATION 4
2.2 UBUNTU INSTALLATION 4
2.2.1 USB SETUP 5
2.2.2 FIRST TIME SETUP 5
2.2.3 NETWORK SETUP 7
2.3 NOVA INSTALLATION 8
2.4 ADDITIONAL NOTES 13
3 HOW TO USE
3.1 WELCOME TO NOVA 14
3.1.1 FIRST TIME LOGIN 14
3.2 BILLING 15
3.2.1 ACCOUNTS 15
3.2.2 CREDITS 17
3.2.3 TRANSACTIONS 19
3.2.4 USER MESSAGES 19
3.2 MIDDLEWARE 21
3.3.1 TYPE 21

Page 2
3.3.2 CATEGORY 22
3.3.3 STREAM SERVERS 23
3.3.4 CHANNELS 24
3.3.5 BRANDING AND ADVERTISING 26
3.3.6 PACKAGES 27
3.3.7 SET-TOP SETTINGS AND CONTROL 29
3.3.8 ADMINISTRATOR LOGS AND CONTROLS 30
3.3.9 STATISTICS 32
3.3.10 IPG (EPG) 32

Page 3
Introduction
1.1 Who We Are
Avov Technology is at the front of next-generation hardware and software. We are
paving the way for a new era of custom OTT/IPTV business solutions with an impressive
lineup of high end set top boxes and middleware software.
Our research and development center is in Beijing and our headquarters are based out
of South Korea. Our goal is to provide the best OTT/IPTV service available (and you
cannot accomplish that task sitting around). Taking the lead in the industry, we are
constantly developing new advances in set top box hardware and the software
platforms linked to OTT/IPTV technology.
In collaboration with our sale offices across North America, we proudly serve millions of
customers across the continent.
We pride ourselves on our relentless focus on quality, performance, our team of
OTT/IPTV experts, and our solutions for set top boxes and Android workflows.
Regardless if you are a business owner or a client using our product(s), Avov Technology
is here to make your experience as memorable as it can be.
1.2 What is Nova Middleware?
Nova Middleware is an extremely flexible IPTV/OTT platform. It allows for the complete
management of processing/distributing streams, user applications, and the
administration of customers on a variety of devices. The advantage of this platform is
that the entire system comes from one supplier.
Not only are you guaranteed consistency in the quality of the product, but this also
ensures its reliability. Since Nova Middleware is an all in one solution, it eliminates the
need for complicated and expensive integration from different systems and different
suppliers.

Page 4
Installation
Name: NOVA Middleware
Last Updated: v1.0.6 Beta Release
NOVA Middleware is recommended to be run on Ubuntu 12.04 LTS or Ubuntu 14.04 LTS
systems. If you ever have any questions or run into any issues, feel free to message Nova
Support novasupport1 on skype. The following installation will be with Ubuntu 14.04 LTS.
2.1 Preparation
If you are setting up a local server, you will need to prepare two USB sticks for the
installation. We will need to wipe one completely to prepare Ubuntu on it and use the
other for data transfer. Identify which USB you will be using for what.
Now unzip the latest release onto one of the USBs. This USB will be your data transfer
USB. You do not need to unzip anything besides the initial zip file. If you are installing
onto a cloud service, then make sure to follow their instructions on how to upload files.
In addition, refresh on the following system calls if you need to:
sudo su (assign root access to the current user)
cd (change directory)
ls (list files)
cp (copy a file/folder)
apt-get (software installer/downloader)
unzip (unzipping tool)
nano (text editor we will be using)
2.2 Ubuntu Installation
We will be installing Ubuntu 14.04 LTS. Alternatively, you can also install 12.04 LTS. If
your server is being hosted by a third party or cloud service, then you do not need to
worry about this. Just follow their instructions, set up a blank 14.04 LTS Ubuntu server,
and then skip straight to section 2.3 Nova Installation.

Page 5
2.2.1 USB Setup
If your server will be locally hosted, then you can proceed. Otherwise skip to 2.3 Nova
Installation. If you would prefer to install Ubuntu with a CD, then you can still follow this
guide but replace USB commands with appropriate DVD commands. To get started,
follow the instructions in the provided links below. You will preparing your sticks with an
Ubuntu Server.
WINDOWS: http://www.ubuntu.com/download/desktop/create-a-usb-stick-on-windows
MAC/OSX: http://www.ubuntu.com/download/desktop/create-a-usb-stick-on-mac-osx
We now need to make sure your machine will boot off of a USB. If your BIOS has not
already been configured for it, then quickly look online for a tutorial on how to do it for
your machine. The following tutorial will suffice for most users.
http://lifehacker.com/5991848/how-to-boot-from-a-cd-or-usb-drive-on-any-pc
2.2.2 First Time Setup
You are now ready to prepare Ubuntu on your system. Follow the instructions on how
to properly set up your machine for Nova Middleware.
NOTE: A "Detect and mount the CD-ROM Failed" error might show up during
installation. If this is the case, simply unplug the USB and try plugging it into a different
port. It should start working then.
Restart your system with the prepared USB/CD plugged in.
1. You should now arrive at the Language screen after starting your installation. Start
by choosing English.
2. Select the location your server will be located in.
3. Say Yes for keyboard layout analysis. Follow the instructions on the screen. Most
keyboards will end up being “us:intl”. If you seem to be getting an incorrect layout,
then choose your keyboard from the list instead.
4. We will be setting up a server with an ethernet connection. Choose eth0 as your
primary network connection and choose a hostname for your network.
5. Enter a name for a new user. You can use your real name or make something up.
6. Enter a username for this account. This is what you will actually see in the console.
Write something you will remember since this is your Ubuntu login!

Page 6
7. Set a password for the user. You will be required to enter this often.
Write something you will remember since this is your Ubuntu password!
8. We suggest to encrypt your home directory for added security.
9. Confirm if your time zone is correct. If not, then pick the correct zone from the list.
10. If you receive a screen asking you to unmount your partition, then select yes. File
systems are automatically unmounted when the system is shut down. If some are
still mounted, then Ubuntu will prompt you to unmount them so it can have access.
You will not lose any files so do not worry.
11. Now determine if you want to partition your hard drive or not. What you choose is
not very important as long as Ubuntu will have enough space to install with LVM.
NOTE: This is a fresh install so avoid reusing old system files and agree to any
prompts regarding install configurations.
12. Determine how much space you would like to use. Realistically you will not use very
much, however, the last thing you want to do is fill your partition.
13. Input your http proxy, if you do not have one or if you do not know what that is
then just leave it blank.
14. You do not want to risk dropping your server due to a bad or unsupported update.
Select “No automatic updates” on the configuring task screen.
15. Do not install any additional software at this point. Just press enter to continue.
16. If you do not have another operating system installed select yes on the GRUB boot
loader. Otherwise select no.
You should now be done your installation. Click continue and make sure to remove your
USB/DVD right before the computer starts up again!

Page 7
2.2.3 Network Setup
Once again, if you are setting up a server on a third party service, then follow their
instructions and skip to section 2.3 Nova Installation. If you are performing a local
installation, then you may continue.
You should find yourself in a console based operating system. Welcome to Ubuntu for
servers! You will find that most settings must be configured manually, including network
configurations. The following instructions will guide you on how to set up your network.
1. If you have not logged in, do so now. You should be using the login you entered
during initial setup.
2. Give yourself root access by typing “sudo su” and then enter your Ubuntu password.
3. To modify the network settings type in “nano /etc/network/interfaces”
Now modify the file so it looks like this:
# This file describes the network interfaces available on your system
# and how to activate them. For more information, see interfaces (5).
# The loopback network interface
auto lo
iface lo inet loopback
# The primary network interface
auto eth0
iface eth0 inet static
address 192.168.0.120 # Your local IP address
netmask 255.255.255.0 # subnet mask, will almost always be this
gateway 192.168.0.1 # Insert your router IP address here
broadcast 10.0.0.255 # Insert your public IP address here
dns-nameservers 8.8.8.8 8.8.4.4 # Google’s name server, input yours here

Page 8
NOTE: Your router IP will likely either be 192.168.0.1 or 192.168.1.1 and you should
check through your internet browser to determine which one you should be using.
NOTE: It is not necessary to change the dns name server. If you are content with
using Google’s name server, or if you do not have your own, then leave it as it is.
4. Now that we have changed the network settings we will restart the system to
properly apply these effects. Type “reboot”
5. Give yourself root access again with “sudo su”. To test the network configurations,
we will attempt to ping google:
ping -c3 www.google.com
NOTE: If your ping test fails then attempt to ping your router with
“ping -c3 xxx.xxx.x.x” to help troubleshoot the issue.
At this point your networking should be working and we can begin the Nova installation.
2.3 Nova Installation
You are now ready to install Nova onto your server. To do so we need to first install
several programs onto the server. You can enter program names in one line separated
by spaces, however, we recommend to install it individually to avoid spelling mistakes
and download issues. When you download MySQL consider using the same password as
your Ubuntu password so it is easier to remember.
1. Install the system components by entering:
apt-get install mysql-server
apt-get install mysql-client
apt-get install apache2
apt-get install php5
apt-get install libapache2-mod-php5
apt-get install php5-mysql
apt-get install php5-curl
apt-get install php5-gd
apt-get install php5-idn

Page 9
apt-get install php-pear
apt-get install php5-imagick
apt-get install php5-imap
apt-get install php5-mcrypt
apt-get install php5-memcache
apt-get install php5-ming
apt-get install php5-ps
apt-get install php5-pspell
apt-get install php5-recode
apt-get install php5-snmp
apt-get install php5-sqlite
apt-get install php5-tidy
apt-get install php5-xmlrpc
apt-get install php5-xsl
apt-get install unzip
apt-get update
service apache2 restart
2. We will now upload Nova Middleware to the server via USB/DVD. If you are
installing on a non-local server then you may skip to Step 4. Otherwise if you are
installing via USB/DVD you may proceed.
Load up the nova release folder on to a spare USB/DVD and plug it into the system.
We recommend extracting the files beforehand and naming the folder “nova”
before you put it onto the USB/DVD.
3. With the files prepared you may now insert the USB/DVD. We will give the
commands for a USB, however the process for a DVD is very similar.
To begin, enter the following:
mkdir /media/usb
fdisk –l

Page 10
The fdisk command should gave you a name for the device you just entered. Look
for a device that looks similar to "/dev/sdb1". Now, replacing sdb1 with the name
you found, prepare the files by running:
mount /dev/sdb1 /media/usb
cp -r /media/usb/nova /var/www/html/nova
unmount /media/usb
The USB is now safe to remove and the files should have been copied to
"/var/www/html/nova".
4. Make sure you are navigated to /var/www/html/nova or /var/www/nova
depending on how your system is set up. Not every system will have the html
directory, so install to which ever path is more fitting.
NOTE: If you are using a third party hosting service, then follow their instructions on
how to upload files. Attempt to extract to /var/www/html/nova or /var/www/nova.
If the server has an equivalent directory, then you may extract to there instead.
Import nova_db_beta_X.X.X.sql to the MySQL database. In the following
instructions, replace the example SQL file with the one you find in your directory. Do
not forget to include the semicolons in the statements.
mysql -u root -p
>>>input the password you made during Mysql installation<<<
create database nova_db;
use nova_db;
source /var/www/html/nova/nova_db_beta_X.X.X.sql;
quit
5. Now to prepare system files. We want to unzip the client and server zip files to the
nova directory. Here is an example on how to perform that
cd /var/www/html/nova/server
unzip portal_X.X.X.zip -d /var/www/html/nova/
cd /var/www/html/nova/
unzip client_X.X.X.zip -d /var/www/html/nova/

Page 11
6. Now to give us access to the MySQL database, we modify the "db.php" files. You
may fine tune the configuration of these files to your liking. The files are found at:
/var/www/html/nova/client/inc/db.php
/var/www/html/nova/portal/billing/inc/db.php
/var/www/html/nova/portal/middleware/inc/db.php
Modify the variables in the header. For testing purposes, updating the password to
your MySQL password and the database to your server IP would be enough.
7. We will now install the ioncube loader for nova portal management. It is for
encrypting the URL and User Account:
cd /var/www/html/nova/ioncube_loader
tar -xzvf ioncube_loader.tar.gz
cp -r ioncube /usr/local/ioncube
php --version
We have just run a command to check our php version. Pay attention to the 4th last
line to see what version is installed. It should look similar to:
PHP 5.5.9-1ubuntu4.17 (cli) (built: May 15 2016 19:05:57)
8. Navigate to “/usr/local/ioncube” and check out the file names. Look at the first two
digits to determine which file you will need to use. Copy that file to
“/usr/lib/php5/20121212”. For example, if the system is using php5.5 then you
would enter:
cp /usr/local/ioncube/ioncube_loader_lin_5.5.so /usr/lib/php5/20121212
9. You will now update your ioncube ini file. When you are editing it, you will want to
match your php files. It should look similar to
zend _extension = /usr/lib/php5/20121212/ioncube_loader_lin_X.X.so
To begin, enter the following:
nano /var/www/html/nova/ioncube_loader/00-ioncube.ini
>>>change the line to match your php settings and then save<<<
cp /var/www/html/nova/ioncube_loader/00ioncube.ini/etc/php5/apache2/conf

Page 12
10. Configure the php ini file. In the file "/etc/php5/apache2/php.ini", before the
comments begin (on line 1), add the following line with the dots included:
... = "/var/www/nova/portal/"
Where the path (on the right side of the equation) should be the nova portal path
on your server.
11. Make sure the php5-mcrypt module is installed and enabled. Enter the following:
apt-get install php5-mcrypt
php5enmod mcrypt
apt-get update
service apache2 restart
You should be able to connect to your server now. Attempt to type the server IP into an
internet browser and see how it responds. You should get a default Ubuntu landing
page. If you cannot connect, try using the command "ifconfig" to get the IP address you
should be entering.
Take a look at the notes if you have any issues and try going through the steps again if it
does not seem to work. Feel free to message Nova Support on skype with skype id
novasupport1 if you have any questions.

Page 13
2.4 Additional Notes
If you receive an http 500 error issue while accessing the portal webpages,
please check your php version and replace the "portal/billing/inc/nova.php" and
"portal/middleware/inc/nova.php" files with "nova_for_php5.3.php" or
"nova_for_php5.5.php" according to your php version.
The "client" and "portal" directory are suggested to be put under "/var/www" or
"/var/www/html" directory so that they can be viewed easily when accessing
the webpage.
The nova directory is suggested to be located as "/var/www/nova/client" and
"/var/www/nova/portal", so the server URL will become
"xxx.xxx.xxx.xxx/nova/client"
For the IMDB function to download the thumbnails for VOD, it is suggested to
run "chmod 777 images -R" to give the nova/client/images directory writing
rights.
When using the excel loader function in Nova, it is suggested to run "chmod 777
excel" to give the "nova/portal/billing/billing/excel" and
"nova/portal/middleware/middleware/excel" writing rights.

Page 14
How to Use
3.1 Welcome to Nova
Nova Middleware is an all in one turnkey solution. It is ready for business deployment
and contains an impressive line-up of features. Since Nova is constantly being updated,
new features and improvements are consistently being released. If you have any
feedback, wish to see new improvements, or have any general questions, then feel free
to get in contact. Nova support can be reached over skype with the id novasupport1.
To begin, it is important to know that the Nova solution is divided into two sections;
middleware and billing. The middleware section is where you will find most of the IPTV
functionality. It is used for controlling streams, set-top boxes, advertising, and other
IPTV related content. The billing section is used for managing accounts, user credits, and
other administrative features. Together they make up what is known as Nova
Middleware.
To use nova there are two login pages. If (for example) your server IP address is
192.168.0.120 then the pages would be:
BILLING: 192.168.0.120/nova/portal/billing/billing/login.php
MIDDLEWARE: 192.168.0.120/nova/portal/middleware/middleware/login.php
3.1.1 First Time Login
Once you start Nova for the first time, there will be a starter account called novatester.
It is a master/super user account that you can create all other accounts with.
The master account is responsible for all server related services, plans, and other
administrative accounts. It has unlimited credits while all other users start with none.
Since the account has unlimited credits, it can hand them out to other accounts as it
pleases. However, this will usually be done after a reseller or manager has paid for
them. The master account can also create sub-master accounts, which are also super
users. The only difference is that sub-master accounts do not have unlimited credits and
therefore must still rely on the master account to get them.

Page 15
Reseller and Manager accounts are limited to the billing section of Nova. They cannot
give themselves credits, however, they can activate client accounts and transfer credits
between them. This means that every time a reseller/manager hands out a credit, they
lose one of their own. If a reseller or manager wants more credits, it is only possible
through the master account. Through this process it allows the owner of the server to
retain control over credit distribution.
The systems are intentionally separated to limit account access. To recap, super user
accounts have full access to both middleware and billing sections. This is in contrast to
manager/reseller accounts which are limited to the billing portion of Nova. All
fundamental changes to the service must be done through super users and all credits
will lead back to the master account.
3.2 Billing
The billing section will be primarily used to manage accounts. Alongside account
settings, you can also do credit management and push messages to clients. Most
accounts are restricted to the billing section of Nova. If you wish to modify server
settings, you must use super users accounts and login through the middleware page.
3.2.1 Accounts
Majority of the work done in the billing section shall be on accounts. For this reason, it is
important to understand this feature well.
There are three account sections to Nova. There are sub-master accounts, manager
accounts, and user accounts. The accounts are fairly straight forward.
Sub-Master Accounts:
These accounts are the super users. The default novatester account can be found here
and it is highly recommended that it is modified. Super user accounts have full access to
Nova and they can modify practically anything. It is important to know that novatester is
the only true master account. That means all credits must eventually come from there.
New super users start with 0 credits and still need novatester to distribute to them.

Page 16
Manager Accounts:
These accounts are the manager/reseller accounts. They can manage basic user
accounts and transfer credits to them. They are restricted to the billing section of Nova.
If your service has resellers, then these are the type of accounts that would be given to
them.
User Accounts:
These are the most basic accounts. Any generic client of the IPTV service will have one.
They have no access to the Nova portal, however, they are managed by the system and
higher level users. Things such as their plan, credit amounts, and parent resellers are all
manageable from the interface.
All account pages follow a similar format. The following is a screenshot of the Sub-
Master Account page; however, it can also be used to explain how the pages Manager
Account and User Account work.
1. This is the form that is used to enter the account information. Anything with an
asterisk (*) is a mandatory field and must be filled out. If an existing account is
selected, then their information will be loaded into these fields. Most of the fields
are self-explanatory. A useful feature is the search criteria at the bottom, which
helps find existing accounts and loads them into the form. Filter by select and use
search name to specify what criteria you are searching under.

Page 17
2. The control buttons modify the state of the page. There are four buttons: add, clear,
edit, and del (standing for delete). If the add button is displayed, Nova is prepared
to add a new user. That means that the form fields represent information going into
a new account. If the edit and del buttons are shown, then an existing account is
loaded in. Clicking edit will update the existing account information while del will
remove the account from Nova. Clear is always shown and will refresh the page. In
doing so, Nova will be prepared to create a new account again.
3. Here you will find the list of existing accounts. The accounts shown will be
determined by what page you are on (you will not see manager accounts while on
the sub-master account page). The columns display some basic information which
helps distinguish between accounts. There may be multiple pages of accounts, so
use the navigation tools at the bottom to flip between them.
4. The select button(s) will load an account in to the form. Each account found in the
list will contain a select button. By clicking on a select button, the corresponding
account will be loaded in to the form. This will also change the state of the page and
allow you to modify the account or delete it.
There is another page called Users Requests. This purpose of this page is to allow lower
level accounts request account changes. Since they do not have direct access to add
them, they can instead file a request through this service. By filling in the information, a
higher level account can later come in and apply the request. You may use this page to
request changes on an existing account or to request the creation of a brand new one.
3.2.2 Credits
Credit pages allow the transferring of credits between accounts. It is important to
remember that the only account with unlimited credits is the master account. This
means that all credits will end up leading back to the novatester account.
Credits are important since it allows an account to have access to the service. If the
account registered with a device is out of credits, then the service will be blocked.
Through this functionality, access is given only to accounts that are supposed to receive
it (usually this is an account that has paid for the service).
Page 18
The following diagram is an example of a credit page. All credit pages follow the same
general format.
1. This section contains the credit information of the account you are logged in as.
Number of credits is the amount of credits being transferred while available credits
is the amount that are still on the account. The transfer credits button is used when
you want to move credits from your account to the other account. Pull credits
(found on the other half of the form) is always the opposite of transfer credits. So if
you were to activate pull credits, then transfer credits would get deactivated (and
vice versa).
2. This form will contain account information from an account selected in the list. It
contains the same type of information as found on the left half of the form. In here
you will find the pull credits button. If activated, the transaction will move credits
from their account into your account. However, not all accounts have this ability.
The master account is always able to do this, but when new accounts are created,
the Pull Credits Disabled box must be left blank.
3. Here you will find the control buttons that process transactions. The clear button is
always displayed and it will reset the page. If an account is selected from the list,
then an apply button will appear. Once you are ready to process a transaction,
clicking the apply button will make it go through.
4. Here you will find the list of accounts that you can select from. Only accounts
matching the page type will be shown. If an account is desired to be selected,
clicking the select button will load its information into the fields. There will likely be
many accounts to select from; you can use the search fields to narrow down your
results. In addition, there is a navigation bar at the bottom of the page that allows
for flipping between the list results.

Page 19
3.2.3 Transactions
It is obviously important to keep track of what transactions occurred. For this reason,
the transaction pages exist. These pages provide logs of credit transfers that occurred.
There are three transaction pages, one for each type of user. The following is an
example Sub-Master Transaction page, however, they all function the same.
1. It is very easy to accumulate a lot of transactions. The search feature makes it far
easier to find a specific transaction that you may be looking for. Filter by your search
term and enter keywords to find logs that match the criteria.
2. It is possible to delete logs by marking them and then clicking delete. To delete all
logs at once, toggle the all box and then select delete. These actions are irreversible
so be careful when using them.
3. Here you will find all the transactions that take place. There is some basic
information displayed to help distinguish between transactions. Only transactions
with the same account type as the page will be shown. It is likely that the logs will
not fit onto the single page, use the navigational tools at the bottom to navigate
between lists.
3.2.4 User Messages
One of the more powerful features of Nova is the ability to send messages to individual
users. This feature is great for reminding clients about payments, pay per view events,
and any other kind of alerts. The message is sent in real time, however, it will wait for
their device to be connected first. In between this time period it is possible to modify
your message and even cancel it if you wish. If their device is already connected, then
the message will be send instantaneously.

Page 20
Here is an example user’s messages page.
1. The form at the top is for searching between user accounts. Given specified
information, you can narrow your list results to find the client you are looking for.
This method is also useful for filtering. Filtering by GROUP allows you to find clients
under certain resellers; useful if only that group of users need to be contacted.
2. Here is the list of users that you can choose from. Clicking select will load their
settings and allow you to send messages. Use the navigation bar to flip between
results.
3. These are the control buttons. If a user was just selected, it will display send and
clear. If a message was selected from the message list, then edit, del (for delete),
and clear will be displayed. Clear will reset the fields but it will not de-select the
message. To completely refresh the page, you must click the clear found at the top
of the page. Send is used for sending a message once you are done filling in the
information. When a message is selected, edit will update the message while del will
delete it.
4. This form holds the information of the message being sent. In here you can also
search for existing messages using the date and search fields. Selecting an existing
message, in the section below, will load its information into here.
5. This contains the list of messages that have already been sent. Only messages
pertaining to the selected user will be shown. If the status of the message is still
“waiting” then you may still modify the message. Messages are only sent when the
user is connected to the service; meaning if they are offline, you can modify the
message before it is still sent.

Page 21
3.3 Middleware
The middleware section is only accessible by master and sub-master accounts. In here
you can control the IPTV solution and the data analytics. Whenever work is being
performed on the actual IPTV service, it will be done through the middleware section.
3.3.1 Type
It is important to keep things organized. Nova middleware allows you to create your
own group of devices, set top boxes, and genres. This will prove useful when creating
new users and IPTV channels.
When creating a new type, you must provide a unique code. Using an existing code will
throw an error. Before you continue, it is recommended that you create a few genres.
That way, when you start creating channels, you are able to immediately categorize
them. The following is an example Type page.
1. This is the type parameter that you will be working with. Changing the type will
reload the list so that only values of that type are displayed.
2. The control buttons follow the same conventional format. If the add button is
shown, clicking it will add the type to the list. Selecting an existing type will display
the edit and delete buttons. Edit will update the type with the new information you
entered, while del will delete the type from Nova. Click clear to reset the page.
3. This is the list of types that are currently saved. Clicking select on the far right will
load up its information and prepare it for editing.

Page 22
3.3.2 Category
As it may be clear now, Nova organizes a lot of things into hierarchies. This is also the
case for channels and channel types. The Category page allows you to rearrange folders
so that it can fit the ideal scheme. Navigation through Nova will match this layout and
this is what users will see when using the service. It is possible to include pictures and
descriptions for each folder; customizing the view even more. All changes are live so it is
recommended to play around with this feature to get the ideal settings.
Here is an example Category page.
1. Here is the category tree. This list displays the hierarchy in which channels are
displayed. If a user wanted to see a VoD from Rome Season 1, through their set-top
box, they would have to navigate to VOD then TV Series then Action then Rome then
finally to Season 1. Clicking on a folder will load the information into the fields on
the right.
2. If a folder is selected, and it happens to be a top directory, then it will be modifiable
here. Realistically this will only be the Live, VOD, and Audio folders. Clicking up or
down will move the position of a folder in its respective list. The add button will add
a sub-folder while delete will delete the current folder. Once you are satisfied with
the changes, click modify to save the settings. It is also possible to add a picture
which will display during set-top box use.
Page 23
3. If the selected folder is a sub-folder, it will be modifiable here. Unlike the top
folders, it is also possible to add a description and set the alpha (transparency) level.
Otherwise the form works the same way. Use the up and down buttons to change
the positioning in the list, the add button to add sub-folders, the delete button to
delete the current folder, and the modify button for when you are ready to save
your changes.
3.3.3 Stream Servers
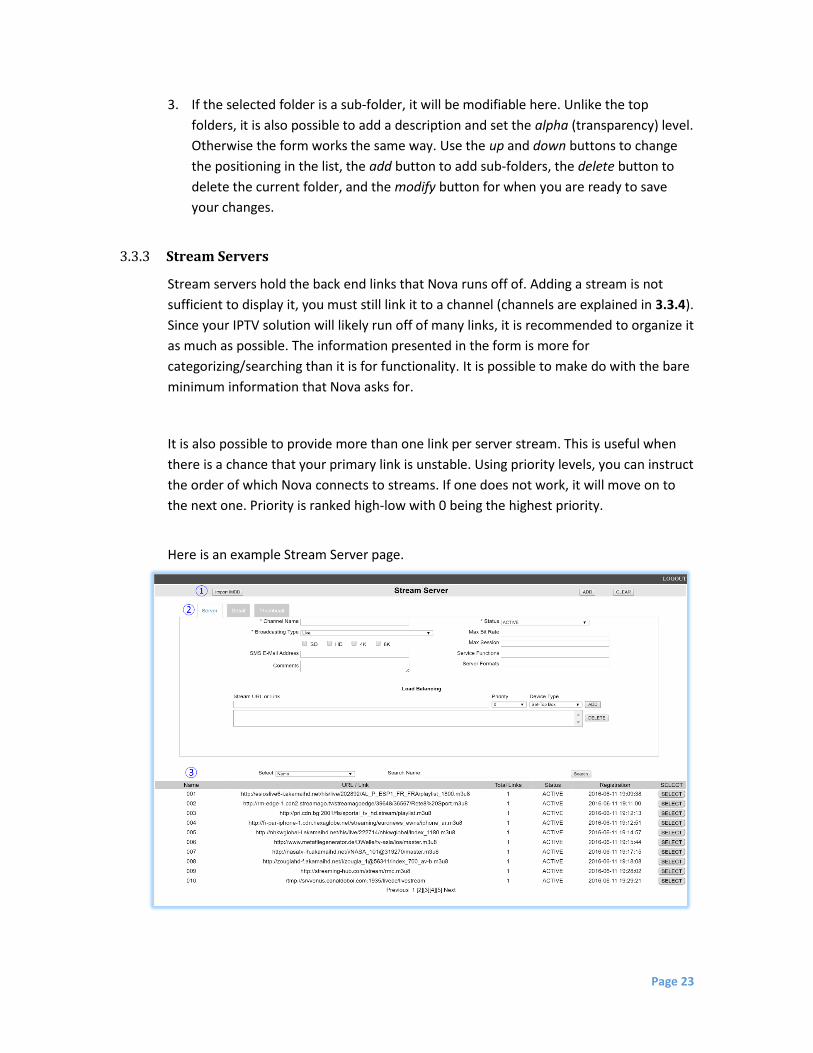
Stream servers hold the back end links that Nova runs off of. Adding a stream is not
sufficient to display it, you must still link it to a channel (channels are explained in 3.3.4).
Since your IPTV solution will likely run off of many links, it is recommended to organize it
as much as possible. The information presented in the form is more for
categorizing/searching than it is for functionality. It is possible to make do with the bare
minimum information that Nova asks for.
It is also possible to provide more than one link per server stream. This is useful when
there is a chance that your primary link is unstable. Using priority levels, you can instruct
the order of which Nova connects to streams. If one does not work, it will move on to
the next one. Priority is ranked high-low with 0 being the highest priority.
Here is an example Stream Server page.

Page 24
1. If the media you are streaming is covered by IMDB, you can provide reliable
descriptions of it through Nova. Grab the IMDB URL for the media you are displaying
and finish the URL that Nova asks for. When you use this stream for a channel, it will
load up the IMDB descriptions automatically for you.
2. Here is the main form. Any field with an asterisk (*) is mandatory. All other fields are
just extra for stronger categorization. It will not hinder the functionality of Nova if
you leave them blank. There are also other tabs. One is for providing more details
while the other is for thumbnail pictures that you may wish to include.
3. The control buttons follow the same conventional format. If the add button is
shown, clicking it will add the stream to the list. Selecting an existing stream will
display the edit and delete buttons. Edit will update the stream with the new
information you entered, while del will delete the stream from Nova.
4. Here is the list of streams that already exist. You may use the search bar to help
narrow down the stream you may be looking for. Clicking select beside an existing
stream will loads its information into the form above. Since there will likely be a lot
of streams, use the navigation tools at the bottom to flip between list results.
3.3.7 Channels
Channels make up the media content of Nova. Similar to conventional TV, each channel
will display some kind of programming. The benefit of IPTV is that you can have all sorts
of channels. In particular, there are four kinds of channels found in Nova; Live Channels,
VoD (Video on Demand) Channels, Audio Channels, and App Channels. They all
function very similarly.
A channel holds all the information that an end user will see while using Nova. Name,
genre, age restriction, and more are all customizable through the channel interface.
What it does not hold is the actual stream to the media being shown. Instead, it points
to an existing server stream (which does all the hard work of keeping that connection
alive). In the following screen shot we will explain how the Live Channels page operates.

Page 25
Here we look at an example screen of the Live Channels page.
1. If you have a formatted csv file, you are able to upload through this function.
However, this tool is still in beta and only meant for testers. This will be later
explained in the final release of the user manual. You can ignore it for now.
2. The form is where all the information is display/entered. If the add button is
displayed, then Nova is ready to add a new channel. If the edit and delete buttons
are shown, then an existing channel has been loaded. Stream servers are meant to
be linked here. Clicking search will open a dialog in which you may search for the
source of your choice.
3. A full list of channels is displayed here. Using the search criteria, you may filter the
results to find a specific channel. Clicking the select button, found beside an existing
channel, will load its information into the form and enable it for editing.
While only live channels were explained, all channel types are controlled in the same
manner. The only difference between channels is the format in which they display
media. Because of the differences, we will go into what each channel page is meant to
be used for.

Page 26
Live Channels:
Live channels display live TV. This is what IPTV is conventionally associated with. Use live
channels for streams that are constantly running and updating.
VoD Channels:
Having on demand content is a huge aspect of IPTV. Utilize Video on Demand channels
to display standalone videos, movies, and TV shows.
Audio Channels:
Not all media is displayed via video. Audio channels can be set up to play sound files
instead. Use this feature to build a library of audio books, music, and other sound based
content.
App Channels:
If you have rights or ownership over certain apps, it is possible to distribute them
through Nova. Compatibility is an issue, so it is important to get in contact with nova
support to see what options are available. This feature is for owners/redistributors of
existing applications, so likely you will not need to worry about it.
3.3.4 Branding and Advertising
Nova middleware comes fully equipped with advertising and branding features.
Branding is simple and allows the user to upload custom images that will appear
throughout Nova. The Advertising page allows you to quickly toggle notice and news
alerts which need to be pre-configured.
News alerts are typically reserved for news or service alerts while notice alerts are
usually reserved for advertising. Despite the two separate pages, the functionality is
actually the same. The pages are separated for organizational purposes, however, you
may technically place advertisements and system alerts in either of the two pages.

Page 27
The following diagram is of the News Setup page, however, the Notice Setup page
follows the same format.
1. The information pertaining to the alert is displayed/edited here. If the add button is
displayed, then Nova is ready to add a new news alert. If the edit and delete buttons
are displayed, then an existing alert is loaded for editing. It is possible to control
which users view the alert by linking it to a tariff plan. This allows you to customize
messages to different audiences. For example, a good use of this feature would be
to advertise premium tariff plans to basic users.
2. A full list of news/notices are displayed here. Using the search criteria, you may
filter the results to find a specific alert. Clicking the select button, found beside an
existing alert, will load its information into the form and enable it for editing.
3.3.5 Packages
There are two kinds of packages found in nova; there are service packages and tariff
packages. Tariff packages are plans that clients can subscribe to. A common example
are internet packages provided by internet providers. Their plans are usually split by
speed and bandwidth while your Nova plans will likely be split by amount of content.
Service packages contain the content placed in tariff packages. An example of a service
package would be basic live channels or premium VoD access. The main difference is a
service package contains a list of channels and a tariff package contains a list of service
packages.

Page 28
In the diagram we can see how channels are assigned to service packages. Then service
packages are assigned to tariff packages. It is important to note that service packages
can continuously be re-used. If multiple tariff packages use the same service package,
then modifying the service package will stretch across all tariff plans.
The service and tariff package pages work extremely similarly. Since tariff packages rely
on existing service packages, we will demonstrate a service package instead.
ChannelsService
PackagesTariff
Package
Basic Package
Basic VoD Channels
Terminator
Live Channels
CNN
Food Network

Page 29
1. Basic information regarding the package is found here. Make sure to provide a
unique code for External ID and a unique name for Package Name. The service
drop-down list will display the different channel types. After selecting a channel
type, it will load all the channels (of that type) into the form boxes.
NOTE: The drop-down list is only found in the service package page. Alternatively,
the tariff page immediately loads all service packages. This is due to there likely
being far more channels than there are service packages.
2. The two large boxes are the form boxes. Once a channel type is selected, or when
an existing package is selected, the channels will load into there. Once they are
loaded, you are able to highlight multiple entries and move them between available
and selected. All selected channels/packages will be saved once add or edit is
clicked.
3. Here you will find the list of existing packages. Clicking a select button will load
information into the form above and prepare it for editing. Use the search tool at
the top to help filter the list and use the navigational tools at the bottom to flip
between pages.
3.3.6 Set-Top Settings and Control
The Set-Top Setting page allows for the modification of existing set top boxes. This page
is similar to the Users Account page in the billing section, however, it is missing the
ability to assign a tariff plan. Refer to 3.2.1 Accounts for how to use the account pages.
Set-Top Control allows for the remote control of a set top box. Functions such as
sending messages, restarting devices, and updating channels are all available through
this interface. The following is an example control page.

Page 30
1. This is the form where basic information is displayed. To select a device, click the
search button to open an external window. Through here you may search and select
the device you are looking for. Control type will specify what command to perform.
Most commands do not need the other fields as they only exist for the send
message and play channel commands respectively.
2. A history of actions is displayed here. Selecting an existing command will load it up
for editing. If the action has not already been received by the user, it is possible to
change the command. However, if the command has already gone through, editing
it will have no purpose. Sometimes it is useful to use the list as a history of what
commands were sent. In the scenario of debugging a client’s system, it might make
sense to refer back to the controls were already used. Use the search parameters to
filter the results and use the navigational tools at the bottom to flip between pages.
3.3.8 Administrator Logs and Controls
Controlling a server is very complicated and it is prone to sensitive changes. It is for this
reason a comprehensive log is extremely important to have. The Administrative logs
record every change made to the server. In here you get logs from every user in the
middleware and the billing sections. This feature is useful in tracking the history of the
server, especially when there is a major change, issue, or bug that needs to be
addressed. Here is an example log page.
1. The search parameters filter the log results. Search by ALL or by specific results to
find what you are looking for. Nova automatically sets the search date to the current
date. If you wish to search within a specific time period, modify the calendar
settings before clicking search. The delete button will delete selected logs from the
list. If the ALL field is selected, then clicking delete will delete all the logs. In most
scenarios you will want to keep the logs; try to avoid using the delete function
unnecessarily.

Page 31
2. The log results will be displayed here. It will display what action was performed, the
account associated with it, and a time stamp. The check box to the left of each log is
to select it for deletion. Clicking the delete button will delete all logs that are
checked. Once again, having a robust history is very beneficial. Try to not use the
delete function when not necessary.
You may now be concerned that another administrator can delete logs when they are
not supposed to. Thankfully there is a system in place to prevent unauthorized changes.
The Administrator Accounts page allows the master account (and other accounts that
are authorized) to set restrictions on administrators. Through here, you are able to set
permissions on what pages an administrator can edit. Here is an example administrator
account page.
1. Here you will find comprehensive details on the selected administrator account. It is
possible to change the user id, password, and personal settings of the account. In
addition, it is possible to set Nova portal access through the Authority list. If no
administrator is selected, it is also possible to create new accounts through this
page. The benefit to this, in respect to the sub-master accounts in billing, is that
access can immediately be set. Sub-master accounts created through the billing
portal will be granted default access to everything.
2. All the existing administrator accounts are displayed here. Use the search feature to
filter results, click select beside an existing account to load it, and use the
navigational tools at the bottom to flip between results.

Page 32
3.3.9 Statistics
Statistics play a huge role in running a successful IPTV service. Analyzing the data
received from users can help pinpoint strengths and weaknesses in the service. Through
a set of tools, Nova allows you to better understand your audience and see what kind of
content clients prefer. Catering to existing clients will not only retain their subscription
but it will also capture new ones from similar demographics.
There are a few statistical engines found in Nova. They are found in the Rating, Set-Top
Box, Stream Server, and Total Count pages. Each page provides statistical analysis on
their retrospective names.
Unfortunately, the tools are still under construction as Nova is still in beta. When Nova
is officially released, these tools will be functional and the updated manual will give
instructions on how to use them. Until then you may ignore these pages.
3.3.10 IPG (EPG)
IPG (Internet Program Guide) or better known as EPG (Electronic Programming Guide) is
an integral part to any TV system. Users want to know what shows are playing and at
what time. You can configure your own EPG through the IPG (EPG) page. There is a lot of
functionality in this feature so it is important to understand how everything works.
Majority of the time, you will be entering existing EPGs. This is because the EPGs for
most channels already exist. Using the service xmltv you can import EPGs straight into
Nova. This is far more convenient than creating everything manually. To do this you
must first upload the xml file to the server. From there you will enter the file path into
the input XML file path field and then click the import button. Nova will automatically
update the Program List with the imported information, however, you are still required
to fill in the remaining fields found at the top.
All EPGs are linked to a channel. From there, whenever the stream is used, it will
provide the EPG linked with it. Even after uploading an EPG you must specify what to
link it to. Using the source button, you can find the channel you wish to provide EPG for.
If you wish to create EPGs manually, then that is also possible. Use the fields found
under Program List to enter new program information and add them to the EPG.

Page 33
Here is an example of an IPG (EPG) page.
1. The import and master clear commands are found here. The clear (EPG) button will
delete all EPG files, so be very cautious when using it. If you wish to reset
information, then use the other clear buttons found on the page. To import EPGs,
you must use the xmltv service; which is quickly found via web search. Upload the
file from xmltv to the server and provide the direct link to it. Clicking import will
load all the Program List information pertaining to the EPG you are importing.
2. Here the main EPG information is displayed. It is important to remember that the
EPG must link back to an existing channel. The search button will bring up a menu to
choose the channel from, however, the channels are limited to the Live, VoD, and
Audio sections. Uploading a photo will display it in addition to the EPG information.
Finally, status will determine if the EPG is currently active or not. As long as status is
active then it can be seen by users.
3. The list of EPGs are found here. Use the search feature to filter results, click select
beside an existing EPG to load it into the form above. Lastly, use the navigational
tools at the bottom to flip between list results.
4. Every EPG also contains a list of programs. A program will be any kind of content (TV
show, movie, etc.) that is shown between set times. A program consists of a name,
description, and the time that it is shown between. Nova will automatically connect
programs together, based on time, to create a nicely formatted EPG for users to see.
5. The list of programs from the EPG are found here. Use the search feature to filter
results, click select beside an existing program to load it into the form above, and
use the navigational tools at the bottom to flip between list results.


![Nova Science Publishers, Inc.gridbus.csse.unimelb.edu.au/papers/GridProgrammingModels2006.pdf · A popular and widely used middleware is the Globus toolkit [5], which provides a](https://img.dokumen.tips/doc/110x75/5f1f46a6515d0c71d23d3b14/nova-science-publishers-inc-a-popular-and-widely-used-middleware-is-the-globus.jpg)