Embed Size (px)
Citation preview
NITRO ROBOTIC POOL CLEANER OPERATION MANUAL
Congratulations on your purchase of the most technologically advanced automatic poolvacuum available today. The Nitro is easy to use and will make maintaining your pool
affordable and effortless. Following these simple directions will insure that the Nitro willquickly and efficiently clean your pool today and for many years to come.
INSTALLATION
• Place the power supply in an area that will allow the cleaner to cover all areas of the pool.
• Be sure to only plug the power supply into a GFI (ground fault interrupter) or ELI (earth leak interrupter) protected electrical outlet.
• Look at the power supply and check that the power supply switch is in the off position.
• Plug the power supply into the protected outlet.
• Plug in the connector from the cleaner into the power supply. The connector is keyed so that it will only plug into the power supply one way. Make sure that the plug is pushed all the way onto the power supply. Slide the connector lock (strain relief) onto the connector and turn the connector lock clockwise until it is snug.
DO NOT RUN THE CLEANER OUT OF THE WATER.OPERATING THE CLEANER OUT OF THE WATER WILL DAMAGE THE MOTORS AND VOID THE WARRANTY
• Place the cleaner into the pool and if needed rock the cleaner side to side to release any trapped air. The cleaner will sink to the bottom of the pool.
• Put enough of the blue cord into the water to assure that the cleaner can easily reach all areas of the pool.
• Turn the switch on the power supply to the on position.
• The cleaner will begin its cleaning program.
• The cleaner will automatically shut itself down after two hours.
• If a second cleaning is required or the unit is accidentally shut off, you should wait one minute before switching the unit on again.
IMPORTANT NOTE: During normal operation, the cleaner will appear to shut off for a few seconds, raise thefront wheels off the pool bottom and move either left or right or turn for an undetermined amount of time. This isnormal and has been preprogrammed into the unit to assure the quickest and most efficient cleaning of your pool.
2
IMPORTANT SAFETY INSTRUCTIONSREAD AND FOLLOW ALL INSTRUCTIONS
SAVE THESE INSTRUCTIONS
! Risk of electrical shock or electrocution – The electrical supply to this product must be installed in accordance with the National Electrical Code and all applicable local codesand ordinances. Improper installation will create an electrical hazard which could result in death or serious injury to pool users or others due to electrical shock, and mayalso cause damage to property.
DO NOT USE EXTENSION CORDS - DEATH OR INJURY CAN RESULT.
To reduce the risk of injury, do not permit children to use this product unless they are closely supervised at all times
If ambient air temperature exceeds 115˚ F., protect the power supply from direct sunlight. Do not cover the power supply.
The sole purpose of this product is for use as a robotic pool cleaner as described in this manual; any modification or other use will void the warranty.
Do not allow children to use, touch, or play near or around the units’ power supply.
A Ground Fault Current Interrupter (GFCI-USA) and Earth Leak Interrupter (ELI-EU) must be installed to protect your electrical outlet and to prevent any possibleelectric shock. Failure to do so could create an electrical hazard which could result in death or serious injury to pool users or others due to electrical shock and mayalso cause damage to property.
Do not connect unit to AC power until installation has been completed.
Do not use if unit is damaged in any way.
Unit must be completely submerged in water or warranty is void.
Make sure the robotic pool cleaner is unplugged from its power supply before opening the unit or performing any other maintenance.
To avoid damage to the power supply and cord, never carry the power supply by the cord or pull on the cord to disconnect from an outlet. Instead, disconnect bypulling the plug, itself, from the outlet. Do not pull cord around sharp corners or edges.
Do not play with the cleaner or cable or apply to body. It can trap or tear hair or body parts. The cable can trip or entangle swimmers which could result in drowning.
Do not operate with a damaged cord or power supply.
Before installing the cleaner, understand the cleaners coverage. The cleaner was not designed to automatically clean steps or to work under solar covers. It was alsonot designed to do initial clean up for a new pool installation.
Your cleaner should not be used while people are swimming in the pool.
The power supply must be at least 12 feet / 4 meters from the pool’s edge at all times!
It is recommended that you clean your filter bag and check the impeller to make sure it is free and clear of debris after every use.
Disconnect the power supply from the outlet when not in use.
DO NOT switch the pool cleaner to “ON” if it is not immersed in the water. Operation the cleaner out of the water may cause severe damage and will result in loss ofwarranty. Always remember to turn the power supply “OFF” and unplug it from the power outlet before removing the cleaner from the pool.
If your robotic pool cleaner is not working as it should or has been dropped or damaged in any way, contact Interline Customer Service before using at [email protected] or visit our website at www.interline-pool.com.
DANGER:
! WARNING:
! WARNING:
! WARNING:
! WARNING:
! WARNING:
! WARNING:
! WARNING:
! WARNING:
! WARNING:
! WARNING:
! WARNING:
! WARNING:
! WARNING:
! WARNING:
! WARNING:
! WARNING:
! CAUTION:
! CAUTION:
! CAUTION:
! CAUTION:
3
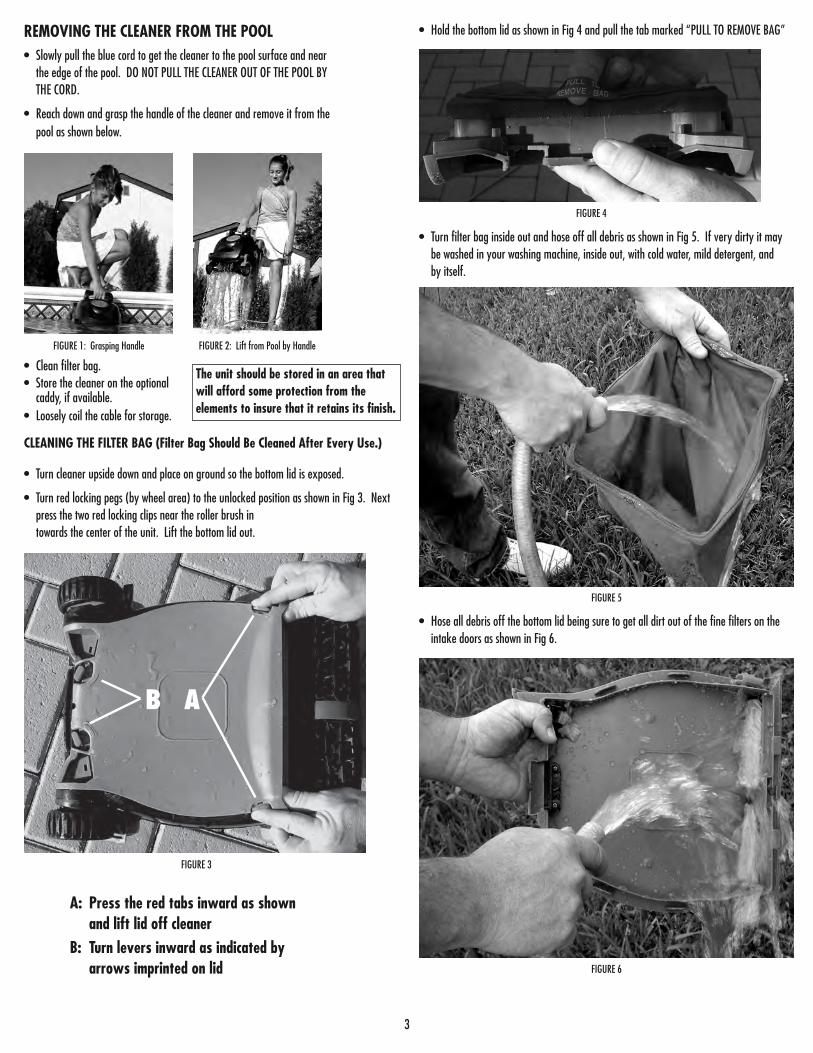
REMOVING THE CLEANER FROM THE POOL• Slowly pull the blue cord to get the cleaner to the pool surface and near
the edge of the pool. DO NOT PULL THE CLEANER OUT OF THE POOL BY THE CORD.
• Reach down and grasp the handle of the cleaner and remove it from the pool as shown below.
FIGURE 1: Grasping Handle FIGURE 2: Lift from Pool by Handle
• Clean filter bag.• Store the cleaner on the optional
caddy, if available.• Loosely coil the cable for storage.
The unit should be stored in an area thatwill afford some protection from theelements to insure that it retains its finish.
CLEANING THE FILTER BAG (Filter Bag Should Be Cleaned After Every Use.)
• Turn cleaner upside down and place on ground so the bottom lid is exposed.
• Turn red locking pegs (by wheel area) to the unlocked position as shown in Fig 3. Next press the two red locking clips near the roller brush in towards the center of the unit. Lift the bottom lid out.
AB
A: Press the red tabs inward as shown and lift lid off cleaner
B: Turn levers inward as indicated by arrows imprinted on lid
FIGURE 3
• Hold the bottom lid as shown in Fig 4 and pull the tab marked “PULL TO REMOVE BAG”
FIGURE 4
• Turn filter bag inside out and hose off all debris as shown in Fig 5. If very dirty it may be washed in your washing machine, inside out, with cold water, mild detergent, and by itself.
FIGURE 5
• Hose all debris off the bottom lid being sure to get all dirt out of the fine filters on the intake doors as shown in Fig 6.
FIGURE 6
4
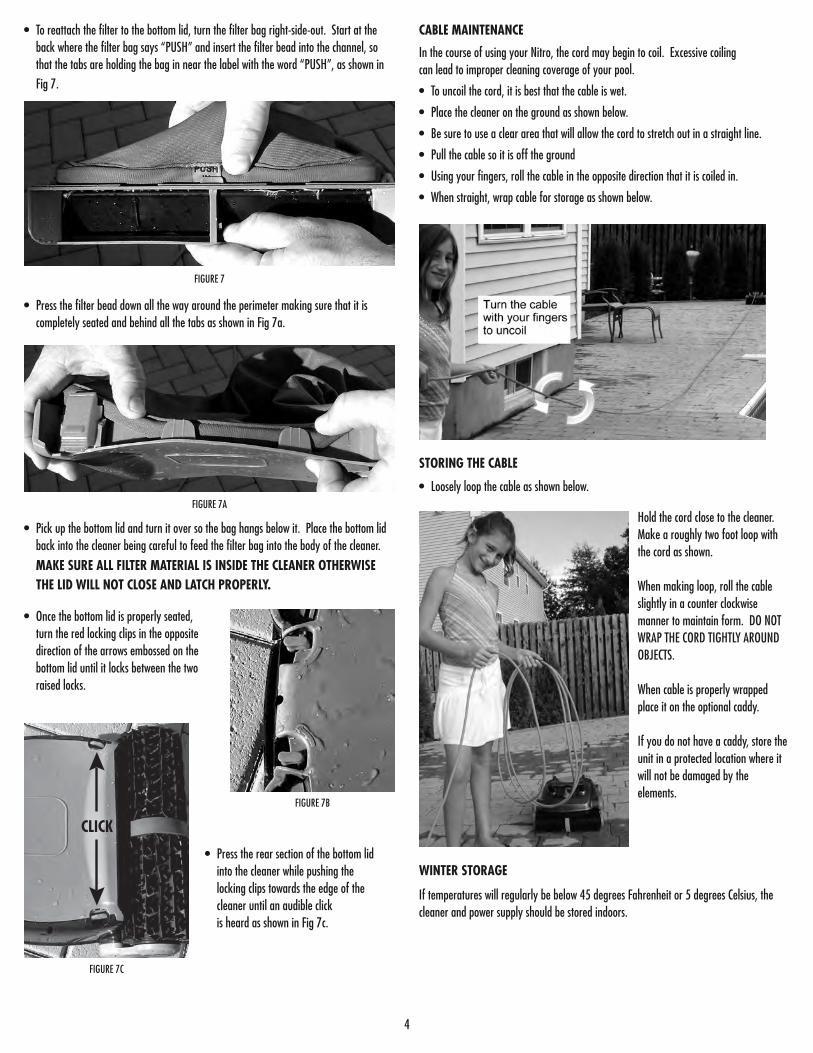
• To reattach the filter to the bottom lid, turn the filter bag right-side-out. Start at the back where the filter bag says “PUSH” and insert the filter bead into the channel, so that the tabs are holding the bag in near the label with the word “PUSH”, as shown in Fig 7.
FIGURE 7
• Press the filter bead down all the way around the perimeter making sure that it is completely seated and behind all the tabs as shown in Fig 7a.
FIGURE 7A
• Pick up the bottom lid and turn it over so the bag hangs below it. Place the bottom lid back into the cleaner being careful to feed the filter bag into the body of the cleaner.
MAKE SURE ALL FILTER MATERIAL IS INSIDE THE CLEANER OTHERWISE THE LID WILL NOT CLOSE AND LATCH PROPERLY.
FIGURE 7B
• Press the rear section of the bottom lid into the cleaner while pushing the locking clips towards the edge of the cleaner until an audible click is heard as shown in Fig 7c.
FIGURE 7C
CLICK
• Once the bottom lid is properly seated,turn the red locking clips in the oppositedirection of the arrows embossed on thebottom lid until it locks between the tworaised locks.
CABLE MAINTENANCE
In the course of using your Nitro, the cord may begin to coil. Excessive coilingcan lead to improper cleaning coverage of your pool.
• To uncoil the cord, it is best that the cable is wet.
• Place the cleaner on the ground as shown below.
• Be sure to use a clear area that will allow the cord to stretch out in a straight line.
• Pull the cable so it is off the ground
• Using your fingers, roll the cable in the opposite direction that it is coiled in.
• When straight, wrap cable for storage as shown below.
STORING THE CABLE
• Loosely loop the cable as shown below.
Hold the cord close to the cleaner.Make a roughly two foot loop withthe cord as shown.
When making loop, roll the cableslightly in a counter clockwisemanner to maintain form. DO NOTWRAP THE CORD TIGHTLY AROUNDOBJECTS.
When cable is properly wrappedplace it on the optional caddy.
If you do not have a caddy, store theunit in a protected location where itwill not be damaged by theelements.
WINTER STORAGE
If temperatures will regularly be below 45 degrees Fahrenheit or 5 degrees Celsius, thecleaner and power supply should be stored indoors.
5
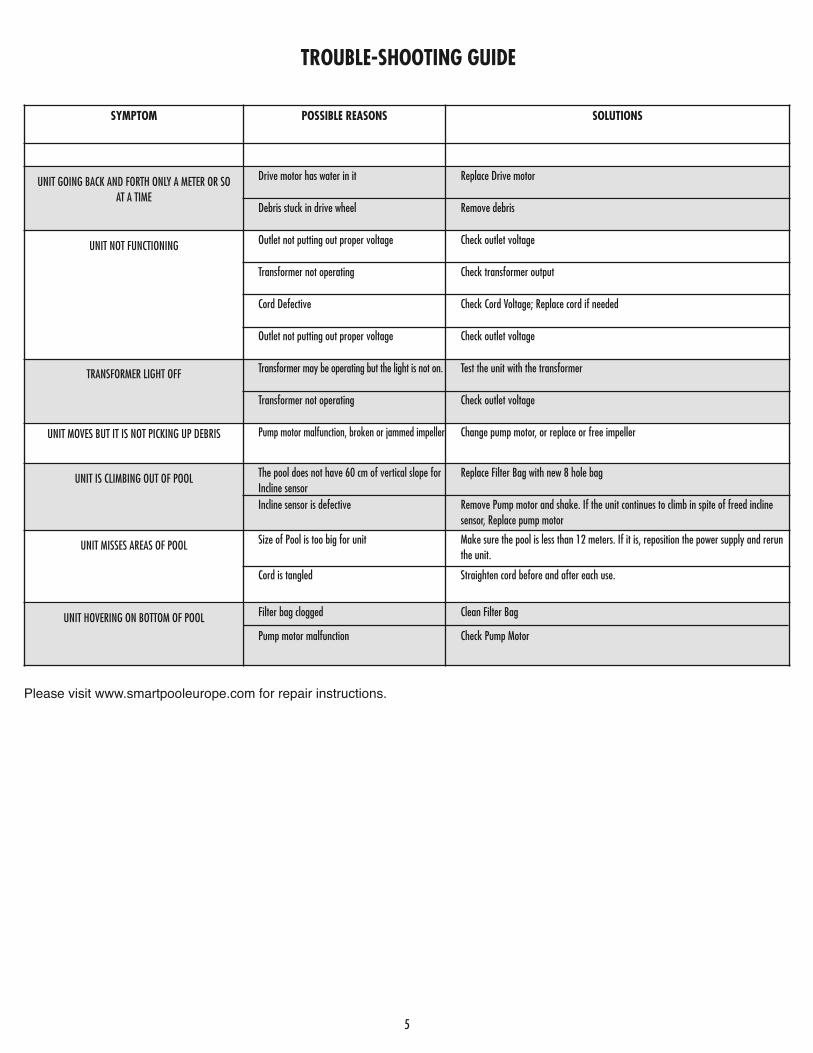
SYMPTOM POSSIBLE REASONS SOLUTIONS
UNIT GOING BACK AND FORTH ONLY A METER OR SOAT A TIME
Drive motor has water in it Replace Drive motor
Debris stuck in drive wheel Remove debris
UNIT NOT FUNCTIONING Outlet not putting out proper voltage Check outlet voltage
Transformer not operating Check transformer output
Cord Defective Check Cord Voltage; Replace cord if needed
Outlet not putting out proper voltage Check outlet voltage
TRANSFORMER LIGHT OFF Transformer may be operating but the light is not on. Test the unit with the transformer
Transformer not operating Check outlet voltage
UNIT MOVES BUT IT IS NOT PICKING UP DEBRIS Pump motor malfunction, broken or jammed impeller Change pump motor, or replace or free impeller
UNIT IS CLIMBING OUT OF POOL The pool does not have 60 cm of vertical slope for Incline sensor
Replace Filter Bag with new 8 hole bag
Incline sensor is defective Remove Pump motor and shake. If the unit continues to climb in spite of freed incline sensor, Replace pump motor
UNIT MISSES AREAS OF POOL Size of Pool is too big for unit Make sure the pool is less than 12 meters. If it is, reposition the power supply and rerun the unit.
Cord is tangled Straighten cord before and after each use.
UNIT HOVERING ON BOTTOM OF POOL Filter bag clogged
Pump motor malfunction
Clean Filter Bag
Check Pump Motor
TROUBLE-SHOOTING GUIDE
Please visit www.smartpooleurope.com for repair instructions.
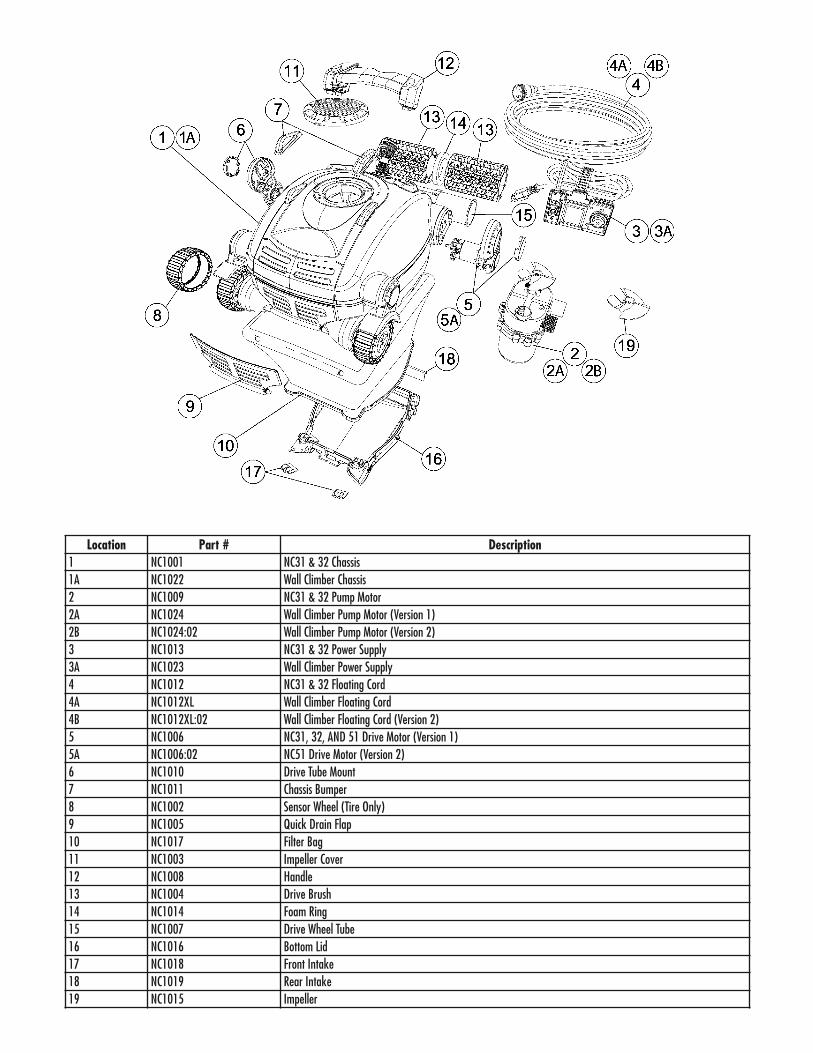
Location Part # Description1 NC1001 NC31 & 32 Chassis1A NC1022 Wall Climber Chassis2 NC1009 NC31 & 32 Pump Motor2A NC1024 Wall Climber Pump Motor (Version 1)2B NC1024:02 Wall Climber Pump Motor (Version 2)3 NC1013 NC31 & 32 Power Supply3A NC1023 Wall Climber Power Supply4 NC1012 NC31 & 32 Floating Cord4A NC1012XL Wall Climber Floating Cord4B NC1012XL:02 Wall Climber Floating Cord (Version 2)5 NC1006 NC31, 32, AND 51 Drive Motor (Version 1) 5A NC1006:02 NC51 Drive Motor (Version 2)6 NC1010 Drive Tube Mount7 NC1011 Chassis Bumper8 NC1002 Sensor Wheel (Tire Only)9 NC1005 Quick Drain Flap10 NC1017 Filter Bag11 NC1003 Impeller Cover12 NC1008 Handle13 NC1004 Drive Brush14 NC1014 Foam Ring15 NC1007 Drive Wheel Tube16 NC1016 Bottom Lid17 NC1018 Front Intake18 NC1019 Rear Intake19 NC1015 Impeller
Model NC32EU
L I M I T E D W A R R A N T Y
This product has been manufactured, tested and inspected in accordance with carefullyspecified engineering requirements. It is warranted to be free from defects in materialsand workmanship under normal use and service, subject to qualifications, conditions andlimitations as described below.
This warranty extends to the first consumer/purchaser for a period of 12 Months from dateof purchase and excludes caddy, cleaning brushes, climbing ring, and filter bag, which areconsidered normal “wear and tear” components.
This warranty covers only normal and reasonable use. Damage, defects, malfunctions orother failures arising from its use without the original transformer or any use which does notcomply with the instructions in the Operator’s Manual, including the failure of the purchaserto provide reasonable and necessary maintenance, shall invalidate this warranty.Damage, defects, malfunctions or other failures caused by or related to repairs performedby any servicer other then an authorized service representative of SMARTPOOL shall notbe covered.
The warranty obligations of SMARTPOOL shall be limited to repair or replacement of theproduct or of any defective component, at the option of SMARTPOOL. Such repair orreplacement may include the use of refurbished components and/or units at the option ofSMARTPOOL. SMARTPOOL shall not be liable or responsible under any circumstancesor in any amount for any consequential or incidental damages, or for any injury ordamages to persons or property using or used in connection with the product, or for lossof profits or other costs or expenses of any kind of character.
THERE ARE NO OTHER WARRANTIES OR REPRESENTATIONS, EITHER EXPRESSOR IMPLIED, WHETHER OF MERCHANTABILITY, FITNESS FOR A PARTICULARPURPOSE, OR OTHER, MADE BY SMARTPOOL OTHER THAN THOSE SPECIFICALLYSET FORTH IN THIS WARRANTY. NO PERSON, FIRM, OR CORPORATION ISAUTHORIZED TO MAKE ANY REPRESENTATIONS OR INCUR ANY OBLIGATIONS INTHE NAME OF OR ON BEHALF OF SMARTPOOL, EXCEPT AS STATED HEREIN. THEREMEDIES SET FORTH IN THIS WARRANTY ARE EXPRESSLY UNDERSTOOD TO BETHE EXCLUSIVE REMEDIES AVAILABLE TO THE PURCHASER, AND THISWARRANTY CONTAINS THE FULL AND COMPLETE AGREEMENTBETWEEN SMARTPOOL AND THE PURCHASER. THIS WARRANTY SETS FORTHTHE ONLY OBLIGATIONS OF SMARTPOOL WITH REGARDS TO THIS PRODUCT,AND THERE ARE NO WARRANTIES WHICH EXTEND BEYOND THE DESCRIPTIONON THE FACE HEREOF.
To obtain warranty service, contact the shop where you purchased your cleaner. Afterreceiving an approval from the shop, return the cleaner, adequately packed, to the locationspecified by the shop. Attach to the cleaner a copy of the invoice including date ofpurchase, serial number and description of the problem.
CAUTION: Some vinyl liners are more susceptible to surface wear or pattern removal than others,caused by objects, such as brushes, floats, toys, chlorine dispensers, and automatic poolcleaners, coming into contact with the vinyl surface. Such patterns can be severelyscratched or abraded merely by rubbing the surface with a brush. Pattern ink can alsorub off when it comes into contact with objects in the pool. SmartPool is not responsiblefor, nor does this limited warranty cover, pattern removal, abrasion, markings on ordamage of any kind to vinyl liners.

8
9
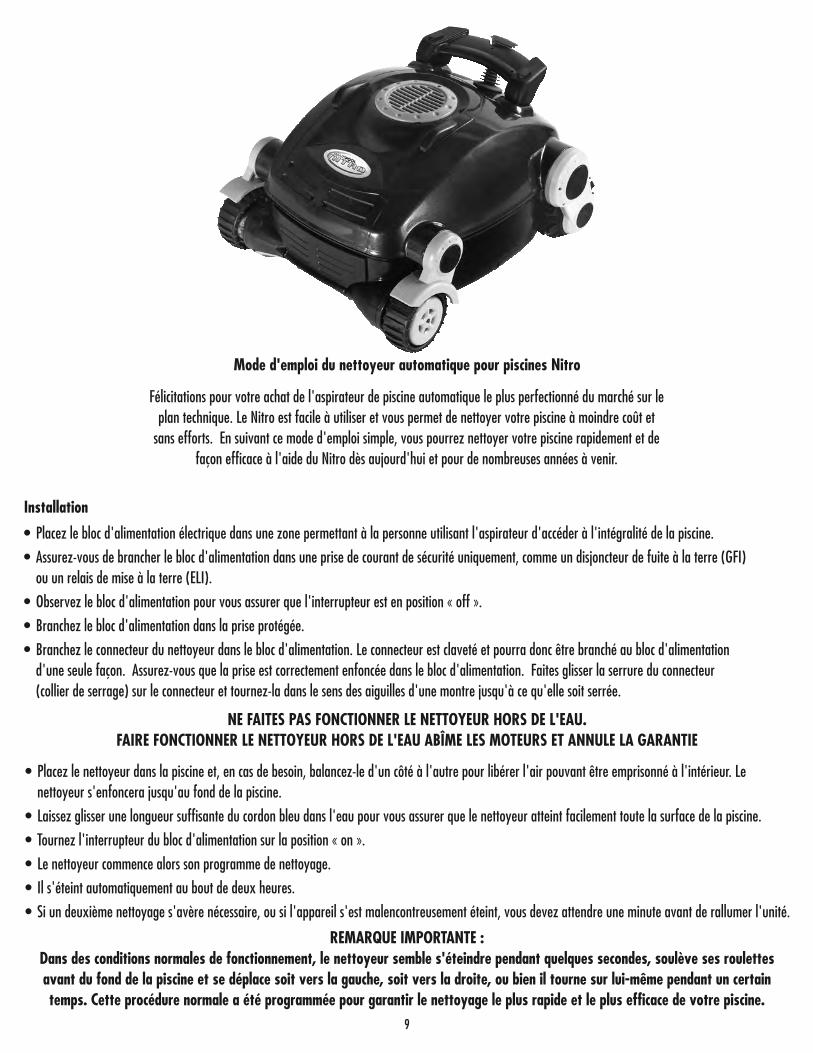
Mode d'emploi du nettoyeur automatique pour piscines Nitro
Félicitations pour votre achat de l'aspirateur de piscine automatique le plus perfectionné du marché sur leplan technique. Le Nitro est facile à utiliser et vous permet de nettoyer votre piscine à moindre coût et
sans efforts. En suivant ce mode d'emploi simple, vous pourrez nettoyer votre piscine rapidement et defaçon efficace à l'aide du Nitro dès aujourd'hui et pour de nombreuses années à venir.
Installation
• Placez le bloc d'alimentation électrique dans une zone permettant à la personne utilisant l'aspirateur d'accéder à l'intégralité de la piscine.
• Assurez-vous de brancher le bloc d'alimentation dans une prise de courant de sécurité uniquement, comme un disjoncteur de fuite à la terre (GFI) ou un relais de mise à la terre (ELI).
• Observez le bloc d'alimentation pour vous assurer que l'interrupteur est en position « off ».
• Branchez le bloc d'alimentation dans la prise protégée.
• Branchez le connecteur du nettoyeur dans le bloc d'alimentation. Le connecteur est claveté et pourra donc être branché au bloc d'alimentation d'une seule façon. Assurez-vous que la prise est correctement enfoncée dans le bloc d'alimentation. Faites glisser la serrure du connecteur (collier de serrage) sur le connecteur et tournez-la dans le sens des aiguilles d'une montre jusqu'à ce qu'elle soit serrée.
NE FAITES PAS FONCTIONNER LE NETTOYEUR HORS DE L'EAU.FAIRE FONCTIONNER LE NETTOYEUR HORS DE L'EAU ABÎME LES MOTEURS ET ANNULE LA GARANTIE
• Placez le nettoyeur dans la piscine et, en cas de besoin, balancez-le d'un côté à l'autre pour libérer l'air pouvant être emprisonné à l'intérieur. Le nettoyeur s'enfoncera jusqu'au fond de la piscine.
• Laissez glisser une longueur suffisante du cordon bleu dans l'eau pour vous assurer que le nettoyeur atteint facilement toute la surface de la piscine.
• Tournez l'interrupteur du bloc d'alimentation sur la position « on ».
• Le nettoyeur commence alors son programme de nettoyage.
• Il s'éteint automatiquement au bout de deux heures.
• Si un deuxième nettoyage s'avère nécessaire, ou si l'appareil s'est malencontreusement éteint, vous devez attendre une minute avant de rallumer l'unité.
REMARQUE IMPORTANTE :Dans des conditions normales de fonctionnement, le nettoyeur semble s'éteindre pendant quelques secondes, soulève ses roulettesavant du fond de la piscine et se déplace soit vers la gauche, soit vers la droite, ou bien il tourne sur lui-même pendant un certaintemps. Cette procédure normale a été programmée pour garantir le nettoyage le plus rapide et le plus efficace de votre piscine.

10
CONSIGNES DE SÉCURITÉ IMPORTANTESLISEZ ET SUIVEZ TOUTES LES INSTRUCTIONS
CES INSTRUCTIONS DOIVENT ÊTRE CONSERVÉES
! Risque de choc électrique ou d'électrocution : le bloc d'alimentation électrique de ce produit doit être installé conformément au Code national de l'électricité et à tous lescodes et règlements locaux applicables. Une mauvaise installation augmente les risques de chocs électriques pouvant causer la mort ou des blessures graves auxutilisateurs de la piscine ou à d'autres personnes ainsi que des dégâts matériels.
N'UTILISEZ PAS DE RALLONGES ÉLECTRIQUES, CAR ELLES PEUVENT CAUSER LA MORT OU DES BLESSURES.
Pour réduire les risques de blessures, n'autorisez aucun enfant à utiliser ce produit.
Si la température ambiante de l'air dépasse 46 °C (115 ° F), ne laissez pas le bloc d'alimentation électrique exposé aux rayons directs du soleil. Ne couvrez pas le blocd'alimentation électrique.
Ce produit doit uniquement être utilisé en tant que nettoyeur de piscine robotisé, tel que décrit dans ce manuel; toute modification ou tout autre usage annule sa garantie.
N'autorisez aucun enfant à utiliser ou à toucher le bloc d'alimentation électrique de l'appareil ni à jouer à proximité.
Un disjoncteur de fuite de terre (GFCI aux États-Unis et ELI en Europe) doit être installé pour protéger votre prise de courant et éviter tout risque de choc électrique. Toutmanquement à cette règle crée un risque de choc électrique pouvant tuer ou blesser gravement les utilisateurs de la piscine ou d'autres personnes ainsi que causer desdégâts matériels.
Ne branchez pas l'appareil sur le courant alternatif tant que l'installation n'est pas terminée.
N'utilisez pas le produit s'il est endommagé d'une quelconque manière.
Lorsque vous faites fonctionner l'appareil, il doit être entièrement sous l'eau pour que la garantie s'applique.
Assurez-vous que le nettoyeur ne soit pas branché à son bloc d'alimentation électrique avant de l'ouvrir ou d'effectuer toute opération d'entretien.
Pour éviter d'endommager le bloc d'alimentation ou le câble électrique, ne déplacez jamais le bloc d'alimentation en le tenant par son câble et ne le tirez pas non pluspour le débrancher de la prise de courant. Tirez plutôt directement sur la fiche elle-même pour la débrancher. Ne tirez pas sur le câble lorsqu'il contourne des coins ou desrebords coupants.
Ne jouez pas avec le nettoyeur ni avec le câble et ne l'appliquez pas sur aucune partie du corps. Il peut aspirer et arracher les cheveux ou la peau. Les utilisateurs etbaigneurs peuvent trébucher sur le câble ou s'empêtrer dans le câble, ce qui peut provoquer des noyades.
Ne faites pas fonctionner l'appareil si le câble ou le bloc d'alimentation est endommagé.
Avant d'installer le nettoyeur, veillez à bien comprendre sa garantie. Ce nettoyeur n'est pas conçu pour nettoyer automatiquement des marches ni fonctionner sous unecouverture solaire. Il n'a pas non plus été conçu pour le premier nettoyage d'une piscine nouvellement installée.
Le nettoyeur ne doit pas être utilisé lorsque des baigneurs s’y trouvent.
Le bloc d'alimentation électrique doit à tout moment se trouver à au moins 4 mètres (12 pi) du bord de la piscine!
Il est recommandé, après chaque utilisation, de nettoyer le sac filtrant et de vérifier la turbine pour s'assurer qu'aucun débris ne peut empêcher le fonctionnement de l'appareil.
Débranchez le bloc d'alimentation de la prise de courant lorsque l'appareil n'est pas utilisé.
N'allumez PAS le nettoyeur de piscine (« ON ») s'il n'est pas complètement sous l'eau. Faire fonctionner le nettoyeur hors de l'eau peut l'endommager gravement et annule sagarantie. N'oubliez jamais de mettre le bloc d'alimentation électrique hors tension (« OFF ») et de le débrancher de la prise électrique avant de retirer le nettoyeur de la piscine.
Si votre nettoyeur est endommagé ou ne fonctionne pas adéquatement, adressez-vous au service à la clientèle de Interline au [email protected] ou consultez notresite Internet www.interline-pool.com avant de l'utiliser.
Danger :
! MISE EN GARDE :
! MISE EN GARDE :
! MISE EN GARDE :
! MISE EN GARDE :
! MISE EN GARDE :
! MISE EN GARDE :
! MISE EN GARDE :
! MISE EN GARDE :
! MISE EN GARDE :
! MISE EN GARDE :
! MISE EN GARDE :
! MISE EN GARDE :
! MISE EN GARDE :
! MISE EN GARDE :
! MISE EN GARDE :
! MISE EN GARDE :
! AVERTISSEMENT :
! AVERTISSEMENT :
! AVERTISSEMENT :
! AVERTISSEMENT :
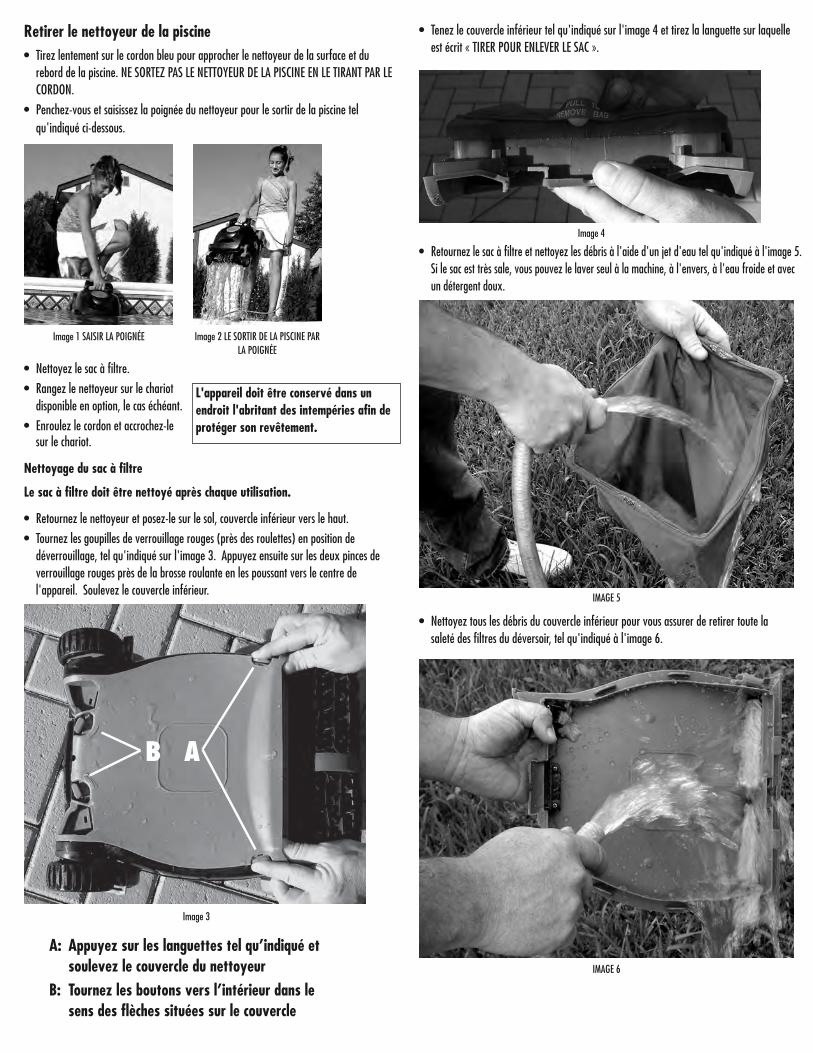
Retirer le nettoyeur de la piscine• Tirez lentement sur le cordon bleu pour approcher le nettoyeur de la surface et du
rebord de la piscine. NE SORTEZ PAS LE NETTOYEUR DE LA PISCINE EN LE TIRANT PAR LE CORDON.
• Penchez-vous et saisissez la poignée du nettoyeur pour le sortir de la piscine tel qu'indiqué ci-dessous.
Image 1 SAISIR LA POIGNÉE Image 2 LE SORTIR DE LA PISCINE PARLA POIGNÉE
• Nettoyez le sac à filtre.
• Rangez le nettoyeur sur le chariot disponible en option, le cas échéant.
• Enroulez le cordon et accrochez-le sur le chariot.
L'appareil doit être conservé dans unendroit l'abritant des intempéries afin deprotéger son revêtement.
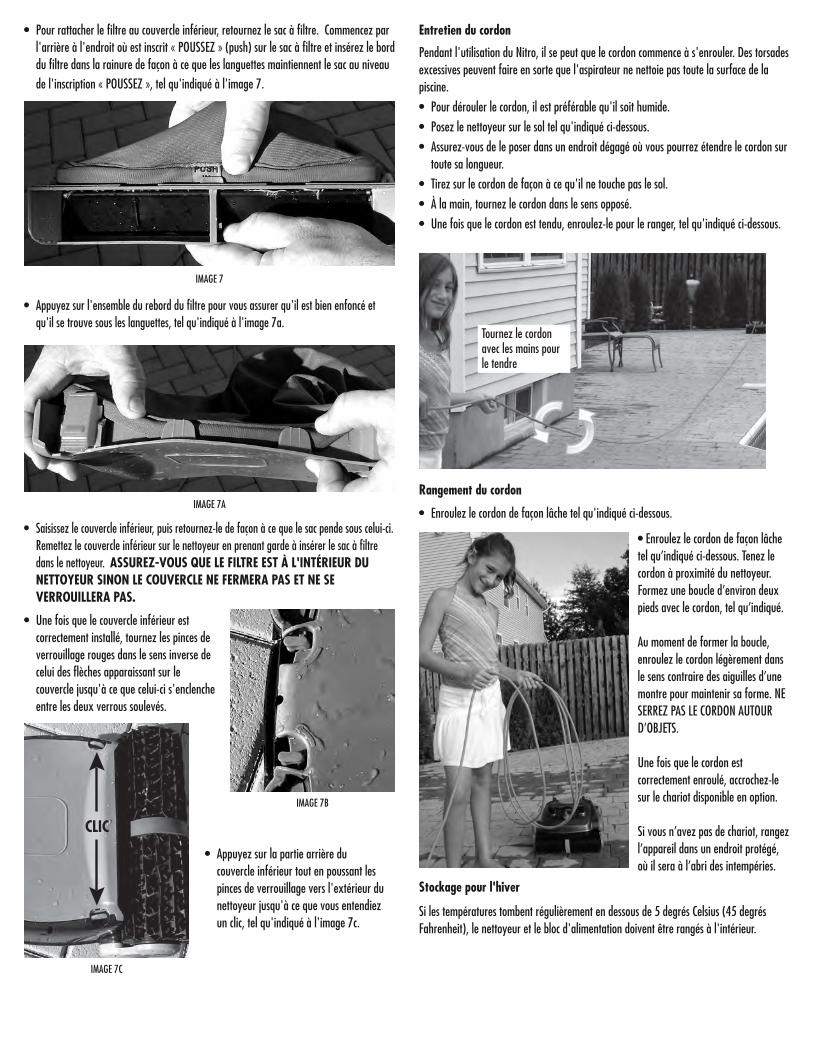
Nettoyage du sac à filtre
• Retournez le nettoyeur et posez-le sur le sol, couvercle inférieur vers le haut.
• Tournez les goupilles de verrouillage rouges (près des roulettes) en position de déverrouillage, tel qu'indiqué sur l'image 3. Appuyez ensuite sur les deux pinces de verrouillage rouges près de la brosse roulante en les poussant vers le centre de l'appareil. Soulevez le couvercle inférieur.
AB
A: Appuyez sur les languettes tel qu’indiqué et soulevez le couvercle du nettoyeur
B: Tournez les boutons vers l’intérieur dans le sens des flèches situées sur le couvercle
Image 3
• Tenez le couvercle inférieur tel qu'indiqué sur l'image 4 et tirez la languette sur laquelle est écrit « TIRER POUR ENLEVER LE SAC ».
Image 4
• Retournez le sac à filtre et nettoyez les débris à l'aide d'un jet d'eau tel qu'indiqué à l'image 5. Si le sac est très sale, vous pouvez le laver seul à la machine, à l'envers, à l'eau froide et avec un détergent doux.
IMAGE 5
• Nettoyez tous les débris du couvercle inférieur pour vous assurer de retirer toute la saleté des filtres du déversoir, tel qu'indiqué à l'image 6.
IMAGE 6
Le sac à filtre doit être nettoyé après chaque utilisation.
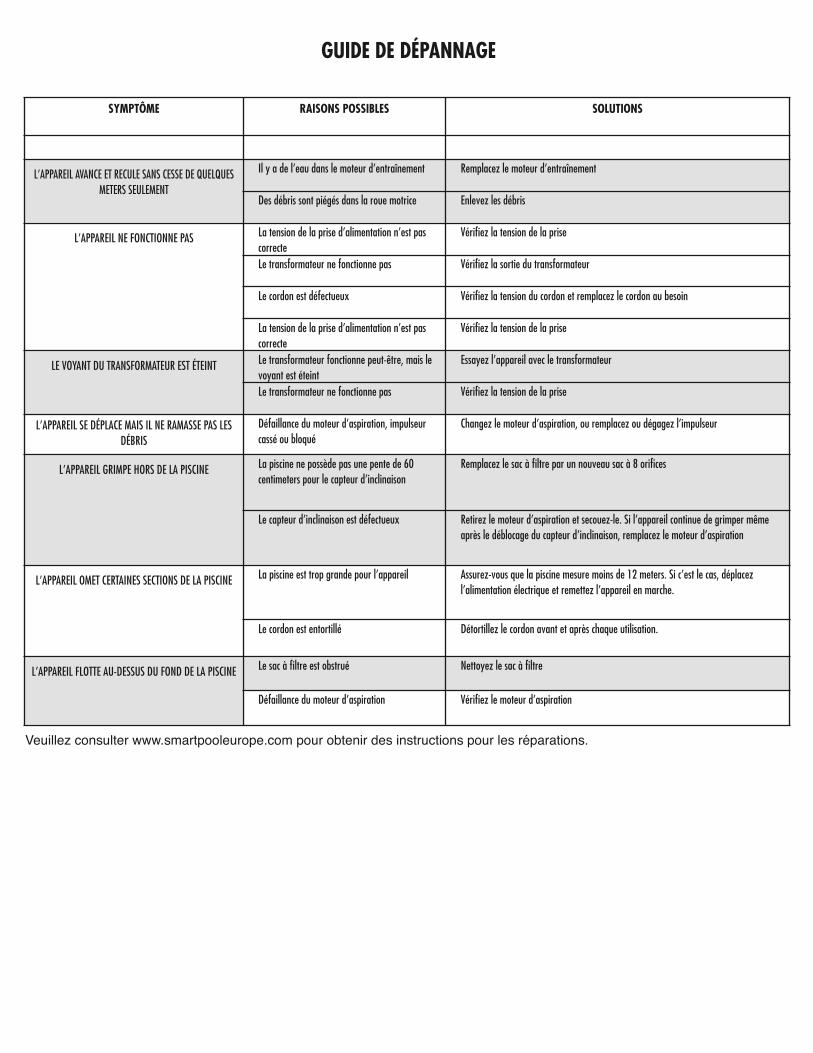
• Pour rattacher le filtre au couvercle inférieur, retournez le sac à filtre. Commencez par l'arrière à l'endroit où est inscrit « POUSSEZ » (push) sur le sac à filtre et insérez le bord du filtre dans la rainure de façon à ce que les languettes maintiennent le sac au niveau de l'inscription « POUSSEZ », tel qu'indiqué à l'image 7.
IMAGE 7
• Appuyez sur l'ensemble du rebord du filtre pour vous assurer qu'il est bien enfoncé et qu'il se trouve sous les languettes, tel qu'indiqué à l'image 7a.
IMAGE 7A
• Saisissez le couvercle inférieur, puis retournez-le de façon à ce que le sac pende sous celui-ci. Remettez le couvercle inférieur sur le nettoyeur en prenant garde à insérer le sac à filtre dans le nettoyeur. ASSUREZ-VOUS QUE LE FILTRE EST À L'INTÉRIEUR DU NETTOYEUR SINON LE COUVERCLE NE FERMERA PAS ET NE SE VERROUILLERA PAS.
IMAGE 7B
• Appuyez sur la partie arrière du couvercle inférieur tout en poussant les pinces de verrouillage vers l'extérieur du nettoyeur jusqu'à ce que vous entendiez un clic, tel qu'indiqué à l'image 7c.
IMAGE 7C
CLIC
• Une fois que le couvercle inférieur est correctement installé, tournez les pinces de verrouillage rouges dans le sens inverse de celui des flèches apparaissant sur le couvercle jusqu'à ce que celui-ci s'enclenche entre les deux verrous soulevés.
Entretien du cordon
Pendant l'utilisation du Nitro, il se peut que le cordon commence à s'enrouler. Des torsadesexcessives peuvent faire en sorte que l'aspirateur ne nettoie pas toute la surface de lapiscine.
• Pour dérouler le cordon, il est préférable qu'il soit humide.
• Posez le nettoyeur sur le sol tel qu'indiqué ci-dessous.
• Assurez-vous de le poser dans un endroit dégagé où vous pourrez étendre le cordon sur toute sa longueur.
• Tirez sur le cordon de façon à ce qu'il ne touche pas le sol.
• À la main, tournez le cordon dans le sens opposé.
• Une fois que le cordon est tendu, enroulez-le pour le ranger, tel qu'indiqué ci-dessous.
Tournez le cordonavec les mains pourle tendre
Rangement du cordon
• Enroulez le cordon de façon lâche tel qu'indiqué ci-dessous.
• Enroulez le cordon de façon lâchetel qu’indiqué ci-dessous. Tenez lecordon à proximité du nettoyeur.Formez une boucle d’environ deuxpieds avec le cordon, tel qu’indiqué.
Au moment de former la boucle,enroulez le cordon légèrement dansle sens contraire des aiguilles d’unemontre pour maintenir sa forme. NESERREZ PAS LE CORDON AUTOURD’OBJETS.
Une fois que le cordon estcorrectement enroulé, accrochez-lesur le chariot disponible en option.
Si vous n’avez pas de chariot, rangezl’appareil dans un endroit protégé,où il sera à l’abri des intempéries.
Stockage pour l'hiver
Si les températures tombent régulièrement en dessous de 5 degrés Celsius (45 degrésFahrenheit), le nettoyeur et le bloc d'alimentation doivent être rangés à l'intérieur.
SYMPTÔME RAISONS POSSIBLES SOLUTIONS
L’APPAREIL AVANCE ET RECULE SANS CESSE DE QUELQUESMETERS SEULEMENT
Il y a de l’eau dans le moteur d’entraînement Remplacez le moteur d’entraînement
Des débris sont piégés dans la roue motrice Enlevez les débris
L’APPAREIL NE FONCTIONNE PAS La tension de la prise d’alimentation n’est pas correcte
Vérifiez la tension de la prise
Le transformateur ne fonctionne pas Vérifiez la sortie du transformateur
Le cordon est défectueux Vérifiez la tension du cordon et remplacez le cordon au besoin
La tension de la prise d’alimentation n’est pas correcte
Vérifiez la tension de la prise
LE VOYANT DU TRANSFORMATEUR EST ÉTEINT Le transformateur fonctionne peut-être, mais le voyant est éteint
Essayez l’appareil avec le transformateur
Le transformateur ne fonctionne pas Vérifiez la tension de la prise
L’APPAREIL SE DÉPLACE MAIS IL NE RAMASSE PAS LESDÉBRIS
Défaillance du moteur d’aspiration, impulseur cassé ou bloqué
Changez le moteur d’aspiration, ou remplacez ou dégagez l’impulseur
L’APPAREIL GRIMPE HORS DE LA PISCINE La piscine ne possède pas une pente de 60 centimeters pour le capteur d’inclinaison
Remplacez le sac à filtre par un nouveau sac à 8 orifices
Le capteur d’inclinaison est défectueux Retirez le moteur d’aspiration et secouez-le. Si l’appareil continue de grimper même après le déblocage du capteur d’inclinaison, remplacez le moteur d’aspiration
L’APPAREIL OMET CERTAINES SECTIONS DE LA PISCINE La piscine est trop grande pour l’appareil Assurez-vous que la piscine mesure moins de 12 meters. Si c’est le cas, déplacez l’alimentation électrique et remettez l’appareil en marche.
Le cordon est entortillé Détortillez le cordon avant et après chaque utilisation.
L’APPAREIL FLOTTE AU-DESSUS DU FOND DE LA PISCINE Le sac à filtre est obstrué Nettoyez le sac à filtre
Défaillance du moteur d’aspiration Vérifiez le moteur d’aspiration
GUIDE DE DÉPANNAGE
Veuillez consulter www.smartpooleurope.com pour obtenir des instructions pour les réparations.

Emplacement Nº de pièce Description1 NC1001 Châssis NC31 et 321A NC1022 Châssis Wall Climber2 NC1009 Moteur de pompe NC31 et 322A NC1024 Moteur de pompe Wall Climber (Version 1)2B NC1024:02 Moteur de pompe Wall Climber (Version 2)3 NC1013 Boîtier d’alimentation NC31 et 323A NC1023 Boîtier d’alimentation Wall Climber4 NC1012 Cordon flottant NC31 et 324A NC1012XL Cordon flottant Wall Climber4B NC1012XL:02 Cordon flottant Wall Climber (Version 2)5 NC1006 Moteur d'entraînement NC31, 32 et 51(Version 1)5A NC1006:02 Moteur d'entraînement NC51(Version 2)6 NC1010 Support du tube d’entraînement 7 NC1011 Butoir du châssis8 NC1002 Roue de capteur (pneu seulement)9 NC1005 Clapet de vidange rapide10 NC1017 Sac filtrant11 NC1003 Grille de protection de la turbine12 NC1008 Poignée13 NC1004 Brosse d’entraînement14 NC1014 Anneau en mousse15 NC1007 Tube de la roue d’entraînement16 NC1016 Couvercle inférieur17 NC1018 Admission avant18 NC1019 Admission arrière19 NC1015 Turbine
NC32EUGARANTIE LIMITÉE
Nitro a été fabriqué, testé et inspecté conformément à des exigences techniques soigneusementprécisées. Il est garanti comme étant exempt de défauts matériels et de vices de fabrication enconditions d’utilisation réputées normales et assujetties aux réserves, conditions et limitationsdécrites ci-dessous.
La présente garantie est concédée au premier acheteur pour une période de 12 mois suivant la dated’achat.
Cette garantie s’applique à tout usage réputé normal et raisonnable de Nitro. Les dommages,défauts, dysfonctionnements ou toute autre défaillance survenant d’un usage sans le transformateurd’origine, ou tout autre usage qui ne se conforme pas aux instructions du mode d’emploi, y comprisl’incapacité de l’acheteur d’assurer un entretien réputé raisonnable et nécessaire, invalideront laprésente garantie. Les dommages, défauts, dysfonctionnements ou toute autre défaillance, causéspar ou liés à un dépanneur autre qu’un technicien agréé par SMARTPOOL ne seront pas couverts.
Les obligations de garantie de SMARTPOOL sont limitées à la réparation ou au remplacement duproduit ou de tout composant défectueux, à la discrétion de SMARTPOOL. Une telle réparation ou untel remplacement peut concerner l’usage de composants remis à neuf ainsi que celui des blocs, à ladiscrétion de SMARTPOOL. En aucun cas ou pour quelque montant que ce soit, SMARTPOOL nesaura être tenu responsable de dommages indirects ou accidentels, ou de préjudices ou blessuressurvenus à des personnes utilisant l’article, ou à des biens utilisés en rapport avec celui-ci, ou encore d’aucune perte de profit ou de tous coûts ou dépenses de quelque sorte ou nature que ce soit.
IL N’EXISTE AUCUNE AUTRE GARANTIE OU REPRÉSENTATION, EXPRESSE OUIMPLICITE, QU’IL S’AGISSE DE QUALITÉ MARCHANDE, D’APTITUDE À UN BUTQUELCONQUE OU AUTRE STIPULÉE PAR SMARTPOOL AUTRE QUE CELLEEXPRESSÉMENT STIPULÉE DANS CETTE GARANTIE. AUCUNE PERSONNE,PERSONNE MORALE OU ENTREPRISE N’EST AUTORISÉE À FAIRE DESOBSERVATIONS OU À DÉCRÉTER DES OBLIGATIONS AU NOM DE SMARTPOOL, ÀL’EXCEPTION DE CE MENTIONNÉ AUX PRÉSENTES. LES PROCÉDURES DE RECOURSMENTIONNÉES DANS CETTE GARANTIE SONT EXPRESSÉMENT COMPRISES COMMEÉTANT DES PROCÉDURES DE RECOURS DISPONIBLES POUR LE PROPRIÉTAIRE DEL’ARTICLE, ET CETTE GARANTIE CONSTITUE L’ACCORD INTÉGRAL ETEXHAUSTIF ENTRE SMARTPOOL ET LE PROPRIÉTAIRE DE L’ARTICLE. CETTEGARANTIE PRÉSENTE LES SEULES OBLIGATIONS DE SMARTPOOL, RELATIVEMENTÀ L’ARTICLE ; IL N’EXISTE AUCUNE AUTRE GARANTIE S’ÉTENDANT AU-DELÀ DE LA
DESCRIPTION DÉCRITE AUX PRÉSENTES.
Pour faire réparer les produits couverts par une garantie, prenez contact avec le magasinoù vous avez acheté votre Nitro. Lorsque ce magasin aura approuvé votre demande,renvoyez le Nitro, dans un emballage convenable, à l’adresse que le magasin vous auradonnée.Joignez au Nitro une copie de la facture faisant apparaître la date de l’achat, lenuméro de série ainsi que la description du problème.
ATTENTION : Certains liners de vinyle sont davantage sujets à la dégradation superficielle ou à l’usure des motifsdues à des objets comme les brosses, les flotteurs, les jouets, les distributeurs de chlore et lesaspirateurs de piscine automatiques lorsque ceux-ci entrent en contact avec les surfaces de vinyle.De tels motifs peuvent être sérieusement égratignés ou abrasés, rien qu’en frottant la surface à labrosse. L’encre des motifs peut également s’estomper en cas de contact avec des objets dans lapiscine. SmartPool n’est pas responsable de l’usure des motifs, de l’abrasion, des marques ou detout autre dommage de quelque sorte que ce soit survenant aux liners de vinyle, pas plus que laprésente garantie limitée ne couvre les dommages cités.

16
17
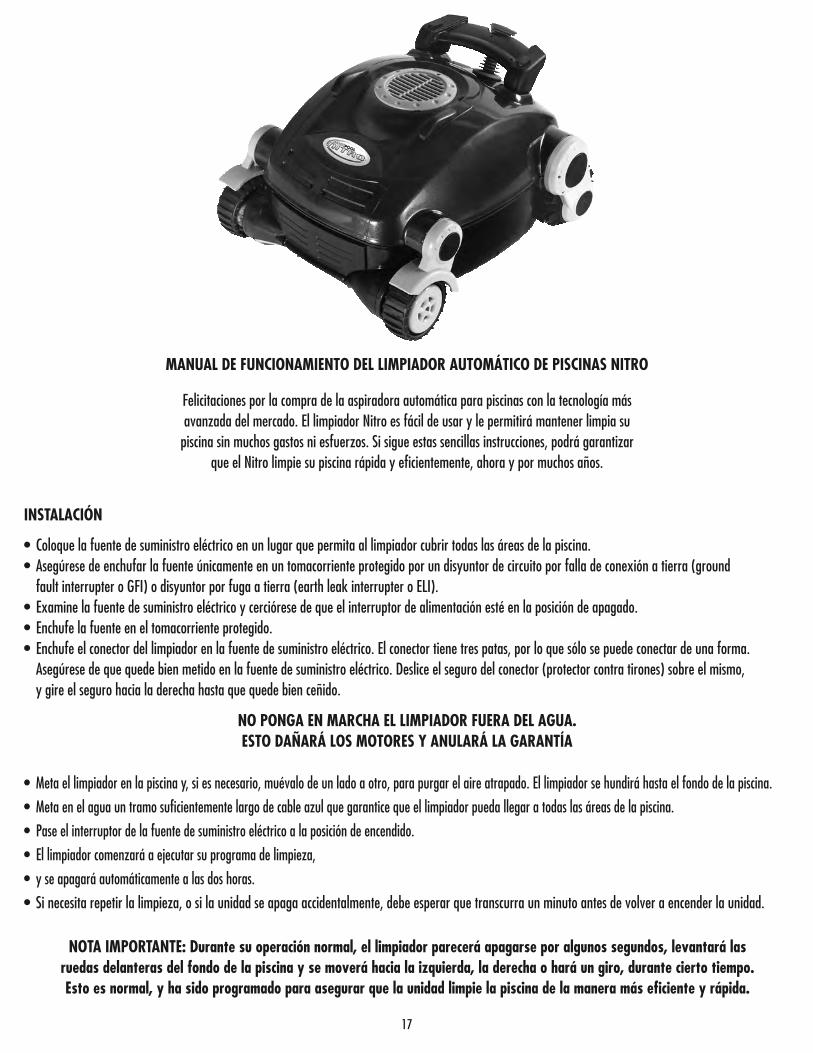
MANUAL DE FUNCIONAMIENTO DEL LIMPIADOR AUTOMÁTICO DE PISCINAS NITRO
Felicitaciones por la compra de la aspiradora automática para piscinas con la tecnología másavanzada del mercado. El limpiador Nitro es fácil de usar y le permitirá mantener limpia supiscina sin muchos gastos ni esfuerzos. Si sigue estas sencillas instrucciones, podrá garantizar
que el Nitro limpie su piscina rápida y eficientemente, ahora y por muchos años.
INSTALACIÓN
• Coloque la fuente de suministro eléctrico en un lugar que permita al limpiador cubrir todas las áreas de la piscina.• Asegúrese de enchufar la fuente únicamente en un tomacorriente protegido por un disyuntor de circuito por falla de conexión a tierra (ground
fault interrupter o GFI) o disyuntor por fuga a tierra (earth leak interrupter o ELI).• Examine la fuente de suministro eléctrico y cerciórese de que el interruptor de alimentación esté en la posición de apagado.• Enchufe la fuente en el tomacorriente protegido.• Enchufe el conector del limpiador en la fuente de suministro eléctrico. El conector tiene tres patas, por lo que sólo se puede conectar de una forma.
Asegúrese de que quede bien metido en la fuente de suministro eléctrico. Deslice el seguro del conector (protector contra tirones) sobre el mismo, y gire el seguro hacia la derecha hasta que quede bien ceñido.
NO PONGA EN MARCHA EL LIMPIADOR FUERA DEL AGUA.ESTO DAÑARÁ LOS MOTORES Y ANULARÁ LA GARANTÍA
• Meta el limpiador en la piscina y, si es necesario, muévalo de un lado a otro, para purgar el aire atrapado. El limpiador se hundirá hasta el fondo de la piscina.
• Meta en el agua un tramo suficientemente largo de cable azul que garantice que el limpiador pueda llegar a todas las áreas de la piscina.
• Pase el interruptor de la fuente de suministro eléctrico a la posición de encendido.
• El limpiador comenzará a ejecutar su programa de limpieza,
• y se apagará automáticamente a las dos horas.
• Si necesita repetir la limpieza, o si la unidad se apaga accidentalmente, debe esperar que transcurra un minuto antes de volver a encender la unidad.
NOTA IMPORTANTE: Durante su operación normal, el limpiador parecerá apagarse por algunos segundos, levantará lasruedas delanteras del fondo de la piscina y se moverá hacia la izquierda, la derecha o hará un giro, durante cierto tiempo.Esto es normal, y ha sido programado para asegurar que la unidad limpie la piscina de la manera más eficiente y rápida.
18
INSTRUCCIONES IMPORTANTES ACERCA DE LA SEGURIDADLEA Y SIGA TODAS LAS INSTRUCCIONES
GUARDE ESTAS INSTRUCCIONES
! Riesgo de descarga eléctrica o electrocución. La alimentación eléctrica de este producto debe instalarse cumpliendo con las normas del Código Nacional de Electricidad ysegún todos los códigos y decretos aplicables. Una instalación incorrecta puede dar lugar a situaciones peligrosas que pueden provocar la muerte o lesiones graves pordescarga eléctrica a los usuarios de la piscina u otras personas, así como causar daños a la propiedad.
NO UTILICE EXTENSIONES - SU USO PUEDE SER CAUSA DE MUERTE O LESIONES.
Para reducir el riesgo de lesiones, no permita que los niños utilicen este producto salvo que estén estrechamente supervisados en todo momento.
Si la temperatura ambiental sobrepasa los 115° F, proteja la fuente eléctrica contra la luz solar. No cubra la fuente eléctrica.
Este producto ha sido creado con el único propósito de usarlo como limpiador automático de piscinas, según se describe en este manual; la garantía quedará anulada si seutiliza el producto para cualquier otro fin o se le hace alguna modificación.
No permita que los niños toquen o usen las unidades de alimentación eléctrica ni jueguen cerca de ellas.
Para proteger la toma de corriente y evitar descargas eléctricas se debe instalar un interruptor de fallo de conexión a tierra (GFCI - EE. UU.) y un interruptor de fuga atierra (ELI - UE). No instalar dichos dispositivos puede dar lugar a situaciones peligrosas que pueden provocar la muerte o lesiones graves por descarga eléctrica a losusuarios de la piscina u otras personas, así como causar daños a la propiedad.
No conecte la unidad a la alimentación de corriente alterna hasta que no complete la instalación.
No lo use si la unidad está dañada de cualquier manera.
Para su uso el equipo debe sumergirse completamente en el agua, de lo contrario la garantía quedará anulada.
Asegúrese de que el robot limpiador de piscinas esté desconectado de la alimentación eléctrica antes de abrir la unidad o de realizar cualquier labor de mantenimiento.
Para evitar daños a la unidad de alimentación y al cable, nunca agarre la unidad por el cable ni tire de él para desconectar el equipo del tomacorriente. En lugar de esto,desconéctelo tirando del enchufe para sacarlo del tomacorriente. No jale el cable pasándolo por esquinas o por bordes afilados.
No juegue con el limpiador ni con el cable, y no lo use para el cuerpo. Puede trabar o desgarrar pelo o partes del cuerpo. Los bañistas pueden tropezar o enredarse con elcable y podrían ahogarse.
No use la unidad si su cable o su fuente de alimentación están dañados.
Antes de instalar el limpiador, asegúrese de comprender su cobertura. El limpiador no fue diseñado para limpiar de forma automática los escalones o para funcionar bajocubiertas solares de piscinas. Tampoco está diseñado para realizar la limpieza inicial de una piscina recién instalada.
Su limpiador no debe utilizarse mientras las personas están en la piscina.
¡La unidad de suministro eléctrico debe permanecer, en todo momento, al menos a 12 pies / 4 metros de distancia del borde de la piscina!
Se recomienda limpiar la bolsa del filtro e inspeccionar el rotor después de cada uso para asegurarse de que no tenga basura.
Cuando no esté utilizando el equipo, desconecte la fuente eléctrica del tomacorriente.
NO ponga el interruptor del limpiador en la posición “ON” si no está sumergido en el agua. Hacer funcionar el limpiador fuera del agua puede causarle daños severos yanular su garantía. Recuerde siempre apagar la alimentación ("OFF") y desconectar el limpiador del tomacorriente antes de sacarlo de la piscina.
Si su limpiador de piscina no trabaja como debe, si se ha dejado caer o ha sufrido algún daño, comuníquese con el servicio de atención al cliente de SmartPool, Inc. antesde volver a utilizarlo, por el teléfono 1-732-730-9880 o visite su sitio web en www.smartpool.com.
PELIGRO:
! ADVERTENCIA:
! ADVERTENCIA:
! ADVERTENCIA:
! ADVERTENCIA:
! ADVERTENCIA:
! ADVERTENCIA:
! ADVERTENCIA:
! ADVERTENCIA:
! ADVERTENCIA:
! ADVERTENCIA:
! ADVERTENCIA:
! ADVERTENCIA:
! ADVERTENCIA:
! ADVERTENCIA:
! ADVERTENCIA:
! ADVERTENCIA:
! ADVERTENCIA:
! ADVERTENCIA:
! ADVERTENCIA:
! PRECAUCIÓN:
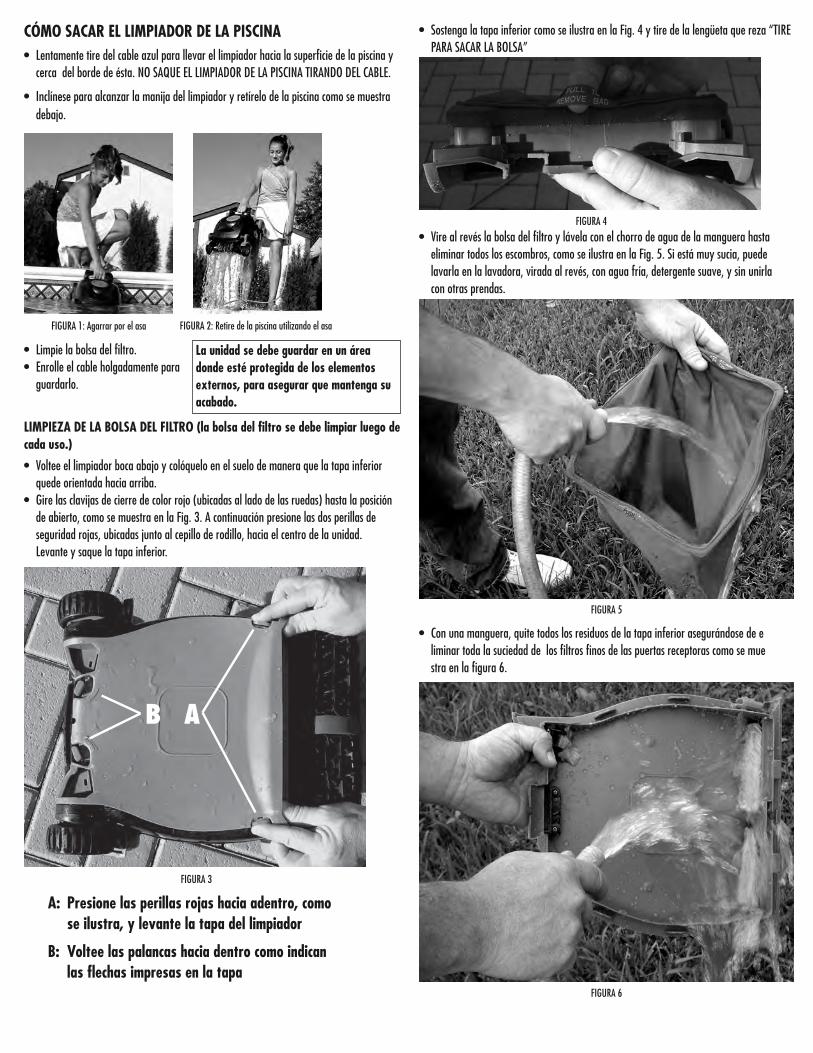
CÓMO SACAR EL LIMPIADOR DE LA PISCINA• Lentamente tire del cable azul para llevar el limpiador hacia la superficie de la piscina y
cerca del borde de ésta. NO SAQUE EL LIMPIADOR DE LA PISCINA TIRANDO DEL CABLE.
• Inclínese para alcanzar la manija del limpiador y retírelo de la piscina como se muestra debajo.
FIGURA 1: Agarrar por el asa FIGURA 2: Retire de la piscina utilizando el asa
• Limpie la bolsa del filtro.• Enrolle el cable holgadamente para
guardarlo.
La unidad se debe guardar en un áreadonde esté protegida de los elementosexternos, para asegurar que mantenga suacabado.
LIMPIEZA DE LA BOLSA DEL FILTRO (la bolsa del filtro se debe limpiar luego decada uso.)
• Voltee el limpiador boca abajo y colóquelo en el suelo de manera que la tapa inferior quede orientada hacia arriba.
• Gire las clavijas de cierre de color rojo (ubicadas al lado de las ruedas) hasta la posición de abierto, como se muestra en la Fig. 3. A continuación presione las dos perillas de seguridad rojas, ubicadas junto al cepillo de rodillo, hacia el centro de la unidad. Levante y saque la tapa inferior.
AB
A: Presione las perillas rojas hacia adentro, como se ilustra, y levante la tapa del limpiador
B: Voltee las palancas hacia dentro como indican las flechas impresas en la tapa
FIGURA 3
• Sostenga la tapa inferior como se ilustra en la Fig. 4 y tire de la lengüeta que reza “TIRE PARA SACAR LA BOLSA”
FIGURA 4
• Vire al revés la bolsa del filtro y lávela con el chorro de agua de la manguera hasta eliminar todos los escombros, como se ilustra en la Fig. 5. Si está muy sucia, puede lavarla en la lavadora, virada al revés, con agua fría, detergente suave, y sin unirla con otras prendas.
FIGURA 5
• Con una manguera, quite todos los residuos de la tapa inferior asegurándose de eliminar toda la suciedad de los filtros finos de las puertas receptoras como se muestra en la figura 6.
FIGURA 6
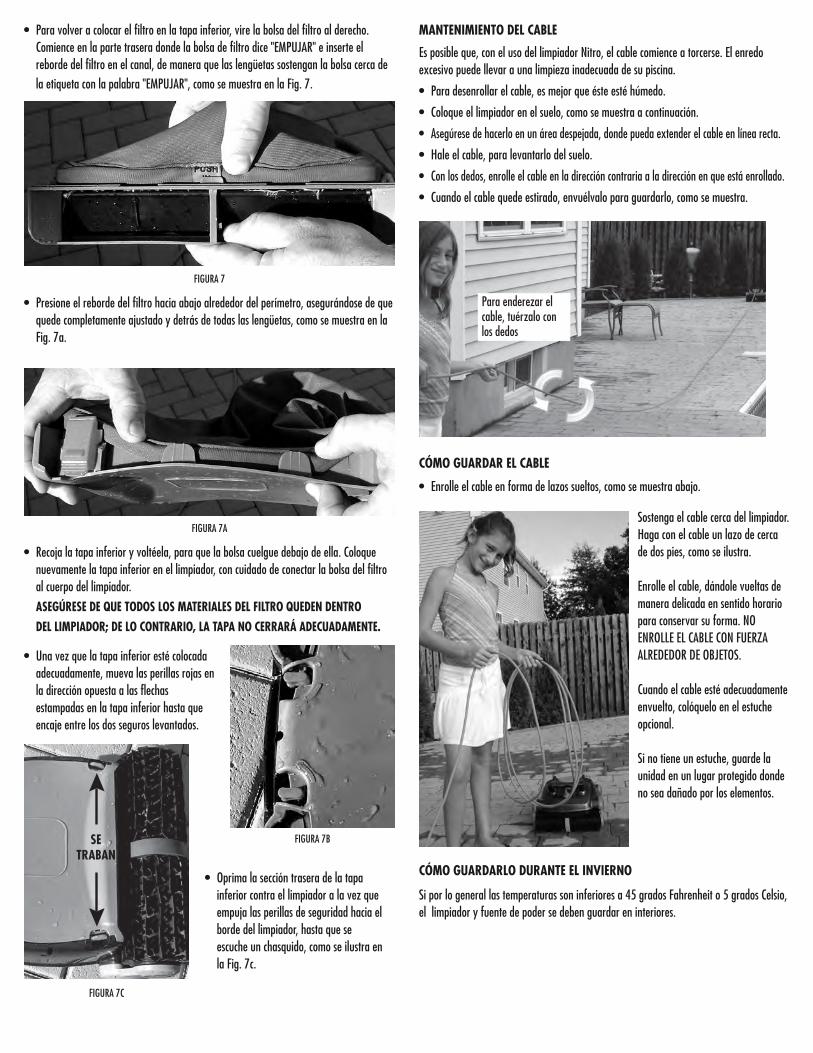
• Para volver a colocar el filtro en la tapa inferior, vire la bolsa del filtro al derecho. Comience en la parte trasera donde la bolsa de filtro dice "EMPUJAR" e inserte el reborde del filtro en el canal, de manera que las lengüetas sostengan la bolsa cerca de la etiqueta con la palabra "EMPUJAR", como se muestra en la Fig. 7.
FIGURA 7
• Presione el reborde del filtro hacia abajo alrededor del perímetro, asegurándose de que quede completamente ajustado y detrás de todas las lengüetas, como se muestra en la Fig. 7a.
FIGURA 7A
• Recoja la tapa inferior y voltéela, para que la bolsa cuelgue debajo de ella. Coloque nuevamente la tapa inferior en el limpiador, con cuidado de conectar la bolsa del filtro al cuerpo del limpiador.
ASEGÚRESE DE QUE TODOS LOS MATERIALES DEL FILTRO QUEDEN DENTRO
DEL LIMPIADOR; DE LO CONTRARIO, LA TAPA NO CERRARÁ ADECUADAMENTE.
FIGURA 7B
• Oprima la sección trasera de la tapa inferior contra el limpiador a la vez que empuja las perillas de seguridad hacia el borde del limpiador, hasta que se escuche un chasquido, como se ilustra en la Fig. 7c.
FIGURA 7C
• Una vez que la tapa inferior esté colocada adecuadamente, mueva las perillas rojas en la dirección opuesta a las flechas estampadas en la tapa inferior hasta que encaje entre los dos seguros levantados.
MANTENIMIENTO DEL CABLE
Es posible que, con el uso del limpiador Nitro, el cable comience a torcerse. El enredo excesivo puede llevar a una limpieza inadecuada de su piscina.
• Para desenrollar el cable, es mejor que éste esté húmedo.
• Coloque el limpiador en el suelo, como se muestra a continuación.
• Asegúrese de hacerlo en un área despejada, donde pueda extender el cable en línea recta.
• Hale el cable, para levantarlo del suelo.
• Con los dedos, enrolle el cable en la dirección contraria a la dirección en que está enrollado.
• Cuando el cable quede estirado, envuélvalo para guardarlo, como se muestra.
CÓMO GUARDAR EL CABLE
• Enrolle el cable en forma de lazos sueltos, como se muestra abajo.
Sostenga el cable cerca del limpiador.Haga con el cable un lazo de cercade dos pies, como se ilustra.
Enrolle el cable, dándole vueltas demanera delicada en sentido horariopara conservar su forma. NOENROLLE EL CABLE CON FUERZAALREDEDOR DE OBJETOS.
Cuando el cable esté adecuadamenteenvuelto, colóquelo en el estucheopcional.
Si no tiene un estuche, guarde launidad en un lugar protegido dondeno sea dañado por los elementos.
CÓMO GUARDARLO DURANTE EL INVIERNO
Si por lo general las temperaturas son inferiores a 45 grados Fahrenheit o 5 grados Celsio,el limpiador y fuente de poder se deben guardar en interiores.
SETRABAN
Para enderezar elcable, tuérzalo conlos dedos
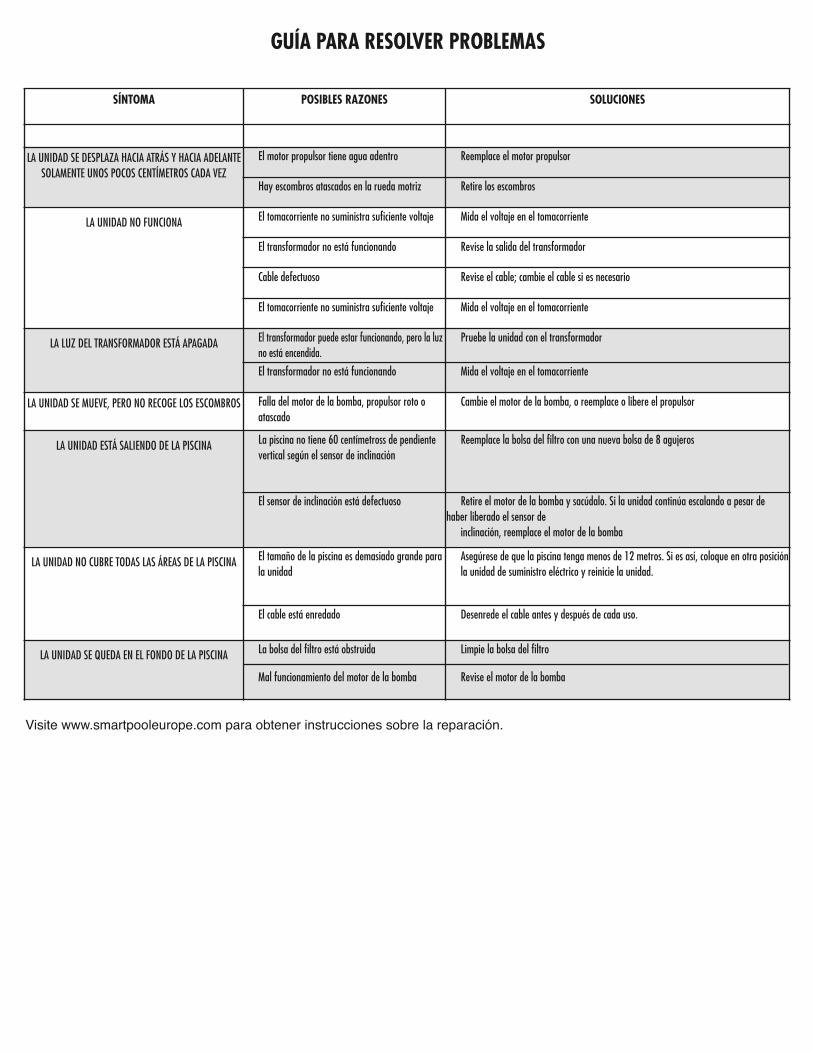
SÍNTOMA POSIBLES RAZONES SOLUCIONES
LA UNIDAD SE DESPLAZA HACIA ATRÁS Y HACIA ADELANTESOLAMENTE UNOS POCOS CENTÍMETROS CADA VEZ
El motor propulsor tiene agua adentro Reemplace el motor propulsor
Hay escombros atascados en la rueda motriz Retire los escombros
LA UNIDAD NO FUNCIONA El tomacorriente no suministra suficiente voltaje Mida el voltaje en el tomacorriente
El transformador no está funcionando Revise la salida del transformador
Cable defectuoso Revise el cable; cambie el cable si es necesario
El tomacorriente no suministra suficiente voltaje Mida el voltaje en el tomacorriente
LA LUZ DEL TRANSFORMADOR ESTÁ APAGADA El transformador puede estar funcionando, pero la luz no está encendida.
Pruebe la unidad con el transformador
El transformador no está funcionando Mida el voltaje en el tomacorriente
LA UNIDAD SE MUEVE, PERO NO RECOGE LOS ESCOMBROS Falla del motor de la bomba, propulsor roto o atascado
Cambie el motor de la bomba, o reemplace o libere el propulsor
LA UNIDAD ESTÁ SALIENDO DE LA PISCINA La piscina no tiene 60 centímetross de pendiente vertical según el sensor de inclinación
Reemplace la bolsa del filtro con una nueva bolsa de 8 agujeros
El sensor de inclinación está defectuoso Retire el motor de la bomba y sacúdalo. Si la unidad continúa escalando a pesar dehaber liberado el sensor de
inclinación, reemplace el motor de la bomba
LA UNIDAD NO CUBRE TODAS LAS ÁREAS DE LA PISCINA El tamaño de la piscina es demasiado grande para la unidad
Asegúrese de que la piscina tenga menos de 12 metros. Si es así, coloque en otra posición la unidad de suministro eléctrico y reinicie la unidad.
El cable está enredado Desenrede el cable antes y después de cada uso.
LA UNIDAD SE QUEDA EN EL FONDO DE LA PISCINA La bolsa del filtro está obstruida
Mal funcionamiento del motor de la bomba
Limpie la bolsa del filtro
Revise el motor de la bomba
GUÍA PARA RESOLVER PROBLEMAS
Visite www.smartpooleurope.com para obtener instrucciones sobre la reparación.
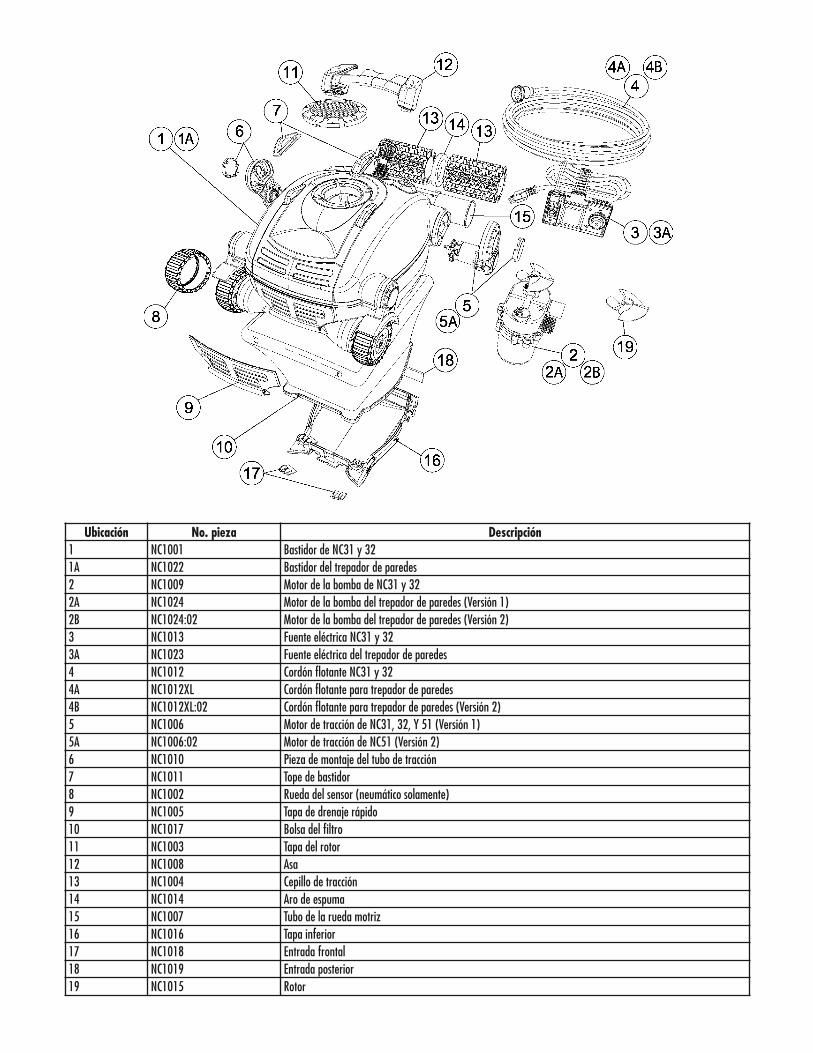
Ubicación No. pieza Descripción1 NC1001 Bastidor de NC31 y 32 1A NC1022 Bastidor del trepador de paredes2 NC1009 Motor de la bomba de NC31 y 32 2A NC1024 Motor de la bomba del trepador de paredes (Versión 1)2B NC1024:02 Motor de la bomba del trepador de paredes (Versión 2)3 NC1013 Fuente eléctrica NC31 y 323A NC1023 Fuente eléctrica del trepador de paredes4 NC1012 Cordón flotante NC31 y 324A NC1012XL Cordón flotante para trepador de paredes4B NC1012XL:02 Cordón flotante para trepador de paredes (Versión 2)5 NC1006 Motor de tracción de NC31, 32, Y 51 (Versión 1)5A NC1006:02 Motor de tracción de NC51 (Versión 2)6 NC1010 Pieza de montaje del tubo de tracción7 NC1011 Tope de bastidor8 NC1002 Rueda del sensor (neumático solamente)9 NC1005 Tapa de drenaje rápido10 NC1017 Bolsa del filtro11 NC1003 Tapa del rotor12 NC1008 Asa13 NC1004 Cepillo de tracción 14 NC1014 Aro de espuma15 NC1007 Tubo de la rueda motriz16 NC1016 Tapa inferior17 NC1018 Entrada frontal18 NC1019 Entrada posterior19 NC1015 Rotor
NC32EUGARANTÍA LIMITADA
Nitro se ha fabricado, sometido a prueba e inspeccionado según requisitos de ingenieríacuidadosamente detallados. Se garantiza que el mismo no tiene defectos de materiales nide mano de obra en condiciones normales de uso y de servicio, según lo dispuesto por
las calificaciones, condiciones y limitaciónes que siguen.
Esta garantía se ofrece al primer consumidor/comprador, por un lapso de 12 meses
desde la fecha de compra.
Esta garantía únicamente ampara el uso normal y razonable del Nitro. Los daños, losdefectos, las fallas de funcionamiento y las demás fallas ocasionadas por su uso sin eltransformador original, y por otro uso que no siga lo dispuesto en las instrucciones delManual del usuario, incluyendo la falta de mantenimiento razonable y necesario ofrecidopor el comprador invalidarán esta garantía. No están amparados los daños, los defectos,las fallas de funcionamiento y las demás fallas ocasionadas o relacionadas con lasreparaciones efectuadas por cualquier técnico que no sea un representante técnico
autorizado de SMARTPOOL.
Las obligaciones de SMARTPOOL en virtud de la garantía, se limitarán a la reparación oal cambio del producto o de todo componente defectuoso, según el criterio deSMARTPOOL. Tal reparación o cambio puede incluir, según el criterio de SMARTPOOL,el uso de componentes o de unidades reacondicionados. SMARTPOOL no se haceresponsable, en ningún caso y por ninguna suma, por ningún daño emergente osecundario, ni por ninguna lesión o daño a personas o a propiedades, ocasionados por oque surjan en relación con el producto, ni por el lucro cesante u otros costos o gastos de
cualquier tipo o naturaleza.
SMARTPOOL NO OFRECE NINGUNA OTRA GARANTÍA O ASEVERACIÓN, BIEN SEAEXPLÍCITA O IMPLICITA, SOBRE LA IDONEIDAD DEL PRODUCTO PARA SUCOMERCIALIZACIÓN, PARA UN PROPÓSITO DADO O PARA OTROS FINES, SALVOLA QUE SE OFRECE ESPECÍFICAMENTE EN ESTA GARANTÍA. NINGUNAPERSONA, FIRMA O EMPRESA ESTÁ AUTORIZADA PARA HACER CUALQUIERASEVERACIÓN NI PARA ASUMIR RESPONSABILIDAD ALGUNA A NOMBRE DE O DEPARTE DE SMARTPOOL, SALVO QUE SE ESPECIFIQUE EN ESTE DOCUMENTO.QUEDA EXPRESAMENTE ENTENDIDO QUE LOS RECURSOS INDICADOS EN ESTAGARANTÍA SE OFRECEN EXCLUSIVAMENTE AL COMPRADOR, Y QUE ESTAGARANTÍA CONTIENE EL CONTRATO ÍNTEGRO ENTRE SMARTPOOL Y ELCOMPRADOR. ESTA GARANTÍA ESTABLECE LAS OBLIGACIONES EXCLUSIVAS DESMARTPOOL RESPECTO A ESTE PRODUCTO, Y NO SE OFRECE MAYOR GARANTÍA
QUE LA QUE SE DESCRIBE EN EL TÍTULO DE ESTE DOCUMENTO.
Para obtener el servicio de garantía, comuníquese con la tienda donde compró su Nitro.Una vez que haya recibido la aprobación de la tienda, devuelva el Nitro, debidamenteempaquetado, al local que ésta le indique. Adjunte al Nitro una copia del recibo, indiquela fecha de compra, el número de serie y describa el problema.
ADVERTENCIA: Algunos revestimientos de vinilo son más susceptibles que otros al desgaste de su superficie o a la pérdida desus diseños, debido al contacto con la superficie de vinilo de objetos como los cepillos, objetos flotantes,juguetes, surtidores de cloro y limpiadores de piscinas. Tales diseños pueden rayarse o sufrir mucha abrasiónsimplemente por frotar la superficie con un cepillo. La tinta de los diseños también se puede desprender cuandoentra en contacto con objetos dentro de la piscina. SmartPool no se responsabiliza por, ni ampara con estagarantía limitada, la desaparición de los diseños, la abrasión, las marcas o los daños de cualquier tipoocasionados al revestimiento de vinilo.

24
25
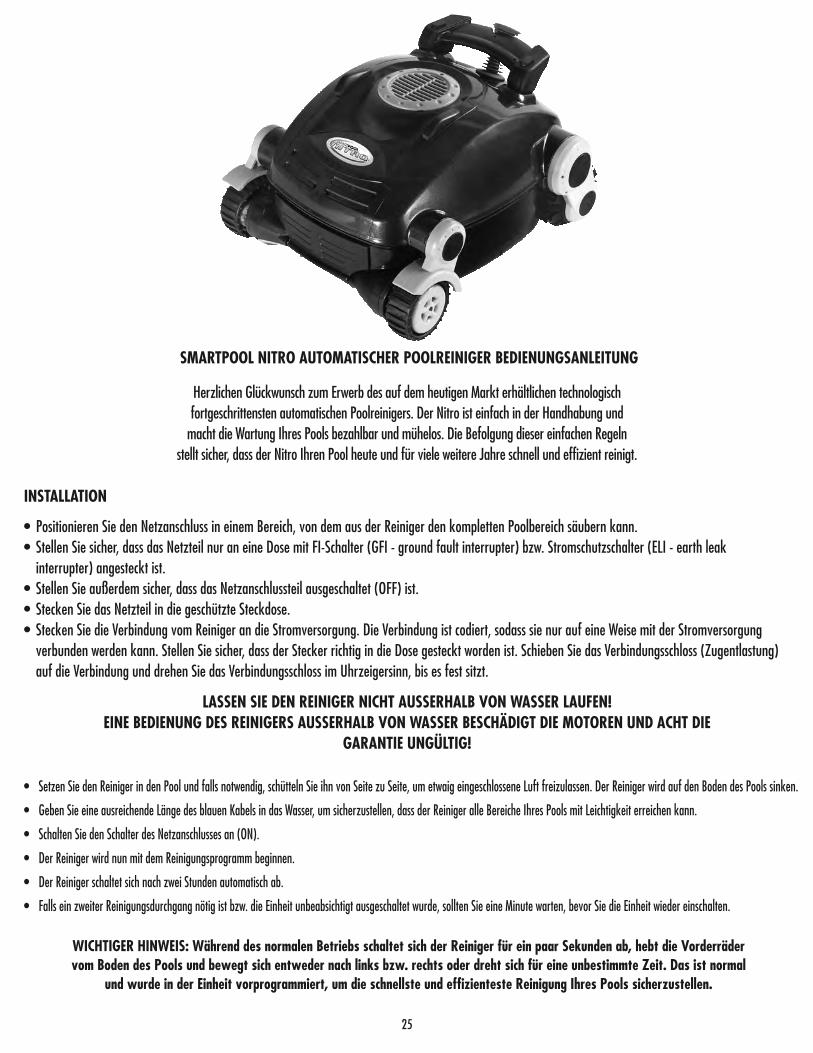
SMARTPOOL NITRO AUTOMATISCHER POOLREINIGER BEDIENUNGSANLEITUNG
Herzlichen Glückwunsch zum Erwerb des auf dem heutigen Markt erhältlichen technologischfortgeschrittensten automatischen Poolreinigers. Der Nitro ist einfach in der Handhabung und
macht die Wartung Ihres Pools bezahlbar und mühelos. Die Befolgung dieser einfachen Regelnstellt sicher, dass der Nitro Ihren Pool heute und für viele weitere Jahre schnell und effizient reinigt.
INSTALLATION
• Positionieren Sie den Netzanschluss in einem Bereich, von dem aus der Reiniger den kompletten Poolbereich säubern kann.• Stellen Sie sicher, dass das Netzteil nur an eine Dose mit FI-Schalter (GFI - ground fault interrupter) bzw. Stromschutzschalter (ELI - earth leak
interrupter) angesteckt ist.• Stellen Sie außerdem sicher, dass das Netzanschlussteil ausgeschaltet (OFF) ist.• Stecken Sie das Netzteil in die geschützte Steckdose.• Stecken Sie die Verbindung vom Reiniger an die Stromversorgung. Die Verbindung ist codiert, sodass sie nur auf eine Weise mit der Stromversorgung
verbunden werden kann. Stellen Sie sicher, dass der Stecker richtig in die Dose gesteckt worden ist. Schieben Sie das Verbindungsschloss (Zugentlastung) auf die Verbindung und drehen Sie das Verbindungsschloss im Uhrzeigersinn, bis es fest sitzt.
LASSEN SIE DEN REINIGER NICHT AUSSERHALB VON WASSER LAUFEN!EINE BEDIENUNG DES REINIGERS AUSSERHALB VON WASSER BESCHÄDIGT DIE MOTOREN UND ACHT DIE
GARANTIE UNGÜLTIG!
• Setzen Sie den Reiniger in den Pool und falls notwendig, schütteln Sie ihn von Seite zu Seite, um etwaig eingeschlossene Luft freizulassen. Der Reiniger wird auf den Boden des Pools sinken.
• Geben Sie eine ausreichende Länge des blauen Kabels in das Wasser, um sicherzustellen, dass der Reiniger alle Bereiche Ihres Pools mit Leichtigkeit erreichen kann.
• Schalten Sie den Schalter des Netzanschlusses an (ON).
• Der Reiniger wird nun mit dem Reinigungsprogramm beginnen.
• Der Reiniger schaltet sich nach zwei Stunden automatisch ab.
• Falls ein zweiter Reinigungsdurchgang nötig ist bzw. die Einheit unbeabsichtigt ausgeschaltet wurde, sollten Sie eine Minute warten, bevor Sie die Einheit wieder einschalten.
WICHTIGER HINWEIS: Während des normalen Betriebs schaltet sich der Reiniger für ein paar Sekunden ab, hebt die Vorderrädervom Boden des Pools und bewegt sich entweder nach links bzw. rechts oder dreht sich für eine unbestimmte Zeit. Das ist normal
und wurde in der Einheit vorprogrammiert, um die schnellste und effizienteste Reinigung Ihres Pools sicherzustellen.
26
WICHTIGE SICHERHEITSANWEISUNGENALLE ANWEISUNGEN LESEN UND BEFOLGEN
BEWAHREN SIE DIESE ANWEISUNGEN BITTE AUF
! Gefahr eines Stromschlags oder Todes durch Stromschlag – Die elektrische Leitung dieses Produktes muss gemäß des National Electrical Code (Nationale Elektrische Vorschriften) und alleranwendbaren örtlichen Vorschriften und Bestimmungen installiert werden. Unsachgemäße Installation führt zu elektrischer Gefahr, die bei Poolbenutzern und anderen durch Stromschlag zuTod oder schwerer Verletzung führen und auch Schaden an Eigentum verursachen kann.
KEINE VERLÄNGERUNGSKABEL VERWENDEN - KANN ZU TOD ODER VERLETZUNG FÜHREN.
Um das Verletzungsrisiko zu verringern, dürfen Kinder dieses Produkt nicht verwenden, außer sie sind ständig strengstens überwacht.
Wenn die Umgebungstemperatur 115° F. (46° C.) überschreitet, das Netzteil vor direkter Sonneneinstrahlung schützen. Netzteil nicht abdecken.
Der einzige Zweck dieses Produkts ist der Einsatz als Poolreinigungs-Roboter, wie in dieser Anleitung beschrieben; alle Veränderungen oder anderen Einsätze machen die Garantie ungültig.
Erlauben Sie Kindern nicht, das Netzteil des Gerätes zu verwenden oder zu berühren oder daneben oder in der Nähe davon zu spielen.
Ein FI-Schalter (Ground Fault Current Interrupter, GFCI-USA) und Stromschutzschalter(Earth Leak Interrupter, ELI-EU) muss installiert sein, um die Steckdose zu schützen und möglicheStromschläge zu verhindern. Ansonsten kann eine elektrische Gefahr entstehen, die bei Poolbenutzern und anderen durch Stromschlag zu Tod oder schwerer Verletzung führen und auchSchaden an Eigentum verursachen kann.
Das Gerät erst nach abgeschlossener Installation an Wechselstrom anschließen.
Verwenden Sie das Gerät bitte nicht, wenn es irgendwie beschädigt ist.
Das Gerät muss vollständig unter Wasser sein oder die Garantie verfällt.
Stellen Sie sicher, dass der Poolreinigungs-Roboter vom Netzgerät getrennt ist, bevor das Gerät geöffnet wird oder sonstige Wartungen durchgeführt werden .
Zur Vermeidung einer Beschädigung des Netzgerätes und Kabels tragen Sie nie das Netzgerät am Kabel oder ziehen es am Kabel aus der Steckdose. Stattdessen entfernen Sie das Kabel,indem Sie den Stecker aus der Steckdose herausziehen. Ziehen Sie das Kabel nicht über scharfe Ecken oder Kanten.
Nicht mit dem Reiniger oder Kabel spielen oder es an den Körper legen. Es könnte Haare oder Körperteile einklemmen oder abreißen. Das Kabel kann Schwimmer behindern oderumschlingen, was zu Ertrinken führen kann.
Verwenden Sie keine beschädigten Kabel oder Netzgeräte.
Vor der Installation des Reinigers machen Sie sich die Reichweite des Reinigers klar. Der Reiniger wurde nicht entworfen, um automatisch Stufen zu reinigen oder unter Sonnenabdeckungenzu arbeiten. Er wurde auch nicht entworfen, um die Erstreinigung für eine neue Poolinstallation durchzuführen.
Ihr Reiniger sollte nicht verwendet werden, während Leute im Pool schwimmen.
Das Netzteil muss stets mindestens 12 Feet / 4 Meter von der Poolkante entfernt sein!
Es wird empfohlen, dass Sie nach jedem Gebrauch die Filtertüte reinigen und das Antriebsrad kontrollieren, um sicherzugehen, dass es frei von Fremdkörpern ist.
Ziehen Sie das Netzteil aus der Steckdose, wenn es nicht gebraucht wird.
NICHT den Poolreiniger auf "ON" (EIN) stellen, wenn er nicht unter Wasser ist. Der Einsatz des Reinigers außerhalb des Wassers kann großen Schaden anrichten und führt zum Verlust derGarantie. Vergessen Sie nie, das Netzteil auf "OFF" (AUS) zu stellen und es aus der Steckdose zu ziehen, bevor Sie den Reiniger aus dem Pool nehmen.
Wenn Ihr Poolreinigungs-Roboter nicht ordnungsgemäß funktioniert oder auf irgendeine Weise beschädigt oder fallen gelassen wurde, kontaktieren Sie vor dem Gebrauch denKundenservice von Interline unter [email protected] oder besuchen Sie unsere Website unter www.smartpooleurope.com.
GEFAHR:
! WARNUNG:
! WARNUNG:
! WARNUNG:
! WARNUNG:
! WARNUNG:
! WARNUNG:
! WARNUNG:
! WARNUNG:
! WARNUNG:
! WARNUNG:
! WARNUNG:
! WARNUNG:
! WARNUNG:
! WARNUNG:
! WARNUNG:
! WARNUNG:
! ACHTUNG:
! ACHTUNG:
! ACHTUNG:
! ACHTUNG:
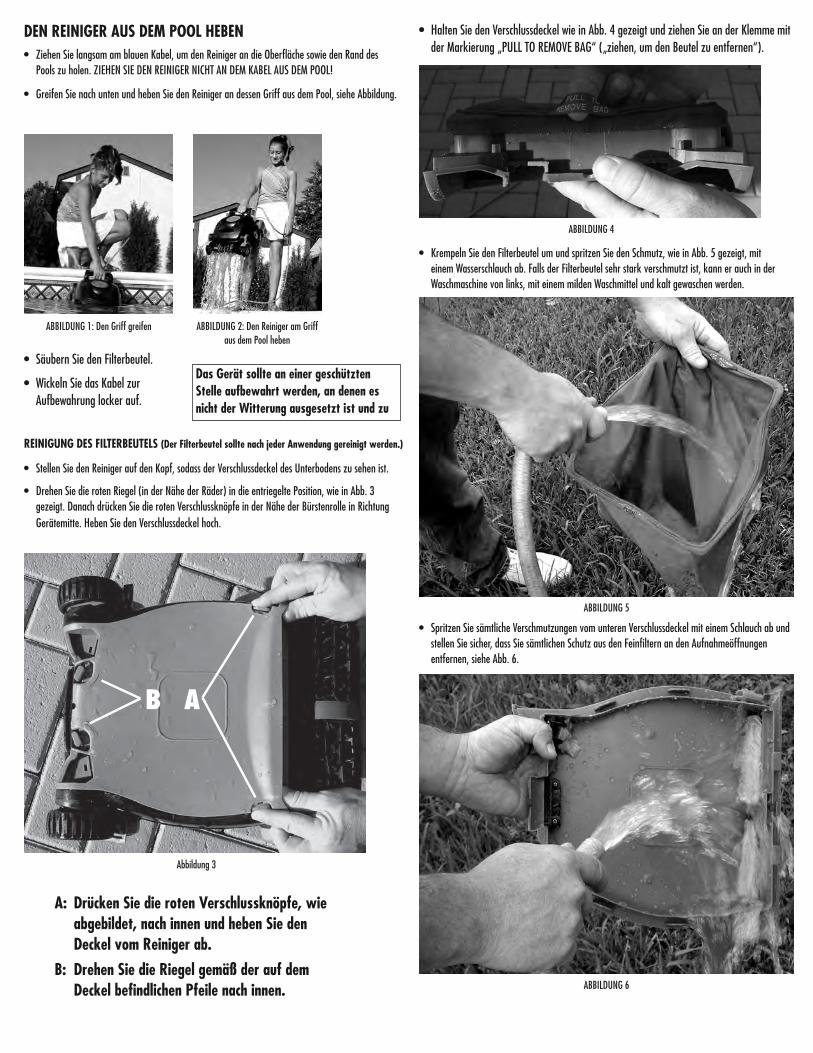
DEN REINIGER AUS DEM POOL HEBEN• Ziehen Sie langsam am blauen Kabel, um den Reiniger an die Oberfläche sowie den Rand des
Pools zu holen. ZIEHEN SIE DEN REINIGER NICHT AN DEM KABEL AUS DEM POOL!
• Greifen Sie nach unten und heben Sie den Reiniger an dessen Griff aus dem Pool, siehe Abbildung.
ABBILDUNG 1: Den Griff greifen ABBILDUNG 2: Den Reiniger am Griffaus dem Pool heben
• Säubern Sie den Filterbeutel.
• Wickeln Sie das Kabel zur Aufbewahrung locker auf.
Das Gerät sollte an einer geschütztenStelle aufbewahrt werden, an denen esnicht der Witterung ausgesetzt ist und zu
REINIGUNG DES FILTERBEUTELS (Der Filterbeutel sollte nach jeder Anwendung gereinigt werden.)
• Stellen Sie den Reiniger auf den Kopf, sodass der Verschlussdeckel des Unterbodens zu sehen ist.
• Drehen Sie die roten Riegel (in der Nähe der Räder) in die entriegelte Position, wie in Abb. 3 gezeigt. Danach drücken Sie die roten Verschlussknöpfe in der Nähe der Bürstenrolle in Richtung Gerätemitte. Heben Sie den Verschlussdeckel hoch.
AB
A: Drücken Sie die roten Verschlussknöpfe, wie abgebildet, nach innen und heben Sie den Deckel vom Reiniger ab.
B: Drehen Sie die Riegel gemäß der auf dem Deckel befindlichen Pfeile nach innen.
Abbildung 3
• Halten Sie den Verschlussdeckel wie in Abb. 4 gezeigt und ziehen Sie an der Klemme mit der Markierung „PULL TO REMOVE BAG“ („ziehen, um den Beutel zu entfernen“).
ABBILDUNG 4
• Krempeln Sie den Filterbeutel um und spritzen Sie den Schmutz, wie in Abb. 5 gezeigt, mit einem Wasserschlauch ab. Falls der Filterbeutel sehr stark verschmutzt ist, kann er auch in der Waschmaschine von links, mit einem milden Waschmittel und kalt gewaschen werden.
ABBILDUNG 5
• Spritzen Sie sämtliche Verschmutzungen vom unteren Verschlussdeckel mit einem Schlauch ab und stellen Sie sicher, dass Sie sämtlichen Schutz aus den Feinfiltern an den Aufnahmeöffnungen entfernen, siehe Abb. 6.
ABBILDUNG 6
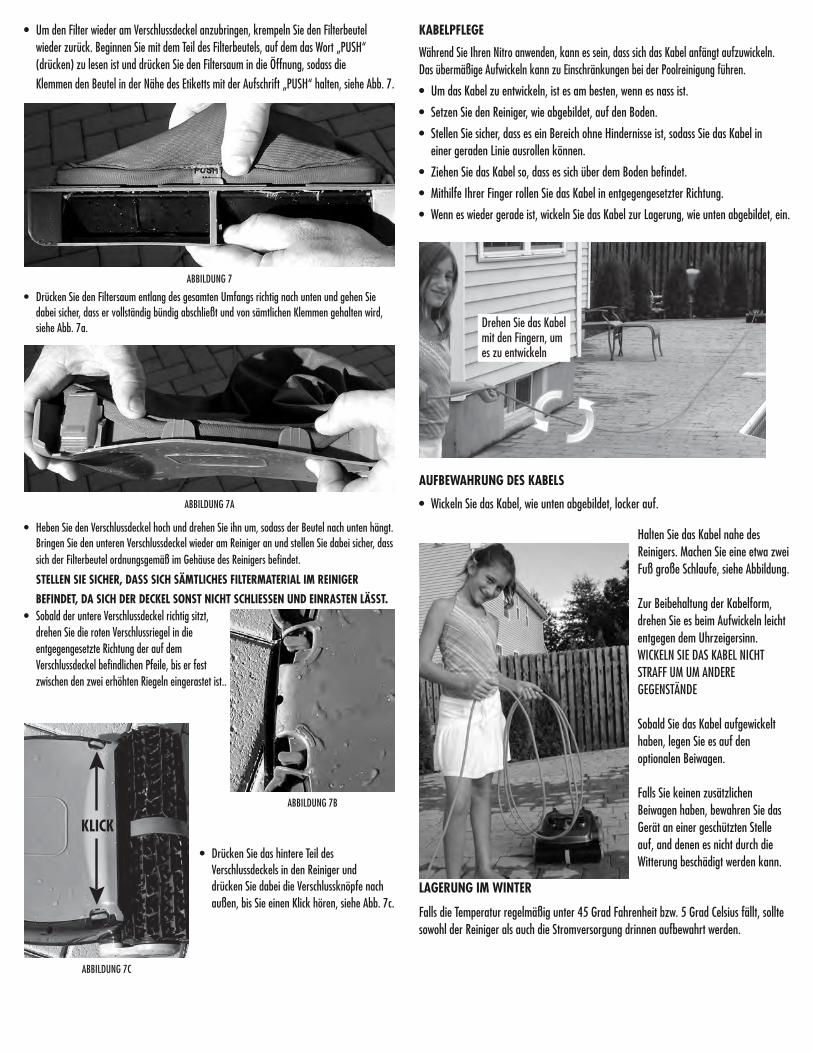
• Um den Filter wieder am Verschlussdeckel anzubringen, krempeln Sie den Filterbeutel wieder zurück. Beginnen Sie mit dem Teil des Filterbeutels, auf dem das Wort „PUSH“ (drücken) zu lesen ist und drücken Sie den Filtersaum in die Öffnung, sodass die Klemmen den Beutel in der Nähe des Etiketts mit der Aufschrift „PUSH“ halten, siehe Abb. 7.
ABBILDUNG 7
• Drücken Sie den Filtersaum entlang des gesamten Umfangs richtig nach unten und gehen Sie dabei sicher, dass er vollständig bündig abschließt und von sämtlichen Klemmen gehalten wird, siehe Abb. 7a.
ABBILDUNG 7A
• Heben Sie den Verschlussdeckel hoch und drehen Sie ihn um, sodass der Beutel nach unten hängt. Bringen Sie den unteren Verschlussdeckel wieder am Reiniger an und stellen Sie dabei sicher, dass sich der Filterbeutel ordnungsgemäß im Gehäuse des Reinigers befindet.
STELLEN SIE SICHER, DASS SICH SÄMTLICHES FILTERMATERIAL IM REINIGER
BEFINDET, DA SICH DER DECKEL SONST NICHT SCHLIESSEN UND EINRASTEN LÄSST.
ABBILDUNG 7B
• Drücken Sie das hintere Teil des Verschlussdeckels in den Reiniger und drücken Sie dabei die Verschlussknöpfe nach außen, bis Sie einen Klick hören, siehe Abb. 7c.
ABBILDUNG 7C
• Sobald der untere Verschlussdeckel richtig sitzt, drehen Sie die roten Verschlussriegel in die entgegengesetzte Richtung der auf dem Verschlussdeckel befindlichen Pfeile, bis er fest zwischen den zwei erhöhten Riegeln eingerastet ist..
KABELPFLEGE
Während Sie Ihren Nitro anwenden, kann es sein, dass sich das Kabel anfängt aufzuwickeln.Das übermäßige Aufwickeln kann zu Einschränkungen bei der Poolreinigung führen.
• Um das Kabel zu entwickeln, ist es am besten, wenn es nass ist.
• Setzen Sie den Reiniger, wie abgebildet, auf den Boden.
• Stellen Sie sicher, dass es ein Bereich ohne Hindernisse ist, sodass Sie das Kabel in einer geraden Linie ausrollen können.
• Ziehen Sie das Kabel so, dass es sich über dem Boden befindet.
• Mithilfe Ihrer Finger rollen Sie das Kabel in entgegengesetzter Richtung.
• Wenn es wieder gerade ist, wickeln Sie das Kabel zur Lagerung, wie unten abgebildet, ein.
AUFBEWAHRUNG DES KABELS
• Wickeln Sie das Kabel, wie unten abgebildet, locker auf.
Halten Sie das Kabel nahe desReinigers. Machen Sie eine etwa zweiFuß große Schlaufe, siehe Abbildung.
Zur Beibehaltung der Kabelform,drehen Sie es beim Aufwickeln leichtentgegen dem Uhrzeigersinn.WICKELN SIE DAS KABEL NICHTSTRAFF UM UM ANDEREGEGENSTÄNDE
Sobald Sie das Kabel aufgewickelthaben, legen Sie es auf denoptionalen Beiwagen.
Falls Sie keinen zusätzlichenBeiwagen haben, bewahren Sie dasGerät an einer geschützten Stelleauf, and denen es nicht durch dieWitterung beschädigt werden kann.
LAGERUNG IM WINTER
Falls die Temperatur regelmäßig unter 45 Grad Fahrenheit bzw. 5 Grad Celsius fällt, solltesowohl der Reiniger als auch die Stromversorgung drinnen aufbewahrt werden.
Drehen Sie das Kabelmit den Fingern, umes zu entwickeln
KLICK
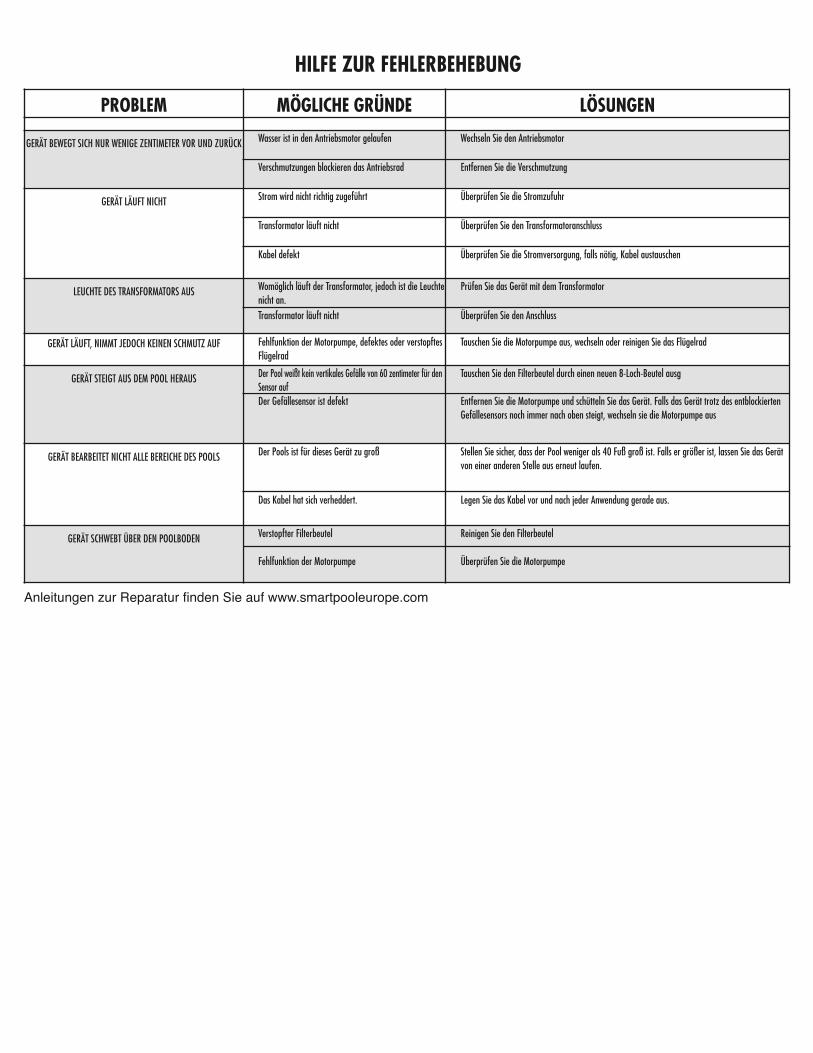
PROBLEM MÖGLICHE GRÜNDE LÖSUNGEN
GERÄT BEWEGT SICH NUR WENIGE ZENTIMETER VOR UND ZURÜCK Wasser ist in den Antriebsmotor gelaufen Wechseln Sie den Antriebsmotor
Verschmutzungen blockieren das Antriebsrad Entfernen Sie die Verschmutzung
GERÄT LÄUFT NICHT Strom wird nicht richtig zugeführt Überprüfen Sie die Stromzufuhr
Transformator läuft nicht Überprüfen Sie den Transformatoranschluss
Kabel defekt Überprüfen Sie die Stromversorgung, falls nötig, Kabel austauschen
LEUCHTE DES TRANSFORMATORS AUS Womöglich läuft der Transformator, jedoch ist die Leuchte nicht an.
Prüfen Sie das Gerät mit dem Transformator
Transformator läuft nicht Überprüfen Sie den Anschluss
GERÄT LÄUFT, NIMMT JEDOCH KEINEN SCHMUTZ AUF Fehlfunktion der Motorpumpe, defektes oder verstopftes Flügelrad
Tauschen Sie die Motorpumpe aus, wechseln oder reinigen Sie das Flügelrad
GERÄT STEIGT AUS DEM POOL HERAUS Der Pool weißt kein vertikales Gefälle von 60 zentimeter für den Sensor auf
Tauschen Sie den Filterbeutel durch einen neuen 8-Loch-Beutel ausg
Der Gefällesensor ist defekt Entfernen Sie die Motorpumpe und schütteln Sie das Gerät. Falls das Gerät trotz des entblockierten Gefällesensors noch immer nach oben steigt, wechseln sie die Motorpumpe aus
GERÄT BEARBEITET NICHT ALLE BEREICHE DES POOLS Der Pools ist für dieses Gerät zu groß Stellen Sie sicher, dass der Pool weniger als 40 Fuß groß ist. Falls er größer ist, lassen Sie das Gerät von einer anderen Stelle aus erneut laufen.
Das Kabel hat sich verheddert. Legen Sie das Kabel vor und nach jeder Anwendung gerade aus.
GERÄT SCHWEBT ÜBER DEN POOLBODEN Verstopfter Filterbeutel
Fehlfunktion der Motorpumpe
Reinigen Sie den Filterbeutel
Überprüfen Sie die Motorpumpe
HILFE ZUR FEHLERBEHEBUNG
Anleitungen zur Reparatur finden Sie auf www.smartpooleurope.com

Ort Teilenummer Beschreibung1 NC1001 NC31 & 32 Gehäuse1A NC1022 Gehäuse des Wandaufsteigers2 NC1009 NC31 & 32 Pumpenmotor2A NC1024 Pumpenmotor des Wandaufsteigers (Version 1)2B NC1024:02 Pumpenmotor des Wandaufsteigers (Version 2)3 NC1013 NC31 & 32 Netzteil3A NC1023 Netzteil des Wandaufsteigers4 NC1012 NC31 & 32 Schwebekabel4A NC1012XL Schwebekabel des Wandaufsteigers4B NC1012XL:02 Schwebekabel des Wandaufsteigers (Version 2)5 NC1006 NC31, 32 UND 51 Antriebsmotor (Version 1)5A NC1006:02 NC51 Antriebsmotor (Version 2)6 NC1010 Antriebsschlauchbefestigung7 NC1011 Gehäusestossfänger8 NC1002 Sensorrad (nur Reifen)9 NC1005 Schnellabflussklappe10 NC1017 Filterbeutel11 NC1003 Flügelradabdeckung12 NC1008 Griff13 NC1004 Antriebsbürsten14 NC1014 Schaumring15 NC1007 Antriebsradschlauch16 NC1016 Bodendeckel17 NC1018 Vordereinlass18 NC1019 Hintereinlass19 NC1015 Flügelrad

NC32EUBESCHRÄNKTE GARANTIE
Nitro wurde gemäß sorgsam spezifizierter technischer Anforderungen hergestellt, getestetund überprüft. Laut Garantie ist das Produkt frei von Material- und Verarbeitungsfehlern,wenn es normal gebraucht und bedient wird, unter Vorbehalt von Voraussetzungen,Konditionen und Beschränkungen, die unten aufgeführt sind.
Diese Garantie gilt für den ersten Verbraucher/Käufer für einen Zeitraum von 12 Monatenab dem Kaufdatum.
Diese Garantie gilt nur für einen normalen und vernünftigen Gebrauch von Nitro. DurchSchäden, Defekte, Störungen oder andere Fehler, die aus dem Gebrauch ohne denursprünglichen Transformator bzw. jedweder Verwendung entstehen, die nicht mit denAnweisungen im Bedienerhandbuch übereinstimmt, einschließlich dem Säumnis desKäufers, eine vernünftige und notwendige Wartung durchzuführen, wird diese Garantieungültig. Diese Garantie deckt keine Schäden, Defekte, Störungen oder anderen Fehlerab, die durch bzw. im Zusammenhang mit Reparaturen entstanden sind, die von einemanderen Wartungsfachmann als einem zugelassenen Wartungsvertreter vonSMARTPOOL durchgeführt wurden.
Die Garantiepflichten von SMARTPOOL sind auf die Reparatur oder den Austausch desProduktes oder des defekten Teils nach dem Ermessen von SMARTPOOL beschränkt. Zueiner Reparatur oder einem Austausch kann die Verwendung von aufgerüsteten Teilenund/oder Einheiten nach dem Ermessen von SMARTPOOL gehören. SMARTPOOL trägtunter keinen Umständen oder in jedwedem Ausmaß die Haftung oder Verantwortung fürbeliebigen Ersatz von mittelbarem Schaden oder Schadenersatz für Neben- undFolgekosten oder für eine beliebige Verletzung oder Schaden an Personen oderEigentum, die es verwenden oder verwendet haben, sowie für Gewinnverluste oderandere Kosten oder Aufwendungen jeder Art, die in Verbindung mit dem Produktentstehen.
ES GIBT SEITENS SMARTPOOL KEINE WEITEREN AUSDRÜCKLICHEN ODERSTILLSCHWEIGENDEN GARANTIEN ODER GEWÄHRLEISTUNGSVERSPRECHEN INBEZUG AUF DIE VERKAUFSFÄHIGKEIT, EIGNUNG FÜR EINEN BESTIMMTENZWECK USW. ALS DIE IN DIESER GARANTIE SPEZIELL AUFGEFÜHRTEN. ES ISTKEINER PERSON, FIRMA ODER KÖRPERSCHAFT GESTATTET, IRGENDWELCHEZUSICHERUNGEN ZU MACHEN ODER VERPFLICHTUNGEN IM NAMEN VON ODERIM AUFTRAG VON SMARTPOOL EINZUGEHEN. DIE IN DIESER GARANTIE ERTEILTENABHILFEN SIND AUSDRÜCKLICH ALS DIE DEM KÄUFER ZUR VERFÜGUNGSTEHENDEN ALLEINIGEN ABHILFEN ANZUERKENNEN, UND DIESE GARANTIEENTHÄLT DEN GESAMTEN UND VOLLSTÄNDIGEN VERTRAG ZWISCHENSMARTPOOL UND DEM KÄUFER. DIESE GARANTIE ENTHÄLT ALLEVERPFLICHTUNGEN VON SMARTPOOL IN BEZUG AUF DIESES PRODUKT, UND ESGIBT KEINE GARANTIEN, DIE ÜBER DIE BESCHREIBUNG DES WORTLAUTSDIESER GARANTIE HINAUSGEHEN.
Um Garantiedienstleistungen zu erhalten, kontaktieren Sie das Geschäft, wo Sie IhrenNitro erworben haben. Nach Erhalt der Genehmigung des Geschäftes schicken Sie denNitro angemessen verpackt an die von dem Geschäft angegebene Stelle. Legen Sie demNitro eine Kopie der Rechnung einschließlich Kaufdatum, Seriennummer und einerProblembeschreibung bei.
ACHTUNG: Einige Vinylverkleidungen besitzen eine größere Anfälligkeit für Oberflächenabnutzung oderMusterabtragung durch Gegenstände wie Bürsten, Plattformwagen, Spielzeuge,Chlorspender und automatische Schwimmbeckenreiniger, die mit der Vinylfläche in Kontaktkommen. Solche Muster können bereits stark zerkratzt oder abgenutzt werden, wenn dieOberfläche mit einer Bürste abgerieben wird. Die Musterfarbe kann auch abgehen, wenn siemit Gegenständen im Schwimmbecken in Berührung kommt. SmartPool haftet nicht fürMusterbeseitigung, Abschabung, Markierungen auf oder Schaden an jeder Art vonVinylverkleidung; dies wird von dieser beschränkten Garantie nicht abgedeckt.

32
33
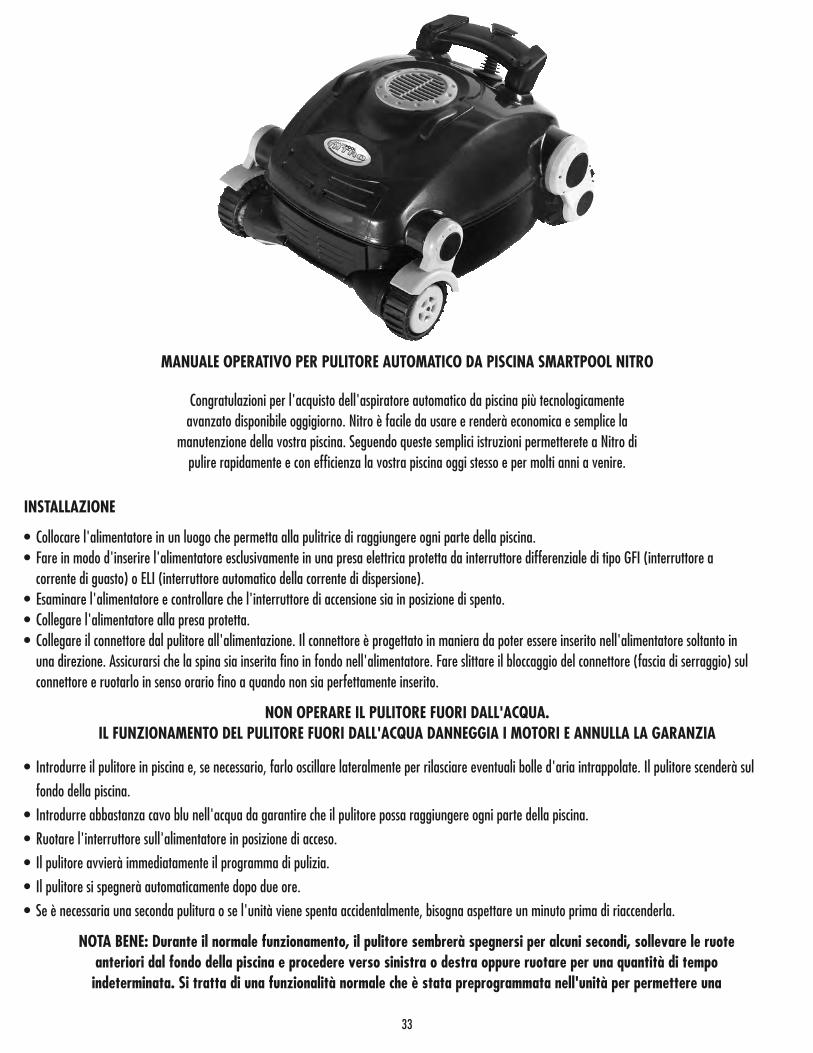
MANUALE OPERATIVO PER PULITORE AUTOMATICO DA PISCINA SMARTPOOL NITRO
Congratulazioni per l'acquisto dell'aspiratore automatico da piscina più tecnologicamenteavanzato disponibile oggigiorno. Nitro è facile da usare e renderà economica e semplice la
manutenzione della vostra piscina. Seguendo queste semplici istruzioni permetterete a Nitro dipulire rapidamente e con efficienza la vostra piscina oggi stesso e per molti anni a venire.
INSTALLAZIONE
• Collocare l'alimentatore in un luogo che permetta alla pulitrice di raggiungere ogni parte della piscina.• Fare in modo d'inserire l'alimentatore esclusivamente in una presa elettrica protetta da interruttore differenziale di tipo GFI (interruttore a
corrente di guasto) o ELI (interruttore automatico della corrente di dispersione).• Esaminare l'alimentatore e controllare che l'interruttore di accensione sia in posizione di spento.• Collegare l'alimentatore alla presa protetta.• Collegare il connettore dal pulitore all'alimentazione. Il connettore è progettato in maniera da poter essere inserito nell'alimentatore soltanto in
una direzione. Assicurarsi che la spina sia inserita fino in fondo nell'alimentatore. Fare slittare il bloccaggio del connettore (fascia di serraggio) sul connettore e ruotarlo in senso orario fino a quando non sia perfettamente inserito.
NON OPERARE IL PULITORE FUORI DALL'ACQUA.IL FUNZIONAMENTO DEL PULITORE FUORI DALL'ACQUA DANNEGGIA I MOTORI E ANNULLA LA GARANZIA
• Introdurre il pulitore in piscina e, se necessario, farlo oscillare lateralmente per rilasciare eventuali bolle d'aria intrappolate. Il pulitore scenderà sul
fondo della piscina.
• Introdurre abbastanza cavo blu nell'acqua da garantire che il pulitore possa raggiungere ogni parte della piscina.
• Ruotare l'interruttore sull'alimentatore in posizione di acceso.
• Il pulitore avvierà immediatamente il programma di pulizia.
• Il pulitore si spegnerà automaticamente dopo due ore.
• Se è necessaria una seconda pulitura o se l'unità viene spenta accidentalmente, bisogna aspettare un minuto prima di riaccenderla.
NOTA BENE: Durante il normale funzionamento, il pulitore sembrerà spegnersi per alcuni secondi, sollevare le ruoteanteriori dal fondo della piscina e procedere verso sinistra o destra oppure ruotare per una quantità di tempoindeterminata. Si tratta di una funzionalità normale che è stata preprogrammata nell'unità per permettere una

34
INDICAZIONI DI SICUREZZA IMPORTANTI LEGGERE E SEGUIRE TUTTE LE ISTRUZIONI
CONSERVARE QUESTA GUIDA
! Rischio di scossa elettrica o elettrocuzione. L'alimentazione elettrica per questo prodotto deve essere installata in conformità con il Codice elettrico nazionale e tutti i codicie le ordinanze locali applicabili. L'errata installazione comporta la creazione di un pericolo elettrico che potrebbe essere causa di morte o lesioni gravi per scossa elettricaagli utenti della piscina o a terzi e può anche provocare danni materiali.
NON USARE CAVI DI PROLUNGA; POSSONO ESSERE CAUSA DI MORTE O LESIONI.
Per ridurre il rischio di lesioni, non consentire l'uso di questo prodotto ai bambini se non sotto stretta e continua supervisione
Se la temperatura dell'aria ambiente è superiore a 115° F., proteggere l'alimentatore di corrente dalla luce diretta del sole. Non coprire l'alimentatore.
Questo prodotto è destinato esclusivamente all'utilizzo come robot pulitore per piscina, secondo quanto descritto nel presente manuale; eventuali modifiche o usi diversicomporteranno l'annullamento della garanzia.
Non consentire ai bambini di usare, toccare o giocare vicino o intorno all'alimentazione elettrica del dispositivo.
Per proteggere la presa di corrente e prevenire eventuali scosse è necessario installare un interruttore differenziale (salvavita) di tipo GFCI (USA) ed ELI (EU) per laprotezione in caso di guasto verso terra o dispersione di corrente. La mancata installazione potrebbe portare alla creazione di un pericolo elettrico che potrebbe esserecausa di morte o lesioni gravi per scossa elettrica agli utenti della piscina o a terzi e può anche provocare danni materiali.
Non collegare l'apparecchio alla corrente alternata finché l'installazione non sia stata completata.
Non utilizzare l'apparecchio se in qualche modo danneggiato.
L'apparecchio deve essere completamente sommerso nell'acqua, altrimenti la garanzia viene annullata.
Accertarsi che il robot pulitore per piscina sia staccato dall'alimentazione di corrente prima di aprirlo o di eseguire eventuali altri interventi di manutenzione.
Per evitare danni all'alimentatore di corrente e al cavo di alimentazione, non trasportare mai l'alimentatore dal filo, né tirare il cavo per staccarlo dalla presa. Piuttosto,staccarlo tirando la spina stessa dalla presa. Non tirare il cavo attorno ad angoli o a bordi taglienti.
Non giocare con il robot o il cavo, né applicarli al corpo. Possono impigliare o strappare capelli o altre parti del corpo. Il cavo può fare inciampare o impigliare i nuotatorie provocarne l'annegamento.
Non utilizzare l'apparecchio con un cavo o un alimentatore di corrente danneggiati.
Prima di installare il robot è necessario comprenderne la copertura. Il robot non è stato progettato per la pulizia automatica di scalini o per funzionare sotto coperturesolari. Non è stato progettato nemmeno per la pulizia iniziale per l'installazione di una piscina nuova.
Non utilizzare il pulitore in presenza di persone nella piscina.
L'alimentatore deve trovarsi sempre ad almeno 12 piedi / 4 metri dal bordo della piscina!
Si raccomanda la pulizia del filtro a sacco e il controllo del girante per garantire l'assenza di impurità dopo ciascun utilizzo.
Staccare l'alimentatore dalla presa quando non in uso.
NON accendere il pulitore se non è immerso nell'acqua. Il funzionamento dell'apparecchio fuori dall'acqua può causare danni gravi e comporta la perdita della garanzia.Ricordarsi sempre di spegnere l'alimentatore e staccarlo dalla presa di corrente prima di togliere il pulitore dalla piscina.
Se il robot pulitore per piscina non funziona come dovrebbe o se viene fatto cadere o viene danneggiato in qualche modo, contattare l'assistenza clienti SmartPool, Inc. alnumero 1-732-730-9880 o visitare il nostro sito www.smartpooleurope.com, prima dell'utilizzo
PERICOLO:
! AVVERTENZA:
! AVVERTENZA:
! AVVERTENZA:
! AVVERTENZA:
! AVVERTENZA:
! AVVERTENZA:
! AVVERTENZA:
! AVVERTENZA:
! AVVERTENZA:
! AVVERTENZA:
! AVVERTENZA:
! AVVERTENZA:
! AVVERTENZA::
! AVVERTENZA:
! AVVERTENZA:
! AVVERTENZA:
! AVVERTENZA:
! AVVERTENZA:
! AVVERTENZA:
! ATTENZIONE:
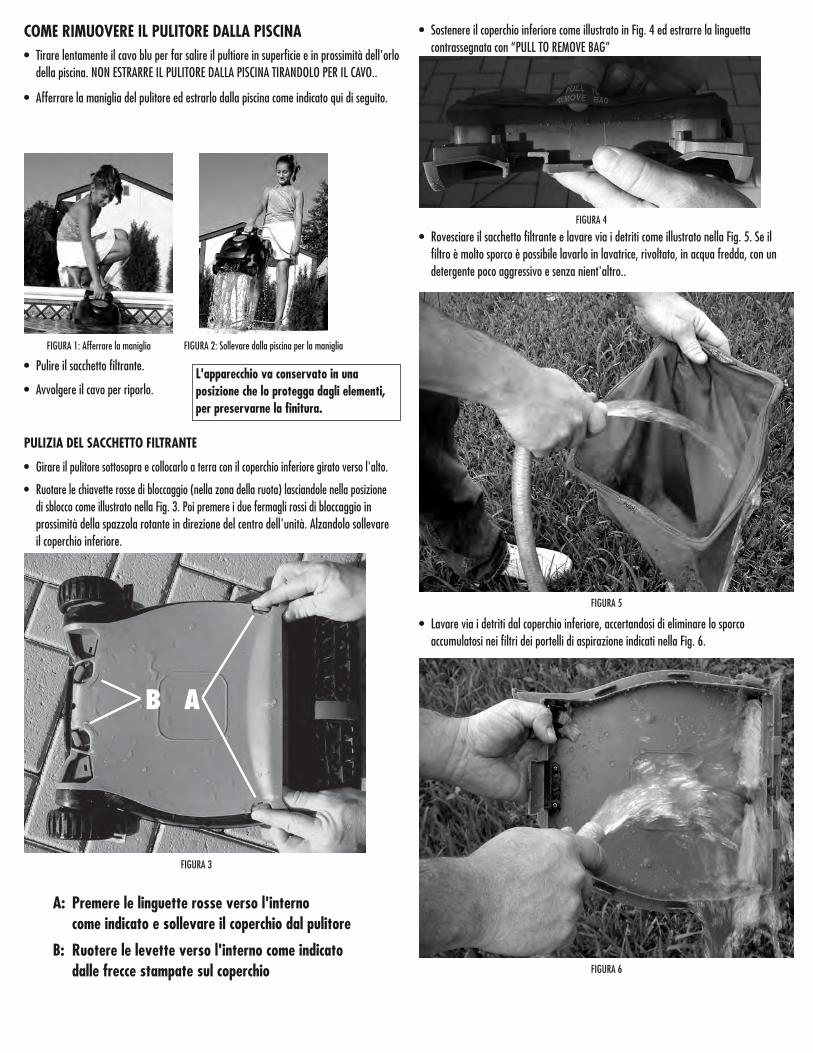
COME RIMUOVERE IL PULITORE DALLA PISCINA• Tirare lentamente il cavo blu per far salire il pultiore in superficie e in prossimità dell'orlo
della piscina. NON ESTRARRE IL PULITORE DALLA PISCINA TIRANDOLO PER IL CAVO..
• Afferrare la maniglia del pulitore ed estrarlo dalla piscina come indicato qui di seguito.
FIGURA 1: Afferrare la maniglia FIGURA 2: Sollevare dalla piscina per la maniglia
• Pulire il sacchetto filtrante.
• Avvolgere il cavo per riporlo.L'apparecchio va conservato in unaposizione che lo protegga dagli elementi,per preservarne la finitura.
PULIZIA DEL SACCHETTO FILTRANTE
• Girare il pulitore sottosopra e collocarlo a terra con il coperchio inferiore girato verso l'alto.
• Ruotare le chiavette rosse di bloccaggio (nella zona della ruota) lasciandole nella posizione di sblocco come illustrato nella Fig. 3. Poi premere i due fermagli rossi di bloccaggio in prossimità della spazzola rotante in direzione del centro dell'unità. Alzandolo sollevare il coperchio inferiore.
AB
A: Premere le linguette rosse verso l'interno come indicato e sollevare il coperchio dal pulitore
B: Ruotere le levette verso l'interno come indicato dalle frecce stampate sul coperchio
FIGURA 3
• Sostenere il coperchio inferiore come illustrato in Fig. 4 ed estrarre la linguetta contrassegnata con “PULL TO REMOVE BAG”
FIGURA 4
• Rovesciare il sacchetto filtrante e lavare via i detriti come illustrato nella Fig. 5. Se il filtro è molto sporco è possibile lavarlo in lavatrice, rivoltato, in acqua fredda, con un detergente poco aggressivo e senza nient'altro..
FIGURA 5
• Lavare via i detriti dal coperchio inferiore, accertandosi di eliminare lo sporco accumulatosi nei filtri dei portelli di aspirazione indicati nella Fig. 6.
FIGURA 6
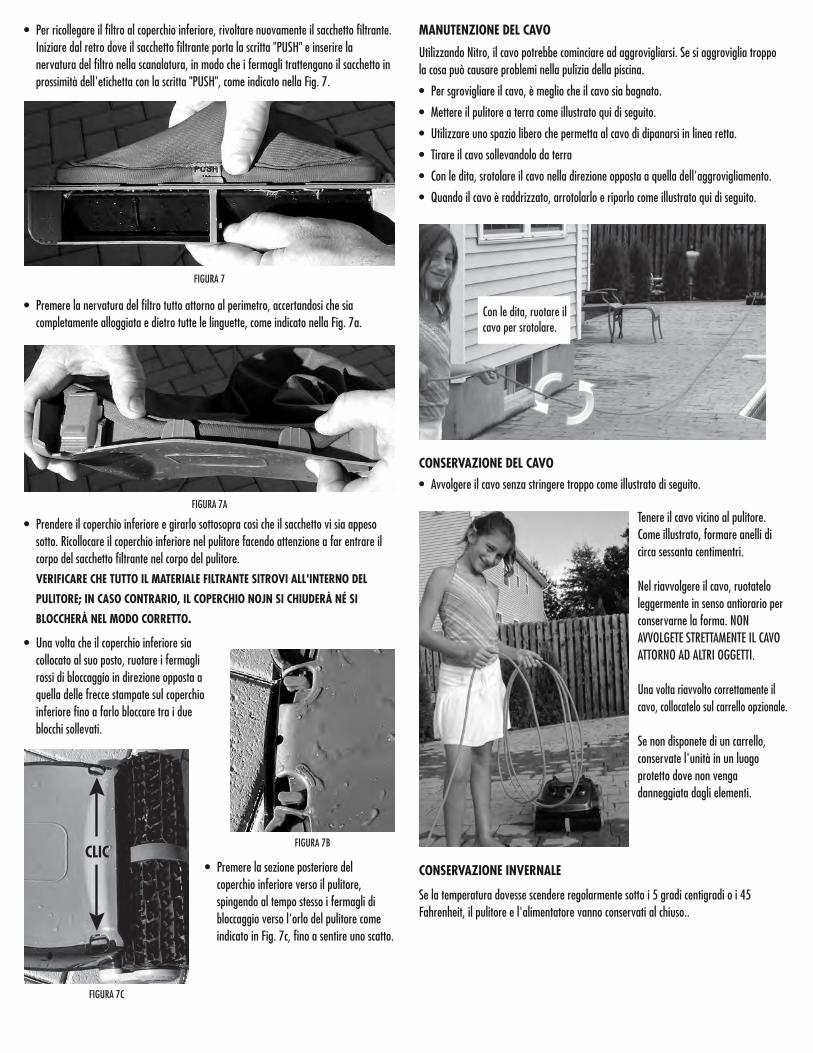
• Per ricollegare il filtro al coperchio inferiore, rivoltare nuovamente il sacchetto filtrante. Iniziare dal retro dove il sacchetto filtrante porta la scritta "PUSH" e inserire la nervatura del filtro nella scanalatura, in modo che i fermagli trattengano il sacchetto in prossimità dell'etichetta con la scritta "PUSH", come indicato nella Fig. 7.
FIGURA 7
• Premere la nervatura del filtro tutto attorno al perimetro, accertandosi che sia completamente alloggiata e dietro tutte le linguette, come indicato nella Fig. 7a.
FIGURA 7A
• Prendere il coperchio inferiore e girarlo sottosopra così che il sacchetto vi sia appeso sotto. Ricollocare il coperchio inferiore nel pulitore facendo attenzione a far entrare il corpo del sacchetto filtrante nel corpo del pulitore.
VERIFICARE CHE TUTTO IL MATERIALE FILTRANTE SITROVI ALL'INTERNO DEL
PULITORE; IN CASO CONTRARIO, IL COPERCHIO NOJN SI CHIUDERÀ NÉ SI
BLOCCHERÀ NEL MODO CORRETTO.
FIGURA 7B
• Premere la sezione posteriore del coperchio inferiore verso il pulitore, spingendo al tempo stesso i fermagli di bloccaggio verso l'orlo del pulitore come indicato in Fig. 7c, fino a sentire uno scatto.
FIGURA 7C
• Una volta che il coperchio inferiore sia collocato al suo posto, ruotare i fermagli rossi di bloccaggio in direzione opposta a quella delle frecce stampate sul coperchio inferiore fino a farlo bloccare tra i due blocchi sollevati.
MANUTENZIONE DEL CAVO
Utilizzando Nitro, il cavo potrebbe cominciare ad aggrovigliarsi. Se si aggroviglia troppola cosa può causare problemi nella pulizia della piscina.
• Per sgrovigliare il cavo, è meglio che il cavo sia bagnato.
• Mettere il pulitore a terra come illustrato qui di seguito.
• Utilizzare uno spazio libero che permetta al cavo di dipanarsi in linea retta.
• Tirare il cavo sollevandolo da terra
• Con le dita, srotolare il cavo nella direzione opposta a quella dell'aggrovigliamento.
• Quando il cavo è raddrizzato, arrotolarlo e riporlo come illustrato qui di seguito.
CONSERVAZIONE DEL CAVO
• Avvolgere il cavo senza stringere troppo come illustrato di seguito.
Tenere il cavo vicino al pulitore.Come illustrato, formare anelli dicirca sessanta centimentri.
Nel riavvolgere il cavo, ruotateloleggermente in senso antiorario perconservarne la forma. NONAVVOLGETE STRETTAMENTE IL CAVOATTORNO AD ALTRI OGGETTI.
Una volta riavvolto correttamente ilcavo, collocatelo sul carrello opzionale.
Se non disponete di un carrello,conservate l'unità in un luogoprotetto dove non vengadanneggiata dagli elementi.
CONSERVAZIONE INVERNALE
Se la temperatura dovesse scendere regolarmente sotto i 5 gradi centigradi o i 45Fahrenheit, il pulitore e l'alimentatore vanno conservati al chiuso..
CLIC
Con le dita, ruotare ilcavo per srotolare.
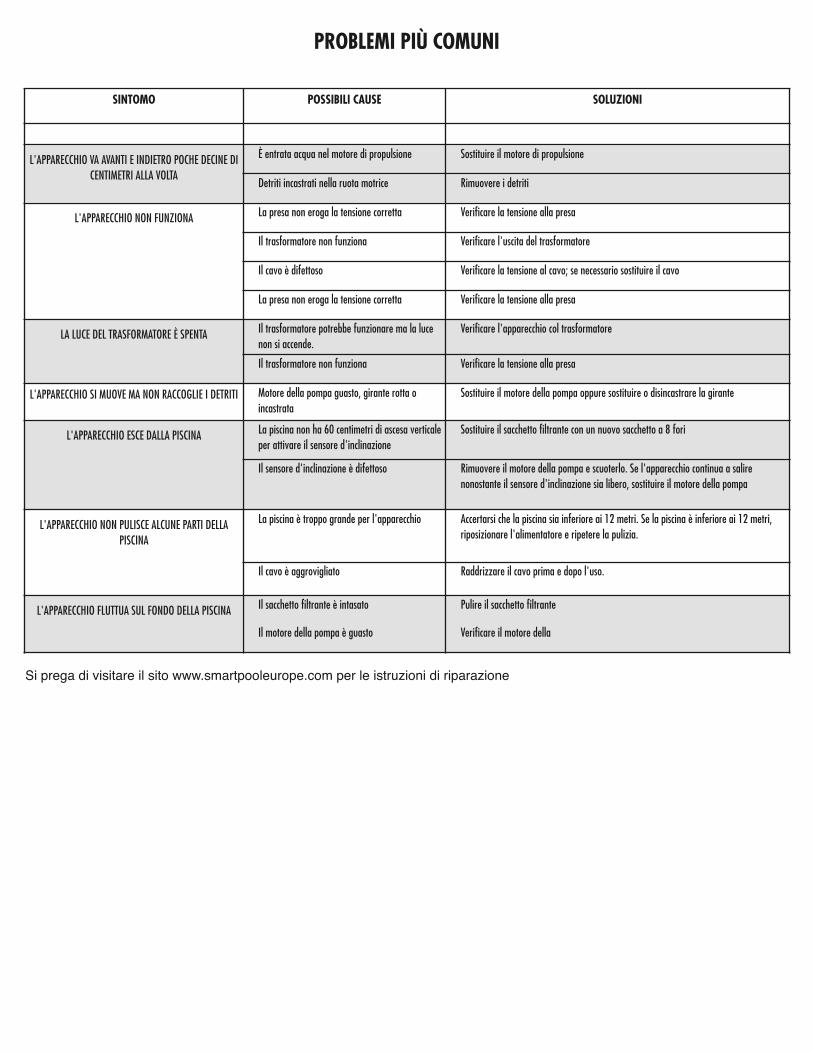
SINTOMO POSSIBILI CAUSE SOLUZIONI
L'APPARECCHIO VA AVANTI E INDIETRO POCHE DECINE DICENTIMETRI ALLA VOLTA
È entrata acqua nel motore di propulsione Sostituire il motore di propulsione
Detriti incastrati nella ruota motrice Rimuovere i detriti
L'APPARECCHIO NON FUNZIONA La presa non eroga la tensione corretta Verificare la tensione alla presa
Il trasformatore non funziona Verificare l'uscita del trasformatore
Il cavo è difettoso Verificare la tensione al cavo; se necessario sostituire il cavo
La presa non eroga la tensione corretta Verificare la tensione alla presa
LA LUCE DEL TRASFORMATORE È SPENTA Il trasformatore potrebbe funzionare ma la luce non si accende.
Verificare l'apparecchio col trasformatore
Il trasformatore non funziona Verificare la tensione alla presa
L'APPARECCHIO SI MUOVE MA NON RACCOGLIE I DETRITI Motore della pompa guasto, girante rotta o incastrata
Sostituire il motore della pompa oppure sostituire o disincastrare la girante
L'APPARECCHIO ESCE DALLA PISCINA La piscina non ha 60 centimetri di ascesa verticale per attivare il sensore d'inclinazione
Sostituire il sacchetto filtrante con un nuovo sacchetto a 8 fori
Il sensore d'inclinazione è difettoso Rimuovere il motore della pompa e scuoterlo. Se l'apparecchio continua a salire nonostante il sensore d'inclinazione sia libero, sostituire il motore della pompa
L'APPARECCHIO NON PULISCE ALCUNE PARTI DELLAPISCINA
La piscina è troppo grande per l'apparecchio Accertarsi che la piscina sia inferiore ai 12 metri. Se la piscina è inferiore ai 12 metri, riposizionare l'alimentatore e ripetere la pulizia.
Il cavo è aggrovigliato Raddrizzare il cavo prima e dopo l'uso.
L'APPARECCHIO FLUTTUA SUL FONDO DELLA PISCINA Il sacchetto filtrante è intasato
Il motore della pompa è guasto
Pulire il sacchetto filtrante
Verificare il motore della
PROBLEMI PIÙ COMUNI
Si prega di visitare il sito www.smartpooleurope.com per le istruzioni di riparazione

Posizione Parte N. Descrizione1 NC1001 Telaio NC31 e 321A NC1022 Telaio scalatrice2 NC1009 Motore pompa NC31 e 322A NC1024 Motore pompa scalatrice (Versione 1)2B NC1024:02 Motore pompa scalatrice (Versione 2)3 NC1013 Alimentatore NC31 e 323A NC1023 Alimentatore scalatrice4 NC1012 Cavo galleggiante NC31 e 324A NC1012XL Cavo galleggiante scalatrice4B NC1012XL:02 Cavo galleggiante scalatrice (Versione 2)5 NC1006 Motore propulsore NC31, 32 E 51 (Versione 1)5A NC1006:02 Motore propulsore NC51 (Versione 2)6 NC1010 Attacco tubo guida7 NC1011 Paracolpi telaio8 NC1002 Ruota sensore (solo pneumatico)9 NC1005 Sportello di drenaggio veloce10 NC1017 Sacchetto filtrante11 NC1003 Copertura elica12 NC1008 Maniglia13 NC1004 Spazzola motrice14 NC1014 Anello in espanso15 NC1007 Tubo ruota motrice16 NC1016 Cofano inferiore17 NC1018 Boccola anteriore18 NC1019 Boccola posteriore19 NC1015 Elica
NC32EUGARANZIA LIMITATA
Il Nitro e’ stato prodotto, collaudato ed ispezionato seguendo dei requisiti ingegnieristiciattentamente studiati. E’ garantito contro difetti di materiale e di lavorazione in normalicircostanze di utilizzo e servizio, secondo le qualifiche, le condizioni ed i limiti indicati quiappresso.
Questa garanzia e’ estesa al primo cliente/acquirente per un periodo di 12 mesi a partiredalla data dell’acquisto.
Questa garanzia copre soltanto un normale e ragionevole uso del Nitro. Danni, difetti,cattivo funzionamento od altri problemi che provengono dall’utilizzo effettuato senza iltrasformatore originale o da un utilizzo che non rispetti le istruzioni fornite nel manualedell’Utente, tra cui la mancanza da parte dell’acquirente di provvedere alla ragionevole enecessaria manutenzione, rendera’ nulla questa garanzia. Danni, difetti, cattivofunzionamento od altri problemi causati od associati a riparazioni effettuate da personeche non siano dei rappresentanti autorizzati della SMARTPOOL non rientrano nellagaranzia.
Gli obblighi di garanzia della SMARTPOOL sono limitati alla riparazione od allasostituzione del prodotto o dei componenti difettosi, a scelta della SMARTPOOL. Nellariparazione o nella sostituzione potrebbe rientrare l’uso di componenti e/o sistemimodificati a scelta della SMARTPOOL. La SMARTPOOL non sara’ ritenuta responsabilein nessuna circostanza o per nessun importo derivante da danni consequenziali odincidentali, da infortuni o danni a persone o cose che usano o usati in relazione alprodotto, perdita di profitti od altri costi o spese di qualsiasi genere.
NON VI SONO ALTRE GARANZIE OD ASSERZIONI, SIA ESPRESSE CHE IMPLICITE,SIA CHE RIGUARDINO LA COMMERCIABILITA’, L’IDONEITA’ PER UN USOPARTICOLARE, OD ALTRO, FATTE DALLA SMARTPOOL OLTRE A QUELLEDESCRITTE ESPRESSAMENTE IN QUESTA GARANZIA. NESSUNA PERSONA, DITTA,O SOCIETA’ E’ AUTORIZZATA A RILASCIARE ALCUNA DICHIARAZIONE O ADINCORRERE IN OBBLIGHI A NOME O PER CONTO DELLA SMARTPOOL, CONL’ECCEZIONE DELLE AFFERMAZIONI QUI FATTE. I RIMEDI INDICATI IN QUESTAGARANZIA SONO ESPRESSAMENTE INTESI COME GLI UNICI RIMEDI DISPONIBILIALL’ACQUIRENTE, E QUESTA GARANZIA COSTITUISCE L’INTERO ACCORDO TRALA SMARTPOOL E L’ACQUIRENTE. QUESTA GARANZIA DESCRIVE GLI UNICIOBBLIGHI DELLA SMARTPOOL PER QUANTO RIGUARDA QUESTO PRODOTTO, ENON ESISTONO ALTRE GARANZIE CHE VANNO ALDILA’ DELLA DESCRIZIONEFORNITA.
Per poter ottenere il servizio assistenza, l’acquirente deve contattare il negozio dove èstato acquistato Nitro. Dopo aver ricevuto l’approvazione dal negozio, rimandare Nitro,adeguatamente imballato, alla sede indicata dal negoziante. Attaccate al Nitro una copiadella fattura contenente la data d’acquisto, il numero di serie e la descrizione delproblema.
AVVERTENZA: Alcuni rivestimenti in vinile sono piu’ suscettibili di altri all’usura della superficie od allarimozione dei disegni, causate da oggetti, come spazzole, galleggianti, giocattoli, boagalleggianti per pastiglie di cloro, e pulitori automatici di piscine, che possano venire acontatto con la superficie in vinile. Questi disegni si possono graffiare o scalfiresemplicemente strofinando la superficie con una spazzola. Anche l’inchiostro dei disegnisi puo’ logorare venendo in contatto con oggetti che si trovano nella piscina. LaSmartPool non e’ responsabile, ne’ rientra in questa garanzia limitata, per la rimozionedei disegni, abrasioni, segni o danni di vario tipo ai rivestimenti in vinile.

40

41
MANUAL DE OPERAÇÃO PARA O LIMPADOR ROBÓTICO SMARTPOOL NITRO DE PISCINA
Parabéns pela sua compra do aspirador automático de piscina mais tecnologicamente avançado queestá disponível nos nossos dias. O Nitro é fácil de utilizar e tornará a manutenção da sua piscina
economicamente acessível e sem esforço. Seguindo estas instruções simples assegurará que o Nitrolimpará, rápida e eficientemente, a sua piscina hoje, e durante muitos anos futuros.
INSTALAÇÃO
• Coloque a fonte de energia numa área que permita ao limpador cobrir todas as áreas da piscina.• Assegure-se de só ligar a fonte de energia a uma tomada eléctrica protegida com um GFI(interruptor com ligação à terra) ou um ELI (interruptor
com descarga para a terra).• Olhe para a fonte de energia e verifique se o interruptor está na posição de desligado.• Ligue a fonte de energia à tomada protegida.• Ligue o conector do limpador à fonte de energia. O conector é codificado, pelo que só encaixará na fonte de energia de uma maneira. Assegure-se
de que a tomada está toda encaixada na fonte de energia. Enfie o fecho do conector (alívio de esforço) no conector e rode o fecho do conector no sentido dos ponteiros do relógio até ficar justo.
NÃO OPERE O LIMPADOR FORA DA ÁGUA.SE OPERAR O LIMPADOR FORA DA ÁGUA, DANIFICARÁ O MOTOR E ANULARÁ A GARANTIA
• Coloque o limpador na piscina e, se necessário, movimente-o para os lados para libertar todo o ar preso. O limpador descerá para o fundo da piscina.
• Mergulhe na água uma quantidade suficiente do cabo azul, de modo a assegurar que o limpador pode facilmente alcançar todas as áreas da piscina.
• Rode o interruptor existente na fonte de energia para a posição de 'on' (ligado).
• O limpador iniciará o seu programa de limpeza.
• O limpador desliga-se automaticamente depois de duas horas de operação.
• Se for requerida uma segunda limpeza, ou a unidade for acidentalmente desligada, deve esperar um minuto antes de a voltar a ligar.
NOTA IMPORTANTE: Durante a operação normal, o limpador parece que se desliga durante alguns segundos. levanta as rodas dafrente do fundo da piscina e movimenta-se para a esquerda ou para a direita, ou roda durante um período de tempo indeterminado.
Isto é normal e foi pré programado na unidade, para garantir a limpeza mais rápida e mais eficiente da sua piscina.
42
INSTRUÇÕES DE SEGURANÇA IMPORTANTES LEIA E SIGA TODAS AS INSTRUÇÕES
GUARDE ESTAS INSTRUÇÕES
! Risco de choque eléctrico ou electrocussão – O fornecimento eléctrico a este produto deve ser instalado em conformidade com o Código Eléctrico Nacional e todos oscódigos e regulamentos aplicáveis locais. A instalação imprópria criará um perigo eléctrico que pode resultar na morte ou lesões sérias para os utilizadores da piscina ououtros, devido a choque eléctrico, e também pode causar danos de propriedade.
NÃO UTILIZE EXTENSÕES ELÉCTRICAS - O RESULTADO PODE SER A MORTE OU LESÕES.
Para reduzir o risco de lesão, não permita a utilização deste produto por crianças a menos que elas sejam sempre atentamente supervisionadas
Se a temperatura do ar ambiente exceder os 115° F. (45° C), proteja a fonte de energia da luz solar directa. Não cubra a fonte de energia.
A única utilização deste produto é como limpador robótico de piscina, conforme descrita neste manual; a garantia será anulada em caso de qualquer modificação ou outrautilização.
Não permita que as crianças utilizem, toquem ou brinquem perto ou à volta da fonte de energia da unidade.
Para proteger o seu receptáculo eléctrico e evitar a possibilidade de qualquer choque eléctrico, devem ser instalados um Interruptor de Corrente de Defeito a Terra (GFCI-USA) e um Interruptor de Passagem de Corrente para a Terra (ELI-EU). A não instalação destes dispositivos pode criar um perigo eléctrico que pode resultar na morte oulesões sérias para os utilizadores da piscina ou outros, devido a choque eléctrico, e também pode causar danos de propriedade.
Ligue a unidade à energia CA somente depois da instalação ter sido terminada.
Não utilize se a unidade estiver danificada, seja como for.
A unidade deve estar completamente submersa em água, caso contrário a garantia é inválida.
Assegure-se de que o limpador robótico de piscina está desligado da fonte de energia antes de abrir a unidade ou de fazer qualquer outra manutenção.
Para evitar danos à fonte de energia e ao cabo eléctrico, nunca movimente a fonte de energia puxando pelo cabo, nem puxe este para o desligar do receptáculo eléctrico.Desligue a unidade, tirando a ficha do receptáculo eléctrico. Não puxe o cabo eléctrico a passar por esquinas ásperas ou arestas.
Não brinque com o limpador ou o cabo, nem os aplique ao corpo. Ele pode apanhar ou cortar cabelo e partes do corpo. O cabo pode prender ou enlaçar-se nosnadadores, o que pode resultar em afogamento.
Não opere quando o cabo eléctrico ou a fonte de energia estiverem danificados.
Antes de instalar o limpador, compreenda a cobertura do limpador. O limpador não foi concebido para limpar automaticamente degraus nem trabalhar debaixo decoberturas contra o sol. Também não foi concebido para fazer a limpeza inicial para a instalação de uma piscina nova.
O seu limpador não deve ser utilizado enquanto houver pessoas a nadar na piscina.
A fonte de energia deve estar sempre a pelo menos 12 pés / 4 metros da beira da piscina!
Recomenda-se que, depois de cada utilização, limpe o saco do filtro e verifique o impulsor para garantir que está desimpedido e sem detritos.
Quando fora de utilização, desligue a fonte de energia do receptáculo eléctrico.
NÃO mude o interruptor do limpador para “ON” (LIGAR) se ele não estiver imerso na água. A utilização do limpador fora da água pode causar danos severos e resultará na perdada garantia. Lembre-se sempre de mudar o interruptor da fonte de energia para “OFF” (DESLIGAR) e de o desligar do receptáculo eléctrico, antes de retirar o limpador da piscina.
Se o seu limpador robótico de piscina não estiver a trabalhar como deveria, ou tiver sido deixado cair ou danificado de qualquer forma, contacte o Serviço aos Clientes daSmartPool, Inc. pelo 1-732-730-9880 ou visite o nosso sítio na web em www.smartpooleurope.com, antes de o utilizar.
PERIGO:
! ADVERTÊNCIA:
! ADVERTÊNCIA:
! ADVERTÊNCIA:
! ADVERTÊNCIA:
! ADVERTÊNCIA:
! ADVERTÊNCIA:
! ADVERTÊNCIA:
! ADVERTÊNCIA:
! ADVERTÊNCIA:
! ADVERTÊNCIA:
! ADVERTÊNCIA:
! ADVERTÊNCIA:
! ADVERTÊNCIA:
! ADVERTÊNCIA:
! ADVERTÊNCIA:
! ADVERTÊNCIA:
! ADVERTÊNCIA:
! ADVERTÊNCIA:
! ADVERTÊNCIA:
! CUIDADO:
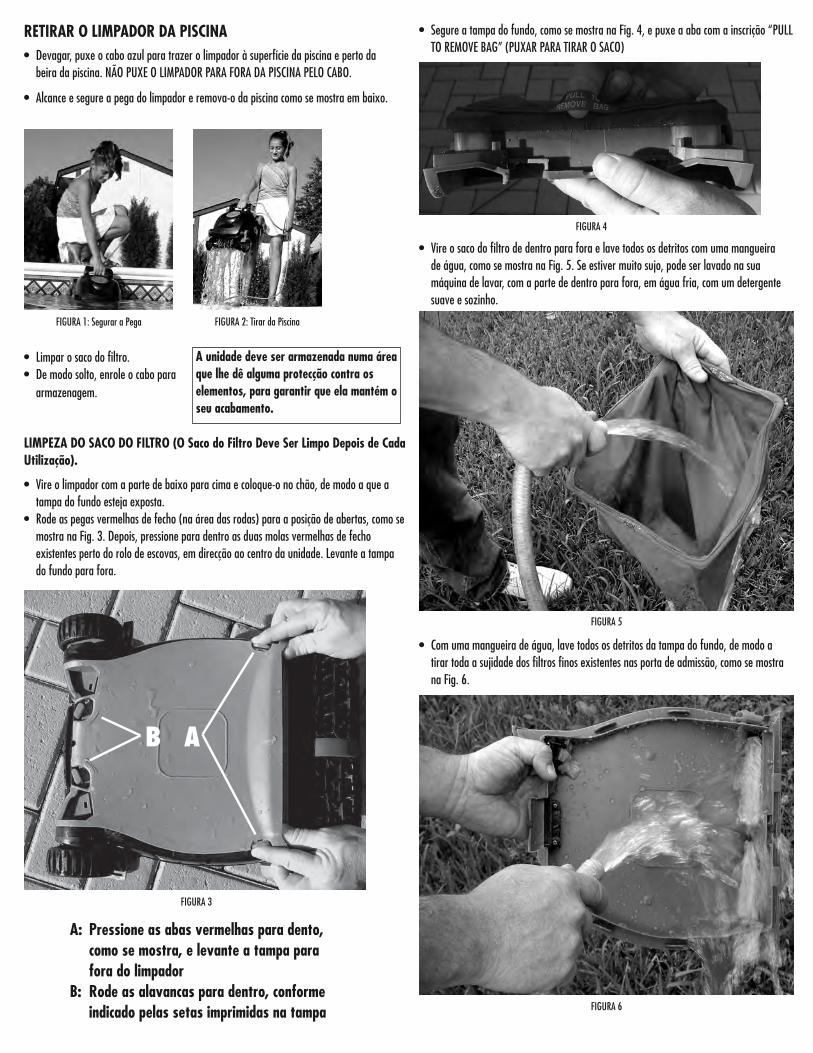
RETIRAR O LIMPADOR DA PISCINA• Devagar, puxe o cabo azul para trazer o limpador à superfície da piscina e perto da
beira da piscina. NÃO PUXE O LIMPADOR PARA FORA DA PISCINA PELO CABO.
• Alcance e segure a pega do limpador e remova-o da piscina como se mostra em baixo.
FIGURA 1: Segurar a Pega FIGURA 2: Tirar da Piscina
• Limpar o saco do filtro.• De modo solto, enrole o cabo para
armazenagem.
A unidade deve ser armazenada numa áreaque lhe dê alguma protecção contra oselementos, para garantir que ela mantém oseu acabamento.
LIMPEZA DO SACO DO FILTRO (O Saco do Filtro Deve Ser Limpo Depois de CadaUtilização).
• Vire o limpador com a parte de baixo para cima e coloque-o no chão, de modo a que a tampa do fundo esteja exposta.
• Rode as pegas vermelhas de fecho (na área das rodas) para a posição de abertas, como se mostra na Fig. 3. Depois, pressione para dentro as duas molas vermelhas de fecho existentes perto do rolo de escovas, em direcção ao centro da unidade. Levante a tampa do fundo para fora.
AB
A: Pressione as abas vermelhas para dento, como se mostra, e levante a tampa para fora do limpador
B: Rode as alavancas para dentro, conforme indicado pelas setas imprimidas na tampa
FIGURA 3
• Segure a tampa do fundo, como se mostra na Fig. 4, e puxe a aba com a inscrição “PULL TO REMOVE BAG” (PUXAR PARA TIRAR O SACO)
FIGURA 4
• Vire o saco do filtro de dentro para fora e lave todos os detritos com uma mangueira de água, como se mostra na Fig. 5. Se estiver muito sujo, pode ser lavado na sua máquina de lavar, com a parte de dentro para fora, em água fria, com um detergente suave e sozinho.
FIGURA 5
• Com uma mangueira de água, lave todos os detritos da tampa do fundo, de modo a tirar toda a sujidade dos filtros finos existentes nas porta de admissão, como se mostra na Fig. 6.
FIGURA 6
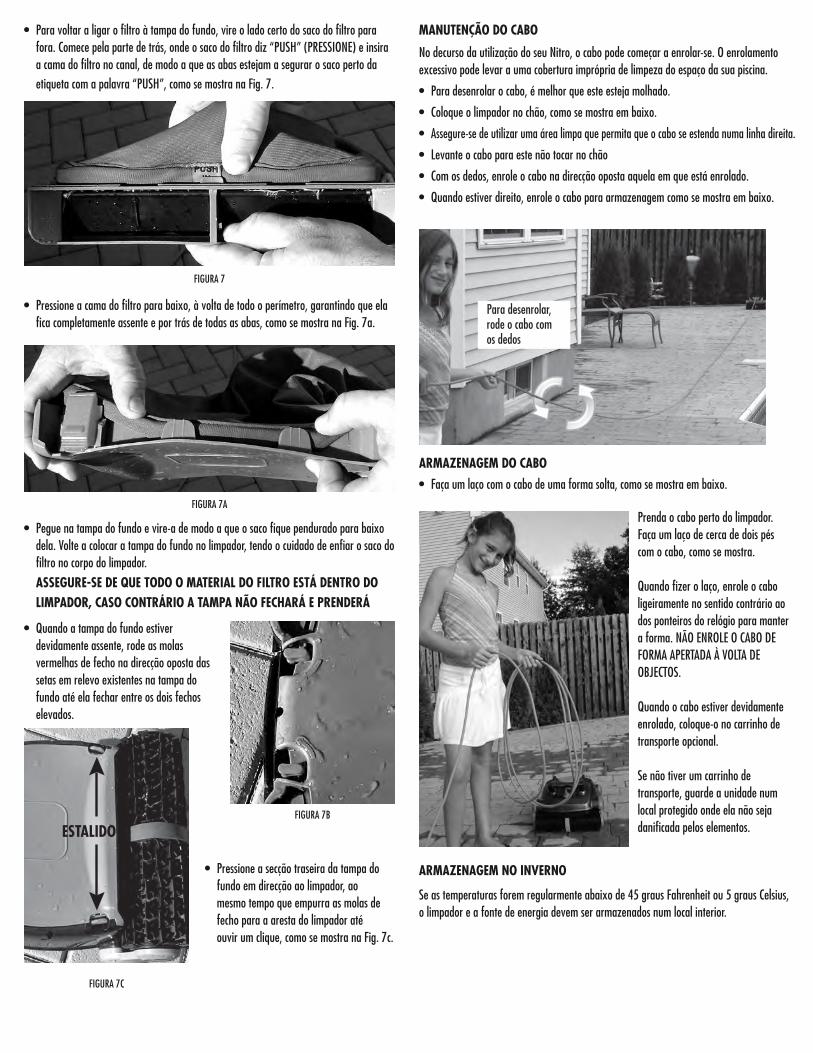
• Para voltar a ligar o filtro à tampa do fundo, vire o lado certo do saco do filtro para fora. Comece pela parte de trás, onde o saco do filtro diz “PUSH” (PRESSIONE) e insira a cama do filtro no canal, de modo a que as abas estejam a segurar o saco perto da etiqueta com a palavra “PUSH”, como se mostra na Fig. 7.
FIGURA 7
• Pressione a cama do filtro para baixo, à volta de todo o perímetro, garantindo que ela fica completamente assente e por trás de todas as abas, como se mostra na Fig. 7a.
FIGURA 7A
• Pegue na tampa do fundo e vire-a de modo a que o saco fique pendurado para baixo dela. Volte a colocar a tampa do fundo no limpador, tendo o cuidado de enfiar o saco do filtro no corpo do limpador.
ASSEGURE-SE DE QUE TODO O MATERIAL DO FILTRO ESTÁ DENTRO DO LIMPADOR, CASO CONTRÁRIO A TAMPA NÃO FECHARÁ E PRENDERÁ
FIGURA 7B
• Pressione a secção traseira da tampa do fundo em direcção ao limpador, ao mesmo tempo que empurra as molas de fecho para a aresta do limpador até ouvir um clique, como se mostra na Fig. 7c.
FIGURA 7C
• Quando a tampa do fundo estiver devidamente assente, rode as molas vermelhas de fecho na direcção oposta das setas em relevo existentes na tampa do fundo até ela fechar entre os dois fechos elevados.
MANUTENÇÃO DO CABO
No decurso da utilização do seu Nitro, o cabo pode começar a enrolar-se. O enrolamento excessivo pode levar a uma cobertura imprópria de limpeza do espaço da sua piscina.
• Para desenrolar o cabo, é melhor que este esteja molhado.
• Coloque o limpador no chão, como se mostra em baixo.
• Assegure-se de utilizar uma área limpa que permita que o cabo se estenda numa linha direita.
• Levante o cabo para este não tocar no chão
• Com os dedos, enrole o cabo na direcção oposta aquela em que está enrolado.
• Quando estiver direito, enrole o cabo para armazenagem como se mostra em baixo.
ARMAZENAGEM DO CABO
• Faça um laço com o cabo de uma forma solta, como se mostra em baixo.
Prenda o cabo perto do limpador.Faça um laço de cerca de dois péscom o cabo, como se mostra.
Quando fizer o laço, enrole o caboligeiramente no sentido contrário aodos ponteiros do relógio para mantera forma. NÃO ENROLE O CABO DEFORMA APERTADA À VOLTA DEOBJECTOS.
Quando o cabo estiver devidamenteenrolado, coloque-o no carrinho detransporte opcional.
Se não tiver um carrinho detransporte, guarde a unidade numlocal protegido onde ela não sejadanificada pelos elementos.
ARMAZENAGEM NO INVERNO
Se as temperaturas forem regularmente abaixo de 45 graus Fahrenheit ou 5 graus Celsius,o limpador e a fonte de energia devem ser armazenados num local interior.
ESTALIDO
Para desenrolar,rode o cabo comos dedos

SINTOMA RAZÕES POSSÍVEIS SOLUÇÕES
A UNIDADE MOVIMENTA-SE PARA TRÁS E PARA FRENTE, POUCOSPÉS DE CADA VEZ
O motor de accionamento tem água dentro Substitua o motor de accionamento
Detritos presos na roda motriz Remova os detritos
UNIDADE NÃO FUNCIONA A tomada de parede não dá a voltagem adequada Verifique a voltagem da tomada
O transformador não funciona Verifique a potência de saída do transformador
Cabo defeituoso Verifique a Voltagem do Cabo; Se necessário, substitua o cabo
A tomada de parede não dá a voltagem adequada Verifique a Voltagem do Cabo; Se necessário, substitua o cabo
LUZ DO TRANSFORMADOR APAGADA O transformador pode estar a funcionar, mas a luz não está acesa.
Teste a unidade com o transformador
O transformador não funciona Verifique a voltagem da tomada de parede
A UNIDADE MOVIMENTA-SE MAS NÃO APANHA OSDETRITOS
Mau funcionamento da moto-bomba, impulsor partido ou bloqueado
Mude a moto-bomba ou substitua ou desbloqueie o impulsor
A UNIDADE ESTÁ A SUBIR PARA FORA DA PISCINA A piscina não tem 60 centímetro de rampa vertical para o sensor Incline (de Inclinação)
Substitua o Saco do Filtro por um saco de 8 orifícios novo
O sensor Incline está defeituoso Remova a moto-bomba e agite-a. Se a unidade continuar a subir, apesar de o sensor de inclinação estar liberto, Substituta a moto-bomba
A UNIDADE NÃO ATINGE ÁREAS DA PISCINA A dimensão da Piscina é demasiado grande para a unidade
Verifique se a piscina tem menos de 40 pés. Se assim for, reposicione a fonte de energia e volte a operar a unidade.
O cabo está emaranhado Endireite o cabo antes e depois de cada utilização.
A UNIDADE ESTÁ ESTACIONÁRIA NO FUNDO DA PISCINA O saco do filtro está entupido
Mau funcionamento da moto-bomba
Limpe o Saco do Filtro
Verifique a Moto-bomba
GUIA DE RESOLUÇÃO DE PROBLEMAS
Por favor, visite www.smartpooleurope.com para instruções sobre reparações.

Localização Peça no. Descrição1 NC1001 NC31 e 32 Carroçaria1A NC1022 Carroçaria do Trepador de Parede2 NC1009 NC31 e 32 Motobomba2A NC1024 Motobomba (Versão 1) do Trepador de Parede2B NC1024:02 Motobomba (Versão 2) do Trepador de Parede3 NC1013 NC31 e 32 Fonte de Energia3A NC1023 Fonte de Energia do Trepador de Parede4 NC1012 NC31 e 32 Cabo Flutuante4A NC1012XL Cabo Flutuante do Trepador de Parede4B NC1012XL:02 Cabo Flutuante do Trepador de Parede (Versão 2)5 NC1006 NC31, 32 E 51 Motor (Versão 1)5A NC1006:02 NC51 Motor (Versão 2)6 NC1010 Conjunto do Tubo Veio7 NC1011 Pára-choques da Carroçaria8 NC1002 Roda Sensora (Só Pneu)9 NC1005 Cobertura da Drenagem Rápida10 NC1017 Saco de Filtro11 NC1003 Tampa do Impulsor12 NC1008 Pega13 NC1004 Escovas Motrizes14 NC1014 Aro de Espuma15 NC1007 Tubo da Roda Motriz16 NC1016 Tampa do Fundo17 NC1018 Entrada da Frente18 NC1019 Entrada da Traseira19 NC1015 Impulsor
NC32EUG A R A N T I A L I M I T A D A
O Nitro foi fabricado, testado e inspeccionado em conformidade com requisitos deengenharia cuidadosamente especificados. Tem a garantia de estar isento de defeitosnos materiais e mão-de-obra, em circunstâncias de utilização e serviço normais,subordinado às qualificações, condições e limitações descritas em baixo.
Esta garantia é concedida ao primeiro consumidor/comprador por um período de 12Meses a contar da data da compra.
Esta garantia apenas cobre a utilização normal e razoável do Nitro. Os danos, defeitos,problemas de funcionamento ou outras falhas surgidas da sua utilização sem otransformador original ou de qualquer utilização que não observe as instruções no Manual doOperador, incluindo, por parte do comprador, o não providenciar a manutenção razoável enecessária, tornarão esta garantia inválida. Não serão cobertos os danos, defeitos,problemas de funcionamento ou outras falhas causadas por, ou relacionadas com,reparações efectuadas por qualquer instalação de serviço que não seja representante deserviço autorizada da SMARTPOOL.
As obrigações da SMARTPOOL no âmbito da garantia serão limitadas à reparação ousubstituição do produto ou de qualquer componente deficiente, conforme opção daSMARTPOOL. Essa reparação ou substituição poderá incluir a utilização de componentese/ou unidades recondicionadas, conforme opção da SMARTPOOL. A SMARTPOOL nãoserá responsável, seja em que circunstâncias for ou em qualquer montante, por quaisquerdanos em consequência ou incidentais, ou por qualquer lesão ou danos causados apessoas ou propriedades, pela utilização ou pelo uso em conexão com o produto, nem pelaperda de lucros ou outros custos ou despesas de qualquer tipo ou caracter.
NÃO HÁ QUAISQUER OUTRAS GARANTIAS OU AFIRMAÇÕES, EXPRESSAS OUIMPLÍCITAS, QUER DE EXPLORABILIDADE, ADEQUAÇÃO PARA UM FIM EMPARTICULAR, OU OUTRO, PRESTADAS PELA SMARTPOOL, PARA ALÉM DASESPECIFICAMENTE REFERIDAS NESTA GARANTIA. NENHUMA PESSOA, FIRMA OUEMPRESA ESTÁ AUTORIZADA A PRESTAR QUAISQUER AFIRMAÇÕES OU AASSUMIR QUAISQUER OBRIGAÇÕES EM NOME OU POR CONTA DA SMARTPOOL,EXCEPTO CONFORME AQUI INDICADO. AS COMPENSAÇÕES ESTABELECIDASNESTA GARANTIA SÃO EXPRESSAMENTE ENTENDIDAS COMO SENDO AS ÚNICASCOMPENSAÇÕES DISPONÍVEIS PARA O COMPRADOR, E ESTA GARANTIA CONTÉMO ACORDO TOTAL E COMPLETO ENTRE A SMARTPOOL E O COMPRADOR. ESTAGARANTIA ESTABELECE AS ÚNICAS OBRIGAÇÕES DA SMARTPOOL NO QUERESPEITA A ESTE PRODUTO, E NÃO HÁ QUAISQUER GARANTIAS QUE SEPROLONGUEM PARA ALÉM DA DESCRIÇÃO AQUI CONTIDA.
Para obter serviço no âmbito da garantia, contacte a loja onde comprou o seu Nitro.Depois de a loja lhe ter dado um impresso de aprovação, devolva o Nitro,adequadamente empacotado, à direcção especificada pela loja. Com o Nitro, envie umacópia da factura com a data da compra, o número de série e a descrição do problema.
CUIDADO: Alguns revestimentos de vinil são mais susceptíveis, que outros, de desgaste na superfícieou de perder o padrão devido a objectos, como escovas, flutuadores, brinquedos,distribuidores de cloro e dispositivos automáticos de limpeza de piscinas, entrarem emcontacto com a superfície de vinil. Esses padrões podem ser severamente riscados ou sofrerabrasão, pelo simples esfregar da superfície com uma escova. A tinta do padrão tambémpode desaparecer quando entra em contacto com objectos existentes na piscina. ASmartPool não é responsável nem esta garantia limitada cobre o desaparecimento dopadrão, a abrasão, as marcas ou qualquer tipo de danos aos revestimentos de vinil.

48

49
GEBRUIKSAANWIJZING VOOR DE SMARTPOOL NITRO ROBOTIC POOL CLEANER
Gefeliciteerd met de aanschaf van de technologisch meest geavanceerde automatischezwembadstofzuiger die thans beschikbaar is. De Nitro is gemakkelijk in het gebruik en maakthet onderhoud van uw zwembad betaalbaar en gemakkelijk. Als u deze eenvoudige instructiesvolgt, reinigt de Nitro uw zwembad vanaf vandaag tot in lengte van jaren. Snel en efficiënt.
INSTALLATIE
• Plaats de voeding zodanig dat het reinigingstoestel uw gehele zwembad kan bereiken.
• Zorg ervoor dat de voeding uitsluitend via een verliesstroomschakelaar of aardlekschakelaar (geaard stopcontact met werkende aardeaansluiting) is aangesloten.
• Controleer dat de voeding is uitgeschakeld.
• Stop de stekker in het geaarde stopcontact.
• Breng de connector van het reinigingstoestel in de netvoeding aan. De connector kan maar op een manier met de netvoeding worden verbonden. Zorg ervoor dat de plug helemaal in de netvoeding is aangebracht. Schuif de vergrendeling van de connector (kabelklem) in de connector en draai de connector met de klok mee totdat deze goed vastzit.
LAAT DE HET REINIGINGSTOESTEL NIET BUITEN HET WATER WERKENDOOR HET REINIGINGSTOESTEL BUITEN WATER TE LATEN WERKEN, KUNNEN DE MOTOREN BESCHADIGD
RAKEN EN KAN DE GARANTIE VERVALLEN.• Plaats reinigingstoestel in het zwembad en beweeg het zonodig zijwaarts heen en weer zodat eventuele lucht kan ontsnappen. Het reingingstoestel
zinkt naar de bodem van het zwembad.
• Laat genoeg blauw snoer in het water zakken zodat het reinigingstoestel gemakkelijk alle gedeelten van het zwembad kan bereiken.
• Zet de schakelaar van de netvoeding in de aan-stand.
• Het reinigingstoestel start het schoonmaakprogramma.
• Na twee uur schakelt het reinigingstoestel zichzelf automatisch uit.
• Wacht een minuut voordat u het reinigingstoestel weer inschakelt als een tweede reinigingsgang noodzakelijk is, of het reinigingstoestel onbedoeld werd uitgeschakeld.
BELANGRIJK: tijdens de normale werking lijkt het alsof het reinigingstoestel zich een paar tellen uitschakelt, devoorwielen van de bodem van het zwembad optilt en voor een onbepaalde duur links of recht beweegt. Dit is
normaal, het reinigingstoestel is zo geprogrammeerd om voor de efficiëntste reiniging van uw zwembad te zorgen.

50
BELANGRIJKE VEILIGHEIDSINSTRUCTIESDEZE INSTRUCTIES GEHEEL DOORLEZEN EN OPVOLGEN
DEZE INSTRUCTIES BEWAREN
! Risico van elektrische schokken of elektrocutie. De elektrische voeding van dit product moet worden geïnstalleerd in overeenstemming met de toepasselijke plaatselijke wet- en regelgeving.Onjuiste installatie schept een gevaarlijke elektriciteitssituatie die de dood of ernstig letsel van zwembadgebruikers of anderen tot gevolg kan hebben als gevolg van schokken. Tevens kandaardoor zaaksschade ontstaan.
GEBRUIK GEEN VERLENGSNOEREN - DIT KAN DE DOOD OF LETSEL TOT GEVOLG HEBBEN.
Laat, ter vermindering van de kans op letsel, dit product niet door kinderen gebruiken, tenzij deze voortdurend onder nauwlettend toezicht staan
Bij temperaturen boven 46° C (115° F) de voedingseenheid tegen direct zonlicht beschermen. De voedingseenheid niet afdekken.
Dit product is uitsluitend bestemd als zwembadrobot zoals beschreven in deze handleiding. Elke wijziging of elk ander gebruik maakt de garantie nietig.
Sta niet toe dat kinderen de voedingseenheid van het apparaat gebruiken, aanraken of in de nabijheid ervan spelen.
Ter beveiliging van het stopcontact en ter voorkoming van mogelijke elektrische schokken dient er een aardlekschakelaar te worden geïnstalleerd. Dit nalaten kan leiden tot een gevaarlijkeelektriciteitssituatie die het overlijden of ernstig letsel van zwembadgebruikers of anderen tot gevolg kan hebben als gevolg van schokken. Tevens kan het zaaksschade veroorzaken.
Niet aansluiten op de netstroom totdat de installatie is voltooid.
Niet gebruiken als het apparaat op enige wijze is beschadigd.
Apparaat moet geheel ondergedompeld zijn in water, anders is de garantie nietig.
Zorg ervoor dat de zwembadrobot niet is aangesloten op de voedingseenheid voordat het apparaat wordt geopend of er enig ander onderhoud aan wordt uitgevoerd.
Til, ter voorkoming van schade aan de voedingseenheid, deze nooit aan het snoer op, en trek de stekker niet aan het snoer uit het stopcontact. Trek in plaats daarvan de stekker zelf uit hetstopcontact. Trek het snoer niet langs scherpe bochten of randen.
Niet spelen met de reiniger of de kabel of op het lichaam in werking stellen. Er kunnen lichaamsdelen of haren in bekneld raken of door worden verwijderd. Zwemmers kunnen over dekabel struikelen of erin verstrikt raken, met verdrinking tot gevolg
Niet laten werken met een beschadigd(e) snoer of voedingseenheid.
Krijg eerst een idee van het dekkingsgebied van de reiniger voordat u de reiniger installeert. De reiniger is niet bedoeld om automatisch trappen te reinigen, of onder solar covers tewerken. Tevens is hij niet bedoeld om de eerste reiniging voor de installatie van een nieuw zwembad uit te voeren.
Uw reiniger moet niet worden gebruikt als er personen in het zwembad zwemmen.
De voedingseenheid moet te allen tijde tenminste 12 feet / 4 meter van de rand van het zwembad verwijderd blijven!
U wordt aangeraden om de filterzak te reinigen en het voortstuwingsmechanisme te controleren om ervoor te zorgen dat het na elk gebruik vrij is van afval.
Haal de stekker van de voedingseenheid uit het stopcontact als het apparaat niet in gebruik is.
SCHAKEL de zwembadreiniger NIET op "ON" als deze niet geheel onder water is. Als de reiniger uit het water werkt, kan deze ernstig beschadigd raken. Dit leidt tot garantieverlies. Denk ersteeds aan om de schakelaar op "OFF" te zetten en de verbinding met het stopcontact te verbreken voordat de reiniger uit het zwembad wordt verwijderd.
Neem contact op met Interline, via Customer Serive, [email protected], of ga naar onze website www.interline-pool.com, als uw zwembadrobot niet naar behoren werkt of is latenvallen of op enige wijze is beschadigd
GEVAAR:
! WAARSCHUWING:
! WAARSCHUWING:
! WAARSCHUWING:
! WAARSCHUWING:
! WAARSCHUWING:
! WAARSCHUWING:
! WAARSCHUWING:
! WAARSCHUWING:
! WAARSCHUWING:
! WAARSCHUWING:
! WAARSCHUWING:
! WAARSCHUWING:
! WAARSCHUWING:
! WAARSCHUWING:
! WAARSCHUWING:
! WAARSCHUWING:
! LET OP:
! LET OP:
! LET OP:
! LET OP:
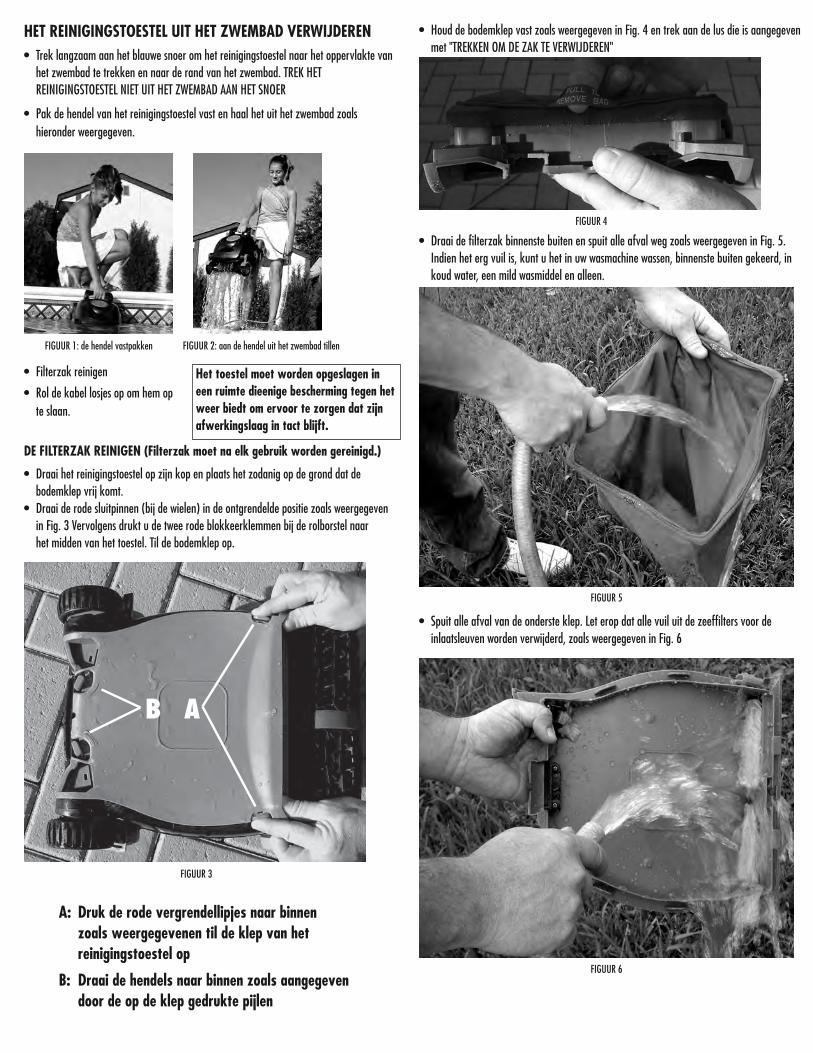
HET REINIGINGSTOESTEL UIT HET ZWEMBAD VERWIJDEREN• Trek langzaam aan het blauwe snoer om het reinigingstoestel naar het oppervlakte van
het zwembad te trekken en naar de rand van het zwembad. TREK HET REINIGINGSTOESTEL NIET UIT HET ZWEMBAD AAN HET SNOER
• Pak de hendel van het reinigingstoestel vast en haal het uit het zwembad zoals hieronder weergegeven.
FIGUUR 1: de hendel vastpakken FIGUUR 2: aan de hendel uit het zwembad tillen
• Filterzak reinigen
• Rol de kabel losjes op om hem op te slaan.
Het toestel moet worden opgeslagen ineen ruimte dieenige bescherming tegen hetweer biedt om ervoor te zorgen dat zijnafwerkingslaag in tact blijft.
DE FILTERZAK REINIGEN (Filterzak moet na elk gebruik worden gereinigd.)
• Draai het reinigingstoestel op zijn kop en plaats het zodanig op de grond dat de bodemklep vrij komt.
• Draai de rode sluitpinnen (bij de wielen) in de ontgrendelde positie zoals weergegeven in Fig. 3 Vervolgens drukt u de twee rode blokkeerklemmen bij de rolborstel naarhet midden van het toestel. Til de bodemklep op.
AB
A: Druk de rode vergrendellipjes naar binnen zoals weergegevenen til de klep van het reinigingstoestel op
B: Draai de hendels naar binnen zoals aangegeven door de op de klep gedrukte pijlen
FIGUUR 3
• Houd de bodemklep vast zoals weergegeven in Fig. 4 en trek aan de lus die is aangegeven met "TREKKEN OM DE ZAK TE VERWIJDEREN"
FIGUUR 4
• Draai de filterzak binnenste buiten en spuit alle afval weg zoals weergegeven in Fig. 5. Indien het erg vuil is, kunt u het in uw wasmachine wassen, binnenste buiten gekeerd, in koud water, een mild wasmiddel en alleen.
FIGUUR 5
• Spuit alle afval van de onderste klep. Let erop dat alle vuil uit de zeeffilters voor de inlaatsleuven worden verwijderd, zoals weergegeven in Fig. 6
FIGUUR 6
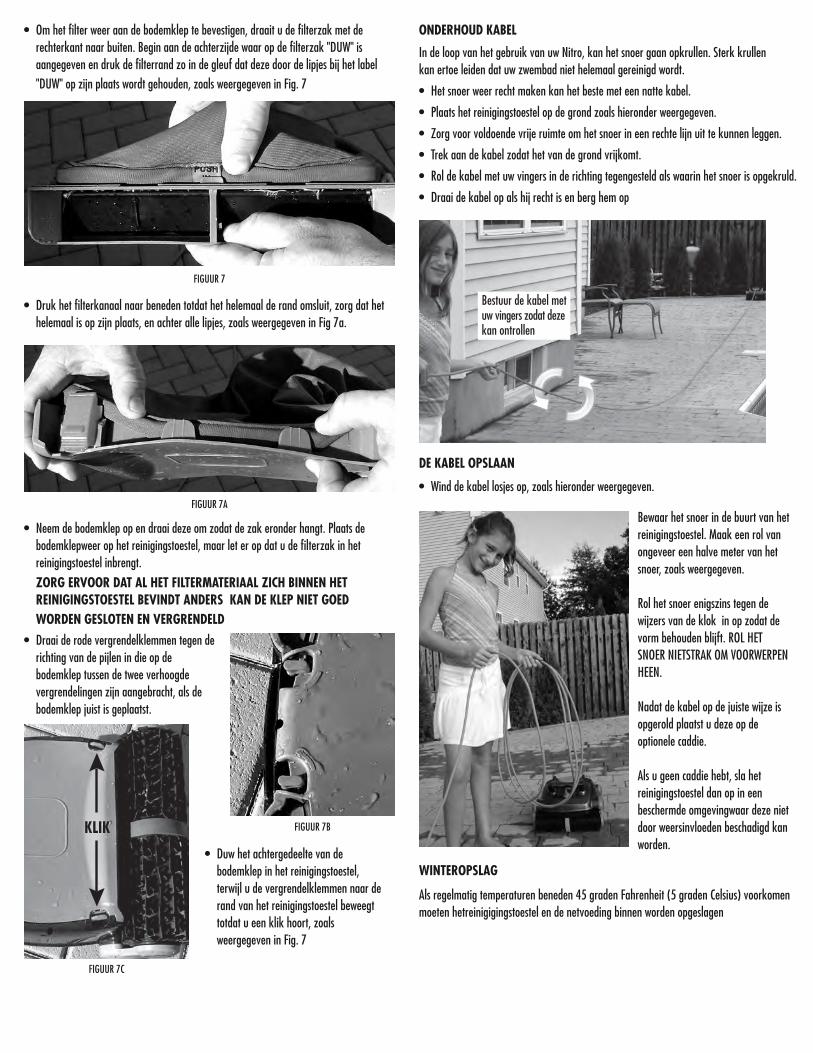
• Om het filter weer aan de bodemklep te bevestigen, draait u de filterzak met de rechterkant naar buiten. Begin aan de achterzijde waar op de filterzak "DUW" is aangegeven en druk de filterrand zo in de gleuf dat deze door de lipjes bij het label "DUW" op zijn plaats wordt gehouden, zoals weergegeven in Fig. 7
FIGUUR 7
• Druk het filterkanaal naar beneden totdat het helemaal de rand omsluit, zorg dat het helemaal is op zijn plaats, en achter alle lipjes, zoals weergegeven in Fig 7a.
FIGUUR 7A
• Neem de bodemklep op en draai deze om zodat de zak eronder hangt. Plaats de bodemklepweer op het reinigingstoestel, maar let er op dat u de filterzak in het reinigingstoestel inbrengt.
ZORG ERVOOR DAT AL HET FILTERMATERIAAL ZICH BINNEN HET REINIGINGSTOESTEL BEVINDT ANDERS KAN DE KLEP NIET GOED WORDEN GESLOTEN EN VERGRENDELD
FIGUUR 7B
• Duw het achtergedeelte van de bodemklep in het reinigingstoestel, terwijl u de vergrendelklemmen naar de rand van het reinigingstoestel beweegt totdat u een klik hoort, zoals weergegeven in Fig. 7
FIGUUR 7C
• Draai de rode vergrendelklemmen tegen de richting van de pijlen in die op de bodemklep tussen de twee verhoogde vergrendelingen zijn aangebracht, als de bodemklep juist is geplaatst.
ONDERHOUD KABEL
In de loop van het gebruik van uw Nitro, kan het snoer gaan opkrullen. Sterk krullen kan ertoe leiden dat uw zwembad niet helemaal gereinigd wordt.
• Het snoer weer recht maken kan het beste met een natte kabel.
• Plaats het reinigingstoestel op de grond zoals hieronder weergegeven.
• Zorg voor voldoende vrije ruimte om het snoer in een rechte lijn uit te kunnen leggen.
• Trek aan de kabel zodat het van de grond vrijkomt.
• Rol de kabel met uw vingers in de richting tegengesteld als waarin het snoer is opgekruld.
• Draai de kabel op als hij recht is en berg hem op
DE KABEL OPSLAAN
• Wind de kabel losjes op, zoals hieronder weergegeven.
Bewaar het snoer in de buurt van hetreinigingstoestel. Maak een rol vanongeveer een halve meter van hetsnoer, zoals weergegeven.
Rol het snoer enigszins tegen dewijzers van de klok in op zodat devorm behouden blijft. ROL HETSNOER NIETSTRAK OM VOORWERPENHEEN.
Nadat de kabel op de juiste wijze isopgerold plaatst u deze op deoptionele caddie.
Als u geen caddie hebt, sla hetreinigingstoestel dan op in eenbeschermde omgevingwaar deze nietdoor weersinvloeden beschadigd kanworden.
WINTEROPSLAG
Als regelmatig temperaturen beneden 45 graden Fahrenheit (5 graden Celsius) voorkomenmoeten hetreinigigingstoestel en de netvoeding binnen worden opgeslagen
KLIK
Bestuur de kabel metuw vingers zodat dezekan ontrollen
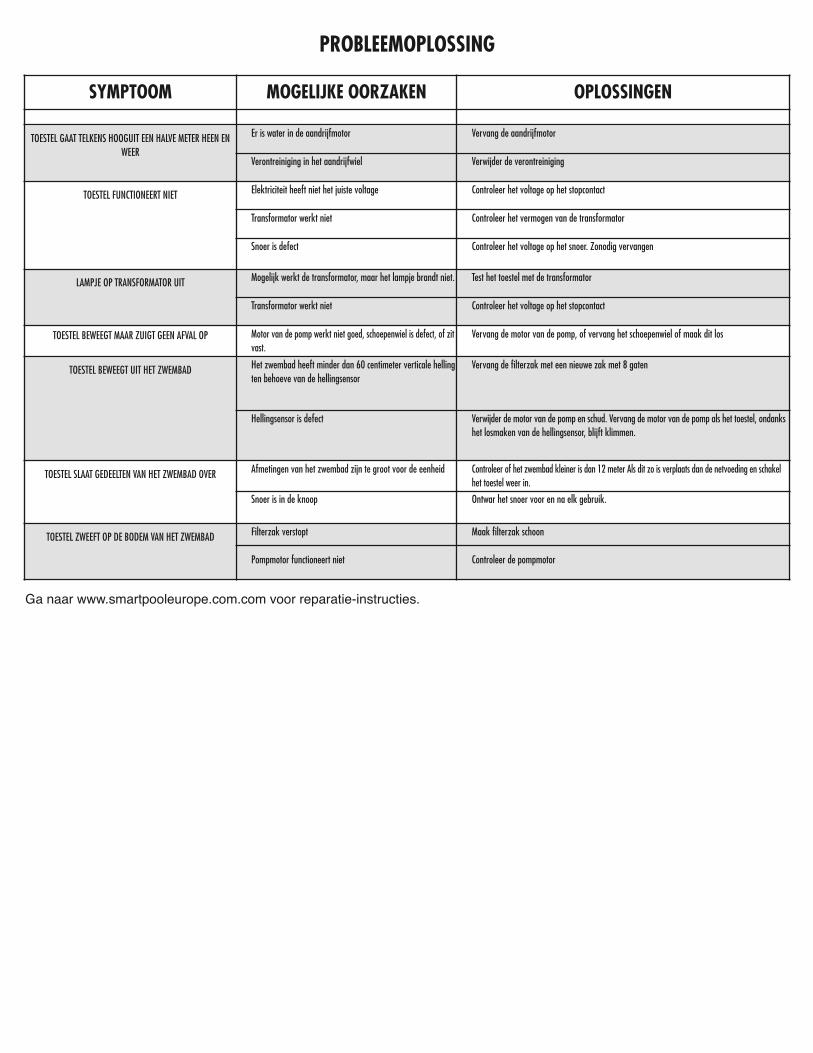
Ga naar www.smartpooleurope.com.com voor reparatie-instructies.
SYMPTOOM MOGELIJKE OORZAKEN OPLOSSINGEN
TOESTEL GAAT TELKENS HOOGUIT EEN HALVE METER HEEN ENWEER
Er is water in de aandrijfmotor Vervang de aandrijfmotor
Verontreiniging in het aandrijfwiel Verwijder de verontreiniging
TOESTEL FUNCTIONEERT NIET Elektriciteit heeft niet het juiste voltage Controleer het voltage op het stopcontact
Transformator werkt niet Controleer het vermogen van de transformator
Snoer is defect Controleer het voltage op het snoer. Zonodig vervangen
LAMPJE OP TRANSFORMATOR UIT Mogelijk werkt de transformator, maar het lampje brandt niet. Test het toestel met de transformator
Transformator werkt niet Controleer het voltage op het stopcontact
TOESTEL BEWEEGT MAAR ZUIGT GEEN AFVAL OP Motor van de pomp werkt niet goed, schoepenwiel is defect, of zit vast.
Vervang de motor van de pomp, of vervang het schoepenwiel of maak dit los
TOESTEL BEWEEGT UIT HET ZWEMBAD Het zwembad heeft minder dan 60 centimeter verticale helling ten behoeve van de hellingsensor
Vervang de filterzak met een nieuwe zak met 8 gaten
Hellingsensor is defect Verwijder de motor van de pomp en schud. Vervang de motor van de pomp als het toestel, ondanks het losmaken van de hellingsensor, blijft klimmen.
TOESTEL SLAAT GEDEELTEN VAN HET ZWEMBAD OVER Afmetingen van het zwembad zijn te groot voor de eenheid Controleer of het zwembad kleiner is dan 12 meter Als dit zo is verplaats dan de netvoeding en schakel het toestel weer in.
Snoer is in de knoop Ontwar het snoer voor en na elk gebruik.
TOESTEL ZWEEFT OP DE BODEM VAN HET ZWEMBAD Filterzak verstopt
Pompmotor functioneert niet
Maak filterzak schoon
Controleer de pompmotor
PROBLEEMOPLOSSING
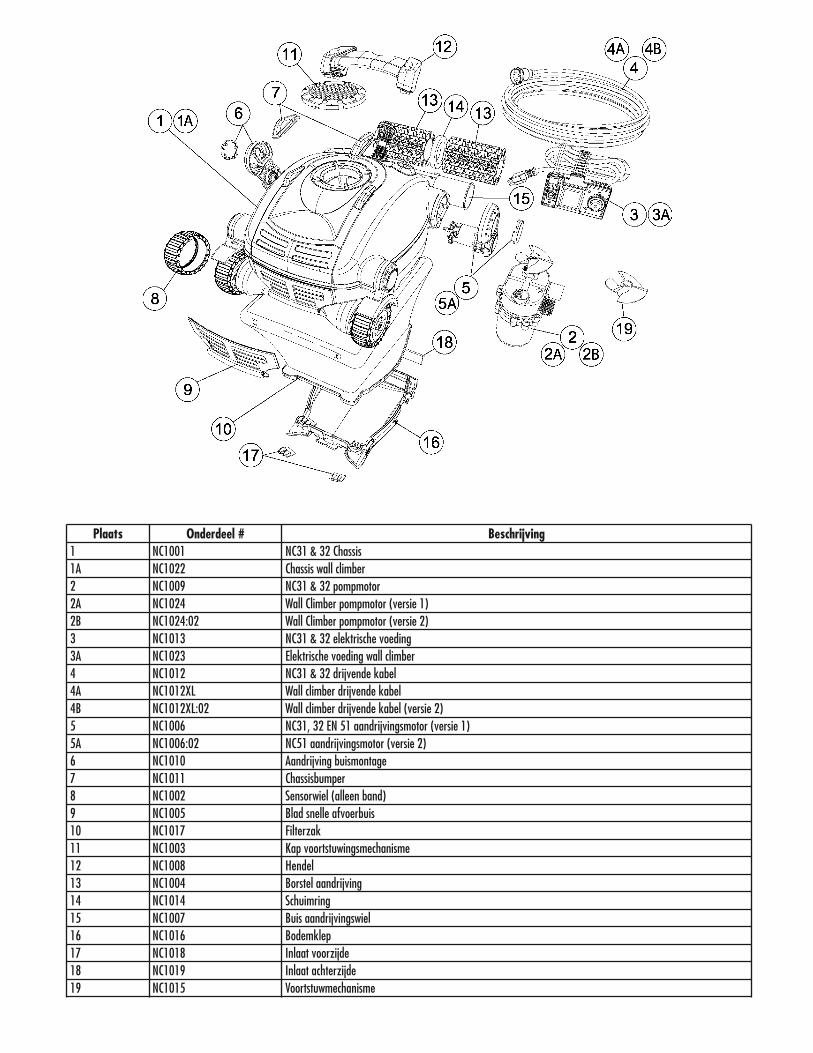
Plaats Onderdeel # Beschrijving1 NC1001 NC31 & 32 Chassis1A NC1022 Chassis wall climber2 NC1009 NC31 & 32 pompmotor2A NC1024 Wall Climber pompmotor (versie 1)2B NC1024:02 Wall Climber pompmotor (versie 2)3 NC1013 NC31 & 32 elektrische voeding3A NC1023 Elektrische voeding wall climber4 NC1012 NC31 & 32 drijvende kabel4A NC1012XL Wall climber drijvende kabel4B NC1012XL:02 Wall climber drijvende kabel (versie 2)5 NC1006 NC31, 32 EN 51 aandrijvingsmotor (versie 1)5A NC1006:02 NC51 aandrijvingsmotor (versie 2)6 NC1010 Aandrijving buismontage7 NC1011 Chassisbumper8 NC1002 Sensorwiel (alleen band)9 NC1005 Blad snelle afvoerbuis10 NC1017 Filterzak11 NC1003 Kap voortstuwingsmechanisme12 NC1008 Hendel13 NC1004 Borstel aandrijving14 NC1014 Schuimring15 NC1007 Buis aandrijvingswiel16 NC1016 Bodemklep17 NC1018 Inlaat voorzijde18 NC1019 Inlaat achterzijde19 NC1015 Voortstuwmechanisme
NC32EUB E P E R K T E G A R A N T I E
Nitro is gemaakt, getest en geïnspecteerd conform de zorgvuldig bepaalde technischevereisten. Mits op normale wijze gebruikt en onderhouden en conform het bepaalde uit deonderstaande aanwijzingen, voorwaarden en beperkingen is dit product gegarandeerd vrijvan materiaal- en productiefouten.
Deze garantie wordt verleend aan de eerste gebruiker/koper en is geldig tot 12 maandenna de aankoopdatum.
Deze garantie dekt uitsluitend het gewone en verantwoorde gebruik van de Nitro.Beschadigingen, defecten, slechte werking en andere operationele fouten, ontstaan alsgevolg van het gebruik van het apparaat zonder de originele transformator of wegens hetniet volgen van de instructies uit de handleiding, inclusief gevallen wanneer de koperverzuimd heeft om het product van een redelijk en noodzakelijk onderhoud te voorzien,maken deze garantie ongeldig. Beschadigingen, defecten, slechte werking en andereoperationele fouten ontstaan als gevolg of in verband met de reparaties uitgevoerd dooreen andere onderhoudsmonteur dan de bevoegde onderhoudsvertegenwoordiger vanSMARTPOOL zullen niet worden gedekt.
De garantieverplichtingen van SMARTPOOL beperken zich tot reparatie of vervanging vanhet product of van zijn defecte onderdeel, hetgeen uiteindelijk door SMARTPOOL bepaaldmag worden. SMARTPOOL is bevoegd om dergelijke reparatie of vervanging van eendefect onderdeel te verrichten door gebruik te maken van eerder gerepareerde onderdelenen/of apparaten. SMARTPOOL kan nimmer en voor geen enkel bedrag verantwoordelijk ofaansprakelijk worden gesteld voor indirecte of bijkomende schade, persoonlijke letsels ofschade aan eigendommen ontstaan als gevolg van of in verband met het gebruik van hetproduct, of voor inkomstenverlies en andere kosten van welke aard dan ook.
SMARTPOOL GEEFT NOG WEIGERT GEEN ENKELE GARANTIE, UITDRUKKELIJKEOF IMPLICIETE, DIE BETREKKING ZOU HEBBEN OP DE VERKOOPMOGELIJKHEDEN,GESCHIKTHEID VOOR EEN BEPAALD DOEL OF ANDERSZINS, ANDERS DAN DEGARANTIE DIE HIERIN SPECIFIEK VERMELD WORDT. GEEN ENKELE PERSOON,ONDERNEMING OF BEDRIJF IS BEVOEGD OM NAMENS OF TEN BEHOEVE VANSMARTPOOL DIENSTEN TE WEIGEREN OF VERPLICHTINGEN OP ZICH TE NEMENDIE HIERIN NIET VERMELD ZIJN. DE ONDERSTEUNING VERMELD IN DEZEGARANTIEVERKLARING DIENT TE WORDEN OPGEVAT ALS ENIGE MOGELIJKEONDERSTEUNING DIE AAN DE KOPER VERLEEND WORDT. DEZEGARANTIEVERKLARING VORMT DERHALVE EEN VOLLEDIG OVEREENKOMSTTUSSEN SMARTPOOL EN DE KOPER. IN DEZE GARANTIEVERKLARING WORDENSLECHTS DE VERPLICHTINGEN VAN SMARTPOOL JEGENS DIT PRODUCTUITEENGEZET EN BESTAAN ER VERDER GEEN ANDERE GARANTIES DIE VERDERZOUDEN GAAN DAN DEZE OMSCHREVEN IN AANVANG VAN DEZE VERKLARING.
Voor het verkrijgen van de in de garantie omschreven diensten neem contact op met dewinkel waar u uw Nitro heft aangeschaft. Nadat de winkel hiermee ingestemd heeft brengde op een adequate wijze ingepakte Nitro naar de locatie aanbevolen door de winkel.Vergeet niet een kopie van de factuur met daarin de aankoopdatum bij uw Nitro bij tesluiten als ook het serienummer en de beschrijving van het probleem.
WAARSCHUWING:Bepaalde binnenzeilen in vinyl zijn gevoeliger voor oppervlakteslijtage of vervaging van hetversierpatroon veroorzaakt door voorwerpen zoals borstels, drijvende voorwerpen, speelgoed,chloordispensers en zwembadrobotten die met de vinyloppervlakte in contact komen. Aan dezeversierpatronen kunnen zichtbare krassen of overmatige schuring ontstaan puur door met eenborstel over de zeiloppervlakte te gaan wrijven. De verf waarmee het versierpatroon is beschilderdkan eveneens vervagen indien deze in contact komt met de voorwerpen in het zwembad.SMARTPOOL neemt geen enkele verantwoordelijkheid op zich voor mogelijke vervaging van hetversierpatroon, afschuring, vlekken op of schade aan de binnenzeilen in vinyl, noch wordt dergelijkeschade gedekt door deze beperkte garantie.

www.smartpooleurope.com • [email protected]