Embed Size (px)
Citation preview
IN USE/CONDUCTOR
LINK/ACTIVITY
tm
Obtaining Other Language Versions: To obtain information in another language about the use of this product, please contact your local Crown Distributor. If you need assistance locating your local distributor, please contact Crown at 574-294-8000.
This manual does not include all of the details of design, production, or variations of the equipment. Nor does it cover every possible situation which may arise during installation, operation or maintenance. If special assistance is needed beyond the scope of this manual, please contact the Crown Technical Support Group.
The information provided in this manual was deemed accurate as of the publication date. However, updates to this information may have occurred. To obtain the latest version of this manual, please visit the Crown website at www.crownaudio.com.
Trademark Notice: Crown, Crown Audio, Amcron, Com-Tech, Macro-Tech, IQ and IQ System are registered trademarks of Crown International. TCP/IQ, SmartAmp, IQ2, PIP and PIP2 are trademarks of Crown International. HiQnet is a trademark of Harman International Industries, Inc. Other trademarks are the property of their respective owners.
Some models may be exported under the name Amcron.®
©2008 by Crown Audio® Inc., 1718 W. Mishawaka Rd., Elkhart, Indiana 46517-9439 U.S.A. Telephone: 574-294-8000
136763-6 4/08
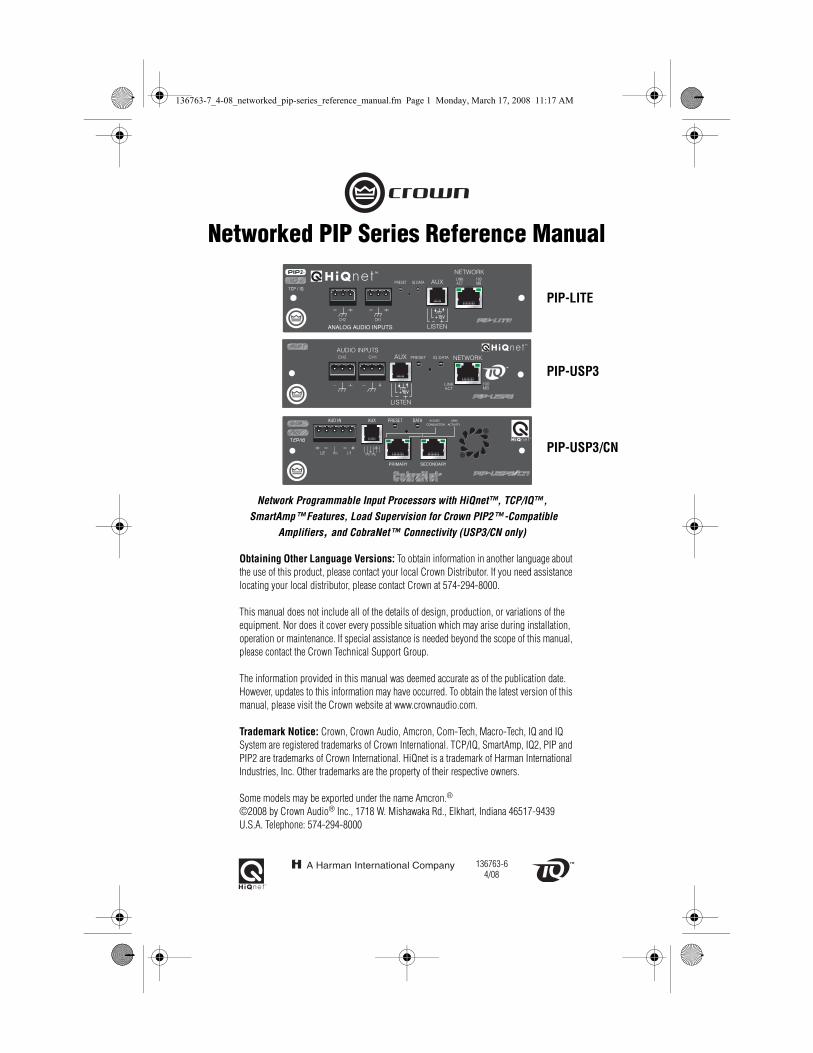
Network Programmable Input Processors with HiQnet™, TCP/IQ™, SmartAmp™Features, Load Supervision for Crown PIP2™-Compatible
Amplifiers, and CobraNet™ Connectivity (USP3/CN only)
Networked PIP Series Reference Manual
ANALOG AUDIO INPUTS
TCP / IQ
PIP-LITE
PIP-USP3
PIP-USP3/CN
136763-7_4-08_networked_pip-series_reference_manual.fm Page 1 Monday, March 17, 2008 11:17 AM

Networked PIP Series
page 2 Reference Manual
Crown Technical Support1718 W. Mishawaka Rd., Elkhart, Indiana 46517-9439 U.S.A.
Phone: 800-342-6939 (North America, Puerto Rico and Virgin Islands) or 574-294-8200Fax: 574-294-8301 Internet: http://www.crownaudio.com
FCC COMPLIANCE NOTICEThis device complies with part 15 of the FCC rules. Operation is subject to the following two conditions: (1) This device may not cause harmful interference, and (2) this device must accept any interference received, including interference that may cause undesired operation.
CAUTION: Changes or modifications not expressly approved by the party responsible for complicance could void the user’s authority to operate the euqipment.
NOTE: This equipment has been tested and found to comply with the limits for a Class B digital device, pursuant to part 15 of the FCC Rules. These limits are designed to provide reasonable protection against harmful interference in a residential installation. This equipment generates, uses, and can radiate radio frequency energy and, if not installed and used in accordance with the instruction manual, may cause harmful interference to radio communications. However, there is no guarantee that interference will not occur in a particular installation. If this equipment does cause harmful interference to radio or televi-sion reception, which can be determined by turning the equipment off and on, the user is encouraged to try to correct the interference by one or more of the following measures:
• Reorient or relocate the receiving antenna.• Increase the separation between the equipment and receiver.• Connect the equipment into an outlet on a circuit different from that to which the
receiver is connected.• Consult the dealer or an experienced radio/TV technician for help.
WARNINGTO REDUCE THE RISK OF ELECTRIC SHOCK, DO NOT EXPOSE THIS EQUIPMENT TO RAIN OR MOISTURE!
WATCH FOR THESE SYMBOLS. The exclamation point triangle is used to alert the user to important operating or maintenance instructions.
The lightning bolt triangle is used to alert the user to the risk of electric shock.
This product complies with CISPR22 Emissions standard, EN55103-1 Emissions standard, and EN55103-2 Immunity standard.
136763-7_4-08_networked_pip-series_reference_manual.fm Page 2 Monday, March 17, 2008 11:17 AM

page 3Reference Manual
Networked PIP Series
DECLARATION of CONFORMITY
Crown Audio, Inc.1718 W. Mishawaka Rd.Elkhart, IN 46517 U.S.A.
EMC Standards:EN 55103-1:1995 Electromagnetic Compatibility – Product Family Standard for Audio, Video, Audio-Visual and Entertainment Lighting Control Apparatus for Professional Use, Part 1: EmissionsEN 55103-1:1995 Magnetic Field Emissions-Annex A @ 10 cm and 1 MEN 61000-3-3:1995 Limitation of Voltage Fluctuations and Flicker in Low-Voltage Supply Systems Rated Current ≤16AEN 55022:1992 + A1:1995 & A2:1997 Limits and Methods of Measurement of Radio Disturbance Characteristics of ITE: Radiated, Class B Limits; Conducted, Class BEN 55103-2:1996 Electromagnetic Compatibility – Product Family Standard for Audio, Video, Audio-Visual and Entertainment Lighting Control Apparatus for Professional Use, Part 2: ImmunityEN 61000-4-2:1995 Electrostatic Discharge Immunity (Environment E2-Criteria B, 4k V Contact, 8k V Air Discharge)EN 61000-4-3:1996 Radiated, Radio-Frequency, Electromagnetic Immunity (Environment E2, criteria A) EN 61000-4-4:1995 Electrical Fast Transient/Burst Immunity (Criteria B)EN 61000-4-5:1995 Surge Immunity (Criteria B) EN 61000-4-6:1996 Immunity to Conducted Disturbances Induced by Radio-Frequency Fields(Criteria A)EN 61000-4-11:1994 Voltage Dips, Short Interruptions and Voltage Variation
Safety Standard:EN 60065: 1998 Safety Requirements – Audio Video and Similar Electronic Apparatus
European Representative’s Name and Address:David Budge10 Harvest CloseYateley GU46 6YSUnited Kingdom
Equipment Type: Control System ComponentsFamily Name: PIPModel Name: PIP-Lite, PIP-USP3, PIP-USP3/CN
Signed
Larry Coburn
Date of Issue: October 1, 2002
I certify that the product identified above conforms to the requirements of the EMC Council Directive 89/335/EEC as amended by 92/31/EEC, and the Low Voltage Directive 73/23/EES as amended by 93/68/EEC.
Susan [email protected]
Title: Senior Vice President of Manufacturing
FOR COMPLIANCE QUESTIONS ONLY:
136763-7_4-08_networked_pip-series_reference_manual.fm Page 3 Monday, March 17, 2008 11:17 AM
Networked PIP Series
page 4 Reference Manual
Quick Install ProcedureThis procedure is provided for those who would like to install the PIP card in the shortest time possible and are already familiar with Crown’s IQ System® or Harman Pro System Architect and HiQnet or TCP/IQ. Less experienced installers or those wishing a full explanation of the installa-tion procedure are encouraged to go to Section 3 where the full installation procedure is described.
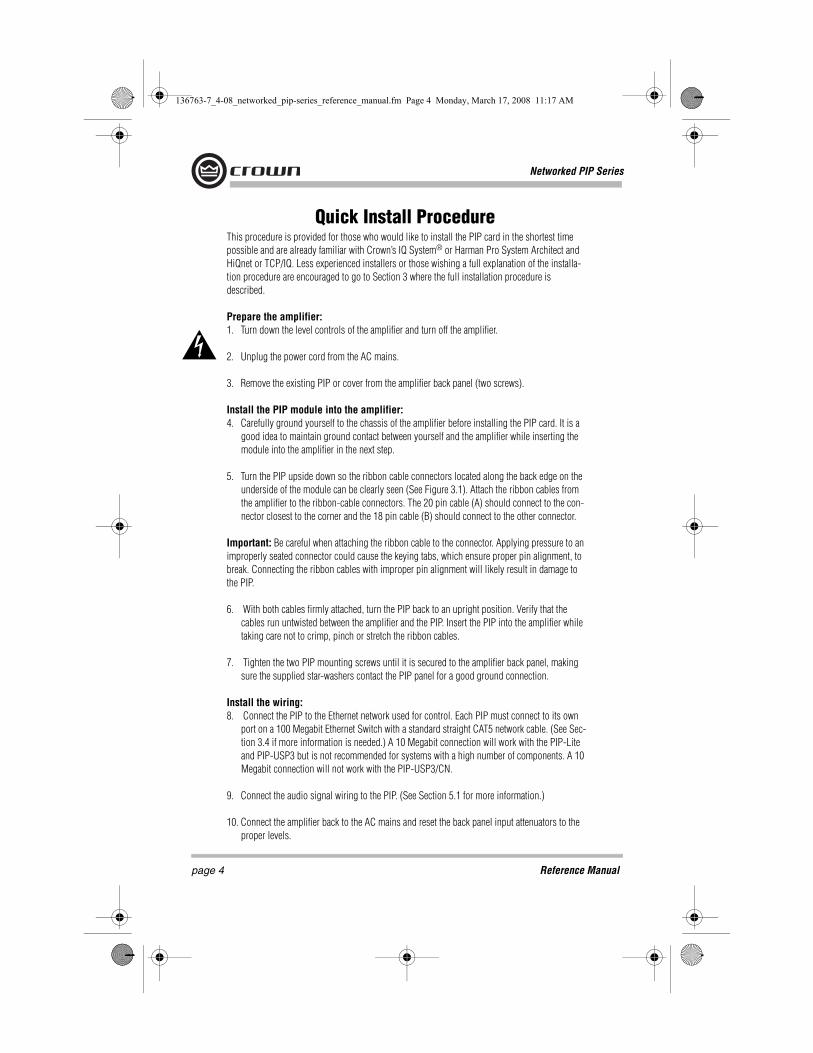
Prepare the amplifier:1. Turn down the level controls of the amplifier and turn off the amplifier.
2. Unplug the power cord from the AC mains.
3. Remove the existing PIP or cover from the amplifier back panel (two screws).
Install the PIP module into the amplifier:4. Carefully ground yourself to the chassis of the amplifier before installing the PIP card. It is a
good idea to maintain ground contact between yourself and the amplifier while inserting the module into the amplifier in the next step.
5. Turn the PIP upside down so the ribbon cable connectors located along the back edge on the underside of the module can be clearly seen (See Figure 3.1). Attach the ribbon cables from the amplifier to the ribbon-cable connectors. The 20 pin cable (A) should connect to the con-nector closest to the corner and the 18 pin cable (B) should connect to the other connector.
Important: Be careful when attaching the ribbon cable to the connector. Applying pressure to an improperly seated connector could cause the keying tabs, which ensure proper pin alignment, to break. Connecting the ribbon cables with improper pin alignment will likely result in damage to the PIP.
6. With both cables firmly attached, turn the PIP back to an upright position. Verify that the cables run untwisted between the amplifier and the PIP. Insert the PIP into the amplifier while taking care not to crimp, pinch or stretch the ribbon cables.
7. Tighten the two PIP mounting screws until it is secured to the amplifier back panel, making sure the supplied star-washers contact the PIP panel for a good ground connection.
Install the wiring:8. Connect the PIP to the Ethernet network used for control. Each PIP must connect to its own
port on a 100 Megabit Ethernet Switch with a standard straight CAT5 network cable. (See Sec-tion 3.4 if more information is needed.) A 10 Megabit connection will work with the PIP-Lite and PIP-USP3 but is not recommended for systems with a high number of components. A 10 Megabit connection will not work with the PIP-USP3/CN.
9. Connect the audio signal wiring to the PIP. (See Section 5.1 for more information.)
10. Connect the amplifier back to the AC mains and reset the back panel input attenuators to the proper levels.
136763-7_4-08_networked_pip-series_reference_manual.fm Page 4 Monday, March 17, 2008 11:17 AM

page 5Reference Manual
Networked PIP Series
Table of Contents
FCC Compliance Notice .............................................................. 2Declaration of Conformity ............................................................ 3Quick Install Procedure ................................................................ 4Illustrations .................................................................................. 71 Welcome ..................................................... 9 1.1 Unpacking ........................................................................ 10 1.2 How to Use This Manual ................................................... 102 Controls, Indicators and Connectors ..................... 11 2.1 PIP-Lite................................................................... 11 2.2 PIP-USP3................................................................ 12 2.3 PIP-USP3/CN.......................................................... 133 Installation .................................................. 14 3.1 Prepare the PIP ................................................................. 14 3.2 Prepare the Amplifier ........................................................ 14 3.3 Install the PIP Into the Amplifier ....................................... 15 3.4 Install the Wiring .............................................................. 16 3.4.1 Wiring Rules.............................................................. 16 3.4.2 Wiring Instructions .................................................... 174 How to Set Up TCP/IP....................................... 19 4.1. Introduction ...................................................................... 19 4.1.1 Glossary .................................................................... 19 4.2 TCP/IP Addressing Rules .................................................. 21 4.3 Network Setup Wizard ................................................. 225 Operation .................................................... 24 5.1 Hardware ........................................................................... 26 5.1.1 Data Indicator ........................................................... 26 5.1.2 Preset Indicator ......................................................... 26 5.1.3 Network Connector ................................................... 26 5.1.4 Link/Activity Indicator ............................................... 26 5.1.5 100 Mb Indicator (PIP-Lite, USP3 only) ................... 26 5.1.6 CobraNet Connectors (USP3/CN only)...................... 26 5.1.7 CobraNet In-use/Conductor Indicator (USP3/CN only) ......................................................... 27 5.1.8 Balanced Audio Inputs .............................................. 27 5.1.9 Aux Input/Output Connector ..................................... 27 5.1.10 Listen Bus or Foldback ............................................ 28 5.1.11 Preset/Reset Switch ................................................ 28 5.2 Features of All Three Modules ........................................... 29 5.2.1 User Presets ............................................................. 29 5.2.2 Clip Event Monitor .................................................... 29 5.2.3 Input Signal Level Monitor ....................................... 29 5.2.4 Output Signal Level Monitor ..................................... 29
136763-7_4-08_networked_pip-series_reference_manual.fm Page 5 Monday, March 17, 2008 11:17 AM

Networked PIP Series
page 6 Reference Manual
Table of Contents (continued)
5.2.5 Thermal Headroom Level Monitor ............................ 29 5.2.6 Power/Standby Control ............................................. 29 5.2.7 Signal Mute .............................................................. 29 5.2.8 Polarity Inverter ....................................................... 30 5.2.9 Input Signal Fader .................................................... 30 5.2.10 Dynamic Gain Monitors (Ghost Faders) .................. 30 5.2.11 Amplifier Information .............................................. 30 5.2.12 User and Channel Labels ........................................ 30 5.2.13 Amplifier Mode ....................................................... 30 5.2.14 Amplifier Output Mode ........................................... 30 5.2.15 Line Voltage Monitor .............................................. 30 5.2.16 Error Reporting ....................................................... 30 5.2.17 Auto Standby .......................................................... 31 5.2.18 Input Signal Compressor/Limiter ............................ 32 5.2.19 Peak Voltage Limiter ............................................... 32 5.2.20 Average Power Limiter ............................................ 33 5.2.21 Clip Eliminator ........................................................ 33 5.2.22 Thermal Limiter ...................................................... 33 5.2.23 Limiter Tie .............................................................. 33 5.2.24 Load Supervision ................................................... 34 5.2.25 Typical Load Characteristics .................................... 35 5.3 PIP-USP3 and PIP-USP3/CN Features.............................. 36 5.3.1 Input Signal Router .................................................... 36 5.3.2 Filters ....................................................................... 36 5.3.3 Delay .......................................................................... 36 5.3.4 Noise Generator ......................................................... 37 5.3.5 Sine-wave Generator .................................................. 37 5.3.6 SLM (System and Load Monitoring) Tab of the Control Panel ............................................. 37 5.4 PIP-USP3/CN Features...................................................... 42 5.4.1 Input Signal Router .................................................... 42 5.5 CobraNet (PIP-USP3/CN only)......................................... 42 5.5.1 CobraNet Module Parameters ................................... 42 5.5.2 CobraNet Input Routing ............................................ 43 5.5.3 CobraNet Output Routing .......................................... 44
136763-7_4-08_networked_pip-series_reference_manual.fm Page 6 Monday, March 17, 2008 11:17 AM

page 7Reference Manual
Networked PIP Series
6 Audio Signal Wiring and Network Basics ................ 45 6.1 A Closer Look at Audio Signal Wiring .................................45 6.2 Network Basics ....................................................................46 6.3 A Closer Look at CobraNet (PIP-USP3./CN only)................49 6.3.1 Fast Ethernet ...............................................................49 6.3.2 Audio Specs ...............................................................50 6.3.3 Bundles and Audio Channels.......................................50 6.3.4 The Conductor ............................................................51 6.3.5 Repeater Networks ......................................................51 6.3.6 Switched Networks .....................................................527 Advanced Features and Options ........................... 53 7.1 Using the AUX Connector ...................................................53 7.1.1 AUX Output .................................................................53 7.1.2 AUX Input ...................................................................54 7.1.3 Listen Bus Wiring ........................................................558 Specifications ............................................... 569 Using the PIP-Lite with the PIP-USP2 Adapter .......... 5810 Troubleshooting............................................. 6011 Service ....................................................... 62 11.1 International and Canada Service......................................62 11.2 US Service .......................................................................62 11.2.1 Factory Service ........................................................62 11.2.2 Factory Service Shipping Instructions ......................62 11.2.3 Packing Instructions .................................................63 11.2.4 Estimate Approval.....................................................63 11.2.5 Payment of Non-Warranty Repairs ............................6312 Warranty .................................................... 64Factory Service Information Form ..................................................67
Illustrations
1.1 PIP Series Modules ..................................................................92.1 PIP-Lite Front Panel Controls, Indicators and Connectors........112.2 Pass the CAT5 Cable Twice Through the Supplied Ferrite Core 112.3 PIP-USP3 Front Panel Controls, Indicators and Connectors ..............................................................................122.4 PIP-USP3/CN Front Panel Controls, Indicators and Connectors ..............................................................................133.1 Installing the PIP into the Amplifier .........................................153.2 Network Wiring.........................................................................17
Table of Contents (continued)
136763-7_4-08_networked_pip-series_reference_manual.fm Page 7 Monday, March 17, 2008 11:17 AM

Networked PIP Series
page 8 Reference Manual
Illustrations (continued)
5.1 PIP-Lite Signal Flow Block Diagram .......................................245.2 PIP-USP3 and PIP-USP3/CN Signal Flow Block Diagram .................................................................................255.3 SLM Tab of the Control Panel .................................................375.4 Typical Impedance Test Plot of Full-Range Speaker ................405.5 Frequency Response of Amplifier and DSP in dBu..................415.6 Impedance Plot and Frequency Response Plot........................416.1 Input Wiring for the PIP-Lite and PIP-USP3 ...........................456.2 Input Wiring for the PIP-USP3/CN..........................................456.3 A TCP/IP Network ..................................................................466.4 Multiple-Network Communications Via an IP Router ..............486.5 Star Network Topology ...........................................................496.6 Multi-Star Topology ...............................................................507.1 AUX Output Control of a Relay ...............................................537.2 Wiring a Remote Preset Selector ............................................547.3 Listen Bus Wiring....................................................................559.1 “General” Tab Showing Indentification of PIP-USP2 Adapter ...................................................................................59
136763-7_4-08_networked_pip-series_reference_manual.fm Page 8 Monday, March 17, 2008 11:17 AM

page 9Reference Manual
Networked PIP Series
*A PIP2-compatible amplifier is necessary to use these PIP modules. To determine if the amplifier is PIP2 compatible, look for the logo on the back of the amplifier. These PIPs are NOT compatible with older Crown PIP amplifiers (except the PIP-Lite if a USP2 adapter is first installed in the amplifier. See Section 9 for more detail on the USP2 adapter.)1Note that the PIP-Lite and PIP-USP3 cannot receive or transmit CobraNet audio. Please use the PIP-USP3/CN if this function is desired.
1 Welcome
The Crown® Networked PIP™ series includes the PIP-Lite, PIP-USP3, and PIP-USP3/CN. Each PIP (Programmable Input Processor) is a module for a PIP2™ com-patible amplifier.* The module connects the amplifier to a 100 Mb Ethernet network allow-ing it to be remotely controlled and monitored via System Architect or IQwic software.
Each PIP is a network component and connects to the audio control/monitor network using standard 100Mb Ethernet hardware. This provides faster communications with HiQnet or TCP/IQ than the previous current loop, IQ® bus, connectivity method. With this protocol, a large (or small) system can be interconnected using standard off-the shelf 100 Mb Ethernet components (switches, Network Interface Cards, and cables). All the PIPs can also be con-nected to the same network used to pass CobraNet audio.1
The audio path in the PIP-Lite is processed totally in the analog domain without the inher-ent noise induced by analog-to-digital conversions. While DSP-type functions are not included with this type of architecture, the standard SmartAmp™ features are. These fea-tures include level control, input compressors, multimode output limiters, error reporting and load monitoring. The enhanced AUX port capability allows the user to interface with the amplifier to provide external manual control and monitoring.
The Crown PIP-USP3 and PIP-USP3/CN include the same SmartAmp features as the PIP-Lite. In addition, the USP3 and USP3/CN are 3rd generation DSP-based PIPs.Their SHARC DSP processor gives the user an enormous amount of digital signal process-ing. Audio routing, faders, meters, polarity & mute, input compressors, filters, multimode output limiters, error reporting, and load monitoring are all available. A built in noise gen-erator and sine-wave generator provide noise masking and test capabilities. In addition, the PIP-USP3/CN allows the transport of real-time digital audio via CobraNet™ over the same 100Mb Ethernet network, providing a simple to install, single-plug solution for full-band-width audio distribution, control, and monitoring.
Figure 1.1PIP Series Modules
IN USE/CONDUCTOR
LINK/ACTIVITY
tm
ANALOG AUDIO INPUTS
TCP / IQ PIP-LiteAnalog
PIP-USP3DSP-based
PIP-USP3/CNDSP-basedWorks with CobraNet
136763-7_4-08_networked_pip-series_reference_manual.fm Page 9 Monday, March 17, 2008 11:17 AM

Networked PIP Series
page 10 Reference Manual
1.1 Unpacking
The unit is shipped in a protective antistatic bag. CAUTION: STATIC ELECTRICITY MAY DAMAGE THE UNIT. Use caution when handling the unit. Carefully ground your-self BEFORE touching the unit. Avoided unnecessary touching the components or solder pads on the circuit board. It is best to handle the unit by its front panel only.
Please unpack and inspect the unit for damage that may have occurred during transit. If damage is found, notify the transportation company immediately. Only the consignee may initiate a claim with the carrier for shipping damage. Crown will be happy to cooperate fully as needed. Save the shipping carton as evidence of damage for the shipper's inspection. Even if the unit arrived in perfect condition, as most do, save all the packing materials. NEVER SHIP THE UNIT WITHOUT THE FACTORY PACK.
1.2 How to Use This Manual
This manual provides you with the necessary information to safely and correctly set up and operate your amplifier accessory. It does not cover every aspect of installation, setup or operation that might occur under every condition. For additional information, please con-sult Crown Tech Support, your system installer or retailer.
We strongly recommend that you read all instructions, warnings and cautions contained in this manual. Also, for your protection, please send in your warranty registration card today, or register online at www.crownaudio.com. And save your bill of sale – it’s your official proof of purchase.
136763-7_4-08_networked_pip-series_reference_manual.fm Page 10 Monday, March 17, 2008 11:17 AM

page 11Reference Manual
Networked PIP Series
2 Controls, Indicators and Connectors
Figure 2.1 PIP-Lite Front Panel Controls, Indicators and Connectors(Note: Actual Product Artwork May Vary Slightly)
ANALOG AUDIO INPUTS
TCP / IQ
A. Balanced Audio Input Connectors3-pin removable barrier-strip connectors, one per channel.
B. Preset IndicatorSignals the number of the current preset, if active, by flashing a series of flashes equal to the current preset number. See Section 4.1.2.
C. Reset/Preset SwitchUsed to change presets, restore settings to factory default or restore all the presets to the factory defaults. During operations of the switch, the Data indicator flashes as an aid to the user. See Section 4.1.11.
D. Data IndicatorFlashes when the PIP-Lite receives a valid command that is addressed to the PIP-Lite. See Section 4.1.1.
E. AUX ConnectorAUX input, AUX output, and Listen Bus. See Section 6.1.
F. Network ConnectorThe network connector is a standard RJ-45 connector that allows the PIP-Lite to connect to an Ethernet network. Connection is made using a standard Category 5 or better cable to a network switch port. For compliance with emission regulations, the supplied ferrite core must be placed on the CAT5 cable, with the cable making two passes through the core as shown in Figure 2.2. The Link Activity LED indicates data activity on the network line. The 100 MB LED indicates that the data is at 100 Megabits. See Section 4.1.3.
G. Mounting Holes
2.1 PIP-Lite
Figure 2.2 Pass the CAT5 Cable Twice Through the
Supplied Ferrite Core
136763-7_4-08_networked_pip-series_reference_manual.fm Page 11 Monday, March 17, 2008 11:17 AM

Networked PIP Series
page 12 Reference Manual
2.2 PIP-USP3
Figure 2.3 PIP-USP3 Front Panel Controls, Indicators and Connectors(Note: Actual Product Artwork May Vary Slightly)
Please refer to Figure 2.3.
A Balanced Audio Input Connector3-pin removable barrier strip connector for each audio channel.B. AUX ConnectorAUX input, AUX output, and Listen Bus. C. Preset IndicatorSignals the number of the current preset, if active, by flashing a series of flashes equal to the current preset number. See Section 4.1.2.D. Reset/Preset SwitchUsed to change presets, restore settings to factory default or restore all the presets to the factory defaults. During operations of the switch, the Data indicator flashes as an aid to the user. See Section 4.1.11.E. Data IndicatorFlashes when the PIP-USP3 receives a valid command that is addressed to the PIP-USP3. See Section 4.1.1.F. Network ConnectorThe network connector is a standard RJ-45 connector that allows the PIP-USP3 to connect to an Ethernet network. Connection is made using a standard Category 5 cable to a network switch port. The Link Activity LED indicates data activity on the network line. The 100 MB LED indicates that the data is at 100 Megabits. See Section 4.1.3.G. Mounting Holes
136763-7_4-08_networked_pip-series_reference_manual.fm Page 12 Monday, March 17, 2008 11:17 AM
page 13Reference Manual
Networked PIP Series
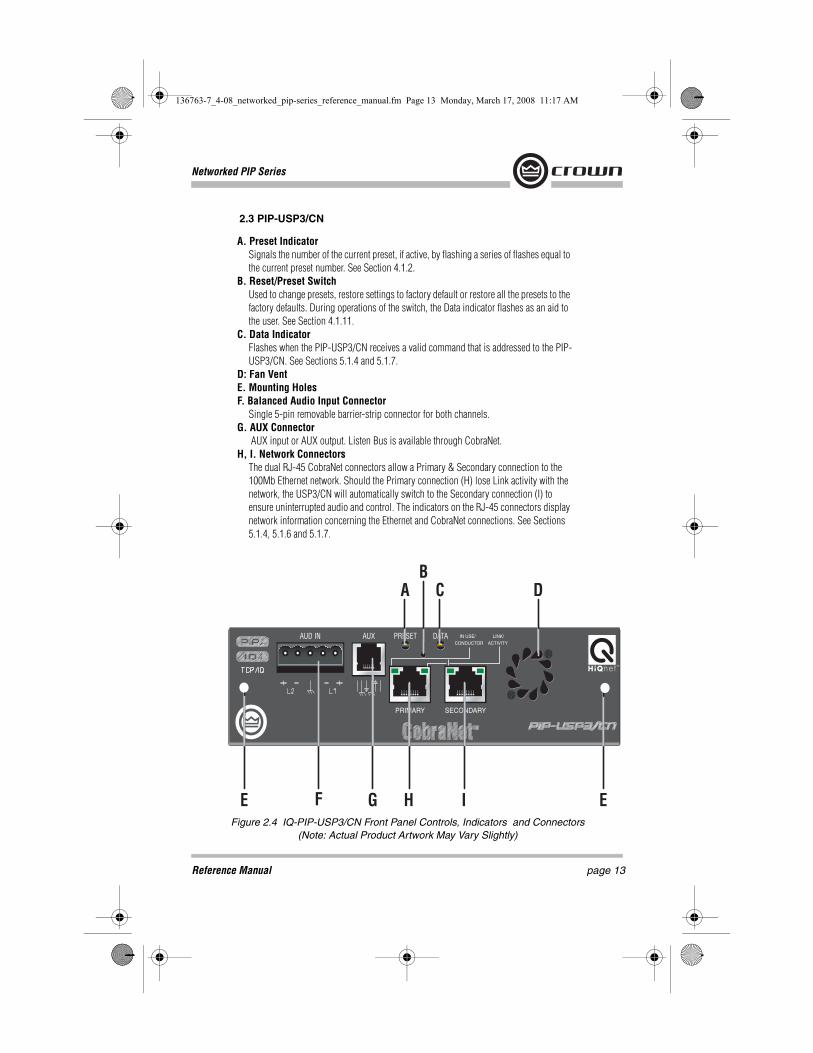
2.3 PIP-USP3/CN
Figure 2.4 IQ-PIP-USP3/CN Front Panel Controls, Indicators and Connectors(Note: Actual Product Artwork May Vary Slightly)
A. Preset IndicatorSignals the number of the current preset, if active, by flashing a series of flashes equal to the current preset number. See Section 4.1.2.
B. Reset/Preset SwitchUsed to change presets, restore settings to factory default or restore all the presets to the factory defaults. During operations of the switch, the Data indicator flashes as an aid to the user. See Section 4.1.11.
C. Data IndicatorFlashes when the PIP-USP3/CN receives a valid command that is addressed to the PIP-USP3/CN. See Sections 5.1.4 and 5.1.7.
D: Fan VentE. Mounting HolesF. Balanced Audio Input Connector
Single 5-pin removable barrier-strip connector for both channels.G. AUX Connector
AUX input or AUX output. Listen Bus is available through CobraNet.H, I. Network Connectors
The dual RJ-45 CobraNet connectors allow a Primary & Secondary connection to the 100Mb Ethernet network. Should the Primary connection (H) lose Link activity with the network, the USP3/CN will automatically switch to the Secondary connection (I) to ensure uninterrupted audio and control. The indicators on the RJ-45 connectors display network information concerning the Ethernet and CobraNet connections. See Sections 5.1.4, 5.1.6 and 5.1.7.
IN USE/CONDUCTOR
LINK/ACTIVITY
tm
136763-7_4-08_networked_pip-series_reference_manual.fm Page 13 Monday, March 17, 2008 11:17 AM

Networked PIP Series
page 14 Reference Manual
3 InstallationBefore beginning, please carefully note:
CAUTION: STATIC ELECTRICITY MAY DAMAGE THE UNIT. Use caution when han-dling the unit. Carefully ground yourself BEFORE touching the unit. Avoided unnecessary touching the components or solder pads on the circuit board. It is best to handle the unit by its front panel only.
3.1 Prepare the PIP
The PIP comes ready to install in the amplifier. This unit does not require setting the “IQ address” as the older current loop, Crown bus, units did. Each PIP (as well as all network components) comes preprogrammed with a unique network (MAC) address. The IQ or HiQ-net address is then set (automatically or manually) via the IQwic or SystemArchitect control software. (Also you will set a TCP/IP network address.)
3.2 Prepare the Amplifier
Turn down the amplifier level controls (full counterclockwise) and turn off the amplifier.
Disconnect the amplifier's power cord.
Remove the existing PIP module from the amplifier back panel (two screws). This may involve disconnecting the PIP module from a PIP2 input adapter. If a PIP2 input adapter is present, remove ribbon cables from the adapter.
136763-7_4-08_networked_pip-series_reference_manual.fm Page 14 Monday, March 17, 2008 11:17 AM

page 15Reference Manual
Networked PIP Series
3.3 Install the PIP Into the AmplifierCarefully ground yourself to the chassis of the amplifier before installing the PIP. It is a good idea to maintain ground contact between yourself and the amplifier while inserting the module into the amplifier.
Connect the PIP module to the amplifier.1. Turn the PIP module upside down so the ribbon
cable connectors located along the back edge on the underside of the module can be clearly seen (See Figure 3.1)
2. Attach the ribbon cables from the amplifier to the ribbon-cable connectors. The 20-pin cable (A) should connect to the connector closest to the corner and the 18 pin cable (B) should connect to the other connector.
Important: Be careful when attaching the ribbon cable to the connector. Don’t pull cables out if they are short. Applying pressure to an improperly seated
connector could cause the keying tabs, which ensure proper pin alignment, to break. Connect-ing the ribbon cables with improper pin align-ment will likely result in damage to the PIP module.
3. Set amplifier sensitivity.
Mount the PIP module in the amplifier. 1. With both cables firmly attached, turn the PIP
back to an upright position. Verify that the cables run untwisted between the amplifier and the PIP module.
2. Insert the PIP module into the amplifier while taking care not to crimp, pinch or stretch the rib-bon cables.
3. Fasten the PIP module to the amplifier rear panel with the two supplied mounting screws. Be sure to use the supplied star-washers for a good ground connection.
Figure 3.1 Installing the PIPinto the Amplifier
EXACT CONFIGURATION OF AMPLIFIER AND RIB-BON CABLES MAY VARY
136763-7_4-08_networked_pip-series_reference_manual.fm Page 15 Monday, March 17, 2008 11:17 AM

Networked PIP Series
page 16 Reference Manual
3.4 Install the Wiring
IMPORTANT: Please read the wiring rules below before installing the wiring. If your com-puter does not communicate with the network devices after installation and addressing, re-read this section, as well as Section 4.2 on addressing rules.
3.4.1 Wiring Rules
• Connect each device to the network through its own cable in a Star Network. Do not con-nect them in a serial fashion (as was done with the previous IQ current loop method).
• Make sure each device has its own Category 5 certified cable connecting it to a central concentrator, most often a switch.
Detailed instructions follow on the next page.
136763-7_4-08_networked_pip-series_reference_manual.fm Page 16 Monday, March 17, 2008 11:17 AM

page 17Reference Manual
Networked PIP Series
3.4.2 Wiring Instructions
1. PIP-Lite and PIP-USP3 ONLY: Using a standard CAT5 cable, connect the network con-nector to a 100 Mb port on an Ethenet switch that is used to form the control network. For more detail see Section 6.2, Network Basics. If the PIP module is not to be connected to a control network, it can be temporaily connected to a computer’s Ethernet port with a crossover cable (TX and RX pairs switched) to set up the PIP module for desired operation.
PIP-USP3/CN ONLY: Using a standard CAT5 cable, connect the Primary CobraNet connec-tor to a 100Mb port on the Ethernet switch that is used to form the CobraNet network. For more detail, see Section 4.1.3. We highly recommend that the CobraNet be a standalone or separate-network LAN. If network redundancy is required, use a standard CAT5 cable to con-nect the Secondary CobraNet connector to a 100Mb port on the auxiliary CobraNet network. HiQnet and TCP/IQ control is also available over the CobraNet network using Harman Pro System Architect or IQWic software.
Computer
Laptop
100Mb Switch
PIP-Lite
PIP-USP3
PIP-USP3/CN
PIP-Lite
PIP-Lite
PIP-Lite
PIP-Lite
PS8810
Figure 3.2 Network Wiring
136763-7_4-08_networked_pip-series_reference_manual.fm Page 17 Monday, March 17, 2008 11:17 AM

Networked PIP Series
page 18 Reference Manual
2. Connect the Audio Input Wiring. The PIP module is equipped with removable barrier block connectors for each channel’s input. See Section 5.1 for more detail on audio wiring. The USP3/CN allows the use of standard balanced audio inputs to act either as CobraNet backup, an emergency override of CobraNet audio, or as an audio input to the CobraNet network. See Section 5.1.6 for additional details. The single 5-pin removable barrier block connector allows both audio channels to be inserted into the USP3/CN, then routed via software control.
3. Connect the AUX wiring if used. See Section 7.1 for more information.
4. Reconnect the amplifier's power cord.
136763-7_4-08_networked_pip-series_reference_manual.fm Page 18 Monday, March 17, 2008 11:17 AM

page 19Reference Manual
Networked PIP Series
4.1 Introduction
Before you set up a TCP/IP network with addressing, it’s important to understand all the terms involved. The following glossary explains network terminology.
4.1.1 Glossary
Network: A group of interconnected components, such as a central computer, network switching equipment, and other computers or devices.
TCP/IP network: A network made of a computer, network switching equipment, and other network devices such as network PIP cards plugged into power amps that communicate using TCP and IP protocols.
Subnet: A small network within a larger network. For example, a control network might be a subnet of a venue's network, which could include computers throughout the building. Or an audio network might be divided into subnets. For example, one audio subnet might be for the house system and another audio subnet might be for the paging system. IP address: An identifier for a computer or device on a TCP/IP network. Each device in a network has its own IP address to identify it. Example: 126.126.17.42. Networks using the TCP/IP protocol route messages based on the IP address of the destination. An IP address is made of four numbers separated by periods. Each number can be zero to 255. Typically the last number should never be a zero or 255. For example, 126.126.17.1 could be an IP address. 126.126.17.0 would not be a typical IP address.
A TCP/ IP or IP address has two parts: the NETWORK ID and the HOST ID. The NETWORK ID identifies the network, and the HOST ID identifies either the subnet and device, or just the device if there is no subnet.
The subnet mask is a code that indicates which part of the TCP/IP address is the NET-WORK ID and which part is the HOST ID. In subnet-mask code, 255 means "This part of the address is the NETWORK ID".
Example:Suppose the IP ADDRESS of a device is 126.126.17.42and the SUBNET MASK is 255.255.0.0. That means, (126.126) is the NETWORK ID. The remaining set of numbers (17.42) is the HOST ID.
4 How to Set Up TCP/IP
136763-7_4-08_networked_pip-series_reference_manual.fm Page 19 Monday, March 17, 2008 11:17 AM

Networked PIP Series
page 20 Reference Manual
If your audio network stands alone (it is not part of a larger network ) then the HOST ID identifies each device in the network.If your audio network is part of a venue's larger network, your network is actually a sub-net-work or subnet. In this case, the HOST ID can be further divided into two or more parts. The first part is the SUBNET ID. The other part is the DEVICE ID. The first part of the HOST ID identifies the subnet of your audio system, and the remaining part identifies the particular device within that subnet.
So in this case, a complete IP address is in the form NETWORK ID - SUBNET ID - DEVICE ID.
All devices in the network have the same network ID. All devices in a subnet have the same subnet ID.
There are many resources available on the Internet for IP and subnet calculation. For a stand-alone system, Crown has provided a worksheet of a tested configuration later in this section.
DHCP (Dynamic Host Configuration Protocol): This a protocol for automatically assigning IP addresses to devices on a network. With dynamic (DHCP) addressing, a device might have a different IP address every time it connects to the network. If a computer is NOT connected to a network with a DHCP server, the computer will place a default net-work ID into the TCP/IP address and Subnet Masks.
DHCP is available with Firmware version 2.0 or higher. It requires Harman Pro System Architect to configure.
136763-7_4-08_networked_pip-series_reference_manual.fm Page 20 Monday, March 17, 2008 11:17 AM

page 21Reference Manual
Networked PIP Series
4.2 TCP/IP Addressing Rules
In the next section, you will be assigning static TCP/IP addresses to the devices in your network. When you do so, be sure to follow the addressing rules below. Otherwise, the computer may not communicate with the devices.
1. Turn off DHCP (automatic addressing).
2. Assign each device a static (fixed) IP address. An IP address is made of four numbers separated by periods. Each number can be zero to 255.
3. Make sure that the computer and all the devices have the same NETWORK IDs in their addresses. This tells the computer that all those devices are on the same network. Various tools are available to determine whether devices are on the same network. In the addressing utility described later, if items are NOT on the same network, they are highlighted in the list.
4. Make sure that each component has its own TCP/IP address, and there are no duplicate addresses. The same holds true for IQ addresses.
5. Assign a subnet mask. Make it the same for all devices on the network. If the network you are assembling will interconnect with other networks, your network is considered to be a subnet within the larger network. Check with the network administrator to determine the proper Subnet Mask for your subnet.
If you have a stand-alone network, you may use a Subnet Mask of 255.255.0.0 for all com-ponents, including the computer.
Note: Just because two components have the same subnet mask does not mean that they are on the same network. As we said, the subnet mask just tells what part of the TCP/IP address is the Network ID.
136763-7_4-08_networked_pip-series_reference_manual.fm Page 21 Monday, March 17, 2008 11:17 AM

Networked PIP Series
page 22 Reference Manual
4.3 Network Setup Wizard
The network setup wizard can assist you in setting up your network for the first time. Using the wizard, you can address your components and be informed of addressing and other errors in the system. Please note that this wizard is designed to work with devices that are on the same physical network segment as the computer it is running on. It will not work through a router.
Select Network Card The first page of the wizard lists all the network adapters (cards) currently in the computer. If you have more than one adapter, you can scroll through the list and see the IP Address, Subnet Mask and Gateway address assigned to each card.
If you have a card with an IP address of 0.0.0.0, it typically means one of several things:
1. The card is disabled. 2. The card is not connected to a network. 3. The card is setup to obtain it's address from a DHCP server, and no DHCP server is available.
Select the card that is connected to the system and click the Next button.
Discover Devices on the Network This page scans the network for available network devices and lists them by product.
If you believe you are connected to the network, but no devices are showing up:
1. You may have selected the wrong network adapter. Click Back and select the proper net-work card. 2. You may have firewall (e.g. Checkpoint, Zone Alarm, Windows XP Service Pack 2) or proxy software running on the computer that is interfering with network communications. Turn off the firewall or proxy and restart the IQ software. 3. Your network may be improperly configured, or components may not be physically con-nected to the network or powered on. Check your network configuration, then click the Refresh button.
If some, but not all, network components are displayed in the list, check to make sure the missing devices are physically connected to the network and powered on, and click Refresh. (If the device is connected and on, you may need to power cycle the device.)
When you are satisfied with the list of devices, click Next.
136763-7_4-08_networked_pip-series_reference_manual.fm Page 22 Monday, March 17, 2008 11:17 AM

page 23Reference Manual
Networked PIP Series
Address Devices on the Network The box labeled Check for Errors will report to you if any devices in the system have mis-configured IP addresses, or if there are duplicate IQ or HiQnet addresses in the system. If there are, what happens next is dependent on what Action to Take is selected:
Readdress all devices - this selection will be the default if 10 or more addressing errors are found in the system. This selection will bring up another page in the wizard where you can readdress all the devices in the system.
Fix errors individually - this selection will be the default if 1 to 9 addressing errors are found in the system. This selection will bring up another page in the wizard where the errors will be listed and you will have the opportunity to fix each error individually.
No action at this time - this selection will be the default if no addressing errors are found.
Select an Action to Take and click Next.
Readdress All Components This page gives you the opportunity to assign IP and, optionally, IQ addresses to all devices in the system. The default values will Assign IP addresses (including Subnet Mask and Gateway address) that match the addresses assigned to the selected network adapter in the computer. You can also Assign IQ Addresses by checking the appropriate box and assigning a range of addresses.
The wizard is able to avoid assigning IP addresses used by other Crown or Harman compo-nents, but it cannot detect if it has assigned an address that is currently being used by another computer or TCP/IP device on the network. If you have other computers or devices on the network, be sure to assign a range of addresses that does not conflict with the addresses assigned to these network nodes.
Click the Readdress button to initiate the readdress process. The wizard will assign addresses to, and reboot, each device on the network.
When the readdressing process is finished, click the Back button to check again for errors, or the Finish button when you are ready to close the wizard.
Fix Errors Individually This page gives you a list of each error detected in the system. Select the error you want to fix in the list, then click Fix Error. A dialog will be displayed that will give the opportunity to change the addresses of the offending device. Clicking OK on this dialog will change the address on the selected device, reboot that device, and remove the error from the list.
When you are done fixing errors, click the Back button to check again for errors, or the Finish button when you are ready to close the wizard.
136763-7_4-08_networked_pip-series_reference_manual.fm Page 23 Monday, March 17, 2008 11:17 AM
Networked PIP Series
page 24 Reference Manual
5 OperationThe PIP-Lite, PIP-USP3 and PIP-USP3/CN are network components that allow control and monitoring of the power amplifier over a standard 100 Mb Ethernet network. Connection to the control computer is made through its standard network adapter.
The PIPs can function independently from the network control. Once the processing is con-figured, the module's non-volatile memory allows the amplifier to continue to function with no external control.
The USP3/CN provides a single-click solution for distribution of audio, control, and moni-toring of the amplifier. A single CAT5 connection to a standard Fast Ethernet network used for CobraNet control provides all of the necessary infrastructure wiring. The software can set up CobraNet audio routing and addressing. In the unlikely event of a network failure, the analog audio balanced inputs provide a backup audio path that can be automatically selected by the USP3/CN if CobraNet audio is disrupted.
Crown strongly recommends the use of a 100 Mb Ethernet network for control and monitor-ing. While some Crown products will function on a 10 Mb Ethernet network, their perfor-mance and network expansion capability will be limited.
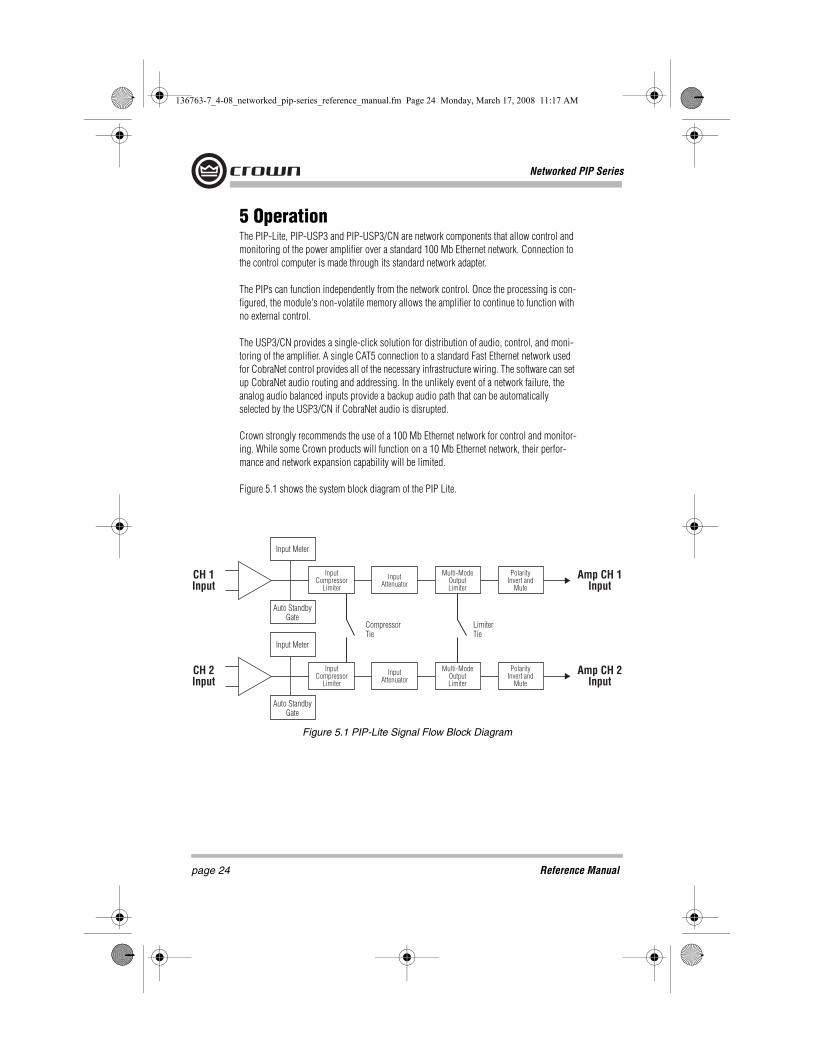
Figure 5.1 shows the system block diagram of the PIP Lite.
Figure 5.1 PIP-Lite Signal Flow Block Diagram
136763-7_4-08_networked_pip-series_reference_manual.fm Page 24 Monday, March 17, 2008 11:17 AM

page 25Reference Manual
Networked PIP Series
Figure 5.2 shows the system block diagram of the USP3 and USP3/CN.
Figure 5.2 PIP-USP3 and PIP-USP3/CN Signal Flow Block Diagram
Band
Pas
sFil
ters a
nd G
ainEQ Filter
sInp
utCo
mpr
esso
rInp
utDe
layEQ Filter
sOu
tput
Delay
Outpu
tLim
iters
Outpu
tFa
der
and
Mute
Input
Meter
Auto
Stan
dby
Gate
Sign
alGe
nera
tors
Input
Sou
rce
Selec
tor
Band
Pas
sFil
ters a
nd G
ainEQ Filter
sInp
utCo
mpr
esso
rInp
utDe
layEQ Filter
sOu
tput
Delay
Outpu
tLim
iters
Outpu
tFa
der
and
Mute
Input
Meter
Auto
Stan
dby
Gate
s s
136763-7_4-08_networked_pip-series_reference_manual.fm Page 25 Monday, March 17, 2008 11:17 AM

Networked PIP Series
page 26 Reference Manual
5.1 Hardware
5.1.1 Data Indicator
An amber Data indicator is provided on the front panel. It flashes whenever a command addressed to the PIP is received. To assist with troubleshooting, an option that forces the data indicator to remain lit is available through the software. Some Crown amplifiers also have a data indicator on their front panels. In these cases this indicator will light simulta-neously as the PIP’s Data indicator.
5.1.2 Preset Indicator
A green Preset indicator is provided on the front panel. This indicator signals the number of the current preset, if active, by continually flashing a series of flashes equal to the current preset number, followed by a pause. A preset is considered “active” if the PIP settings match those in the selected preset. If a change is made to any setting then the preset is con-sidered “inactive,” and the indicator stops flashing.
5.1.3 Network Connector
The network connector is a standard RJ-45 connector that allows the PIP to connect to an Ethernet network. Connection is made using a standard CAT5 cable to a network switch port. In cases where a PIP is used in stand-alone mode (not connected to an network) it can be configured using a crossover cable (TX and RX pairs swapped) directly to a computer’s network adapter port. The PIP-USP3/CN has both a primary and secondary network con-nector (see Section 5.1.6).
5.1.4 Link/Activity Indicator
The Link/Activity indicator is provided on the network connector to display the status of the Ethernet connection. Whenever the PIP is properly connected to another functioning net-work port, the indicator lights. When the PIP detects the presence of network traffic, the indicator flashes. Note: This differs from the Data indicator mentioned previously in that it flashes for all network traffic, not just for commands addressed to this component.
5.1.5 100 Mb Indicator (PIP-Lite, USP3 only)
The green 100 Mb indicator is also provided on the network connector. It lights when the PIP detects that it is connected with a 100 Megabit connection. Note: The PIP is compatible with 10 Megabit Ethernet networks. However, a 10 Megabit network is not recommended, especially for systems with a large number of IQ components
5.1.6 CobraNet Connectors (USP3/CN only)
The Primary and Secondary CobraNet RJ-45 connectors allow the USP3/CN to interface to the 100Mb Ethernet based CobraNet network. While the Primary CobraNet connector is the main connection to the CobraNet network, the Secondary connector is the "backup" or redundant connection to the CobraNet network. If the Primary connection fails due to cut wire, failed network switch, etc., this port is automatically enabled and ready to receive the CobraNet network data witin a few seconds. Connection is made using standard CAT5 cable to a network switch port. Crown strongly recommends the use of switches and not hubs in the implementation of the CobraNet network. Use of hubs will limit the amount of CobraNet traffic that can reside on the network and create unnecessary limitations in the network.
136763-7_4-08_networked_pip-series_reference_manual.fm Page 26 Monday, March 17, 2008 11:17 AM

page 27Reference Manual
Networked PIP Series
5.1.7 CobraNet In-Use/Conductor Indicator (USP3/CN only)
The indicator on the left side of each CobraNet RJ-45 connector turns ON if the port is in-use (i.e. the link is being used to transmit or receive active CobraNet traffic), and will blink if the device is also the conductor (the timing reference).
5.1.8 Balanced Audio Inputs
This removable barrier block connector allows line level audio signals to be input to the PIP. The PIP-Lite and PIP-USP3 use two 3-pin connectors (one per channel), while the PIP-USP3/CN uses one 5-pin connector that handles both channels. The USP3/CN accepts line level analog audio signals in addition to the digital audio that is available through the CobraNet network. In the USP3/CN, this analog audio can be used for one of three purposes:
• Backup of the CobraNet Network audio: In the unlikely event of a loss of CobraNet audio to the USP3/CN, the module would automatically switch over to the Balanced Audio Inputs.• Emergency Override: If a hardwired override signal would be required of the entire system, the USP3/CN would automatically sense the presence of the Override Signal at the Balanced Audio Inputs and switch to that signal.• CobraNet Network Audio Inputs: Each USP3/CN can act as a CobraNet audio Input source by converting the Balanced Audio Inputs to CobraNet.
5.1.9 Aux Input/Output Connector
An RJ-11 connector provides three functions: AUX output, AUX input and Listen Bus. Ana-log Listen Bus or foldback is not available in the PIP-USP3/CN. The AUX output is a mul-tifunctional control output that delivers 15 VDC limited to 15 mA. It can be configured in three modes:• Manual mode: The output is simply controlled with a command from the IQ software.• Error reporting mode: The AUX out is active when the PIP detects an error. Each error source (Thermal, Clip, Load, Amp Fault, and Line Voltage) can be individually enabled to activate the AUX output when the error conditions are met.• Flash preset mode: The AUX output can be configured to flash the preset number like the front panel indicator.
An inversion control allows the AUX output functionally to be inverted for the manual and error reporting modes. The inversion control is ignored for flash preset mode. The AUX input is a two-state input with a high state defined as voltage between 4 and 15 VDC. The low state is defined as voltages between 0 and 1.6 VDC. It has a 10K input impedance. The AUX input can be configured in several modes:
• None: In this mode the PIP makes no changes to its operation. However, the AUX input status can be monitored through the IQwic software and used for functions within the soft-ware.• Mute Channel 1, Mute Channel 2, and Mute both functions each mute their respective channels when the AUX input is active. Likewise, the Power Channel 1, Power Channel 2, and Power Off Both functions disable the respective channels dur-ing an active AUX input.
136763-7_4-08_networked_pip-series_reference_manual.fm Page 27 Monday, March 17, 2008 11:17 AM

Networked PIP Series
page 28 Reference Manual
• The Cycle Preset Mode will advance the PIP through a defined range of presets on a low-to-high transition of the AUX input. The inversion object changes the activity to a high-to-low transition. The range of presets is defined by the max preset and min preset controls. Once the max preset is reached the next defined AUX input event will cycle the PIP to the minimum preset.• AUX Input Inversion: This control allows the low state to activate the selected func-tion. Normally, the high state activates the selected AUX input function.
The AUX port provides a power supply for the AUX input. This 15 VDC at 15 mA supply can be connected through a switch to the AUX input. This allows a simple switch closure to operate the aux input without the need of an external power supply. See Section 6.1 for details on using the AUX port.
5.1.10 Listen Bus or Foldback
The AUX port is also used for the Listen Bus connection. Two pins of the connector pro-vide a balanced line-level audio output that can be selectively driven by either channel under IQ software control. Multiple PIP-Lite and PIP-USP3 modules can have their Listen Bus outputs wired onto a single bus allowing the system operator to listen to any of their outputs.
5.1.11 Preset/Reset Switch
The Preset/Reset switch is a recessed pushbutton located between the Data and Preset indi-cators. It is activated by a straightened paper clip or similar object. This switch can be used to change presets, restore settings to factory default or restore all the presets to the factory defaults. During operations of the switch, the Data indicator flashes as an aid to the user.
To select a preset: Remove all audio input signals. With the PIP powered up, momen-tarily hold the preset switch in for one flash of the Data indicator (less than 2 seconds) and then release. The PIP will load the next preset in the defined preset range. The range of pre-sets is defined by the Maximum Preset and Minimum Preset controls. Once the Maximum Preset is reached the next momentary depression of the switch will cycle the PIP to the Minimum Preset. The Preset indicator will flash the number of the selected preset followed by a pause. Restore the audio input signals.
To restore the unit to factory default settings: Remove all audio input signals. Hold the Reset/Preset switch in for two flashes of the Data light (longer than 2 seconds). The Data indicator will flash rapidly for a moment. Restore the audio input signals. To restore the unit including presets to factory default settings: Remove all audio input signals. Hold the Reset/Preset switch while applying power to the unit. The Data and Preset indicator will both light. Release the switch within 5 seconds (before the Data and Preset indicators go out). The Data indicator will flash rapidly for a moment. Restore the audio input signals.
136763-7_4-08_networked_pip-series_reference_manual.fm Page 28 Monday, March 17, 2008 11:17 AM

page 29Reference Manual
Networked PIP Series
5.2 Features of All Three Modules
The exact location of the following controls varies with the software. These features might be inaccessible from the standard control panel, but accessible from a custom control page.
5.2.1 User Presets
The control settings for all the functions can be stored as presets. A total of ten presets can be saved in the PIP’s nonvolatile memory. Each preset can be named with a 30 character name describing its function, which is also stored in the PIP’s memory.• The Store Preset Control saves the current setting to the specified preset.• The Recall Preset Control recalls the specified preset settings. • The Preset Valid Monitor indicates if a change has been made to any setting since the last time a preset has be saved or recalled. • The Last Stored or Recalled Preset Monitor indicates what the Last Stored or Recalled preset is.
5.2.2 Clip Event Monitor
A clip detector is provided each channel. These monitors will indicate any clip condition(> 0.05% distortion) in the amplifier channel. The clip detectors also can indicate certain errors (See Section 4.2.18).
5.2.3 Input Signal Level Monitor
The input signal level of each channel can be monitored. The measurement range is from +20dBu to -40dBu with 0.5dBu resolution. Each audio channel has the following monitors:• Analog Audio Input: The audio input at the Balanced Audio Inputs of the PIP's front panel.• Switched Audio Input: The audio input after the Input Audio Router.• CobraNet Audio Input (USP3/CN only): The audio input level from the selected CobraNet audio channel.
5.2.4 Output Signal Level Monitor
The output signal level of each channel can be monitored. The measurement range is from 0 dB to –40 dB with 0.5 dB resolution. The monitors are scaled so that 0 dB is referenced to the full rated output voltage of the amplifier. In Com-Tech® amplifiers the scaling can be changed between the rated 70V output and the rated 8-ohm level. For all other amplifier models, the scale is set to the rated output level.
5.2.5 Thermal Headroom Level Monitor
The thermal headroom level of each channel can be monitored with the software. This level represents the percent of available power/thermal capacity that is currently being used within the output section of the amplifier. When the thermal headroom level reaches 100%, the amplifier cannot produce any more power and it will begin to protect the output devices by limiting their drive level. The thermal limiter feature of the PIP can be set to engage at a pre-selected thermal level. (See Section 5.2.19.)
5.2.6 Power/Standby Control
Each channel can be independently turned on and off.
5.2.7 Signal Mute
The output signal of each channel can be independently muted. This function produces 60 dB or more of attenuation.
136763-7_4-08_networked_pip-series_reference_manual.fm Page 29 Monday, March 17, 2008 11:17 AM

Networked PIP Series
page 30 Reference Manual
5.2.8 Polarity Inverter
The input signal polarity of each channel can be independently inverted.
5.2.9 Input Signal Fader
Each input signal can be adjusted under software control. The gain range is +20dB to–80dB in 0.5dB steps. In addition to adjustment of the post input router signal, each Analog Audio Input has a separate Fader that allows the trim of the Analog Audio Input before the Input Router.
5.2.10 Dynamic Gain Monitors (Ghost Faders)
These indicators let the user monitor the actual signal path gain. The actual gain may vary from the input attenuator settings as a result of compression and limiting. On standard IQwic software control panels, these indicators appear as flying ghost faders behind the input atten-uator controls. System Architect has separate gain-reduction meters.
5.2.11 Amplifier Information
At startup, the PIP extracts several useful items of information about the host amplifier. These include manufacturer, model, date code, and serial number. This information is stored in the software system inventory and is displayed on the software control panels.
5.2.12 User and Channel Labels
The PIP can store two user labels and two channel labels. These labels are 30-character strings that can be set by the user to indicate the function of the amplifier and its channels. For example, “LOWER RIGHT CLUSTER, FOR DELAY.”
5.2.13 Amplifier Mode
The host amplifier’s mode status — Stereo (Dual), Bridge-Mono, or Parallel-Mono — can be sent to the PIP with this control. IQwic then becomes aware of the amplifier's mode and the IQ-PIP of the Channel 2 controls. The actual mode of the amplifier cannot be controlled by this function. The amplifier mode must be selected with the switch located on the amplifier rear panel.
5.2.14 Amplifier Output Mode
On Com-Tech series amplifiers, the output mode (70V or 8-4 ohm) should be set on the PIP with these controls. This allows the PIP to scale its output meters appropriately and lets the software become aware of the settings. The actual mode of the amplifier cannot be controlled by this function. The amplifier output mode, for each channel, must be selected with the switches located on the rear of the amplifier.
5.2.15 Line Voltage Monitor
The AC line voltage supplied to the amplifier can be monitored with this function in the CTs series of amplifiers. This function is NOT supported in any other amplifier. The amplifier line voltage is displayed, and no user input is required.
5.2.16 Error Reporting
The PIP can detect four different error conditions per channel and errors in the AC line volt-age. Each error type can be configured to report the error through the control network and/or the AUX port. Network reported errors appear in the control software’s Error Window.
136763-7_4-08_networked_pip-series_reference_manual.fm Page 30 Monday, March 17, 2008 11:17 AM

page 31Reference Manual
Networked PIP Series
The software offer many options to further report errors, including audible alerts, printout, email, pager, serial port and fax. The exact options vary depending if you are using System Architect or IQwic. The options are set in the software. The following describes each error source.
CLIP: The PIP can be configured to report if an excessive number of clip events occur in either amplifier channel. The clip events are consider an error if they exceed the defined count per the defined unit of time. The Count Control sets the maximum number of events before the error is reported. The range is 1 to 100. The Time Control defines the amount of time that the events are counted before starting the counting process over. Its range is 1 to 10 seconds. Note: Clip events are defined as the start of each clip and every 10milliseconds the amplifier is in clip thereafter. Using a high count setting with a short time setting may result in clip error never being detected.
THERMAL: Errors can be generated for excessive temperature in the output section of the amplifier channel. The Threshold Control sets the level that, if exceeded, will generate the error report. This control has a range of 1 to 100%.
FAULT: Some PIP2-compatible amplifiers provide a fault signal to the PIP if it detects some catastrophic amplifier failure.
LOAD: If the load monitoring feature is activated, an error report can be generated if the load impedance moves outside the pre-selected range. See Section 4.2.29 for instructions on set-ting up load monitoring.
LINE VOLTAGE: In the CTs series of amplifiers, the AC line voltage can be monitored and an error generated whenever the voltage is outside of the limits set by the software.
5.2.17 Auto Standby
The Auto Standby feature automatically turns off either amplifier channel when no audio input signal has been detected for a period of time. The channels are controlled independently. It is similar to an audio gate but it atenuates the power supply. There are three parameters which control this feature for each channel:
Enable: Enables or disables this feature.
Input Gate Level: Sets the level, in dBu, below which the high-voltage supply of an ampli-fier channel will be turned off. The range is from +16 dBu to –40 dBu.
Turn-Off Delay: Sets the time, in minutes, that the input signal must remain below the gate level before the channel will be disabled. The range is from 0 to 255 minutes. A setting of zero is provided to facilitate the setup of the input gate level.
Power-On Delay Control: This control multiplies the addresses by a time offset to provide sequencing of power-on in the amplifiers. So if you apply power to the entire rack at once, and this feature is engaged, the amplifers will come on in series based on their addresses.
136763-7_4-08_networked_pip-series_reference_manual.fm Page 31 Monday, March 17, 2008 11:17 AM

Networked PIP Series
page 32 Reference Manual
5.2.18 Input Signal Compressor/Limiter
An input signal compressor/limiter is available for each channel. Five parameters control this feature:
Enable: Enables or disables this function.
Threshold: Sets the level, in dBu, above which the compressor begins to attenuate the input signal. This level corresponds to the input level meter reading. The compressor is “feed-forward,” meaning that the level detection point is located before the gain control stage. The range is from +20 dBu to – 50 dBu.
Hysteresis: A “dead zone” that ensures a significant change before acting. The range is from 0 to 12 dB. It requires the signal to go above the upper threshold before engaging and to go below the lower threshold before releasing. Hysteresis is not included in the standard System Architect control panel, but it is available on a custom control page.
Attack Time: Sets the attack time of the compressor. The attack time is defined as the time it takes the compressor to attenuate the signal gain by 20 dB. The range is from 1 millisec-ond to 0.1 second.
Release Time: Sets the release time of the compressor. The release time is defined as the time it takes the compressor to increase the signal gain by 20 dB. The range is from10 milliseconds to 10 seconds.
Compression Ratio: Sets the compression ratio of the compressor. The ratio is the rela-tion between the amount of attenuation applied by the compressor verses the amount that the input signal is over the threshold. The available settings are 2:1 to 32:1.
Beyond the three controls for each channel, a single-control Compressor Tie connects the compressors together. The compressors are tied at their sense points, meaning that the greater of the two input signals will be used as stimulus for both compressors. Each com-pressor will still compress based on its individual threshold, attack, release and ratio set-tings. Compressor Tie is not included in the standard System Architect control panel, but it is available on a custom control page.
5.2.19 Peak Voltage LimiterThis limits the peak voltage output of the amplifier. Four parameters control this limiter for each channel:
Enable: Enables or disables this function.
Threshold: Sets the level, in absolute voltage, which the limiter will allow from the ampli-fier. The range is from 12 Vpk to 255 Vpk.
Attack Time: Sets the attack time of the limiter. The attack time is defined as the time it takes the limiter to attenuate the output signal by 20 dB. The range is from 1 millisecond to 100 milliseconds.
136763-7_4-08_networked_pip-series_reference_manual.fm Page 32 Monday, March 17, 2008 11:17 AM

page 33Reference Manual
Networked PIP Series
Release Time: Sets the release time of the compressor. The release time is defined as the time it takes the limiter to increase the output signal by 20 dB. The range is from 10 milli-seconds to 10 seconds.
5.2.20 Average Power Limiter
This limits the long-term output power of the amplifier. Four parameters control this limiter for each channel:
Enable: Enables or disables this limiter.
Threshold: Sets the average power level, in watts, which the limiter will allow from the amplifier channel. The range is from 10 watts to 10,000 watts. This level should be set to the connected loudspeaker’s long-term power rating.
Attack Time: Sets the attack time of the limiter. The attack time is defined as the time it takes the limiter to attenuate the output signal by 20 dB. The range is from 1 second to 30 seconds.
Release Time: Sets the release time of the compressor. The release time is defined as the time it takes the limiter to increase the output signal by 20 dB. The range is from 1 second to 30 seconds.
5.2.21 Clip Eliminator
This limiter monitors the clip events and attenuates the input signal to prevent amplifier clipping. The attack and release times are preset to optimum rates. Only one parameter controls this limiter. Enable enables or disables this limiter.
5.2.22 Thermal Limiter
This thermal limiter is provided to limit the amplifier output proportionally to available ther-mal headroom, allowing smooth system level reduction while preventing amplifier overload. Three parameters control this limiter for each channel:
Enable: Enables or disables this limiter.
Threshold: Sets the thermal level, in percent, above which the limiting will begin. The range is from 1% to 100%.
Attenuation: Sets the amount, in dB, that will be attenuated for each percentage point that the thermal level exceeds the threshold. The range is from 0.5 dB to 6 dB in 0.5 dB steps.
5.2.23 Limiter Tie
This control forces both channels to track by using the greatest (worst case) attenuation of any limiter from either channel. With this option disabled, each channel will independently take the greatest attenuation of its own four limiters (voltage, power, clip, thermal) and ignore the limiting of the other channel. Note that this function does not include the effects of the input compressors. To tie the input compressors, use the Compressor Tie function. Compressor Tie is not included in the standard System Architect control panel, but it is available on a custom control page.
136763-7_4-08_networked_pip-series_reference_manual.fm Page 33 Monday, March 17, 2008 11:17 AM

Networked PIP Series
page 34 Reference Manual
5.2.24 Load Supervision
The load supervision feature allows real-time monitoring of the load connected to each amplifier channel. When enabled, the PIP continuously monitors the amplifier output voltage and current, and calculates the long-term average load impedance. The measured load impedance is compared against the user-defined high and low limits. If either limit is exceeded, the status indicator and, if enabled, the IQwic Error Reporting functions alert the user of the problem. There are six controls and two indicators for each channel:
Enable: Enables or disables the load-supervision function.
High Limit: Sets the upper bound above which the system will report a “high” error status.
Low Limit: Sets the lower bound below which the system will report a “low” error status.
Nominal Load Impedance: Sets the expected average impedance for the connected load. This value determines the output signal level required for the test. This parameter is also used by the average power limiter to determine the expected power threshold. (See Section 4.2.25).
Report Error to Network: Enables Error Reporting to send an error report via the network so that high and low load conditions are reported to the software. (See Section 4.2.18).
Report Error to Aux: Enables and high or low load error to be reported by the AUX output. (See Sections 4.2.18 and 6.1.)
Test Indicator: This indicator is active when the amplifier output signal is sufficient to allow load impedance calculation and test verification.
Low/Normal/High Indicator: This indicator shows the present status of the load imped-ance with respect to the user-defined high and low limits.
Z Average Monitor: Reports the actual calculated average load impedance in ohms. Its range is from 0 ohms to 250 ohms.
Load Supervision ApplicationsThe Load Supervision feature can be used to monitor the amplifier load in real time with almost any program material. Average load impedance is calculated as a function of ampli-fier output voltage and current. This function is different from the SLM feature as it uses the program material to calculate. The system requires approximately 20-30 mA of average amplifier output current for adequate supervision. This allows typically low average output power levels of less than ½ watt with most loads. The maximum load impedance for reliable system performance is limited to about 50 ohms. Higher impedances can be measured but may require higher amplifier output levels for reliable operation.
136763-7_4-08_networked_pip-series_reference_manual.fm Page 34 Monday, March 17, 2008 11:17 AM

page 35Reference Manual
Networked PIP Series
Most amplifier/load systems can be configured and supervised by following these steps:
1. Configure your audio system using a known “good” load, then enable the Load Supervi-sion feature.
2. Provide typical program material at a level high enough to light the “test” indicator.3. Run the system at this level until the average impedance stabilizes. This may take sec-
onds to minutes depending on level, duty-cycle, etc. 4. Set the nominal impedance at the measured value average. This optimizes the supervi-
sion algorithm for voltage and current levels versus the actual load. Note: a higher nom-inal setting will require higher output levels.
5. Set the high limit at twice average and the low limit at one-fourth nominal. (These limits are somewhat arbitrary but should be a good starting point.)
6. Let the system run for extended periods using any and all typical program material.7. Adjust the high/low limits, if necessary, to account for any variance in average measured
impedance.8. Enable error reporting, if desired. This procedure should work well for most applications. However, some applications can be a little more difficult. Some very low-level and/or low duty-cycle signals may not ade-quately “test” the load. Lab and situation testing have shown output levels as small 40 dB below rated amplifier output to be enough for most low-impedance loads. Higher imped-ance loads such as those used in “lightly-loaded” 70V distribution lines may require signal level near 20 dB below rated output.
The “Nominal Load Impedance” control is used to optimize the system for the most accu-rate calculation of load impedance. It should be set to the expected nominal (or rated) impedance of the “normal” load. The high limit should be set for at least 2 times the expected nominal or actual measured load, while the low limit should be set to ½ the expected nominal or actual measured load.
The following example calculates the SPL necessary for supervision of a typical 8-ohm system. While the resulting 80-dB SPL @ 1 meter is definitely above conversation level, it is not uncomfortable.
An “8 ohm” example:30 mA into 8 ohms = 0.007watts 8-ohm driver sensitivity = 100dB for 1W @ 1 meter0.007W/1W = –20dBRequired SPL for supervision test is 100dB – 20dB = 80dB SPL @ 1 meter
5.2.25 Typical Load Characteristics
It is well known that the typical loudspeaker impedance is not the same for all frequencies. This variance is due to the effect of electrical properties such as the expected increase in impedance at high frequencies due to driver voice-coil inductance, or the peaks and valleys due to passive crossovers. Testing of various passive boxes has shown peaks of 100 ohms or more! Low-frequency impedance variation can come from the interaction of the driver compliance with that of the box. The low frequency variations are usually wide bandwidth and may vary from 6 to 30 ohms on an 8-ohm driver.
136763-7_4-08_networked_pip-series_reference_manual.fm Page 35 Monday, March 17, 2008 11:17 AM

Networked PIP Series
page 36 Reference Manual
These anomalies are easily averaged out by the PIP supervision algorithm in most systems. However, there may be some extreme situations for very narrow bandwidth (i.e. single-note) signals and/or very widely varying loads that the algorithm simply cannot overcome. In these cases, widening the high and low limits will help decrease the “sensitivity” of supervi-sion and decrease the chance of “nuisance” error reports.
5.3 PIP-USP3 and PIP-USP3/CN Features
5.3.1 Input Signal Router
Each channel of the PIP’s signal processing has an Input Signal Router that allows the choice of audio signal that will be used by the channel. The user may choose the following configuration:• Analog Audio: This is the audio input from the audio connector on the front panel of the PIP. Choices for the Analog Audio input are Channel 1, Channel 2, or a sum of Channels 1 and 2.
5.3.2 Filters Each audio channel has five separate places where filters can be placed in the system. There are 64 filters total within the USP3 or USP3/CN and they can be placed anywhere within the system. In addition to filtering, each possesses up to +/-24dB of gain. The filters will vary based on the firmware and software being run. The following filters are available:• Lowpass: Bessel 2-4, Butterworth1-4, and Linkwitz-Riley 4 (Firmware 2.0 provides up to 8 Linkwitz-Riley filters)• Highpass: Bessel 2-4, Butterworth1-4, and Linkwitz-Riley 4 (Firmware 2.0 provides up to 8 Linkwitz-Riley filters)• Lowshelf: Low-frequency shelving EQ • Highshelf: High-frequency shelving EQ• Lowpass EQ: Variable Q from 0.1 to 35• Highpass EQ: Variable Q from 0.1 to 35• Parametric EQ: Variable Q from 0.1 to 35• All Pass: 1st and 2nd order
All Pass filters provide no gain change to the output, but provide a phase change at the selected frequency. This corrects the phase relationship of the output without a gain reduc-tion, such as is found in other filters.
5.3.3 Delay
Due to the nature of DSP processing, there is some inherent delay or latency within the PIP. These delays are:• Balanced Audio Input ADC: 250 µs for the USP3, 312 µs for the USP3/CN• USP3 DSP Processing: 665 µs • USP3/CN DSP Processing: 665 µs• Output DAC: 135 µs• USP3 input to output: 250 µs + 665 µs + 135 µs = 1.050 ms• USP3/CN CobraNet input to output: 665 µs + 135 µs = 800 µs • USP3/CN Analog input to output: 312 µs + 665 µs + 135 µs = 1.112 ms
136763-7_4-08_networked_pip-series_reference_manual.fm Page 36 Monday, March 17, 2008 11:17 AM

page 37Reference Manual
Networked PIP Series
In addition to these unavoidable delays, additional delay can be added to each channel. Each channel is capable of 2.0 seconds of delay in 20.8 µs increments.Overall delay = inherent delay + coarse delay + fine delay.
5.3.4 Noise Generator
Each channel has an independent uncorrelated noise generator that allows noise to be mixed into the audio signal. This is useful for noise masking applications and testing. Each channel has the following controls:• Noise On/Off: The channel's noise generator can be independently turned on.• Noise Type: Full spectrum white noise or pink noise.• Noise Level: A fader to allow the noise level to be controlled.
5.3.5 Sine-wave Generator
A sine-wave signal generator allows the mixing of a single tone into the audio signal. Typi-cal applications can be for the injection of a high frequency tone (19kHz) into the signal in paging type system to continually drive the speaker, allowing continuous monitoring of the speaker load. The following controls exist:• Sine On/Off: The sine-wave signal generator's function.• Sine Frequency: Controllable from 20Hz to 20kHz.• Sine Level: Each channel's sine-wave signal level can be independently controlled.
5.3.6 SLM (System and Load Monitoring) Tab of the Control Panel
This function is available only in IQwic, not in System Architect v1.0. Also, it is available for the PIP-USP3 and PIP-USP3/CN, but not for the PIP-Lite.
Figure 5.3 SLM Tab of the Control Panel
136763-7_4-08_networked_pip-series_reference_manual.fm Page 37 Monday, March 17, 2008 11:17 AM

Networked PIP Series
page 38 Reference Manual
The SLM tab allows you to test network-PIP components for impedance vs. frequency and frequency response. The USP3 and USP3/CN include a signal generator to provide a swept sine-wave signal for the tests. Described below are the three sections of the SLM tab: Sweep, Channel SLM and Tolerance.
SweepThe Sweep section of the SLM tab is used to set the sine-wave sweep parameters:• Start frequency• Stop frequency• Sine Wave Generator Signal Level (– infinity to + 20 dBu)• Resolution (frequency step size of the test sweep)
You can set the sweep’s start and stop frequencies either with the Start and Stop drop-down menus, or with the sliders on the frequency scale at the bottom. IQwic maintains at least1/24 octave difference between the Start and Stop frequencies.
Note: Please see the online help for assistance with the software navigation.
Channel System and Load Monitoring
This section of the SLM tab (one section per channel) allows you to set up tests. Basically you run a reference curve on a known good component, then run tests at a future date. Those test results will be compared to the measured reference values.
The Mode drop-down menu selects the type of test:• Off-Pass means that no testing actually is taking place. The PIP reports back a "pass" condition so that errors are not triggered.• Impedance Test means that the PIP card measures the impedance of the load currently connected to the amplifier and compares it to the reference curve stored earlier. If it is out of tolerance then the software reports an error.• Frequency Test means that the PIP card measures the frequency response of the amplifier and DSP, and compares it to the reference stored earlier. If it is outside of the tolerance then the software reports an error.• Imp./Freq. Test combines both of the tests above.
136763-7_4-08_networked_pip-series_reference_manual.fm Page 38 Monday, March 17, 2008 11:17 AM

page 39Reference Manual
Networked PIP Series
• Reference measures both the impedance-vs.-frequency and frequency response of a known good component. All other tests are compared to these results until a new reference is created.
Impedance and Frequency Pass/Fail IndicatorsThese show whether the channel passed or failed the selected test.
Start/Stop FrequenciesThese are the lowest and highest frequencies of the displayed curve. You can set these fre-quencies either with the drop-down menus or with sliders on the frequency scale at the bot-tom.
Tolerance Section of the SLM TabThese controls allow you to set tolerances for impedance and frequency tests.
Impedance Tolerance (1% to 100%, one per channel)Use the Impedance Tolerance control to set the percentage of difference by which an imped-ance test may vary from the reference and still be considered "passing." Tests conducted where the impedance is measured at a percentage outside this tolerance at any point along the frequency range will be considered "failed" for purposes of the impedance test. Use either the drop-down menu or the slider.
Frequency Tolerance (1 dB to 25 dB, one per channel)Use the Frequency Tolerance control to set the difference in dB by which a frequency test may vary from the reference and still be considered "passing." Tests conducted where the frequency is measured at a dB level outside of this tolerance at any point along the fre-quency range will be considered "failed" for purposes of the frequency test. Use either the drop-down menu or the slider.
Report ErrorsReport Errors via Standard Error Reporting: If this button is set to the on position, the results of a test are reported in the standard error reporting windows.Report Errors via Aux: If this button is set to the on position, the results of a test are reported via the Aux Out port of the USP3 or USP3/CN. The Aux Out port will be set high if all tests have a Pass result. It will be set low if any of the tests fail.
Conducting a TestOnce tests are set up, you may initiate a test by clicking on the Start button located at the top of the Control Panel. This will cause a swept sine wave to be generated through each channel at the frequencies and levels defined. While a test is in progress, the Testing LED will blink. Once a test is completed, the "Pass/Fail" indicators will be updated accordingly.
136763-7_4-08_networked_pip-series_reference_manual.fm Page 39 Monday, March 17, 2008 11:17 AM

Networked PIP Series
page 40 Reference Manual
Figure 5.4 Typical Impedance Test Plot of Full-Range Speaker
CurvesClicking on the "Curves" button will allow you to look at any of the curves that were gener-ated as the result of tests performed. These curves are displayed in a separate Curve Viewer. Some typical curves are shown in Figures 5.4, 5.5 and 5.6.
In Figure 5.4, find the File Menu at the top left of the impedance plot. The first choice is “Export View to .DIF...” .DIF is a common spreadsheet file format. “Notes” allows you to attach added information that will be saved in the file.
136763-7_4-08_networked_pip-series_reference_manual.fm Page 40 Monday, March 17, 2008 11:17 AM

page 41Reference Manual
Networked PIP Series
Figure 5.6 Impedance Plot and Frequency Response Plot
Figure 5.5 Frequency Response of Amplifier and DSP in dBu
136763-7_4-08_networked_pip-series_reference_manual.fm Page 41 Monday, March 17, 2008 11:17 AM

Networked PIP Series
page 42 Reference Manual
5.4 PIP-USP3/CN Features
5.4.1 Input Signal Router
Each channel of the PIP’s signal processing has an Input Signal Router that allows the choice of audio signal that will be used by the channel. The user may choose one of the fol-lowing configurations:• CobraNet Audio: This is the assigned CobraNet audio as setup in the CobraNet Input section of the software. See Section 6.3 for more details. Choices for the CobraNet Input are Channel 1, Channel 2, or a sum of Channels 1 and 2.• CobraNet with Analog Backup: This allows the use of the Balanced Audio Inputs to be used as backup to the CobraNet audio should the network's audio be lost for any reason. In this mode, the USP3/CN will sense the loss of the CobraNet audio and will automatically switch to the chosen Balanced Audio Input until CobraNet network audio returns.• CobraNet with Analog Override : If an external emergency override of the CobraNet audio is required, this mode will allow the automatic switching of the Balanced Audio Input over the CobraNet audio input if a signal is noticed on the Analog Input. When the Emer-gency Override is completed, the CobraNet audio will be routed to the channel after 10 sec-onds.
5.5 CobraNet (PIP-USP3/CN only)
CobraNet is a licensed technology developed by Peak Audio, Inc. consisting of proprietary communications protocol, firmware and hardware. It allows reliable, deterministic trans-mission of digital audio over a 100Base-T Fast Ethernet network. The PIP-USP3/CN oper-ates as a networked device on a CobraNet network, and interfaces digital audio from the network to the amplifer. Refer to Section 6.3 for a more thorough discussion about Cobra-Net technology.*
This section describes the PIP-USP3/CN’s CobraNet control and monitoring features. These features are accessed via the control software. Please refer to the software documen-tation if you are unfamiliar with the software.
5.5.1 CobraNet Module Parameters
The internal CobraNet Network Interface Module contains several parameters for control and monitor of status of the CobraNet network, and do not directly affect the control net-work. These variables can also be controlled and monitored through the CobraNet network using CobraCAD™** or other industry-standard SNMP-enabled network management software.
ConductorAny CobraNet device can be configured to operate either as Network Conductor or a Per-former:• Active Indicator: This indicator, viewable in IQ software, reports the present Conductor status of the device. If the indicator is ON, the unit is operating as the network Conductor. When OFF, the unit is operating as a Performer. • Priority: This parameter adjusts the priority level for becoming the Conductor. When set to zero, the PIP-USP3/CN will never function as the Conductor, and when set to 255 it will always function as the Conductor. The higher the priority number, the more likely unit will act as the Conductor. The Priority object is stored in presets.
136763-7_4-08_networked_pip-series_reference_manual.fm Page 42 Monday, March 17, 2008 11:17 AM

page 43Reference Manual
Networked PIP Series
System NameThis parameter is user-settable to any alpha-numeric string of 30 characters or less. The intended use is to communicate a unique name for the particular device to a network. The System Name object is stored in presets.
System DescriptionThis parameter is configured at the factory and is read-only. The intended use is to commu-nicate a unique device description to a network.
System LocationThis parameter is user-settable to any alpha-numeric string of 30 characters or less. The intended use is to communicate a unique description of the device location to a network. This object is stored in presets.
System ContactThis parameter is user-settable to any alpha-numeric string of 30 characters or less. The intended use is to communicate the designated contact person (in case of service or other network issue) to the network. This object is stored in presets.
Firmware VersionThis parameter is configured at the factory and is read-only. The intended use is to commu-nicate the presently loaded CobraNet module firmware version to a network.
MAC AddressThis parameter is configured at the factory and is read-only. The setting defines a unique IEEE802-recognized address for use with any Ethernet based network.
IP AddressThis IP address is for the CobraNet control ONLY. It is used by SNMP agents such asCobraNet Disco to control CobraNet specific functions.
This IP address should not be confused with the control system’s IP address that is used to control and monitor the USP3/CN.
5.5.2 CobraNet Input Routing
CobraNet input routing includes the following controls:
CobraNet Receive BundlesThe PIP-USP3/CN can receive four unique CobraNet Bundles (RxA, RxB, RxC, RxD). Each Bundle includes an “Active” indicator to indicate whether the particular Bundle is being actively transmitted onto the network.
*For the most comprehensive information available on CobraNet technology, visit Peak Audio’s CobraNet website at www.peakaudio.com.
**CobraCAD is a software tool that provides a simple graphic user interface for the design of CobraNet networks. It is available for download from Peak Audio’s website at www.peakaudio.com.
136763-7_4-08_networked_pip-series_reference_manual.fm Page 43 Monday, March 17, 2008 11:17 AM

Networked PIP Series
page 44 Reference Manual
CobraNet Receive ChannelsEach CobraNet Bundle contains up to eight digital audio channels. Each channel is selected at its respective transmitter to contain none, 16-, 20- or 24-bit audio sample data. A total of two audio channels can be processed by the PIP-USP3/CN at any one time. Any of the eight channels on a bundle can be can be routed to either of the two processing channel inputs on the PIP-USP3/CN. • Channel Label: Each received digital audio channel can be assigned a user-specified label to indicate intended use, source or other information. The label is stored in presets along with the bundle number and receive channel information.
5.5.3 CobraNet Output Routing
CobraNet output routing includes the following controls:
CobraNet Transmit BundlesThe PIP-USP3/CN can transmit up to four unique CobraNet Bundles (TxA, TxB, TxC, TxD). Each Transmit Bundle includes the following controls and monitor functions:• Receiver Count: This meter reports the number of CobraNet nodes actively receiving the Bundle being sourced to the network by this bundle. • Transmit Position: This meter reports the transmitter’s relative position as assigned by th e CobraNet Conductor. Lower numbers are transmitted before higher numbers. • Transmit Priority: This control adjusts the relative priority for the particular transmit-ter. Higher numbers indicate a higher priority. One may choose to increase the transmitter priority for an emergency page microphone in a heavily loaded network. The Transmit Pri-ority object is stored in presets.
CobraNet Transmit ChannelsEach CobraNet Bundle can contain up to eight unique digital audio channels. Each channel is selected at its respective transmitter to contain none, 16-, 20- or 24-bit audio sample data. A total of 32 channels can be transmitted by a single PIP-USP3/CN at any one time; however, only 4 channels can be sent on up to four Bundles. The CobraNet Transmit Chan-nel object is stored in presets.
• Channel Label: Each transmitted digital audio channel can be assigned a user-speci-fied label to indicate intended use, source or other information. The Channel Label object is stored in presets. The USP3/CN provides four audio channels onto the CobraNet network.
• Output Amplifier Audio: By sampling the actual output audio of the amplifer, Cobra-Net allows remote access and monitoring of each amplifier channel at the output of the amplifier! CobraNet extends the "Listen Bus" feature found on other PIP modules to any network user, allowing them to listen to the output of any networked amplifier from any location on the network.
• Balanced Audio Inputs: This allows the USP3/CN to be used not only as a CobraNet receiver for amplifier audio, it provides a remote access point to allow audio to go onto the CobraNet network. In applications where a single pair of audio inputs is required into CobraNet, this feature provides a very cost effective means of CobraNet Input.
136763-7_4-08_networked_pip-series_reference_manual.fm Page 44 Monday, March 17, 2008 11:17 AM

page 45Reference Manual
Networked PIP Series
6 Audio Signal Wiring and Network BasicsThis section provides additional information about audio signal wiring and HiQnet or Network basics. For more information about any of these topics, contact Crown Technical Support. For AUX connector wiring, see Section 7.
6.1 A Closer Look at Audio Signal Wiring
Balanced audio inputs connect to the PIP through one or two removable barrier blocks. The audio cables should be wired in the following manner (See Figures 6.1 and 6.2). If possible, the use of balanced wiring is strongly recommended. Some important guide-lines follow.
• Always use shielded wire. The higher the density of the shield (the outer conductor) the better. Spiral wrapped shield is not recommended.• When using unbalanced lines keep the cables as short as possible. Avoid lengths greater than 10 feet (3 meters).• Do not run the audio input cables together with the high-level wiring such as loud-speaker wires or AC cords. (This lessens the chance of hum and noise being induced into the input cables.)• Turn the entire sound system off before changing any connections. Turn the level con-trols down before powering the system back up. Crown is not liable for damage incurred when any transducer or component is overdriven.
DO NOT USE THE CHANNEL 2 INPUT if the amplifier is used in either Bridge-Mono orParallel-Mono mode.
For additional information on audio input wiring please refer to the Crown Amplifier Appli-cation Guide available online at www.crownaudio.com. It contains helpful information on preventing unwanted subsonic frequencies, radio frequency interference, ground loops, and feedback oscillation.
Figure 6.2 Input Wiring for the PIP-USP3/CN
Figure 6.1 Input Wiring for the PIP-Lite and PIP-USP3
136763-7_4-08_networked_pip-series_reference_manual.fm Page 45 Monday, March 17, 2008 11:17 AM

Networked PIP Series
page 46 Reference Manual
6.2 Network Basics
HiQnet and TCP/IQ are network based protocols that have the ability to control and monitor networked components over a common TCP/IP network. For components that have Cobra-Net capability, HiQnet and TCP/IQ have the ability to control and monitor these compo-nents over the same Ethernet network used for CobraNet audio, resulting in a single Category-5 connection for control, monitoring, and digital audio. Figure 6.3 shows a typi-cal TCP/IP network.
TCP/IP offers a number of advantages over other non-network communications platforms.• The use of “off-the-shelf” networking hardware. This technology makes use of network connectivity and hardware commonly used in the computer industry, making it both low-cost and readily available.• Better Performance. The capacity for real-time display of meters is greatly enhanced through the use of the wide-bandwidth network.• Single connection for both CobraNet audio and control communications. Gone are the days of multiple connections to a component for audio and control. A single CAT5 connection handles it all.
Figure 6.3 A TCP/IP Network
136763-7_4-08_networked_pip-series_reference_manual.fm Page 46 Monday, March 17, 2008 11:17 AM

page 47Reference Manual
Networked PIP Series
Some of the features of HiQnet and TCP/IQ include:• Ability to quickly discover all components connected to the network.• Synchronization of multiple control points on a network.• Components on different Local Area Networks (LANs) through the use of an IP router.• Component firmware upgrades via the network.
Ethernet Networks are established through the use of either a hub or a switch. These devices are centralized in the network and transfer the Ethernet data from point to point. Ethernet data is transferred in data packets that have addresses coded into their structure. Hubs and switches decipher these addresses and route the data packets to the appropriate component. Hubs do this by taking packets from any port and sending them out all other ports. Switches, on the other hand, are more intelligent and examine each packet’s address, sending that packet only to the addressed component. This results in a much more efficient data flow.
Communications between networks is allowed, but requires the use of a special piece of equipment called an IP Router. The router acts as a Gateway to allow this communication to exist. Any data traffic that is to go to the other network is routed through the IP Router. The CobraNet data is held behind but IP data goes through.
Each IQ Component has three identifiers that are used in theTCP/IQ or HiQnet system:• Media Access Control (MAC) Address• Internet Protocol (IP) Address• IQ or HiQnet Address
Let’s explain each identifier.
Media Access Control (MAC) Address: This is a physical address that specifies a specific physical network component. This address is predefined during manufacture and cannot be modified. No two network components have the same MAC address and each component is uniquely identified by its MAC address. This 48 bit address is located on the outside of every IQ component and is shown in hexadecimal format as 6 two-byte octets such as: 00-0A-40-00-DC-2F
Internet Protocol (IP) Address: The IP address of a component is assigned during the setup of the network and identifies the IQ component to a larger audience. Because the MAC address is limited to a single physical LAN, communications between LANs is impos-sible solely through the use of the MAC address. The IP address allows components and controllers on other networks to communicate with each other through the use of an IP Router as shown in Figure 6.4.
136763-7_4-08_networked_pip-series_reference_manual.fm Page 47 Monday, March 17, 2008 11:17 AM
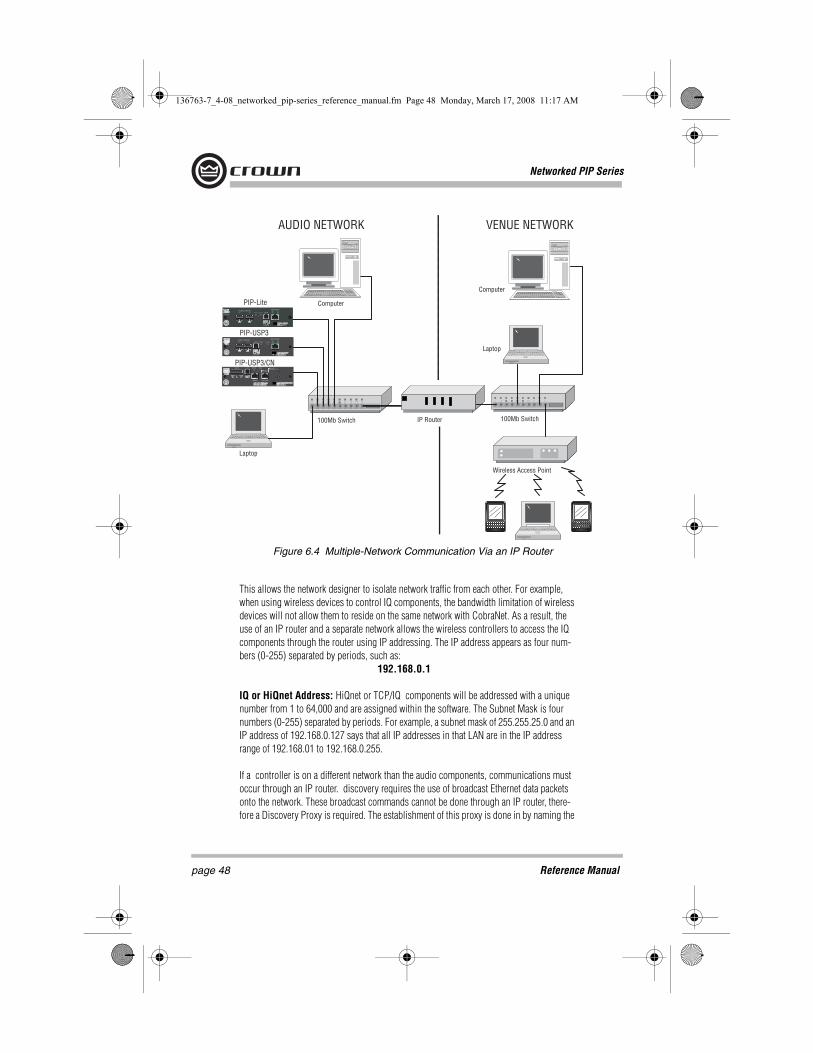
Networked PIP Series
page 48 Reference Manual
This allows the network designer to isolate network traffic from each other. For example, when using wireless devices to control IQ components, the bandwidth limitation of wireless devices will not allow them to reside on the same network with CobraNet. As a result, the use of an IP router and a separate network allows the wireless controllers to access the IQ components through the router using IP addressing. The IP address appears as four num-bers (0-255) separated by periods, such as: 192.168.0.1
IQ or HiQnet Address: HiQnet or TCP/IQ components will be addressed with a unique number from 1 to 64,000 and are assigned within the software. The Subnet Mask is four numbers (0-255) separated by periods. For example, a subnet mask of 255.255.25.0 and an IP address of 192.168.0.127 says that all IP addresses in that LAN are in the IP address range of 192.168.01 to 192.168.0.255.
If a controller is on a different network than the audio components, communications must occur through an IP router. discovery requires the use of broadcast Ethernet data packets onto the network. These broadcast commands cannot be done through an IP router, there-fore a Discovery Proxy is required. The establishment of this proxy is done in by naming the
Figure 6.4 Multiple-Network Communication Via an IP Router
Computer
Laptop
100Mb Switch
PIP-Lite
PIP-USP3
PIP-USP3/CN
100Mb SwitchIP Router
Computer
Wireless Access Point
Laptop
AUDIO NETWORK VENUE NETWORK
136763-7_4-08_networked_pip-series_reference_manual.fm Page 48 Monday, March 17, 2008 11:17 AM

page 49Reference Manual
Networked PIP Series
IP address of a known component on the component network as the Discovery Proxy within IQWin or TCPIQ Util. In System Architect it is done in Tools > Options > Network Settings > Manage Network Connections.
6.3 A Closer Look at CobraNet (PIP-USP3/CN only)
Licensed by Peak Audio, CobraNet is a protocol, firmware and hardware that lets you transmit digital audio over a 100Base-T Fast-Ethernet network. This section provides an overview of CobraNet. Peak Audio has provided a number of technical papers that describe CobraNet in detail. These papers are available at: http://www.PeakAudio.com.
6.3.1 Fast Ethernet
(100Base-T)
Fast Ethernet (100Base-T) runs at 100Mbps (Megabits per second). It uses a hub or net-work switch to interconnect all network nodes (components). This forms a star network (see Figure 6.5). In a star network, all PCs are connected to a centralized hub or switch. Messages are sent from the originating PC to the hub, which then transmits the message either to the whole network or, if a switched hub (network switch) is used, to the destina-tion device only.
Figure 6.5 Star Network Topology
136763-7_4-08_networked_pip-series_reference_manual.fm Page 49 Monday, March 17, 2008 11:17 AM

Networked PIP Series
page 50 Reference Manual
In larger Fast Ethernet networks, additional hubs, concentrators, and other network hardware are used to form a larger network, as shown in Figure 6.6.
Today, commonly available networking cards are 10/100Base-T capable, which allows them to be used on either 10BaseT or 100Base-T networks.
The maximum length of cable for CobraNet is the same as for Ethernet:100 meters over CAT-5 copper cable, 2 kilometers over multimode fiber. Proprietary “Fast Ethernet via single mode fiber” networks can reach even further.
6.3.2 Audio Specs
Sample rate: CobraNet can handle sample rates of 48 kHz or 96 kHz, but the PIPs work only at 48 kHz. They cannot receive audio from devices operating at 96 kHz.
Bit depth: Set each channel to transmit 16-, 20- or 24-bit audio data as desired.
Latency: There are three choices of latency through the network: 5.333 ms, 2.66 ms, or 1.44 ms.
6.3.3 Bundles and Audio Channels
You will be assigning all audio channels to groups called Bundles for transmission over the CobraNet network. Bundles were formerly called Network Channels.
A bundle can carry up to 8 audio channels. Up to eight bundles can be sent in a 100 Mbps line, depending on the signal's bit depth and sampling rate.
Figure 6.6 Multi-Star Topology
136763-7_4-08_networked_pip-series_reference_manual.fm Page 50 Monday, March 17, 2008 11:17 AM

page 51Reference Manual
Networked PIP Series
The usual assignment is 8 channels at 20 bits. You can use fewer channels per bundle, but maximum size bundles are suggested for the most efficient use of network bandwidth. If 24-bit data is desired, then only 7 audio channels can be loaded into a single Bundle.In IQwic, you create audio connections between sending devices (transmitters) and receiv-ing devices (receivers). For example, a mixer could be a transmitter, and a power amp could be a receiver.
You assign each connection a Bundle number. The Bundle number indicates which devices are communicating with each other.
Also in IQwic or System Architect, you address each connection as Multicast or Unicast. A Multicast (Broadcast) connection is from one transmitter to multiple receivers. A Unicast connection is from one transmitter to one receiver. For example, if you send a mixer's digi-tal audio signal to several power amps, the signal would be Multicast. Unicast is most used on “switched” networks requiring more than 64 channels.
You specify a connection as Multicast or Unicast by the delivery address it you give it in IQwic or System Architect. 255 and lower is Multicast (Broadcast); 256 and up is Unicast.
6.3.4 The Conductor
A CobraNet system is coordinated by one audio device in the network called the Conductor. It regulates the CobraNet digital audio traffic on the CobraNet network. That is, the Conduc-tor is the master clock for the rest of the network.
You choose one device to be the network conductor based on a priority scheme. The Con-ductor indicator will light on the CobraNet device that is serving as the conductor.
The Conductor handles time-division multiplexing and clock recovery on the network. The Conductor periodically broadcasts a well-defined “beat” packet to all components to recover synchronous timing information. The “beat” also specifies which addresses can transmit at certain time slots within the “beat” period.
Each transmitting device is allowed to transmit in a given time-slot within the Conductor-controlled isochronous cycle time. The time-slot is determined by the assigned bundle pri-ority. Higher bundle priorities receive lower-numbered positions and are transmitted first.
6.3.5 Repeater Networks
CobraNet can operate on repeater networks or switched networks. Repeater networks use low-cost Ethernet hubs. Switched networks use network switches.
Hubs send all data packets to all connected nodes. That is, all devices in the network receive data -- even the Unicast data. Switches send specific packets to specific devices.
Up to 8 full-loaded Bundles (64 audio channels) are allowed on a repeater network. More Bundles may be allowed if they are loaded with less than the full eight audio channels.
Generally, a repeater-based CobraNet network must carry only CobraNet data to guarantee reliable transmission of audio packets. Use of repeater networks is not recommended.
136763-7_4-08_networked_pip-series_reference_manual.fm Page 51 Monday, March 17, 2008 11:17 AM

Networked PIP Series
page 52 Reference Manual
6.3.6 Switched Networks
A more complex CobraNet network can be built using Ethernet switches. Switches do not simply broadcast each and every packet to all nodes. Instead, they check each incoming data packet to determine its destination and (very quickly) transmit the data to only that des-tination port. This allows for more network data flow, more Bundles and more audio chan-nels.
In effect, each network port in an audio component has 100MB of bandwidth. The network can be as large as 100MB times the number of ports on the network.
Another advantage of switched networks is “full-duplex” connections between compo-nents. A full-duplex link allows simultaneous send and receive over the same Ethernet con-nection.
In theory, each connection can simultaneously send and receive up to 64 channels per node, for a total of 128 channels. However, current CobraNet components can handle only 64 channels (32 in and 32 out).
Switches and full-duplex connections allow up to 128 channels per component, and greater than 3000 individual Unicast channels.
Switched networks also allow controllers (such as computers) to be on the same network as CobraNet devices.
136763-7_4-08_networked_pip-series_reference_manual.fm Page 52 Monday, March 17, 2008 11:17 AM

page 53Reference Manual
Networked PIP Series
7 Advanced Features and Options7.1 Using the AUX Connector
The AUX connector offers a means to tap some of the flexibility of the Harman Pro System Architect or Crown IQ System. It can be used to enable peripherals, send a signal to another system component, and send a line-level audio signal of the amplifier's output.
The AUX connector is an RJ-11 type. Pins 3 and 4 are used as a control output. Pins 2 and 3 function as a control input. Pin 5 is a voltage supply pin for use with the control input. Pins 1 and 6 support the Listen Bus or Foldback feature in the IQ-PIP-Lite and IQ-PIP-USP3 only.
7.1.1 AUX Output
The AUX output provides a +15 VDC output, current limited to 10 mA, which can be switched on or off under software control. In its basic mode, the AUX output can be used to control auxiliary equipment. To control AC-line-powered equipment the AUX output must actuate a relay. The relay would then turn on the auxiliary equipment. See Figure 7.1.
Figure 7.1 AUX Output Control of a Relay
136763-7_4-08_networked_pip-series_reference_manual.fm Page 53 Monday, March 17, 2008 11:17 AM
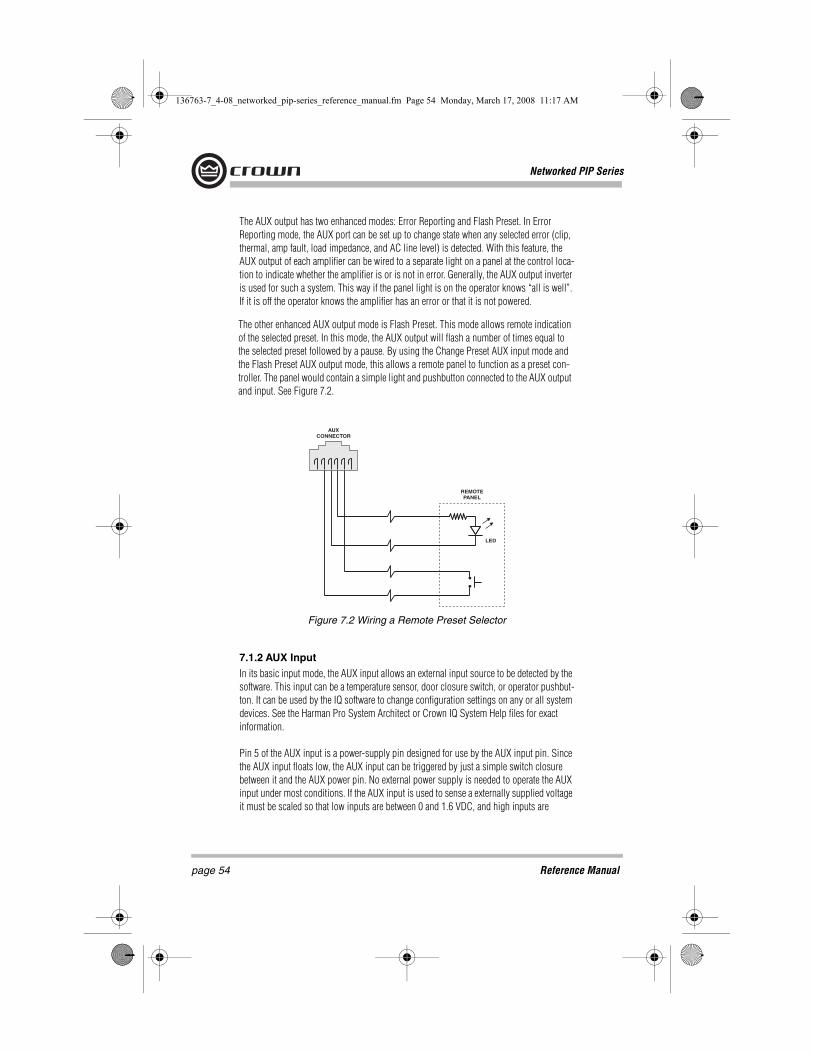
Networked PIP Series
page 54 Reference Manual
The AUX output has two enhanced modes: Error Reporting and Flash Preset. In Error Reporting mode, the AUX port can be set up to change state when any selected error (clip, thermal, amp fault, load impedance, and AC line level) is detected. With this feature, the AUX output of each amplifier can be wired to a separate light on a panel at the control loca-tion to indicate whether the amplifier is or is not in error. Generally, the AUX output inverter is used for such a system. This way if the panel light is on the operator knows “all is well”. If it is off the operator knows the amplifier has an error or that it is not powered.
Figure 7.2 Wiring a Remote Preset Selector
The other enhanced AUX output mode is Flash Preset. This mode allows remote indication of the selected preset. In this mode, the AUX output will flash a number of times equal to the selected preset followed by a pause. By using the Change Preset AUX input mode and the Flash Preset AUX output mode, this allows a remote panel to function as a preset con-troller. The panel would contain a simple light and pushbutton connected to the AUX output and input. See Figure 7.2.
7.1.2 AUX Input
In its basic input mode, the AUX input allows an external input source to be detected by the software. This input can be a temperature sensor, door closure switch, or operator pushbut-ton. It can be used by the IQ software to change configuration settings on any or all system devices. See the Harman Pro System Architect or Crown IQ System Help files for exact information.
Pin 5 of the AUX input is a power-supply pin designed for use by the AUX input pin. Since the AUX input floats low, the AUX input can be triggered by just a simple switch closure between it and the AUX power pin. No external power supply is needed to operate the AUX input under most conditions. If the AUX input is used to sense a externally supplied voltage it must be scaled so that low inputs are between 0 and 1.6 VDC, and high inputs are
136763-7_4-08_networked_pip-series_reference_manual.fm Page 54 Monday, March 17, 2008 11:17 AM

page 55Reference Manual
Networked PIP Series
between 4 and 15 VDC. Externally supplied voltages should be referenced to AUX ground on pin 3.
The AUX input features seven enhanced modes. The first six modes allow the AUX input to mute or power-down either or both channels. The AUX Input Inversion Control allows either a high or low AUX input to activate these functions. These modes can be used for emer-gency shutdown for a fire alarm system. A simple switch closure from the alarm system would disable an entire sound system when a fire alarm is activated.
7.1.3 Listen Bus Wiring
The AUX port is also used for the Listen Bus or Foldback connection. Pins 1 and 6 of the connector provide a balanced line-level audio output that can be selectively driven by either channel under software control. Multiple IQ-PIP-USP3 modules can have their Listen Bus outputs wired onto a single bus allowing the system operator to listen to any of their out-puts.
Figure 7.3 Listen Bus Wiring
6 5 4 3 2 1
AUXCONNECTOR
TO BALANCEDINPUT
+
–
136763-7_4-08_networked_pip-series_reference_manual.fm Page 55 Monday, March 17, 2008 11:17 AM

Networked PIP Series
page 56 Reference Manual
8 Specifications
Connectors: See Figure 2.1, 2.2 or 2.3.Network: RJ-45 connector forming an IEEE 802.3 Ethernet NIC connection. AUX: RJ-11.Channel 1 and Channel 2 balanced inputs:PIP-Lite and PIP-USP3: 3-pin, 5mm removable barrier block (one per channel). PIP-USP3/CN: One 5-pin, 5mm removable barrier block.
Indicators: See Figure 2.1, 2.2 or 2.3. A yellow DATA indicator flashes when the PIP receives a valid command that is addressed to the PIP. A green PRESET indicator flashes to indicate the selected and active user preset.
PIP-Lite and PIP-USP3: A yellow LINK ACT indicator (integrated in the network connector) indicates a valid Ethernet link when lit and the presence of Ethernet traffic when flashing. A green 100 MB indicator (integrated in the network connector) indicates a valid 100 Megabit connection.
PIP-USP3/CN: A green LINK indicator (integrated in the network connector ) indicates a valid Ethernet link when lit and the presence of Ethernet traffic when flashing. The left indi-cator lights yellow on the port in use, and will blink if the device is also the conductor (tim-ing reference). 7A yellow FAULT indicator shows that an unexpected condition within the CobraNet interface has been detected.
Memory Backup: 4 Megabit nonvolatile FLASH memory for backup of run-time settings, presets, and program storage. Capable of 10,000 write cycles.
Communications: 100Mb Fast Ethernet conforming to IEEE 802.3.
Power Requirements:PIP-Lite: Approx. 5 watts.PIP-USP3: Approx. 7 watts.PIP-USP3/CN: Approx. 9 watts.
136763-7_4-08_networked_pip-series_reference_manual.fm Page 56 Monday, March 17, 2008 11:17 AM

page 57Reference Manual
Networked PIP Series
Audio Performance: Input Impedance: Nominally 20 kilohms balanced, 10 kilohms unbalanced. Maximum Analog Input Level: + 20 dBu. ADC Conversion (USP3, USP3/CN only) USP3: 24 bit USP3/CN: 18 bit DSP Processing (USP3, USP3/CN only): 32 bit, Floating Point DAC Conversion (USP3, USP3/CN only): 24 bit Signal to Noise Ratio (USP3, USP3/CN only): 70 dB typical (A-weighted, 20Hz to 20kHz). Dynamic Range: PIP-Lite: >110 dB (A-weighted, 20 Hz to 20 kHz) PIP-USP3: >105 dB (A-weighted, 20Hz to 20kHz) PIP-USP3/CN: >105 dB (A-weighted, 20Hz to 20 kHz) Crosstalk (USP3, USP3/CN only): > 60 dB @ 1KHz. Common Mode Rejection (CMR): 50 dB typical. Total Harmonic Distortion + Noise (THD +N): PIP-Lite: < 0.05% (1 kHz, 0 dBu). PIP-USP3 and IQ-PIP-USP3/CN: < 0.05% (20Hz to 20kHz). Frequency Response: ± 0.5 dB, 20Hz to 20kHz. Input/Output Monitor Accuracy: Typically ±1dB.
Table 1: Latency
PIP-USP3 PIP-USP3/CN
A/D conversion 250 µs 312 µs
D/A conversion 135 µs 135 µs
DSP processing 665 µs 665 µs
8 Specifications
136763-7_4-08_networked_pip-series_reference_manual.fm Page 57 Monday, March 17, 2008 11:17 AM

Networked PIP Series
page 58 Reference Manual
9 Using the PIP-Lite with theIQ-PIP-USP2 AdapterThe IQ-PIP-USP2 Adapter allows many older Crown PIP-compatible amplifiers (i.e., Macro-Tech® 00 Series, Com-Tech 00 Series, and Studio Reference Series amplifiers) to access the power and versatility of the Crown PIP-Lite module. The PIP-USP3 and PIP-USP3/CN do not work with the IQ-PIP-USP2 Adapter.
The IQ-PIP-USP2 Adapter can be installed into the following Crown amplifier models:CT-200*, CT-400*, CT-800*, CT-1600*MA-600, MA-1200, MA-2400 MA-3600VZ, MA-5000VZ**MA-24x6, MA-36x12Macro Reference*Studio Reference IStudio Reference II
*Important: Some of the first generation Com-Tech Series and Macro-Reference amplifi-ers have soldered 16-pin ribbon and 5-pin signal cable connections, rather than the modu-lar type described in Section 3.3. If you find that your original Com-Tech Series or Macro-Reference amplifier has the soldered type cable connections, contact the Crown Technical Support Group for installation instructions.
**Important: Some newer Macro-Tech MA-5000VZ amplifiers are already PIP2-compati-ble and can accept the PIP-Lite directly. Older MA-5000VZ amplifiers are not PIP2-com-patible. Those amplifiers have soldered 16-pin ribbon and 5-pin signal connections, rather than the modular type described in Section 3.3. If you find that your MA-5000VZ amplifier has the soldered type cable connections, contact the Crown Technical Support Group for installation instructions.
Important: The IQ-PIP-USP2 Adapter is designed for use with the IQ-PIP-USP2 module and PIP-Lite ONLY, and will NOT work with the IQ-PIP-USP2/CN, USP3, USP3/CN, or any other PIP module.
136763-7_4-08_networked_pip-series_reference_manual.fm Page 58 Monday, March 17, 2008 11:17 AM

page 59Reference Manual
Networked PIP Series
Figure 9.1 IQwic “General” Tab Showing Identification of IQ-PIP-USP2 Adapter
Please note the following differences when using the PIP-Lite with the IQ-PIP-USP2 Adapter:
Different Identification within the software• The software recognizes and identifies the IQ-PIP-USP2 Adapter itself, rather than the host amplifier module (see Figure 9.1).• The serial number is fixed to “AFTERMKT.”• The Date Code is fixed to the date of the IQ-PIP-USP2 Adapter manufacture.
136763-7_4-08_networked_pip-series_reference_manual.fm Page 59 Monday, March 17, 2008 11:17 AM

Networked PIP Series
page 60 Reference Manual
10 Troubleshooting
Problem: DATA indicator does not flash or illuminate, even though a valid command was sent.
Possible causes:• Command was not addressed to the PIP.• Network configuration cable is disconnected or broken.
To assist with troubleshooting, an option that forces the data indicator to remain lit is available through the software. Some Crown amplifiers also have a data indicator on their front panels. In these cases this indi-cator will light simultaneously with the PIP's data indicator.
Problem: Green Preset indicator is flashing, or is not flashing.
Possible cause: This is not a problem. This indicator signals the number of the current preset, if active, by flashing a series of flashes equal to the current preset number. A preset is considered “active” ifthe PIP settings match those in the selected preset. If a change is made to any setting then the preset is considered “inactive,” and the indicator stops flashing.
PIP-USP3/CN ONLY
Problem: Green LINK indicator is not lit.Possible cause: Ethernet link is not present. Check Ethernet con-nections to switch. PIP-USP3/CN is not connected to100Base-T switch.
PIP-USP3/CN ONLY
Problem: Both right indicators flash yellow in unison to report a fatal error.Possible cause: An unexpected condition within the CobraNet inter-face has been detected.
IN USE/CONDUCTOR
LINK/ACTIVITY
IN USE/CONDUCTOR
LINK/ACTIVITY
NOTE: Actual product artwork may vary slightly.
136763-7_4-08_networked_pip-series_reference_manual.fm Page 60 Monday, March 17, 2008 11:17 AM
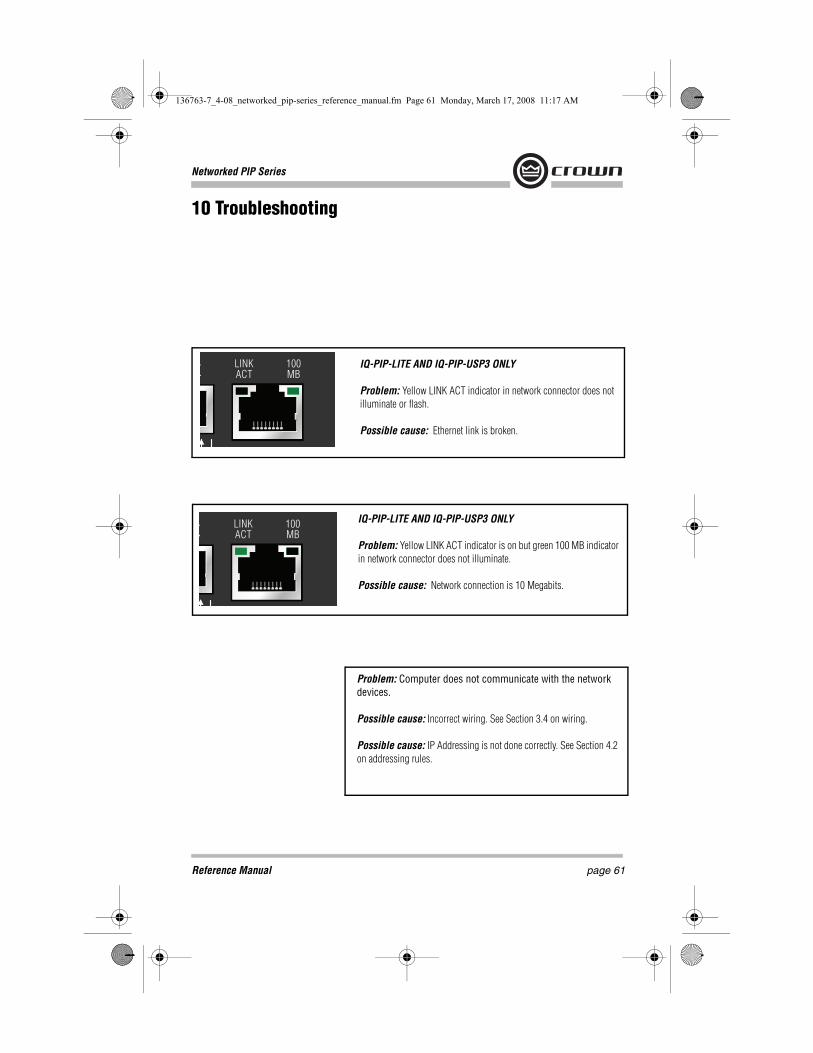
page 61Reference Manual
Networked PIP Series
IQ-PIP-LITE AND IQ-PIP-USP3 ONLY
Problem: Yellow LINK ACT indicator in network connector does not illuminate or flash.
Possible cause: Ethernet link is broken.
IQ-PIP-LITE AND IQ-PIP-USP3 ONLY
Problem: Yellow LINK ACT indicator is on but green 100 MB indicator in network connector does not illuminate.
Possible cause: Network connection is 10 Megabits.
10 Troubleshooting
Problem: Computer does not communicate with the network devices.
Possible cause: Incorrect wiring. See Section 3.4 on wiring.
Possible cause: IP Addressing is not done correctly. See Section 4.2 on addressing rules.
136763-7_4-08_networked_pip-series_reference_manual.fm Page 61 Monday, March 17, 2008 11:17 AM

Networked PIP Series
page 62 Reference Manual
11 Service11.1 International and Canada ServiceService must be done at the Crown factory. Contact your local distributor for more information.
11.2 US ServiceService must be done at the Crown factory (see Sections 9.2.1 and 9.2.2). It is important that you have your copy of the bill of sale as your proof of purchase.
11.2.1 Factory ServiceCrown accepts no responsibility for non-serviceable product that is sent to us for factory repair. It is the owner’s responsibility to ensure that their product is serviceable prior to sending it to the factory. Serviceable product list is available at http://crownweb.crownintl.com/crownrma/. For more information, please contact us direct.
A Service Return Authorization (SRA) is required for product being sent to the factory for repair. An SRA can be completed online at www.crownaudio.com/support/factserv.htm. If you do not have access to the web, please call Crown’s Customer Service at 574.294.8200 or 800.342.6939 extension 8205.
For warranty service, we will pay for ground shipping both ways in the United States. Contact Crown Customer Service to obtain prepaid shipping labels prior to sending the unit. Or, if you prefer, you may prepay the cost of shipping, and Crown will reimburse you. Send copies of the shipping receipts to Crown to receive reimbursement.
Your repaired unit will be returned via UPS ground. Please contact us if other arrangements are required.
11.2.2 Factory Service Shipping Instructions1. Service Return Authorization (SRA) is required for product being sent to the factory for ser-
vice. Please complete the SRA by going to www.crownaudio.com/support/factserv.htm. If you do not have access to our website, call 1.800.342.6939, extension 8205 and we'll create the SRA for you.
2. See packing instructions that follow.
3. Ship product to: CROWN AUDIO FACTORY SERVICE 1718 W MISHAWKA RD. ELKHART, IN 46517
4. Use a bold black marker and write the SRA number on three sides of the box.
5. Record the SRA number for future reference. The SRA number can be used to check the repair status.
136763-7_4-08_networked_pip-series_reference_manual.fm Page 62 Monday, March 17, 2008 11:17 AM

page 63Reference Manual
Networked PIP Series
11.2.3 Packing InstructionsImportant: These instructions must be followed. If they are not followed, Crown Audio, Inc. assumes no responsibility for damaged goods and/or accessories that are sent with your unit.
1. Fill out and include the Crown Audio Factory Service Information sheet in the back of this man-ual.
2. Do not ship any accessories (manuals, cords, hardware, etc.) with your unit. These items are not needed to service your product. We will not be responsible for these items.
3. When shipping your Crown product, it is important that it has adequate protection. Place the unit in a static-proof bag. We recommend you use the original pack material when returning the product for repair. If you do not have the original box, please call Crown at 800.342.6939 or 574.294.8210 and order new pack material. (Do not ship your unit in a wood or metal cabinet.)
4. If you provide your own shipping pack, the minimum recommended requirements for materials are as follows:
a. 200 P.S.I. burst test, Double-Wall carton that allows for 2-inch solid Styrofoam on all six sides of unit or 3 inches of plastic bubble wrap on all six sides of unit.
b. Securely seal the package with an adequate carton sealing tape.
c. Do not use light boxes or “peanuts”. Damage caused by poor packaging will not be covered under warranty.
5. Enclose the completed Crown Audio Factory Service Information form (or securely attach it to the outside of carton) and re-seal the shipping pack with a sturdy carton sealing tape.
11.2.4 Estimate ApprovalApproval of estimate must be given within 30 days after being notified by Crown Audio Inc. Units still in the possession of Crown after 30 days of the estimate will become the property of Crown Audio Inc.
11.2.5 Payment of Non-Warranty Repairs
Payment on out-of-warranty repairs must be received within 30 days of the repair date. Units unclaimed after 30 days become the property of Crown Audio Inc.
If you have any questions, please contact Crown Factory Service.
Crown Factory Service1718 W. Mishawaka Rd.
Elkhart, Indiana 46517 U.S.A.Telephone:
574-294-8200800-342-6939 (North America,
Puerto Rico, and Virgin Islands only)Facsimile:
574-294-8301 (Technical Support)574-294-8124 (Factory Service)
Internet: http://www.crownaudio.com
11 Service
136763-7_4-08_networked_pip-series_reference_manual.fm Page 63 Monday, March 17, 2008 11:17 AM

Networked PIP Series
page 64 Reference Manual
12 Warranty UNITED STATES & CANADA
SUMMARY OF WARRANTY
Crown International, 1718 West Mishawaka Road, Elkhart, Indiana 46517-4095 U.S.A. warrants to you, the ORIGINAL PURCHASER and ANY SUBSEQUENT OWNER of each NEW Crown product, for a period of three (3) years from the date of purchase by the original purchaser (the “warranty period”) that the new Crown product is free of defects in materials and workmanship. We further warrant the new Crown product regardless of the reason for failure, except as excluded in this Warranty.
Warranty is only valid within the country in which the product was purchased.
ITEMS EXCLUDED FROM THIS CROWN WARRANTY
This Crown Warranty is in effect only for failure of a new Crown product which occurred within the Warranty Period. It does not cover any product which has been damaged because of any intentional misuse, accident, negligence, or loss which is covered under any of your insurance contracts. This Crown Warranty also does not extend to the new Crown product if the serial number has been defaced, altered, or removed.
WHAT THE WARRANTOR WILL DO
We will remedy any defect, regardless of the reason for failure (except as excluded), by repair, replacement, or refund. We may not elect refund unless you agree, or unless we are unable to provide replacement, and repair is not practical or cannot be timely made. If a refund is elected, then you must make the defective or malfunctioning product available to us free and clear of all liens or other encum-brances. The refund will be equal to the actual purchase price, not including interest, insurance, closing costs, and other finance charges less a reasonable depreciation on the product from the date of original purchase. Warranty work can only be performed at our authorized service centers or at the factory. Warranty work for some products can only be performed at our factory. We will remedy the defect and ship the product from the service center or our factory within a reasonable time after receipt of the defective product at our authorized service center or our factory. All expenses in remedying the defect, including surface shipping costs in the United States, will be borne by us. (You must bear the expense of shipping the product between any foreign country and the port of entry in the United States including the return shipment, and all taxes, duties, and other customs fees for such foreign shipments.)
HOW TO OBTAIN WARRANTY SERVICE
You must notify us of your need for warranty service within the warranty period. All components must be shipped in a factory pack, which, if needed, may be obtained from us free of charge. Corrective action will be taken within a reasonable time of the date of receipt of the defective product by us or our authorized service center. If the repairs made by us or our authorized service center are not satis-factory, notify us or our authorized service center immediately.
DISCLAIMER OF CONSEQUENTIAL AND INCIDENTAL DAMAGES
YOU ARE NOT ENTITLED TO RECOVER FROM US ANY INCIDENTAL DAMAGES RESULTING FROM ANY DEFECT IN THE NEW CROWN PRODUCT. THIS INCLUDES ANY DAMAGE TO ANOTHER PRODUCT OR PRODUCTS RESULTING FROM SUCH A DEFECT. SOME STATES DO NOT ALLOW THE EXCLUSION OR LIMITATIONS OF INCIDENTAL OR CONSEQUENTIAL DAMAGES, SO THE ABOVE LIMITATION OR EXCLUSION MAY NOT APPLY TO YOU.
WARRANTY ALTERATIONS
No person has the authority to enlarge, amend, or modify this Crown Warranty. This Crown Warranty is not extended by the length of time which you are deprived of the use of the new Crown product. Repairs and replacement parts provided under the terms of this Crown Warranty shall carry only the unexpired portion of this Crown Warranty.
DESIGN CHANGES
We reserve the right to change the design of any product from time to time without notice and with no obligation to make corresponding changes in products previously manufactured.
LEGAL REMEDIES OF PURCHASER
THIS CROWN WARRANTY GIVES YOU SPECIFIC LEGAL RIGHTS, YOU MAY ALSO HAVE OTHER RIGHTS WHICH VARY FROM STATE TO STATE. No action to enforce this Crown Warranty shall be commenced after expiration of the warranty period.
THIS STATEMENT OF WARRANTY SUPERSEDES ANY OTHERS CONTAINED IN THIS MANUAL FOR CROWN PRODUCTS. 9/07
136763-7_4-08_networked_pip-series_reference_manual.fm Page 64 Monday, March 17, 2008 11:17 AM

page 65Reference Manual
Networked PIP Series
12 Warranty (continued)
WORLDWIDE EXCEPT USA & CANADA
SUMMARY OF WARRANTY
Crown International, 1718 West Mishawaka Road, Elkhart, Indiana 46517-4095 U.S.A. warrants to you, the ORIGINAL PURCHASER and ANY SUBSEQUENT OWNER of each NEW Crown1 product, for a period of three (3) years from the date of purchase by the original pur-chaser (the “warranty period”) that the new Crown product is free of defects in materials and workmanship, and we further warrant the new Crown product regardless of the reason for failure, except as excluded in this Warranty.
Warranty is only valid within the country in which the product is purchased.
1 Note: If your unit bears the name “Amcron,” please substitute it for the name “Crown” in this warranty.
ITEMS EXCLUDED FROM THIS CROWNWARRANTY
This Crown Warranty is in effect only for failure of a new Crown product which occurred within the Warranty Period. It does not cover any product which has been damaged because of any intentional misuse, accident, negligence, or loss which is covered under any of your insurance contracts. This Crown Warranty also does not extend to the new Crown product if the serial number has been defaced, altered, or removed.
WHAT THE WARRANTOR WILL DO
We will remedy any defect, regardless of the reason for failure (except as excluded), by repair, replacement, or refund. We may not elect refund unless you agree, or unless we are unable to provide replacement, and repair is not practical or cannot be timely made. If a refund is elected, then you must make the defective or malfunctioning product available to us free and clear of all liens or other encumbrances. The refund will be equal to the actual purchase price, not including interest, insurance, closing costs, and other finance charges less a reasonable depreciation on the product from the date of original purchase. Warranty work can only be performed at our authorized ser-vice centers. We will remedy the defect and ship the product from the service center within a reasonable time after receipt of the defective product at our authorized service center.
HOW TO OBTAIN WARRANTY SERVICE
You must notify your local Crown importer of your need for warranty service within the warranty period. All components must be shipped in the original box. Corrective action will be taken within a reasonable time of the date of receipt of the defective product by our authorized service center. If the repairs made by our authorized service center are not satisfactory, notify our authorized service center immediately.
DISCLAIMER OF CONSEQUENTIAL AND INCIDENTAL DAMAGES
YOU ARE NOT ENTITLED TO RECOVER FROM US ANY INCIDENTAL DAMAGES RESULTING FROM ANY DEFECT IN THE NEW CROWN PRODUCT. THIS INCLUDES ANY DAMAGE TO ANOTHER PRODUCT OR PRODUCTS RESULTING FROM SUCH A DEFECT.
WARRANTY ALTERATIONS
No person has the authority to enlarge, amend, or modify this Crown Warranty. This Crown Warranty is not extended by the length of time which you are deprived of the use of the new Crown product. Repairs and replacement parts provided under the terms of this Crown Warranty shall carry only the unexpired portion of this Crown Warranty.
DESIGN CHANGES
We reserve the right to change the design of any product from time to time without notice and with no obligation to make corresponding changes in products previously manufactured.
LEGAL REMEDIES OF PURCHASER
No action to enforce this Crown Warranty shall be commenced after expiration of the warranty period.
THIS STATEMENT OF WARRANTY SUPERSEDES ANY OTHERS CONTAINED IN THIS MANUAL FCR OWN PRODUCTS. 9/07
136763-7_4-08_networked_pip-series_reference_manual.fm Page 65 Monday, March 17, 2008 11:17 AM

Networked PIP Series
page 66 Reference Manual
THIS PAGE INTENTIONALLY LEFT BLANK
136763-7_4-08_networked_pip-series_reference_manual.fm Page 66 Monday, March 17, 2008 11:17 AM

page 67Reference Manual
Networked PIP Series
Crown Factory Service Information Shipping Address: Crown Factory Service, 1718 W. Mishawaka Rd., Elkhart, IN 46517
PLEASE PRINT CLEARLY
SRA #: __________________(If sending product to Crown factory service.) Model: ______________ Serial Number: _____________________ Purchase Date: ____________
PRODUCT RETURN INFORMATION
Individual or Business Name: _____________________________________________________________________ Phone #: _____________________________________ Fax #: __________________________________ E-Mail: _______________________________________
Street Address (please, no P.O. Boxes): ____________________________________________________________ ____________________________________________________________________________________________ City: _________________________________________________ State/Prov: ____________________ Postal Code: _________________ Country: _________________________
Nature of problem: _____________________________________________________________________________ _____________________________________________________________________________________________ _______________________________________________________________________________________________________________________________ ______________________________ _______________________________________________________________________________________________________________________________ _____________________________
Other equipment in your system: _________________________________________________________________ ____________________________________________________________________________________________
If warranty is expired, please provide method of payment. Proof of purchase may be required to validate warranty.
PAYMENT OPTIONS
I have open account payment terms. Purchase order required. PO#: ______________________ COD
Credit Card (Information below is required; however if you do not want to provide this information at this time, we will contact you when your unit is repaired for the information.)
Credit card information:
Type of credit card: MasterCard Visa American Express Discover
Type of credit card account: Personal/Consumer Business/Corporate
Card # ____________________________ Exp. date: _____________ * Card ID #: _________________________
* Card ID # is located on the back of the card following the credit card #, in the signature area. On American Express, it may be located on the front of the card. This number is required to process the charge to your account. If you do not want to provide it at this time, we will call you to obtain this number when the repair of your unit is complete.
Name on credit card: ____________________________________________________________ Billing address of credit card: __________________________________________ __________________________________________ __________________________________________ __________________________________________
136763-7_4-08_networked_pip-series_reference_manual.fm Page 67 Monday, March 17, 2008 11:17 AM

136763-7_4-08_networked_pip-series_reference_manual.fm Page 68 Monday, March 17, 2008 11:17 AM