Embed Size (px)
Citation preview

Address: 4F, Block 5, Wuzi Industrial Park, Fada Road, Bantian, Longgang District, Shenzhen, ChinaE-Mail: info@cctv-ax. netWebsite: www. cctv-ax. com
Network DVR Quick Installation Manual
Thank you for using Digital Video Recorder!
Instructions:
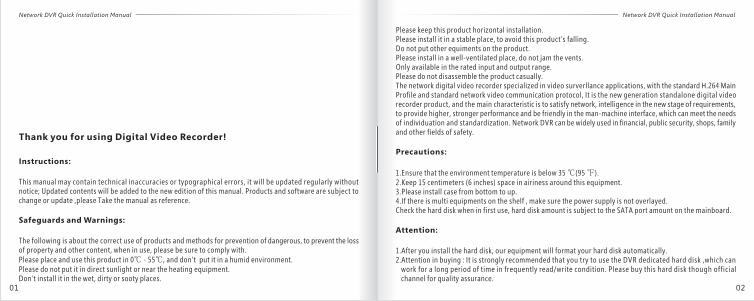
This manual may contain technical inaccuracies or typographical errors, it will be updated regularly without notice; Updated contents will be added to the new edition of this manual. Products and software are subject to change or update ,please Take the manual as reference.
Safeguards and Warnings:
The following is about the correct use of products and methods for prevention of dangerous, to prevent the loss of property and other content, when in use, please be sure to comply with.Please place and use this product in 0℃ - 55℃, and don't put it in a humid environment.Please do not put it in direct sunlight or near the heating equipment.Don't install it in the wet, dirty or sooty places.
Please keep this product horizontal installation.Please install it in a stable place, to avoid this product's falling.Do not put other equiments on the product.Please install in a well-ventilated place, do not jam the vents.Only available in the rated input and output range.Please do not disassemble the product casually.The network digital video recorder specialized in video surverllance applications, with the standard H.264 Main Profile and standard network video communication protocol, It is the new generation standalone digital video recorder product, and the main characteristic is to satisfy network, intelligence in the new stage of requirements, to provide higher, stronger performance and be friendly in the man-machine interface, which can meet the needs of individuation and standardization. Network DVR can be widely used in financial, public security, shops, family and other fields of safety.
Precautions:
1.Ensure that the environment temperature is below 35 ℃(95 ℉).2.Keep 15 centimeters (6 inches) space in airiness around this equipment. 3.Please install case from bottom to up.4.If there is multi equipments on the shelf , make sure the power supply is not overlayed.Check the hard disk when in first use, hard disk amount is subject to the SATA port amount on the mainboard.
Attention:
1.After you install the hard disk, our equipment will format your hard disk automatically.2.Attention in buying : It is strongly recommended that you try to use the DVR dedicated hard disk ,which can work for a long period of time in frequently read/write condition. Please buy this hard disk though official channel for quality assurance.
0201
Network DVR Quick Installation Manual Network DVR Quick Installation Manual
Basic Operation
1.1 Login
After equipment starts normally, you need log in the system, which provides corresponding functions according to user authority.
Note: One preset administrator account exists, username is admin, password is empty, user can change password, but can not change the authorities. Administrator can add, delete or config user parameter.
Password protection: An alarm beep popup when password was inputed incorrectly for continuous 3 times, and system will be locked after password was inputed incorrectly for continuous 5 times. After 30 minutes or reboot the DVR system will be unlocked by itself. For security, the password should be modified as soon as your first using the DVR.
1.2 Preview
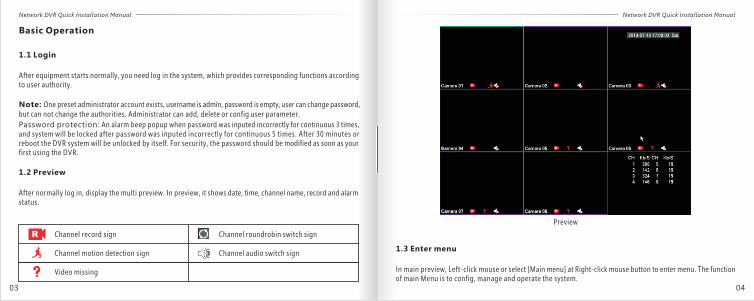
After normally log in, display the multi preview. In preview, it shows date, time, channel name, record and alarm status.
Channel record sign Channel roundrobin switch sign
Channel motion detection sign Channel audio switch sign
Video missing
0403
Network DVR Quick Installation Manual Network DVR Quick Installation Manual
Preview
1.3 Enter menu
In main preview, Left-click mouse or select [Main menu] at Right-click mouse button to enter menu. The function of main Menu is to config, manage and operate the system.
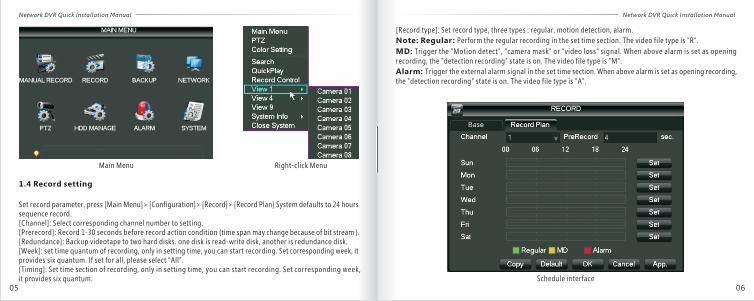
Main Menu Right-click Menu
1.4 Record setting
Set record parameter, press [Main Menu]> [Configuration]> [Record]> [Record Plan] System defaults to 24 hours sequence record.[Channel]: Select corresponding channel number to setting.[Prerecord]: Record 1-30 seconds before record action condition (time span may change because of bit stream ).[Redundance]: Backup videotape to two hard disks. one disk is read-write disk, another is redundance disk.[Week]: set time quantum of recording, only in setting time, you can start recording. Set corresponding week, it provides six quantum. If set for all, please select “All”.[Timing]: Set time section of recording, only in setting time, you can start recording. Set corresponding week, it provides six quantum.
0605
Network DVR Quick Installation Manual Network DVR Quick Installation Manual
[Record type]: Set record type, three types : regular, motion detection, alarm.
Note: Regular: Perform the regular recording in the set time section. The video file type is "R".
MD: Trigger the "Motion detect", "camera mask" or "video loss" signal. When above alarm is set as opening recording, the "detection recording" state is on. The video file type is "M".
Alarm: Trigger the external alarm signal in the set time section. When above alarm is set as opening recording, the "detection recording" state is on. The video file type is "A".
Schedule interface
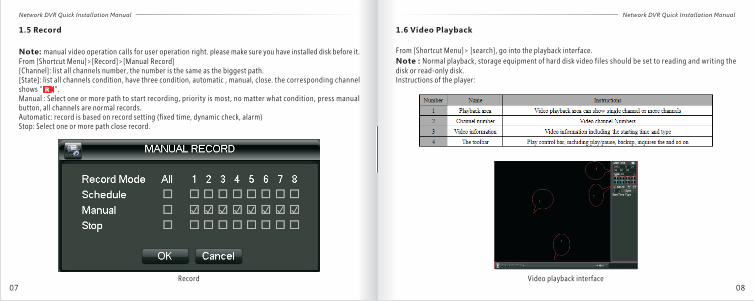
1.5 Record
Note: manual video operation calls for user operation right. please make sure you have installed disk before it. From [Shortcut Menu]>[Record]>[Manual Record][Channel]: list all channels number, the number is the same as the biggest path.[State]: list all channels condition, have three condition, automatic , manual, close. the corresponding channel shows “ ”.Manual : Select one or more path to start recording, priority is most, no matter what condition, press manual button, all channels are normal records.Automatic: record is based on record setting (fixed time, dynamic check, alarm)Stop: Select one or more path close record.
Record0807
Network DVR Quick Installation Manual Network DVR Quick Installation Manual
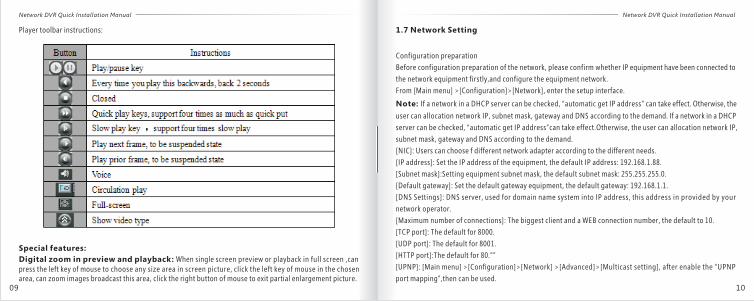
1.6 Video Playback
From [Shortcut Menu]> [search], go into the playback interface.
Note : Normal playback, storage equipment of hard disk video files should be set to reading and writing the disk or read-only disk.Instructions of the player:
Video playback interface
Player toolbar instructions:
Special features:
Digital zoom in preview and playback: When single screen preview or playback in full screen ,can press the left key of mouse to choose any size area in screen picture, click the left key of mouse in the chosen area, can zoom images broadcast this area, click the right button of mouse to exit partial enlargement picture.
1009
Network DVR Quick Installation Manual Network DVR Quick Installation Manual
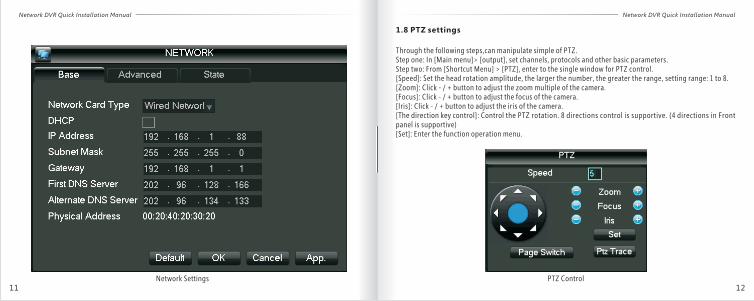
1.7 Network Setting
Configuration preparation
Before configuration preparation of the network, please confirm whether IP equipment have been connected to
the network equipment firstly,and configure the equipment network.
From [Main menu] >[Configuration]>[Network], enter the setup interface.
Note: If a network in a DHCP server can be checked, “automatic get IP address” can take effect. Otherwise, the
user can allocation network IP, subnet mask, gateway and DNS according to the demand. If a network in a DHCP
server can be checked, “automatic get IP address”can take effect.Otherwise, the user can allocation network IP,
subnet mask, gateway and DNS according to the demand.
[NIC]: Users can choose f different network adapter according to the different needs.
[IP address]: Set the IP address of the equipment, the default IP address: 192.168.1.88.
[Subnet mask]:Setting equipment subnet mask, the default subnet mask: 255.255.255.0.
[Default gateway]: Set the default gateway equipment, the default gateway: 192.168.1.1.
[DNS Settings]: DNS server, used for domain name system into IP address, this address in provided by your
network operator.
[Maximum number of connections]: The biggest client and a WEB connection number, the default to 10.
[TCP port]: The default for 8000.
[UDP port]: The default for 8001.
[HTTP port]:The default for 80.””
[UPNP]: [Main menu] >[Configuration]>[Network] >[Advanced]>[Multicast setting], after enable the “UPNP
port mapping”,then can be used.
Network Settings1211
Network DVR Quick Installation Manual Network DVR Quick Installation Manual
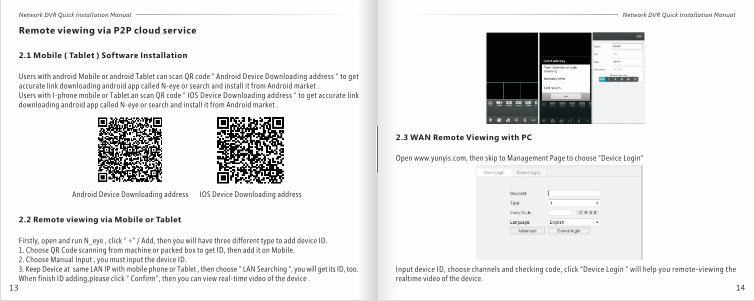
1.8 PTZ settings
Through the following steps,can manipulate simple of PTZ.Step one: In [Main menu]> [output], set channels, protocols and other basic parameters.Step two: From [Shortcut Menu] > [PTZ], enter to the single window for PTZ control. [Speed]: Set the head rotation amplitude, the larger the number, the greater the range, setting range: 1 to 8.[Zoom]: Click - / + button to adjust the zoom multiple of the camera. [Focus]: Click - / + button to adjust the focus of the camera.[Iris]: Click - / + button to adjust the iris of the camera.[The direction key control]: Control the PTZ rotation. 8 directions control is supportive. (4 directions in Front panel is supportive)[Set]: Enter the function operation menu.
PTZ Control
Remote viewing via P2P cloud service
2.1 Mobile ( Tablet ) Software Installation
Users with android Mobile or android Tablet can scan QR code “ Android Device Downloading address “ to get accurate link downloading android app called N-eye or search and install it from Android market .Users with I-phone mobile or Tablet an scan QR code “ IOS Device Downloading address “ to get accurate link downloading android app called N-eye or search and install it from Android market .
2.2 Remote viewing via Mobile or Tablet
Firstly, open and run N_eye , click “ +” / Add, then you will have three different type to add device ID.1. Choose QR Code scanning from machine or packed box to get ID, then add it on Mobile.2. Choose Manual Input , you must input the device ID.3. Keep Device at same LAN IP with mobile phone or Tablet , then choose “ LAN Searching “, you will get its ID, too.When finish ID adding,please click “ Confirm”, then you can view real-time video of the device .
Android Device Downloading address IOS Device Downloading address
1413
Network DVR Quick Installation Manual Network DVR Quick Installation Manual
2.3 WAN Remote Viewing with PC
Open www.yunyis.com, then skip to Management Page to choose “Device Login”
Input device ID, choose channels and checking code, click “Device Login “ will help you remote-viewing the realtime video of the device.
Announce
This manual only introduces basic operation, specific operation refer to E-manual in CD.If Product description has problem, it is subject to our company explanation.This manual adapts to different types, every specific operation can not list, please contact custom service if having problems.
1615
Network DVR Quick Installation Manual Network DVR Quick Installation Manual