Embed Size (px)
Citation preview
NetVanta IP Telephony Course L1-1
NetVanta 7100 Exercise Exploring the NetVanta 7100 System
This is an exercise to explore the NetVanta 7100 system and become familiar with system options. You will connect to your NetVanta 7100 virtual lab unit, navigate through both GUI and CLI menus, and make minimal changes.
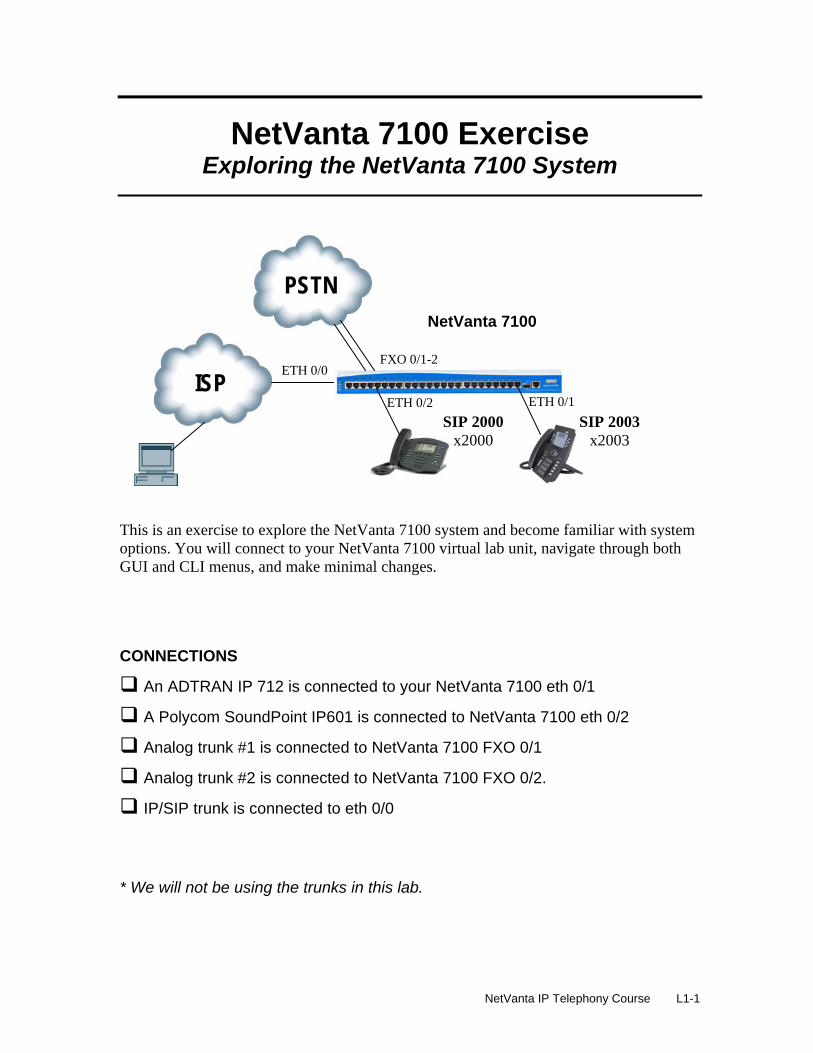
CONNECTIONS
An ADTRAN IP 712 is connected to your NetVanta 7100 eth 0/1
A Polycom SoundPoint IP601 is connected to NetVanta 7100 eth 0/2
Analog trunk #1 is connected to NetVanta 7100 FXO 0/1
Analog trunk #2 is connected to NetVanta 7100 FXO 0/2.
IP/SIP trunk is connected to eth 0/0 * We will not be using the trunks in this lab.
ETH 0/0
NetVanta 7100
ISP
PSTN
FXO 0/1-2
SIP 2000 x2000
SIP 2003 x2003
ETH 0/2 ETH 0/1
NetVanta 7100 Exercise – Exploring the NetVanta 7100 System
L1-2 NetVanta IP Telephony Course
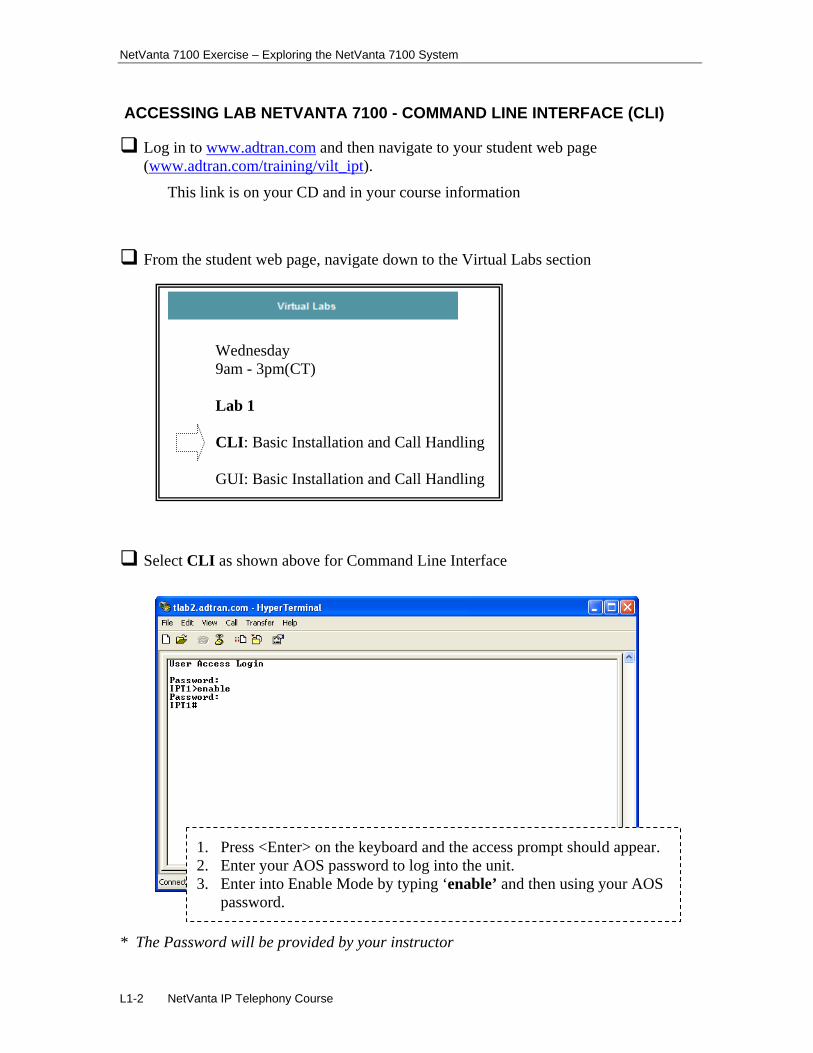
ACCESSING LAB NETVANTA 7100 - COMMAND LINE INTERFACE (CLI)
Log in to www.adtran.com and then navigate to your student web page (www.adtran.com/training/vilt_ipt).
This link is on your CD and in your course information
From the student web page, navigate down to the Virtual Labs section
Wednesday 9am - 3pm(CT) Lab 1 CLI: Basic Installation and Call Handling GUI: Basic Installation and Call Handling
Select CLI as shown above for Command Line Interface
* The Password will be provided by your instructor
1. Press <Enter> on the keyboard and the access prompt should appear. 2. Enter your AOS password to log into the unit. 3. Enter into Enable Mode by typing ‘enable’ and then using your AOS
password.
NetVanta 7100 Exercise – Exploring the NetVanta 7100 System
NetVanta IP Telephony Course L1-3
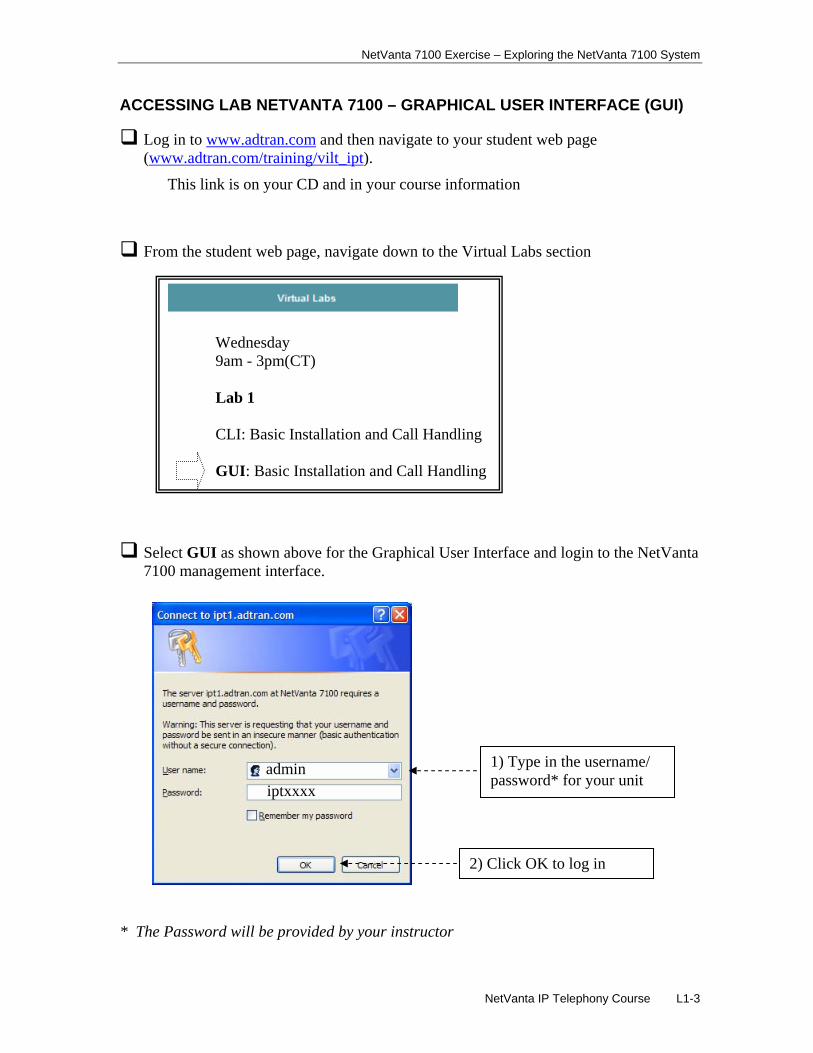
ACCESSING LAB NETVANTA 7100 – GRAPHICAL USER INTERFACE (GUI)
Log in to www.adtran.com and then navigate to your student web page (www.adtran.com/training/vilt_ipt).
This link is on your CD and in your course information
From the student web page, navigate down to the Virtual Labs section
Wednesday 9am - 3pm(CT) Lab 1 CLI: Basic Installation and Call Handling GUI: Basic Installation and Call Handling
Select GUI as shown above for the Graphical User Interface and login to the NetVanta 7100 management interface.
* The Password will be provided by your instructor
admin iptxxxx
1) Type in the username/ password* for your unit
2) Click OK to log in

NetVanta 7100 Exercise – Exploring the NetVanta 7100 System
L1-4 NetVanta IP Telephony Course
NetVanta 7100 Exercise – Exploring the NetVanta 7100 System
NetVanta IP Telephony Course L1-5
EXPLORING THE FIRMWARE FILES
Navigate to your CLI connection. This section will explore the location of the unit’s firmware files and contents of NVRAM.
1. Type “show flash" to display the contents of NVRAM.
IPTX# show flash
2. What NetVanta 7100 firmware file do you have in NVRAM?
______________________________________________________________
3. Type “show cflash" to display the contents of compact flash.
IPTX# show cflash
4. Notice that you have both an ADTRAN and Polycom directory in CFLASH.
EXPLORING SYSTEM AND DATA SETTINGS
Navigate to your Web GUI system lab connection. This section will explore various system settings in the GUI interface. You will be able to test remote management options and discover connected devices.
5. Navigate to the System / System Summary screen. Answer the following questions about your NetVanta 7100 System:
What is the NetVanta 7100 current firmware version? _____________________
What is the NetVanta 7100 serial number? _____________________________
What is the current system clock source? _______________________________
NetVanta 7100 Exercise – Exploring the NetVanta 7100 System
L1-6 NetVanta IP Telephony Course
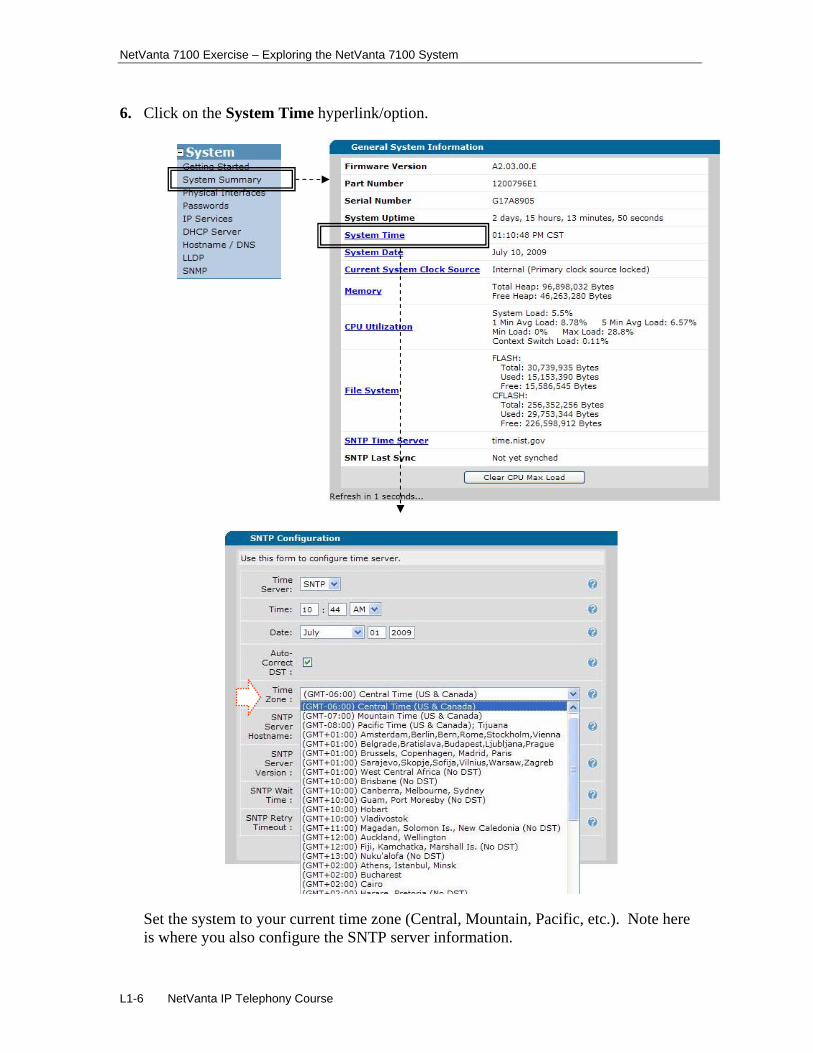
6. Click on the System Time hyperlink/option.
Set the system to your current time zone (Central, Mountain, Pacific, etc.). Note here is where you also configure the SNTP server information.
NetVanta 7100 Exercise – Exploring the NetVanta 7100 System
NetVanta IP Telephony Course L1-7
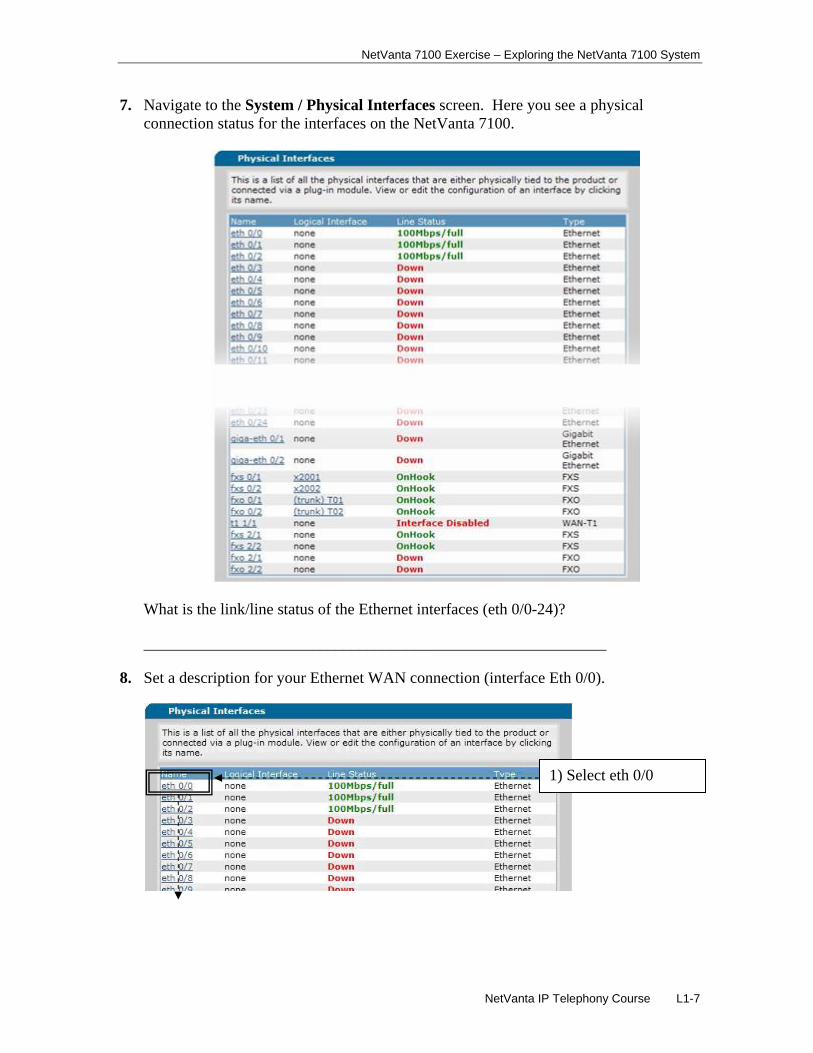
7. Navigate to the System / Physical Interfaces screen. Here you see a physical connection status for the interfaces on the NetVanta 7100.
What is the link/line status of the Ethernet interfaces (eth 0/0-24)?
__________________________________________________________
8. Set a description for your Ethernet WAN connection (interface Eth 0/0).
1) Select eth 0/0
NetVanta 7100 Exercise – Exploring the NetVanta 7100 System
L1-8 NetVanta IP Telephony Course
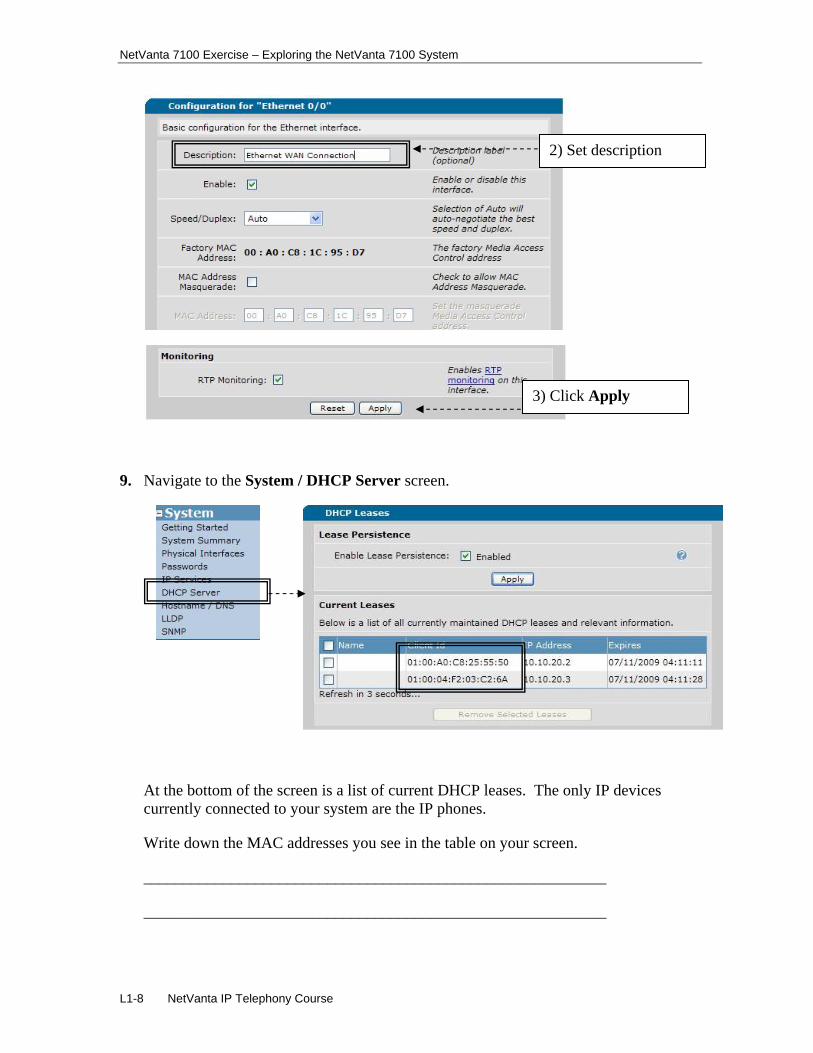
9. Navigate to the System / DHCP Server screen.
At the bottom of the screen is a list of current DHCP leases. The only IP devices currently connected to your system are the IP phones.
Write down the MAC addresses you see in the table on your screen.
__________________________________________________________
__________________________________________________________
2) Set description
3) Click Apply

NetVanta 7100 Exercise – Exploring the NetVanta 7100 System
NetVanta IP Telephony Course L1-9
10. On the System / DHCP Server screen, select the Excluded Ranges tab.
You want to exclude the IP addresses you will be using for servers, etc. on your network. Define an excluded address range of 10.10.10.1 through 10.10.10.5.
11. On the System / DHCP Server screen, view the DHCP Pools under the DHCP Server Settings window.
What DHCP pools do you see here?
__________________________________________________________
1) Define excluded address range
2) Click ‘Add’
NetVanta 7100 Exercise – Exploring the NetVanta 7100 System
L1-10 NetVanta IP Telephony Course
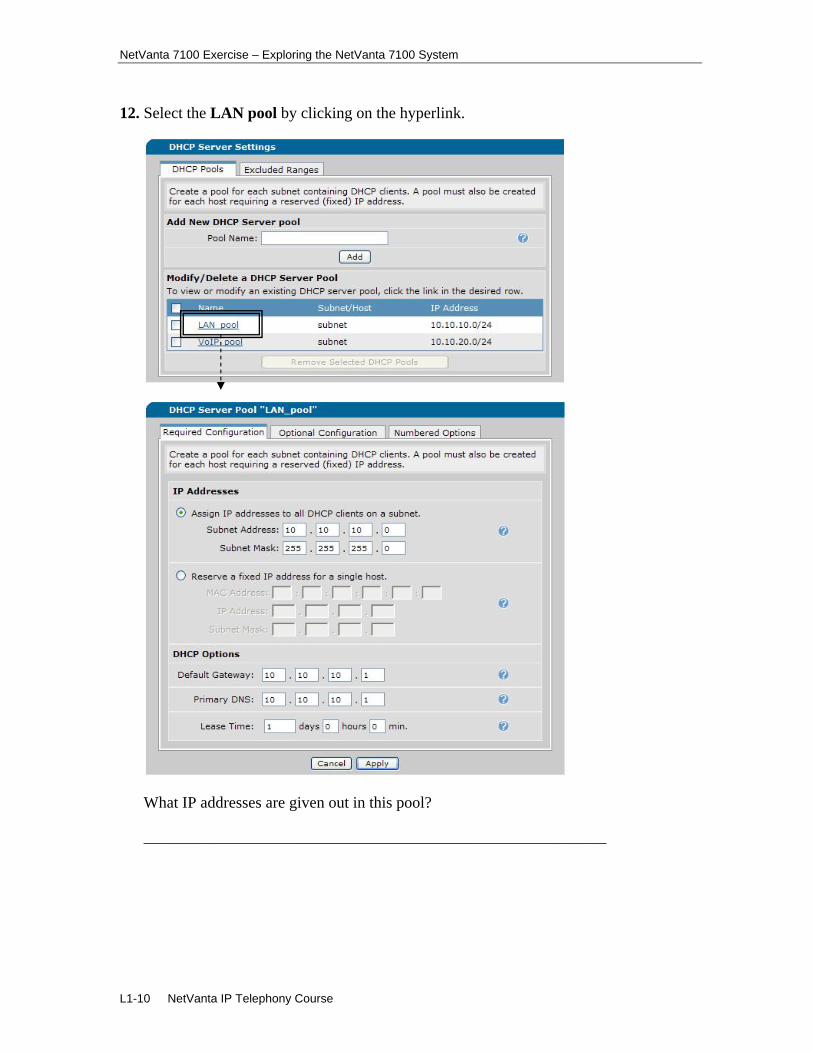
12. Select the LAN pool by clicking on the hyperlink.
What IP addresses are given out in this pool?
__________________________________________________________
NetVanta 7100 Exercise – Exploring the NetVanta 7100 System
NetVanta IP Telephony Course L1-11
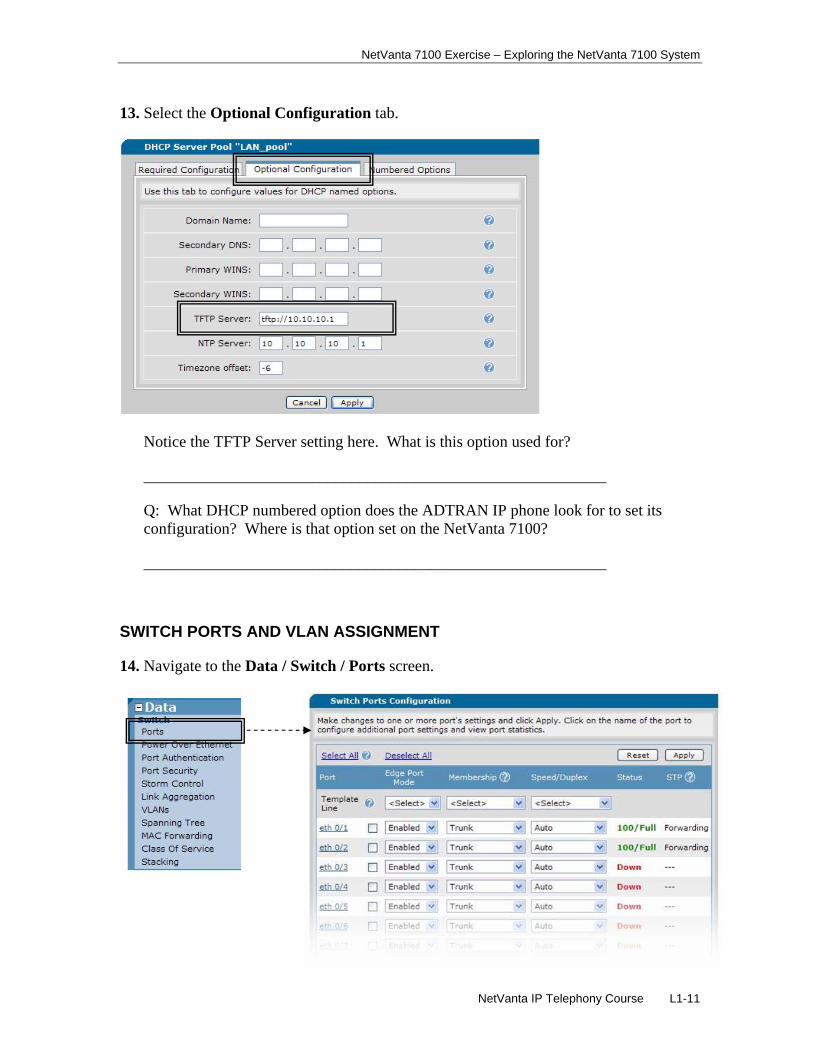
13. Select the Optional Configuration tab.
Notice the TFTP Server setting here. What is this option used for?
__________________________________________________________
Q: What DHCP numbered option does the ADTRAN IP phone look for to set its configuration? Where is that option set on the NetVanta 7100?
__________________________________________________________
SWITCH PORTS AND VLAN ASSIGNMENT
14. Navigate to the Data / Switch / Ports screen.
NetVanta 7100 Exercise – Exploring the NetVanta 7100 System
L1-12 NetVanta IP Telephony Course
What is the VLAN membership set to for each Ethernet interface (eth 0/1-24)?
__________________________________________________________
Q: What is the default Voice VLAN? ________________________________
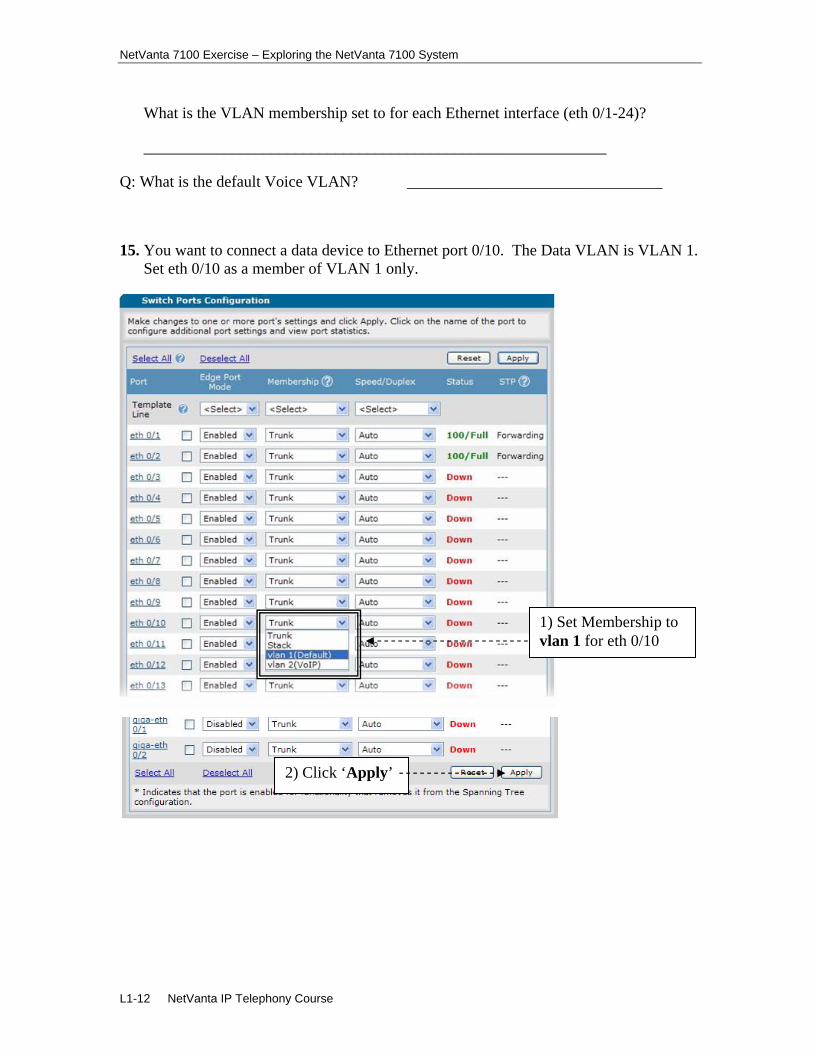
15. You want to connect a data device to Ethernet port 0/10. The Data VLAN is VLAN 1. Set eth 0/10 as a member of VLAN 1 only.
1) Set Membership to vlan 1 for eth 0/10
2) Click ‘Apply’
NetVanta 7100 Exercise – Exploring the NetVanta 7100 System
NetVanta IP Telephony Course L1-13
POWER OVER ETHERNET
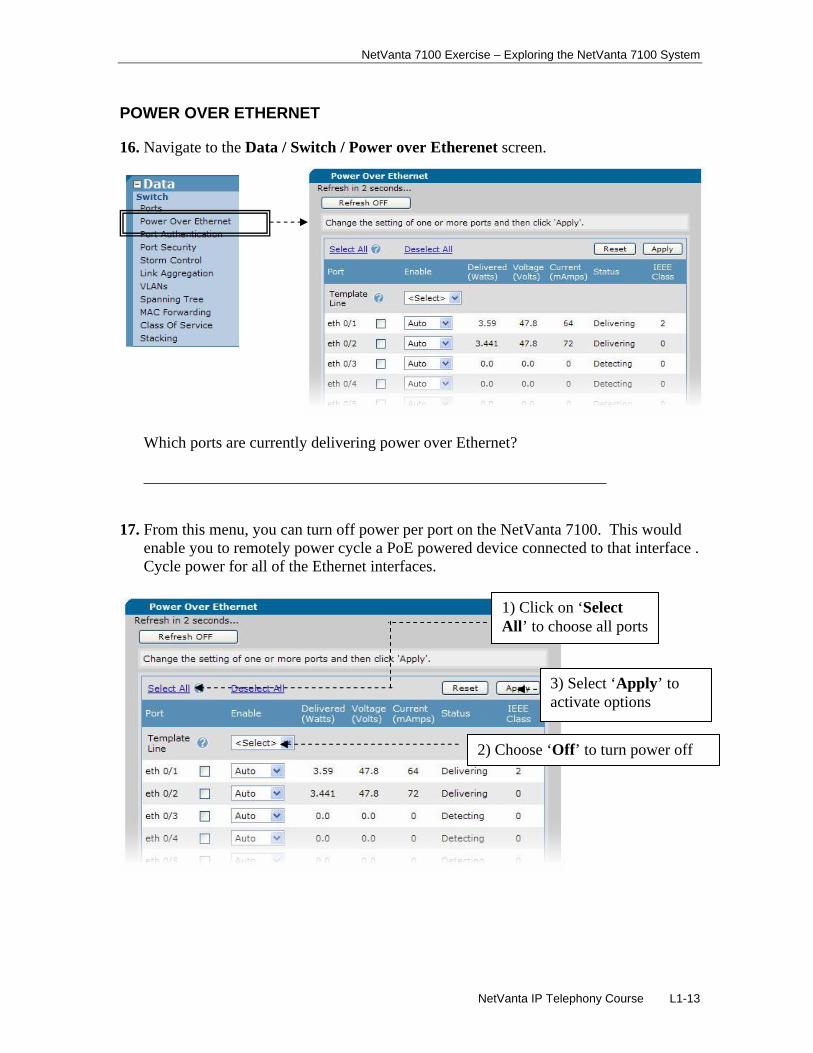
16. Navigate to the Data / Switch / Power over Etherenet screen.
Which ports are currently delivering power over Ethernet?
__________________________________________________________
17. From this menu, you can turn off power per port on the NetVanta 7100. This would enable you to remotely power cycle a PoE powered device connected to that interface . Cycle power for all of the Ethernet interfaces.
1) Click on ‘Select All’ to choose all ports
2) Choose ‘Off’ to turn power off
3) Select ‘Apply’ to activate options
NetVanta 7100 Exercise – Exploring the NetVanta 7100 System
L1-14 NetVanta IP Telephony Course
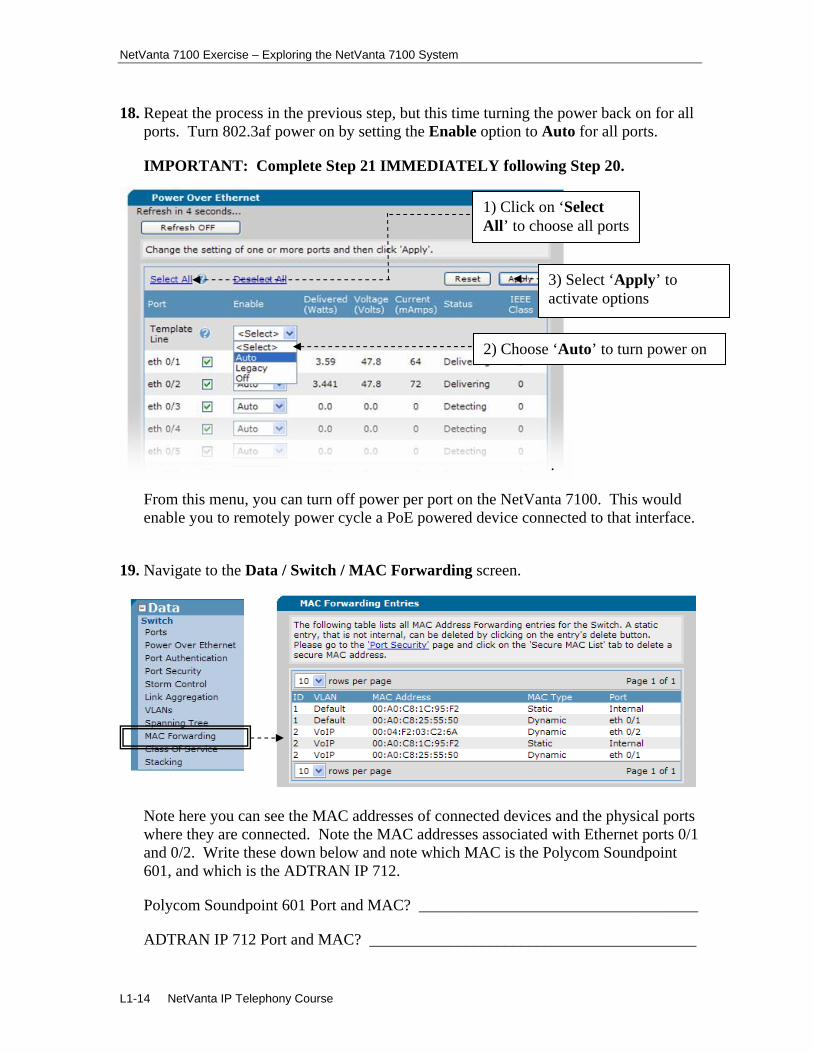
18. Repeat the process in the previous step, but this time turning the power back on for all ports. Turn 802.3af power on by setting the Enable option to Auto for all ports.
IMPORTANT: Complete Step 21 IMMEDIATELY following Step 20.
.
From this menu, you can turn off power per port on the NetVanta 7100. This would enable you to remotely power cycle a PoE powered device connected to that interface.
19. Navigate to the Data / Switch / MAC Forwarding screen.
Note here you can see the MAC addresses of connected devices and the physical ports where they are connected. Note the MAC addresses associated with Ethernet ports 0/1 and 0/2. Write these down below and note which MAC is the Polycom Soundpoint 601, and which is the ADTRAN IP 712.
Polycom Soundpoint 601 Port and MAC? ___________________________________
ADTRAN IP 712 Port and MAC? _________________________________________
1) Click on ‘Select All’ to choose all ports
2) Choose ‘Auto’ to turn power on
3) Select ‘Apply’ to activate options
NetVanta 7100 Exercise – Exploring the NetVanta 7100 System
NetVanta IP Telephony Course L1-15
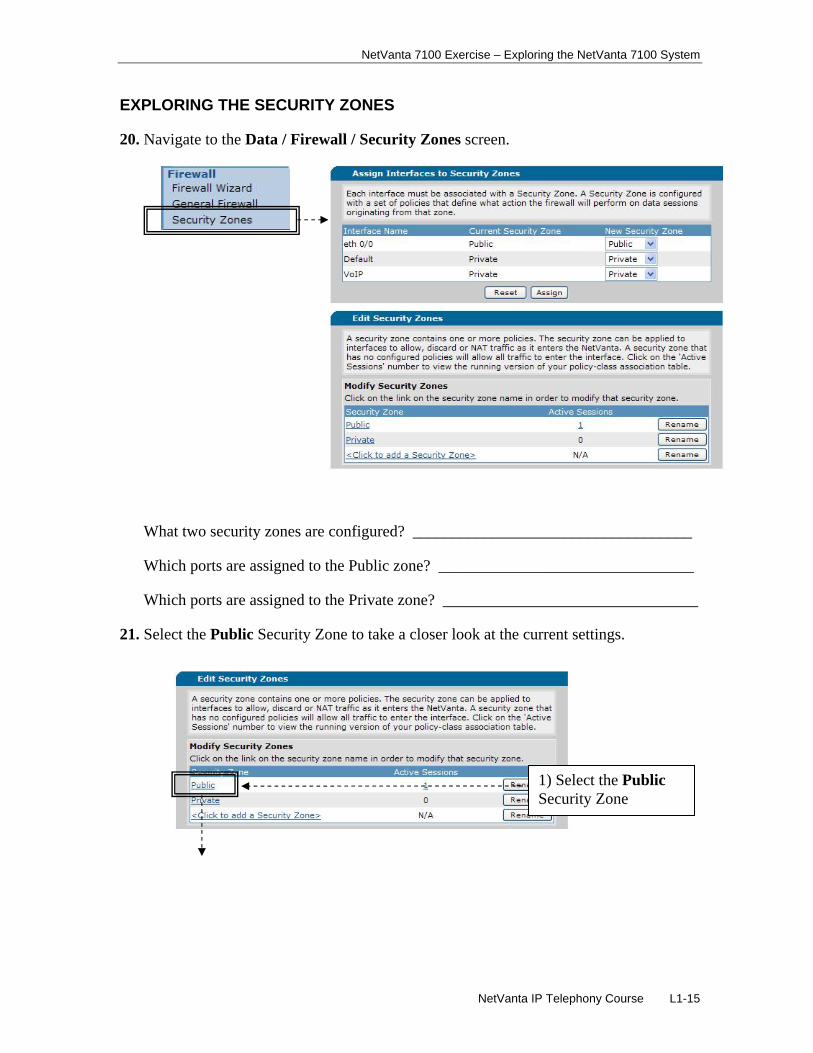
EXPLORING THE SECURITY ZONES
20. Navigate to the Data / Firewall / Security Zones screen.
What two security zones are configured? ___________________________________
Which ports are assigned to the Public zone? ________________________________
Which ports are assigned to the Private zone? ________________________________
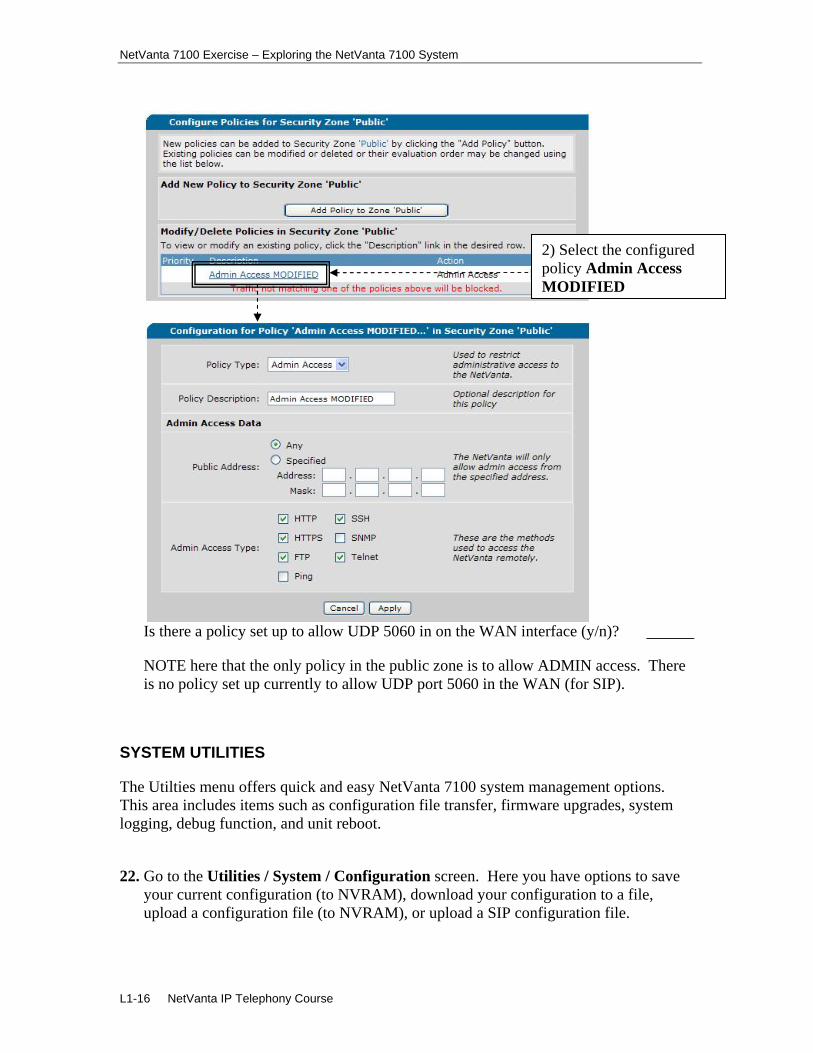
21. Select the Public Security Zone to take a closer look at the current settings.
1) Select the Public Security Zone
NetVanta 7100 Exercise – Exploring the NetVanta 7100 System
L1-16 NetVanta IP Telephony Course
Is there a policy set up to allow UDP 5060 in on the WAN interface (y/n)?
NOTE here that the only policy in the public zone is to allow ADMIN access. There is no policy set up currently to allow UDP port 5060 in the WAN (for SIP).
SYSTEM UTILITIES
The Utilties menu offers quick and easy NetVanta 7100 system management options. This area includes items such as configuration file transfer, firmware upgrades, system logging, debug function, and unit reboot.
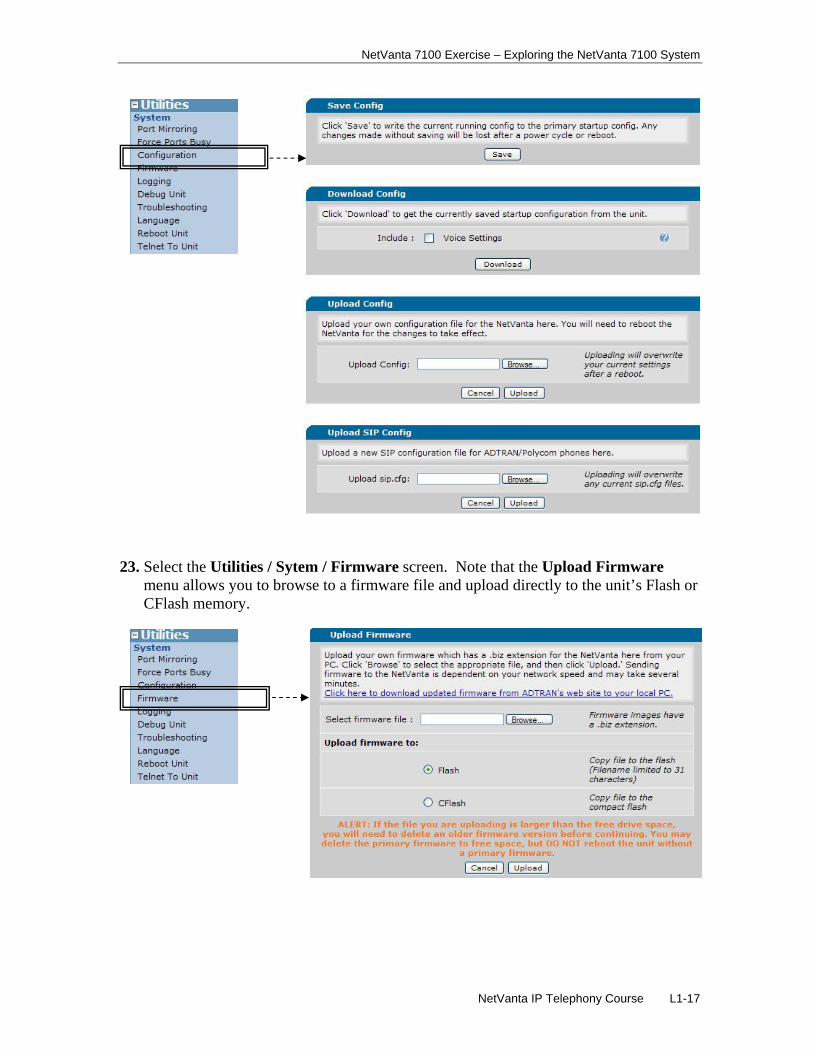
22. Go to the Utilities / System / Configuration screen. Here you have options to save your current configuration (to NVRAM), download your configuration to a file, upload a configuration file (to NVRAM), or upload a SIP configuration file.
2) Select the configured policy Admin Access MODIFIED
NetVanta 7100 Exercise – Exploring the NetVanta 7100 System
NetVanta IP Telephony Course L1-17
23. Select the Utilities / Sytem / Firmware screen. Note that the Upload Firmware menu allows you to browse to a firmware file and upload directly to the unit’s Flash or CFlash memory.

NetVanta 7100 Exercise – Exploring the NetVanta 7100 System
L1-18 NetVanta IP Telephony Course
24. The Set Primary / Backup Firmware menu is on the same screen selected previously (Utilities / System / Firmware). Once the firmware file is loaded into memory, here the primary and/or backup firmware image is selected for the unit. This is also a place to check and see how much memory space is available before trying to upload a new firmware image.
What is the primary firmware image set to in your unit? ________________________
How much Flash memory space is currently available? ________________________
How much CFlash memory space is available?
25. Save your configuration by clicking Save in upper right corner of GUI.
NetVanta 7100 Exercise – Exploring the NetVanta 7100 System
NetVanta IP Telephony Course L1-19
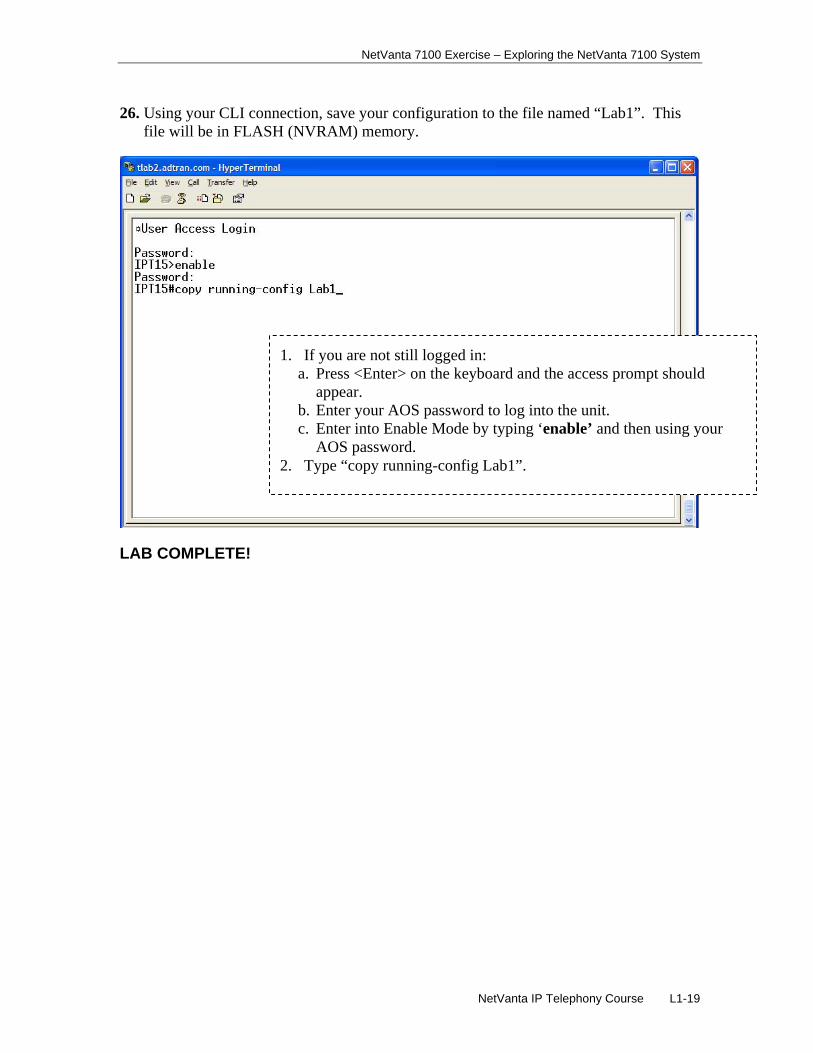
26. Using your CLI connection, save your configuration to the file named “Lab1”. This file will be in FLASH (NVRAM) memory.
LAB COMPLETE!
1. If you are not still logged in: a. Press <Enter> on the keyboard and the access prompt should
appear. b. Enter your AOS password to log into the unit. c. Enter into Enable Mode by typing ‘enable’ and then using your
AOS password. 2. Type “copy running-config Lab1”.


