Embed Size (px)
Citation preview

1
NATIONAL OPEN UNIVERSITY OF NIGERIA
SCHOOL OF SCIENCE AND TECHNOLOGY
COURSE CODE: CIT 484
COURSE TITLE: WEBSITE DESIGN & PROGRAMMING

2
CSC 484 WEBSITE DESIGN &PROGRAMMING Course Developer/Writer Dr J.N. Ndunagu National Open University of Nigeria
Course Editor Dr B. C. Mbam Course Coordinator Dr J.N. Ndunagu
NATIONAL OPEN UNIVERSITY OF NIGERIA
COURSE
GUIDE

3
COURSE GUIDE CIT 484 - WEBSITE DESIGN & PROGRAMMING National Open University of Nigeria Headquarters 14/16 Ahmadu Bello Way Victoria Island Lagos Abuja Annex 245 Samuel Adesujo Ademulegun Street Central Business District Opposite Arewa Suites Abuja e-mail: @nou.edu.ng URL: .nou.edu.ng National Open University of Nigeria 2010 First Printed -------- - ISBN: All Rights Reserved Printed by …………….. For National Open University of Nigeria TABLE OF CONTENTS Introduction……………………………………………….. v What you will learn in this Course……………………....... v Course Aim………………………………………………...vi Course Objectives…………………………………………. vi Working through this Course………………………………vii Course Materials…………………………………………...viii Study Units…………………………………………………viii Recommended Texts……………………………………….ix Assignment File……………………………………………xii

4
Presentation Schedule……………………………………...xii Assessment…………………………………………………xii Tutor Marked Assignments (TMAs)……………………….xii Final Examination and Grading……………………………xii Course Marking Scheme……………………………………xiii Course Overview………………………………………….. xiv How to get the most from this course……………………. xiv Tutors and Tutorials……………………………………….. xv
Introduction
Welcome to CIT 484: Website design and Programming which is a three credit unit course offered in the fourth year to students of the undergraduate degree programme in Communication Technology. There are fifteen study Units in this course. There are no perquisites for studying this course. It has been developed with appropriate local and foreign examples suitable for audience.
This course guide is for distance learners enrolled in the B.Sc. Communication Technology programme of the National Open University of Nigeria. This guide
5
is one of the several resource tools available to you to help you successfully complete this course and ultimately your programme.
In this guide you will find very useful information about this course: aims, objectives, what the course is about, what course materials you will be using; available services to support your learning; information on assignments and examination. It also offers you guidelines on how to plan your time for study; the amount of time you are likely to spend on each study unit; your tutor –marked assignments.
I strongly recommend that you go through this course guide and complete the feedback form at the end before you begin your study of the course. The feedback form must be submitted to your tutorial facilitator along with your first assignment.
I wish you all the best in your learning experience and successful completion of this course.
What you will learn in this Course The overall aim of this course, CIT 484, is to teach you the fundamentals of HTML and the Web. It starts with the basics and then moves on to the more advanced concepts. The Internet and the World Wide Web are also treated. You will also learn about creating lists, getting feedback with forms, creating tables and frames. Finally, you will be introduced to JavaScript, dealing with Java Script variables and data types, Statement and Operators and Control structures, object based programming message box in JavaScript.
Course Aim This course aims at designing web pages using HTML and Java Script. You are not expected to have experience in the languages before using this course material. It is hoped that the knowledge would help you become proficient in HTML, fully versed in the language’s syntax, semantics and elements of style.
Course Objectives
6
In order to achieve this aim, the course has a set of objectives. Each unit has specific objectives which are included at the beginning of the unit. You are expected to read these objectives before you study the unit. You may wish to refer to them during your study to check on your progress. You should always look at the unit objectives after completion of each unit. By doing so, you would have followed the instructions in the unit.
Below are the comprehensive objectives of the course as a whole. By meeting these objectives, you should have achieved the aim of the course. Therefore, after going through this course you should be able to:
� Define the Internet � Differentiate between the Internet and the World Wild Web � Describe the History of the Internet � List World Wide Web browser software available in this course
material � Explain the meaning of WWW � Describe how WWW works � Explain parts of URLs � Define HTML � Describe the History of HTML � Explain how HTML works � Describe how to open a Notepad � Describe markup tag in HTML � Write a simple HTML Document using text editor � Describe the head and body section of HTML � Create a headline for your document using head section � Describe the paragraph marker.
� Describe the physical markup tags � Describe the logical markup tags � State the difference between formatting tags and preformatted text � Define hypertext link � List types and uses of hypertext link � State the steps of creating hyperlinks � Define unordered lists, ordered list, definition list and list within list � State the steps in creating unordered lists, ordered list, definition list
and list within list � Distinguish between Ordered list and list within list � Explain HTML form � List types of input field in HTML form � Create a simple HTML form � Explain JavaScript language � Describe the history of JavaScript
7
� Distinguish the difference between Java and JavaScript � List the features of JavaScript � Explain JavaScript Variables � List JavaScript Data types � Describe Global Scope Variables � Explain two types of statement in JavaScript � List types of Operators in JavaScript � List types of Control Structures
Working through this Course
To complete this course, you are required to read each study unit, read the textbooks and read other materials which may be provided by the National Open University of Nigeria.
Each unit contains tutor marked assignments and at certain points in the course you would be required to submit assignment for assessment purposes. At the end of the course there is a final examination. The course should take you about a total of 15 weeks to complete. Below is the list of all the components of the course, what you have to do and how you should allocate your time to each unit in order to complete the course on time and successfully.
This course entails that you spend a lot of time to read and practice. For easy understanding of this course, I will advise that you avail yourself the opportunity of attending the tutorials sessions where you would have the opportunity to compare your knowledge with that of other people, and also have your questions answered.
The Course Material
The main components of this course are:
1. The Course Guide
2. Study Units
3. Further Reading/References
4. Assignments
8
5. Presentation Schedule
Study Units
There are 15 study units and 4 modules in this course. They are:
� MODULE ONE - THE INTERNET AND THE WORLD WIDE WEB � UNIT ONE - The Internet � UNIT TWO - Understanding the WWW � UNIT THREE - HTML and the WEB
� MODULE TWO – The Basics of HTML
� UNIT ONE - Getting Started with HTML � UNIT TWO - Understanding the Basics of HTML � UNIT THREE - Formatting Text � UNIT FOUR – Using Hypertext Links
� MODULE THREE- Lists, Tables and Frames in HTML
� UNIT ONE – Creating Lists in HTML � UNIT TWO – Getting Feedback with Forms � UNIT THREE – Using Tables � UNIT FOUR– Using Frames
� MODULE FOUR - JavaScript
� UNIT ONE - Introduction to Java Script � UNIT TWO - Java Script variables and data types � UNIT THREE - Statement and operators � UNIT FOUR - Control structures object based programming message
box in JavaScript
Recommended Texts
These texts will be of enormous benefit to you in learning this course:
• `Arpajian, S., and R. Mullen. 1996. How to use HTML 3.2. Emeryville, Ziff-Davis Press. 219 pp.
• Abbate, Janet. Inventing the Internet. Cambridge: MIT Press, 1999. • Andrew H. Watt, Jinjer L. Simon, Jonathan Watt: Teach Yourself
JavaScript in 21 Days, Pearson Education, ISBN 0672322978
9
• Andy Harris, Andrew Harris: JavaScript Programming, Premier Press, ISBN 0761534105
• Barnet, Belinda (2004). Lost In The Archive: Vision, Artefact And Loss In
The Evolution Of Hypertext. University of New South Wales, PhD thesis.
• Bemer, Bob, "A History of Source Concepts for the Internet/Web"
• Bolter, Jay David (2001). Writing Space: Computers, Hypertext, and the
Remediation of Print. New Jersey: Lawrence Erlbaum Associates. ISBN 0-
8058-2919-9. • Buckland, Michael (2006). Emanuel Goldberg and His Knowledge
Machine. Libraries Unlimited. ISBN 0-31331-332-6. • Byers, T. J. (April 1987). "Built by association". PC World 5: 244–251.
• Campbell-Kelly, Martin; Aspray, William. Computer: A History of the
Information Machine. New York: BasicBooks, 1996. • Castro, E. 1998. HTML 4 for the world wide web.Berkeley, Peachpit
Press. 336 pp.
• Cicconi, Sergio (1999). "Hypertextuality". Mediapolis. Ed. Sam Inkinen.
Berlino & New York: De Gruyter.: 21–43. http://www.cisenet.com/cisenet/writing/essays/hypertextuality.htm.
• Clark, David D., "The Design Philosophy of the DARPA Internet
Protocols", Computer Communications Review 18:4, August 1988, pp. 106–114
• Conklin, J. (1987). "Hypertext: An Introduction and Survey". Computer 20
(9): 17–41. doi:10.1109/MC.1987.1663693. • Crane, Gregory (1988). "Extending the boundaries of instruction and
research". T.H.E. Journal (Technological Horizons in Education)
(Macintosh Special Issue): 51–54.
. • Danny Goodman, Brendan Eich: JavaScript Bible, Wiley, John &
Sons, ISBN 0764533428 • Danny Goodman, Scott Markel: JavaScript and DHTML
Cookbook, O'Reilly & Associates, ISBN 0596004672 • David Flanagan, Paula Ferguson: JavaScript: The Definitive Guide,
O'Reilly & Associates, ISBN 0596000480
10
• Engelbart, Douglas C. (1962). Augmenting Human Intellect: A Conceptual
Framework, AFOSR-3233 Summary Report, SRI Project No. 3579. http://www.dougengelbart.org/pubs/augment-3906.html.
• Ensslin, Astrid (2007). Canonizing Hypertext: Explorations and
Constructions. London: Continuum. ISBN 0-8264-95583. • Gary B. Shelly, Thomas J. Cashman, William J. Dorin, Jeffrey Quasney:
JavaScript: Complete Concepts and Techniques, Course Technology, ISBN 0789562332
• Graham, I. S. 1997. HTML sourcebook, third edition. New York, John Wiley & Sons. 620 pp.
• Graham, Ian S. The HTML Sourcebook: The Complete Guide to HTML. New York: John Wiley and Sons, 1995.
• Heim, Michael (1987). Electric Language: A Philosophical Study of Word
Processing. New Haven: Yale University Press. ISBN 0-300-07746-7. Scott ArpajianKrol, Ed. Hitchhiker's Guide to the Internet, 1987.
• Landow, George (2006). Hypertext 3.0 Critical Theory and New Media in
an Era of Globalization: Critical Theory and New Media in a Global Era
(Parallax, Re-Visions of Culture and Society). Baltimore: The Johns
Hopkins University Press. ISBN 0-8018-8257-5. • Nelson, Theodor H. (1973). "A Conceptual framework for man-machine
everything". AFIPS Conference Proceedings VOL. 42. pp. M22–M23. • Nelson, Theodor H. (1992). Literary Machines 93.1. Sausalito CA: Mindful
Press. ISBN 0-89347-062-7. • Nelson, Theodor H. (September 1965). "Complex information
processing: a file structure for the complex, the changing and the
indeterminate". ACM/CSC-ER Proceedings of the 1965 20th national
conference. http://portal.acm.org/citation.cfm?id=806036. • Nelson, Theodor H. (September 1970). "No More Teachers’ Dirty Looks".
Computer Decisions. http://www.newmediareader.com/excerpts.html. • Nick Heinle, Richard Koman: Designing with JavaScript, O'Reilly &
Associates, ISBN 1565923006 • Nigel McFarlane: Rapid Application Development with Mozilla, Prentice
Hall Professional Technical References, ISBN 0131423436
• Scientific American Special Issue on Communications, Computers, and Networks, September, 1991
11
• Scott Duffy: How to do Everything with JavaScript, Osborne, ISBN 0072228873
• Sham Bhangal, Tomasz Jankowski: Foundation Web Design: Essential HTML, JavaScript, CSS, PhotoShop, Fireworks, and Flash, APress L. P., ISBN 1590591526
• Thomas A. Powell, Fritz Schneider: JavaScript: The Complete Reference, McGraw-Hill Companies, ISBN 0072191279
• Van Dam, Andries (July 1988). "Hypertext: '87 keynote address".
Communications of the ACM 31: 887–895. doi:10.1145/48511.48519. http://www.cs.brown.edu/memex/HT_87_Keynote_Address.html.
• Williams, R. 1994. The non-designer’s design book. Design and typographic principles for the visual novice. Berkeley, Peachpit Press. 144 pp.
• Williams, R., and J. Tollett. 1998. The non-designer’s web book. An easy guide to creating, designing , and posting your own web site. Berkeley, Peachpit Press. 288 pp.
• Yankelovich, Nicole; Landow, George P., and Cody, David (1987).
"Creating hypermedia materials for English literature students". SIGCUE
Outlook 20 (3).
Assignment File The assignment file will be given to you in due course. In this file, you will find all the details of the work you must submit to your tutor for marking. The marks you obtain for these assignments will count towards the final mark for the course. Altogether, there are 15 tutor marked assignments for this course. Presentation Schedule The presentation schedule included in this course guide provides you with important dates for completion of each tutor marked assignment. You should therefore endeavor to meet the deadlines. Assessment There are two aspects to the assessment of this course. First, there are tutor marked assignments; and second, the written examination. Therefore, you are expected to take note of the facts, information and problem solving gathered during the course. The tutor marked assignments must be submitted to your tutor for formal assessment, in accordance to the deadline given. The work submitted will count for 40% of your total

12
course mark. At the end of the course, you will need to sit for a final written examination. This examination will account for 60% of your total score. Tutor Marked Assignments (TMAs)
There are 15 TMAs in this course. You need to submit all the TMAs. The best 4 will therefore be counted. When you have completed each assignment, send them to your tutor as soon as possible and make certain that it gets to your tutor on or before the stipulated deadline. If for any reason you cannot complete your assignment on time, contact your tutor before the assignment is due to discuss the possibility of extension. Extension will not be granted after the deadline, unless on extraordinary cases. Final Examination and Grading The final examination on CIT 484 will last for a period of 3 hours and have a value of 60% of the total course grade. The examination will consist of questions which reflect the tutor marked assignments that you have previously encountered. Furthermore, all areas of the course will be examined. It would be better to use the time between finishing the last unit and sitting for the examination, to revise the entire course. You might find it useful to review your TMAs and comment on them before the examination. The final examination covers information from all parts of the course. Course marking Scheme The following table includes the course marking scheme Table 1 Course Marking Scheme
Assessment Marks Assignments 1-15
15 assignments, 40% for the best 4 Total = 10% X 4 = 40%
Final Examination 60% of overall course marks
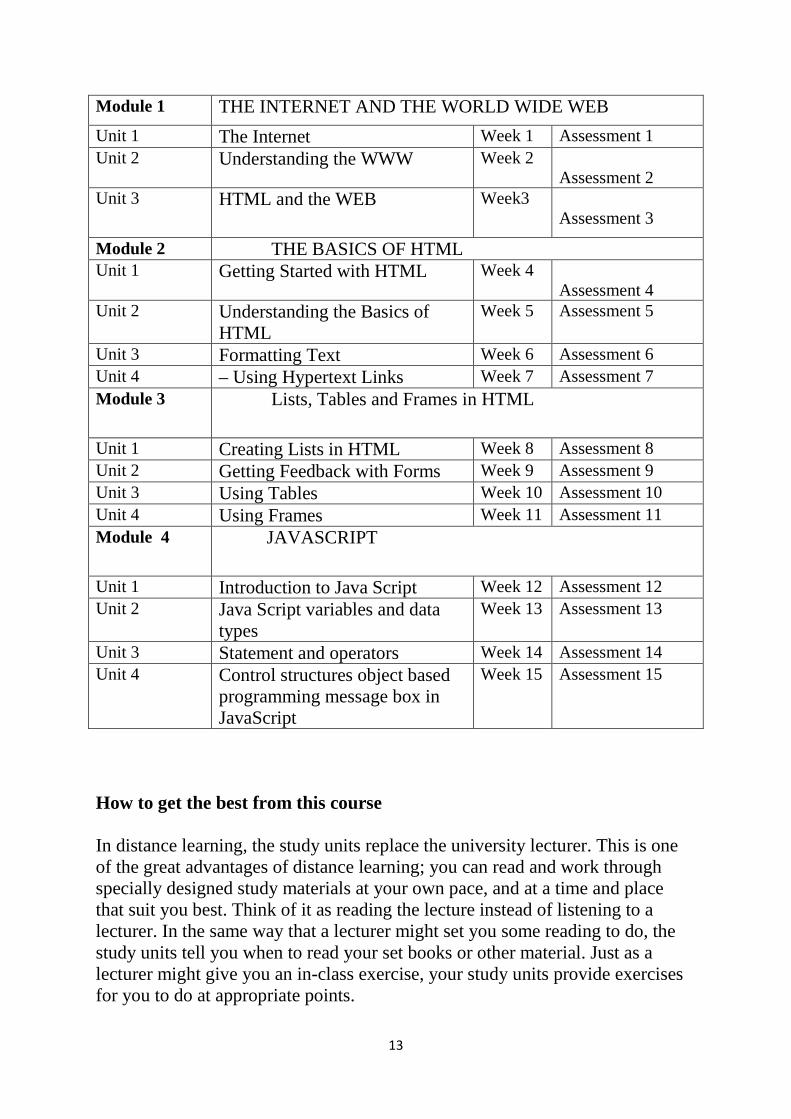
Total 100% of Course Marks Course Overview This table indicates the units, the number of weeks required to complete them and the assignments. Table 2: Course Organizer Unit Title of the work Weeks
Activity Assessment (End of Unit)
Course Guide Week 1
13
Module 1 THE INTERNET AND THE WORLD WIDE WEB
Unit 1 The Internet Week 1 Assessment 1 Unit 2 Understanding the WWW Week 2
Assessment 2 Unit 3 HTML and the WEB
Week3 Assessment 3
Module 2 THE BASICS OF HTML Unit 1 Getting Started with HTML Week 4
Assessment 4 Unit 2 Understanding the Basics of
HTML Week 5 Assessment 5
Unit 3 Formatting Text Week 6 Assessment 6 Unit 4 – Using Hypertext Links Week 7 Assessment 7 Module 3 Lists, Tables and Frames in HTML
Unit 1 Creating Lists in HTML Week 8 Assessment 8 Unit 2 Getting Feedback with Forms Week 9 Assessment 9 Unit 3 Using Tables Week 10 Assessment 10 Unit 4 Using Frames Week 11 Assessment 11 Module 4 JAVASCRIPT
Unit 1 Introduction to Java Script Week 12 Assessment 12 Unit 2 Java Script variables and data
types Week 13 Assessment 13
Unit 3 Statement and operators Week 14 Assessment 14 Unit 4 Control structures object based
programming message box in JavaScript
Week 15 Assessment 15
How to get the best from this course In distance learning, the study units replace the university lecturer. This is one of the great advantages of distance learning; you can read and work through specially designed study materials at your own pace, and at a time and place that suit you best. Think of it as reading the lecture instead of listening to a lecturer. In the same way that a lecturer might set you some reading to do, the study units tell you when to read your set books or other material. Just as a lecturer might give you an in-class exercise, your study units provide exercises for you to do at appropriate points.

14
Each of the study units follows a common format. The first item is an introduction to the subject matter of the unit and how a particular unit is integrated with the other units and the course as a whole. Next is a set of learning objectives. These objectives enable you know what you should be able to do by the time you have completed the unit. You should use these objectives to guide your study. When you have finished the units you must go back and check whether you have achieved the objectives. If you make a habit of doing this you will significantly improve your chances of passing the course. Remember that your tutor’s job is to assist you. When you need help, don’t hesitate to call and ask your tutor to provide it.
� Read this Course Guide thoroughly. � Organize a study schedule. Refer to the ‘Course Overview’ for more
details. Note the time you are expected to spend on each unit and how the assignments relate to the units. Whatever method you chose to use, you should decide on it and write in your own dates for working on each unit.
� Once you have created your own study schedule, do everything you can to stick to it. The major reason that students fail is that they lag behind in their course work.
� Turn to Unit 1 and read the introduction and the objectives for the unit. � Assemble the study materials. Information about what you need for a
unit is given in the ‘Overview’ at the beginning of each unit. You will almost always need both the study unit you are working on and one of your set of books on your desk at the same time.
� Work through the unit. The content of the unit itself has been arranged to provide a sequence for you to follow. As you work through the unit you will be instructed to read sections from your set books or other articles. Use the unit to guide your reading.
� Review the objectives for each study unit to confirm that you have achieved them. If you feel unsure about any of the objectives, review the study material or consult your tutor.
� When you are confident that you have achieved a unit’s objectives, you can then start on the next unit. Proceed unit by unit through the course and try to pace your study so that you keep yourself on schedule.
� When you have submitted an assignment to your tutor for marking, do not wait for its return before starting on the next unit. Keep to your schedule. When the assignment is returned, pay particular attention to your tutor’s comments on the tutor-marked assignment form. Consult your tutor as soon as possible if you have any questions or problems.
15
� After completing the last unit, review the course and prepare yourself for the final examination. Check that you have achieved the unit objectives (listed at the beginning of each unit) and the course objectives (listed in this Course Guide).
Tutors and Tutorials There are 15 hours of tutorials provided in support of this course. You will be notified of the dates, times and location of these tutorials, together with the name and phone number of your tutor, as soon as you are allocated a tutorial group.
� Your tutor will mark and comment on your assignments, keep a close watch on your progress and on any difficulties you might encounter and provide assistance to you during the course. You must mail or submit your tutor-marked assignments to your tutor well before the due date (at least two working days are required). They will be marked by your tutor and returned to you as soon as possible.
� Do not hesitate to contact your tutor by telephone, or e-mail if you need help. The following might be circumstances in which you would find help necessary. Contact your tutor if:
� You do not understand any part of the study units or the assigned readings
� You have a question or problem with an assignment, with your tutor’s comments on an assignment or with the grading of an assignment.
You should try your best to attend the tutorials. This is the only chance to have face to face contact with your tutor and to ask questions which are answered instantly. You can raise any problem encountered in the course of your study. To gain the maximum benefit from course tutorials, prepare a question list before attending them. You will learn a lot from participating in discussions actively. GOODLUCK!
MODULE ONE – THE INTERNET AND THE WORLD WIDE WEB
UNIT ONE - The Internet 1.0 Introduction 2.0 Objectives 3.0 Main Content
3.1 – The Internet 3.2 – History of the Internet
16
3.3 - Modern Uses 3.4 - Information 3.5 - Communication 3.6 - Data Transfer 3.7 – Access
3.8 - Sociology of the Internet
4.0 Conclusion 5.0 Summary 6.0 Tutor Marked Assignment 7.0 Further Reading and Other Resources
U NIT TWO – Understanding the WWW 1.0 Introduction 2.0 Objectives 3.0 Main Content
3.1– How the WWW works
3.2– How do URLs work
3.3-How to Use a Web Browser
3.4 How to Use a Hypertext link
4.0 Conclusion 5.0 Summary 6.0 Tutor Marked Assignment 7.0 Further Reading and Other Resources
UNIT THREE – HTML AND THE WEB
1.0 Introduction
2.0 Objectives
3.0 Main Content
3.1. What is HTML?
3.2. History of HTML
3.3. How HTML works with the Web
3.3.1 How HTML works on the Web
3.3.2. What are the tags up to?
3.3.3 Is there anything HTML cannot do?
17
3.4. Things you can do with HTML
4.0 . Conclusion
5.0 Summary 6.0 Tutor Marked Assignment
7.0 Further Reading and Other Resources
MODULE TWO –The Basics of HTML
UNIT ONE - Getting Started with HTML
1.0 Introduction 2.0 Objectives 3.0 Main Content
3.1 – How to Use Notepad 3.2 – How to Use Markup Tags 3.3 - How to Write a Simple HTML Document 3.4 - How to Use Special HTML Editing Software
4.0 Conclusion 5.0 Summary 6.0 Tutor Marked Assignment 7.0 Further Reading and Other Resources
UNIT TWO - Understanding the Basics of HTML
1.0 Introduction 2.0 Objectives 3.0 Main Content
3.1 – How to Use the Head Section 3.2 – How to Use the Body Section 3.3 - How to Use Headings 3.4 - How to Use the Paragraph Tag 3.5 - How to Use Special Characters
4.0 Conclusion 5.0 Summary 6.0 Tutor Marked Assignment 7.0 Further Reading and Other Resources
UNIT THREE - Formatting Text
1.0 Introduction 2.0 Objectives 3.0 Main Content
3.1 – How to Format Characters with Physical Tags
18
3.2 – How to Format Characters with Logical Markup Tags 3.3 - How to Format Paragraphs 3.4 - How to Use Text Breaks 3.5 - How to Use Preformatted Text
4.0 Conclusion 5.0 Summary 6.0 Tutor Marked Assignment 7.0 Further Reading and Other Resources
UNIT FOUR – Using Hypertext Links
1.0 Introduction 2.0 Objectives 3.0 Main Content
3.1 How to Create a Hyperlink 3.2 How to Use the ID Attribute 3.3 How to Use Relative Path Names
4.0 Conclusion 5.0 Summary 6.0 Tutor Marked Assignment 7.0 Further Reading and Other Resources
MODULE THREE –Lists, Tables and Frames in HTML
UNIT ONE – Creating Lists in HTML
1.0 Introduction
2.0 Objectives
3.0 Main Content
3.1How to Create Unordered Lists
3.2How to Create Ordered Lists
3.3. How to Create Definition Lists
3.4 How to Create Lists within Lists
4. 0 Conclusion
5.0 Summary
6. 0 Tutor Marked Assignment
7.0 Further Reading and Other Resources
UNIT TWO – Getting Feedback with Forms
19
1.0 Introduction
2.0 Objectives
3.0 Main Content
3.1 HTML form
3.2 How to Create a Simple Form
3.3 How to Use Input Fields in Forms
4. 0 Conclusion
5.0 Summary
6. 0 Tutor Marked Assignment
7.0 Further Reading and Other Resources
UNIT THREE – Using Tables
1.0 Introduction 2.0 Objectives
3.0 Main Content
3.1. How to create a simple Table
3. 2 How to format Tables
4.0 Conclusion
5.0 Summary
6.0 Tutor Marked Assignment
7.0 Further Reading and Other Resources
MODULE FOUR – JAVASCRIPT
UNIT ONE - Introduction to Java Script 1.0 Introduction 2.0 Objectives 3.0 Main Content
3.1 What is JavaScript? 3.2 The basic concepts of JavaScript and client-side scripting 3.3. History of JavaScript
4.0 Conclusion
5.0 Summary
6.0 Tutor Marked Assignment
20
7.0 Further Reading and Other Resources
UNIT TWO: Java Script variables and data types
1.0 Introduction
2.0 Objectives
3.0 Main Content
3.1 JavaScript Variables 3.2 Java Script Data type
4.0 Conclusion
5.0 Summary
6.0 Tutor Marked Assignment
7.0 Further Reading and Other Resources
UNIT THREE: Statement and Operators
1.0 Introduction
2.0 Objectives
3.0 Main Content
3.1 JavaScript Statement 3.2 JavaScript Operators
3.3 Control structures
4.0 Conclusion
5.0 Summary
6.0 Tutor Marked Assignment
7.0 Further Reading and Other Resources
MODULE ONE – WEBSITE DESIGN
UNIT ONE - THE INTERNET
1.0 INTRODUCTION
2.0 OBJECTIVES
3.0 MAIN CONTENT
3.1– The Internet
3.2– History of the Internet
3.3 - Modern Uses
21
3.4 - Information 3.5 Communication 3.6 - Data Transfer
3.7 – Access
3.8 - Sociology of the Internet
4.0 CONCLUSION
5.0 SUMMARY
6.0 TUTOR MARKED ASSIGNMENT
7.0 FURTHER READING AND OTHER RESOURCES
1.0 INTRODUCTION
Web design is the process of planning and creating a website. Text, images, digital media and interactive elements are shaped by the web designer to produce the page seen on the web browser. It is the creation of digital environments that facilitate and encourage human activity; reflect or adapt to individual voices and content; and change gracefully over time while always retaining their identity.
The terms Internet and World Wide Web are often used in everyday speech without much distinction. However, the Internet and the World Wide Web are not one and the same. The Internet is a global data communications system. It is a hardware and software infrastructure services that provide connectivity between computers. In contrast, the Web is one of communication via the Internet. It is a collection of interconnected documents and other resources, linked by hyperlinks and URLs.
2.0 OBJECTIVES
By the end of this unit, you should be able to: � Define the Internet � Differentiate between the Internet and the World Wild Web � Describe the History of the Internet � List World Wide Web browser software available in this course material
3.0 MAIN CONTENT
3.1 – The Internet
The Internet is a global system of interconnected computer networks that use the standard Internet Protocol Suite (TCP/IP) to serve billions of users worldwide. It is a network of networks that consists of millions of private, public, academic, business, and government networks, of local to global scope, that are linked by a broad array of electronic, wireless and optical networking technologies. The Internet carries a vast range of information resources and services, such as the inter-linked hypertext documents of the World Wide Web (WWW) and the infrastructure to support electronic mail.

22
Most traditional communications media including telephone, music, film, and television are reshaped or redefined by the Internet, giving birth to new services such as Voice over Internet Protocol (VoIP) and IPTV. Newspaper, book and other print publishing are adapting to Web site technology, or are reshaped into blogging and web feeds. The Internet has enabled or accelerated new forms of human interactions through instant messaging, Internet forums, and social networking. Online shopping has boomed both for major retail outlets and small artisans and traders. Business-to-business and financial services on the Internet affect supply chains across entire industries.
The origins of the Internet reach back to research of the 1960s, commissioned by the United States government in collaboration with private commercial interests to build robust, fault-tolerant, and distributed computer networks. The funding of a new U.S. backbone by the National Science Foundation in the 1980s, as well as private funding for other commercial backbones, led to worldwide participation in the development of new networking technologies, and the merger of many networks. The commercialization of what was by the 1990s an international network resulted in its popularization and incorporation into virtually every aspect of modern human life. As of 2009, an estimated quarter of Earth's population used the services of the Internet.
The Internet has no centralized governance in either technological implementation or policies for access and usage; each constituent network sets its own standards. Only the overreaching definitions of the two principal name spaces in the Internet, the Internet Protocol address space and the Domain Name System, are directed by a maintainer organization, the Internet Corporation for Assigned Names and Numbers (ICANN). The technical underpinning and standardization of the core protocols (IPv4 and IPv6) is an activity of the Internet Engineering Task Force (IETF), a non-profit organization of loosely affiliated international participants that anyone may associate with by contributing technical expertise.
3.2– History of the Internet
The USSR's launch of Sputnik spurred the United States to create the Advanced Research Projects Agency (ARPA or DARPA) in February 1958 to regain a technological lead. ARPA created the Information Processing Technology Office (IPTO) to further the research of the Semi Automatic Ground Environment (SAGE) program, which had networked country-wide radar systems together for the first time. The IPTO's purpose was to find ways to address the US military's concern about survivability of their communications networks, and as a first step interconnect their computers at the Pentagon, Cheyenne Mountain, and Strategic Air Command headquarters (SAC). J. C. R. Licklider, a promoter of universal networking, was selected to head the IPTO. Licklider moved from the Psycho-Acoustic Laboratory at Harvard University to MIT in 1950, after becoming interested in information technology. At MIT, he served on a committee that established Lincoln Laboratory and worked on the SAGE project. In 1957 he became a Vice President at BBN, where he bought the first production PDP-1 computer and conducted the first public demonstration of time-sharing.
At the IPTO, Licklider's successor Ivan Sutherland in 1965 got Lawrence Roberts to start a project to make a network, and Roberts based the technology on the work of Paul Baran, who had written an exhaustive study for the United States Air Force that recommended packet switching (opposed to circuit switching) to achieve better network robustness and disaster survivability. Roberts had worked at the MIT Lincoln Laboratory originally established to work on the design of the SAGE system. UCLA professor Leonard Kleinrock had provided

23
the theoretical foundations for packet networks in 1962, and later, in the 1970s, for hierarchical routing, concepts which have been the underpinning of the development towards today's Internet.
Sutherland's successor Robert Taylor convinced Roberts to build on his early packet switching successes and come and be the IPTO Chief Scientist. Once there, Roberts prepared a report called Resource Sharing Computer Networks which was approved by Taylor in June 1968 and laid the foundation for the launch of the working ARPANET the following year.
After much work, the first two nodes of what would become the ARPANET were interconnected between Kleinrock's Network Measurement Center at the UCLA's School of Engineering and Applied Science and Douglas Engelbart's NLS system at SRI International (SRI) in Menlo Park, California, on 29 October 1969. The third site on the ARPANET was the Culler-Fried Interactive Mathematics center at the University of California at Santa Barbara, and the fourth was the University of Utah Graphics Department. In an early sign of future growth, there were already fifteen sites connected to the young ARPANET by the end of 1971.
The ARPANET was origin of today's Internet. In an independent development, Donald Davies at the UK National Physical Laboratory developed the concept of packet switching in the early 1960s, first giving a talk on the subject in 1965, after which the teams in the new field from two sides of the Atlantic ocean first became acquainted. It was actually Davies' coinage of the wording packet and packet switching that was adopted as the standard terminology. Davies also built a packet-switched network in the UK, called the Mark I in 1970. Bolt Beranek and Newman (BBN), the private contractors for ARPANET, set out to create a separate commercial version after establishing "value added carriers" was legalized in the U.S. The network they established was called Telenet and began operation in 1975, installing free public dial-up access in cities throughout the U.S. Telenet was the first packet-switching network open to the general public.
Following the demonstration that packet switching worked on the ARPANET, the British Post Office, Telenet, DATAPAC and TRANSPAC collaborated to create the first international packet-switched network service. In the UK, this was referred to as the International Packet Switched Service (IPSS), in 1978. The collection of X.25-based networks grew from Europe and the US to cover Canada, Hong Kong and Australia by 1981. The X.25 packet switching standard was developed in the CCITT (now called ITU-T) around 1976.
X.25 was independent of the TCP/IP protocols that arose from the experimental work of DARPA on the ARPANET, Packet Radio Net and Packet Satellite Net during the same time period.
The early ARPANET ran on the Network Control Program (NCP), implementing the host-to-host connectivity and switching layers of the protocol stack, designed and first implemented in December 1970 by a team called the Network Working Group (NWG) led by Steve Crocker. To respond to the network's rapid growth as more and more locations connected, Vinton Cerf and Robert Kahn developed the first description of the now widely used TCP protocols during 1973 and published a paper on the subject in May 1974. Use of the term "Internet" to describe a single global TCP/IP network originated in December 1974 with the publication of RFC 675, the first full specification of TCP that was written by Vinton Cerf,
24
Yogen Dalal and Carl Sunshine, then at Stanford University. During the next nine years, work proceeded to refine the protocols and to implement them on a wide range of operating systems. The first TCP/IP-based wide-area network was operational by 1 January 1983 when all hosts on the ARPANET were switched over from the older NCP protocols. In 1985, the United States' National Science Foundation (NSF) commissioned the construction of the NSFNET, a university 56 kilobit/second network backbone using computers called "fuzzballs" by their inventor, David L. Mills. The following year, NSF sponsored the conversion to a higher-speed 1.5 megabit/second network. A key decision to use the DARPA TCP/IP protocols was made by Dennis Jennings, then in charge of the Supercomputer program at NSF.
The opening of the NSFNET to other networks began in 1988. The US Federal Networking Council approved the interconnection of the NSFNET to the commercial MCI Mail system in that year and the link was made in the summer of 1989. Other commercial electronic mail services were soon connected, including OnTyme, Telemail and Compuserve. In that same year, three commercial Internet service providers (ISPs) began operations: UUNET, PSINet, and CERFNET. Important, separate networks that offered gateways into, then later merged with, the Internet include Usenet and BITNET. Various other commercial and educational networks, such as Telenet (by that time renamed to Sprintnet), Tymnet, Compuserve and JANET were interconnected with the growing Internet in the 1980s as the TCP/IP protocol became increasingly popular. The adaptability of TCP/IP to existing communication networks allowed for rapid growth. The open availability of the specifications and reference code permitted commercial vendors to build interoperable network components, such as routers, making standardized network gear available from many companies. This aided in the rapid growth of the Internet and the proliferation of local-area networking. It seeded the widespread implementation and rigorous standardization of TCP/IP on UNIX and virtually every other common operating system.
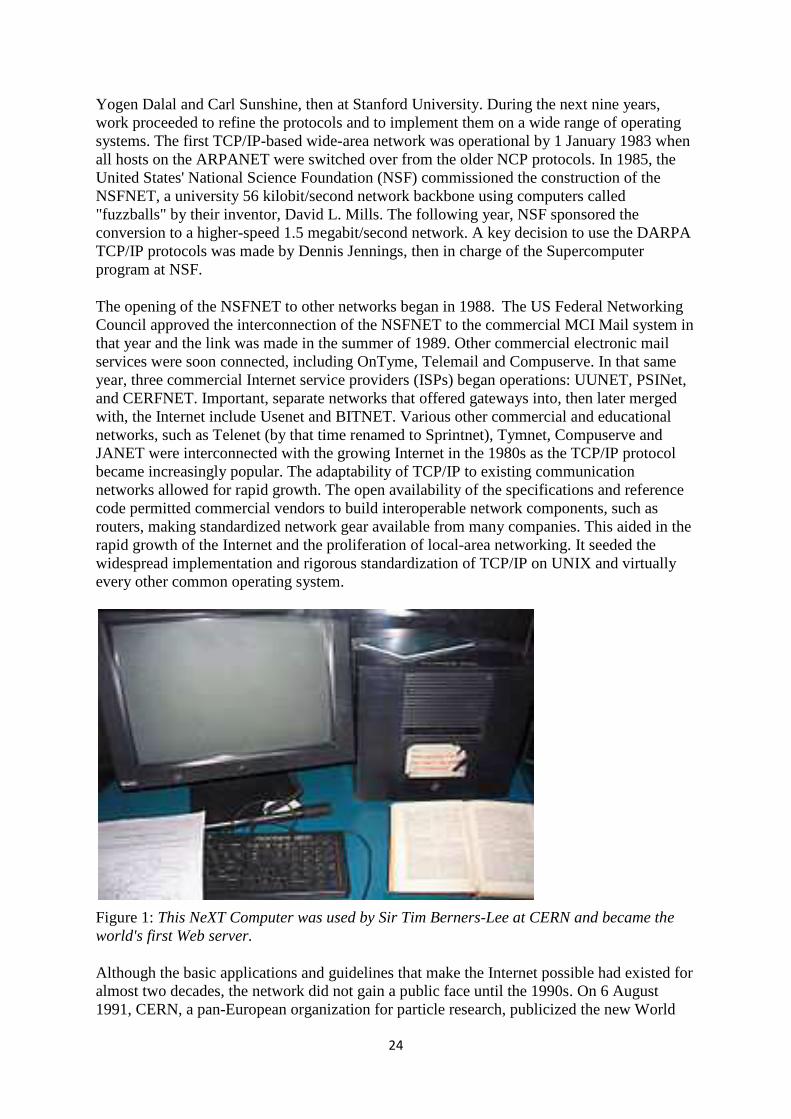
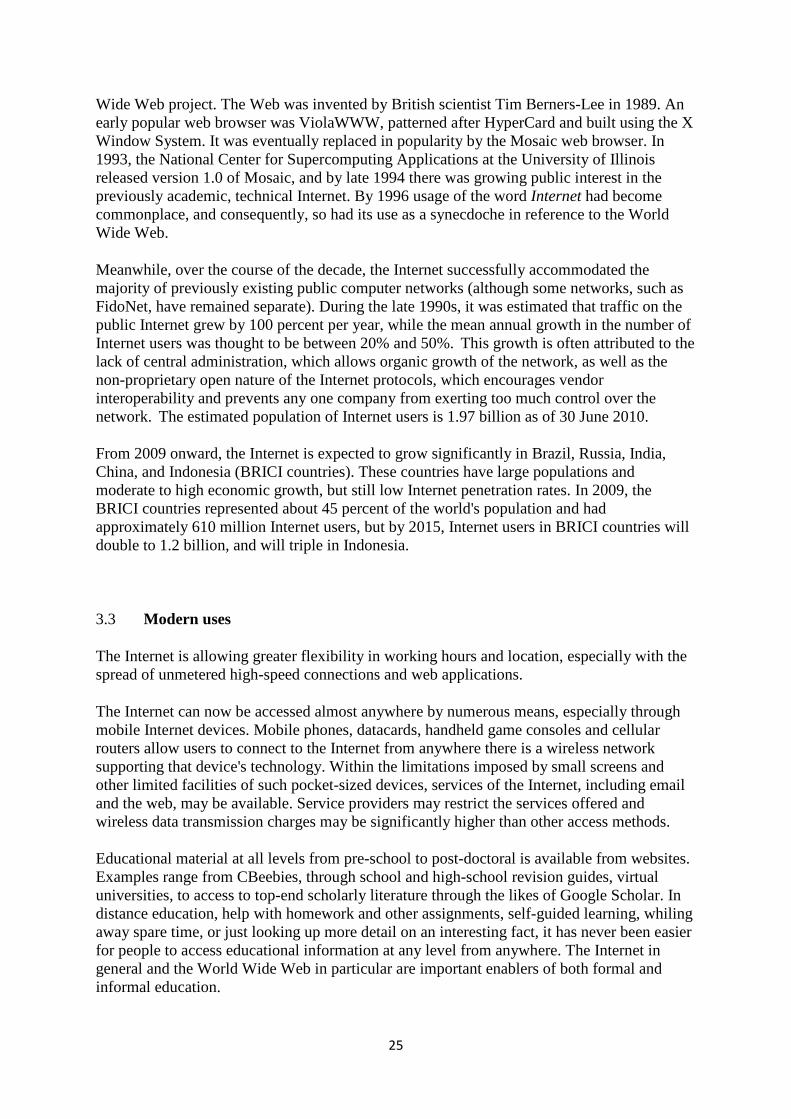
Figure 1: This NeXT Computer was used by Sir Tim Berners-Lee at CERN and became the world's first Web server.
Although the basic applications and guidelines that make the Internet possible had existed for almost two decades, the network did not gain a public face until the 1990s. On 6 August 1991, CERN, a pan-European organization for particle research, publicized the new World
25
Wide Web project. The Web was invented by British scientist Tim Berners-Lee in 1989. An early popular web browser was ViolaWWW, patterned after HyperCard and built using the X Window System. It was eventually replaced in popularity by the Mosaic web browser. In 1993, the National Center for Supercomputing Applications at the University of Illinois released version 1.0 of Mosaic, and by late 1994 there was growing public interest in the previously academic, technical Internet. By 1996 usage of the word Internet had become commonplace, and consequently, so had its use as a synecdoche in reference to the World Wide Web.
Meanwhile, over the course of the decade, the Internet successfully accommodated the majority of previously existing public computer networks (although some networks, such as FidoNet, have remained separate). During the late 1990s, it was estimated that traffic on the public Internet grew by 100 percent per year, while the mean annual growth in the number of Internet users was thought to be between 20% and 50%. This growth is often attributed to the lack of central administration, which allows organic growth of the network, as well as the non-proprietary open nature of the Internet protocols, which encourages vendor interoperability and prevents any one company from exerting too much control over the network. The estimated population of Internet users is 1.97 billion as of 30 June 2010.
From 2009 onward, the Internet is expected to grow significantly in Brazil, Russia, India, China, and Indonesia (BRICI countries). These countries have large populations and moderate to high economic growth, but still low Internet penetration rates. In 2009, the BRICI countries represented about 45 percent of the world's population and had approximately 610 million Internet users, but by 2015, Internet users in BRICI countries will double to 1.2 billion, and will triple in Indonesia.
3.3 Modern uses
The Internet is allowing greater flexibility in working hours and location, especially with the spread of unmetered high-speed connections and web applications.
The Internet can now be accessed almost anywhere by numerous means, especially through mobile Internet devices. Mobile phones, datacards, handheld game consoles and cellular routers allow users to connect to the Internet from anywhere there is a wireless network supporting that device's technology. Within the limitations imposed by small screens and other limited facilities of such pocket-sized devices, services of the Internet, including email and the web, may be available. Service providers may restrict the services offered and wireless data transmission charges may be significantly higher than other access methods.
Educational material at all levels from pre-school to post-doctoral is available from websites. Examples range from CBeebies, through school and high-school revision guides, virtual universities, to access to top-end scholarly literature through the likes of Google Scholar. In distance education, help with homework and other assignments, self-guided learning, whiling away spare time, or just looking up more detail on an interesting fact, it has never been easier for people to access educational information at any level from anywhere. The Internet in general and the World Wide Web in particular are important enablers of both formal and informal education.
26
The low cost and nearly instantaneous sharing of ideas, knowledge, and skills has made collaborative work dramatically easier, with the help of collaborative software. Not only can a group cheaply communicate and share ideas, but the wide reach of the Internet allows such groups to easily form in the first place. An example of this is the free software movement, which has produced, among other programs, Linux, Mozilla Firefox, and OpenOffice.org. Internet "chat", whether in the form of IRC chat rooms or channels, or via instant messaging systems, allow colleagues to stay in touch in a very convenient way when working at their computers during the day. Messages can be exchanged even more quickly and conveniently than via email. Extensions to these systems may allow files to be exchanged, "whiteboard" drawings to be shared or voice and video contact between team members.
Version control systems allow collaborating teams to work on shared sets of documents without either accidentally overwriting each other's work or having members wait until they get "sent" documents to be able to make their contributions. Business and project teams can share calendars as well as documents and other information. Such collaboration occurs in a wide variety of areas including scientific research, software development, conference planning, political activism and creative writing. Social and political collaboration is also becoming more widespread as both Internet access and computer literacy grow. From the flash mob 'events' of the early 2000s to the use of social networking in the 2009 Iranian election protests, the Internet allows people to work together more effectively and in many more ways than was possible without it.
The Internet allows computer users to remotely access other computers and information stores easily, wherever they may be across the world. They may do this with or without the use of security, authentication and encryption technologies, depending on the requirements. This is encouraging new ways of working from home, collaboration and information sharing in many industries. An accountant sitting at home can audit the books of a company based in another country, on a server situated in a third country that is remotely maintained by IT specialists in a fourth. These accounts could have been created by home-working bookkeepers, in other remote locations, based on information emailed to them from offices all over the world. Some of these things were possible before the widespread use of the Internet, but the cost of private leased lines would have made many of them infeasible in practice. An office worker away from their desk, perhaps on the other side of the world on a business trip or a holiday, can open a remote desktop session into his normal office PC using a secure Virtual Private Network (VPN) connection via the Internet. This gives the worker complete access to all of his or her normal files and data, including email and other applications, while away from the office. This concept has been referred to among system administrators as the Virtual Private Nightmare, because it extends the secure perimeter of a corporate network into its employees' homes.
3.4 Information
Many people use the terms Internet and World Wide Web, or just the Web, interchangeably, but the two terms are not synonymous. The World Wide Web is a global set of documents, images and other resources, logically interrelated by hyperlinks and referenced with Uniform Resource Identifiers (URIs). URIs allow providers to symbolically identify services and clients to locate and address web servers, file servers, and other databases that store documents and provide resources and access them using the Hypertext Transfer Protocol (HTTP), the primary carrier protocol of the Web. HTTP is only one of the hundreds of
27
communication protocols used on the Internet. Web services may also use HTTP to allow software systems to communicate in order to share and exchange business logic and data.
World Wide Web browser software, such as Microsoft's Internet Explorer, Mozilla Firefox, Opera, Apple's Safari, and Google Chrome, let users navigate from one web page to another via hyperlinks embedded in the documents. These documents may also contain any combination of computer data, including graphics, sounds, text, video, multimedia and interactive content including games, office applications and scientific demonstrations. Through keyword-driven Internet research using search engines like Yahoo! and Google, users worldwide have easy, instant access to a vast and diverse amount of online information. Compared to printed encyclopedias and traditional libraries, the World Wide Web has enabled the decentralization of information.
The Web has also enabled individuals and organizations to publish ideas and information to a potentially large audience online at greatly reduced expense and time delay. Publishing a web page, a blog, or building a website involves little initial cost and many cost-free services are available. Publishing and maintaining large, professional web sites with attractive, diverse and up-to-date information is still a difficult and expensive proposition, however. Many individuals and some companies and groups use web logs or blogs, which are largely used as easily updatable online diaries. Some commercial organizations encourage staff to communicate advice in their areas of specialization in the hope that visitors will be impressed by the expert knowledge and free information, and be attracted to the corporation as a result. One example of this practice is Microsoft, whose product developers publish their personal blogs in order to pique the public's interest in their work. Collections of personal web pages published by large service providers remain popular, and have become increasingly sophisticated. Whereas operations such as Angelfire and GeoCities have existed since the early days of the Web, newer offerings from, for example, Facebook and MySpace currently have large followings. These operations often brand themselves as social network services rather than simply as web page hosts.
Advertising on popular web pages can be lucrative, and e-commerce or the sale of products and services directly via the Web continues to grow.
When the Web began in the 1990s, a typical web page was stored in completed form on a web server, formatted with HTML, ready to be sent to a user's browser in response to a request. Over time, the process of creating and serving web pages has become more automated and more dynamic. Websites are often created using content management or wiki software with, initially, very little content. Contributors to these systems, who may be paid staff, members of a club or other organization or members of the public, fill underlying databases with content using editing pages designed for that purpose, while casual visitors view and read this content in its final HTML form. There may or may not be editorial, approval and security systems built into the process of taking newly entered content and making it available to the target visitors.
3.5 Communication
Electronic mail, or email, is an important communications service available on the Internet. The concept of sending electronic text messages between parties in a way analogous to mailing letters or memos predates the creation of the Internet. Pictures, documents and other files are sent as email attachments. Emails can be cc-ed to multiple email addresses.
28
Internet telephony is another common communications service made possible by the creation of the Internet. VoIP stands for Voice-over-Internet Protocol, referring to the protocol that underlies all Internet communication. The idea began in the early 1990s with walkie-talkie-like voice applications for personal computers. In recent years many VoIP systems have become as easy to use and as convenient as a normal telephone. The benefit is that, as the Internet carries the voice traffic, VoIP can be free or cost much less than a traditional telephone call, especially over long distances and especially for those with always-on Internet connections such as cable or ADSL. VoIP is maturing into a competitive alternative to traditional telephone service. Interoperability between different providers has improved and the ability to call or receive a call from a traditional telephone is available. Simple, inexpensive VoIP network adapters are available that eliminate the need for a personal computer.
Voice quality can still vary from call to call but is often equal to and can even exceed that of traditional calls. Remaining problems for VoIP include emergency telephone number dialing and reliability. Currently, a few VoIP providers provide an emergency service, but it is not universally available. Traditional phones are line-powered and operate during a power failure; VoIP does not do so without a backup power source for the phone equipment and the Internet access devices. VoIP has also become increasingly popular for gaming applications, as a form of communication between players. Popular VoIP clients for gaming include Ventrilo and Teamspeak. Wii, PlayStation 3, and Xbox 360 also offer VoIP chat features.
3.6 Data transfer
File sharing is an example of transferring large amounts of data across the Internet. A computer file can be emailed to customers, colleagues and friends as an attachment. It can be uploaded to a website or FTP server for easy download by others. It can be put into a "shared location" or onto a file server for instant use by colleagues. The load of bulk downloads to many users can be eased by the use of "mirror" servers or peer-to-peer networks. In any of these cases, access to the file may be controlled by user authentication, the transit of the file over the Internet may be obscured by encryption, and money may change hands for access to the file. The price can be paid by the remote charging of funds from, for example, a credit card whose details are also passed—usually fully encrypted—across the Internet. The origin and authenticity of the file received may be checked by digital signatures or by MD5 or other message digests. These simple features of the Internet, over a worldwide basis, are changing the production, sale, and distribution of anything that can be reduced to a computer file for transmission. This includes all manner of print publications, software products, news, music, film, video, photography, graphics and the other arts. This in turn has caused seismic shifts in each of the existing industries that previously controlled the production and distribution of these products.
Streaming media is the real-time delivery of digital media for the immediate consumption or enjoyment by end users. Many radio and television broadcasters provide Internet feeds of their live audio and video productions. They may also allow time-shift viewing or listening such as Preview, Classic Clips and Listen Again features. These providers have been joined by a range of pure Internet "broadcasters" who never had on-air licenses. This means that an Internet-connected device, such as a computer or something more specific, can be used to access on-line media in much the same way as was previously possible only with a television or radio receiver. The range of available types of content is much wider, from specialized technical webcasts to on-demand popular multimedia services. Podcasting is a variation on

29
this theme, where—usually audio—material is downloaded and played back on a computer or shifted to a portable media player to be listened to on the move. These techniques using simple equipment allow anybody, with little censorship or licensing control, to broadcast audio-visual material worldwide.
Digital media streaming increases the demand for network bandwidth. For example, standard image quality needs 1 Mbps link speed for SD 480p, HD 720p quality requires 2.5 Mbps, and the top-of-the-line HDX quality needs 4.5 Mbps for 1080p.
Webcams are a low-cost extension of this phenomenon. While some webcams can give full-frame-rate video, the picture is usually either small or updates slowly. Internet users can watch animals around an African waterhole, ships in the Panama Canal, traffic at a local roundabout or monitor their own premises, live and in real time. Video chat rooms and video conferencing are also popular with many uses being found for personal webcams, with and without two-way sound. YouTube was founded on 15 February 2005 and is now the leading website for free streaming video with a vast number of users. It uses a flash-based web player to stream and show video files. Registered users may upload an unlimited amount of video and build their own personal profile. YouTube claims that its users watch hundreds of millions, and upload hundreds of thousands of videos daily.
3.7 Access
The prevalent language for communication on the Internet has been English. This may be a result of the origin of the Internet, as well as the language's role as a lingua franca. Early computer systems were limited to the characters in the American Standard Code for Information Interchange (ASCII), a subset of the Latin alphabet.
After English (27%), the most requested languages on the World Wide Web are Chinese (23%), Spanish (8%), Japanese (5%), Portuguese and German (4% each), Arabic, French and Russian (3% each), and Korean (2%). By region, 42% of the world's Internet users are based in Asia, 24% in Europe, 14% in North America, 10% in Latin America and the Caribbean taken together, 6% in Africa, 3% in the Middle East and 1% in Australia/Oceania. The Internet's technologies have developed enough in recent years, especially in the use of Unicode, that good facilities are available for development and communication in the world's widely used languages. However, some glitches such as mojibake (incorrect display of some languages' characters) still remain.
Common methods of Internet access in homes include dial-up, landline broadband (over coaxial cable, fiber optic or copper wires), Wi-Fi, satellite and 3G/4G technology cell phones. Public places to use the Internet include libraries and Internet cafes, where computers with Internet connections are available. There are also Internet access points in many public places such as airport halls and coffee shops, in some cases just for brief use while standing. Various terms are used, such as "public Internet kiosk", "public access terminal", and "Web payphone". Many hotels now also have public terminals, though these are usually fee-based. These terminals are widely accessed for various usage like ticket booking, bank deposit, online payment etc. Wi-Fi provides wireless access to computer networks, and therefore can do so to the Internet itself. Hotspots providing such access include Wi-Fi cafes, where would-be users need to bring their own wireless-enabled devices such as a laptop or PDA. These services may be free to all, free to customers only, or fee-based. A hotspot need not be limited to a confined location. A whole campus or park, or even an entire city can be enabled.
30
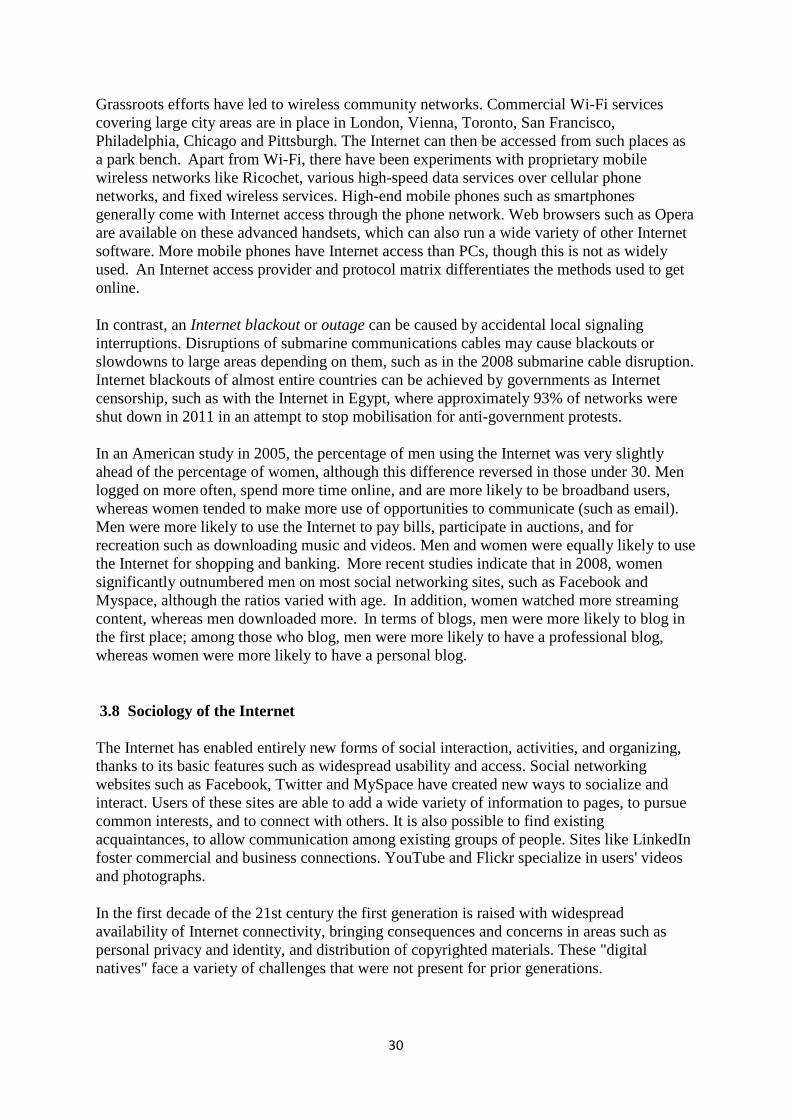
Grassroots efforts have led to wireless community networks. Commercial Wi-Fi services covering large city areas are in place in London, Vienna, Toronto, San Francisco, Philadelphia, Chicago and Pittsburgh. The Internet can then be accessed from such places as a park bench. Apart from Wi-Fi, there have been experiments with proprietary mobile wireless networks like Ricochet, various high-speed data services over cellular phone networks, and fixed wireless services. High-end mobile phones such as smartphones generally come with Internet access through the phone network. Web browsers such as Opera are available on these advanced handsets, which can also run a wide variety of other Internet software. More mobile phones have Internet access than PCs, though this is not as widely used. An Internet access provider and protocol matrix differentiates the methods used to get online.
In contrast, an Internet blackout or outage can be caused by accidental local signaling interruptions. Disruptions of submarine communications cables may cause blackouts or slowdowns to large areas depending on them, such as in the 2008 submarine cable disruption. Internet blackouts of almost entire countries can be achieved by governments as Internet censorship, such as with the Internet in Egypt, where approximately 93% of networks were shut down in 2011 in an attempt to stop mobilisation for anti-government protests.
In an American study in 2005, the percentage of men using the Internet was very slightly ahead of the percentage of women, although this difference reversed in those under 30. Men logged on more often, spend more time online, and are more likely to be broadband users, whereas women tended to make more use of opportunities to communicate (such as email). Men were more likely to use the Internet to pay bills, participate in auctions, and for recreation such as downloading music and videos. Men and women were equally likely to use the Internet for shopping and banking. More recent studies indicate that in 2008, women significantly outnumbered men on most social networking sites, such as Facebook and Myspace, although the ratios varied with age. In addition, women watched more streaming content, whereas men downloaded more. In terms of blogs, men were more likely to blog in the first place; among those who blog, men were more likely to have a professional blog, whereas women were more likely to have a personal blog.
3.8 Sociology of the Internet
The Internet has enabled entirely new forms of social interaction, activities, and organizing, thanks to its basic features such as widespread usability and access. Social networking websites such as Facebook, Twitter and MySpace have created new ways to socialize and interact. Users of these sites are able to add a wide variety of information to pages, to pursue common interests, and to connect with others. It is also possible to find existing acquaintances, to allow communication among existing groups of people. Sites like LinkedIn foster commercial and business connections. YouTube and Flickr specialize in users' videos and photographs.
In the first decade of the 21st century the first generation is raised with widespread availability of Internet connectivity, bringing consequences and concerns in areas such as personal privacy and identity, and distribution of copyrighted materials. These "digital natives" face a variety of challenges that were not present for prior generations.
31
The Internet has achieved new relevance as a political tool, leading to Internet censorship by some states. The presidential campaign of Howard Dean in 2004 in the United States was notable for its success in soliciting donation via the Internet. Many political groups use the Internet to achieve a new method of organizing in order to carry out their mission, having given rise to Internet activism. Some governments, such as those of Iran, North Korea, Myanmar, the People's Republic of China, and Saudi Arabia, restrict what people in their countries can access on the Internet, especially political and religious content. This is accomplished through software that filters domains and content so that they may not be easily accessed or obtained without elaborate circumvention.
In Norway, Denmark, Finland and Sweden, major Internet service providers have voluntarily, possibly to avoid such an arrangement being turned into law, agreed to restrict access to sites listed by authorities. While this list of forbidden URLs is only supposed to contain addresses of known child pornography sites, the content of the list is secret. Many countries, including the United States, have enacted laws against the possession or distribution of certain material, such as child pornography, via the Internet, but do not mandate filtering software. There are many free and commercially available software programs, called content-control software, with which a user can choose to block offensive websites on individual computers or networks, in order to limit a child's access to pornographic materials or depiction of violence.
The Internet has been a major outlet for leisure activity since its inception, with entertaining social experiments such as MUDs and MOOs being conducted on university servers, and humor-related Usenet groups receiving much traffic. Today, many Internet forums have sections devoted to games and funny videos; short cartoons in the form of Flash movies are also popular. Over 6 million people use blogs or message boards as a means of communication and for the sharing of ideas. The pornography and gambling industries have taken advantage of the World Wide Web, and often provide a significant source of advertising revenue for other websites. Although many governments have attempted to restrict both industries' use of the Internet, this has generally failed to stop their widespread popularity.
One main area of leisure activity on the Internet is multiplayer gaming. This form of recreation creates communities, where people of all ages and origins enjoy the fast-paced world of multiplayer games. These range from MMORPG to first-person shooters, from role-playing video games to online gambling. This has revolutionized the way many people interact while spending their free time on the Internet. While online gaming has been around since the 1970s, modern modes of online gaming began with subscription services such as GameSpy and MPlayer. Non-subscribers were limited to certain types of game play or certain games. Many people use the Internet to access and download music, movies and other works for their enjoyment and relaxation. Free and fee-based services exist for all of these activities, using centralized servers and distributed peer-to-peer technologies. Some of these sources exercise more care with respect to the original artists' copyrights than others.
Many people use the World Wide Web to access news, weather and sports reports, to plan and book vacations and to find out more about their interests. People use chat, messaging and email to make and stay in touch with friends worldwide, sometimes in the same way as some previously had pen pals. The Internet has seen a growing number of Web desktops, where users can access their files and settings via the Internet.
32
Cyber slacking can become a drain on corporate resources; the average UK employee spent 57 minutes a day surfing the Web while at work, according to a 2003 study by Peninsula Business Services. Internet addiction disorder is excessive computer use that interferes with daily life. Some psychologists believe that Internet use has other effects on individuals for instance interfering with the deep thinking that leads to true creativity.
Internet usage has been correlated to users' loneliness. Lonely people tend to use the Internet as an outlet for their feelings and to share their stories with others, such as in the "I am lonely will anyone speak to me" thread.
4.0 CONCLUSION: Internet is a short form of the technical term internetwork, the result of interconnecting computer networks with special gateways or routers. The Internet is also often referred to as the Net.
5.0 SUMMARY: In this unit, you have learnt:
• Definition of the Internet • History of the Internet • Similar and distinguishing elements of the Internet and WWW • Different Search Engines • Sociology of the Internet
6.0 Tutor Marked Assignment
� Define the Internet � Differentiate between the Internet and the WWW � List other things WWW can be used to do
7.0 Further Reading and Other Resources
• Abbate, Janet. Inventing the Internet. Cambridge: MIT Press, 1999. • Bemer, Bob, "A History of Source Concepts for the Internet/Web" • Campbell-Kelly, Martin; Aspray, William. Computer: A History of the Information
Machine. New York: BasicBooks, 1996. • Clark, David D., "The Design Philosophy of the DARPA Internet Protocols",
Computer Communications Review 18:4, August 1988, pp. 106–114 • Graham, Ian S. The HTML Sourcebook: The Complete Guide to HTML. New York:
John Wiley and Sons, 1995. • Krol, Ed. Hitchhiker's Guide to the Internet, 1987. • Krol, Ed. Whole Internet User's Guide and Catalog. O'Reilly & Associates, 1992. • Scientific American Special Issue on Communications, Computers, and Networks,
September, 1991
U NIT TWO – Understanding the WWW
1.0 INTRODUCTION
2.0 OBJECTIVES
33
4.0 MAIN CONTENT 4.1 – How the WWW works 4.2 – How do URLs work 4.3 -How to Use a Web Browser 4.4 How to Use a Hypertext link
5.0 CONCLUSION 6.0 SUMMARY 7.0 TUTOR MARKED ASSIGNMENT 8.0 FURTHER READING AND OTHER RESOURCES
1.0 INTRODUCTION
One of the best things about the World Wide Web is that it is just as easy to create Web pages as it is to browse them. The key to publishing on the Web is having a firm understanding of Hypertext Markup Language (HTML). Despite the intimidating name, HTML is extremely simple to learn and use. By the time you finish this course material, you will be well on your way to becoming an HTML wizard.
Before diving head-first into the language of HTML itself, it will help you to understand a little bit about how the World Wide Web works. After all, HTML is designed to guide users through the vast and tangled resources of the Web. As a student of this course , you will need to understand some of the basics behind the architecture of the World Wide Web. Knowing how the Web works, as well as when it doesn't and why, can help you make important decisions about how to construct your own Web pages.
It would be impossible to describe in detail the inner workings of the Web in a single Unit. With that in mind, this Unit provides you with a "refresher course" on the basics. Armed with this basic knowledge, you'll be able to move on to writing your own Web pages in a very short time.
2.0 OBJECTIVES At the end of this unit, you should be able to:
� Explain the meaning of WWW � Describe how WWW works � Explain parts of URLs
3.0 MAIN CONTENT
3.1 How the WWW works
The World Wide Web is a system of hypertext documents that are linked to each other. Internet is the means to access this set of interlinked documents. These hypertext documents can contain text, images or even audio and video data. The World Wide Web, serving as an enormous information base, has also facilitated the spread of this information across the globe. It has led to the emergence of the Internet age. It will not be an exaggeration to say that the Internet owes its popularity to the World Wide Web.
34
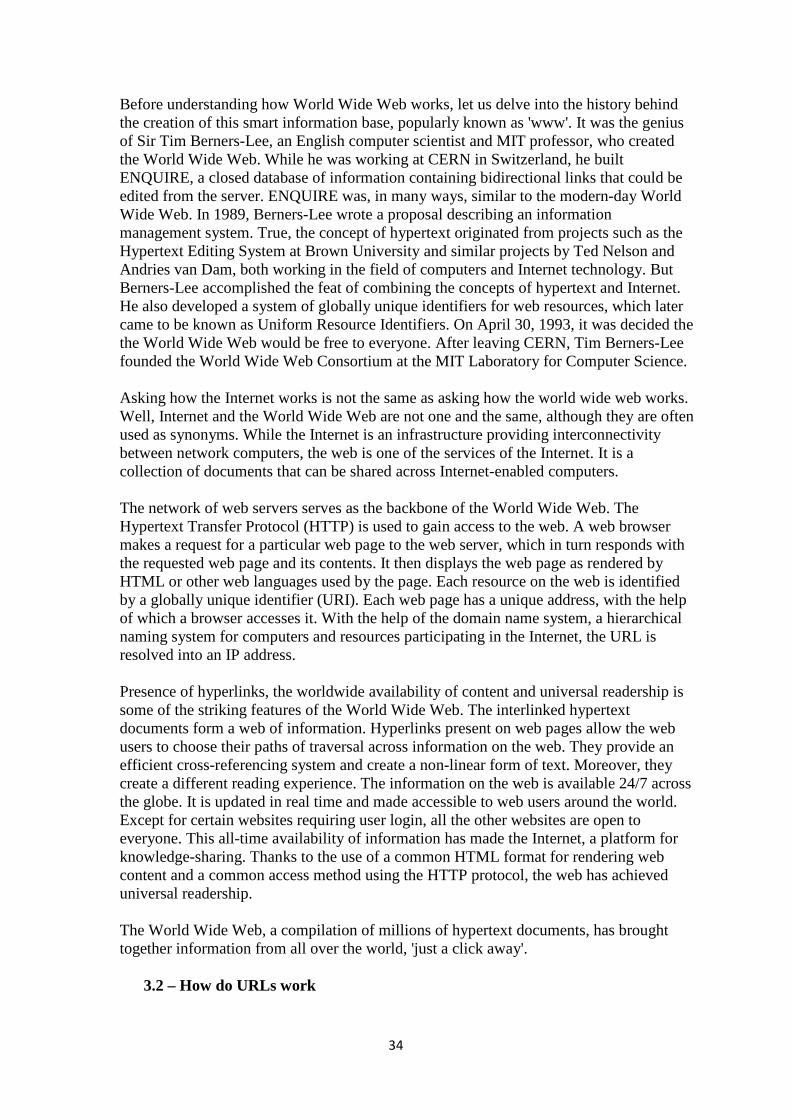
Before understanding how World Wide Web works, let us delve into the history behind the creation of this smart information base, popularly known as 'www'. It was the genius of Sir Tim Berners-Lee, an English computer scientist and MIT professor, who created the World Wide Web. While he was working at CERN in Switzerland, he built ENQUIRE, a closed database of information containing bidirectional links that could be edited from the server. ENQUIRE was, in many ways, similar to the modern-day World Wide Web. In 1989, Berners-Lee wrote a proposal describing an information management system. True, the concept of hypertext originated from projects such as the Hypertext Editing System at Brown University and similar projects by Ted Nelson and Andries van Dam, both working in the field of computers and Internet technology. But Berners-Lee accomplished the feat of combining the concepts of hypertext and Internet. He also developed a system of globally unique identifiers for web resources, which later came to be known as Uniform Resource Identifiers. On April 30, 1993, it was decided the the World Wide Web would be free to everyone. After leaving CERN, Tim Berners-Lee founded the World Wide Web Consortium at the MIT Laboratory for Computer Science. Asking how the Internet works is not the same as asking how the world wide web works. Well, Internet and the World Wide Web are not one and the same, although they are often used as synonyms. While the Internet is an infrastructure providing interconnectivity between network computers, the web is one of the services of the Internet. It is a collection of documents that can be shared across Internet-enabled computers. The network of web servers serves as the backbone of the World Wide Web. The Hypertext Transfer Protocol (HTTP) is used to gain access to the web. A web browser makes a request for a particular web page to the web server, which in turn responds with the requested web page and its contents. It then displays the web page as rendered by HTML or other web languages used by the page. Each resource on the web is identified by a globally unique identifier (URI). Each web page has a unique address, with the help of which a browser accesses it. With the help of the domain name system, a hierarchical naming system for computers and resources participating in the Internet, the URL is resolved into an IP address. Presence of hyperlinks, the worldwide availability of content and universal readership is some of the striking features of the World Wide Web. The interlinked hypertext documents form a web of information. Hyperlinks present on web pages allow the web users to choose their paths of traversal across information on the web. They provide an efficient cross-referencing system and create a non-linear form of text. Moreover, they create a different reading experience. The information on the web is available 24/7 across the globe. It is updated in real time and made accessible to web users around the world. Except for certain websites requiring user login, all the other websites are open to everyone. This all-time availability of information has made the Internet, a platform for knowledge-sharing. Thanks to the use of a common HTML format for rendering web content and a common access method using the HTTP protocol, the web has achieved universal readership. The World Wide Web, a compilation of millions of hypertext documents, has brought together information from all over the world, 'just a click away'.
3.2 – How do URLs work
35
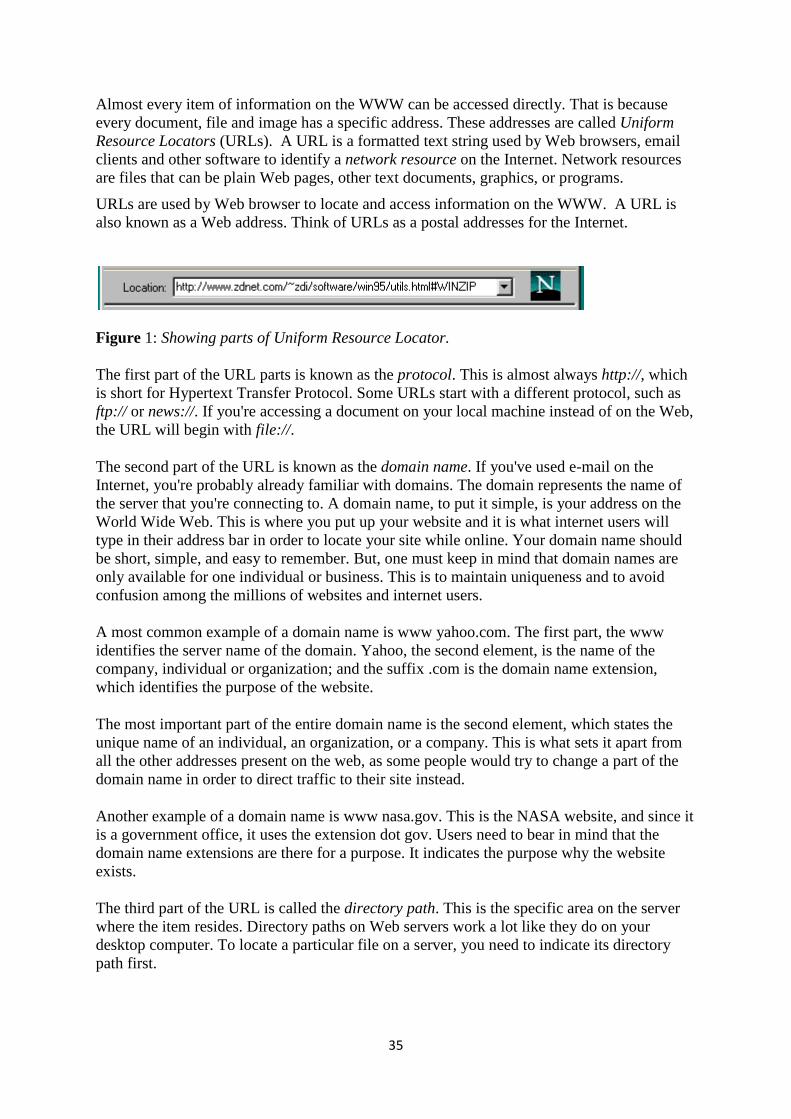
Almost every item of information on the WWW can be accessed directly. That is because every document, file and image has a specific address. These addresses are called Uniform Resource Locators (URLs). A URL is a formatted text string used by Web browsers, email clients and other software to identify a network resource on the Internet. Network resources are files that can be plain Web pages, other text documents, graphics, or programs.
URLs are used by Web browser to locate and access information on the WWW. A URL is also known as a Web address. Think of URLs as a postal addresses for the Internet.
Figure 1: Showing parts of Uniform Resource Locator.
The first part of the URL parts is known as the protocol. This is almost always http://, which is short for Hypertext Transfer Protocol. Some URLs start with a different protocol, such as ftp:// or news://. If you're accessing a document on your local machine instead of on the Web, the URL will begin with file://.
The second part of the URL is known as the domain name. If you've used e-mail on the Internet, you're probably already familiar with domains. The domain represents the name of the server that you're connecting to. A domain name, to put it simple, is your address on the World Wide Web. This is where you put up your website and it is what internet users will type in their address bar in order to locate your site while online. Your domain name should be short, simple, and easy to remember. But, one must keep in mind that domain names are only available for one individual or business. This is to maintain uniqueness and to avoid confusion among the millions of websites and internet users.
A most common example of a domain name is www yahoo.com. The first part, the www identifies the server name of the domain. Yahoo, the second element, is the name of the company, individual or organization; and the suffix .com is the domain name extension, which identifies the purpose of the website.
The most important part of the entire domain name is the second element, which states the unique name of an individual, an organization, or a company. This is what sets it apart from all the other addresses present on the web, as some people would try to change a part of the domain name in order to direct traffic to their site instead.
Another example of a domain name is www nasa.gov. This is the NASA website, and since it is a government office, it uses the extension dot gov. Users need to bear in mind that the domain name extensions are there for a purpose. It indicates the purpose why the website exists.
The third part of the URL is called the directory path. This is the specific area on the server where the item resides. Directory paths on Web servers work a lot like they do on your desktop computer. To locate a particular file on a server, you need to indicate its directory path first.
36
The fourth part of the URL is called the document file name. This indicates the specific file being accessed. This is usually an HTML file, but it can also be an image, sound, or another file.
Sometimes the URL contains a fifth part, known as the anchor name. This is a pointer to a specific part of an HTML document. It's always preceded by the pound sign (#). Anchors are especially useful for large documents.
Absolute vs. Relative URLs
Full URLs featuring all substrings are called absolute URLs. In some cases such as within Web pages, URLs can contain only the one location element. These are called relative URLs. Relative URLs are used for efficiency by Web servers and a few other programs when they already know the correct URL protocol and host.
3.3- How to Use a Web Browser
Many people can successfully navigate the World Wide Web without any problem at all and may even consider themselves experts of the Web. On the other hand, there are thousands of other people who do not even know the first thing about operating a web browser. If you would like to know how to operate a web browser (the tool you use to navigate the internet), such asNetscape, Microsoft's Internet Explorer or Mozilla's Firefox without taking an expensive computer-learning class then here are the basics of using a web browser of your choice.
37
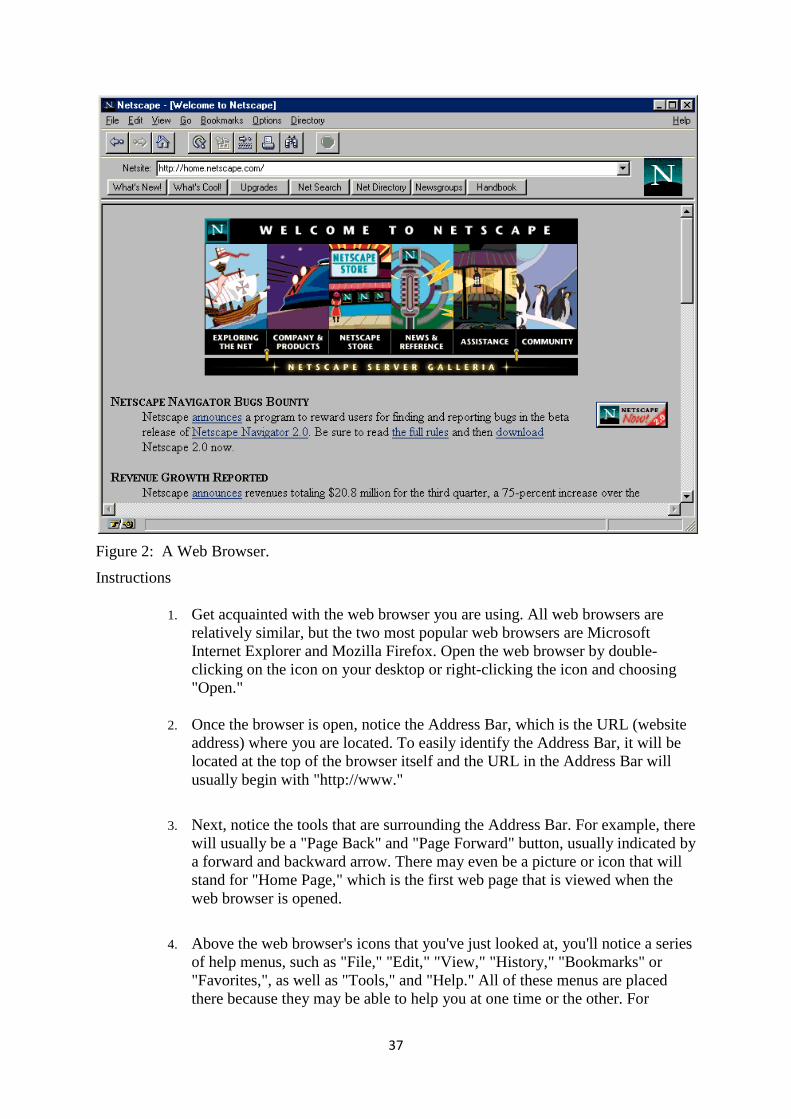
Figure 2: A Web Browser.
Instructions
1. Get acquainted with the web browser you are using. All web browsers are relatively similar, but the two most popular web browsers are Microsoft Internet Explorer and Mozilla Firefox. Open the web browser by double-clicking on the icon on your desktop or right-clicking the icon and choosing "Open."
2. Once the browser is open, notice the Address Bar, which is the URL (website address) where you are located. To easily identify the Address Bar, it will be located at the top of the browser itself and the URL in the Address Bar will usually begin with "http://www."
3. Next, notice the tools that are surrounding the Address Bar. For example, there
will usually be a "Page Back" and "Page Forward" button, usually indicated by a forward and backward arrow. There may even be a picture or icon that will stand for "Home Page," which is the first web page that is viewed when the web browser is opened.
4. Above the web browser's icons that you've just looked at, you'll notice a series
of help menus, such as "File," "Edit," "View," "History," "Bookmarks" or "Favorites,", as well as "Tools," and "Help." All of these menus are placed there because they may be able to help you at one time or the other. For
38
example, clicking once on "Bookmarks" or "Favorites" will show you a list of all the websites that you have placed in your "favorite" list.
5. Two important things to know how to do are to get to a specific website
destination of your choice and make that website one of your "favorites" or "bookmarks."We will start with navigating to a specific website of your choice. If you have a specific URL of a website in mind then feel free to use that. For this example, we'll use the Google Search Engine home page. In the Address Bar which is located at the top of the web browser, type in the full URL of the website you would like to go to. In this example, we'll type in "http://www.google.com." After you've typed in the full URL, either press "Enter" on the keyboard or click on the arrow icon or "go" button located at the very right end of the Address Bar. After you have done that the website should appear on your web browser's screen.
6. We will now put this website, the website of your choice or in this example
we're using www.google.com, in your "Favorites" or "Bookmarks" list. Click on the "Bookmark" or "Favorites" menu at the top of the web browser and choose the option that says either, "Bookmark this page," or "Add to Favorites." Your website is now in the "Favorites" or "Bookmarks" list and all you will need to do to get back to that website is to click on the "Bookmarks" or "Favorites" menu again and click on the website that you have favorited or bookmarked.
7. You have just learned how to do two very important tasks in two of the most
popular web browsers that are used for navigating the internet. For any other help that is needed, the web browser's own "Help" section can be read by clicking on the "Help" menu at the top of the web browser and choosing the browser help section. In Mozilla Firefox, this section is called "Help Contents," while in Microsoft's Internet Explorer it is called "Contents and Index."
Experiment with your Web browser to get an understanding of how navigation works on the World Wide Web. It is a good idea to use a few different browsers and note the differences. Knowing how users browse the Web is an important part of understanding how you should construct your own HTML pages.
3.4 How to Use a Hypertext link Using a hypertext link to move from one place to another is one of the most common activities on the World Wide Web. In fact, hypertext links are the very essence of the Web. The following steps explain how to use links and describe a little of what happens behind the scenes.
39
1. find a link on the page, look for text that's displayed in a different color. By default, hypertext links you haven't used are blue and underlined. Links you've already visited are purple. These colors can be changed, however.
2. Using your mouse, place the pointer over the hypertext link and click. There will be a brief delay after you press on the hypertext link.
3. During this delay, your browser client is contacting the Web server referenced in the hypertext link's URL. It is attempting to retrieve the referenced document.
Figure 3: An example of HTML document.
4. Once the contact has been established, your browser begins displaying the new document.
5. Not all links appear as text. Many links appear in images, such as buttons or icons. Sometimes a colored border will appear around the image, or it will be designed to look like a button. In many browsers, the cursor will change to a hand when it passes over a hypertext link. These visual clues help the reader understand that it is a link. However, sometimes there are no visual clues. Understanding the need to provide visual clues is an important part of being an HTML author.
4.0 CONCLUSION: Hypertext is one the most common activities on the WWW. It is the very essence of the Web.
5.0 SUMMARY: In this unit, you have learnt: • The working method of WWW • The work of the URLs in the system • How hypertext links are used.
6.0 Tutor Marked Assignment
� What is the difference between Absolute and Relative URLs? � Explain the term WWW � What is the work of Hypertext Transfer Protocol (HTTP)?
40
� Give three examples of domain names?
7.0 Further Reading and Other Resources
• Abbate, Janet. Inventing the Internet. Cambridge: MIT Press, 1999. • Bemer, Bob, "A History of Source Concepts for the Internet/Web" • Campbell-Kelly, Martin; Aspray, William. Computer: A History of the Information
Machine. New York: BasicBooks, 1996. • Clark, David D., "The Design Philosophy of the DARPA Internet Protocols",
Computer Communications Review 18:4, August 1988, pp. 106–114 • Graham, Ian S. The HTML Sourcebook: The Complete Guide to HTML. New York:
John Wiley and Sons, 1995. • Krol, Ed. Hitchhiker's Guide to the Internet, 1987. • Krol, Ed. Whole Internet User's Guide and Catalog. O'Reilly & Associates, 1992. • Scientific American Special Issue on Communications, Computers, and Networks,
September, 1991
41
UNIT THREE – HTML AND THE WEB
1.0 Introduction
2.0 Objectives
3.0 Main Content
3.1. What is HTML
3.2. History of HTML
3.3. How HTML works with the Web
3.3.1 How HTML works on the Web
3.3.2. What are the tags up to?
3.3.3 Is there anything HTML cannot do?
3.4. Things you can do with HTML
4.0. Conclusion
5.0 Summary
6.0 Tutor Marked Assignment
7.0 Further Reading and Other Resources
1.0 INTRODUCTION
Web designers utilize markup language, most notably HTML for structure and CSS for presentation to develop pages that can be read by web browsers. This unit will deal on only HTML structures. HTML is not the only way to present information on the Web, but it is the glue that holds everything together. In addition to begin a markup language for displaying text, images, and multimedia, HTML provides instructions to Web browsers in order to control how documents are viewed and how they relate to each other. For all its simplicity, HTML is a very powerful language.
In this unit, we will take a look at how HTML interacts with the Web and students are expected to explore some of the ways that it is begin used today on popular web sites.
2.0 OBJECTIVES
At the end of this unit, you should be able to: � Define HTML � Describe the History of HTML � Explain how HTML works
3.0 MAIN CONTENT
3.1. What is HTML?
42
HTML is a computer language devised to allow website creation. These websites can then be viewed by anyone else connected to the Internet. It is relatively easy to learn, with the basics being accessible to most people in one sitting; and quite powerful in what it allows you to create. It is constantly undergoing revision and evolution to meet the demands and requirements of the growing Internet audience under the direction of the World Wide Web Consortium, W3C, the organisation charged with designing and maintaining the language.
The full meaning of HTML is HyperText Markup Language.
• HyperText is the method by which you move around on the web — by clicking on special text called hyperlinks which bring you to the next page. The fact that it is hyper just means it is not linear — i.e. you can go to any place on the Internet whenever you want by clicking on links — there is no set order to do things in.
• Markup is what HTML tags do to the text inside them. They mark it as a certain type of text (italicised text, for example).
• HTML is a Language, as it has code-words and syntax like any other language.
3.1.1 How does HTML works?
HTML consists of a series of short codes typed into a text-file by the site author — these are the tags. The text is then saved as a html file, and viewed through a browser, like Internet Explorer or firefox. This browser reads the file and translates the text into a visible form, rendering the page as the author had intended. Writing your own HTML entails using tags correctly to create your vision. You can use anything from a rudimentary text-editor to a powerful graphical editor to create HTML pages.
3.1.2 What are the tags up to?
The tags are what separate normal text from HTML code. You might know them as the words between the <angle-brackets>. They allow all the cool stuff like images and tables and stuff, just by telling your browser what to render on the page. Different tags will perform different functions. The tags themselves don’t appear when you view your page through a browser, but their effects do. The simplest tags do nothing more than apply formatting to some text, like this:
<b>These words will be bold</b>, and these will not.
In the example above, the <b> tags were wrapped around some text, and their effect will be that the contained text will be bolded when viewed through an ordinary web browser.
3.1.3 Is there anything HTML cannot do?
Of course, but since making websites became more popular and needs increased many other supporting languages have been created to allow new stuff to happen, plus HTML is modified every few years to make way for improvements.
Cascading Stylesheets are used to control how your pages are presented, and make pages more accessible. Basic special effects and interaction is provided by JavaScript, which adds a
43
lot of power to basic HTML. Most of this advanced stuff is for later down the road, but when using all of these technologies together, you have a lot of power at your disposal.
3.2. History of HTML
A markup language combines text as well as coded instructions on how to format that text and the term "markup" originates from the traditional practice of 'marking up' the margins of a paper manuscript with printer's instructions. Nowadays, however, if you mention the term 'markup' to any knowledgeable web author, the first thing they are likely to think of is 'HTML'.
In the Beginning HTML —which is short for HyperText Markup Language— is the official language of the World Wide Web and was first conceived in 1990. HTML is a product of SGML (Standard Generalized Markup Language) which is a complex, technical specification describing markup languages, especially those used in electronic document exchange, document management, and document publishing. HTML was originally created to allow those who were not specialized in SGML to publish and exchange scientific and other technical documents. HTML especially facilitated this exchange by incorporating the ability to link documents electronically using hyperlinks. Thus the name Hypertext Markup Language. However, it was quickly realized by those outside of the discipline of scientific documentation that HTML was relatively easy to learn, was self contained and lent itself to a number of other applications. With the evolution of the World Wide Web, HTML began to proliferate and quickly spilled over into the mainstream.
Browser Wars
Soon, companies began creating browsers —the software required to view an HTML document, i.e., a web page— and as they gained popularity it gave rise to competition and other web browsers. It may surprise some that back in late 1995, Netscape —which now plays a distant second to the King Kong of browsers, Internet Explorer— was the dominant browser on the market. In fact, Netscape was the first browser to support Javascript, animated gifts and HTML frames. Thus began the so-called 'browser wars' and, along with seeing who could implement more 'bells and whistles' than the other guy, browser makers also began inventing proprietary HTML elements that only worked with their browsers. Some examples of these are the <marquee>...</marquee> tags (scrolling text) which originally only worked with Internet Explorer and the <blink>...</blink> tags (blinking text) which still only works with Gecko-based browsers such as Mozilla or Netscape. A side effect of all this competition was that HTML became fragmented and web authors soon found that their web pages looked fine in one browser but not in another. Hence it became increasingly difficult and time consuming to create a web page that would display uniformly across a number of different browsers. (This phenomenon remains to some extent to this very day.)

44
Meanwhile, an organization known as the World Wide Web Consortium (W3C for short) was working steadily along in the background to standardize HTML. Several recommendations were published by the W3C during the late 1990s which represented the official versions of HTML and provided an ongoing comprehensive reference for web authors. Thus the birth of HTML 2.0 in September 1995, HTML 3.2 in January 1997 and HTML 4.01 in December 1999. By now, Internet Explorer (IE) had eclipsed Netscape Navigator as the browser to use while surfing the net due to its superior capabilities but also largely due to the fact that the IE came bundled with the Windows operating system. Essentially when people bought computers using the Windows OS, it had the 'internet installed on it'. This tended to suit people just fine since the typical newcomer to computers was someone who was tentatively striking forth to take on this intimidating new-fangled technology that was crammed to the rafters with indecipherable acronyms, software help files that made no sense and buggy programs. Hence, the more 'instant' solutions this new technology offered, the better it was.
3.3. How HTML works with the Web
HTML allows the individual elements on the Web to be brought together and presented as a collection. Text, images, multimedia, and other files can all be packaged together using HTML. This section of unit three explains the basic principles behind the interaction between HTML and the WWW.
You can always view the HTML source code for a particular page through your browser. Once you've mastered the basics of HTML, this is a great way to learn how other authors put together their HTML documents. To view the source code of the current document in Netscape, choose Document Source from the View menu.
45
Figure 1: Document Source from the View menu
1. The author of the Web page assembles all of the materials necessary, including text, charts, images, and sounds.
2. All of the material for the Web page is linked together using HTML. HTML codes control the appearance, layout, and flow of the page. The amazing thing about HTML is that it is all done with simple text codes that anyone can understand.
3. When someone connects to a Web server from his or her computer, the HTML file is transferred from server to client. Because an HTML file is simple text, this usually happens very quickly.
4. The Web browsing software (the client) interprets the layout and markup commands specified in the HTML file and then display the text exactly as the HTML author intended.
5. Any images and charts on the page are retrieved as well. The HTML file tells the Web browser what images to download and how to display them on the page.
3.3.1. How HTML works on the Web
a) Your Computer
The browser on your computer sends a request for an HTML document from a remote server using addresses called URLs (Uniform Resource Locators). When the data is located and returned, your browser displays the web page (text and graphics) according to the HTML tags in the document.
b) Connection to the Internet
A dial up modem in your computer or a direct high speed data transmission line connects your computer to an internet service provider.
c) Internet Service Provider
Your internet service provider is probably an internet web server and is connected to all the other computers on the web. Your web server sends your request for an HTML document and sends back the file to you.
d) Internet
The internet is a collection of web servers around the world. Each server has a URL and will forward your request on until it reaches the server you are looking for. When the data is returned to you, it may travel a totally different route over different computers.
e) Remote server
The remote web server with the URL you are looking for has all the HTML files including text, graphics, sound, and video. It may also have gateway scripts that are programs running on the server to process data.
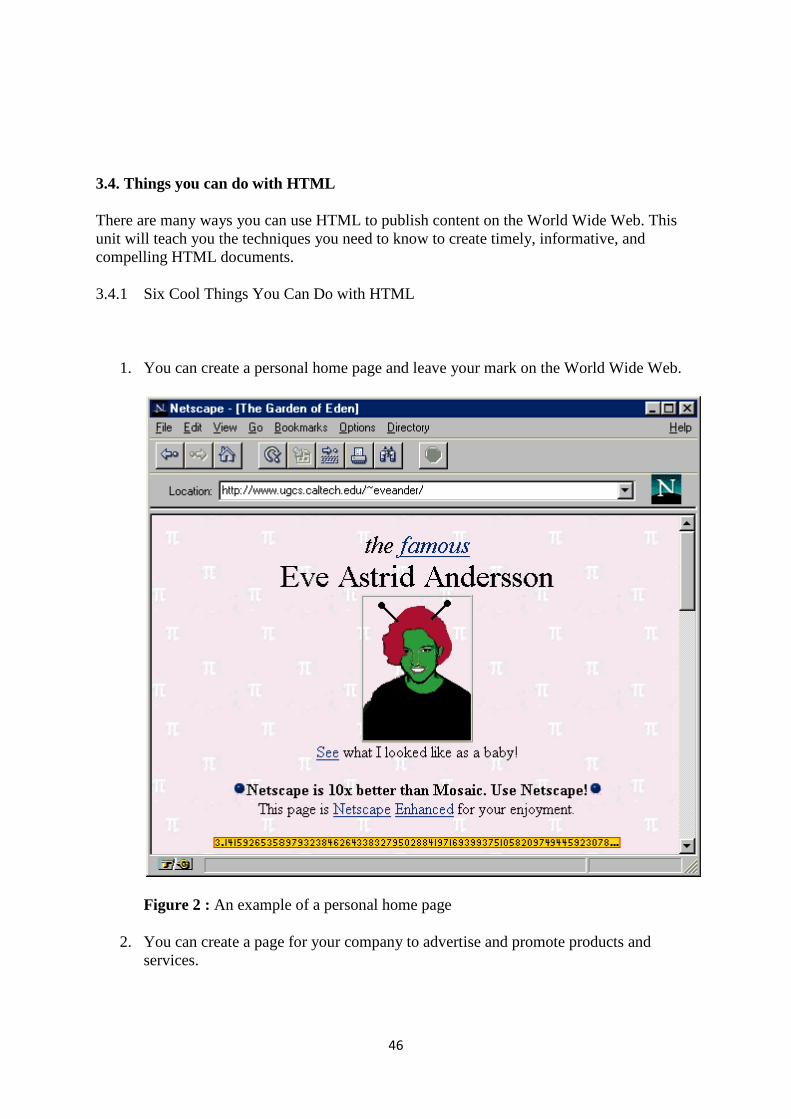
46
3.4. Things you can do with HTML
There are many ways you can use HTML to publish content on the World Wide Web. This unit will teach you the techniques you need to know to create timely, informative, and compelling HTML documents.
3.4.1 Six Cool Things You Can Do with HTML
1. You can create a personal home page and leave your mark on the World Wide Web.
Figure 2 : An example of a personal home page
2. You can create a page for your company to advertise and promote products and services.
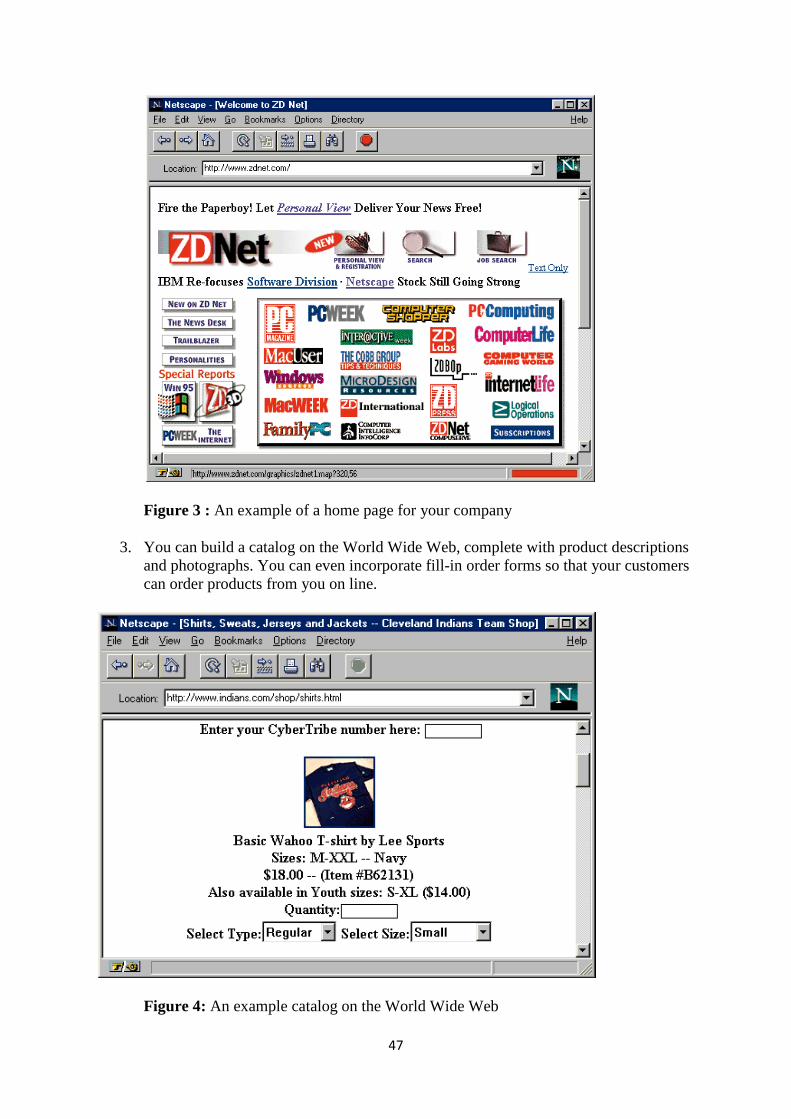
47
Figure 3 : An example of a home page for your company
3. You can build a catalog on the World Wide Web, complete with product descriptions and photographs. You can even incorporate fill-in order forms so that your customers can order products from you on line.
Figure 4: An example catalog on the World Wide Web
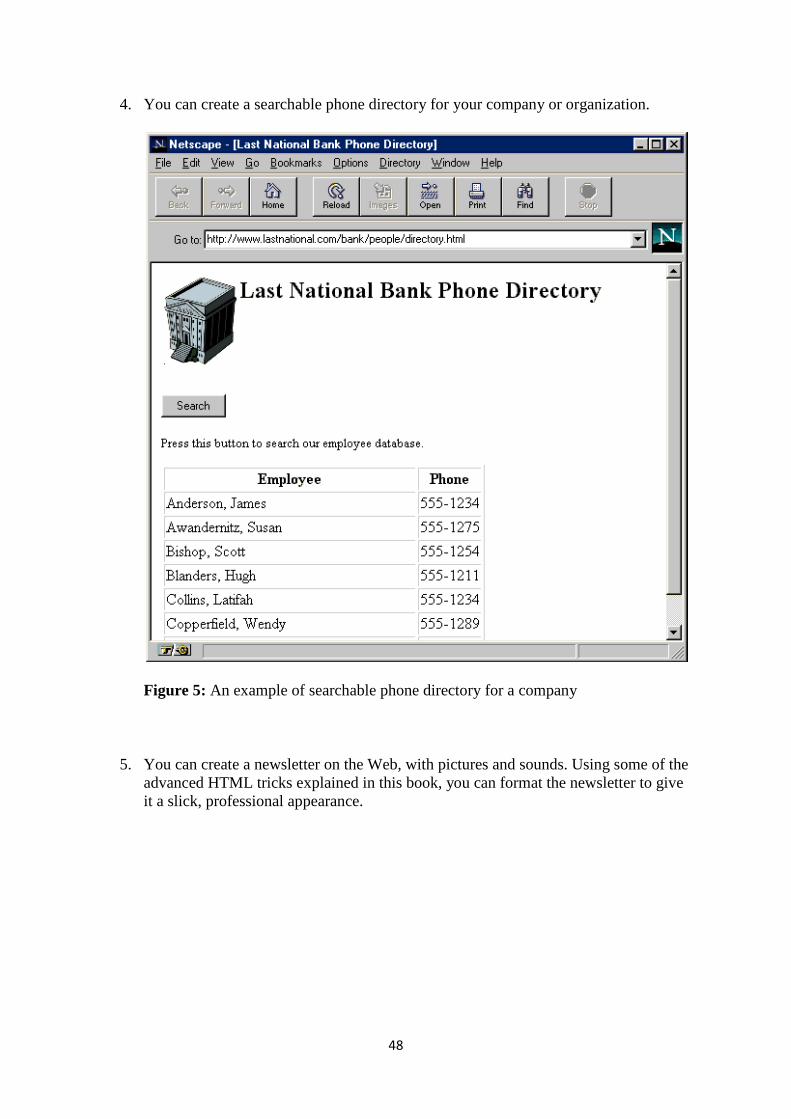
48
4. You can create a searchable phone directory for your company or organization.
Figure 5: An example of searchable phone directory for a company
5. You can create a newsletter on the Web, with pictures and sounds. Using some of the advanced HTML tricks explained in this book, you can format the newsletter to give it a slick, professional appearance.
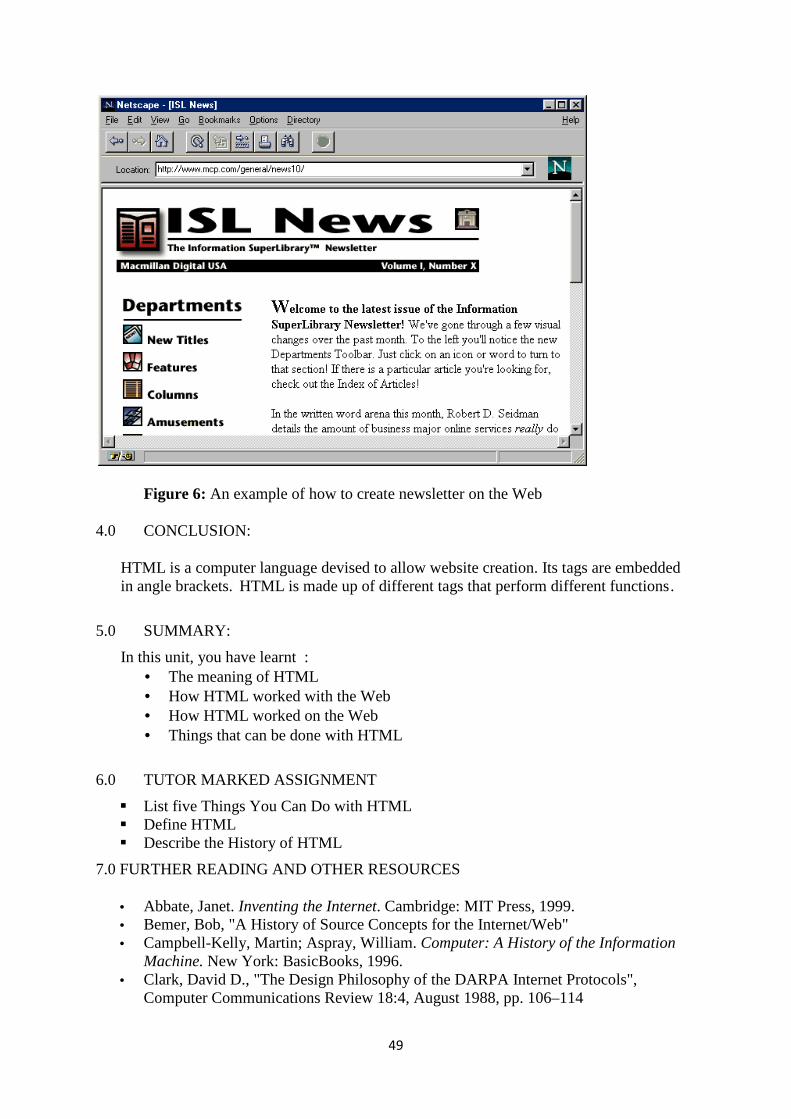
49
Figure 6: An example of how to create newsletter on the Web
4.0 CONCLUSION:
HTML is a computer language devised to allow website creation. Its tags are embedded in angle brackets. HTML is made up of different tags that perform different functions .
5.0 SUMMARY:
In this unit, you have learnt : • The meaning of HTML • How HTML worked with the Web • How HTML worked on the Web • Things that can be done with HTML
6.0 TUTOR MARKED ASSIGNMENT
� List five Things You Can Do with HTML � Define HTML � Describe the History of HTML
7.0 FURTHER READING AND OTHER RESOURCES
• Abbate, Janet. Inventing the Internet. Cambridge: MIT Press, 1999. • Bemer, Bob, "A History of Source Concepts for the Internet/Web" • Campbell-Kelly, Martin; Aspray, William. Computer: A History of the Information
Machine. New York: BasicBooks, 1996. • Clark, David D., "The Design Philosophy of the DARPA Internet Protocols",
Computer Communications Review 18:4, August 1988, pp. 106–114
50
• Graham, Ian S. The HTML Sourcebook: The Complete Guide to HTML. New York: John Wiley and Sons, 1995.
• Krol, Ed. Hitchhiker's Guide to the Internet, 1987. • Krol, Ed. Whole Internet User's Guide and Catalog. O'Reilly & Associates, 1992. • Scientific American Special Issue on Communications, Computers, and Networks,
September, 1991
51
MODULE TWO –THE BASICS OF HTML
UNIT ONE - GETTING STARTED WITH HTML
1.0 Introduction
2.0 Objectives
3.0 Main Content
3.1– How to Use Notepad
3.2– How to Use Markup Tags
3.3 - How to Write a Simple HTML Document 3.4 - How to Use Special HTML Editing Software
4.0 Conclusion
5.0 Summary
6.0 Tutor Marked Assignment
7.0 Further Reading and Other Resources
1.0 INTRODUCTION
This Unit will introduce you to the basics of HTML.We will take a quick look at Notepad, which is one of the tools you really need to write HTML documents. We will also go over the fundamentals of a basic HTML document. You will even learn how to write your first Web page! It might be tempting to skip ahead and check out the "cool stuff" in the later Modules of this Course Material. But if you spend some time going over the basics, it will serve you well in the long run. Enough chatter. Let's get going.
2.0 OBJECTIVES At the end of this unit, you should be able to:
• Describe how to open a Notepad • Describe markup tag in HTML • Write a simple HTML Document using Notepad editor
3.0 MAIN CONTENT 3.1 – How to Use Notepad
HTML is not really anything more than plain text. For that reason, you don't need any special editors or compilers to create HTML files. In fact, you can create all of your HTML files with the simplest of text editors. There are many specialized
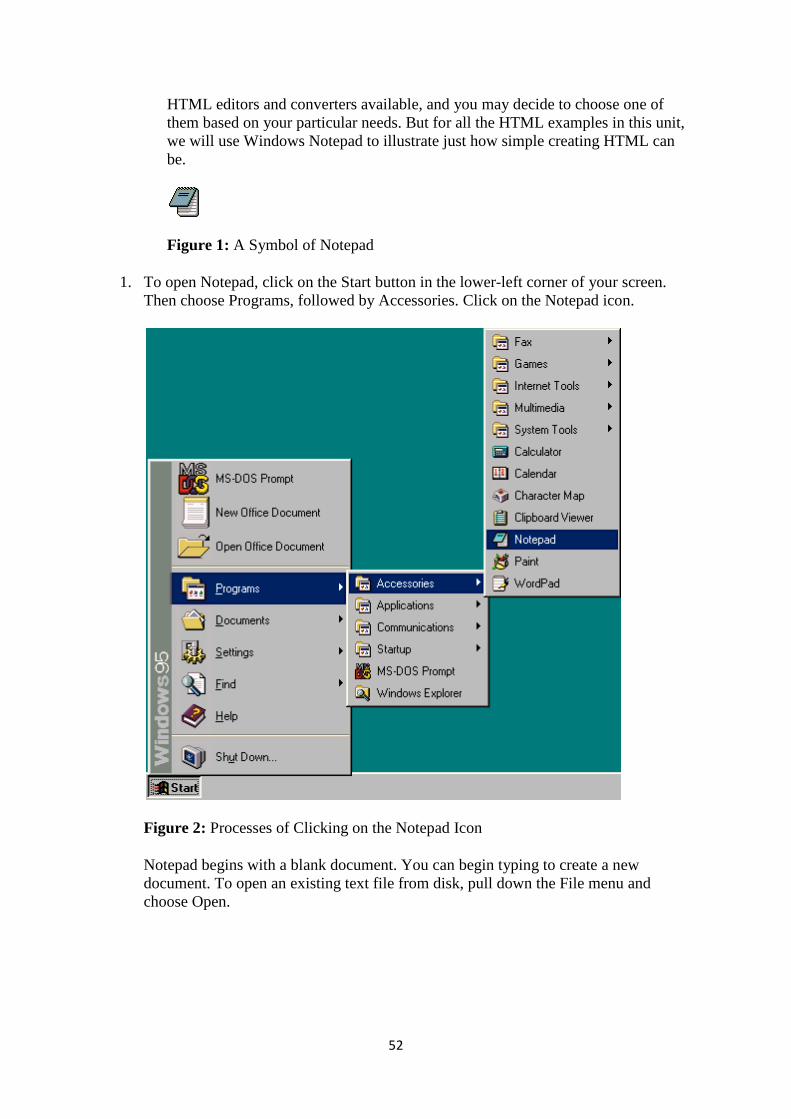
52
HTML editors and converters available, and you may decide to choose one of them based on your particular needs. But for all the HTML examples in this unit, we will use Windows Notepad to illustrate just how simple creating HTML can be.
Figure 1: A Symbol of Notepad
1. To open Notepad, click on the Start button in the lower-left corner of your screen. Then choose Programs, followed by Accessories. Click on the Notepad icon.
Figure 2: Processes of Clicking on the Notepad Icon
Notepad begins with a blank document. You can begin typing to create a new document. To open an existing text file from disk, pull down the File menu and choose Open.
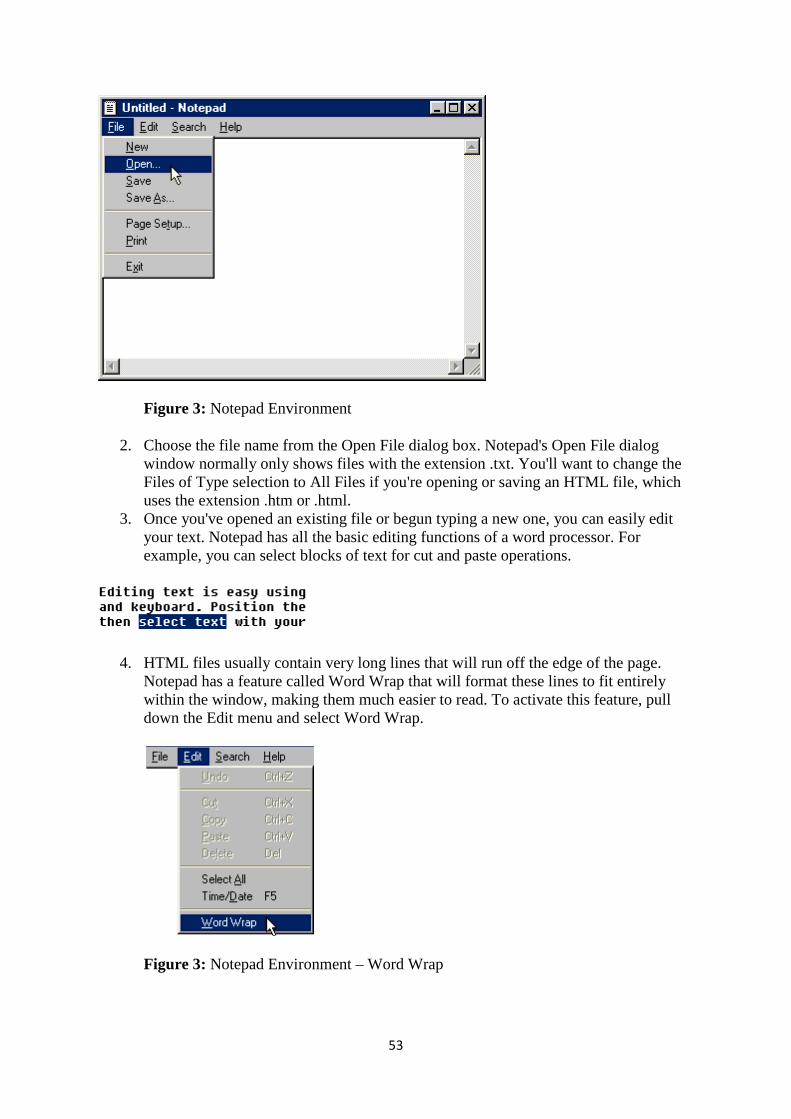
53
Figure 3: Notepad Environment
2. Choose the file name from the Open File dialog box. Notepad's Open File dialog window normally only shows files with the extension .txt. You'll want to change the Files of Type selection to All Files if you're opening or saving an HTML file, which uses the extension .htm or .html.
3. Once you've opened an existing file or begun typing a new one, you can easily edit your text. Notepad has all the basic editing functions of a word processor. For example, you can select blocks of text for cut and paste operations.
4. HTML files usually contain very long lines that will run off the edge of the page. Notepad has a feature called Word Wrap that will format these lines to fit entirely within the window, making them much easier to read. To activate this feature, pull down the Edit menu and select Word Wrap.
Figure 3: Notepad Environment – Word Wrap

5. To save your HTML file, first pull down the File menu. If this is a new file that you started from scratch, choose Save As and then type a file name. Remember to use .htm or .html as the file extenout which extension you should use.) If this is an existing file that you opened from Notepad, you can just choose Save from the File menu.
3.2– How to Use Mark up Tags
The use of markup tags is whaextensively in HTML, and they provide ways to control text formatting, create links to other documents, and even incorporate images and sounds. In short, markup tags are the key to making HTML pages work. Markup tags are not caseelement tag (which you'll learn about in the next unit) can be typed as even <BoDy>.
Figure 4 : An example of body element tag
1. Open a new file in Notepad and type in the words example, we'll make this text appear in boldface type
2. HTML markup tags are easy to create. They consist of a left angle bracket, the name of the tag, and a right angle bracket. The left and right angle brackets are also known to some as less-than and greater<B> where you'd like the boldface type to begin.
3. Locate the place where you'd like the boldface to stop. At this point, you need to create an ending tag for the boldface type. An ending tag looks just like a starting tag, except it is preceded by a forwtag, type </B>.
54
To save your HTML file, first pull down the File menu. If this is a new file that you started from scratch, choose Save As and then type a file name. Remember to use .htm or .html as the file extension. (Check with your Web server administrator to find out which extension you should use.) If this is an existing file that you opened from Notepad, you can just choose Save from the File menu.
How to Use Mark up Tags
The use of markup tags is what separates HTML from plain text. Markup tags are used extensively in HTML, and they provide ways to control text formatting, create links to other documents, and even incorporate images and sounds. In short, markup tags are the key to
rk. Markup tags are not case sensitive. For example, the body element tag (which you'll learn about in the next unit) can be typed as <BODY>
An example of body element tag
Open a new file in Notepad and type in the words “ the bold new frontierexample, we'll make this text appear in boldface type from the following sentence:
HTML markup tags are easy to create. They consist of a left angle bracket, the name of the tag, and a right angle bracket. The left and right angle brackets are also known
than and greater-than symbols. To start a boldface markup tag, type where you'd like the boldface type to begin.
Locate the place where you'd like the boldface to stop. At this point, you need to create an ending tag for the boldface type. An ending tag looks just like a starting tag, except it is preceded by a forward slash character (/). To mark the end of the boldface
To save your HTML file, first pull down the File menu. If this is a new file that you started from scratch, choose Save As and then type a file name. Remember to use
sion. (Check with your Web server administrator to find out which extension you should use.) If this is an existing file that you opened from
t separates HTML from plain text. Markup tags are used extensively in HTML, and they provide ways to control text formatting, create links to other documents, and even incorporate images and sounds. In short, markup tags are the key to
sensitive. For example, the body <BODY>, <body>, or
bold new frontier” . In this from the following sentence:.
HTML markup tags are easy to create. They consist of a left angle bracket, the name of the tag, and a right angle bracket. The left and right angle brackets are also known
than symbols. To start a boldface markup tag, type
Locate the place where you'd like the boldface to stop. At this point, you need to create an ending tag for the boldface type. An ending tag looks just like a starting tag,
ard slash character (/). To mark the end of the boldface

4. When viewed with a Web browser, the text between the appear in boldface.
Figure 5: An example
5. Almost every markup tag in HTML requires both a starting tag and an ending tag. One notable exception is the paragraph marker, <P>, which does not require an ending </P> tag.
3.3 How to Write a Simple HTML Document
Now that you have learned how to create markup tags, the next step is to learn how to put them together to create a simple HTML Document. The basic HTML document contains two parts: the head and the body. The head section contains important information abodocument itself, such as the title. The actual text, images, and markup tags are placed in the body section. You will learn the specifics of both sections in the next unit.
Figure 6: A Simple HTML Document
55
When viewed with a Web browser, the text between the <B> and </B>
An example of Bold Tag
Almost every markup tag in HTML requires both a starting tag and an ending tag. One notable exception is the paragraph marker, <P>, which does not require an
How to Write a Simple HTML Document
Now that you have learned how to create markup tags, the next step is to learn how to put them together to create a simple HTML Document. The basic HTML document contains two
. The head section contains important information abodocument itself, such as the title. The actual text, images, and markup tags are placed in the body section. You will learn the specifics of both sections in the next unit.
HTML Document
</B> tags will
Almost every markup tag in HTML requires both a starting tag and an ending tag. One notable exception is the paragraph marker, <P>, which does not require an
Now that you have learned how to create markup tags, the next step is to learn how to put them together to create a simple HTML Document. The basic HTML document contains two
. The head section contains important information about the document itself, such as the title. The actual text, images, and markup tags are placed in the body section. You will learn the specifics of both sections in the next unit.
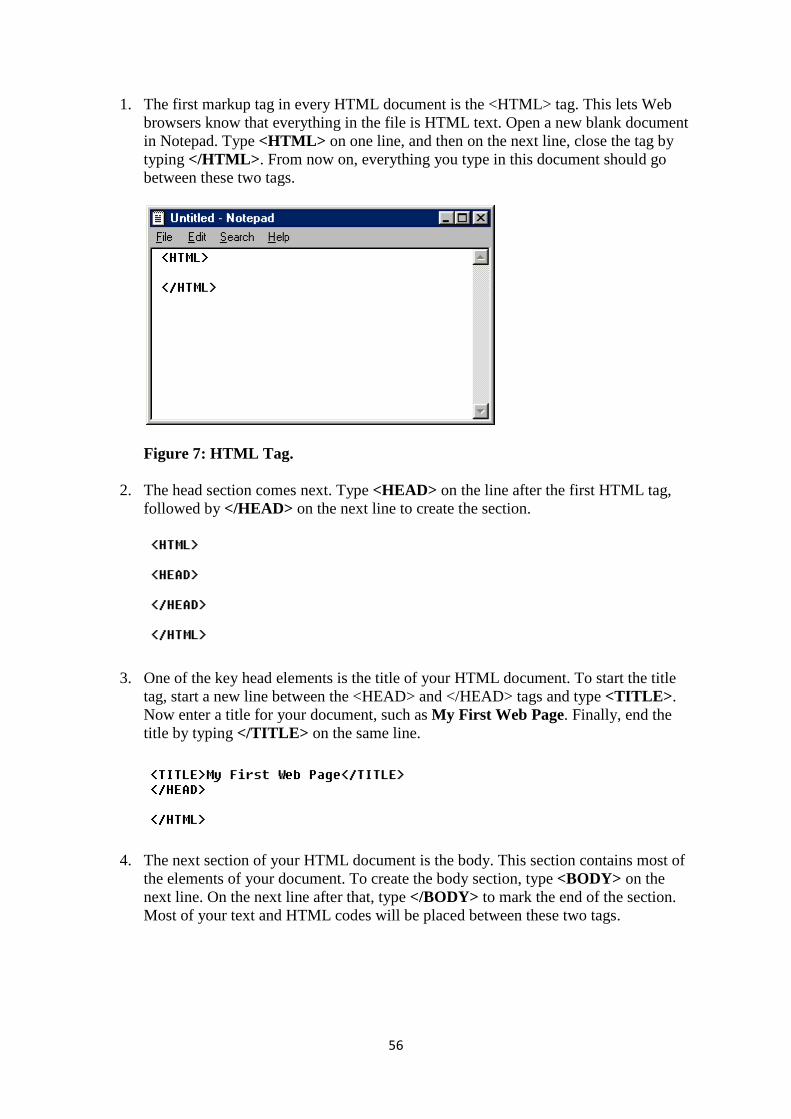
1. The first markup tag in every HTML document is the <HTML> tag. This lets Web browsers know that everything in the file is HTML text. Open a new blank document in Notepad. Type <HTML>typing </HTML> . From now on, everything you type in this document should go between these two tags.
Figure 7: HTML T ag.
2. The head section comes next. Type followed by </HEAD>
3. One of the key head elements is the title of your HTML document. To start the title tag, start a new line between the <HEAD> and </HEAD> tags and type Now enter a title for your document, such as title by typing </TITLE>
4. The next section of your HTML document is the body. This section contains most of the elements of your document. To create the body section, type next line. On the next line after that, type Most of your text and HTML codes will be placed between these two tags.
56
The first markup tag in every HTML document is the <HTML> tag. This lets Web browsers know that everything in the file is HTML text. Open a new blank document
<HTML> on one line, and then on the next line, close the tag by . From now on, everything you type in this document should go
between these two tags.
ag.
The head section comes next. Type <HEAD> on the line after the first HTML tag, </HEAD> on the next line to create the section.
One of the key head elements is the title of your HTML document. To start the title tag, start a new line between the <HEAD> and </HEAD> tags and type Now enter a title for your document, such as My First Web Page. Finally, end the
</TITLE> on the same line.
The next section of your HTML document is the body. This section contains most of the elements of your document. To create the body section, type <BODY>next line. On the next line after that, type </BODY> to mark the end of the section. Most of your text and HTML codes will be placed between these two tags.
The first markup tag in every HTML document is the <HTML> tag. This lets Web browsers know that everything in the file is HTML text. Open a new blank document
on one line, and then on the next line, close the tag by . From now on, everything you type in this document should go
on the line after the first HTML tag,
One of the key head elements is the title of your HTML document. To start the title tag, start a new line between the <HEAD> and </HEAD> tags and type <TITLE> .
. Finally, end the
The next section of your HTML document is the body. This section contains most of <BODY> on the end of the section.
Most of your text and HTML codes will be placed between these two tags.
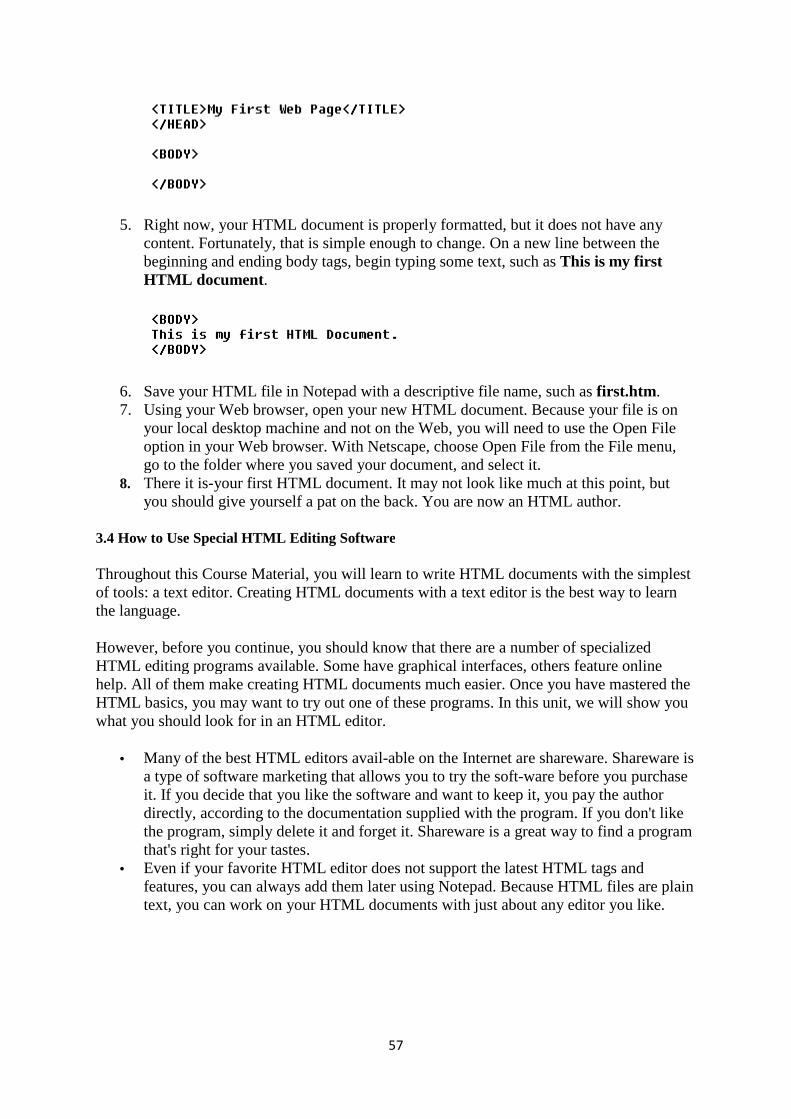
5. Right now, your HTML document is properly formatted, but it does not have any content. Fortunately, that is simple enough to change. On a new line between the beginning and ending body tags, begin typing some text, such as HTML document .
6. Save your HTML file in Notepad with a descriptive file name, such as 7. Using your Web browser, open your new HTML document. Because your file is on
your local desktop machine and not on the Web, you will need to use the Open File option in your Web browser. With Netscape, choose Open File from the File menu, go to the folder where you saved your document, and select it.
8. There it is-your first HTML docyou should give yourself a pat on the back. You are now an HTML author.
3.4 How to Use Special HTML Editing Software
Throughout this Course Material, you will learn to write HTML documents with the simplest of tools: a text editor. Creating HTML documents with a text editor is the best way to learn the language.
However, before you continue, you should know that there aHTML editing programs available. Some have graphical interfaces, others feature online help. All of them make creating HTML documents much easier. Once you have mastered the HTML basics, you may want to try out one of these progrwhat you should look for in an HTML editor.
• Many of the best HTML editors availa type of software marketing that allows you to try the softit. If you decide that you like the software and want to keep it, you pay the author directly, according to the documentation supplied with the program. If you don't like the program, simply delete it and forget it. Shareware is a great way to find a program that's right for your tastes.
• Even if your favorite HTML editor does not support the latest HTML tags and features, you can always add them later using Notepad. Because HTML files are plain text, you can work on your HTML documents with just about any editor you like.
57
Right now, your HTML document is properly formatted, but it does not have any content. Fortunately, that is simple enough to change. On a new line between the
ginning and ending body tags, begin typing some text, such as This is my first
Save your HTML file in Notepad with a descriptive file name, such as Using your Web browser, open your new HTML document. Because your file is on our local desktop machine and not on the Web, you will need to use the Open File
option in your Web browser. With Netscape, choose Open File from the File menu, go to the folder where you saved your document, and select it.
your first HTML document. It may not look like much at this point, but you should give yourself a pat on the back. You are now an HTML author.
3.4 How to Use Special HTML Editing Software
Throughout this Course Material, you will learn to write HTML documents with the simplest of tools: a text editor. Creating HTML documents with a text editor is the best way to learn
However, before you continue, you should know that there are a number of specialized HTML editing programs available. Some have graphical interfaces, others feature online help. All of them make creating HTML documents much easier. Once you have mastered the HTML basics, you may want to try out one of these programs. In this unit, we will show you what you should look for in an HTML editor.
Many of the best HTML editors avail-able on the Internet are shareware. Shareware is a type of software marketing that allows you to try the soft-ware before you purchase
If you decide that you like the software and want to keep it, you pay the author directly, according to the documentation supplied with the program. If you don't like the program, simply delete it and forget it. Shareware is a great way to find a program hat's right for your tastes.
Even if your favorite HTML editor does not support the latest HTML tags and features, you can always add them later using Notepad. Because HTML files are plain text, you can work on your HTML documents with just about any editor you like.
Right now, your HTML document is properly formatted, but it does not have any content. Fortunately, that is simple enough to change. On a new line between the
This is my first
Save your HTML file in Notepad with a descriptive file name, such as first.htm . Using your Web browser, open your new HTML document. Because your file is on our local desktop machine and not on the Web, you will need to use the Open File
option in your Web browser. With Netscape, choose Open File from the File menu,
ument. It may not look like much at this point, but you should give yourself a pat on the back. You are now an HTML author.
Throughout this Course Material, you will learn to write HTML documents with the simplest of tools: a text editor. Creating HTML documents with a text editor is the best way to learn
re a number of specialized HTML editing programs available. Some have graphical interfaces, others feature online help. All of them make creating HTML documents much easier. Once you have mastered the
ams. In this unit, we will show you
able on the Internet are shareware. Shareware is ware before you purchase
If you decide that you like the software and want to keep it, you pay the author directly, according to the documentation supplied with the program. If you don't like the program, simply delete it and forget it. Shareware is a great way to find a program
Even if your favorite HTML editor does not support the latest HTML tags and features, you can always add them later using Notepad. Because HTML files are plain text, you can work on your HTML documents with just about any editor you like.
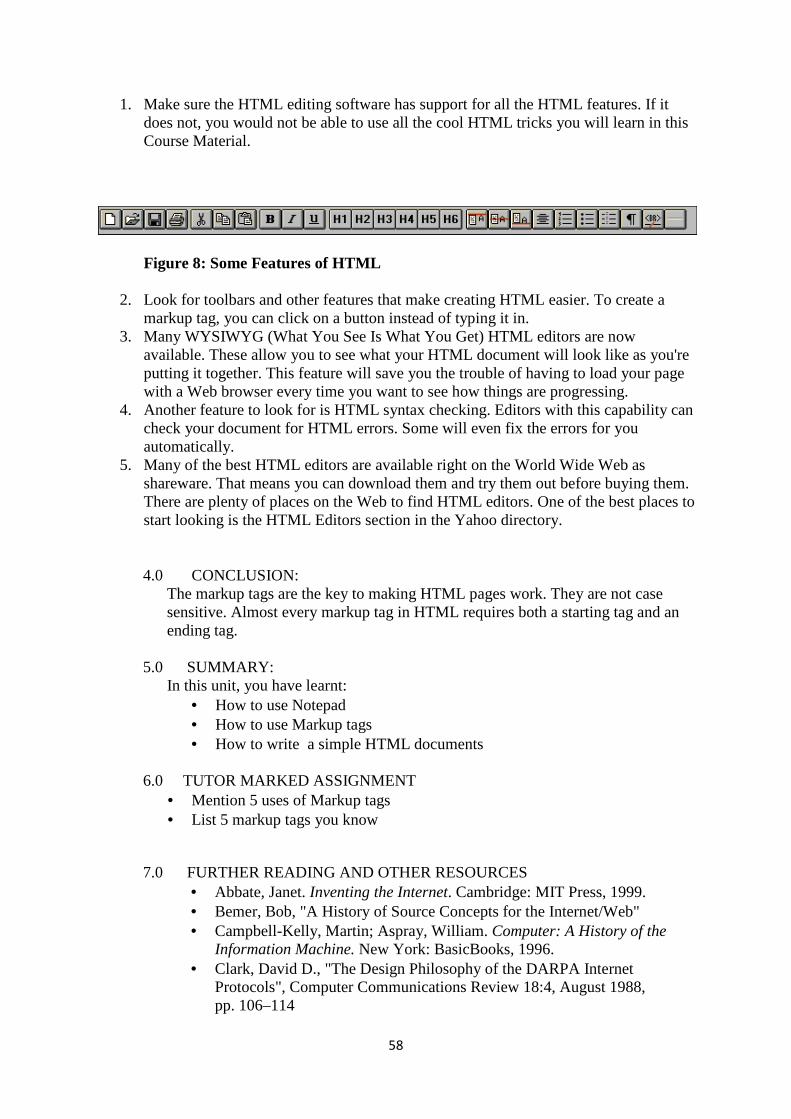
58
1. Make sure the HTML editing software has support for all the HTML features. If it does not, you would not be able to use all the cool HTML tricks you will learn in this Course Material.
Figure 8: Some Features of HTML
2. Look for toolbars and other features that make creating HTML easier. To create a markup tag, you can click on a button instead of typing it in.
3. Many WYSIWYG (What You See Is What You Get) HTML editors are now available. These allow you to see what your HTML document will look like as you're putting it together. This feature will save you the trouble of having to load your page with a Web browser every time you want to see how things are progressing.
4. Another feature to look for is HTML syntax checking. Editors with this capability can check your document for HTML errors. Some will even fix the errors for you automatically.
5. Many of the best HTML editors are available right on the World Wide Web as shareware. That means you can download them and try them out before buying them. There are plenty of places on the Web to find HTML editors. One of the best places to start looking is the HTML Editors section in the Yahoo directory.
4.0 CONCLUSION:
The markup tags are the key to making HTML pages work. They are not case sensitive. Almost every markup tag in HTML requires both a starting tag and an ending tag.
5.0 SUMMARY: In this unit, you have learnt:
• How to use Notepad • How to use Markup tags • How to write a simple HTML documents
6.0 TUTOR MARKED ASSIGNMENT
• Mention 5 uses of Markup tags • List 5 markup tags you know
7.0 FURTHER READING AND OTHER RESOURCES • Abbate, Janet. Inventing the Internet. Cambridge: MIT Press, 1999. • Bemer, Bob, "A History of Source Concepts for the Internet/Web" • Campbell-Kelly, Martin; Aspray, William. Computer: A History of the
Information Machine. New York: BasicBooks, 1996. • Clark, David D., "The Design Philosophy of the DARPA Internet
Protocols", Computer Communications Review 18:4, August 1988, pp. 106–114
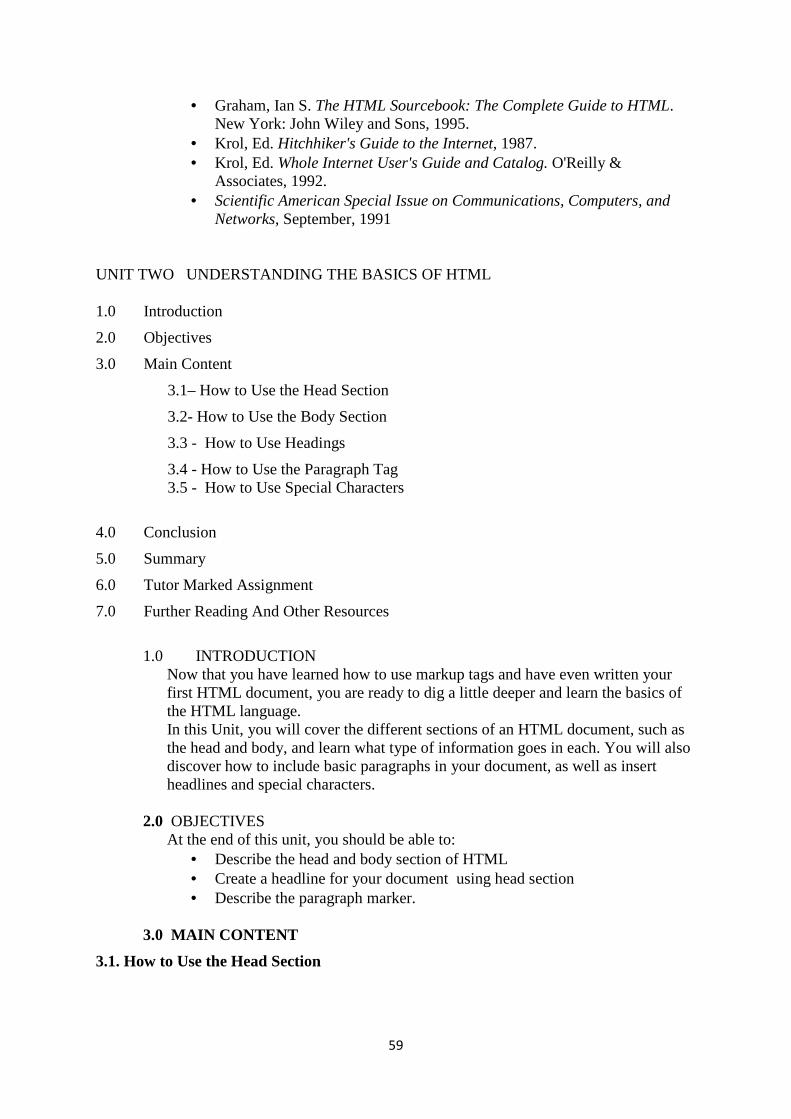
59
• Graham, Ian S. The HTML Sourcebook: The Complete Guide to HTML. New York: John Wiley and Sons, 1995.
• Krol, Ed. Hitchhiker's Guide to the Internet, 1987. • Krol, Ed. Whole Internet User's Guide and Catalog. O'Reilly &
Associates, 1992. • Scientific American Special Issue on Communications, Computers, and
Networks, September, 1991
UNIT TWO UNDERSTANDING THE BASICS OF HTML
1.0 Introduction
2.0 Objectives
3.0 Main Content
3.1– How to Use the Head Section
3.2- How to Use the Body Section
3.3 - How to Use Headings
3.4 - How to Use the Paragraph Tag 3.5 - How to Use Special Characters
4.0 Conclusion
5.0 Summary
6.0 Tutor Marked Assignment
7.0 Further Reading And Other Resources
1.0 INTRODUCTION
Now that you have learned how to use markup tags and have even written your first HTML document, you are ready to dig a little deeper and learn the basics of the HTML language. In this Unit, you will cover the different sections of an HTML document, such as the head and body, and learn what type of information goes in each. You will also discover how to include basic paragraphs in your document, as well as insert headlines and special characters.
2.0 OBJECTIVES At the end of this unit, you should be able to:
• Describe the head and body section of HTML • Create a headline for your document using head section • Describe the paragraph marker.
3.0 MAIN CONTENT
3.1. How to Use the Head Section
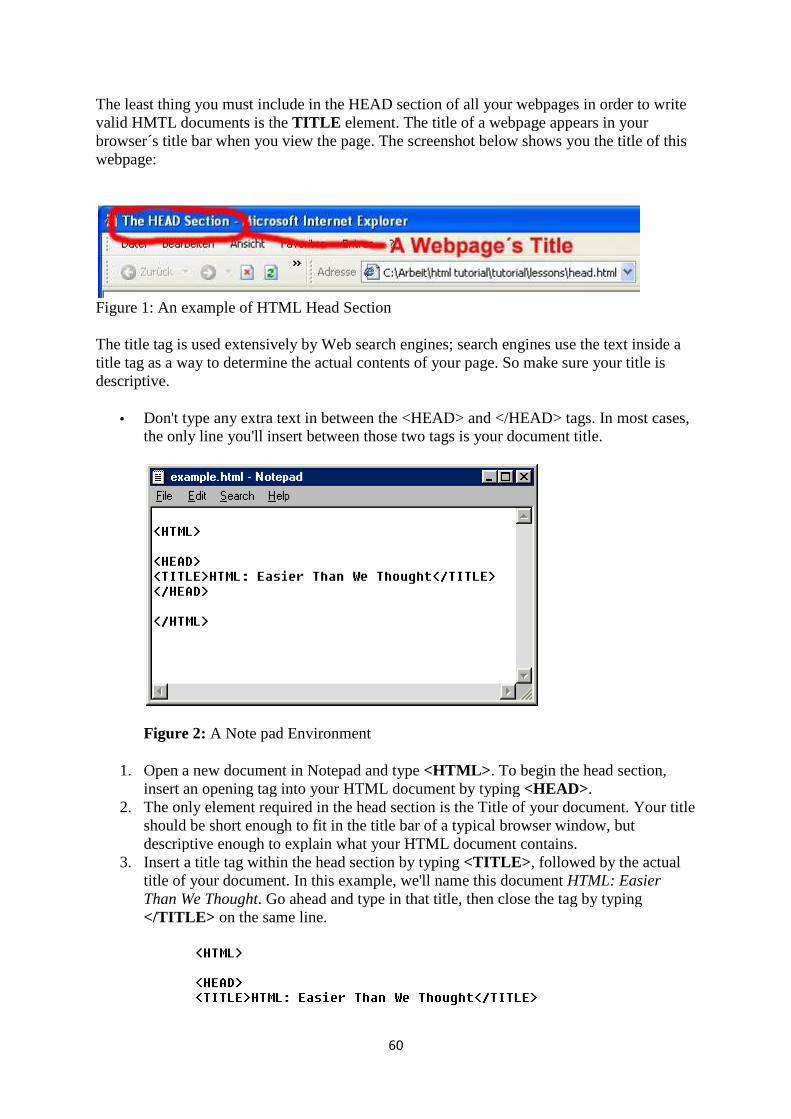
The least thing you must include in the HEAD section of all your webpages in order to write valid HMTL documents is the browser´s title bar when you view the page. The screenshot below shows yowebpage:
Figure 1: An example of HTML The title tag is used extensively by Web search engines; search engines use the text inside a title tag as a way to determine the actual contents of your page. So make sure your title is descriptive.
• Don't type any extra text in between the <HEAD> and </Hthe only line you'll insert between those two tags is your document title.
Figure 2: A Note pad Environment
1. Open a new document in Notepad and type insert an opening tag into your HTML document by typing
2. The only element required in the head section is the Title of your document. Your title should be short enough to fit in the title bar of a typical browser window, but descriptive enough to explain what your HTML document contains.
3. Insert a title tag within the head section by typing title of your document. In this example, we'll name this document Than We Thought. Go ahead and type in that title, then close the tag by typing </TITLE> on the same line.
60
The least thing you must include in the HEAD section of all your webpages in order to write valid HMTL documents is the TITLE element. The title of a webpage appears in your browser´s title bar when you view the page. The screenshot below shows yo
An example of HTML Head Section
The title tag is used extensively by Web search engines; search engines use the text inside a title tag as a way to determine the actual contents of your page. So make sure your title is
Don't type any extra text in between the <HEAD> and </HEAD> tags. In most cases, the only line you'll insert between those two tags is your document title.
A Note pad Environment
Open a new document in Notepad and type <HTML> . To begin the head section, insert an opening tag into your HTML document by typing <HEAD>The only element required in the head section is the Title of your document. Your title should be short enough to fit in the title bar of a typical browser window, but descriptive enough to explain what your HTML document contains.
in the head section by typing <TITLE> , followed by the actual title of your document. In this example, we'll name this document HTML: Easier
. Go ahead and type in that title, then close the tag by typing on the same line.
The least thing you must include in the HEAD section of all your webpages in order to write element. The title of a webpage appears in your
browser´s title bar when you view the page. The screenshot below shows you the title of this
The title tag is used extensively by Web search engines; search engines use the text inside a title tag as a way to determine the actual contents of your page. So make sure your title is
EAD> tags. In most cases, the only line you'll insert between those two tags is your document title.
. To begin the head section, <HEAD>.
The only element required in the head section is the Title of your document. Your title should be short enough to fit in the title bar of a typical browser window, but descriptive enough to explain what your HTML document contains.
, followed by the actual HTML: Easier
. Go ahead and type in that title, then close the tag by typing
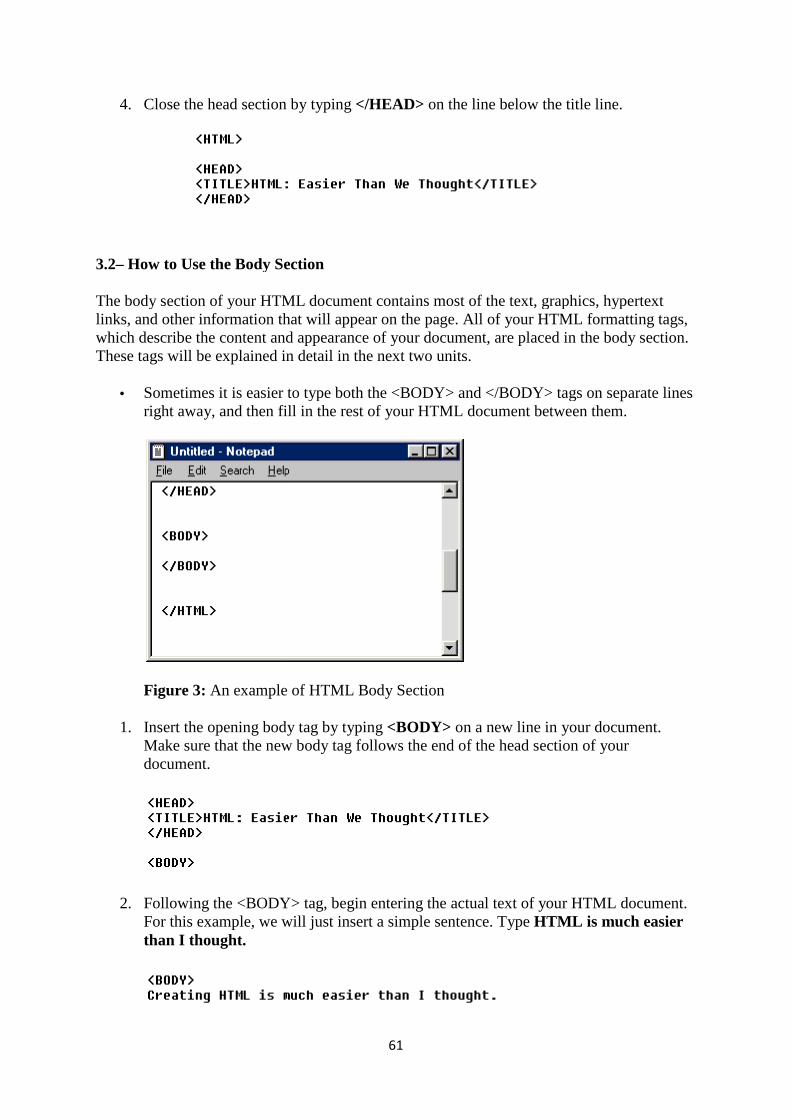
4. Close the head section by typing
3.2– How to Use the Body Section
The body section of your HTML document contains most of the text, graphics, hypertext links, and other information that will appear on the page.which describe the content and appearance of your document, are placed in the body section. These tags will be explained in detail in the next two units.
• Sometimes it is easier to type both the <BODY> and </BODY> tags onright away, and then fill in the rest of your HTML document between them.
Figure 3: An example of HTML Body Section
1. Insert the opening body tag by typing Make sure that the new body tag follows the end of the head section of your document.
2. Following the <BODY> tag, begin entering the actual text of your HTML document. For this example, we will just insert a simple sentethan I thought.
61
Close the head section by typing </HEAD> on the line below the title line.
How to Use the Body Section
The body section of your HTML document contains most of the text, graphics, hypertext links, and other information that will appear on the page. All of your HTML formatting tags, which describe the content and appearance of your document, are placed in the body section. These tags will be explained in detail in the next two units.
Sometimes it is easier to type both the <BODY> and </BODY> tags onright away, and then fill in the rest of your HTML document between them.
An example of HTML Body Section
Insert the opening body tag by typing <BODY> on a new line in your document. Make sure that the new body tag follows the end of the head section of your
Following the <BODY> tag, begin entering the actual text of your HTML document. For this example, we will just insert a simple sentence. Type HTML is much easier
on the line below the title line.
The body section of your HTML document contains most of the text, graphics, hypertext All of your HTML formatting tags,
which describe the content and appearance of your document, are placed in the body section.
Sometimes it is easier to type both the <BODY> and </BODY> tags on separate lines right away, and then fill in the rest of your HTML document between them.
on a new line in your document. Make sure that the new body tag follows the end of the head section of your
Following the <BODY> tag, begin entering the actual text of your HTML document. HTML is much easier
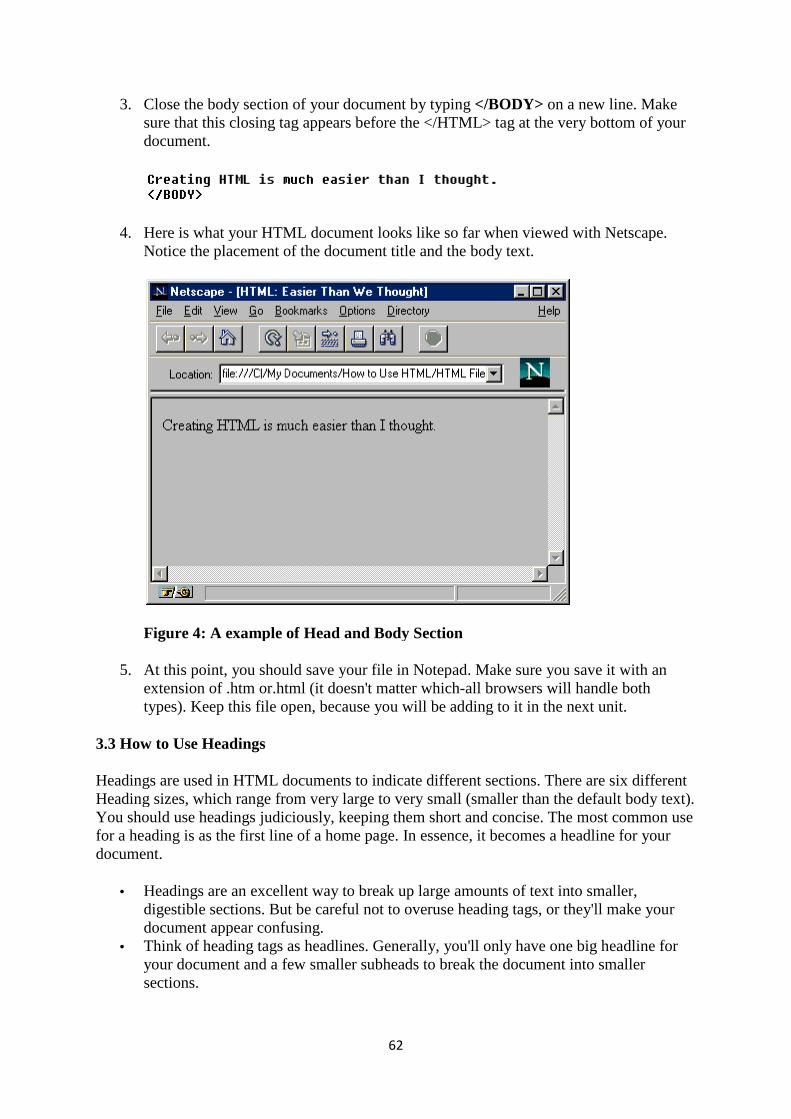
3. Close the body section of your document by typing sure that this closing tag appears before the </HTML> tag at the very bottom of your document.
4. Here is what your HTML documentNotice the placement of the document title and the body text.
Figure 4: A example of Head and Body Section
5. At this point, you should save your file in Notepad. Make sure you save it with an extension of .htm or.html (it doesn't matter whichtypes). Keep this file open, because you will be adding to it in the next unit.
3.3 How to Use Headings
Headings are used in HTML documents to indicate different sections. There are six different Heading sizes, which range from very large to very small (smaller than the default body text). You should use headings judiciously, keeping them short and concise. The mofor a heading is as the first line of a home page. In essence, it becomes a headline for your document.
• Headings are an excellent way to break up large amounts of text into smaller, digestible sections. But be careful not to overuse heading document appear confusing.
• Think of heading tags as headlines. Generally, you'll only have one big headline for your document and a few smaller subheads to break the document into smaller sections.
62
Close the body section of your document by typing </BODY> on a new line. Make sure that this closing tag appears before the </HTML> tag at the very bottom of your
Here is what your HTML document looks like so far when viewed with Netscape. Notice the placement of the document title and the body text.
A example of Head and Body Section
should save your file in Notepad. Make sure you save it with an extension of .htm or.html (it doesn't matter which-all browsers will handle both types). Keep this file open, because you will be adding to it in the next unit.
gs are used in HTML documents to indicate different sections. There are six different Heading sizes, which range from very large to very small (smaller than the default body text). You should use headings judiciously, keeping them short and concise. The mofor a heading is as the first line of a home page. In essence, it becomes a headline for your
Headings are an excellent way to break up large amounts of text into smaller, digestible sections. But be careful not to overuse heading tags, or they'll make your document appear confusing. Think of heading tags as headlines. Generally, you'll only have one big headline for your document and a few smaller subheads to break the document into smaller
on a new line. Make sure that this closing tag appears before the </HTML> tag at the very bottom of your
looks like so far when viewed with Netscape.
should save your file in Notepad. Make sure you save it with an all browsers will handle both
types). Keep this file open, because you will be adding to it in the next unit.
gs are used in HTML documents to indicate different sections. There are six different Heading sizes, which range from very large to very small (smaller than the default body text). You should use headings judiciously, keeping them short and concise. The most common use for a heading is as the first line of a home page. In essence, it becomes a headline for your
Headings are an excellent way to break up large amounts of text into smaller, tags, or they'll make your
Think of heading tags as headlines. Generally, you'll only have one big headline for your document and a few smaller subheads to break the document into smaller
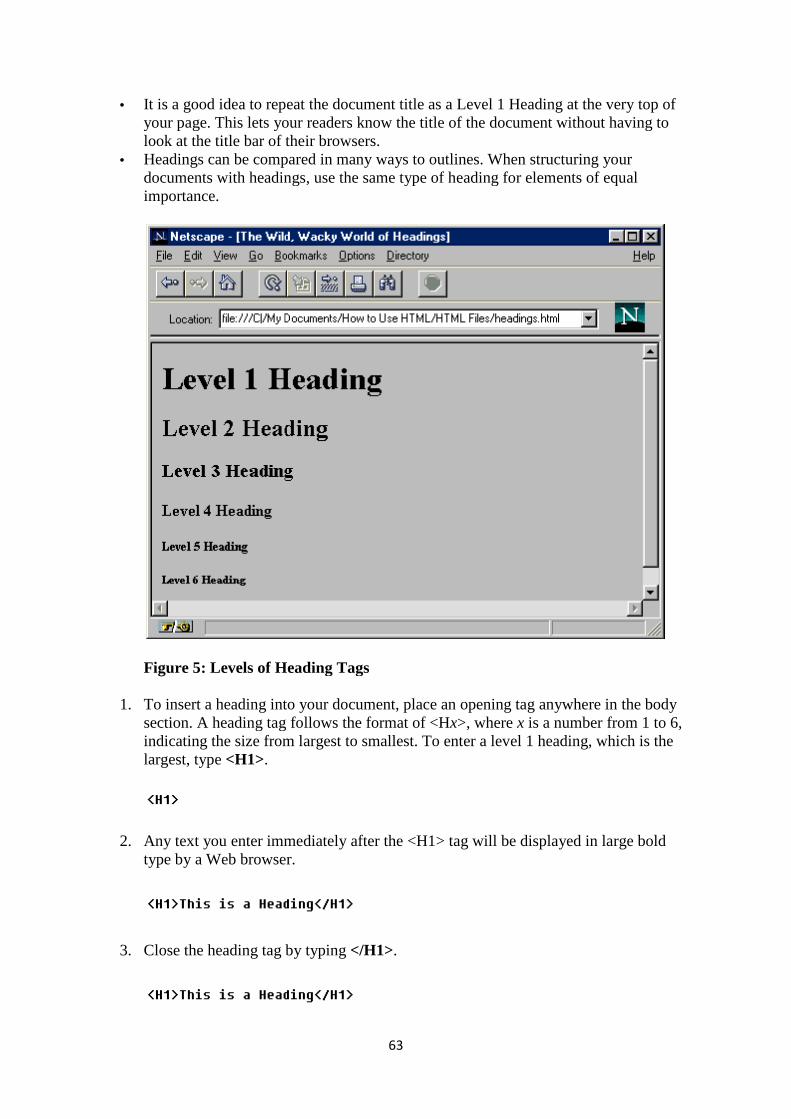
• It is a good idea to repeat tyour page. This lets your readers know the title of the document without having to look at the title bar of their browsers.
• Headings can be compared in many ways to outlines. When structuring your documents with headings, use the same type of heading for elements of equal importance.
Figure 5: Levels of Heading Tags
1. To insert a heading into your document, place an section. A heading tag follows the format of <Hindicating the size from largest to smallest. To enter a level 1 heading, which is the largest, type <H1>.
2. Any text you enter immediateltype by a Web browser.
3. Close the heading tag by typing
63
It is a good idea to repeat the document title as a Level 1 Heading at the very top of your page. This lets your readers know the title of the document without having to look at the title bar of their browsers. Headings can be compared in many ways to outlines. When structuring your documents with headings, use the same type of heading for elements of equal
Levels of Heading Tags
To insert a heading into your document, place an opening tag anywhere in the body section. A heading tag follows the format of <Hx>, where x is a number from 1 to 6, indicating the size from largest to smallest. To enter a level 1 heading, which is the
Any text you enter immediately after the <H1> tag will be displayed in large bold type by a Web browser.
Close the heading tag by typing </H1>.
he document title as a Level 1 Heading at the very top of your page. This lets your readers know the title of the document without having to
Headings can be compared in many ways to outlines. When structuring your documents with headings, use the same type of heading for elements of equal
opening tag anywhere in the body is a number from 1 to 6,
indicating the size from largest to smallest. To enter a level 1 heading, which is the
y after the <H1> tag will be displayed in large bold
4. You can experiment with different sized headings by changing the number of the heading tag to any value between 1 and 6. The result wil
3.4 How to Use the Paragraph Tag
One of the most commonly used tags in HTML is the paragraph marker, which is used to break apart blocks of text into separate paragraphs. Any formatting that you perform in Notepad, such as placing carriage returns, extra spaces, or tab stops, will be ignored by Web browsers. The only way to indicate separate paragraphs is by using the paragraph marker. Unfortunately, despite its simplicity, the paragraph marker is also one of the most misunderstood tags in HTML.
• Remember that in HTML, paragraph tags are considered to be containers of text. That means each paragraph should have a starting <P> tag and an ending </P> tag. Early versions of HTML used the <P> tag as a paragraph separator.
• Paragraphs can contain more than plain text. You can place images, hyperlinks, and many other HTML elements inside paragraphs as well. You will learn more about these elements in later
1. The most important thing to remember about the paragraph tag beginning of a paragraph, not the end. The original HTML standard used the paragraph marker differently, which has led to some confusion.
2. To insert a new paragraph, type document. This will tell the browser to insert a line space and start a new paragraph.
3. Enter the text of the paragraph after this tag. Remember that any carriage returns or line breaks you enter into Notepad will be ignored by a Web browser. The browser will continue to treat the text as part of the current paragraph until it sees another <P> tag.
64
You can experiment with different sized headings by changing the number of the heading tag to any value between 1 and 6. The result wil l look something like this.
3.4 How to Use the Paragraph Tag
One of the most commonly used tags in HTML is the paragraph marker, which is used to break apart blocks of text into separate paragraphs. Any formatting that you perform in
as placing carriage returns, extra spaces, or tab stops, will be ignored by Web browsers. The only way to indicate separate paragraphs is by using the paragraph marker. Unfortunately, despite its simplicity, the paragraph marker is also one of the most
sunderstood tags in HTML.
Remember that in HTML, paragraph tags are considered to be containers of text. That means each paragraph should have a starting <P> tag and an ending </P> tag. Early versions of HTML used the <P> tag as a paragraph separator. Paragraphs can contain more than plain text. You can place images, hyperlinks, and many other HTML elements inside paragraphs as well. You will learn more about these elements in later modules.
The most important thing to remember about the paragraph tag is that it marks the beginning of a paragraph, not the end. The original HTML standard used the paragraph marker differently, which has led to some confusion. To insert a new paragraph, type <P> anywhere in the body section of your HTML
l tell the browser to insert a line space and start a new paragraph.
Enter the text of the paragraph after this tag. Remember that any carriage returns or line breaks you enter into Notepad will be ignored by a Web browser. The browser
treat the text as part of the current paragraph until it sees another <P>
You can experiment with different sized headings by changing the number of the l look something like this.
One of the most commonly used tags in HTML is the paragraph marker, which is used to break apart blocks of text into separate paragraphs. Any formatting that you perform in
as placing carriage returns, extra spaces, or tab stops, will be ignored by Web browsers. The only way to indicate separate paragraphs is by using the paragraph marker. Unfortunately, despite its simplicity, the paragraph marker is also one of the most
Remember that in HTML, paragraph tags are considered to be containers of text. That means each paragraph should have a starting <P> tag and an ending </P> tag. Early
Paragraphs can contain more than plain text. You can place images, hyperlinks, and many other HTML elements inside paragraphs as well. You will learn more about
is that it marks the beginning of a paragraph, not the end. The original HTML standard used the
anywhere in the body section of your HTML l tell the browser to insert a line space and start a new paragraph.
Enter the text of the paragraph after this tag. Remember that any carriage returns or line breaks you enter into Notepad will be ignored by a Web browser. The browser
treat the text as part of the current paragraph until it sees another <P>

Figure 6: An Example of
4. You can indicate the end of a paragraph by typing </P>The end of the current paragraph is implied whenever a new paragraph marker is found by a browser.
5. Continue entering new paragraphs of text, using the <P> tag to indicate the beginning of each.
3.5 How to Use Special Characters
By now, you may have noticed a potential problem with HTML. All of the markup tags are indicated by left and right angle brackets (greatercharacters are reserved by HTML for use with tags. What happens when one of these characters in your text?
That's a good question, and the problem isn't limited to just those two symbols. A number of characters can't be typed directly into the body text HTML, including many foreign language symbols. Fortunately, HTML provides a solution through the use of
65
An Example of Paragraph Tag.
You can indicate the end of a paragraph by typing </P>. However, this tag is optional. The end of the current paragraph is implied whenever a new paragraph marker is
Continue entering new paragraphs of text, using the <P> tag to indicate the beginning
l Characters
By now, you may have noticed a potential problem with HTML. All of the markup tags are indicated by left and right angle brackets (greater-than and less-than symbols). These characters are reserved by HTML for use with tags. What happens when you want to include one of these characters in your text?
That's a good question, and the problem isn't limited to just those two symbols. A number of characters can't be typed directly into the body text HTML, including many foreign language
tunately, HTML provides a solution through the use of character
. However, this tag is optional. The end of the current paragraph is implied whenever a new paragraph marker is
Continue entering new paragraphs of text, using the <P> tag to indicate the beginning
By now, you may have noticed a potential problem with HTML. All of the markup tags are than symbols). These
you want to include
That's a good question, and the problem isn't limited to just those two symbols. A number of characters can't be typed directly into the body text HTML, including many foreign language
character entities. By
using special codes, HTML can display all of the characters in the ISOcharacter set. HTML 3.2 also includes support for many mathematical symbols.
1. Locate your cursor at the position in the document where the character entity for the special character is to be placed.
2. A character entity begins with an ampersand (&), followed by the code, and ends with a semicolon. To place a double quote in your document, for
3. Other common character entities for characters that are reserved for HTML tags are < for the less-than symbol; ampersand. Note that these named character entities are case
4. You can also use named character entities for many foreign language symbols. For example, to create the umlaut used in the German phrase, in über alles.
5. In addition to named character entities, you can use numbered character entities. HTML uses a subset of the ISO 8859/1 8including the copyright symbol, trademark symbol, and mathematical symbols, aravailable when referenced by their numbered character entity.
6. To insert a numerical character entity into HTML, type an ampersand, followed by a pound sign, the number of the character and a semicolon. For example, to enter the registered trademark symbfind a partial list of numerical character entities in the Appendix.
4.0 CONCLUSION:The two major sections of an HTML document are the head and body sections. The two sections are
5.0 SUMMARY: In this unit, you have learnt:
66
using special codes, HTML can display all of the characters in the ISO-Latincharacter set. HTML 3.2 also includes support for many mathematical symbols.
cursor at the position in the document where the character entity for the special character is to be placed.
A character entity begins with an ampersand (&), followed by the code, and ends with a semicolon. To place a double quote in your document, for example, type
Other common character entities for characters that are reserved for HTML tags are than symbol; > for the greater-than symbol; and
ampersand. Note that these named character entities are case-sensitive.You can also use named character entities for many foreign language symbols. For example, to create the umlaut used in the German phrase, über alles
In addition to named character entities, you can use numbered character entities. HTML uses a subset of the ISO 8859/1 8-bit character set, and several characters, including the copyright symbol, trademark symbol, and mathematical symbols, aravailable when referenced by their numbered character entity. To insert a numerical character entity into HTML, type an ampersand, followed by a pound sign, the number of the character and a semicolon. For example, to enter the registered trademark symbol into your document, you would type ®find a partial list of numerical character entities in the Appendix.
CONCLUSION: The two major sections of an HTML document are the head and body sections. The two sections are always within the HTML tags.
In this unit, you have learnt:
Latin-1 (ISO 8859) character set. HTML 3.2 also includes support for many mathematical symbols.
cursor at the position in the document where the character entity for the
A character entity begins with an ampersand (&), followed by the code, and ends with example, type " .
Other common character entities for characters that are reserved for HTML tags are than symbol; and & for the
sensitive. You can also use named character entities for many foreign language symbols. For
über alles, you would type
In addition to named character entities, you can use numbered character entities. bit character set, and several characters,
including the copyright symbol, trademark symbol, and mathematical symbols, are
To insert a numerical character entity into HTML, type an ampersand, followed by a pound sign, the number of the character and a semicolon. For example, to enter the
®. You can
The two major sections of an HTML document are the head and body sections.
67
• How to use the head and the body sections • How to use headings and • How to insert paragraphs tags. • How to use special characters
6.0 TUTOR MARKED ASSIGNMENT
• Given 5 line document, insert 3 new paragraphs on the document • What are the uses of the head section of HTML document • What are the steps of inserting paragraph tags in a document.
7.0 FURTHER READING AND OTHER RESOURCES
1. `Arpajian, S., and R. Mullen. 1996. How to use HTML 3.2. Emeryville, Ziff-Davis Press. 219 pp.
2. Castro, E. 1998. HTML 4 for the world wide web.Berkeley, Peachpit Press. 336 pp. 3. Graham, I. S. 1997. HTML sourcebook, third edition. New York, John Wiley &
Sons. 620 pp. 4. Williams, R. 1994. The non-designer’s design book. Design and typographic
principles for the visual novice. Berkeley, Peachpit Press. 144 pp. 5. Williams, R., and J. Tollett. 1998. The non-designer’s web book. An easy guide to
creating, designing , and posting your own web site. Berkeley, Peachpit Press. 288 pp.
UNIT THREE - FORMATTING TEXT
1.0 Introduction
2.0 Objectives
3.0 Main Content
3.1– How to Format Characters with Physical Tags
3.2– How to Format Characters with Logical Markup Tags
3.3 - How to Format Paragraphs
3.4- How to Use Text Breaks
3.5 How to Use Preformatted Text
4.0 Conclusion
5.0 Summary
6.0 Tutor Marked Assignment
7.0 Further Reading and Other Resources
68
1.0 INTRODUCTION
HTML was originally designed as a markup language, not as a formatting and layout specification. The key difference is that HTML allows the author to specify how certain elements are to be used, not necessarily how they are supposed to look. The actual details of presentation are left up to the client-the Web browser.
That is how HTML was originally designed, but that is not necessarily how things turned out. Increasingly, HTML designers are demanding greater control over the look and feel of their documents. HTML provides that control, and yet still allows HTML authors to take the first approach and allow formatting to be handled entirely by the browser.
As the author of your own document, you will decide how you want your page to look. In this unit, you will learn how to handle basic formatting for text and paragraphs. You will also learn a few valuable techniques for breaking large amounts of text into readable chunks.
2.0 OBJECTIVES
At the end of this unit, you should be able to: • Describe the physical markup tags • Describe the logical markup tags • State the difference between formatting tags and preformatted text
3.0 MAIN CONTENT
3.1 How to Format Characters with Physical Tags
HTML provides two general ways to apply formatting to text. The first group of formatting tags is collectively known as physical markup tags. This type of tag gets its name because it indicates a specific change in appearance. Bold and italic tags, for example, are known as physical markup tags because they directly specify how the text should appear on screen. In this section of the unit, we will look at how you can use physical tags in HTML.
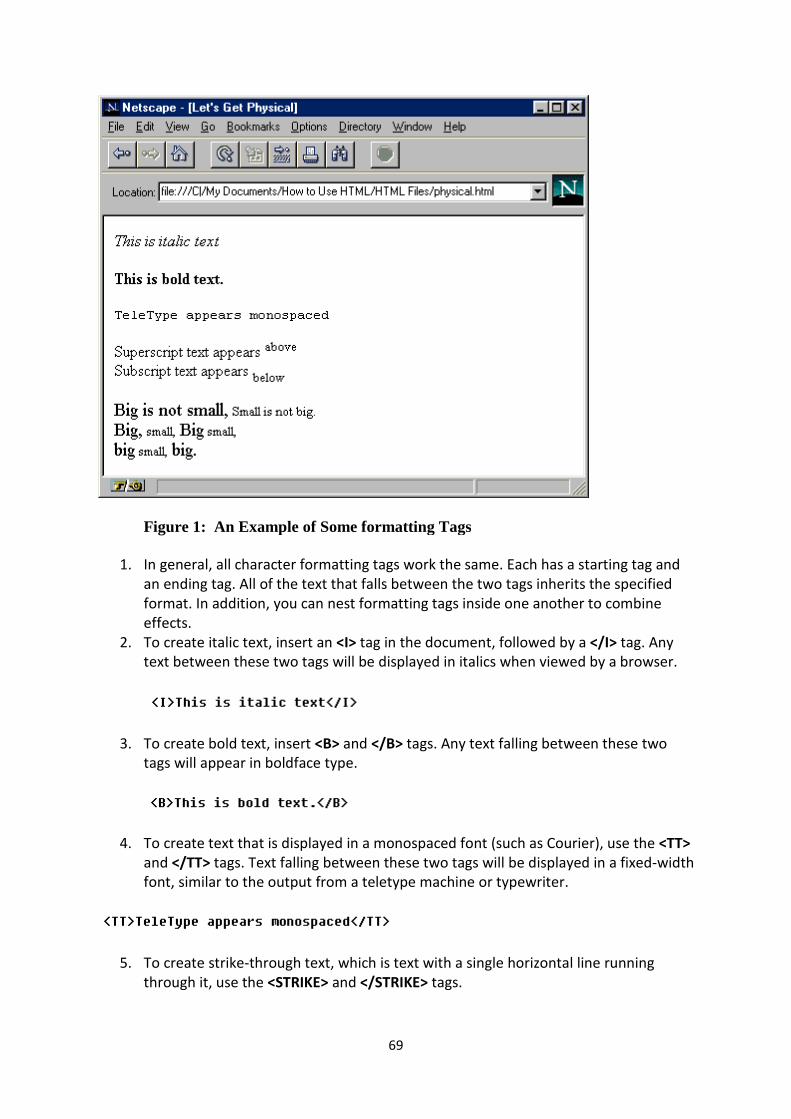
Figure 1: An Example of Some formatting Tags
1. In general, all character formatting tags work the same. Each has a starting tag and
an ending tag. All of the text that falls between the two tags inherits the specified
format. In addition, you can nest formatting tags inside one another to combine
effects.
2. To create italic text, insert an
text between these two tags will be displayed in italics when viewed by a browser.
3. To create bold text, insert
tags will appear in boldface type.
4. To create text that is displayed in a monospaced font (such as Courier), use the
and </TT> tags. Text falling between these two tags will be displayed in a fixed
font, similar to the output from a teletyp
5. To create strike-through text, which is text with a single horizontal line running
through it, use the <STRIKE>
69
Example of Some formatting Tags
In general, all character formatting tags work the same. Each has a starting tag and
an ending tag. All of the text that falls between the two tags inherits the specified
format. In addition, you can nest formatting tags inside one another to combine
To create italic text, insert an <I> tag in the document, followed by a
text between these two tags will be displayed in italics when viewed by a browser.
To create bold text, insert <B> and </B> tags. Any text falling between these t
tags will appear in boldface type.
To create text that is displayed in a monospaced font (such as Courier), use the
tags. Text falling between these two tags will be displayed in a fixed
font, similar to the output from a teletype machine or typewriter.
through text, which is text with a single horizontal line running
<STRIKE> and </STRIKE> tags.
In general, all character formatting tags work the same. Each has a starting tag and
an ending tag. All of the text that falls between the two tags inherits the specified
format. In addition, you can nest formatting tags inside one another to combine
tag in the document, followed by a </I> tag. Any
text between these two tags will be displayed in italics when viewed by a browser.
tags. Any text falling between these two
To create text that is displayed in a monospaced font (such as Courier), use the <TT>
tags. Text falling between these two tags will be displayed in a fixed-width
through text, which is text with a single horizontal line running
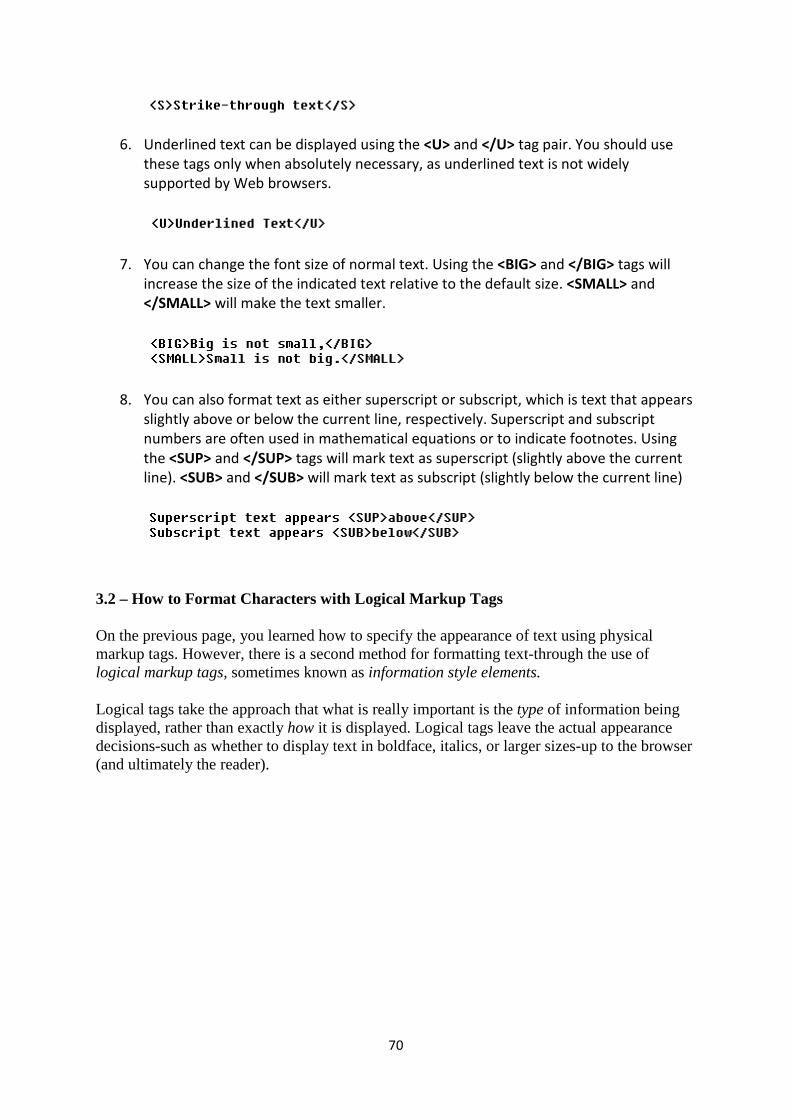
6. Underlined text can be displayed using the
these tags only when absolutely necessary, as underlined text is not widely
supported by Web browsers.
7. You can change the font size of normal text. Using the
increase the size of the indicated text relative to the default size.
</SMALL> will make the text smaller.
8. You can also format text as either superscript or subscript, which is text that appears
slightly above or below the current line, respectively. Superscript and subscript
numbers are often used in mathematical equat
the <SUP> and </SUP>
line). <SUB> and </SUB>
3.2 – How to Format Characters with Logical
On the previous page, you learned how to specify the appearance of text using physical markup tags. However, there is a second method for formatting textlogical markup tags, sometimes known as
Logical tags take the approach that what is really important is the displayed, rather than exactly decisions-such as whether to display text in boldface, italics, or larg(and ultimately the reader).
70
Underlined text can be displayed using the <U> and </U> tag pair. You should use
nly when absolutely necessary, as underlined text is not widely
supported by Web browsers.
You can change the font size of normal text. Using the <BIG> and </BIG>
increase the size of the indicated text relative to the default size. <SMALL>
will make the text smaller.
You can also format text as either superscript or subscript, which is text that appears
slightly above or below the current line, respectively. Superscript and subscript
numbers are often used in mathematical equations or to indicate footnotes. Using
</SUP> tags will mark text as superscript (slightly above the current
</SUB> will mark text as subscript (slightly below the current line)
How to Format Characters with Logical Markup Tags
On the previous page, you learned how to specify the appearance of text using physical markup tags. However, there is a second method for formatting text-through the use of
sometimes known as information style elements.
gical tags take the approach that what is really important is the type of information being displayed, rather than exactly how it is displayed. Logical tags leave the actual appearance
such as whether to display text in boldface, italics, or larger sizes
tag pair. You should use
nly when absolutely necessary, as underlined text is not widely
</BIG> tags will
<SMALL> and
You can also format text as either superscript or subscript, which is text that appears
slightly above or below the current line, respectively. Superscript and subscript
ions or to indicate footnotes. Using
tags will mark text as superscript (slightly above the current
will mark text as subscript (slightly below the current line)
On the previous page, you learned how to specify the appearance of text using physical through the use of
of information being displayed. Logical tags leave the actual appearance
er sizes-up to the browser
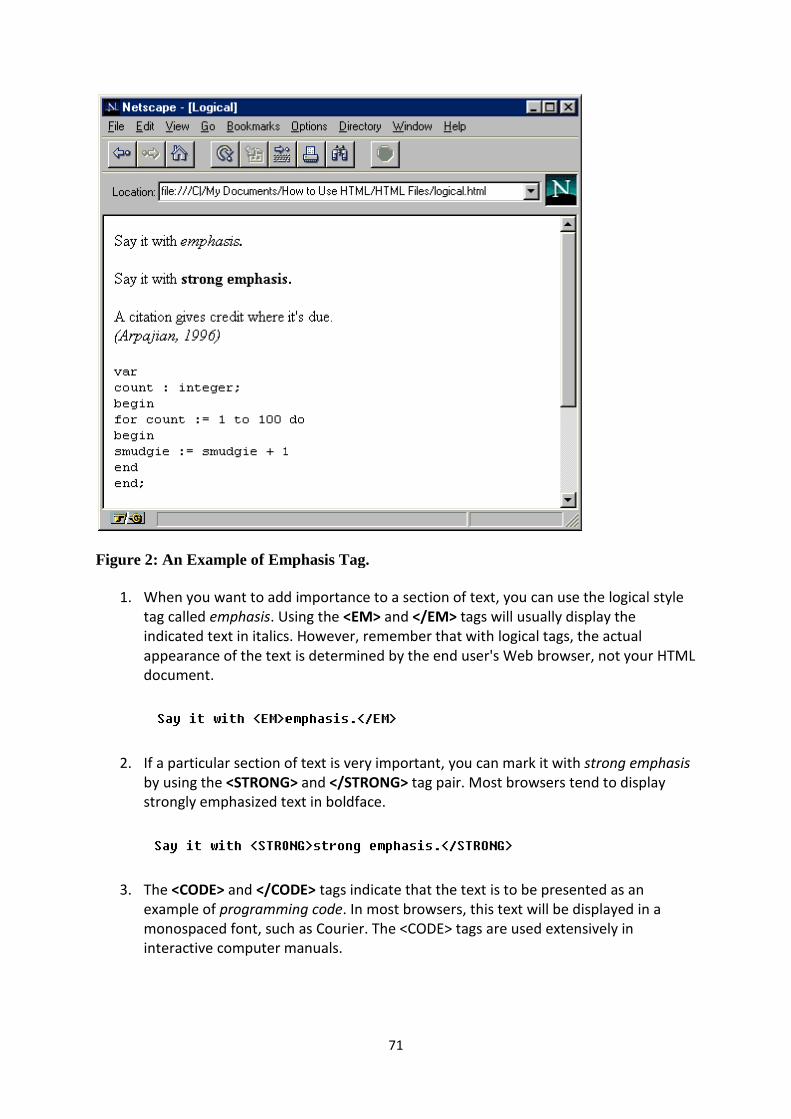
Figure 2: An Example of Emphasis Tag.
1. When you want to add importance to a section of text, you can use the logical style
tag called emphasis. Using the
indicated text in italics. However, remember that with logical tags, the actual
appearance of the text is determined by the end user's Web browser, not your HTML
document.
2. If a particular section of text is very important, you can mark it with
by using the <STRONG>
strongly emphasized text in boldface.
3. The <CODE> and </CODE>
example of programming
monospaced font, such as Courier. The <CODE> tags are used extensively
interactive computer manuals.
71
An Example of Emphasis Tag.
When you want to add importance to a section of text, you can use the logical style
. Using the <EM> and </EM> tags will usually display the
indicated text in italics. However, remember that with logical tags, the actual
e text is determined by the end user's Web browser, not your HTML
If a particular section of text is very important, you can mark it with
<STRONG> and </STRONG> tag pair. Most browsers tend to display
hasized text in boldface.
</CODE> tags indicate that the text is to be presented as an
programming code. In most browsers, this text will be displayed in a
monospaced font, such as Courier. The <CODE> tags are used extensively
interactive computer manuals.
When you want to add importance to a section of text, you can use the logical style
tags will usually display the
indicated text in italics. However, remember that with logical tags, the actual
e text is determined by the end user's Web browser, not your HTML
If a particular section of text is very important, you can mark it with strong emphasis
tag pair. Most browsers tend to display
tags indicate that the text is to be presented as an
. In most browsers, this text will be displayed in a
monospaced font, such as Courier. The <CODE> tags are used extensively in
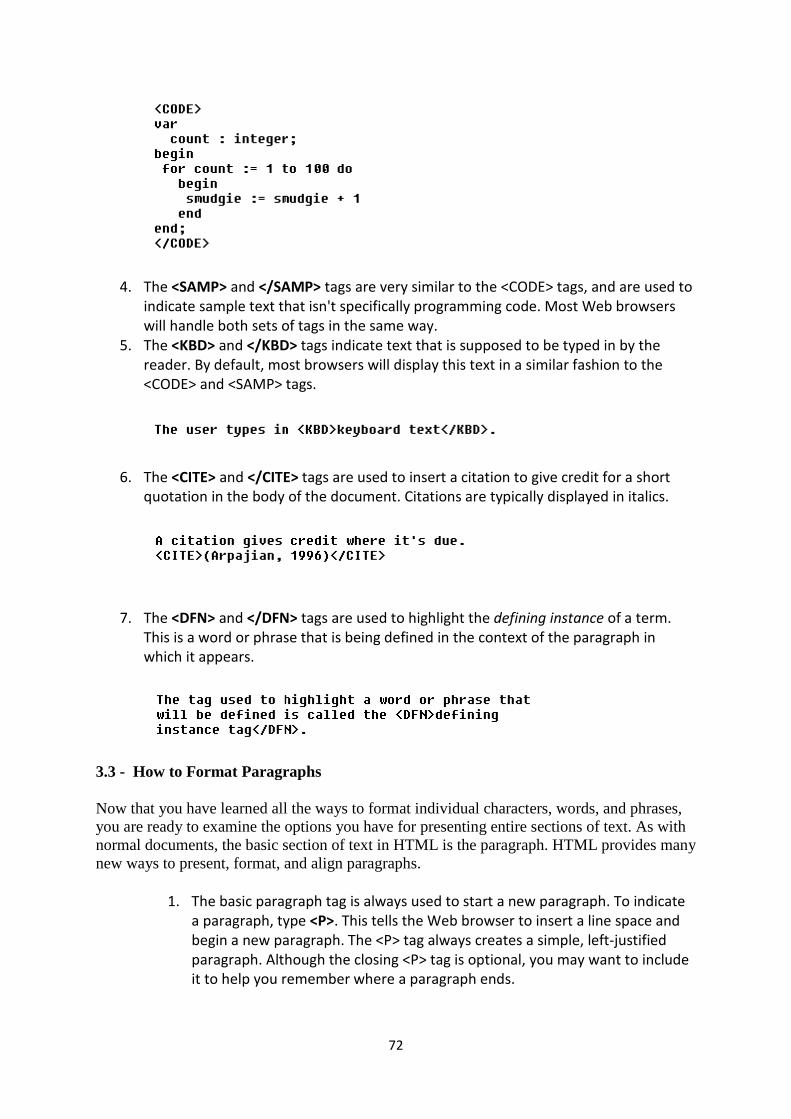
4. The <SAMP> and </SAMP>
indicate sample text that isn't specifically programming code. Most Web browsers
will handle both sets of tags in the same way.
5. The <KBD> and </KBD>
reader. By default, most browsers will display this text in a similar fashion to the
<CODE> and <SAMP> tags.
6. The <CITE> and </CITE>
quotation in the body of the document. Citations are typically displayed in italics.
7. The <DFN> and </DFN>
This is a word or phrase that is being defined in the context of the paragraph in
which it appears.
3.3 - How to Format Paragraphs
Now that you have learned all the ways to format individual characters, words, and phrases, you are ready to examine the options you have for presenting entire sections of text. As with normal documents, the basic section of text in HTML is the paragraph. HTML provides many new ways to present, format, and align paragraphs.
1. The basic paragraph tag is always used
a paragraph, type
begin a new paragraph. The <P> tag always creates a simple, left
paragraph. Although the closing <P> tag is optional, you may want
it to help you remember where a paragraph ends.
72
</SAMP> tags are very similar to the <CODE> tags, and are used to
indicate sample text that isn't specifically programming code. Most Web browsers
will handle both sets of tags in the same way.
</KBD> tags indicate text that is supposed to be typed in by the
reader. By default, most browsers will display this text in a similar fashion to the
<CODE> and <SAMP> tags.
</CITE> tags are used to insert a citation to give credit fo
quotation in the body of the document. Citations are typically displayed in italics.
</DFN> tags are used to highlight the defining instance
This is a word or phrase that is being defined in the context of the paragraph in
How to Format Paragraphs
Now that you have learned all the ways to format individual characters, words, and phrases, examine the options you have for presenting entire sections of text. As with
normal documents, the basic section of text in HTML is the paragraph. HTML provides many new ways to present, format, and align paragraphs.
The basic paragraph tag is always used to start a new paragraph. To indicate
a paragraph, type <P>. This tells the Web browser to insert a line space and
begin a new paragraph. The <P> tag always creates a simple, left
paragraph. Although the closing <P> tag is optional, you may want
it to help you remember where a paragraph ends.
tags are very similar to the <CODE> tags, and are used to
indicate sample text that isn't specifically programming code. Most Web browsers
tags indicate text that is supposed to be typed in by the
reader. By default, most browsers will display this text in a similar fashion to the
tags are used to insert a citation to give credit for a short
quotation in the body of the document. Citations are typically displayed in italics.
instance of a term.
This is a word or phrase that is being defined in the context of the paragraph in
Now that you have learned all the ways to format individual characters, words, and phrases, examine the options you have for presenting entire sections of text. As with
normal documents, the basic section of text in HTML is the paragraph. HTML provides many
to start a new paragraph. To indicate
. This tells the Web browser to insert a line space and
begin a new paragraph. The <P> tag always creates a simple, left-justified
paragraph. Although the closing <P> tag is optional, you may want to include
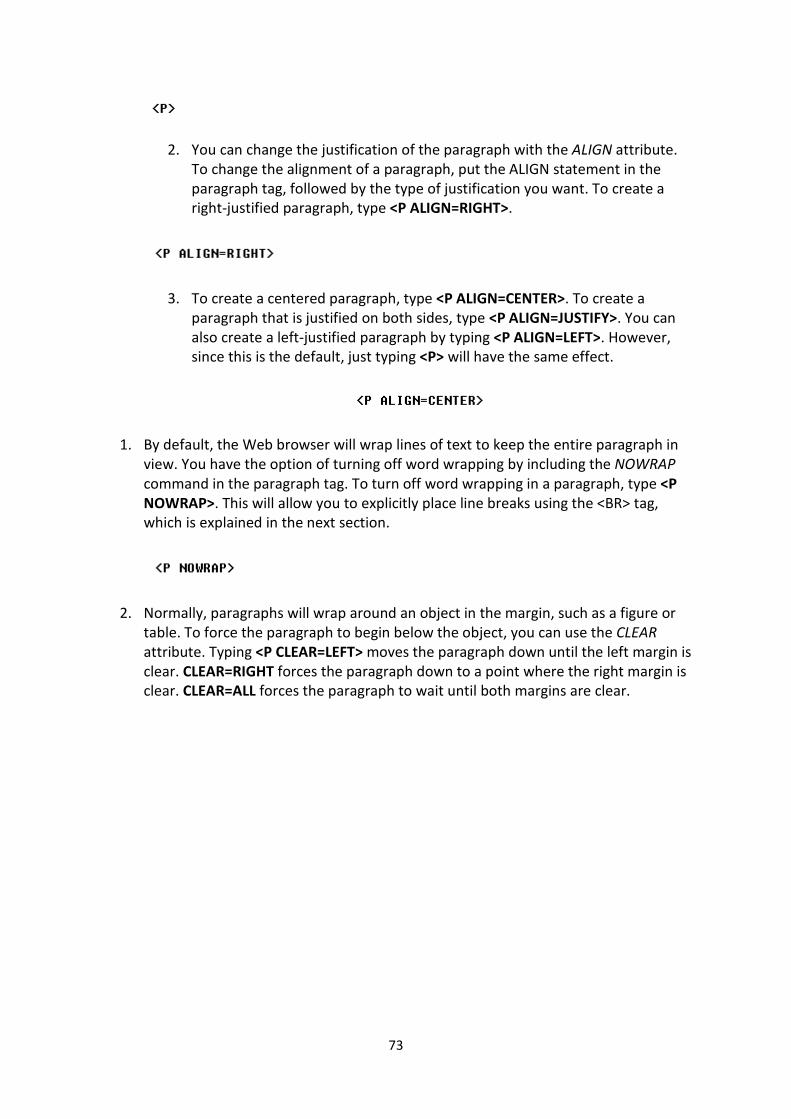
2. You can change the justification of the paragraph with the
To change the alignment of a paragraph, put the ALIGN statement in the
paragraph tag, followed by the type of justification you want. To create a
right-justified paragraph, type
3. To create a centered paragraph, type
paragraph that is justified on both sides, type
also create a left
since this is the default, just typing
1. By default, the Web browser will wrap lines of text to keep the entire paragraph in
view. You have the option of turning off word wrapping by including the
command in the paragraph tag. To turn off word wrapping in a paragraph, type
NOWRAP>. This will allow y
which is explained in the next section.
2. Normally, paragraphs will wrap around an object in the margin, such as a figure or
table. To force the paragraph to begin below the object, you can use the
attribute. Typing <P CLEAR=LEFT>
clear. CLEAR=RIGHT forces the paragraph down to a point where the right margin is
clear. CLEAR=ALL forces the paragraph to wait until both margins are clear.
73
You can change the justification of the paragraph with the ALIGN
To change the alignment of a paragraph, put the ALIGN statement in the
paragraph tag, followed by the type of justification you want. To create a
justified paragraph, type <P ALIGN=RIGHT>.
To create a centered paragraph, type <P ALIGN=CENTER>. To create a
paragraph that is justified on both sides, type <P ALIGN=JUSTIFY>
also create a left-justified paragraph by typing <P ALIGN=LEFT>
since this is the default, just typing <P> will have the same effect.
he Web browser will wrap lines of text to keep the entire paragraph in
view. You have the option of turning off word wrapping by including the
command in the paragraph tag. To turn off word wrapping in a paragraph, type
. This will allow you to explicitly place line breaks using the <BR> tag,
which is explained in the next section.
Normally, paragraphs will wrap around an object in the margin, such as a figure or
table. To force the paragraph to begin below the object, you can use the
<P CLEAR=LEFT> moves the paragraph down until the left margin is
forces the paragraph down to a point where the right margin is
forces the paragraph to wait until both margins are clear.
ALIGN attribute.
To change the alignment of a paragraph, put the ALIGN statement in the
paragraph tag, followed by the type of justification you want. To create a
. To create a
<P ALIGN=JUSTIFY>. You can
<P ALIGN=LEFT>. However,
will have the same effect.
he Web browser will wrap lines of text to keep the entire paragraph in
view. You have the option of turning off word wrapping by including the NOWRAP
command in the paragraph tag. To turn off word wrapping in a paragraph, type <P
ou to explicitly place line breaks using the <BR> tag,
Normally, paragraphs will wrap around an object in the margin, such as a figure or
table. To force the paragraph to begin below the object, you can use the CLEAR
moves the paragraph down until the left margin is
forces the paragraph down to a point where the right margin is
forces the paragraph to wait until both margins are clear.
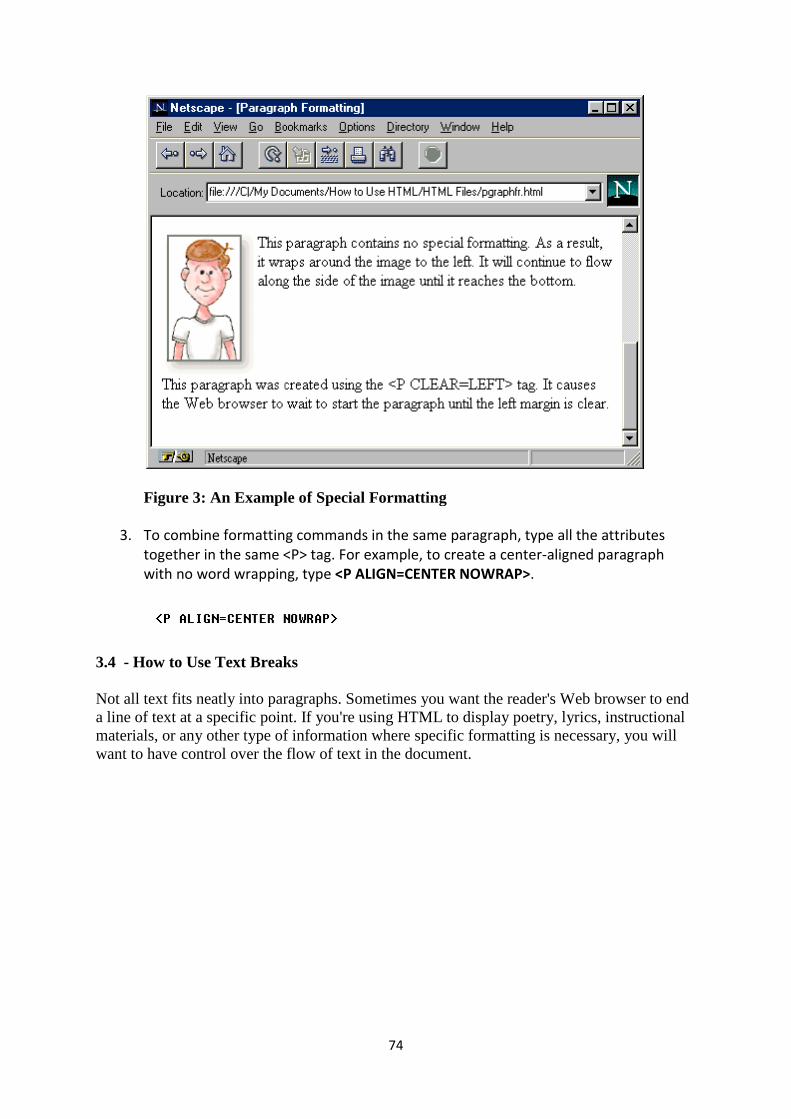
Figure 3: An Example of Special Formatting
3. To combine formatting commands in the same paragraph, type all the attributes
together in the same <P>
with no word wrapping, type
3.4 - How to Use Text Breaks
Not all text fits neatly into paragraphs. Sometimes you want the reader's Web browser to end a line of text at a specific point. If you're using HTML to display poetry, lyrics, instructional materials, or any other type of information where specific formatting is necessary, you will want to have control over the flow of text in the document.
74
An Example of Special Formatting
To combine formatting commands in the same paragraph, type all the attributes
together in the same <P> tag. For example, to create a center-aligned paragraph
with no word wrapping, type <P ALIGN=CENTER NOWRAP>.
How to Use Text Breaks
Not all text fits neatly into paragraphs. Sometimes you want the reader's Web browser to end pecific point. If you're using HTML to display poetry, lyrics, instructional
materials, or any other type of information where specific formatting is necessary, you will want to have control over the flow of text in the document.
To combine formatting commands in the same paragraph, type all the attributes
aligned paragraph
Not all text fits neatly into paragraphs. Sometimes you want the reader's Web browser to end pecific point. If you're using HTML to display poetry, lyrics, instructional
materials, or any other type of information where specific formatting is necessary, you will
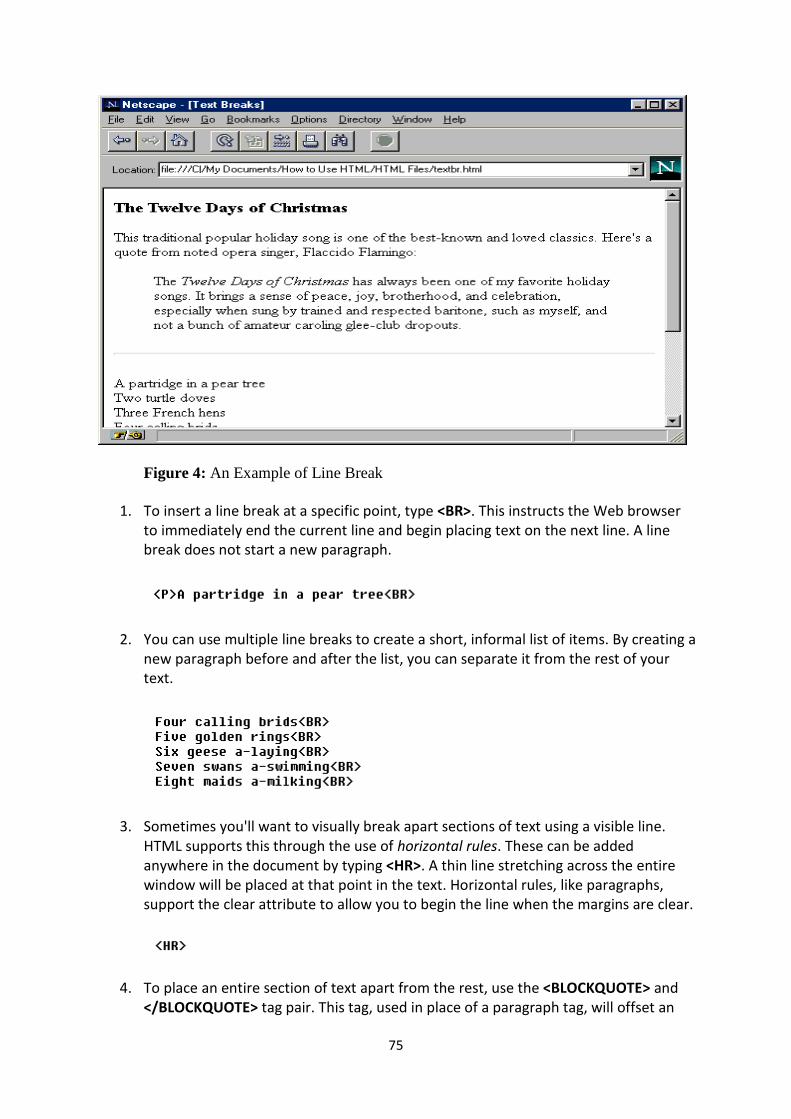
Figure 4: An Example of Line Break
1. To insert a line break at a specific point, type
to immediately end the current line and begin placing text on the next line. A line
break does not start a new paragraph.
2. You can use multiple line breaks to create a short, informal list of items. By creating a
new paragraph before and after the list, you can separate it from the rest of your
text.
3. Sometimes you'll want to visually break apart sections of text using a vis
HTML supports this through the use of
anywhere in the document by typing
window will be placed at that point in the text. Horizontal rules, like paragraphs,
support the clear attribute to allow you to begin the line when the margins are clear.
4. To place an entire section of text apart from the rest, use the
</BLOCKQUOTE> tag pair. This tag, used in place of a paragraph tag, will offset an
75
An Example of Line Break
To insert a line break at a specific point, type <BR>. This instructs the Web browser
to immediately end the current line and begin placing text on the next line. A line
break does not start a new paragraph.
You can use multiple line breaks to create a short, informal list of items. By creating a
new paragraph before and after the list, you can separate it from the rest of your
Sometimes you'll want to visually break apart sections of text using a vis
HTML supports this through the use of horizontal rules. These can be added
anywhere in the document by typing <HR>. A thin line stretching across the entire
window will be placed at that point in the text. Horizontal rules, like paragraphs,
ort the clear attribute to allow you to begin the line when the margins are clear.
To place an entire section of text apart from the rest, use the <BLOCKQUOTE>
tag pair. This tag, used in place of a paragraph tag, will offset an
. This instructs the Web browser
to immediately end the current line and begin placing text on the next line. A line
You can use multiple line breaks to create a short, informal list of items. By creating a
new paragraph before and after the list, you can separate it from the rest of your
Sometimes you'll want to visually break apart sections of text using a visible line.
. These can be added
. A thin line stretching across the entire
window will be placed at that point in the text. Horizontal rules, like paragraphs,
ort the clear attribute to allow you to begin the line when the margins are clear.
<BLOCKQUOTE> and
tag pair. This tag, used in place of a paragraph tag, will offset an
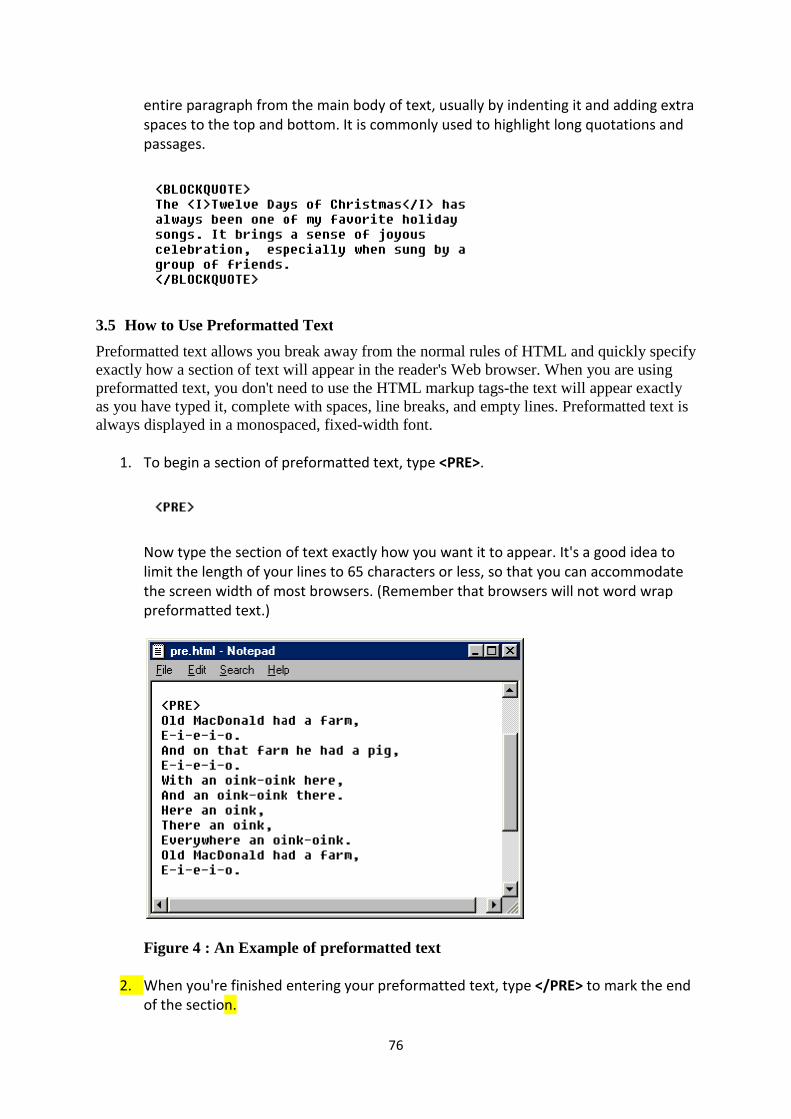
entire paragraph from the main body of text, usually by indenting it and adding extra
spaces to the top and bottom. It is commonly used to highlight long quotations and
passages.
3.5 How to Use Preformatted Text
Preformatted text allows you break away from the normal rules of HTML and quickly specify exactly how a section of text will appear in the reader's Web browser. When you are using preformatted text, you don't need to use the HTML markup tagsas you have typed it, complete with spaces, line breaks, and empty lines. Preformatted text is always displayed in a monospaced, fixed
1. To begin a section of preformatted text, type
Now type the section of text exactly
limit the length of your lines to 65 characters or less, so that you can accommodate
the screen width of most browsers. (Remember that browsers will not word wrap
preformatted text.)
Figure 4 : An Example of preformatted text
2. When you're finished entering your preformatted text, type
of the section.
76
paragraph from the main body of text, usually by indenting it and adding extra
spaces to the top and bottom. It is commonly used to highlight long quotations and
How to Use Preformatted Text
Preformatted text allows you break away from the normal rules of HTML and quickly specify exactly how a section of text will appear in the reader's Web browser. When you are using preformatted text, you don't need to use the HTML markup tags-the text will as you have typed it, complete with spaces, line breaks, and empty lines. Preformatted text is always displayed in a monospaced, fixed-width font.
To begin a section of preformatted text, type <PRE>.
Now type the section of text exactly how you want it to appear. It's a good idea to
limit the length of your lines to 65 characters or less, so that you can accommodate
the screen width of most browsers. (Remember that browsers will not word wrap
An Example of preformatted text
When you're finished entering your preformatted text, type </PRE>
paragraph from the main body of text, usually by indenting it and adding extra
spaces to the top and bottom. It is commonly used to highlight long quotations and
Preformatted text allows you break away from the normal rules of HTML and quickly specify exactly how a section of text will appear in the reader's Web browser. When you are using
the text will appear exactly as you have typed it, complete with spaces, line breaks, and empty lines. Preformatted text is
how you want it to appear. It's a good idea to
limit the length of your lines to 65 characters or less, so that you can accommodate
the screen width of most browsers. (Remember that browsers will not word wrap
</PRE> to mark the end
3. You can apply character formatting styles, such as bold
text. Headings and paragraphs will not work in preformatted text blocks, however.
4.0 CONCLUSION:The physical and logical markup tags are the two general ways of formatting text. They are with different markup tags.
5.0 SUMMARY: In this unit, you have learnt the following:• Physical Markup tags• Logical Markup tags• Paragraph formatting
6.0 TUTOR MARKED ASSIGNMENT
• List the physical Markup tags you know?• Distinguish between physical and logical markup tags
7.0 FURTHER READING AND OTHER RESOURCES
• `Arpajian, S., and R. Mullen. 1996.
Davis Press. 219 pp. • Castro, E. 1998.
336 pp. • Graham, I. S. 1997.
& Sons. 620 pp. • Williams, R. 1994.
principles for the visual novice. • Williams, R., and J. Tollett. 1998.
guide to creating, designing , and posting your own web site. Peachpit Press. 288 pp.
UNIT FOUR – USING HYPERTEXT LINKS
1.0 Introduction
2.0 Objectives
3.0 Main Content
3.1 How to Create a Hyperlink
3.2 How to Use the ID Att
3.4 How to Use Relative Path Names
4.0 Conclusion
77
You can apply character formatting styles, such as bold and italic, in preformatted
text. Headings and paragraphs will not work in preformatted text blocks, however.
CONCLUSION: The physical and logical markup tags are the two general ways of formatting text. They are with different markup tags.
In this unit, you have learnt the following: Physical Markup tags Logical Markup tags Paragraph formatting
TUTOR MARKED ASSIGNMENT List the physical Markup tags you know? Distinguish between physical and logical markup tags
URTHER READING AND OTHER RESOURCES
`Arpajian, S., and R. Mullen. 1996. How to use HTML 3.2.Davis Press. 219 pp. Castro, E. 1998. HTML 4 for the world wide web.Berkeley, Peachpit Press.
Graham, I. S. 1997. HTML sourcebook, third edition. New York, John Wiley & Sons. 620 pp. Williams, R. 1994. The non-designer’s design book. Design and typographic principles for the visual novice. Berkeley, Peachpit Press. 144 pp. Williams, R., and J. Tollett. 1998. The non-designer’s web book. An easy guide to creating, designing , and posting your own web site. Peachpit Press. 288 pp.
USING HYPERTEXT LINKS
How to Create a Hyperlink
How to Use the ID Attribute
How to Use Relative Path Names
and italic, in preformatted
text. Headings and paragraphs will not work in preformatted text blocks, however.
The physical and logical markup tags are the two general ways of formatting text.
How to use HTML 3.2. Emeryville, Ziff-
Berkeley, Peachpit Press.
. New York, John Wiley
designer’s design book. Design and typographic Berkeley, Peachpit Press. 144 pp.
designer’s web book. An easy guide to creating, designing , and posting your own web site. Berkeley,

78
5.0 Summary
6.0 Tutor Marked Assignment
7.0 Further Reading And Other Resources
1.0 INTRODUCTION
The single greatest feature of the World Wide Web is its diverse collection of documents, which number in the millions. All of these documents are brought together through the use of hypertext links. Users navigate the Web by clicking on the links that HTML authors provide. Hypertext links are a crucial part of HTML-which, after all, is short for Hypertext Markup Language. In this unit, we will look at the simple process behind how hyperlinks work in HTML documents. You will also learn how to link to a specific point in a large document by using the ID attribute. Finally, we will take a look at the difference between using absolute and relative path names in your hyperlink references. Linking is one of the easiest and most important parts of using HTML. So warm up your Web browser and Notepad and get ready to explore.
2.0 OBJECTIVES
At the end of this unit, you should be able to: • Define hypertext link • List types and uses of hypertext link • State the steps of creating hyperlinks • Create hyperlinks
3.0 MAIN CONT
3.1 What is hypertext link Hypertext is text displayed on a computer or other electronic device with references (hyperlinks) to other text that the reader can immediately access, usually by a mouse click or key press sequence. Apart from running text, hypertext may contain tables, images and other presentational devices. Hypertext is the underlying concept defining the structure of the World Wide Web. It is an easy-to-use and flexible format to share information over the Internet.
Types and uses of hypertext
Hypertext documents can either be static (prepared and stored in advance) or dynamic (continually changing in response to user input). Static hypertext can be used to cross-reference collections of data in documents, software applications, or books on CDs. A well-constructed system can also incorporate other user-interface conventions, such as menus and command lines. Hypertext can develop very complex and dynamic systems of linking and cross-referencing. The most famous implementation of hypertext is the World Wide Web , first deployed in 1992.
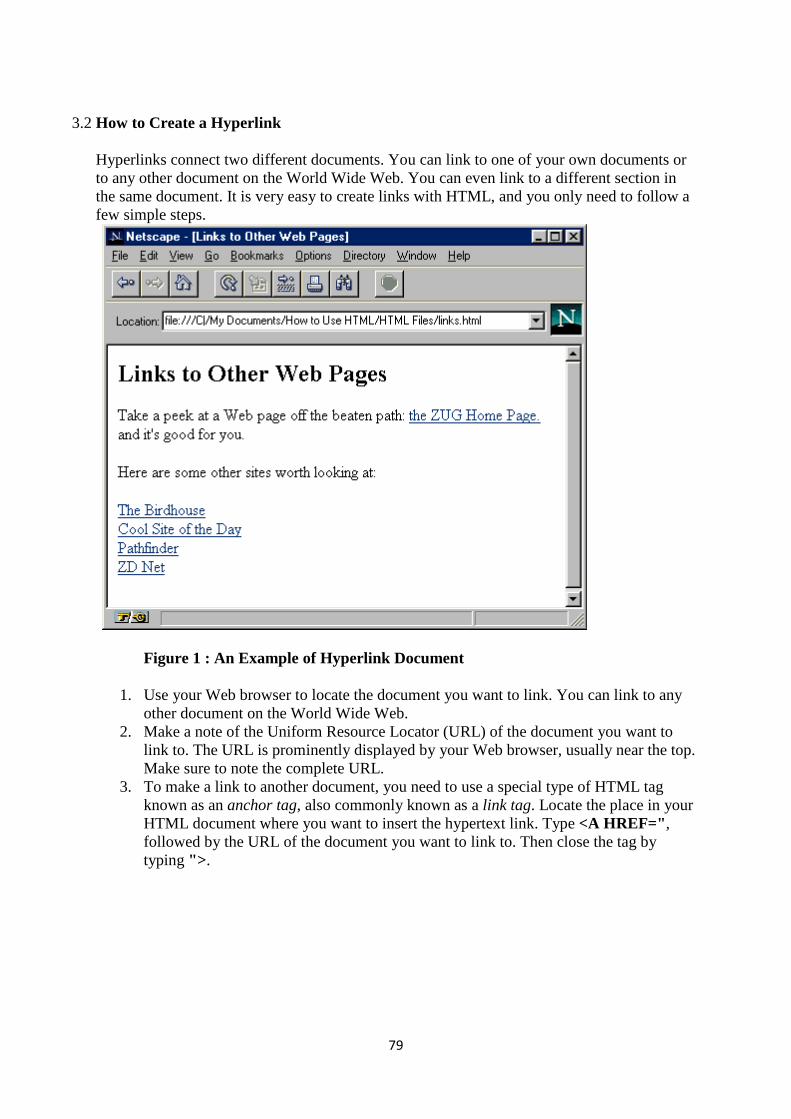
79
3.2 How to Create a Hyperlink
Hyperlinks connect two different documents. You can link to one of your own documents or to any other document on the World Wide Web. You can even link to a different section in the same document. It is very easy to create links with HTML, and you only need to follow a few simple steps.
Figure 1 : An Example of Hyperlink Document
1. Use your Web browser to locate the document you want to link. You can link to any other document on the World Wide Web.
2. Make a note of the Uniform Resource Locator (URL) of the document you want to link to. The URL is prominently displayed by your Web browser, usually near the top. Make sure to note the complete URL.
3. To make a link to another document, you need to use a special type of HTML tag known as an anchor tag, also commonly known as a link tag. Locate the place in your HTML document where you want to insert the hypertext link. Type <A HREF=" , followed by the URL of the document you want to link to. Then close the tag by typing "> .
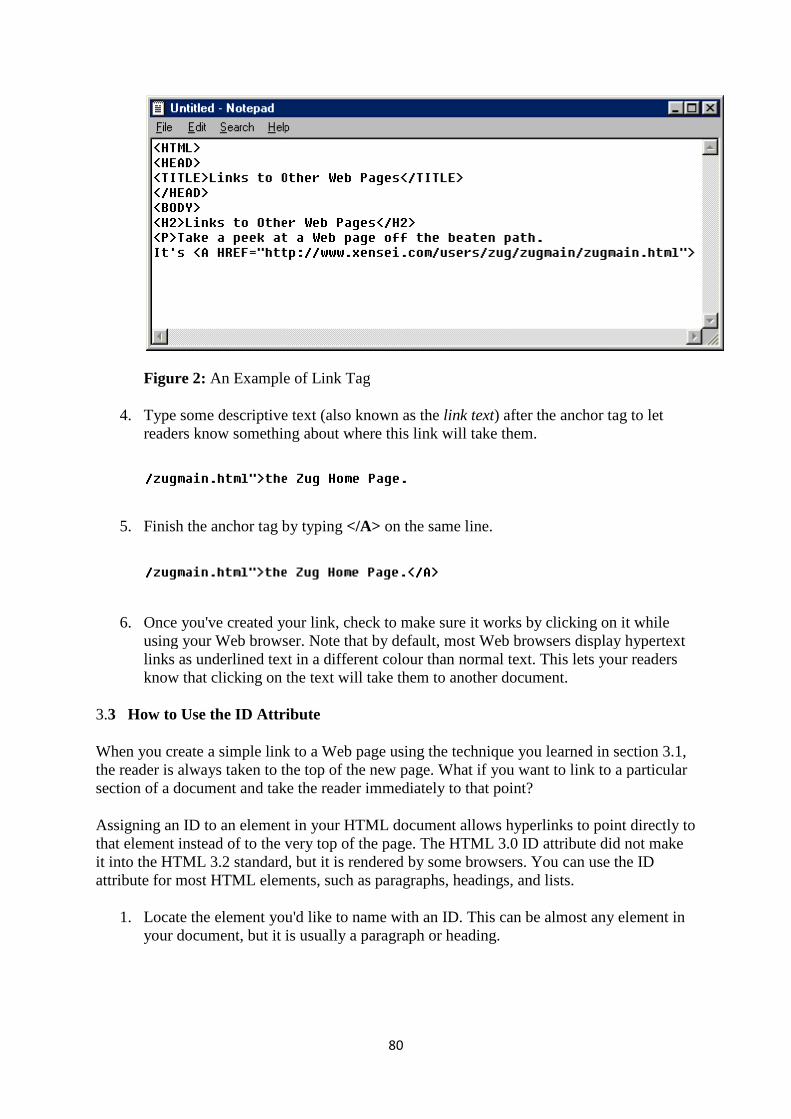
Figure 2: An Example of Link Tag
4. Type some descriptive text (also known as the readers know something about where this link will take them.
5. Finish the anchor tag by typing
6. Once you've created your linkusing your Web browser. Note that by default, most Web browsers display hypertext links as underlined text in a different colour than normal text. This lets your readers know that clicking on the text w
3.3 How to Use the ID Attribute
When you create a simple link to a Web page using the technique you learned the reader is always taken to the top of the new page. What if you want to link to a particular section of a document and take the reader immediately to that point?
Assigning an ID to an element in your HTML document allows hyperlinks to point directthat element instead of to the very top of the page. The HTML 3.0 ID attribute did not make it into the HTML 3.2 standard, but it is rendered by some browsers. You can use the ID attribute for most HTML elements, such as paragraphs, headings, and lis
1. Locate the element you'd like to name with an ID. This can be almost any element in your document, but it is usually a paragraph or heading.
80
Example of Link Tag
Type some descriptive text (also known as the link text) after the anchor tag to let readers know something about where this link will take them.
Finish the anchor tag by typing </A> on the same line.
Once you've created your link, check to make sure it works by clicking on it while using your Web browser. Note that by default, most Web browsers display hypertext links as underlined text in a different colour than normal text. This lets your readers know that clicking on the text will take them to another document.
How to Use the ID Attribute
When you create a simple link to a Web page using the technique you learned the reader is always taken to the top of the new page. What if you want to link to a particular section of a document and take the reader immediately to that point?
Assigning an ID to an element in your HTML document allows hyperlinks to point directthat element instead of to the very top of the page. The HTML 3.0 ID attribute did not make it into the HTML 3.2 standard, but it is rendered by some browsers. You can use the ID attribute for most HTML elements, such as paragraphs, headings, and lists.
Locate the element you'd like to name with an ID. This can be almost any element in your document, but it is usually a paragraph or heading.
) after the anchor tag to let
, check to make sure it works by clicking on it while using your Web browser. Note that by default, most Web browsers display hypertext links as underlined text in a different colour than normal text. This lets your readers
When you create a simple link to a Web page using the technique you learned in section 3.1, the reader is always taken to the top of the new page. What if you want to link to a particular
Assigning an ID to an element in your HTML document allows hyperlinks to point directly to that element instead of to the very top of the page. The HTML 3.0 ID attribute did not make it into the HTML 3.2 standard, but it is rendered by some browsers. You can use the ID
ts.
Locate the element you'd like to name with an ID. This can be almost any element in
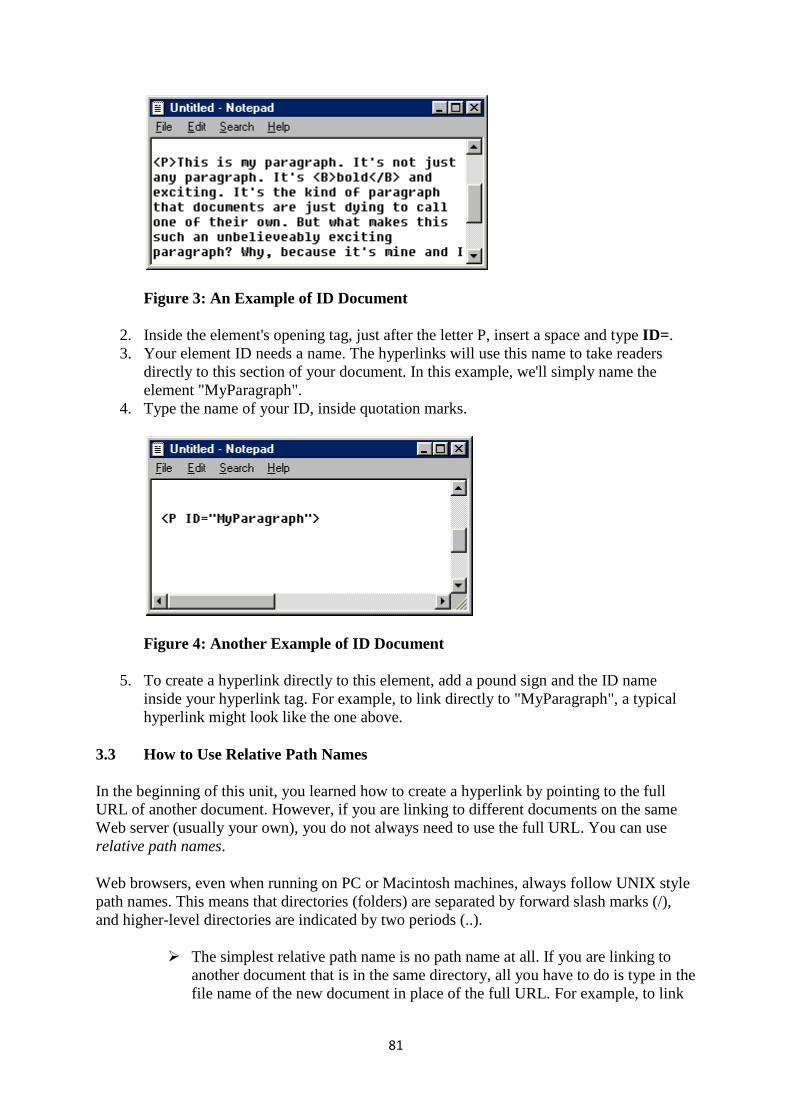
81
Figure 3: An Example of ID Document
2. Inside the element's opening tag, just after the letter P, insert a space and type ID= . 3. Your element ID needs a name. The hyperlinks will use this name to take readers
directly to this section of your document. In this example, we'll simply name the element "MyParagraph".
4. Type the name of your ID, inside quotation marks.
Figure 4: Another Example of ID Document
5. To create a hyperlink directly to this element, add a pound sign and the ID name inside your hyperlink tag. For example, to link directly to "MyParagraph", a typical hyperlink might look like the one above.
3.3 How to Use Relative Path Names
In the beginning of this unit, you learned how to create a hyperlink by pointing to the full URL of another document. However, if you are linking to different documents on the same Web server (usually your own), you do not always need to use the full URL. You can use relative path names.
Web browsers, even when running on PC or Macintosh machines, always follow UNIX style path names. This means that directories (folders) are separated by forward slash marks (/), and higher-level directories are indicated by two periods (..).
� The simplest relative path name is no path name at all. If you are linking to another document that is in the same directory, all you have to do is type in the file name of the new document in place of the full URL. For example, to link
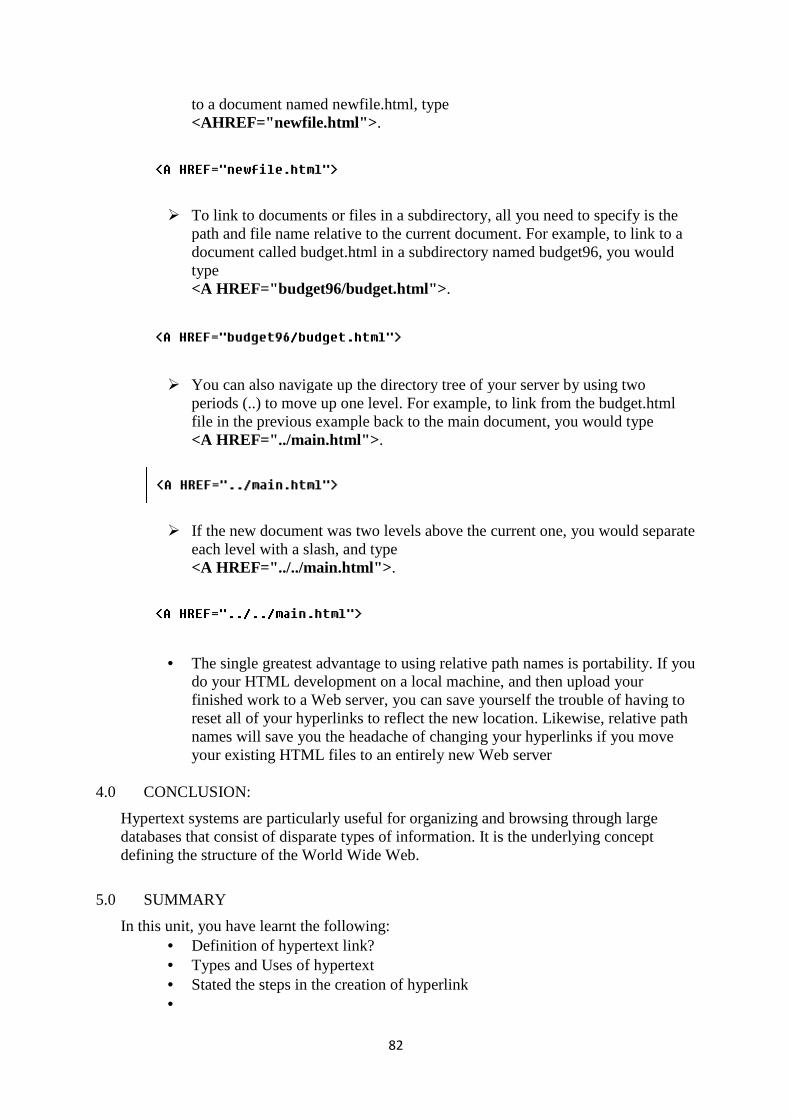
to a document named newfile.html, type<AHREF="newfile.html">
� To link to documents or files in a subdirectory, all you need to specify is the path and file name relative to the current document. For example, to link to a document called budget.html in a subdirectory named budget96, you would type <A HREF="budget96/b
� You can also navigate up the directory tree of your server by using two periods (..) to move up one level. For example, to link from the budget.html file in the previous example back to the main document, you would type<A HREF="../main.ht
� If the new document was two levels above the current one, you would separate each level with a slash, and type <A HREF="../../main.html">
• The single greatest advantage to using relative path names is portability. If you do your HTML developmefinished work to a Web server, you can save yourself the trouble of having to reset all of your hyperlinks to reflect the new location. Likewise, relative path names will save you the headache of changing your hyyour existing HTML files to an entirely new Web server
4.0 CONCLUSION:
Hypertext systems are particularly useful for organizing and browsing through large databases that consist of disparate types of information. It is the underlying defining the structure of the
5.0 SUMMARY
In this unit, you have learnt the following:• Definition of hypertext link?• Types and Uses of hypertext• Stated the steps in the creation of hyperlink•
82
to a document named newfile.html, type <AHREF="newfile.html"> .
To link to documents or files in a subdirectory, all you need to specify is the path and file name relative to the current document. For example, to link to a document called budget.html in a subdirectory named budget96, you would
<A HREF="budget96/budget.html"> .
You can also navigate up the directory tree of your server by using two periods (..) to move up one level. For example, to link from the budget.html file in the previous example back to the main document, you would type<A HREF="../main.ht ml"> .
If the new document was two levels above the current one, you would separate each level with a slash, and type <A HREF="../../main.html"> .
The single greatest advantage to using relative path names is portability. If you do your HTML development on a local machine, and then upload your finished work to a Web server, you can save yourself the trouble of having to reset all of your hyperlinks to reflect the new location. Likewise, relative path names will save you the headache of changing your hyperlinks if you move your existing HTML files to an entirely new Web server
Hypertext systems are particularly useful for organizing and browsing through large databases that consist of disparate types of information. It is the underlying defining the structure of the World Wide Web.
In this unit, you have learnt the following: Definition of hypertext link? Types and Uses of hypertext
the steps in the creation of hyperlink
To link to documents or files in a subdirectory, all you need to specify is the path and file name relative to the current document. For example, to link to a document called budget.html in a subdirectory named budget96, you would
You can also navigate up the directory tree of your server by using two periods (..) to move up one level. For example, to link from the budget.html file in the previous example back to the main document, you would type
If the new document was two levels above the current one, you would separate
The single greatest advantage to using relative path names is portability. If you nt on a local machine, and then upload your
finished work to a Web server, you can save yourself the trouble of having to reset all of your hyperlinks to reflect the new location. Likewise, relative path
perlinks if you move
Hypertext systems are particularly useful for organizing and browsing through large databases that consist of disparate types of information. It is the underlying concept
83
6.0 TUTOR MARKED ASSIGNMENT
• Define hypertext link • Distinguish between hyperlink and hypertext • List the steps of creating a hyperlink
7.0 FURTHER READING AND OTHER RESOURCES
• Barnet, Belinda (2004). Lost In The Archive: Vision, Artefact And Loss In The Evolution Of
Hypertext. University of New South Wales, PhD thesis.
• Bolter, Jay David (2001). Writing Space: Computers, Hypertext, and the Remediation of Print.
New Jersey: Lawrence Erlbaum Associates. ISBN 0-8058-2919-9.
• Buckland, Michael (2006). Emanuel Goldberg and His Knowledge Machine. Libraries Unlimited.
ISBN 0-31331-332-6.
• Byers, T. J. (April 1987). "Built by association". PC World 5: 244–251.
• Cicconi, Sergio (1999). "Hypertextuality". Mediapolis. Ed. Sam Inkinen. Berlino & New York: De
Gruyter.: 21–43. http://www.cisenet.com/cisenet/writing/essays/hypertextuality.htm.
• Conklin, J. (1987). "Hypertext: An Introduction and Survey". Computer 20 (9): 17–41.
doi:10.1109/MC.1987.1663693.
• Crane, Gregory (1988). "Extending the boundaries of instruction and research". T.H.E. Journal
(Technological Horizons in Education) (Macintosh Special Issue): 51–54.
• Ensslin, Astrid (2007). Canonizing Hypertext: Explorations and Constructions. London:
Continuum. ISBN 0-8264-95583.
• Landow, George (2006). Hypertext 3.0 Critical Theory and New Media in an Era of Globalization:
Critical Theory and New Media in a Global Era (Parallax, Re-Visions of Culture and Society).
Baltimore: The Johns Hopkins University Press. ISBN 0-8018-8257-5.
• van Dam, Andries (July 1988). "Hypertext: '87 keynote address". Communications of the ACM 31:
887–895. doi:10.1145/48511.48519.
http://www.cs.brown.edu/memex/HT_87_Keynote_Address.html.
• Yankelovich, Nicole; Landow, George P., and Cody, David (1987). "Creating hypermedia materials
for English literature students". SIGCUE Outlook 20 (3): All.
84
MODULE THREE –LISTS, TABLES AND FRAMES IN HTML
UNIT ONE – Creating Lists in HTML
1. 0. Introduction
2.0. Objectives
3.0 Main Content
3.1 How to Create Unordered Lists
3.2 How to Create Ordered Lists
3.3. How to Create Definition Lists
3.4.How to Create Lists within Lists
4.0 Conclusion
5.0 Summary
6.0 Tutor Marked Assignment
7.0 Further Reading And Other Resources
1.0 INTRODUCTION
Everyone makes lists. Whether you use them for groceries, to-do items, or holiday gifts and cards, lists are an important part of one’s life. Lists are also important on the World Wide Web. The environment of the Web calls for information to be presented in a concise and timely manner. Lists are ideal vehicles for delivering all kinds of information on line. In HTML, you have many choices for how to create and present lists. In this unit, we will look at ways to create unordered lists, ordered (numbered) lists, and a special type of list known as a definition list. You will also learn how to combine multiple levels of lists.
2.0 OBJECTIVES In this unit, you should be able to:
• Define unordered lists, ordered list, definition list and list within list • State the steps in creating unordered lists, ordered list, definition list and
list within list • Distinguish between Ordered list and list within list
3.0 MAIN CONTENT
3.1 How to Create Unordered Lists
The simplest list in HTML is the unordered or bulleted list. This is ideal for listing items that have no particular hierarchy or order of importance. Unordered lists are very common on the Web and are used to convey items of note in a quick and concise manner. Web browsers
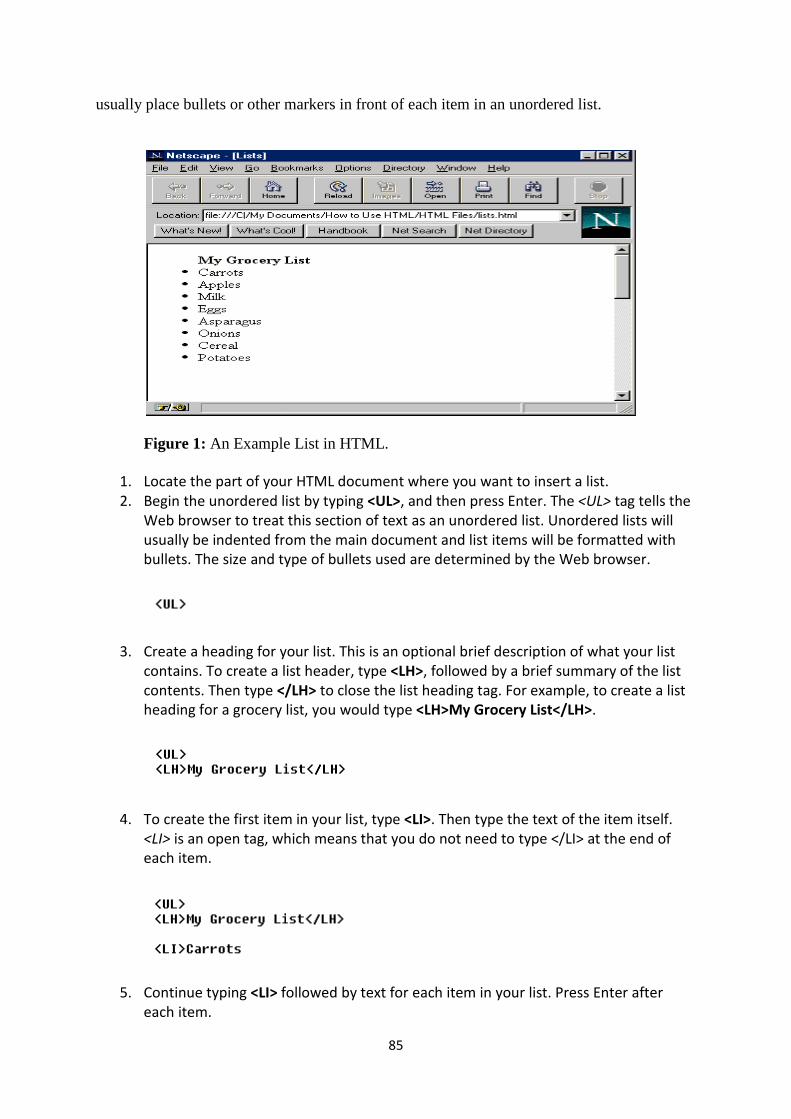
usually place bullets or other markers in front of each item in an unordered list.
Figure 1: An Example List in HTML.
1. Locate the part of your HTML document where you want to insert a list.
2. Begin the unordered list by typing
Web browser to treat this section of text as an unordered list. Unordered lists will
usually be indented from the main document and list items will be formatted with
bullets. The size and type of bullets used are determined by the Web browse
3. Create a heading for your list. This is an optional brief description of what your list
contains. To create a list header, type
contents. Then type </LH>
heading for a grocery list, you would type
4. To create the first item in your list, type
<LI> is an open tag, which means that you do not need to type </LI> at the end of
each item.
5. Continue typing <LI> followed by text for each item in your list. Press Enter after
each item.
85
r other markers in front of each item in an unordered list.
An Example List in HTML.
Locate the part of your HTML document where you want to insert a list.
Begin the unordered list by typing <UL>, and then press Enter. The
Web browser to treat this section of text as an unordered list. Unordered lists will
usually be indented from the main document and list items will be formatted with
bullets. The size and type of bullets used are determined by the Web browse
Create a heading for your list. This is an optional brief description of what your list
contains. To create a list header, type <LH>, followed by a brief summary of the list
</LH> to close the list heading tag. For example, to cre
heading for a grocery list, you would type <LH>My Grocery List</LH>
To create the first item in your list, type <LI>. Then type the text of the item itself.
is an open tag, which means that you do not need to type </LI> at the end of
followed by text for each item in your list. Press Enter after
r other markers in front of each item in an unordered list.
Locate the part of your HTML document where you want to insert a list.
, and then press Enter. The <UL> tag tells the
Web browser to treat this section of text as an unordered list. Unordered lists will
usually be indented from the main document and list items will be formatted with
bullets. The size and type of bullets used are determined by the Web browser.
Create a heading for your list. This is an optional brief description of what your list
, followed by a brief summary of the list
to close the list heading tag. For example, to create a list
<LH>My Grocery List</LH>.
. Then type the text of the item itself.
is an open tag, which means that you do not need to type </LI> at the end of
followed by text for each item in your list. Press Enter after
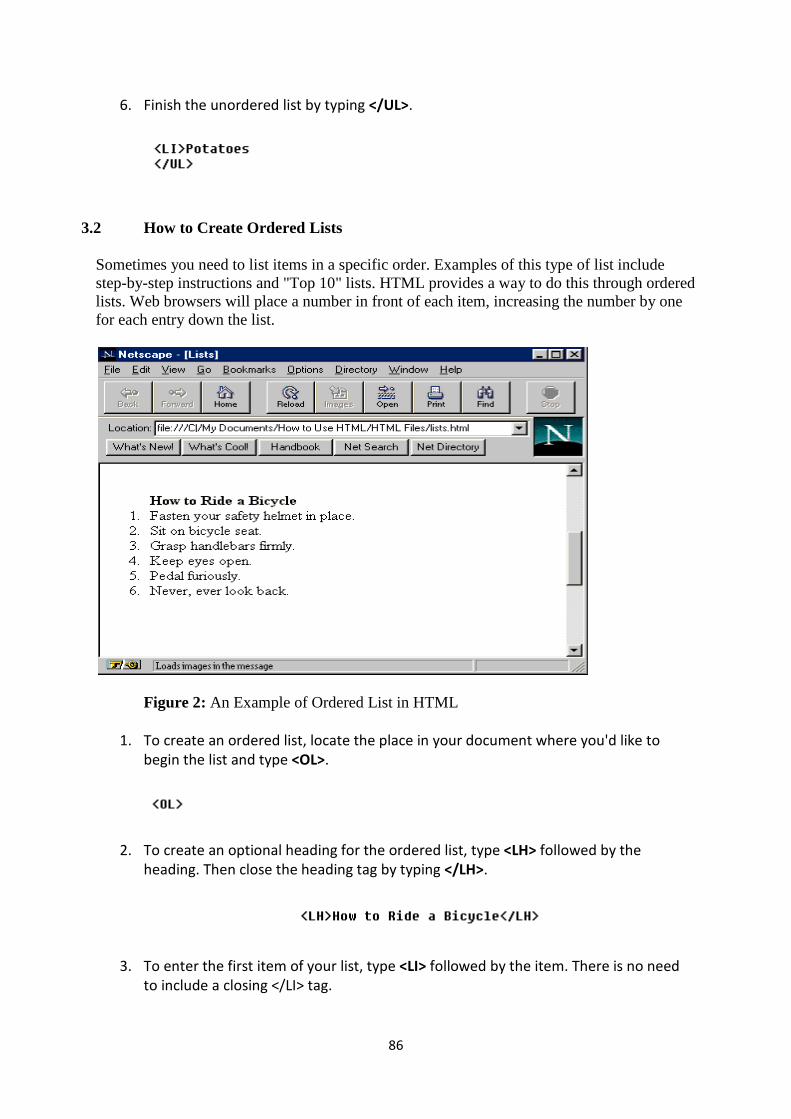
6. Finish the unordered list by typing
3.2 How to Create Ordered Lists
Sometimes you need to list items in a specific order. Examples of this type of list include step-by-step instructions and "Top 10" lists. HTML provides a way to do this through ordered lists. Web browsers will place a number in front of each item, increasifor each entry down the list.
Figure 2: An Example of Ordered List in HTML
1. To create an ordered list, locate the place in your document where you'd like t
begin the list and type
2. To create an optional heading for the ordered list, type
heading. Then close the heading tag by typing
3. To enter the first item of your list, type
to include a closing </LI> tag.
86
Finish the unordered list by typing </UL>.
How to Create Ordered Lists
Sometimes you need to list items in a specific order. Examples of this type of list include step instructions and "Top 10" lists. HTML provides a way to do this through ordered
lists. Web browsers will place a number in front of each item, increasing the number by one
An Example of Ordered List in HTML
To create an ordered list, locate the place in your document where you'd like t
begin the list and type <OL>.
To create an optional heading for the ordered list, type <LH> followed by the
heading. Then close the heading tag by typing </LH>.
To enter the first item of your list, type <LI> followed by the item. There is no need
to include a closing </LI> tag.
Sometimes you need to list items in a specific order. Examples of this type of list include step instructions and "Top 10" lists. HTML provides a way to do this through ordered
ng the number by one
To create an ordered list, locate the place in your document where you'd like to
followed by the
followed by the item. There is no need
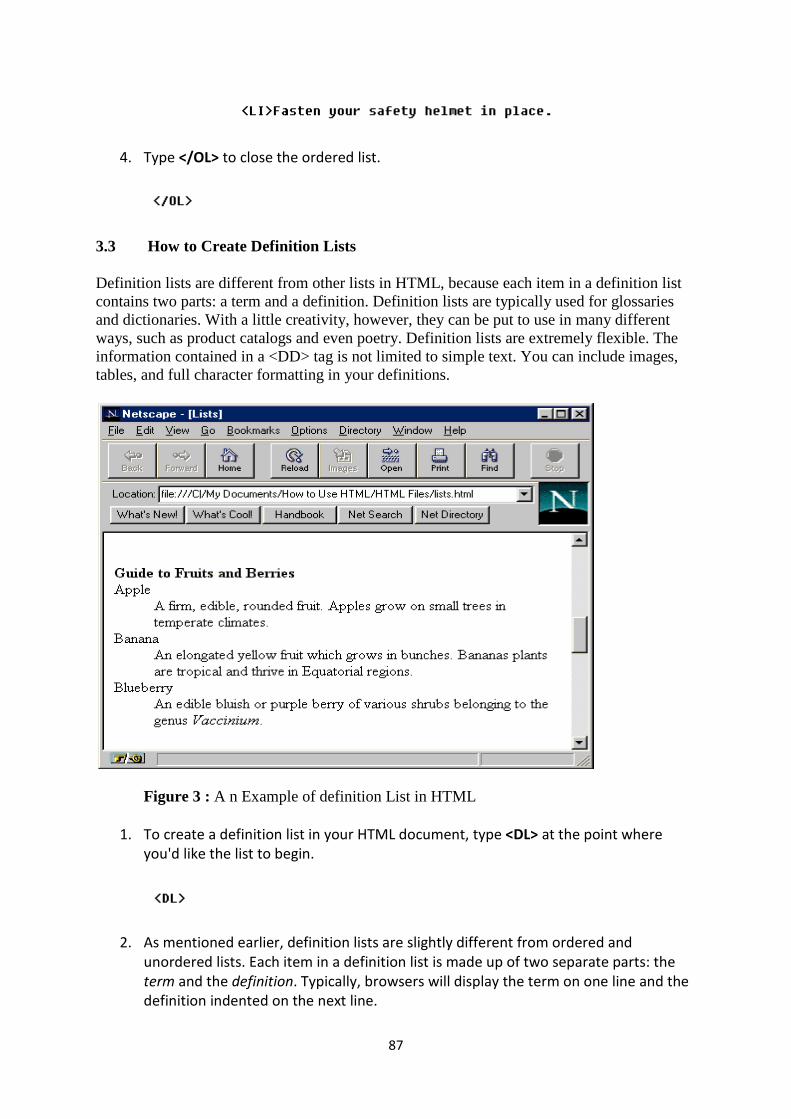
4. Type </OL> to close the ordered list.
3.3 How to Create Definition
Definition lists are different from other lists in HTML, because each item in a definition list contains two parts: a term and a definition. Definition lists are typically used for glossaries and dictionaries. With a little creativity, however, theways, such as product catalogs and even poetry. Definition lists are extremely flexible. The information contained in a <DD> tag is not limited to simple text. You can include images, tables, and full character formatt
Figure 3 : A n Example of definition List in HTML
1. To create a definition list in your HTML document, type
you'd like the list to begin.
2. As mentioned earlier, definition lists are slightly different from ordered and
unordered lists. Each item in a definition list is made up of two separate parts: the
term and the definition
definition indented on the next line.
87
to close the ordered list.
How to Create Definition Lists
Definition lists are different from other lists in HTML, because each item in a definition list contains two parts: a term and a definition. Definition lists are typically used for glossaries and dictionaries. With a little creativity, however, they can be put to use in many different ways, such as product catalogs and even poetry. Definition lists are extremely flexible. The information contained in a <DD> tag is not limited to simple text. You can include images, tables, and full character formatting in your definitions.
A n Example of definition List in HTML
To create a definition list in your HTML document, type <DL> at the point where
you'd like the list to begin.
As mentioned earlier, definition lists are slightly different from ordered and
unordered lists. Each item in a definition list is made up of two separate parts: the
definition. Typically, browsers will display the term on one line and the
definition indented on the next line.
Definition lists are different from other lists in HTML, because each item in a definition list contains two parts: a term and a definition. Definition lists are typically used for glossaries
y can be put to use in many different ways, such as product catalogs and even poetry. Definition lists are extremely flexible. The information contained in a <DD> tag is not limited to simple text. You can include images,
at the point where
As mentioned earlier, definition lists are slightly different from ordered and
unordered lists. Each item in a definition list is made up of two separate parts: the
owsers will display the term on one line and the
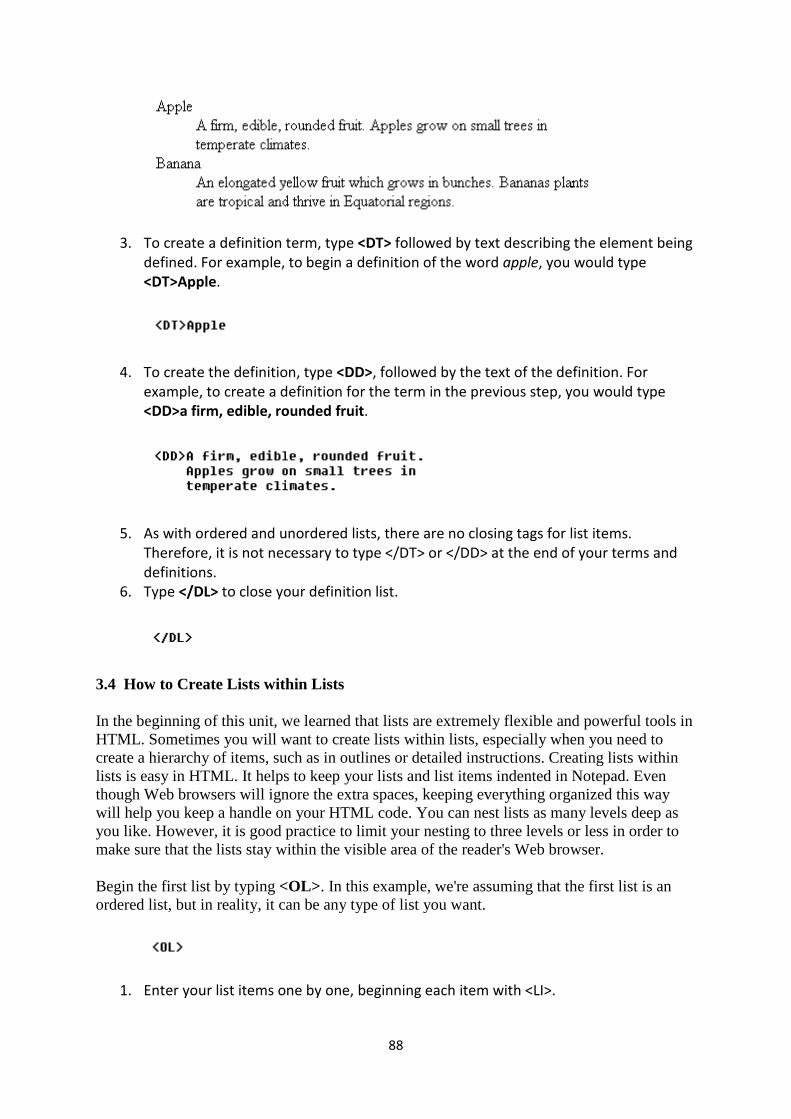
3. To create a definition term, type
defined. For example, to begin a definition of the word
<DT>Apple.
4. To create the definition, type
example, to create a definition for the term in the previous step, you would type
<DD>a firm, edible, rounded fruit
5. As with ordered and unordered lists, there are no closing tags for list items.
Therefore, it is not necessary to type </DT> or </DD> at the end of your terms and
definitions.
6. Type </DL> to close your definition list.
3.4 How to Create Lists within Lists
In the beginning of this unit, we learned that lists are extremely flexible and powerful tools in HTML. Sometimes you will want to create lists within lists, especially when you need to create a hierarchy of items, such as in outlines or detailed instructilists is easy in HTML. It helps to keep your lists and list items indented in Notepad. Even though Web browsers will ignore the extra spaces, keeping everything organized this way will help you keep a handle on your HTML code. Yoyou like. However, it is good practice to limit your nesting to three levels or less in order to make sure that the lists stay within the visible area of the reader's Web browser.
Begin the first list by typing <OL>ordered list, but in reality, it can be any type of list you want.
1. Enter your list items one by one, beginning each item with <LI>.
88
To create a definition term, type <DT> followed by text describing the element being
defined. For example, to begin a definition of the word apple, you would type
To create the definition, type <DD>, followed by the text of the definition. For
example, to create a definition for the term in the previous step, you would type
<DD>a firm, edible, rounded fruit.
As with ordered and unordered lists, there are no closing tags for list items.
Therefore, it is not necessary to type </DT> or </DD> at the end of your terms and
to close your definition list.
How to Create Lists within Lists
In the beginning of this unit, we learned that lists are extremely flexible and powerful tools in HTML. Sometimes you will want to create lists within lists, especially when you need to create a hierarchy of items, such as in outlines or detailed instructions. Creating lists within lists is easy in HTML. It helps to keep your lists and list items indented in Notepad. Even though Web browsers will ignore the extra spaces, keeping everything organized this way will help you keep a handle on your HTML code. You can nest lists as many levels deep as you like. However, it is good practice to limit your nesting to three levels or less in order to make sure that the lists stay within the visible area of the reader's Web browser.
<OL> . In this example, we're assuming that the first list is an ordered list, but in reality, it can be any type of list you want.
Enter your list items one by one, beginning each item with <LI>.
followed by text describing the element being
, you would type
, followed by the text of the definition. For
example, to create a definition for the term in the previous step, you would type
As with ordered and unordered lists, there are no closing tags for list items.
Therefore, it is not necessary to type </DT> or </DD> at the end of your terms and
In the beginning of this unit, we learned that lists are extremely flexible and powerful tools in HTML. Sometimes you will want to create lists within lists, especially when you need to
ons. Creating lists within lists is easy in HTML. It helps to keep your lists and list items indented in Notepad. Even though Web browsers will ignore the extra spaces, keeping everything organized this way
u can nest lists as many levels deep as you like. However, it is good practice to limit your nesting to three levels or less in order to make sure that the lists stay within the visible area of the reader's Web browser.
. In this example, we're assuming that the first list is an
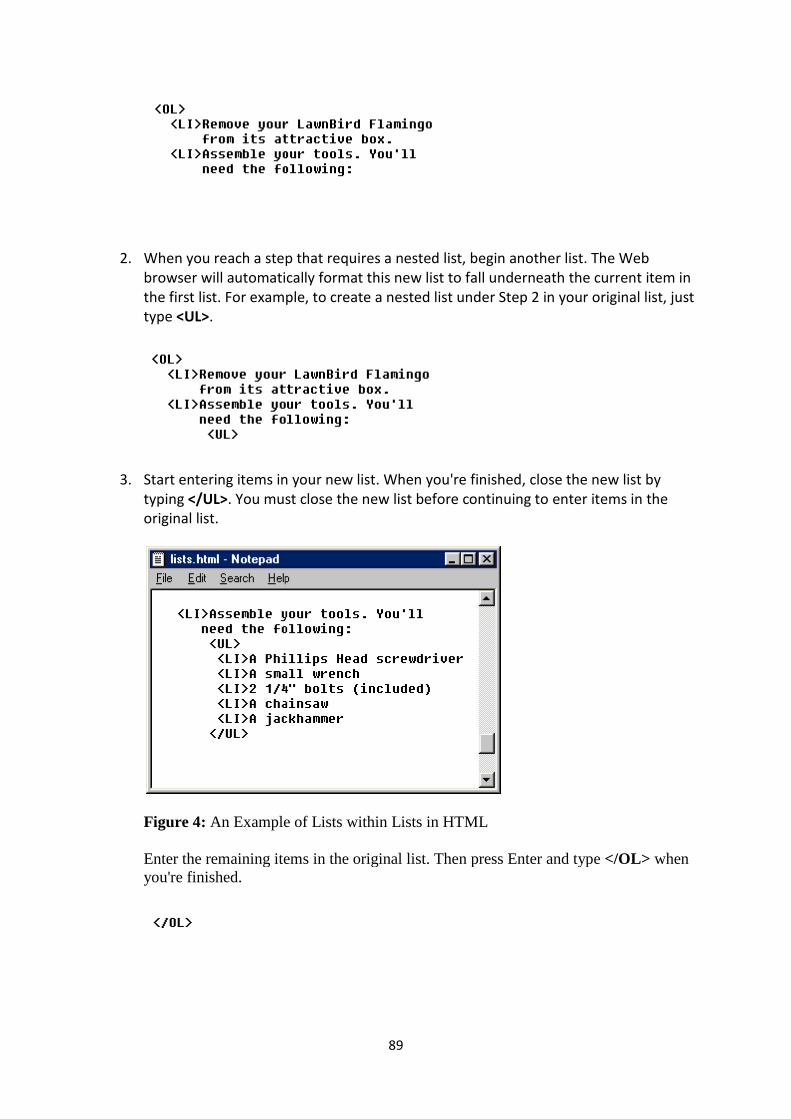
2. When you reach a step that requires a nested list, begin
browser will automatically format this new list to fall underneath the current item in
the first list. For example, to create a nested list under Step 2 in your original list, just
type <UL>.
3. Start entering items in your new list.
typing </UL>. You must close the new list before continuing to enter items in the
original list.
Figure 4: An Example of Lists
Enter the remaining items in the original list. Then press Enter and type you're finished.
89
When you reach a step that requires a nested list, begin another list. The Web
browser will automatically format this new list to fall underneath the current item in
the first list. For example, to create a nested list under Step 2 in your original list, just
Start entering items in your new list. When you're finished, close the new list by
. You must close the new list before continuing to enter items in the
An Example of Lists within Lists in HTML
Enter the remaining items in the original list. Then press Enter and type
another list. The Web
browser will automatically format this new list to fall underneath the current item in
the first list. For example, to create a nested list under Step 2 in your original list, just
When you're finished, close the new list by
. You must close the new list before continuing to enter items in the
Enter the remaining items in the original list. Then press Enter and type </OL> when

90
4.0 CONCLUSION: HTML has generally three types of lists namely Unordered lists, Ordered list and Definition list, these are sometimes called numbered lists. They are ideal vehicles for delivering all kinds of information online.
5.0 SUMMARY: In this unit, you have learnt the following:
• Definitions of Unordered lists, Ordered list and Definition list • Markup tags for Unordered lists, Ordered list and Definition list • How to create Unordered lists, Ordered list and Definition list • How to create Lists within Lists
6.0 TUTOR MARKED ASSIGNMENT • Define Definition list in HTML • State the steps in creating an Ordered list • State the steps in creating Lists within Lists
7.0 FURTHER READING AND OTHER RESOURCES
• Byers, T. J. (April 1987). "Built by association". PC World 5: 244–251.
• Cicconi, Sergio (1999). "Hypertextuality". Mediapolis. Ed. Sam Inkinen. Berlino &
New York: De Gruyter.: 21–43.
http://www.cisenet.com/cisenet/writing/essays/hypertextuality.htm.
• Conklin, J. (1987). "Hypertext: An Introduction and Survey". Computer 20 (9):
17–41. doi:10.1109/MC.1987.1663693.
• Heim, Michael (1987). Electric Language: A Philosophical Study of Word
Processing. New Haven: Yale University Press. ISBN 0-300-07746-7.
• Nelson, Theodor H. (September 1970). "No More Teachers’ Dirty Looks".
Computer Decisions. http://www.newmediareader.com/excerpts.html.
• Nelson, Theodor H. (1973). "A Conceptual framework for man-machine
everything". AFIPS Conference Proceedings VOL. 42. pp. M22–M23.
• Nelson, Theodor H. (1992). Literary Machines 93.1. Sausalito CA: Mindful Press.
ISBN 0-89347-062-7.
• van Dam, Andries (July 1988). "Hypertext: '87 keynote address".
Communications of the ACM 31: 887–895. doi:10.1145/48511.48519.
http://www.cs.brown.edu/memex/HT_87_Keynote_Address.html.
• Yankelovich, Nicole; Landow, George P., and Cody, David (1987). "Creating
hypermedia materials for English literature students". SIGCUE Outlook 20 (3)
UNIT TWO – GETTING FEEDBACK WITH FORMS
1.0 Introduction
2.0 Objectives
3.0 Main Content
3.1 HTML form
91
3.2 How to Create a Simple Form
3.3 How to Use Input Fields in Forms
4. 0 Conclusion
5.0 Summary
6. 0 Tutor Marked Assignment
7.0 Further Reading and Other Resources
1.0 INTRODUCTION Until now, HTML has been a one-way street. That is, we've only covered the tools to create and publish information for end users to read. But what about feedback and interaction? The World Wide Web isn't just about publishing. It's designed for communication, which is a street that travels in more than one direction. The biggest tool for allowing your readers to communicate with you via the Web is the HTML form. Forms are special collections of markup tags that work with Web servers to produce a means of obtaining whatever information you need from visitors to your Web site. In this unit, we will discover how to create a basic form in HTML, as well as how to use all the available types of input fields at your disposal. Finally, we will discuss some basic principles behind CGI, the Common Gateway Interface, which is the system behind the scenes that make forms work.
2.0 OBJECTIVES In this unit, you should be able to:
• Explain HTML form • List types of input field in HTML form • Create a simple HTML form
3.0 MAIN CONTENT
3.1 HTML form
A webform on a web page allows a user to enter data that is sent to a server for processing. Webforms resemble paper or database forms because internet users fill out the forms using checkboxes, radio buttons, or text fields. For example, webforms can be used to enter shipping or credit card data to order a product or can be used to retrieve data (e.g., searching on a search engine).
In addition to functioning as input templates for new information, webforms can also be used to query and display existing data in a similar manner to mail merge forms, with the same advantages. The decoupling of message structure and underlying data allow both to vary independently. The use of webforms for this purpose avoids the problems associated with explicitly creating separate web pages for each record in a database.

92
Webforms are defined in formal programming languages such as Perl, PHP, Java, Javascript or .NET (including ASP.NET). The implementations of these languages often automatically invoke user interface idioms, such as grids and themes, minimizing programming time, costs and risks.
A form in HTML is by far the most common way to use a form online.
The following elements can make up the user-inputting portion of a form:
• input field o text – a simple text box that allows input of a single line of text (an alternative,
password, is used for security purposes, in which the characters typed in are invisible or replaced by symbols such as *)
o checkbox – a check box o radio – a radio button o file – a file select control for uploading a file o reset – a reset button that, when activated, tells the browser to restore the
values to their initial values. o submit – a button that tells the browser to take action on the form (typically to
send it to a server) • textarea – much like the text input field except a textarea allows for multiple rows of
data to be shown and entered • select – a drop-down list that displays a list of items a user can select from
These basic elements provide most possible graphical user interface (GUI) elements, but not all. For example, there are no equivalents to a combo box, balloon help, tree view, or grid view. A grid view, however, can be mimicked by using a standard HTML table with each cell containing a text input element. A tree view could also be mimicked through nested tables or, more semantically appropriately, nested lists. Many of these are available through JavaScript libraries
3.2 How to Create a Simple Form
Fill-out forms in HTML are easy, quick, and painless. In fact, you can create a simple fill-out form in just a few simple steps. Long forms usually work best when placed in their own HTML documents. If your form requires a lot of input, create a new HTML document just for the form and then create a hyperlink to it from your main page. This will eliminate clutter and confusion. You're not limited to just input fields in your form. You can use all the normal HTML paragraph and character formatting codes. It is often a good idea to place brief paragraphs in front of groups of input fields to help explain what needs to be entered in the form.
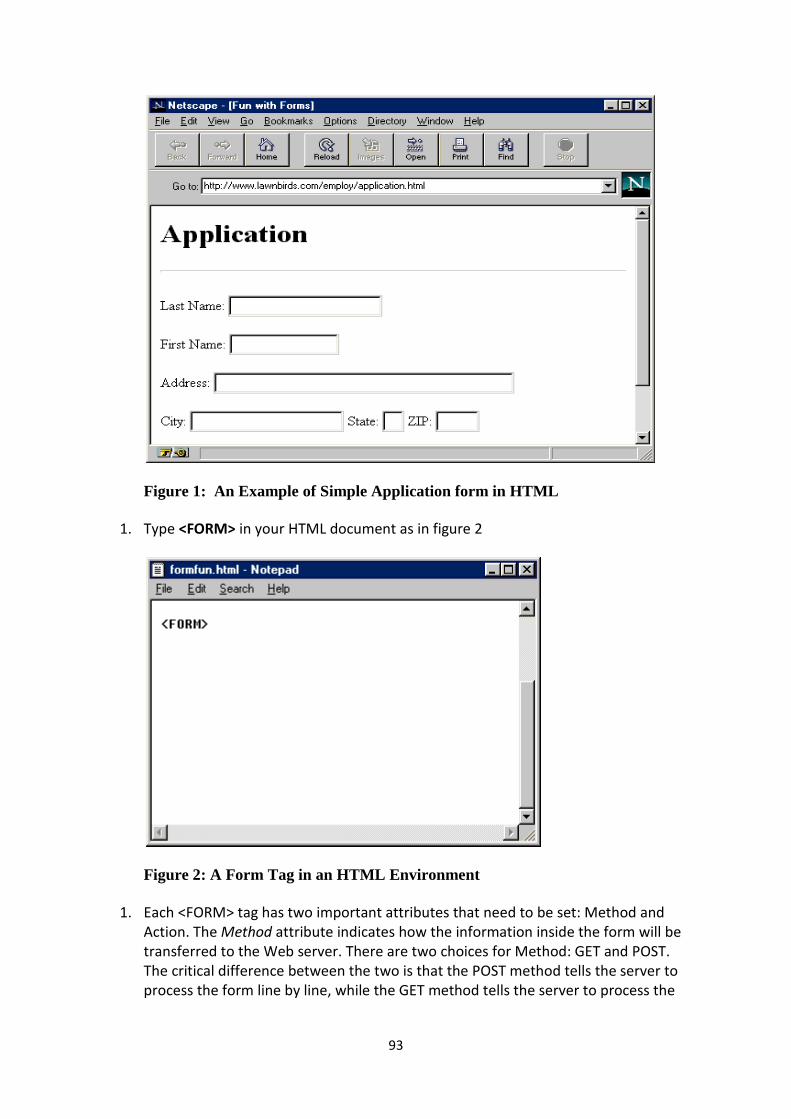
93
Figure 1: An Example of Simple Application form in HTML
1. Type <FORM> in your HTML document as in figure 2
Figure 2: A Form Tag in an HTML Environment
1. Each <FORM> tag has two important attributes that need to be set: Method and
Action. The Method attribute indicates how the information inside the form will be
transferred to the Web server. There are two choices for Method: GET and POST.
The critical difference between the two is that the POST method tells the server to
process the form line by line, while the GET method tells the server to process the
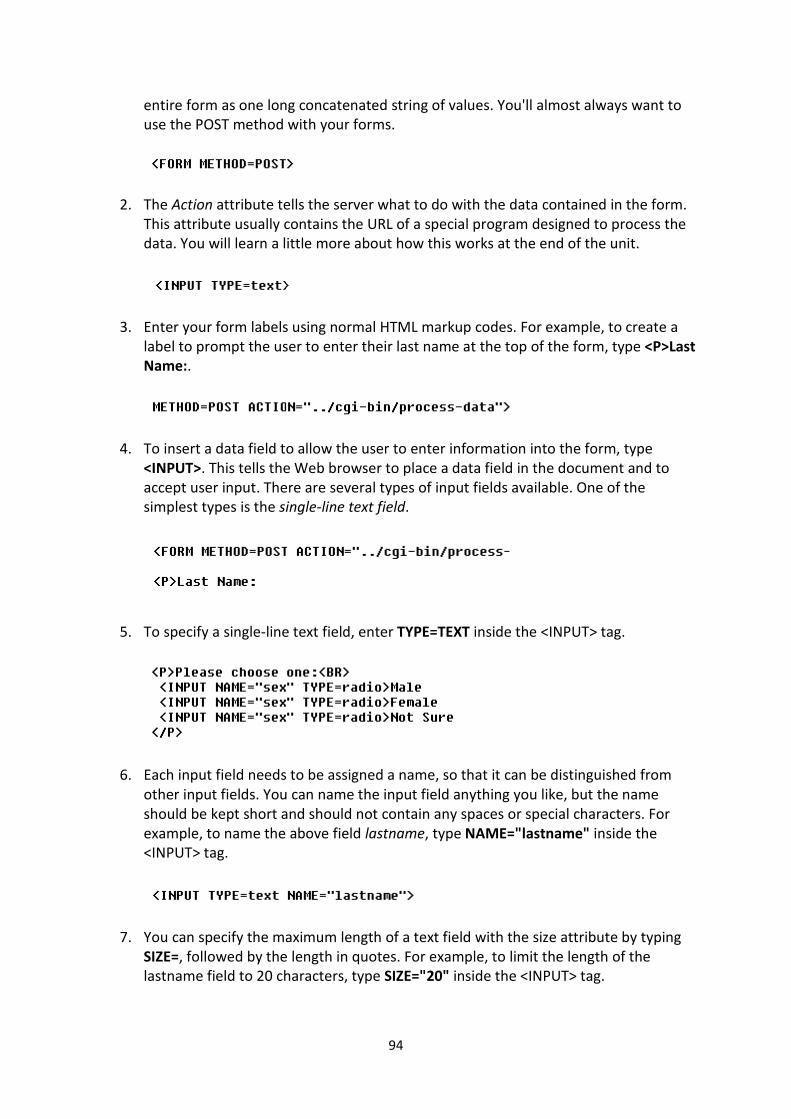
entire form as one long concatenated string of values. You'll almost always want to
use the POST method with your fo
2. The Action attribute tells the server what to do with the data contained in the form.
This attribute usually contains the URL of a special program designed to process the
data. You will learn a little more about how this works at the end of the uni
3. Enter your form labels using normal HTML markup codes. For example, to create a
label to prompt the user to enter their last name at the top of the form, type
Name:.
4. To insert a data field to allow the user to enter information into the fo
<INPUT>. This tells the Web browser to place a data field in the document and to
accept user input. There are several types of input fields available. One of the
simplest types is the single
5. To specify a single-line text field,
6. Each input field needs to be assigned a name, so that it can be distinguished from
other input fields. You can name the input field anything you like, but the name
should be kept short and should not contain any
example, to name the above field
<INPUT> tag.
7. You can specify the maximum length of a text field with the size attribute by typing
SIZE=, followed by the length in quotes. For e
lastname field to 20 characters, type
94
entire form as one long concatenated string of values. You'll almost always want to
use the POST method with your forms.
attribute tells the server what to do with the data contained in the form.
This attribute usually contains the URL of a special program designed to process the
data. You will learn a little more about how this works at the end of the uni
Enter your form labels using normal HTML markup codes. For example, to create a
label to prompt the user to enter their last name at the top of the form, type
To insert a data field to allow the user to enter information into the fo
. This tells the Web browser to place a data field in the document and to
accept user input. There are several types of input fields available. One of the
single-line text field.
line text field, enter TYPE=TEXT inside the <INPUT> tag.
Each input field needs to be assigned a name, so that it can be distinguished from
other input fields. You can name the input field anything you like, but the name
should be kept short and should not contain any spaces or special characters. For
example, to name the above field lastname, type NAME="lastname"
You can specify the maximum length of a text field with the size attribute by typing
, followed by the length in quotes. For example, to limit the length of the
lastname field to 20 characters, type SIZE="20" inside the <INPUT> tag.
entire form as one long concatenated string of values. You'll almost always want to
attribute tells the server what to do with the data contained in the form.
This attribute usually contains the URL of a special program designed to process the
data. You will learn a little more about how this works at the end of the unit.
Enter your form labels using normal HTML markup codes. For example, to create a
label to prompt the user to enter their last name at the top of the form, type <P>Last
To insert a data field to allow the user to enter information into the form, type
. This tells the Web browser to place a data field in the document and to
accept user input. There are several types of input fields available. One of the
inside the <INPUT> tag.
Each input field needs to be assigned a name, so that it can be distinguished from
other input fields. You can name the input field anything you like, but the name
spaces or special characters. For
NAME="lastname" inside the
You can specify the maximum length of a text field with the size attribute by typing
xample, to limit the length of the
inside the <INPUT> tag.
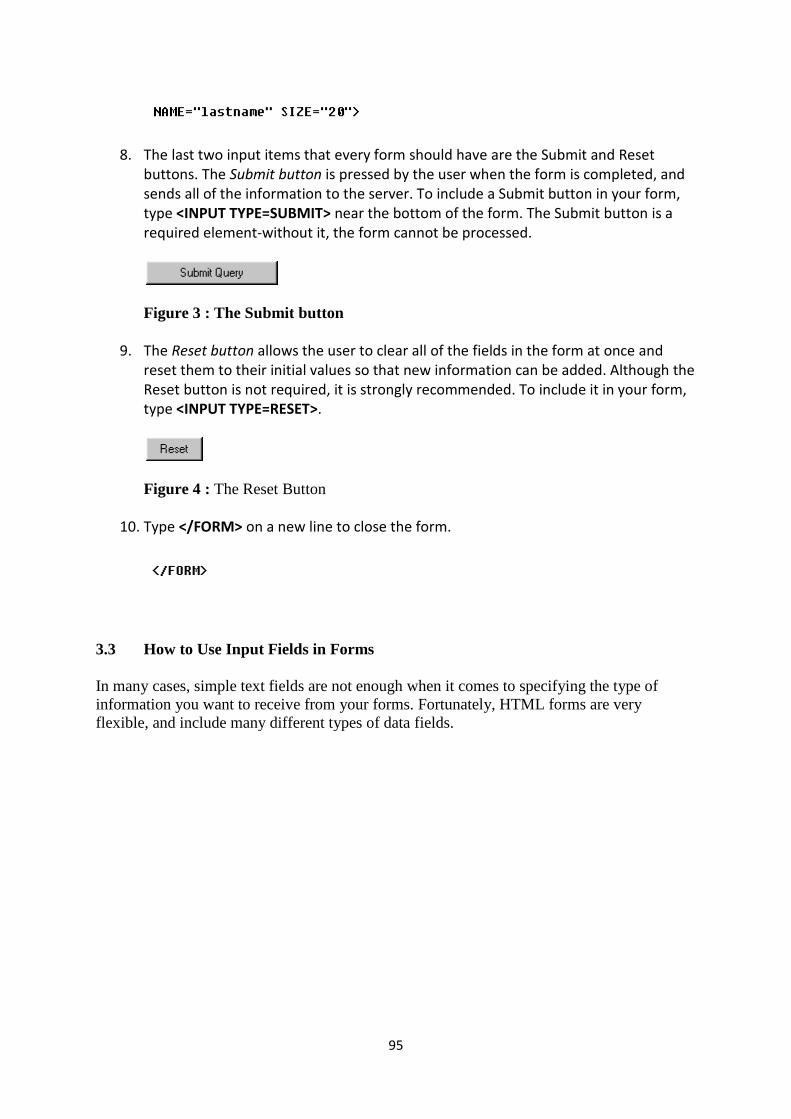
8. The last two input items that every form should have are the Submit and Reset
buttons. The Submit button
sends all of the information to the server. To include a Submit button in your form,
type <INPUT TYPE=SUBMIT>
required element-without it, the form cannot be processed.
Figure 3 : The Submit
9. The Reset button allows the user to clear all of the fields in the form at once and
reset them to their initial values so that new information can be
Reset button is not required, it is strongly recommended. To include it in your form,
type <INPUT TYPE=RESET>
Figure 4 : The Reset Button
10. Type </FORM> on a new line to close the form.
3.3 How to Use Input Fields in Forms
In many cases, simple text fields are not enough when it comes to specifying the type of information you want to receive from your forms. Fortunately, HTML forms are very flexible, and include many different types of data fields.
95
The last two input items that every form should have are the Submit and Reset
button is pressed by the user when the form is c
sends all of the information to the server. To include a Submit button in your form,
<INPUT TYPE=SUBMIT> near the bottom of the form. The Submit button is a
without it, the form cannot be processed.
Submit button
allows the user to clear all of the fields in the form at once and
reset them to their initial values so that new information can be added. Although the
Reset button is not required, it is strongly recommended. To include it in your form,
<INPUT TYPE=RESET>.
The Reset Button
on a new line to close the form.
How to Use Input Fields in Forms
In many cases, simple text fields are not enough when it comes to specifying the type of information you want to receive from your forms. Fortunately, HTML forms are very flexible, and include many different types of data fields.
The last two input items that every form should have are the Submit and Reset
is pressed by the user when the form is completed, and
sends all of the information to the server. To include a Submit button in your form,
near the bottom of the form. The Submit button is a
allows the user to clear all of the fields in the form at once and
added. Although the
Reset button is not required, it is strongly recommended. To include it in your form,
In many cases, simple text fields are not enough when it comes to specifying the type of information you want to receive from your forms. Fortunately, HTML forms are very
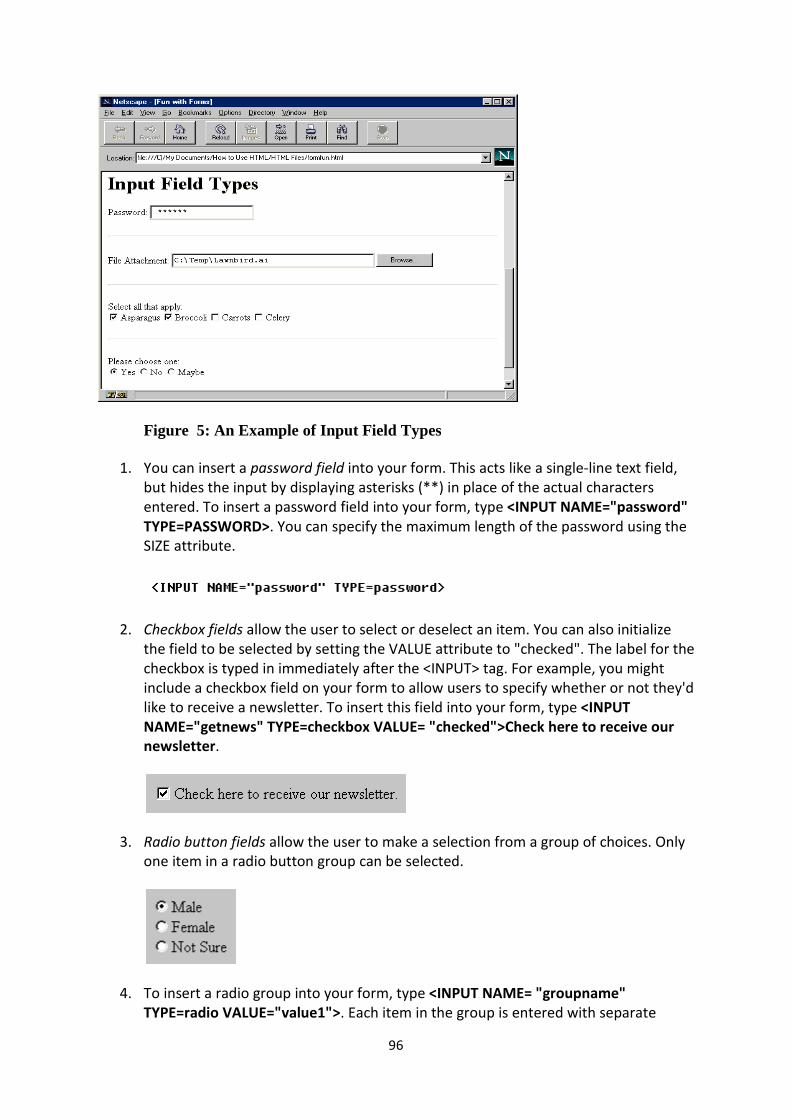
Figure 5: An Example of Input Field Types
1. You can insert a password
but hides the input by displaying asterisks (*
entered. To insert a password field into your form, type
TYPE=PASSWORD>. You can specify the maximum length of the password using the
SIZE attribute.
2. Checkbox fields allow the user to select or
the field to be selected by setting the VALUE attribute to "checked". The label for the
checkbox is typed in immediately after the <INPUT> tag. For example, you might
include a checkbox field on your form to allow
like to receive a newsletter. To insert this field into your form, type
NAME="getnews" TYPE=checkbox VALUE= "checked">Check here to receive our
newsletter.
3. Radio button fields allow the user to make a selection from a group of choices. Only
one item in a radio button group can be selected.
4. To insert a radio group into your form, type
TYPE=radio VALUE="value1">
96
An Example of Input Field Types
password field into your form. This acts like a single
but hides the input by displaying asterisks (**) in place of the actual characters
entered. To insert a password field into your form, type <INPUT NAME="password"
. You can specify the maximum length of the password using the
allow the user to select or deselect an item. You can also initialize
the field to be selected by setting the VALUE attribute to "checked". The label for the
checkbox is typed in immediately after the <INPUT> tag. For example, you might
include a checkbox field on your form to allow users to specify whether or not they'd
like to receive a newsletter. To insert this field into your form, type
NAME="getnews" TYPE=checkbox VALUE= "checked">Check here to receive our
allow the user to make a selection from a group of choices. Only
one item in a radio button group can be selected.
To insert a radio group into your form, type <INPUT NAME= "groupname"
TYPE=radio VALUE="value1">. Each item in the group is entered with
into your form. This acts like a single-line text field,
*) in place of the actual characters
<INPUT NAME="password"
. You can specify the maximum length of the password using the
deselect an item. You can also initialize
the field to be selected by setting the VALUE attribute to "checked". The label for the
checkbox is typed in immediately after the <INPUT> tag. For example, you might
users to specify whether or not they'd
like to receive a newsletter. To insert this field into your form, type <INPUT
NAME="getnews" TYPE=checkbox VALUE= "checked">Check here to receive our
allow the user to make a selection from a group of choices. Only
<INPUT NAME= "groupname"
. Each item in the group is entered with separate
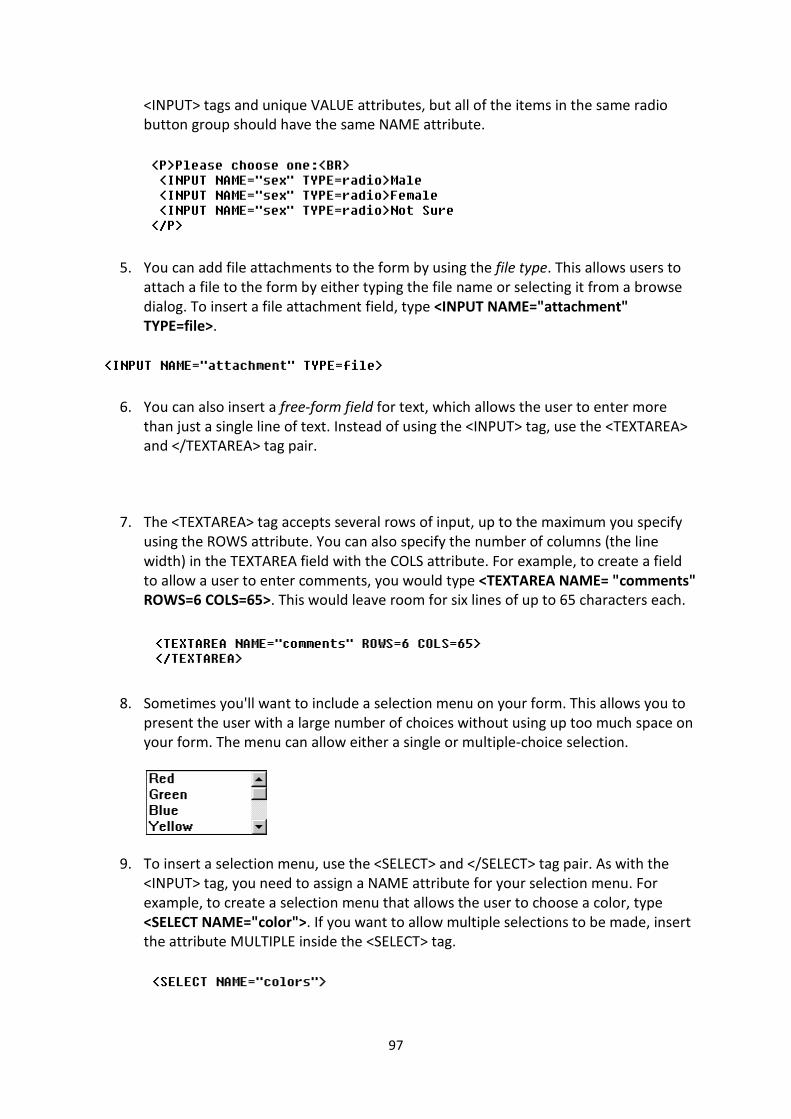
<INPUT> tags and unique VALUE attributes, but all of the items in the same radio
button group should have the same NAME attribute.
5. You can add file attachments to the form by using the
attach a file to the form b
dialog. To insert a file attachment field, type
TYPE=file>.
6. You can also insert a free
than just a single line of text. Instead of using the <INPUT> tag, use the <TEXTAREA>
and </TEXTAREA> tag pair.
7. The <TEXTAREA> tag accepts several rows of input, up to the maximum you specify
using the ROWS attribute. You can also specify the number of columns (the line
width) in the TEXTAREA field with the COLS attribute. For example, to create a field
to allow a user to enter comments, you would type
ROWS=6 COLS=65>. This would leave room for six lines of up to 65 characters each.
8. Sometimes you'll want to include a selection menu on your form. This allows you to
present the user with a large number of choices without using up too much space on
your form. The menu can allow either a single or multiple
9. To insert a selection menu, use the <SELECT> and </SELECT> tag pair. As with the
<INPUT> tag, you need to assign a NAME attribute for your selection menu. For
example, to create a selection menu that allows the user to choose a color, type
<SELECT NAME="color">
the attribute MULTIPLE inside the <SELECT> tag.
97
<INPUT> tags and unique VALUE attributes, but all of the items in the same radio
button group should have the same NAME attribute.
You can add file attachments to the form by using the file type. This allows users to
attach a file to the form by either typing the file name or selecting it from a browse
dialog. To insert a file attachment field, type <INPUT NAME="attachment"
free-form field for text, which allows the user to enter more
of text. Instead of using the <INPUT> tag, use the <TEXTAREA>
and </TEXTAREA> tag pair.
The <TEXTAREA> tag accepts several rows of input, up to the maximum you specify
using the ROWS attribute. You can also specify the number of columns (the line
in the TEXTAREA field with the COLS attribute. For example, to create a field
to allow a user to enter comments, you would type <TEXTAREA NAME= "comments"
. This would leave room for six lines of up to 65 characters each.
want to include a selection menu on your form. This allows you to
present the user with a large number of choices without using up too much space on
your form. The menu can allow either a single or multiple-choice selection.
To insert a selection menu, use the <SELECT> and </SELECT> tag pair. As with the
<INPUT> tag, you need to assign a NAME attribute for your selection menu. For
example, to create a selection menu that allows the user to choose a color, type
lor">. If you want to allow multiple selections to be made, insert
the attribute MULTIPLE inside the <SELECT> tag.
<INPUT> tags and unique VALUE attributes, but all of the items in the same radio
. This allows users to
y either typing the file name or selecting it from a browse
<INPUT NAME="attachment"
for text, which allows the user to enter more
of text. Instead of using the <INPUT> tag, use the <TEXTAREA>
The <TEXTAREA> tag accepts several rows of input, up to the maximum you specify
using the ROWS attribute. You can also specify the number of columns (the line
in the TEXTAREA field with the COLS attribute. For example, to create a field
<TEXTAREA NAME= "comments"
. This would leave room for six lines of up to 65 characters each.
want to include a selection menu on your form. This allows you to
present the user with a large number of choices without using up too much space on
choice selection.
To insert a selection menu, use the <SELECT> and </SELECT> tag pair. As with the
<INPUT> tag, you need to assign a NAME attribute for your selection menu. For
example, to create a selection menu that allows the user to choose a color, type
. If you want to allow multiple selections to be made, insert
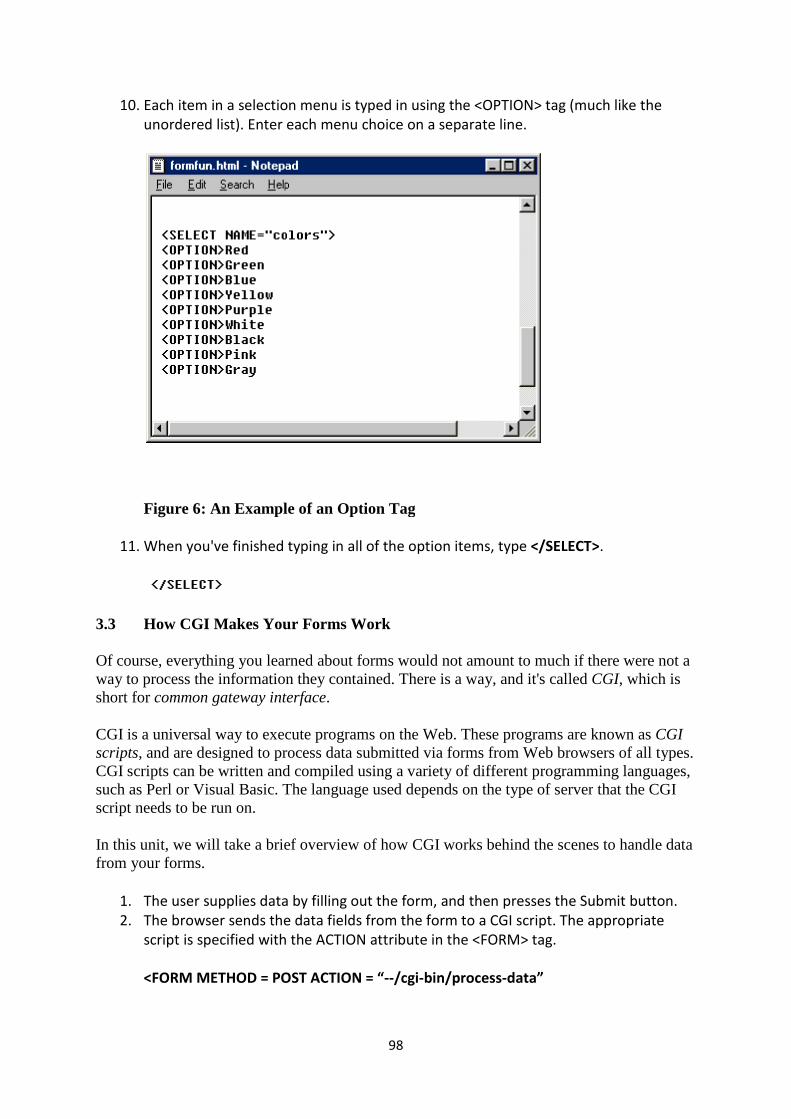
10. Each item in a selection menu is typed in using the <OPTION> tag (much like the
unordered list). Enter each menu choice on a separate line
Figure 6: An Example of an Option Tag
11. When you've finished typing in all of the option items, type
3.3 How CGI Makes Your Forms Work
Of course, everything you learned about forms would not amount to much if there were not a way to process the information they contained. There is a way, and it's called short for common gateway interface
CGI is a universal way to execute programs on the Web. These programs are known as scripts, and are designed to process data submitted via forms from Web browsers of all types. CGI scripts can be written and compiled using a variety of different programming languages, such as Perl or Visual Basic. The language used depends on the type of serverscript needs to be run on.
In this unit, we will take a brief overview of how CGI works behind the scenes to handle data from your forms.
1. The user supplies data by filling out the form, and then presses the Submit button.
2. The browser sends the data fields from the form to a CGI script. The appropriate
script is specified with the ACTION attribute in the <FORM> tag.
<FORM METHOD = POST ACTION = “
98
Each item in a selection menu is typed in using the <OPTION> tag (much like the
unordered list). Enter each menu choice on a separate line.
An Example of an Option Tag
When you've finished typing in all of the option items, type </SELECT>
How CGI Makes Your Forms Work
Of course, everything you learned about forms would not amount to much if there were not a on they contained. There is a way, and it's called
interface.
CGI is a universal way to execute programs on the Web. These programs are known as , and are designed to process data submitted via forms from Web browsers of all types.
CGI scripts can be written and compiled using a variety of different programming languages, such as Perl or Visual Basic. The language used depends on the type of server
In this unit, we will take a brief overview of how CGI works behind the scenes to handle data
The user supplies data by filling out the form, and then presses the Submit button.
the data fields from the form to a CGI script. The appropriate
script is specified with the ACTION attribute in the <FORM> tag.
<FORM METHOD = POST ACTION = “--/cgi-bin/process-data”
Each item in a selection menu is typed in using the <OPTION> tag (much like the
</SELECT>.
Of course, everything you learned about forms would not amount to much if there were not a on they contained. There is a way, and it's called CGI, which is
CGI is a universal way to execute programs on the Web. These programs are known as CGI , and are designed to process data submitted via forms from Web browsers of all types.
CGI scripts can be written and compiled using a variety of different programming languages, such as Perl or Visual Basic. The language used depends on the type of server that the CGI
In this unit, we will take a brief overview of how CGI works behind the scenes to handle data
The user supplies data by filling out the form, and then presses the Submit button.
the data fields from the form to a CGI script. The appropriate
99
3. The CGI script processes the data supplied by the browser.
4. At this CGI point, the CGI script may update a database on the server, instructs the
server to perform additional functions, or even execute additional CGI scripts.
5. The script finishes and returns information to the server, usually in the form of a new
HTML document that is created by the script.
6. The server sends the new information along to the Web browser, which displays it.
4.0 CONCLUSION:
Forms are a vital tool for the webmaster to receive information from the web surfer, such as: their name, email address, credit card, etc .Every web form must have Submit and Reset buttons in addition to other input fields.
5.0 SUMMARY In this unit, you have learnt the following:
• Definition of Web form • Types of Input fields in Web form • How to create a simple web form
6.0 TUTOR MARKED ASSIGNMENT
• Describe a web form • List the last input field of a web form • Create a simple web form
7.0 FURTHER READING AND OTHER RESOURCES
• Crane, Gregory (1988). "Extending the boundaries of instruction and research".
T.H.E. Journal (Technological Horizons in Education) (Macintosh Special Issue):
51–54.
• Engelbart, Douglas C. (1962). Augmenting Human Intellect: A Conceptual
Framework, AFOSR-3233 Summary Report, SRI Project No. 3579.
http://www.dougengelbart.org/pubs/augment-3906.html.
• Ensslin, Astrid (2007). Canonizing Hypertext: Explorations and Constructions.
London: Continuum. ISBN 0-8264-95583.
• Heim, Michael (1987). Electric Language: A Philosophical Study of Word
Processing. New Haven: Yale University Press. ISBN 0-300-07746-7

100
UNIT THREE – USING TABLES
1.0 Introduction
2.0 Objective
3.0 Main Content
3.1. How to create a simple Table
3. 2 How to Format Table
4.0 Conclusion
5.0 Summary
6.0 Tutor Marked Assignment
7.0 Further Reading and Other Resources
1.0.INTRODUCTION:
One of the most significant additions to HTML is support for tables. Tables give HTML authors much greater control over the display and layout of their pages. Typically, you would use tables to display any type of data that looks best in rows and columns. A good rule of thumb is if it looks good as a spreadsheet, then it belongs in a table.
Tables are not just for numerical data. They can be used to creatively solve a number of challenges with presenting information in HTML. Tables can be used to enhance a number of existing HTML elements, such as lists and forms. You can even use tables to gain precision control over the layout of your HTML document.
Of course, there's always a catch. Tables are notoriously difficult and tedious to create in HTML. And because the specification for HTML is still not final, some of the formatting details for tables are subject to change.
2.0 OBJECTIVES
In this unit, you should be able to:
• Create a simple Table • Create a Table with Border • Format Tables
3.0 MAIN CONTENT
3.1. How to Create a Simple Table
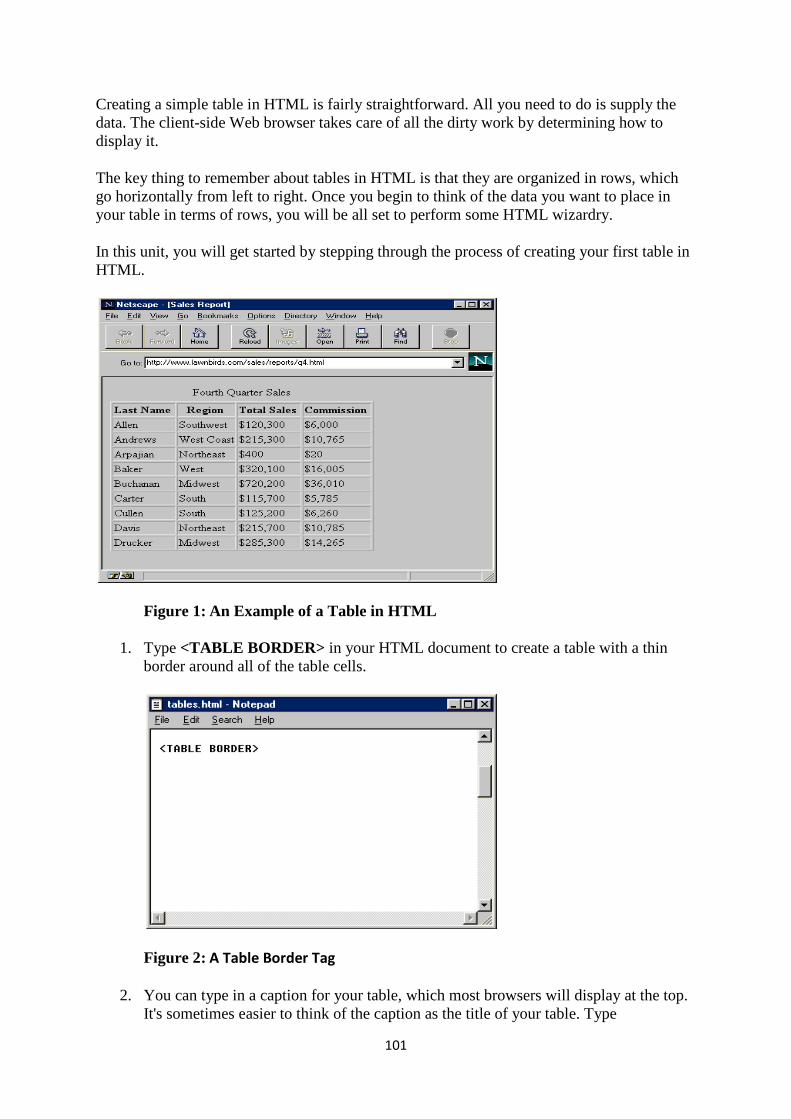
101
Creating a simple table in HTML is fairly straightforward. All you need to do is supply the data. The client-side Web browser takes care of all the dirty work by determining how to display it.
The key thing to remember about tables in HTML is that they are organized in rows, which go horizontally from left to right. Once you begin to think of the data you want to place in your table in terms of rows, you will be all set to perform some HTML wizardry.
In this unit, you will get started by stepping through the process of creating your first table in HTML.
Figure 1: An Example of a Table in HTML
1. Type <TABLE BORDER> in your HTML document to create a table with a thin border around all of the table cells.
Figure 2: A Table Border Tag
2. You can type in a caption for your table, which most browsers will display at the top. It's sometimes easier to think of the caption as the title of your table. Type
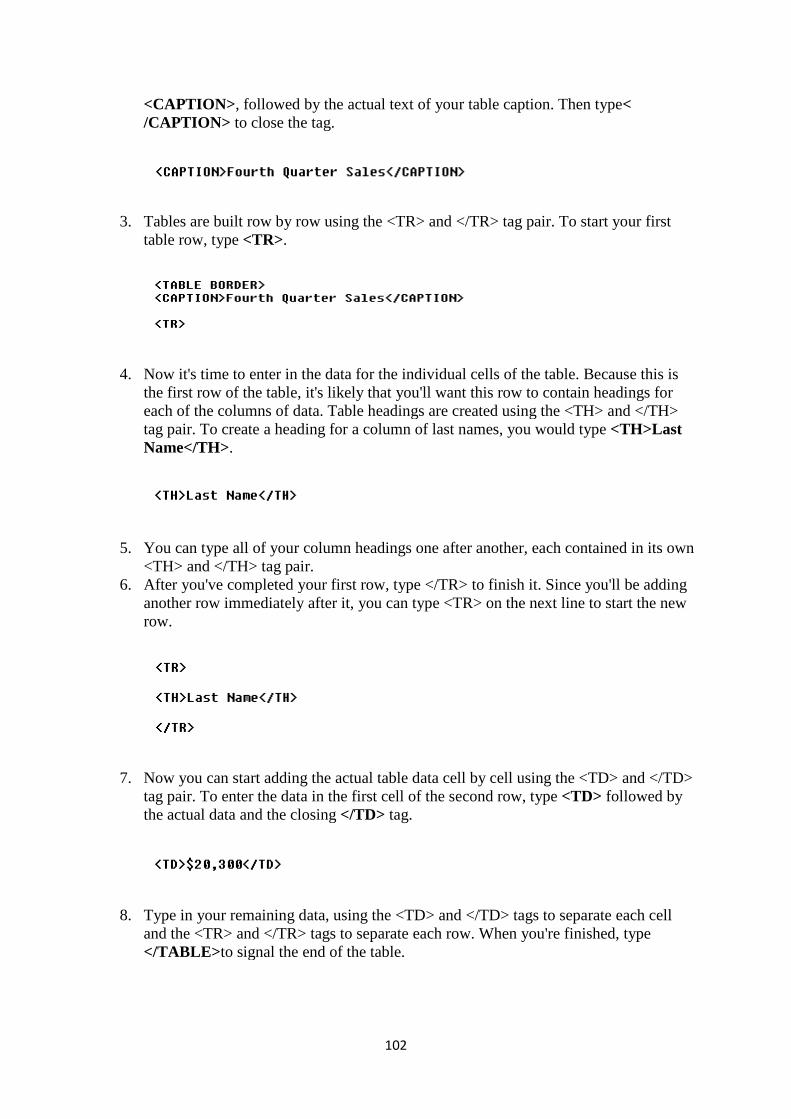
<CAPTION> , followed by the actual text of your table caption. Then type/CAPTION> to close the tag.
3. Tables are built row by row using the <TR>table row, type <TR>.
4. Now it's time to enter in the data for the individual cells of the table. Because this is the first row of the table, it's likely that you'll want this row to contain headings for each of the columns of data. Table headings are created using the <TH> and </TH> tag pair. To create a heading for a column of last names, you would type Name</TH>.
5. You can type all of your column headings one after another, each contained in its own <TH> and </TH> tag pair.
6. After you've completed your first row, type </TR> to finish it. Since you'll be adding another row immediately after it, you can type <TR> on the next line to start the new row.
7. Now you can start adding the actual table data cell by ctag pair. To enter the data in the first cell of the second row, typethe actual data and the closing
8. Type in your remaining data, using the <TD> and </TD> tags to separate each cell and the <TR> and </TR> tags to separate each row. When you're finished, type </TABLE> to signal the end of the table.
102
, followed by the actual text of your table caption. Then typeto close the tag.
Tables are built row by row using the <TR> and </TR> tag pair. To start your first .
Now it's time to enter in the data for the individual cells of the table. Because this is the first row of the table, it's likely that you'll want this row to contain headings for
columns of data. Table headings are created using the <TH> and </TH> tag pair. To create a heading for a column of last names, you would type
You can type all of your column headings one after another, each contained in its own and </TH> tag pair.
After you've completed your first row, type </TR> to finish it. Since you'll be adding another row immediately after it, you can type <TR> on the next line to start the new
Now you can start adding the actual table data cell by cell using the <TD> and </TD> tag pair. To enter the data in the first cell of the second row, type <TD>the actual data and the closing </TD> tag.
Type in your remaining data, using the <TD> and </TD> tags to separate each cell nd </TR> tags to separate each row. When you're finished, type
to signal the end of the table.
, followed by the actual text of your table caption. Then type<
and </TR> tag pair. To start your first
Now it's time to enter in the data for the individual cells of the table. Because this is the first row of the table, it's likely that you'll want this row to contain headings for
columns of data. Table headings are created using the <TH> and </TH> tag pair. To create a heading for a column of last names, you would type <TH>Last
You can type all of your column headings one after another, each contained in its own
After you've completed your first row, type </TR> to finish it. Since you'll be adding another row immediately after it, you can type <TR> on the next line to start the new
ell using the <TD> and </TD> <TD> followed by
Type in your remaining data, using the <TD> and </TD> tags to separate each cell nd </TR> tags to separate each row. When you're finished, type

3.2. How to Format Tables
Because HTML is a markup language and not a layout language, the actual display of HTML tables is left up to the Web browser. The height and width of the individual cells are calculated by the browser based on their contents. In general, browsers do a good job of displaying table contents all by themselves. Sometimes, however, you'll want to exercise a little more control over how your tables are displayed. HTML 3's table formatting codes let you do just that.
1. To create a table with no border at all, simply type your table a 3-D beveled look by adjusting the size of the outside border. This featis only supported by Netscape browsers. To adjust the size of the outside table border, use the BORDER attribute. For example, to create a table with a border that is 8 pixels wide, type <TABLE BORDER=8>
Figure 3: Table Border Cell
2. Netscape also adds extensions to give you even greater control over the borders and spacing of the cells inside your table. To change the size of the internal borders, add the CELLSPACING attribute to your <TABLE> tag. For example, to create a table with a wide internal border, type
103
Because HTML is a markup language and not a layout language, the actual display of HTML browser. The height and width of the individual cells are
calculated by the browser based on their contents. In general, browsers do a good job of displaying table contents all by themselves. Sometimes, however, you'll want to exercise a
l over how your tables are displayed. HTML 3's table formatting codes let
To create a table with no border at all, simply type <TABLE> . You can also give D beveled look by adjusting the size of the outside border. This feat
is only supported by Netscape browsers. To adjust the size of the outside table border, use the BORDER attribute. For example, to create a table with a border that is 8
<TABLE BORDER=8> .
Table Border Cell Spacing = 5j
Netscape also adds extensions to give you even greater control over the borders and spacing of the cells inside your table. To change the size of the internal borders, add the CELLSPACING attribute to your <TABLE> tag. For example, to create a table
wide internal border, type <TABLE BORDER CELLSPACING=5>
Because HTML is a markup language and not a layout language, the actual display of HTML browser. The height and width of the individual cells are
calculated by the browser based on their contents. In general, browsers do a good job of displaying table contents all by themselves. Sometimes, however, you'll want to exercise a
l over how your tables are displayed. HTML 3's table formatting codes let
. You can also give D beveled look by adjusting the size of the outside border. This feature
is only supported by Netscape browsers. To adjust the size of the outside table border, use the BORDER attribute. For example, to create a table with a border that is 8
Netscape also adds extensions to give you even greater control over the borders and spacing of the cells inside your table. To change the size of the internal borders, add the CELLSPACING attribute to your <TABLE> tag. For example, to create a table
<TABLE BORDER CELLSPACING=5> .
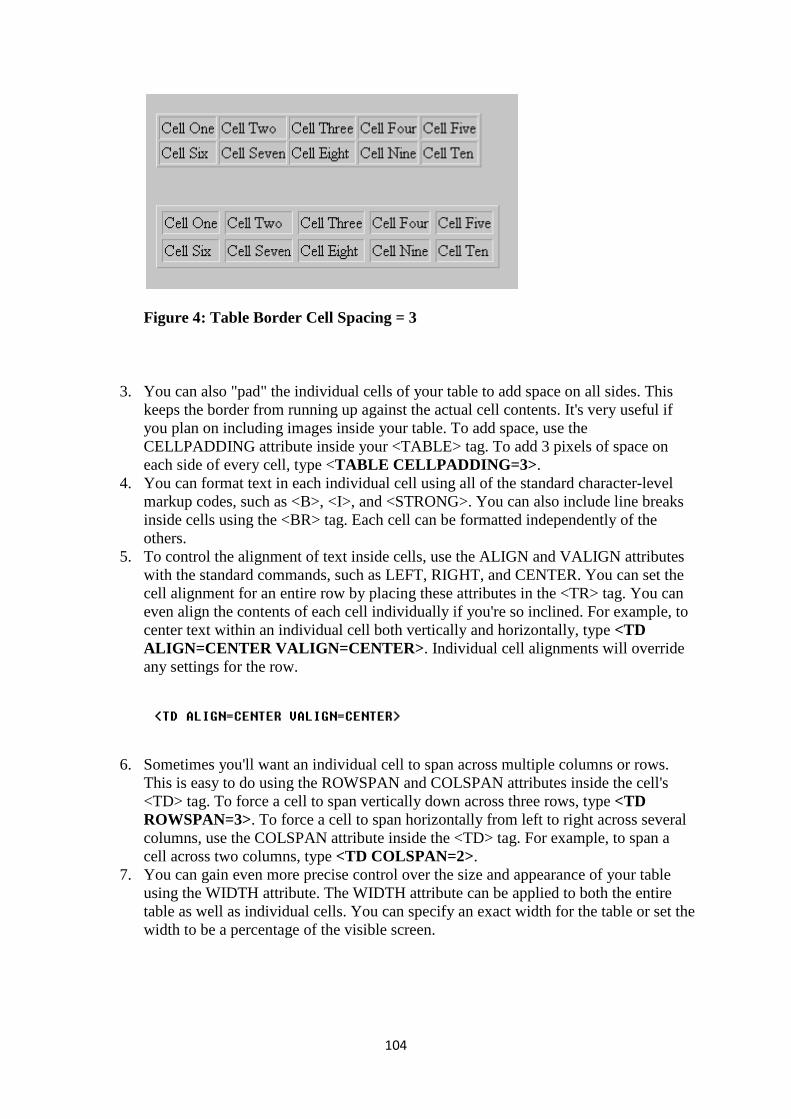
Figure 4: Table Border Cell
3. You can also "pad" the individual cells of your table to add space on all keeps the border from running up against the actual cell contents. It's very useful if you plan on including images inside your table. To add space, use the CELLPADDING attribute inside your <TABLE> tag. To add 3 pixels of space on each side of every cell, type <
4. You can format text in each individual cell using all of the standard charactermarkup codes, such as <B>, <I>, and <STRONG>. You can also include line breaks inside cells using the <BR> tag. Each cell can be others.
5. To control the alignment of text inside cells, use the ALIGN and VALIGN attributes with the standard commands, such as LEFT, RIGHT, and CENTER. You can set the cell alignment for an entire row by placing these attribueven align the contents of each cell individually if you're so inclined. For example, to center text within an individual cell both vertically and horizontally, type ALIGN=CENTER VALIGN=CENTER>any settings for the row.
6. Sometimes you'll want an individual cell to span across multiple columns or rows. This is easy to do using the ROWSPAN and COLSPAN attributes inside the cell's <TD> tag. To force a cell to span vertically down acrosROWSPAN=3>. To force a cell to span horizontally from left to right across several columns, use the COLSPAN attribute inside the <TD> tag. For example, to span a cell across two columns, type
7. You can gain even more prusing the WIDTH attribute. The WIDTH attribute can be applied to both the entire table as well as individual cells. You can specify an exact width for the table or set the width to be a percentage of
104
Table Border Cell Spacing = 3
ou can also "pad" the individual cells of your table to add space on all keeps the border from running up against the actual cell contents. It's very useful if you plan on including images inside your table. To add space, use the CELLPADDING attribute inside your <TABLE> tag. To add 3 pixels of space on
every cell, type <TABLE CELLPADDING=3> . You can format text in each individual cell using all of the standard charactermarkup codes, such as <B>, <I>, and <STRONG>. You can also include line breaks inside cells using the <BR> tag. Each cell can be formatted independently of the
To control the alignment of text inside cells, use the ALIGN and VALIGN attributes with the standard commands, such as LEFT, RIGHT, and CENTER. You can set the cell alignment for an entire row by placing these attributes in the <TR> tag. You can even align the contents of each cell individually if you're so inclined. For example, to center text within an individual cell both vertically and horizontally, type ALIGN=CENTER VALIGN=CENTER> . Individual cell alignments wany settings for the row.
Sometimes you'll want an individual cell to span across multiple columns or rows. This is easy to do using the ROWSPAN and COLSPAN attributes inside the cell's <TD> tag. To force a cell to span vertically down across three rows, type
. To force a cell to span horizontally from left to right across several columns, use the COLSPAN attribute inside the <TD> tag. For example, to span a cell across two columns, type <TD COLSPAN=2>. You can gain even more precise control over the size and appearance of your table using the WIDTH attribute. The WIDTH attribute can be applied to both the entire table as well as individual cells. You can specify an exact width for the table or set the width to be a percentage of the visible screen.
ou can also "pad" the individual cells of your table to add space on all sides. This keeps the border from running up against the actual cell contents. It's very useful if you plan on including images inside your table. To add space, use the CELLPADDING attribute inside your <TABLE> tag. To add 3 pixels of space on
You can format text in each individual cell using all of the standard character-level markup codes, such as <B>, <I>, and <STRONG>. You can also include line breaks
formatted independently of the
To control the alignment of text inside cells, use the ALIGN and VALIGN attributes with the standard commands, such as LEFT, RIGHT, and CENTER. You can set the
tes in the <TR> tag. You can even align the contents of each cell individually if you're so inclined. For example, to center text within an individual cell both vertically and horizontally, type <TD
. Individual cell alignments will override
Sometimes you'll want an individual cell to span across multiple columns or rows. This is easy to do using the ROWSPAN and COLSPAN attributes inside the cell's
s three rows, type <TD . To force a cell to span horizontally from left to right across several
columns, use the COLSPAN attribute inside the <TD> tag. For example, to span a
ecise control over the size and appearance of your table using the WIDTH attribute. The WIDTH attribute can be applied to both the entire table as well as individual cells. You can specify an exact width for the table or set the
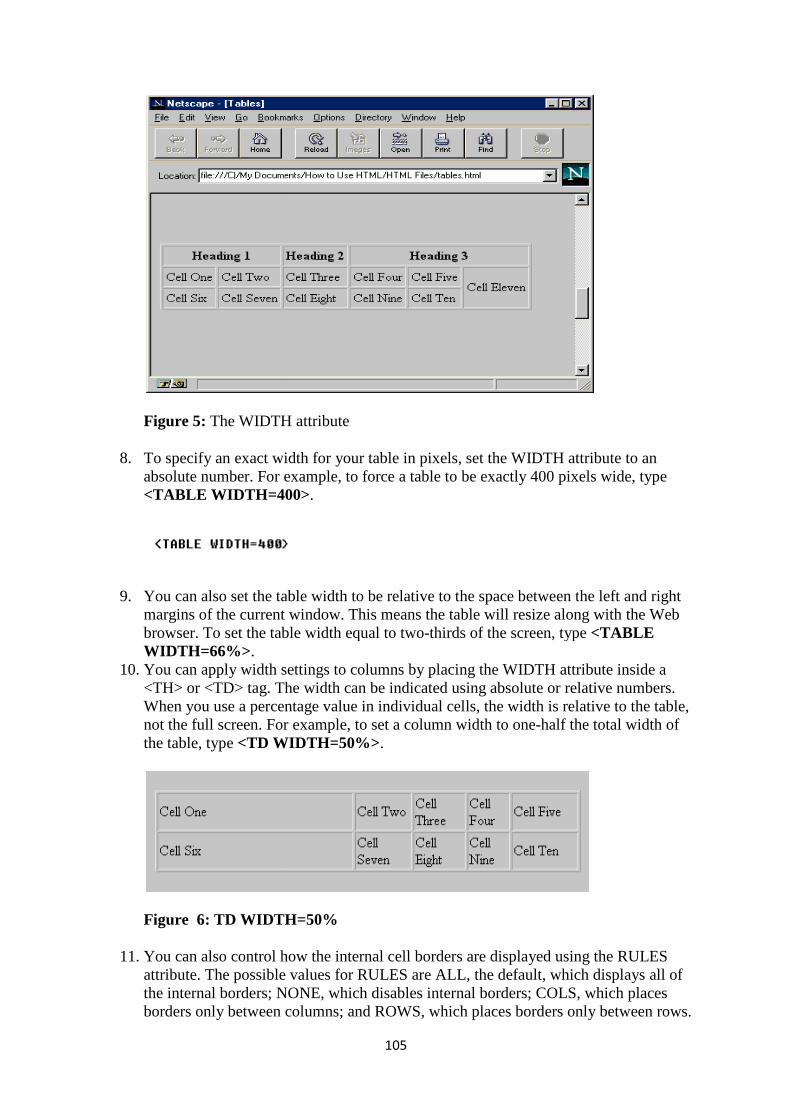
Figure 5: The WIDTH attribute
8. To specify an exact width for your table in pixels, set the WIDTH attribute to an absolute number. For example, to force a table to be exactly 400 pixels wide, type <TABLE WIDTH=400>
9. You can also set the table width to be relative to the space between tmargins of the current window. This means the table will resize along with the Web browser. To set the table width equal to twoWIDTH=66%> .
10. You can apply width settings to columns by placing the WIDTH att<TH> or <TD> tag. The width can be indicated using absolute or relative numbers. When you use a percentage value in individual cells, the width is relative to the table, not the full screen. For example, to set a column width to onethe table, type <TD WIDTH=50%>
Figure 6: TD WIDTH=50%
11. You can also control how the internal cell borders are displayed using the RULES attribute. The possible values for RULES are ALL, the default, which displays all of the internal borders; NONE, which disables internal borders; COLS, which places borders only between columns; and ROWS, which places borders only between rows.
105
The WIDTH attribute
To specify an exact width for your table in pixels, set the WIDTH attribute to an absolute number. For example, to force a table to be exactly 400 pixels wide, type <TABLE WIDTH=400> .
You can also set the table width to be relative to the space between tmargins of the current window. This means the table will resize along with the Web browser. To set the table width equal to two-thirds of the screen, type
You can apply width settings to columns by placing the WIDTH att<TH> or <TD> tag. The width can be indicated using absolute or relative numbers. When you use a percentage value in individual cells, the width is relative to the table, not the full screen. For example, to set a column width to one-half th
<TD WIDTH=50%> .
TD WIDTH=50%
You can also control how the internal cell borders are displayed using the RULES ble values for RULES are ALL, the default, which displays all of
the internal borders; NONE, which disables internal borders; COLS, which places borders only between columns; and ROWS, which places borders only between rows.
To specify an exact width for your table in pixels, set the WIDTH attribute to an absolute number. For example, to force a table to be exactly 400 pixels wide, type
You can also set the table width to be relative to the space between the left and right margins of the current window. This means the table will resize along with the Web
thirds of the screen, type <TABLE
You can apply width settings to columns by placing the WIDTH attribute inside a <TH> or <TD> tag. The width can be indicated using absolute or relative numbers. When you use a percentage value in individual cells, the width is relative to the table,
half the total width of
You can also control how the internal cell borders are displayed using the RULES ble values for RULES are ALL, the default, which displays all of
the internal borders; NONE, which disables internal borders; COLS, which places borders only between columns; and ROWS, which places borders only between rows.
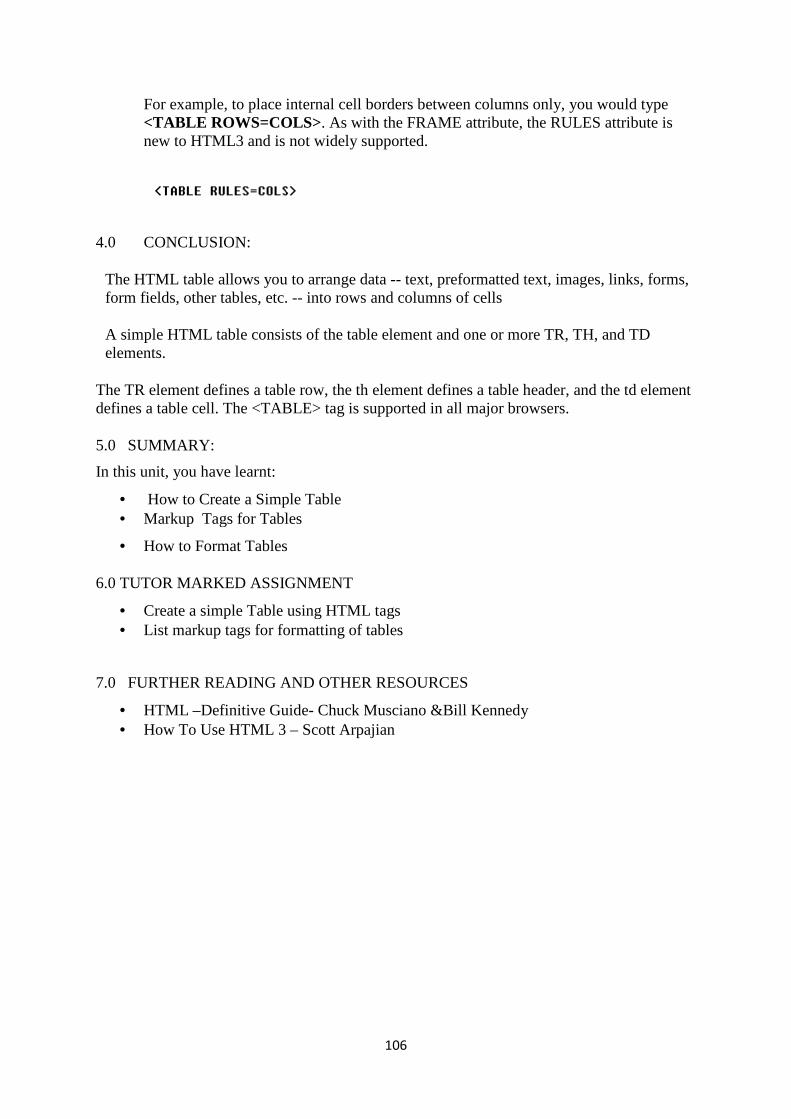
For example, to place internal <TABLE ROWS=COLS>new to HTML3 and is not widely supported.
4.0 CONCLUSION:
The HTML table allows you to arrange data form fields, other tables, etc.
A simple HTML table consists of the table element and one or more elements.
The TR element defines a table row, the thdefines a table cell. The <TABLE
5.0 SUMMARY:
In this unit, you have learnt:
• How to Create a Simple Table• Markup Tags for Tables
• How to Format Tables
6.0 TUTOR MARKED ASSIGNMENT
• Create a simple Table using HTML tags• List markup tags for formatting of tables
7.0 FURTHER READING AND OTHER RESOURCES
• HTML –Definitive Guide• How To Use HTML 3
106
For example, to place internal cell borders between columns only, you would type <TABLE ROWS=COLS> . As with the FRAME attribute, the RULES attribute is new to HTML3 and is not widely supported.
The HTML table allows you to arrange data -- text, preformatted text, images, links, forms, form fields, other tables, etc. -- into rows and columns of cells
A simple HTML table consists of the table element and one or more TR, TH
element defines a table row, the th element defines a table header, and the td element TABLE> tag is supported in all major browsers.
How to Create a Simple Table Markup Tags for Tables
How to Format Tables
R MARKED ASSIGNMENT
Create a simple Table using HTML tags List markup tags for formatting of tables
FURTHER READING AND OTHER RESOURCES
Definitive Guide- Chuck Musciano &Bill Kennedy How To Use HTML 3 – Scott Arpajian
cell borders between columns only, you would type . As with the FRAME attribute, the RULES attribute is
images, links, forms,
TR, TH, and TD
element defines a table header, and the td element > tag is supported in all major browsers.
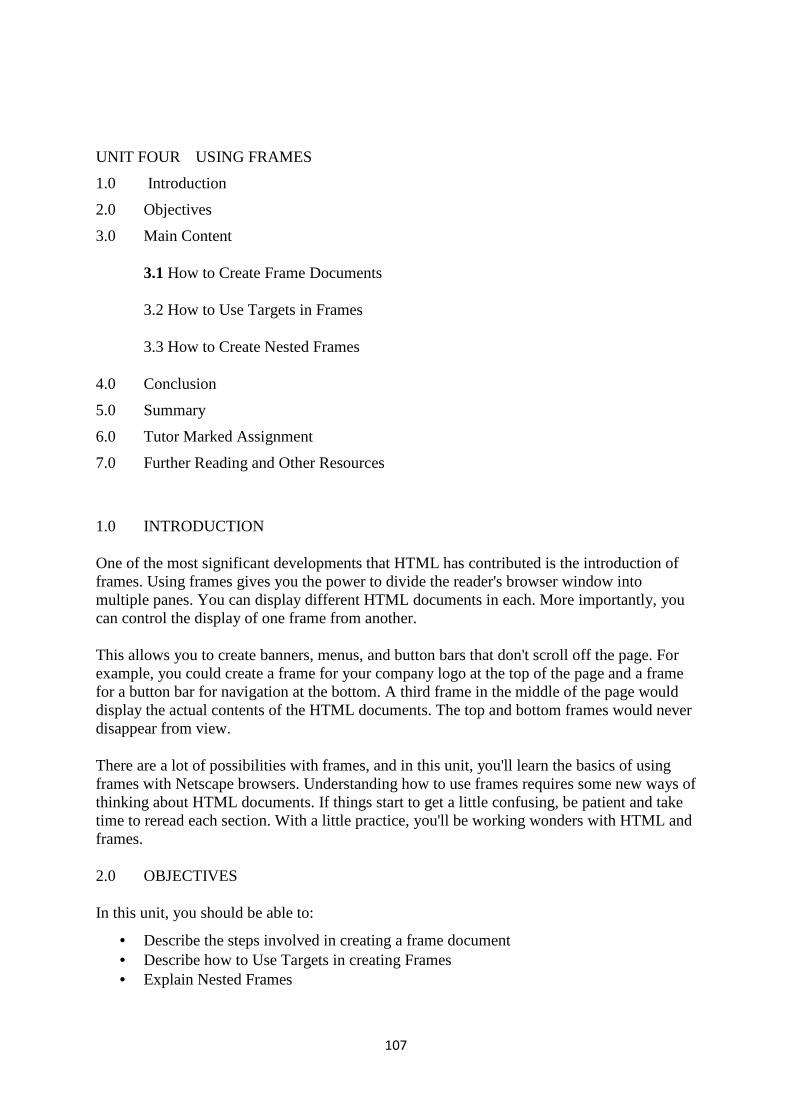
107
UNIT FOUR USING FRAMES
1.0 Introduction
2.0 Objectives
3.0 Main Content
3.1 How to Create Frame Documents
3.2 How to Use Targets in Frames
3.3 How to Create Nested Frames
4.0 Conclusion
5.0 Summary
6.0 Tutor Marked Assignment
7.0 Further Reading and Other Resources
1.0 INTRODUCTION
One of the most significant developments that HTML has contributed is the introduction of frames. Using frames gives you the power to divide the reader's browser window into multiple panes. You can display different HTML documents in each. More importantly, you can control the display of one frame from another.
This allows you to create banners, menus, and button bars that don't scroll off the page. For example, you could create a frame for your company logo at the top of the page and a frame for a button bar for navigation at the bottom. A third frame in the middle of the page would display the actual contents of the HTML documents. The top and bottom frames would never disappear from view.
There are a lot of possibilities with frames, and in this unit, you'll learn the basics of using frames with Netscape browsers. Understanding how to use frames requires some new ways of thinking about HTML documents. If things start to get a little confusing, be patient and take time to reread each section. With a little practice, you'll be working wonders with HTML and frames.
2.0 OBJECTIVES
In this unit, you should be able to:
• Describe the steps involved in creating a frame document • Describe how to Use Targets in creating Frames • Explain Nested Frames

3.0 MAIN CONTENT
3.1 How to Create Frame Documents
The first thing to understand about frames is that they use an entirely new kind of HTML document, called a frame document. Frame documents the frames. Frame documents don't contain any other HTML content.
Once you've built your frame document, you can fill the frames with regular HTML documents. But before we get too far ahead of ourselves, let's concentrasimple set of frames.
In this section, we'll create an empty frame document. Actually, the frame document is not empty. It will only appear empty when viewed with the browser, because we won't be putting any regular HTML documents insframe layout works.
1. Open a new document in Notepad, and type in <HEAD>. Press Enter again.
2. Type <TITLE>My First Frame Document</TITLE>,line, type </HEAD>and press Enter one more time.
3. So far, this looks just like a normal HTML document. Here's where things get different, though. Instead of typing <BODY>, type <FRAMESET> tag instructs Netscape th
4. Place the cursor inside the <FRAMESET> tag and typethree horizontal frames of equal relative height. The asterisk character instructs the browser to give the frame all the remaining space in three asterisks, Netscape will give each frame one
5. On the next line, type <FRAME NAME=frame1 SRC="blank.html">.the name frame1 to the first frame in your document. The SRC attributebrowser to display the HTML document named blank.html in this frame. Normally,
108
How to Create Frame Documents
The first thing to understand about frames is that they use an entirely new kind of HTML document, called a frame document. Frame documents control the layout and appearance of the frames. Frame documents don't contain any other HTML content.
Once you've built your frame document, you can fill the frames with regular HTML documents. But before we get too far ahead of ourselves, let's concentrate on creating a very
In this section, we'll create an empty frame document. Actually, the frame document is not empty when viewed with the browser, because we won't be putting
any regular HTML documents inside. This section will give you a chance to understand how
Open a new document in Notepad, and type in <HTML>. Press Enter, then type in Press Enter again.
<TITLE>My First Frame Document</TITLE>, then press Enter. On the next and press Enter one more time.
So far, this looks just like a normal HTML document. Here's where things get different, though. Instead of typing <BODY>, type <FRAMESET>.<FRAMESET> tag instructs Netscape that this is a frame layout document.
Place the cursor inside the <FRAMESET> tag and typeROWS="*,*,*".three horizontal frames of equal relative height. The asterisk character instructs the browser to give the frame all the remaining space in the window. Because there are three asterisks, Netscape will give each frame one-third of the available space.
<FRAME NAME=frame1 SRC="blank.html">.to the first frame in your document. The SRC attribute
browser to display the HTML document named blank.html in this frame. Normally,
The first thing to understand about frames is that they use an entirely new kind of HTML control the layout and appearance of
Once you've built your frame document, you can fill the frames with regular HTML te on creating a very
In this section, we'll create an empty frame document. Actually, the frame document is not empty when viewed with the browser, because we won't be putting
ide. This section will give you a chance to understand how
Press Enter, then type in
press Enter. On the next
So far, this looks just like a normal HTML document. Here's where things get <FRAMESET>. The
at this is a frame layout document.
ROWS="*,*,*". This creates three horizontal frames of equal relative height. The asterisk character instructs the
the window. Because there are third of the available space.
<FRAME NAME=frame1 SRC="blank.html">. This assigns to the first frame in your document. The SRC attribute tells the
browser to display the HTML document named blank.html in this frame. Normally,
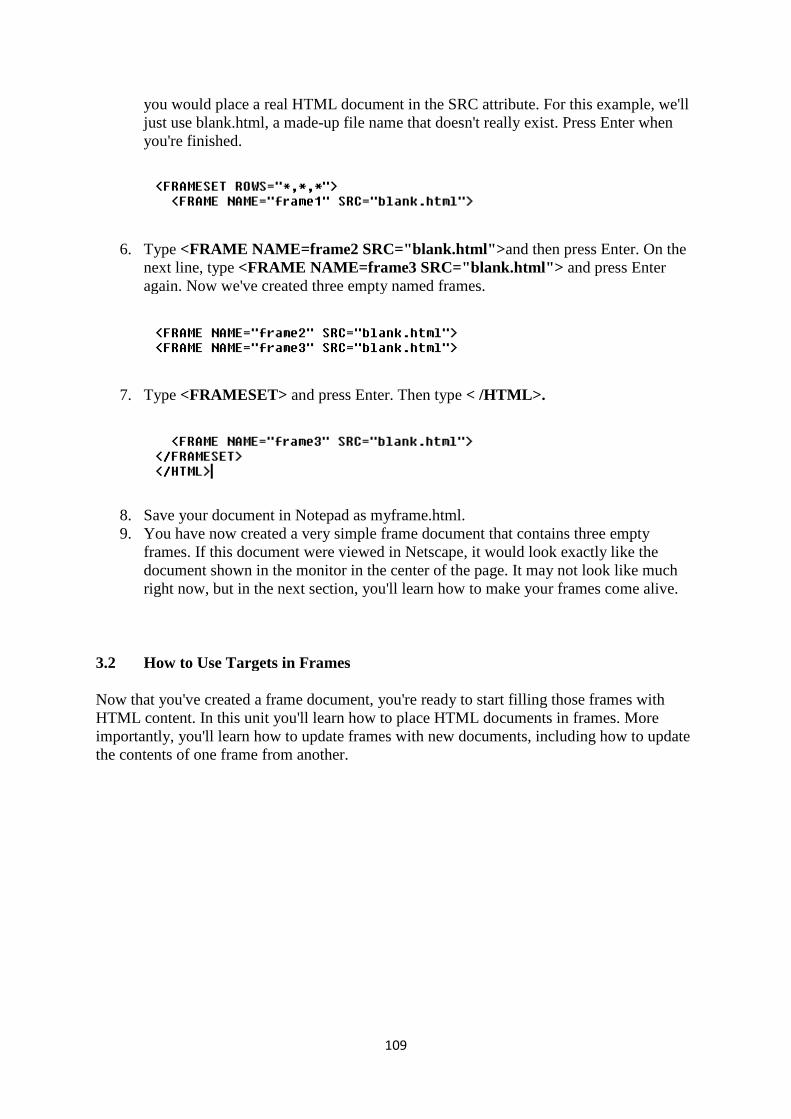
you would place a real HTML document in the SRC attribute. For this example, we'll just use blank.html, a madeyou're finished.
6. Type <FRAME NAME=frame2 SRC="blank.html">next line, type <FRAME NAME=frame3 SRC="blank.html"> again. Now we've created three empty named frames.
7. Type <FRAMESET>
8. Save your document in Notepad as myframe.html.9. You have now created a very simple frame document that contains three empty
frames. If this document were viewed in Netscape, it would look exactly like the document shown in the monitor in the cenright now, but in the next section, you'll learn how to make your frames come alive.
3.2 How to Use Targets in Frames
Now that you've created a frame document, you're ready to start filling those frames with HTML content. In this unit you'll learn how to place HTML documents in frames. More importantly, you'll learn how to update frames with new documents, including how tthe contents of one frame from another.
109
you would place a real HTML document in the SRC attribute. For this example, we'll just use blank.html, a made-up file name that doesn't really exist. Press Enter whe
<FRAME NAME=frame2 SRC="blank.html"> and then press Enter. On the <FRAME NAME=frame3 SRC="blank.html"> and press Enter
again. Now we've created three empty named frames.
<FRAMESET> and press Enter. Then type < /HTML>.
Save your document in Notepad as myframe.html. You have now created a very simple frame document that contains three empty frames. If this document were viewed in Netscape, it would look exactly like the document shown in the monitor in the center of the page. It may not look like much right now, but in the next section, you'll learn how to make your frames come alive.
How to Use Targets in Frames
Now that you've created a frame document, you're ready to start filling those frames with you'll learn how to place HTML documents in frames. More
importantly, you'll learn how to update frames with new documents, including how tthe contents of one frame from another.
you would place a real HTML document in the SRC attribute. For this example, we'll up file name that doesn't really exist. Press Enter when
and then press Enter. On the and press Enter
You have now created a very simple frame document that contains three empty frames. If this document were viewed in Netscape, it would look exactly like the
ter of the page. It may not look like much right now, but in the next section, you'll learn how to make your frames come alive.
Now that you've created a frame document, you're ready to start filling those frames with you'll learn how to place HTML documents in frames. More
importantly, you'll learn how to update frames with new documents, including how to update

Figure 1: Frames in HTML Documents
1. Frames are updated using targets. contain a frame name. Targets specify which frame the hyperlink should update.
2. Before we go any further, we'll need to create a few HTML documents that contain hyperlinks using targets. Launch Notepad and open a ne<HTML> and press Enter.
3. Type <HEAD> and press Enter. Then type press Enter. Finally, type
4. Type <BODY> and press Enter. Then type Enter.
5. Type <P> to start your first paragraph. Then type
6. Here's where we'll start placing hyperlinks with target attributes. These three hyperlinks will allow the user to display different documents in the top frame. Type <A HREF="a. html" TARGET="frame1">A</A>.
110
Frames in HTML Documents
Frames are updated using targets. Targets are simply hyperlink tag extensions that contain a frame name. Targets specify which frame the hyperlink should update.Before we go any further, we'll need to create a few HTML documents that contain hyperlinks using targets. Launch Notepad and open a new document. Then type
and press Enter. > and press Enter. Then type <TITLE>Document A</TITLE
press Enter. Finally, type </HEAD>and press Enter again.
and press Enter. Then type <H1>Document A</H1>
to start your first paragraph. Then type Top Frame: and press Enter.
Here's where we'll start placing hyperlinks with target attributes. These three hyperlinks will allow the user to display different documents in the top frame. Type
html" TARGET="frame1">A</A>. This link will load a.html (the
are simply hyperlink tag extensions that contain a frame name. Targets specify which frame the hyperlink should update. Before we go any further, we'll need to create a few HTML documents that contain
w document. Then type
<TITLE>Document A</TITLE > and
<H1>Document A</H1> and press
and press Enter.
Here's where we'll start placing hyperlinks with target attributes. These three hyperlinks will allow the user to display different documents in the top frame. Type
This link will load a.html (the
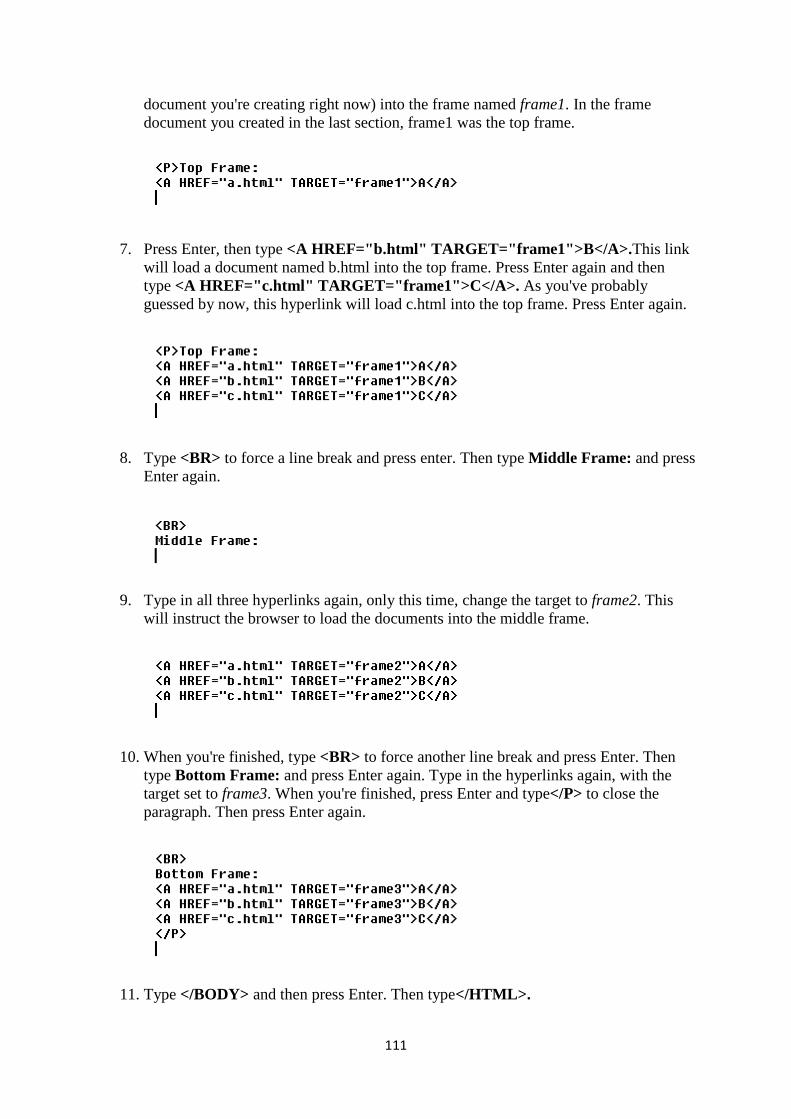
document you're creating right now) into the frame named document you created in the last section, frame1 was the top frame.
7. Press Enter, then type will load a document named b.html into the top frame. Press Enter again and then type <A HREF="c.html" TARGET="frame1">C</A>. guessed by now, this hyperlink will load c.html into the top frame. Press Enter
8. Type <BR> to force a line break and press enter. Then type Enter again.
9. Type in all three hyperlinks again, only this time, change the target to will instruct the browser to load the documents into the middl
10. When you're finished, type type Bottom Frame: and press Enter again. Type in the hyperlinks again, with the target set to frame3. When you're finished, press Enter and typeparagraph. Then press Enter again.
11. Type </BODY> and then press Enter. Then type
111
document you're creating right now) into the frame named frame1. In the frame document you created in the last section, frame1 was the top frame.
Press Enter, then type <A HREF="b.html" TARGET="frame1">B</A>.will load a document named b.html into the top frame. Press Enter again and then
<A HREF="c.html" TARGET="frame1">C</A>. As you've probably guessed by now, this hyperlink will load c.html into the top frame. Press Enter
to force a line break and press enter. Then type Middle Frame:
Type in all three hyperlinks again, only this time, change the target to will instruct the browser to load the documents into the middle frame.
When you're finished, type <BR> to force another line break and press Enter. Then and press Enter again. Type in the hyperlinks again, with the
. When you're finished, press Enter and type</P>paragraph. Then press Enter again.
and then press Enter. Then type</HTML>.
. In the frame document you created in the last section, frame1 was the top frame.
TARGET="frame1">B</A>. This link will load a document named b.html into the top frame. Press Enter again and then
As you've probably guessed by now, this hyperlink will load c.html into the top frame. Press Enter again.
Middle Frame: and press
Type in all three hyperlinks again, only this time, change the target to frame2. This e frame.
to force another line break and press Enter. Then and press Enter again. Type in the hyperlinks again, with the
</P> to close the
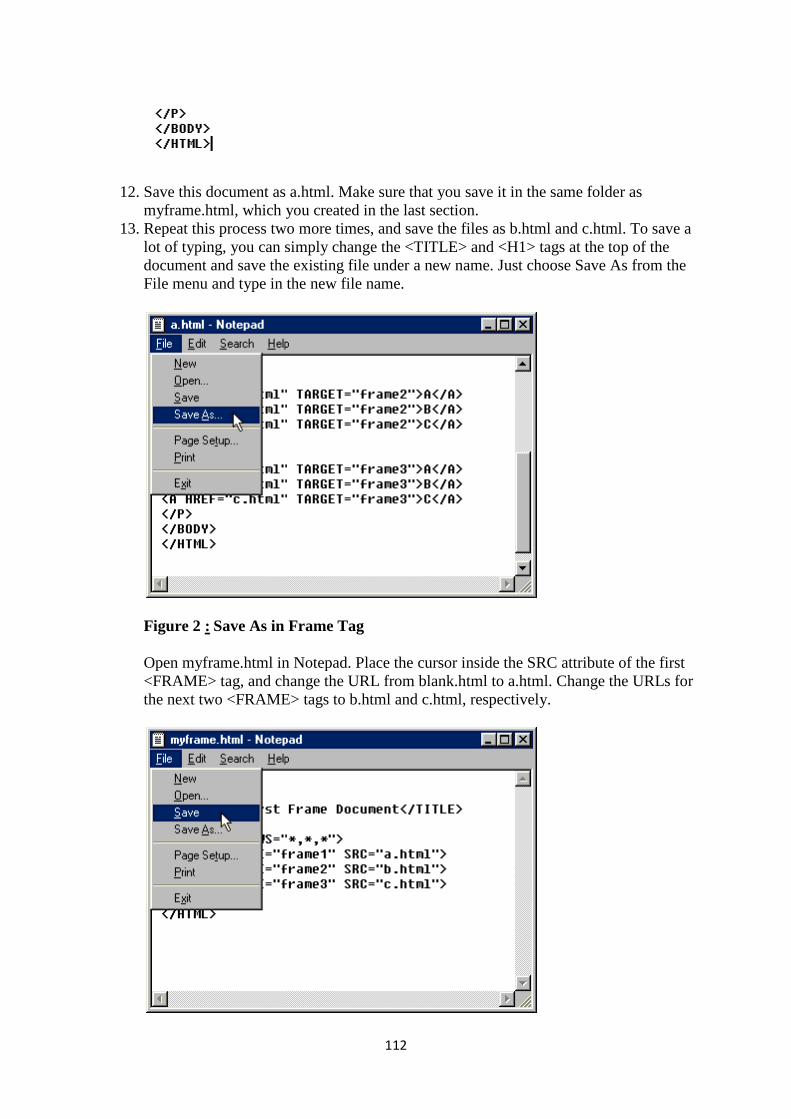
12. Save this document as a.html. Make sure that you save it in the same folder as myframe.html, which you created in the last section.
13. Repeat this process two more times, and save the files as b.html and c.html. To save a lot of typing, you can simply change the <TITLE> and <H1> tags at the top of the document and save the existing file under a new name. Just choose Save As from the File menu and type in t
Figure 2 : Save As in
Open myframe.html in Notepad. Place the cursor inside the SRC attribute of the first <FRAME> tag, and change the URL from the next two <FRAME> tags to b.html and c.html, respectively.
112
Save this document as a.html. Make sure that you save it in the same folder as myframe.html, which you created in the last section.
s two more times, and save the files as b.html and c.html. To save a lot of typing, you can simply change the <TITLE> and <H1> tags at the top of the document and save the existing file under a new name. Just choose Save As from the File menu and type in the new file name.
Save As in Frame Tag
Open myframe.html in Notepad. Place the cursor inside the SRC attribute of the first <FRAME> tag, and change the URL from blank.html to a.html. Change the URLs for the next two <FRAME> tags to b.html and c.html, respectively.
Save this document as a.html. Make sure that you save it in the same folder as
s two more times, and save the files as b.html and c.html. To save a lot of typing, you can simply change the <TITLE> and <H1> tags at the top of the document and save the existing file under a new name. Just choose Save As from the
Open myframe.html in Notepad. Place the cursor inside the SRC attribute of the first blank.html to a.html. Change the URLs for
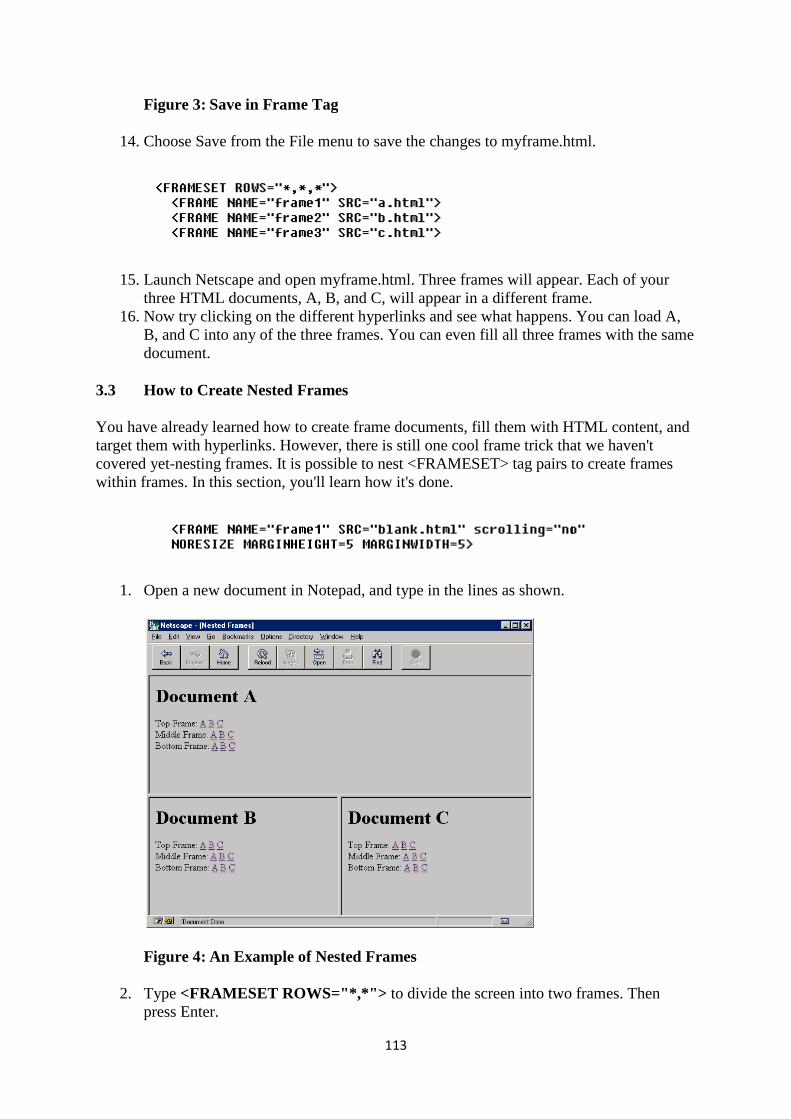
Figure 3: Save in Frame Tag
14. Choose Save from the File menu to save the
15. Launch Netscape and open myframe.html. Three frames will appear. Each of your three HTML documents, A, B, and C, will appear in a different frame.
16. Now try clicking on the different hyperlinks and see what happens. You can load AB, and C into any of the three frames. You can even fill all three frames with the same document.
3.3 How to Create Nested Frames
You have already learned how to create frame documents, fill them with HTML content, and target them with hyperlinks. However, there is still one cool frame trick that we haven't covered yet-nesting frames. It is possible to nest <FRAMESET> tag pairs to create frames within frames. In this section, you'll learn how it's done.
1. Open a new document in Notepad, and type in
Figure 4: An Example of
2. Type <FRAMESET ROWS="*,*">press Enter.
113
Save in Frame Tag
Choose Save from the File menu to save the changes to myframe.html.
Launch Netscape and open myframe.html. Three frames will appear. Each of your three HTML documents, A, B, and C, will appear in a different frame.Now try clicking on the different hyperlinks and see what happens. You can load AB, and C into any of the three frames. You can even fill all three frames with the same
How to Create Nested Frames
You have already learned how to create frame documents, fill them with HTML content, and However, there is still one cool frame trick that we haven't
nesting frames. It is possible to nest <FRAMESET> tag pairs to create frames within frames. In this section, you'll learn how it's done.
Open a new document in Notepad, and type in the lines as shown.
An Example of Nested Frames
<FRAMESET ROWS="*,*"> to divide the screen into two frames. Then
changes to myframe.html.
Launch Netscape and open myframe.html. Three frames will appear. Each of your three HTML documents, A, B, and C, will appear in a different frame. Now try clicking on the different hyperlinks and see what happens. You can load A, B, and C into any of the three frames. You can even fill all three frames with the same
You have already learned how to create frame documents, fill them with HTML content, and However, there is still one cool frame trick that we haven't
nesting frames. It is possible to nest <FRAMESET> tag pairs to create frames
to divide the screen into two frames. Then
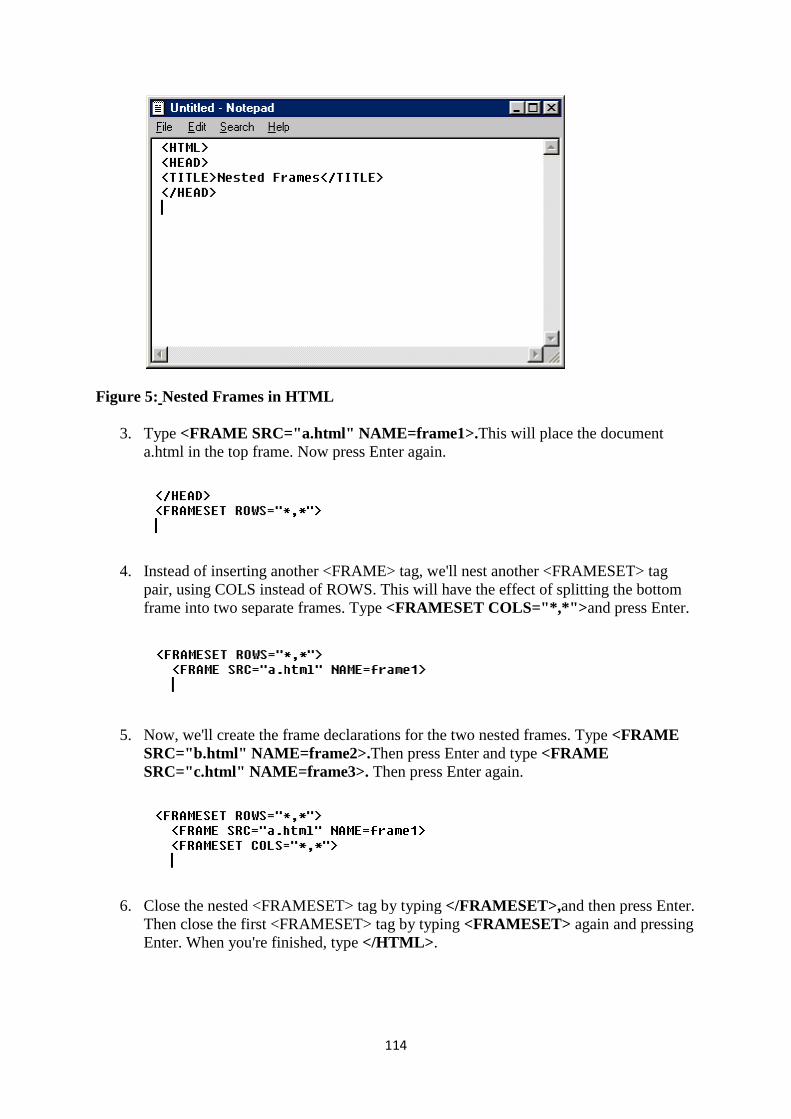
Figure 5: Nested Frames in HTML
3. Type <FRAME SRC="a.html" NAME=frame1>.a.html in the top frame. Now press Enter again.
4. Instead of inserting another <FRAME> tag, we'll nest another <FRAMESET>pair, using COLS instead of ROWS. This will have the effect of splitting the bottom frame into two separate frames. Type
5. Now, we'll create the frame declarations for the two nested frames. Type SRC="b.html" NAME=frame2>.SRC="c.html" NAME=frame3>.
6. Close the nested <FRAMESET> tag by typing Then close the first <FRAMESET> tag by typing Enter. When you're finished, type
114
in HTML
<FRAME SRC="a.html" NAME=frame1>. This will place the document a.html in the top frame. Now press Enter again.
Instead of inserting another <FRAME> tag, we'll nest another <FRAMESET>pair, using COLS instead of ROWS. This will have the effect of splitting the bottom frame into two separate frames. Type <FRAMESET COLS="*,*">
Now, we'll create the frame declarations for the two nested frames. Type l" NAME=frame2>. Then press Enter and type <FRAME
SRC="c.html" NAME=frame3>. Then press Enter again.
Close the nested <FRAMESET> tag by typing </FRAMESET>,and then press Enter. Then close the first <FRAMESET> tag by typing <FRAMESET>
ter. When you're finished, type </HTML> .
This will place the document
Instead of inserting another <FRAME> tag, we'll nest another <FRAMESET> tag pair, using COLS instead of ROWS. This will have the effect of splitting the bottom
<FRAMESET COLS="*,*"> and press Enter.
Now, we'll create the frame declarations for the two nested frames. Type <FRAME <FRAME
and then press Enter. again and pressing
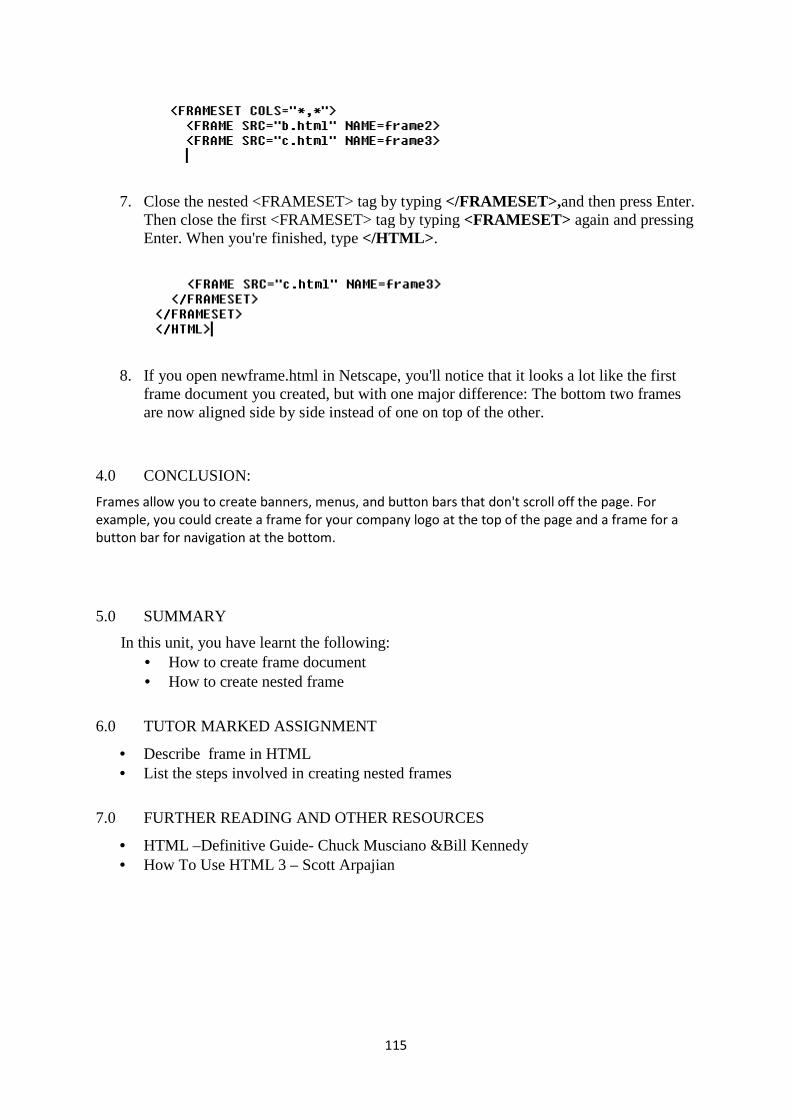
7. Close the nested <FRAMESET> tag by typing Then close the first <FRAMESET> tag by typing Enter. When you're finished, type
8. If you open newframe.html in Netscape, you'll notice that it looks a lot like the first frame document you created, but with one major difference: The bottom two frames are now aligned side by side instead of one on top of the other.
4.0 CONCLUSION:
Frames allow you to create banners, menus, and button bars that don't scroll off the page. For
example, you could create a frame for your company logo at the top of the page and a frame for a
button bar for navigation at the bottom
5.0 SUMMARY
In this unit, you have learnt the following:• How to create frame document• How to create nested frame
6.0 TUTOR MARKED ASSIGNMENT
• Describe frame in HTML• List the steps involved
7.0 FURTHER READING AND OTHER RESOURCES
• HTML –Definitive Guide• How To Use HTML 3
115
Close the nested <FRAMESET> tag by typing </FRAMESET>,and then press Enter. Then close the first <FRAMESET> tag by typing <FRAMESET> Enter. When you're finished, type </HTML> .
rame.html in Netscape, you'll notice that it looks a lot like the first frame document you created, but with one major difference: The bottom two frames are now aligned side by side instead of one on top of the other.
you to create banners, menus, and button bars that don't scroll off the page. For
example, you could create a frame for your company logo at the top of the page and a frame for a
button bar for navigation at the bottom.
have learnt the following: How to create frame document How to create nested frame
TUTOR MARKED ASSIGNMENT
Describe frame in HTML List the steps involved in creating nested frames
FURTHER READING AND OTHER RESOURCES
ive Guide- Chuck Musciano &Bill Kennedy How To Use HTML 3 – Scott Arpajian
and then press Enter. again and pressing
rame.html in Netscape, you'll notice that it looks a lot like the first frame document you created, but with one major difference: The bottom two frames
you to create banners, menus, and button bars that don't scroll off the page. For
example, you could create a frame for your company logo at the top of the page and a frame for a

116
MODULE FOUR - JAVASCRIPT
UNIT ONE - Introduction to Java Script
UNIT TWO - Java Script variables and data types
UNIT THREE - Statement and operators
UNIT FOUR - Control structures object based programming message box in JavaScript
UNIT ONE INTRODUCTION TO JAVA SCRIPT
1.0 Introduction
2.0 Objectives
3.0 Main Content
3.1 What is JavaScript? 3.2 The basic concepts of JavaScript and client-side scripting 3.3 History of JavaScript
4.0 Conclusion
5.0 Summary
6.0 Tutor Marked Assignment
7.0 Further Reading and Other Resources
1.0 INTRODUCTION
In this unit, we will discover what makes JavaScript an Object-based scripting language and take a look at the language’s origin ,history and will introduce you to the basic concepts of JavaScript and client-side scripting in general. JavaScript is the scripting language used on millions of Web pages. Its main purpose is to add interactivity to the browser and Web pages. It also complements very popular server-side programming languages and platforms, like ASP.NET (actually, JavaScript is used in many ASP.NET controls). As it is very easy to learn, you'll soon start writing your first scripts. It doesn’t matter if you're already an expert or just a beginner in the world of web development – JavaScript will add that "extra something" to your Web pages. You will be quizzed at the end of the unit, so pay attention!
2.0 OBJECTIVES:
At the end of this unit, you should be able to
• Explain JavaScript language • Describe the history of JavaScript • Distinguish the difference between Java and JavaScript • List the features of JavaScript

117
3.0 MAIN CONTENT
3.1 What is JavaScript? JavaScript is the client side scripting language, developed by netscape, used along with HTML to build a efficient web site / webpage. JavaScript is used in most websites to enrich the interface and enhance the user experience. In the beginning stages, web pages were developed only using html, which are nothing but static pages. User interaction and dynamic changes are not possible with html. With the advent of scripting languages the problem was solved. There are two types of script languages - server side and client side. When a page is requested, the request is sent to the server and data is fetched and viewed in the browser.
• If the dynamic changes in the webpage are caused in the client side (the browsers like mozilla / IE). It is called client side scripting language (E.g. - JavaScript).
• If the dynamic changes in the web page are caused in the server side (the server checks the request and based on the data it makes changes in the page before sending the data to the browser). It is called server side scripting language (E.g. - PHP).
Java script codes are embedded in HTML files. Whenever a browser requests for a webpage, the HTML file along with script is transferred to the browser.
JavaScript is used to create dynamic changes, validate forms, detect visitor details, create/use cookies, etc.. JavaScript works in all major browsers, such as Internet Explorer, Mozilla, Firefox, Netscape, Opera, Safari and more.
3.2. The basic concepts of JavaScript and client-side scripting
JavaScript is a client side, interpreted, object oriented, high level scripting language, while Java is a client side, compiled, object oriented, high level language. Now after that mouthful, here's what it means.
Client side Programs are passed to the computer that the browser is on, and that computer runs them. The alternative is server side, where the program is run on the server and only the results are passed to the computer that the browser is on. Examples of this would be PHP, Perl, ASP, JSP etc. Currently the most popular client-side scripting language is JavaScript
Interpreted
118
The program is passed as source code with all the programming language visible. It is then converted into machine code as it is being used. Compiled languages are converted into machine code first then passed around, so you never get to see the original programming language. Java is actually dual half compiled, meaning it is half compiled (to 'byte code') before it is passed, then executed in a virtual machine which converts it to fully compiled code just before use, in order to execute it on the computer's processor. Interpreted languages are generally less fussy about syntax and if you have made mistakes in a part they never use, the mistake usually will not cause you any problems.
Scripting
This is a little harder to define. Scripting languages are often used for performing repetitive tasks. Although they may be complete programming languages, they do not usually go into the depths of complex programs, such as thread and memory management. They may use another program to do the work and simply tell it what to do. They often do not create their own user interfaces, and instead will rely on the other programs to create an interface for them. This is quite accurate for JavaScript. We do not have to tell the browser exactly what to put on the screen for every pixel (though there is a relatively new API known as canvas that makes this possible if needed), we just tell it that we want it to change the document, and it does it. The browser will also take care of the memory management and thread management, leaving JavaScript free to get on with the things it wants to do.
High level
Written in words that are as close to English as possible. The contrast would be with assembly code, where each command can be directly translated into machine code.
What is Object Oriented Programming? An Object Oriented Programming is a set of tools and methods that enable software Engineers to build reliable, user friendly, maintainable, well documented, reusable software systems that fulfils the requirements of its users. It is claimed that object-orientation provides software developers with new mind tools to use in solving a wide variety of problems. Object-orientation provides a new view of computation. A software system is seen as a community of objects that cooperate with each other by passing messages in solving a problem. Not all programming languages can be ‘‘object oriented’’. Yet claims have been made to the effect that APL, Ada, Clu, C++, LOOPS, and Smalltalk are object oriented programming languages An object-oriented programming language provides support for the following object oriented concepts:
• Objects and Classes • Inheritance
119
• Polymorphism and Dynamic binding
What Is an Object?
An object is a software bundle of related state and behavior. Software objects are often used to model the real-world objects that you find in everyday life. This lesson explains how state and behavior are represented within an object, introduces the concept of data encapsulation, and explains the benefits of designing your software in this manner.
What Is a Class? A class is a blueprint or prototype from which objects are created. This section defines a class that models the state and behavior of a real-world object. It intentionally focuses on the basics, showing how a simple class can cleanly model state and behavior.
What Is an Inheritance? Inheritance provides a powerful and natural mechanism for organizing and structuring your software. This section explains how classes inherit state and behavior from their super classes, and explains how to derive one class from another using the simple syntax provided by the Java programming language.
What is polymorphism?
In object-oriented programming, polymorphism (from the Greek meaning "having multiple forms") is the characteristic of being able to assign a different meaning or usage to something in different contexts - specifically, to allow an entity such as a variable, a function, or an object to have more than one form. There are several different kinds of polymorphism.
What is Dynamic Binding The property of object-oriented programming languages where the code executed to perform a given operation is determined at run time from the class of the operand(s). There may be several different classes of objects which can receive a given message. An expression may denote an object which may have more than one possible class and that class can only be determined at run time. New classes may be created that can receive a particular message, without changing (or recompiling) the code which sends the message. A class may be created that can receive any set of existing messages.
Java and JavaScript
Never confuse JavaScript with Java. Java is an application development language developed
by SUN Microsystems and has no links with J avaScript. JavaScript was created long before

120
java was developed. JavaScript is many times denoted as Java Script.
Table 1. JavaScript compared to Java
JavaScript Java Interpreted (not compiled) by client Compiled byte codes down loaded from
server, executed on client Object-based. No distinction between types of objects. Inheritance is through the prototype mechanism and properties and methods can be added to any object dynamically.
Object-oriented. Objects are divided into classes and instances with all inheritance through the class hierarchy. Classes and instances cannot have properties or methods added dynamically.
Code integrated with, and embedded in, HTML
Applets distinct from HTML (accessed from HTML pages).
Variable data types not declared (loose typing).
Variable data types must be declared (strong typing).
Dynamic binding. Object references checked at runtime
Static binding. Object references must exist at compile-time
Cannot automatically write to hard disk. Cannot automatically write to hard disk (in Java Applets).
3.3. History of JavaScript
It's useful to start with an idea of the language's history. JavaScript was created in 1995 by Brendan Eich, an engineer at Netscape, and first released with Netscape 2 early in 1996. It was originally going to be called LiveScript, but was renamed in an ill-fated marketing decision to try to capitalize on the popularity of Sun Microsystem's Java language — despite the two having very little in common. This has been a source of confusion ever since.
Microsoft released a mostly-compatible version of the language called JScript with IE 3 several months later. Netscape submitted the language to Ecma International, a European standards organization, which resulted in the first edition of the ECMAScript standard in 1997. The standard received a significant update as ECMAScript edition 3 in 1999, and has stayed pretty much stable ever since. The fourth edition was abandoned, due to political differences concerning language complexity. Many parts of the fourth edition forming a basis of the new ECMAScript edition 5, published in December of 2009.
This stability is great news for developers, as it's given the various implementations plenty of time to catch up. I'm going to focus almost exclusively on the edition 3 dialect. For familiarity, I will stick with the term JavaScript throughout.
Unlike most programming languages, the JavaScript language has no concept of input or output. It is designed to run as a scripting language in a host environment, and it is up to the host environment to provide mechanisms for communicating with the outside world. The most common host environment is the browser, but JavaScript interpreters can also be found in Adobe Acrobat, Photoshop, Yahoo!'s Widget engine, and even server side environments.
121
4.0 CONCLUSION:
JavaScript is NOT the same as Java. Java was developed at Sun Micro Systems. The two languages are related, but yet are very different and have different purposes. Java is a full-featured Object-Oriented Programming language that creates separate applets (mini-applications) that do not interrelate with HTML like JavaScript does. JavaScript is much simpler to program than Java. JavaScript was designed for a more specific purpose exposing useful properties of the Web client and server to a script programmer.
5.0 SUMMARY:
In this unit, you have learnt:
• The difference between Java and JavaScript • The History of JavaScript • Explanation of JavaScript
6.0 TUTOR MARKED ASSIGNMENT
• Distinguish between Java and JavaScript • What is client-side scripting? • Describe the history of JavaScripting
7.0 FURTHER READING AND OTHER RESOURCES
• Nigel McFarlane: Rapid Application Development with Mozilla, Prentice Hall
Professional Technical References, ISBN 0131423436
• Danny Goodman, Scott Markel: JavaScript and DHTML Cookbook, O'Reilly
& Associates, ISBN 0596004672
• Danny Goodman, Brendan Eich: JavaScript Bible, Wiley, John & Sons, ISBN
0764533428
• Andrew H. Watt, Jinjer L. Simon, Jonathan Watt: Teach Yourself JavaScript
in 21 Days, Pearson Education, ISBN 0672322978
• Andy Harris, Andrew Harris: JavaScript Programming, Premier Press, ISBN
0761534105
• Gary B. Shelly, Thomas J. Cashman, William J. Dorin, Jeffrey Quasney:
JavaScript: Complete Concepts and Techniques, Course Technology, ISBN
0789562332
• Nick Heinle, Richard Koman: Designing with JavaScript, O'Reilly &
Associates, ISBN 1565923006
122
UNIT TWO: JAVA SCRIPT VARIABLES AND DATA TYPES
1.0 Introduction
2.0 Objectives
3.0 Main Content
3.1 JavaScript Variables
3.2 Java Script Data type
4.0 Conclusion
5.0 Summary
6.0 Tutor Marked Assignment
7.0 Further Reading and Other Resources
1.0 INTRODUCTION
JavaScript is an object language; it has data types and variables. Its syntax comes from the Java and C languages, so many structures from those languages apply to JavaScript as well. One of the key differences is that JavaScript does not have classes; instead, the class functionality is accomplished by object prototypes. The other main difference is that functions are objects, giving functions the capacity to hold executable code and be passed around like any other object.
This unit covers the JavaScript Variables and primitive data types of string, boolean, and number, as well as the built-in functions for modifying values of these types. In addition, we’ll look at two special data types in JavaScript, null and undefined, toward the end of the unit.
2.0 OBJECTIVES
At the end of this unit, you should be able to:
• Explain JavaScript Variables • List JavaScript Data types • Describe Global Scope Variables
3.0 MAIN CONTENT
3.1 JavaScript Variables
Every piece of data is known as a value. When a value is referred in a statement, it is called a literal value. For the same reason people are identified by names as opposed to "human" or "person", literal values can be named in order to make repeated reference to them practical, efficient and readable. These names are called variables.
Declaring and Initializing the Variables
123
var num; // declare variable, has null value num = 20; // assign a value, null value is replaced //OR var num=20; // declare AND assign value (initialize) var a,b,c,d; //multiple variables may be declared simultaneously var a = 5, b = 6, c = 7,d=8; //multiple variables may be initialized simultaneously
Variable Names Variable names cannot contain spaces, begin with a number but can see the underscore (_) . JavaScript Variable name can not use any reserved keywords. Two words can either be separated by an underscore (my_variable) or (myVariable).
Variable Scope There are two types of Variable scope:- 1. Globle scope Variable, 2 . Local scope Variable.
1.Globle scope Variable:- A variable declared or initialized outside a function body has a global scope, making it accessible to all other statements within the same document. 2. Local scope Variable:- A variable declared or initialized within a function body has a local scope, making it accessible only to statements within the same function body. [NOTE:- If a variable is initialized inside a function body but the var keyword is left off, the variable has a global scope and is only accessible after the function containing it is invoked. It is better to always use the var keyword ]
3.2 Java Script Data type
Data Type:- A data type is defined by the value assigned to it . A variable could be a number on one line, then assigned a string value and later be assigned an object reference. JavaScript would change its data type dynamically .It also represent the data's nature. Data is directly treated on those data types and calculate up on the works.
There are two types of the data types, namely:-
• .Primitive data types • Compositive data types
Primitive data types:- Primitive data types are the simplest building blocks of a program. The types are the following:-
• Numeric:-JavaScript supports both integers and floating point numbers .Integers are whole numbers and it does not support the decimal numbers such as : 145 . Floating point numbers are fractional numbers or decimal numbers. Such as : 12.50
• String:- String is a collection of characters enclosed in either single quotes or double quotes .If the string starts with a single quotes it must end with single quotes .If the string starts with a double quotes, it must end with double quotes . Such as: 'Welcome to JavaScript' or "Welcome to JavaScript".
• Boolean:-Boolean literals are logical values that have only one of two values, true or false. It is used in conditional statements. Our statements are checked true or false then we use the Boolean variables.
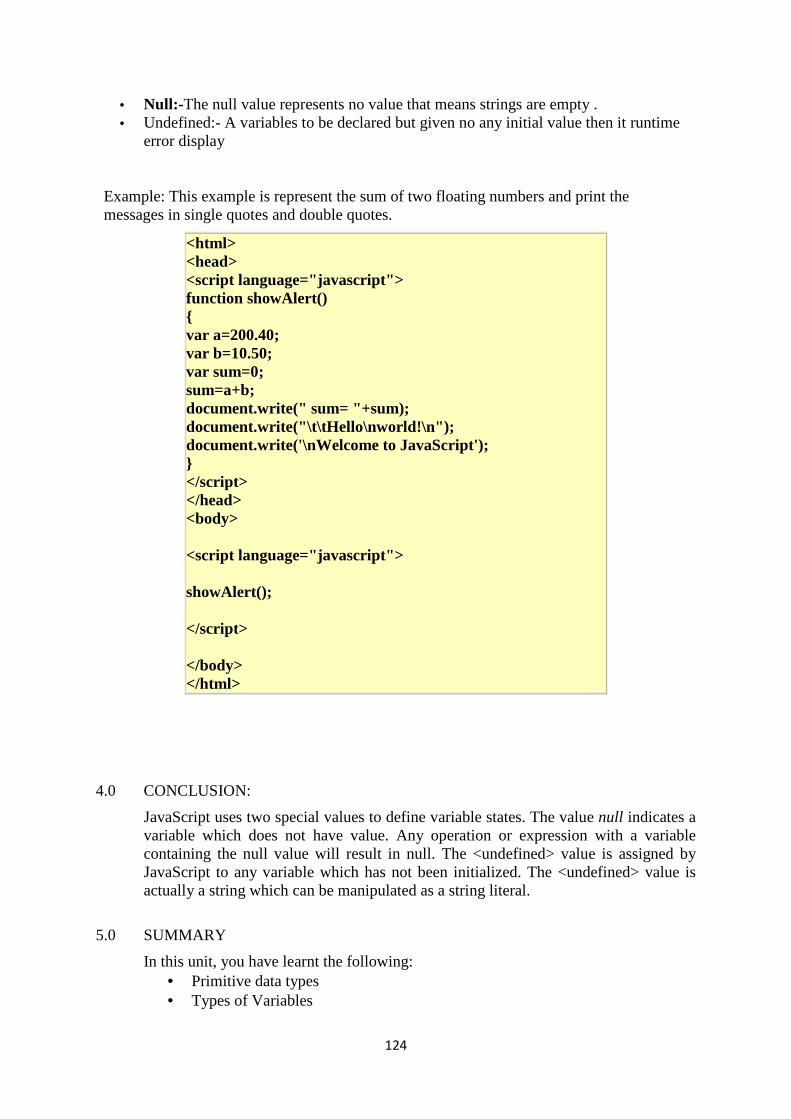
124
• Null:- The null value represents no value that means strings are empty . • Undefined:- A variables to be declared but given no any initial value then it runtime
error display
Example: This example is represent the sum of two floating numbers and print the messages in single quotes and double quotes.
<html> <head> <script language="javascript"> function showAlert() { var a=200.40; var b=10.50; var sum=0; sum=a+b; document.write(" sum= "+sum); document.write("\t\tHello\nworld!\n"); document.write('\nWelcome to JavaScript'); } </script> </head> <body> <script language="javascript"> showAlert(); </script> </body> </html>
4.0 CONCLUSION:
JavaScript uses two special values to define variable states. The value null indicates a variable which does not have value. Any operation or expression with a variable containing the null value will result in null. The <undefined> value is assigned by JavaScript to any variable which has not been initialized. The <undefined> value is actually a string which can be manipulated as a string literal.
5.0 SUMMARY
In this unit, you have learnt the following: • Primitive data types • Types of Variables
125
• Definition of a Variable
6.0 TUTOR MARKED ASSIGNMENT
• Distinguish between Globe Scope and Local Scope Variable • Define Variable
7.0 FURTHER READING AND OTHER RESOURCES
• Danny Goodman, Brendan Eich: JavaScript Bible, Wiley, John & Sons, ISBN
0764533428
• Andrew H. Watt, Jinjer L. Simon, Jonathan Watt: Teach Yourself JavaScript in 21
Days, Pearson Education, ISBN 0672322978
• Thomas A. Powell, Fritz Schneider: JavaScript: The Complete Reference,
McGraw-Hill Companies, ISBN 0072191279
• Scott Duffy: How to do Everything with JavaScript, Osborne, ISBN 0072228873
• Andy Harris, Andrew Harris: JavaScript Programming, Premier Press, ISBN
0761534105
• Gary B. Shelly, Thomas J. Cashman, William J. Dorin, Jeffrey Quasney:
JavaScript: Complete Concepts and Techniques, Course Technology, ISBN
0789562332
• Nick Heinle, Richard Koman: Designing with JavaScript, O'Reilly & Associates,
ISBN 1565923006
126
UNIT THREE STATEMENT AND OPERATORS
1.0 Introduction
2.0 Objectives
3.0 Main Content
3.1 JavaScript Statement 3.2 JavaScript Operators
3.3 Control structures
4.0 Conclusion
5.0 Summary
6.0 Tutor Marked Assignment
7.0 Further Reading and Other Resources
1.0 INTRODUCTION
In this unit, you will learn the JavaScript Statement, Operators and Control Structures.
2.0 OBJECTIVES
At the end of this unit, you should be able to: • Explain two types of statement in JavaScript • List types of Operators in JavaScript • List types of Control Structures
3.0 MAIN CONTENT
3.1 JavaScript Statement
The JavaScript language supported Two type Condition.
� .if statement � Function
if Statement
if statements execute a set of commands if a specified condition is true. If the condition is false, another set of statements can be executed through the use of the else keyword.
The main idea behind if statement is embodied by the sentence: "If the weather's good tomorrow, we'll go out and have a picnic and Lisa will do cartwheels -- else, we'll stay in and Catherine will watch TV."
As you can see, the idea is quite intuitive and, surprisingly enough, so is the syntax:
if (condition) {
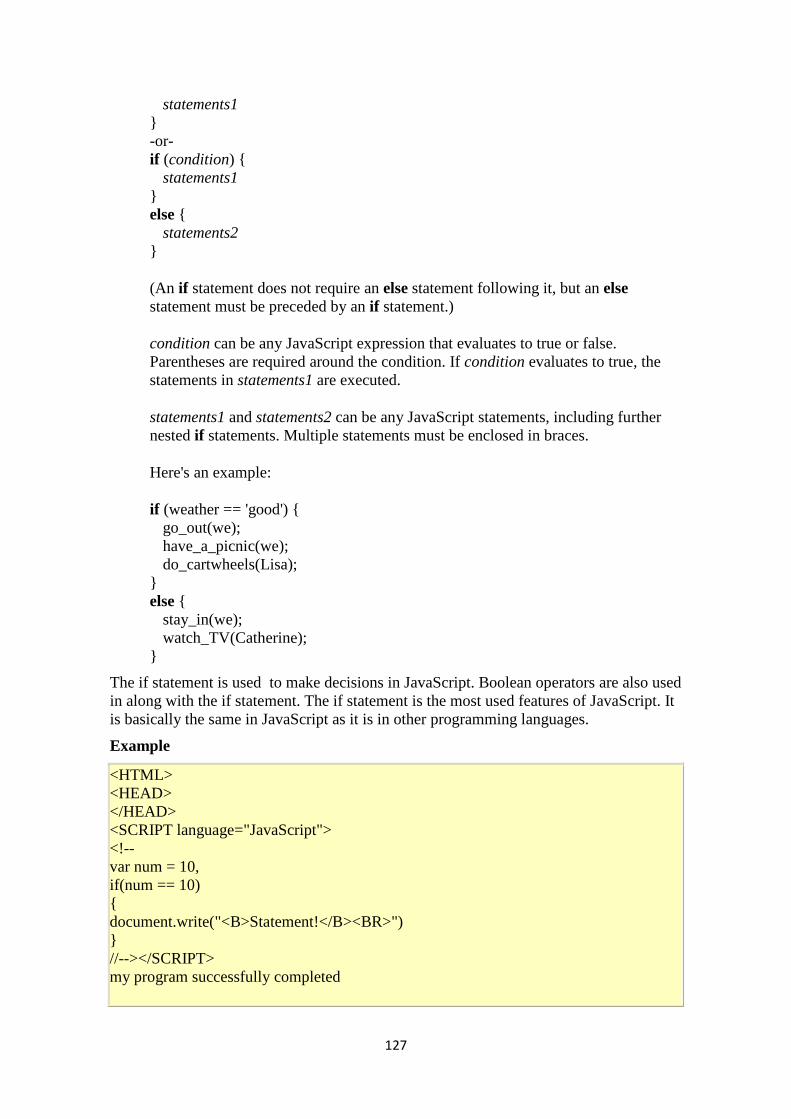
127
statements1 } -or- if (condition) { statements1 } else { statements2 }
(An if statement does not require an else statement following it, but an else statement must be preceded by an if statement.)
condition can be any JavaScript expression that evaluates to true or false. Parentheses are required around the condition. If condition evaluates to true, the statements in statements1 are executed.
statements1 and statements2 can be any JavaScript statements, including further nested if statements. Multiple statements must be enclosed in braces.
Here's an example:
if (weather == 'good') { go_out(we); have_a_picnic(we); do_cartwheels(Lisa); } else { stay_in(we); watch_TV(Catherine); }
The if statement is used to make decisions in JavaScript. Boolean operators are also used in along with the if statement. The if statement is the most used features of JavaScript. It is basically the same in JavaScript as it is in other programming languages.
Example
<HTML> <HEAD> </HEAD> <SCRIPT language="JavaScript"> <!-- var num = 10, if(num == 10) { document.write("<B>Statement!</B><BR>") } //--></SCRIPT> my program successfully completed
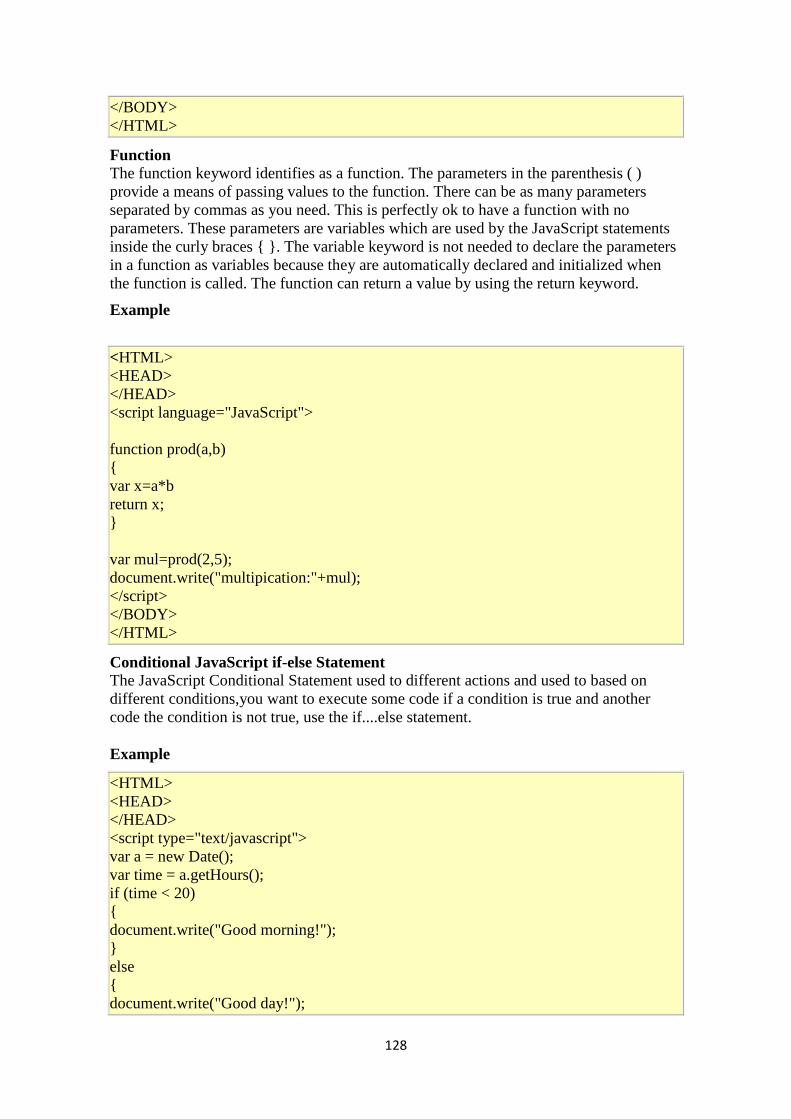
128
</BODY> </HTML>
Function The function keyword identifies as a function. The parameters in the parenthesis ( ) provide a means of passing values to the function. There can be as many parameters separated by commas as you need. This is perfectly ok to have a function with no parameters. These parameters are variables which are used by the JavaScript statements inside the curly braces { }. The variable keyword is not needed to declare the parameters in a function as variables because they are automatically declared and initialized when the function is called. The function can return a value by using the return keyword.
Example
<HTML> <HEAD> </HEAD> <script language="JavaScript"> function prod(a,b) { var x=a*b return x; } var mul=prod(2,5); document.write("multipication:"+mul); </script> </BODY> </HTML>
Conditional JavaScript if-else Statement The JavaScript Conditional Statement used to different actions and used to based on different conditions,you want to execute some code if a condition is true and another code the condition is not true, use the if....else statement. Example
<HTML> <HEAD> </HEAD> <script type="text/javascript"> var a = new Date(); var time = a.getHours(); if (time < 20) { document.write("Good morning!"); } else { document.write("Good day!");
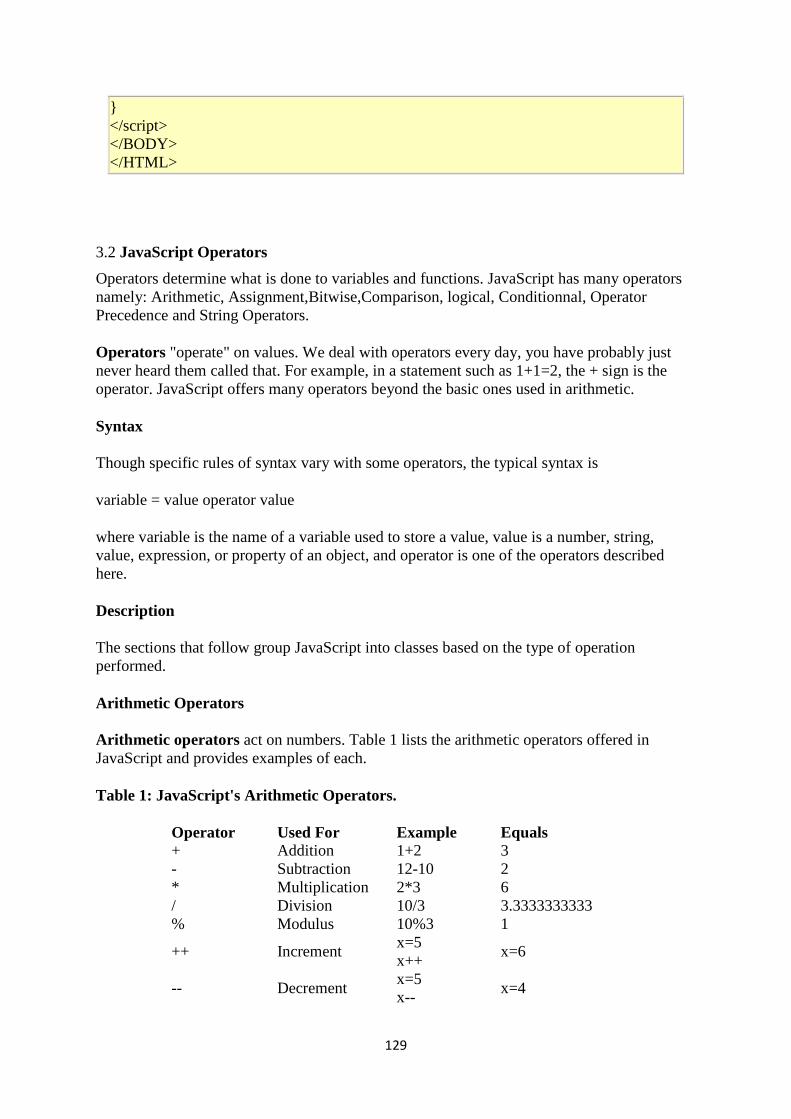
129
} </script> </BODY> </HTML>
3.2 JavaScript Operators
Operators determine what is done to variables and functions. JavaScript has many operators namely: Arithmetic, Assignment,Bitwise,Comparison, logical, Conditionnal, Operator Precedence and String Operators.
Operators "operate" on values. We deal with operators every day, you have probably just never heard them called that. For example, in a statement such as 1+1=2, the + sign is the operator. JavaScript offers many operators beyond the basic ones used in arithmetic.
Syntax
Though specific rules of syntax vary with some operators, the typical syntax is
variable = value operator value
where variable is the name of a variable used to store a value, value is a number, string, value, expression, or property of an object, and operator is one of the operators described here.
Description
The sections that follow group JavaScript into classes based on the type of operation performed.
Arithmetic Operators
Arithmetic operators act on numbers. Table 1 lists the arithmetic operators offered in JavaScript and provides examples of each.
Table 1: JavaScript's Arithmetic Operators.
Operator Used For Example Equals + Addition 1+2 3 - Subtraction 12-10 2 * Multiplication 2*3 6 / Division 10/3 3.3333333333 % Modulus 10%3 1
++ Increment x=5 x++
x=6
-- Decrement x=5 x--
x=4

130
- Unary negation -20 negative 20
The modulus of a number is the remainder after the first division. For example, 10/3 results in 3, remainder 1. The modulo (%) operator returns that remainder, 1.
The increment operator, ++, is just a shortcut way of saying variable + 1. For example, the two statements that follow mean exactly the same thing. The latter one is just shorter and quicker to type: x = x + 1 as x++
The same holds true for the decrement (--) operator.
With the negation operator, if the minus sign is used in front of a value without being part of a larger expression, then JavaScript assumes it indicates a negative number, just as in day-to-day arithmetic. For example, x= 5; y= -x results in x being equal to 5 and y being equal to -5.
Assignment Operators
Assignment operators are used to assign a value to a variable by using the simple equal symbol (=) operator with the syntax
variablename = value
For example:
x=15; y=20; z=x+y;
After all three lines have been executed, the variable x contains the number 15, the variable y contains 20, and the variable z contains 35 (the sum of 15+20).
Some shorthand operators exist that you can use to do some arithmetic and assign the result to a value in one fell swoop. Those operators are shown in Table 2.
Table 2: JavaScript's Assignment Operators.
Operator Example Meaning += x+=y x=x+y -= x-=y x=x-y *= x*=y x=x*y /= x/=y x=x/y % x%=y x=x%y
Bitwise Operators
Bitwise operators treat their values as binary numbers (1's and 0's) rather than as numeric values. You may never need to use these so don't waste too much energy trying to memorize them. But just in case you do come across a bitwise operator, Table 3 shows what each one does.
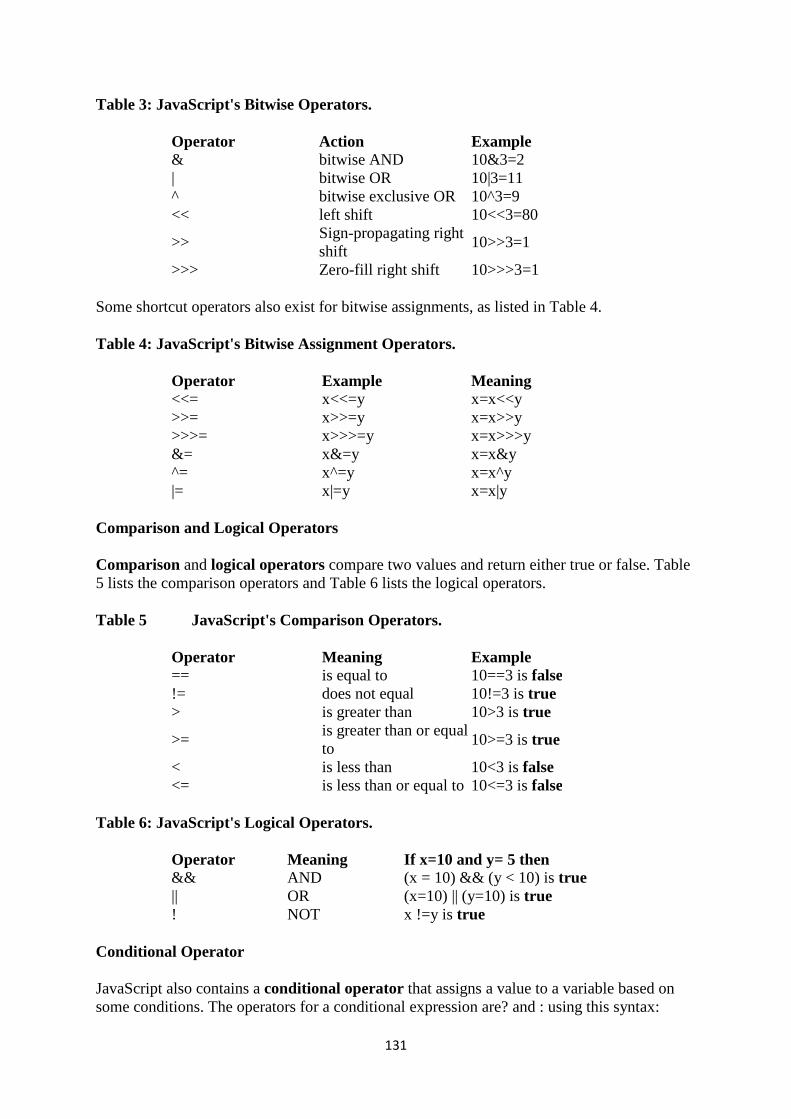
131
Table 3: JavaScript's Bitwise Operators.
Operator Action Example & bitwise AND 10&3=2 | bitwise OR 10|3=11 ^ bitwise exclusive OR 10^3=9 << left shift 10<<3=80
>> Sign-propagating right shift
10>>3=1
>>> Zero-fill right shift 10>>>3=1
Some shortcut operators also exist for bitwise assignments, as listed in Table 4.
Table 4: JavaScript's Bitwise Assignment Operators.
Operator Example Meaning <<= x<<=y x=x<<y >>= x>>=y x=x>>y >>>= x>>>=y x=x>>>y &= x&=y x=x&y ^= x^=y x=x^y |= x|=y x=x|y
Comparison and Logical Operators
Comparison and logical operators compare two values and return either true or false. Table 5 lists the comparison operators and Table 6 lists the logical operators.
Table 5 JavaScript's Comparison Operators.
Operator Meaning Example == is equal to 10==3 is false != does not equal 10!=3 is true > is greater than 10>3 is true
>= is greater than or equal to
10>=3 is true
< is less than 10<3 is false <= is less than or equal to 10<=3 is false
Table 6: JavaScript's Logical Operators.
Operator Meaning If x=10 and y= 5 then && AND (x = 10) && (y < 10) is true || OR (x=10) || (y=10) is true ! NOT x !=y is true
Conditional Operator
JavaScript also contains a conditional operator that assigns a value to a variable based on some conditions. The operators for a conditional expression are? and : using this syntax:
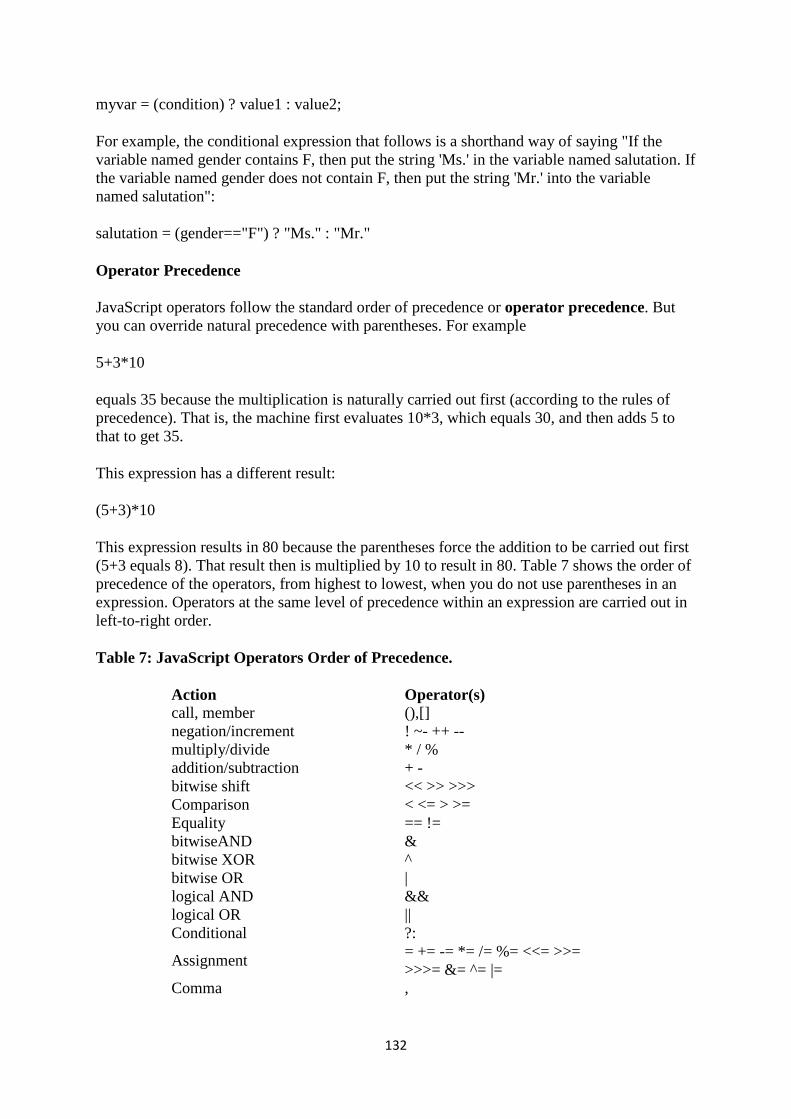
132
myvar = (condition) ? value1 : value2;
For example, the conditional expression that follows is a shorthand way of saying "If the variable named gender contains F, then put the string 'Ms.' in the variable named salutation. If the variable named gender does not contain F, then put the string 'Mr.' into the variable named salutation":
salutation = (gender=="F") ? "Ms." : "Mr."
Operator Precedence
JavaScript operators follow the standard order of precedence or operator precedence. But you can override natural precedence with parentheses. For example
5+3*10
equals 35 because the multiplication is naturally carried out first (according to the rules of precedence). That is, the machine first evaluates 10*3, which equals 30, and then adds 5 to that to get 35.
This expression has a different result:
(5+3)*10
This expression results in 80 because the parentheses force the addition to be carried out first (5+3 equals 8). That result then is multiplied by 10 to result in 80. Table 7 shows the order of precedence of the operators, from highest to lowest, when you do not use parentheses in an expression. Operators at the same level of precedence within an expression are carried out in left-to-right order.
Table 7: JavaScript Operators Order of Precedence.
Action Operator(s) call, member (),[] negation/increment ! ~- ++ -- multiply/divide * / % addition/subtraction + - bitwise shift << >> >>> Comparison < <= > >= Equality == != bitwiseAND & bitwise XOR ^ bitwise OR | logical AND && logical OR || Conditional ?:
Assignment = += -= *= /= %= <<= >>= >>>= &= ^= |=
Comma ,
133
string Operators
String operators are chunks of text, such as Hello (rather than a number such as 10). Unlike numbers, you cannot add, subtract, multiply, and divide strings. Example: 2*3 = 6 is fine. But what is "Hello" * "There"? The question makes no sense.
You can, however, concatenate strings, which is a fancy name for "stick them together." You use the + operator to concatenate strings. Here is an example where we create three variable, x, y, and z, all of which contains strings:
x="Hello";
y="There";
z=x+y;
The result is that z now contains HelloThere.
Why is there no space between the words? Because to a computer, strings are just meaningless strings of characters. To a computer, the string hello in no more meaningful than the string bvhdsz. They are both just strings. If you want to add a space between the words, you can pop a space into the expression. A literal space would be a space enclosed in quotation marks (" "). Hence, this series of commands x="Hello"; y="There";
z=x+" "+y;
results in z containing Hello There. A shortcut operator also exists for string concatenation +=. For example
x="Hello" y="There"
x+=" "+y
in which case x equals itself with a space and y tacked on, x then contains Hello There.
3.3 Control structures
If ... else
if (condition) { statements } else { statements }
Loops
134
Loops are an incredibly useful programming tool. Loops handle repetitive tasks extremely well, especially in the context of consecutive elements. Arrays immediately spring too mind here, since array elements are numbered consecutively. It would be quite intuitive (and equally practical), for instance, to write a loop that added 1 to each element within an array.
The two most common types of loops are for and while loops:
• for Loops
A for loop constitutes a statement which consists of three expressions, enclosed in parentheses and separated by semicolons, followed by a block of statements executed in the loop.
This definition may, at first, sound confusing. Indeed, it is hard to understand for loops without seeing them in action.
A for loop resembles the following:
for (initial-expression; condition; increment-expression) { statements }
The initial-expression is a statement or variable declaration. It is typically used to initialize a counter variable. This expression may optionally declare new variables with the var keyword.
The condition is evaluated on each pass through the loop. If this condition evaluates to true, the statements in statements are performed. When the condition evaluates to false, the execution of the for loop stops. This conditional test is optional. If omitted, the condition always evaluates to true.
The increment-expression is generally used to update or increment the counter variable.
The statements constitute a block of statements that are executed as long as condition evaluates to true. This can be a single statement or multiple statements. Although not required, it is good practice to indent these statements from the beginning of the for statement to make your code more readable.
Check out the following for statement. It starts by declaring the variable i and initializing it to zero. It checks whether i is less than nine, performs the two successive statements, and increments i by one after each pass through the loop:
var n = 0; for (var i = 0; i < 3; i++) { n += i;
135
alert("The value of n is now " + n); }
While Loops
The while loop, although most people would not recognize it as such, is for's twin. The two can fill in for one another - using either one is only a matter of convenience or preference according to context. while creates a loop that evaluates an expression, and if it is true, executes a block of statements. The loop then repeats, as long as the specified condition is true.
The syntax of while differs slightly from that of for:
while (condition) { statements }
condition is evaluated before each pass through the loop. If this condition evaluates to true, the statements in the succeeding block are performed. When condition evaluates to false, execution continues with the statement following statements.
statements is a block of statements that are executed as long as the condition evaluates to true. Although not required, it is good practice to indent these statements from the beginning of the statement.
The following while loop iterates as long as n is less than three.
var n = 0; var x = 0; while(n < 3) { n++; x += n; alert("The value of n is " + n + ". The value of x is " + x); }
Switch statement
switch (expression) { case label1 : statements; break; case label2 : statements;
136
break; default : statements; }
Functions
A function is a block with a (possibly empty) argument list that is normally given a name. A
function may give back a return value.
function function-name(arg1, arg2, arg3) { statements; return expression; }
Example: Euclid's original algorithm of finding the greatest common divisor. (This is a
geometrical solution which subtracts the shorter segment from the longer):
function gcd(segmentA, segmentB) { while(segmentA!=segmentB) if(segmentA>segmentB) segmentA -= segmentB; else segmentB -= segmentA; return(segmentA); }
The number of arguments given when calling a function must not necessarily accord to the
number of arguments in the function definition. Within the function the arguments may as
well be accessed through the arguments array.
Every function is an instance of Function, a type of base object. Functions can be created and
assigned like any other objects, and passed as arguments to other functions. Thus JavaScript
supports higher-order functions. For example:
Array.prototype.fold = function (value, functor) { var result = value; for (var i = 0; i < this.length; i++) { result = functor(result, this[i]); } return result;
137
} var sum = [1,2,3,4,5,6,7,8,9,10].fold(0, function (a, b) { return a + b })
results in the value:
55
User interaction
Most interaction with the user is done by using HTML forms which can be accessed through
the HTML DOM. However there are as well some very simple means of communicating with
the user:
Alert dialog box
Confirm dialog box
Prompt dialog box
Status bar
Console
4.0 CONCLUSION:
Operators determine what is done to variables and functions. JavaScript has many operators namely: Arithmetic, Assignment,Bitwise,Comparison, logical, Conditionnal, Operator Precedence and String Operators. There is only one String Operator: concatenation (+). It’s funny that a language that uses = and == to give the programmer greater flexibility would also use the + to add numbers and concatenate strings.
5.0 SUMMARY
In this unit, you have learnt : • Definition of Loop • Types of Operators • Types of Statement in JavaScript
6.0 TUTOR MARK ASSIGNMENT
• Define a Loop? • Distinguish between any two types of Loops • List types of Operators • List types of Control Structure you know.
138
7.0 REFERENCES/FURTHER READING
• Andy Harris, Andrew Harris: JavaScript Programming, Premier Press, ISBN
0761534105
• Danny Goodman, Brendan Eich: JavaScript Bible, Wiley, John & Sons, ISBN
0764533428
• Gary B. Shelly, Thomas J. Cashman, William J. Dorin, Jeffrey Quasney:
JavaScript: Complete Concepts and Techniques, Course Technology, ISBN
0789562332
• Nick Heinle, Richard Koman: Designing with JavaScript, O'Reilly &
Associates, ISBN 1565923006
• Nigel McFarlane: Rapid Application Development with Mozilla, Prentice Hall
Professional Technical References, ISBN 0131423436
• Scott Duffy: How to do Everything with JavaScript, Osborne, ISBN
0072228873
• Thomas A. Powell, Fritz Schneider: JavaScript: The Complete Reference,
McGraw-Hill Companies, ISBN 0072191279


![NATIONAL OPEN UNIVERSITY OF NIGERIAnouedu.net/sites/default/files/2017-03/COP 311 MAIN TEXT.pdfNATIONAL OPEN UNIVERSITY OF NIGERIA ... [TMA]. The sources of ... to provide relevant](https://img.dokumen.tips/doc/110x75/5aacb5d47f8b9a693f8d673f/national-open-university-of-311-main-textpdfnational-open-university-of-nigeria.jpg)