Embed Size (px)
Citation preview
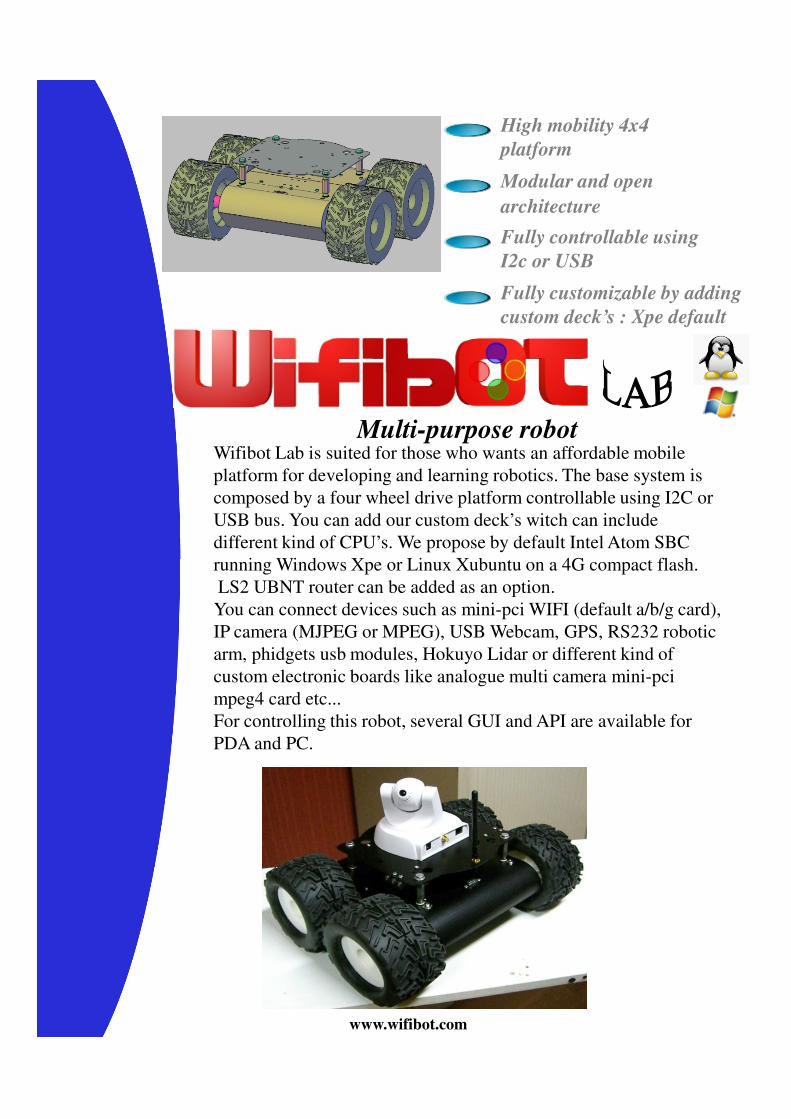
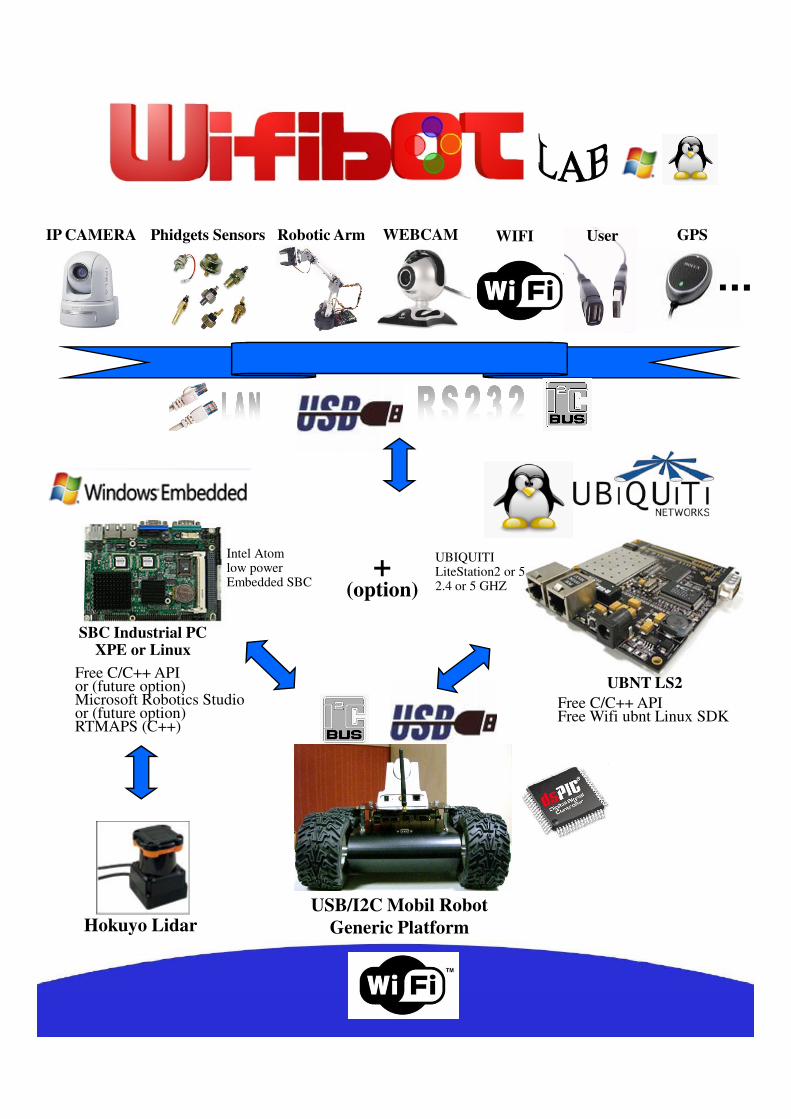
Wifibot Lab is suited for those who wants an affordable mobile
platform for developing and learning robotics. The base system is
composed by a four wheel drive platform controllable using I2C or
USB bus. You can add our custom deck’s witch can include
different kind of CPU’s. We propose by default Intel Atom SBC
running Windows Xpe or Linux Xubuntu on a 4G compact flash.
High mobility 4x4
platform
Modular and open
architecture
Fully customizable by adding
custom deck’s : Xpe default
Multi-purpose robot
Fully controllable using
I2c or USB
running Windows Xpe or Linux Xubuntu on a 4G compact flash.
LS2 UBNT router can be added as an option.
You can connect devices such as mini-pci WIFI (default a/b/g card),
IP camera (MJPEG or MPEG), USB Webcam, GPS, RS232 robotic
arm, phidgets usb modules, Hokuyo Lidar or different kind of
custom electronic boards like analogue multi camera mini-pci
mpeg4 card etc...
For controlling this robot, several GUI and API are available for
PDA and PC.
www.wifibot.com

Sensors:
Speed Control:
Motors:
Dimensions:
Batteries:
2x Hall effect encoders
Battery level
1 X DSPIC 33f (PID)
ICD2/3 (option)
4x motors 12V
50:1
8.87Kg/cm
150 rpm
Length : 30 cm
Width : 35 cm
Height : 15 cm
Weight : 3.8 Kg
9.6V NiMh Batteries: 9.6V NiMh
10000 mAH
Charger included
Control Bus: I2C / USB
Intel Atom
WEBCAM WIFI User GPSIP CAMERA Robotic ArmPhidgets Sensors
UBIQUITI+
SBC Industrial PCXPE or Linux
Intel Atomlow power Embedded SBC
USB/I2C Mobil Robot
Generic Platform
UBIQUITILiteStation2 or 52.4 or 5 GHZ
+(option)
Free C/C++ APIor (future option)Microsoft Robotics Studioor (future option) RTMAPS (C++)
Free C/C++ APIFree Wifi ubnt Linux SDK
UBNT LS2
Hokuyo Lidar
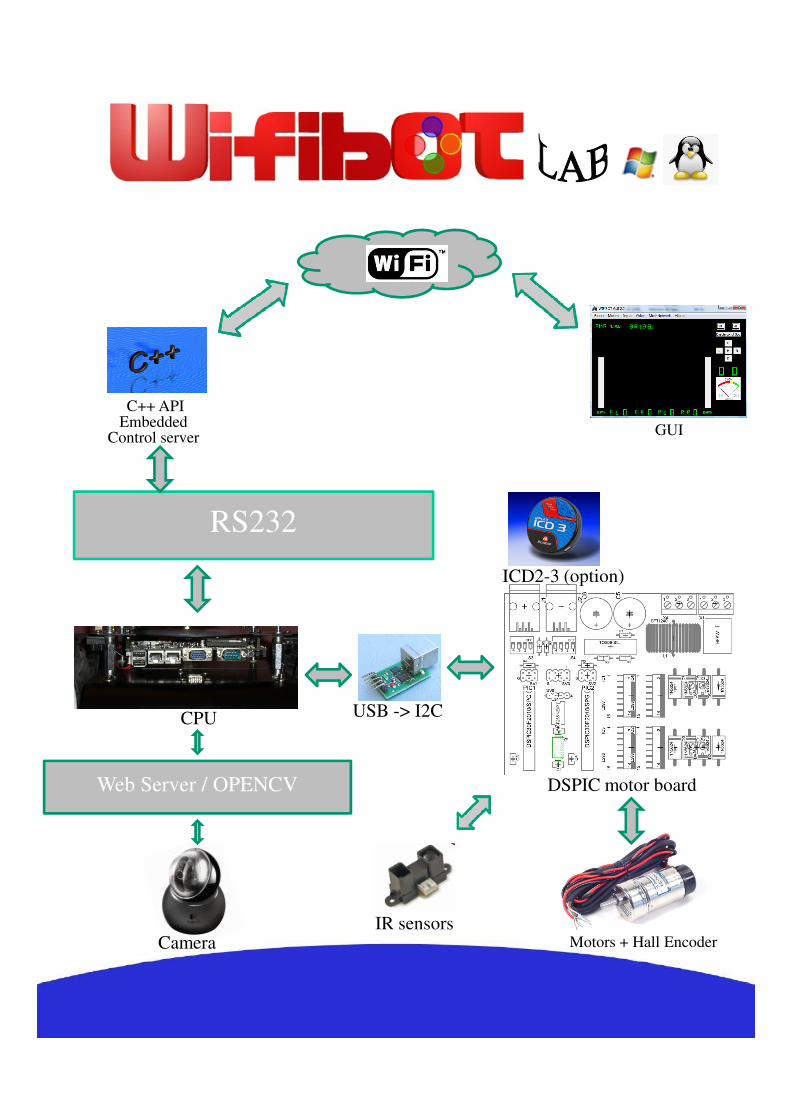
RS232
C++ APIEmbedded
Control serverGUI
XPe
USB -> I2C
DSPIC motor board
Motors + Hall Encoder
CPU
ICD2-3 (option)
Camera
Web Server / OPENCV
IR sensors
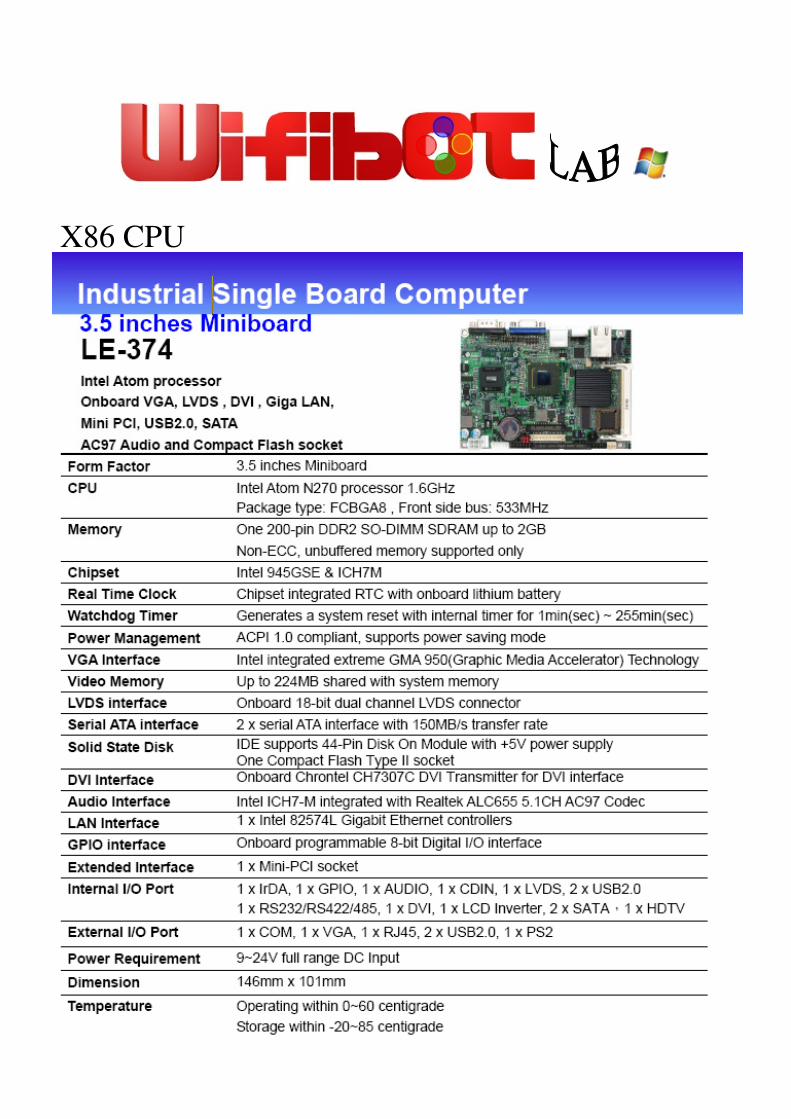
X86 CPU
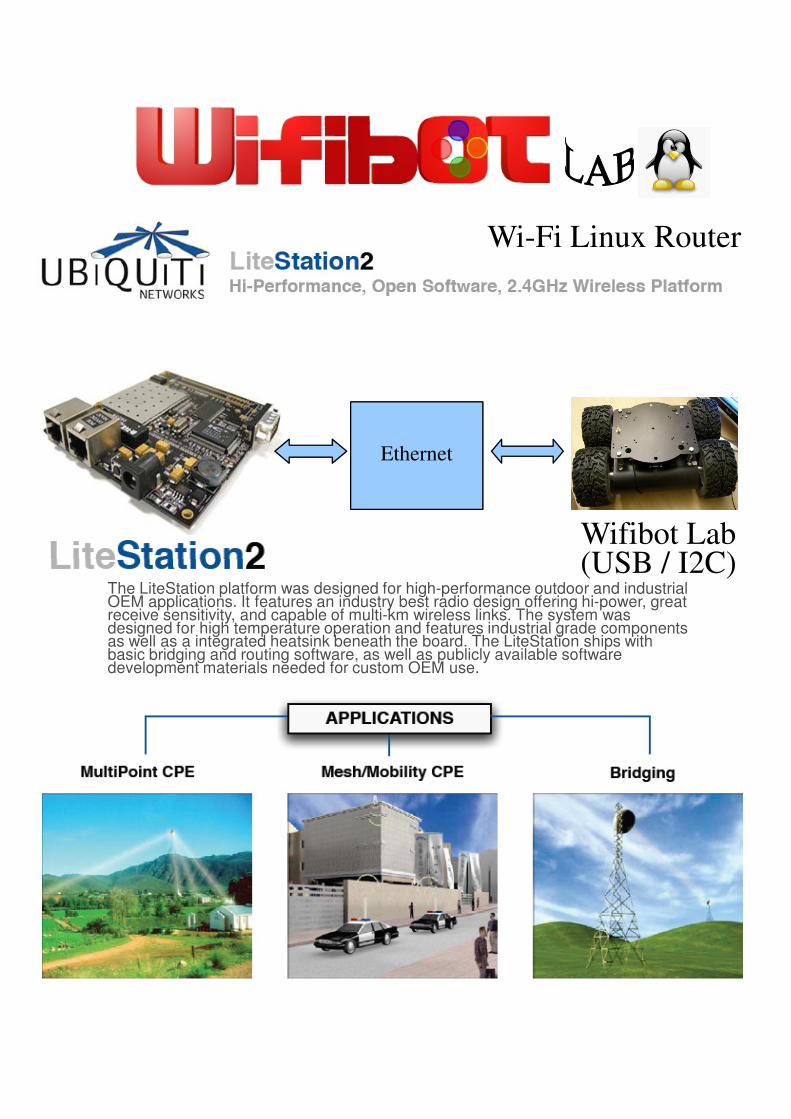
Ethernet
Wifibot Lab(USB / I2C)
Wi-Fi Linux Router
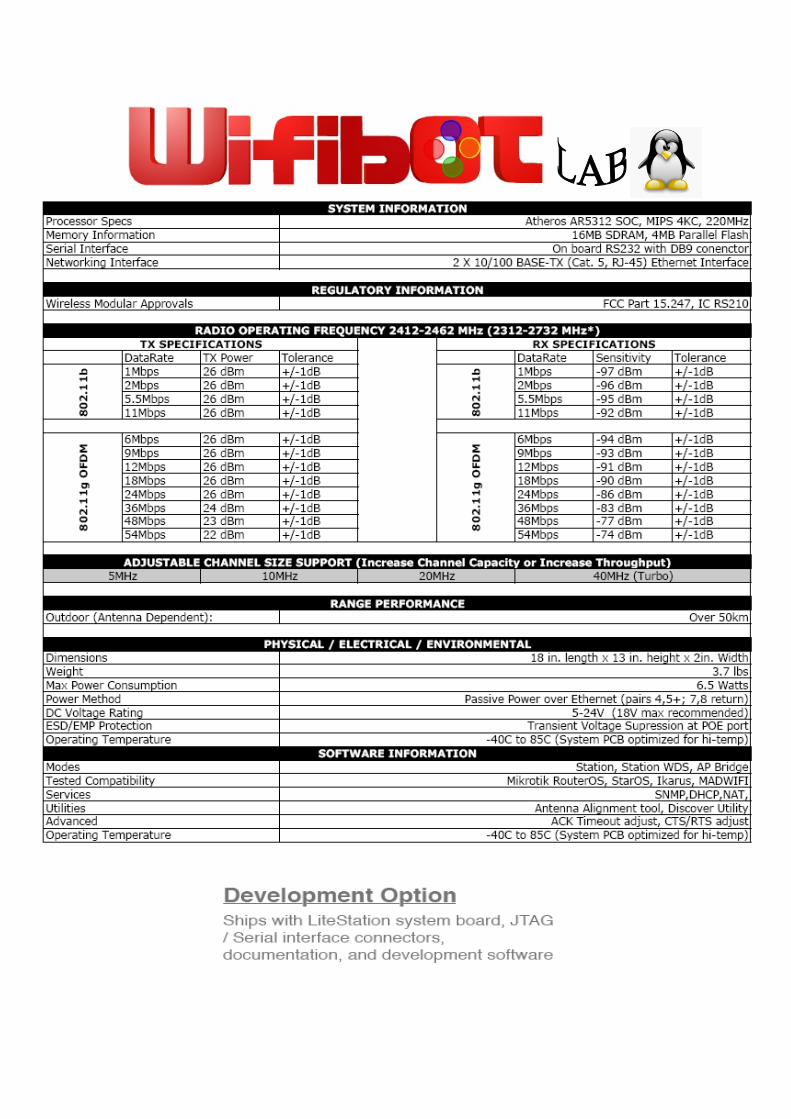
(USB / I2C) The LiteStation platform was designed for high-performance outdoor and industrialOEM applications. It features an industry best radio design offering hi-power, greatreceive sensitivity, and capable of multi-km wireless links. The system wasdesigned for high temperature operation and features industrial grade componentsas well as a integrated heatsink beneath the board. The LiteStation ships withbasic bridging and routing software, as well as publicly available softwaredevelopment materials needed for custom OEM use.
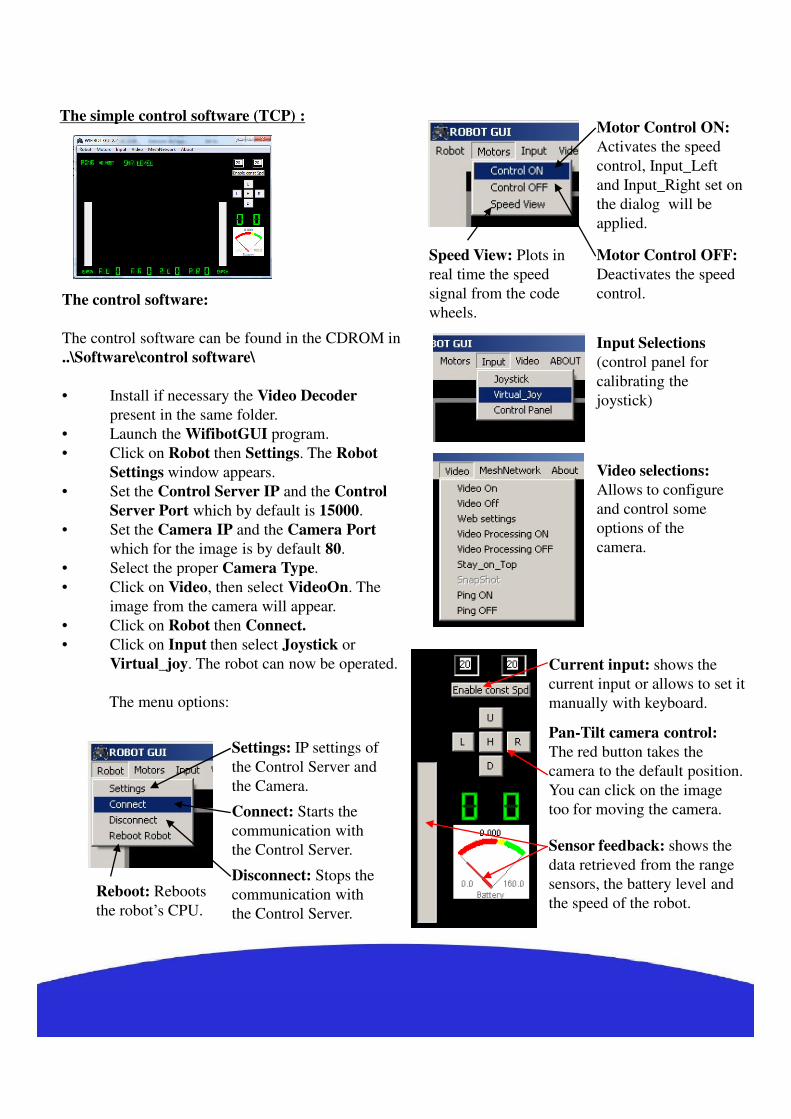
The control software:
The control software can be found in the CDROM in
..\Software\control software\
• Install if necessary the Video Decoder
present in the same folder.
• Launch the WifibotGUI program.
• Click on Robot then Settings. The Robot
Settings window appears.
• Set the Control Server IP and the Control
Server Port which by default is 15000.
• Set the Camera IP and the Camera Port
which for the image is by default 80.
• Select the proper Camera Type.
Input Selections
(control panel for
calibrating the
joystick)
Video selections:
Allows to configure
and control some
options of the
camera.
Speed View: Plots in
real time the speed
signal from the code
wheels.
Motor Control ON:
Activates the speed
control, Input_Left
and Input_Right set on
the dialog will be
applied.
Motor Control OFF:
Deactivates the speed
control.
The simple control software (TCP) :
• Select the proper Camera Type.
• Click on Video, then select VideoOn. The
image from the camera will appear.
• Click on Robot then Connect.
• Click on Input then select Joystick or
Virtual_joy. The robot can now be operated.
The menu options:
Settings: IP settings of
the Control Server and
the Camera.
Connect: Starts the
communication with
the Control Server.
Disconnect: Stops the
communication with
the Control Server.
Reboot: Reboots
the robot’s CPU.
Pan-Tilt camera control:
The red button takes the
camera to the default position.
You can click on the image
too for moving the camera.
Current input: shows the
current input or allows to set it
manually with keyboard.
Sensor feedback: shows the
data retrieved from the range
sensors, the battery level and
the speed of the robot.
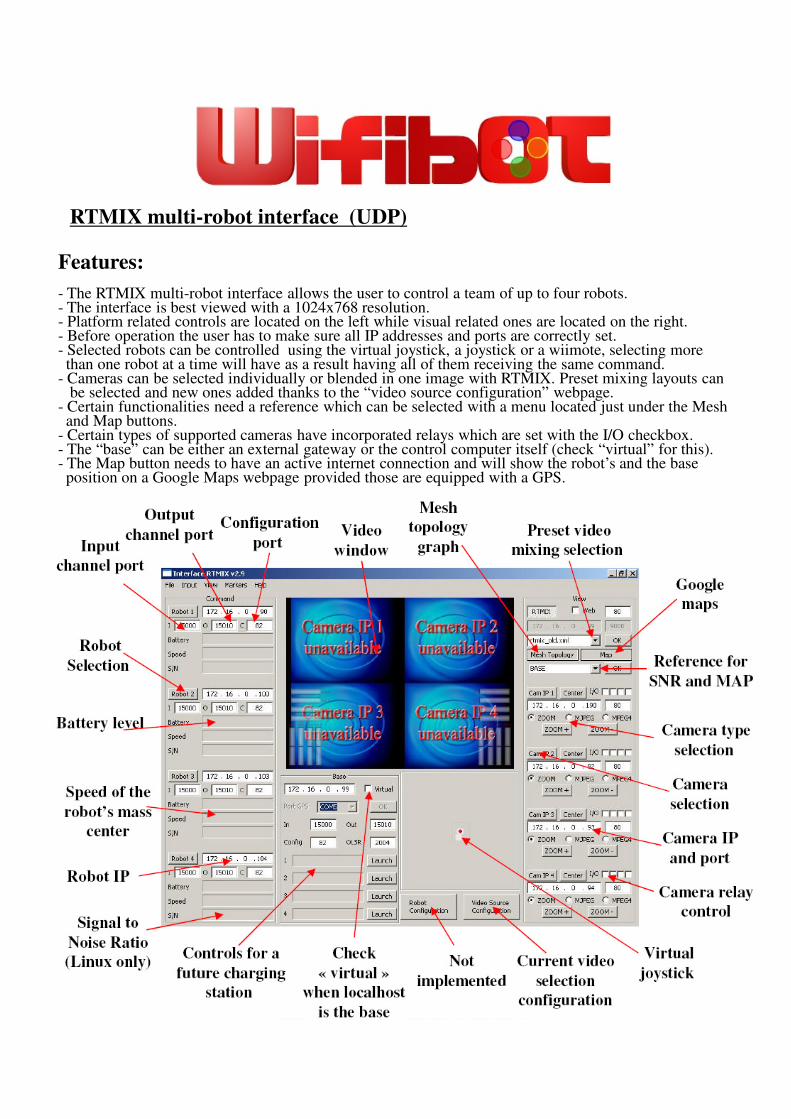
RTMIX multi-robot interface (UDP)
Features:
- The RTMIX multi-robot interface allows the user to control a team of up to four robots.- The interface is best viewed with a 1024x768 resolution. - Platform related controls are located on the left while visual related ones are located on the right.- Before operation the user has to make sure all IP addresses and ports are correctly set. - Selected robots can be controlled using the virtual joystick, a joystick or a wiimote, selecting morethan one robot at a time will have as a result having all of them receiving the same command.
- Cameras can be selected individually or blended in one image with RTMIX. Preset mixing layouts canbe selected and new ones added thanks to the “video source configuration” webpage.
- Certain functionalities need a reference which can be selected with a menu located just under the Meshand Map buttons.
- Certain types of supported cameras have incorporated relays which are set with the I/O checkbox.- The “base” can be either an external gateway or the control computer itself (check “virtual” for this).- The Map button needs to have an active internet connection and will show the robot’s and the base position on a Google Maps webpage provided those are equipped with a GPS.