Embed Size (px)
Citation preview

Instructor: I-Chun Tsai MP3 Digital Authoring Animation
Instructional Technology, Educational Foundations and Leadership 1
MP3: Digital Authoring Animation- Flash
Objectives
- Understand the concepts of Adobe Flash and terminology. - Identify operation tools of Adobe Flash. - Describe how these tools are used to create motions/shape tween, animations and symbols. - Learn how to import and use images and sounds in Adobe Flash. - Organize thoughts and ideas to complete tasks. - Produce creative works on Adobe Flash. - Understand how to structure and design a webpage (Textbook2: Ch6-8)
Required Readings
- Textbook2: Ch6, Ch7, & Ch8 - Flash CS4 & CS5 Tutorial: http://www.atomiclearning.com/highed/en/search
Recommended Resources
- Motion & Shape Tweening: http://www.youtube.com/watch?v=wumvSDgEG0k&feature=related - Masking: http://www.youtube.com/watch?v=H2JelPiMljY&feature=related - Flash Animation Tutorials: Step-by-Step Lessons http://animation.about.com/od/flashanimationtutorials/Flash_Animationons.htm - Flash Actionscript Tutorials http://tutorialoutpost.com/tutorials/flash/actionscript - Cartoon Animation Tutorial create flash cartoons free and easy http://www.leconcombre.com/board/flashtutorial/us/flashmaniacsquinzeus.html
Examples Frog Enigma: http://www.albinoblacksheep.com/flash/frog Virtual Dissection Software: http://www.froguts.com/flash_content/index.html
I. About Adobe Flash
Adobe Flash previously called Shockwave Flash and Macromedia Flash - is a set of multimedia technologies developed and distributed by Adobe Systems and earlier by Macromedia. Since its introduction in 1996, Flash technology has become a popular method for adding animation and interactivity to web pages; Flash is commonly used to create animation, advertisements, various web page components, to integrate video into web pages, and more recently, to develop rich Internet applications.
Adobe Flash components
• Toolbox - Where you keep your tools. • Stage - Where the action is. • Timeline - What keeps everything from happening at once.
To open Adobe Flash: 1- Click on Adobe Flash icon. 2- Press on Flash Document.

Instructor: I-Chun Tsai MP3 Digital Authoring Animation
Instructional Technology, Educational Foundations and Leadership 2
1. Adobe Flash Main Page 2. Key Frames • Describes an object’s details at a given point in time. • Includes position, size, rotation, skew, and transparency. • Those values are maintained until either there are no more frames or another keyframe overrides it. • Keyframes are created automatically when an object is placed on the stage. • It is a good idea to only place one object in a given keyframe on a given layer.
3. Static Elements • A static element is something that needs to be on the stage for a period of time but does not move. • Any number of static elements can share a single layer. • Placing elements on the stage will create the key frame containing them. • To stretch out this key frame so that the elements will exist over a period of time, do one of the following. • Click on the last frame that the static elements will exist. Then select Insert: Timeline: Frame (F5); this
will extend the key frame to this frame.
Toolbox
Stage
Timeline
Instructor: I-Chun Tsai MP3 Digital Authoring Animation
Instructional Technology, Educational Foundations and Leadership 3
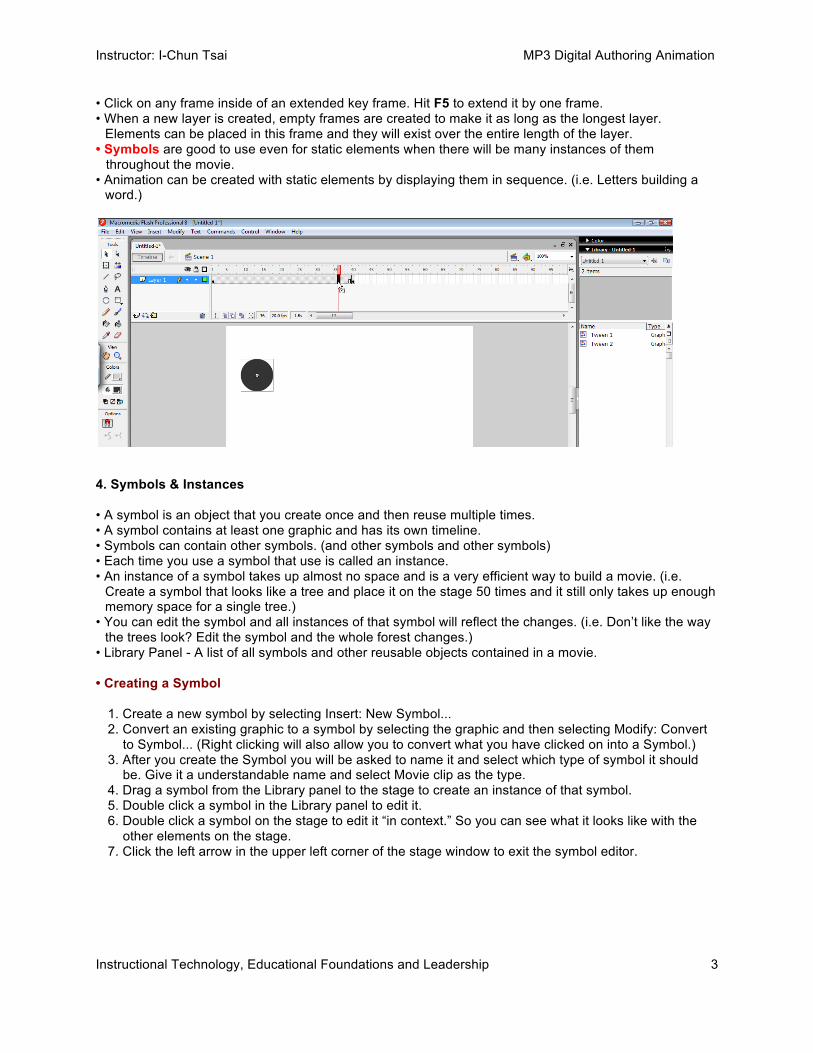
• Click on any frame inside of an extended key frame. Hit F5 to extend it by one frame. • When a new layer is created, empty frames are created to make it as long as the longest layer.
Elements can be placed in this frame and they will exist over the entire length of the layer. • Symbols are good to use even for static elements when there will be many instances of them
throughout the movie. • Animation can be created with static elements by displaying them in sequence. (i.e. Letters building a
word.)
4. Symbols & Instances • A symbol is an object that you create once and then reuse multiple times. • A symbol contains at least one graphic and has its own timeline. • Symbols can contain other symbols. (and other symbols and other symbols) • Each time you use a symbol that use is called an instance. • An instance of a symbol takes up almost no space and is a very efficient way to build a movie. (i.e.
Create a symbol that looks like a tree and place it on the stage 50 times and it still only takes up enough memory space for a single tree.)
• You can edit the symbol and all instances of that symbol will reflect the changes. (i.e. Don’t like the way the trees look? Edit the symbol and the whole forest changes.)
• Library Panel - A list of all symbols and other reusable objects contained in a movie. • Creating a Symbol
1. Create a new symbol by selecting Insert: New Symbol... 2. Convert an existing graphic to a symbol by selecting the graphic and then selecting Modify: Convert
to Symbol... (Right clicking will also allow you to convert what you have clicked on into a Symbol.) 3. After you create the Symbol you will be asked to name it and select which type of symbol it should
be. Give it a understandable name and select Movie clip as the type. 4. Drag a symbol from the Library panel to the stage to create an instance of that symbol. 5. Double click a symbol in the Library panel to edit it. 6. Double click a symbol on the stage to edit it “in context.” So you can see what it looks like with the
other elements on the stage. 7. Click the left arrow in the upper left corner of the stage window to exit the symbol editor.

Instructor: I-Chun Tsai MP3 Digital Authoring Animation
Instructional Technology, Educational Foundations and Leadership 4
5. Scenes • Scenes allow multiple timelines to be sequenced together in a single movie. • To create a new Scene, select Insert: Scene. This will create a new scene and move the stage window
and timeline to that new scene. • To move from one scene to another, select the desired scene from the Scene icon/popup list in the
upper right corner of the stage window. • To reorder or rename a scene, select Window: Other Panels: Scene to show the Scene’s pallet. There
panels can be renamed, reordered, created and deleted. • When a movie plays and reaches the end of one scene, the playback head jumps to the next scene. • The Scene Panel can be displayed by selecting Window: Design Panels: Scene. With this panel, you
can create, delete, duplicate and reorder scenes. • There are some severe restrictions to scenes that make them unsuitable for more complex movies but
for simple, linear animation like what we are currently working on, they are ideal.

Instructor: I-Chun Tsai MP3 Digital Authoring Animation
Instructional Technology, Educational Foundations and Leadership 5
6. Bitmaps Images • A bitmap can be a digital photograph, scan of a document, graphic borrowed from a web page,
animated GIF, etc. • Flash can import JPEG, GIF, BMP, PSD (Photoshop native file), TIFF, etc. • An array of colored dots or pixels makes up a bitmap image. • Bitmaps are very good at reproducing real life scenes. They can represent subtle shapes like clouds,
people’s faces, and rich textures like a field of grass. • Their drawbacks are they take up a lot of space (expensive) and don’t scale up in size very well. • They are imported into your Flash movie by selecting File :Import: Import to Stage... or File: Import:
Import to Library... • Both commands add it to the Library but the first also places it onto the stage for you. • They are like symbols in that they are only stored in your movie once no matter how many times you
use them. • Bitmaps are unlike symbols as they must be placed in a symbol like any other graphic to be tweened. • Scale a bitmap, using a bitmap editor like Photoshop, as close as you can to the final size to help
minimize the amount of space they take up. • Double-clicking the bitmap in the Library window will display an information dialog box that allows you to
change the JPEG compression settings. • Flash supports alpha channels in the image if they are there. (An alpha channel is extra information that
defines the transparency of each pixel in the image allowing parts of your image to be transparent and others, opaque.)
• A bitmap cannot be edited in Flash but you can launch the program that created the bitmap by Right-clicking on the bitmap in the Library window and selecting “Edit with...”

Instructor: I-Chun Tsai MP3 Digital Authoring Animation
Instructional Technology, Educational Foundations and Leadership 6
II. Motion/Shape Tweens
Youtube Tutorial: http://www.youtube.com/watch?v=wumvSDgEG0k&feature=related • ‘Tween’ is short for “in-between” When you want something to move in Flash, you define the start and
end points (key frames, F6) of the motion and the computer creates all the frames “in-between.” • Only Symbols can be Tweened for motion & Don’t group the image into a symbols for Shape
Tweening • There can only be one symbol in the layer your are Tweening. 1. Creating a Motion Tween
• You create the first key frame by simply placing a symbol on the stage. • To create the end point key frame click on a frame later in the timeline in the same layer as the first key
frame. Then select Insert: Timeline: Keyframe. (Click F6)

Instructor: I-Chun Tsai MP3 Digital Authoring Animation
Instructional Technology, Educational Foundations and Leadership 7
• Then select the new end key frame and move the symbol to its ending location. • Click a frame in between the two key frames and select Insert: Timeline: Create Motion Tween. (If you
use CS4 & 5, you will just select the Motion Tween Type: Classic Tween to create the motion tween.) Before Flash CS4, there were motion tweens and shape tweens only; however, now in Flash CS4 and CS5, you may have a third option: classic motion tweens. Below is an explanation to help you understand the difference between these tweens. - Classic tweens works like the way the old motion tweens used to be in Flash CS3 and earlier
versions. When using classic motion tween, you'd have to manually create all your keyframes and connect all of them by selecting class motion tweens when staying in between the frames between point A to point B.
- Motion tweens animates symbols moving in space. When creating a motion tween, you can right click on the symbol select the option: “create motion tween,” move the symbol on that frame, and Flash will automatically build a motion path animating the frames between that frame and the next keyframe. Any frame where you manually move the tweened symbol becomes a keyframe. You can also adjust the points of the motion path as the way you want the symbol to move. Basically, classic motion tween and motion tween affect position and rotation.
• Selecting the start or end key frames and then moving the object will change the motion path of the
tween. • Clicking in the middle of the motion Tween will display all the properties of the Tween in the Properties
Inspector. • An object can change size during the tween by simply adjusting the size of the object in one of the key
frames. • An object can be made to rotate during the tween by either rotating the object at one of the key frames
or changing the value of the “Rotate” pop-up in the Property Inspector. • An object can be made to fade in our out during a tween by changing the ‘alpha’ value at either end of
the tween.
2. Creating a Classic Motion Guide When using class motion tween, you can use motion guide to control the path for the motion. You can
follow the steps below to create a motion tween (classic) with motion guide.
• You can create a symbol when staying in the first frame. After the symbol is drew and converted to a
symbol (right click on the selected object and select CONVERT TO SYMBOL), the first frame becomes a keyframe.

Instructor: I-Chun Tsai MP3 Digital Authoring Animation
Instructional Technology, Educational Foundations and Leadership 8
• When the object become a symbol, you will find it look like above (with a circle dot in the center).
•Then, you will move the cursor to the end point of the frame where you want the symbol to move to, and
right click to select Insert Keyframe (Insert/Timeline/Insert Keyframe).
• Then, you will find the frames between the first and the second keyframes appear as gray color.

Instructor: I-Chun Tsai MP3 Digital Authoring Animation
Instructional Technology, Educational Foundations and Leadership 9
• Then, right click on the layer title of this motion layer and select ADD CLASSIC MOTION GUIDE.
• After that, you will find a Guide layer appearing on the top of the motion layer. Then, you will stay your
cursor in between any frame of the two keyframes in Motion layer and right click to select CREATE CLASSIC TWEENS.
• After that, you need to stay your cursor in the first frame of the Guide layer and draw a path on the stage.

Instructor: I-Chun Tsai MP3 Digital Authoring Animation
Instructional Technology, Educational Foundations and Leadership 10
• When the guide path is drew, you will stay in the first keyframe of the Motion Layer and move the circle spot in the center of the object to match with the start point of the path.
• Then, move your cursor to the second keyframe of the Motion Layer and match the end point of the path to the center circle of the object. Now, you can text the motion guide.

Instructor: I-Chun Tsai MP3 Digital Authoring Animation
Instructional Technology, Educational Foundations and Leadership 11
3. Creating a Shape Tween
• You create the first key frame by simply placing a drawing object on the stage. (don’t group the object
into a symbol because you will change the shape of the object later.) • To create the end point key frame click on a frame later in the timeline in the same layer as the first key
frame. Then select Insert: Timeline: Keyframe. (Click F6) • Then select the new end key frame and move the object to its ending location and change the shape of
the object that you want it to be in the end. • Click a frame in between the two key frames and select Insert: Timeline: Create Motion Tween. • Selecting the start or end key frames and then moving the object will change the motion path of the
tween. • Clicking in the middle of the motion Tween will display all the properties of the Tween in the Properties
Inspector. Select the “shape” for the Tween value.
4. Create Shape Tween with Shape Hint When creating shape tween, you can use Shape Hint to help control the shape changing during transforming process. Below are steps to show you how you can apply Shape Hint. This is an example showing how a text T can transform into an F. • You need to stay in the first frame of the layer and use Text Tool to create a T. After typing the T, you
need to break the T into apart by using MODIFY/BREAK APART when selecting T. If you forget to break the text into a part, you can not change its shape.

Instructor: I-Chun Tsai MP3 Digital Authoring Animation
Instructional Technology, Educational Foundations and Leadership 12
• After breaking the T into apart, you will then move to the frame where you want the tween to end. For
example, we move to the 30th frame and then insert a keyframe there.
• Then, you will stay in the second keyframe (30th frame) and type a word that you want to T to transform to (i.e. F) and delete the original T. Then, you still need to break F into apart.

Instructor: I-Chun Tsai MP3 Digital Authoring Animation
Instructional Technology, Educational Foundations and Leadership 13
• After that, you will move your cursor to stay in between the two keyframes and right click to create shape tween.
• After that, you will move your cursor to stay in the first keyframe and select MODIFY/SHAPE/ADD SHAPE HINT. After a shape hint is added, you will find a red circle latter (i.e. “a”) appearing on the text T. You will move the red a to where you want the shape point to be. Then, you will move your cursor to the second key frame and adjust the red circle a on the F to the corresponding point where you want to first circle a on T to change.

Instructor: I-Chun Tsai MP3 Digital Authoring Animation
Instructional Technology, Educational Foundations and Leadership 14
• Then, you will continue adding shape hints (up to maximum of 26). Now, you are ready to text the shape tween. Please remember that you always can add shape hints after you have added a shape tween in between to keyframes.
III. Masking
Youtube Tutorial: http://www.youtube.com/watch?v=H2JelPiMljY&feature=related Masking is revealing portion of your picture or graphic in the layer below. While surfing through net you might have come across lots of beautiful Flash effects such as ripple effect , some wording with sky background or glitter bordering an object, and wondered "How? What is the logic behind this". The answer for all this is masking. To create a masking effect, you will need to: 1. Create a layer that will be masked: background layer. • You create the first key frame by simply placing a symbol object on the stage or you can import an
image to the background layer.

Instructor: I-Chun Tsai MP3 Digital Authoring Animation
Instructional Technology, Educational Foundations and Leadership 15
2. Create a masking layer: • You create the first key frame by simply placing circle symbol object on the stage. (This circle symbol
is the mask that everything on the first layer will show when it is within the mask.) Using Oval tool from your tool box, draw a circle in your "Mask" layer and delete it's border. Drag the circle to one end of your picture.
• Now go to "frame 30" of your "Mask" layer and press "F6" to insert a new keyframe. • Now go to "frame 30" of your "background" layer and press "F6" to insert a new key frame, so that your
background image is available all through your mask.

Instructor: I-Chun Tsai MP3 Digital Authoring Animation
Instructional Technology, Educational Foundations and Leadership 16
• Select "frame 40" of your "Mask" layer, that is your new keyframe, Keeping the playhead on "frame 30"
of "Mask" layer, drag the circle to other end of your picture. • Now go back to "frame 1" of your "Mask" layer, keeping the playhead on "frame 1" of your "Mask" layer,
select Shape tween in your properties window.
• Right click on the "Mask" layer (the area where you named the layer not where the frames exist) and
select Mask.
• Your Mask is all ready. Press Ctrl+Enter to view your Mask.
III. Sounds
• Adding sounds and sound effects to your movie enhance it more than one might think. • Flash can read AIFF, WAV, MP3, AU, and number of other sound file formats. • Sounds, like bitmaps, are imported into the library once but can be used any number of times without
taking up more space. • A sound can be played at a certain point in time by being attached to a keyframe.
Instructor: I-Chun Tsai MP3 Digital Authoring Animation
Instructional Technology, Educational Foundations and Leadership 17
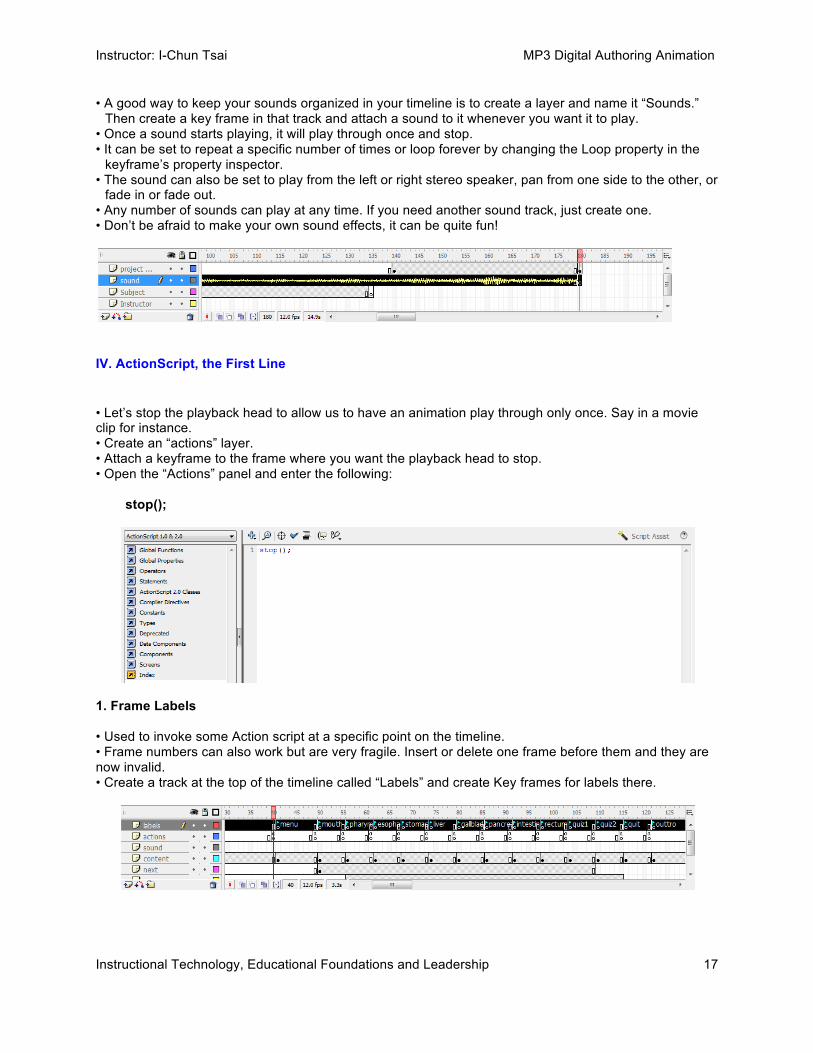
• A good way to keep your sounds organized in your timeline is to create a layer and name it “Sounds.” Then create a key frame in that track and attach a sound to it whenever you want it to play.
• Once a sound starts playing, it will play through once and stop. • It can be set to repeat a specific number of times or loop forever by changing the Loop property in the
keyframe’s property inspector. • The sound can also be set to play from the left or right stereo speaker, pan from one side to the other, or
fade in or fade out. • Any number of sounds can play at any time. If you need another sound track, just create one. • Don’t be afraid to make your own sound effects, it can be quite fun!
IV. ActionScript, the First Line
• Let’s stop the playback head to allow us to have an animation play through only once. Say in a movie clip for instance. • Create an “actions” layer. • Attach a keyframe to the frame where you want the playback head to stop. • Open the “Actions” panel and enter the following: stop();
1. Frame Labels • Used to invoke some Action script at a specific point on the timeline. • Frame numbers can also work but are very fragile. Insert or delete one frame before them and they are now invalid. • Create a track at the top of the timeline called “Labels” and create Key frames for labels there.

Instructor: I-Chun Tsai MP3 Digital Authoring Animation
Instructional Technology, Educational Foundations and Leadership 18
2. Frame Scripts • Used to make something happen at a particular time in an animation. • Attached to a keyframe. • Create a track at the top of the timeline called “Actions” and create Keyframes for scripts there. • Common frame scripts • stop(); • gotoAndPlay( label ); • gotoAndStop( label ); • Goto commands can either use a frame number or a label. • DO NOT USE FRAME NUMBERS! They are fragile and become invalid easily. • Inserting or deleting a frame will break any reference to a frame past that frame. • Frame labels will move with the timeline and inserts and deletes do not affect them.
V. Button Type Symbols
• Select “Button” instead of “Movie Clip” when creating new symbol. • Identical to “movie clip” type symbols except for special frames in their timeline. • “Up” frame is shown when the button is at rest. • “Over” frame is shown when the mouse is over the button. • “Down” frame is shown when the mouse is pressed on the button. • “Hit” frame is never shown but defines the clickable area of the button. • Cursor changes to pointing finger when it is over the button.
Instructor: I-Chun Tsai MP3 Digital Authoring Animation
Instructional Technology, Educational Foundations and Leadership 19
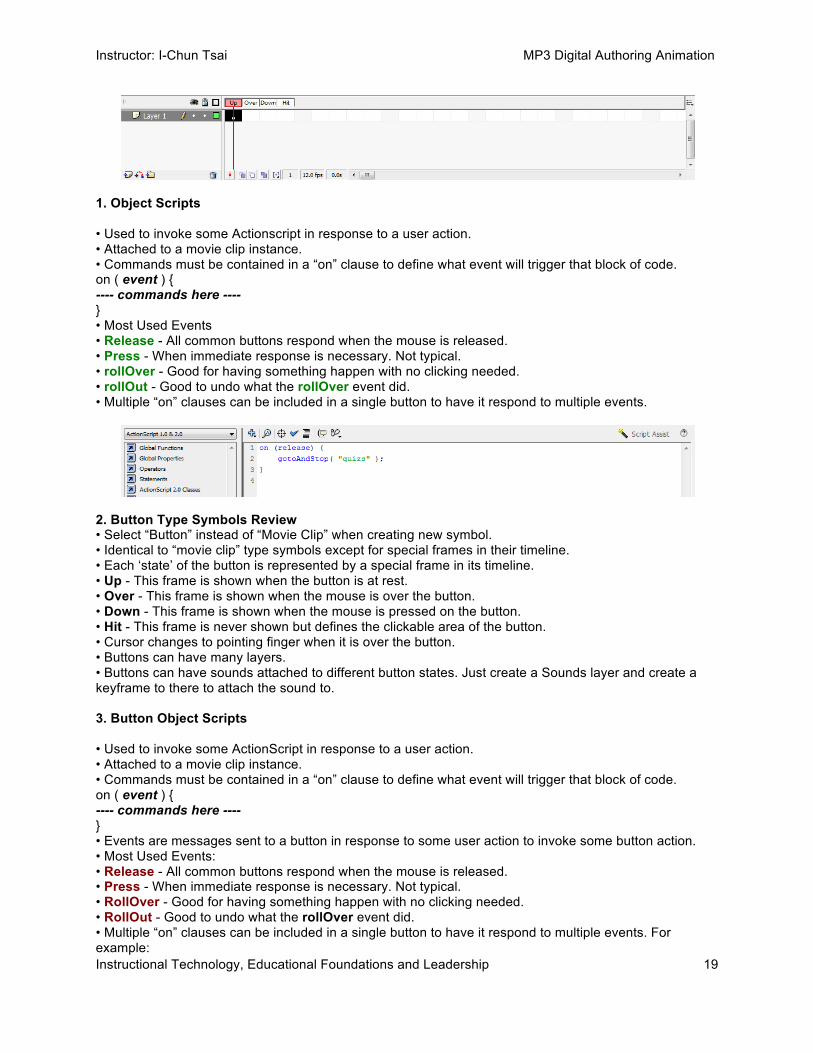
1. Object Scripts • Used to invoke some Actionscript in response to a user action. • Attached to a movie clip instance. • Commands must be contained in a “on” clause to define what event will trigger that block of code. on ( event ) { ---- commands here ---- } • Most Used Events • Release - All common buttons respond when the mouse is released. • Press - When immediate response is necessary. Not typical. • rollOver - Good for having something happen with no clicking needed. • rollOut - Good to undo what the rollOver event did. • Multiple “on” clauses can be included in a single button to have it respond to multiple events.
2. Button Type Symbols Review • Select “Button” instead of “Movie Clip” when creating new symbol. • Identical to “movie clip” type symbols except for special frames in their timeline. • Each ‘state’ of the button is represented by a special frame in its timeline. • Up - This frame is shown when the button is at rest. • Over - This frame is shown when the mouse is over the button. • Down - This frame is shown when the mouse is pressed on the button. • Hit - This frame is never shown but defines the clickable area of the button. • Cursor changes to pointing finger when it is over the button. • Buttons can have many layers. • Buttons can have sounds attached to different button states. Just create a Sounds layer and create a keyframe to there to attach the sound to. 3. Button Object Scripts • Used to invoke some ActionScript in response to a user action. • Attached to a movie clip instance. • Commands must be contained in a “on” clause to define what event will trigger that block of code. on ( event ) { ---- commands here ---- } • Events are messages sent to a button in response to some user action to invoke some button action. • Most Used Events: • Release - All common buttons respond when the mouse is released. • Press - When immediate response is necessary. Not typical. • RollOver - Good for having something happen with no clicking needed. • RollOut - Good to undo what the rollOver event did. • Multiple “on” clauses can be included in a single button to have it respond to multiple events. For example:
Instructor: I-Chun Tsai MP3 Digital Authoring Animation
Instructional Technology, Educational Foundations and Leadership 20
on (rollOver) { ! stop(); } on (rollOut) { ! play(); } How to organize thoughts and ideas to complete the projects: We will talk about the importance of selecting the topic before creating the project. We should have a perspective about what we are going to do before getting started with Adobe Flash or any software. It is important to create a scenario or outline for the project which contains all things we want to do in the project. This step is required if we want to organize our thoughts and ideas. So, this step is the first step before doing any thing.